Embed Size (px)
Citation preview

Deltek Cobra® Installation Guide
April 1, 2013
Installation Guide ii
While Deltek has attempted to verify that the information in this document is accurate and complete, some typographical or technical errors may exist. The recipient of this document is solely responsible for all decisions relating to or use of the information provided herein.
The information contained in this publication is effective as of the publication date below and is subject to change without notice.
This publication contains proprietary information that is protected by copyright. All rights are reserved. No part of this document may be reproduced or transmitted in any form or by any means, electronic or mechanical, or translated into another language, without the prior written consent of Deltek, Inc.
This edition published April 2013.
© 2013 Deltek, Inc.
Deltek’s software is also protected by copyright law and constitutes valuable confidential and proprietary information of Deltek, Inc. and its licensors. The Deltek software, and all related documentation, is provided for use only in accordance with the terms of the license agreement. Unauthorized reproduction or distribution of the program or any portion thereof could result in severe civil or criminal penalties.
All trademarks are the property of their respective owners.
Installation Guide iii
Contents Overview .......................................................................................................................................... 1
Appendices .................................................................................................................................. 1
Logical Tiers ................................................................................................................................ 1
Installation Models ....................................................................................................................... 1
Microsoft® .NET Architecture ...................................................................................................... 5
Adding Custom Notes to This Guide ........................................................................................... 5
If You Need Assistance ................................................................................................................... 6
Customer Services ...................................................................................................................... 6
Customer Care Connect Site ...................................................................................................... 6
Additional Documentation ........................................................................................................... 7
Downloading Deltek Products using Deltek Software Manager ...................................................... 8
Accessing DSM Directly .............................................................................................................. 8
Accessing DSM from within the Customer Care Connect Site ................................................... 9
DSM Documentation and Troubleshooting ................................................................................. 9
Getting Started ............................................................................................................................... 10
Questions to Ask Before You Begin .......................................................................................... 10
Running Multiple Instances of Cobra ........................................................................................ 10
Contacting Technical Services .................................................................................................. 10
System Requirements ................................................................................................................... 11
Hardware and Software Requirements ..................................................................................... 11
Permissions Required for Cobra ............................................................................................... 11
Database Requirements ........................................................................................................... 12
Logical Tier Requirements ........................................................................................................ 13
Installing Cobra 5.1 ........................................................................................................................ 14
Running Multiple Client Versions of Cobra on the Same Machine ........................................... 15
Upgrading From an Earlier Version of Cobra ............................................................................ 17
Running Cobra from a Citrix/Terminal Server ........................................................................... 21
Integrating Cobra with Open Plan ............................................................................................. 22
Establishing a Database ................................................................................................................ 23
ODBC Data Sources Configuration ........................................................................................... 23
Stand-Alone Installation ................................................................................................................. 24
Stand-Alone Model Prerequisites Checklist .............................................................................. 24
Stand-Alone Installation on an Oracle Database ...................................................................... 25
Stand-Alone Installation on a Microsoft SQL Database ............................................................ 31
Multi-User Installation .................................................................................................................... 38
Installation Guide iv
Server - Deployment Installation (Client/Server Mode) ................................................................. 39
Database Server Prerequisites Checklist.................................................................................. 39
Client Workstation Prerequisites Checklist ............................................................................... 39
Server - Deployment Installation on an Oracle Database ......................................................... 40
Server – Deployment Installation on a Microsoft SQL Database .............................................. 48
Server – n-Tier Installation (N-Tier Application Server Mode) ...................................................... 55
Load Balancing .......................................................................................................................... 55
Database Server Prerequisites Checklist.................................................................................. 57
Application Server Prerequisites Checklist ............................................................................... 57
Client Workstation Prerequisites Checklist ............................................................................... 58
Server n-Tier Installation on an Oracle Database ..................................................................... 59
Server n-Tier Installation on a Microsoft SQL Database ........................................................... 66
Installing the Client on a Workstation ............................................................................................ 74
Upgrading an Existing Workstation Installation ......................................................................... 74
Performing a New Cobra Workstation Installation .................................................................... 75
Running Scripts to Create Database Tables ................................................................................. 78
Running Scripts Manually ......................................................................................................... 78
Data Tool ....................................................................................................................................... 79
Adding Data Sources ................................................................................................................ 83
Editing Data Sources ................................................................................................................. 88
Data Conversion Wizard ................................................................................................................ 89
Launching Cobra 5.1 ................................................................................................................... 102
EPM Security Administrator ......................................................................................................... 103
Adding a New Data Source ..................................................................................................... 103
Editing an Existing Data Source .............................................................................................. 108
Switching to Another Data Source .......................................................................................... 109
Adding, Deleting, and Renaming Users .................................................................................. 110
Changing User Passwords ...................................................................................................... 113
Creating, Deleting, and Renaming Roles ................................................................................ 114
Creating, Deleting, and Renaming Groups ............................................................................. 117
Adding/Removing Users to/from a Group ............................................................................... 119
Defining User and Group Roles .............................................................................................. 121
Performance Tips ........................................................................................................................ 122
Optimizing Performance with Oracle ....................................................................................... 122
Deleting Temporary Report Data ............................................................................................ 122
Logging SQL Calls .................................................................................................................. 123
Restarting the Service in an N-Tier Environment .................................................................... 123

Installation Guide v
Appendix A: Manually Creating the CobraWorkstation Share .................................................... 124
Appendix B: Configure Cobra to Work with Microsoft Project Server ......................................... 127
Overview
Installation Guide 1
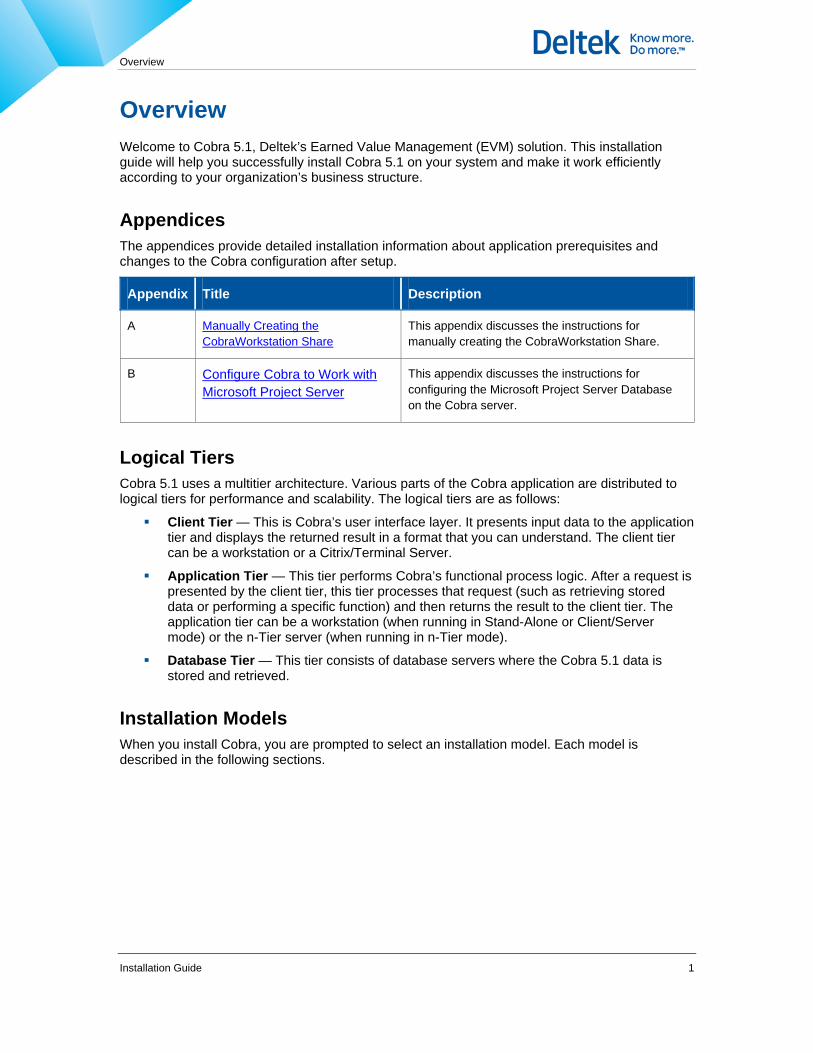
Overview Welcome to Cobra 5.1, Deltek’s Earned Value Management (EVM) solution. This installation guide will help you successfully install Cobra 5.1 on your system and make it work efficiently according to your organization’s business structure.
Appendices The appendices provide detailed installation information about application prerequisites and changes to the Cobra configuration after setup.
Appendix Title Description
A Manually Creating the CobraWorkstation Share
This appendix discusses the instructions for manually creating the CobraWorkstation Share.
B Configure Cobra to Work with Microsoft Project Server
This appendix discusses the instructions for configuring the Microsoft Project Server Database on the Cobra server.
Logical Tiers Cobra 5.1 uses a multitier architecture. Various parts of the Cobra application are distributed to logical tiers for performance and scalability. The logical tiers are as follows:
Client Tier — This is Cobra’s user interface layer. It presents input data to the application tier and displays the returned result in a format that you can understand. The client tier can be a workstation or a Citrix/Terminal Server.
Application Tier — This tier performs Cobra’s functional process logic. After a request is presented by the client tier, this tier processes that request (such as retrieving stored data or performing a specific function) and then returns the result to the client tier. The application tier can be a workstation (when running in Stand-Alone or Client/Server mode) or the n-Tier server (when running in n-Tier mode).
Database Tier — This tier consists of database servers where the Cobra 5.1 data is stored and retrieved.
Installation Models When you install Cobra, you are prompted to select an installation model. Each model is described in the following sections.

Overview
Installation Guide 2
N-Tier Application Server The n-Tier application server model is designed for multi-user implementations. It provides quick access to Cobra 5.1 via LAN or internal WAN. Using this model, users can also remotely connect to Cobra across the Internet via VPN connection into the corporate network. Load balancing can also be implemented in this model for large-scale implementations (see Load Balancing). You can also use this model when deploying Cobra on a Citrix environment (see Running Cobra from a Citrix/Terminal Server). See Benefits of Using N-Tier for more information about the n-Tier architecture.
Figure 1 – N-Tier Application Server Tier Model
Benefits of Using N-Tier
Enhanced performance and scalability — An n-Tier application distributes its tiers among three or more separate computers. In this setup, the client tier is installed on user workstations, the application tier resides on a more centralized computer, and the database tier is on a computer that manages data storage. Having each tier on a separate machine enhances performance and scalability because each tier runs on a dedicated machine. Also, in an n-Tier setup, the application server is the one that communicates with the database server. This makes the client a dedicated request input and result output device, which lightens its workload so that its processing power can be used for other system applications.
Overview
Installation Guide 3
Load balancing — Load balancing distributes the processing workload between two or more application servers. This optimizes the use of your resources and minimizes the response time of requested tasks. See Load Balancing to learn how to configure Cobra for load balancing.
Automatic client updating — When an update to Cobra 5.1 is available, you update only the application server. When a client accesses an updated application server, the updates are automatically applied to the client.
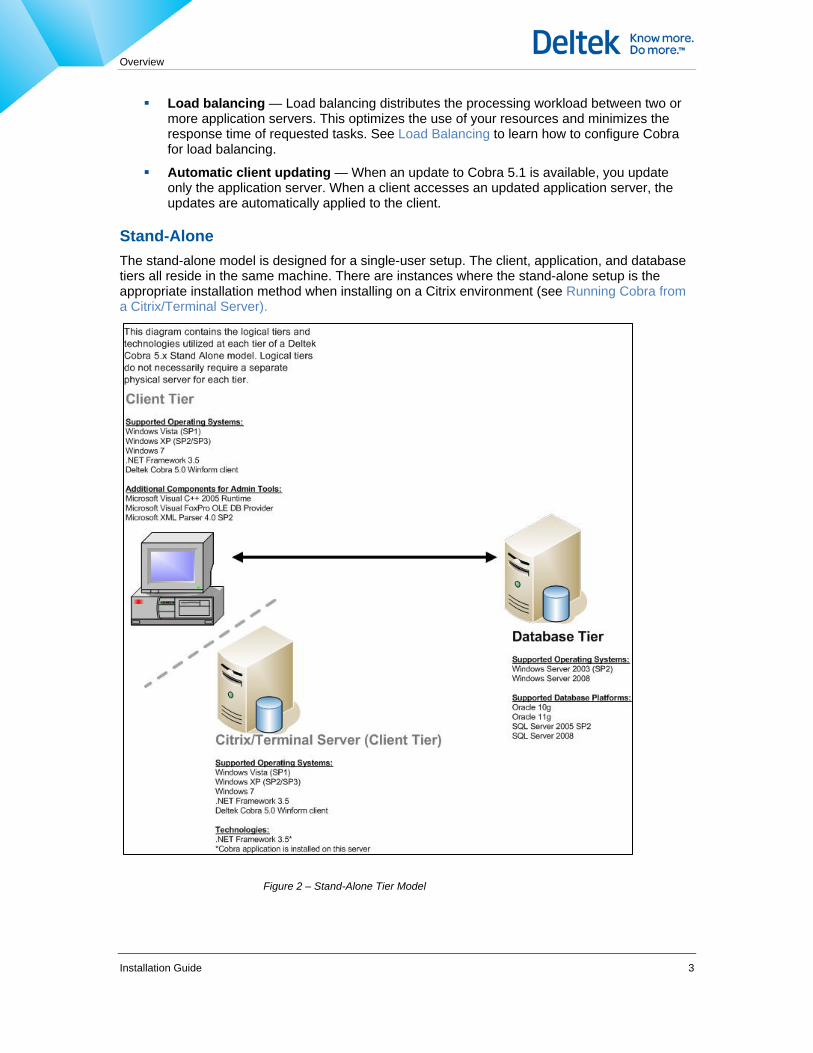
Stand-Alone The stand-alone model is designed for a single-user setup. The client, application, and database tiers all reside in the same machine. There are instances where the stand-alone setup is the appropriate installation method when installing on a Citrix environment (see Running Cobra from a Citrix/Terminal Server).
Figure 2 – Stand-Alone Tier Model
Overview
Installation Guide 4
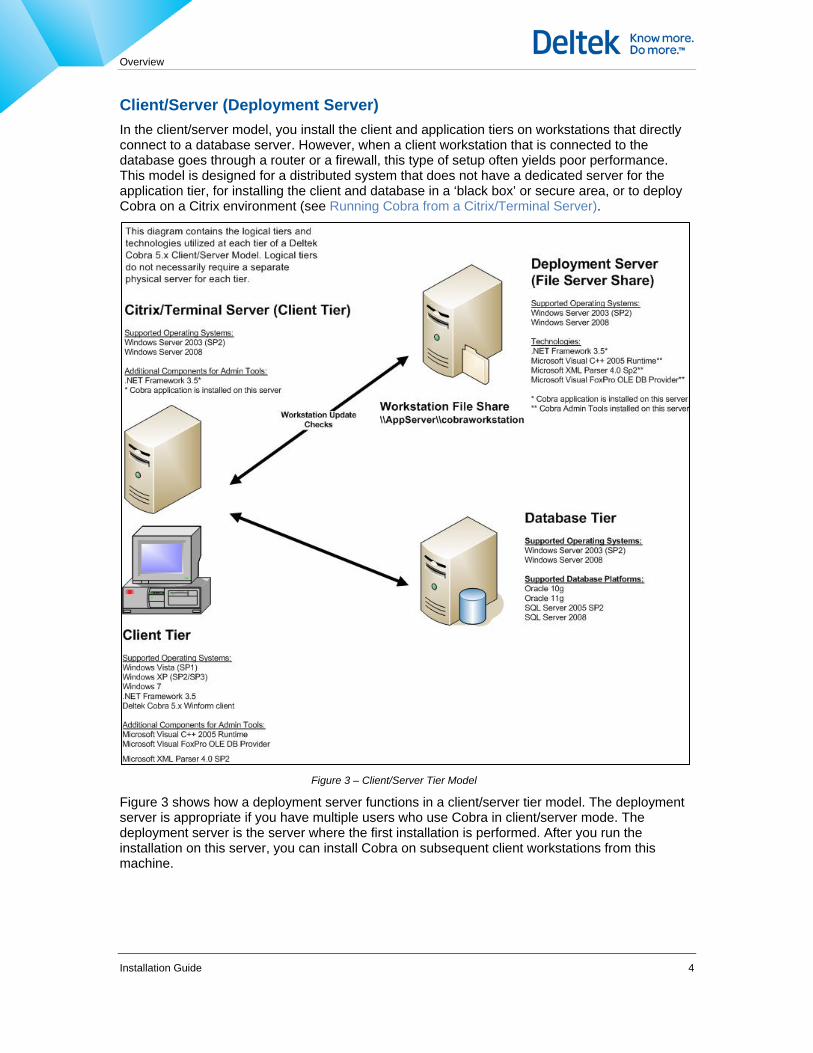
Client/Server (Deployment Server) In the client/server model, you install the client and application tiers on workstations that directly connect to a database server. However, when a client workstation that is connected to the database goes through a router or a firewall, this type of setup often yields poor performance. This model is designed for a distributed system that does not have a dedicated server for the application tier, for installing the client and database in a ‘black box’ or secure area, or to deploy Cobra on a Citrix environment (see Running Cobra from a Citrix/Terminal Server).
Figure 3 – Client/Server Tier Model
Figure 3 shows how a deployment server functions in a client/server tier model. The deployment server is appropriate if you have multiple users who use Cobra in client/server mode. The deployment server is the server where the first installation is performed. After you run the installation on this server, you can install Cobra on subsequent client workstations from this machine.
Overview
Installation Guide 5
Microsoft® .NET Architecture With the release of version 5.1, Cobra’s entire architecture is built on the Microsoft’s® .NET Framework. .NET Framework is Microsoft’s name for a set of software technologies they have developed to connect information, people, systems, and devices. Visit http://www.microsoft.com/net/ for more information about Microsoft .NET Framework.
The .NET Framework allows Cobra to be an n-Tier application and provide quick access for remote users without using Windows Terminal Server or Citrix®. This architecture allows some processing to occur on the client — such as the spreading of time-phased budgets — while another process — such as Recalculate — occurs on the application server at the same time. The .NET Framework literally provides both quick remote access to the data like a Web application and the rich user interface of a Windows application.
.NET Framework-based applications are easier to build, deploy, and integrate with outside systems than those built using earlier technologies. The move to .NET Framework promises enhanced performance, reliability, and scalability. It also provides easier deployment and faster product development. The .NET Framework version 3.5 SP1 must be installed on the client and the application server.
You can install a copy of .NET Framework from http://msdn.microsoft.com/en-us/netframework/cc378097.
Adding Custom Notes to This Guide If you would like to add custom notes to this guide that are specific to your company, Adobe® Reader® X provides this ability. If you do not already use Adobe Reader X, you can download it here free from Adobe.
To add a custom note using Adobe Reader X, complete the following steps: 1. On the Reader toolbar, click Comment at far right.
2. In the Annotations pane that displays, click Sticky Note. The cursor changes to match the button.
3. Position the cursor at the location in the guide where you want the note to appear, and click. A note icon is inserted at the location and a text box pops up.
4. Enter your information in the text box.
5. Continue adding notes as needed.
6. Save the document.
Deltek recommends that you save the document to a slightly different filename so as to keep the original from being overwritten.
When reading the document, cursor over a note icon to see the information. Double-click a note icon to edit the information.
If You Need Assistance
Installation Guide 6
If You Need Assistance If you need assistance installing, implementing, or using Cobra, Deltek makes a wealth of information and expertise readily available to you.
Customer Services For over 20 years, Deltek has maintained close relationships with client firms, helping with their problems, listening to their needs, and getting to know their individual business environments. A full range of customer services has grown out of this close contact, including the following:
Extensive self-support options through the Customer Care Connect Web portal.
Phone and email support from Customer Care analysts
Technical services
Consulting services
Custom programming
Classroom, on-site, and Web-based training
Find out more about these and other services from the Customer Care Connect site.
Customer Care Connect Site The Deltek Customer Care Connect site is a support Web portal for Deltek customers who purchase an Ongoing Support Plan (OSP).
The following are some of the many options you have at the Customer Care Connect site:
Download the latest versions of your Deltek products
Search Deltek’s knowledge base
Ask questions, exchange ideas, and share knowledge with other Deltek customers through the Deltek Connect Customer Forums
Display or download product information, such as release notes, user guides, technical information, and white papers
Submit a support case and check on its progress
Transfer requested files to a Customer Care analyst
Use Quick Chat to submit a question to a Customer Care analyst online
Subscribe to Deltek communications about your Deltek products and services
Receive alerts of new Deltek releases and hot fixes
If you need assistance using the Customer Care Connect site, the online help available on the site provides answers for most questions
If You Need Assistance
Installation Guide 7
Access Customer Care Connect
To access the Customer Care Connect site, complete the following steps: 1. Go to http://support.deltek.com.
2. Enter your Customer Care Connect Username and Password.
3. Click Log In.
If you do not have a username and password for the Customer Care Connect site, contact your firm’s Cobra Administrator.
If you forget your username or password, you can click the Account Assistance button on the login screen for help.
Additional Documentation The following table lists the additional Deltek documentation available for this release. Except where noted, all the user guides and quick reference guides listed in this table are available for download from the Deltek Customer Care Connect site.
Document Name Description
Cobra 5.1 Release Notes This document contains important information concerning the installation and use of the product, and describes outstanding issues.
Cobra 5.1 Data Structure This document contains updated version of all WST tables. These tables are used by several applications, such as Open Plan, Cobra, and WelcomHome.
Cobra 5.1 Online Help The online help contains detailed information and instructions on how to use Cobra’s various features.
EPM Security Administrator Online Help This document is for system administrators only. It contains detailed information on how to define security rights and maintain license keys, users, groups, roles, and access to the various EPM applications.
Downloading Deltek Products using Deltek Software Manager
Installation Guide 8
Downloading Deltek Products using Deltek Software Manager You can use Deltek Software Manager (DSM) to download complete Deltek products, hot fixes, and sub-releases. You can access DSM directly or through the Deltek Customer Care Connect site.
When you access DSM directly, you will be prompted to log on before you can access the application. If you access DSM from within the Deltek Customer Care site, you do not have to log on since you are already logged into the Customer Care site.
Accessing DSM Directly To access Deltek Software Manager directly, complete the following steps:
1. Launch Deltek Software Manager by taking one of the following actions:
Click here.
On your desktop, click Start » Programs » Deltek » Cobra » Deltek Software Manager.
2. In the Deltek Software Manager logon dialog box, enter your Deltek Customer Care User ID and Password, and click Logon.
3. To select the folder where you want to download Deltek products, click Settings above the right pane of Deltek Software Manager.
When you log on for the first time, Deltek Software Manager asks you to select a default folder where Deltek products are to be downloaded.
4. Use the Settings dialog box to specify the folder where you want to download Deltek products, and click OK.
You can change this folder anytime in the Settings dialog box.
5. In the left pane of Deltek Software Manager, expand the Deltek product that you want to download, if it is not already expanded.
If you clicked the link in step 1 to access DSM, the application automatically selects Cobra for you.
6. Select the product type that you want to download. Your options are Complete, HotFix, and Sub-Release.
7. In the table, select the check box that corresponds to the Deltek product that you want to download. The right pane displays a message stating that the product has been added to the download queue.
To view the items in the download queue, click View Download Queue at the bottom of the left pane.
Downloading Deltek Products using Deltek Software Manager
Installation Guide 9
8. Click Download at the bottom of the left pane. Deltek Software Manager downloads the product to the folder that you selected.
Accessing DSM from within the Customer Care Connect Site To access Deltek Software Manager from within the Customer Care Connect site, complete the following steps:
1. In your Web browser, go to http://support.deltek.com.
2. Enter your Customer Care Connect Username and Password, and click Log In.
3. When the Customer Care Connect site displays, click the Product Downloads tab.
You are automatically logged into Deltek Software Manager.
4. To select the folder where you want to download Deltek products, click Settings above the right pane of Deltek Software Manager.
When you log on for the first time, Deltek Software Manager asks you to select a default folder where Deltek products are to be downloaded.
5. Use the Settings dialog box to specify the folder where you want to download Deltek products, and click OK.
You can change this folder anytime in the Settings dialog box.
6. In the left pane of Deltek Software Manager, expand the Deltek product that you want to download, if it is not already expanded.
7. Select the product type that you want to download. Your options are Complete, HotFix, and Sub-Release.
8. In the table, select the check box that corresponds to the Deltek product that you want to download. The right pane displays a message stating that the product has been added to the download queue.
To view the items in the download queue, click View Download Queue at the bottom of the left pane.
9. Click Download at the bottom of the left pane. Deltek Software Manager downloads the product to the folder that you selected.
DSM Documentation and Troubleshooting To view the online help for Deltek Software Manager, click here.
To view a tutorial on how to use Deltek Software Manager, click here.
To view more information on troubleshooting Deltek Software Manager, click here.
The above troubleshooting link will only work if you are logged into Deltek Customer Care Connect.
Getting Started
Installation Guide 10
Getting Started Before you begin to install Cobra, you should understand the Cobra architecture, your deployment options, and hardware/software requirements. There are also several things you should consider to optimize the use of the software.
Questions to Ask Before You Begin You should answer the following questions before installing Cobra:
Are you upgrading from an earlier version of Cobra? See Upgrading from an Earlier Version of Cobra to learn how to upgrade your Cobra installation.
How many concurrent users do you expect to use Cobra? If you have fewer than four Cobra users, you can use the free version of Microsoft SQL Server 2005 Express Edition to establish your database.
Which installation model should you use? See Installation Models to learn more about which installation model is appropriate for your firm.
Do your client workstations and servers meet hardware and software requirements? See Hardware and Software Requirements for more information on the system requirements.
Are you using Oracle or Microsoft SQL as your database platform? Cobra can run on either platform.
Does your technical staff need additional training on Microsoft Windows Server 2003/2008, Microsoft SQL Server 2005/2008, or Oracle 10g/11g?
Running Multiple Instances of Cobra The Cobra server installation is designed to connect to a single database. If you wish to have two Cobra databases, you will need two Cobra server (or client) installations.
Cobra 5.1 does not install in the same folder or database as Cobra 4.7. See Upgrading from an Earlier Version of Cobra for details on how to run 4.7 and 5.1 on the same machine.
Contacting Technical Services While Deltek has worked hard to ensure an easy installation, in certain situations installation can be complex, and may require special consideration. The complexity can increase, for example, with multiple server installation, load balancing, database replication, or other complex deployments. In such cases, we recommend contacting Deltek Technical Services to schedule your Cobra installation.
Deltek's team of technical consultants can assist you with your installation in a timely manner. When you contact the Technical Services department, technical specialists schedule a phone and Microsoft Live Meeting appointment to walk your IT staff through your Cobra installation. Deltek’s involvement ensures that all applications are installed properly, regardless of the complexity of the deployment scenario.
The Technical Services department’s assistance is billed on a time and materials basis. While installation assistance is not required, it is recommended to ensure that you optimize your investment in Cobra from the time of installation. Many Deltek clients have benefited from the Deltek Technical Services department’s experience and knowledge of the Cobra installation process.
System Requirements
Installation Guide 11
System Requirements Your purchase of Cobra indicates that your firm has made a substantial commitment to ensure your organization has a fully integrated earned value management solution. To support that commitment, we strongly recommend that you carefully consider the hardware requirements necessary to run Cobra properly.
Hardware and Software Requirements Although hardware and software requirements vary from one Cobra implementation to another, Deltek does provide some general recommendations. The Deltek Cobra 5.1 Hardware and Software Requirements document is available on the Customer Care Connect site. Visit https://support.deltek.com and search for Knowledge Base article no. 41877.
You must install Microsoft .NET Framework 3.5 SP1 on your servers and client workstations. You can install .NET Framework 3.5 SP1 from this site: http://msdn.microsoft.com/en-us/netframework/cc378097.
Cobra reports require Microsoft Excel. Make sure that the latest version of Microsoft Excel is installed in the clients and server.
Cobra requires the following software applications to run the Admin Tools. If not detected, Cobra automatically installs these applications during installation.
Microsoft OLE DB Provider for Visual FoxPro 9.0. (You can download the software from: http://www.microsoft.com/downloads/details.aspx?familyid=E1A87D8F-2D58-491F-A0FA-95A3289C5FD4&displaylang=en#filelist.)
Microsoft Visual C++ 2005 SP1 Redistributable Package (x86). (You can download the software from: http://www.microsoft.com/downloads/details.aspx?familyid=200b2fd9-ae1a-4a14-984d-389c36f85647&displaylang=en.)
MSXML 4.0 Service Pack 2 (Microsoft XML Core Services). (You can download the software from: http://www.microsoft.com/downloads/details.aspx?FamilyId=3144B72B-B4F2-46DA-B4B6-C5D7485F2B42&displaylang=en.)
Permissions Required for Cobra To install the application tier, you must have full rights to the application tier. After the installation, users must have read rights to a number of folders:
C:\Program Files\Deltek\Cobra 5\ReportTemplates
C:\Program Files\Deltek\Cobra 5\Samples
C:\Program Files\Deltek\Cobra 5\Workstation
C:\Program Files\Deltek\Cobra 5\Import Files
You need to create the Import Files folder manually. The folder is used to improve performance when importing data. The Integration Wizard can either transfer data from the local machine to the server or allow you to copy the file manually to the application server before the process starts. The second option is typically faster to process.
System Requirements
Installation Guide 12
To install the administrator client, you must have administrator privileges. After the installation, you must have full rights to the Deltek Cobra 5.1 folder and subfolders where error logs are created and reports are saved by default (C:\Documents and Settings\<USER PROFILE>\My Documents\Deltek\Cobra).
See Logical Tiers for a clear explanation of where the application tier exists in a stand alone or client server install.
In an n-tier installation, there are no specific file system rights necessary for users to install the standard client tier. If you are not an administrative user, see Hardware and Software Requirements for a list of Microsoft components needed on your client workstation.
Your n-tier server service should be granted permissions (or run under a suitable account which has the permissions) to access network paths that users might normally use to store backups, import files, etc. This allows your application server to directly read/write to those locations rather than always sending data via a client workstation.
Database Requirements Cobra requires one of the following databases to store data:
Oracle 10g/11g – Oracle 10g version 10.2.0.4 or later is required.
You must install the Administrator version of the Oracle client on the application tier.
The Oracle client must be the same version as the oracle database, except when you are using an x64 database. The Oracle client must be in 32 bit.
Before starting the installation, make sure that:
You only have one version of the Oracle client installed on the application tier.
You can connect to your database using the Enterprise Manager Console.
Microsoft SQL Server 2005/2008
If you have fewer than four Cobra users, you can use the free version of Microsoft SQL Server 2005 Express Edition
Install the latest Deltek-supported Microsoft SQL service pack. Please see the appropriate guide from the list:
Microsoft SQL Server 2005 Administrator’s Guide
Deltek Microsoft SQL Server 2005 Express Edition/MSDE 2000 Administrator’s Guide.
These guides are available from the Knowledge Center tab of Deltek’s e-support site at https://support.deltek.com.
If you are installing Cobra to a database which already contains another Deltek IPM application that is not configured to use Unicode, you must update the existing database tables to use Unicode structures before installing Cobra. Please contact Customer Care if you need assistance.
System Requirements
Installation Guide 13
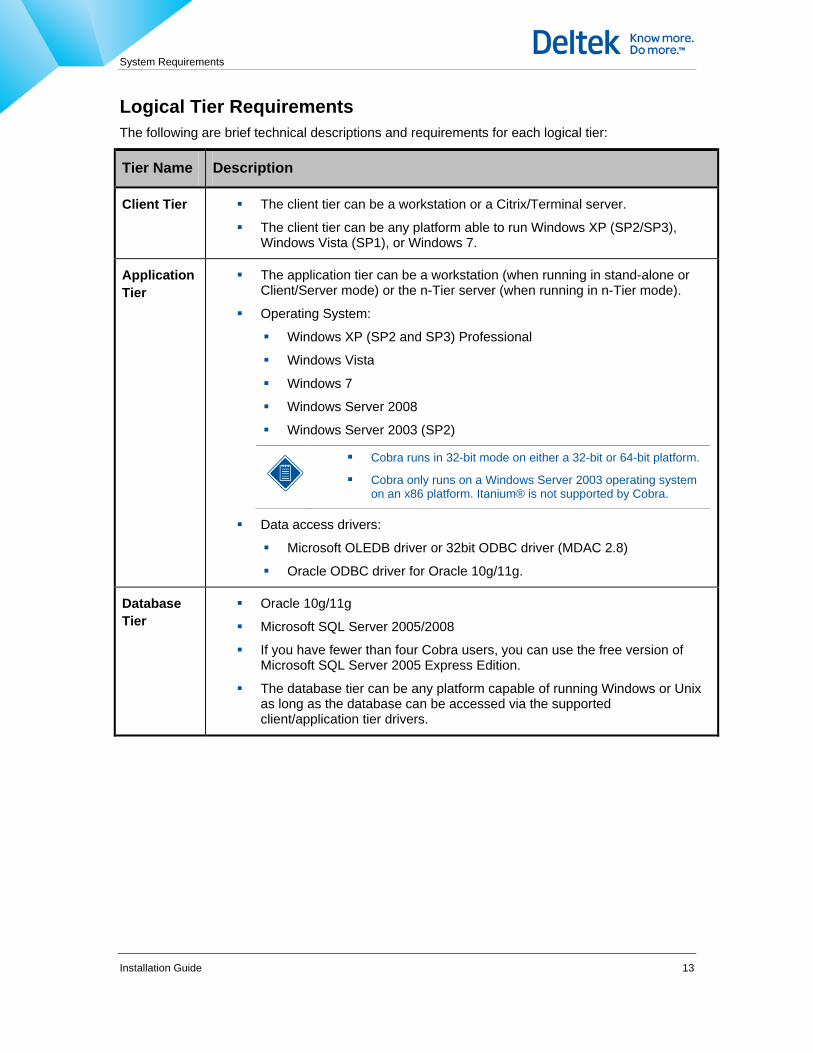
Logical Tier Requirements The following are brief technical descriptions and requirements for each logical tier:
Tier Name Description
Client Tier The client tier can be a workstation or a Citrix/Terminal server.
The client tier can be any platform able to run Windows XP (SP2/SP3), Windows Vista (SP1), or Windows 7.
Application Tier
The application tier can be a workstation (when running in stand-alone or Client/Server mode) or the n-Tier server (when running in n-Tier mode).
Operating System:
Windows XP (SP2 and SP3) Professional
Windows Vista
Windows 7
Windows Server 2008
Windows Server 2003 (SP2)
Cobra runs in 32-bit mode on either a 32-bit or 64-bit platform.
Cobra only runs on a Windows Server 2003 operating system on an x86 platform. Itanium® is not supported by Cobra.
Data access drivers:
Microsoft OLEDB driver or 32bit ODBC driver (MDAC 2.8)
Oracle ODBC driver for Oracle 10g/11g.
Database Tier
Oracle 10g/11g
Microsoft SQL Server 2005/2008
If you have fewer than four Cobra users, you can use the free version of Microsoft SQL Server 2005 Express Edition.
The database tier can be any platform capable of running Windows or Unix as long as the database can be accessed via the supported client/application tier drivers.
Installing Cobra 5.1
Installation Guide 14
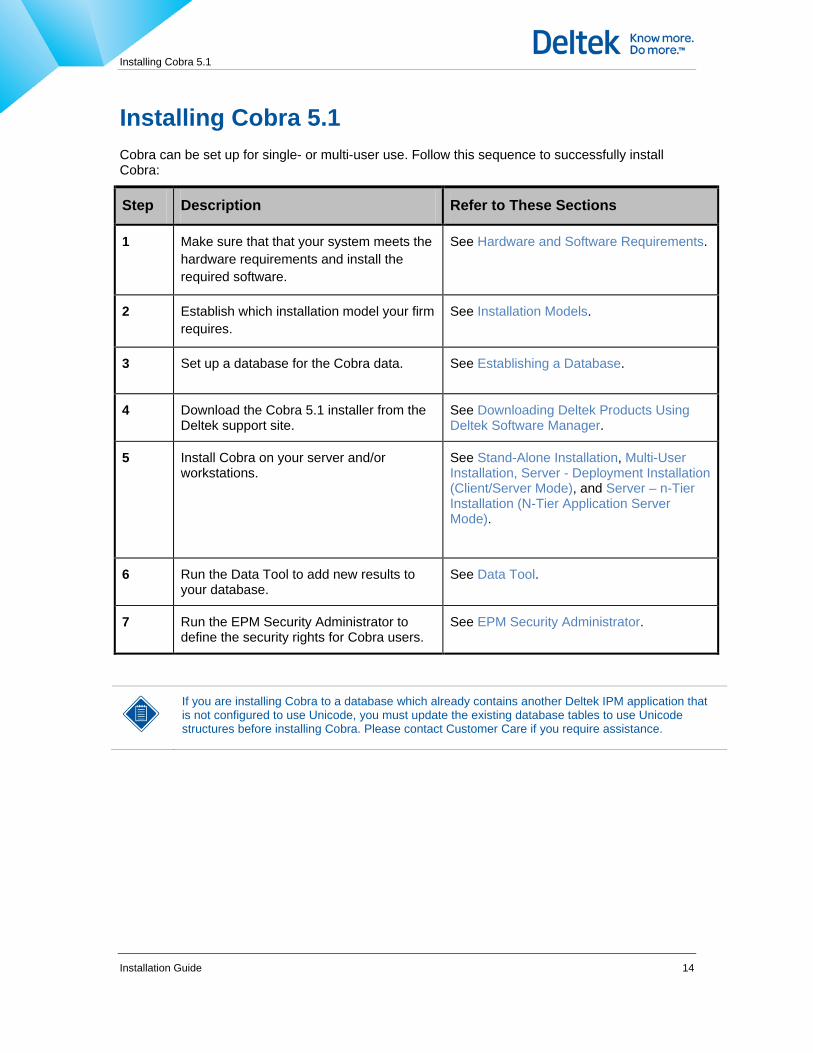
Installing Cobra 5.1 Cobra can be set up for single- or multi-user use. Follow this sequence to successfully install Cobra:
Step Description Refer to These Sections
1 Make sure that that your system meets the hardware requirements and install the required software.
See Hardware and Software Requirements.
2 Establish which installation model your firm requires.
See Installation Models.
3 Set up a database for the Cobra data. See Establishing a Database.
4 Download the Cobra 5.1 installer from the Deltek support site.
See Downloading Deltek Products Using Deltek Software Manager.
5 Install Cobra on your server and/or workstations.
See Stand-Alone Installation, Multi-User Installation, Server - Deployment Installation (Client/Server Mode), and Server – n-Tier Installation (N-Tier Application Server Mode).
6 Run the Data Tool to add new results to your database.
See Data Tool.
7 Run the EPM Security Administrator to define the security rights for Cobra users.
See EPM Security Administrator.
If you are installing Cobra to a database which already contains another Deltek IPM application that is not configured to use Unicode, you must update the existing database tables to use Unicode structures before installing Cobra. Please contact Customer Care if you require assistance.

Installing Cobra 5.1
Installation Guide 15
Running Multiple Client Versions of Cobra on the Same Machine Use the information in this section to run multiple client versions of Cobra on the same machine in an n-tier, client-server, or stand-alone environment.
Running Multiple Versions of Cobra on an N-Tier Environment
To run multiple versions of Cobra on an n-tier environment, complete the following steps on the client machine:
1. Confirm that the first n-tier installation is working correctly.
2. Copy the Cobra installation folder to a new folder.
3. Copy the shortcut and modify the contents of the shortcut to point to the copy of Cobra in the new folder.
4. Confirm that the new shortcut launches Cobra without any errors.
5. Uninstall Cobra from the client machine.
Performing this step leaves the copied shortcuts and Cobra folder intact.
6. Install a new n-tier installation on a different application server.
7. Install Cobra on the client machine from the new n-tier installation.
Using this technique, you can start either version of Cobra by clicking on their respective shortcuts.
All copies of Cobra running on the same machine will send log information to the same log files in the \My Documents\Deltek\Cobra\Logs folder.
Running Multiple Versions of Cobra on a Client-Server or Stand-Alone Environment by Specifying an Alternative Configuration File The IdeaBlade.Ibconfig file contains application configuration information such as data source connections.
You can pass the /configfolder parameter to the Cobra, Data Tool, and Conversion applications to specify the location of the IdeaBlade.Ibconfig file. You can add the parameter to the Target field on the Properties dialog box for the application’s startup icon.
For example, if the IdeaBlade.Ibconfig file is moved to the folder "C:\my cobra config" then use the following value for the Target field in Cobra’s startup icon:
"C:\Program Files\Deltek\Cobra 5\DeltekCobra.exe" /configfolder:"C:\my cobra config"
You must add quotes around the folder name (“C:\my cobra config" in this example) only if the path contains spaces.
Installing Cobra 5.1
Installation Guide 16
If you omit this parameter then the application uses the IdeaBlade.Ibconfig file in the application’s folder.
You can also use this parameter with the Data Tool and the Data Conversion Wizard.
All copies of Cobra running on the same machine will send log information to the same log files in the \My Documents\Deltek\Cobra\Logs folder.
Installing Cobra 5.1
Installation Guide 17
Upgrading From an Earlier Version of Cobra
Upgrading from any version of Cobra 5.0 or Cobra 5.1 To upgrade your existing version of Cobra 5.0 or Cobra 5.1, you must run the Cobra 5.1 installation from the same machine where you initially installed Cobra 5.0 or Cobra 5.1. That is your workstation if you are using the stand-alone model, or your deployment server if you are using the client/server or n-Tier application server model. Client workstations will automatically update the subsequent users’ log into Cobra.
To upgrade from any version of Cobra 5.0 or Cobra 5.1: 1. Log onto the application server as an administrator.
2. From the application server, launch the DeltekCobra51.exe file that you downloaded from the Deltek Support site (see Downloading Deltek Products Using Deltek Software Manager).
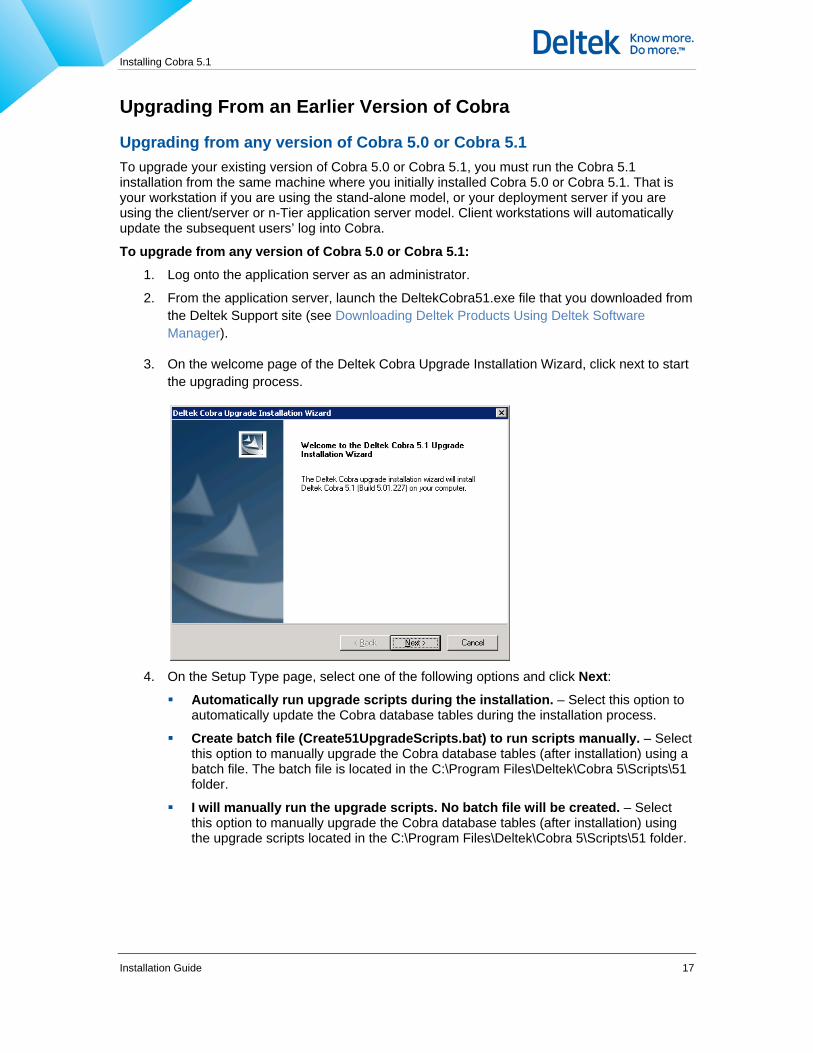
3. On the welcome page of the Deltek Cobra Upgrade Installation Wizard, click next to start the upgrading process.
4. On the Setup Type page, select one of the following options and click Next:
Automatically run upgrade scripts during the installation. – Select this option to automatically update the Cobra database tables during the installation process.
Create batch file (Create51UpgradeScripts.bat) to run scripts manually. – Select this option to manually upgrade the Cobra database tables (after installation) using a batch file. The batch file is located in the C:\Program Files\Deltek\Cobra 5\Scripts\51 folder.
I will manually run the upgrade scripts. No batch file will be created. – Select this option to manually upgrade the Cobra database tables (after installation) using the upgrade scripts located in the C:\Program Files\Deltek\Cobra 5\Scripts\51 folder.
Installing Cobra 5.1
Installation Guide 18
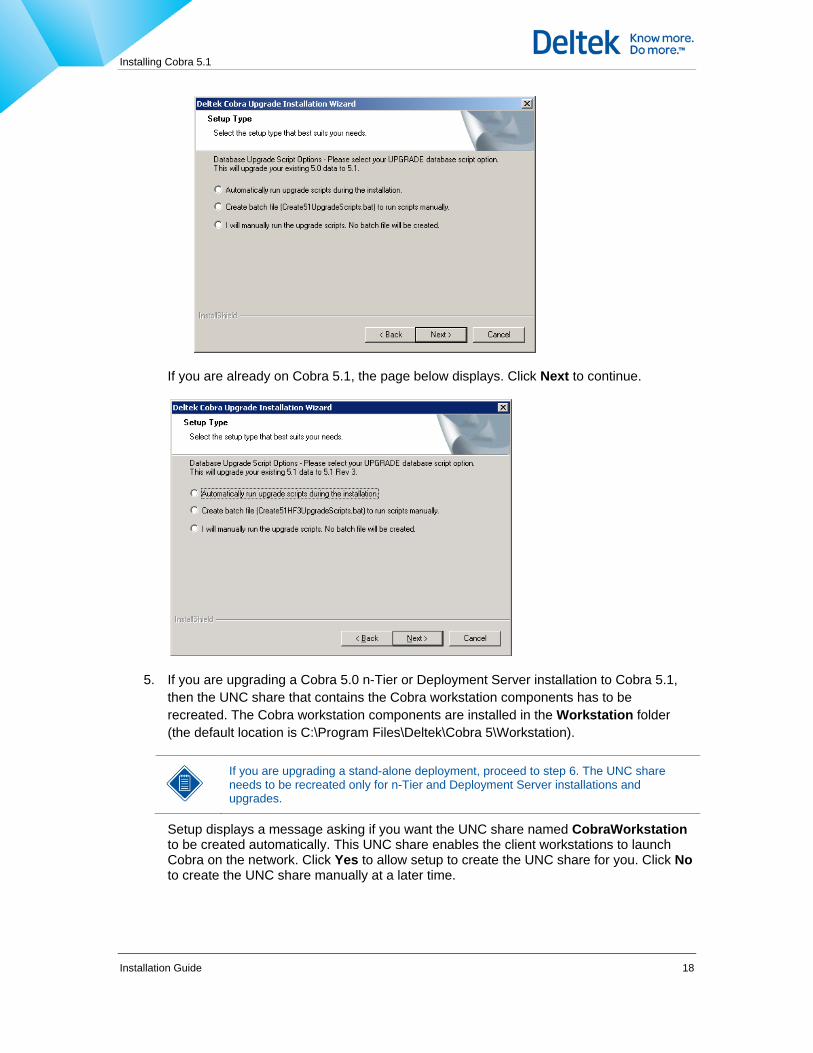
If you are already on Cobra 5.1, the page below displays. Click Next to continue.
5. If you are upgrading a Cobra 5.0 n-Tier or Deployment Server installation to Cobra 5.1, then the UNC share that contains the Cobra workstation components has to be recreated. The Cobra workstation components are installed in the Workstation folder (the default location is C:\Program Files\Deltek\Cobra 5\Workstation).
If you are upgrading a stand-alone deployment, proceed to step 6. The UNC share needs to be recreated only for n-Tier and Deployment Server installations and upgrades.
Setup displays a message asking if you want the UNC share named CobraWorkstation to be created automatically. This UNC share enables the client workstations to launch Cobra on the network. Click Yes to allow setup to create the UNC share for you. Click No to create the UNC share manually at a later time.
Installing Cobra 5.1
Installation Guide 19
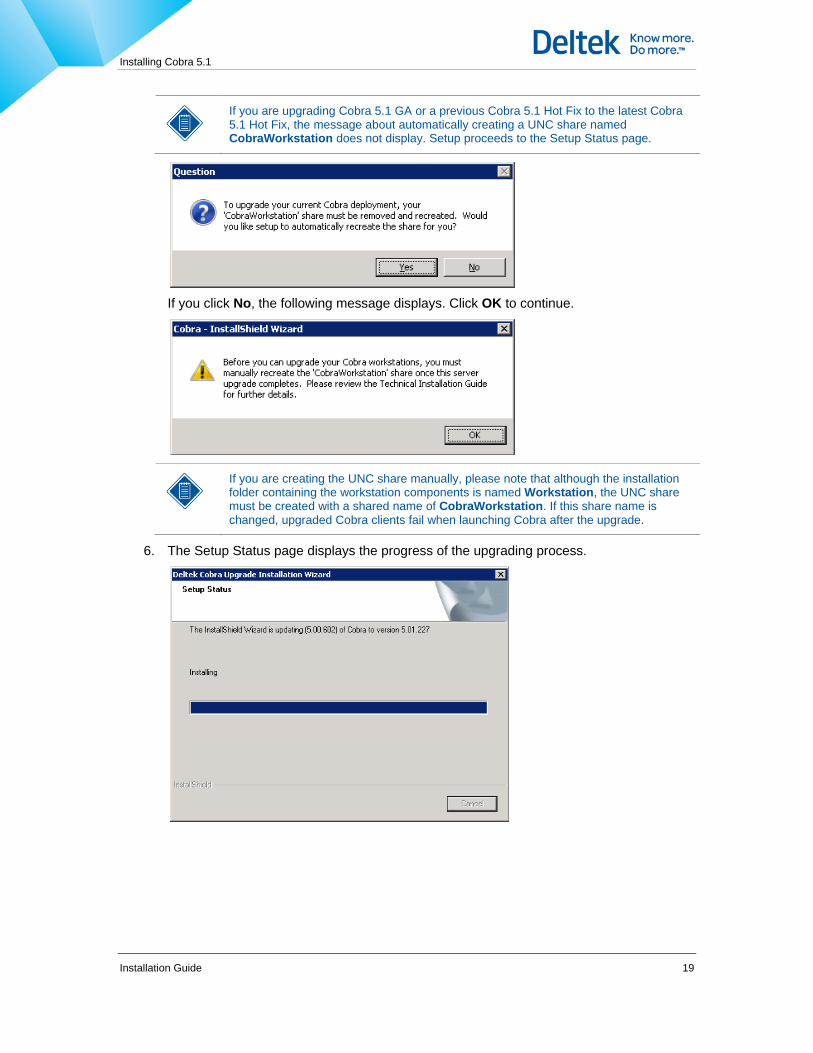
If you are upgrading Cobra 5.1 GA or a previous Cobra 5.1 Hot Fix to the latest Cobra 5.1 Hot Fix, the message about automatically creating a UNC share named CobraWorkstation does not display. Setup proceeds to the Setup Status page.
If you click No, the following message displays. Click OK to continue.
If you are creating the UNC share manually, please note that although the installation folder containing the workstation components is named Workstation, the UNC share must be created with a shared name of CobraWorkstation. If this share name is changed, upgraded Cobra clients fail when launching Cobra after the upgrade.
6. The Setup Status page displays the progress of the upgrading process.
Installing Cobra 5.1
Installation Guide 20
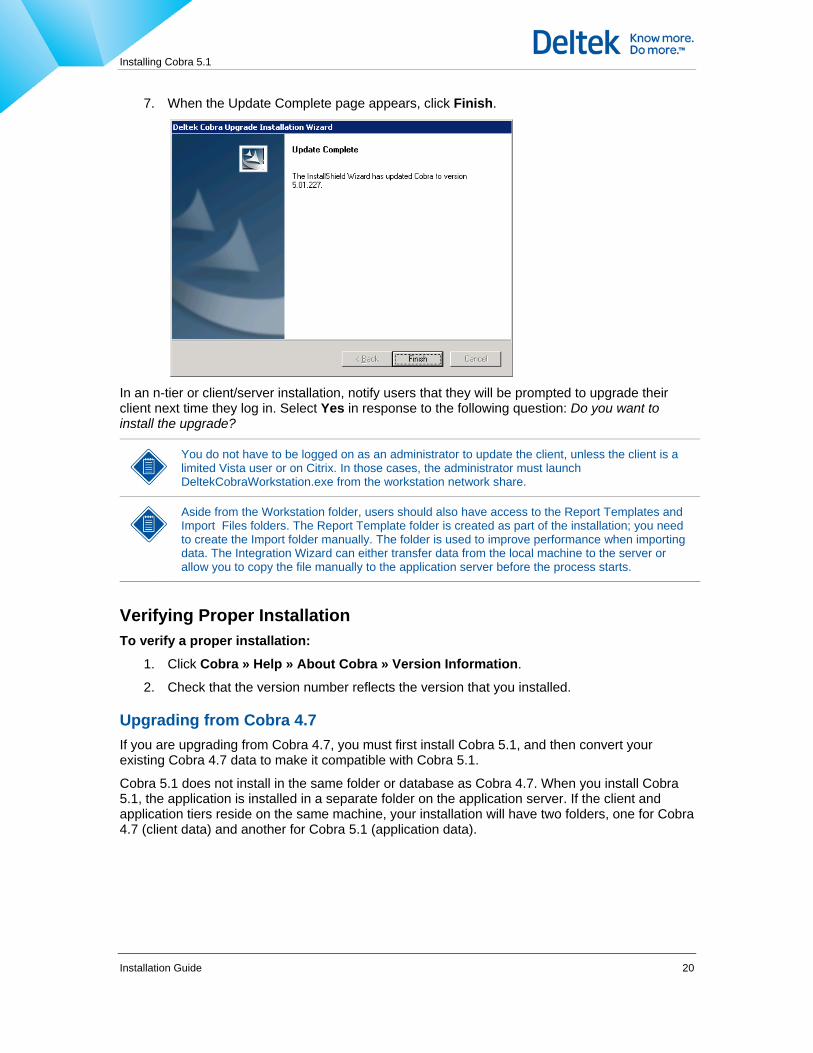
7. When the Update Complete page appears, click Finish.
In an n-tier or client/server installation, notify users that they will be prompted to upgrade their client next time they log in. Select Yes in response to the following question: Do you want to install the upgrade?
You do not have to be logged on as an administrator to update the client, unless the client is a limited Vista user or on Citrix. In those cases, the administrator must launch DeltekCobraWorkstation.exe from the workstation network share.
Aside from the Workstation folder, users should also have access to the Report Templates and Import Files folders. The Report Template folder is created as part of the installation; you need to create the Import folder manually. The folder is used to improve performance when importing data. The Integration Wizard can either transfer data from the local machine to the server or allow you to copy the file manually to the application server before the process starts.
Verifying Proper Installation To verify a proper installation:
1. Click Cobra » Help » About Cobra » Version Information.
2. Check that the version number reflects the version that you installed.
Upgrading from Cobra 4.7 If you are upgrading from Cobra 4.7, you must first install Cobra 5.1, and then convert your existing Cobra 4.7 data to make it compatible with Cobra 5.1.
Cobra 5.1 does not install in the same folder or database as Cobra 4.7. When you install Cobra 5.1, the application is installed in a separate folder on the application server. If the client and application tiers reside on the same machine, your installation will have two folders, one for Cobra 4.7 (client data) and another for Cobra 5.1 (application data).
Installing Cobra 5.1
Installation Guide 21
During the installation, you are prompted to provide a database name. Make sure you provide a new database for Cobra 5.1. Use the Data Conversion Wizard to convert your Cobra 4.7 data to your Cobra 5.1 tables (see Data Conversion Wizard). This allows you to use Cobra 4.7 while migrating your projects to Cobra 5.1.
If you are installing Cobra 5.1 onto a different server than Cobra 4.7, the paths identified in your 4.7 Cobra.ini file must be applicable on the new server when using the Data Conversion Wizard.
Cobra combines Budget Element and RBS to create a resource file that is compatible with Cobra 5.1. This resource file is created based on the RBS file from Cobra 4.7. Cobra then transfers the Budget Element result details to that resource file.
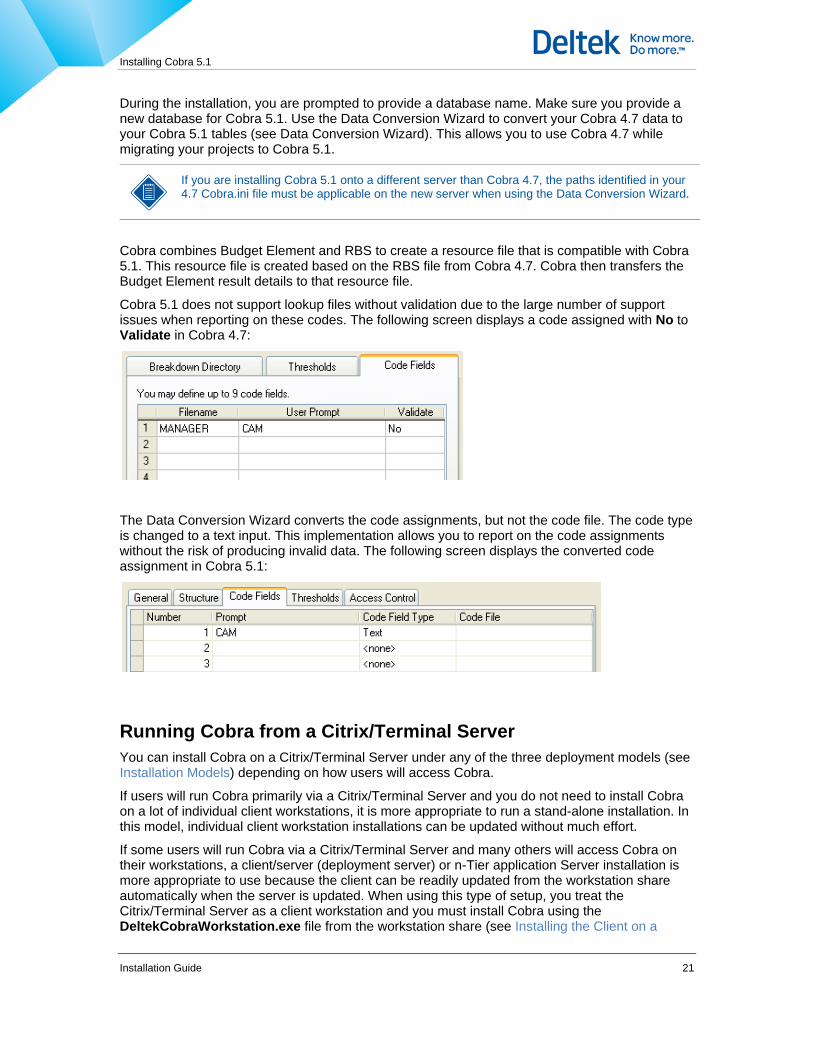
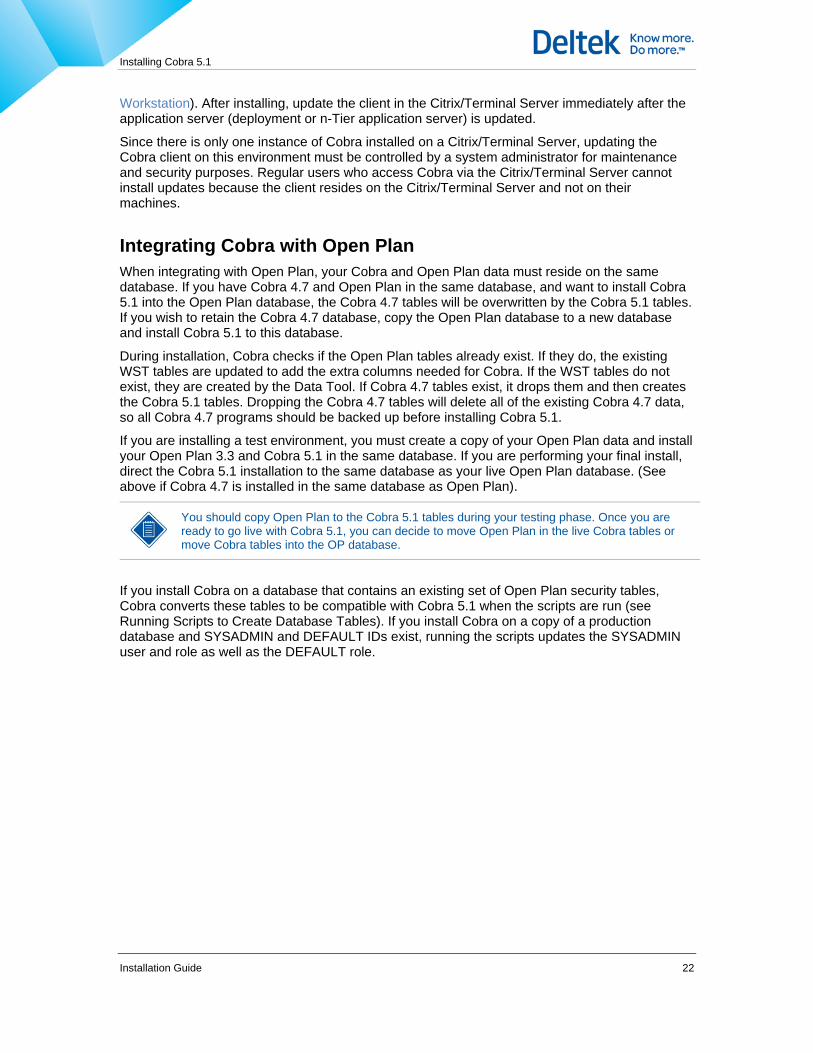
Cobra 5.1 does not support lookup files without validation due to the large number of support issues when reporting on these codes. The following screen displays a code assigned with No to Validate in Cobra 4.7:
The Data Conversion Wizard converts the code assignments, but not the code file. The code type is changed to a text input. This implementation allows you to report on the code assignments without the risk of producing invalid data. The following screen displays the converted code assignment in Cobra 5.1:
Running Cobra from a Citrix/Terminal Server You can install Cobra on a Citrix/Terminal Server under any of the three deployment models (see Installation Models) depending on how users will access Cobra.
If users will run Cobra primarily via a Citrix/Terminal Server and you do not need to install Cobra on a lot of individual client workstations, it is more appropriate to run a stand-alone installation. In this model, individual client workstation installations can be updated without much effort.
If some users will run Cobra via a Citrix/Terminal Server and many others will access Cobra on their workstations, a client/server (deployment server) or n-Tier application Server installation is more appropriate to use because the client can be readily updated from the workstation share automatically when the server is updated. When using this type of setup, you treat the Citrix/Terminal Server as a client workstation and you must install Cobra using the DeltekCobraWorkstation.exe file from the workstation share (see Installing the Client on a
Installing Cobra 5.1
Installation Guide 22
Workstation). After installing, update the client in the Citrix/Terminal Server immediately after the application server (deployment or n-Tier application server) is updated.
Since there is only one instance of Cobra installed on a Citrix/Terminal Server, updating the Cobra client on this environment must be controlled by a system administrator for maintenance and security purposes. Regular users who access Cobra via the Citrix/Terminal Server cannot install updates because the client resides on the Citrix/Terminal Server and not on their machines.
Integrating Cobra with Open Plan When integrating with Open Plan, your Cobra and Open Plan data must reside on the same database. If you have Cobra 4.7 and Open Plan in the same database, and want to install Cobra 5.1 into the Open Plan database, the Cobra 4.7 tables will be overwritten by the Cobra 5.1 tables. If you wish to retain the Cobra 4.7 database, copy the Open Plan database to a new database and install Cobra 5.1 to this database.
During installation, Cobra checks if the Open Plan tables already exist. If they do, the existing WST tables are updated to add the extra columns needed for Cobra. If the WST tables do not exist, they are created by the Data Tool. If Cobra 4.7 tables exist, it drops them and then creates the Cobra 5.1 tables. Dropping the Cobra 4.7 tables will delete all of the existing Cobra 4.7 data, so all Cobra 4.7 programs should be backed up before installing Cobra 5.1.
If you are installing a test environment, you must create a copy of your Open Plan data and install your Open Plan 3.3 and Cobra 5.1 in the same database. If you are performing your final install, direct the Cobra 5.1 installation to the same database as your live Open Plan database. (See above if Cobra 4.7 is installed in the same database as Open Plan).
You should copy Open Plan to the Cobra 5.1 tables during your testing phase. Once you are ready to go live with Cobra 5.1, you can decide to move Open Plan in the live Cobra tables or move Cobra tables into the OP database.
If you install Cobra on a database that contains an existing set of Open Plan security tables, Cobra converts these tables to be compatible with Cobra 5.1 when the scripts are run (see Running Scripts to Create Database Tables). If you install Cobra on a copy of a production database and SYSADMIN and DEFAULT IDs exist, running the scripts updates the SYSADMIN user and role as well as the DEFAULT role.
Establishing a Database
Installation Guide 23
Establishing a Database Make sure one of the following database applications is installed:
Oracle 10g/11g
The Oracle client and ODBC drivers need to be installed on the application tier. This is the workstation in Stand-Alone and Client/Server installation modes. These are installed through the Oracle Administrator client installation. You must also ensure that you have a valid connection to your database (TNSnames.ora) before you begin your installation.
Microsoft SQL Server 2005/2008
If you have fewer than four Cobra users, you can use the free version of Microsoft SQL Server 2005 Express Edition
You must then create a database for storing Cobra data. You also need:
Name of the database server
A user ID and password (with rights to create tables) for the database
The server name of the database
Refer to the Oracle or Microsoft SQL documentation for details on how to perform the above steps.
After establishing your database, you must install .NET Framework 3.5 SP1 on your server and client workstations. You can install .NET Framework 3.5 SP1 from this site: http://msdn.microsoft.com/en-us/netframework/cc378097.
ODBC Data Sources Configuration During the stand-alone, client/server, and n-Tier application server installations, a System DSN is created in ODBC Data Sources. This DSN is named Cobra5DSN and is necessary for application processing functions that use the Visual FoxPro interfaces to connect to the Cobra database. This DSN is not created on workstation installations when using the n-Tier application server installation option as these processing functions occur on the n-Tier server itself and not on the local workstation.

Stand-Alone Installation
Installation Guide 24
Stand-Alone Installation The stand-alone model is designed for a single-user setup. The client, application, and database tiers all reside in the same machine. There are instances where the stand-alone setup is the appropriate installation method when installing on a Citrix environment (see Running Cobra from a Citrix/Terminal Server).
Stand-Alone Model Prerequisites Checklist
Step Description
1 Make sure that your system meets the client, application, and database tier requirements (see Logical Tier Requirements).
2 Install one of the following database platforms:
Oracle 10g/11g
You have to start the Enterprise Manager Console and ensure you have a valid connection to your database (TNSnames.ora).
Microsoft SQL Server 2005/2008
If you have fewer than four Cobra users, you can use the free version of Microsoft SQL Server 2005 Express Edition. Install Cobra on your server and/or workstations.
3 Establish a database for storing the Cobra data. Refer to the Microsoft SQL or Oracle documentation on how to create a database, define a database name, and define a username and password with rights to create tables.
4 Install Microsoft .NET Framework 3.5 SP1 from this site: http://msdn.microsoft.com/en-us/netframework/cc378097.
5 Download the Cobra 5.1 installer from this site: https://support.deltek.com.
Cobra automatically installs the following prerequisite software:
Microsoft OLE DB Provider for Visual FoxPro 9.0 (You can download the software from this site: http://www.microsoft.com/downloads/details.aspx?familyid=E1A87D8F-2D58-491F-A0FA-95A3289C5FD4&displaylang=en#filelist.)
Microsoft Visual C++ 2005 SP1 Redistributable Package (x86) (You can download the software from: http://www.microsoft.com/downloads/details.aspx?familyid=200b2fd9-ae1a-4a14-984d-389c36f85647&displaylang=en.)
MSXML 4.0 Service Pack 2 (Microsoft XML Core Services) (You can download the software from: http://www.microsoft.com/downloads/details.aspx?FamilyId=3144B72B-B4F2-46DA-B4B6-C5D7485F2B42&displaylang=en.).
Stand-Alone Installation
Installation Guide 25
Stand-Alone Installation on an Oracle Database To install in Stand-Alone mode on an Oracle database:
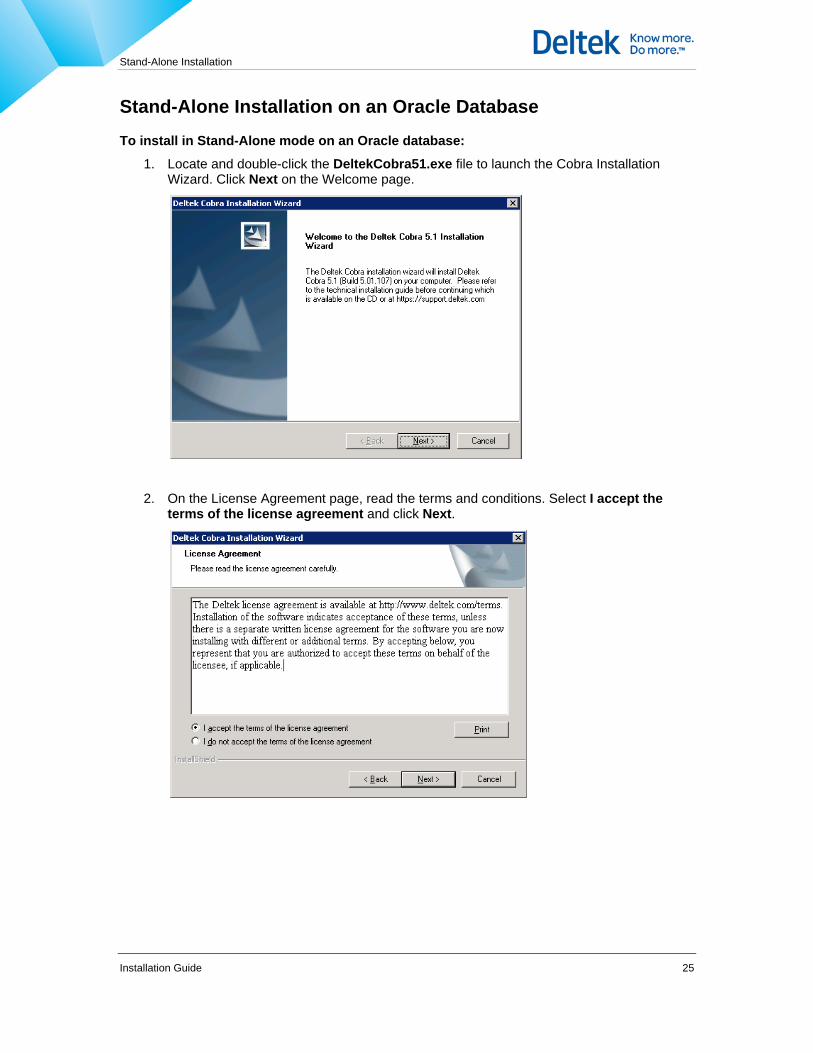
1. Locate and double-click the DeltekCobra51.exe file to launch the Cobra Installation Wizard. Click Next on the Welcome page.
2. On the License Agreement page, read the terms and conditions. Select I accept the terms of the license agreement and click Next.

Stand-Alone Installation
Installation Guide 26
3. On the Customer Information page, enter the User Name, Company Name, and the Serial Number that came with the software. Click Next.
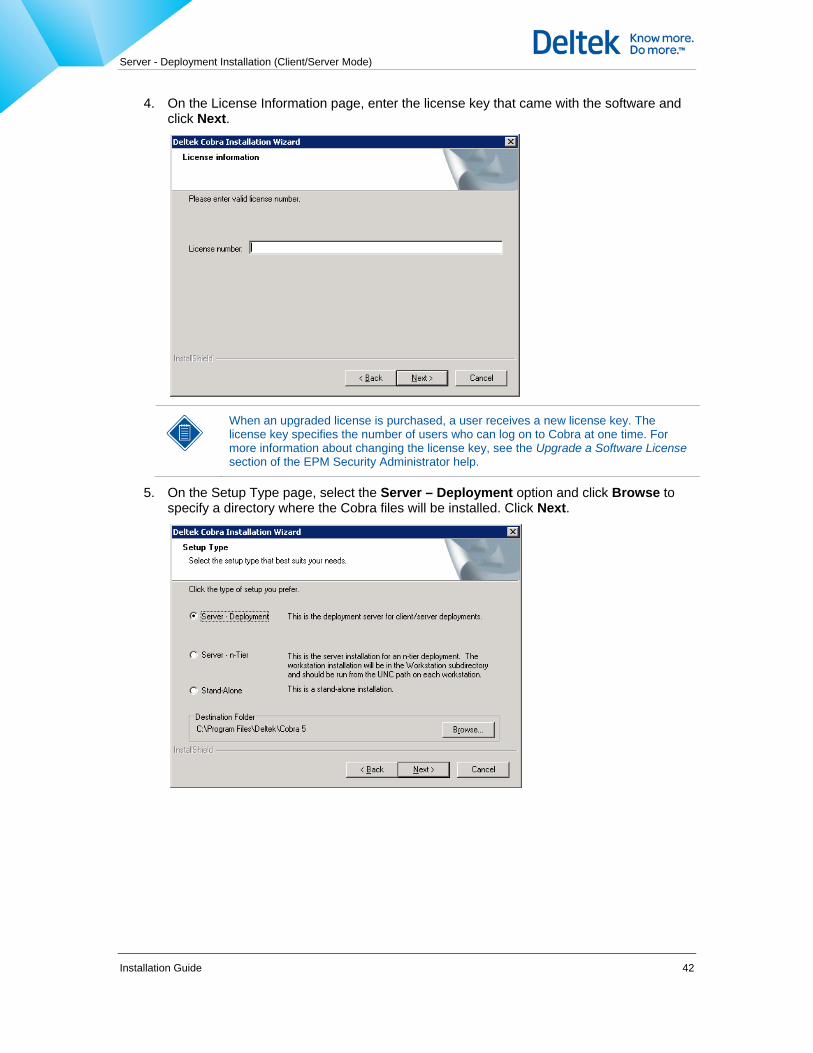
4. On the License Information page, enter the license key that came with the software and
click Next.
When an upgraded license is purchased, a user receives a new license key. The license key specifies the number of users who can log on to Cobra at one time. For more information about changing the license key, see the Upgrade a Software License section of the EPM Security Administrator help.

Stand-Alone Installation
Installation Guide 27
5. On the Setup Type page, select the Stand-Alone option and then click Browse to specify a directory where the Cobra files will be installed. Click Next.
6. On the Setup Type page, select the Oracle 10g/11g option and click Next.
Stand-Alone Installation
Installation Guide 28
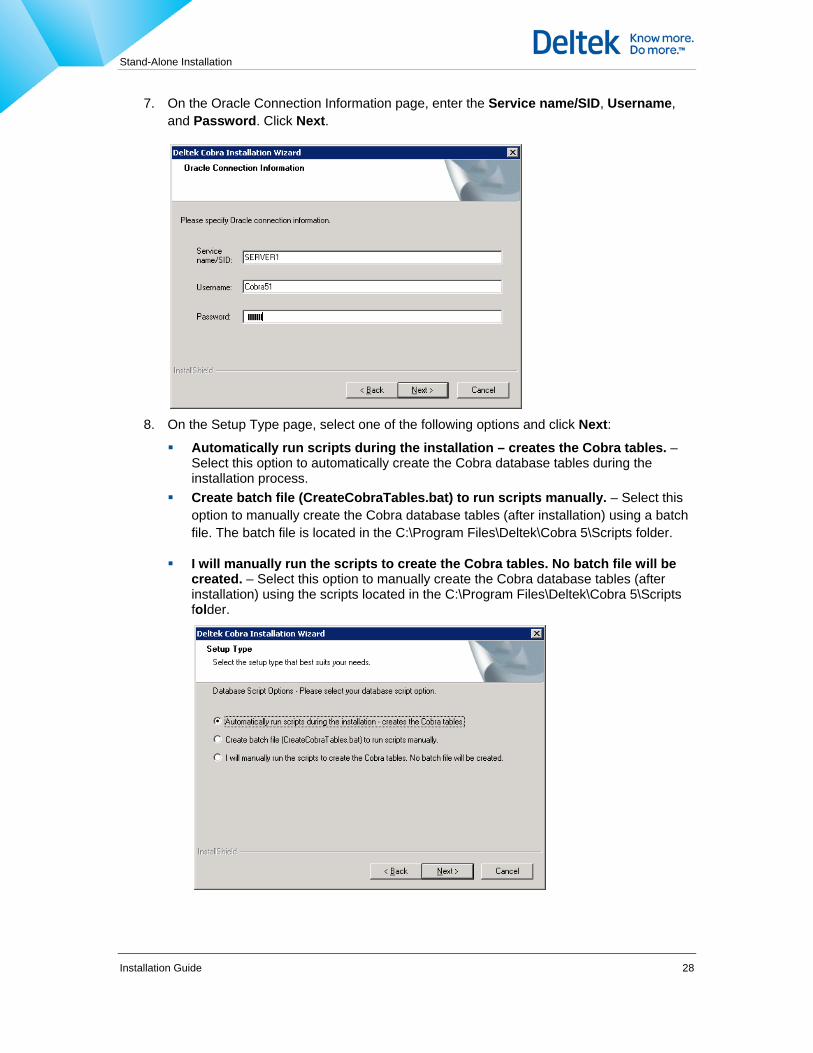
7. On the Oracle Connection Information page, enter the Service name/SID, Username, and Password. Click Next.
8. On the Setup Type page, select one of the following options and click Next:
Automatically run scripts during the installation – creates the Cobra tables. – Select this option to automatically create the Cobra database tables during the installation process.
Create batch file (CreateCobraTables.bat) to run scripts manually. – Select this option to manually create the Cobra database tables (after installation) using a batch file. The batch file is located in the C:\Program Files\Deltek\Cobra 5\Scripts folder.
I will manually run the scripts to create the Cobra tables. No batch file will be created. – Select this option to manually create the Cobra database tables (after installation) using the scripts located in the C:\Program Files\Deltek\Cobra 5\Scripts folder.
Stand-Alone Installation
Installation Guide 29
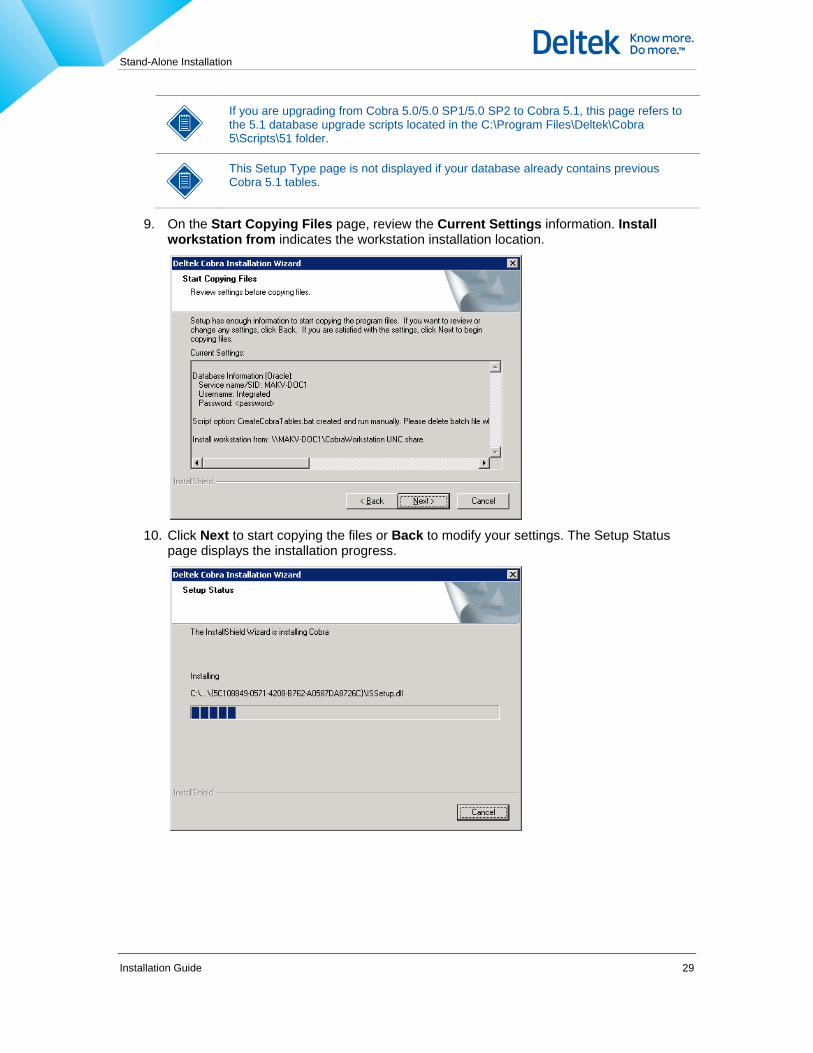
If you are upgrading from Cobra 5.0/5.0 SP1/5.0 SP2 to Cobra 5.1, this page refers to the 5.1 database upgrade scripts located in the C:\Program Files\Deltek\Cobra 5\Scripts\51 folder.
This Setup Type page is not displayed if your database already contains previous Cobra 5.1 tables.
9. On the Start Copying Files page, review the Current Settings information. Install workstation from indicates the workstation installation location.
10. Click Next to start copying the files or Back to modify your settings. The Setup Status
page displays the installation progress.
Stand-Alone Installation
Installation Guide 30
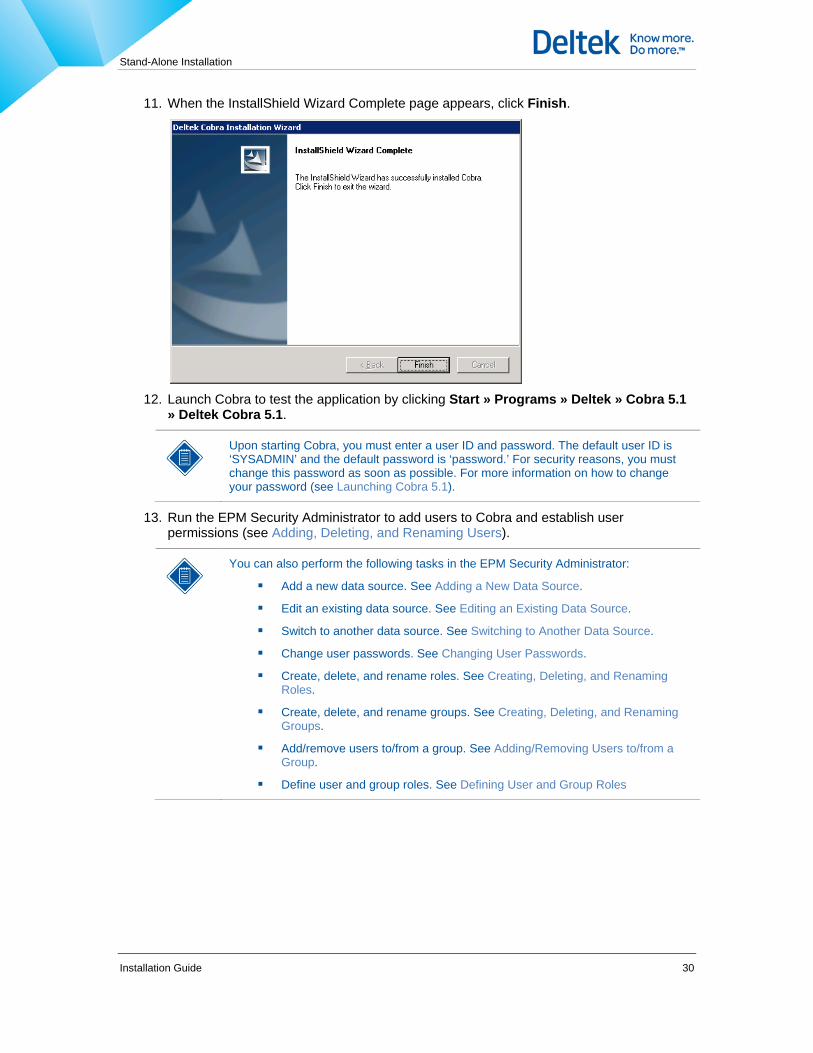
11. When the InstallShield Wizard Complete page appears, click Finish.
12. Launch Cobra to test the application by clicking Start » Programs » Deltek » Cobra 5.1
» Deltek Cobra 5.1.
Upon starting Cobra, you must enter a user ID and password. The default user ID is ‘SYSADMIN’ and the default password is ‘password.’ For security reasons, you must change this password as soon as possible. For more information on how to change your password (see Launching Cobra 5.1).
13. Run the EPM Security Administrator to add users to Cobra and establish user permissions (see Adding, Deleting, and Renaming Users).
You can also perform the following tasks in the EPM Security Administrator:
Add a new data source. See Adding a New Data Source.
Edit an existing data source. See Editing an Existing Data Source.
Switch to another data source. See Switching to Another Data Source.
Change user passwords. See Changing User Passwords.
Create, delete, and rename roles. See Creating, Deleting, and Renaming Roles.
Create, delete, and rename groups. See Creating, Deleting, and Renaming Groups.
Add/remove users to/from a group. See Adding/Removing Users to/from a Group.
Define user and group roles. See Defining User and Group Roles
Stand-Alone Installation
Installation Guide 31
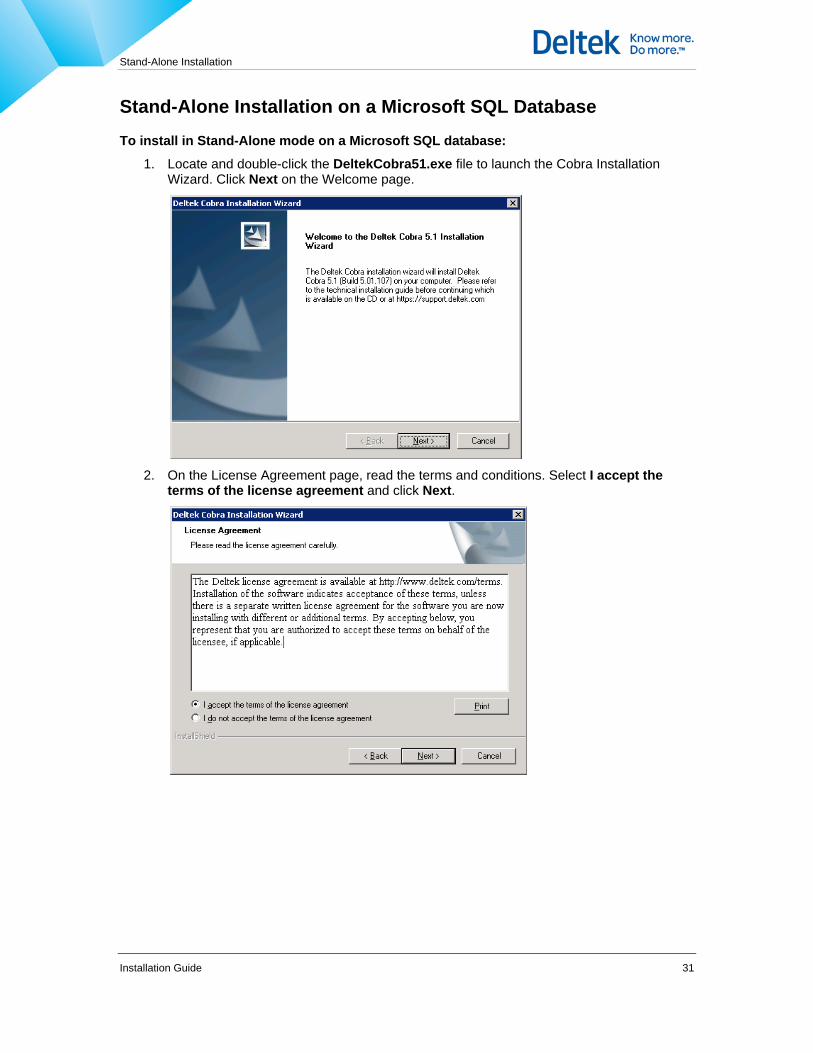
Stand-Alone Installation on a Microsoft SQL Database To install in Stand-Alone mode on a Microsoft SQL database:
1. Locate and double-click the DeltekCobra51.exe file to launch the Cobra Installation Wizard. Click Next on the Welcome page.
2. On the License Agreement page, read the terms and conditions. Select I accept the
terms of the license agreement and click Next.

Stand-Alone Installation
Installation Guide 32
3. On the Customer Information page, enter the User Name, Company Name, and the Serial Number that came with the software. Click Next.
4. On the License Information page, enter the license key that came with the software and
click Next.
When an upgraded license is purchased, a user receives a new license key. The license key specifies the number of users who can log on to Cobra at one time. For more information about changing the license key, see the Upgrade a Software License section of the EPM Security Administrator help.
Stand-Alone Installation
Installation Guide 33
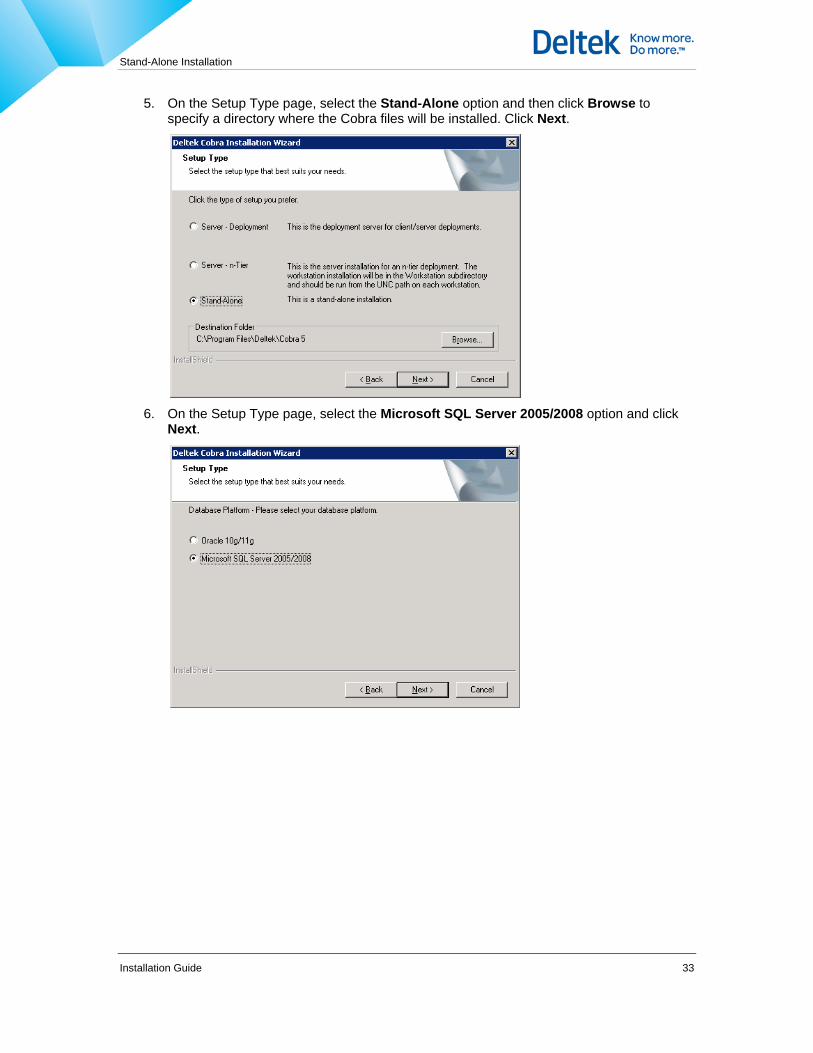
5. On the Setup Type page, select the Stand-Alone option and then click Browse to specify a directory where the Cobra files will be installed. Click Next.
6. On the Setup Type page, select the Microsoft SQL Server 2005/2008 option and click
Next.
Stand-Alone Installation
Installation Guide 34
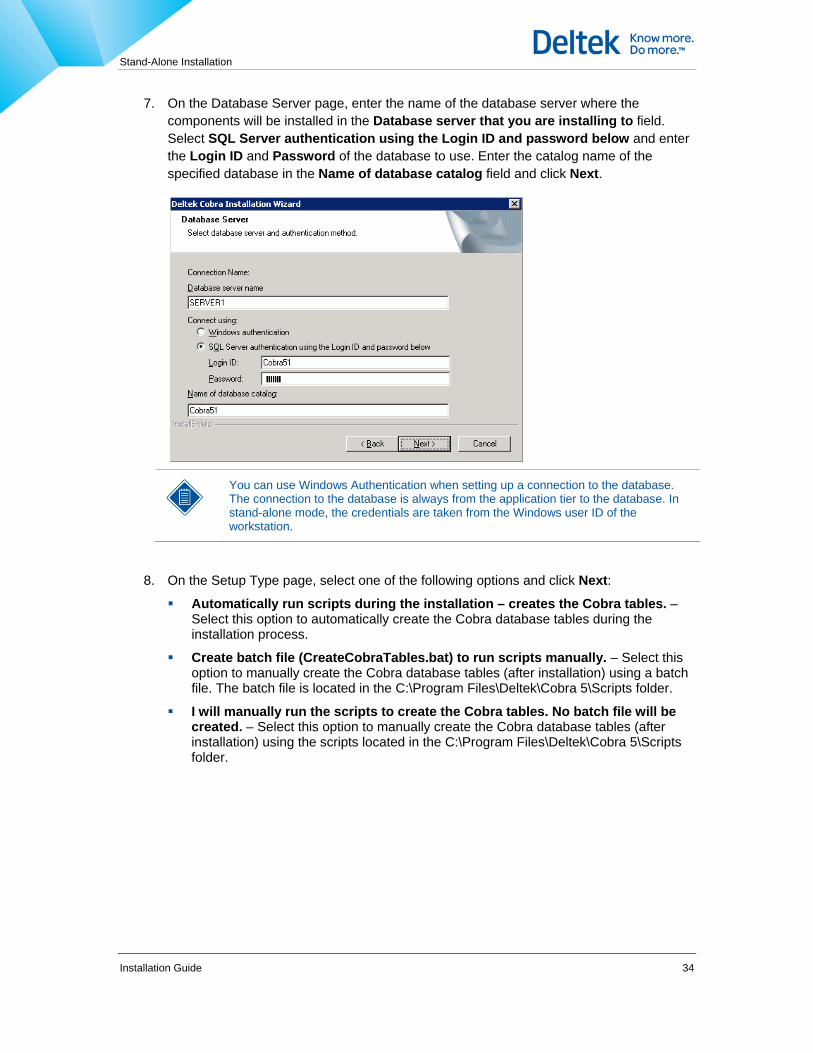
7. On the Database Server page, enter the name of the database server where the components will be installed in the Database server that you are installing to field. Select SQL Server authentication using the Login ID and password below and enter the Login ID and Password of the database to use. Enter the catalog name of the specified database in the Name of database catalog field and click Next.
You can use Windows Authentication when setting up a connection to the database. The connection to the database is always from the application tier to the database. In stand-alone mode, the credentials are taken from the Windows user ID of the workstation.
8. On the Setup Type page, select one of the following options and click Next:
Automatically run scripts during the installation – creates the Cobra tables. – Select this option to automatically create the Cobra database tables during the installation process.
Create batch file (CreateCobraTables.bat) to run scripts manually. – Select this option to manually create the Cobra database tables (after installation) using a batch file. The batch file is located in the C:\Program Files\Deltek\Cobra 5\Scripts folder.
I will manually run the scripts to create the Cobra tables. No batch file will be created. – Select this option to manually create the Cobra database tables (after installation) using the scripts located in the C:\Program Files\Deltek\Cobra 5\Scripts folder.

Stand-Alone Installation
Installation Guide 35
If you are upgrading from Cobra 5.0/5.0 SP1/5.0 SP2 to Cobra 5.1, this page refers to the 5.1 database upgrade scripts located in the C:\Program Files\Deltek\Cobra 5\Scripts\51 folder.
This Setup Type page is not displayed if your database already contains previous Cobra 5.1 tables.
9. On the Start Copying Files page, review the Current Settings information. Install workstation from indicates the workstation installation location.
Stand-Alone Installation
Installation Guide 36
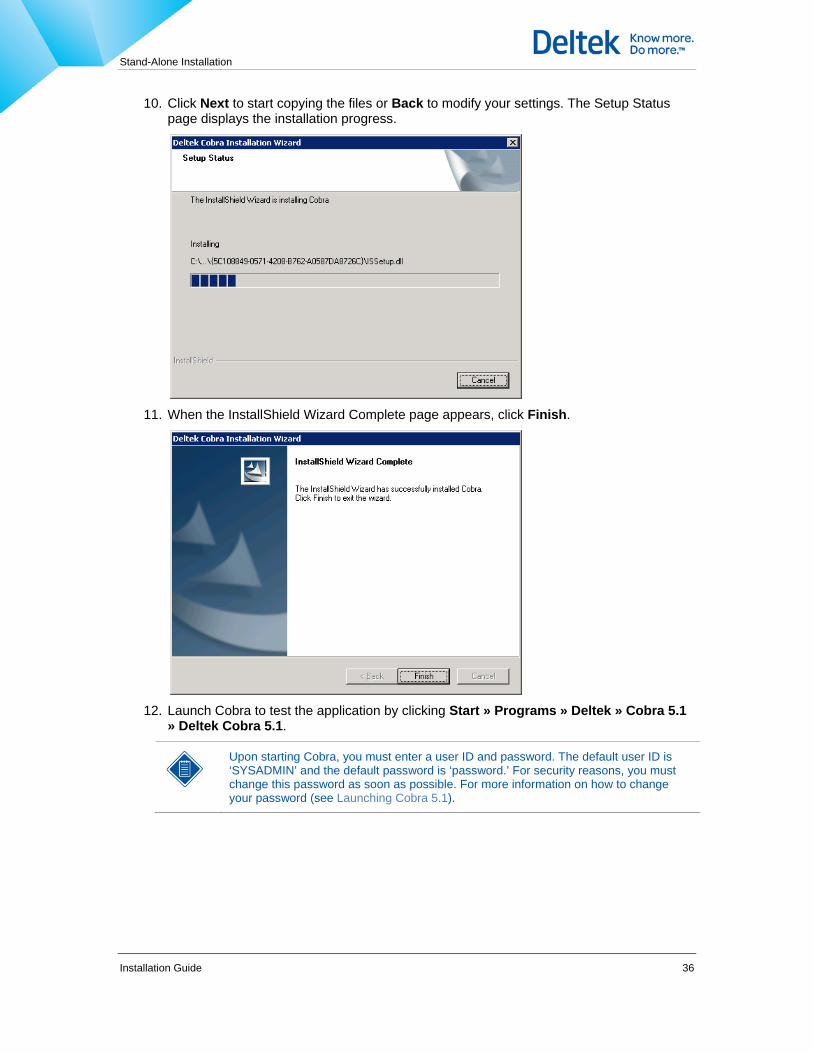
10. Click Next to start copying the files or Back to modify your settings. The Setup Status page displays the installation progress.
11. When the InstallShield Wizard Complete page appears, click Finish.
12. Launch Cobra to test the application by clicking Start » Programs » Deltek » Cobra 5.1
» Deltek Cobra 5.1.
Upon starting Cobra, you must enter a user ID and password. The default user ID is ‘SYSADMIN’ and the default password is ‘password.’ For security reasons, you must change this password as soon as possible. For more information on how to change your password (see Launching Cobra 5.1).
Stand-Alone Installation
Installation Guide 37
13. Run the EPM Security Administrator to add users to Cobra and establish user permissions (see Adding, Deleting, and Renaming Users).
You can also perform the following tasks in the EPM Security Administrator:
Add a new data source. See Adding a New Data Source.
Edit an existing data source. See Editing an Existing Data Source.
Switch to another data source. See Switching to Another Data Source.
Change user passwords. See Changing User Passwords.
Create, delete, and rename roles. See Creating, Deleting, and Renaming Roles.
Create, delete, and rename groups. See Creating, Deleting, and Renaming Groups.
Add/remove users to/from a group. See Adding/Removing Users to/from a Group.
Define user and group roles. See Defining User and Group Roles
Multi-User Installation
Installation Guide 38
Multi-User Installation There are two types of multi-user installations:
Client/Server (Deployment Server)
N-Tier Application Server
See Installation Models for more information about these multi-user installations.
Installing Cobra for multiple users has two parts: you must first run the Server setup on your server (see Server - Deployment Installation (Client/Server Mode) or Server – n-Tier Installation (N-Tier Application Server Mode)), and then run the Workstation setup on each machine that will access that server (see Installing the Client on a Workstation).
You only have to run the Server setup once.
The server setup will check the following:
User installing is a local administrator on the server
Microsoft .NET Framework 3.5 is installed
Microsoft XML Core Services 4.0 is installed
Server - Deployment Installation (Client/Server Mode)
Installation Guide 39
Server - Deployment Installation (Client/Server Mode) The client/server installation creates the configuration file, copies the workstation setup, creates a network share to run the workstation setup, and enables automatic update capabilities. This is the server model to select if you are going to be running in client/server mode. In the client/server mode, processing is performed on the client. This server model is useful for small implementations (for example, 2 – 5 users) and ideal for a black-box or secure environment.
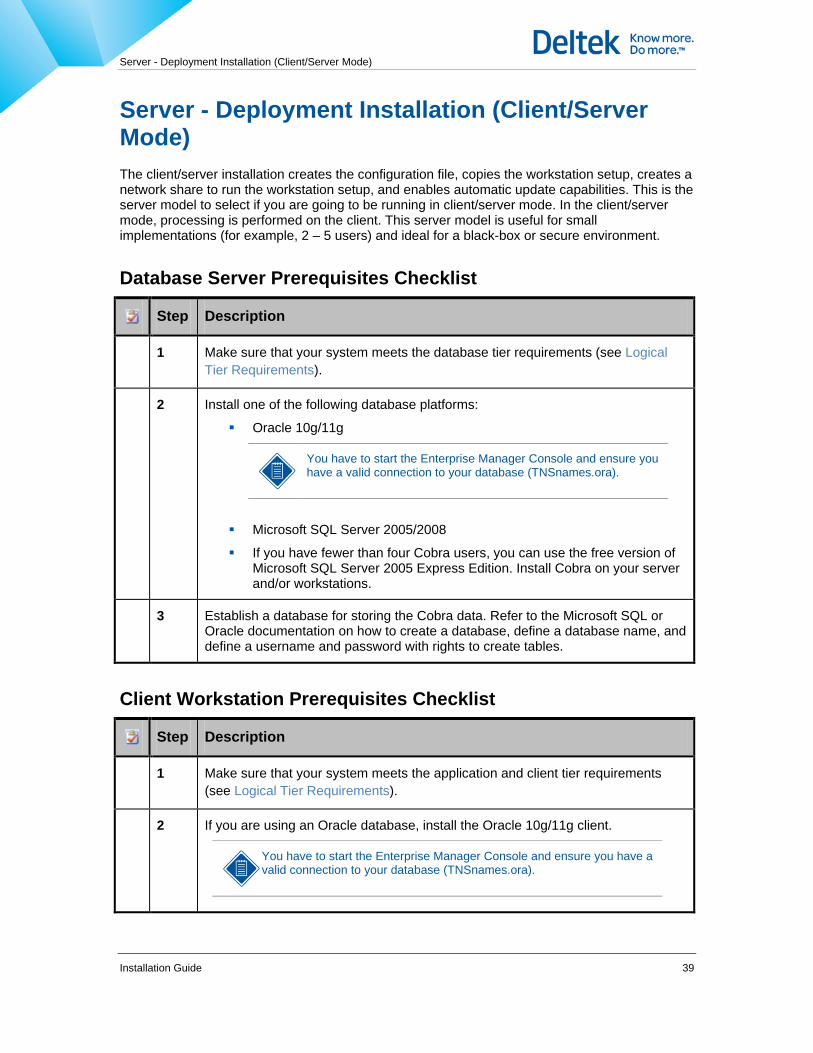
Database Server Prerequisites Checklist
Step Description
1 Make sure that your system meets the database tier requirements (see Logical Tier Requirements).
2 Install one of the following database platforms:
Oracle 10g/11g
You have to start the Enterprise Manager Console and ensure you have a valid connection to your database (TNSnames.ora).
Microsoft SQL Server 2005/2008
If you have fewer than four Cobra users, you can use the free version of Microsoft SQL Server 2005 Express Edition. Install Cobra on your server and/or workstations.
3 Establish a database for storing the Cobra data. Refer to the Microsoft SQL or Oracle documentation on how to create a database, define a database name, and define a username and password with rights to create tables.
Client Workstation Prerequisites Checklist
Step Description
1 Make sure that your system meets the application and client tier requirements (see Logical Tier Requirements).
2 If you are using an Oracle database, install the Oracle 10g/11g client.
You have to start the Enterprise Manager Console and ensure you have a valid connection to your database (TNSnames.ora).
Server - Deployment Installation (Client/Server Mode)
Installation Guide 40
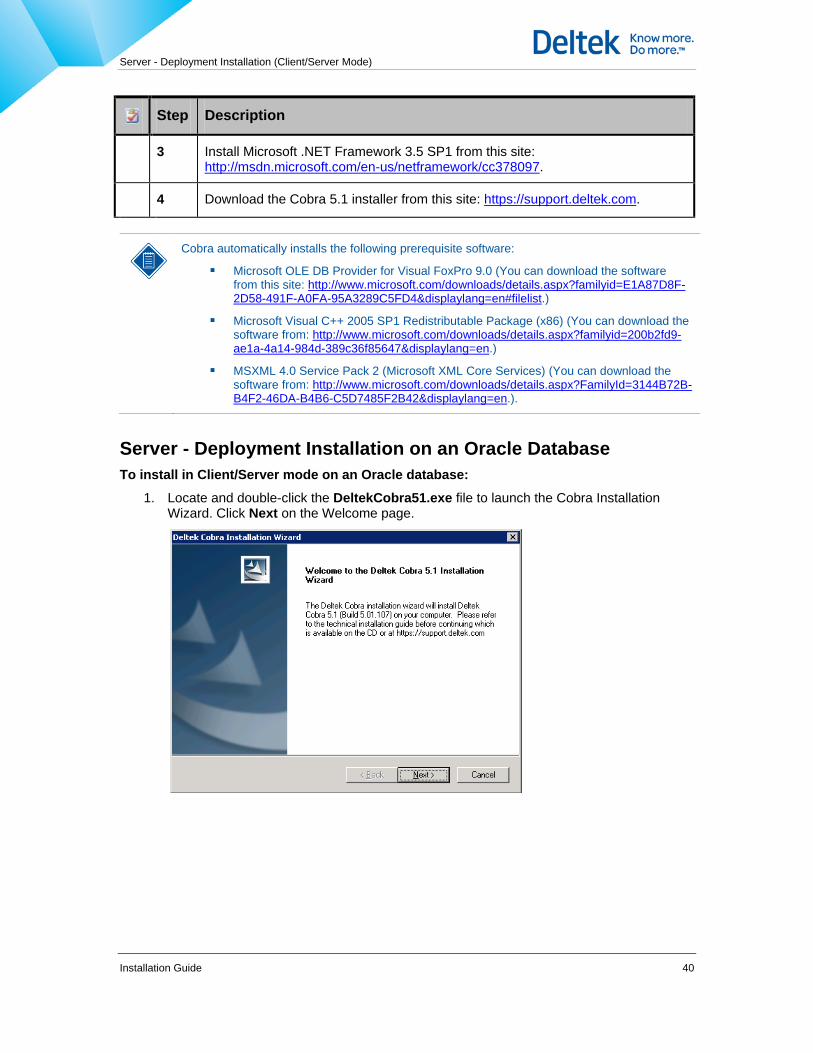
Step Description
3 Install Microsoft .NET Framework 3.5 SP1 from this site: http://msdn.microsoft.com/en-us/netframework/cc378097.
4 Download the Cobra 5.1 installer from this site: https://support.deltek.com.
Cobra automatically installs the following prerequisite software:
Microsoft OLE DB Provider for Visual FoxPro 9.0 (You can download the software from this site: http://www.microsoft.com/downloads/details.aspx?familyid=E1A87D8F-2D58-491F-A0FA-95A3289C5FD4&displaylang=en#filelist.)
Microsoft Visual C++ 2005 SP1 Redistributable Package (x86) (You can download the software from: http://www.microsoft.com/downloads/details.aspx?familyid=200b2fd9-ae1a-4a14-984d-389c36f85647&displaylang=en.)
MSXML 4.0 Service Pack 2 (Microsoft XML Core Services) (You can download the software from: http://www.microsoft.com/downloads/details.aspx?FamilyId=3144B72B-B4F2-46DA-B4B6-C5D7485F2B42&displaylang=en.).
Server - Deployment Installation on an Oracle Database To install in Client/Server mode on an Oracle database:
1. Locate and double-click the DeltekCobra51.exe file to launch the Cobra Installation Wizard. Click Next on the Welcome page.

Server - Deployment Installation (Client/Server Mode)
Installation Guide 41
2. On the License Agreement page, read the terms and conditions. Select I accept the terms of the license agreement and click Next.
3. On the Customer Information page, enter the User Name, Company Name, and the
Serial Number that came with the software. Click Next.
Server - Deployment Installation (Client/Server Mode)
Installation Guide 42
4. On the License Information page, enter the license key that came with the software and click Next.
When an upgraded license is purchased, a user receives a new license key. The license key specifies the number of users who can log on to Cobra at one time. For more information about changing the license key, see the Upgrade a Software License section of the EPM Security Administrator help.
5. On the Setup Type page, select the Server – Deployment option and click Browse to specify a directory where the Cobra files will be installed. Click Next.

Server - Deployment Installation (Client/Server Mode)
Installation Guide 43
6. If you are performing a clean install of Cobra 5.1, then the UNC share that contains the Cobra workstation components has to be recreated. The Cobra workstation components are installed in the Workstation folder (the default location is C:\Program Files\Deltek\Cobra 5\Workstation).
Aside from the Workstation folder, users should also have access to the Report Templates and Import Files folders. The Report Template folder is created as part of the installation; you need to create the Import folder manually. The folder is used to improve performance when importing data. The Integration Wizard can either transfer data from the local machine to the server or allow you to copy the file manually to the application server before the process starts.
Setup displays a message asking if you want the UNC share named CobraWorkstation to be created automatically. This UNC share enables the client workstations to launch Cobra on the network. Click Yes to allow setup to create the UNC share for you. Click No to create the UNC share manually at a later time.
If you click No, the following message displays. Click OK to continue.
If you are creating the UNC share manually, please note that although the installation folder containing the Workstation components is named Workstation, the UNC share must be created with a shared name of CobraWorkstation. If this share name is changed, upgraded Cobra clients fail when launching Cobra after the installation.
Server - Deployment Installation (Client/Server Mode)
Installation Guide 44
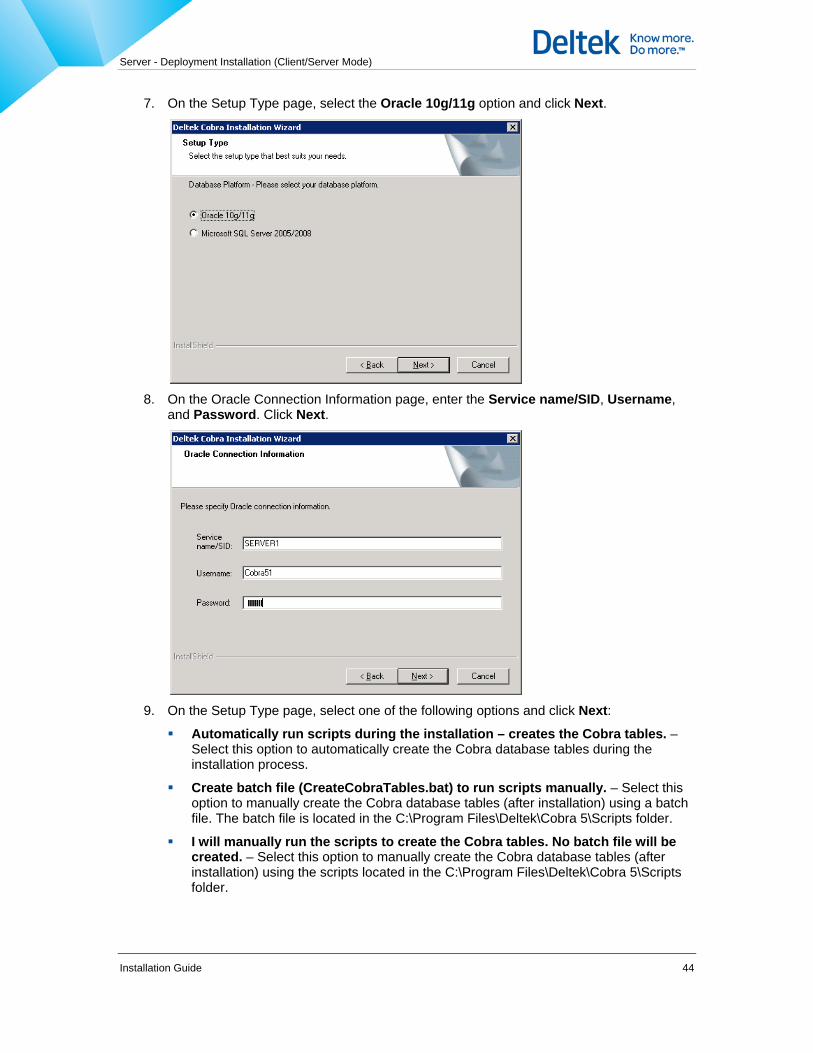
7. On the Setup Type page, select the Oracle 10g/11g option and click Next.
8. On the Oracle Connection Information page, enter the Service name/SID, Username,
and Password. Click Next.
9. On the Setup Type page, select one of the following options and click Next:
Automatically run scripts during the installation – creates the Cobra tables. – Select this option to automatically create the Cobra database tables during the installation process.
Create batch file (CreateCobraTables.bat) to run scripts manually. – Select this option to manually create the Cobra database tables (after installation) using a batch file. The batch file is located in the C:\Program Files\Deltek\Cobra 5\Scripts folder.
I will manually run the scripts to create the Cobra tables. No batch file will be created. – Select this option to manually create the Cobra database tables (after installation) using the scripts located in the C:\Program Files\Deltek\Cobra 5\Scripts folder.

Server - Deployment Installation (Client/Server Mode)
Installation Guide 45
If you are upgrading from Cobra 5.0/5.0 SP1/5.0 SP2 to Cobra 5.1, this page refers to the 5.1 database upgrade scripts located in the C:\Program Files\Deltek\Cobra 5\Scripts\51 folder.
This Setup Type page is not displayed if your database already contains previous Cobra 5.1 tables.
10. On the Start Copying Files page, review the Current Settings information. Install workstation from indicates the workstation installation location.
11. Click Next to start copying the files or Back to modify your settings. The Setup Status
page displays the installation progress.

Server - Deployment Installation (Client/Server Mode)
Installation Guide 46
12. When the InstallShield Wizard Complete page appears, click Finish.
13. After you install Cobra on your application server, install the client on each workstation
that will use Cobra (see Installing the Client on a Workstation).
14. Launch Cobra on the workstation to test the application by clicking Start » Programs » Deltek » Cobra 5.1 » Deltek Cobra 5.1.
Upon starting Cobra, you must enter a user ID and password. The default user ID is ‘SYSADMIN’ and the default password is ‘password.’ For security reasons, you must change this password as soon as possible. For more information on how to change your password (see Launching Cobra 5.1).
15. Run the EPM Security Administrator on the application server to add users to Cobra and establish user permissions (see Adding, Deleting, and Renaming Users).
Server - Deployment Installation (Client/Server Mode)
Installation Guide 47
You can also perform the following tasks in the EPM Security Administrator:
Add a new data source. See Adding a New Data Source.
Edit an existing data source. See Editing an Existing Data Source.
Switch to another data source. See Switching to Another Data Source.
Change user passwords. See Changing User Passwords.
Create, delete, and rename roles. See Creating, Deleting, and Renaming Roles.
Create, delete, and rename groups. See Creating, Deleting, and Renaming Groups.
Add/remove users to/from a group. See Adding/Removing Users to/from a Group.
Define user and group roles. See Defining User and Group Roles
Server - Deployment Installation (Client/Server Mode)
Installation Guide 48
Server – Deployment Installation on a Microsoft SQL Database To install in Client/Server mode on a Microsoft SQL database:
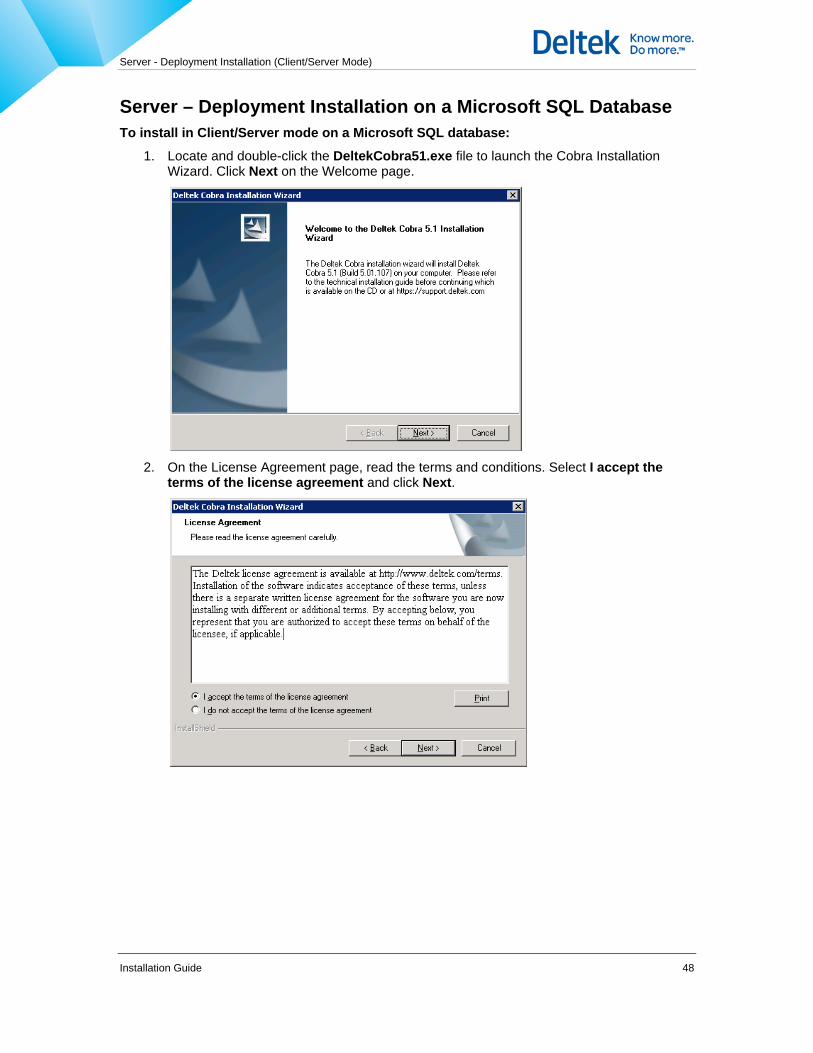
1. Locate and double-click the DeltekCobra51.exe file to launch the Cobra Installation Wizard. Click Next on the Welcome page.
2. On the License Agreement page, read the terms and conditions. Select I accept the
terms of the license agreement and click Next.

Server - Deployment Installation (Client/Server Mode)
Installation Guide 49
3. On the Customer Information page, enter a User Name, Company Name, and the Serial Number that came with the software. Click Next.
4. On the License Information page, enter the license key that came with the software and
click Next.
When an upgraded license is purchased, a user receives a new license key. The license key specifies the number of users who can log on to Cobra at one time. For more information about changing the license key, see the Upgrade a Software License section of the EPM Security Administrator help.
Server - Deployment Installation (Client/Server Mode)
Installation Guide 50
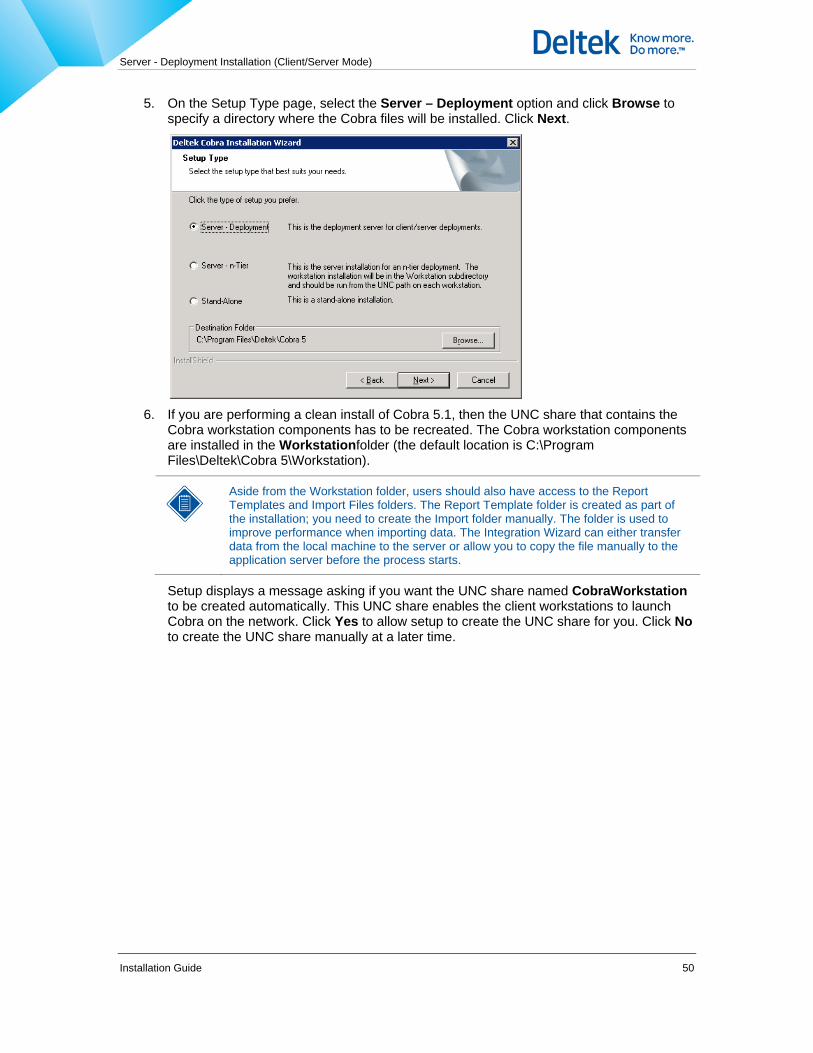
5. On the Setup Type page, select the Server – Deployment option and click Browse to specify a directory where the Cobra files will be installed. Click Next.
6. If you are performing a clean install of Cobra 5.1, then the UNC share that contains the
Cobra workstation components has to be recreated. The Cobra workstation components are installed in the Workstationfolder (the default location is C:\Program Files\Deltek\Cobra 5\Workstation).
Aside from the Workstation folder, users should also have access to the Report Templates and Import Files folders. The Report Template folder is created as part of the installation; you need to create the Import folder manually. The folder is used to improve performance when importing data. The Integration Wizard can either transfer data from the local machine to the server or allow you to copy the file manually to the application server before the process starts.
Setup displays a message asking if you want the UNC share named CobraWorkstation to be created automatically. This UNC share enables the client workstations to launch Cobra on the network. Click Yes to allow setup to create the UNC share for you. Click No to create the UNC share manually at a later time.

Server - Deployment Installation (Client/Server Mode)
Installation Guide 51
If you click No, the following message displays. Click OK to continue.
If you are creating the UNC share manually, please note that although the installation folder containing the Workstation components is named Workstation, the UNC share must be created with a shared name of CobraWorkstation. If this share name is changed, upgraded Cobra clients fail when launching Cobra after the installation.
7. On the Setup Type page, select the Microsoft SQL Server 2005/2008 option and click Next.
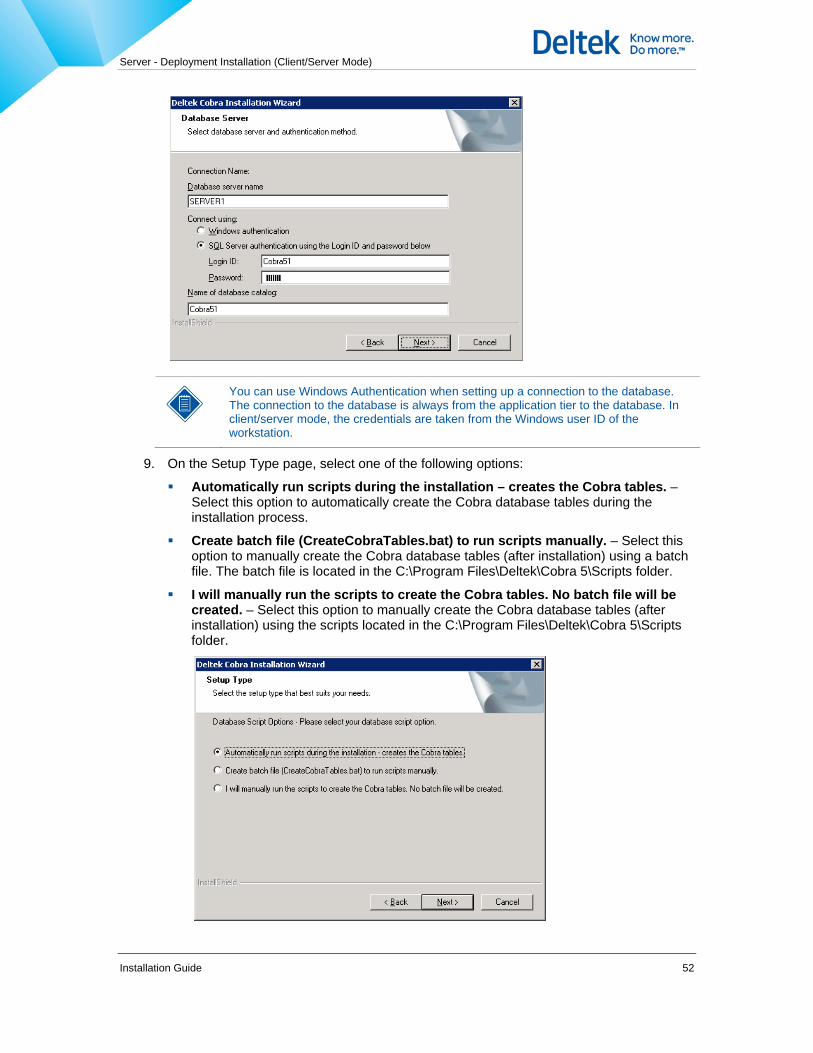
8. On the Database Server page, enter the name of the database server where the
components will be installed in the Database server that you are installing to field. Select SQL Server authentication using the Login ID and password below and enter the Login ID and Password of the database to use. Enter the catalog name of the specified database in the Name of database catalog field and click Next.
Server - Deployment Installation (Client/Server Mode)
Installation Guide 52
You can use Windows Authentication when setting up a connection to the database. The connection to the database is always from the application tier to the database. In client/server mode, the credentials are taken from the Windows user ID of the workstation.
9. On the Setup Type page, select one of the following options:
Automatically run scripts during the installation – creates the Cobra tables. – Select this option to automatically create the Cobra database tables during the installation process.
Create batch file (CreateCobraTables.bat) to run scripts manually. – Select this option to manually create the Cobra database tables (after installation) using a batch file. The batch file is located in the C:\Program Files\Deltek\Cobra 5\Scripts folder.
I will manually run the scripts to create the Cobra tables. No batch file will be created. – Select this option to manually create the Cobra database tables (after installation) using the scripts located in the C:\Program Files\Deltek\Cobra 5\Scripts folder.

Server - Deployment Installation (Client/Server Mode)
Installation Guide 53
If you are upgrading from Cobra 5.0/5.0 SP1/5.0 SP2 to Cobra 5.1, this page refers to the 5.1 database upgrade scripts located in the C:\Program Files\Deltek\Cobra 5\Scripts\51 folder.
This Setup Type page is not displayed if your database already contains previous Cobra 5.1 tables.
10. On the Start Copying Files page, review the Current Settings information. Install workstation from indicates the workstation installation location.
11. Click Next to start copying the files or Back to modify your settings. The Setup Status
page displays the installation progress.
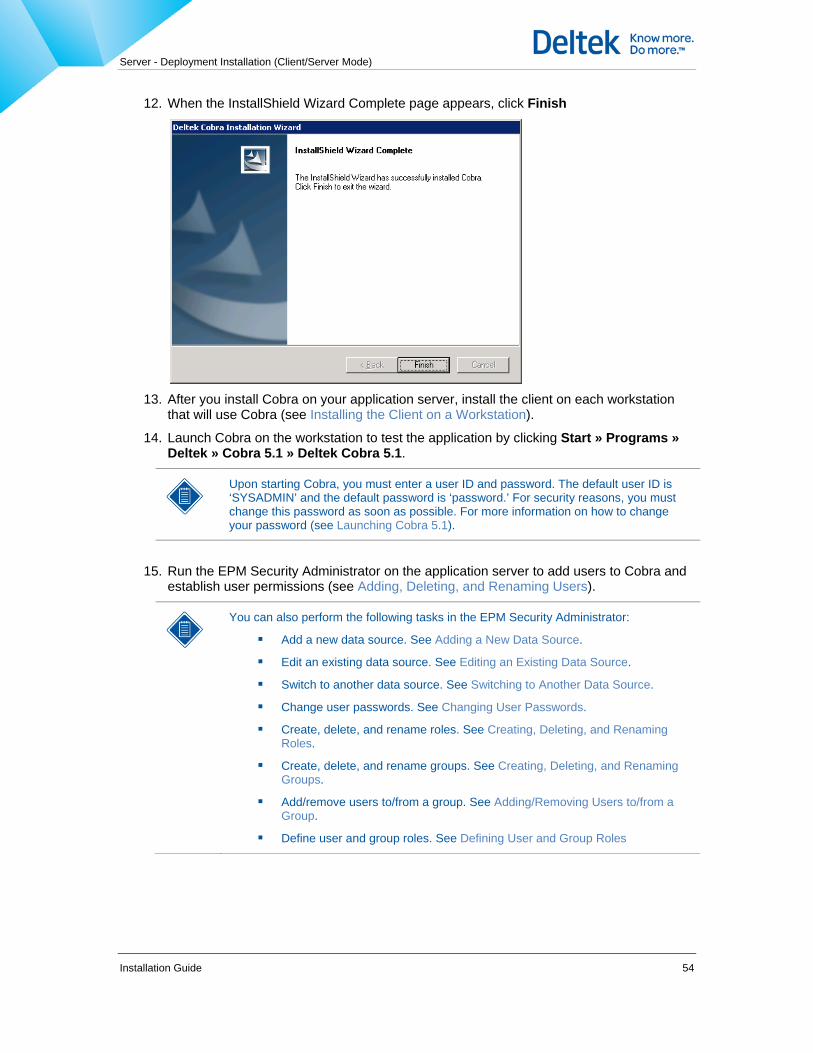
Server - Deployment Installation (Client/Server Mode)
Installation Guide 54
12. When the InstallShield Wizard Complete page appears, click Finish
13. After you install Cobra on your application server, install the client on each workstation
that will use Cobra (see Installing the Client on a Workstation).
14. Launch Cobra on the workstation to test the application by clicking Start » Programs » Deltek » Cobra 5.1 » Deltek Cobra 5.1.
Upon starting Cobra, you must enter a user ID and password. The default user ID is ‘SYSADMIN’ and the default password is ‘password.’ For security reasons, you must change this password as soon as possible. For more information on how to change your password (see Launching Cobra 5.1).
15. Run the EPM Security Administrator on the application server to add users to Cobra and establish user permissions (see Adding, Deleting, and Renaming Users).
You can also perform the following tasks in the EPM Security Administrator:
Add a new data source. See Adding a New Data Source.
Edit an existing data source. See Editing an Existing Data Source.
Switch to another data source. See Switching to Another Data Source.
Change user passwords. See Changing User Passwords.
Create, delete, and rename roles. See Creating, Deleting, and Renaming Roles.
Create, delete, and rename groups. See Creating, Deleting, and Renaming Groups.
Add/remove users to/from a group. See Adding/Removing Users to/from a Group.
Define user and group roles. See Defining User and Group Roles

Server – n-Tier Installation (N-Tier Application Server Mode)
Installation Guide 55
Server – n-Tier Installation (N-Tier Application Server Mode) The n-Tier application server installation copies the files needed for an n-Tier deployment model, creates the configuration file, copies the workstation setup, creates a network share to run the workstation setup from, and enables automatic update capabilities. This is the server model to select if you are going to be running in n-Tier mode. This server model is useful for large or many-user environments. Processing is performed on the application server.
To perform the installation, you must know the Oracle or Microsoft SQL Server connection information (although it is not validated during the installation).
Load Balancing If you have two or more application servers, you can set up the n-Tier Application Server for load balancing. This will distribute the processing workload among your application servers, optimizing the use of your resources and minimizing the response time of requested tasks.
To install in n-Tier Application Server mode in load balancing configuration:
1. Install Cobra on each application server (see Server – n-Tier Installation (N-Tier Application Server Mode)) that will host the load balancing configuration.
2. Configure a virtual IP (VIP) address in conjunction with the load balancing technology being deployed.
3. Locate the Ideablade.Ibconfig file in the C:\Program Files\Deltek\Cobra 5\Workstation folder.
4. Use a file editor to open the Ideablade.Ibconfig file and replace the server name in the <remoteBaseURL> tag with the VIP address you configured for this load balancing setup. For example, if your VIP address is cobra.yourcompany.com, replace the existing address with: http://cobra.yourcompany.com (see the sample code below).
<remoting>
<remotePersistenceEnabled>false</remotePersistenceEnabled> <communicationsTechnology>Remoting</communicationsTechnology>
<remoteBaseURL>http://cobra.yourcompany.com</remoteBaseURL>
<serverPort>9009</serverPort>
<serviceName>PersistenceService</serviceName>
<serverDetectTimeoutMilliseconds>-1</serverDetectTimeoutMilliseconds>
<proxyPort>0</proxyPort>
</remoting>
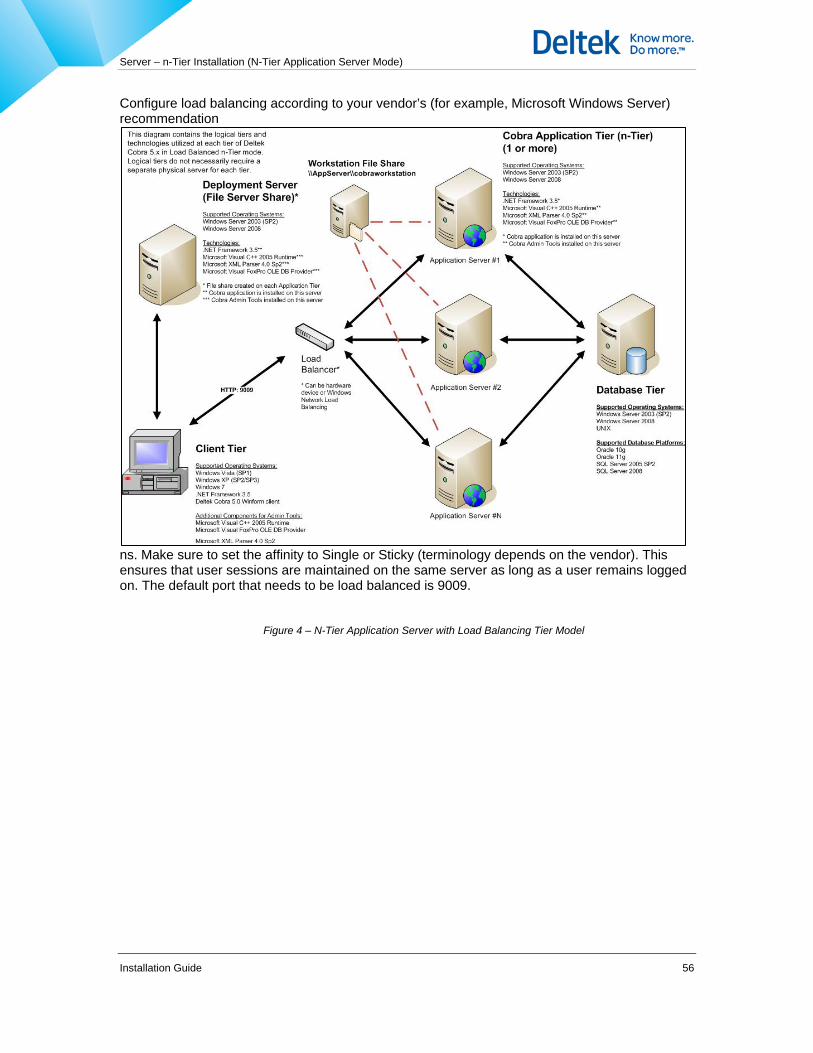
Server – n-Tier Installation (N-Tier Application Server Mode)
Installation Guide 56
Configure load balancing according to your vendor’s (for example, Microsoft Windows Server) recommendation
ns. Make sure to set the affinity to Single or Sticky (terminology depends on the vendor). This ensures that user sessions are maintained on the same server as long as a user remains logged on. The default port that needs to be load balanced is 9009.
Figure 4 – N-Tier Application Server with Load Balancing Tier Model

Server – n-Tier Installation (N-Tier Application Server Mode)
Installation Guide 57
Database Server Prerequisites Checklist
Step Description
1 Make sure that your system meets the database tier requirements (see Logical Tier Requirements).
2 Install one of the following database platforms:
Oracle 10g/11g
You have to start the Enterprise Manager Console and ensure you have a valid connection to your database (TNSnames.ora).
Microsoft SQL Server 2005/2008
If you have fewer than four Cobra users, you can use the free version of Microsoft SQL Server 2005 Express Edition. Install Cobra on your server and/or workstations.
3 Establish a database for storing the Cobra data. Refer to the Microsoft SQL or Oracle documentation on how to create a database, define a database name, and define a username and password with rights to create tables.
Application Server Prerequisites Checklist
Step Description
1 Make sure that your system meets the application tier requirements (see Logical Tier Requirements).
2 Install the following software:
Microsoft OLE DB Provider for Visual FoxPro 9.0 (You can download the software from this site: http://www.microsoft.com/downloads/details.aspx?familyid=E1A87D8F-2D58-491F-A0FA-95A3289C5FD4&displaylang=en#filelist.)
Microsoft Visual C++ 2005 SP1 Redistributable Package (x86) (You can download the software from: http://www.microsoft.com/downloads/details.aspx?familyid=200b2fd9-ae1a-4a14-984d-389c36f85647&displaylang=en.)
MSXML 4.0 Service Pack 2 (Microsoft XML Core Services) (You can download the software from: http://www.microsoft.com/downloads/details.aspx?FamilyId=3144B72B-B4F2-46DA-B4B6-C5D7485F2B42&displaylang=en.)
3 Install Microsoft .NET Framework 3.5 SP1 from this site: http://msdn.microsoft.com/en-us/netframework/aa569263.aspx.
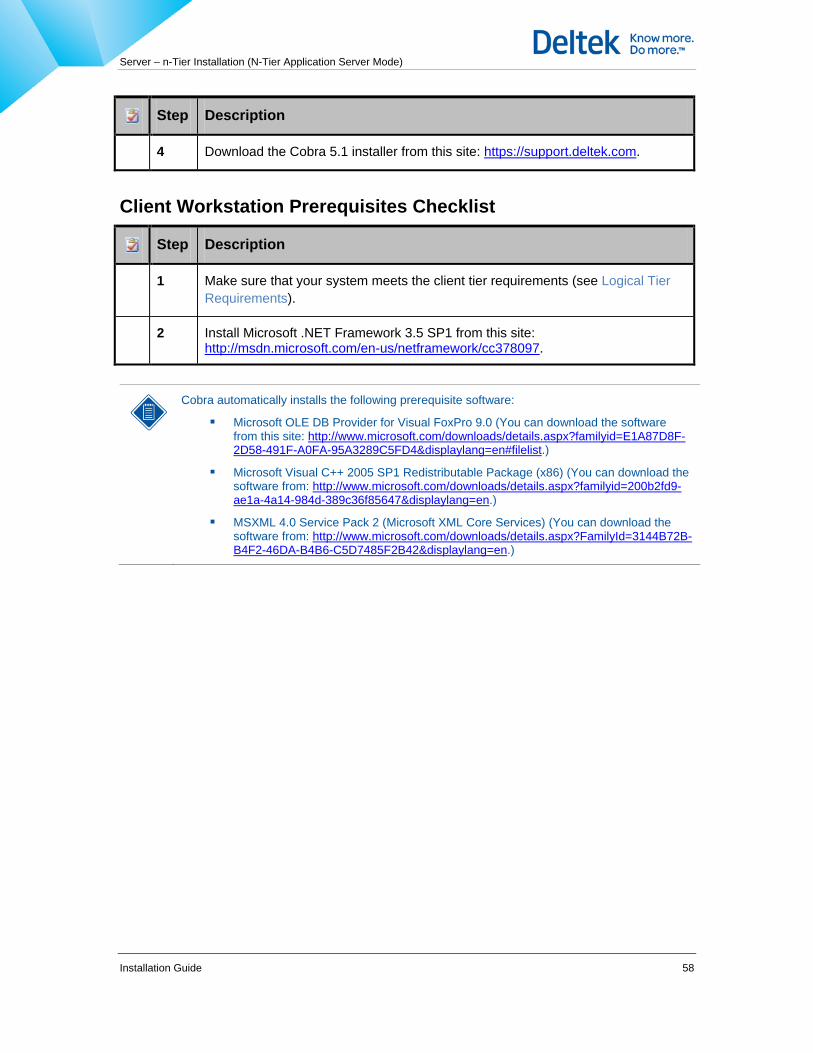
Server – n-Tier Installation (N-Tier Application Server Mode)
Installation Guide 58
Step Description
4 Download the Cobra 5.1 installer from this site: https://support.deltek.com.
Client Workstation Prerequisites Checklist
Step Description
1 Make sure that your system meets the client tier requirements (see Logical Tier Requirements).
2 Install Microsoft .NET Framework 3.5 SP1 from this site: http://msdn.microsoft.com/en-us/netframework/cc378097.
Cobra automatically installs the following prerequisite software:
Microsoft OLE DB Provider for Visual FoxPro 9.0 (You can download the software from this site: http://www.microsoft.com/downloads/details.aspx?familyid=E1A87D8F-2D58-491F-A0FA-95A3289C5FD4&displaylang=en#filelist.)
Microsoft Visual C++ 2005 SP1 Redistributable Package (x86) (You can download the software from: http://www.microsoft.com/downloads/details.aspx?familyid=200b2fd9-ae1a-4a14-984d-389c36f85647&displaylang=en.)
MSXML 4.0 Service Pack 2 (Microsoft XML Core Services) (You can download the software from: http://www.microsoft.com/downloads/details.aspx?FamilyId=3144B72B-B4F2-46DA-B4B6-C5D7485F2B42&displaylang=en.)

Server – n-Tier Installation (N-Tier Application Server Mode)
Installation Guide 59
Server n-Tier Installation on an Oracle Database To install in n-Tier application mode on an Oracle database:
1. Locate and double-click the DeltekCobra51.exe file to launch the Cobra Installation Wizard. Click Next on the Welcome page.
2. On the License Agreement page, read the terms and conditions. Select I accept the
terms of the license agreement and click Next.
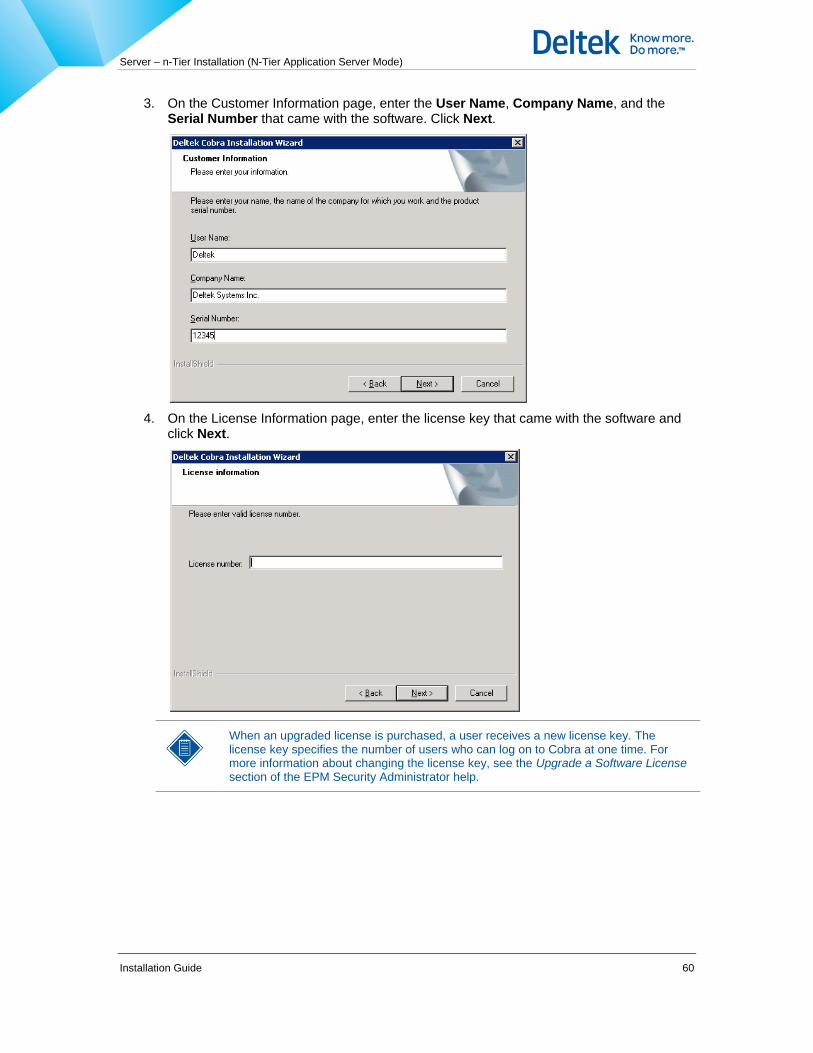
Server – n-Tier Installation (N-Tier Application Server Mode)
Installation Guide 60
3. On the Customer Information page, enter the User Name, Company Name, and the Serial Number that came with the software. Click Next.
4. On the License Information page, enter the license key that came with the software and
click Next.
When an upgraded license is purchased, a user receives a new license key. The license key specifies the number of users who can log on to Cobra at one time. For more information about changing the license key, see the Upgrade a Software License section of the EPM Security Administrator help.
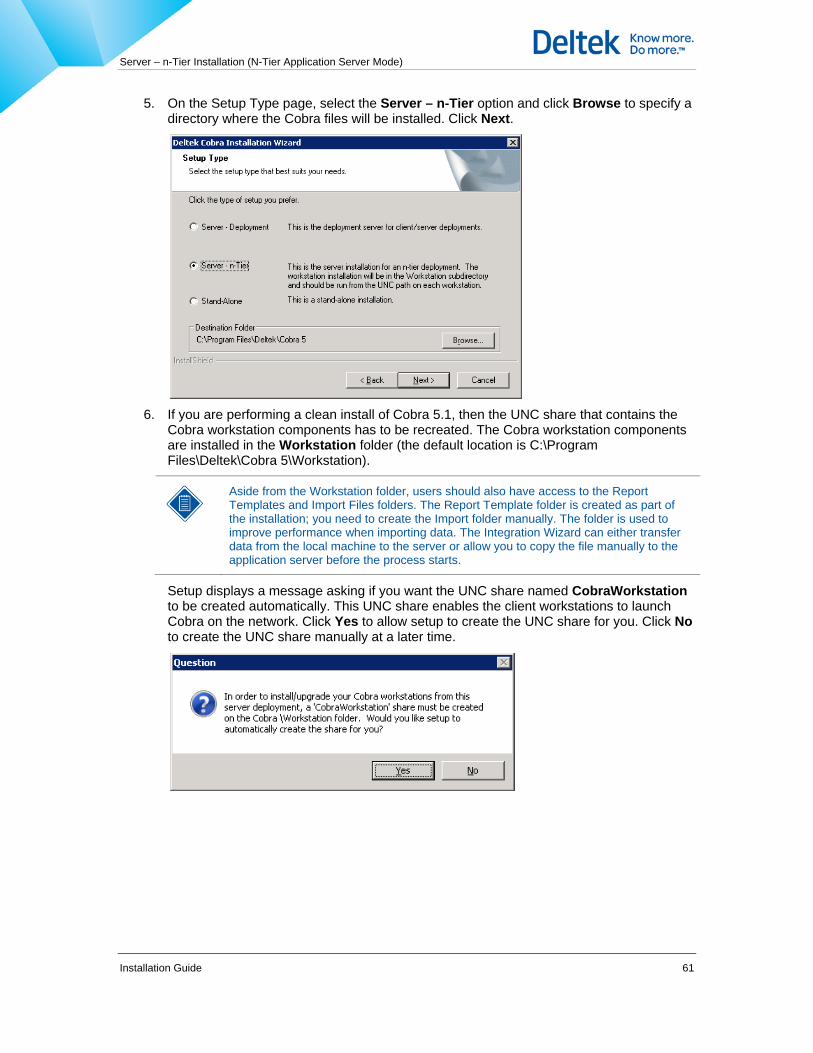
Server – n-Tier Installation (N-Tier Application Server Mode)
Installation Guide 61
5. On the Setup Type page, select the Server – n-Tier option and click Browse to specify a directory where the Cobra files will be installed. Click Next.
6. If you are performing a clean install of Cobra 5.1, then the UNC share that contains the
Cobra workstation components has to be recreated. The Cobra workstation components are installed in the Workstation folder (the default location is C:\Program Files\Deltek\Cobra 5\Workstation).
Aside from the Workstation folder, users should also have access to the Report Templates and Import Files folders. The Report Template folder is created as part of the installation; you need to create the Import folder manually. The folder is used to improve performance when importing data. The Integration Wizard can either transfer data from the local machine to the server or allow you to copy the file manually to the application server before the process starts.
Setup displays a message asking if you want the UNC share named CobraWorkstation to be created automatically. This UNC share enables the client workstations to launch Cobra on the network. Click Yes to allow setup to create the UNC share for you. Click No to create the UNC share manually at a later time.

Server – n-Tier Installation (N-Tier Application Server Mode)
Installation Guide 62
If you click No, the following message displays. Click OK to continue.
If you are creating the share manually, please note that although the installation folder containing the Workstation components is named Workstation, the UNC share must be created with a shared name of CobraWorkstation. If this share name is changed, upgraded Cobra clients fail when launching Cobra after the installation.
7. On the Setup Type page, select the Oracle 10g/11g option and click Next.
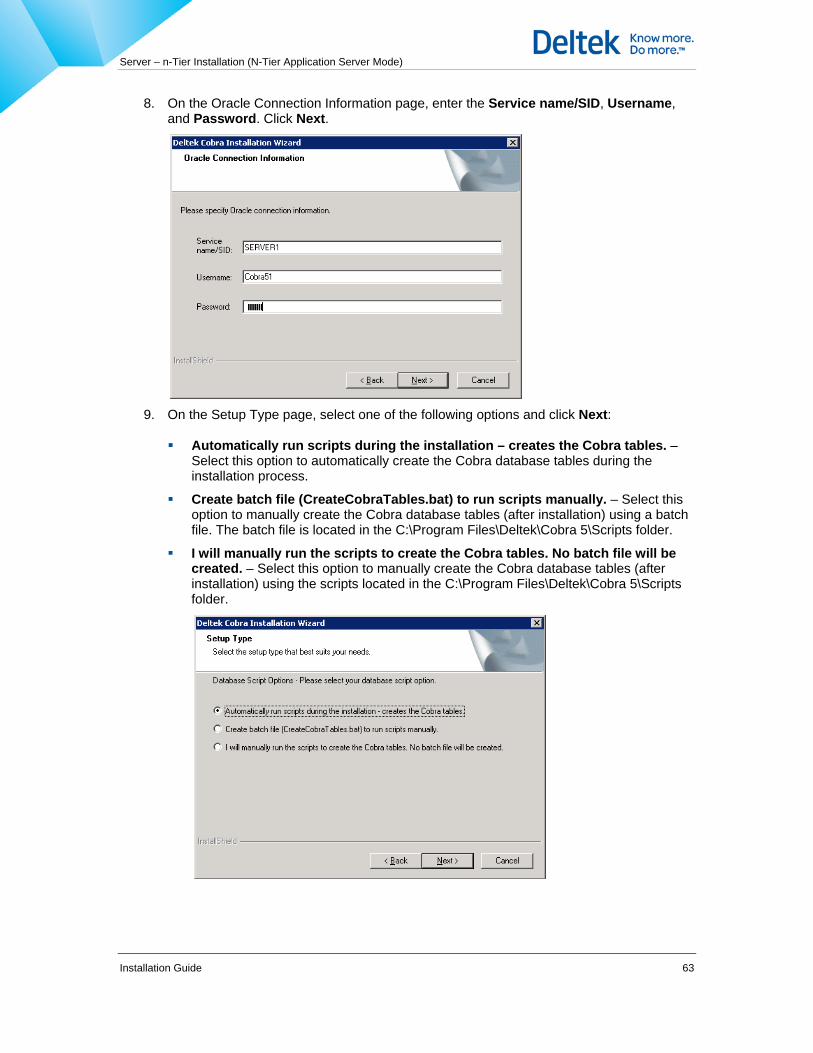
Server – n-Tier Installation (N-Tier Application Server Mode)
Installation Guide 63
8. On the Oracle Connection Information page, enter the Service name/SID, Username, and Password. Click Next.
9. On the Setup Type page, select one of the following options and click Next:
Automatically run scripts during the installation – creates the Cobra tables. – Select this option to automatically create the Cobra database tables during the installation process.
Create batch file (CreateCobraTables.bat) to run scripts manually. – Select this option to manually create the Cobra database tables (after installation) using a batch file. The batch file is located in the C:\Program Files\Deltek\Cobra 5\Scripts folder.
I will manually run the scripts to create the Cobra tables. No batch file will be created. – Select this option to manually create the Cobra database tables (after installation) using the scripts located in the C:\Program Files\Deltek\Cobra 5\Scripts folder.
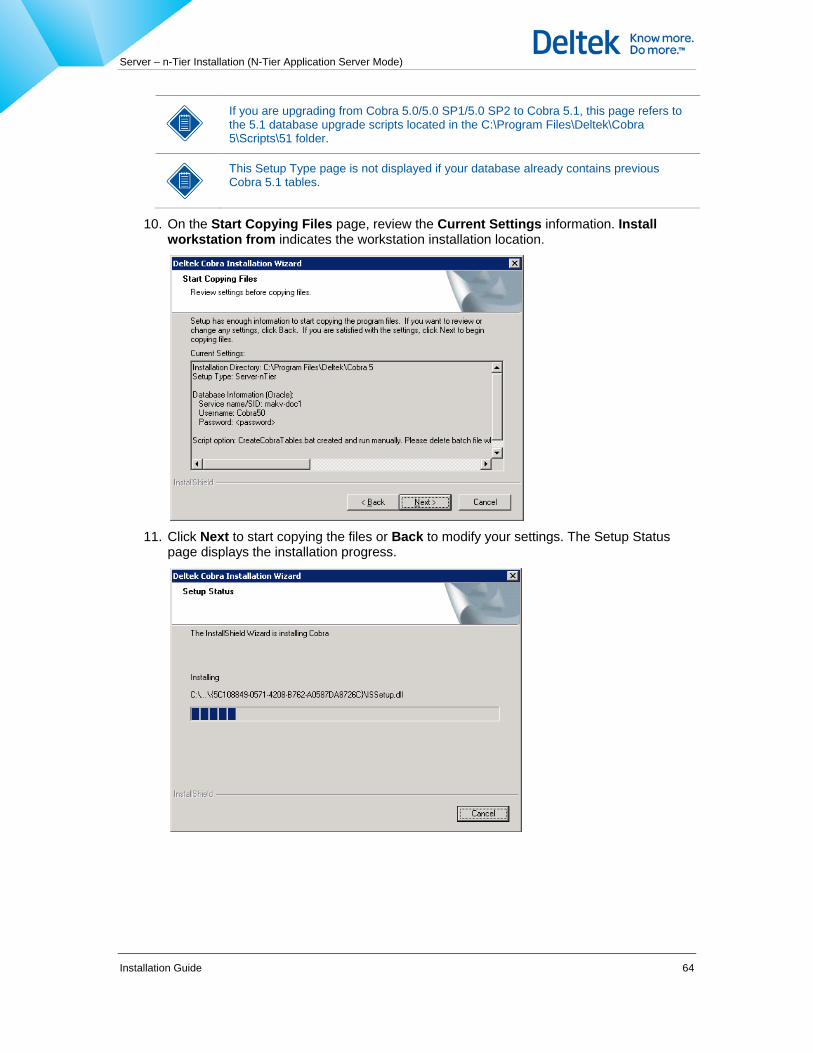
Server – n-Tier Installation (N-Tier Application Server Mode)
Installation Guide 64
If you are upgrading from Cobra 5.0/5.0 SP1/5.0 SP2 to Cobra 5.1, this page refers to the 5.1 database upgrade scripts located in the C:\Program Files\Deltek\Cobra 5\Scripts\51 folder.
This Setup Type page is not displayed if your database already contains previous Cobra 5.1 tables.
10. On the Start Copying Files page, review the Current Settings information. Install workstation from indicates the workstation installation location.
11. Click Next to start copying the files or Back to modify your settings. The Setup Status
page displays the installation progress.

Server – n-Tier Installation (N-Tier Application Server Mode)
Installation Guide 65
12. When the InstallShield Wizard Complete page appears, click Finish.
13. After you install Cobra on your application server, install the client on each workstation
that will use Cobra (see Installing the Client on a Workstation).
14. Launch Cobra on the workstation to test the application by clicking Start » Programs » Deltek » Cobra 5.1 » Deltek Cobra 5.1.
Upon starting Cobra, you must enter a user ID and password. The default user ID is ‘SYSADMIN’ and the default password is ‘password.’ For security reasons, you must change this password as soon as possible. For more information on how to change your password (see Launching Cobra 5.1).
15. Run the EPM Security Administrator on the application server to add users to Cobra and establish user permissions (see Adding, Deleting, and Renaming Users).
You can also perform the following tasks in the EPM Security Administrator:
Add a new data source. See Adding a New Data Source.
Edit an existing data source. See Editing an Existing Data Source.
Switch to another data source. See Switching to Another Data Source.
Change user passwords. See Changing User Passwords.
Create, delete, and rename roles. See Creating, Deleting, and Renaming Roles.
Create, delete, and rename groups. See Creating, Deleting, and Renaming Groups.
Add/remove users to/from a group. See Adding/Removing Users to/from a Group.
Define user and group roles. See Defining User and Group Roles

Server – n-Tier Installation (N-Tier Application Server Mode)
Installation Guide 66
Server n-Tier Installation on a Microsoft SQL Database To install in n-Tier Application Server mode on a Microsoft SQL database:
1. Locate and double-click the DeltekCobra51.exe file to launch the Cobra Installation Wizard. Click Next on the Welcome page.
2. On the License Agreement page, read the terms and conditions. Select I accept the
terms of the license agreement and click Next.

Server – n-Tier Installation (N-Tier Application Server Mode)
Installation Guide 67
3. On the Customer Information page, enter the User Name, Company Name, and the Serial Number that came with the software. Click Next.
4. On the License Information page, enter the license key that came with the software and
click Next.
When an upgraded license is purchased, a user receives a new license key. The license key specifies the number of users who can log on to Cobra at one time. For more information about changing the license key, see the Upgrade a Software License section of the EPM Security Administrator help.
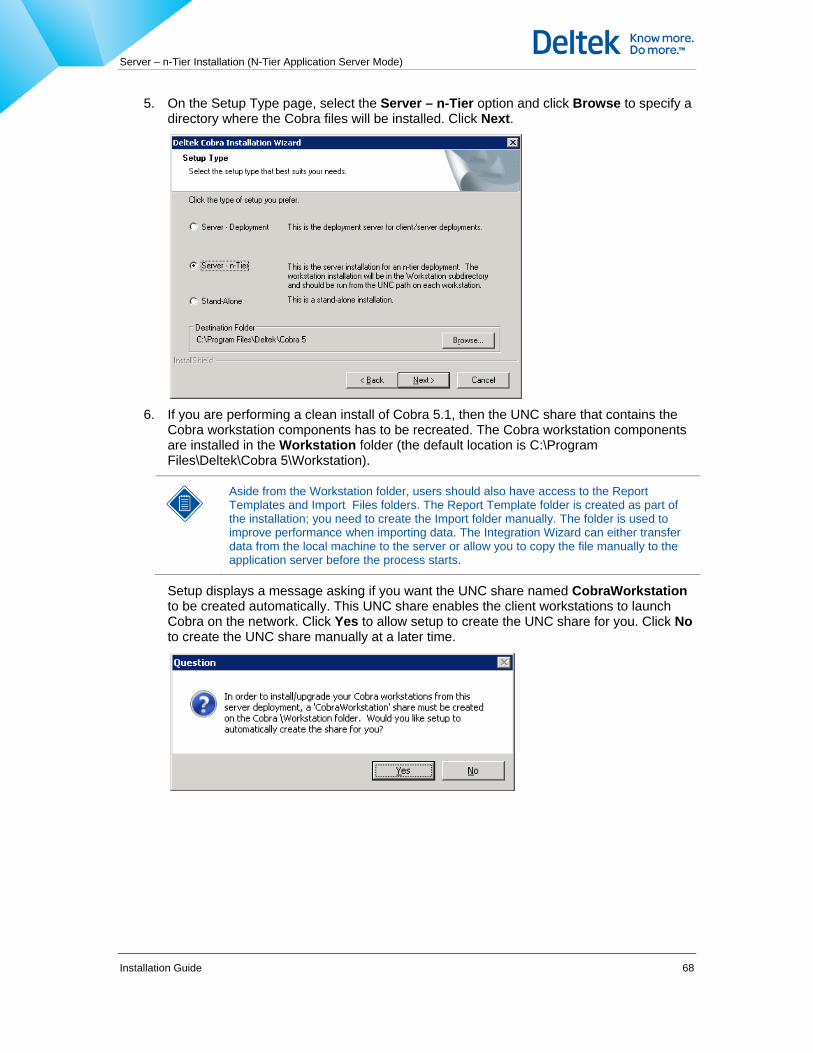
Server – n-Tier Installation (N-Tier Application Server Mode)
Installation Guide 68
5. On the Setup Type page, select the Server – n-Tier option and click Browse to specify a directory where the Cobra files will be installed. Click Next.
6. If you are performing a clean install of Cobra 5.1, then the UNC share that contains the
Cobra workstation components has to be recreated. The Cobra workstation components are installed in the Workstation folder (the default location is C:\Program Files\Deltek\Cobra 5\Workstation).
Aside from the Workstation folder, users should also have access to the Report Templates and Import Files folders. The Report Template folder is created as part of the installation; you need to create the Import folder manually. The folder is used to improve performance when importing data. The Integration Wizard can either transfer data from the local machine to the server or allow you to copy the file manually to the application server before the process starts.
Setup displays a message asking if you want the UNC share named CobraWorkstation to be created automatically. This UNC share enables the client workstations to launch Cobra on the network. Click Yes to allow setup to create the UNC share for you. Click No to create the UNC share manually at a later time.

Server – n-Tier Installation (N-Tier Application Server Mode)
Installation Guide 69
If you click No, the following message displays. Click OK to continue.
If you are creating the share manually, please note that although the installation folder containing the Workstation components is named Workstation, the UNC share must be created with a shared name of CobraWorkstation. If this share name is changed, upgraded Cobra clients fail when launching Cobra after the installation.
7. On the Setup Type page, select the Microsoft SQL Server 2005/2008 option and click Next.
8. On the Database Server page, enter the name of the database server where the
components will be installed in the Database server that you are installing to field. Select SQL Server authentication using the Login ID and password below and enter the Login ID and Password of the database to use. Enter the catalog name of the specified database in the Name of database catalog field and click Next.
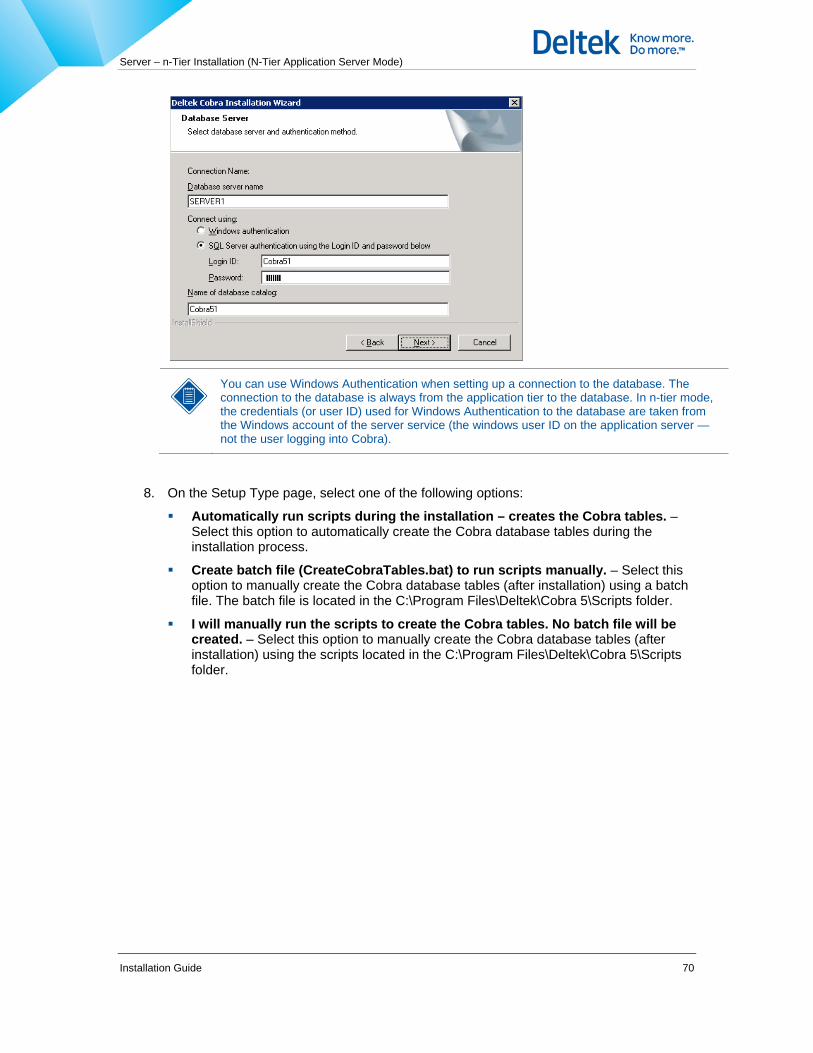
Server – n-Tier Installation (N-Tier Application Server Mode)
Installation Guide 70
You can use Windows Authentication when setting up a connection to the database. The connection to the database is always from the application tier to the database. In n-tier mode, the credentials (or user ID) used for Windows Authentication to the database are taken from the Windows account of the server service (the windows user ID on the application server — not the user logging into Cobra).
8. On the Setup Type page, select one of the following options:
Automatically run scripts during the installation – creates the Cobra tables. – Select this option to automatically create the Cobra database tables during the installation process.
Create batch file (CreateCobraTables.bat) to run scripts manually. – Select this option to manually create the Cobra database tables (after installation) using a batch file. The batch file is located in the C:\Program Files\Deltek\Cobra 5\Scripts folder.
I will manually run the scripts to create the Cobra tables. No batch file will be created. – Select this option to manually create the Cobra database tables (after installation) using the scripts located in the C:\Program Files\Deltek\Cobra 5\Scripts folder.
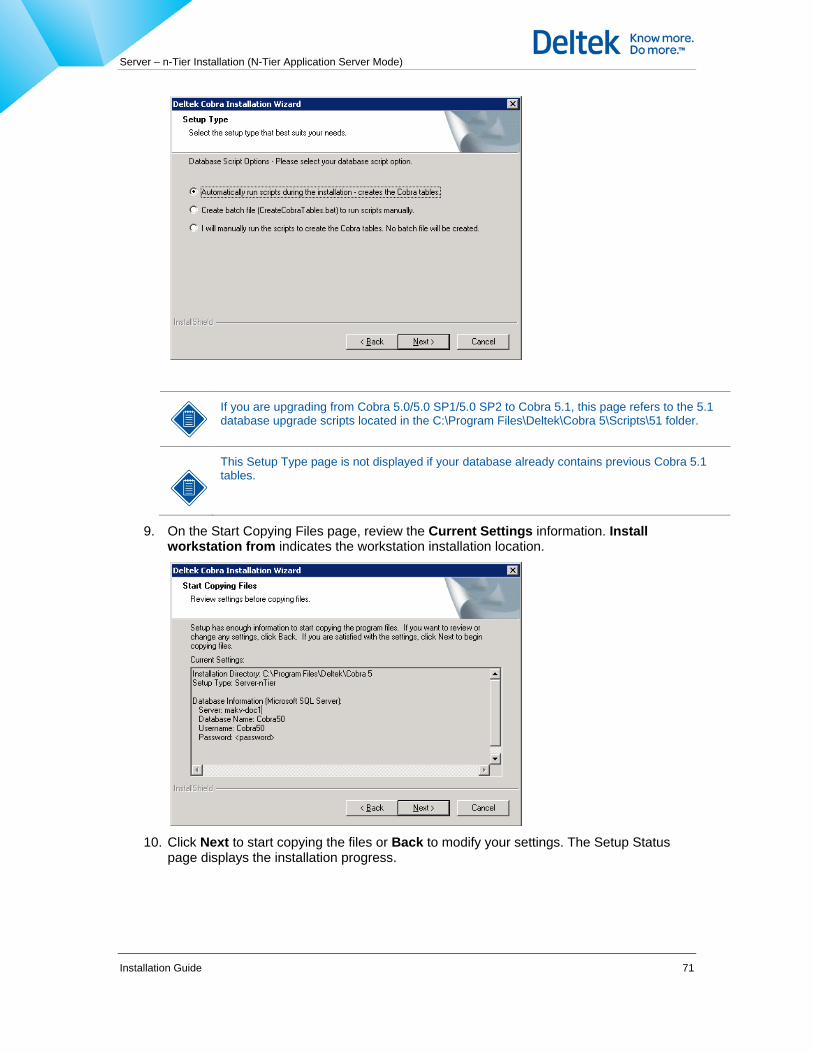
Server – n-Tier Installation (N-Tier Application Server Mode)
Installation Guide 71
If you are upgrading from Cobra 5.0/5.0 SP1/5.0 SP2 to Cobra 5.1, this page refers to the 5.1 database upgrade scripts located in the C:\Program Files\Deltek\Cobra 5\Scripts\51 folder.
This Setup Type page is not displayed if your database already contains previous Cobra 5.1 tables.
9. On the Start Copying Files page, review the Current Settings information. Install workstation from indicates the workstation installation location.
10. Click Next to start copying the files or Back to modify your settings. The Setup Status
page displays the installation progress.

Server – n-Tier Installation (N-Tier Application Server Mode)
Installation Guide 72
11. When the InstallShield Wizard Complete page appears, click Finish.
12. After you install Cobra on your application server, install the client on each workstation
that will use Cobra (see Installing the Client on a Workstation).
13. Launch Cobra on the workstation to test the application by clicking Start » Programs » Deltek » Cobra 5.1 » Deltek Cobra 5.1.
Upon starting Cobra, you must enter a user ID and password. The default user ID is ‘SYSADMIN’ and the default password is ‘password.’ For security reasons, you must change this password as soon as possible. For more information on how to change your password (see Launching Cobra 5.1).
14. Run the EPM Security Administrator on the application server to add users to Cobra and establish user permissions (see Adding, Deleting, and Renaming Users).

Server – n-Tier Installation (N-Tier Application Server Mode)
Installation Guide 73
You can also perform the following tasks in the EPM Security Administrator:
Add a new data source. See Adding a New Data Source.
Edit an existing data source. See Editing an Existing Data Source.
Switch to another data source. See Switching to Another Data Source.
Change user passwords. See Changing User Passwords.
Create, delete, and rename roles. See Creating, Deleting, and Renaming Roles.
Create, delete, and rename groups. See Creating, Deleting, and Renaming Groups.
Add/remove users to/from a group. See Adding/Removing Users to/from a Group.
Define user and group roles. See Defining User and Group Roles

Installing the Client on a Workstation
Installation Guide 74
Installing the Client on a Workstation Run the Workstation setup on your workstations. It is important that you run the workstation setup from the network share (<SERVER>\CobraWorkstation) that is created during installation so that auto-update capabilities are enabled and will work. If you chose the option to manually create the CobraWorkstation share, you must do so before continuing. You must run this setup on each workstation initially, and then the auto-update capabilities will take over.
Upgrading an Existing Workstation Installation To upgrade an existing Cobra client installation on a workstation:
1. On the workstation, launch the Cobra client application. Cobra detects that a new version is available and displays a message asking if you want to install the upgrade. Click Yes to install the upgrade.
If you chose to manually create the CobraWorkstation share, you must do so before users launch the Cobra client application on their workstations. If the CobraWorkstation share is not yet created when users launch the client application, the following error message displays.
2. Cobra copies the installation updates and automatically updates the local Cobra
installation to the latest version. Once the update is completed, setup terminates automatically. You can then launch Cobra from the shortcut to log on to the application.
If you have any of the Cobra tools or the EPM Security Administrator installed in the \\Program Files\ folder and you are running Cobra for the first time (after the server has been upgraded) on Windows Vista or Windows 7 workstations with very restrictive UAC security settings, Deltek recommends right-clicking the Cobra shortcut and clicking Run As Administrator.
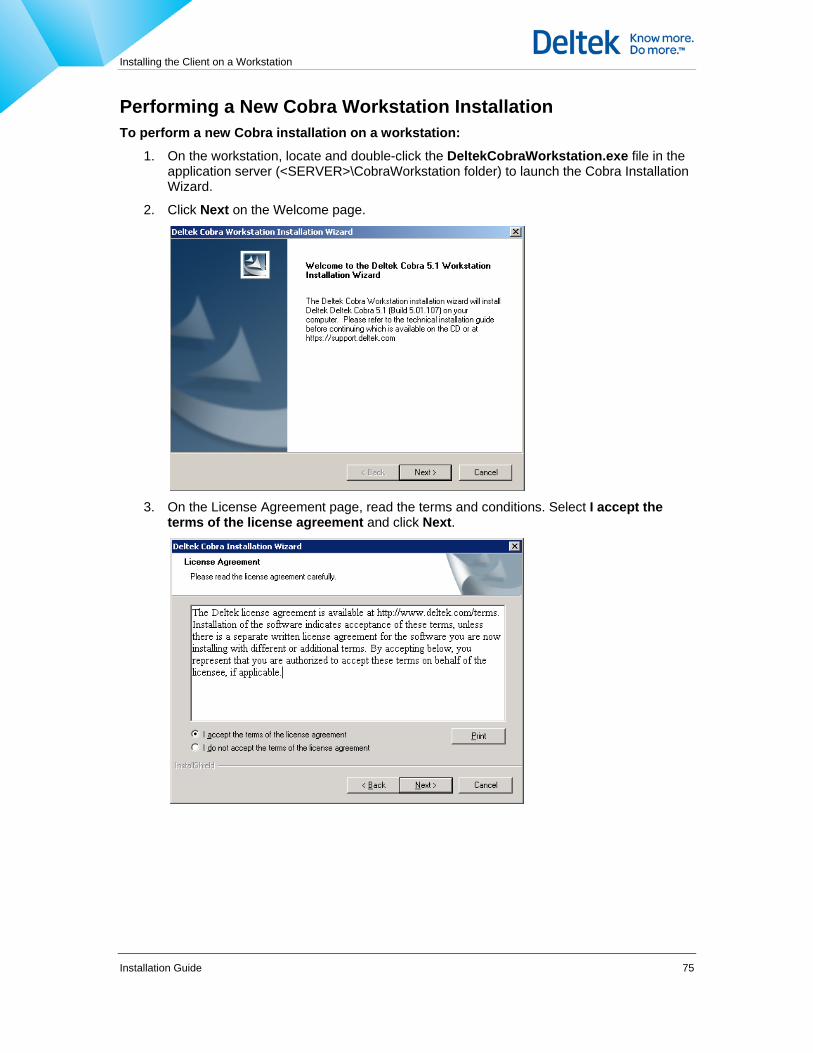
Installing the Client on a Workstation
Installation Guide 75
Performing a New Cobra Workstation Installation To perform a new Cobra installation on a workstation:
1. On the workstation, locate and double-click the DeltekCobraWorkstation.exe file in the application server (<SERVER>\CobraWorkstation folder) to launch the Cobra Installation Wizard.
2. Click Next on the Welcome page.
3. On the License Agreement page, read the terms and conditions. Select I accept the
terms of the license agreement and click Next.
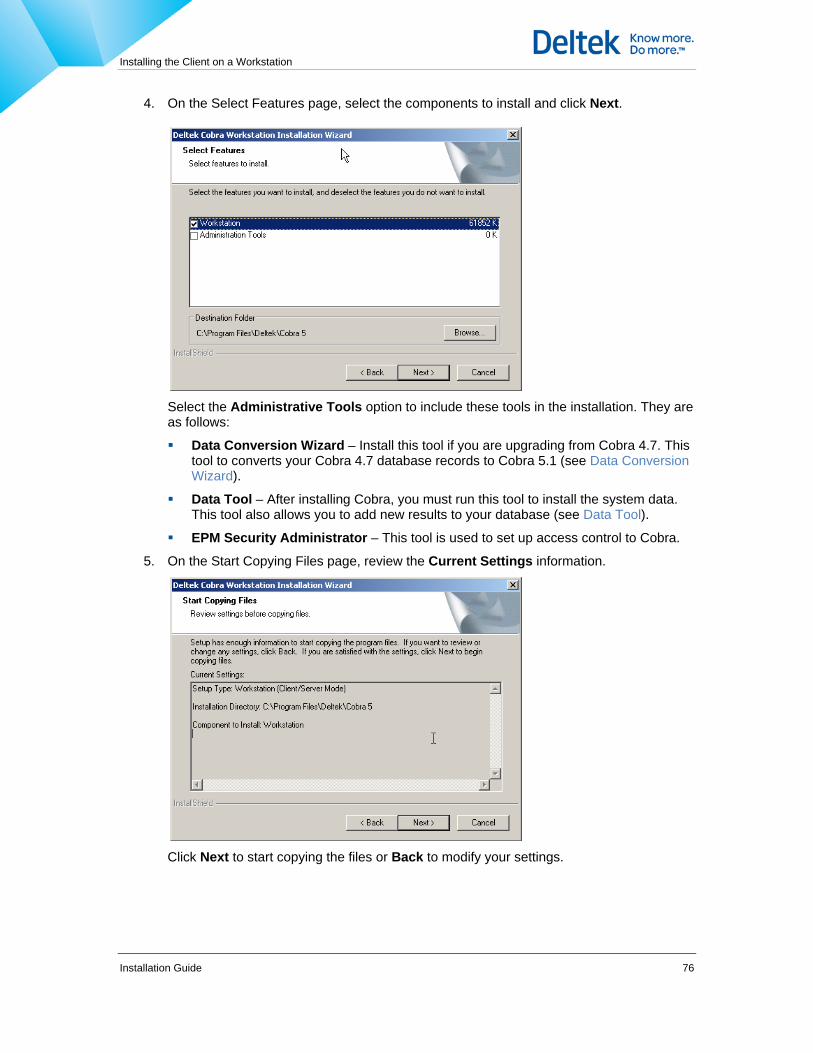
Installing the Client on a Workstation
Installation Guide 76
4. On the Select Features page, select the components to install and click Next.
Select the Administrative Tools option to include these tools in the installation. They are as follows:
Data Conversion Wizard – Install this tool if you are upgrading from Cobra 4.7. This tool to converts your Cobra 4.7 database records to Cobra 5.1 (see Data Conversion Wizard).
Data Tool – After installing Cobra, you must run this tool to install the system data. This tool also allows you to add new results to your database (see Data Tool).
EPM Security Administrator – This tool is used to set up access control to Cobra.
5. On the Start Copying Files page, review the Current Settings information.
Click Next to start copying the files or Back to modify your settings.
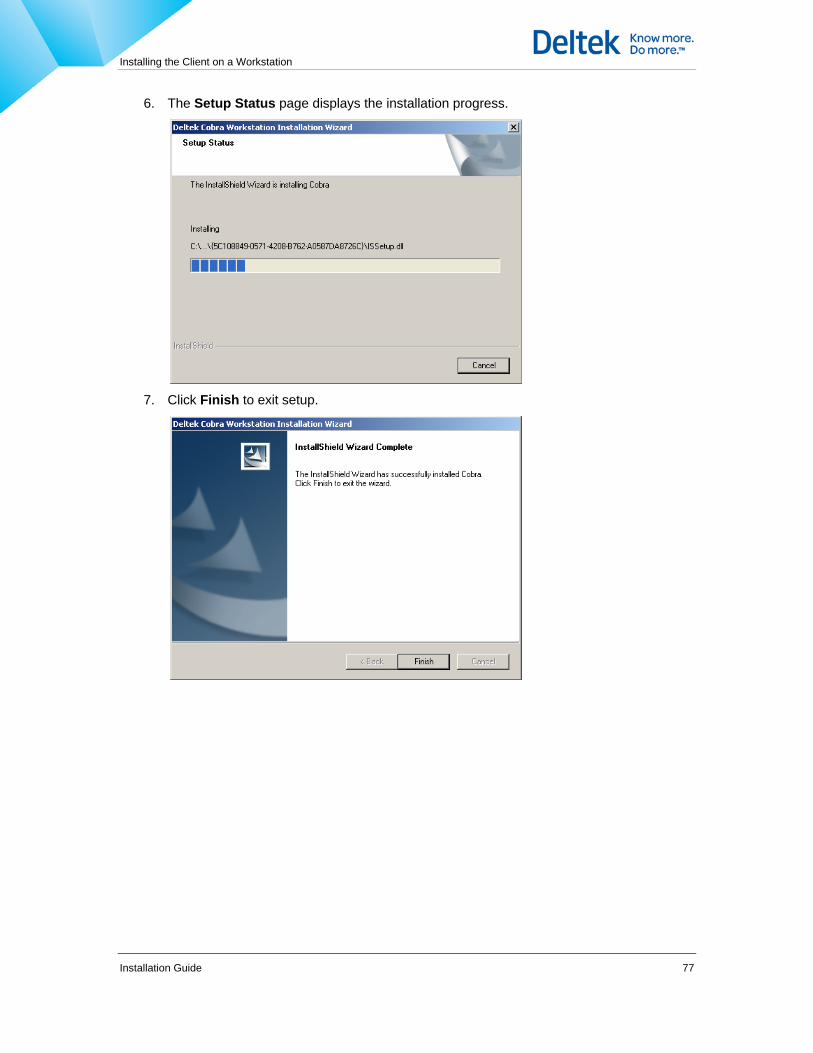
Installing the Client on a Workstation
Installation Guide 77
6. The Setup Status page displays the installation progress.
7. Click Finish to exit setup.

Running Scripts to Create Database Tables
Installation Guide 78
Running Scripts to Create Database Tables The Cobra installer allows you to choose whether to create database tables automatically or manually. If you opted to automatically create the Cobra 5 database tables, the scripts are run during the installation process. Otherwise, you can create database tables manually using a batch file (created during installation) or individual scripts located in this folder: C:\Program Files\Deltek\Cobra 5\Scripts.
Running Scripts Manually If you opted to manually run the scripts, you can use one of the .bat files found in the C:\Program Files\Deltek\Cobra 5\Scripts folder depending on what database you are using:
RunAllScripts_Oracle.bat if you are using an Oracle database
RunAllScripts_Sql.bat if you are using a Microsoft SQL database
There are parameters that can be passed to the batch, but they must be passed in a specific order. The following table indicates what order the parameters must be passed:
Oracle Batch Parameter Order Microsoft SQL Batch Parameter Order
1. Server\Instance Name
2. User ID (default is cobra50)
3. Password (default is cobra50)
1. Database Name
2. Server\Instance Name
3. User ID
4. Password
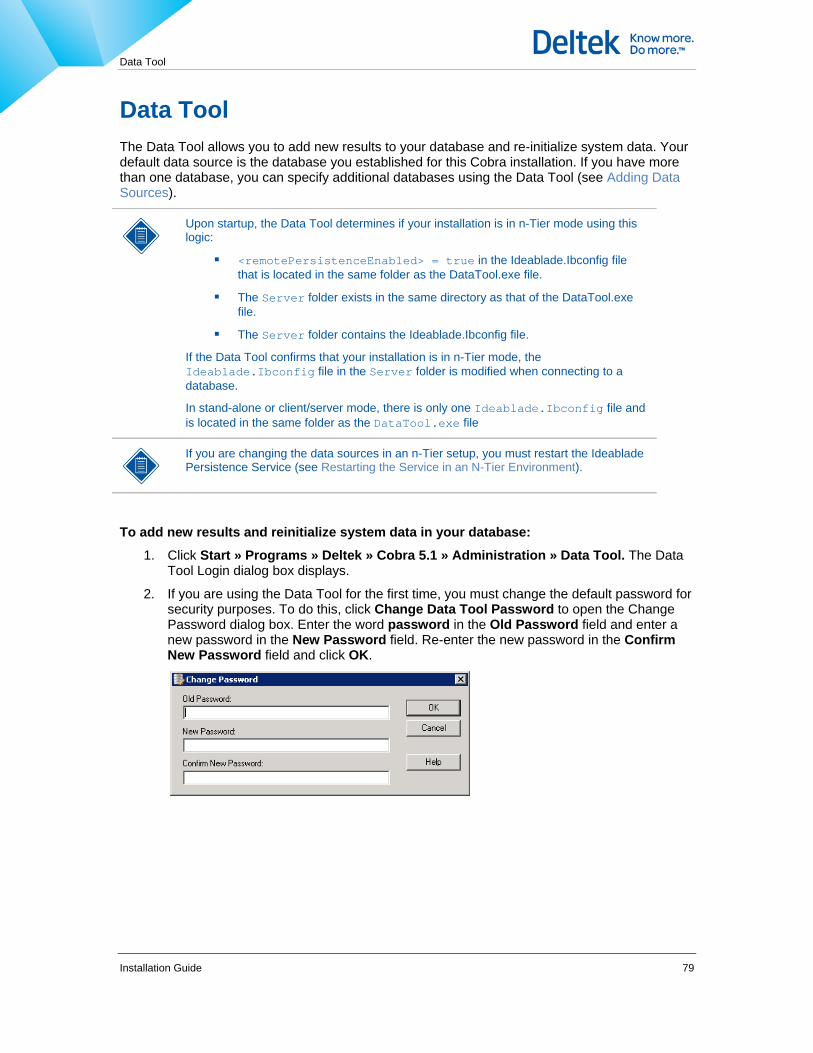
Data Tool
Installation Guide 79
Data Tool The Data Tool allows you to add new results to your database and re-initialize system data. Your default data source is the database you established for this Cobra installation. If you have more than one database, you can specify additional databases using the Data Tool (see Adding Data Sources).
Upon startup, the Data Tool determines if your installation is in n-Tier mode using this logic:
<remotePersistenceEnabled> = true in the Ideablade.Ibconfig file that is located in the same folder as the DataTool.exe file.
The Server folder exists in the same directory as that of the DataTool.exe file.
The Server folder contains the Ideablade.Ibconfig file.
If the Data Tool confirms that your installation is in n-Tier mode, the Ideablade.Ibconfig file in the Server folder is modified when connecting to a database.
In stand-alone or client/server mode, there is only one Ideablade.Ibconfig file and is located in the same folder as the DataTool.exe file
If you are changing the data sources in an n-Tier setup, you must restart the Ideablade Persistence Service (see Restarting the Service in an N-Tier Environment).
To add new results and reinitialize system data in your database: 1. Click Start » Programs » Deltek » Cobra 5.1 » Administration » Data Tool. The Data
Tool Login dialog box displays.
2. If you are using the Data Tool for the first time, you must change the default password for security purposes. To do this, click Change Data Tool Password to open the Change Password dialog box. Enter the word password in the Old Password field and enter a new password in the New Password field. Re-enter the new password in the Confirm New Password field and click OK.
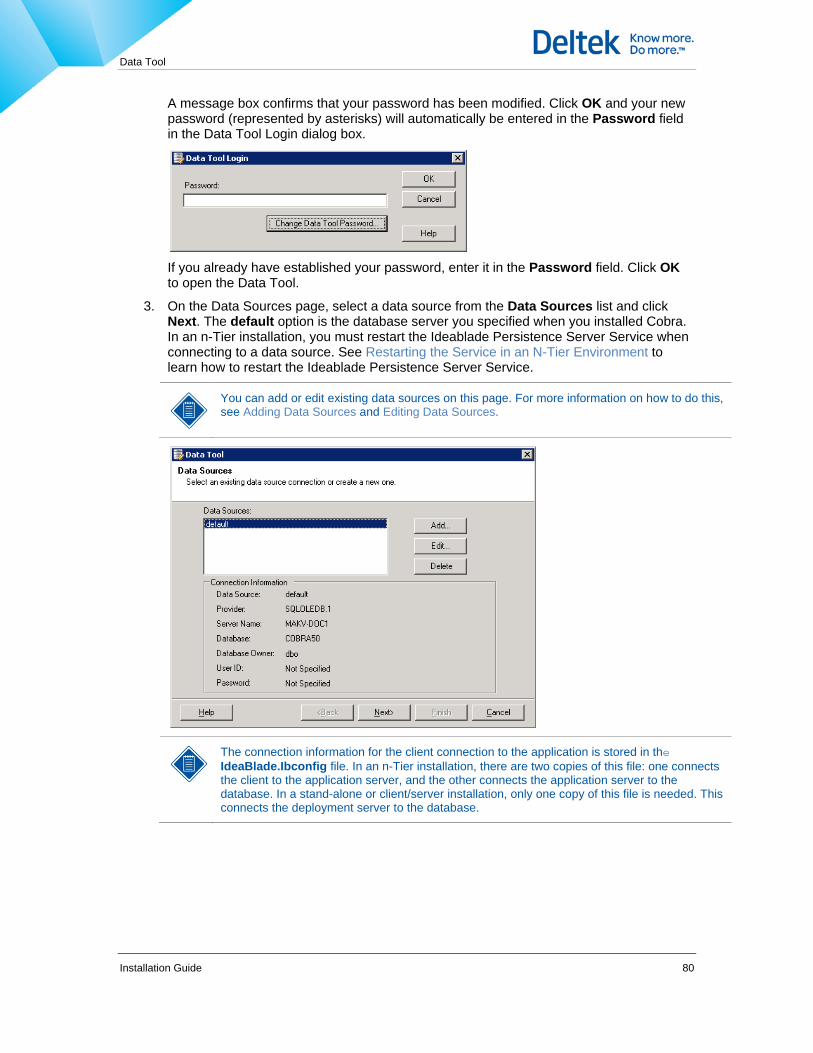
Data Tool
Installation Guide 80
A message box confirms that your password has been modified. Click OK and your new password (represented by asterisks) will automatically be entered in the Password field in the Data Tool Login dialog box.
If you already have established your password, enter it in the Password field. Click OK to open the Data Tool.
3. On the Data Sources page, select a data source from the Data Sources list and click Next. The default option is the database server you specified when you installed Cobra. In an n-Tier installation, you must restart the Ideablade Persistence Server Service when connecting to a data source. See Restarting the Service in an N-Tier Environment to learn how to restart the Ideablade Persistence Server Service.
You can add or edit existing data sources on this page. For more information on how to do this, see Adding Data Sources and Editing Data Sources.
The connection information for the client connection to the application is stored in the IdeaBlade.Ibconfig file. In an n-Tier installation, there are two copies of this file: one connects the client to the application server, and the other connects the application server to the database. In a stand-alone or client/server installation, only one copy of this file is needed. This connects the deployment server to the database.

Data Tool
Installation Guide 81
4. On the Options page, select the actions to perform. Select the Define Results option to add, delete, or restore results in your database. Click Next.
Choosing the Initialize Cobra system data option resets your system data. Use this option only if you are sure that your system data needs resetting.
5. If you selected the Define Results option on the previous page, the Define Results page displays. On this page, click: Add to define a new result; Delete to remove a result from the Results list; or Reset to Default List to restore the default set of results. Click Next.
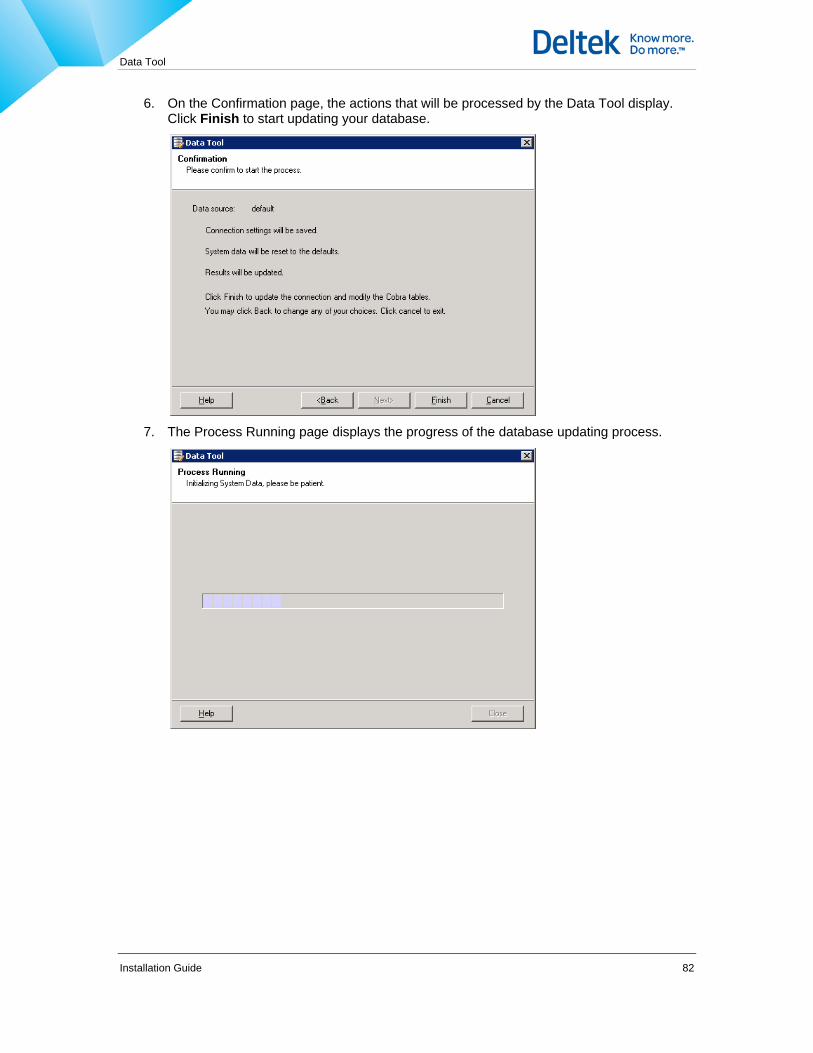
Data Tool
Installation Guide 82
6. On the Confirmation page, the actions that will be processed by the Data Tool display. Click Finish to start updating your database.
7. The Process Running page displays the progress of the database updating process.

Data Tool
Installation Guide 83
8. On the Process Complete page, click View Log to display processing information or Close to exit the Data Tool.
9. Restart the Ideablade Persistence Server Service (see Restarting the Service in an N-
Tier Environment).
Adding Data Sources If you have two or more databases to be used by Cobra, you can add them in the Data Tool.
If you switch from one data source to another, all users accessing that Cobra installation is also switched to the new data source. In an n-tier environment, you must restart the Ideablade service after switching data sources.
If you want to have separate database instances accessible at the same time via an n-tier setup, you need to have separate n-tier server installations because a single n-tier server can only point to one database, and workstations will only connect to the database that the n-tier server points to.
For client-server and stand-alone environments, you just need to point to the new data source using the Data Tool.
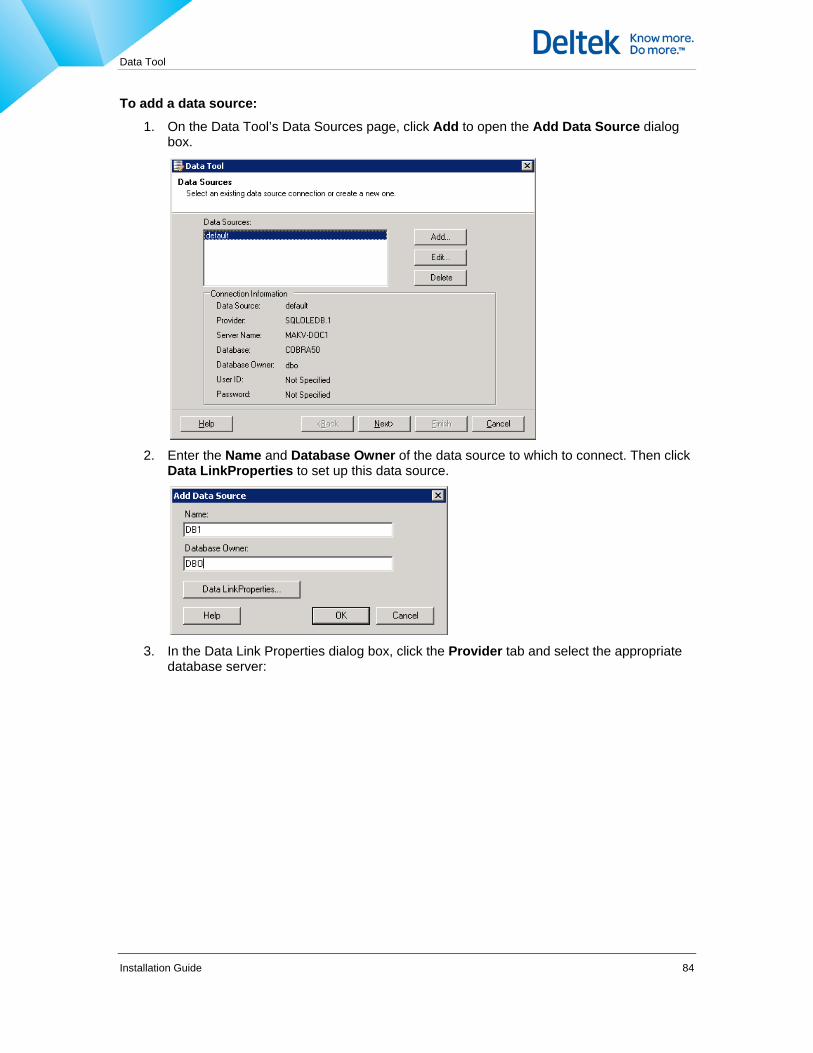
Data Tool
Installation Guide 84
To add a data source:
1. On the Data Tool’s Data Sources page, click Add to open the Add Data Source dialog box.
2. Enter the Name and Database Owner of the data source to which to connect. Then click
Data LinkProperties to set up this data source.
3. In the Data Link Properties dialog box, click the Provider tab and select the appropriate
database server:

Data Tool
Installation Guide 85
If you are using an SQL Server database, select the Microsoft OLE DB Provider for SQL Server option.
If you are using an Oracle database, select the Microsoft OLE DB Provider for Oracle
or Oracle Provider for OLE DB option.

Data Tool
Installation Guide 86
4. Click Next to go to the Connection tab and follow the appropriate set of actions:
If you are using SQL Server, enter the server name of the data source. Next, in the Enter information to log on to the server field, enter the User name and Password you use to log on to the database. Make sure that the Allow saving password option is selected. Lastly, select the Select the database on the server option and specify the location of the Cobra 5.1 records.
You can also use Windows NT Integrated security to log on to the server .
If you are using an Oracle server, enter the server name of the data source. Then,
select the Use a specific user name and password option and enter the User name and Password you use to log on to the database. Make sure that the Allow saving password option is selected.
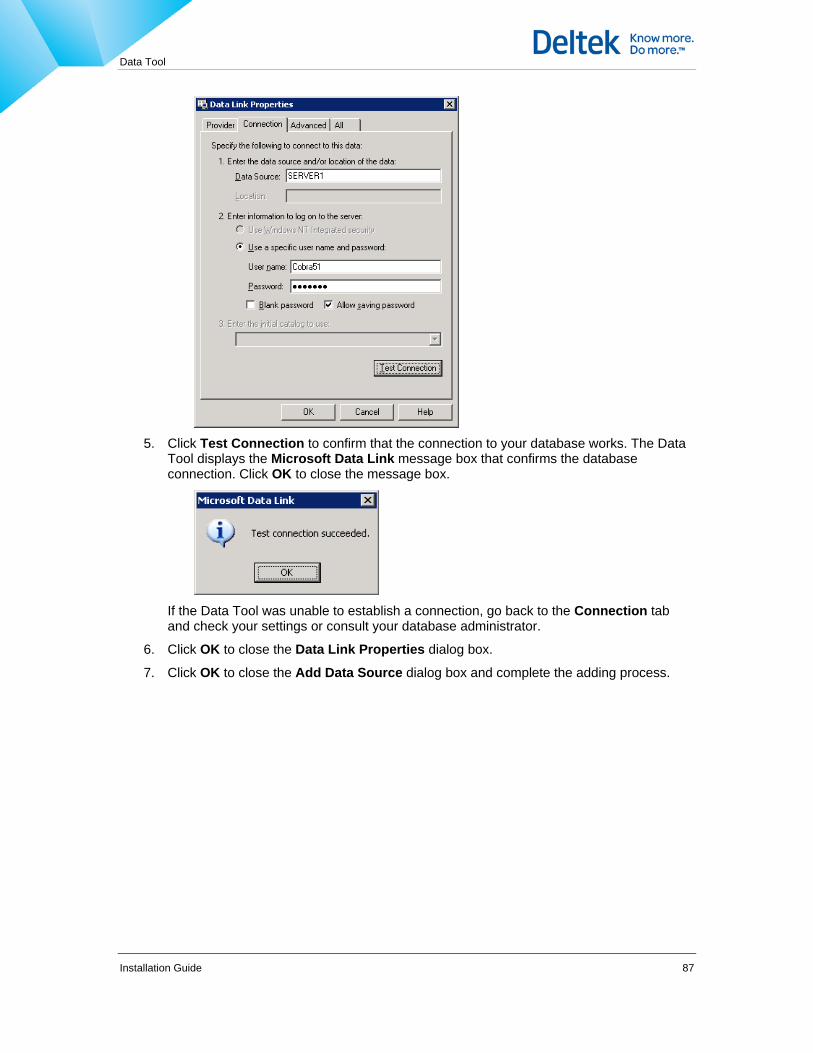
Data Tool
Installation Guide 87
5. Click Test Connection to confirm that the connection to your database works. The Data
Tool displays the Microsoft Data Link message box that confirms the database connection. Click OK to close the message box.
If the Data Tool was unable to establish a connection, go back to the Connection tab and check your settings or consult your database administrator.
6. Click OK to close the Data Link Properties dialog box.
7. Click OK to close the Add Data Source dialog box and complete the adding process.
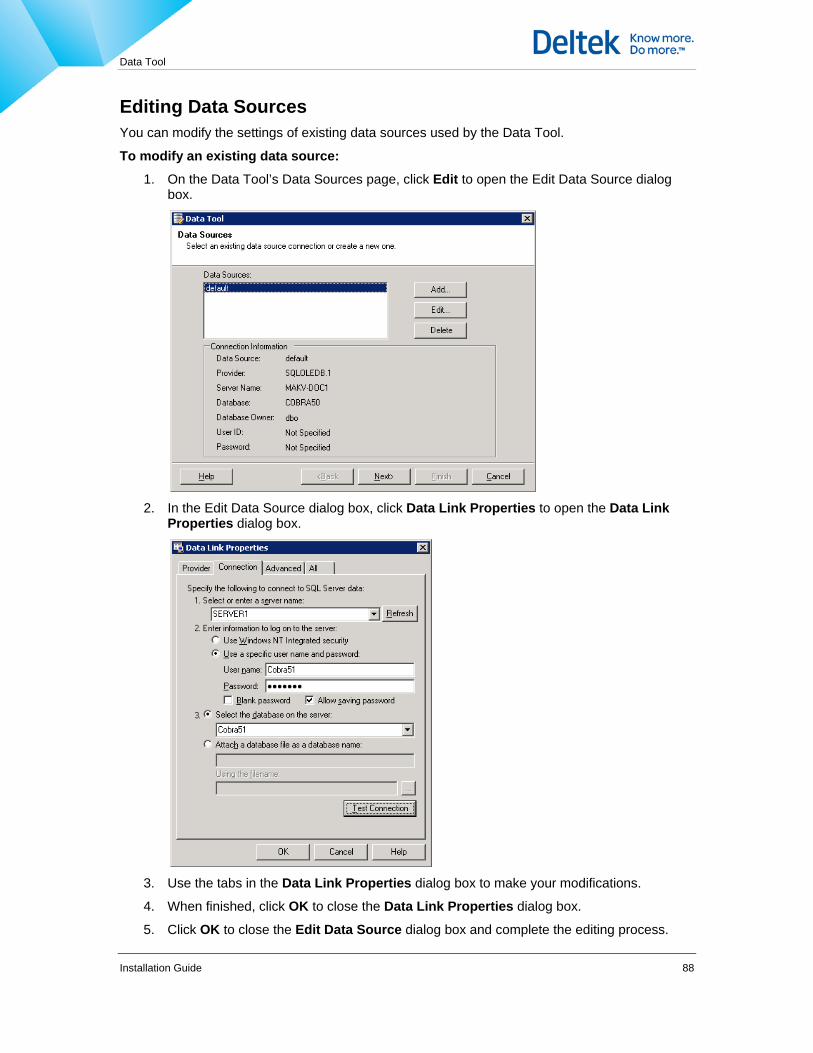
Data Tool
Installation Guide 88
Editing Data Sources You can modify the settings of existing data sources used by the Data Tool.
To modify an existing data source:
1. On the Data Tool’s Data Sources page, click Edit to open the Edit Data Source dialog box.
2. In the Edit Data Source dialog box, click Data Link Properties to open the Data Link
Properties dialog box.
3. Use the tabs in the Data Link Properties dialog box to make your modifications.
4. When finished, click OK to close the Data Link Properties dialog box.
5. Click OK to close the Edit Data Source dialog box and complete the editing process.
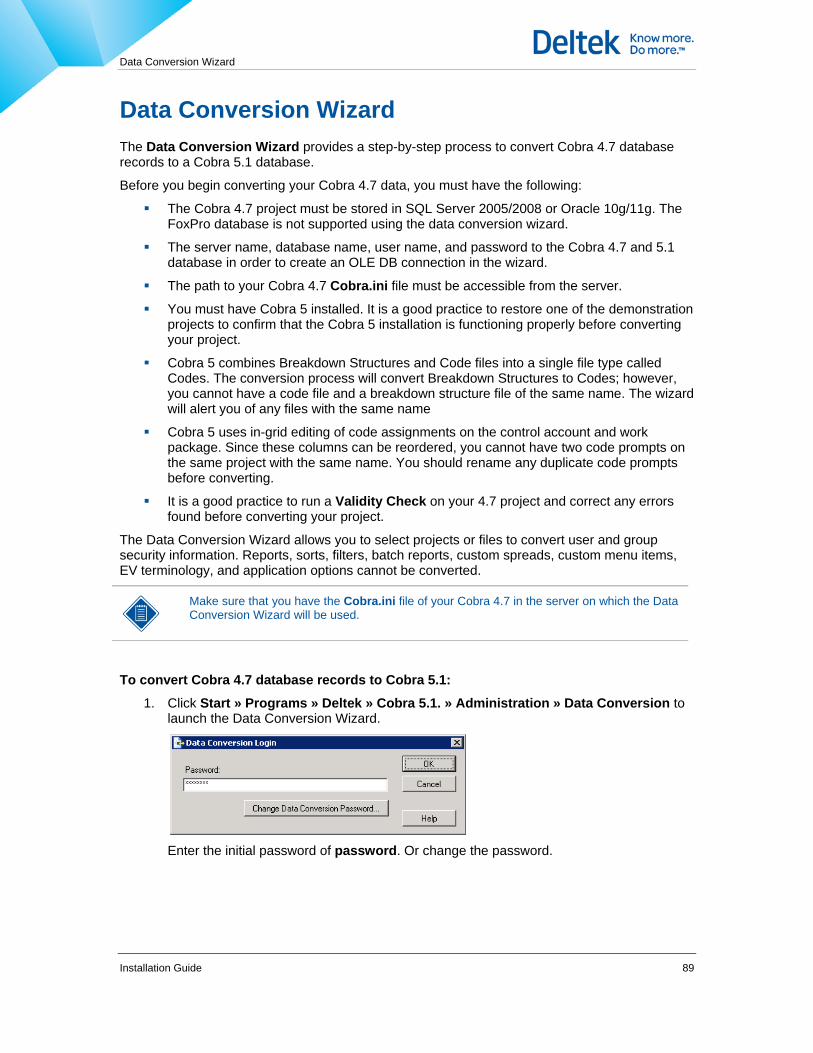
Data Conversion Wizard
Installation Guide 89
Data Conversion Wizard The Data Conversion Wizard provides a step-by-step process to convert Cobra 4.7 database records to a Cobra 5.1 database.
Before you begin converting your Cobra 4.7 data, you must have the following:
The Cobra 4.7 project must be stored in SQL Server 2005/2008 or Oracle 10g/11g. The FoxPro database is not supported using the data conversion wizard.
The server name, database name, user name, and password to the Cobra 4.7 and 5.1 database in order to create an OLE DB connection in the wizard.
The path to your Cobra 4.7 Cobra.ini file must be accessible from the server.
You must have Cobra 5 installed. It is a good practice to restore one of the demonstration projects to confirm that the Cobra 5 installation is functioning properly before converting your project.
Cobra 5 combines Breakdown Structures and Code files into a single file type called Codes. The conversion process will convert Breakdown Structures to Codes; however, you cannot have a code file and a breakdown structure file of the same name. The wizard will alert you of any files with the same name
Cobra 5 uses in-grid editing of code assignments on the control account and work package. Since these columns can be reordered, you cannot have two code prompts on the same project with the same name. You should rename any duplicate code prompts before converting.
It is a good practice to run a Validity Check on your 4.7 project and correct any errors found before converting your project.
The Data Conversion Wizard allows you to select projects or files to convert user and group security information. Reports, sorts, filters, batch reports, custom spreads, custom menu items, EV terminology, and application options cannot be converted.
Make sure that you have the Cobra.ini file of your Cobra 4.7 in the server on which the Data Conversion Wizard will be used.
To convert Cobra 4.7 database records to Cobra 5.1:
1. Click Start » Programs » Deltek » Cobra 5.1. » Administration » Data Conversion to launch the Data Conversion Wizard.
Enter the initial password of password. Or change the password.
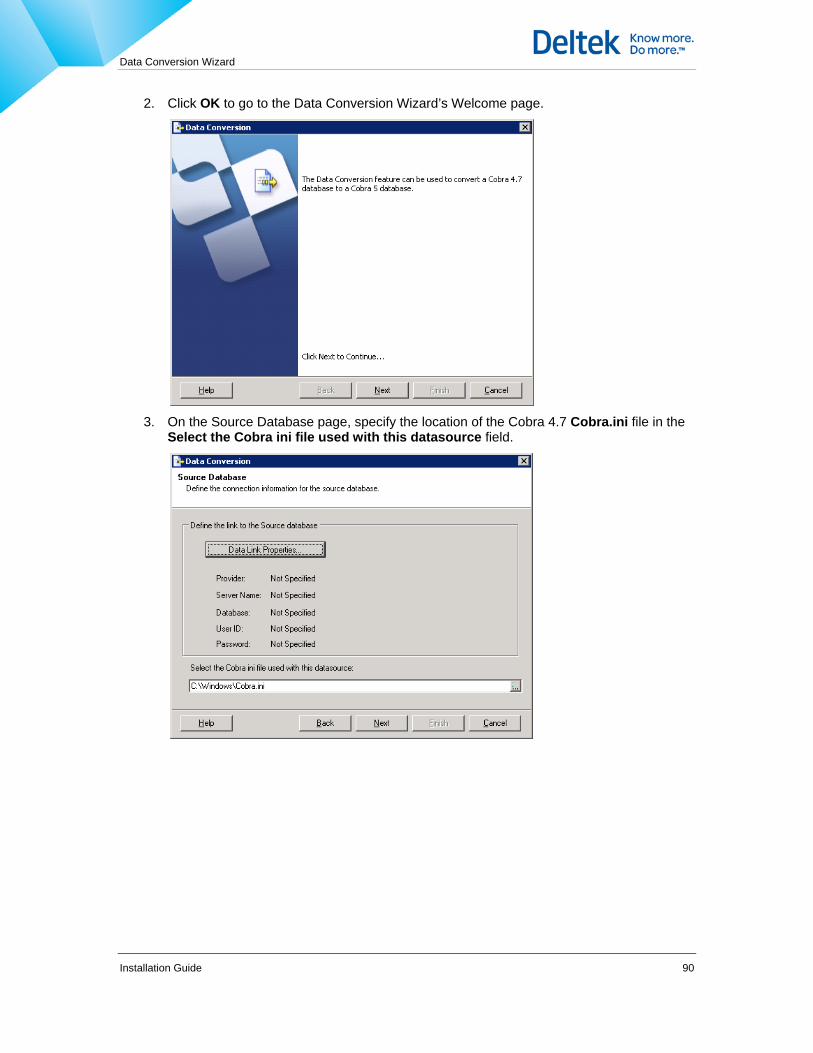
Data Conversion Wizard
Installation Guide 90
2. Click OK to go to the Data Conversion Wizard’s Welcome page.
3. On the Source Database page, specify the location of the Cobra 4.7 Cobra.ini file in the
Select the Cobra ini file used with this datasource field.
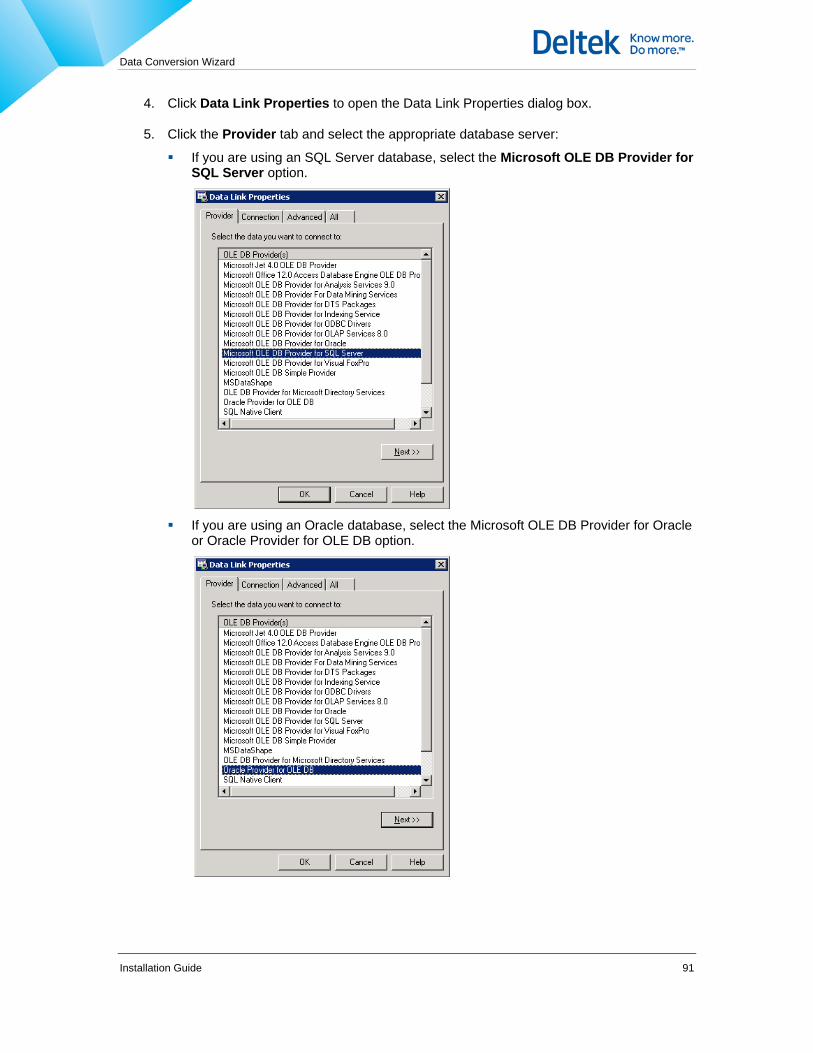
Data Conversion Wizard
Installation Guide 91
4. Click Data Link Properties to open the Data Link Properties dialog box.
5. Click the Provider tab and select the appropriate database server:
If you are using an SQL Server database, select the Microsoft OLE DB Provider for SQL Server option.
If you are using an Oracle database, select the Microsoft OLE DB Provider for Oracle
or Oracle Provider for OLE DB option.

Data Conversion Wizard
Installation Guide 92
6. Click Next to go to the Connection tab and follow the appropriate set of actions:
If you are using SQL Server, enter the server name of the data. Next, in the Enter information to log on to the server field, enter the User name and Password you use to log on to the database. Make sure that the Allow saving password option is selected. Lastly, select the Select the database on the server option and specify the location of the Cobra 4.7 records.
You can also use Windows NT Integrated security to log on to the server.
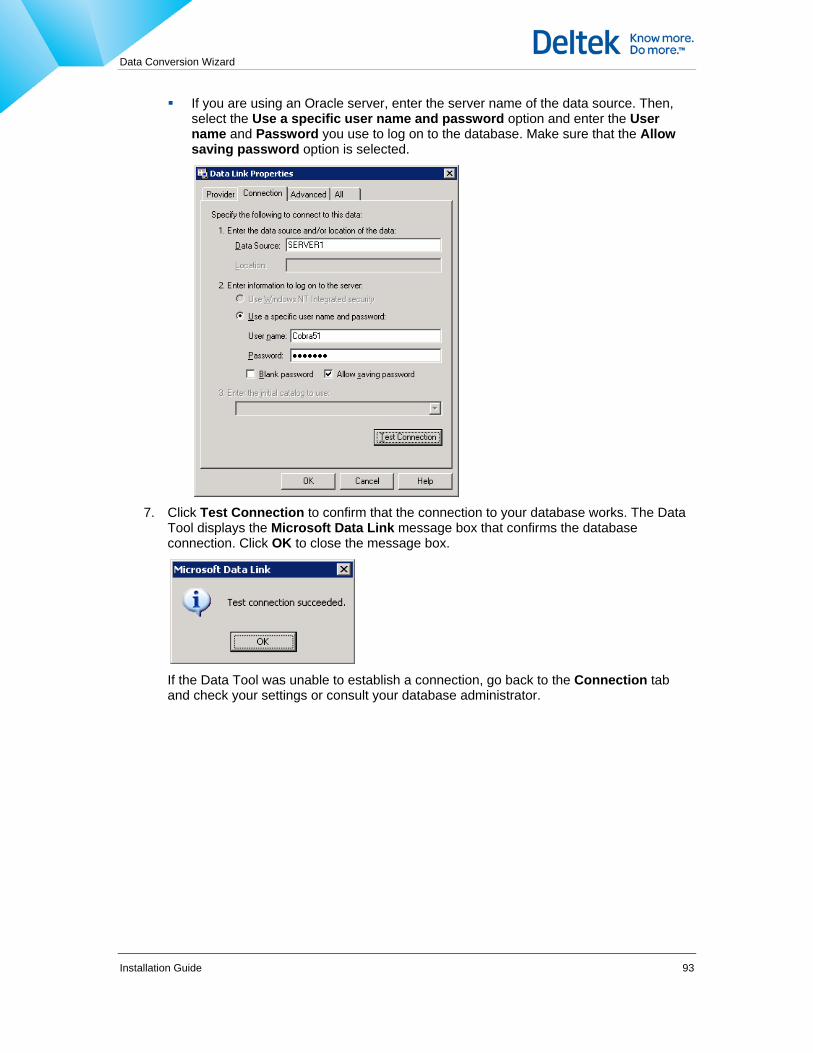
Data Conversion Wizard
Installation Guide 93
If you are using an Oracle server, enter the server name of the data source. Then, select the Use a specific user name and password option and enter the User name and Password you use to log on to the database. Make sure that the Allow saving password option is selected.
7. Click Test Connection to confirm that the connection to your database works. The Data
Tool displays the Microsoft Data Link message box that confirms the database connection. Click OK to close the message box.
If the Data Tool was unable to establish a connection, go back to the Connection tab and check your settings or consult your database administrator.
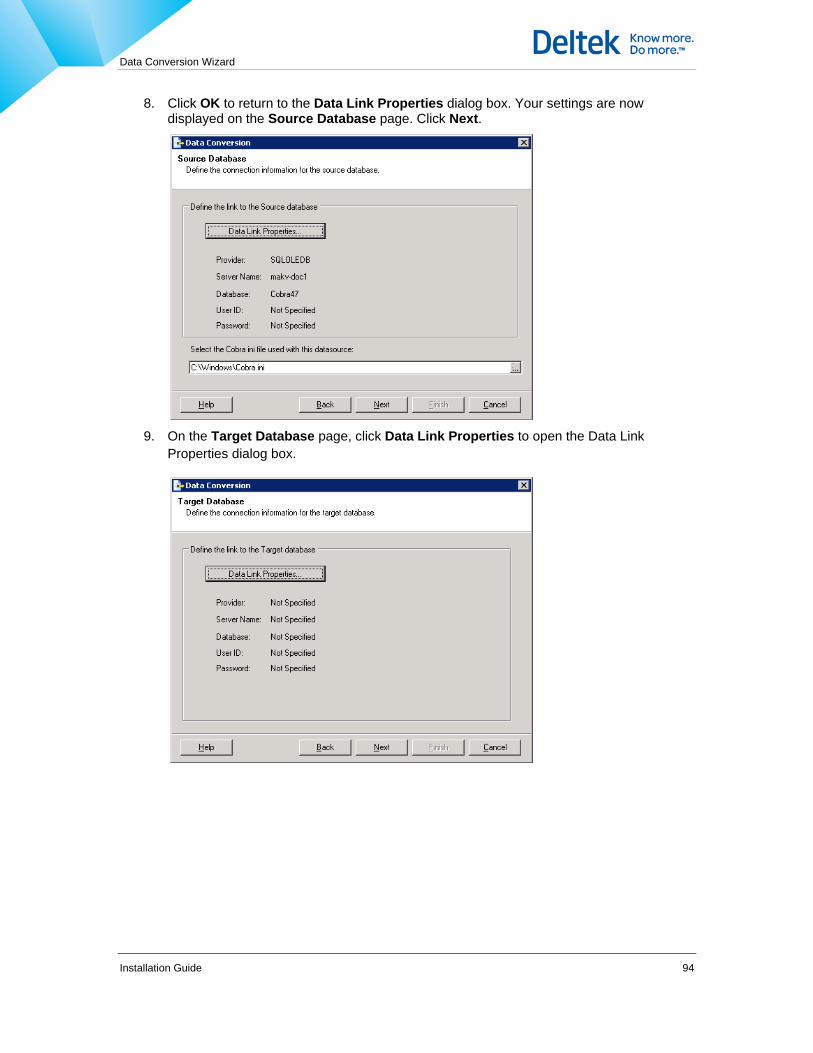
Data Conversion Wizard
Installation Guide 94
8. Click OK to return to the Data Link Properties dialog box. Your settings are now displayed on the Source Database page. Click Next.
9. On the Target Database page, click Data Link Properties to open the Data Link
Properties dialog box.
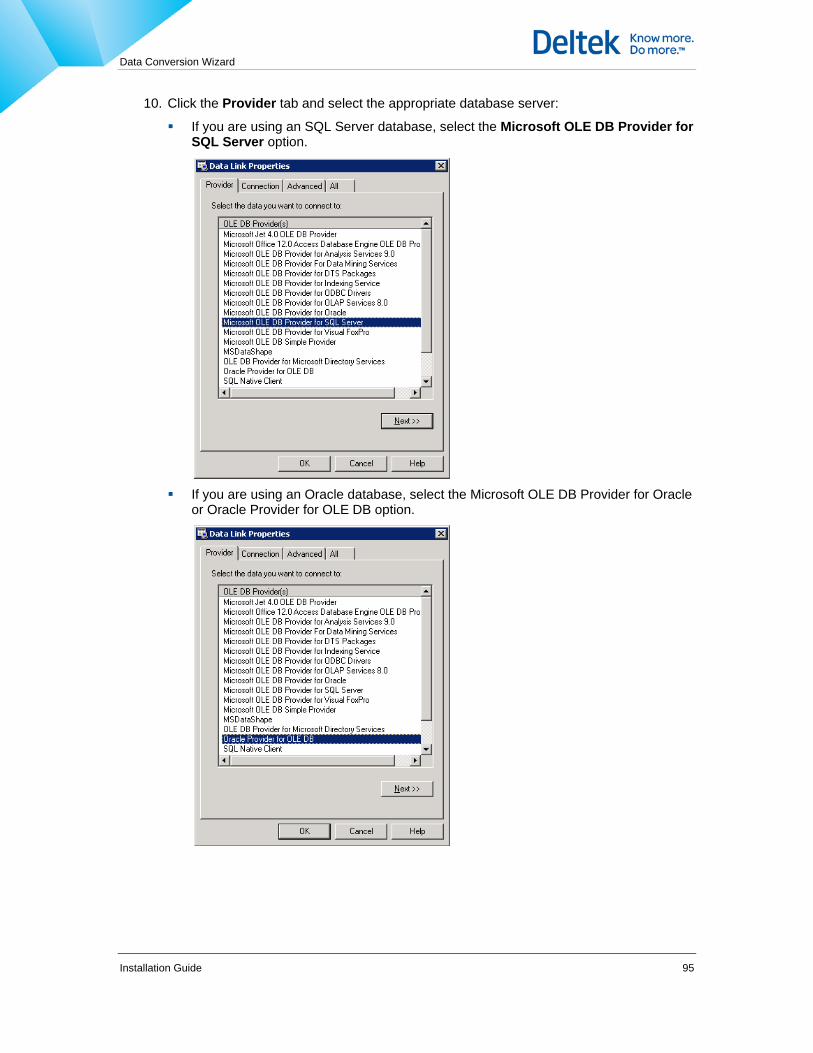
Data Conversion Wizard
Installation Guide 95
10. Click the Provider tab and select the appropriate database server:
If you are using an SQL Server database, select the Microsoft OLE DB Provider for SQL Server option.
If you are using an Oracle database, select the Microsoft OLE DB Provider for Oracle
or Oracle Provider for OLE DB option.
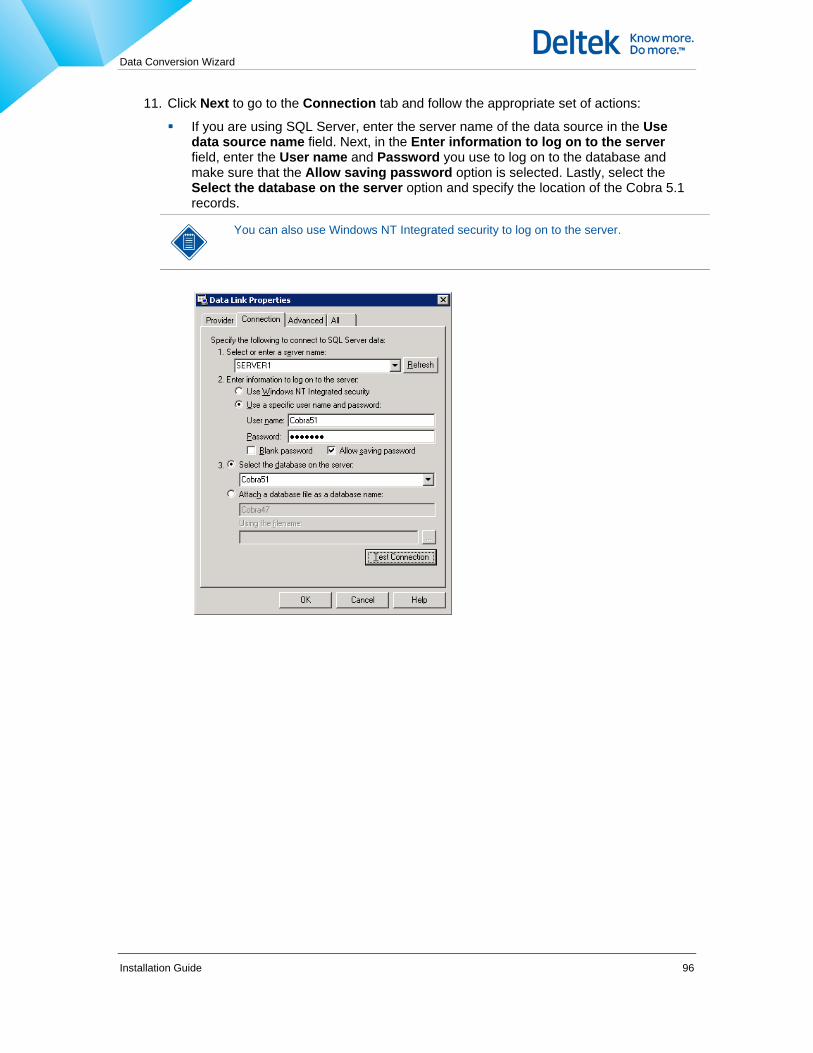
Data Conversion Wizard
Installation Guide 96
11. Click Next to go to the Connection tab and follow the appropriate set of actions:
If you are using SQL Server, enter the server name of the data source in the Use data source name field. Next, in the Enter information to log on to the server field, enter the User name and Password you use to log on to the database and make sure that the Allow saving password option is selected. Lastly, select the Select the database on the server option and specify the location of the Cobra 5.1 records.
You can also use Windows NT Integrated security to log on to the server.
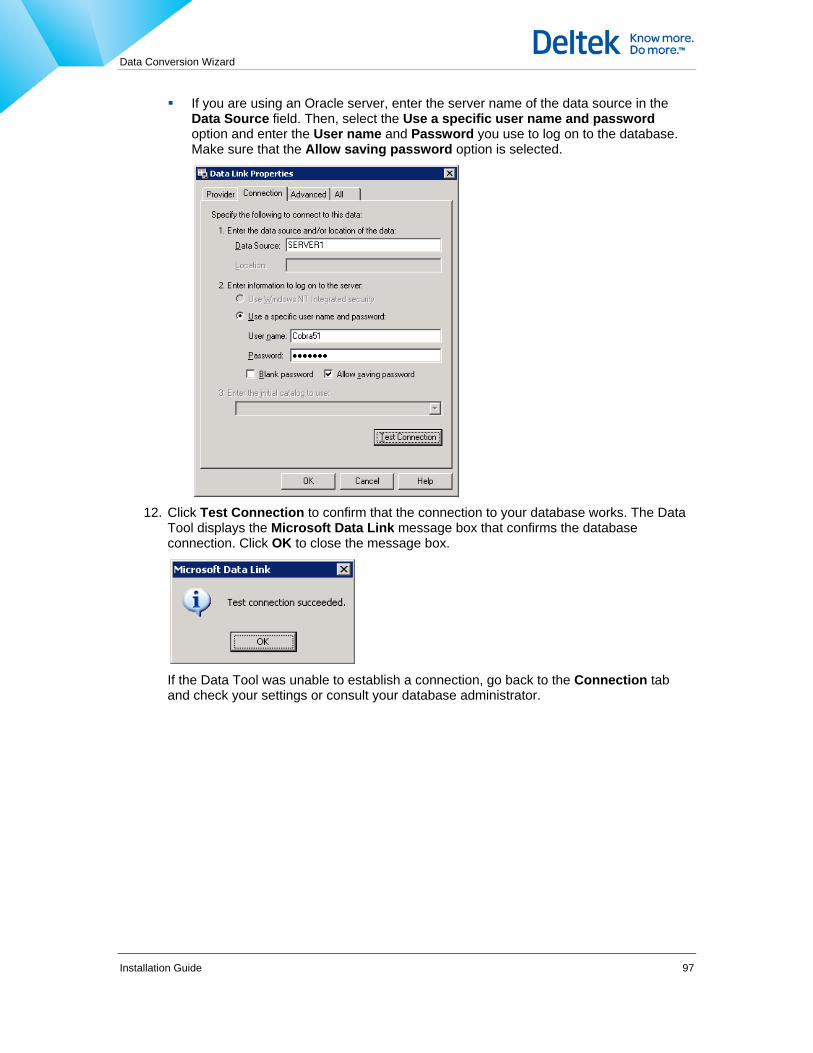
Data Conversion Wizard
Installation Guide 97
If you are using an Oracle server, enter the server name of the data source in the Data Source field. Then, select the Use a specific user name and password option and enter the User name and Password you use to log on to the database. Make sure that the Allow saving password option is selected.
12. Click Test Connection to confirm that the connection to your database works. The Data
Tool displays the Microsoft Data Link message box that confirms the database connection. Click OK to close the message box.
If the Data Tool was unable to establish a connection, go back to the Connection tab and check your settings or consult your database administrator.

Data Conversion Wizard
Installation Guide 98
13. Click OK to close the Data Link Properties dialog box. Your settings are now displayed on the Target Database page. Click Next to continue.
14. On the Conversion Options page, select the appropriate options and click Next.
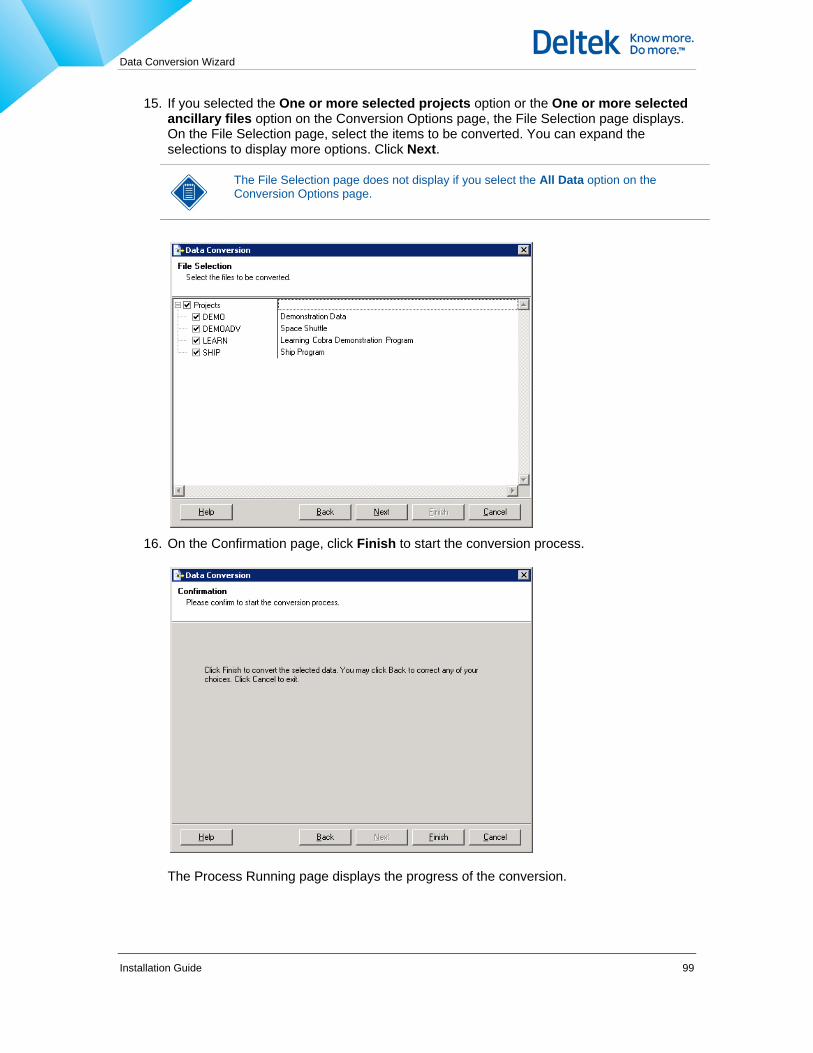
Data Conversion Wizard
Installation Guide 99
15. If you selected the One or more selected projects option or the One or more selected ancillary files option on the Conversion Options page, the File Selection page displays. On the File Selection page, select the items to be converted. You can expand the selections to display more options. Click Next.
The File Selection page does not display if you select the All Data option on the Conversion Options page.
16. On the Confirmation page, click Finish to start the conversion process.
The Process Running page displays the progress of the conversion.

Data Conversion Wizard
Installation Guide 100
17. Click Abort if you wish to cancel the conversion process.
When the conversion is finished, the Process Complete dialog box appears.
18. Click View Log to display the conversion details or click Close to exit the Data
Conversion Wizard.
Cobra 5.1 does not support lookup files without validation due to the large number of support issues when reporting on these codes. The following screen displays a code assigned with No to Validate in Cobra 4.7:
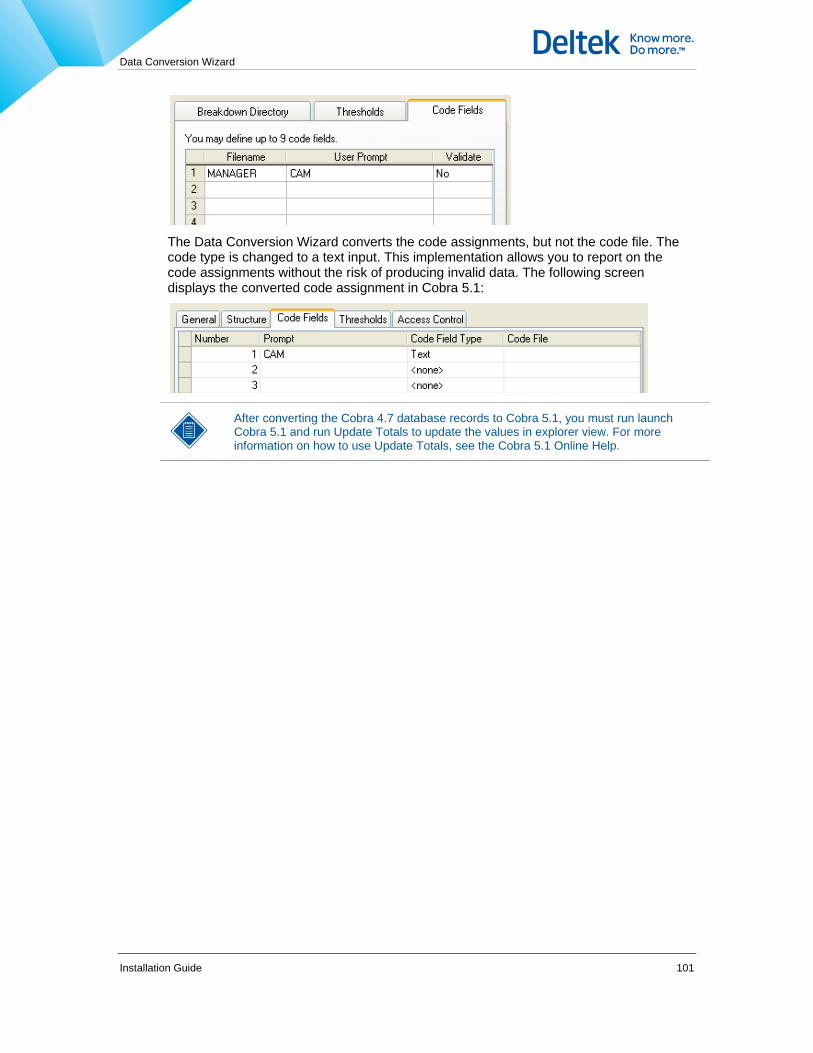
Data Conversion Wizard
Installation Guide 101
The Data Conversion Wizard converts the code assignments, but not the code file. The code type is changed to a text input. This implementation allows you to report on the code assignments without the risk of producing invalid data. The following screen displays the converted code assignment in Cobra 5.1:
After converting the Cobra 4.7 database records to Cobra 5.1, you must run launch Cobra 5.1 and run Update Totals to update the values in explorer view. For more information on how to use Update Totals, see the Cobra 5.1 Online Help.
Launching Cobra 5.1
Installation Guide 102
Launching Cobra 5.1 After installing Cobra and using the EPM Security Administrator, you can click Start » Programs » Deltek » Cobra 5.1 » Deltek Cobra 5.1 to test launching the software. Upon starting Cobra, you must enter a user ID and password. The default user ID is ‘SYSADMIN’ and the default password is ‘password.’ For security reasons, you must change this password as soon as possible.
To change your password:
1. Click File » Change Password to display the Change Password dialog box.
2. Enter your current password in the Old Password field.
3. Enter a new password in the New Password field.
4. Re-enter the new password in the Re-enter New Password field.
5. Click OK to save the new password and close the Change Password dialog box.
If you are a system administrator, you can change each Cobra user’s password using the EPM Security Administrator (see Changing User Passwords).
After you have tested launching Cobra, the next step is to establish user security rights. See EPM Security Administrator for more information.
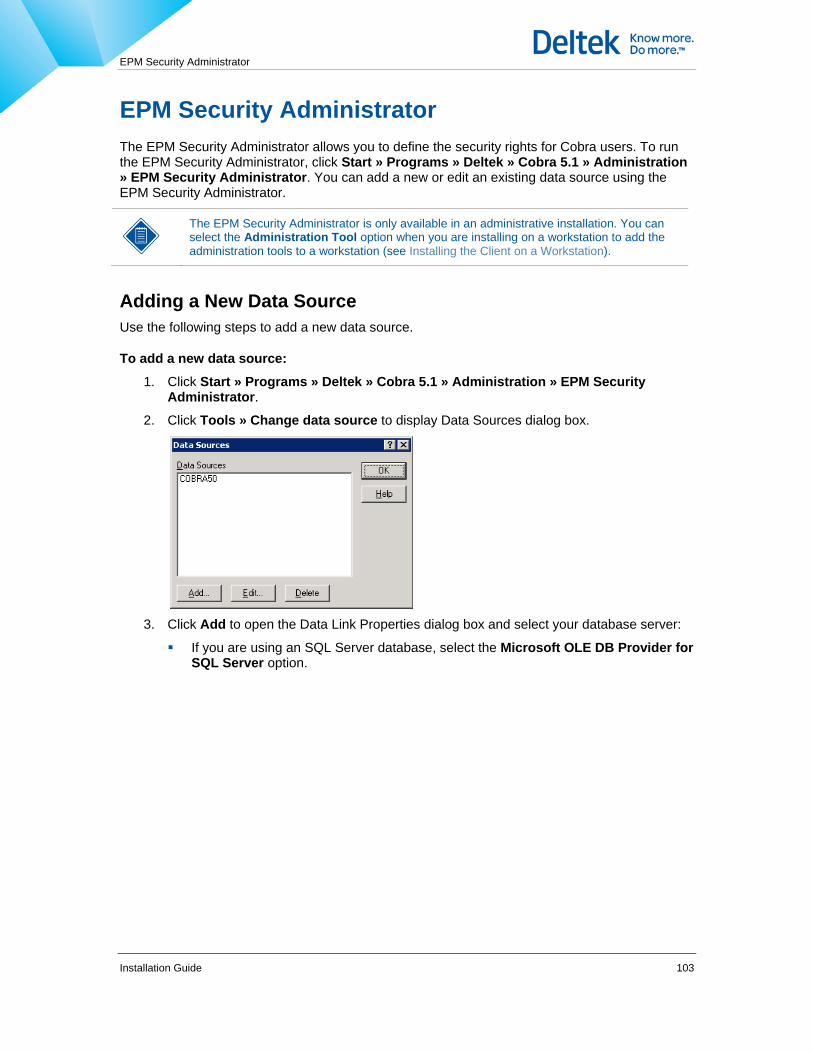
EPM Security Administrator
Installation Guide 103
EPM Security Administrator The EPM Security Administrator allows you to define the security rights for Cobra users. To run the EPM Security Administrator, click Start » Programs » Deltek » Cobra 5.1 » Administration » EPM Security Administrator. You can add a new or edit an existing data source using the EPM Security Administrator.
The EPM Security Administrator is only available in an administrative installation. You can select the Administration Tool option when you are installing on a workstation to add the administration tools to a workstation (see Installing the Client on a Workstation).
Adding a New Data Source Use the following steps to add a new data source.
To add a new data source:
1. Click Start » Programs » Deltek » Cobra 5.1 » Administration » EPM Security Administrator.
2. Click Tools » Change data source to display Data Sources dialog box.
3. Click Add to open the Data Link Properties dialog box and select your database server:
If you are using an SQL Server database, select the Microsoft OLE DB Provider for SQL Server option.
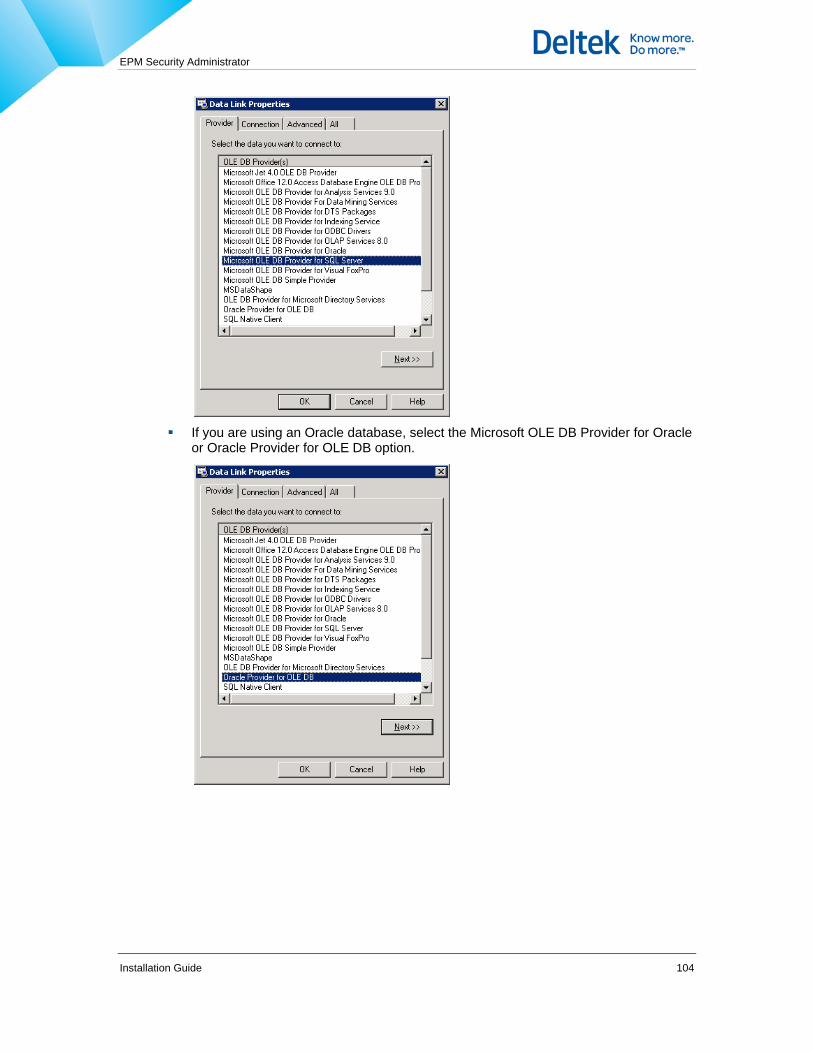
EPM Security Administrator
Installation Guide 104
If you are using an Oracle database, select the Microsoft OLE DB Provider for Oracle
or Oracle Provider for OLE DB option.
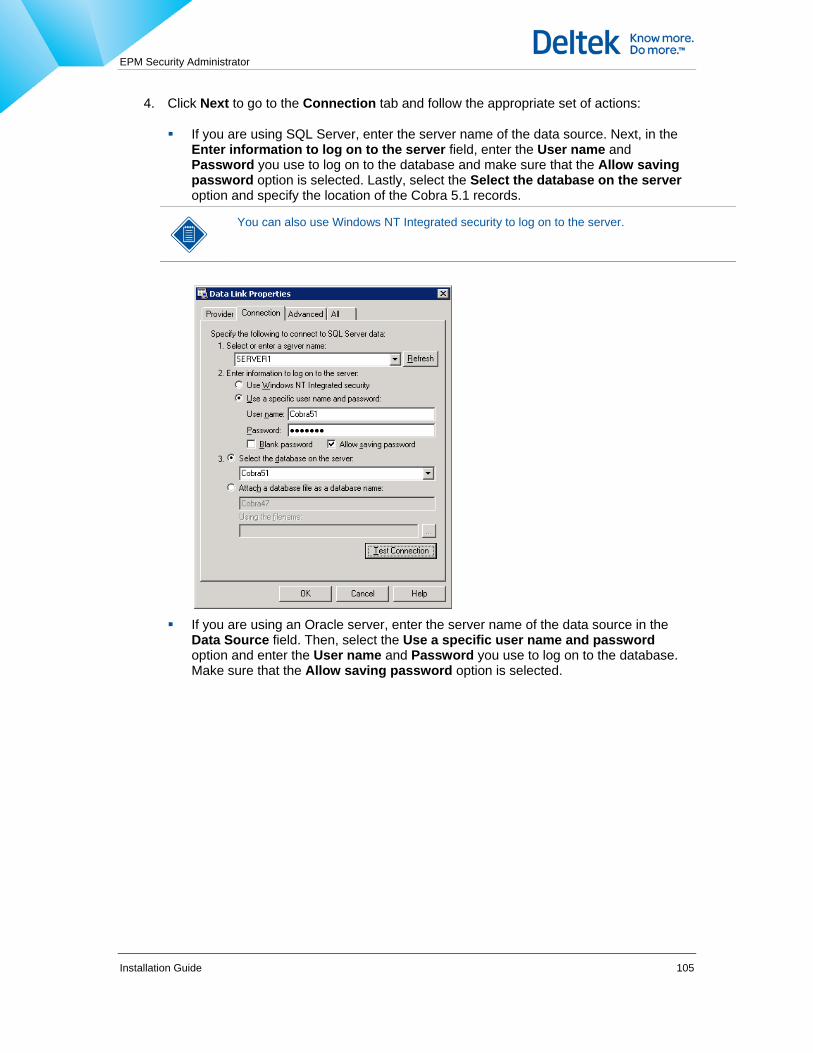
EPM Security Administrator
Installation Guide 105
4. Click Next to go to the Connection tab and follow the appropriate set of actions:
If you are using SQL Server, enter the server name of the data source. Next, in the Enter information to log on to the server field, enter the User name and Password you use to log on to the database and make sure that the Allow saving password option is selected. Lastly, select the Select the database on the server option and specify the location of the Cobra 5.1 records.
You can also use Windows NT Integrated security to log on to the server.
If you are using an Oracle server, enter the server name of the data source in the
Data Source field. Then, select the Use a specific user name and password option and enter the User name and Password you use to log on to the database. Make sure that the Allow saving password option is selected.
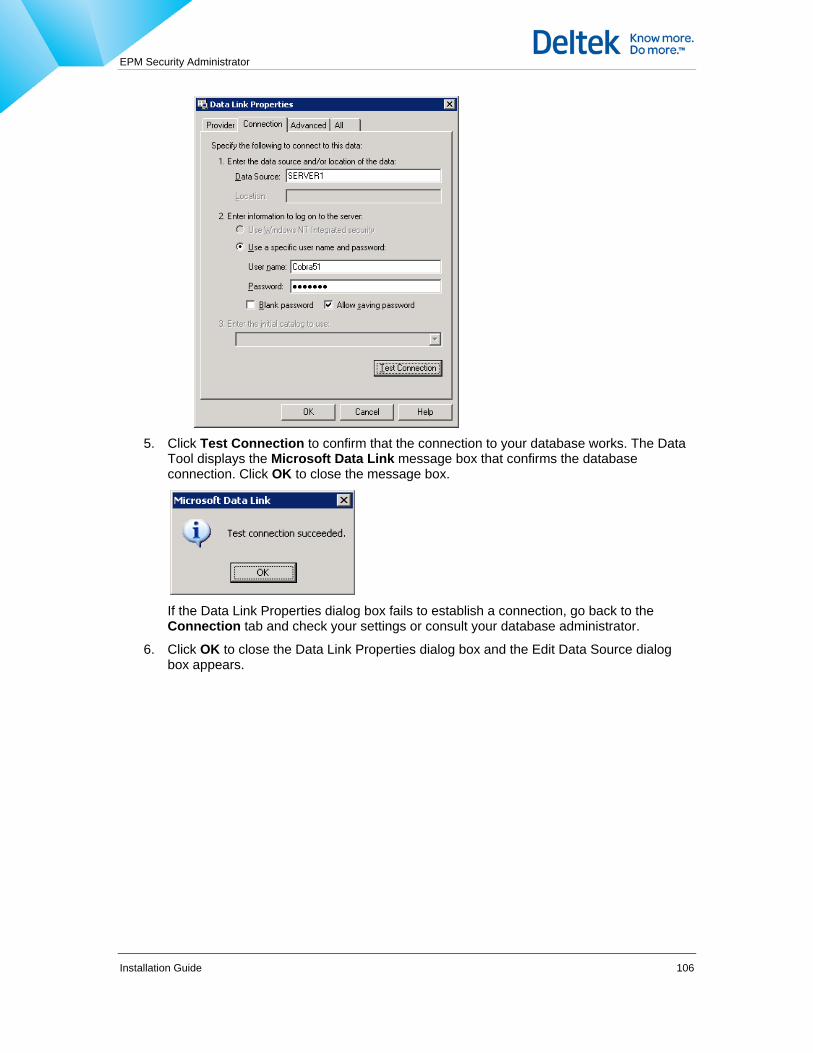
EPM Security Administrator
Installation Guide 106
5. Click Test Connection to confirm that the connection to your database works. The Data
Tool displays the Microsoft Data Link message box that confirms the database connection. Click OK to close the message box.
If the Data Link Properties dialog box fails to establish a connection, go back to the Connection tab and check your settings or consult your database administrator.
6. Click OK to close the Data Link Properties dialog box and the Edit Data Source dialog box appears.
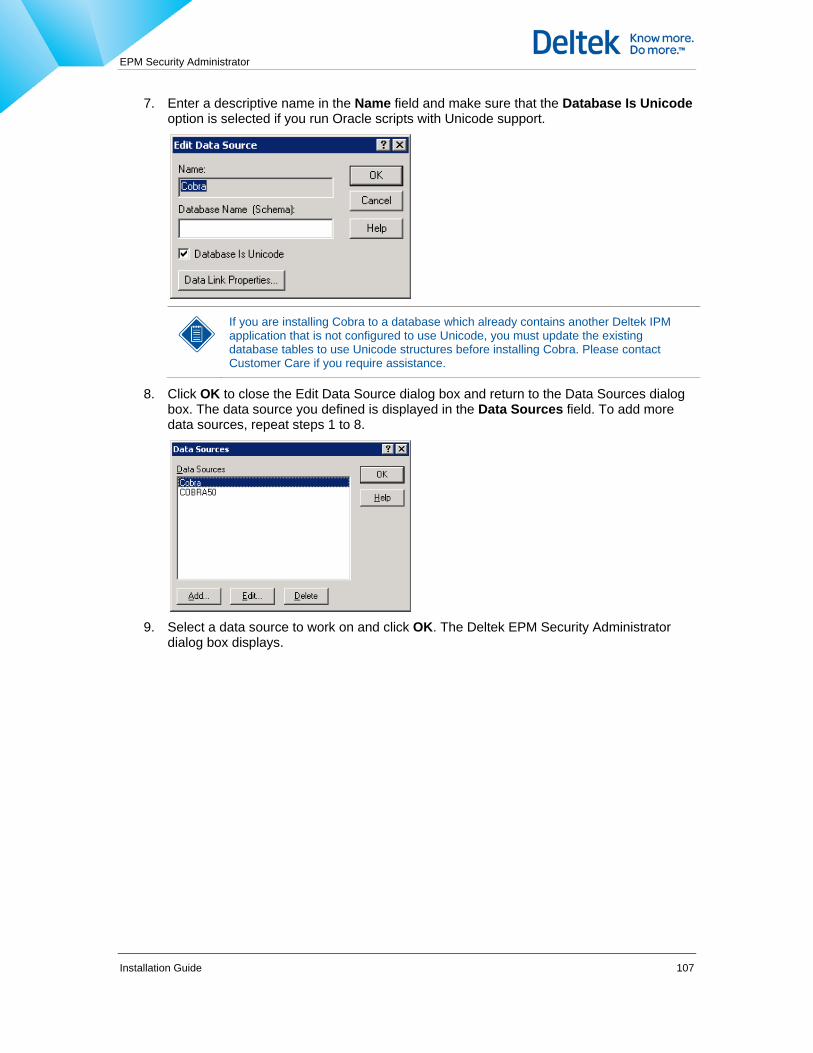
EPM Security Administrator
Installation Guide 107
7. Enter a descriptive name in the Name field and make sure that the Database Is Unicode option is selected if you run Oracle scripts with Unicode support.
If you are installing Cobra to a database which already contains another Deltek IPM application that is not configured to use Unicode, you must update the existing database tables to use Unicode structures before installing Cobra. Please contact Customer Care if you require assistance.
8. Click OK to close the Edit Data Source dialog box and return to the Data Sources dialog box. The data source you defined is displayed in the Data Sources field. To add more data sources, repeat steps 1 to 8.
9. Select a data source to work on and click OK. The Deltek EPM Security Administrator
dialog box displays.
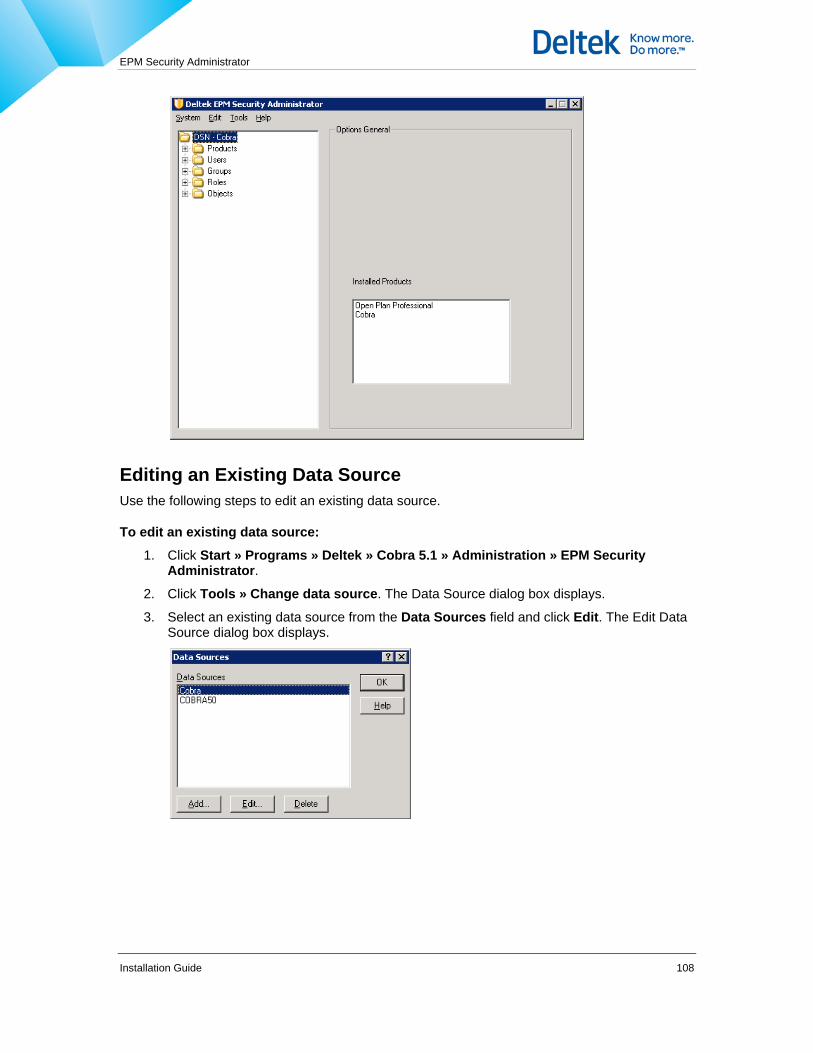
EPM Security Administrator
Installation Guide 108
Editing an Existing Data Source Use the following steps to edit an existing data source.
To edit an existing data source:
1. Click Start » Programs » Deltek » Cobra 5.1 » Administration » EPM Security Administrator.
2. Click Tools » Change data source. The Data Source dialog box displays.
3. Select an existing data source from the Data Sources field and click Edit. The Edit Data Source dialog box displays.

EPM Security Administrator
Installation Guide 109
4. Click Data Link Properties to display the Data Link Properties dialog box.
5. Use the tabs in the Data Link Properties dialog box to enter or select your new
preferences.
6. Click OK to save your modifications and close the Data Link Properties dialog box.
7. Click OK to close the Edit Data Source dialog box.
8. Click OK to close the Data Sources dialog box and go back to the EPM Security Administrator dialog box.
Switching to Another Data Source To connect to another data source, click Tools » Change data source. This displays the Data Sources dialog box. You can then select a different data source from the Data Sources field or click Add to define a new data source (see Adding a New Data SourceError! Reference source not found.).
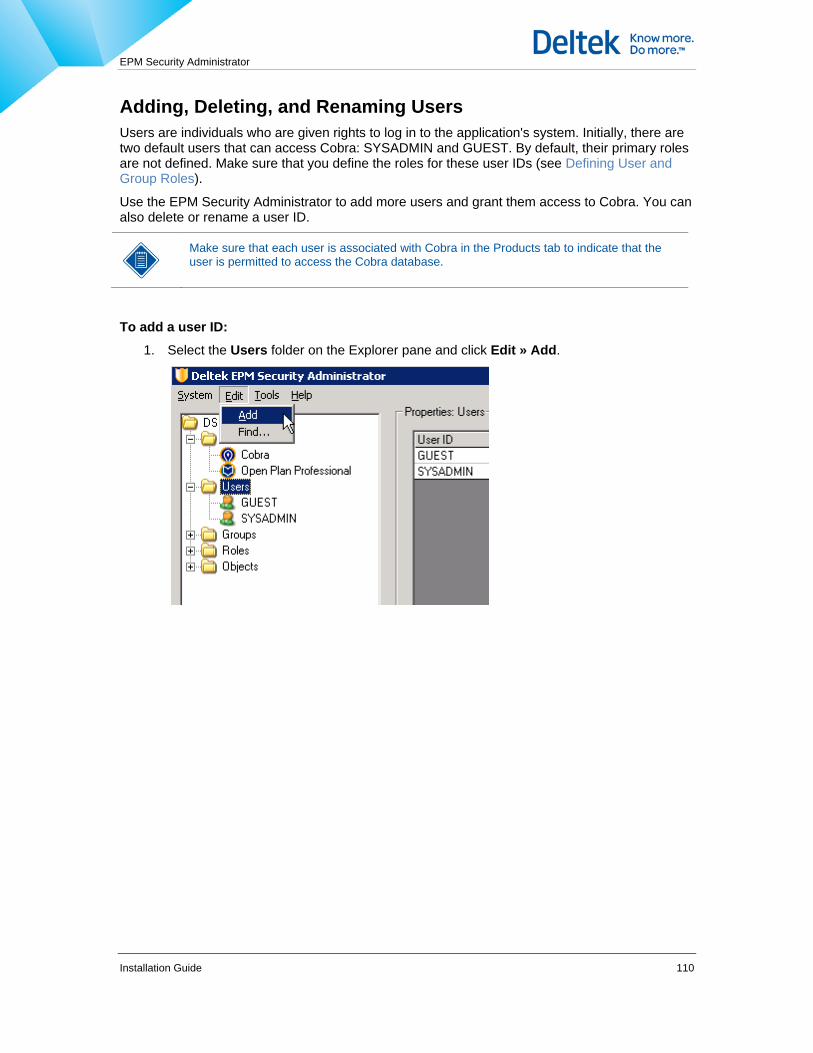
EPM Security Administrator
Installation Guide 110
Adding, Deleting, and Renaming Users Users are individuals who are given rights to log in to the application's system. Initially, there are two default users that can access Cobra: SYSADMIN and GUEST. By default, their primary roles are not defined. Make sure that you define the roles for these user IDs (see Defining User and Group Roles).
Use the EPM Security Administrator to add more users and grant them access to Cobra. You can also delete or rename a user ID.
Make sure that each user is associated with Cobra in the Products tab to indicate that the user is permitted to access the Cobra database.
To add a user ID: 1. Select the Users folder on the Explorer pane and click Edit » Add.
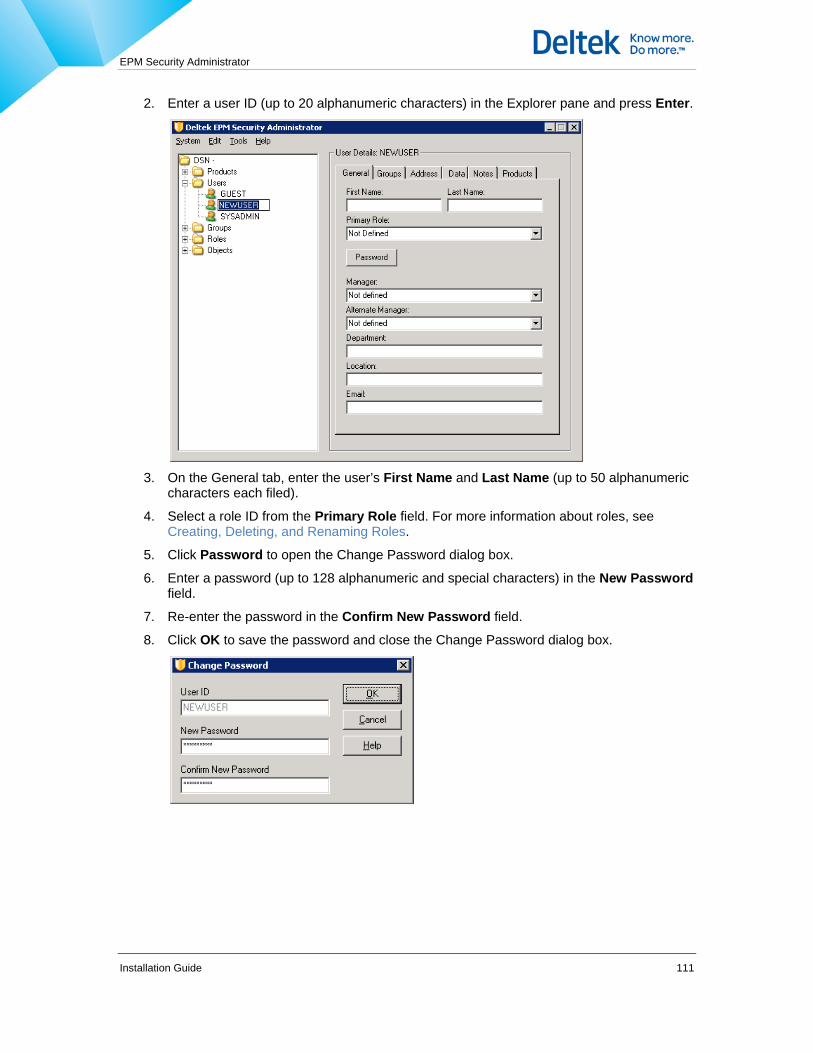
EPM Security Administrator
Installation Guide 111
2. Enter a user ID (up to 20 alphanumeric characters) in the Explorer pane and press Enter.
3. On the General tab, enter the user’s First Name and Last Name (up to 50 alphanumeric
characters each filed).
4. Select a role ID from the Primary Role field. For more information about roles, see Creating, Deleting, and Renaming Roles.
5. Click Password to open the Change Password dialog box.
6. Enter a password (up to 128 alphanumeric and special characters) in the New Password field.
7. Re-enter the password in the Confirm New Password field.
8. Click OK to save the password and close the Change Password dialog box.

EPM Security Administrator
Installation Guide 112
9. Click the Products tab and click Add to display the Add Product dialog box.
10. Select Cobra from the Select Product field and click OK to close the Add Product dialog
box. The selected product is displayed in the Accessible Products field.
11. Use the other tabs in the User Details group box to add more optional information for this user. For more information about these tabs, see the Online Help.

EPM Security Administrator
Installation Guide 113
To delete an existing user ID:
1. Expand the Users folder on the Explorer pane and select a user ID to delete.
2. Click Edit » Delete to remove the selected user ID from the list.
To rename an existing user ID:
1. Expand the Users folder on the Explorer pane and select a user ID to rename.
2. Click the highlighted user ID again and enter a new user ID.
3. Press Enter to apply the new user ID.
Changing User Passwords If users forget their password, as a system administrator, you can use the EPM Security Administrator to reset user passwords. You can then send the new password to the Cobra user. For security purposes, advise the user to change the password as soon as possible.
To change a user’s password: 1. Expand the Users folder on the Explorer pane and select a user ID from the list.
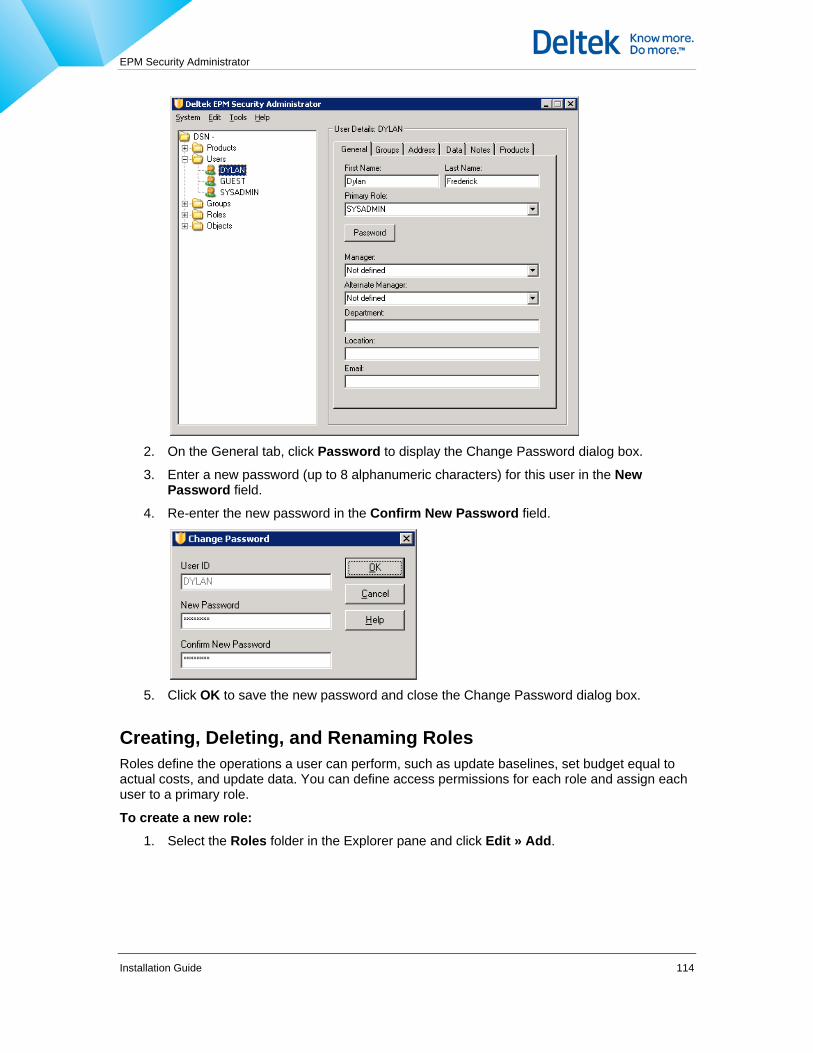
EPM Security Administrator
Installation Guide 114
2. On the General tab, click Password to display the Change Password dialog box.
3. Enter a new password (up to 8 alphanumeric characters) for this user in the New Password field.
4. Re-enter the new password in the Confirm New Password field.
5. Click OK to save the new password and close the Change Password dialog box.
Creating, Deleting, and Renaming Roles Roles define the operations a user can perform, such as update baselines, set budget equal to actual costs, and update data. You can define access permissions for each role and assign each user to a primary role.
To create a new role: 1. Select the Roles folder in the Explorer pane and click Edit » Add.
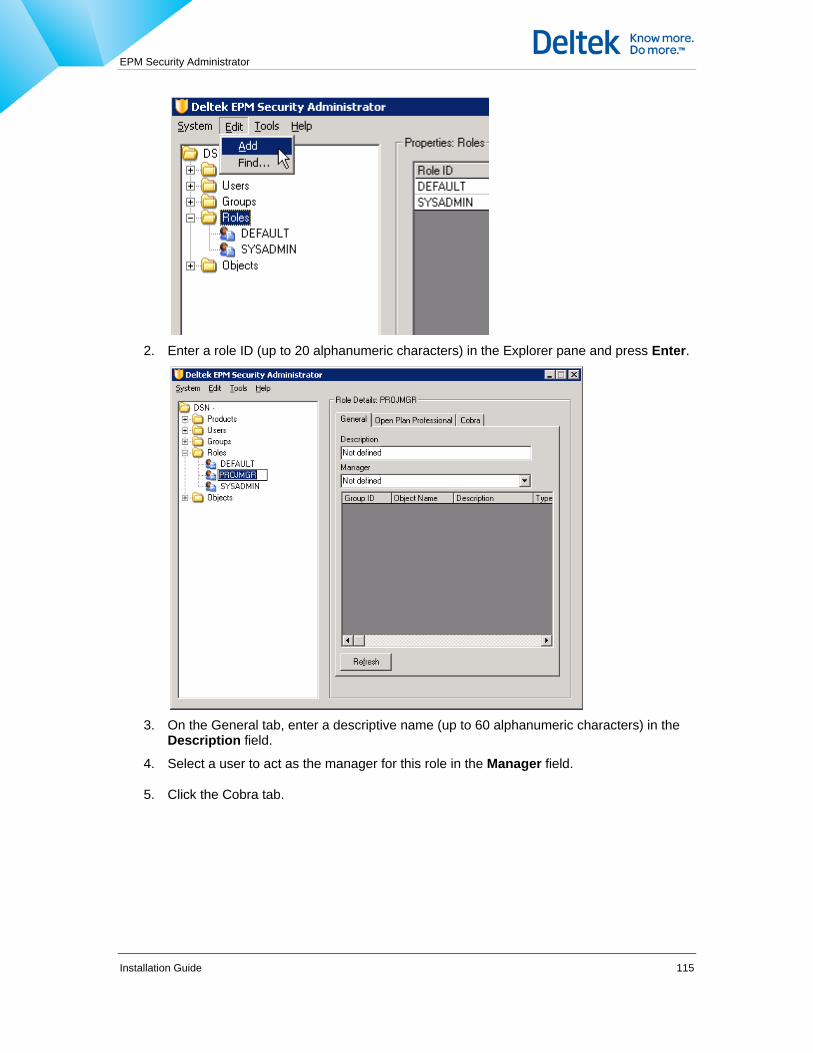
EPM Security Administrator
Installation Guide 115
2. Enter a role ID (up to 20 alphanumeric characters) in the Explorer pane and press Enter.
3. On the General tab, enter a descriptive name (up to 60 alphanumeric characters) in the
Description field.
4. Select a user to act as the manager for this role in the Manager field.
5. Click the Cobra tab.
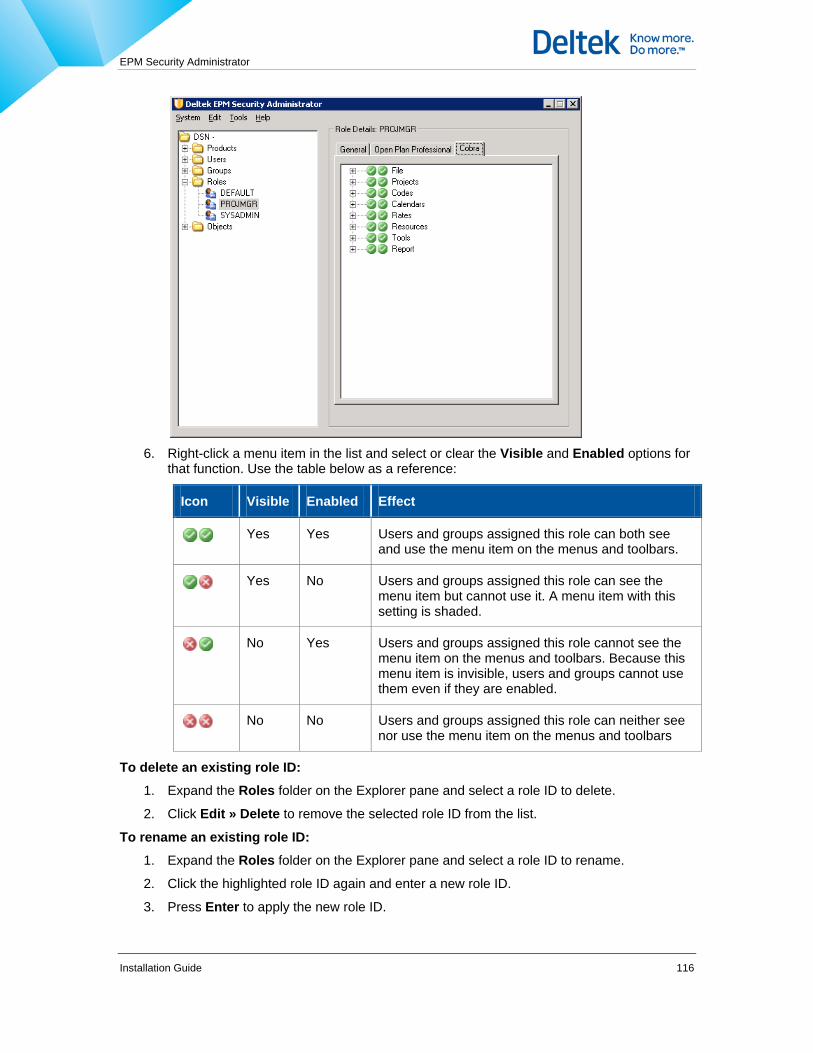
EPM Security Administrator
Installation Guide 116
6. Right-click a menu item in the list and select or clear the Visible and Enabled options for
that function. Use the table below as a reference:
Icon Visible Enabled Effect
Yes Yes Users and groups assigned this role can both see and use the menu item on the menus and toolbars.
Yes No Users and groups assigned this role can see the menu item but cannot use it. A menu item with this setting is shaded.
No Yes Users and groups assigned this role cannot see the menu item on the menus and toolbars. Because this menu item is invisible, users and groups cannot use them even if they are enabled.
No No Users and groups assigned this role can neither see nor use the menu item on the menus and toolbars
To delete an existing role ID: 1. Expand the Roles folder on the Explorer pane and select a role ID to delete.
2. Click Edit » Delete to remove the selected role ID from the list.
To rename an existing role ID: 1. Expand the Roles folder on the Explorer pane and select a role ID to rename.
2. Click the highlighted role ID again and enter a new role ID.
3. Press Enter to apply the new role ID.
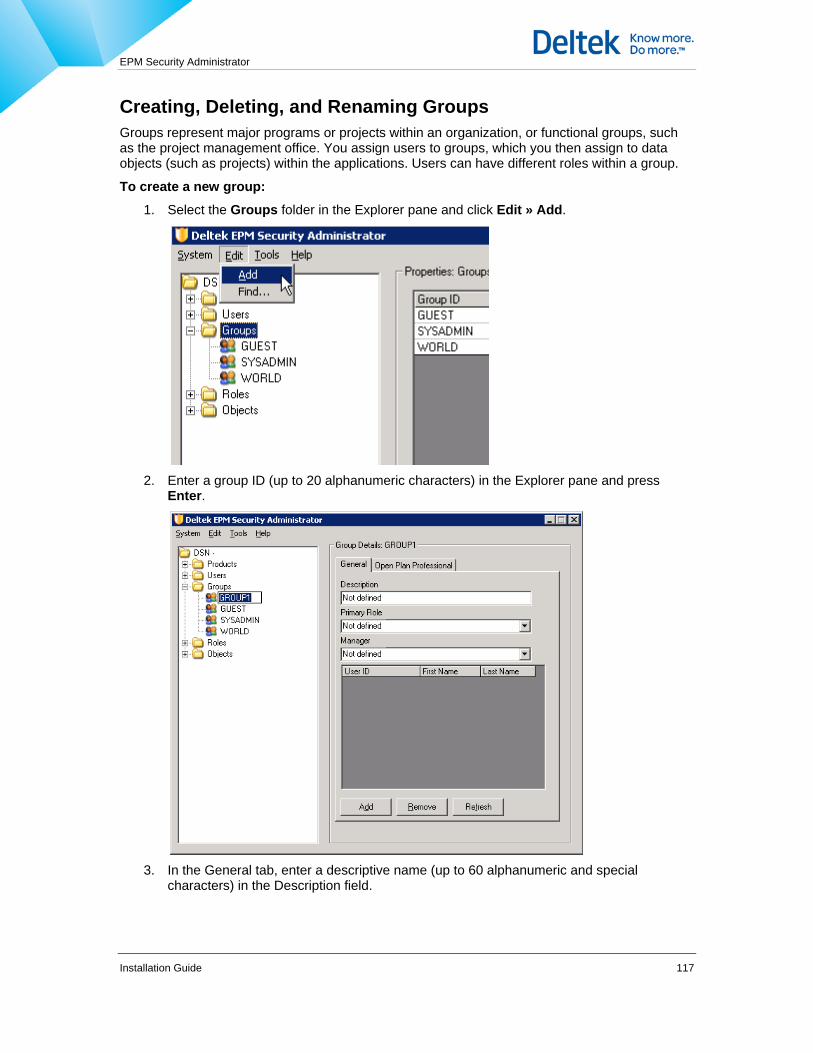
EPM Security Administrator
Installation Guide 117
Creating, Deleting, and Renaming Groups Groups represent major programs or projects within an organization, or functional groups, such as the project management office. You assign users to groups, which you then assign to data objects (such as projects) within the applications. Users can have different roles within a group.
To create a new group:
1. Select the Groups folder in the Explorer pane and click Edit » Add.
2. Enter a group ID (up to 20 alphanumeric characters) in the Explorer pane and press
Enter.
3. In the General tab, enter a descriptive name (up to 60 alphanumeric and special
characters) in the Description field.

EPM Security Administrator
Installation Guide 118
4. Select a role ID in the Primary Role field. For more information about roles, see Creating, Deleting, and Renaming Roles.
5. Select a user that will act as the manager for this group in the Manager field.
To delete an existing group ID:
1. Expand the Groups folder on the Explorer pane and select a group ID to delete.
2. Click Edit » Delete to remove the selected group ID from the list.
To rename an existing role ID:
1. Expand the Groups folder on the Explorer pane and select a group ID to rename.
2. Click the highlighted group ID again and enter a new group ID.
3. Press Enter to apply the new group ID.
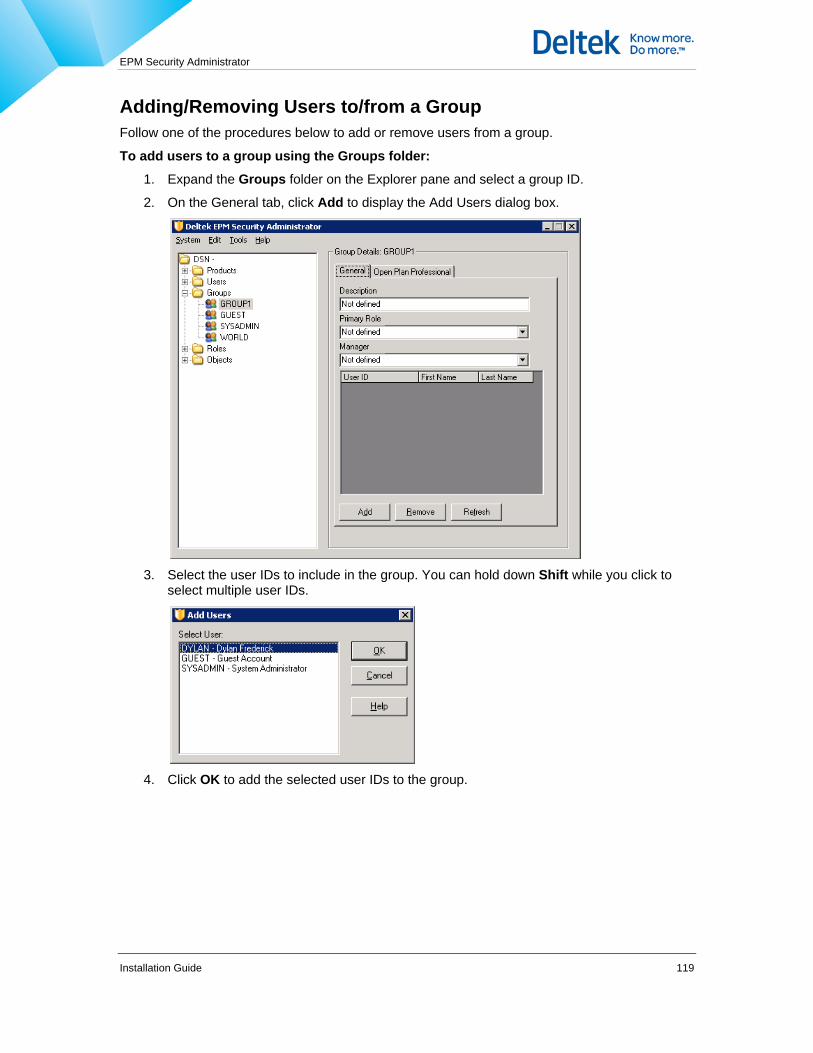
EPM Security Administrator
Installation Guide 119
Adding/Removing Users to/from a Group Follow one of the procedures below to add or remove users from a group.
To add users to a group using the Groups folder:
1. Expand the Groups folder on the Explorer pane and select a group ID.
2. On the General tab, click Add to display the Add Users dialog box.
3. Select the user IDs to include in the group. You can hold down Shift while you click to
select multiple user IDs.
4. Click OK to add the selected user IDs to the group.
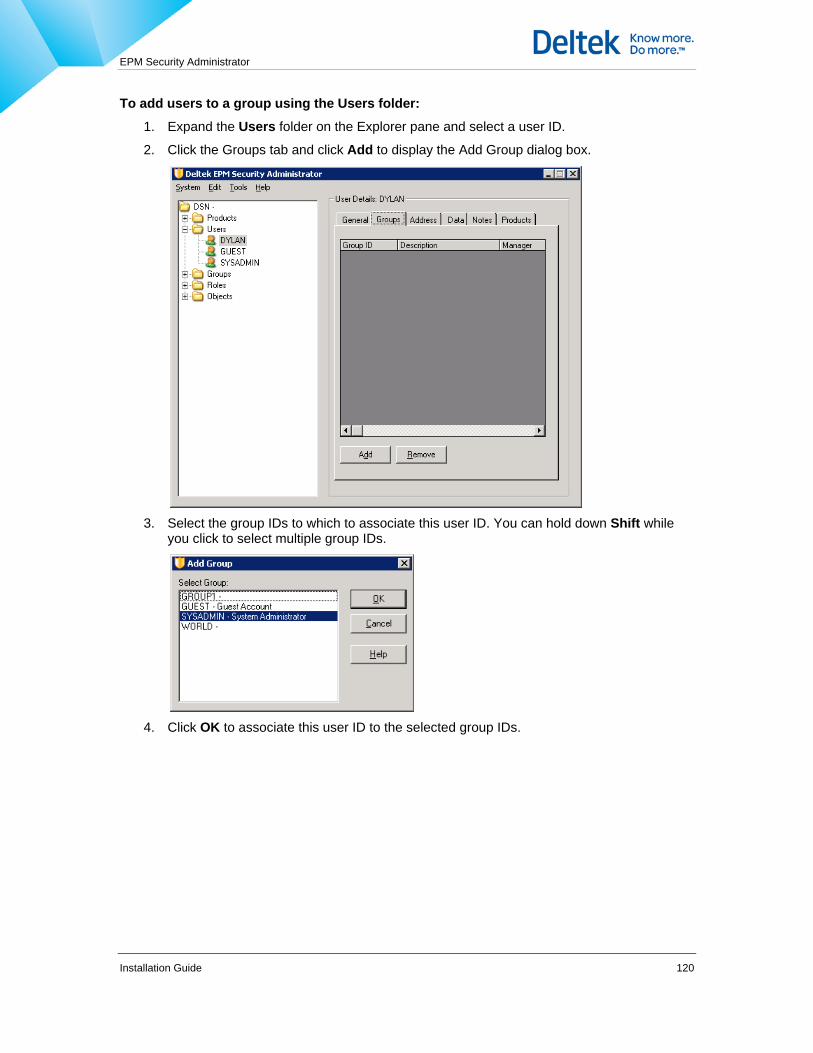
EPM Security Administrator
Installation Guide 120
To add users to a group using the Users folder:
1. Expand the Users folder on the Explorer pane and select a user ID.
2. Click the Groups tab and click Add to display the Add Group dialog box.
3. Select the group IDs to which to associate this user ID. You can hold down Shift while
you click to select multiple group IDs.
4. Click OK to associate this user ID to the selected group IDs.
EPM Security Administrator
Installation Guide 121
To remove users from a group using the Groups folder:
1. Expand the Users folder on the Explorer pane and select a group ID.
2. On the General tab, select a user ID from the table window and click Remove. A confirmation dialog box displays.
3. Click OK to delete the selected user ID from this group.
To remove users from a group using the Users folder:
1. Expand the Users folder on the Explorer pane and select a user ID.
2. Click the Groups tab and select a group ID from the table window.
3. Click Remove. A confirmation dialog box appears.
4. Click OK to delete the group ID from the table window
Defining User and Group Roles Follow one of the procedures below to assign a role to a user or group.
To define a role for a user:
1. Expand the Users folder on the Explorer pane and select a user ID.
2. In the General tab, select a role ID from the Primary Role field.
To define a role for group:
1. Expand the Groups folder on the Explorer pane and select a group ID.
2. In the General tab, select a role ID from the Primary Role field.

Performance Tips
Installation Guide 122
Performance Tips Cobra data is stored in either an SQL Server or Oracle database. Cobra’s performance greatly depends on the efficiency of the database and the connection to that database. Refer to the following guidelines on how to optimize Cobra’s performance:
Make sure that the database tier has adequate hardware.
Make sure that the database is configured for optimum performance.
Make sure that the connection between the database tier and the application tier has adequate bandwidth.
Remove routers or firewalls that may hinder performance.
Make sure that the latest ODBC DSN drivers are installed in the application tier.
Optimizing Performance with Oracle If Cobra is going to store a lot of project data on an Oracle database, you must monitor the database to ensure that it is running in optimum performance. For example:
Statistics are turned on and working correctly.
Indexes are used.
The extent percentage is high.
The rollback segments are large.
The time-phased table in Cobra can expand to millions or even billions of records in a large implementation. When a report is produced, all time-phased data for a particular project are retrieved from the database. Over time, the records for each project can be spread across the entire table. Deltek’s performance lab and customers have provided the following performance tips:
Reorder the database — Extracting the data in the primary index order, truncating the table, and reloading the records so that the database is ordered in the primary index improves performance.
Delete and recreate the indexes — An index can become fragmented. Dropping and recreating the index resolves this problem.
Deleting Temporary Report Data When you run a report, tables in the database are used to optimize queries. If a user abnormally aborts a report, the temporary contents may not be deleted in these tables. This can result to slow performance when reporting records.
You can use the SQL Command Utility to access the DeleteReportQueryTables.sql script file to delete the contents of these temporary report tables. All currently running reports will fail during this process.

Performance Tips
Installation Guide 123
To run the delete script:
1. Start Cobra.
2. Click Tools » SQL Command Utility to open the SQL Command Utility dialog box.
3. Click Open and navigate to the C:\Program Files\Deltek\Cobra 5\Scripts folder.
4. Select the Delete Temporary Report Tables.SQL and click Open.
5. Click Execute to run the delete script.
Logging SQL Calls There’s an option in the Configure dialog box on the Data Access tab that allows you to log the SQL calls in the ProcessLog.xml file located in the \\My Documents\Deltek\Cobra\Logs folder. If this option is left enabled, this file becomes larger and may affect Cobra’s performance.
Restarting the Service in an N-Tier Environment If your Cobra installation is in n-Tier application server mode, periodically restarting the service can improve the performance. The frequency of restarting the service varies based on user utilization. Restarting the service terminates active Cobra sessions so we recommend scheduling this task when users are not connected to the system. To restart the service, set up a scheduled task to run the following command lines:
net stop “Ideablade PersistenceServer Service”
net start “Ideablade PersistenceServer Service”.
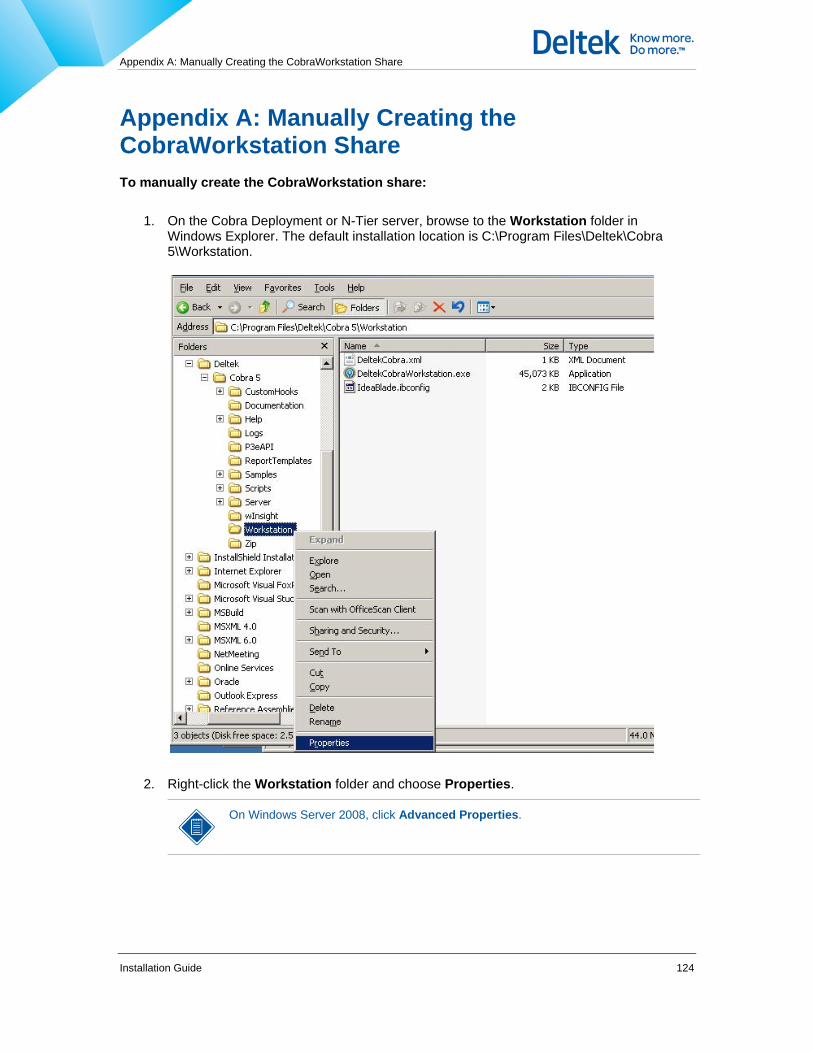
Appendix A: Manually Creating the CobraWorkstation Share
Installation Guide 124
Appendix A: Manually Creating the CobraWorkstation Share To manually create the CobraWorkstation share:
1. On the Cobra Deployment or N-Tier server, browse to the Workstation folder in
Windows Explorer. The default installation location is C:\Program Files\Deltek\Cobra 5\Workstation.
2. Right-click the Workstation folder and choose Properties.
On Windows Server 2008, click Advanced Properties.
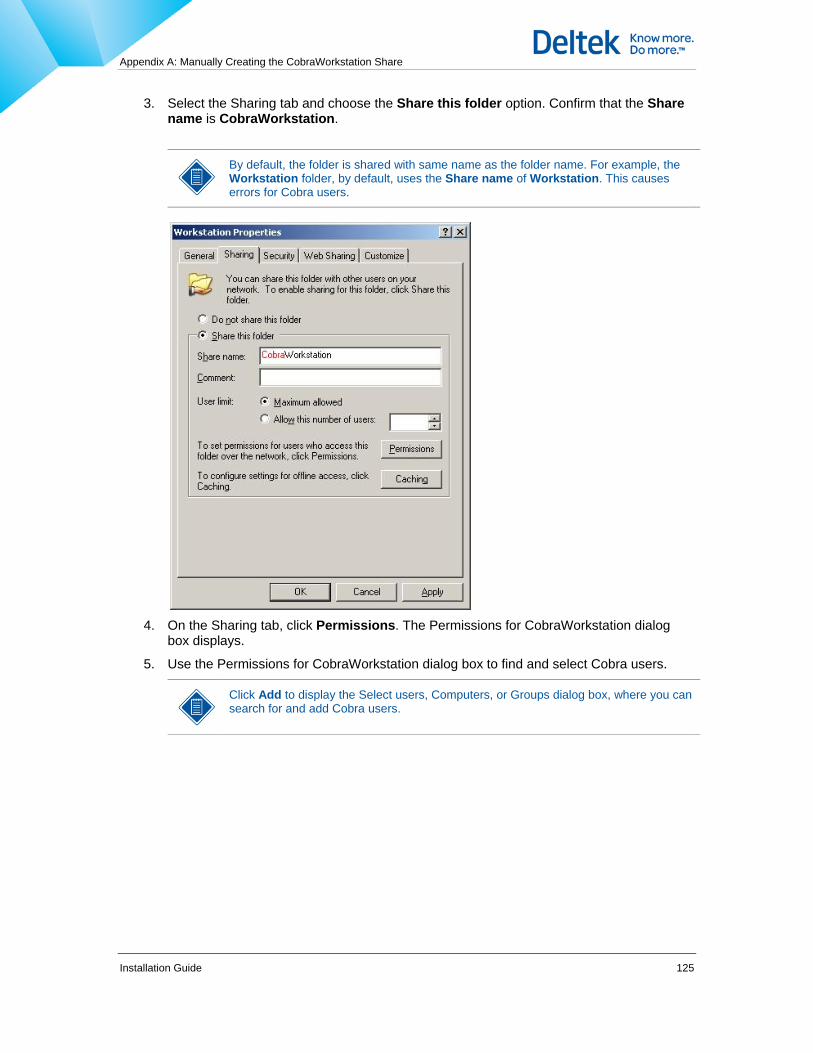
Appendix A: Manually Creating the CobraWorkstation Share
Installation Guide 125
3. Select the Sharing tab and choose the Share this folder option. Confirm that the Share name is CobraWorkstation.
By default, the folder is shared with same name as the folder name. For example, the Workstation folder, by default, uses the Share name of Workstation. This causes errors for Cobra users.
4. On the Sharing tab, click Permissions. The Permissions for CobraWorkstation dialog
box displays.
5. Use the Permissions for CobraWorkstation dialog box to find and select Cobra users.
Click Add to display the Select users, Computers, or Groups dialog box, where you can search for and add Cobra users.
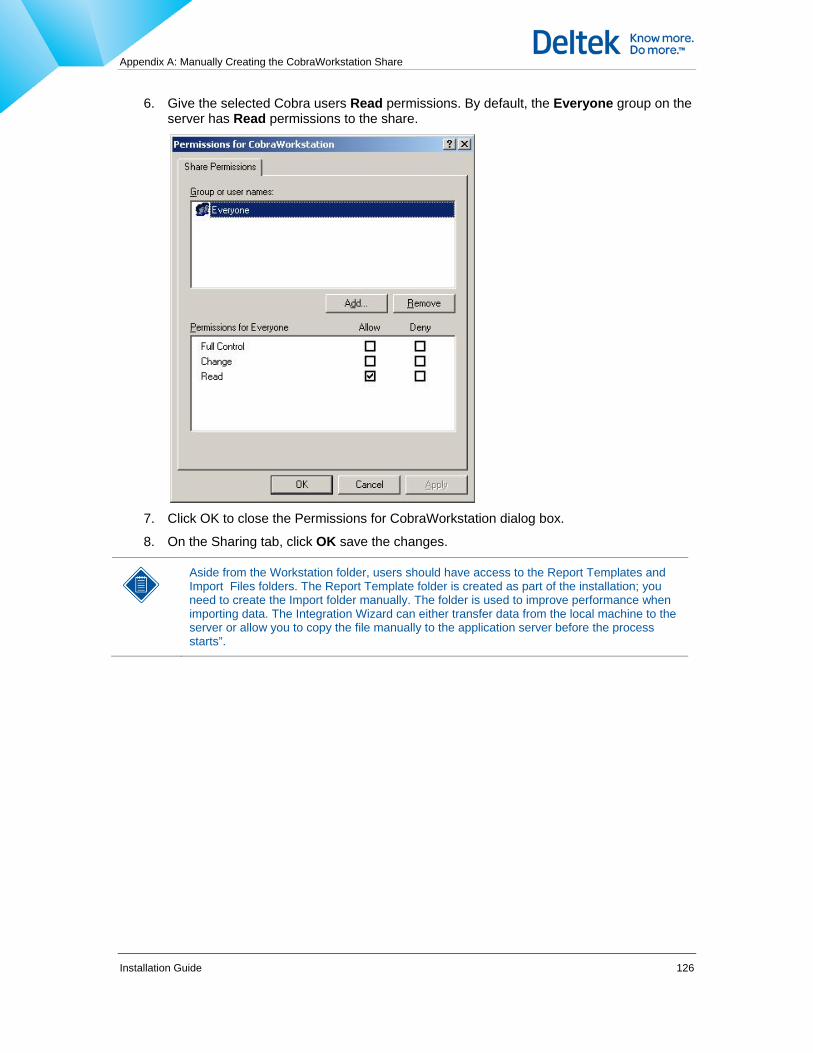
Appendix A: Manually Creating the CobraWorkstation Share
Installation Guide 126
6. Give the selected Cobra users Read permissions. By default, the Everyone group on the server has Read permissions to the share.
7. Click OK to close the Permissions for CobraWorkstation dialog box.
8. On the Sharing tab, click OK save the changes.
Aside from the Workstation folder, users should have access to the Report Templates and Import Files folders. The Report Template folder is created as part of the installation; you need to create the Import folder manually. The folder is used to improve performance when importing data. The Integration Wizard can either transfer data from the local machine to the server or allow you to copy the file manually to the application server before the process starts”.
Appendix B: Configure Cobra to Work with Microsoft Project Server
Installation Guide 127
Appendix B: Configure Cobra to Work with Microsoft Project Server Cobra supports direct integration with Microsoft Project (MSP) Server. The procedure below requires access to SQL Server Studio and MSP Server database. When you complete the steps, the Integration Wizard displays the necessary pages where you can define the connection information for an easy and direct integration with MSP Server.
Refer to the release notes for the supported versions of Microsoft Project Server.
To configure the MSP Server database in order to support integration with Cobra, complete the following steps:
1. Using the Microsoft SQL Server Management Studio, connect to the SQL Server with MSP Server setup.
2. Once connected, expand the Databases folder and look for the PWA Reporting and PWA Published databases:
PWA_Reporting_<UID>
PWA_Published_<UID>
The database name usually contains a unique ID (UID) similar to the following: PWA_Published_33DB2809_4292_472C_BEED_9634BBB374E7.
3. Take note of the names of the databases.
Copy the names of the databases to a text editor (such as Notepad).
4. Open the script called MSP_Server_SQLServer.sql located in the Cobra application script subfolder.
For standalone deployment, the default installation folder is: C:\Program Files\Deltek\Cobra 5\Scripts.
For client/server and n-tier deployments, you can find the script in the Cobra installation folder on the server.
5. Edit the script by replacing all occurrences of:
PWA_Reporting with the name of your Reporting database (2 occurrences)
PWA_ Published with the name of your Published database (104 occurrences)
Keep the square brackets around the database names.
6. Run the script against the MSP Server database.
Appendix B: Configure Cobra to Work with Microsoft Project Server
Installation Guide 128
7. If the scripts complete successfully, the MSP Server databases are ready to run the Cobra Integration using MSP Server. You can define the connection information to the MSP Server on the New Connection Dialog Box of the Integration Wizard.

Deltek is the leading global provider of enterprise software and information solutions for professional services firms, government contractors, and government agencies. For decades, we have delivered actionable insight that empowers our customers to unlock their business potential. Over 14,000 organizations and 1.8 million users in approximately 80 countries around the world rely on Deltek to research and identify opportunities, win new business, optimize resource, streamline operations, and deliver more profitable projects. Deltek – Know more. Do more.®
deltek.com


