Embed Size (px)
Citation preview
Users Guide
CureTRAK Users GuideProduct Quality Optimization System
Part Number A38-2873-00 Rev 1.1

Copyright 1998-1999 ECD, Inc. All Rights Reserved. Printed in USA Foreign and US Products of ElectronicControls Design, Inc. are covered by foreign and US Patents and Patents Pending. Information in this publicationsupersedes all previously published information. This Publication may not be translated and/or reproduced orstored in data retrieval system, or transmitted in any form or by any means without the express written permissionof Electronic Controls Design, Inc. Specification and price change privileges reserved.
The trapezoidal ECD logo is a registered trademark of Electronic Controls Design, Inc. CureTRAK is atrademark of Electronic Controls Design, Inc. MS-DOS and Windows are registered trademarks of MicrosoftCorporation. IBM, IBM PC and PS/2 are registered trademarks of International Business Machines Corporation.
SINCE 1964
ECD, Inc.4287-A S.E. International WayMilwaukie, Oregon 97222-8825
Telephone: (800) 323-4548(503) 659-6100
FAX: (503) 659-4422Technical Support: (800) 323-4548
Email: [email protected]: http://www.ecd.com

ECD, INC.End User License Agreementfor ECD Software Products
NOTICE TO USER:THIS IS A CONTRACT. BY INSTALLING THIS SOFTWARE YOUACCEPT ALL THE TERMS AND CONDITIONS OF THIS AGREEMENT.
This Electronic Controls Design, Incorporated ("ECD") End User LicenseAgreement accompanies ECD software products and related explanatorymaterials ("Software"). The term “Software” also shall include anyupgrades, modified versions or updates of the Software licensed to youby ECD. Please read the Agreement on the following page carefully. Atthe end, you will be asked to accept this agreement and continue toinstall or, if you do not wish to accept this Agreement, to decline thisagreement, in which case you will not be able to use the Software.

Upon your acceptance of this Agreement, ECD grants to you a nonexclusive license to use theSoftware, provided that you agree to the following:1. Use of the Software.
You may install the Software on a hard disk or other storage device; install and use the Software on a fileserver for use on a network for the purposes of (i) permanent installation onto hard disks or other storagedevices or (ii) use of the Software over such network; and make backup copies of the Software.
ECD Software is sold for use with one or more ECD hardware product: M.O.L.E.®, SuperM.O.L.E.® Thinline,SuperM.O.L.E.® Gold, SuperM.O.L.E.® Gold RF, AeroM.O.L.E.®, WaveRIDER®, OvenRIDER™, INDATA® orCureTRAK™. This Agreement allows you to use the Software with the ECD hardware product purchased. Youmust order and pay for additional copies of the software if additional ECD hardware products are purchased.
You may make and distribute unlimited copies of the Software, licensed with the respective ECD hardwareproduct you purchased, as long as each copy that you make and distribute contains this Agreement, the samecopyright and other proprietary notices pertaining to this Software that appear in the Software, and that thepurpose of distributing the software is for the purpose of viewing, analyzing and reporting data captured by theassociated ECD hardware product. If you download an updated version of the Software, for the respectivehardware product you purchased, from the Internet or similar on-line source, you must include the ECDcopyright notice for the Software with any on-line distribution and on any media you distribute that includes theSoftware.
2. Copyright and Trademark RightsThe Software is owned by ECD and its suppliers, and its structure, organization and code are valuable tradesecrets of ECD and its suppliers. The Software also is protected by United States Copyright Law andInternational Treaty provisions. You may use trademarks only insofar as required to comply with Section 1 ofthis Agreement and to identify printed output produced by the Software, in accordance with acceptedtrademark practice, including identification of trademark owner’s name. Such use of any trademark does notgive you any rights of ownership in that trademark. Except as stated above, this Agreement does not grant youany intellectual property rights in the Software.
3. RestrictionsYou agree not to modify, adapt, translate, reverse engineer, decompile, disassemble or otherwise attempt todiscover the source code of the Software. The Software is licensed and distributed by ECD for viewing,analyzing and reporting data captured by associated ECD hardware products.
4. No WarrantyThe Software is being delivered to you AS IS and ECD makes no warranty as to its use or performance. ECDAND ITS SUPPLIERS DO NOT AND CANNOT WARRANT THE PERFORMANCE OR RESULTS YOU MAYOBTAIN BY USING THE SOFTWARE OR DOCUMENTATION. ECD AND ITS SUPPLIERS MAKE NOWARRANTIES, EXPRESS OR IMPLIED, AS TO NONINFRINGEMENT OF THIRD PARTY RIGHTS,MERCHANTABILITY, OR FITNESS FOR ANY PARTICULAR PURPOSE. IN NO EVENT WILL ECD OR ITSSUPPLIERS BE LIABLE TO YOU FOR ANY CONSEQUENTIAL, INCIDENTAL OR SPECIAL DAMAGES,INCLUDING ANY LOST PROFITS OR LOST SAVINGS, EVEN IF AN ECD REPRESENTATIVE HAS BEENADVISED OF THE POSSIBILITY OF SUCH DAMAGES, OR FOR ANY CLAIM BY ANY THIRD PARTY.Some states or jurisdictions do not allow the exclusion or limitation of incidental, consequential or specialdamages, or the exclusion of implied warranties or limitations on how long an implied warranty may last, so theabove limitations may not apply to you.
5. Governing Law and General ProvisionsThis Agreement will be governed by the laws of the State of Oregon, U.S.A., excluding the application of itsconflicts of law rules. This Agreement will not be governed by the United Nations Convention on Contracts forthe International Sale of Goods, the application of which is expressly excluded. If any part of this Agreement isfound void and unenforceable, it will not affect the validity of the balance of the Agreement, which shall remainvalid and enforceable according to its terms. You agree that the Software will not be shipped, transferred orexported into any country or used in any manner prohibited by the United States Export Administration Act orany other export laws, restrictions or regulations. This Agreement shall automatically terminate upon failure byyou to comply with its terms. This Agreement may only be modified in writing signed by an authorized officerof ECD.
Unpublished-rights reserved under the copyright laws of the United States.Electronic Controls Design Incorporated, 4287-A SE International Way, Milwaukie, Oregon 97222 USA.
YOUR ACCEPTANCE OF THE FOREGOING AGREEMENT WAS INDICATED DURING INSTALLATION.

CureTRAK ♦♦i♦♦
TABLE OF CONTENTS
Introduction .......................................................................................................................................... iv
� How to Use This Manual .............................................................................................................. iv• Terms used in this Manual ........................................................................................................... iv• Product Symbols ...........................................................................................................................v• Fonts Used in this Manual.............................................................................................................v• Operators Safety Information....................................................................................................... vi
1.0 Unpacking ........................................................................................................................................1
2.0 System Description .........................................................................................................................2
2.1 Thermal Barrier Description.......................................................................................................32.2 Data Box Description .................................................................................................................52.3 Cure Conformance Software Description..................................................................................6
3.0 Setup ................................................................................................................................................8
3.1 Charging the Data Box Battery ..................................................................................................83.2 Software Setup...........................................................................................................................9
3.2.1 Software Installation .......................................................................................................103.2.2 Installing CureTRAK software on a PC ..........................................................................10
� Installing CureTRAK software on a PC with Windows 3.X ........................................10� Installing CureTRAK software on a PC with Windows 95, 98 or NT..........................11• Starting the Software ..................................................................................................12
3.3 Installing the Communication Cable ........................................................................................133.4 Configuring the Communication Port.......................................................................................14
4.0 Operation ....................................................................................................................................... 17
4.1 Data Collection.........................................................................................................................174.2 Uploading Data ........................................................................................................................25
5.0 CureTRAK Cure Conformance Software ...................................................................................... 28
5.1 Standard Worksheet functions.................................................................................................285.1.1 Worksheet tabs...............................................................................................................285.1.2 Selecting Worksheets.....................................................................................................285.1.3 Split-bar...........................................................................................................................285.1.4 Worksheet Tab Scroll Arrows.........................................................................................285.1.5 Scrollbars ........................................................................................................................29

CureTRAK ♦♦ii♦♦
6.0 Worksheet Descriptions ................................................................................................................ 30
6.1 The Welcome Worksheet ........................................................................................................306.1.1 Welcome Worksheet Menus and Toolbar Buttons.........................................................31
6.2 Finder Worksheet.....................................................................................................................326.2.1 Finder Menus and Toolbar Buttons ................................................................................336.2.2 Parameter Group Row....................................................................................................346.2.3 Parameter Labels ...........................................................................................................356.2.4 Parameter Units..............................................................................................................356.2.5 Data Run Rows...............................................................................................................366.2.6 Filters ..............................................................................................................................37
6.3 Profile Worksheet.....................................................................................................................396.3.1 Profile Menus and Toolbar..............................................................................................406.3.2 Customer Data................................................................................................................406.3.3 Data Graph .....................................................................................................................41
6.3.3.1 Temperature Reference Lines...........................................................................416.3.3.2 Data Plots...........................................................................................................426.3.3.3 Channel Legend.................................................................................................436.3.3.4 The Data Table ..................................................................................................44
7.0 Menu and Tool Commands........................................................................................................... 45
7.1 File Menu..................................................................................................................................457.1.1 New.................................................................................................................................457.1.2 Open ...............................................................................................................................467.1.3 Close...............................................................................................................................467.1.4 Save................................................................................................................................477.1.5 Save As...........................................................................................................................477.1.6 Save as Text Archive......................................................................................................487.1.7 Load Text Archive ...........................................................................................................497.1.8 Company Info..................................................................................................................507.1.9 Preferences.....................................................................................................................52
7.1.9.1 Units ...................................................................................................................527.1.9.2 Tag File Number ................................................................................................537.1.9.3 Configuration......................................................................................................54
7.1.10 Print Certification ..........................................................................................................557.1.11 Print Preview.................................................................................................................567.1.12 Print...............................................................................................................................577.1.13 Exit ................................................................................................................................587.1.14 Language ......................................................................................................................58

CureTRAK ♦♦iii♦♦
7.2 Edit Menu .................................................................................................................................597.2.1 Undo................................................................................................................................597.2.2 Redo................................................................................................................................597.2.3 Remove Row ..................................................................................................................597.2.4 Hide Row ........................................................................................................................59
7.3 View Menu ...............................................................................................................................607.3.1 Toolbar ............................................................................................................................607.3.2 Status Bar .......................................................................................................................607.3.3 Zoom In...........................................................................................................................607.3.4 Zoom Out ........................................................................................................................607.3.5 100%...............................................................................................................................60
7.4 CureTRAK Menu......................................................................................................................617.4.1 Set CureTRAK Clock ......................................................................................................617.4.2 Read CureTRAK Data ....................................................................................................63
7.5 Window Menu ..........................................................................................................................647.5.1 Cascade..........................................................................................................................647.5.2 Tile ..................................................................................................................................647.5.3 Open File ........................................................................................................................64
7.6 Navigate Menu.........................................................................................................................657.7 Help Menu................................................................................................................................66
7.7.1 Index ...............................................................................................................................667.7.2 Using Help ......................................................................................................................677.7.3 About CureTRAK ............................................................................................................687.7.4 Context Help ...................................................................................................................687.7.5 Copy Button ....................................................................................................................68
8.0 Service and Calibration ................................................................................................................. 69
8.1 Service Troubleshooting ..........................................................................................................69• Hardware Problems..............................................................................................................70• Communication/Software Problems.....................................................................................73• Calibration.............................................................................................................................74
8.2 CureTRAK Cleaning Instructions.............................................................................................758.3 How to Get Additional Help......................................................................................................75
APPENDIX A: Specifications............................................................................................................... 76
• Thermal Barrier ...........................................................................................................................76• Data Box......................................................................................................................................78
APPENDIX B: Menus & Toolbar Buttons............................................................................................ 80
• Menus..........................................................................................................................................80• Toolbar Icons...............................................................................................................................81
APPENDIX C: Options and Accessories ............................................................................................ 82

CureTRAK ♦♦iv♦♦
Introduction
�� How to Use This Manual
This User’s Guide explains how to use ECD’s (Electronic Controls Design Inc.)CureTRAK Product Quality Optimization System and CureTRAK Cure Conformancesoftware.
This manual is written for users of varied experience. If a section covers informationyou already know, feel free to skip to the next section.
• You do not need to be a computer expert to use this manual or CureTRAK CureConformance software.
• The manual assumes you are familiar with Microsoft Windows.
•• Terms used in this Manual
The following statements describe special terms that will be in this manual.
• Workbook, contains all of the worksheets and the uploaded data set saved with fileextension (.MCT).
• Worksheet, the individual pages or sheets in the workbook file.
• Data Set, multiple data runs uploaded into the workbook file.
• Data Run / Experiment, the data uploaded from the Data Box.
• Thermocouple, may be referred to as T/C.
• Informs the user that the note identifies conditions or practices that could result in damage to the equipment.
• Informs the user that the note identifies conditions or practices that could result in personal injury or damage to property other than the equipment.
• Informs the user that the note includes important information.
• Informs the user that the note includes a handy software tip.

CureTRAK ♦♦v♦♦
•• Product Symbols
The following symbols are used within this manual and on the product:
• Direct Current (DC) Power
• Alternating Current (AC) Power
• CAUTION: Whenever this internationally recognized symbol is used on theproduct, additional information concerning that particular feature or functionappears in the manual.
• WARNING: Electric Shock or Energy Hazard.
• Battery Charger protected throughout by double or reinforced insulation.
• Indoor use only. For electric-shock protection, always operate the batterycharger in a protected, indoor location.
• WARNING: Burn Hazard, Surfaces may be Hot!
• Data Port
• Start Logging
• Stop Logging
• Input power connector
•• Fonts Used in this Manual
This manual uses a special font to indicate terms or words that can be found directly onthe PC display.
For example: “Select the Open command from the File menu to open a new workbookfile. This font indicates the words Open and File are actually found on the PC display asmenu items.
CureTRAK ♦♦vi♦♦
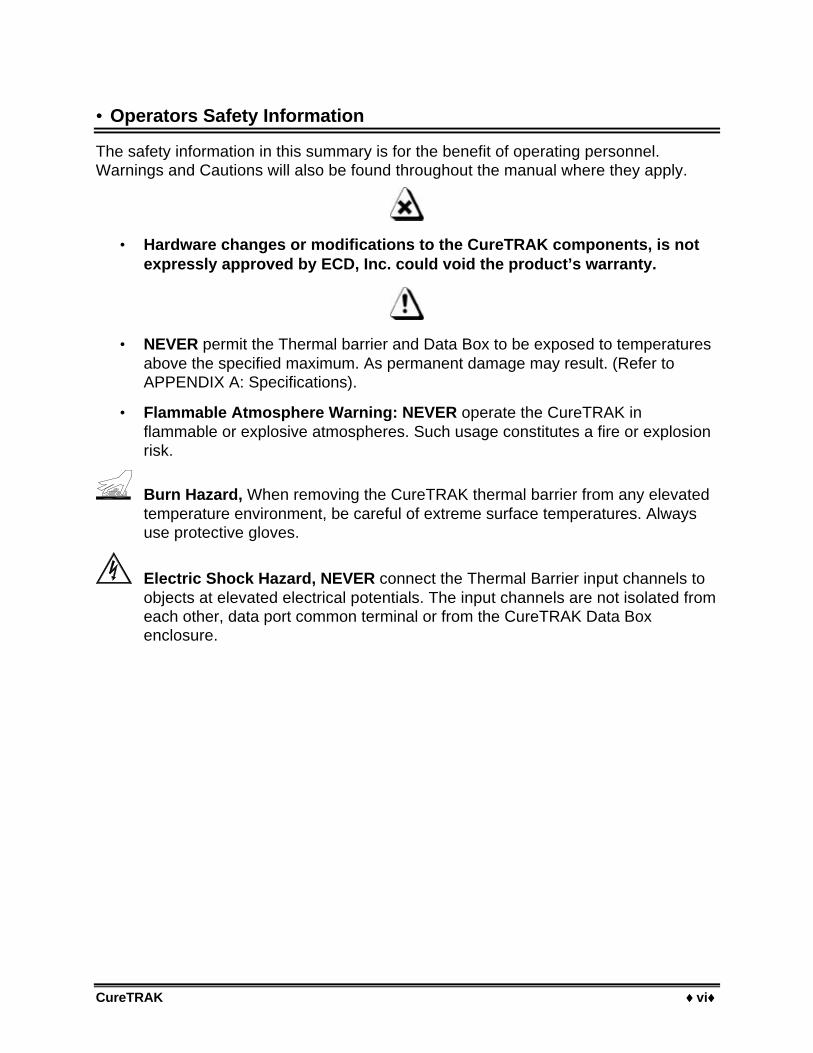
•• Operators Safety Information
The safety information in this summary is for the benefit of operating personnel.Warnings and Cautions will also be found throughout the manual where they apply.
• Hardware changes or modifications to the CureTRAK components, is notexpressly approved by ECD, Inc. could void the product’s warranty.
• NEVER permit the Thermal barrier and Data Box to be exposed to temperaturesabove the specified maximum. As permanent damage may result. (Refer toAPPENDIX A: Specifications).
• Flammable Atmosphere Warning: NEVER operate the CureTRAK inflammable or explosive atmospheres. Such usage constitutes a fire or explosionrisk.
Burn Hazard, When removing the CureTRAK thermal barrier from any elevatedtemperature environment, be careful of extreme surface temperatures. Alwaysuse protective gloves.
Electric Shock Hazard, NEVER connect the Thermal Barrier input channels toobjects at elevated electrical potentials. The input channels are not isolated fromeach other, data port common terminal or from the CureTRAK Data Boxenclosure.

CureTRAK ♦♦vii♦♦
Battery Warnings:
• Recharge batteries using only the ECD approved charger.
• The Internal Data Box battery pack is a rechargeable nickel-cadmium or nickel-metal hydride type and is not user-serviceable.
• Replace batteries only with same type or approved alternate type. Using anotherbattery type may present a risk of fire or explosion.
• Abuse of batteries can cause them to rupture or explode, causing personal injuryand/or equipment damage.
• Do not dispose batteries in fire, disassemble them, or allow the temperature ofbatteries to exceed 100°C (212°F). Battery explosion and exposure to batteryelectrolytes and materials can be a health or personal injury hazard.
• Always dispose used batteries, especially Nickel-Cadmium types, promptly andin conformance with local hazardous waste disposal regulations. Nickel-Metal-Hydride batteries do not contain Cadmium, however disposal must still conformto local regulations.
• Keep batteries away from children.
To prevent CureTRAK equipment damage, observe the following precautions:
• Do not immerse the Thermal Barrier or Data Box in liquids.
• Do not subject the CureTRAK components to sharp impacts.
• Do not excessively stress the PC serial cable.
• Do not expose the CureTRAK components to corrosive environments.
• The CureTRAK components have no user-serviceable parts, do notdisassemble.
The warranty will not cover damage caused by neglect or abuse of this product.To maintain the safety features incorporated in this product, operation must be instrict compliance with the requirements specified herein.

CureTRAK ♦♦1♦♦
1.0 Unpacking
There are two main CureTRAK kit combinations shown in Figure 1-1. Inspect all components andaccessories of the kit to make sure that the kit is complete, and if any damage has been caused byshipping.
CureTRAK QUICK REFERENCE GUIDE
Figure 1-1: CureTRAK Standard Kit
DATA BOX
RS-232 COMMUNICATIONCABLE & CONNECTORS
CureTRAK USERS GUIDE CureTRAK QUICK REFERENCE GUIDE
CureTRAKSOFTWARE
(3 OR 6)CHANNELTHERMAL BARRIER
BATTERYCHARGER

CureTRAK ♦♦2♦♦
2.0 System Description
The CureTRAK consists of two major components: A microprocessor based datacollection logger referred to as the Data Box, and three or six channel thermal barriercalled the CT3C and CT6C. While profiling product in the oven, the Data Box collectsthe data needed to produce the Certificate of Cure Conformance. The internal memoryof the Data Box can collect and store approximately two hours of data. After the datacollection is complete, the Data Box is then connected to a personal computer (PC) andthe data is uploaded using the CureTRAK software.
DATA BOX
PC
THERMOCOUPLE SENSORS
123456
CHARGER
Figure 2-1: System Block Diagram

CureTRAK ♦♦3♦♦
2.1 Thermal Barrier Description
Exterior Features:
• Channel Connectors: The channel connectors are standard high temperaturemini T/C connectors that are linked to the Data Box inside the thermal barrier.
• Security Latches: These latches secure the two barrier halves together andcreate a thermal seal for protecting the Data Box.
• Handles: These handles are used to properly carry and hang the barrier onconveyor hooks. The handles also make it easy to separate the two barrierhalves when removing the Data Box.
Figure 2-2: Thermal Barrier Exterior Features
SECURITYLATCHES
HANDLES
(3 OR 6) CHANNELCONNECTORS

CureTRAK ♦♦4♦♦
Interior Features:
• Heat sink Blocks: These removable heat sink blocks are located on both sidesof the Data Box to provide extra thermal protection.
• Slide Guide: The Slide guide is designed to properly guide the Data Box andthe heat sink blocks into the thermal barrier inner box.
The Data Box connector must be correctly orientated with the thermal barrierconnector prior to insertion.
• Data Connector: The Data Connector is where the Data Box is linked to theexternal T/C connectors.
Figure 2-3: Thermal Barrier Interior Features
SLIDE GUIDE
DATA CONNECTOR
DATA BOX
HEAT SINKBLOCKS

CureTRAK ♦♦5♦♦
2.2 Data Box Description
Data Box Features:
• Data Port: This port transfers the logged data through the communication cableto the PC.
• Status LED & Legend: Flashes different configurations to show the user thecurrent status of the Data Box. Refer to the Status legend on the front panel forthe proper Status LED definitions.
• Start/Stop Switch: Starts and Stops the data collection process.
• Charging Connector & LED: This is where the battery charger is connected tocharge the internal battery. When the battery is charging the red charging LEDwill illuminate and stay constant.
• Data Connector: This connector is located on the back panel of the Data Box islinked to the thermal barrier external T/C connectors.
Figure 2-4: Data Box Exterior Features
DATA PORT STATUS LED & LEGEND
START/STOP SWITCH
CHARGINGCONNECTOR & LED
DATA CONNECTOR

CureTRAK ♦♦6♦♦
2.3 Cure Conformance Software Description
The CureTRAK Cure Conformance Software included in the CureTRAK Kit isdesigned to receive and print data in a Cure Conformance Certificate/ISO Documentformat. The illustration shown in Figure 2-5 is an example of the Profile worksheet.
WORKSHEET TABS
MENUS TOOLBARCUSTOMERDATATITLE BAR
DATA GRAPH
LEGEND
DATA TABLE
SCROLL ARROWS STATUS BAR
Figure 2-5: Cure Conformance Software

CureTRAK ♦♦7♦♦
Software Features:
• Title Bar: This bar contains the program name, version, and the activeworkbook file name.
• Menus: These menus contain the commands for each worksheet. Eachworksheet may contain different commands to supply specific function for eachworksheet. Individual worksheet menus are described in detail in their specifiedsections of this manual.
• Toolbar: The Toolbar has buttons to serve as shortcuts to the menu commands.Individual worksheet toolbar buttons are described in detail in their specifiedsections of this manual. Each worksheet may have different items on the toolbarbecause of the different features offered by each worksheet.
• Customer Data: This area of the software is where the user to enters thecustomer data for the cure conformance certificate.
• Data Graph: This area of the screen shows the recorded temperature data.
• Channel Legend: This legend is to easily determine individual data lines whenprinted or copied in black and white.
• Data Table: This area of the screen shows the cure times in 25° increments.
• Worksheet Tabs: These tabs are used to gain easy access to each worksheet.
• Worksheet Scroll Arrows: These arrows are used to view other worksheet tabswhen the Horizontal scroll bar is covering them.
• Split-bar: This bar slides the Horizontal Scroll bar to the left or right so all orpart of the worksheet tabs can be viewed.
• Status Bar: This bar on the bottom of the worksheet display shows the availableHelp information, Graph, mouse pointer X-Y position, current date and time.
• Horizontal Scroll Bar: This bar scrolls the worksheet display horizontally leftand right.
• Vertical Scroll Bar: This bar scrolls the worksheet display vertically up anddown.
CureTRAK ♦♦8♦♦
3.0 Setup
This section covers the necessary steps to setup and operate the CureTRAK system.
3.1 Charging the Data Box Battery
Because a rechargeable battery powers the Data Box, it is important to make sure it ischarged and operating properly.
It is recommended that the Data Box battery be charged prior to using the CureTRAKsystem for the first time.
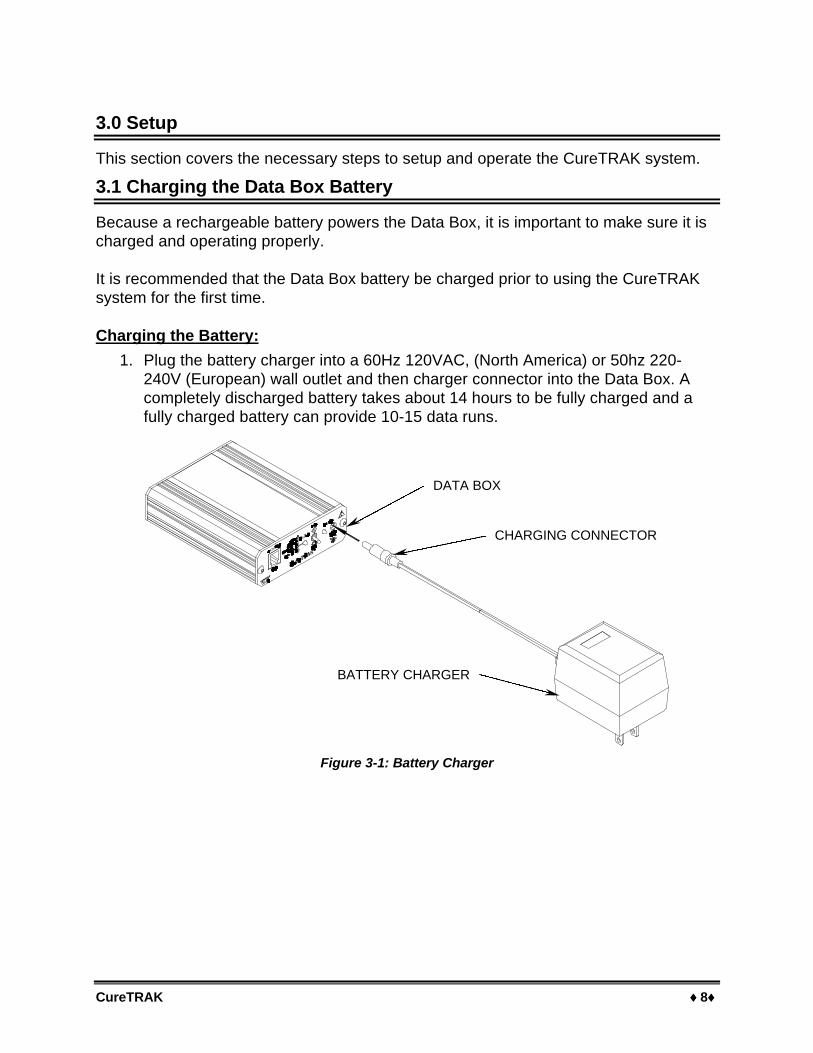
Charging the Battery:
1. Plug the battery charger into a 60Hz 120VAC, (North America) or 50hz 220-240V (European) wall outlet and then charger connector into the Data Box. Acompletely discharged battery takes about 14 hours to be fully charged and afully charged battery can provide 10-15 data runs.
Figure 3-1: Battery Charger
DATA BOX
BATTERY CHARGER
CHARGING CONNECTOR

CureTRAK ♦♦9♦♦
3.2 Software Setup
Before the CureTRAK Cure Conformance software can be used, a 486 or bettercomputer that can run Windows will be required to run the software.
Specific recommendations are as follows:
CPU, RAM, Hardware: Pentium processor16 megabytes of RAM (minimum).24 megabytes of free disk space.
Operating System: Windows 3.1, Windows for Workgroups 3.11,Windows 95, 98 or Windows NT.
For optimum performance when running the software with Windows 3.1 orWindows 3.11 for Workgroups, set the virtual memory to maximum. (See yourMicrosoft Windows manual for details).
Disk Drive: 3.5” high-density floppy disk drive.
Mouse: Windows compatible mouse, plugged into either a dedicated mouse or serial port.
Serial Port: At least one port in addition to the one used for the mouse.
Video: Color VGA or better graphics adapter and appropriate video monitor. (SVGA is highly recommended)
It is recommended that when using the software the PC display be set to 800 x600 (See your Microsoft Windows manual for details).
Printer: Color printer is recommended.
It is recommended that the software not be run on a computer that is using asoftware program used to double the computers RAM.

CureTRAK ♦♦10♦♦
3.2.1 Software Installation
Before the Software is installed view the README file on Disk 1 (any standard textviewer can be used). The README contains the latest information on the CureTRAKsoftware and installation instructions.
3.2.2 Installing CureTRAK software on a PC
All running applications must be closed before installing the software.
�� Installing CureTRAK software on a PC with Windows 3.X
Make sure the Program Manager is running under Windows.
1. Insert disk 1 in the disk drive.
2. Select Run from the File menu.
3. Type the drive name, colon, backslash and Setup in the Command Line text boxand click the OK command button.
For example, if disk 1 is inserted into the “A” drive type: A:\Setup.
Figure 3-2: Run Dialog Window
4. Closely follow the setup instructions provided with the software
When installing the software, carefully read the on-screen installationinstructions because in some instances the amount of disks required to completefull installation may vary.

CureTRAK ♦♦11♦♦
�� Installing CureTRAK software on a PC with Windows 95, 98 or NT
All running applications must be closed before installing the software.
1. Insert disk 1 in the disk drive.
2. Select Run from the Windows 95 Start up menu.
3. Type the drive name, colon, backslash and Setup in the Open text box and clickthe OK command button.
For example, if disk 1 is inserted into the “A” drive type: A:\Setup.
Figure 3-3: Run Dialog Box
4. Closely follow the setup instructions provided with the software
When installing the software, carefully read the on-screen installationinstructions because in some instances, the amount of disks required tocomplete full installation may vary.

CureTRAK ♦♦12♦♦
•• Starting the Software
Prior to starting, click the README icon to read the latest release notes
After the software is installed, start the software program by either double-clicking theCureTRAK icon from the program group or select it from the ECD CureTRAK programsub-menu.
Figure 3-4: CureTRAK Program Group
Once the software installation is complete, it is important to start the softwareand configure the communication port (refer to section 3.4 Configuring theCommunication Port).
CureTRAK ♦♦13♦♦
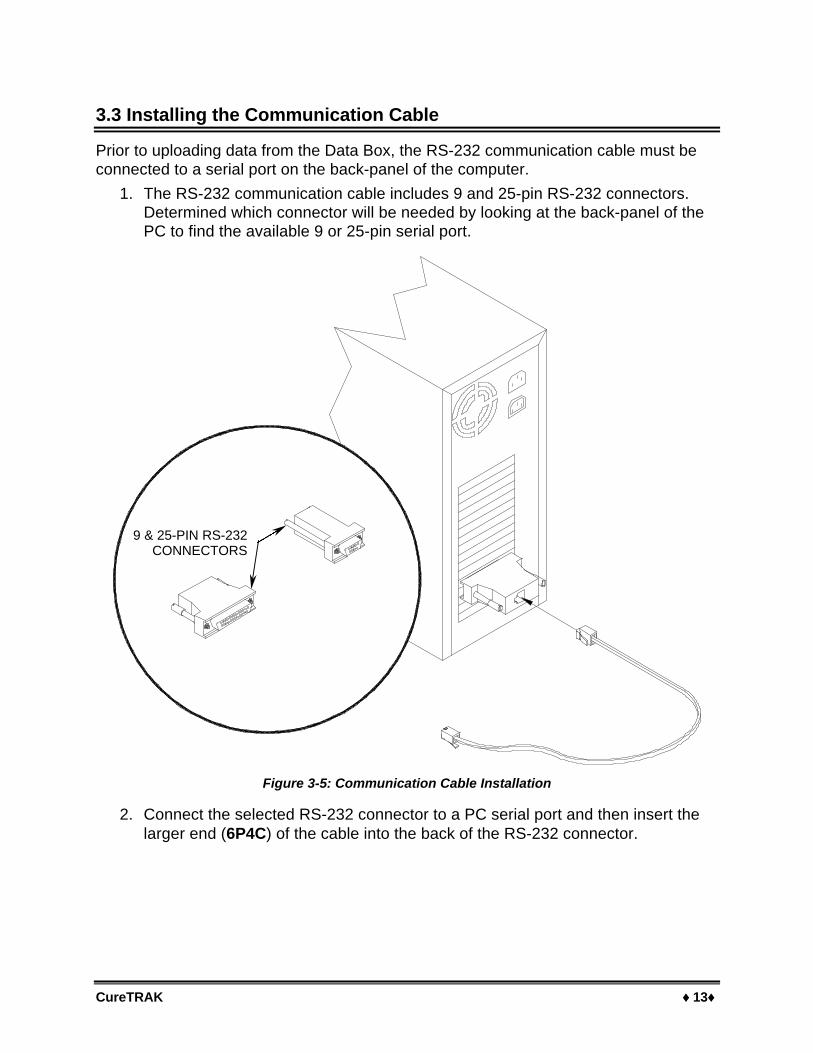
3.3 Installing the Communication Cable
Prior to uploading data from the Data Box, the RS-232 communication cable must beconnected to a serial port on the back-panel of the computer.
1. The RS-232 communication cable includes 9 and 25-pin RS-232 connectors.Determined which connector will be needed by looking at the back-panel of thePC to find the available 9 or 25-pin serial port.
Figure 3-5: Communication Cable Installation
2. Connect the selected RS-232 connector to a PC serial port and then insert thelarger end (6P4C) of the cable into the back of the RS-232 connector.
9 & 25-PIN RS-232CONNECTORS

CureTRAK ♦♦14♦♦
3.4 Configuring the Communication Port
To complete the setup, the Data Box and the software must be able to communicatewith each other, the Configuration command is used for this purpose.
1. Start the CureTRAK software.
2. Click the Finder or Profile worksheet tab.
STEP (3)
STEP (2)
Figure 3-6: Com Port Setup
CureTRAK ♦♦15♦♦
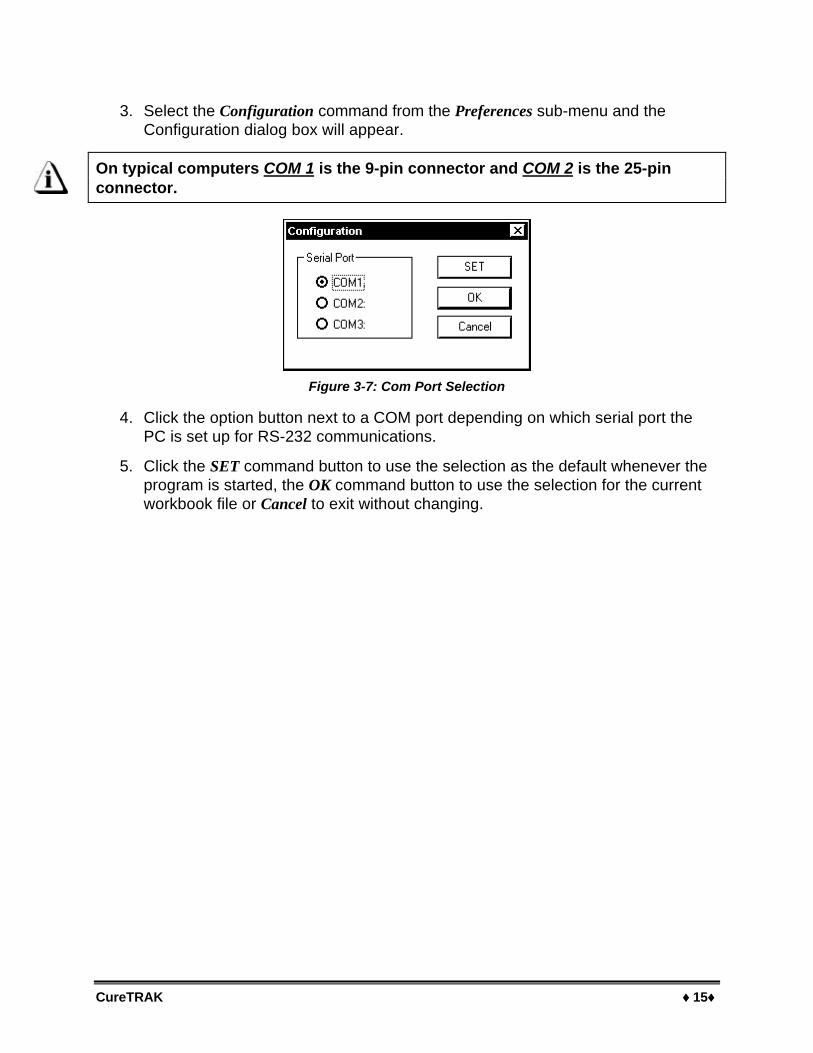
3. Select the Configuration command from the Preferences sub-menu and theConfiguration dialog box will appear.
On typical computers COM 1 is the 9-pin connector and COM 2 is the 25-pinconnector.
Figure 3-7: Com Port Selection
4. Click the option button next to a COM port depending on which serial port thePC is set up for RS-232 communications.
5. Click the SET command button to use the selection as the default whenever theprogram is started, the OK command button to use the selection for the currentworkbook file or Cancel to exit without changing.
CureTRAK ♦♦16♦♦
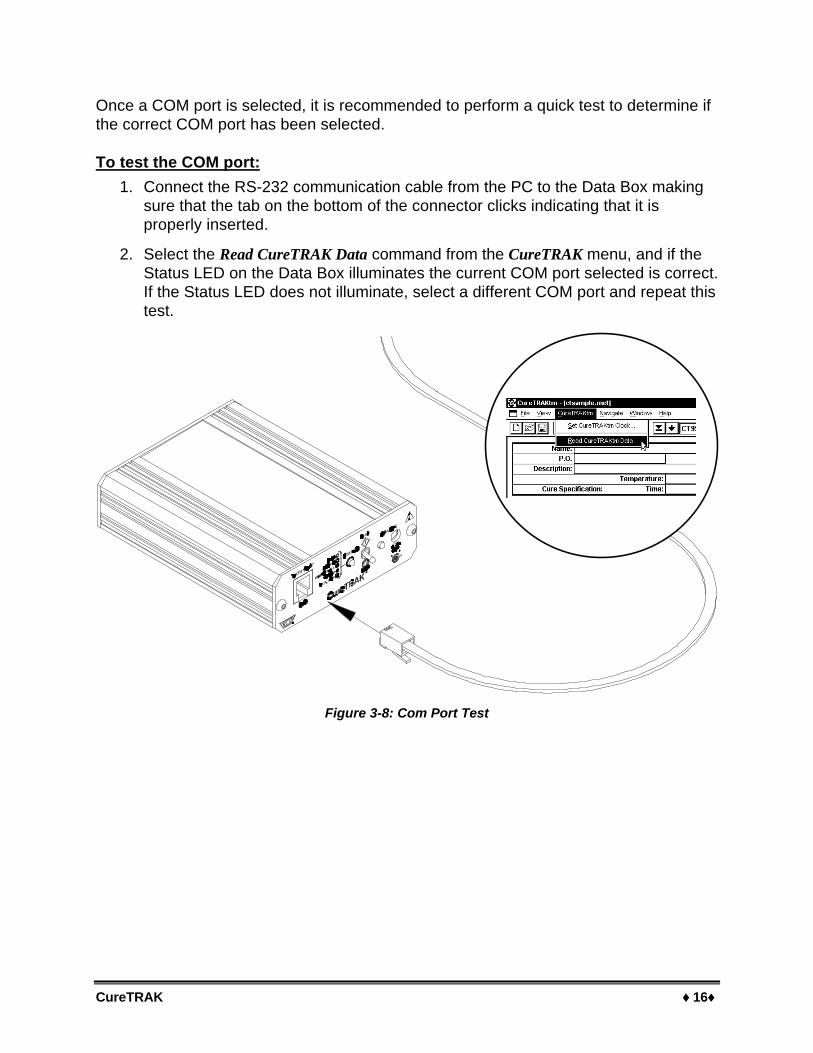
Once a COM port is selected, it is recommended to perform a quick test to determine ifthe correct COM port has been selected.
To test the COM port:
1. Connect the RS-232 communication cable from the PC to the Data Box makingsure that the tab on the bottom of the connector clicks indicating that it isproperly inserted.
2. Select the Read CureTRAK Data command from the CureTRAK menu, and if theStatus LED on the Data Box illuminates the current COM port selected is correct.If the Status LED does not illuminate, select a different COM port and repeat thistest.
Figure 3-8: Com Port Test

CureTRAK ♦♦17♦♦
4.0 Operation
This section covers a typical data collection process these steps may vary dependingon the process your company uses. Refer to sections 5.0 CureTRAK CureConformance Software through 7.0 Menu and Tool Commands for more complete anddetailed instructions for all software features and functions explained in the followingsteps.
4.1 Data Collection
1. Prior to collecting data, be sure that the thermal barrier and the heatsink blocksare cooled to approximately room temperature. To start collecting data, insertthe Data Box into the thermal barrier by orientating the male data connector onthe back-panel of the Data Box with the female data connector in the bottom ofthe thermal barrier inner box. Slide the Data Box down the slide guide, and pressthe Data Box down until it is fully seated.
Figure 4-1: Data Box Installation
SLIDE GUIDE
DATA BOX

CureTRAK ♦♦18♦♦
2. Once the Data Box is fully seated, start the turn the Start/Stop switch to the“Start” position. Determine if the Data Box is ready to collect data by interpretingthe Status LED on the front-panel. The Status light has five status indicators:“Stop”, “Logging”, “Memory Full”, “PC COM” and “Batt Low”. The Data Box isready to collect data when the Status LED blinks every six seconds (See Statuslegend definitions below for details).
Figure 4-2: Data Box Preparation
Status Legend Definitions:
• Stop: When the Status LED does not illuminate the Data Box is not loggingdata.
• Logging: The Status LED flashes once every six seconds when the Data Box islogging data.
• Memory Full: The Status LED will flash repeatedly when the Data Box memoryis full, while the Data Box is logging data.
• PC COM: The Status LED will illuminate and stay constant when the PC iscommunicating with the Data Box.
• Batt Low: When the Data Box is “Started” and The Status LED blinks “ON” and”OFF” in one-second intervals, it is indicating that the battery is low.
STATUS LED
STATUSLEGEND

CureTRAK ♦♦19♦♦
Figure 4-3: Status Legend

CureTRAK ♦♦20♦♦
3. When it is determined that the Data Box is ready to collect data, insert the roomtemperature heatsink blocks on both sides of the Data Box.
Figure 4-4: Heatsink Blocks Insertion
4. Place the top half of the barrier on the bottom half and secure the four latches.
Figure 4-5: Securing the Barrier Top
HEATSINKBLOCKS
CureTRAK ♦♦21♦♦
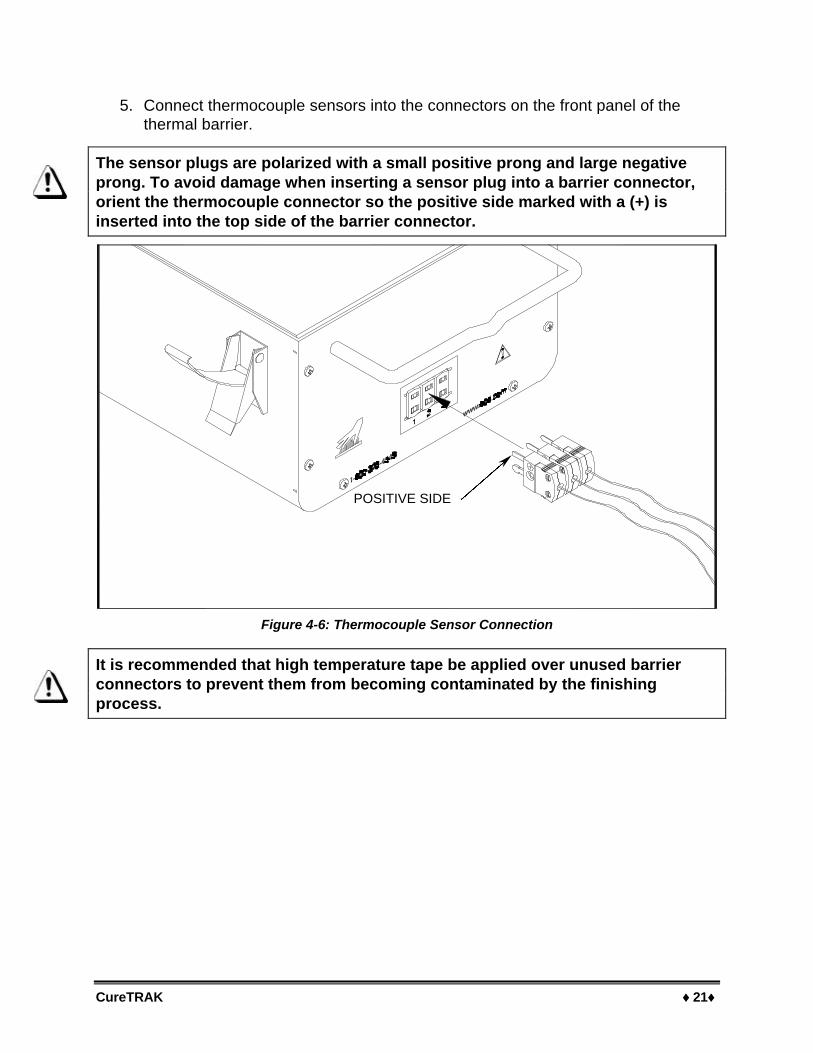
5. Connect thermocouple sensors into the connectors on the front panel of thethermal barrier.
The sensor plugs are polarized with a small positive prong and large negativeprong. To avoid damage when inserting a sensor plug into a barrier connector,orient the thermocouple connector so the positive side marked with a (+) isinserted into the top side of the barrier connector.
Figure 4-6: Thermocouple Sensor Connection
It is recommended that high temperature tape be applied over unused barrierconnectors to prevent them from becoming contaminated by the finishingprocess.
POSITIVE SIDE

CureTRAK ♦♦22♦♦
6. Check the specifications of the conveyor hooks to determine if they can supportthe thermal barrier weight (refer to APPENDIX A: Specifications for barrierweight). If the hook can support the barrier, use the front and/or the top handlesto hang the barrier on the oven conveyor. The front handle is equipped withsmall notch to help prevent CureTRAK from sliding off the conveyor hooks. Also,make sure that the sensor plugs are facing up. Hanging the barrier in thisposition will decrease the possibility of the plugs becoming detached.
Figure 4-7: Hanging the Thermal Barrier
Do not hang the thermal barrier by any of the latches, this could cause a latch torelease, damaging the thermal barrier and/or the data box.

CureTRAK ♦♦23♦♦
7. Attach the thermocouple sensors to unsprayed product(s).
Figure 4-8: Sensor Attachment
To prevent the sensor wires from becoming entangled or disconnected duringthe process, make sure that they do not contact oven parts or other product.

CureTRAK ♦♦24♦♦
8. When the CureTRAK emerges from the oven and the data collection process iscomplete, perform the following steps:
a. Using protective gloves, remove the barrier from the conveyor hook, anddetach the sensors from the barrier T/C connectors.
b. Unlatch the barrier top and remove. Place the top to the side and make surethe inner box is exposed to open air allowing it to cool faster.
c. Turn the Data Box switch to the “Stop” position.
d. Remove the heatsink blocks, gripping firmly to avoid dropping.
e. Remove the Data Box from the thermal barrier.
Condensation may collect on the interior cavity of the thermal barrier cavity. Ifthis should occur, simply remove it by using a dry cloth. This small amount ofmosture will not damage the data box or thermal barrier.
Figure 4-9: Data Box Removal
The thermal barrier and heatsink blocks must cool down to room temperatureprior to using again (Typical cooling time is a minimum of 1.5 hours).

CureTRAK ♦♦25♦♦
4.2 Uploading Data
1. To upload data, place the Data Box on a table or flat surface near a PC that hasECD’s CureTRAK software.
2. Insert the communication cable into the data port. Make sure to properly alignthe tab on the bottom of the communication cable plug with the bottom of thedata port connector.
It is very important that the Start/Stop switch is not switched to the “Start”position prior to uploading data, this action will start the data collection processand the previous data collected will be lost.
Figure 4-10: Data Communication Connection
3. Start the CureTRAK software by clicking the CureTRAK Icon and then open adesired file workbook to upload the data into.
When the software is started it will open the last workbook file used.

CureTRAK ♦♦26♦♦
4. Select the Read CureTRAK Data command from the CureTRAK menu to startuploading data.
Figure 4-11: Read CureTRAK Data Function
Once the Read CureTRAK Data command has been selected, the Status LED willautomatically illuminate and stay constant indicating that the data is being transferredto the PC. When the data transfer has completed the Status LED will turn “OFF”.
Figure 4-12: Transferring Data
Once the data transfer is complete, the data will remain in the memory of the Data Boxuntil another data run is performed. Disconnect the communication cable and set theData Box to one side until the thermal barrier cools.
STATUS LIGHT

CureTRAK ♦♦27♦♦
5. Now prepare the Cure Conformance Certificate/ISO document by entering therequired customer and product information specific to the product in theappropriate fields. Refer to Section 6.3.2 Customer Data for detailed information.
Figure 4-13: Customer and Product Data Fields
6. Once the customer and product data has been entered, select the PrintCertification command from the File menu to print the Cure ConformanceCertificate/ISO document.
Figure 4-14: Print Certification Command
Refer to Section 5.0 CureTRAK Cure Conformance Software for more completeand detailed instructions for file access and all software features and functions.

CureTRAK ♦♦28♦♦
5.0 CureTRAK Cure Conformance Software
This section presents an overview of a Cure Conformance software worksheetmanagement window. When the software is started, it will automatically load thepreviously saved workbook file. In the case when it is first installed and started it willload the sample workbook file supplied with the software (i.e. ctsample.mct).
5.1 Standard Worksheet functions
5.1.1 Worksheet tabs
There are three standard worksheets. Each worksheet is labeled with worksheet tabslocated on the bottom left of the display.
Figure 5-1: Worksheet Tabs
5.1.2 Selecting Worksheets
To a view worksheet, use the mouse pointer to click on a worksheet tab. The worksheettab will then become highlighted, and the worksheet will now be visible.
The keyboard does not allow access to the worksheets. The only way to selectthe worksheet is by using the mouse pointer.
Figure 5-2: Selecting Worksheet Tabs
5.1.3 Split-bar
The Split-bar on the tab bar lets the user slide the Horizontal scroll bar to the left orright, so all of the worksheet tabs can be viewed. This feature is located on the leftedge of the Horizontal scroll bar.
5.1.4 Worksheet Tab Scroll Arrows
Worksheet tabs may be hidden behind the horizontal scroll bar. To view them the usercan either use the Tab Scroll Arrows located on the left of the worksheet tabs or usethe Split-bar.

CureTRAK ♦♦29♦♦
5.1.5 Scrollbars
The worksheets have both Horizontal and Vertical screen scroll bars so the non-visibleareas of the worksheet can be scrolled into view. The Horizontal scroll bar is located inthe lower right corner and can be scrolled left or right by pressing the left or rightarrows located on each end of the scroll bar. The user may also scroll the display bysliding the center scroll bar left or right. The Vertical scroll bar located on the right sideof the screen has the same features as the Horizontal scrollbar except it scrolls theworksheet display up and down.
CLICK HERE TO SCROLL WORKSHEET TABS
CLICK AND DRAG TO VIEWWORKSHEET TABS
CLICK TOSINGLE STEPWORKSHEET
VIEW LEFT ORRIGHT
CLICK AND DRAG TO SLIDE THEVIEW HORIZONTALLY
Figure 5-3: Worksheet Options

CureTRAK ♦♦30♦♦
6.0 Worksheet Descriptions
The following sections offer brief explanations for the worksheet functions and how theybenefit the user. Refer to section 7.0 Menu and Tool for information on how to use allof the menu commands.
6.1 The Welcome Worksheet
The Welcome worksheet contains an introductory CureTRAK picture and is thecoversheet of the workbook.
Welcome worksheet features:
• Menus and Toolbar.
MENUS & TOOLBAR
Figure 6-1: Welcome Worksheet

CureTRAK ♦♦31♦♦
6.1.1 Welcome Worksheet Menus and Toolbar Buttons
• Menus: File, View, CureTRAK, and Help.
• Toolbar Buttons: Print, Zoom In, Zoom Out, 100%, Read CureTRAK Data,About, and Context Help.
Figure 6-2: Welcome Worksheet Menus and Toolbar Buttons
CureTRAK ♦♦32♦♦
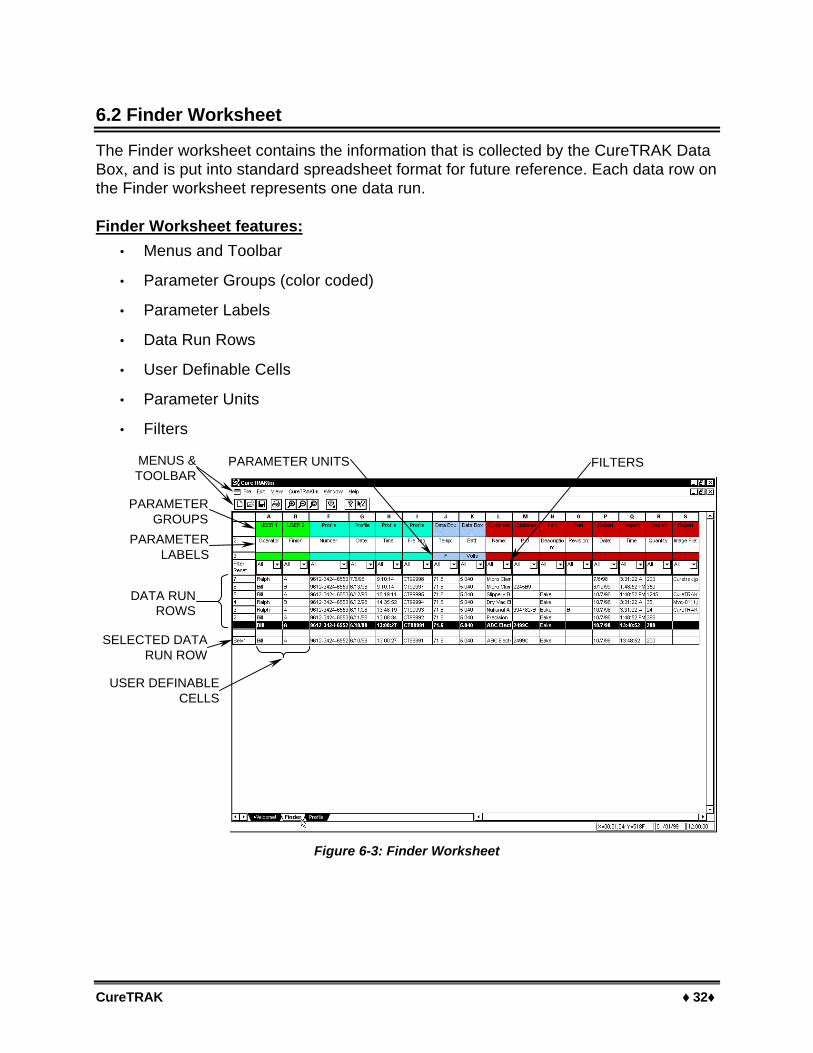
6.2 Finder Worksheet
The Finder worksheet contains the information that is collected by the CureTRAK DataBox, and is put into standard spreadsheet format for future reference. Each data row onthe Finder worksheet represents one data run.
Finder Worksheet features:
• Menus and Toolbar
• Parameter Groups (color coded)
• Parameter Labels
• Data Run Rows
• User Definable Cells
• Parameter Units
• Filters
PARAMETER UNITSMENUS &TOOLBAR
PARAMETERGROUPS
PARAMETERLABELS
FILTERS
DATA RUNROWS
SELECTED DATARUN ROW
USER DEFINABLECELLS
Figure 6-3: Finder Worksheet

CureTRAK ♦♦33♦♦
6.2.1 Finder Menus and Toolbar Buttons
• Menus: File, Edit, View, CureTRAK, Window and Help.
• Toolbar buttons: New, Open, Save, Print, Zoom In, Zoom Out, 100%, ReadCureTRAK Data, About and Context Help.
Figure 6-4: Finder Worksheet Menus and Toolbar Buttons
CureTRAK ♦♦34♦♦
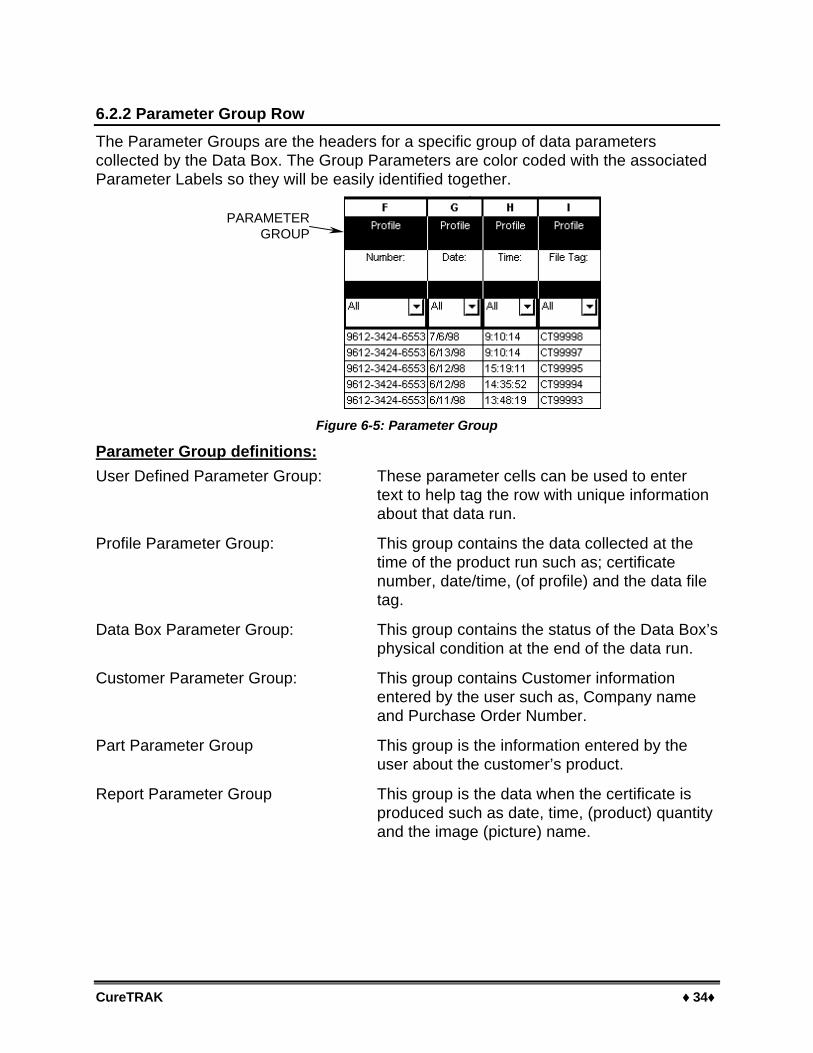
6.2.2 Parameter Group Row
The Parameter Groups are the headers for a specific group of data parameterscollected by the Data Box. The Group Parameters are color coded with the associatedParameter Labels so they will be easily identified together.
PARAMETERGROUP
Figure 6-5: Parameter Group
Parameter Group definitions:
User Defined Parameter Group: These parameter cells can be used to enter text to help tag the row with unique information about that data run.
Profile Parameter Group: This group contains the data collected at the time of the product run such as; certificate number, date/time, (of profile) and the data file tag.
Data Box Parameter Group: This group contains the status of the Data Box’sphysical condition at the end of the data run.
Customer Parameter Group: This group contains Customer informationentered by the user such as, Company nameand Purchase Order Number.
Part Parameter Group This group is the information entered by theuser about the customer’s product.
Report Parameter Group This group is the data when the certificate isproduced such as date, time, (product) quantityand the image (picture) name.

CureTRAK ♦♦35♦♦
6.2.3 Parameter Labels
Parameter Labels are where all of the specific parameters in each group are named.
PARAMETER LABEL
Figure 6-6: Parameter Label
6.2.4 Parameter Units
The Parameter Units are the units of measurement for that parameter. For example, inthe Data Box Group Parameter, the Parameter Label Temp: is in degrees Fahrenheit.
PARAMETER UNITS
Figure 6-7: Parameter Units

CureTRAK ♦♦36♦♦
6.2.5 Data Run Rows
All of the data runs uploaded into the workbook file are listed on the Finder worksheetas individual rows. The first data run uploaded into the workbook file is in the bottomrow and the most recent data run uploaded is in the top row.
When any data run row is selected, all of the cells in the entire row are highlighted inpurple and blue. The purple cells indicate that the cells can be modified and the bluecells indicate the data cannot be modified.
When a data run row is selected, the data for that row will be shown in the Sel= rowlocated at the bottom of the data run rows.
When any individual data cell in a data run row is selected, all of the cells in the entirerow are highlighted in green and yellow. The green cells indicate that the cells can bemodified and the yellow cells indicate the data cannot be modified.
The data run rows can also be moved into any order desired. This is useful when theuser wants to place similar data runs together.
To change the order of the data run:
1. Select the number cell of a data run row with the mouse pointer. The row willthen become highlighted in purple and blue.
2. Drag the row and drop it to a desired location.
Figure 6-8: Drag and Drop Data Rows
Selected rows and columns can be “copied” by pressing keys (CTRL + C) andthen “pasted” (Ctrl + V) into other spreadsheet applications.
CureTRAK ♦♦37♦♦
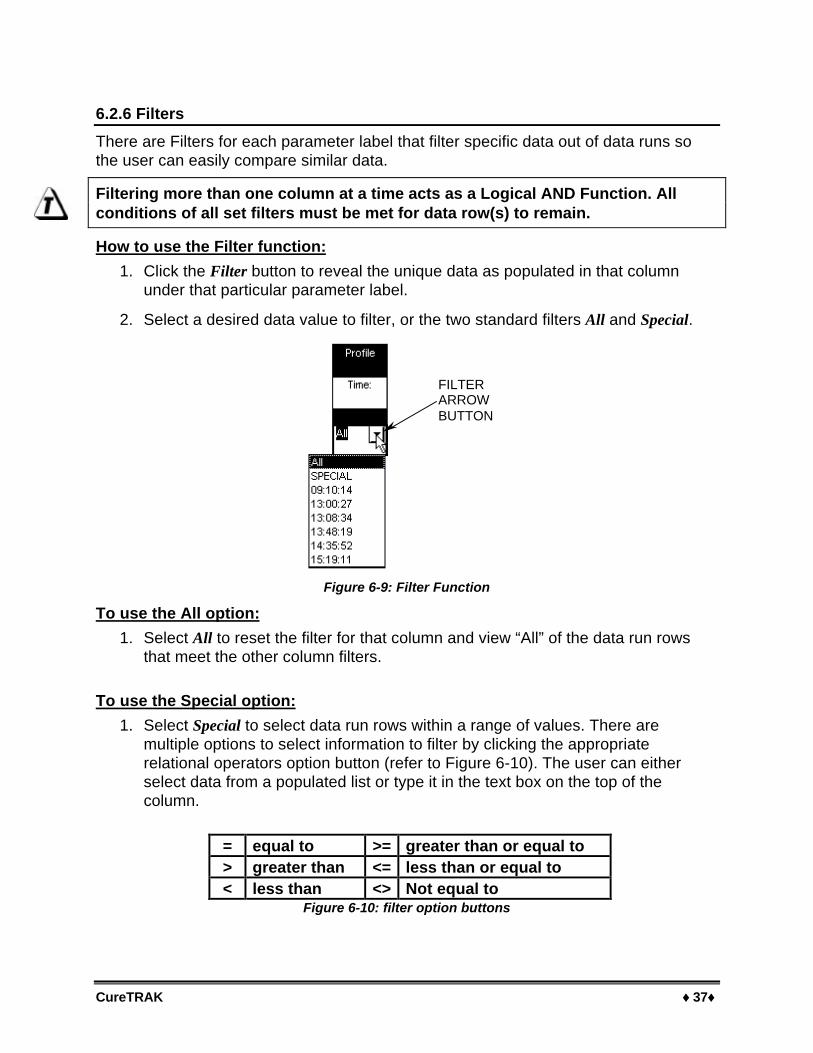
6.2.6 Filters
There are Filters for each parameter label that filter specific data out of data runs sothe user can easily compare similar data.
Filtering more than one column at a time acts as a Logical AND Function. Allconditions of all set filters must be met for data row(s) to remain.
How to use the Filter function:
1. Click the Filter button to reveal the unique data as populated in that columnunder that particular parameter label.
2. Select a desired data value to filter, or the two standard filters All and Special.
FILTERARROWBUTTON
Figure 6-9: Filter Function
To use the All option:
1. Select All to reset the filter for that column and view “All” of the data run rowsthat meet the other column filters.
To use the Special option:
1. Select Special to select data run rows within a range of values. There aremultiple options to select information to filter by clicking the appropriaterelational operators option button (refer to Figure 6-10). The user can eitherselect data from a populated list or type it in the text box on the top of thecolumn.
= equal to >= greater than or equal to> greater than <= less than or equal to< less than <> Not equal to
Figure 6-10: filter option buttons

CureTRAK ♦♦38♦♦
2. Select a data filter by:
• Clicking the greater than relational operator option button beside the left datacolumn.
• Click a Parameter value from the list or type it in the text box.
• Click the AND logical operator option button.
• Click the less than relational operator option button beside the right datacolumn.
• Click a Parameter value from the list or type it in the text box.
The Clear command button can be selected at any time to clear the selections andthen new values can be selected.
3. Click the OK command button to accept the selected data filters or Cancel toreturn to the worksheet without executing the filter request.
Figure 6-11: Special Filter Feature Dialog Box
In this example the data filtered would be all times between, but not including 13:48:19and 15:19:11.
To reset all filters and restore the entire set of collected data, click the Filter Resetbutton on the Finder worksheet.
CureTRAK ♦♦39♦♦
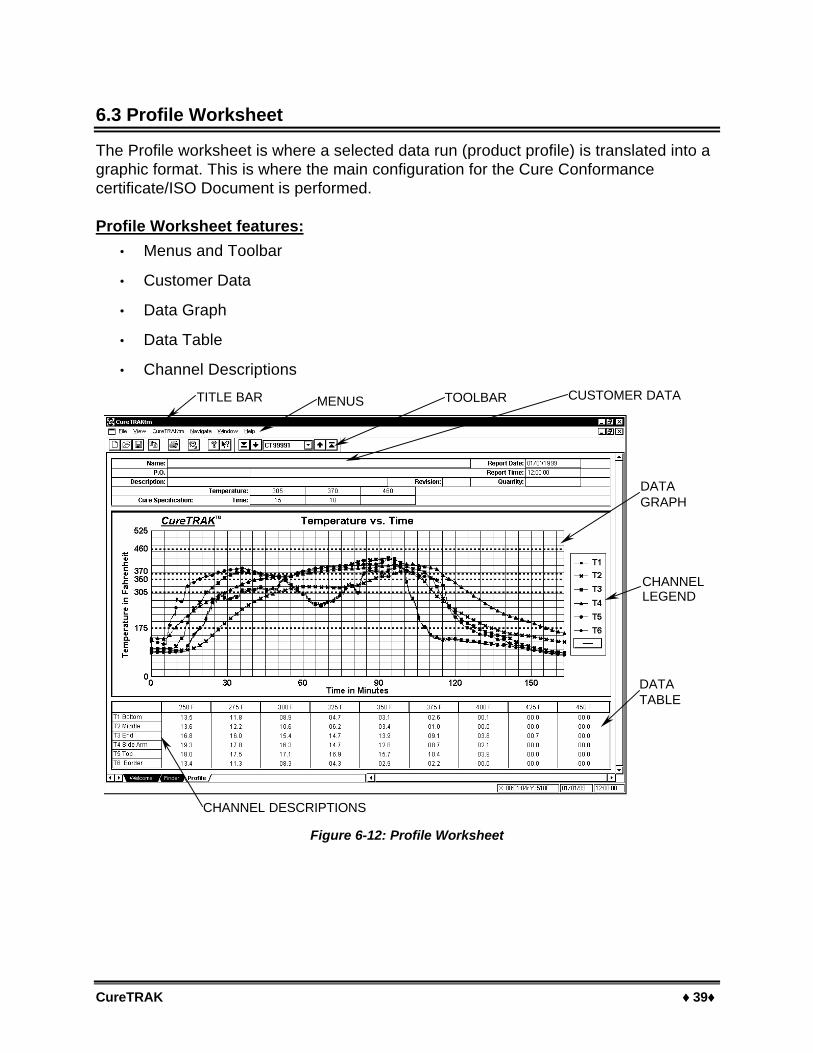
6.3 Profile Worksheet
The Profile worksheet is where a selected data run (product profile) is translated into agraphic format. This is where the main configuration for the Cure Conformancecertificate/ISO Document is performed.
Profile Worksheet features:
• Menus and Toolbar
• Customer Data
• Data Graph
• Data Table
• Channel Descriptions
CHANNEL DESCRIPTIONS
DATATABLE
MENUS TOOLBAR
DATAGRAPH
CUSTOMER DATATITLE BAR
CHANNELLEGEND
Figure 6-12: Profile Worksheet

CureTRAK ♦♦40♦♦
6.3.1 Profile Menus and Toolbar
• Menus: File, View, CureTRAK, Navigate, Window and Help.
• Toolbar buttons: New, Open, Save, Copy, Print, Read CureTRAK Data, About,Context Help, First (data run of the data set), Back to previous data run, Forwardto the next data run and Last data run of the data set.
Figure 6-13: Profile Worksheet Menu Bar and Tool Buttons
6.3.2 Customer Data
Customer Data are cells where the user enters unique customer data to complete theCure Conformance certificate/ISO Document.
Customer Data Cells:
• Name: Customer’s company name.
• P.O.: Customer’s Purchase Order number.
• Description: Description of the customer’s product.
• Revision: Revision of the product listed in the description.
• Quantity: Product quantity that the certificate covers.
• Report Date: This cell displays the date of when the certificate is printed andthe user can also enter a date of their choice.
• Report Time: This cell displays the time of when the certificate is printed andthe user can also enter a time of their choice.
• Temperature: These cells allow the user to apply low, medium and hightemperature reference lines for product specific cure specifications.
• Time: These cells allow the user to enter a specific time for the cureschedule temperatures mentioned above.
Figure 6-14: Customer Data Fields

CureTRAK ♦♦41♦♦
6.3.3 Data Graph
The Data Graph is a powerful yet simple display that shows a graph of the datacollected from one data run.
Data Graph features:
• Temperature Reference Lines
• Data Plots
• Channel Legend
• Marker Toggle
• X/Y Readout
6.3.3.1 Temperature Reference Lines
Up to three Temperature reference lines can be added to the Data Graph. TheseTemperature reference lines are colored horizontal lines and can be positionedanywhere within the range of Y-values in the graph using the Temp Ref Lines cells inthe customer data area of the Profile worksheet.
To add Temperature Reference lines to the Data Graph:
1. Enter Y-axis value(s) by typing it in a Temp Ref line cell.
2. Press the [enter] key or tab to the next cell to use the new settings or press the[esc] key to make no changes.
Temp Ref lines
Figure 6-15: Temperature Reference Lines
CureTRAK ♦♦42♦♦
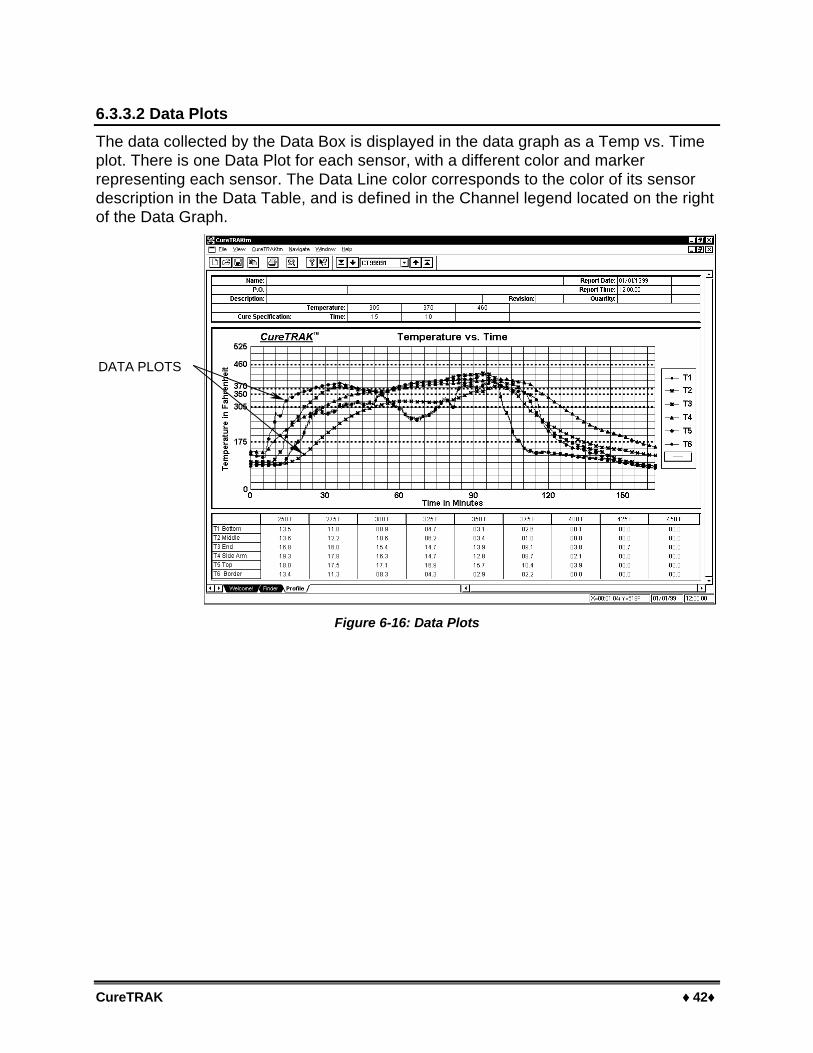
6.3.3.2 Data Plots
The data collected by the Data Box is displayed in the data graph as a Temp vs. Timeplot. There is one Data Plot for each sensor, with a different color and markerrepresenting each sensor. The Data Line color corresponds to the color of its sensordescription in the Data Table, and is defined in the Channel legend located on the rightof the Data Graph.
DATA PLOTS
Figure 6-16: Data Plots

CureTRAK ♦♦43♦♦
6.3.3.3 Channel Legend
There is a channel legend located on the right side of the Data Graph to assist the userto easily identify the different sensor Data plots when the graph is printed in black andwhite.
Figure 6-17: Channel Legend
The Data Plot Markers can be toggled “ON” or “OFF”. When the markers are toggledoff the user can get a better view of the individual Data Plot lines.
To toggle the Markers:
1. If there is a plain line in the button the Data Plots click the marker button totoggle to plain lines and if there is a line with two markers click the marker buttonto toggle to the markers “ON”.
Figure 6-18: Marker Toggle Options

CureTRAK ♦♦44♦♦
6.3.3.4 The Data Table
The Data Table includes a column of editable sensors location positions and the time(in minutes) above each temperature at the top of the columns.
SENSOR DESCRIPTIONS DATA TABLE(SENSOR DATA)
Figure 6-19: Data Table Description
Each sensor is labeled in the Data Table. To add a custom description, click the sensordescription cell and type a desired sensor description. Press the [enter] key to acceptor press the escape [esc] key to reset any changes. The color of the channeldescription text indicates which Data Plot it represents.
CureTRAK ♦♦45♦♦
7.0 Menu and Tool Commands
This section explains how to use all of the Menu and Toolbar button commands. Eachof the following sections will list all of the commands specific to each of the menus.
7.1 File Menu
Options in the File menu are designed to help send instructions to the printer and setup the workbook(s). The File menu options are described in the following sections.
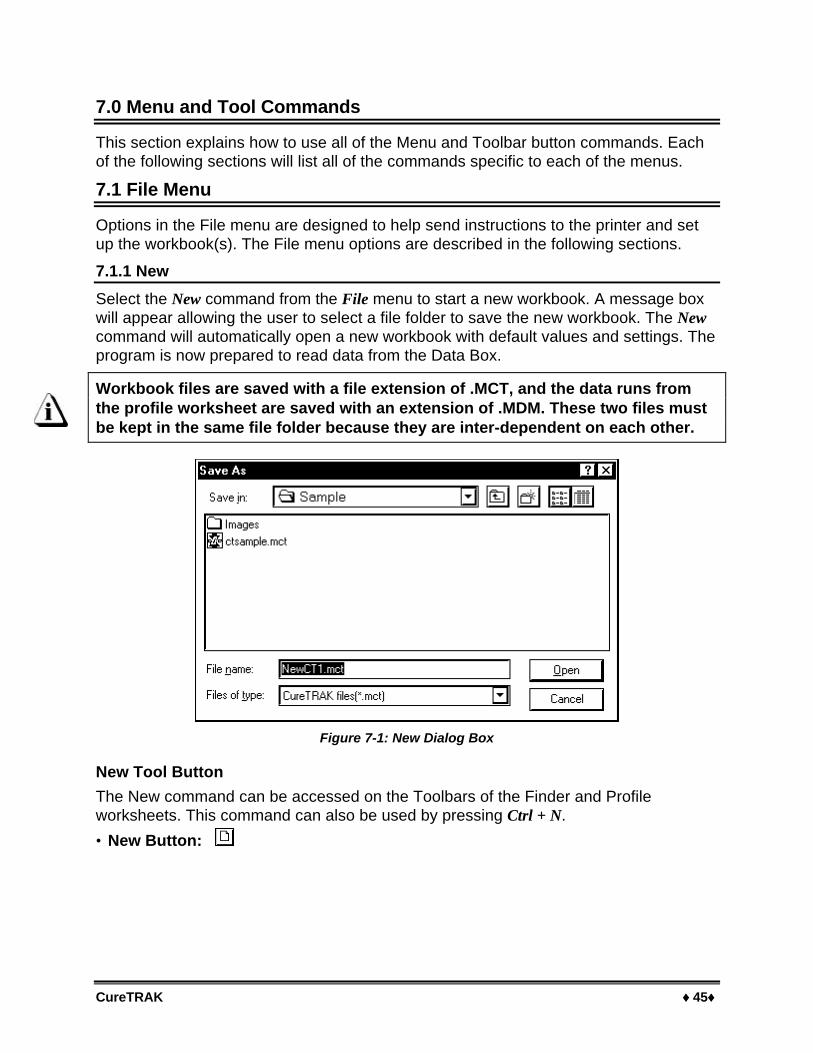
7.1.1 New
Select the New command from the File menu to start a new workbook. A message boxwill appear allowing the user to select a file folder to save the new workbook. The Newcommand will automatically open a new workbook with default values and settings. Theprogram is now prepared to read data from the Data Box.
Workbook files are saved with a file extension of .MCT, and the data runs fromthe profile worksheet are saved with an extension of .MDM. These two files mustbe kept in the same file folder because they are inter-dependent on each other.
Figure 7-1: New Dialog Box
New Tool Button
The New command can be accessed on the Toolbars of the Finder and Profileworksheets. This command can also be used by pressing Ctrl + N.
• New Button:

CureTRAK ♦♦46♦♦
7.1.2 Open
The Open command opens an existing workbook file.
Figure 7-2: Open Dialog Box
To open a workbook file:
1. Select the Open command from the File menu. A list box of workbook files withan extension of (.MCT) files will appear.
2. Highlight the desired workbook file to open by clicking.
3. Click the OK command button to open, or Cancel to return to the currentworksheet.
More than one workbook file can be open at a time and can be viewed by usingthe commands on the Window File menu (refer to section 7.5 Window Menu).
The Open command can be accessed on the Finder and Profile worksheet Toolbars.This command can also be used by pressing Ctrl + O.
• Open Button:
7.1.3 Close
Select the Close command from the File menu to close the current workbook andautomatically save all of the data and configuration changes. If there is a secondworkbook open, closing a workbook will return to the previous workbook.

CureTRAK ♦♦47♦♦
7.1.4 Save
Select the Save command from the File menu to save the current workbook file afterchanges have been made. When the user saves the file, all of the current data runsand options in the workbook are saved.
The Save command can be accessed on the Finder and Profile worksheet Toolbars.This command can also be used by pressing Ctrl + S.
• Save Button:
7.1.5 Save As
Select the Save As command from the File menu to save the current workbook with anew file name. When the user saves the file, the current appearance of the workbookand the options that have been set are saved with it.
Figure 7-3: Save As Window

CureTRAK ♦♦48♦♦
7.1.6 Save as Text Archive
Select the Save As Text Archive command from the File menu to save all of the data setsin the workbook file as a text archive with a file extension of (.CTA). This is a usefulway to save large worksheets because text archive files are much smaller than savingin workbook file format. When a data run is uploaded into the software, the softwareconverts the data to the current language, unit of temperature and distance units’configuration. The Save As Text Archive command saves the data set back to itsoriginal internal CureTRAK Data Box data format.
Figure 7-4: Save As Text Archive Window
This command is a useful for protecting all of the collected data in case the filemay accidentally get deleted or corrupted.

CureTRAK ♦♦49♦♦
7.1.7 Load Text Archive
Select the Load Text Archive command from the File menu to load a previously savedtext archive file. This command clears the currently loaded data and loads the archivefile in its place.
Figure 7-5: Load Text Archive Dialog Box
Once the Load Text Archive command has been selected, all currently loadeddata will be cleared. To avoid clearing data, load archive files into a newworkbook file.

CureTRAK ♦♦50♦♦
7.1.8 Company Info
The Company Info command has a default header of Certificate of CureConformance/ISO Document and cells to enter a company name and address. Thiscommand is also equipped with a feature to have a company logo and a picture (image)of the product placed in the header of the certificate/document.
To customize Company information:
1. Select the Company Info command from the File menu.
2. Click the cell to type in company information. Press the [enter] key or tab toanother cell to accept.
Figure 7-6: Cure Conformance Company Information

CureTRAK ♦♦51♦♦
3. Select the square cell labeled “Your Logo Here” or press the Open commandbutton to add or change a company logo. When this cell is activated a dialog boxwill appear prompting the user to choose an image file. The image filessupported by the software are Dib-(.dib), Gif (.gif), Pcx (.pcx), Tiff (.tiff), Targa(.tga), Bitmap (.bmp) and Jpeg (.jpg).
Figure 7-7: Image Dialog Box
4. To add a product picture from a digital camera, scanned photograph/artwork tothe header, repeat step three.
5. When finished customizing the header, click the OK command button to acceptthe additions/changes or click Cancel to return to the Profile worksheet withoutmaking any additions/changes.
Once an image (picture) or logo is selected, copy of that image is added to theCureTRAK “Images” folder. This allows the user to easily locate any image orlogo files.

CureTRAK ♦♦52♦♦
7.1.9 Preferences
The Preferences sub-menu commands perform custom setup tasks.
Figure 7-8: Preferences Sub-Menu
7.1.9.1 Units
The software can be configured to operate with different units of temperature.
To change Units of Temperature:
1. Select the Units command from the Preferences sub-menu.
2. Click the option button beside Fahrenheit or Celsius.
3. Click the OK command button to use the choices as the default temperatureunits or Cancel to return to the worksheet without making any changes.
Figure 7-9: Units Configuration Window

CureTRAK ♦♦53♦♦
7.1.9.2 Tag File Number
An eight-character tag is automatically assigned to the (*.MDM) portion of a data runuploaded from the Data Box. The first two characters are automatically assigned CTand the next six characters are in numerical sequence and can be specified by theuser.
To change the Tag File number sequence:
1. Select the Tag File Number command from the File menu.
2. A dialog box will appear allowing the user to enter a tag file number in the textbox, or use the number automatically assigned by the software.
Figure 7-10: Tag File Number Dialog Box
3. Click the OK command button to accept the Tag File Number or click Cancel toclose the window without changing the number.
If a tag file number is entered that currently exists, that (.MDM) file will beincremented automatically to avoid that file from being overwritten. Tag filenumbers are PC dependent not workbook file dependent.

CureTRAK ♦♦54♦♦
7.1.9.3 Configuration
The Configuration command is used to set a communication (COM) port so the PC andthe Data Box can communicate. This command is very important when the software isfirst installed or PC hardware configurations have changed.
Figure 7-11: Port Configuration Window
To configure a Com port:
1. Select the Configuration command from the File menu and the Configurationdialog box will appear.
2. Click the option button next to a COM port depending on which serial port thePC is set up for RS-232 communications.
3. Click the SET command button to use the selection as the default whenever theprogram is started.
4. Click the OK command button to use the selection for the current workbook fileor Cancel to exit without changing.

CureTRAK ♦♦55♦♦
7.1.10 Print Certification
Select the Print Certification command from the File menu to print the Certificate ofCure Conformance/ISO Document. The options that appear on the Print dialog box willdepend on the type of printer and the printer driver installed.
To print a certificate/ISO Document:
1. Select the Print Certification command from the File Menu. A standard Windowsor driver dependent print dialog box will appear.
2. Select desired print options.
Figure 7-12: Print Dialog Box
3. Click the OK command button to print the worksheet or Cancel to close the printwindow without printing.
The Print command can be accessed on the Profile worksheet Toolbar.
• Print Certification Button:
CureTRAK ♦♦56♦♦
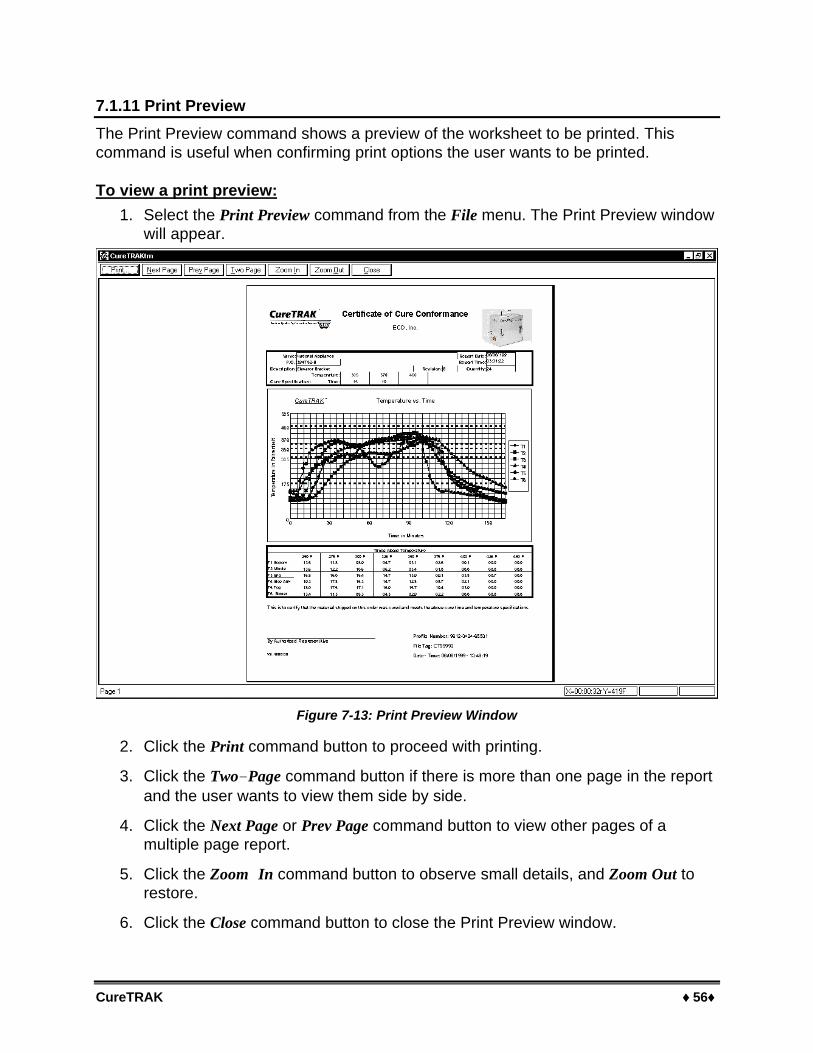
7.1.11 Print Preview
The Print Preview command shows a preview of the worksheet to be printed. Thiscommand is useful when confirming print options the user wants to be printed.
To view a print preview:
1. Select the Print Preview command from the File menu. The Print Preview windowwill appear.
Figure 7-13: Print Preview Window
2. Click the Print command button to proceed with printing.
3. Click the Two-Page command button if there is more than one page in the reportand the user wants to view them side by side.
4. Click the Next Page or Prev Page command button to view other pages of amultiple page report.
5. Click the Zoom In command button to observe small details, and Zoom Out torestore.
6. Click the Close command button to close the Print Preview window.

CureTRAK ♦♦57♦♦
7.1.12 Print
The Print command prints worksheet information from the workbook. The options thatappear on the Print dialog box will depend on the type of printer and the printer driverinstalled.
To print a worksheet:
1. Select the Print command from the File menu and a standard Windows or driver-dependent print dialog box will appear.
2. Select the desired print options.
Figure 7-14: Print Dialog Box
3. Click the OK command button to print the worksheet.
4. Click the Cancel command button to close the print window without printing.
The Print command can be accessed on the Welcome and Finder worksheet Toolbars.This command can also be used by pressing Ctrl + P
• Print Button:

CureTRAK ♦♦58♦♦
7.1.13 Exit
Select the Exit command to quit the software program and automatically save all of thedata and configuration changes.
7.1.14 Language
All of the menus and commands have been translated in five different languages.When the software is installed, a dialog box appears prompting the user to select apreferred language. After the software is installed the user can select a differentlanguage from the Languages sub-menu in the File menu.
Figure 7-15: Language Sub-Menu
Selecting a different language will not affect the Help command. Help is inenglish only.
CureTRAK ♦♦59♦♦
7.2 Edit Menu
The Edit menu commands assist the user to modify the data set on the Finderworksheet so the most beneficial data is assembled.
7.2.1 Undo
Select the Undo command to undo any previous action. For example if the filtercommand is used and then the user decides that command was not necessary, theUndo command will restore it back to its original format. Multiple undo actions can beperformed with the undo command.
The Undo command can also be used by pressing Ctrl + Z
7.2.2 Redo
Select the Redo command to restore the action made by using the Undo command. LikeUndo, the user can use Redo to restore all of the Undo actions.
The Redo command can also be used by pressing Ctrl + R
7.2.3 Remove Row
Select the Remove Row command to remove a data run row that is not wanted. Thiscommand is helpful when data has been collected and the user feels it is not beneficialto the workbook data set.
This command is permanent and the data run row can not be retrieved onceperformed. The software program will warn the user with a message box.
7.2.4 Hide Row
Select the Hide Row command to exclude a row without eliminating it completely fromthe workbook file when analyzing the uploaded data run. This command is similar to thefilter function, and is helpful when data has been collected and it may not be beneficialto the data set. To restore hidden data set row(s) click the Red Filter Reset buttonlocated on the Spreadsheet worksheet (refer to section 6.2.6 Filters).

CureTRAK ♦♦60♦♦
7.3 View Menu
The View menu commands assist the user manipulate what areas are viewed on theworksheet display.
7.3.1 Toolbar
Select the Toolbar command from the View menu to activate or deactivate the toolbar.When the Toolbar is deactivated, more of the worksheet area appears on the PCdisplay. When there is a checkmark beside the Toolbar command it is activated andwhen the checkmark is not there it is deactivated.
7.3.2 Status Bar
Select the Status bar command from the View menu to activate or deactivate the Statusbar on the bottom of the worksheets. When the Status Bar is deactivated, more of theworksheet area appears on the PC display. When there is a checkmark beside theStatus bar command it is activated and when the checkmark is not there it isdeactivated.
7.3.3 Zoom In
Select the Zoom In command from the View menu to make the current worksheet viewlarger. The Zoom In command has the capability to zoom in multiple times. When themaximum zoom level has been reached the Zoom In command will be dimmed.
The Zoom In command can be accessed on the Welcome, and Finder worksheetToolbars. This button will speed up the Zoom In process if multiple zooms are desired.
• Zoom In Button:7.3.4 Zoom Out
Select the Zoom Out command from the View menu to make the current worksheet viewsmaller. The Zoom Out command has the capability to zoom out multiple times. Whenthe minimum zoom has been reached the Zoom Out command will be dimmed.
The Zoom Out command can be accessed on the Welcome, and Finder worksheetToolbars. This button will speed up the Zoom Out process if multiple zooms aredesired.
• Zoom Out Button:7.3.5 100%
Select the 100% command from the View menu to return the worksheet to its defaultdisplay size.
The 100% command can be accessed on the Welcome, and Finder worksheetToolbars.
• 100% Button:

CureTRAK ♦♦61♦♦
7.4 CureTRAK Menu
The CureTRAK menu commands configure the Data Box for collecting data for analysisand to read it after data collection.
The Data Box must be connected to a PC and the proper communication portmust be configured to properly use the CureTRAK menu commands. Refer tosection 3.4 Configuring the Communication Port.
7.4.1 Set CureTRAK Clock
The CureTRAK Data Box has an internal clock it uses to identify the time and date ofeach data run and to control when each measurement is recorded. The clock should beset prior to data collection to ensure that the proper time was recorded.
Figure 7-16: Set CureTRAK Clock Dialog Box
CureTRAK ♦♦62♦♦
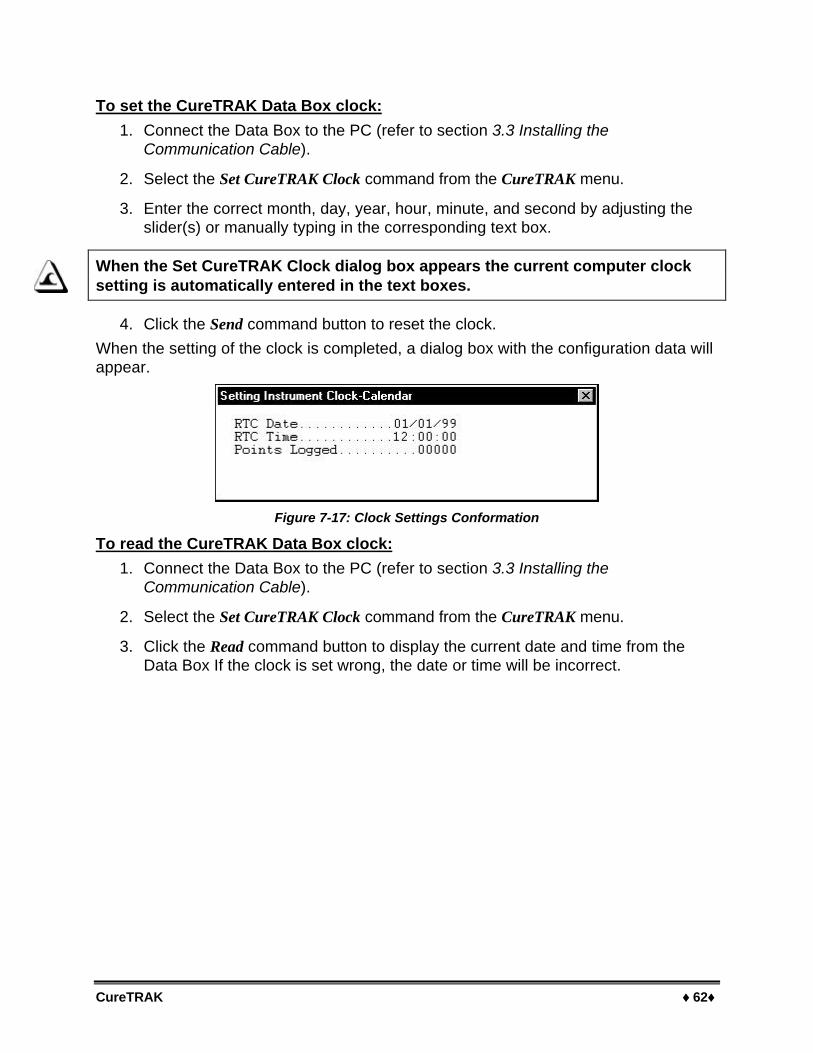
To set the CureTRAK Data Box clock:
1. Connect the Data Box to the PC (refer to section 3.3 Installing theCommunication Cable).
2. Select the Set CureTRAK Clock command from the CureTRAK menu.
3. Enter the correct month, day, year, hour, minute, and second by adjusting theslider(s) or manually typing in the corresponding text box.
When the Set CureTRAK Clock dialog box appears the current computer clocksetting is automatically entered in the text boxes.
4. Click the Send command button to reset the clock.
When the setting of the clock is completed, a dialog box with the configuration data willappear.
Figure 7-17: Clock Settings Conformation
To read the CureTRAK Data Box clock:
1. Connect the Data Box to the PC (refer to section 3.3 Installing theCommunication Cable).
2. Select the Set CureTRAK Clock command from the CureTRAK menu.
3. Click the Read command button to display the current date and time from theData Box If the clock is set wrong, the date or time will be incorrect.

CureTRAK ♦♦63♦♦
7.4.2 Read CureTRAK Data
The Read CureTRAK Data command starts the data transfer process after completingthe data collection process.
To read CureTRAK data:
1. Connect the Data Box to the PC (refer to section 3.3 Installing theCommunication Cable).
2. Select the Read CureTRAK Data command from the CureTRAK menu and astatus bar dialog box will appear indicating that data retrieval from the Data Boxhas begun.
Figure 7-18: Status Message Box
After the data is uploaded, the software will send a message to the Data Box verifyingthe time and reporting how many points were logged during the last data collectionprocess. A dialog box will then appear informing the user of this function.
Figure 7-19: Clock Verification
Once data transfer is complete, the dialog box will disappear and will return to thecurrent worksheet.
If the Data Box has not collected enough data to create a complete profile amessage box will appear (refer to Figure 7-20).
Figure 7-20: Communication Error Dialog box
The Read CureTRAK Data command can be accessed on all worksheet Toolbars.
• Read CureTRAK Data Button:
CureTRAK ♦♦64♦♦
7.5 Window Menu
The Window menu arranges opened workbook files for viewing and quick access.
7.5.1 Cascade
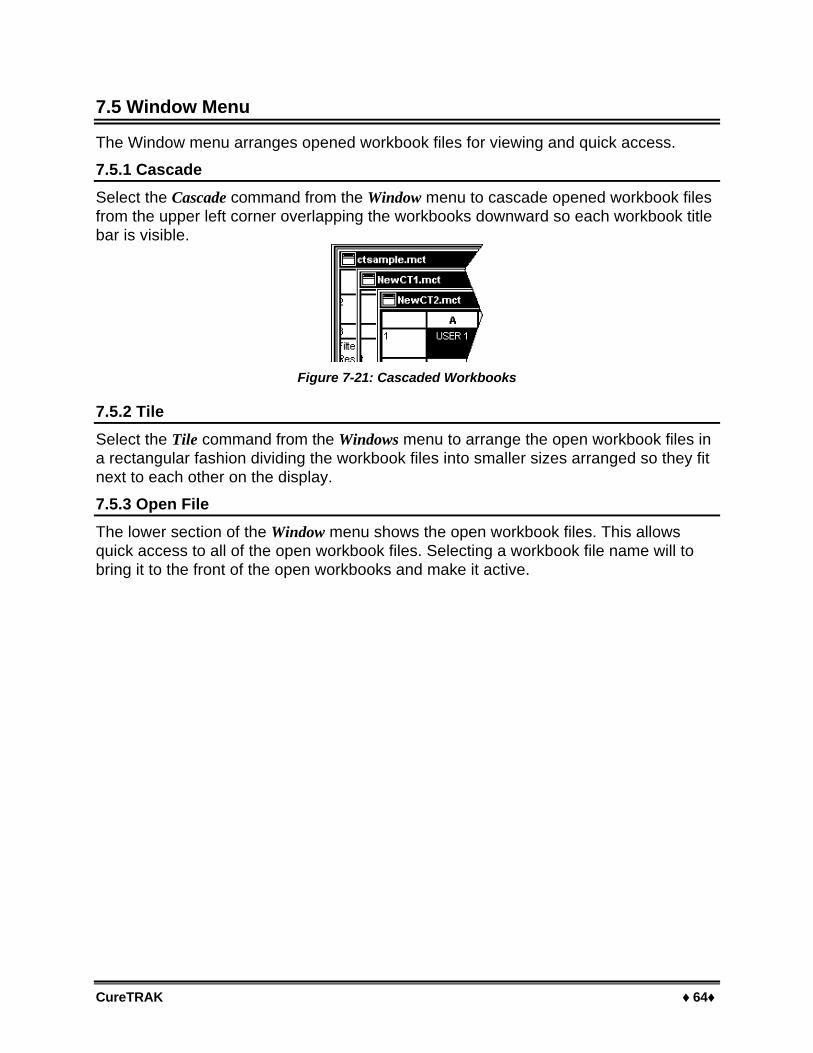
Select the Cascade command from the Window menu to cascade opened workbook filesfrom the upper left corner overlapping the workbooks downward so each workbook titlebar is visible.
Figure 7-21: Cascaded Workbooks
7.5.2 Tile
Select the Tile command from the Windows menu to arrange the open workbook files ina rectangular fashion dividing the workbook files into smaller sizes arranged so they fitnext to each other on the display.
7.5.3 Open File
The lower section of the Window menu shows the open workbook files. This allowsquick access to all of the open workbook files. Selecting a workbook file name will tobring it to the front of the open workbooks and make it active.

CureTRAK ♦♦65♦♦
7.6 Navigate Menu
When viewing data runs on the Profile worksheet, the Navigate menu allows the user toview other data runs without having to select them from the Finder worksheet. It willenable the user to view the data runs one above or one below the currently vieweddata run, or jump to the first or last data runs uploaded into the open workbook.
• Navigate ButtonsThe Navigate commands can be accessed on the Profile worksheet Toolbar.
LAST DATA RUNFIRST DATA RUN
FORWARD TONEXT DATA RUN
BACK TO PREVIOUSDATA RUN
Figure 7-22: Navigate Tool Buttons
• Navigate File Tag IndicatorWhen navigating to different data runs on the Profile worksheet to help inform the userwhich data run they are viewing, there is a file tag indicator located on the Toolbar.
Figure 7-23: File Tag Indicator

CureTRAK ♦♦66♦♦
7.7 Help Menu
The Help menu is a complete online reference tool that can be used at any time. Helpis especially useful when information is needed quickly or when this Users guide is notavailable. Help contains a description for each command or dialog box and explainsmany procedures for accomplishing common tasks.
• Index
• Using Help
• About CureTRAK
7.7.1 Index
To use Index:
1. Select the Index command from the Help menu.
2. Click a topic that is colored in green and underlined to proceed to that topic.
3. Click Search to access an alphabetical help topic search engine.
Figure 7-24: Help for CureTRAK Software

CureTRAK ♦♦67♦♦
7.7.2 Using Help
Select the Using Help command from the Help menu to display the Microsoft How toUse Help Window. This is the best way to learn about using the CureTRAK SoftwareHelp system.
Figure 7-25: Using Help Window

CureTRAK ♦♦68♦♦
7.7.3 About CureTRAK
Select About CureTRAK from the Help menu to display the software version, releasedate and company information.
Figure 7-26: About CureTRAK Window
The About command can be accessed on all of the worksheet Toolbars.
• About Button:
7.7.4 Context Help
Use the Context Help command button to obtain Help on a specific portion of thesoftware. Click the Context Help button on the Toolbar, the mouse pointer will change toan arrow and question mark. Click somewhere in the screen on any worksheet, such asanother Toolbar button. The Help information will be shown for the item clicked.
• Context Help Button:
7.7.5 Copy Button
There is a Copy Button that can be accessed on the Profile worksheet Toolbar. Thisbutton copies the entire Profile worksheet to the clipboard so it can be pasted into otherapplications.
• Copy Button:

CureTRAK ♦♦69♦♦
8.0 Service and Calibration
Service Safety Summary:WARNING
THE FOLLOWING CALIBRATION AND SERVICE INSTRUCTIONS ARE FOR USEBY QUALIFIED PERSONNEL ONLY. REFER TO THE OPERATOR’S SAFETYSUMMARY AND THE SERVICE SAFETY SUMMARY PRIOR TO PERFORMING ANYSERVICE.
General Service Information:This section covers maintaining and troubleshooting the thermocouples, software,wiring, and other parts of the system.
8.1 Service Troubleshooting
Check the appropriate section of the manual to be sure you’re following the correctprocedures. Read the READ.ME file for the latest information on the current software release.
Decide if the problem is with the Hardware or Software.
• If the problem occurs while attempting to log data, the Hardware may be faulty.
• If the problem occurs while attempting to communicate between the Data Boxand the PC, the Communications links may be faulty.
• If the problem occurs while attempting to use some other function of theCureTRAK software, the software may be faulty.
Once you have decided what item in the Kit is causing the problem, refer to thefollowing sections. Problems that are more likely or more easily corrected are listed firstin each section. Start at the top of the list and work your way down. If the problem isstill unresolved go to the section 8.3 How to Get Additional Help.

CureTRAK ♦♦70♦♦
•• Hardware Problems
This section describes problems that can occur with the Thermal barrier, Data Box orThermocouple Sensors.
Data Box will not respond to Start/Stop switch or PC software
• Low or exhausted battery: In most cases a low or exhausted causes the DataBox from responding to the PC software or Start/Stop switch. The batteries willself-discharge from one to two months if not charged periodically. When not inuse, it is best to continue to charge the Data Box. A full charge will last for a fullday (8 to 10 hours) of normal use. If the unit is to be inactive for a long period oftime (more then a week), you need not continue to charge the Data Box for thattime, but you should place the Data Box on charge one day prior to planned use.
• Data Box not reset: After the batteries have been allowed to fully discharge, itmay be necessary to reset the Data Box once it is placed on charge.
1. For older design Data Boxes, use the Rest Tool supplied to reset the Data Boxafter a few minutes of charge.
2. New design Data Boxes may be reset immediately after connecting the chargerby pressing the reset button using a pin or paper clip.
RESETBUTTON
PINRESETTOOL

CureTRAK ♦♦71♦♦
Wrong or erratic temperature readings:
• Open or intermittent thermocouple, cable, or connector: Individual channelsbeing detected as “Open” on the profile plot will indicate this. Checkthermocouples, wires and insulation, to see if the thermocouple sensor has notbecome unplugged from the thermal barrier. Inspect connectors visually fordamage or loose connections caused by pulling the thermocouple wires insteadof the connectors when removing from the barrier. Tighten all the connections.Check with an ohmmeter or millivolt meter if available, or substitute athermocouple that you know works properly.
• Shorted thermocouple, cable, or connector: This is harder to find. A shortedthermocouple connector or cable creates a new thermocouple junction at thelocation of the short; therefore actual temperatures are recorded, but probablynot the ones you wanted. If the short is intermittent, then the recordedtemperatures may jump between that of the thermocouple and that of the shortedlocation. Visually check for shorts inside of connectors and for damagedinsulation on the wires. Repair or replace any suspicious components.
• Wrong type thermocouple, connector, or wire: Wrong thermocouple typeswill give consistently wrong readings, either always high or always low. Wrongconnectors or wrong wire types (used as an extension) create extrathermocouple junctions and uncontrolled temperature offsets. Use only Type Kthermocouples, wire, and connectors.
• Thermocouple connector wired backwards: Typically causes hightemperatures to read as negative (e.g., -150°F.). Should be Yellow=Ch, Red=Al.

CureTRAK ♦♦72♦♦
• Low Battery warning charge: Charge the battery.
• Conductive contamination inside the Data Box: This is known to cause“spikes” (abrupt jumps in value) in the recorded temperatures. Other kinds oferrors are also possible. See: Calibration Verification and Troubleshooting forcleaning instructions.
• Incorrect calibration: If the recorded temperatures for all of the active channelsare wrong in the same direction (e.g., all about 5% too high), then possibly theData Box has been incorrectly re-calibrated. See the manual section“Calibration” for cautions and procedures, or return the Data Box to ECD for re-calibration.
• The Data Box never turns “ON”, and cannot be read by the software, or theLED does not illuminate while the software is attempting to read: The batterymay be dead or physically damaged. Return the Data Box to ECD for service.
• The Data Box never turns on, but the software can read the Data Box data:The start switch is defective. Return to ECD for service.
• Internal temperature effects: If the Data Box has been subjected to an internaltemperature in excess of the published specifications. Temperatures outside thespecified operating range may cause incorrect readings and shorten power packlife. Internal temperatures in excess of the specified maximum temperaturemay cause permanent, irreparable damage to your Data Box.
If the internal temperature of the Data Box exceeds 80°C (far exceeding themaximum warranted internal temperature of 65°C), it stops logging, saves thecurrent data, and shuts down. If the high temperature did not damage the DataBox, you can recover the data.

CureTRAK ♦♦73♦♦
•• Communication/Software Problems
• “Instrument not responding” and/or “Communication error” messages: Trytriggering the Data Box switch. If you cannot get the LED to flash, you have ahardware problem with the Data Box itself. Hardware Problems. If you canactivate the Data Box with the switch, check for the following:
1. Wrong PC port. Cable must be connected to a COM port, whichever wasselected on the “Software Configuration” screen.
2. Conflicting use of COM port. Perhaps some other software, such as a mousedriver or communications program, is trying to use the COM port.
3. Cable defective. Order a spare or replacement cables from ECD; seeOptional Accessories.
4. Internal battery is very weak, charge the battery.
5. Data Box is damaged. Return it to ECD for service.
• Cable or port problems: Refer to “Instrument not responding” error, above.
• “Profile data for this run is unavailable” error message in Data graph on theProfile worksheet: Workbook files are saved as .MCT and the profile data fromthe profile worksheet is saved as .MDM. You must not separate these intodifferent file folders, because they are dependent on each other.

CureTRAK ♦♦74♦♦
•• Calibration
Because the Data Box is made with precision components with high temperaturestability and tight tolerances, the analog-to-digital converter remains stable for years.High quality components together with software algorithms based on the IPTS-68
standard for Type K thermocouples have been provided to yield the specified accuracyand long-term stability. Each unit is tested at the factory before it is shipped.
Depending on use, however, the temperature accuracy should be periodically verifiedusing a suitable temperature standard. Any observed inaccuracies are probably notcaused by calibration error but by any one of a number of other sources, primarily thefollowing:
1. Poor thermocouple connections or open thermocouples.
2. Using a standard that is inaccurate or one not traceable to the nationalstandards agency, such as the National Institute of Standards and Technology(NIST, formerly the Nation Bureau of Standards) in the USA.
• Check the accuracy of your standard and that it is traceable to NIST. Be surethat you're using Type K thermocouple wire connected to the standard. Be surethat your standard is cold-junction compensated, or use an ice-point reference.
3. Extremely low battery charge.
• Recharge the Data Box battery. Refer to section 3.1 Charging the Data BoxBattery.
4. Sudden changes in ambient temperature.
• Allow Data Box to stabilize for 1/2 hour before calibration.If after checking these possible sources of inaccuracy the Data Box still needs to be calibrated, thereare two calibration methods: one using a thermocouple simulator and one using a voltage referenceand an ice point reference.
Do not attempt to calibrate the Data Box if you have never used a thermocouplesimulator, or you are unsure of the accuracy of your thermocouple simulator.(Contact ECD for the proper calibration procedure).
Please contact ECD technical support to request a Return Merchandise Authorizationfor your calibration.
IPTS-68* - International Practical Temperature Scale of 1968

CureTRAK ♦♦75♦♦
8.2 CureTRAK Cleaning Instructions
The product must never be immersed in water or any other cleaning agent. Simply wipeoff the exterior of the enclosure with a cloth dampened with a mild, water-basedcleaning solution. To prevent damage, do not clean the product using organic solvents,caustic or corrosive solutions, or abrasive cleansers. Do not allow any cleaning solutionto penetrate the enclosure.
8.3 How to Get Additional Help
If you still have problems, let us help you. Contact ECD test or service technicians sowe can walk you through various tests.
Here is the information on how to contact ECD:
Technical Support: (800) 323-4548FAX: (503) 659-4422Email: [email protected]: http://www.ecd.com

CureTRAK ♦♦76♦♦
APPENDIX A: Specifications
•• Thermal Barrier
Mechanical:Weight: 15.9 lbs. (7.2kg)
Physical Dimensions: Length: 10.5” (26.7cm)Height: 10.25” (26cm)Width: 8” (20.3)
Figure A-1: Thermal Barrier Exterior Dimensions

CureTRAK ♦♦77♦♦
Environmental:Temperature: 475°F (246°C)Operating time: 40 minutes (starting with barrier at room temperature).
CureTRAK CT3C & CT6C Armor Chart
100
150
200
250
300
350
400
450
500
30 45 60 75 90 105 120 135 150
Time (min)
Tem
p (
*F)

CureTRAK ♦♦78♦♦
•• Data Box
Electrical/Mechanical:Weight: 9.1 ounces
Physical Dimensions: Length: 4.125 in (10.5cm)Height: 1.125 in (2.9cm)Width: 3.25 in (8.3cm)
Power: International Rechargeable Battery:Nickel-Metal-Hydride (NiMH), 6V, 200mA-hour,Part Number: F30-2873-10.
Charge Time: 14 hoursExpected Battery Life: up to 300 to 400 charging cyclesAverage number of data runs per battery charge: 10 runs
Charger: North AmericanInput: 120 VAC, 60 HzOutput: 9VDC, 120mA
Continental EuropeanInput: 230 VAC, 50HzOutput: 9 VDC, 120 mA
Temperature Accuracy: T/C Sensor: (standard limits of error) ±4°F (2.2°C)CJC Sensor: ±4.5°F (2.5°C) absoluteA/D System: ±0.3°F (0.17°C)Conformity to IPTS-68: ±0.1°F (0.06°C)Channel to Channel: ±1.8°F (1°C)Calibration points: 212°F (100°C) and 1832°F (1000°C)Resolution:
Displayed: 1°F (1°C)Calculation: 0.1°F
Range: 0°F - 1832°F (-18°C - 1000°C)
Time Accuracy: Time base: .02% of totalResolution: (Log rate) 6 seconds
Data Capacity: 1200 Data points @ 6-second intervals for 2 hours.
IPTS-68 (International Practical Temperature Scale of 1968)

CureTRAK ♦♦79♦♦
Environmental:Temperature (operating): 32°F to 122°F (0°C to 50°C).Temperature (Warranteed):150°F (65°C) Maximum. The Data Box automatically
stops logging when the internal temperature exceeds a safe level.
Operating time: Dependent on Thermal Barrier. See Thermal Barrier Specifications.

CureTRAK ♦♦80♦♦
APPENDIX B: Menus & Toolbar Buttons
•• Menus
Active menus for the Welcome Worksheet:
Active menus for the Finder Worksheet:
Active menus for the Profile Worksheet:

CureTRAK ♦♦81♦♦
•• Toolbar Icons
Back (To Previous Data Run) OpenContext Help Print
Copy Read CureTRAK DataFirst (Data Run) SaveLast (Data Run) Zoom 100%Next (Data Run) Zoom InNew Zoom Out

CureTRAK ♦♦82♦♦
APPENDIX C: Options and Accessories
CureTRAK Accessories and Value Added Options
Accessories Part NumberData Box Battery Charger, 120V (North American) SE38-2873-25Data Box Battery Charger, 230V (Continental Europe) SE38-2873-21Heat Sink Blocks (Set of 2) SE38-2873-62RS-232 Data Cable (9 & 25 pin Connectors & Cable) SE28-0050-25Kapton Tape Roll (5/8” x 108ft) SG10-0021-00-1Hi-Temp Gloves (2000°F) SE38-2873-88
ThermocouplesThermocouples, three 0.02”, Type “K” (6ft) SE38-2873-63Thermocouples, six 0.02”, Type “K” (6ft) SE38-2873-66Thermocouples, six 0.02”, Type “K” (6ft) Inconel Overbraid 900°F SE38-2873-87Ambient “Clamp On” Sensor, Type “K” SE31-0290-61Surface “Clamp On” Sensor, Type “K” SE31-0290-62Ambient “Magnet” Sensor, Type “K” SE31-0290-63Surface “Magnet” Sensor, Type “K” SE31-0290-64Thermocouple Extension, three, Type K (6’) SE38-2873-64Thermocouple Value Pack: SE38-2873-60• Set of three 0.02”, Type “K” (6ft)• Ambient “Clamp On” Sensor, Type “K”• Ambient “Magnet” Sensor, Type “K”• Surface “Clamp On” Sensor, Type “K”• Surface “Magnet” Sensor, Type “K”• Kapton Tape Roll (5/8” x 108ft)
Manuals & SoftwareCureTRAK Cure Conformance Software Kit SE38-2873-03CureTRAK Operation Manual SA38-2873-00CureTRAK Quick Reference Guide SA38-2873-06SourceTRAK Systems Profiling Software Kit SE37-4286-03
Preferred Service Option• Product warranty, (Doubled from 1 year to 2) SZ00-2873-00
Guaranteed 2 business day turn-around on allrepair/calibration procedures.
• One free preventative maintenance/calibrationservice procedure including new Data boxrechargeable battery.
• 15% discount off all CureTRAK accessories for• 2 years after instrument purchase


