Embed Size (px)
Citation preview
Operating Instructions
Copy/Document ServerReference
this machine and keep it handy for future reference. For safe and correct use, be sure to read th before using the machine.
Placing Originals
Copying
Connect Copy
Document Server
Appendix
1
2
3
4
5
Read this manual carefully before you use eSafety Information in "About This Machine"
Introduction
This manual contains detailed instructions and notes on the operation and use of this machine. For yoursafety and benefit, read this manual carefully before using the machine. Keep this manual in a handyplace for quick reference.
Important
Contents of this manual are subject to change without prior notice. In no event will the company be li-able for direct, indirect, special, incidental, or consequential damages as a result of handling or oper-ating the machine.
Notes:
Some illustrations in this manual might be slightly different from the machine.
Certain options might not be available in some countries. For details, please contact your local dealer.
Caution:
Use of controls or adjustments or performance of procedures other than those specified in this manualmight result in hazardous radiation exposure.
Notes:
The model names of the machines do not appear in the following pages. Check the type of your ma-chine before reading this manual. (For details, see “Machine Types”, About This Machine.)
• Type 1: 8055/DSm755/LD255/Aficio MP 5500
• Type 2: 8065/DSm765/LD265/Aficio MP 6500
• Type 3: 8075/DSm775/LD275/Aficio MP 7500
Certain types might not be available in some countries. For details, please contact your local dealer.
Two kinds of size notation are employed in this manual. With this machine refer to the inch version.
For good copy quality, the supplier recommends that you use genuine toner from the supplier.
The supplier shall not be responsible for any damage or expense that might result from the use of partsother than genuine parts from the supplier with your office products.
i
Manuals for This Machine
Refer to the manuals that are relevant to what you want to do with the machine.
❖ About This MachineBe sure to read the Safety Information in this manual before using the machine.This manual provides an introduction to the functions of the machine. It alsoexplains the control panel, preparation procedures for using the machine,how to enter text, and how to install the CD-ROMs provided.
❖ General Settings GuideExplains User Tools settings, and Address Book procedures such as register-ing, e-mail addresses, and user codes. Also refer to this manual for explana-tions on how to connect the machine.
❖ TroubleshootingProvides a guide to solving common problems, and explains how to replacepaper, toner, staples, and other consumables.
❖ Security ReferenceThis manual is for administrators of the machine. It explains security func-tions that the administrators can use to protect data from being tampered, orprevent the machine from unauthorized use. Also refer to this manual for theprocedures for registering administrators, as well as setting user and admin-istrator authentication.
❖ Copy/Document Server ReferenceExplains Copier and Document Server functions and operations. Also refer tothis manual for explanations on how to place originals.
❖ Printer ReferenceExplains Printer functions and operations.
❖ Scanner ReferenceExplains Scanner functions and operations.
❖ Network GuideExplains how to configure and operate the machine in a network environ-ment, and use the software provided.This manual covers all models, and includes descriptions of functions andsettings that might not be available on this machine. Images, illustrations, andinformation about operating systems that are supported might also differslightly from those of this machine.

ii
❖ Other manuals• PostScript3 Supplement• UNIX Supplement• Manuals for DeskTopBinder Lite
• DeskTopBinder Lite Setup Guide• DeskTopBinder Introduction Guide• Auto Document Link Guide
Note❒ Manuals provided are specific to machine types.❒ Adobe Acrobat Reader/Adobe Reader must be installed in order to view the
manuals as PDF files.❒ For “UNIX Supplement”, please visit our Web site or consult an authorized
dealer.❒ “PostScript3 Supplement” and “UNIX Supplement” include descriptions of
functions and settings that might not be available on this machine.

iii
What You Can Do with This Machine
Functions differ depending on machine type and options.
Referencep.3 “Functions Requiring Optional Configurations”
Types of Duplex Copies
❖ 1-sided 2 Pages → 2-sided 1 PageSee p.70 “Duplex”.
❖ 2-sided 1 Page → 2-sided 1 PageSee p.70 “Duplex”.
❖ 1-sided 4 Pages → 2-sided 1 PageSee p.77 “Two-Sided Combine”.
GCBOOK0E
iv
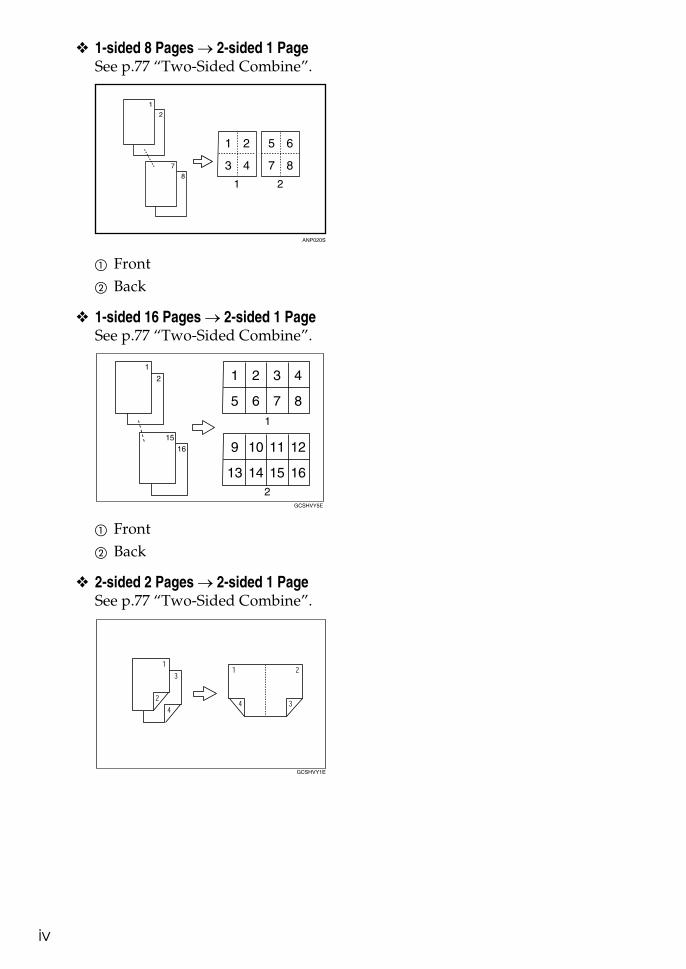
❖ 1-sided 8 Pages → 2-sided 1 PageSee p.77 “Two-Sided Combine”.
A FrontB Back
❖ 1-sided 16 Pages → 2-sided 1 PageSee p.77 “Two-Sided Combine”.
A FrontB Back
❖ 2-sided 2 Pages → 2-sided 1 PageSee p.77 “Two-Sided Combine”.
ANP020S
GCSHVY5E
GCSHVY1E
v
❖ 2-sided 4 Pages → 2-sided 1 PageSee p.77 “Two-Sided Combine”.
A FrontB Back
❖ 2-sided 8 Pages → 2-sided 1 PageSee p.77 “Two-Sided Combine”.
A FrontB Back
❖ Bound Originals → 2-sided PagesSee p.82 “Booklet/Magazine”.
GCSHVY2E
GCSHVY6E
vi
❖ Front/Back Bound → Originals 2-sided PagesSee p.82 “Booklet/Magazine”.
❖ Mix 1 & 2 SidedSee p.88 “Mix 1 & 2 Sided”.
Copying Book Originals
❖ 1-sided 4 Pages → BookletSee p.82 “Booklet/Magazine”.• Open to left
GCKONZ0J
GCBOOK0E

vii
• Open to right
❖ 2-sided 2 Pages → BookletSee p.82 “Booklet/Magazine”.• Open to left
• Open to right
❖ 1-sided → MagazineSee p.82 “Booklet/Magazine”.• Open to left
GCBOOK1E
GCAH010E
GCAH020E
GCBOOK3E

viii
• Open to right
❖ 2-sided → MagazineSee p.82 “Booklet/Magazine”.• Open to left
• Open to right
GCBOOK4E
GCAH030E
GCAH040E
ix
Combining Multiple Pages onto a Single Page
See p.74 “One-Sided Combine”.
❖ 1-sided 2 Pages → 1-sided 1 Page
❖ 1-sided 4 Pages → 1-sided 1 Page
❖ 1-sided 8 Pages → 1-sided 1 Page
GCSHVY7E
GCSHVY8J
GCSHVY3J

x
❖ 2-sided 1 Page → 1-sided 1 Page
❖ 2-sided 2 Pages → 1-sided 1 Page
❖ 2-sided 4 Pages → 1-sided 1 Page
GCSHVYOJ
GCSHVYBJ
GCSHVY4J
xi
Copying Originals Such as Books
❖ Bound Originals → 1-sided PagesSee p.80 “Series Copies”.
❖ Bound Originals → 2-sided PagesSee p.82 “Booklet/Magazine”.
❖ Front/Back Bound Originals → 2-sided PagesSee p.82 “Booklet/Magazine”.
CP2B0100
xii
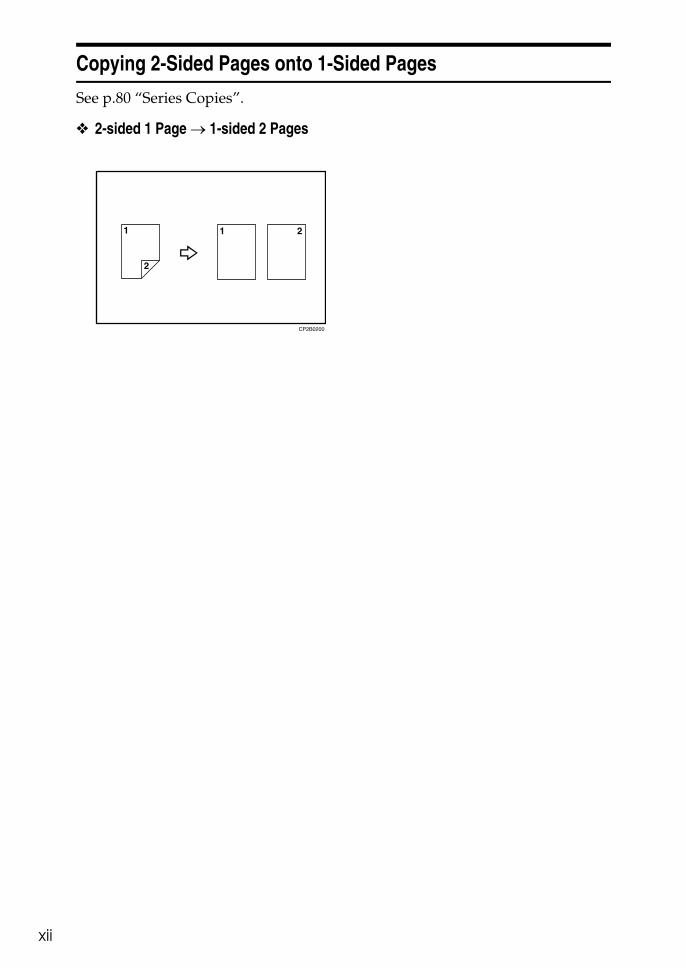
Copying 2-Sided Pages onto 1-Sided Pages
See p.80 “Series Copies”.
❖ 2-sided 1 Page → 1-sided 2 Pages
CP2B0200
xiii
TABLE OF CONTENTSManuals for This Machine ...................................................................................... iWhat You Can Do with This Machine.................................................................. iii
Types of Duplex Copies ............................................................................................ iiiCopying Book Originals............................................................................................. viCombining Multiple Pages onto a Single Page ......................................................... ixCopying Originals Such as Books............................................................................. xiCopying 2-Sided Pages onto 1-Sided Pages........................................................... xii
Notice ......................................................................................................................1How to Read This Manual .....................................................................................2
Symbols .....................................................................................................................2Functions Requiring Optional Configurations....................................................3Display Panel..........................................................................................................4
Simplified Display.......................................................................................................5User Tools Menu (Copier and Document Server Features) ...............................6
1. Placing Originals
Originals ...............................................................................................................11Sizes and Weights of Recommended Originals.......................................................11
Originals not recommended for the Auto Document Feeder (ADF) ......................12Sizes Detectable by the Auto Paper Select .............................................................13
Sizes difficult to detect...........................................................................................14Missing Image Area .................................................................................................15
Placing Originals..................................................................................................16Original Orientation ..................................................................................................16Placing Originals on the Exposure Glass.................................................................18Placing Originals in the Auto Document Feeder ......................................................18Batch mode ..............................................................................................................20SADF mode..............................................................................................................21Mixed size mode ......................................................................................................22Original size .............................................................................................................23
Regular sizes.........................................................................................................23Custom sizes .........................................................................................................24
2. Copying
Basic Procedure...................................................................................................25Interrupt Copy ..........................................................................................................26Left Original Beeper .................................................................................................27Copy Face Up ..........................................................................................................27Copying onto Tab Stock...........................................................................................28Auto Start .................................................................................................................30Job Preset ................................................................................................................31
Job List .................................................................................................................32Job List screen .........................................................................................................32Checking jobs in the print queue..............................................................................33Changing the order of jobs.......................................................................................34Holding print jobs .....................................................................................................34Deleting jobs ............................................................................................................35Checking Job History ...............................................................................................35
xiv
Copying from the Bypass Tray...........................................................................36When copying onto Regular Size Paper ..................................................................38When copying onto Custom Size Paper ..................................................................39When copying onto OHP Transparencies................................................................40When copying onto Thick Paper ..............................................................................41
Copier Functions .................................................................................................42Adjusting Copy Image Density .................................................................................42
Auto image density ................................................................................................42Manual image density............................................................................................43Combined auto and manual image density ...........................................................43
Selecting the Original Type Setting..........................................................................44Selecting Copy Paper ..............................................................................................45
Auto Paper Select..................................................................................................46Manual Paper Select .............................................................................................46
Preset Reduce/Enlarge ............................................................................................47Create Margin function ..........................................................................................49
Zoom........................................................................................................................49To select the ratio with [o] and [n] .....................................................................50To enter the ratio with the number keys ................................................................50
Auto Reduce/Enlarge ...............................................................................................51Size Magnification ....................................................................................................52Directional Magnification (%) ...................................................................................53
To enter the ratio with the number keys ................................................................54To specify a ratio with [o] and [n] ......................................................................54
Directional Size Magnification (inch) ........................................................................55Sort...........................................................................................................................57
Sample copy..........................................................................................................59Changing the Number of Sets ...............................................................................60
Stack ........................................................................................................................60Staple .......................................................................................................................61Punch .......................................................................................................................64Z-fold ........................................................................................................................66
Using the Z-fold Support Tray ...............................................................................67Z-fold positions and Z-folding Copies ....................................................................69
Duplex ......................................................................................................................70Originals and copy orientation ...............................................................................73
One-Sided Combine.................................................................................................74Two-Sided Combine.................................................................................................77Series Copies...........................................................................................................80Booklet/Magazine.....................................................................................................823 Edges Full Bleed ...................................................................................................87Mix 1 & 2 Sided ........................................................................................................88Scanning Position ....................................................................................................89Margin Adjustment ...................................................................................................91Erase........................................................................................................................92
Border Erase (same width)....................................................................................94Border Erase (different width)................................................................................95Center Erase .........................................................................................................96Center/Border Erase (same width) ........................................................................97Center/Border Erase (different width)....................................................................98Inside Erase...........................................................................................................99Outside Erase......................................................................................................100
Background Numbering .........................................................................................101

xv
Preset Stamp .........................................................................................................102Changing the stamp position, size and density ...................................................104
User Stamp ............................................................................................................104Changing the user stamp position .......................................................................106To program the user stamp .................................................................................107To delete the user stamp.....................................................................................109
Date Stamp ............................................................................................................110To change the format of date ..............................................................................112To change the date stamp position .....................................................................112
Page Numbering ....................................................................................................113Changing the stamp position ...............................................................................115Specifying the first printing page and start number
(“P1,P2...”, “-1-,-2-...”, “P.1,P.2...”, “1,2...”) ........................................................115Specifying the first printing page and start number (“1/5,2/5…”).........................117Specifying the first printing page and start number (“1-1,1-2…”) ........................118
Stamp Text.............................................................................................................119Changing the stamp position ...............................................................................120
Image Repeat.........................................................................................................121Double Copies........................................................................................................122Centering................................................................................................................124Positive/Negative ...................................................................................................125Covers....................................................................................................................126Designate ...............................................................................................................128Chapters.................................................................................................................129Blank Slip Sheets ...................................................................................................130Slip Sheets .............................................................................................................132
Storing Originals in the Document Server ......................................................134Programs ............................................................................................................136
Storing a Program..................................................................................................136Changing a Stored Program ..................................................................................137Deleting a Program ................................................................................................138Recalling a Program...............................................................................................138Programming Defaults in Initial Display .................................................................139
3. Connect Copy
What is Connect Copy?.....................................................................................141How It Works..........................................................................................................142
Machine Types and Options................................................................................142Interrupt Copy......................................................................................................142Before You Start ..................................................................................................143
Connect Copy Display Panel ............................................................................144Display panel of the sub-machine ..........................................................................145
Using Connect Copy..........................................................................................146Order of Copy Output.............................................................................................149
Auto Reset when using Connect Copy................................................................150Auto Off ...............................................................................................................150
Exiting Connect Copy.............................................................................................150Copying Stored Documents Using Connect Print ..................................................151
Using Job Preset in Connect Copy ..................................................................153
xvi
Connect Copy Job Flow....................................................................................155When One of the Two Machines is Idle .................................................................155
Using the idle machine as the main machine (Connect Copy)............................156Using the machine currently copying as the main machine (Connect Copy: Job Preset)....157
When Both Machines are in Use............................................................................157When both machines are copying the same number of originals
(Connect Copy: Job Preset) ..............................................................................158When one machines is copying a larger number of originals (Connect Copy: Job Preset) ...159
4. Document Server
Relationship between Document Server and Other Functions .....................161Document Server Display ......................................................................................162Simplified Display...................................................................................................163Preview Display......................................................................................................164
Using the Document Server..............................................................................166Storing Data ...........................................................................................................166
To register or change a user name (When using a user name registered to the Address Book)..............................168
To register or change a user name (When using a user name not registered to the Address Book)........................169
To register or change a user name (When no name is registered to the Address Book)..........................................170
To change a file name.........................................................................................170To set or change a Password..............................................................................171
Changing User Name, File Name or Password of a Stored Document .................172Checking the Details of a Stored Document ..........................................................173Searching for a Stored Document..........................................................................174
To search by file name ........................................................................................174To search by user name......................................................................................175
Printing a Stored Document ...................................................................................176When Interrupting Printing...................................................................................177Changing Number of Print Copies while Printing is in Progress..........................178Sample Print ........................................................................................................178Printing the First Page .........................................................................................179Printing a Specified Page ....................................................................................180Printing a Specified Range..................................................................................181
Deleting a Document..............................................................................................182Displaying a Document in Document Server with Web Image Monitor..................183Downloading Stored Documents............................................................................184
5. Appendix
Function Compatibility ......................................................................................185Supplementary Information ..............................................................................187
INDEX....................................................................................................... 203

1
Notice
Do not copy or print any item for which reproduction is prohibited by law.Copying or printing the following items is generally prohibited by local law:bank notes, revenue stamps, bonds, stock certificates, bank drafts, checks, pass-ports, driver's licenses.The preceding list is meant as a guide only and is not inclusive. We assume noresponsibility for its completeness or accuracy. If you have any questions con-cerning the legality of copying or printing certain items, consult with your legaladvisor.Some illustrations in this manual might be slightly different from the machine.
2
How to Read This Manual
Note❒ For proper use of this product, be sure to read About This Machine first.❒ Supplementary information about the copier mode is described in “Supple-
mentary Information”.
Referencep.187 “Supplementary Information”
Symbols
This manual uses the following symbols:
Indicates important safety notes.Ignoring these notes could result in serious injury or death. Be sure to read these notes.They can be found in the “Safety Information” section of About This Machine.
Indicates important safety notes.Ignoring these notes could result in moderate or minor injury, or damage to themachine or to property. Be sure to read these notes. They can be found in the“Safety Information” section of About This Machine.
Indicates points to pay attention to when using the machine, and explanationsof likely causes of paper misfeeds, damage to originals, or loss of data. Be sureto read these explanations.
Indicates supplementary explanations of the machine's functions, and instruc-tions on resolving user errors.
This symbol is located at the end of sections. It indicates where you can find fur-ther relevant information.[ ]Indicates the names of keys that appear on the machine's display panel.{ }Indicates the names of keys on the machine's control panel.

3
Functions Requiring Optional Configurations
Certain functions require special machine configuration and extra options as follows.Copying onto the Tab Stock: Tab sheet fenceStack: 3,000Sheet-50Sheet Staple Finisher, booklet finisher, or 3,000Sheet-100Sheet Staple FinisherStaple: 3,000Sheet-50Sheet Staple Finisher, booklet finisher, or 3,000Sheet-100Sheet Staple FinisherStaple (Saddle Stitch): booklet finisherPunch: 3,000Sheet-50Sheet Staple Finisher, booklet finisher, or 3,000Sheet-100Sheet Staple FinisherZ-fold: booklet finisher or 3,000Sheet-100Sheet Staple Finisher, with Z-foldingunitConnect Copy: Copy Connector

4
Display Panel
The function items displayed serve as selector keys. You can select or specify anitem by lightly pressing them.When you select or specify an item on the display panel, it is highlighted like
. Keys appearing as cannot be used.
❖ Initial copy display
1. Original function, Image Densityand Special Original function.
2. Operational status and messages.
3. You can register up to three frequent-ly used reduce/enlarge ratios other thanthe fixed reduce/enlarge ratios. See“Reproduction Ratio”, General Set-tings Guide.
4. Numbers of originals scanned intomemory, copies set, and copies made.
5. Displays contents of the shortcutkeys. You can register frequentlyused functions in these keys. See“General Features”, General SettingsGuide.
6. Sort, Stack, Staple, Punch, Z-foldfunctions.
7. Displays available functions. Pressa function name to display its menu.For example, press [Reduce / Enlarge]to switch the Reduce/Enlarge menu.
8. A clip mark indicates the current-ly selected function.
ANP078S

5
Simplified Display
This section explains how to switch to the simplified display.When you press the {Simplified Display} key, the screen changes from the initialdisplay to the simplified display.Letters and keys are displayed at a larger size, making operations easier.
❖ Example of a simplified display
1. [Key Color]Press to change the key color and increasethe brightness of the display panel.
Note❒ To return to the initial display, press the {Simplified Display} key again.❒ Certain keys do not appear on the simplified display.
ANP057S
ANP079S
6
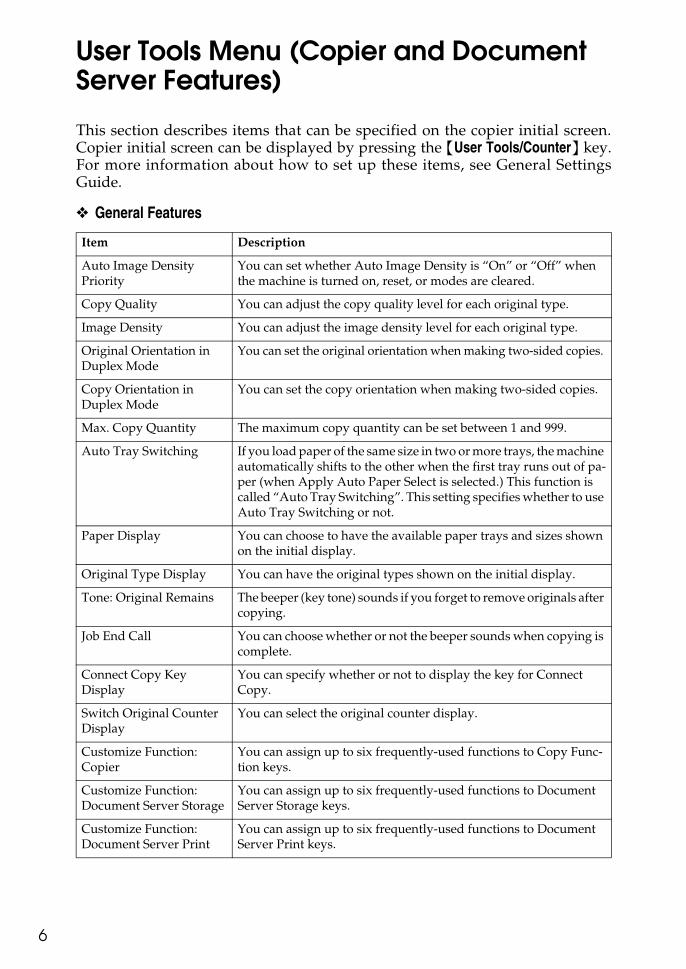
User Tools Menu (Copier and Document Server Features)
This section describes items that can be specified on the copier initial screen.Copier initial screen can be displayed by pressing the {User Tools/Counter} key.For more information about how to set up these items, see General SettingsGuide.
❖ General Features
Item Description
Auto Image Density Priority
You can set whether Auto Image Density is “On” or “Off” when the machine is turned on, reset, or modes are cleared.
Copy Quality You can adjust the copy quality level for each original type.
Image Density You can adjust the image density level for each original type.
Original Orientation in Duplex Mode
You can set the original orientation when making two-sided copies.
Copy Orientation in Duplex Mode
You can set the copy orientation when making two-sided copies.
Max. Copy Quantity The maximum copy quantity can be set between 1 and 999.
Auto Tray Switching If you load paper of the same size in two or more trays, the machine automatically shifts to the other when the first tray runs out of pa-per (when Apply Auto Paper Select is selected.) This function is called “Auto Tray Switching”. This setting specifies whether to use Auto Tray Switching or not.
Paper Display You can choose to have the available paper trays and sizes shown on the initial display.
Original Type Display You can have the original types shown on the initial display.
Tone: Original Remains The beeper (key tone) sounds if you forget to remove originals after copying.
Job End Call You can choose whether or not the beeper sounds when copying is complete.
Connect Copy Key Display
You can specify whether or not to display the key for Connect Copy.
Switch Original Counter Display
You can select the original counter display.
Customize Function: Copier
You can assign up to six frequently-used functions to Copy Func-tion keys.
Customize Function: Document Server Storage
You can assign up to six frequently-used functions to Document Server Storage keys.
Customize Function: Document Server Print
You can assign up to six frequently-used functions to Document Server Print keys.
7
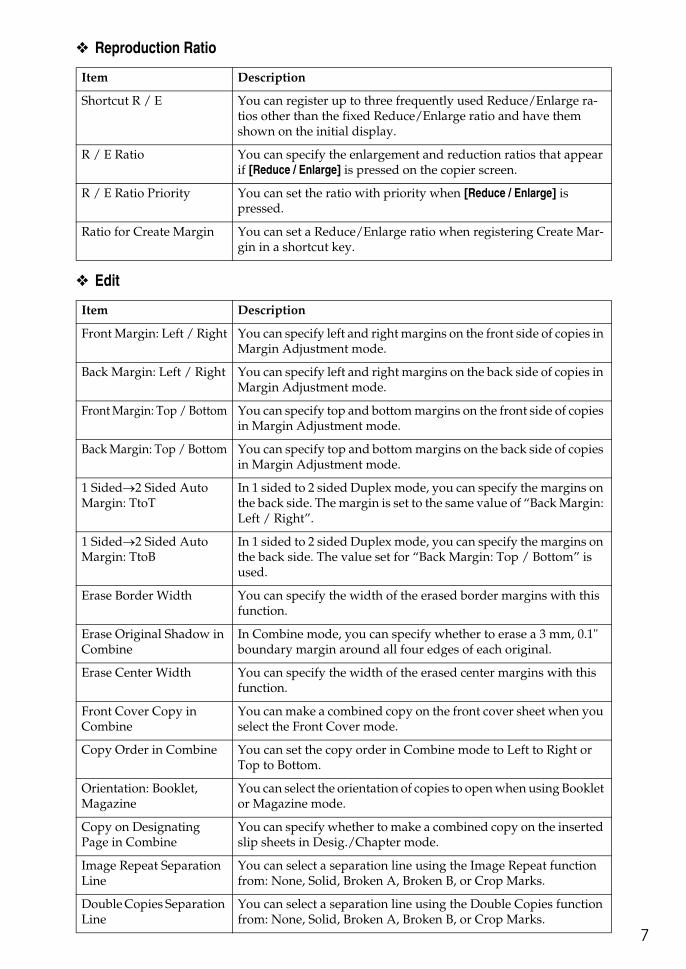
❖ Reproduction Ratio
❖ Edit
Item Description
Shortcut R / E You can register up to three frequently used Reduce/Enlarge ra-tios other than the fixed Reduce/Enlarge ratio and have them shown on the initial display.
R / E Ratio You can specify the enlargement and reduction ratios that appear if [Reduce / Enlarge] is pressed on the copier screen.
R / E Ratio Priority You can set the ratio with priority when [Reduce / Enlarge] is pressed.
Ratio for Create Margin You can set a Reduce/Enlarge ratio when registering Create Mar-gin in a shortcut key.
Item Description
Front Margin: Left / Right You can specify left and right margins on the front side of copies in Margin Adjustment mode.
Back Margin: Left / Right You can specify left and right margins on the back side of copies in Margin Adjustment mode.
Front Margin: Top / Bottom You can specify top and bottom margins on the front side of copies in Margin Adjustment mode.
Back Margin: Top / Bottom You can specify top and bottom margins on the back side of copies in Margin Adjustment mode.
1 Sided→2 Sided Auto Margin: TtoT
In 1 sided to 2 sided Duplex mode, you can specify the margins on the back side. The margin is set to the same value of “Back Margin: Left / Right”.
1 Sided→2 Sided Auto Margin: TtoB
In 1 sided to 2 sided Duplex mode, you can specify the margins on the back side. The value set for “Back Margin: Top / Bottom” is used.
Erase Border Width You can specify the width of the erased border margins with this function.
Erase Original Shadow in Combine
In Combine mode, you can specify whether to erase a 3 mm, 0.1" boundary margin around all four edges of each original.
Erase Center Width You can specify the width of the erased center margins with this function.
Front Cover Copy in Combine
You can make a combined copy on the front cover sheet when you select the Front Cover mode.
Copy Order in Combine You can set the copy order in Combine mode to Left to Right or Top to Bottom.
Orientation: Booklet, Magazine
You can select the orientation of copies to open when using Booklet or Magazine mode.
Copy on Designating Page in Combine
You can specify whether to make a combined copy on the inserted slip sheets in Desig./Chapter mode.
Image Repeat Separation Line
You can select a separation line using the Image Repeat function from: None, Solid, Broken A, Broken B, or Crop Marks.
Double Copies Separation Line
You can select a separation line using the Double Copies function from: None, Solid, Broken A, Broken B, or Crop Marks.
8
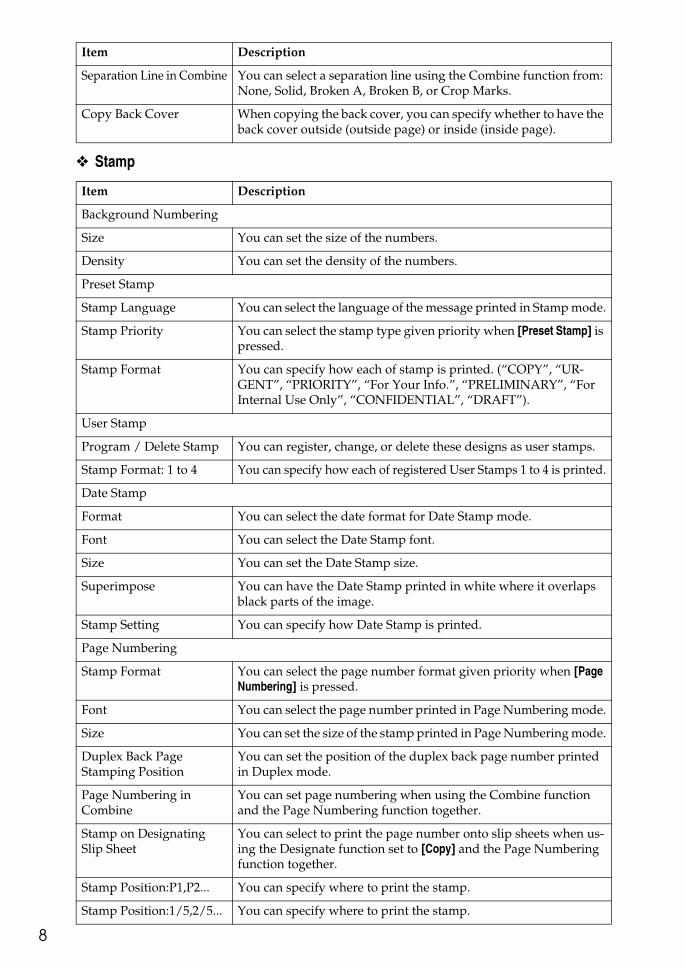
❖ Stamp
Separation Line in Combine You can select a separation line using the Combine function from: None, Solid, Broken A, Broken B, or Crop Marks.
Copy Back Cover When copying the back cover, you can specify whether to have the back cover outside (outside page) or inside (inside page).
Item Description
Background Numbering
Size You can set the size of the numbers.
Density You can set the density of the numbers.
Preset Stamp
Stamp Language You can select the language of the message printed in Stamp mode.
Stamp Priority You can select the stamp type given priority when [Preset Stamp] is pressed.
Stamp Format You can specify how each of stamp is printed. (“COPY”, “UR-GENT”, “PRIORITY”, “For Your Info.”, “PRELIMINARY”, “For Internal Use Only”, “CONFIDENTIAL”, “DRAFT”).
User Stamp
Program / Delete Stamp You can register, change, or delete these designs as user stamps.
Stamp Format: 1 to 4 You can specify how each of registered User Stamps 1 to 4 is printed.
Date Stamp
Format You can select the date format for Date Stamp mode.
Font You can select the Date Stamp font.
Size You can set the Date Stamp size.
Superimpose You can have the Date Stamp printed in white where it overlaps black parts of the image.
Stamp Setting You can specify how Date Stamp is printed.
Page Numbering
Stamp Format You can select the page number format given priority when [Page Numbering] is pressed.
Font You can select the page number printed in Page Numbering mode.
Size You can set the size of the stamp printed in Page Numbering mode.
Duplex Back Page Stamping Position
You can set the position of the duplex back page number printed in Duplex mode.
Page Numbering in Combine
You can set page numbering when using the Combine function and the Page Numbering function together.
Stamp on Designating Slip Sheet
You can select to print the page number onto slip sheets when us-ing the Designate function set to [Copy] and the Page Numbering function together.
Stamp Position:P1,P2... You can specify where to print the stamp.
Stamp Position:1/5,2/5... You can specify where to print the stamp.
Item Description
9
❖ Input / Output
❖ Administrator Tools
Stamp Position:-1-,-2-... You can specify where to print the stamp.
Stamp Position:P.1,P.2... You can specify where to print the stamp.
Stamp Position:1,2... You can specify where to print the stamp.
Stamp Position:1-1,1-2... You can specify where to print the stamp.
Superimpose You can have page numbers printed in white where they overlap black parts of the image.
Page Numbering Initial Letter
Switch the page print language.
Stamp Text
Font You can select the Stamp Text font.
Size You can set the Stamp Text size.
Superimpose You can have the Stamp Text printed in white when it overlaps black parts of the image.
Stamp Setting You can specify how Stamp Text is printed.
Item Description
Switch to Batch You can select to have Batch mode or SADF mode displayed when you press [Special Original].
SADF Auto Reset In SADF mode, an original must be set within a specified time after the previous original has been fed. You can adjust this time from 3 to 99 seconds in increments of 1 second.
Rotate Sort: Auto Paper Continue
You can specify to continue copying when paper of the required orientation has run out during rotatesorting.
Copy Eject Face Method in Glass Mode
You can specify the way in which copies are delivered when copy-ing an original placed on the exposure glass.
Copy Eject Face Method in Bypass Mode
You can specify the way in which copies are delivered when copy-ing in Bypass mode.
Memory Full Auto Scan Restart
When memory becomes full while scanning originals, the machine can make copies of scanned originals first, and then automatically proceed scanning remaining originals.
Letterhead Setting If you select [Yes] in this function, the machine rotates images correctly.
Staple Position Specify which Top 2 staples or Bottom shown on the initial display with priority.
Punch Type Specify which punch type (2 holes or 3 holes) has priority to be shown on the initial display.
Simplified Screen: Finishing Types
You can select which key is displayed with higher priority for “Fin-ishing Types” on the Simplified Screen.
Item Description
Menu Protect Using Menu Protect, you can limit the settings available to users other than the administrator.
Item Description

10

1. Placing Originals
11
This chapter describes the types of originals you can set and how to place originals.
Originals
This section describes the types of originals that can be placed, paper sizes thatare automatically detected, and missing image area.
Sizes and Weights of Recommended Originals
The following describes recommended paper sizes and non-recommended orig-inals for the ADF.
❖ Metric version
❖ Inch version
Note❒ The maximum number of originals that can be placed in the ADF is about 100
(paper weight is 80 g/m2, 20 lb.).❒ The weight range for originals when using Mixed Size mode is 52-81 g/m2
(13.8-21.5 lb.).
Original location Original size Original weight
Exposure glass Up to A3 -
ADF One-sided originals:A3L - B6 JIS (Japanese Industrial Standard)KL
40-128 g/m2
(35-110 kg)
Two-sided originals: A3L-B6 JIS (Japanese Industrial Standard)KL
52-128 g/m2
(45-110 kg)
Original location Original size Original weight
Exposure glass Up to 11" × 17" -
ADF One-sided originals: 11" × 17"L-51/2" × 81/2"KL
11-34 lb.
Two-sided originals: 11" × 17"L-51/2" × 81/2"KL
14-34 lb.

Placing Originals
12
1
Originals not recommended for the Auto Document Feeder (ADF)
Placing the following types of originals in the ADF can cause paper misfeeds orlight & black lines or result in damage to the originals. Place these originals onthe exposure glass instead.• Originals other than those specified on “Sizes and Weights of Recommended
Originals”.• Stapled or clipped originals• Perforated or torn originals• Curled, folded, or creased originals• Pasted originals• Originals with any kind of coating, such as thermal fax paper, art paper, alu-
minum foil, carbon paper, or conductive paper• Originals with perforated lines• Originals with indexes, tags, or other projecting parts• Sticky originals such as translucent paper• Thin, highly flexible originals• Thick originals such as postcards• Bound originals such as books• Transparent originals such as OHP transparencies or translucent paper• Originals that are still wet with ink or white-out.
Note❒ The original might become dirty if it is written with a pencil or a similar tool.
Originals
13
1
Sizes Detectable by the Auto Paper Select
Sizes detectable by the exposure glass and ADF are:
❖ Metric version
*1 If you wish to make A5 L detectable from the exposure glass, contact your ser-vice representative.
*2 You can select from 81/2" × 13", 81/4" × 13", 8" × 13" with User Tools (System Set-tings).
*3 If you wish to switch to the detectable paper size from 8KL to 11" × 17"L, or from16KKL to 81/2" × 11"KL, contact your service representative.
*4 8K: 390 mm - 267 mm, 16K: 267 mm - 195 mm
❖ Inch version
*1 If you wish to switch to detectable paper size from 11" × 17"L to 11" × 15"L, from81/2" × 14"L to 81/2" × 13"L, from 81/2" × 11"L to 10" × 8"L, from 11" × 81/2"Kto 71/4" × 101/2"K, contact your service representative.
Size A3L
B4 JISL
A4K
L
B5 JISK
L
A5K
A5L
B6 JISK
L
11" × 17"L
81/2" × 13"L
8" × 13"L
8KL *4
16KK
L *4
81/4" × 13"L
81/2" × 11"K
L
Original location
Exposure glass
× *1 × × *2
× *2 × × × *2 ×
ADF × *3 × *3
*3
× × *3
Size A3L
A4K
L
11" × 17"L
81/2" × 14"L
81/2" × 11"K
L
51/2" × 81/2"L
81/2" × 51/2"K
11" × 15"L
10" × 14"L
8" × 10"L
81/2" × 13"L
71/4" × 101/2"K
71/4" × 101/2"L
Original location
Exposure glass
× × × × × × × × ×
ADF *1
*1
*1
× *1 × *1 × *1 × *1

Placing Originals
14
1
❖ Exposure glass
❖ ADF
Note❒ If you want to use the ADF to copy custom size originals that are between 432 mm
and 1260 mm in length by using the ADF, contact your service representative.❒ When you copy custom size originals, make sure you specify the size of the
originals. If not, the image may not be copied properly.
Referencep.24 “Custom sizes”
Sizes difficult to detect
It is difficult for the machine to automatically detect the sizes of the followingtypes of originals, so select the paper size manually.• Originals with indexes, tags, or other projecting parts• Transparent originals such as OHP transparencies or translucent paper• Dark originals with a lot of text and drawings• Originals which partially contain a solid image• Originals which have solid images at their edges
CP01AEE
AAE044E
Originals
15
1
Missing Image Area
Even if you place originals in the ADF or on the exposure glass correctly, 3 mm(0.1") margins on all four sides might not be copied.
A 0.5 mm or more (Max 3.5 mm), 0.02" or more (Max 0.14")B 2 ± 2 mm, 0.08" ± 0.08"C 2 ± 1.5 mm, 0.08" ± 0.06"D 4 ± 2 mm, 0.16" ± 0.08"
GCGENK2E
Placing Originals
16
1
Placing Originals
This section describes the procedure for placing originals on the exposure glassand in the ADF.Take care to place originals after any correction fluid and ink has completelydried. Not taking this precaution could cause marks on the exposure glass thatwill be copied onto paper.
Note❒ For original sizes you can set, see “Originals”.
Referencep.11 “Originals”
Original Orientation
When using the ADF, place the original face up.When using the exposure glass, place the original face down.
A ADFB Exposure glass
ZGVX010E
Placing Originals
17
1
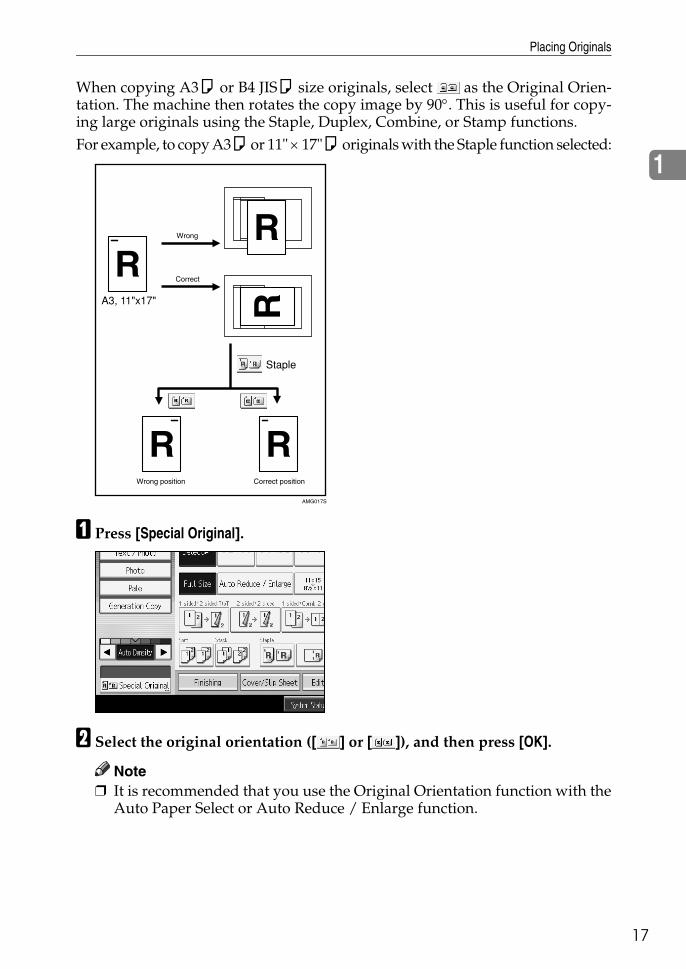
When copying A3K or B4 JISK size originals, select as the Original Orien-tation. The machine then rotates the copy image by 90°. This is useful for copy-ing large originals using the Staple, Duplex, Combine, or Stamp functions.For example, to copy A3K or 11" × 17"K originals with the Staple function selected:
A Press [Special Original].
B Select the original orientation ([ ] or [ ]), and then press [OK].
Note❒ It is recommended that you use the Original Orientation function with the
Auto Paper Select or Auto Reduce / Enlarge function.
AMG017S
Placing Originals
18
1
Placing Originals on the Exposure Glass
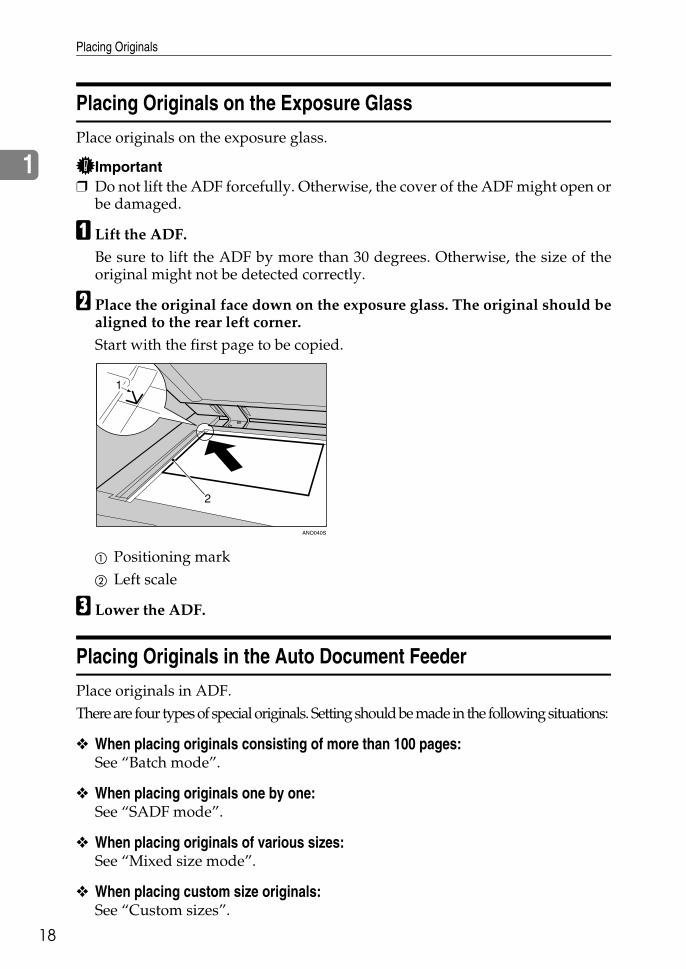
Place originals on the exposure glass.
Important❒ Do not lift the ADF forcefully. Otherwise, the cover of the ADF might open or
be damaged.
A Lift the ADF.Be sure to lift the ADF by more than 30 degrees. Otherwise, the size of theoriginal might not be detected correctly.
B Place the original face down on the exposure glass. The original should bealigned to the rear left corner. Start with the first page to be copied.
A Positioning markB Left scale
C Lower the ADF.
Placing Originals in the Auto Document Feeder
Place originals in ADF.There are four types of special originals. Setting should be made in the following situations:
❖ When placing originals consisting of more than 100 pages: See “Batch mode”.
❖ When placing originals one by one: See “SADF mode”.
❖ When placing originals of various sizes:See “Mixed size mode”.
❖ When placing custom size originals:See “Custom sizes”.
ANO040S

Placing Originals
19
1
A Adjust the guide to the original size.
B Set the aligned originals face up into the ADF. Do not stack originals beyond the limit mark.The last page should be on the bottom.Be sure not to block the sensor or load the original untidily. Doing so maycause the machine to detect the size of the scanned image incorrectly or dis-play a paper misfeed message. Also, be sure not to place originals or other ob-jects on the top cover. Doing so may cause a malfunction.
A Sensors
A Limit markB Document guide
Note❒ Straighten curls in the originals before placing them on the ADF.❒ To prevent multiple sheets from being fed at once, fan the original before placing it on the ADF.❒ Set the original squarely.
Referencep.20 “Batch mode”p.21 “SADF mode”p.22 “Mixed size mode”p.24 “Custom sizes”

Placing Originals
20
1
Batch mode
In Batch mode, the machine copies an original of more than 100 pages as onedocument, even if it is placed on the ADF in parts.
Important❒ Place special originals, such as translucent paper, one by one.
A Press [Special Original].
B Select [Batch] and then press [OK].
C Place the first part of the original, and then press the {Start} key.
D After the first part of the original has been fed, place the next part, thenpress the {Start} key.
Note❒ When [SADF] is displayed in step B, set [Batch] with [Switch to Batch]. See
“Input/Output”, General Settings Guide.❒ To copy subsequent originals in this mode, repeat step D. ❒ When the Sort, Combine or 1 Sided→2 Sided mode has been set, press the{q} key after all originals have been scanned.
Reference“Input/Output”, General Settings Guide
Placing Originals
21
1
SADF mode
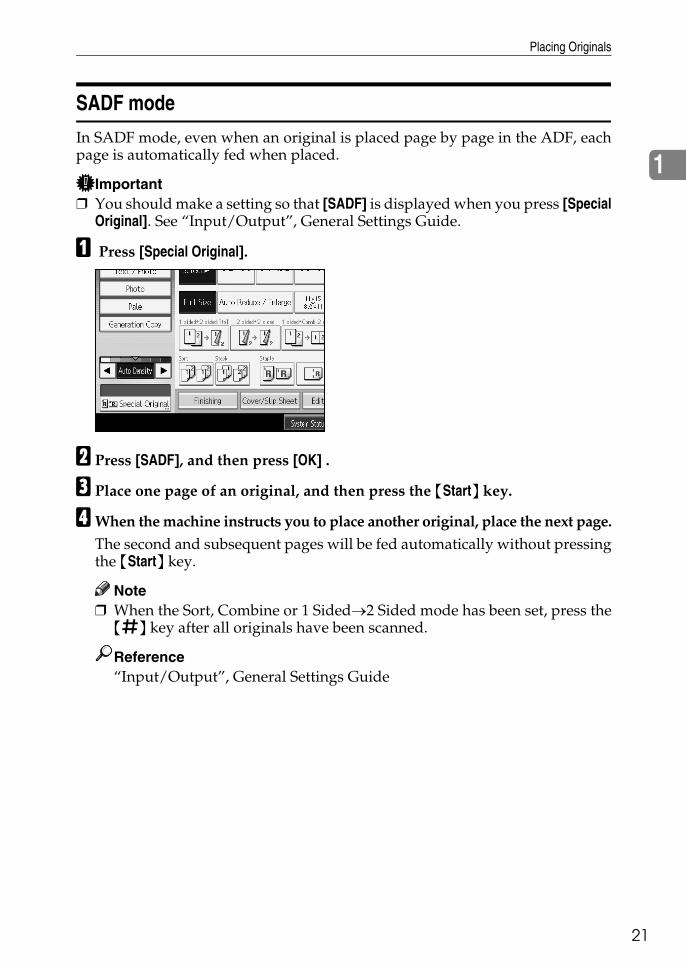
In SADF mode, even when an original is placed page by page in the ADF, eachpage is automatically fed when placed.
Important❒ You should make a setting so that [SADF] is displayed when you press [Special
Original]. See “Input/Output”, General Settings Guide.
A Press [Special Original].
B Press [SADF], and then press [OK] .
C Place one page of an original, and then press the {Start} key.
DWhen the machine instructs you to place another original, place the next page.The second and subsequent pages will be fed automatically without pressingthe {Start} key.
Note❒ When the Sort, Combine or 1 Sided→2 Sided mode has been set, press the{q} key after all originals have been scanned.
Reference“Input/Output”, General Settings Guide
Placing Originals
22
1
Mixed size mode
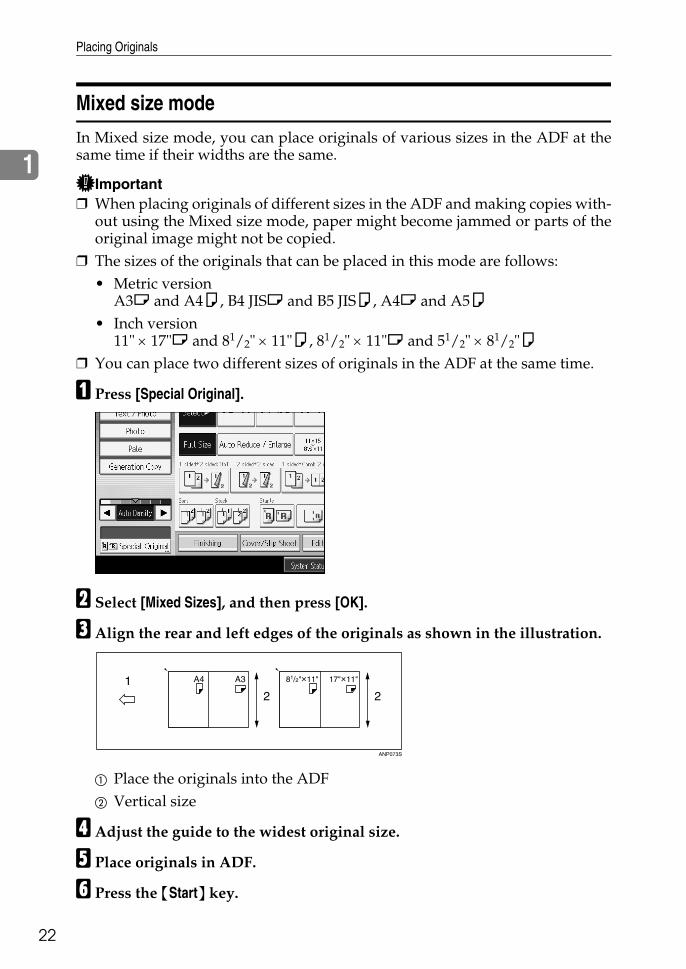
In Mixed size mode, you can place originals of various sizes in the ADF at thesame time if their widths are the same.
Important❒ When placing originals of different sizes in the ADF and making copies with-
out using the Mixed size mode, paper might become jammed or parts of theoriginal image might not be copied.
❒ The sizes of the originals that can be placed in this mode are follows:• Metric version
A3L and A4K, B4 JISL and B5 JISK, A4L and A5K• Inch version
11" × 17"L and 81/2" × 11"K, 81/2" × 11"L and 51/2" × 81/2"K❒ You can place two different sizes of originals in the ADF at the same time.
A Press [Special Original].
B Select [Mixed Sizes], and then press [OK].
C Align the rear and left edges of the originals as shown in the illustration.
A Place the originals into the ADFB Vertical size
D Adjust the guide to the widest original size.
E Place originals in ADF.
F Press the {Start} key.
ANP073S

Placing Originals
23
1
Original size
Specify the size of the originals.
Regular sizes
Select the size of the originals from the regular sizes.
A Press [Special Original].
B Press [Original Size] .
C Press [Regular Size].
D Select the size of original, and then press [OK] twice.
E Place the original, and then press the {Start} key.
Placing Originals
24
1
Custom sizes
When placing custom size originals in the ADF, specify the size of the originals.
Important❒ Paper that has a vertical length of 128–297 mm (5.1"-11.6") and a horizontal
length of 128–432 mm (5.1"-17") can be placed with this function.
A Press [Special Original].
B Press [Original Size].
C Press [Custom Size].
D Enter the horizontal size of the original with the number keys, and thenpress the {q} key.
E Enter the vertical size of the original with the number keys, and then pressthe {q} key.
F Press [OK] twice.
G Place the originals, and then press the {Start} key.
Note❒ If you make a mistake in step D or E, press [Clear] or the {Clear/Stop} key in
step D, and then enter the value again.

2. Copying
25
This chapter describes the procedure for making copies in various modes.
Basic Procedure
This section describes the basic procedure for making copies.
Important❒ When User Code Authentication is set, enter your user code (up to eight dig-
its) with the number keys so that the machine accepts copy jobs. See “Admin-istrator Tools”, General Settings Guide.
❒ When Basic Authentication, Windows Authentication, LDAP Authentica-tion, or Integration Server Authentication is set, enter your login user nameand user password so that the machine accepts copy jobs. Ask the user ad-ministrator for the login user name and login password. For details, see“When the Authentication Screen is Displayed”, About This Machine.
AMake sure “Ready” appears on the screen.If any other function is displayed, press the {Copy} key on the left side of thecontrol panel.• Initial copy screen
BMake sure no previous settings remain. When there are previous settings remaining, press the {Clear Modes} key andenter the setting again.
C Place your originals.
DMake desired settings.
E Enter the number of copies using the number keys.The maximum copy quantity that can be set is 999.
Copying
26
2
F Press the {Start} key.The machine starts copying.When placing originals on the exposure glass, press the {q} key after alloriginals are scanned.Copies are delivered face down.
Note❒ Always log off when you have finished using the machine to prevent un-
authorized users from using the machine.❒ To stop the machine during a multi-copy run, press the {Clear/Stop} key.❒ To cancel all copy jobs and return the machine to the default condition,
press the {Clear Modes} key.❒ To clear entered values, press the {Clear/Stop} key or [Cancel] on the screen.❒ To confirm settings, press [Check Modes].
Reference“When the Authentication Screen is Displayed”, About This Machine“Administrator Tools”, General Settings Guide
Interrupt Copy
Use this function to interrupt a long copy job to make urgently needed copies.
A Press the {Interrupt} key.
B The machine stops scanning. Remove the originals that were being copied.
C Place the originals you want to copy.
D Press the {Start} key.The machine starts making copies.
EWhen copying is complete, remove the originals and copies.
F Press the {Interrupt} key again.The interrupt key indicator goes off.
ANP067S

Basic Procedure
27
2
G Replace the originals that you were copying, and then press the {Start} key.Following message “Reset x originals.”, replace the originals that youwere copying.
Note❒ The previous copy job settings are restored. Simply press the {Start} key to
continue copying from where it left off.
Left Original Beeper
The beeper sounds and an error message is displayed when you leave your orig-inals on the exposure glass after copying.
Note❒ For details, see “General Features”, General Settings Guide.
Reference“General Features”, General Settings Guide
Copy Face Up
When using this function, copies are delivered in the reverse order from theoriginals.• 1 Sided → 1 Sided
• 2 Sided → 2 Sided
ANO060S
ANO061S

Copying
28
2
Important❒ Before using this function, register “Reverse Ejection: Face Up/ Down” as a
copy function key. For details, see “General Features”, General SettingsGuide.
A Press [Reverse Ejection: Face Up/ Down].
B Place originals, and then press the {Start} key.
Reference“General Features”, General Settings Guide
Copying onto Tab Stock
You can copy onto tab stock.
Important❒ Before using this function, set the tray for tab stock and set the position of the
index tab. See “Tray Paper Settings”, General Settings Guide.
❒ The tab stock can be placed in tray 2-3.
GCINDX0E
GCINDX1E
Basic Procedure
29
2
❒ When setting tab stock, always use the optional tab sheet fence.
❒ Set tab stock so that it will be fed from the side without the tab first.❒ Adjust the back fence position so that the tab sheet fence will fit the tab stock.
A Select the paper tray where the tab stock is set.
B Place originals, and then press the {Start} key.
Note❒ Check the position of the index tab to avoid cropping the image.❒ Set the tab stock with the side to be copied facing down.❒ Tab stock is always fed starting from the top tab.
A OriginalsB Tab stockC Copies
ANO043S
ANO044S
GCINDX2E

Copying
30
2
Reference“Tray Paper Settings”, General Settings Guide
Auto Start
Copying starts immediately when the machine is ready.
AMake your settings while “Select copy mode, then press the Startkey.” and “Scanning originals can be started.” are displayed alternately.
B Place the original.
C Press the {Start} key.The machine scans the original.Copying starts automatically once the machine is ready.
Basic Procedure
31
2
Job Preset
You can set up the next copy job in the document server while the current one isprocessing.When the current copy job is finished, the next copy job will start automatically.
A Press [New Job] when “Copying...” appears.
B Be sure message “Ready” appears, and then set up the next copy job.
C Place the originals, and then press the {Start} key.All originals are scanned.When the preset job is complete, a job preset confirmation dialog box appears.
D Press [Exit].You return to the copy screen.After the current copy job, the next copy job starts automatically.
Note❒ You can switch the display to the current copy job by pressing [To Copying
Screen]. You can switch the display to the preset job by pressing [To Reserv.Screen].
❒ Each job stored is allocated a job number that is displayed on the ReservedJob screen.

Copying
32
2
Job List
Jobs printed using Copy, Document Server, or Printer mode are temporarilystored in the machine, and then executed in order. The Job List function allowsyou to manage these jobs. For example, you can cancel incorrect job settings orprint an urgent document.
Note❒ You cannot use the Job List function when Interrupt Copy is active.
Job List screen
This section explains displays and icons that appear in the Job List screen. The Job List screen varies depending on whether [Job Order] is selected withPrint Priority for the System Settings. For details about the setting procedure, see“General Features”, General Settings Guide.
❖ When [Job Order] is not selected:The job list is displayed for each of the functions.
❖ When [Job Order] is selected:The job list is displayed for all functions in the order of print jobs.
ANP058S
AMG038S
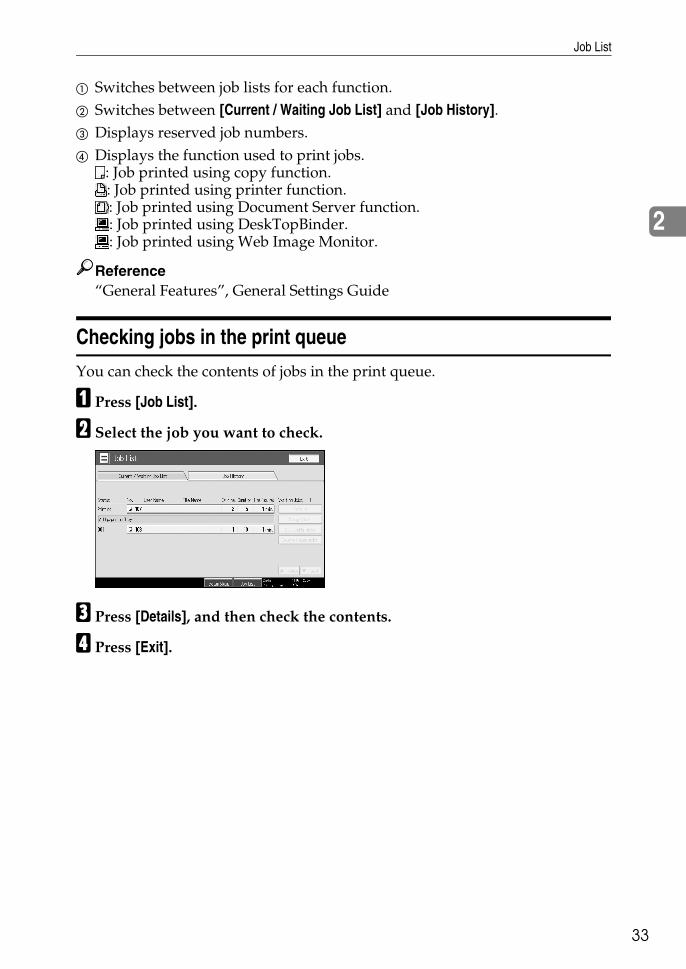
Job List
33
2
A Switches between job lists for each function.B Switches between [Current / Waiting Job List] and [Job History].C Displays reserved job numbers.D Displays the function used to print jobs.
: Job printed using copy function.: Job printed using printer function.: Job printed using Document Server function.: Job printed using DeskTopBinder.: Job printed using Web Image Monitor.
Reference“General Features”, General Settings Guide
Checking jobs in the print queue
You can check the contents of jobs in the print queue.
A Press [Job List].
B Select the job you want to check.
C Press [Details], and then check the contents.
D Press [Exit].
Copying
34
2
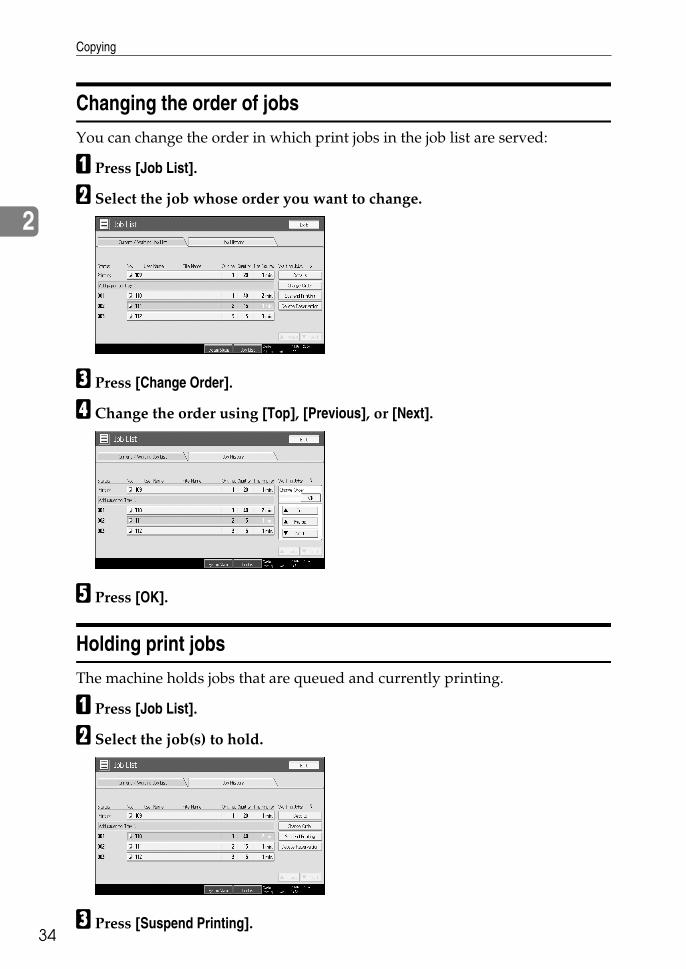
Changing the order of jobs
You can change the order in which print jobs in the job list are served:
A Press [Job List].
B Select the job whose order you want to change.
C Press [Change Order].
D Change the order using [Top], [Previous], or [Next].
E Press [OK].
Holding print jobs
The machine holds jobs that are queued and currently printing.
A Press [Job List].
B Select the job(s) to hold.
C Press [Suspend Printing].
Job List
35
2
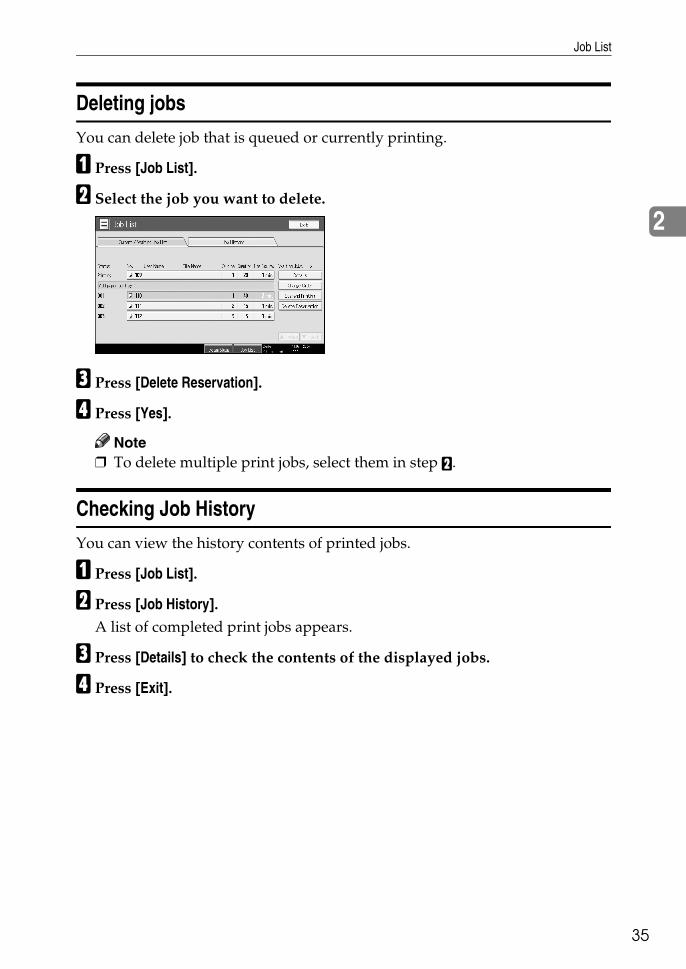
Deleting jobs
You can delete job that is queued or currently printing.
A Press [Job List].
B Select the job you want to delete.
C Press [Delete Reservation].
D Press [Yes].
Note❒ To delete multiple print jobs, select them in step B.
Checking Job History
You can view the history contents of printed jobs.
A Press [Job List].
B Press [Job History].A list of completed print jobs appears.
C Press [Details] to check the contents of the displayed jobs.
D Press [Exit].
Copying
36
2
Copying from the Bypass Tray
The bypass tray allows you to copy non-standard paper.
Important❒ The bypass tray is set to [1 Sided→2 Sided] by default. When copying from the
bypass tray, select [1 Sided→1 Sided] in [Dup./Combine/Series]. You can changethe initial settings. See “Programming Defaults in Initial Display”.
❒ Paper has a vertical length of 100-305 mm (3.9-12 inch) and a horizontallength of 139.7-600 mm (5.5-23.6 inch) can be copied from the bypass tray.
❒ The machine can automatically detect the following sizes as standard sizecopy paper:• Metric version: A3L, A4L, A5L• Inch version: A3L, 11" × 17"L, 81/2" × 14"L, 51/2" × 81/2"L
❒ If you want to use the size of paper other than the above, be sure to specifythe size.
❒ When copying on OHP transparencies or paper heavier than 105 g/m2 (about27.9 lb.), you need to specify the type and size of paper with “Special Original”.
❒ The maximum number of sheets you can load into the bypass tray depend onpaper type. The number should not exceed the upper limit.
❒ When paper larger than 433 mm (17.1 inch) in size is used, the paper may be-come wrinkled, may not be fed into the machine, or may cause paper jams.
❒ When copying onto special paper such as adhesive labels, always select “FaceUp”. If you select “Face Down”, a paper misfeed may occur.
❒ If you place originals on the exposure glass and want the copies to be deliv-ered face down, select “Face Down” for both ”Copy Eject Face Method inGlass Mode” and “Copy Eject Face Method in Bypass Mode” of User Tools.
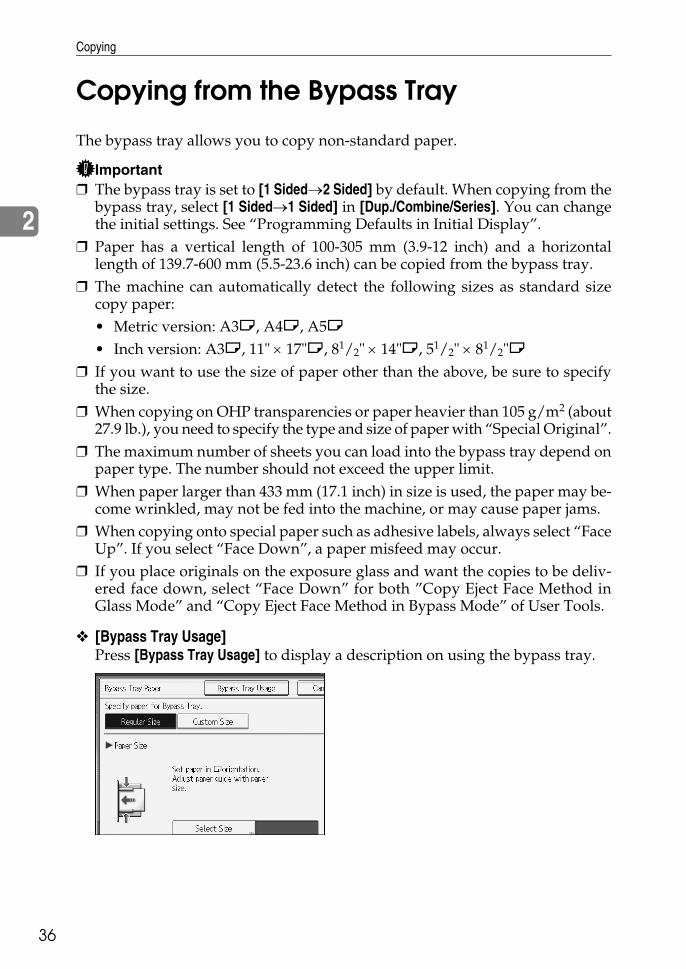
❖ [Bypass Tray Usage]Press [Bypass Tray Usage] to display a description on using the bypass tray.

Copying from the Bypass Tray
37
2
A Open the bypass tray.
B Insert the paper face-up until you hear the beep, and then align the paperguide to the paper size.If the guide is not flush against the copy paper, images might be skewed orpaper misfeeds might occur. Do not stack paper over the upper limit mar, otherwise, images might beskewed or paper misfeeds might occur.Swing out the extender to support paper sizes larger than A4L or 81/2" × 11"L.To prevent multiple sheets from being fed at once, fan paper before placing iton the tray.
A Extender
C Press the {q} key.
D Select the size and type of the paper.
E Place the paper, and then press the {Start} key.
FWhen the copy job is finished, press the {Clear Modes} key to clear the settings.
Note❒ When the Sort function is selected, press the {q} key after all originals
have been scanned.
Referencep.139 “Programming Defaults in Initial Display”

Copying
38
2
When copying onto Regular Size Paper
Makes copies onto regular size paper from the bypass tray.
A Open the bypass tray, and then align the paper guide to the paper size.
B Insert the paper face-up until you hear the beep.
C Press the {q} key.
D Press [Select Size].
E Select the paper size.
F Press [OK] twice.

Copying from the Bypass Tray
39
2
When copying onto Custom Size Paper
Makes copies onto custom size paper from the bypass tray.
A Open the bypass tray, and then align the paper guide to the paper size.
B Insert the paper face-up until you hear the beep.
C Press the {q} key.
D Press [Custom Size].
E Enter the horizontal size of the original with the number keys, and thenpress [q].
F Enter the vertical size of the original with the number keys, and then press[q].
G Press [OK].
Note❒ If you make a mistake in step E or F, press [Clear] or the {Clear/Stop} key,
and then enter the value again.❒ To register the custom size entered in F, press [Program] and then press [Exit]
in the confirmation screen.

Copying
40
2
When copying onto OHP Transparencies
When copying onto OHP transparencies, select the type and size of paper.
Important❒ We recommend that you use specified OHP transparencies.❒ OHP transparencies must be loaded face up in the tray with the notched cor-
ner of the sheet in the appropriate corner of the tray.❒ To prevent multiple sheets from being fed at once, fan paper before placing it
on the tray.❒ When copying onto OHP transparencies, remove copied sheets one by one.
A Open the bypass tray, and then align the paper guide to the paper size.
B Insert the paper face-up until you hear the beep.
C Press the {q} key.
D Select paper type ([OHP (Transparency)]) in the Special Paper settings.
E Select the paper size, and then press [OK] twice to return to the initial display.
F Place the paper, and then press the {Start} key.
GWhen the copy job is finished, press the {Clear Modes} key to clear the settings.
Note❒ For OHP transparencies, print speed is slower when compared to printing
on plain paper.❒ If you have selected [OHP (Transparency)] in “Special Paper”, you cannot
have copies delivered face down.

Copying from the Bypass Tray
41
2
When copying onto Thick Paper
When copying onto thick paper, select the type and size of paper.To prevent multiple sheets from being fed at once, fan paper before placing it onthe tray.
A Open the bypass tray, and then align the paper guide to the paper size.
B Insert the paper face-up until you hear the beep.
C Press the {q} key.
D Press [Thick Paper].
E Select the paper size.
F Press [OK] twice.
G Place the paper, and then press the {Start} key.
HWhen the copy job is finished, press the {Clear Modes} key to clear the settings.
Note❒ For thick paper, print speed is slower when compared to printing on plain
paper.❒ If you have selected [Thick Paper] in “Special Paper”, you cannot have cop-
ies delivered face down.
Copying
42
2
Copier Functions
This section describes the copy functions.
Adjusting Copy Image Density
There are three types of adjustment available.
❖ Auto Image DensityThe machine automatically adjusts the image density by scanning the densi-ties of originals. Dark texture originals (such as newspaper or recycled paper)will be copied so that background will not be reproduced.
❖ Manual image densityYou can adjust the general density of the original in seven increments.
❖ Combined auto and manual image densityAdjusts the density of an image only for dark texture originals.
Auto image density
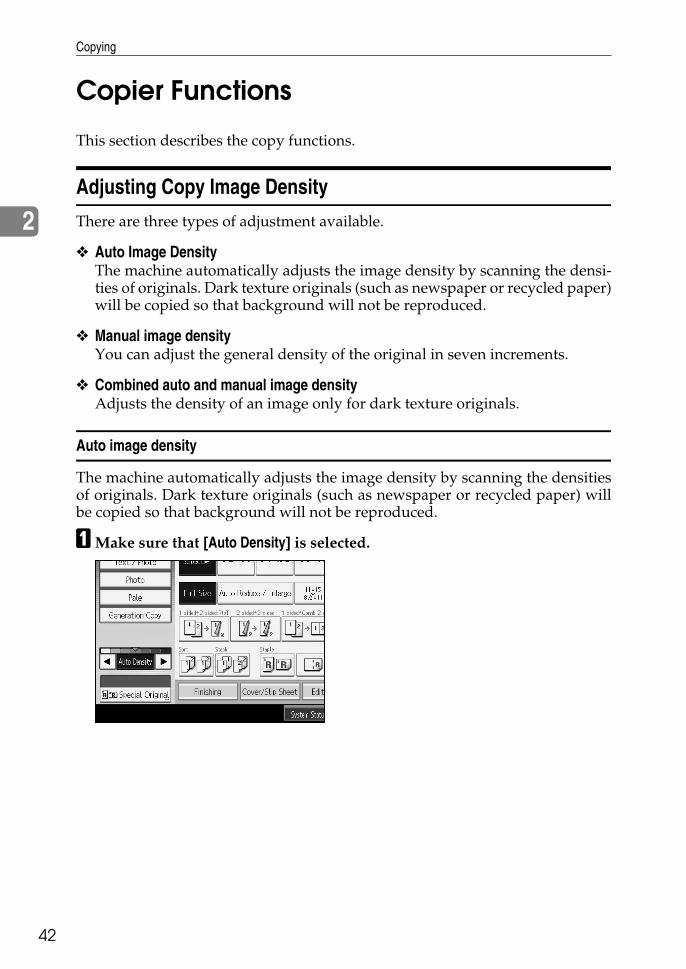
The machine automatically adjusts the image density by scanning the densitiesof originals. Dark texture originals (such as newspaper or recycled paper) willbe copied so that background will not be reproduced.
AMake sure that [Auto Density] is selected.

Copier Functions
43
2
Manual image density
You can adjust the general density of the original in seven increments.
A If [Auto Density] is selected, press [Auto Density] to cancel it.
B Press [W] or [V] to adjust the image density. The density indicator “{”moves.
Combined auto and manual image density
Adjusts the density of an image only for dark texture originals.
AMake sure [Auto Density] is selected.
B Press [W] or [V] to adjust the density. The density indicator “{” moves.
Copying
44
2
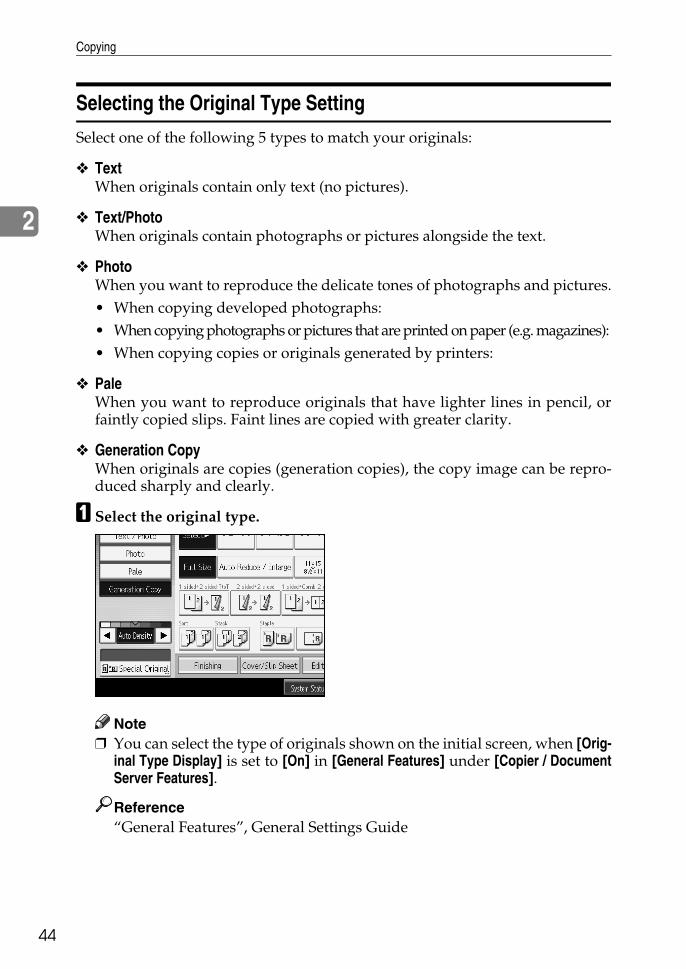
Selecting the Original Type Setting
Select one of the following 5 types to match your originals:
❖ TextWhen originals contain only text (no pictures).
❖ Text/PhotoWhen originals contain photographs or pictures alongside the text.
❖ PhotoWhen you want to reproduce the delicate tones of photographs and pictures.• When copying developed photographs:• When copying photographs or pictures that are printed on paper (e.g. magazines):• When copying copies or originals generated by printers:
❖ PaleWhen you want to reproduce originals that have lighter lines in pencil, orfaintly copied slips. Faint lines are copied with greater clarity.
❖ Generation CopyWhen originals are copies (generation copies), the copy image can be repro-duced sharply and clearly.
A Select the original type.
Note❒ You can select the type of originals shown on the initial screen, when [Orig-
inal Type Display] is set to [On] in [General Features] under [Copier / DocumentServer Features].
Reference“General Features”, General Settings Guide

Copier Functions
45
2
Selecting Copy Paper
There are two ways to select copy paper:
❖ Auto Paper SelectThe machine selects a suitable size of copy paper automatically based on theoriginal size and the reproduction ratio.
❖ Manual Paper SelectChoose the tray containing the paper you wish to copy onto: a paper tray, by-pass tray or Large Capacity Tray (LCT).
The following table shows copy paper sizes and directions that can be used withAuto Paper Select (when copying at a ratio of 100%).
❖ Metric version
❖ Inch version
Note❒ Only the paper trays set to [No Display] or [Recycled Paper] in Paper Type and
also set to [Yes] in Apply Auto Paper Select in Tray Paper Settings can be se-lected in Auto Paper Select mode.
Referencep.12 “Originals not recommended for the Auto Document Feeder (ADF)”“Tray Paper Settings”, General Settings Guide
Original location Paper size and orientation
Exposure glass A3L, B4 JISL, A4KL, B5 JISKL, A5K, 81/2" × 13"L
ADF A3L, B4 JISL, A4KL, B5 JISKL, A5KL, B6 JISKL, 81/2" × 13"L, 8KL, 16KKL
Original location Paper size and orientation
Exposure glass 11" × 17"L, 81/2" × 14"L, 81/2" × 11"KL, 81/2" × 51/2"K
ADF A3L, A4KL, 11" × 17"L, 81/2" × 14"L, 81/2" × 11"KL, 51/2" × 81/2"KL, 10" × 14"L, 71/4" × 101/2"L
Copying
46
2
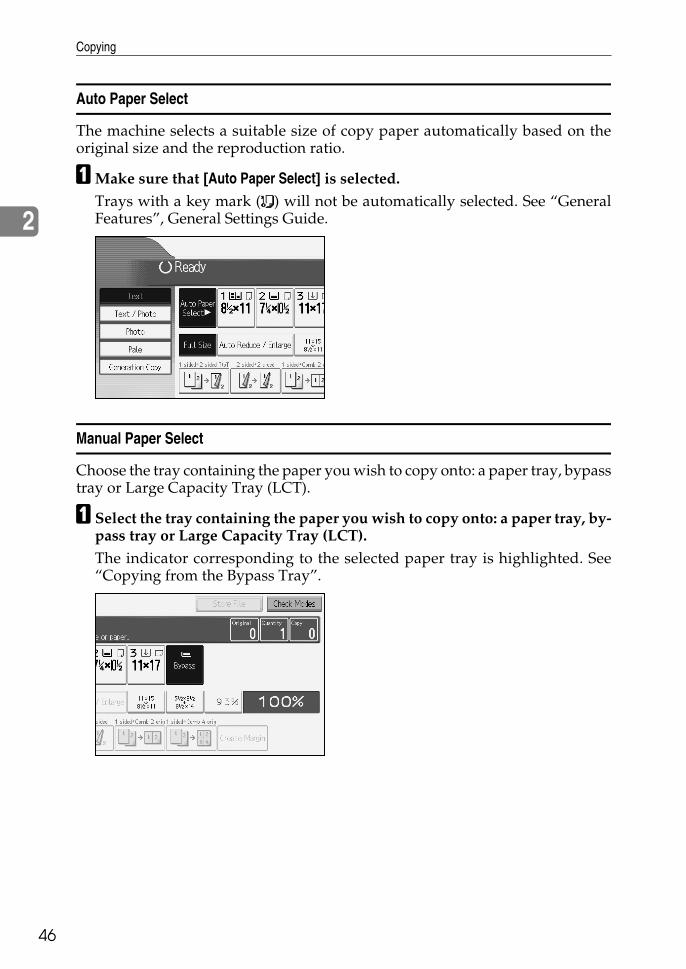
Auto Paper Select
The machine selects a suitable size of copy paper automatically based on theoriginal size and the reproduction ratio.
AMake sure that [Auto Paper Select] is selected.Trays with a key mark ( ) will not be automatically selected. See “GeneralFeatures”, General Settings Guide.
Manual Paper Select
Choose the tray containing the paper you wish to copy onto: a paper tray, bypasstray or Large Capacity Tray (LCT).
A Select the tray containing the paper you wish to copy onto: a paper tray, by-pass tray or Large Capacity Tray (LCT).The indicator corresponding to the selected paper tray is highlighted. See“Copying from the Bypass Tray”.

Copier Functions
47
2
Note❒ If the direction in which your original is placed (K or L) is different from
that of the paper you are copying onto, this function rotates the originalimage by 90° and fits it on the copy paper (rotated copy).
❒ This function works when [Auto Paper Select] or [Auto Reduce / Enlarge] is se-lected. See “Auto Paper Select” and “Auto Reduce/Enlarge”.
❒ The default setting for Auto Tray Switching is [With Image Rotation]. Youcannot use the Rotated Copy function if this setting is changed to [WithoutImage Rotation] or [Off]. See “General Features”, General Settings Guide.
❒ Depending on the settings for the Punch, Staple or Z-fold functions, youmay not be able to use the Rotated Copy function.
Referencep.36 “Copying from the Bypass Tray”p.51 “Auto Reduce/Enlarge”p.61 “Staple”p.64 “Punch”“General Features”, General Settings Guide
Preset Reduce/Enlarge
Reduces or enlarges images. You can select a preset ratio for copying.
GCROTA0E
Copying
48
2
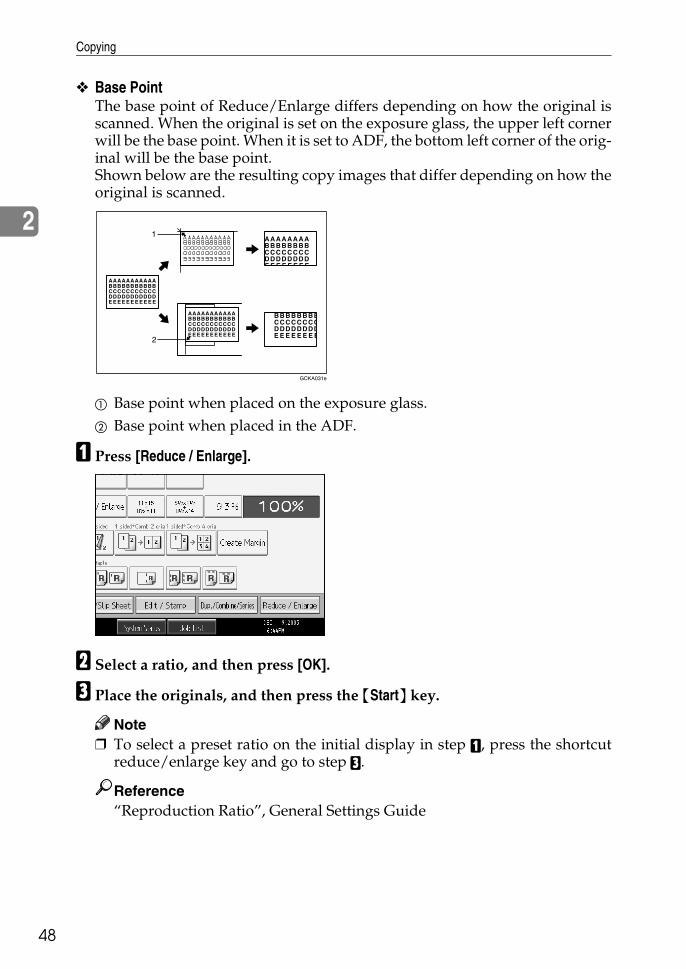
❖ Base PointThe base point of Reduce/Enlarge differs depending on how the original isscanned. When the original is set on the exposure glass, the upper left cornerwill be the base point. When it is set to ADF, the bottom left corner of the orig-inal will be the base point.Shown below are the resulting copy images that differ depending on how theoriginal is scanned.
A Base point when placed on the exposure glass.B Base point when placed in the ADF.
A Press [Reduce / Enlarge].
B Select a ratio, and then press [OK].
C Place the originals, and then press the {Start} key.
Note❒ To select a preset ratio on the initial display in step A, press the shortcut
reduce/enlarge key and go to step C.
Reference“Reproduction Ratio”, General Settings Guide
GCKA031e
Copier Functions
49
2
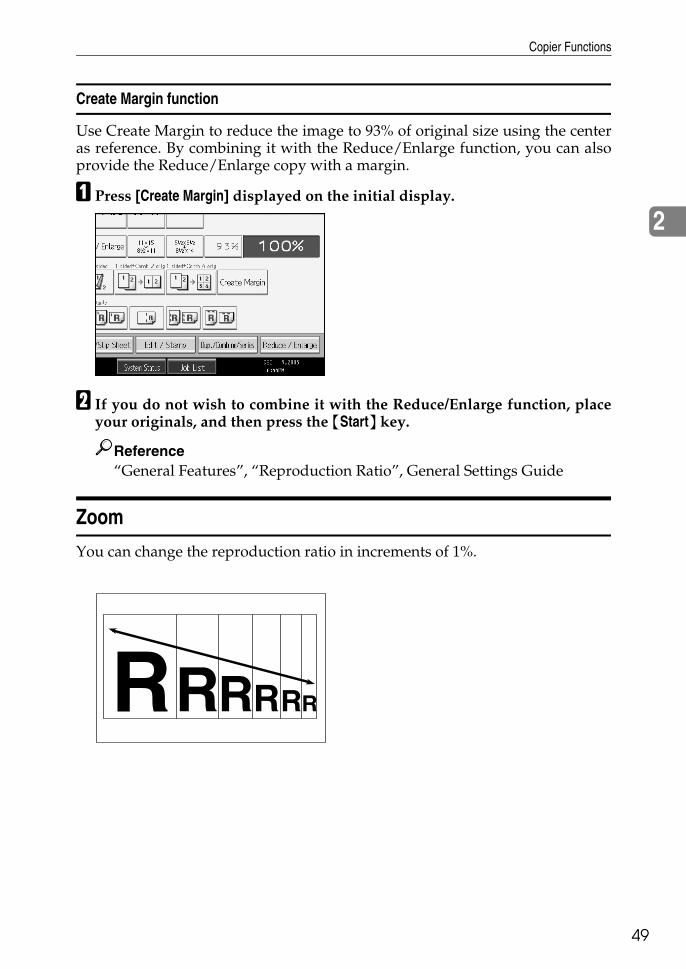
Create Margin function
Use Create Margin to reduce the image to 93% of original size using the centeras reference. By combining it with the Reduce/Enlarge function, you can alsoprovide the Reduce/Enlarge copy with a margin.
A Press [Create Margin] displayed on the initial display.
B If you do not wish to combine it with the Reduce/Enlarge function, placeyour originals, and then press the {Start} key.
Reference“General Features”, “Reproduction Ratio”, General Settings Guide
Zoom
You can change the reproduction ratio in increments of 1%.
Copying
50
2
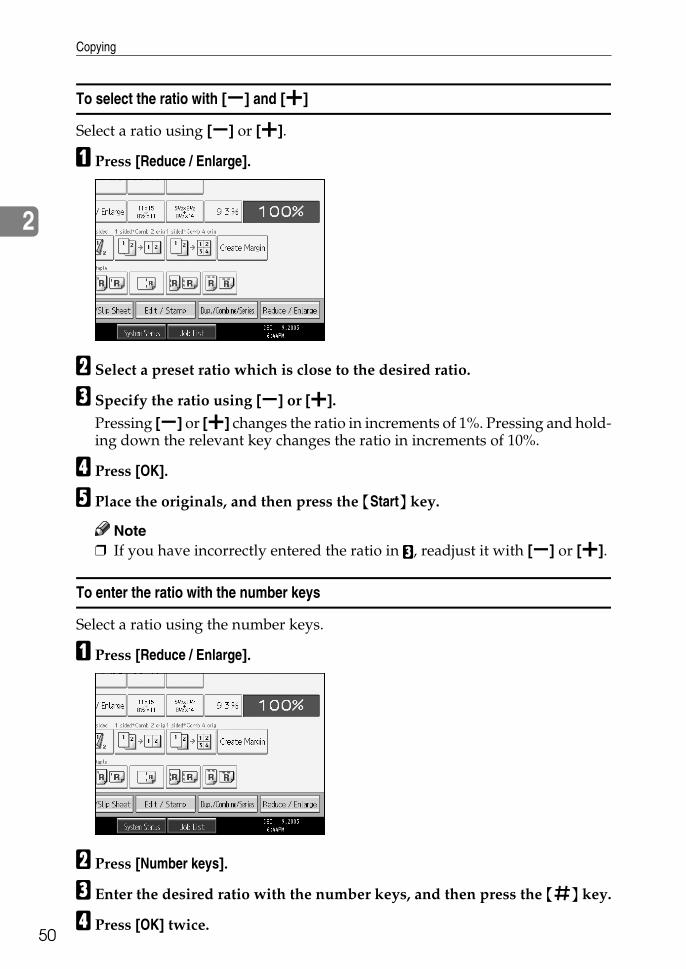
To select the ratio with [o] and [n]
Select a ratio using [o] or [n].
A Press [Reduce / Enlarge].
B Select a preset ratio which is close to the desired ratio.
C Specify the ratio using [o] or [n]. Pressing [o] or [n] changes the ratio in increments of 1%. Pressing and hold-ing down the relevant key changes the ratio in increments of 10%.
D Press [OK].
E Place the originals, and then press the {Start} key.
Note❒ If you have incorrectly entered the ratio in C, readjust it with [o] or [n].
To enter the ratio with the number keys
Select a ratio using the number keys.
A Press [Reduce / Enlarge].
B Press [Number keys].
C Enter the desired ratio with the number keys, and then press the {q} key.
D Press [OK] twice.
Copier Functions
51
2
E Place the originals, and then press the {Start} key.
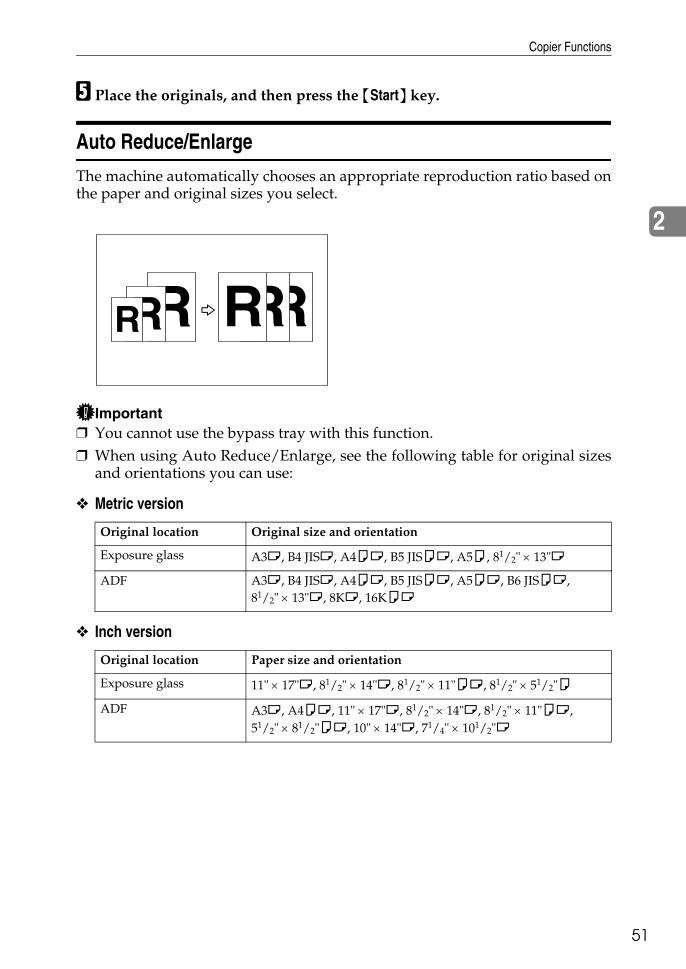
Auto Reduce/Enlarge
The machine automatically chooses an appropriate reproduction ratio based onthe paper and original sizes you select.
Important❒ You cannot use the bypass tray with this function.❒ When using Auto Reduce/Enlarge, see the following table for original sizes
and orientations you can use:
❖ Metric version
❖ Inch version
Original location Original size and orientation
Exposure glass A3L, B4 JISL, A4KL, B5 JISKL, A5K, 81/2" × 13"L
ADF A3L, B4 JISL, A4KL, B5 JISKL, A5KL, B6 JISKL, 81/2" × 13"L, 8KL, 16KKL
Original location Paper size and orientation
Exposure glass 11" × 17"L, 81/2" × 14"L, 81/2" × 11"KL, 81/2" × 51/2"K
ADF A3L, A4KL, 11" × 17"L, 81/2" × 14"L, 81/2" × 11"KL, 51/2" × 81/2"KL, 10" × 14"L, 71/4" × 101/2"L

Copying
52
2
A Press [Auto Reduce / Enlarge].
B Select the paper type.
C Place the originals, and then press the {Start} key.
Referencep.12 “Originals not recommended for the Auto Document Feeder (ADF)”
Size Magnification
You can calculate an enlargement or reduction ratio based on the lengths of theoriginal and copy.
Measure and specify the lengths of the original and copy by comparing “A” with“a”.
ANP059S
Copier Functions
53
2
A Press [Reduce / Enlarge].
B Press [Size Magnification].
C Enter the length of the original with the number keys, and then press the {q} key.You can enter sizes between 1 to 999 mm (0.1" to 99.9") in 1 mm (0.1") steps.
D Enter the length of the copy with the number keys, and then press the {q} key.
E Press [OK] twice.
F Place the originals, and then press the {Start} key.
Note❒ To change the length after pressing the {q} key in D, select [Original] or
[Copy], and then enter the desired length.
Directional Magnification (%)
Specify the horizontal and vertical lengths of the original and copy image at dif-ferent reproduction ratio. Copies can be reduced or enlarged at different repro-duction ratios horizontally and vertically.
a: Horizontal ratiob: Vertical ratio
CP2P01EE

Copying
54
2
To enter the ratio with the number keys
Select a ratio using the number keys.
A Press [Reduce / Enlarge].
B Press [Direct. Mag. %].
C Press [Horizontal].
D Enter the desired ratio with the number keys, and then press the {q} key.
E Press [Vertical].
F Enter the desired ratio with the number keys, and then press the {q} key.
G Press [OK] twice.
H Place the originals, and then press the {Start} key.
To specify a ratio with [o] and [n]
Select a ratio using [o] or [n].
A Press [Reduce / Enlarge].
B Press [Direct. Mag. %].
C Press [[n] [o] keys].
D Press [Horizontal].
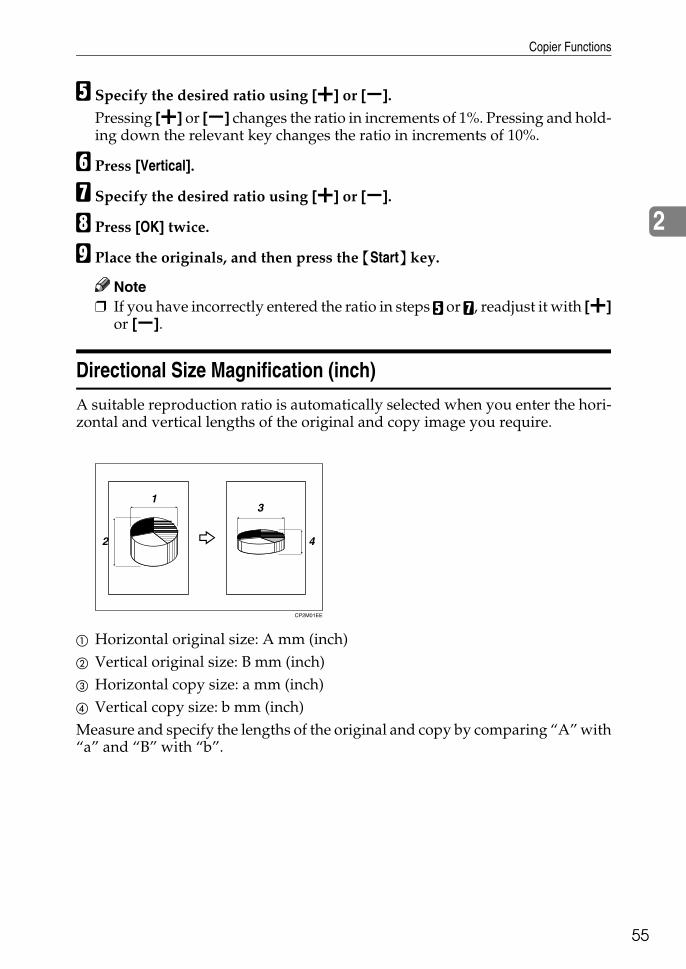
Copier Functions
55
2
E Specify the desired ratio using [n] or [o].Pressing [n] or [o] changes the ratio in increments of 1%. Pressing and hold-ing down the relevant key changes the ratio in increments of 10%.
F Press [Vertical].
G Specify the desired ratio using [n] or [o].
H Press [OK] twice.
I Place the originals, and then press the {Start} key.
Note❒ If you have incorrectly entered the ratio in steps E or G, readjust it with [n]
or [o].
Directional Size Magnification (inch)
A suitable reproduction ratio is automatically selected when you enter the hori-zontal and vertical lengths of the original and copy image you require.
A Horizontal original size: A mm (inch)B Vertical original size: B mm (inch)C Horizontal copy size: a mm (inch)D Vertical copy size: b mm (inch)Measure and specify the lengths of the original and copy by comparing “A” with“a” and “B” with “b”.
CP2M01EE

Copying
56
2
A Press [Reduce / Enlarge].
B Press [Dir. Size Mag. Inch].
C Enter the horizontal size of the original with the number keys, and thenpress the {q} key.You can enter sizes between 1 to 999 mm (0.1" to 99.9") in 1 mm (0.1") steps.
D Enter the horizontal size of the copy with the number keys, and then pressthe {q} key.
E Enter the vertical size of the original with the number keys, and then pressthe {q} key.You can enter sizes between 1 to 999 mm (0.1" to 99.9") in 1 mm (0.1") steps.
F Enter the vertical size of the copy with the number keys, and then press the{q} key.
G Press [OK] twice.
H Place the originals, and then press the {Start} key.
Note❒ To change a length in steps C to F, press the key you wish to change and
enter the new value.
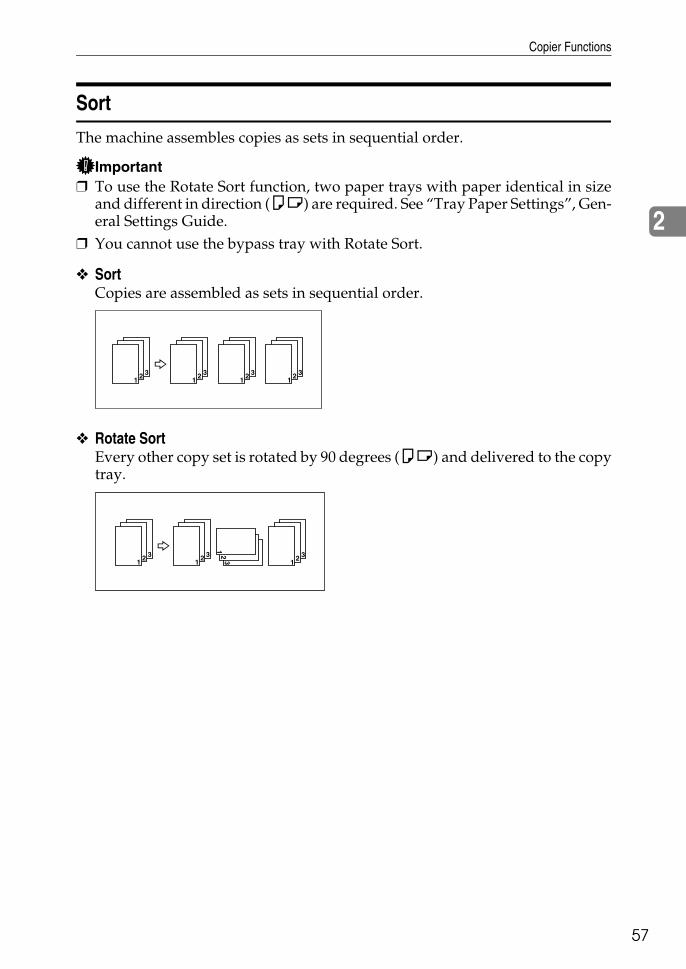
Copier Functions
57
2
Sort
The machine assembles copies as sets in sequential order.
Important❒ To use the Rotate Sort function, two paper trays with paper identical in size
and different in direction (KL) are required. See “Tray Paper Settings”, Gen-eral Settings Guide.
❒ You cannot use the bypass tray with Rotate Sort.
❖ SortCopies are assembled as sets in sequential order.
❖ Rotate SortEvery other copy set is rotated by 90 degrees (KL) and delivered to the copytray.
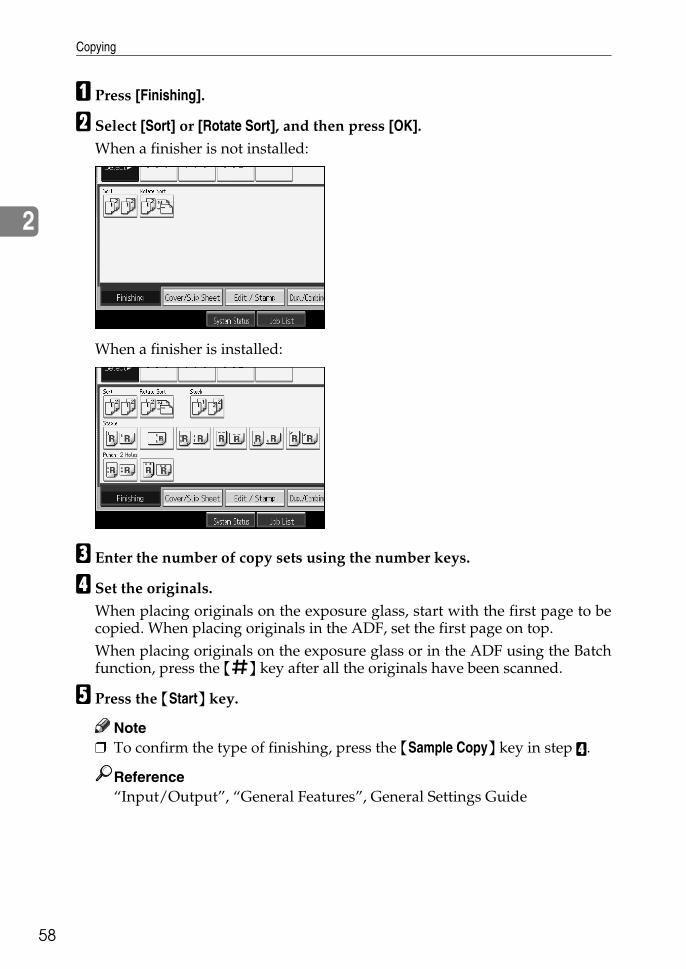
Copying
58
2
A Press [Finishing].
B Select [Sort] or [Rotate Sort], and then press [OK].When a finisher is not installed:
When a finisher is installed:
C Enter the number of copy sets using the number keys.
D Set the originals.When placing originals on the exposure glass, start with the first page to becopied. When placing originals in the ADF, set the first page on top.When placing originals on the exposure glass or in the ADF using the Batchfunction, press the {q} key after all the originals have been scanned.
E Press the {Start} key.
Note❒ To confirm the type of finishing, press the {Sample Copy} key in step D.
Reference“Input/Output”, “General Features”, General Settings Guide
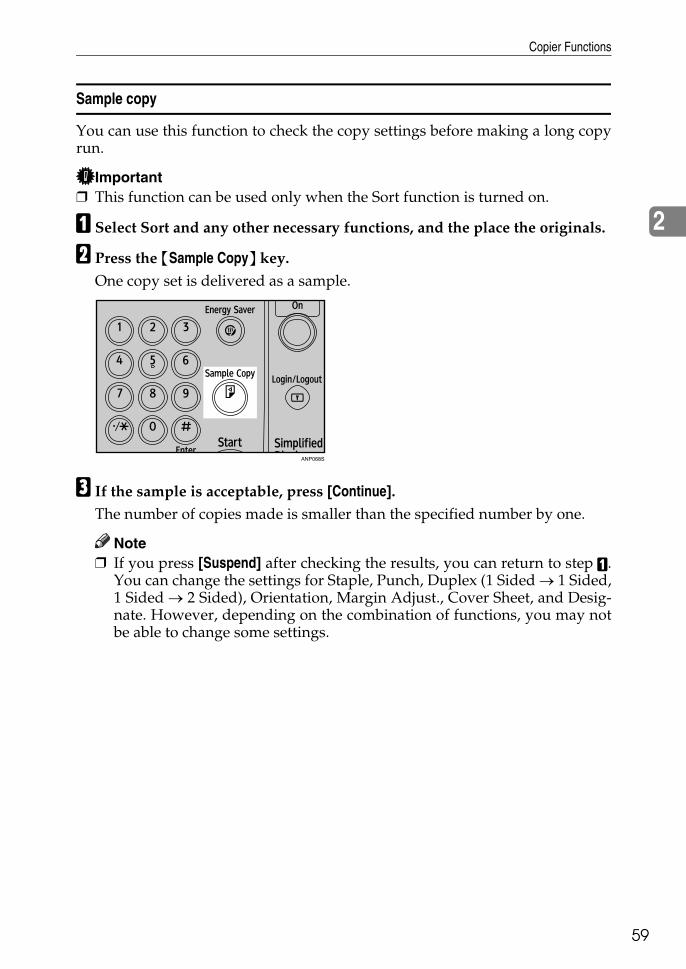
Copier Functions
59
2
Sample copy
You can use this function to check the copy settings before making a long copyrun.
Important❒ This function can be used only when the Sort function is turned on.
A Select Sort and any other necessary functions, and the place the originals.
B Press the {Sample Copy} key.One copy set is delivered as a sample.
C If the sample is acceptable, press [Continue].The number of copies made is smaller than the specified number by one.
Note❒ If you press [Suspend] after checking the results, you can return to step A.
You can change the settings for Staple, Punch, Duplex (1 Sided → 1 Sided,1 Sided → 2 Sided), Orientation, Margin Adjust., Cover Sheet, and Desig-nate. However, depending on the combination of functions, you may notbe able to change some settings.
ANP068S

Copying
60
2
Changing the Number of Sets
You can change the number of copy sets during copying.
Important❒ This function can be used only when the Sort function is turned on.
AWhile “Copying...” is displayed, press the {Clear/Stop} key.
B Press [Change Quantity].
C Enter the number of copy sets with the number keys, and then press the{q} key.
D Press [Continue].Copying starts again.
Note❒ The range of print copies enterable in step C depends on when the {Clear/Stop}
key is pressed.
Stack
This function groups together copies of each page in a multi-page original.
Every other page stack is shifted for ease of separation.
Important❒ You cannot use the bypass tray with this function.
Copier Functions
61
2
A Press [Stack].
B Enter the number of copies with the number keys.
C Place the originals, and then press the {Start} key.
Note❒ When placing originals on the exposure glass, start with the first page to
be copied. When placing originals in the ADF, set the first page on top.
Staple
Individual copy sets can be stapled.
Important❒ If you select Saddle Stitch without having the stapler cartridge for Saddle
Stitch set in the booklet finisher, a paper misfeed might occur.❒ You cannot use the bypass tray with this function.
❖ Original orientation and stapling positionPlace originals in the ADF in the orientation in which they can be read nor-mally. When placing the original on the exposure glass, keep the same orien-tation, but set the original facing downwards. When copy paper is identical in size and orientation to the original, the orig-inal orientations and staple positions are as follows.
Copying
62
2
❖ 3,000Sheet-50Sheet Staple Finisher, 3,000Sheet-100Sheet Staple Finisher
❖ Booklet finisher
ANP014S
ANP015S
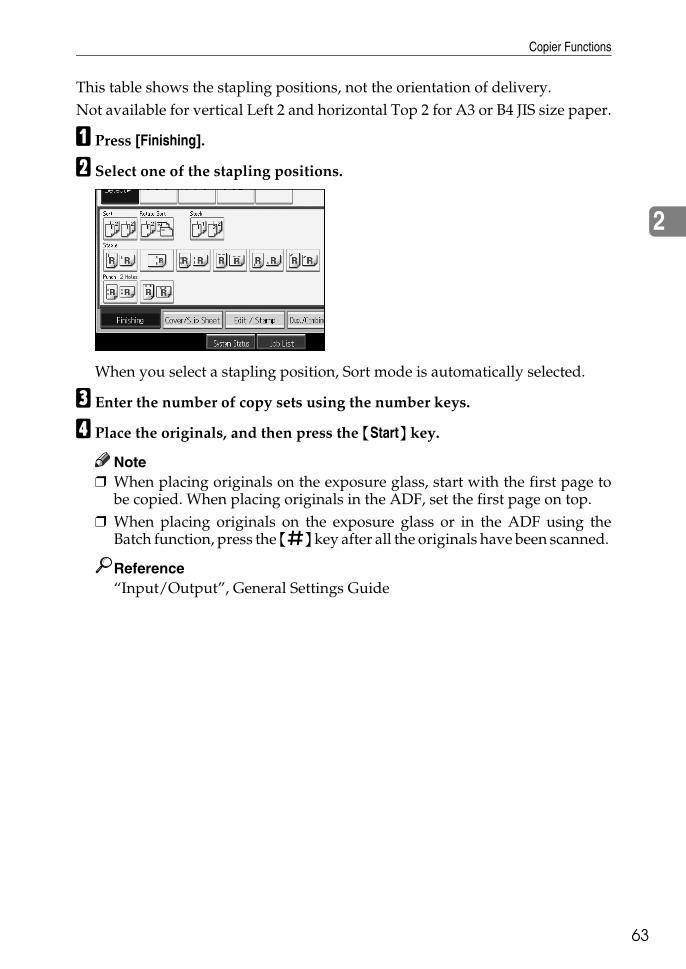
Copier Functions
63
2
This table shows the stapling positions, not the orientation of delivery.Not available for vertical Left 2 and horizontal Top 2 for A3 or B4 JIS size paper.
A Press [Finishing].
B Select one of the stapling positions.
When you select a stapling position, Sort mode is automatically selected.
C Enter the number of copy sets using the number keys.
D Place the originals, and then press the {Start} key.
Note❒ When placing originals on the exposure glass, start with the first page to
be copied. When placing originals in the ADF, set the first page on top.❒ When placing originals on the exposure glass or in the ADF using the
Batch function, press the {q} key after all the originals have been scanned.
Reference“Input/Output”, General Settings Guide
Copying
64
2
Punch
You can make punch holes in copies.
❖ 2 holes
❖ 3 holes
❖ 4 holes
GCPNCH1E
GCPNCH3E
GCPNCH0E

Copier Functions
65
2
Important❒ The 4-hole punch type is only capable of punching in the 4-hole format.❒ You cannot use the bypass tray with this function.
❖ Original orientation and punch hole positionsThe relationship between the orientation in which you place the original andthe punch hole positions is as follows:
This table shows the punch hole positions, not the orientation of delivery.Not available for vertical 2 hole left and horizontal 2 hole top for A3 or B4 JIS sizepaper.
Orientation in which original is set Punch hole
positions Exposure glass ADF
Stan
dar
d
2 holes
K
L
3 holes
K
L
4 holes
K
L
90°
Tur
n
2 holes
K
L
3 holes
K
L
4 holes
K
L

Copying
66
2
A Press [Finishing].
B Select one of the punch hole positions.
C Place the originals, and then press the {Start} key.
Z-fold
Makes two parallel folds, one of which faces in and the other facing out.
Note❒ You cannot use the bypass tray with this function.
Reference“General Features”, General Settings Guide.
ACC010S
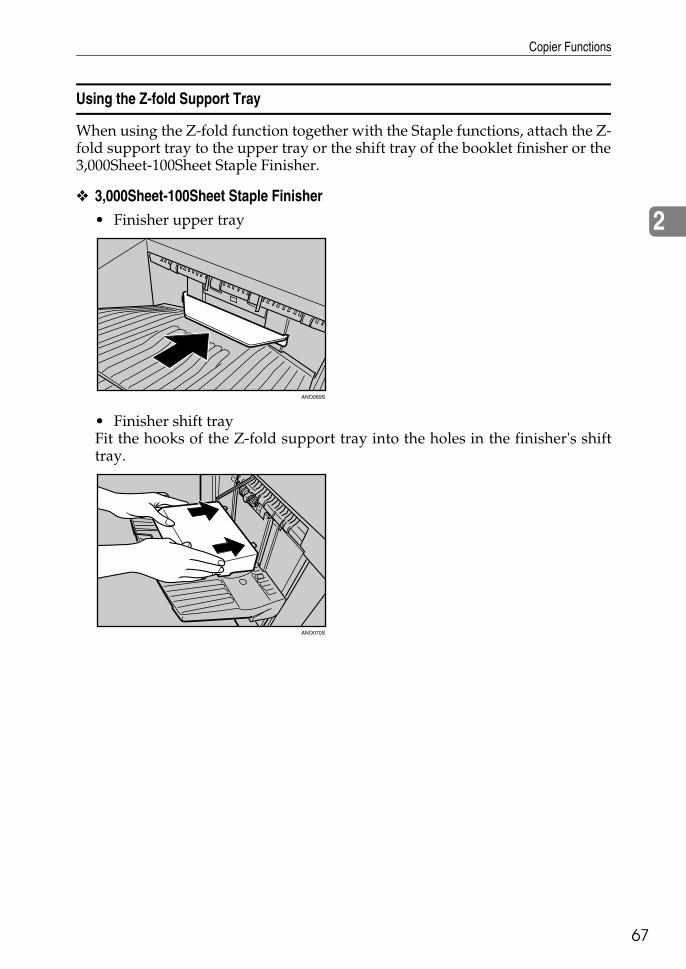
Copier Functions
67
2
Using the Z-fold Support Tray
When using the Z-fold function together with the Staple functions, attach the Z-fold support tray to the upper tray or the shift tray of the booklet finisher or the3,000Sheet-100Sheet Staple Finisher.
❖ 3,000Sheet-100Sheet Staple Finisher• Finisher upper tray
• Finisher shift trayFit the hooks of the Z-fold support tray into the holes in the finisher's shifttray.
ANO069S
ANO070S

Copying
68
2
❖ Booklet Finisher• Finisher upper trayFit the hooks of the Z-fold support tray into the dents in the finisher's uppertray.
• Finisher shift trayOpen and close the front cover to reset the machine. Fit the hooks of the Z-fold support tray into the holes in the finisher's shift tray while keeping thefront cover open.
Close the front cover of the finisher. The Z-fold support tray is lowered tocomplete the installation.
Note❒ Remove the Z-fold support tray when outputting prints to the finisher's shift
tray without using the Z-fold function. If you leave the Z-fold support tray inplace, prints are not stacked properly.
ANO066S
ANO041S
ANO068S
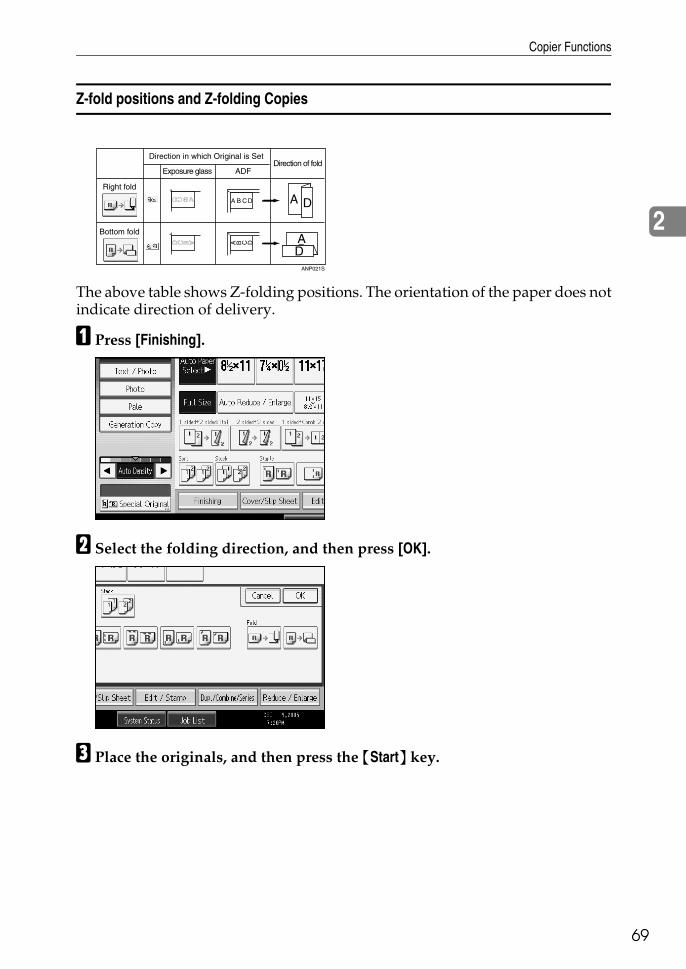
Copier Functions
69
2
Z-fold positions and Z-folding Copies
The above table shows Z-folding positions. The orientation of the paper does notindicate direction of delivery.
A Press [Finishing].
B Select the folding direction, and then press [OK].
C Place the originals, and then press the {Start} key.
ANP021S
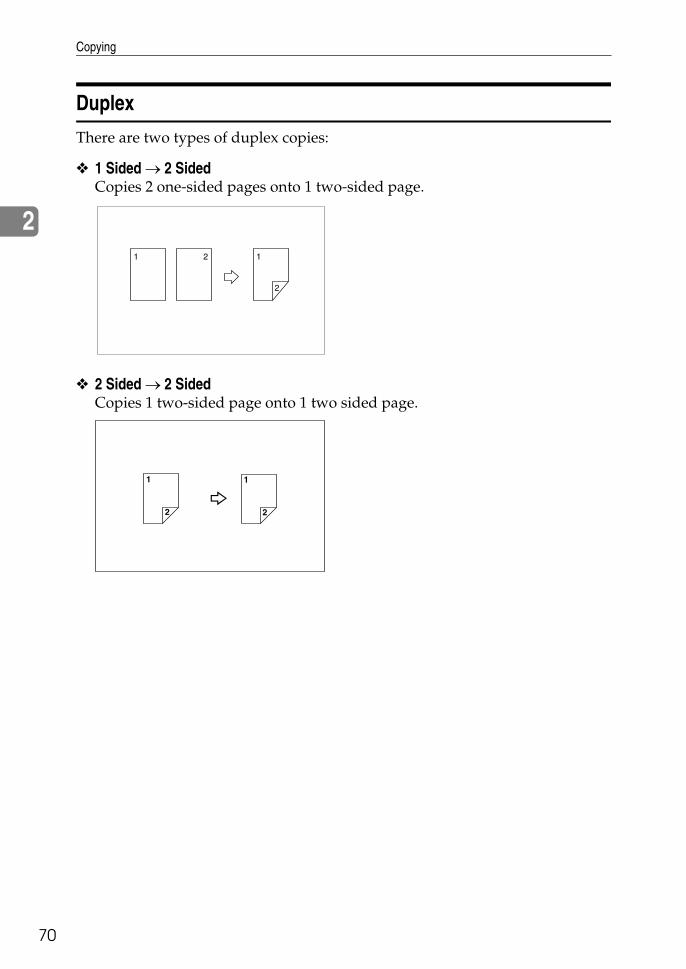
Copying
70
2
Duplex
There are two types of duplex copies:
❖ 1 Sided → 2 SidedCopies 2 one-sided pages onto 1 two-sided page.
❖ 2 Sided → 2 SidedCopies 1 two-sided page onto 1 two sided page.

Copier Functions
71
2
❖ Original orientation and completed copiesCopy images differ according to the orientation in which you place the origi-nals (K or L).The table shows the orientation of images on the front and back of copies, notthe orientation of delivery.
GCRYOU1E
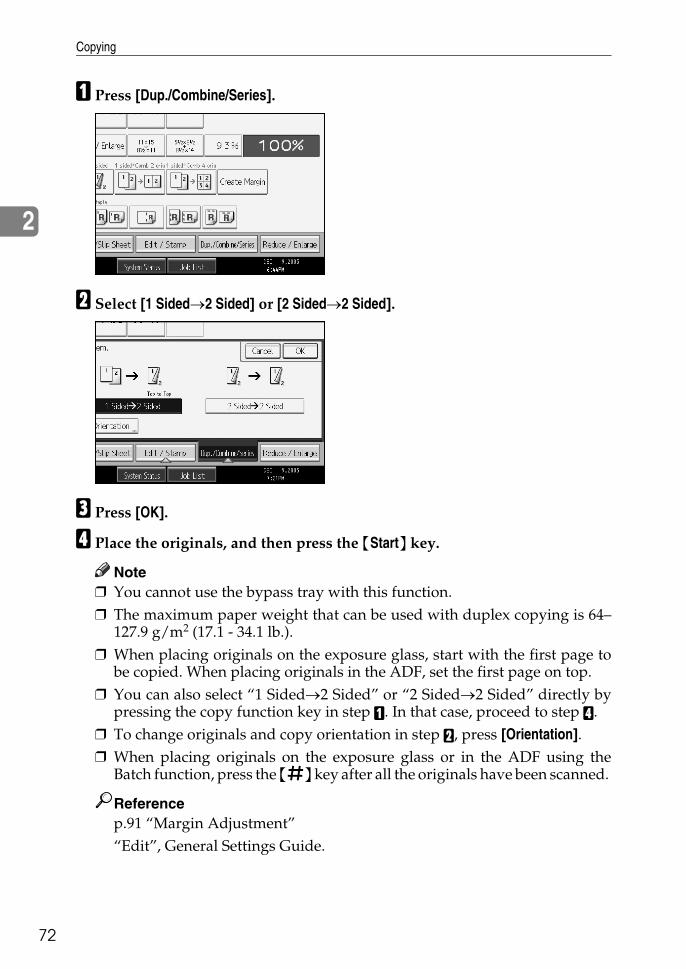
Copying
72
2
A Press [Dup./Combine/Series].
B Select [1 Sided→2 Sided] or [2 Sided→2 Sided].
C Press [OK].
D Place the originals, and then press the {Start} key.
Note❒ You cannot use the bypass tray with this function.❒ The maximum paper weight that can be used with duplex copying is 64–
127.9 g/m2 (17.1 - 34.1 lb.).❒ When placing originals on the exposure glass, start with the first page to
be copied. When placing originals in the ADF, set the first page on top.❒ You can also select “1 Sided→2 Sided” or “2 Sided→2 Sided” directly by
pressing the copy function key in step A. In that case, proceed to step D.❒ To change originals and copy orientation in step B, press [Orientation].❒ When placing originals on the exposure glass or in the ADF using the
Batch function, press the {q} key after all the originals have been scanned.
Referencep.91 “Margin Adjustment”“Edit”, General Settings Guide.

Copier Functions
73
2
Originals and copy orientation
The orientation can be selected when copying Duplex job.• Top to Top
• Top to Bottom
A Select orientation [Top to Top] or [Top to Bottom], and then press [OK].
Note❒ The default setting is [Top to Top]. You can change the default orientation
with Copier Features.
Reference“General Features”, General Settings Guide
Duplex1
Duplex2
Copying
74
2
One-Sided Combine
Combine several pages onto one side of a sheet.There are six types of One-Sided Combine.
❖ 1 Sided 2 Pages → Combine 1 SideCopies 2 one-sided originals to one side of a sheet.
❖ 1 Sided 4 Pages → Combine 1 SideCopies 4 one-sided originals to one side of a sheet.
❖ 1 Sided 8 Pages → Combine 1 SideCopies 8 one-sided originals to one side of a sheet.
GCSHVY7E
GCSHVY8J
GCSHVY3J
Copier Functions
75
2
❖ 2 Sided 1 Page → Combine 1 SideCopies 1 two-sided original to one side of a sheet.
❖ 2 Sided 2 Page → Combine 1 SideCopies 2 two-sided originals to one side of a sheet.
❖ 2 Sided 4 Page → Combine 1 SideCopies 4 two-sided originals to one side of a sheet.
❖ Orientation of the original and combine image positionOpen to left (K) originals
GCSHVYOJ
GCSHVYBJ
GCSHVY4J
GCSHUY1E
Copying
76
2
Open to top (L) originals
Placing originals and copying• Originals read from left to right
• Originals read from top to bottom
A Press [Dup./Combine/Series].
B Press [Combine].
C Select [1 Sided] or [2 Sided] for original, and then press [Combine 1 Side] for Copy.
D Select the number of originals to combine.
GCSHUY2E
Combine5
Combine6

Copier Functions
77
2
E Select the paper.
F Press [OK].
G Place the originals, and then press the {Start} key.
Note❒ You cannot use the bypass tray with this function.❒ You can also select [1 sided→Comb 2 orig] or [1 sided→Comb 4 orig] directly
by pressing the copy function key in step A. In that case, proceed to step G.
Referencep.73 “Originals and copy orientation”“Edit”, General Settings Guide
Two-Sided Combine
Combine various pages of originals into one sheet with two sides.There are six types of Two-Sided Combine.
❖ 1 Sided 4 Pages → Combine 2 SidesCopies 4 one-sided originals to one sheet with two pages per side.
❖ 1 Sided 8 Pages → Combine 2 SidesCopies 8 one-sided originals to one sheet with four pages per side.
GCBOOK1E
GCSHVYAE
Copying
78
2
❖ 1 Sided 16 Pages → Combine 2 SidesCopies 16 one-sided originals to one sheet with eight pages per side.
❖ 2 Sided 4 Pages → Combine 2 SidesCopies 2 two-sided originals to one sheet with two pages per side.
❖ 2 Sided 8 Pages → Combine 2 SidesCopies 4 two-sided originals to one sheet with four pages per side.
A FrontB Back
GCSHVY5E
GCSHVY1E
GCSHVY2E

Copier Functions
79
2
❖ 2 Sided 16 Pages → Combine 2 SidesCopies 8 two-sided originals to one sheet with eight pages per side.
A FrontB Back
A Press [Dup./Combine/Series].
B Press [Combine].
C Select [1 Sided] or [2 Sided] for Original, and then press [Combine 2 Sides] forCopy.
D Select the number of originals to combine.
E Select the paper.
F Press [OK].
G Place the originals, and then press the {Start} key.
GCSHVY6E
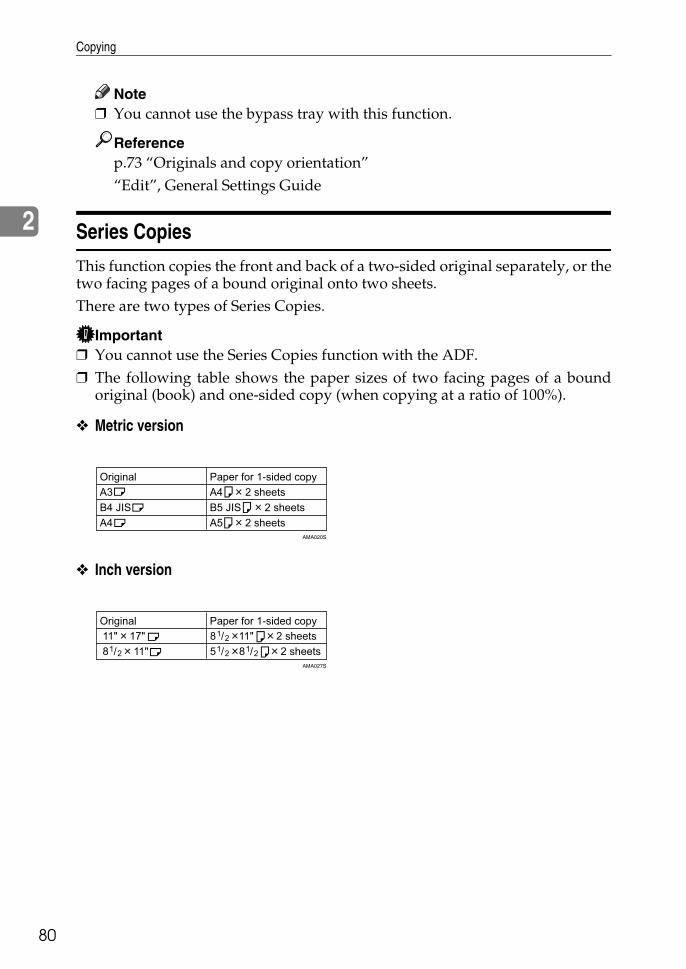
Copying
80
2
Note❒ You cannot use the bypass tray with this function.
Referencep.73 “Originals and copy orientation”“Edit”, General Settings Guide
Series Copies
This function copies the front and back of a two-sided original separately, or thetwo facing pages of a bound original onto two sheets.There are two types of Series Copies.
Important❒ You cannot use the Series Copies function with the ADF.❒ The following table shows the paper sizes of two facing pages of a bound
original (book) and one-sided copy (when copying at a ratio of 100%).
❖ Metric version
❖ Inch version
AMA020S
AMA027S

Copier Functions
81
2
❖ Book → 1 SidedYou can make one-sided copies from two facing pages of a bound original (book).
❖ 2 Sided → 1 SidedYou can make one-sided copies from two-sided originals.
A Press [Dup./Combine/Series].
B Press [Series].
C Select [2 Sided→1 Sided] or [Book→1 Sided], and then press [OK].If you selected [2 Sided→1 Sided], you can change the orientation.
D Press [OK].
E Place the original on the exposure glass, and then press the {Start} key.
Note❒ If you selected [Book→1 Sided], press the {q} key after all originals have
been scanned.
CP2B0100

Copying
82
2
Booklet/Magazine
Copies two or more originals in page order.There are six types of Booklet/Magazine.The following table shows the paper sizes of two-sided original and two-sidedcopy (when copying at a ratio of 100%).
❖ Metric version
❖ Inch version
❖ 1 Sided → BookletMake copies in page order for a folded booklet as shown.• Open to left
• Open to right
ANP060S
ANP061S
GCBOOK0E
GCBOOK1E

Copier Functions
83
2
❖ 2 Sided → BookletMake two-sided originals to copies in page order for a folded booklet asshown.• Open to left
• Open to right
❖ 1 Sided → MagazineCopies two or more originals to make copies in page order when they arefolded and stacked.• Open to left
GCAH010E
GCAH020E
GCBOOK3E

Copying
84
2
• Open to right
❖ 2 Sided → MagazineCopies two or more originals of two-sided to make copies in page order whenthey are folded and stacked.• Open to left
• Open to right
GCBOOK4E
GCAH030E
GCAH040E
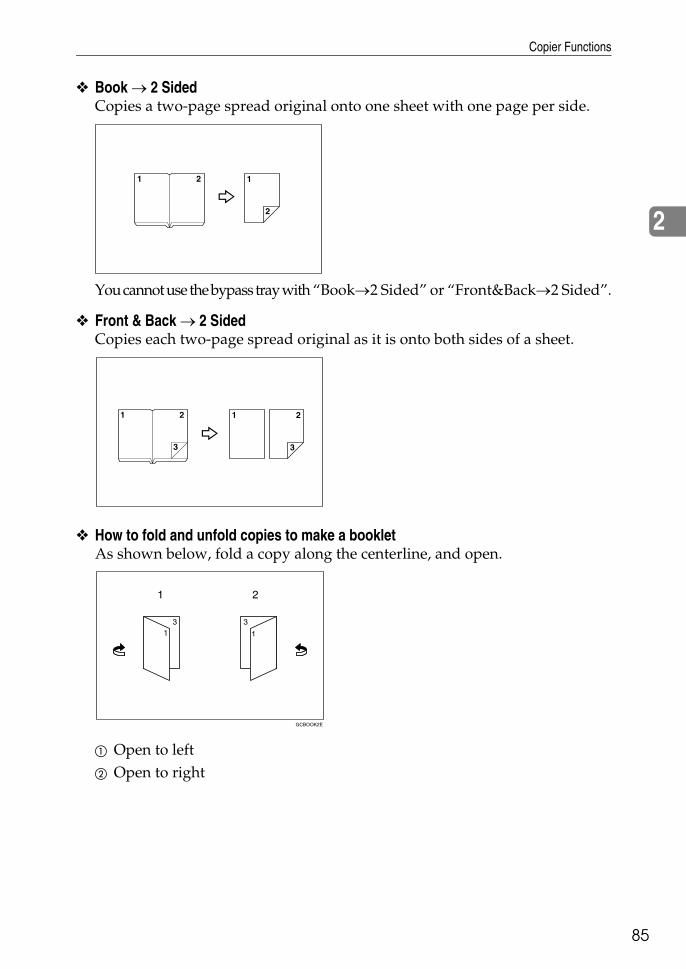
Copier Functions
85
2
❖ Book → 2 SidedCopies a two-page spread original onto one sheet with one page per side.
You cannot use the bypass tray with “Book→2 Sided” or “Front&Back→2 Sided”.
❖ Front & Back → 2 SidedCopies each two-page spread original as it is onto both sides of a sheet.
❖ How to fold and unfold copies to make a bookletAs shown below, fold a copy along the centerline, and open.
A Open to leftB Open to right
GCBOOK2E

Copying
86
2
❖ How to fold and unfold copies to make a magazineAs shown below, fold and stack copies to make a magazine, and open. • Open to left
• Open to right
Important❒ Before using this function, select [Open to Left] or [Open to Right] with [Orientation:
Booklet, Magazine] in advance. See “General Features”, General Settings Guide.
A Press [Dup./Combine/Series].
B Press [Book].
C Select a book type separately for the original ([1 Sided] or [2 Sided]) and copy([Booklet] or [Magazine]), or select a book type from [Book→2 Sided] and[Front&Back→2 Sided].
D Select the paper.
E Press [OK].
GCBOOK5E
GCBOOK6E
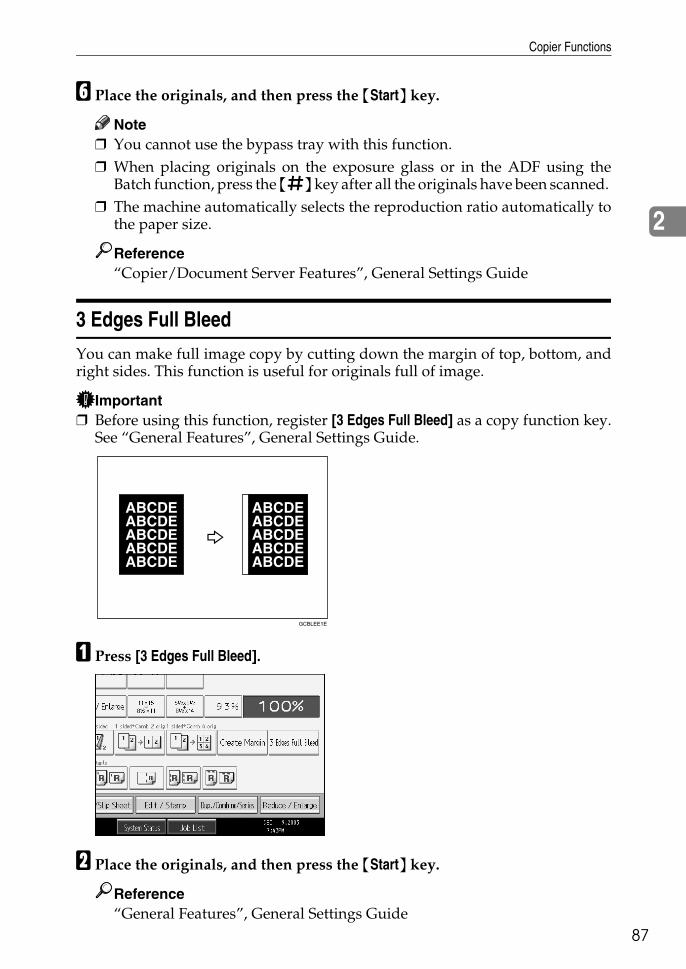
Copier Functions
87
2
F Place the originals, and then press the {Start} key.
Note❒ You cannot use the bypass tray with this function.❒ When placing originals on the exposure glass or in the ADF using the
Batch function, press the {q} key after all the originals have been scanned. ❒ The machine automatically selects the reproduction ratio automatically to
the paper size.
Reference“Copier/Document Server Features”, General Settings Guide
3 Edges Full Bleed
You can make full image copy by cutting down the margin of top, bottom, andright sides. This function is useful for originals full of image.
Important❒ Before using this function, register [3 Edges Full Bleed] as a copy function key.
See “General Features”, General Settings Guide.
A Press [3 Edges Full Bleed].
B Place the originals, and then press the {Start} key.
Reference“General Features”, General Settings Guide
GCBLEE1E
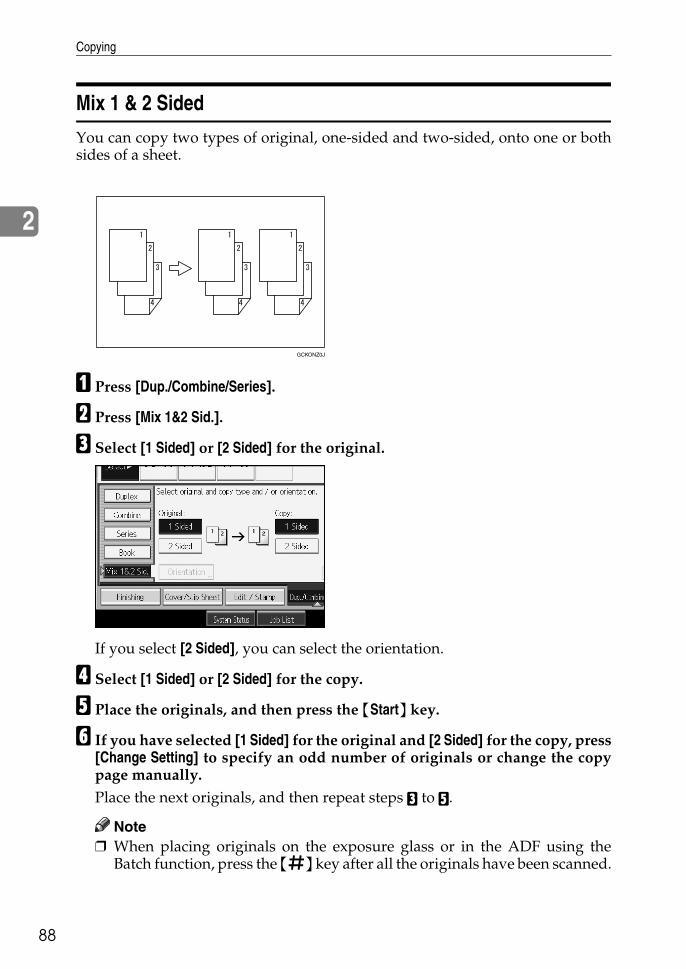
Copying
88
2
Mix 1 & 2 Sided
You can copy two types of original, one-sided and two-sided, onto one or bothsides of a sheet.
A Press [Dup./Combine/Series].
B Press [Mix 1&2 Sid.].
C Select [1 Sided] or [2 Sided] for the original.
If you select [2 Sided], you can select the orientation.
D Select [1 Sided] or [2 Sided] for the copy.
E Place the originals, and then press the {Start} key.
F If you have selected [1 Sided] for the original and [2 Sided] for the copy, press[Change Setting] to specify an odd number of originals or change the copypage manually.Place the next originals, and then repeat steps C to E.
Note❒ When placing originals on the exposure glass or in the ADF using the
Batch function, press the {q} key after all the originals have been scanned.
GCKONZ0J

Copier Functions
89
2
Scanning Position
You can move the scanning position of originals.
A Point from which the machine begins scanning
Note❒ You can move the scanning position up to 30 mm (in 1 mm increments) up-
ward, downward, to left and to right.
A Top: 0 – 30 mm, 0" – 1.2"B Right: 0 – 30 mm, 0" – 1.2"C Bottom: 0 – 30 mm, 0" – 1.2"D Left: 0 – 30 mm, 0" – 1.2"
A Press [Edit / Stamp].
B Press [Scan Position].
Copying
90
2
C Set the scanning position for the front of the original. Press [↑] or [↓] to setthe top or bottom position. Press [←] or [→] to set the left or right position.
D Set the scanning position for the back of the original. Press [↑] or [↓] to setthe top or bottom position. Press [←] or [→] to set the left or right position.Then press [OK].
E Place the originals, and then press the {Start} key.
Note❒ If you have incorrectly set the position, readjust with [↑], [↓], [←] or [→] .❒ If you don't need to set the scanned position of the back of the original,
press [OK] and go to step E.❒ The scanning position for the back is valid only when you are copying 2-
sided originals.

Copier Functions
91
2
Margin Adjustment
You can make a binding margin.
A Press [Edit / Stamp].
B Press [Margin Adj.].
C Set a binding margin for a front page. Press [←] and [→] when setting theleft and right margins, and [↓] and [↑] when setting the top and bottom margins.
D Set a binding margin for the back side pages. Press [←] and [→] when set-ting the left and right margins, and [↓] and [↑] when setting the top and bot-tom margins, and then press [OK].Margin on the back side of the page is valid when [1 Sided→2 Sided] or [Com-bine 2 Sides] is selected.
E Place the originals, and then press the {Start} key.
Note❒ You can set the binding margin up to 30 mm (in 1 mm increments).❒ If you make a mistake, press [←], [→], [↓], [↑], or press [Clear] to set a new
value.❒ If you do not need to specify the margins for the back side pages in step C,
press [OK] and proceed to step E.
Reference“Edit”, General Settings Guide

Copying
92
2
Erase
You can erase the center and/or all four sides of the original image.This function comes in the following modes:
❖ BorderErases the original's edge margin from the copy.
❖ CenterErases the original's center margin from the copy.
❖ Center/BorderErases both the original's center and edge margins from the copy.
❖ InsideErases a designated area of the copy image.
❖ OutsideErases all areas of the copy image other than the area you have selected.

Copier Functions
93
2
Note❒ The erase width is set to 10 mm (0.4 inch) as a default. You can change this
setting with Edit under User Tools Menu (Copier and Document Server Features).❒ The relationship between the original orientation and the erased part is as follows:
A Erased partB 2-99 mm (0.1"-3.9")
Reference“Edit”, General Settings Guide
L original K original
Copying
94
2
Border Erase (same width)
This mode erases the edge margin of the original image.
A Press [Edit / Stamp].
B Press [Erase].
C Press [Erase Center / Border].
D Press [Same Width].
E Set an erase border width with [n] or [o].Pressing [n] or [o] changes the width in increments of 1 mm (0.1 inch).Pressing and holding down the relevant key changes the width in incrementsof 10 mm (0.4 inch).If you select to erase the image on the back of the original, press [2 Sided Set-ting] and [Back].Erasing the image on the back is valid when you copy 2-Sided originals.
F Press [OK] twice.
G Place the originals, and then press the {Start} key.
Note❒ To change the value entered in step E, press [n] and [o] to set a new value.
Copier Functions
95
2
Border Erase (different width)
This mode erases the edge margin of the original image.
A Press [Edit / Stamp].
B Press [Erase].
C Press [Erase Center / Border].
D Press [Different Width].
E Press the key for the border you want to change and set an erase width with[n] and [o].Pressing [n] or [o] changes the width in increments of 1 mm (0.1 inch).Pressing and holding down the relevant key changes the width in incrementsof 10 mm (0.4 inch).If you select to erase the image on the back of the original, press [2 Sided Set-ting] and [Back].Erasing the image on the back is valid when you copy 2-Sided originals.
F Press [OK] twice.
G Place the originals, and then press the {Start} key.

Copying
96
2
Center Erase
This mode erases the center margin of the original image.
A Press [Edit / Stamp].
B Press [Erase].
C Press [Erase Center / Border].
D Press [Erase Center].
E Set the erase center width with [n] and [o].Pressing [n] or [o] changes the width in increments of 1 mm (0.1 inch).Pressing and holding down the relevant key changes the width in incrementsof 10 mm (0.4 inch).If you select to erase the image on the back of the original, press [2 Sided Set-ting] and [Back].Erasing the image on the back is valid when you copy 2-Sided originals.
F Press [OK] twice.
G Place the originals, and then press the {Start} key.
Copier Functions
97
2
Center/Border Erase (same width)
This mode erases both the center and edge margins of the original image.
A Press [Edit / Stamp].
B Press [Erase].
C Press [Erase Center / Border].
D Press [Erase Center/ Border].
E Press [Same Width].
F Press [Center], and then set the erase center width with [n] and [o].Pressing [n] or [o] changes the width in increments of 1 mm (0.1 inch).Pressing and holding down the relevant key changes the width in incrementsof 10 mm (0.4 inch).If you select to erase the image on the back of the original, press [2 Sided Set-ting] and [Back].Erasing the image on the back is valid when you copy 2-Sided originals.
G Press [Border], and then set the erase border width with [n] and [o].Pressing [n] or [o] changes the width in increments of 1 mm (0.1 inch).Pressing and holding down the relevant key changes the width in incrementsof 10 mm (0.4 inch).
H Press [OK] twice.

Copying
98
2
I Place the originals, and then press the {Start} key.
Center/Border Erase (different width)
This mode erases both the center and edge margins of the original image.
A Press [Edit / Stamp].
B Press [Erase].
C Press [Erase Center / Border].
D Press [Erase Center/ Border].
E Press [Different Width].
F Press the key for the order you want to change and set an erase width with[n] and [o].Pressing [n] or [o] changes the width in increments of 1 mm (0.1 inch).Pressing and holding down the relevant key changes the width in incrementsof 10 mm (0.4 inch).If you select to erase the image on the back of the original, press [2 Sided Set-ting] and [Back].Erasing the image on the back is valid when you copy 2-Sided originals.
G Press [OK] twice.
H Place the originals, and then press the {Start} key.

Copier Functions
99
2
Inside Erase
A Specify the point where the machine starts scanning (X1, Y1) and where itstops scanning (X2, Y2).You can input lengths of 0 – 432 mm, 0 – 17".
B Press [Edit / Stamp].
C Press [Erase].
D Press [Erase Inside 1] – [Erase Inside 5].
E Enter the value of [X1] with the number keys, and then press [q].
F Enter the value of [Y1] with the number keys, and then press [q].
G Enter the value of [X2] with the number keys, and then press [q].
H Enter the value of [Y2] with the number keys, and then press [q].If you select to erase the image on the back of the original, press [2 Sided Set-ting] and [Back].Erasing the image on the back is valid when you copy 2-Sided originals.
I Press [OK].If you want to go on to erase another area, repeat from steps D to I.
J Press [OK].
K Place the originals, and then press the {Start} key.

Copying
100
2
Outside Erase
A Specify the point where the machine starts scanning (X1, Y1) and where itstops scanning (X2, Y2).You can input lengths of 0 – 432 mm, 0 – 17".
B Press [Edit / Stamp].
C Press [Erase].
D Press [Erase Outside].
E Enter the value of [X1] with the number keys, and then press [q].
F Enter the value of [Y1] with the number keys, and then press [q].
G Enter the value of [X2] with the number keys, and then press [q].
H Enter the value of [Y2] with the number keys, and then press [q].If you select to erase the image on the back of the original, press [2 Sided Set-ting] and [Back].Erasing the image on the back is valid when you copy 2-Sided originals.
I Press [OK] twice.
J Place the originals, and then press the {Start} key.
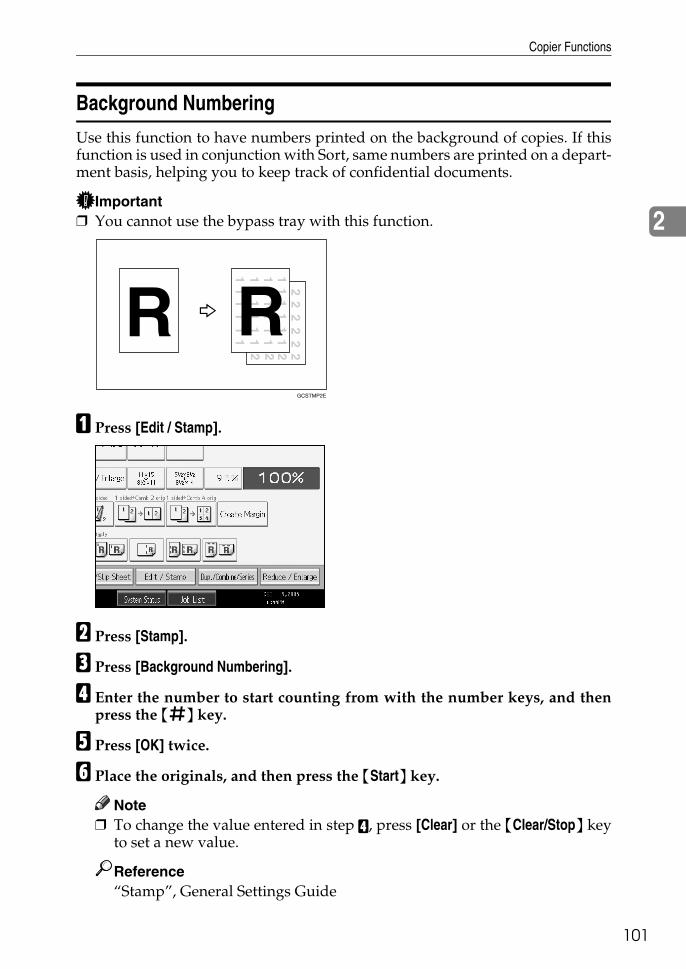
Copier Functions
01
2
1
Background Numbering
Use this function to have numbers printed on the background of copies. If thisfunction is used in conjunction with Sort, same numbers are printed on a depart-ment basis, helping you to keep track of confidential documents.
Important❒ You cannot use the bypass tray with this function.
A Press [Edit / Stamp].
B Press [Stamp].
C Press [Background Numbering].
D Enter the number to start counting from with the number keys, and thenpress the {q} key.
E Press [OK] twice.
F Place the originals, and then press the {Start} key.
Note❒ To change the value entered in step D, press [Clear] or the {Clear/Stop} key
to set a new value.
Reference“Stamp”, General Settings Guide
GCSTMP2E
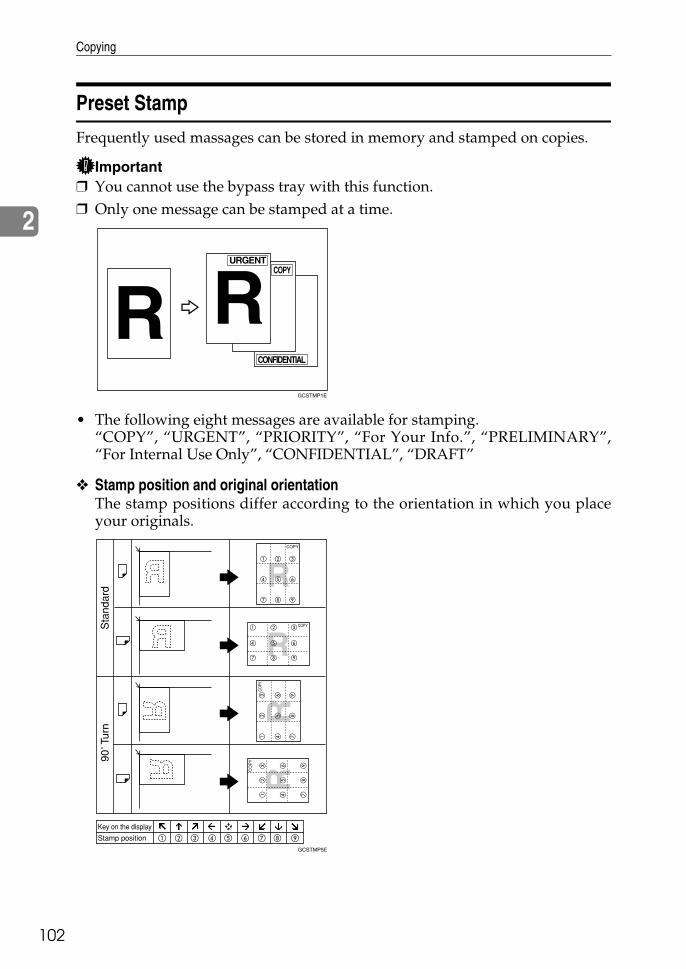
Copying
102
2
Preset Stamp
Frequently used massages can be stored in memory and stamped on copies.
Important❒ You cannot use the bypass tray with this function.❒ Only one message can be stamped at a time.
• The following eight messages are available for stamping.“COPY”, “URGENT”, “PRIORITY”, “For Your Info.”, “PRELIMINARY”,“For Internal Use Only”, “CONFIDENTIAL”, “DRAFT”
❖ Stamp position and original orientationThe stamp positions differ according to the orientation in which you placeyour originals.
GCSTMP1E
GCSTMP5E
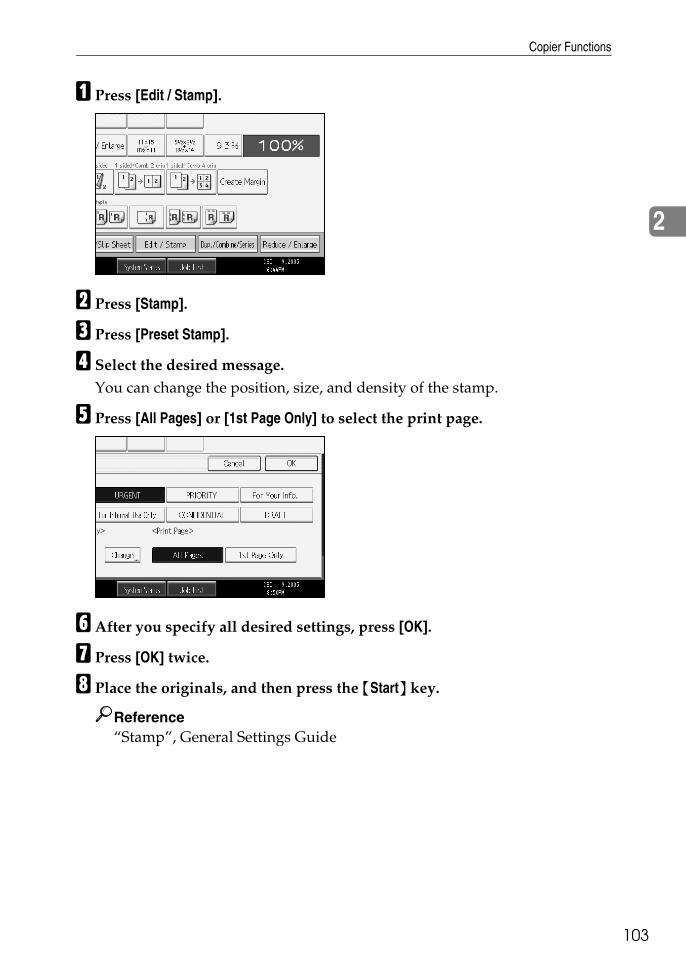
Copier Functions
03
2
1
A Press [Edit / Stamp].
B Press [Stamp].
C Press [Preset Stamp].
D Select the desired message.You can change the position, size, and density of the stamp.
E Press [All Pages] or [1st Page Only] to select the print page.
F After you specify all desired settings, press [OK].
G Press [OK] twice.
H Place the originals, and then press the {Start} key.
Reference“Stamp”, General Settings Guide
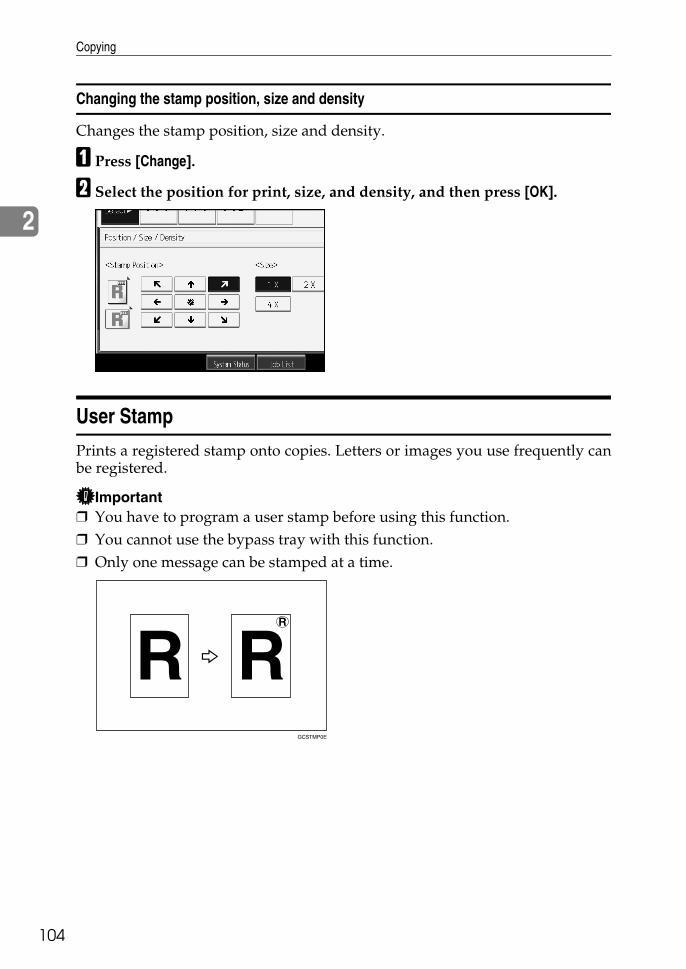
Copying
104
2
Changing the stamp position, size and density
Changes the stamp position, size and density.
A Press [Change].
B Select the position for print, size, and density, and then press [OK].
User Stamp
Prints a registered stamp onto copies. Letters or images you use frequently canbe registered.
Important❒ You have to program a user stamp before using this function. ❒ You cannot use the bypass tray with this function.❒ Only one message can be stamped at a time.
GCSTMP0E

Copier Functions
05
2
1
❖ Stamp position and original orientationThe user stamp positions differ according to the orientation in which youplace your originals.
A Press [Edit / Stamp].
B Press [Stamp].
C Press [User Stamp].
D Select the desired stamp type. You can change the stamp position.
GCSTMP6E

Copying
106
2
E Press [All Pages] or [1st Page Only] to select the print page.
F After you specify all desired settings, press [OK].
G Press [OK].
H Place the originals, and then press the {Start} key.
Reference“Stamp”, General Settings Guide
Changing the user stamp position
Changes the stamp position.
A Press [Change] under Stamp Position.
B Select the desired position, and then press [OK].
Copier Functions
07
2
1
To program the user stamp
This function scans an image that is used as a user stamp.The range of stamp images for readability is 10–297 mm (0.4"-11.7") high and 10–432 mm (0.4"-17.0") wide. However, if the value exceeds the maximum value ofthe area (5,000 mm2, 7.75 inch2), it is corrected within the range of the area automatically.
Important❒ Up to four frequently used images can be stored in memory.
AMake sure that the machine is in copier mode.
B Press the {User Tools/Counter} key.
C Press [Copier / Document Server Features].
D Press [Stamp].
E Press [User Stamp].
F Press [Program / Delete Stamp].
ZGVX040E
ANP069S
Copying
108
2
G Press [mProgram], and then press the stamp number you want to program.
H Enter the user stamp name (up to ten characters) with the letter keys, andthen press [OK].
I Enter the horizontal size of the stamp with the number keys, and then pressthe {q} key.
J Enter the vertical size of the stamp with the number keys, and then pressthe {q} key.
K Place the original for user stamp on the exposure glass, and then press [StartScanning].The original will be scanned, and the stamp will be registered.
L Press [Exit].
M Press [Exit].The display returns to the User Tools/Counter/Enquiry menu screen.
N Press [Exit].Exits settings and gets ready to copy.
Note❒ Stamp numbers with m already have settings in them. Stamp numbers
that are not registered yet are marked with “Not Programmed”.❒ If the user stamp number is already being used, the machine will ask you
if you want to overwrite it. To overwrite it, press [Yes]; otherwise, press[No].
❒ Originals cannot be scanned from the ADF when programming the userstamp.
Copier Functions
09
2
1
To delete the user stamp
Deletes an image registered as a user stamp.You cannot restore a deleted stamp.
AMake sure that the machine is in Copy mode.
B Press the {User Tools/Counter} key.
C Press [Copier / Document Server Features].
D Press [Stamp].
E Press [User Stamp].
F Press [Program / Delete Stamp].
G Press [Delete], and then press the stamp number you want to delete.
H Select [Yes], and then press [Exit].
I Press [Exit].The display returns to the User Tools/Counter/Enquiry menu screen.
J Press [Exit].Exits settings and gets ready to copy.
ANP069S
Copying
110
2
Date Stamp
You can use this function to print dates onto copies.
The following five date print styles are available.• MM/DD/YYYY• MM.DD.YYYY• DD/MM/YYYY• DD.MM.YYYY• YYYY.MM.DD
❖ Stamp position and original orientationThe date stamp positions differ according to the orientation in which youplace your originals.
Important❒ You cannot use the bypass tray with this function.
ANP055S
AMG023S
Copier Functions
11
2
1
A Press [Edit / Stamp].
B Press [Stamp].
C Press [Date Stamp].
D Press [Change Format], and then press [OK].You can change the Stamp, style and position of the date to be stamped.
E Press [All Pages] or [1st Page Only] to select the print page.
F After you specify all desired settings, press [OK].
G Press [OK].
H Place the originals, and then press the {Start} key.
Reference“Stamp”, General Settings Guide
Copying
112
2
To change the format of date
Changes the style of date to be stamped.
A Press [Change Format] under Current Date.
B Select the date format, and then press [OK].
To change the date stamp position
Changes the stamp position.
A Press [Change] under Stamp Position.
B Select the desired position, and then press [OK].
Copier Functions
13
2
1
Page Numbering
You can use this function to print page numbers onto copies.
There are six types of page numbering.• P1,P2,…• 1/5,2/5,…• -1-,-2-,…• P.1,P.2,…• 1, 2, …• 1-1,1-2,…
❖ Original orientation and stamp positionThe page stamp positions differ according to the orientation in which youplace your originals.
CP2G0100
GCSTMP8E
Copying
114
2
Important❒ You cannot use the bypass tray with this function.
A Press [Edit / Stamp].
B Press [Stamp].
C Press [Page Numbering].
D Select the format.
You can specify the stamp, position, pages to be stamped, and numbering.
E After you specify all desired settings, press [OK].
F Press [OK].
G Place the originals, and then press the {Start} key.
Reference“Stamp”, General Settings Guide

Copier Functions
15
2
1
Changing the stamp position
Changes the stamp position.
A Press [Change] under Stamp Position.
B Select the desired position, and then press [OK].
C After you specify all desired settings, press [OK].
D Place the originals, and then press the {Start} key.
Specifying the first printing page and start number (“P1,P2...”, “-1-,-2-...”, “P.1,P.2...”, “1,2...”)
Below explains the example when “P1, P2 …” is selected. The steps are the samefor other cases.
A Press [Change] under Change Numbering.
B Press [First Printing Page], enter the original sheet number from which to startprinting from, and then press the {q} key.
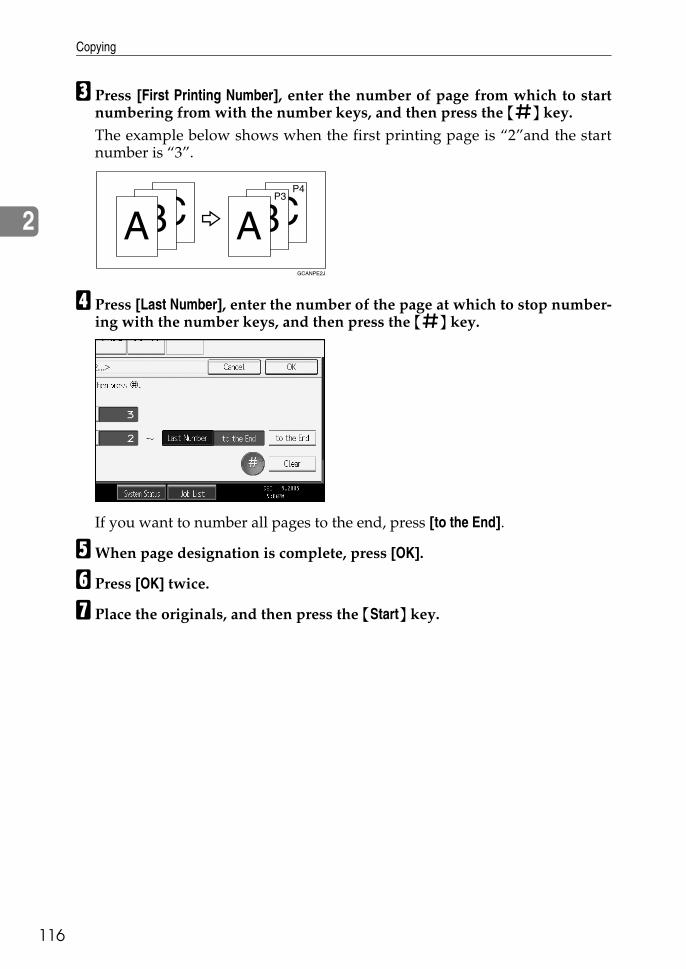
Copying
116
2
C Press [First Printing Number], enter the number of page from which to startnumbering from with the number keys, and then press the {q} key. The example below shows when the first printing page is “2”and the startnumber is “3”.
D Press [Last Number], enter the number of the page at which to stop number-ing with the number keys, and then press the {q} key.
If you want to number all pages to the end, press [to the End].
EWhen page designation is complete, press [OK].
F Press [OK] twice.
G Place the originals, and then press the {Start} key.
GCANPE2J

Copier Functions
17
2
1
Specifying the first printing page and start number (“1/5,2/5…”)
A Press [Change] under Change Numbering.
B Press [First Printing Page]. Enter the original sheet number from which to startprinting, and then press the {q} key.
You can enter between 1 and 9999 for the original sheet number from whichto start printing.
C Press [First Printing Number], enter the number of page from which to startnumbering from with the number keys, and then press the {q} key.
D To change the number to end numbering, press [Last Number], enter thatnumber with the number keys, and then press the {q} key.Proceed to step E when not changing.If you want to number all pages to the end, press [to the End].The last number is the last page number to print. For example, if Total Pagesis ten, if you want to print up to seven pages and do not want to print frompage 8 on, enter “7” for Last Number. Normally, you do not need to enter thenumber.
E Press [Total Pages], enter the total number of original pages with the numberkeys, and then press the {q} key.
FWhen page designation is complete, press [OK] three times.
G Place the originals, and then press the {Start} key.
Note❒ To change the number entered in step B, press [Clear] or the {Clear/Stop}
key, and then enter a new number.❒ To change the settings (the first printing page, the number of page from
which to start numbering, or total number of pages) after pressing [OK] instep F, press [Change] and then enter the numbers again.
❒ To change a page number, press [StartPage], and then enter the numberwith number keys.
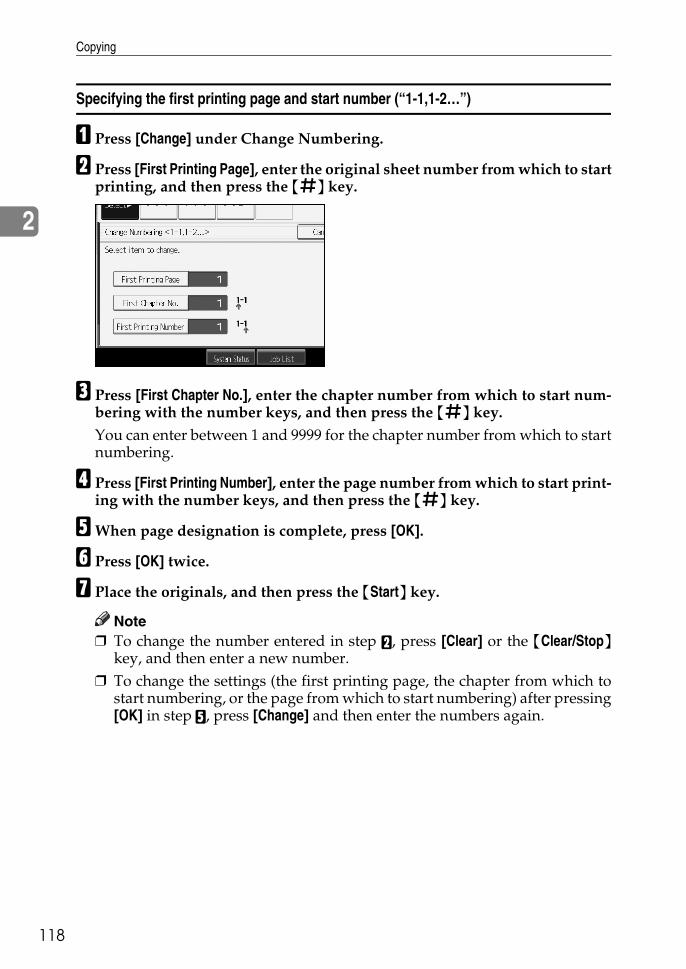
Copying
118
2
Specifying the first printing page and start number (“1-1,1-2…”)
A Press [Change] under Change Numbering.
B Press [First Printing Page], enter the original sheet number from which to startprinting, and then press the {q} key.
C Press [First Chapter No.], enter the chapter number from which to start num-bering with the number keys, and then press the {q} key.You can enter between 1 and 9999 for the chapter number from which to startnumbering.
D Press [First Printing Number], enter the page number from which to start print-ing with the number keys, and then press the {q} key.
EWhen page designation is complete, press [OK].
F Press [OK] twice.
G Place the originals, and then press the {Start} key.
Note❒ To change the number entered in step B, press [Clear] or the {Clear/Stop}
key, and then enter a new number.❒ To change the settings (the first printing page, the chapter from which to
start numbering, or the page from which to start numbering) after pressing[OK] in step E, press [Change] and then enter the numbers again.

Copier Functions
19
2
1
Stamp Text
You can stamp important text on copies up to 64 letters.
GCSTMT0E
AFU109S
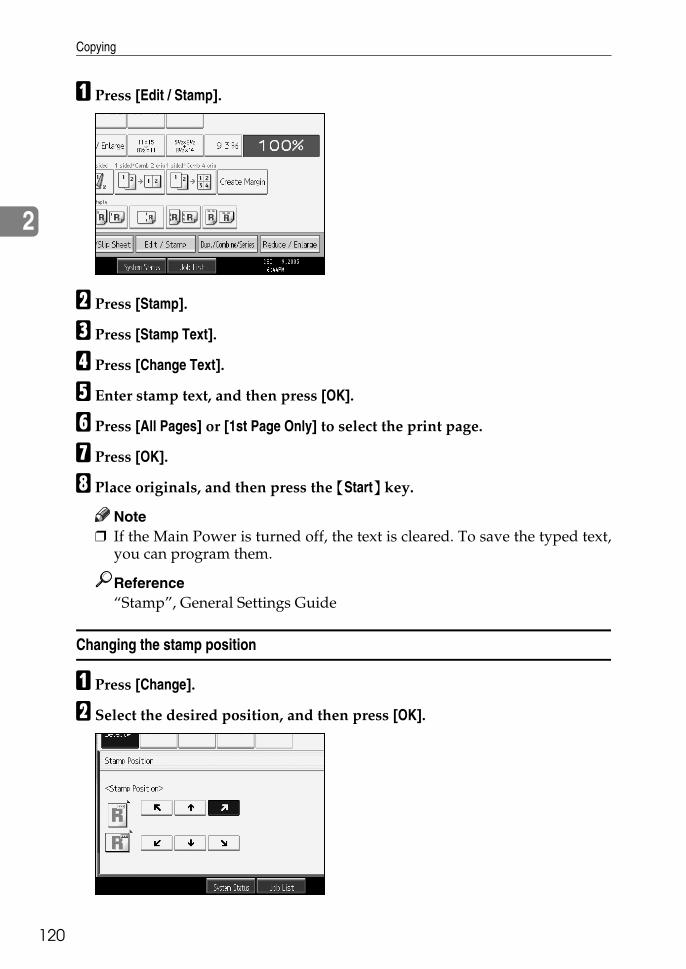
Copying
120
2
A Press [Edit / Stamp].
B Press [Stamp].
C Press [Stamp Text].
D Press [Change Text].
E Enter stamp text, and then press [OK].
F Press [All Pages] or [1st Page Only] to select the print page.
G Press [OK].
H Place originals, and then press the {Start} key.
Note❒ If the Main Power is turned off, the text is cleared. To save the typed text,
you can program them.
Reference“Stamp”, General Settings Guide
Changing the stamp position
A Press [Change].
B Select the desired position, and then press [OK].
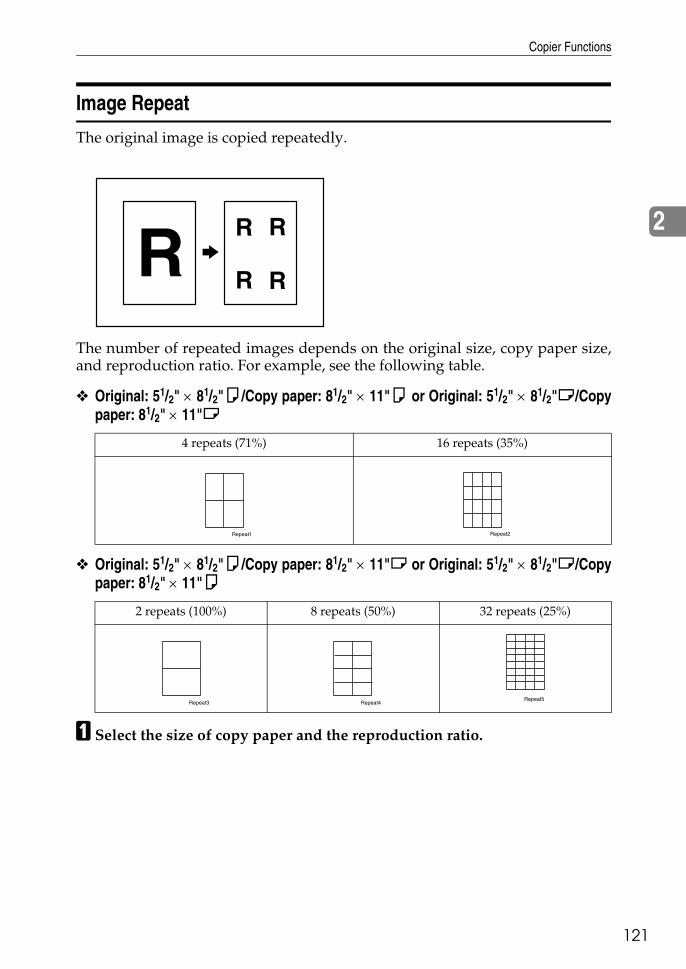
Copier Functions
21
2
1
Image Repeat
The original image is copied repeatedly.
The number of repeated images depends on the original size, copy paper size,and reproduction ratio. For example, see the following table.
❖ Original: 51/2" × 81/2"K/Copy paper: 81/2" × 11"K or Original: 51/2" × 81/2"L/Copypaper: 81/2" × 11"L
❖ Original: 51/2" × 81/2"K/Copy paper: 81/2" × 11"L or Original: 51/2" × 81/2"L/Copypaper: 81/2" × 11"K
A Select the size of copy paper and the reproduction ratio.
4 repeats (71%) 16 repeats (35%)
2 repeats (100%) 8 repeats (50%) 32 repeats (25%)
Repeat1 Repeat2
Repeat3 Repeat4Repeat5

Copying
122
2
B Press [Edit / Stamp].
C Press [Edit Image].
D Press [Image Repeat].
E Press [OK].
F Place the originals, and then press the {Start} key.
Reference“Edit”, General Settings Guide
Double Copies
One original image is copied twice onto one sheet, as shown.
Important❒ You cannot use the bypass tray with this function.❒ Originals with a size of A5L, B6 JISKL, 51/2" × 81/2"L cannot be detected
properly on the exposure glass. Be sure to select the copy paper manually orplace the originals in the ADF.
❒ The following table shows original and copy paper sizes (when copying at aratio of 100%).
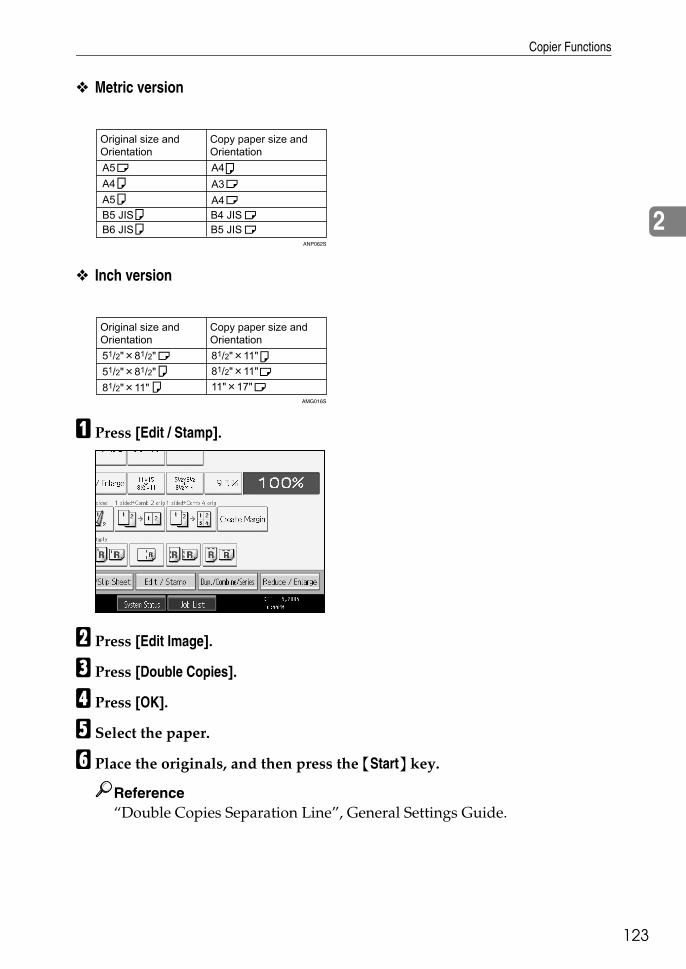
Copier Functions
23
2
1
❖ Metric version
❖ Inch version
A Press [Edit / Stamp].
B Press [Edit Image].
C Press [Double Copies].
D Press [OK].
E Select the paper.
F Place the originals, and then press the {Start} key.
Reference“Double Copies Separation Line”, General Settings Guide.
ANP062S
AMG016S

Copying
124
2
Centering
You can make copies with the image moved to the center of the copy paper.
Important❒ You cannot use the bypass tray with this function.❒ The original sizes and directions for centering are listed below.
❖ Metric version
❖ Inch version
A Select the paper.
B Press [Edit / Stamp].
Original location Original size and orientation
Exposure glass A3L, B4 JISL, A4KL, B5 JISKL, A5K, 81/2" × 13"L
ADF A3L, B4 JISL, A4KL, B5 JISKL, A5KL, B6 JISKL, 81/2" × 13"L, 8KL, 16KKL
Original location Original size and orientation
Exposure glass 11" × 17"L, 81/2" × 14"L, 81/2" × 11"KL, 81/2" × 51/2"K
ADF A3L, A4KL, 11" × 17"L, 81/2" × 14"L, 81/2" × 11"KL, 51/2" × 81/2"KL, 10" × 14"L, 71/4" × 101/2"L
GCCNTR0E

Copier Functions
25
2
1
C Press [Edit Image].
D Press [Centering].
E Press [OK].
F Place the originals, and then press the {Start} key.
Positive/Negative
If your original is black and white, copy images are inverted.
A Press [Edit / Stamp].
B Press [Edit Image].
C Press [Positive / Negative].
D Press [OK].
E Select the paper.
F Place the originals, and then press the {Start} key.
GCHATN1E
Copying
126
2
Covers
You can use this function to create cover sheets by adding additional pages ofdifferent paper, or copying existing pages onto different paper.
Important❒ You can set neither the copy paper for originals nor cover sheets in the bypass
tray.❒ If you have selected “Interposer” for “Cover Sheet Tray”, in System Settings,
you cannot copy on the cover sheets that you have specified for this function.❒ When selecting [Copy], select whether the front and back covers are copied 1
Sided or 2 Sided.Covers function includes Front Cover and Front/Back Covers.
❖ Front coverThe first page of your originals is copied on specific paper sheet for covers, ora cover sheet is inserted before the first copy.• Copy
• Blank
❖ Back CoverThe last page of originals is copied onto a specified cover sheet paper, or acover sheet is inserted after the last page.• Copy
ADB001S

Copier Functions
27
2
1
• Blank
❖ Front/Back CoversThe first and last pages of your original are copied on separate paper for useas covers, or a cover sheet is inserted before the first copy and after the lastcopy.• Copy
• Blank
A Set the tray for the front cover or back cover sheet.You can select the tray for the front or back cover sheet using the Tray PaperSettings in System Settings.The cover sheet should be the same size and direction as the copy paper.
B Press [Cover/Slip Sheet].
C Select [Copy] or [Blank] for the front or back cover sheet, and then press [OK].
ADB002S
GCCOVE0J

Copying
128
2
D Select the paper tray that contains the sheet paper to copy the originals.
E Place the originals, and then press the {Start} key.
Reference“Tray Paper Settings”, General Settings Guide
Designate
Use this function to have certain pages of your original copied onto slip sheetsor to insert a slip sheet for each page specified.
Important❒ You cannot place the copy paper in the bypass tray.❒ If you have selected “Interposer” for “Designation Sheet 2 Tray” in System
Settings, you cannot copy on the slip sheets that you have specified for thisfunction.
A Set the tray you want to use for slip sheets.The paper for slip sheets should be of the same size as the copy paper and alsobe set in the same direction.
B Press [Cover/Slip Sheet].
C Press [Designate / Chapter].
D Select [Designate: Copy] or [Designate: Blank].
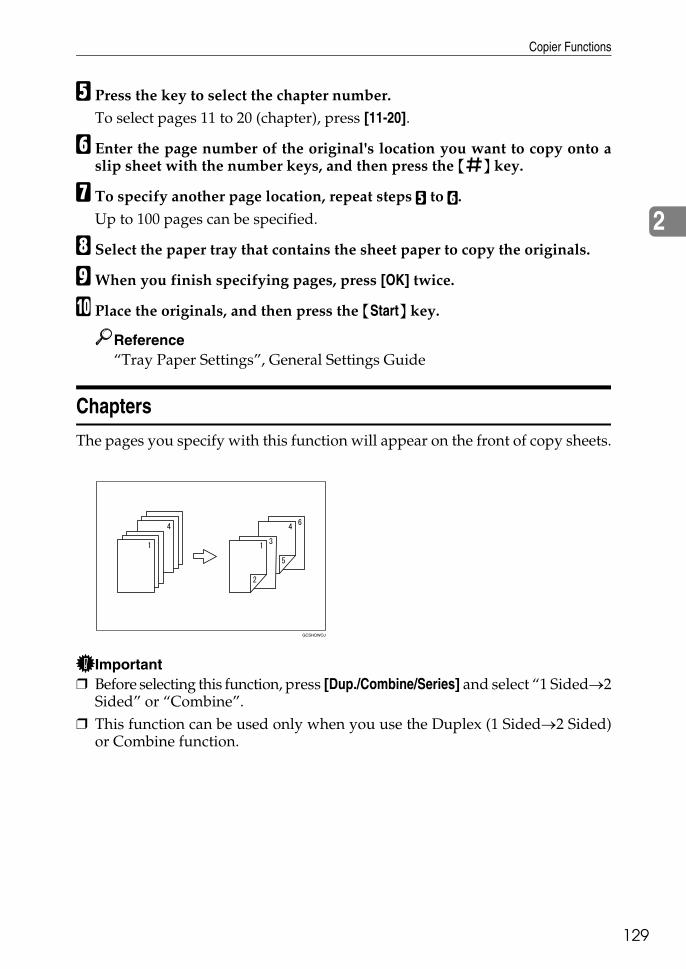
Copier Functions
29
2
1
E Press the key to select the chapter number.To select pages 11 to 20 (chapter), press [11-20].
F Enter the page number of the original's location you want to copy onto aslip sheet with the number keys, and then press the {q} key.
G To specify another page location, repeat steps E to F.Up to 100 pages can be specified.
H Select the paper tray that contains the sheet paper to copy the originals.
IWhen you finish specifying pages, press [OK] twice.
J Place the originals, and then press the {Start} key.
Reference“Tray Paper Settings”, General Settings Guide
Chapters
The pages you specify with this function will appear on the front of copy sheets.
Important❒ Before selecting this function, press [Dup./Combine/Series] and select “1 Sided→2
Sided” or “Combine”.❒ This function can be used only when you use the Duplex (1 Sided→2 Sided)
or Combine function.
GCSHOWOJ

Copying
130
2
A Press [Cover/Slip Sheet].
B Press [Designate / Chapter].
C Press [Chapter].
D Press the key to select the chapter number.To select pages 11 to 20 (chapter), press [11-20].
E Enter the page location of the first page of the first chapter with the numberkeys, and then press the {q} key.Up to 100 chapter locations can be specified.
F To specify another page location, repeat steps D to E.
G Select the paper tray that contains the sheet paper to copy the originals.
HWhen you finish specifying page location, press [OK] twice.
I Place the originals, and then press the {Start} key.
Blank Slip Sheets
You can insert a blank slip sheet before or after a specified page.

Copier Functions
31
2
1
A Set the tray for the blank slip sheet.The paper for slip sheets should be of the same size as the copy paper and alsobe set in the same direction.
B Press [Cover/Slip Sheet].
C Press [Designate / Chapter].
D Press [Insert Sheet].
E Press the key to select the chapter number.
F Select the paper tray for slip sheets.
G Select [Before] to insert slip sheets before the desired page. Select [After] toinsert slip sheets after the desired page. Enter the page number with thenumber keys.
H Press [Number of Sheets], and use the number keys to enter the number ofsheets you wish to insert, and then press the {q} key.
I To specify another location where to insert sheets, repeat steps E to H.
J Select the paper tray containing the paper to copy the originals onto.
KWhen you have finished specifying all settings, press [OK] twice.
L Place originals, and then press the {Start} key.
Reference“Tray Paper Settings”, General Settings Guide.

Copying
132
2
Slip Sheets
Every time an original page changes, a slip sheet is inserted. This function canbe used to automatically insert a slip sheet between OHP transparencies, or as astacking function.You can also copy onto slip sheets.
Important❒ If [1 Sided→2 Sided] is set, change it to [1 Sided→1 Sided].
❖ When placing OHP transparencies in the bypass tray• Copy
• Blank
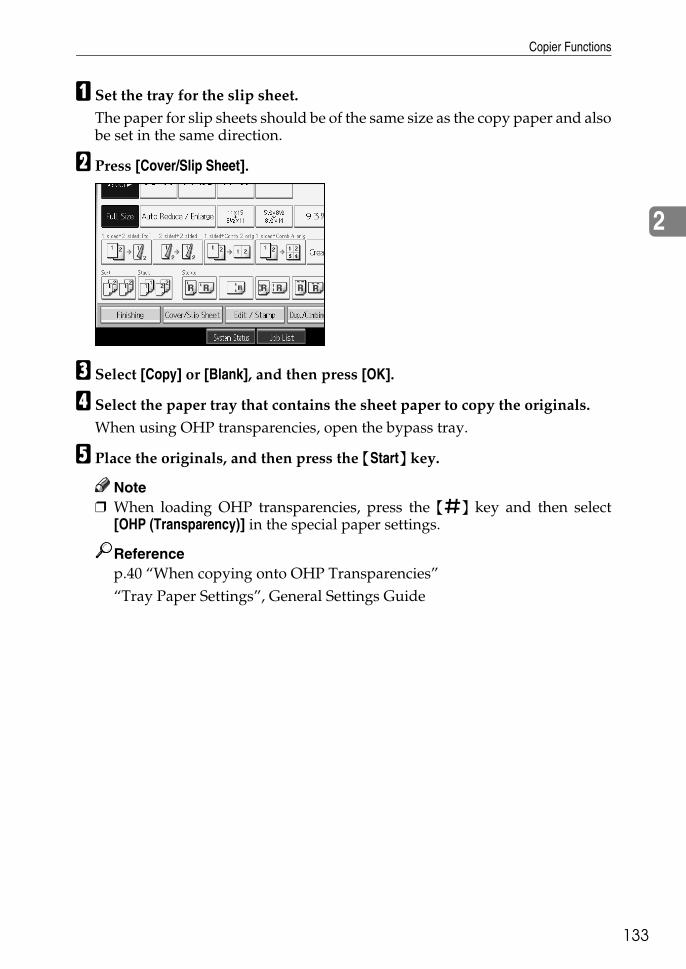
Copier Functions
33
2
1
A Set the tray for the slip sheet.The paper for slip sheets should be of the same size as the copy paper and alsobe set in the same direction.
B Press [Cover/Slip Sheet].
C Select [Copy] or [Blank], and then press [OK].
D Select the paper tray that contains the sheet paper to copy the originals.When using OHP transparencies, open the bypass tray.
E Place the originals, and then press the {Start} key.
Note❒ When loading OHP transparencies, press the {q} key and then select
[OHP (Transparency)] in the special paper settings.
Referencep.40 “When copying onto OHP Transparencies”“Tray Paper Settings”, General Settings Guide

Copying
134
2
Storing Originals in the Document Server
Using the Document Server enables you to store documents being read with thecopy feature on the hard disk of this machine. Thus you can print them later ap-plying necessary conditions.
Important❒ Machine failure can result in data loss. Important data stored on the hard disk
should be backed up. The manufacturer shall not be responsible for any dam-age that might result from loss of data.
A Press [Store File].
B Enter a user name, file name, or password if necessary.
C Press [OK].
D Place your originals.
Storing Originals in the Document Server
35
2
1
EMake scanning settings for the original.
F Press the {Start} key.Copies are delivered and scanned data is stored in the hard disk.
Note❒ When interrupting the scan, press the {Clear/Stop} key. Pressing [Continue]
from the confirmation screen resumes the scan. Pressing [Stop] deletes thescanned images and the original on the automatic document feeder (ADF)will be ejected.
❒ When placing originals on the exposure glass, press the {q} key after alloriginals are scanned.
❒ According to the factory default, the documents stored on the DocumentServer are deleted three days (72 hours) after the storing date. You can can-cel the automatic document deletion or select other period than three daysfor the automatic deletion. For more information about changing settings,see “Administrator Tools”, General Settings Guide.
❒ To check if the document has been stored, press the {Document Server} keyto display the document selection screen.
❒ If you want to store another document, do so after copying is complete.❒ For further information about the Document Server, see “Document Server”.❒ For details about printing stored documents, see “Printing a Stored Document”.❒ For details about setting user name, file name, and password, see “Storing
Data”.❒ Depending on the security settings, [Access Privileges] is displayed instead
of [User Name].❒ For details about procedure for setting [Access Privileges], ask the administrator.
Referencep.166 “Using the Document Server”p.176 “Printing a Stored Document”p.166 “Storing Data”“Administrator Tools”, General Settings Guide.
Copying
136
2
Programs
You can store the frequently used copy job settings in the machine memory andrecall them for future use.You can store up to 10 programs.
Note❒ Paper settings are stored based on paper size. So if you place more than one
paper tray of the same size, the paper tray prioritized with the Copier Fea-tures will be selected first. See “Tray Paper Settings”, General Settings Guide.
❒ Programs are not cleared by turning the power off or by pressing the {ClearModes} key.
Referencep.139 “Programming Defaults in Initial Display”“Tray Paper Settings”, General Settings Guide.
Storing a Program
Stores a program.
A Edit the copy settings.
B Press the {Program} key.
C Press [Program].
ANP070S

Programs
37
2
1
D Press the program number you want to store.
E Enter the program name.You can enter up to 40 characters.
F Press [OK].The screen returns to the program screen, showing the program number followed bythe program name. The screen returns to the initial copy display after a short time.
Note❒ Program numbers with m against them already have settings made for them.
Changing a Stored Program
Changes program settings.
A Check the program settings.
B Set the contents of a program.
C Press the {Program} key.
D Press [Program].
E Press the program number you want to store.
F Press [Yes].
G Enter the program name.You can enter up to 40 characters.
H Press [OK].The screen returns to the program screen, showing the program number followed bythe program name. The screen returns to the initial copy display after a short time.
Note❒ When you want to check the contents of a program, recall the program.❒ When it is overwritten, the previous program is deleted.

Copying
138
2
Deleting a Program
Erases the contents of program.
A Press the {Program} key.
B Press [Delete].
C Press the program number you want to delete.
D Press [Yes].The program is deleted, and the screen returns to the copy screen.
Recalling a Program
Recalls a stored program and copies its contents.
A Press the {Program} key.
B Press [Recall].
C Press the program number you want to recall.The stored settings are displayed.
D Place the originals, and then press the {Start} key.
Note❒ Only programs with m against them contain a program in step C.
Programs
39
2
1
Programming Defaults in Initial Display
This section describes how to program defaults for the initial display whenmodes are cleared or reset, or immediately after the operation switch is turned.The default settings you can program are Paper Tray, Original Type, Density,Special Original, Original Orientation, Cover/Slip Sheet, Dup./Combine/Se-ries, Reduce / Enlarge, Finishing.
A Specify scan settings and any other settings you require in the initial display.
B Press the {Program} key.
C Press [Program as Defaults].
D Press [Program].
EWhen a confirmation dialog appears, press [Yes].The current settings are programmed as defaults. The screen returns to theinitial display.
Note❒ To restore the factory default settings on the initial display, press [Restore
Factory Defaults].❒ The default settings can be programmed separately for the normal screen
and simplified screens.

Copying
140
2

3. Connect Copy
41
1This section explains how to make copies using two machines connected via theCopy Connector (optional).
What is Connect Copy?
Connect Copy allows you to connect two machines together via a cable. Whenyou set up a copy job on one machine (the main machine), data is transferred tothe other (the sub-machine) so copies can be made on both simultaneously.
❖ High-speed copying for greater productivityLarge volume copy runs can be completed in shorter time. For instance, whentwo 75 copies/minute machines are connected together, a speed of 150 cop-ies/ minute can be achieved (paper size of A4K, 81/2" × 11"K).
❖ Reducing time lossEven if one machine stops due to a paper jam, or runs out of toner or paper,the other machine can automatically take over and finish the job.
ANO045S
Connect Copy
142
3
How It Works
After the original is scanned, the data is stored on the hard disk of the main ma-chine. As soon as the main machine starts copying, the data is transferred to thehard disk of the sub-machine, and the sub-machine then starts copying.In this manual, the two machines connected are referred to as main machine andsub-machine.
A Main machineB Sub-machineThe main machine is the one on which you press [Connect Copy] to make ConnectCopy settings. The other machine becomes the sub-machine.
Machine Types and Options
• Both machines need not be of the same type.• You can still use Connect Copy without an optional finisher or Large Capac-
ity Tray (LCT). However, to use the Staple and Punch functions, the optionalfinisher and punch unit must be installed on both machines. To use the Sad-dle Stitch function, the optional booklet finisher must be installed on both ma-chines. To use the Z-fold function, the optional Z-folding unit and bookletfinisher must be installed on both machines.
Interrupt Copy
• You can use the Interrupt function on the sub-machine, but not on the mainmachine.
• You cannot use Connect Copy when a job has been paused using the Inter-rupt function.
ANO046S
What is Connect Copy?
43
3
1
Before You Start
Both machines must have paper trays loaded with paper of the same size, typeand orientation.To ensure the same copy results from both machines, • Copy Quality settings in the User Tools should be the same on each machine.• Both main and sub machines should be installed with the same type of finisher.
Reference“General Features”, General Settings Guide

Connect Copy
144
3
Connect Copy Display Panel
The display panel shows machine status, error messages and function menus.
❖ Initial copy display
1. [Connect Copy]Press to switch from the initial copy dis-play to the Connect Copy display.
2. Paper SelectDisplays the size, type and orientation ofthe paper set on both machines.
3. Numbers of originalsDisplays the number of originals scannedinto memory of the main machine.
4. Number of setsDisplays the number of sets of copies.
5. Number of copiesDisplay the number of copies for the mainmachine.Press this part of the display to display thetotal number of copies for two machines.
❖ Display during Connect Copy
Note❒ The connect copy function is not available from the simplified display on the
main machine.
ANP086S
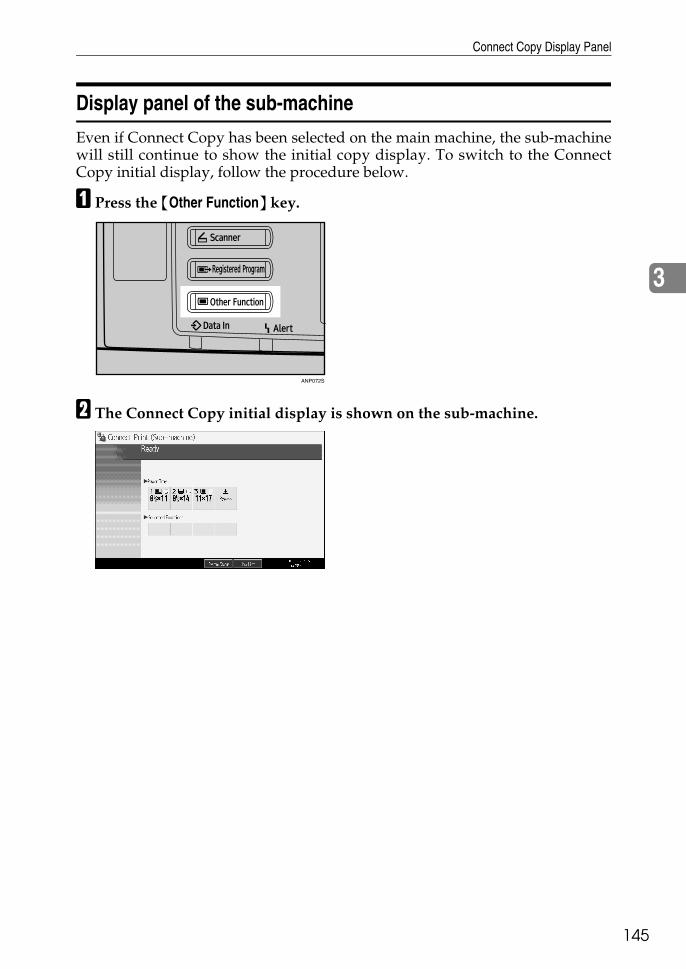
Connect Copy Display Panel
45
3
1
Display panel of the sub-machine
Even if Connect Copy has been selected on the main machine, the sub-machinewill still continue to show the initial copy display. To switch to the ConnectCopy initial display, follow the procedure below.
A Press the {Other Function} key.
B The Connect Copy initial display is shown on the sub-machine.
ANP072S
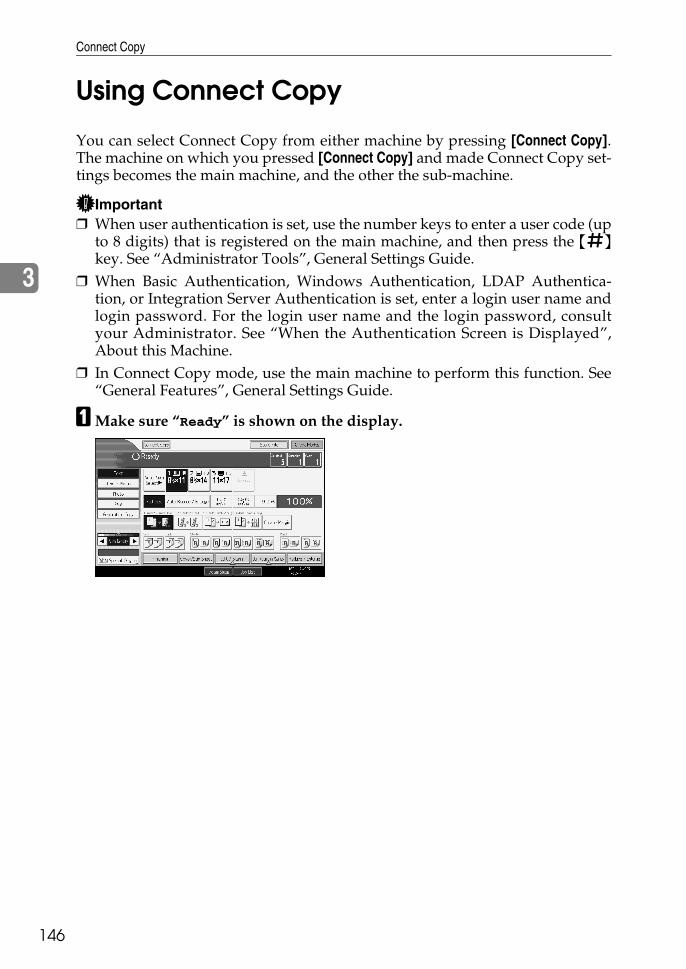
Connect Copy
146
3
Using Connect Copy
You can select Connect Copy from either machine by pressing [Connect Copy].The machine on which you pressed [Connect Copy] and made Connect Copy set-tings becomes the main machine, and the other the sub-machine.
Important❒ When user authentication is set, use the number keys to enter a user code (up
to 8 digits) that is registered on the main machine, and then press the {q}key. See “Administrator Tools”, General Settings Guide.
❒ When Basic Authentication, Windows Authentication, LDAP Authentica-tion, or Integration Server Authentication is set, enter a login user name andlogin password. For the login user name and the login password, consultyour Administrator. See “When the Authentication Screen is Displayed”,About this Machine.
❒ In Connect Copy mode, use the main machine to perform this function. See“General Features”, General Settings Guide.
AMake sure “Ready” is shown on the display.
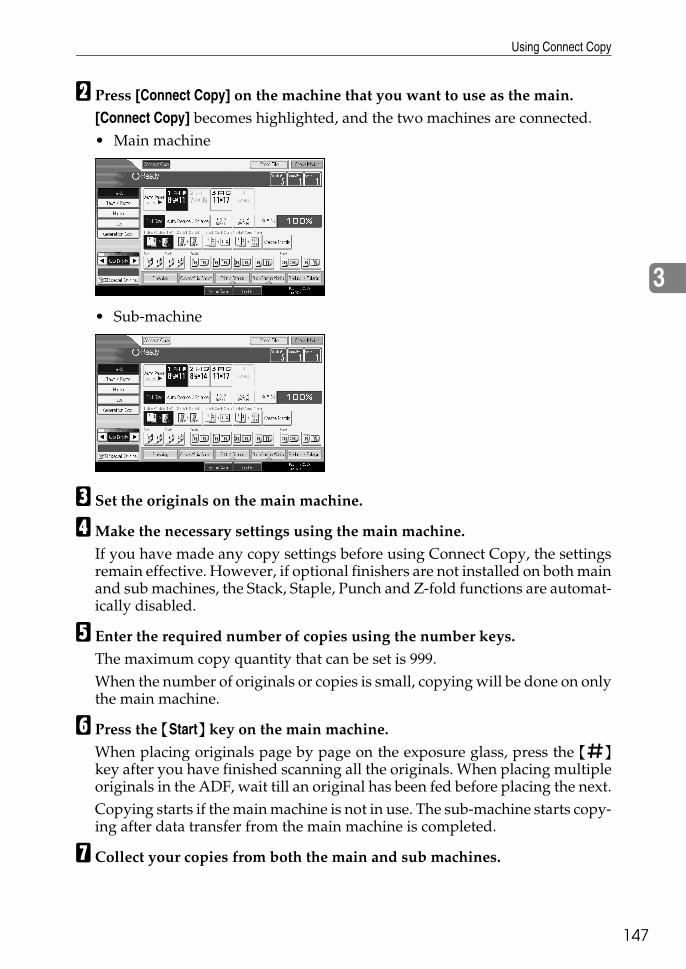
Using Connect Copy
47
3
1
B Press [Connect Copy] on the machine that you want to use as the main.[Connect Copy] becomes highlighted, and the two machines are connected.• Main machine
• Sub-machine
C Set the originals on the main machine.
DMake the necessary settings using the main machine.If you have made any copy settings before using Connect Copy, the settingsremain effective. However, if optional finishers are not installed on both mainand sub machines, the Stack, Staple, Punch and Z-fold functions are automat-ically disabled.
E Enter the required number of copies using the number keys.The maximum copy quantity that can be set is 999.When the number of originals or copies is small, copying will be done on onlythe main machine.
F Press the {Start} key on the main machine.When placing originals page by page on the exposure glass, press the {q}key after you have finished scanning all the originals. When placing multipleoriginals in the ADF, wait till an original has been fed before placing the next.Copying starts if the main machine is not in use. The sub-machine starts copy-ing after data transfer from the main machine is completed.
G Collect your copies from both the main and sub machines.

Connect Copy
148
3
Note❒ If you cancel Connect Copy mode, press [Connect Copy], which is highlight-
ed on the main machine.❒ The number of copies might differ on the main and sub machines.❒ Both machines may not finish copying at the same time.❒ When using the Sort/Staple function, copying is divided between the two
machines by the number of sets. If a paper misfeed occurs when processinga set of copes, it is not possible for the other machine to take over the re-mainder of that particular set.
❒ To interrupt ADF scanning, press the {Clear/Stop} key on the main ma-chine, and then select [Stop] in response to the message that appears.
❒ To stop copying, press the {Clear/Stop} key on the main machine, and thenselect [Stop] in response to the message that appears.
❒ When the memory to store originals exceeds the maximum, an error mes-sage appears. For details, see “When Memory is full”, Troubleshooting.
Referencep.20 “Batch mode”“When the Authentication Screen is Displayed”, About this Machine“Administrator Tools”, General Settings Guide“When Memory is full”, Troubleshooting
Using Connect Copy
49
3
1
Order of Copy Output
❖ When copying with the Sort/Staple function(Example) Copying 6 sets of a three-page original
A Main machineB Sub-machineCopies are delivered face-down on both the main and sub machines.When using the Sort/Staple function, the processing of one copy set cannotbe divided between the two machines.
❖ When copying with the Stack function(Example) Making 2 copies of each page of a six-page original
A Main machineB Sub-machineCopies are delivered face-down on both the main and sub machines.Copies are delivered as shown in the above illustration.
ANP047S
ANP048S
Connect Copy
150
3
Auto Reset when using Connect Copy
The machine exits Connect Copy mode automatically and returns to the initialcondition after a certain period of time has lapsed after job completion. This iscalled “Auto Reset”.
Note❒ When the Auto Reset time of the sub-machine lapses when it is processing an
Interrupt Copy job, the sub-machine will return to its original position andthe Interrupt Copy job will be cancelled.
Reference“Timer Settings”, General Settings Guide
Auto Off
The machine automatically turns itself after a certain period of time has lapsedafter job completion. This is called “Auto Off”. In Connect Copy mode, the sub-machine will not turn off automatically.
Reference“Timer Settings”, General Settings Guide
Exiting Connect Copy
This section explains how to cancel Connect Copy mode and return to standardcopying mode.
A Press [Connect Copy] on the main machine.The machine returns to standard copying mode.
Note❒ Settings made on the main machine during Connect Copy mode remain effective.❒ If you press the {Clear Modes} key on the main machine, Connect Copy
mode is cancelled and the main machine returns to its initial condition.

Using Connect Copy
51
3
1
Copying Stored Documents Using Connect Print
You can print a document stored in the Document Server using the ConnectPrint function.
Important❒ The main machine is the one on which the document is stored.
A Press the {Document Server} key.
B Select the document to be printed.The selected document is highlighted.
C Repeat step if you want to select more documents.The documents will be printed in the order that they have been selected.
D If you need to change the print settings, press [To Printing Screen].If you do not need to change any settings, proceed to step E.
E Press [Connect Print].The key is highlighted and the two machines are connected.
F Enter the required number of copies using the number keys.The maximum copy quantity that can be set is 999.
G Press the {Start} key.
Connect Copy
152
3
Note❒ Some documents may not be displayed, depending on the security func-
tion settings.❒ To change the printing order, press the highlighted documents to cancel
your selection. Select again in the desired order.❒ You can also cancel all your selections by pressing the {Clear Modes} key.❒ To register new printing conditions or numbers of copies in step D, press
[Save Print Settings].❒ If you are selecting multiple files, you can check the file names and print-
ing order by pressing [T] and [U] to scroll through the list.❒ Press [Select File] to return to the Select Files to Print display.❒ If you have entered a wrong value, press the {Clear/Stop} key and enter
again.❒ When using the Sort function, you can check the print results by making a
sample copy on the main machine. See “Sample copy”.❒ Sample copies can only be made on the main machine only.❒ The main machine begins making copies from the document stored in the
Document Server. Copying on the sub-machine starts when the documentis transferred from the main machine.
❒ To stop the printing, press the {Clear/Stop} key on the main machine, andthen follow the instructions on the display.
❒ The number of copies might differ on the main and sub machines.❒ Both machines may not finish copying at the same time.
Referencep.59 “Sample copy”

Using Job Preset in Connect Copy
53
3
1
Using Job Preset in Connect Copy
You can make settings for the next Connect Copy job when the current job is stillin progress on the main machine. When the current job finishes, the next job be-gins automatically.
A On the main machine, confirm that “Press [New Job] to make reserva-tion.” is displayed, and then press [New Job].
B Confirm that “Ready” is displayed, and then press [Connect Copy].
C Place the originals in the main machine.
D Confirm that “Ready” is displayed, and then make settings for the job.
E Press the {Start} key on the main machine.Press the {q} key when you have finished scanning all the originals.When placing multiple originals in the ADF, wait till the first original hasbeen fed before placing the next.Scanning begins. As soon as the current job is finished, the next job starts automatically.
Note❒ You can preset a maximum of eight jobs.❒ Preset jobs in Connect Copy mode can only be changed when the main ma-
chine has finished scanning the originals.❒ Preset jobs in Connect Copy mode can only be changed when copying has
yet to begin on either machine.

Connect Copy
154
3
Referencep.31 “Job Preset”

Connect Copy Job Flow
55
3
1
Connect Copy Job Flow
The job flow depends on the status of the two machines.
When One of the Two Machines is Idle
One of the machines is copying Original A.
ANP049S

Connect Copy
156
3
Using the idle machine as the main machine (Connect Copy)
AMake Connect Copy settings for Original B on machine <2> (the idle machine).
BMachine <2> begins copying Original B. Machine <1> also starts copyingOriginal B when it has finished with Original A.
A Sub-machineB Main machine
ANP026S
ANP027S
Connect Copy Job Flow
57
3
1
Using the machine currently copying as the main machine (Connect Copy: Job Preset)
AMake Connect Copy settings for Original B on machine <1> (the machinecurrently in use).
BWhen machine <1> has finished with Original A, Connect Copy is activat-ed and both machines begin copying Original B.
A Sub-machineB Main machine
When Both Machines are in Use
One machine is copying Original A and the other Original B.
ANP028S
ANP029S
ANP050S
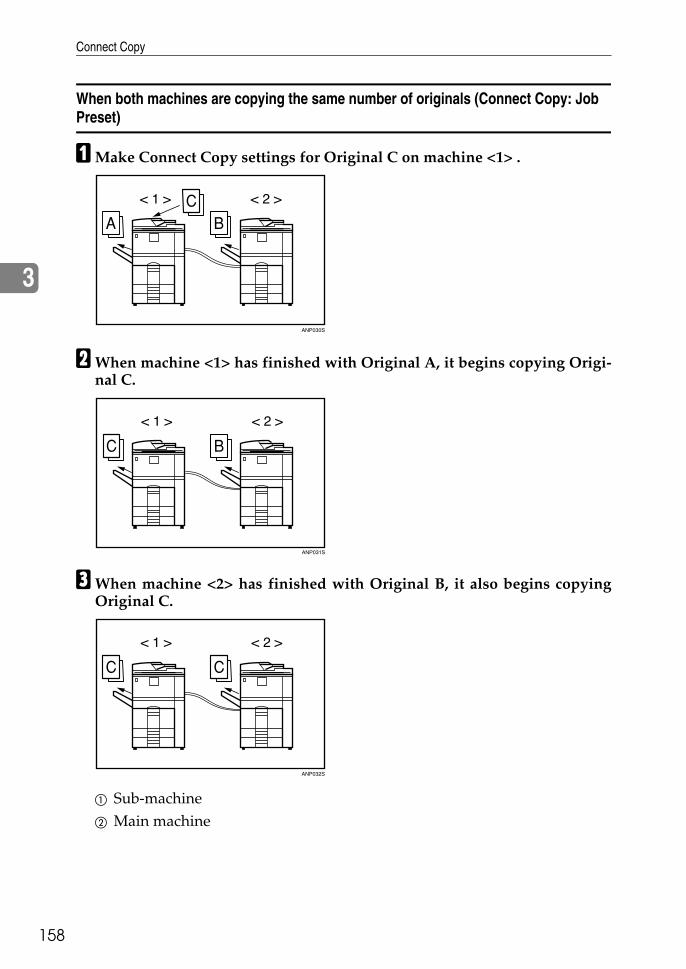
Connect Copy
158
3
When both machines are copying the same number of originals (Connect Copy: Job Preset)
AMake Connect Copy settings for Original C on machine <1> .
BWhen machine <1> has finished with Original A, it begins copying Origi-nal C.
CWhen machine <2> has finished with Original B, it also begins copyingOriginal C.
A Sub-machineB Main machine
ANP030S
ANP031S
ANP032S
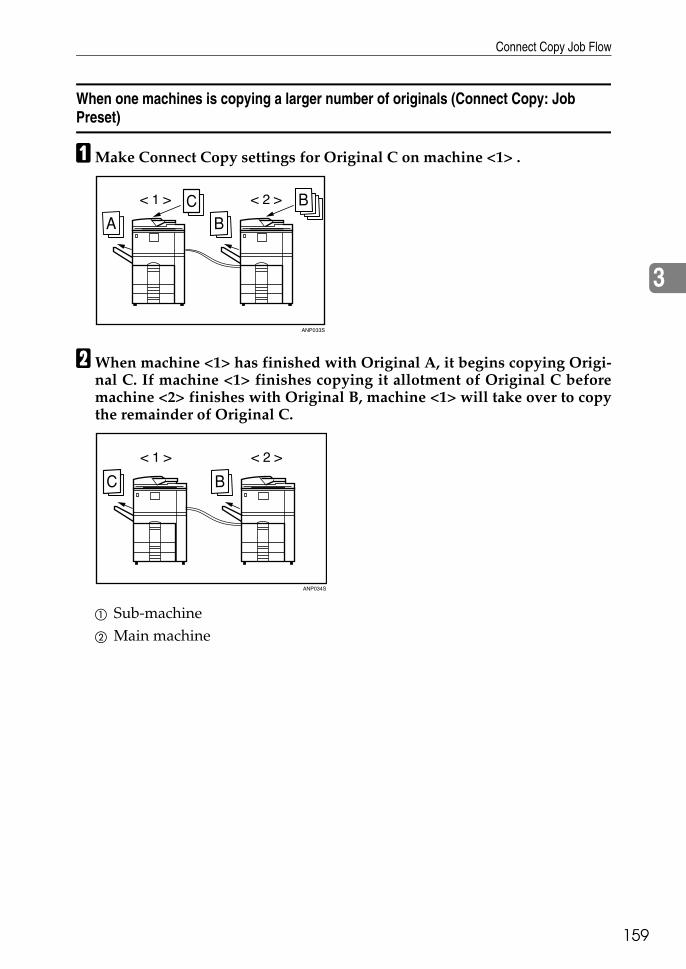
Connect Copy Job Flow
59
3
1
When one machines is copying a larger number of originals (Connect Copy: Job Preset)
AMake Connect Copy settings for Original C on machine <1> .
BWhen machine <1> has finished with Original A, it begins copying Origi-nal C. If machine <1> finishes copying it allotment of Original C beforemachine <2> finishes with Original B, machine <1> will take over to copythe remainder of Original C.
A Sub-machineB Main machine
ANP033S
ANP034S

Connect Copy
160
3

4. Document Server
61
1Using the Document Server enables you to store documents being read with thecopy feature on the hard disk of this machine. Thus you can print them later ap-plying necessary conditions.
Relationship between Document Server and Other Functions
State of the Document Server varies depending on the function used.
❖ Copier Functions• Storing method: Copy/Document Server• List display: Available• Printing: Available• Transmission: Unavailable
❖ Printer Functions• Storing method: Personal computer• List display: Available• Printing: Available• Transmission: Unavailable
❖ Scanner Functions• Storing method: Scanner• List display: Unavailable
When documents are stored with the scanner feature, you can confirmthem from the scanner feature screen. See “Displaying the List of StoredFiles”, Scanner Reference.
• Printing: Unavailable• Transmission: Available
Transmission is done by use of the stored document transmission of thescanner feature. See “When Using E-mail, Folder Sending, Storing or Net-work Delivery Function”, Scanner Reference.
Reference“Displaying the List of Stored Files”, “When Using E-mail, Folder Sending,Storing or Network Delivery Function”, Scanner Reference
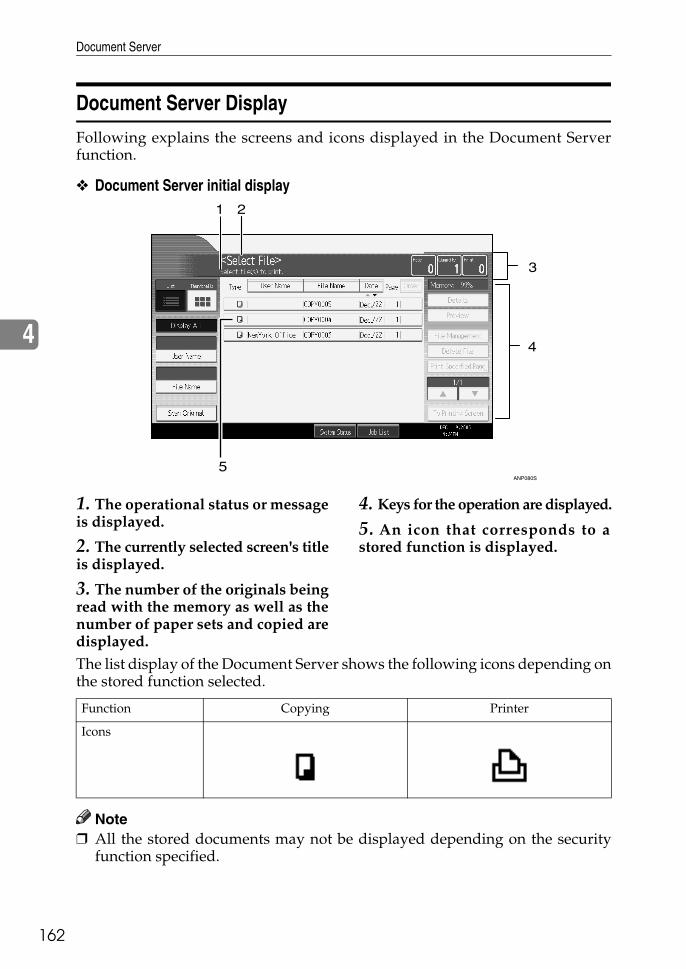
Document Server
162
4
Document Server Display
Following explains the screens and icons displayed in the Document Serverfunction.
❖ Document Server initial display
1. The operational status or messageis displayed.
2. The currently selected screen's titleis displayed.
3. The number of the originals beingread with the memory as well as thenumber of paper sets and copied aredisplayed.
4. Keys for the operation are displayed.
5. An icon that corresponds to astored function is displayed.
The list display of the Document Server shows the following icons depending onthe stored function selected.
Note❒ All the stored documents may not be displayed depending on the security
function specified.
ANP080S
Function Copying Printer
Icons
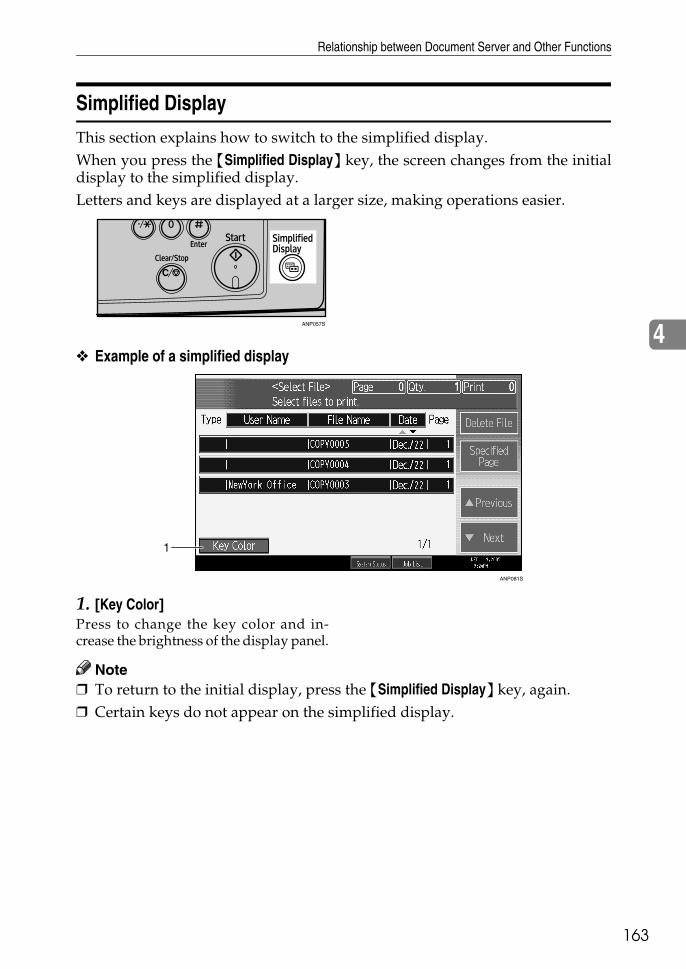
Relationship between Document Server and Other Functions
63
4
1
Simplified Display
This section explains how to switch to the simplified display.When you press the {Simplified Display} key, the screen changes from the initialdisplay to the simplified display.Letters and keys are displayed at a larger size, making operations easier.
❖ Example of a simplified display
1. [Key Color]Press to change the key color and in-crease the brightness of the display panel.
Note❒ To return to the initial display, press the {Simplified Display} key, again.❒ Certain keys do not appear on the simplified display.
ANP057S
ANP081S

Document Server
164
4
Preview Display
Following explains the preview display displaying procedure and the items dis-played on this screen.The Preview Display appears after scanning completes. You can also displaystored documents on the preview display. For details, see “Displaying the Listof Stored Files”, Scanner Reference.The preview display denotes the screen that allows confirming contents of thescanned documents.
❖ Preview Display
1. [←][→][↑][↓]They are used to move the portion to bedisplayed.
2. [Zoom Out], [Zoom In]Used to scale up or down the documentto be displayed.
3. [Exit]The login screen will appear.
4. Display FileUsed to display the document name.[Switch] is displayed on the previewscreen for the stored documents. Abovekey is used to switch the document to bedisplayed in the preview.
5. Display PageUsed to display the currently openedpage number, total number of pages, andpage size.
6. [Switch]Used to turn the page of the selected document.
7. Display PositionWhen the image is enlarged, the positionon the document indicated by this key isdisplayed.
ANP082S
Relationship between Document Server and Other Functions
65
4
1
Note❒ When the preview is already selected from another function, the preview
screen function may become unusable.❒ The preview display is also not available when the paper size is larger than
A3.❒ If the image file is corrupt, store it again.
Reference“Displaying the List of Stored Files”, Scanner Reference
Document Server
166
4
Using the Document Server
Following describes how to use the Document Server.
Storing Data
Following describes the procedure for storing documents on the DocumentServer.
Important❒ Data stored in the machine might be lost if some kind of failure occurs. The
manufacturer shall not be responsible for any damage resulting from loss ofdata.
❒ Be careful not to let anyone know your password, especially when entering apassword or recording it. Keep any record of your password in a secure place.
❒ Avoid using a single number or consecutive numbers for a password such as“0000” or “1234”, since the numbers like this are easy to guess, so using themwill not provide a worthwhile level of security.
❒ A document accessed with a correct password remains selected even after op-erations are complete, and it can be accessed by other users. To stop this, besure to press the {Clear Modes} key to cancel the document selection.
❒ The user name used when adding a document to the Document Server is toidentify the document creator and type. It is not to protect confidential docu-ments from others.
❖ File NameStored documents are automatically named “COPY0001”, “COPY0002”. Youcan change assigned file names.
❖ User NameYou can register a user name to identify the user or user group that stored thedocuments. To assign it, you can register the user name using the name as-signed to the user code, or by entering the name directly.
❖ PasswordTo prevent unauthorized printing, you can set a password for any stored file.A protected file can only be accessed if its password is entered. When a pass-word is set for the documents, the lock icon appears next to the documents.
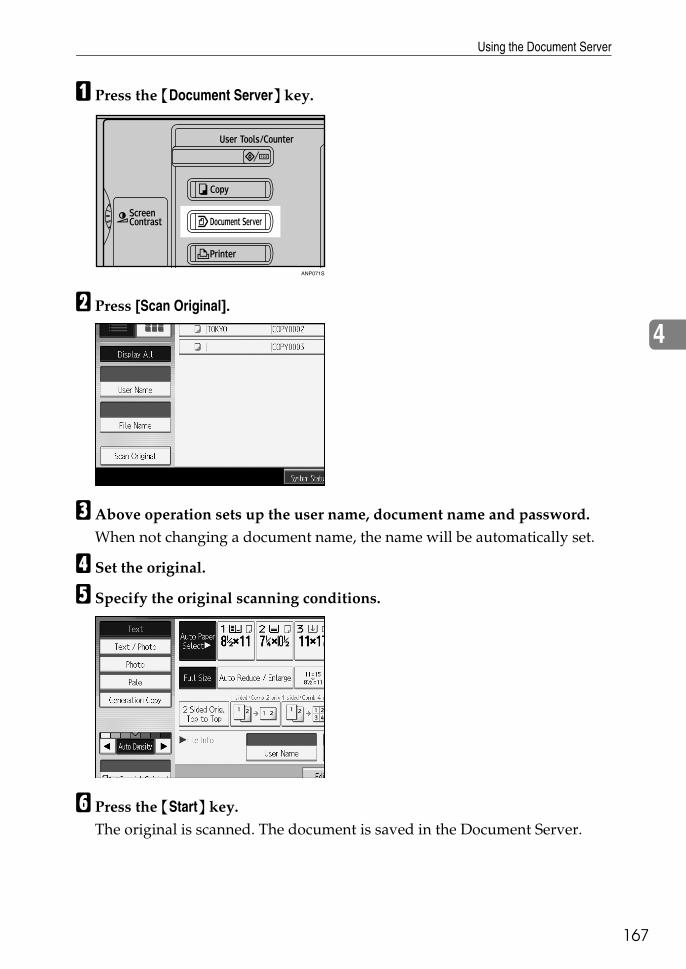
Using the Document Server
67
4
1
A Press the {Document Server} key.
B Press [Scan Original].
C Above operation sets up the user name, document name and password.When not changing a document name, the name will be automatically set.
D Set the original.
E Specify the original scanning conditions.
F Press the {Start} key.The original is scanned. The document is saved in the Document Server.
ANP071S

Document Server
168
4
Note❒ Enter a four- to eight-digit password.❒ By default, data stored in the Document Server is deleted after three days
(72 hours). You can specify the time taken for the stored data to be deletedautomatically. See “Auto delete File in Document Server”, General Set-tings Guide.
❒ If you do not want stored data to be automatically deleted, select [Off] inAuto Delete File before storing a document. If you select [On] later, datastored after will be automatically deleted.
❒ When the machine is printing a document stored using the copier function,wait until printing has finished before you store a document in the Docu-ment Server.
❒ To stop scanning, press the {Clear/Stop} key. To restart a paused scanningjob, press [Continue] in the confirmation display. To delete saved imagesand cancel the job, press [Stop].
❒ When a password is set, the lock icon appears on the left side of the filename.
❒ After scanning, stored documents appear on the Select Files to Print dis-play. If this display does not appear, press [Scanning Complete].
❒ When placing an original on the exposure glass, press [Scanning Complete]after all the originals have been scanned.
Reference“Administrator Tools”, General Settings Guide
To register or change a user name (When using a user name registered to the Address Book)
Following describes the procedure for registering or changing a user name to beattached to a stored document.
A Display the original scan screen.
B Press [User Name].
The user name input screen appears.
C Select the user name and then press [OK].

Using the Document Server
69
4
1
To register or change a user name (When using a user name not registered to the Address Book)
Following describes the procedure for registering or changing a user name to beattached to a stored document.
A Display the original scan screen.
B Press [User Name].
The user name input screen appears.
C Select the user name and then press [Manual Entry].
The user name change screen will appear.
D Enter the user name and then press [OK].
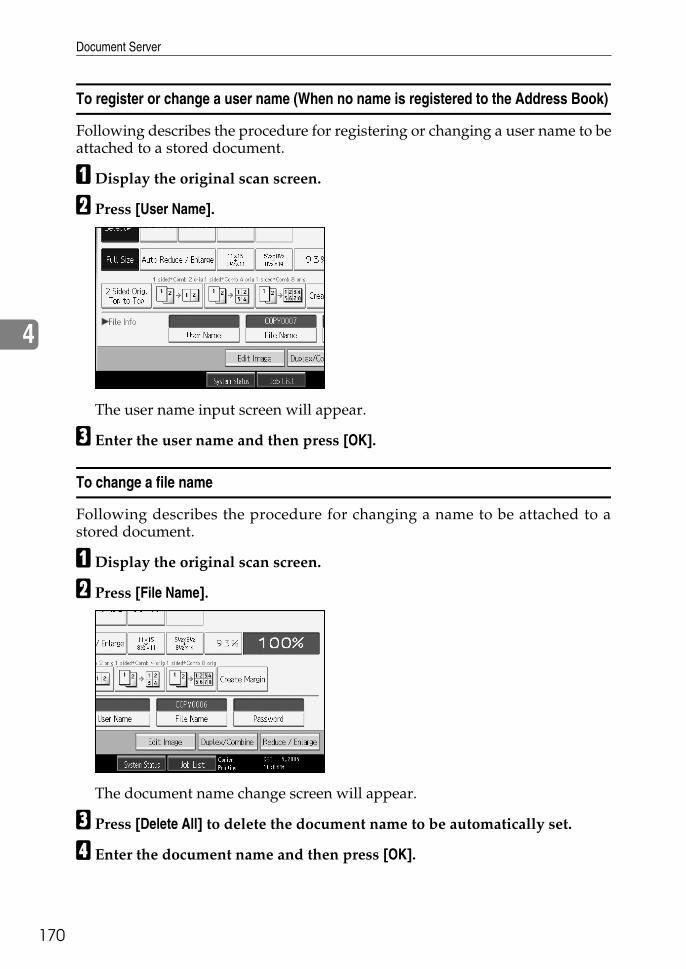
Document Server
170
4
To register or change a user name (When no name is registered to the Address Book)
Following describes the procedure for registering or changing a user name to beattached to a stored document.
A Display the original scan screen.
B Press [User Name].
The user name input screen will appear.
C Enter the user name and then press [OK].
To change a file name
Following describes the procedure for changing a name to be attached to astored document.
A Display the original scan screen.
B Press [File Name].
The document name change screen will appear.
C Press [Delete All] to delete the document name to be automatically set.
D Enter the document name and then press [OK].

Using the Document Server
71
4
1
Note❒ In stepC, pressing [Backspace] allows you to delete up to any desired location.❒ You can enter up to 20 characters for a document name. In the list, however,
up to 16 characters are displayed as the document name. If above limits areexceeded, the list will display up to 15 characters for the document name.
To set or change a Password
Following describes the procedure for setting or changing a password to be at-tached to a stored document.
A Display the original scan screen.
B Press [Password].
C Enter the password using the number keys and then press [OK].You can use four to eight digits for specifying the password.
D Enter the password again and then press [OK].
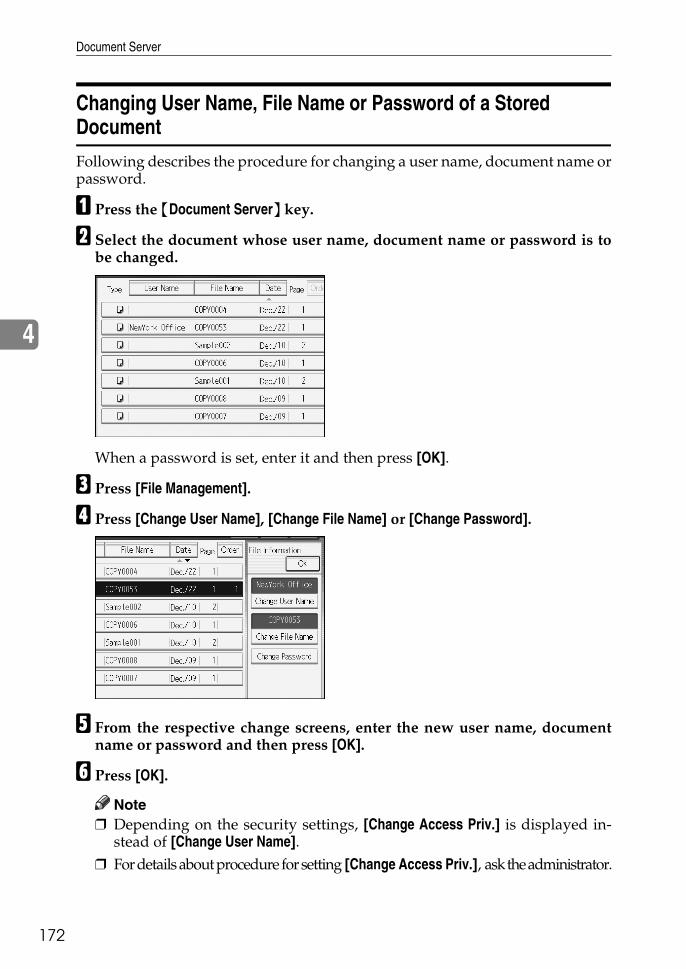
Document Server
172
4
Changing User Name, File Name or Password of a Stored Document
Following describes the procedure for changing a user name, document name orpassword.
A Press the {Document Server} key.
B Select the document whose user name, document name or password is tobe changed.
When a password is set, enter it and then press [OK].
C Press [File Management].
D Press [Change User Name], [Change File Name] or [Change Password].
E From the respective change screens, enter the new user name, documentname or password and then press [OK].
F Press [OK].
Note❒ Depending on the security settings, [Change Access Priv.] is displayed in-
stead of [Change User Name].❒ For details about procedure for setting [Change Access Priv.], ask the administrator.
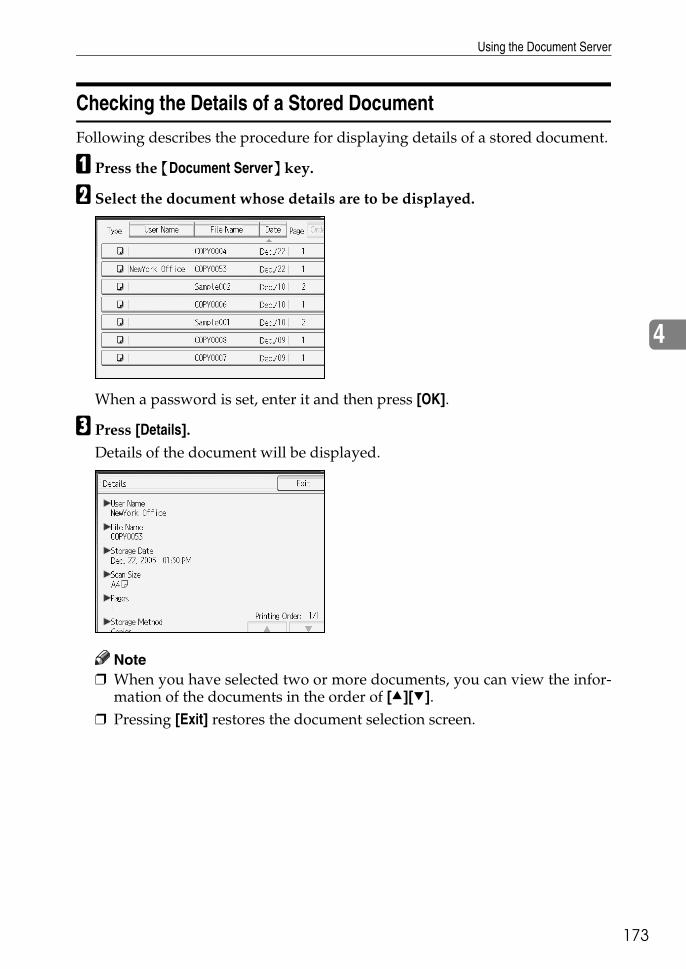
Using the Document Server
73
4
1
Checking the Details of a Stored Document
Following describes the procedure for displaying details of a stored document.
A Press the {Document Server} key.
B Select the document whose details are to be displayed.
When a password is set, enter it and then press [OK].
C Press [Details].Details of the document will be displayed.
Note❒ When you have selected two or more documents, you can view the infor-
mation of the documents in the order of [U][T].❒ Pressing [Exit] restores the document selection screen.

Document Server
174
4
Searching for a Stored Document
Following describes the procedure for searching a stored document from username or document name.You can rearrange the currently chronologically ordered documents in any de-sired order.
❖ To search by file nameFollowing describes the procedure for searching a stored document from thedocument name.
❖ To search by user nameFollowing describes the procedure for searching a stored document from theuser name.
Note❒ Installing DeskTopBinder Lite enables search and reordering of stored docu-
ments from PC.❒ For more information about DeskTopBinder Lite, see Instruction Manual and
Help of DeskTopBinder Lite.
To search by file name
Following describes the procedure for searching a stored document from thedocument name.
A Press the {Document Server} key.
B Press [File Name].
C Enter the document name to be searched and then press [OK].A document name that matches completely from the starting character willbe searched and displayed on the document selection screen.
Note❒ Pressing [Display All] displays ever stored document.
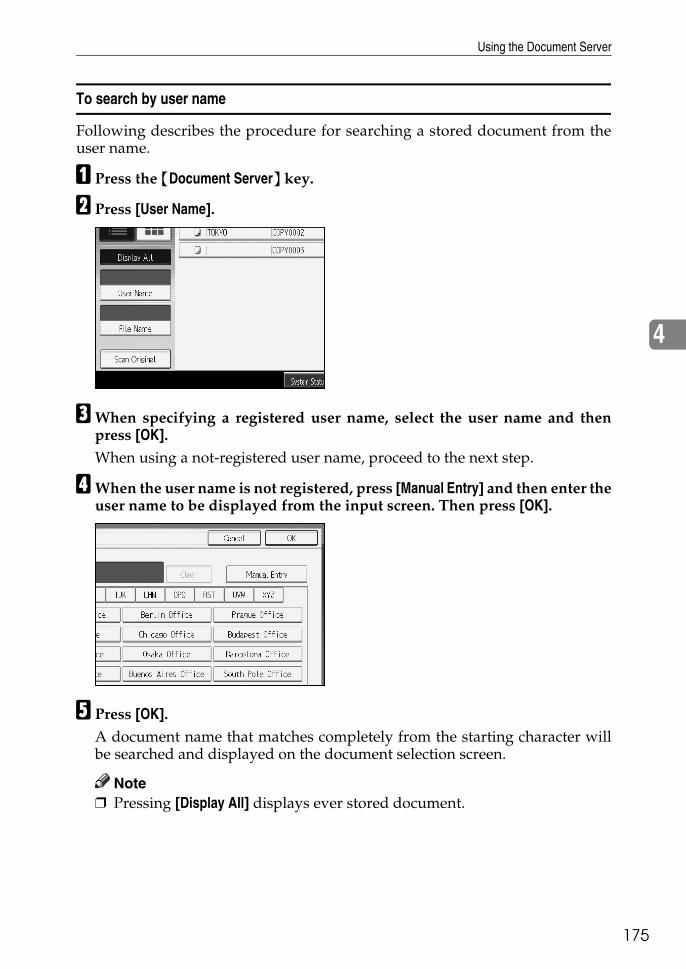
Using the Document Server
75
4
1
To search by user name
Following describes the procedure for searching a stored document from theuser name.
A Press the {Document Server} key.
B Press [User Name].
CWhen specifying a registered user name, select the user name and thenpress [OK].When using a not-registered user name, proceed to the next step.
DWhen the user name is not registered, press [Manual Entry] and then enter theuser name to be displayed from the input screen. Then press [OK].
E Press [OK].A document name that matches completely from the starting character willbe searched and displayed on the document selection screen.
Note❒ Pressing [Display All] displays ever stored document.

Document Server
176
4
Printing a Stored Document
Following describes the procedure for printing a stored document.Using Web Image Monitor allows you to print a document stored in the Docu-ment Server from your PC.
A Press the {Document Server} key.
B Select the document to be printed.When a password is set, enter it and then press [OK].
CWhen printing two or more documents at a time, repeat the operation in B.Up to 30 documents can be printed.
DWhen specifying printing conditions, press [To Printing Screen].The printing condition screen will appear. User name of the document, doc-ument name and the order of printing of this document will be displayed.
E Enter the number of print copies using the number keys.
Up to 999 copies are specifiable.
F Press the {Start} key.Printing will be started.

Using the Document Server
77
4
1
Note❒ You can search the target document using, in step B, [User Name] or [File
Name] situated in the upper left side of the screen.❒ Some of the selected document may not be printed due to the difference in
the size or resolution.❒ When changing the printing order, cancel the highlight and then specify
the order correctly.❒ Pressing the {Clear Modes} key cancels every selection.❒ Pressing [Order] displays the selected documents in the printing order.❒ The copy and printer features holds the specified printing conditions after
the operation is over and applies them at the next printing.❒ When two or more documents are specified, the printing conditions are
stored on the first document but not on the succeeding documents.❒ Following settings are available for the printing conditions. For respective
printing results, see “Copier Functions”.• Book binding style (2 Sided Top to Top, 2 Sided Top to Bottom, Maga-
zine, Booklet)• Treatment of front cover (Cover/Slip Sheet, Edit / Stamp)• Finish (Sort, Rotate Sort, Stack, Staple, Punch)
❒ When printing two or more copies while selecting the sort function, youcan confirm the finish by printing only one copy.
❒ When printing two or more documents at a time, you can print them as asingle continuous document by specifying the order of their printing.
❒ When printing two or more documents at a time, the printing conditionsset for the first document are applied to all the remaining documents.
❒ When two or more documents are selected, pressing [U][T] allows you toconfirm the user name, document name and printing order being designat-ed for deletion in step B.
❒ Pressing [Select File] restores the document selection screen.
Referencep.42 “Copier Functions”
When Interrupting Printing
Following describes the procedure for interrupting printing work.
A Press the {Clear/Stop} key
B Press [Suspend].
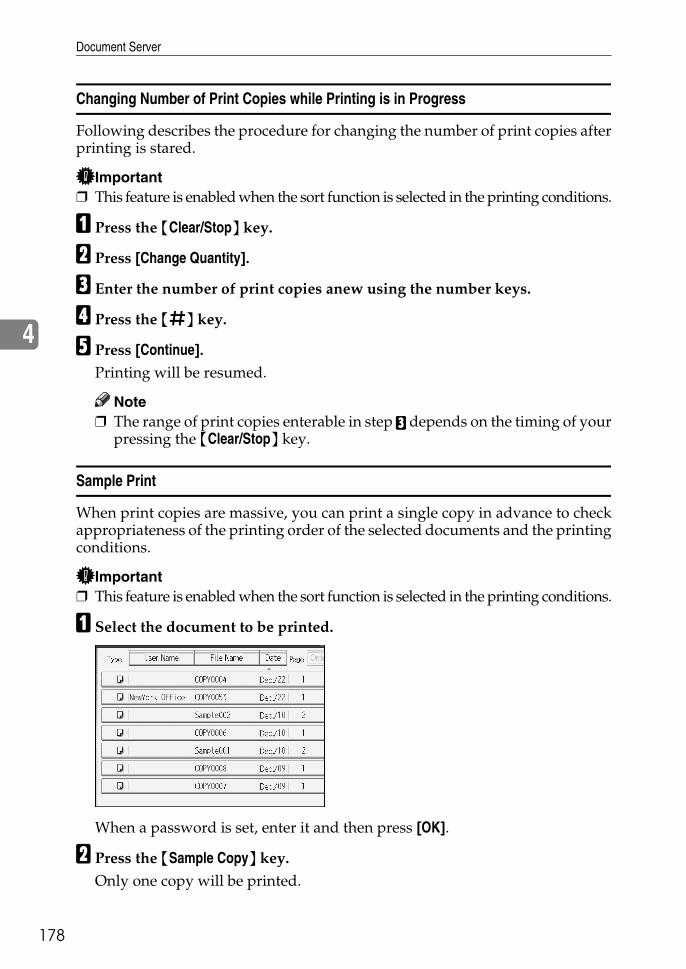
Document Server
178
4
Changing Number of Print Copies while Printing is in Progress
Following describes the procedure for changing the number of print copies afterprinting is stared.
Important❒ This feature is enabled when the sort function is selected in the printing conditions.
A Press the {Clear/Stop} key.
B Press [Change Quantity].
C Enter the number of print copies anew using the number keys.
D Press the {q} key.
E Press [Continue].Printing will be resumed.
Note❒ The range of print copies enterable in step C depends on the timing of your
pressing the {Clear/Stop} key.
Sample Print
When print copies are massive, you can print a single copy in advance to checkappropriateness of the printing order of the selected documents and the printingconditions.
Important❒ This feature is enabled when the sort function is selected in the printing conditions.
A Select the document to be printed.
When a password is set, enter it and then press [OK].
B Press the {Sample Copy} key.Only one copy will be printed.

Using the Document Server
79
4
1
C Press [Continue].Printing will be resumed.
Note❒ You can search the target document using, in step A, [User Name] or [File
Name] situated in the upper left side of the screen.❒ In the display order field of step A, you can sort the documents by [User
Name], [File Name], [Date]. Press the item to be used for the sorting.❒ To cancel the selection in step A, press the highlighted document again.❒ To cancel the printing, press [Suspend]. The print screen will appear, en-
abling to set another item.
Printing the First Page
In order to confirm the print results, you can print the first page alone of the doc-ument selected from the document selection screen.When two or more documents are selected, the first page of the respective doc-uments is printed.
A Select the document to be printed (confirmed).When a password is set, enter it and then press [OK].
B Press [Print Specified Page].
C Press [1st Page].
D Press the {Start} key.
Note❒ You can search the target document using, in step A, [User Name] or [File
Name] situated in the upper left side of the screen.❒ In the display order field of step A, you can sort the documents by [User
Name], [File Name], [Date]. Press the item to be used for the sorting.❒ To cancel the selection in step A, press the highlighted document again.
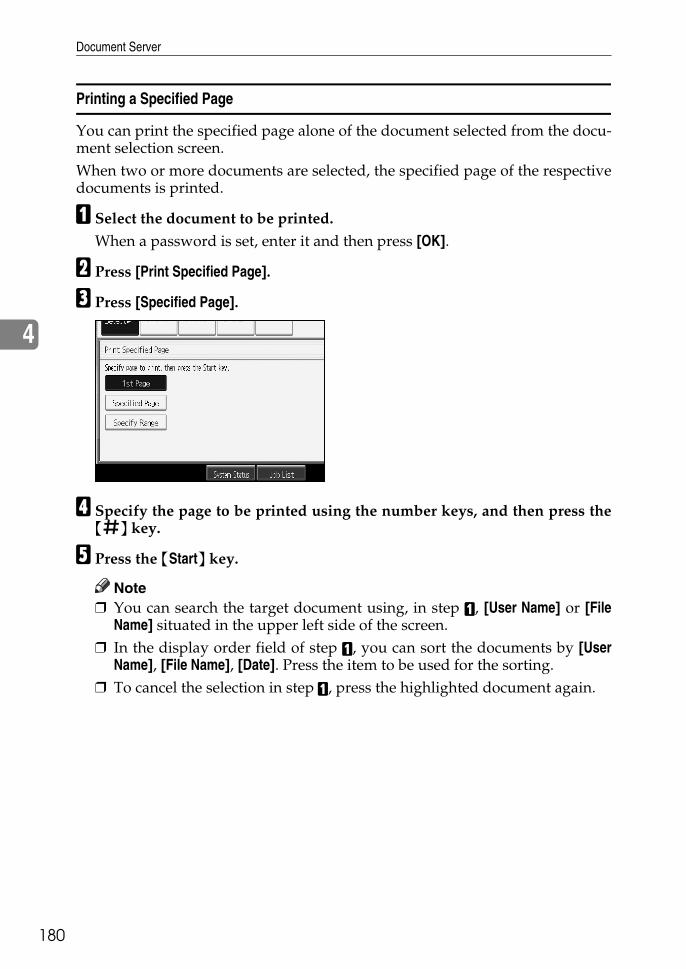
Document Server
180
4
Printing a Specified Page
You can print the specified page alone of the document selected from the docu-ment selection screen.When two or more documents are selected, the specified page of the respectivedocuments is printed.
A Select the document to be printed.When a password is set, enter it and then press [OK].
B Press [Print Specified Page].
C Press [Specified Page].
D Specify the page to be printed using the number keys, and then press the{q} key.
E Press the {Start} key.
Note❒ You can search the target document using, in step A, [User Name] or [File
Name] situated in the upper left side of the screen.❒ In the display order field of step A, you can sort the documents by [User
Name], [File Name], [Date]. Press the item to be used for the sorting.❒ To cancel the selection in step A, press the highlighted document again.
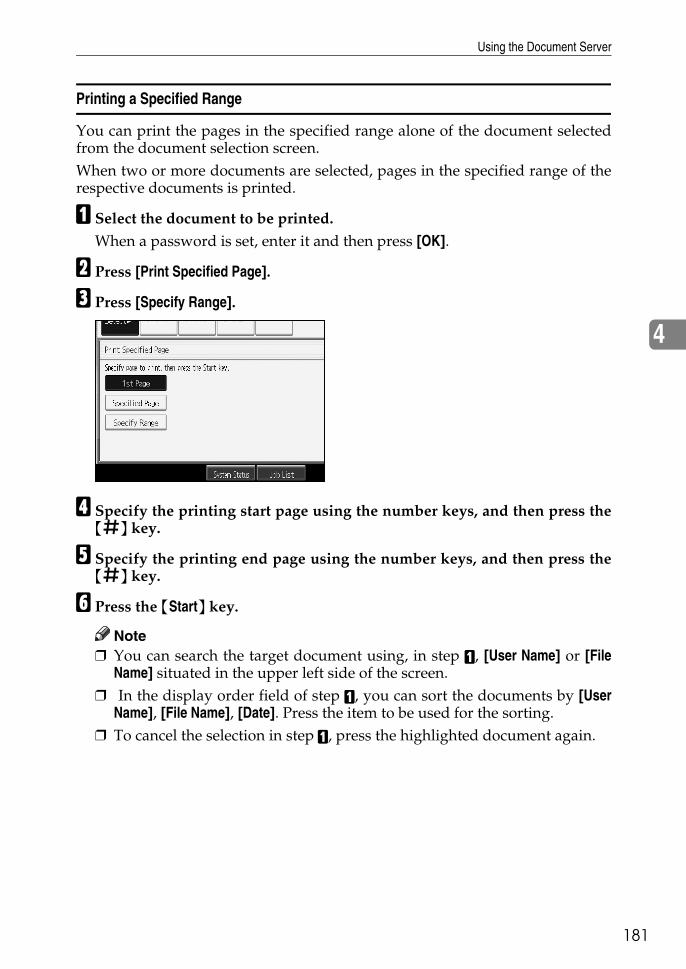
Using the Document Server
81
4
1
Printing a Specified Range
You can print the pages in the specified range alone of the document selectedfrom the document selection screen.When two or more documents are selected, pages in the specified range of therespective documents is printed.
A Select the document to be printed.When a password is set, enter it and then press [OK].
B Press [Print Specified Page].
C Press [Specify Range].
D Specify the printing start page using the number keys, and then press the{q} key.
E Specify the printing end page using the number keys, and then press the{q} key.
F Press the {Start} key.
Note❒ You can search the target document using, in step A, [User Name] or [File
Name] situated in the upper left side of the screen.❒ In the display order field of step A, you can sort the documents by [User
Name], [File Name], [Date]. Press the item to be used for the sorting.❒ To cancel the selection in step A, press the highlighted document again.
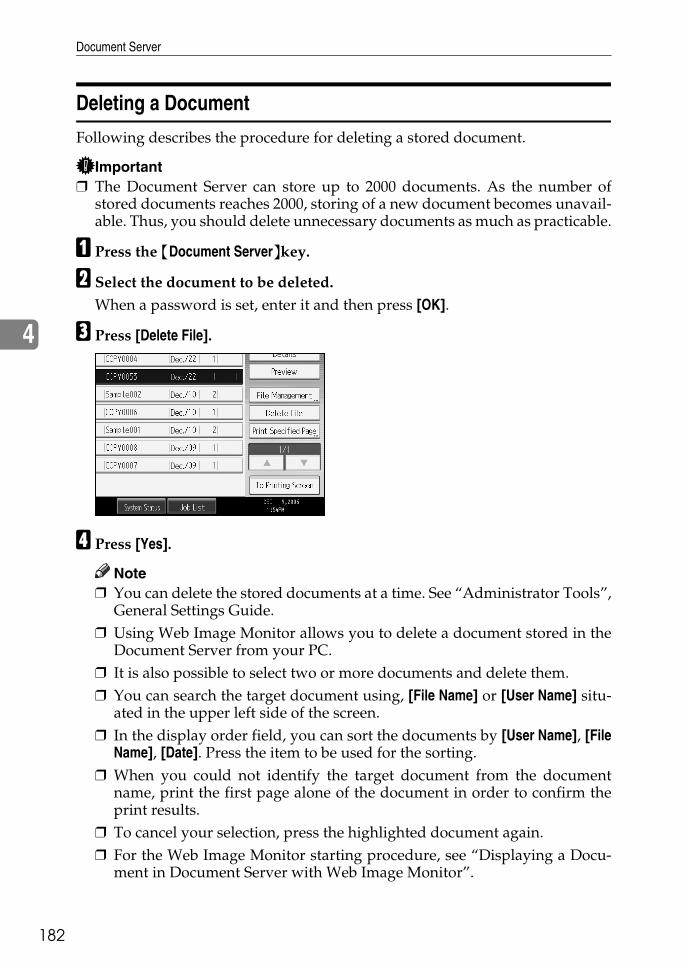
Document Server
182
4
Deleting a Document
Following describes the procedure for deleting a stored document.
Important❒ The Document Server can store up to 2000 documents. As the number of
stored documents reaches 2000, storing of a new document becomes unavail-able. Thus, you should delete unnecessary documents as much as practicable.
A Press the {Document Server}key.
B Select the document to be deleted.When a password is set, enter it and then press [OK].
C Press [Delete File].
D Press [Yes].
Note❒ You can delete the stored documents at a time. See “Administrator Tools”,
General Settings Guide.❒ Using Web Image Monitor allows you to delete a document stored in the
Document Server from your PC.❒ It is also possible to select two or more documents and delete them.❒ You can search the target document using, [File Name] or [User Name] situ-
ated in the upper left side of the screen.❒ In the display order field, you can sort the documents by [User Name], [File
Name], [Date]. Press the item to be used for the sorting.❒ When you could not identify the target document from the document
name, print the first page alone of the document in order to confirm theprint results.
❒ To cancel your selection, press the highlighted document again.❒ For the Web Image Monitor starting procedure, see “Displaying a Docu-
ment in Document Server with Web Image Monitor”.

Using the Document Server
83
4
1
Referencep.183 “Displaying a Document in Document Server with Web Image Mon-itor”“Administrator Tools”, General Settings Guide
Displaying a Document in Document Server with Web Image Monitor
Following describes the procedure for confirming contents of a stored documenton the PC screen by use of Web Image Monitor.
A Start Web browser.
B Enter “http:// (IPv4 address of this machine) /” to the address.Top page of Web Image Monitor will be displayed.
C Click [Document Server].The list of documents in the Document Server will be displayed
D Click of the document you want to confirm.Information of the document will be displayed.
E Confirm contents of the document.
Note❒ You can change the document list display format in step C. Click
(Thumbnails), (Icons), or (Details) for the display format.❒ When you want to enlarge the preview display in step E, click [Enlarge Image].

Document Server
184
4
Downloading Stored Documents
Following describes the procedure for downloading a stored document to thePC by use of Web Image Monitor.
Important❒ When downloading a document stored with the copy feature, you must pre-
pare the extended data conversion board.
A Start Web browser.
B Enter “http://(IPv4 address of this machine)/” to the address.Top page of Web Image Monitor will be displayed.
C Click [Document Server].List of the documents will be displayed.
D Click of the document you want to download.
E Select [PDF], [JPEG], or [Multi-page TIFF] for the file format.
F Click [OK].
G Click [OK] in the confirmation window.
Note❒ You can change the document list display format in step D. Click
(Thumbnails), (Icons), or (Details) for the display format.❒ In step E, you cannot select [JPEG] for a document being stored with the
scanner.❒ In step E, you cannot select [Multi-page TIFF] for a document being stored
with the copy or printer.❒ When downloading a document with [Multi-page TIFF] in step E, you must
prepare a Printer/Scanner Unit and File Format Convertor.
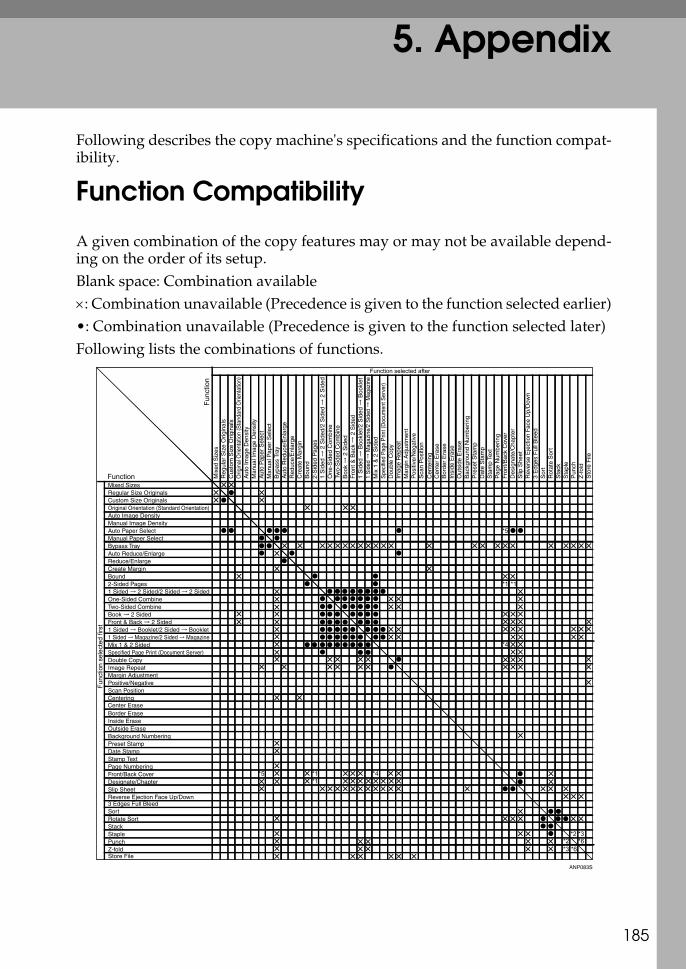
5. Appendix
85
1Following describes the copy machine's specifications and the function compat-ibility.
Function Compatibility
A given combination of the copy features may or may not be available depend-ing on the order of its setup.Blank space: Combination available×: Combination unavailable (Precedence is given to the function selected earlier)•: Combination unavailable (Precedence is given to the function selected later)Following lists the combinations of functions.
ANP083S

Appendix
186
5
The following combinations are not possible.*1 Front/Back Cover or Designate/Chapter with 2 Sided → 1 Sided*2 Top 2 of Staple with 2 holes left of Punch. Top/ Top Slant/ Bottom of Staple with 2
holes top of Punch.*3 Top 2 of Staple with Right Fold. Left 2 of Staple with Bottom Fold. Bottom of Staple
with Bottom Fold. Top Slant of Staple with Bottom Fold. Saddle Stitch of Staple withZ-fold.
*4 Front Cover with 2 Sided → 1 Sided.*5 Auto Paper Select with Back Cover.*6 Left of punch with Bottom Fold. Top of punch with Right Fold.
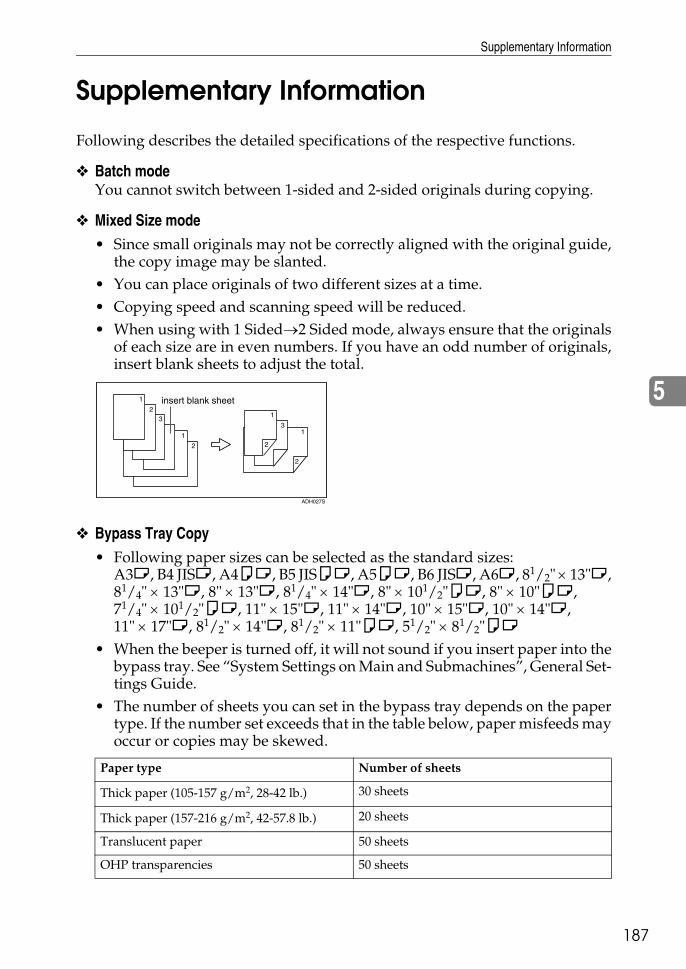
Supplementary Information
87
5
1
Supplementary Information
Following describes the detailed specifications of the respective functions.
❖ Batch modeYou cannot switch between 1-sided and 2-sided originals during copying.
❖ Mixed Size mode• Since small originals may not be correctly aligned with the original guide,
the copy image may be slanted.• You can place originals of two different sizes at a time.• Copying speed and scanning speed will be reduced.• When using with 1 Sided→2 Sided mode, always ensure that the originals
of each size are in even numbers. If you have an odd number of originals,insert blank sheets to adjust the total.
❖ Bypass Tray Copy• Following paper sizes can be selected as the standard sizes:
A3L, B4 JISL, A4KL, B5 JISKL, A5KL, B6 JISL, A6L, 81/2" × 13"L,81/4" × 13"L, 8" × 13"L, 81/4" × 14"L, 8" × 101/2"KL, 8" × 10"KL, 71/4" × 101/2"KL, 11" × 15"L, 11" × 14"L, 10" × 15"L, 10" × 14"L, 11" × 17"L, 81/2" × 14"L, 81/2" × 11"KL, 51/2" × 81/2"KL
• When the beeper is turned off, it will not sound if you insert paper into thebypass tray. See “System Settings on Main and Submachines”, General Set-tings Guide.
• The number of sheets you can set in the bypass tray depends on the papertype. If the number set exceeds that in the table below, paper misfeeds mayoccur or copies may be skewed.
Paper type Number of sheets
Thick paper (105-157 g/m2, 28-42 lb.) 30 sheets
Thick paper (157-216 g/m2, 42-57.8 lb.) 20 sheets
Translucent paper 50 sheets
OHP transparencies 50 sheets
ADH027S
Appendix
188
5
❖ Preset Enlarge/Reduce• You can select one of 12 preset ratios (5 enlargement ratios, 7 reduction ratios).• Following shows the relation between the original's size and copied-to pa-
per size at respective scaling factors.• Metric version
400% (Area ratio 16 times):-200% (Area ratio 4 times): A5 → A3, B6 JIS → B4 JIS141% (Area ratio 2 times): A4 → A3, A5 → A4, B5 JIS → B4 JIS, B6 JIS →B5 JIS122%: A4 → B4 JIS, A5 → B5 JIS115%: B4 JIS → A3, B5 JIS → A4, B6 JIS → A593%:-85%: B4 JIS → A4, B5 JIS → A578%: B4 JIS→F4, B4 JIS→F73% (Area ratio 1/2times): A3 → A4, A4 → A5, B4 JIS → B5 JIS, B5 JIS →B6 JIS65%: A3→F50% (Area ratio 1/4times): A3 → A5, B4 JIS → B6 JIS25%:-
• Inch version400%(Area ratio 16 times): -200%(Area ratio 4 times): 51/2" × 81/2"→11" × 17"155% (Area ratio 2 times): 51/2" × 81/2"→81/2" × 14"129%: 81/2" × 11"→11" × 17"121%: 81/2" × 14"→11" × 17"93%: -85%: F→81/2" × 11"78%: 81/2" × 14"→81/2" × 11"73%: 11" × 15"→81/2" × 11"65%: 11" × 17"→81/2" × 11"50% (Area ratio 1/4times): 11" × 17"→51/2" × 81/2"25%: -
• You can select a ratio regardless of the size of an original or copy paper.With some ratios, parts of the image might not be copied or margins willappear on copies.
❖ Zoom• The reproduction ratios you can specify are 25-400%.• You can select a ratio regardless of the size of an original or copy paper.
With some ratios, parts of the image might not be copied or margins willappear on copies.
❖ Size Magnification• The reproduction ratios you can specify are 25-400%.
Supplementary Information
89
5
1
❖ Directional Size Magnification• The reproduction ratios you can specify are 25-400%.• When entering a percentage ratio, you can specify any value in the permit-
ted range, regardless of original or copy paper size. However, dependingon settings and other conditions, part of the image may not be copied, ormargins will appear on copies.
• When entering a size in mm, if the calculated ratio is over the maximum orunder the minimum ratio, it is automatically adjusted to within availablerange. However, with some ratios, parts of the image might not be copiedor margins will appear on copies.
❖ Sort, Stack• Paper sizes and orientations that can be used with the Stack function are as
follows:A3L - A6L, B6L, 11" × 17" - 51/2" × 81/2", 12" × 18"
• Paper sizes and orientations that can be used in the Rotate Sort function areA4KL, B5 JISKL and 81/2" × 11"KL.
• The following table shows you the numbers of copies than the tray canhold. Remove copies from the tray when the maximum is exceeded.Copy tray
3,000Sheet-100Sheet Staple Finisher (upper tray)
3,000Sheet-100Sheet Staple Finisher (shift tray)
Paper Size and Direction Number of Copies
A3, B5 JIS or smaller 250 sheets (80 g/m2, 20 lb.)
B4 JIS or smaller 500 sheets (80 g/m2, 20 lb.)
Paper Size and Direction Number of Copies
A4, 81/2" × 11" or smaller 500 sheets (80 g/m2, 20 lb.)
B4 JIS, 81/2" × 14" or larger 250 sheets (80 g/m2, 20 lb.)
Paper Size and Direction Number of Copies
A4K, B5 JISK, 81/2" × 11"K 3000 sheets (80 g/m2, 20 lb.)
A3L, B4 JISL, A4L, B5 JISL, 11" × 17"L, 81/2" × 14"L, 81/2" × 11"L, 12" × 18"L 1500 sheets (80 g/m2, 20 lb.)
A5K, 51/2" × 81/2"K 500 sheets (80 g/m2, 20 lb.)
A5L, 51/2" × 81/2"L 100 sheets (80 g/m2, 20 lb.)
Appendix
190
5
3,000Sheet-50Sheet Staple Finisher (upper tray)
3,000Sheet-50Sheet Staple Finisher (shift tray)
Booklet Finisher (upper tray)
Booklet finisher (shift tray)
• When using the Rotate Sort or Staple functions, the capacity may be reduced.
Paper Size and Direction Number of Copies
A4, 81/2" × 11" or smaller 250 sheets (80 g/m2, 20 lb.)
B4 JIS, 81/2" × 14" or larger 50 sheets (80 g/m2, 20 lb.)
Paper Size and Direction Number of Copies
A4K, 81/2" × 11"K 3000 sheets (80 g/m2, 20 lb.)
A3L, B4 JISL, A4L, B5 JISL, 11" × 17"L, 81/2" × 14"L, 81/2" × 11"L, 12" × 18"L 1500 sheets (80 g/m2, 20 lb.)
A5K 500 sheets (80 g/m2, 20 lb.)
A5L, B6 JISL, 51/2" × 81/2"L, A6L 100 sheets (80 g/m2, 20 lb.)
Paper Size and Direction Number of Copies
A4, 81/2" × 11" or smaller 250 sheets (80 g/m2, 20 lb.)
B4 JIS, 81/2" × 14" or larger 50 sheets (80 g/m2, 20 lb.)
Paper Size and Direction Number of Copies
A4K, 81/2" × 11"K 2000 sheets (80 g/m2, 20 lb.)
A3L, B4 JISL, A4L, B5 JISL, 11" × 17"L, 81/2" × 14"L, 81/2" × 11"L, 12" × 18"L 1000 sheets (80 g/m2, 20 lb.)
A5K 500 sheets (80 g/m2, 20 lb.)
A5L, B6 JISL, 51/2" × 81/2"L 100 sheets (80 g/m2, 20 lb.)
Supplementary Information
91
5
1
❖ Staple• The following types of paper cannot be stapled:
• Postcard• Translucent paper• OHP transparencies• Label paper (adhesive labels)• Thick paper• Curled paper• Paper of low stiffness• Paper of mixed sizes
• In the following cases, copies will be delivered to the shift tray without stapling:• When the number of sheets for one set is over stapler capacity.• When memory reaches 0% during copying.
• When using the Staple function with [1 Sided→1 Sided], [1 Sided→2 Sided],[2 Sided→1 Sided], [2 Sided→2 Sided], [Double Copies], select K original for Land L original for K copy.
• When using the Staple function with [1 sided→Comb 2 orig], [1 sided→2 sid-ed:TtoB], [1 sided→2 sided:TtoT], [Double Copies], select K paper for L orig-inal and L for K original.
• When using the Staple function [Staple: Left 2] or [Staple: Top 2] with theCombine function [1 Sided→1 Sided], [1 Sided→2 Sided], [2 Sided→1 Sided], [2Sided→2 Sided], [Double Copies], select K paper for L original and L paperfor K original.
• If a finisher is installed, the mixed size function and the auto paper selec-tion function become available. These functions make it possible to choosethe paper appropriate for stapling from the mixed sizes. Prior to the oper-ation, you should set on the feed tray the paper of the size to be used. Fol-lowing sizes allow the stapling when mixed with other sizes.• A3L and A4K• B4 JISL and B5 JISK• A4L and A5K• 11" × 17"L and 81/2" × 11"K• 81/2" × 11"L and 51/2" × 81/2"K
Appendix
192
5
• Paper sizes and orientations that can be used in the Staple function and thestapler capacity are as follows:3,000Sheet-100Sheet Staple Finisher
3,000Sheet-50Sheet Staple Finisher, Booklet finisher (upper tray/ shift tray)
Booklet finisher (booklet tray)
• When stapling B4 JISL, A3L, Legal 81/2" × 14"L, 11" × 17"L, be sure toextend the paper support plate of the finisher tray.
• When the number of copies exceeds tray capacity, copying stops. If thishappens, remove the copies from the shift tray, and then resume copying.The tray capacity for the stapled sheets is as follows: (paper weight: 80 g/m2,20 lb.)3,000Sheet-100Sheet Staple Finisher (Finisher shift tray without Z-folding unit)
Paper Size and Orientation Stapler Capacity
A3L, B4 JISL, 11" × 17"L, 81/2" × 14"L 50 sheets (80 g/m2, 20 lb.)
A4KL, B5 JISKL, 81/2" × 11"KL 100 sheets (80 g/m2, 20 lb.)
Paper Size and Orientation Stapler Capacity
A3L, B4 JISL, 11" × 17"L, 81/2" × 14"L 30 sheets (80 g/m2, 20 lb.)
A4KL, B5 JISKL, 81/2" × 11"KL 50 sheets (80 g/m2, 20 lb.)
Paper Size and Orientation Stapler Capacity
A3L, B4 JISL, A4L, B5 JISL, 11" × 17"L, 81/2" × 14"L, 81/2" × 11"L, 12" × 18"L 15 sheets (80 g/m2, 20 lb.)
Paper Size and Orientation Number of SheetsNumber of Stapled Copies
A4KL, B5 JISKL, 81/2" × 11"KL
2- to 9-leaf binding150 sets
(Max. 3000 sheets)
10- to 100-leaf binding200 to 30 sets
(Max. 3000 sheets)
A3L, B4 JISL, 11" × 17"L, 81/2" × 14"L
2- to 9-leaf binding150 sets
(Max. 1500 sheets)
10- to 50-leaf binding150 to 30 sets
(Max. 1500 sheets)
Supplementary Information
93
5
1
3,000Sheet-100Sheet Staple Finisher (Finisher shift tray with Z-folding unit)
3,000Sheet-50Sheet Staple Finisher
Paper weight: 80 g/m2 (20 lb.) Booklet finisher
Paper weight: 80 g/m2 (20 lb.)
Paper SizeNumber of Z-folded Sheets
Number of Stapled Copies
Z-folded A3 n A4
Z-folded B4 JIS n B5 JIS
Z-folded 11" × 17" n 81/2" × 11"
2 to 1015 to 3 sets
(Max. 30 sheets for Z-folded paper)
Paper Size and Orientation Number of SheetsNumber of Stapled Copies
A4K, 81/2" × 11"K
2- to 19-leaf binding150 sets
(Max. 3000 sheets)
20- to 50-leaf binding150 to 60 sets
(Max. 3000 sheets)
A4L, B5 JISKL, 81/2" × 11"L
2- to 14-leaf binding100 sets
(Max. 1500 sheets)
15- to 50-leaf binding100 to 30 sets
(Max. 1500 sheets)
Other sizes
2- to 14-leaf binding100 sets
(Max. 1500 sheets)
15- to 30-leaf binding100 to 33 sets
(Max. 1500 sheets)
Paper Size and Orientation Number of SheetsNumber of Stapled Copies
A4K, 81/2" × 11"K
2- to 12-leaf binding150 sets
(Max. 2000 sheets)
13- to 50-leaf binding150 to 40 sets
(Max. 2000 sheets)
A4L, B5 JISKL, 81/2" × 11"L
2- to 9-leaf binding100 sets
(Max. 1000 sheets)
10- to 50-leaf binding100 to 20 sets
(Max. 1000 sheets)
Other sizes
2- to 9-leaf binding100 sets
(Max. 1000 sheets)
10- to 30-leaf binding100 to 33 sets
(Max. 1000 sheets)

Appendix
194
5
• You cannot change stapling positions during copying.• When the original image is rotated, the staple orientation changes by 90°.• When [Top] or [Bottom] is selected and the paper with the same orientation
as the original is not loaded, the image is rotated and the paper with thesame size and the different orientation is selected.
• With certain stapling settings, you cannot use the Rotate function. • If you select the Saddle Stitch function with the Booklet finisher, the ma-
chine staples and folds the paper in the center, then delivers the paper folded.• If you select the Saddle Stitch function in Magazine mode, the machine sta-
ples the paper, and folds it like a book, then delivers the paper folded.
❖ Punch• When using Punch and Combine, Double Copies, or Auto Reduce/En-
large, the message “Blank part will appear. Check orientation.” may ap-pear because of the orientation of the original and the copy paper. If thisoccurs, change the orientation of the copy paper.
• Punchable paper sizes are as follows:
Punch Unit Type Position Paper Size
2 holes type L A3 – A5, 11" × 17", 81/2" × 11"
K A4 – A5, 81/2" × 11"
3 holes type L A3, B4 JIS, 11" × 17"
K A4, B5 JIS, 81/2" × 11"
4 holes type L A3, B4 JIS, 11" × 17"
K A4, B5 JIS, 81/2" × 11"

Supplementary Information
95
5
1
❖ Z-fold• You cannot use the following copy paper with this function:
• Recycled paper• Special paper• Translucent paper• Letterhead• Thick paper• Color paper 1• Color paper 2• Tab stock• OHP transparencies• Label paper (adhesive labels)• Postcards
• Paper fed from the interposer cannot be Z-folded.• Paper sizes that can be Z-folded are as follows:
• Booklet Finisher / 3,000Sheet-100Sheet Staple FinisherA3L, B4 JISL, A4L, 11" × 17"L, 81/2" × 14", L, 81/2" × 11"L, 12" × 18"L
• The number of Z-folded copies that can be stacked on the finisher trays areas follows. When the number of copies exceeds capacity, remove themfrom the trays.
• The paper sizes that can be stapled after being Z-folded are A3L, B4 JISLand 11" × 17"L.
3,000Sheet-100Sheet Staple Finisher (Finisher upper/shift tray)
30 sheets
Booklet Finisher (Finisher upper/shift tray) B4 JIS, 81/2" × 14" :30 sheets
A4, 81/2" × 11" or smaller :20 sheets

Appendix
196
5
• Even if you place different size originals in the ADF, appropriate size ofcopy paper can be automatically selected and stapled using the Mixed Sizemode and Auto Paper Select function. Load the paper you want to use inthe paper trays beforehand. Paper sizes that can be stapled when using theMixed Size mode are as follows:• A3L and A4K• B4 JISL and B5 JISK• A4L and A5K• 11" × 17"L and 81/2" × 11"K• 81/2" × 11"L and 51/2" × 81/2"K
• Depending on the Z-fold settings, you may not be able to use Rotate Sort.• Even if you have selected [Face Up] for Eject Copy Face up/Down in Glass
Mode, the copies will be delivered face down.
❖ Duplex• Following paper sizes and directions allow the double-side copy.
A3L, B4 JISL, A4KL, B5 JISKL, A5KL, 11" × 17"L, 81/2" × 14"L,81/2" × 11"KL, 51/2" × 81/2"KL, 81/2" × 13"L, 81/4" × 13"L, 8" × 13"L,71/4" × 101/2"L, 11" × 15"L, 11" × 14"L, 10" × 15"L, 10" × 14"L, 81/4" × 14"L, 8" × 101/2"L, 210 × 340 mmL, 210 × 182 mmL, 210 × 170 mmK, 8KL, 16KKL
• You cannot use the following copy paper with this function:• paper of a size smaller than A5, 51/2" × 81/2"• Translucent paper• Label paper (adhesive labels)• OHP transparencies• Paper thicker than 105 g/m2, 28 lb.• Paper thinner than 64 g/m2, 17 lb.• Postcards• Tab stock
• When an odd number of originals is placed in the ADF, the back of the lastpage of copied paper is blank.
• During copying, the image is shifted to allow for the binding margin.• Front and back image quality of copies may differ.
ACC013S

Supplementary Information
97
5
1
❖ Combine• In this mode, the machine selects the reproduction ratio automatically.
This reproduction ratio depends on copy paper sizes and the number oforiginals.
• The reproduction ratios you can specify are 25-400%.• If the calculated ratio is under the minimum ratio, it is automatically ad-
justed to within available range. However, with some ratios, parts of theimage might not be copied.
• You cannot use custom size paper.• If the orientation of originals is different from that of the copy paper, the
machine will automatically rotate the image by 90° to make copies properly.• If the number of originals placed is less than the number specified for com-
bining, the last page segment is left blank as shown.
❖ Booklet/Magazine• The machine sets the reproduction ratio automatically to meet the paper
size and copies the originals together onto the paper.• The reproduction ratios you can specify are 25-400%.• If the calculated ratio is under the minimum ratio, it is automatically ad-
justed to within available range. However, with some ratios, parts of theimage might not be copied.
• If the orientation of originals is different from that of the copy paper, themachine will automatically rotate the image by 90° to make copies properly.
• You cannot copy with originals different in size and orientation.• If the number of originals scanned is less than a multiple of 4, the last page
is copied blank.• In Magazine mode, the copying may take some time after scanning originals.• When the optional booklet finisher is installed, if you select Saddle Stitch
function in Magazine mode, the machine staples and folds the paper in thecenter, then delivers the paper folded.

Appendix
198
5
❖ Image Repeat• Depending on the paper size, ratio, and orientation, parts of repeated im-
ages may not be copied.• If you use this function with “Custom Size”, you can copy repeatedly the
image in the area you want by specifying the vertical and horizontallengths from the base point. In this case, place your original on the expo-sure glass.
A Base pointB Horizontal lengthC Vertical length
❖ Centering• Though the original is set to a different orientation from the paper loaded,
the machine will not rotate the image by 90° (Rotate copy).
❖ Erase• The width of the erased margin varies depending on the reproduction ratio.• If the size of the original is different from sizes listed in the following chart,
the erased margin might be shifted:• Metric version
Exposure glass : A3L, B4 JISL, A4KL, B5 JISKLADF : A3L, B4 JISL, A4KL, B5 JISKL, A5KL
• Inch versionExposure glass: 11" × 17"L, 81/2" × 14"L, 81/2" × 11"KL, 10" × 14"LADF: 11" × 17"L, 81/2" × 14"L, 81/2" × 11"KL, 51/2" × 81/2"L, 10" × 14"L
• By combining “Erase Inside 1” - ”Erase Inside 5”, you can erase up to 5 ar-eas at the same time.
❖ Background Numbering• The numbers appear to overlap the copied image in some cases.
❖ Margin Adjustment• If you set a binding margin that is too wide, part of the image may not be copied.• When making copies in the Combine mode, the binding margin is added
to the copies after the combination is finished.
Supplementary Information
99
5
1
❖ Preset Stamp• You can change the size and density of the stamp with User Tools. De-
pending on the setting, density may change.• Depending on paper size, if you change the stamp size, parts of the stamp
might not be printed.• When you use this function with the Magazine or Booklet function, you
can print the stamp only on the first page.
❖ Date Stamp• When using Combine mode, the date stamp is printed as follows:
• With the Combine function
• With the Magazine or Booklet function
AMG026S
AMG027S

Appendix
200
5
❖ Page Numbering• When page numbering is used with Combine mode, page numbers are
printed as follows:• Page Numbering per original:
With 1 Sided/2 Sided using the Combine function
With the Magazine or Booklet function
• Page Numbering per copy:With 1 Sided/2 Sided using the Combine function
• If you combine this function with the Duplex (Top to Top) function and se-lect [P1,P2...] or [1/5,2/5...], page numbers on the back are printed as follows:
A FrontB Back
GCANPE0E
GCANPE1E
GCANPE2E
GCSTMPBE
Supplementary Information
01
5
2
❖ Front Cover, Front/Back Cover• If Blank mode is selected, the cover will not be counted as a copy.• Front and back covers are two-sided copied depending on the settings
made in Display Time in Cover Sheet Tray of User Tools (System Settings).• At Mode Selected… Depends on the setting done from Cover Sheet Tray.• Full Time… Depends on the setting done from Paper Type.
See “Tray Paper Settings”, General Settings Guide.
❖ Designate• When “Combine (1 Sided→2 Sided)” has been selected, specified pages
will always be copied on the front of copies in the same way as in Chaptersmode.
❖ Slip sheet• If you do not copy onto slip sheets, they are excluded from the number of
copies counted.
Appendix
202
5
❖ Connect Copy
Important❒ Do not use the connecting cable with other equipment.❒ Always turn off the main power of the main and sub-machines when be-
fore disconnecting the cable. Otherwise it might lead to malfunctioning ofthe two machines.
• You can store on a program whether or not to use Connect Copy.• Select the copy paper using the main machine.
• When [Connect Copy] is pressed, only the paper trays common to bothmachines will be displayed. The other paper trays appear faded out andcannot be selected.
• When two or more trays hold the desired paper size, the paper tray willbe selected according to the Paper Tray Priority settings made on the re-spective machine. See “Tray Paper Settings”, General Settings Guide.
• If the {Clear Modes} key is pressed on the main machine while you are mak-ing settings, Connect Copy will be cancelled.
• Even if the sub-machine is in Energy Saver mode, the main machine canstill connect to make copies.
• When an Interrupt job on the sub-machine has finished, press the {Inter-rupt} key.
• Connect Copy jobs are displayed on the Job List of the sub-machine. How-ever, they cannot be deleted from the sub-machine.
• In Connect Copy, both machines follow the user authentication settings ofthe main machine.• You cannot manage the number of copies according to machine. The
number of copies is shown as a total of the two machines, and is moni-tored on the main machine
• Even if user codes are set and you enter a user code before using thesub-machine, you cannot manage the number of copies made on thesub-machine.
• If user codes are set on only the sub-machine, you need not enter a usercode in order to use the sub-machine for Connect Copy. In this case, youcannot manage the number of copies according to user.

03
2INDEX
1 Sided 16 Pages to Combine 2 Sides, 771 Sided 2 Pages to Combine 1 Side, 741 Sided 4 Pages to Combine 1 Side, 741 Sided 4 Pages to Combine 2 Sides, 771 Sided 8 Pages to Combine 1 Side, 741 Sided 8 Pages to Combine 2 Sides, 771 Sided to 2 Sided, 701 Sided to Booklet, 821 Sided to Magazine, 822 Sided 16 Pages to Combine 2 Sides, 772 Sided 1 Page to Combine 1 Side, 742 Sided 2 Page to Combine 1 Side, 742 Sided 4 Pages to Combine 2 Sides, 772 Sided 4 Page to Combine 1 Side, 742 Sided 8 Pages to Combine 2 Sides, 772 Sided to 1 Sided, 802 Sided to 2 Sided, 702 Sided to Booklet, 823 Edges Full Bleed, 87
A
Adjusting Copy Image Density, 42Administrator Tools, 6Auto Document Feeder, 12Auto image density, 42Auto Off, 150Auto Paper Select, 45, 46Auto Reduce/Enlarge, 51Auto Reset when using Connect Copy, 150Auto Start, 30
B
Background Numbering, 101, 187Basic Procedure, 25Batch mode, 20, 187Before You Start, 143Binding margin, 91Blank Slip Sheets, 130Booklet, 82Booklet/Magazine, vi, xi, 82, 187Book to 1 Sided, 80Book to 2 Sided, 82Border Erase, 92, 94, 95, 97, 98Bypass tray, 38, 39Bypass Tray Copy, 187
C
Center, 96, 97, 98, 124Center/Border Erase, 92, 97Center Erase, 92, 96Centering, 124, 187Changing a Stored Program, 137Changing Number of Print Copies
while Printing is in Progress, 178Changing the Number of Sets, 60Changing the order of jobs, 34Changing the stamp position, 120Changing User Name, File Name or
Password of a Stored Document, 172Chapters, 129Checking Job History, 35Checking jobs in the print queue, 33Checking the Details of a Stored Document, 173Check the copy, 59Combine, 187Combined auto and
manual image density, 42, 43Connect Copy, 141, 142, 145, 149, 155,
156, 157, 187Connect Copy: Job Preset, 157, 158, 159Connect Copy Display Panel, 144Connect Copy Job Flow, 155Copier Functions, 42, 161Copy Face Up, 27Copying, 25Copying 2-Sided Pages, xiiCopying from the Bypass Tray, 36Copying onto OHP Transparencies, 40Copying onto Tab Stock, 28Copying onto Thick Paper, 41Copying onto Thin Paper, 40Copying Originals Such as Books, xiCopying Stored Documents Using
Connect Print, 151Covers, 126Create Margin function, 49Custom size, 39Custom sizes, 24
204
D
Date, 112Date Stamp, 110, 187Default, 139Deleting a Document, 182Deleting a Program, 138Deleting jobs, 35Density, 104Designate, 128, 187Detect, 14Different sizes, 22Directional Magnification, 53, 54Directional Size Magnification (inch), 55Display, 4Displaying a Document in Document
Server with Web Image Monitor, 183Display panel of the sub-machine, 145Document Server, 161Document Server Display, 162Double Copies, 122Downloading Stored Documents, 184Duplex, iii, 70, 187
E
Edit, 6Erase, 92, 187Exiting Connect Copy, 150
F
First printing number, 115, 117, 118First printing page, 115, 117, 118Format of date, 112Front/Back Covers, 126Front & Back to 2 Sided, 82Front cover, 126Front Cover, Front/Back Cover, 187Function Compatibility, 185
G
General Features, 6Generation Copy, 44
H
Holding print jobs, 34How to fold, 82How to fold and unfold copies to
make a booklet, 82How to fold and unfold copies to
make a magazine, 82How to Read This Manual, 2How to unfold, 82
I
Image density, 42Image Repeat, 121, 187Initial Display, 139Input / Output, 6Inside Erase, 99Interrupt Copy, 26, 142Interrupting Printing, 177Invert, 125
J
Job List, 32Job List screen, 32Job Preset, 31
K
Key Color, 5
L
Last Number, 115, 117Left Original Beeper, 27
M
Machine Types and Options, 142Magazine, 82Manual image density, 43Manual Paper Select, 46Manuals for This Machine, iMap, 44Margin Adjustment, 91, 187Missing image area, 15Mix 1 & 2 Sided, 88Mixed size mode, 22, 187
N
Notice, 1Number keys, 50, 54
05
2O
One-Sided Combine, ix, 74onto 1-Sided Pages, xiiOption, 3Order of Copy Output, 149Orientation, 104Original, 11Original Orientation, 16Original orientation, 61, 102, 104, 110, 113Original orientation and completed copies, 70Original orientation position, 65Originals, 11, 15Originals and copy orientation, 73Original size, 23Outside Erase, 100
P
Page Numbering, 113, 115, 117, 118, 187Pale, 44Photo, 44Placing, 11Placing Originals, 16Placing Originals in the
Auto Document Feeder, 18Placing Originals on the Exposure Glass, 18Position, 61, 104Positive/Negative, 125Preset Enlarge/Reduce, 187Preset Reduce/Enlarge, 47Preset Stamp, 102, 104, 187Preview Display, 164Printer Functions, 161Printing a Specified Page, 180Printing a Specified Range, 181Printing a Stored Document, 176Printing the First Page, 179Program, 107, 139Programs, 136Punch, 64Punch holes, 64
R
Ratio, 50Recalling a Program, 138Regular sizes, 23Repeat, 121Reproduction Ratio, 6Revers, 125Rotate Sort, 57
S
SADF, 21SADF mode, 21Sample copy, 59Sample Print, 178Scanner Functions, 161Scanning Position, 89Searching for a Stored Document, 174Selecting Copy Paper, 45Series Copies, 80Simplified Display, 163Simplified display, 5Simplified Display key, 5Size, 104Size Magnification, 52, 187Sizes, 14Sizes and Weights of
Recommended Originals, 11Sizes Detectable, 13Slip Sheet, 187Slip Sheets, 132Sort, 57, 187Specified Area Repeat, 121Stack, 60, 187Stamp, 6Stamp position, 102, 104, 106, 110, 112,
113, 115Stamp Text, 119Staple, 61, 187Stapler, 61Storing a Program, 136Storing Data, 166Storing Originals in the Document Server, 134Symbols, 2
T
Tab stock, 28Text, 44Text/Photo, 44To change a file name, 170To delete the user stamp, 109To register or change a
user name, 168, 169, 170To search by file name, 174To search by user name, 175To set or change a Password, 171Two-Sided Combine, 77
206
EN USA B246-7657U
User Stamp, 104, 106, 107, 109Using Connect Copy, 146Using Job Preset in Connect Copy, 153Using the Document Server, 166Using the idle machine
as the main machine, 156Using the machine currently copying
as the main machine, 157Using the Z-fold Support Tray, 67
V
Various sizes, 22
W
What You Can Do with This Machine, iiiWhen both machines are copying the
same number of originals, 158When Both Machines are in Use, 157When copying onto Regular Size Paper, 38When no name is registered to the
Address Book, 170When one machines is copying a
larger number of originals, 159When One of the Two Machines is Idle, 155When using a user name
not registered to the Address Book, 169When using a user name
registered to the Address Book, 168Whole Area Repeat, 121
Z
Z-fold, 66, 187Z-folding Copies, 69Z-fold positions, 69Zoom, 49, 187

In accordance with IEC 60417, this machine uses the following symbols for the main power switch:
a means POWER ON.
c means STAND BY.
Trademarks
PostScript®, Acrobat® are registered trademark of Adobe Systems Incorporated.
Other product names used herein are for identification purposes only and might be trademarks of theirrespective companies. We disclaim any and all rights to those marks.
Copyright © 2006
Operating Instructions
Copy/Docum
ent Server
Referenc eType for 8055/DSm755/LD255/Aficio MP 5500
Type for 8065/DSm765/LD265/Aficio MP 6500 Type for 8075/DSm775/LD275/Aficio MP 7500EN USA B246-7657

Printer/Scanner Unit Type7500
Operating Instructions
Printer Reference
this machine and keep it handy for future reference. For safe and correct use, be sure to read th before using the machine.
Preparing the Machine
Setting Up the Printer Driver
Other Print Operations
Saving and Printing Using the Document Server
The Functions and Settings of the Machine
Appendix
1
2
3
4
5
6
Read this manual carefully before you use eSafety Information in "About This Machine"

IntroductionThis manual contains detailed instructions and notes on the operation and use of this machine. For yoursafety and benefit, read this manual carefully before using the machine. Keep this manual in a handyplace for quick reference.
ImportantContents of this manual are subject to change without prior notice. In no event will the company be li-able for direct, indirect, special, incidental, or consequential damages as a result of handling or oper-ating the machine.
Do not copy or print any item for which reproduction is prohibited by law.Copying or printing the following items is generally prohibited by local law:bank notes, revenue stamps, bonds, stock certificates, bank drafts, checks, passports, driver's licenses.The preceding list is meant as a guide only and is not inclusive. We assume no responsibility for itscompleteness or accuracy. If you have any questions concerning the legality of copying or printing cer-tain items, consult with your legal advisor.
Caution:Use of controls or adjustments or performance of procedures other than those specified in this manualmight result in hazardous radiation exposure.
Two kinds of size notation are employed in this manual. With this machine refer to the inch version.
TrademarksMicrosoft®, Windows® and Windows NT® are registered trademarks of Microsoft Corporation in theUnited States and/or other countries.Adobe®, PostScript®, Acrobat®, PageMaker® and Adobe Type Manager are registered trademarks ofAdobe Systems Incorporated.PCL® is a registered trademark of Hewlett-Packard Company.Apple, AppleTalk, EtherTalk, Macintosh, Mac OS and True Type are registered trademarks of AppleComputer, Inc.BonjourTM is a trademark of Apple Computer, Inc.IPS-PRINTTM Printer Language Emulation Copyright© 2000, Oak Technology, Inc., All Rights Re-served.UNIX is a registered trademark in the United States and other countries, licensed exclusively throughX/Open Company Limited.The Bluetooth® word mark and logos are owned by the Bluetooth SIG, Inc. and any use of such marksby Ricoh Company, Ltd. is under license.NetWare is a registered trademark of Novell, Inc.Other product names used herein are for identification purposes only and might be trademarks of theirrespective companies. We disclaim any and all rights to those marks.
The proper names of the Windows operating systems are as follows:• The product name of Windows® 95 is Microsoft® Windows® 95• The product name of Windows® 98 is Microsoft® Windows® 98• The product name of Windows® Me is Microsoft® Windows® Millennium Edition (Windows Me)• The product name of Windows® 2000 are as follows:
Microsoft® Windows® 2000 ProfessionalMicrosoft® Windows® 2000 ServerMicrosoft® Windows® 2000 Advanced Server
• The product name of Windows® XP are as follows:Microsoft® Windows® XP Home EditionMicrosoft® Windows® XP Professional
• The product names of Windows ServerTM 2003 are as follows:Microsoft® Windows ServerTM 2003 Standard EditionMicrosoft® Windows ServerTM 2003 Enterprise EditionMicrosoft® Windows ServerTM 2003 Web Edition
• The product name of Windows NT® 4.0 are as follows:Microsoft® Windows NT® Workstation 4.0Microsoft® Windows NT® Server 4.0
NotesSome illustrations in this manual might be slightly different from the machine.Certain options might not be available in some countries. For details, please contact your local dealer.

i
Manuals for This Machine
Refer to the manuals that are relevant to what you want to do with the machine.
❖ About This MachineBe sure to read the Safety Information in this manual before using the ma-chine.This manual provides an introduction to the functions of the machine. It alsoexplains the control panel, preparation procedures for using the machine,how to enter text, and how to install the CD-ROMs provided.
❖ General Settings GuideExplains User Tools settings, and Address Book procedures such as register-ing e-mail addresses, and user codes. Also refer to this manual for explana-tions on how to connect the machine.
❖ Trouble ShootingProvides a guide to solving common problems, and explains how to replacepaper, toner, staples, and other consumables.
❖ Security ReferenceThis manual is for administrators of the machine. It explains security func-tions that the administrators can use to protect data from being tampered, orprevent the machine from unauthorized use.Also refer to this manual for the procedures for registering administrators, aswell as setting user and administrator authentication.
❖ Copy/Document Server ReferenceExplains Copier and Document Server functions and operations. Also refer tothis manual for explanations on how to place originals.
❖ Printer ReferenceExplains Printer functions and operations.
❖ Scanner ReferenceExplains Scanner functions and operations.
❖ Network GuideExplains how to configure and operate the machine in a network environ-ment, and use the software provided.This manual covers all models, and includes descriptions of functions andsettings that might not be available on this machine. Images, illustrations, andinformation about operating systems that are supported might also differslightly from those of this machine.
ii
❖ Other manuals• Manuals for This Machine• Safety Information• Quick Reference Copy Guide• Quick Reference Printer Guide• Quick Reference Scanner Guide• PostScript3 Supplement• UNIX Supplement• Manuals for DeskTopBinder Lite
• DeskTopBinder Lite Setup Guide• DeskTopBinder Introduction Guide• Auto Document Link Guide
Note❒ Manuals provided are specific to machine types.❒ Adobe Acrobat Reader/Adobe Reader must be installed in order to view the
manuals as PDF files.❒ For “UNIX Supplement”, please visit our Web site or consult an authorized
dealer.❒ “PostScript3 Supplement” and “UNIX Supplement” include descriptions of
functions and settings that might not be available on this machine.
iii
TABLE OF CONTENTSManuals for This Machine ...................................................................................... iHow to Read This Manual .....................................................................................1
Symbols .....................................................................................................................1Display Panel..........................................................................................................2
Initial Display ..............................................................................................................2Simplified Display.......................................................................................................3
Job List ...................................................................................................................4Job List screen ...........................................................................................................4Checking jobs in the print queue................................................................................5Changing the order of jobs.........................................................................................6Holding print jobs .......................................................................................................6Deleting jobs ..............................................................................................................7Checking Job History .................................................................................................7
Printer Features Menu...........................................................................................8Setting Paper on the Bypass Tray......................................................................12
Setting the Paper Size Using the Control Panel ......................................................14Setting Custom Size Paper Using the Control Panel ...............................................15Setting Thick Paper or OHP Transparencies Using the Control Panel ....................16
1. Preparing the Machine
Confirming the Connection Method...................................................................19Network Connection.................................................................................................19Local Connection .....................................................................................................22
Installing the Printer Driver.................................................................................23Quick Install..............................................................................................................23Installing the Printer Driver for the Selected Port .....................................................25
Using as a Windows Network Printer ................................................................35Using as a NetWare Print Server / Remote Printer ...........................................37
Form Feed................................................................................................................39Banner Page ............................................................................................................39Printing after Resetting the Printer ...........................................................................39
Installing the Printer Driver Using USB .............................................................40Windows Me - USB ..................................................................................................40Windows 2000 - USB ...............................................................................................42Windows XP, Windows Server 2003 - USB .............................................................43
Printing with Parallel Connection.......................................................................45Installing the Printer Driver Using IEEE 1394 (SCSI print)...............................47
Windows 2000..........................................................................................................47Windows XP, Windows Server 2003........................................................................49
Printing with Bluetooth Connection...................................................................51Supported Profiles....................................................................................................51Printing with Bluetooth Connection ..........................................................................52Configuring Security Mode Settings.........................................................................53Printing in the Security Mode ...................................................................................53
Making Option Settings for the Printer ..............................................................54Conditions for Bidirectional Communication ............................................................54If Bidirectional Communication Is Disabled..............................................................56
iv
Installing Font Manager 2000..............................................................................57Using Adobe PageMaker Version 6.0, 6.5, or 7.0 ..............................................58
2. Setting Up the Printer Driver
PCL - Accessing the Printer Properties.............................................................59Windows 95 / 98 / Me - Accessing the Printer Properties ........................................59Windows 2000 - Accessing the Printer Properties ...................................................60Windows XP, Windows Server 2003 - Accessing the Printer Properties .................62Windows NT 4.0 - Accessing the Printer Properties ................................................63
RPCS - Accessing the Printer Properties ..........................................................66Windows 95 / 98 / Me - Accessing the Printer Properties ........................................66Windows 2000 - Accessing the Printer Properties ...................................................68Windows XP, Windows Server 2003 - Accessing the Printer Properties .................70Windows NT 4.0 - Accessing the Printer Properties ................................................72
3. Other Print Operations
Printing a PDF File Directly.................................................................................75Printing Method ........................................................................................................75Using DeskTopBinder Lite .......................................................................................75Using commands .....................................................................................................78
Unauthorized Copy Control ................................................................................79Using [Data security for copying] .................................................................................79Using [Mask type:] .....................................................................................................81Important Notice.......................................................................................................82
Using the Print Job Function..............................................................................83Selecting the Initial Print Job List .............................................................................86
Printing from the Print Job Screen ....................................................................87Sample Print.............................................................................................................87Locked Print .............................................................................................................91Hold Print .................................................................................................................95Stored Print ..............................................................................................................98
Printing from the Jobs Per User ID Screen .....................................................102Printing the Selected Print Job...............................................................................102Printing All Print Jobs .............................................................................................104
Form Feed...........................................................................................................106Printing from a Selected Tray.................................................................................106Canceling a Print Job .............................................................................................107
Canceling a Print Job ........................................................................................108Canceling a Print Job Using the Control Panel ......................................................108Windows - Canceling a Print Job from the computer .............................................109
Checking the Error Log .....................................................................................110Spool Printing ....................................................................................................111User Defined Pages ...........................................................................................112Printing with the Finisher..................................................................................113
Staple .....................................................................................................................114Punch .....................................................................................................................116Collate ....................................................................................................................118
Covers.................................................................................................................120

v
Chaptering ..........................................................................................................124No slip sheets.........................................................................................................124Inserting chapter slip sheets ..................................................................................125
Slip Sheet............................................................................................................126Tab Sheet............................................................................................................127Z-fold ...................................................................................................................128
Folding Positions....................................................................................................128Notes on the Z-fold Function..................................................................................129
4. Saving and Printing Using the Document Server
Accessing the Document Server......................................................................131
5. The Functions and Settings of the Machine
Mainframe...........................................................................................................133Functions................................................................................................................133Interface .................................................................................................................133
List of the Setting Items ....................................................................................134Web Image Monitor................................................................................................134telnet ......................................................................................................................139Settings that can be used with PostScript 3...........................................................139
6. Appendix
Specifications.....................................................................................................141Options...................................................................................................................143
INDEX....................................................................................................... 146

vi

1
How to Read This Manual
Symbols
This manual uses the following symbols:
Indicates important safety notes.Ignoring these notes could result in serious injury or death. Be sure to read thesenotes. They can be found in the "Safety Information" section of About This Ma-chine.
Indicates important safety notes.Ignoring these notes could result in moderate or minor injury, or damage to themachine or to property. Be sure to read these notes. They can be found in the"Safety Information" section of About This Machine.
Indicates points to pay attention to when using the machine, and explanationsof likely causes of paper misfeeds, damage to originals, or loss of data. Be sureto read these explanations.
Indicates supplementary explanations of the machine’s functions, and instruc-tions on resolving user errors.
This symbol is located at the end of sections. It indicates where you can find fur-ther relevant information.[ ]Indicates the names of keys that appear on the machine’s display panel.{ }Indicates the names of keys on the machine’s control panel.
2
Display Panel
This section describes configuration using the display panel when the printerfunction is selected.
Initial Display
Important❒ The machine switches to offline when you make settings when the machine
is online. After you complete the setting, the machine switches to online au-tomatically.
❒ If you make a setting when the machine is offline, it will stay offline after-wards.
❒ The function items displayed serve as selector keys. You can select or specifyan item by pressing it lightly.
❒ When you select or specify an item on the display panel, it becomes highlighted.❒ Keys dimmed (for example, ) cannot be used.
1. Operational status or messagesDisplays current machine status, such as“Ready”, “Offline”, and “Printing...”. In-formation about the print job (user IDand document name) appears in this sec-tion.
2. [fOnline]/[ Offline]When you press these keys, the machineswitches between online and offline.When the machine is online, it can re-ceive data from the computer.When the machine is offline, it cannot re-ceive data from the computer.
3. [Form Feed]Press to print all the data left in the ma-chine's input buffer.
• When the machine is online, the statusappears dimly.
• This function is not available with theRPCS printer language.
4. [Job Reset]Press to cancel the current print job.If you press it when the machine is offlineand Hex Dump is selected, Hex Dump iscanceled.
1
2
34
5 6 7
8
ANW201S
3
5. [Print Jobs]Press to display print jobs sent from acomputer.
6. [Error Log]Press to display the error logs of printjobs that sent from a computer.
7. [Spooling Job List]Press to display spooled jobs.
8. Paper Tray Status indicatorsThe paper tray settings appear.
Note❒ When the power is turned on, the copier display is shown. This is a factory
default. This initial setting can be changed. See “System Settings”, GeneralSettings Guide.
Simplified Display
This section explains how to switch to the simplified display.When you press {Simplified Display}, the screen changes from the initial displayto the simplified display. Letters and keys are displayed at a larger size, makingoperations easier.
❖ Example of a simplified display
Note❒ To return to the initial display, press {Simplified Display} again.❒ Certain keys do not appear on the simplified display.
ANV202S
4
Job List
Jobs printed using Copy, Document Server, or Printer mode are temporarilystored in the machine, and then executed in order. The Job List function allowsyou to manage these jobs. For example, you can cancel incorrect job settings orprint an urgent document.
Note❒ You cannot use the Job List function when Interrupt Copy is active.
Job List screen
This section explains displays and icons that appear in the Job List screen. The Job List screen varies depending on whether [Job Order] is selected withPrint Priority for the System Settings. For details about the setting procedure, see“General Features”, General Settings Guide.
❖ When [Job Order] is not selected:The job list is displayed for each of the functions.
21
3ANP058S

5
❖ When [Job Order] is selected:The job list is displayed for all functions in the order of print jobs.
A Switches between job lists for each function.B Switches between [Current / Waiting Job List] and [Job History].C Displays reserved job numbers.D Displays the function used to print jobs.
: Job printed using copy function.: Job printed using printer function.: Job printed using Document Server function.: Job printed using DeskTopBinder.: Job printed using Web Image Monitor.
Reference“General Features”, General Settings Guide
Checking jobs in the print queue
You can check the contents of jobs in the print queue.
A Press [Job List].
B Select the job you want to check.
C Press [Details], and then check the contents.
D Press [Exit].
AMG038S
2
3 4
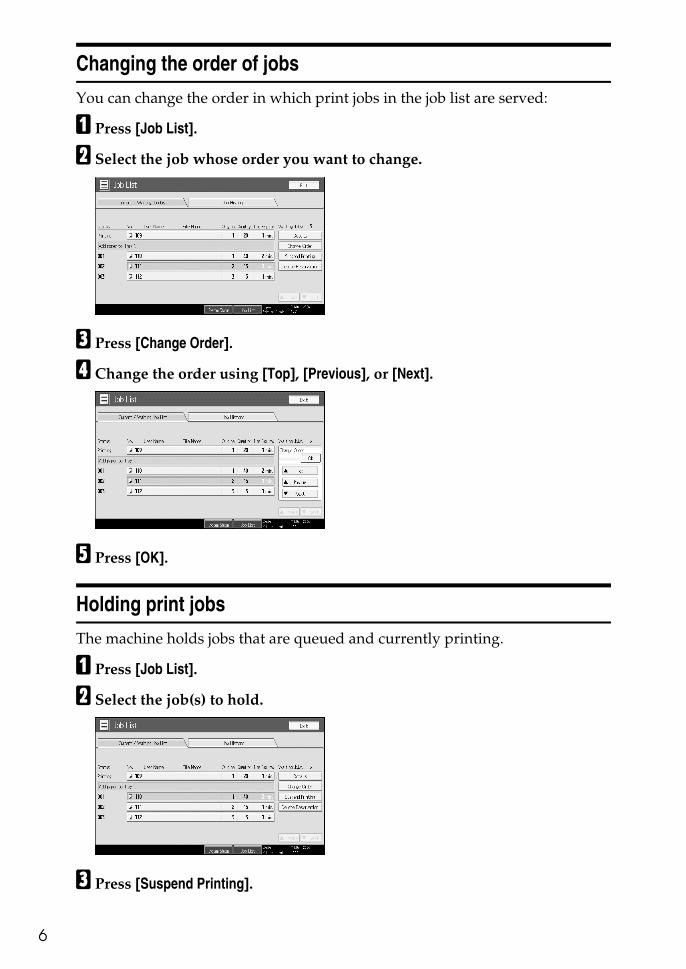
6
Changing the order of jobs
You can change the order in which print jobs in the job list are served:
A Press [Job List].
B Select the job whose order you want to change.
C Press [Change Order].
D Change the order using [Top], [Previous], or [Next].
E Press [OK].
Holding print jobs
The machine holds jobs that are queued and currently printing.
A Press [Job List].
B Select the job(s) to hold.
C Press [Suspend Printing].

7
Deleting jobs
You can delete job that is queued or currently printing.
A Press [Job List].
B Select the job you want to delete.
To delete multiple print jobs, select all print jobs you want to delete.
C Press [Delete Reservation].
D Press [Yes].
Note❒ To delete multiple print jobs, select them in step B.
Checking Job History
You can view the history contents of printed jobs.
A Press [Job List].
B Press [Job History].A list of completed print jobs appears.
C Press [Details] to check the contents of the displayed jobs.
D Press [Exit].
8
Printer Features Menu
The following explains settings and meanings of functions on Printer Feature.Printer Feature screen appears when you press the {User Tools/Counter} key. Fordetails, see “Printer Features”, General Settings Guide.
❖ List/Test Print
❖ Maintenance
Menu Description
Multiple Lists You can print the configuration page and error log.
Configuration Page You can print the machine's current configu-ration values.
ErrorLog You can print error logs listing all errors that occurred during printing.
Menu List You can print a Menu List showing the ma-chine's function menus.
PCL Configuration / Font Page You can print the current configuration and installed PCL font list.
PS Configuration / Font Page You can print the current configuration and installed PostScript font list.
This menu can be selected only when the op-tional PostScript 3 unit is installed.
PDF Configuration / Font Page You can print the current configuration and installed PDF font list.
This menu can be selected only when the op-tional PostScript 3 unit is installed.
Hex Dump You can print in the Hex Dump mode.
Menu Description
Menu Protect This function lets you protect menu settings from accidental change. It makes it impossi-ble to change menu settings with normal procedures unless you perform the required key operations.
In a network environment, only administra-tors can make changes to menu settings.
List / Test Print Lock You can lock the [List / Test Print] menu.
Delete All Temporary Print Jobs You can delete all print jobs temporarily stored in the machine.
Delete All Stored Print Jobs You can delete all print jobs stored in the ma-chine.

9
❖ System
Menu Description
Print Error Report You can print an error report when a printer or memory error occurs.
Auto Continue You can select this to enable Auto Continue. When it is On, printing continues after a sys-tem error occurs.
Memory Overflow Select this to have a memory overflow error report printed.
Job Separation You can enable Job Separation.
This menu can be selected only when a fin-isher (optional) is installed.
Auto Delete Temporary Print Jobs You can select to automatically delete print jobs temporarily stored in the machine.
Auto Delete Stored Print Jobs You can select to automatically delete print jobs stored in the machine.
Initial Print Job List You can set the default Printer screen when you press [Print Jobs].
Memory Usage You can select the amount of memory used in Font Priority or Frame Priority, according to paper size or resolution.
Duplex You can select to have print on both sides of each page.
Copies You can specify the number of print sets. This setting is disabled if the number of pag-es to print has been specified with the printer driver or another command.
Blank Page Print You can select whether or not to print blank pages.
Toner Saving Make setting to select either to apply or not to apply Toner Saving.
Spool Image You can select to print spool images.
The print job transmitted from the computer is temporarily stored on the machine's hard disk as bitmap images that can be printed when transmission is complete.
Reserved Job Waiting Time You can specify how long the machine waits to receive a print job before allowing other functions such as the copier and scanner functions to interrupt it.
Printer Language You can specify the printer language.
Sub Paper Size You can enable the Auto Substitute Paper Size (A4↔LT) feature.
Page Size You can select the default paper size.

10
❖ Host Interface
❖ PCL Menu
Letterhead Setting You can rotate original images when printing.
When printing, original images are always rotated by 180 degrees. Therefore, output might not be as expected when printing onto letterhead or preprinted paper requiring ori-entation. Using this function, you can specify image rotation.
Bypass Tray Setting Priority You can specify which of the two options, (Printer) Driver / Command or Machine Set-tings, has priority for determining the paper size for the bypass tray.
Edge to Edge Print You can select whether or not to print on the entire sheet.
Default Printer Language You can set the default printer language if the machine cannot find the printer language automatically.
Tray Switching You can set to switch the paper tray.
Menu Description
I/O Buffer You can set the size of the I/O Buffer. Nor-mally it is not necessary to change this setting.
I/O Timeout You can set how many seconds the machine should wait before ending a print job. If data from another port usually arrives in the mid-dle of a print job, you should increase this timeout period.
Menu Description
Orientation You can set the page orientation.
Form Lines You can set the number of lines per page.
Font Source You can set the storage location of the default font.
Font Number You can set the ID of the default font you want to use.
Point Size You can set the point size you want to use for the selected font.
Font Pitch You can set the number of characters per inch for the selected font.
Symbol Set You can specify the set of print characters for the selected font. The available options are as follows:
Courier Font You can select a courier font type.
Extend A4 Width You can extend the printing area width when printing on A4 sheet with PCL.
Menu Description

11
❖ PS Menu (optional)
❖ PDF Menu (optional)
Note❒ Some options do not appear depending optional units or selected printer lan-
guages.❒ Some options cannot be set depending on security settings.
ReferenceFor details, see “Printer Features”, General Settings Guide.For more information about copier features and system settings, see CopyReference and General Settings Guide.
Append CR to LF When set to On, a carriage return will follow each line feed: CR=CR, LF=CR−LF, FF=CR−FF.
Resolution You can set the print resolution in dots per inch.
Menu Description
Data Format You can select a data format.
Resolution You can set the print resolution in dots per inch.
Menu Description
Change PDF Password You can set the password for the PDF file ex-ecuting PDF Direct Print.
PDF Group Password You can set the group password already specified with DeskTopBinder Lite.
Resolution You can set the print resolution in dots per inch.
Menu Description

12
Setting Paper on the Bypass Tray
This section gives instructions for setting paper on the bypass tray.For details about paper size and paper type, see “Recommended Paper Size andTypes”, About This Machine.
Important❒ The following functions are disabled when printing from the bypass tray:
• Duplex/Booklet printing• Auto Tray Select• Auto Tray Switching• Rotating Collate• Staple (when the optional unit is installed)• Punch (when the optional unit is installed)• Z-fold (when the optional unit is installed)
A Open the bypass tray.
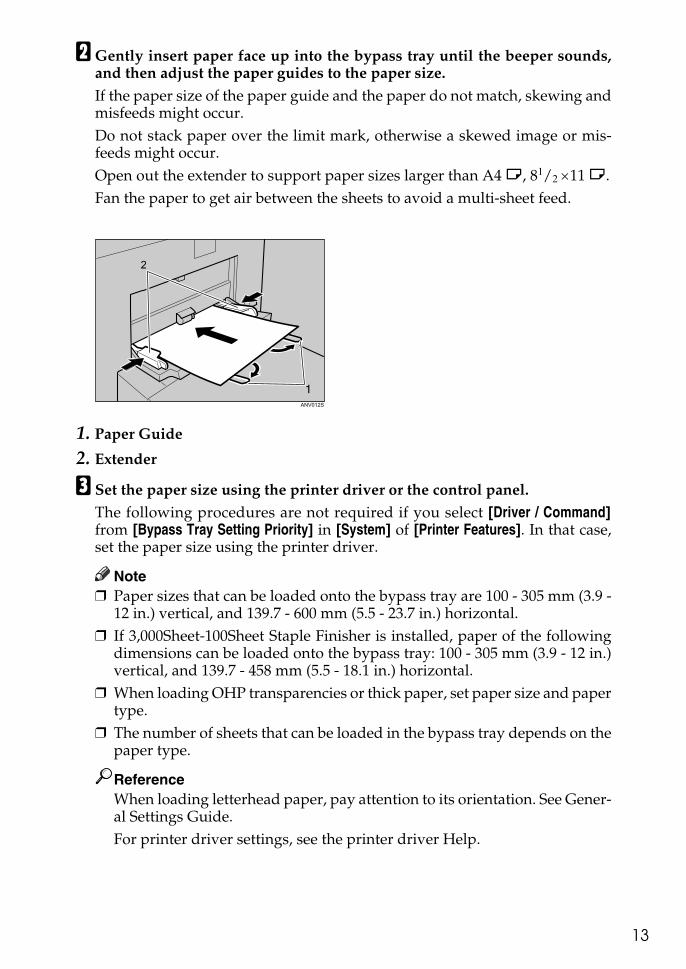
13
B Gently insert paper face up into the bypass tray until the beeper sounds,and then adjust the paper guides to the paper size.If the paper size of the paper guide and the paper do not match, skewing andmisfeeds might occur.Do not stack paper over the limit mark, otherwise a skewed image or mis-feeds might occur.Open out the extender to support paper sizes larger than A4 L, 81/2 ×11 L.Fan the paper to get air between the sheets to avoid a multi-sheet feed.
1. Paper Guide
2. Extender
C Set the paper size using the printer driver or the control panel.The following procedures are not required if you select [Driver / Command]from [Bypass Tray Setting Priority] in [System] of [Printer Features]. In that case,set the paper size using the printer driver.
Note❒ Paper sizes that can be loaded onto the bypass tray are 100 - 305 mm (3.9 -
12 in.) vertical, and 139.7 - 600 mm (5.5 - 23.7 in.) horizontal.❒ If 3,000Sheet-100Sheet Staple Finisher is installed, paper of the following
dimensions can be loaded onto the bypass tray: 100 - 305 mm (3.9 - 12 in.)vertical, and 139.7 - 458 mm (5.5 - 18.1 in.) horizontal.
❒ When loading OHP transparencies or thick paper, set paper size and papertype.
❒ The number of sheets that can be loaded in the bypass tray depends on thepaper type.
ReferenceWhen loading letterhead paper, pay attention to its orientation. See Gener-al Settings Guide.For printer driver settings, see the printer driver Help.
2
ANV012S
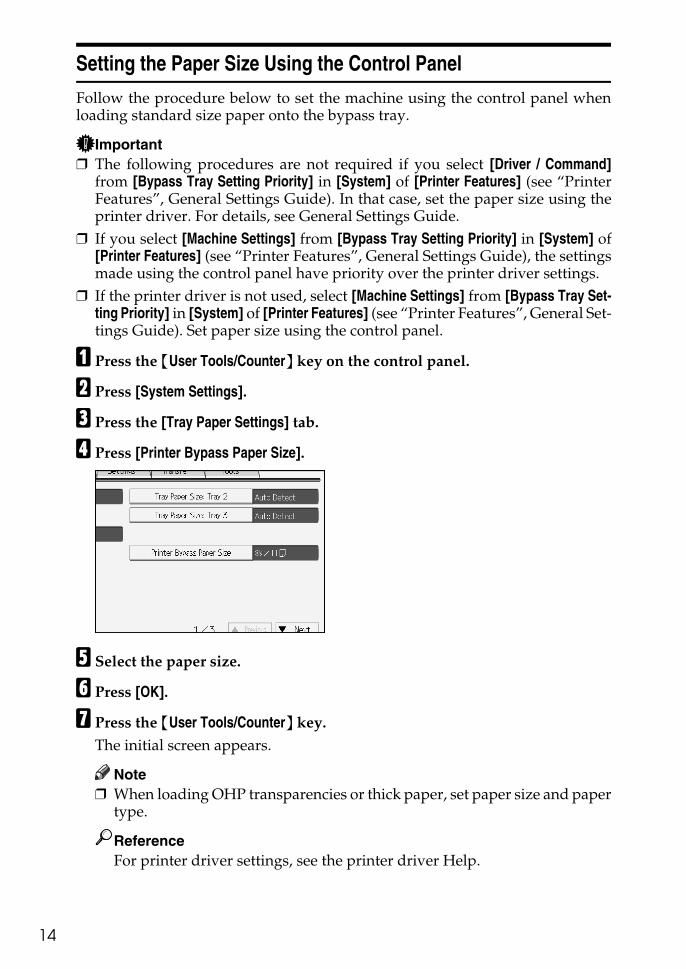
14
Setting the Paper Size Using the Control Panel
Follow the procedure below to set the machine using the control panel whenloading standard size paper onto the bypass tray.
Important❒ The following procedures are not required if you select [Driver / Command]
from [Bypass Tray Setting Priority] in [System] of [Printer Features] (see “PrinterFeatures”, General Settings Guide). In that case, set the paper size using theprinter driver. For details, see General Settings Guide.
❒ If you select [Machine Settings] from [Bypass Tray Setting Priority] in [System] of[Printer Features] (see “Printer Features”, General Settings Guide), the settingsmade using the control panel have priority over the printer driver settings.
❒ If the printer driver is not used, select [Machine Settings] from [Bypass Tray Set-ting Priority] in [System] of [Printer Features] (see “Printer Features”, General Set-tings Guide). Set paper size using the control panel.
A Press the {User Tools/Counter} key on the control panel.
B Press [System Settings].
C Press the [Tray Paper Settings] tab.
D Press [Printer Bypass Paper Size].
E Select the paper size.
F Press [OK].
G Press the {User Tools/Counter} key.The initial screen appears.
Note❒ When loading OHP transparencies or thick paper, set paper size and paper
type.
ReferenceFor printer driver settings, see the printer driver Help.

15
Setting Custom Size Paper Using the Control Panel
Follow the procedure below to set the machine using the control panel whenloading custom size paper onto the bypass tray.
Important❒ The following procedures are not required if you select [Driver / Command]
from [Bypass Tray Setting Priority] in [System] of [Printer Features] (see “PrinterFeatures”, General Settings Guide). In that case, set the paper size using theprinter driver.
❒ If you select [Machine Settings] from [Bypass Tray Setting Priority] in [System] of[Printer Features] (see “Printer Features”, General Settings Guide), the settingsmade using the control panel have priority over the printer driver settings.
❒ If the printer driver is not used, select [Machine Settings] from [Bypass Tray Set-ting Priority] in [System] of [Printer Features] (see “Printer Features”, General Set-tings Guide). Set paper size using the control panel.
A Press the {User Tools/Counter} key on the control panel.
B Press [System Settings].
C Press the [Tray Paper Settings] tab.
D Press [Printer Bypass Paper Size].
E Press [Custom Size].
If a custom size is already set, press [Change Size].
F Press [Vertical], enter the vertical size of the paper using the number keys,and then press the {q} key.
G Press [Horizontal], enter the horizontal size of the paper using the numberkeys, and then press the {q} key.
H Press [OK].The paper sizes entered are displayed.
I Press the {User Tools/Counter} key.The initial screen appears.
Note❒ When loading OHP transparencies or thick paper, set paper size and paper
type.❒ For printer driver settings, see the printer driver Help.

16
Setting Thick Paper or OHP Transparencies Using the Control Panel
Follow the procedure below to set the machine using the control panel whenloading thick paper or OHP transparencies onto the bypass tray.
Important❒ The following procedures are not required if you select [Driver / Command]
from [Bypass Tray Setting Priority] in [System] of [Printer Features] (see “PrinterFeatures”, General Settings Guide). In that case, set the paper size using theprinter driver.
❒ If you select [Machine Settings] from [Bypass Tray Setting Priority] in [System] of[Printer Features] (see “Printer Features”, General Settings Guide), the settingsmade using the control panel have priority over the printer driver settings.
❒ If the printer driver is not used, select [Machine Settings] from [Bypass Tray Set-ting Priority] in [System] of [Printer Features] (see “Printer Features”, General Set-tings Guide). Set the paper size using the control panel.
A Press the {User Tools/Counter} key on the control panel.
B Press [System Settings].
C Press the [Tray Paper Settings] tab.
D Press [TNext] to scroll through the list.
E Press [Paper Type: Bypass Tray].
F To print on OHP transparencies, press [OHP (Transparency)] in the [PaperType] area. To print on thick paper, press [Thick paper] in the [Paper Type] area.
G Press [OK].The paper type selected is displayed.

17
H Press the {User Tools/Counter} key.The initial screen appears.
Note❒ The settings made will remain valid until they are reset again. After print-
ing on OHP transparencies or thick paper, make sure to clear settings forthe next user.
❒ For printer driver settings, see the printer driver Help.

18

1. Preparing the Machine
19
Confirming the Connection Method
This machine supports network and local connection.Before installing the printer driver, check how the machine is connected. Followthe driver installation procedure that is appropriate to the connection method.
Network Connection
This machine can be used as a Windows printing port or network printer.
Using This Machine as the Windows Printing port
Network connections can be established through Ethernet, IEEE 802.11b, andIEEE 1394 (IPv4 over 1394).Available ports are determined based on the combination of Windows operatingsystem version and connection method used.
❖ Windows 95 / 98
Connection Method Available Ports
Ethernet / IEEE 802.11b SmartDeviceMonitor for Client port
IEEE 1394 (IPv4 over 1394) None
ZZZ035S
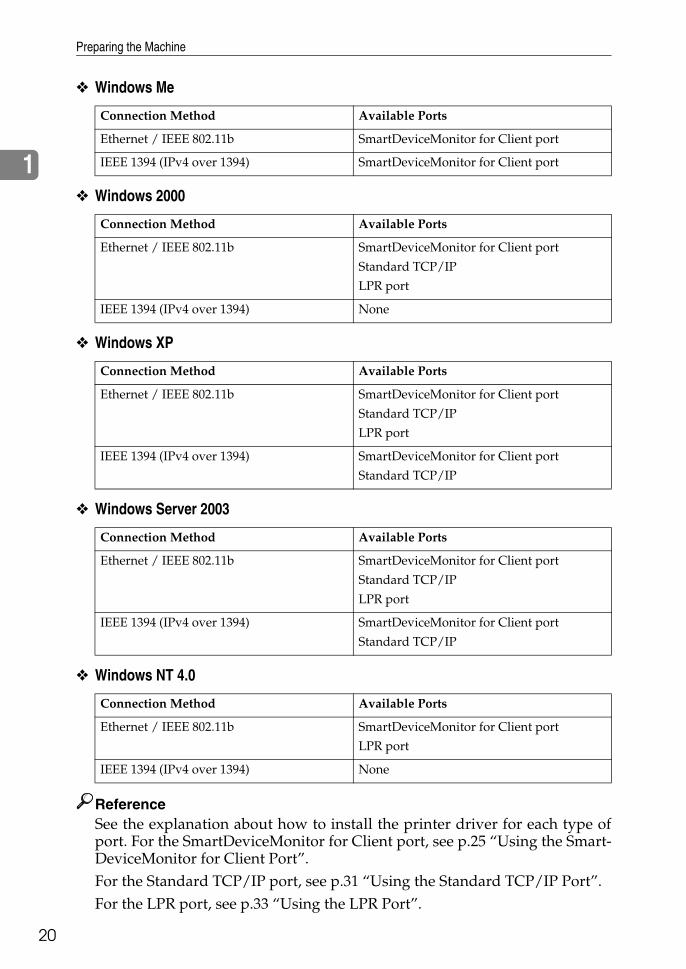
Preparing the Machine
20
1
❖ Windows Me
❖ Windows 2000
❖ Windows XP
❖ Windows Server 2003
❖ Windows NT 4.0
ReferenceSee the explanation about how to install the printer driver for each type ofport. For the SmartDeviceMonitor for Client port, see p.25 “Using the Smart-DeviceMonitor for Client Port”.For the Standard TCP/IP port, see p.31 “Using the Standard TCP/IP Port”.For the LPR port, see p.33 “Using the LPR Port”.
Connection Method Available Ports
Ethernet / IEEE 802.11b SmartDeviceMonitor for Client port
IEEE 1394 (IPv4 over 1394) SmartDeviceMonitor for Client port
Connection Method Available Ports
Ethernet / IEEE 802.11b SmartDeviceMonitor for Client port
Standard TCP/IP
LPR port
IEEE 1394 (IPv4 over 1394) None
Connection Method Available Ports
Ethernet / IEEE 802.11b SmartDeviceMonitor for Client port
Standard TCP/IP
LPR port
IEEE 1394 (IPv4 over 1394) SmartDeviceMonitor for Client port
Standard TCP/IP
Connection Method Available Ports
Ethernet / IEEE 802.11b SmartDeviceMonitor for Client port
Standard TCP/IP
LPR port
IEEE 1394 (IPv4 over 1394) SmartDeviceMonitor for Client port
Standard TCP/IP
Connection Method Available Ports
Ethernet / IEEE 802.11b SmartDeviceMonitor for Client port
LPR port
IEEE 1394 (IPv4 over 1394) None

Confirming the Connection Method
21
1
Using as a network printer
This machine can be used as the Windows network printer, the NetWare printserver, or the NetWare remote printer.
Note❒ In an IPv6 environment, Netware servers cannot be used.
ReferenceSee the explanation about how to install the printer driver for each type ofnetwork printer. For the Windows network printer, see p.35 “Using as a Windows NetworkPrinter”.For the NetWare print server and remote printer, see p.37 “Using as a Net-Ware Print Server / Remote Printer”.
ZZZ036S
Preparing the Machine
22
1
Local Connection
Local connections can be established via parallel, USB, IEEE 1394 (SCSI print),and Bluetooth connections.Windows operating system version determines the available connection methods.• Windows 95:
Parallel connections• Windows 98:
Parallel connections• Windows 98 SE / Me:
USB and Parallel connections• Windows 2000:
USB, Parallel, IEEE 1394 (SCSI print), and Bluetooth connections• Windows XP:
USB, Parallel, IEEE 1394 (SCSI print), and Bluetooth connections• Windows Server 2003:
USB, Parallel, IEEE 1394 (SCSI print), and Bluetooth connections• Windows NT 4.0:
Parallel connections
ReferenceSee the explanation about how to install the printer driver for each method ofconnection. For the USB connection, see p.40 “Installing the Printer Driver Using USB”.For the parallel connection, see p.45 “Printing with Parallel Connection”.For the IEEE 1394 (SCSI print) connection, see p.47 “Installing the PrinterDriver Using IEEE 1394 (SCSI print)”.For the Bluetooth connection, see p.20 “Windows 2000”.
Installing the Printer Driver
23
1
Installing the Printer Driver
This section explains how to install the printer driver. There are two ways to in-stall the printer driver: using Quick Install, which installs the settings at once, orinstalling the appropriate driver according to the port you want to use.
Quick Install
Windows 95 / 98 / Me / 2000 / XP, Windows Server 2003, and Windows NT 4.0users can easily install this software using the supplied CD-ROM.Using Quick Install, the PCL printer driver and/or RPCS printer driver, Desk-TopBinder Lite and SmartDeviceMonitor for Client are installed under networkenvironment, and the TCP/IP port will be set.
Important❒ To install printer driver under Windows 2000 / XP Professional, Windows
Server 2003, and Windows NT 4.0, you must have an account that has Man-age Printers permission. Log on as an Administrator.
❒ If you connect using USB, refer to p.40 “Installing the Printer Driver UsingUSB” and install the printer driver.
A Quit all applications currently running.
B Insert the CD-ROM into the CD-ROM drive.The installer starts. Auto Run may not work with certain operating system settings. If this hap-pens, launch “Setup.exe” on the CD-ROM root directory.
C Select an interface language, and then click [OK].The default interface language is English.
D Click [Quick Install].The software license agreement appears in the [License Agreement] dialog box.
E After reading the agreement, click [I accept the agreement.], and then click[Next >].
F Select the machine model you want to use in the [Select Printer] dialog box.For network connection via TCP/IP, select the machine whose IP address isdisplayed in [Connect To].For parallel connection, select the machine whose printer port is displayed in[Connect To].
G Click [Install].The printer driver installation starts.

Preparing the Machine
24
1
H Click [Finish].A message about restarting the computer appears. Restart the computer tocomplete installation.
I Click [Exit] in the first dialog box of the installer, and then take out the CD-ROM.
Note❒ To stop installation of the selected software, click [Cancel] before installa-
tion is complete.❒ Auto Run may not work with certain operating system settings. If this hap-
pens, launch “Setup.exe” on the CD-ROM root directory.❒ Select a machine to whose IP address is displayed in [Connect To] to install
SmartDeviceMonitor for Client when using TCP/IP.
ReferenceQuick Install is not available unless bidirectional communication betweenthe machine and computer is enabled via parallel connection. See p.56 “IfBidirectional Communication Is Disabled” for details about bidirectionalcommunication between the machine and computer.
Installing the Printer Driver
25
1
Installing the Printer Driver for the Selected Port
Using the SmartDeviceMonitor for Client Port
Important❒ To install SmartDeviceMonitor for Client under Windows 2000 / XP Profes-
sional, Windows Server 2003, and Windows NT 4.0, you must have an ac-count that has Manage Printers permission. Log on as an Administrator.
❒ Install SmartDeviceMonitor for Client before installing the printer driverwhen using the SmartDeviceMonitor for Client port.
Installing SmartDeviceMonitor for Client
A Quit all applications currently running.
B Insert the CD-ROM into the CD-ROM drive.The installer starts.
C Select an interface language, and then click [OK].The default interface language is English.
D Click [DeskTopBinder - SmartDeviceMonitor for Client].
E Select an interface language, and then click [Next >].The default interface language is English.
F The message to quit all other applications appears. Quit all applications,and then click [Next >].
G The software license agreement appears in the [License Agreement] dialogbox. After reading through its contents, click [Yes].
H Click [Full install] or [Custom Install].[Full install] installs all required applications: DeskTopBinder Lite and Smart-DeviceMonitor for Client.[Custom Install] installs selected applications.
I Follow the instructions on the display and click [Next >] to proceed next step.
J After the installation is completed, select one of the options to restart thecomputer either now or later, and click [Complete]. Restart the computer to complete installation.
Note❒ To stop installation of the selected software, click [Cancel] before installa-
tion is complete.❒ Auto Run may not work with certain operating system settings. If this hap-
pens, launch “Setup.exe” on the CD-ROM root directory.
Preparing the Machine
26
1
Changing the Port Settings for SmartDeviceMonitor for Client
Follow the procedure below to change the SmartDeviceMonitor for Client set-tings, such as TCP/IP timeout, recovery/parallel printing, and printer groups.
Windows 95 / 98:
A Open the [Printers] window from the [Start] menu.
B In the [Printers] window, click the icon of the printer you want to use. Onthe [File] menu, click [Properties].
C Click the [Details] tab, and then click [Port Settings].The [Port Settings] dialog box appears.
Windows 2000 / Windows NT 4.0:
A Open [Printers] window from [Start] menu.
B In the [Printers] window, click the icon of the printer you want to use. Onthe [File] menu, click [Properties].
C On the [Ports] tab, click [Configure Port].The [Configuration] dialog box appears.
Windows XP, Windows Server 2003:
A Open the [Printers and Faxes] window from the [Start] menu.The [Printers and Faxes] window appears.
B Click the icon of the machine you want to use. On the [File] menu, click[Properties]. The printer properties appear.
C Click the [Ports] tab, and then click [Configure Port].The [Port Configuration] dialog box appears.
Note❒ For TCP/IP, timeout setting can be configured.❒ User, proxy, and timeout settings can be configured for IPP.❒ If no settings on the [Recovery/Parallel Printing] tab are available, follow the
procedure below.A Click [Cancel] to close the [Port Configuration:] dialog box.B Start SmartDeviceMonitor for Client, and then right-click the SmartDe-
viceMonitor for Client icon on the tasktray.C Point to [Properties], and then click [Extended Features Settings].D Select the [Set Recovery/Parallel Printing for each port] check box.E Click [OK] to close the [Extended Features Settings] dialog box.
ReferenceFor information about these settings, see “Using SmartDeviceMonitor forClient”, Network Guide, or SmartDeviceMonitor for Client Help.
Installing the Printer Driver
27
1
Installing the PCL or RPCS Printer Driver (TCP/IP)
Important❒ To install this printer driver under Windows 2000 / XP Professional, Win-
dows Server 2003, and Windows NT 4.0, you must have an account that hasManage Printers permission. Log on as an Administrators or Power Usersgroup member.
A Quit all applications currently running.
B Insert the CD-ROM into the CD-ROM drive.The installer starts.
C Select an interface language, and then click [OK].The default interface language is English.
D Click [PCL/RPCS Printer Drivers].
E The software license agreement appears in the [License Agreement] dialog box.After reading the agreement, click [I accept the agreement.], and then click [Next >].
F Select the printer driver you want to use in the [Select Program] dialog box.You can select several printer drivers.
G Click [Next >].
H Select the machine model you want to use.The printer name can be changed in the [Change settings for 'Printer Name'] box.
I Double-click the printer name to display the printer settings.The details shown in [Comment:], [Driver:], and [Port:] vary depending on theoperating system, printer model, and port.
J Click [Port:], and then click [Add].
K Click [SmartDeviceMonitor], and then click [OK].
L Click [TCP/IP], and then click [Search].A list of printers using TCP/IP appears.
M Select the printer you want to use, and then click [OK].Only printers that respond to a broadcast from the computer appear. To usea machine not listed here, click [Specify Address], and then enter the IP addressor host name of the machine.
N Check that the port of the selected printer is displayed in [Port:].
Preparing the Machine
28
1
O Set a user code, if necessary. Up to 8 numeric characters can be entered. No alphabetic character or symbolcan be entered.
P Select the [Default Printer] check box to configure the printer as default.
Q Click [Continue].Installation starts.
R After the installation is completed, select one of the options to restart thecomputer either now or later, and then click [Finish].Restart the computer to complete installation.
Note❒ Setting a user code allows a SmartDeviceMonitor for Admin user to dis-
play and check statistics about the number of sheets which each userprints. For details, see SmartDeviceMonitor for Admin Help.
❒ Auto Run may not work with certain operating system settings. If this hap-pens, launch “Setup.exe” on the CD-ROM root directory.
❒ Under Windows 95 / 98 / Me, you cannot add an IP address partially sim-ilar to the one already used. For example, if “192.168.0.2” is in use,“192.168.0.2xx” cannot be used. Similarly, if “192.168.0.20” is in use,“192.168.0.2” cannot be used.
ReferenceA message appears if there is a newer version of the printer driver alreadyinstalled. If there is, you cannot install the printer driver using Auto Run.If you still want to install the printer driver, use [Add Printer]. See “When aMessage Appears during Installation of the Printer Driver”, TroubleShooting.

Installing the Printer Driver
29
1
Installing the PCL or RPCS Printer Driver (IPP)
Important❒ To install printer driver under Windows 2000 / XP Professional, Windows
Server 2003, and Windows NT 4.0, you must have an account that has Man-age Printers permission. Log on as an Administrators or Power Users groupmember.
A Quit all applications currently running.
B Insert the CD-ROM into the CD-ROM drive.The installer starts.
C Select an interface language, and then click [OK].The default interface language is English.
D Click [PCL/RPCS Printer Drivers].
E The software license agreement appears in the [License Agreement] dialog box.After reading the agreement, click [I accept the agreement.], and then click [Next >].
F Select a printer driver you want to use in the [Select Program] dialog box.You can select several printer drivers.
G Select the machine model you want to use.The printer name can be changed in the [Change settings for 'Printer Name'] box.
H Double-click the printer name to display the printer settings.The details shown in [Comment:], [Driver:], and [Port:] vary depending on theoperating system, printer model, and port.
I Click [Port:], and then click [Add].
J Click [SmartDeviceMonitor], and then click [OK].
K Click [IPP].
L In the [Printer URL] box, enter “http://printer's address/printer” as the print-er's address.If the server authentication is issued, to enable SSL (a protocol for encryptedcommunication), enter “https://printer's address/printer” (Internet Explor-er 5.01, or a higher version must be installed).(example IP address: 192.168.15.16)http://192.168.15.16/printer
https://192.168.15.16/printer
You can enter “http://printer's address/ipp” as the printer's address.
Preparing the Machine
30
1
M Enter a name for identifying the printer in [IPP Port Name]. Use a name dif-ferent from the one of any existing port.If a name is not specified here, the address entered in the [Printer URL] box be-comes the IPP port name.
N Click [Detailed Settings] to make necessary settings.For information about the settings, see SmartDeviceMonitor for Client Help.
O Click [OK].
P Check that the port of the selected printer is displayed in [Port:].
Q Set a user code, if necessary. Up to 8 numeric characters can be entered. No alphabetic characters or sym-bols can be entered.
R Select the [Default Printer] check box to configure the printer as default.
S Click [Continue].Installation starts.
T After the installation is completed, select one of the options to restart thecomputer either now or later, and then click [Finish].Restart the computer to complete installation.
Note❒ To stop installation of the selected software, click [Cancel] before installa-
tion is complete.❒ Auto Run may not work with certain operating system settings. In that
case, launch “Setup.exe” on the CD-ROM root directory.❒ Setting a user code allows a SmartDeviceMonitor for Admin user to dis-
play and check the number of sheets each user prints. For details, seeSmartDeviceMonitor for Admin Help.
ReferenceA message appears if there is a newer version of the printer driver alreadyinstalled. If there is, you cannot install the printer driver using Auto Run.If you still want to install the printer driver, use [Add Printer]. See “When aMessage Appears during Installation of the Printer Driver”, TroubleShooting.
Installing the Printer Driver
31
1
Using the Standard TCP/IP Port
This describes how to install the PCL or RPCS printer driver using the TCP/IPport.
Important❒ To install this printer driver under Windows 2000 / XP Professional, and
Windows Server 2003, you must have an account that has Manage Printerspermission. Log on as an Administrators or Power Users group member.
❒ In an IPv6 environment, you cannot use the Standard TCP/IP Port. Use theSmartDeviceMonitor for Client port.
Installing the PCL or RPCS Printer Driver
A Quit all applications currently running.
B Insert the CD-ROM into the CD-ROM drive.The installer starts.
C Select an interface language, and then click [OK].The default interface language is English.
D Click [PCL/RPCS Printer Drivers].
E The software license agreement appears in the [License Agreement] dialog box.After reading the agreement, click [I accept the agreement.], and then click [Next >].
F Select a printer driver you want to use in the [Select Program] dialog box.You can select several printer drivers.
G Click [Next >].
H Select the machine model you want to use.The printer name can be changed in the [Change settings for 'Printer Name'] box.
I Double-click the printer name to display the printer settings.The details shown in [Comment:], [Driver:], and [Port:] vary depending on theoperating system, printer model, and port.
J Click [Port:], and then click [Add].
K Click [Standard TCP/IP Port], and then click [OK].Configure the Standard TCP/IP port settings, and then see Windows Help if[Standard TCP/IP Port] does not appear.
L Click [Next >] in the [Add Standard TCP/IP Printer Port Wizard] dialog box.
Preparing the Machine
32
1
M Enter the printer name or IP address in the [Printer Name or IP Address] box.The [Port Name] text box automatically obtains a port name. Change this nameif necessary.When the device selection appears, select “RICOH NetworkPrinter Driver CModel”.
N Click [Next >].
O Click [Finish] in the [Add Standard TCP/IP Printer Port Wizard] dialog box.The installation start dialog box reappears.
P Check that the port of the selected printer is displayed in [Port:].
Q Configure the default printer as necessary.
R Click [Continue].The printer driver installation starts.
S After the installation is completed, select one of the options to restart thecomputer either now or later, and then click [Finish].Restart the computer to complete installation.
Note❒ To stop installation of the selected software, click [Cancel] before installa-
tion is complete.❒ Auto Run may not work with certain operating system settings. In that
case, launch “Setup.exe” on the CD-ROM root directory.
ReferenceA message appears if there is a newer version of the printer driver alreadyinstalled. If there is, you cannot install the printer driver using Auto Run.If you still want to install the printer driver, use [Add Printer]. See “When aMessage Appears during Installation of the Printer Driver”, TroubleShooting.

Installing the Printer Driver
33
1
Using the LPR Port
This describes how to install the PCL or RPCS printer driver using the LPR port.
Important❒ To install this printer driver under Windows 2000 / XP Professional, Win-
dows Server 2003, and Windows NT 4.0, you must have an account that hasManage Printers permission. Log on as an Administrators or Power Usersgroup member.
Installing the PCL or RPCS Printer Driver
A Quit all applications currently running.
B Insert the CD-ROM into the CD-ROM drive.The installer starts.
C Select an interface language, and then click [OK].The default interface language is English.
D Click [PCL/RPCS Printer Drivers].
E The software license agreement appears in the [License Agreement] dialog box.After reading the agreement, click [I accept the agreement.], and then click [Next >].
F Select a printer driver you want to use in the [Select Program] dialog box.You can select several printer drivers.
G Select the machine model you want to use.The printer name can be changed in the [Change settings for 'Printer Name'] box.
H Click [Next >].
I Double-click the printer name to display the printer settings.The details shown in [Comment:], [Driver:], and [Port:] vary depending on theoperating system, printer model, and port.
J Click [Port:], and then click [Add].
K Click [LPR Port], and then click [OK].If [LPR Port] does not appear, see Windows Help and install it.
L Enter the printer's IP address in the [Name or address of server providing lpd]box.
M Enter “lp” in the [Name of printer or print queue on that server] box, and then click[OK].The port is added.
Preparing the Machine
34
1
N Check that the port of the selected printer is displayed in [Port:].
O Configure the default printer as necessary.
P Click [Continue].The printer driver installation starts.
Q After the installation is completed, select one of the options to restart thecomputer either now or later, and then click [Finish].Restart the computer to complete installation.
Note❒ To stop installation of the selected software, click [Cancel] before installa-
tion is complete.❒ Auto Run may not work with certain operating system settings. In that
case, launch “Setup.exe” on the CD-ROM root directory.
ReferenceA message appears if there is a newer version of the printer driver alreadyinstalled. If there is, you cannot install the printer driver using Auto Run.If you still want to install the printer driver, use [Add Printer]. See “When aMessage Appears during Installation of the Printer Driver”, TroubleShooting.
Using as a Windows Network Printer
35
1
Using as a Windows Network Printer
This describes how to install the PCL or RPCS printer driver when using theprinter as a Windows network printer.To use the print server, install the printer driver by selecting “Network printerserver”, and then select the Windows 2000 / XP, Windows Server 2003, or Win-dows NT 4.0 shared printer.This section assumes that the client has already been configured to communicatewith a Windows 2000 / XP, Windows Server 2003, or Windows NT 4.0 printserver. Do not begin the following procedure before the client is set up and con-figured correctly.
Important❒ To install the printer driver under Windows 2000 / XP Professional, Win-
dows Server 2003, and Windows NT 4.0, you must have an account that hasManage Printers permission. Log on as an Administrators or Power Usersgroup member.
❒ If you print with a print server connected to the printer using the SmartDe-viceMonitor port, Recovery Printing and Parallel Printing cannot be usedfrom the client.
❒ If you print with a Windows XP or Windows Server 2003 print server, notifi-cation functions of SmartDeviceMonitor may not be used with the client.
❒ If you print with a Windows NT 4.0 print server, install the printer driver be-fore you connect the print server to the printer.
Installing the PCL or RPCS Printer Driver
A Quit all applications currently running.
B Insert the CD-ROM into the CD-ROM drive.The installer starts.
C Select an interface language, and then click [OK].The default interface language is English.
D Click [PCL/RPCS Printer Drivers].
E The software license agreement appears in the [License Agreement] dialog box.After reading the agreement, click [I accept the agreement.], and then click [Next >].
F Select the printer driver you want to use in the [Select Program] dialog box.You can select several printer drivers.
G Click [Next >].

Preparing the Machine
36
1
H Select the [Printer Name] check box to select the printer models you want to use.The printer name can be changed in the [Change settings for 'Printer Name'] box.
I Double-click the printer name to display the printer settings.The details shown in [Comment:], [Driver:], and [Port:] vary depending on theoperating system, printer model, and port.
J Click [Port:], and then click [Add].
K Click [Network Printer], and then click [OK].
L Double-click the computer name you want to use as a print server in the[Browse for Printer] window.
M Select the printer you want to use, and then click [OK].
N Check that the port of the selected printer is displayed in [Port:].
O Configure the user code as necessary.For an RPCS printer driver, a user code can be set after the printer driver in-stallation. For information about user code, see the printer driver Help.
P Select the [Default Printer] check box to configure the printer as default.
Q Click [Continue].The printer driver installation starts.
R After the installation is completed, select one of the options to restart thecomputer either now or later, and then click [Finish].Restart the computer to complete installation.
Note❒ To stop installation of the selected software, click [Cancel] before installa-
tion is complete.❒ Auto Run may not work with certain operating system settings. In that
case, launch “Setup.exe” on the CD-ROM root directory.
ReferenceA message appears if there is a newer version of the printer driver alreadyinstalled. If there is, you cannot install the printer driver using Auto Run.If you still want to install the printer driver, use [Add Printer]. See “When aMessage Appears during Installation of the Printer Driver”, TroubleShooting.

Using as a NetWare Print Server / Remote Printer
37
1
Using as a NetWare Print Server / Remote Printer
This describes how to set up the Windows computer used as the NetWare client.
Important❒ To install this printer driver under Windows 2000 / XP Professional, Win-
dows Server 2003, and Windows NT 4.0, you must have an account that hasManage Printers permission. Log on as an Administrators or Power Usersgroup member.
❒ In an IPv6 environment, Netware servers cannot be used.The following explanation assumes NetWare Client is installed on the clientcomputer and the NetWare server environment is correctly set up. Install all nec-essary client applications before following this procedure.Set up the printer driver while logging on to the NetWare file server.The following values are used in the example:• Operating system: Windows 98• NetWare version: 4.1• File server name: CAREE• Queue name: R-QUEUE
A Insert the CD-ROM into the CD-ROM drive.The installer starts.Auto Run may not work with certain operating system settings. In that case,launch “Setup.exe” on the CD-ROM root directory.
B Select an interface language, and then click [OK].The default interface language is English.
C Click [PCL/RPCS Printer Drivers].
D The software license agreement appears in the [License Agreement] dialog box.After reading the agreement, click [I accept the agreement.], and then click [Next >].
E Select the printer driver you want to use in the [Select Program] dialog box.You can select several printer drivers.
F Click [Next >].
G Select the [Printer Name] check box to select the printer model you want to use.The printer name can be changed in the [Change settings for 'Printer Name'] box.

Preparing the Machine
38
1
H Double-click the printer name to display the printer settings.The details shown in [Comment:], [Driver:], and [Port:] vary depending on theoperating system, printer model, and port.
I Click [Port:], and then click [Add].
J Click [Network Printer], and then click [OK].
K Double-click the name of the NetWare file server on the network tree.The created queue is displayed.
L Select the print queue, and then click [OK].
M Check that the port of the selected printer is displayed in [Port:].
N Click [Continue].The printer driver installation starts.
O Click [Finish] in the [Select Program] dialog box.
P After the installation is completed, select one of the options to restart thecomputer either now or later, and then click [Finish].Restart the computer to complete installation.
Q After restarting the computer, launch the [Printers] window, and then openthe printer properties.Under Windows XP or Windows Server 2003, open the printer propertiesfrom the [Printers and Faxes] window.
R On the [Printer Settings] tab, clear the [Form Feed] and [Enable Banner] checkboxes.Under Windows 2000 / XP, Windows Server 2003, or Windows NT 4.0, clickthe [NetWare setting] tab.Do not select these check boxes since they are automatically selected by theprinter driver. If you select the check boxes, the printer may not print correctly.
S Click [OK] to close the printer properties dialog box.
Note❒ To stop installation of the selected software, click [Cancel] before installa-
tion is complete.❒ The protocol is set to inactive as default. Enable it using Web Image Mon-
itor or Telnet.
Using as a NetWare Print Server / Remote Printer
39
1
Form Feed
Do not use NetWare to configure form feed. Form feed is controlled by the print-er driver on Windows. If NetWare form feed is configured, the printer may notprint properly.Follow the procedure below to disable form feed according to the operating sys-tem used:• Under Windows 95 / 98 / Me, clear the [Form feed] check box on the [Printer
Settings] tab in the printer properties dialog box.• Under Windows 2000 / XP, Windows Server 2003, or Windows NT 4.0, clear
the [Form feed] check box on the [NetWare Settings] tab in the printer propertiesdialog box.
Banner Page
Do not use NetWare to configure a banner page.Follow the procedure below to disable banner pages according to the operatingsystem used:• Under Windows 95 / 98 / Me, clear the [Enable banner] check box on the [Print-
er Settings] tab in the printer properties dialog box.• Under Windows 2000 / XP, Windows Server 2003, or Windows NT 4.0, clear
the [Enable banner] check box on the [NetWare Settings] tab in the printer prop-erties dialog box.
Printing after Resetting the Printer
Printer to print server connection requires 30 - 40 seconds to resume after theprinter is reset. During this period, jobs may be accepted (depending on Net-Ware specifications) but not printed.To print after resetting the printer as the remote printer, check on the print serverthat the remote printer is disconnected, or wait for two minutes before trying toprint.

Preparing the Machine
40
1
Installing the Printer Driver Using USB
This section explains how to install printer drivers using USB.Before installing, check that only the operating system is running on the compu-ter and no print jobs are in progress.The printer drivers can be installed from the supplied CD-ROM provided withthis machine.
Windows Me - USB
Important❒ Installation via USB is not possible under Windows 95 / 98. Upgrade to Win-
dows Me or later.❒ Download USB Printing Support for Windows Me from the supplier's Web site.When USB is first used, the plug and play function starts and the [New HardwareFound], [Device Driver Wizard], or [Add New Hardware Wizard] dialog box appears, de-pending on the operating system.If the printer driver has already been installed, plug and play is enabled, and theicon of the printer connected to the “USB” port is added to the [Printers] window.
A Download USB Printing Support from the supplier's Web site.Use a search to find the model name, and then download USB Printing Sup-port from the supplier's Web site.Save it where you can locate it easily.
B Connect the machine to the computer using the USB cable.Connect the USB cable firmly.
C In the Found New Hardware Wizard display, click [Search for a suitable driverfor my device [recommended]], and then click [Next >].
D Select the [Specify a location:] check box, and then click [Browse...].The [Browse for Folder] dialog box appears.
E Specify the location where USB Printing Support is located, and then click[Next >].
F Check the location, and then click [Next >].USB Printing Support is installed.
G Click [Finish].If the printer driver has already been installed, plug and play is enabled, andthe icon of the printer connected to the “USB001” port is added to the [Printers]window.

Installing the Printer Driver Using USB
41
1
H Insert the printer driver. Click [Search for the best driver for your device. [Recom-mended]], and then click [Next >].
I Select the [Specify a location:] check box, and then click [Browse...].The [Browse for Folder] dialog box appears.
J Insert the CD-ROM into the CD-ROM drive.
Note❒ When Auto Run starts, click [Exit].❒ To disable Auto Run, press the {Shift} key when inserting the CD-ROM
into the drive and keep it pressed until the computer finishes reading fromthe CD-ROM.
K Specify the location where the source files of the printer driver are stored,and then click [Next >].If the CD-ROM drive is D, the source files of the printer driver are stored inthe following location:• RPCS
D:\DRIVERS\RPCS\WIN9X_ME\(Language)\DISK1• PCL 5c (for color printing)
D:\DRIVERS\PCL5C\WIN9X_ME\(Language)\DISK1• PCL 5e (for B & W printing)
D:\DRIVERS\PCL5E\WIN9X_ME\(Language)\DISK1• PCL 6
D:\DRIVERS\PCL6\WIN9X_ME\(Language)\DISK1• PostScript 3 (“Scanner Driver and Utilities” CD-ROM)
D:\DRIVERS\PS\WIN9X_ME\(Language)\DISK1
L Check the location, and then click [Next >].Add Printer Wizard starts.
M Click [Finish].Installation is complete. If installation is successful, the icon of the printerconnected to the “USB001” port is added to the [Printers] window.
Note❒ The number after “USB” varies depending on the number of printers con-
nected.❒ It is not necessary to reinstall USB Printing Support when connecting a dif-
ferent machine via USB interface when USB Printing Support is installed.❒ After installing USB Printing Support, if the printer driver is not installed,
follow the plug-and-play instructions of the printer.

Preparing the Machine
42
1
Windows 2000 - USB
Important❒ Installing a printer driver requires Administrator permission. Log on using
an account that has Administrator permission.When USB is first used, Found New Hardware Wizard starts, and USB PrintingSupport is installed automatically.If the printer driver has already been installed, plug and play is enabled, and theicon of the printer connected to the “USB” port is added to the [Printers] window.If the printer driver is not installed, follow the plug-and-play instructions of theprinter to install it from the supplied CD-ROM.
A Connect the machine to the computer using the USB cable.Connect the USB cable firmly.
B In the Found New Hardware Wizard display, click [Search for a suitable driverfor my device [recommended]], and then click [Next >].
C Select the [Specify location] check box, and then click [Next >].
D Insert the CD-ROM into the CD-ROM drive.When Auto Run starts, click [Exit].To disable Auto Run, press the left {Shift} key when inserting the CD-ROMinto the drive and keep it pressed until the computer finishes reading fromthe CD-ROM.
E Specify the location where the source files of the printer driver is stored.If the CD-ROM drive is D, the source files of the printer driver are stored inthe following location:• RPCS
D:\DRIVERS\RPCS\WIN2K_XP\(Language)\DISK1• PCL 5c (for color printing)
D:\DRIVERS\PCL5C\WIN2K_XP\(Language)\DISK1• PCL 5e (for B & W printing)
D:\DRIVERS\PCL5E\WIN2K_XP\(Language)\DISK1• PCL 6
D:\DRIVERS\PCL6\WIN2K_XP\(Language)\DISK1• PostScript 3 (“Scanner Driver and Utilities” CD-ROM)
D:\DRIVERS\PS\WIN2K_XP\(Language)\DISK1
F Check the printer driver location, and then click [OK].
G Click [Next >].
Installing the Printer Driver Using USB
43
1
H Click [Finish].If the printer driver has already been installed, plug and play is enabled, andthe icon of the printer connected to the “USB001” port is added to the [Printers]window.
Note❒ The number after “USB” varies depending on the number of printers con-
nected.
Windows XP, Windows Server 2003 - USB
Important❒ Installing a printer driver requires Administrators permission. Log on using
an account that has Administrators permission.When USB is first used, Found New Hardware Wizard starts, and USB PrintingSupport is installed automatically.If the printer driver has already been installed, plug and play is enabled, and theicon of the printer connected to the “USB” port is added to the [Printers] window.The printer drivers can be installed from the supplied CD-ROM provided withthis machine.If the printer driver is not installed, follow the plug-and-play instructions of theprinter to install it from the supplied CD-ROM.
A Connect the machine to the computer using the USB cable.Connect the USB cable firmly.
B In the Found New Hardware Wizard display, click [Search for a suitable driverfor my device [recommended]], and then click [Next >].
C Insert the CD-ROM into the CD-ROM drive.If Auto Run starts, click [Cancel], and then [Exit].To disable Auto Run, press the left {Shift} key when inserting the CD-ROMinto the drive and keep it pressed until the computer finishes reading fromthe CD-ROM.
Preparing the Machine
44
1
D Select the [Include this location in the search] check box under [Search for the bestdriver in these location], and then click [Browse] to select the printer driver lo-cation.If the CD-ROM drive is D, the source files of the printer driver are stored inthe following location:• RPCS
D:\DRIVERS\RPCS\WIN2K_XP\(Language)\DISK1• PCL 5c (for color printing)
D:\DRIVERS\PCL5C\WIN2K_XP\(Language)\DISK1• PCL 5e (for B & W printing)
D:\DRIVERS\PCL5E\WIN2K_XP\(Language)\DISK1• PCL 6
D:\DRIVERS\PCL6\WIN2K_XP\(Language)\DISK1• PostScript 3 (“Scanner Driver and Utilities” CD-ROM)
D:\DRIVERS\PS\WIN2K_XP\(Language)\DISK1
E Check the printer driver location, and then click [Next >].
F Click [Continue].
G Click [Finish].If installation is successful, the icon of the printer connected to the “USB001”port is added to the [Printers and Faxes] window.
Note❒ The number after “USB” varies depending on the number of printers con-
nected.

Printing with Parallel Connection
45
1
Printing with Parallel Connection
This describes how to install the PCL or RPCS printer driver when using the par-allel port.To use a machine connected using a parallel interface, click [LPT1] when install-ing the printer driver.
Important❒ To install this printer driver under Windows 2000 / XP Professional, Win-
dows Server 2003, and Windows NT 4.0, you must have an account that hasManage Printers permission. Log on as an Administrators or Power Usersgroup member.
Installing the PCL or RPCS Printer Driver
A Quit all applications currently running.
B Insert the CD-ROM into the CD-ROM drive.The installer starts.
C Select an interface language, and then click [OK].The default interface language is English.
D Click [PCL/RPCS Printer Drivers].
E The software license agreement appears in the [License Agreement] dialog box.After reading the agreement, click [I accept the agreement.], and then click [Next >].
F Select the printer driver you want to use in the [Select Program] dialog box. You can select several printer drivers.
G Click [Next >].
H Select the [Printer Name] check box to select the printer model you want touse.The printer name can be changed in the [Change settings for 'Printer Name'] box.
I Double-click the printer name to display the printer settings.The details shown in [Comment:], [Driver:], and [Port:] vary depending on theoperating system, printer model, and port.
J Check that [LPT1:] is shown in [Port:].
K Select the [Default Printer] check box to configure the printer as default.
L Click [Finish].The printer driver installation starts.
Preparing the Machine
46
1
M After the installation is completed, select one of the options to restart thecomputer either now or later, and then click [Finish].Restart the computer to complete installation.
Note❒ To stop installation of the selected software, click [Cancel] before installa-
tion is complete.❒ Auto Run may not work with certain operating system settings. In that
case, launch “Setup.exe” on the CD-ROM root directory.
ReferenceA message appears if there is a newer version of the printer driver alreadyinstalled. If there is, you cannot install the printer driver using Auto Run.If you still want to install the printer driver, use [Add Printer]. See “When aMessage Appears during Installation of the Printer Driver”, TroubleShooting.

Installing the Printer Driver Using IEEE 1394 (SCSI print)
47
1
Installing the Printer Driver Using IEEE 1394 (SCSI print)
The printer drivers can be installed from the supplied CD-ROM provided withthis machine.
Important❒ Quit all applications currently running, and do not print during installation.❒ Do not connect IEEE 1394 or USB devices to the computer or turn on another
printers during installation.❒ Before uninstalling the printer driver, check that the IEEE 1394 interface cable
is disconnected from the computer.❒ SCSI print must be set to “active” from the control panel. For details, see Net-
work Guide.
Note❒ This machine can receive print data from one computer at a time only. A mes-
sage may appear if print jobs from different computers collide.❒ If jobs collide, the first received job is printed first.❒ When the printer driver is properly installed, connecting or disconnecting the
optional IEEE 1394 cable causes the printer icon to change.
Windows 2000
This describes how to install the printer driver to the computer with Windows2000 installed, using IEEE 1394 (SCSI print).
Important❒ If [Found New Hardware Wizard] appears every time the computer is started or
the cable is connected, disable the device. To install another printer driver af-ter setting the “1394_00n” port, click [1394_00] as a port during the printerdriver installation.
❒ Installing this printer driver requires Administrators permission. Log on us-ing an account that has Administrators permission.
❒ The optional 1394 interface unit can be used only with Service Pack 1 (SP1) orhigher.
A Connect the machine to the computer using the IEEE 1394 interface cable.
B Click [Next >] in the [Found New Hardware Wizard] dialog box.
CWhen the message “This wizard will complete the installation for this De-vice: Unknown” appears, click [Specify a location], and then click [Next >].
DWhen the message “Locate Driver Files” appears, select the [Optional searchlocations.] check box, and then click [Specify a location], and then click [Next >].
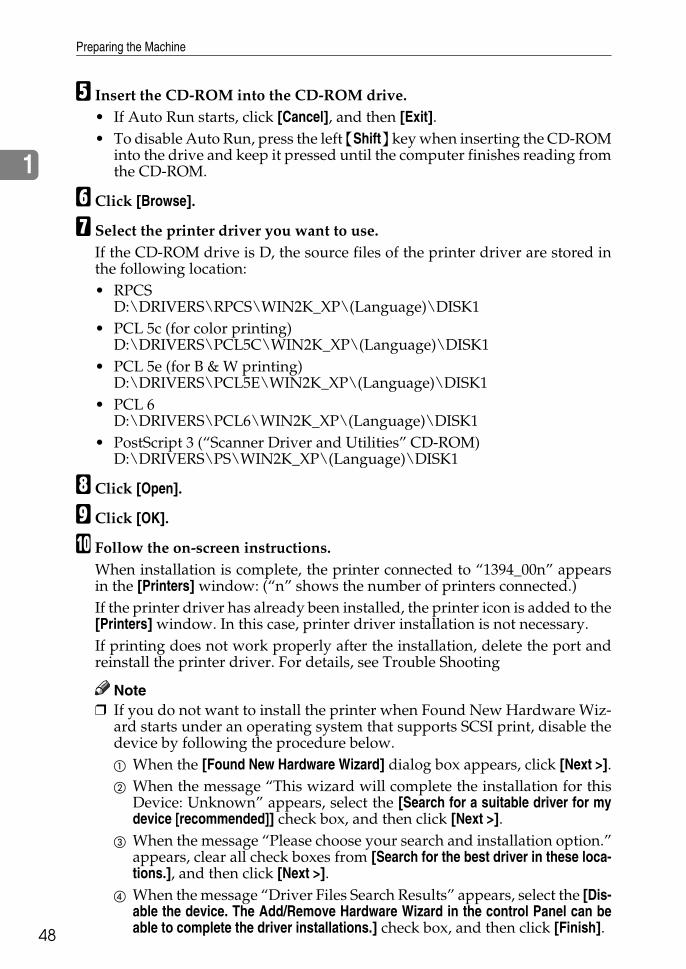
Preparing the Machine
48
1
E Insert the CD-ROM into the CD-ROM drive.• If Auto Run starts, click [Cancel], and then [Exit].• To disable Auto Run, press the left {Shift} key when inserting the CD-ROM
into the drive and keep it pressed until the computer finishes reading fromthe CD-ROM.
F Click [Browse].
G Select the printer driver you want to use.If the CD-ROM drive is D, the source files of the printer driver are stored inthe following location:• RPCS
D:\DRIVERS\RPCS\WIN2K_XP\(Language)\DISK1• PCL 5c (for color printing)
D:\DRIVERS\PCL5C\WIN2K_XP\(Language)\DISK1• PCL 5e (for B & W printing)
D:\DRIVERS\PCL5E\WIN2K_XP\(Language)\DISK1• PCL 6
D:\DRIVERS\PCL6\WIN2K_XP\(Language)\DISK1• PostScript 3 (“Scanner Driver and Utilities” CD-ROM)
D:\DRIVERS\PS\WIN2K_XP\(Language)\DISK1
H Click [Open].
I Click [OK].
J Follow the on-screen instructions.When installation is complete, the printer connected to “1394_00n” appearsin the [Printers] window: (“n” shows the number of printers connected.)If the printer driver has already been installed, the printer icon is added to the[Printers] window. In this case, printer driver installation is not necessary.If printing does not work properly after the installation, delete the port andreinstall the printer driver. For details, see Trouble Shooting
Note❒ If you do not want to install the printer when Found New Hardware Wiz-
ard starts under an operating system that supports SCSI print, disable thedevice by following the procedure below.A When the [Found New Hardware Wizard] dialog box appears, click [Next >].B When the message “This wizard will complete the installation for this
Device: Unknown” appears, select the [Search for a suitable driver for mydevice [recommended]] check box, and then click [Next >].
C When the message “Please choose your search and installation option.”appears, clear all check boxes from [Search for the best driver in these loca-tions.], and then click [Next >].
D When the message “Driver Files Search Results” appears, select the [Dis-able the device. The Add/Remove Hardware Wizard in the control Panel can beable to complete the driver installations.] check box, and then click [Finish].
Installing the Printer Driver Using IEEE 1394 (SCSI print)
49
1
Windows XP, Windows Server 2003
This describes how to install the printer driver to the computer with WindowsXP or Windows Server 2000 installed, using IEEE 1394 (SCSI print).
Important❒ SCSI print must be set to “active” from the control panel. For details, see Net-
work Guide.❒ Installing this printer driver requires Administrators permission. Log on us-
ing an account that has Administrators permission.
A Connect the machine to the computer using the IEEE 1394 interface cable.When the [Found New Hardware Wizard] dialog box appears, check that [This wiz-ard helps you install software for: (Unknown)] is displayed.
B Select the [Install from a list on specific location (Advanced)] check box, and thenclick [Next >].
CWhen the message “Please choose your search and installation option.” ap-pears, select the [Search for the best driver in these locations.] check box, selectthe [Include this location in the search:] check box, and then select the [Includethis location in the search:] check box.
D Insert the CD-ROM into the CD-ROM drive.If Auto Run starts, click [Cancel], and then [Exit].To disable Auto Run, press the left {Shift} key when inserting the CD-ROMinto the drive and keep it pressed until the computer finishes reading fromthe CD-ROM.
E Specify the location where the source files of the printer driver is stored,and then click [Next >].If the CD-ROM drive is D, the source files of the printer driver are stored inthe following location:• RPCS
D:\DRIVERS\RPCS\WIN2K_XP\(Language)\DISK1• PCL 5c (for color printing)
D:\DRIVERS\PCL5C\WIN2K_XP\(Language)\DISK1• PCL 5e (for B & W printing)
D:\DRIVERS\PCL5E\WIN2K_XP\(Language)\DISK1• PCL 6
D:\DRIVERS\PCL6\WIN2K_XP\(Language)\DISK1• PostScript 3 (“Scanner Driver and Utilities” CD-ROM)
D:\DRIVERS\PS\WIN2K_XP\(Language)\DISK1When installation is complete, the printer connected to “1394_00n” appears inthe [Printers and Faxes] window. (“n” shows the number of printers connected.)

Preparing the Machine
50
1
F Follow the on-screen instructions.If the printer driver has already been installed, the printer icon is added to the[Printers and Faxes] window. In this case, printer driver installation is not nec-essary.Even if the printer driver is already installed, the message “Found New Hard-ware Wizard” may appear when the machine is connected to the computerusing the IEEE 1394 interface cable for the first time. In that case, install theprinter driver.
Note❒ This machine can receive print data from one computer at a time only. If a
print job from a computer collides with other data, a message may appearon the computer.
❒ To install another printer driver after setting the “1394_00n” port, click[1394_00] as a port during the printer driver installation.
❒ When the printer driver is properly installed, connecting or disconnectingthe optional IEEE 1394 cable causes the printer icon to change.
❒ If printing does not work properly after the installation, delete the port andreinstall the printer driver. For details, see Trouble Shooting.
❒ If you do not want to install the printer when Found New Hardware Wiz-ard starts under an operating system that supports SCSI print, disable thedevice by following the procedure below:A When the [Found New Hardware Wizard] dialog box appears, check that
[This wizard helps you install software for: Unknown] is displayed, select the[Install from a list on specific location (Advanced)] check box, and then click[Next >].
B When the message “Please choose your search and installation option.”appears, clear all check boxes from [Search for the best driver in these loca-tions.], and then click [Next >].
C When the message “The wizard could not find the software on yourcomputer for..” appears, click [OK].
D When the message “Cannot Install this Hardware” appears, select the[Don't prompt again to install the software] check box, and then click [Finish].
Printing with Bluetooth Connection
51
1
Printing with Bluetooth Connection
This describes how to print using with Bluetooth devices.
Supported Profiles
Refer the following supported profiles for Bluetooth connection.
❖ SPP, HCRP• A maximum of two Bluetooth adaptor or Bluetooth-equipped computers
can be connected at the same time using the Bluetooth interface: one bySPP, one by HCRP.
• When connecting more than one Bluetooth adaptor or Bluetooth-equippedcomputer at the same time, the first device that establishes connection is se-lected. When selecting the connection between the other devices, cancelthe first established connection.
• SPP connection does not support bidirectional communications.• HCRP connection supports bidirectional communications.
❖ BIP• For BIP connection, a module including PostScript 3 must be installed in
the machine.• Only one Bluetooth adaptor or Bluetooth-equipped computer can be con-
nected via BIP.• Only JPEG images that can be printed using BIP.• User codes are disabled for BIP.
You cannot print if print functions are restricted.• Some printers do not support BIP.
Note❒ In this manual, the instruction referred to print using SPP. To print using
HCRP or BIP, see the Help supplied with the Bluetooth adapter you use.

Preparing the Machine
52
1
Printing with Bluetooth Connection
To install the printer driver, follow the procedure used to install parallel interface.
Important❒ To install the printer driver under Windows 2000 / XP Professional or Win-
dows Server 2003, you must have an account that has Manage Printers per-mission. Log on as an Administrators or Power Users group member.
A Start 3Com Bluetooth Connection Manager.
B Check that the printer you want to use appears in 3Com Bluetooth Connec-tion Manager.
C On the [Tool] menu, click [COM port].
D Check that the message “Bluetooth Serial Client (COMx) “ appears underClient Ports. (X indicates the COM port number used by Bluetooth.)
E Click [Close].
F On the [Start] menu, point to [Settings], and then click [Printers].The [Printers] window appears.
G Click the icon of the printer you want to use.
H On the [File] menu, click [Properties].
I Click the [Ports] tab.
J Under [Port], select the [COMx:] check box. X indicates the COM portnumber used by Bluetooth.
K Click [OK].Close the [Printers] window.
Note❒ To always use the same printer, select the [Always use for this connection]
check box.❒ System requirements vary depending on the Bluetooth standard and spec-
ifications. For details, see the manuals supplied with each product.❒ For information about setting up Bluetooth under other operating systems
or using it with different utilities, see the manuals supplied with those op-erating systems or utilities.
❒ If a dialog box appears while transmitting a print job, reestablish networkconnection as follows:A Select the printer you want to use in the [Printers and Faxes] box.B Click [Connect].
ReferenceFor details, see the manuals supplied with the Bluetooth adaptor or com-puter equipped with Bluetooth.

Printing with Bluetooth Connection
53
1
Configuring Security Mode Settings
This describes how to configure the security mode settings.
A Start 3Com Bluetooth Connection Manager.
B On the [Tools] menu, click [Security Mode].The [Security Mode] dialog box appears.
C Select the security mode in the [Security Mode:] list.If you click [High], or [Custom], and specify [Link] in the [Custom Settings] dialogbox, enter the Bluetooth password. For information about entering the pass-word, see p.53 “Printing in the Security Mode”.For all other security modes and custom settings, no password is required.For information about each mode, see the manuals supplied with the utility.
D Click [OK].Close the [Security Mode] dialog box.
ReferenceFor details about the security mode, see 3Com Bluetooth Connection Man-ager Help. For details about the password entry which is required to trans-mit print jobs, see p.53 “Printing in the Security Mode”.
Printing in the Security Mode
This describes how to print in the security mode.
A Send the print job to the printer in use.Depending on the computer configuration, the [Connect] dialog box may ap-pear. If it does, use it to establish the network connection.
B The [Authentication] dialog box appears.
C Enter the Bluetooth password, and then click [OK].As the Bluetooth password, enter the last four digits of the machine's serialnumber. You can find the serial number on the label attached to the back ofthe machine. For example, if the serial number is 00A0-001234, the Bluetoothpassword is 1234.
D The print job is sent.
Note❒ The Bluetooth password differs for each machine and cannot be changed.
Preparing the Machine
54
1
Making Option Settings for the Printer
Make option settings for the machine using the printer driver when bidirectionalcommunication is disabled.
ReferenceFor details about making option settings for the printer, see p.56 “If Bidirec-tional Communication Is Disabled”.
Conditions for Bidirectional Communication
Bidirectional communication allows information about paper size and feed di-rection settings to be automatically sent to the printer. You can check machinestatus from your computer.• Bidirectional communication is supported by Windows 95 / 98 / Me / 2000
/ XP, Windows Server 2003, and Windows NT 4.0.• If you use the RPCS printer driver and bidirectional communication is ena-
bled under Windows 2000, the [Change Accessories] tab is unavailable.
Note❒ The RPCS printer driver supports bidirectional communications and updates
the machine status automatically.❒ The PCL printer driver supports bidirectional communications. You can up-
date the machine status manually.To support bidirectional communication, the following conditions must be met:
❖ When connected with parallel cables• The computer must support bidirectional communication.• The machine must support bidirectional communication.• The interface cable must support bidirectional communication.• The machine must be connected to the computer using the standard paral-
lel cables and parallel connectors.• Under Windows 2000, [Enable bidirectional support] must be selected, and
[Enable printer pooling] must not be selected on the [Ports] tab with the RPCSprinter driver.

Making Option Settings for the Printer
55
1
❖ When connected with the network• The machine must support bidirectional communication.• SmartDeviceMonitor for Client included on the CD-ROM must be in-
stalled, and TCP/IP must be used.• Under Windows 2000, [Enable bidirectional support] must be selected, and
[Enable printer pooling] must not be selected on the [Ports] tab with the RPCSprinter driver.
• In addition to the above, one of the following conditions must also be met:• The SmartDeviceMonitor for Client port and the TCP/IP protocol must
be used.• The standard TCP/IP port must be used without changing the default
port name (for Windows 2000 / XP and Windows Server 2003).• Microsoft TCP/IP print IP address must be specified for use (for Win-
dows NT 4.0).• IPP port name must include the IP address when using the IPP protocol.
❖ When connected with IEEE 1394• The computer must support bidirectional communication.• The machine must be connected to the IEEE 1394 connector of a computer
using the IEEE 1394 interface cable.• [Activate] must be selected in the SCSI print of IEEE 1394 and [Activate] must
be selected in the Bidi-SCSI print.• Under Windows 2000 / XP or Windows Server 2003, [Enable bidirectional
support] must be selected, and [Enable printer pooling] must not be selectedon the [Ports] tab with RPCS printer driver.
❖ When connected with USBThe machine must be connected to the computer's USB port using the USB in-terface cable.The computer must support bidirectional communication.
Note❒ Install SmartDeviceMonitor for Client from the supplied CD-ROM.

Preparing the Machine
56
1
If Bidirectional Communication Is Disabled
Set up option settings when bidirectional communications are disabled.
Important❒ Under Windows 2000 / XP and Windows Server 2003, Manage Printers per-
mission is required to change the printer properties in the [Printers] folder.Log on as an Administrators or Power Users group member.
❒ Under Windows NT 4.0, Full Control permission is required to change theprinter properties in the [Printers] (Windows 2000) or [Printers and Faxes] (Win-dows XP / Windows Server 2003) folder. Log on as an Administrators orPower Users group member.
A On the [Start] menu, point to [Settings], and then click [Printers].The [Printers] window appears.When using Windows XP or Windows Server 2003, point to [Settings] on the[Start] menu, and then click [Printers and Faxes]. The [Printers and Faxes] win-dow appears.
B Click the icon of the printer you want to use.
C On the [File] menu, click [Properties].
D Click the [Change Accessories] tab.If options in the [Change Accessories] tab are disabled, bidirectional connectionis enabled. In this case, no change is necessary for option settings.If you are using the RPCS printer driver, click the [Change Accessories] tab.
E Select options installed from the [Options] area, and then make the neces-sary settings.
F Select the total amount of the memory in [Total memory:] when the optionalSDRAM module is added.
G Under [Paper source tray settings:], click and highlight the tray to be used, andthen select the appropriate size, position, and type for the tray. Select the[Do not use Auto Tray Select] check box to exclude the tray from the targets ofautomatic tray selection.
H Click [OK] to close the printer properties dialog box.

Installing Font Manager 2000
57
1
Installing Font Manager 2000
Important❒ Under Windows 2000 / XP, Windows Server 2003, or Windows NT 4.0, installing
applications by Auto Run requires administrator permission. To install a printerdriver by Auto Run, log on using an account that has administrator permission.
A Quit all applications currently running.
B Insert the CD-ROM into the CD-ROM drive.The installer starts.
C Click [Font Manager 2000].
D Follow the instructions on the screen.
Preparing the Machine
58
1
Using Adobe PageMaker Version 6.0, 6.5, or 7.0
Under Windows 95 / 98 / Me / 2000 / XP, Windows Server 2003, or WindowsNT 4.0 with Adobe PageMaker, you need to copy PPD files to the PageMakerfolder.PPD files have the .ppd extension in the folder “DRIVERS\PS\WIN9X_ME\(Language)\DISK1” on the CD-ROM.The “WIN9X_ME” folder inside the “PS” folder is for Windows 95 / 98 / Me.Use the folder at this level that is appropriate for the operating system you arecurrently using.The third folder “(Language)” may be substituted by an appropriate languagename.Copy the .ppd file to the PageMaker folder.• For PageMaker 6.0 default installation
The directory is “C:\PM6\RSRC\PPD4”.• For PageMaker 6.5 default installation
The directory is “C:\PM65\RSRC\USENGLISH\PPD4”.The “USENGLISH” may vary depending on your language selection.
• For PageMaker 7.0 default installationThe directory is “C:\PM7\RSRC\USENGLISH\PPD4”.The “USENGLISH” may vary depending on your language selection.
Note❒ If the driver is not set correctly after copying the “.ppd” file, printing may not
be performed properly.❒ When using PageMaker, the optional features that can be selected by the
printer driver will not be active. The following procedure describes how toactivate the optional printer features.A On the [File] menu, click [Print].
The [Print Document] dialog box appears.B Make the necessary settings in the [Features] box.

2. Setting Up the Printer Driver
59
PCL - Accessing the Printer Properties
Windows 95 / 98 / Me - Accessing the Printer Properties
There are two methods to open the printer properties dialog box.
Making Printer Default Settings
To make the printer default settings, open the printer properties dialog box fromthe [Printers] window.
Important❒ You cannot change the printer default settings for each user. Settings made in
the printer properties dialog box are applied to all users.
A On the [Start] menu, point to [Settings], and then click [Printers].The [Printers] window appears.
B Click the icon of the printer you want to use.
C On the [File] menu, click [Properties].
DMake the necessary settings, and then click [OK].
Note❒ With some applications, the printer driver settings are not used, and the
application's own default settings are applied.
ReferenceFor details, see the printer driver Help.
Making Printer Settings from an Application
You can make printer settings for a specific application.To make printer settings for a specific application, open the printer propertiesdialog box from that application. The following explains how to make settingsfor the WordPad application provided with Windows 95 / 98 / Me.
A On the [File] menu, click [Print].The [Print] dialog box appears.
B Select the printer you want to use in the [Name] list, and then click [Properties].The printer properties dialog box appears.
CMake the necessary settings, and then click [OK].

Setting Up the Printer Driver
60
2
D Click [OK] to start printing.
Note❒ The procedure to open the printer properties dialog box may vary depend-
ing on the application. For details, see the manuals provided with the ap-plication you use.
❒ With some applications, the printer driver settings are not used, and theapplication's own default settings are applied.
❒ Any settings you make in the following procedure are valid for the currentapplication only.
❒ General users can change the properties displayed in the [Print] dialog boxof an application. Settings made here are used as defaults when printingfrom this application.
ReferenceFor details, see the printer driver Help.
Windows 2000 - Accessing the Printer Properties
Making Printer Default Settings - The Printer Properties
Important❒ To change the printer default settings including option configuration settings,
log on using an account that has Manage Printers permission. Members of theAdministrator and Power Users groups have Manage Printers permission bydefault.
❒ You cannot change the printer default settings for each user. Settings made inthe printer properties dialog box are applied to all users.
A On the [Start] menu, point to [Settings], and then click [Printers].The [Printers] window appears.
B Click the icon of the printer you want to use.
C On the [File] menu, click [Properties].The printer properties dialog box appears.
DMake the necessary settings, and then click [OK].
Note❒ Settings you make here are used as the default settings for all applications.
ReferenceFor details, see the printer driver Help.

PCL - Accessing the Printer Properties
61
2
Making Printer Default Settings - Printing Preferences
Important❒ You cannot change the printer default settings for each user. Settings made in
the printer properties dialog box are applied to all users.
A On the [Start] menu, point to [Settings], and then click [Printers].The [Printers] window appears.
B Click the icon of the printer you want to use.
C On the [File] menu, click [Printing Preferences...].The [Printing Preferences] dialog box appears.
DMake the necessary settings, and then click [OK].
Note❒ Settings you make here are used as the default settings for all applications.
ReferenceFor details, see the printer driver Help.
Making Printer Settings from an Application
You can make printer settings for a specific application.To make printer settings for a specific application, open the [Printing Preferences]dialog box from that application. The following explains how to make settingsfor the WordPad application provided with Windows 2000.
A On the [File] menu, click [Print...].The [Print] dialog box appears.
B Select the printer you want to use in the [Select Printer] list.
CMake the necessary settings, and then click [Apply] to start printing.
Note❒ The procedure to open the [Printing Preferences] dialog box may vary de-
pending on the application. For details, see the manuals provided with theapplication you use.
❒ Any settings you make in the following procedure are valid for the currentapplication only.
❒ General users can change the properties displayed in the [Print] dialog boxof an application. Settings made here are used as defaults when printingfrom this application.
ReferenceFor details, see the printer driver Help.
Setting Up the Printer Driver
62
2
Windows XP, Windows Server 2003 - Accessing the Printer Properties
Making Printer Default Settings - The Printer Properties
Important❒ To change the printer default settings including option configuration settings,
log on using an account that has Manage Printers permission. Members of theAdministrators and Power Users groups have Manage Printers permissionby default.
❒ You cannot change the printer default settings for each user. Settings made inthe printer properties dialog box are applied to all users.
A On the [Start] menu, click [Printers and Faxes].The [Printers and Faxes] window appears.
B Click the icon of the printer you want to use.
C On the [File] menu, click [Properties].The printer properties dialog box appears.
DMake the necessary settings, and then click [OK].
Note❒ Settings you make here are used as the default settings for all applications.
ReferenceFor details, see the printer driver Help.
Making Printer Default Settings - Printing Preferences
Important❒ You cannot change the printer default settings for each user. Settings made in
the printer properties dialog box are applied to all users.
A On the [Start] menu, click [Printers and Faxes].The [Printers and Faxes] window appears.
B Click the icon of the printer you want to use.
C On the [File] menu, click [Printing Preferences...].The [Printing Preferences] dialog box appears.
DMake the necessary settings, and then click [OK].
Note❒ Settings you make here are used as the default settings for all applications.
ReferenceFor details, see the printer driver Help.
PCL - Accessing the Printer Properties
63
2
Making Printer Settings from an Application
You can make printer settings for a specific application.To make printer settings for a specific application, open the [Printing Preferences]dialog box from that application. The following explains how to make settingsfor the WordPad application provided with Windows XP.
A On the [File] menu, click [Print...].The [Print] dialog box appears.
B Select the printer you want to use in the [Select Printer] list, and then click[Preferences].
CMake the necessary settings, and then click [OK] to start printing.
Note❒ The procedure to open the [Printing Preferences] dialog box may vary de-
pending on the application. For details, see the manuals provided with theapplication you use.
❒ Any settings you make in the following procedure are valid for the currentapplication only.
❒ General users can change the properties displayed in the [Print] dialog boxof an application. Settings made here are used as defaults when printingfrom this application.
ReferenceFor details, see the printer driver Help.
Windows NT 4.0 - Accessing the Printer Properties
Making Printer Default Settings - The Printer Properties
Important❒ To change the printer default settings including option configuration settings,
log on using an account that has Full Control permission. Members of the Ad-ministrators, Server Operators, Print Operators, and Power Users groupshave Full Control permission by default.
❒ You cannot change the printer default settings for each user. Settings made inthe printer properties dialog box are applied to all users.
A On the [Start] menu, point to [Settings], and then click [Printers].The [Printers] window appears.
B Click the icon of the printer you want to use.
C On the [File] menu, click [Properties].The printer properties dialog box appears.
Setting Up the Printer Driver
64
2
DMake the necessary settings, and then click [OK].
Note❒ Settings you make here are used as the default settings for all applications.
ReferenceFor details, see the printer driver Help.
Making Printer Default Settings - Default
Important❒ To change the printer default settings including option configuration settings,
log on using an account that has Full Control permission. Members of the Ad-ministrators, Server Operators, Print Operators, and Power Users groupshave Full Control permission by default.
❒ You cannot change the printer default settings for each user. Settings made inthe printer properties dialog box are applied to all users.
A On the [Start] menu, point to [Settings], and then click [Printers].The [Printers] window appears.
B Click the icon of the printer you want to use.
C On the [File] menu, click [Document Defaults].The [Default] dialog box appears.
DMake the necessary settings, and then click [OK].
Note❒ Settings you make here are used as the default settings for all applications.
ReferenceFor details, see the printer driver Help.

PCL - Accessing the Printer Properties
65
2
Making Printer Settings from an Application
You can make printer settings for a specific application.To make printer settings for a specific application, open the printer propertiesdialog box from that application. The following explains how to make settingsfor the WordPad application provided with Windows NT 4.0.
A On the [File] menu, click [Print].The [Print] dialog box appears.
B Select the printer you want to use in the [Name] list, and then click [Properties].The printer properties dialog box appears.
CMake the necessary settings, and then click [OK].
D Click [OK] to start printing.
Note❒ The procedure to open the printer properties dialog box may vary depend-
ing on the application. For details, see the manuals provided with the ap-plication you use.
❒ With some applications, the printer driver settings are not used, and theapplication's own default settings are applied.
❒ Any settings you make in the following procedure are valid for the currentapplication only.
❒ General users can change the properties displayed in the [Print] dialog boxof an application. Settings made here are used as defaults when printingfrom this application.
ReferenceFor details, see the printer driver Help.
Setting Up the Printer Driver
66
2
RPCS - Accessing the Printer Properties
Windows 95 / 98 / Me - Accessing the Printer Properties
There are two dialog box types of the printer properties dialog box.“Multi-tab” is used as an example in this manual. For details about changing thedialog box types, see the printer driver Help.
❖ Multi-tabThis dialog box type is designed for users who often change print settings toperform various printing operations.
❖ Custom SettingThis dialog box type is designed for users who rarely change print settings.This type of dialog box may vary depending on the installed options.
Making Printer Default Settings
To make the printer default settings, open the printer properties dialog box fromthe [Printers] window.
Important❒ You cannot change the printer default settings for each user. Settings made in
the printer properties dialog box are applied to all users.
A On the [Start] menu, point to [Settings], and then click [Printers].The [Printers] window appears.
B Click the icon of the printer you want to use.
C On the [File] menu, click [Properties].When you open the printer properties dialog box initially after installing theRPCS printer driver, a confirmation message appears. After clicking [OK], theprinter properties dialog box appears.
DMake the necessary settings, and then click [OK].
Note❒ With some applications, the printer driver settings are not used, and the
application's own default settings are applied.
ReferenceFor details, see the printer driver Help.
RPCS - Accessing the Printer Properties
67
2
Making Printer Settings from an Application
You can make printer settings for a specific application.To make printer settings for a specific application, open the printer propertiesdialog box from that application. The following explains how to make settingsfor the WordPad application provided with Windows 95 / 98 / Me.
A On the [File] menu, click [Print].The [Print] dialog box appears.
B Select the printer you want to use in the [Name] list, and then click [Properties].The printer properties dialog box appears.
CMake the necessary settings, and then click [OK].
D Click [OK] to start printing.
Note❒ The procedure to open the printer properties dialog box may vary depend-
ing on the application. For details, see the manuals provided with the ap-plication you use.
❒ With some applications, the printer driver settings are not used, and theapplication's own default settings are applied.
❒ Any settings you make in the following procedure are valid for the currentapplication only.
❒ General users can change the properties displayed in the [Print] dialog boxof an application. Settings made here are used as defaults when printingfrom this application.
ReferenceFor details, see the printer driver Help.

Setting Up the Printer Driver
68
2
Windows 2000 - Accessing the Printer Properties
This describes how to launch printer driver's properties.
Making Printer Default Settings - The Printer Properties
Important❒ To change the printer default settings including option configuration settings,
log on using an account that has Manage Printers permission. Members of theAdministrators and Power Users groups have Manage Printers permissionby default.
❒ You cannot change the printer default settings for each user. Settings made inthe printer properties dialog box are applied to all users.
A On the [Start] menu, point to [Settings], and then click [Printers].The [Printers] window appears.
B Click the icon of the printer you want to use.
C On the [File] menu, click [Properties].The printer properties dialog box appears.When you open the printer properties dialog box initially after installing theRPCS printer driver, a confirmation message appears. After clicking [OK], theprinter properties dialog box appears.
DMake the necessary settings, and then click [OK].
Note❒ Settings you make here are used as the default settings for all applications.
ReferenceFor details, see the printer driver Help.
Making Printer Default Settings - Printing Preferences
Important❒ You cannot change the printer default settings for each user. Settings made in
the printer properties dialog box are applied to all users.
A On the [Start] menu, point to [Settings], and then click [Printers].The [Printers] window appears.
B Click the icon of the printer you want to use.
C On the [File] menu, click [Printing Preferences...].The [Printing Preferences] dialog box appears.

RPCS - Accessing the Printer Properties
69
2
DMake the necessary settings, and then click [OK].
Note❒ Settings you make here are used as the default settings for all applications.
ReferenceFor details, see the printer driver Help.
Making Printer Settings from an Application
You can make printer settings for a specific application.To make printer settings for a specific application, open the [Printing Preferences]dialog box from that application. The following explains how to make settingsfor the WordPad application provided with Windows 2000.
A On the [File] menu, click [Print...].The [Print] dialog box appears.
B Select the printer you want to use in the [Select Printer] list.
CMake the necessary settings, and then click [Apply] to start printing.
Note❒ The procedure to open the [Printing Preferences] dialog box may vary de-
pending on the application. For details, see the manuals provided with theapplication you use.
❒ Any settings you make in the following procedure are valid for the currentapplication only.
❒ General users can change the properties displayed in the [Print] dialog boxof an application. Settings made here are used as defaults when printingfrom this application.
ReferenceFor details, see the printer driver Help.
Setting Up the Printer Driver
70
2
Windows XP, Windows Server 2003 - Accessing the Printer Properties
Making Printer Default Settings - The Printer Properties
Important❒ To change the printer default settings including option configuration settings, log
on using an account that has Manage Printers permission. Members of the Admin-istrators and Power Users groups have Manage Printers permission by default.
❒ You cannot change the printer default settings for each user. Settings made inthe printer properties dialog box are applied to all users.
A On the [Start] menu, click [Printers and Faxes].The [Printers and Faxes] window appears.
B Click the icon of the printer you want to use.
C On the [File] menu, click [Properties].The printer properties dialog box appears.When you open the printer properties dialog box initially after installing theRPCS printer driver, a confirmation message appears. After clicking [OK], theprinter properties dialog box appears.
DMake the necessary settings, and then click [OK].
Note❒ Settings you make here are used as the default settings for all applications.
ReferenceFor details, see the printer driver Help.
Making Printer Default Settings - Printing Preferences
Important❒ You cannot change the printer default settings for each user. Settings made in
the printer properties dialog box are applied to all users.
A On the [Start] menu, click [Printers and Faxes].The [Printers and Faxes] window appears.
B Click the icon of the printer you want to use.
C On the [File] menu, click [Printing Preferences...].The [Printing Preferences] dialog box appears.
DMake the necessary settings, and then click [OK].
Note❒ Settings you make here are used as the default settings for all applications.
ReferenceFor details, see the printer driver Help.

RPCS - Accessing the Printer Properties
71
2
Making Printer Settings from an Application
You can make printer settings for a specific application.To make printer settings for a specific application, open the [Printing Preferences]dialog box from that application. The following explains how to make settingsfor the WordPad application provided with Windows XP.
A On the [File] menu, click [Print...].The [Print] dialog box appears.
B Select the printer you want to use in the [Select Printer] list.
CMake the necessary settings, and then click [Apply] to start printing.
Note❒ The procedure to open the [Printing Preferences] dialog box may vary de-
pending on the application. For details, see the manuals provided with theapplication you use.
❒ Any settings you make in the following procedure are valid for the currentapplication only.
❒ General users can change the properties displayed in the [Print] dialog boxof an application. Settings made here are used as defaults when printingfrom this application.
ReferenceFor details, see the printer driver Help.

Setting Up the Printer Driver
72
2
Windows NT 4.0 - Accessing the Printer Properties
Making Printer Default Settings - The Printer Properties
Important❒ To change the printer default settings including option configuration settings,
log on using an account that has Full Control permission. Members of the Ad-ministrators, Server Operators, Print Operators, and Power Users groupshave Full Control permission by default.
❒ You cannot change the printer default settings for each user. Settings made inthe printer properties dialog box are applied to all users.
A On the [Start] menu, point to [Settings], and then click [Printers].The [Printers] window appears.
B Click the icon of the printer you want to use.
C On the [File] menu, click [Properties].The printer properties dialog box appears.When you open the printer properties dialog box initially after installing theRPCS printer driver, a confirmation message appears. After clicking [OK], theprinter properties dialog box appears.
DMake the necessary settings, and then click [OK].
Note❒ Settings you make here are used as the default settings for all applications.
ReferenceFor details, see the printer driver Help.
Making Printer Default Settings - Default
Important❒ To change the printer default settings including option configuration settings,
log on using an account that has Full Control permission. Members of the Ad-ministrators, Server Operators, Print Operators, and Power Users groupshave Full Control permission by default.
❒ You cannot change the printer default settings for each user. Settings made inthe printer properties dialog box are applied to all users.
A On the [Start] menu, point to [Settings], and then click [Printers].The [Printers] window appears.
B Click the icon of the printer you want to use.
RPCS - Accessing the Printer Properties
73
2
C On the [File] menu, click [Document Defaults...].The [Default] dialog box appears.
DMake the necessary settings, and then click [OK].
Note❒ Settings you make here are used as the default settings for all applications.
ReferenceFor details, see the printer driver Help.
Making Printer Settings from an Application
You can make printer settings for a specific application.To make printer settings for a specific application, open the printer propertiesdialog box from that application. The following explains how to make settingsfor the WordPad application provided with Windows NT 4.0.
A On the [File] menu, click [Print].The [Print] dialog box appears.
B Select the printer you want to use in the [Name] list, and then click [Properties].The printer properties dialog box appears.
CMake the necessary settings, and then click [OK].
D Click [OK] to start printing.
Note❒ The procedure to open the printer properties dialog box may vary depend-
ing on the application. For details, see the manuals provided with the ap-plication you use.
❒ With some applications, the printer driver settings are not used, and theapplication's own default settings are applied.
❒ Any settings you make in the following procedure are valid for the currentapplication only.
❒ General users can change the properties displayed in the [Print] dialog boxof an application. Settings made here are used as defaults when printingfrom this application.
ReferenceFor details, see the printer driver Help.

Setting Up the Printer Driver
74
2

3. Other Print Operations
75
Printing a PDF File Directly
You can send PDF files directly to the machine for printing, without having toopen a PDF application.
Important❒ This function is possible only when the optional PostScript 3 unit is installed.❒ This function is possible for genuine Adobe PDF files only.❒ Version 1.3, 1.4, and 1.5 PDF files are compatible.❒ Transparency and JBIG2 (functions of PDF version 1.4) are not compatible.❒ PDF version 1.5 exclusive functions are not compatible. ❒ Some types of High Compression PDF files are not supported. Consult your
sales representative about the supported file types.
Note❒ Paper size errors may occur when printing on custom size paper.
Printing Method
The following procedures explain the two methods of direct PDF printing - us-ing DeskTopBinder Lite or by entering commands.
Using DeskTopBinder Lite
Installing DeskTopBinder Lite
Follow the procedure below to install DeskTopBinder Lite.
A Quit all applications currently running.
B Insert the CD-ROM into the CD-ROM drive.The installer starts.
Note❒ Auto Run may not work under certain operating system settings. In this
case, launch “Setup.exe” located on the CD-ROM root directory.
C Select an interface language, and then click [OK].
D Click [DeskTopBinder - SmartDeviceMonitor for Client] , and then click [Next].
E Follow the instructions on the display to install DeskTopBinder Lite.If you are required to restart the computer after installing DeskTopBinderLite, restart the computer and continue the configuration.

Other Print Operations
76
3
DeskTopBinder Lite Enhancements
Follow the DeskTopBinder Lite enhancement procedure to print PDF files directly.
A On the [Start] menu, click [Programs], [DeskTopBinder], and [Extended FeaturesWizard].
BWhen [Extended Features Wizard] appears, select [Start], and then click [Next]repeatedly until the [Printing Functions3] screen appears.
C On the [Printing Functions3] screen, click [Add] to display [PDF Direct Print Properties].
D Select Driver for This Machine, click [OK], and then click [Next] repeatedlyuntil [Finish] is displayed.Click [Finish].
Function Palette
The Function palette contains buttons for functions that are already configuredthrough DeskTopBinder Lite enhancement. Using these buttons, you can printWindows files, preview printouts, convert images, and register scanners for doc-uments without having to open DeskTopBinder Lite. You can also use thesefunctions simply by dragging a target file to the button corresponding to the re-quired function and dropping it there.
A On the [Start] menu, click [Programs], [DeskTopBinder], and [Function Palette].An icon for the Function palette is added to the task bar displayed at the bot-tom right of the screen.
B Right-click the icon that is added to the task bar, and then click [Properties]to display the Properties screen.
C Click the [Contents] tab, select the [PDF Direct Printing] check box at the center,and then click [OK].The [Properties] screen closes and the [PFD Direct Printing] icon is added to thepalette.
PDF Direct Printing
Use the method below to print PDF files directly.
A Drag the PDF file you want to print to the PDF Direct Printing icon in thepalette and drop it there.
B [Output File List-PDF Direct Print] is displayed.Highlight the PDF you want to print, and then click [OK]. The PDF file is printed.
Printing a PDF File Directly
77
3
Printing PDF Password-Protected Documents
Follow the procedure below to print password-protected PDF files.
A In the Windows [Start] menu, click [Programs], [DeskTopBinder], and [ExtendedFeatures Wizard].
BWhen [Extended Features Wizard] appears, select [Start], and then click [Next]repeatedly until the [Printing Functions3] screen appears.
C On the [Printing Functions3] screen, click [Properties...] to display [PDF DirectPrint Properties].
D Select the [Use PDF Password] check box at the bottom right of the screen, andthen click [OK].Click [Next] repeatedly until [Finish] appears.Click [Finish] to close the [Extended Features Wizard] screen.
EMove the PDF file you want to print to the PDF Direct Printing icon on thepalette using a drag-and-drop operation.
F [Output File List-PDF Direct Print] is displayed.Select the PDF file you want to output to make it reverse video, and then click[OK].
G The [PDF Direct Print Properties] screen opens.Enter the password for the PDF file you want to print in the [PDF Password]field at the bottom right of the screen, and then click [OK].The password-protected PDF file is printed.
Note❒ Before printing a password-protected PDF file, perform one of the following:
• Enter the PDF password in the PDF Direct Printing Properties screen• Specify a PDF password by selecting [Change PDF Password] in the [PDF
Menu] menu on the control panel of this machine❒ If a [PDF Group Password] for the [PDF Menu] menu is assigned to either
DeskTopBinder Lite or the control panel of this machine, a same grouppassword needs to be assigned to the other.

Other Print Operations
78
3
PDF Direct Print Properties
1. Setting Name:Displays the plug-in configuration name(up to 63 single byte characters)
2. Change Icon...Changes the icon displayed on the toolbar.
3. Printer name:Displays a list of RPCS drivers that sup-port PDF direct printing.
4. DuplexPrints on both sides of sheets.
5. LayoutPrints multiple pages on a single sheet.
6. PunchPunch holes in output sheets.
7. StapleStaple together output sheets.
8. “Display this dialog box beforeprinting” Dialog boxAppears in PDF direct printing mode ifthis check box is selected.
9. Orientation:Specifies the original's orientation.
10. Number of copiesSpecifies the number of copies to print.
11. CollateSorts printed sheets.
12. RangeSpecifies the print area on each page.
13. Resolution:Specifies a print resolution.
14. PDF Password:If the PDF file is password-protected, en-ter the password in this field. Otherwise,the file cannot be printed.
15. Group Password:If a group password is assigned to Desk-TopBinder Lite and this machine, enterthe group password in this field. Other-wise, printing cannot start.
Using commands
You can print PDF files directly, using commands such as “ftp” “sftp”and “lpr”.
ReferenceFor details about UNIX commands, see Network Guide.
ANW014S
16
12
3
45
67
8
9
1011
12
1314
15

Unauthorized Copy Control
79
3
Unauthorized Copy Control
You can embed patterns and text under printed text to prevent unauthorizedcopying of the document. Unauthorized Copy Control consists of two functions:[Data security for copying] and [Mask type:].
Important❒ This function is designed to discourage copying of confidential documents; it
does not prevent unauthorized use of information.
Opening the Unauthorized Copy Control Window
A In the RPCS printer driver, open the [Printing Preference] window.
B Click [Add/Change Custom Settings...].
C Select the [Unauthorized copy...] check box.
D Click [Control Settings...].The Unauthorized Copy Control window appears.
Note❒ For details, see the printer driver Help.
Using [Data security for copying]
You can embed a pattern by setting it in the printer driver.
❖ Setting [Data security for copying] in the printer driver• Select the [Data security for copying] checkbox. You can also enter the text in
the [Text:] box.• You cannot select the [Mask type:] checkbox at the same time.• To print a document protected by gray overprint, the machine must be set
up correctly. Consult your administrator.

Other Print Operations
80
3
❖ Printing a document using [Data security for copying]
1. The pattern and text you have setis printed.
2. The document is copied or storedin copiers/multifunction machineswhich the optional Copy Data Secu-rity unit is installed.
3. The document is blanked by grayoverprint.
Note❒ When printing a document that is set with [Data security for copying], the ma-
chine does not require the optional Copy Data Security unit to be installed.The Copy Data Security unit is required when copying or storing a documentprotected by gray overprint.
❒ Only the RPCS printer driver is supported.❒ You cannot partially embed a pattern and text in a document.❒ Use 182 × 257 mm (71/4 × 101/2 in.) or larger paper.❒ Use ordinary or recycled paper of at least 70% whiteness.❒ Duplex printing may interfere with this function as a result of text and pat-
terns being visible through the paper.
ReferenceFor details about setting [Data security for copying], see the printer driver Help.
AJL030S
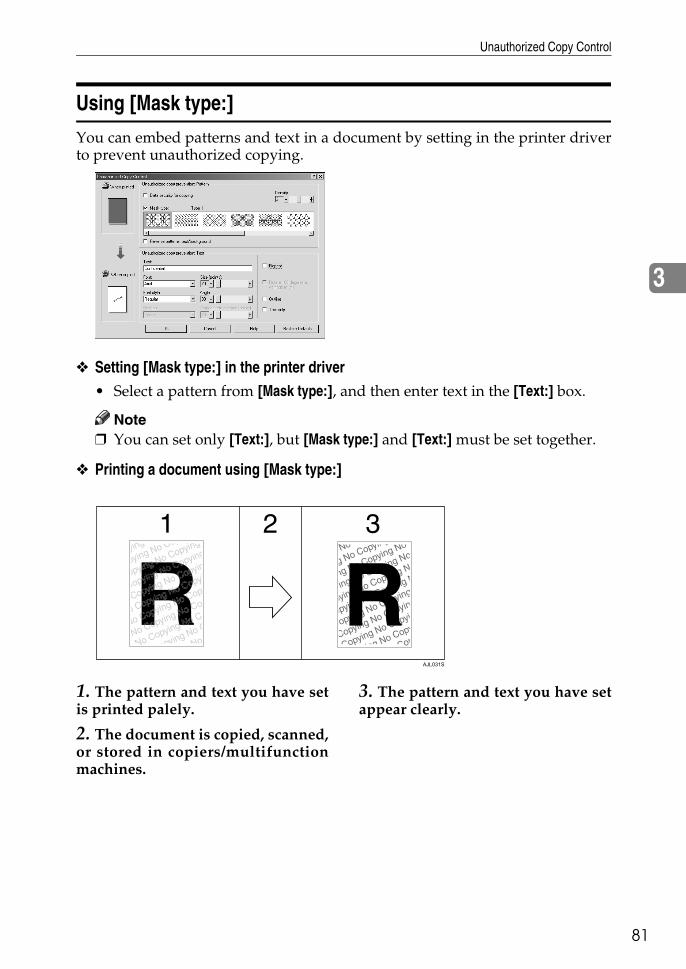
Unauthorized Copy Control
81
3
Using [Mask type:]
You can embed patterns and text in a document by setting in the printer driverto prevent unauthorized copying.
❖ Setting [Mask type:] in the printer driver• Select a pattern from [Mask type:], and then enter text in the [Text:] box.
Note❒ You can set only [Text:], but [Mask type:] and [Text:] must be set together.
❖ Printing a document using [Mask type:]
1. The pattern and text you have setis printed palely.
2. The document is copied, scanned,or stored in copiers/multifunctionmachines.
3. The pattern and text you have setappear clearly.
AJL031S

Other Print Operations
82
3
Note❒ Only the RPCS printer driver is supported.❒ You cannot partially embed patterns and text strings in a document.❒ To make the embedded pattern clear, set the character size at least 50 pt (pref-
erably 70 to 80 pt) and character angle to between 30 and 40 degrees.❒ Due to the effects of the settings, the results of copying, scanning, and saving
documents in the document server may vary depending on the machinemodel and setting conditions.
❒ Printing with background patterns and text may be slower than normal printing.
ReferenceFor details about setting [Mask type:], see the printer driver Help.
Important Notice
• The supplier does not provide warranty regarding the appearance of printpatterns and other copy protection features. The appearance of the print pat-terns and the performance of Unauthorized Copy Control may vary depend-ing on the quality of paper used and the machine model and settings.
• The supplier takes no responsibility for any damages sustained in connectionwith use of or inability to make use of Unauthorized Copy Control print patterns.
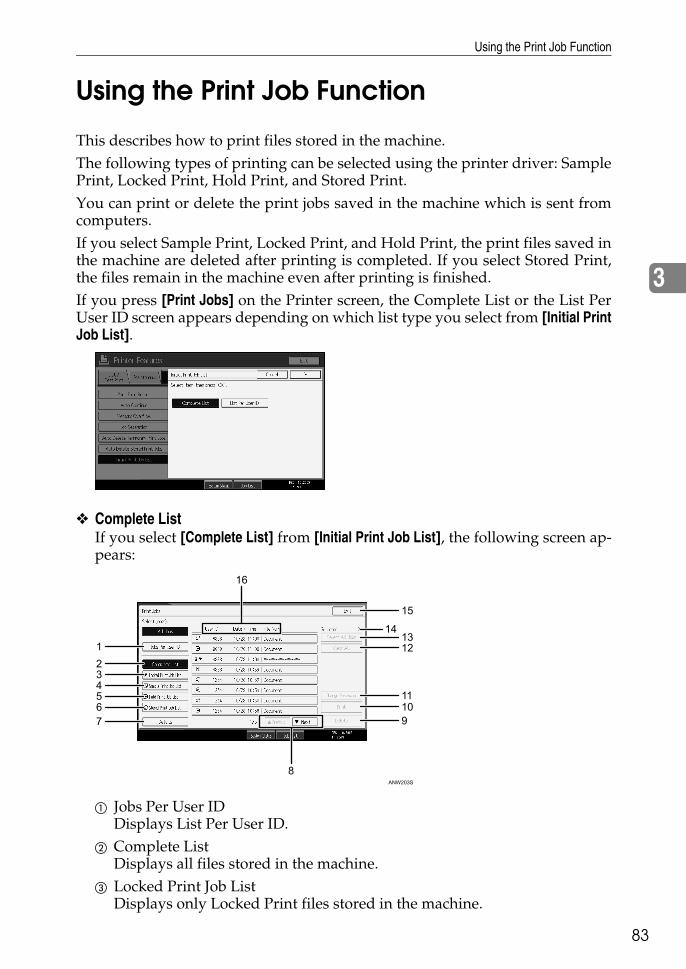
Using the Print Job Function
83
3
Using the Print Job Function
This describes how to print files stored in the machine.The following types of printing can be selected using the printer driver: SamplePrint, Locked Print, Hold Print, and Stored Print.You can print or delete the print jobs saved in the machine which is sent fromcomputers. If you select Sample Print, Locked Print, and Hold Print, the print files saved inthe machine are deleted after printing is completed. If you select Stored Print,the files remain in the machine even after printing is finished. If you press [Print Jobs] on the Printer screen, the Complete List or the List PerUser ID screen appears depending on which list type you select from [Initial PrintJob List].
❖ Complete ListIf you select [Complete List] from [Initial Print Job List], the following screen ap-pears:
A Jobs Per User IDDisplays List Per User ID.
B Complete ListDisplays all files stored in the machine.
C Locked Print Job ListDisplays only Locked Print files stored in the machine.
1234567
8
91011
1213
15
14
16
ANW203S

Other Print Operations
84
3
D Sample Print Job ListDisplays only Sample Print files stored in the machine.
E Hold Print Job ListDisplays only Hold Print files stored in the machine.
F Stored Print Job ListDisplays only Stored Print files stored in the machine.
G DetailsDisplays details about a selected file.
H [UPrevious]/[TNext]If the list of files does not fit on the screen, scroll down to view the list.
I [Delete]Deletes a selected file.
J [Print]Prints a selected file.
K [Change Password]Changes or deletes the password of a file if a password is set. To changethe password, press [Change], enter the current password, and then enterthe new password on the confirmation screen. To delete the password,press [Change], leave the entering/confirming a new password box blank,and then press the [OK] key.You can also set passwords to the Stored Print files that do not currentlyhave passwords.
L [Clear All]Clears all selections.
M [Select All Jobs]Selects all files stored in the machine.
N Selected:Displays number of the files selected.
O [Exit]Returns to the Printer screen.
P User ID, Date/Time, and File Name displayDisplays the time when the instruction to print the stored files was entered,the User IDs, and the file names.
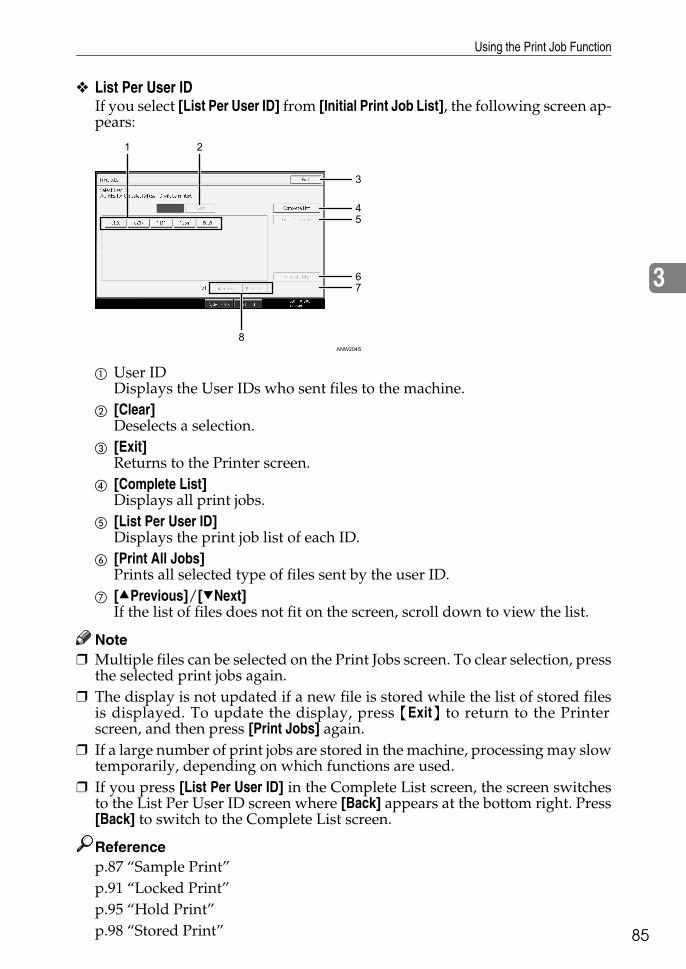
Using the Print Job Function
85
3
❖ List Per User IDIf you select [List Per User ID] from [Initial Print Job List], the following screen ap-pears:
A User IDDisplays the User IDs who sent files to the machine.
B [Clear]Deselects a selection.
C [Exit]Returns to the Printer screen.
D [Complete List]Displays all print jobs.
E [List Per User ID]Displays the print job list of each ID.
F [Print All Jobs]Prints all selected type of files sent by the user ID.
G [UPrevious]/[TNext]If the list of files does not fit on the screen, scroll down to view the list.
Note❒ Multiple files can be selected on the Print Jobs screen. To clear selection, press
the selected print jobs again.❒ The display is not updated if a new file is stored while the list of stored files
is displayed. To update the display, press {Exit} to return to the Printerscreen, and then press [Print Jobs] again.
❒ If a large number of print jobs are stored in the machine, processing may slowtemporarily, depending on which functions are used.
❒ If you press [List Per User ID] in the Complete List screen, the screen switchesto the List Per User ID screen where [Back] appears at the bottom right. Press[Back] to switch to the Complete List screen.
Referencep.87 “Sample Print”p.91 “Locked Print”p.95 “Hold Print”p.98 “Stored Print”
1 2
8
3
45
67
ANW204S

Other Print Operations
86
3
Selecting the Initial Print Job List
Follow the procedure below to set the initial Print Jobs screen, and to show it.
Selecting the Initial Print Job List
A Press the {User Tools/Counter} key.
B Press [Printer Features].The Printer Features menu appears
C On the [System] tab, press [Initial Print Job List].
D Select either [Complete List] or [List Per User ID].
Displaying a Print Job List
A Press [Print Jobs].
Either the Complete List or List Per User ID screen appears.
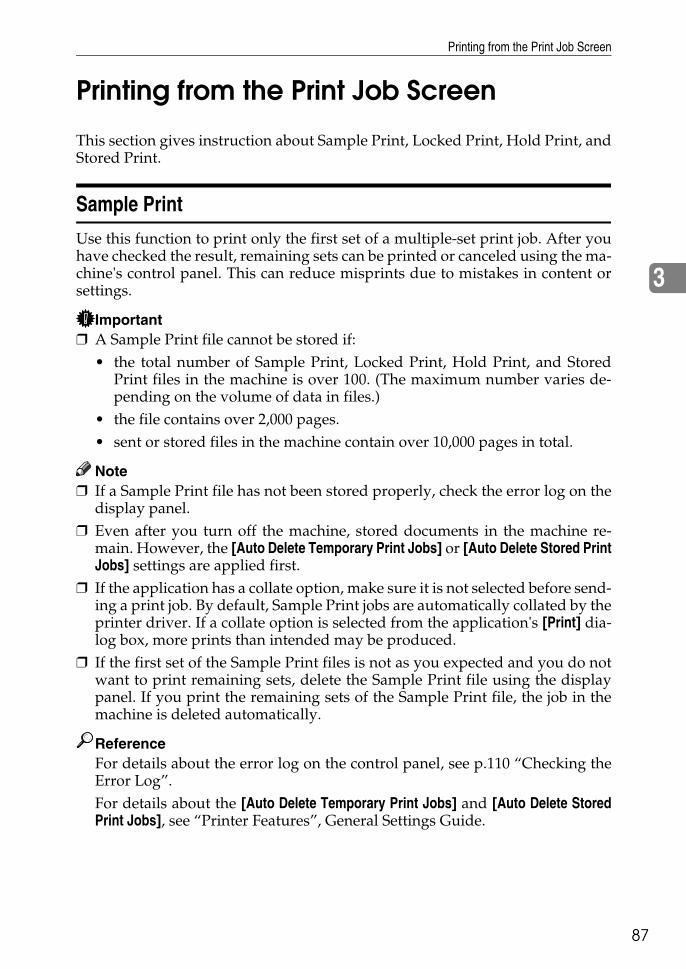
Printing from the Print Job Screen
87
3
Printing from the Print Job Screen
This section gives instruction about Sample Print, Locked Print, Hold Print, andStored Print.
Sample Print
Use this function to print only the first set of a multiple-set print job. After youhave checked the result, remaining sets can be printed or canceled using the ma-chine's control panel. This can reduce misprints due to mistakes in content orsettings.
Important❒ A Sample Print file cannot be stored if:
• the total number of Sample Print, Locked Print, Hold Print, and StoredPrint files in the machine is over 100. (The maximum number varies de-pending on the volume of data in files.)
• the file contains over 2,000 pages.• sent or stored files in the machine contain over 10,000 pages in total.
Note❒ If a Sample Print file has not been stored properly, check the error log on the
display panel.❒ Even after you turn off the machine, stored documents in the machine re-
main. However, the [Auto Delete Temporary Print Jobs] or [Auto Delete Stored PrintJobs] settings are applied first.
❒ If the application has a collate option, make sure it is not selected before send-ing a print job. By default, Sample Print jobs are automatically collated by theprinter driver. If a collate option is selected from the application's [Print] dia-log box, more prints than intended may be produced.
❒ If the first set of the Sample Print files is not as you expected and you do notwant to print remaining sets, delete the Sample Print file using the displaypanel. If you print the remaining sets of the Sample Print file, the job in themachine is deleted automatically.
ReferenceFor details about the error log on the control panel, see p.110 “Checking theError Log”.For details about the [Auto Delete Temporary Print Jobs] and [Auto Delete StoredPrint Jobs], see “Printer Features”, General Settings Guide.

Other Print Operations
88
3
Printing a Sample Print File
The following procedure describes how to print a Sample Print file with the PCL6/5e and the RPCS printer driver. For information about how to print a SamplePrint file with the PostScript 3 printer driver, see PostScript 3 Supplement in-cluded as a PDF file on the CD-ROM.
Important❒ Applications with their own drivers, such as PageMaker, do not support this
function.❒ If you are using Mac OS X, you need Mac OS X v10.2 or higher to use this
function.
A Configure Sample Print in the printer driver's properties.For details about configuring the printer drivers, see the relevant Help files.
B Start printing from the application's [Print] dialog box.Make sure to set more than two copies.The Sample Print job is sent to the machine, and the first set is printed.
C On the machine's control panel, press the {Printer} key to display the Printerscreen.
D Press [Print Jobs].
A list of print files stored in the machine appears.
E Press[Sample Print Job List].
A list of Sample Print files stored in the machine appears.Depending on the security settings, certain print jobs may not be displayed.
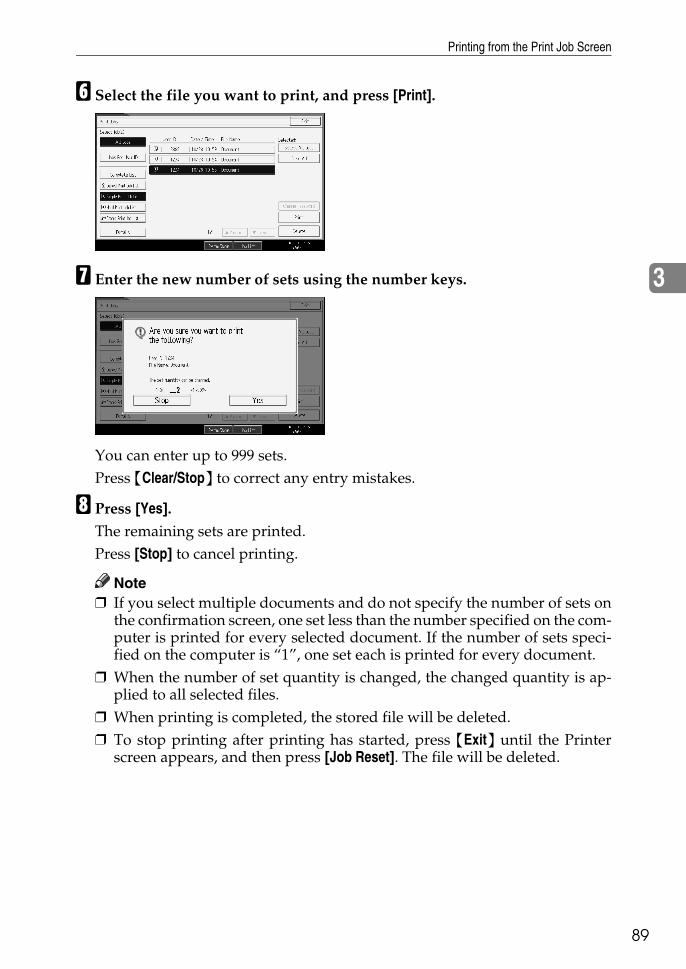
Printing from the Print Job Screen
89
3
F Select the file you want to print, and press [Print].
G Enter the new number of sets using the number keys.
You can enter up to 999 sets.Press {Clear/Stop} to correct any entry mistakes.
H Press [Yes].The remaining sets are printed.Press [Stop] to cancel printing.
Note❒ If you select multiple documents and do not specify the number of sets on
the confirmation screen, one set less than the number specified on the com-puter is printed for every selected document. If the number of sets speci-fied on the computer is “1”, one set each is printed for every document.
❒ When the number of set quantity is changed, the changed quantity is ap-plied to all selected files.
❒ When printing is completed, the stored file will be deleted.❒ To stop printing after printing has started, press {Exit} until the Printer
screen appears, and then press [Job Reset]. The file will be deleted.
Other Print Operations
90
3
Deleting Sample Print Files
If you are not satisfied with the sample printout, you can delete the Sample Printfile, revise it and print it again until the settings are suitable.
A Press the {Printer} key to display the Printer screen.
B Press [Print Jobs].A list of the print files stored in the machine appears.
C Press [Sample Print Job List].A list of Sample Print files stored in the machine appears.Depending on the security settings, certain print jobs may not be displayed.
D Select the file you want to delete, and then press [Delete].The delete confirmation screen will appear.
E Press [Yes] to delete the file.The selected file is deleted.
Note❒ If you do not want to delete the file, press [No].
Printing from the Print Job Screen
91
3
Locked Print
Use this function to maintain privacy when printing confidential documents onthe machine over a shared network. Usually, it is possible to print data using thedisplay panel once it is stored in this machine. When using Locked Print, it is notpossible to print unless a password is entered on the machine's display panel.Your confidential documents will be safe from being viewed by other people.
Important❒ A Locked Print file cannot be stored if:
• the total number of Sample Print, Locked Print, Hold Print, and StoredPrint files in the machine is over 100. (The maximum number varies de-pending on the volume of data in files.)
• the file contains over 2,000 pages.• sent or stored files in the machine contain over 10,000 pages in total.
Note❒ If a Locked Print file has not been stored properly, check the error log on the
display panel.❒ Even after you turn off the machine, stored documents remain. However, the
[Auto Delete Temporary Print Jobs] or [Auto Delete Stored Print Jobs] settings areapplied first.
❒ If the application has a collate option, make sure it is not selected before send-ing a print job. Locked Print jobs are automatically collated by the printerdriver as default. If a collate option is selected in the application print dialogbox, more sets than intended may be printed.
❒ After the Locked Print file is printed, the job is automatically deleted.
ReferenceFor details about the error log on the display panel, see p.110 “Checking theError Log”.For details about the [Auto Delete Temporary Print Jobs] and [Auto Delete StoredPrint Jobs], see “Printer Features”, General Settings Guide.
Other Print Operations
92
3
Printing a Locked Print File
The following procedure describes how to print a Locked Print file with the PCL6/5e and the RPCS printer driver. For information about how to print a LockedPrint file with the PostScript 3 printer driver, see PostScript 3 Supplement in-cluded as a PDF file on the CD-ROM.
Important❒ Applications with their own drivers, such as PageMaker, do not support this
function.❒ If you are using Mac OS X, you need Mac OS X v10.2 or higher to use this
function.
A Configure the Locked Print in the printer driver's properties.For details about configuring the printer drivers, see the corresponding Helpfiles.
B Start printing from the application's [Print] dialog box.The Locked Print job is sent to the machine.
C On the machine's control panel, press the {Printer} key to display the Printerscreen.
D Press [Print Jobs].
A list of print files stored in the machine appears.
E Press [Locked Print Job List].
A list of Locked Print files stored in the machine appears.Depending on the security settings, certain print jobs may not be displayed.
Printing from the Print Job Screen
93
3
F Select the file you want to print, and then press [Print].
The password screen appears.
G Enter the password using the number keys, and then press {OK}.
The print confirmation screen appears.A confirmation screen will appear if the password is not entered correctly.Press [Exit] to enter the password again.If multiple print files are selected, the machine prints files that correspond tothe entered password. The number of files to be printed is displayed on theconfirmation screen.If you forgot your password, ask your network administrator for help.
H Press [Yes].The locked file is printed.Press [Stop] to cancel printing.
Note❒ When printing is completed, the stored file will be deleted.❒ To stop printing after printing has started, press {Exit} until the Printer
screen appears, and then press [Job Reset]. The file will be deleted.
Other Print Operations
94
3
Deleting Locked Print Files
A Press the {Printer} key to display the Printer screen.
B Press [Print Jobs].
C Press [Locked Print Job List].A list of Locked Print files stored appears.Depending on the security settings, certain print jobs may not be displayed.
D Select the file you want to delete, and then press [Delete]The password screen is displayed.
E Enter the password using the number keys, and then press [OK].The delete confirmation screen appears.A confirmation screen will appear if the password is not entered correctly.Press [Exit] to enter the password again.If you forgot the password, consult your network administrator.
F Press [Yes].The selected file is deleted.If you do not want to delete the file, press [No].
Note❒ If multiple print files are selected, the machine deletes files that correspond
to the entered password. The number of files to be deleted is displayed onthe confirmation screen.
Printing from the Print Job Screen
95
3
Hold Print
Use this function to temporarily hold a file in the machine, and print it from thecomputer or the machine's control panel later.
Important❒ A Hold Print file cannot be stored if:
• the total number of Sample Print, Locked Print, Hold Print, and StoredPrint files in the machine is over 100. (The maximum number varies de-pending on the volume of data in files.)
• the file contains over 2,000 pages.• sent or stored files in the machine contain over 10,000 pages in total.
Note❒ If a Hold Print file has not been stored properly, check the error log on the dis-
play panel.❒ Even after you turn off the machine, stored documents in the machine re-
main. However, the [Auto Delete Temporary Print Jobs] or [Auto Delete Stored PrintJobs] settings are applied first.
❒ If the application has a collate option, make sure it is not selected before send-ing a print job. By default, Hold Print jobs are automatically collated by theprinter driver. If a collate option is selected from the application's Print dialogbox, more prints than intended may be produced.
ReferenceFor details about the error log on the display panel, see p.110 “Checking theError Log”.For details about the [Auto Delete Temporary Print Jobs] and [Auto Delete StoredPrint Jobs], see “Printer Features”, General Settings Guide.
Printing a Hold Print File
The following procedure describes how to print a Hold Print file with the PCL6/5e and the RPCS printer driver. For information about how to print a HoldPrint file with the PostScript 3 printer driver, see Postscript 3 Supplement in-cluded as a PDF file in the supplied CD-ROM.
Important❒ Applications with their own drivers, such as PageMaker, do not support this
function.❒ If you are using Mac OS X, you need Mac OS X v10.2 or higher to use this
function.
A Configure Hold Print in the printer driver’s properties.For details about configuring the printer drivers, see the relevant Help files.
B Click [Details...], and then enter a User ID in the [User ID:] box.
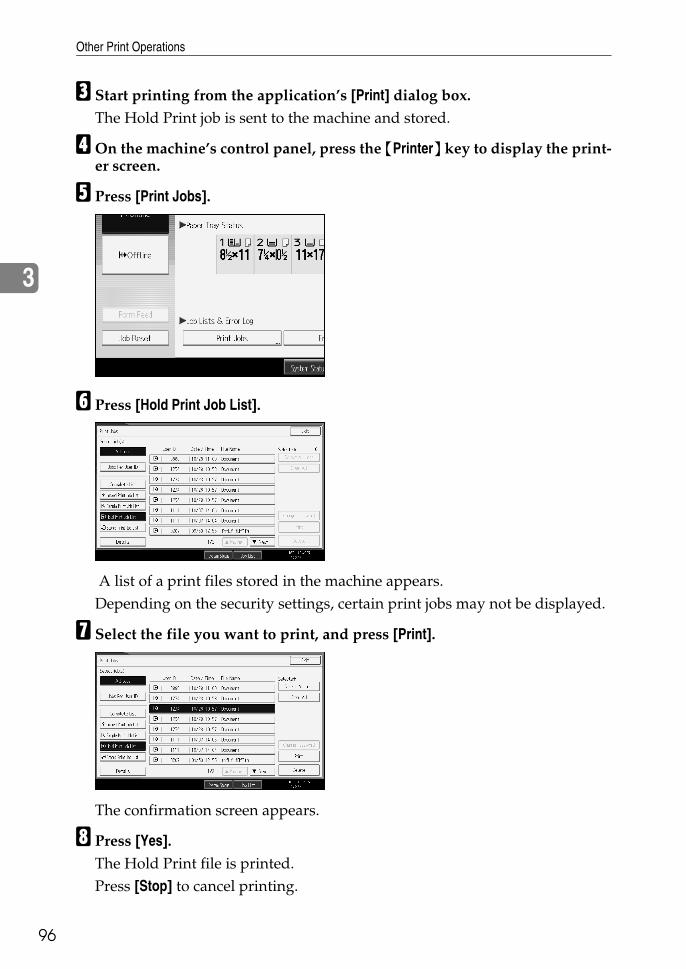
Other Print Operations
96
3
C Start printing from the application’s [Print] dialog box.The Hold Print job is sent to the machine and stored.
D On the machine’s control panel, press the {Printer} key to display the print-er screen.
E Press [Print Jobs].
F Press [Hold Print Job List].
A list of a print files stored in the machine appears.Depending on the security settings, certain print jobs may not be displayed.
G Select the file you want to print, and press [Print].
The confirmation screen appears.
H Press [Yes].The Hold Print file is printed.Press [Stop] to cancel printing.

Printing from the Print Job Screen
97
3
Note❒ When printing is completed, the stored file is deleted.❒ To stop printing after printing has started, press {Exit} until the Printer
screen appears, and then press [Job Reset]. The file will be deleted.
ReferenceFor details about setting printer drivers, see the printer driver Help. Youcan also print or delete a Hold Print file from Web Image Monitor. For de-tails, see Web Image Monitor Help.
Deleting Hold Print Files
A Press the {Printer} key to display the Printer screen.
B Press [Print Jobs].A list of print files stored in the machine appears.
C Press [Hold Print Job List].A list of a Hold Print files stored in the machine appears.Depending on the security settings, certain print jobs may not be displayed.
D Select the file you want to delete, and then press [Delete]The delete confirmation screen appears.
E Press [Yes] to delete the file.The selected file is deleted.If you do not want to delete the file, press [No].
Other Print Operations
98
3
Stored Print
As print files are not deleted after printing is completed, sending the same printfile every time is not necessary, effective when printing same files repeatedly.
Important❒ A Stored Print file cannot be stored if:
• the total number of Sample Print, Locked Print, Hold Print, and StoredPrint files in the machine is over 100. (The maximum number varies de-pending on the volume of data in files.)
• the file contains over 1,000 pages.• sent or stored files in the machine contain over 2,000 pages in total.
Note❒ If a Stored Print file has not been stored properly, check the error log on the
display panel.❒ Even after you turn off the machine, stored documents remain. However, the
[Auto Delete Temporary Print Jobs] or [Auto Delete Stored Print Jobs] settings areapplied first.
❒ If the application has a collate option, make sure it is not selected before send-ing a print job. By default, Stored Print jobs are automatically collated by theprinter driver. If a collate option is selected from the application's Print dialogbox, more prints than intended may be produced.
ReferenceFor details about the error log on the display panel, see p.110 “Checking theError Log”.For details about the [Auto Delete Temporary Print Jobs] and [Auto Delete StoredPrint Jobs], see “Printer Features”, General Settings Guide.
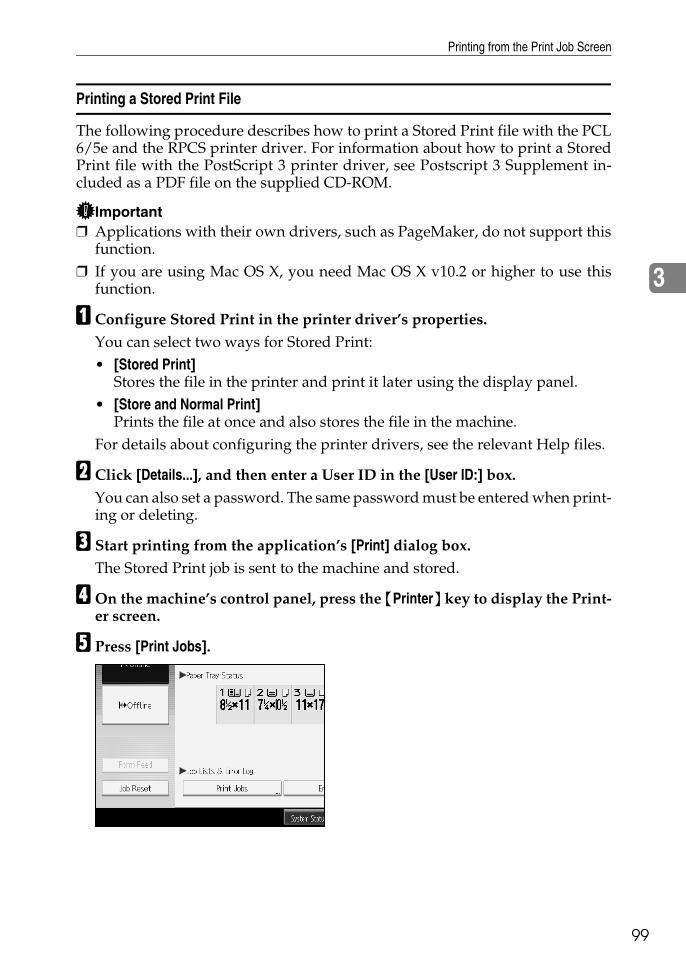
Printing from the Print Job Screen
99
3
Printing a Stored Print File
The following procedure describes how to print a Stored Print file with the PCL6/5e and the RPCS printer driver. For information about how to print a StoredPrint file with the PostScript 3 printer driver, see Postscript 3 Supplement in-cluded as a PDF file on the supplied CD-ROM.
Important❒ Applications with their own drivers, such as PageMaker, do not support this
function.❒ If you are using Mac OS X, you need Mac OS X v10.2 or higher to use this
function.
A Configure Stored Print in the printer driver’s properties.You can select two ways for Stored Print:• [Stored Print]
Stores the file in the printer and print it later using the display panel.• [Store and Normal Print]
Prints the file at once and also stores the file in the machine.For details about configuring the printer drivers, see the relevant Help files.
B Click [Details...], and then enter a User ID in the [User ID:] box.You can also set a password. The same password must be entered when print-ing or deleting.
C Start printing from the application’s [Print] dialog box.The Stored Print job is sent to the machine and stored.
D On the machine’s control panel, press the {Printer} key to display the Print-er screen.
E Press [Print Jobs].

Other Print Operations
100
3
F Press [Stored Print Job List].
A list of Stored Print files stored in the machine appears.
G Select the file you want to print, and press [Print].
The confirmation screen appears.If you set a password in the printer driver, a password confirmation screenappears. Enter the password.If multiple print files are selected, the machine prints files that correspond tothe entered password and files that do not require a password. The numberof files to be printed is displayed on the confirmation screen.If you forgot your password, ask your network administrator for help.
H Enter the number of sets using the number keys.
You can enter up to 999 sets.Press {Clear/Stop} to correct any entry mistakes.
I Press [Yes].The Stored Print file is printed.Press [Stop] to cancel printing.

Printing from the Print Job Screen
01
3
1
Note❒ When multiple print files are selected, the minimum number of set quan-
tity among all settings is applied.❒ When the number of set quantity is changed, the changed quantity is ap-
plied to all selected print files.❒ To stop printing after printing has started, press [Exit] until the Printer
screen appears, and then press [Job Reset]. A Stored Print file is not deletedeven if [Job Reset] is pressed.
❒ The Stored Print file that sent to the machine is not deleted unless you de-lete a file or select [Auto Delete Stored Print Jobs] (see “Printer Features”, Gen-eral Settings Guide).
ReferenceFor details about setting printer drivers, see the printer driver Help. Youcan also print or delete a Stored Print file from Web Image Monitor. For de-tails, see Web Image Monitor Help.
Deleting Stored Print Files
A Press the {Printer} key to display the Printer screen.
B Press [Print Jobs].A list of print files stored in the machine appears.
C Press [Stored Print Job List].A list of Stored Print files stored in the machine appears.Depending on the security settings, certain print jobs may not be displayed.
D Select the file you want to delete, and press [Delete].The delete confirmation screen appears.If you set the password in the printer driver, enter the password to delete.If multiple print files are selected, and some of these require a password, themachine deletes files that correspond to the entered password and files thatdo not require a password. The number of files to be deleted is displayed onthe confirmation screen.If you forgot the password, consult your network administrator.
E Press [Yes] to delete the file.The selected file is deleted.If you do not want to delete the file, press [No].

Other Print Operations
102
3
Printing from the Jobs Per User ID Screen
This describes how to print the files saved in the machine from the User IDscreen.
Printing the Selected Print Job
A Press the {Printer} key.The Printer screen appears.
B On the Printer screen, press [Print Jobs].
A list of user IDs whose files are stored in the machine appears.
C Press the user ID whose file you want to print.
You cannot select multiple user IDs at the same time.Press [UPrevious] or [TNext] to scroll through the list.Press [Clear] to cancel a selection.
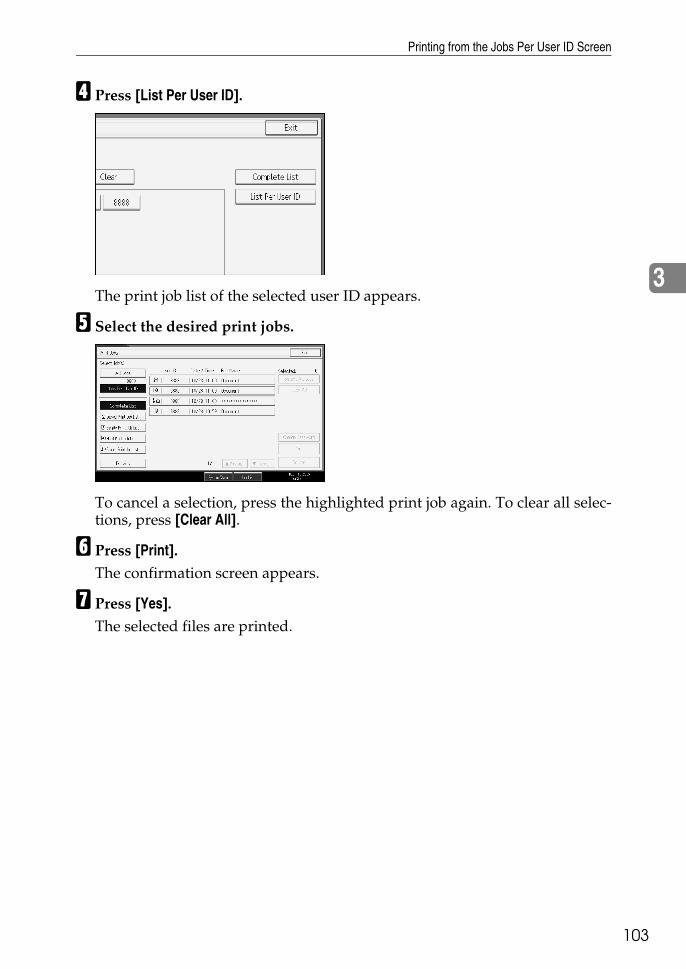
Printing from the Jobs Per User ID Screen
03
3
1
D Press [List Per User ID].
The print job list of the selected user ID appears.
E Select the desired print jobs.
To cancel a selection, press the highlighted print job again. To clear all selec-tions, press [Clear All].
F Press [Print].The confirmation screen appears.
G Press [Yes].The selected files are printed.
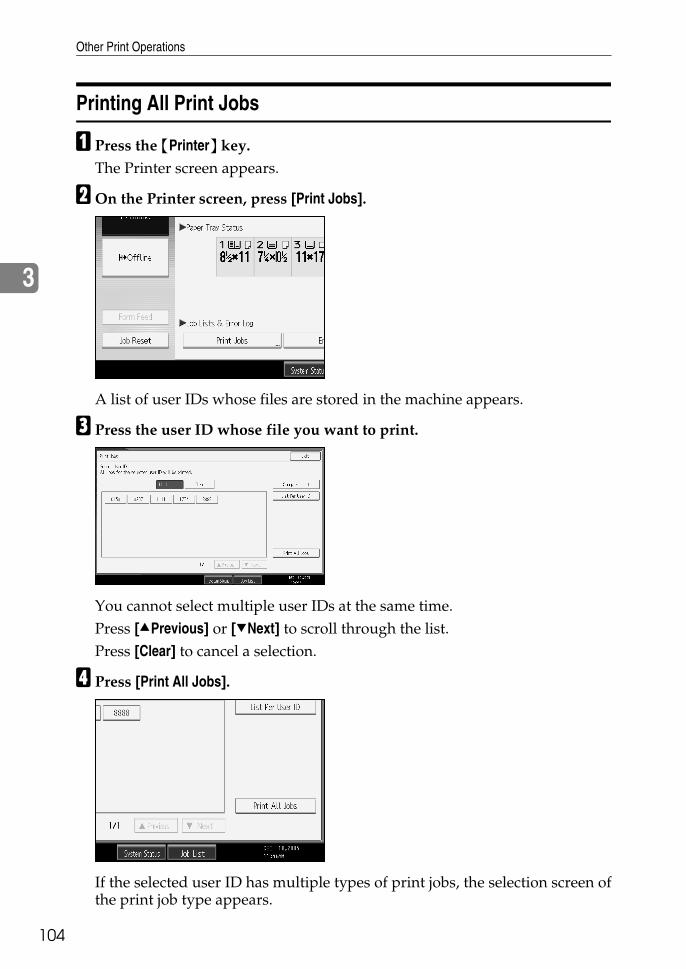
Other Print Operations
104
3
Printing All Print Jobs
A Press the {Printer} key.The Printer screen appears.
B On the Printer screen, press [Print Jobs].
A list of user IDs whose files are stored in the machine appears.
C Press the user ID whose file you want to print.
You cannot select multiple user IDs at the same time.Press [UPrevious] or [TNext] to scroll through the list.Press [Clear] to cancel a selection.
D Press [Print All Jobs].
If the selected user ID has multiple types of print jobs, the selection screen ofthe print job type appears.

Printing from the Jobs Per User ID Screen
05
3
1
E Select the desired print job type, and then press [OK].
The confirmation screen appears.The confirmation screen does not appear if the selected ID has only one typeof print jobs.
F Press [Yes].The selected files are printed.
Note❒ After printing is completed, Sample Print, Locked Print, and Hold Print
files are deleted.❒ You cannot select a print job that is not stored under the selected user ID.❒ If you select multiple Sample Print Files and do not specify the number of
sets on the confirmation screen, one set less than the number specified onthe computer is printed for every selected document. If the number of setsspecified on the computer is “1”, one set each is printed for every docu-ment.
❒ If you select Stored Print, the number you set on the confirmation screen isapplied to all files of the selected print job type. If you do not set a quantity,the minimum number is applied to all files.
❒ If you select Locked Print, enter the correct password. If there are multiplepasswords, the machine prints only files that correspond to the enteredpassword.
❒ If you select Stored Print files, and some of these require a password, themachine prints files that correspond to the entered password and files thatdo not require a password.

Other Print Operations
106
3
Form Feed
This section gives instructions for operating the machine when there is no tray forthe selected paper size or type, or when paper loaded in the machine has run out.
Important❒ The tray cannot be changed if the following functions are set:
• Staple• Punch• Duplex Print to a tray that does not support duplex printing• Cover Sheet• Front or Back Covers• Slip Sheet• Chaptering• Z-folf
Note❒ If form feed is selected for a tray with the following settings, you can change
the tray by canceling the settings:• Staple• Punch• Duplex Print to a tray that does not support duplex printing
❒ If Auto Continue is selected, form fed paper is printed after a set interval. See“Printer Features”, General Settings Guide.
Printing from a Selected Tray
If the machine does not have a tray for the selected paper size or paper type, orif the selected paper loaded in the machine has run out, a caution message ap-pears. If this message appears, do the following procedure.
A Press the {Printer} key.
B Select the tray for form feed from those that appear on the display panel.If you want to print after adding paper to the tray, select the tray after loadingthe correct paper.
C Press [OK].The machine prints using the selected tray.
Note❒ If a tray with a smaller paper size is selected, the print job may be cut short,
or other problems may occur.

Form Feed
07
3
1
Canceling a Print Job
Follow the procedure below for canceling the print job if the message promptingform feed appears.
A Press the {Printer} key.The Printer screen appears.
B Press [Job Reset].Delete the stored print jobs, and then cancel form feed.
C Press [Reset the Job] to cancel the current print job, or [Reset All Jobs] to cancelall jobs.A confirmation message appears.
D Press [Yes] to cancel the print job.Press [No] to return to the previous display.
Note❒ To resume printing print jobs, press [Resume Printing]❒ If the machine is shared by multiple computers, be careful not to acciden-
tally cancel someone else's print job.❒ Under Windows, if the machine is connected to the computer using a par-
allel cable, sent print jobs may be canceled if [Reset All Jobs] is pressedwhile “Waiting...” is on the display panel. After the interval set in [I/O Time-out] in Printer Features has passed, the next print job can be sent. A printjob sent from a different client computer will not be canceled in this case.
❒ You cannot stop printing data that has already been processed. For thisreason, printing may continue for a few pages after you press [Job Reset].
❒ A print job containing a large volume of data may take considerable timeto stop.
ReferenceFor details, see p.108 “Canceling a Print Job”.

Other Print Operations
108
3
Canceling a Print Job
This section gives instruction to stop printing from the computer or the displaypanel.
Canceling a Print Job Using the Control Panel
A Press the {Printer} key.The Printer screen appears.
B Press [Job Reset].
C Press [Reset the Job] or [Reset All Jobs].
• [Reset the Job]: cancels the print job currently being processed.• [Reset All Jobs]: cancels all jobs in the print queue.• [Resume Printing]: resumes printing print jobs.A confirmation message appears.
D Press [Yes] to cancel the print job.Press [No] to return to the previous display.
Canceling a Print Job
09
3
1
Windows - Canceling a Print Job from the computer
You can cancel a print job from the computer if transferring print jobs is not com-pleted.
A Double-click the printer icon on the Windows task tray.A window appears, showing all print jobs currently queued for printing.Check the current status of the job you want to cancel.
B Select the name of the job you want to cancel.
C On the [Document] menu, click [Cancel].
D Press the {Printer} key on the machine's control panel.
Note❒ If the machine is shared by multiple computers, be careful not to acciden-
tally cancel someone else's print job.❒ If the machine is connected to the computer using a parallel cable, sent
print jobs may be canceled if [Reset All Jobs] is pressed while “Waiting...”is on the display panel. After the interval set in [I/O Timeout] in Printer Fea-tures has passed, the next print job can be sent. A print job sent from a dif-ferent client computer will not be canceled in this case.
❒ Under Windows XP, Windows Server 2003, or Windows NT 4.0, click [Can-cel] on the [Document] menu.
❒ Under Windows 95/98/Me/2000 or Windows NT 4.0, you can also openthe print job queue window by double-clicking the machine icon in the[Printers] machine window (the [Printers and Faxes] window under Win-dows XP and Windows Server 2003).
❒ You cannot stop printing data that has already been processed. For thisreason, printing may continue for a few pages after you press [Job Reset].
❒ A print job containing a large volume of data may take considerable timeto stop.
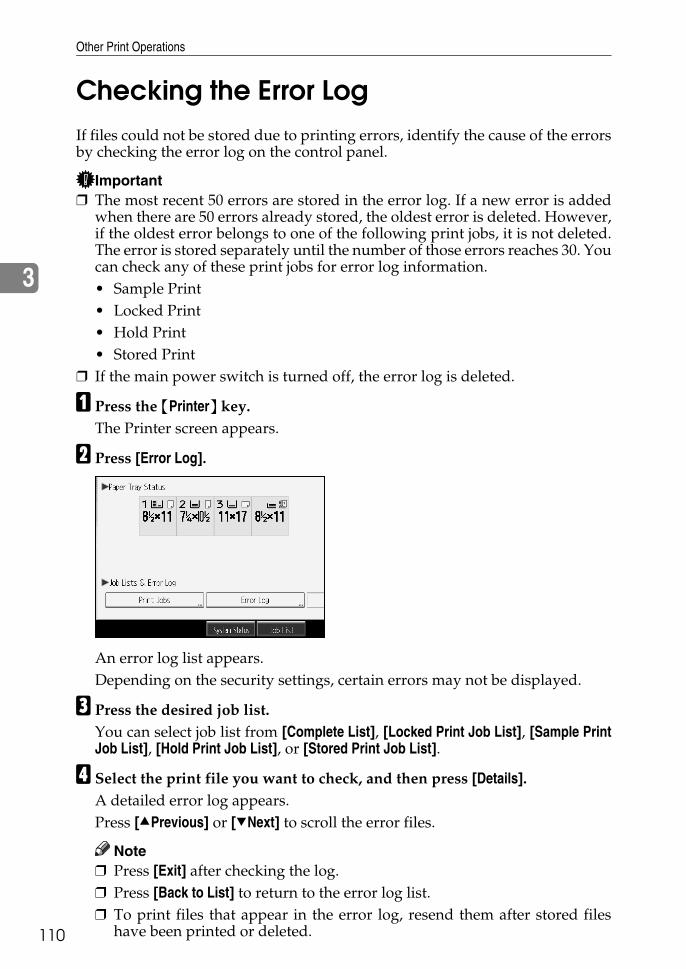
Other Print Operations
110
3
Checking the Error LogIf files could not be stored due to printing errors, identify the cause of the errorsby checking the error log on the control panel.
Important❒ The most recent 50 errors are stored in the error log. If a new error is added
when there are 50 errors already stored, the oldest error is deleted. However,if the oldest error belongs to one of the following print jobs, it is not deleted.The error is stored separately until the number of those errors reaches 30. Youcan check any of these print jobs for error log information.• Sample Print• Locked Print• Hold Print• Stored Print
❒ If the main power switch is turned off, the error log is deleted.
A Press the {Printer} key.The Printer screen appears.
B Press [Error Log].
An error log list appears.Depending on the security settings, certain errors may not be displayed.
C Press the desired job list.You can select job list from [Complete List], [Locked Print Job List], [Sample PrintJob List], [Hold Print Job List], or [Stored Print Job List].
D Select the print file you want to check, and then press [Details].A detailed error log appears.Press [UPrevious] or [TNext] to scroll the error files.
Note❒ Press [Exit] after checking the log.❒ Press [Back to List] to return to the error log list.❒ To print files that appear in the error log, resend them after stored files
have been printed or deleted.
Spool Printing
11
3
1
Spool Printing
Spool Printing allows print jobs transferred from a computer to be temporarilystored, and then prints them after they are transferred. This shortens printingtime as it maximizes printer efficiency.
Important❒ During Spool Printing, the hard disk is accessed and the Data In indicator
blinks. Turning off the computer or machine during Spool Printing can dam-age the hard disk. Also, if the computer or machine is turned off during SpoolPrinting, spooled jobs will be deleted. Therefore, do not turn the power of thecomputer or machine off during Spool Printing.
❒ If data is sent to the machine using other protocols besides diprint, lpr, ipp,ftp, sftp, and smb, Spool Printing cannot be performed.
❖ Setting Spool PrintingSpool Printing can be set using telnet or Web Image Monitor.• Using Web Image Monitor
See Network Guide or Help for more information.• Using telnet
Type in “spoolsw spool on” to set Spool Printing.See Network Guide for more information about telnet.
❖ Viewing a list of spool jobs on the display panelIf Spool Printing is set, a list of spooled jobs can be viewed on the display pan-el screen.Press the {Printer} key, and then press [Spooling Job List]. A list of spooled jobsappears.• Deleting jobs
Select files to be deleted, and then press [Delete].
❖ Viewing/Deleting spool jobs in Web Image MonitorStart Web Image Monitor and enter the machine's IP address in the addressbar. This displays the top page.For more information, see Network Guide.
Note❒ Up to a maximum of 150 jobs at once can be spool printed.❒ If Spool Printing is not set, you cannot select [Spooling Job List].❒ Printing the first page with Spool Printing will be slow.❒ The computer requires less print processing time when large amounts of data
are spooled.❒ Stored spool jobs can be viewed or deleted using Web Image Monitor.
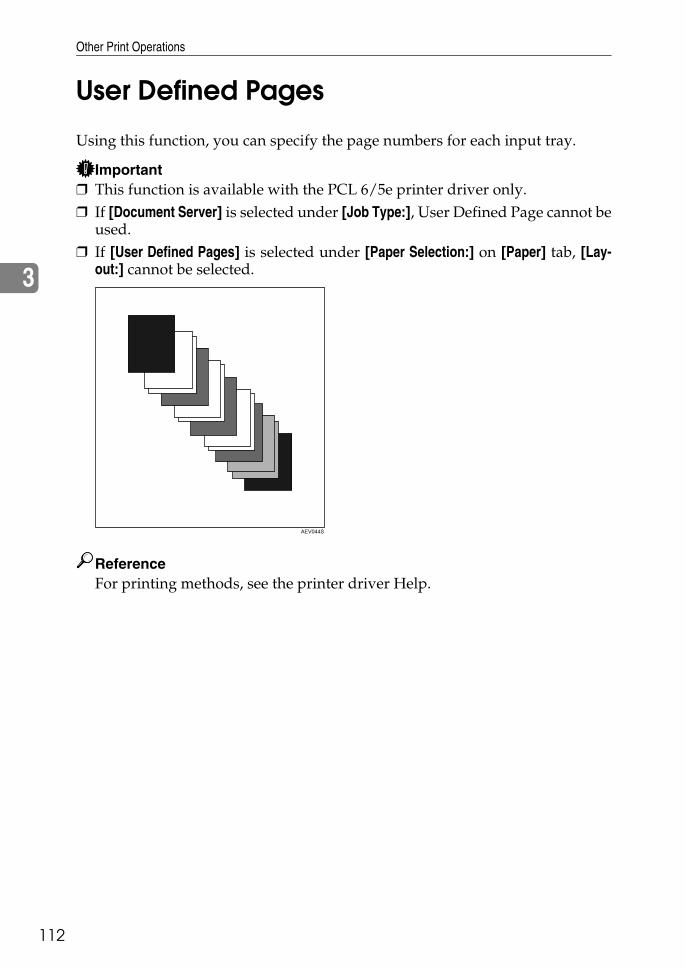
Other Print Operations
112
3
User Defined Pages
Using this function, you can specify the page numbers for each input tray.
Important❒ This function is available with the PCL 6/5e printer driver only.❒ If [Document Server] is selected under [Job Type:], User Defined Page cannot be
used.❒ If [User Defined Pages] is selected under [Paper Selection:] on [Paper] tab, [Lay-
out:] cannot be selected.
ReferenceFor printing methods, see the printer driver Help.
AEV044S
Printing with the Finisher
13
3
1
Printing with the Finisher
You can collate, staple, or punch holes in printed paper by installing the optionalfinisher. Make sure you read the following precautions when using the optionalfinisher.
Important❒ Make option settings for the machine using the printer driver when bidirec-
tional communication is disabled. ❒ Be sure to set the paper size and paper orientation in the printer driver when
using duplex printing, booklet printing, combined printing (layout), stapleand punch functions.
❒ The machine can have only one of the following installed at any one time:3,000Sheet-50Sheet Staple Finisher, 3,000Sheet-100Sheet Staple Finisher,Booklet Finisher, Shift Tray, or Copy Tray.
❒ The optional Mailbox can be installed with the 3,000Sheet-50Sheet Staple Fin-isher or Booklet Finisher. The optional Mailbox cannot be installed if the3,000Sheet-100Sheet Staple Finisher, Shift Tray, or Copy Tray is installed.
Note❒ Depending on the application, print settings may not be enabled and printed
output may not be as expected.❒ When setting Staple or Collate in the printer driver, make sure that the Collate
check box is cleared in the application's [Print] dialog box. If Collate is enabledin the application, printing will not be as intended.
❒ When printing restarts after removing jammed paper, the printing positionmay be different, depending on the location of the jam.• If the paper jam occurred in the optional finisher, printing will restart from
the top page of the data currently being printed, or from the page wherethe paper jam occurred.
• If the paper jam occurred in the machine, printing will restart from thepage where the paper jam occurred.
❒ Even if the paper jam occurred in the machine, the error will not be clearedunless the cover of the finisher is opened and closed.
ReferenceFor details about duplex printing, booklet printing, or combined printing(layout), see the printer driver Help.For information about optional finishers, see General Settings Guide.To remove paper misfeeds, see Trouble Shooting.
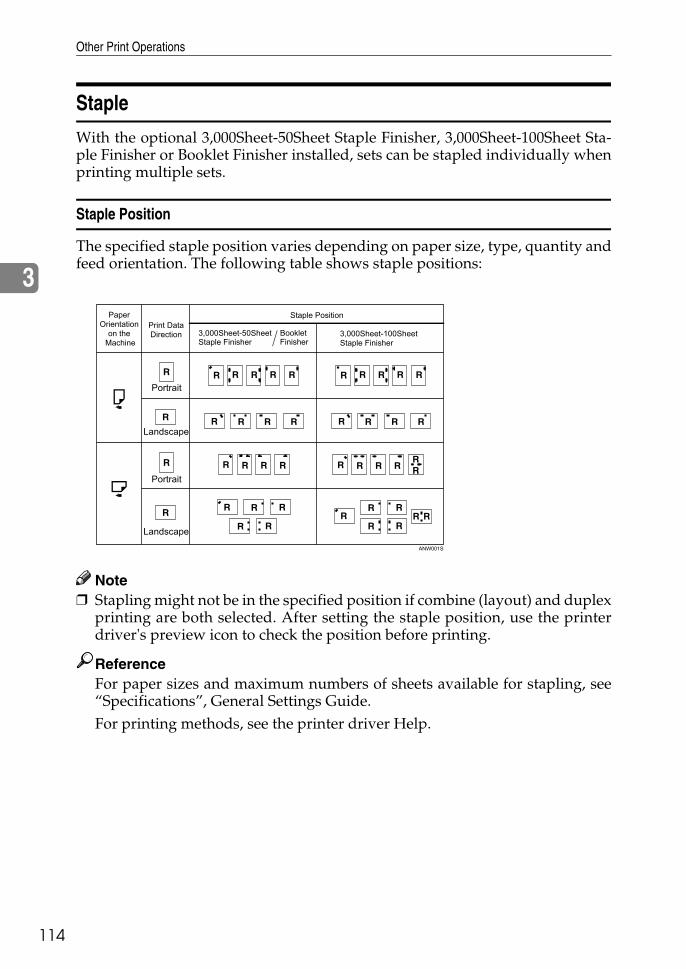
Other Print Operations
114
3
Staple
With the optional 3,000Sheet-50Sheet Staple Finisher, 3,000Sheet-100Sheet Sta-ple Finisher or Booklet Finisher installed, sets can be stapled individually whenprinting multiple sets.
Staple Position
The specified staple position varies depending on paper size, type, quantity andfeed orientation. The following table shows staple positions:
Note❒ Stapling might not be in the specified position if combine (layout) and duplex
printing are both selected. After setting the staple position, use the printerdriver's preview icon to check the position before printing.
ReferenceFor paper sizes and maximum numbers of sheets available for stapling, see“Specifications”, General Settings Guide.For printing methods, see the printer driver Help.
ANW001S
Printing with the Finisher
15
3
1
Stapling Precautions
Important❒ Stapling can be done only with the optional finisher installed.
❖ Staple printing will be canceled under the following conditions:• If the number of pages exceeds maximum for stapling.• If a paper size that cannot be stapled is selected.• If a paper type that cannot be stapled is selected.• If positions other than those fixed for stapling are specified.• If there are inconsistencies between the orientation in the duplex mode and
the staple position.• If there are inconsistencies between the orientation in letterhead mode and
the staple position.• If paper sizes are mixed when a different paper size is specified during a
print job.• When feeding paper from the bypass tray.• When staples have run out and Auto Continue is set (Printing will contin-
ue without stapling after the message has been displayed).• When only 1 page is printed When staples have run out.
Note❒ When the stapling is cancelled, “BD: Staple has been cancelled.” appears. ❒ If Staple or Shift Collate is selected with the optional 3,000Sheet-50Sheet Sta-
ple Finisher, 3,000Sheet-100Sheet Staple Finisher and Booklet Finisher in-stalled, the paper will be output to the finisher shift tray irrespective of thesetting.
❒ When printing on letterhead, stapling may not be at the specified position. ❒ If you cannot make staple settings even with 3,000Sheet-50Sheet Staple Fin-
isher, 3,000Sheet-100Sheet Staple Finisher, and Booklet Finisher installed, op-tions may not be set correctly in the printer driver. Correct option settings inthe printer driver. For details, see the printer driver Help.
❒ When the finisher is being used for another function's job (for example, a copyjob), printing will start after that job ends.
❒ Be sure to set paper size and orientation in the printer driver when stapling. ❒ When duplex printing is selected, adjust staple positions to the binding orien-
tation. ❒ Depending on the software you are using, print settings may not be saved
and the printed result may not be as expected. ❒ When setting Staple in the printer driver settings, make sure that a collate op-
tion is not selected in the print settings of the application. If a collate option isselected in the application, printing will not be as intended.

Other Print Operations
116
3
Punch
With the optional 3,000Sheet-50Sheet Staple Finisher, 3,000Sheet-100Sheet Sta-ple Finisher, Booklet Finisher, or both the Mailbox and Punch Kit is installed,holes can be punched into printed output.
Punch Position
The specified punch position varies depending on paper feed and print data ori-entation. The following table shows punch positions:
Note❒ Punch positions will vary slightly from page to page as holes are punched
into each sheet individually.
ReferenceFor information about paper sizes that can be punched, see “Specifications”,General Settings Guide.For printing methods, see the printer driver Help.
ANV101S
Printing with the Finisher
17
3
1
Punching Precautions
Follow these precautions when using the punch function.
Important❒ This function is possible only when the optional 3,000Sheet-50Sheet Staple
Finisher, 3,000Sheet-100Sheet Staple Finisher, or both the Mailbox and PunchKit is installed.
❖ Punch printing will be canceled under the following conditions:• When a paper type that cannot be punched is selected.• When a paper size that cannot be punched is selected.• If positions other than those fixed for punching are specified.• If there are inconsistencies between the orientation in duplex mode and the
punch position.• If there are inconsistencies between the orientation in letterhead mode and
the punch position.• When feeding paper from the bypass tray.• When the punch receptacle has become full and Auto Continue is set
(Printing will continue without punching after the message appears).• If there are inconsistencies between the staple position and the punch po-
sition, when using with staple function.
Note❒ When the punching is cancelled, “BE: Punch has been cancelled.” appears.❒ Punching might not be in the specified position when printing on letterhead
paper.❒ If you cannot make punch settings even with the optional finisher installed,
options may not be set correctly in the printer driver. Correct option settingsin the printer driver. For details, see the printer driver Help.
❒ When duplex print is selected, adjust the punch position to the binding direction. ❒ Be sure to set the punch position the same as the staple position when using
it with the staple function.❒ Be sure to set paper size and orientation in the printer driver when punching. ❒ Depending on the application, print settings may not be enabled and printed
output may not be as expected.❒ When setting Punch in the printer driver settings, make sure that a collate op-
tion is not selected in the print settings of the application. ❒ If a collate option is selected in the application, printing will not be as intended.❒ The punch function and Z-fold function cannot be selected concurrently.
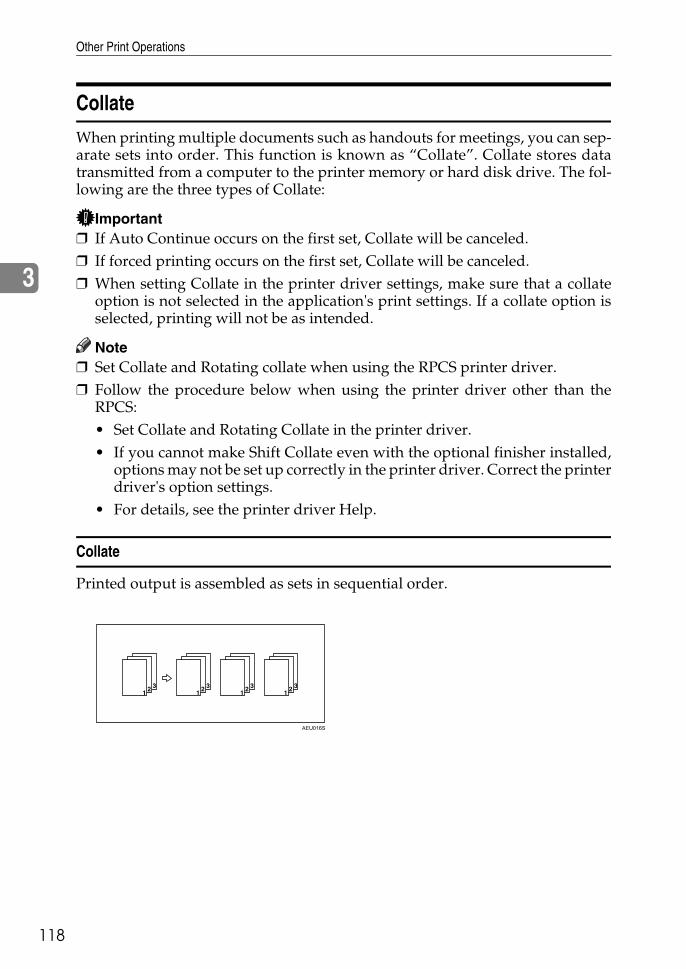
Other Print Operations
118
3
Collate
When printing multiple documents such as handouts for meetings, you can sep-arate sets into order. This function is known as “Collate”. Collate stores datatransmitted from a computer to the printer memory or hard disk drive. The fol-lowing are the three types of Collate:
Important❒ If Auto Continue occurs on the first set, Collate will be canceled.❒ If forced printing occurs on the first set, Collate will be canceled.❒ When setting Collate in the printer driver settings, make sure that a collate
option is not selected in the application's print settings. If a collate option isselected, printing will not be as intended.
Note❒ Set Collate and Rotating collate when using the RPCS printer driver.❒ Follow the procedure below when using the printer driver other than the
RPCS:• Set Collate and Rotating Collate in the printer driver.• If you cannot make Shift Collate even with the optional finisher installed,
options may not be set up correctly in the printer driver. Correct the printerdriver's option settings.
• For details, see the printer driver Help.
Collate
Printed output is assembled as sets in sequential order.
AEU016S
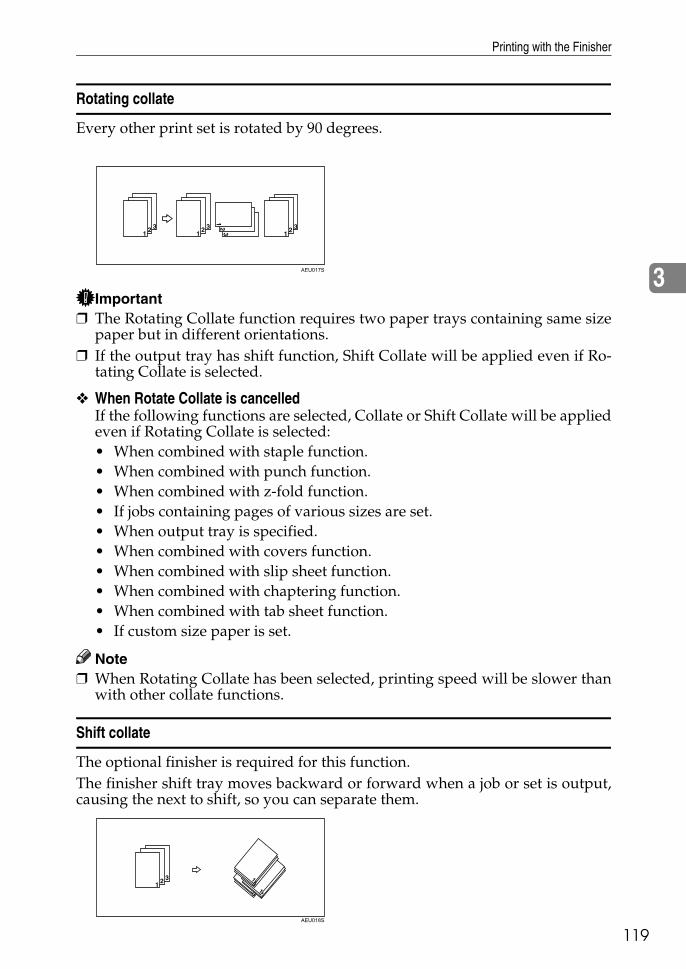
Printing with the Finisher
19
3
1
Rotating collate
Every other print set is rotated by 90 degrees.
Important❒ The Rotating Collate function requires two paper trays containing same size
paper but in different orientations.❒ If the output tray has shift function, Shift Collate will be applied even if Ro-
tating Collate is selected.
❖ When Rotate Collate is cancelledIf the following functions are selected, Collate or Shift Collate will be appliedeven if Rotating Collate is selected:• When combined with staple function.• When combined with punch function.• When combined with z-fold function.• If jobs containing pages of various sizes are set.• When output tray is specified.• When combined with covers function.• When combined with slip sheet function.• When combined with chaptering function.• When combined with tab sheet function.• If custom size paper is set.
Note❒ When Rotating Collate has been selected, printing speed will be slower than
with other collate functions.
Shift collate
The optional finisher is required for this function. The finisher shift tray moves backward or forward when a job or set is output,causing the next to shift, so you can separate them.
AEU017S
AEU018S

Other Print Operations
120
3
Covers
Using this function, you can insert cover and back sheets fed from a differenttray to that of the main paper, and print on them.
Important❒ To use this function, Collate must be set. Rotating Collate cannot be set.❒ The cover sheets should be the same size and orientation as the body of the
paper.
❖ Cover sheetPrints the first page of the document on the sheet for the cover page.• Print on one side
Prints on one side of the cover sheet only, even when duplex printing is se-lected.
• Print on both sidesPrints on both sides of the cover sheet when duplex printing is selected.• Front cover printed on both sides
• Front cover printed on one side
AEV016S
AEV017S
AEV032S
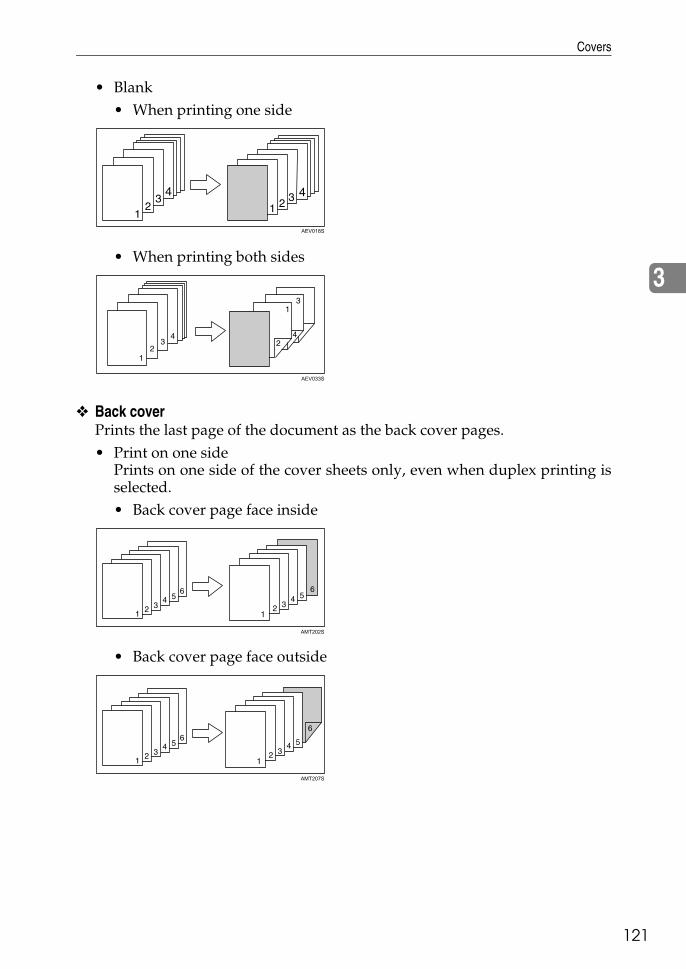
Covers
21
3
1
• Blank• When printing one side
• When printing both sides
❖ Back coverPrints the last page of the document as the back cover pages.• Print on one side
Prints on one side of the cover sheets only, even when duplex printing isselected.• Back cover page face inside
• Back cover page face outside
AEV018S
AEV033S
AMT202S
AMT207S

Other Print Operations
122
3
• Print on both sidesPrints on both sides of the cover sheets when duplex printing is selected.• Back cover page face inside, and the number of pages is odd
• Back cover page face outside, and the number of pages is odd
• Back cover page face inside, and the number of pages is even
• Back cover page face outside, and the number of pages is even
AMT203S
AMT204S
AMT205S
AMT206S
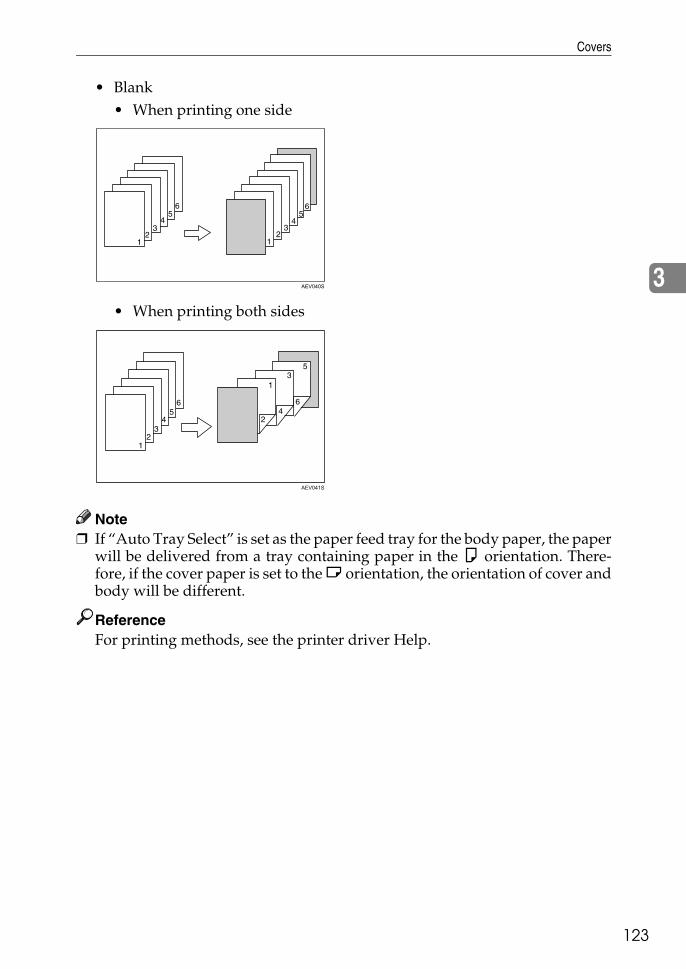
Covers
23
3
1
• Blank• When printing one side
• When printing both sides
Note❒ If “Auto Tray Select” is set as the paper feed tray for the body paper, the paper
will be delivered from a tray containing paper in the K orientation. There-fore, if the cover paper is set to the L orientation, the orientation of cover andbody will be different.
ReferenceFor printing methods, see the printer driver Help.
AEV040S
AEV041S
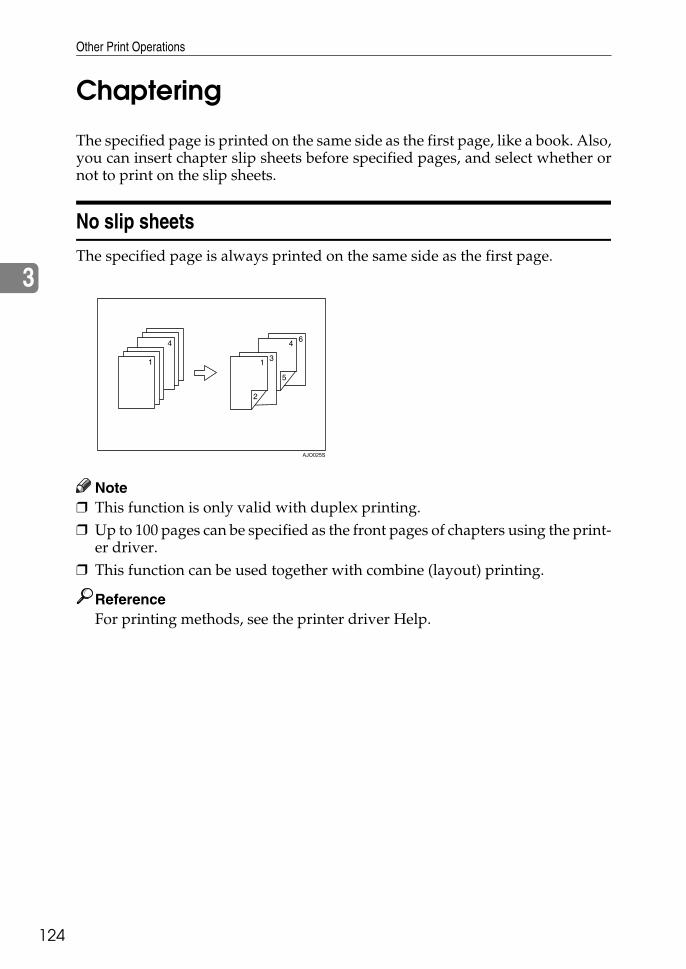
Other Print Operations
124
3
Chaptering
The specified page is printed on the same side as the first page, like a book. Also,you can insert chapter slip sheets before specified pages, and select whether ornot to print on the slip sheets.
No slip sheets
The specified page is always printed on the same side as the first page.
Note❒ This function is only valid with duplex printing.❒ Up to 100 pages can be specified as the front pages of chapters using the print-
er driver.❒ This function can be used together with combine (layout) printing.
ReferenceFor printing methods, see the printer driver Help.
AJO025S
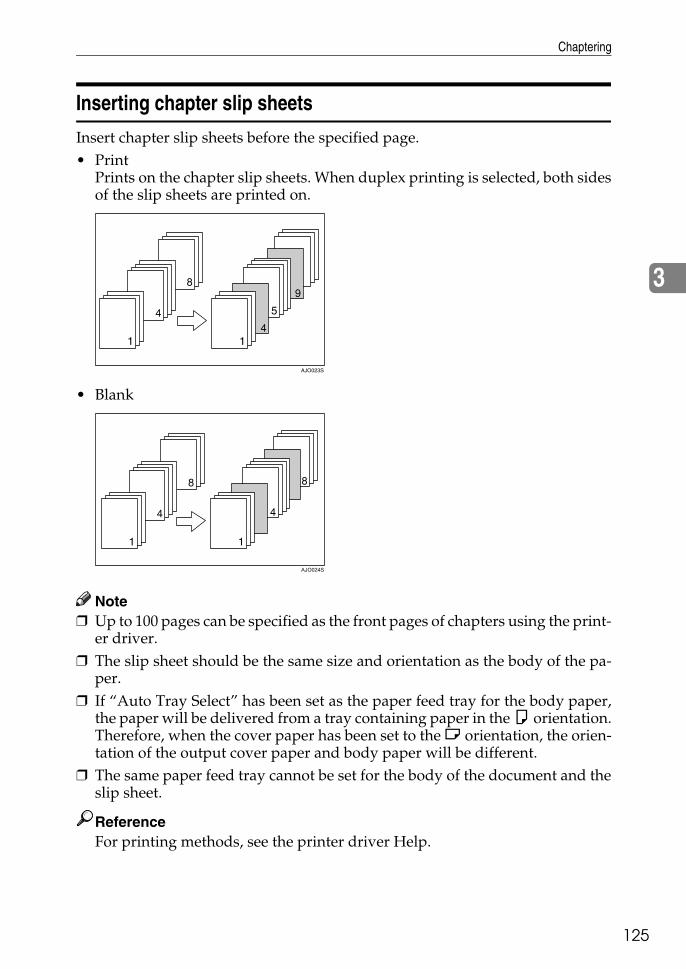
Chaptering
25
3
1
Inserting chapter slip sheets
Insert chapter slip sheets before the specified page.• Print
Prints on the chapter slip sheets. When duplex printing is selected, both sidesof the slip sheets are printed on.
• Blank
Note❒ Up to 100 pages can be specified as the front pages of chapters using the print-
er driver.❒ The slip sheet should be the same size and orientation as the body of the pa-
per.❒ If “Auto Tray Select” has been set as the paper feed tray for the body paper,
the paper will be delivered from a tray containing paper in the K orientation.Therefore, when the cover paper has been set to the L orientation, the orien-tation of the output cover paper and body paper will be different.
❒ The same paper feed tray cannot be set for the body of the document and theslip sheet.
ReferenceFor printing methods, see the printer driver Help.
AJO023S
AJO024S

Other Print Operations
126
3
Slip Sheet❖ a slip sheet between each page
• Blank
❖ Inserting a slip sheet between OHP transparencies• Print
• Blank
Note❒ Collate cannot be set when using slip sheets.❒ When the duplex printing or cover printing is set, you cannot insert slip sheets.❒ The slip sheet should be the same size and orientation as the main paper.❒ If “Auto Tray Select” has been set as the paper feed tray for the body paper,
the paper will be delivered from a tray containing paper in K orientation.Therefore, when the cover paper has been set to L orientation, the orienta-tion of the output cover paper and body paper will be different.
❒ The same paper feed tray cannot be set for the main paper and slip sheets.
AEV019S
AEU023S
AEV020S
AEU024S
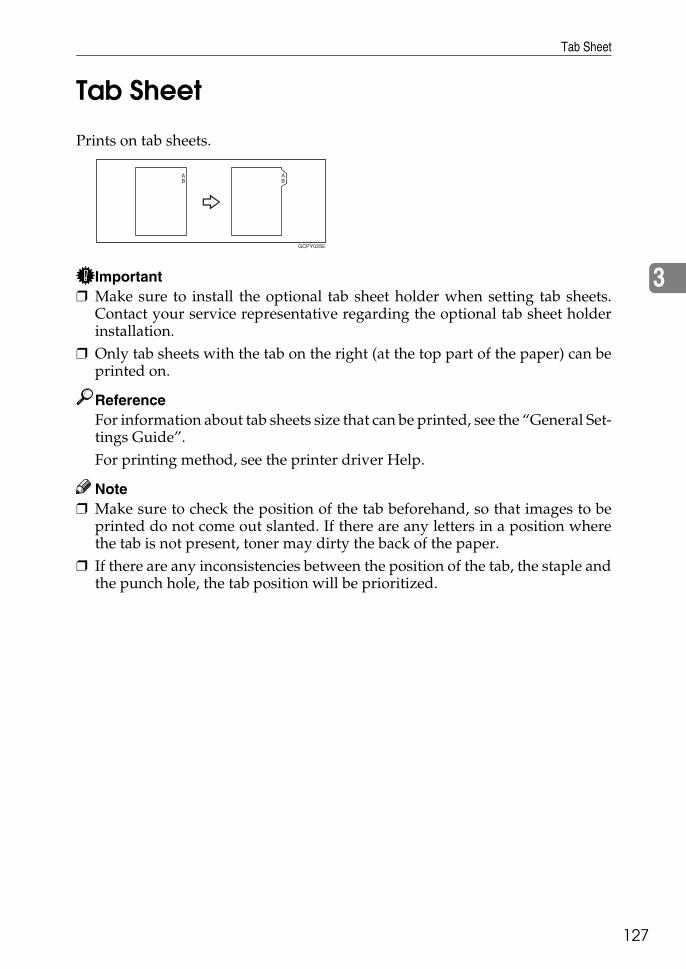
Tab Sheet
27
3
1
Tab Sheet
Prints on tab sheets.
Important❒ Make sure to install the optional tab sheet holder when setting tab sheets.
Contact your service representative regarding the optional tab sheet holderinstallation.
❒ Only tab sheets with the tab on the right (at the top part of the paper) can beprinted on.
ReferenceFor information about tab sheets size that can be printed, see the “General Set-tings Guide”.For printing method, see the printer driver Help.
Note❒ Make sure to check the position of the tab beforehand, so that images to be
printed do not come out slanted. If there are any letters in a position wherethe tab is not present, toner may dirty the back of the paper.
❒ If there are any inconsistencies between the position of the tab, the staple andthe punch hole, the tab position will be prioritized.
GCPY025E

Other Print Operations
128
3
Z-fold
You can Z-fold prints when the optional Z-folding unit and the optional3,000Sheet-100Sheet Staple Finisher or Booklet Finisher are attached.
Folding Positions
When Z-folding, select the folding positions for the front page using the printerdriver.The relationship between the size of the front page and that of subsequent pagesdetermines whether the subsequent pages can be Z-folded.
*1 Select the folding position according to the print direction.*2 If the size of the paper is the same as that of the front page, the paper can be Z-folded
only if the front page can be Z-folded.
AEW009S
AC
AC
CA
ABC
ABC
ABC
ABC ABC
Folding position*1
Right fold Z-fold not possible
Z-fold possible
Z-fold not possible
Z-fold possible
Z-fold not possible
Z-fold possible
Bottom fold
Left fold
Right fold
Bottom fold
Left fold
ResultPrint direction
Feeddirection
Front page
AEW010S
Paper size
Subsequent pages
Larger than front page
Smaller than front page
Z-fold possible
Z-fold not possible
Result*2

Z-fold
29
3
1
Notes on the Z-fold Function
Follow these precautions when using the punch function.
❖ Z-folding will be canceled under the following conditions:• When the Z-fold function is not supported for the selected paper type• The Z-fold function is not supported for OHP transparencies, labels, thick
paper, translucent paper, and tab stock paper.• When form feeding is used• When the paper is fed from the optional interposer tray• The rotating collate and auto tray switching cannot be used when Z-folding.• When using Booklet Finisher.
Note❒ You can Z-fold with A3, A4, B4, 11"×17", 8 1/2"×11", and 8 1/2"×14" paper.❒ Z-folded paper can be stapled.❒ When stapling Z-folded paper, fewer sheets than normal can be stapled to-
gether. This is because a single Z-folded sheet is equivalent to 10 non-Z-fold-ed sheets.
❒ The Z-fold function and punch function cannot be used together. If the Z-foldfunction is used, punch function settings are canceled.
The output has the following appearance:
ANW013S
ABC
A B C
A B CABC
ABC ABC
ABC
ABCABC A
BC A
BC A
BC
AB
C
AB
C
ABC
RABC
RABC
R
ABC R
AB
C
R
R
A C
RAC
AC AC
RCA
CA CA
ABC
AC
AC AC
AB
C
AC
ABC
CA
CA CA
A C
CA
A C
CA
Left foldRight fold Bottom fold
A4 A4
A4 A4
A4 A3
A4 A3
A4 A5
A4 A5
Front page, Subsequent pages

Other Print Operations
130
3
4. Saving and Printing Usingthe Document Server
31
1Accessing the Document Server
The Document Server enables you to store documents on the machine's harddisk, allowing you to edit and print as you, and when you, want.
Important❒ Applications with their own drivers, such as PageMaker, do not support this
function.
Note❒ When you use the Document Server, the following functions can be selected
using the machine's control panel:• Copies• Collate• Duplex• Staple• Z-fold• Paper selection: Paper source tray, paper type, paper output tray.• Functions related to paper selection: Cover Sheet, Slip Sheet.
❒ The above items are dimmed, so you cannot set them from the printer prop-erties dialog box when the Document Server is selected.
❒ You must enter a user ID, using up to eight alphanumeric characters.❒ You should enter a Password and File Name to distinguish the job from others.❒ Up to 3,000 files can be stored in the Document Server. No new files can be
stored after 3,000 is reached. Even if less than 3,000 files are stored, new filescannot be stored when• a file to be stored contains more than 2,000 pages,• the total number of pages contained in files stored exceeds 10,000,• the hard disk is full.
❒ The Document Server also stores files scanned using the Automatic Docu-ment Feeder (ADF) or exposure glass. You should delete unnecessary storedfiles once in a while so as not to exceed the capacity of the hard disk. For de-tails about deleting stored files, see General Settings Guide.
❒ When using the hard disk for functions other than those of Document Server,you may not be able to store new files in the Document Server, even if thereare less than 3,000 files stored.
ReferenceFor more information about Document Server functions, see General SettingsGuide.For information about how to access Document Server from a client, see theprinter driver Help.

Saving and Printing Using the Document Server
132
4

5. The Functions and Settingsof the Machine
33
1Mainframe
Network Guide, PostScript 3 Supplement, and UNIX Supplement cover all mod-els, and therefore contain all the functions and settings. This chapter describesthe functions and setting items used for configuring the model you are using.
ReferenceFor details about functions and setting items, see Network Guide, PostScript3 Supplement and UNIX Supplement.
Functions
The following functions are available with the machine:• Copy• Printer• Scanner• Document Server
Note❒ The machine must be equipped with the Printer/Scanner Unit in order to use
the printer or scanner function.
Interface
The following interfaces are available with the machine:• Ethernet (100BASE-TX/10BASE-T)• USB (2.0)• IEEE 1284 (Parallel)(Optional)• IEEE 1394 (Optional)• IEEE 802.11b (Wireless LAN)(Optional)• Bluetooth (Optional)• Ethernet (1000BASE-T)(Optional)
Note❒ To use the IEEE 1284, IEEE 1394, IEEE 802.11b (wireless LAN), Bluetooth or
Ethernet (Optional) interface, the machine must be equipped with the corre-sponding unit for that interface.
❒ You cannot have the IEEE 1394, IEEE 1284, IEEE 802.11b (wireless LAN), andBluetooth interface on the machine at the same time.
❒ You cannot have the standard Ethernet and the optional Ethernet interface onthe machine at the same time.

The Functions and Settings of the Machine
134
5
List of the Setting Items
Web Image Monitor
The following tables show Web Image Monitor items that can be viewed or mod-ified depending on the selected mode on the Web browser.Select one of the following modes to log on Web Image Monitor:• User mode: log on as a user• Administrator mode: log on as an administrator
❖ Home• Status
• Configuration
• Counter
• Inquiry
Menu User mode Administrator mode
Toner Read Read
Input Tray Read Read
Output Tray Read Read
Menu User mode Administrator mode
Function Read Read
System Read Read
Version Read Read
Printer Language Read Read
Menu User mode Administrator mode
Copier Read Read
Printer Read Read
Send/TX Total Read Read
Scanner Send Read Read
Other Function (s) Read Read
Menu User mode Administrator mode
Machine Maitenance/Re-pair
Read Read
Sales Representative Read Read
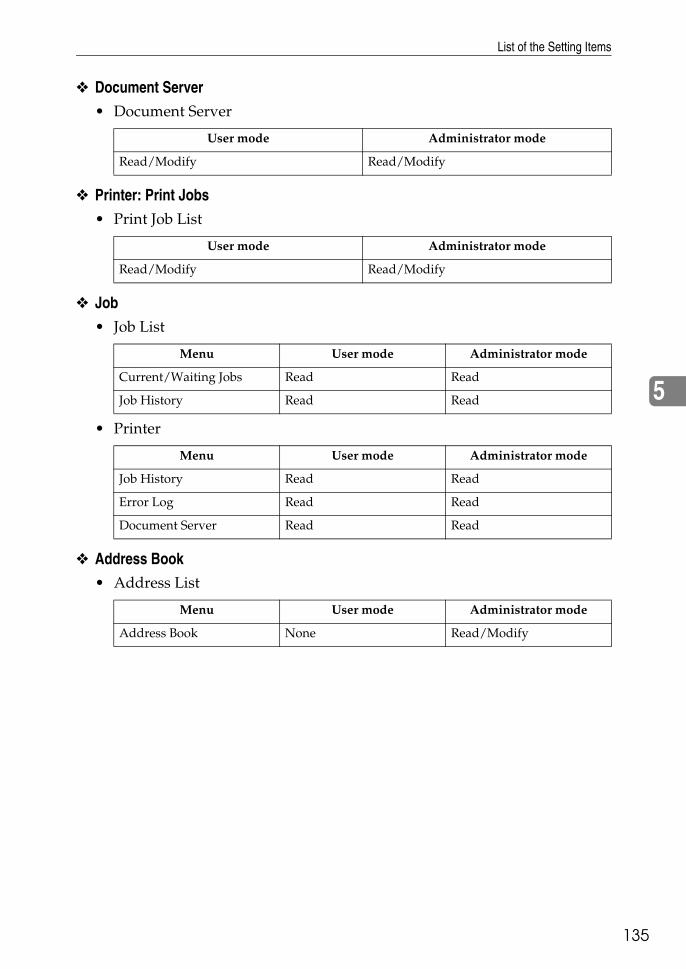
List of the Setting Items
35
5
1
❖ Document Server• Document Server
❖ Printer: Print Jobs• Print Job List
❖ Job• Job List
• Printer
❖ Address Book• Address List
User mode Administrator mode
Read/Modify Read/Modify
User mode Administrator mode
Read/Modify Read/Modify
Menu User mode Administrator mode
Current/Waiting Jobs Read Read
Job History Read Read
Menu User mode Administrator mode
Job History Read Read
Error Log Read Read
Document Server Read Read
Menu User mode Administrator mode
Address Book None Read/Modify

The Functions and Settings of the Machine
136
5
❖ Configuration• Device Settings
• Printer
• Interface
Menu User mode Administrator mode
System Read Read/Modify
Paper Read Read/Modify
Date/Time Read Read/Modify
Timer Read Read/Modify
Logs Read Read/Modify
E-mail Read Read/Modify
Auto E-mail Notification None Read/Modify
On-demand E-mail Notifi-cation
None Read/Modify
File Transfer None Read/Modify
User Authentication Man-agement
None Read/Modify
Administrator Authentica-tion Management
None Read/Modify
Program/Change Adminis-trator
None Read/Modify
LDAP Server None Read/Modify
Menu User mode Administrator mode
Basic Settings Read Read/Modify
Tray Parameters (PCL) None Read/Modify
Tray Parameters (PS) None Read/Modify
PDF Temporary Password Modify None
PDF Group Password None Modify
PDF Fixed Password None Modify
Menu User mode Administrator mode
Interface Settings Read Read/Modify

List of the Setting Items
37
5
1
• Network
• Security
• RC Gate
• Webpage
Menu User mode Administrator mode
IPv4 Read Read/Modify
IPv6 Read Read/Modify
NetWare Read Read/Modify
AppleTalk Read Read/Modify
SMB Read Read/Modify
SNMP None Read/Modify
SNMPv3 None Read/Modify
SSDP None Read/Modify
Bonjour Read Read/Modify
System Log Read Read
Menu User mode Administrator mode
Network Security None Read/Modify
Access Control None Read/Modify
IPP Authentication None Read/Modify
SSL/TLS None Read/Modify
ssh None Read/Modify
Site Certificates None Read/Modify
DeviceCertificates None Read/Modify
Menu User mode Administrator mode
Setup RC Gate None Read/Modify
Update RC Gate Firmware None Read/Modify
RC Gate Proxy None Read/Modify
Menu User mode Administrator mode
Webpage Read/Modify Read/Modify
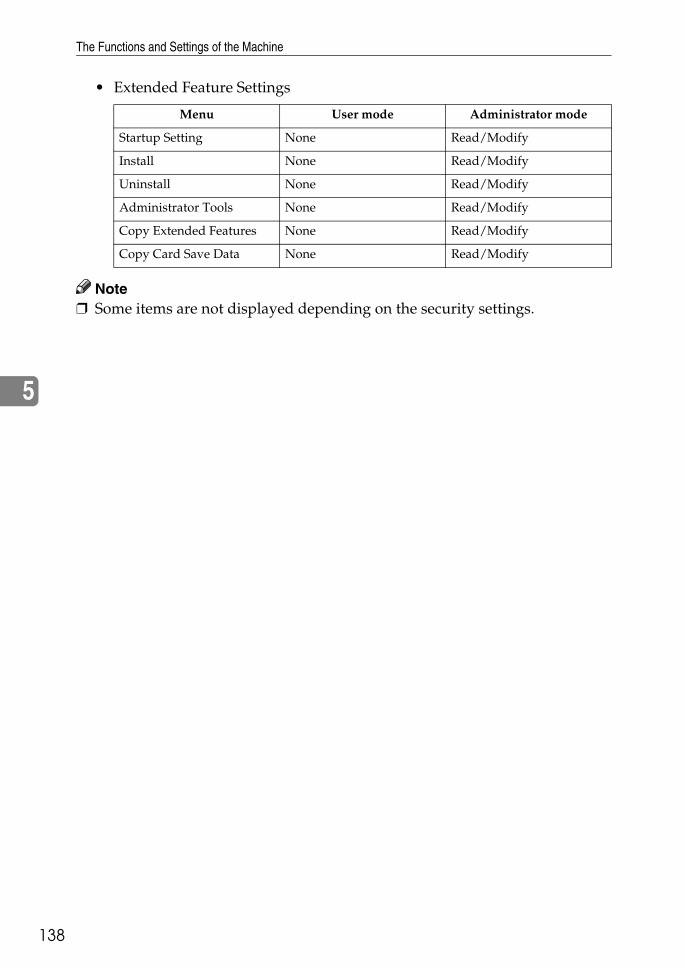
The Functions and Settings of the Machine
138
5
• Extended Feature Settings
Note❒ Some items are not displayed depending on the security settings.
Menu User mode Administrator mode
Startup Setting None Read/Modify
Install None Read/Modify
Uninstall None Read/Modify
Administrator Tools None Read/Modify
Copy Extended Features None Read/Modify
Copy Card Save Data None Read/Modify

List of the Setting Items
39
5
1
telnet
The following telnet can be used with the machine:access, appletalk, authfree, autonet, bonjour (rendezvous), btconfig, device-name, dhcp, diprint, dns, domainname, help, hostname, ifconfig, info, ipp, ipv6,lpr, netware, passwd, prnlog, route, set, show, slp, smb, snmp, sntp, spoolsw,sprint, ssdp, ssh, status, syslog, upnp, web, wiconfig, wins
Settings that can be used with PostScript 3
The following PostScript 3 settings can be used with the machine:
Note❒ Depending on a type of printer drivers, different items may be displayed.
Settings Selectable Items
Collate: Off, On
Dithering: Auto, Photographic, Text, User Setting
Duplex: Off, Open to Left, Open to Top
Fit to Print Size: Prompt User, Nearest Size and Scale, Nearest Size and Crop
Image Smoothing: Off, On, Auto, Less than 90 ppi, Less than 150 ppi, Less than 200 ppi, Less than 300 ppi
Input Tray: AutoSelect Tray, Bypass Tray, Tray 1(LCT), Tray 2, Tray 3, Large Capacity Tray
Output Tray: Printer Default, Copy Tray, Finisher SR970/4000 Upper Tray, Finisher SR970/4000 Shift Tray, Fnisher SR4000 Booklet Tray, Finisher SR841 Upper Tray, Finisher SR841 Shift Tray, Booklet Processor Tray, Mailbox Tray 1–9
Resolution 600 dpi, 1200dpi
Size: See General Setting Guide.
Staple: Off, Top Left, Top Right, 2 at Left, 2 at Right, 2 at Top, 2 at Center
Edge Smoothing On, Off
Toner Saving On, Off
Type: See General Setting Guide.
Paper Selection Same Paper for All Pages, Different Paper for First Page, Use Slip Sheet, Chaptering
Punch: Off, 2 at Left, 2 at Right, 2 at Top, 3 at Left, 3 at Right, 3 at Top, 4 at Left, 4 at Right, 4 at Top

The Functions and Settings of the Machine
140
5
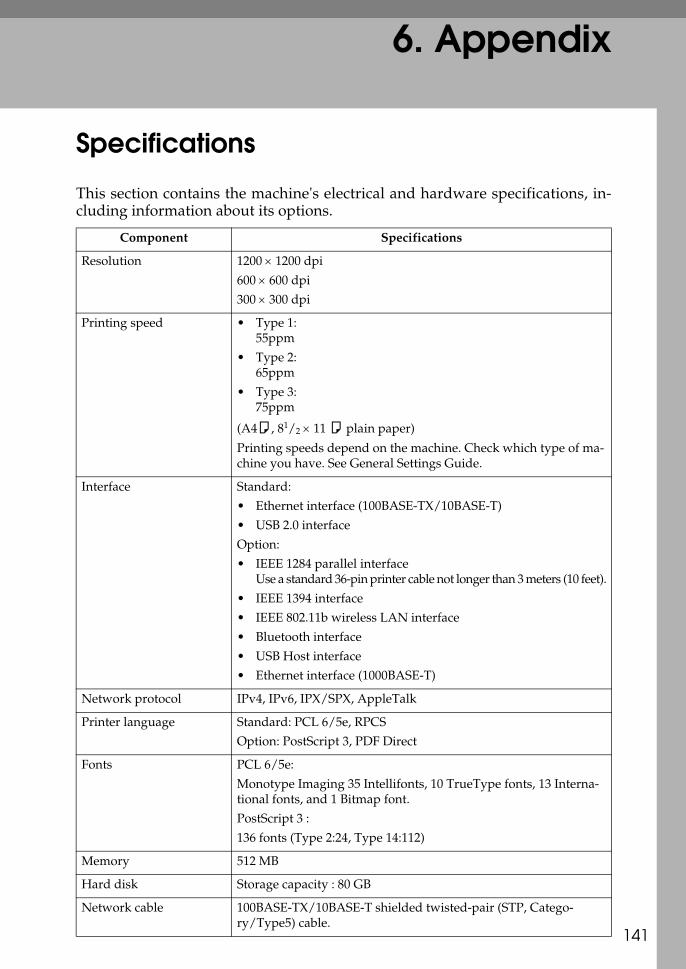
6. Appendix
41
1Specifications
This section contains the machine's electrical and hardware specifications, in-cluding information about its options.
Component Specifications
Resolution 1200 × 1200 dpi
600 × 600 dpi
300 × 300 dpi
Printing speed • Type 1:55ppm
• Type 2:65ppm
• Type 3:75ppm
(A4K, 81/2 × 11 K plain paper)
Printing speeds depend on the machine. Check which type of ma-chine you have. See General Settings Guide.
Interface Standard:
• Ethernet interface (100BASE-TX/10BASE-T)
• USB 2.0 interface
Option:
• IEEE 1284 parallel interfaceUse a standard 36-pin printer cable not longer than 3 meters (10 feet).
• IEEE 1394 interface
• IEEE 802.11b wireless LAN interface
• Bluetooth interface
• USB Host interface
• Ethernet interface (1000BASE-T)
Network protocol IPv4, IPv6, IPX/SPX, AppleTalk
Printer language Standard: PCL 6/5e, RPCS
Option: PostScript 3, PDF Direct
Fonts PCL 6/5e:
Monotype Imaging 35 Intellifonts, 10 TrueType fonts, 13 Interna-tional fonts, and 1 Bitmap font.
PostScript 3 :
136 fonts (Type 2:24, Type 14:112)
Memory 512 MB
Hard disk Storage capacity : 80 GB
Network cable 100BASE-TX/10BASE-T shielded twisted-pair (STP, Catego-ry/Type5) cable.
Appendix
142
6
Note❒ When using MacOS, use only the USB Interface (Standard). The optional USB
host interface board is not supported.❒ When using the USB Interface (Standard) with Mac OS 10.3.3, USB2.0 is sup-
ported.❒ When using the USB Interface (Standard) with Windows Me, install USB
Printing Support. Windows Me only supports USB 1.1 speed.
USB Interface (Standard) • Supported Operating System:Windows Me/2000/XP, Windows Server 2003, MacOS 10.3.3 or later
• Transmission spec.USB 2.0 Standard
• Connectable Device:Devices corresponding to USB 2.0 Standard
Component Specifications

Specifications
43
6
1
Options
Important❒ Only one optional interface board can be installed in the machine at a time.
Therefore, the optional IEEE 1394 interface board, the IEEE 802.11b interfaceunit, the IEEE 1284 interface board, and Bluetooth interface unit cannot be in-stalled concurrently.
IEEE 1394 Interface Board Type B
❖ Transmission spec.:IEEE 1394
❖ Interface:IEEE std 1394-1995 compliantIEEE std 1394a-2000 compliant
❖ Device class:SCSI print (Windows 2000/XP, Windows Server 2003)IP over 1394 (Windows Me/XP, Windows Server 2003)
❖ Protocol:SBP-2 (SCSI print)TCP/IP (IP over 1394)
❖ Interface connector:IEEE 1394 (6 pin × 2)
❖ Required cable:1394 interface cable (6 pin × 4 pin, 6 pin × 6 pin)
Note❒ You cannot plug devices together to create loops.❒ Do not use cable that is more than 4.5 meters in length.
❖ Data transfer speed:Maximum 400 Mbps
❖ Connectable number of devices on a bus:Maximum 63
❖ Allowed cable hops on a bus:Maximum 16
❖ Power supply:Non external power supplyCable Power repeated (IEEE 1394a-2000 compliant)
Appendix
144
6
IEEE 1284 Interface Board Type A
❖ Transmission spec.:IEEE 1284
❖ Required cable:Standard IEEE 1284 compliant Micro Centronics 36 pin cable
IEEE 802.11b Interface Unit Type H
❖ Transmission spec.:Based on IEEE 802.11b (wireless LAN)
❖ Protocol:TCP/IP, IPX/SPX, AppleTalk
Note❒ SmartDeviceMonitor and Web Image Monitor are supported.
❖ Data transfer speed:Auto select from below speed1 Mbps, 2 Mbps, 5.5 Mbps, 11 Mbps
❖ Frequency range:• Inch version:
2412 - 2462 MHz (1 - 11 channels)• Metric version:
2412 - 2472 MHz (1 - 13 channels)
❖ Transmittable distance:1 Mbps 400 m2 Mbps 270 m5.5 Mbps 200 m11 Mbps 140 m
Note❒ These figures are a guideline for outdoor use. In general, the transmittable
distance indoors is 10 - 100 m, depending on environment.
❖ Transmission mode:Ad hoc, and infrastructure mode

Specifications
45
6
1
Bluetooth Interface Unit Type 3245
❖ Supported Profiles:• SPP (Serial Port Profile)• HCRP (Hardcopy Cable Replacement Profile)• BIP (Basic Imaging Profile)
❖ Frequency Range:2.45 GHz ISM band
❖ Data Transmission Speed:723 kbps
Note❒ The transmission speed is adjusted according to factors such as the dis-
tance and obstacles between the devices, radio signal condition and Blue-tooth adaptor.
❖ Maximum Range:10 m
USB Host Type A
❖ Interface Connector:USB 1.1 host interface A type
❖ Data Transmission Speed:12 Mbps (Full speed)
❖ Distance Between Devices:2.5 m
Gigabit Ethernet Type 7300
❖ Interface Connector:• Ethernet (10Base-T, 100Base-TX, 1000Base-T)• USB 2.0
It requires a USB computer port and cable that support USB 2.0.
❖ Data Transmission Speed:• Ethernet: 1000 Mbps, 100 Mbps, 10 Mbps• USB: 480 Mbps (High speed: USB 2.0), 12 Mbps (Full speed)
❖ Protocol:TCP/IP, IPX/SPX, AppleTalk
❖ Distance Between Devices:• Ethernet: 100 m• USB: 5 m

146
INDEXB
Bluetooth Interface Unit Type 3245, 145Bypass tray, 12
Custom size paper using the control panel, 15
setting the paper size using the control panel, 14
C
Canceling a jobWindows, 108
Changing the order of jobs, 6Chaptering, 124Checking Job History, 7Checking jobs in the print queue, 5Collate, 118Control panel
hold print, 95locked print, 91printer features, 8sample print, 87stored print, 98
Covers, 120Custom size paper
printing, bypass tray, 12
D
Deleting jobs, 7Display panel, 2Document Server, 131
E
Error log, 110
F
Finisher, 113Font Manager 2000, 57Fonts, 141
G
Gigabit Ethernet Type 7300, 145
H
Hard disk, 141Holding print jobs, 6Hold print
deleting, 97printing, 95
How to Read This Manual, 1
I
IEEE 1284 Interface Board Type A, 144IEEE 1394 Interface Board Type B, 143IEEE 802.11b Interface Unit Type H, 144Initial Display, 2Inserting chapter slip sheets, 125Installing the printer driver
Quick Install, 23Installing the Printer Driver Using USB, 40Interface, 141
J
Job List, 4Job List screen, 4
L
List Per User IDprinting all print jobs, 102, 104printing the desired print job, 102
Locked printdeleting, 94printing, 92
M
Manuals for This Machine, iMemory, 141
N
Network cable, 141Network protocol, 141No slip sheets, 124

47
1O
OHP Transparenciesprinting, bypass tray, 16
Operating system, 141Options, 143
P
PageMaker, 58PDF Direct Print, 75Printer Features Menu, 8Printer language, 141Printing a PDF file directly
PDF direct print, 75Printing Method
PDF direct print, 75Printing speed, 141Printing with Bluetooth Connection
Windows, 51Printing with Parallel Connection
Windows 2000, 45Punch, 116
R
Resolution, 141Rotating collate, 119
S
Sample printdeleting, 90printing, 88
Shift collate, 119Simplified Display, 3Slip Sheet, 126Specifications, 141Spool printing, 111Staple, 114Stored print
deleting, 101printing, 99
T
Tab Sheet, 127Thick Paper
printing, bypass tray, 16
U
Unauthorized copy control, 79data security for copying, 79mask type, 81
USB Host Type A, 145Using commands, 78Using the Print Job Function, 83
W
Windowscanceling a job, 108
Windows 2000printer properties, PCL, 60printer properties, RPCS, 68
Windows 95/98/Meprinter properties, PCL, 59printer properties, RPCS, 66
Windows NT 4.0document defaults, PCL, 64document defaults, RPCS, 72printer properties, PCL, 63printer properties, RPCS, 72
Windows Server 2003printer properties, PCL, 62printer properties, RPCS, 70
Windows XPprinter properties, PCL, 62printer properties, RPCS, 70

148
EN USA B841-7507
Note to users in the United States of America
Note:This equipment has been tested and found to comply with the limits for a Class B digital device, pursu-ant to Part 15 of the FCC Rules. These limits are designed to provide reasonable protection againstharmful interference in a residential installation. This equipment generates, uses and can radiate radiofrequency energy and, if not installed and used in accordance with the instructions, may cause harmfulinterference to radio communications. However, there is no guarantee that interference will not occurin a particular installation. If this equipment does cause harmful interference to radio or television re-ception, which can be determined by turning the equipment off and on, the user is encouraged to try tocorrect the interference by one more of the following measures:
Reorient or relocate the receiving antenna.Increase the separation between the equipment and receiver.Connect the equipment into an outlet on a circuit different from that to which the receiver isconnected.Consult the dealer or an experienced radio /TV technician for help.
Caution:Changes or modifications not expressly approved by the party responsible for compliance could voidthe user's authority to operate the equipment.
Declaration of ConformityProduct Name: Printer/Scanner ControllerModel Number: Printer Scanner Unit Type 7500Responsible party: Ricoh CorporationAddress: 5 Dedrick Place, West Caldwell, NJ 07006Telephone number: 973-882-2000This device complies with Part 15 of the FCC Rules.Operation is subject to the following two conditions:1. This device may not cause harmful interference, and2. this device must accept any interference received,including interference that may cause undesired operation.
1. Properly shielded and grounded cables and connectors must be used for connections to a hostcomputer (and/or peripheral) in order to meet FCC emission limits.
2. An AC adapter with a ferrite core must be used for RF interference suppression.
Note to users in Canada
Note:This Class B digital apparatus complies with Canadian ICES-003.
Remarque concernant les utilisateurs au Canada
Avertissement:Cet appareil numérique de la classe B est conforme à la norme NMB-003 du Canada.
Copyright © 2005

Printer/Scanner Unit Type 7500O
perating Instr
uctions Printer ReferenceEN USA B841-7507

Printer/Scanner UnitType 7500
Operating Instructions
Scanner Reference
this machine and keep it handy for future reference. For safe and correct use, be sure to read th before using the machine.
Sending Scan Files by E-mail
Sending Scan Files to Folders
Storing Files Using the Scanner Function
Delivering Scan Files
Scanning Originals with the Network TWAIN Scanner
Various Scan Settings
Appendix
1
2
3
4
5
6
7
Read this manual carefully before you use eSafety Information in "About This Machine"
Introduction
This manual contains detailed instructions and notes on the operation and use of this machine. For yoursafety and benefit, read this manual carefully before using the machine. Keep this manual in a handyplace for quick reference.
Important
Contents of this manual are subject to change without prior notice. In no event will the company be li-able for direct, indirect, special, incidental, or consequential damages as a result of handling or oper-ating the machine.
Do not copy or print any item for which reproduction is prohibited by law.
Copying or printing the following items is generally prohibited by local law:
bank notes, revenue stamps, bonds, stock certificates, bank drafts, checks, passports, driver's licens-es.
The preceding list is meant as a guide only and is not inclusive. We assume no responsibility for itscompleteness or accuracy. If you have any questions concerning the legality of copying or printing cer-tain items, consult with your legal advisor.
Two kinds of size notation are employed in this manual. With this machine refer to the inch version.
Some illustrations in this manual might be slightly different from the machine.
Certain options might not be available in some countries. For details, please contact your local dealer.
Trademarks
• Adobe®, PostScript®, and Acrobat® are trademarks of Adobe Systems Incorporated.
• Pentium® is a registered trademark of Intel Corporation.
• NetWare® is a registered trademark of Novell, inc.
• Microsoft®, Windows®, and Windows NT® are registered trademarks of Microsoft Corporation.
• Other product names used herein are for identification purposes only and might be trademarks oftheir respective companies. We disclaim any and all rights to those marks.
• The product name of Windows® 95 is Microsoft® Windows® 95.
• The product name of Windows® 98 is Microsoft® Windows® 98.
• The product name of Windows® Me is Microsoft® Windows® Millennium Edition (Windows Me).
• The product names of Windows® 2000 are as follows:Microsoft® Windows® 2000 ProfessionalMicrosoft® Windows® 2000 ServerMicrosoft® Windows® 2000 Advanced Server
• The product names of Windows® XP are as follows:Microsoft® Windows® XP Home EditionMicrosoft® Windows® XP Professional
• The product names of Windows ServerTM 2003 are as follows:Microsoft® Windows ServerTM 2003 Standard EditionMicrosoft® Windows ServerTM 2003 Enterprise EditionMicrosoft® Windows ServerTM 2003 Web Edition
• The product names of Windows NT® 4.0 are as follows:Microsoft® Windows NT® Workstation 4.0Microsoft® Windows NT® Server 4.0
i
Manual for This Machine
Refer to the manuals that are relevant to what you want to do with the machine.
❖ About This MachineBe sure to read the Safety Information in this manual before using the ma-chine.This manual provides an introduction to the functions of the machine. It alsoexplains the control panel, preparation procedures for using the machine,how to enter text, and how to install the CD-ROMs provided.
❖ General Settings GuideExplains User Tools settings, and Address Book procedures such as register-ing e-mail addresses, and user codes. Also refer to this manual for explana-tions on how to connect the machine.
❖ TroubleshootingProvides a guide to solving common problems, and explains how to replacepaper, toner, staples, and other consumables.
❖ Security ReferenceThis manual is for administrators of the machine. It explains security func-tions that the administrators can use to protect data from being tampered, orprevent the machine from unauthorized use.Also refer to this manual for the procedures for registering administrators, aswell as setting user and administrator authentication.
❖ Copy/ Document Server ReferenceExplains Copier and Document Server functions and operations. Also refer tothis manual for explanations on how to place originals.
❖ Printer ReferenceExplains Printer functions and operations.
❖ Scanner ReferenceExplains Scanner functions and operations.
❖ Network GuideExplains how to configure and operate the machine in a network environ-ment, and use the software provided.This manual covers all models, and includes descriptions of functions andsettings that might not be available on this machine. Images, illustrations, andinformation about operating systems that are supported might also differslightly from those of this machine.
❖ Other manuals• Manuals for This Machine• Safety Information• Quick Reference Copy Guide• Quick Reference Printer Guide
ii
• Quick Reference Scanner Guide• PostScript3 Supplement• UNIX Supplement• Manuals for DeskTopBinder Lite
• DeskTopBinder Lite Setup Guide• DeskTopBinder Introduction Guide• Auto Document Link Guide
Note❒ Manuals provided are specific to machine types.❒ Adobe Acrobat Reader/Adobe Reader must be installed in order to view the
manuals as PDF files.❒ For "UNIX Supplement", please visit our Web site or consult an authorized
dealer.❒ "PostScript3 Supplement" and "UNIX Supplement" include descriptions of
functions and settings that might not be available on this machine.❒ The following software products are referred to using general names:
*Optional
Product name General name
DeskTopBinder Lite and DeskTopBinder Pro-fessional *
DeskTopBinder
ScanRouter EX Professional * and ScanRouter EX Enterprise *
the ScanRouter delivery software

iii
TABLE OF CONTENTSManual for This Machine ........................................................................................ iHow to Read This Manual .....................................................................................1
Symbols .....................................................................................................................1About the Scanner Functions...............................................................................2Display Panel..........................................................................................................3
Simplified Display.......................................................................................................3Confirmation Displays ................................................................................................4
Scanner Features...................................................................................................8
1. Sending Scan Files by E-mail
Before Sending Scan Files by E-mail.................................................................11Outline of Sending Scan Files by E-mail..................................................................11Preparation for Sending by E-mail ...........................................................................12Registering E-mail Addresses in the Address Book.................................................12E-mail Screen...........................................................................................................13
Basic Operation for Sending Scan Files by E-mail...........................................14Switching to the E-mail Screen ..........................................................................17Specifying E-mail Destinations ..........................................................................18
Selecting the Destination from the Machine’s Address Book...................................18Entering an E-mail Address Manually ......................................................................22Selecting Destinations by Searching an LDAP Server.............................................23Registering a Directly-Entered Destination in the Address Book .............................25
Specifying the E-mail Sender .............................................................................27Selecting a Sender from the List ..............................................................................27Using a Registration Number to Specify a Sender Name ........................................28Selecting the Sender by Searching the Machine’s Address Book ...........................28
Specifying the E-mail Subject.............................................................................31Specifying the E-mail Message ..........................................................................32
Selecting a Message from the List ...........................................................................32Manual Entry of a Message .....................................................................................33
Simultaneous Storage and Sending by E-mail .................................................34Sending the URL by E-mail......................................................................................35
2. Sending Scan Files to Folders
Before Sending Files by Scan to Folder ............................................................37Outline of Sending Scan Files by Scan to Folder.....................................................37Preparation for Sending by Scan to Folder ..............................................................39Registering Destination Folders in the Address Book..............................................40Scan to Folder Screen .............................................................................................41
Basic Operations When Using Scan to Folder..................................................42Switching to the Scan to Folder Screen ............................................................44Specifying Scan to Folder Destinations ............................................................45
Selecting the Destination from the Machine’s Address Book...................................45Sending Files to a Shared Network Folder ..............................................................49Sending Files to an FTP Server ...............................................................................52Sending Files to an NDS Tree or NetWare Server ..................................................54Registering the Path to the Selected Destination in the Address Book ...................57
Simultaneous Storage and Sending by Scan to Folder ...................................59

iv
3. Storing Files Using the Scanner Function
Before Storing Files.............................................................................................61Outline of File Storage under the Scanner Function ................................................61
Basic Operation for Storing Scan Files .............................................................63Specifying File Information for a Stored File ....................................................65
Specifying a User Name ..........................................................................................65Specifying a File Name ............................................................................................66Specifying a Password.............................................................................................67
Displaying the List of Stored Files .....................................................................68List of Stored Files ...................................................................................................68Searching the List of Stored Files ............................................................................69
Checking Stored Files .........................................................................................71Checking a Stored File Selected from the List .........................................................71Checking Stored Files from a Client Computer........................................................72
Sending a Stored File ..........................................................................................74Sending Stored Files................................................................................................74
Managing Stored Files.........................................................................................76Deleting a Stored File...............................................................................................76Changing Data for a Stored File...............................................................................77
4. Delivering Scan Files
Before Delivering Files ........................................................................................81Outline of Scan File Delivery....................................................................................81Preparing to Deliver a File........................................................................................82Installing DeskTopBinder Lite from the Supplied CD-ROM .....................................83Network Delivery Scanner Screen ...........................................................................84
Basic Operation for Delivering Files ..................................................................85Switching to the Network Delivery Scanner Screen.........................................88Specifying Delivery Destinations .......................................................................89
Selecting Destinations Registered in the Delivery Server’s Address Book..............89Specifying the Sender .........................................................................................93
Selecting a Sender from the Sender List in the Delivery Server’s Destination List....93Selecting the Sender by Entering the Registration Number.....................................94Selecting a Sender by Searching the Delivery Server’s Destination List .................95
Specifying the Subject of the E-mail to Be Transmitted via the Delivery Server..... 97Simultaneous Storage and Delivery...................................................................98
5. Scanning Originals with the Network TWAIN Scanner
Before Using the Network TWAIN Scanner .......................................................99Outline of the Network TWAIN Scanner.................................................................100Preparing to Use the Network TWAIN Scanner .....................................................101Installing the TWAIN Driver from the Supplied CD-ROM.......................................102
Basic Network TWAIN Scanner Operation ......................................................103
v
6. Various Scan Settings
Scan Settings .....................................................................................................105Items for Specifying Scan Settings..................................................................106
Scan Type ..............................................................................................................106Resolution ..............................................................................................................106Scan Size ...............................................................................................................106Edit .........................................................................................................................114
Adjusting Image Density ...................................................................................115Setting of Original Feed Type ...........................................................................116
Original Orientation ................................................................................................116Original Settings.....................................................................................................118Batch, SADF ..........................................................................................................120Divide .....................................................................................................................121
Scanning Multiple Pages of Originals as One File .........................................123Setting File Type and File Name.......................................................................125
Setting File Type ....................................................................................................125Setting File Name...................................................................................................126Security Settings to PDF Files ...............................................................................128
Programs ............................................................................................................132Registering Frequently Used Setting .....................................................................132Recalling a Registered Content .............................................................................133Changing a Registered Program............................................................................134Deleting a Program ................................................................................................135Changing the Registered Program Name ..............................................................135Registering Initial Values for Initial Display ............................................................136
Scan Settings When Using Twain Scanner .....................................................137Setting Original Orientation on the TWAIN Scanner ..............................................137When Scanning Originals of Mixed Sizes Using TWAIN Scanner .........................138
7. Appendix
Relationship between Resolution and File Size..............................................139When Using E-mail, Folder Sending, Storing or Network Delivery Function .........139When Using as a TWAIN Scanner.........................................................................140
Relationship between File Type Specified for Scanning and File Types for Sending E-mail and Folder........................................................................142
Software Supplied on CD-ROM ........................................................................143Quick Install............................................................................................................143TWAIN Driver .........................................................................................................143DeskTopBinder Lite................................................................................................144
Values of Various Set Items for Transmission/Storage/Delivery Function .... 146Transmission Function ...........................................................................................146Storage Function....................................................................................................148Network Delivery Function .....................................................................................149
Specifications.....................................................................................................150
INDEX....................................................................................................... 151

vi

1
How to Read This Manual
Symbols
This manual uses the following symbols:
Indicates important safety notes.Ignoring these notes could result in serious injury or death. Be sure to read thesenotes. They can be found in the "Safety Information" section of About This Ma-chine.
Indicates important safety notes.Ignoring these notes could result in moderate or minor injury, or damage to themachine or to property. Be sure to read these notes. They can be found in the"Safety Information" section of About This Machine.
Indicates points to pay attention to when using the machine, and explanationsof likely causes of paper misfeeds, damage to originals, or loss of data. Be sureto read these explanations.
Indicates supplementary explanations of the machine’s functions, and instruc-tions on resolving user errors.
This symbol is located at the end of sections. It indicates where you can find fur-ther relevant information.[ ]Indicates the names of keys that appear on the machine’s display panel.{ }Indicates the names of keys on the machine’s control panel.
2
About the Scanner Functions
This section describes functions you can use in the scanner mode.For details about each function, see respective chapters.
❖ Sending scanned filesThere are several methods you can use to send captured data as files to com-puters.• Sending scan files by e-mail
For details, see chapter 1 "Sending Scan Files by E-mail".• Sending scan files to a shared folder
For details, see chapter 2 "Sending Scan Files to Folders".• Sending scan files to an FTP server
For details, see chapter 2 "Sending Scan Files to Folders".• Sending scan files to a NetWare server
For details, see chapter 2 "Sending Scan Files to Folders".• Delivering scan files using the delivery server
For details, see chapter 4 "Delivering Scan Files".
❖ Scanning originals using the TWAIN driverUse the TWAIN driver to specify the machine where originals will be scannedfrom a client computer. For details, see chapter 5 "Scanning Originals with theNetwork TWAIN Scanner".
❖ Storing filesYou can store scan files on the machine's hard disk. Stored files can be sentlater. For details, see chapter 3 "Storing Files Using the Scanner Function".
Note❒ When the Copy Data Security Unit is installed, if you scan an original that
was printed using the data security for copying function, the machine beepsand an entirely gray page is sent or stored. You can use the log file to checkwho scanned the confidential original. For details about the data security forcopying function, consult the administrator.
Referencep.11 “Sending Scan Files by E-mail”p.37 “Sending Scan Files to Folders”p.81 “Delivering Scan Files”p.99 “Scanning Originals with the Network TWAIN Scanner”p.61 “Storing Files Using the Scanner Function”

3
Display Panel
This section explains the simplified display and three confirmation screens:Check Modes, Preview, and Transmission File Status.You can find explanations about the E-mail screen, Scan to Folder screen, List ofStored Files screen, or Network Delivery Scanner screen in this manual. For de-tails, see "E-mail Screen", "Scan to Folder Screen", "List of Stored Files", and "Net-work Delivery Scanner Screen".
Referencep.13 “E-mail Screen”p.41 “Scan to Folder Screen”p.68 “List of Stored Files”p.84 “Network Delivery Scanner Screen”
Simplified Display
This section explains how to switch to the simplified display.When you press {Simplified Display}, the screen changes from the initial displayto the simplified display.Letters and keys are displayed at a larger size, making operations easier.
❖ Example of Simplified Display
1. [Key Color]Press to change the key color and in-crease the brightness of the display panel.
This does not apply to the initial scannerscreen.
ANP057S
AMW005S

4
Note❒ To return to the initial screen, press {Simplified Display} again.❒ Certain keys do not appear on the simplified display.
Confirmation Displays
This section explains three confirmation displays: Check Modes, Preview andTransmission File Status.
Check Modes
This section explains items that are displayed and how to display the CheckModes screen.Use the Check Modes screen to check scanning and transmission settings.Pressing [Check Modes] switches the screen from the initial scanner screen to theCheck Modes screen.
❖ Check Modes
1. OriginalDisplays Scan Settings, Original FeedType, and other scanning settings.
2. Transmission function iconDisplays the icon of the transmissionfunction in use.
3. Sender and DestinationDisplays the sender and transmission ordelivery destinations.
4. SendDisplays transmission settings such asSender and Subject.
AMW002S

5
Preview
This section explains items that are displayed and how to display the Previewscreen.Use the Preview screen to check that of originals have been scanned correctly.You can display the Preview screen when sending files by e-mail or Scan to Fold-er, delivering files, or simultaneously sending and delivering files.To display the Preview screen, press [Preview], and then start scanning while[Preview] is still selected.
❖ Preview
1. [Zoom Out] and [Zoom In]Press to reduce or enlarge the displayedpreview.
2. [←][→][↑][↓]Press to shift the displayed area.
3. [Cancel TX]Press to close a preview and interrupt atransmission.
4. [Continue TX]Press to close a preview and continue atransmission.
5. Display FileDisplays a file's name and size.
6. Display PageDisplays the number of the currently dis-played page, total number of pages, pagesize, and color mode.
7. [Switch]Press to change the page of the selectedfile that is displayed.
8. Display PositionDisplays the position of an image whenenlarged.
Note❒ Preview is not available if a file is stored using [Store Only].❒ Preview is not available when sending a stored file.❒ You can view a stored file using the Preview screen displayed from the list of
stored files. For details about viewing a stored file, see "Checking a Stored FileSelected from the List".
AMW006S
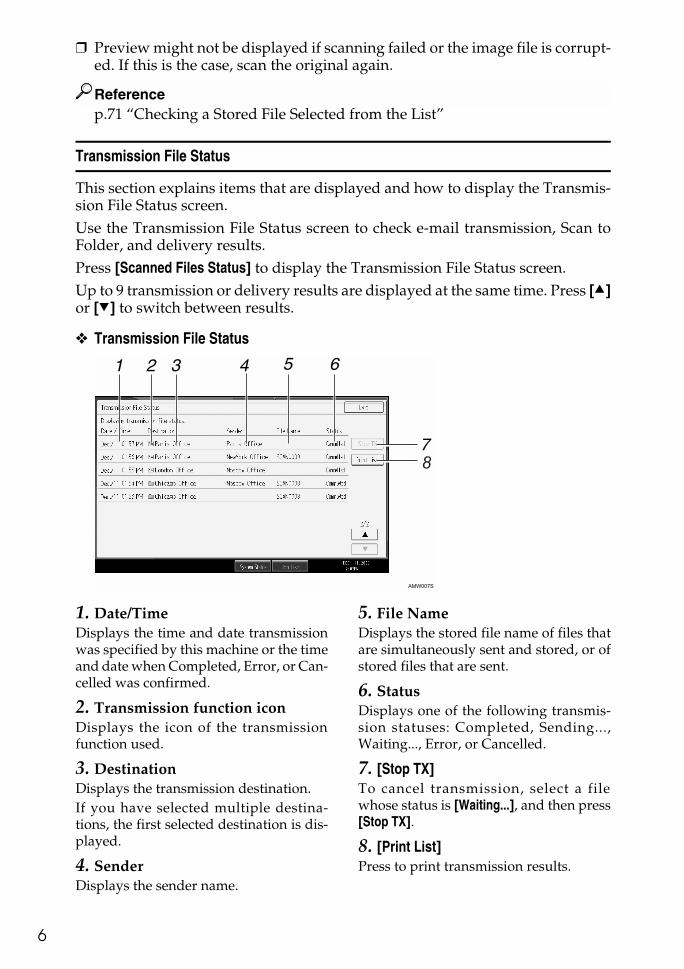
6
❒ Preview might not be displayed if scanning failed or the image file is corrupt-ed. If this is the case, scan the original again.
Referencep.71 “Checking a Stored File Selected from the List”
Transmission File Status
This section explains items that are displayed and how to display the Transmis-sion File Status screen.Use the Transmission File Status screen to check e-mail transmission, Scan toFolder, and delivery results.Press [Scanned Files Status] to display the Transmission File Status screen.Up to 9 transmission or delivery results are displayed at the same time. Press [U]or [T] to switch between results.
❖ Transmission File Status
1. Date/TimeDisplays the time and date transmissionwas specified by this machine or the timeand date when Completed, Error, or Can-celled was confirmed.
2. Transmission function iconDisplays the icon of the transmissionfunction used.
3. DestinationDisplays the transmission destination.If you have selected multiple destina-tions, the first selected destination is dis-played.
4. SenderDisplays the sender name.
5. File NameDisplays the stored file name of files thatare simultaneously sent and stored, or ofstored files that are sent.
6. StatusDisplays one of the following transmis-sion statuses: Completed, Sending...,Waiting..., Error, or Cancelled.
7. [Stop TX]To cancel transmission, select a filewhose status is [Waiting...], and then press[Stop TX].
8. [Print List]Press to print transmission results.
AMW007S

7
Note❒ You cannot check scanner function transmission results by pressing [Job List]
at the bottom of the screen. To check transmission results, press [Scanned FilesStatus], and then display the Transmission File Status screen.
❒ Depending on security settings, some transmission results might not be dis-played.

8
Scanner Features
This section explains Scanner Features settings.To display the Scanner Features screen, press {User Tools / Counter}. For detailedsetting method, see General Settings Guide.
❖ General Settings
❖ Scan Settings
Items Description
Switch Title Sets index to use when the list of destinations of this machine is displayed.
Update Delivery Server Destina-tion List
Allows you to update the delivery server's destination list by pressing [Update Delivery Server Destination List]. To use this function, under [System Settings], set [Deliv-ery Option] to [On].
Search Destination Specify the default search destination list from the ma-chine's address book or the LDAP server. To search through an LDAP server, under [System Settings], reg-ister the LDAP server, and then set [LDAP Search] to [On].
TWAIN Standby Time Select the machine's response if a client computer tries to use the TWAIN scanner while scanning is in progress.
Destination List Display Priority 1 Select the default destination list from the machine's destination list or from the Destination List managed by the delivery server.
Destination List Display Priority 2 Select whether to prioritize the e-mail destination list or the folder destination list.
Print & Delete Scanner Journal Specify the machine's response of the maximum num-ber of scanner journals is exceeded.
Print Scanner Journal Allows you to print the scanner journal. The scanner journal is then deleted.
Delete Scanner Journal Allows you to delete the scanner journal without printing it.
Items Description
Wait Time for Next Orig.: Exposure Glass
Set which operation the machine performs while wait-ing for additional originals after scanning from the ex-posure glass.
Wait Time for Next Original(s): SADF
Sets the operation of this machine on the queue for ad-ditional originals after scanning the originals with Au-tomatic Document Feeder (ADF). This function is not available unless ADF is installed.
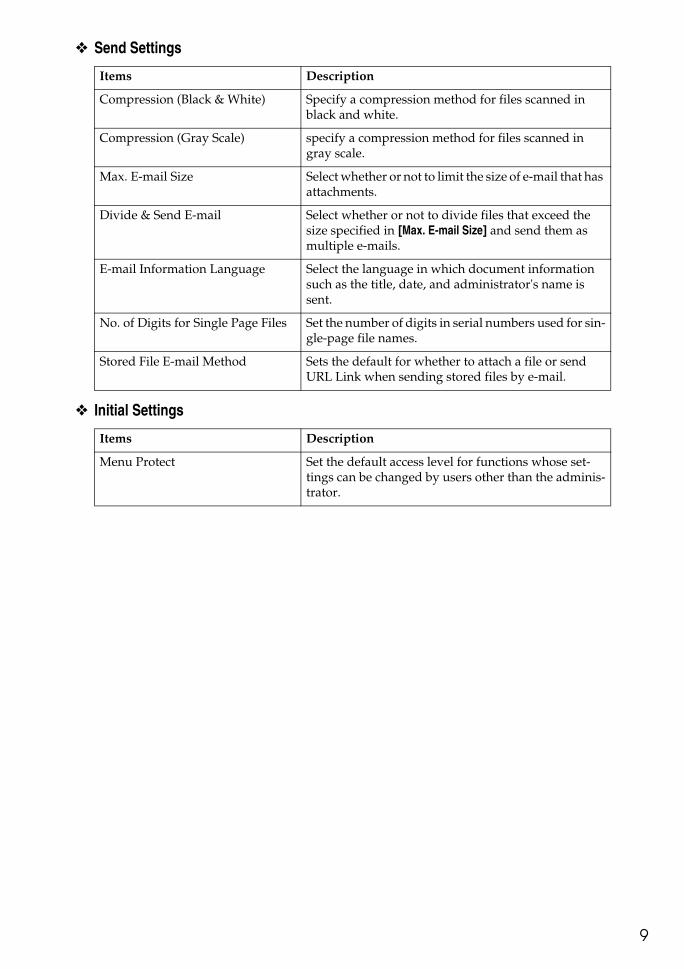
9
❖ Send Settings
❖ Initial Settings
Items Description
Compression (Black & White) Specify a compression method for files scanned in black and white.
Compression (Gray Scale) specify a compression method for files scanned in gray scale.
Max. E-mail Size Select whether or not to limit the size of e-mail that has attachments.
Divide & Send E-mail Select whether or not to divide files that exceed the size specified in [Max. E-mail Size] and send them as multiple e-mails.
E-mail Information Language Select the language in which document information such as the title, date, and administrator's name is sent.
No. of Digits for Single Page Files Set the number of digits in serial numbers used for sin-gle-page file names.
Stored File E-mail Method Sets the default for whether to attach a file or send URL Link when sending stored files by e-mail.
Items Description
Menu Protect Set the default access level for functions whose set-tings can be changed by users other than the adminis-trator.

10
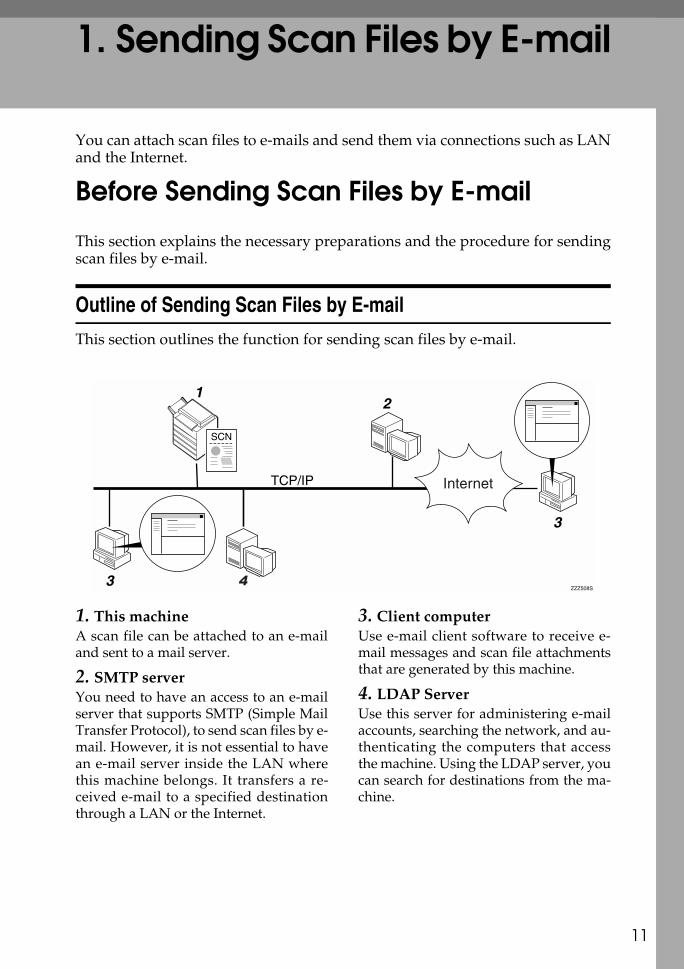
1. Sending Scan Files by E-mail
11
You can attach scan files to e-mails and send them via connections such as LANand the Internet.
Before Sending Scan Files by E-mail
This section explains the necessary preparations and the procedure for sendingscan files by e-mail.
Outline of Sending Scan Files by E-mail
This section outlines the function for sending scan files by e-mail.
1. This machineA scan file can be attached to an e-mailand sent to a mail server.
2. SMTP serverYou need to have an access to an e-mailserver that supports SMTP (Simple MailTransfer Protocol), to send scan files by e-mail. However, it is not essential to havean e-mail server inside the LAN wherethis machine belongs. It transfers a re-ceived e-mail to a specified destinationthrough a LAN or the Internet.
3. Client computerUse e-mail client software to receive e-mail messages and scan file attachmentsthat are generated by this machine.
4. LDAP ServerUse this server for administering e-mailaccounts, searching the network, and au-thenticating the computers that accessthe machine. Using the LDAP server, youcan search for destinations from the ma-chine.
ZZZ508S
Sending Scan Files by E-mail
12
1
Preparation for Sending by E-mail
This section explains the preparation and settings for sending scan files by e-mail.
A Connect the machine to the network.Connect the machine to the network using an Ethernet cable or IEEE 1394 ca-ble, or wireless LAN (IEEE 802.11b).
BMake the necessary network setting in [System Settings].If you have connected the machine to the network using an Ethernet cable,make the following settings. For details, see General Settings Guide.• Specify the machine’s IPv4 address and subnet mask.• Specify the IPv4 gateway address.• In [Effective Protocol], enable [IPv4].• Specify the SMTP server.
C If necessary, change settings in [Send Settings] under [Scanner Features].
Note❒ To connect the machine to the network using an IEEE 1394 cable or wire-
less LAN (IEEE 802.11b), an extended 1394 board or extended wirelessLAN board is required respectively. For details, see Network Guide.
❒ Items to set up in [System Settings] vary depending on the network environ-ment. For more information about network settings, see General SettingsGuide.
❒ For more information about [Scanner Features], see General Settings Guide.
Registering E-mail Addresses in the Address Book
You can register frequently used e-mail addresses in the address book.Register e-mail addresses in [Address Book Management] under [AdministratorTools] from [System Settings]. Addresses can also be registered as groups.
Note❒ For details about registering e-mail addresses in the address book, see Gener-
al Settings Guide.❒ You can also register e-mail addresses in the address book using Web Image
Monitor or SmartDeviceMonitor for Admin. For details about how to installthese applications, see Network Guide. For details about registering address-es in the address book, see Help of respective applications.
❒ Depending on the machine type, you may not be able to use the machinewhen it is updating the address book using CSV files (retrieved using Smart-DeviceMonitor for Admin) that contain user codes.
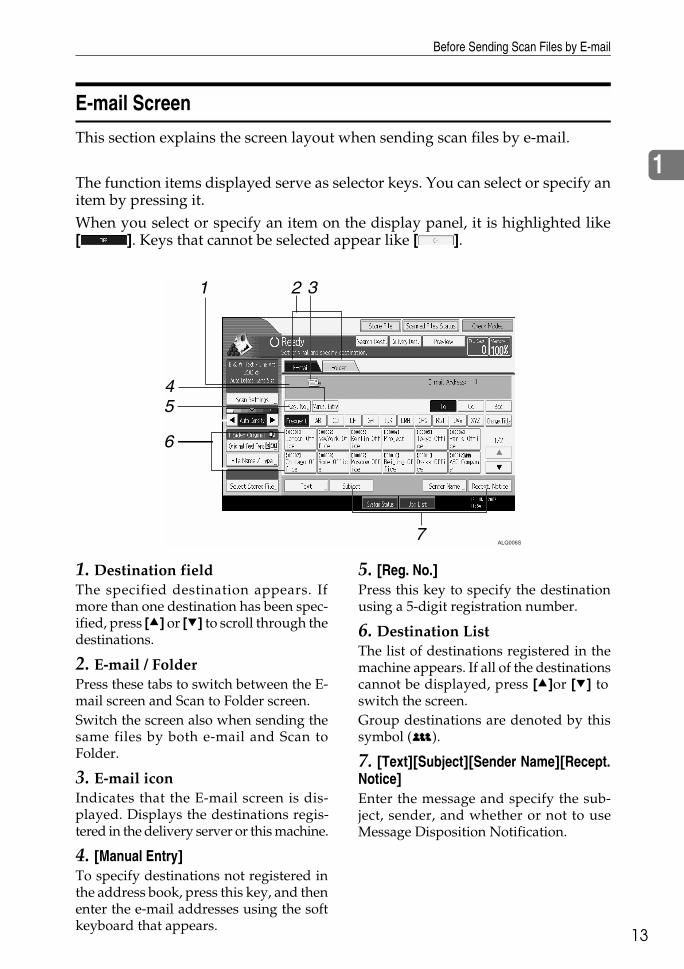
Before Sending Scan Files by E-mail
13
1
E-mail Screen
This section explains the screen layout when sending scan files by e-mail.
The function items displayed serve as selector keys. You can select or specify anitem by pressing it.When you select or specify an item on the display panel, it is highlighted like[ ]. Keys that cannot be selected appear like [ ].
1. Destination fieldThe specified destination appears. Ifmore than one destination has been spec-ified, press [U] or [T] to scroll through thedestinations.
2. E-mail / FolderPress these tabs to switch between the E-mail screen and Scan to Folder screen.Switch the screen also when sending thesame files by both e-mail and Scan toFolder.
3. E-mail iconIndicates that the E-mail screen is dis-played. Displays the destinations regis-tered in the delivery server or this machine.
4. [Manual Entry]To specify destinations not registered inthe address book, press this key, and thenenter the e-mail addresses using the softkeyboard that appears.
5. [Reg. No.]Press this key to specify the destinationusing a 5-digit registration number.
6. Destination ListThe list of destinations registered in themachine appears. If all of the destinationscannot be displayed, press [U]or [T] toswitch the screen.Group destinations are denoted by thissymbol ( ).
7. [Text][Subject][Sender Name][Recept.Notice]Enter the message and specify the sub-ject, sender, and whether or not to useMessage Disposition Notification.
ALQ006S

Sending Scan Files by E-mail
14
1
Basic Operation for Sending Scan Files by E-mail
This section describes the basic operation for sending scan files by e-mail.
AMake sure that no previous settings remain.If a previous setting remains, press {Clear Modes}.
B If the network delivery scanner screen or Scan to Folder screen appears,switch to the E-mail screen.For details, see "Switching to the E-mail Screen".
C Place originals.
D If necessary, press [Scan Settings] to specify scanner settings such as resolu-tion and scan size.For details, see "Various Scan Settings".
E If necessary, specify the scanning density.For details, see "Adjusting Image Density".
F If necessary, press [Original Feed Type] to specify settings such as originalside and orientation.For details, see "Setting of Original Feed Type".
Basic Operation for Sending Scan Files by E-mail
15
1
G If necessary, press [File Name / Type] to specify settings such as file name andfile format.For details, see "Setting File Type and File Name".
H Specify the destination.You can specify multiple destinations.For details, see "Specifying E-mail Destinations".
I If necessary, press [Text] to enter the e-mail message.For details, see "Specifying the E-mail Message"
J If necessary, press [Subject] to specify the e-mail subject.For details, see "Specifying the E-mail Subject".
K To specify the e-mail sender, press [Sender Name].For details, see "Specifying the E-mail Sender".
L To use Message Disposition Notification, press [Recept. Notice].If you select [Recept. Notice], the selected e-mail sender will receive e-mail no-tification when the e-mail recipient has opened the e-mail.
M Press {Start}.If you are scanning batches, place the next originals.
Note❒ If you have selected two or more destinations, the destinations can be
made to appear one by one by pressing [U] or [T] next to the destinationfield.
❒ To cancel a selected destination, display the destination in the destinationfield, and then press {Clear / Stop}. You can cancel a destination selectedfrom the address book by pressing the selected destination again.
❒ In [System Settings], you can specify the administrator’s e-mail address asthe default sender name. This lets you send e-mail without entering any-thing for [Sender Name]. For details, see General Settings Guide.
❒ Depending on the security setting, the logged-on user may be specified as[Sender Name].
❒ To use Message Disposition Notification, log on to the machine as a userand specify the sender. Note, however, that the [Recept. Notice] notificatione-mail may not be transmitted if the e-mail software of the recipient doesnot support Message Disposition Notification.
❒ By pressing {Check Modes}, you can switch from the initial scanner screento the Check Modes screen so you can check the settings. For details, see"Check Modes".
❒ If you press [Preview], and then scan a document, the Preview screen ap-pears. For details, see "Preview".
❒ To cancel scanning, press {Clear / Stop}.
Sending Scan Files by E-mail
16
1
❒ You can also store a scan file and simultaneously send it by e-mail. For de-tails, see "Simultaneous Storage and Sending by E-mail".
Referencep.17 “Switching to the E-mail Screen”p.105 “Various Scan Settings”p.115 “Adjusting Image Density”p.116 “Setting of Original Feed Type”p.125 “Setting File Type and File Name”p.18 “Specifying E-mail Destinations”p.32 “Specifying the E-mail Message”p.31 “Specifying the E-mail Subject”p.27 “Specifying the E-mail Sender”p.4 “Check Modes”p.5 “Preview”p.34 “Simultaneous Storage and Sending by E-mail”
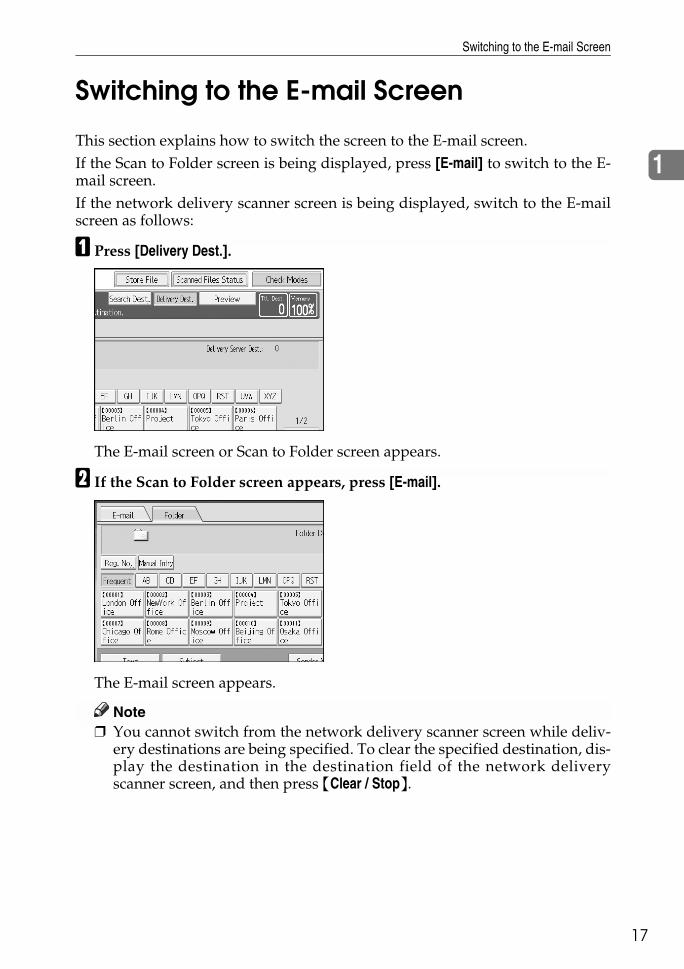
Switching to the E-mail Screen
17
1
Switching to the E-mail Screen
This section explains how to switch the screen to the E-mail screen.If the Scan to Folder screen is being displayed, press [E-mail] to switch to the E-mail screen.If the network delivery scanner screen is being displayed, switch to the E-mailscreen as follows:
A Press [Delivery Dest.].
The E-mail screen or Scan to Folder screen appears.
B If the Scan to Folder screen appears, press [E-mail].
The E-mail screen appears.
Note❒ You cannot switch from the network delivery scanner screen while deliv-
ery destinations are being specified. To clear the specified destination, dis-play the destination in the destination field of the network deliveryscanner screen, and then press {Clear / Stop}.

Sending Scan Files by E-mail
18
1
Specifying E-mail Destinations
This section explains how to specify e-mail destinations.You can specify e-mail destinations by any of the following methods:• Select the destination from the machine’s address book• Enter the e-mail address directly• Search the LDAP server for the destination and select itBefore you select destinations, make sure you have selected [To]. If necessary,press [Cc] or [Bcc], and then select destinations.
Selecting the Destination from the Machine’s Address Book
This section explains how to select the destination from the machine’s addressbook.
Important❒ To use this function, you must register the destinations in [System Settings] in
advance. For details, see General Settings Guide.You can use the following methods to select destinations registered in the ma-chine's address book:• Select a destination from the list• Select a destination by entering the registration number• Select a destination by searching the machine's address book
Selecting a destination from the list
Select the destination from the destination list.
A In the destination list, press the key including the destination name.
The key of the selected destination is highlighted, and the destination appearsin the destination field at the top of the screen.
Specifying E-mail Destinations
19
1
If the target destination does not appear, take one of the following steps:• Display the destination by selecting its initial letter from the title• Display the destination by pressing [U] or [T]
Note❒ Depending on the security setting, some destinations may not appear in
the destination list.
Selecting destinations by entering the registration numbers
Select the destination from the machine’s address book using its registrationnumber.
A Press [Reg. No.].
B Using the number keys, enter the five-digit registration number assignedto the required destination folder.If the entered number is less than five digits, press {q} after the last number.Example: To enter 00003 Press {3}, and then press {q}.
C Press [OK].By pressing [Change], you can change the selected destination.

Sending Scan Files by E-mail
20
1
Searching the machine’s address book for the destination and selecting it
This section explains how to search the machine’s address book for the destina-tion and select it.
A Press [Search Dest.].
B To search by name, press [Name].To search by e-mail address, press [E-mail Address].The soft keyboard appears so you can enter the name or e-mail address.You can also search by combining [Name] and [E-mail Address].
C Enter part of the destination name.To search by e-mail address, enter part of the address.
D Press [OK].
E If necessary, press [Advanced Search], and then specify the detailed searchcriteria.By pressing [Advanced Search], you can search using criteria such as [Name], [E-mail Address], and [Folder Name]. You can also search by combining the [Begin-ning Word] or [End Word] criteria with the other criteria.
The illustrated screen is an example. The items that actually appear on thescreen may differ.
F Press [Start Search].Destinations that match the search criteria are displayed.
Specifying E-mail Destinations
21
1
G Select a destination.
H Select [To], [Cc], or [Bcc].
I Press [OK].
Note❒ If [LDAP Search] is set to [On] in [System Settings], check that [Address Book]
in the upper part on the screen has been selected before executing thesearch.
❒ Search criteria that appear in [Advanced Search], such as [Name], [E-mail Ad-dress], and [Folder Name], are registered in the machine’s address book. Fordetails, see General Setting Guide.
❒ By pressing [Details], you can view details about the selected destinations.❒ Up to 100 destinations can be displayed as search results.❒ By pressing [Advanced Search], the following criteria appear:• [Beginning Word]: The names which start with the entered character or char-
acters are targeted.For example, to search for "ABC", enter "A".
• [End Word]: The names which end with the entered character or charactersare targeted.For example, to search for "ABC", enter "C".
• [Exact Match]: The names which correspond to an entered character or char-acters are targeted.For example, to search for "ABC", enter "ABC".
• [Include one Word]: The names which contain an entered character or char-acters are targeted.For example, to search for "ABC", enter "A", "B", or "C".
• [Exclude Words]: The names which do not contain an entered character orcharacters are targeted.For example, to search for "ABC", enter "D".

Sending Scan Files by E-mail
22
1
Entering an E-mail Address Manually
This section explains how to enter an e-mail address manually.
A Press [Manual Entry].
The soft keyboard appears so you can enter the e-mail address.
B Enter the e-mail address.
C Press [OK].
Note❒ Depending on the security settings, [Manual Entry] may not be displayed.❒ To change a registered destination e-mail address, press [Edit] to the left of
the destination field to display the soft keyboard, use the soft keyboard toenter the new address, and then click [OK].
❒ The e-mail address that is entered directly can be registered in the ma-chine’s address book. For details, see "Registering a Directly-Entered Des-tination in the Address Book".
Referencep.25 “Registering a Directly-Entered Destination in the Address Book”
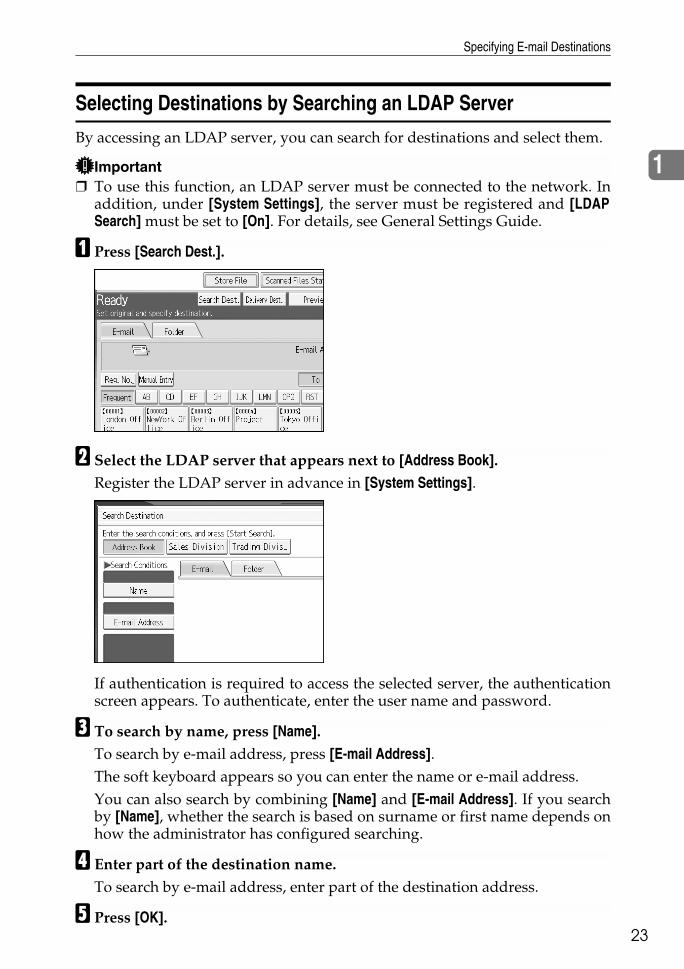
Specifying E-mail Destinations
23
1
Selecting Destinations by Searching an LDAP Server
By accessing an LDAP server, you can search for destinations and select them.
Important❒ To use this function, an LDAP server must be connected to the network. In
addition, under [System Settings], the server must be registered and [LDAPSearch] must be set to [On]. For details, see General Settings Guide.
A Press [Search Dest.].
B Select the LDAP server that appears next to [Address Book].Register the LDAP server in advance in [System Settings].
If authentication is required to access the selected server, the authenticationscreen appears. To authenticate, enter the user name and password.
C To search by name, press [Name].To search by e-mail address, press [E-mail Address].The soft keyboard appears so you can enter the name or e-mail address.You can also search by combining [Name] and [E-mail Address]. If you searchby [Name], whether the search is based on surname or first name depends onhow the administrator has configured searching.
D Enter part of the destination name.To search by e-mail address, enter part of the destination address.
E Press [OK].
Sending Scan Files by E-mail
24
1
F If necessary, press [Advanced Search], and then specify the detailed searchcriteria.By pressing [Advanced Search], you can search using criteria such as [Name], [E-mail Address], [Company Name], [Department Name], and [Search Options]. You canalso search by combining the [Beginning Word] or [End Word] criteria with theother criteria.
The illustrated screen is an example. The items that actually appear on thescreen may differ.
G Press [Start Search].Destinations that match the search criteria are displayed.
H Select the destination.
I Select [To], [Cc], or [Bcc].
J Press [OK].
Note❒ The [Fax Destination], [Company Name], [Department Name], and [Search Op-
tions] search criteria that appear in [Advanced Search] are registered in theLDAP server. [Search Options] can be registered in [System Settings]. For de-tails, see General Settings Guide.
❒ By pressing [Details], you can view details about the selected destinations.❒ Up to 100 destinations can be displayed as search results.❒ If an e-mail address returned by the LDAP server is too long, it will be im-
possible to specify it as the destination. For details about the number ofcharacters that can be specified, see "Sending E-mail".
❒ It is possible for more than one e-mail address to be registered for a desti-nation. However, only one e-mail address per destination will appear inthe search results. It depends on the LDAP server which e-mail addresswill be displayed. Usually, it is the e-mail address registered first.
❒ By pressing [Advanced Search], the following criteria appear:• [Beginning Word]: The names which start with the entered character or char-
acters are targeted.For example, to search for "ABC", enter "A".

Specifying E-mail Destinations
25
1
• [End Word]: The names which end with the entered character or charactersare targeted.For example, to search for "ABC", enter "C".
• [Exact Match]: The names which correspond to an entered character or char-acters are targeted.For example, to search for "ABC", enter "ABC".
• [Include one Word]: The names which contain an entered character or char-acters are targeted.For example, to search for "ABC", enter "A", "B", or "C".
• [Exclude Words]: The names which do not contain an entered character orcharacters are targeted.For example, to search for "ABC", enter "D".
• [Fuzzy Search]: a vague search (The function of this vague search dependson the system supported by the LDAP server.)
Referencep.146 “Sending E-mail”
Registering a Directly-Entered Destination in the Address Book
This section explains how to register a directly-entered destination in the ma-chine’s address book. You can also register a destination selected from the LDAPserver.
A In the destination field, display the destination you want to register.
B Press [Prg. Dest.].
Sending Scan Files by E-mail
26
1
C Press [Names], and then specify the name and other information to be regis-tered.For details about specifying the information to be registered, see General Set-tings Guide.
D Press [OK].
Note❒ Depending on the security setting, [Prg. Dest.] may not appear. In such case,
you cannot complete the registration.❒ To register in the machine’s address book a destination searched for and
selected from the LDAP server, display the destination, and then press[Prg. Dest.].
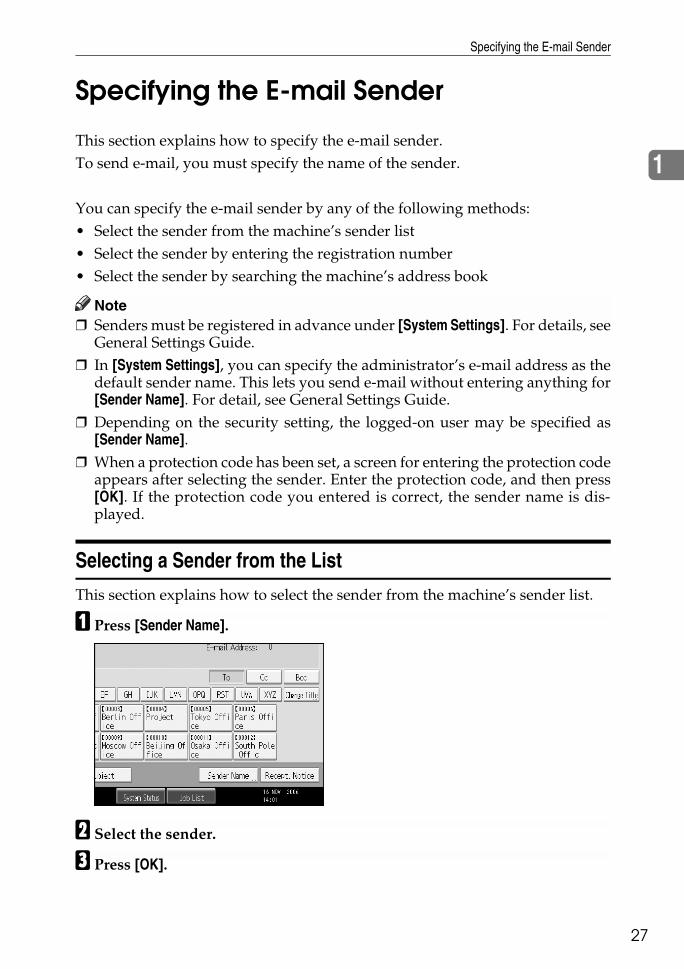
Specifying the E-mail Sender
27
1
Specifying the E-mail Sender
This section explains how to specify the e-mail sender.To send e-mail, you must specify the name of the sender.
You can specify the e-mail sender by any of the following methods:• Select the sender from the machine’s sender list• Select the sender by entering the registration number• Select the sender by searching the machine’s address book
Note❒ Senders must be registered in advance under [System Settings]. For details, see
General Settings Guide.❒ In [System Settings], you can specify the administrator’s e-mail address as the
default sender name. This lets you send e-mail without entering anything for[Sender Name]. For detail, see General Settings Guide.
❒ Depending on the security setting, the logged-on user may be specified as[Sender Name].
❒ When a protection code has been set, a screen for entering the protection codeappears after selecting the sender. Enter the protection code, and then press[OK]. If the protection code you entered is correct, the sender name is dis-played.
Selecting a Sender from the List
This section explains how to select the sender from the machine’s sender list.
A Press [Sender Name].
B Select the sender.
C Press [OK].

Sending Scan Files by E-mail
28
1
Using a Registration Number to Specify a Sender Name
Select the sender from the destination list according to the registration number.
A Press [Sender Name].
B Press [Registration No.].
C Using the number keys, enter the five-digit registration number assignedto the required destination folder.If the entered number is less than five digits, press {q} after the last number.Example: To enter 00006Press {6}, and then press {q}.
D Press [OK] twice.By pressing [Change], you can change the selected destination.
Selecting the Sender by Searching the Machine’s Address Book
This section explains how to select the sender by searching the machine’s ad-dress book.
A Press [Sender Name].
B Press [Search].
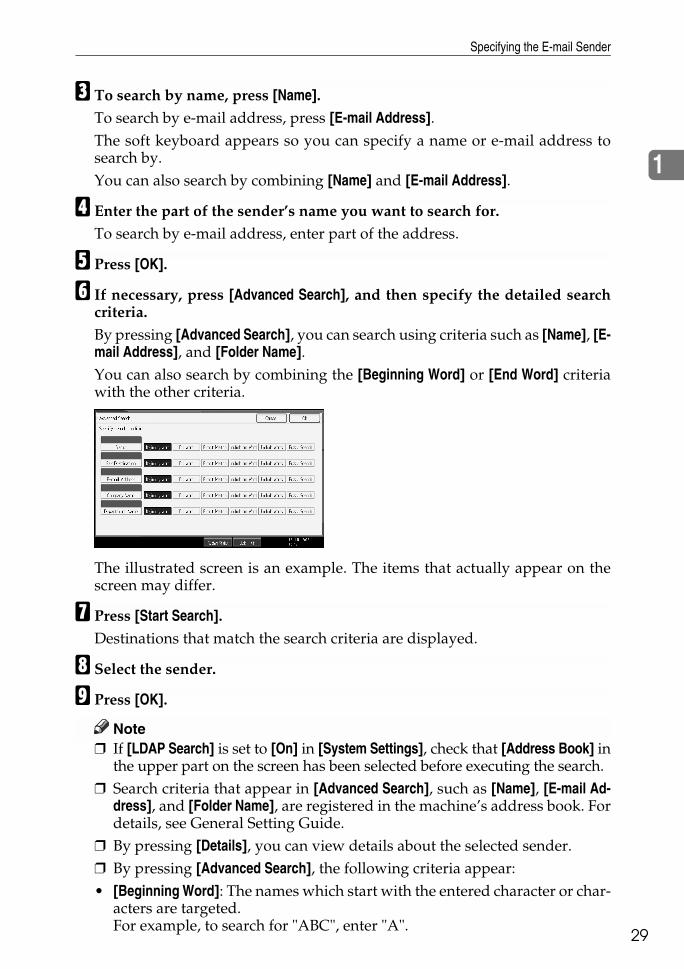
Specifying the E-mail Sender
29
1
C To search by name, press [Name].To search by e-mail address, press [E-mail Address].The soft keyboard appears so you can specify a name or e-mail address tosearch by.You can also search by combining [Name] and [E-mail Address].
D Enter the part of the sender’s name you want to search for.To search by e-mail address, enter part of the address.
E Press [OK].
F If necessary, press [Advanced Search], and then specify the detailed searchcriteria.By pressing [Advanced Search], you can search using criteria such as [Name], [E-mail Address], and [Folder Name].You can also search by combining the [Beginning Word] or [End Word] criteriawith the other criteria.
The illustrated screen is an example. The items that actually appear on thescreen may differ.
G Press [Start Search].Destinations that match the search criteria are displayed.
H Select the sender.
I Press [OK].
Note❒ If [LDAP Search] is set to [On] in [System Settings], check that [Address Book] in
the upper part on the screen has been selected before executing the search.❒ Search criteria that appear in [Advanced Search], such as [Name], [E-mail Ad-
dress], and [Folder Name], are registered in the machine’s address book. Fordetails, see General Setting Guide.
❒ By pressing [Details], you can view details about the selected sender.❒ By pressing [Advanced Search], the following criteria appear:• [Beginning Word]: The names which start with the entered character or char-
acters are targeted.For example, to search for "ABC", enter "A".

Sending Scan Files by E-mail
30
1
• [End Word]: The names which end with the entered character or charactersare targeted.For example, to search for "ABC", enter "C".
• [Exact Match]: The names which correspond to an entered character or char-acters are targeted.For example, to search for "ABC", enter "ABC".
• [Include one Word]: The names which contain an entered character or char-acters are targeted.For example, to search for "ABC", enter "A", "B", or "C".
• [Exclude Words]: The names which do not contain an entered character orcharacters are targeted.For example, to search for "ABC", enter "D".
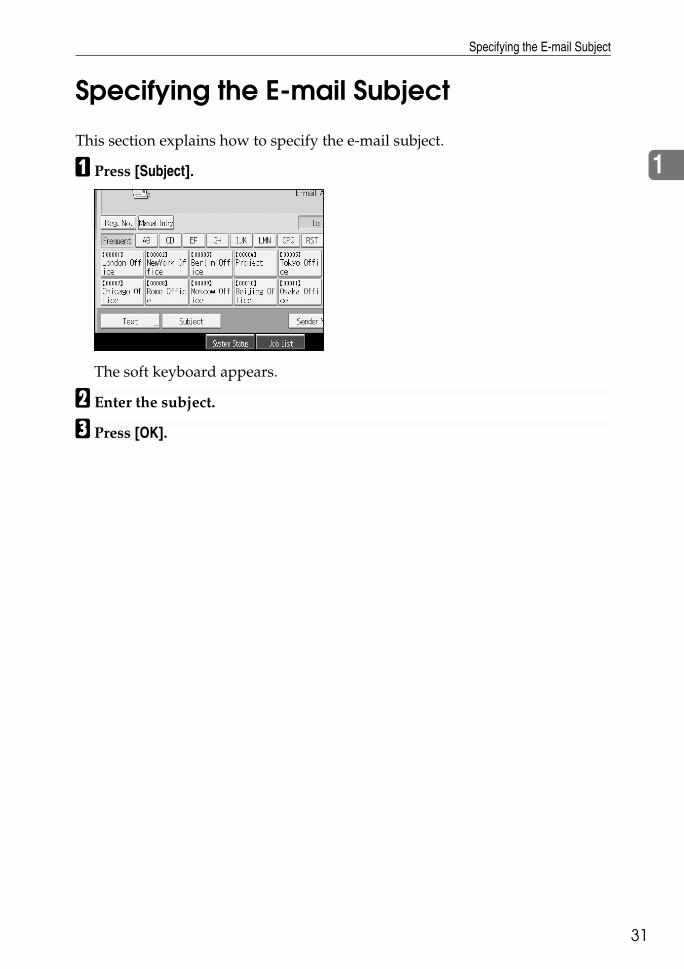
Specifying the E-mail Subject
31
1
Specifying the E-mail Subject
This section explains how to specify the e-mail subject.
A Press [Subject].
The soft keyboard appears.
B Enter the subject.
C Press [OK].
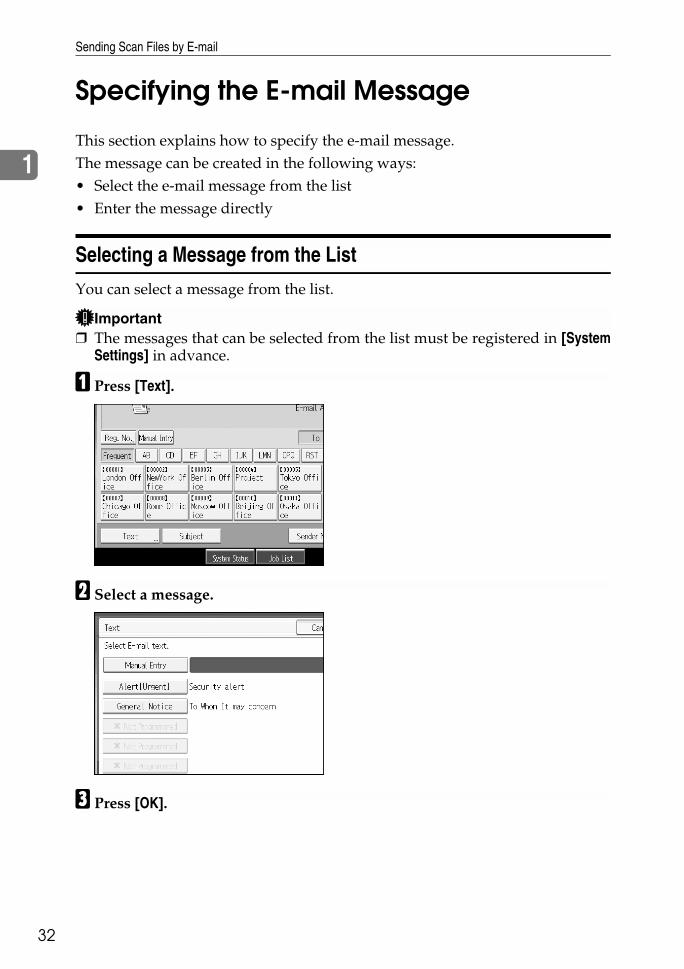
Sending Scan Files by E-mail
32
1
Specifying the E-mail Message
This section explains how to specify the e-mail message.The message can be created in the following ways:• Select the e-mail message from the list• Enter the message directly
Selecting a Message from the List
You can select a message from the list.
Important❒ The messages that can be selected from the list must be registered in [System
Settings] in advance.
A Press [Text].
B Select a message.
C Press [OK].

Specifying the E-mail Message
33
1
Manual Entry of a Message
You can enter the message manually.
A Press [Text].
B Press [Manual Entry].The soft keyboard appears so you can enter the message.
C Enter the message.
D Press [OK] twice.

Sending Scan Files by E-mail
34
1
Simultaneous Storage and Sending by E-mail
This section explains how to store a file and simultaneously send it by e-mail.
A Press [Store File].
BMake sure [Send & Store] is selected.
C If necessary, specify file data, such as [User Name], [File Name], and [Password].For details, see " Specifying File Information for a Store File".
D Press [OK].
E Specify the setting for sending the file by e-mail, and then send the file.For details about sending a file by e-mail, see "Basic Operation for SendingScan Files by E-mail".
Note❒ If you simultaneously store scan files and send them by e-mail, the files
cannot be retransmitted from the E-mail screen. To retransmit the files, se-lect the file on the screen for selecting stored files, and then send them. Fordetails, see "Sending a Stored File".
Referencep.65 “Specifying File Information for a Stored File”p.14 “Basic Operation for Sending Scan Files by E-mail”p.74 “Sending a Stored File”

Simultaneous Storage and Sending by E-mail
35
1
Sending the URL by E-mail
This section explains how to send the URL of the stored file by e-mail.
Important❒ To send the URL of the stored file by e-mail without sending the file itself, you
must specify the setting in [Scanner Features]. For details, see General SettingsGuide.
You can send the URL when you send a stored file by e-mail, and when you storea file and simultaneously send it by e-mail.With the transmitted URL, the recipient can view, download, or delete the fileindicated by the URL over the network using Web Image Monitor. Even if youcannot send a file by e-mail because of network limitations, you can still send theURL of the file.
A In [Scanner Features], select [Send URL Link] under [Stored File E-mail Method].For details about specifying the setting, see General Settings Guide.
B Send a stored file by e-mail. Alternatively, store a file and simultaneouslysend it by e-mail.For details about sending a stored file by e-mail, see "Sending a Stored File".For details about storing a file and simultaneously sending it by e-mail, see"Simultaneous Storage and Sending by E-mail".An e-mail such as the one shown below will be sent to the destination.
C In the e-mail destination, click the URL.Web Image Monitor starts.
D View, delete, or download the file over the network using Web ImageMonitor.
Note❒ It is recommended that you use Web Image Monitor on the same network
environment. For details about settings for using Web Image Monitor, seeNetwork Guide.
❒ Depending on the environment, even if you click the URL in the file sentby e-mail, the browser may not start and you may not be able to view thefile. If this happens, click the same URL again, or manually enter the URLin the browser's address bar.

Sending Scan Files by E-mail
36
1
❒ For details about the functions for displaying and downloading stored filesusing Web Image Monitor, see Network Guide.
❒ To display details about the functions for managing stored files using WebImage Monitor, click [Help] on the upper right of each Web browser's win-dow.
❒ You can send the URL by e-mail and simultaneously send it by Scan toFolder. In this case, the file is sent to the Scan to Folder destination, not theURL.

2. Sending Scan Files to Folders
37
Using the Scan to Folder function, you can send scan files over the network toshared folders, FTP server folders, or NetWare folders.
Before Sending Files by Scan to Folder
This section describes the preparations and procedure for sending files by Scanto Folder.
Outline of Sending Scan Files by Scan to Folder
This section outlines the function for sending scan files by Scan to Folder.
Sending files to shared folders
1. This machineYou can send scan files to shared net-work folders. To send scan files to sharednetwork folders, use the SMB protocol.
2. Computer with a shared folderTo use this function, it is necessary to cre-ate a shared folder in advance. You canspecify a shared folder to save scan files.
3. Client computerYou can also browse scanned files savedto a shared folder from a client computer.
ZZZ509S

Sending Scan Files to Folders
38
2
Sending files to an FTP server
1. This machineYou can send scan files to FTP serverfolders. To send scan files to FTP serverfolders, use the FTP protocol.
2. FTP serverThe FTP server is a server that providesfile transfer services among computerson the same network. Transferred filesare stored on this server. It is essential toha ve t h e F T P s er v e r i ns i d e t heLAN/WAN where this machine belongs.It is not possible to access an FTP servervia a proxy server.
3. Client computerYou can browse scanned files saved to anFTP server from a client computer. Youneed to have an FTP client program onthe computer to connect to an FTP server.
ZZZ510S
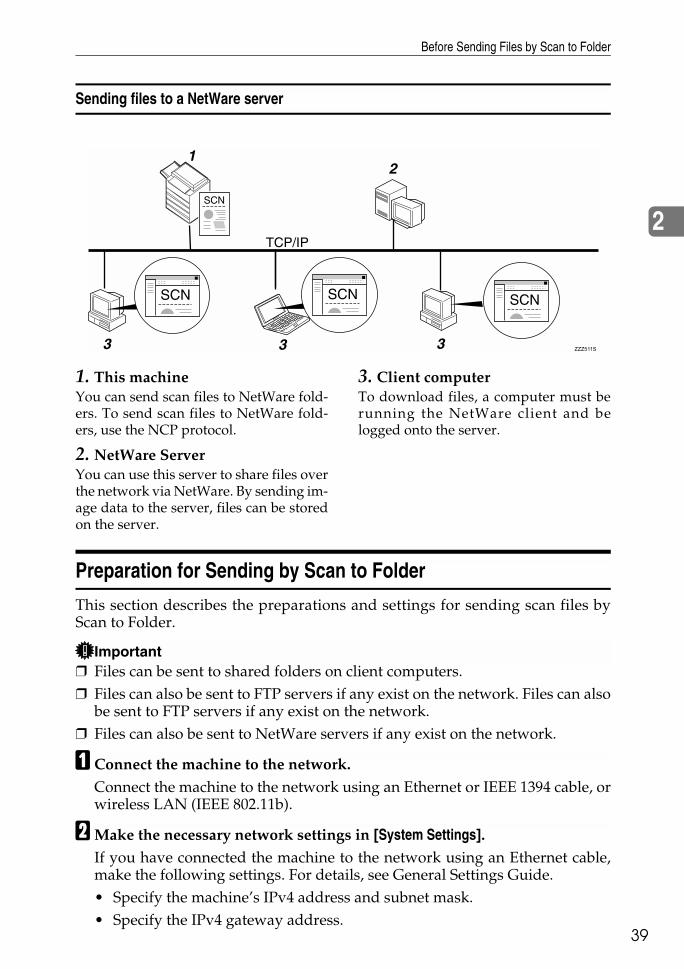
Before Sending Files by Scan to Folder
39
2
Sending files to a NetWare server
1. This machineYou can send scan files to NetWare fold-ers. To send scan files to NetWare fold-ers, use the NCP protocol.
2. NetWare ServerYou can use this server to share files overthe network via NetWare. By sending im-age data to the server, files can be storedon the server.
3. Client computerTo download files, a computer must berunning the NetWare client and belogged onto the server.
Preparation for Sending by Scan to Folder
This section describes the preparations and settings for sending scan files byScan to Folder.
Important❒ Files can be sent to shared folders on client computers.❒ Files can also be sent to FTP servers if any exist on the network. Files can also
be sent to FTP servers if any exist on the network.❒ Files can also be sent to NetWare servers if any exist on the network.
A Connect the machine to the network.Connect the machine to the network using an Ethernet or IEEE 1394 cable, orwireless LAN (IEEE 802.11b).
BMake the necessary network settings in [System Settings].If you have connected the machine to the network using an Ethernet cable,make the following settings. For details, see General Settings Guide.• Specify the machine’s IPv4 address and subnet mask.• Specify the IPv4 gateway address.
ZZZ511S

Sending Scan Files to Folders
40
2
• In [Effective Protocol], enable [IPv4].• To send files to shared folders, enable [SMB] in [Effective Protocol]. To send
files to NetWare folders, enable [NetWare] in [Effective Protocol].
C If necessary, change settings in [Send Settings] under [Scanner Features].
Note❒ To connect the machine to the network using an IEEE 1394 cable or wire-
less LAN (IEEE 802.11b), an extended 1394 board or extended wirelessLAN board is required respectively. For details, see Network Guide.
❒ Items to set up in [System Settings] vary depending on the network environ-ment. For more information about network settings, see General SettingsGuide.
❒ For details about [Scanner Features], see General Settings Guide.❒ Sending files using SMB is available only under a NetBIOS over TCP/IP
environment. Sending files using SMB is not available under a NetBEUIenvironment.
❒ Even when settings made with the control panel, Web Image Monitor, Tel-net, or other methods do not permit the use of SMB and FTP, sending filesis still possible.
Registering Destination Folders in the Address Book
You can register the addresses of frequently-used destination folders in the ad-dress book. Register the folder addresses in [Address Book Management] under[Administrator Tools] from [System Settings]. These addresses can also be registeredas groups.
Note❒ For details about registering the address of a destination folder in the address
book, see General Settings Guide.❒ You can register entries in the address book using Web Image Monitor or
SmartDeviceMonitor for Admin. For details about installing SmartDevice-Monitor for Admin, see "Monitoring and Configuring the Printer", NetworkGuide. For details about registering addresses, see each application’s Help.
❒ Depending on the machine type, you may not be able to use the machinewhen it is updating the address book using CSV files (retrieved using Smart-DeviceMonitor for Admin) that contain user codes.
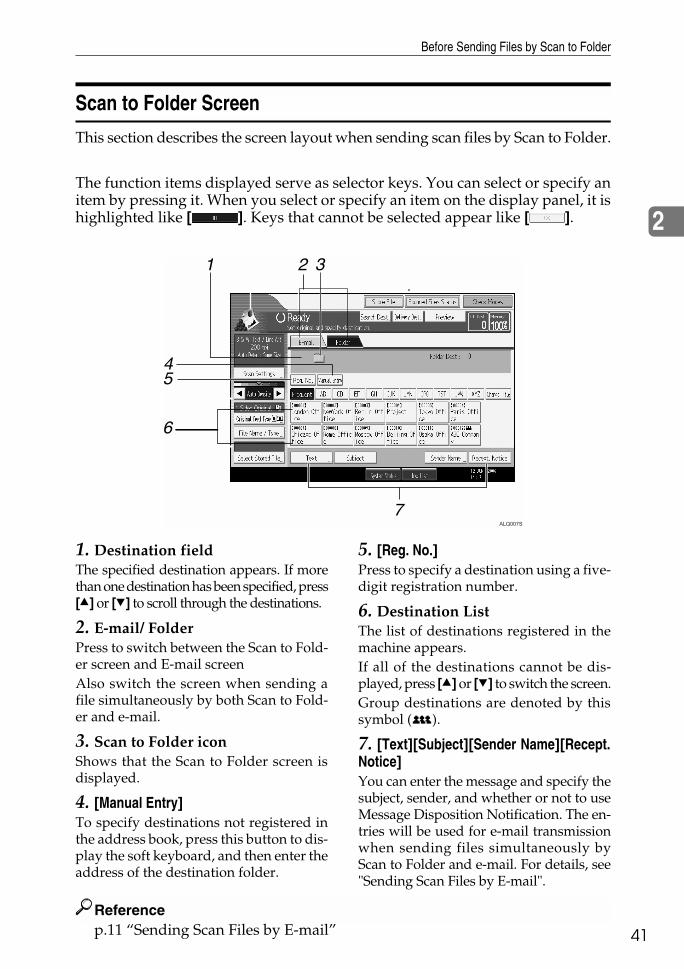
Before Sending Files by Scan to Folder
41
2
Scan to Folder Screen
This section describes the screen layout when sending scan files by Scan to Folder.
The function items displayed serve as selector keys. You can select or specify anitem by pressing it. When you select or specify an item on the display panel, it ishighlighted like [ ]. Keys that cannot be selected appear like [ ].
1. Destination fieldThe specified destination appears. If morethan one destination has been specified, press[U] or [T] to scroll through the destinations.
2. E-mail/ FolderPress to switch between the Scan to Fold-er screen and E-mail screenAlso switch the screen when sending afile simultaneously by both Scan to Fold-er and e-mail.
3. Scan to Folder iconShows that the Scan to Folder screen isdisplayed.
4. [Manual Entry]To specify destinations not registered inthe address book, press this button to dis-play the soft keyboard, and then enter theaddress of the destination folder.
5. [Reg. No.]Press to specify a destination using a five-digit registration number.
6. Destination ListThe list of destinations registered in themachine appears.If all of the destinations cannot be dis-played, press [U] or [T] to switch the screen.Group destinations are denoted by thissymbol ( ).
7. [Text][Subject][Sender Name][Recept.Notice]You can enter the message and specify thesubject, sender, and whether or not to useMessage Disposition Notification. The en-tries will be used for e-mail transmissionwhen sending files simultaneously byScan to Folder and e-mail. For details, see"Sending Scan Files by E-mail".
Referencep.11 “Sending Scan Files by E-mail”
ALQ007S
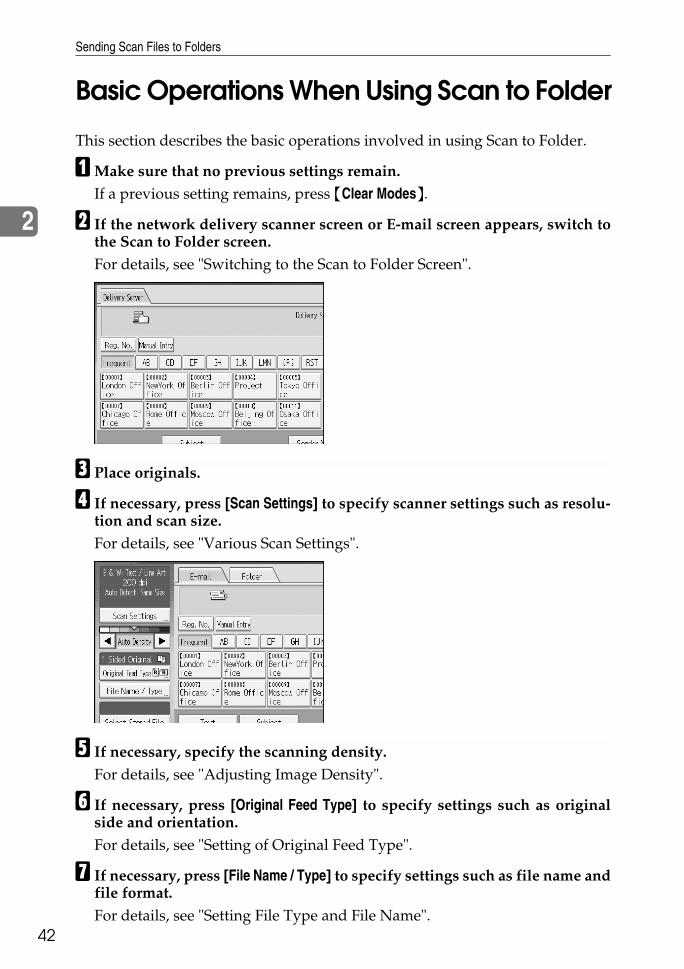
Sending Scan Files to Folders
42
2
Basic Operations When Using Scan to Folder
This section describes the basic operations involved in using Scan to Folder.
AMake sure that no previous settings remain.If a previous setting remains, press {Clear Modes}.
B If the network delivery scanner screen or E-mail screen appears, switch tothe Scan to Folder screen.For details, see "Switching to the Scan to Folder Screen".
C Place originals.
D If necessary, press [Scan Settings] to specify scanner settings such as resolu-tion and scan size.For details, see "Various Scan Settings".
E If necessary, specify the scanning density.For details, see "Adjusting Image Density".
F If necessary, press [Original Feed Type] to specify settings such as originalside and orientation.For details, see "Setting of Original Feed Type".
G If necessary, press [File Name / Type] to specify settings such as file name andfile format.For details, see "Setting File Type and File Name".
Basic Operations When Using Scan to Folder
43
2
H Specify the destination.You can specify multiple destinations.For details, see "Specifying Scan to Folder Destinations".
I Press {Start}.If you are scanning batches, place the next originals.
Note❒ If you have selected more than one destination, you can press [U] or [T]
next to the destination field to scroll through the destinations.❒ To cancel a selected destination, display the destination in the destination
field, and then press {Clear / Stop}. You can cancel a destination selectedfrom the address book by pressing the selected destination again.
❒ By pressing {Check Modes}, you can switch from the initial scanner screento the Check Modes screen so you can check the settings. For details, see"Check Modes".
❒ If you press [Preview], and then scan a document, the Preview screen ap-pears. For details, see "Preview".
❒ To cancel scanning, press {Clear / Stop}.❒ You can also store a file and simultaneously send it by Scan to Folder. For
details, see "Simultaneous Storage and Sending by Scan to Folder".
Referencep.44 “Switching to the Scan to Folder Screen”p.105 “Various Scan Settings”p.115 “Adjusting Image Density”p.116 “Setting of Original Feed Type”p.125 “Setting File Type and File Name”p.45 “Specifying Scan to Folder Destinations”p.4 “Check Modes”p.5 “Preview”p.59 “Simultaneous Storage and Sending by Scan to Folder”

Sending Scan Files to Folders
44
2
Switching to the Scan to Folder Screen
This section explains how to switch to the Scan to Folder screen.If the E-mail screen is being displayed, press [Folder] to switch to the Scan toFolder screen.If the network delivery scanner screen is being displayed, switch to the Scan toFolder screen as follows:
A Press [Delivery Dest.].
The E-mail screen or Scan to Folder screen appears.
B If the E-mail screen appears, press [Folder].
The Scan to Folder screen appears.
Note❒ You cannot switch from the network delivery scanner screen while deliv-
ery destinations are being specified. To clear the specified destination, dis-play the destination in the destination field of the network deliveryscanner screen, and then press {Clear / Stop}.
Specifying Scan to Folder Destinations
45
2
Specifying Scan to Folder Destinations
This section explains how to specify Scan to Folder destinations.You can send a file by Scan to Folder by any of the following methods:• Select a destination registered in the machine’s address book• Send a file to a shared network folder• Send a file to an FTP server• Send a file to an NDS tree or a NetWare server
Selecting the Destination from the Machine’s Address Book
This section explains how to select the destination from the machine’s addressbook.
Important❒ To use this function, you must register the destinations in [System Settings] in
advance.
You can select a destination registered in the machine’s address book by any ofthe following methods:• Select the destination from the destination list• Select the destination by entering its registration number• Select the destination by searching the machine’s address book
Note❒ If you have specified the address protection cord for accessing the address
book, the screen for entering the address protection cord appears.❒ Depending on the security setting, some destinations may not appear in the
destination list.
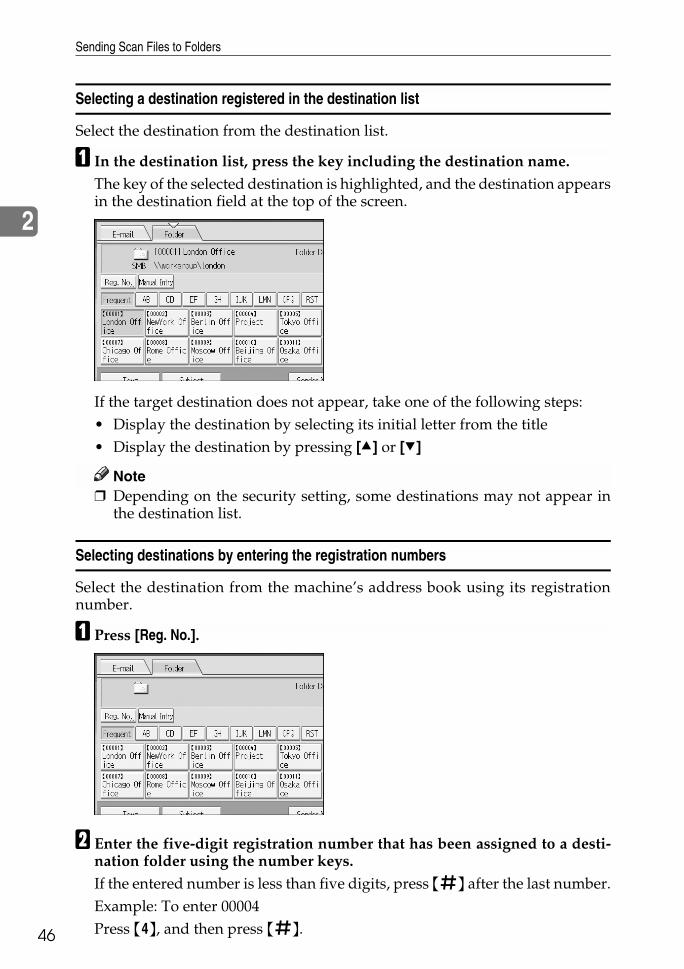
Sending Scan Files to Folders
46
2
Selecting a destination registered in the destination list
Select the destination from the destination list.
A In the destination list, press the key including the destination name.The key of the selected destination is highlighted, and the destination appearsin the destination field at the top of the screen.
If the target destination does not appear, take one of the following steps:• Display the destination by selecting its initial letter from the title• Display the destination by pressing [U] or [T]
Note❒ Depending on the security setting, some destinations may not appear in
the destination list.
Selecting destinations by entering the registration numbers
Select the destination from the machine’s address book using its registrationnumber.
A Press [Reg. No.].
B Enter the five-digit registration number that has been assigned to a desti-nation folder using the number keys.If the entered number is less than five digits, press {q} after the last number.Example: To enter 00004Press {4}, and then press {q}.

Specifying Scan to Folder Destinations
47
2
C Press [OK].By pressing [Change], you can change the selected destination.
Searching the machine’s address book for the destination and selecting it
This section explains how to search the machine’s address book for the destina-tion and select it.
A Press [Search Dest.].
B To search by name, press [Name].To search by path, press [Folder].
The soft keyboard appears so you can enter the name or path.You can also search by combining [Name] and [Folder Name].
C Enter part of the destination name.To search by path, enter part of the path.
D Press [OK].
Sending Scan Files to Folders
48
2
E If necessary, press [Advanced Search], and then specify the detailed search criteria.By pressing [Advanced Search], you can search using criteria such as [Name], [E-mail Address], and [Folder Name].You can also search by combining the [Beginning Word] or [End Word] criteriawith the other criteria.
The illustrated screen is an example. The items that actually appear on thescreen may differ.
F Press [Start Search].Destinations that match the search criterion are displayed.
G Select the destination folder.
H Press [OK].
Note❒ Search criteria that appear in [Advanced Search], such as [Name], [E-mail Ad-
dress], and [Folder], are registered in the machine’s address book. For de-tails, see General Setting Guide.
❒ By pressing [Details], you can view details about the selected destinations.❒ Up to 100 destinations can be displayed as search results.❒ By pressing [Advanced Search], the following criteria appear:• [Beginning Word]: The names which start with the entered character or char-
acters are targeted.For example, to search for "ABC", enter "A".
• [End Word]: The names which end with the entered character or charactersare targeted.For example, to search for "ABC", enter "C".
• [Exact Match]: The names which correspond to an entered character or char-acters are targeted.For example, to search for "ABC", enter "ABC".
• [Include one Word]: The names which contain an entered character or char-acters are targeted.For example, to search for "ABC", enter "A", "B", or "C".
• [Exclude Words]: The names which do not contain an entered character orcharacters are targeted.For example, to search for "ABC", enter "D".

Specifying Scan to Folder Destinations
49
2
Sending Files to a Shared Network Folder
This section explains how to specify the destination when sending files to ashared network folder.
Important❒ The shared folder must have been created on the client computer in advance.❒ Depending on the operating system of the client computer, access to the
shared folder may require authentication.
You can send a file to a shared folder over the network by any of the followingmethods:• Enter the path to the destination directly• Specify the path by browsing the network for the destination
Entering the path to the destination manually
You can enter the path to the destination folder manually.
A Press [Manual Entry].
B Press [SMB].
C Press [Manual Entry] on the right side of the path field.The soft keyboard appears.
D Enter the path for the folder.The following is an example of a path where the folder name is "user" and thecomputer name is "desk01": \\desk01\user.Instead of specifying the destination using its path, you can also use its IPv4address.
E Press [OK].
Sending Scan Files to Folders
50
2
F Depending on the destination setting, enter the user name for logging onto the client computer.Press [Manual Entry] to the right of the user name field to display the soft key-board.
G Depending on the destination setting, enter the password for logging on tothe client computer.Press [Manual Entry] for the password to display the soft keyboard.
H Press [Connection Test].A connection test is performed to check whether the specified shared folderexists.
I Check the connection test result, and then press [Exit].
J Press [OK].
Note❒ If authentication is required to access the folder, the login screen appears.
Enter the user name and password.❒ If you change the protocol after entering the path name, user name, or
password, a confirmation message appears.❒ IPv4 address entry is supported by Windows98/Me/2000/XP, Windows
NT4.0, and Windows Server 2003.❒ Computer and shared folder names containing more than 12 characters
cannot be displayed.❒ To change the path for the folder that has been entered, press [Change] on
the left side of the destination field. Enter the correct path for the folder,and then press [OK].
❒ The connection test may take time.❒ You may not be able to press [Connection Test] right after pressing [Cancel]
during a connection test.❒ Even if the connection test was successful, the machine may fail to transfer
the file if you do not have write privileges for the file or there is not enoughfree hard disk space.
❒ You can register the path to the destination in the machine’s address book.For details, see "Registering the Path to the Selected Destination in the Ad-dress Book".
Referencep.57 “Registering the Path to the Selected Destination in the AddressBook”
Specifying Scan to Folder Destinations
51
2
Specifying the path by browsing the network for destinations
You can browse computers on the network for the destination folder, and thenspecify the path.
A Press [Manual Entry].
B Press [SMB].
C Press [Browse Network] under the path name field.
Domains or workgroups on the network appear.
D Select the domain or workgroup in which the destination folder is located.
E Select the client computer that has the destination folder.If you cannot find the computer you are looking for, press [Up One Level] andbrowse that level.If authentication is required to access the selected computer, the authentica-tion screen appears. To authenticate, enter the user name and password.
F Select the destination folder.When the selected folder has sub-folders, the sub-folders list appears.If you cannot find the destination folder, press [Up One Level], and then searchfor the folder at that level.
Sending Scan Files to Folders
52
2
G Press [OK] twice.
Note❒ If authentication is required to access the folder, the login screen appears.
Enter the user name and password.❒ If you change the protocol after entering the path name, user name, or
password, a confirmation message appears.❒ Computer and shared folder names containing more than 12 characters
cannot be displayed.❒ Up to 100 computers or shared folders can be displayed.❒ The machine may fail to transfer the file if you do not have the write priv-
ileges for the shared folder or there is not enough free hard disk space.❒ You can register the path to the destination in the machine’s address book.
For details, see "Registering the Path to the Selected Destination in the Ad-dress Book".
Referencep.57 “Registering the Path to the Selected Destination in the AddressBook”
Sending Files to an FTP Server
This section explains how to specify destinations when sending files to an FTPserver.
Entering the path to an FTP server manually
You can enter the path to an FTP server manually.
A Press [Manual Entry].
B Press [FTP].
C Press [Manual Entry] on the right side of the server name field.The soft keyboard appears.
Specifying Scan to Folder Destinations
53
2
D Enter a server name.Instead of specifying the destination using its path, you can also use its IPv4address.
E Press [Manual Entry] on the right side of the path field.
F Enter the path for the folder.The following is an example of a path where the folder name is "user" and thesubfolder name is "lib": user\lib.
G Press [OK].
H Enter the user name according to the setting at the destination.Press [Manual Entry] to the right of the user name field to display the soft key-board.
I Enter the password according to the setting at the destination.Press [Manual Entry] next to the password field to make the soft keyboard appear.
J To change the port number which is set in [System Settings], press [Change]on the right side of the port number field. Enter a port number using thenumber keys, and then press {q}.
K Press [Connection Test].A connection test is performed to check whether the specified folder exists.
L Check the connection test result, and then press [Exit].
M Press [OK].
Note❒ If you change the protocol after entering the path name, user name, or
password, a confirmation message appears.❒ The connection test may take time.❒ You may not be able to press [Connection Test] right after pressing [Cancel]
during a connection test.❒ To change the registered path to a destination folder, press [Edit] to the left
of the destination field to display the soft keyboard, enter the new path,and then click [OK].
❒ You can register the path to the destination in the machine’s address book.For details, see "Registering the Path to the Selected Destination in the Ad-dress Book".
❒ The machine may fail to transfer the file if you do not have write privilegesfor the folder or there is not enough free hard disk space.
Referencep.57 “Registering the Path to the Selected Destination in the AddressBook”
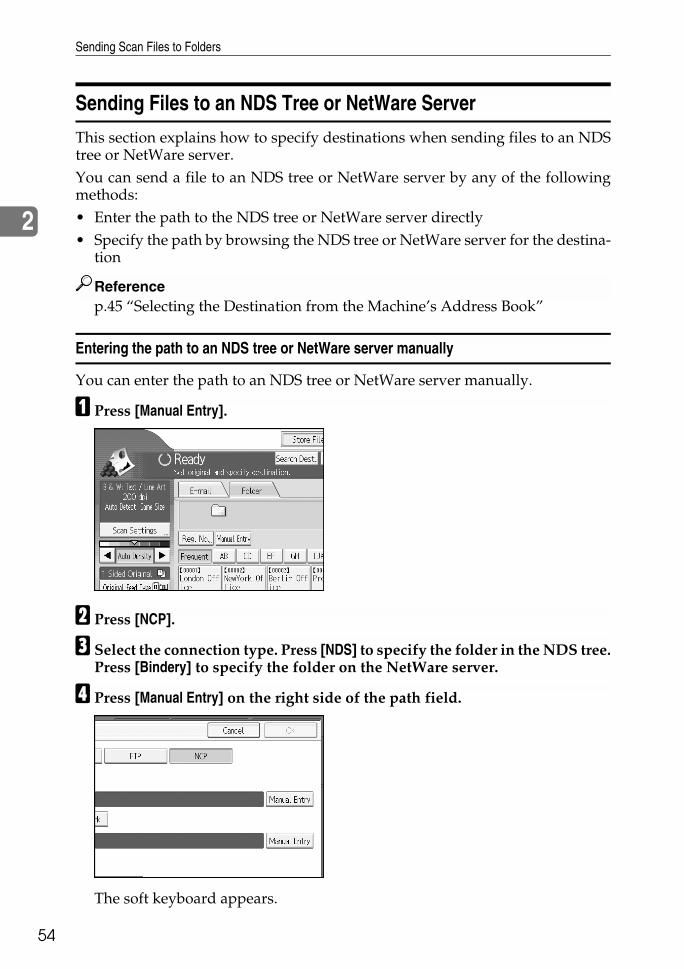
Sending Scan Files to Folders
54
2
Sending Files to an NDS Tree or NetWare Server
This section explains how to specify destinations when sending files to an NDStree or NetWare server.You can send a file to an NDS tree or NetWare server by any of the followingmethods:• Enter the path to the NDS tree or NetWare server directly• Specify the path by browsing the NDS tree or NetWare server for the destina-
tion
Referencep.45 “Selecting the Destination from the Machine’s Address Book”
Entering the path to an NDS tree or NetWare server manually
You can enter the path to an NDS tree or NetWare server manually.
A Press [Manual Entry].
B Press [NCP].
C Select the connection type. Press [NDS] to specify the folder in the NDS tree.Press [Bindery] to specify the folder on the NetWare server.
D Press [Manual Entry] on the right side of the path field.
The soft keyboard appears.
Specifying Scan to Folder Destinations
55
2
E Enter the path for the folder.If you set the connection type to [NDS], the NDS tree name is "tree", the nameof the context including the volume is "context", the volume name is "vol-ume", and the folder name is "folder", the path will be \\tree\volume.con-text\folder".If you set the connection type to [Bindery], the NetWare server name is "serv-er", the volume name is "volume", and the folder name is "folder", the pathwill be "\\server\volume\folder".
F Press [OK].
G Enter the user name for logging on to the NDS tree or NetWare server.Press [Manual Entry] to the right of the user name field. The soft keyboard ap-pears.If you press [NDS] for [Connection Type], enter the user name, and then enterthe name of the context containing the user object. If the user name is "user"and the name of the Context is "context", the user name will be "user.context".
H If a password is specified for the log on user, enter it.Press [Manual Entry] to the right of the password field. The soft keyboard ap-pears.
I Press [Connection Test].A connection test is performed to check whether the specified share folder ex-ists.
J Check the connection test result, and then press [Exit].
K Press [OK].
Note❒ If you change the protocol after entering the path name, user name, or
password, a confirmation message appears. ❒ To change a registered path to a destination folder, press [Edit] to the left to
the destination field to display the soft keyboard, enter the correct path tothe folder, and then press [OK].
❒ You can connect only to folders that you have the read privileges for.❒ The connection test may take time.❒ You may not be able to press [Connection Test] right after pressing [Cancel]
during a connection test.❒ Even if the connection test was successful, the machine may fail to transfer
the file if you do not have write privileges for the file or there is not enoughfree hard disk space.
❒ You can register the path to the destination in the machine’s address book.For details, see "Registering the Path to the Selected Destination in the Ad-dress Book".
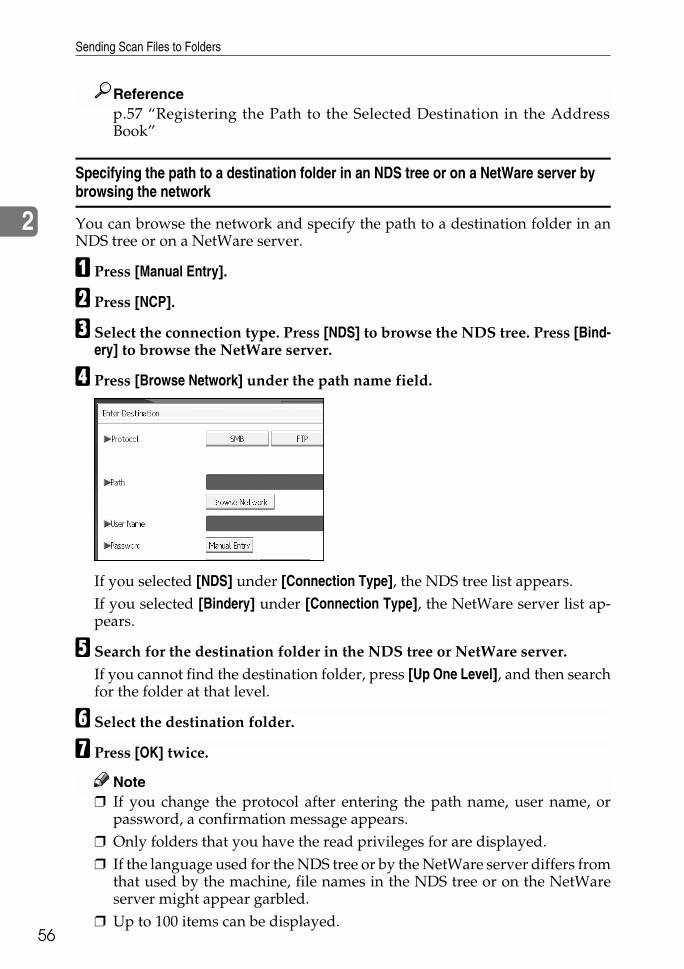
Sending Scan Files to Folders
56
2
Referencep.57 “Registering the Path to the Selected Destination in the AddressBook”
Specifying the path to a destination folder in an NDS tree or on a NetWare server by browsing the network
You can browse the network and specify the path to a destination folder in anNDS tree or on a NetWare server.
A Press [Manual Entry].
B Press [NCP].
C Select the connection type. Press [NDS] to browse the NDS tree. Press [Bind-ery] to browse the NetWare server.
D Press [Browse Network] under the path name field.
If you selected [NDS] under [Connection Type], the NDS tree list appears. If you selected [Bindery] under [Connection Type], the NetWare server list ap-pears.
E Search for the destination folder in the NDS tree or NetWare server.If you cannot find the destination folder, press [Up One Level], and then searchfor the folder at that level.
F Select the destination folder.
G Press [OK] twice.
Note❒ If you change the protocol after entering the path name, user name, or
password, a confirmation message appears.❒ Only folders that you have the read privileges for are displayed.❒ If the language used for the NDS tree or by the NetWare server differs from
that used by the machine, file names in the NDS tree or on the NetWareserver might appear garbled.
❒ Up to 100 items can be displayed.
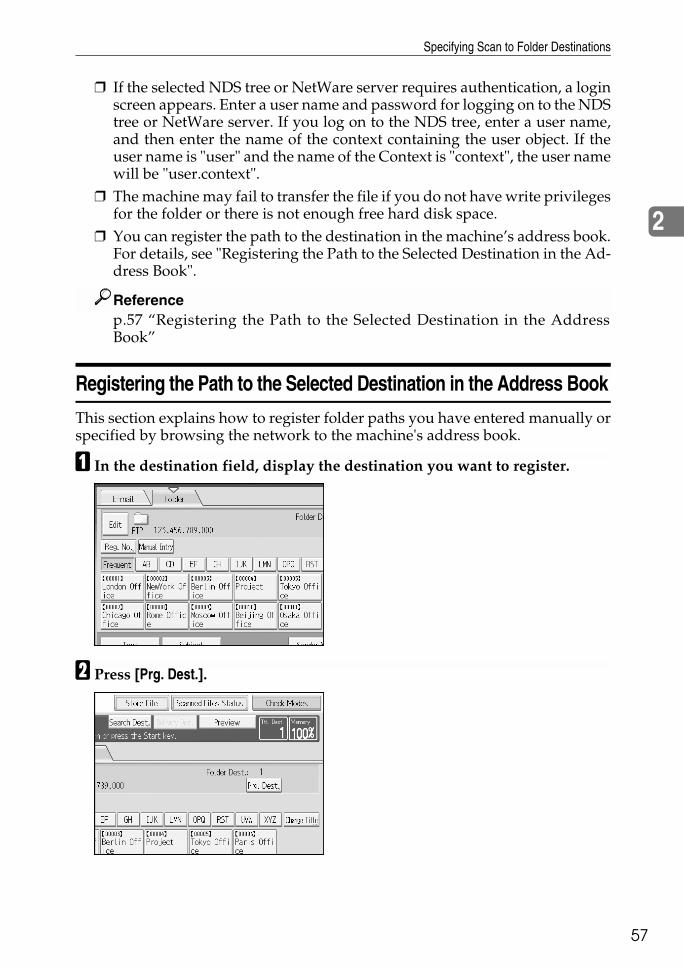
Specifying Scan to Folder Destinations
57
2
❒ If the selected NDS tree or NetWare server requires authentication, a loginscreen appears. Enter a user name and password for logging on to the NDStree or NetWare server. If you log on to the NDS tree, enter a user name,and then enter the name of the context containing the user object. If theuser name is "user" and the name of the Context is "context", the user namewill be "user.context".
❒ The machine may fail to transfer the file if you do not have write privilegesfor the folder or there is not enough free hard disk space.
❒ You can register the path to the destination in the machine’s address book.For details, see "Registering the Path to the Selected Destination in the Ad-dress Book".
Referencep.57 “Registering the Path to the Selected Destination in the AddressBook”
Registering the Path to the Selected Destination in the Address Book
This section explains how to register folder paths you have entered manually orspecified by browsing the network to the machine's address book.
A In the destination field, display the destination you want to register.
B Press [Prg. Dest.].
Sending Scan Files to Folders
58
2
C Press [Names], and then specify the name and other information to be regis-tered.For details about specifying the information to be registered, see General Set-tings Guide.
D Press [OK].
Note❒ Depending on the security setting, [Prg. Dest.] may not appear.

Simultaneous Storage and Sending by Scan to Folder
59
2
Simultaneous Storage and Sending by Scan to Folder
This section explains how to store a file and simultaneously send it by Scan toFolder.
A Press [Store File].
BMake sure that [Send & Store] is selected.
C If necessary, specify file data, such as [User Name], [File Name], and [Password].For details, see "Specifying File Information for a Stored File".
D Press [OK].
E Specify the setting for sending the file by Scan to Folder, and then send thefile.For details about sending a file by Scan to Folder, see "Basic Operations WhenUsing Scan to Folder".
Note❒ Depending on the security setting, [Access Privileges] may appear instead
of [User Name]. For details about specifying [Access Privileges], consult theadministrator.
❒ If you simultaneously store scan files and send them by Scan to Folder, thefiles cannot be retransmitted from the Scan to Folder screen. To retransmitthe files, select the files on the Select Stored File screen, and then sendthem. For details, see "Sending a Stored File".
Referencep.65 “Specifying File Information for a Stored File”p.42 “Basic Operations When Using Scan to Folder”p.74 “Sending a Stored File”

Sending Scan Files to Folders
60
2
3. Storing Files Using the ScannerFunction
61
Using the scanner function, you can store scan files in the machine and then sendthe stored files by e-mail or Scan to Folder.
Before Storing Files
This section outlines file storage under the scanner function and provides relat-ed cautions.
Outline of File Storage under the Scanner Function
This section outlines storing files under the scanner function.
Important❒ You can specify a password for each stored file. Files that are not password-
protected can be accessed by other users on the same local area network usingDeskTopBinder. It is recommended that you protect stored files from unau-thorized access by specifying passwords.
❒ Scan file stored in the machine may be lost if some kind of failure occurs. Weadvise against using the hard disk to store important files. The supplier shallnot be responsible for any damage that may result from the loss of files. Forlong-term storage of files, we recommend the use of DeskTopBinder. For de-tails, contact your local dealer.
1. This MachineYou can store scan files on the machine’shard disk. The stored files can be sent bye-mail, Scan to Folder, or the network de-livery scanner.
2. Client ComputerUsing DeskTopBinder, you can, over thenetwork, view, copy, or delete files storedin the machine. Using Web Image Moni-tor, you can, over the network, view,download, or delete files stored in the ma-chine. For details about DeskTopBinderLite, see DeskTopBinder Lite–relatedmanuals. For details about Web ImageMonitor, see Web Image Monitor Help.
ZZZ512S

Storing Files Using the Scanner Function
62
3
Note❒ Stored files will be deleted after a set period. For details about specifying the
period, see General Settings Guide.❒ Files stored under the scanner function cannot be printed from the machine’s
control panel. Print the files from a client computer after receiving them onthe computer.
❒ You can also store a file and simultaneously send it by e-mail or Scan to Fold-er, or store it and simultaneously deliver it. For details, see "SimultaneousStorage and Sending by E-mail", "Simultaneous Storage and Sending by Scanto Folder", and "Simultaneous Storage and Delivery".
Referencep.34 “Simultaneous Storage and Sending by E-mail”p.59 “Simultaneous Storage and Sending by Scan to Folder”p.98 “Simultaneous Storage and Delivery”
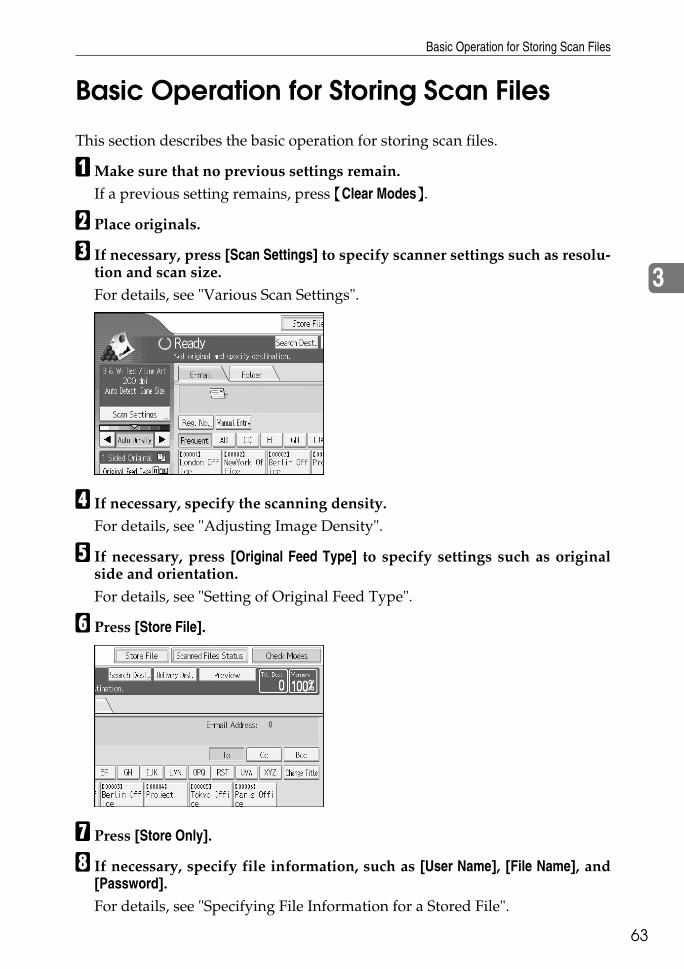
Basic Operation for Storing Scan Files
63
3
Basic Operation for Storing Scan Files
This section describes the basic operation for storing scan files.
AMake sure that no previous settings remain.If a previous setting remains, press {Clear Modes}.
B Place originals.
C If necessary, press [Scan Settings] to specify scanner settings such as resolu-tion and scan size.For details, see "Various Scan Settings".
D If necessary, specify the scanning density.For details, see "Adjusting Image Density".
E If necessary, press [Original Feed Type] to specify settings such as originalside and orientation.For details, see "Setting of Original Feed Type".
F Press [Store File].
G Press [Store Only].
H If necessary, specify file information, such as [User Name], [File Name], and[Password].For details, see "Specifying File Information for a Stored File".

Storing Files Using the Scanner Function
64
3
I Press [OK].
J Press {Start}.If you are scanning batches, place the next originals.
Note❒ Depending on the security setting, [Access Privileges] may appear instead
of [User Name]. For details about specifying [Access Privileges], consult theadministrator.
❒ By pressing [Send & Store], you can simultaneously store scan files and sendthem. For details, see "Simultaneous Storage and Sending by E-mail", "Si-multaneous Storage and Sending by Scan to Folder", and "SimultaneousStorage and Delivery".
❒ If a destination or sender has been selected, you cannot press [Store Only].❒ To cancel scanning, press {Clear / Stop}.
Referencep.105 “Various Scan Settings”p.115 “Adjusting Image Density”p.116 “Setting of Original Feed Type”p.65 “Specifying File Information for a Stored File”p.34 “Simultaneous Storage and Sending by E-mail”p.59 “Simultaneous Storage and Sending by Scan to Folder”p.98 “Simultaneous Storage and Delivery”

Specifying File Information for a Stored File
65
3
Specifying File Information for a Stored File
You can specify data for a stored file, such as user name, file name, and pass-word.By specifying data for a stored file, you can search for the file by user name orfile name, or protect the file with a password to prevent other people from ac-cessing the file.
Specifying a User Name
You can specify a user name for the stored file.
A Press [Store File].
The Store File screen appears.
B Press [User Name].A list of user names appears.
C Press the user name you want to specify.The user names shown here are names that were registered on the [Adminis-trator Tools] tab in [System Settings]. To specify a name not shown here, press[Manual Entry], and then enter the user name.
D Press [OK] twice.
Note❒ Depending on the security setting, [Access Privileges] may appear instead
of [User Name]. For details about specifying [Access Privileges], consult theadministrator.

Storing Files Using the Scanner Function
66
3
Specifying a File Name
This section explains how to change the name of a stored file.A stored file is allocated a name starting with "SCAN" followed by a 4-digitnumber.• Example: SCAN0001You can change this file name.
A Press [Store File].
The Store File screen appears.
B Press [File Name].The soft keyboard appears.
C Change the file name.
D Press [OK] twice.
Note❒ For details about entering the text, see About This Machine.

Specifying File Information for a Stored File
67
3
Specifying a Password
You can specify a password for the stored file.
Important❒ Do not forget the password. If you forget it, consult the system administrator
of the machine.
By specifying a password, you can ensure that only the people who know thepassword can view the file.
A Press [Store File].
The Store File screen appears.
B Press [Password].
C Using the number keys, enter a four to eight-digit number.
D Press [OK].
E Enter the same number again using the number keys.
F Press [OK] twice.
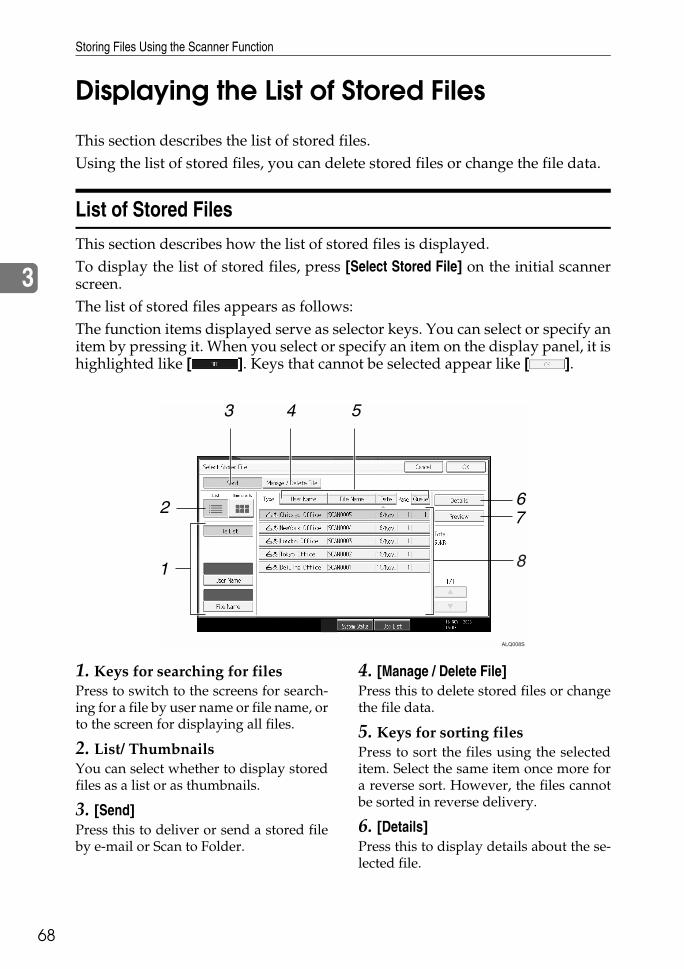
Storing Files Using the Scanner Function
68
3
Displaying the List of Stored Files
This section describes the list of stored files.Using the list of stored files, you can delete stored files or change the file data.
List of Stored Files
This section describes how the list of stored files is displayed.To display the list of stored files, press [Select Stored File] on the initial scannerscreen.The list of stored files appears as follows:The function items displayed serve as selector keys. You can select or specify anitem by pressing it. When you select or specify an item on the display panel, it ishighlighted like [ ]. Keys that cannot be selected appear like [ ].
1. Keys for searching for filesPress to switch to the screens for search-ing for a file by user name or file name, orto the screen for displaying all files.
2. List/ ThumbnailsYou can select whether to display storedfiles as a list or as thumbnails.
3. [Send]Press this to deliver or send a stored fileby e-mail or Scan to Folder.
4. [Manage / Delete File]Press this to delete stored files or changethe file data.
5. Keys for sorting filesPress to sort the files using the selecteditem. Select the same item once more fora reverse sort. However, the files cannotbe sorted in reverse delivery.
6. [Details]Press this to display details about the se-lected file.
ALQ008S
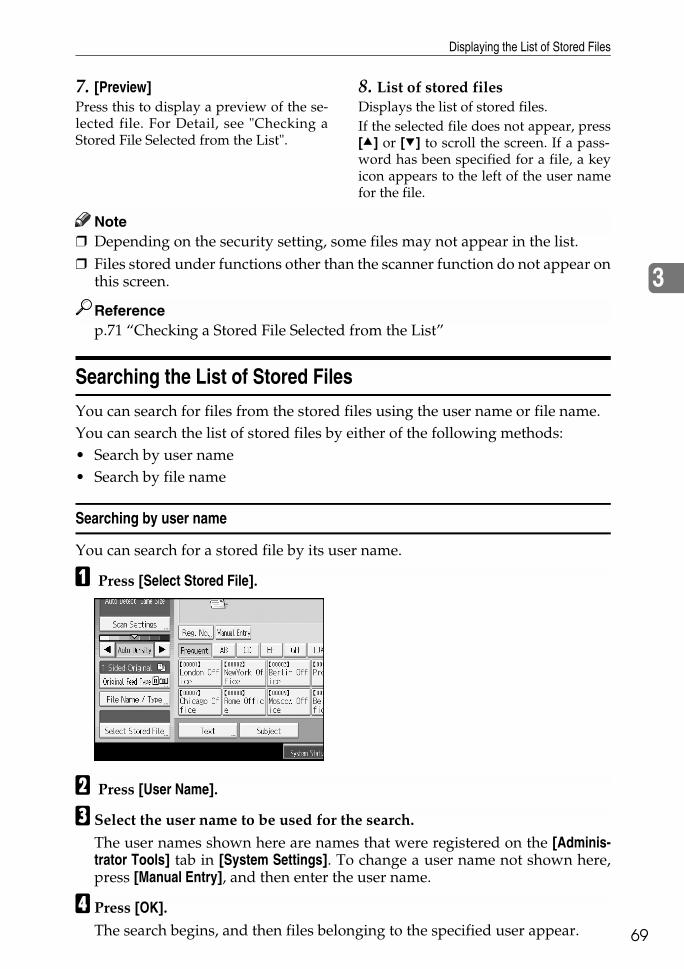
Displaying the List of Stored Files
69
3
7. [Preview]Press this to display a preview of the se-lected file. For Detail, see "Checking aStored File Selected from the List".
8. List of stored filesDisplays the list of stored files.If the selected file does not appear, press[U] or [T] to scroll the screen. If a pass-word has been specified for a file, a keyicon appears to the left of the user namefor the file.
Note❒ Depending on the security setting, some files may not appear in the list.❒ Files stored under functions other than the scanner function do not appear on
this screen.
Referencep.71 “Checking a Stored File Selected from the List”
Searching the List of Stored Files
You can search for files from the stored files using the user name or file name.You can search the list of stored files by either of the following methods:• Search by user name• Search by file name
Searching by user name
You can search for a stored file by its user name.
A Press [Select Stored File].
B Press [User Name].
C Select the user name to be used for the search.The user names shown here are names that were registered on the [Adminis-trator Tools] tab in [System Settings]. To change a user name not shown here,press [Manual Entry], and then enter the user name.
D Press [OK].The search begins, and then files belonging to the specified user appear.
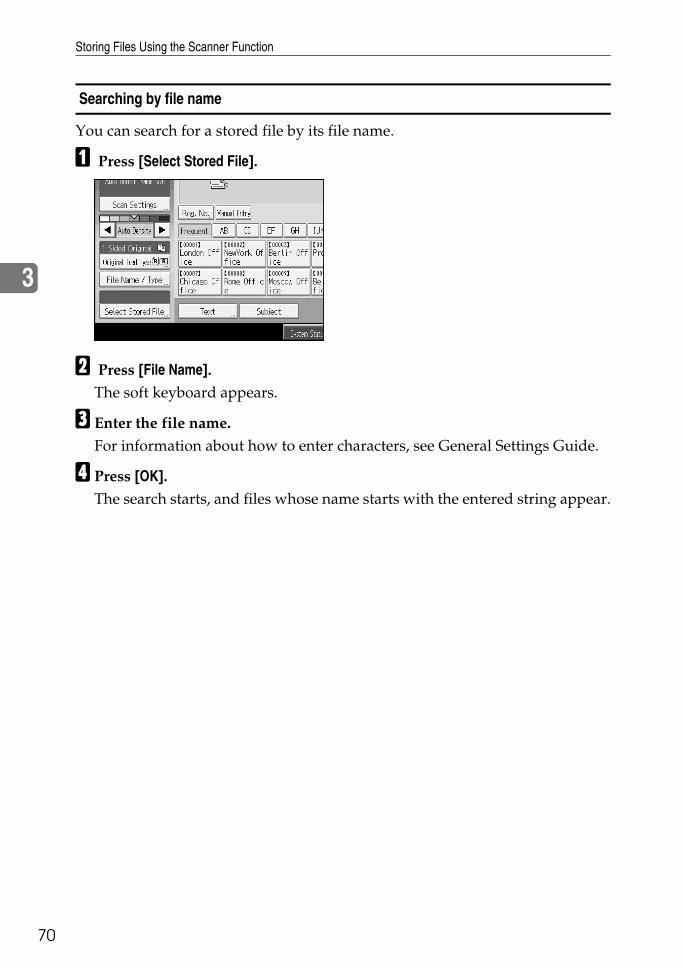
Storing Files Using the Scanner Function
70
3
Searching by file name
You can search for a stored file by its file name.
A Press [Select Stored File].
B Press [File Name].The soft keyboard appears.
C Enter the file name.For information about how to enter characters, see General Settings Guide.
D Press [OK].The search starts, and files whose name starts with the entered string appear.
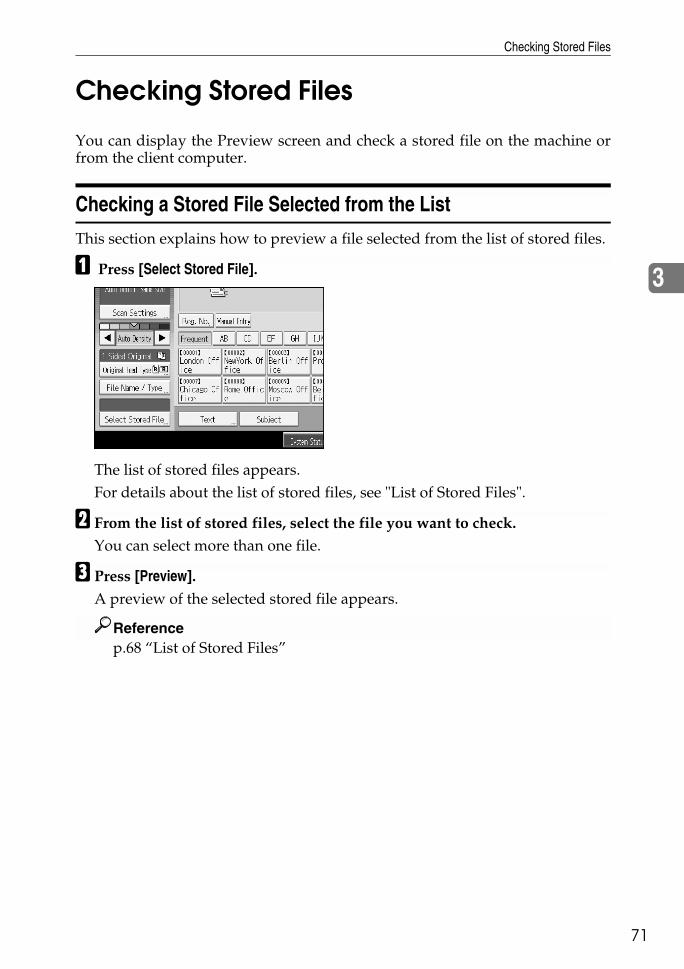
Checking Stored Files
71
3
Checking Stored Files
You can display the Preview screen and check a stored file on the machine orfrom the client computer.
Checking a Stored File Selected from the List
This section explains how to preview a file selected from the list of stored files.
A Press [Select Stored File].
The list of stored files appears.For details about the list of stored files, see "List of Stored Files".
B From the list of stored files, select the file you want to check.You can select more than one file.
C Press [Preview].A preview of the selected stored file appears.
Referencep.68 “List of Stored Files”

Storing Files Using the Scanner Function
72
3
Stored File Preview Screen
1. [Zoom Out], [Zoom In]In previewing, you can reduce or enlargethe file image.
2. [←][→][↑][↓]You can scroll the preview screen.
3. [Switch]You can switch to a preview of anotherpage.
4. [Switch]You can switch to a preview of anotherfile.
5. Display FileThe name and size of the selected file ap-pear.
6. Display PageThe page number of the previewed page,total number of pages, page size, and col-or mode appear.
7. Display PositionWhen the preview is enlarged, the loca-tion of the part of the page displayed onthe preview screen is indicated.
Checking Stored Files from a Client Computer
Using DeskTopBinder Lite or Web Image Monitor, you can also display the listof files stored in the machine on a client computer.
Important❒ To view stored files from a client computer, the IPv4 address of the machine
must be specified.
You can also check files stored under the copier, Document Server, and printerfunctions. The screen used to illustrate the procedure is an example. Dependingon the machine model or operating environment, the items that appear on theactual screen may differ.
AMW014S
Checking Stored Files
73
3
Displaying the List of Stored Files with DeskTopBinder Lite
Using DeskTopBinder Lite, you can display the list of files stored in the machineon a client computer.The stored files will appear in the DeskTopBinder Lite window as follows:The illustration is an example. The items that actually appear may be different.
Note❒ You can also transfer the stored files to the client computer.❒ For details about DeskTopBinder, see the DeskTopBinder-related manuals.❒ For details about installing DeskTopBinder Lite, see "Installing DeskTop-
Binder Lite from the Supplied CD-ROM".
Referencep.83 “Installing DeskTopBinder Lite from the Supplied CD-ROM”
Using Web Image Monitor to Display Stored Files
The stored files are displayed and can be checked also on a client computer usingWeb Image Monitor.The stored files will appear in the Web Image Monitor window as follows:When you enter http:// (machine IPv4 address)/ in the address bar of the Webbrowser on a client computer, the top page of Web Image Monitor appears.
Note❒ You can also download the stored files.❒ It is recommended that you use Web Image Monitor only within your local
area network.❒ For details about displaying or downloading stored files using Web Image
Monitor, see General Settings Guide.❒ For details about making settings for using Web Image Monitor, see Network
Guide.❒ For details about functions for managing stored files using Web Image Mon-
itor, click [Help] on the upper-right corner of the displayed screen.
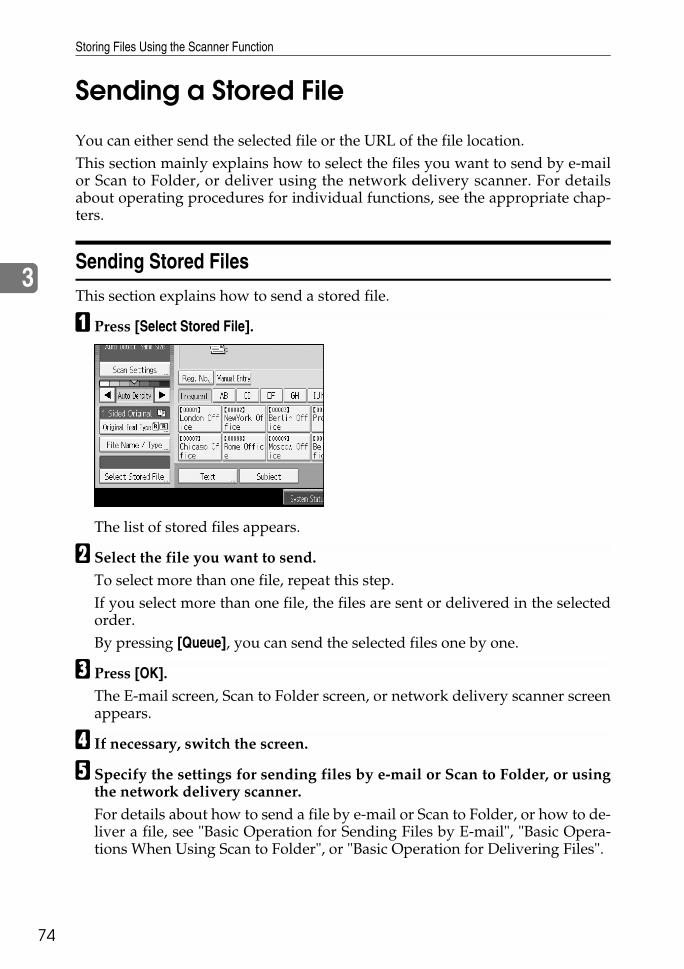
Storing Files Using the Scanner Function
74
3
Sending a Stored File
You can either send the selected file or the URL of the file location.This section mainly explains how to select the files you want to send by e-mailor Scan to Folder, or deliver using the network delivery scanner. For detailsabout operating procedures for individual functions, see the appropriate chap-ters.
Sending Stored Files
This section explains how to send a stored file.
A Press [Select Stored File].
The list of stored files appears.
B Select the file you want to send.To select more than one file, repeat this step.If you select more than one file, the files are sent or delivered in the selectedorder.By pressing [Queue], you can send the selected files one by one.
C Press [OK].The E-mail screen, Scan to Folder screen, or network delivery scanner screenappears.
D If necessary, switch the screen.
E Specify the settings for sending files by e-mail or Scan to Folder, or usingthe network delivery scanner.For details about how to send a file by e-mail or Scan to Folder, or how to de-liver a file, see "Basic Operation for Sending Files by E-mail", "Basic Opera-tions When Using Scan to Folder", or "Basic Operation for Delivering Files".

Sending a Stored File
75
3
F Press {Start}.The selected files are sent by e-mail or Scan to Folder, or using the networkdelivery scanner.
Note❒ If you choose a file protected by a password, a screen to enter the password
appears. To select the file, enter the correct password, and then press [OK].❒ When you send a stored file by e-mail, either the file can be attached to the
e-mail or the URL of the file location can be sent. This setting must be madein advance in [Scanner Features]. For details, see General Settings Guide.
Referencep.14 “Basic Operation for Sending Scan Files by E-mail”p.42 “Basic Operations When Using Scan to Folder”p.85 “Basic Operation for Delivering Files”

Storing Files Using the Scanner Function
76
3
Managing Stored Files
This section explains how to delete stored files and how to change the data forstored files.
Deleting a Stored File
This section explains how to delete a stored file.
A Press [Select Stored File].
The list of stored files appears.
B Press [Manage / Delete File].
The [Manage / Delete File] screen appears.
C Select the file you want to delete.
D Press [Delete File].A confirmation message about deleting the file appears.
E Press [Yes].
Note❒ Files waiting for delivery cannot be deleted.❒ You can also delete files stored in the machine by accessing the machine
from a client computer using Web Image Monitor or DeskTopBinder. Fordetail about Web Image Monitor, see Web Image Monitor Help. For detailsabout DeskTopBinder, see the manuals supplied with DeskTopBinder.
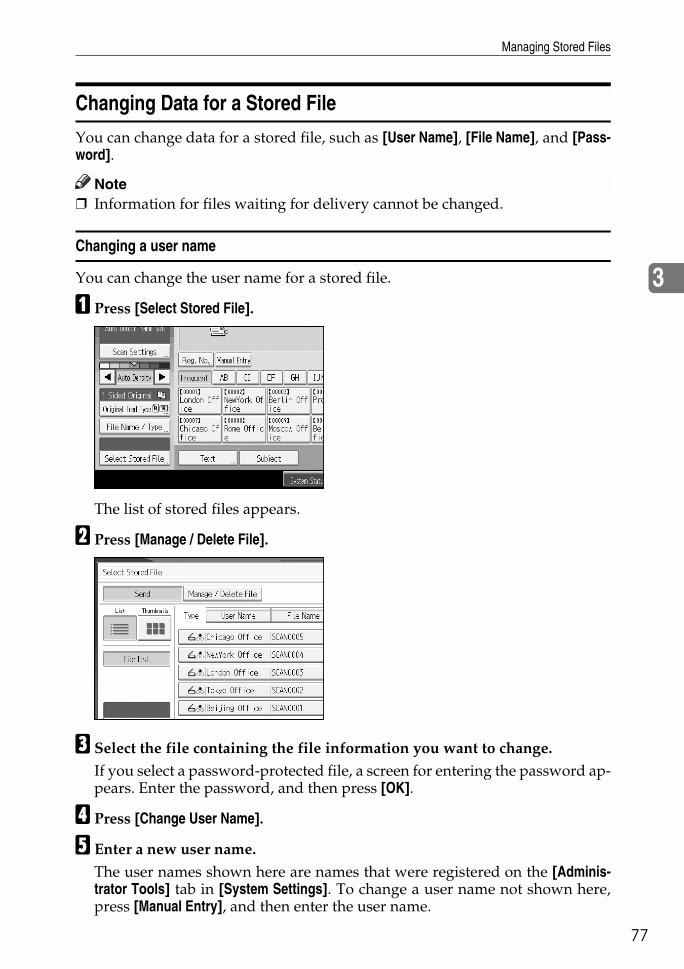
Managing Stored Files
77
3
Changing Data for a Stored File
You can change data for a stored file, such as [User Name], [File Name], and [Pass-word].
Note❒ Information for files waiting for delivery cannot be changed.
Changing a user name
You can change the user name for a stored file.
A Press [Select Stored File].
The list of stored files appears.
B Press [Manage / Delete File].
C Select the file containing the file information you want to change.If you select a password-protected file, a screen for entering the password ap-pears. Enter the password, and then press [OK].
D Press [Change User Name].
E Enter a new user name.The user names shown here are names that were registered on the [Adminis-trator Tools] tab in [System Settings]. To change a user name not shown here,press [Manual Entry], and then enter the user name.
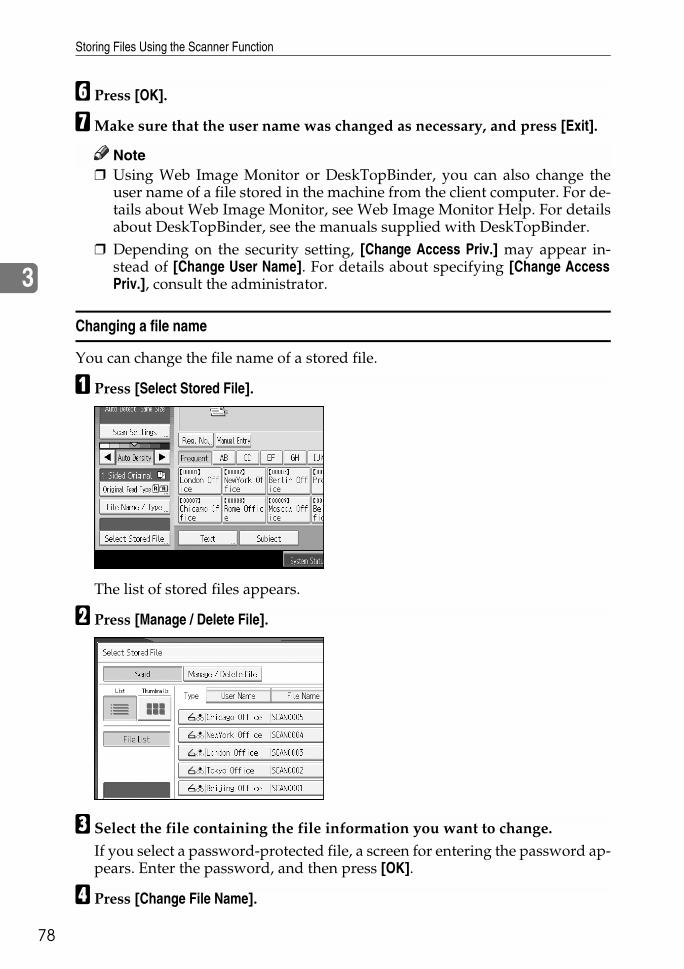
Storing Files Using the Scanner Function
78
3
F Press [OK].
GMake sure that the user name was changed as necessary, and press [Exit].
Note❒ Using Web Image Monitor or DeskTopBinder, you can also change the
user name of a file stored in the machine from the client computer. For de-tails about Web Image Monitor, see Web Image Monitor Help. For detailsabout DeskTopBinder, see the manuals supplied with DeskTopBinder.
❒ Depending on the security setting, [Change Access Priv.] may appear in-stead of [Change User Name]. For details about specifying [Change AccessPriv.], consult the administrator.
Changing a file name
You can change the file name of a stored file.
A Press [Select Stored File].
The list of stored files appears.
B Press [Manage / Delete File].
C Select the file containing the file information you want to change.If you select a password-protected file, a screen for entering the password ap-pears. Enter the password, and then press [OK].
D Press [Change File Name].
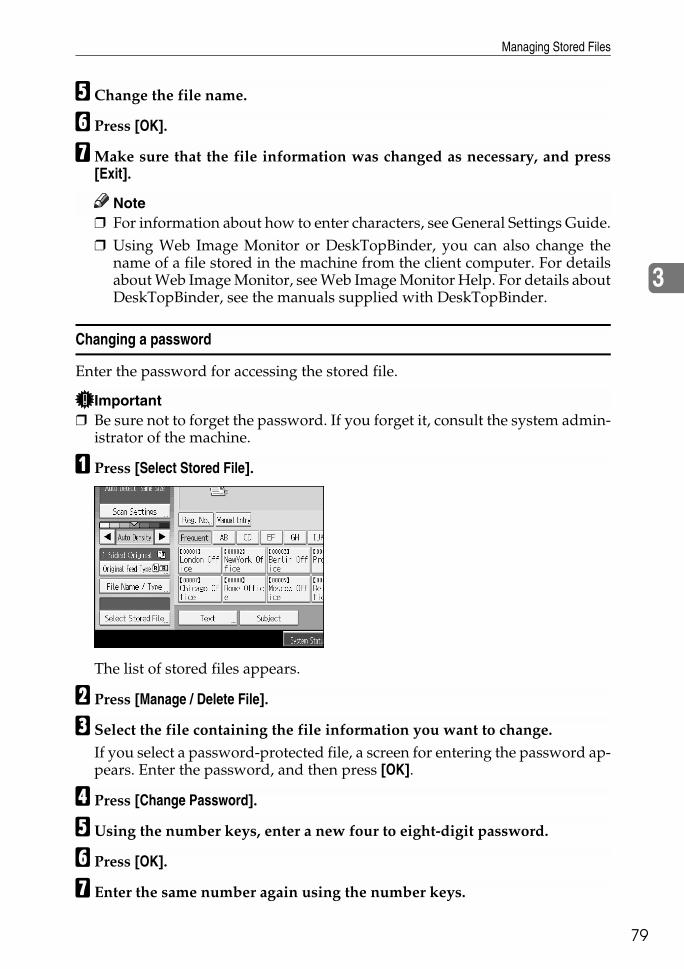
Managing Stored Files
79
3
E Change the file name.
F Press [OK].
GMake sure that the file information was changed as necessary, and press[Exit].
Note❒ For information about how to enter characters, see General Settings Guide.❒ Using Web Image Monitor or DeskTopBinder, you can also change the
name of a file stored in the machine from the client computer. For detailsabout Web Image Monitor, see Web Image Monitor Help. For details aboutDeskTopBinder, see the manuals supplied with DeskTopBinder.
Changing a password
Enter the password for accessing the stored file.
Important❒ Be sure not to forget the password. If you forget it, consult the system admin-
istrator of the machine.
A Press [Select Stored File].
The list of stored files appears.
B Press [Manage / Delete File].
C Select the file containing the file information you want to change.If you select a password-protected file, a screen for entering the password ap-pears. Enter the password, and then press [OK].
D Press [Change Password].
E Using the number keys, enter a new four to eight-digit password.
F Press [OK].
G Enter the same number again using the number keys.

Storing Files Using the Scanner Function
80
3
H Press [OK].
Note❒ Using Web Image Monitor or DeskTopBinder, you can also change the
password of a file stored in the machine from the client computer. For de-tails about Web Image Monitor, see Web Image Monitor Help. For detailsabout DeskTopBinder, see the manuals supplied with DeskTopBinder.

4. Delivering Scan Files
81
Using the ScanRouter delivery software, you can deliver by various methodsscan files produced by the machine.
Before Delivering Files
This section describes the necessary preparations and the procedure for usingthe network delivery scanner.
Important❒ To use the network delivery scanner function, you need a delivery server on
which the optional the ScanRouter delivery software is installed. You alsoneed to register data about destinations and senders in the delivery server.
Outline of Scan File Delivery
This section outlines the function for delivering files using the network delivery scanner.
1. This machineYou can send scan files to the deliveryserver.
2. Delivery serverInstall the ScanRouter delivery softwareon this computer to use it as the deliveryserver.After receiving a scan file, the deliveryserver delivers the file according to thesetting specified for the destination. Thedelivery settings are as follows:
• Storing the file in an in-tray• Delivering the file by e-mail
• Storing the file in a selected folderFor details about the ScanRouter deliverysoftware, see the manuals supplied withthe ScanRouter delivery software.
3. Client ComputerHow to check a file from the client com-puter depends on the delivery method.For example, you can check a file by oneof the following methods:
• Use DeskTopBinder to view a file de-livered to the in-tray
• Use e-mail software to receive e-mailwith an attached file
• Browse a folder for a stored file
ZZZ513S
Delivering Scan Files
82
4
Preparing to Deliver a File
This section describes the preparations and settings for delivering scan files.
Important❒ To use the network delivery scanner, you need a delivery server on which an
application such as the optional the ScanRouter delivery software is installed.For details about the ScanRouter delivery software, see the manuals suppliedwith the ScanRouter delivery software.
❒ To view files delivered to an in-tray, DeskTopBinder must be installed on theclient computer.
A Connect the machine to the network.Connect the machine to the network using an Ethernet cable or IEEE 1394 ca-ble, or wireless LAN (IEEE 802.11b).
BMake the necessary network settings in [System Settings].If you have connected the machine to the network using an Ethernet cable,make the following settings. For details, see General Settings Guide.• Specify the machine’s IPv4 address and subnet mask• In [Effective Protocol], enable [IPv4]• Set [Delivery Option] to [On]
C If necessary, change settings in [Send Settings] under [Scanner Features].
D Using the ScanRouter delivery software, register this machine as an I/O de-vice. In addition, specify register destinations and specify such settings asthe delivery type and sender.For details, see the manuals supplied with the ScanRouter delivery software.
Note❒ To connect the machine to the network using an IEEE 1394 cable or wire-
less LAN (IEEE 802.11b), an extended 1394 board or extended wirelessLAN board is required respectively. For details, see Network Guide.
❒ Items to set up in [System Settings] vary depending on the network environ-ment. For details about the network settings, see General Settings Guide.
❒ For details about installing DeskTopBinder Lite, see "Installing DeskTop-Binder Lite from the Supplied CD-ROM".
Referencep.83 “Installing DeskTopBinder Lite from the Supplied CD-ROM”
Before Delivering Files
83
4
Installing DeskTopBinder Lite from the Supplied CD-ROM
This section explains how to install DeskTopBinder Lite on a client computerfrom the supplied "Scanner/PostScript® Drivers and Utilities" CD-ROM.To view or receive files delivered to the in-trays, you must install DeskTopBind-er Lite on the client computer.
AMake sure Windows is running on the client computer, and then insert the"Scanner/PostScript® Drivers and Utilities" CD-ROM into the CD-ROMdrive.The installer is automatically started and the [Scanner/PostScript® Drivers andUtilities] dialog box appears.
B Click [DeskTopBinder Lite].The [DeskTopBinder Lite Setup] dialog box appears.For the subsequent installation steps, see the Setup Guide displayed from the[DeskTopBinder Lite Setup] dialog box.
Note❒ Before you start the installation, check the system requirements for Desk-
TopBinder Lite. For details, see "Software Supplied on CD-ROM".❒ You can install the software using the auto-run program. For details about
the auto-run program, see "Quick Install".
Referencep.143 “Software Supplied on CD-ROM”p.143 “Quick Install”
Delivering Scan Files
84
4
Network Delivery Scanner Screen
This section describes the screen layout when using the network delivery scan-ner.
The function items displayed serve as selector keys. You can select or specify anitem by pressing it. When you select or specify an item on the display panel, it ishighlighted like [ ]. Keys that cannot be selected appear like [ ].
1. Destination FieldThe specified destination appears. Ifmore than one destination has been spec-ified, press [U] or [T] to scroll through thedestinations.
2. Network delivery scanner iconIndicates that the network delivery scan-ner screen is displayed.
3. [Reg. No.]Press this key to specify the destinationusing a 3-digit registration number.
4. [Manual Entry]To send a file by e-mail via the deliveryserver to a destination not registered inthe delivery server’s Destination List,press this key to display the soft key-board. Then use the soft keyboard to en-ter the e-mail address. For details abouthow to send a file by e-mail via the deliv-ery server, see the ScanRouter deliverysoftware manual.
5. Destination ListThe list of destinations registered in thedelivery server appears. If all of the desti-nations cannot be displayed, press [U] or[U] to switch the screen. Group destina-tions are denoted by this symbol ( ).
6. [Subject][Sender Name][Recept. No-tice]Specify the subject, sender, and whetheror not to enable Message Disposition No-tification for the file to be transmitted.
ALQ009S
Basic Operation for Delivering Files
85
4
Basic Operation for Delivering Files
This section describes the basic operation for delivering scan files using the net-work delivery scanner.
Important❒ You must register destinations and senders in advance using the ScanRouter
delivery software installed on the delivery server.
AMake sure that no previous settings remain.If a previous setting remains, press {Clear Modes}.
B If the E-mail screen or Scan to Folder screen appears, switch to the networkdelivery scanner screen.For details, see "Switching to the Network Delivery Scanner Screen".
C Place originals.
D If necessary, press [Scan Settings] to specify scanner settings such as resolu-tion and scan size.For details, see "Various Scan Settings".
E If necessary, specify the scanning density.For details, see "Adjusting Image Density".
F If necessary, press [Original Feed Type] to specify settings such as originalside and orientation.For details, see "Setting of Original Feed Type".
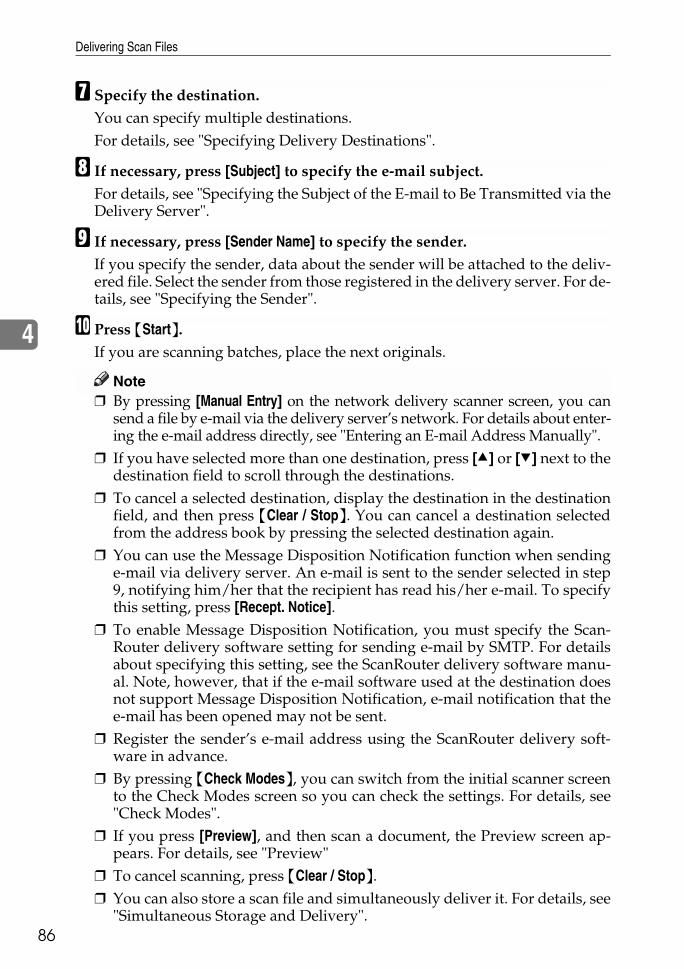
Delivering Scan Files
86
4
G Specify the destination.You can specify multiple destinations.For details, see "Specifying Delivery Destinations".
H If necessary, press [Subject] to specify the e-mail subject.For details, see "Specifying the Subject of the E-mail to Be Transmitted via theDelivery Server".
I If necessary, press [Sender Name] to specify the sender.If you specify the sender, data about the sender will be attached to the deliv-ered file. Select the sender from those registered in the delivery server. For de-tails, see "Specifying the Sender".
J Press {Start}.If you are scanning batches, place the next originals.
Note❒ By pressing [Manual Entry] on the network delivery scanner screen, you can
send a file by e-mail via the delivery server’s network. For details about enter-ing the e-mail address directly, see "Entering an E-mail Address Manually".
❒ If you have selected more than one destination, press [U] or [T] next to thedestination field to scroll through the destinations.
❒ To cancel a selected destination, display the destination in the destinationfield, and then press {Clear / Stop}. You can cancel a destination selectedfrom the address book by pressing the selected destination again.
❒ You can use the Message Disposition Notification function when sendinge-mail via delivery server. An e-mail is sent to the sender selected in step9, notifying him/her that the recipient has read his/her e-mail. To specifythis setting, press [Recept. Notice].
❒ To enable Message Disposition Notification, you must specify the Scan-Router delivery software setting for sending e-mail by SMTP. For detailsabout specifying this setting, see the ScanRouter delivery software manu-al. Note, however, that if the e-mail software used at the destination doesnot support Message Disposition Notification, e-mail notification that thee-mail has been opened may not be sent.
❒ Register the sender’s e-mail address using the ScanRouter delivery soft-ware in advance.
❒ By pressing {Check Modes}, you can switch from the initial scanner screento the Check Modes screen so you can check the settings. For details, see"Check Modes".
❒ If you press [Preview], and then scan a document, the Preview screen ap-pears. For details, see "Preview"
❒ To cancel scanning, press {Clear / Stop}.❒ You can also store a scan file and simultaneously deliver it. For details, see
"Simultaneous Storage and Delivery".
Basic Operation for Delivering Files
87
4
Referencep.88 “Switching to the Network Delivery Scanner Screen”p.105 “Various Scan Settings”p.115 “Adjusting Image Density”p.116 “Setting of Original Feed Type”p.89 “Specifying Delivery Destinations”p.97 “Specifying the Subject of the E-mail to Be Transmitted via the Deliv-ery Server”p.93 “Specifying the Sender”p.22 “Entering an E-mail Address Manually”p.5 “Preview”p.4 “Check Modes”p.98 “Simultaneous Storage and Delivery”

Delivering Scan Files
88
4
Switching to the Network Delivery Scanner Screen
This section explains how to switch the screen to the network delivery scannerscreen.If the E-mail screen or Scan to Folder screen is being displayed, switch to the net-work delivery scanner screen.
A Press [Delivery Dest.].
The network delivery scanner screen appears.
Note❒ You cannot switch from the E-mail screen or Scan to Folder screen while
destinations or senders are being specified. To clear a specified destination,display the destination in the destination field of the E-mail screen or Scanto Folder screen, and then press {Clear / Stop}.
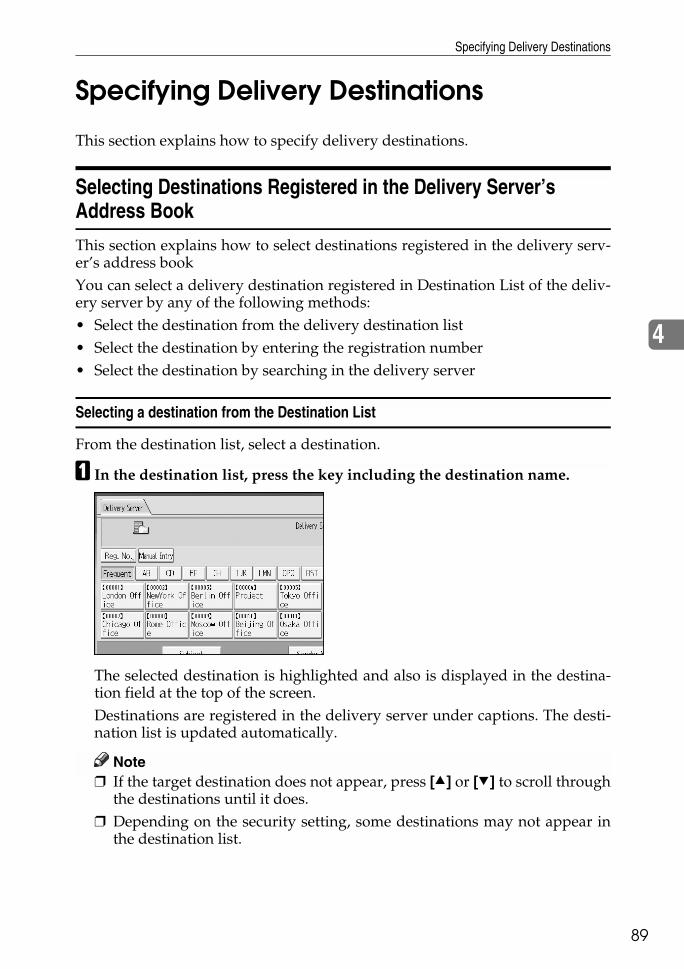
Specifying Delivery Destinations
89
4
Specifying Delivery Destinations
This section explains how to specify delivery destinations.
Selecting Destinations Registered in the Delivery Server’s Address Book
This section explains how to select destinations registered in the delivery serv-er’s address bookYou can select a delivery destination registered in Destination List of the deliv-ery server by any of the following methods:• Select the destination from the delivery destination list• Select the destination by entering the registration number• Select the destination by searching in the delivery server
Selecting a destination from the Destination List
From the destination list, select a destination.
A In the destination list, press the key including the destination name.
The selected destination is highlighted and also is displayed in the destina-tion field at the top of the screen.Destinations are registered in the delivery server under captions. The desti-nation list is updated automatically.
Note❒ If the target destination does not appear, press [U] or [T] to scroll through
the destinations until it does.❒ Depending on the security setting, some destinations may not appear in
the destination list.

Delivering Scan Files
90
4
Selecting destinations by entering their registration numbers
Select a destination by entering its Short ID number (registered using the Scan-Router delivery software). For details about how to set Short IDs, see the manu-als supplied with the ScanRouter delivery software.
A Press [Reg. No.].
B Using the number keys, enter the three-digit registration number, and thenpress {q}.You can also enter a registration number of fewer than three digits.Example: To enter 009Press {9}, and then press {q}.
C Press [OK].By pressing [Change], you can change the selected destination.
Note❒ To cancel a selected destination, press [U] or [T] next to the destination
field to scroll through the destinations until the one you want to cancel ap-pears, and then press {Clear / Stop}.

Specifying Delivery Destinations
91
4
Selecting destinations by searching the delivery server’s Destination List
In the delivery server’s Destination List, you can search for destinations and se-lect them.
A Press [Search Dest.].
B To search by name, press [Name].To search by comment, press [Comment].The soft keyboard appears so you can enter the name or comment.You can also search by combining [Name] and [Comment].
C Enter part of the destination name.To search by comment, enter part of the comment.
D Press [OK].
E If necessary, press [Advanced Search], and then specify the detailed searchcriteria.By pressing [Advanced Search], you can search by [Name] and [Comment]. Youcan also search by combining the [Beginning Word] or [End Word] criteria withthe other criteria.
F Press [Start Search].Destinations that match the search criteria are displayed.
G Select the destination.
Delivering Scan Files
92
4
H Press [OK].
Note❒ The Comment search function searches for destinations by comment infor-
mation, which is a registration item required by the ScanRouter deliverysoftware.
❒ By pressing [Details], you can view details about the selected destinations.❒ Up to 100 destinations can be displayed as search results.❒ By pressing [Advanced Search], the following criteria appear:• [Beginning Word]: The names which start with the entered character or char-
acters are targeted.For example, to search for "ABC", enter "A".
• [End Word]: The names which end with the entered character or charactersare targeted.For example, to search for "ABC", enter "C".
• [Exact Match]: The names which correspond to an entered character or char-acters are targeted.For example, to search for "ABC", enter "ABC".
• [Include one Word]: The names which contain an entered character or char-acters are targeted.For example, to search for "ABC", enter "A", "B", or "C".
• [Exclude Words]: The names which do not contain an entered character orcharacters are targeted.For example, to search for "ABC", enter "D".
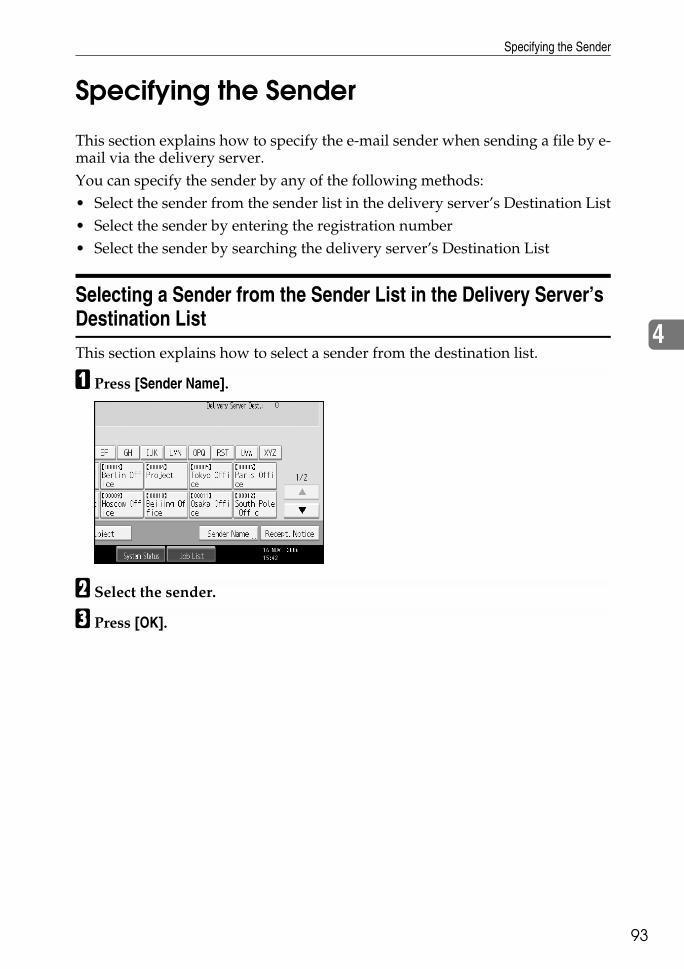
Specifying the Sender
93
4
Specifying the Sender
This section explains how to specify the e-mail sender when sending a file by e-mail via the delivery server.You can specify the sender by any of the following methods:• Select the sender from the sender list in the delivery server’s Destination List• Select the sender by entering the registration number• Select the sender by searching the delivery server’s Destination List
Selecting a Sender from the Sender List in the Delivery Server’s Destination List
This section explains how to select a sender from the destination list.
A Press [Sender Name].
B Select the sender.
C Press [OK].
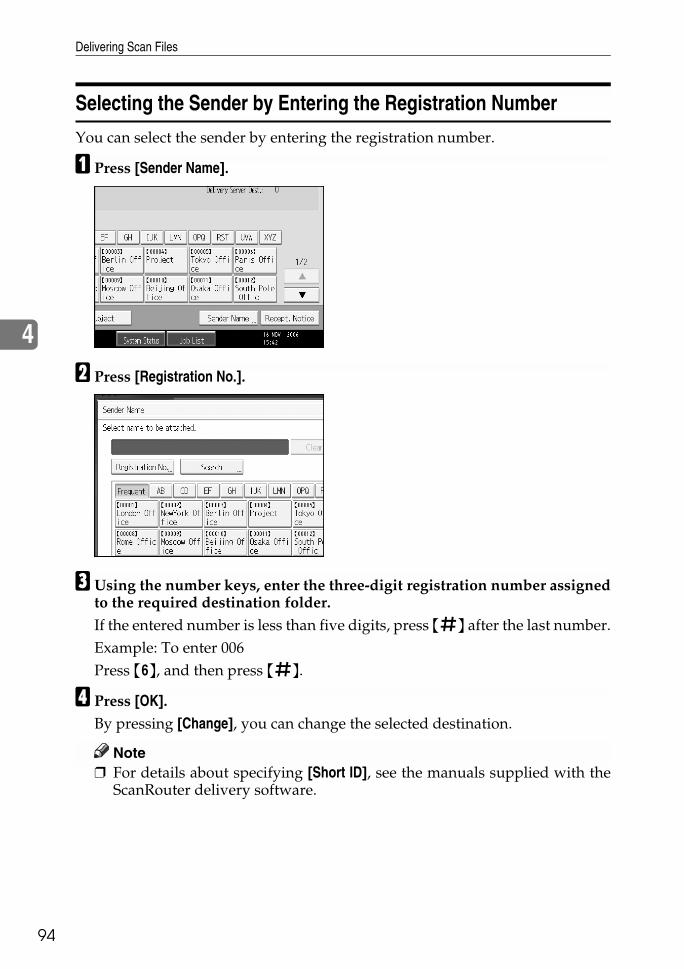
Delivering Scan Files
94
4
Selecting the Sender by Entering the Registration Number
You can select the sender by entering the registration number.
A Press [Sender Name].
B Press [Registration No.].
C Using the number keys, enter the three-digit registration number assignedto the required destination folder.If the entered number is less than five digits, press {q} after the last number.Example: To enter 006Press {6}, and then press {q}.
D Press [OK].By pressing [Change], you can change the selected destination.
Note❒ For details about specifying [Short ID], see the manuals supplied with the
ScanRouter delivery software.

Specifying the Sender
95
4
Selecting a Sender by Searching the Delivery Server’s Destination List
This section explains how to select a sender by searching the delivery server’sDestination List.
A Press [Sender Name].
B Press [Search].
C To search by name, press [Name].To search by comment, press [Comment].The soft keyboard appears so you can enter the name or comment.You can also search by combining [Name] and [Comment].
D Enter part of the sender name.To search by comment, enter part of the comment.
E Press [OK].

Delivering Scan Files
96
4
F If necessary, press [Advanced Search], and then specify the detailed searchcriteria.By pressing [Advanced Search], you can search by [Name] and [Comment]. Youcan also search by combining the [Beginning Word] or [End Word] criteria withthe other criteria.
G Press [Start Search].Destinations that match the search criteria are displayed.
H Select the sender.
I Press [OK].
Note❒ The Comment search function searches for destinations by comment infor-
mation, which is a registration item required by the ScanRouter deliverysoftware.
❒ By pressing [Details], you can view details about the selected destinations.❒ Up to 100 items can be displayed as the search results.❒ By pressing [Advanced Search], the following criteria appear:• [Beginning Word]: The names which start with the entered character or char-
acters are targeted.For example, to search for "ABC", enter "A".
• [End Word]: The names which end with the entered character or charactersare targeted.For example, to search for "ABC", enter "C".
• [Exact Match]: The names which correspond to an entered character or char-acters are targeted.For example, to search for "ABC", enter "ABC".
• [Include one Word]: The names which contain an entered character or char-acters are targeted.For example, to search for "ABC", enter "A", "B", or "C".
• [Exclude Words]: The names which do not contain an entered character orcharacters are targeted.For example, to search for "ABC", enter "D".
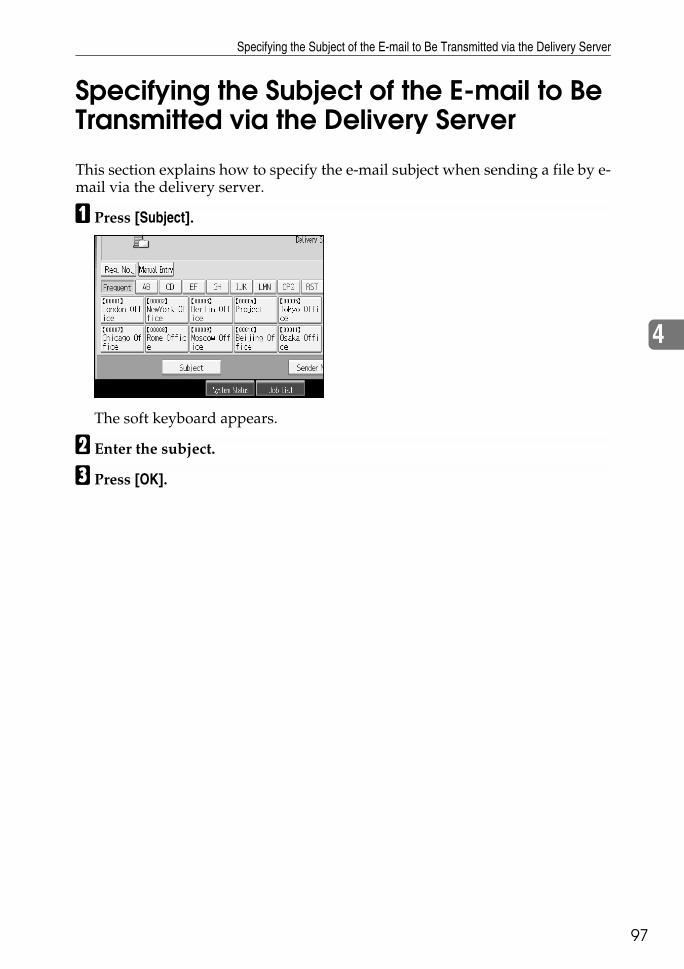
Specifying the Subject of the E-mail to Be Transmitted via the Delivery Server
97
4
Specifying the Subject of the E-mail to Be Transmitted via the Delivery Server
This section explains how to specify the e-mail subject when sending a file by e-mail via the delivery server.
A Press [Subject].
The soft keyboard appears.
B Enter the subject.
C Press [OK].
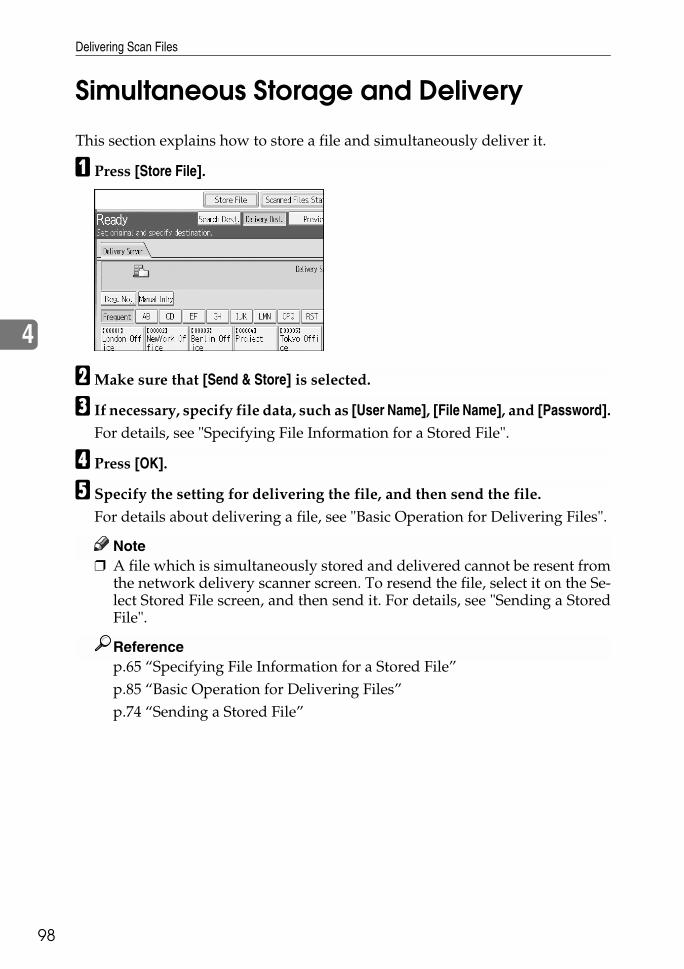
Delivering Scan Files
98
4
Simultaneous Storage and Delivery
This section explains how to store a file and simultaneously deliver it.
A Press [Store File].
BMake sure that [Send & Store] is selected.
C If necessary, specify file data, such as [User Name], [File Name], and [Password].For details, see "Specifying File Information for a Stored File".
D Press [OK].
E Specify the setting for delivering the file, and then send the file.For details about delivering a file, see "Basic Operation for Delivering Files".
Note❒ A file which is simultaneously stored and delivered cannot be resent from
the network delivery scanner screen. To resend the file, select it on the Se-lect Stored File screen, and then send it. For details, see "Sending a StoredFile".
Referencep.65 “Specifying File Information for a Stored File”p.85 “Basic Operation for Delivering Files”p.74 “Sending a Stored File”
5. Scanning Originals with theNetwork TWAIN Scanner
99
Using the machine, you can scan originals into a client computer over the net-work.
Before Using the Network TWAIN Scanner
This section describes the preparations and procedure for using the networkTWAIN scanner.
Important❒ To use the network TWAIN scanner, you must install the TWAIN driver,
which is on the supplied CD-ROM. For details about installing the TWAINdriver, see "Installing the TWAIN Driver from the Supplied CD-ROM".
❒ To use the network TWAIN scanner, a TWAIN-compliant application, suchas DeskTopBinder, must be installed on the client computer. DeskTopBinderLite is on the supplied CD-ROM. For details about installing DeskTopBinderLite, see "Installing DeskTopBinder Lite from the Supplied CD-ROM".
Referencep.102 “Installing the TWAIN Driver from the Supplied CD-ROM”p.83 “Installing DeskTopBinder Lite from the Supplied CD-ROM”
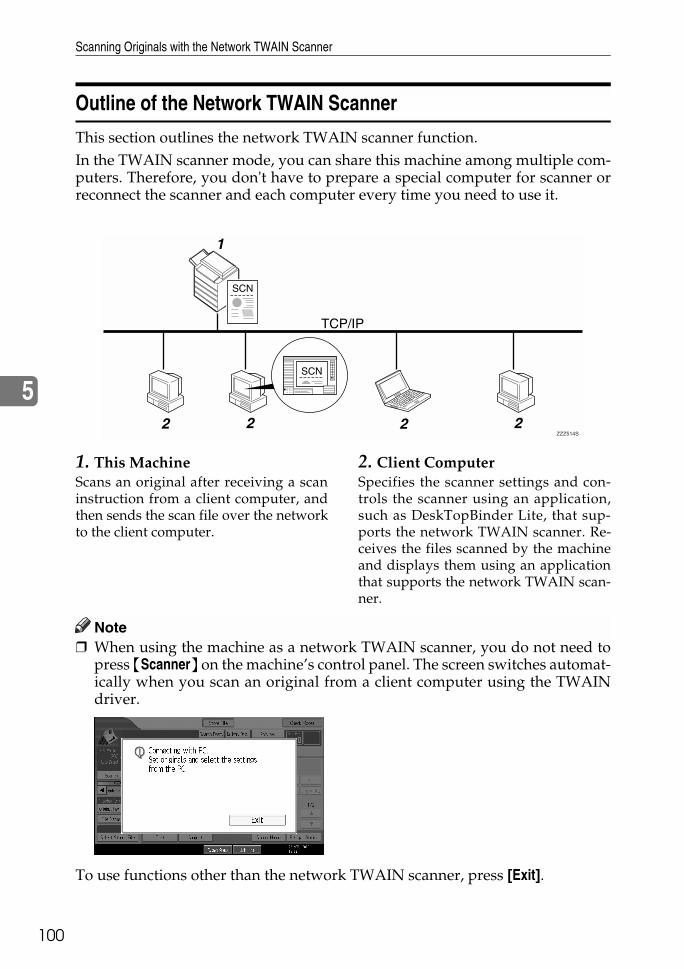
Scanning Originals with the Network TWAIN Scanner
100
5
Outline of the Network TWAIN Scanner
This section outlines the network TWAIN scanner function.In the TWAIN scanner mode, you can share this machine among multiple com-puters. Therefore, you don't have to prepare a special computer for scanner orreconnect the scanner and each computer every time you need to use it.
1. This MachineScans an original after receiving a scaninstruction from a client computer, andthen sends the scan file over the networkto the client computer.
2. Client ComputerSpecifies the scanner settings and con-trols the scanner using an application,such as DeskTopBinder Lite, that sup-ports the network TWAIN scanner. Re-ceives the files scanned by the machineand displays them using an applicationthat supports the network TWAIN scan-ner.
Note❒ When using the machine as a network TWAIN scanner, you do not need to
press {Scanner} on the machine’s control panel. The screen switches automat-ically when you scan an original from a client computer using the TWAINdriver.
To use functions other than the network TWAIN scanner, press [Exit].
ZZZ514S
Before Using the Network TWAIN Scanner
01
5
1
Preparing to Use the Network TWAIN Scanner
This section describes the preparations and settings for using the machine as anetwork TWAIN scanner.
Important❒ To use the network TWAIN scanner, an application that supports the scan-
ner, such as DeskTopBinder Lite, must be installed on the computer. Desk-TopBinder Lite is on the supplied CD-ROM. For details about installingDeskTopBinder Lite, see "Installing DeskTopBinder Lite from the SuppliedCD-ROM".
A Connect the machine to the network.Connect the machine to the network using an Ethernet cable or IEEE 1394 ca-ble, or Wireless LAN (IEEE 802.11b).
BMake the necessary network settings in [System Settings].If you have connected the machine to the network using an Ethernet cable,make the following settings. For details, see General Settings Guide.• Specify the machine’s IPv4 address and subnet mask• In [Effective Protocol], enable [IPv4]
C Install the TWAIN driver on a client computer.For details about installing the TWAIN driver, see "Installing the TWAINDriver from the Supplied CD-ROM".
Note❒ To connect the machine to network using an IEEE 1394 cable or wireless
LAN (IEEE 802.11b), an extended 1394 board or extended wireless LANboard is required respectively. For details, see Network Guide.
❒ For details about [System Settings], see General Settings Guide.❒ Items to set up in [System Settings] vary depending on the network environ-
ment. For details about the network settings, see General Settings Guide.
Referencep.102 “Installing the TWAIN Driver from the Supplied CD-ROM”p.83 “Installing DeskTopBinder Lite from the Supplied CD-ROM”

Scanning Originals with the Network TWAIN Scanner
102
5
Installing the TWAIN Driver from the Supplied CD-ROM
This section explains how to install the TWAIN driver on a client computer fromthe supplied "Scanner/PostScript® Drivers and Utilities" CD-ROM.To use the network TWAIN scanner, you must install the TWAIN driver on a cli-ent computer.
A Start Windows, and then insert the CD-ROM labeled "Scanner/PostScript®
Drivers and Utilities" into the CD-ROM drive of the client computer.The installer is automatically started and the [Scanner/PostScript® Drivers andUtilities] dialog box appears.
B Click [TWAIN Driver].
C The installer of the TWAIN Driver starts. Follow the instructions.
Note❒ Before you start the installation, check the system requirements for the
TWAIN driver. For details about the system requirements, see "SoftwareSupplied on CD-ROM".
❒ You can install the software using the auto-run program. For details aboutthe auto-run program, see "Quick Install".
❒ If the installer does not start automatically, see "Quick Install".❒ When the installation is complete, a message about restarting the client
computer may appear. In this case, restart the client computer.❒ After the installation is complete, a folder with the name of the machine in
use is added in [Program] on the [Start] menu. Help can be displayed fromhere.
❒ Notes on using the network TWAIN scanner are provided in "Readme.txt".Be sure to read them before use.
Referencep.143 “Software Supplied on CD-ROM”p.143 “Quick Install”
Basic Network TWAIN Scanner Operation
03
5
1
Basic Network TWAIN Scanner Operation
This section describes the basic operation for scanning with the network TWAINscanner.
Important❒ To use the network TWAIN scanner, a TWAIN-compliant application, such
as DeskTopBinder and the TWAIN driver must be installed on the client com-puter.
The following procedure uses Windows XP and DeskTopBinder Lite by way ofexample.
A On the [Start] menu, point to [Program], point to [DeskTopBinder], and thenclick [DeskTopBinder].
B On the [Tools] menu, click [Scanner Settings...].
C Click [Select Scanner Driver...].
D Select the name of the machine you want to use in the list, and then click[Select...].
E Click [OK].
F Place originals.
G On the [File] menu, point to [Add Document], and then click [Scan...] to displaythe Scanner Control dialog box.A dialog box that is used to control a scanner using the TWAIN driver is re-ferred to as the Scanner Control dialog box.
HMake settings according to such factors as the type of original, type of scan-ning, and orientation of the original.For details, see the TWAIN driver Help.
I In the Scanner Control dialog box, click [Scan...].Depending on the security setting, if you press [Scan...], a dialog box for en-tering the user name and password may appear.If there are more originals to be scanned, place the next original, and thenclick [Scan...].If there are no more originals to be scanned, click [Complete].
J On the [File] menu, click [Exit].

Scanning Originals with the Network TWAIN Scanner
104
5
K Enter the file name, and then click [OK].The DeskTopBinder viewer closes and the image is stored in DeskTopBinderLite.
Note❒ If you have already selected a scanner, you do not need to select the scan-
ner unless you want to change it.❒ Using DeskTopBinder, you can edit and print scan files. For more informa-
tion about DeskTopBinder, see DeskTopBinder manuals.❒ The model name of the connected scanner appears in the title bar of the
Scanner Control dialog box. If there is more than one scanner of the samemodel on the network, make sure you have selected the correct scanner. Ifyou have not, click [Select Scanner Driver...], and then select the scanneragain. If the correct scanner does not appear in the list, check that the scan-ner is correctly connected to the network and that its IPv4 address has beenspecified. If the correct scanner still does not appear, consult the networkadministrator.

6. Various Scan Settings
05
1This section describes various scan settings.
Scan Settings
This section explains how to make Scan settings.
A Press [Scan Settings].
B Specify resolution, scan size, and other settings, as required.
C Press [OK].

Various Scan Settings
106
6
Items for Specifying Scan Settings
This section describes the items for Scan Settings.
Scan Type
Select a scan type that is appropriate for your original.
❖ [Text]Appropriate to increase OCR readability using an OCR-compliant applica-tion.
❖ [Text / Line Art]Standard black and white originals containing mainly characters. Createsscanned images suitable for printing.
❖ [Text / Photo]Originals containing a mixture of photographs, pictures and characters (two-value). Creates scanned images suitable for printing.
❖ [Photo]Originals containing photographs and other pictures (two-value). Createsscanned images suitable for printing.
❖ [Gray Scale]Originals containing photographs and other pictures (multi-value). Createsscanned images suitable for displaying on a computer screen.
Resolution
Select resolution for scanning originals.Select [100 dpi], [200 dpi], [300 dpi], [400 dpi], or [600 dpi] as the scanning resolution.
Scan Size
Select the size of the original to be scanned.The following items and sizes can be selected:
❖ [Auto Detect]Scans original sizes using the automatic size detect function.
❖ [Mixed Sizes]Scans a batch of originals of the same width by different length by detectingthe length of each.
Items for Specifying Scan Settings
07
6
1
❖ Template size11 × 17S, 81/2 × 14S, 81/2 × 13S, 81/2 × 11R, 81/2 × 11S, 51/2 × 81/2R, 51/2 × 81/2S, A3S, A4R, A4S, A5R, A5S, B4 JISS, B5 JISR, B5 JISS
❖ [Custom Size]Scans in a specified size.
Note❒ If [Custom Size] is selected, you can specify the dimensions (width and height)
of the scan area in inch.❒ When scanning originals of the same width but different length at the same
time, place them correctly by referring to the chart below.
Relationship of original of mixed sizes and scan size
This section explains differences you need to be aware of when scanning origi-nals of the same width but different length (such as 11" × 17" & 11" × 8 1/2") usingthe original position setting and size.• If you select [Mixed Sizes], the machine detects the length of same width orig-
inals and scans them. You can place combinations of the following original sizes:11" × 17"L & 81/2" × 11"K, 81/2" × 11"L & 51/2" × 81/2"K
• If a template size is selected, the machine scans originals at the selected sizeregardless of the actual size of originals. If an original is smaller than the se-lected size, the machine applies margins to the scan area.
• If [Auto Detect] is selected for scanning originals from the exposure glass, themachine detects the size of individual originals and scans accordingly.
• If only [Auto Detect] is selected for scanning originals from the ADF, the ma-chine detects the size of the largest original and scans all the other originalsbased on that size.
AMW012S

Various Scan Settings
108
6
Setting procedure of custom size when scanning an entire original
This section explains how to set a custom size for scanning an entire original.To scan the entire area of an original, measure its dimensions and enter them un-der Original Size (X1 and Y1) and Scan Area (X3 and Y3).The following example explains how to scan the entire area of an original.
You do not need to specify a Start Position (X2 and Y2). Specify it as 0 inch.For Scan Size, enter the same value as Original Size.
A Press [Scan Settings].
B Press [Scan Size].
C Press [Custom Size].
AMW008S

Items for Specifying Scan Settings
09
6
1
D Specify Original Size (X1 and Y1) using the number keys, and then press{q}.For example, set X1 to 17.0 inch and Y1 to 8.0 inch.
E Set Start Position (X2 and Y2) to 0 inch and then press {q}.For example, set X2 and Y2 to 0 inch, and press {q}.
F Specify Scan Area (X3 and Y3) using the number keys, and then press {q}.For example, set X3 to 17.0 inch and Y3 to 8.0 inch.
G Press [OK].
H Check Scan Area (X3 and Y3) displayed above [Custom Size], and then press[OK].

Various Scan Settings
110
6
Setting procedure of custom size when scanning part of an original
This section explains how to set a custom size for scanning an area within anoriginal.To scan part of the original, it is necessary to specify Original Size (X1 and Y1),Start Position (X2 and Y2), and Scan Area (X3 and Y3). Relationship of OriginalSize, Start Position, and Scan Size differs depending on the original orientationand set position. Make settings correctly by referring to the following examples.
❖ Example 1
❖ Example 2
Original is placed in the orientation on the ex-
posure glass or in the ADF
Original is placed in the orientation on the ex-
posure glass
AMW009S
AMW010S
Items for Specifying Scan Settings
11
6
1
❖ Example 3
Examples 1 and 2 (above) explain the procedure for scanning the "R" area of theoriginal.
A Press [Scan Settings].
B Press [Scan Size].
C Press [Custom Size].
Original is placed in the orientation in the ADF
AMW011S

Various Scan Settings
112
6
D Specify Original Size (X1 and Y1) using the number keys, and then press{q}.For example, set X1 to 17.0 inch and Y1 to 8.0 inch.
E Specify Start Position (X2 and Y2) using the number keys, and then press{q}.For example, set X2 to 2.0 inch and Y2 to 1.0 inch.
F Specify Scan Area (X3 and Y3) using the number keys, and then press {q}.For example, set X3 and Y3 to 3.0 inch.
G Press [OK].
H Check Scan Area (X3 and Y3) displayed above [Custom Size], and then press[OK].
Items for Specifying Scan Settings
13
6
1
How to set originals to scan them by custom size
This section explains how to place originals you want to scan at Custom size.
❖ Original orientation settingUnder [Original Orientation], select [ ] or [ ] according to the orientation ofyour original. To display [Original Orientation], on the Scanner Features screen,press [Original Feed Type]. For details, see "Setting of Original Feed Type".
❖ Placing an originalPlace originals face up in the ADF; face down on the exposure glass.
❖ Original Orientation is [ ]
❖ Original Orientation is [ ]
Referencep.116 “Setting of Original Feed Type”
Placing an original in the ADF
Placing an original on the exposure glass
Align the original, turn it rightward or left-ward, and then place it face down on the expo-sure glass.
Placing an original in the ADF
Placing an original on the exposure glass
Turn the original over, place it face down on the exposure glass, and then align it with the top left corner of the exposure glass.
ALQ017S
ALQ018S
ALQ019S
ALQ020S
Various Scan Settings
114
6
Edit
Make editing settings.
❖ [Erase Border]Deletes the borders of the scanned original according to the specified width.If you select [Same Width], you can specify, in inch, a uniform width for dele-tion all around the original (top, bottom, left, and right sides). If you select[Different Width], you can specify in inch a different width for deletion for eachside.
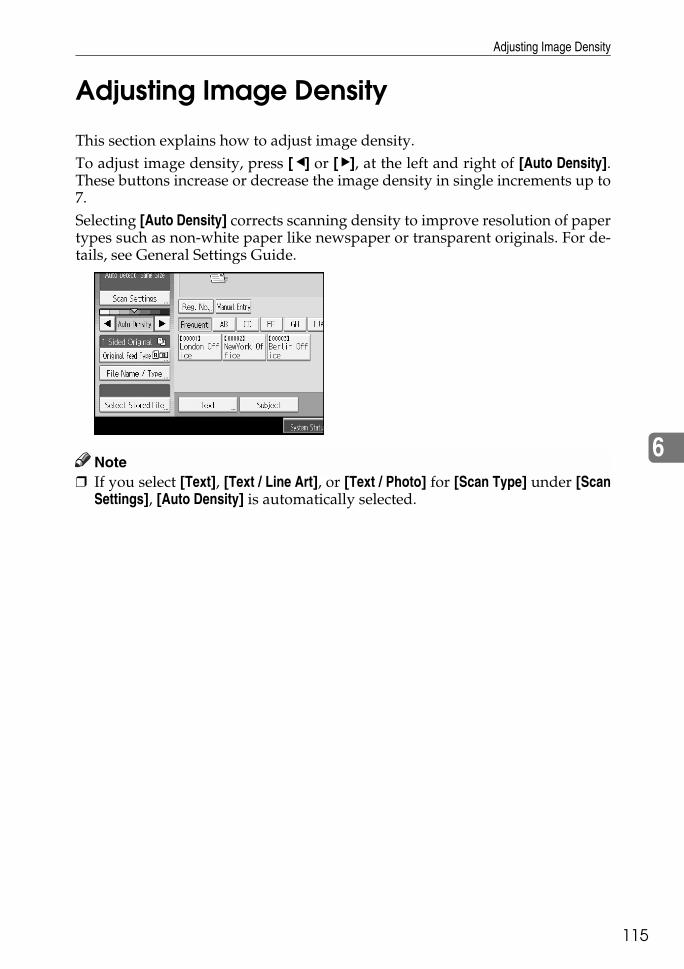
Adjusting Image Density
15
6
1
Adjusting Image Density
This section explains how to adjust image density.To adjust image density, press [W] or [V], at the left and right of [Auto Density].These buttons increase or decrease the image density in single increments up to7.Selecting [Auto Density] corrects scanning density to improve resolution of papertypes such as non-white paper like newspaper or transparent originals. For de-tails, see General Settings Guide.
Note❒ If you select [Text], [Text / Line Art], or [Text / Photo] for [Scan Type] under [Scan
Settings], [Auto Density] is automatically selected.

Various Scan Settings
116
6
Setting of Original Feed Type
This section explains Original Feed Type settings such as orientation and scansides of originals.
Original Orientation
This section explains how to correctly display the top/bottom orientation ofscanned originals on a client computer screen.
A Press [Original Feed Type].
B Press [ ] or [ ] to select the same orientation as that of original.
C Press [OK].
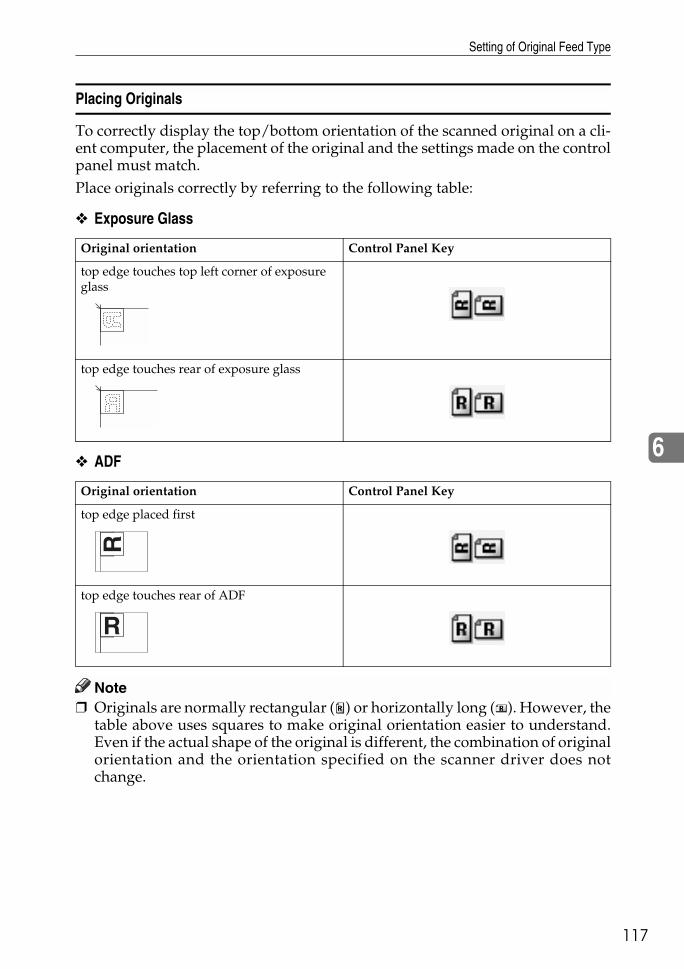
Setting of Original Feed Type
17
6
1
Placing Originals
To correctly display the top/bottom orientation of the scanned original on a cli-ent computer, the placement of the original and the settings made on the controlpanel must match.Place originals correctly by referring to the following table:
❖ Exposure Glass
❖ ADF
Note❒ Originals are normally rectangular ( ) or horizontally long ( ). However, the
table above uses squares to make original orientation easier to understand.Even if the actual shape of the original is different, the combination of originalorientation and the orientation specified on the scanner driver does notchange.
Original orientation Control Panel Key
top edge touches top left corner of exposure glass
top edge touches rear of exposure glass
Original orientation Control Panel Key
top edge placed first
top edge touches rear of ADF
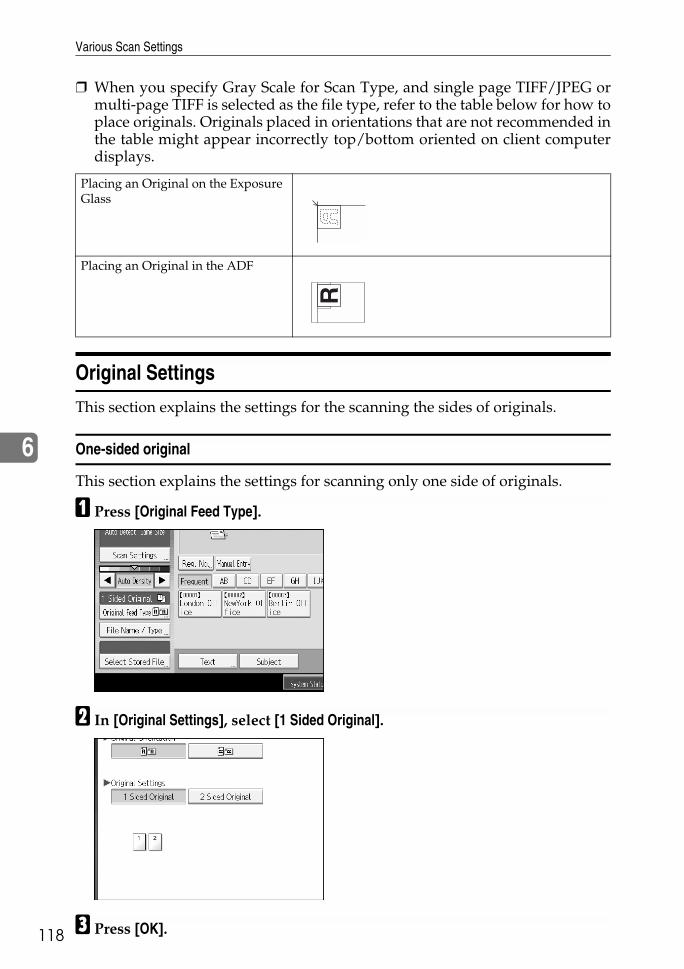
Various Scan Settings
118
6
❒ When you specify Gray Scale for Scan Type, and single page TIFF/JPEG ormulti-page TIFF is selected as the file type, refer to the table below for how toplace originals. Originals placed in orientations that are not recommended inthe table might appear incorrectly top/bottom oriented on client computerdisplays.
Original Settings
This section explains the settings for the scanning the sides of originals.
One-sided original
This section explains the settings for scanning only one side of originals.
A Press [Original Feed Type].
B In [Original Settings], select [1 Sided Original].
C Press [OK].
Placing an Original on the Exposure Glass
Placing an Original in the ADF

Setting of Original Feed Type
19
6
1
Two-sided original
This section explains the settings for scanning both sides of originals.
A Press [Original Feed Type].
B In [Original Settings], select [2 Sided Original].
C In [Page Opening Orientation], select [Top to Top] or [Top to Bottom] according tothe binding orientation of the originals.
D If the last page of the last original is blank, in [Last Page], select [1 Side] or [2Sides].To skip the last page, select [1 Side].To scan the last page as blank page, select [2 Sides].
Top to Top
Top to Bottom
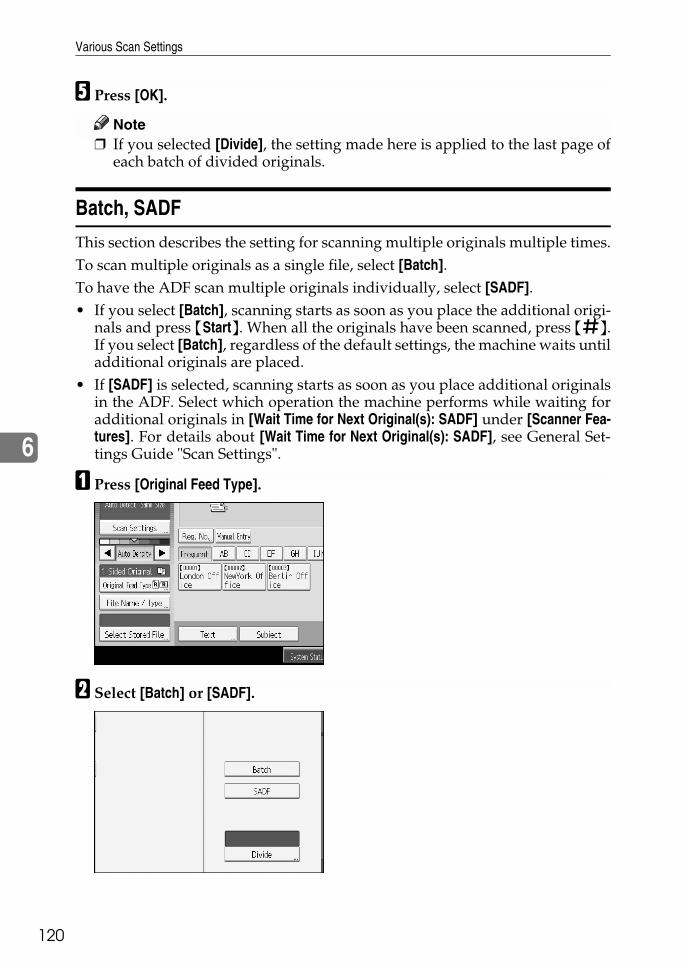
Various Scan Settings
120
6
E Press [OK].
Note❒ If you selected [Divide], the setting made here is applied to the last page of
each batch of divided originals.
Batch, SADF
This section describes the setting for scanning multiple originals multiple times.To scan multiple originals as a single file, select [Batch].To have the ADF scan multiple originals individually, select [SADF].• If you select [Batch], scanning starts as soon as you place the additional origi-
nals and press {Start}. When all the originals have been scanned, press {q}.If you select [Batch], regardless of the default settings, the machine waits untiladditional originals are placed.
• If [SADF] is selected, scanning starts as soon as you place additional originalsin the ADF. Select which operation the machine performs while waiting foradditional originals in [Wait Time for Next Original(s): SADF] under [Scanner Fea-tures]. For details about [Wait Time for Next Original(s): SADF], see General Set-tings Guide "Scan Settings".
A Press [Original Feed Type].
B Select [Batch] or [SADF].

Setting of Original Feed Type
21
6
1
C Press [OK].
Note❒ If [SADF] is selected, scanning starts as soon as you place additional origi-
nals in the ADF. However, in the following cases you must press {Start} tostart scanning additional originals.
• After scanning additional originals using the exposure glass• After changing settings while waiting for additional originals• After opening/closing the ADF
Referencep.123 “Scanning Multiple Pages of Originals as One File”
Divide
This section explains settings for dividing multiple originals by a specified num-ber of pages and then sending them.
A Press [Original Feed Type].
B Press [Divide].

Various Scan Settings
122
6
C Press [Change], and then use the number keys to enter the number of pagesyou want to divide the job into sets of.
D Press {q}.
E If necessary, press [Division Check].When you select [Division Check], if the originals were not scanned in orderdue to a paper jam or multi-sheet feed, a screen for stopping or continuingscanning appears at the end of the scan.
F Press [OK] twice.The current settings are displayed.
Note❒ If the last page of a batch of divided originals is blank, you can skip that
page. To skip scanning, in [Last Page] under [2 Sided Original], select [1 Side].To scan the last page as a blank page, select [2 Sides]. For details, see "Two-sided original".
Referencep.119 “Two-sided original”
Scanning Multiple Pages of Originals as One File
23
6
1
Scanning Multiple Pages of Originals as One File
This section explains the procedure for sending multiple originals as a multi-page file or storing them as a single stored file.
Important❒ To send multiple originals as a multi-page file, in [File Name / Type], select a
multi-page file type. For details about file types, see "Setting File Type andFile Name".
A Press [Original Feed Type].
B Select [Batch] or [SADF].To scan originals using the exposure glass, select [Batch]. To scan originals us-ing the ADF, select [SADF]. For detail about [Batch] and [SADF], see "Batch,SADF".
C Press [OK].
D Place originals.
EMake settings for sending by e-mail or Scan to Folder, delivering, or stor-ing.

Various Scan Settings
124
6
F Press {Start} to scan originals.If [Batch] is selected, place additional originals, and then press {Start}.If [SADF] is selected, scanning starts automatically when you place additionaloriginals.Repeat this step until all originals are scanned.
G After all originals are scanned, press {q}.Storing or transmission starts.
Note❒ If [Batch] is selected, originals can be scanned using the ADF.❒ When scanning originals using the exposure glass, depending on the set-
tings for [Wait Time for Next Orig.: Exposure Glass] under [Scanner Features], themachine can wait for additional originals even if [Batch] is not selected in[Original Feed Type]. For details about [Wait Time for Next Orig.: Exposure Glass],see General Settings Guide.
❒ If, under [Scanner Features], [Set Wait Time] is set for [Wait Time for Next Orig.:Exposure Glass] or [Wait Time for Next Original(s): SADF], place additional orig-inals within the specified time. When the countdown ends, transmission orstorage starts automatically. To start transmission or storage before thecountdown is completed, press {q}. Countdown is canceled if Scan Set-tings or other settings are changed in the meantime. Place additional orig-inals, and then press {Start}. The machine scans the originals and thecountdown is resumed. For details about [Wait Time for Next Orig.: ExposureGlass] and [Wait Time for Next Original(s): SADF], see General Settings Guide.
❒ If [SADF] is selected, scanning from the exposure glass is enabled afterscanning from the ADF. If this happens, you must press {Start} to startscanning.
Referencep.125 “Setting File Type and File Name”p.120 “Batch, SADF”

Setting File Type and File Name
25
6
1
Setting File Type and File Name
This section explains the procedure for setting file type, file name, and securityfor PDF files.
Setting File Type
This section explains the procedure for setting the file type of a file you want tosend. File types can be specified when sending files by e-mail or Scan to Folder,and sending stored files by e-mail or Scan to Folder
Important❒ To deliver files, set the file type using the delivery server computer. For de-
tails, see the manuals supplied with the ScanRouter delivery software.❒ Files are stored in TIFF or JPEG format. If [Store Only] is selected for [Store File],
file type cannot be specified. If [Send & Store] is selected for [Store File], files canbe sent by e-mail or Scan to Folder in a specified format. However, files arenot stored in the specified file type. Specify the file type for stored files whensending them.
Selectable file types differ depending on scan and other settings. You can selectone of the following file types:• For Single Page
[TIFF / JPEG] or [PDF]• For Multi-page
[TIFF] or [PDF]
A Press [File Name / Type].

Various Scan Settings
126
6
B Select a file type.
C Press [OK].
Setting File Name
This section explains the procedure for setting a file name.Scanned file will be given a file name consisting of the time and date of scanning,4-digit page number, etc.• Single-page and divided multi-page files are assigned file names that contain
the date and time of scanning and a four-digit page number. An underscoreis inserted between the date and time and the four-digit page number.(Example: For a file scanned in single-page TIFF at 10 ms, 15 sec., 15:30 hourson Dec. 31, 2020, the file name will be 20201231153015010_0001.tif)
• Multi-page files are given file names that contain the time and date of scan-ning.(Example: For a file scanned in multi-page TIFF at 10 ms, 15 sec., 15:30 hourson Dec. 31, 2020, the file name will be 20201231153015010.tif)
If necessary, you can change the file name.
A Press [File Name / Type].

Setting File Type and File Name
27
6
1
B Press [File Name].
The soft keyboard appears.
C Enter a file name.
D Press [OK] twice.
Changing the starting digit of file name serial numbers
A single-page file is assigned a serial number after the file name. The startingnumber of this serial number can be changed as follows:
A Press [File Name / Type].
B Press [Change] to the right of the entry box.
C Using the number keys, enter the starting digit of the serial number.
D Press {q}.
Various Scan Settings
128
6
E Press [OK].
Note❒ You can change the starting digit only if other than [Single Page] is selected
as the file type.❒ You can change the number of digits in the serial number. Change the
number under [Scanner Features], [No. of Digits for Single Page Files]. For de-tails, see "Send Settings", General Settings Guide.
Security Settings to PDF Files
This section explains security settings for PDF files.Use security settings to prevent unauthorized access to PDF files.
Important❒ Security settings can be made for PDF files only.
Encrypting PDF files
Set a password to protect and encrypt a PDF file . Only users who have the pass-word can open and decrypt the PDF file.
Important❒ Encryption is possible only for scan files sent by e-mail or Scan to Folder.❒ You cannot open an encrypted file without a password. Make sure you do not
forget a file's password.
A Press [File Name / Type].
B Check that [PDF] is selected.
C Press [Security Settings].
D Select [Encryption].

Setting File Type and File Name
29
6
1
E In [Encrypt Document], select [On].
F In [Password], press [Enter].
G Enter a password, and then press [OK].The password entered here will be required to open the PDF file.
H Enter the password again, and then press [OK].
I In [Encryption Level], select [40 bit] or [128 bit].
J Press [OK] twice.
Note❒ A document password cannot be the same as the Master password.❒ You can enter up to 32 alphanumeric characters for a document password.❒ PDF files created under the [128 bit] Encryption Level cannot be viewed us-
ing Adobe Acrobat Reader 3.0 and 4.0.
Various Scan Settings
130
6
Changing security permissions for PDF files
Set a Master Password to restrict unauthorized printing, changing, copying, orextracting of a PDF file's content. Only users who have the Master Password canreset or change these restrictions.
Important❒ Encryption is possible only for scan files sent by e-mail or Scan to Folder.❒ You cannot reset or change a file's restriction setting without the Master Pass-
word. Make a note of the Master Password in a secure place.
A Press [File Name / Type].
B Check that [PDF] is selected.
C Press [Security Settings].
D Select [Permissions].
E In [Master Password], select [Set].
Setting File Type and File Name
31
6
1
F In [Password], press [Enter].
G Enter a password, and then press [OK].The password entered here will be required to change the security settings ofthe PDF file.
H Enter then password again, and then press [OK].
I Select the security permission setting.You can specify the following security settings:• Print permission: [Prohibit], [Allow], or [Low Resolution Only]• Editing permission: [Prohibit] or [Allow]• Copying or extracting content permission: [Prohibit] or [Allow]
J Press [OK] twice.
Note❒ The [Password] and [Master Password] cannot be the same.❒ You can enter up to 32 alphanumeric characters for a Master Password.❒ If [40 bit] is selected as the PDF encryption level, you cannot select [Low Res-
olution Only] as the print permission.

Various Scan Settings
132
6
Programs
You can register frequently used settings in the machine memory and recallthem for future use.
Note❒ You can register up to 10 programs for the scanner mode.❒ Programs are not deleted by turning the power off or by pressing {Clear
Modes} unless the content is deleted or newly registered.❒ The following settings can be registered to programs: Scan Settings, 1 Sided/2
Sided Original, Top to Top/Top to Bottom, skip scanning back side of the lastpage, Divide, Original Orientation, File Type, Batch/SADF, Store File, Pre-view, and Reception Notice.
❒ Setting made on the simplified display cannot be registered to a program.
Registering Frequently Used Setting
To register frequently used settings in a program:
A On the initial scanner screen, make the settings you want to register in aprogram.
B Press {Program}.
C Press [Program].
AMW013S
Programs
33
6
1
D Select the number of the program in which you want to register the set-tings.Program numbers with malready have settings in them.
E Enter the program name.
F Press [OK].The Program screen reappears. When the settings are successfully registered,m appears on the left side of the registered program number and the pro-gram name appears on the right side. The initial screen reappears after a mo-ment.
Recalling a Registered Content
To recall settings registered in a program and use them for scanning:
A Press {Program}.
B Press [Recall].
C Press the number of the program you want to recall.Settings registered in the program are recalled and the initial scanner screenreappears.Settings are not registered in numbers that appear without m.
D Place originals, and then press {Start}.
Various Scan Settings
134
6
Changing a Registered Program
To change the settings registered to a program:
A Press {Program}.
B Press [Recall].
C Press the number of the program you want to recall.
D Change settings of the program.
E Press the number of the program you want to recall.
F Press {Program}.
G Press the number of the program whose settings you changed or the num-ber of a different program in which you want to register the changed set-tings.
H If you select a program that is already registered, a confirmation messageappears. To overwrite the program, press [Yes].If you select a new program number, you can omit this step. Proceed to thenext step.
I Enter a program name.
J Press [OK].If overwritten, the registered program is deleted.The new program name appears briefly, and then the initial screen reappearsafter a moment.
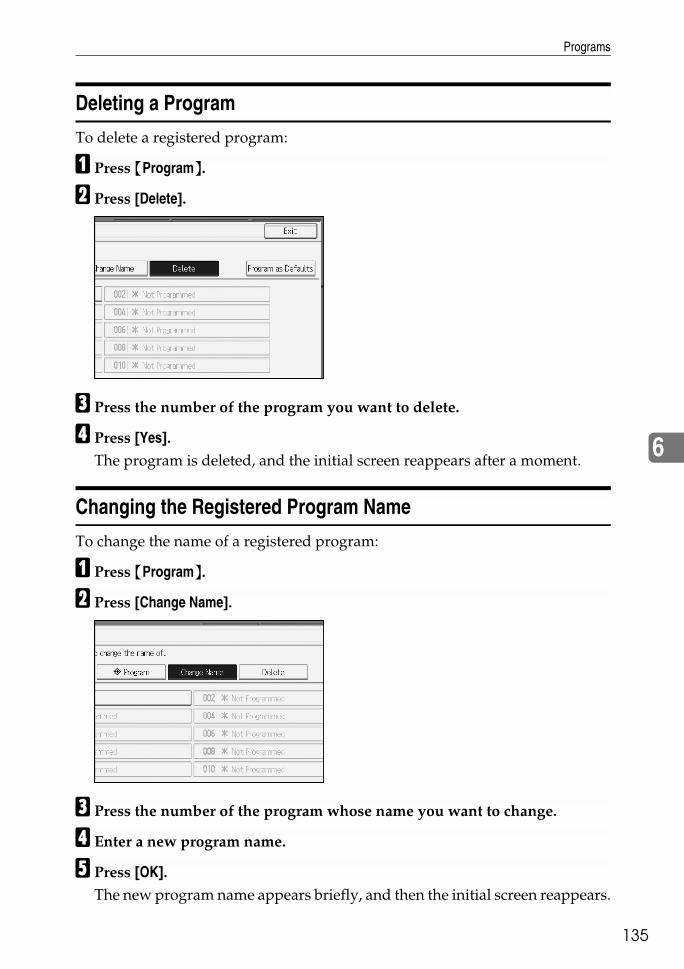
Programs
35
6
1
Deleting a Program
To delete a registered program:
A Press {Program}.
B Press [Delete].
C Press the number of the program you want to delete.
D Press [Yes].The program is deleted, and the initial screen reappears after a moment.
Changing the Registered Program Name
To change the name of a registered program:
A Press {Program}.
B Press [Change Name].
C Press the number of the program whose name you want to change.
D Enter a new program name.
E Press [OK].The new program name appears briefly, and then the initial screen reappears.

Various Scan Settings
136
6
Registering Initial Values for Initial Display
This section explains how to set defaults for the initial screen, which appearswhen the machine is turned on or when settings are cleared or reset.The following settings can be registered as defaults: Scan Settings, 1 Sided/2 Sid-ed Original, Top to Top/Top to Bottom, skip scanning back side of the last page,Divide, Original Orientation, File Type, Batch/SADF, Store File, Preview, andReception Notice.
AMake the necessary scan settings on the initial screen.
B Press {Program}.
C Press [Program as Defaults].
D Press {Program}.
E A confirmation screen appears. Press [Yes].The current settings are registered as defaults, and then the initial screen re-appears.
Note❒ To restore the initial screen's original default settings, press [Restore Factory
Defaults].❒ Default settings for the initial screen can be registered for normal screens
and simplified displays respectively.
AMW013S
Scan Settings When Using Twain Scanner
37
6
1
Scan Settings When Using Twain Scanner
This section explains how to specify original orientation and scan setting for abundle of mixed size originals when using the TWAIN scanner.
Setting Original Orientation on the TWAIN Scanner
To correctly display the top/bottom orientation of the scanned original on a cli-ent computer, the placement of the original and the settings made in the ScannerControl dialog box must match.
A Open the Scanner Control dialog box.For details about how to open the Scanner Control dialog box, see "Basic Net-work TWAIN Scanner Operation".
B In the [Original Scan Method:] list, select the place where the original is placed.
C In the [Orig.Orientn.:] list, select [ ] or [ ].
D In the [Orientation:] list, select [ / ], [ / ],[ / ], or [ / ].
E If an original is placed in the ADF, from the drop down menu of [Scan Set-tings], select [1 Sided], [2 Sided(Top to Top)], or [2 Sided(Top to Bottom)].
Referencep.103 “Basic Network TWAIN Scanner Operation”
Placing Originals
The following table shows the relationship between the original orientation andthe Scanner Properties dialog box settings:
❖ Exposure Glass
Original Orientation TWAIN Scanner Control Dialog Box Key
top edge touches top left of exposure glass
This orientation is the TWAIN driver's stan-dard setting. Place originals in this orientation normally.
top edge touches rear of exposure glass
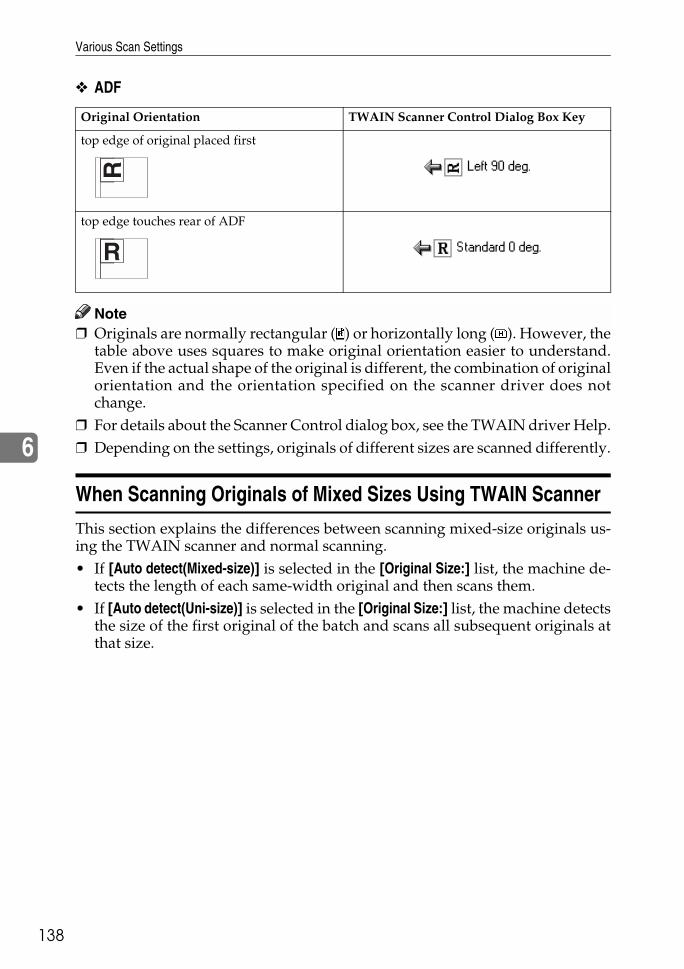
Various Scan Settings
138
6
❖ ADF
Note❒ Originals are normally rectangular ( ) or horizontally long ( ). However, the
table above uses squares to make original orientation easier to understand.Even if the actual shape of the original is different, the combination of originalorientation and the orientation specified on the scanner driver does notchange.
❒ For details about the Scanner Control dialog box, see the TWAIN driver Help.❒ Depending on the settings, originals of different sizes are scanned differently.
When Scanning Originals of Mixed Sizes Using TWAIN Scanner
This section explains the differences between scanning mixed-size originals us-ing the TWAIN scanner and normal scanning.• If [Auto detect(Mixed-size)] is selected in the [Original Size:] list, the machine de-
tects the length of each same-width original and then scans them.• If [Auto detect(Uni-size)] is selected in the [Original Size:] list, the machine detects
the size of the first original of the batch and scans all subsequent originals atthat size.
Original Orientation TWAIN Scanner Control Dialog Box Key
top edge of original placed first
top edge touches rear of ADF
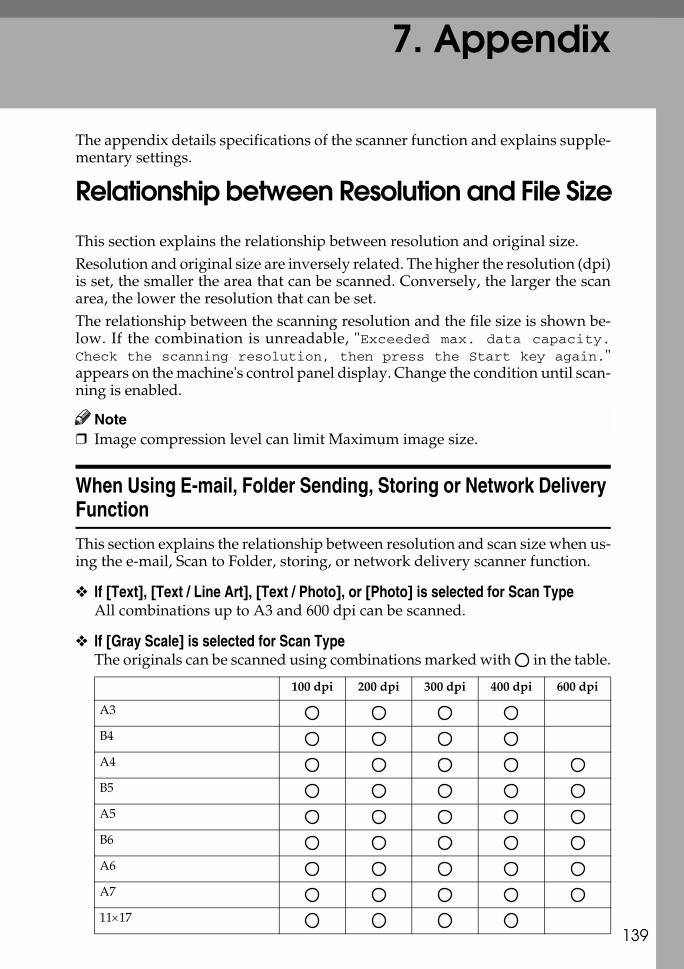
7. Appendix
39
1The appendix details specifications of the scanner function and explains supple-mentary settings.
Relationship between Resolution and File Size
This section explains the relationship between resolution and original size.Resolution and original size are inversely related. The higher the resolution (dpi)is set, the smaller the area that can be scanned. Conversely, the larger the scanarea, the lower the resolution that can be set.The relationship between the scanning resolution and the file size is shown be-low. If the combination is unreadable, "Exceeded max. data capacity.Check the scanning resolution, then press the Start key again."appears on the machine's control panel display. Change the condition until scan-ning is enabled.
Note❒ Image compression level can limit Maximum image size.
When Using E-mail, Folder Sending, Storing or Network Delivery Function
This section explains the relationship between resolution and scan size when us-ing the e-mail, Scan to Folder, storing, or network delivery scanner function.
❖ If [Text], [Text / Line Art], [Text / Photo], or [Photo] is selected for Scan TypeAll combinations up to A3 and 600 dpi can be scanned.
❖ If [Gray Scale] is selected for Scan TypeThe originals can be scanned using combinations marked with in the table.
100 dpi 200 dpi 300 dpi 400 dpi 600 dpi
A3
B4
A4
B5
A5
B6
A6
A7
11×17
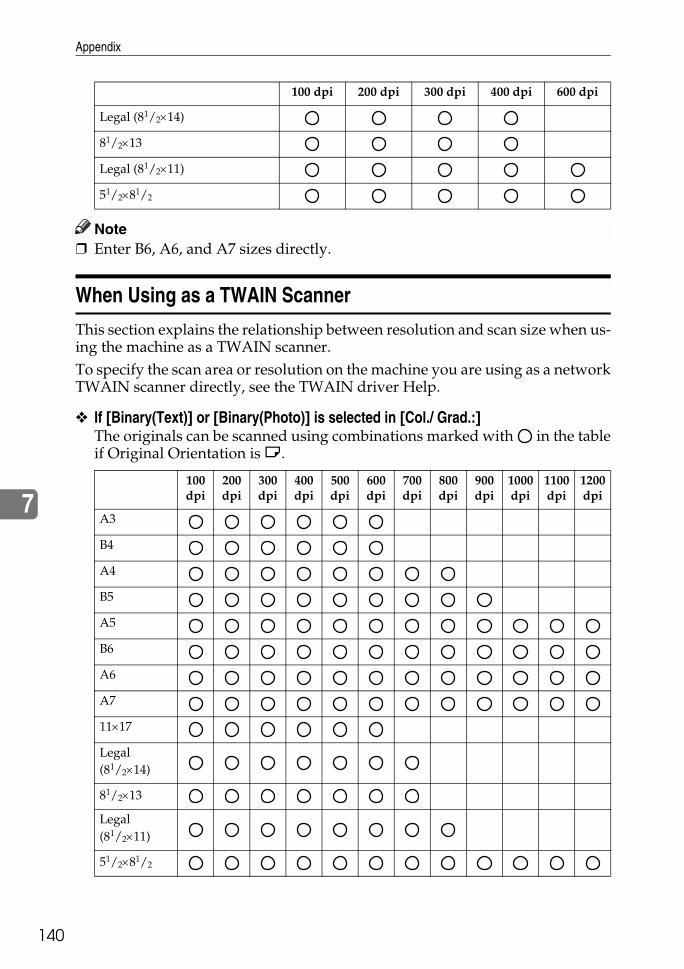
Appendix
140
7
Note❒ Enter B6, A6, and A7 sizes directly.
When Using as a TWAIN Scanner
This section explains the relationship between resolution and scan size when us-ing the machine as a TWAIN scanner.To specify the scan area or resolution on the machine you are using as a networkTWAIN scanner directly, see the TWAIN driver Help.
❖ If [Binary(Text)] or [Binary(Photo)] is selected in [Col./ Grad.:] The originals can be scanned using combinations marked with in the tableif Original Orientation is L.
Legal (81/2×14)
81/2×13
Legal (81/2×11)
51/2×81/2
100 dpi
200 dpi
300 dpi
400 dpi
500 dpi
600 dpi
700 dpi
800 dpi
900 dpi
1000 dpi
1100 dpi
1200 dpi
A3
B4
A4
B5
A5
B6
A6
A7
11×17
Legal (81/2×14)
81/2×13
Legal (81/2×11)
51/2×81/2
100 dpi 200 dpi 300 dpi 400 dpi 600 dpi

Relationship between Resolution and File Size
41
7
1
❖ If [Gray Scale] is selected in [Col./ Grad.:]The originals can be scanned using combinations marked with in the tableif Original Orientation is L.
Note❒ Enter A7 sizes directly.
100 dpi
200 dpi
300 dpi
400 dpi
500 dpi
600 dpi
700 dpi
800 dpi
900 dpi
1000 dpi
1100 dpi
1200 dpi
A3
B4
A4
B5
A5
B6
A6
A7
11×17
Legal (81/2×14)
81/2×13
Legal (81/2×11)
51/2×81/2

Appendix
142
7
Relationship between File Type Specified for Scanning and File Types for Sending E-mail and Folder
This section explains the relationship between the file type specified for scan-ning originals and the file type to which files are converted when sent by e-mailor Scan to Folder.
❖ Single page file type
❖ Multi-page file type
Note❒ When you select to convert a scanned original to a single-page TIFF/JPEG
file, if gray scale is selected in [Scan Type] under [Scan Settings], depending onthe [Compression (Gray Scale)] setting under [Scanner Features], the file typechanges as follows:• [On]...JPEG• [Off]...TIFF
❒ When you set [Compression (Gray Scale)] to [On] under [Scanner Features], if youspecify gray scale in [Scan Type] under [Scan Settings], you cannot select multi-page TIFF as the file type.
❒ Files are stored in single-page format. When sending files by e-mail or Scanto Folder, you can select single-page or multi-page format.
❒ JPEG format files cannot be sent as a multi-page TIFF file even if you specifyto send it as a multi-page TIFF. The file is sent in a default format other thanmulti-page TIFF.
Scan Setting TIFF/JPEG specified PDF specified
Black and white TIFF PDF
Gray scale TIFF (uncompressed) / JPEG (com-pressed)
Scan Setting TIFF specified PDF specified
Black and white TIFF PDF
Gray scale TIFF (uncompressed) PDF

Software Supplied on CD-ROM
43
7
1
Software Supplied on CD-ROM
This section explains the applications on the supplied CD-ROM.
Quick Install
This section explains the auto-run program.When the CD-ROM is inserted into a client computer running Windows95/98/Me/2000/XP, Windows Server2003, or Windows NT 4.0, the installerstarts up automatically (auto run) to install various software.
Note❒ For installation under Windows 2000/XP, Windows Server 2003, or Win-
dows NT 4.0, log on as an Administrators group member.❒ If plug and play function is in operation, [New Hardware Found] will be dis-
played when starting Windows 2000/XP or Windows Server 2003. Whenstarting Windows NT 4.0, [Found New Hardware Wizard] will be displayed.When starting Windows 95/98/Me, [New Hardware] or [Device Driver Wizard]will be displayed depending on the system version. If this screen appears,click [Cancel], insert the CD-ROM attached to this machine into the CD-ROMdrive of the client computer, and then install by auto-run.
❒ Quick Install may not automatically work with certain operating system set-tings. If this happens, start "Setup.exe" on the CD-ROM root directory.
❒ To disable auto-run, set CD-ROM while pressing Shift key. Keep the Shift keypressed until the computer finishes reading from the CD-ROM.
❒ If [Cancel] is pressed during installation, the installation of all the softwarethereafter will be stopped. If cancelled, reinstall the remaining software afterrestarting the client computer.
TWAIN Driver
This section tells you the file path to the TWAIN driver and the TWAIN driver'ssystem requirements.You must install this driver if you want to scan originals or use the machine as anetwork TWAIN scanner.
❖ File pathThe TWAIN driver is stored in the following folder on the CD-ROM:\DRIVERS\TWAIN
❖ System requirements• Computer hardware
PC/AT-compatible machines that support the operating system properlyThis driver cannot be used in RISC-based processor (MIPS R series, AlphaAXP, or PowerPC) Windows NT environments.
Appendix
144
7
• Operating systemMicrosoft Windows 95/98/MeMicrosoft Windows 2000/XPMicrosoft Windows NT 4.0Microsoft Windows Server 2003
• Display resolution800×600 pixels, 256 colors or higher
DeskTopBinder Lite
This section tells you the file path to DeskTopBinder Lite, the DeskTopBinderLite system requirements, and the applications that are installed with DeskTop-Binder Lite.DeskTopBinder is installed on the client computers to integrate and manage var-ious kinds of files such as scan files, files created with applications, and existingscan files. This software allows you to use various functions for stored scan filessuch as viewing stored files. Also, with the ScanRouter delivery software, youcan view the files stored in in-trays of the delivery server or use other functionsfor stored files. For details about DeskTopBinder Lite, see DeskTopBinder Litemanuals or DeskTopBinder Lite Help.
❖ File pathDeskTopBinder Lite is stored in the following folder on the CD-ROM provid-ed with this machine:\UTILITY\DESKV2
❖ System requirements• Computer hardware
PC/AT-compatible machines that support the following operating systemproperly
• Operating systemWhen installing all functions of DeskTopBinder Microsoft Windows98SE/Me/2000 Professional SP1 or later/2000 Server SP1 or later/ 2000Advanced Server SP1 or later/XP Professional/XP Home Edition Mi-crosoft Windows Server 2003 Standard Edition/Enterprise Edition
When installing only SmartDeviceMonitor for ClientMicrosoft Windows 95 SP1/98/98SE/Me/2000 Professional SP1 or lat-er/2000 Server SP1 or later/XP Professional/XP Home EditionMicrosoft Windows Server 2003 Standard Edition/Enterprise EditionMicrosoft Windows NT 4.0 SP5 or later
• Display resolution800×600 pixels, 64K colors or higher

Software Supplied on CD-ROM
45
7
1
❖ Software installed with DeskTopBinder Lite• Auto Document Link
Auto Document Link on the client computer monitors in-trays of the deliv-ery server periodically, retrieves files delivered to in-trays, and notifies theuser of delivery.
• RFWriterInstead of printing files created with an application, the RFWriter convertsthose files into TIFF or BMP image files and registers them in a work folderof the DeskTopBinder. For details, see DeskTopBinder Help.
• Function PaletteFunction Palette allows you to use DeskTopBinder functions such as Scanusing TWAIN scanner or Print without starting DeskTopBinder. To usethese functions from Function Palette, you must first configure them usingDeskTopBinder Extended Features. For details about Function Palette, seeDeskTopBinder manuals.
• SmartDeviceMonitor for ClientSmartDeviceMonitor for Client provides functions for continuous devicestatus monitoring on the network via TCP/IP or IPX/SPX.
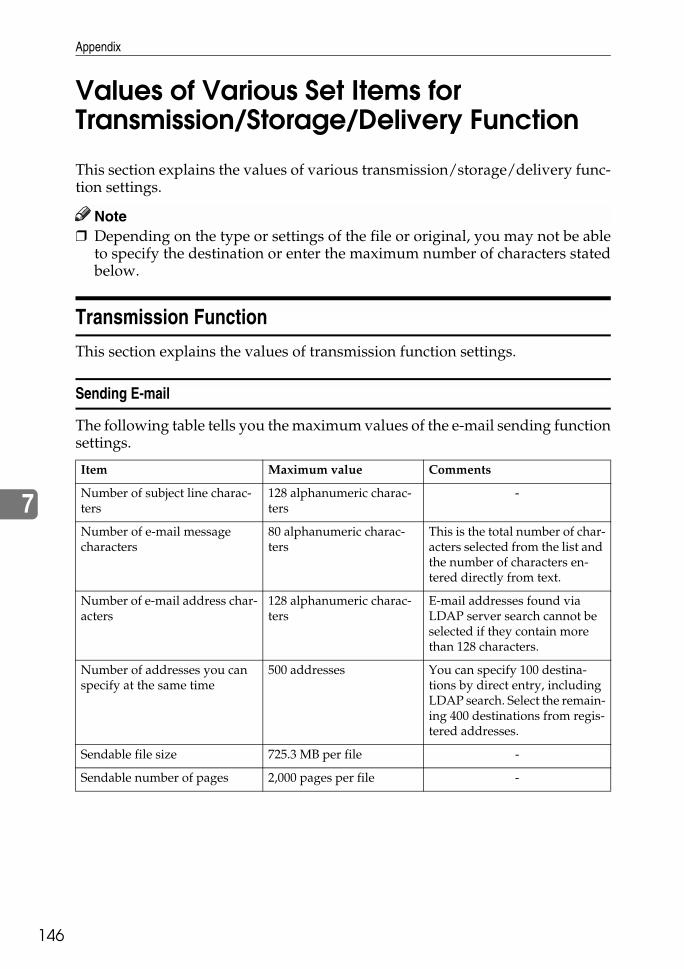
Appendix
146
7
Values of Various Set Items for Transmission/Storage/Delivery Function
This section explains the values of various transmission/storage/delivery func-tion settings.
Note❒ Depending on the type or settings of the file or original, you may not be able
to specify the destination or enter the maximum number of characters statedbelow.
Transmission Function
This section explains the values of transmission function settings.
Sending E-mail
The following table tells you the maximum values of the e-mail sending functionsettings.
Item Maximum value Comments
Number of subject line charac-ters
128 alphanumeric charac-ters
-
Number of e-mail message characters
80 alphanumeric charac-ters
This is the total number of char-acters selected from the list and the number of characters en-tered directly from text.
Number of e-mail address char-acters
128 alphanumeric charac-ters
E-mail addresses found via LDAP server search cannot be selected if they contain more than 128 characters.
Number of addresses you can specify at the same time
500 addresses You can specify 100 destina-tions by direct entry, including LDAP search. Select the remain-ing 400 destinations from regis-tered addresses.
Sendable file size 725.3 MB per file -
Sendable number of pages 2,000 pages per file -

Values of Various Set Items for Transmission/Storage/Delivery Function
47
7
1
Folder transmission
The following table tells you the maximum values of the Scan to Folder functionsettings.
Simultaneous Transmission
The following table tells you the maximum values of settings for using the E-mail and Scan to Folder functions simultaneously.
Item Maximum value Comments
Number of path name charac-ters on SMB
128 alphanumeric charac-ters
-
Number of user name charac-ters on SMB
64 alphanumeric charac-ters
-
Number of password charac-ters on SMB
64 alphanumeric charac-ters
-
Number of server name charac-ters on FTP
64 alphanumeric charac-ters
-
Number of path name charac-ters on FTP
128 alphanumeric charac-ters
-
Number of user name charac-ters on FTP
64 alphanumeric charac-ters
-
Number of password charac-ters on FTP
64 alphanumeric charac-ters
-
Number of path name charac-ters on NCP
128 alphanumeric charac-ters
-
Number of user name charac-ters on NCP
64 alphanumeric charac-ters
-
Number of password charac-ters on NCP
64 alphanumeric charac-ters
-
Number of addresses you can specify at the same time
50 addresses You can specify a maximum of 50 directly entered destinations.
Sendable file size 2,000 MB per file -
Item Maximum value Comments
Number of destinations you can select for E-mail and Scan to Folder
550 addresses -
Number of destinations you can select for sending by e-mail
500 addresses You can specify a maximum of 100 directly entered destina-tions, including LDAP search-retrieved destinations.
Number of destinations you can set for sending by Scan to Fold-er
50 addresses -

Appendix
148
7
Storage Function
The following table tells you the maximum values of the storage function set-tings.
Item Maximum value Comments
Number of file name characters 64 alphanumeric charac-ters
On the control panel, the first 16 characters are displayed. When viewing the stored files from a client computer using Desk-TopBinder, all the entered char-acters can be viewed.
Number of user name charac-ters
20 alphanumeric charac-ters
On the control panel, the first 16 characters are displayed. When viewing the stored files from a client computer using Desk-TopBinder, all the entered char-acters can be viewed.
Number of password charac-ters
4-8 digit number -
Number of stored files you can select at the same time
30 files -
Storable number of files 3,000 files This is the total number of files stored under the scanner, copi-er, document box, and printer functions.
Storable number of pages 10,000 pages This is the total number of files stored under the scanner, copi-er, document box, and printer functions.
Storable number of pages per file
2,000 pages -
Storable size 2,000 MB per file -
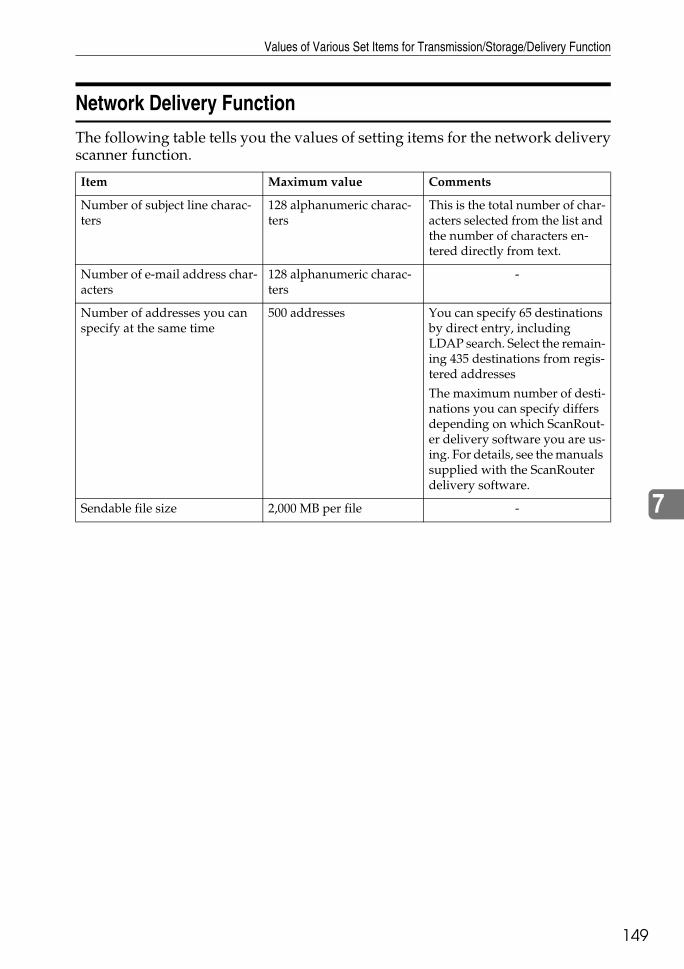
Values of Various Set Items for Transmission/Storage/Delivery Function
49
7
1
Network Delivery Function
The following table tells you the values of setting items for the network deliveryscanner function.
Item Maximum value Comments
Number of subject line charac-ters
128 alphanumeric charac-ters
This is the total number of char-acters selected from the list and the number of characters en-tered directly from text.
Number of e-mail address char-acters
128 alphanumeric charac-ters
-
Number of addresses you can specify at the same time
500 addresses You can specify 65 destinations by direct entry, including LDAP search. Select the remain-ing 435 destinations from regis-tered addresses
The maximum number of desti-nations you can specify differs depending on which ScanRout-er delivery software you are us-ing. For details, see the manuals supplied with the ScanRouter delivery software.
Sendable file size 2,000 MB per file -
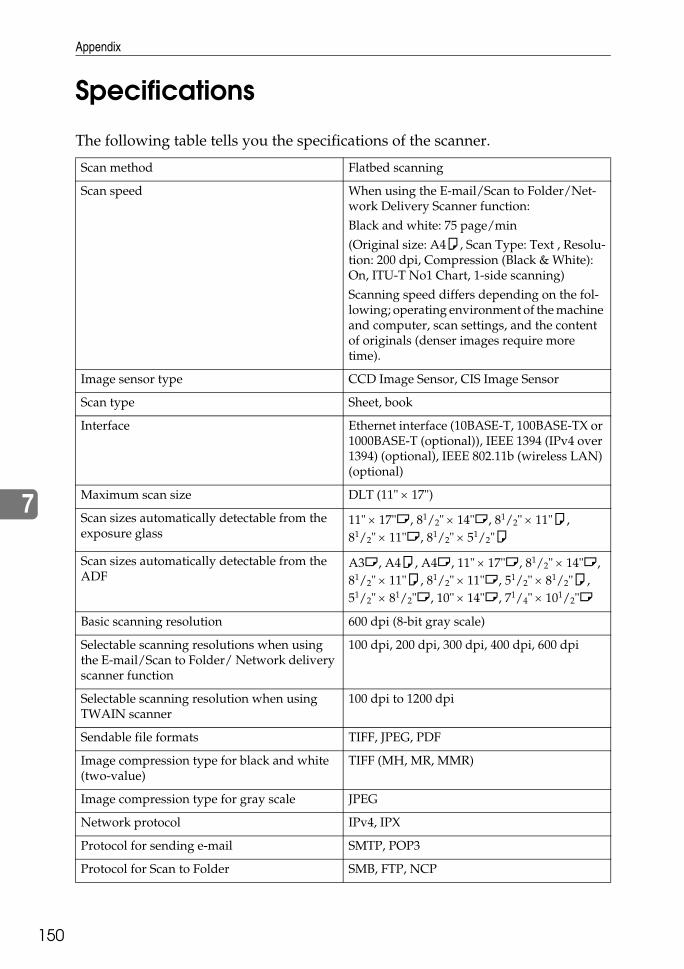
Appendix
150
7
Specifications
The following table tells you the specifications of the scanner.
Scan method Flatbed scanning
Scan speed When using the E-mail/Scan to Folder/Net-work Delivery Scanner function:
Black and white: 75 page/min
(Original size: A4K, Scan Type: Text , Resolu-tion: 200 dpi, Compression (Black & White): On, ITU-T No1 Chart, 1-side scanning)
Scanning speed differs depending on the fol-lowing; operating environment of the machine and computer, scan settings, and the content of originals (denser images require more time).
Image sensor type CCD Image Sensor, CIS Image Sensor
Scan type Sheet, book
Interface Ethernet interface (10BASE-T, 100BASE-TX or 1000BASE-T (optional)), IEEE 1394 (IPv4 over 1394) (optional), IEEE 802.11b (wireless LAN) (optional)
Maximum scan size DLT (11" × 17")
Scan sizes automatically detectable from the exposure glass
11" × 17"L, 81/2" × 14"L, 81/2" × 11"K, 81/2" × 11"L, 81/2" × 51/2"K
Scan sizes automatically detectable from the ADF
A3L, A4K, A4L, 11" × 17"L, 81/2" × 14"L, 81/2" × 11"K, 81/2" × 11"L, 51/2" × 81/2"K, 51/2" × 81/2"L, 10" × 14"L, 71/4" × 101/2"L
Basic scanning resolution 600 dpi (8-bit gray scale)
Selectable scanning resolutions when using the E-mail/Scan to Folder/ Network delivery scanner function
100 dpi, 200 dpi, 300 dpi, 400 dpi, 600 dpi
Selectable scanning resolution when using TWAIN scanner
100 dpi to 1200 dpi
Sendable file formats TIFF, JPEG, PDF
Image compression type for black and white (two-value)
TIFF (MH, MR, MMR)
Image compression type for gray scale JPEG
Network protocol IPv4, IPX
Protocol for sending e-mail SMTP, POP3
Protocol for Scan to Folder SMB, FTP, NCP

51
1INDEXA
Address Book, 12, 40, 47ADF, 113, 116, 137Adjusting image density, 115Advanced search, 20, 23, 28, 47Auto density, 115Auto Detect, 106Auto-run program, 143
B
Batch, 120Bindery, 54, 56Black & White, 106
C
CD-ROM, 143Change, 76, 77Changing a password, 79Changing a user name, 77Checking a stored file selected from the list, 68Check modes, 13Confirmation displays, 4
check modes, 4Preview, 5transmission file status, 6
CSV file, 12, 40Custom size, 106, 108, 110, 113
D
Delete, 76Deleting a stored file, 76Delivery server, 81, 89DeskTopBinder Lite, 72, 73, 81, 83, 144Destination list, 18, 46Display, 3
confirmation displays, 4Simplified Display, 3
Divide, 121
E
Edit, 114Effective Protocol, 39E-mail, 139E-mail address, 12E-mail destination, 18
Address Book, 18Destination list, 18registration numbers, 19
E-mail message, 32E-mail screen, 13, 17Entering an e-mail address, 22Entering registration numbers, 90Entering the path, 49Erase border, 114Ethernet, 12, 39, 101Exposure glass, 113, 116, 137
F
File information, 65, 66, 67File name, 65, 66, 78, 125File type, 125Folder sending, 139FTP, 38FTP server, 52Functions, 2
G
General settings, 8Gray Scale, 106
I
IEEE1394, 12, 39, 101Initial settings, 9Install, 83, 102I/O device, 81
J
JPEG, 142
L
LDAP, 11LDAP server, 23Line Art, 106List of stored files, 74
152
M
Managing stored files, 76, 77, 78, 79Manual entry, 22, 33, 49Mixed sizes, 106, 107, 138Multi-pages, 142
N
NCP, 54, 56NDS, 54, 56NetWare, 39, 54, 56Network Delivery, 139
O
One sided original, 118Operation for delivering files, 85Original feed type, 116, 118Original settings, 118
P
Password, 65, 67, 79PDF, 125, 142
changing security permissions, 130encrypting, 128
Photo, 106Placing an original, 113Preparation, 82
sending by e-mail, 12Program as Defaults, 136Programs, 132, 136
changing registered program, 134changing the name, 135deleting, 135recalling, 133registering, 132
Q
Quick install, 143
R
Registering a destination, 25Registering in the address book, 25Registering the path, 57Registration numbers, 19, 28, 46, 90, 94Resolution, 106Resolution and file size, 139, 140Restore Factory Defaults, 136Result of sending, 6Return receipt, 85Ridoc IO Admin, 12, 40
S
SADF, 120Scanner Features, 8Scanning multiple pages, 123ScanRouter delivery software, 81Scan settings, 8, 105Scan Size, 106Scan to Folder, 37, 42Scan Type, 106, 139Screen, 68, 84
Scan to Folder, 41Search by comment, 91Searching by file name, 70, 78Searching by user name, 69, 95Searching the delivery server’s
destination list, 91Searching the list of stored files, 69Searching the machine’s address book, 20Security settings, 128Selecting a destination, 23, 89, 91
machine’s address book, 45Selecting a sender, 27, 93Sender, 27, 28, 93Sender name, 27, 28, 93, 94, 95Sending by Scan to Folder, 39Sending files
FTP, 52shared network folder, 49
Sending scan files, 37Sending scan files by e-mail, 11, 14Sending the URL by e-mail, 35Send settings, 9Serial number, 127Setting file name, 126Setting file type, 125Simultaneous storage and delivery, 98Simultaneous storage and sending
by e-mail, 34Simultaneous storage and sending
by Scan to Folder, 59Single page, 142SMB, 37, 51SMTP, 11Specifications, 150Specifying destinations, 45Specifying the message, 32Specifying the path, 51Specifying the sender, 27, 93Specifying the subject, 31Storage, 34, 59, 98Store only, 63Storing, 61, 139Storing scan files, 34, 59, 63, 98

53
1Subject, 97Subject/Text, 31, 32, 33Switching screen, 17
network delivery scanner screen, 88Scan to Folder, 44
Symbol, 1
T
Template size, 106Text, 106TIFF, 142TIFF/JPEG, 125Transmission function
folder transmission, 147sending e-mail, 146simultaneous transmission, 147
TWAIN Driver, 102, 103, 143TWAIN scanner, 99, 100, 103, 137, 138, 140
setting original orientation, 137Two sided original, 119
U
User name, 65, 77User Tools / Counter, 8
V
Values of various set items, 146network delivery function, 149storage function, 148transmission function, 146
W
Web Image Monitor, 12, 40, 61, 72, 73Wireless LAN, 12, 39, 101

154
EN USA B841-7700
Note to users in Canada
Note:
This Class B digital apparatus complies with Canadian ICES-003.
Remarque concernant les utilisateurs au Canada
Avertissement:
Cet appareil numérique de la classe B est conforme à la norme NMB-003 du Canada.
Note to users in the United States of America
Note:
This equipment has been tested and found to comply with the limits for a Class B digital device, pursu-ant to Part 15 of the FCC Rules. These limits are designed to provide reasonable protection againstharmful interference in a residential installation. This equipment generates, uses and can radiate radiofrequency energy and, if not installed and used in accordance with the instructions, may cause harmfulinterference to radio communications. However, there is no guarantee that interference will not occurin a particular installation. If this equipment does cause harmful interference to radio or television re-ception, which can be determined by turning the equipment off and on, the user is encouraged to try tocorrect the interference by one more of the following measures:
Reorient or relocate the receiving antenna.Increase the separation between the equipment and receiver.Connect the equipment into an outlet on a circuit different from that to which the receiver isconnected.Consult the dealer or an experienced radio /TV technician for help.
Caution:
Changes or modifications not expressly approved by the party responsible for compliance could voidthe user's authority to operate the equipment.
Declaration of Conformity
Product Name: Printer/Scanner ControllerModel Number: Printer/Scanner Unit Type 7500
Responsible party: Ricoh Corporation
Address: 5 Dedrick Place, West Caldwell, NJ 07006Telephone number: 973-882-2000
This device complies with Part 15 of the FCC Rules.
Operation is subject to the following two conditions:1. This device may not cause harmful interference, and
2. this device must accept any interference received,
including interference that may cause undesired operation.
Copyright © 2006

Printer/Scanner Unit Type 7500O
perating Instr
uctions Scanner ReferenceEN USA B841-7700
Network Guide
this machine and keep it handy for future reference. For safe and correct use, be sure to read th before using the machine.
Using a Printer Server
Monitoring and Configuring the Printer
Special Operations under Windows
Appendix
1
2
3
4
Read this manual carefully before you use eSafety Information in "About This Machine"
Introduction
This manual contains detailed instructions and notes on the operation and use of this machine. For yoursafety and benefit, read this manual carefully before using the machine. Keep this manual in a handyplace for quick reference.
Important
Contents of this manual are subject to change without prior notice. In no event will the company be li-able for direct, indirect, special, incidental, or consequential damages as a result of handling or oper-ating the machine.
Software Version Conventions Used in This Manual
• NetWare 3.x means NetWare 3.12 and 3.2.• NetWare 4.x means NetWare 4.1, 4.11, 4.2 and IntranetWare.
Trademarks
Microsoft®, Windows® and Windows NT® are registered trademarks of Microsoft Corporation in theUnited States and/or other countries.Apple, AppleTalk, EtherTalk, Macintosh, Mac OS , and TrueType are trademarks of Apple Computer,Inc, registered in the United States and other countries.BonjourTM is a trademark of Apple Computer Inc.Netscape and Netscape Navigator are registered trademarks of Netscape Communications Corpora-tion.Novell, NetWare, NDS and NDPS are registered trademarks of Novell, Inc.PostScript® and Acrobat® are registered trademarks of Adobe Systems, Incorporated.UNIX is a registered trademark in the United States and other countries, licensed exclusively throughX/Open Company Limited.Citrix® and MetaFrame® are registered trademarks of Citrix Systems, Inc.The Bluetooth® word mark and logos are owned by the Bluetooth SIG, Inc. and any use of such marksby Ricoh Company, Ltd. is under license.UPnP is a trademark of the UPnP Implementers Corporation.Other product names used herein are for identification purposes only and might be trademarks of theirrespective companies. We disclaim any and all rights to those marks.
The proper names of the Windows operating systems are as follows:• The product name of Windows® 95 is Microsoft® Windows 95.• The product name of Windows® 98 is Microsoft® Windows 98.• The product name of Windows® Me is Microsoft® Windows Millennium Edition (Windows Me).• The product names of Windows® 2000 are as follows:
Microsoft® Windows® 2000 ProfessionalMicrosoft® Windows® 2000 ServerMicrosoft® Windows® 2000 Advanced Server
• The product names of Windows® XP are as follows:Microsoft® Windows® XP Home EditionMicrosoft® Windows® XP Professional
• The product names of Windows Server™ 2003 are as follows:Microsoft® Windows Server™ 2003 Standard EditionMicrosoft® Windows Server™ 2003 Enterprise EditionMicrosoft® Windows Server™ 2003 Web Edition
• The product names of Windows NT® 4.0 are as follows:Microsoft® Windows NT® Workstation 4.0Microsoft® Windows NT® Server 4.0
• RSA Data Security, Inc. MD5 Message-Digest AlgorithmCopyright© 1991-2, RSA Data Security, Inc. Created 1991. All rights reserved.License to copy and use this software is granted provided that it is identified as the “RSA Data Se-curity, Inc. MD5 Message-Digest Algorithm” in all material mentioning or referencing this softwareor this function.License is also granted to make and use derivative works provided that such works are identifiedas “derived from the RSA Data Security, Inc. MD5 Message-Digest Algorithm” in all material men-tioning or referencing the derived work.RSA Data Security, Inc. makes no representations concerning either the merchantability of this soft-ware or the suitability of this software for any particular purpose. It is provided “as is” without ex-press or implied warranty of any kind.These notices must be retained in any copies of any part of this documentation and/or software.

i
Manuals for This Machine
Refer to the manuals that are relevant to what you want to do with the machine.
❖ About This MachineBe sure to read the Safety Information in this manual before using the ma-chine.This manual provides an introduction to the functions of the machine. It alsoexplains the control panel, preparation procedures for using the machine,how to enter text, and how to install the CD-ROMs provided.
❖ General Settings GuideExplains User Tools settings, and Address Book procedures such as register-ing fax numbers, e-mail addresses, and user codes. Also refer to this manualfor explanations on how to connect the machine.
❖ Trouble ShootingProvides a guide to solving common problems, and explains how to replacepaper, toner or print cartridge, and other consumables.
❖ Security ReferenceThis manual is for administrators of the machine. It explains security func-tions that the administrators can use to protect data from being tampered, orprevent the machine from unauthorized use. Also refer to this manual for theprocedures for registering administrators, as well as setting user and admin-istrator authentication.
❖ Copy/Document Server ReferenceExplains Copier and Document Server functions and operations. Also refer tothis manual for explanations on how to place originals.
❖ Copy ReferenceExplains Copier functions and operations. Also refer to this manual for expla-nations on how to place originals.
❖ Facsimile ReferenceExplains Facsimile functions and operations.
❖ Printer ReferenceExplains Printer functions and operations.
❖ Scanner ReferenceExplains Scanner functions and operations.
ii
❖ Network GuideExplains how to configure and operate the machine in a network environ-ment, and use the software provided.This manual covers all models, and includes descriptions of functions andsettings that might not be available on this machine. Images, illustrations, andinformation about operating systems that are supported might also differslightly from those of this machine.
❖ Other manuals• Manuals for This Machine• Safety Information• Quick Reference Copy Guide• Quick Reference Fax Guide• Quick Reference Printer Guide• Quick Reference Scanner Guide• PostScript 3 Supplement• UNIX Supplement• Manuals for DeskTopBinder Lite
• DeskTopBinder Lite Setup Guide• DeskTopBinder Introduction Guide• Auto Document Link Guide
Note❒ Manuals provided are specific to machine types.❒ Adobe Acrobat Reader/Adobe Reader must be installed in order to view the
manuals as PDF files.
iii
TABLE OF CONTENTSManuals for This Machine ...................................................................................... iHow to Read This Manual .....................................................................................1
Symbols .....................................................................................................................1Setting Up the Machine on a Network..................................................................2
Initial Settings Overview.............................................................................................2Initial Settings.............................................................................................................5
1. Using a Printer Server
Preparing Printer Server .....................................................................................23Printing notification via SmartDeviceMonitor for Client ............................................24
Using NetWare .....................................................................................................25Setting Up as a Print Server (NetWare 3.x) .............................................................26Setting Up as a Print Server (NetWare 4.x, 5 / 5.1, 6 / 6.5) .....................................27Using Pure IP in the NetWare 5 / 5.1 or 6 / 6.5 Environment...................................28Setting Up as a Remote Printer (NetWare 3.x) ........................................................30Setting Up as a Remote Printer (NetWare 4.x, 5 / 5.1, 6 / 6.5) ................................32
2. Monitoring and Configuring the Printer
Using Web Image Monitor...................................................................................35Displaying Top Page ................................................................................................37When user authentication is set ...............................................................................38About Menu and Mode.............................................................................................39Access in the Administrator Mode............................................................................41Displaying Web Image Monitor Help........................................................................41
Using SmartDeviceMonitor for Admin ...............................................................42Installing SmartDeviceMonitor for Admin .................................................................43Changing the Network Interface Board Configuration..............................................43Locking the Menus on the Machine's Control Panel ................................................44Changing the Paper Type ........................................................................................45Managing User Information......................................................................................45Configuring the Energy Saver Mode ........................................................................48Setting a Password ..................................................................................................48Checking the Machine Status ..................................................................................49Changing Names and Comments ............................................................................49Load Fax Journal .....................................................................................................50Viewing and Deleting Spool Print Jobs ....................................................................51Managing Address Information ................................................................................51
Using SmartDeviceMonitor for Client ................................................................52Monitoring Printers ...................................................................................................52Checking the Machine Status ..................................................................................52When Using IPP with SmartDeviceMonitor for Client ..............................................53
Printer Status Notification by E-Mail..................................................................54Auto E-mail Notification............................................................................................55On-demand E-mail Notification ................................................................................56Mail authentication ...................................................................................................56On-demand E-mail Notification ................................................................................57

iv
Remote Maintenance by telnet ...........................................................................59Using telnet ..............................................................................................................59access ......................................................................................................................60appletalk...................................................................................................................61authfree ....................................................................................................................61autonet .....................................................................................................................61bonjour(rendezvous) ................................................................................................62btconfig.....................................................................................................................63devicename..............................................................................................................63dhcp .........................................................................................................................64diprint .......................................................................................................................65dns ...........................................................................................................................65domainname ............................................................................................................67help ..........................................................................................................................67hostname .................................................................................................................67ifconfig......................................................................................................................68info ...........................................................................................................................69ipp ............................................................................................................................69ipv6...........................................................................................................................70lpr .............................................................................................................................70netware ....................................................................................................................70passwd .....................................................................................................................71prnlog .......................................................................................................................71route .........................................................................................................................71set ............................................................................................................................72show.........................................................................................................................74slp.............................................................................................................................74smb ..........................................................................................................................74snmp ........................................................................................................................75sntp ..........................................................................................................................77spoolsw ....................................................................................................................78sprint ........................................................................................................................78ssdp..........................................................................................................................78ssh............................................................................................................................79status........................................................................................................................79syslog .......................................................................................................................79upnp .........................................................................................................................79web...........................................................................................................................80wiconfig ....................................................................................................................81wins ..........................................................................................................................84
SNMP.....................................................................................................................85Getting Printer Information over the Network...................................................86
Current Printer Status ..............................................................................................86Printer configuration .................................................................................................95
Understanding the Displayed Information ........................................................96Print Job Information ................................................................................................96Print Log Information................................................................................................97Configuring the Network Interface Board .................................................................98
Message List ......................................................................................................105System Log Information .........................................................................................105
v
3. Special Operations under Windows
Printing Files Directly from Windows ..............................................................113Setup......................................................................................................................113Using a Host Name Instead of an IPv4 Address....................................................113Printing Commands................................................................................................115
4. Appendix
When Using Windows Terminal Service / MetaFrame....................................117Operating Environment ..........................................................................................117Supported Printer Drivers.......................................................................................117Limitations ..............................................................................................................117
Using DHCP........................................................................................................119Using AutoNet ........................................................................................................120
Precautions ........................................................................................................121Connecting a Dial-Up Router to a Network ............................................................121NetWare Printing....................................................................................................123When the optional IEEE 802.11b interface unit Is Installed ...................................123
Information about Installed Applications ........................................................125RSA® BSAFE.........................................................................................................125
Specifications.....................................................................................................126
INDEX....................................................................................................... 128

vi

1
How to Read This Manual
Symbols
This manual uses the following symbols:
Indicates important safety notes.Ignoring these notes could result in serious injury or death. Be sure to read thesenotes. They can be found in the “Safety Information” section of About This Ma-chine.
Indicates important safety notes.Ignoring these notes could result in moderate or minor injury, or damage to themachine or to property. Be sure to read these notes. They can be found in the“Safety Information” section of About This Machine.
Indicates points to pay attention to when using the machine, and explanationsof likely causes of paper misfeeds, damage to originals, or loss of data. Be sureto read these explanations.
Indicates supplementary explanations of the machine’s functions, and instruc-tions on resolving user errors.
This symbol is located at the end of sections. It indicates where you can find fur-ther relevant information.[ ]Indicates the names of keys that appear on the machine’s display panel.{ }Indicates the names of keys on the machine’s control panel.

2
Setting Up the Machine on a Network
This section describes the network settings you can change with User Tools (Sys-tem Settings). Make settings according to functions you want to use and the in-terface to be connected.
Important❒ These settings should be made by the systems administrator, or after consult-
ing with the systems administrator.
Initial Settings Overview
❖ Interface Settings
Menu Description
Machine IPv4 Address Specifies the machine IPv4 address and sub-net mask in the network environment.
IPv4 Gateway Address Configure the gateway address for the rout-er or host computer used as a gateway.
Machine IPv6 Address Specifies the machine IPv6 address and sub-net mask in the network environment.
IPv6 Gateway Address Configure the gateway address for the router or host computer used as a gateway.
IPv6 Gateway Address Specifies the automatic configuration of the IPv6 Stateless Address.
DNS Configuration Make settings for the DNS server.
DDNS Configuration Specifies the DDNS settings.
Domain Name Specifies the domain name.
WINS Configuration Specifies the WINS server settings.
Effective Protocol Select the protocol to use in the network.
NCP Delivery Protocol Select the protocol for NCP delivery:
NW Frame Type Select the frame type when you use NetWare.
LAN Type Select interface, IEEE 802.11b (wireless LAN) or Ethernet when you have installed the op-tional IEEE 802.11b interface unit.
Ethernet Speed Set the access speed for networks.
Ping Command Check the network connection with ping command using given IP address.
SMB Computer Name Specifies the SMB computer name.
SMB Work Group Specifies the SMB work group.
Permit SNMPv3 Communication Set the encrypted communication of SNMP v3.
Permit SSL / TLS Communication Set the encrypted communication of SSL/TLS.
Host Name Specify the host name.
3
Machine Name Specify the machine name.
IPv4 over 1394 Specifies when you use the function of the IEEE 1394 interface to connect the machine to the network, or you print from computer with the IP over 1394 driver.
SCSI print (SBP-2) Specifies when you print using the SCSI print client function supported by Windows 2000/XP, or Windows Server 2003.
Bidirectional SCSI print Specifies the printer's response mode etc. for status requests when using the IEEE 1394 in-terface.
Communication Mode Specifies the communication mode of the wireless LAN.
SSID Setting Specifies SSID to distinguish the access point in infrastructure mode or 802.11 ad hoc mode.
Channel Specifies a channel when you select 802.11b ad hoc mode or ad hoc mode.
WEP (Encryption) Key Specifies the encryption of the IEEE 802.11b (wirelessLAN).
Transmission Speed Specifies the communication speed of the IEEE 802.11b (wirelessLAN).
Restore Factory Defaults Return the IEEE 802.11b (wireless LAN) set-tings to their defaults.
4
❖ File Transfer Settings
Menu Description
SMTP Server Specifies the SMTP server name.
SMTP Authentication Configures SMTP authentication (PLAIN, LOGIN, CRAM-MD5, DIGEST-MD5
POP before SMTP Configures POP authentication (POP before SMTP).
Reception Protocol Specifies Reception Protocol for receiving Internet faxes.
POP3 / IMAP4 Settings Specify the POP3 or IMAP4 server name for receiving Internet faxes.
Administrator's E-mail Address This appears as the sender’s address on e-mailed scanned documents, if the sender is not specified .
E-mail Communication Port Specifies the [POP3], [IMAP4], and [SMTP] port numbers for receiving Internet faxes.
E-mail Reception Interval Specify, in minutes, the time limit for receiv-ing Internet faxes via POP3 or IMAP4 server.
Max. Reception E-mail Size Specifies the [Max. Reception E-mail Size] for receiving Internet faxes.
E-mail Storage in Server Specifies whether or not to store received Inter-net fax e-mails on the POP3 or IMAP4 server.
Program / Change / Delete E-mail Message Specify the user name and password re-quired when sending scan file directly to a shared folder on a computer running Win-dows, or to an FTP server.
Default User Name / Password (Send) Specifies the user name and password re-quired when sending scan file directly to a shared folder on a computer running Win-dows, or to an FTP server.
Program / Change / Delete Subject Program, change, or delete the subject used when sending an Internet fax or scan file as an attachment.
Fax E-mail Account Specify [E-mail Address],[User Name] , and [Password] for receiving Internet faxes.
Scanner Resend Interval Time Specifies the interval the machine waits be-fore resending scan file, if they cannot be sent to the delivery server or mail server.
Number of Scanner Resends Sets a maximum number of times scan file is resent to the delivery server or mail server
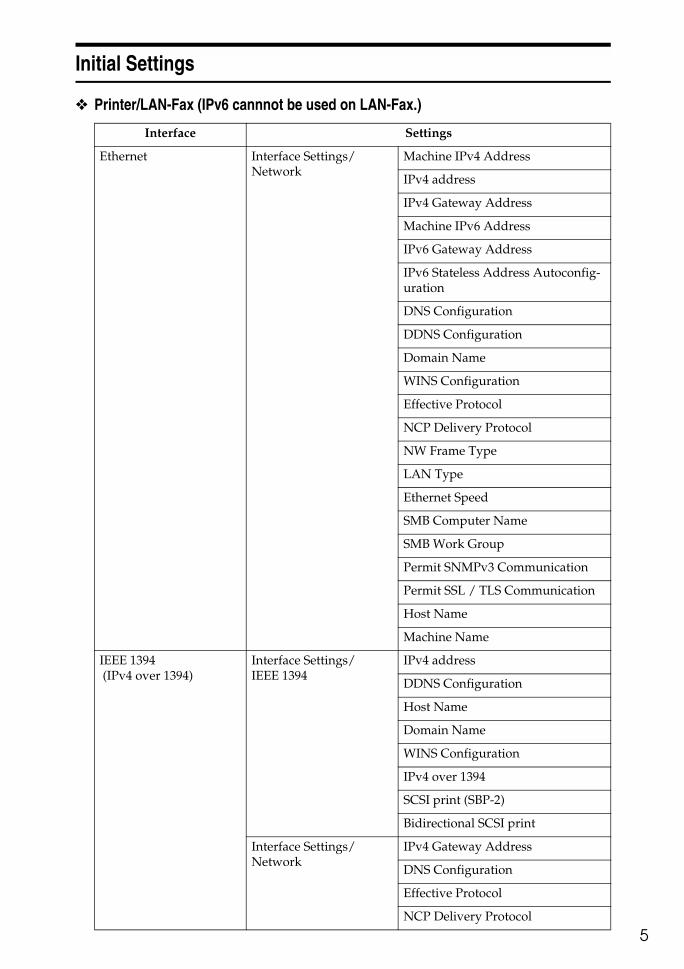
5
Initial Settings
❖ Printer/LAN-Fax (IPv6 cannnot be used on LAN-Fax.)
Interface Settings
Ethernet Interface Settings/Network
Machine IPv4 Address
IPv4 address
IPv4 Gateway Address
Machine IPv6 Address
IPv6 Gateway Address
IPv6 Stateless Address Autoconfig-uration
DNS Configuration
DDNS Configuration
Domain Name
WINS Configuration
Effective Protocol
NCP Delivery Protocol
NW Frame Type
LAN Type
Ethernet Speed
SMB Computer Name
SMB Work Group
Permit SNMPv3 Communication
Permit SSL / TLS Communication
Host Name
Machine Name
IEEE 1394 (IPv4 over 1394)
Interface Settings/IEEE 1394
IPv4 address
DDNS Configuration
Host Name
Domain Name
WINS Configuration
IPv4 over 1394
SCSI print (SBP-2)
Bidirectional SCSI print
Interface Settings/Network
IPv4 Gateway Address
DNS Configuration
Effective Protocol
NCP Delivery Protocol

6
IEEE 802.11b (wireless LAN)
Interface Settings/Network
Machine IPv4 Address
IPv4 address
IPv4 Gateway Address
Machine IPv6 Address
IPv6 Gateway Address
IPv6 Stateless Address Autoconfig-uration
DNS Configuration
DDNS Configuration
Domain Name
WINS Configuration
NW Frame Type
LAN Type
Ethernet Speed
Effective Protocol
NCP Delivery Protocol
SMB Computer Name
SMB Work Group
Permit SNMPv3 Communication
Permit SSL / TLS Communication
Host Name
Machine Name
Interface Settings/IEEE 802.11b
Communication Mode
SSID Setting
Channel
WEP (Encryption) Key
Security Method
Wireless LAN Signal
Transmission Speed
Interface Settings
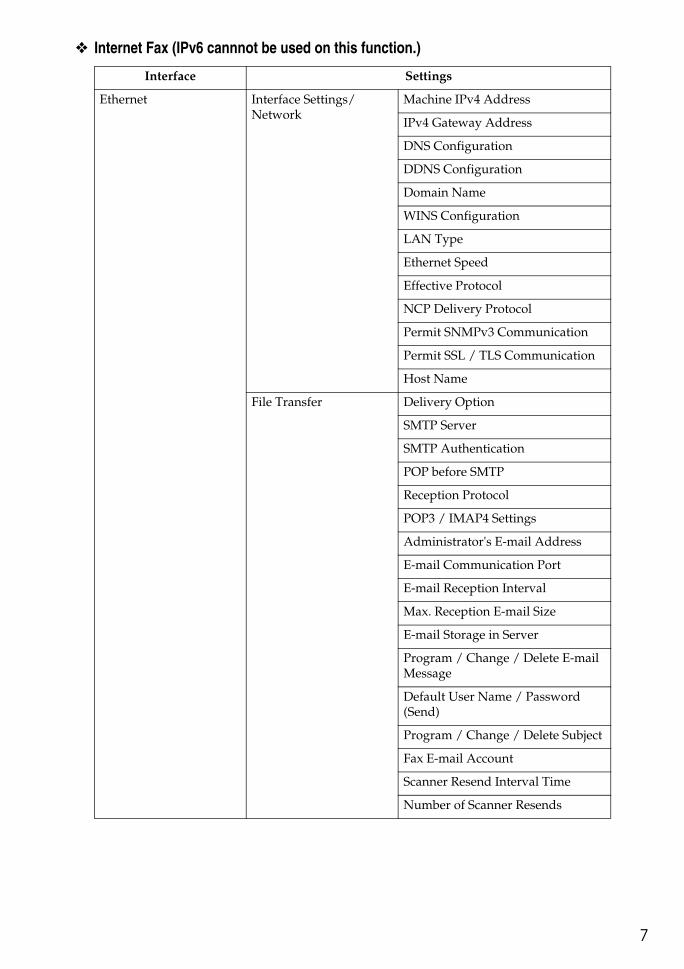
7
❖ Internet Fax (IPv6 cannnot be used on this function.)
Interface Settings
Ethernet Interface Settings/Network
Machine IPv4 Address
IPv4 Gateway Address
DNS Configuration
DDNS Configuration
Domain Name
WINS Configuration
LAN Type
Ethernet Speed
Effective Protocol
NCP Delivery Protocol
Permit SNMPv3 Communication
Permit SSL / TLS Communication
Host Name
File Transfer Delivery Option
SMTP Server
SMTP Authentication
POP before SMTP
Reception Protocol
POP3 / IMAP4 Settings
Administrator's E-mail Address
E-mail Communication Port
E-mail Reception Interval
Max. Reception E-mail Size
E-mail Storage in Server
Program / Change / Delete E-mail Message
Default User Name / Password (Send)
Program / Change / Delete Subject
Fax E-mail Account
Scanner Resend Interval Time
Number of Scanner Resends

8
IEEE 1394 (IPv4 over 1394)
Interface Settings/IEEE 1394
IPv4 address
IPv4 over 1394
DDNS Configuration
WINS Configuration
Host Name
Domain Name
Interface Settings/Network
IPv4 Gateway Address
DNS Configuration
Effective Protocol
NCP Delivery Protocol
File Transfer SMTP Server
SMTP Authentication
POP before SMTP
Reception Protocol
POP3 / IMAP4 Settings
Administrator's E-mail Address
E-mail Communication Port
E-mail Reception Interval
Max. Reception E-mail Size
E-mail Storage in Server
Program / Change / Delete E-mail Message
Program / Change / Delete Subject
Fax E-mail Account
Scanner Resend Interval Time
Number of Scanner Resends
Interface Settings
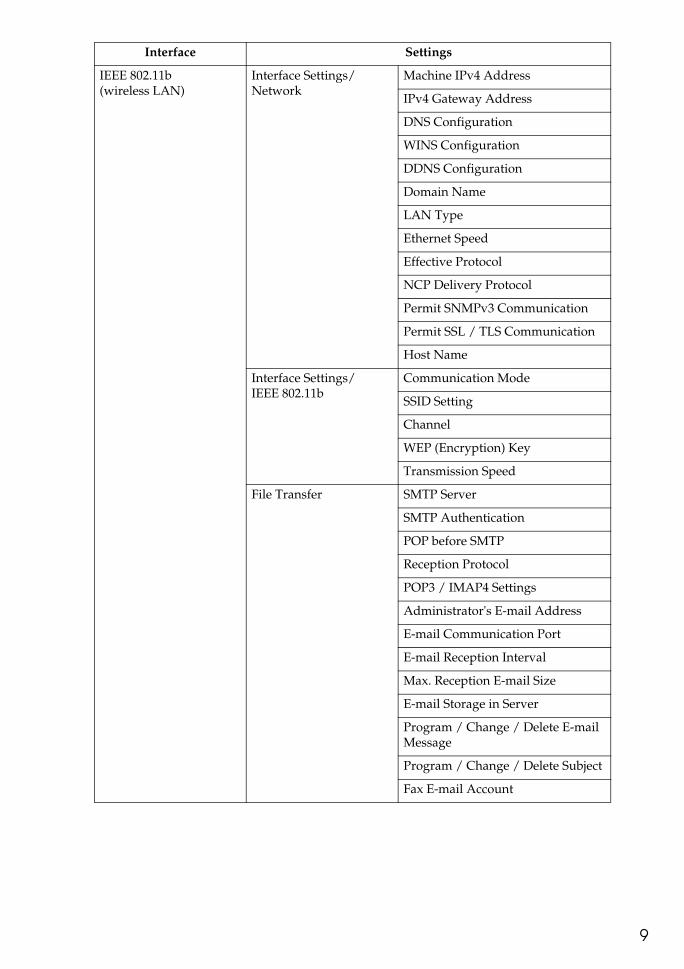
9
IEEE 802.11b (wireless LAN)
Interface Settings/Network
Machine IPv4 Address
IPv4 Gateway Address
DNS Configuration
WINS Configuration
DDNS Configuration
Domain Name
LAN Type
Ethernet Speed
Effective Protocol
NCP Delivery Protocol
Permit SNMPv3 Communication
Permit SSL / TLS Communication
Host Name
Interface Settings/IEEE 802.11b
Communication Mode
SSID Setting
Channel
WEP (Encryption) Key
Transmission Speed
File Transfer SMTP Server
SMTP Authentication
POP before SMTP
Reception Protocol
POP3 / IMAP4 Settings
Administrator's E-mail Address
E-mail Communication Port
E-mail Reception Interval
Max. Reception E-mail Size
E-mail Storage in Server
Program / Change / Delete E-mail Message
Program / Change / Delete Subject
Fax E-mail Account
Interface Settings

10
❖ IP-Fax (IPv6 cannnot be used on this function.)
Interface Settings
Ethernet Interface Settings/Network
Machine IPv4 Address
IPv4 Gateway Address
DNS Configuration
DDNS Configuration
Domain Name
WINS Configuration
LAN Type
Ethernet Speed
Effective Protocol
Permit SNMPv3 Communication
Permit SSL / TLS Communication
Host Name
IEEE 1394 (IPv4 over 1394)
Interface Settings/IEEE 1394
IPv4 address
IPv4 over 1394
DDNS Configuration
WINS Configuration
Host Name
Domain Name
Interface Settings/Network
IPv4 Gateway Address
DNS Configuration
Effective Protocol
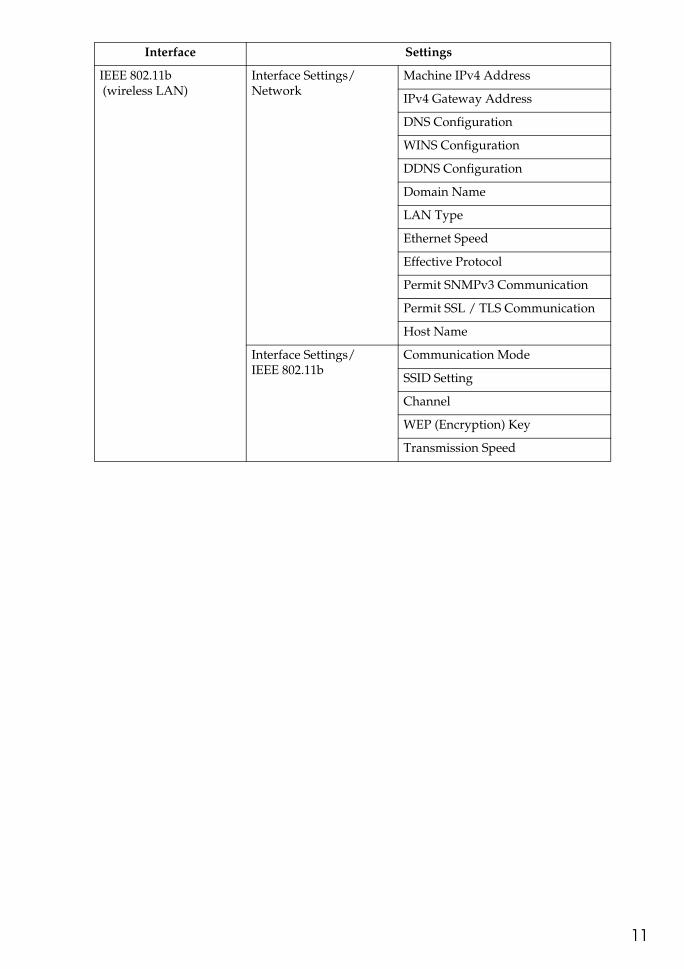
11
IEEE 802.11b (wireless LAN)
Interface Settings/Network
Machine IPv4 Address
IPv4 Gateway Address
DNS Configuration
WINS Configuration
DDNS Configuration
Domain Name
LAN Type
Ethernet Speed
Effective Protocol
Permit SNMPv3 Communication
Permit SSL / TLS Communication
Host Name
Interface Settings/IEEE 802.11b
Communication Mode
SSID Setting
Channel
WEP (Encryption) Key
Transmission Speed
Interface Settings
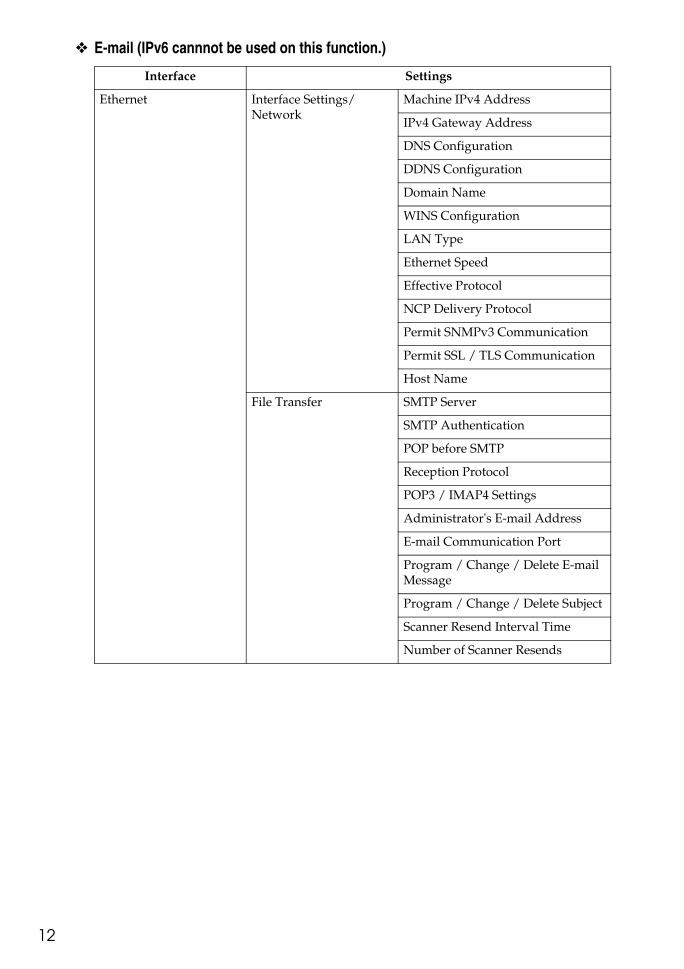
12
❖ E-mail (IPv6 cannnot be used on this function.)
Interface Settings
Ethernet Interface Settings/Network
Machine IPv4 Address
IPv4 Gateway Address
DNS Configuration
DDNS Configuration
Domain Name
WINS Configuration
LAN Type
Ethernet Speed
Effective Protocol
NCP Delivery Protocol
Permit SNMPv3 Communication
Permit SSL / TLS Communication
Host Name
File Transfer SMTP Server
SMTP Authentication
POP before SMTP
Reception Protocol
POP3 / IMAP4 Settings
Administrator's E-mail Address
E-mail Communication Port
Program / Change / Delete E-mail Message
Program / Change / Delete Subject
Scanner Resend Interval Time
Number of Scanner Resends

13
IEEE 1394 (IPv4 over 1394)
Interface Settings/IEEE 1394
IPv4 address
IPv4 over 1394
DDNS Configuration
WINS Configuration
Host Name
Domain Name
Interface Settings/Network
IPv4 Gateway Address
DNS Configuration
Effective Protocol
NCP Delivery Protocol
File Transfer SMTP Server
SMTP Authentication
POP before SMTP
Reception Protocol
POP3 / IMAP4 Settings
Administrator's E-mail Address
Reception Protocol
Program / Change / Delete E-mail Message
Program / Change / Delete Subject
Scanner Resend Interval Time
Number of Scanner Resends
Interface Settings
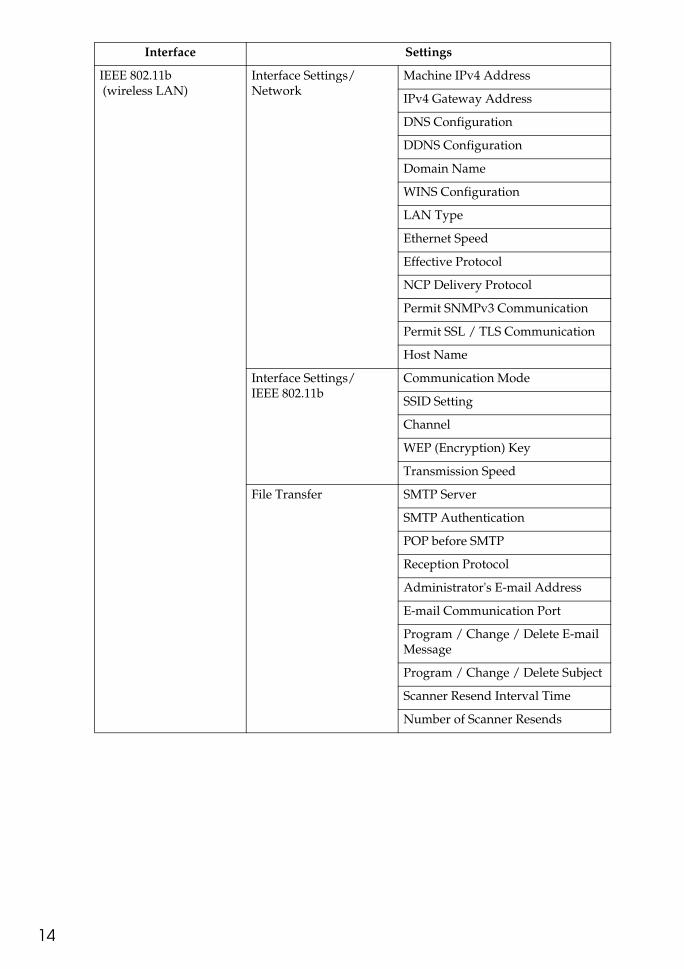
14
IEEE 802.11b (wireless LAN)
Interface Settings/Network
Machine IPv4 Address
IPv4 Gateway Address
DNS Configuration
DDNS Configuration
Domain Name
WINS Configuration
LAN Type
Ethernet Speed
Effective Protocol
NCP Delivery Protocol
Permit SNMPv3 Communication
Permit SSL / TLS Communication
Host Name
Interface Settings/IEEE 802.11b
Communication Mode
SSID Setting
Channel
WEP (Encryption) Key
Transmission Speed
File Transfer SMTP Server
SMTP Authentication
POP before SMTP
Reception Protocol
Administrator's E-mail Address
E-mail Communication Port
Program / Change / Delete E-mail Message
Program / Change / Delete Subject
Scanner Resend Interval Time
Number of Scanner Resends
Interface Settings
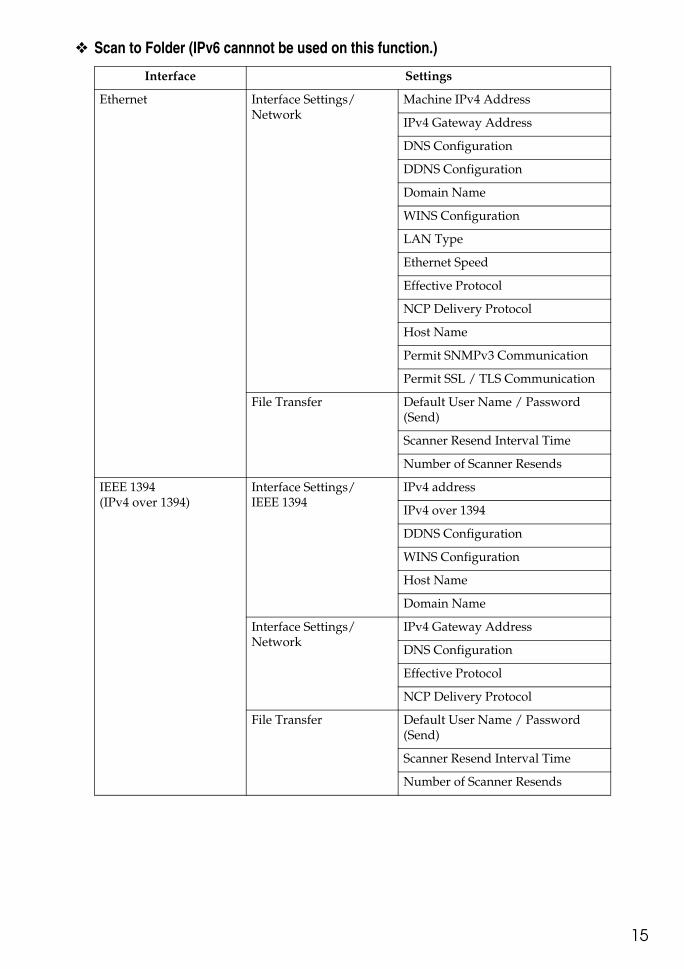
15
❖ Scan to Folder (IPv6 cannnot be used on this function.)
Interface Settings
Ethernet Interface Settings/Network
Machine IPv4 Address
IPv4 Gateway Address
DNS Configuration
DDNS Configuration
Domain Name
WINS Configuration
LAN Type
Ethernet Speed
Effective Protocol
NCP Delivery Protocol
Host Name
Permit SNMPv3 Communication
Permit SSL / TLS Communication
File Transfer Default User Name / Password (Send)
Scanner Resend Interval Time
Number of Scanner Resends
IEEE 1394 (IPv4 over 1394)
Interface Settings/IEEE 1394
IPv4 address
IPv4 over 1394
DDNS Configuration
WINS Configuration
Host Name
Domain Name
Interface Settings/Network
IPv4 Gateway Address
DNS Configuration
Effective Protocol
NCP Delivery Protocol
File Transfer Default User Name / Password (Send)
Scanner Resend Interval Time
Number of Scanner Resends
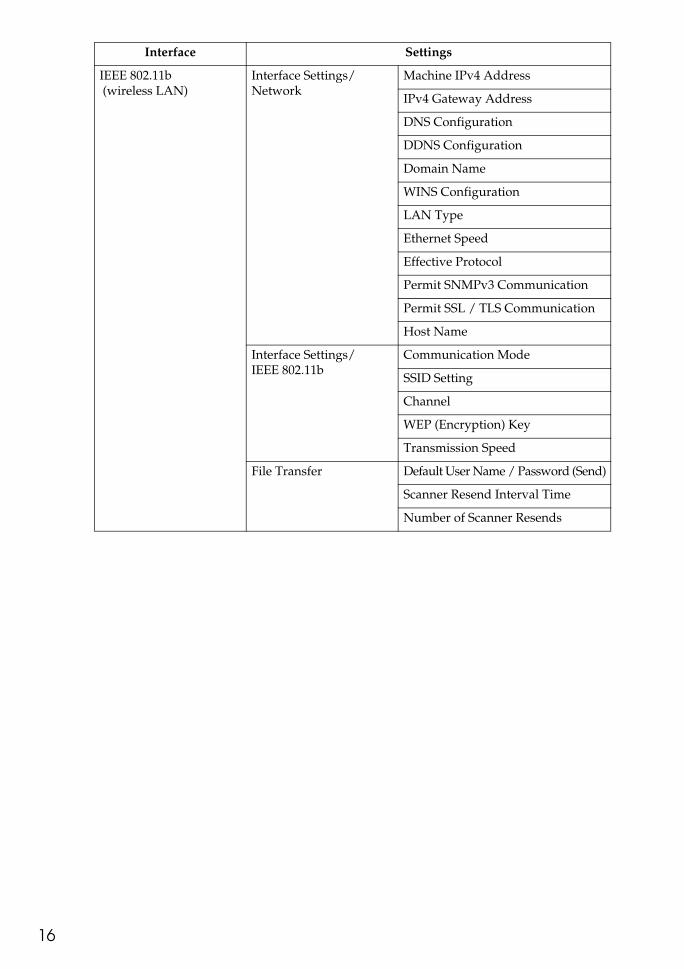
16
IEEE 802.11b (wireless LAN)
Interface Settings/Network
Machine IPv4 Address
IPv4 Gateway Address
DNS Configuration
DDNS Configuration
Domain Name
WINS Configuration
LAN Type
Ethernet Speed
Effective Protocol
Permit SNMPv3 Communication
Permit SSL / TLS Communication
Host Name
Interface Settings/IEEE 802.11b
Communication Mode
SSID Setting
Channel
WEP (Encryption) Key
Transmission Speed
File Transfer Default User Name / Password (Send)
Scanner Resend Interval Time
Number of Scanner Resends
Interface Settings

17
❖ Network Delivery Scanner (IPv6 cannnot be used on this function.)
Interface Settings
Ethernet Interface Settings/Network
Machine IPv4 Address
IPv4 Gateway Address
DNS Configuration
DDNS Configuration
Domain Name
WINS Configuration
LAN Type
Ethernet Speed
Effective Protocol
NCP Delivery Protocol
Permit SNMPv3 Communication
Permit SSL / TLS Communication
Host Name
File Transfer Delivery Option
Fax RX File Transmission
Scanner Resend Interval Time
Number of Scanner Resends
IEEE 1394 (IPv4 over 1394)
Interface Settings/IEEE 1394
IPv4 address
IPv4 over 1394
DDNS Configuration
WINS Configuration
Host Name
Domain Name
Interface Settings/Network
IPv4 Gateway Address
DNS Configuration
Effective Protocol
NCP Delivery Protocol
File Transfer Delivery Option
Fax RX File Transmission
Scanner Resend Interval Time
Number of Scanner Resends

18
IEEE 802.11b (wireless LAN)
Interface Settings/Network
Machine IPv4 Address
IPv4 Gateway Address
DNS Configuration
DDNS Configuration
Domain Name
WINS Configuration
LAN Type
Ethernet Speed
Effective Protocol
NCP Delivery Protocol
Permit SNMPv3 Communication
Permit SSL / TLS Communication
Host Name
Interface Settings/IEEE 802.11b
Communication Mode
SSID Setting
Channel
WEP (Encryption) Key
Transmission Speed
File Transfer Delivery Option
Fax RX File Transmission
Scanner Resend Interval Time
Number of Scanner Resends
Interface Settings
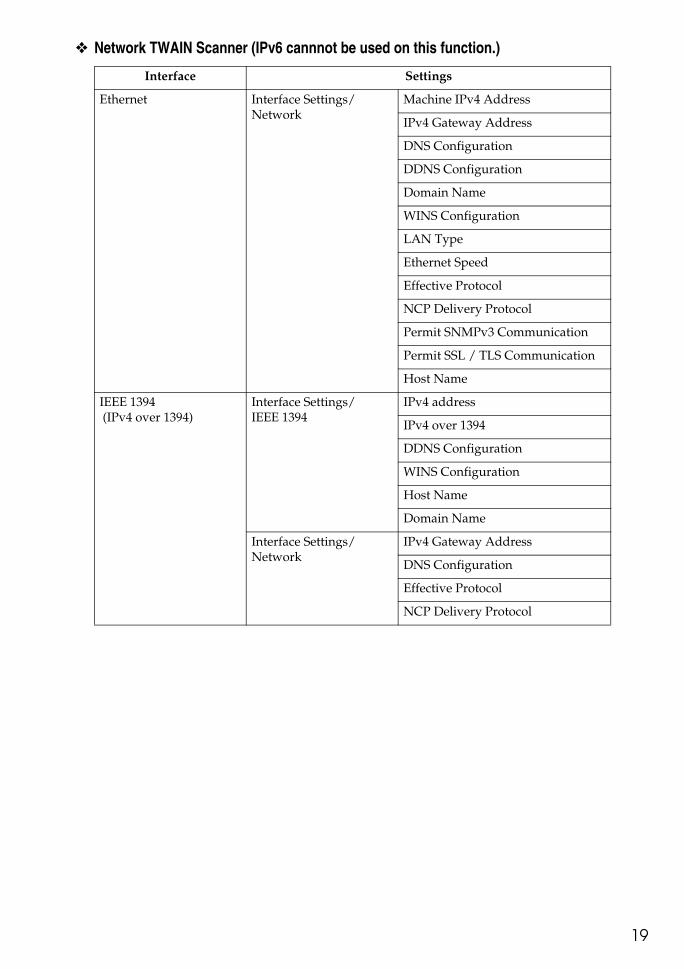
19
❖ Network TWAIN Scanner (IPv6 cannnot be used on this function.)
Interface Settings
Ethernet Interface Settings/Network
Machine IPv4 Address
IPv4 Gateway Address
DNS Configuration
DDNS Configuration
Domain Name
WINS Configuration
LAN Type
Ethernet Speed
Effective Protocol
NCP Delivery Protocol
Permit SNMPv3 Communication
Permit SSL / TLS Communication
Host Name
IEEE 1394 (IPv4 over 1394)
Interface Settings/IEEE 1394
IPv4 address
IPv4 over 1394
DDNS Configuration
WINS Configuration
Host Name
Domain Name
Interface Settings/Network
IPv4 Gateway Address
DNS Configuration
Effective Protocol
NCP Delivery Protocol
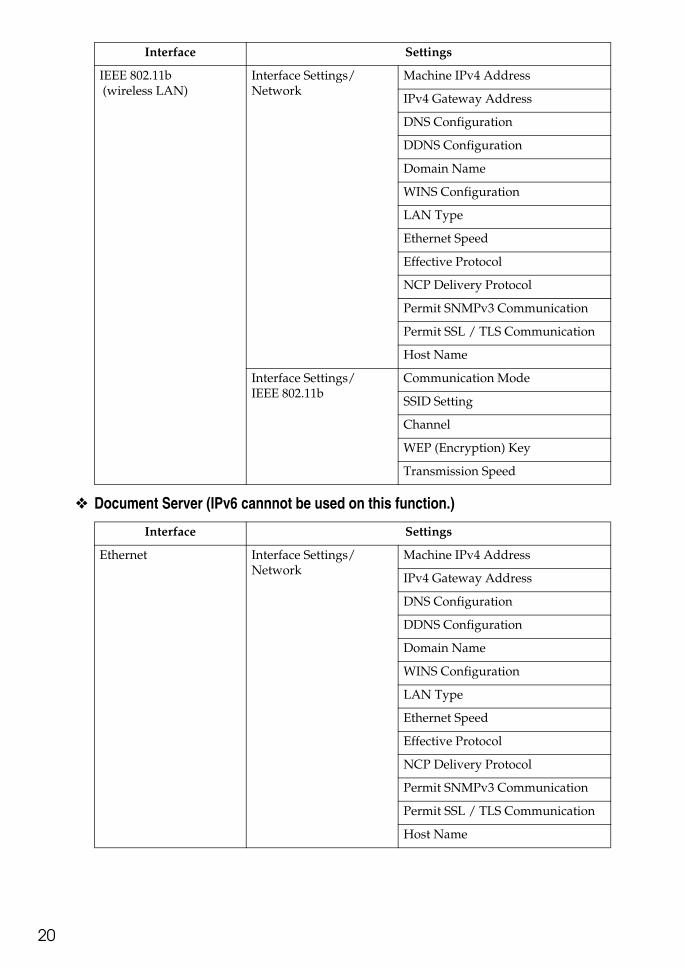
20
❖ Document Server (IPv6 cannnot be used on this function.)
IEEE 802.11b (wireless LAN)
Interface Settings/Network
Machine IPv4 Address
IPv4 Gateway Address
DNS Configuration
DDNS Configuration
Domain Name
WINS Configuration
LAN Type
Ethernet Speed
Effective Protocol
NCP Delivery Protocol
Permit SNMPv3 Communication
Permit SSL / TLS Communication
Host Name
Interface Settings/IEEE 802.11b
Communication Mode
SSID Setting
Channel
WEP (Encryption) Key
Transmission Speed
Interface Settings
Ethernet Interface Settings/Network
Machine IPv4 Address
IPv4 Gateway Address
DNS Configuration
DDNS Configuration
Domain Name
WINS Configuration
LAN Type
Ethernet Speed
Effective Protocol
NCP Delivery Protocol
Permit SNMPv3 Communication
Permit SSL / TLS Communication
Host Name
Interface Settings
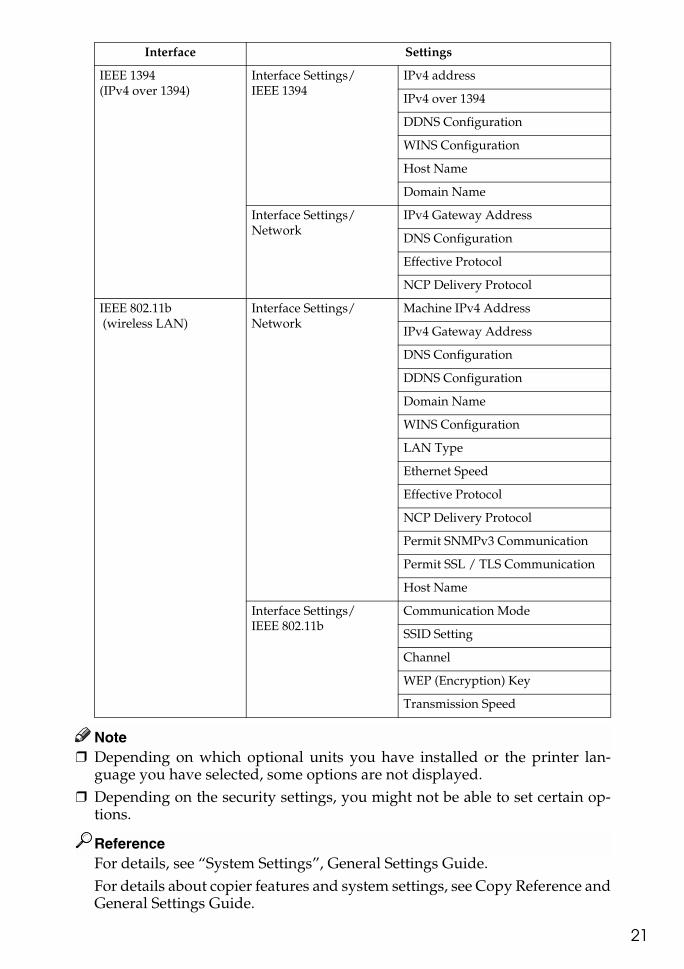
21
Note❒ Depending on which optional units you have installed or the printer lan-
guage you have selected, some options are not displayed.❒ Depending on the security settings, you might not be able to set certain op-
tions.
ReferenceFor details, see “System Settings”, General Settings Guide.For details about copier features and system settings, see Copy Reference andGeneral Settings Guide.
IEEE 1394(IPv4 over 1394)
Interface Settings/IEEE 1394
IPv4 address
IPv4 over 1394
DDNS Configuration
WINS Configuration
Host Name
Domain Name
Interface Settings/Network
IPv4 Gateway Address
DNS Configuration
Effective Protocol
NCP Delivery Protocol
IEEE 802.11b (wireless LAN)
Interface Settings/Network
Machine IPv4 Address
IPv4 Gateway Address
DNS Configuration
DDNS Configuration
Domain Name
WINS Configuration
LAN Type
Ethernet Speed
Effective Protocol
NCP Delivery Protocol
Permit SNMPv3 Communication
Permit SSL / TLS Communication
Host Name
Interface Settings/IEEE 802.11b
Communication Mode
SSID Setting
Channel
WEP (Encryption) Key
Transmission Speed
Interface Settings

22
1. Using a Printer Server
23
Preparing Printer Server
This section explains how to config-ure the machine as a Windows net-w o r k p r i n t e r . T h e m a c h i n e i sconfigured to enabling network cli-ents to use it. When the networkprinter is connected via SmartDevice-Monitor for Client, you can set theprinting notification function to noti-fy clients of the results of their printjobs.
Important❒ Under Windows 2000, Windows
XP Professional, or Windows Serv-er 2003, to change printer proper-ties in the [Printer] folder, you needPrinter Management access au-thentication; under Windows NT4.0, Full Control access authentica-tion. Log on to the file server as anAdministrator or member of thePowerUsers group.
A Open the [Printers] window fromthe [Start] menu.The [Printers] window appears.Under Windows XP or WindowsServer 2003, [Printer and Fax] win-dow appears.
B Click the icon of the machine youwant to use. On the [File] menu,click [Properties]. The printerproperties appear.
C On the [Sharing] tab, click [Shared As: ].
D To share the machine with usersusing a different version of Win-dows, click [Additional Drivers...].If you have installed an alternativedriver by selecting [Share As: ] dur-ing the printer driver installation,this step can be ignored.
E Click [OK], and then close theprinter properties.
Using a Printer Server
24
1
Printing notification via SmartDeviceMonitor for Client
Follow the procedure below to con-figure the machine to use the printingnotification function of SmartDevice-Monitor for Client.
Setting the print server
Important❒ Under Windows 2000, Windows
XP Professional, or Windows Serv-er 2003, to change printer proper-ties in the [Printer] folder, you needPrinter Management access au-thentication; under Windows NT4.0, Full Control access authentica-tion. Log on to the file server as anAdministrator or member of thePowerUsers group.
A On the [Start] menu, point to [Pro-grams], [DeskTopBinder], [SmartDe-viceMonitor for Client], and thenclick [Print Server Setting].The print server setting dialog boxappears.
B Select the [Notify client PCs of print-out/data-transmission ] check box,and then click [OK].After print server setting is made, adialog box appears. Confirm thedialog box content, and click [OK].Click [Cancel] to interrupt the pro-cedure.A dialog box appears for client setting.
C Click [OK].The print server setting is complet-ed. Each client must be set to re-ceive print notification.
Note❒ Current printing jobs restart
from the beginning after thespooler pauses briefly.
❒ When the expansion function isnot used, the function is auto-matically set as available.
❒ If you log on using an accountthat does not have Administra-tor privileges, the client may notbe notified.
Setting a Client
A On the [Start] menu, point to [Pro-gram], [DeskTopBinder], [SmartDe-viceMonitor for Client], and thenclick [Extended Features Settings].A dialog box for setting the expan-sion function appears.
B Select the [Notify of printout/data-transmission when using print server]check box.
C Click [OK]. The client setting is completed.
Note❒ Set the printing notification
function on the printer driver aswell as on SmartDeviceMonitorfor Client.
Using NetWare
25
1
Using NetWare
This section describes the setting pro-cedure for network printers in theNetWare environment. In the Net-Ware environment, you can connectthe machine as a “print server” or “re-mote printer”.
Important❒ IPv6 cannnot be used on this function.
❖ Setting procedure• When using the machine as a
print serverA Installing SmartDeviceMon-
itor for AdminB Setting the network interface
board.C Turning the machine off and
then back on.• When using the machine as a
remote printerA Installing SmartDeviceMoni-
tor for Admin.B Setting the network interface
board. C Setting NetWare.D Starting the print server.
Note❒ This procedure assumes an envi-
ronment is already prepared fornormal NetWare running theprinting service setting.
❒ The procedure is explained withthe following example settings:• File server’s name …CAREE• Print server’s name …PSERV• Printer’s name …R-PRN• Queue name …R-QUEUE
❖ Using SmartDeviceMonitor for AdminTo use the machine in a NetWareenvironment, use SmartDevice-Monitor for Admin to set the Net-Ware printing environment.
Note❒ The NetWare Client provided
by Novell is required to set theprinting environment usingSmartDeviceMonitor for Ad-min under the following envi-ronments:• NDS mode in Windows 95/
98/Me• NDS or Bindery mode in Win-
dows 2000/XP, Windows NT 4.0
Referencep.43 “Installing SmartDevice-Monitor for Admin”
❖ Printers listed by SmartDeviceMoni-tor for AdminSmartDeviceMonitor for Adminlists printers connected to the net-work. If you cannot identify themachine you want to configure,print configuration page, and thencheck the machine name.
Using a Printer Server
26
1
Setting Up as a Print Server (NetWare 3.x)
Follow the procedure below to con-nect the machine as a print server us-ing NetWare 3.x.
A Log on to the file server as a su-pervisor or supervisor equivalent.
B Start NIB Setup Tool from the[Start] menu.
C Click [Wizard], and then click [OK].
D Select the printer you want to con-figure, and then click [Next].A dialog box prompting you toperform the remaining configura-tion tasks in the Web browser ap-pears. Click [OK], and then waituntil Web Image Monitor starts au-tomatically.
E Cick [Login].A dialog box for entering the loginuser name and password appears.
F Enter the login user name andpassword, and then click [Login].For details about the login username and password, consult yournetwork administrator.
G Click [Configuration] in the left ar-ea, and then click [NetWare].• Print Server Name: Enter the
NetWare print server name. Touse the interface board as aprint server, enter the name of aprint server that is not active onthe file server. Use up to 47characters.
• Logon Mode: Specify whetherto designate a file server or NDStree when logging on to Net-Ware.
• File Server Name: When a fileserver name is entered here,only the specified file server issearched for. This item is man-datory. Use up to 47 characters.
• NDS Tree: To enable NDS mode,enter the name of the NDS treeyou want to log on to. Use up to32 alphanumeric characters.
• NDS Context Name: To enableNDS mode, enter the print servercontext. Use up to 127 characters.
• Operation Mode: Specify wheth-er to use the interface board as aprint server or a remote printer.
• Remote Printer No.: This item iseffective when the interfaceboard is specified as a remoteprinter. Enter the same numberas the number of the printer tobe created on the print server (0to 254 characters).
• Job Timeout: When the interfaceboard is used as a NetWare re-mote printer, the printer cannotdetect when a print job ends.Therefore, the printer termi-nates printing when a certainperiod of time has elapsed sinceit last received print data (i.e.,when it has not received printdata for a certain period oftime). Specify here this periodof time (3 to 255 seconds). Theinitial value is 15 (seconds).
• Frame Type: Select the frame typefrom the drop-down menu.
• Print Server Protocol: Select theprotocol for NetWare from thedrop-down menu.
• NCP Delivery Protocol: Selectthe protocol for NCP delivery.
Using NetWare
27
1
H Confirm the settings, and thenclick [OK].Configuration is now complete.Wait several before restarting WebImage Monitor.
I Click [Logout].
Note❒ To check the configuration is
correct, enter the followingfrom the command prompt:F:> USERLIST
❒ If the printer works as config-ured, the name of the print serv-er appears as a connected user.
❒ If you cannot identify the print-er you want to configure, checkthe printer name against theconfiguration page printedfrom the printer. For detailsabout printing a configurationpage, see Printer Reference.
❒ If no printer names appear inthe list, match the frame typesof IPX/SPXs for the computerand printer. Use the [Network]dialog box of Windows tochange the frame type of thecomputer.
Setting Up as a Print Server (NetWare 4.x, 5 / 5.1, 6 / 6.5)
Follow the procedure below to con-nect the machine as a print server us-ing NetWare 4.x, NetWare 5 / 5.1, orNetWare 6 / 6.5.
Important❒ When using the printer as a print
server in NetWare 4.x, NetWare 5/ 5.1, or NetWare 6 / 6.5, set it tothe NDS mode.
❒ When using NetWare 5 / 5.1 orNetWare 6 / 6.5, set the printer asa print server.
A Log on to the file server as an ad-ministrator or administratorequivalent.
B Start NIB Setup Tool from the[Start] menu.
C Click [Wizard], and then click [OK].
D Select the printer you want to con-figure, and then click [Next].A dialog box prompting you toperform the remaining configura-tion tasks in the Web browser ap-pears. Click [OK], and then waituntil Web Image Monitor starts au-tomatically.
E Click [Login].A dialog box for entering the loginuser name and password appears.
F Enter the login user name and pass-word, and then click [Login].For details about the login username and password, consult yournetwork administrator.
G Click [Configuration] in the left ar-ea, and then click [NetWare].

Using a Printer Server
28
1
H Confirm the settings, and thenclick [OK].Configuration is now complete.Wait several minutes before re-starting Web Image Monitor.
I Click [Logout].
Referencep.26 “Setting Up as a Print Serv-er (NetWare 3.x)”
Using Pure IP in the NetWare 5 / 5.1 or 6 / 6.5 Environment
Follow the procedure below to con-nect the machine as a print server in apure IP environment of NetWare 5 /5.1 or NetWare 6 / 6.5.
Important❒ When creating a queued print serv-
er in a pure IP environment of Net-Ware 5 / 5.1 or NetWare 6 / 6.5,create a print queue on the file serv-er using NetWare Administrator.
❒ This printer is not available as a re-mote printer for use in a pure IPenvironment.
❒ To use the printer in a pure IP en-vironment, set it to IPv4.
Setting up using NWadmin
A From Windows, start NWadmin.For details about NWadmin, seethe NetWare manuals.
B Select the object in which the printqueue is located in the directorytree, and then click [Create] on the[Object] menu.
C In the [Class of new object] box, click[Print Queue], and then click [OK].
D In the [Print Queue Name] box, enterthe name of the print queue.
E In the [Print Queue Volume] box,click [Browse].
F In the [Available objects] box, click thevolume in which the print queue iscreated, and then click [OK].
G Check the settings, and then click[Create].
Using NetWare
29
1
H Select the object in which theprinter is located, and then click[Create] on the [Object] menu.
I In the [Class of new object] box,click [Printer], and then click [OK].For NetWare 5, click [Printer (NonNDPS)].
J In the [Printer name] box, enter theprinter name.
K Select the [Define additional proper-ties] check box, and then click[Create].
L Click [Assignments], and then click[Add] in the [Assignments] area.
M In the [Available objects] box, clickthe queue you created, and thenclick [OK].
N Click [Configuration], click [Parallel]in the [Printer type] list, and thenclick [Communication].
O Click [Manual load] in the [Commu-nication type] area, and then click[OK].
P Check the settings, and then click[OK].
Q Select a context specified usingNIB Setup Tool, and then click[Create] on the [Object] menu.
R In the [Class of new object] box,click [Print Server], and then click[OK]. For NetWare 5, click [PrintSever (Non NDPS)].
S In the [Print Server Name] box, enterthe print server name.Use the same print server namespecified using NIB Setup Tool.
T Select the [Define additional proper-ties] check box, and then click[Create].
U Click [Assignments], and then click[Add] in the [Assignments] area.
V In the [Available objects] box, clickthe queue you created, and thenclick [OK].
W Check the settings, and then click[OK].
Setting up using NIB Setup Tool
A Log on to the file server as an ad-ministrator or administratorequivalent.
B Start NIB Setup Tool from the [Start]menu.
C Click [Property Sheet], and then click[OK].
D Select the printer you want to con-figure, and then click [Next].A dialog box prompting you toperform the remaining configura-tion tasks in the Web browser ap-pears. Click [OK], and then waituntil Web Image Monitor starts au-tomatically.
E Click [Login].A dialog box for entering the [LoginUser Name] and [Login Password] ap-pears.
F Enter the user login user nameand password, and then click[Login].For details about the login nameand password, consult your net-work administrator.
G Click [Configuration] in the left ar-ea, and then click [NetWare].
Using a Printer Server
30
1
H Confirm the settings, and thenclick [OK].Configuration is now complete.Wait several minutes before re-starting Web Image Monitor.
I Click [Logout].
Referencep.26 “Setting Up as a Print Serv-er (NetWare 3.x)”
Setting Up as a Remote Printer (NetWare 3.x)
Follow the procedure below to usethe machine as a remote printer un-der NetWare 3.x.
Setting up using PCONSOLE
A Enter “PCONSOLE” from the command prompt.F:> PCONSOLE
B Create a print queue.When using the existing printqueue, go to the procedure for cre-ating a printer.
C From the [Available Options] menu,select [Print Queue Information], andthen press the {Enter} key.
D Press {Insert} key, and then enter aprint queue name.
E Press {Esc} key to return to the[Available Options] menu.
F Set up the network connection toa printer.
G On the [Available Options] menu,click [Print Server Information], andthen press the {Enter} key.
H To create a new print server, pressthe {Insert} key, and then enter aprint server name.For a currently defined print serv-er, select a print server in the [PrintServer] list.Use the same printer name speci-fied using NIB Setup Tool.
I From the [Print Server Information]menu, select [Print Server Configura-tion].
Using NetWare
31
1
J From the [Print Server Configuration]menu, select [Printer Configuration].
K Select the printer indicated as [NotInstalled].Use the same printer number spec-ified as the remote printer numberusing NIB Setup Tool.
L To change the printer name, entera new name.A name “printer x” is assigned tothe printer. The “x” stands for thenumber of the selected printer.
M As type, select [Remote Parallel, LPT1].The IRQ, Buffer size, Starting form,and Queue service mode are auto-matically configured.
N Press the {Esc} key, and thenclick [Yes] on the confirmationmessage.
O Press the {Esc} key to return to[Print Server Configuration Menu].
P Assign print queues to the createdprinter.
Q From [Print Server ConfigurationMenu], select [Queues Serviced ByPrinter].
R Select the printer created.
S Press the {Insert} key to select aqueue serviced by the printer. You can select several queues.
T Follow the instructions on thescreen to make other necessarysettings.Following these steps, check thatthe queues are assigned.
U Press the {Esc} key until "Exit?"appears, and then select [Yes] toexit PCONSOLE.
V Start the print server by enteringthe following from the console ofthe NetWare server. If the print server is in operation,quit and restart it.
❖ To quitCAREE: unload pserver
❖ To startCAREE: load pserver print_server_name
Note❒ If the printer works as config-
ured, the message "Waiting forjob" appears.
Setting up using NIB Setup Tool
A Log on to the file server as a su-pervisor or supervisor equivalent.
B Start NIB Setup Tool from the[Start] menu.
C Click [Property Sheet], and thenclick [OK].
D Select the printer you want to con-figure, and then click [Next].A dialog box prompting you toperform the remaining configura-tion tasks in the Web browser ap-pears. Click [OK], and then waituntil Web Image Monitor starts au-tomatically.
E Click [Login].A dialog box for entering the [LoginUser Name] and [Login Password] ap-pears.
F Enter the login user name andpassword, and then click [Login].For details about the login username and password, consult yournetwork administrator.

Using a Printer Server
32
1
G Click [Configuration] in the left ar-ea, and then click [NetWare].
H Confirm the settings, and thenclick [OK].Configuration is now complete.Wait several minutes before re-starting Web Image Monitor.
I Click [Logout].
Referencep.26 “Setting Up as a Print Serv-er (NetWare 3.x)”
Setting Up as a Remote Printer (NetWare 4.x, 5 / 5.1, 6 / 6.5)
Follow the procedure below to usethe printer as a remote printer underNetWare 4.x, 5 / 5.1 and 6 / 6.5.
Important❒ To use the printer as a remote
printer under NetWare 4.x, 5 / 5.1,6 / 6.5, set it to NDS mode.
❒ Do not use the printer as a remoteprinter when Pure IP is used.
Setting up using NWadmin
A From Windows, start NWadmin.For details about NWadmin, seethe NetWare manuals.
B Set up the network connection toa print queue. Select the object inwhich the print queue is locatedin the directory tree, and thenclick [Create] on the [Object] menu.
C In the [Class of new object] box,click [Print Queue], and then click[OK].
D In the [Print Queue Name] box, enterthe name of the print queue.
E In the [Print Queue Volume] box,click [Browse].
F In the [Available objects] box, clickthe volume in which the printqueue is created, and then click[OK].
G Check the settings, and then click[Create].
Using NetWare
33
1
H Set up the network connection toa printer. Select the object inwhich the printer is located, andthen click [Create] on the [Object]menu.
I In the [Class of new object] box,click [Printer], and then click [OK].For NetWare 5, click [Printer (NonNDPS)].
J In the [Printer name] box, enter theprinter name
K Select the [Define additional proper-ties] check box, and then click[Create].
L Assign print queues to the createdprinter. Click [Assignments], andthen click [Add] in the [Assign-ments] area.
M In the [Available objects] box, clickthe queue you created, and thenclick [OK].
N Click [Configuration], click [Parallel]in the [Printer type] list, and thenclick [Communication].
O Click [Manual load] in the [Commu-nication type] area, and then click[OK]. Check the settings, and thenclick [OK].
P Set up the network connection toa print server. Select a contextspecified using NIB Setup Tool,and then click [Create] on the [Ob-ject] menu.
Q In the [Class of new object] box,click [Print Server], and then click[OK]. For NetWare 5, click [PrintSever (Non NDPS)].
R In the [Print Server Name:] box, en-ter the print server name.Use the same print server namespecified using NIB Setup Tool.
S Select the [Define additional proper-ties] check box, and then click[Create].
T Assign the printer to the createdprint server. Click [Assignments],and then click [Add] in the [Assign-ments] area.
U In the [Available objects] box, clickthe queue you created, and thenclick [OK].
V In the [Printers] area, click theprinter you assigned, and thenclick [Printer Number]
W Enter the printer number, andthen click [OK]. Check the set-tings, and then click [OK].Use the same printer number spec-ified as the remote printer numberusing NIB Setup Tool.
X Start the print server by enteringthe following from the console ofthe NetWare server.If the print server is in operation,quit and restart it.
❖ To exitCAREE: unload pserver
❖ To startCAREE: load pserver print_server_name
Y Enter the printer server name asthe context name, and then pressthe {Enter} key.
Z Select the printer name on thecontext menu, and then press the{Enter} key.
Using a Printer Server
34
1
Setting up using NIB Setup Tool
A Log on to the file server as an ad-ministrator or administratorequivalent.
B Start NIB Setup Tool from the[Start] menu.
C Click [Property Sheet], and thenclick [OK].
D Select the printer you want to con-figure, and then click [Next].A dialog box prompting you toperform the remaining configura-tion tasks in the Web browser ap-pears. Click [OK], and then waituntil Web Image Monitor starts au-tomatically.
E Click [Login].A dialog box for entering the [LoginUser Name] and [Login Password] ap-pears.
F Enter the user login name andpassword, and then click [Login].For details about the login username and password, consult yournetwork administrator.
G Click [Configuration] in the left ar-ea, and then click [NetWare].
H Confirm the settings, and thenclick [OK].Configuration is now complete.Wait several minutes before re-starting Web Image Monitor.
I Click [Logout].
Referencep.26 “Setting Up as a Print Serv-er (NetWare 3.x)”
2. Monitoring and Configuringthe Printer
35
Using Web Image Monitor
Using Web Image Monitor, you can check the machine status and change settings.
❖ Available operationsThe following operations can be remotely performed using Web Image Mon-itor from a client computer.• Displaying machine status or settings• Checking the print job status or history• Checking, modifying, printing, or deleting print jobs stored in the Docu-
ment Server• Interrupting currently printing jobs• Resetting the printer• Managing the Address Book • Making machine settings• Making network protocol settings• Making security settings
❖ Configuring the machineTo perform the operations from Web Image Monitor, TCP/IP is required. Af-ter the machine is configured to use TCP/IP, operations from Web ImageMonitor become available.
❖ Recommended Web browser• Windows:
Internet Explorer 5.5 SP1 or higherNetscape Navigator 6.2 or higher
• Mac OS:Netscape Navigator 6.2 or higherSafari 1.0 or higher
Monitoring and Configuring the Printer
36
2
Note❒ To use Netscape Navigator with Secured Sockets Layer (SSL: an encryption
protocol), use Netscape Navigator 7.0 or higher. ❒ Use Netscape Navigator 7.0 or higher with IPv6. ❒ Safari cannot be used on Mac OS X 10.4.1.❒ If the previous versions of the Web browser above are used or JavaScript and
cookies are not enabled with the Web browser used, display and operationproblems may occur.
❒ If you are using a proxy server, change the Web browser settings. Contactyour network administrator for information about the settings.
❒ The previous page may not appear even after the back button of a Webbrowser is clicked. If this happens, click the refresh button of a Web browser.
❒ Updating the machine information is not automatically performed. Click[Refresh] in the display area to update the machine information.
❒ We recommend using Web Image Monitor in the same network. ❒ You cannot access to the machine from outside the firewall.❒ When using the machine under DHCP, the IP address may be automatically
changed by the DHCP server settings. Enable DDNS setting on the machine,and then connect using the machine's host name. Alternatively, set a static IPaddress to the DHCP server.
❒ If the HTTP port is disabled, connection to the machine using the machine'sURL cannot be established. SSL setting must be enabled on this machine. Fordetails, consult your network administrator.
❒ When using the SSL encryption protocol, enter “https://(printer's ad-dress)/”. Internet Explorer must be installed on your computer. Use the mostrecent available version. We recommend Internet Explorer 6.0 or later.
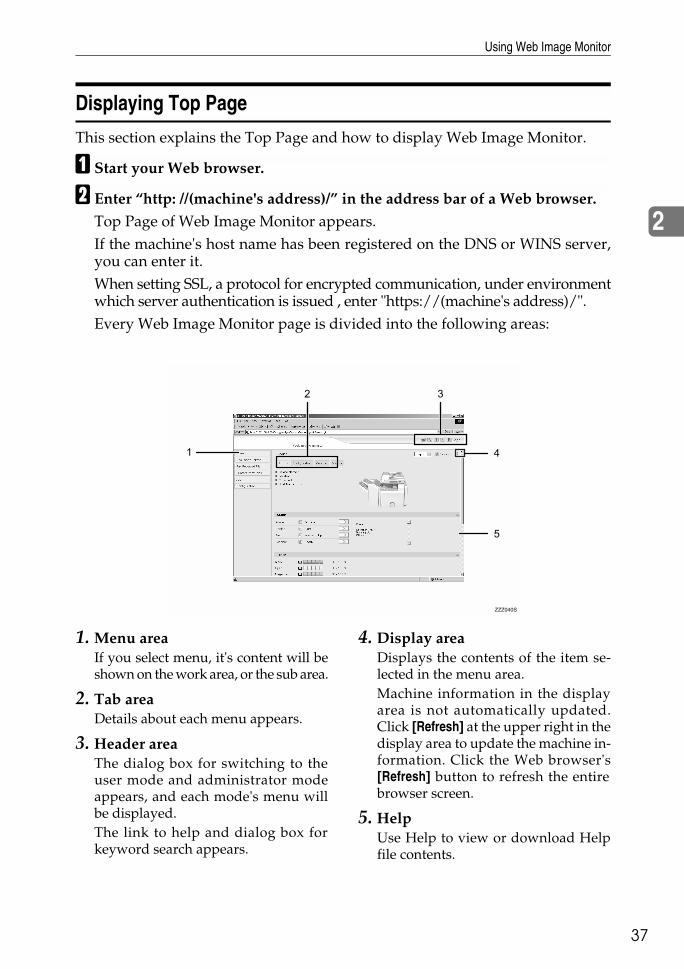
Using Web Image Monitor
37
2
Displaying Top Page
This section explains the Top Page and how to display Web Image Monitor.
A Start your Web browser.
B Enter “http: //(machine's address)/” in the address bar of a Web browser.Top Page of Web Image Monitor appears.If the machine's host name has been registered on the DNS or WINS server,you can enter it.When setting SSL, a protocol for encrypted communication, under environmentwhich server authentication is issued , enter "https://(machine's address)/".Every Web Image Monitor page is divided into the following areas:
1. Menu areaIf you select menu, it's content will beshown on the work area, or the sub area.
2. Tab areaDetails about each menu appears.
3. Header areaThe dialog box for switching to theuser mode and administrator modeappears, and each mode's menu willbe displayed. The link to help and dialog box forkeyword search appears.
4. Display areaDisplays the contents of the item se-lected in the menu area.Machine information in the displayarea is not automatically updated.Click [Refresh] at the upper right in thedisplay area to update the machine in-formation. Click the Web browser's[Refresh] button to refresh the entirebrowser screen.
5. HelpUse Help to view or download Helpfile contents.
ZZZ040S

Monitoring and Configuring the Printer
38
2
Note❒ When using a host name under Windows Server 2003 with IPv6 protocol,
perform host name resolution using an exrernal DNS server. The host filecannot be used.
When user authentication is set
Login (using Web Image Monitor)
Follow the procedure below to log onwhen user authentication is set.
A Click [Login].
B Enter a login user name and pass-word, and then click [Login].For details about the login username and password, consult yournetwork administrator.
Note❒ For user code authentication,
enter a user code in [User Name],and then click [OK].
❒ The procedure may differ de-pending on the Web browserused.
Log Off (using Web Image Monitor)
Click [Logout] to log off.
Note❒ When you log on and made the
setting, always click [Logout].

Using Web Image Monitor
39
2
About Menu and Mode
There are two modes available with Web Image Monitor: user mode and admin-istrator mode.Displayed Items may differ depending on the machine type.
❖ About User ModeIn the user mode, machine status, settings, and print job status can be viewed,but the machine settings cannot be changed.
1. HomeThe [Status], [Configuration], [Counter],and [Inquiry] tab are displayed. Detailsof the tab menu are displayed on thework area.
2. Document ServerDisplay files stored in the DocumentServer.
3. Fax Received FileDisplay received fax files.
4. Printer: Print JobsAllows you to display list of SamplePrint, Locked Print, Hold Print, andStored Print jobs.
5. JobDisplay all print files.
6. ConfigurationDisplay current machine and networksettings.
ZZZ041S
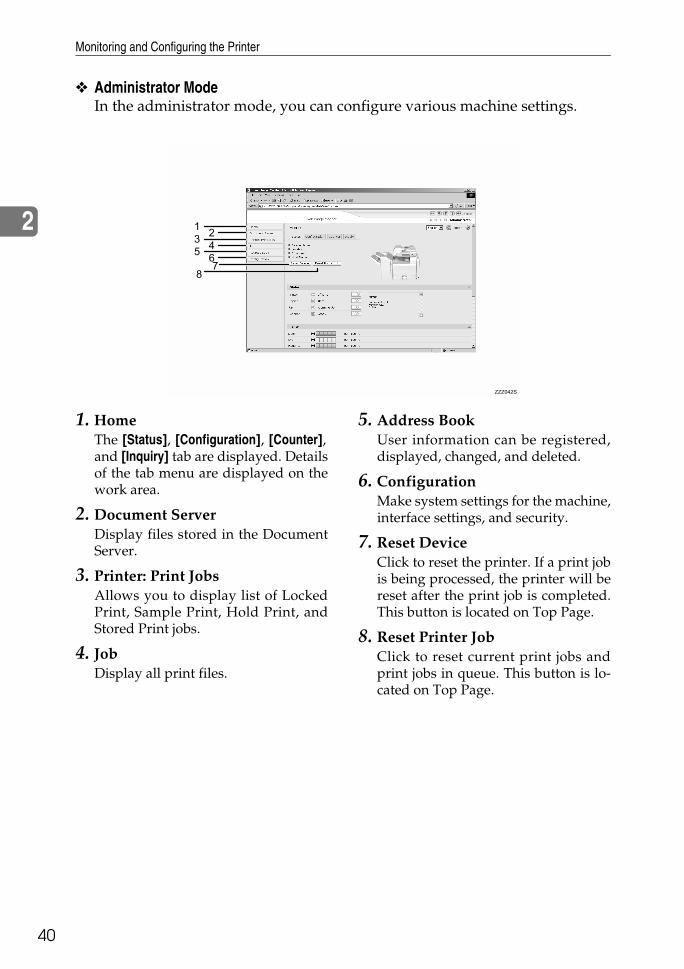
Monitoring and Configuring the Printer
40
2
❖ Administrator ModeIn the administrator mode, you can configure various machine settings.
1. HomeThe [Status], [Configuration], [Counter],and [Inquiry] tab are displayed. Detailsof the tab menu are displayed on thework area.
2. Document ServerDisplay files stored in the DocumentServer.
3. Printer: Print JobsAllows you to display list of LockedPrint, Sample Print, Hold Print, andStored Print jobs.
4. Job Display all print files.
5. Address Book User information can be registered,displayed, changed, and deleted.
6. Configuration Make system settings for the machine,interface settings, and security.
7. Reset Device Click to reset the printer. If a print jobis being processed, the printer will bereset after the print job is completed.This button is located on Top Page.
8. Reset Printer Job Click to reset current print jobs andprint jobs in queue. This button is lo-cated on Top Page.
ZZZ042S
Using Web Image Monitor
41
2
Access in the Administrator Mode
Follow the procedure below to accessWeb Image Monitor in the adminis-trator mode.
A On Top Page, click [Login].The window for entering the loginuser name and password appears.
B Enter your login user name andpassword, and then click [Login].For details about the login username and password, consult yournetwork administrator.
Displaying Web Image Monitor Help
When using Help for the first time,clicking either [Help] in the header areaor the icon marked "?" in the displayarea makes the following screen ap-pear, in which you can view Help intwo different ways, as shown below:
❖ Viewing Help on our Web siteDownloading Help to your com-puter
❖ Downloading and Checking HelpYou can download Help to yourcomputer. As the Help URL, youcan specify the path to the local fileto view the Help without connect-ing to the Internet.
Note❒ By clicking [Help] in the header ar-
ea, the contents of Help appear.❒ By clicking "?", the Help icon in the
display area, Help for the settingitems in the display area appears.
Downloading Help
A In the [OS] list, select the operat-ing system.
B In the [Language] list, select thelanguage.
C Click [Download].
D Download Help by following theinstructions on the screen.
E Store the downloaded compressedfile in a location, and then decom-press the file.To view the downloaded Web Im-age Monitor Help, set the path to thelocation of the decompressed file.
Linking the URL of the Help File to the [Help] Button.
You can link the URL of the help fileon a computer or Web server to the[Help] button.
A Log on to Web Image Monitor inthe administrator mode.
B In the menu area, click [Configura-tion].
C Click [Webpage].
D In the [Set Help URL Target] box, en-ter the URL of the help file.If you saved the help file to"C:\HELP\EN", enter "file://C:/HELP/".For example, if you saved the file to a Webserver, and the URL of the index file is "ht-tp:// a.b.c.d/HELP/EN/index.html", en-ter "http://a.b.c.d/HELP/".
E Click [OK].
Monitoring and Configuring the Printer
42
2
Using SmartDeviceMonitor for Admin
Using SmartDeviceMonitor for Ad-min, you can monitor the networkprinters. Also, you can change theconfiguration of the network inter-face board using TCP/IP or IPX/SPX.
Important❒ IPv6 cannnot be used on this function.
❖ Protocol stack provided with Operat-ing System• Windows 95/98/Me
TCP/IPIPX/SPXNetWareNetWare Client32 for Windows 95IntraNetWare Client for Win-dows 95Novell Client for Windows95/98/Me
• Windows 2000TCP/IPIPX/SPXNetWareNovell Client for WindowsNT/2000/XP
• Windows Server 2003TCP/IPIPX/SPX
• Windows XPTCP/IPIPX/SPXNovell Client for WindowsNT/2000/XP
• Windows NT 4.0TCP/IPIPX/SPXClient Service for NetWareNetWare Client32 for Windows NTIntraNetWare Client for Win-dows NTNovell Client for WindowsNT/2000/XP
❖ Available operationsThe following functions are available:• Limits settings done from the
control panel, and disableschanges made to certain items.
• Enables selection of paper typeloaded in the machine.
• Switches to, and comes out ofEnergy Saver mode.
• Checks information about print-ing, paper quantity, etc.
• Simultaneously monitors multi-ple printers. When there aremany printers, you can creategroups and classify printers tofacilitate management.
• Checks the machine's networksettings and detailed device in-formation.
• Enables you to change the ma-chine's network settings.
• You can check details of printjobs sent from a computer.
• Allows you to check job histo-ries of printed, faxed (LAN-Fax), scanned, and photocopieddocuments identified by usercodes.
• Allows selection of functionssuch as printing and scanningfor each user code.
• Fax numbers and e-mail address-es stored in the machine can bechanged and saved by computer.
• You can check each fax job his-tory entry.
• You can make settings for anddisplay the status changes ofgroup devices.

Using SmartDeviceMonitor for Admin
43
2
• Using Address Management Tool,you can manage LAN-Fax num-bers, user names for Scan to Fold-er, and addresses for sending andreceiving Internet faxes.
• The e-mail sender’s name andfolder can be protected.
Installing SmartDeviceMonitor for Admin
Follow the procedure below to installSmartDeviceMonitor for Admin
A Quit all applications currently running.
B Insert the CD-ROM into the CD-ROM drive.The installer starts.
C Select an interface language, andthen click [OK].The following languages are avail-able: Czech, Danish, German, Eng-lish, Spanish, French, Italian,Hungarian, Dutch, Norwegian,Polish, Portuguese , Finnish,Swedish, Chinese Simple and Chi-nese Traditional.
D Click [SmartDeviceMonitor for Admin].
E Click [Next >].The software license agreementappears in the [License Agreement]dialog box.
F After reading through its contents,click [Next >].
G Follow the instructions on the screen.A message appears when the in-stallation is completed.
H Click [OK].A message about restarting thecomputer may appear. Restart thecomputer to complete installation.
Note❒ Auto Run may not work under
certain operating system set-tings. In this case, launch “Set-up.exe” located on the CD-ROM root directory.
❒ If you are required to restart thecomputer after installing Smart-DeviceMonitor for Admin, re-start the computer and continuethe configuration.
Changing the Network Interface Board Configuration
Follow the procedure below tochange the network interface boardconfiguration using SmartDevice-Monitor for Admin.
A Start SmartDeviceMonitor for Admin.
B On the [Group:] menu, point to[Search Device], and then click[TCP/IP], [IPX/SPX] or [TCP/IP SNMPv3].A list of machines using the select-ed protocol appears.Select the protocol of the machinewhose configuration you want tochange.If you are using TCP/IP SNMP v3,enter the user authentication.
C In the list, select a machine whoseconfiguration you want to change.
Monitoring and Configuring the Printer
44
2
D On the [Tools] menu, click [NIB Set-up Tool].A Web browser opens and thewindow for entering the login username and password for the WebImage Monitor administrator ap-pears.NIB Setup Tool starts when thenetwork interface board is default.Click [Web Browser], and then click[OK].
E Enter the login user name andpassword, and then click [Login].For details about the login username and password, consult yournetwork administrator.
F Configure settings using Web Im-age Monitor.
G Quit Web Image Monitor.
H Quit SmartDeviceMonitor for Admin.
Referencep.35 “Using Web Image Moni-tor”
Locking the Menus on the Machine's Control Panel
Follow the procedure below to lockthe menus on the machine's controlpanel.
A Start SmartDeviceMonitor for Admin.
B On the [Group:] menu, point to[Search Device], and then click[TCP/IP], [IPX/SPX] or [TCP/IP SNMPv3].A list of machines using the select-ed protocol appears.Select the protocol of the machinewhose configuration you want tochange.If you are using TCP/IP SNMP v3,enter the user authentication.
C Select a machine.
D On the [Tools] menu, point to [De-vice Settings], and then click [LockOperation Panel Menu].A Web browser opens and thewindow for entering the login username and password for the WebImage Monitor administrator ap-pears.
E Enter the login user name andpassword, and then click [Login].For details about the user nameand password, consult your net-work administrator.The [System] page of Web ImageMonitor appears. Enter requiredsetting items.
F Quit Web Image Monitor.
G Quit SmartDeviceMonitor for Admin.
Note❒ For details about setting items,
see Help in the [General Settings]on [Configuration] page.

Using SmartDeviceMonitor for Admin
45
2
Changing the Paper Type
Follow the procedure below tochange the paper type.
A Start SmartDeviceMonitor for Admin.
B On the [Group:] menu, point to[Search Device], and then click[TCP/IP], [IPX/SPX] or [TCP/IP SNMPv3].A list of machines using the select-ed protocol appears.Select the protocol of the machinewhose configuration you want tochange.If you are using TCP/IP SNMP v3,enter the user authentication.
C In the list, select a machine whosec o n f i g u r a t i o n y o u w a n t t ochange.
D On the [Tools] menu, point to [De-vice Settings], and then click [SelectPaper Type].A Web browser opens and the win-dow for entering the login username and password for the Web Im-age Monitor administrator appears.
E Enter the login user name andpassword, and then click [Login].For details about the login username and password, consult yournetwork administrator.The [Paper] page appears. Select a paper type in the [PaperType] list for each tray.Enter re-quired setting items.
F Quit Web Image Monitor.
G Quit SmartDeviceMonitor for Admin.
Note❒ For details about setting items,
see Help in the [General Settings]on [Configuration] page.
Managing User Information
Follow the procedure below to man-age the user's information usingSmartDeviceMonitor for Admin.Prints jobs can be managed and func-tions restricted by user codes.
Starting User Management Tool
Follow the procedure below to startUser Management Tool.
A Start SmartDeviceMonitor for Admin.
B On the [Group:] menu, point to[Search Device], and then click[TCP/IP], [IPX/SPX] or [TCP/IP SNMPv3].A list of machines using the select-ed protocol appears.Select the protocol of the machinewhose configuration you want tochange.If you are using TCP/IP SNMP v3,enter the user authentication.
C In the list, select a machine youwant to manage.
D On the [Tools] menu, click [User Man-agement Tool].The dialog box for entering thelogin user name and password ap-pears.
E Enter the user name and pass-word, and then click [OK].For details about the user nameand password, consult your net-work administrator.User Management Tool starts.
Note❒ For details about User Manage-
ment Tool, see SmartDevice-Monitor for Admin Help.
Monitoring and Configuring the Printer
46
2
Displaying the Number of Sheets Printed
Follow the procedure below to dis-play the number of sheets printed un-der each user code.
A Start SmartDeviceMonitor for Ad-min User Management Tool.
B Click the [User Counter Information]tab of User Management Tool.The number of pages printed un-der each user code appears.
C Click [Exit] on the [Files] menu toquit User Management Tool.
Exporting the information about the number of pages printed
Follow the procedure below to exportthe information of the number of pag-es printed under each user code as a.csv file.
A Start SmartDeviceMonitor for Ad-min User Management Tool.
B Click the [User Counter Information]tab of User Management Tool.
C On the [Files] menu, click [ExportUser Statistics List].
D Specify the save location and filename, and then click [Save].
E Click [Exit] on the [Files] menu toquit User Management Tool.
Resetting the number of pages printed to 0.
Follow the procedure below to resetthe number of pages printed undereach user code to 0.
A Start SmartDeviceMonitor for Ad-min User Information Manage-ment Tool.
B Click the [User Counter Information]tab of User Management Tool.
C Click the user whose informationyou want to reset.
D On the [Edit] menu, click [ResetUser Counters].
E Select the check box of the itemsyou want to reset, and then click[OK].A confirmation message appears.
F Click [OK].The number of pages printed is re-set to 0.
G On the [Edit] menu, click [Apply Set-tings].Changes are applied to informa-tion on the [User Counter Informa-tion] tab.
H Click [Exit] on the [Files] menu toquit User Management Tool.

Using SmartDeviceMonitor for Admin
47
2
Restricting Functions
Follow the procedure below to re-strict use of individual functions.
A Start SmartDeviceMonitor forAdmin User Management Tool.
B Click the [User Counter Information]tab of User Management Tool.
C Click the user whose functionsyou want to restrict.
D On the [Edit] menu of User Man-agement Tool, click [Restrict Ac-cess To Device].
E Select the check box of the func-tions you want to restrict.
F Click [OK].A confirmation message appears.
G Click [Yes].The settings are applied.
Setting Applicable Functions to New Users
Follow the procedure below to addnew users and set functions applica-ble to them.
A Start SmartDeviceMonitor for Ad-min User Management Tool.
B Click the [Access Control List:] tabof User Management Tool.
C On the [Edit] menu, click [Adds NewUser].
D Enter the user code and user name.
E Select the check box of the func-tions applicable to the new user.If the check boxes are unavailable,there is no restriction to use thatfunction.
F Click [OK].The new user is added.
G On the [Edit] menu, click [ApplySettings].The settings are applied.
H Click [Exit] on the [Files] menu toquit User Management Tool.
Note❒ For details about setting restric-
tions, see SmartDeviceMonitorfor Admin Help.

Monitoring and Configuring the Printer
48
2
Configuring the Energy Saver Mode
Follow the procedure below to con-figure Energy Saver mode.
A Start SmartDeviceMonitor for Admin.
B On the [Group:] menu, point to[Yes], and then click [TCP/IP],[IPX/SPX] or [TCP/IP SNMPv3].A list of machines using the select-ed protocol appears.Select the protocol of the machinewhose configuration you want tochange.If you are using TCP/IP SNMP v3,enter the user authentication.
C Select the machine whose set-tings you want to make.To make settings for all machinesin the selected group, select no ma-chine.
D On the [Group:] menu, point to [En-ergy Saver Mode], point to [Set Indi-vidually] to make the settings foronly the selected machine orpoint to [Set By Group] to make thesettings for all machines in the se-lected group, and then click [On]or [Off].
E Quit SmartDeviceMonitor for Admin.
Note❒ For details about the setting for
Energy Saver mode, see Smart-DeviceMonitor for AdminHelp.
Setting a Password
Follow the procedure below to set apassword.
A Start SmartDeviceMonitor for Admin.
B On the [Group:] menu, point to[Search Device], and then click[TCP/IP], [IPX/SPX] or [TCP/IP SNMPv3].A list of machines using the select-ed protocol appears.Select the protocol of the machinewhose configuration you want tochange.If you are using TCP/IP SNMP v3,enter the user authentication.
C In the list, select a machine whosec o n f i g u r a t i o n y o u w a n t t ochange.
D On the [Tools] menu, click [NIB Set-up Tool].A Web browser opens and the dia-log box for entering the login username and password for the WebImage Monitor administrator ap-pears.NIB Setup Tool starts when the net-work interface board is default. Fol-low the instructions on the screen.
E Enter the login user name andpassword, and then click [Login].For details about the user nameand password, consult your net-work administrator.
F Click [Configuration].
G Click [Program / Change Administra-tor] on the [Device Settings] area,and then change the settings.
H Quit Web Image Monitor.
I Quit SmartDeviceMonitor for Admin.
Using SmartDeviceMonitor for Admin
49
2
Checking the Machine Status
Follow the procedure below to checkmachine status.
A Start SmartDeviceMonitor for Admin.
B On the [Group:] menu, point to[Search Device], and then click[TCP/IP], [IPX/SPX] or [TCP/IP SNMPv3].A list of machines using the select-ed protocol appears.Select the protocol of the machinewhose configuration you want tochange.If you are using TCP/IP SNMP v3,enter the user authentication.
C To obtain status details, select themachine in the list, and then click[Open] on the [Device] menu.The machine status appears in thedialog box.
D Click [System] or [Printer].The machine status appears in thedialog box.
E Quit SmartDeviceMonitor for Admin.
Note❒ For details about items in the di-
alog box, see SmartDeviceMon-itor for Admin Help.
Changing Names and Comments
Follow the procedure below tochange the names and comments ofthe machine.
A Start SmartDeviceMonitor for Admin.
B On the [Group:] menu, point to[Search Device], and then click[TCP/IP], [IPX/SPX] or [TCP/IP SNMPv3].A list of machines using the select-ed protocol appears.Select the protocol of the machinewhose configuration you want tochange.If you are using TCP/IP SNMP v3,enter the user authentication.
C Select a machine in the list, andthen click [NIB Setup Tool] on the[Tools] menu.A Web browser opens and thewindow for entering the login username and password for the WebImage Monitor administrator ap-pears.NIB Setup Tool starts when thenetwork interface board is default.Follow the instructions on thescreen.
Monitoring and Configuring the Printer
50
2
D Enter the login user name andpassword, and then click [Login].For details about the login username and password, consult yournetwork administrator.
E Click [Configuration].
F Click [System] on the [Device Set-tings] area., and then change thesettings.
G Quit Web Image Monitor.
H Quit SmartDeviceMonitor for Admin.
Note❒ In the [Device Name] box, enter a
device name on the machine us-ing up to 31 characters.
❒ In the [Comment] box, enter acomment on the machine usingup to 31 characters.
Load Fax Journal
A Start SmartDeviceMonitor for Admin.
B On the [Group:] menu, point to[Search Device], and then click[TCP/IP], [IPX/SPX] or [TCP/IP SNMPv3].A list of machines using the select-ed protocol appears.Select the protocol of the machinewhose configuration you want tochange.If you are using TCP/IP SNMP v3,enter the user authentication.
C Select a machine in the list, andthen click [Load Fax Journal] on the[Tools] menu.A Web browser opens and thewindow for entering the login username and password for the WebImage Monitor administrator ap-pears.
D Enter the login user name andpassword, and then click [Login].For details about the login username and password, consult yournetwork administrator.Load Fax Journal area appears inthe Web Image Monitor.
E Quit Web Image Monitor.
F Quit SmartDeviceMonitor for Admin.
Note❒ For details, see Help in [Load Fax
Journal] area.

Using SmartDeviceMonitor for Admin
51
2
Viewing and Deleting Spool Print Jobs
A Start SmartDeviceMonitor for Admin.
B On the [Group:] menu, point to[Search Device], and then click[TCP/IP], [IPX/SPX] or [TCP/IP SNMPv3].A list of machines using the select-ed protocol appears.Select the protocol of the machinewhose configuration you want tochange.If you are using TCP/IP SNMP v3,enter the user authentication.
C Select a machine in the list, andthen click [Spool Print ing JobList(Printer)] on the [Tools] menu.A Web browser opens and the dia-log box for entering the login username and password for the WebImage Monitor administrator ap-pears.
D Enter the login user name andpassword, and then click [Login].For details about the login username and password, consult yournetwork administrator.Spool Printing Job List appears inthe Web Image Monitor.To delete the Spool Printing Job,select the document you want todelete and then click [Delete].
Note❒ To display Spool Printing Job
List, spool must be set to [Ena-ble] on Web Image Monitor inadvance.
❒ For details, see Help in theSpoolPrinting Job List area.
Managing Address Information
A Start SmartDeviceMonitor for Admin.
B On the [Group:] menu, point to[Search Device], and then clickIPX/SPX or [TCP/IP SNMPv3].A list of machines using the select-ed protocol appears.Select the protocol of the machinewhose configuration you want tochange.If you are using TCP/IP SNMP v3,enter the user authentication.
C Select a machine in the list, andthen click [Address ManagementTool]on the [Tools] menu.The dialog box for entering thelogin user name and password ap-pears.
D Enter the login user name andpassword, and then click [OK].Address Management Tool starts. For details about the login username and password, consult yournetwork administrator.
Note❒ For details, see Address Man-
agement Tool Help.
Monitoring and Configuring the Printer
52
2
Using SmartDeviceMonitor for Client
To view the status of machines usingSmartDeviceMonitor for Client, con-figure SmartDeviceMonitor for Clientbeforehand.
Monitoring Printers
Follow the procedure below to moni-tor the machine using SmartDevice-Monitor for Client.
A Right-click the SmartDeviceMon-itor for Client icon, point to [Prop-erties], and then click [Option...].The [SmartDeviceMonitor for Client -Options] dialog box appears.
B Select the machine you want tomonitor, and then select the [To BeMonitored] check box in the Moni-toring Information Settings area.To display the machine status inthe task tray using the SmartDe-viceMonitor for Client icon, selectthe [Displayed on Task Bar] checkbox.
C Click [OK].The dialog box closes and the con-figured machine is monitored.
Note❒ For details about status icons,
see SmartDeviceMonitor forClient Help.
Checking the Machine Status
Follow the procedure below to checkmachine status using SmartDevice-Monitor for Client.
A For status details, right-click theSmartDeviceMonitor for Clienticon, and then click the machine.The machine status appears in thedialog box.
Note❒ For details about items in the di-
alog box, see SmartDeviceMon-itor for Client Help.

Using SmartDeviceMonitor for Client
53
2
When Using IPP with SmartDeviceMonitor for Client
When using IPP with SmartDevice-Monitor for Client, note the follow-ing:• The network printer can only re-
ceive one print job from SmartDe-viceMonitor for Client at a time.While the network printer is print-ing, another user cannot access ituntil the job is finished. In thiscase, SmartDeviceMonitor for Cli-ent tries to access the networkprinter until the retry interval ex-pires.
• If SmartDeviceMonitor for Clientcannot access the network printerand times out, it will stop sendingthe print job. In this case, youshould cancel the paused statusfrom the print queue window.SmartDeviceMonitor for Clientwill resume access to the networkprinter. You can delete the printjob from the print queue window,but canceling a print job printed bythe network printer might causethe next job sent from another userto be incorrectly printed.
• If a print job sent from SmartDe-viceMonitor for Client is interrupt-ed and the network printer cancelsthe job because something wentwrong, send the print job again.
• Print jobs sent from another com-puter do not appear in the printqueue window, regardless of pro-tocol.
• If various users send print jobs us-ing SmartDeviceMonitor for Clientto network printers, the printingorder might not be the same as thatin which the jobs were sent.
• An IP address cannot be used forthe IPP port name because the IPaddress is used for the SmartDe-viceMonitor for Client port name.
• When setting SSL, a protocol forencrypted communication, underenvironment which server authen-t icat ion is i ssued, enter "ht -tps://(machine's address)/".Internet Explorer must be installedon your computer. Use the highestversion. Internet Explorer 6.0 orhigher is recommended.
• If the [Security Alert] dialog box ap-pears when accessing the machineusing IPP to create or configure anIPP port, or when printing, installthe certificate. To select the certifi-cate store location when using Cer-tificate Import Wizard, click [Placeall certificates in the following store],and then click [Local Computer] un-der [Trusted Root Certification Author-ities].
Note❒ For details about SSL settings,
consult your network adminis-trator.

Monitoring and Configuring the Printer
54
2
Printer Status Notification by E-Mail
Whenever a paper tray becomes emp-ty or paper is jammed, an e-mail alertis issued to the registered addressesto notify the printer status.For this notification, you can makethe e-mail notification settings.Notification timing and e-mail con-tent can be set.You can be notified of the followingevents:• Service call.• Toner cartridge is empty.• Toner cartridge is nearly empty.• Waste toner bottle (waste toner ink
tank) is full.• Waste toner bottle (waste toner ink
tank) is nearly full.• Stapler has no staples.• Punch dust is full• Paper has jammed.• Open door is detected.• The paper tray is empty.• The paper tray is nearly empty.• A paper tray error occurred.• Output paper tray is full.• Unit connection error.• Duplex unit error.• Hard disk drive is full.
Note❒ When the service call is set, foll-
wing call results can be sent.• Failure automatic call success• Failure automatic call out of time• Failure automatic call failure• Consumable automatic call
success• Consumable automatic call
success• Remote machine check failure• Firmware update confirmed
❒ Other call results can be dis-played, depending on the ma-chine type.
❒ For details about the servicecall, contact your service orsales representative.
A On the [Administrator Tools] menu,set [Notify Machine Status] to [On] us-ing the control panel.The default is [On].
B Open a Web browser, and thenenter “http: / / (machine's ad-dress)/” in the address bar.Top Page of Web Image Monitorappears.When setting SSL, a protocol forencrypted communication, underenvironment which server authen-tication is issued , enter “ht-tps://(machine's address)/”.
C Click [Login] on Top Page of WebImage Monitor.The window for entering the loginuser name and password appears.

Printer Status Notification by E-Mail
55
2
D Enter the login user name andpassword, and then click Login.For details about the login username and password, consult yournetwork administrator.
E In the menu area, click [Configura-tion].
F Click [E-mail] on the [Device Set-tings] area.
GMake the following settings:• Items in the Reception column:
Make the necessary settings forsending and receiving e-mail.
• Items in the SMTP column:Configure the SMTP server.Check your mailing environ-ment, and then specify the nec-essary items. You can alsoperform mail authentication forthe SMTP server.
• Items in the POP before SMTPcolumn: Configure the POPserver. Check your mailing en-vironment, and then specify thenecessary items. You can alsoperform mail authentication forthe POP server.
• Items in the POP3/IMAP4 col-umn: Configure the POP3 orIMAP4 server. Check yourmailing environment, and thenspecify the necessary items.
• Items in the E-mail ReceptionPort column: Configure the portto be used for access to the mailserver.
• Items in the E-mail Notificationcolumn: Items in the E-Mail No-tification Account column:Specify these items if you wantto use on-demand e-mail notifi-cation.
H Click [OK].
Auto E-mail Notification
A Click [Configuration] in the menu ar-ea, and then click [Auto E-mail Notifi-cation] on the [Device Settings] area.The dialog box for making notifi-cation settings appears.
BMake the following settings:• Items in Notification Message
column: You can set this accord-ing to your needs, for example,the machine's location, servicerepresentative contact informa-tion.
• Items in the Groups to Notifycolumn: E-mail notification ad-dresses can be grouped as re-quired.
• Items in the Select Groups/Itemsto Notify column: Select groupsfor each notification type, such asmachine status and error.To make detailed settings forthese items, click [Edit] next to[Detailed Settings of Each Item].
C Click [OK].
D Click [Logout].
E Quit Web Image Monitor.

Monitoring and Configuring the Printer
56
2
On-demand E-mail Notification
A Click [Configuration] in the menuarea, and then click [On-demand E-mail Notification] on the [Device Set-tings] area.The dialog box for making notifi-cation settings appears.
BMake the following settings:• Notification Subject: Enter a text
string to be added to the subjectline of return e-mails.
• Items in Notification Messagecolumn: You can set this accord-ing to your needs, for example,the machine's location, servicerepresentative contact informa-tion.
• Items in the Access Restrictionto Information column: Selectwhether to restrict accessesbased on a specific category ofinformation.
• Items in the Receivable E-mailAddress/Domain Name Set-tings column: Enter an e-mailaddress or domain name to usefor requesting information by e-mail and to receive its return e-mail.
C Click [OK].
D Click [Logout].
E Quit Web Image Monitor.
Mail authentication
You can configure mail authentica-tion to prevent illegal use of the mailserver.
❖ SMTP AuthenticationSpecify SMTP authentication.When mail is sent to the SMTPserver, authentication is per-formed using the SMTP AUTHprotocol by prompting the mailoriginator to enter the user nameand password.This prevents ille-gal use of the SMTP server.A In the menu area, click [E-mail]B Make the following settings:
• SMTP Authentication: Ena-ble or disable SMTP authen-tication.
• SMTP Auth. E-mail Address:Enter the e-mail address.
• SMTP Auth. User Name: En-ter the SMTP account name.
• SMTP Auth. Password: Toset or change the passwordfor SMTP AUTH.
• SMTP Auth. Encryption: Se-lect whether to encrypt thepassword or not. [Encryption]-[Auto Select]: Ifthe authentication method isPLAIN, LOGIN, CRAM-MD5, or DIGEST-MD5.[Encryption]-[Enable]: If theauthentication method isCRAM-MD5 or DIGEST-MD5.[Encryption]-[Disable]: If theauthentication method isPLAIN or LOGIN.
C Click [OK]D Click [Logout].E Quit Web Image Monitor.
Printer Status Notification by E-Mail
57
2
❖ POP before SMTP AuthenticationSelect whether to log on to thePOP3 server before sending e-mail.A In the menu area, click [E-mail].B Make the following settings:
• POP before SMTP: Enable ordisable POP before SMTP.
• POP E-mail Address: Enterthe e-mail address.
• POP User Name: Enter thePOP account name.
• POP Password: To set orchange the POP password.
• Timeout setting after POPAuth.: Enter the time availa-ble before connecting to theSMTP server after logging onto the POP server.
C Click [OK].D Click [Logout].E Quit Web Image Monitor.
On-demand E-mail Notification
To use on-demand e-mail notifica-tion, perform the following configu-ration tasks in Web Image Monitor.A In the menu area, click [E-mail].B Make the following settings:
• E-mail Notification E-mail Ad-dress: Enter the address usingalphanumeric characters.
• Receive E-mail Notification:Specify whether to use on-de-mand e-mail notification.
• E-mail Notification User Name:Enter the administrator's username as the mail originator name.
• E-mail Notification Password:Enter the password of the mailnotification user.
C Click [OK].D Click [Logout].E Quit Web Image Monitor.
❖ Format of on-demand e-mail messagesTo use mail notification, you needto send an on-demand e-mail mes-sage to this machine.Using your mail software, enterthe following:
Note❒ A mail message must be within
1 MB in size.❒ E-mail may be incomplete if sent
immediately after power on.
Item Description
Subject (Referred to as Subject)
Enter a request re-garding the de-vice.For details, see thetable below.
From (Referred to as From)
Specify a valid mail address. Th-edevice informa-tion willbe sent to the address speci-fied here.

Monitoring and Configuring the Printer
58
2
❖ Subject fieldFormat: devicestatus?parameter-name=parameter[&=parame-ter][&=parameter]...
Note❒ The Subject field is case-insensi-
tive.❒ Parameter names can be written
in any order.
❖ Subject field coding examples
❖ Parameters
❖ Parameters specifying the information to be obtained
❖ Parameters specifying the mail format
Note❒ HTML and XML can be selecet-
ed for subject field, but output istext only.
❖ Parameters that specify the language for mail bodies
Coding example Action
devicestatus?re-quest=syscon-fig&format=text&lang=en
The device's sys-tem configuration-information will be sentin an English text format.
devicestatus?re-quest=sysconfig
The device's sys-tem configuration-information will be sentin a preset for-mat and language.
Parameter Meaning Default
request Informa-tion to be obtained
Mandatory
format Mail format Mail will be sent in the format pre-setfor each mail ad-dress.
lang Language for mail body
Mail will be sent in the languagep-reset for each mail address.
Information to be obtained
Parameter
System configura-tion information
sysconfig
Network configu-ration information
netconfig
Printer configura-tion information
prtconfig
Supplies informa-tion
supply
Device status in-formation
status
Mail format Parameter
Text text
HTML html
XML xml
Language Parameter
Japanese ja
English en

Remote Maintenance by telnet
59
2
Remote Maintenance by telnet
Important❒ Remote Maintenance should be
password-protected so that accessis allowed to administrators only.
❒ The password is the same as theone of Web Image Monitor admin-istrator. When the password ischanged using "mshell", otherpasswords change also.
❒ Some command cannot be set de-pending on the model type.
Using telnet
Follow the procedure below to usetelnet.
Important❒ Only one user at a time can log on
to perform remote maintenance.
A Use the IP address or the hostname of the machine to start telnet.% telnet IP_address
B Enter your user name and pass-word.For details about the user nameand password, consult your net-work administrator.For user authentication, enter alogin user name and password.For user code authentication, entera user code in User Name.
C Enter a command.
D Quit telnet.msh> logout
The configuration message aboutsaving the changes appears.
E Enter "yes" to save the changes,and then press the {Enter} key.If you do not want to save thechanges, enter "no", and then pressthe {Enter} key. To make furtherchanges, enter "return" at the com-mand line, and then press the {En-ter} key.
Note❒ If the message "Can not write
NVRAM information" appears,the changes are not saved. Re-peat the procedure above.
❒ When the changes are saved,the network interface board isreset automatically with thatchanges.
❒ When the network interfaceboard resets, the print job inprint process will be printed.However, print jobs in queuewill be canceled.
Monitoring and Configuring the Printer
60
2
access
Use the “access” command to viewand configure access control. You canalso specify two or more access ranges.
❖ View settingsmsh> access
❖ IPv4 Configurationmsh> access range“start-address end-ad-dress”
• The star mark represents a tar-get number between 1 and 5.(Up to five access ranges can beregistered and selected.)
Example: to specify accessible IPv4addresses between 192.168.0.10and 192.168.0.20:msh> access 1 range 192.168.0.10 192.168.0.20
❖ IPv6 Configurationmsh> access range6“start-address end-ad-dress”
• The star mark represents a tar-get number between 1 and 5.(Up to five access ranges can beregistered and selected.)
Example: to specify accessible IPv6addresses between 2001:DB8::100and 2001:DB8::200.msh> access 1 range62001:DB8::1002001:DB8::200
❖ IPv6 access mask Configurationmsh> access mask6 “base-address prefixlen”
• The star mark represents a tar-get number between 1 and 5.(Up to five access ranges can beregistered and selected.)
Example: to specify accessible IPv6addresses to 2001:DB8::/32 msh> access 1 mask6 2001:DB8:: 32
❖ Access control initialization msh> access flush
• Use the "flush" command to re-store the default settings so thata l l a cc e s s r a n g e s b e c o m e"0.0.0.0" for IPv4, and "::" forIPv6.
Note❒ The access range restricts comput-
ers from use of the machine by IPaddress. If you do not need to re-strict printing, make the setting"0.0.0.0" for IPv4, and "::" for IPv6.
❒ Valid ranges must be from lower(start address) to higher (end ad-dress).
❒ If you are running IPv4 or IPv6, upto five access ranges can be regis-tered and selected.
❒ IPv6 can register and select therange and the mask for each accessranges.
❒ IPv6 mask ranges between 1 - 128can be selected.
❒ Up to five access ranges can bespecified. The entry is invalid if thetarget number is omitted.
❒ You cannot send print jobs, or ac-cess Web Image Monitor anddiprint from a restricted IP ad-dress.
Remote Maintenance by telnet
61
2
appletalk
Use the “appletalk” command toview and configure Appletalk param-eters.
❖ View settingsmsh> appletalk
• [2] means "active" and [0]means "inactive".
• The default is [2].
❖ Changing PAP timeout configurationmsh> appletalk ptimeoutvalue > 0
• Timeout value becomes effec-tive.
msh> appletalk ptimeoutvalue = 0
• Timeout value becomes ineffec-tive.
authfree
Use the “msh> set bonjour” com-mand to display and configure au-thent icat ion exc lus ion contro lsettings.
❖ View Settingsmsh> authfreeIf print job authentication exclu-sion is not set, authentication ex-c l u s i o n c o n t r o l c a n n o t b edisplayed.
❖ IPv4 address settingsmsh> authfree "ID" range_addr1 range_addr2
❖ IPv6 address settingsmsh> authfree "ID" range6_addr1 range6_addr2
❖ IPv6 address mask settingsmsh> authfree "ID" mask6_addr1 masklen
❖ Parallel/USB settingsmsh> authfree [parallel|usb] [on|off]To enable authfree, set to "on". Todisable authfree, set to "off".Always specify the interface.
❖ Authentication exclusion control ini-tializationmsh> authfree flush
Note❒ For IPv4 and IPv6, up to five access
ranges can be registered and se-lected.
autonet
Use the “autonet” command to con-figure AutoNet parameters.
❖ View settingsThe following command displaysthe current AutoNet settings:msh> autonet
❖ ConfigurationYou can configure AutoNet set-tings.msh> autonet {on|off}
• {on} means "active" and {off}means "inactive".
❖ Current interface priority configura-tion displaymsh> autonet priority

Monitoring and Configuring the Printer
62
2
❖ Interface priority configurationmsh> autonet priority“interface_name”
• You can give interface's Au-toNet parameter priority.
• Priority settings are availablewhen multiple interfaces are in-stalled.
• ip1394 can be specified onlywhen the IEEE 1394 interface isinstalled.
• wlan can be specified onlywhen the IEEE 802.11b interfaceis installed.
Note❒ If an interface is not selected, the
current interface connection set-tings remain in effect.
❒ For details about AutoNet, refer toautonet parameters.
bonjour(rendezvous)
Use the “bonjour(rendezvous)” com-mand to display bonjour(rendez-vous)-related settings.
❖ View settingsBonjour settings are displayed.msh> bonjour
❖ Bonjour service name settingYou can specify the bonjour serv-ice name.msh> bonjour cname “compu-ter name”
• The computer name can be en-tered using up to 63 alphanu-meric characters.
❖ Bonjour Installation location informa-tion settingYou can enter information aboutthe location where the printer is in-stalled.msh> bonjour location “lo-cation”
• Information about location canbe entered using up to 32 alpha-numeric characters.
❖ Setting order of priority for each pro-tocol• diprint
msh> bonjour diprint [0–99]
• lprmsh> bonjour lpr [0–99]
• ippmsh> bonjour ipp [0–99]
You can specify the order of prior-ity for “diprint”, “lpr”, and “ipp”.Smaller numbers indicate higherpriority.
Interface name Interface config-ured
ether Ethernet interface
ip1394 IEEE 1394 interface
wlan IEEE 802.11b inter-face
Remote Maintenance by telnet
63
2
❖ IP TTL settingmsh> bonjour ip ttl {1-255}You can specify the IP TTL (thenumber of routers a packet canpass through).
Note❒ The default is 255.
❖ Resetting the computer name and lo-cation informationYou can reset the computer nameand location information.msh> bonjour clear {cname| location}
• cnameReset the computer name. Thedefault computer name will bedisplayed when the computer isrestarted.
• locationReset the location information.The previous location informa-tion will be deleted.
❖ Interface configurationmsh> bonjour linklocal“interface_name”
• If many types of interface are in-stalled, configure the interfacethat communicates with linklo-cal address.
• If you do not specify an inter-face, the Ethernet interface isautomatically selected.
• ip1394 can be specified only whenthe IEEE 1394 interface is installed.
• wlan can be specified only when theIEEE 802.11b interface is installed.
btconfig
Use the "btconfig" command to makeBluetooth settings.
❖ View settingsBluetooth settings are displayed.msh> btconfig
❖ Mode settingsYou can set the Bluetooth opera-tion mode to {private} or {public}.msh> btconfig {private |public}
• The default is {public}.
devicename
Use the "devicename" command todisplay and change the printer name.
❖ View settingsmsh> devicename
❖ Printer name configurationmsh> devicename name“string”
• Enter a printer name using upto 31 alphanumeric characters.
• Set single names for each print-er.
❖ Printer name initializationmsh> devicename clear name
• Reset the printer name to its de-fault.
Interface Interface config-ured
ether Ethernet interface
ip1394 IEEE 1394 interface
wlan IEEE 802.11b inter-face
Monitoring and Configuring the Printer
64
2
dhcp
Use the "dhcp" command to config-ure DHCP settings.
❖ View settingsThe following command displaysthe current DHCP settings.msh> dhcp
❖ ConfigurationYou can configure DHCP.msh> dhcp “interface_name”{on|off}
• Click {on} to enable dhcp. Click{off} to disable DHCP.
• If the DNS server address anddomain name are obtained fromDHCP, be sure to click {on}.
• ip1394 can be specified onlywhen the IEEE 1394 interface isinstalled.
• wlan can be specified onlywhen the IEEE 802.11 interfaceis installed.
❖ Current interface priority configura-tion displaymsh> dhcp priority
❖ Interface priority configurationmsh> dhcp priority “interface_name”
• You can select which interfacehas DHCP parameter priority.
• Priority settings are availablewhen multiple interfaces are in-stalled.
❖ DNS server address selectionmsh> dhcp dnsaddr {dhcp |static}
• Specify whether to obtain theDNS server address from theDHCP server or use the addressset by a user.
• To obtain the DNS server addressfrom the DHCP server, specify"dhcp". To use the address set bya user, specify "static".
❖ Domain name selectionmsh> dhcp domainname {dhcp| static}
• Specify whether to obtain thedomain name from the DNSserver or use the domain nameset by a user.
• To obtain the domain name fromthe DHCP server, specify "dhcp".To use the domain name set by auser, specify "static".
Referencep.119 “Using DHCP”p.65 “dns”p.67 “domainname”
Interface name Interface config-ured
ether Ethernet interface
ip1394 IEEE 1394 interface
wlan IEEE 802.11 inter-face
Remote Maintenance by telnet
65
2
diprint
The direct printing port enables directprinting from a network-connectedcomputer.Use the “diprint” command tochange direct printing port settings.
❖ View settingsThe following command displays thecurrent direct printing port settings:msh> diprintExample output:port 9100timeout=300(sec)bidirect oncon multiapl async
• The “port” specifies the portnumber of the direct printingport.
• The “bidirect” setting indicateswhether the direct printing portis bidirectional or not.
❖ Setting timeoutmsh> diprint timeout [30~65535]
• You can specify the timeout in-terval to use when the printer isexpecting data from the net-work.
• The default is 300 seconds.
❖ Specifying the number of concurrentconnectionsmsh> diprint con {multi |single}
• The above command specifiesthe number of concurrentdiprint connections. Specify“multi” for multiple connec-tions or “single” for a singleconnection.
• The default is “multi”.
dns
Use the “dns” command to configureor display DNS (Domain Name Sys-tem) settings.
❖ View settingsThe following command displayscurrent DNS settings:msh> dns
❖ IPv4 DNS server configurationThe following command enablesor disables the IPv4 DNS serveraddress:msh> dns “number” server“server address”The following command displaysa configuration using the IP ad-dress 192.168.15.16 on a DNS 1server:msh> dns 1 server 192.168.15.16
• You can register IPv4 DNS Serv-er address.
• You can register up to threeIPv4 DNS server numbers.
• You cannot use “255.255.255.255”as the DNS server address.
❖ IPv6 DNS server configurationThe following command enablesor disables the IPv4 DNS serveraddress:msh> dns “number” server6“server address”
• You can register IPv6 DNS Serv-er address.
• You can register up to threeIPv6 DNS server numbers.
Monitoring and Configuring the Printer
66
2
❖ Dynamic DNS function settingmsh> dns “interface_name”ddns {on|off}
• You can set the dynamic DNSfunction "active" or "inactive".
• {on} means "active" and {off}means "inactive".
• ip1394 can be specified onlywhen the IEEE 1394 interface isinstalled.
• wlan can be specified onlywhen the IEEE 802.11b interfaceis installed.
❖ Specifying the record overlap operationmsh> dns overlap {update|add}
• You can specify operations per-formed when records overlap.
• updateTo delete old records and regis-ter new records.
• addTo add new records and storethe old records.
• When CNAME overlaps, it is al-ways changed, irrespective ofsettings.
❖ CNAME registrationmsh> dns cname {on|off}
• You can specify whether to reg-ister CNAME.
• {on} means "active" and {off}means "inactive".
• The CNAME registered is thedefault name beginning withr n p . C N A M E c a n n o t b echanged.
❖ A records registrationmsh> dns arecord {dhcp|own}
• {dhcp}You can specify the method ofregistering an A record whenthe dynamic DNS function isenabled and DHCP is used.
• {own}To register an A record usingthe printer as the DNS client.The DNS server address and thedomain name already designat-ed are used for the registration.
❖ Record updating interval settingsmsh> dns interval “time”
• You can specify the interval af-ter which records are updatedwhen using the dynamic DNSfunction.
• The updating interval is speci-fied hourly. It can be entered be-tween 1 and 255 hours.
• The default is 24 hours.
Interface name Interface config-ured
ether Ethernet interface
ip1394 IEEE 1394 interface
wlan IEEE 802.11b inter-face

Remote Maintenance by telnet
67
2
domainname
Use the "domainname" command todisplay or configure the domainname settings.You can configure the Ethernet inter-face, IEEE 1394 interface, or IEEE802.11b interface.
❖ View settingsThe following command displaysthe current domain name:msh> domainname
❖ Interface domain configurationmsh> domainname “interface_name”
❖ Setting the Domain Namemsh> domainname “interface_name” name “domain name”
• A domain name can be enteredusing up to 63 alphanumericcharacters.
• The Ethernet interface and IEEE802.11b interface will have thesame domain name.
• ip1394 can be specified onlywhen the IEEE 1394 interface isinstalled.
• wlan can be specified onlywhen the IEEE 802.11b interfaceis installed.
❖ Deleting the Domain Namemsh> domainname “interface_name” clear name
help
Use the "help" command to displaythe available command list and theprocedures for using those com-mands.
❖ Command list displaymsh> help
❖ Display of procedure for using com-mandsmsh> help “command_name”
hostname
Use the “hostname” command tochange the printer name.
❖ View settingsmsh> hostname
❖ IPv4 Configurationmsh> hostname “interface_name ” “printer_name”
• Enter the printer name using upto 63 alphanumeric characters.
• You cannot use a printer namebeginning “RNP” (in either up-per or lower case).
• The Ethernet interface and IEEE802.11b interface will have thesame printer name.
• ip1394 can be specified onlywhen the IEEE 1394 interface isinstalled.
Interface Interface set
ether Ethernet interface
ip1394 IEEE 1394 interface
wlan IEEE 802.11b inter-face

Monitoring and Configuring the Printer
68
2
• wlan can be specified onlywhen the IEEE 802.11b interfaceis installed.
❖ Initializing the printer name for eachinterfacemsh>hostname “interface_name” clear name
ifconfig
Use the "ifconfig" command to viewand configure TCP/IP (IP address,subnet mask, broadcast address, de-fault gateway address) for the printer.
❖ View settingsmsh> ifconfig
❖ IPv4 Configurationmsh> ifconfig “interface_name” “parameter” “ad-dress”
• If you did not enter an interfacename, it is automatically set tothe Ethernet interface.
• ip1394 can be specified onlywhen the IEEE 1394 interface isinstalled.
• wlan can be specified onlywhen the IEEE 802.11b interfaceis installed.
The following explains how toc o n f i g u r e an I P v 4 a d d r es s192.168.15.16 on Ethernet inter-face.msh> ifconfig ether 192.168.15.16
❖ IPv6 Configurationmsh> ifconfig ether inet6interface_name ” “printer_name”The following explains how toconf igure a IPv6 address to2001:DB8::100 with prefix length64 on the Ethernet interface.msh> ifconfig ether inet62001:DB8::100 64
❖ Netmask configurationmsh> ifconfig “interface_name” netmask “address”The following explains how to con-figure a subnet mask 255.255.255.0on Ethernet interface.msh> ifconfig ether net-mask 255.255.255.0
❖ Broadcast address configurationmsh> ifconfig “interface_name” broadcast “address”
Interface name Interface config-ured
ether Ethernet interface
ip1394 IEEE 1394 interface
wlan IEEE 802.11b inter-face
Interface name Interface config-ured
ether Ethernet Interface
ip1394 IEEE 1394 Inter-face
wlan IEEE 802.11b Inter-face
Remote Maintenance by telnet
69
2
❖ Changing the Interfacemsh> ifconfig “interface” up
• You can specify either the Eth-ernet interface or IEEE 802.11binterface when using the op-tional IEEE 802.11b interfaceunit.You cannot specify the IEEE1394 interface.
Note❒ To get the above addresses, contact
your network administrator.❒ Use the default configuration if you
cannot obtain setting addresses.❒ The IP address, subnet mask and
broadcast address are the same asthat for the ethernet interface andIEEE 802.11b interface.
❒ When installing the optional 1394Interface board, set the IP addressand subnet mask so that it does notoverlap with the ethernet interfaceor the IEEE 1394 interface.
❒ TCP/IP configuration is the samefor both Ethernet and IEEE 802.11interface. If interfaces are changed,the new interface inherits the con-figuration.
❒ Use "0x" as the initial two letters ofa hexadecimal address.
info
Use the "info" command to displayprinter information such as papertray, output tray, and printer lan-guage.
❖ Printer information displaymsh> info
Referencep.86 “Getting Printer Informationover the Network”
ipp
Use the “ipp” command to view andconfigure IPP settings.
❖ Viewing settingsThe following command displaysthe current IPP settings:msh> ipp
❖ IPP timeout configuration Specify how many seconds thecomputer waits before cancelingan interrupted print job. The timecan be entered between 30 to 65535seconds.msh> ipp timeout [30 - 65535]
❖ IPP user authorization configurationUse IPP user authorization to re-strict users to print with IPP. Thedefault is “off”.msh> ipp auth {basic|di-gest|off}
• User authorization settings are“basic” and “digest”.
• If user authorization is speci-fied, register a user name. Youcan register up to 10 users.
❖ IPP user configurationConfigure IPP users according tothe following messages:msh> ipp userThe following message appears:msh> Input user number (1to 10):Enter the number, user name, andpassword.msh> IPP user name:user1msh> IPP password:*******After configuring the settings, thefollowing message appears:User configuration changed.
Monitoring and Configuring the Printer
70
2
ipv6
Use the “ipv6” command to displayand configure IPv6 settings.
❖ View Settingmsh> ipv6
❖ IPv6 stateless addressmsh> ipv6 stateless {on|off}
lpr
Use the “lpr” command to view andconfigure LPR settings.
❖ View Settingmsh> lpr
❖ Checking host name when deletingthe jobmsh> lpr chkhost {on|off}
netware
Use the “netware” command to viewand configure the NetWare settingssuch as the print server name or fileserver name.
❖ Netware Printer Server Namesmsh> netware pname charac-ter string
• Enter the NetWare print servername using up to 47 characters.
❖ Netware File Server Namesmsh> netware fname charac-ter string
• Enter the NetWare file servername using up to 47 characters.
❖ Encap typemsh> netware encap {802.3|802.2|snap|ethernet2|auto}
❖ Remote Printer Numbermsh> netware rnum {0–254}
❖ Timeoutmsh> netware timeout {3–255}
❖ Printer server modemsh> netware mode pservermsh> netware mode ps
❖ Remote printer modemsh> netware mode rprintermsh> netware mode rp
❖ NDS context namemsh> netware context char-acter string
❖ SAP intervalmsh> netware “sap_interval”
❖ Setting login mode for file servermsh> netware login server
❖ Setting login mode for NDS treemsh> netware login tree
❖ Setting login mode for NDS tree namemsh> netware tree “NDSname”
❖ File transfer protocolmsh> netware trans {ipv4pri|ipxpri|ipv4|ipx}
• If you do not specify the proto-col, the current setting is dis-played.
Protocol Set Protocol
ipv4pri IPv4+IPX(IPv4)
ipxpri IPv4+IPX(IPX)
ipv4 IPv4
ipx IPX
Remote Maintenance by telnet
71
2
passwd
Use the “passwd” command to changethe remote maintenance password.
❖ Changing the Passwordmsh> passwd
• Enter the current password.• Enter the new password.• Renter the new password to
confirm it.
❖ Changing the Password of the admin-istrators using the Supervisormsh> passwd {Administra-tor ID}
• Enter the new password.• Renter the new password to
confirm it.
Note❒ Be sure not to forget or lose the
password.❒ The password can be entered using
up to 32 alphanumeric characters.Passwords are case-sensitive. Forexample, "R" is not the same as "r".
prnlog
Use the “prnlog” command to obtainprinter log information.
❖ Print logs displaymsh> prnlog
• Display previous print jobs.msh> prnlog “ID Number”
• Specify the ID number of thedisplayed print log informationto display additional detailsabout a print job.
Referencep.86 “Getting Printer Informationover the Network”.
route
Use the “route” command to viewand control the routing table.
❖ Specified route information displaymsh> route get “destina-tion”
• Specify the IPv4 address to des-tination.“0.0.0.0” cannot be specified asdestination address.
❖ Enabling/disabling specified IPv4destinationmsh> route active {host|net} “destination” {on | off}
• You can turn the specified desti-nation on or off. Host becomesthe default setting.
❖ Adding IPv4 Routing Tablemsh> route add {host|net}“destination” “gateway”
• Adds a host or network route to“destination”, and a gatewayaddress to “gateway” in the ta-ble.
• Specify the IPv4 address to des-tination and gateway.
• Host becomes the default set-ting.
❖ Setting the Default IPv4 Gatewaymsh> route add default“gateway”
❖ Deleting specified IPv4 destinationfrom Routing Tablemsh> route delete {host|net} “destination”
• Host becomes the default set-ting.
• IPv4 address of destination canbe specified.
Monitoring and Configuring the Printer
72
2
❖ Setting IPv6 Default Gatewaymsh> route add6 defaultgateway
❖ Adding a specified IPv6 destination toRouting Tablemsh> route add6 {destina-tion} prefixlen gateway
• Specify the IPv6 address to des-tination and gateway.
❖ Deleting a specified IPv6 destinationfrom Routing Tablemsh> route delete6 {desti-nation} prefixlen
• Specify the IPv6 address to des-tination and gateway.
❖ Display information about a specifiedIPv6 route informationmsh> route get6 {destina-tion}
• Specify the IPv6 address to des-tination and gateway.
❖ Enabling/disabling a specified IPv6destinationmsh> route active6 {desti-nation} prefixlen {on |off}
❖ Route initializationmsh> route flush
Note❒ The maximum number of IPv4
routing tables is 16.❒ The maximum number of IPv6
routing tables is 2.❒ Set a gateway address when com-
municating with devices on an ex-ternal network.
❒ The same gateway address isshared by all interfaces.
❒ “Prefixlen” is a number between 1and 128.
set
Use the "set" command to set the pro-tocol information display "active" or"inactive".
❖ View settingsThe following command displaysprotocol information (active/inac-tive).msh> set ipv4
msh> set ipv6
msh> set appletalk
msh> set netware
msh> set smb
msh> set scsiprint
• scsiprint is available when theoptional IEEE 1394 interfaceboard is installed.
msh> set ip1394
• ip1394 is available when the op-tional IEEE 1394 interface boardis installed.
msh> set protocol
• When protocol is specified, in-formation about TCP/IP, Ap-pleTalk, Netware, SCSI print,IPv4 over 1394, PictBridge andSMB appears.
msh> set lpr
msh> set lpr6
msh> set ftp
msh> set ftp6
msh> set rsh
msh> set rsh6
msh> set diprint
msh> set diprint6
msh> set web
msh> set snmp
msh> set ssl
msh> set ssl6

Remote Maintenance by telnet
73
2
msh> set nrs
msh> set rfu
msh> set rfu6
msh> set ipp
msh> set ipp6
msh> set http
msh> set http6
msh> set bonjour
msh> set nbt
msh> set ssdp
msh> set ssh
msh> set sftp
msh> set sftp6
❖ Configuration• Enter “up”to enable protocol,
and enter “down” to disableprotocol.
You can set the protocol to "active"or "inactive".msh> set ipv4 {up | down}
• If you disable IPv4, you cannotuse remote access after loggingoff. If you did this by mistake,you can use the control panel toenable remote access via IPv4.
• Disabling IPv4 also disablesip1394, lpr, ftp, rsh, diprint,web, snmp, ssl, ipp, http, bon-jour, and sftp
msh> set ipv6 {up | down}
• If you disable IPv6, you cannotuse remote access after loggingoff. If you did this by mistake,you can use the control panel toenable remote access via IPv6.
• Disabling IPv6 also disableslpr6, ftp6, rsh6, diprint6, ssl6,ipp6, http6, and sftp6.
msh> set appletalk {up | down}
msh> set netware {up | down}
msh> set smb {up | down}
msh> set lpr {up | down}
msh> set lpr6 {up | down}
msh> set ftp {up | down}
msh> set ftp6 {up | down}
msh> set rsh {up | down}
msh> set rsh6 {up | down}
msh> set diprint {up | down}
msh> set diprint6 {up | down}
msh> set web {up | down}
msh> set snmp {up | down}
msh> set ssl {up | down}
msh> set ssl6 {up | down}
• If Secured Sockets Layer (SSL,an encryption protocol) func-tion is not available for theprinter, you cannot use thefunction by enabling it.
msh> set nrs {up | down}
msh> set rfu {up | down}
msh> set rfu6 {up | down}
msh> set ipp {up | down}
msh> set ipp6 {up | down}
msh> set http {up | down}
msh> set http6 {up | down}
msh> set bonjour {up |down}
msh> set ssh {up | down}
msh> set ssdp {up | down}
msh> set nbt {up | down}
msh> set sftp {up | down}
msh> set sftp6 {up | down}
Monitoring and Configuring the Printer
74
2
show
Use the "show" command to displaynetwork interface board configura-tion settings.
❖ View settingsmsh> show
• If "-p" is added, you can viewsettings one by one.
Referencep.98 “Configuring the Network In-terface Board”
slp
Use “slp” command to view and con-figure SLP settings.msh> slp ttl “ttl_val”
• You can search the NetWare serverusing SLP in the PureIP environ-ment of NetWare 5/5.1. Using the"slp" command, you can configurethe value of TTL which can be usedby SLP multicast packet.
• The default value of TTL is 1. Asearch is executed only within a lo-cal segment. If the router does notsupport multicast, the settings arenot available even if the TTL valueis increased.
• The acceptable TTL value is be-tween 1 and 255.
smb
Use the “smb” command to configureor delete the computer or workgroupname for SMB.
❖ Computer Name settings msh> smb comp “computername”
• Set computer name using up to15 characters. Names beginningwith "RNP" or "rnp" cannot beentered.
❖ Working Group Name settingsmsh> smb group “work groupname”
• Set workgroup name using upto 15 characters
❖ Comment settingsmsh> smb comment “comment”
• Set comment using up to 31characters.
❖ Notify print job completionmsh> smb notif {on | off}
• To notify print job completion,specify “on”. Otherwise, specify“off”
❖ Deleting Computer Namemsh> smb clear comp
❖ Deleting Group Namemsh> smb clear group
❖ Deleting Commentmsh> smb clear comment
❖ View Protocolmsh> smb protocol

Remote Maintenance by telnet
75
2
snmp
Use the “snmp” command to displayand edit SNMP configuration settingssuch as the community name.
❖ View settingsmsh> snmp
• Default access settings 1 is asfollows:Community name:publicIPv4 address:0.0.0.0IPv6 address:::I PX ad -dress:00000000:000000000000Access type:read-onlyE f f e c t i v e P r o t o -col:IPv4/IPv6/IPX
• Default access settings 2 is asfollows:Community name:adminIPv4 address:0.0.0.0IPv6 address:::I PX ad -dress:00000000:000000000000Access type:read-writeE f f e c t i v e P r o t o -col:IPv4/IPv6/IPX
• If "-p" is added, you can viewsettings one by one.
• To display the current commu-nity, specify its registrationnumber.
❖ Displaymsh> snmp ?
❖ Community name configurationmsh> snmp “number” name“community_name”
• You can configure ten SNMPaccess settings numbered 1-10.
• The printer cannot be accessedfrom SmartDeviceMonitor forAdmin or SmartDeviceMonitorfor Client if “public” is not reg-istered in numbers 1-10. Whenchanging the community name,use SmartDeviceMonitor forAdmin and SNMP Setup Toolto correspond with printer set-tings.
• The community name can beentered using up to 15 charac-ters.
❖ Deleting community namemsh> snmp “number” clear name
❖ Access type configurationmsh> snmp “number” type“access_type”
Access type Type of access per-mission
no not accessible
read read only
write read and write
trap user is notified of trapmessages

Monitoring and Configuring the Printer
76
2
❖ Protocol configurationmsh> snmp {ipv4|ipv6|ipx}{on|off}
• Use the following command toset protocols "active" or "inac-tive": If you set a protocol "inac-tive", all access settings for thatprotocol are disabled.
• Specify "ipv4" for IPv4, "ipv6"for IPv6, or "ipx" for IPX/SPX.
• {on} means "active" and {off}means "inactive".
• Only IPv4 supports the IEEE1394 interface.
• All protocols cannot be turnedoff concurrently.
❖ Configuration of protocol for eachregistration numbermsh> snmp “number” active{ipv4|ipv6|ipx} {on|off}
• To change the protocol of accesssettings, use the following com-mand. However, if you havedisabled a protocol with theabove command, activating ithere has no effect.
❖ Access configurationmsh> snmp “number” {ipv4|ipv6|ipx} “address”
• You can configure a host ad-dress according to the protocolused.
• The network interface board ac-cepts requests only from hoststhat have IPv4, IPv6, and IPXaddresses with access types of"read-only" or "read-write". En-ter “0” to have network inter-face board accept requests fromany host without requiring aspecific type of access.
• Enter a host address to deliver"trap" access type information to.
• To specify IPv4 or IPv6, enter"ipv4" or "ipv6" followed by aspace, and then the IPv4 or IPv6address.
• To specify IPX/SPX, enter "ipx"followed by a space, the IPX ad-dress followed by a decimal,and then the MAC address ofthe network interface board.
❖ sysLocation configurationmsh> snmp location
❖ Deleting sysLocationmsh> snmp clear location
❖ sysContact settingmsh> snmp contact
❖ Deleting sysContactmsh> snmp clear contact
❖ SNMP v1v2 function configurationmsh> snmp v1v2 {on|off}
• Specify "on" to enable, and "off"to disable.
❖ SNMP v3 function configurationmsh> snmp v3 {on|off}
• Specify "on" to enable, and "off"to disable.
❖ SNMP TRAP configurationmsh> snmp trap {v1|v2|v3}{on|off}
• Specify "on" to enable, and "off"to disable.
❖ Remote Configuration Authorizationconfigurationmsh> snmp remote {on|off}
• Specify "on" to enable, and "off"to disable the SNMP v1v2 setting.
Remote Maintenance by telnet
77
2
❖ SNMP v3 TRAP configuration displaymsh> snmp v3trap
msh> snmp v3trap {1-5}
• If a number from 1-5 is entered,settings are displayed for thatnumber only.
❖ Configuring a sending address forSNMP v3 TRAPmsh> snmp v3trap {1-5}{ipv4|ipv6|ipx} “address”
❖ Configuring a sending protocol forSNMP v3 TRAPmsh> snmp v3trap {1-5} ac-tive {ipv4|ipv6|ipx}{on|off}
❖ Configuring a user account for SNMPv3 TRAPmsh> snmp v3trap {1-5} ac-count “account_name”
• Enter an account name using upto 32 alphanumeric characters.
❖ Deleting an SNMP v3 TRAP user ac-countmsh> snmp v3trap {1-5}clear account
❖ Configuring an SNMP v3 encryptionalgorithmmsh> snmp v3auth {md5|sha1}
❖ Configuring SNMP v3 encryptionmsh> snmp v3priv {auto|on}
• Set "auto" for automatic encryp-tion configuration
• Set "on" for mandatory encryp-tion configuration.
sntp
The printer clock can be synchronizedwith a NTP server clock using SimpleNetwork Time Protocol (SNTP). Usethe "sntp" command to change SNTPsettings.
❖ View settingsmsh> sntp
❖ NTP server address configurationYou can specify the IP address ofthe NTP server.msh> sntp server “IP_address”
❖ Interval configurationmsh> sntp interval “polling_time”
• You can specify the interval atwhich the printer synchronizeswith the operator-specifiedNTP server. The default is 60minutes.
• The interval can be enteredfrom 0, or between 16 and10,080 minutes.
• If you set 0, the printer synchro-nizes with the NTP server onlywhen you turn the printer on. Af-ter that, the printer does not syn-chronize with the NTP server.
❖ Time-zone configurationmsh> sntp timezone “+/-hour_time”
• You can specify the time differ-ence between the printer clockand NTP server clock. The val-ues are between –12:00 and+13:00.

Monitoring and Configuring the Printer
78
2
spoolsw
Use the “spoolsw” command to viewand configure Job Spool settings.You can only specify diprint, trap, lpr,ipp, ftp, sftp, and smb(TCP/IP) pro-tocol.• The “spoolsw” command for con-
figuring Job Spool settings is avail-able only when the optional harddisk is installed.
❖ View settingsThe Job Spool setting appears.msh> spoolsw
❖ Job Spool settingmsh> spoolsw spool {on|off}
Note❒ Specify "on" to enable Job Spool,
or "off" to disable it.
❖ Resetting Job spool settingmsh> spoolsw clear job{on|off}
• When the printer power is cutduring job spooling, this deter-mines whether to reprint thespooled job.
❖ Protocol configurationmsh> spoolsw diprint{on|off}msh> spoolsw lpr {on|off}msh> spoolsw ipp {on|off}msh> spoolsw smb {on|off}msh> spoolsw ftp {on|off}msh> spoolsw sftp {on|off}
• You can specify the settings fordiprint, lpr, ipp, ftp, sftp, andsmb.
sprint
Use the “sprint” command to viewand configure IEEE 1394 (SCSI print)settings.
❖ View settingsIEEE 1394 (SCSI print) settings aredisplayed.msh> sprint
❖ Bidirectional configuration for IEEE1394 (SCSI print)Use this setting to set IEEE 1394(SCSI print) bidirectional.The default is “on”.msh> sprint bidi {on | off}
ssdp
Use the “ssdp” command to view andconfigure SSDP settings.
❖ View settingsmsh> ssdp
❖ Setting effective timemsh> ssdp profile {1801–86400}The default is 10800 seconds.
❖ Advertise packet TTL settingsmsh> ssdp ttl {1–255}The default is 4.
Remote Maintenance by telnet
79
2
ssh
Use the “ssh” command to view andconfigure SSH settings.
❖ View settingsmsh> ssh
❖ Data compression communicationsettingsmsh> ssh compression{on|off}The default is "on".
❖ SSH/SFTP communication port settingmsh> ssh port {22, 1024–65535}The default is 22.
❖ SSH/SFTP communication timeoutsettingmsh> ssh timeout {0–65535}The default is 300.
❖ SSH/SFTP communication login time-out settingmsh> ssh logintimeout {0–65535}The default is 300.
❖ Setting an open key for SSH/SFTPmsh> ssh genkey {512|768|1024} "character string"Create an open key for SSH/SFTPcommunication.Usable characters are ASCII 0x20-0x7e (32 bytes) other than "0".The default key length is 1024, andthe character string is blank.
❖ Deleting open key for ssh/sftp com-municationmsh> ssh delkey
Note❒ If you do not specify a character
string, current setting is displayed.
status
Use the “status” command to displaythe printer status.
❖ view messagesmsh> status
Referencep.86 “Current Printer Status”
syslog
Use the “syslog” command to displaythe information stored in the printer'ssystem log.
❖ View messagemsh> syslog
Referencep.105 “System Log Information”
upnp
Use the "upnp" command to displayand configure the universal plug andplay.
❖ Public URL displaymsh> upnp url
❖ Public URL configurationmsh> upnp url "string"
• Enter the URL string in the char-acter string.
❖ Deleting Public URLmsh> upnp clear url
Monitoring and Configuring the Printer
80
2
web
Use the “web” command to displayand configure parameters on WebImage Monitor.
❖ View Settingsmsh> web
❖ URL ConfigurationYou can set URLs linked by click-ing [URL] on Web Image Monitor.Specify "1" or "2" for x as thenumber corresponding to the URL.Up to two URLs can be registeredand specified.msh> web url http://”TheURL or IP address you wantto register”/
❖ Resetting URLs registered as linkdestinationsmsh> web x clear urlSpecify "1" or "2" for x as the corre-sponding number to the URL.
❖ Link name configurationYou can enter the name for URLthat appears on Web Image Moni-tor.Specify "1" or "2" for x as the corre-sponding number to the l inkname.msh> web name “Name youwant to display”
❖ Resetting URL names registered aslink destinationsmsh> web x clear nameSpecify "1" or "2" for x as thenumber corresponding to the linkname.
❖ Help URL ConfigurationYou can set URLs linked by click-ing [Help] or [?] on Web ImageMonitor.msh> web help http://”HelpURL or IP address”/help/
❖ Resetting Help URLmsh> web clear help
Remote Maintenance by telnet
81
2
wiconfig
Use the "wiconfig" command to makesettings for IEEE 802.11b.
❖ View settingsmsh> wiconfig
❖ View IEEE 802.11b settingsmsh> wiconfig cardinfo
• If IEEE 802.11b is not workingcorrectly, its information is notdisplayed.
❖ Configurationmsh> wiconfig “parameter”
Parameter Value configured
mode [ap|ad-hoc|802.11adhoc]
You can set the in-frastructure mode(ap) , the 802.11 Adhoc mode (802.11adhoc), or the ad hoc mode (adhoc).
The default is ad hoc mode.
ssid “IDvalue” You can make set-tings for the SSID in the infrastruc-ture mode.
Usable characters are ASCII 0x20-0x7e (32 bytes).
An SSID value is set automatically to the nearest ac-cess point if no set-ting is made.
If no setting is made for the 802.11 ad hoc mode, the same-value as for the in-frastructure mode or an ASSID value is automatically set. The default is blank.
channel frequency “channelno.”
You can enable or disable the WEP function. To enable the WEP function, specify [on]; to dis-able it, specify [off].
To start the WEP function, enter the correct WEP key. The default is “11”.
key [ “key value” ] val [1|2|3|4]
You can specify the WEP key when entering in hexa-decimal.
With a 64-bit WEP, you can use 10 digit hexadecimals. With a 128-bit WEP, you can use 26 digit hexadeci-mals.
Up to four WEP keys can be regis-tered. Specify the number to be reg-istered with “val”.
When a WEP is specified by key, the WEP specified by key phrase is overwritten.
To use this func-tion, set the same key number and WEP key for all ports that transmit data to each other. Put “0x”on the front of WEP key.
You can omit the numbers with “val”. The key number is set to 1 when making these omissions. The default is blank.
Parameter Value configured
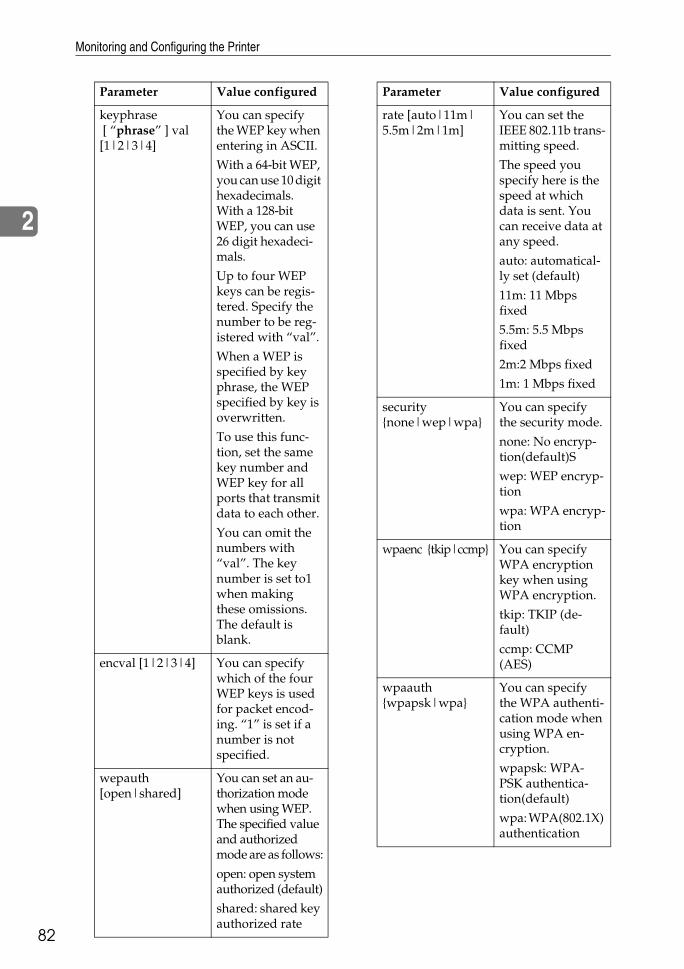
Monitoring and Configuring the Printer
82
2
keyphrase [ “phrase” ] val [1|2|3|4]
You can specify the WEP key when entering in ASCII.
With a 64-bit WEP, you can use 10 digit hexadecimals. With a 128-bit WEP, you can use 26 digit hexadeci-mals.
Up to four WEP keys can be regis-tered. Specify the number to be reg-istered with “val”.
When a WEP is specified by key phrase, the WEP specified by key is overwritten.
To use this func-tion, set the same key number and WEP key for all ports that transmit data to each other.
You can omit the numbers with “val”. The key number is set to1 when making these omissions. The default is blank.
encval [1|2|3|4] You can specify which of the four WEP keys is used for packet encod-ing. “1” is set if a number is not specified.
wepauth [open|shared]
You can set an au-thorization mode when using WEP. The specified value and authorized mode are as follows:
open: open system authorized (default)
shared: shared key authorized rate
Parameter Value configured
rate [auto|11m|5.5m|2m|1m]
You can set the IEEE 802.11b trans-mitting speed.
The speed you specify here is the speed at which data is sent. You can receive data at any speed.
auto: automatical-ly set (default)
11m: 11 Mbps fixed
5.5m: 5.5 Mbps fixed
2m:2 Mbps fixed
1m: 1 Mbps fixed
security {none|wep|wpa}
You can specify the security mode.
none: No encryp-tion(default)S
wep: WEP encryp-tion
wpa: WPA encryp-tion
wpaenc {tkip|ccmp} You can specify WPA encryption key when using WPA encryption.
tkip: TKIP (de-fault)
ccmp: CCMP (AES)
wpaauth {wpapsk|wpa}
You can specify the WPA authenti-cation mode when using WPA en-cryption.
wpapsk: WPA-PSK authentica-tion(default)
wpa: WPA(802.1X) authentication
Parameter Value configured
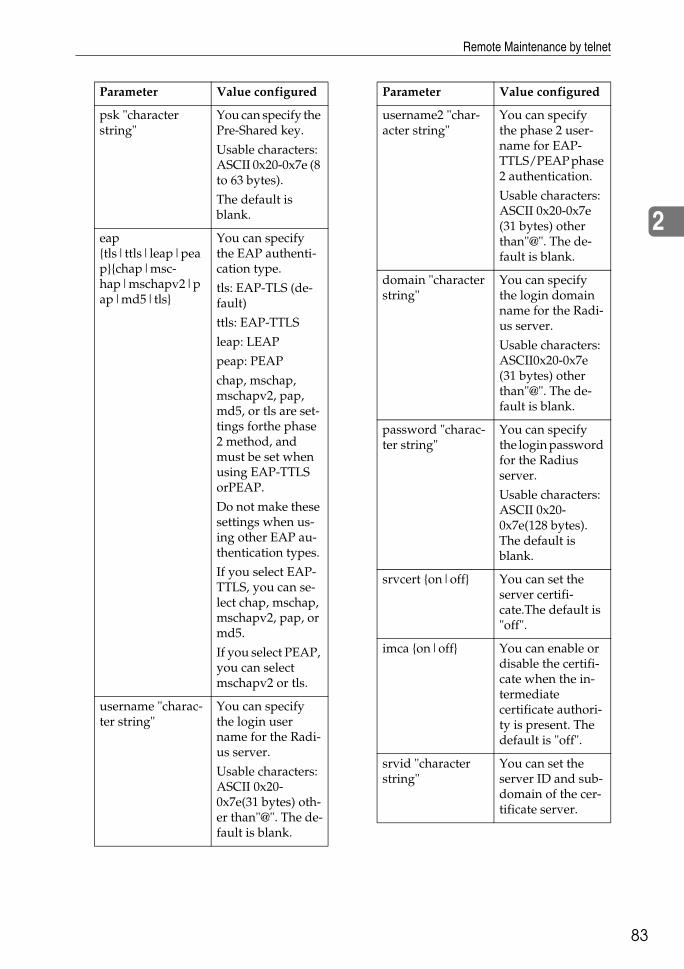
Remote Maintenance by telnet
83
2
psk "character string"
You can specify the Pre-Shared key.
Usable characters: ASCII 0x20-0x7e (8 to 63 bytes).
The default is blank.
eap {tls|ttls|leap|peap}{chap|msc-hap|mschapv2|pap|md5|tls}
You can specify the EAP authenti-cation type.
tls: EAP-TLS (de-fault)
ttls: EAP-TTLS
leap: LEAP
peap: PEAP
chap, mschap, mschapv2, pap, md5, or tls are set-tings forthe phase 2 method, and must be set when using EAP-TTLS orPEAP.
Do not make these settings when us-ing other EAP au-thentication types.
If you select EAP-TTLS, you can se-lect chap, mschap, mschapv2, pap, or md5.
If you select PEAP, you can select mschapv2 or tls.
username "charac-ter string"
You can specify the login user name for the Radi-us server.
Usable characters: ASCII 0x20-0x7e(31 bytes) oth-er than"@". The de-fault is blank.
Parameter Value configured
username2 "char-acter string"
You can specify the phase 2 user-name for EAP-TTLS/PEAP phase 2 authentication.
Usable characters: ASCII 0x20-0x7e (31 bytes) other than"@". The de-fault is blank.
domain "character string"
You can specify the login domain name for the Radi-us server.
Usable characters: ASCII0x20-0x7e (31 bytes) other than"@". The de-fault is blank.
password "charac-ter string"
You can specify the login password for the Radius server.
Usable characters: ASCII 0x20-0x7e(128 bytes). The default is blank.
srvcert {on|off} You can set the server certifi-cate.The default is "off".
imca {on|off} You can enable or disable the certifi-cate when the in-termediate certificate authori-ty is present. The default is "off".
srvid "character string"
You can set the server ID and sub-domain of the cer-tificate server.
Parameter Value configured
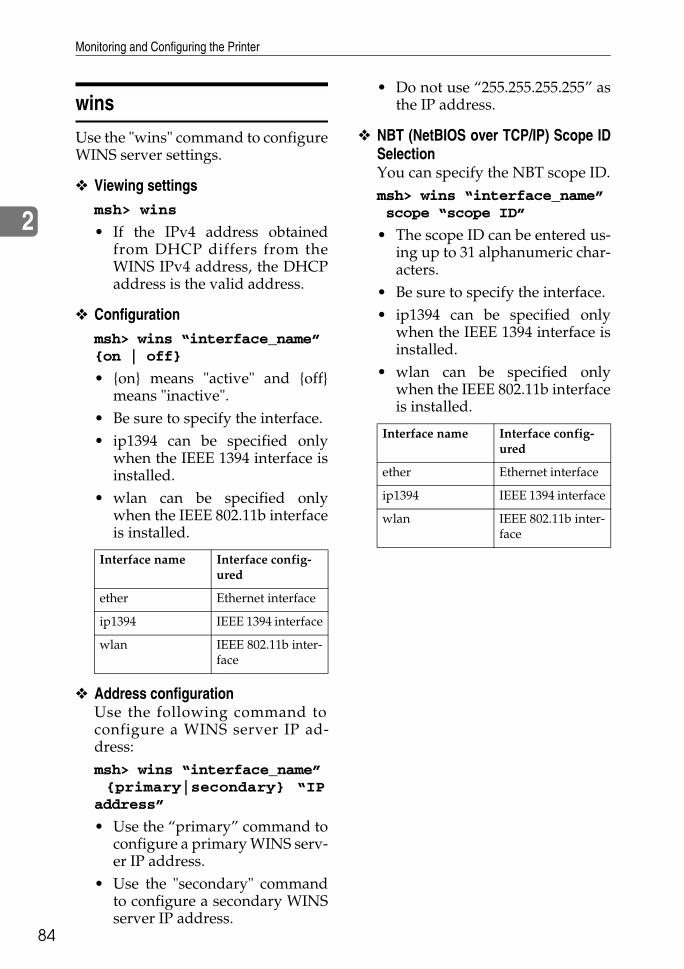
Monitoring and Configuring the Printer
84
2
wins
Use the "wins" command to configureWINS server settings.
❖ Viewing settingsmsh> wins
• If the IPv4 address obtainedfrom DHCP differs from theWINS IPv4 address, the DHCPaddress is the valid address.
❖ Configurationmsh> wins “interface_name” {on | off}
• {on} means "active" and {off}means "inactive".
• Be sure to specify the interface.• ip1394 can be specified only
when the IEEE 1394 interface isinstalled.
• wlan can be specified onlywhen the IEEE 802.11b interfaceis installed.
❖ Address configurationUse the following command toconfigure a WINS server IP ad-dress:msh> wins “interface_name” {primary|secondary} “IPaddress”
• Use the “primary” command toconfigure a primary WINS serv-er IP address.
• Use the "secondary" commandto configure a secondary WINSserver IP address.
• Do not use “255.255.255.255” asthe IP address.
❖ NBT (NetBIOS over TCP/IP) Scope IDSelectionYou can specify the NBT scope ID.msh> wins “interface_name” scope “scope ID”
• The scope ID can be entered us-ing up to 31 alphanumeric char-acters.
• Be sure to specify the interface.• ip1394 can be specified only
when the IEEE 1394 interface isinstalled.
• wlan can be specified onlywhen the IEEE 802.11b interfaceis installed.
Interface name Interface config-ured
ether Ethernet interface
ip1394 IEEE 1394 interface
wlan IEEE 802.11b inter-face
Interface name Interface config-ured
ether Ethernet interface
ip1394 IEEE 1394 interface
wlan IEEE 802.11b inter-face
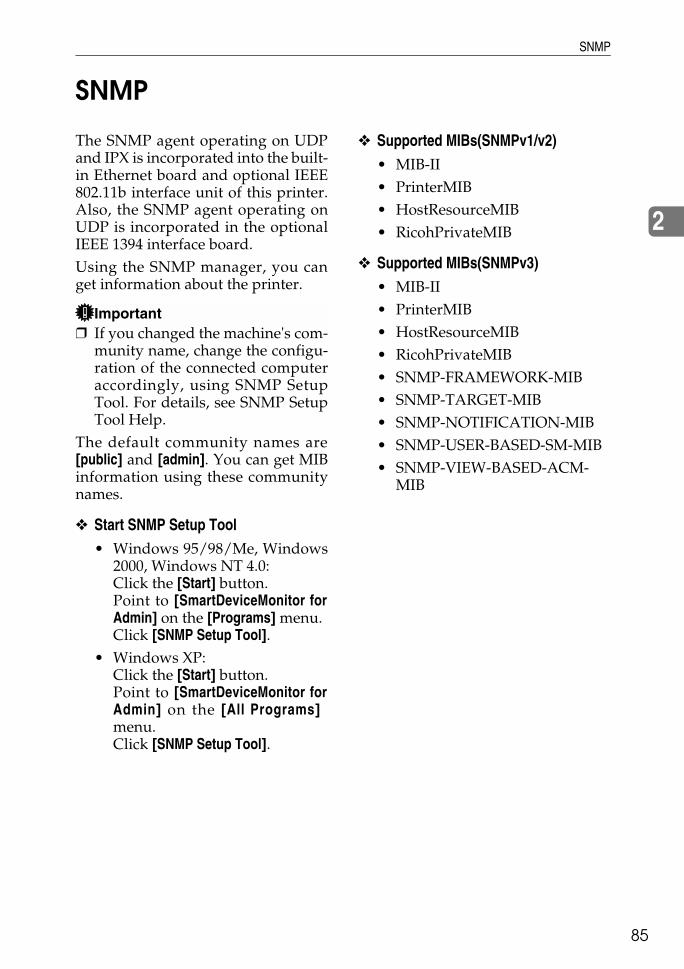
SNMP
85
2
SNMP
The SNMP agent operating on UDPand IPX is incorporated into the built-in Ethernet board and optional IEEE802.11b interface unit of this printer.Also, the SNMP agent operating onUDP is incorporated in the optionalIEEE 1394 interface board.Using the SNMP manager, you canget information about the printer.
Important❒ If you changed the machine's com-
munity name, change the configu-ration of the connected computeraccordingly, using SNMP SetupTool. For details, see SNMP SetupTool Help.
The default community names are[public] and [admin]. You can get MIBinformation using these communitynames.
❖ Start SNMP Setup Tool• Windows 95/98/Me, Windows
2000, Windows NT 4.0:Click the [Start] button.Point to [SmartDeviceMonitor forAdmin] on the [Programs] menu.Click [SNMP Setup Tool].
• Windows XP:Click the [Start] button.Point to [SmartDeviceMonitor forAdmin] on the [All Programs]menu.Click [SNMP Setup Tool].
❖ Supported MIBs(SNMPv1/v2)• MIB-II• PrinterMIB• HostResourceMIB• RicohPrivateMIB
❖ Supported MIBs(SNMPv3)• MIB-II• PrinterMIB• HostResourceMIB• RicohPrivateMIB• SNMP-FRAMEWORK-MIB• SNMP-TARGET-MIB• SNMP-NOTIFICATION-MIB• SNMP-USER-BASED-SM-MIB• SNMP-VIEW-BASED-ACM-
MIB

Monitoring and Configuring the Printer
86
2
Getting Printer Information over the Network
This section explains details of each item displayed in the printer status and in-formation.This manual covers all models, and therefore contains functions and settingsthat may not be available for your model.
Current Printer Status
The printer status can be checked using the following commands:• UNIX: Use the "lpq" command and "rsh", "rcp", “ftp”, and "sftp" parameters. • mshell: Use the "status" command.
Messages Description
1-Sheet Bypass Error: No Select The one sheet bypass tray is open but printing from another tray was selected.
1-Sheet Bypass Error: Not Open The one sheet bypass tray is closed but printing from the one sheet bypass tray was selected.
1-Sheet Output Error: No Select The one sheet bypass tray is open but printing from another tray was selected.
1-Sheet Output Error: Not Open The one sheet bypass tray is closed but printing from the one sheet bypass tray was selected.
Access Restricted The job was canceled because user have no authority.
Add staples (Booklet: Back) The staple of booklet finisher (back) is exhausted.
Add staples (Booklet: Both) The staple of booklet finisher is exhausted.
Add staples (Booklet: Front) The staple of booklet finisher (front) is exhausted.
Adjusting... The machine is initializing or calibrating.
Alert at Printer: Yellow LED An error has occurred.
Call Service Center There is a malfunction in the machine.
Canceled The job is reset.
Canceling Job... The job is being reset.
Card/Counter not inserted The machine is waiting for prepaid card or key.
Coin or amount not inserted The machine is waiting for coin to be inserted.
Coin/Key Counter not inserted The machine is waiting for coin or key counter.
Configuring... Setting is being changed.
Cooling Down Fusing Unit... The fusing unit is cooling down.
Copy Tray Internal tray is full.
Cover Open: ADF The document feeder is open.
Cover Open: Bridge Unit Left The cover of the left bridge unit is open.
Cover Open: Bridge Unit Center The cover of the middle bridge unit is open.

Getting Printer Information over the Network
87
2
Cover Open: Duplex Unit Left The cover of the left duplex unit is open.
Cover Open: Duplex Unit Right The cover of the right duplex unit is open.
Cover Open: Fin. Front Left A front left cover of Finisher is open.
Cover Open: Fin. Front Right A front right cover of Finisher is open.
Cover Open: Bridge Unit Right The cover of the right bridge unit is open.
Cover Open: Duplex Unit The cover of the duplex unit is open.
Cover Open: Finisher The cover of Finisher is open.
Cover Open: Finisher Cover The cover of Finisher is open.
Cover Open: Finisher Front The front cover of Finisher is open.
Cover Open: Finisher Rear The cover of the rear finisher is open.
Cover Open: Finisher Upper The upper cover of Finisher is open.
Cover Open: Finisher Upper-L A upper left cover of Finisher is open.
Cover Open: Finisher Upper-R A upper right cover of Finisher is open.
Cover Open: Front Cover The front cover is open.
Cover Open: Fusing Unit Cover The cover of the fusing unit is open.
Cover Open: Interposer Tray Low The lower cover of the interposer unit is open.
Cover Open: Interposer Tray Up The upper cover of the interposer unit is open.
Cover Open: LCT Front Cover The front cover of the Large Capacity tray is open.
Cover Open: Lower Left Cover The lower left cover is open.
Cover Open: Lower Right Cover The lower right cover is open.
Cover Open: Mailbox A cover of Mailbox is open.
Cover Open: Mid-Covers Covers for anti jamming are open.
Cover Open: Z-folding Upper An upper cover of Z fold unit is open.
Cover Open: Right Cover The right cover is open.
Cover Open: Shift Tray Cover The shift tray cover is open.
Cover Open: Upper Cover The upper cover is open.
Cover Open: Upper Left Cover The upper left cover is open
Cover Open: Upper Right Cover The upper right cover is open.
Data Size Error The data size error occurred.
Empty: Black Toner The black toner cartridge is almost empty.
Empty: Cyan Toner The cyan toner cartridge is almost empty.
Empty: Magenta Toner The magenta toner cartridge is almost empty.
Empty: One of Toner Bottles One of the toner bottles is empty.
Empty: Toner The toner cartridge is almost empty.
Empty: Yellow Toner The yellow toner cartridge is almost empty.
Messages Description
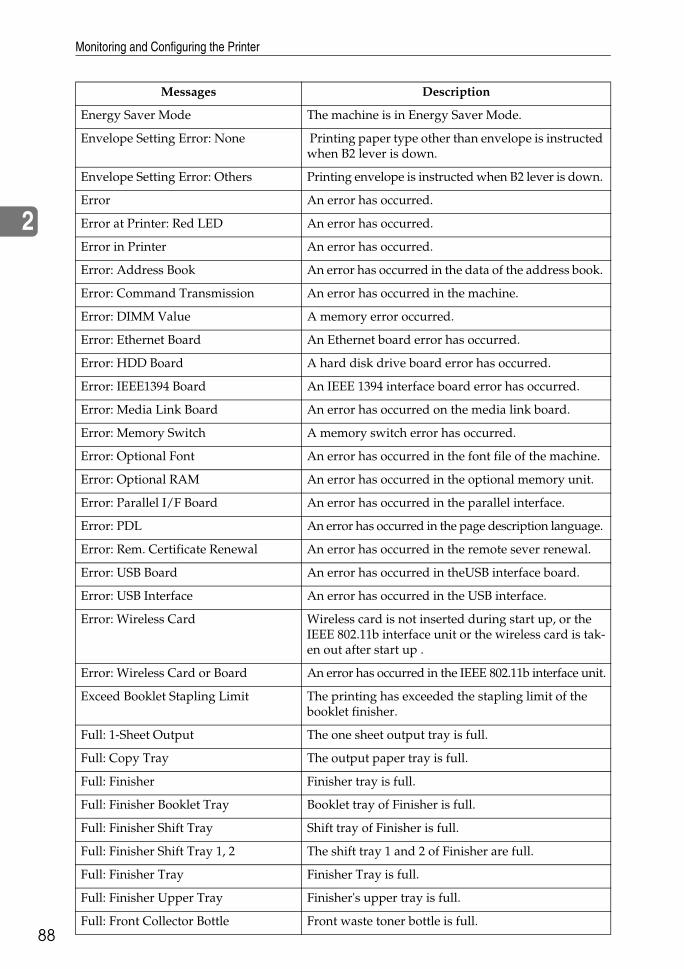
Monitoring and Configuring the Printer
88
2
Energy Saver Mode The machine is in Energy Saver Mode.
Envelope Setting Error: None Printing paper type other than envelope is instructed when B2 lever is down.
Envelope Setting Error: Others Printing envelope is instructed when B2 lever is down.
Error An error has occurred.
Error at Printer: Red LED An error has occurred.
Error in Printer An error has occurred.
Error: Address Book An error has occurred in the data of the address book.
Error: Command Transmission An error has occurred in the machine.
Error: DIMM Value A memory error occurred.
Error: Ethernet Board An Ethernet board error has occurred.
Error: HDD Board A hard disk drive board error has occurred.
Error: IEEE1394 Board An IEEE 1394 interface board error has occurred.
Error: Media Link Board An error has occurred on the media link board.
Error: Memory Switch A memory switch error has occurred.
Error: Optional Font An error has occurred in the font file of the machine.
Error: Optional RAM An error has occurred in the optional memory unit.
Error: Parallel I/F Board An error has occurred in the parallel interface.
Error: PDL An error has occurred in the page description language.
Error: Rem. Certificate Renewal An error has occurred in the remote sever renewal.
Error: USB Board An error has occurred in theUSB interface board.
Error: USB Interface An error has occurred in the USB interface.
Error: Wireless Card Wireless card is not inserted during start up, or the IEEE 802.11b interface unit or the wireless card is tak-en out after start up .
Error: Wireless Card or Board An error has occurred in the IEEE 802.11b interface unit.
Exceed Booklet Stapling Limit The printing has exceeded the stapling limit of the booklet finisher.
Full: 1-Sheet Output The one sheet output tray is full.
Full: Copy Tray The output paper tray is full.
Full: Finisher Finisher tray is full.
Full: Finisher Booklet Tray Booklet tray of Finisher is full.
Full: Finisher Shift Tray Shift tray of Finisher is full.
Full: Finisher Shift Tray 1, 2 The shift tray 1 and 2 of Finisher are full.
Full: Finisher Tray Finisher Tray is full.
Full: Finisher Upper Tray Finisher's upper tray is full.
Full: Front Collector Bottle Front waste toner bottle is full.
Messages Description
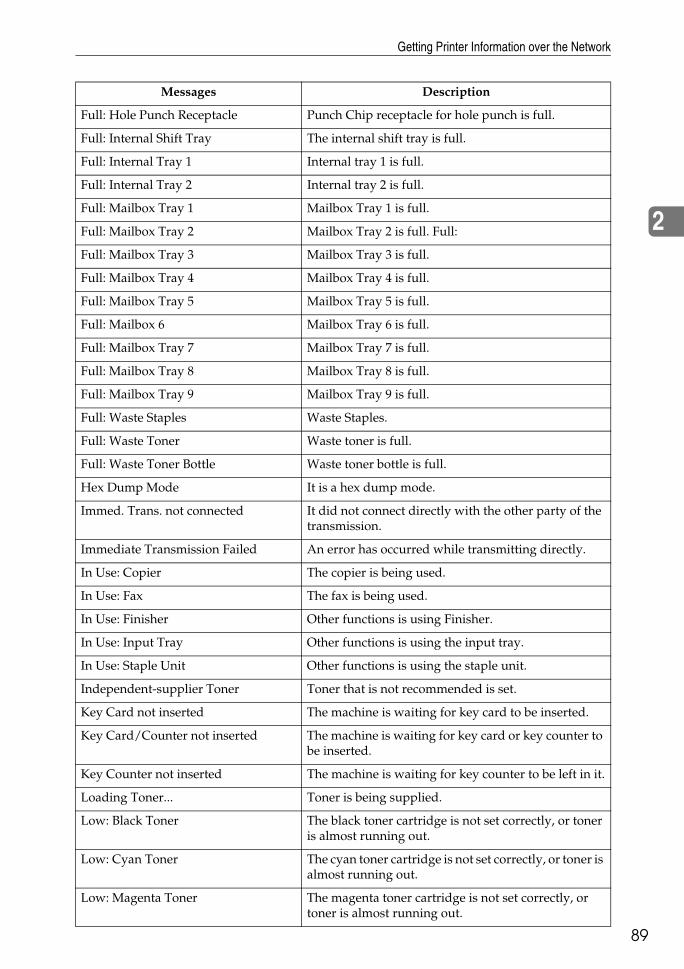
Getting Printer Information over the Network
89
2
Full: Hole Punch Receptacle Punch Chip receptacle for hole punch is full.
Full: Internal Shift Tray The internal shift tray is full.
Full: Internal Tray 1 Internal tray 1 is full.
Full: Internal Tray 2 Internal tray 2 is full.
Full: Mailbox Tray 1 Mailbox Tray 1 is full.
Full: Mailbox Tray 2 Mailbox Tray 2 is full. Full:
Full: Mailbox Tray 3 Mailbox Tray 3 is full.
Full: Mailbox Tray 4 Mailbox Tray 4 is full.
Full: Mailbox Tray 5 Mailbox Tray 5 is full.
Full: Mailbox 6 Mailbox Tray 6 is full.
Full: Mailbox Tray 7 Mailbox Tray 7 is full.
Full: Mailbox Tray 8 Mailbox Tray 8 is full.
Full: Mailbox Tray 9 Mailbox Tray 9 is full.
Full: Waste Staples Waste Staples.
Full: Waste Toner Waste toner is full.
Full: Waste Toner Bottle Waste toner bottle is full.
Hex Dump Mode It is a hex dump mode.
Immed. Trans. not connected It did not connect directly with the other party of the transmission.
Immediate Transmission Failed An error has occurred while transmitting directly.
In Use: Copier The copier is being used.
In Use: Fax The fax is being used.
In Use: Finisher Other functions is using Finisher.
In Use: Input Tray Other functions is using the input tray.
In Use: Staple Unit Other functions is using the staple unit.
Independent-supplier Toner Toner that is not recommended is set.
Key Card not inserted The machine is waiting for key card to be inserted.
Key Card/Counter not inserted The machine is waiting for key card or key counter to be inserted.
Key Counter not inserted The machine is waiting for key counter to be left in it.
Loading Toner... Toner is being supplied.
Low: Black Toner The black toner cartridge is not set correctly, or toner is almost running out.
Low: Cyan Toner The cyan toner cartridge is not set correctly, or toner is almost running out.
Low: Magenta Toner The magenta toner cartridge is not set correctly, or toner is almost running out.
Messages Description

Monitoring and Configuring the Printer
90
2
Low: Toner The toner cartridge is not set correctly,or toner is al-most running out.
Low: Yellow Toner The yellow toner cartridge is not set correctly, or toner is almost running out.
Malfunction: Booklet Stapler There is a problem with booklet finisher.
Malfunction: Booklet Processor There is a problem with booklet finisher.
Malfunction: Duplex Unit There is a problem with the duplex unit.
Malfunction: Ext. Charge Unit There is a problem with the external charge unit.
Malfunction: Finisher There is a problem with the finisher.
Malfunction: Interposer There is a problem with the interposer.
Malfunction: LCT There is a problem with the large capacity tray.
Malfunction: Multi-hole Punch GPC There is a problem with the multi hole punching unit.
Malfunction: Output Tray There is a problem with the output tray.
Malfunction: Staple Unit There is a problem with the staple unit.
Malfunction: Tray 1 There is a problem with tray 1.
Malfunction: Tray 2 There is a problem with tray 2.
Malfunction: Tray 3 There is a problem with tray 3.
Malfunction: Tray 3 (LCT) There is a problem with tray 3 (LCT).
Malfunction: Tray 4 There is a problem with tray 4.
Malfunction: Tray 5 There is a problem with tray 5.
Malfunction: Tray 6 There is a problem with tray 6.
Malfunction: Tray 7 There is a problem with tray 7.
Memory Low: Copy Memory shortage has occurred while the copy was operating.
Memory Low: Data Storage Memory shortage has occurred while the document was being accumulated.
Memory Low: Fax Scanning Memory shortage has occurred while transmitting the fax.
Memory Low: Scanning Memory shortage has occurred while the scanner was working.
Miscellaneous Error Other error has occurred.
Mismatch: Paper Size Indicated paper tray does not contain paper of selected size.
Mismatch: Paper Size and Type Indicated paper tray does not contain paper of select-ed size and type.
Mismatch: Paper Type Indicated paper tray does not contain paper of selected type.
Near Replacing: Black PCU Prepare the new black photoconductor unit.
Near Replacing: Cleaning Unit Prepare the new cleaning unit.
Near Replacing: Color Dev. Unit Prepare the new color development unit.
Near Replacing: Color PCU Prepare the new color photoconductor unit.
Messages Description

Getting Printer Information over the Network
91
2
Near Replacing: Develop. Unit C Prepare the new development unit (cyan).
Near Replacing: Develop. Unit K Prepare the new development unit (black).
Near Replacing: Develop. Unit M Prepare the new development unit (magenta).
Near Replacing: Develop. Unit Y Prepare the new development unit (yellow).
Near Replacing: Fusing Unit Prepare the new fusing unit.
Near Replacing: Maintenance Kit Prepare the new maintenance kit.
Near Replacing: Transfer Unit Prepare the new transfer unit.
Nearly Full: Collector Bottle Waste toner bottle is nearly full.
Nearly Full: Waste Toner Waste toner bottle is nearly full.
Nearly Full:Front CollectBottle Front collector bottle is nearly full.
Nearly Full:Sucked Toner Bottle Waste toner bottle is nearly full.
Need more Booklet Staples Stapler has almost run out of staples.
No Paper: 1-Sheet Bypass There is no paper in 1-sheet bypass tray.
No Paper: Interposer Tray There is no paper in interposer unit.
No Paper: Selected Tray There is no paper in specified tray.
No Paper: Tray 1 There is no paper in tray 1.
No Paper: Tray 1 (LCT) There is no paper in the large capacity tray (tray 1).
No Paper: Tray 2 There is no paper in tray 2.
No Paper: Tray 3 There is no paper in tray 3.
No Paper: Tray 3 (LCT) There is no paper in tray 3 (Large Capacity tray).
No Paper: Tray 4 There is no paper in tray 4.
No Paper: Tray 5 There is no paper in tray 5.
No Paper: Tray 6 There is no paper in tray 6.
No Paper: Tray 7 There is no paper in tray 7.
Not Detected: B2 Lever B2 lever is not correctly set.
Not Detected: Black Toner Black toner is not correctly set.
Not Detected: Charger Charger is not correctly set.
Not Detected: Cleaning Unit The cleaning unit is not correctly set.
Not Detected: Cyan Toner Cyan toner is not correctly set.
Not Detected: Develop. Unit (C) The development unit (cyan) is not correctly set.
Not Detected: Develop. Unit (K) The development unit (black) is not correctly set.
Not Detected: Develop. Unit (M) The development unit (magenta) is not correctly set.
Not Detected: Develop. Unit (Y) The development unit (yellow) is not correctly set.
Not Detected: Duplex Feed Unit The duplex unit is not correctly set.
Not Detected: Duplex Unit The duplex feed unit is not correctly set.
Messages Description
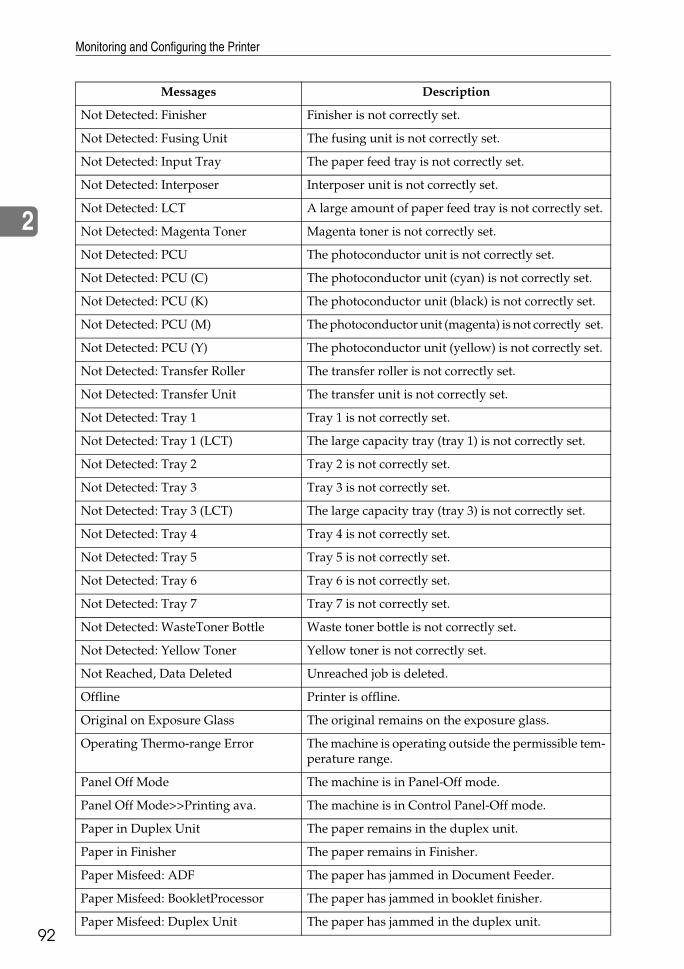
Monitoring and Configuring the Printer
92
2
Not Detected: Finisher Finisher is not correctly set.
Not Detected: Fusing Unit The fusing unit is not correctly set.
Not Detected: Input Tray The paper feed tray is not correctly set.
Not Detected: Interposer Interposer unit is not correctly set.
Not Detected: LCT A large amount of paper feed tray is not correctly set.
Not Detected: Magenta Toner Magenta toner is not correctly set.
Not Detected: PCU The photoconductor unit is not correctly set.
Not Detected: PCU (C) The photoconductor unit (cyan) is not correctly set.
Not Detected: PCU (K) The photoconductor unit (black) is not correctly set.
Not Detected: PCU (M) The photoconductor unit (magenta) is not correctly set.
Not Detected: PCU (Y) The photoconductor unit (yellow) is not correctly set.
Not Detected: Transfer Roller The transfer roller is not correctly set.
Not Detected: Transfer Unit The transfer unit is not correctly set.
Not Detected: Tray 1 Tray 1 is not correctly set.
Not Detected: Tray 1 (LCT) The large capacity tray (tray 1) is not correctly set.
Not Detected: Tray 2 Tray 2 is not correctly set.
Not Detected: Tray 3 Tray 3 is not correctly set.
Not Detected: Tray 3 (LCT) The large capacity tray (tray 3) is not correctly set.
Not Detected: Tray 4 Tray 4 is not correctly set.
Not Detected: Tray 5 Tray 5 is not correctly set.
Not Detected: Tray 6 Tray 6 is not correctly set.
Not Detected: Tray 7 Tray 7 is not correctly set.
Not Detected: WasteToner Bottle Waste toner bottle is not correctly set.
Not Detected: Yellow Toner Yellow toner is not correctly set.
Not Reached, Data Deleted Unreached job is deleted.
Offline Printer is offline.
Original on Exposure Glass The original remains on the exposure glass.
Operating Thermo-range Error The machine is operating outside the permissible tem-perature range.
Panel Off Mode The machine is in Panel-Off mode.
Panel Off Mode>>Printing ava. The machine is in Control Panel-Off mode.
Paper in Duplex Unit The paper remains in the duplex unit.
Paper in Finisher The paper remains in Finisher.
Paper Misfeed: ADF The paper has jammed in Document Feeder.
Paper Misfeed: BookletProcessor The paper has jammed in booklet finisher.
Paper Misfeed: Duplex Unit The paper has jammed in the duplex unit.
Messages Description
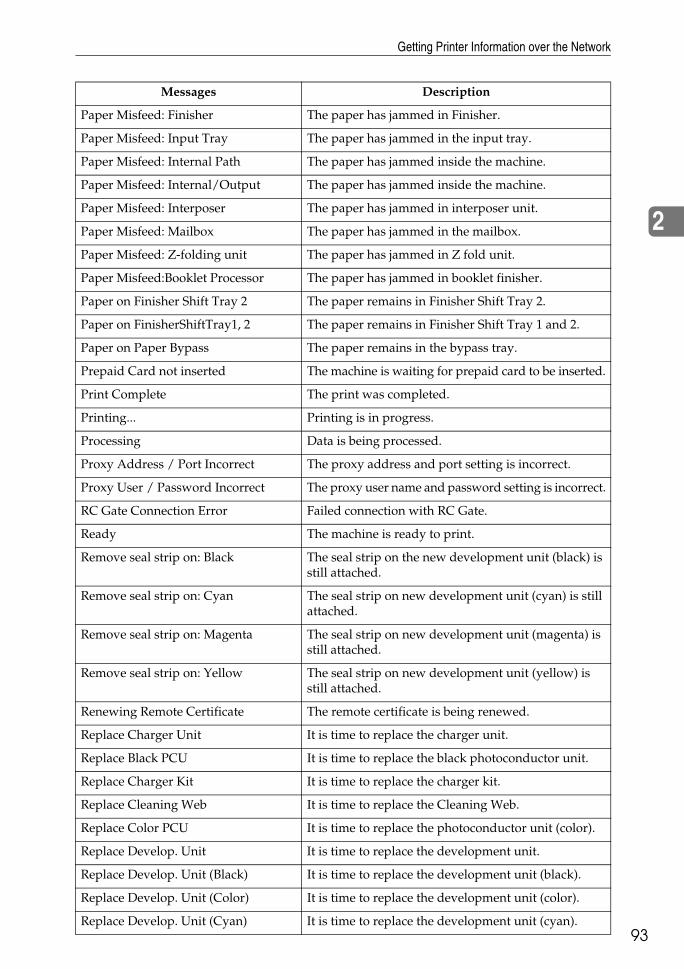
Getting Printer Information over the Network
93
2
Paper Misfeed: Finisher The paper has jammed in Finisher.
Paper Misfeed: Input Tray The paper has jammed in the input tray.
Paper Misfeed: Internal Path The paper has jammed inside the machine.
Paper Misfeed: Internal/Output The paper has jammed inside the machine.
Paper Misfeed: Interposer The paper has jammed in interposer unit.
Paper Misfeed: Mailbox The paper has jammed in the mailbox.
Paper Misfeed: Z-folding unit The paper has jammed in Z fold unit.
Paper Misfeed:Booklet Processor The paper has jammed in booklet finisher.
Paper on Finisher Shift Tray 2 The paper remains in Finisher Shift Tray 2.
Paper on FinisherShiftTray1, 2 The paper remains in Finisher Shift Tray 1 and 2.
Paper on Paper Bypass The paper remains in the bypass tray.
Prepaid Card not inserted The machine is waiting for prepaid card to be inserted.
Print Complete The print was completed.
Printing... Printing is in progress.
Processing Data is being processed.
Proxy Address / Port Incorrect The proxy address and port setting is incorrect.
Proxy User / Password Incorrect The proxy user name and password setting is incorrect.
RC Gate Connection Error Failed connection with RC Gate.
Ready The machine is ready to print.
Remove seal strip on: Black The seal strip on the new development unit (black) is still attached.
Remove seal strip on: Cyan The seal strip on new development unit (cyan) is still attached.
Remove seal strip on: Magenta The seal strip on new development unit (magenta) is still attached.
Remove seal strip on: Yellow The seal strip on new development unit (yellow) is still attached.
Renewing Remote Certificate The remote certificate is being renewed.
Replace Charger Unit It is time to replace the charger unit.
Replace Black PCU It is time to replace the black photoconductor unit.
Replace Charger Kit It is time to replace the charger kit.
Replace Cleaning Web It is time to replace the Cleaning Web.
Replace Color PCU It is time to replace the photoconductor unit (color).
Replace Develop. Unit It is time to replace the development unit.
Replace Develop. Unit (Black) It is time to replace the development unit (black).
Replace Develop. Unit (Color) It is time to replace the development unit (color).
Replace Develop. Unit (Cyan) It is time to replace the development unit (cyan).
Messages Description

Monitoring and Configuring the Printer
94
2
Note❒ For details about UNIX commands, see UNIX Supplement.❒ Check the error contents that may be printed in the configuration page. For
details about printing a configuration page, see Printer Reference.
Replace Develop. Unit (Magenta) It is time to replace the development unit (magenta).
Replace Develop. Unit (Yellow) It is exchange time of the development unit (yellow).
Replace Feed Belt It is time to replace the feed belt.
Replace Feed Roller It is time to replace the transfer roller.
Replace Fuser Oil Unit It is time to replace the fuser oil unit.
Replace Fusing Unit It is time to replace the fusing unit.
Replace PCU It is time to replace the photoconductor unit.
Replace PCU(Color) It is time to replace the photoconductor unit(Color).
Replace Sustainer Unit It is time to replace the sustainer unit.
Replace Toner Suction Motor It is time to replace the toner suction motor.
Replace Transfer Belt It is time to replace the transfer belt.
Replace Transfer Cleaning Unit It is time to replace the transfer cleaning unit.
Retarding... Printing has stopped momentarily to allow printed sheets to dry.
SD Card Authentication failed SD card authentication failed.
Setting Remotely The RDS setting is being processed.
Shift Tray Internal output tray is full.
Skipped due to Error Skipped the error.
Storage Complete The storage is complete.
Storage Failed The storage has failed.
Supplies Order Call failed The supply order call has failed.
Suspend / Resume Key Error Finisher stop button was pressed.
Transmission Aborted The transmission was interrupted.
Transmission Complete The transmission completion was completed.
Transmission Failed The transmission has failed.
Tray Error: Chaptering The paper feed tray specification error has occurred because chaptering as well as the normal paper use the same tray for printing.
Tray Error: Duplex Printing Selected paper tray cannot be used for duplex printing.
Unit Left Open: ADF Document feeder is opened.
Waiting for Job Suspension The machine is waiting for Job Suspension.
Warming Up... The machine is warming up.
Messages Description
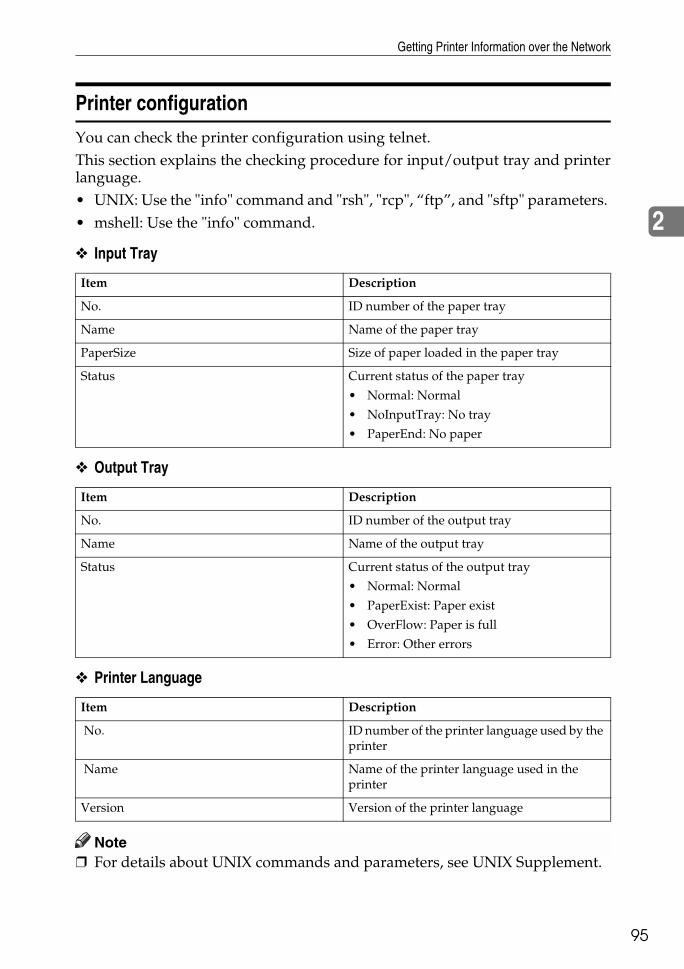
Getting Printer Information over the Network
95
2
Printer configuration
You can check the printer configuration using telnet.This section explains the checking procedure for input/output tray and printerlanguage.• UNIX: Use the "info" command and "rsh", "rcp", “ftp”, and "sftp" parameters. • mshell: Use the "info" command.
❖ Input Tray
❖ Output Tray
❖ Printer Language
Note❒ For details about UNIX commands and parameters, see UNIX Supplement.
Item Description
No. ID number of the paper tray
Name Name of the paper tray
PaperSize Size of paper loaded in the paper tray
Status Current status of the paper tray
• Normal: Normal
• NoInputTray: No tray
• PaperEnd: No paper
Item Description
No. ID number of the output tray
Name Name of the output tray
Status Current status of the output tray
• Normal: Normal
• PaperExist: Paper exist
• OverFlow: Paper is full
• Error: Other errors
Item Description
No. ID number of the printer language used by the printer
Name Name of the printer language used in the printer
Version Version of the printer language

Monitoring and Configuring the Printer
96
2
Understanding the Displayed Information
This section explains how to read status information returned by the network in-terface board.
Print Job Information
Use the following command to display print job information:• UNIX: Use the "info" command and "rsh", "rcp", “ftp”, and "sftp" parameters. • mshell: Use the "info" command.
Note❒ For details about UNIX commands and parameters, see UNIX Supplement.
Item Description
Rank Print job status.
• ActivePrinting or preparing for printing.
• WaitingWaiting to be transferred to the printer.
Owner Print request user name.
Job Print request number.
Files The name of the document.
Total Size The size of the data (spooled).
The default is 0 bytes.
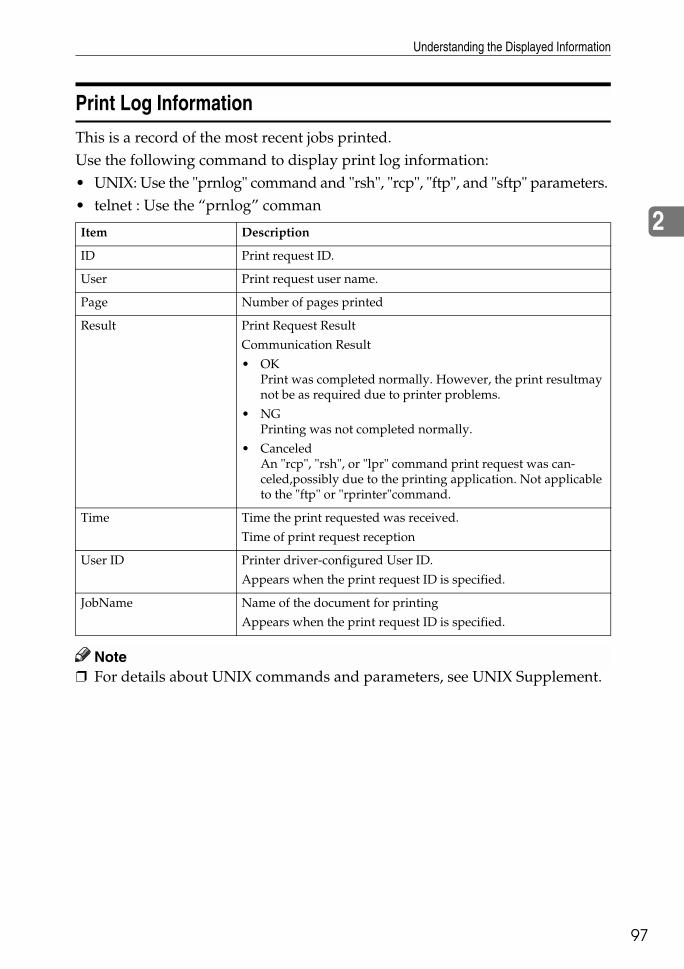
Understanding the Displayed Information
97
2
Print Log Information
This is a record of the most recent jobs printed.Use the following command to display print log information:• UNIX: Use the "prnlog" command and "rsh", "rcp", "ftp", and "sftp" parameters. • telnet : Use the “prnlog” comman
Note❒ For details about UNIX commands and parameters, see UNIX Supplement.
Item Description
ID Print request ID.
User Print request user name.
Page Number of pages printed
Result Print Request Result
Communication Result
• OKPrint was completed normally. However, the print resultmay not be as required due to printer problems.
• NGPrinting was not completed normally.
• CanceledAn "rcp", "rsh", or "lpr" command print request was can-celed,possibly due to the printing application. Not applicable to the "ftp" or "rprinter"command.
Time Time the print requested was received.
Time of print request reception
User ID Printer driver-configured User ID.
Appears when the print request ID is specified.
JobName Name of the document for printing
Appears when the print request ID is specified.
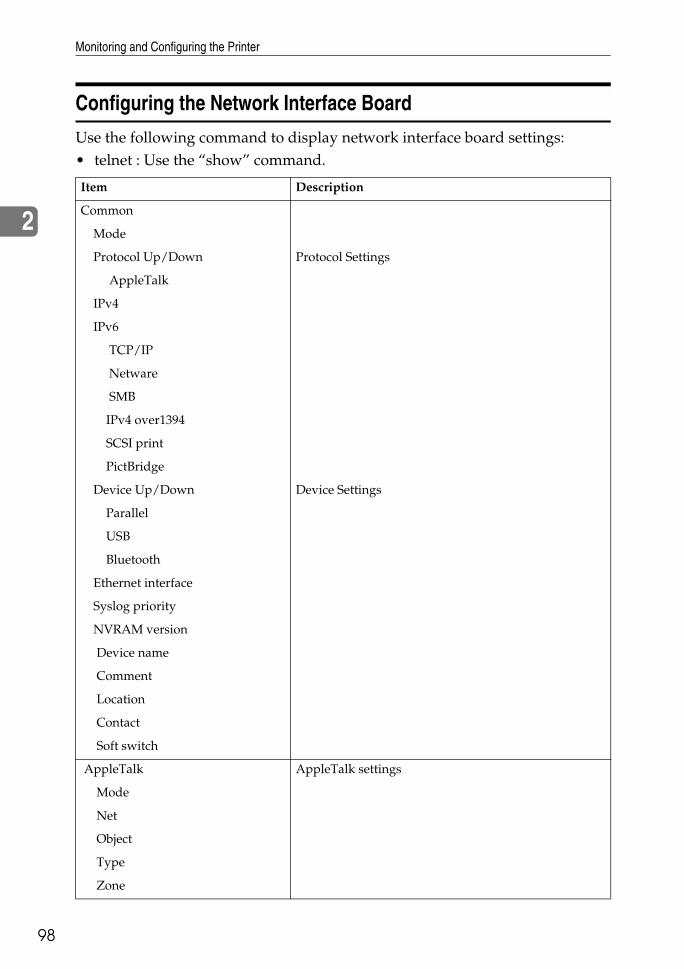
Monitoring and Configuring the Printer
98
2
Configuring the Network Interface Board
Use the following command to display network interface board settings:• telnet : Use the “show” command.
Item Description
Common
Mode
Protocol Up/Down Protocol Settings
AppleTalk
IPv4
IPv6
TCP/IP
Netware
SMB
IPv4 over1394
SCSI print
PictBridge
Device Up/Down Device Settings
Parallel
USB
Bluetooth
Ethernet interface
Syslog priority
NVRAM version
Device name
Comment
Location
Contact
Soft switch
AppleTalk AppleTalk settings
Mode
Net
Object
Type
Zone

Understanding the Displayed Information
99
2
TCP/IP TCP/IP settings
Mode(IPv4)
Mode(IPv6)
ftp
lpr
rsh
telnet
diprint
web
http
ftpc
snmp
ipp
autonet
bonjour
ssl
nrs
rfu
nbt
ssdp
ssh
sftp
IPv4
DHCP
Address
Netmask
Broadcast
Gateway
IPv6
Stateless
Manual
Gateway
EncapType
Host name
DNS Domain
Item Description
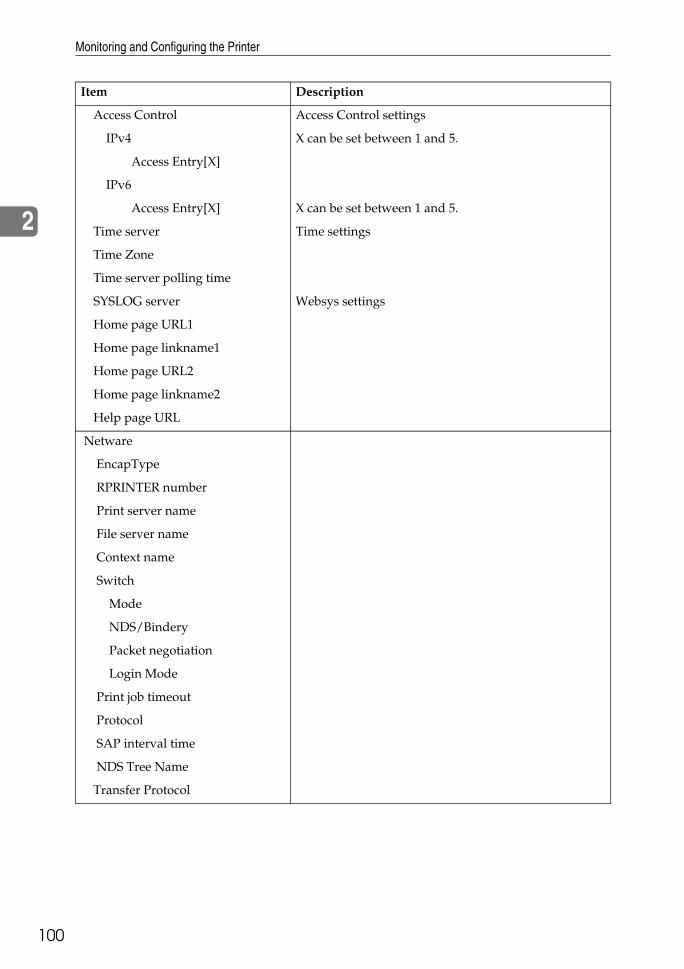
Monitoring and Configuring the Printer
100
2
Access Control Access Control settings
IPv4 X can be set between 1 and 5.
Access Entry[X]
IPv6
Access Entry[X] X can be set between 1 and 5.
Time server Time settings
Time Zone
Time server polling time
SYSLOG server Websys settings
Home page URL1
Home page linkname1
Home page URL2
Home page linkname2
Help page URL
Netware
EncapType
RPRINTER number
Print server name
File server name
Context name
Switch
Mode
NDS/Bindery
Packet negotiation
Login Mode
Print job timeout
Protocol
SAP interval time
NDS Tree Name
Transfer Protocol
Item Description
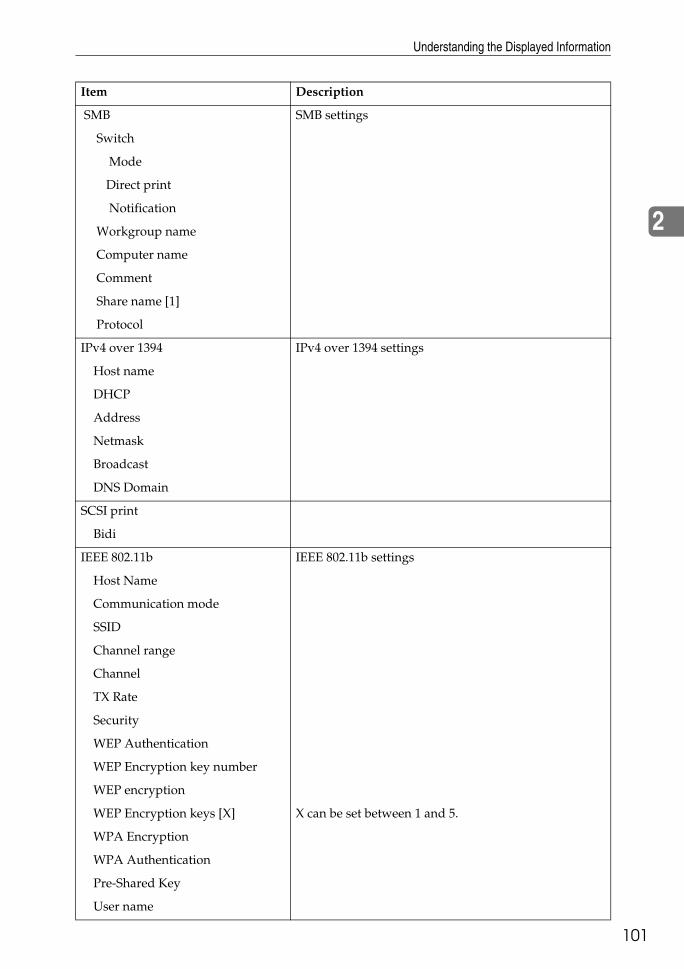
Understanding the Displayed Information
01
2
1
SMB SMB settings
Switch
Mode
Direct print
Notification
Workgroup name
Computer name
Comment
Share name [1]
Protocol
IPv4 over 1394 IPv4 over 1394 settings
Host name
DHCP
Address
Netmask
Broadcast
DNS Domain
SCSI print
Bidi
IEEE 802.11b IEEE 802.11b settings
Host Name
Communication mode
SSID
Channel range
Channel
TX Rate
Security
WEP Authentication
WEP Encryption key number
WEP encryption
WEP Encryption keys [X] X can be set between 1 and 5.
WPA Encryption
WPA Authentication
Pre-Shared Key
User name
Item Description
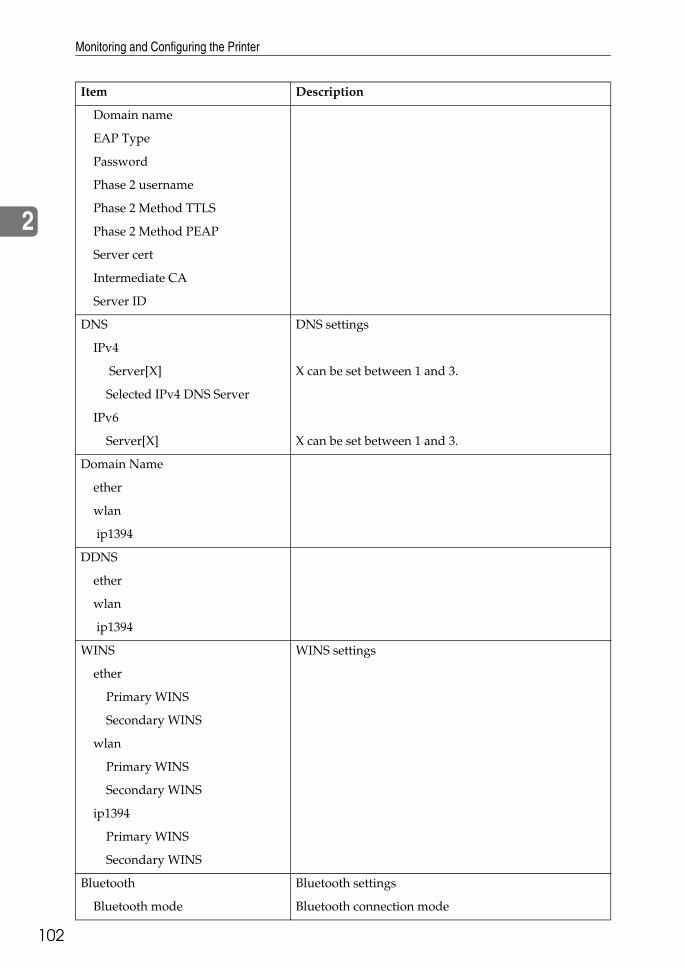
Monitoring and Configuring the Printer
102
2
Domain name
EAP Type
Password
Phase 2 username
Phase 2 Method TTLS
Phase 2 Method PEAP
Server cert
Intermediate CA
Server ID
DNS DNS settings
IPv4
Server[X] X can be set between 1 and 3.
Selected IPv4 DNS Server
IPv6
Server[X] X can be set between 1 and 3.
Domain Name
ether
wlan
ip1394
DDNS
ether
wlan
ip1394
WINS WINS settings
ether
Primary WINS
Secondary WINS
wlan
Primary WINS
Secondary WINS
ip1394
Primary WINS
Secondary WINS
Bluetooth Bluetooth settings
Bluetooth mode Bluetooth connection mode
Item Description
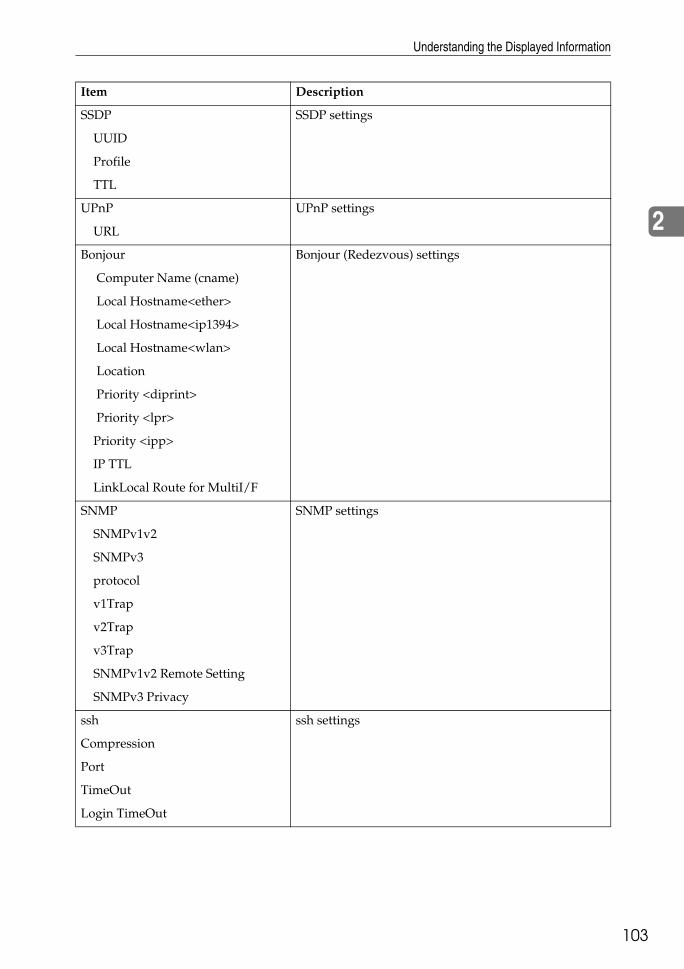
Understanding the Displayed Information
03
2
1
SSDP SSDP settings
UUID
Profile
TTL
UPnP UPnP settings
URL
Bonjour Bonjour (Redezvous) settings
Computer Name (cname)
Local Hostname<ether>
Local Hostname<ip1394>
Local Hostname<wlan>
Location
Priority <diprint>
Priority <lpr>
Priority <ipp>
IP TTL
LinkLocal Route for MultiI/F
SNMP SNMP settings
SNMPv1v2
SNMPv3
protocol
v1Trap
v2Trap
v3Trap
SNMPv1v2 Remote Setting
SNMPv3 Privacy
ssh ssh settings
Compression
Port
TimeOut
Login TimeOut
Item Description
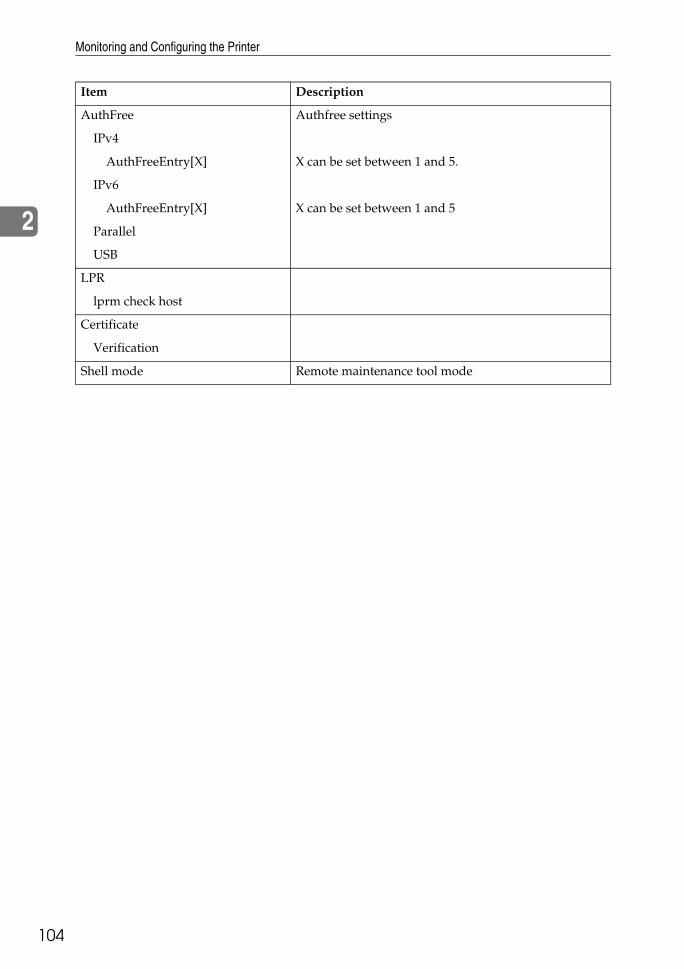
Monitoring and Configuring the Printer
104
2
AuthFree Authfree settings
IPv4
AuthFreeEntry[X] X can be set between 1 and 5.
IPv6
AuthFreeEntry[X] X can be set between 1 and 5
Parallel
USB
LPR
lprm check host
Certificate
Verification
Shell mode Remote maintenance tool mode
Item Description
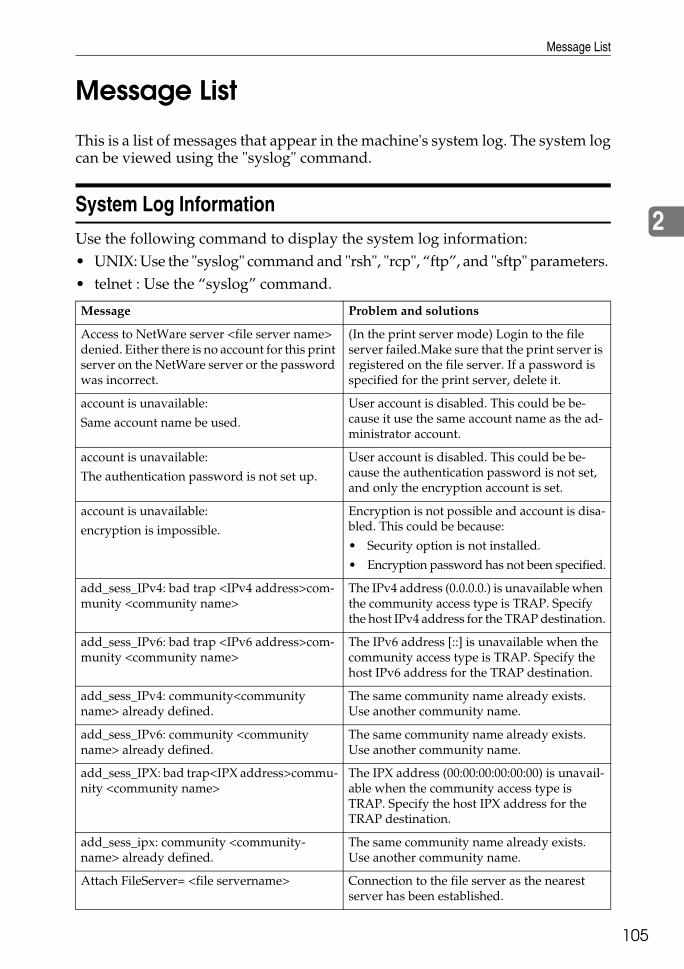
Message List
05
2
1
Message List
This is a list of messages that appear in the machine's system log. The system logcan be viewed using the "syslog" command.
System Log Information
Use the following command to display the system log information:• UNIX: Use the "syslog" command and "rsh", "rcp", “ftp”, and "sftp" parameters. • telnet : Use the “syslog” command.
Message Problem and solutions
Access to NetWare server <file server name> denied. Either there is no account for this print server on the NetWare server or the password was incorrect.
(In the print server mode) Login to the file server failed.Make sure that the print server is registered on the file server. If a password is specified for the print server, delete it.
account is unavailable:
Same account name be used.
User account is disabled. This could be be-cause it use the same account name as the ad-ministrator account.
account is unavailable:
The authentication password is not set up.
User account is disabled. This could be be-cause the authentication password is not set, and only the encryption account is set.
account is unavailable:
encryption is impossible.
Encryption is not possible and account is disa-bled. This could be because:
• Security option is not installed.
• Encryption password has not been specified.
add_sess_IPv4: bad trap <IPv4 address>com-munity <community name>
The IPv4 address (0.0.0.0.) is unavailable when the community access type is TRAP. Specify the host IPv4 address for the TRAP destination.
add_sess_IPv6: bad trap <IPv6 address>com-munity <community name>
The IPv6 address [::] is unavailable when the community access type is TRAP. Specify the host IPv6 address for the TRAP destination.
add_sess_IPv4: community<community name> already defined.
The same community name already exists. Use another community name.
add_sess_IPv6: community <community name> already defined.
The same community name already exists. Use another community name.
add_sess_IPX: bad trap<IPX address>commu-nity <community name>
The IPX address (00:00:00:00:00:00) is unavail-able when the community access type is TRAP. Specify the host IPX address for the TRAP destination.
add_sess_ipx: community <community-name> already defined.
The same community name already exists. Use another community name.
Attach FileServer= <file servername> Connection to the file server as the nearest server has been established.

Monitoring and Configuring the Printer
106
2
Attach to print queue <print queue name> (In the print server mode) Attached to the print queue.
Authentication mode mismatch< SSID > Authentication mode is different to the AP. The required SSID is the SSID of the access point connected to when in infrastructure mode.
btd is disabled. Communication via Bluetooth is unavailable because btd is disabled in the security mode.
Enable the btd in the security mode.
centrod is disabled. Communication via parallel connection is un-available because centrod is disabled in the se-curity mode.
Enable centrod in the security mode.
Cannot create service connection (In the remote printer mode) Connection to the file server has not been established. The number of file server users may have exceeded the maximum capacity of the file server.
Cannot find rprinter (<print server name>/<printer number>)
The printer with the number displayed on the print server does not exist. Make sure that the printer number is registered on the print server.
Change IP address from DHCP Server. The IP address changes when DHCP lease is re-newed. To always assign the same IP address, set a static IP address to the DHCP server.
child process exec error! (process name) The network service failed to start. Turn the printer off and then on. If this does not work, contact your service or sales representative.
Client password rejected The client's password was rejected. Check the client password.
Client tls certificate rejected The client's TLS certificate was rejected. Check the certificate.
Connected DHCP Server(<DHCP serverad-dress>).
The IP address was successfully received from the DHCPserver.
Could not attach to FileServer<error number> (In the remote printer mode) Connection to the file server has not been established. The file server has refused the connection. Check the file server configuration.
Could not attach to PServer<print server> (In the remote printer mode) Connection to the print server has not been established. The print server has refused the connection. Check the print server configuration.
Current Interface Speed:xxxMbps Speed of the network (10Mbps, 100 Mbps, or 1Gbps).
Current IP address <currentIP address> Current IPv4 address.
Current IPX address<IPX address> Current IPX address
Message Problem and solutions
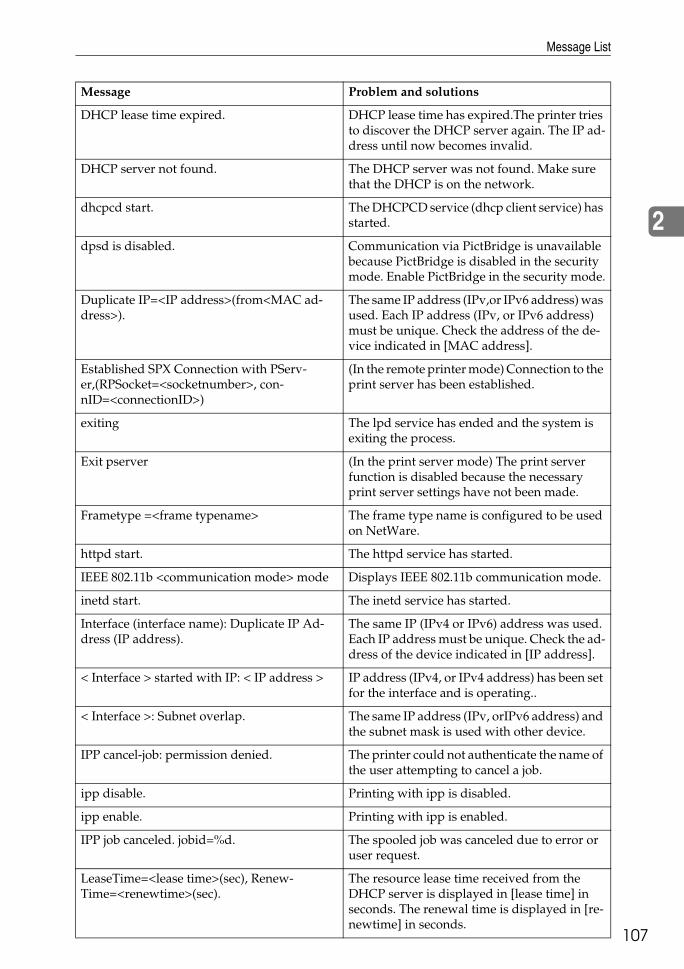
Message List
07
2
1
DHCP lease time expired. DHCP lease time has expired.The printer tries to discover the DHCP server again. The IP ad-dress until now becomes invalid.
DHCP server not found. The DHCP server was not found. Make sure that the DHCP is on the network.
dhcpcd start. The DHCPCD service (dhcp client service) has started.
dpsd is disabled. Communication via PictBridge is unavailable because PictBridge is disabled in the security mode. Enable PictBridge in the security mode.
Duplicate IP=<IP address>(from<MAC ad-dress>).
The same IP address (IPv,or IPv6 address) was used. Each IP address (IPv, or IPv6 address) must be unique. Check the address of the de-vice indicated in [MAC address].
Established SPX Connection with PServ-er,(RPSocket=<socketnumber>, con-nID=<connectionID>)
(In the remote printer mode) Connection to the print server has been established.
exiting The lpd service has ended and the system is exiting the process.
Exit pserver (In the print server mode) The print server function is disabled because the necessary print server settings have not been made.
Frametype =<frame typename> The frame type name is configured to be used on NetWare.
httpd start. The httpd service has started.
IEEE 802.11b <communication mode> mode Displays IEEE 802.11b communication mode.
inetd start. The inetd service has started.
Interface (interface name): Duplicate IP Ad-dress (IP address).
The same IP (IPv4 or IPv6) address was used. Each IP address must be unique. Check the ad-dress of the device indicated in [IP address].
< Interface > started with IP: < IP address > IP address (IPv4, or IPv4 address) has been set for the interface and is operating..
< Interface >: Subnet overlap. The same IP address (IPv, orIPv6 address) and the subnet mask is used with other device.
IPP cancel-job: permission denied. The printer could not authenticate the name of the user attempting to cancel a job.
ipp disable. Printing with ipp is disabled.
ipp enable. Printing with ipp is enabled.
IPP job canceled. jobid=%d. The spooled job was canceled due to error or user request.
LeaseTime=<lease time>(sec), Renew-Time=<renewtime>(sec).
The resource lease time received from the DHCP server is displayed in [lease time] in seconds. The renewal time is displayed in [re-newtime] in seconds.
Message Problem and solutions
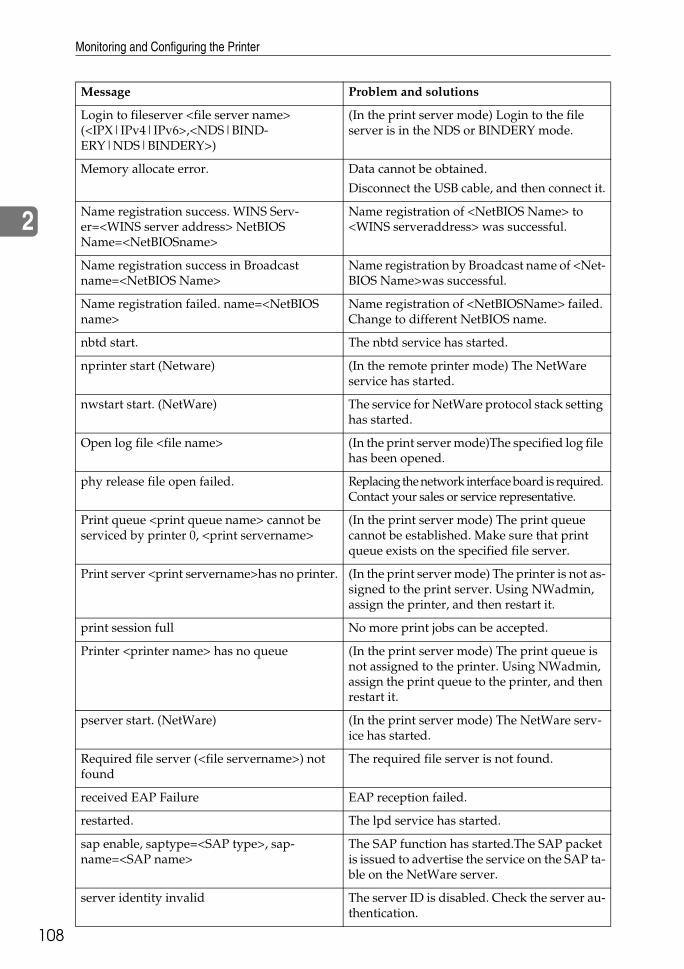
Monitoring and Configuring the Printer
108
2
Login to fileserver <file server name> (<IPX|IPv4|IPv6>,<NDS|BIND-ERY|NDS|BINDERY>)
(In the print server mode) Login to the file server is in the NDS or BINDERY mode.
Memory allocate error. Data cannot be obtained.
Disconnect the USB cable, and then connect it.
Name registration success. WINS Serv-er=<WINS server address> NetBIOS Name=<NetBIOSname>
Name registration of <NetBIOS Name> to <WINS serveraddress> was successful.
Name registration success in Broadcast name=<NetBIOS Name>
Name registration by Broadcast name of <Net-BIOS Name>was successful.
Name registration failed. name=<NetBIOS name>
Name registration of <NetBIOSName> failed. Change to different NetBIOS name.
nbtd start. The nbtd service has started.
nprinter start (Netware) (In the remote printer mode) The NetWare service has started.
nwstart start. (NetWare) The service for NetWare protocol stack setting has started.
Open log file <file name> (In the print server mode)The specified log file has been opened.
phy release file open failed. Replacing the network interface board is required. Contact your sales or service representative.
Print queue <print queue name> cannot be serviced by printer 0, <print servername>
(In the print server mode) The print queue cannot be established. Make sure that print queue exists on the specified file server.
Print server <print servername>has no printer. (In the print server mode) The printer is not as-signed to the print server. Using NWadmin, assign the printer, and then restart it.
print session full No more print jobs can be accepted.
Printer <printer name> has no queue (In the print server mode) The print queue is not assigned to the printer. Using NWadmin, assign the print queue to the printer, and then restart it.
pserver start. (NetWare) (In the print server mode) The NetWare serv-ice has started.
Required file server (<file servername>) not found
The required file server is not found.
received EAP Failure EAP reception failed.
restarted. The lpd service has started.
sap enable, saptype=<SAP type>, sap-name=<SAP name>
The SAP function has started.The SAP packet is issued to advertise the service on the SAP ta-ble on the NetWare server.
server identity invalid The server ID is disabled. Check the server au-thentication.
Message Problem and solutions
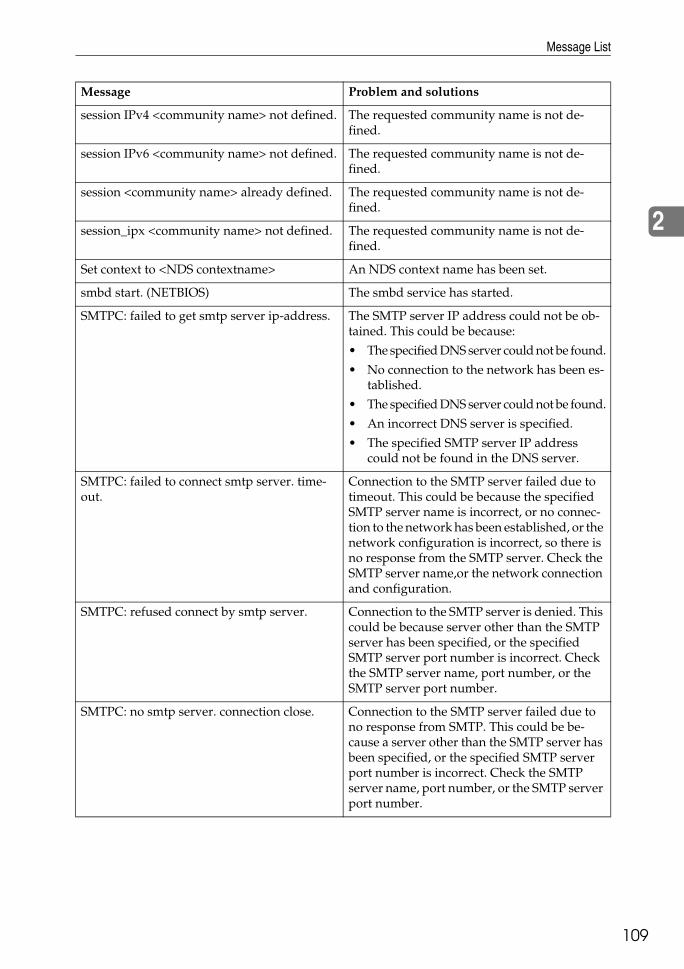
Message List
09
2
1
session IPv4 <community name> not defined. The requested community name is not de-fined.
session IPv6 <community name> not defined. The requested community name is not de-fined.
session <community name> already defined. The requested community name is not de-fined.
session_ipx <community name> not defined. The requested community name is not de-fined.
Set context to <NDS contextname> An NDS context name has been set.
smbd start. (NETBIOS) The smbd service has started.
SMTPC: failed to get smtp server ip-address. The SMTP server IP address could not be ob-tained. This could be because:
• The specified DNS server could not be found.
• No connection to the network has been es-tablished.
• The specified DNS server could not be found.
• An incorrect DNS server is specified.
• The specified SMTP server IP address could not be found in the DNS server.
SMTPC: failed to connect smtp server. time-out.
Connection to the SMTP server failed due to timeout. This could be because the specified SMTP server name is incorrect, or no connec-tion to the network has been established, or the network configuration is incorrect, so there is no response from the SMTP server. Check the SMTP server name,or the network connection and configuration.
SMTPC: refused connect by smtp server. Connection to the SMTP server is denied. This could be because server other than the SMTP server has been specified, or the specified SMTP server port number is incorrect. Check the SMTP server name, port number, or the SMTP server port number.
SMTPC: no smtp server. connection close. Connection to the SMTP server failed due to no response from SMTP. This could be be-cause a server other than the SMTP server has been specified, or the specified SMTP server port number is incorrect. Check the SMTP server name, port number, or the SMTP server port number.
Message Problem and solutions

Monitoring and Configuring the Printer
110
2
SMTPC: failed to connect smtp server. Connection to the SMTP server failed. This could be because no connection to the network has been established, or the network configu-ration is incorrect, so there is no response from the SMTP server, or the specified SMTP server name is incorrect, or the specified SMTP server IP address could not be found in the DNS serv-er, or a server other than the SMTP server has been specified, or the specified SMTP server port number is incorrect. Check the DNS Serv-er's IP address and SMTP server's IP address, or the SMTP servername and SMTP port number, or the SMTP server's SMTP port number, or the network connection and con-figuration.
SMTPC: username or password wasn't correct. [response code] (information)
Connection to the SMTP server failed, because the specified SMTP user name is incorrect, or the specified SMTP password is incor-rect.Check the SMTP user name and password.
Snmp over IPv4 is ready Communication over IPv4 with snmp is available.
Snmp over IPv6 is ready. Communication over IPv6 with snmp is available.
Snmp over IPv4 over 1394 is ready. Communication over IPv4 over 1394 with snmp is available.
Snmp over ipx is ready. Communication over IPX with snmp is available.
snmpd start. The snmpd service has started.
started. The direct print service has started.
Started. The bonjour (rendezvous) function is enabled.
terminated. The bonjour (rendezvous) function is disabled.
The print server received error <error number> during attempt to log in to the net-work. Access to the network was denied. Ver-ify that the print server name and password are correct.
Login to the file server failed.The print server is not registered or a password is specified. Register the print server without specifying a password.
too many pictures. PictBridge printing failed because too many image are sent during one print transacation. Reduce images at one print transaction.
trap account is unavailable. v3Trap cannot be sent. This could be because the Trap destination account is different from the account specified by the printer.
usbd is disable. Plug and Play function and printing is disabled because usbd is disabled in the security mode.
Enable usbd in the security mode.
WINS name registration: No response to serv-er<WINS server address>
There was no response from the WINS server. Check the correct WINS server address is en-tered. Alternatively,check the WINS server is functioning properly.
Message Problem and solutions

Message List
11
2
1
Note❒ For details about UNIX commands and parameters, see UNIX Supplement.
WINS wrong scopeID=<Scope ID> An invalid scope ID was used.Use a valid scope ID.
wpa authentication Failed WPA authentication failed. Check the WPA configuration.
wpa authentication started WPA authentication has started.
wpa IEEE802.1X started WPA authentication has started.
wpa connecting to authenticator WPA is connecting to authenticator.
wpa link up WPA key exchange has finished, and commu-nication has been terminated.
wpa probe response doesn't have IE. WPA probe response does not have IE.
wpa success authenticated WPA authentication was successful.
wpa success key received WPA key reception was successful.
wpa waiting for key Waiting for WPA key.
wpasupd start wpasupd has started.
wpasupd stop wpasupd has ended.
Message Problem and solutions

Monitoring and Configuring the Printer
112
2

3. Special Operations underWindows
13
1Printing Files Directly from Windows
You can print files directly usingWindows commands. For example,you can print PostScript files for Post-Script 3.
❖ Windows 95/98/MeYou can print files directly usingftp or sftp command.
❖ Windows 2000/XP, Windows Server2003, Windows NT 4.0You can print files directly usinglpr, rcp ftp or sftp command.
Setup
Follow the procedure below to makenetwork environment settings.
A Enable TCP/IP with the controlpanel, and then set up the print-er’s network environment aboutTCP/IP including IP addresses.TCP/IP of the printer is set as de-fault.
B Install a TCP/IP in Windows toset up the network environment.Consult the network administratorfor the local setting information.
C To print under Windows 2000/XP,Windows Server 2003, install“Printing service for UNIX” as thenetwork application. To print un-der Windows NT 4.0, install “Mi-crosoft TCP/IP printing” as thenetwork application.
Referencep.119 “Using DHCP”
Using a Host Name Instead of an IPv4 Address
When a host name is defined, you canspecify a printer by host name insteadof IP address. The host names varydepending on the network environ-ment.
When using DNS
Use the host name set to the data fileon the DNS server.
When setting the IPv4 address of a printer using DHCP
Use the printer name on the configu-ration page as the host name.
Note❒ For details about printing a config-
uration page, see General SettingGuide.
In other cases
Add the IP address and host name ofthe network printer to the hosts fileon the computer used for printing.Methods of addition vary dependingon operating systems.

Special Operations under Windows
114
3
Windows 95/98/Me
A Copy \WINDOWS\HOSTS.SAMto the same directory and name it“HOSTS” with no extension.
B Open the "\WINDOWS\HOSTS"file created using memo pad files,for instance.
C Add an IP address and host nameto the hosts file using the follow-ing format:192.168.15.16 host # NP
"192.168.15.16" is the IP address,"host" is the printer's host name,and "#NP" is replaced by com-ments. Insert a space or tab between"192.168.15.16" and "host", between"host" and "#NP" respectively, us-ing one line for this format.
D Save the file.
Windows 2000/XP, Windows Server 2003, Windows NT 4.0
A Open the hosts file using memopad files, for instance.The hosts file is in the followingfolder:\WINNT\SYSTEM32\DRIV-ERS\ETC\HOSTS
"\WINNT" is the directory of theinstallation destination for Win-dows 2000/XP, Windows Server2003, and Windows NT 4.0.
B Add an IPv4 or IPv6address andhost name to the hosts file usingthe following format:192.168.15.16 host # NP
"192.168.15.16" is the IPv4 address,"host" is the printer's host name,and "#NP" is replaced by com-ments. Insert a space or tab be-tween "192.168.15.16" and "host",between "host" and "#NP" respec-tively, using one line for this for-mat.2001:DB::100 host # NP
"2001:DB::100" is the IPv6 address,"host" is the printer's host name,and "#NP" is replaced by com-ments. Insert a space or tab between"2001:DB::100" and "host", between"host" and "#NP" respectively, us-ing one line for this format.
C Save the file.
Note❒ When using a host name under
Windows Server 2003 with IPv6protocol, perform host nameresolution using an exrernalDNS server. The host file cannotbe used.

Printing Files Directly from Windows
15
3
1
Printing Commands
The following explains printing oper-ations using the “lpr”, “rcp”, and“ftp” commands.Enter commands using the commandprompt window. The location of thecommand prompts varies dependingon operating systems:• Windows 95/98
[Start] - [Programs] - [MS-DOSPrompt]
• Windows Me [Start] - [Programs] - [Accessories] -[MS-DOS Prompt]
• Windows 2000 [Start] - [Programs] - [Accessories] -[Command Prompt]
• Windows XP, Windows Server 2003 [Start] - [All Programs] - [Accesso-ries] - [Command Prompt]
• Windows NT 4.0 [Start] - [Programs] - [CommandPrompt]
Note❒ Match the data format of the file to
be printed with the emulationmode of the printer.
❒ If the message "print requests full"appears, no print jobs can be ac-cepted. Try again when sessionsend. For each command, theamount of possible sessions is indi-cated as follows:• lpr: 5(When the spool printing
function is available: 10)• rcp, rsh: 5• ftp: 3• sftp: 3
❒ Enter the file name in a format in-cluding the path from the directo-ry executing commands.
❒ The “option” specified in a com-mand is an intrinsic printer optionand its syntax is similar to printingfrom UNIX. For details, see UNIXSupplement.
lpr
❖ When specifying a printer by IP ad-dressc:> lpr -Sprinter's IP ad-dress [-Poption] [-ol]\pass name\file name
❖ When using a host name instead of anIP addressc:> lpr -Sprinter's hostname [-Poption] [-ol]\pass name\file nameWhen printing a binary file, addthe "-ol" option (lowercase O, andlowercase L).
When using a printer with the hostname "host" to print a PostScript filen a m e d " f i l e 1 " l o c a t e d i n t h e"C:\PRINT" directory, the commandline is as follows:c:> lpr -Shost -Pfile-type=RPS -ol C:\PRINT\file1

Special Operations under Windows
116
3
rcp
First, register the printer's host namein the hosts file.c:> rcp [-b] \pass name\filename [pass name\file name...]printer's host name:[option]
Note❒ In file names, "*" and "?" can be
used as wild cards.❒ When printing a binary file, add
the “-b” option.When using a printer with the hostname "host" to print a PostScript filenamed "file 1" or "file 2" located in the"C:\PRINT" directory, the commandline is as follows:c:> rcp -b C:\PRINT\file1C:\PRINT\file2 host:file-type=RPS
Referencep.113 “Using a Host Name Insteadof an IPv4 Address”
ftp/sftp
Use the "put" or "mput" command accord-ing to the number of files to be printed.
❖ When one file is printedftp> put \pass name\filename [option]
❖ When multiple files are printedftp> mput \pass name\filename [\pass name\filename...] [option]
Follow the procedure below to printusing the "ftp" command.
A Formulate the printer's IP addressor the host name of the hosts fileprinter as an argument and usethe "ftp" or “sftp” command.% ftp printer's IP address
B Enter the user name and pass-word, and then press the {# Enter}key.For details about the user nameand password, consult your net-work administrator.User:Password:
When user authentication is set,enter a login user name and pass-word.
CWhen printing a binary file, setthe file mode to binary.ftp> bin
When printing a binary file in AS-CII mode, print may not come outcorrectly.
D Specify files to be printed.The following shows the examplesof printing a PostScript file named"file 1" in the "C:\PRINT" directoryand printing file 1 and file 2.ftp> put C:\PRINT\file1filetype=RPSftp> mput C:\PRINT\file1C:\PRINT\file2
E Quit ftp.ftp> bye
Note❒ “=”, “,”, “_”, and “;”cannot be
used for filenames. File nameswill be read as option strings.
❒ For “mput” command, optioncan not be defined.
❒ For “mput” command, “*” and“?” can be used as wild cards infile names.
❒ When printing a binary file inASCII mode, print may notcome out correctly.

4. Appendix
17
1When Using Windows Terminal Service / MetaFrame
The following explains how to useWindows Terminal Service andMaintenance.
Operating Environment
The following operating systems andMetaFrame versions are supported.
❖ Windows NT Server 4.0 TerminalServer Edition• MetaFrame 1.8 SP3 / FR1+SP3 /
SP4• MetaFrame XP 1.0 SP1 / SP2 /
FR1
❖ Windows 2000 Server / AdvancedServer• MetaFrame 1.8 SP3 / FR1+SP3 /
SP4• MetaFrame XP 1.0 SP1 / SP2 /
SP3 / FR1 / FR2 / FR3• MetaFrame Presentation Server
3.0• Citrix Presentation Server 4.0
❖ Windows 2003 Server• MetaFrame XP 1.0 FR3• MetaFrame Presentation Server
3.0• Citrix Presentation Server 4.0
Supported Printer Drivers
❖ When Windows Terminal Service isoperating• PCL drivers• PostScript 3• RPCS drivers
Note❒ Some RPCS printer driver func-
tions do not work if Windows Ter-minal Service is installed.
Limitations
The following limitations apply to theWindows Terminal Service environ-ment.These limitations are built in Win-dows Terminal Service or Meta-Frame.
Appendix
118
4
❖ Windows Terminal ServiceIn the Windows Terminal Serviceenvironment, some of the printerdriver’s functions is unavailable.In an environment where Win-dows Terminal Service is installed,some of the printer driver’s func-tions is unavailable, even if anyfunction of Windows TerminalService is not used. When you in-stall SmartDeviceMonitor for Cli-ent in an environment where theTerminal Service is running on aWindows NT Server 4.0 TerminalServer Edition or the Windows2000 Server family computer, besure to install it using the installmode. The following are the twomethods of installation using theinstall mode:A Use [Add/Remove Programs] in
[Control Panel] to install Smart-DeviceMonitor for Client.
B Enter the following commandi n t h e M S - D O S c o m m a n dprompt:
To quit the install mode, enter thefollowing command in the MS-DOS command prompt.
❖ MetaFrame's [Auto-creating clientprinters] Using [Auto-creating client printers]can select a logical printer createdby copying the client's local printerdata to the MetaFrame server. Westrongly recommend testing thisfunction in your network environ-ment before using it for your work.• The settings for optional equip-
ment will not be stored in theserver after the equipment isdisconnected. The settings foroptional equipment will be re-stored to its defaults each timethe client computer logs on tothe server.
• When printing a large numberof bitmap images or using theserver in a WAN environmentover dial-up lines such as ISDN,printing may not be possible orerrors may occur, depending ondata transfer rates.
• When using MetaFrame XP 1.0or higher versions, we recom-mend making settings in [ClientPrinter bandwidth] under [CitrixManagement Console] accordingto the environment.
• If a print error occurs on theserver and the print job or aprinter created in [Auto-creatingclient printers] cannot be deleted,we recommend the following:• MetaFrame 1.8 SP3, Meta-
Frame XP 1.0 SP1/FR1Make settings in [Delete unfin-ished print jobs] in the registry.For details, see the Readme fileprovided with MetaFrame.
• MetaFrame XP 1.0 FR2Make settings in [Delete pendingprint jobs at logout] under [Print-er Properties Management] of Cit-rix Management Console.
❖ MetaFrame's [Printer driver replica-tion] Using [Printer driver replication] candistribute printer drivers across allservers in a server farm. Westrongly recommend testing thisfunction in your network environ-ment before using it for your work.• If the printer drivers are not
properly copied, install them di-rectly onto each server.
Using DHCP
19
4
1
Using DHCP
You can use the printer in a DHCP en-vironment. You can also register theprinter NetBIOS name on a WINSserver when it is running.If you connect an Ethernet interfaceand IEEE 1394 (IPv4 over 1394) inter-face simultaneously, pay attention tothe following:
❖ When a static IPv4 address is set forboth interfaces• IPv4 Address: If interface IPv4
addresses overlap, the Ethernetinterface is selected.
• Subnet Mask: If interface subnetmasks overlap, the Ethernet in-terface is selected.
• Gateway Address: The selectedvalue is applied. Make the gate-way address setting inside thesubnet set in the interface. If avalue is beyond the range of thesubnet selected by the interface,the machine operates using"0.0.0.0".
❖ When obtaining addresses from theDHCP server• IP Address, Subnet Mask: you
can configure addresses as-signed by a DHCP server. If IPaddresses overlap or the samesubnet IP addresses are select-ed, the effective value is as-signed only to the prioritizedinterface. Ethernet has defaultinterface priority.
• AutoNet: A temporary IPv4 ad-dress starting with 169.254 andnot used on the network, is as-signed to the prioritized inter-face.Default interface priority isIEEE 1394 (IPv4 over 1394).
• Gateway Address, DNS ServerAddress, and Domain Name:You can configure the addressesassigned by DHCP to the prior-itized interface.If the gateway address is be-yond the range of the subnet se-lected for the interface, them ac h in e o p er a t e s u s i n g"0.0.0.0".Ethernet has default interfacepriority.
❖ When there are static IP addressesand addresses assigned by DHCP• IPv4 Address and subnet mask:
if a static IPv4 address is thesame as an address assigned byDHCP, or the static subnetmask address and the subnetmask address assigned byDHCP overlap, the machineuses the static IPv4 address in-terface. The interface with theDHCP setting is set by default.
• Gateway Address: operates usingthe address entered manually.If a static address is not selected,or is set to 0.0.0.0, the interfaceusing the address assigned byDHCP is used.
Note❒ Printers that register the printer
NetBIOS name on a WINS servermust be configured for the WINSserver.
❒ Supported DHCP servers are Mi-crosoft DHCP Server includedwith Windows 2000 Server, Win-dows Server 2003, and WindowsNT 4.0, and the DHCP server in-cluded with NetWare and UNIX.

Appendix
120
4
❒ If you do not use the WINS server,reserve the printer's IP address inthe DHCP server so the same IPaddress is assigned every time.
❒ To use the WINS server, changethe WINS server setting to “active”using the control panel.
❒ Using the WINS server, you canconfigure the host name via the re-mote network printer port.
❒ DHCP relay-agent is not support-ed. If you use DHCP relay-agenton a network via ISDN, it will re-sult in increased line charges. Thisis because your computer connectsto the ISDN line whenever a packetis transferred from the printer.
❒ If there is more than one DHCPserver, use the same setting for allservers. The machine operates us-ing data from the DHCP serverthat responds first.
Using AutoNet
If the printer IPv4 address is not auto-matically assigned by the DHCP serv-er, a temporary IP address startingwith 169.254 and not used on the net-work can be automatically selected bythe printer.
Note❒ The IP address assigned by the
DHCP server is given priority overthat selected by AutoNet.
❒ You can confirm the current IPv4address on the configuration page.For more information about theconfiguration page, see GeneralSettings Guide.
❒ When AutoNet is running, theNetBIOS name is not registered onthe WINS server.
❒ The machine cannot communicatewith devices that do not have theAutoNet function. However, thismachine can communicate withMacintosh computers runningMac OS X 10.2.3. or higher.
Precautions
21
4
1
Precautions
Please pay attention to the followingwhen using the network interfaceboard. When configuration is neces-sary, follow the appropriate proce-dures below.
Connecting a Dial-Up Router to a Network
When using NetWare (file server)
If the NetWare file server and printerare on opposite sides of a router,packets are sent back and forth con-tinuously, possibly incurring com-munications charges. Because packettransmission is a feature of NetWare,you need to change the configurationof the router. If the network you areusing does not allow you to configurethe router, configure the machine in-stead.
❖ Configuring the routerFilter packets so they do not passover the dial-up router.
Note❒ The MAC address of the filter-
ing printer is printed on theprinter configuration page. Formore information about print-ing a configuration page, seePrinter Reference.
❒ For more information aboutconfiguring the printer if therouter cannot be configured, seethe following instructions.
Configuring the printer with NetWare
A Following the setup method de-scribed earlier in this manual,configure the file server.
B Set the frame type for NetWareenvironment.
ReferenceFor more information about se-lecting a frame type, see theGeneral Settings Guide.
Configuring the printer without NetWare
AWhen not printing, the networkinterface board sends packetsover the network. Set NetWare to“inactive”.
ReferenceFor more information about se-lecting a protocol, see GeneralSettings Guide.
Appendix
122
4
When Using Network Utility
If the machine is connected to a net-work, observe the following pointswhen setting up the machine orchanging settings:For more details, see the operating in-structions and Help for ScanRouterV2 Professional and DeskTopBinderLite/Professional.
❖ When a dial-up router is connected ina network environmentThe settings for the delivery serverto be connected must be made ap-propriately for the machine withScanRouter V2 Professional, AutoDocument Link, or DeskTopBind-er Lite/Professional. In addition,set up connected devices using theI/O settings of ScanRouter V2 Ad-ministration Utility.If the network environment chang-es, make the necessary changes forthe delivery server using the ma-chine, the administration utility ofclient computers, Auto DocumentLink, and DeskTopBinder Lite/Pro-fessional. Also, set the correct infor-mation for the connected devicesusing the I/O settings of ScanRout-er V2 Administration Utility.
Important❒ If the machine is set up to con-
nect to the delivery server via adial-up router, the router willdial and go online whenever aconnection to the delivery serv-er is made. Telephone chargesmay be incurred.
❖ When connected to a computer thatuses dial-up access• Do not install ScanRouter V2
Professional on a computerwhich uses dial-up access.
• When using ScanRouter V2 Pro-fessional , DeskTopBinderLite/Professional, Auto Docu-ment Link, or a TWAIN driveron a computer with dial-up ac-cess, a dial-up connection maybe performed when connectingto the delivery server and otherequipment, depending on thesetup. If the computer is set upto connect to the Internet auto-matically, the confirmation dia-log box will not appear, andtelephone charges may be in-curred without your beingaware of it. To prevent unneces-sary connections, the computershould be set up so the confir-mation dialog box always ap-pears before establishing aconnection. Do not make unnec-essary connections when usingthe above listed software.
Precautions
23
4
1
NetWare Printing
Form feed
You should not configure form feedon NetWare. Form feed is controlledby the printer driver on Windows. IfNetWare form feed is configured, theprinter might not work properly. Ifyou want to change form feed set-tings, always configure them usingWindows.• Under Windows 95/98/Me, clear
the [Form feed] check box on the[Printer Settings] tab in the printerproperties dialog box.
• Under Windows 2000/XP andWindows Server 2003, clear the[Form feed] check box on the [Net-Ware Settings] tab in the printerproperties dialog box.
• Under Windows NT 4.0, clear the[Form feed] check box on the [Net-Ware Settings] tab in the printerproperties dialog box.
Banner page
You should not configure a bannerpage on NetWare. If you want tochange the banner page setting, al-ways configure it using Windows.• Under Windows 95/98/Me, clear
the [Enable banner] check box on the[Printer Settings] tab in the printerproperties dialog box.
• Under Windows 2000/XP andWindows Server 2003, clear the[Enable banner] check box on the[NetWare Settings] tab in the printerproperties dialog box.
• Under Windows NT 4.0, clear the[Enable banner] check box on the[NetWare Settings] tab in the printerproperties dialog box.
Printing after resetting the machine
After resetting the remote printer, theconnection from the print server willbe cut off for about 30-40 seconds be-fore re-connecting. Depending on theNetWare specification, print jobs maybe accepted, but they will not beprinted during this interval.When using the machine as a remoteprinter, wait about two minutes afterresetting before attempting to print.
When the optional IEEE 802.11b interface unit Is Installed
When using the wireless LAN interfaceon the network, note the following:
❖ When moving the machineDetach the antennas when relocat-ing the machine locally.After moving the machine, reat-tach the antennas, ensuring that: • The antennas are positioned
clear of obstacles.• There is 40 to 60 mm between
the antennas, so that they do nottouch.
• The exposure glass cover and theAuto Document Feeder (ADF)do not knock the antennas.

Appendix
124
4
❖ If the network area provides poor ra-dio environmentWhere radio wave conditions arebad, the network may not functiondue to interrupted or failed con-nections. When checking the wire-less LAN signal and the accesspoint, follow the procedure belowto improve the situation:• Position the access point nearer
to the machine.• Clear the space between access
point and machine of obstruc-tions.
• Move radio wave generatingappliances, such as micro-waves, away from the machineand access point.
Note❒ For information about how to
check radio wave status, see theGeneral Settings Guide.
❒ For more information about accesspoint radio wave conditions, referto the access point manual.
Information about Installed Applications
25
4
1
Information about Installed Applications
RSA® BSAFE
• This product includes RSA®
BSAFE cryptographic or securityprotocol software from RSA Secu-rity Inc.
• RSA is a registered trademark andBSAFE is a registered trademark ofRSA Security Inc.in the UnitedStates and/or other countries.
• RSA Security Inc. All rights re-served.
Appendix
126
4
Specifications
Interface 100BASE-TX, 10BASE-T, IEEE 1394 (IPv4 over 1394), IEEE 802.11b
Frame type EthernetII, IEEE 802.2, IEEE 802.3, SNAP
Printer (LAN-Fax) IPv4
LPR
RSH
RCP
DIPRINT
FTP
IPP
IPX/SPX (NetWare)
AppleTalk
SMB
Internet Fax IPv4
SMTP
POP3
IMAP4
Network Scanner IPv4
RSH
FTP
SMTP
POP3
SMB
NCP
Document Server IPv4
FTP
HTTP
Management Function IPv4
RSH
RCP
FTP
SNMP
HTTP
TELNET (mshell)
NBT
DHCP
DNS
LDAP
SNMP v1/v2 MIB-II, PrinterMIB, HostResourceMIB, RicohPrivateMIB

Specifications
27
4
1
The optional IEEE 1394 interface board supports only IPv4 over 1394.To use IPP and SMB, use the SmartDeviceMonitor for Client port.To use IPP under Windows XP, Windows Server 2003, use the Standard IPPport. To use IPP under Windows 98, Windows 2000, Windows NT, use Smart-DeviceMonitor for Client.Appletalk can be used when the PostScript 3 module is installed.
SNMP v3 MIB-II, PrinterMIB, HostResourceMIB, RicohPrivateMIB, SNMP-FRAMEWORK-MIB, SNMP-TARGET-MIB, SNMP-NOTIFICA-TION-MIB, SNMP-USER-BASED-SM-MIB, SNMP-VIEW-BASED-ACM-MIB

128
INDEXA
Access Control, 60appletalk, 61authfree, 61Auto E-mail Notification, 55AutoNet, 120Autonet, 61
B
Bluetooth, 63Bonjour, 62
C
Changing the Network Interface Board Configuration, 43
Changing the Paper Type, 45Configuring the Energy Saver Mode, 48
D
DHCP, 64, 119dial-up router, 121Displaying Web Image Monitor Help, 41DNS, 65dns, 65Domain Name, 67
G
Getting Printer Information over the Network, 86
Going to the Top Page, 37
H
Host Name, 67How to Read This Manual, 1
I
IEEE 802.11b, 81ifconfig, 68info, 69information, 74, 96, 97, 98, 105Installing, 43IPP, 69ipv6, 70
J
Job Spool, 78
L
Locking the Menus on the machine's Control Panel, 44
lpr, 70
M
Mail authentication, 56Managing User Information, 45message, 105MIB, 85
N
netware, 70NetWare 5/5.1, 27, 28NetWare 6/6.5, 27, 28Notify by e-mail function, 54
O
On-demand E-mail Notification, 57
P
passwd, 71Password, 71precautions, 121Printer Status Notification by E-mail, 54Printing Commands, 115Printing Files Directly from Windows, 113prnlog, 71Pure IP, 28
R
remote printer, setup, 32route, 71
29
1S
set, 72Setting a Password, 48Setting Up as a Print Server, 26, 27, 28Setting Up as a Remote Printer, 30, 32Setup, 113show, 74slp, 74SmartDeviceMonitor for Admin, 43smb, 74SNMP, 85snmp, 75sntp, 77specifications, 126spoolsw, 78status, 79syslog, 79
T
TCP/IP address, 68telnet, 59, 61, 84Types of Menu Configuration and Mode, 39
U
Using a Host Name Instead of an IP Address, 113
W
Web Image Monitor, 35WINS, 84

130
GB GB EN USA AE AE B229-8558
Copyright © 2005

Network G
uide
GB GBEN USA
AE AE B229-8558

PostScript 3 Supplement
this machine and keep it handy for future reference. For safe and correct use, be sure to read th before using the machine.
Windows Configuration
Mac OS Configuration
Using PostScript 3
Printer Utility for Mac
1
2
3
4
Read this manual carefully before you use eSafety Information in "About This Machine"
Introduction
This manual contains detailed instructions and notes on the operation and use of this machine. For yoursafety and benefit, read this manual carefully before using the machine. Keep this manual in a handyplace for quick reference.
Important
Contents of this manual are subject to change without prior notice. In no event will the company be li-able for direct, indirect, special, incidental, or consequential damages as a result of handling or oper-ating the machine.
Trademarks
Microsoft®, Windows® and Windows NT® are registered trademarks of Microsoft Corporation in theUnited States and/or other countries.
Adobe® and PostScript® are registered trademarks of Adobe Systems Incorporated.
Apple, AppleTalk, EtherTalk, Macintosh, Mac OS and TrueType are trademarks of Apple Computer,Inc, registered in the U.S. and other countries.
BonjourTM is a trademark of Apple Computer, Inc.
The Bluetooth® word mark and logos are owned by the Bluetooth SIG, Inc. and any use of such marksby Ricoh Company, Ltd. is under license.
Other product names used herein are for identification purposes only and might be trademarks of theirrespective companies. We disclaim any and all rights in those marks.
The proper names of the Windows operating systems are as follows:
• The product name of Windows® 95 is Microsoft® Windows 95.
• The product name of Windows® 98 is Microsoft® Windows 98.
• The product name of Windows® Me is Microsoft® Windows Millennium Edition (Windows Me).
• The product names of Windows® 2000 are as follows:Microsoft® Windows® 2000 Advanced ServerMicrosoft® Windows® 2000 ServerMicrosoft® Windows® 2000 Professional
• The product names of Windows® XP are as follows:Microsoft® Windows® XP ProfessionalMicrosoft® Windows® XP Home Edition
• The product names of Windows ServerTM 2003 are as follows:Microsoft® Windows ServerTM 2003 Standard EditionMicrosoft® Windows ServerTM 2003 Enterprise Edition
• The product names of Windows NT® 4.0 are as follows:Microsoft® Windows NT® Server 4.0
• Microsoft® Windows NT® Workstation 4.0
Notes:
Some illustrations in this manual might be slightly different from the machine.
Certain options might not be available in some countries. For details, please contact your local dealer.
i
Manuals for This Machine
Refer to the manuals that are relevant to what you want to do with the machine.
❖ About This MachineBe sure to read the Safety Information in this manual before using the ma-chine.This manual provides an introduction to the functions of the machine. It alsoexplains the control panel, preparation procedures for using the machine,how to enter text, and how to install the CD-ROMs provided.
❖ General Settings GuideExplains User Tools settings, and Address Book procedures such as register-ing fax numbers, e-mail addresses, and user codes. Also refer to this manualfor explanations on how to connect the machine.
❖ Trouble ShootingProvides a guide to solving common problems, and explains how to replacepaper, toner or print cartridge, and other consumables.
❖ Security ReferenceThis manual is for administrators of the machine. It explains security func-tions that the administrators can use to protect data from being tampered, orprevent the machine from unauthorized use. Also refer to this manual for theprocedures for registering administrators, as well as setting user and admin-istrator authentication.
❖ Copy/Document Server ReferenceExplains Copier and Document Server functions and operations. Also refer tothis manual for explanations on how to place originals.
❖ Copy ReferenceExplains Copier functions and operations. Also refer to this manual for expla-nations on how to place originals.
❖ Facsimile ReferenceExplains Facsimile functions and operations.
❖ Printer ReferenceExplains Printer functions and operations.
❖ Scanner ReferenceExplains Scanner functions and operations.
ii
❖ Network GuideExplains how to configure and operate the machine in a network environ-ment, and use the software provided.This manual covers all models, and includes descriptions of functions andsettings that might not be available on this machine. Images, illustrations, andinformation about operating systems that are supported might also differslightly from those of this machine.
❖ Other manuals• Manuals for This Machine• Safety Information• Quick Reference Copy Guide• Quick Reference Fax Guide• Quick Reference Printer Guide• Quick Reference Scanner Guide• PostScript 3 Supplement• UNIX Supplement• Manuals for DeskTopBinder Lite
• DeskTopBinder Lite Setup Guide• DeskTopBinder Introduction Guide• Auto Document Link Guide
Note❒ Manuals provided are specific to machine types.❒ Adobe Acrobat Reader/Adobe Reader must be installed in order to view the
manuals as PDF files.
iii
TABLE OF CONTENTSManuals for This Machine ...................................................................................... iHow to Read This Manual .....................................................................................1
Symbols .....................................................................................................................1
1. Windows Configuration
Using the DeskTop Binder-SmartDeviceMonitor for Client Port.......................3Installing DeskTop Binder-SmartDeviceMonitor for Client .........................................3Installing the PostScript 3 Printer Driver (Windows 95 / 98 / Me - TCP/IP)................4Installing the PostScript 3 Printer Driver (Windows 95 / 98 / Me - IPP) .....................5Installing the PostScript 3 Printer Driver (Windows 2000 - TCP/IP)...........................7Installing the PostScript 3 Printer Driver (Windows 2000 - IPP) ................................8Installing the PostScript 3 Printer Driver (Windows XP,
Windows Server 2003 - TCP/IP)............................................................................10Installing the PostScript 3 Printer Driver (Windows XP,
Windows Server 2003 - IPP)..................................................................................11Installing the PostScript 3 Printer Driver (Windows NT 4.0 - TCP/IP)......................12Installing the PostScript 3 Printer Driver (Windows NT 4.0 - IPP)............................14Changing the Port Settings for DeskTop Binder-SmartDeviceMonitor for Client .....15
Using the Standard TCP/IP Port .........................................................................17Installing the PostScript 3 Printer Driver (Windows 2000) .......................................17Installing the PostScript 3 Printer Driver (Windows XP, Windows Server 2003) .....18
Using the LPR Port ..............................................................................................20Installing the PostScript 3 Printer Driver (Windows 2000) .......................................20Installing the PostScript 3 Printer Driver (Windows XP, Windows Server 2003) .....21Installing the PostScript 3 Printer Driver (Windows NT 4.0).....................................22
Using as the Windows Network Printer .............................................................23Installing the PostScript 3 Printer Driver (Windows 95 / 98 / Me) ............................23Installing the PostScript 3 Printer Driver (Windows 2000) .......................................24Installing the PostScript 3 Printer Driver (Windows XP, Windows Server 2003) .....25Installing the PostScript 3 Printer Driver (Windows NT 4.0).....................................26
Using as the NetWare Print Server / Remote Printer........................................27When using the PostScript 3 Printer Driver..............................................................27
Installing the Printer Driver Using USB .............................................................28Windows 98 SE / Me - USB .....................................................................................28Windows 2000 - USB ...............................................................................................30Windows XP, Windows Server 2003 - USB .............................................................31Troubleshooting for using USB ................................................................................32
Printing with Parallel Connection.......................................................................33Installing the PostScript 3 Printer Driver (Windows 95 / 98 / Me) ............................33Installing the PostScript 3 printer driver (Windows 2000) ........................................34Installing the PostScript 3 Printer Driver (Windows XP, Windows Server 2003) .....35Installing the PostScript 3 Printer Driver (Windows NT 4.0).....................................36
Installing the Printer Driver Using IEEE 1394 (SCSI print)...............................37Windows 2000..........................................................................................................37Windows XP, Windows Server 2003........................................................................39
Printing with Bluetooth Connection...................................................................41Supported Profiles....................................................................................................41Printing with Bluetooth Connection ..........................................................................42

iv
If a Message Appears during Installation ..........................................................44Making Option Settings for the Printer ..............................................................45Setting Up the Printer Driver...............................................................................46
Windows 95 / 98 / Me - Accessing the Printer Properties ........................................46Windows 2000 - Accessing the Printer ....................................................................48Windows XP, Windows Server 2003 - Accessing the Printer Properties .................50Windows NT 4.0 - Accessing the Printer Properties ................................................52
2. Mac OS Configuration
Mac OS..................................................................................................................55Installing the PostScript 3 Printer Driver and PPD File ............................................55Setting Up PPD Files ...............................................................................................56Setting Up Options ...................................................................................................56Installing Adobe Type Manager ...............................................................................57Installing Screen fonts..............................................................................................57Changing to EtherTalk .............................................................................................58
Mac OS X ..............................................................................................................59Installing the PPD Files ............................................................................................59Setting Up the PPD File ...........................................................................................59Setting Up Options ...................................................................................................60Using USB Interface.................................................................................................60Using Bonjour (Rendezvous) ...................................................................................61Changing to EtherTalk .............................................................................................62
Configuring the Printer........................................................................................63
3. Using PostScript 3
Setting Up Options ..............................................................................................65Printing a Document............................................................................................67
Job Type ..................................................................................................................68User Code ................................................................................................................89Paper Selection........................................................................................................90Paper Size................................................................................................................90Fit to Paper...............................................................................................................90Input Slot ..................................................................................................................91Resolution ................................................................................................................91Orientation Override.................................................................................................92Gradation .................................................................................................................92Toner Saving / Level Color.......................................................................................93Duplex Printing.........................................................................................................93Collate ......................................................................................................................95Paper Type...............................................................................................................96Destination Tray .......................................................................................................96Staple .......................................................................................................................97Punch .......................................................................................................................97Z-fold ........................................................................................................................98Watermark................................................................................................................98Watermark Text........................................................................................................98Watermark Font .......................................................................................................99Watermark Size........................................................................................................99Watermark Angle .....................................................................................................99Watermark Style.....................................................................................................100
v
Color Mode.............................................................................................................100Color Setting ..........................................................................................................101Color Profile ...........................................................................................................102Black Over Print .....................................................................................................103Gray Reproduction .................................................................................................103Dithering.................................................................................................................104CMYK Simulation Profile........................................................................................105Image Smoothing ...................................................................................................105Separate into CMYK ..............................................................................................106Color Control ..........................................................................................................106
4. Printer Utility for Mac
Installing Printer Utility for Mac........................................................................107Starting Printer Utility for Mac ..........................................................................108
Mac OS ..................................................................................................................108Mac OS X...............................................................................................................108
Printer Utility for Mac Functions ......................................................................109Downloading PS Fonts...........................................................................................110Displaying Printer's Fonts.......................................................................................110Deleting Fonts ........................................................................................................111Initializing the Printer Disk......................................................................................111Page Setup ............................................................................................................112Printing Fonts Catalog............................................................................................112Printing Fonts Sample............................................................................................112Renaming the Printer .............................................................................................112Restarting the Printer .............................................................................................113Downloading PostScript Files ................................................................................114Selecting the Zone .................................................................................................114Displaying the Printer Status..................................................................................115Launching the Dialogue Console ...........................................................................115
INDEX....................................................................................................... 117

vi
1
How to Read This Manual
Symbols
This manual uses the following symbols:
Indicates important safety notes.Ignoring these notes could result in serious injury or death. Be sure to read thesenotes. They can be found in the “Safety Information” section of About This Ma-chine.
Indicates important safety notes.Ignoring these notes could result in moderate or minor injury, or damage to themachine or to property. Be sure to read these notes. They can be found in the“Safety Information” section of About This Machine.
Indicates points to pay attention to when using the machine, and explanationsof likely causes of paper misfeeds, damage to originals, or loss of data. Be sureto read these explanations.
Indicates supplementary explanations of the machine’s functions, and instruc-tions on resolving user errors.
This symbol is located at the end of sections. It indicates where you can find fur-ther relevant information.[ ]Indicates the names of keys that appear on the machine’s display panel.{ }Indicates the names of keys on the machine’s control panel.

2
1. Windows Configuration
3
Using the DeskTop Binder-SmartDeviceMonitor for Client Port
Installing DeskTop Binder-SmartDeviceMonitor for Client
Important❒ To install DeskTop Binder-SmartDeviceMonitor for Client under Windows
2000 / XP Professional, Windows Server 2003, and Windows NT 4.0, youmust have an account that has Manage Printers permission. Log on as an Ad-ministrator.
❒ Install DeskTop Binder-SmartDeviceMonitor for Client before installing the print-er driver when using the DeskTop Binder-SmartDeviceMonitor for Client port.
A Quit all applications currently running.
B Insert the CD-ROM into the CD-ROM drive.The installer starts.
C Select an interface language, and then click [OK].The default interface language is English.
D Click [DeskTopBinder - SmartDeviceMonitor for Client].
E The software license agreement appears in the [License Agreement] dialogbox. After reading through its contents, click [I accept the agreement.], andthen click [Next >].
F Click the [DeskTopBinder - SmartDeviceMonitor for Client] checkbox, and thenclick [Next >].The DeskTop Binder-SmartDeviceMonitor for Client installer starts.
G Follow the instructions on the display to install DeskTop Binder-SmartDe-viceMonitor for Client.
H Click [Finish].If you are required to restart the computer after installing DeskTop Binder-SmartDeviceMonitor for Client, restart the computer.
Note❒ To stop installation of the selected software, click [Cancel] before installa-
tion is complete.❒ Auto Run may not work with certain operating system settings. In that
case, launch “Setup.exe” on the CD-ROM root directory.
Windows Configuration
4
1
Installing the PostScript 3 Printer Driver (Windows 95 / 98 / Me - TCP/IP)
A Quit all applications currently running.
B Insert the CD-ROM into the CD-ROM drive.The installer starts.
C Select an interface language, and then click [OK].The default interface language is English.The printer driver with the selected language will be installed. The Englishprinter driver is installed when the following language is selected: Cestina,Magyar, Polski, Portugues, Suomi.
D Click [PostScript 3 Printer Driver].Add Printer Wizard starts.
E Click [Next >].
F Click [Local Printer], and then click [Next >].A dialog box for selecting the printer manufacturer and model name appears.
G Select the name of the machine whose driver you want to install, and thenclick [Next >].
H In the [Available ports:] box, click [Printer Port], and then click [Next >].
I Change the printer name if you want, and then click [Next >].Select the [Yes] check box to configure the printer as default.
J Specify whether or not to print a test page, and then click [Finish].
K On the [Start] menu, point to [Settings], and then click [Printers].The [Printers] window appears.
L Click the icon of the printer you want to use. On the [File] menu, click [Prop-erties].
M On the [Details] tab, click [Add Port…].
N Click [DeskTop Binder-SmartDeviceMonitor] in the [Other] list, and then click[OK].
O Click [TCP/IP], and then click [Search].A list of printers using TCP/IP appears.
Using the DeskTop Binder-SmartDeviceMonitor for Client Port
5
1
P Select the printer you want to use, and then click [OK].Only printers that respond to a broadcast from the computer appear. To usea machine not listed here, click [Specify Address], enter the IP address or hostname of the machine, and then click [OK].You cannot add an IP address partially similar to the one already used. Forexample, if “192.168.0.2” is in use, “192.168.0.2xx” cannot be used. Similarly,if “192.168.0.20” is in use, “192.168.0.2” cannot be used.
Q Check that the selected port is highlighted in [Print to the following port], andthen click [OK].
R Restart the computer to complete installation.
Note❒ A user code can be set after the printer driver installation. For information
about user code, see the printer driver Help.❒ Auto Run may not work with certain operating system settings. In that
case, launch “Setup.exe” on the CD-ROM root directory.
Installing the PostScript 3 Printer Driver (Windows 95 / 98 / Me - IPP)
A Quit all applications currently running.
B Insert the CD-ROM into the CD-ROM drive.The installer starts.
C Select an interface language, and then click [OK].The default interface language is English.The printer driver with the selected language will be installed. The Englishprinter driver is installed when the following language is selected: Cestina,Magyar, Polski, Portugues, Suomi.
D Click [PostScript 3 Printer Driver].Add Printer Wizard starts.
E Click [Next >].
F Click [Local Printer], and then click [Next >].A dialog box for selecting the printer manufacturer and model name appears.
G Select the name of the machine whose driver you want to install, and thenclick [Next >].
H In the [Available ports:] box, click [Printer Port], and then click [Next >].
I Change the printer name if you want, and then click [Next >].Select the [Yes] check box to configure the printer as default.

Windows Configuration
6
1
J Specify whether or not to print a test page, and then click [Finish].
K On the [Start] menu, point to [Settings], and then click [Printers].The [Printers] window appears.
L Click the icon of the printer you want to use. On the [File] menu, click [Prop-erties].
M On the [Details] tab, click [Add Port…].
N Click [DeskTop Binder-SmartDeviceMonitor] in the [Other] list, and then click[OK].
O Click [IPP].
P In the [Printer URL] box, enter “http://(printer's address)/printer” as the print-er's address.If the server authentification is issued, to enable SSL ( a protocol for encryptedcommunication), enter “https://(printer's address)/printer” (Internet Ex-plorer 5.01, or a higher version must be installed).(example IP address: 192.168.15.16)http://192.168.15.16/printer
https://192.168.15.16/printer
You can enter "http://printer's address/ipp" as the printer's address.
Q Enter a name for identifying the printer in [IPP Port Name]. Use a name dif-ferent from the one of any existing port.If a name is not specified here, the address entered in the [Printer URL] box be-comes the IPP port name.
R Click [Detailed Settings] to configure proxy server, IPP user name, and othersettings. Make these settings, and then click [OK].You can enter "http://printer's address/ipp" as the printer's address.
S Click [OK].
T Check that the selected port is highlighted in [Print to the following port], andthen click [OK] .
U Restart the computer to complete installation.
Note❒ A user code can be set after the printer driver installation. For information
about user code, see the printer driver Help.❒ Auto Run may not work with certain operating system settings. In that
case, launch “Setup.exe” on the CD-ROM root directory.
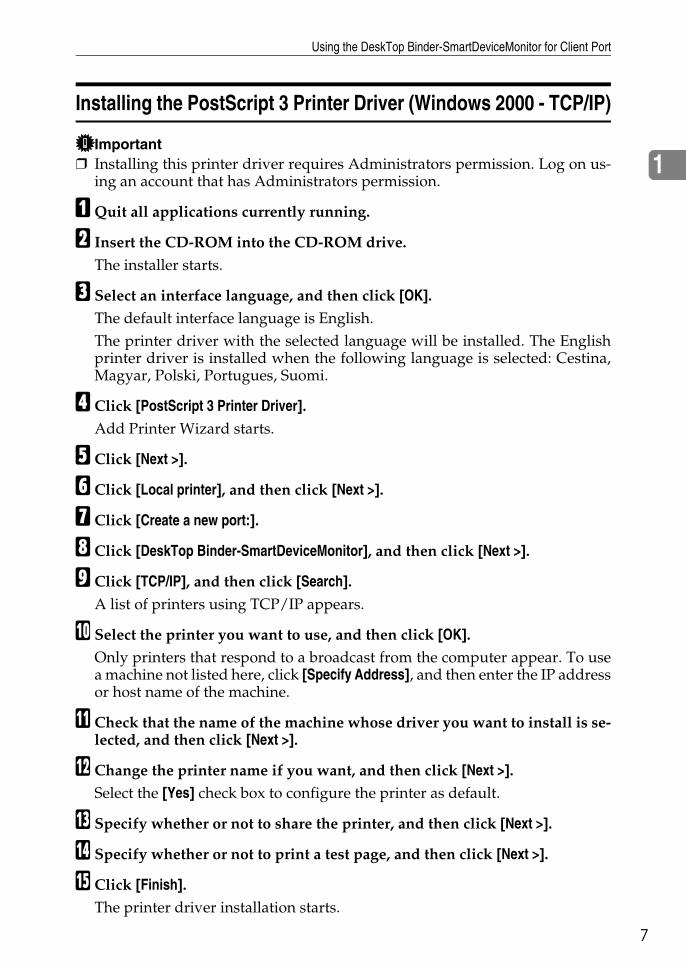
Using the DeskTop Binder-SmartDeviceMonitor for Client Port
7
1
Installing the PostScript 3 Printer Driver (Windows 2000 - TCP/IP)
Important❒ Installing this printer driver requires Administrators permission. Log on us-
ing an account that has Administrators permission.
A Quit all applications currently running.
B Insert the CD-ROM into the CD-ROM drive.The installer starts.
C Select an interface language, and then click [OK].The default interface language is English.The printer driver with the selected language will be installed. The Englishprinter driver is installed when the following language is selected: Cestina,Magyar, Polski, Portugues, Suomi.
D Click [PostScript 3 Printer Driver].Add Printer Wizard starts.
E Click [Next >].
F Click [Local printer], and then click [Next >].
G Click [Create a new port:].
H Click [DeskTop Binder-SmartDeviceMonitor], and then click [Next >].
I Click [TCP/IP], and then click [Search].A list of printers using TCP/IP appears.
J Select the printer you want to use, and then click [OK].Only printers that respond to a broadcast from the computer appear. To usea machine not listed here, click [Specify Address], and then enter the IP addressor host name of the machine.
K Check that the name of the machine whose driver you want to install is se-lected, and then click [Next >].
L Change the printer name if you want, and then click [Next >].Select the [Yes] check box to configure the printer as default.
M Specify whether or not to share the printer, and then click [Next >].
N Specify whether or not to print a test page, and then click [Next >].
O Click [Finish].The printer driver installation starts.
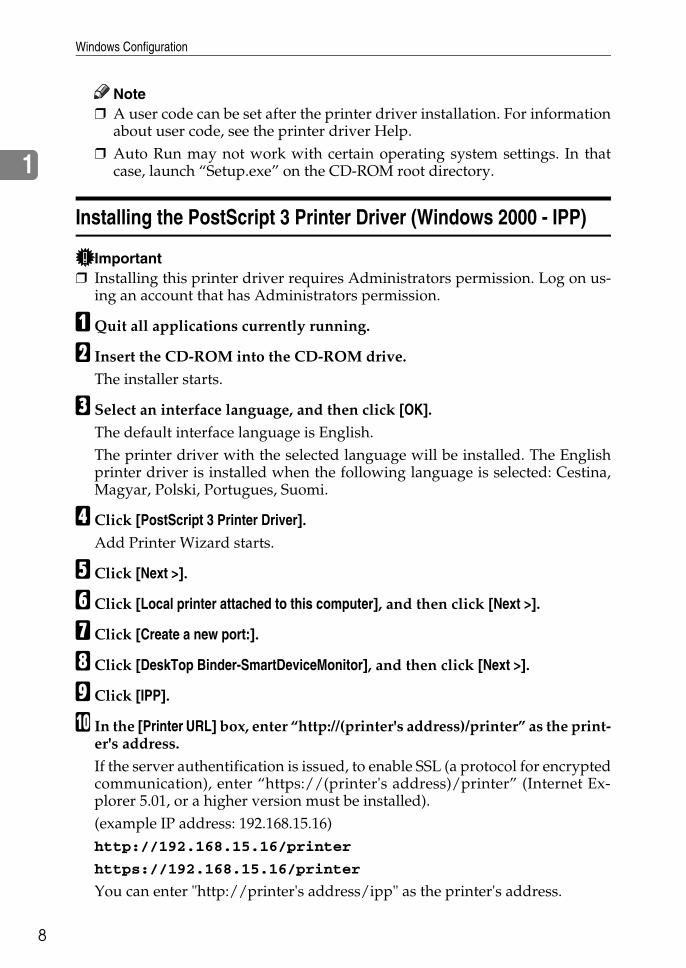
Windows Configuration
8
1
Note❒ A user code can be set after the printer driver installation. For information
about user code, see the printer driver Help.❒ Auto Run may not work with certain operating system settings. In that
case, launch “Setup.exe” on the CD-ROM root directory.
Installing the PostScript 3 Printer Driver (Windows 2000 - IPP)
Important❒ Installing this printer driver requires Administrators permission. Log on us-
ing an account that has Administrators permission.
A Quit all applications currently running.
B Insert the CD-ROM into the CD-ROM drive.The installer starts.
C Select an interface language, and then click [OK].The default interface language is English.The printer driver with the selected language will be installed. The Englishprinter driver is installed when the following language is selected: Cestina,Magyar, Polski, Portugues, Suomi.
D Click [PostScript 3 Printer Driver].Add Printer Wizard starts.
E Click [Next >].
F Click [Local printer attached to this computer], and then click [Next >].
G Click [Create a new port:].
H Click [DeskTop Binder-SmartDeviceMonitor], and then click [Next >].
I Click [IPP].
J In the [Printer URL] box, enter “http://(printer's address)/printer” as the print-er's address.If the server authentification is issued, to enable SSL (a protocol for encryptedcommunication), enter “https://(printer's address)/printer” (Internet Ex-plorer 5.01, or a higher version must be installed).(example IP address: 192.168.15.16)http://192.168.15.16/printer
https://192.168.15.16/printer
You can enter "http://printer's address/ipp" as the printer's address.
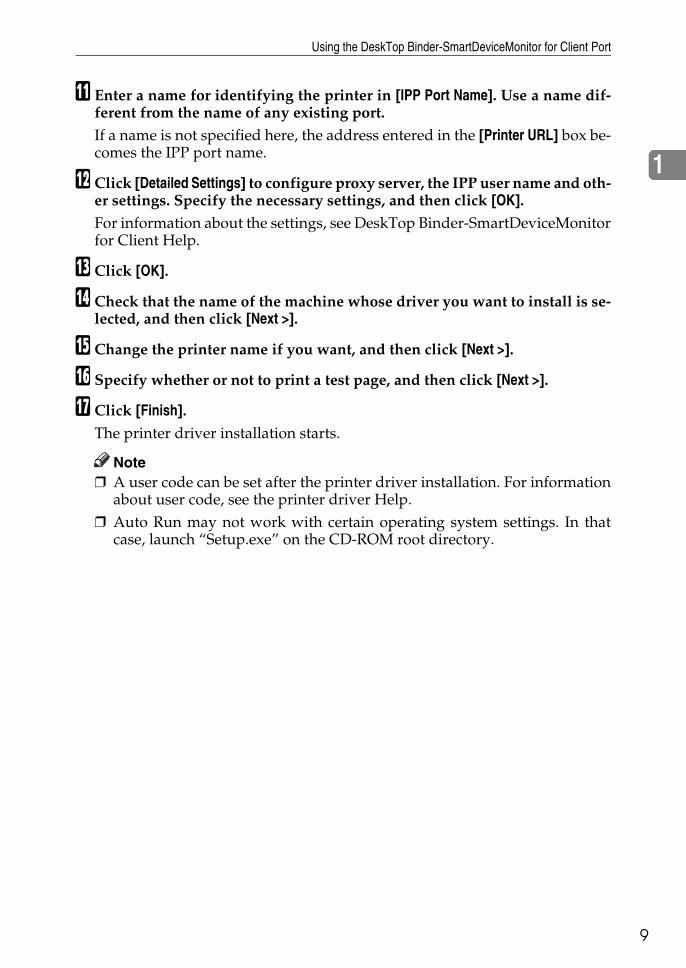
Using the DeskTop Binder-SmartDeviceMonitor for Client Port
9
1
K Enter a name for identifying the printer in [IPP Port Name]. Use a name dif-ferent from the name of any existing port.If a name is not specified here, the address entered in the [Printer URL] box be-comes the IPP port name.
L Click [Detailed Settings] to configure proxy server, the IPP user name and oth-er settings. Specify the necessary settings, and then click [OK]. For information about the settings, see DeskTop Binder-SmartDeviceMonitorfor Client Help.
M Click [OK].
N Check that the name of the machine whose driver you want to install is se-lected, and then click [Next >].
O Change the printer name if you want, and then click [Next >].
P Specify whether or not to print a test page, and then click [Next >].
Q Click [Finish].The printer driver installation starts.
Note❒ A user code can be set after the printer driver installation. For information
about user code, see the printer driver Help.❒ Auto Run may not work with certain operating system settings. In that
case, launch “Setup.exe” on the CD-ROM root directory.
Windows Configuration
10
1
Installing the PostScript 3 Printer Driver (Windows XP, Windows Server 2003 - TCP/IP)
Important❒ Installing this printer driver requires Administrators permission. Log on us-
ing an account that has Administrators permission.
A Quit all applications currently running.
B Insert the CD-ROM into the CD-ROM drive.The installer starts.
C Select an interface language, and then click [OK].The default interface language is English.The printer driver with the selected language will be installed. The Englishprinter driver is installed when the following language is selected: Cestina,Magyar, Polski, Portugues, Suomi.
D Click [PostScript 3 Printer Driver].Add Printer Wizard starts.
E Click [Next >].
F Click [Local printer attached to this computer.], and then click [Next >].
G Click [Create a new port:].
H Click [DeskTop Binder-SmartDeviceMonitor], and then click [Next >].
I Click [TCP/IP], and then click [Search].A list of printers using TCP/IP appears.
J Select the printer you want to use, and then click [OK].Only printers that respond to a broadcast from the computer appear. To usea machine not listed here, click [Specify Address], and then enter the IP addressor host name of the machine.
K Check that the name of the machine whose driver you want to install is se-lected, and then click [Next >].
L Change the printer name if you want, and then click [Next >].Select the [Yes] check box to configure the printer as default.
M Specify whether or not to print a test page, and then click [Next >].
N Click [Finish].The printer driver installation starts.
Note❒ A user code can be set after the printer driver installation. For information
about user code, see the printer driver Help.❒ Auto Run may not work with certain operating system settings. In that
case, launch “Setup.exe”on the CD-ROM root directory.
Using the DeskTop Binder-SmartDeviceMonitor for Client Port
11
1
Installing the PostScript 3 Printer Driver (Windows XP, Windows Server 2003 - IPP)
Important❒ Installing this printer driver requires Administrators permission. Log on us-
ing an account that has Administrators permission.
A Quit all applications currently running.
B Insert the CD-ROM into the CD-ROM drive.The installer starts.
C Select an interface language, and then click [OK].The default interface language is English.The printer driver with the selected language will be installed. The Englishprinter driver is installed when the following language is selected: Cestina,Magyar, Polski, Portugues, Suomi.
D Click [PostScript 3 Printer Driver].Add Printer Wizard starts.
E Click [Next >].
F Click [Local printer attached to this computer.], and then click [Next >].
G Click [Create a new port:].
H Click [DeskTop Binder-SmartDeviceMonitor], and then click [Next >].
I Click [IPP].
J In the [Printer URL] box, enter “http://(printer's address)/printer” as the print-er's address.If the server authentification is issued, to enable SSL (a protocol for encryptedcommunication), enter “https://(printer's address)/printer” (Internet Ex-plorer 5.01, or a higher version must be installed).(example IP address: 192.168.15.16)http://192.168.15.16/printer
https://192.168.15.16/printer
You can enter "http://printer's address/ipp" as the printer's address.
K Enter a name for identifying the printer in [IPP Port Name]. Use a name dif-ferent from the one of any existing port.If a name is not specified here, the address entered in the [Printer URL] box be-comes the IPP port name.
Windows Configuration
12
1
L Click [Detailed Settings] to make necessary settings.For information about the settings, see DeskTop Binder-SmartDeviceMonitorfor Client Help.
M Click [OK].
N Check that the name of the printer driver you want to install is selected, andthen click [Next >].
O Change the name of the printer if you want, and then click [Next >].Select the [Yes] check box to configure the printer as default.
P Specify whether or not to print a test page, and then click [Next >].
Q Click [Finish].The printer driver installation starts.
Note❒ A user code can be set after the printer driver installation. For information
about user code, see the printer driver Help.❒ Auto Run may not work with certain operating system settings. In that
case, launch “Setup.exe” on the CD-ROM root directory.
Installing the PostScript 3 Printer Driver (Windows NT 4.0 - TCP/IP)
Important❒ Installing this printer driver requires Administrators permission. Log on us-
ing an account that has Administrators permission.
A Quit all applications currently running.
B Insert the CD-ROM into the CD-ROM drive.The installer starts.
C Select an interface language, and then click [OK].The default interface language is English.The printer driver with the selected language will be installed. The Englishprinter driver is installed when the following language is selected: Cestina,Magyar, Polski, Portugues, Suomi.
D Click [PostScript 3 Printer Driver].Add Printer Wizard starts.
E Select [My Computer], and then click [Next >].
F Click [Add Port...].
G Click [DeskTop Binder-SmartDeviceMonitor], and then click [New Port...].

Using the DeskTop Binder-SmartDeviceMonitor for Client Port
13
1
H Click [TCP/IP], and then click [Search].A list of printers using [TCP/IP] appears.
I Select the printer you want to use, and then click [OK].Only printers that respond to a broadcast from the computer appear. To usea machine not listed here, click [Specify Address], and then enter the IP addressor host name of the machine.
J Click [Close] to close the [Printer Port] dialog box.
K Click [Next >].
L Check that the name of the machine whose driver you want to install is se-lected, and then click [Next >].
M Change the printer name if you want, and then click [Next >].Select the [Yes] check box to configure the printer as default.
N Specify whether or not to share the printer, and then click [Next >].
O Specify whether or not to print a test page, and then click [Finish].The printer driver installation starts.
P Restart the computer to complete installation if necessary.
Note❒ A user code can be set after the printer driver installation . For information
about user code, see the printer driver Help.❒ Auto Run may not work with certain operating system settings. In that
case, launch “Setup.exe” on the CD-ROM root directory.

Windows Configuration
14
1
Installing the PostScript 3 Printer Driver (Windows NT 4.0 - IPP)
Important❒ Installing this printer driver requires Administrators permission. Log on us-
ing an account that has Administrators permission.
A Quit all applications currently running.
B Insert the CD-ROM into the CD-ROM drive.The installer starts.
C Select an interface language, and then click [OK].The default interface language is English.The printer driver with the selected language will be installed. The Englishprinter driver is installed when the following language is selected: Cestina,Magyar, Polski, Portugues, Suomi.
D Click [PostScript 3 Printer Driver].Add Printer Wizard starts.
E Select [My Computer], and then click [Next >].
F Click [Add Port...].
G Click [DeskTop Binder-SmartDeviceMonitor], and then click [New Port...].
H Click [IPP].
I In the [Printer URL] box, enter “http://(printer's address)/printer”as the print-er's address.If the server authentification is issued, to enable SSL (a protocol for encryptedcommunication), enter “https://(printer's address)/printer” (Internet Ex-plorer 5.01, or a higher version must be installed).(example IP address: 192.168.15.16)http://192.168.15.16/printer
https://192.168.15.16/printer
You can enter "http://printer's address/ipp" as the printer's address.
J Enter a name for identifying the printer in [IPP Port Name]. Use a name dif-ferent from the one of any existing port.If a name is not specified here, the address entered in the [Printer URL] box be-comes the IPP port name.
K Click [Detailed Settings] to make necessary settings.For information about the settings, see DeskTop Binder-SmartDeviceMonitorfor Client Help.
Using the DeskTop Binder-SmartDeviceMonitor for Client Port
15
1
L Click [OK].
M Click [Close] to close the [Printer Port] dialog box.
N Click [Next >].
O Check that the name of the machine whose driver you want to install is se-lected, and then click [Next >].
P Change the printer name if you want, and then click [Next >].Select the [Yes] check box to configure the printer as default.
Q Specify whether or not to share the printer, and then click [Next >].
R Specify whether or not to print a test page, and then click [Finish].The printer driver installation starts.
S Restart the computer to complete installation if necessary.
Note❒ A user code can be set after the printer driver installation. For information
about user code, see the printer driver Help.❒ Auto Run may not work with certain operating system settings. In that
case, launch “Setup.exe” on the CD-ROM root directory.
Changing the Port Settings for DeskTop Binder-SmartDeviceMonitor for Client
Follow the procedure below to change the DeskTop Binder-SmartDeviceMonitor forClient settings, such as TCP/IP timeout, recovery/parallel printing, and printer groups.
Windows 95 / 98:
A Open the [Printers] window from the [Start] menu.
B In the [Printers] window, click the icon of the printer you want to use. Onthe [File] menu, click [Properties].
C Click the [Details] tab, and then click [Port Settings].The [Port Settings] dialog box appears.
Windows Configuration
16
1
Windows 2000 / Windows NT 4.0:
A Open the [Printers] window from the [Start] menu.
B In the [Printers] window, click the icon of the printer you want to use. Onthe [File] menu, click [Properties].
C On the [Ports] tab, click [Configure Port] The [Port Configuration] dialog box appears.
Windows XP, Windows Server 2003:
A Open the [Printers and Faxes] window from the [Start] menu.The [Printers and Faxes] window appears.
B Click the icon of the machine you want to use. On the [File] menu, click[Properties]. The printer properties appear.
C Click the [Port] tab, and then click [Configure Port].The [Port Configuration] dialog box appears.• For TCP/IP, timeout setting can be configured.• User, proxy, and timeout settings can be configured for IPP.
ReferenceFor information about these settings, see DeskTop Binder-SmartDevice-Monitor for Client Help.
How to enable Recovery/Parallel Printing
If no settings on the [Recovery/Parallel Printing] tab are available, follow the procedure below.
A Start DeskTop Binder-SmartDeviceMonitor for Client, and then right-clickthe DeskTop Binder-SmartDeviceMonitor for Client icon on the taskbar.
B Click [Extended Features Settings], and then select the [Set Recovery/ParallelPrinting for each port] check box.
C Click [OK] to close the [Extended Features Settings] dialog box
Using the Standard TCP/IP Port
17
1
Using the Standard TCP/IP Port
Installing the PostScript 3 Printer Driver (Windows 2000)
Important❒ Installing this printer driver requires Administrators permission. Log on us-
ing an account that has Administrators permission.❒ In an IPv6 environment, you cannot use the Standard TCP/IP Port. Use the
DeskTop Binder-SmartDeviceMonitor port.
A Quit all applications currently running.
B Insert the CD-ROM into the CD-ROM drive.The installer starts.
C Select an interface language, and then click [OK].The default interface language is English.The printer driver with the selected language will be installed. The Englishprinter driver is installed when the following language is selected: Cestina,Magyar, Polski, Portugues, Suomi.
D Click [PostScript 3 Printer Driver].Add Printer Wizard starts.
E Click [Next >].
F Click [Local printer], and then click [Next >].
G Click [Create a new port:].
H Click [Standard TCP/IP Port], and then click [Next >].
I Click [Next >] in the [Add Standard TCP/IP Printer Port Wizard] dialog box.
J Enter the printer name or IP address in the [Printer Name or IP Address] box.The [Port Name] text box automatically obtains a port name. Change this nameif necessary.When screen for Device selection appears, select "RICOH NetworkPrinterDriver C Model".
K Click [Next >]
L Click [Finish] in the [Add Standard TCP/IP Printer Port Wizard] dialog box.
M Check that the name of the machine whose driver you want to install is se-lected, and then click [Next >].

Windows Configuration
18
1
N Change the printer name if you want, and then click [Next >].Select the [Yes] check box to configure the printer as default.
O Click [Next >].
P Specify whether or not to print a test page, and then click [Next >].
Q Click [Finish].The printer driver installation starts.
Note❒ A user code can be set after the printer driver installation . For information
about user code, see the printer driver Help.❒ Auto Run may not work with certain operating system settings. In that
case, launch “Setup.exe” on the CD-ROM root directory.
Installing the PostScript 3 Printer Driver (Windows XP, Windows Server 2003)
Important❒ Installing this printer driver requires Administrators permission. Log on us-
ing an account that has Administrators permission.❒ In an IPv6 environment, you cannot use the Standard TCP/IP Port. Use the
DeskTop Binder-SmartDeviceMonitor port.
A Quit all applications currently running.
B Insert the CD-ROM into the CD-ROM drive.The installer starts.
C Select an interface language, and then click [OK].The default interface language is English.The printer driver with the selected language will be installed. The Englishprinter driver is installed when the following language is selected: Cestina,Magyar, Polski, Portugues, Suomi.
D Click [PostScript 3 Printer Driver].Add Printer Wizard starts.
E Click [Next >].
F Click [Local printer attached to this printer], and then click [Next >].
G Click [Create a new port:].
H Click [Standard TCP/IP Port] in [Create a new port], and then click [Next >].
I Click [Next >] in the [Add Standard TCP/IP Printer Port Wizard] dialog box.

Using the Standard TCP/IP Port
19
1
J Enter the printer name or IP address in the [Printer Name or IP Address] box.The [Port Name] text box automatically obtains a port name. Change this nameif necessary.When screen for Device selection appears, select "RICOH NetworkPrinterDriver C Model".
K Click [Next >]
L Click [Finish] in the [Add Standard TCP/IP Printer Port Wizard] dialog box.
M Check that the name of the machine whose driver you want to install is se-lected, and then click [Next >].
N Change the printer name if you want, and then click [Next >].Select the [Yes] check box to configure the printer as default.
O Specify whether or not to print a test page, and then click [Next >].
P Click [Finish].The printer driver installation starts.
Note❒ A user code can be set after the printer driver installation. For information
about user code, see the printer driver Help.❒ Auto Run may not work with certain operating system settings. In that
case, launch “Setup.exe” on the CD-ROM root directory.

Windows Configuration
20
1
Using the LPR Port
Installing the PostScript 3 Printer Driver (Windows 2000)
Important❒ Installing this printer driver requires Administrators permission. Log on us-
ing an account that has Administrators permission.
A Quit all applications currently running.
B Insert the CD-ROM into the CD-ROM drive.The installer starts.
C Select an interface language, and then click [OK].The default interface language is English.The printer driver with the selected language will be installed. The Englishprinter driver is installed when the following language is selected: Cestina,Magyar, Polski, Portugues, Suomi.
D Click [PostScript 3 Printer Driver].Add Printer Wizard starts.
E Click [Next >].
F Click [Local printer], and then click [Next >].
G Click [Create a new port:].
H Click [LPR Port], and then click [Next >].
I Enter the printer's IP address in the [Name or address of server providing lpd] box.
J Enter “lp” in the [Name of printer or print queue on that server] box, and then click [OK].
K Check that the name of the machine whose driver you want to install is se-lected, and then click [Next >].
L Change the printer name if you want, and then click [Next >].Select the [Yes] check box to configure the printer as default.
M Click [Next >].
N Specify whether or not to print a test page, and then click [Next >].
O Click [Finish].The printer driver installation starts.
Note❒ A user code can be set after the printer driver installation. For information
about user code, see the printer driver Help.❒ Auto Run may not work with certain operating system settings. In that
case, launch “Setup.exe” on the CD-ROM root directory.

Using the LPR Port
21
1
Installing the PostScript 3 Printer Driver (Windows XP, Windows Server 2003)
Important❒ Installing this printer driver requires Administrators permission. Log on us-
ing an account that has Administrators permission.❒ In an IPv6 environment, you cannot use the LPR Port. Use the DeskTop Bind-
er-SmartDeviceMonitor port.
A Quit all applications currently running.
B Insert the CD-ROM into the CD-ROM drive.The installer starts.
C Select an interface language, and then click [OK].The default interface language is English.The printer driver with the selected language will be installed. The Englishprinter driver is installed when the following language is selected: Cestina,Magyar, Polski, Portugues, Suomi.
D Click [PostScript 3 Printer Driver].Add Printer Wizard starts.
E Select [My Computer], and then click [Next >].
F Click [Local Printer attached to this computer.], and then click [Next >].
G Click [Create a new port:].
H Click [LPR Port] in [Create a new port], and then click [Next >].
I Enter the printer's IP address in the [Name or address of server providing lpd] box.
J Enter “lp” in the [Name of printer or print queue on that server box], and then click [OK].
K Check that the name of the machine whose driver you want to install is se-lected, and then click [Next >].
L Change the printer name if you want, and then click [Next >].Select the [Yes] check box to configure the printer as default.
M Click [Next >].
N Specify whether or not to print a test page, and then click [Next >].
O Click [Finish].The printer driver installation starts.
Note❒ A user code can be set after the printer driver installation. For information
about user code, see the printer driver Help.❒ Auto Run may not work with certain operating system settings. In that
case, launch “Setup.exe” on the CD-ROM root directory."
Windows Configuration
22
1
Installing the PostScript 3 Printer Driver (Windows NT 4.0)
Important❒ Installing this printer driver requires Administrators permission. Log on us-
ing an account that has Administrators permission.
A Quit all applications currently running.
B Insert the CD-ROM into the CD-ROM drive.The installer starts.
C Select an interface language, and then click [OK].The default interface language is English.The printer driver with the selected language will be installed. The Englishprinter driver is installed when the following language is selected: Cestina,Magyar, Polski, Portugues, Suomi.
D Click [PostScript 3 Printer Driver].Add Printer Wizard starts.
E Select [My Computer], and then click [Next >].
F Click [Add Port...].
G Select [LPR Port], and then click [New Port...].
H Enter the printer's IP address in the [Name or address of server providing lpd] box.
I Enter “lp” in the [Name of printer or print queue on that server:] box, and then click [OK].
J Click [Close] to close the [Printer Port] dialog box.
K Click [Next >].
L Check that the name of the machine whose driver you want to install is se-lected, and then click [Next >].
M Change the printer name if you want, and then click [Next >].Select the [Yes] check box to configure the printer as default.
N Specify whether or not to share the printer, and then click [Next >].
O Specify whether or not to print a test page, and then click [Finish].The printer driver installation starts.
P Restart the computer to complete installation.
Note❒ A user code can be set after the printer driver installation. For information
about user code, see the printer driver Help.❒ Auto Run may not work with certain operating system settings. In that
case, launch “Setup.exe” on the CD-ROM root directory.

Using as the Windows Network Printer
23
1
Using as the Windows Network Printer
Installing the PostScript 3 Printer Driver (Windows 95 / 98 / Me)
Important❒ If you print from a print server connected to the printer using the DeskTop
Binder-SmartDeviceMonitor port, the client cannot use Recovery Printingand Parallel Printing.
A Quit all applications currently running.
B Insert the CD-ROM into the CD-ROM drive.The installer starts.
C Select an interface language, and then click [OK].The default interface language is English.The printer driver with the selected language will be installed. The Englishprinter driver is installed when the following language is selected: Cestina,Magyar, Polski, Portugues, Suomi.
D Click [PostScript 3 Printer Driver].Add Printer Wizard starts.
E Click [Next >].
F Click [Network printer], and then click [Next >].
G Click [Browse].
H Click the computer name you want to use as a print server in the [Browse forPrinter] window.
I Select the printer you want to use, and then click [OK].
J Check the location of the selected printer is shown, and then click [Next >].
K Change the printer name if you want, and then click [Next >].Select the [Yes] check box to configure the printer as default.
L Specify whether or not to print a test page, and then click [Finish].
M Restart the computer.
Note❒ A user code can be set after the printer driver installation. For information
about user code, see the printer driver Help.❒ Auto Run may not work with certain operating system settings. In that
case, launch “Setup.exe” on the CD-ROM root directory.
Windows Configuration
24
1
Installing the PostScript 3 Printer Driver (Windows 2000)
Important❒ Installing a printer driver requires Administrators permission. Log on using
an account that has Administrators permission.❒ If you print from a print server connected to the printer using the DeskTop
Binder-SmartDeviceMonitor port, the client cannot use Recovery Printingand Parallel Printing.
A Quit all applications currently running.
B Insert the CD-ROM into the CD-ROM drive.The installer starts.
C Select an interface language, and then click [OK].The default interface language is English.The printer driver with the selected language will be installed. The Englishprinter driver is installed when the following language is selected: Cestina,Magyar, Polski, Portugues, Suomi.
D Click [PostScript 3 Printer Driver].Add Printer Wizard starts.
E Click [Next >].
F Click [Network printer], and then click [Next >].
G Select the location method from the [Locate Your Printer] screen, and thenclick [Next >].
H Double-click the computer name you want to use as a print server in the[Shared printers] window.
I Select the printer you want to use, and then click [Next >].
J The printer driver installation starts.
K Click [Next >].Select the [Yes] check box to configure the printer as default.
L Click [Finish].Restart the computer to complete installation.
Note❒ A user code can be set after the printer driver installation. For information
about user code, see the printer driver Help.❒ Auto Run may not work with certain operating system settings. In that
case, launch “Setup.exe” on the CD-ROM root directory.

Using as the Windows Network Printer
25
1
Installing the PostScript 3 Printer Driver (Windows XP, Windows Server 2003)
Important❒ Installing this printer driver requires Administrators permission. Log on us-
ing an account that has Administrators permission.❒ If you print from a print server connected to the printer using the DeskTop
Binder-SmartDeviceMonitor port, the client cannot use Recovery Printingand Parallel Printing.
❒ If you print with a Windows XP or Windows Server 2003 print server, Desk-Top Binder-SmartDeviceMonitor notification functions may not be possiblefor the client.
A Quit all applications currently running.
B Insert the CD-ROM into the CD-ROM drive.The installer starts.
C Select an interface language, and then click [OK].The default interface language is English.The printer driver with the selected language will be installed. The Englishprinter driver is installed when the following language is selected: Cestina,Magyar, Polski, Portugues, Suomi.
D Click [PostScript 3 Printer Driver].Add Printer Wizard starts.
E Click [Next >].
F Click [A network printer, or a printer attached to another computer] and then click [Next >].
G Select [Browse for a printer], and then click [Next >].
H Double-click the computer name you want to use as a print server in the[Shared printers] window.
I Select the printer you want to use, and then click [Next >].
J The printer driver installation starts.
K Click [Next >].Select the [Yes] check box to configure the printer as default.
L Click [Finish].Restart the computer to complete installation.
Note❒ A user code can be set after the printer driver installation. For information
about user code, see the printer driver Help.❒ Auto Run may not work with certain operating system settings. In that
case, launch “Setup.exe” on the CD-ROM root directory.
Windows Configuration
26
1
Installing the PostScript 3 Printer Driver (Windows NT 4.0)
Important❒ Installing this printer driver requires Administrators permission. Log on us-
ing an account that has Administrators permission.❒ If you print from a print server connected to the printer using the DeskTop
Binder-SmartDeviceMonitor port, the client cannot use Recovery Printingand Parallel Printing.
❒ To print from a Windows NT 4.0 print server, install the printer driver beforeyou connect the print server to the printer.
A Quit all applications currently running.
B Insert the CD-ROM into the CD-ROM drive.The installer starts.
C Select an interface language, and then click [OK].The default interface language is English.The printer driver with the selected language will be installed. The Englishprinter driver is installed when the following language is selected: Cestina,Magyar, Polski, Portugues, Suomi.
D Click [PostScript 3 Printer Driver].Add Printer Wizard starts.
E Click [Network printer server], and then click [Next >].
F Click [Next >].
G Double-click the computer name you want to use as a print server in the[Shared printers] window.
H Select the printer you want to use, and then click [Next >].
I Check the location of the selected printer is shown, and then click [Next >].
J Change the printer name if you want, and then click [Next >].
K Specify whether or not to print a test page, and then click [Finish].Restart the computer to complete installation.
Note❒ A user code can be set after the printer driver installation. For information
about user code, see the printer driver Help.❒ Auto Run may not work with certain operating system settings. In that
case, launch “Setup.exe” on the CD-ROM root directory.
Using as the NetWare Print Server / Remote Printer
27
1
Using as the NetWare Print Server / Remote Printer
When using the PostScript 3 Printer Driver
Important❒ In an IPv6 environment, Netware servers cannot be used.Follow the procedure below to set up the PostScript 3 printer driver.
A In the [Printers] or [Printers and Faxes] window, open the printer properties.
B Click the [PostScript] tab.When using Windows 2000 / XP or Windows NT 4.0, click the [Device Set-tings] tab, and then proceed to step to clear the check box.
C Click [Advanced].
D Clear the [Send CTRL+D before job] and [Send CTRL+D after job] check boxes, andthen click [OK].
E Click [OK] to close the printer properties dialog box.

Windows Configuration
28
1
Installing the Printer Driver Using USB
This section explains how to install printer drivers using USB.
Important❒ Make sure that machine is connected to the computer's USB ports using the
USB interface cable.Before installing, check that only the operating system is running on the compu-ter and no print jobs are in progress.The printer drivers can be installed from the CD-ROM provided with this ma-chine.
Windows 98 SE / Me - USB
Important❒ Installation via USB is not possible under Windows 95 / 98. Upgrade to Win-
dows 98 SE / Me.If the printer driver has already been installed, plug and play is enabled, and theicon of the printer connected to the "USB" port is added to the [Printers] window.
A Turn off the power of the machine.
B Connect the machine to the computer using the USB cable.Connect the USB cable firmly.
C Turn on the power of the machine.The plug and play function starts and the [New Hardware Found], [Device DriverWizard], or [Add New Hardware Wizard] dialog box appears, depending on the op-erating system.
D Click [Next >].
E Click [Search for the best driver for your device. {Recommended}.], and then click [Next >].
F Select the [Specify a location:] check box, and then click [Browse...].The [Browse for Folder] dialog box appears.
G Insert the CD-ROM into the CD-ROM drive.
H Specify the location where USB Printing Support is located, and then click [Next >].If the CD-ROM drive is D, the source files of USB Printing Support are storedin the following location:D:\DRIVERS\RPCS\WIN9X_ME
I Check the location, and then click [Next >].USB Printing Support is installed.
Installing the Printer Driver Using USB
29
1
J Click [Finish].If the printer driver has already been installed, plug and play is enabled, andthe icon of the printer connected to the "USB001" port is added to the [Printers]window.
K Click [Next >].
L Click [Search for the best driver for your device. {Recommended}.], and then click [Next >].
M Select the [Specify a location:], check box, and then click [Browse...].The [Browse for Folder] dialog box appears.
N Insert the CD-ROM into the CD-ROM drive.
O Specify the location where the source files of the printer driver is stored,and then click [Next >].If the CD-ROM drive is D, the source files of the printer driver are stored inthe following location:• PostScript 3
D:\DRIVERS\PS3\WIN9X_ME\(Language)\DISK1
P Check the location, and then click [Next >].Add Printer Wizard starts.
Q Click [Finish].Installation is complete. If installation is successful, the icon of the printerconnected to the "USB001" port is added to the [Printers] window.
Note❒ When Auto Run starts, click [Exit].❒ To disable Auto Run, press the {Shift} key when inserting the CD-ROM
into the drive and keep it pressed until the computer finishes reading fromthe CD-ROM.
❒ The number after "USB" varies depending on the number of printers con-nected.
❒ It is not necessary to reinstall USB Printing Support when connecting a dif-ferent machine via USB interface when USB Printing Support is installed.
❒ After installing USB Printing Support, if the printer driver is not installed,follow the plug-and-play instructions of the printer.
❒ Install the printer driver from the CD-ROM provided with the printer.

Windows Configuration
30
1
Windows 2000 - USB
Important❒ Installing a printer driver requires Administrators permission. Log on using
an account that has Administrators permission.If the printer driver has already been installed, plug and play is enabled, and theicon of the printer connected to the "USB" port is added to the [Printers] window.If the printer driver is not installed, follow the plug-and-play instructions of theprinter to install it from the CD-ROM provided.
A Check that the power of the printer is off.
B Connect the machine to the computer using the USB cable.Connect the USB cable firmly.
C Turn on the power of the machine.Found New Hardware Wizard starts, and USB Printing Support is installedautomatically.
D Click [Next >] in the [Found New Hardware Wizard] dialog box.
E Select the [Search for a suitable driver for my device (recommended)] check box,and then click [Next >].
F Select the [Specify location] check box, and then click [Next >].
G Insert the CD-ROM into the CD-ROM drive.
H Specify the location where the source files of the printer driver is stored.If the CD-ROM drive is D, the source files of the printer driver are stored inthe following location:• PostScript 3
D:\DRIVERS\PS3\WIN2K_XP\(Language)\DISK1
I Check the printer driver location, and then click [OK].
J Click [Next >].
K Click [Finish].If the printer driver has already been installed, plug and play is enabled, and theicon of the printer connected to the "USB001" port is added to the [Printers] window.
Note❒ When Auto Run starts, click [Exit].❒ To disable Auto Run, press the left {Shift} key when inserting the CD-ROM
into the drive and keep it pressed until the computer finishes reading fromthe CD-ROM.
❒ The number after “USB” varies depending on the number of printers con-nected.

Installing the Printer Driver Using USB
31
1
Windows XP, Windows Server 2003 - USB
Important❒ Installing a printer driver requires Administrators permission. Log on using
an account that has Administrators permission.If the printer driver has already been installed, plug and play is enabled, and theicon of the printer connected to the "USB" port is added to the [Printers] window.The printer drivers can be installed from the CD-ROM provided with this ma-chine.If the printer driver is not installed, follow the plug-and-play instructions of theprinter to install it from the CD-ROM provided.
A Turn off the power of the machine.
B Connect the machine to the computer using the USB cable.Connect the USB cable firmly.
C Turn on the power of the machine.Found New Hardware Wizard starts, and USB Printing Support is installedautomatically.
D In the Found New Hardware Wizard display, click [Search for a suitable driverfor my device [recommended] ], and then click [Next >].
E To disable Auto Run, press the left {Shift} key when inserting the CD-ROMinto the drive and keep it pressed until the computer finishes reading fromthe CD-ROM.
F Select the [Include this location in the search] check box under [Search for the bestdriver in these location], and then click [Browse] to select the printer driver lo-cation.If the CD-ROM drive is D, the source files of the printer driver are stored inthe following location:• PostScript 3
D:\DRIVERS\PS3\WIN2K_XP\(Language)\DISK1
G Check the printer driver location, and then click [Next >].
H Click [Continue].
I Click [Finish].If installation is successful, the icon of the printer connected to the "USB001"port is added to the [Printers] window.
Note❒ If Auto Run starts, click [Cancel], and then [Exit].❒ The number after “USB” varies depending on the number of printers con-
nected.

Windows Configuration
32
1
Troubleshooting for using USB
Problems Solutions
The machine is not automatically rec-ognized.
Turn off the power of the machine, reconnect the USB cable, and then turn it on again.
Windows has already configured the USB settings.
Open Windows' Device Manager, and then, under [Uni-versal Serial Bus controllers], remove any conflicting de-vices. Conflicting devices have a yellow [!] or [?] icon by them. Take care not to accidentally remove required de-vices. For details, see Windows Help.
Note❒ When using Windows 2000 / XP or Windows Server
2003, an erroneous device is displayed under [USB Controller] in the [Device Manager] dialog box.

Printing with Parallel Connection
33
1
Printing with Parallel Connection
To use a machine connected using a parallel interface, click [LPT1] when install-ing the printer driver.
Installing the PostScript 3 Printer Driver (Windows 95 / 98 / Me)
A Quit all applications currently running.
B Insert the CD-ROM into the CD-ROM drive.The installer starts.
C Select an interface language, and then click [OK].The default interface language is English.The printer driver with the selected language will be installed. The Englishprinter driver is installed when the following language is selected: Cestina,Magyar, Polski, Portugues, Suomi.
D Click [PostScript 3 Printer Driver].Add Printer Wizard starts.
E Click [Next >].
F Click [Local printer], and then click [Next >].A dialog box for selecting the printer manufacturer and model name appears.
G Select the name of the machine whose printer driver you want to install,and then click [Next >].
H In the [Available ports:] box, click [Printer Port], and then click [Next >].
I Change the printer name if you want, and then click [Next >].Select the [Yes] check box to configure the printer as default.
J Specify whether or not to print a test page, and then click [Finish].
K Restart the computer to complete installation.
Note❒ A user code can be set after the printer driver installation. For information
about user code, see the printer driver Help.❒ Auto Run may not work with certain operating system settings. In that
case, launch “Setup.exe” on the CD-ROM root directory.
Windows Configuration
34
1
Installing the PostScript 3 printer driver (Windows 2000)
Important❒ Installing this printer driver requires Administrators permission. Log on us-
ing an account that has Administrators permission.
A Quit all applications currently running.
B Insert the CD-ROM into the CD-ROM drive.The installer starts.
C Select an interface language, and then click [OK].The default interface language is English.The printer driver with the selected language will be installed. The Englishprinter driver is installed when the following language is selected: Cestina,Magyar, Polski, Portugues, Suomi.
D Click [PostScript 3 Printer Driver].Add Printer Wizard starts.
E Click [Next >].
F Click [Local printer], and then click [Next >].A dialog box for selecting the printer manufacturer and model name appears.
G Select [LPT1] at the [Printer Port] dialog box, and then click [Next >].
H Select whether or not to share the printer, and then click [Next >].
I Select the name of the machine whose driver you want to install, and thenclick [Next >].
J Select whether or not you want to print a test page, and then click [Finish].The printer driver installation starts.
K Restart the computer to complete installation if necessary.
Note❒ A user code can be set after the printer driver installation. For information
about user code, see the printer driver Help.❒ Auto Run may not work with certain operating system settings. In that
case, launch “Setup.exe” on the CD-ROM root directory.
Printing with Parallel Connection
35
1
Installing the PostScript 3 Printer Driver (Windows XP, Windows Server 2003)
Important❒ Installing this printer driver requires Administrators permission. Log on us-
ing an account that has Administrators permission.
A Quit all applications currently running.
B Insert the CD-ROM into the CD-ROM drive.The installer starts.
C Select an interface language, and then click [OK].The default interface language is English.The printer driver with the selected language will be installed. The Englishprinter driver is installed when the following language is selected: Cestina,Magyar, Polski, Portugues, Suomi.
D Click [PostScript 3 Printer Driver].Add Printer Wizard starts.
E Click [Next >].
F Click [Local printer attached to this computer], and then click [Next >].
G Select the port you want to use, and then click [Next >].A dialog box for selecting the printer manufacturer and model name appears.
H Select the name of the machine whose driver you want to install, and thenclick [Next >].
I Click [Close] to close the [Printer Port] dialog box.
J Click [Next >].
K Change the printer name if you want, and then click [Next >].
L Specify whether or not to print a test page, and then click [Finish].The printer driver installation starts.
M Restart the computer to complete installation.
Note❒ A user code can be set after the printer driver installation. For information
about user code, see the printer driver Help.❒ Auto Run may not work with certain operating system settings. In that
case, launch “Setup.exe” on the CD-ROM root directory.

Windows Configuration
36
1
Installing the PostScript 3 Printer Driver (Windows NT 4.0)
Important❒ Installing this printer driver requires Administrators permission. Log on us-
ing an account that has Administrators permission.
A Quit all applications currently running.
B Insert the CD-ROM into the CD-ROM drive.The installer starts.
C Select an interface language, and then click [OK].The default interface language is English.The printer driver with the selected language will be installed. The Englishprinter driver is installed when the following language is selected: Cestina,Magyar, Polski, Portugues, Suomi.
D Click [PostScript 3 Printer Driver].Add Printer Wizard starts.
E Select [My Computer], and then click [Next >].
F Select the port you want to use, and then click [Next >].A dialog box for selecting the printer manufacturer and model name appears.
G Select the name of the machine whose driver you want to install, and thenclick [Next >].
H Change the printer name if you want, and then click [Next >].Select the [Yes] check box to configure the printer as default.
I Specify whether or not to share the printer, and then click [Next >].
J Specify whether or not to print a test page, and then click [Finish].The printer driver installation starts.
K Restart the computer to complete installation if necessary.
Note❒ A user code can be set after the printer driver installation. For information
about user code, see the printer driver Help.❒ Auto Run may not work with certain operating system settings. In that
case, launch “Setup.exe” on the CD-ROM root directory.
Installing the Printer Driver Using IEEE 1394 (SCSI print)
37
1
Installing the Printer Driver Using IEEE 1394 (SCSI print)
The printer drivers can be installed from the CD-ROM provided with this ma-chine.
Important❒ Quit all applications currently running, and do not print during installation.❒ Do not connect IEEE 1394 or USB devices to the computer or turn on another
printers during installation.❒ Before uninstalling the printer driver, check that the IEEE 1394 interface cable
is disconnected from the computer.❒ SCSI print must be set to "active" from the control panel. For details, see Net-
work Guide.❒ This machine can receive print data from one computer at a time only. An
message may appear if jobs from different computers collide.❒ If jobs collide, the first received is printed first.❒ When the printer driver is properly installed, connecting or disconnecting the
optional IEEE 1394 cable causes the printer icon to change.
Windows 2000
Important❒ Installing this printer driver requires Administrators permission. Log on us-
ing an account that has Administrators permission.❒ The optional 1394 interface unit can be used only with Service Pack 1 (SP1) or
higher.
A Connect the machine and computer using the IEEE 1394 interface cable.
B Click [Next >] in the [Found New Hardware Wizard] dialog box.
CWhen the message "This wizard will complete the installation for this De-vice: Unknown" appears, click [Specify a location], and then click [Next >].
DWhen the message "Locate Driver Files" appears, select the [Optional searchlocations.] check box, and then click [Specify a location], and then click [Next >].
E To disable Auto Run, press the left {Shift} key when inserting the CD-ROMinto the drive and keep it pressed until the computer finishes reading fromthe CD-ROM.If Auto Run starts, click [Cancel], and then [Exit].
F Click [Browse].
Windows Configuration
38
1
G Select the printer driver you want to use.If the CD-ROM drive is D, the source files of the printer driver are stored inthe following location:• PostScript 3
D:\DRIVERS\PS3\WIN2K_XP\(Language)\DISK1\
H Click [Open].
I Click [OK].
J Follow the instructions.When installation is complete, the printer connected to "1394_00n" appears inthe [Printers] window. ("n" shows the number of printers connected.)
Note❒ If [Found New Hardware Wizard] appears every time the computer is started
or the cable is connected, disable the device. To install another printer driv-er after setting the "1394_00n" port, click [1394_00] as a port during theprinter driver installation.
❒ If the printer driver has already been installed, the printer icon is added tothe [Printers] window. In this case, printer driver installation is not neces-sary.
❒ If printing does not work properly after the installation, delete the port andreinstall the printer driver. For details, see "When You Cannot Print", Trou-ble Shooting.
Disable the device
If you do not want to install the printer when Found New Hardware Wizardstarts under an operating system that supports SCSI print, disable the device byfollowing the procedure below.
AWhen the [Found New Hardware Wizard] dialog box appears, click [Next >].
BWhen the message "This wizard will complete the installation for this De-vice: Unknown" appears, select the [Search for a suitable driver for my device rec-ommended] check box, and then click [Next >].
CWhen the message "Please choose your search and installation option." ap-pears, clear all check boxes from [Search for the best driver in these locations.],and then click [Next >].
DWhen the message "Driver Files Search Results" appears, select the [Disablethe device. The Add/Remove Hardware Wizard in the control Panel can be able to com-plete the driver installations.] check box, and then click [Finish]."
Installing the Printer Driver Using IEEE 1394 (SCSI print)
39
1
Windows XP, Windows Server 2003
Important❒ SCSI print must be set to "active" from the control panel. For details, see Net-
work Guide.❒ Installing this printer driver requires Administrators permission. Log on us-
ing an account that has Administrators permission.❒ When the printer driver is properly installed, connecting or disconnecting the
optional IEEE 1394 cable causes the printer icon to change.
A Connect the machine and computer using the IEEE 1394 interface cable.When the [Found New Hardware Wizard] dialog box appears, check that [This wiz-ard helps you install software for: (Unknown)] is displayed.
B Select the [Install from a list on specific location (Advanced)] check box, and thenclick [Next >].
CWhen the message "Please choose your search and installation option." ap-pears, select the [Search for the best driver in these locations.] check box, selectthe [Include this location in the search:] check box, and then select the [Includethis location in the search:] check box.
D To disable Auto Run, press the left {Shift} key when inserting the CD-ROMinto the drive and keep it pressed until the computer finishes reading fromthe CD-ROM.If Auto Run starts, click [Cancel], and then [Exit].
E Specify the location where the source files of the printer driver is stored,and then click [Next >].If the CD-ROM drive is D, the source files of the printer driver are stored inthe following location:• PostScript 3
D:\DRIVERS\PS3\WIN2K_XP\(Language)\DISK1\When installation is complete, the printer connected to "1394_00n" appears inthe [Printers and Faxes] window. ("n" shows the number of printers connected.)
Windows Configuration
40
1
F Follow the instructions.
Note❒ This machine can receive print data from one computer at a time only. If a
job from a computer collides with other data, a message may appear on thecomputer.
❒ To install another printer driver after setting the "1394_00n" port, click[1394_00] as a port during the printer driver installation.
❒ If the printer driver has already been installed, the printer icon is added tothe [Printers and Faxes] window. In this case, printer driver installation isnot necessary.
❒ Even if the printer driver is already installed, the message " Found NewHardware Wizard" may appear when the machine and the computer areconnected using the IEEE 1394 interface cable for the first time. If it does,install the printer driver.
❒ If printing does not work properly after the installation, delete the port andreinstall the printer driver. For details, see "When You Cannot Print", Trou-ble Shooting.
Disable the device
If you do not want to install the printer when Found New Hardware Wizardstarts under an operating system that supports SCSI print, disable the device byfollowing the procedure below
AWhen the [Found New Hardware Wizard] dialog box appears, check that [Thiswizard helps you install software for: Unknown] displayed, select [Install from a liston specific location (Advanced)] check box, and then click [Next >].
BWhen the message "Please choose your search and installation option." ap-pears, clear all check boxes from [Search for the best driver in these locations.],and then click [Next >].
CWhen the message "The wizard could not find the software on your com-puter for.." appears, click [OK].
DWhen the message "Cannot Install this Hardware" appears, select the [Don'tprompt again to install the software] check box, and then click [Finish].
Printing with Bluetooth Connection
41
1
Printing with Bluetooth Connection
Supported Profiles
❖ SPP, HCRP• A maximum of two Bluetooth adaptor or Bluetooth-equipped computers
can be connected at the same time using the Bluetooth interface: one bySPP, one by HCRP.
• When connecting more than one Bluetooth adaptor or Bluetooth-equippedcomputer at the same time, the first device that establishes connection is se-lected. When selecting the connection between the other devices, cancelthe first established connection.
• Conditions for bidirectional communications• SPP connection does not support bidirectional communications.• HCRP connection supports bidirectional communications.
❖ BIP• For BIP connection, a module including PostScript 3 must be installed in
the machine.• Only one Bluetooth adaptor or Bluetooth-equipped computer can be con-
nected via BIP.• Only JPEG images that can be printed using BIP.• User codes are disabled for BIP.
You cannot print if print functions are restricted.• Some printers do not support BIP.
Windows Configuration
42
1
Printing with Bluetooth Connection
To install the printer driver, follow the procedure used to install parallel interface.
Important❒ To install the printer driver under Windows 2000 / XP Professional or Win-
dows Server 2003, you must have an account that has Manage Printers per-mission. Log on as an Administrator or Power Users group member.
Note❒ System requirements vary depending on the Bluetooth standard and specifi-
cations. For details, see the manuals provided with each product.❒ For information about setting up Bluetooth under other operating systems or
using it with different utilities, see the manuals provided with those operat-ing systems or utilities.
A Start 3Com Bluetooth Connection Manager.
B Check that the printer you want to use appears in 3Com Bluetooth Connec-tion Manager.
C On the [Tool] menu, click [COM port].
D Check that the message "Bluetooth Serial Client (COMx) " appears underClient Ports. (X indicates the COM port number used by Bluetooth.)
E Click [Close].
F On the [Start] menu, point to [Settings], and then click [Printers].The [Printers] window appears.
G Click the icon of the printer you want to use.
H On the [File] menu, click [Properties].
I Click the [Ports] tab.
J Under [Port], select the [COMx:] check box. X indicates the COM portnumber used by Bluetooth.
K Click [OK].Close the [Printers] window.
Printing with Bluetooth Connection
43
1
If a dialog box appears while transmitting a print job, reestablish network connection as follows:
A Select the printer you want to use in the [Printers and Fax] box.
B Click [Connect].
Note❒ To always use the same printer, select the [Always use for this connection] check box.
ReferenceFor details, see the manuals provided with the Bluetooth adaptor or com-puter equipped with Bluetooth.
Configuring Security Mode Settings
A Start 3Com Bluetooth Connection Manager.
B On the [Tools] menu, click [Security Mode].The [Security Mode] dialog box appears.
C Select the security mode in the [Security Mode:] list.If you click [High], or [Custom], and specify [Link] in the [Custom Settings] dialogbox, enter the Bluetooth password. For information about entering the pass-word, see p.43 “Printing in the Security Mode” For all other security modes and custom settings, no password is required.For information about each mode, see the manuals provided with the utility.
D Click [OK].Close the [Security Mode] dialog box.
ReferenceFor details about the security mode, see 3Com Bluetooth Connection Man-ager Help. For details about the password entry which is required to trans-mit print jobs, see p.43 “Printing in the Security Mode”.
Printing in the Security Mode
A Send the print job to the printer in use.Depending on the computer configuration, the [Connect] dialog box may ap-pear. If it does, use it to establish the network connection.
B The [Authentication] dialog box appears.
C Enter the Bluetooth password, and then click [OK].As the Bluetooth password, enter the last four digits of the machine's serialnumber. You can find the serial number on the label on the back of the machine.For example, if the serial number is 00A0-001234, the Bluetooth password is 1234.
D The print job is sent.
Note❒ The Bluetooth password differs for each machine and cannot be changed.
Windows Configuration
44
1
If a Message Appears during Installation
Message number 58 or 34 indicates the printer driver cannot be installed usingAuto Run. Install the printer driver using [Add Printer] or [Install Printer].
For Windows 95 / 98 / Me, Windows 2000 and Windows NT 4.0:
A On the [Start] menu, point to [Settings], and then click [Printers].
B Double-click the Add Printer icon.
C Follow the instructions in Add Printer Wizard.
Note❒ If the printer driver is on a CD-ROM, the location of the PostScript 3 printer
driver is either D:\DRIVERS\PS3\WIN9X_ME\(Language)\DISK1,D:\DRIVERS\PS3\WIN2K_XP\(Language)\DISK1, or D:\DRIV-ERS\PS3\NT4\(Language)\DISK1. If the installer starts, click [Cancel] to quit.
For Windows XP Professional and Windows Server 2003:
A On the [Start] menu, click [Printers and Faxes].
B Click [Add a printer].
C Follow the instructions in Add Printer Wizard.
Note❒ If the printer driver is on a CD-ROM, the location of the RPCS printer driv-
er is D:\DRIVERS\PS3\WIN2K_XP\(Language)\DISK1. If the installerstarts, click [Cancel] to quit.
For Windows XP Home Editions:
A On the [Start] menu, click [Control Panel].
B Click [Printers and Other Hardware].
C Click [Printers and Faxes].
D Click [Install Printer].
E Follow the instructions in Add Printer Wizard.
Note❒ If the printer driver is on a CD-ROM, the location of the RPCS printer driv-
er is D:\DRIVERS\PS3\WIN2K_XP\(Language)\DISK1. If the installerstarts, click [Cancel] to quit.
Making Option Settings for the Printer
45
1
Making Option Settings for the Printer
Make option settings for the machine using the printer driver when bidirectionalcommunication is disabled.Set up option settings when bidirectional communications are disabled.
Important❒ Under Windows 2000 / XP and Windows Server 2003, Manage Printers per-
mission is required to change the printer properties in the [Printers] folder.Log on as an Administrators or Power Users group member.
❒ Under Windows NT 4.0, Full Control permission is required to change theprinter properties in the [Printers] folder. Log on as an Administrators or Pow-er Users group member.
A On the [Start] menu, point to [Settings], and then click [Printers].The [Printers] window appears.
B Click the icon of the printer you want to use.
C On the [File] menu, click [Properties].
D Click the [Accessories] tab.Under Windows 2000 / XP, Windows Server 2003 and Windows NT 4.0, clickthe [Device Settings] tab.
E Select options installed from the [Options] area, and then make the neces-sary settings.Under Windows 2000 / XP, Windows Server 2003 and Windows NT 4.0, clickthe [Installable Options] area.
F Click [Aplly], and then click [OK] to close the printer properties dialog box.
ReferenceFor details about making option settings for the printer, see p.65 “SettingUp Options”.
Windows Configuration
46
1
Setting Up the Printer Driver
Windows 95 / 98 / Me - Accessing the Printer Properties
There are two methods to open the printer properties dialog box.
Making printer default settings
To make the printer default settings, open the printer properties dialog box fromthe [Printers] window.
Important❒ You cannot change the printer default settings for each user. Settings made in
the printer properties dialog box are applied to all users.
A On the [Start] menu, point to [Settings], and then click [Printers].The [Printers] window appears.
B Click the icon of the printer you want to use.
C On the [File] menu, click [Properties].The printer properties dialog box appears.
DMake the necessary settings, and then click [OK].
E Click [OK].
Note❒ With some applications, the printer driver settings are not used, and the
application's own default settings are applied.
ReferenceFor details, see the printer driver Help.
Setting Up the Printer Driver
47
1
Making printer settings from an application
You can make printer settings for a specific application.To make printer settings for a specific application, open the printer propertiesdialog box from that application. The following explains how to make settingsfor the WordPad application provided with Windows 95/98/Me.
A On the [File] menu, click [Print].The [Print] dialog box appears.
B Select the printer you want to use in the [Name] list, and then click [Properties].The printer properties dialog box appears.
CMake the necessary settings, and then click [OK].
D Click [OK] to start printing.
Note❒ The procedure to open the printer properties dialog box may vary depend-
ing on the application. For details, see the manuals provided with the ap-plication you use.
❒ With some applications, the printer driver settings are not used, and theapplication's own default settings are applied.
❒ Any settings you make in the following procedure are valid for the currentapplication only.
❒ General users can change the properties displayed in the [Print] dialog boxof an application. Settings made here are used as defaults when printingfrom this application.
ReferenceFor details, see the printer driver Help.
Windows Configuration
48
1
Windows 2000 - Accessing the Printer
Making printer default settings - the printer properties
Important❒ To change the printer default settings including option configuration settings,
log on using an account that has Manage Printers permission. Members of theAdministrators and Power Users groups have Manage Printers permissionby default.
❒ You cannot change the printer default settings for each user. Settings made inthe printer properties dialog box are applied to all users.
A On the [Start] menu, point to [Settings], and then click [Printers].The [Printers] window appears.
B Click the icon of the printer you want to use.
C On the [File] menu, click [Properties].The printer properties dialog box appears.
DMake the necessary settings, and then click [OK].
Note❒ Settings you make here are used as the default settings for all applications.❒ Do not make a setting for [Form to Tray Assignment].
ReferenceFor details, see the printer driver Help.
Making printer default settings - Printing Preferences
Important❒ You cannot change the printer default settings for each user. Settings made in
the printer properties dialog box are applied to all users.
A On the [Start] menu, point to [Settings], and then click [Printers].The [Printers] window appears.
B Click the icon of the printer you want to use.
C On the [File] menu, click [Printing Preferences...].The [Printing Preferences] dialog box appears.
DMake the necessary settings, and then click [OK].
Note❒ Settings you make here are used as the default settings for all applications.
ReferenceFor details, see the printer driver Help.
Setting Up the Printer Driver
49
1
Making printer settings from an application
You can make printer settings for a specific application.To make printer settings for a specific application, open the [Printing Preferences]dialog box from that application. The following explains how to make settingsfor the WordPad application provided with Windows 2000.
A On the [File] menu, click [Print...].The [Print] dialog box appears.
B Select the printer you want to use in the [Select Printer] list.
C On the [Preferences] tab, make the necessary settings, and then click [Print]to start printing.
Note❒ The procedure to open the [Printing Preferences] dialog box may vary de-
pending on the application. For details, see the manuals provided with theapplication you use.
❒ Any settings you make in the following procedure are valid for the currentapplication only.
❒ General users can change the properties displayed in the [Print] dialog boxof an application. Settings made here are used as defaults when printingfrom this application.
ReferenceFor details, see the printer driver Help.

Windows Configuration
50
1
Windows XP, Windows Server 2003 - Accessing the Printer Properties
Making printer default settings - the printer properties
Important❒ To change the printer default settings including option configuration settings, log
on using an account that has Manage Printers permission. Members of the Admin-istrators and Power Users groups have Manage Printers permission by default.
❒ You cannot change the printer default settings for each user. Settings made inthe printer properties dialog box are applied to all users.
A On the [Start] menu, click [Printers and Faxes].The [Printers and Faxes] window appears.
B Click the icon of the printer you want to use.
C On the [File] menu, click [Properties].The printer properties dialog box appears.
DMake the necessary settings, and then click [OK].
Note❒ Settings you make here are used as the default settings for all applications.❒ Do not make a setting for [Form to Tray Assignment].
ReferenceFor details, see the printer driver Help.
Making printer default settings - Printing Preferences
Important❒ You cannot change the printer default settings for each user. Settings made in
the printer properties dialog box are applied to all users.
A On the [Start] menu, click [Printers and Faxes].The [Printers and Faxes] window appears.
B Click the icon of the printer you want to use.
C On the [File] menu, click [Printing Preferences...].The [Printing Preferences] dialog box appears.
DMake the necessary settings, and then click [OK].
Note❒ Settings you make here are used as the default settings for all applications.
ReferenceFor details, see the printer driver Help.
Setting Up the Printer Driver
51
1
Making printer settings from an application
You can make printer settings for a specific application.To make printer settings for a specific application, open the [Printing Preferences]dialog box from that application. The following explains how to make settingsfor the WordPad application provided with Windows XP.
A On the [File] menu, click [Print...].The [Print] dialog box appears.
B Select the printer you want to use in the [Select Printer] list.
C On the [Preference] tab, make the necessary settings, and then click [Print] tostart printing.
Note❒ The procedure to open the [Printing Preferences] dialog box may vary de-
pending on the application. For details, see the manuals provided with theapplication you use.
❒ Any settings you make in the following procedure are valid for the currentapplication only.
❒ General users can change the properties displayed in the [Print] dialog boxof an application. Settings made here are used as defaults when printingfrom this application.
ReferenceFor details, see the printer driver Help.
Windows Configuration
52
1
Windows NT 4.0 - Accessing the Printer Properties
Making printer default settings - the printer properties
Important❒ To change the printer default settings including option configuration settings,
log on using an account that has Full Control permission. Members of the Ad-ministrators, Server Operators, Print Operators, and Power Users groupshave Full Control permission by default.
❒ You cannot change the printer default settings for each user. Settings made inthe printer properties dialog box are applied to all users.
A On the [Start] menu, point to [Settings], and then click [Printers].The [Printers] window appears .
B Click the icon of the printer you want to use.
C On the [File] menu, click [Properties].The printer properties dialog box appears.
DMake the necessary settings, and then click [OK].
Note❒ Settings you make here are used as the default settings for all applications.❒ Do not make a setting for [Form to Tray Assignment].
ReferenceFor details, see the printer driver Help.
Making printer default settings - Default
Important❒ To change the printer default settings including option configuration settings,
log on using an account that has Full Control permission. Members of the Ad-ministrators, Server Operators, Print Operators, and Power Users groupshave Full Control permission by default.
❒ You cannot change the printer default settings for each user. Settings made inthe printer properties dialog box are applied to all users.
A On the [Start] menu, point to [Settings], and then click [Printers].The [Printers] window appears.
B Click the icon of the printer you want to use.
C On the [File] menu, click [Document Defaults...].The [Default] dialog box appears.
Setting Up the Printer Driver
53
1
DMake the necessary settings, and then click [OK].
Note❒ Settings you make here are used as the default settings for all applications.
ReferenceFor details, see the printer driver Help.
Making printer settings from an application
You can make printer settings for a specific application.To make printer settings for a specific application, open the printer propertiesdialog box from that application. The following explains how to make settingsfor the WordPad application provided with Windows NT 4.0.
A On the [File] menu, click [Print].The [Print] dialog box appears.
B Select the printer you want to use in the [Name] list, and then click [Proper-ties].The printer properties dialog box appears.
CMake the necessary settings, and then click [OK].
D Click [OK] to start printing.
Note❒ The procedure to open the printer properties dialog box may vary depend-
ing on the application. For details, see the manuals provided with the ap-plication you use.
❒ With some applications, the printer driver settings are not used, and theapplication's own default settings are applied.
❒ Any settings you make in the following procedure are valid for the currentapplication only.
❒ General users can change the properties displayed in the [Print] dialog boxof an application. Settings made here are used as defaults when printingfrom this application.
ReferenceFor details, see the printer driver Help.

Windows Configuration
54
1
2. Mac OS Configuration
55
Mac OSThis section explains how to configure a Mac OS to use EtherTalk and USB.The following explains how to configure Mac OS 9.1. If you are not using MacOS 9.1, see the manual of the Mac OS you are using for details
Important❒ For Mac OS 8.6 and higher. (Mac OS X Classic environment is supported.)
Note❒ The PostScript 3 printer driver is stored in the following folder on the CD-ROM.
Mac OS 8 and 9:PS Driver:(language):Disk1
Installing the PostScript 3 Printer Driver and PPD FileIt is necessary to install a printer driver and PostScript Printer Description (PPD)files to print from a Mac OS.Follow the procedure below to install a printer driver and a PPD file into a MacOS using Mac OS 8.6 and higher.
PostScript 3 Printer Driver
A Insert the CD-ROM into the CD-ROM drive.
B Double-click the CD-ROM drive icon.
C Double-click the [Mac OS 8 and 9] folder.
D Double-click the [PS Driver] folder.
E Double-click the folder of the language you use.
F Open [Disk1], and then double-click the installer icon.
G Follow the instructions on the screen.
PPD Files
A Double-click the CD-ROM drive icon.
B Double-click the [Mac OS 8 and 9] folder.
C Double-click the [Printer Descriptions] folder.
D Double-click the folder of the language you are using.
E Open the [DISK1] folder.

Mac OS Configuration
56
2
F Drag the PPD file and the plugin file into [Printer Descriptions] in [Extensions]under [System Folder].
G Restart the Mac OS.
Setting Up PPD Files
Important❒ Make sure that the printers are connected to an AppleTalk network before
performing the following procedure.
A On the [Apple] menu, click [Chooser].
B Click the Adobe PS icon.
C In the [Select a PostScript Printer:] list, click the name of the printer you want to use.
D Click [Create].
E Click the printer you want to use, and then click [Setup].A PPD file is set up and the Adobe PS icon appears at the left of the printername in the list. Follow the procedure on p.56 “Setting Up Options” to makeoption settings; otherwise close the [Chooser] dialog box.
Setting Up Options
A On the [Apple] menu, click [Chooser].
B Click the Adobe PS icon.
C In the [Select a PostScript Printer:] list, click the name of the printer you wantto use, and then click [Setup].
D Click [Configure].A list of options appears.
E Select the option you want to set up, and then select an appropriate setting for it.
F Click [OK].The list of options closes.
G Click [OK].The [Chooser] dialog box appears.
H Close the [Chooser] dialog box.
Note❒ If the option you want to select is not displayed, PPD files may not be set
up correctly. To complete the setup, check the name of the PPD file dis-played in the dialog box.
Mac OS
57
2
Installing Adobe Type Manager
Important❒ Quit all applications currently running before installation. Install ATM after
you restart the computer.
A Start a Mac OS.
B Insert the CD-ROM into the CD-ROM drive.
C Double-click the CD-ROM drive con.
D Double-click the [Mac OS 8 and 9] folder.
E Double-click the [ATM] folder.
F Double-click the ATM 4.6.2 installer icon.
G Follow the instructions on the screen.
HWhen the procedure is complete, restart the computer. ATM will be com-pletely installed only after restarting.
I On the [Apple] menu, open [Control Panel], and then click [~ATM].
J The ATM control panel opens.
Note❒ For details about installation, see the operating instructions in the ATM folder.
Installing Screen fontsFollow the procedure below to install screen fonts.The screen fonts described below can be found in the [Fonts] folder on the CD-ROM.
A Start a Mac OS.
B Insert the CD-ROM into the CD-ROM drive.The CD-ROM drive icon appears.
C Double-click the CD-ROM drive icon.The contents of the CD-ROM appear.
D Double-click the [Mac OS 8 and 9] folder.
E Double-click the [Fonts] folder.
F Double-click the [Screen font] folder.
G Double-click the [TrueType] or [Type1] folder.Select the font type you want to use.
Mac OS Configuration
58
2
H Copy the fonts you want to install in [System Folder].A confirmation message appears.
I Click [OK].The fonts are installed.
J Restart the Mac OS.
Changing to EtherTalkFollow the procedure below to configure to a Mac OS to use EtherTalk.
A Open [Control Panel], and then double-click the AppleTalk icon.
B On the [Connect via:] pop-up menu, click [Ethernet].
C If you change zones, select a name on the [Current zone:] pop-up menu.
D Close the AppleTalk control panel.
E Restart the computer.
Note❒ The procedures used to configure Mac OS may vary depending on the Mac
OS version. The following describes how to configure Mac OS 9.1. If youare using a different version of Mac OS, use the following procedures as areference and see the manuals for your Mac OS version.
❒ Confirm the Connection to the Printer with TCP/IP
ReferenceFor information about installing applications required for EtherTalk, seethe Mac OS manuals.

Mac OS X
59
2
Mac OS X
This section explains how to configure a Mac OS X to use EtherTalk, USB andTCP/IP.Follow the procedure below to configure Mac OS X 10.3.8. If you are not usingMac OS X 10.3.8, see the manual of the Mac OS X you are using for details.
Important❒ For Mac OS X 10.1 or higher.
Note❒ The PPD files are stored in the following folder on the CD-ROM.
Mac OS X:PPD Installer
Installing the PPD Files
Follow the procedure below to install a PPD file to print from Mac OS X.
Important❒ You need an administrator name and a password (phrase). For details, con-
sult your network administrator.
A Insert the CD-ROM into the CD-ROM drive.
B Double-click the CD-ROM drive icon.
C Double-click the [Mac OS X] folder.
D Double-click the [MacOSX PPD Installer] folder.
E Double-click the installer icon.
F Follow the instructions on the screen.
Setting Up the PPD File
A Start Printer Setup Utility.
B Click [Add].
❖ Mac OS X 10.4 or laterClick a printer that has "AppleTalk" indicated in the "Connection" column.If the zone is set, click [More Printers...], and then select the zone from thesecond pop-up menu.
❖ Other Mac OS XClick [AppleTalk] on the first pop-up menu.If the zone is set, select the zone from the second pop-up menu.
Mac OS Configuration
60
2
C Select the printer, and then select its manufacturer from the [Printer Model:]pop-up menu.Under Mac OS X 10.4 or later, you are using from the [Print Using] popupmenu.A list of printer types appears.
D Select the PPD file for the model you are using, and then click [Add].
E Quit Printer Setup Utility.
Setting Up Options
A Start System Preferences.
B Click [Print & Fax].
C In the [Printer] list, click the name of the printer you want to use, and thenclick [Printer Setup...].
D Select the option you want to set up, and then select an appropriate settingfor it.
E Click [Apply Changes].
Note❒ If the option you want to select is not displayed, PPD files may not be set
up correctly. To complete the setup, check the name of the PPD file dis-played in the dialog box.
Using USB Interface
Follow the procedure below to set up USB connection.
A Start Printer Setup Utility.
B Click [Add].
❖ Mac OS X 10.4 or laterClick a printer that has "USB" indicated in the "Connection" column.
❖ Other Mac OS XClick [USB] on the pop-up menu.The connected printer appears.
C Select the printer, and then select its manufacturer from the [Printer Model:]pop-up menu.Under Mac OS X 10.4 or later, you are using from the [Print Using] pop-up menu.A list of printer types appears.
Mac OS X
61
2
D Select the connected printer from the list of printer models, and then click[Add].
E Quit Printer Setup Utility.
Note❒ When printing with a USB connection to a Macintosh computer, printer
language does not change automatically. Use the control panel on thisprinter to change printer language to [Auto Detect] or [PS] before printing.
❒ USB2.0 can be used only with Mac OS X 10.3.3 or higher.
Using Bonjour (Rendezvous)
Follow the procedure below to print using Bonjour (Rendezvous) under Mac OSX 10.2.3 or higher. Ethernet, wireless LAN and IEEE 1394 (IP over 1394) connec-tions can also be used.
A Start Printer Setup Utility.
B Click [Add].
❖ Mac OS X 10.4 or laterClick a printer that has "Bonjour" indicated in the "Connection" column.If the zone is set, click [More Printers...], and then select the zone from thesecond pop-up menu.
❖ Other Mac OS XClick [Rendezvous] on the pop-up menu.If the zone is set, select the zone from the second pop-up menu.
C Select the name of the connected printer from the list of printer models, andthen click [Add].Under Mac OS X 10.4 or later, Installable Options window appears. Select theoption you want to set up, and then select an appropriate setting for it, andthen [Continue].
D Quit Printer Setup Utility.
Note❒ When printing with a Rendezvous connection to a Macintosh computer,
printer language does not change automatically. Use the control panel onthis printer to change printer language to [Auto Detect] or [PS] before print-ing.
Mac OS Configuration
62
2
Changing to EtherTalk
Follow the procedure below to configure a Mac OS X to use EtherTalk.
Important❒ You need an administrator name and a password (phrase). For details, con-
sult your network administrator
A Open [System Preference], and then click the Network icon.
B Click [Built-in Ethernet] in the [Show:] list box.
C Click the [AppleTalk] tab.
D Select the [Make AppleTalk Active] check box.
E To change AppleTalk zones, select a name from the [AppleTalk Zone:] pop-upmenu.
FWhen the settings are made, click [Apple Now].
ReferenceFor information about installing applications required for EtherTalk, seethe Mac OS manuals.
Configuring the Printer
63
2
Configuring the Printer
Use the control panel to enable AppleTalk. (The default is active.)

Mac OS Configuration
64
2
3. Using PostScript 3
65
Setting Up Options
To use installed options correctly, first set up the printer driver. If the options arenot recognized, you cannot use them, even though they are physically installed.The procedure to set up a printer driver varies depending on the operating system.
❖ Windows
Important❒ If your system is Windows 2000, Windows XP Professional, or Windows
Server 2003, changing printer driver settings requires Manage Printerspermission. Members of Administrators and Power Users groups haveManage Printers permission by default. When you change printer driversettings, log on with an account that has Manage Printers permission.
❒ If your system is Windows NT 4.0, changing printer driver settings re-quires Full Control access permission. Members of Administrators, ServerOperators, Print Operators, and Power Users groups have Full Controlpermission by default. When you change printer driver settings, log onwith an account that has Full Control permission.
❒ If you are using Adobe Page Maker 6.0, 6.5, or 7.0 with Windows 95 / 98 /Me / 2000 / XP, Windows Server 2003, or Windows NT 4.0, you have toset up options in the Adobe PageMaker's print dialog box.
You can set up any of the options using the following tabs:
Note❒ To set up options, access the printer driver from Windows. You cannot set
up options if you access the printer driver from an application.
Windows 95 / 98 / Me [Options] on the [Accessories] tab.
Windows 2000 / XP, Windows Server 2003
[Installable Options] on the [Device Settings] tab.
Windows NT 4.0 [Installable Options] on the [Device Settings] tab in the Properties dialog box.
Mac OS For ethernet, [Chooser] on the Apple Menu. For USB, [Change Setup] from the [Printing] menu to open the Desktop printer.
Mac OS X [Printer Setup...] in [Print & Fax] to open the System Pref-erences.

Using PostScript 3
66
3
❖ Mac OS
Important❒ If you are using Mac OS X, this functions cannot be used.You can set up all options using the [Chooser] dialog box.
ReferenceSee p.45 “Making Option Settings for the Printer”, p.56 “Setting Up Options”or p.60 “Setting Up Options” for the installation method appropriate to yourprinting environment.

Printing a Document
67
3
Printing a Document
This documentation describes the specific printer functions and menus that areadded by installing the PPD file. For more information about the functions andmenus of the Windows 95 / 98 / Me PostScript printer driver, see the printerdriver's Help.
Important❒ On a Macintosh, Mac OS 8.6 or higher (Mac OS X Classic environment is sup-
ported.), or Mac OS X 10.1 or higher is required.❒ If you are using Mac OS X 10.1.x, the following functions cannot be used:
• Sample Print• Locked Print• Hold Print• Stored Print• Store and Print• Document Server• User Code
❒ Applications, such as PageMaker, that have their own drivers do not supportthe following functions:• Sample Print• Locked Print• Hold Print• Stored Print• Store and Print• Document Server
Note❒ If you are using Mac OS X 10.2.x or higher, the Job Type function can be used.❒ “Mac OS X” in the tables below refers to Mac OS X 10.2.3. Depending on the
version, [Features x] is displayed as [Set x] (x is a number). Make adjustmentsaccording to the version you use.
Using PostScript 3
68
3
Job Type
Use this to select the type of print job.The following table shows the tabs or menus where you can select this function.
You can select the following items:
❖ Normal PrintSelect this for normal printing. The print job starts immediately after the printcommand is given.
Note❒ Under Windows 95 / 98 / Me, if you want to use an User ID, click the [De-
tails...] button.
❖ Sample PrintUse this function to print only one set of a multiple print jobs.The other sets are saved in the machine. The saved job can be printed from themachine's control panel. You can also delete the saved job.
Note❒ The “User ID” can contain up to eight alphanumeric (a- z, A- Z, 0- 9) characters.❒ Entering the “User ID” helps you distinguish your print job from others.
ReferenceFor details about how to use Sample Print, see p.70 “How to Use SamplePrint”.
❖ Locked PrintUse this function to save documents in the machine memory with a pass-word, and then edit and print them as you want.
Note❒ The “User ID” can contain to eight alphanumeric (a-z, A-Z, 0-9) characters.
The “Password” must be 4-8 digits.❒ Entering the “User ID” helps you distinguish your print job from others.
ReferenceFor details about how to use Locked Print, see p.74 “How to Use LockedPrint”.
Windows 95 / 98 / Me [Job Type:] on the [Setup] tab.
Windows 2000 / XP, Windows Serv-er 2003
[Job Type:] on the [Job Log] tab in the Printing Preferences dialog box.
Windows NT 4.0 [Job Type:] on the [Job Log] tab in the Document Defaults dialog box.
Mac OS [Job Type:] on [Job Log] in the print dialog box.
Mac OS X [Job Type:] on [Job Log] in the print dialog box.
Printing a Document
69
3
❖ Hold PrintUse this function to temporarily hold a file in the machine, and print it fromthe computer or the machine's control panel later.
Note❒ The “User ID” can contain up to eight alphanumeric (a- z, A- Z, 0- 9) char-
acters.❒ The “File Name” can contain to 16 alphanumeric (a-z, A-Z, 0-9) characters.❒ Entering the “User ID” helps you distinguish your print job from others.
ReferenceFor details about how to use Hold Print, see p.79 “How to Use Hold Print”.
❖ Stored PrintUse this function to store a file in the machine, and then print it from the com-puter or the machine's control panel later.
Note❒ The “User ID” can contain up to eight alphanumeric (a- z, A- Z, 0- 9) char-
acters. The “Password” must be 4-8 digits.❒ The “File Name” can contain to 16 alphanumeric (a-z, A-Z, 0-9) characters.❒ You can assign a password to a saved document, but password assignment
is not mandatory.❒ Entering the “User ID” helps you distinguish your print job from others.
ReferenceFor details about how to use Stored Print, see p.83 “How to Use StoredPrint/Store and Print”.
❖ Store and PrintUse this function to prints the file at once and also stores the file in the printer.
Note❒ The “User ID” can contain up to eight alphanumeric (a- z, A- Z, 0- 9) char-
acters. The “Password” must be 4-8 digits.❒ The “File Name” can contain to 16 alphanumeric (a-z, A-Z, 0-9) characters.❒ You can assign a password to a saved document, but password assignment
is not mandatory.❒ Entering the “User ID” helps you distinguish your print job from others.
ReferenceFor details about how to use Stored Print, see p.83 “How to Use StoredPrint/Store and Print”.
Using PostScript 3
70
3
❖ Document ServerUse this function to store hard disk documents that you want to print as wellas documents you might want to later combine or process for printing.
Note❒ The “File Name” can contain to 16 alphanumeric (a-z, A-Z, 0-9) characters.
ReferenceFor details about the Document Server function, see "Accessing the Docu-ment Server", Printer Reference.
How to Use Sample Print
Follow the procedure below to print a document using the Sample Print function.
Windows 95 / 98 / Me
A In the application, on the [File] menu, click [Print].The [Print] dialog box appears.
B Select the printer, and then click [Properties].
C Click the [Setup] tab.
D In the [Job Type:] list, click [Sample Print].
E Click [Details...].
F In the [User ID:] box, enter a user ID using up to eight alphanumeric (a-z, A-Z, 0-9) characters.The user ID associates the user with his / her jobs.
G Click [OK].
H Click [OK] to close the printer properties dialog box.
I Set the number of copies to two or more, and then start the printing fromthe application's [Print] dialog box.The sample print job is sent to the machine and one set is printed.
J Check the printed output to make sure the settings are correct.If the settings are correct, perform the following steps.If you want to delete a saved job, see p.74 “Deleting a Sample Print File”.
K On the machine's control panel, press the {Printer} key to display the printer screen.
L Press [Print Jobs].

Printing a Document
71
3
M Press [Sample Print Job List].A list of sample print files stored in the machine appears.User ID, Date / Time and File Name also appear.
N Select the file you want to print by pressing it.A list of the print files stored in the machine appears.
O Press [Print] to change the number of sets to be printed.
P Enter the new number of sets using the number keys.If you do not want to change the set quantity, perform the following step.You can enter up to 999 sets.Press {Clear/Stop} to correct any entry mistakes.When multiple files are selected without setting a quantity, 1 page less thanthe minimum number of all settings is applied.
Q Press [Yes].The remaining sets are printed.
Note❒ Press [Stop] to cancel printing.❒ When printing finishes, the stored file is deleted.❒ To cancel printing, press [Exit]. Then, press [Job Reset]. After it has started,
the file is deleted.❒ If there is a print job outstanding, this is printed before the sample print job.❒ If the application has a collate option, make sure it is not selected before
sending a print job. The printer driver automatically collates Sample Printjobs by default. If the collate option is selected in the application's [Print] di-alog box, there may be more prints than required.
Windows 2000 / XP, Windows Server 2003, Windows NT 4.0
A In the application, on the [File] menu, click [Print].The [Print] dialog box appears.
B Right-click the printer icon, and then click [Printing Preference] on the command menu.If you are using Windows 2000, select the printer, and then perform the following steps.If you are using Windows XP or Windows Server 2003, select the printer, andthen click [Preferences].
C Click the [Job Log] tab.
D In the [Job Type:] list, click [Sample Print].
E In the [User ID:] box, enter a user ID using up to eight alphanumeric (a-z, A-Z, 0-9) characters.The user ID associates the user with his / her jobs.

Using PostScript 3
72
3
F Click [OK] to close the printer properties dialog box.If you are using Windows 2000, perform the following steps.
G Set the number of copies to two or more, and then start the printing fromthe application's [Print] dialog box.The sample print job is sent to the machine, and one set is printed.
H Check the printed output to make sure the settings are correct.If the settings are correct, perform the following steps to print the remaining sets.If you want to delete a saved job, see p.74 “Deleting a Sample Print File”.
I On the machine's control panel, press the {Printer} key to display the printer screen.
J Press [Print Jobs].
K Press [Sample Print Job List].A list of sample print files stored in the machine appears.User ID, Date / Time and File Name also appear.
L Select the file you want to print by pressing it.A list of print files stored in the machine appears.
M Press [Print] to change the number of sets to be printed.
N Enter the new number of sets using the number keys.If you do not want to change the set quantity, perform the following steps.You can enter up to 999 sets.Press {Clear/Stop} to correct any entry mistakes.When multiple files are selected without setting a quantity, 1 page less thanthe minimum number of all settings is applied.
O Press [Yes].The remaining sets are printed.
Note❒ Press [Stop] to cancel printing.❒ When printing finishes, the stored file is deleted.❒ To cancel printing, press [Exit]. Then, press [Job Reset]. After it has started,
the file is deleted.❒ If there is a print job outstanding, this will be printed before the sample
print job.❒ If the application has a collate option, make sure it is not selected before
sending a print job. The printer driver automatically collates Sample Printjobs by default. If the collate option is selected in the application's [Print] di-alog box, there may be more prints than required.
Printing a Document
73
3
Mac OS / Mac OS X
A In the application, on the [File] menu, click [Print].The [Print] dialog box appears.
B Set the number of copies to two or more.The sample print job is sent to the machine, and one set is printed.
C In the pop-up menu, click [Job Log].
D On the [Job Type:] pop-up menu, select [Sample Print].
E In the [User ID:] box, enter a user ID using up to eight alphanumeric (a-z, A-Z, 0-9) characters.The user ID associates the user with his / her jobs.
F Check the printed output to make sure the settings are correct.If the settings are correct, perform the following steps to print the remaining sets.If you want to delete a saved job, see p.74 “Deleting a Sample Print File”.
G On the machine's control panel, press the {Printer} key to display the printer screen.
H Press [Print Jobs].
I Press [Sample Print Job List].A list of sample print files stored in the machine appears.User ID, Date / Time and File Name also appear.
J Select the file you want to print by pressing it.A list of print files stored in the machine appears.
K Press [Print] to change the number of sets to be printed.
L Enter the new number of sets using the number keys.If you do not want to change the set quantity, perform the following steps.You can enter up to 999 sets.Press {Clear/Stop} to correct any entry mistakes.When multiple files are selected without setting a quantity, 1 page less thanthe minimum number of all settings is applied.
M Press [Yes].The remaining sets are printed.
Note❒ Press [Stop] to cancel printing.❒ When printing finishes, the stored file is deleted.❒ To cancel printing, press [Exit]. Then, press [Job Reset]. After it has started,
the file is deleted.❒ If there is a print job outstanding, this is printed before the sample print job.
Using PostScript 3
74
3
Deleting a Sample Print File
If a printed document is not as required, you can delete the Sample Print file.
A On the machine's control panel, press the {Printer} key to display the printer screen.
B Press [Print Jobs].A list of print files stored in the machine appears.
C Press [Stored Print Job List].A list of sample print files stored in the machine appears.
D Select the file you want to delete by pressing it.To cancel a selection, press the highlighted jobs again.Only one file can be selected at a time.
E Press [Delete].A confirmation screen appears.
F Press [Yes] to delete the file.After the file is deleted the printer screen reappears.Press [No] to cancel the delete request.
How to Use Locked Print
Follow the procedure below to print a document using the Locked Print function.
Windows 95 / 98 / Me
A In the application, click [Print] on the [File] menu.The [Print] dialog box appears.
B Select the printer, and then click [Properties].
C Click the [Setup] tab.
D In the [Job Type:] list, click [Locked Print].
E Click [Details...].
F In the [User ID:] box, enter a user ID using up to eight alphanumeric (a-z, A-Z, 0-9) characters, and then enter a 4-8 digit password in the [Password:] box.The user ID associates the user with his / her jobs.
G Click [OK].
H Click [OK] to close the printer properties dialog box.

Printing a Document
75
3
I After making the necessary settings, click [OK] to close the [Print] dialog box.The document file is saved in the machine.To print the document, perform the following steps.To delete the document, see p.78 “Deleting a Locked Print File”.
J On the machine's control panel, press the {Printer} key to display the printer screen.
K Press [Print Jobs].A list of print files stored in the machine appears.
L Press [Locked Print Job List].A list of locked print files stored in the machine appears.User ID, Date / Time and File Name also appear.
M Select the file you want to print by pressing it.
N Press [Print].The password screen appears.
O Enter the password using the number keys, and then press [OK].A confirmation screen appears.A confirmation screen will appear if the password is not entered correctly.Press [OK] to enter the password again.When multiple print files are selected, the machine prints only files that cor-respond to the entered password. The number of files is displayed on the con-firmation screen.
P Press [Yes].A locked file is printed.
Note❒ Press [Stop] to cancel printing.❒ To cancel printing, press [Exit]. Then, press [Job Reset]. After it has started,
the file is deleted.❒ If the application has a collate option, make sure it is not selected before
sending a print job. The printer driver automatically collates Locked Printjobs by default. If the collate option is selected in the application's [Print] di-alog box, there may be more prints than required.
Using PostScript 3
76
3
Windows 2000 / XP, Windows Server 2003, Windows NT 4.0
A In the application, on the [File] menu, click [Print].The [Print] dialog box appears.
B Right-click the printer icon, and then click [Printing Preference] on the com-mand menu.If you are using Windows 2000, select the printer, and then perform the fol-lowing steps.If you are using Windows XP or Windows Server 2003, select the printer, andthen click [Preferences].
C Click the [Job Log] tab.
D In the [Job Type:] list, click [Locked Print].
E In the [User ID:] box, enter a user ID using up to eight alphanumeric (a-z, A-Z, 0-9) characters, and then enter a 4-8 digit password in the [Password:] box.The user ID associates user with his / her jobs.
F Click [OK] to close the printer properties dialog box.If you are using Windows 2000, perform the following steps.
G Start the printing from the application's [Print] dialog box.The document file is saved in the machine.To print the document, perform the following steps.To delete the document, see p.78 “Deleting a Locked Print File”.
H On the machine's control panel, press the {Printer} key to display the printer screen.
I Press [Print Jobs].A list of print files stored in the machine appears.
J Press [Locked Print Job List].A list of locked print files stored in the machine appears.User ID, Date / Time and File Name also appear.
K Select the file you want to print by pressing it.
L Press [Print].The password screen appears.
Printing a Document
77
3
M Enter the password using the number keys, and then press [OK].A confirmation screen appears.A confirmation screen will appear if the password is not entered correctly.Press [OK] to enter the password again.When multiple print files are selected, the machine prints only files that cor-respond to the entered password. The number of files is displayed on the con-firmation screen.
N Press [Yes].The locked file is printed.
Note❒ Press [Stop] to cancel printing.❒ To cancel printing, press [Exit]. Then, press [Job Reset]. After it has started,
the file is deleted.❒ If the application has a collate option, make sure it is not selected before
sending a print job. The printer driver automatically collates Locked Printjobs by default. If the collate option is selected in the application's [Print] di-alog box, there may be more prints than required.
Mac OS / Mac OS X
A In the application, click [Print] on the [File] menu.The [Print] dialog box appears.
B In the pop-up menu, click [Job Log].
C On the [Job Type:] pop-up menu, click [Locked Print].
D In the [User ID:] box, enter a user ID using up to eight alphanumeric (a-z, A-Z, 0-9) characters, and then enter a 4-8 digit password in the [Password:] box.The user ID associates the user with his / her jobs.
E After making the necessary settings, click [Print].The document file is saved in the machine.To print the document, perform the following steps.To delete the document, see p.78 “Deleting a Locked Print File”.
F On the machine's control panel, press the {Printer} key to display the printer screen.
G Press [Print Jobs].A list of print files stored in the machine appears.
H Press [Locked Print Job List].A list of locked print files stored in the machine appears.User ID, Date / Time and File Name also appear.
Using PostScript 3
78
3
I Select the file you want to print by pressing it.
J Press [Print].The password screen appears.
K Enter the password using the number keys, and then press [OK].A confirmation screen appears.A confirmation screen will appear if the password is not entered correctly.Press [OK] to enter the password again.When multiple print files are selected, the machine prints only files that cor-respond to the entered password. The number of files is displayed on the con-firmation screen.
L Press [Yes].The locked file is printed.
Note❒ Press [Stop] to cancel printing.❒ To cancel printing, press [Exit]. Then, press [Job Reset]. After it has started,
the file is deleted.
Deleting a Locked Print File
If a printed document is not as required, you can delete the Locked Print file.
A On the machine's control panel, press the {Printer} key to display the printer screen.
B Press [Print Jobs].A list of print files stored in the machine appears.
C Press [Locked Print Job List].A list of locked print files stored in the machine appears.
D Select the file you want to delete by pressing it.To cancel a selection, press the highlighted job again.Only one file can be selected at a time.
E Press [Delete].A password screen appears.
F Enter the password using the number keys, and then press [OK].A confirmation screen appears.A confirmation screen will reappear if the password was entered incorrectly.Press [OK] to enter the password again.When multiple files are selected, the machine deletes only files that corre-spond to the entered password. The number of files to be deleted is displayedon the confirmation screen.
Printing a Document
79
3
G Press [Yes].After the file is deleted, the printer screen reappears.
Note❒ Press [No] to cancel the delete request.
How to Use Hold Print
Follow the procedure below to print a document using the Hold Print function.
Windows 95 / 98 / Me
A In the application, on the [File] menu, click [Print].The [Print] dialog box appears.
B Select the printer, and then click [Properties].
C Click the [Setup] tab.
D In the [Job Type:] list, click [Hold Print].
E Click [Details...].
F In the [User ID:] box, enter a user ID using up to eight alphanumeric (a-z, A-Z, 0-9) characters. File Name can also be set.The user ID associates the user with his / her jobs.
G Click [OK].
H Click [OK] to close the printer properties dialog box.
I After making the necessary settings, click [OK] to close the [Print] dialog box.The document file is saved in the machine.To print the document, perform the following steps.To delete the document, see p.82 “Deleting a Hold Print File”.
J On the machine's control panel, press the {Printer} key to display the printer screen.
K Press [Print Jobs].A list of the print files stored in the machine appears.
L Press [Hold Print Job List].A list of hold print files stored in the machine appears.User ID, Date / Time and File Name also appear.Depending on the security settings, certain print jobs may not be displayed.
M Select the file you want to print by pressing it.

Using PostScript 3
80
3
N Press [Print].A confirmation screen appears.
O Press [Yes].The hold print file is printed.
Note❒ Press [Stop] to cancel printing.❒ To cancel printing, press [Exit]. Then, press [Job Reset]. After it has started,
the file is deleted.❒ When printing is finished, the stored file is deleted.❒ If the application has a collate option, make sure it is not selected before
sending a print job. The printer driver automatically collates Hold Printjobs by default. If a collate option is selected from the application's Print di-alog box, there may be more prints than required.
Windows 2000 / XP, Windows Server 2003, Windows NT 4.0
A In the application, on the [File] menu, click [Print].The [Print] dialog box appears.
B Right-click the printer icon, and then click [Printing Preference] on the com-mand menu.If you are using Windows 2000, select the printer, and then perform the fol-lowing steps.If you are using Windows XP or Windows Server 2003, select the printer, andthen click [Preferences].
C Click the [Job Log] tab.
D In the [Job Type:] list, click [Hold Print].
E In the [User ID:] box, enter a user ID using up to eight alphanumeric (a-z, A-Z, 0-9) characters. File Name can also be set.The user ID associates the user with his / her jobs.
F Click [OK] to close the printer properties dialog box.If you are using Windows 2000, perform the following steps.
G Start the printing from the application's [Print] dialog box.The document file is saved in the machine.To print the document, perform the following steps.To delete the document, see p.82 “Deleting a Hold Print File”.
H On the machine's control panel, press the {Printer} key to display the printer screen.

Printing a Document
81
3
I Press [Print Jobs].A list of print files stored in the machine appears.
J Press [Hold Print Job List].A list of hold print files stored in the machine appears.User ID, Date / Time and File Name also appear.Depending on the security settings, certain print jobs may not be displayed.
K Select the file you want to print by pressing it.
L Press [Print].A confirmation screen appears.
M Press [Yes].The hold print file is printed.
Note❒ Press [Stop] to cancel printing.❒ To cancel printing, press [Exit]. Then, press [Job Reset]. After it has started,
the file is deleted.❒ When printing finishes, the stored file is deleted.❒ If the application has a collate option, make sure it is not selected before
sending a print job. The printer driver automatically collates Hold Printfiles by default. If a collate option is selected from the application's Printdialog box, there may be more prints than required.
Mac OS / Mac OS X
A From an application, on the [File] menu, click [Print].The [Print] dialog box appears.
B In the pop-up menu, click [Job Log].
C On the [Job Type:] pop-up menu, click [Hold Print].
D In the [User ID:] box, enter the user ID using up to eight alphanumeric (a-z,A-Z, 0-9) characters. File Name can also be set.The user ID associates the user with his / her jobs.
E After making the necessary settings, click [Print].The document file is saved in the machine.To print the document, perform the following steps.To delete the document, see p.82 “Deleting a Hold Print File”.
F On the machine's control panel, press the {Printer} key to display the printer screen.
Using PostScript 3
82
3
G Press [Print Jobs].A list of print files stored in the machine appears.
H Press [Hold Print Job List].A list of hold print files stored in the machine appears.User ID, Date / Time and File Name also appear.Depending on the security settings, certain print jobs may not be displayed.
I Select the file you want to print by pressing it.
J Press [Print].A confirmation screen appears.
K Press [Yes].The hold print file is printed.
Note❒ Press [Stop] to cancel printing.❒ To cancel printing, press [Exit]. Then, press [Job Reset]. After it has started,
the file is deleted.❒ When printing is completed, the stored file is deleted.
Deleting a Hold Print File
If a printed document is not as required, you can delete the Hold Print file.
A On the machine's control panel, press the {Printer} key to display the printer screen.
B Press [Print Jobs].A list of the print files stored in the machine appears.
C Press [Hold Print Job List].A list of Hold Print files stored in the machine appears.Depending on the security settings, certain print jobs may not be displayed.
D Select the file you want to delete by pressing it.
E Press [Delete].A confirmation screen appears.
F Press [Yes].After the file is deleted, the printer screen reappears.
Note❒ Press [No] to cancel the delete request.
Printing a Document
83
3
How to Use Stored Print/Store and Print
Follow the procedure below to print a document using the Stored Print function.
Windows 95 / 98 / Me
A In the application, on the [File] menu, click [Print].The [Print] dialog box appears.
B Select the printer, and then click [Properties].
C Click the [Setup] tab.
D In the [Job Type:] list, click [Stored Print] or [Store and Print].• [Stored Print]
Stores the file in the printer and print it later using the control panel.• [Store and Print]
Prints the file at once and also stores the file in the printer.
E Click [Details...].
F In the [User ID:] box, enter a user ID using up to eight alphanumeric (a-z, A-Z, 0-9) characters, and then enter a 4-8 digit password in the [Password:] box.File Name can also be set.The user ID associates the user with his / her jobs.You can assign a password to a saved document, but password assignment isnot mandatory.The same password must be entered when printing or deleting.
G Click [OK].
H Click [OK] to close the printer properties dialog box.
I After making the necessary settings, click [OK] to close the [Print] dialog box.The document file is saved in the machine.To print the document, perform the following steps.To delete the document, see p.87 “Deleting a Stored Print File”.
J On the machine's control panel, press the {Printer} key to display the printer screen.
K Press [Print Jobs].A list of print files stored in the machine appears.
L Press [Stored Print Job List].A list of stored print files stored in the machine appears.User ID, Date / Time and File Name also appear.Depending on the security settings, certain print jobs may not be displayed.

Using PostScript 3
84
3
M Select the file you want to print by pressing it.
N Press [Print].A confirmation screen appears.If you have already set a password, proceed to the following step.
O Enter a password using the number keys on the password screen, and thenpress [OK]A confirmation screen will appear if the password is not entered correctly.Press [OK] to enter the password again.If you have not set the password, proceed to the following step.
P Press [Yes].The stored print file is printed.
Note❒ Press [Stop] to cancel printing.❒ To cancel printing, press [Exit]. Then, press [Job Reset]. After it has started,
the file is deleted.❒ The Stored Print files sent to the machine are not deleted unless you delete
them in the machine or select [Auto Delete Stored Print Jobs] (see "System",Printer Reference). For details, see p.87 “Deleting a Stored Print File”.
If the application has a collate option, make sure it is not selected before send-ing a print job. The printer driver collates the Stored Print files by default. Ifa collate option is selected from the application's Print dialog box, there maybe more prints than required.
Windows 2000 / XP, Windows Server 2003, Windows NT 4.0
A In the application, on the [File] menu, click [Print].The [Print] dialog box appears.
B Right-click the printer icon, and then click [Printing Preference] on the com-mand menu.If you are using Windows 2000, select the printer, and then perform the fol-lowing steps.If you are using Windows XP or Windows Server 2003, select the printer, andthen click [Preferences].
C Click the [Job Log] tab.
D In the [Job Type:] list, click [Stored Print] or [Store and Print].• [Stored Print]
Stores the file in the printer and print it later using the control panel.• [Store and Print]
Prints the file at once and also stores the file in the printer.

Printing a Document
85
3
E In the [User ID:] box, enter a user ID using up to eight alphanumeric (a-z, A-Z, 0-9) characters, and then enter a 4-8 digit password in the [Password:] box.File Name can also be set.The user ID associates the user with his / her job.You can assign a password to a saved document, but password assignment isnot mandatory.The same password must be entered when printing or deleting.
F Click [OK] to close the printer properties dialog box.If you are using Windows 2000, perform the following steps.
G Start the printing from the application's [Print] dialog box.The document file is saved in the machine.To print the document, perform the following steps.To delete the document, see p.87 “Deleting a Stored Print File”.
H On the machine's control panel, press the {Printer} key to display the printer screen.
I Press [Print Jobs].A list of print files stored in the machine appears.
J Press [Stored Print Job List].A list of stored print files stored in the machine appears.User ID, Date / Time and File Name also appear.Depending on the security settings, certain print jobs may not be displayed.
K Select the file you want to print by pressing it.
L Press [Print].A confirmation screen appears.If you have already set a password, proceed to the following step.
M Enter a password using the number keys on the password screen, and thenpress [OK]A confirmation screen will appear if the password is not entered correctly.Press [OK] to enter the password again.If you have not set the password, proceed to the following step.
Using PostScript 3
86
3
N Press [Yes].The stored file is printed.
Note❒ Press [Stop] to cancel printing.❒ To cancel printing, press [Exit]. Then, press [Job Reset]. After it has started,
the file is deleted.❒ Stored Print files sent to the machine are not deleted unless you delete
them in the machine or select [Auto Delete Stored Print Jobs] (see "System",Printer Reference). For details, see p.87 “Deleting a Stored Print File”.
❒ If the application has a collate option, make sure it is not selected beforesending a print job. The printer driver automatically collate Stored Printfiles by default. If a collate option is selected from the application's Printdialog box, there may be more prints than required.
Mac OS / Mac OS X
A In the application, on the [File] menu, click [Print].The [Print] dialog box appears.
B In the pop-up menu, click [Job Log].
C On the [Job Type:] pop-up menu, click [Stored Print] or [Store and Print].• [Stored Print]
Stores the file in the printer and print it later using the control panel.• [Store and Print]
Prints the file at once and also stores the file in the printer.
D In the [User ID:] box, enter a user ID using up to eight alphanumeric (a-z, A-Z, 0-9) characters, and then enter a 4-8 digit password in the [Password:] box.File Name can also be set.The user ID associates the user with his / her jobs.You can assign a password to a saved document, but password assignment isnot mandatory.The password must be entered when printing or deleting.
E After making the necessary settings, click [Print].The document file is saved in the machine.To print the document, perform the following steps.To delete the document, see p.87 “Deleting a Stored Print File”.
F On the machine's control panel, press the {Printer} key to display the printer screen.
G Press [Print Jobs].A list of print files stored in the machine appears.

Printing a Document
87
3
H Press [Stored Print Job List].A list of stored print files stored in the machine appears.User ID, Date / Time and File Name also appear.Depending on the security settings, certain print jobs may not be displayed.
I Select the file you want to print by pressing it.
J Press [Print].A confirmation screen appears.If you have already set a password, proceed to the following step.
K Enter a password using the number keys on the password screen, and thenpress [OK]A confirmation screen will appear if the password is not entered correctly.Press [OK] to enter the password again.If you have not set the password, proceed to the following step.
L Press [Yes].The stored file is printed.
Note❒ Press [Stop] to cancel printing.❒ To cancel printing, press [Exit]. Then, press [Job Reset]. After it has started,
the file is deleted.❒ Stored Print files sent to the machine is not deleted unless you delete them
in the machine or select [Auto Delete Stored Print Jobs] (see "System", PrinterReference). For details, see p.87 “Deleting a Stored Print File”.
Deleting a Stored Print File
If a printed document is not as required, you can delete the stored print file.
A On the machine's control panel, press the {Printer} key to display the printer screen.
B Press [Print Jobs].A list of print files stored in the machine appears.
C Press [Stored Print Job List].A list of stored print files stored in the machine appears.
D Select the file you want to delete by pressing it.To cancel a selection, press the highlighted job again.
E Press [Delete].A confirmation screen appears.
Using PostScript 3
88
3
F Press [Yes].After the file is deleted, the printer screen reappears.
Note❒ Press [No] to cancel the delete request.❒ If you have already set a password in the printer driver, enter it to delete.
How to Use Document Server
Follow the procedure below to print a document using the Document Server function.
Important❒ An optional hard disk drive is required to use the Document Server function.
Windows 95 / 98 / Me
A In the application, click [Print] on the [File] menu.The [Print] dialog box appears.
B Select the printer, and then click [Properties].
C Click the [Setup] tab.
D In the [Job Type:] list, click [Document Server].
E Click [Details...].
F Enter a user ID, file name, and password in the dialog box that appears. Thefile name and password are optional.
G Click [OK].
H Start the printing from the application's [Print] dialog box.
Windows 2000 / XP, Windows Server 2003, Windows NT 4.0
A In the application, on the [File] menu, click [Print].The [Print] dialog box appears.
B Right-click the printer icon, and then click [Printing Preference] on the com-mand menu.If you are using Windows 2000, select the printer, and then perform the following steps.If you are using Windows XP or Windows Server 2003, select the printer, andthen click [Preferences].
C Click the [Job Log] tab.
D In the [Job Type:] list, click [Document Server].

Printing a Document
89
3
E Enter a user ID, file name, and password in the dialog box that appears. Thefile name and password are optional.
F Click [OK].If you are using Windows 2000, perform the following steps.
G Start the printing from the application's [Print] dialog box.
Mac OS / Mac OS X
Important❒ If you are using Mac OS X 10.1.x, this function cannot be used.If you are using Mac OS X 10.2.x or higher, the Job Type function can be used.
A In the application, on the [File] menu, click [Print].The [Print] dialog box appears.
B In the pop-up menu, click [Job Log].
C On the [Job Type:] pop-up menu, click [Document Server].
D Enter a user ID, file name, and password in the dialog box that appears. Thefile name and password are optional.
E Start the printing from the application's [Print] dialog box.
User CodeUse this to set a user code for print logging.Enter a user code using up to eight digits. A user code identifies a group of usersand allows you to check the number of sheets printed under each code withSmartDeviceMonitor for Admin.The following table shows the tabs or menus where you can select this function.
ReferenceFor details about using SmartDeviceMonitor for Admin, see Help.
Windows 95 / 98 / Me [User Code] on the [Statistics] tab.
Windows 2000 / XP, Windows Serv-er 2003
[User ID:] on the [Job Log] tab in the Printing Preferences dialog box.
Windows NT 4.0 [User ID:] on the [Job Log] tab in the Document Defaults dialog box.
Mac OS Select the [Enable User Code] check box, and then enter a user code in the [User Code] box on [Job Log] in the print dialog box.
Mac OS X Select the [Enable User Code] check box, and then enter a user code in the [User Code] box on [Job Log] in the print dialog box.

Using PostScript 3
90
3
Paper Selection
All Pages and Destination Tabs
Use this to select the media type and input tray.
Important❒ This function is for Windows 95 / 98 / Me only.
ReferenceFor details about the [All Pages] and [Destination] tabs. See the printer driver's Help.
Paper Size
Use this to select the size of paper you want to use.The following table shows the tabs or menus where you can select this function.
ReferenceFor details about the paper sizes supported by this machine, see General Set-ting Guide.
Fit to Paper
When the size of the document and paper size differ, set whether or not to printaccording to paper size.
Windows 95 / 98 / Me [Size:] on the [Paper] tab.
Windows 2000 / XP, Windows Serv-er 2003
[Paper Size:] on [Paper/Output] on [Advanced...] on the [Pa-per/Quality] tab in the Printing Preference dialog box.
Windows NT 4.0 [Paper Size:] on the [Page Setup] tab in the Document De-faults dialog box.
Mac OS [Paper:] on the [Page Attributes] tab in the Page Setup dia-log box.
Mac OS X [Paper Size:] in the Page Setup dialog box.
Windows 95 / 98 / Me [Fit to Print Size:] on the [Paper] tab.
Windows 2000 / XP, Windows Serv-er 2003
[Fit to Print Size:] on [Printer Features] on [Document Options] on [Advanced...] on the [Paper/Quality] tab in the Printing Preferences dialog box.
Windows NT 4.0 [Fit to Paper] on [Document Options] on the [Advanced] tab in the Document Defaults dialog box.
Mac OS [Fit to Paper:] on [Printer Specific Options] in the print dialog box.
Mac OS X [Fit to Paper:] on the [Features x] tab on [Printer Features] in the print dialog box.
Printing a Document
91
3
❖ Prompt UserPrint is performed with the size of document to be printed unchanged.
❖ Nearest Size and ScaleIf the paper size is smaller than the selected paper size, the driver reduces theprint size.If the paper size is larger than the size of document to be printed, print is notto fit the paper size.
❖ Nearest Size and CropWhen the paper size is smaller than the size of document to be printed, printis adjusted to meet the paper size.
Input Slot
Use this to select the paper sources.The following table shows the tabs or menus where you can select this function.
ReferenceFor details about the paper sources, see Printer Reference.
Resolution
Use this to set the resolution types.The following table shows the tabs or menus where you can select this function.
ReferenceFor more information about the resolution types, see Printer Reference.
Windows 95 / 98 / Me [Input Tray:] on the [Paper] tab.
Windows 2000 / XP, Windows Serv-er 2003
[Paper Source] on the [Paper/Quality] tab in the Printing Preferences dialog box.
Windows NT 4.0 [Paper Source] on the [Page Setup] tab in the Document Defaults dialog box.
Mac OS [Paper Source:] on [General] in the print dialog box.
Mac OS X [Paper Feed] in the print dialog box.
Windows 95 / 98 / Me [Resolution] on the [Print Quality] tab.
Windows 2000 / XP, Windows Serv-er 2003
[Resolution] on [Graphic] on the [Paper/Quality] or [Layout] tab in the Printing Preferences dialog box.
Windows NT 4.0 [Graphic] on the [Advanced] tab in the Document Defaults dialog box.
Mac OS [Resolution] on [Printer Specific Options] in the print dialog box.
Mac OS X [Resolution] on the [Features x] tab on [Printer Features] in the print dialog box.
Using PostScript 3
92
3
Orientation Override
Use this to set the paper orientation.The following table shows the tabs or menus where you can select this function.
You can select the following items:• Off• Landscape• Portrait
Gradation
Use this to select a type of gradation based on your purpose.The following table shows the tabs or menus where you can select this function.
ReferenceFor details about the gradation types, see Printer Reference.
Windows 95 / 98 / Me [Orientation:] on the [Setup] tab.
Windows 2000 / XP, Windows Serv-er 2003
[Orientation Override] on [Printer Features] on [Advanced...] on the [Paper/Quality] tab in the Printing Preferences dia-log box.
Windows NT 4.0 [Orientation Override] on [Printer Features] on [Document Op-tions] on the [Advanced] tab in the Document Defaults di-alog box.
Mac OS [Orientation Override] on [Printer Specific Options] in the print dialog box.
Mac OS X [Orientation Override] on the [Features x] tab on [Printer Fea-tures] in the print dialog box.
Windows 95 / 98 / Me [Print Quality] tab.
Windows 2000 / XP, Windows Serv-er 2003
[Printer Features] on [Advanced...] on the [Paper/Quality] tab in the Printing Preferences dialog box.
Windows NT 4.0 [Document Options] on the [Advanced] tab in the Document Defaults dialog box.
Mac OS [Printer Specific Options] in the print dialog box.
Mac OS X [Gradation] on the [Features x] tab on [Printer Features] in the print dialog box.

Printing a Document
93
3
Toner Saving / Level Color
Use this function to reduce the amount of toner used when printing.The following table shows the tabs or menus where you can select this function.
ReferenceFor details about this function, see Printer Reference.
Duplex Printing
Use this function to select duplex printing.
Important❒ To use this function, the optional duplex unit must be installed on the ma-
chine.The following table shows the tabs or menus where you can select this function.
The following items may vary depending on the operating system you are using.
Windows 95 / 98 / Me [Toner Saving] on the [Print Quality] tab.
Windows 2000 / XP, Windows Serv-er 2003
[Toner Saving] on [Printer Features] on [Advanced...] on the [Paper/Quality] tab in the Printing Preferences dialog box.
Windows NT 4.0 [Toner Saving] on [Printer Features] on [Document Options] on the [Advanced] tab in the Document Defaults dialog box.
Mac OS [Toner Saving] on [Printer Specific Options] in the print dia-log box.
Mac OS X [Toner Saving] on the [Features x] tab on [Printer Features] in the print dialog box.
Windows 95 / 98 / Me [Duplex:] on the [Setup] tab.
Windows 2000 / XP, Windows Serv-er 2003
[Print on Both Sides] on the [Layout] tab in the Printing Preferences dialog box.
Windows NT 4.0 [Print on Both Sides (Duplex Printing)] on the [Page Setup] tab in the Document Defaults dialog box.
Mac OS [Print on Both Sides] on [Layout] in the print dialog box.
Mac OS X • 10.3 or higherThe [Two Sided Printing] check box on [Layout] in the print dialog box.
• Other Mac OS XThe [Print on both Sides] check box on [Duplex] in the print dialog box.
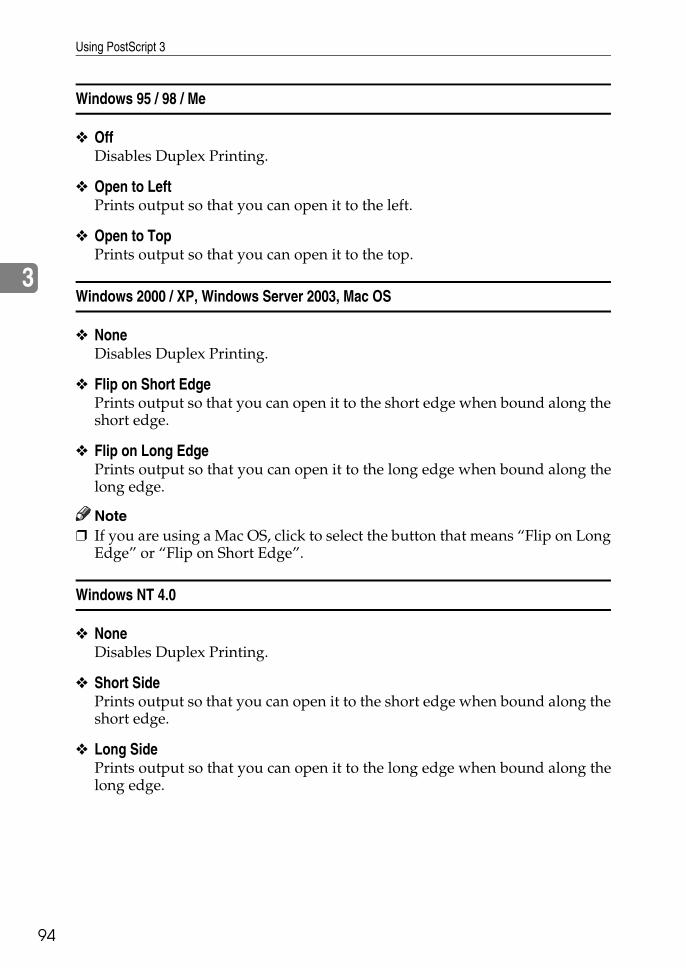
Using PostScript 3
94
3
Windows 95 / 98 / Me
❖ OffDisables Duplex Printing.
❖ Open to LeftPrints output so that you can open it to the left.
❖ Open to TopPrints output so that you can open it to the top.
Windows 2000 / XP, Windows Server 2003, Mac OS
❖ NoneDisables Duplex Printing.
❖ Flip on Short EdgePrints output so that you can open it to the short edge when bound along theshort edge.
❖ Flip on Long EdgePrints output so that you can open it to the long edge when bound along thelong edge.
Note❒ If you are using a Mac OS, click to select the button that means “Flip on Long
Edge” or “Flip on Short Edge”.
Windows NT 4.0
❖ NoneDisables Duplex Printing.
❖ Short SidePrints output so that you can open it to the short edge when bound along theshort edge.
❖ Long SidePrints output so that you can open it to the long edge when bound along thelong edge.
Printing a Document
95
3
Mac OS X
The following functions are selectable under Mac OS X 10.3 or higher (for Mac OSX 10.2 or earlier, see p.94 “Windows 2000 / XP, Windows Server 2003, Mac OS”):
❖ OffDisables Duplex Printing.
❖ Long-Edge BindingPrints output so that you can open it to the long edge when bound along thelong edge.
❖ Short-Edge BindingPrints output so that you can open it to the short edge when bound along theshort edge.
CollateUse this function to enable collation. With this feature, the machine can efficient-ly print collated sets of multiple-page documents.
Important❒ To use this function, a memory unit of at least 192 MB or hard disk drive must
be installed on the machine.❒ If you are using Windows 2000, Windows XP, Mac OS or Mac OS X, make
sure that the following check boxes have not been selected.• Windows 2000
The [Collate] check box on [Printer Features] on [Advanced...] on the [Paper/Quality] tab in the Printing Preferences dialog box.
• Windows XPThe [Collate] check box on [Paper/Output] on [Advanced...] on the [Paper/ Qual-ity] tab in the Printing Preferences dialog box.
• Mac OSThe [Collate] check box in the print dialog box.
• Mac OS XThe [Collate] check box on [Copies & Pages] in the printer dialog box.
The following table shows the tabs or menus where you can select this function.
Windows 95 / 98 / Me [Collate:]on the [Setup] tab.
Windows 2000, Windows XP [Collate:] on [Printer Features] on [Advanced...] on the [Pa-per/Quality] tab in the Printing Preferences dialog box.
Windows NT 4.0 [Collate:] on [Printer Features] on [Document Options] on the [Advanced] tab in the Document Defaults dialog box.
Mac OS [Collate:] on [Printer Specific Options] in the print dialog box.
Mac OS X [Collate:] on the [Feature 1] tab on [Printer Feature] in the printer dialog box.

Using PostScript 3
96
3
Paper Type
Use this to select the paper type.The following table shows the tabs or menus where you can select this function.
ReferenceFor details about the media type supported by this machine, see General Set-ting Guide.
Destination Tray
Use this to select the destination tray.The following table shows where you can select this function.
ReferenceFor details about the destination tray supported by this machine, see \Gener-al Setting Guide.
Windows 95 / 98 / Me [Type:] on the [Paper] tab.
Windows 2000 / XP, Windows Serv-er 2003
[Media:] on the [Paper/Quality] tab in the Printing Prefer-ence dialog box.
Windows NT 4.0 [Paper/Output] on the [Advanced] tab in the Document De-faults dialog box.
Mac OS [Paper Type:] on [Printer Specific Options] in the print dialog box.
Mac OS X [Paper Type] on the [Features x] tab on [Printer Features] in the print dialog box.
Windows 95 / 98 / Me [Output Tray:] in the [Paper] tab.
Windows 2000 / XP, Windows Serv-er 2003
[Destination] in [Printer Features] on [Advanced...] on the [Pa-per/Quality] or [Layout] tab.
Windows NT 4.0 [Destination] in [Printer Features] on [Document Options] on the [Advanced] tab.
Mac OS [Destination] in [Printer Specific Options] in the print dialog box.
Mac OS X [Destination]on the [Features x] tab in [Printer Features] in the print dialog box.
Printing a Document
97
3
Staple
Use this function to staple sheets of printed paper together.
Important❒ When stapling, use the finisher option. See General Setting Guide or Printer
Reference.The following table shows where you can select this function.
Note❒ The stapling location might differ depending on the orientation of the ma-
chine set in the printer and the orientation of the data to be printed. For de-tails, see Printer Reference.
Punch
Use this function to punch holes in the printed documents.
Important❒ When punching holes, use the finisher option. See Printer Reference.The following table shows where you can select this function.
Note❒ Punch positions and the number of punch holes that are available will change
depending on the type of finisher, the original's orientation, and the printingpaper size and orientation. For details, see Printer Reference.
Windows 95 / 98 / Me [Staple:] on the [Setup] tab.
Windows 2000 / XP, Windows Serv-er 2003
[Staple:] in [Printer Features] on [Advanced...] on the [Pa-per/Quality] or [Layout] tab.
Windows NT 4.0 [Staple:] in [Printer Features] on [Document Options] on the [Advanced] tab.
Mac OS [Staple:] in [Printer Specific Options] in the print dialog box.
Mac OS X [Staple:] on the [Features x] tab in [Printer Features] in the print dialog box.
Windows 95 / 98 / Me [Punch:] on the [Setup] tab.
Windows 2000 / XP, Windows Serv-er 2003
[Punch:] in [Printer Features] on [Advanced...] on the [Pa-per/Quality] or [Layout] tab.
Windows NT 4.0 [Punch:] in [Printer Features] on [Document Options] on the [Advanced] tab.
Mac OS [Punch:] in [Printer Specific Options] in the print dialog box.
Mac OS X [Punch:] on the [Features x] tab in[Printer Features] in the print dialog box.

Using PostScript 3
98
3
Z-fold
Use this function to select the Z-fold type in the printed documents.
Important❒ When Z-fold, use the finisher option. See Printer Reference.The following table shows where you can select this function.
Watermark
Set the Watermark function.
Note❒ When using this function under Windows 95 / 98 / Me, Mac OS, or Mac OS
X, see the printer driver Help. The following explains the procedure for Win-dows 2000 / XP, Windows Server 2003, and Windows NT 4.0.
Watermark Text
Select the Watermark Text type.
Note❒ When using this function under Windows 95 / 98 / Me, Mac OS, or Mac OS
X, see the printer driver Help. The following explains the procedure for Win-dows 2000 / XP, Windows Server 2003, and Windows NT 4.0.
Windows 95/98/Me [Z-fold] on the [Setup] tab.
Windows 2000 / XP, Windows Serv-er 2003
[Z-fold] in [Printer Features] on [Advanced...] on the [Pa-per/Quality] or [Layout] tab.
Windows NT 4.0 [Z-fold] in [Printer Features] on [Document Options] on the [Advanced] tab.
Mac OS [Z-fold] in [Printer Specific Options] in the print dialog box.
Mac OS X [Z-Fold] on the [Features x] tab in[Printer Features] in the print dialog box.
Windows 2000 / XP, Windows Serv-er 2003
[Watermark:] on [Printer Features] on [Advanced...] on the [Paper/Quality] or [Layout] tab in the Printing Preferences dialog box.
Windows NT 4.0 [Watermark:] on [Printer Features] on [Document Options] on the [Advanced] tab in the Document Defaults dialog box.
Windows 2000 / XP, Windows Serv-er 2003
[Watermark Text:] on [Printer Features] on [Advanced...] on the [Paper/Quality] or [Layout] tab in the Printing Prefer-ences dialog box.
Windows NT 4.0 [Watermark Text:] on [Printer Features] on [Document Op-tions] on the [Advanced] tab in the Document Defaults di-alog box.
Printing a Document
99
3
Watermark FontSelect the Watermark Font type.
Note❒ When using this function under Windows 95 / 98 / Me, Mac OS, or Mac OS
X, see the printer driver Help. The following explains the procedure for Win-dows 2000 / XP, Windows Server 2003, and Windows NT 4.0.
Watermark SizeSelect the Watermark Size size.
Note❒ When using this function under Windows 95 / 98 / Me, Mac OS, or Mac OS
X, see the printer driver Help. The following explains the procedure for Win-dows 2000 / XP, Windows Server 2003, and Windows NT 4.0.
Watermark AngleSelect the Watermark angle.
Important❒ This item is only for portrait, not for landscape.
Note❒ When using this function under Windows 95 / 98 / Me, Mac OS, or Mac OS
X, see the printer driver Help. The following explains the procedure for Win-dows 2000 / XP, Windows Server 2003, and Windows NT 4.0.
Windows 2000 / XP, Windows Serv-er 2003
[Watermark Font:] on [Printer Features] on [Advanced...] on the [Paper/Quality] or [Layout] tab in the Printing Prefer-ences dialog box.
Windows NT 4.0 [Watermark Font:] on [Printer Features] on [Document Op-tions] on the [Advanced] tab in the Document Defaults di-alog box.
Windows 2000 / XP, Windows Serv-er 2003
[Watermark Size:] on [Printer Features] on [Advanced...] on the [Paper/Quality] or [Layout] tab in the Printing Prefer-ences dialog box.
Windows NT 4.0 [Watermark Size:] on [Printer Features] on [Document Op-tions] on the [Advanced] tab in the Document Defaults di-alog box.
Windows 2000 / XP, Windows Serv-er 2003
[Watermark Angle:] on [Printer Features] on [Advanced...] on the [Paper/Quality] or [Layout] tab in the Printing Prefer-ences dialog box.
Windows NT 4.0 [Watermark Angle:] on [Printer Features] on [Document Op-tions] on the [Advanced] tab in the Document Defaults di-alog box.
Using PostScript 3
100
3
Watermark StyleSelect the Watermark style.
Note❒ When using this function under Windows 95 / 98 / Me, Mac OS, or Mac OS
X, see the printer driver Help. The following explains the procedure for Win-dows 2000 / XP, Windows Server 2003, and Windows NT 4.0.
Color ModeUse this to select whether the document is printed in color or black and white.The following table shows the tabs or menus where you can select this function.
You can select the following items:
❖ ColorPrints color documents in full color.
Note❒ Color images will be printed using CMYK toner, Cyan, Magenta, Yellow
and Black. CMYK are three primary subtractive colors.❒ If you want to adjust the print color, adjust the settings in the Advanced
dialog box accessed from the Advanced button on the [Paper/Quality] tab.
❖ Black and WhitePrints everything, including color documents, in black and white. Black andWhite printing is faster than Color printing. To stop black and white areas be-ing printed with CMYK toner, select [Black and White] in the printer driver aswell as in the application.
Note❒ If you use Windows 95/98/Me, this mode is called “Color/ Black and
White:”.
Windows 2000 / XP, Windows Serv-er 2003
[Watermark Style:] on [Printer Features] on [Advanced...] on the [Paper/Quality] or [Layout] tab in the Printing Prefer-ences dialog box.
Windows NT 4.0 [Watermark Style:] on [Printer Features] on [Document Op-tions] on the [Advanced] tab in the Document Defaults di-alog box.
Windows 95/98/Me [Color/ Black and White:] on the [Setup] tab.
Windows 2000 / XP, Windows Serv-er 2003
[Color Mode] on [Printer Features] on [Advanced...] on the [Paper/Quality] tab in the Printing Preferences dialog box.
Windows NT 4.0 [Color Mode] on [Printer Features] on [Document Options] on the [Advanced] tab in the Document Defaults dialog box.
Mac OS [Color Mode] on [Printer Specific Options] in the print dialog box.
Mac OS X [Color Mode] on the [Features x] tab on [Printer Features] in the print dialog box.

Printing a Document
01
3
1
Color Setting
Use this to select the correction method used for color conversion.
Important❒ If you use Windows 95/98/Me, you can configure [Color Setting:] in [Ad-
vanced] by selecting [Manual] from the [Color] setting. [Automatic] sets the print-er to “Super Fine”.
The following table shows the tabs or menus where you can select this function.
You can select the following items:
❖ OffNo modification to the color setting.
❖ FineSelect this setting to perform color matching based on one of the printer'sbuilt- in color rendering dictionaries and perform CMYK conversion. Thissetting performs the printing which output target is Monitor γ = 1.8.
❖ Super FineSelect this setting to use a color rendering dictionary as in the “Fine” setting butproduce output that is more vivid. Use this setting to emphasize light colors.This setting performs the printing which output target is Monitor γ = 2.2.
Note❒ The color rendering dictionary that is selected in the “Color Profile” setting is used.❒ Use this to select a color rendering dictionary (CRD). The CRD is referred to
color matching, so you should select the appropriate CRD for the documentyou are printing. The selected CRD is also referred to when [Fine] or [SuperFine] is selected for “Color Setting:”. The following items are available: [Au-to],[Photographic], [Presentation] and [Solid Color].
Windows 95/98/Me [Color Setting:] on the [Advanced]window displayed when clicking [Advanced...] after selecting [Manual] on [Color] on the [Print Quality] tab.
Windows 2000 / XP, Windows Serv-er 2003
[Color Setting:] on [Printer Features] on [Advanced...] on the [Paper/Quality] tab in the Printing Preferences dialog box.
Windows NT 4.0 [Color Setting:] on [Printer Features] on [Document Options] on the [Advanced] tab in the Document Defaults dialog box.
Mac OS [Color Setting:] on [Printer Specific Options] in the print dia-log box.
Mac OS X [Color Setting:] on the [Features x] tab on [Printer Features] in the print dialog box.

Using PostScript 3
102
3
Color ProfileUse this to select the color profile pattern.
Important❒ If you use Windows 95/98/Me, you can configure [Color Profile:] in [Advanced] by
selecting [Manual] from the[Color] setting. [Automatic] sets the printer to “Auto”.The following table shows the tabs or menus where you can select this function.
You can select the following items:
❖ AutoUse this setting to configure the best color profile pattern automatically de-pending on the appearance of the document to be printed.
❖ PhotographicUse this setting to enhance the reproduction of photos and graphics that in-clude midtones.
❖ PresentationUse this setting to enhance the reproduction of documents that contain textand graphics. This CRD is best for printing colored charts, graphs, presenta-tion materials and so on. If you use this CRD for printing photographs, thecolor or gradations might not be reproduced well.
❖ Solid ColorUse this setting to print specific colors, logos and so on.
❖ User SettingUse this setting to print images with downloaded CRD from your application.
❖ CLP Simulation1Use this setting to print blue color more brightly and vividly.
❖ CLP Simulation2Use this setting to print blue color more brightly and vividly. Print results arelighter than those of CLP Simulation1.
Windows 95/98/Me [Color Profile:] in the [Advanced]dialog box displayed when you click [Advanced...], after selecting [Manual] from [Color] on the [Print Quality] tab.
Windows 2000 / XP, Windows Serv-er 2003
[Color Profile] on [Printer Features] on [Advanced...] on the [Paper/Quality] tab in the Printing Preferences dialog box.
Windows NT 4.0 [Color Profile] on [Printer Features] on [Document Options] on the [Advanced] tab in the Document Defaults dialog box.
Mac OS [Color Profile] on [Printer Specific Options] in the print dialog box.
Mac OS X [Color Profile] on the [Features x] tab on [Printer Features] in the print dialog box.

Printing a Document
03
3
1
Note❒ Use this to select a color rendering dictionary (CRD). The CRD is referred to
color matching, so you should select the appropriate CRD for the documentyou are printing. The selected CRD is also referred to when [Fine] or [SuperFine] is selected for “Color Setting:”. The following items are available: [Au-to],[Photographic], [Presentation] and [Solid Color].
Black Over Print
Select whether or not to apply a black color over any other colors when printing.The following table shows the tabs or menus where you can select this function.
Gray Reproduction
Use this to select the Black Color mode for text and line art.The following table shows the tabs or menus where you can select this function.
You can select the following items:
❖ Black by KPrints using black toner
Windows 95/98/Me [Black Over Print] in [Advanced] by selecting [Manual] from the [Color] setting.
Windows 2000 / XP, Windows Serv-er 2003
[Black Over Print] on [Printer Features] on [Advanced...] on the [Paper/Quality] tab in the Printing Preferences dialog box.
Windows NT 4.0 [Black Over Print] on [Printer Features] on [Document Op-tions] on the [Advanced] tab in the Document Defaults di-alog box.
Mac OS [Black Over Print] on [Printer Specific Options] in the print dialog box.
Mac OS X [Black Over Print] on the [Features x] tab on [Printer Features] in the print dialog box.
Windows 95/98/Me [Gray Reproduction (Text/Line Art):] in [Advanced] by select-ing [Manual] from the [Color] setting. [Automatic] sets the printer to “Pure Black Text”.
Windows 2000 / XP, Windows Serv-er 2003
[Gray Reproduction (Text/Line Art):] on [Printer Features] on [Advanced...] on the [Paper/Quality] tab in the Printing Pref-erences dialog box.
Windows NT 4.0 [Gray Reproduction (Text/Line Art):] on [Printer Features] on [Document Options] on the [Advanced] tab in the Document Defaults dialog box.
Mac OS [Gray Reproduction (Text/Line Art):] on [Printer Specific Op-tions] in the print dialog box.
Mac OS X [Gray Reproduction (Text/Line Art):] on the [Features x] tab on [Printer Features] in the print dialog box.

Using PostScript 3
104
3
❖ Black/Gray by KPrints black using gray.
❖ CMY + KPrints using all toner colors.
❖ Black/Gray by K (Text only)Prints black text in gray.
❖ Black by K (Text only)Prints text using black toner.
Dithering
Use this to set the Image Rendering mode.The following table shows the tabs or menus where you can select this function.
You can select the following items:
❖ AutoUse this setting to configure the best dithering method automatically depend-ing on the appearance of the document to be printed.
❖ PhotographicPerforms dithering using an appropriate pattern for photographs.
❖ TextPerforms dithering using an appropriate pattern for text.
❖ User SettingUse this setting to print images set in half tone in your application.
Windows 95 / 98 / Me [Dithering:] in the [Advanced]dialog box displayed when you click [Advanced...], after selecting [Manual] from [Color] on the [Print Quality] tab.
Windows 2000 / XP, Windows Serv-er 2003
[Dithering:] on [Printer Features] on [Advanced...] on the [Pa-per/Quality] or [Layout] tab in the Printing Preferences di-alog box.
Windows NT 4.0 [Dithering:] on [Printer Features] on [Document Options] on the [Advanced] tab in the Document Defaults dialog box.
Mac OS [Dithering:] on [Printer Specific Options] in the print dialog box.
Mac OS X [Dithering:] on the [Features x] tab on [Printer Features] in the print dialog box.
Printing a Document
05
3
1
CMYK Simulation ProfileYou can simulate the color tone of the printing ink.You can select the printing ink from US OffsetPrint, Euroscale and JapanColor.
Image SmoothingUse this to select the image smoothing type.The following table shows the tabs or menus where you can select this function.
❖ OffDisables image smoothing.
❖ OnPerforms image smoothing unconditionally.
❖ AutoPerforms image smoothing automatically for images that have a resolutionless than 25% of supported printer resolution.
Windows 95/98/Me [CMYK Simulation Profile:] in the [Advanced]dialog box dis-played when you click [Advanced...], after selecting [Man-ual] from [Color] on the [Print Quality] tab.
Windows 2000 / XP, Windows Serv-er 2003
[CMYK Simulation Profile:] on [Printer Features] on [Ad-vanced...] on the [Paper/Quality] tab in the Printing Prefer-ences dialog box.
Windows NT 4.0 [CMYK Simulation Profile:] on [Printer Features] on [Document Options] on the [Advanced] tab in the Document Defaults dialog box.
Mac OS [CMYK Simulation Profile:] on [Printer Specific Options] in the print dialog box.
Mac OS X [CMYK Simulation Profile:] on the [Features x] tab on [Printer Features] in the print dialog box.
Windows 95 / 98 / Me [Image Smoothing:] in the [Advanced]dialog box displayed when you click [Advanced...], after selecting [Manual] from [Color] on the [Print Quality] tab.
Windows 2000 / XP, Windows Serv-er 2003
[Image Smoothing:] on [Printer Features] on [Advanced...] on the [Paper/Quality] or [Layout]tab in the Printing Preferenc-es dialog box.
Windows NT 4.0 [Image Smoothing:] on [Printer Features] on [Document Options] on the [Advanced] tab in the Document Defaults dialog box.
Mac OS [Image Smoothing:] on [Printer Specific Options] in the print dialog box.
Mac OS X [Image Smoothing:] on the [Features x] tab on [Printer Fea-tures] in the print dialog box.

Using PostScript 3
106
3
❖ Less than 90 ppi - Less than 300 ppiPerforms image smoothing only when the image has an image resolution(pixels per inch) less than the respective value you have selected in the list.
Note❒ When [Auto] is selected, data processing may take a long time.❒ When Image Smoothing: is used for a mask image, this function may have an
undesired effect on the print result.
Separate into CMYKUse this to select the print separation type.You can separate the printing data into CMYK to specify a specific color combination.
Color ControlUse this to select whether or not you want the colors in the documents to be adjustedbefore printing so that the printed page matches closer to the colors on the screen.The following table shows the tabs or menus where you can select this function.
❖ Image Color ControlDisplay the Image Color Matching dialog box, click this button to specify ex-actly how you want the colors on your screen adjusted before printing.
Note❒ If you use Windows 2000 / XP or Windows Server 2003, this function is called
“Image Color Management”.❒ If you use Windows NT 4.0, this function can not be configured.❒ If you use Mac OS, this function is called “Color Matching”.
Windows 95/98/Me [Separate into CMYK:] in the [Advanced]dialog box dis-played when you click [Advanced...], after selecting [Man-ual] from [Color] on the [Print Quality] tab.
Windows 2000 / XP, Windows Serv-er 2003
[Separate into CMYK:] on [Printer Features] on [Advanced...] on the [Paper/Quality] tab in the Printing Preferences dialog box.
Windows NT 4.0 [Separate into CMYK:] on [Printer Features] on [Document Options] on the [Advanced] tab in the Document Defaults dialog box.
Mac OS [Separate into CMYK:] on [Printer Specific Options] in the print dialog box.
Mac OS X [Separate into CMYK:] on the [Features x] tab on [Printer Fea-tures] in the print dialog box.
Windows 95/98/Me The [Print Quality] tab.
Windows 2000 / XP, Windows Serv-er 2003
[Graphic] on [Advanced] on the [Paper/Quality] tab in the Printing Preferences dialog box.
Windows NT 4.0 This function is not available.
Mac OS [Color] on the [Color Matching] tab in the print dialog box.
Mac OS X This function is not available.
4. Printer Utility for Mac
07
1By using Printer Utility for Mac, you can download fonts, change the name ofthe printer and so on.
Important❒ If a Macintosh and printer are connected by USB, you cannot use Printer Util-
ity for Mac.
Installing Printer Utility for Mac
Follow these steps to install Printer Utility for Mac on the machine.
A Start the Mac OS.
B Insert the CD-ROM into the CD-ROM drive.The CD-ROM icon appears.
C Double-click the CD-ROM icon.The contents of the CD-ROM appear.
D Double-click the [Mac OS] folder.Under Mac OS X, double-click the [Mac OS X] folder.
E Double-click the [PS Utility] folder on the CD-ROM, and then drag the [Print-er Utility for Mac] file, and then drop it into the Macintosh hard disk.
F Drag the CD-ROM icon and drop it into [Trash] to eject the CD-ROM.Printer Utility for Mac is installed.
Note❒ Printer Utility for Mac is included on the CD-ROM labeled “Printer Dri-
vers and Utilities”.❒ Printer Utility for Mac requires Mac OS 8.1 or higher. (Mac OS X Classic
environment is supported.)❒ Printer Utility for Mac cannot use Mac OS X (native mode).
Printer Utility for Mac
108
4
Starting Printer Utility for Mac
The following instructions describe how to start Printer Utility for Mac.
Mac OS
Important❒ Before starting Printer Utility for Mac, make sure the printer is selected in
[Chooser] on the Apple menu.
A Double-click the Printer Utility for Mac icon.The [Printer Utility for Mac] dialog box appears.
B Click [OK].Printer Utility for Mac will take a few seconds to start.
Mac OS X
A Double-click the Printer Utility for Mac icon.The [Printer Utility for Mac] dialog box appears.
B Click [OK].
C In the [Available Printers:] box, select the printer you want to use.If you change zones, select a name from [Available Network Zones:].Click [Choose Printer...] on the Printer Utility for Mac menu if you want tochange the printer.
D Select the printer you want to use.Printer Utility for Mac will take a few seconds to start.
E Click [Choose].
Printer Utility for Mac Functions
09
4
1
Printer Utility for Mac Functions
Printer Utility for Mac functions are described below.
❖ File menu• [Download PS Fonts...]
Download fonts (PostScript Type 1) to the printer. See p.110 “Download-ing PS Fonts”.
• [Display Printer's Fonts...]Display and delete the fonts in printer memory and the printer's hard diskdrive. See p.110 “Displaying Printer's Fonts”.
• [Initialize Printer's Disk...]Initialize the printer's hard disk drive. See p.111 “Initializing the PrinterDisk”.
• [Page Setup...]Set up the paper size to print “Printer Font Catalog” and “Printer FontSample”. See p.112 “Page Setup”.
• [Print Fonts Catalog...]Print the names of available fonts. See p.112 “Printing Fonts Catalog”.
• [Print Fonts Sample...]Print a sample of fonts. See p.112 “Printing Fonts Sample”.
• [Rename Printer...]Change the printer's name when viewed via Appletalk. See p.112 “Renam-ing the Printer”.
• [Restart Printer]Restart the printer. See p.113 “Restarting the Printer”.
❖ Utility menu• [Download PostScript File...]
Download a PostScript file. See p.114 “Downloading PostScript Files”.• [Select Zone...]
Change the zone to which the printer belongs to via Appletalk. See p.114“Selecting the Zone”.
• [Display Printer Status...]Display the status of the printer. See p.115 “Displaying the Printer Status”.
• [Launch Dialogue Console...]Create and edit a PostScript file, and then download it to the printer. Seep.115 “Launching the Dialogue Console”.

Printer Utility for Mac
110
4
Downloading PS Fonts
You can download the PS fonts to the printer's memory or hard disk drive.
Important❒ The following procedures to download the fonts assume that you are a system
administrator. If you are not, be sure to consult your system administrator.❒ If the printer restarts, all the printer settings return to their defaults.❒ Confirm that a Mac OS and the printer are connected with Appletalk.❒ During the download, do not turn off the power switch, operate the panel or
open or close the cover.
A Select [Download PS Fonts...] on the [File] menu.
B Click [Add to list].The dialog box to select fonts appears.
C Click to select the desired font files, and then click [Open].The list of selectable font names appears.
D After adding all the fonts you want to download, click [OK].The dialog box of selected fonts to download appears.
E Click [Download].The fonts begin to download, and the download status is shown.
FWhen the completion message appears, click [OK].
G Click [Cancel].
Note❒ Some fonts cannot be downloaded.❒ Before downloading, read the documentation about the fonts you want to use.
Displaying Printer's Fonts
You can display the available fonts currently downloaded to the printer. Fontsin the printer's memory and hard disk drive can be displayed.
A Select [Display Printer's Fonts...] on the [File] menu.A dialog box appears.
B Select [Printer's memory] or [Printer's disk].
C Click [OK].
Note❒ The fonts displayed in italics are the default fonts.

Printer Utility for Mac Functions
11
4
1
Deleting Fonts
You can delete fonts from the printer's memory or hard disk drive.
Important❒ You cannot delete the fonts displayed in italic.
A Select [Display Printer's fonts] on the [File] menu.A dialog box appears.
B Select [Printer's memory] or [Printer's disk].
C Select the fonts you want to delete.
D Click [Delete].A confirmation message appears.
E Confirm the fonts you want to delete and the printer name from which youwant to delete the fonts.
F Click [Continue], and then click [OK].
G Click [OK].
Initializing the Printer Disk
When initializing the printer's hard disk drive, all the fonts downloaded to theprinter's hard disk drive are deleted. Before initializing, be sure to check thefonts on the hard disk drive.
Important❒ When initializing the printer's hard disk drive from the operation panel, all of
the data on the printer's hard disk drive is deleted. Before initializing, be sureto check the data on the hard disk drive.
❒ Do not turn off the power switch until initializing is completed, otherwise thehard disk drive might be damaged.
A Select [Initialize Printer's Disk...] on the [File] menu.The confirmation message appears.To cancel initialization, click [Cancel].
B Click [Execute].Initializing starts.
CWhen the completion message appears, click [OK].
Printer Utility for Mac
112
4
Page Setup
You can set the paper size on which to print “Print Fonts Catalogue” and “PrintsFonts Sample”.
A Select [Page Setup...] on the [File] menu.
B Choose the paper size.
Printing Fonts Catalog
Print the names of fonts available on the printer.
A Select [Print Fonts Catalogue] on the [File] menu.
B Click [Print].
Note❒ The paper selected under [Page Setup] is used.
Printing Fonts Sample
You can print samples of fonts downloaded to the hard disk drive or memory.
A Select [Print Fonts Sample...] on the [File] menu.
B Click [Print].
Note❒ Print by using the paper selected on [Page Setup].
Renaming the Printer
You can change the printer name displayed under Appletalk. If you connect sev-eral printers on the network, assign different names so you can identify them. Ifseveral printers have the same name, a digit appears next to the printer name in[Chooser].
Important❒ You can enter up to 31 digits and letters.❒ Do not use symbols, for example “*”, “:”, “=”, “@”, “~”.
Printer Utility for Mac Functions
13
4
1
Mac OS
A On the [File] menu, click [Rename Printer...].
B In the [New Name:] filed enter a new name.
C Click [Rename].The printer name is changed.
D Click [OK].
E On the Apple menu, click [Chooser].
F Click the [AdobePS] icon.
G Select the printer whose name you changed, and then close the [Chooser] di-alog box.If there are several Appletalk zones, select the zone the machine belongs to.
Mac OS X
A On the [File] menu, click [Rename Printer...].
B In the [New Name:] filed enter a new name.
C Click [Rename].The printer name is changed.
D Click [OK].
E On the [Printer Utility for Mac] menu, click [Choose Printer...].
F In the [Available Network Zones:] list, select the zone for the Macintosh in use.
G In the [Available Printers:] list, select the printer whose name you changed,and then click [Choose].
Restarting the Printer
You can restart the printer.
A Select [Restart Printer] on the [File] menu.
B Confirm the message that appears on the screen, and then click [Restart].The printer restarts.The fonts that you downloaded in the printer's memory will be deleted.If the printer restarts, all the printer settings return to their defaults.
Printer Utility for Mac
114
4
Downloading PostScript Files
You can download a Postscript file to the printer.
A Select [Download PostScript File...] on the [Utility] menu.
B Select the file name to download and click the file name, and then click[Open].
C Type the log file name, and then click [Save...].The selected file is downloaded.Errors are recorded in the log file.
Selecting the Zone
You can change the zone to which the printer belongs under Appletalk.
Important❒ Confirm that a Macintosh and printer are connected with Appletalk.
Mac OS
A On the [Utility] menu, click [Select Zone...].The zone to which the printer belongs and the available zone list appear.
B Select the zone in which you want to locate the printer, and then click[Change].A confirmation message appears.
C Click [Continue].A confirmation message appears.
D Click [OK].
E On the Apple menu, click [Chooser].
F Click the [AdobePS] icon.
G In the [Appletalk zone:] list, select the zone you changed.
H In the [Select a PostScript Printer:] list, select the printer you want to use.
I Close the [Chooser] dialog box.

Printer Utility for Mac Functions
15
4
1
Mac OS X
A On the [Utility] menu, click [Select Zone...].The zone to which the printer belongs and the available zone list appear.
B Select the zone which you want to locate the printer in, and then click[Change].A confirmation message appears.
C Click [Continue].A confirmation message appears.
D Click [OK].
E On the [Printer Utility for Mac] menu, click [Choose Printer...].
F In the [Available Network Zones:] list, select the zone you changed.
G In the [Available Printers:] list, select the model of printer in use, and thenclick [Choose].
Displaying the Printer Status
You can display and confirm the current status of the printer.
A Select [Display Printer Status...] on the [Utility] menu.The current status of the printer appears.
B Confirm the current status of the printer.You can confirm the memory capacity, the VM (Virtual Memory) space, thehard disk drive status and available space on the hard disk drive. You canalso confirm the zone to which the printer belongs to.
C Click [OK].
Launching the Dialogue Console
You can create and edit a PostScript file for printing, and then download it to the printer.
Important❒ “Launch Dialogue Console” is recommended for users with an understand-
ing of PostScript.❒ Do not download any file other than PostScript files to the printer.❒ “Launch Dialogue Console” must be used at your own responsibility.
A Select [Launch Dialogue Console...] on the [Utility] menu.Open the editing screen. The Dialogue Console menu bar appears.

Printer Utility for Mac
116
4
B Type the PostScript command in the editor screen.To edit a PostScript file, select [Open] on the [File] menu to open it.You can search or replace a character string by using the [Search] menu.
C After editing the PostScript file, select [Download Top Window] on [Console]menu to start printing.The PostScript file is sent to the printer.The [Reply from Printer] box opens, depending on the PostScript file you sent.
D Select [Return To Main Menu] on the [Console] menu to close the PostScript file.

17
1INDEXB
Black Over Print, 103
C
Changing to EtherTalk, 58, 62CMYK Simulation Profile, 105Collate, 95Color Control, 106Color Mode, 100Color Profile, 102Color Setting, 101
D
Deleting a Hold Print File, 82Deleting a Locked Print File, 78Deleting a Sample Print File, 74Deleting a Stored Print File, 87Deleting Fonts, 111Destination Tray, 96Displaying Printer's Fonts, 110Displaying the Printer Status, 115Dithering, 104Document Server, 88Downloading PostScript Files, 114Downloading PS Fonts, 110Duplex Printing, 93
F
Fit to Paper, 90Functions
Printer Utility for Mac, 109
G
Gradation, 92Gray Reproduction, 103
H
How to Read This Manual, 1
I
Image Smoothing, 105Initializing Printer Disk, 111Input Slot, 91Installing, 107
Printer Utility for Mac, 107Installing Adobe Type Manager
Mac OS, 57Installing Screen fonts
Mac OS, 57Installing the PostScript 3 Printer Driver
and PPD FileMac OS, 55
Installing the PPD FilesMac OS X, 59
Installing the Printer Driver Using USBWindows 2000, 28
J
Job Type, 68
L
Launching the Dialogue Console, 115Level Color, 93
M
Mac OS, 55Mac OS X, 59
P
Page Setup, 112Paper Selection, 90Paper Size, 90Paper Type, 96Printer Utility for Mac, 107, 112, 114
Functions, 109Printing Fonts Catalog, 112Printing Fonts Sample, 112Printing with Bluetooth Connection
Windows, 41Printing with Parallel Connection
Windows 2000, 33Punch, 97

118
EN USA GB GB AE AE B229-8559R
Renaming the Printer, 112Resolution, 91Restarting the Printer, 113
S
Selecting the Zone, 114Separate into CMYK, 106Setting Up Options, 65
Mac OS, 56Mac OS X, 60
Setting Up PPD FilesMac OS, 56
Setting Up the PPD FileMac OS X, 59
Staple, 97
T
Toner Saving, 93
U
User Code, 89Using Bonjour
Mac OS X, 61Using USB Interface
Mac OS X, 60
W
Watermark, 98Watermark Angle, 99Watermark Font, 99Watermark Size, 99Watermark Style, 100Watermark Text, 98Windows 2000
printer properties, PostScript 3, 48Windows 95/98/Me
printer properties, PostScript 3, 46Windows NT 4.0
document defaults, PostScript 3, 52printer properties, PostScript 3, 52
Windows Server 2003printer properties, PostScript 3, 50
Windows XPprinter properties, PostScript 3, 50
Z
Z-Fold, 98

Copyright © 2005

PostScript 3 Supplement
EN USAGB GB
AE AE B229-8559

UNIX Supplement
this machine and keep it handy for future reference. For safe and correct use, be sure to read th before using the machine.
Read this manual carefully before you use eSafety Information in "About This Machine"

Introduction
This manual contains detailed instructions and notes on the operation and use of this machine. For yoursafety and benefit, read this manual carefully before using the machine. Keep this manual in a handyplace for quick reference.
Important
Contents of this manual are subject to change without prior notice. In no event will the company be li-able for direct, indirect, special, incidental, or consequential damages as a result of handling or oper-ating the machine.
Notes
This manual covers all models, and therefore contains functions and settings that may not be availablefor your model.
Functions and supported operating systems may differ from those of your model.
Trademarks
UNIX is a registered trademark in the United States and other countries, licensed exclusively throughX/Open Company Limited.
PostScript and Acrobat are registered trademarks of Adobe Systems, Incorporated.
Sun, SunOS and Solaris are trademarks or registered trademarks of Sun Microsystems, Inc. in theUnited States and other countries.
HP-UX is a registered trademark of Hewlett-Packard Company.
LINUX is a trademark of Linus Torvalds.
RED HAT is a registered trademark of Red Hat, Inc.
PictBridge is a trademark.
Other product names used herein are for identification purposes only and might be trademarks of theirrespective companies. We disclaim any and all rights to those marks.
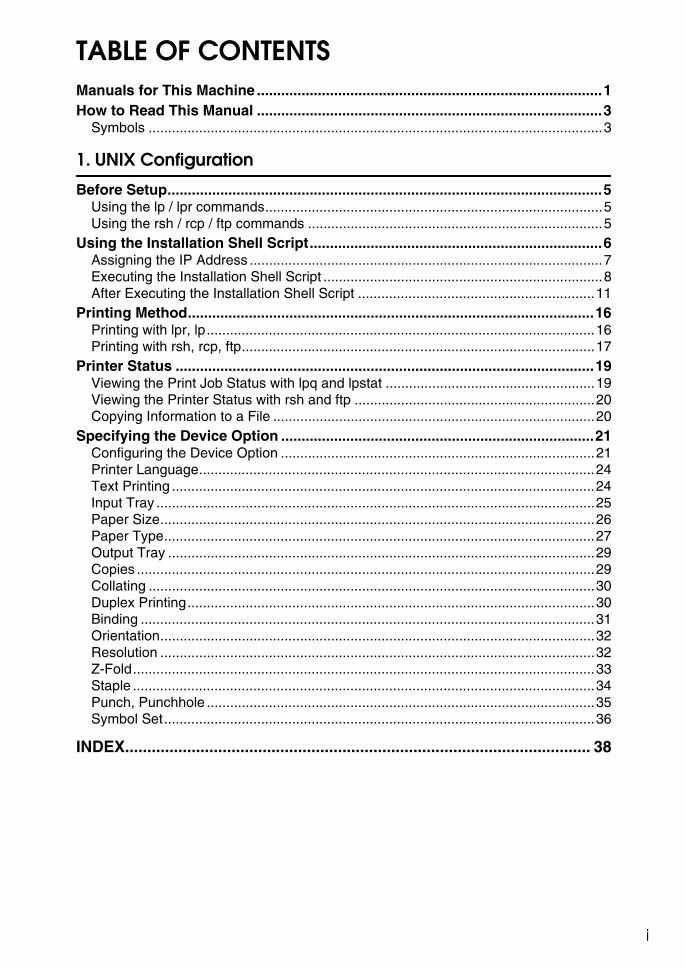
i
TABLE OF CONTENTSManuals for This Machine .....................................................................................1How to Read This Manual .....................................................................................3
Symbols .....................................................................................................................3
1. UNIX Configuration
Before Setup...........................................................................................................5Using the lp / lpr commands.......................................................................................5Using the rsh / rcp / ftp commands ............................................................................5
Using the Installation Shell Script........................................................................6Assigning the IP Address ...........................................................................................7Executing the Installation Shell Script ........................................................................8After Executing the Installation Shell Script .............................................................11
Printing Method....................................................................................................16Printing with lpr, lp....................................................................................................16Printing with rsh, rcp, ftp...........................................................................................17
Printer Status .......................................................................................................19Viewing the Print Job Status with lpq and lpstat ......................................................19Viewing the Printer Status with rsh and ftp ..............................................................20Copying Information to a File ...................................................................................20
Specifying the Device Option .............................................................................21Configuring the Device Option .................................................................................21Printer Language......................................................................................................24Text Printing .............................................................................................................24Input Tray .................................................................................................................25Paper Size................................................................................................................26Paper Type...............................................................................................................27Output Tray ..............................................................................................................29Copies ......................................................................................................................29Collating ...................................................................................................................30Duplex Printing.........................................................................................................30Binding .....................................................................................................................31Orientation................................................................................................................32Resolution ................................................................................................................32Z-Fold.......................................................................................................................33Staple .......................................................................................................................34Punch, Punchhole ....................................................................................................35Symbol Set...............................................................................................................36
INDEX......................................................................................................... 38

ii

1
Manuals for This Machine
Refer to the manuals that are relevant to what you want to do with the machine.
❖ About This MachineBe sure to read the Safety Information in this manual before using the ma-chine.This manual provides an introduction to the functions of the machine. It alsoexplains the control panel, preparation procedures for using the machine,how to enter text, and how to install the CD-ROMs provided.
❖ General Settings GuideExplains User Tools settings, and Address Book procedures such as register-ing fax numbers, e-mail addresses, and user codes. Also refer to this manualfor explanations on how to connect the machine.
❖ Trouble ShootingProvides a guide to solving common problems, and explains how to replacepaper, toner or print cartridge, and other consumables.
❖ Security ReferenceThis manual is for administrators of the machine. It explains security func-tions that the administrators can use to protect data from being tampered, orprevent the machine from unauthorized use. Also refer to this manual for theprocedures for registering administrators, as well as setting user and admin-istrator authentication.
❖ Copy/Document Server ReferenceExplains Copier and Document Server functions and operations. Also refer tothis manual for explanations on how to place originals.
❖ Copy ReferenceExplains Copier functions and operations. Also refer to this manual for expla-nations on how to place originals.
❖ Facsimile ReferenceExplains Facsimile functions and operations.
❖ Printer ReferenceExplains Printer functions and operations.
❖ Scanner ReferenceExplains Scanner functions and operations.

2
❖ Network GuideExplains how to configure and operate the machine in a network environ-ment, and use the software provided.This manual covers all models, and includes descriptions of functions andsettings that might not be available on this machine. Images, illustrations, andinformation about operating systems that are supported might also differslightly from those of this machine.
❖ Other manuals• Manuals for This Machine• Safety Information• Quick Reference Copy Guide• Quick Reference Fax Guide• Quick Reference Printer Guide• Quick Reference Scanner Guide• PostScript 3 Supplement• UNIX Supplement• Manuals for DeskTopBinder Lite
• DeskTopBinder Lite Setup Guide• DeskTopBinder Introduction Guide• Auto Document Link Guide
Note❒ Manuals provided are specific to machine types.❒ Adobe Acrobat Reader/Adobe Reader must be installed in order to view the
manuals as PDF files.❒ “Post Script 3 Supplement“ and “UNIX Supplement” include descriptions of
functions and settings that might not be available on this machine.

3
How to Read This Manual
Symbols
This manual uses the following symbols:
Indicates important safety notes.Ignoring these notes could result in serious injury or death. Be sure to read thesenotes. They can be found in the “Safety Information” section of About This Ma-chine.
Indicates important safety notes.Ignoring these notes could result in moderate or minor injury, or damage to themachine or to property. Be sure to read these notes. They can be found in the“Safety Information” section of About This Machine.
Indicates points to pay attention to when using the machine, and explanationsof likely causes of paper misfeeds, damage to originals, or loss of data. Be sureto read these explanations.
Indicates supplementary explanations of the machine’s functions, and instruc-tions on resolving user errors.
This symbol is located at the end of sections. It indicates where you can find fur-ther relevant information.[ ]Indicates the names of keys that appear on the machine’s display panel.{ }Indicates the names of keys on the machine’s control panel.

4
1. UNIX Configuration
5
This section explains how to set up a network printer and check print status us-ing UNIX.
Before Setup
Important❒ To print from a UNIX workstation, use a file that the printer supports.Setting up varies depending on the printing commands. Make sure to make set-tings accordingly.
Using the lp / lpr commands
A Use the installation shell script to register the device option, as well as theprinter host name and the IP address.See p.6 “Using the Installation Shell Script”.
B Start printing.See p.16 “Printing Method”.
Using the rsh / rcp / ftp commands
A Edit the host file to register the printer host name and the IP address.
B Start printing.See p.16 “Printing Method”.
ReferenceSee p.11 “After Executing the Installation Shell Script” for host file editing.
Note❒ If you cannot edit the host file, use the install shell script to register the host
name.
UNIX Configuration
6
1
Using the Installation Shell Script
The installation shell script helps with the setup process. The installation shellscript automates some of the tasks in configuring /etc/hosts, /etc/printcap; cre-ating the spool directory for BSD UNIX; and running the lpadmin command forSystem V UNIX.
Important❒ The installation shell script can be used on the following workstations: (it can-
not be used with other types of workstations.)• SunOS 4.x.x• Solaris 2.x(Sun OS 5.x), Solaris 7, Solaris 8,• HP-UX• Redhat Linux• UnixWare• OpenServer
Note❒ Depending on security settings when installed, rsh / rcp /telnet may not be
usable with Red Hat 7.1 or later. Change the security level to allows use of rsh/ rcp /telnet. For details about how to change the setting, see the operatinginstructions for Red Hat.
❒ When you use NIS (Network Information Service) or DNS, you should con-figure the server before running the installation shell script.
❒ Installation shell script does not support CUPS. For details about the settingsof CUPS, see the manual that comes with the UNIX workstation , and theCUPS' manual.
❒ When you use Solaris and HP-UX, you can set UNIX configuration with ad-mintools that came with Solaris and HP-UX. For details about setting usingthe admintools, see the admintool's manual.
ReferenceFor details about the configuration utility of your operating system, see themanual that came with the utility.

Using the Installation Shell Script
7
1
Assigning the IP Address
Important❒ Configure the machine to use TCP/IP.
• Make sure that TCP/IP on the machine is set to active. (Default setting isactive.)
• Assign an IP address to the machine and configure the other settings re-quired for TCP/IP.
ReferenceFor details about how to make the above settings, see the manual that comeswith this machine.
Checking the IP address configuration
Follow the procedure below to make sure that the IP address has been config-ured correctly.• The following procedure uses the sample IP address: 192.168.15.16.
A Enter the following:# ping 192.168.15.16
If the address has been configured correctly, the following message appears:192.168.15.16 is alive
If the address has been configured incorrectly, the following message ap-pears:no answer from 192.168.15.16
Note❒ When you use NIS, the IP address and host name are written to /etc/hosts
on the master server. When you use DNS, the information is written to adata file on the name server. After writing the host name and IP address tothe file, make sure that the configuration is correct by pinging the host.# ping host_name
❒ If the host name is registered with an IP address, the server can access theprinter using its host name instead of its IP address.
UNIX Configuration
8
1
Executing the Installation Shell Script
Having configured the printer IP address, follow the procedure below to executethe installation shell script and set up the workstation printing environment.
Important❒ Before executing the installation shell script, the IP address, host name and
printer name are required.❒ The following procedures use the sample IP address: 192.168.15.16; sample
host name: nphost; and sample printer name: np.❒ Use ftp to get the installation shell script from the printer.
A Log on to the workstation as root.If you do not log on as root, the installation shell script will not run.
B Get the installation shell script from the printer.
CMove to the directory you want to copy the installation shell script to.
D Use ftp to connect to the printer with the IP address that you just config-ured.# ftp 192.168.15.16Connected to 192.168.15.16220 printer FTP server ready.name (192.168.15.16:root:)
EWhen a user name is requested, leave the user name field blank and pressthe {RETURN} ( {ENTER} ) key.331 Password required for root.Password:
FWhen a password is requested, leave the password field blank and pressthe {RETURN} ( {ENTER} ) key.230 User root logged in.ftp>
G Enter the following to get the installation shell script:ftp> get install
H Close the ftp session.ftp> bye221 Goodbye.#
I Run the installation shell script.# sh ./install
Insert a period and slash before the current directory.

Using the Installation Shell Script
9
1
J Enter a number to select the workstation operating system that you are using.Network printer install shell Select your workstation OS type 1.SunOS 4.x.x 2.Solaris 2.x, Solaris 7-9 (SunOS5.x) 3.HP-UX 4.UnixWare 5.Linux 6.OpenServer 7.Quit Enter <1-7>:2
If you select “7”, the installation shell script ends.
K Enter the printer's IP address.Enter Printer host IP address <xxx.xxx.xxx.xxx> [re-turn=skip]:192.168.15.16
If the host name of the printer has already been configured, press the {RE-TURN} ( {ENTER} ) key. Nothing will be added to the /etc/hosts file.
L Enter the printer's host name.Enter Printer host name : nphost
If no IP address was entered in step K, nothing is added to the /etc/hosts file.
M Configure the printer name.Enter logical printer name [default nphost_prn]
If you want to use the default name, press the {RETURN} ( {ENTER} ) key. En-ter a new name, if you want to use a different one.The host name entered in step L followed by “_prn” appears in “default”.
N Set the print option.Enter remote printer name [default lp]:
• Press the {RETURN} ( {ENTER} ) key, and printing with PCL or PostScriptis enabled.
• If you want to set the device option, enter the option parameter.Enter remote printer name [default lp]:tray=tray1
• If you enter “text”, text printing is enabled.If you enter “text”, printing with PCL and PostScript is disabled.Enter remote printer name [default lp]:text
You can enter up to 14 characters for HP-UX 11.0, 256 for Solaris 8 and RedHat Linux 7.0, and 51 for Red Hat Linux 6.2.After setup with the installation shell script is complete, and if you enteredthe IP address in step K, the following message appears:hosts file is modified
UNIX Configuration
10
1
O Perform a test print to make sure that the settings are correct.# lpr -Pnp file_name
# lp -d np file_name
Note❒ SunOS, UnixWare, and OpenServer appear on the screen, but they are not
supported. Use Solaris, HP-UX, or Linux.❒ The IP address will be added to the /etc/hosts file.❒ The host name will be added to the /etc/hosts file.❒ When printing with the lp command, use ( _ ) instead of ( = ) and ( ; ) in-
stead of ( , ) for operating systems that cannot use ( = ) and ( , ) such as So-laris 2.5 or later.
ReferenceFor details about lpr and lp, see p.16 “Printing Method”.For details about the device option, see p.21 “Specifying the Device Op-tion”.
Deleting the printer
To print using the lp or lpr command, the option specified when the installationshell script is executed is used. Change the option in accordance with the work-station you are using.
❖ BSD UNIX workstation, LinuxDelete the printer entry from /etc/printcap, and then execute the installationshell script again. Select options during the setup process.Alternatively, search the printer entry from /etc/printcap, and change its rpcapability to option setting.
❖ Solaris, HP-UXDelete the printer entry, and then execute the installation shell script again.Select options during the setup process. To delete the printer entry, follow theprocedure below:A Stop the scheduler.
# /usr/sbin/lpshut
B Delete the printer.# /usr/sbin/lpadmin -x printer_name
C Restart the scheduler.# /usr/lib/lpsched

Using the Installation Shell Script
11
1
After Executing the Installation Shell Script
The printing environment is set up automatically when the installation shellscript is executed.This section describes setup contents when the installation shell script is execut-ed under Red Hat Linux, Solaris, and HP-UX.
Linux
❖ Adding the IP address and host name to the /etc/hosts fileThe following line is added to the /etc/hosts file. The IP address and printerhost name which you previously entered in the installation script will beused:192.168.15.16 nphost # Network Printer
• 192.168.15.16 is the IP address, nphost is the host name, from # to the endof the line is the comment.
Note❒ The /etc/hosts file contains a list of the IP addresses and host names of all
hosts communicating on the network. Each entry is delimited with a spaceor a tab, and each line is separated with a return.
❒ If you do not use NIS or DNS, you must manually enter the IP address andhost name of each workstation using the network printer in the /etc/hostsfile.
❖ Adding an entry to the /etc/printcap fileThe following entry is added to the /etc/printcap file, which is the configu-ration for printing with the lpr command. In order to use the lpr command toprint, you need to edit the /etc/hosts file, add an entry for the network print-er to the /etc/printcap file and create a spool directory:##PRINTTOOL3## REMOTEnp|Network Printer:|np|Network Printer:|np|Network Print-er:|np|Network Printer:|np|Network Printer:|np|NetworkPrinter:|np|Network Printer:|np|Network Printer:|np|Net-work Printer:|np|Network Printer:|np|Network Print-er:|np|Network Printer:|np|Network Printer:|np|NetworkPrinter:|np|Network Printer:|np|Network Printer:\ :rm=nphost:\ :rp=option:\ :sd=/var/spool/lpd/npd:\ :lf=/var/log/npd-errs:\ :sh:\ :mx#0:

UNIX Configuration
12
1
Note❒ The /etc/printcap file is used to register the name and attributes of a print-
er. You must make an entry for the network printer in the /etc/printcapfile of all workstations using the network printer.
❒ You must make an entry for each printer option when using the sameprinter.
❒ Each entry is separated with colons into several fields. The syntax is to be-gin each entry with a colon, followed by the entry, and then end with a co-lon, a back slash, and then a return.
❒ The first line of the field is the name of the printer. You use this name whenlogging on to a network printer from a workstation. You can define severaldifferent names by separating each name with the “|” character.
❒ The second and following lines contain the printer's attributes. Attributesare represented by two-character names referred to as capabilities. For de-tails about capabilities, see the following table:
Capability Explanation Value requiredfor the network printer.
rm Host name ofthe printer. The host namethat was registered with the /etc/hosts file.
rp Optional specification.
“lp” will be assigned, if the option isnot used.
Select optionsfor printing. For de-tails about available options, see p.21 “Specifying the Device Op-tion”.
sd Path name ofthe spool directory. Path name ofthe spool directory that is to be created.
lf Path name ofthe log file. Path name ofthe log file.
For example /var/log/lpd-errs.
mx Maximum filesize which the direc-tory can copy. When set to 0, the size is unlimited. Ifnothing is en-tered, the size is set to 1024 k.
None, or somethingsuitable.
Using the Installation Shell Script
13
1
❖ Making the spool directoryCreate a spool directory under /var/spool/lpd. The name of the spool direc-tory should be the name of the printer followed by a “d”.
Note❒ The spool directory is used to control data used for print jobs. For example,
when a print job is created, a temporary copy of the data used is created inthe spool directory. All workstations accessing the network printer need tohave a spool directory for the network printer.
❒ A spool directory should be made for every network printer entry listed inthe /etc/printcap file.
❒ The spool directory should normally be made under /var/spool/lpd andthe name should match that listed under the sd capability in /etc/print-cap. Change the owner and group of the directory to root and lp. The fol-lowing examples show how to make a /var/spool/lpd/npd spooldirectory:# cd /var/spool/lpd# mkdir npd# chown root npd# chgrp lp npd
❖ Making the log fileError messages are logged to a file created in the /var/log directory. The logfile name is the printer name followed by “d-errs”.
Note❒ The log file is used for logging errors or warning messages by the UNIX
workstation.❒ The log file should be made for every network printer entry listed in the
/etc/printcap file.❒ The log file should normally be made under /var/log directory and the
name should match that listed under the lf capability in /etc/printcap.Change the owner and group of the log file to root and lp. The followingexamples show how to make a /var/log/npd-errs file:# cd /var/log# touch npd-errs# chown root npd-errs# chgrp lp npd-errs
UNIX Configuration
14
1
Solaris
❖ Adding the IP address and host name to the /etc/hosts fileThe following line is added to the /etc/hosts file. The IP address and printerhost name previously entered in the installation script will be used.192.168.15.16 nphost # Network Printer
• 192.168.15.16 is the IP address, nphost is the host name, from # to the endof the line is the comment.
Note❒ The /etc/hosts file contains a list of IP addresses and host names of all
hosts communicating on the network. Each entry is delimited with a spaceor a tab, and each line is separated with a return.
❒ If you do not use NIS or DNS, you must manually enter the IP address andhost name of each workstation using the network printer in the /etc/hostsfile.
❖ Registering the printerThe installation shell script registers the printer as a remote printer followingthe procedure below:A If your workstation is Solaris 2.5.1, register the print server and print client
to the print service.# lpsystem -t bsd -R 0 -y Network Printer nphost
B Register the printer as a remote printer.# lpadmin -p np -s nphost!option -T dump -I any
• np is the printer name, nphost is the host name. For details about “op-tion”, see p.21 “Specifying the Device Option”.“lp” will be assigned, if the option is not used.When printing with the lp command, use ( _ ) instead of ( = ) and ( ; )instead of ( , ) for operating systems that cannot use ( = ) and ( , ) such asSolaris 2.5 or later.
C If your workstation is Solaris 2.5.1, set the print job to active so it can be ac-cepted by the print queue./usr/lib/accept np
D If your workstation is Solaris 2.5.1, set the print job to active to print./usr/lib/enable np

Using the Installation Shell Script
15
1
HP-UX
❖ Adding the IP address and host name to the /etc/hosts fileThe following line is added to the /etc/hosts file. The IP address and printerhost name previously entered in the installation script will be used:192.168.15.16 np # Network Printer
• 192.168.15.16 is the IP address, np is the host name, from # to the end ofthe line is the comment.
Note❒ The /etc/hosts file contains a list of IP addresses and host names of all
hosts communicating on the network. Each entry is delimited with a spaceor a tab, and each line is separated with a return.
❒ If you do not use NIS or DNS, you must manually enter the IP address andhost name of each workstation using the network printer in the /etc/hostsfile.
❖ Registering the printerThe installation shell script registers the printer as a remote printer followingthe procedure below:A Stop the scheduler.
/usr/lib/lpshut
B Register the printer./usr/lib/lpadmin -Pnp -v/dev/null -mrmodel
-ormnphost -orpoption -ob3
• np is the printer name, nphost is the host name.For details about “option”, see p.21 “Specifying the Device Option”.“lp” will be assigned, if the option is not used.
C Set the printer so the print job is listed in the print queue./usr/lib/accept np
D Set the printer to perform the print job./usr/lib/enable np
E Restart the scheduler./usr/lib/lpsched
UNIX Configuration
16
1
Printing Method
Printing with lpr, lp
Execute one of the following commands according to type of workstation used:
❖ BSD UNIX workstation, Linux% lpr -Pprinter_name file_name [file_name...]For example:The printer name is np, file names are file1 and file2% lpr -Pnp file1 file2
❖ Solaris, HP-UX% lp -d printer_name file_name [file_name...]For example:The printer name is np, file names are file1 and file2% lp -d np file1 file2
Note❒ “printer_name” is the name entered when executing the installation shell
script.❒ You can use wild cards ( * or ? ) for the file name.❒ The message “print session full” appears when the maximum number of
print requests has been reached (max. 5 sessions —Job Spool setting availa-ble). You should try to print again when the number of requests is less thanfive. You can check the number of print requests using telnet. For detailsabout using telnet, see the manual that comes with this machine.
❒ The number of print sessions does not change, whether you increase or re-duce the machine's total memory size.
Printing Method
17
1
Printing with rsh, rcp, ftp
You can also print using the rsh, rcp and ftp commands.
Note❒ Print using a format the printer supports.❒ You should try to print again when the number of requests is zero.❒ The message “print session full” appears when the maximum number of
print requests is reached.❒ The maximum number of print sessions varies depending on the command.
When using the rsh, rcp command, the maximum number of print sessions is5; when using the ftp command, the number is 3.
rsh
% rsh host_name print < file_name
For example:host name is nphost, file name is file1% rsh nphost print < file1
Note❒ “host_name” is the name entered when executing the installation shell script.❒ If you are using HP-UX, use the remsh command instead of rsh.
rcp
❖ To specify and print the file % rcp file_name [file_name...] host_name:For example:host name is nphost, file names are file1 and file2% rcp file1 file2 nphost:
❖ To print all of the files in a directory% rcp -r directory_name host_name:For example:host name is nphost, directory name is directory% rcp -r directory1 nphost:
Note❒ “histamine” is the name entered when executing the installation shell script.❒ You can use wild cards ( * or ? ) for the file name.
UNIX Configuration
18
1
ftp
Use the put or mput commands depending on the number of files to be printed.
Important❒ File names cannot contain “=” or “,”.❒ You can use wild cards ( * or ? ) for the file name with the mput command.
❖ To print one fileftp> put file_name
❖ To print several filesftp> mput file_name [file_name...]
The following procedure shows an example of how to print a file using ftp.It is not possible to set options with the mput command:
A Start ftp using the IP address or host name of the printer.% ftp IP_address
B Enter the user name. Skip the password, and then press the {RETURN} ( {EN-TER} ) key.Name:Password:
C Set the file transfer mode to binary.ftp> bin
If the file transfer mode is not set to binary, the image may not be printed cor-rectly.
D Print the file.For example, to print the file named file1:ftp> put file1
For example, to print the two files named file1 and file2:ftp> mput file1 file2
E Exit ftp.ftp> bye
Printer Status
19
1
Printer Status
You can use the following commands to have information and printer status dis-played or copied to a file.Use the lpq or lpstat command to display the status of the printer or informationabout print jobs.Use the rsh, rcp or ftp commands to get more detailed information from theprinter.
Viewing the Print Job Status with lpq and lpstat
❖ BSD UNIX workstation, Linux% lpq -Pprinter_name For example: Printer name is np % lpq -Pnp
❖ System V UNIX, Solaris, HP-UX% lpstat -o printer_name For example: Printer name is np% lpstat -o np
Note❒ If you are using HP-UX, do not put a space between “-o” and “printer
name”.

UNIX Configuration
20
1
Viewing the Printer Status with rsh and ftpUse the rsh or ftp command to display printer status or information about printjobs using specified parameters.You can use these commands for BSD and System V UNIX.If your workstation is HP-UX, use the remsh command instead of rsh.• rsh
% rsh host_name parameter
• ftp% ftp host_nameUser user_namepassword:ftp> get parameter -
Parameters that can be used with rsh, rcp and ftp :
Note❒ Leave the user name and password blank, and then press the {RETURN} ( {ENTER} )
key.❒ “-” indicates standard output. Display will be displayed on screen if standard
output has not been specified.
Copying Information to a FileUse the rcp or ftp command to copy information about specified parameters to a file.You can use these commands for BSD and System V UNIX.
Important❒ The same parameters are used as those above.• rcp
% rcp host_name:parameter file_name
• ftp% ftp host_nameUser: user_namepassword:ftp> get parameter file_name
Note❒ Leave the user name and password blank, and then press the {RETURN} ( {EN-
TER} ) key.
Parameter Informationreturned
statStatus ofthe printer.
Information about print jobs.
info Informationabout the paper tray, output tray and printer language.
prnlog Record ofthe last 10 jobs printed.
syslog Record ofmessages about the network interface board.
Specifying the Device Option
21
1
Specifying the Device Option
With the following options, you can print with specific printer functions.This manual covers all models, and therefore contains functions and settingsthat may not be available for your model.
Configuring the Device Option
Important❒ The optional character strings the printer can recognize contain a maximum
of 512 bytes.❒ The number of available characters used as options is limited, depending on
operating systems.The configuration of the print option varies, depending on printing commands.• rsh
% rsh host_name print option1=value1,… < file_name
• rcp % rcp file_name host_name:option1=value1,…
• ftp ftp> put file_name option1=value1,…
Host_name is the printer host name. File_name is the file name you want to print.The device option is specified in the form of “option=value”. For details abouttypes of device options and values, see the following explanations.For example, the following settings are for printing with rsh, rcp, and ftp : switchto PostScript, feed paper from paper feed tray 1, set the printing amount to 3 sets,and print with the resolution set to 600 dpi (host_name :nphost, file_name :file1).• rsh
% rsh nphost print filetype=postscript,tray=tray1,cop-ies=3,resolution=600 < file1
• rcp% rcp file1 nphost:filetype=postscript,tray=tray1,cop-ies=3,resolution=600
• ftpftp> put file1 filetype=postscript,tray=tray1,cop-ies=3,resolution=600

UNIX Configuration
22
1
Note❒ Multiple options must be separated by commas (,). Do not use spaces.❒ When the printing file contains the PCL, PJL, PostScript commands control of
the option, the command takes priority.❒ Enter the option using the lp or lpr command, when the shell script is imple-
mented. The option settings made here are configured as default. You mustcreate another printer if you want to change printer option settings. For de-tails about changing the configured option, see p.10 “Deleting the printer”.
❒ When printing with the lp command, use ( _ ) instead of ( = ) and ( ; ) instead of( , ) for operating systems that cannot use ( = ) and ( , ) such as Solaris 2.5 or later.
Using the cd command with ftp
For printing with ftp, if the option is specified using the cd command, it becomesavailable whenever the put or mput command is used.ftp> cd option
Note❒ The pwd command shows the current option settings.
ftp> pwd
List of the device options
Device option Value Functionsummary.
filetype pcl, postscript( rps), pdf, pict-bridge
Specifies the printerlanguage for printing.
filter text Specifies the text printing.
tray tray1~tray7, lct, bypass, all Specifies the input tray.
paper a0~a6, a3wide, jisb1~jisb6, an-sic, ledger, letter, halfletter, le-gal, executive, fgl, foolscap, folio, com10, C5, C6, dl, mon-arch, k8, k16, custom
Specifies the paper size.
papertype plain, recycled, special, special2, special3, thick, thick2, thick3, thin, tabstock, transparency, color, letterhead, preprinted, prepunched, labels, bond, card-stock, translucent, usercolor1, usercolor2, yellow, green, blue, purple, ivory, orange, pink, red, gray, middlethick, envelope, hgplain, inkjetjpost, jpost, plain-orrecycled, plainduplexback-side, thickduplexbackside, film, used, glossy, auto
Specifies the paper type.

Specifying the Device Option
23
1
outbin inner, optionaloutputbin1~12, lower, finishershift, finisher-proof, finisherbooklet, upper
Specifies the output tray.
copies Number of copies (1–9999) Specifies the number ofcopies.
qty Number of collated sets(1–999) Specifies the number tocollate.
duplex on, off Specifies whether duplex-printing is on or off.
binding longedge, shortedge, left, right, top
Specifies the bindingdirection for duplex printing.
orientation portrait, landscape Specifies the feed directionof the paper.
resolution value of resolution (200,300, 400, 600, 1200)
Specifies the resolutionfor printing.
fold off, zbottom, zright, zleft Specifies the foldingposition.
staple booklet, left2land, left2port, lefttop, lefttophorizland, leftto-phorizport, lefttopslantland, lefttopslantport, lefttopvert-land, lefttopvertport, right2land, right2port, right-top, righttophorizland, rightto-phorizport, righttopslantland, righttopslantport, right-topvertland, righttopvertport, top2land, top2port, off
Specifies the staple position.
punch off, leftport, leftland, rightport, rightland, topport, topland
Specifies the punch position.
punchhole 2, 3, 4 Specifies the number ofpunch holes.
symbol set desktop, iso4, iso6, iso11, iso15, iso17, iso21, iso60, iso69, isol1, isol2, isol5, legal, math8, mspubl, pc8, pc850, pc852, pc8dn, pc8tk, pifont, psmath, pstext, roman8, vn-intl, vnmath, vnus, win30, winl1, winl2, winl5
Specify the set of printcharac-ters.
Device option Value Functionsummary.

UNIX Configuration
24
1
Printer Language
Select a printer language to print.filetype=printer language
fil=printer language
The following sample shows how to print with PostScript 3 (host name: nphost,file name: file1):• rsh
% rsh nphost print filetype=postscript < file1
• rcp% rcp file1 nphost:filetype=postscript
• ftpftp> put file1 filetype=postscript
Text Printing
Set this function when printing text files directly.filter=text
The following sample shows how to print text files directly.• rsh
% rsh nphost print filter=text < file1
• rcp % rcp file1 nphost:filter=text
• ftp ftp> put file1 filter=text
Printer language Value
PCL pcl
PostScript3 postscriptor rps
PDF pdf
PictBridge pictbridge

Specifying the Device Option
25
1
Input Tray
Select a default input tray.
Important❒ Only installed input trays are available.tray=value of input tray
The following sample shows how to print from tray 2 (host name: nphost, filename: file1):• rsh
% rsh nphost print tray=tray2 < file1
• rcp% rcp file1 nphost:tray=tray2
• ftpftp> put file1 tray=tray2
Input tray Value
Tray 1 tray1
Tray 2 tray2
Tray 3 tray3
Tray 4 tray4
Tray 5 tray5
Tray 6 tray6
Tray 7 tray7
Large Capacity Tray(LCT) lct
Bypass tray bypass
Auto Tray Select all
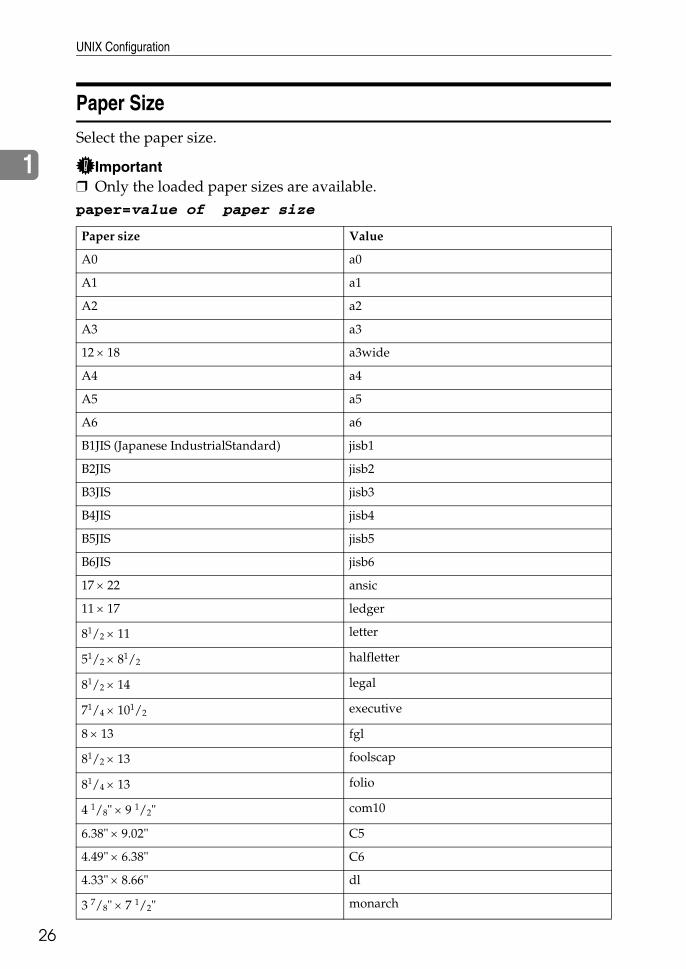
UNIX Configuration
26
1
Paper Size
Select the paper size.
Important❒ Only the loaded paper sizes are available.paper=value of paper size
Paper size Value
A0 a0
A1 a1
A2 a2
A3 a3
12 × 18 a3wide
A4 a4
A5 a5
A6 a6
B1JIS (Japanese IndustrialStandard) jisb1
B2JIS jisb2
B3JIS jisb3
B4JIS jisb4
B5JIS jisb5
B6JIS jisb6
17 × 22 ansic
11 × 17 ledger
81/2 × 11 letter
51/2 × 81/2 halfletter
81/2 × 14 legal
71/4 × 101/2 executive
8 × 13 fgl
81/2 × 13 foolscap
81/4 × 13 folio
4 1/8" × 9 1/2" com10
6.38" × 9.02" C5
4.49" × 6.38" C6
4.33" × 8.66" dl
3 7/8" × 7 1/2" monarch

Specifying the Device Option
27
1
The following sample shows how to print using A4 size paper (host name:nphost, file name: file1):• rsh% rsh nphost print paper=a4 < file1
• rcp% rcp file1 nphost:paper=a4
• ftpftp> put file1 paper=a4
Paper Type
Select the paper type.
Important❒ Only the loaded paper types are available.mediatype=value of paper type
10 1/2" × 15.35" k8
7.68" × 10 1/2" k16
Custom size custom
Paper type Value
Plain paper/recycled paper plainorrecycled
Plain paper plain
Preprinted paper preprinted
Prepunched paper prepunched
Letterhead letterhead
Recycled paper recycled
Color paper color
usercolor1
usercolor2
Special paper special
special2
special3
Thick paper thick
thick2
thick3
Semi thick paper middlethick
Thin paper thin
Paper size Value
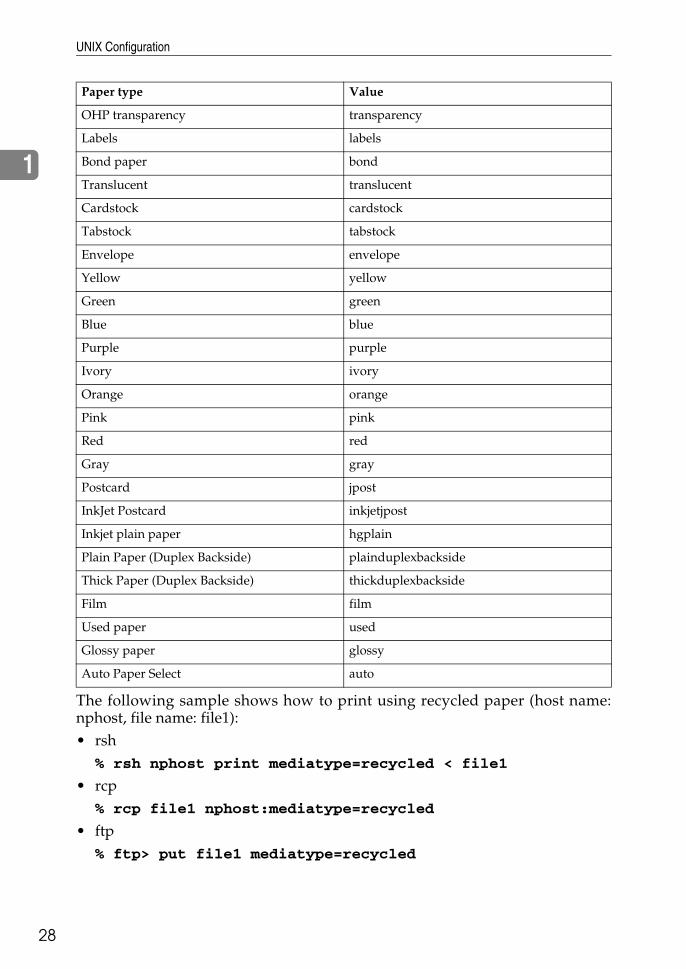
UNIX Configuration
28
1
The following sample shows how to print using recycled paper (host name:nphost, file name: file1):• rsh
% rsh nphost print mediatype=recycled < file1
• rcp% rcp file1 nphost:mediatype=recycled
• ftp% ftp> put file1 mediatype=recycled
OHP transparency transparency
Labels labels
Bond paper bond
Translucent translucent
Cardstock cardstock
Tabstock tabstock
Envelope envelope
Yellow yellow
Green green
Blue blue
Purple purple
Ivory ivory
Orange orange
Pink pink
Red red
Gray gray
Postcard jpost
InkJet Postcard inkjetjpost
Inkjet plain paper hgplain
Plain Paper (Duplex Backside) plainduplexbackside
Thick Paper (Duplex Backside) thickduplexbackside
Film film
Used paper used
Glossy paper glossy
Auto Paper Select auto
Paper type Value
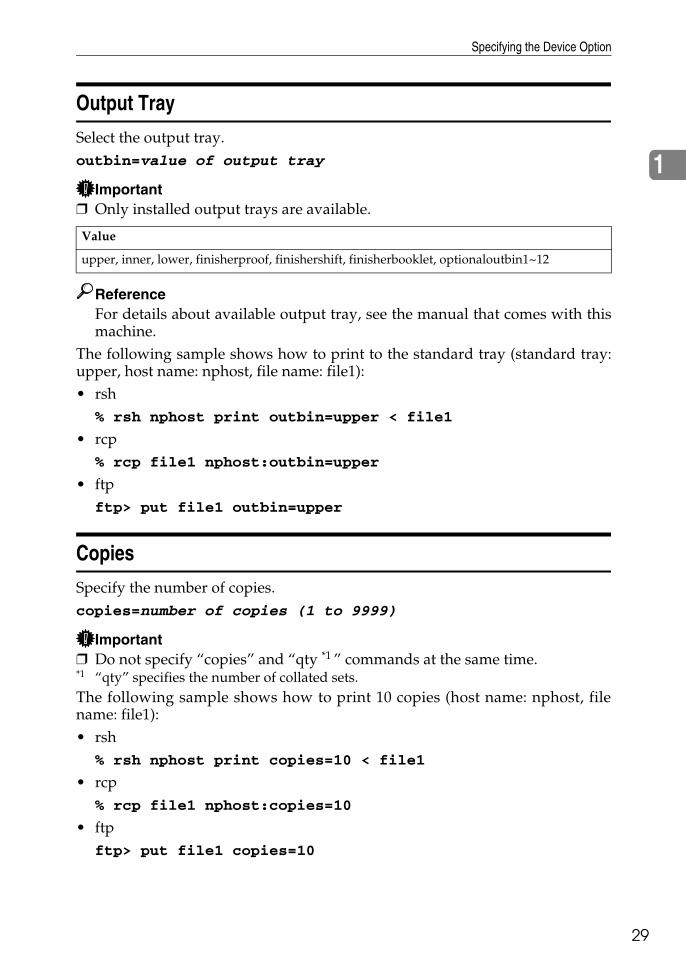
Specifying the Device Option
29
1
Output Tray
Select the output tray.outbin=value of output tray
Important❒ Only installed output trays are available.
ReferenceFor details about available output tray, see the manual that comes with thismachine.
The following sample shows how to print to the standard tray (standard tray:upper, host name: nphost, file name: file1):• rsh
% rsh nphost print outbin=upper < file1
• rcp% rcp file1 nphost:outbin=upper
• ftpftp> put file1 outbin=upper
Copies
Specify the number of copies.copies=number of copies (1 to 9999)
Important❒ Do not specify “copies” and “qty *1 ” commands at the same time.*1 “qty” specifies the number of collated sets.The following sample shows how to print 10 copies (host name: nphost, filename: file1):• rsh
% rsh nphost print copies=10 < file1
• rcp% rcp file1 nphost:copies=10
• ftpftp> put file1 copies=10
Value
upper, inner, lower, finisherproof, finishershift, finisherbooklet, optionaloutbin1~12
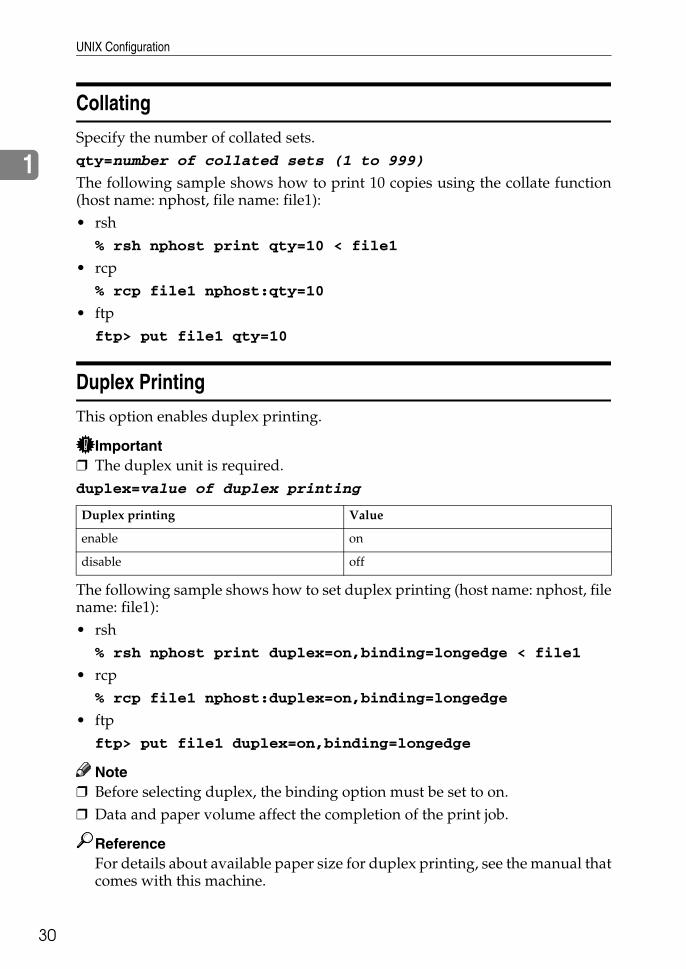
UNIX Configuration
30
1
Collating
Specify the number of collated sets.qty=number of collated sets (1 to 999)
The following sample shows how to print 10 copies using the collate function(host name: nphost, file name: file1):• rsh
% rsh nphost print qty=10 < file1
• rcp% rcp file1 nphost:qty=10
• ftpftp> put file1 qty=10
Duplex Printing
This option enables duplex printing.
Important❒ The duplex unit is required.duplex=value of duplex printing
The following sample shows how to set duplex printing (host name: nphost, filename: file1):• rsh
% rsh nphost print duplex=on,binding=longedge < file1
• rcp% rcp file1 nphost:duplex=on,binding=longedge
• ftpftp> put file1 duplex=on,binding=longedge
Note❒ Before selecting duplex, the binding option must be set to on.❒ Data and paper volume affect the completion of the print job.
ReferenceFor details about available paper size for duplex printing, see the manual thatcomes with this machine.
Duplex printing Value
enable on
disable off
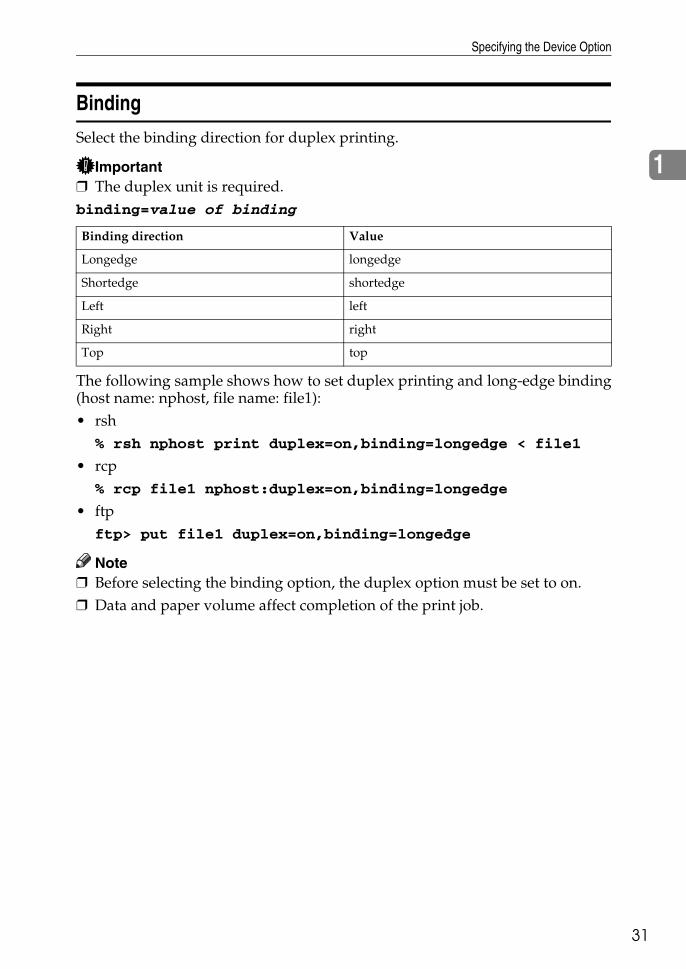
Specifying the Device Option
31
1
Binding
Select the binding direction for duplex printing.
Important❒ The duplex unit is required.binding=value of binding
The following sample shows how to set duplex printing and long-edge binding(host name: nphost, file name: file1):• rsh
% rsh nphost print duplex=on,binding=longedge < file1
• rcp% rcp file1 nphost:duplex=on,binding=longedge
• ftpftp> put file1 duplex=on,binding=longedge
Note❒ Before selecting the binding option, the duplex option must be set to on.❒ Data and paper volume affect completion of the print job.
Binding direction Value
Longedge longedge
Shortedge shortedge
Left left
Right right
Top top

UNIX Configuration
32
1
Orientation
Select the paper feed orientation.
Important❒ This function is only for PCL.orientation=feed direction (portrait or landscape)
The following sample shows how to print the paper vertically using the orienta-tion function (host name : nphost, file name : file1): • rsh
% rsh nphost print orientation=portrait < file1
• rcp% rcp file1 nphost:orientation=portrait
• ftpftp> put file1 orientation=portrait
Resolution
Select the printing resolution.resolution=value of resolution
The following sample shows how to print with 600 dpi and better quality. (hostname: nphost, file name: file1):• rsh
% rsh nphost print resolution=600 < file1
• rcp% rcp file1 nphost:resolution=600
• ftpftp> put file1 resolution=600
Orientation value
Portrait portrait
Landscape landscape
Resolution Value
1200 dpi 1200
600 dpi 600
400 dpi 400
300 dpi 300
200 dpi 200
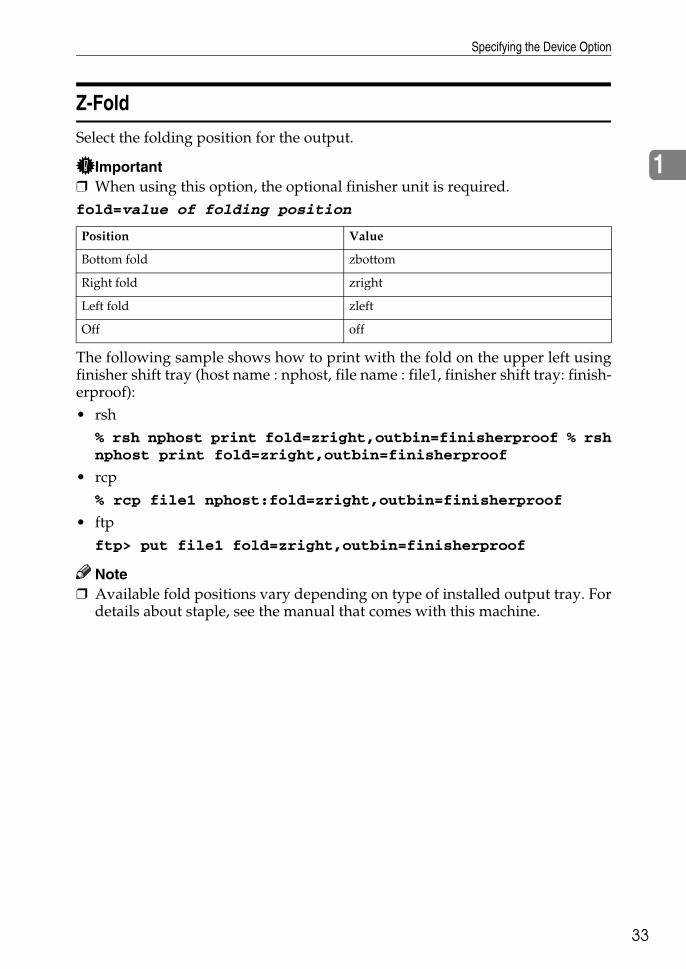
Specifying the Device Option
33
1
Z-Fold
Select the folding position for the output.
Important❒ When using this option, the optional finisher unit is required.fold=value of folding position
The following sample shows how to print with the fold on the upper left usingfinisher shift tray (host name : nphost, file name : file1, finisher shift tray: finish-erproof):• rsh
% rsh nphost print fold=zright,outbin=finisherproof % rshnphost print fold=zright,outbin=finisherproof
• rcp% rcp file1 nphost:fold=zright,outbin=finisherproof
• ftpftp> put file1 fold=zright,outbin=finisherproof
Note❒ Available fold positions vary depending on type of installed output tray. For
details about staple, see the manual that comes with this machine.
Position Value
Bottom fold zbottom
Right fold zright
Left fold zleft
Off off

UNIX Configuration
34
1
Staple
Select the staple position for the output.
Important❒ When using this option, the optional finisher unit is required.staple=value of staple position
The following sample shows how to print with the staple on the upper left usingfinisher shift tray (host name : nphost, file name : file1, finisher shift tray: finish-erproof):• rsh
% rsh nphost print staple=lefttop,outbin=finisherproof <file1
• rcp% rcp file1 nphost:staple=lefttop,outbin=finisherproof
• ftpftp> put file1 staple=lefttop,outbin=finisherproof
Note❒ Available staple positions vary depending on type of installed output tray.
For details about staple, see the manual that comes with this machine.
Position Value
Off off
Left top lefttop
Right top righttop
Left top horiz lefttophorizland, lefttophorizport
Left top slant lefttopslantland, lefttopslantlport
Left top vert lefttopvertland, lefttopvertport
Right top horiz righttophorizland, righttophorizport
Right top slant righttopslantland, righttopslantport
Right top vert righttopvertland, righttopvertport
Left 2 left2land, left2port
Right 2 right2land, right2port
Top 2 top2land, top2port
Booklet booklet
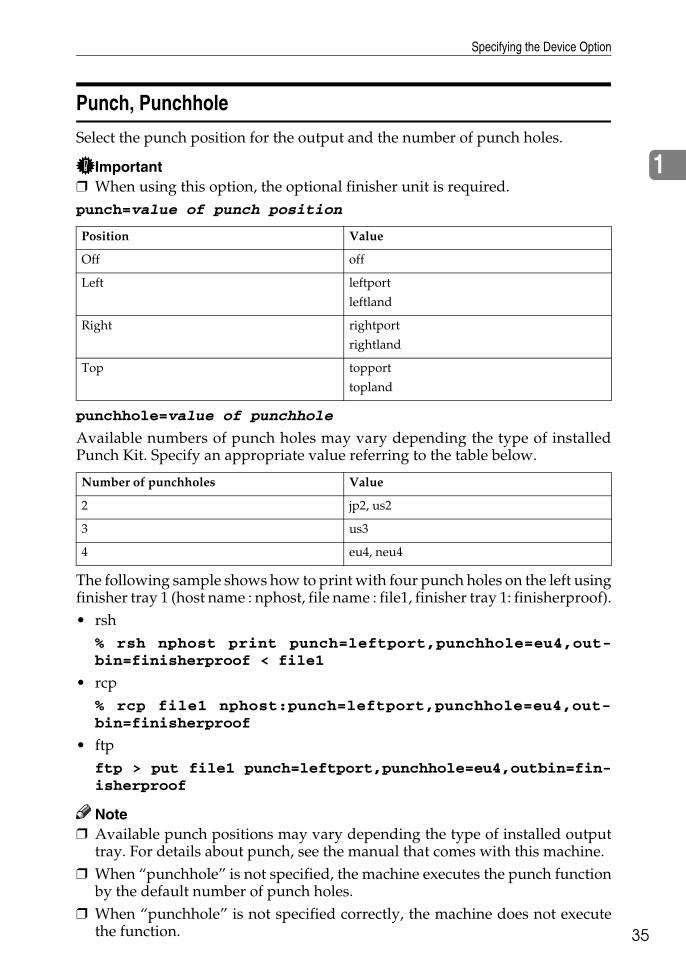
Specifying the Device Option
35
1
Punch, Punchhole
Select the punch position for the output and the number of punch holes.
Important❒ When using this option, the optional finisher unit is required.punch=value of punch position
punchhole=value of punchhole
Available numbers of punch holes may vary depending the type of installedPunch Kit. Specify an appropriate value referring to the table below.
The following sample shows how to print with four punch holes on the left usingfinisher tray 1 (host name : nphost, file name : file1, finisher tray 1: finisherproof).• rsh
% rsh nphost print punch=leftport,punchhole=eu4,out-bin=finisherproof < file1
• rcp% rcp file1 nphost:punch=leftport,punchhole=eu4,out-bin=finisherproof
• ftpftp > put file1 punch=leftport,punchhole=eu4,outbin=fin-isherproof
Note❒ Available punch positions may vary depending the type of installed output
tray. For details about punch, see the manual that comes with this machine.❒ When “punchhole” is not specified, the machine executes the punch function
by the default number of punch holes.❒ When “punchhole” is not specified correctly, the machine does not execute
the function.
Position Value
Off off
Left leftport
leftland
Right rightport
rightland
Top topport
topland
Number of punchholes Value
2 jp2, us2
3 us3
4 eu4, neu4
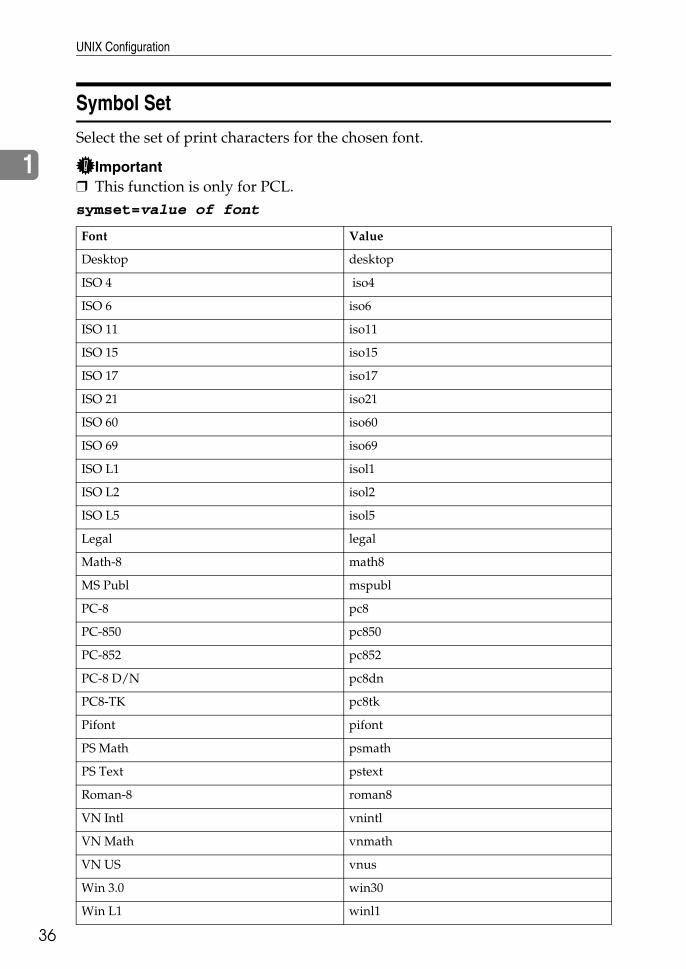
UNIX Configuration
36
1
Symbol Set
Select the set of print characters for the chosen font.
Important❒ This function is only for PCL.symset=value of font
Font Value
Desktop desktop
ISO 4 iso4
ISO 6 iso6
ISO 11 iso11
ISO 15 iso15
ISO 17 iso17
ISO 21 iso21
ISO 60 iso60
ISO 69 iso69
ISO L1 isol1
ISO L2 isol2
ISO L5 isol5
Legal legal
Math-8 math8
MS Publ mspubl
PC-8 pc8
PC-850 pc850
PC-852 pc852
PC-8 D/N pc8dn
PC8-TK pc8tk
Pifont pifont
PS Math psmath
PS Text pstext
Roman-8 roman8
VN Intl vnintl
VN Math vnmath
VN US vnus
Win 3.0 win30
Win L1 winl1
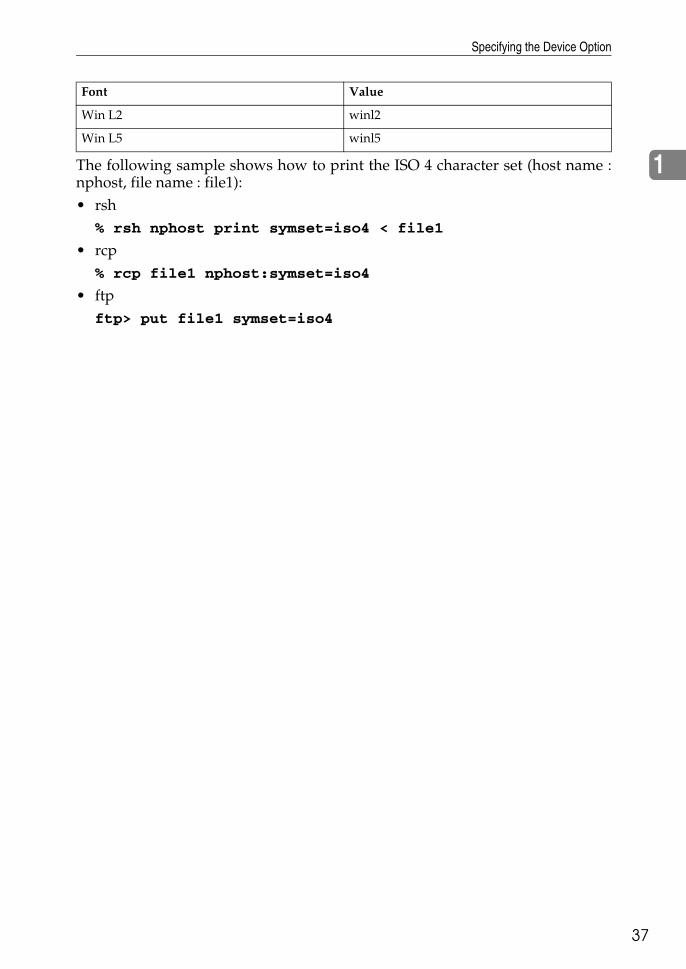
Specifying the Device Option
37
1
The following sample shows how to print the ISO 4 character set (host name :nphost, file name : file1):• rsh% rsh nphost print symset=iso4 < file1
• rcp% rcp file1 nphost:symset=iso4
• ftpftp> put file1 symset=iso4
Win L2 winl2
Win L5 winl5
Font Value
38
INDEXB
BindingOption, 31
BSD UNIX workstationDeleting the printer, 10Printer Status, 19Printing Method, 16
C
CollatingOption, 30
configurationUNIX, 5
CopiesOption, 29
D
Deleting the printer, 10Device Option, 21Duplex Printing
Option, 30
F
ftpPrinting, 18
H
How to Read This Manual, 3HP-UX
Deleting the printer, 10Printer Status, 19Printing Method, 16
I
Input TrayOption, 25
Installation Shell Script, 6, 8, 11IP Address, 7
L
LinuxDeleting the printer, 10Printer Status, 19Printing Method, 16
lpPrinting, 16
lprPrinting, 16
O
OrientationOption, 32
Output TrayOption, 29
P
Paper SizeOption, 26
Paper TypeOption, 27
Printer LanguageOption, 24
Printer Status, 19ftp, 20rsh, 20
Printing Method, 16Printing with rsh, rcp, ftp, 17Punch, Punchhole
Option, 35
R
rcpPrinting, 17
ResolutionOption, 32
rshPrinting, 17

39
S
SolarisDeleting the printer, 10Printer Status, 19Printing Method, 16
StapleOption, 34
Symbol SetOption, 36
System V UNIXPrinter Status, 19
T
Text PrintingOption, 24
U
UNIX, 5
Z
Z-FoldOption, 33

40
EN USA GB GB AE AE B229
Copyright © 2005

UNIX Supplement
EN USAGB GB
AE AE


