Embed Size (px)
Citation preview

ImportantPlease read this “User’s Manual” carefully to familiarize yourself with safe and effective usage.
• For the latest product information including the “User’s Manual”, refer to our web site :
www.eizoglobal.com
Network Color Management Solution
User’s Manual
Ver.1.1

No part of this manual may be reproduced, stored in a retrieval system, or transmitted, in any form or by any means, electronic, mechanical, or otherwise, without the prior written permission of EIZO Corporation.EIZO Corporation is under no obligation to hold any submitted material or information confidential unless prior arrangements are made pursuant to EIZO Corporation’s receipt of said information. Although every effort has been made to ensure that this manual provides up-to-date information, please note that specifications are subject to change without notice.
2
CONTENTSCONTENTS ............................................................. 3Chapter 1 Introduction ....................................... 4
1-1. Features ......................................................... 41-2. Software Combination ................................. 41-3. ColorNavigator Network Overview ............. 5
● User accounts ................................................. 5 ● Supported browsers ........................................ 5 ● Applicable Monitors ......................................... 5
1-4. Main Screen ................................................... 6 ● Monitor management ...................................... 6 ● Group/user management ................................ 7
Chapter 2 ColorNavigator Network Implementation ................................. 8
2-1. ColorNavigator Network Implementation ... 82-2. Login / Logout ............................................... 9
● Log in ............................................................... 9 ● Log out ............................................................ 9
2-3. Group Management .....................................10 ● Registration ....................................................10 ● Edit .................................................................10
2-4. User Management ........................................11 ● Registration ....................................................11 ● Edit .................................................................11 ● Log-in user settings ........................................12
2-5. Client Computer Configuration ..................13
Chapter 3 Monitor Management ..................... 173-1. Monitor List ...................................................17
● Filtering monitors ............................................17 ● Setting the items to display ............................19 ● Removing Monitors ....................................... 20 ● Copying to clipboard ..................................... 20 ● Downloading as CSV file ............................... 20
3-2. Detailed Monitor Information .....................213-3. Remote Control ........................................... 22
● Monitor settings ............................................. 22 ● Request to upload ......................................... 30 ● Asset information settings ..............................31
Chapter 4 Troubleshooting .............................. 32Appendix .............................................................. 33
Trademark ............................................................... 33
3CONTENTS
Chapter 1 IntroductionColorNavigator Network is an administrative support tool that allows you to access a server from a network computer, using a web browser, in order to centrally manage the settings and asset information of the monitors connected to the computers with ColorNavigator 7, ColorNavigator NX or ColorNavigator NetAgent software installed.
1-1. Features • Listing computers and monitors
- Displays a list of computers and their connected monitors. - Checks the status of monitors via network and supports monitor quality control.
• Remote operation of monitors - Monitor settings
Allows settings of SelfCalibration (adjustment target and schedule), SelfCorrection (schedule), and color mode (type selection*1, adjustment and mode enabled / disabled).
*1 Depending on the monitor, this setting may not be available. For details, refer to the ColorNavigator 7 or ColorNavigator NX User’s Manual.
- Asset information settings Unique asset information can be set to individual monitors.
- Data upload request You can request a client computer to upload the latest computer information.
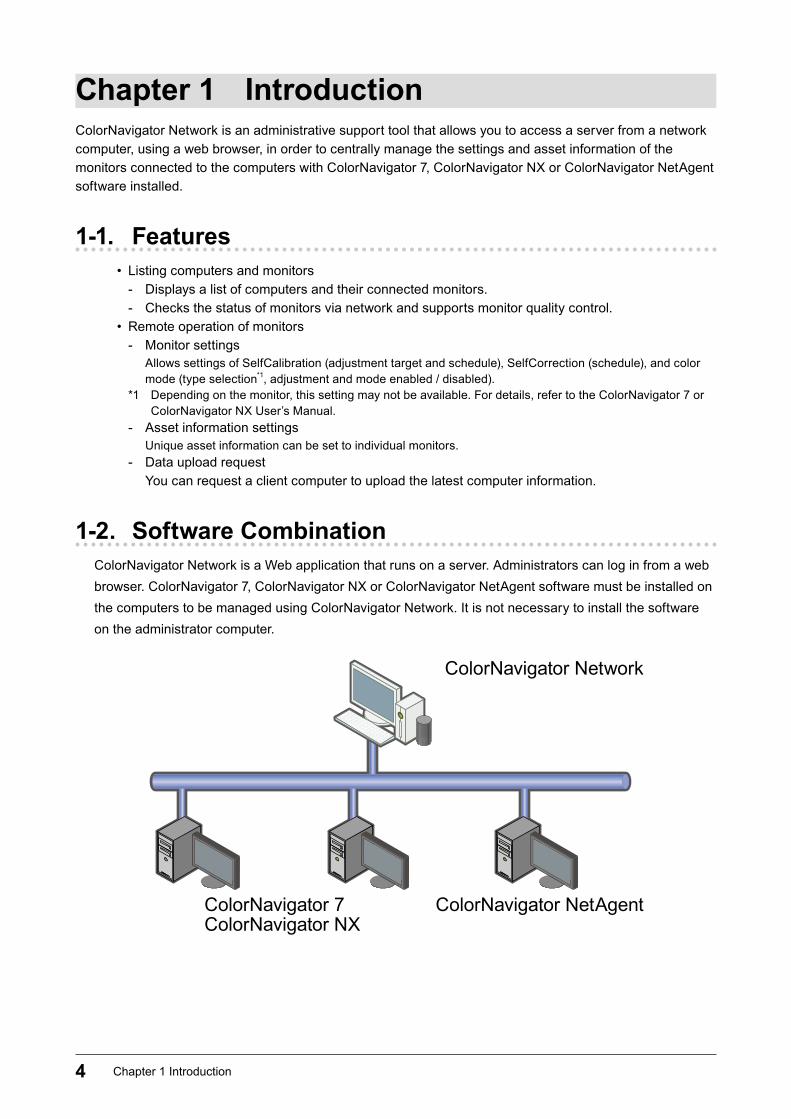
1-2. Software CombinationColorNavigator Network is a Web application that runs on a server. Administrators can log in from a web browser. ColorNavigator 7, ColorNavigator NX or ColorNavigator NetAgent software must be installed on the computers to be managed using ColorNavigator Network. It is not necessary to install the software on the administrator computer.
ColorNavigator Network
ColorNavigator NetAgentColorNavigator 7ColorNavigator NX
4 Chapter 1 Introduction
1-3. ColorNavigator Network Overview
●User accountsThere are three levels of user accounts: “System administrator”, “Standard user” and “Restricted user”. Privileges assigned to each user account level differ as shown below. For how to add and set a user account, see “2-4. User Management” (page 11).
√: Possible, -: Not possibleFunction System
administratorStandard
userRestricted
userBrowsing monitor information √ √ √Remote control of monitors Monitor settings √ √ -
Asset information settings √ √ -Data upload request √ √ √
Group/user settings √ - -
●Supported browsersThe latest versions of the following browsers can be used. Ensure that JavaScript and cookies are enabled.
Windows • Google Chrome • Microsoft Edge
macOS • Google Chrome • Safari
Linux • Google Chrome • Mozilla FirefoxNote
• Firefox is recommended for a web browser for Linux.
●Applicable MonitorsThe ColorNavigator Network can manage EIZO ColorEdge monitors (excluding CG3146 / CG3145 / CS230 / CS240 / CS270) used with a ColorNavigator 7 or ColorNavigator NX environment. For more information, refer to our web site (www.eizoglobal.com).
5Chapter 1 Introduction
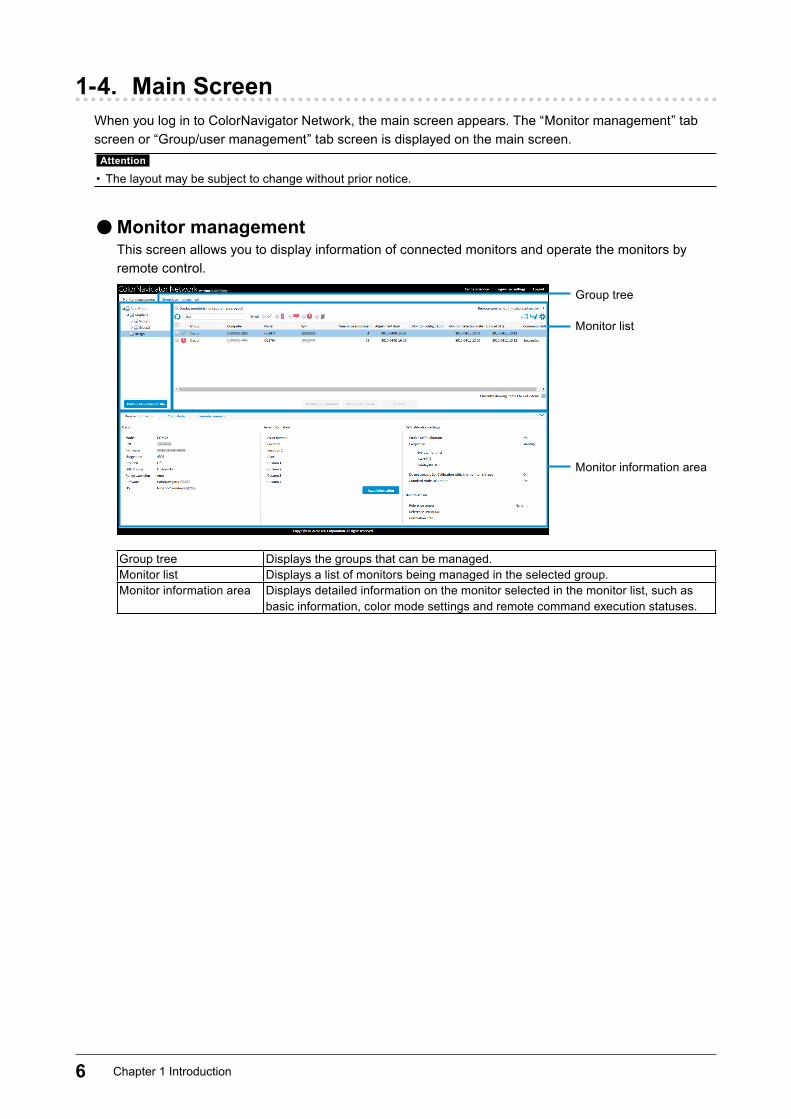
1-4. Main ScreenWhen you log in to ColorNavigator Network, the main screen appears. The “Monitor management” tab screen or “Group/user management” tab screen is displayed on the main screen.
Attention
• The layout may be subject to change without prior notice.
●Monitor managementThis screen allows you to display information of connected monitors and operate the monitors by remote control.
Group tree
Monitor list
Monitor information area
Group tree Displays the groups that can be managed.Monitor list Displays a list of monitors being managed in the selected group.Monitor information area Displays detailed information on the monitor selected in the monitor list, such as
basic information, color mode settings and remote command execution statuses.
6 Chapter 1 Introduction
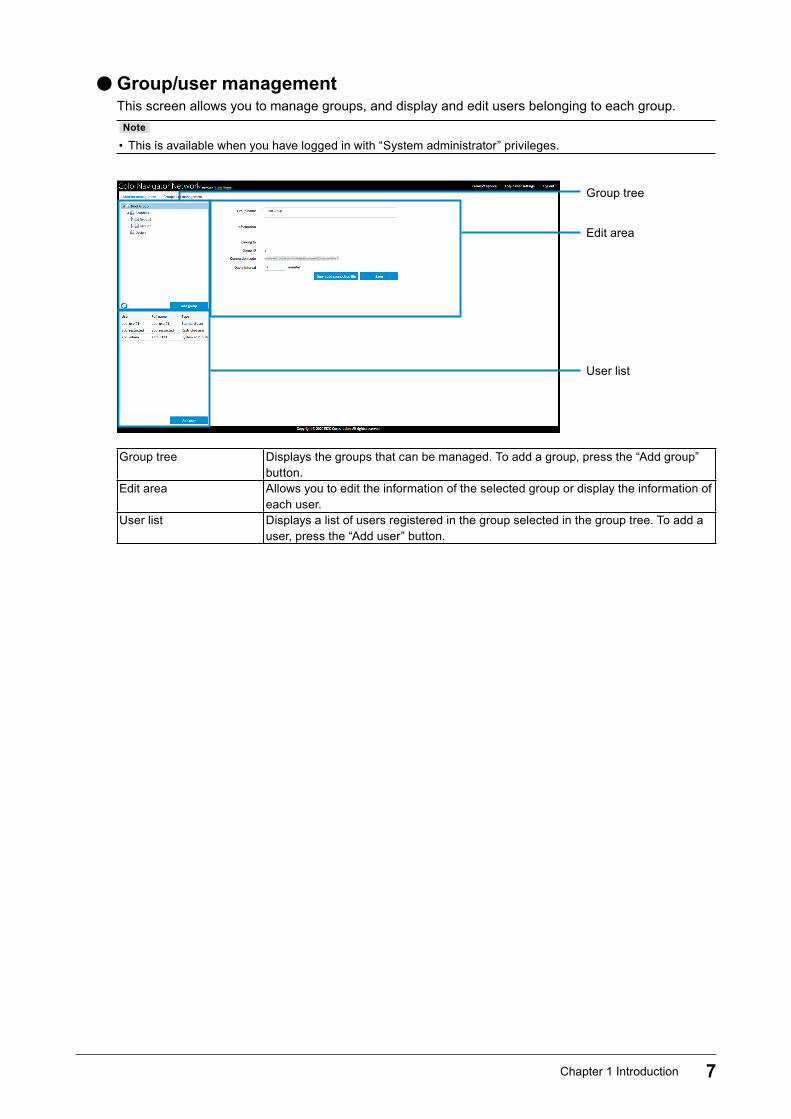
●Group/user managementThis screen allows you to manage groups, and display and edit users belonging to each group.
Note
• This is available when you have logged in with “System administrator” privileges.
Group tree
Edit area
User list
Group tree Displays the groups that can be managed. To add a group, press the “Add group” button.
Edit area Allows you to edit the information of the selected group or display the information of each user.
User list Displays a list of users registered in the group selected in the group tree. To add a user, press the “Add user” button.
7Chapter 1 Introduction

Chapter 2 ColorNavigator Network Implementation
To use ColorNavigator Network, register groups, add user accounts and configure client computers as necessary.
2-1. ColorNavigator Network ImplementationThe implementation procedure is shown below.
1. Log in to ColorNavigator Network (page 9).
2. Add groups as necessary (page 10).
3. Register users in each group as necessary (page 10).
4. Download the connection file for each group (page 13).
5. Configure client computers (page 14).
8 Chapter 2 ColorNavigator Network Implementation
2-2. Login / Logout
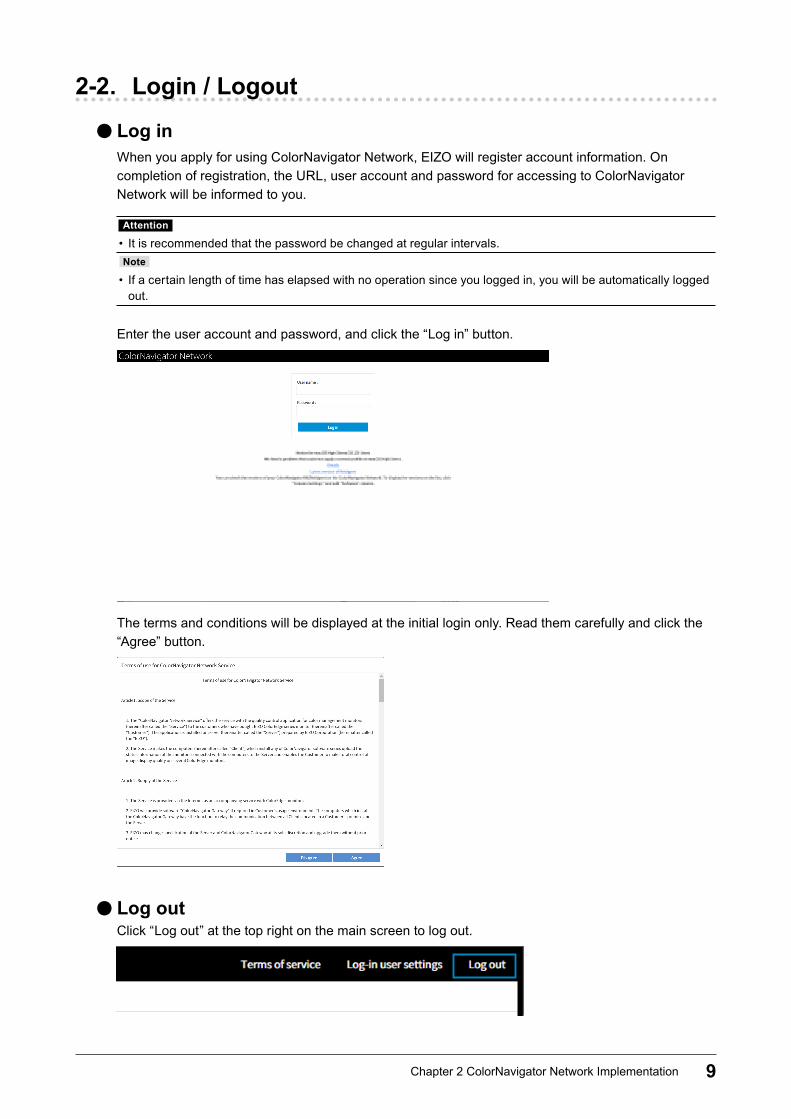
●Log inWhen you apply for using ColorNavigator Network, EIZO will register account information. On completion of registration, the URL, user account and password for accessing to ColorNavigator Network will be informed to you.
Attention
• It is recommended that the password be changed at regular intervals.Note
• If a certain length of time has elapsed with no operation since you logged in, you will be automatically logged out.
Enter the user account and password, and click the “Log in” button.
The terms and conditions will be displayed at the initial login only. Read them carefully and click the “Agree” button.
●Log outClick “Log out” at the top right on the main screen to log out.
9Chapter 2 ColorNavigator Network Implementation
2-3. Group ManagementGroups can be created. It is possible to create groups within a group. Groups are managed on the “Group/user management” tab screen of the main screen.
Attention
• Once a group is created, it cannot be deleted.Note
• Groups can be managed only when you logged in with “System administrator” privileges.
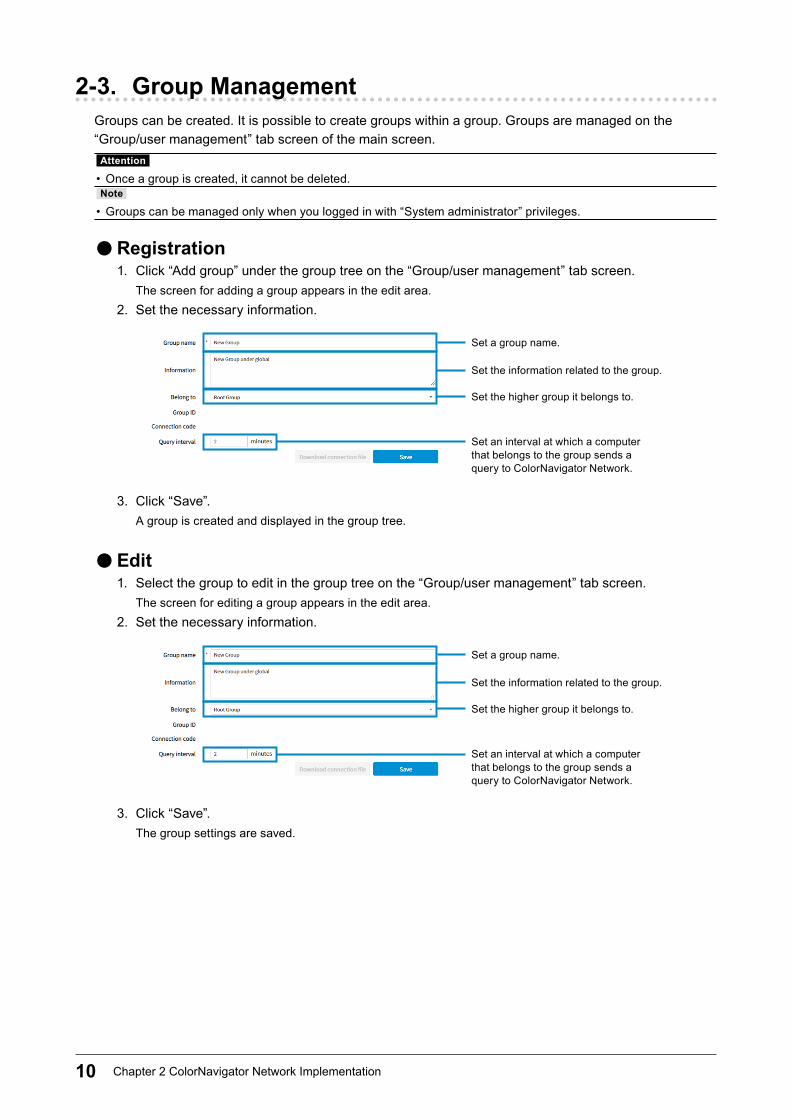
●Registration1. Click “Add group” under the group tree on the “Group/user management” tab screen.
The screen for adding a group appears in the edit area.2. Set the necessary information.
Set a group name.
Set an interval at which a computer that belongs to the group sends a query to ColorNavigator Network.
Set the information related to the group.
Set the higher group it belongs to.
3. Click “Save”.A group is created and displayed in the group tree.
●Edit1. Select the group to edit in the group tree on the “Group/user management” tab screen.
The screen for editing a group appears in the edit area.2. Set the necessary information.
Set a group name.
Set an interval at which a computer that belongs to the group sends a query to ColorNavigator Network.
Set the information related to the group.
Set the higher group it belongs to.
3. Click “Save”.The group settings are saved.
10 Chapter 2 ColorNavigator Network Implementation
2-4. User ManagementUsers can be added to a group. Users can browse the information of the group which they belong to and its subgroup(s).
Note
• Users can be managed only when you logged in with “System administrator” privileges.
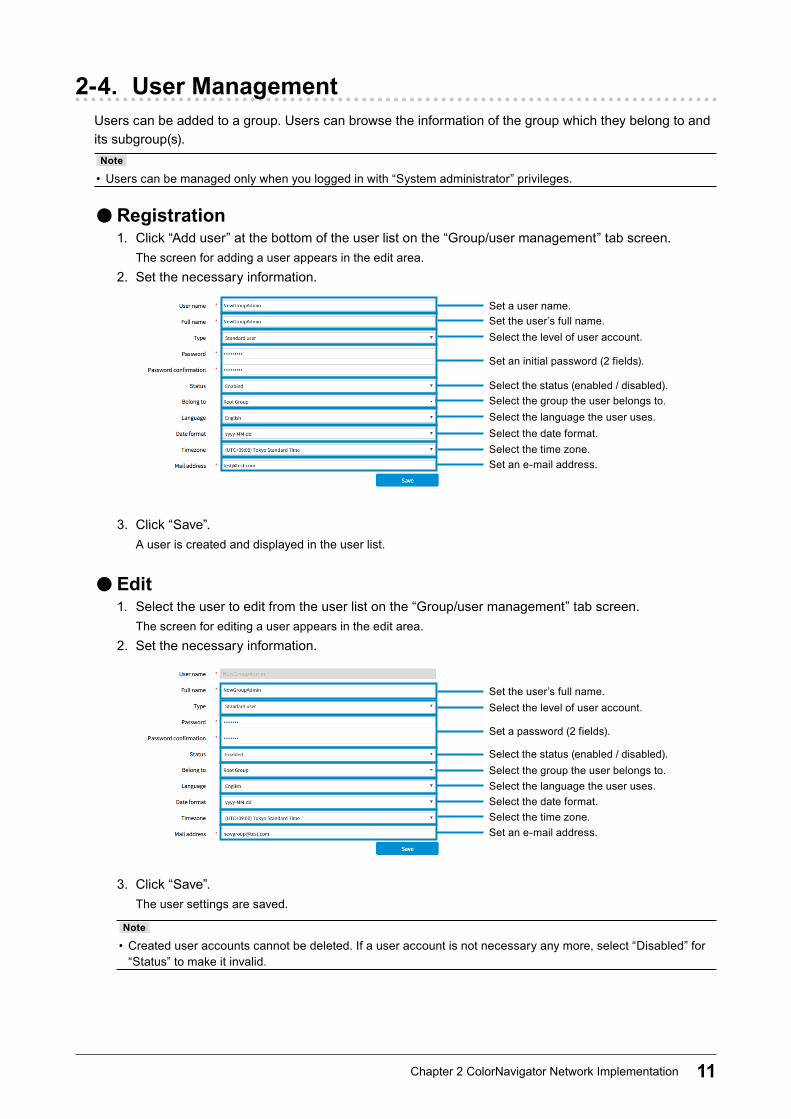
●Registration1. Click “Add user” at the bottom of the user list on the “Group/user management” tab screen.
The screen for adding a user appears in the edit area.2. Set the necessary information.
Set a user name.Set the user’s full name.Select the level of user account.
Set an initial password (2 fields).
Select the status (enabled / disabled).Select the group the user belongs to.Select the language the user uses.Select the date format.Select the time zone.Set an e-mail address.
3. Click “Save”.A user is created and displayed in the user list.
●Edit1. Select the user to edit from the user list on the “Group/user management” tab screen.
The screen for editing a user appears in the edit area.2. Set the necessary information.
Set the user’s full name.Select the level of user account.
Set a password (2 fields).
Select the status (enabled / disabled).Select the group the user belongs to.Select the language the user uses.Select the date format.Select the time zone.Set an e-mail address.
3. Click “Save”.The user settings are saved.
Note
• Created user accounts cannot be deleted. If a user account is not necessary any more, select “Disabled” for “Status” to make it invalid.
11Chapter 2 ColorNavigator Network Implementation
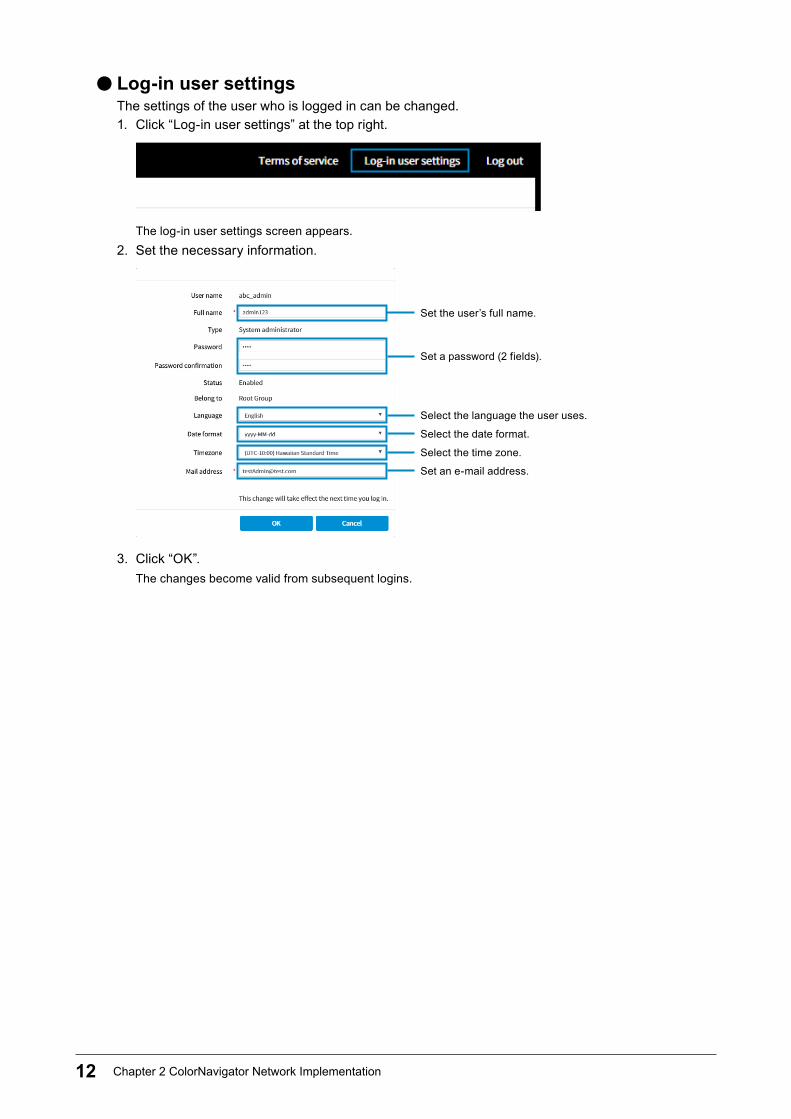
●Log-in user settingsThe settings of the user who is logged in can be changed.1. Click “Log-in user settings” at the top right.
The log-in user settings screen appears.2. Set the necessary information.
Set the user’s full name.
Set a password (2 fields).
Select the language the user uses.
Select the date format.
Select the time zone.
Set an e-mail address.
3. Click “OK”.The changes become valid from subsequent logins.
12 Chapter 2 ColorNavigator Network Implementation
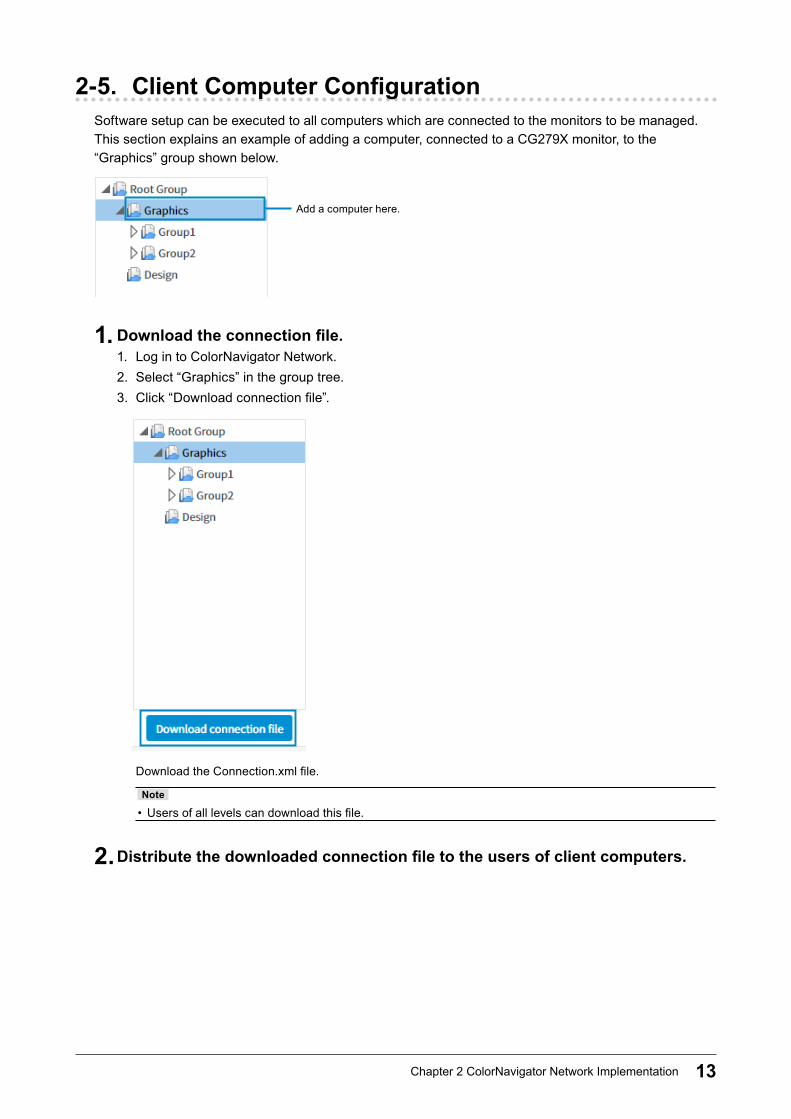
2-5. Client Computer ConfigurationSoftware setup can be executed to all computers which are connected to the monitors to be managed.This section explains an example of adding a computer, connected to a CG279X monitor, to the “Graphics” group shown below.
Add a computer here.
1. Download the connection file.1. Log in to ColorNavigator Network.2. Select “Graphics” in the group tree.3. Click “Download connection file”.
Download the Connection.xml file.
Note
• Users of all levels can download this file.
2. Distribute the downloaded connection file to the users of client computers.
13Chapter 2 ColorNavigator Network Implementation
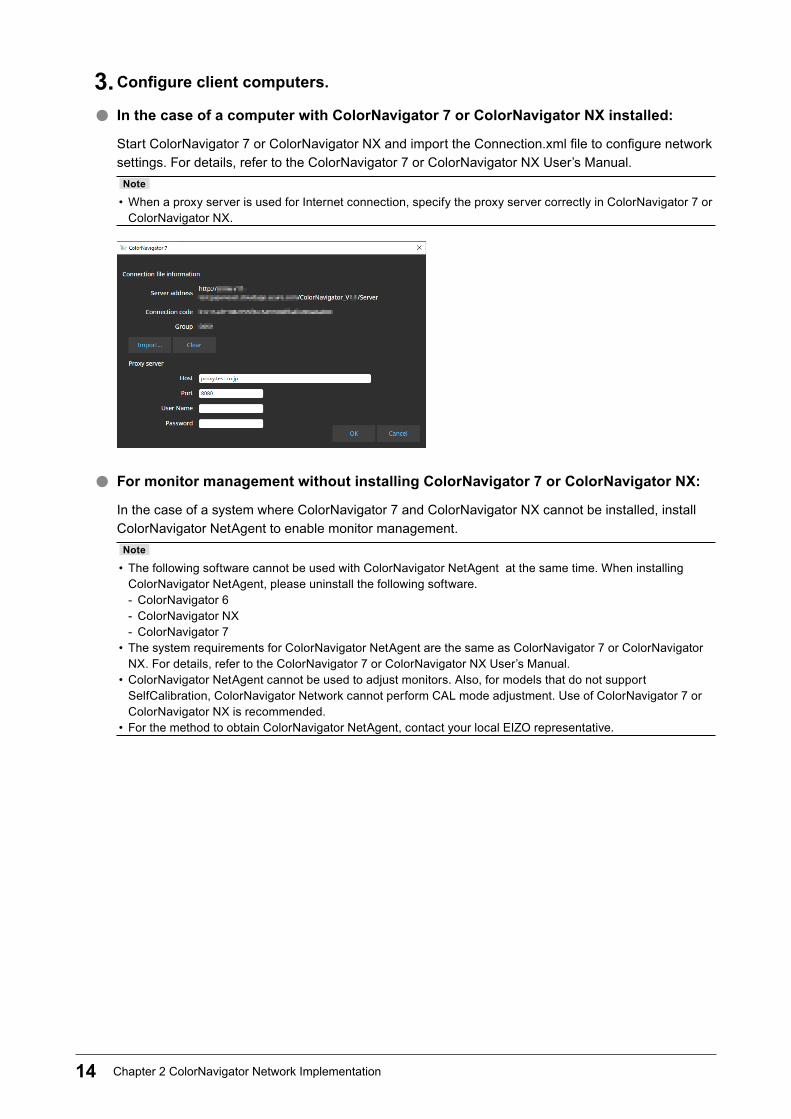
3. Configure client computers.
● In the case of a computer with ColorNavigator 7 or ColorNavigator NX installed:
Start ColorNavigator 7 or ColorNavigator NX and import the Connection.xml file to configure network settings. For details, refer to the ColorNavigator 7 or ColorNavigator NX User’s Manual.
Note
• When a proxy server is used for Internet connection, specify the proxy server correctly in ColorNavigator 7 or ColorNavigator NX.
● For monitor management without installing ColorNavigator 7 or ColorNavigator NX:
In the case of a system where ColorNavigator 7 and ColorNavigator NX cannot be installed, install ColorNavigator NetAgent to enable monitor management.
Note
• The following software cannot be used with ColorNavigator NetAgent at the same time. When installing ColorNavigator NetAgent, please uninstall the following software. - ColorNavigator 6 - ColorNavigator NX - ColorNavigator 7
• The system requirements for ColorNavigator NetAgent are the same as ColorNavigator 7 or ColorNavigator NX. For details, refer to the ColorNavigator 7 or ColorNavigator NX User’s Manual.
• ColorNavigator NetAgent cannot be used to adjust monitors. Also, for models that do not support SelfCalibration, ColorNavigator Network cannot perform CAL mode adjustment. Use of ColorNavigator 7 or ColorNavigator NX is recommended.
• For the method to obtain ColorNavigator NetAgent, contact your local EIZO representative.
14 Chapter 2 ColorNavigator Network Implementation
● Windows1. Unzip the downloaded file.2. Copy the Connection.xml file into the folder that contains the “Setup.exe” file within the folder
created by extraction.3. When a proxy server is used for Internet connection, edit the Proxy.xml file in the folder that
contains the “Setup.exe” file to set up the proxy server.4. Execute “Setup.exe”.
Note
• To uninstall ColorNavigator NetAgent, follow the procedure below.1. Select “Control Panel” - “Uninstall a program”.2. Select “CNNetAgent” from the list and click “Uninstall”.
• A user account with “Administrator” privileges is required for installation and uninstallation. • Please consult your system administrator for your account.
● macOS1. Unzip the downloaded file.2. Copy the Connection.xml file into the folder that contains the “CNNetAgent.pkg” file within the
folder created by extraction.3. When a proxy server is used for Internet connection, edit the Proxy.xml file in the folder that
contains the “CNNetAgent.pkg” file to set up the proxy server.4. Execute “CNNetAgent.pkg”.
Note
• To uninstall ColorNavigator NetAgent, follow the procedure below.1. Launch “Activity Monitor” and quit “CNNetAgent”.2. Delete the following files and folder.
• /Applications/CNNetAgent.app • /Library/Application Support/EIZO/ColorNavigator NetAgent • /Library/LaunchAgents/com.eizo.ColorNavigatorNetAgent.plist
● Linux1. Unzip the downloaded file.2. Copy the Connection.xml file into the directory that contains the “install.sh” file within the directory
created by extraction.3. When a proxy server is used for Internet connection, edit the Proxy.xml file in the directory that
contains the “install.sh” file to set up the proxy server.4. Execute “install.sh”.
Note
• To uninstall ColorNavigator NetAgent, execute “uninstall.sh” in the directory created by extraction. • The user account must have root privileges for installation and uninstallation.
Note
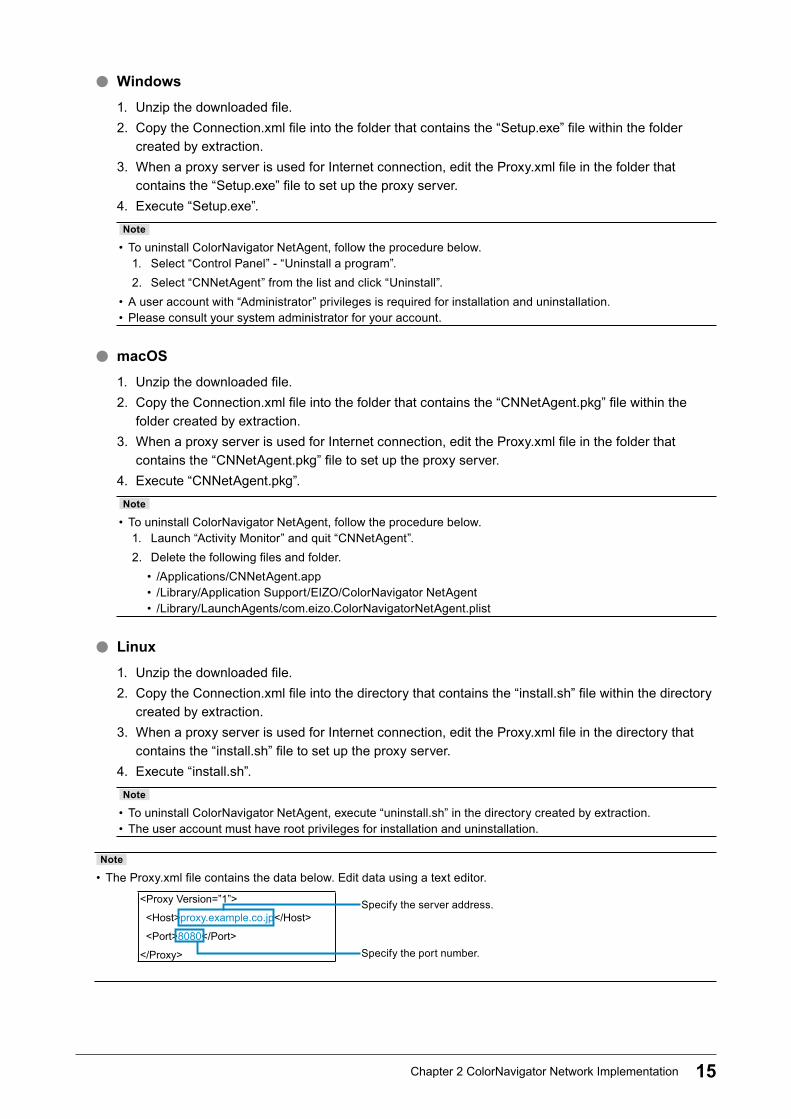
• The Proxy.xml file contains the data below. Edit data using a text editor.
<Proxy Version=”1”>
<Host>proxy.example.co.jp</Host>
<Port>8080</Port>
</Proxy>
Specify the server address.
Specify the port number.
15Chapter 2 ColorNavigator Network Implementation
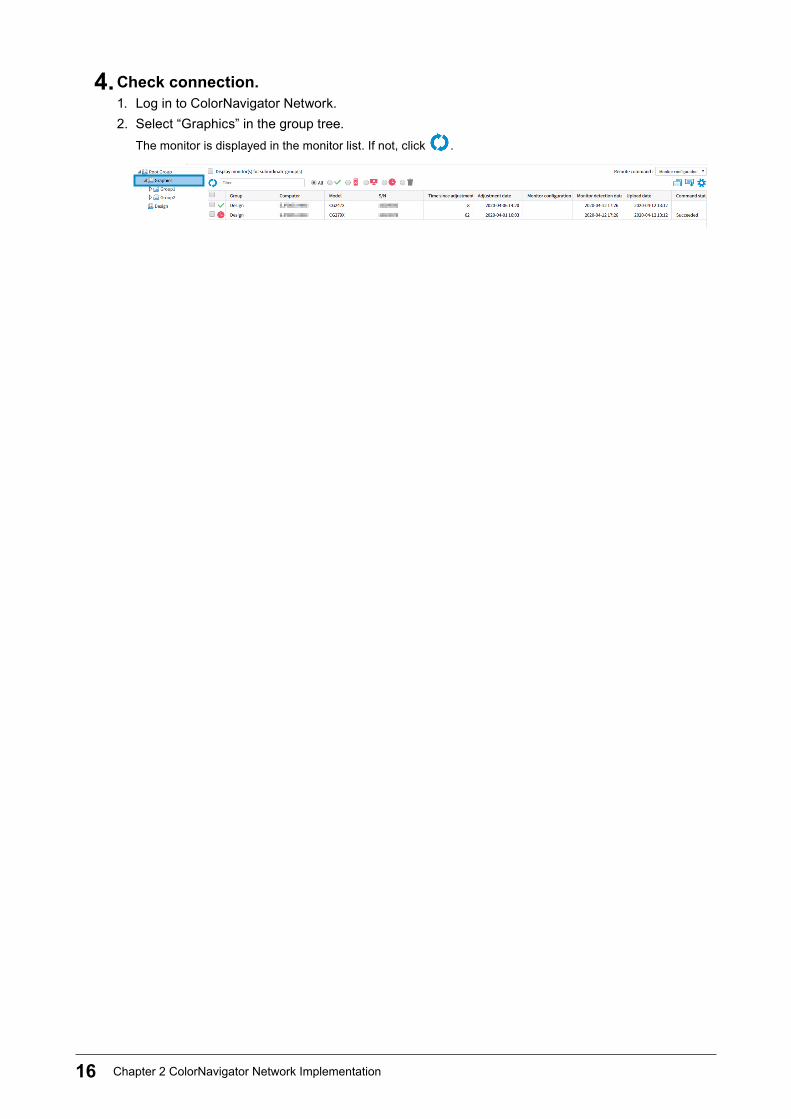
4. Check connection.1. Log in to ColorNavigator Network.2. Select “Graphics” in the group tree.
The monitor is displayed in the monitor list. If not, click .
16 Chapter 2 ColorNavigator Network Implementation
Chapter 3 Monitor ManagementIndividual monitor management or central monitor management can be performed on the “Monitor management” screen.
3-1. Monitor List
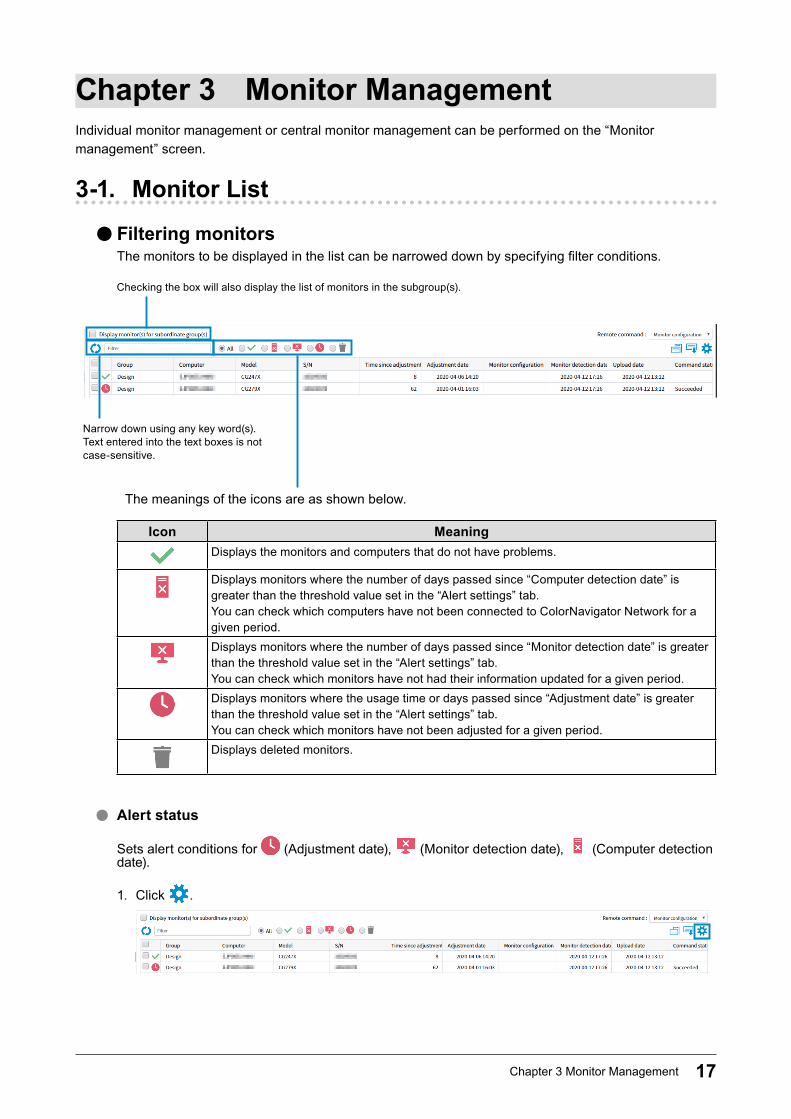
●Filtering monitorsThe monitors to be displayed in the list can be narrowed down by specifying filter conditions.
Narrow down using any key word(s). Text entered into the text boxes is not case-sensitive.
Checking the box will also display the list of monitors in the subgroup(s).
The meanings of the icons are as shown below.
Icon MeaningDisplays the monitors and computers that do not have problems.
Displays monitors where the number of days passed since “Computer detection date” is greater than the threshold value set in the “Alert settings” tab.You can check which computers have not been connected to ColorNavigator Network for a given period.Displays monitors where the number of days passed since “Monitor detection date” is greater than the threshold value set in the “Alert settings” tab.You can check which monitors have not had their information updated for a given period.Displays monitors where the usage time or days passed since “Adjustment date” is greater than the threshold value set in the “Alert settings” tab.You can check which monitors have not been adjusted for a given period.Displays deleted monitors.
● Alert status
Sets alert conditions for (Adjustment date), (Monitor detection date), (Computer detection date).
1. Click .
17Chapter 3 Monitor Management
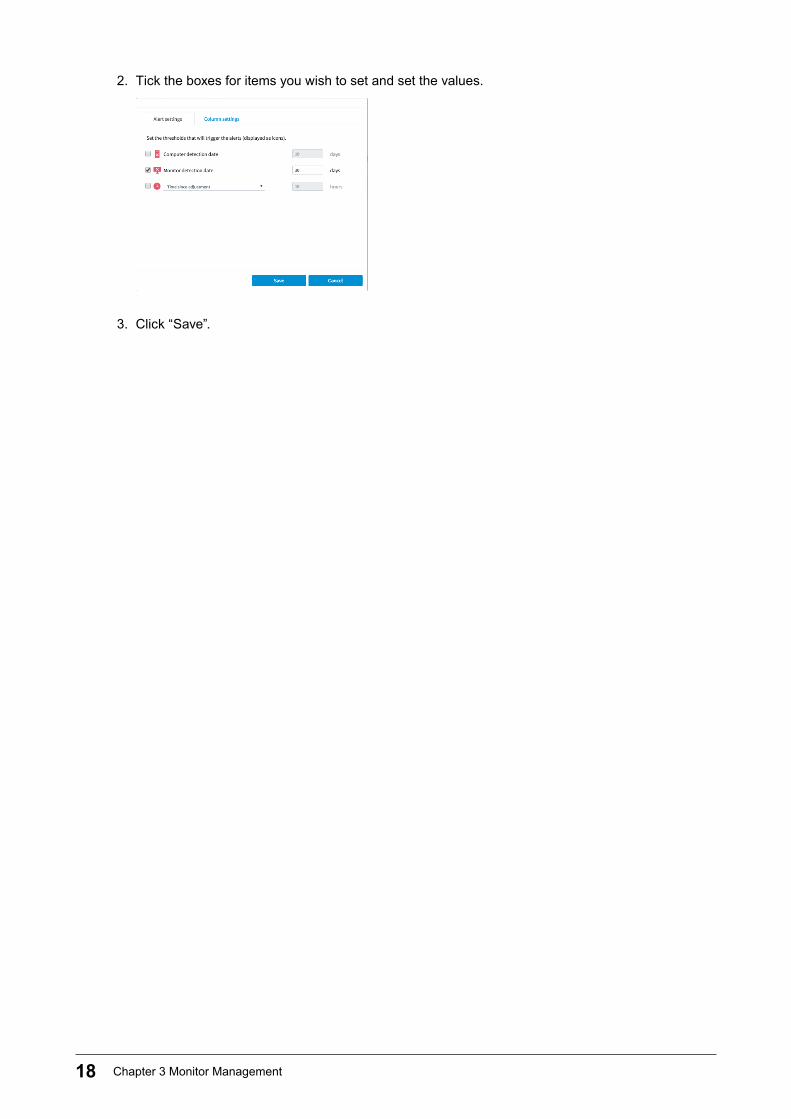
2. Tick the boxes for items you wish to set and set the values.
3. Click “Save”.
18 Chapter 3 Monitor Management

●Setting the items to displayThe items to display in the monitor list can be configured.1. Click .
2. Click the “Column settings” tab and add or remove the items.The items that can be added to the list.
Move the selected items upward by one line.
Move the selected items downward by one line.
The items displayed in the list.
Add the selected items to the monitor list.
Remove the selected items from the monitor list.
Reset the items displayed in the monitor list to the default settings.
3. Click “Save”.
19Chapter 3 Monitor Management
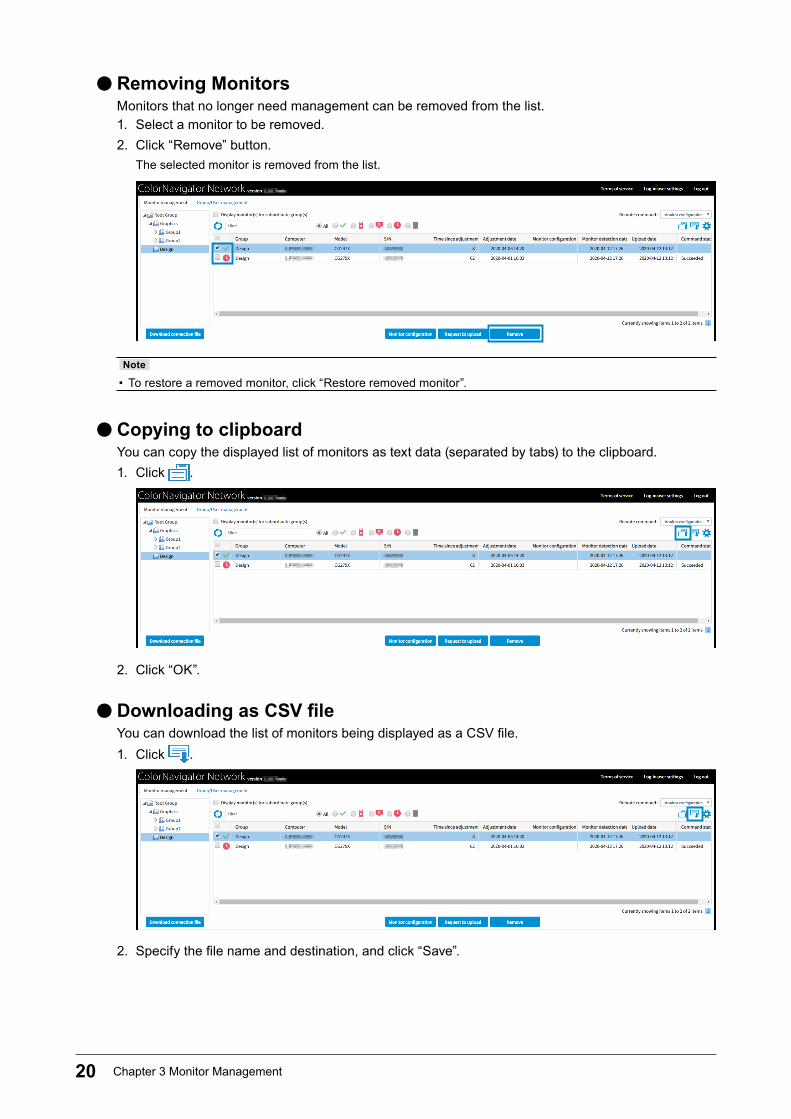
●Removing MonitorsMonitors that no longer need management can be removed from the list.1. Select a monitor to be removed.2. Click “Remove” button.
The selected monitor is removed from the list.
Note
• To restore a removed monitor, click “Restore removed monitor”.
●Copying to clipboardYou can copy the displayed list of monitors as text data (separated by tabs) to the clipboard.1. Click .
2. Click “OK”.
●Downloading as CSV fileYou can download the list of monitors being displayed as a CSV file.1. Click .
2. Specify the file name and destination, and click “Save”.
20 Chapter 3 Monitor Management
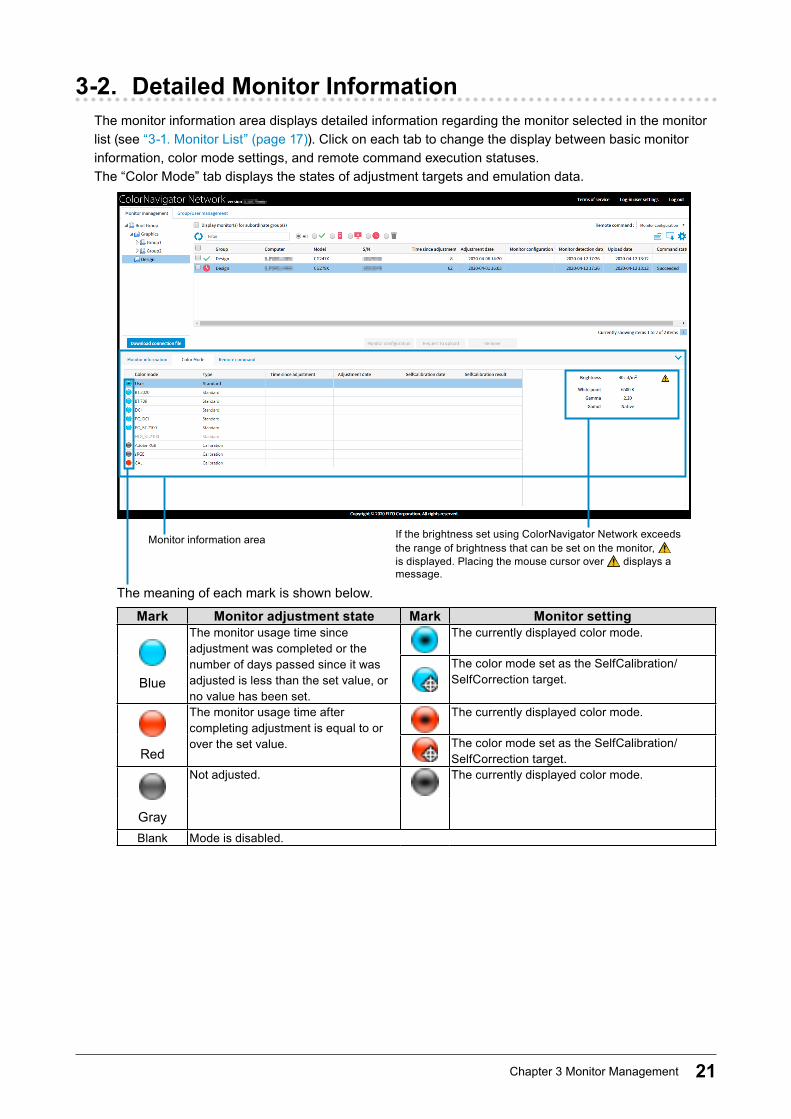
3-2. Detailed Monitor InformationThe monitor information area displays detailed information regarding the monitor selected in the monitor list (see “3-1. Monitor List” (page 17)). Click on each tab to change the display between basic monitor information, color mode settings, and remote command execution statuses.The “Color Mode” tab displays the states of adjustment targets and emulation data.
The meaning of each mark is shown below.
Monitor information area If the brightness set using ColorNavigator Network exceeds the range of brightness that can be set on the monitor, is displayed. Placing the mouse cursor over displays a message.
Mark Monitor adjustment state Mark Monitor setting
Blue
The monitor usage time since adjustment was completed or the number of days passed since it was adjusted is less than the set value, or no value has been set.
The currently displayed color mode.
The color mode set as the SelfCalibration/SelfCorrection target.
Red
The monitor usage time after completing adjustment is equal to or over the set value.
The currently displayed color mode.
The color mode set as the SelfCalibration/SelfCorrection target.
Gray
Not adjusted. The currently displayed color mode.
Blank Mode is disabled.
21Chapter 3 Monitor Management
3-3. Remote ControlMultiple monitors can be controlled centrally.
Attention
• When remotely controlling a CS/CX series monitor, the following limitations apply. - CAL mode will not be adjusted. Perform calibration using ColorNavigator 7 or ColorNavigator NX.
●Monitor settingsSend the monitor settings to the monitor(s). The monitor settings consist of the following settings.Color mode settings • The following settings are made for all color modes.
- Color mode type (Calibration (Advanced) or Standard) *1
- Calibration targets for SelfCalibration (Calibration (Advanced) mode) - Adjustment settings (Standard Mode) Brightness, white point (color temperature), gamma, and color gamut*1
SelfCalibration / SelfCorrection settings*2
• The following settings are made. - SelfCalibration / SelfCorrection enabled or disabled - SelfCalibration / SelfCorrection schedule - Standard Mode calibration enabled or disabled
Key lock setting • The key lock is enabled or disabled for the monitor.*1 Not available with CG245W, CG246, CG275W, CG276, CX240 and CX270*2 Not available with CS2420, CS2730, CS2410, CS2731, CS2740 and CS2740-X
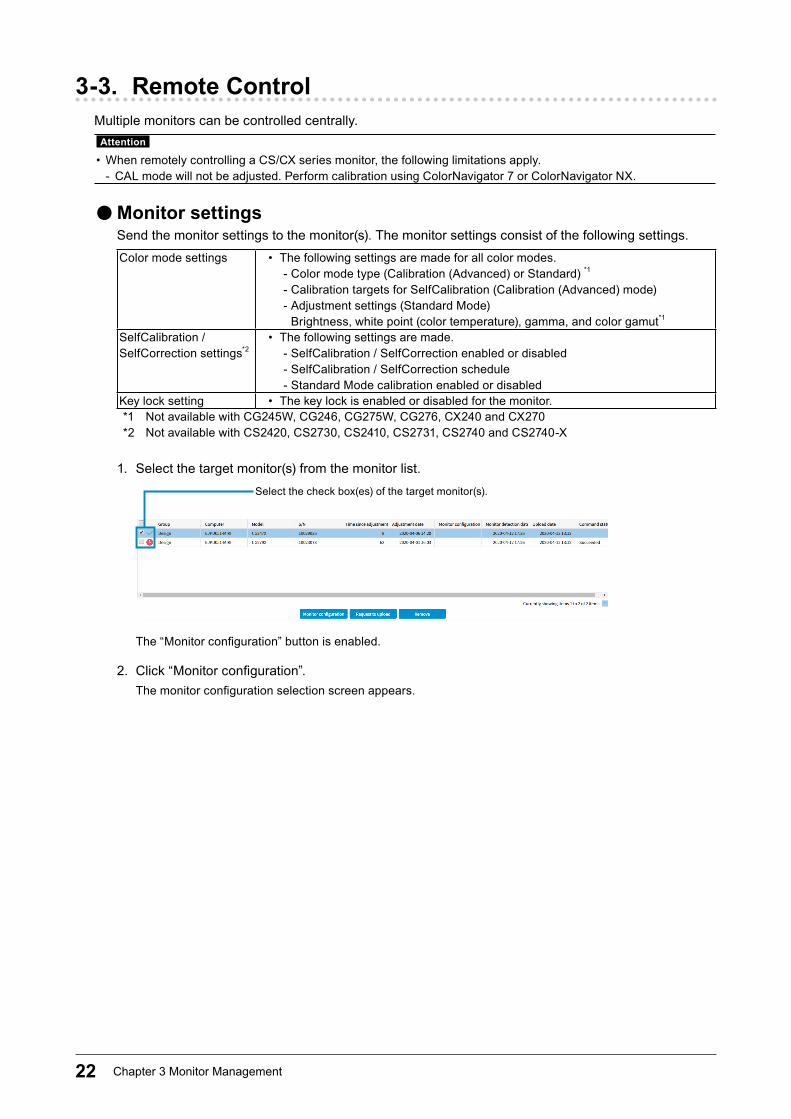
1. Select the target monitor(s) from the monitor list.Select the check box(es) of the target monitor(s).
The “Monitor configuration” button is enabled.
2. Click “Monitor configuration”.The monitor configuration selection screen appears.
22 Chapter 3 Monitor Management
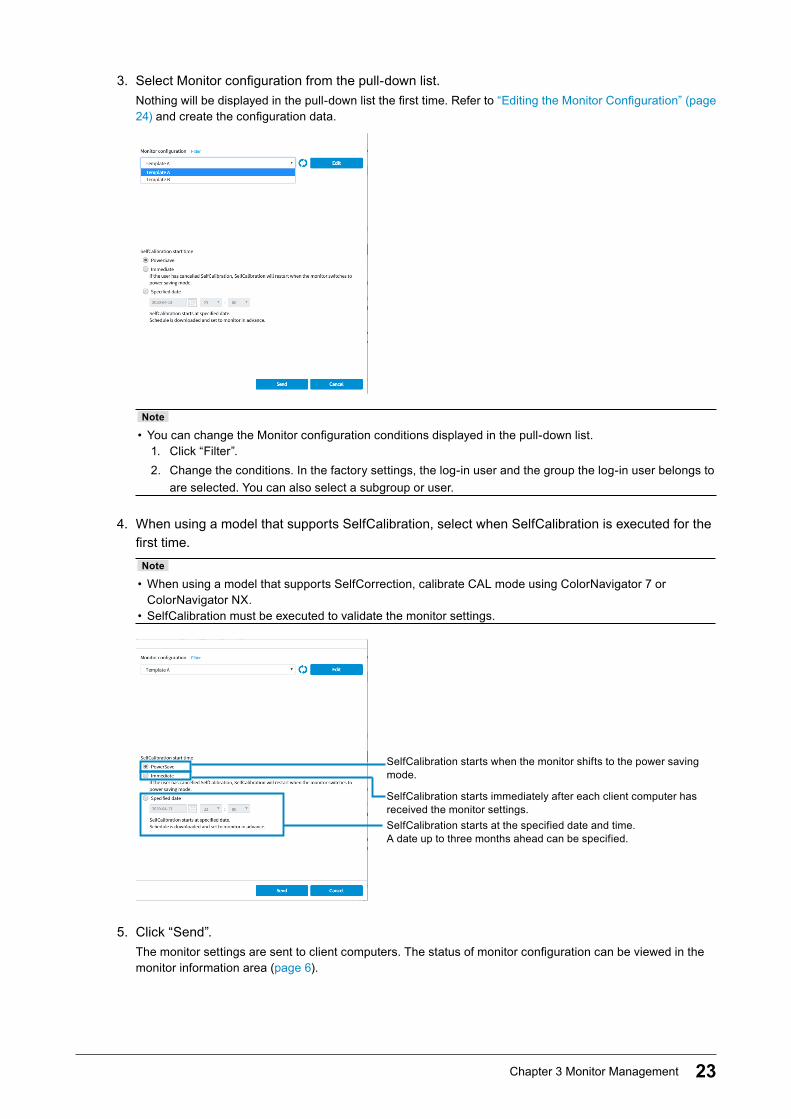
3. Select Monitor configuration from the pull-down list.Nothing will be displayed in the pull-down list the first time. Refer to “Editing the Monitor Configuration” (page 24) and create the configuration data.
Note
• You can change the Monitor configuration conditions displayed in the pull-down list.1. Click “Filter”.2. Change the conditions. In the factory settings, the log-in user and the group the log-in user belongs to
are selected. You can also select a subgroup or user.
4. When using a model that supports SelfCalibration, select when SelfCalibration is executed for the first time.
Note
• When using a model that supports SelfCorrection, calibrate CAL mode using ColorNavigator 7 or ColorNavigator NX.
• SelfCalibration must be executed to validate the monitor settings.
SelfCalibration starts when the monitor shifts to the power saving mode.
SelfCalibration starts immediately after each client computer has received the monitor settings.SelfCalibration starts at the specified date and time.A date up to three months ahead can be specified.
5. Click “Send”.The monitor settings are sent to client computers. The status of monitor configuration can be viewed in the monitor information area (page 6).
23Chapter 3 Monitor Management
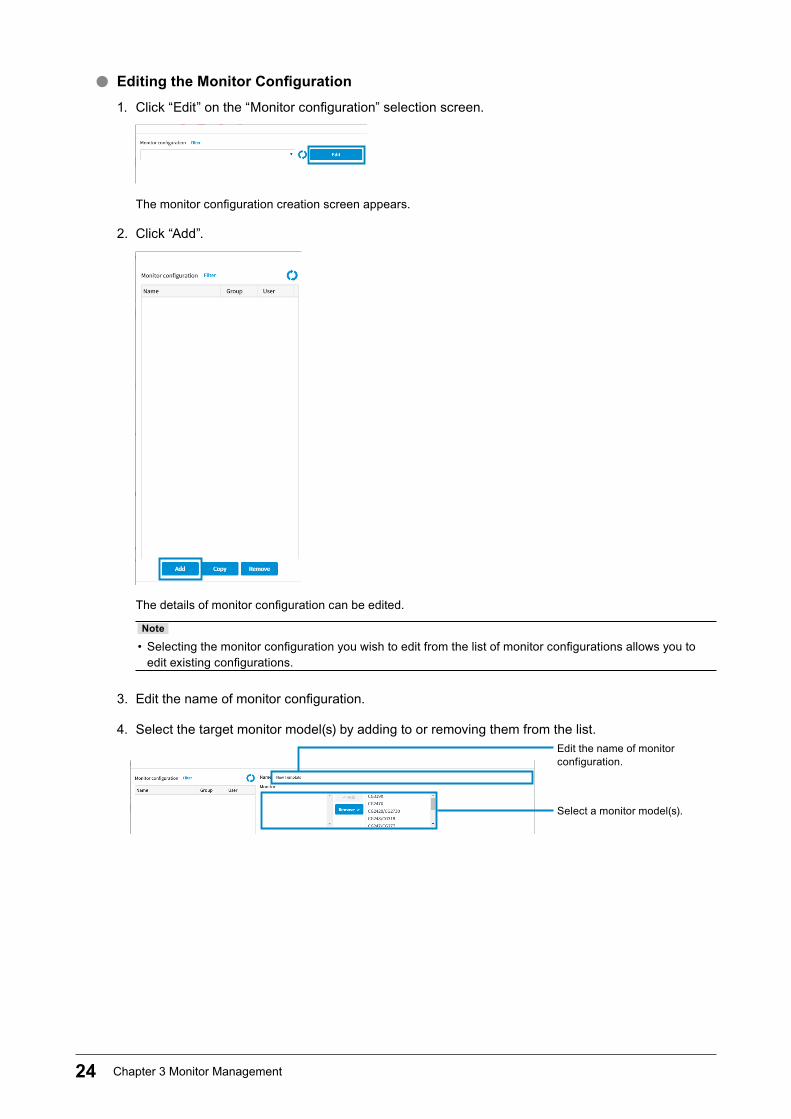
● Editing the Monitor Configuration1. Click “Edit” on the “Monitor configuration” selection screen.
The monitor configuration creation screen appears.
2. Click “Add”.
The details of monitor configuration can be edited.
Note
• Selecting the monitor configuration you wish to edit from the list of monitor configurations allows you to edit existing configurations.
3. Edit the name of monitor configuration.
4. Select the target monitor model(s) by adding to or removing them from the list.Edit the name of monitor configuration.
Select a monitor model(s).
24 Chapter 3 Monitor Management
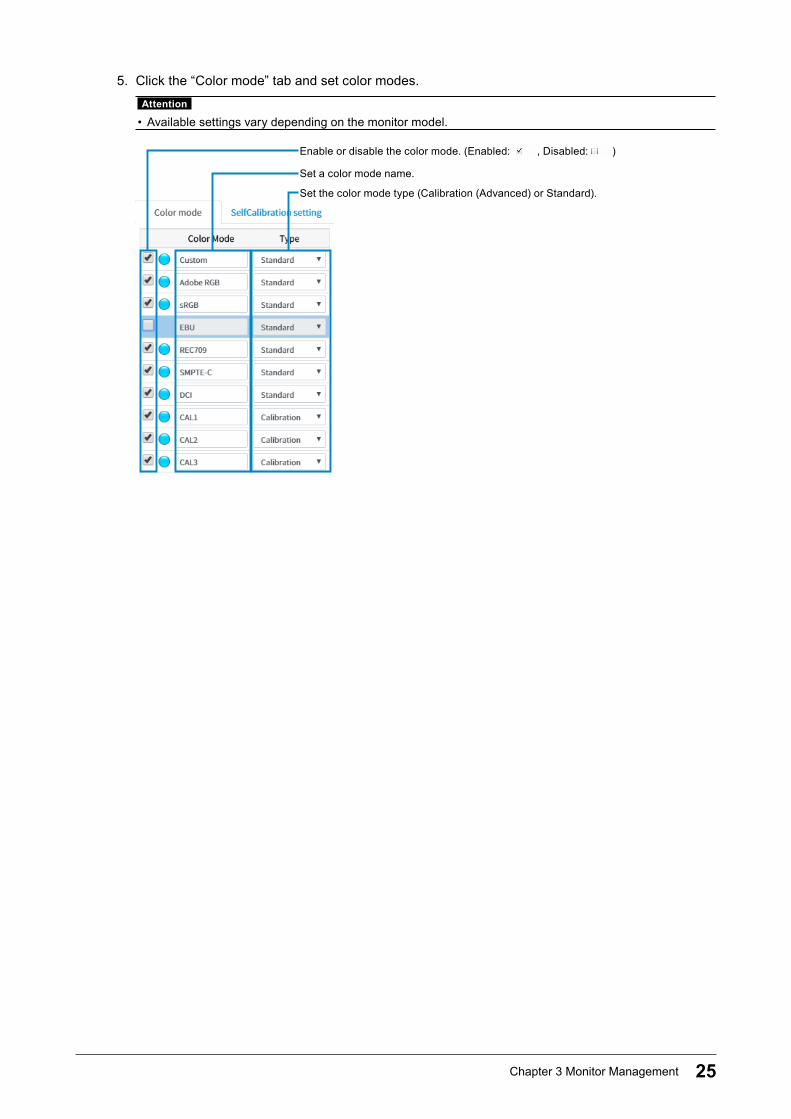
5. Click the “Color mode” tab and set color modes.Attention
• Available settings vary depending on the monitor model.
Enable or disable the color mode. (Enabled: , Disabled: )
Set a color mode name.
Set the color mode type (Calibration (Advanced) or Standard).
25Chapter 3 Monitor Management
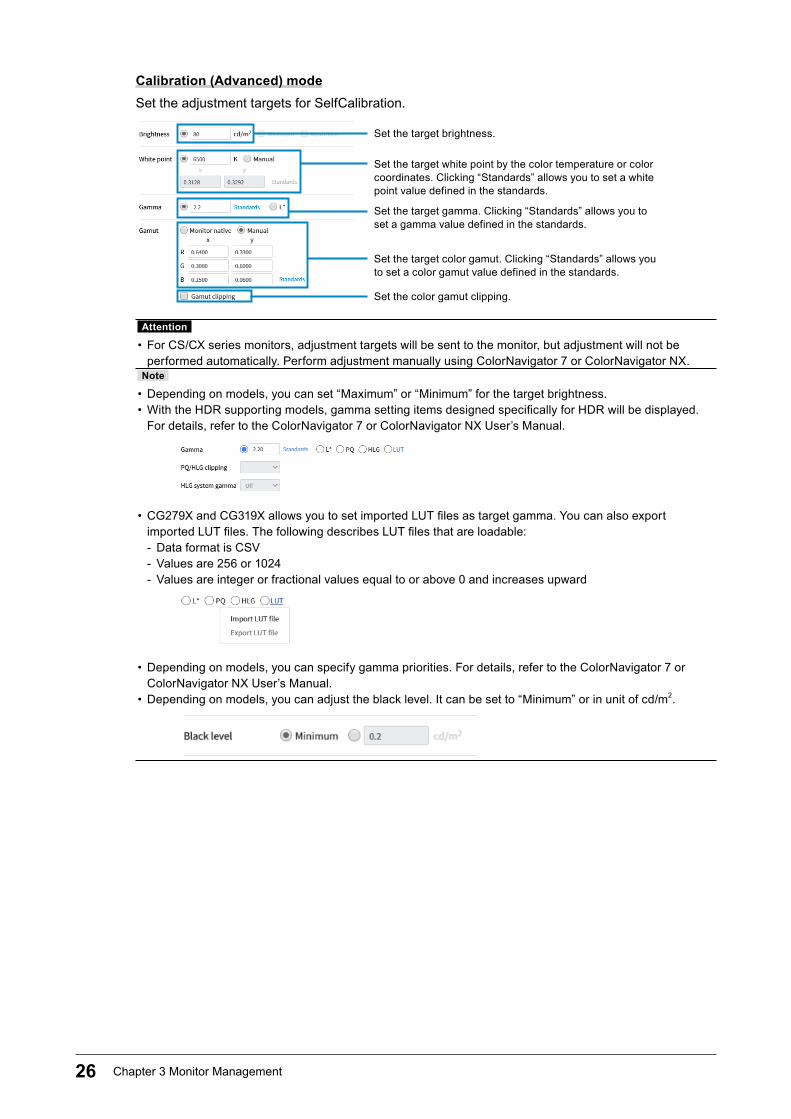
Calibration (Advanced) modeSet the adjustment targets for SelfCalibration.
Set the target brightness.
Set the target white point by the color temperature or color coordinates. Clicking “Standards” allows you to set a white point value defined in the standards.
Set the target color gamut. Clicking “Standards” allows you to set a color gamut value defined in the standards.
Set the color gamut clipping.
Set the target gamma. Clicking “Standards” allows you to set a gamma value defined in the standards.
Attention
• For CS/CX series monitors, adjustment targets will be sent to the monitor, but adjustment will not be performed automatically. Perform adjustment manually using ColorNavigator 7 or ColorNavigator NX.
Note
• Depending on models, you can set “Maximum” or “Minimum” for the target brightness. • With the HDR supporting models, gamma setting items designed specifically for HDR will be displayed. For details, refer to the ColorNavigator 7 or ColorNavigator NX User’s Manual.
• CG279X and CG319X allows you to set imported LUT files as target gamma. You can also export imported LUT files. The following describes LUT files that are loadable: - Data format is CSV - Values are 256 or 1024 - Values are integer or fractional values equal to or above 0 and increases upward
• Depending on models, you can specify gamma priorities. For details, refer to the ColorNavigator 7 or ColorNavigator NX User’s Manual.
• Depending on models, you can adjust the black level. It can be set to “Minimum” or in unit of cd/m2.
26 Chapter 3 Monitor Management
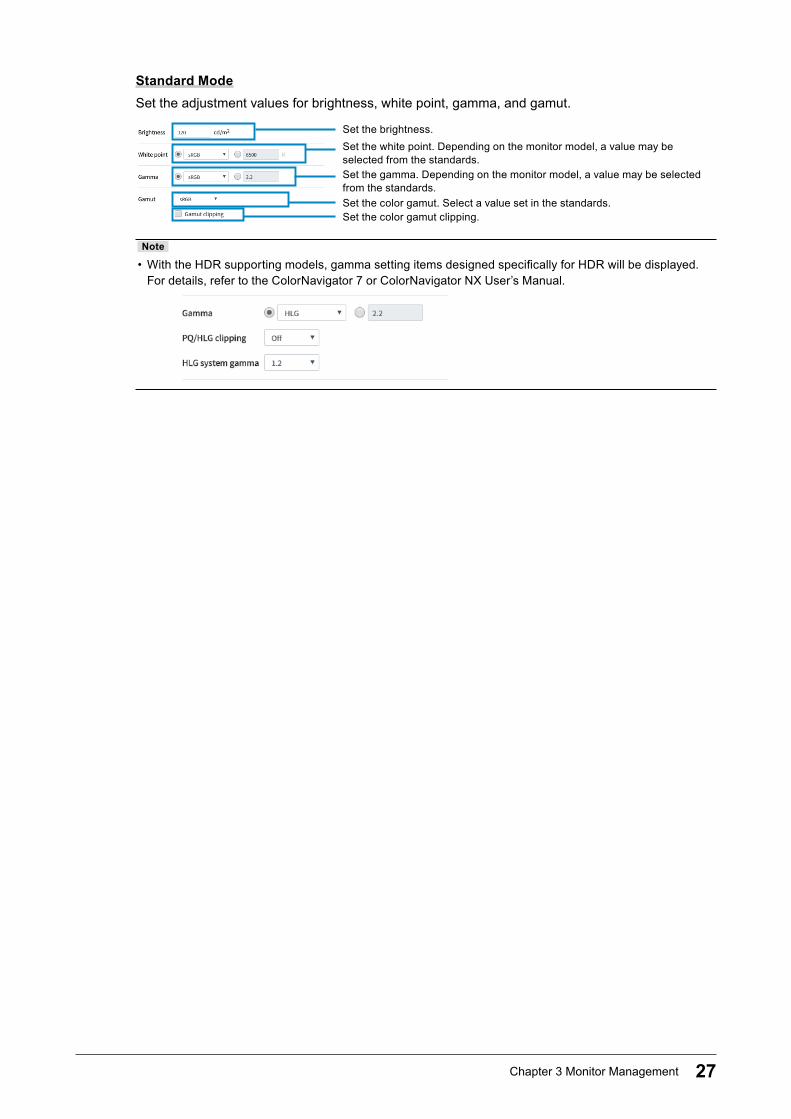
Standard ModeSet the adjustment values for brightness, white point, gamma, and gamut.
Set the brightness.Set the white point. Depending on the monitor model, a value may be selected from the standards.Set the gamma. Depending on the monitor model, a value may be selected from the standards.Set the color gamut. Select a value set in the standards.Set the color gamut clipping.
Note
• With the HDR supporting models, gamma setting items designed specifically for HDR will be displayed. For details, refer to the ColorNavigator 7 or ColorNavigator NX User’s Manual.
27Chapter 3 Monitor Management
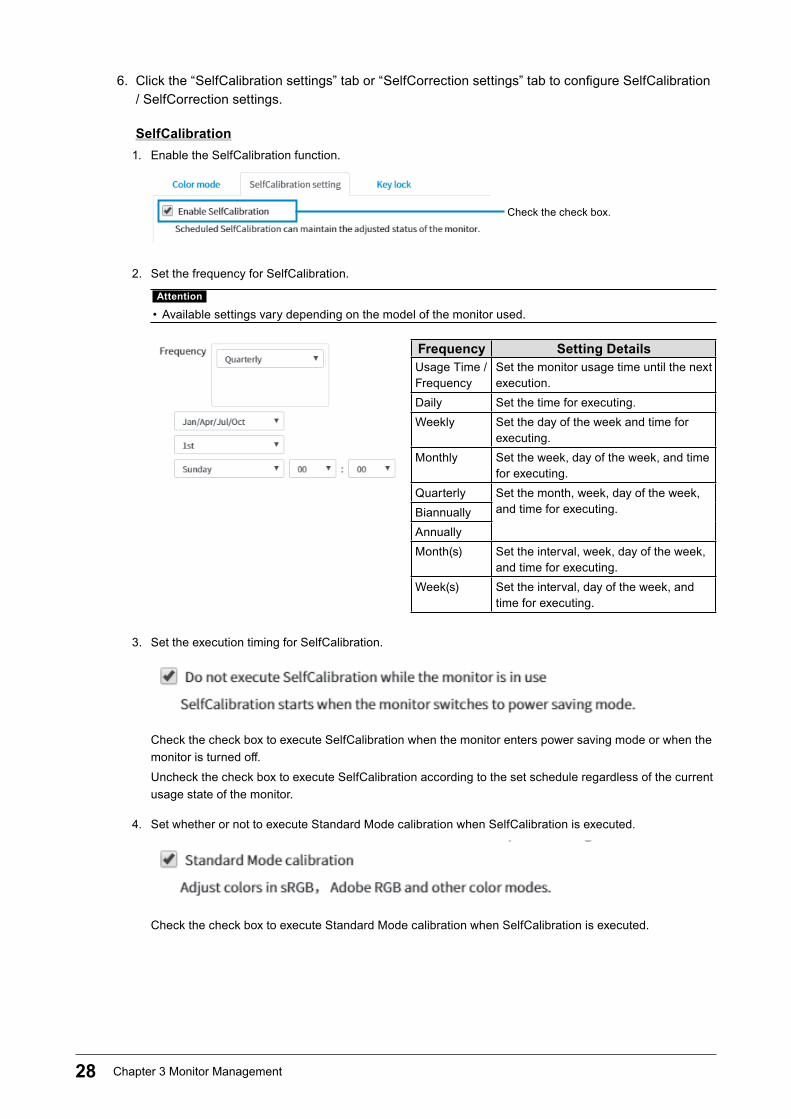
6. Click the “SelfCalibration settings” tab or “SelfCorrection settings” tab to configure SelfCalibration / SelfCorrection settings.
SelfCalibration1. Enable the SelfCalibration function.
Check the check box.
2. Set the frequency for SelfCalibration.
Attention
• Available settings vary depending on the model of the monitor used.
Frequency Setting DetailsUsage Time / Frequency
Set the monitor usage time until the next execution.
Daily Set the time for executing.Weekly Set the day of the week and time for
executing.Monthly Set the week, day of the week, and time
for executing.Quarterly Set the month, week, day of the week,
and time for executing.BiannuallyAnnuallyMonth(s) Set the interval, week, day of the week,
and time for executing.Week(s) Set the interval, day of the week, and
time for executing.
3. Set the execution timing for SelfCalibration.
Check the check box to execute SelfCalibration when the monitor enters power saving mode or when the monitor is turned off.Uncheck the check box to execute SelfCalibration according to the set schedule regardless of the current usage state of the monitor.
4. Set whether or not to execute Standard Mode calibration when SelfCalibration is executed.
Check the check box to execute Standard Mode calibration when SelfCalibration is executed.
28 Chapter 3 Monitor Management
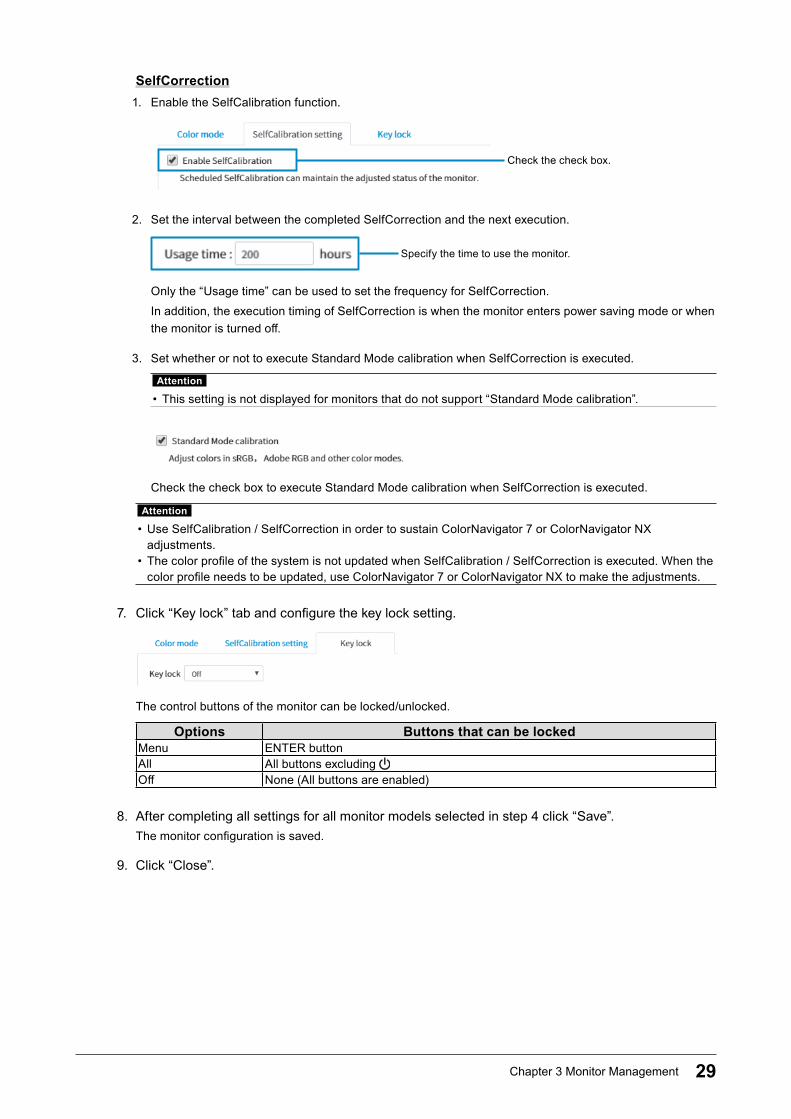
SelfCorrection1. Enable the SelfCalibration function.
Check the check box.
2. Set the interval between the completed SelfCorrection and the next execution.
Specify the time to use the monitor.
Only the “Usage time” can be used to set the frequency for SelfCorrection.In addition, the execution timing of SelfCorrection is when the monitor enters power saving mode or when the monitor is turned off.
3. Set whether or not to execute Standard Mode calibration when SelfCorrection is executed.
Attention
• This setting is not displayed for monitors that do not support “Standard Mode calibration”.
Check the check box to execute Standard Mode calibration when SelfCorrection is executed.
Attention
• Use SelfCalibration / SelfCorrection in order to sustain ColorNavigator 7 or ColorNavigator NX adjustments.
• The color profile of the system is not updated when SelfCalibration / SelfCorrection is executed. When the color profile needs to be updated, use ColorNavigator 7 or ColorNavigator NX to make the adjustments.
7. Click “Key lock” tab and configure the key lock setting.
The control buttons of the monitor can be locked/unlocked.
Options Buttons that can be lockedMenu ENTER buttonAll All buttons excluding Off None (All buttons are enabled)
8. After completing all settings for all monitor models selected in step 4 click “Save”.The monitor configuration is saved.
9. Click “Close”.
29Chapter 3 Monitor Management
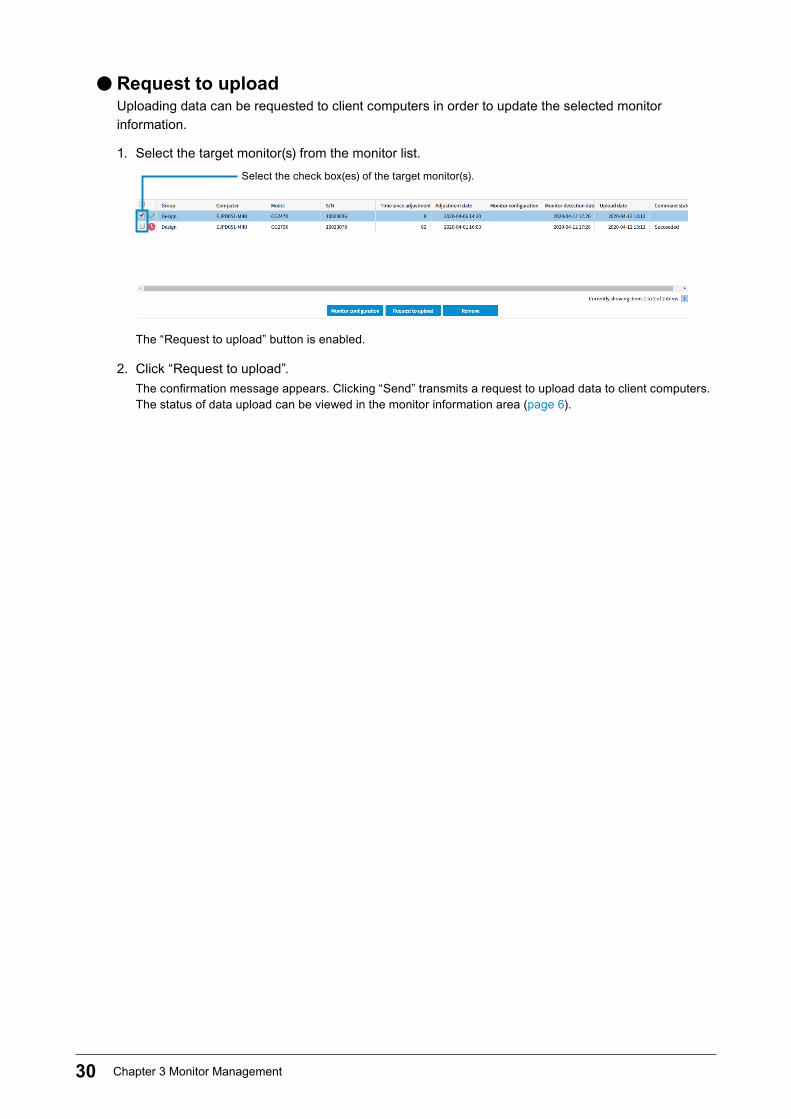
●Request to uploadUploading data can be requested to client computers in order to update the selected monitor information.
1. Select the target monitor(s) from the monitor list.Select the check box(es) of the target monitor(s).
The “Request to upload” button is enabled.
2. Click “Request to upload”.The confirmation message appears. Clicking “Send” transmits a request to upload data to client computers. The status of data upload can be viewed in the monitor information area (page 6).
30 Chapter 3 Monitor Management
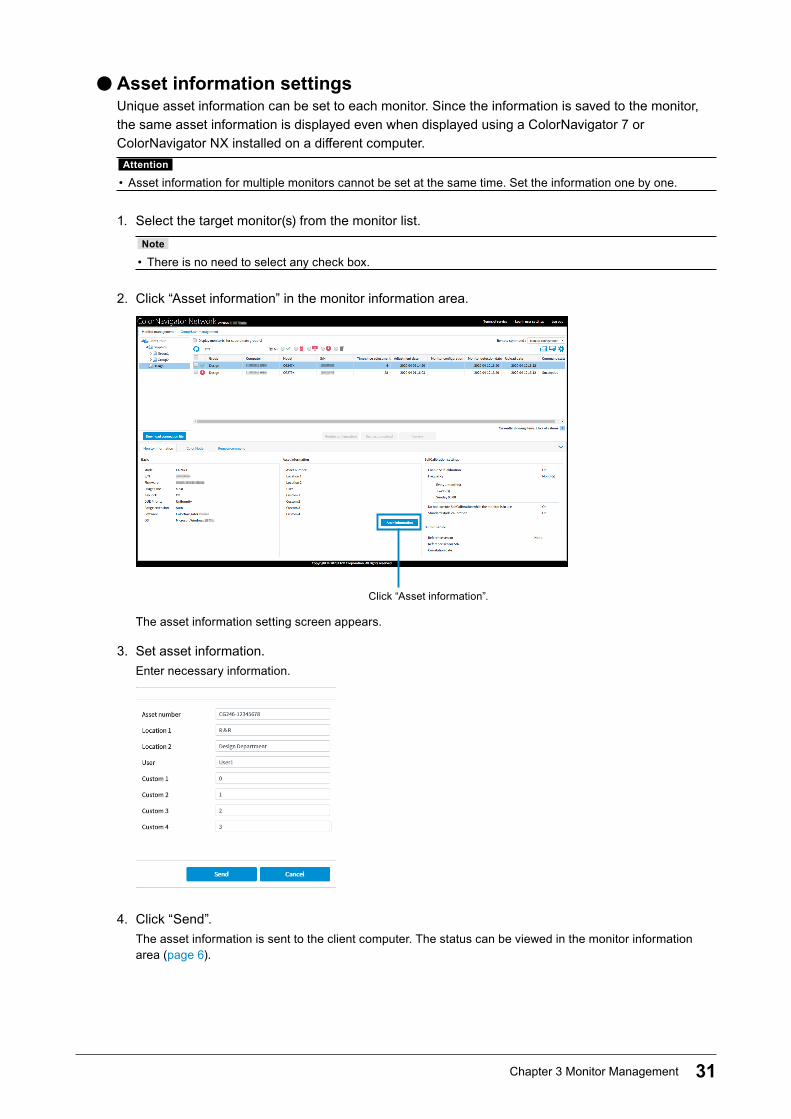
●Asset information settingsUnique asset information can be set to each monitor. Since the information is saved to the monitor, the same asset information is displayed even when displayed using a ColorNavigator 7 or ColorNavigator NX installed on a different computer.
Attention
• Asset information for multiple monitors cannot be set at the same time. Set the information one by one.
1. Select the target monitor(s) from the monitor list.Note
• There is no need to select any check box.
2. Click “Asset information” in the monitor information area.
Click “Asset information”.
The asset information setting screen appears.
3. Set asset information.Enter necessary information.
4. Click “Send”.The asset information is sent to the client computer. The status can be viewed in the monitor information area (page 6).
31Chapter 3 Monitor Management
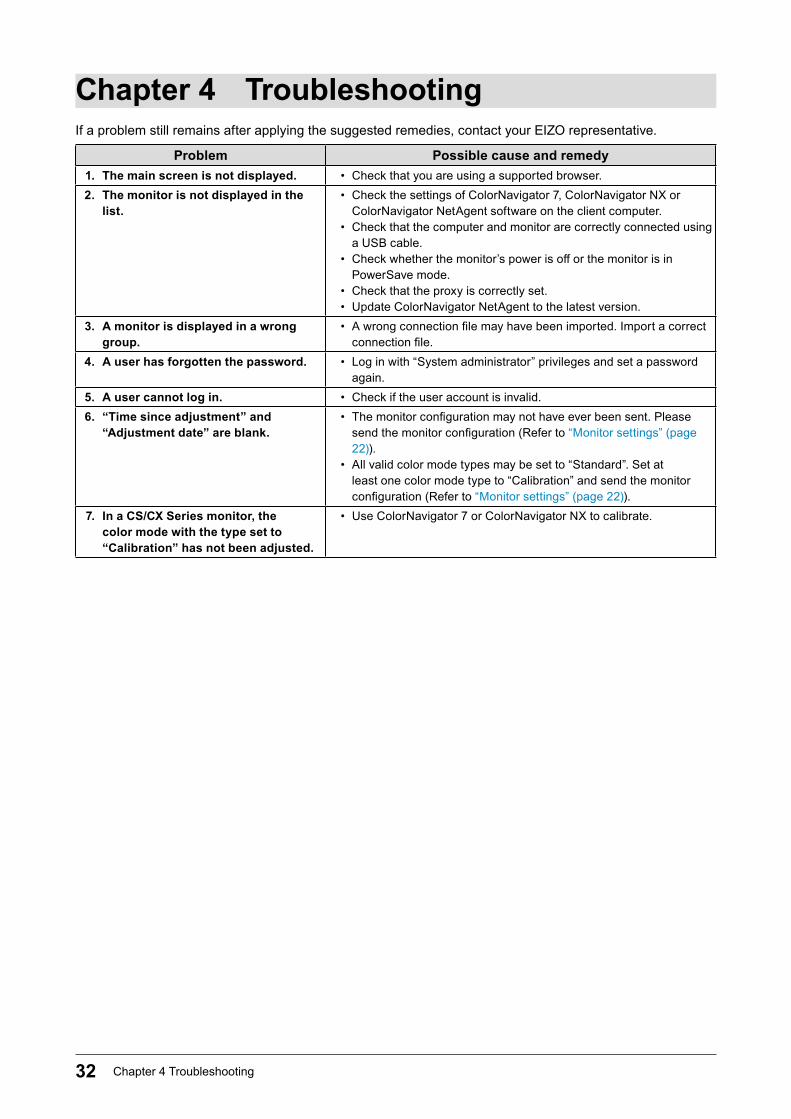
Chapter 4 TroubleshootingIf a problem still remains after applying the suggested remedies, contact your EIZO representative.
Problem Possible cause and remedy1. The main screen is not displayed. • Check that you are using a supported browser.2. The monitor is not displayed in the
list. • Check the settings of ColorNavigator 7, ColorNavigator NX or
ColorNavigator NetAgent software on the client computer. • Check that the computer and monitor are correctly connected using
a USB cable. • Check whether the monitor’s power is off or the monitor is in
PowerSave mode. • Check that the proxy is correctly set. • Update ColorNavigator NetAgent to the latest version.
3. A monitor is displayed in a wrong group.
• A wrong connection file may have been imported. Import a correct connection file.
4. A user has forgotten the password. • Log in with “System administrator” privileges and set a password again.
5. A user cannot log in. • Check if the user account is invalid.6. “Time since adjustment” and
“Adjustment date” are blank. • The monitor configuration may not have ever been sent. Please
send the monitor configuration (Refer to “Monitor settings” (page 22)).
• All valid color mode types may be set to “Standard”. Set at least one color mode type to “Calibration” and send the monitor configuration (Refer to “Monitor settings” (page 22)).
7. In a CS/CX Series monitor, the color mode with the type set to “Calibration” has not been adjusted.
• Use ColorNavigator 7 or ColorNavigator NX to calibrate.
32 Chapter 4 Troubleshooting
Appendix
TrademarkMicrosoft, Windows, Internet Explorer, Microsoft Edge and .NET Framework are registered trademarks of Microsoft Corporation in the United States and other countries.EIZO, the EIZO Logo, ColorEdge, CuratOR, DuraVision, FlexScan, FORIS, RadiCS, RadiForce, RadiNET, Raptor and ScreenManager are registered trademarks of EIZO Corporation in Japan and other countries.ColorEdge Tablet Controller, ColorNavigator, EcoView NET, EIZO EasyPIX, EIZO Monitor Configurator, EIZO ScreenSlicer, G-Ignition, i•Sound, Quick Color Match, RadiLight, Re/Vue, SafeGuard, Screen Administrator, Screen InStyle and UniColor Pro are trademarks of EIZO Corporation.All other company names, product names, and logos are trademarks or registered trademarks of their respective companies.
33Appendix

Copyright © 2014 - 2021 EIZO Corporation. All rights reserved.
www.eizoglobal.com03V25034H1UM-CNNET
8th Edition - June, 2021


