Embed Size (px)
Citation preview
Prepared by Rafe
Desktop Application with Visual Basic 6.0 82
Class 8 ADO and Recordsets
Session Objectives:
At the end of this session, you will be able to:
Describe the advantages of the ADO
Understand how to create a connection and connect to a data source
Create and open a Recordset
Display data from the Recordset
Manipulate data in the Recordset
Navigation methods
Updating Records
Insertion of Records
Deletion of Records
Collections
13.1 A Recap
The previous session began with an introduction to interfaces and the types of interfaces such as
the Single Document Interface and the Multi Document Interface.
Next, the session went into the details of the two interface types, like their features and their
drawbacks.
The session ended with a brief introduction to the two ways in which the child windows can be
arranged in a MDI Window.
13.2 OLE DB
13.2.1 An Introduction
Each DBMS stores data in a particular format. For example, Microsoft Access stores data in the
‘mdb’ file while FoxPro uses the ‘dbf’ format.
This means that, traditionally, a database application is developed keeping in mind a particular
type of database. Changing from one DBMS to another means rewriting the application to handle
data in a new format. This meant that a lot of time and effort is spent in recreating the application
each time we wanted to change databases.
13.2.2 A Problem
In the early days of computing, organisations typically used just a single DBMS. The database
was manipulated using applications written specifically for this type of database or the DBMS’s
facilities itself.
ADO and Recordsets 83
For example, if the data is stored in Oracle then we can use:
PL/SQL
SQL*Plus
to access data in the Oracle database.
However, over the years with the widespread use of computing technology, it is found that
typically a medium to large size organisation started to use different types of DBMS.
For example, consider a finance company. The department that deals with fixed deposits might
use Access as the local DBMS while at the organisation level Microsoft SQL Server is used to
maintain data. This company may have an application that needs to access the data at both the
locations.
Consider another scenario; that of a company providing database software solutions. It will have
to create separate versions of a given product for the different DBMS.
The need of the hour was to have a method of accessing databases such that the application
remains unchanged even when the databases changed. This is referred to as open database
connectivity.
13.2.3 A Solution
It is possible to build applications that are able to communicate with different databases if we
separate the actual communication with the database from the application.
This is achieved if the application always gives a command in a particular manner. This
command is then ‘translated’ such that it is understood by the DBMS.
By using different ‘translators’ as go-betweens between the application and the DBMS, we can
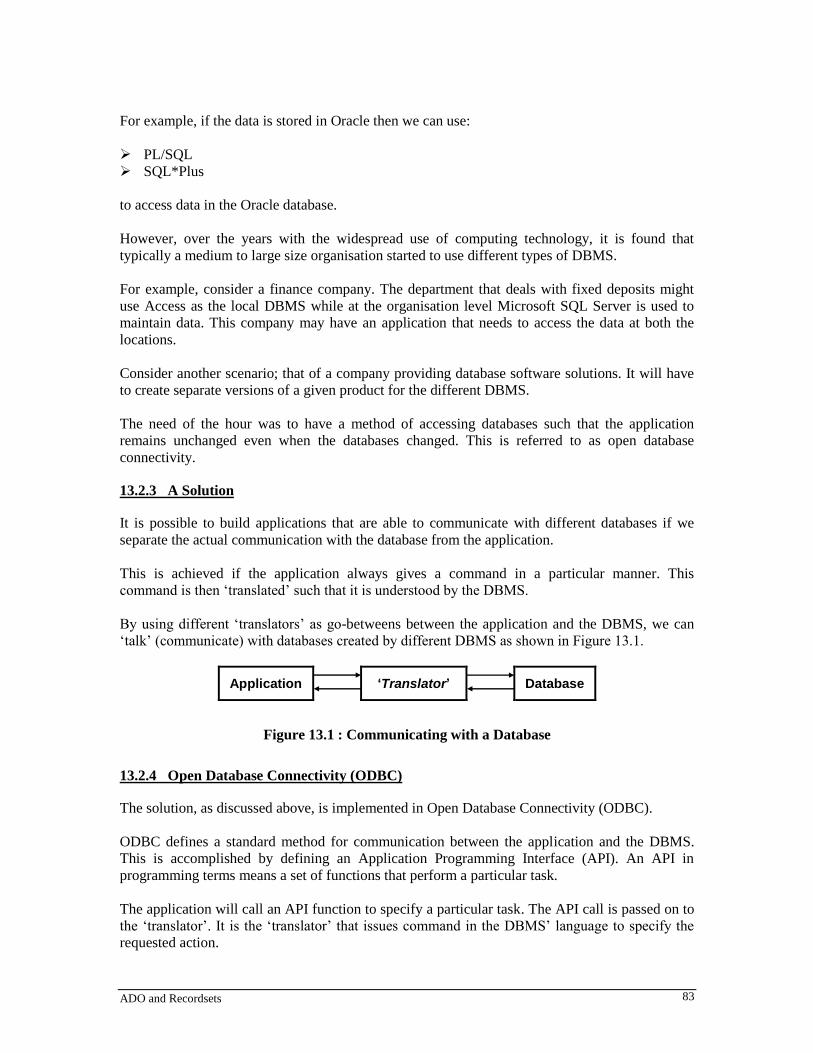
‘talk’ (communicate) with databases created by different DBMS as shown in Figure 13.1.
Application ‘Translator’ Database
Figure 13.1 : Communicating with a Database
13.2.4 Open Database Connectivity (ODBC)
The solution, as discussed above, is implemented in Open Database Connectivity (ODBC).
ODBC defines a standard method for communication between the application and the DBMS.
This is accomplished by defining an Application Programming Interface (API). An API in
programming terms means a set of functions that perform a particular task.
The application will call an API function to specify a particular task. The API call is passed on to
the ‘translator’. It is the ‘translator’ that issues command in the DBMS’ language to specify the
requested action.
Prepared by Rafe
Desktop Application with Visual Basic 6.0 84
The ‘translator’ is referred to as the ODBC Driver. It is the driver that implements the various
API such that they are understood by the DBMS. Thus, there is a driver for each DBMS to be
accessed.
The ODBC Driver accepts the command from the application and converts it to a format
understood by the target DBMS. In addition, the ODBC driver also receives the result of the
command execution from the DBMS and passes it back to the application.
13.2.5 OLE DB
While ODBC defined API that could be used to access any data, it did not support the OO
approach that was gaining popularity.
OLE DB is a database architecture that enables applications to have uniform access to data stored
in diverse information sources, regardless of the location or type. OLE DB defines a set of COM
(Component Object Model) interfaces that enable a uniform access to data stored in diverse
DBMS. An interface is a class with all functions abstract.
An abstract function in OO is a function that has no implementation and must be implemented in
the derived class.
The users derive classes from these interfaces and implement them in their application. The
objects created from the classes are used for different database actions like connecting, handling
the records etc.
Because OLE DATABASE defines interfaces, it is said to be low-level and can be implemented
directly only in OO languages like C++. Thus, it is not possible to directly implement OLE DB
Interfaces in a high-level 4GL like Visual Basic.
Microsoft has solved this problem by providing ActiveX Data Objects (ADO). These are
Microsoft defined objects that allow data access through OLE DB.
You will learn about ActiveX in great detail in later Sessions.
13.3 Introduction to ADO
There is an increasing popularity of distributed applications and databases in the IT industry. A
distributed application is one that has two parts – a front-end that runs on the client computer and
a back-end that runs on the server. In distributed applications, the main aim is to divide the
computing task into two sections.
The front-end requires minimal resources and runs on the workstation of the client. The back-end
requires large amounts of data or specialised hardware and runs on the server. A connection
between the client and the server allows data to flow in both directions between the client and
server.
With the growing need and popularity of distributed applications and the different formats in
which data is stored there was a need to have a mechanism that supported these applications and
databases. As a solution, OLE DB brought a new approach of accessing data.
ADO and Recordsets 85
13.3.1 Data Access in Visual Basic
Visual Basic provides three data access interfaces. They are:
Data Access Objects (DAO)
Version 3 of Visual Basic introduced the DAO. This technology allows accessing and
manipulating local databases. We are already familiar with the Data control based on the DAO
technology. The main drawback in this technology is that it is not designed to access remote
databases.
Remote Data Objects (RDO)
RDO was designed to give access to remote databases. Version 4 of Visual Basic introduced this
technology. It is useful when accessing data from relational databases such as the MS SQL server
and Oracle.
The limitation to RDO is that it does not access desktop databases efficiently.
ActiveX Data Objects (ADO)
ADO is an interface to OLE DB, introduced in Version 6 of Visual Basic. This is Microsoft’s
newest data access technology and provides access to almost any data stored in different formats.
ADO is a replacement for the older DAO and RDO and gives you us features not found in either.
For example, the ADO enables accessing data from relational and nonrelational databases. It also
allows us to access other data sources such as, e-mail, file systems, project management tools and
spreadsheets.
OLE DB provides the underlying access to data with ADO as its interface.
13.4 Accessing Data with the ADO Data Control
The ADO Data control is the key element in creating data access applications with a minimum of
code. It provides a visual interface for setting data access properties.
It provides a link between an application and the data we need to access. We create this link by
placing the ADO Data control on a form and setting its properties. Once we establish the link we
can display data on the form by binding controls to the ADO Data control without writing any
code.
Controls can be bound to the ADO Data control if they possess the DataSource property. These
include the CheckBox, ComboBox, Image, Label, ListBox, PictureBox and TextBox controls.
Besides these Visual Basic provides data-bound controls such as DataCombo, DataGrid, Chart
and DataList.
The default Data control that appears in the toolbox of Visual Basic is the older data control
based on the DAO technology.
Prepared by Rafe
Desktop Application with Visual Basic 6.0 86
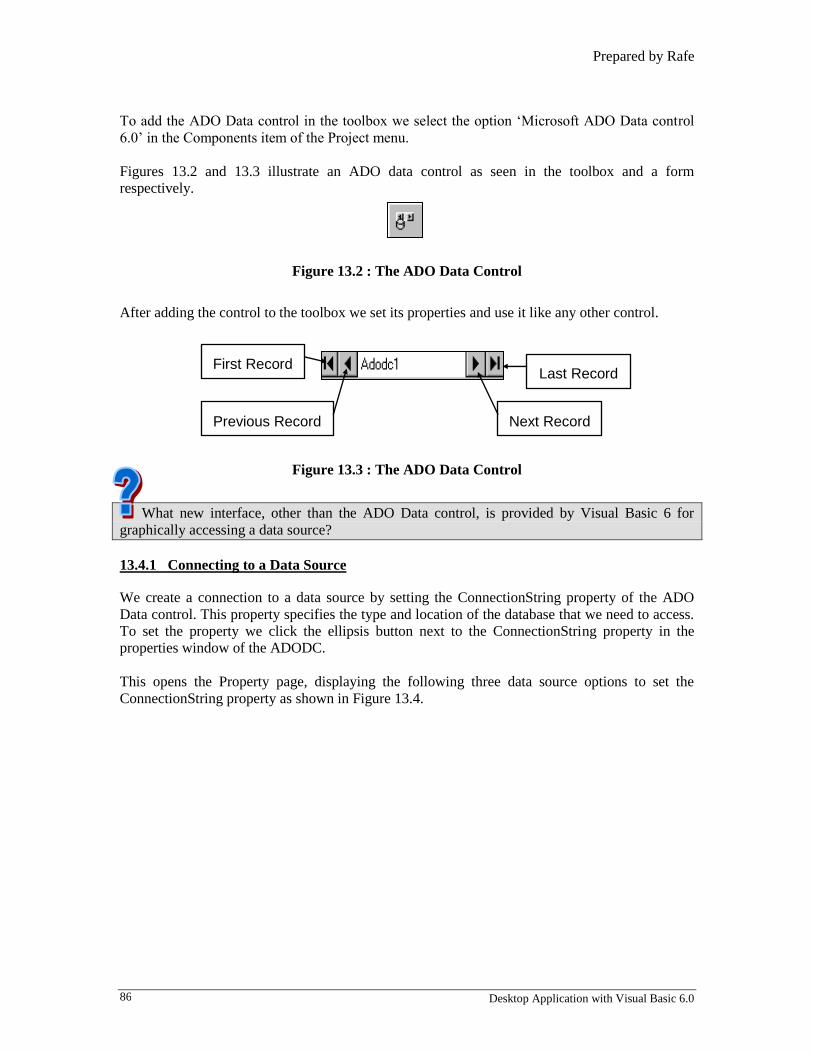
To add the ADO Data control in the toolbox we select the option ‘Microsoft ADO Data control
6.0’ in the Components item of the Project menu.
Figures 13.2 and 13.3 illustrate an ADO data control as seen in the toolbox and a form
respectively.
Figure 13.2 : The ADO Data Control
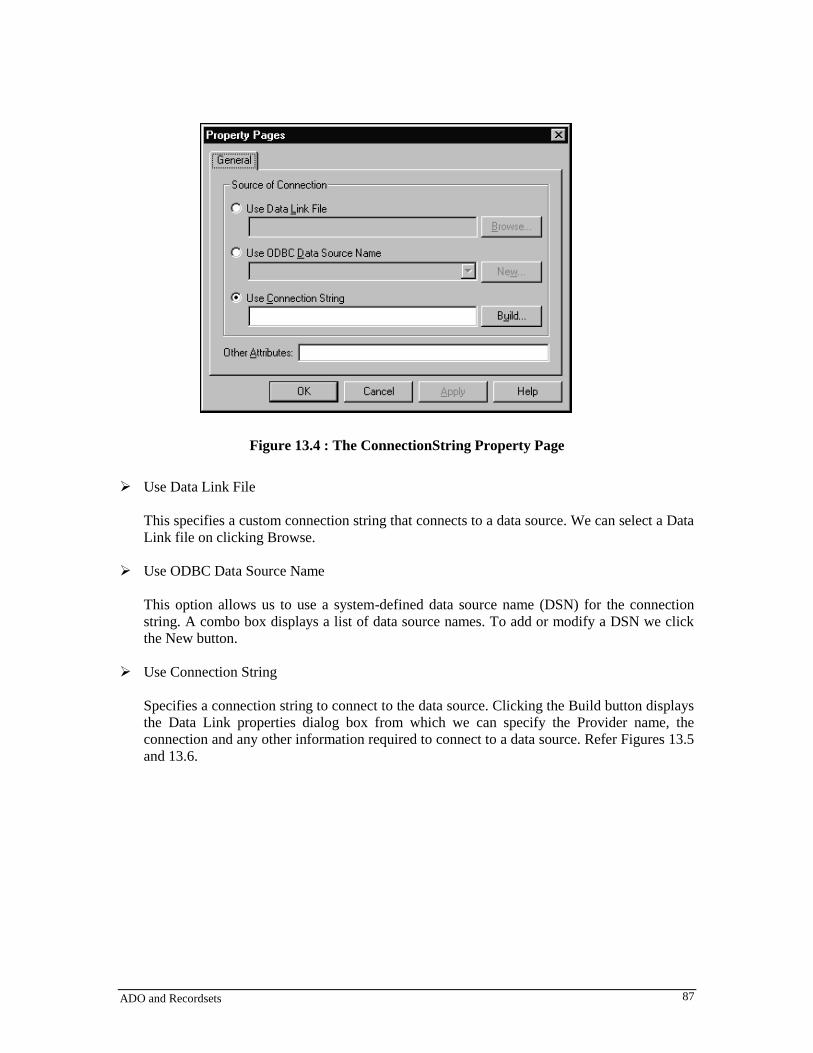
After adding the control to the toolbox we set its properties and use it like any other control.
Figure 13.3 : The ADO Data Control
What new interface, other than the ADO Data control, is provided by Visual Basic 6 for
graphically accessing a data source?
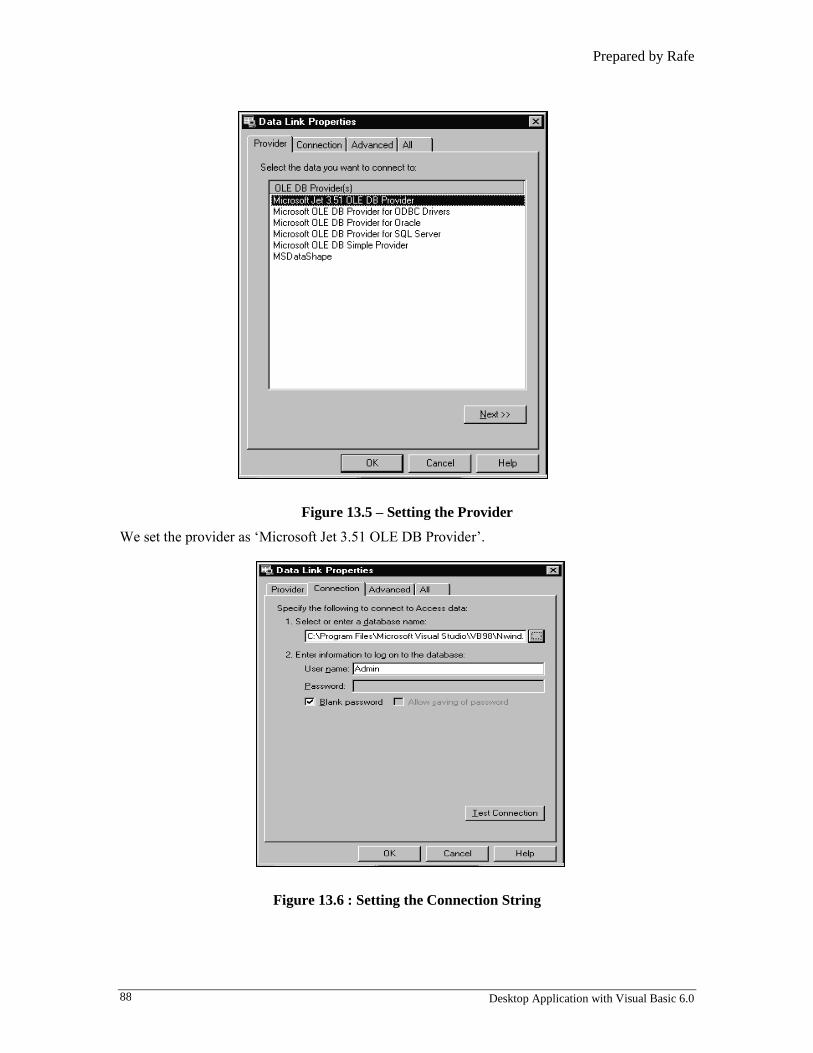
13.4.1 Connecting to a Data Source
We create a connection to a data source by setting the ConnectionString property of the ADO
Data control. This property specifies the type and location of the database that we need to access.
To set the property we click the ellipsis button next to the ConnectionString property in the
properties window of the ADODC.
This opens the Property page, displaying the following three data source options to set the
ConnectionString property as shown in Figure 13.4.
Last Record
Next Record Previous Record
First Record
ADO and Recordsets 87
Figure 13.4 : The ConnectionString Property Page
Use Data Link File
This specifies a custom connection string that connects to a data source. We can select a Data
Link file on clicking Browse.
Use ODBC Data Source Name
This option allows us to use a system-defined data source name (DSN) for the connection
string. A combo box displays a list of data source names. To add or modify a DSN we click
the New button.
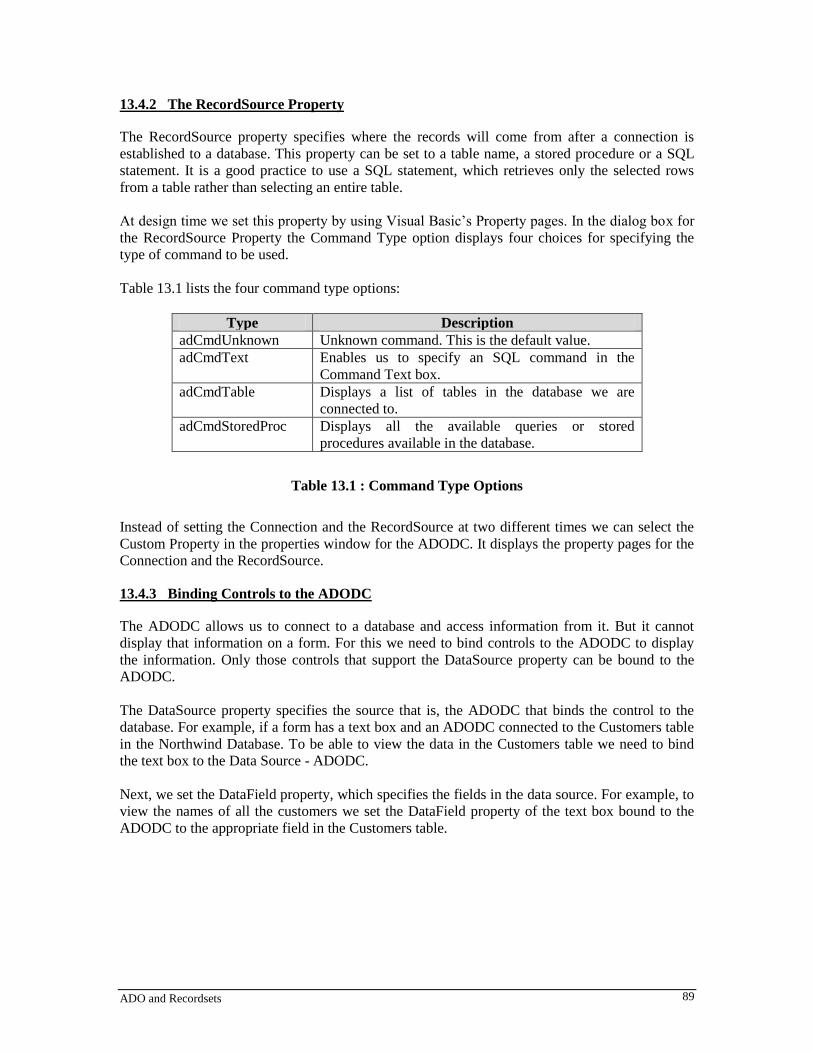
Use Connection String
Specifies a connection string to connect to the data source. Clicking the Build button displays
the Data Link properties dialog box from which we can specify the Provider name, the
connection and any other information required to connect to a data source. Refer Figures 13.5
and 13.6.
Prepared by Rafe
Desktop Application with Visual Basic 6.0 88
Figure 13.5 – Setting the Provider
We set the provider as ‘Microsoft Jet 3.51 OLE DB Provider’.
Figure 13.6 : Setting the Connection String
ADO and Recordsets 89
13.4.2 The RecordSource Property
The RecordSource property specifies where the records will come from after a connection is
established to a database. This property can be set to a table name, a stored procedure or a SQL
statement. It is a good practice to use a SQL statement, which retrieves only the selected rows
from a table rather than selecting an entire table.
At design time we set this property by using Visual Basic’s Property pages. In the dialog box for
the RecordSource Property the Command Type option displays four choices for specifying the
type of command to be used.
Table 13.1 lists the four command type options:
Type Description
adCmdUnknown Unknown command. This is the default value.
adCmdText Enables us to specify an SQL command in the
Command Text box.
adCmdTable Displays a list of tables in the database we are
connected to.
adCmdStoredProc Displays all the available queries or stored
procedures available in the database.
Table 13.1 : Command Type Options
Instead of setting the Connection and the RecordSource at two different times we can select the
Custom Property in the properties window for the ADODC. It displays the property pages for the
Connection and the RecordSource.
13.4.3 Binding Controls to the ADODC
The ADODC allows us to connect to a database and access information from it. But it cannot
display that information on a form. For this we need to bind controls to the ADODC to display
the information. Only those controls that support the DataSource property can be bound to the
ADODC.
The DataSource property specifies the source that is, the ADODC that binds the control to the
database. For example, if a form has a text box and an ADODC connected to the Customers table
in the Northwind Database. To be able to view the data in the Customers table we need to bind
the text box to the Data Source - ADODC.
Next, we set the DataField property, which specifies the fields in the data source. For example, to
view the names of all the customers we set the DataField property of the text box bound to the
ADODC to the appropriate field in the Customers table.
Prepared by Rafe
Desktop Application with Visual Basic 6.0 90
When the buttons on the ADODC are clicked, all the controls bound to the ADODC display data
of the current record. Also, any changes made to the data in the bound controls are written back to
the database. This reduces writing code to a great extent.
The following is the lists of controls in the toolbox of Visual Basic that can be bound to the
ADODC.
Picture Box
Label
Text Box
Check Box
Combo Box
List Box
Image
OLE Control
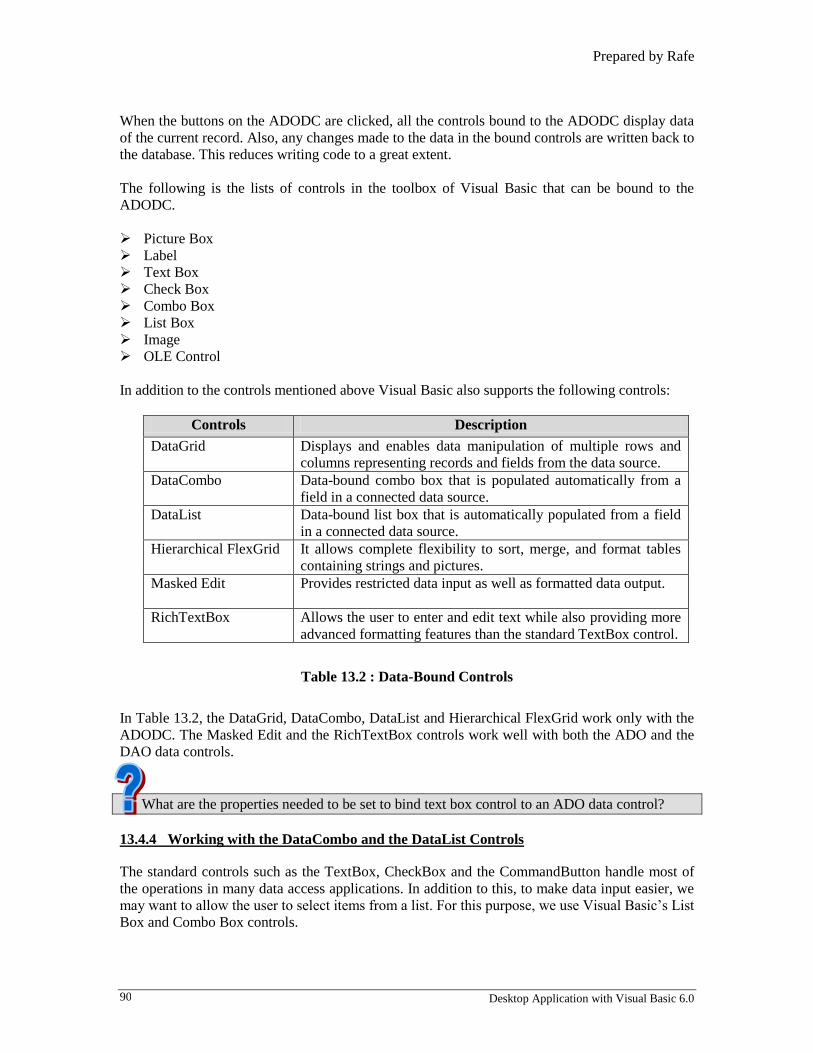
In addition to the controls mentioned above Visual Basic also supports the following controls:
Controls Description
DataGrid Displays and enables data manipulation of multiple rows and
columns representing records and fields from the data source.
DataCombo Data-bound combo box that is populated automatically from a
field in a connected data source.
DataList Data-bound list box that is automatically populated from a field
in a connected data source.
Hierarchical FlexGrid It allows complete flexibility to sort, merge, and format tables
containing strings and pictures.
Masked Edit Provides restricted data input as well as formatted data output.
RichTextBox Allows the user to enter and edit text while also providing more
advanced formatting features than the standard TextBox control.
Table 13.2 : Data-Bound Controls
In Table 13.2, the DataGrid, DataCombo, DataList and Hierarchical FlexGrid work only with the
ADODC. The Masked Edit and the RichTextBox controls work well with both the ADO and the
DAO data controls.
What are the properties needed to be set to bind text box control to an ADO data control?
13.4.4 Working with the DataCombo and the DataList Controls
The standard controls such as the TextBox, CheckBox and the CommandButton handle most of
the operations in many data access applications. In addition to this, to make data input easier, we
may want to allow the user to select items from a list. For this purpose, we use Visual Basic’s List
Box and Combo Box controls.
ADO and Recordsets 91
In the normal mode that is, when not bound to a data control we are already familiar with the
working of the List and the Combo Box controls. When bound to a data control they have the
additional capability of displaying and editing data from a database. They differ from the
DataCombo and the DataList in the way they are set up.
When bound to the ADODC, the List Box and the Combo Box display data from a field in the
database. In case of the List Box, the data field is bound to the selected item of the List property.
To modify the value of a field using the List box we select an item in the list, which is stored in
the field specified by the DataField property. The Text property of the Combo Box is used to bind
the field of the ADODC. Hence the user can select an item either by typing text into the combo
box, or by selecting it from the list.
For simple list applications the standard List Box and the Combo Box controls work just fine.
However, we need to use the DataList and the DataCombo controls as there are some important
differences that give them great flexibility and usefulness in database applications. Both controls
can be automatically filled from a database field from the data control to which they are bound.
Consider a database that stores information about the Doctors in one table and about Patients in
another table. We then link a patient to a doctor who treats the patient by storing the Doctor’s ID
in the patient’s table. A standard database would not store all the details such as, name and
specialisation of the doctor in the patient’s table.
When we enter a new patient’s details, the user should be able to enter the Doctor’s Id by
selecting the Doctor’s name from a list. The standard ListBox and Combo box controls cannot be
used to achieve this because the items in the list are the ones that are bound to the corresponding
fields in the database. This is the reason that the DataCombo and DataList were created.
These controls are not part of the standard toolbox but must be added by selecting the ‘Microsoft
DataList Controls 6.0 (OLE DB)’ option from the Components item of the Project menu.
13.4.5 Creating a Recordset
After getting connected to a database and learning how to display information from the database
in the bound controls we now learn to manipulate data with the ADO Data control.
The Recordset property of the ADODC is an object that represents the entire set of records from a
table or the results of an executed command. The Recordset object is used to access records
returned from a query. At any given time, a Recordset object points to a single record called the
current record in the set of records returned from a query.
We use the Recordset object to do the following manipulations to the data in a database:
Adding records
Modifying records
Deleting records
Finding specific records

Prepared by Rafe
Desktop Application with Visual Basic 6.0 92
13.4.6 Adding Records
We use the AddNew method to add new records to a Recordset. When we add a new record, the
ADODC clears the information in the bound controls to prepare them for the addition. The
following code adds a new record:
adoEmployees.Recordset.AddNew
This record becomes the current record. The new record is added to the database when we move
to another record. This action prompts the ADODC to save the new record to the database. To
cancel any changes made to a record we use the CancelUpdate method. The syntax of the
CancelUpdate method is as follows:
adoEmployees.Recordset.CancelUpdate
13.4.7 Modifying Records
The ADODC automatically modifies records when we move to the record that we wish to change.
Make the necessary changes and the move to the next record. We can also use the Update method
to modify a current record.
The following code can be added to the Click event of a Command Button:
adoEmployees.Recordset.Update
To cancel any changes made to the current record we use the CancelUpdate method.
13.4.8 Deleting Records
The Delete method of the Recordset enables us to delete a record. The record is remove from the
database, but the bound controls still display the information of the deleted record until we
reposition the record pointer to another record.
The following code invokes the Delete method:
adoEmployee.Recordset.Delete
13.4.9 Finding Records
Searching for a specific record requires invoking the Find method of the Recordset and specifying
the condition for the search.
The Find method has the following syntax:
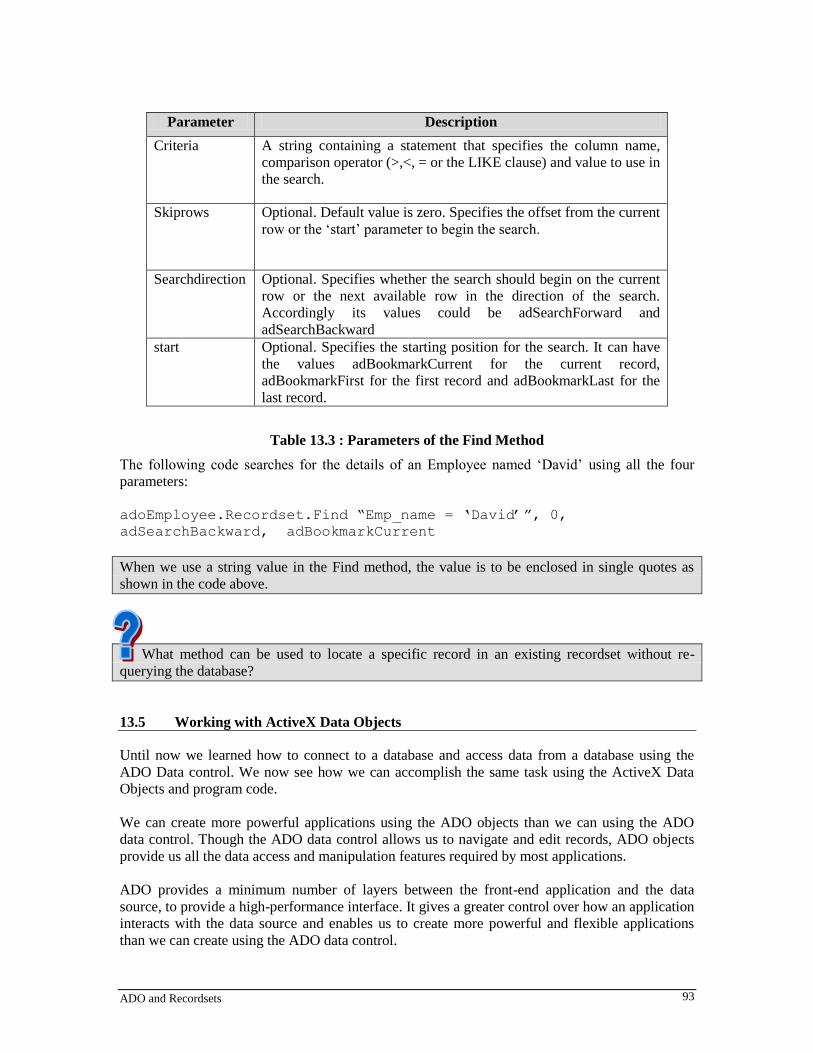
object.Find (criteria, skiprows, searchdirection, start)
ADO and Recordsets 93
Parameter Description
Criteria A string containing a statement that specifies the column name,
comparison operator (>,<, = or the LIKE clause) and value to use in
the search.
Skiprows Optional. Default value is zero. Specifies the offset from the current
row or the ‘start’ parameter to begin the search.
Searchdirection Optional. Specifies whether the search should begin on the current
row or the next available row in the direction of the search.
Accordingly its values could be adSearchForward and
adSearchBackward
start Optional. Specifies the starting position for the search. It can have
the values adBookmarkCurrent for the current record,
adBookmarkFirst for the first record and adBookmarkLast for the
last record.
Table 13.3 : Parameters of the Find Method
The following code searches for the details of an Employee named ‘David’ using all the four
parameters:
adoEmployee.Recordset.Find “Emp_name = ‘David’”, 0,
adSearchBackward, adBookmarkCurrent
When we use a string value in the Find method, the value is to be enclosed in single quotes as
shown in the code above.
What method can be used to locate a specific record in an existing recordset without re-
querying the database?
13.5 Working with ActiveX Data Objects
Until now we learned how to connect to a database and access data from a database using the
ADO Data control. We now see how we can accomplish the same task using the ActiveX Data
Objects and program code.
We can create more powerful applications using the ADO objects than we can using the ADO
data control. Though the ADO data control allows us to navigate and edit records, ADO objects
provide us all the data access and manipulation features required by most applications.
ADO provides a minimum number of layers between the front-end application and the data
source, to provide a high-performance interface. It gives a greater control over how an application
interacts with the data source and enables us to create more powerful and flexible applications
than we can create using the ADO data control.
Prepared by Rafe
Desktop Application with Visual Basic 6.0 94
Some of the advantages of using ADO objects than using the ADO Data control are:
Validation of any information entered by the user before it goes into the database
We can create database applications that do not require a user interface. Since the ADO data
control is a graphical component, it can be used only in programs with a visual component
We can use SQL statements to modify multiple records at a time
The ADO object model has the following three main objects that are required to access data from
an existing database:
Connection
Recordset
Command
Before we create the ADO objects we have to make a reference to the ADO object library that
tells Visual basic that our program will be using the ADO. To achieve this, we select the
‘Microsoft ActiveX Data Objects 2.0 Library’ option from References in the Project menu.
13.5.1 Connection
When we work with data in a database, we must first create a connection to the data source. The
Connection object makes a connection between an application and the data source such as
Microsoft SQL server. Each Connection object supports multiple lower level objects such as
Recordset objects and Command objects. Creating a Connection object is similar to setting the
ConnectionString property of the ADODC.
13.5.2 Recordset
A Recordset object represents the entire set of records from a table or the results of an executed
command. The Recordset object is used to access records returned from a query. We manipulate
data almost entirely using the Recordset objects. This object is constructed using records (rows)
and fields (columns).
We can also create a Connection using a Recordset object. But creating a Connection object
explicitly, enables us to open multiple Recordset objects on the same connection.
13.5.3 Command
We use a Command object to query a database and access the records that are returned from the
database. The records are returned in a Recordset object. Command objects can be used to create
a Recordset object and obtain records, to execute a bulk operation, or to manipulate the structure
of a database.
We can execute a command on a Connection object or a query as part of opening a Recordset
object, without defining a Command object.
The following are the operations used in a typical ADO based application:

ADO and Recordsets 95
Create a Connection object
This requires a connection string, which contains the information used to establish a
connection to a data source. It consists of the data source name, user identification and
password.
Open the Connection
The main way that an ADO connects to a data source is by opening the connection.
Execute a query on the data source
After we connect to the data source we can execute a query. Issuing a query command
implies that the data source should return a Recordset object containing rows of the
information that we specify in the query. Commands are written in SQL. We can use a
Command object to build the queries.
Manipulate the records returned from the query
The records returned by executing the query are available to the application to navigate, or
update. The cursor type, as we already know from Session 2, decides whether we need to
change or simply view the data in the Recordset.
Terminate the connection
The connection to the data source is closed
13.6 Creating and Opening a Connection
We use the Connection object to connect to a data source.
13.6.1 Creating a Connection Object
To create a connection object we specify the following steps:
We declare a variable to create a connection object. The statement will be as follows:
Dim con As ADODB.Connection
Set con = New Connection
ADODB is the ProgId (Programmatic Identifier) that enables us to create a Connection object. An
instance of a connection is created.
Or we can also create a connection object by omitting the ProgId.
Dim con As New Connection
Prepared by Rafe
Desktop Application with Visual Basic 6.0 96
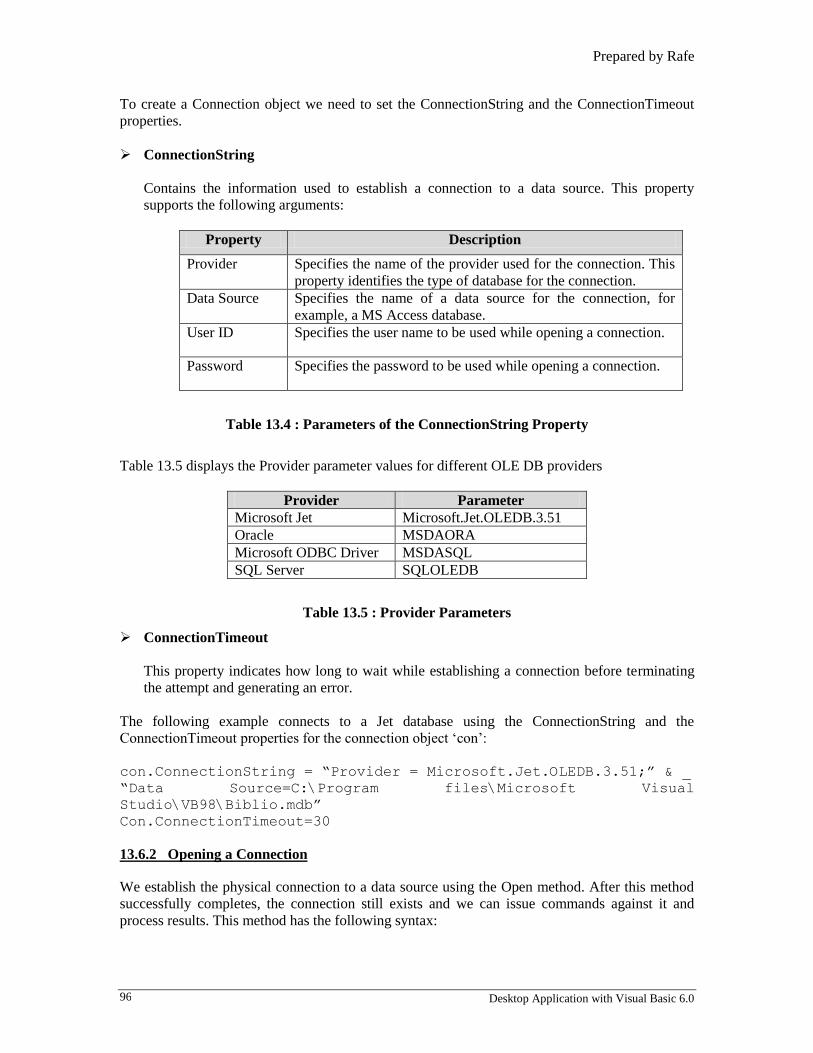
To create a Connection object we need to set the ConnectionString and the ConnectionTimeout
properties.
ConnectionString
Contains the information used to establish a connection to a data source. This property
supports the following arguments:
Property Description
Provider Specifies the name of the provider used for the connection. This
property identifies the type of database for the connection.
Data Source Specifies the name of a data source for the connection, for
example, a MS Access database.
User ID Specifies the user name to be used while opening a connection.
Password Specifies the password to be used while opening a connection.
Table 13.4 : Parameters of the ConnectionString Property
Table 13.5 displays the Provider parameter values for different OLE DB providers
Provider Parameter
Microsoft Jet Microsoft.Jet.OLEDB.3.51
Oracle MSDAORA
Microsoft ODBC Driver MSDASQL
SQL Server SQLOLEDB
Table 13.5 : Provider Parameters
ConnectionTimeout
This property indicates how long to wait while establishing a connection before terminating
the attempt and generating an error.
The following example connects to a Jet database using the ConnectionString and the
ConnectionTimeout properties for the connection object ‘con’:
con.ConnectionString = “Provider = Microsoft.Jet.OLEDB.3.51;” & _
“Data Source=C:\Program files\Microsoft Visual
Studio\VB98\Biblio.mdb”
Con.ConnectionTimeout=30
13.6.2 Opening a Connection
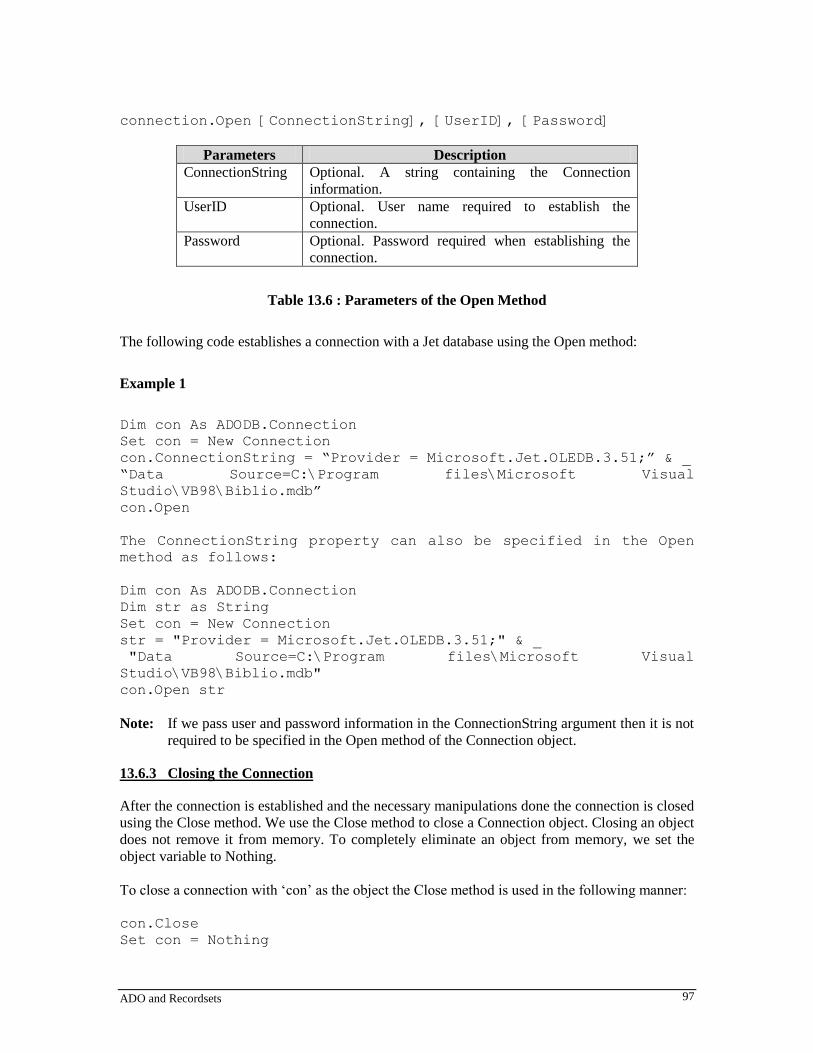
We establish the physical connection to a data source using the Open method. After this method
successfully completes, the connection still exists and we can issue commands against it and
process results. This method has the following syntax:
ADO and Recordsets 97
connection.Open [ConnectionString], [UserID], [Password]
Parameters Description
ConnectionString Optional. A string containing the Connection
information.
UserID Optional. User name required to establish the
connection.
Password Optional. Password required when establishing the
connection.
Table 13.6 : Parameters of the Open Method
The following code establishes a connection with a Jet database using the Open method:
Example 1
Dim con As ADODB.Connection
Set con = New Connection
con.ConnectionString = “Provider = Microsoft.Jet.OLEDB.3.51;” & _
“Data Source=C:\Program files\Microsoft Visual
Studio\VB98\Biblio.mdb”
con.Open
The ConnectionString property can also be specified in the Open
method as follows:
Dim con As ADODB.Connection
Dim str as String
Set con = New Connection
str = "Provider = Microsoft.Jet.OLEDB.3.51;" & _
"Data Source=C:\Program files\Microsoft Visual
Studio\VB98\Biblio.mdb"
con.Open str
Note: If we pass user and password information in the ConnectionString argument then it is not
required to be specified in the Open method of the Connection object.
13.6.3 Closing the Connection
After the connection is established and the necessary manipulations done the connection is closed
using the Close method. We use the Close method to close a Connection object. Closing an object
does not remove it from memory. To completely eliminate an object from memory, we set the
object variable to Nothing.
To close a connection with ‘con’ as the object the Close method is used in the following manner:
con.Close
Set con = Nothing
Prepared by Rafe
Desktop Application with Visual Basic 6.0 98
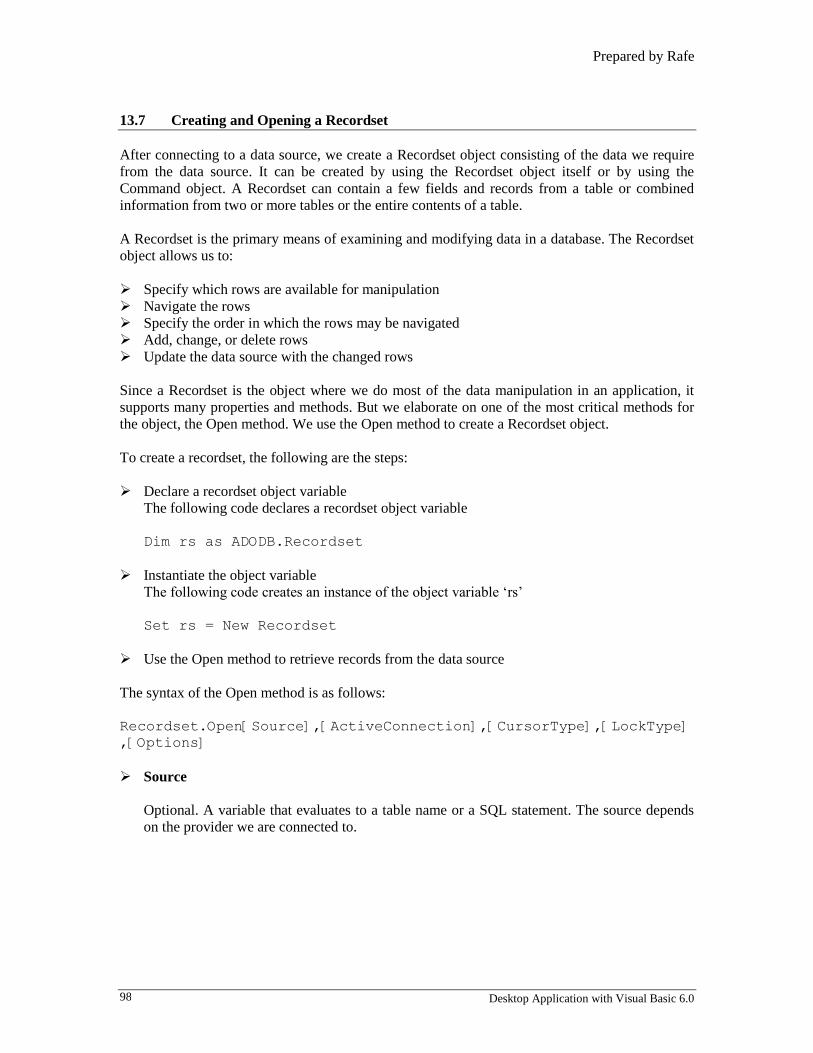
13.7 Creating and Opening a Recordset
After connecting to a data source, we create a Recordset object consisting of the data we require
from the data source. It can be created by using the Recordset object itself or by using the
Command object. A Recordset can contain a few fields and records from a table or combined
information from two or more tables or the entire contents of a table.
A Recordset is the primary means of examining and modifying data in a database. The Recordset
object allows us to:
Specify which rows are available for manipulation
Navigate the rows
Specify the order in which the rows may be navigated
Add, change, or delete rows
Update the data source with the changed rows
Since a Recordset is the object where we do most of the data manipulation in an application, it
supports many properties and methods. But we elaborate on one of the most critical methods for
the object, the Open method. We use the Open method to create a Recordset object.
To create a recordset, the following are the steps:
Declare a recordset object variable
The following code declares a recordset object variable
Dim rs as ADODB.Recordset
Instantiate the object variable
The following code creates an instance of the object variable ‘rs’
Set rs = New Recordset
Use the Open method to retrieve records from the data source
The syntax of the Open method is as follows:
Recordset.Open[Source],[ActiveConnection],[CursorType],[LockType]
,[Options]
Source
Optional. A variable that evaluates to a table name or a SQL statement. The source depends
on the provider we are connected to.

ADO and Recordsets 99
ActiveConnection
Optional. If we have already created a connection to the data source then we can use the
name of the connection for further communication required to create and maintain the
Recordset. If a connection has not been established then this parameter supports the use of all
the information required to make a connection. But this exists as long as the Recordset exists.
CursorType
Optional. We are already familiar with Cursors and Cursor types in the previous session.
Indicates the type of cursor the Recordset uses. The ADO model supports four types of
cursors. Refer Table 7.
Cursor Type ADO Constant
Forward – Only adOpenForwardOnly - — Behaves like a dynamic cursor
except that it allows to scroll only forward through records.
Keyset adOpenKeyset - Prevents us from seeing records that other
users add, and prevents access to records that other users
delete.
Dynamic AdOpenDynamic – Allows additions, changes, and
deletions by other users, and allows all types of movement
through the Recordset.
Static adOpenStatic - Allows all types of movement through the
Recordset. Additions, changes, or deletions by other users
will not be visible.
Table 13.7 : Types of Cursors
LockType
Optional. Indicates the type of locks placed on records during editing. By default all ADO
Recordsets are read-only. Table 13.8 lists the options for locking:
Lock Type Description
AdLockReadOnly (Default) Read-only. Data cannot be altered.
AdLockPessimistic The provider does what is required to ensure successful editing of
the records, by locking the page containing the record immediately
upon editing. This prevents other users from editing the record.
AdLockOptimistic The page containing the record is locked only when the records are
updated. Conflict arises when two users attempt to update the same
record. The update is granted to the user who first issues the
Update method.
Prepared by Rafe
Desktop Application with Visual Basic 6.0 100
Lock Type Description
AdLockBatchOptimistic Uses the BatchUpdate method to write the entire batch of rows to
the Recordset. Allows us to make modifications on a number of
rows without having to write those changes to the Recordset after
each row.
Table 13.8 : ADO Lock Types
Options
Optional. Indicates how the provider should evaluate the Source argument. The values of this
parameter are similar to the Command Type option of the RecordSource property of the
ADODC. Refer Table 13.1 for the values of the Option argument of the Open method.
The following example opens a connection and a Recordset. We open a Recordset on the Author
table and a keyset cursor with a pessimistic lock type:
Example 2
Dim con As ADODB.Connection
Dim rs as New Recordset
Set con = New Connection
con.ConnectionString = “Provider = Microsoft.Jet.OLEDB.3.51;” & _
“Data Source=C:\Program Files\Microsoft Visual
Studio\VB98\Biblio.mdb”
con.Open
rs. Open“Select *from Author”, con,adOpenKeyset,adLockPessimistic
A Recordset object variable can also be created using the ADODB progId as follows
Dim rs as ADODB.Recordset
Set rs = New Recordset
Example 2 assumes that a connection exists. We can also create a connection using a Recordset
object as shown in the following example:
Example 3
Dim rs as New Recordset
rs.Open “Select * from Author”, & _
“Provider = Microsoft.Jet.OLEDB.3.51;” & _
“Data Source = C:\Program Files\Microsoft Visual
Studio\VB98\Biblio.mdb” & _, adOpenKeyset, adLockPessimistic
In Example 3, we open the connection in the ActiveConnection parameter of the Recordset
object.
ADO and Recordsets 101
13.7.1 Displaying Data in a Recordset
After we create a Recordset we can access the fields of each record.
The following example illustrates how to retrieve a customer’s name and address stored in the
fields c_name and c_add of the Customer table from the current record and place it into variables:
Example 4
Dim name As String
Dim address As String
name=rs.Fields(“c_name”)
address=rs.Fields(“c_add”)
If we do not want to reference the name of the field, the above code can be written as follows
(assume that name and address are the first and third fields respectively).
Dim name As String
Dim address As String
name = rs.Fields(0)
address = rs.Fields(2)
We can also use a shorthand method of extracting data by using an exclamation point operator (!).
This operator is called a ‘bang’. The above code can be written using the bang operator as
follows:
Example 5
Dim name As String
Dim address As String
name = rs!c_name
address = rs!c_add
The following example retrieves information from the Customer table and places the information
in the appropriate text boxes.
Example 6
Private Sub Form_Load()
Dim con As ADODB.Connection
Dim rscust As ADODB.Recordset
Set con = New Connection
con.ConnectionString = "Provider =
Microsoft.Jet.OLEDB.3.51;" & _
“Data Source=C:\Program files\Microsoft Visual
Studio\VB98\Nwind.mdb"
con.Open
Prepared by Rafe
Desktop Application with Visual Basic 6.0 102
Set rscust = New Recordset
rscust.Open "Customers", con
txtcustid.Text = rscust!CustomerId
txtcustname.Text = rscust!CustomerName
End Sub
13.7.2 Navigating Through a Recordset
Now that we have created a Recordset and learnt how to extract data from the current row, the
next step is to navigate through the Recordset. The ADO model supports four primary methods of
navigating through the Recordset object.
Table 13.9 illustrates the four methods:
Navigation Method Description
MoveNext Takes the user to the next record in the Recordset. If an attempt is
made to move to the record after EOF, an error occurs.
MovePrevious Moves the user to the previous record in the Recordset. Moving past
BOF results in an error.
MoveFirst Takes the user to the first record of the Recordset.
MoveLast Takes the user to the last record of the Recordset.
Table 13.9 : Recordset Navigation Methods
The syntax for using the methods listed in Table 13.9 is:
object.method
The following example uses the MovePrevious and the MoveFirst methods. A messagebox is
displayed if the user attempts to move past the BOF clicking the command button cmdPrev:
Private Sub cmdPrev_Click()
rst.MovePrevious
If rst.BOF=True Then
MsgBox “Already at the beginning of the Recordset”
rst.MoveFirst
End If
End Sub
In addition to the methods listed in Table 13.9 we also have the following methods and
properties:
Method and Properties Description
ADO and Recordsets 103
Method and Properties Description
Move Method Moves the cursor, relative to its current
position, within a Recordset object.
AbsolutePage Property Used to identify the page number on which the
current record is located.
AbsolutePosition Property Determines the relative position of a Recordset
object’s current record.
NextRecordset Method Clears the current Recordset object and returns
the next Recordset by advancing through a
series of commands. Required when dealing
with multiple Recordsets.
Table 13.10 : Additional Navigation Methods and Properties
13.7.3 Finding Records
A user can also search a Recordset for a record that satisfies a certain condition. If the condition
is met, the Recordset position is set on the found record; otherwise, the position is set on the end
of the Recordset. This can be done by using the Find method that we are already familiar with in
the beginning of this Session.
The Find method has the following syntax:
object.Find (criteria, skiprows, searchdirection, start)
The following example locates the records of customers whose age is greater than 40.
Example 7
rscust.Find “Age> 40”, 0, adSearchForward, adBookmarkCurrent
The Find method can be used only on a scrollable Recordset.
13.7.4 Editing Records
Updating data in a Recordset is as simple as displaying data. A user can make changes and save
the results back to the data source.
The Update method has the following syntax:
Recordset . Update Fields, Values
Prepared by Rafe
Desktop Application with Visual Basic 6.0 104
Parameters Description
Fields Optional. Represents a name of the field or fields we wish to modify.
Values Optional. Represents values in the field of the new record.
Table 13.11 : Parameters of the Update Method
Example 8 changes the current record of the Publisher table and then saves it to the data source.
We assign the values of the controls to the appropriate fields of the Recordset:
Example 8
Private Sub cmdSave_Click()
rspub!name = txtname.Text
rspub!City = txtcity.Text
rspub.Update
End Sub
To cancel the changes before they are saved to the data source we use the CancelUpdate method.
The syntax of the CancelUpdate method is as follows:
Recordset.CancelUpdate
13.7.5 Adding Records
The AddNew method of the Recordset object is used to insert a new record. This method is
invoked prior to inserting values. Once the required values are inserted the values are saved back
to the data source using the Update method. The newly inserted records are added at the end of
the Recordset.
The following example uses the AddNew method to insert a new record in the Employee table. It
checks if the user entered values for both the ID and the name of an employee in the respective
text boxes and invokes the AddNew method. The new record is then saved to the data source
using the Update method.
Example 9
Private Sub Add()
If (txtID.Text <> ”“) And (txtName.Text <> “”) Then
rstemp.AddNew
rstemp!emp_id = txtID.Text
rstemp!name = txtName.Text
rstemp.Update
End if
ADO and Recordsets 105
End sub
We can use the CancelUpdate method to cancel the insertion of a new record.
13.7.6 Deleting Records
The Delete method of the Recordset deletes the current record from a Recordset. We can delete
only one record at a time.
The syntax of this statement is as follows:
Recordset.Delete
After deleting the current record, it is deleted from the database, but the deleted record remains
current until we move to a different record. Retrieving field values from the deleted record
generates an error. Once we move away from the deleted record, it is no longer accessible.
We do not require the Update method to save the results to a data source. It would be a good
practice to confirm whether the user really wants to delete the record.
The following code in the Click event of the command button cmdDelete deletes the current
record from the Employee table after confirmation from the user:
Example 10
Private Sub cmdDelete_Click()
Dim ans As Integer
ans = MsgBox("Do you want to Delete this record?", vbYesNo)
If ans = vbYes Then
rsemp.Delete
rsemp.MoveFirst
else
Exit Sub
End if
End Sub
13.7.7 Closing a Recordset
We use the Close method to close a Recordset and free any system resources. Closing a
Recordset does not remove it from the memory.
The syntax to close a recordset is as follows:
Recordset.Close
13.8 Using the Command Object
Using the Recordset object, we executed a SQL command to retrieve data. The Open method of
the Recordset object gives us the ability to execute simple queries and stored procedures. But it
Prepared by Rafe
Desktop Application with Visual Basic 6.0 106
does have some limitations. If we want to execute stored procedures and SQL commands that
have parameters we need to use the Command object.
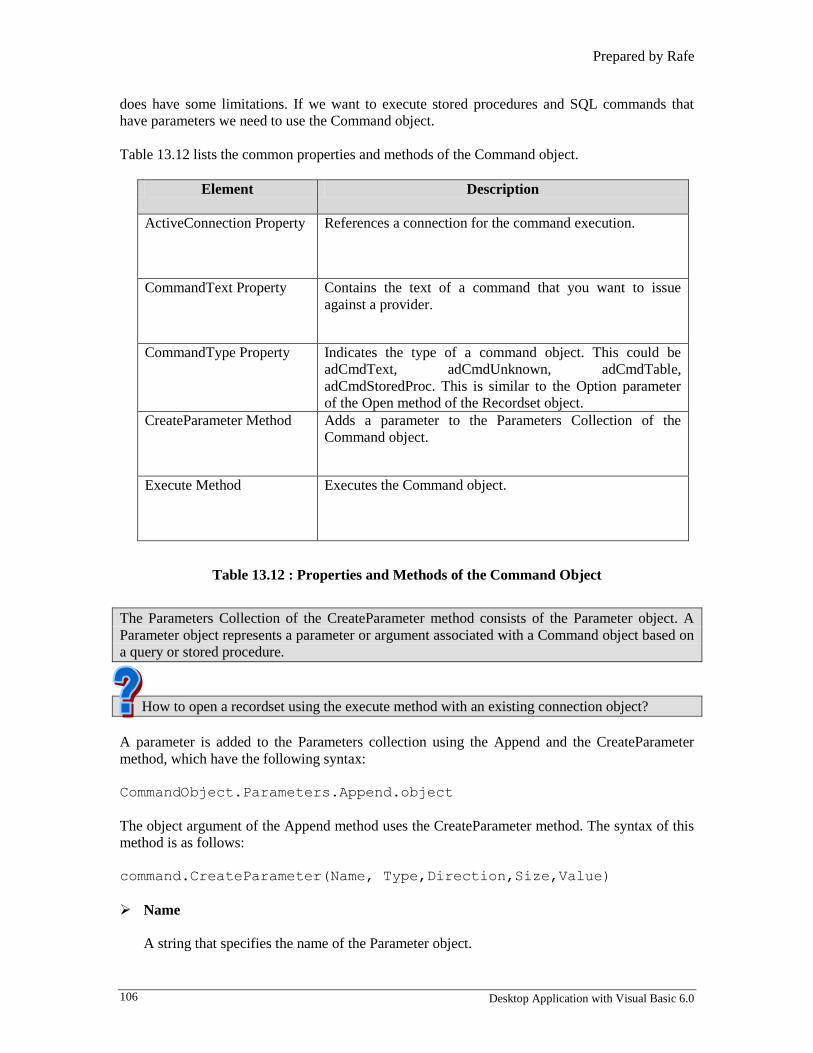
Table 13.12 lists the common properties and methods of the Command object.
Element Description
ActiveConnection Property References a connection for the command execution.
CommandText Property Contains the text of a command that you want to issue
against a provider.
CommandType Property Indicates the type of a command object. This could be
adCmdText, adCmdUnknown, adCmdTable,
adCmdStoredProc. This is similar to the Option parameter
of the Open method of the Recordset object.
CreateParameter Method Adds a parameter to the Parameters Collection of the
Command object.
Execute Method Executes the Command object.
Table 13.12 : Properties and Methods of the Command Object
The Parameters Collection of the CreateParameter method consists of the Parameter object. A
Parameter object represents a parameter or argument associated with a Command object based on
a query or stored procedure.
How to open a recordset using the execute method with an existing connection object?
A parameter is added to the Parameters collection using the Append and the CreateParameter
method, which have the following syntax:
CommandObject.Parameters.Append.object
The object argument of the Append method uses the CreateParameter method. The syntax of this
method is as follows:
command.CreateParameter(Name, Type,Direction,Size,Value)
Name
A string that specifies the name of the Parameter object.
ADO and Recordsets 107
Type
Specifies the data type of the Parameter object.
Direction
Specifies whether data is to be sent to a query or returned from query.
Size
Specifies the maximum length of the parameter value in characters or bytes.
Value
Specifies the value of the Parameter object.
The following example updates the student name in the Student table of the StudentData
database.
Example 11
Private Sub Form_Load()
Dim con As ADODB.Connection
Dim cmd As ADODB.Command
Dim str As String
Set con = New ADODB.Connection
Set cmd = New ADODB.Command
con.ConnectionString = "Provider =
Microsoft.Jet.OLEDB.3.51;" & _
"Data Source=C:\Program files\Microsoft Visual
Studio\VB98\studentdata.mdb"
con.Open
Set cmd.ActiveConnection = con
str = "Update Student Set studentname = 'Jim Baker' where
studentname= 'Liz Nizon’"
cmd.CommandText = str
cmd.Execute
End Sub
13.9 Collections
A collection is a way of grouping a set of related items. Collections in Visual Basic keep track of
loaded forms in a program (the Forms collection), or all the controls on a form (the Controls
collection).
When we put two text boxes on a form, they are separate controls with the distinct Name property
(Text1 and Text2), but they both belong to the class - TextBox. They also share the characteristic
Prepared by Rafe
Desktop Application with Visual Basic 6.0 108
that they are on the same form. The two TextBoxes also share the characteristic that they are
controls. All controls have common characteristics that make them different from forms and other
objects in Visual Basic. Thus we define a Collection as an object that contains zero or more
objects of the same class.
Collections have their own properties and methods. The objects in a collection are referred to as
‘members’ of the collection. Each member of the collection is numbered sequentially beginning
from 0; this is the ‘index number’ of the member. We use collections to simplify code if we need
to perform the same operation on all the objects in a collection.
For example, consider a form with four text boxes and a CommandButton to save the details
entered in the TextBoxes. The following code checks if the user has left any of the text boxes
blank. The details are saved only after the user enters all the details. We use the For each…Next
loop to repeat a group of statements for each member in the collection.
Collections in Visual Basic have the following features in common:
We can add items to a collection
We can remove items from a collection
We can refer to the specific members of a collection
The Collection object keeps a count of the number of members in a collection.
Example 11
Private Sub cmdSave_Click()
Dim ctl as Control
For Each ctl in Controls
If TypeOf ctl Is TextBox then
If ctl.Text=”” Then
MsgBox “All Fields must be entered”
Exit Sub
End if
End if
Next ctl
End Sub
What is the difference between a Control array and a Collection of Controls?
13.9.1 Using the Methods of a Collection
The Collection object in Visual Basic has three methods that enable us to manipulate the
collection of objects: Add, Item and Remove.
These methods enable adding, retrieving and removing individual items in the collection.

ADO and Recordsets 109
13.9.2 The Add Method
Most collections use the Add method to add members to a collection. The syntax of the Add
method is as follows:
object.Add item, key, before, after
item (Required) is the member to be added to the collection
key (Optional) is the string used to identify the member
Before (Optional) specifies that the new item should be placed in the collection before the
member specified in the Before parameter
After (Optional) specifies that the new item should be placed in the collection after the
member specified in the After parameter
The Before and the After parameters enable us to sort the members as they are added to the
collection.
The following code uses the Add method to add the ‘Inst’ object to the collection ‘col’ as follows:
col.Add Inst, “mkev”
Inst is the member to be inserted and “mkev” is the key that identifies the Inst object.
13.9.3 The Remove Method
We use the Remove method to remove items from a collection just as we can add items to the
collection. The syntax is as follows:
object.Remove(Index)
The Index can be either the numeric index of the member or the key property of the member.
For example, if the key of the third element in a collection is “E003” we can use either of these
two statements to delete it from the collection ‘coll’:
coll.Remove 3
-or-
coll.Remove “E003”
13.9.4 The Item Method
This method is used to access a specific item from the collection. It is a method used by all the
collections and has the following syntax:
object.Item(Index)
The Index can be either the numeric index of the member or its key property.
Prepared by Rafe
Desktop Application with Visual Basic 6.0 110
To access the third item in a collection ‘col’, with the key “E003”, we use the Item method as
follows:
col.Item(3)
-or-
col.Item(“E003”)
13.9.5 The Count Property
The Collection object has a single property and is used to tell how many items are there in the
collection. The following is the syntax of the Count property.
object.Count
We use the Count property in code as follows:
Dim i as Integer
For i=1 to col.Count
Print col.Item(i)
Next
The above code prints all the members in the collection ‘col’ using the Count property.
There are two text boxes text1 and text2 in a collection of controls .How to check that only
numeric values are entered in the text box text2?

Desktop Application with Visual Basic 6.0 82
The Session in Brief
ActiveX Data Object (ADO) provides an interface to OLE DB.
Controls can be bound to the ADO Data control if they possess the DataSource property.
Microsoft’s ActiveX Data Objects (ADO) is an alternative to creating database application
through code.
The ADO object model has the following three main objects that are required to access data
from an existing database:
Connection
Recordset
Command
The Connection object creates a connection between an application and the data source.
The Recordset object is used to access records returned from a query. Data is almost entirely
manipulated using Recordset objects.
A Command object is used to query a database and access the records that are returned from
the database.
To create a Connection object we need to set the ConnectionString and the
ConnectionTimeout properties.
We establish the physical connection to a data source using the Open method of the
Connection object.
We use the Close method to close a Connection object. Closing an object does not remove it
from memory.
To completely eliminate an object from memory, we set the object variable to Nothing.
To display data from a Recordset we use the bang (!) operator or the Fields collection.
The four primary methods to navigate the recordset are:
MoveNext-Takes the user to the next record in the Recordset.
MovePrevious-Moves the user to the previous record in the Recordset.
MoveFirst-Takes the user to the first record of the Recordset.
MoveLast -Takes the user to the last record of the Recordset.
The AddNew method is used to insert a record into a Recordset.
The Delete method deletes the current record from a Recordset.
We use the Command object to execute stored procedures and SQL commands that have
parameters.


