Embed Size (px)
Citation preview

12
Logical Trader
Chapter One – Know Your ACD’s
When you go in for your annual physical, the doctor takes your blood
pressure, listens to your heart and lungs, draws some blood, etc. Based on all
these indicators, the doctor makes a determination about how healthy you are.
Now, assume that the patient drops dead right there on the examination table.
He has no pulse! Then it doesn’t matter what his cholesterol level was, right?
No pulse … no life.
I use this analogy to explain the ACD methodology. In trading, you’ll be
looking at a variety of factors, including pivots, moving averages, and so forth.
But there will always be one underlying factor – like the patient’s pulse – without
which everything else becomes meaningless. That “pulse” is the ACD factor. It
doesn’t matter whether 64 out of 65 indicators are a “go” for a trade. If the ACD
is the one missing indicator, then there is no trade.
So what is this ACD and what’s it all about? ACD is the name I’ve given
to my trading methodology, which can be applied to virtually any commodity,
stock or currency as long as there is sufficient volatility and liquidity. The basic
premise of ACD is to plot particular price points, which we’ll discuss in depth, in
relation to the opening range. As I mentioned in the Introduction, I have traded
using ACD for nearly 20 years and I still use it today. I’ve taught it to thousands
of other people over the past 15 years who in turn have adapted it to suit their
own trading styles and parameters. My point is that ACD has a proven track

13
record, not only for me, but also for numerous other professional traders.
Therefore, it can be incorporated into your trading system to help you plot out
and execute your trading strategy.
But before we go any further, I must state that trading is an inherently risky
endeavor and therefore not suitable for everyone. Any investment in derivatives
or stocks may put you at risk of losing an amount even greater than your original
investment. (See the full Disclaimer in the Appendix of this book.)
My purpose in this book is not to “sell” you on trading, but to show you the
methodology that I, as well as others whom I have trained, have used. As you go
through this book, keep a pen and a pad of paper handy so you can follow along
with the trading examples. Whether you’re a novice trader or you’ve been at this
for a while, I believe you’ll find that the ACD system has something for you and
your style of trading.
The Opening Range
ACD starts with the concept of the opening range. The opening range is
the initial timeframe of trading for a stock, commodity, currency, bond or other
financial derivatives at the start of each new trading session. For stocks, the
opening range timeframe is generally the first 20 minutes of the day, meaning if
Stock X trades from $30.00 to $30.75 in the first 20 minutes of the day, that is the
opening range to be used in the ACD system for that particular day. However, if
a stock has a delayed opening, you must take the first 20 minutes of active
trading.
14
In commodities, the length of time used for the opening range varies from
5 minutes to 30 minutes, depending upon an individual trader’s time horizon.
Some commodity futures contracts open using a monthly rotation at the start of
the trading day. When this occurs, I use that initial trading period – from the time
the contract for a particular month is opened and then closed temporarily while
the next month opens – as the opening range. Alternatively, if you’re a short-
term, day-trader in a particular commodity, you may decide that the opening
range you’ll use is five minutes – particularly if you trade on the floor. Or if you
day-trade upstairs you might choose a 10- to 15-minute opening range, or a
longer timeframe – such as 20 to 30 minutes – if you typically take a position in a
market that has a longer trade duration. (See our current list of opening range
timeframes in the Appendix.) The key is to define the time period for the opening
range and then be consistent when you trade using that time period.
There is one other important consideration about the opening range, and
that is making sure it’s based on its domicile market. What do I mean by that? If
you’re trading natural gas futures, then you know the domicile market is the New
York Mercantile Exchange. That’s where the opening is established. But if you
were trading, say, Japanese yen, then the opening of the U.S. currency markets
wouldn’t apply. Rather, you’d have to look to the opening of the Japanese
markets. Same thing with a foreign-domiciled commodity such as North Sea
Brent crude oil. In stocks, for example, the opening range for UK-based
Vodaphone (VOD) is in London, which would be approximately 3:00 a.m. to 3:20
a.m. New York time, even though the stock also trades in the United States. The
15
same thing occurs with ADR’s (American Depository Receipts) representing
foreign stocks that trade on U.S. exchanges. The true opening range is
established in the domicile market.
I discovered this years ago the proverbial hard way when I tried to apply
the ACD system to some foreign currencies and bonds. I couldn’t figure out why
the system wasn’t working at first and then I realized that the U.S. wasn’t the
primary market for these instruments. Therefore, I had to look to the opening in
the market where these commodities, currencies and bonds are based.
Once you have identified the opening range, this price range is an
important reference point for your trading strategy. Here’s why:
If you subscribe to the “random walk” theory, which states that the
market’s movements are random and totally unpredictable, then the opening
range would not be any more important than any other price level during the
trading day. Right? For example, crude oil trades from 9:45 a.m. Eastern time
until 3:10 p.m. Eastern Time. If you divided that day into 10-minute intervals,
you’d have 32 parcels of time (and five minutes left over). So, each 10-minute
time interval would account for roughly 1/32 of the market activity.
Using random walk theory, you’d expect that the opening range
(established in the first 10 minutes of trading) would be the high 1/32 of the time,
or it would be the low 1/32 of the time. Therefore, random walk theory would
dictate that 1/16 of the time the opening range would be EITHER the high or the
low.
16
Now, what if I told you that in volatile markets – not static, and not
necessarily trending markets – the opening range tends to be the high or the low
17-23% of the time? Would that get your attention? Yes. Because this
observation would tell you that the opening range being at the high of the low of
the day roughly one-fifth of the time is what we call “statistically significant.” In
complete layman’s terms, this means the opening range is not just another 10-
minute interval out of 32 of them in the trading day. It has more weight than any
other time interval.
Let’s take another example. Let’s say that you divide the trading day up
into roughly 64, five-minute intervals. Random walk theory would state that the
opening, five-minute range would be the high 1/64 of the time or the low 1/64 of
the time. So it would be either of those extremes 1/32 of the time. However, in
volatile markets, that five-minute opening range is actually the high or the low of
the day about 15-18% of the time. So instead of about 3% of the time, as
random walk theory would predict, the first five minutes of the trading day turns
out to be the high or the low 15-18% of the time. Again, statistically significant.
And, from a trader’s perspective, if you knew that something was going to market
the high or the low 15% of the time, you’d want to know that. Right?
Further, if you take a look at the other 5- or 10-minute intervals in the
trading day, the opening range price extremes are repeated a miniscule
percentage of the time. That means once the opening range is put in, the
market returns to that price range only on rare occasions – far less than the

17
random walk theory would predict. Thus, here’s the first concept of the ACD
Methodology:
* * *
The opening range is the statistically significant part of the trading
day, marking the high or low for the day (in volatile markets) about 20% of
the time.
* * *
So what do you do with that information? As a trader and a student of the
market, I believe the opening range to be statistically significant. Thus, I
constructed a trading model based on breakouts of the opening range, based on
the premise that once this occurs the market is likely to continue in that direction.
These breakouts are determined using a time and price filter that is applied to the
opening range. As you’ll learn in this chapter, once you have defined the
opening range you can determine your “A” points at which to establish a short or
long position, as well as the B, C and D points. But first, let’s take a look at the
starting point – Point A.
Point A
For the purpose of this exercise, let’s say you are day trading crude oil, of
the U.S. variety, with its primary market for futures at the New York Mercantile
Exchange (Nymex). As a pit trader, you decide that your opening range is the
first five minutes of trading. On this particular day, the opening range for crude
oil is 25.60 to 25.70. Thus, the opening range has been established. Let’s mark
it down in a graphic like this (see Chart 1-1).

18
INSERT Chart 1-1
Based on this opening range, the “A” point to enter a long or short position
is plotted above or below the opening range, based upon set variables. These
variables are based upon our own proprietary research, the process of which I
won’t share with you except to say that the ACD values are based upon the
volatility measurements of a particular stock, commodity or financial derivative.
(Please see the table in the Appendix that gives the current A values for several
commodities and stocks, along with current opening range timeframes.)
Using our example of crude oil, I can tell you that “A” points are plotted 7
to 8 ticks above or below the market. Going back to our graphic, here’s how it
would look (Chart 1-2).
(Chart 1-2)
If the market were to immediately trade above the opening range and
reach the price level of $25.77 to 25.78 – and trade there for a period of time
equivalent to half the opening range timeframe -- then the market has
established an “A up.” Thus, if the market traded up to $25.77-$25.78 and
stayed there for 2 ½ minutes (half the five-minute timeframe for the opening
range), you would establish a long position/bias above $25.77-$25.78.
Conversely, if the market immediately traded below the opening range to
$25.53-$25.52 and traded there for at 2 ½ minutes, the market would have

19
established an “A” down. At this point, you would establish a short position/bias
below $25.53-$25.52.
* * *
“A” points – up or down – are based upon a certain number of ticks
above or below the opening range, if trading is sustained at these levels for
a period of time equivalent to half the duration of the opening range that
you have chosen.
* * *
Remember, on any given day you can have EITHER an “A” up or an “A”
down. The “A” level is determined when (and if) the market trades above or
below the opening range. If the market goes up to 25.77 to make an A up, then
there is no A down, even if the market turns around and trades below the
opening range.
* * *
There is only “one A” per day. That means, once an A up is
established, there can be no A down for that trading day. Or, if an A down
is established, there can be no A up for that trading day.
* * *
As you plot the various price reference points, you must ask yourself at all
times where you’d get out if you were wrong. After all, if you were to go into
business, wouldn’t you want to know how much capital you needed to invest and
how much you’d be at risk for? Trading must be treated the same way. When

20
you make a trade, you must know where your exit point is if the market turns
against you, and how much you would stand to lose if that happened. That’s
where the “B” level comes in. Once you have an “A” established – up or down –
your stop for getting out of an unprofitable trade is “B.” The B level, where you
would be bias neutral, is delineated by the opening range.
In other words, using the example above, if you established a long
position above 25.77-25.78 and then the market broke immediately and traded
lower, your stop to exit the trade would be at the lowest end of the opening
range, or in this case 25.60. Conversely, if you went short below 25.53-25.52,
your stop to exit the trade would be the highest end of the opening range, or
25.70.
Keep in mind when exiting any trade that the price at which you want to
get out may not be where you will be filled. “Slippage” – the difference between
your target price and the price at which your order is filled – is a reality in the
market. Slippage can be small or significant depending largely upon market
conditions.
As you follow the ACD system, remember that it is symmetrical. The
strategy for the upside (a long position) is the mirror opposite of the strategy for
the downside (a short position).
Let’s assume that the market did reach the “A” target on the upside, which
I call “making an A up.” In the example we just used, the market traded up to
25.77-25.78, stayed above this level for more than 2 ½ minutes, and you went
long at, say, 25.79. You stayed long all the way to 26.10, at which you exited the

21
trade profitably. Now, the market trades lower and falls below the opening-range
low of 25.60. What do you do?
The answer is you do nothing.
In this case, the market has made an “A up” and now is trading below the
opening range, which is the Point B, at which your bias is neutral. The next step
is to wait for the next ACD signal for a new bias, in this case for the market to
trade to Point C.
Point C
Once an “A” has been made the next probable entry point in the ACD
system is Point “C.” Point C’s are calculated (just like A’s) based upon a certain
number of ticks above or below the opening range. In the example of crude oil,
A’s are 7-8 ticks above/below the market. Point C’s in crude oil are 11-13 ticks
above/below the market. (A reference list of our current values to calculate Point
C’s on various stocks and commodities also can be found in the Appendix.) As
you’ll see, for commodities the price differential to calculate a Point A is different
than that to calculate a Point C. For a stock, however, the differential to calculate
a Point A or a Point C is the same.
Now take a look at our trade graphic:
Insert Chart 1-3
Using this example, what would happen if the market traded all the way to
the C down point? Point C is the crossover point at which your bias shifts from

22
bullish to bearish, or vice versa. Here, if the market traded down to $25.49-25.47
and traded at or below that level for 2 ½ minutes (half the length of time of the
opening range) you would establish a short position/bias.
* * *
Point C is the “crossover point” at which your bias shifts from
bullish to bearish, or vice versa.
* * *
If you establish a short position below Point C, what’s the first thing you
must ask yourself: Where will you get out if you are wrong? Just as with the
Point A, the stop for Point C coincides with the opening range. If you have a “C
down,” the stop – known as Point D – would be one tick above the top of the
opening range. Here’s what it would look like (Chart 1-4) (same as Chart 1-3
plus Point D marked - NOTE TO TRICIA AND JOE).
INSERT Chart 1-4
Since this system is symmetrical, here’s what it would look like in the
case of an A down and a C up. (If you have a “C up,” the Point D stop would be
one tick below the bottom of the opening range.)
INSERT Chart 1-5

23
The Time Factor
As you plot your trades based on Point A up/down and Point C up/down,
there is another concept that you must keep in mind: time. Too many traders
focus only on price, and not enough on time. In other words, when plotting out
your trade, it is not only if a price level is reached but how long the market
spends there. The vast majority of traders I know trade on price, but not on time.
How many people have you heard say that if you take a position and it doesn’t go
anywhere in 20 or 30 minutes then you should get out? Very few, if any. I’m
here to state that time is the most important factor in trading. If the scenario
you’ve envisioned doesn’t materialize within a certain time frame, then just move
on and look for the next trade.
* * *
In trading, time is actually more important than price.
* * *
How do you factor time into your trades? Simple. You set the time
parameters for a certain scenario to occur. As a minimum, the market must trade
at a certain level for a time period equivalent to half the opening range. As a
maximum, if the market has not acted the way you expected within a timeframe
equivalent to the opening range, then get out. We’ll discuss the maximum
timeframe shortly. But for now, let’s take a look at what happens when the
market “touches” a certain price point, but fails to spend enough time there.
If you have an “A up” plotted at, say, 62.125 and the market goes up to
that price, touches it and immediately sells off, was your target reached? No.

24
The market must spend time equivalent to half the length of your opening range
at a price target in order to be valid. Here’s what I mean. If you’re day trading and
you have an opening range of 5 minutes, then the market must spend at least 2
½ minutes at your price targets to trigger them. So in the example above, if the
market didn’t spend 2 ½ minutes at 62.125 – but rather, just touched it and
immediately went down – then you didn’t have an A up.
Now, a question to see if you’ve been paying attention: If you didn’t have
an A up, what happens to the A down target?
Answer: It’s still in the running. The market has not made A up – yet –
although it might later on. Or, it could continue to sell off and make an A down.
At this point, you could conceivably have an “A” on the upside or the downside.
Once again, you must wait to see what the setup is before taking action.
Now, let’s say you’re a short-term trader, holding positions for a day or
sometimes a couple of days. The opening range you like to use is 20 minutes.
The market trades below the opening range and touches the A down target.
How long would it have to trade there in order to be a valid A down? Did you
remember? Of course, it’s 10 minutes.
Suppose the market then rallies sharply, trading through the opening
range and hits your Point C. (Remember, Point C is always in the opposite
direction of Point A. If you have an A up, Point C is on the downside. If you have
an A down, then Point C is on the upside.)
Continuing with the example given above, how long would the market
have to stay at or above Point C to be valid? Exactly – 10 minutes.
25
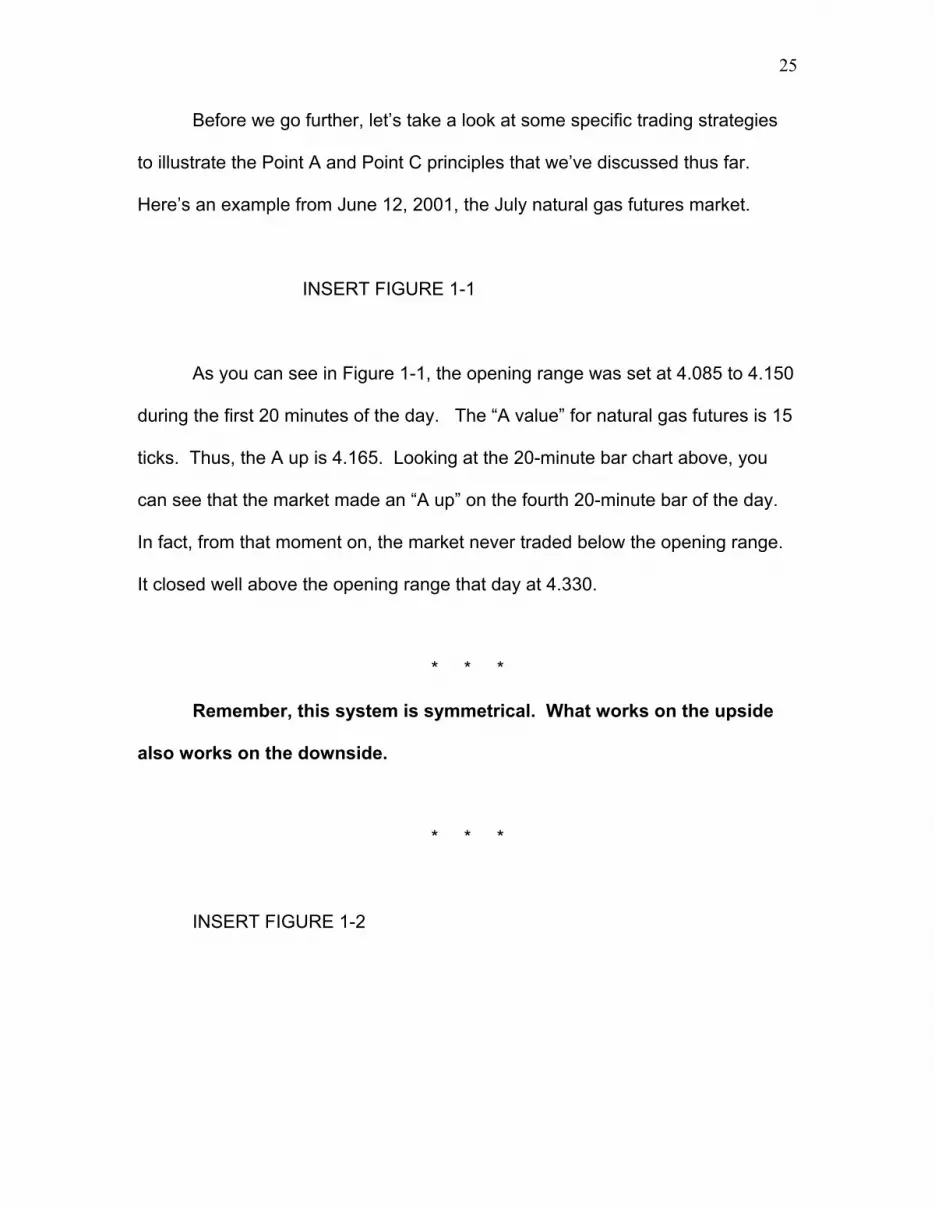
Before we go further, let’s take a look at some specific trading strategies
to illustrate the Point A and Point C principles that we’ve discussed thus far.
Here’s an example from June 12, 2001, the July natural gas futures market.
INSERT FIGURE 1-1
As you can see in Figure 1-1, the opening range was set at 4.085 to 4.150
during the first 20 minutes of the day. The “A value” for natural gas futures is 15
ticks. Thus, the A up is 4.165. Looking at the 20-minute bar chart above, you
can see that the market made an “A up” on the fourth 20-minute bar of the day.
In fact, from that moment on, the market never traded below the opening range.
It closed well above the opening range that day at 4.330.
* * *
Remember, this system is symmetrical. What works on the upside
also works on the downside.
* * *
INSERT FIGURE 1-2

26
This example is from June 27, 2001, in the July unleaded gasoline
contract. The opening range from the first 20 minutes of trading was .7440 to
.7580. The A value is 25 ticks. As you can see in the chart above, the market
quickly traded lower and made the “A down” on the second, 20-minute bar. From
that point until the close of trading, the market never traded in or above the
opening range. The market closed sharply lower at .7065.
In the previous examples, we looked at an A up and an A down in markets
that move basically in one direction for the day. Now, let’s take a look at trades
that take into account both a Point A and a Point C. To review, once an A is
made (up or down) if the market then reverses, the target becomes Point C, at
which the bias crosses over from bullish to bearish, or vice versa.
INSERT FIGURE 1-3
This example (Figure 1-3) is from unleaded gasoline futures for May 29,
2001. The opening range on that day was .9700 to .9780. The A value is 25
ticks. As the market moved higher from the opening, an A up was made at .9805
on the second 20-minute bar of the trading day. The market continued to trade
higher, topping out on the fifth bar. The market then sells off, and trades into and
ultimately below the opening range. Remember, once an A up is made, when
the market trades back below the opening range, you are not looking to establish

27
a short position. Rather, your bias is neutral until you reach the downside target
to enter the market, which would be Point C.
The Point C value for this market is 85 ticks below the lower end of the
opening range. Thus, a Point C down was established at .9615. Once the
market traded at that level for 10 minutes (equivalent to half of the length of time
for the opening range) you could have established a short position. The market
then traded lower – approaching .9500 – before recovering somewhat. At the
close, however, it remained below the Point C at .9555.
In the next example, we look at the opposite, but symmetrical, scenario of
a market that established an A down and then rallied to make a C up. Figure 1-4
shows Broadcom Corp. (BRCM) on March 1, 2001. (As I mentioned before, the
ACD System works equally well with stocks and commodities, as long as the
market has sufficient volatility and liquidity.)
INSERT FIGURE 1-4
In this stock, as in any stock, the price differentials for Point A and Point C
are the same. In the case of Broadcom, the differential is 76 cents. The opening
range for BRCM was 44.25 to 46.44. The stock traded mostly within the opening
range for the first seven 20-minute bars. Then it traded below the range and
established an A down at 43.49 on the next bar. The stock continued to break,
putting in a low for the day around 40.76. The market then traded steadily
higher, continuing through the opening range (at which you would have had a
28
neutral bias) to make a C up at 76 cents above the high of the opening range at
47.20. This occurred late in the session and the stock traded as high as 48,
before settling within the opening range at 46.00.
In each of the previous examples, Point A’s and Point C’s were
established because the market not only traded to these levels, but traded there
for a time period equivalent to half the opening range. What happens, however,
when the market touches a certain level – such as an A up target – but does not
stay there? Rather than sustaining trade at that level, it seems to “snap back.”
This is what I call a rubber band trade.
Go find a rubber band somewhere on your desk or in the junk drawer in
the other room. Hold the rubber band between your thumb and index finger of
your left hand and of your right hand. Move your hands apart until the rubber
band is stretched to the limit. What happens when you let go of the rubber
band? It snaps back.
When the market seems to stretch in the same way but can’t go any
further, it tends to “snap back” quickly in other direction. Keeping the rubber
band visual in your mind, imagine that Point A (up or down) is the limit. So if the
market has to “stretch” to get at or near that point, you’d expect a quick reversal.
Here’s an example of what I mean: Crude oil futures establish an opening
range for the first 5 minutes of the day at 20.60 to 20.70. The A up target would
be 20.78. The market struggles to the upside and just touches 20.77 – 1 tick
away from the A up target – and starts to move down quickly. An “A up” was not
established. The market nearly touched the target, but like a rubber band that’s

29
stretched to the limit, it couldn’t go any further and starts to snap back the other
way.
Insert CHART 1-6
Now, if you determine the market is accelerating to the downside, on this
“rubber band trade” you do not have to wait until the A down to get short. Once
the market “snaps back” at or near the A up target you can opt to go short below
the “snap back” point since you had a “failed A up.”
Insert Chart 1-6 (duplicate)
At this point, take a look at what you’re risking. Remember, the question
you must always ask yourself is, where do I get out if I’m wrong? In this case the
A up target is still a valid one – since you’re above the opening range. But it’s
only 5 ticks above your entry level. Thus, if the market goes back up to the A
target at 20.78, you’re stopped out and you lose 5 ticks. And, if the market
doesn’t start to accelerate to the downside within the next 10 minutes
(remember, time is more important, than price) you exit.

30
Let’s say, the market does accelerate, going through the opening range
and trades below 20.60. At this point, you can choose a profitable exit point for
your short position. Chances are, however, if the market trades from here back
into the opening range, you’d exit the short position. Again, the risk was only 5
ticks to the upside, for a possible long ride down. Remember, nobody gets blown
out of trading for risking 5 ticks when they stand to make 20!
Let’s take a look at the concept of a “failed A” from the opposite
perspective. (See Chart 1-7)
Insert CHART 1-7
In this scenario, the market trades lower after the opening and approaches
the A down target at 20.52. But with an opening range of 5 minutes, the market
must spend at least 2 ½ minutes at 20.52 to establish an A down. Instead, the
market trades down to 20.53, then like a rubber band stretched to its limit, seems
to “snap back” to a higher level. At this point, with a failed A down, your risk of
establishing a long position after the “snap back” is small, as long as you know
where you’d get out if you’re wrong – the A down target.
* * *
Establishing a short position on a failed A up or a long position on a
failed A down provides the potential to make a profit that far outweighs the
risk.
* * *

31
Remember, this concept of the “rubber band trading” only works if you
have a failed A or a failed A down. Once an “A” has been established, you must
retain a bullish bias above the opening range and a bearish one below.
Of course, traders sometimes violate the rules of even the best system.
Consider it some fluky part of human nature, or an exercise of free will. Who
knows! It might even work out for you on occasion. But what I hope will happen
when you make these “no rhyme or reason trades” is you do so with small
positions. By that I mean you know that the ACD System is not dictating this
trade you’re about to take. In fact, you may take a trade because you’re PO’ed
with yourself for missing a trade that the system was dictating. An A up was
established, you missed the opportunity to get long, and now the market is back
below the A up point. You should be waiting for a point of reference to initiate a
long position. But instead, you decide to get short below Point A just because
you feel like it. And if this rationale is going on inside your head, no one (except
you) can talk you out of it.
These are not good reasons to trade. But traders are humans, and often
highly emotional creatures at that. Thus, they do not follow logic like little robots.
Believe me, after trading for 20 years and teaching literally thousands of traders I
know this.
So what do you do – in the real world? If the ACD System is not aligned
with what you’re bound and determined to do, then don’t “step on the gas.” Don’t
load up on this trade. Rather, if you’re going to make this trade anyway, then do
so with a small, scaled-down position. Ride the brake a little. If you make this

32
dumb trade (any trade for which you do not have a good reason is a dumb trade,
even if it’s profitable) then at least your risk exposure won’t be too great.
Believe me, I could preach discipline and the need to take only those trade
that are dictated by the system until the next millennium, and there would be
times when traders – including those who work for me and myself included – will
disregard the system and trade their own insane ways. When this happens to
you, you’ll have your own emotional, irrational reasons. Maybe the night before
your significant other sent a dish flying like a Frisbee at you in the middle of a
“discussion.” The next morning you’re mad as hell and you’re going to buy this
market. Or, your mother-in-law decides to visit … for the next six weeks. In a
moment of blind rage, you decide you’re selling this market because it’s the end
of the world…as you know it.
I can’t stop you from doing these trades. You can’t even stop yourself! But
if you can retain one shred of discipline, you won’t load up on these trades.
You’ll risk 10 contracts – and not 100.
Now back to our example. Let’s say that you are of sound mind and body
and you’re following the ACD System. Commodity Z has an opening range of
14.10 to 14.40. The A value is 10 ticks. The market struggles above the opening
range and then creeps higher, touching 14.49, before selling off sharply. What
could you do?
If you recognized this as a potential “rubber band trade,” then you’d
establish a short position at, say, 14.46 after the market touches 14.49 and
“snaps back.” Your buy stop to exit the trade would be at 14.50 – the A up point.

33
Your risk, you know, is 4 points to the upside. Now, let’s say the market sells off
sharply, trades through the opening range, and goes as low at 13.20. And let’s
say that you decide to get out right there and, because this is your lucky day, that
turns out to be the low of the day. You made 126 ticks and risked 4!
* * *
A “rubber band” trade is made when the market approaches or just
touches a target and snaps back. In that instance, you would go short just
below the A up or go long just above the A down. Your stop on the trade
would be the A up/down price point. Or, you’d exit the trade if the market
didn’t move in the direction you anticipated within your time frame.
* * *
At this point, we’ve really only begun to discuss the ACD methodology.
But already, what’s important to note is that this system is comprised of price
reference points. In other words, you have prices to lean against as you make
your trades, enabling you to maximize your size and minimize your risk. The “A”
points in the ACD system should be leaned upon the same way you’d use some
information in the market. For example, what would be the risk to sell 1,000
share of Microsoft short at 95 ¾ if you see there is an order to sell 1 million
shares short at 96! You’d have all the confidence in the world, right? Use the
Point A targets in the same way.
* * *

34
Points of reference in ACD give you something to “lean against” as
you make your trades. At all times, you know where you’re getting out if
you’re wrong. The result is confidence to trade.
* * *
Using this rationale of “always know where to get out if you’re wrong,” you
can use the ACD System to do other types of trades such as buying dips and
selling rallies, with Points A and C as references. (See Chart 1-8).
Insert Chart 1-8
According to the ACD system, once an A is established, your bias has to
reflect the market’s relation to the opening range – long above it and short below
it. So, let’s say the market makes an A up at 20.85 and you hold that long
position to exit profitably at 21.50. Now, the market trades lower, and goes
below the Point A – but it’s still above the bottom of the opening range. You
believe that the market still has some upside potential. Thus, you decide to buy
this “dip.”
What’s crucial, however, is that you buy the “bounce.” Never try to pick
the top or the bottom. Let the market discover a price low and begin to move
higher. Then, you’d have a point of reference – in this case the low of that move
– against which to establish a long position.
Once again, the question at all times is where will you get out if you’re
wrong? In the scenario just described of getting long below the A up, your stop

35
point -- where your bias turns from bullish to neutral – would be the bottom of the
opening range.
Let’s take the opposite scenario. Assume the opening range is 20.50 to
20.40, and the market makes an A down at 20.33, where it trades for 2 ½
minutes. You establish a short position, and exit profitably when the market
moves down to 19.85. Now, the market starts to rally a bit, but is still below the
opening range. At 20.38, the market stalls and then begins to trade lower. You
go short at 20.37 with a stop at the top of the opening range.
These buy the dip, sell the rally variations on the ACD strategy do not
violate any of the basic rules. Once the A up or the A down are established, you
retain a bullish bias above the opening range and a bearish one below. The
decision to fade is based upon what you observe in the market. At all times,
however, you know where your stop is.
If you trade with this kind of discipline, you can take the little hits that are
inevitable – when you buy the dip, for example, but the market ends up breaking.
No one is right in this market 100% of the time. But you need to think of yourself
like a boxer. If you protect yourself (using stops) you can take the little jabs. But
you’ll avoid the knock-out punch. Those who can will become the veterans in
this market, the survivors. Using the reference points of the system, you’ll be
able to draft your strategy – always knowing where you’ll get out if your wrong.
* * *
1. Plot Point A’s and C’s as points of reference.

36
2. “Lean against” these reference points as you execute your
trades.
3. Maximize your size when the trading scenario is favorable. At all
times, minimize your risk.
4. Know where you are getting out if you’re wrong.
5. If you can answer #4, you will trade with confidence.
* * *
Let’s examine another strategy based on the A and C reference points – in
this case, fading Point C’s. First let’s review. Once an “A” has been established
– to the upside or the downside – a “C” comes into play when the market moves
in the opposite direction to sufficient magnitude.
For example, in crude oil, the A value is 7-8 ticks. The C value is 11-13
ticks. Thus if the opening range is 20.50 to 20.60, the A up would be made at
20.67-20.68. The C down would be 20.39-20.37.
Now, let’s say that crude oil does make an A up and trades higher, then
starts to sell off. It accelerates to the downside, trading through the opening
range (at which your bias is neutral) and then approaches your C down price
level at 20.39-20.37. But instead of trading at that price and then going lower, it
touches 20.38 – and like the rubber band in previous examples – it snaps back
and trades higher.
That is a classic failed C down. The market touched the Point C level, but
it did not trade there for a period of time equivalent to half the opening range.
After the market bounces from the failed C down, you could decide to fade that
37
moving, taking a long position just above it. Your stop would be Point C, at which
you’d have to abandon your upward bias. Now, you profit potential is extended
all the way from the entry point, through the opening range, while your risk
potential is comparatively smaller.
Here’s another “real world” example of this kind of trade, which we call
“Good A Up, Failed C Down.” (Or, the opposite, Good A Down, Failed C Up.)
Insert Figure 1-5
Figure 1-5 shows the March contract for S&P futures (based on the
Standard & Poor’s 500 Stock Index), on January 22, 2001. An A Up at 1353.50
is confirmed on the third 15-minute bar of the day. Then, later in the day, the
market breaks down and touches the C-down level at 1344.50, but fails to stay
there for the time limit of at least 7 1/2 minutes. Rather, the market trades higher
from there and closes well above the opening range.
The importance of TIME cannot be stressed enough, particularly in these
opening pages. As you saw in the example above, while the market did touch
the Point C level, it did not trade for a sufficient length of time there. That failure
to trade at or below Point C for 7 1/2 minutes (half the time span of the opening
range) is what made it a failed Point C down.
But what about the other extreme of time - too much time? As I
mentioned earlier in the chapter, the time factor includes a minimum of time that
the market must trade at a certain level, and a maximum amount of time in which

38
something must happen. In other words, if the market hasn’t made the move you
expected within a reasonable amount of time (as it relates to your trading time
frame) then exit the trade.
Let’s say you have a 15-minute timeframe for a day trade and you decide,
as in the previous example, to go long S&P futures above the failed Point C. But
let’s say that, instead of trading steadily higher, the market just sits there and
doesn’t go anywhere for 15 minutes. In that scenario, you’d exit the trade and
look for the next set up. Why? Because the more time spent at a certain price
level allows you too many traders to do the same thing. Remember, the masses
are usually wrong, and when the trade is too “easy” to make it generally doesn’t
result in a profit. Therefore, if you hang on too long waiting for the desired
outcome to materialize than you run the risk of becoming what I call the “retail
bus people.”
If you live in the New York-area as I do, you’re familiar with the busses
that take people down to the casinos in Atlantic City. Maybe the bus ride is even
free and they get $10 in chips once they get there. But by the time they leave, the
money is definitely in the pockets of the casinos and not the bus patrons. The
trading universe also has its “bus people,” the amateurs, the uninformed or the
uninitiated. Now, I’ve probably offended somebody with this description, but for
the moment, just suspend your judgment. The point is this group of individuals,
when it comes to investing, is almost always 100% wrong. So as a trader, you
don’t want to do what the retail bus people are doing. Thus, if you put on a trade
and the market just sits there, you run the risk of more people acting the same

39
way that you have – buying where you bought or selling where you sold. And if
this is the case, the result is inevitably a trade that goes against you.
* * *
When you trade, pick your time frame and stick with it. Don’t
become one of the “bus people” by hanging onto a position too long.
Remember, the bus people are almost always wrong.
* * *
Of course, there are times when the market really fakes you out. It trades
lower, makes an A down, then quickly reverses and stops you out at the opening
range, then it rallies to make a C up, at which you get long, and then reverses
again and settles right in the middle of the opening range. Down, up and then
nowhere… This is a “F--- You” trade, when the market essentially gives you the
proverbial finger. Even though you followed the ACD System to the letter,
literally, you didn’t make any headway – in fact you’ve got two losing trades for
the day.
Luckily, those days are usually in the minority, as long as your market
meets the basic criteria:
• Sufficient liquidity. You want to make sure there’s enough volume
of trades that you can enter and exit at or near you price targets.

40
• Intra-day volatility. A market like the Eurodollars has great volume,
but it doesn’t move intra-day. With no volatility, there is no
opportunity to trade the ACD system. The volatility has to be there.
And at all times, know where to get out of it all goes against you. If you
don’t, you could end up like a trader, whom we’ll call “HUBB.” HUBB traded
heating oil futures for my firm at the Nymex. One day, he found himself in the
unfortunate position of being the only bidder. Everybody else was selling, but ol’
HUBB was buying. From everybody. And, of course, the market was moving
lower (which was why everybody else wanted to be a seller).
Who knows why – perhaps HUBB was fishing for the bottom and the
eventual turnaround. Or maybe he just forgot out to say “Sell ‘em” instead of “buy
em.” Whatever the reason, HUBB kept buying. In the final moments, HUBB
suddenly stormed the podium in the trading pit. Now mind you, the podium is
where the exchange officials stand to monitor the prices and make any price-
related announcements. HUBB commandeered the podium mike and
announced he was “60 bid, for whatever you want.” He told the astonished
crowd that he was leaving his trading cards at the podium and anyone who
wanted to sell to him could just write down their names. As the story goes, some
25 brokers ran up and wrote down their names to sell to HUBB at 60.
Needless to say we gave HUBB a little rest after that. Once he got control
of himself again, he eventually returned to trading – but this time with a better
sense of discipline.

41
Now, what was the rule that HUBB forgot? He didn’t know where (or in his
case how) he was getting out when he was obviously wrong.


