Embed Size (px)
Citation preview


© 2017 FXpansion
Contents
1 Introduction 4
................................................................................................................................... 5Using BFD31.1
................................................................................................................................... 9Global controls1.2
................................................................................................................................... 12BFD3 Core Library tracking notes1.3
................................................................................................................................... 14Setting up additional content1.4
2 Browsing for sounds 17
................................................................................................................................... 22Browser reference2.1
................................................................................................................................... 28BFD3 File menu2.2
................................................................................................................................... 30Importing Samples into BFD32.3
3 Using BFD3's sounds 32
................................................................................................................................... 38Kit display3.1
................................................................................................................................... 42Drum editor3.2
................................................................................................................................... 48Mixer controls3.3
.......................................................................................................................................................... 52Faders mode
.......................................................................................................................................................... 56Tweaks mode
.......................................................................................................................................................... 58Effects/Sends modes
.......................................................................................................................................................... 59Other mixer controls
................................................................................................................................... 61Effects and Sends3.4
.......................................................................................................................................................... 67Dynamics
.......................................................................................................................................................... 72Filters
.......................................................................................................................................................... 75Spatial
.......................................................................................................................................................... 80Effects
.......................................................................................................................................................... 83Legacy
.......................................................................................................................................................... 84Utility
................................................................................................................................... 86Exporting audio from BFD33.5
4 Using the Groove engine 88
................................................................................................................................... 91Grooves Browser4.1
................................................................................................................................... 97Palette4.2
................................................................................................................................... 102Groove Editor4.3
.......................................................................................................................................................... 108Editor Tools
.......................................................................................................................................................... 113Saving and Exporting Grooves
................................................................................................................................... 117Groove FX4.4
................................................................................................................................... 119Drum Track4.5
................................................................................................................................... 125Recording Grooves with MIDI4.6
................................................................................................................................... 127Importing MIDI files and BFD 1.5 Grooves4.7

3
© 2017 FXpansion
5 MIDI key and automation mapping 129
................................................................................................................................... 131MIDI Key Maps5.1
................................................................................................................................... 140Using Electronic Drumkits5.2
................................................................................................................................... 147Automation Maps5.3
................................................................................................................................... 150Program Change playlist5.4
6 BFD3 Preferences 152
................................................................................................................................... 153Data Preferences6.1
................................................................................................................................... 154Grooves Preferences6.2
................................................................................................................................... 156Session Preferences6.3
................................................................................................................................... 158MIDI Preferences6.4
................................................................................................................................... 159Engine Preferences6.5
................................................................................................................................... 162GUI Preferences6.6
7 BFD3 Key Map Reference 164
8 Using the BFD3 standalone application 165
9 DemoPacks 166
10 Jukebox player 169
11 NFUZD Export features 170
12 BFDLACTool 173

BFD3 Operation Manual4
© 2017 FXpansion
1 Introduction
Welcome to BFD3!
Thank you for purchasing BFD3!
Please take time to study this manual in order to get the most out of BFD3's deep and powerful functionality.
For an overview of how to operate BFD3, please read chapter 1 and the opening sections of chapters 2 and 3.
BFD3's Groove engine, mapping functions and preferences are covered in chapters 4-6.
Credits
Programming: SKoT McDonald, Steve Baker
Additional programming: Angus Hewlett, Paul Chana, Henry Lindsay-Smith, Andrew Simper
Tom resonance algorithm research: Alice Clifford
QA: Drew Vernon, Mike Bugh, Tom Meaney, Jamaine Obeng, Sam Gillies, Lawrence King
Project management: Rory Dow, Angus Hewlett, Henry Lindsay-Smith, Rhiannon McLaren
Video: Rory Dow, Ryan Sellers
Documentation: Mayur Maha
GUI design: Paul Chana, Angus Hewlett
Image design: Rus Brockman
Web development: Andreas Schnetzler, Sam Sharp, Rob Philp
Artist Relations: Clare O'Brien
Support: Alex Volmer, Ryan Sellers, Lawrence King
FXpansion USA: Terry Hardin, Leslie Crook, Brian McGovern
BFD3 Core Library audio production, recording and editing
Rail Jon Rogut and Andrew Scheps for Platinum Samples
John Emrich
Grooves
Steve Ferrone, Brooks Wackerman, Bobby Jarzombek, Peter Erskine, Stanton Moore, John Emrich (allcourtesy of Platinum Samples), Jacques Mathias
Preset design
Jacques Mathias, John Emrich, Drew Vernon, Rory Dow, Emre Ramazanoglu, Tristan Klein
Licensing and copyright
FXpans ion grants the O wner of a BFD3 license the right to c reate finished mus ical works and performances with the sounds and
software that comprise the BFD3 produc t, its expans ion packs , and any downloadable content made available from
www.fxpans ion.com or its partners .
The making of sample libraries in any form, commerc ial or otherwise, be they either s ingle hits , drumloops , or fully mixed audio
c lips is s tric tly forbidden without express written agreement of FXpans ion and its audio partners , and violations will be prosecuted
to the full extent of international and local copyright law. The ownership of all the BFD3 audio material and assoc iated MIDI
performances is fully asserted by FXpans ion and its audio partners . P lease feel free to contac t FXpans ion for any c larification.
The O wner may only ins tall and use BFD3 on multiple computers s tric tly under the following conditions: where multiple computers
comprise part of a s ingle compos ition works tation for a s ingle composer; or where the owner has two non-concurrent s ites of work,
for example a s tudio desktop computer and a laptop computer for live performances .
Multiple ins tallation is controlled by a machine-spec ifc challenge and response sys tem with a limited number of authorizations .
FXpans ion may, at its own disc retion, grant further authorizations for a particular license holder.
This software is licensed, not sold. A s such, any re-sale of your license will be subjec t to a one-time $50 USD trans fer fee.
BFD and FXpans ion are trademarks of FXpans ion A udio UK Ltd.
FXpans ion A udio UK Ltd. is part of the RO LI ecosys tem.
© 2017 RO LI Ltd. A ll trademarks acknowledged. 'Mac ' and assoc iated brands are trademarks of A pple Inc . RTA S and A A X are
trademarks of A vid Technology Inc . V ST is a trademark of Steinberg GmbH. Windows is a trademark of M ic rosoft C orporation.
O ther trademarks mentioned are held by their respec tive owners and are used for information purposes only.
Manual revis ion 6 for BFD3 v3.2 .0 .6

Introduction 5
© 2017 FXpansion
1.1 Using BFD3
BFD3 layout
Global controls and navigation bar
The upper part of the BFD3 interface features a number of Global controls that relate to working with andmanaging BFD3.
The navigation bar features buttons to access various parts of BFD3, described below.
Browser
The Browser panel is used to load sounds and Grooves into BFD3. Using the tab buttons in the navigation bar atthe top of this panel, it can be switched to browse for Presets (entire BFD3 states), Kits (configurations ofDrums in slots), Drums (individual percussive instruments to load into the current kit) or Grooves (patterns orsequences that play BFD3's sounds).
This panel is also switchable to the Automation panel using the Auto button.
The Browser panel can be hidden by clicking the currently active tab button. Click any of the buttons to make itvisible again.
To get started with BFD3, double-click any item in the Presets browser to load an entire mix-ready preset.
Kit display
The Kit display shows the physical layout of the kit, which is comprised of a number of Drum slots.
The currently selected Drum slot is highlighted - click any slot to select it and audition the Drum.
The Kit display is also used for the Link function which allows you to layer Drums together so that they areplayed at the same time.
Drum Editor
The Drum Editor contains a wide array of parameters for tweaking the sound and response of the currentlyselected Drum and contains 2 pages, accessed by the Tech and Model buttons in the navigation bar.
Clicking the currently active button hides the Drum Editor panel entirely. Click either button again to display it ifit is currently hidden.

BFD3 Operation Manual6
© 2017 FXpansion
Click the Effects button to show the Effects Editor
Mixer
The mixer area represents a comprehensive mixingengine for the audio channels within BFD3's sounds.
A Drum (or Drum slot if it is empty) can be selectedby clicking its mixer channel.
Effects Editor
The Effects Editor is shown by clicking the Effectsbutton in the main BFD3 navigation bar. It displaysthe currently selected mixer channel's effect slotsand Send controls.
Additional pages and panels
The following pages and panels are accessed using buttons in the navigation bar:
Groove Editor
The Groove Editor is displayed by clicking the Groove Editor button. This page represents the entire Grooveengine - it shows the Groove Palette, Groove Editor and Groove FX sections.
Key Map panel
Click the Key Map button to display the Key Map page, used for creating and editing custom Key Map setups forassigning MIDI notes to Drum articulations.
This page is also useful for checking the layout of the current Key Map.
Automation panel
Click the Auto button above the Browser to display the Automation panel in place of the Browser. This panelprovides control over assigning MIDI CC, note and host automation parameters to BFD3 controls for remotecontrol purposes.
Click any other Browser tab button to exit the Automation panel.
How to approach the BFD3 interface
The philosophy of BFD3 is to recreate all aspects of studio drum recording and production within your computer.
The Kit display and Drum Editor can be considered as the drumkit in a studio.
The Mixer and Effects Editor represent the control room with a mixing console and outboard processing.
The Groove engine and Key Map panel are related to the 2 ways that BFD3's sounds can be played, ineffect representing the drummer.
Working with BFD3
The basic workflow in BFD3 can be considered in the following steps:
1. Load a BFD3 Preset, a kit or assemble a kit from individual Drums using the Browser.
2. Use the Drum Editor to modify the underlying drum sounds.
3. Use the Mixer to either process the sounds internally or to route microphone audio channels (eithercompletely discretely or after some submixing if you require) into individual channels in your host/DAW forfurther processing or recording.
4. Play the Drum sounds with MIDI notes or with the Groove engine.
5. The resulting audio can be recorded by BFD3's audio export functions or, if you've routed channels discretelyinto your host, you can use its own recording functions.
Please consult the opening sections of chapter 2 and chapter 3 for a more detailed guide to the main aspects ofthis workflow. See chapter 4 for a full guide to operation of the Groove engine.

Introduction 7
© 2017 FXpansion
Important concepts in BFD3
Drums, articulations and velocity layers
Direct micchannels
Ambient micchannels: OH, Room,Amb3 etc.
An articulation is a type of way of hitting a drum, cymbal, hihat or otherpercussive instrument. The following are examples of articulations:
striking the main surface, bell or edge of a cymbal
striking the main head of a snare or playing a rim-shot or sidestick
Within BFD3, an articulation is the smallest addressable entity. It is itselfcomposed of a series of individual samples, called velocity layers, due tothe fact that they represent a dynamic graduation from quiet to loud,designed to be addressable by the MIDI note velocity range of 0 (silent) to127 (loudest possible sound).
Each velocity layer sample is actually composed of multiple direct andambient mic channels: audio channels captured by multiple microphones.
See below for more details on mic channels.
Articulations can be triggered in 2 ways:
MIDI notes assigned to articulations with the Key Map
Groove engine events
Articulations can also be triggered by audition previews in various parts ofBFD3 - the Drum Editor lets you preview all articulations in a Drum, forexample.
BFD3's Drums contain a variety of articulations - see the section below for alist of available articulations.
A Drum is composed of 1 or more articulations, and is the name given to anyinstrument within the kit in BFD3, whether it is a kick, snare, tom, cymbal,hihat or percussion instrument.
Snares contain between 5 and 7 articulations and hihats contain up to 11while other instruments such as toms may feature only 1.
Mic channels
When Drum articulations are triggered by incoming MIDI or Groove engine events, the audio generated is fed toBFD3's mixer in the form of Direct mic channels and Ambient mic channels. Direct mic channels contain audiosignals recorded by microphones close to the Drum, while Ambient mic channels contain audio signals recordedby stereo mic pairs over the kit (Overhead, or OH) and at various positions in the recording room (Room, Amb3). BFD3's library also contains further mono room and hardware-compressed direct mic channels for increasedmixing flexibility.
Direct mic channels from each Drum arerepresented by an individual Drum channel on theBFD3 mixer.
Kicks and Snares feature multiple sub-mics whichare mixed into single Kick and Snare 'mix' channels.These channels, along with Tom channels, can alsocontain bleed and spill signals from other Drums,depending on their Bleed settings.
Ambient mic channels of each type - OH, Room,Amb3 etc. - from all Drums are mixed together intothe OH, Room, Amb3 etc. channels in the BFD3 mixer.
These Ambient mic channels are mixed into the Ambient Mix channel.
For further details on mic channels, bleed and spill signals and other aspects of mixing within BFD3, see chapter3.

BFD3 Operation Manual8
© 2017 FXpansion
Articulations in BFD3's Drums
Note: the following list represents all possible articulations for each Drum. Not all included Drums include allpossible articulations. Articulations also vary between different BFD-compatible libraries and expansion packs.BFD3 is capable of supporting all articulations - any Key Map assignments use an intelligent substitution system ifa required articulation is not present in the currently loaded Drum.
Kicks
Hit [Default]
NoSnare
Snares
Drag
Flam
HalfEdge
Hit [Default]
Rim Shot
Rim Click
SS (SideStick)
Hihats
Bell Tip
Closed Shank
Closed Tip [Default]
Half Shank
Half Tip
Open Shank
Open Tip
Pedal
Quarter Shank
Quarter Tip
Splash
ThreeQ Shank
ThreeQ Tip
Toms
Hit [Default]
Rim
Rim Click
Cymbals
Bow [Default]
Bell
Edge
Percussion
Hit
Alt
Note:
Some Percussion Drums are classified as Snares, dueto possessing more than 2 articulations. Drums suchas these can be loaded in the same way as any otherPercussion Drum into a Percussion slot. However, theadditional articulations are not available via MIDInotes until they are assigned in the Key Map panel.They are, however, always accessible in the Grooveengine.
Alternatively, these drums can be loaded into theSnare slot if you prefer, in which case the articulationsare already mapped to MIDI notes. An additionalSnare slot can also be used, although all itsarticulations would need to be mapped using the KeyMap panel.

Introduction 9
© 2017 FXpansion
1.2 Global controls
Master Gain
The Master Gain control can be considered as an overall volume level for the entire BFD3 audio engine. Itadjusts the level of all kit-piece mic channels relative to any individual settings.
BFD3 LCD: Presets view
Current Preset
This indicator displays the name of the last loadedBFD3 Preset.
Program change index
If a Program Change playlist is currently active, this part of the LCD displays the index number of the currentprogram in the playlist.
Previous/Next Preset
These buttons browse through the available Presets sequentially.
Current Groove
If the Groove engine is currently active, the currently playing Groove is shown here.
Audio indicator
The Audio indicator is lit when the BFD3 plugin has successfully launched and been integrated into the hostaudio engine or when the BFD3 standalone app has successfully established communication with the specifiedaudio device.
MIDI indicator
The MIDI indicator is momentarily lit whenever BFD3 receives any MIDI input.
LCD Dashboard
Click the Dashboard button in the LCD to show the Dashboard controls if they are not currently visible.
Tune (Master Tune)
The Tune control adjusts the overall tuning (pitch) ofall Drums in the kit relative to their individual Tuningsettings.
Dyn (Master Dynamics)
The Dyn control shifts the velocity range of incoming events (from MIDI notes or from the Groove engine)across the entire kit - in effect, making the 'drummer' play the kit with more or less intensity.
AMG mode (Anti-MachineGun mode)
The AMG mode button activates or deactivates the AMG (Anti-MachineGun) functions in BFD3.
If it is deactivated, there is no additional humanization applied - each incoming event velocity always triggers thecorresponding velocity layer directly.
Loud (Loudness Randomization)
The Loud control sets the overall amount of loudness randomization across all Drums while the AMG button isactivated. The degree of randomization imposed upon each Drum in the kit depends upon its individual AMGVar. setting, found within the Articulations section of the Drum Editor's Model page - in fact, this setting can bemade for each articulation within each Drum.
Since this control scales, or multiplies, the individual AMG Var. settings (in the Drum Editor) for each Drumarticulation, if it is set to 0 then no loudness randomization will occur for any Drum articulations.

BFD3 Operation Manual10
© 2017 FXpansion
Tone (Tone Randomization)
The Tone control sets the amount of velocity layer randomization across all Drums while the AMG button isactivated. The name of this control relates to the fact that velocity layer randomization predominantly impartstimbral or tonal variation due to multiple velocity layer samples being used. As well as sounding different due tosubtle differences in drum resonances on each strike, different samples also feature subtle differences inloudness, so a degree of subtle variation in amplitude is to be expected.
The Tone control operates in conjunction with each Drum articulation's AMG Var. setting in exactly the sameway as the Loud control described above.
Memory usage
This indicator features 2 parts:
The first part displays how much RAM is being used by BFD3 - this includes the cached start portion of eachsound, plus a small overhead for BFD3's engine.
The second part displays the entire size for the current kit - including the start portions of sounds held in RAMand the remaining data on disk.
CPU and disk performance meters
The 3 horizontal meters in the status bar measure several aspects of BFD3's system resource usage.
Synthesis engine CPU usage
The synthesis engine is involved in receiving MIDI input or generating Groove engine events and playing backthe relevant articulations.
Mixer engine CPU usage
The mixer engine processes all routing, mixing and FX functions in BFD3.
Hard disk load
This meter indicates the intensity of hard disk resource usage. Do not be alarmed if this meter reaches highvalues, as your machine may well be able to handle a large amount of disk usage. It is intended as an indicatorof the amount of hard disk activity that is occurring.
If your machine cannot handle the amount of disk usage required, the side-effects are usually clearly audible –tails may be cut or intermittent, and audio dropouts or other artifacts may occur.
Transport, Position, Tempo & Time Signature controls
These controls are used in conjunction with the Grooves engine.
Grooves Auto-play mode
The Auto-play mode allows you to define how the BFD3 Transport affects Groove playback.
Auto-play Off
In the Off mode, Groove playback is not started automaticallywhen the transport is started.
Instead, Grooves must be assigned to MIDI notes and played via MIDI. This mode should be used if you intendto trigger BFD3's sounds with external MIDI notes rather than with its internal Groove engine.
Auto-play Palette or Track
When set to Palette or Track, Groove playback is started in the Palette or Drum Track.
See the Palette section for more details on the Auto-play mode setting.
Interface width
The Interface width buttons adjust the horizontal size of the BFD3 interface window. Increasing the widthallows larger visible areas of BFD3's panels: the size of the interface is not scaled.
Context info display
The context info display, located underneath theTransport, shows the parameter name and value for thecontrol currently under the mouse cursor.
While a control is being adjusted, the context info display remains locked to the parameter until the mousebutton is released, showing the control's value as it changes.
BFD3 main menus
The BFD3 menus at the upper-left of the interface provide a number of additional functions.

Introduction 11
© 2017 FXpansion
File menu
The contents of this menu are covered in the Browser chapter - it mainly provides additional loading/import andfunctions to those in the Browser as well as functions to save various elements in the current BFD3 session.
Tools menu
Show Preferences
This function displays the Preferences panel.
Set up content locations
This function displays the Content Locations panel.
Set up DemoPacks
This function displays the DemoPacks panel.
Show MIDI Log
This function displays the external MIDI Log window, showing incomingMIDI data for troubleshooting purposes.
Save disk space with BFDLACTool
This function launches the BFDLACTool application.
This external application allows pre-BFD3 expansion data to be compressed into BFD3's new BFDLAC losslesscompression format in order to save disk space.
Offline mode
This switch is intended for use with hosts that provide an offline (non-realtime) bounce or mixdown facility. Whenthe Offline switch is activated, BFD3 waits for all data to be properly delivered from the hard disk beforeallowing the host to continue, ensuring that sounds are not cut off before their full decay is complete.
Please note that Offline mode is non-realtime, and should only be used during offline mixdown or rendering inyour sequencer, if it even offers this feature. Do not leave the Offline switch enabled during regular realtimeplayback.
If your sequencer only provides realtime bouncing facilities, you should leave Offline mode turned off at alltimes.
Help menu
Launch online Manual
This function launches the online HTML operation manual. A PDF manualcan also be downloaded from FXpansion.com/BFD3
Launch "What's New?"
This function launches the What's New document which details changessince BFD2.
Start BFD3 Setup Wizard
This function starts the BFD3 Setup Wizard, which adjusts a fewpreferences, the most important of which is the Profile - this sets upBFD3's engine preferences in a way that is best suited to the amount ofRAM you have in your machine.
Use the drop-down menu to specify the amount of RAM in your machine from the 3 available choices.
The Main host application setting simply adjusts the Octave numbering scheme setting in the BFD3Preferences, while the MIDI controller setting specifies the current Key Map - this can also be achieved usingthe Load Key Map function in the File menu.
Launch BFD3 Online FAQ/Online Support/Online Forum
These functions launch various online help resources.
Check for BFD3 updates
This function checks the FXpansion.com website for BFD3 updates.
About BFD3
This function displays the About box, containing the credits listing for BFD3. Click the About Box to return to themain BFD3 interface.

BFD3 Operation Manual12
© 2017 FXpansion
1.3 BFD3 Core Library tracking notes
Kits 1-4
Kits 1-4 were recorded at Ocean Studios, Burbank, California, USA and are oriented towards metal, indie, 70srock and pop, but they are capable of being used for all kinds of styles with the right Drum Editor tweaking andmixer processing.
Production/engineering by Rail von Rogut and Andrew Scheps for Platinum Samples.
Kit 1 (Metal)
DW Mardi Gras Sparkle kit
2 kicks and 6 toms
Tama Tempesta snare
Zildjian cymbals
3 crashes
splash
china
ride
New Beats Mastersound hihat
Kit 2 (Indie)
Pork Pie Black Sparkle kit
Kick and 3 toms
Tama Bell Brass snare
Zildjian A-series cymbals
Crash
2 rides
Kit 3 (70s rock)
Ludwig Stainless Steel kit
Kick and 3 toms
Ludwig Hammered Supraphonic snare
Paiste cymbals
2002 crash
202 ride
2002 hihat
Giant Beat crash
Kit 4 (Pop)
Gretsch Purple kit
Kick and 4 toms
Canopus Bronze Piccolo snare
Paiste Signature cymbals
ride
2 crashes
hihat
Recording chain includes:
Neve 80 series console with 1081, 1073 and 1084 EQ modules
Neve 2254E, 33609 compressors
Fairchild 670 and 660
EL8 Distressors
ADR Vocal Stresser
DBX 160
Urei 1176

Introduction 13
© 2017 FXpansion
Kits 5, 6, 7
These kits were recorded at Omega Studios, Maryland, USA and provide dedicated Stick, Brush and Mallet kits.These kits offer a different room sound to kits 1-4 and a different character of sound with its own recordingchain. They are very well suited to jazz and funk projects, but with tweaking and processing can be used for avariety of sounds for other genres.
Kit 5 (Stick) / Kit 6 (Brush) / Kit 7 (Mallet)
Mapleworks Custom kit
Kick and 6 toms
Mapleworks Custom snares
2 versions: 13" and 14"
Mapex Black Panther Blade snare
Bosphorus cymbals
6 crash/ride/splash cymbals
Hihat
Bonus Percussion
Cabasa
Tambourine
Group claps
Jam blocks
Cowbell
Recording chain includes:
UA, API, JDK ATI8MX2, Neve VR-60, Metric Halo ULN2 preamps
Yamaha SubKick mic on kicks
BFD3 Operation Manual14
© 2017 FXpansion
1.4 Setting up additional content
Content Locations panel
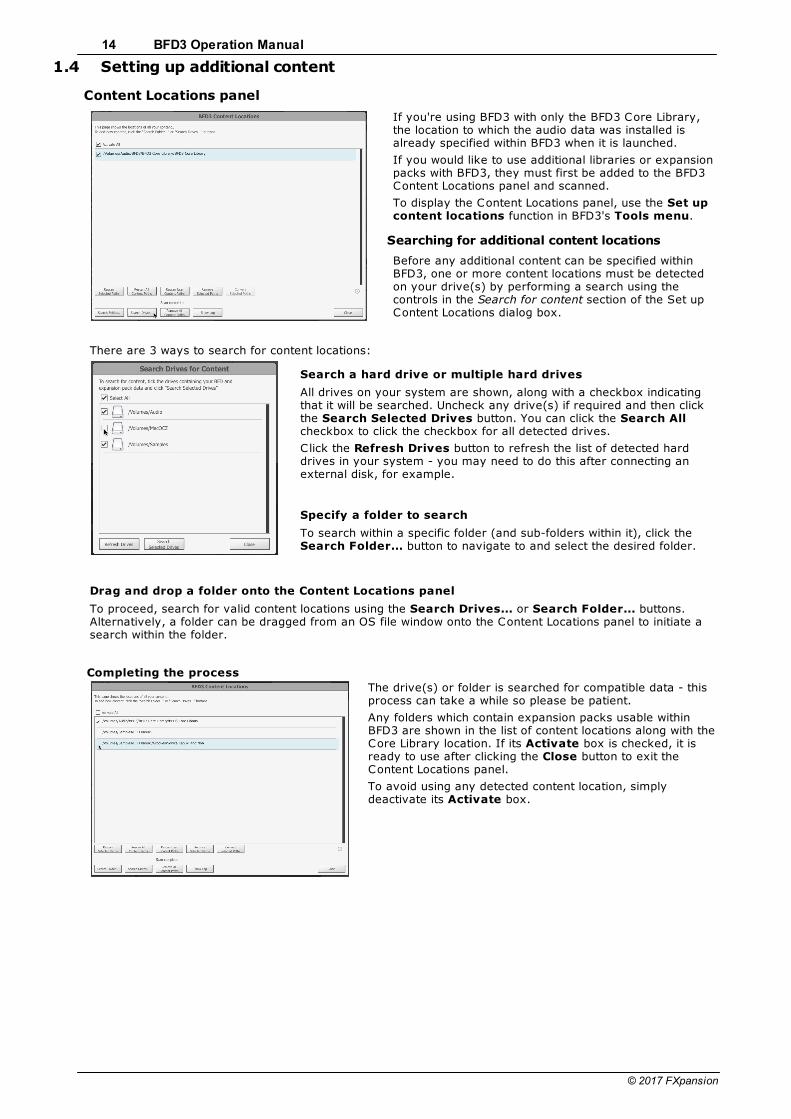
If you're using BFD3 with only the BFD3 Core Library,the location to which the audio data was installed isalready specified within BFD3 when it is launched.
If you would like to use additional libraries or expansionpacks with BFD3, they must first be added to the BFD3Content Locations panel and scanned.
To display the Content Locations panel, use the Set upcontent locations function in BFD3's Tools menu.
Searching for additional content locations
Before any additional content can be specified withinBFD3, one or more content locations must be detectedon your drive(s) by performing a search using thecontrols in the Search for content section of the Set upContent Locations dialog box.
There are 3 ways to search for content locations:
Search a hard drive or multiple hard drives
All drives on your system are shown, along with a checkbox indicatingthat it will be searched. Uncheck any drive(s) if required and then clickthe Search Selected Drives button. You can click the Search Allcheckbox to click the checkbox for all detected drives.
Click the Refresh Drives button to refresh the list of detected harddrives in your system - you may need to do this after connecting anexternal disk, for example.
Specify a folder to search
To search within a specific folder (and sub-folders within it), click the Search Folder... button to navigate to and select the desired folder.
Drag and drop a folder onto the Content Locations panel
To proceed, search for valid content locations using the Search Drives... or Search Folder... buttons.Alternatively, a folder can be dragged from an OS file window onto the Content Locations panel to initiate asearch within the folder.
Completing the process
The drive(s) or folder is searched for compatible data - thisprocess can take a while so please be patient.
Any folders which contain expansion packs usable withinBFD3 are shown in the list of content locations along with theCore Library location. If its Activate box is checked, it isready to use after clicking the Close button to exit theContent Locations panel.
To avoid using any detected content location, simplydeactivate its Activate box.

Introduction 15
© 2017 FXpansion
Additional Content Path functions
The main part of the Content Locations panel is a listing of the currently specified content locations (known as'data paths' in previous versions of BFD).
A content location can contain 1 or more BFD-compatible libraries, presets, kits, key maps, grooves or otherfiles. Use the Info display button to show a summary of the contents of each content location.
Activate
Each content location features a checkbox which activates it within BFD3. Uncheck the box to deactivate anypath.
Activate All
Click the Activate All button to activate all paths currently listed.
Rescan Selected Paths
Click this button to rescan the data within the currently selected content paths. This may be required if any itemshave been manually deleted or added.
Rescan All Content Paths
This function rescans the contents of all currently detected content locations in the list.
Rescan User Content Paths
This function rescans the BFD3 user content locations within your Documents/FXpansion/BFD3 folder, usefulif any Presets or other files have been added manually. Note that the BFD3 user content location is not shown inthe Content Locations panel listing.
Remove selected Path
This button removes the currently selected location in the list. The removed path does not reappear in the listuntil it is encountered by one of the search operations described earlier.
Add BFD2 Paths
This function can be used if an installation of BFD2 also exists on the system - all data paths (content locations)currently specified in BFD2's settings are read and added as BFD3 content locations. In addition, BFD2's systemand user documents locations are also added as content locations so that all Presets and Kits available withinBFD2 are also available in BFD3's Browsers.
Remove All Content Paths
This function removes all content locations currently shown in the list.
Show Log
Click this button to display a separate log window containinga detailed report of any content location scans which can beuseful for troubleshooting purposes. The log can be savedusing the Save... button or by using the Copy toClipboard button to paste into a separate document oremail, while the Clear button empties the contents of thelog buffer.
Info display
This display is hidden by default - its visibility is toggled byclicking the Info display button. When visible, it displays asummary of the contents of each selected path in the listing.
Filters
The Filters menu is provided in case it is necessary to manage a very large number of data paths, as it allowsthe list to be filtered by various criteria to make management easier. By default it is set to Show all Paths - thefollowing additional settings are available:
• Hide Disabled paths
• Hide Groove-only paths
• Hide Drum-only paths
• Hide Preset/Kit-only paths
If any data paths are hidden as a result of the current Filters setting, an alert is shown next to the Activate Allbutton.
Close
Click the Close button to exit the Content Locations panel and return to the main BFD3 interface.
Authorizing additional expansion packs
If you are upgrading to BFD3 with BFD2 on the same system and your expansion packs are already authorizedfor use within BFD2, they do not need to be re- authorized for use in BFD3.

BFD3 Operation Manual16
© 2017 FXpansion
If they have not yet been authorized, they must be authorized in License Manager at this point. Once it has beenencountered during a BFD3 content scan, each expansion pack is inserted as a separate product into FX LicenseManager.
Therefore, after scanning, launch License Manager if it is not already running and authorize the expansion packsin the same way as you authorized BFD3.
Potential issues with content locations/data paths
If you are having problems with content not appearing within BFD3, please ensure the following:
Content location folder structure
Each content location can contain either a /Data or /Audio sub-folder - not both.
If any of your specified content locations features both a /Data and /Audio sub-folder, the easiest way toovercome the issue is to create a new folder elsewhere, move the /Audio folder to it, then add and activatethe new folder as another content location within BFD3.
If you are continuing to use BFD2 on your system to load older sessions, the new folder should also be addedto your BFD2 data paths after which the BFD2 database must be rescanned.
Users of the BFD Big Orchestral Marching Band expansion pack should be aware that its original installeroffered a choice of installing to a BFD1 or BFD2 data path.
If in any doubt regarding the above, please contact our support team who will be happy to assist you.
Check for all installed elements
Drums
Expansion pack content often contains multiple types of files which can be loaded, such as Presets, Kits, Kit-pieces (Drums) or Grooves. Not all expansion packs feature Kits and/or Presets so to conclusively verifywhether the expansion pack has been installed and authorized, please make sure that its contained Drums existin the Drums Browser. Use the Library Quick-filter menu in order to filter the Browser to only show the contentsof the expansion pack.
Presets and Kits
All expansion packs which were released prior to BFD3 will feature only BFD2 and/or BFD1 Presets or Kits. If anysuch files exist in an activated content location, they are shown in BFD3's Presets and Kits Browsers.

Browsing for sounds 17
© 2017 FXpansion
2 Browsing for soundsThe Browser panel is actually switchable between the Browser andAutomation mapping panel. It is also capable of being hidden entirely.
If the Automation mapping mode is currently active or if the panel iscurrently hidden, click any of the following Browser mode buttons - each ofwhich switches the Browser view to one of 4 loadable elements in BFD3:
Presets
Kits
Drums
Grooves
the entire state of BFD3
a set of Drums with additional Drum Editor settings
individual drums, cymbals or other instruments within a kitsuch as kicks, snares, hihats, rides, crashes, toms,cowbells and other percussion
drum performance patterns
The Browser lists only 1 of these 4 types of components at any one time - click the Presets, Kits, Drums andGrooves tab buttons to switch between them.
Click the currently active Browser tab button to hide the Browser panel if required.
Loading a preset
By default, the Browser shows the available factory presets. Presets are loaded in either of 2 ways:
Double-click
Double-click a Preset in the Browser listing to load it.
Loading a preset replaces the entire state of BFD3 including grooves,key and automation mappings and session-specific settings. Therefore,you are prompted for confirmation before the Preset is loaded.
This confirmation prompt can be disabled by deactivating the ConfirmPreset loading setting in the Options menu.
Drag and drop
Drag and drop a Preset from the Browser listing onto the main part of the BFD3 interface. Again, you areprompted for confirmation before the preset is loaded - the prompt can be disabled in the Options menu.
It is possible to avoid loading parts of presets by deactivating the various Include when loading buttons - seethe Browser reference section.
Try loading one of the factory presets - this loads a set of Grooves, so press Play in the BFD3 transport or inyour host/DAW to hear the sounds being played.
Loading a Kit
A Kit is loaded in the same ways as a Preset. In both cases, you are asked for confirmation when loading a Kitby default - this prompt can be disabled by deactivating the Confirm Kit loading setting in the Options menu.
Double-click
Double-click a Kit in the Browser listing to load it.

BFD3 Operation Manual18
© 2017 FXpansion
Drag and drop
Drag and drop a Kit from the Browser listing onto the main part of the BFD3 interface.
When loading a Kit it is possible to choose whether to Include its stored Drum Editor Tweaks and whether toReset the current array of Drum Slots and Mixer settings - see the Browser reference section for more detailson these controls.

Browsing for sounds 19
© 2017 FXpansion
Loading Drums into slots
Drums are the basic building blocks for building your own kit or for replacing parts of an existing Kit or Preset.There are several ways of loading Drums:
Preview-in-context
Let's say you've loaded a preset as described above. Try swapping out the snare as follows:
1. Press play on the BFD3 transport (or in your host/DAW) if it is notalready running.
2. Double-click the Snare channel in the mixer orthe Snare in the kit display. The snare slot is nowselected and the Browser switches to show theavailable snares in your library (the FocusBrowser setting in the Drums Browser Optionsmenu must be enabled for this to occur).
3. Click a snare in the listing - this previews it in placeof the previous snare and will be heard whenever thesnare slot is triggered by the Groove engine (or byincoming MIDI).
4. Try out the various snares until you find one youwant to load into the kit permanently - click the Load button flashing at the right in order to do this.
... or click the Cancel button to return to theprevious snare without loading anything.
The preview-in-context function requires thatthe Preview drum on channel whenselected setting is activated in the DrumsBrowser Options menu.

BFD3 Operation Manual20
© 2017 FXpansion
Drums can also be loaded in the following ways:
Double-click
First, select the desired destination Drum slot by clicking it in the Kit displayor in the mixer.
Then double-click a Drum in the Browser listing to load it to the currentlyselected Drum slot.
Drag and drop
To load to a specific Drum slot, drag and drop fromthe Drums Browser onto the desired Drum mixerchannel.
To load to a new Drum slot, drag from the DrumsBrowser and drop between channels in the mixer.
Drums can also be dragged to the Kit display - into a specific slot or to an empty area in order to load the Druminto a new slot. In the above example, a 2nd Kick is being added to the current Kit for a double-kickconfiguration.
In addition, Drums can be loaded to Drum lanes in the Groove Editor page - either via drag and drop or bydouble-clicking to load to the slot associated with the currently selected Drum lane.
The Target slot indicator always shows the currently selected destination slot when loading a Drum, alongwith its currently loaded Drum if it exists.

Browsing for sounds 21
© 2017 FXpansion
Audition methods
Drums can be auditioned in several ways before loading:
Preview-in-context
The preview-in-context system, enabled by the Preview drum on channel when selected setting in theOptions menu, is described above.
Hold down ALT during selection
Hold down ALT when clicking any Drum in the listing to audition its main articulation.
The preview click area is velocity-sensitive: click towards the left side of the Drum item in the Browser for lowervelocity layer previews, and towards the right for higher velocity layers.
Preview on select
If the Audition when clicking drum setting is enabled in the Options menu, the main articulation of the Drumis played when it is selected - without the ALT key having to be held down.
Again, the preview click area for the Drum item is velocity sensitive.
Previewing articulations
The Info display panel contains functions for auditioning any articulation within the selected Drum. See the nextsection for details.
Processed Drums
Many Drums in the listing feature the same underlying Drum, transformed with additional damping, tuning,effects and other settings within BFD3. The purpose of these Processed Drums is to have an array of production-ready sounds which can slot straight into a mix with little or no further adjustment. You can think of them as'Drum channel strips'.
To show Processed Drums in the Browser, activate the Processed button. To revert to viewing only raw Drumswith no additional processing, deactivate the Processed button in the browser.
Loading files from BFD 1.5 and BFD2
Presets and Kits from BFD 1.5 and BFD2 are shown in the Browser if they are found within any data locationsscanned by BFD3's Content Locations panel. Their settings are recreated within BFD3 as closely as possible,bearing in mind the differences within BFD3's audio engine and approach to dynamics and humanization.
If you have chosen not to add your BFD 1.5 and BFD2 file locations to BFD3, the Load from file and Importfunctions in BFD3's File menu can be used to load files into the current session or to convert files to BFD3format manually.
Loading Grooves
See the Grooves Browser section for information on loading Grooves.

BFD3 Operation Manual22
© 2017 FXpansion
2.1 Browser reference
Loading options for Presets and Kits
Include when loading...
Presets
When the Preset Browser is visible, several toggle switches are shownat the top of the Browser panel. These allow you to activate ordeactivate certain elements when loading Presets.
By default, all elements of Presets are loaded - effectively replacing theentire previous state of BFD3.
By deactivating its switch, any of the following elements can beprevented from loading:
• Kit (Drums and Drum Editor settings)
• Mix (Mixer)
• Grv (Groove Palette, Drum Track and Groove Editor settings)
• Key (Key Map)
• Auto (Automation map – MIDI CC, note and host automation assignments)
• Glo - (Global settings, Session preferences)
By default, the Key and Auto buttons are deactivated, because typically it would not be desirable to keepchanging these settings when trying different Presets.
Kits
In the Kit Browser, if the Include... Tweaks button is activated, theDrum Editor settings for each Drum in the Kit are loaded.
If the button is deactivated, the Drum Editor settings are reset tofactory defaults when a Kit is loaded.
Reset when loading... (Kits only)
These buttons toggle whether certain elements in BFD3 are reset whenloading a new Kit.
Slots
If the Slots button is activated, any current slots not which are used inthe kit to be loaded are removed.
If the button is deactivated, only slots used by the kit are affected -unused slots remain completely unaffected.
Mixer
If the Mixer button is activated, all mixer channels are reset when the kit is loaded - unused mixer channelsincluding Aux channels are deleted and the Drum channels used by the Kit are set to factory defaults.
If the button is deactivated, the current mixer configuration and settings remain unchanged.
Processed (Drums only)
This button toggles visibility between regular Drums and Processed Drums in the Browser listing.
Processed Drums are regular Drums saved with additional Drum Editor and mixer channel settings for a moreproduced, mix-ready sound compared to that of a raw underlying Drum.
Processed Drums are shown separately to regular Drums to reinforce the fact that loading them changes theentire contents of the Drum channel including mixer settings, which is much more difficult to overcome thanreturning to the previous Drum if you decide you don't like the one you just loaded.

Browsing for sounds 23
© 2017 FXpansion
Filtering the browser listing
The Browser's filtering functions allow you to narrow down the Browser listing according to various criteria.
Click the Filters button to open the Filters panel - this panel allows you to see all available filtering criteriasimultaneously.
Many filters are also available on the main Browser panel in the form of Quick-filter drop-down menus - seebelow.
Filters panel: Drums
The Filters panel shows all filtering criteria simultaneously. The numbers in brackets represent the number ofitems that would be available when specifying each of the filtering criteria.
The Drums Browser offers a number of criteria with which to filter thelisting.
Favourites
Favourites are user-defined groups to which any Drums can be added -working with Favourite Lists is discussed below.
Library
The Library field refers to the original library to which the Drum belongs - for example, the BFD3 Core Librarycontent represents a library, as does the BFD2 factory content, or any expansion pack.
Class
The Class field represents the Drum class or type - whether it is a kick, snare, tom, cymbal, hihat or percussioninstrument. Toms and cymbals also feature sub-classes.
By changing the Class that is shown by default for the currently selected slot, you can load any type of Druminto it - not just those intended for the particular slot type, but please note that certain caveats apply when doingso. See the 'Possible loading problems' section below for usage guidelines.
Beater
The Beater type varies according to various Drum classes.
Manufacturer
This filter type lets you see all Drums by certain manufacturer(s).
Filtering the listing to display only cymbals played with mallets
Filters panel: Kits, Presets
The Kits and Presets tabs of the Browser feature only 2 filtering criteria: Favourites and Library.

BFD3 Operation Manual24
© 2017 FXpansion
Setting filters according to Browser items
The Browser context menu contains a Filters sub-menu which lists the filtering criteria for an item inthe Browser listing.
Selecting the Beater type, for example, adds it to theSearch bar and filters the Browser listing accordingly.
Quick-filters: Class filters (Drums only)
The Drums Browser features dedicated buttons which display drop-down menus for filtering the Drum Class (and sub-class in the case oftoms and cymbals) - these achieve the same function as using thepopout Filters panel.
When the Focus browser setting is activated in the Options menu,the corresponding Class filter button is enabled when selecting a Drumslot if the Drums Browser is currently visible. Double-click the Drum slotto bring the Drums Browser into view as well as enabling the relevantClass filter.
Quick-filters: Favourites and Library filters
The Presets, Kits and Drums Browsers all feature dedicated buttons which display drop-down menus for settingthe Favourites and Library filters. The Favourites system is described below.
Searching
Using the Search text-box is another way of narrowingdown the Browser listing.
Click the text-box and type a search term - theexample shows typing "18" while viewing all cymbals tofind all available 18" cymbals.
Searches operate in conjunction with the Filtersdescribed above.
The Recent searches drop-down menu lists all recent searches for the Drum type. Use the Clear recentsearches function to remove all entries from this menu.

Browsing for sounds 25
© 2017 FXpansion
Favourites
Right-click on a Browser item in order to displaythe Add to Favourite list function. This is a sub-menu showing all available Favourite Lists to whichto add the selected item.
In the above example, no groups have yet beenset up. Click the Create New List... function todisplay a dialog prompting you to enter a name forthe new Favourite List.
The item is added to the newly created FavouriteList, which is now shown on the Fav menu and alsoin the Filters panel under the Favourites column.When the List is activated, the Browser listing isfiltered to show the items in the List.
Search/Filter status and removal
Each search term or filter that is active is represented within the searchbar at the top of the Browser panel.
To deactivate any item, simply click the Remove button at the right sideof each item - the item is then removed from the active searches/filters.
Other controls
Target Slot indicator (Drums only)
The Target Slot indicator displays information aboutthe destination Drum slot:
Target Slot
This part of the indicator shows which slot is currentlyset as the destination for previewing-in-place andloading when a Drum is selected in the listing.
Currently loaded in Slot
This part of the indicator shows the name of any Drumalready loaded into the slot.
Browser context menu
Right-click on any item in the Browser listing to display the Browser context menu.
Filters
This sub-menu provides a convenient way to set Filters according to the selected Preset/Kit/Drum. For Presetsand Kits, the sub-menu shows the Library Filter settings. For Drums, the Library, Beater and ManufacturerFilter settings are shown. Click any of these items to filter the Browser listing according to the Filter setting.
Add to Favourite list
This function is used for the Favourites system - see above.
Hide (remove from Browser)
This function removes the item from the Browser listing. No files aredeleted - instead, the item is hidden until the next time the contentlocation which includes them is rescanned.
To remove items permanently, their files must be deleted from disk.The location of each file can be seen using the Info display panel (seebelow) or the Show in Finder / Show in Explorer functions.
Change Library
This function is available only for user-generated Presets and Kits. Itallows the Library tag of the file to be set - an existing Library tag canbe used or a new tag can be created by using the Enter Libraryname function.
Show in Finder (Mac)Show in Explorer (Windows)
This function displays the selected file within a system file window (Finder on Mac, Explorer on Windows).

BFD3 Operation Manual26
© 2017 FXpansion
Options menu
Most functions in the Options menu are availableonly when the Drums Browser is currently visible.
Get extra drums
This function opens the FXpansion website and displays available expansion libraries for BFD3.
Import samples (Drums only)
Clicking this button opens the Sample import panel with which you can create single-articulation mono or stereoDrums with multiple velocity layers from a set of one of more samples. These Drums can be loaded from theBrowser into any BFD3 session after they are created.
Audition when clicking Drum (Drums only)
Enabling this setting results in the main articulation of each Drum being automatically previewed as it is selectedin the Browser.
Preview drum on channel when selected (Drums only)
Activating this setting enables the preview-in-place functionality of the Browser.
Focus browser on selected channel (Drums only)
With this setting activated, selecting a Drum slot or Drum mixer channel results in the relevant Drum type beingshown in the Browser listing. This means that with a kick slot selected, the Browser shows available kicks, whena snare slot is selected, the available snares are shown, and so on.
Sort by...
The Sort by function offers a number of ways toorder items in the Browser.
Presets and Kits can be sorted by Name, Folder or Date Modified (again, this is particularly useful for userPresets/Kits). The Folder setting is particularly useful if user presets are arranged within sub-folders in the userlocation or if factory or expansion pack Presets/Kits have been manually rearranged into sub-folders within thefactory location.
Drums can be sorted alphabetically by Manufacturer name or by their Dimensions.
Confirm Preset loading (Presets only)
Deactivate this setting to disable the confirmation prompt when loading a new Preset.
Confirm Kit loading (Kits only)
Deactivate this setting to disable the confirmation prompt when loading a new Kit (or when using the Loadrandom Kit function in the File menu).
Browser info display
Resizing the Info display
Activating the Info display button enables the Info display at the lower partof the Browser. This display contains information about the currentlyselected item in the Browser. For Drums, it also has additional functions formanually auditioning individual articulations.
Click and drag up/down on the separator above the Info display to resize thearea of the Browser devoted to the actual item listing and the Info displaypanel at the bottom.
Presets, Kits
The info display shows information about which Drums exist in each of theslots within a Preset or Kit. Any contained Drums which are invalid -unauthorized, not present or corrupt - are listed in red.
The location of the Preset or Kit file is also shown.
Drums
The Info display shows information about the selected Drum and auditionfunctions for its articulations.
Articulation audition strips
Each articulation present within the selected kit-piece can be previewed byclicking its Audition strip. Click towards the left of the strip for lower velocitylayers, and towards the right for higher layers.
Info
The info box shows factory information about the selected kit-piece.
Dimensions
Materials
manufacturer

Browsing for sounds 27
© 2017 FXpansion
Auditioning a Bell articulation
for a ride cymbal
Model/name
Beater type
Production date
Class
Size on disk
Location in the data path
Factory Library
Possible loading problems
Even though each Drum slot in BFD3 is intended for a certain type of Drum - be it a kick, snare, hihat, cymbal orpercussion instrument - it also allows you to change the Drum Class filter to load any Drum into any slot. Whenbuilding arbitrary kits in this way, you should be aware of the following potential issues:
1. Articulation mappings
Because different Drums have different numbers of articulations, the Key Map may not feature enougharticulation mappings for the non-standard Drum.
If you load a Snare into a Tom slot, for instance, the slot holds 6 Snare articulations although only 3 are actuallymapped. The extra snare articulations need to be mapped to MIDI notes before they can be triggered.
If, on the other hand, you load a Tom into a Snare slot, any mappings which exist for the Snare that do not havea logical equivalent for a Tom 'fall back' to a suitable available tom articulation.
It is not recommended to load different types of Drums into the Hihat slot. This slot is specially designed to loadHihats and there is no real reason to load any other type of Drum into this slot.
If you have an electronic drumkit, you should be aware that the Hihat slot is the only slot that supports variablehihat control. Likewise, only the Snare1 slot supports positional sensing control.
2. Grooves
Even though Groove events do not rely on articulations being mapped, they are nevertheless usually intendedfor a certain type of kit-piece articulation. In the vast majority of cases, Grooves are designed for kits that followsuggested kit-piece slot uses.
Like articulation mappings, Groove events fall back intelligently to suitable articulations in the loaded kit-piece,so this can be good for experimentation. Please bear in mind, however, that a Groove simply may not makesense when played with a completely different type of kit configuration.
BFD3 Operation Manual28
© 2017 FXpansion
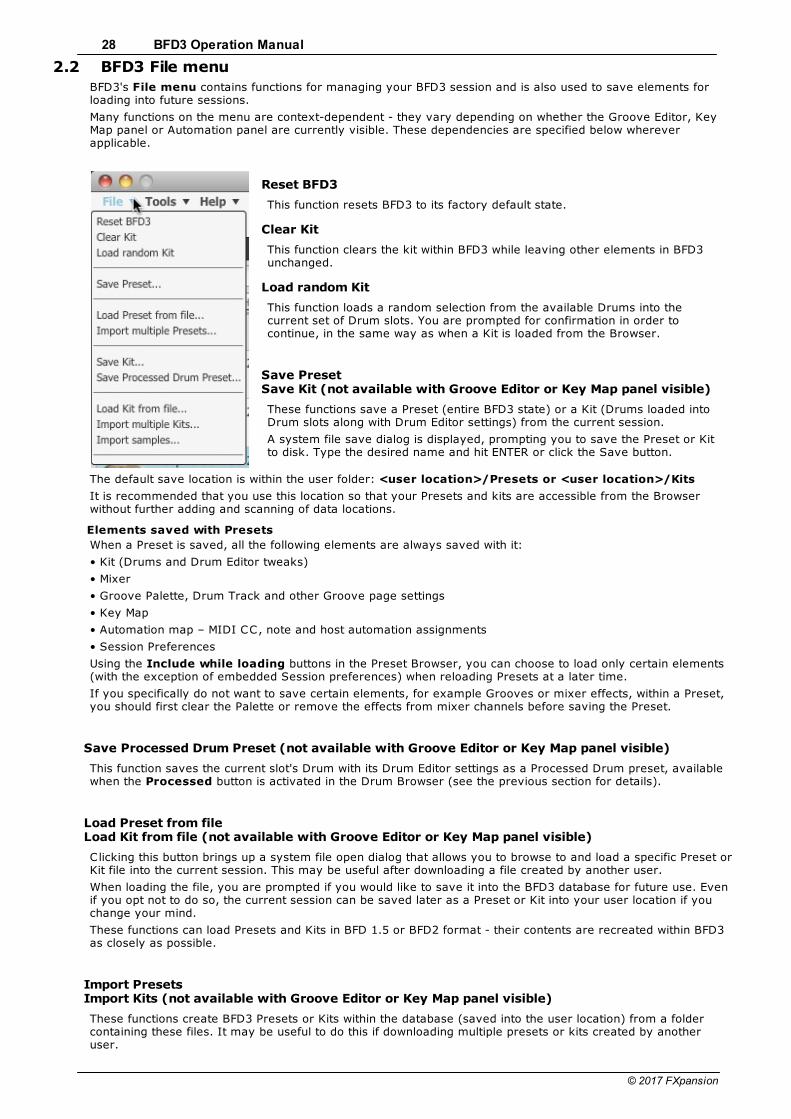
2.2 BFD3 File menu
BFD3's File menu contains functions for managing your BFD3 session and is also used to save elements forloading into future sessions.
Many functions on the menu are context-dependent - they vary depending on whether the Groove Editor, KeyMap panel or Automation panel are currently visible. These dependencies are specified below whereverapplicable.
Reset BFD3
This function resets BFD3 to its factory default state.
Clear Kit
This function clears the kit within BFD3 while leaving other elements in BFD3unchanged.
Load random Kit
This function loads a random selection from the available Drums into thecurrent set of Drum slots. You are prompted for confirmation in order tocontinue, in the same way as when a Kit is loaded from the Browser.
Save PresetSave Kit (not available with Groove Editor or Key Map panel visible)
These functions save a Preset (entire BFD3 state) or a Kit (Drums loaded intoDrum slots along with Drum Editor settings) from the current session.
A system file save dialog is displayed, prompting you to save the Preset or Kitto disk. Type the desired name and hit ENTER or click the Save button.
The default save location is within the user folder: <user location>/Presets or <user location>/Kits
It is recommended that you use this location so that your Presets and kits are accessible from the Browserwithout further adding and scanning of data locations.
Elements saved with Presets
When a Preset is saved, all the following elements are always saved with it:
• Kit (Drums and Drum Editor tweaks)
• Mixer
• Groove Palette, Drum Track and other Groove page settings
• Key Map
• Automation map – MIDI CC, note and host automation assignments
• Session Preferences
Using the Include while loading buttons in the Preset Browser, you can choose to load only certain elements(with the exception of embedded Session preferences) when reloading Presets at a later time.
If you specifically do not want to save certain elements, for example Grooves or mixer effects, within a Preset,you should first clear the Palette or remove the effects from mixer channels before saving the Preset.
Save Processed Drum Preset (not available with Groove Editor or Key Map panel visible)
This function saves the current slot's Drum with its Drum Editor settings as a Processed Drum preset, availablewhen the Processed button is activated in the Drum Browser (see the previous section for details).
Load Preset from fileLoad Kit from file (not available with Groove Editor or Key Map panel visible)
Clicking this button brings up a system file open dialog that allows you to browse to and load a specific Preset orKit file into the current session. This may be useful after downloading a file created by another user.
When loading the file, you are prompted if you would like to save it into the BFD3 database for future use. Evenif you opt not to do so, the current session can be saved later as a Preset or Kit into your user location if youchange your mind.
These functions can load Presets and Kits in BFD 1.5 or BFD2 format - their contents are recreated within BFD3as closely as possible.
Import PresetsImport Kits (not available with Groove Editor or Key Map panel visible)
These functions create BFD3 Presets or Kits within the database (saved into the user location) from a foldercontaining these files. It may be useful to do this if downloading multiple presets or kits created by anotheruser.

Browsing for sounds 29
© 2017 FXpansion
The Import Kits function can import BFD 1.5 or BFD2 format kit files - their contents are recreated within BFD3as closely as possible.
The Import Presets function works only with BFD3 Presets - BFD 1.5 and BFD2 Presets can be loaded directlyfrom the Browser - simply ensure that your BFD 1.5 and/or BFD2 user locations are included within BFD3'sContent Locations panel.
Groove-related functions (only available with Groove Editor visible)
Save Groove paletteSave GrooveExport Groove MIDIExport Groove audioExport Drum Track MIDIExport Drum Track audio
These functions are discussed in the Grooves section.
Key Map-related functions (only available with Key Map panel visible)
Load Key MapSave Key MapSave Key + Automation mapsLoad Key Map from fileImport Key MapsSave MIDI Event Log
These functions are discussed in the Key Maps section.
Automation Map-related functions (only available with Automation panel visible)
Load Automation MapSave Automation MapSave Key + Automation mapsLoad Automation Map from fileLoad Program Change PlaylistSave Program Change PlaylistSave MIDI Event Log
These functions are discussed in the Automation Maps section.

BFD3 Operation Manual30
© 2017 FXpansion
2.3 Importing Samples into BFD3
Overview
BFD3 allows you to import mono or stereo .WAV files to create single-articulationDrums, which can have multiple velocity layers.
The following caveats apply with the Sample Import function:
There can be only 1 articulation in the imported Drum. It can be either oneamplitude-scaled sample, or multiple velocity layers.
Imported Drums only produce sound in the direct bus. There is no facility formultiple microphones or ambience channels. It is possible to add space to importedsounds by using BFD3's reverb effects.
Only 1 channel is active for the imported Drum in the mixer, regardless of whichKit-Piece slot is used, unless it is loaded into the kick1 or snare1 slots.
Samples can be mono or stereo, but you cannot use a combination of mono andstereo samples in the same imported Drum.
Sample Import panel
In order to create a Drum from a set of one ormore samples, you must open the Sample Importpanel using the Import samples... function in theDrum Browser Options menu.
Import settings
Destination
Select a Content Location to which to save theimported samples as a Drum.
Imported sounds stream in the same way as othersounds in BFD3, so the path must be one of thelocations set up in the BFD3 Content Locationspanel.
If you receive an error when importing samples, make sure that you have adequate permissions to write to thelocation, and try again.
Drum Type
Choose the Drum type (Class) from this drop-down menu. The Drum can beclassified as a Kick, Snare, Tom, Cymbal or Percussion Drum. Hihats are notan available option because they would require more than one articulation.
If you require imported hihats, create separate Drums for open and closedsamples with a Percussion classification. Load each of these into Percussionslots, then use the Key Map page to layer the relevant hihat articulations withthose of the imported Drums. It is advised to save the session as a Preset inorder to use it again in future if required.
Drum Name
Type a name for the created Drum. This is the name which is visible in the Drum Browser.
Photo settings
Any JPEG, PNG or TGA image file can be specified as a photo to associate with the imported Drum. If none isspecified, a default image is used.
Browse button
Clicking the Browse button opens a system file open dialog allowing you to browse to a JPEG, PNG or TGA file tospecify for the imported Drum. The file must have a resolution of 180x150 pixels.
Clear button
Clicking this button removes the photo currently specified for the imported Drum.
Velocity layer settings
This section lets you add samples, and sort them into the desired order, from the lowest velocity layer at the topof the list, to the highest layer at the bottom.

Browsing for sounds 31
© 2017 FXpansion
Add Layer(s)
Click this button to add a sample. Any mono orstereo WAV file can be selected, but it must be at asample rate of 44.1kHz, at a bit depth of either 16or 24 bit.
If only one sample is specified, BFD3 automaticallyscales the amplitude of the imported Drum withincoming Groove/MIDI event velocity.
If 2 or more samples are specified, they are splitproportionally across the velocity range. Anyadditional mplitude scaling must be appliedmanually with the Range control after the Drumhas been loaded.
Remove Layer(s)
With a sample selected, click this button to remove the sample from the list of velocity layers.
Move layer up
Click this button to move the selected sample up the list of velocity layers: it changes places with the sampleimmediately above it.
Move layer down
Click this button to move the selected sample down the list of velocity layers: it changes places with the sampleimmediately below it.
Import & Cancel
Click the Import button to import the Drum with the current settings - it is saved to the content locationspecified and added to the current database, so once the Import operation is complete, it is now available to usefrom the Drum Browser (it is not loaded automatically to the current session).
If you change your mind and decide that you don’t want to import a Drum at this time, click the Cancel button.

BFD3 Operation Manual32
© 2017 FXpansion
3 Using BFD3's soundsOnce you've assembled a kit in BFD3 using the Browser (see the previous chapter), you're free to manipulatethe sounds using the extensive Drum modelling and mixing engine.
This section provides an overview for using BFD3's audio engine. The subsequent sections throughout thischapter go into more detail about each part of the interface.
1. Drum slots and selection
Central to BFD3 is the concept ofselection - selecting a Drum slotresults in showing its adjustableparameters in the Drum Editor.
Selecting a Drum slot in the Kitdisplay
Click a Drum slot in the Kit display toselect it.
Selecting Drum slots is central tomany functions in BFD3.
As described in the previous chapter,the selected slot is used as the targetdestination slot for loading Drumsfrom the browser via double-click.
If the slot already contains a loadedDrum, its contents are shown in theDrum Editor when selected.
Selecting a mixer channel
Clicking a mixer channel to select it. If a channel is associated with a Drum - a Drumchannel or one of its mic sub-channels - it is also selected as the current Drum slot,and its contents are displayed in the Drum Editor.
The differences between Drum slots and mixer channels
While some mixer channels represent Drum slots, this is not true of all mixerchannels, such as Ambient or Aux channels for example.
The currently selected Drum slot is effectively the last Drum slot that was selected.
See the Kit display section for further details on using the Kit display panel to manage slots and use the Linkfunction for Drum layering.

Using BFD3's sounds 33
© 2017 FXpansion
2. Using the Drum Editor
The Drum Editor contains a comprehensive set of tools to adjust the sound and response of the Drum in thecurrently selected slot. It is divided into 2 pages - the Tech page features 'drum tech'-oriented functions, whilethe Model page's functions deal with modelling real-world kit behaviour. Click the Tech or Model buttons toshow the panel if it is currently hidden. The following controls are described in full detail in the Drum Editorsection.
Tech page
General & Tuning
The Trim and Pan controls allow you to change the overall level of the Drumand the panning of its direct mic channels within the stereo field. Each Drumalso features Mute and Solo buttons. The Tuning function changes the pitch ofthe Drum.
Bleed and Ambient Mics
These controls relate to certain mic channels for the each Drum which aremixed with signals from other Drums before the mixer. These controls allowyou to adjust levels and other aspects of these signals - bleed can be disabledor routed to the Drum's own mixer channel while Ambient mic signals can berouted to discrete Aux channels if you wish.
Loudness
The Loudness functions allow you to adjust the dynamic response of theDrum. BFD3's drum sounds are recorded at a wide variety of velocities (strikingintensity) - adjusting these settings can drastically alter the feel and sound ofdrum performances.
The Velocity Dynamics control scales the velocity of incoming events (fromMIDI notes or from the Groove engine) - in effect, making the 'drummer' playthe kit with more or less intensity. The Curve control alters the velocityresponse of incoming events to the Drum from the default linear 1:1 mapping.The Dynamic Range control introduces amplitude scaling to increase ordecrease the dynamic range (the difference in level between the quietest andloudest layers) of the Drum's velocity layer range.
Model (Modelling) page
Damping/Hihat Tighten
The Damping section lets you reduce the decay time of a Drum. For basicdamping, simply increase the Damping Amount control as desired.
The Hihat Tighten controls (available only for the hihat slot) achieve a similarresult, except that only the closed articulations of hihats are affected.
Choke Response
This set of controls provides adjustment over the choking behaviour of a Drum- in other words, how a preceding event for the Drum decays when a newevent is triggered.
Tom resonance and Cymbal Swell
The modelled functions in BFD3 use dedicated synthesis in order to recreatecertain properties of a drumkit.
The Tom Resonance function creates the sympathetic resonance generatedby toms when other toms, kicks and snares are struck.
When the Cymbal Swell function is activated, additional shaping is applied tocymbal articulations when played rapidly in succession to simulate their real-world behaviour.
Articulations
This section offers level control and more advanced velocity-related functionsfor individual articulations.
It also contains the Variance control - this adjusts the degree to whicharticulations are affected by the AMG (Anti-MachineGun) functions in BFD3'sDashboard panel.
By default, these controls are applied to All Articulations - as indicated by thedrop-down menu - so the entire Drum is affected.

BFD3 Operation Manual34
© 2017 FXpansion
3. Using the Mixer and Effects
Channel types
BFD3's mixer contains a number of different types of channels.
Drum channels
Drum channels are the basic building blocks in BFD3's mixer - they can beconsidered in the same way as recorded drum tracks.
A Drum channel represents a Drum slot and its direct microphone channel(s)and can take the following forms:
A Drum Mix channel fed by a mix of Drum mic sub-channels
The first Kick and Snare slots exist in this form.
A single direct microphone channel
Hihat, Tom, Cymbal, Percussion and further Kick/Snare slots
Using the Kick 1 and Snare 1 channels
Click the Expand/Collapse button to show themic channels within the Kick or Snare channel.
Click the Expand/Collapse button again on anyof the mic sub-channels or the parent Mix channelto return it to a single mixer channel.
Each mic sub-channel can be treated individually, from basic adjustment of the level and pan controls to usingeffects and sends for processing. If you prefer, these channels can be routed to other Aux channels instead oftheir parent Kick or Snare channel.
Auditioning Drum channels
Drum channels feature an audition function for auditioning the main articulation of the Drum loaded within them -ALT-click the image at the top of the channel to preview its main articulation.
Ambient channels
Ambient mic channels appear in the mixer in a similar way to Kick and Snare mic channels - they are comprisedof an Ambient Mix channel fed by a mix of Ambient mic sub-channels.

Using BFD3's sounds 35
© 2017 FXpansion
Click the Expand/Collapse button to show theambient mic channels within the Ambient Mixchannel. The Ambient Mix channel is selected in thisexample.
Click the Expand/Collapse button again on anyof the Ambient mic sub-channels or the parentAmbient Mix channel to return it to a single mixerchannel.
Each Ambient mic sub-channel is a mix of the Ambient mic channels of that type from all Drums in the currentkit: for example, the OH channel is a mix of all Drums' Overhead mic channels.
All sounds compatible with BFD3 contain at least 3 sets of stereo ambient mics - OH (OverHead), Room andAmb3 (usually a set of PZM boundary mics or a room mic set further back than the Room set). Some Drumsfeature additional mono room and compressed direct channels which appear as numbered Mono and Compchannels.
Adjusting the Ambience Mix channel's level effectively sets the 'wet' level of the overall mix.
Note that the Drum Editor's Ambient Mics section allows powerful control over each Drum's Ambient micchannels - it is possible to independently set levels and also to route Ambient mic channels to Aux channeldestinations rather than the default routing to the corresponding Ambient channel in the mixer.
Aux channels
Aux channels, 2 of which exist in the default BFD3 mixer layout, can be considered inthe same way as a 'buss' or a 'group' on a mixing console. Any number of signals canbe routed to an Aux channel, from the following sources:
Drum and Ambience mixer channels
The entire output of one or more mixer channels can be routed to an Aux channel usingtheir Output selector controls for sub-mixing before further routing afterwards.
Alternatively, a variable amount of one or more mixer channels can be routed to an Auxchannel in parallel using the Send controls.
The Output selector and other mixer channel controls are discussed in detail in theMixer controls section later in this chapter.
Drum Editor
The controls in the Ambient Mics section of the Drum Editor allow individual Drums' Ambient mic channels to besent to Aux channels for discrete processing.
In actual fact, the Kick, Snare and Ambient mix channels are special Aux channels to which the Kick, Snare andAmbient sub-mics are routed via their Output selector controls. However, even if their sub-mics are routed toother destination channels or outputs, the Expand/Collapse buttons still toggle their visibility in the mixer.
Master channel
The Master channel is, by default, the eventual Output destination for all channels in BFD3. It is effectively aspecial Aux channel that is hard-wired to the primary stereo output of the BFD3 plugin.
As mentioned above, channels can be sub-mixed into other Aux channel 'stems'. Alternatively, channels can berouted outside BFD3 using its multiple sub-outputs.
Of course, a combination of all these approaches can be used.

BFD3 Operation Manual36
© 2017 FXpansion
Routing channels to plugin outputs for further external processing
The Output selector control at the bottom of each channel lets you route any channelto one of BFD3's multiple sub-outputs. This routing can occur at any stage of the mix -individual Drum mic channels can be routed externally to do all your mixing withplugins in your DAW or outboard gear, or some sub-mixing using Aux channels can beconducted first within BFD3, with the Aux channels being routed to external outputs.
Shortcuts for sequential output assignment
The mixer channel context menu, displayed by right-clicking on any channel, offersshortcuts for simple sequential output assignment. To conduct all mixing andprocessing of mic signals outside BFD3, use the Auto-Assign outputs (Direct)function on the mixer's channel context menu. Use the Auto-Assign outputs(Master) function to return to the default output assignments.
Using the built-in mixing functions, FX and Sends
Selecting a Mixer channel results in showing its contents inthe Effects Editor. This panel displays the channel's 6effect slots and 4 Sends which operate in a very similarway to those found in most DAWs - see the Effects andSends section for a detailed guide.
This panel and the Kit display cannot be viewedsimultaneously. Use the Effects and Kit buttons in thenavigation bar to switch between them.
4. Mixer channel modes
The mixer features 4 modes, activated by the Channel Mode switches: the Faders, Effects, Sends andTweaks buttons above the mixer. Each mode shows a different set of controls on each mixer channel.
Faders channel mode
The Faders mode is the default, and displays controls regularly found on mixer channels, most of which shouldbe familiar to you already. See the Mixer channel controls section for full details of all the controls.
Tweaks channel mode
The Tweaks channel mode offers varying types of controls for each channel, depending on the channel type.The most important functions are described below - see the Mixer channel controls section for details of allcontrols.
Drum channels
Drum Mix channels feature Tune, Trim and Damp (Damping amount) controls in Tweaks mode. Theseparameters are also found in the Drum Editor but are provided within the mixer for convenience and andoverview of multiple channels' settings.
Ambient channels
The Distance control adjusts the distance of each pair of ambience mics from the kit. This control effectivelyintroduces a delay between the relevant set of ambient mics and the direct mic signals.
The Width control (available only on stereo channels such as OH (Overhead), Room and Amb3) adjusts thestereo width of the channel between mono (especially useful for powerful, fat room sounds), stereo at the centreposition and expanded stereo at the fully clockwise position.

Using BFD3's sounds 37
© 2017 FXpansion
Effects and Sends channel modes
The Effects channel mode displays all channels' Effect insert slots,allowing an overview of multiple channels' Effect slotssimultaneously.
Effect devices cannot be edited directly in this mode - devices canbe only inserted and powered on/off. Clicking the E (Edit) button fora slot takes you directly to the device within the Effects Editor.
See the Effects/Sends modes section for more details of thesecontrols.
The Sends channel mode shows all controls for the channel's 4Sends. The controls are smaller versions of all the controls in theSends panel in the Effects Editor.
5. Other mixing functions and exporting audio
Minimixer
The Mini Mixer displays any combination of often-used mixerchannels within a panel visible at the right side of the mixer. Clickthe Mini Mixer button to toggle its visibility.
Any channel(s) can be added to the Mini Mixer using the channelcontext menu - simply right-click on any channel and use the AddChan to Mini Mixer function.
See the Mixer controls section for more details on using the MiniMixer.
In the example below, the Overhead, Room, Amb3 and Masterchannels have been added to the Mini Mixer so they are alwaysvisible.
Mixer toolbar
The toolbar above the mixer features a number of controls for managing mixes - see the Mixer controls sectionfor a guide to these controls.
Export panel
BFD3 allows you to export audio directly to disk using the controls in the Export panel. These functions are usefulfor creating drum recordings using the BFD3 standalone application, or they may be more convenient forcreating multi-channel mixdowns than your host/DAW. See the Exporting audio section later in this chapter formore details.

BFD3 Operation Manual38
© 2017 FXpansion
3.1 Kit display
The kit display offers a top-down view of the current kit, representing its physical layout. Each part of the kit thatis shown represents a Drum slot.
Selecting slots
The Kit display has 2 modes - Selectand Link - selectable via thecorresponding buttons at the top ofthe panel.
With the Select function active, clcika Drum slot in the display to select it.
When a slot is selected in the Kitdisplay, it also becomes selected inthe mixer, and vice versa. Itscontents are also shown in the DrumEditor if it is currently visible.
When the Link function is active,slots cannot be selected. See belowfor details of using Link mode.
Slot indicators
Moving the cursor over a Drum slotresults in indicating the location of theslot in the mixer with an arrow.
The same is true of the reverse -mousing over a Drum mixer channelhighlights the corresponding slot inthe Kit display (if it is currentlydisplayed) using the same type ofindicator arrow.
In the screenshot, the Snare slot isselected - shown by the selectionindicators on the Kit display andmixer - but the cursor is hoveredabove the Hihat slot - its mixerchannel is indicated by an arrow.
Auditioning Drums within slots
The current contents of any slot can be quickly auditioned by clicking the slot. This plays the main articulation forthe Drum - closed tip for hihats or 'Hit' for other Drum types. To audition any articulations, use the Articulationssection in the Drum Editor Model page.
Drum event indicators
When a Drum receives a MIDI, Groove or preview event, its surface flashes in the kit display to indicate that ithas been played.

Using BFD3's sounds 39
© 2017 FXpansion
Info display
Click the Info display button to show the Kitdisplay info. This shows information about the Drumslot under the cursor. If the cursor is moved awayfrom any slots, information about the currentlyselected slot is shown.
The display shows information such as the name,manufacturer, model, materials and otherinformation about the Drum within the slot.
This display also shows the Drum Slot identifier,the Class (type) of Drum currently loaded into itand its Size, in MB, both on disk and currently inRAM.
Audience / Drummer perspective
By default, BFD3 is set to Drummer perspective, meaning that the panning of the kit is oriented towards thedrummer's perspective, as seated at the drumkit.
Switching to Audience perspective by clicking the Audience button inverts all mic channels within BFD3,meaning that the kit is heard from the other side - the audience facing the drummer at the kit. Click the Drummer button to switch back to Drummer perspective.
Link mode
Enter Link mode by clicking the Link button at the top of the Kit displaypanel. When the Link function is active, it is not possible to select Drumslots in the Kit display. Instead, this mode is used for linking Drumstogether for layering purposes.
To link two Drums while in Link mode, click and drag one of the Drums (thesource) onto the other (the destination).
When the source Drum is triggered, the linked destination Drum is also triggered.If it is the same Drum type, the corresponding articulation is triggered. If thedestination Drum's Class differs from that of the source Drum, an attempt ismade to trigger an articulation with the same name. If this does not exist, thefirst articulation is played ('closed tip' for hihats and 'hit' for all other Drum types).
It is also possible to set up Links using the slot context menu - see below.
Note that to layer specific individual articulations, it is necessary to set this up inthe Key Map.
After the link has been created, it is represented on the Kit displayand in the mixer when the mouse cursor is moved over the sourceslot.
Removing a link
To remove a link, right-click on the source Drum slot and use the Unlink from... sub-menu on the slot context menu that appears.
A list of links from the Drum are shown in the context menu thatappears. Click on the link that you want to remove in order to breakthe link.
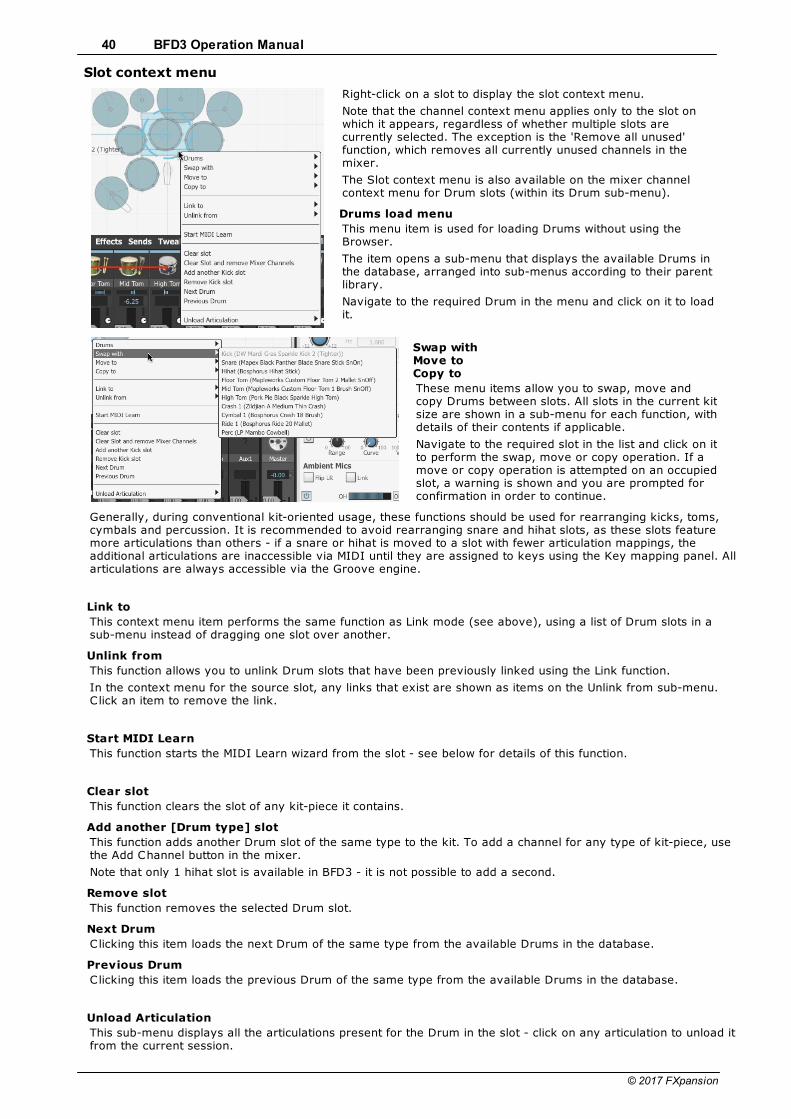
BFD3 Operation Manual40
© 2017 FXpansion
Slot context menu
Right-click on a slot to display the slot context menu.
Note that the channel context menu applies only to the slot onwhich it appears, regardless of whether multiple slots arecurrently selected. The exception is the 'Remove all unused'function, which removes all currently unused channels in themixer.
The Slot context menu is also available on the mixer channelcontext menu for Drum slots (within its Drum sub-menu).
Drums load menu
This menu item is used for loading Drums without using theBrowser.
The item opens a sub-menu that displays the available Drums inthe database, arranged into sub-menus according to their parentlibrary.
Navigate to the required Drum in the menu and click on it to loadit.
Swap withMove toCopy to
These menu items allow you to swap, move andcopy Drums between slots. All slots in the current kitsize are shown in a sub-menu for each function, withdetails of their contents if applicable.
Navigate to the required slot in the list and click on itto perform the swap, move or copy operation. If amove or copy operation is attempted on an occupiedslot, a warning is shown and you are prompted forconfirmation in order to continue.
Generally, during conventional kit-oriented usage, these functions should be used for rearranging kicks, toms,cymbals and percussion. It is recommended to avoid rearranging snare and hihat slots, as these slots featuremore articulations than others - if a snare or hihat is moved to a slot with fewer articulation mappings, theadditional articulations are inaccessible via MIDI until they are assigned to keys using the Key mapping panel. Allarticulations are always accessible via the Groove engine.
Link to
This context menu item performs the same function as Link mode (see above), using a list of Drum slots in asub-menu instead of dragging one slot over another.
Unlink from
This function allows you to unlink Drum slots that have been previously linked using the Link function.
In the context menu for the source slot, any links that exist are shown as items on the Unlink from sub-menu.Click an item to remove the link.
Start MIDI Learn
This function starts the MIDI Learn wizard from the slot - see below for details of this function.
Clear slot
This function clears the slot of any kit-piece it contains.
Add another [Drum type] slot
This function adds another Drum slot of the same type to the kit. To add a channel for any type of kit-piece, usethe Add Channel button in the mixer.
Note that only 1 hihat slot is available in BFD3 - it is not possible to add a second.
Remove slot
This function removes the selected Drum slot.
Next Drum
Clicking this item loads the next Drum of the same type from the available Drums in the database.
Previous Drum
Clicking this item loads the previous Drum of the same type from the available Drums in the database.
Unload Articulation
This sub-menu displays all the articulations present for the Drum in the slot - click on any articulation to unload itfrom the current session.

Using BFD3's sounds 41
© 2017 FXpansion
Unloading any articulation(s) that you don't need frees up RAM resources, as the associated pre-cached startportions of audio are unloaded from RAM.
Any unloaded articulations remain unavailable until another Drum is loaded into the slot.
Drum memory display
Click the Drum memory display button to show a graphicindicating the amount of RAM for the currently selectedDrum.
The upper figure shows the size of the entire Drum ondisk.
The lower figure shows the amount of RAM used by thecached portions of the Drum's samples.
The circular graph represents the amount of RAM used bythe current Drum in relation to the rest of the Kit.
MIDI Learn wizard
The MIDI Learn wizard is a simple tool for mappingDrum articulations to MIDI notes. It is provided as analternative to using the Key Map panel, although formore complex mapping operations and fine-tuningexisting mappings, it is necessary to use the functionsin the Key Map panel.
When the wizard is launched using the Start MIDILearn button from a Drum's slot context menu (seeabove), the relevant Drum's first articulation ispresented on-screen, along with a message indicatingthat BFD3 is waiting for MIDI note input - play a MIDInote to map it to the articulation.
The wizard then allows an additional time period for adifferent MIDI note to be played (in case the originalnote was played in error) - this additional time periodcan be defined using the MIDI learn accept timesetting in the Preferences. The default setting is 5seconds.
The wizard then moves onto the Drum's remaining articulations until they are all assigned or until the wizard isclosed with the Close button.
Next slot mode
If this setting is activated, the wizard moves onto the Drum in the next slot after all the current Drum'sarticulations have been assigned to MIDI notes.
If Next slot mode is deactivated, the wizard is closed after all of the current Drum's articulations have beenassigned.
Wait for MIDI input
When this setting is activated, the wizard waits indefinitely for a MIDI note to be played before moving onto thenext articulation in the Drum.
When Wait for MIDI input is deactivated, a set time is allowed for a MIDI note to be played for eacharticulation (the default is 15 seconds). If no note is received within this time, no assignment is made for thearticulation.
The amount of time that is allowed can be defined in the Preferences using the MIDI learn skip time setting.

BFD3 Operation Manual42
© 2017 FXpansion
3.2 Drum editor
The Drum Editor contains a comprehensive set of tools to adjust the sound andresponse of the Drum in the currently selected slot. It is designed to allow youto tweak each part of the kit just like you would in a real-world drum recordingenvironment.
The Drum Editor features 2 pages, each displayed with the Tech and Modeltab buttons on the main BFD3 navigation bar.
Click the Tech or Model tab buttons to make the panel visible if it is currently hidden. To hide the panel again,click the currently active tab button.
The Tech page deals with 'drum-technician' type tasks such as tuning, control over bleed and ambient mics.
The Model page is oriented towards BFD3's drum modelling functions such as tom resonance, cymbal swells,damping and choking response. It also features advanced control over individual Drum articulations.
Tech page
General section
Trim
The Trim control is an overall volume control for the Drum. Adjusting itaffects the level of all the Drum's mic channels equally. It can beconsidered as a 'pre' volume control - it sets the level of the Drum atthe start of the signal path before any routing and mixing features areapplied.
Pan
The Drum's Pan control is identical to that on its channel in the mixer.
It sets the position in the stereo field of the Drum's Direct mics only. Itdoes not affect the Drum's Ambient mic channels.
The Ambient mics section features the Flip LR button to invert thestereo image of the Drum's stereo Ambient mic channels - this can beuseful if you need to pan a Drum to the other side of the stereo field.
Mute / Solo
These buttons mute and solo all mic channels for the Drum.
Drum image
ALT-click this image to preview the Drum's main articulation.
Tuning section
Tune / st
The Tune function increases (clockwise from centre position) ordecreases (anti-clockwise from centre position) the pitch of the Drum. Itis possible to tune Drums up to an octave away from its original pitch.
The amount of tuning is shown in the st display. Click this display toenter a tuning amount in semitones.
While tuning cymbals has no obvious real-world equivalent, it is still very useful to do so in the virtual domain.With snares, the sidestick can optionally remain unaffected if the Disable sidestick tuning option is enabled inthe BFD3 Engine Preferences.
Hz / Key / Learn
These displays and controls are available only for Tom slots. When a Tom is loaded, BFD3 automaticallycalculates its fundamental pitch, which is is shown in the Hz display and its equivalent MIDI note is shown in theKey display. Click the Learn button and play a MIDI key - the Tune setting for the Tom is set to a pitchequivalent to that of the played key, within an octave of the tom's original pitch. The key that is played is shownin the Key display, with the new new pitch displayed in the Hz and st displays.

Using BFD3's sounds 43
© 2017 FXpansion
Bleed section
The Bleed controls allow you to adjust the level and routing of a Drum's bleed and spill signals. Bleed signals inBFD3 represent the sound of other Drums captured by the Kick and Snare mics, while spill is simulated bleed inthe Tom mics.
Bleed destination
The Bleed destination buttons allow control over the routing of the recorded bleed from the Drum within the Kickand Snare mics. 3 routings are possible:
On
The Drum's bleed is routed as normal to the first Kick and Snare slots' mixer channels.
Direct
The Drum's bleed is routed to its primary direct mic channel. Therefore, there would be no bleed from the Drumin the Kick and Snare mic channels.
Off
The Drum's bleed is disabled completely and not heard in the mix at all.
Trim
This control adjusts the level of the recorded Kick/Snare bleed signals.
Bleed Send
The Bleed Send control adjusts the overall level of all bleed output from the Drum - this includes recordedbleed (the sound of the Drum recorded in the Kick/Snare mics) and simulated spill - simulated bleed signals ofthe following types:
Kick in the Tom mics
Snare in the Tom mics
Toms in other Tom mics
Bleed Return
The Bleed Return control sets the input level of the mix of all bleed signals routed to the Drum's direct micchannels. This includes the following:
Any recorded bleed or simulated spill signals from other Drums
The recorded bleed signal from the Drum itself if it is routed to its primary direct mic channel (using the Direct Bleed destination setting described above) - this is the only possible signal for hihat/cymbal/percussionslots.
Adjusting bleed levels globally
You can change overall bleed levels by using the Kick, Snare and Other Master bleed controls on the mixer'sMaster channel, visible while the Tweaks channel mode is active (click the Tweaks button above the mixer).
Loudness section
The Loudness controls relate to the dynamics of the Drum - its playing intensity and the resulting level andtimbre.
Power
Activating this button enables the Loudness section controls. With the Power button deactivated, none of thecontrols in the Loudness section have any effect on the Drum.
Vel Dyn (Velocity Dynamics)
The Velocity Dynamics control shifts the velocity range of incoming events (from MIDI notes or from theGroove engine) - in effect, making the 'drummer' play the Drum with more or less intensity.
Curve
The Curve control allows you to alter the amplitude of the Drum in response to the incoming velocity of MIDI orGroove trigger events.
With the Curve control at 0, there is an exact 1:1 mapping of incoming velocity to the natural recordedamplitude of the corresponding velocity layer.
As the control is increased, the level of the resulting audio from the event is increased from its natural recordinglevel between the minimum and maximum velocity values. The greatest increase in gain occurs at the middle ofthe velocity range.
Range (Dynamic Range)
The Range control effectively extends the range of the dynamics curve by using automatic amplitudeadjustment of the range of samples for the velocity layers. Increasing the control creates a larger difference inamplitude between the quietest and loudest layers for each articulation.
Ambient Mics section
The Ambient Mics section's controls allow manipulation of the various Ambient mic channels for a Drum,providing many creative opportunities that would simply not be possible in a real-world drum recording.
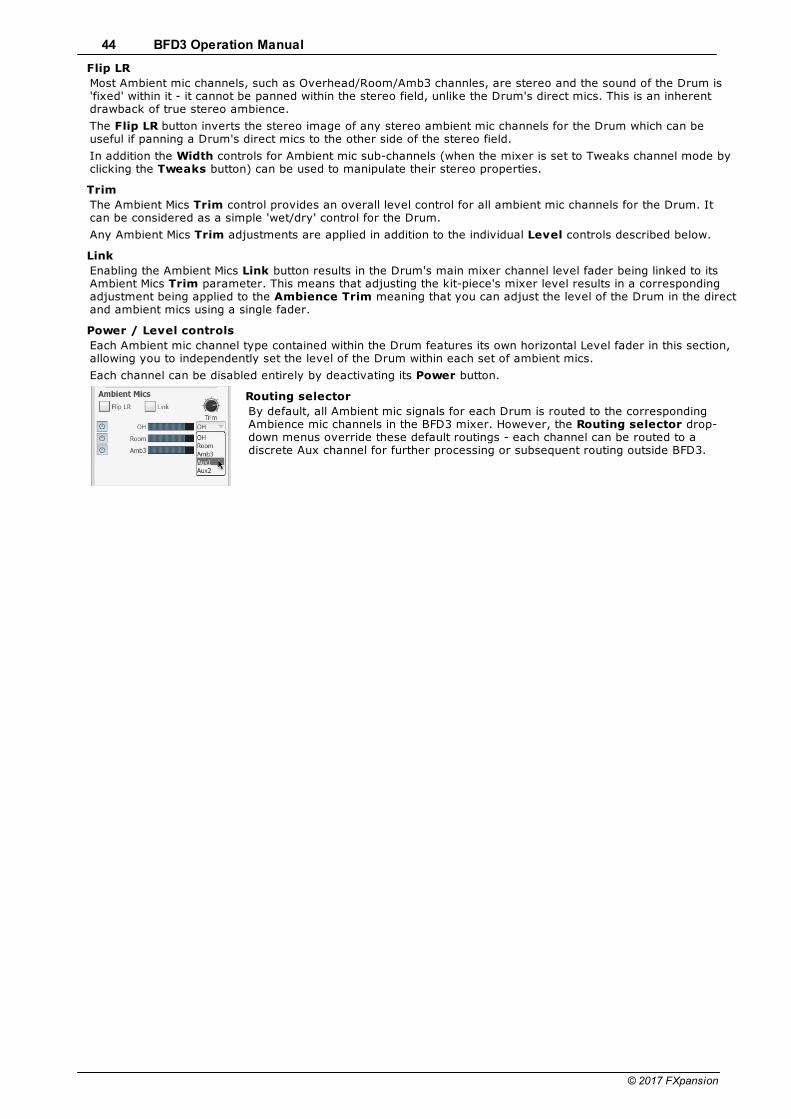
BFD3 Operation Manual44
© 2017 FXpansion
Flip LR
Most Ambient mic channels, such as Overhead/Room/Amb3 channles, are stereo and the sound of the Drum is'fixed' within it - it cannot be panned within the stereo field, unlike the Drum's direct mics. This is an inherentdrawback of true stereo ambience.
The Flip LR button inverts the stereo image of any stereo ambient mic channels for the Drum which can beuseful if panning a Drum's direct mics to the other side of the stereo field.
In addition the Width controls for Ambient mic sub-channels (when the mixer is set to Tweaks channel mode byclicking the Tweaks button) can be used to manipulate their stereo properties.
Trim
The Ambient Mics Trim control provides an overall level control for all ambient mic channels for the Drum. Itcan be considered as a simple 'wet/dry' control for the Drum.
Any Ambient Mics Trim adjustments are applied in addition to the individual Level controls described below.
Link
Enabling the Ambient Mics Link button results in the Drum's main mixer channel level fader being linked to itsAmbient Mics Trim parameter. This means that adjusting the kit-piece's mixer level results in a correspondingadjustment being applied to the Ambience Trim meaning that you can adjust the level of the Drum in the directand ambient mics using a single fader.
Power / Level controls
Each Ambient mic channel type contained within the Drum features its own horizontal Level fader in this section,allowing you to independently set the level of the Drum within each set of ambient mics.
Each channel can be disabled entirely by deactivating its Power button.
Routing selector
By default, all Ambient mic signals for each Drum is routed to the correspondingAmbience mic channels in the BFD3 mixer. However, the Routing selector drop-down menus override these default routings - each channel can be routed to adiscrete Aux channel for further processing or subsequent routing outside BFD3.

Using BFD3's sounds 45
© 2017 FXpansion
Model (Modelling) page
Damping section
The Damping controls allows you to decrease the decay of the Drum,simulating the effect of a blanket or pillow inside a kick drum or placingobjects which absorb vibrations onto a snare or tom head.
Amount
Use the Amount control to set the amount of damping required.
Freq
The Freq control represents a crossover frequency. Below thisfrequency, the decay of the Drum's ambient mic channels is shortenedaccording to the damping amount. Above the frequency, less dampingis required. This results in a more natural ambience sound when usingthe damping functions. To damp the entire frequency range within theambient mics, increase the Freq control to its maximum setting.
Amb Ratio
The Amb Ratio control allows you to adjust the amount of damping inthe Ambient channels. With the control at the default maximum setting,less damping occurs in the Ambient channels than on the directchannels. With the control at the minimum setting, the same amount ofdamping is applied in the direct and Ambient channels.
Choke Response section
The Choke Response section provides control over the chokingbehaviour of a Drum - in other words, how a preceding event for theDrum decays when a new event is triggered.
Power button
The Power button must be activated for the settings in this section to beapplied to the current Drum. If the button is deactivated, the defaultchoke response settings specified in the Preferences are used.
Base/Range
All Drum types have a default choking behaviour which is defined in theBFD3 preferences using a set of Base/Range values. The Base andRange controls in the Drum Editor allow custom choking responses forindividual Drums. See the Engine Preferences section for more detailson setting Base/Range values.
Drag (Snare only)
This parameter allows the adjustment of the additional Drag Choke fade time for Snares, and is not available forother Drum types.
Choke Group
The Choke Group function allows you to create choking behaviour between Drums - setting 2 Drums to thesame Choke Group means that they choke each other.
Cymbal Swell section
The controls in this section are only available when a Cymbal is thecurrently selected Drum. When activated with the Power button,Cymbal articulations played in rapid succession are shaped to simulatetheir real-world behaviour.
Swell algorithms
Several Swell algorithms are provided, selectable via the drop-downmenu - each provides different swell characteristics.
Amount
The Amount control adjusts the intensity of the cymbal swell emulation.
The meter displays a real-time representation of the energy within the cymbal when the Swell function is active.

BFD3 Operation Manual46
© 2017 FXpansion
Articulations section
These controls are provided for tweaking the response of individualDrum articulations although they can be applied for all articulations ifyou wish.
Articulation selector
Select the articulation to adjust using the Articulation selector drop-down menu - select All articulations in order to affect all articulations inthe Drum.
Multiple values
If any articulations feature individual settings for any of the controls inthe Articulations section, a Multiple Value indicator is shown beside itwhen All Articulations is currently selected for editing. Note thatadjusting any control with All Articulations selected results in overwritingthe individual settings for any articulations.
Audition strip
The Audition strip plays a preview the selected articulation whenclicked. The velocity of the audition depends on where the strip isclicked – the lowest velocity layer is at the left side of the strip and thehighest later is at the right.
With All articulations specified in the selector, a preview of the Drum'smain articulation is played.
Artic Trim
The Artic Trim control adjusts the level of articulations between -inf and +12dB.
One of the most common examples for using this control would be to change the level of closed hihatarticulations in relation to open ones. With the Hihat slot selected, select the Closed Tip articulation and adjustthe Artic Trim control, repeating the process for the Closed Shank articulation.
The default setting for this control is 0 dB, meaning that all articulations are played at their natural recordedlevels.
Vel to Pitch
The Vel to Pitch control allows the tuning of each articulation to vary depending on incoming trigger eventvelocity. Uses of this control range from extreme creative effects to very subtle changes which can give someextra character to the sound of the kit.
Settings range from -100% to 100%. Positive values result in increasing pitch with higher velocities, whilenegative values result in decreasing pitch with higher velocities.
Vel to Damp
The Vel to Damp control allows the amount of damping applied to the articulation to be varied according to thevelocity of incoming trigger events. It effectively allows you to control the decay of articulations with velocity andcan offer very interesting approaches to dynamics and space within your drum tracks.
Any changes in the damping applied to each articulation as a result of this parameter are applied relative to theDrum's overall Damping Amount setting.
Settings range from -100% to 100%. Positive values result in increased damping with higher velocities, whilenegative values result in reduced damping with higher velocities.
Variance (Anti-machinegun variation)
This control adjusts the maximum amount of loudness or tonal humanization that is possible for the articulation.
BFD3 features 2 controls to adjust the global amount of 'Anti-MachineGun' humanization, located in the Dashboard - click the Dashboard button in the LCD display in the top-centre of the interface. The Loud(Loudness humanize) control adjusts the amount of volume randomization applied across the kit, while the Tone(Tone humanize) adjusts the amount of randomization between velocity layers, leading to tonal variation due tothe Drum being struck at a different intensity. The maximum amount of variation for each Drum in the kit isdictated using the Drum Editor's Variance control. The AMG button in the Dashboard must be activated toenable these functions.
These functions serve to make drum parts sound less 'robotic' or 'machinegun-like' by adding natural-soundingdynamic and tonal variations that are inherent in a human drummer's performance.
Setting the Variance control to zero can be useful for avoiding humanization of certain parts of the kit.
Tom Resonance
The Tom Resonance functions create the sympathetic resonance generated by Toms when other Drums areplayed. These functions are available only for the Kick, Snare and Tom slots.

Using BFD3's sounds 47
© 2017 FXpansion
Power
This button enables or disables the resonance function for the Drum.When it is active, the Drum triggers the tom resonance algorithm in theTom slots.
Res Trim
This control adjusts the level of the resonance generated by the Drumin the Tom slots.
Spill Trim
This control adjusts the level of the Drum's bleed or spill signals (if theyexist) in the Tom slots.
Hihat tighten (Hihat slot only)
This function allows you to adjust the closed Hihat sound to sound tighter and more snappy. It achieves a similarresult to the regular Damping functions at the top of the Modelling page, except that only the closed Hihatarticulations (Closed Tip and Closed Shank) are affected.
The Damping control adjusts the amount of tightening that is applied to closed tip articulations. The Pitchcontrol adjusts the amount of subtle pitch increase that occurs as the hihat is tightened.
The Hihat Tighten function varies within the closed zone when using variable hihat control so that the amountspecified with the controls is applied at the maximum closed pedal position (when the pedal MIDI CC# value is127).

BFD3 Operation Manual48
© 2017 FXpansion
3.3 Mixer controls
Mixer Toolbar
The toolbar at the top of the mixer channels provides several useful functions for managing your mixes.
Export
This button toggles visibility of the Export panel, containing settings relating to exporting audio from BFD3.
View menu
The View menu features several settings to customize the current view of the mixer.
Simple
When this setting is enabled, certain advanced controls are omitted from beingdisplayed on BFD3's mixer channels:
Input trim controls (Input, Bleed, Sidechain)
Effect/Send slot indicators
Animate Hits
When this setting is enabled, Drum channels are animated to indicate that anincoming trigger for one of its articulations has been received.
Export on Right
Enabling the Export on Right setting results in the Export panel appearing on the right side of the mixer whenopened, rather than the left.
Visibility toggle settings
The relevant settings toggle the visibility of Aux Channels, Direct channels, Ambient channels, SideChainand Metronome channels in the mixer.
Signal
The Signal setting toggles the overlaidsignal routing indicators which visuallyindicate output, send and sidechainroutings for the channel underneath thecursor.
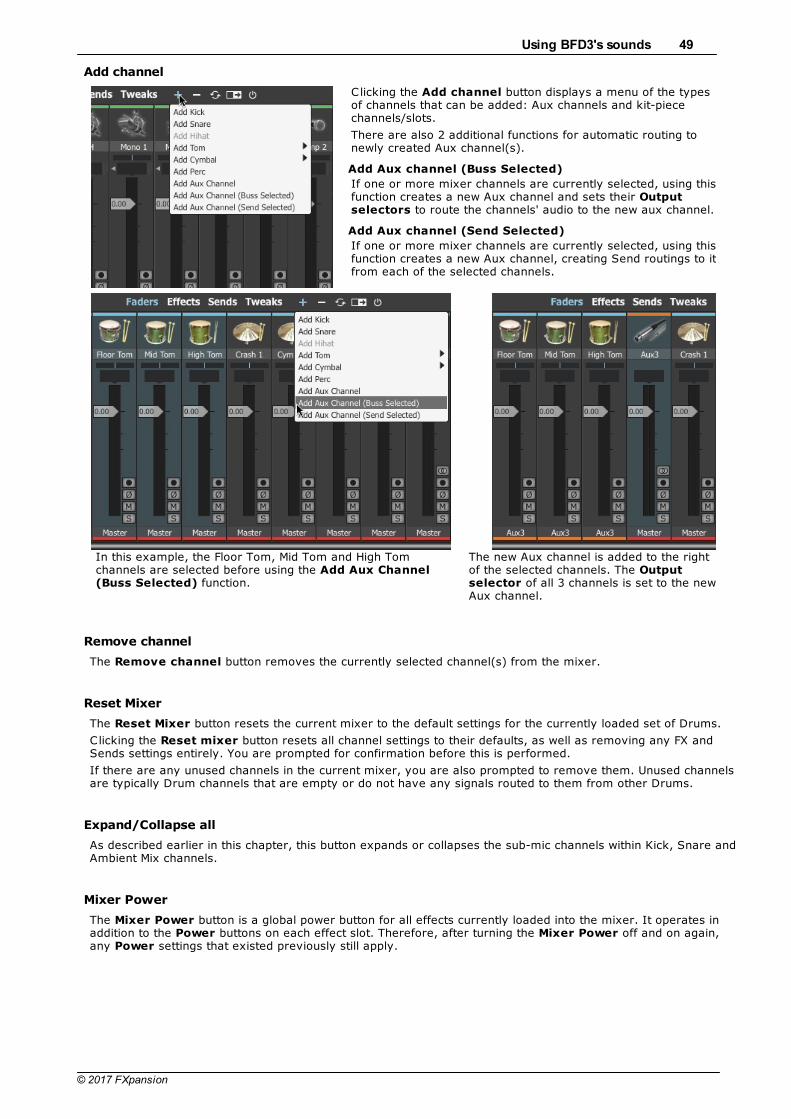
Using BFD3's sounds 49
© 2017 FXpansion
Add channel
Clicking the Add channel button displays a menu of the typesof channels that can be added: Aux channels and kit-piecechannels/slots.
There are also 2 additional functions for automatic routing tonewly created Aux channel(s).
Add Aux channel (Buss Selected)
If one or more mixer channels are currently selected, using thisfunction creates a new Aux channel and sets their Outputselectors to route the channels' audio to the new aux channel.
Add Aux channel (Send Selected)
If one or more mixer channels are currently selected, using thisfunction creates a new Aux channel, creating Send routings to itfrom each of the selected channels.
In this example, the Floor Tom, Mid Tom and High Tomchannels are selected before using the Add Aux Channel(Buss Selected) function.
The new Aux channel is added to the rightof the selected channels. The Outputselector of all 3 channels is set to the newAux channel.
Remove channel
The Remove channel button removes the currently selected channel(s) from the mixer.
Reset Mixer
The Reset Mixer button resets the current mixer to the default settings for the currently loaded set of Drums.
Clicking the Reset mixer button resets all channel settings to their defaults, as well as removing any FX andSends settings entirely. You are prompted for confirmation before this is performed.
If there are any unused channels in the current mixer, you are also prompted to remove them. Unused channelsare typically Drum channels that are empty or do not have any signals routed to them from other Drums.
Expand/Collapse all
As described earlier in this chapter, this button expands or collapses the sub-mic channels within Kick, Snare andAmbient Mix channels.
Mixer Power
The Mixer Power button is a global power button for all effects currently loaded into the mixer. It operates inaddition to the Power buttons on each effect slot. Therefore, after turning the Mixer Power off and on again,any Power settings that existed previously still apply.

BFD3 Operation Manual50
© 2017 FXpansion
Working with the Mixer
Selecting channels
Click anywhere on a channel in order to select it.The selected channel is highlighted.
The last selected Drum channel is shown in theDrum Editor.
You can select multiple channels in order to manipulatetheir controls simultaneously.
All selected channels are highlighted.
Click any selected channel to select it as the currentchannel - this can be useful with Drum channels inorder to show their settings in the Drum Editor.
To select multiple channels:
• CTRL-click on a channel (Windows)• CMD-click on a channel (Mac)
Adds the channel to the current selection.
• SHIFT-click
Selects all channels between the SHIFT-clicked channel and the existing selection.
Manipulating multiple channels
When multiple channels are selected, their main controls can beadjusted together: the level, Pan, mute/solo functions, Recordenable, Phase flip and Ouput selector controls can all beadjusted in this way.
Adjusting a control on one of the selected channels results inthe control being changed for all selected channels.
Holding down ALT while adjusting a control on one of theselected channels results in the control being inversely affectedon all the other selected channels. This functionality does notinclude the channel output routing selector.
Holding down the ALT and SHIFT keys while setting the channeloutput routing results in the selected channels being set toascending destinations of the same type (i.e. either outputs oraux channels).

Using BFD3's sounds 51
© 2017 FXpansion
Rearranging channels on the mixer
You may want to move channels around in the mixer in order tosuit personal preference. In order to do this, click on a channel’sselection bar and drag it left or right as desired.
Channel processing order
There is one important caveat when rearranging channels. Theprocessing order in the mixer is defined from left to right.
A channel's Output selector or Send Destination can only berouted to another channel to its right.
BFD3 does not allow you to move any channel that contains avalid routing to a position in the mixer that would break thisrule.
The Master channel must always be at the extreme right of themixer, and cannot be moved to any other position.

BFD3 Operation Manual52
© 2017 FXpansion
3.3.1 Faders mode
Channel controls: Faders mode
This is the default channel mode featuring controls that are typically found in most mixing consoles or host/DAWmixing environments.
Channel colour
The coloured strip at the top of each channel is indicative of the channel type. Drum channels are light-blue,Ambience channels are green, the Ambience Mix channel is dark blue, Aux channels are orange and the Masterchannel is red.
Channel Image
The channel image serves as a visual indicator of the mixer channel type.
Drum channels
Drum channels display an image of the Drum loaded into them and also feature an audition function - ALT-clickthe channel image on any Drum channel to audition its main articulation (if the Drum slot is not empty).
Label strip and coloured tab
The label strip allows you to change the default labelling for each channel. Double-click the label strip to edit itscontents, and press ENTER to finish.
It is recommended to keep names short, as only a small number of characters are visible on the strip!
Level fader
The Level fader sets the final level of the channel.
Level meter
The Level meter provides a visual guide of the channel's level. It includes momentary peak level indicators aswell as red clip indicators – click these to reset their state.
Pan
For Drum channels, a Pan control exists on the main Drum channel (but not on its mic sub-channels), whichallows you to set the pan position of the Drum's direct mic channels.
Drum channel Pan controls are duplicated within the Drum Editor (in the Tech page).
On stereo channels, the Pan control actually functions as a balance control.
Expand/Collapse (Kick/Snare Drum and Ambience channels only)
The Expand/Collapse button is only available for Kick and Snare Drum channels and Ambience channels. Ittoggles the visibility of the parent Mix channel's mic sub-channels.
The Expand/Collapse All button above the mixer can be used to fold out all Drum and Ambience mic sub-channels.

Using BFD3's sounds 53
© 2017 FXpansion
In this example, the indicatorsshow that Send 1 is active onthe Perc channel and effects1-3 are active on the Aux 1channel.
Effect and Send indicators
All channels feature a set of 6 orange LEDs to represent active Effectslots on the channel.
Additionally, they also feature a set of 4 yellow LEDs to representactive Sends on the channel.
Input trim controls (only available when Simple viewdisabled)
The following input trim controls are not visible by default - to enablethem, disable the Simple option within the View Options menu.
Bleed input trim (Drum mic channels only)
This control is available on Kick, Snare and Tom Drum mic channelsand adjusts the level of all recorded bleed and simulated spill signalsarriving at the channel.
This control is not available for Hihat, Cymbal and Percussionchannels.
Input trim (Drum Mix channels, Ambience Mix channel, Aux channels and Master channel only)
This control adjusts the level of the channel's main input signal. This input can receive signals as a result ofrouting one or more channels' outputs to it, and/or by creating one or more sends to the channel’s main input:the Input trim adjusts the level of the mix of all signals routed to it.
The current input signal's level is represented on the small LED meter above the control.
SideChain trim (Drum Mix channels, Ambience Mix channel, Aux channels and Master channel only)
Certain channels feature a sidechain input, for which the Sidechain trim control provides an overall levelcontrol. Sidechains can receive signals from more than one source: this control adjusts the level of the overallmix of these signals.
The current sidechain input signal's level is represented on the small LED meter above the control.
Mono/Stereo (Aux channels, Drum Mix and Ambience Mix channels only)
By default, Aux channels (and similar channels such as Drum Mix and Ambience Mix channels) are added to themixer as stereo channels. The Mono/Stereo button toggles the channel between stereo and mono operation.
If any FX devices exist on an aux channel before it is changed from stereo to mono status, they are switched formono versions automatically with their settings intact, and vice versa.
Record enable
This button is used in conjunction with BFD3's audio export features. Enabling this button for achannel means that the channel is exported as adiscrete audio file when performing any audioexport.
Click the button to record enable a mixerchannel; click it again to record disable it.
The Export panel contains several other featuresallowing you to record enable and disablemultiple mixer channels.
Phase flip
This button allows you to invert the phase of any channel.
Please note that all BFD3's mic channels are provided in phase with each other (including for Drums whichfeature multiple out of phase mics, such as kicks and snares).

BFD3 Operation Manual54
© 2017 FXpansion
Mute & Solo
All channels have a mute and solo button.
The mixer features very flexible mute and solo behaviour. It features two types of mute and solo states: impliedand hard.
• Engaging only the solo button on a channel results in implied mutes on all other channels: mutes are shownelsewhere, but the mute state of those channels is only implied. When the solo button is disengaged, the impliedmutes on the other non-soloed channels are also disengaged.
• Implied solos are generated on channels contributing signals to the soloed channel, or in its subsequent signalpath. They are shown in a 'half-lit' state.
• Engaging only the mute button on a channel results in only that channel being hard muted (it is in an actualmuted state).
• Engaging both mute and solo buttons on a channel results in the mute overriding the solo. Both buttons are litto show that the hard solo and mute states are engaged. While in this state, unmuting the channel results in itreverting to a hard-soloed state. If the channel is instead unsoloed, it will be left in a hard-muted state – it is notan implied mute.
• Hard-muting an 'auto-soloed' channel (in implied solo state) overrides the implied solo and the channel ismuted.
Solo Isolate function
Channels can be set to solo isolate mode, which means that they are alwaysheard when soloing any other channel.
To put a channel into solo isolate mode, click its solo button while holding downthe SHIFT key. The solo button becomes 'half-lit', and is always heard alongwith any other soloed channel.
Rude Solo indicator
The mixer toolbar contains a Rude Solo indicator, as shown in the image tothe left. It is always lit whenever 1 or more channels are currently soloed.
This indicator can be ALT-clicked to un-solo all channels currently in a hard solostate.
Output selector
Using the Output selector control, each mixer channel can be routed to anyavailable output or any available Aux channel as long as it is positioned to theright of the source channel in the mixer layout (see the 'Channel processing order'section below).
Any number of channels may be routed to the same output or Aux channel - theyare summed before the output or before the input of the destination Aux channel.
The output routing selector does not exist on the master channel, as it ishardwired to the first set of BFD3 outputs.

Using BFD3's sounds 55
© 2017 FXpansion
Special channel types
There are 2 other types of channel within BFD3, which are enabled using the View menu inthe mixer toolbar.
Metronome channel
The Metronome channel lets you adjust the BFD3 metronome, used when recordingGrooves from MIDI input. Its level can be set using the channel's fader and, using theOutput selector, it can be routed to a discrete output if required. The level can also bequickly set to one of 4 settings by right-clicking on the Metronome button in the Transport.
SideChain channel
BFD3 features an external SideChain input, allowing you to drivecompression effects within BFD3's mixer The Sidechain channel allowsyou to process the Sidechain input discretely.
To use the SideChain input, a suitable signal (such as a bass track)should first be routed to BFD3's external SideChain input - please set thisaccordingly in the standalone application's menus or consult your host/DAW's documentation for details on how to accomplish this when usingBFD3 as a plugin.
The output of the SideChain channel (as specified by its Outputselector) is always routed to the destination channel's SideChain inputrather than its main input. See the Effects and Sends section later in thischapter for details on using the SideChain input on a channel to drivesuitable effects.

BFD3 Operation Manual56
© 2017 FXpansion
3.3.2 Tweaks mode
Channel controls: Tweaks mode
The controls in this mode vary depending on the channel type.
Drum channels
For Drum channels, controls for Tune, Trim and Damp (Damping amount) are available. These controls arealso located within the Drum Editor.
Note that these controls are disabled for Drum mic sub-channels.
Ambient channels
The following controls exist for Ambient mic channels - like Aux channels, the Ambient Mix channel features Trim and SC Trim controls - see below for details of these controls.
Distance (Ambient mic channels)
The Distance control offers a virtual control over the distance of each set of ambient mic channels from the kit.
Effectively it puts a short delay between the ambience channels and the direct mics. It has a similar effect to theambience as a 'pre-delay' control has over the wet signal on an artificial reverb unit.
If custom routing of ambience signals has been set up using the Drum Editor, the Distance control has no effecton these signals with altered routings. It is possible to achieve the same effects using the Delay FX device on therelevant destination Aux channel(s).
Width (stereo channels only)
Using the Width control, you can change the width of Ambient mic channels' stereo field. Settings range frommono to fully enhanced stereo.
This setting is available only for stereo ambient mic channels. It applies to ambient mic signals of the relevanttype even if they have been routed to custom Aux channel destinations using the Drum Editor
Aux channels
The following controls adjust the levels of the signals entering the the Aux channel's input. If the input is clipping,it may be more convenient to decrease these controls instead of reducing the levels of all signals routed to it.
Trim
This control adjusts the level of the main input to the Aux channel.
SC Trim
This control adjusts the level of the Aux channel's SideChain input.
Metronome channel
In Faders mode, This channel is used for level control and setting the Output routingof the Transport's Metronome function, which is intended to be used during Grooverecording.
Tweaks mode allows access to additional options for the Metronome. These settingscan also be found in the Grooves Preferences.
Type
Click the Type setting to display a drop-down menu allowing you to select between anumber of available metronome sounds.
Mode
The Mode setting can be switched so that the metronome is heard in either of thefollowing transport situations: Record only and Record and Play. This function can alsobe accessed by right-clicking on the Metronome button.

Using BFD3's sounds 57
© 2017 FXpansion
Master channel
Preview (Preview level)
The Preview Level fader sets the level of all Drum slot and Browser auditionpreviews.
Direct (Direct level)
This fader controls the level of all direct channels together. It is a pre-mixer control – italters the level of all mic channels before they enter their direct channels on the mixer.
Mute & Solo
These buttons allow you to mute and solo all direct mic channels in the mixer.
Kick (Master Kick bleed level)
This control adjusts the overall level of bleed signals in the Kick mic channels, relativeto the individual bleed levels set for each Drum in the Drum Editor.
Snare (Master Snare bleed level)
This control operates similarly to the Kick bleed level control except it acts on theoverall level of Snare mic bleed.
Other (Other mic bleed level)
Some expansion pack libraries contain bleed in direct channels other than the kick and snare channels. Forexample, some BFD XFL kicks and snares possess an additional bleed signal in the hihat direct mic channel. Thisbleed appears in the hihat slot direct mic channel if one of these kit-pieces is used.
The Other control sets the bleed levels in all other direct mics except kicks and snares. If you are not using anysuch kit-pieces, this control does not have any effect.

BFD3 Operation Manual58
© 2017 FXpansion
3.3.3 Effects/Sends modes
Channel controls: Effects mode
The Effects channel mode displays effect selection and power controls for each channel simultaneously, allowingan overview for multiple channels.
Full control of the effect devices loaded into each slot is only possible within the Effects Editor.
Effect slot Power
Each effect slot features a Power button to activate or deactivateit. Deactivate the Power button to bypass the effect.
ALT-click any Power button to activate or deactivate all effect slotsin the channel.
Effect device selector
Click the Effect device selector to display a drop-down menu ofavailable effects.
To remove a device from the slot, select No Effect from the menu.
E (Edit)
Clicking the Edit button for any of the 6 effect slots displays the contained device's interface within the EffectsEditor (this panel replaces the Kit display if it is not already visible).
Channel controls: Sends mode
This mode displays the Send controls for all channels. The controls in this mode are fully editable (see the Effects Editor section for details about the controls).

Using BFD3's sounds 59
© 2017 FXpansion
3.3.4 Other mixer controls
Mini Mixer
The Mini Mixer allows you to add any combination of often-usedmixer channels to an additional panel which is always visible at theright side of the mixer when the Mini Mixer button at the top-rightof the mixer is activated.
This can be useful for viewing certain channels regardless of thecurrent scroll position in the mixer, or whether the required Drum orAmbient Mix channel is expanded.
Any channel(s) can be added to the Mini Mixer using the channelcontext menu - simply right-click on any channel and use the AddChan to Mini Mixer function.
Once the required channels have been added, click the Mini Mixerbutton. Click and drag left/right on the border between the MiniMixer and the rest of the mixer to adjust the space devoted to each.
The above example shows a Mini Mixer configuration of Overhead, Room, Amb3 and Master channels
Channel context menu
BFD3's mixer features a comprehensive system of managing channel settings, including loading and savingchannel settings as presets. This is achieved by using the channel context menu.
This context menu is displayed by right-clicking anywhere on a channel (in Faders mode) or on the channelimage in Effects/Sends/Tweaks modes.
Note that the channel context menu applies only to the channel on which it appears, regardless of whethermultiple channels are currently selected. The exceptions are the Remove all unused channels and Auto-Assign outputs functions.
Drum sub-menu
This sub-menu, available only on Drum channels, offers the samefunctions as the slot context menu in the Kit display.
Load channel preset
This function brings up a system file load dialog which allows you toload a previously saved channel strip preset. Any applicable settingsare loaded – if the preset contains settings that are inappropriate forthe destination channel, they are ignored.
Save channel preset
Using this function, you can save the contents of a channel strip to apreset for future use via a system file save dialog box.
Copy channel
This function copies the settings of the channel strip to the clipboard.
Paste channel
This function pastes the channel strip settings stored in the clipboard tothe current channel. Any applicable settings are applied – if theclipboard preset contains settings that are inappropriate for thedestination channel, they are ignored.
Paste channel effects
This function pastes only the effects stored the clipboard withoutpasting any other channel strip settings.

BFD3 Operation Manual60
© 2017 FXpansion
Reset channel
This function resets the channel’s parameters to their initialized state (default settings), although effects andsends are not affected.
Clear channel Effects
This function removes all devices from the channel's effect slots.
Clear channel sends
This function removes any send settings on the channel. It does not appear on the master channel’s contextmenu, as it does not possess any sends.
Remove channel
This function appears only when applicable. It allows you to remove aux channels and direct or ambiencechannels that are not being used by loaded kit-pieces or by bleed signals from other kit-pieces.
Remove all unused channels
Unlike the other functions on the channel context menu, Remove all unused channels does not apply only tothe current channel. It removes all currently unused channels in the mixer – this includes direct and ambiencechannels that are not being used by loaded Drums or by bleed signals from other Drums, as well as auxchannels that are not output or send destinations from any channels.
Auto-Assign outputs functionsThese functions set the Output selector parameter for all channels simultaneously for 3 common routingscenarios. These functions can radically alter your mix configuration so please proceed with caution. You areprompted for confirmation before proceeding.
Auto-Assign outputs (Direct)
This function assigns the Output selector for all individual microphones to discrete outputs - this includes Drummic/sub-mic channels and Ambient mic channels.
When this function is used, any existing Output selector assignments to Aux channels and 'parent' Mixchannels (Kick/Snare/Ambient Mix channels) are lost.
This feature is designed to allow you to easily transmit all Drum and Ambient mic channels to your host/DAW forfurther mixing, processing or to bounce the signals as audio tracks.
Auto-Assign outputs (Mixdown)
This feature is intended to be used with Aux channel sub-mixes of Drums. It assigns the Output selector for allAux channels and Mix channels (Kick/Snare/Ambient Mix channels) to discrete outputs.
This means that, for example, the default routing setup would be altered so that the Kick, Snare and AmbientMix are set to discrete stereo outputs, with the Master channel containing all other Drums (and hard-wired to thefirst stereo output). The 2 Aux channels in the default mixer setup are also routed to discrete stereo outputs.
If Aux channel sub-mixes of the other Drums have been created (for example, if the Toms and Cymbals haveeach been mixed down to a single Aux channel), these Aux channels are also routed to discrete stereo outputs.
Auto-Assign outputs (Master)
This function assigns all channels to their default Output selector routing assignments, effectively sending allsignals to the Master channel.
Kick/Snare Drum sub-mics are routed to their parent Drum Mix channels
Ambient mics are routed to the Ambient Mix channel
Drum Mix, Ambient Mix and all other Drum and Aux channels are routed to the Master channel.
Auto-Assign outputs (WYSIWYG)
Standing for 'What You See Is What You Get', this function sequentially assigns the output of each direct channelto a mono output, and any Bus, Aux or Ambient mic channel to a stereo output.

Using BFD3's sounds 61
© 2017 FXpansion
3.4 Effects and Sends
The Effects Editor allows full control over thecurrently selected channel's 6 insert effectslots and its 4 Sends. This panel and the Kitdisplay cannot be viewed simultaneously.Click the Effects button to show the EffectsEditor in place of the Kit display.
Overview
The Effects rack
Effects are BFD3's built-in DSP audioprocessors. The Effects rack shows thecontents of the 6 effect slots on the currentlyselected mixer channel.
Effect slots
Each of the 6 available effect slots can hostany of the internal BFD3 DSP effect devices.
Effect scroller
The Effect scroller is a representation of the selected channel's 6 available effect slots, with the highlightedarea indicating which slots are currently visible. The size of the visible area depends upon the current widthsetting of the BFD3 window.
To change the visible area, click and drag the highlighted area or simply click the part of the scrollerrepresenting the desired effect slots.
Sends
The Send controls represent the 4 Send routings available from the selected mixer channel, usually todestination Aux channels, allowing you to set up parallel processing routings suitable for reverbs and parallelcompression: like any other mixer channel, destination Aux channels feature 6 effect slots for these purposes.
Sends can also be routed to other channelsfor SideChain processing purposes.
Click the Sends button at the top-right of theEffects Editor panel to show the Sendcontrols if they are not currently visible.Click the Sends button again to hide thecontrols.
Sends are discussed later in this section.

BFD3 Operation Manual62
© 2017 FXpansion
Initializing and using Effects
Initializing an effect device within a channel's effect slot
There are 3 ways to load a device into an effect slot:
Effect slot's Effect device selector
Each of the 6 effect slots for a channel features a main header section whichfeatures an Effect device selector drop-down menu with a number of othercontrols.
Firstly, select the desired channel in the mixer by clicking it. Then, display theEffects Editor by clicking the Effects button in BFD3's main navigation bar.
Click the part of the desired effect slot header that shows No Effect - if the slot isempty - or the name of the effect already loaded into the slot. This displays amenu of available effects arranged within sub-menus according to effect type.Navigate to the desired effect device and click it to load it into the slot. Theprevious contents of the effect slot are discarded.
Effect context menu
Display the Effects Editor for a mixer channel as described above.
Right-click on any effect slot to display the effect context menu. The Effectdevice selector menu is located within the New Effect sub-menu, againproviding all available effects arranged within sub-menus according to effect type.
Navigate to the desired effect device and click it to load it into the slot. Theprevious contents of the effect slot are discarded.
Effects channel mode in the mixer
Switching the mixer to Effects channel mode (with the Effectschannel mode switch) shows basic controls for all channels' 6 effectslots simultaneously.
The Effect device selector allows you to load an effect deviceinto each slot. Each slot's Power button is also available, as is anEdit button to quickly switch to viewing the effect in the ChannelEditor if it is not already visible.

Using BFD3's sounds 63
© 2017 FXpansion
Main effect slot controls
All effect slots share the following common controls on their interfaces:
Power button
The Power button enables or disables the effect device loaded intothe slot. With the button deactivated, the device is disabled andbypassed.
This control is also available in the mixer's Effects channel mode.
You can also turn all currently loaded effect devices on and off usingthe main Effect Power button above the mixer.
Effect device selector
This drop-down menu provides a menu of available effects. Click any effect in the menu to load it into the slotand replace its previous contents.
Preset menu
The Preset menu features a drop-down menu showing all available presets for the effect device in the slot.
Preset Prev / Next
The Preset Prev / Next cycle through the effect's available presets.
A/B Compare
These buttons toggle between two distinct states for the effect, each with its own settings and preset-loading.
By default, the 'A state' is in operation and highlighted in blue. To try completely different settings without havingto save the current settings as a preset first, click the B button - this switches to the 'B state' and all furtheradjustments are now made to the B state. Presets can be loaded and any effect settings can be changed asdesired.
To return to the A state, click the A button again - the original settings reappear. Of course, any adjustmentspreviously made to the B state are recalled should you decide to return to it by clicking the B button again.
Mix
The Mix control, which allows blending between the processed (wet) and unprocessed (dry) signals, exists on allBFD3 effect devices.
Note that this control only appears when an effect device is loaded into the slot.
By default, all effects are set to 100% wet, but this control allows you to adjust this as required.
This control is useful on compressor devices for creating parallel compression effects for a single channel withoutneeding to set up an additional aux channel.
SideChain mode
The SideChain mode button is only available on certain SideChain-enabledeffects when used on on Aux channels and the Master channel.
When the button is activated on the Comp Bus as in this example, the effectuses the SideChain input for driving the peak detection circuit, meaning thatthe amplitude characteristics of a separate signal are used to treat theamplitude of the actual signal entering the compressor's main input.
When the EQ or EQ8 devices are used, activating the SideChain mode buttonresults in the device processing the SideChain signal before it reaches aSideChain-enabled effect further on in the channel's signal path.
This function is provided for situations when greater tonal control of theSideChain input signal is required than that offered by the Key HP control onthe Comp Bus effect, for example.
BFD3's SideChain features are discussed in more detail later in this chapter.

BFD3 Operation Manual64
© 2017 FXpansion
Managing Effects with the Effect context menu
Right-click on an effect interface to display the effect context menu.
EQ / Comp Bus
These items represent shortcuts for loading the EQ or Bus Compressor into theeffect slot, as these are likely to be the most commonly used processors in a mix.
New effect
This sub-menu performs the same function as the slot's Effect device selector -it provides a menu of available effects. Click any effect in the menu to load it intothe slot and replace its previous contents.
Cut / Copy / Paste Effect
These functions allow you to cut/copy/paste effect devices between effect slots and mixer channels.
Reset effect
This function resets the current effect to its default settings.
Clear effect
This function removes the effect from the slot.
Load preset
Clicking this item displays a system file open dialog which allows you to load previously saved preset files for theeffect.
You can also use the Preset selector in order to quickly browse through available presets saved in the defaultpreset folder for the effect.
Save preset
Clicking this item brings up a system file save dialog, allowing you to save the effect’s current settings as apreset - it is recommended to use the default location so that presets become available on the effect's Presetmenu.
Swapping and copying effect devices between slots using drag and drop
Effects can be re-ordered and copied between a channel's effect slots using drag and drop. This offers a quickerway of performing these tasks compared to using the Copy/Paste and Clear functions on the effect contextmenu.
Swapping effects between slots
Simply click an effect device's interface, dragit to the left or right and drop it into anotherslot.
Any effect device already loaded within thedestination is swapped into the original slotthat was moved over it.
Copying an effect from one slot to another
Hold down the ALT key while performing a drag and drop operation as described above to copy the originaleffect onto the destination slot.
Any effect device previously in the destination slot is discarded.

Using BFD3's sounds 65
© 2017 FXpansion
Using Sends and Sidechains
4 Sends are available per channel for parallel processing and sidechaining purposes. Sends can be routed to anyavailable Aux channel as long as the destination channel is to the right of the source channel. They can also berouted to the Master channel and other channels such as Drum and Ambient Mix channels (these are effectivelyAux channels with Drum sub-mic or Ambient mic channels' outputs routed to them) for sidechain applications.
Sends can be routed into the main input or to the sidechain input of the destination channel. Sidechaining is usedfor certain effects which allow you to process the main input while reacting to properties of the sidechain inputsignal.
Displaying Send controls
Controls for Sends can be displayed in 2 ways:
Sends panel in Effects Editor
Firstly, select the desired channel in the mixer byclicking it. Then, display the Effects Editor by clickingthe Effects button in BFD3's main navigation bar.
If the Sends panel is not currently displayed withinthe Effects Editor, click the Sends button to make itvisible.
Sends channel mode in the mixer
Switching the mixer to Sends channel mode showssmaller versions of the Send controls for all channelssimultaneously.
Send controls
The following controls are available for all 4 Sends from the currently selected channel, and can be accessedusing the Sends panel in the Effects Editor or using the Sends channel mode in the mixer.
Power
The Power button activates or deactivates the Send. This button is activatedautomatically when the Dest control is used to set a Send destination.
Dest (Destination)
The Send destination is selected using the Dest drop-down menu.
Level
This control sets the Send level - the amount of the signal that is sent to thedestination.
Routing mode
Using this set of buttons, each Send can be routed from any of 3 source pointsin the channel signal path:
Pre (Pre FX, pre-fader)
The Send signal is tapped before the channel's effect slots. This point is alsopre-fader. Therefore, the signal reaches the Send destination without beingprocessed by the channel's effects, and is not affected by any level adjustmentvia the channel's level fader.
FX (Post-FX, pre-fader)
The Send signal is tapped after the channel's effects but before the fader. Therefore, the signal reaches theSend destination after being processed by the channel's effects, but is not affected by any level adjustment viathe channel's level fader.
Fader (Post-fader)
The Send signal is tapped after the channel's level fader. Therefore, the signal reaches the Send destinationafter being processed by the entire channel including its effect slots and level fader.
This is the default setting for the Routing mode parameter.
Sidechain mode
The send signal can be routed to either the main input for the destination channel or, with the SideChain modebutton activated, to its SideChain input.

BFD3 Operation Manual66
© 2017 FXpansion
If the signal is sent to the SideChain input, the signal is not processed through the channel and its effects, butinstead is used for sidechain-enabled effects with their SideChain mode button enabled. There is one exception- the EQ is capable of processing a channel's SideChain signal for reasons which are discussed in the 'Usingsidechaining' section below.
Using Sidechaining
Sidechaining is the use of one signal to control the behaviour of a processor that acts on another signal.Generally, the amplitude of the sidechained signal is used to determine the dynamic output of the processedsignal and it is not directly heard in the output of the processor at all. It is a common feature in compressors, inorder to compress one signal according to the amplitude of another for a variety of dynamic effects.
In BFD3, any mixer channel can be used as a SideChain source for a compressor or gate inserted on an Auxchannel or the Master channel.
In addition, the SideChain can also be used as the FM source when the filter FM function is used in the Filter Moddevice.
Setting up sidechains
To set up a channel as a SideChainsource for a compressor on anotherchannel, first set up a Send to adestination channel with thecompressor, and turn up the levelof the Send.
Then, click the Sidechain buttonfor the Send source setting inthe Sends panel.
This Send is now routed to theSideChain input of the destinationchannel.
Click the SideChain mode buttonon a compressor loaded into a sloton the destination channel. It nowreacts to the SideChain signal withthe resulting gain reduction appliedto the main input signal.
EQ-ing the sidechain
A common problem when compressing is the existence of excessive low-endfrequencies in a sidechain signal causing a compressor to react more than desired.BFD3's compressors include a high-pass filter to quickly filter out the low end fromthe signal used by the peak detection process.
However, you may need to apply a more complex EQ process to a SideChain signalin order to isolate a particular band of frequencies such as the mid 'crack' of asnare sound. In such cases, proceed as described above, but insert an EQ on thedestination channel, ensuring that it is inserted before the compressor.
Now, click the SC button on the EQ's interface: the channel's SideChain input signalis processed by the EQ rather than the channel's main input signal. The processedSideChain signal is then used by the compressor as the source for its peakdetection circuit (after the compressor's SC button has also been enabled).

Using BFD3's sounds 67
© 2017 FXpansion
3.4.1 Dynamics
Common compression parameters
The following definitions apply to most of BFD3's dynamics processors. However, please note that the DCAMEnvShaper device has a very different approach to its time-related parameters (Attack and Sustain).
Attack
The Attack control on a compressor represents the speed at which the gain is reduced when transients passthrough it.
This control is often misunderstood - the Attack time does NOT indicate the amount of time taken before thecompressor starts to compress.
Release
The Release control on a compressor sets the speed at which the gain level returns to normal after a transienthas passed.
Ratio
The Ratio specifies the gain reduction applied by the compressor. The numbers in the ratio represent thechange in gain before and after compression.
For example, assuming that the threshold level has been breached, then a ratio of 2:1 would mean that forevery 2 dB of increased signal level coming into the compressor, the output level rises by 1dB.
Advanced features in BFD3's dynamics processors
SideChain button
The BFD3 Comp Bus, NoiseGate and DCAM EnvShaper feature the ability to process a signal using the transientcharacteristics of another. By enabling the SideChain button, the device's peak detection circuit reacts to thechannel's SideChain input rather than the main input but still applies the processing to the main input signal. Thisallows you to control the dynamics of the main input signal with another signal entirely.
The Filter Mod device also features a SideChain button for driving its envelope follower and FM functions whilethe EQ and EQ8 devices also have a SideChain button for EQ-ing the channel's SideChain signal.
Parallel compression and the Mix control
Parallel compression involves mixing a compressed signal (usually fairly heavily compressed) with the originaldry signal, in order to achieve the 'huge' sound of a compressed drum mix while keeping the transients of theoriginal drums intact.
While it is uncommon to see a wet/dry mix control on a compressor, the Mix control on BFD3's compressors isvery useful for applying parallel compression to a single mono or stereo channel without needing to createadditional Aux channels. If you need to apply parallel compression to more than one channel at once, you mustfirst create a sub-mix on an Aux channel.
Comp Chan
Comp Chan (channel compressor) is derived from a classic 'feedback-basedFET limiting amplifier' design.
It features a 'fixed-threshold' design – the threshold at which compressionstarts is not adjustable. In practice, this means you may need to adjust the Input and Output levels when changing ratios.
Input & Output
This control adjusts the level of the signal entering the compressor. Once theinput level has reached the internal threshold, compression begins. When thishappens, use the Output control to turn down the increased input. The Inputcontrol ranges from -20 tp +40 dB, while the Output control ranges from -40dB to +20 dB.
Attack
The Attack control has a range between 0.02 ms and 0.8 ms.
Release
The Release control has a range between 50ms and 1.1 seconds.
Ratio
This control sets the compression Ratio to 4:1 , 8:1 , 12:1, 20:1 or 'Nuke', which is an emulation of the 'allbuttons' mode on a classic limiting amplifier design. It results in a particularly brutal type of compression withaccompanying distortion artifacts.

BFD3 Operation Manual68
© 2017 FXpansion
Comp Bus
This device is based on a classic bus compressor design from the centresection of a well-known British large-format mixing console.
It is most commonly used to add 'glue' and power to a drum bus. However, italso works very well as a channel compressor in its own right, offering adifferent flavour of compression compared to the Comp Chan.
Key HP (Key signal High-pass)
The Key HP control adjusts a variable high pass filter on the key signal that isused for the compressor's amplitude detection. It is applied whether the maininput or the SideChain input is being used to drive the compressor. No filteringis applied to the audible signal - only to that being used to drive the peakdetection circuit.
This control is useful when there is too much low-end in the sidechain signal,resulting in the compressor reacting more heavily than desired.
Attack
Six Attack times are available: 0.1 ms, 0.3 ms, 1 ms, 3 ms, 10 ms, 30 ms.
Release
Five Release settings are available: 0.1 ms, 0.3 ms, 0.6 ms, 1.2 ms and Auto.
Ratio
Three Ratio settings are available: 2:1, 4:1 and 10:1.
Threshold
Unlike the Comp Chan, the Comp Bus device allows you to adjust the Threshold, which represents the signallevel at which the compressor begins to react.
Output
The Output control allows you to increase the overall output level after the compressor circuit has applied gainreduction to the input signal.
Limit
The Limit button applies analog non-linearities to the input to the compressor's amplitude detection circuit (whilenot affecting the input signal itself). This results in a more transparent character to the compression effect,especially on attack phases of transients.
Comp VCA
The Comp VCA device is a modelled emulation of a VCA-based compressor circuit with a fast and clean compression characteristic.
Input
The Input control adjusts the signal level entering the compressor circuit.Higher levels result in the compressor circuit reacting more heavily.
Attack
The Attack time can be set between 100µs (microseconds) and 100ms(milliseconds).
Release
The Release time can be set between 10ms and 2s.
Ratio
The Ratio can be set between 1:1 and 50:1.
Threshold
The Threshold represents the signal level at which the compressor begins toreact.
Output
The Output control allows you to increase the overall output level after thecompressor circuit has applied gain reduction to the input signal.

Using BFD3's sounds 69
© 2017 FXpansion
DCAM EnvShaper
DCAM EnvShaper offers an alternative approach to dynamics processing byallowing you to adjust the intensity of the attack and sustain portions oftransients.
Attack
The Attack control adjusts the intensity of the attack phase of detected peaksin the audio signal. Increase the control to intensify attack transients, anddecrease it to soften transients.
Sustain
The Sustain control adjusts the intensity of release portions of detectedpeaks in the audio signal, which increases or decreases the apparent sustainof sounds in the signal.
Increase this control for more sustain, and decrease it for less sustain. This control is useful for adjusting theperceived level of ambience in a channel. Negative settings can produce damping effects for drum sounds.
Signal Bias
The Signal Bias control adjusts the sensitivity and release characteristics of DCAM EnvShaper. At low settings itis more sensitive to short transients while at higher settings it is more sensitive to longer transients.
NoiseGate
A noise gate is a type of dynamics processor that attenuates the input signaluntil its amplitude exceeds an adjustable threshold level, at which time thegate 'opens' to allow audio through at its actual level.
They are often used during drum mixing in order to isolate drums withinsignals containing bleed or spill from other drums. Another common use is toreduce the decay of toms and kicks. Noise gates are often referred to simplyas 'gates'.
While BFD3 contains bleed channels, these can be turned down or offcompletely rather than having to use gates to minimize bleed. Likewise, thedecay of kit-pieces can be adjusted using the Damping controls in the DrumEditor. However, using gates can be good for creative effects, or simply forrecreating the types of techniques used in real drum mixing sessions.
BFD3's NoiseGate has a SideChain function which allows you to create triggered 'chopping' effects very easily.For example, route any channel such as a hihat or a user sample direct channel to the master channel'ssidechain input and insert a noise gate in one of the master channel's effect slots. Enable the sidechain button forthe gate and adjust the threshold until the sidechain input triggers the audio on the channel.
When setting very fast Attack and Release times, it is common to hear 'clicks' in the audio when the gateopens and closes, especially with sounds predominantly comprised of low frequencies such as kicks and toms.This behaviour is completely normal - these times simply need to be increased slightly to overcome the problem.
Attack
The Attack control adjusts the speed at which the gate opens once the Threshold has been exceeded by theinput signal's amplitude.
Hold
The Hold parameter controls the amount of time the gate remains open after the input signal has dropped belowthe Threshold level.
Release
The Release control adjusts the speed at which the gate closes at the end of the hold time.
Threshold
The Threshold control allows you to set the level at which the gate starts to open. When the input signalamplitude exceeds the level specified by the Threshold control, the gate starts to open to allow audio through.
Input Filter
This control provides high-pass and low-pass filters to process the input signal used to trigger the gate (whetherit is the main input signal or the SideChain input signal) while leaving the actual processed signal unfiltered. Thisallows you to isolate certain frequencies in the input to improve the gating response – for example, excessivelow frequencies in the input can make the gate react more sensitively than required.
To adjust this control, click and drag the light blue arrows at the left and right of the blue active frequency bandthe light-blue arrows represent the cutoff frequencies of the high-pass and low-pass filters.
Key Listen
Enabling the Key Listen button lets you hear the key input being used to trigger the NoiseGate's amplitudedetection circuit instead of the processed input signal. The key signal can be either the main input or thesidechain input.
It is very useful when using the Input Filter and/or the SideChain input.

BFD3 Operation Manual70
© 2017 FXpansion
Hysteresis
Noise gates have a tendency to open and close very quickly when the input signal's amplitude remains close tothe threshold level for longer periods, something that can result in 'gate chatter'.
Increasing the Hysteresis control smooths out the gate response to reduce this problem, although the gatebecomes less sensitive to small changes around the threshold level.
Mix
With the Mix control at 100%, the NoiseGate mutes the signal completely when closed. If you want to let thesignal through at a low level, decrease the Mix control to allow more of the dry signal through.
Distortion
The Distortion device is an updated version of BFD2's Drive processor which is nowavailable within the Legacy sub-menu.
Mode
The Mode drop-down menu selects between a wide variety of distortion types.
Drive
The Drive control sets the amount of distortion that takes place.
Input Filter
This control provides high-pass and low-pass filters before the distortion stage toenable you to shape the tonal characteristics of the signal going into the drivecircuit.
For example, you may want to distort the high end of a kick drum while leaving the deep low end unchanged.
To adjust this control, click and drag the light blue arrows at the left and right of the blue active frequency bandthe light-blue arrows represent the cutoff frequencies of the high-pass and low-pass filters.
These filters are crossover filters – the active frequency band is processed by the distortion circuit with its leveladjustable via the Dirty control. The frequencies that are filtered out before the distortion stage are accessiblevia the Clean control.
Dirty & Clean
The Dirty control sets the amount of post-distortion signal that is heard at the output.
The Clean control sets the amount of the clean signal, which is comprised of the signals filtered out by InputFilter control.
Please note that these are not 'wet' and 'dry' controls – use the standard Mix control at the top of the effectinterface in order to mix between the pre- and post-effect signals.
Tone
The Tone control provides a simple -6 dB/oct low-pass filter for the processed signal after the distortion stage.It allows you to roll off unwanted high frequencies that may have been generated in the signal as part of thedistortion effect.
Limiter
A limiter is effectively a compressor with a very fast attack time and a high ratiofor signals that exceed the maximum level.
Input
The Input control adjusts the level of the signal going into the Limiter algorithm.Higher input levels lead to more pronounced and 'brutal' limiting.
Hardness
The Hardness control adjusts the strength of the Limiter's 'knee'. At high settings,peaks are clipped with a 'brick-wall' limiting effect. At lower settings, gain reductionoccurs more slowly (with slower attack and release settings), leading to a morenatural effect with less 'pumping'.
Output
The Output control allows you to attenuate the processed output signal from the Limiter.

Using BFD3's sounds 71
© 2017 FXpansion
Gain
The Gain effect is a simple tool for increasing or decreasing a channel's level.
Gain
The Gain control lets you increase the channel's gain up to 18 dB, or decrease itup to -inf dB.

BFD3 Operation Manual72
© 2017 FXpansion
3.4.2 Filters
EQ
BFD3's EQ provides 4 bands of EQ, including two parametric mid bands.
L (Low) and H (High) bands
The Low and High bands are switchable between a bell with a fixed Q of 2.5 octave(with the Bell button activated) and a shelving response with a fixed rolloff of 12dB per octave (with the Bell button deactivated).
• Low band Freq range: 40 to 600hz
• Low band Gain range: +/- 16.5 dB
• High band Freq range: 600 to 14khz
• High band Gain range: +/- 20 dB
LM (Low Mid) and HM (High Mid) parametric bands
The Mid bands feature bell curves with adjustable Q.
• Low Mid Band Freq range: 200hz to 2Khz
• High Mid band Freq range: 800hz to 7khz
• Q range: 0.5 octave to 2.5 octave
Band Power
Each band has its own Power button allowing you to save CPU by only using the bands you need.
SideChain
Enabling the EQ's SideChain button allows you to EQ the channel's sidechain input. It can be very useful to EQ aSideChain input before it enters a compressor as it may feature excessive energy in a part of the frequencyspectrum leading to an undesired compression response. Note that the EQ must be placed before the SideChain-enabled processor in the channel's effect chain.
Frequency Display control
The EQ curve can be adjusted by clicking and dragging the graphical display in the EQ effect interface. To edit aband in this way, move the mouse cursor over the display. The display is divided into 4 zones for each band,each highlighted in a different colour corresponding to that of each band's controls on the interface.
With a band highlighted, click and drag up/down to adjust the band's Gain, and left/right to adjust its Freq. Forthe two Mid bands, click and drag up/down while holding down the ALT key to adjust the band's Q.
EQ8
The EQ8 device is an 8-band version of the EQ - it features the same controlsbut for 8 bands (numbered 1-8) instead of the 4 bands in the standard EQdevice.
Bands 1 and 8 behave in the same way as the Low and High bands in thestandard EQ device, while all other bands behave in the same way as the EQ'sparametric Low Mid and High Mid bands.
Filter
The Filter effect provides non-resonant high-pass and low-pass filters for broadtonal shaping of signals.
It can be used to roll off the low end in Overhead and Room buses, or to removeultra-low frequencies from kick drums, espcially when low-shelving EQ is applied.
HP Frequency
The -18dB/Oct high-pass filter removes frequencies below the specified frequencywhich can be set within a range between 20hz and 500hz.
LP Frequency
The -12 dB/Oct low-pass filter removes frequencies above the specified frequency,which can be set within a range of 35 Hz to 3 kHz.
Power buttons
The HP In and LP In buttons are power buttons for each filter – when activated, the filter is enabled, and whendeactivated, the filter is bypassed.

Using BFD3's sounds 73
© 2017 FXpansion
Filter Mod
This device features a state-variable multimode filter with a response of 12 dbper octave, capable of self-oscillation and featuring input and output drivestages.
It has a built-in envelope follower to modulate the filter's cutoff frequencyrelative to the input's amplitude. This function is modelled on an analogue full-wave rectified envelope follower. Additionally, the filter frequency can bemodulated at audio rate by the input signal.
Alternatively, the channel's SideChain input can be used as the audio sourcefor the envelope follower and audio-rate FM functions. For example you coulduse a bass drum tuned very low as a rough and ready LFO to modulate thefilter.
Mode
4 filter Mode settings are available, each offering different filtering functions relative to the cutoff frequency.
Low (Low-pass)
Low-pass mode allows through only frequencies below the cutoff frequency.
High (High-pass)
High-pass mode allows through only frequencies above the cutoff frequency.
Band (Band-pass)
Band-pass mode allows through only a band of frequencies around the cutoff frequency.
Notch
This is the opposite of a band pass - it allows through all other frequencies except a band of frequencies aroundthe cutoff frequency.
Modulating a notch filter can give phaser-like results.
In Drive
The In Drive control sets the amount of signal gain before the filtering stage. As well as increasing the gain,using more drive results in a rich and complex interaction with the filter's resonance due to modelled non-linearities within it.
Out Drive
The Out Drive control adjusts the gain of an OTA-type non-linear amp function at the output, in order to boostand colour the filtered signal.
Pitch
The Pitch control adjusts the cutoff frequency of the filter. It is measured in semitones.
Resonance
This control adjusts the resonance of the filter, accentuating the frequencies around the cutoff frequency set bythe Pitch control.
High Resonance settings cause the filter to self-oscillate – please exercise caution with your speaker levelswhen using resonant self-oscillation.
Attack
This control changes how quickly the envelope follower section responds to transients in the input signal. LongerAttack times mean that the filter takes a longer time to respond to amplitude changes.
Release
The Release control changes how quickly the envelope follower causes the filter to return to its original positionwhen the input signal decreases after a transient.
Env Depth
The Env Depth control adjusts the amount of modulation of the filter's cutoff frequency by the built-in envelopefollower.
FM Depth
The FM Depth control sets the amount of audio-rate modulation of the cutoff frequency by the input.

BFD3 Operation Manual74
© 2017 FXpansion
SideChain
Enabling the SideChain button results in the channel's SideChain input being used as the source for theFilterMod device's envelope follower and audio-rate FM features. This means other channels can be used tomodulate the filter cutoff.
This function allows you to be very creative with the filter – here's a few ideas to try out:
for quick and dirty LFOs, try tuning a kick down really low and using it as the filter FM source, perhaps aftersome additional processing such as low-pass filtering
load arbitrary sounds as user samples using BFD3's sample import functions, and use them as the filter FMsource
try using the TestTone or TestPulse devices as filter FM sources
Comb
The Comb device is useful for psychedelic chorus and phaser-style effects.Comb filters use technique of feeding a delayed version of the signal back intoitself to create a series of harmonically related notches across the frequencyspectrum reminiscent of the teeth of a comb. Changing the amount of delayaffects the position of these notches and creates the effect of 'sweeping' theresultant frequency bands.
Pitch
The Pitch control adjusts the centre frequency of the comb filter, changingthe position of the comb frequency bands.
Resonance
The Resonance control adjusts the amount of feedback used for the combfilter.
Mode
The Mode control sets the feedback polarity between positive and negative settings.
Drive
The Drive control increases the level of the signal entering the comb filter circuit, adding saturation andoverdrive.
Rate
The Rate control adjusts the speed of the Comb device's built-in sine LFO for modulating the Pitch.
Depth
The Depth control adjusts the amount of modulation of the Pitch control with the internal sine LFO.
HiLo Balance
The HiLo Balance device is a 'tilt'-style EQ which cuts high frequencies whenboosting low frequencies, and vice versa.
Balance
The Balance control sets the degree of 'tilt' between low and highfrequencies. At the centre position no effect is applied to the incoming audio.
At values higher than the centre position, high frequencies are boosted whilelow frequencies are attenuated by the same amount.
At values lower than the centre position, low frequencies are boosted whilehigh frequencies are attenuated by the same amount.
Crossover
This control sets the point between the low and high frequency bands.

Using BFD3's sounds 75
© 2017 FXpansion
3.4.3 Spatial
Delay
The Delay effect can operate as a stereo or mono delay line, depending onwhether it is used on a stereo or mono channel.
Time
The delay Time can be set either in absolute time values in seconds or intempo-based values (selectable using the Sync control).
Sync
When the Sync button is set to BPM, the delay time is set in tempo-based valuesrelative to BFD3's current tempo. Possible values range from 64th note to 2 bars,including dotted and triplet variations, the latter being especially useful for classicshuffle grooves using simple ¼-note input. In Seconds mode, the delay time isset as an absolute time value, ranging from 31 ms to 4 seconds.
Feedback
The Feedback control sets the amount of delay regenerations, caused by feeding the delayed signal back intothe input. Higher values feed the delayed signal back in at a higher amplitude, leading to more regenerations ofthe input signal. Settings of 100% lead to indefinite regenerations until the value is reduced, and with good useof the built-in filtering can result in classic psychedelic, dubby analog delay effects.
Swing
The delay features 2 taps, which are played at the same time with the swing control at the centre position.
By turning down the Swing control, you can move the left tap before the right tap, up to a distance of half thedelay time. By turning up the Swing control, the right tap is moved up to a distance of half the delay time beforethe left tap.
This control opens up a wide variety of swung delay grooves.
Feedback Filter
This control consists of a high-pass and low-pass filter allowing you to apply tonal shaping to each delayregeneration.
To adjust this control, click and drag the light blue arrows at the left and right of the blue active frequency band -the light-blue arrows represent the cutoff frequencies of the high-pass and low-pass filters.
Sum In (stereo only)
When the Delay is used on a stereo channel, activating this button sums the left and right inputs to a singlemono signal and feeds one delay line instead of two.
Delay Multi Tap
This device provides 4 separate delay taps.
Time
The 4 Time controls set the delay time for each of the 4 delay taps.
Sync
When the Sync parameter is set to BPM, the delay time is set in tempo-basedvalues relative to BFD3's current tempo. Possible values range from 64th note to2 bars, including dotted and triplet variations, the latter being especially usefulfor classic shuffle grooves using simple ¼-note input. In Seconds mode, thedelay time is set as an absolute time value, ranging from 31ms to 4 seconds.
Gain
The 4 Gain controls allow you to set the level of each of the 4 delay taps.
Feedback
The 4 Feed controls set the amount of feedback for each of the 4 delay taps.
Pan (Stereo only)
When the device is used on a stereo channel, the Pan control allows each of the 4 taps can be positioned withinthe stereo field.
Feedback Filter
This control consists of a high-pass and low-pass filter allowing you to apply tonal shaping to each delayregeneration - the same filtering settings are applied to all 4 delay taps.
To adjust this control, click and drag the light blue arrows at the left and right of the blue active frequency band -the light-blue arrows represent the cutoff frequencies of the high-pass and low-pass filters.
Time (Master)
This control offers a master control for the delay time of all 4 delay taps. It applies an offset to the Timesettings for all 4 taps.
Feedback (Master)
This control offers a master control for the feedback of all 4 delay taps. It applies an offset to the Feedbacksettings for all 4 taps.
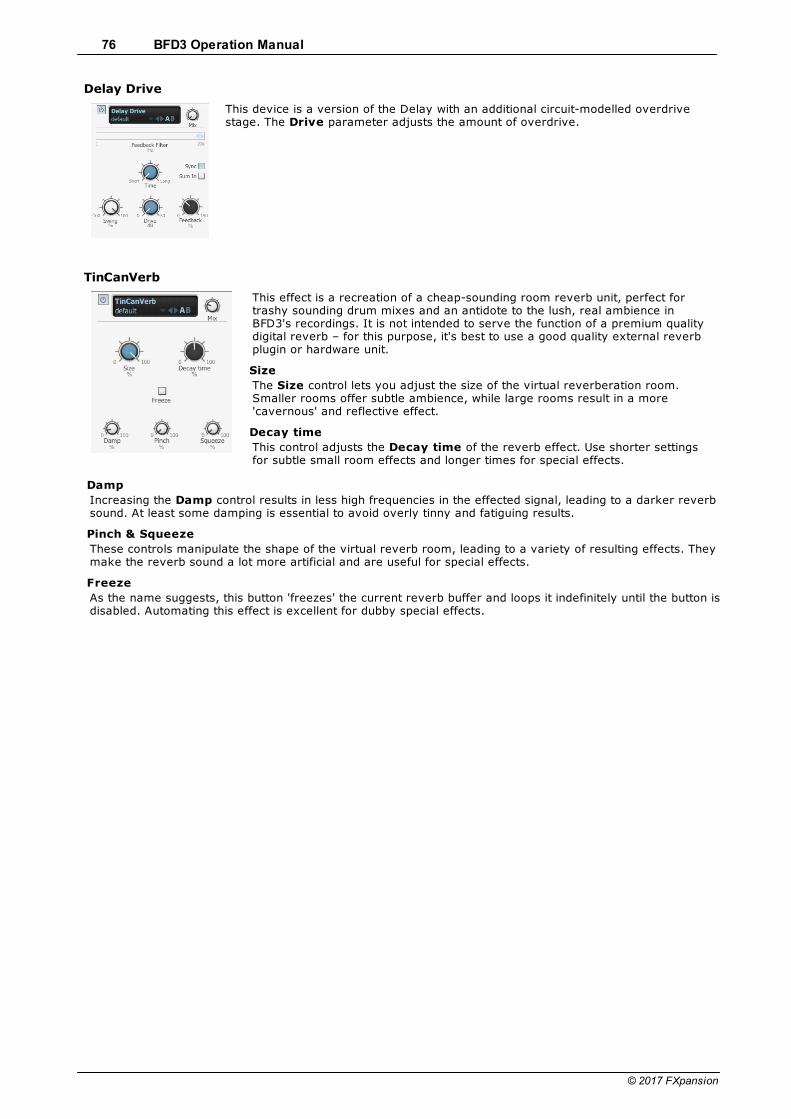
BFD3 Operation Manual76
© 2017 FXpansion
Delay Drive
This device is a version of the Delay with an additional circuit-modelled overdrivestage. The Drive parameter adjusts the amount of overdrive.
TinCanVerb
This effect is a recreation of a cheap-sounding room reverb unit, perfect fortrashy sounding drum mixes and an antidote to the lush, real ambience inBFD3's recordings. It is not intended to serve the function of a premium qualitydigital reverb – for this purpose, it's best to use a good quality external reverbplugin or hardware unit.
Size
The Size control lets you adjust the size of the virtual reverberation room.Smaller rooms offer subtle ambience, while large rooms result in a more'cavernous' and reflective effect.
Decay time
This control adjusts the Decay time of the reverb effect. Use shorter settingsfor subtle small room effects and longer times for special effects.
Damp
Increasing the Damp control results in less high frequencies in the effected signal, leading to a darker reverbsound. At least some damping is essential to avoid overly tinny and fatiguing results.
Pinch & Squeeze
These controls manipulate the shape of the virtual reverb room, leading to a variety of resulting effects. Theymake the reverb sound a lot more artificial and are useful for special effects.
Freeze
As the name suggests, this button 'freezes' the current reverb buffer and loops it indefinitely until the button isdisabled. Automating this effect is excellent for dubby special effects.
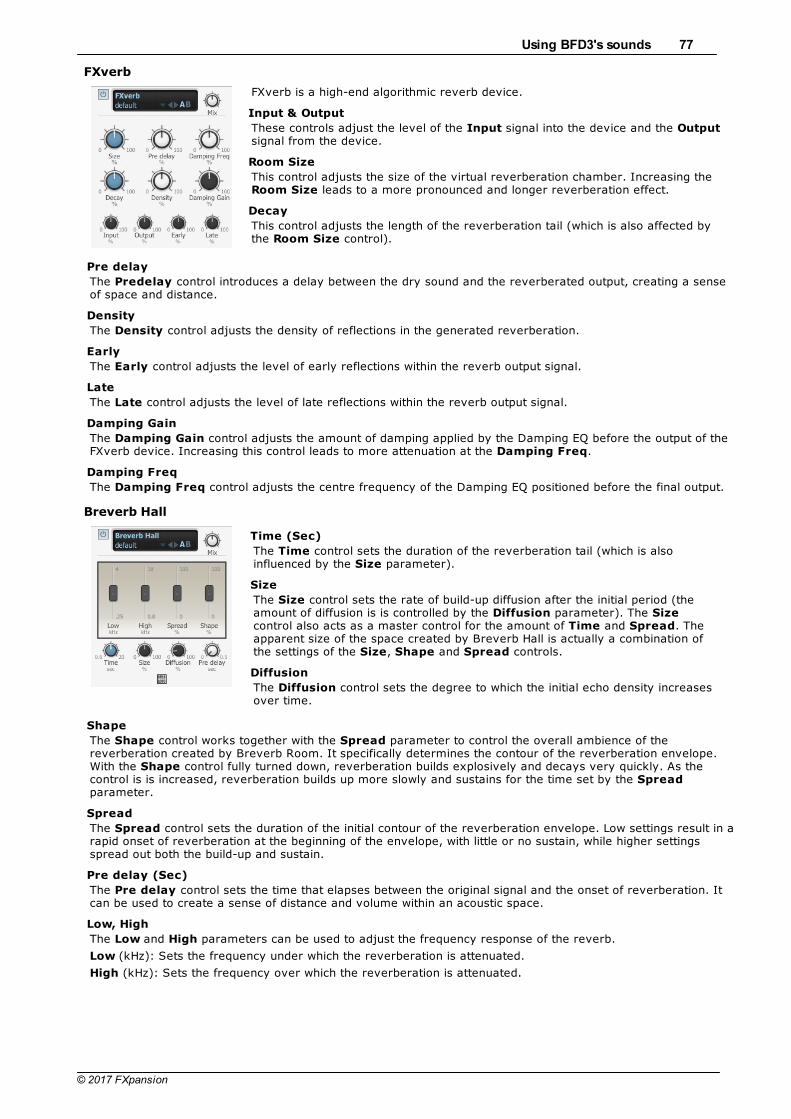
Using BFD3's sounds 77
© 2017 FXpansion
FXverb
FXverb is a high-end algorithmic reverb device.
Input & Output
These controls adjust the level of the Input signal into the device and the Outputsignal from the device.
Room Size
This control adjusts the size of the virtual reverberation chamber. Increasing the Room Size leads to a more pronounced and longer reverberation effect.
Decay
This control adjusts the length of the reverberation tail (which is also affected bythe Room Size control).
Pre delay
The Predelay control introduces a delay between the dry sound and the reverberated output, creating a senseof space and distance.
Density
The Density control adjusts the density of reflections in the generated reverberation.
Early
The Early control adjusts the level of early reflections within the reverb output signal.
Late
The Late control adjusts the level of late reflections within the reverb output signal.
Damping Gain
The Damping Gain control adjusts the amount of damping applied by the Damping EQ before the output of theFXverb device. Increasing this control leads to more attenuation at the Damping Freq.
Damping Freq
The Damping Freq control adjusts the centre frequency of the Damping EQ positioned before the final output.
Breverb Hall
Time (Sec)
The Time control sets the duration of the reverberation tail (which is alsoinfluenced by the Size parameter).
Size
The Size control sets the rate of build-up diffusion after the initial period (theamount of diffusion is is controlled by the Diffusion parameter). The Sizecontrol also acts as a master control for the amount of Time and Spread. Theapparent size of the space created by Breverb Hall is actually a combination ofthe settings of the Size, Shape and Spread controls.
Diffusion
The Diffusion control sets the degree to which the initial echo density increasesover time.
Shape
The Shape control works together with the Spread parameter to control the overall ambience of thereverberation created by Breverb Room. It specifically determines the contour of the reverberation envelope.With the Shape control fully turned down, reverberation builds explosively and decays very quickly. As thecontrol is is increased, reverberation builds up more slowly and sustains for the time set by the Spreadparameter.
Spread
The Spread control sets the duration of the initial contour of the reverberation envelope. Low settings result in arapid onset of reverberation at the beginning of the envelope, with little or no sustain, while higher settingsspread out both the build-up and sustain.
Pre delay (Sec)
The Pre delay control sets the time that elapses between the original signal and the onset of reverberation. Itcan be used to create a sense of distance and volume within an acoustic space.
Low, High
The Low and High parameters can be used to adjust the frequency response of the reverb.
Low (kHz): Sets the frequency under which the reverberation is attenuated.
High (kHz): Sets the frequency over which the reverberation is attenuated.

BFD3 Operation Manual78
© 2017 FXpansion
Breverb Room
Time (Sec)
The Time control sets the duration of the reverberation tail (which is alsoinfluenced by the Size parameter).
Size
The Size control sets the apparent size of the acoustic space being emulatedby the algorithm. Values from minimum to 50% are typical of the ambience ofa typical recording room.
Diffusion
The Diffusion control sets the degree to which the initial echo densityincreases over time.
Decay
The Decay control sets the balance between late reverberation and early reflections. When the control is fullyturned down, only the early reflections are present. As it is increased, late reverberations are introduced to thesignal.
Pre delay (Sec)
The Pre delay control sets the time that elapses between the original signal and the onset of reverberation. Itcan be used to create a sense of distance and volume within an acoustic space.
Low, High
The Low and High parameters can be used to adjust the frequency response of the reverb.
Low (kHz): Sets the frequency under which the reverberation is attenuated.
High (kHz): Sets the frequency over which the reverberation is attenuated.
Breverb Plate
Time (Sec)
The Time control sets the duration of the reverberation tail (which is alsoinfluenced by the Size parameter).
Size
The Size control sets the apparent size of the metal plate emulated by theBreverb Plate algorithm.
Diffusion
The Diffusion control sets the degree to which the initial echo densityincreases over time.
Pre delay (Sec)
The Pre delay control sets the time that elapses between the original signal and the onset of reverberation. Itcan be used to create a sense of distance and volume within an acoustic space.
Shape
The Shape control determines the contour of the reverberation envelope. With the control fully turned down,reverberation builds explosively and decays very quickly. As the control is increased, reverberation builds upmore gradually and sustains for longer.
Low, High
The Low and High parameters can be used to adjust the frequency response of the reverb.
Low (kHz): Sets the frequency under which the reverberation is attenuated.
High (kHz): Sets the frequency over which the reverberation is attenuated.

Using BFD3's sounds 79
© 2017 FXpansion
Breverb Inverse
Time (Sec)
The Time control sets the duration of the reverberation tail. This time, addedto the Pre delay time, is the time that elapses from the original signal to theend of the reverberation process.
Diffusion
The Diffusion control sets the degree to which the initial echo densityincreases over time.
Pre delay (Sec)
The Pre delay control sets the amount of time that elapses between theoriginal signal and the onset of reverberation. It can be used to create asense of distance and volume within an acoustic space.
Low, High
The Low and High parameters can be used to adjust the frequency response of the reverb.
Low (kHz): Sets the frequency under which the reverberation is attenuated.
High (kHz): Sets the frequency over which the reverberation is attenuated.

BFD3 Operation Manual80
© 2017 FXpansion
3.4.4 Effects
Flanger
The Flanger effect is a short modulated delay line with feedback to the input. It isused for a sense of movement and for psychedelic effects from the subtle to theextreme. It features a built-in sine LFO for modulating the flanging delay line.
Rate
The Rate control affects the speed of modulation of the flanger delay time.
Depth
The Depth control adjusts the amount of modulation of the delay time.
Display
The VU-style display represents the current flanging delay time.
Pos (Position)
This control introduces an additional fixed delay time to the Flanger's delay line. It is a very short delay, rangingfrom 0 ms to 15 ms.
Feedback
This control adjusts the amount of the flanged signal that is fed back into the input.
Higher Feedback settings result in a more pronounced flanging effect. Settings over 50% lead to extreme combfilter type effects.
Spread (stereo only)
This control allows you to adjust the panning of the left and right channel processed signals.
Phase (stereo only)
The Phase control offsets the phase of the internal LFOs for the left and right channels.
Flip Phase
By default (with the Flip Phase button deactivated), the flanged signal is in positive phase with the input signal.
Activating the Flip Phase button inverts the flanged signal's phase in relation to the input signal.
A positive phase setting tends to lead to a more obvious flanging effect.
Phaser
The Phaser uses phase cancelling techniques (with the use of all-pass filtering) tocreate a series of peaks across the frequency spectrum. When these peaks areswept, a psychedelic sweeping effect is created.
Mode
The Mode control selects between a number of phaser responses. 4, 6, 8 and 12stage phaser types are available, with positive or negative feedback. The numberof stages refers to the number of all-pass filters within the algorithm.
Pitch
The Pitch control adjusts the centre frequency of the all-pass filters used in thePhaser algorithm.
Resonance
The Resonance control adjusts the amount of resonance (feedback) in the all-pass filters.
Phase
The Phase control adjusts the phase between the dry signal and the all-pass filtered signal.
Depth
The Depth control adjusts the amount of Pitch modulation from the Phaser device's internal LFO that modulatesthe Pitch parameter for classic phaser effect sounds.
Rate
The Rate control adjusts the speed of the internal LFO.
Sync
When the Sync parameter is set to BPM, the Rate control is set in tempo-based values relative to BFD3'scurrent tempo. Possible values range from 64th note to 2 bars, including dotted and triplet variations.
In Seconds mode, the Rate control is set as an absolute time value, ranging from 31ms to 4 seconds.

Using BFD3's sounds 81
© 2017 FXpansion
Chorus
The Chorus effect is a modulation effect that is pitch-based. It is used forthickening up sounds.
Rate
The Rate control adjusts the speed of pitch modulation.
Depth
The Depth control adjusts the amount of modulation away from the inputsignal's original pitch.
Spread (stereo only)
This control varies the panning of the left and right pitch-modulated signals.
Bit Crusher
The Bitcrusher effect provides a type of digital distortion that occurs when thesample-rate and bit-depth of the audio is reduced. It allows you to simulatethe sound of early samplers, useful for underground hip-hop and other 'lo-fi'styles.
Bits
The Bits control reduces the bit depth from a maximum of 16 bits to aminimum of 1 bit, which is effectively digital noise. The digital noise generatedby the bit-reduction process is referred to as quantisation noise.
Early digtal drum machines and samplers tended to have 8 or 12 bitresolution.
Freq
The Freq control adjusts the sample rate frequency of the audio processed by the effect and ranges from amaximum of 100 kHz to a minimum of 1 Hz.
Lower sample rates result in an aliasing effect on the processed audio.
Drive
The Drive control adjusts the amount of drive in an OTA-type distortion stage after the crossover filters. Thisallows gain and colour to be added to the signal before it is processed by the Bit and Freq processes.
Input Filter
This control provides high-pass and low-pass filters for isolating a part of the signal before the sample-rate andbit-depth reduction stages.
To adjust this control, click and drag the light blue arrows at the left and right of the blue active frequency bandthe light-blue arrows represent the cutoff frequencies of the high-pass and low-pass filters.
These filters are crossover filters – the active frequency band is processed by the bitcrushing circuit with its leveladjustable via the Dirty control. The frequencies that are filtered out before the bitcrushing stage are accessiblevia the Clean control.
Dirty & Clean
The Dirty control sets the amount of processed signal that is heard at the output.
The Clean control sets the amount of the clean signal, which is comprised of the signals filtered out by theInput Filter before processing.
Please note that these are not 'wet' and 'dry' controls – use the Mix control at the top of the effect interface inorder to mix between the pre- and post-effect signals.
Tone
The Tone control provides a simple -6 dB/oct low-pass filter for the Dirty signal after the bitcrushing process. Itallows you to roll off unwanted high frequencies that may have been generated in the signal as part of thedistortion effect.

BFD3 Operation Manual82
© 2017 FXpansion
RingMod
A ring modulator multiplies two signals together, giving you the sum and thedifference between them and the output.
BFD3's RingMod device contains an internal oscillator that provides one of thesignals, the other being the drum sound passing through it.
This effect is useful for radical, inharmonic timbral changes for moreexperimental-sounding mixes.
Mode
The Mode control adjusts the waveshape of the internal oscillator which ismultiplied with the audio input to the effect. Sine, Triangle, Saw, Square andParabolic oscillator shapes a re available, as well as white or pink noise.
Pitch
The Pitch control tunes the internal oscillator within a range of an octave.
Drive
The Drive control introduces an adjustable amount of distortion on the input signal. Overdriving the signal in thisway changes the waveshape of the input, leading to further variations in the resulting effect.
Frequency shifter
A frequency shifter changes the frequency of the sound passing through it - allfrequencies in the signal are adjusted by a fixed amount. This differs from apitch-shifter which adjusts the frequencies of fundamental frequencies andtheir harmonics by a proportional amount to preserve the harmonic series ofthe original signal. Therefore, a frequency shifter usually results in inharmonicand clangorous sounds.
Pitch
The Pitch control adjusts the amount of frequency shifting, and is representedin semitones. You can shift the input signal's frequencies up or down by up to36 semitones (3 octaves).
Gain
The Gain control adjusts the level of the output signal.
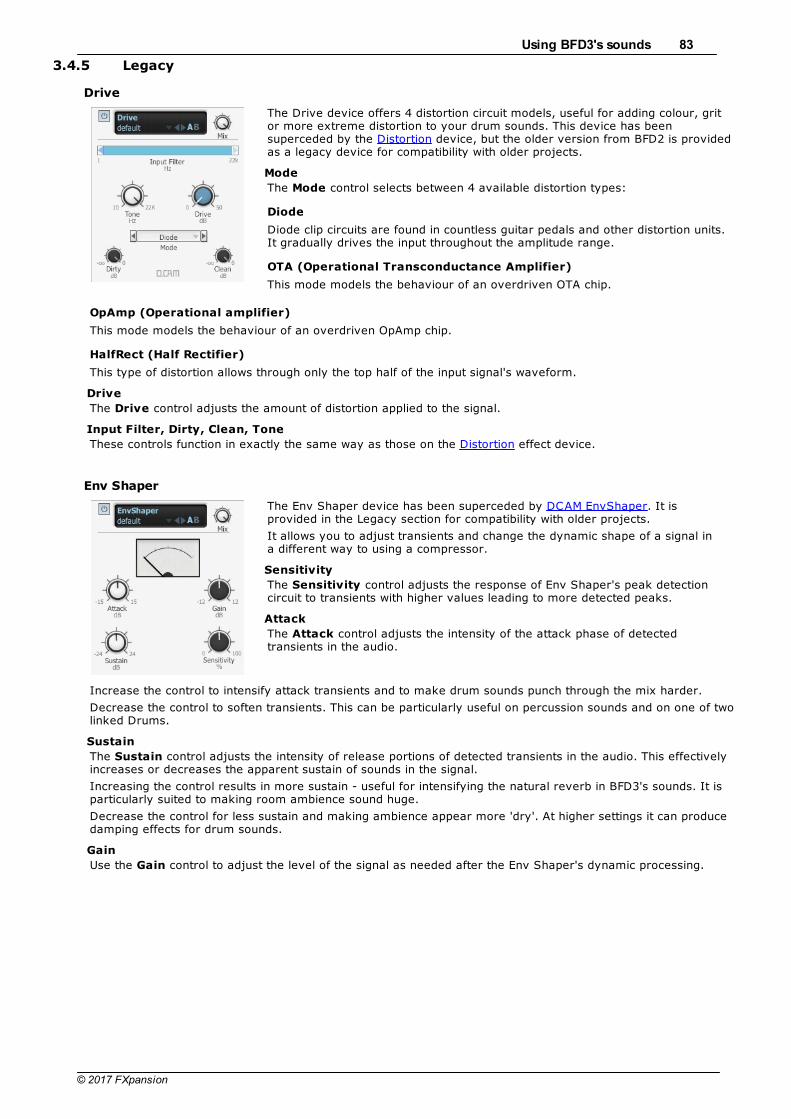
Using BFD3's sounds 83
© 2017 FXpansion
3.4.5 Legacy
Drive
The Drive device offers 4 distortion circuit models, useful for adding colour, gritor more extreme distortion to your drum sounds. This device has beensuperceded by the Distortion device, but the older version from BFD2 is providedas a legacy device for compatibility with older projects.
Mode
The Mode control selects between 4 available distortion types:
Diode
Diode clip circuits are found in countless guitar pedals and other distortion units.It gradually drives the input throughout the amplitude range.
OTA (Operational Transconductance Amplifier)
This mode models the behaviour of an overdriven OTA chip.
OpAmp (Operational amplifier)
This mode models the behaviour of an overdriven OpAmp chip.
HalfRect (Half Rectifier)
This type of distortion allows through only the top half of the input signal's waveform.
Drive
The Drive control adjusts the amount of distortion applied to the signal.
Input Filter, Dirty, Clean, Tone
These controls function in exactly the same way as those on the Distortion effect device.
Env Shaper
The Env Shaper device has been superceded by DCAM EnvShaper. It isprovided in the Legacy section for compatibility with older projects.
It allows you to adjust transients and change the dynamic shape of a signal ina different way to using a compressor.
Sensitivity
The Sensitivity control adjusts the response of Env Shaper's peak detectioncircuit to transients with higher values leading to more detected peaks.
Attack
The Attack control adjusts the intensity of the attack phase of detectedtransients in the audio.
Increase the control to intensify attack transients and to make drum sounds punch through the mix harder.
Decrease the control to soften transients. This can be particularly useful on percussion sounds and on one of twolinked Drums.
Sustain
The Sustain control adjusts the intensity of release portions of detected transients in the audio. This effectivelyincreases or decreases the apparent sustain of sounds in the signal.
Increasing the control results in more sustain - useful for intensifying the natural reverb in BFD3's sounds. It isparticularly suited to making room ambience sound huge.
Decrease the control for less sustain and making ambience appear more 'dry'. At higher settings it can producedamping effects for drum sounds.
Gain
Use the Gain control to adjust the level of the signal as needed after the Env Shaper's dynamic processing.

BFD3 Operation Manual84
© 2017 FXpansion
3.4.6 Utility
Utility
The Utility device is a stereo gain and pan adjustment tool.
It allows for individual gain and pan levels to be set for both left and rightchannels of the signal independently.
Please note that the Utility device can only be used on a stereo mixer channel.
Amp
This control adjusts the independent left and right gain levels of the signal.
PanThis control adjusts the independent left and right pan levels of the signal.
Phase
When enabled, this control inverts the phase of either the left or right channel ofthe signal.
Mute
This control allows either the left or right channels of the signal to be muted independently.
LR 2 MS
The LR 2 MS device is used to encode a left/right stereo signal into a Mid-Sidestereo signal, which can be used to create a wider or narrower stereo mix andallows for a more precise adjustment of stereo width that pan controls.
Mid Gain
This control adjusts the amount of gain applied to the Mid element of the signal.
Side Gain
This control adjust the amount of gain applied to the Side element of the signal.
Both the Mid and Side elements of the signal can be independently disabledusing the Mid Gain and Side Gain buttons.
MS 2 LR
The MS 2 LR device is the reverse of the LR 2 MS device, and is used to decodea Mid-Side signal into a left/right stereo signal.
Mid Gain
This control adjusts the amount of gain applied to the Mid element of the signal.
Side Gain
This control adjust the amount of gain applied to the Side element of the signal.
As with this LR 2 MS device, both the Mid and Side elements of the signal canbe independently disabled using the Mid Gain and Side Gain buttons.
FFT
The FFT device is a spectrum analysis tool.
It shows a representation of the output signal from theeffect device immediately to its left. It is useful for trackingdown causes of problematic frequency output that may begenerated by some effect settings.
Please note that FFT processing consumes substantialamounts of CPU power.
Smoothing
This control adjusts the amount of smoothing used toreduce jitter in the display. Increasing the Smoothingcontrol results in a more stable display although accuracymay be compromised.
Update Time
This control adjusts the frequency at which the audio signal is analysed and displayed. Shorter Update Timesettings consume more CPU cycles (FFT analysis is a substantially CPU-hungry process).
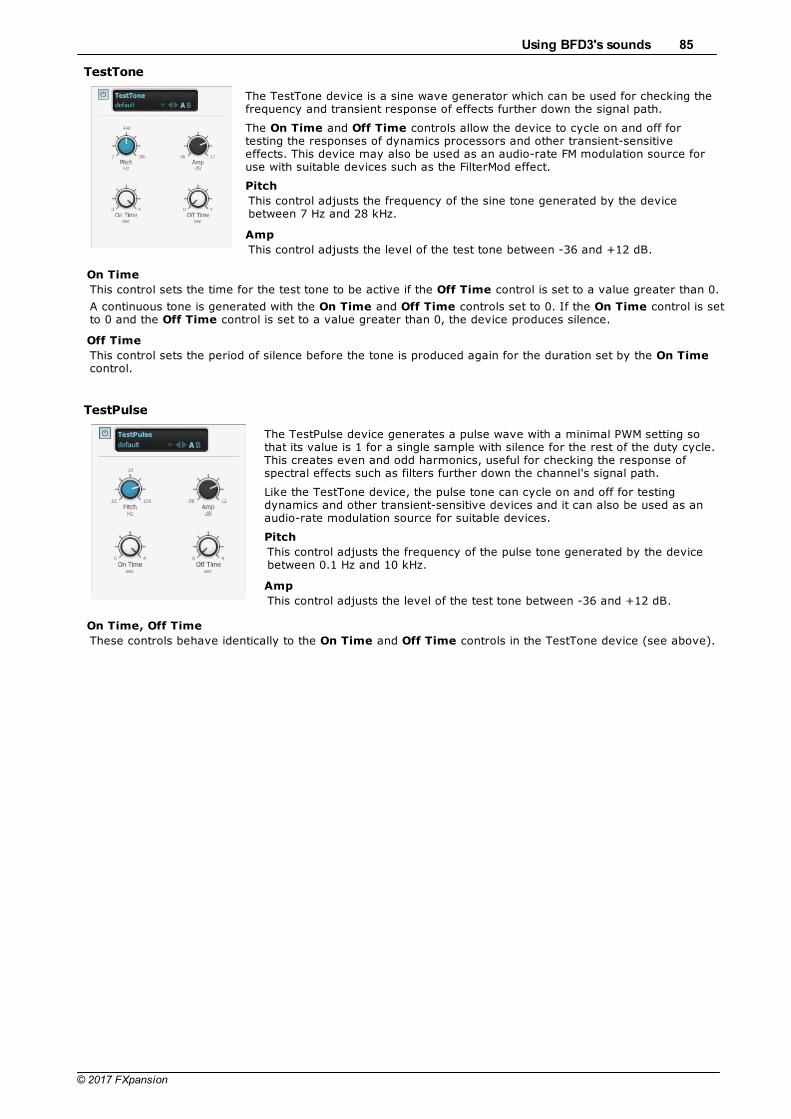
Using BFD3's sounds 85
© 2017 FXpansion
TestTone
The TestTone device is a sine wave generator which can be used for checking thefrequency and transient response of effects further down the signal path.
The On Time and Off Time controls allow the device to cycle on and off fortesting the responses of dynamics processors and other transient-sensitiveeffects. This device may also be used as an audio-rate FM modulation source foruse with suitable devices such as the FilterMod effect.
Pitch
This control adjusts the frequency of the sine tone generated by the devicebetween 7 Hz and 28 kHz.
Amp
This control adjusts the level of the test tone between -36 and +12 dB.
On Time
This control sets the time for the test tone to be active if the Off Time control is set to a value greater than 0.
A continuous tone is generated with the On Time and Off Time controls set to 0. If the On Time control is setto 0 and the Off Time control is set to a value greater than 0, the device produces silence.
Off Time
This control sets the period of silence before the tone is produced again for the duration set by the On Timecontrol.
TestPulse
The TestPulse device generates a pulse wave with a minimal PWM setting sothat its value is 1 for a single sample with silence for the rest of the duty cycle.This creates even and odd harmonics, useful for checking the response ofspectral effects such as filters further down the channel's signal path.
Like the TestTone device, the pulse tone can cycle on and off for testingdynamics and other transient-sensitive devices and it can also be used as anaudio-rate modulation source for suitable devices.
Pitch
This control adjusts the frequency of the pulse tone generated by the devicebetween 0.1 Hz and 10 kHz.
Amp
This control adjusts the level of the test tone between -36 and +12 dB.
On Time, Off Time
These controls behave identically to the On Time and Off Time controls in the TestTone device (see above).

BFD3 Operation Manual86
© 2017 FXpansion
3.5 Exporting audio from BFD3
Click the Export button to display the Export panel if it is not currentlyvisible. This panel allows you to export multi-channel mixdowns directly todisk from BFD3.
BFD3's export functions operate in conjunction with the mixer's Recordenable buttons - activate the Record enable button for any channel thatyou desire to export as a discrete audio file, or use the functions forrecord enabling channels within the Export panel as described below.
Exporting is also possible from the Groove engine - individual Grooves orthe Drum Track can be exported using BFD3's File menu when theGroove Editor is visible.
Groove engine export operations follow the settings specified in the Export panel where applicable.
Export folder
This control shows the path (folder location) to which to write exportedaudio files. Click the Browse button at the right to specify any location onyour system.
It is recommended to use a drive that is not used for BFD3's audio data,as it may not be possible to properly stream samples for playback whilerecording to the same drive.
File Prefix
The filename of each exported audio file contains the name of each mixerchannel (editable in the label strip) enabled for export, along with theoptional File Prefix. Resulting files are named in the following format:
FilePrefix_MixerChannel.WAV
Bit depth
This setting dictates the resolution of the exported audio files. 16, 24 and 32 bit resolutions are available.
Functions for record enabling channels
Export channel list
All current mixer channels are displayed in the channel list at the left ofthe Export panel. Click any channel to toggle its Record enable status.
Alternatively, click any channel and drag up or down to toggle the Recordenable status of multiple adjacent channels. The Arm Group buttons canalso be used to quickly Record enable various channel types:
All
Click this button to activate the Record enable function on all mixerchannels.
None
Click this button to deactivate the Record enable function on all mixerchannels.
Dir
Click this button to toggle the Record enable function on all Direct mic mixer channels.
Amb
Click this button to toggle the Record enable function on all Ambient mic mixer channels.
Aux
Click this button to toggle the Record enable function on all Aux mixer channels.
Mix
Click this button to toggle the Record enable function on the Kick/Snare/Ambient Mix channels.
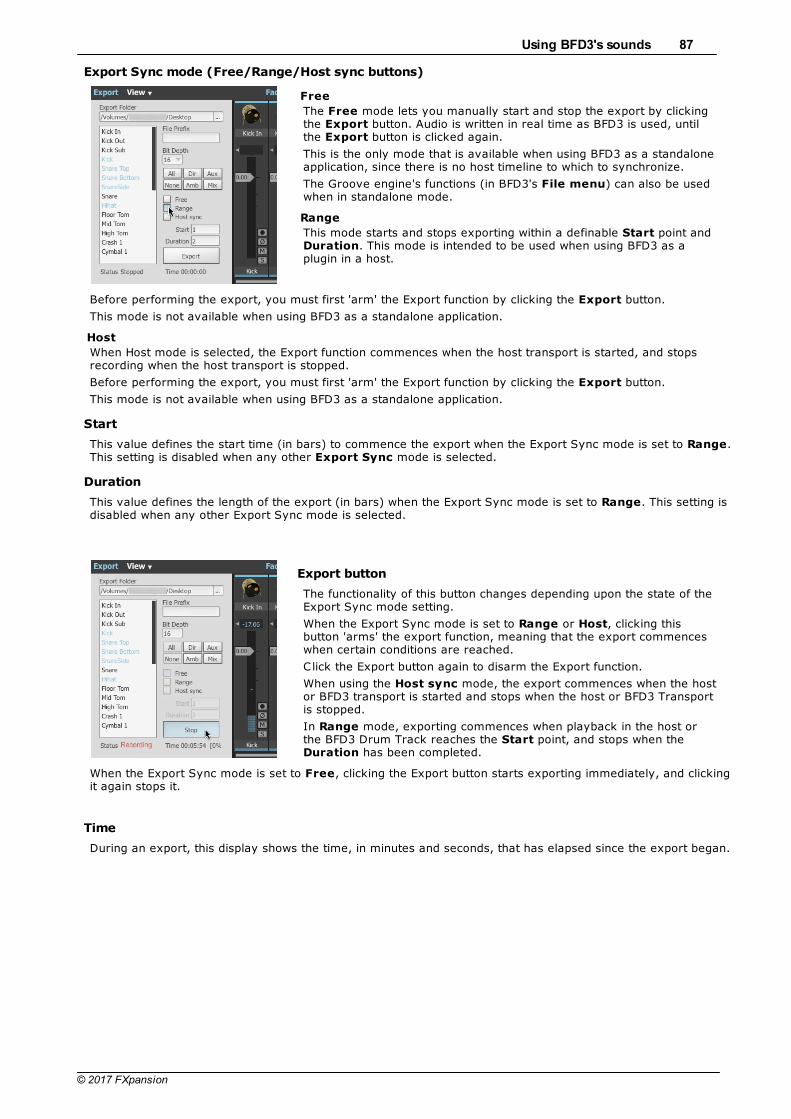
Using BFD3's sounds 87
© 2017 FXpansion
Export Sync mode (Free/Range/Host sync buttons)
Free
The Free mode lets you manually start and stop the export by clickingthe Export button. Audio is written in real time as BFD3 is used, untilthe Export button is clicked again.
This is the only mode that is available when using BFD3 as a standaloneapplication, since there is no host timeline to which to synchronize.
The Groove engine's functions (in BFD3's File menu) can also be usedwhen in standalone mode.
Range
This mode starts and stops exporting within a definable Start point andDuration. This mode is intended to be used when using BFD3 as aplugin in a host.
Before performing the export, you must first 'arm' the Export function by clicking the Export button.
This mode is not available when using BFD3 as a standalone application.
Host
When Host mode is selected, the Export function commences when the host transport is started, and stopsrecording when the host transport is stopped.
Before performing the export, you must first 'arm' the Export function by clicking the Export button.
This mode is not available when using BFD3 as a standalone application.
Start
This value defines the start time (in bars) to commence the export when the Export Sync mode is set to Range.This setting is disabled when any other Export Sync mode is selected.
Duration
This value defines the length of the export (in bars) when the Export Sync mode is set to Range. This setting isdisabled when any other Export Sync mode is selected.
Export button
The functionality of this button changes depending upon the state of theExport Sync mode setting.
When the Export Sync mode is set to Range or Host, clicking thisbutton 'arms' the export function, meaning that the export commenceswhen certain conditions are reached.
Click the Export button again to disarm the Export function.
When using the Host sync mode, the export commences when the hostor BFD3 transport is started and stops when the host or BFD3 Transportis stopped.
In Range mode, exporting commences when playback in the host orthe BFD3 Drum Track reaches the Start point, and stops when theDuration has been completed.
When the Export Sync mode is set to Free, clicking the Export button starts exporting immediately, and clickingit again stops it.
Time
During an export, this display shows the time, in minutes and seconds, that has elapsed since the export began.

BFD3 Operation Manual88
© 2017 FXpansion
4 Using the Groove engine
Groove engine overview
The Groove engine is BFD3's sequencer or 'virtual drummer': it provides access to a large library of drumperformances as well as providing the ability to edit these performances or create your own.
If you simply intend to use BFD3 as a sound module triggered by external MIDI notes, it is possible to ignore theGrooves page completely.
To use the Groove engine, click the Groove Editor button in BFD3's main navigation bar.
Groove Browser
BFD3's Browser, on the left side of its interface, is used to preview and load Groove and Palette files - click the Grooves button at the top of the Browser to switch to the Groove Browser from any other Browser tab or if theBrowser is currently hidden.
Previewing is synchronized to the BFD3 transport (which is synchronized to the host/DAW when running as aplugin) so you can preview different sets of Grooves in context with your project. In fact, it is possible to jam ina live situation using Groove and Palette previewing in the Browser. However, to create controllable, flexiblesetups that can be recalled in future, Grooves must be loaded into the Palette or Drum Track.
Palette
At the right side of the Groove Editor panel is the Palette - click the Palette button to make it visible if it is notcurrently displayed. The Palette is a bank of 'slots' to which Grooves are loaded.
Grooves loaded into the Palette can be used in several ways:
They can be played automatically in sync with the BFD3 transport (and that of your host/DAW when runningthe BFD3 plugin) using the Auto-play settings
They can be arranged into the single-lane Drum Track, allowing you to lay out a full song's drums within BFD3
They can be assigned to MIDI notes using the Key Map panel and triggered using external MIDI notes
The Palette is discussed in detail later in this chapter.
Palette files
BFD3 also contains the concept of Palette files on disk - these represent saved states of the entire Grooveengine: a set of Grooves loaded into the Palette slots along with all other Groove engine settings.
Grooves and Groove events
The basic components used in the Groove engine are Grooves: pattern 'clips' containing sequenced events thattrigger BFD3's Drum articulations. Grooves aren't MIDI clips, but they behave in a very similar way. They aresequences of time-stamped drum hit events but they bypass MIDI note mappings, instead triggering BFD3'sDrum articulations directly.
It is possible to record events into Grooves via MIDI note input and import or export Grooves as MIDI files orsequences in your host/DAW. Grooves can also be triggered with MIDI notes - each Groove 'slot' within BFD3'sPalette can be assigned to a MIDI note for external triggering.

Using the Groove engine 89
© 2017 FXpansion
Drum Track
Grooves can be arranged on the the Drum Track - a simple, single-lane sequencer for Grooves by draggingthem from the Palette or directly from the Groove Browser. The Drum Track is activated by setting the Auto-play mode accordingly - when active, the Drum Track is automatically synchronized to the BFD3 transport orthat of your host/DAW when using the BFD3 plugin.
Groove Editor
The Groove Editor provides comprehensive tools for creating and editing Groove events.
Groove FX
The Groove FX section can apply several non-destructive real-time processes to change the feel of the Grooveengine's output in a number of different ways. It is possible to make Grooves sound more 'humanized' or morequantized and 'robotic' while the dynamics, complexity and amount of swing-style syncopation that is applied toGrooves can also be adjusted.
Transport and Auto-play mode
The BFD3 transport is central to most aspects of Groove engine operations. The transport is started by activatingthe Play button.
When using BFD3 as a plugin in a host/DAW, the BFD3transport is started simultaneously with that of the host. It isalso possible to start the BFD3 plugin's transport with the Play button while the host is stopped - however,subsequently starting the host transport results inresynchronizing BFD3 to the host.
The transport is used in conjunction with BFD3's Auto-Playmode which is located to its right. The Auto-play functionsdictate whether to automatically start Groove playback fromthe Drum Track or the Palette when the transport is started.
The Auto-play mode setting is discussed in more detail in the Palette section later in this chapter and in theGlobal controls section in the opening chapter.
The Stop button stops the transport. This is possible even when the BFD3 plugin is playing in sync with the host– Groove playback stops while the host keeps playing. If the host is stopped and restarted, Groove playbackrestarts in sync with the host position. After playback has been stopped in this way when using the Drum Track,if BFD3 is restarted without host sync, playback commences from the position at which playback was previouslystopped.
The Panic button stops playback of any Grooves that may be currently playing (it also stops any drum soundsand effect tails that may be currently playing).
The Record, Loop, Metronome and Return to start buttons are used for certain features involved withrecording Grooves and using the Drum Track.
The Tempo and Time signature indicators display the current tempo and time signature. When running BFD3as a plugin in a host/DAW that provides tempo and time signature information, these controls are not editableand BFD3 is locked to the host. In other situations, these displays can be manually adjusted: double-click andtype a new value. The Tempo can also be adjusted via click/drag up/down.
The Beat light indicator flashes on every beat when the Groove engine is playing.
The Playback position indicator displays the current playback position in bars and beats while the transport isstarted. When using BFD3 in a host, this indicator shows the current song position of the host. When using thestandalone application, this indicator can show any of the following:
• The current position in the current Groove when using any Auto-Play mode except Track• The current position in the Drum Track when using the Track Auto-play mode• The current position in the Groove when recording events in real time via MIDI
Undo/Redo function
Every operation performed in the Groove page canbe reversed by clicking the Undo and Redobuttons. The multiple-level Undo function is veryuseful as many functions which can drasticallychange your work are only a click away. Clickingthe Redo button reverses the last Undo operation.
To view the action that would be undone by clickingthe Undo button, move the mouse over the button– the last action is shown in the context info display.

BFD3 Operation Manual90
© 2017 FXpansion
Virtually any action can be undone, even loading an entirely new Palette.
While you can set up any number of levels for the multiple-level Undo/Redo in the Grooves Preferences, notethat more undo levels use more RAM.
MIDI Out function
In compatible hosts, the output of the BFD3 plugin's Groove engine is available as a MIDI output stream fortriggering other instruments on entirely different MIDI tracks.
The only plugin format that supports this feature is VST although not all hosts support MIDI output from plugins.
To use the MIDI output, the Send MIDI out setting must be activated in the Session Preferences. By default,MIDI channel 1 is used for transmitted note events. This can be changed using the MIDI Out channel setting.

Using the Groove engine 91
© 2017 FXpansion
4.1 Grooves Browser
To fully utilize Grooves within BFD3, they must be loaded into Paletteslots or directly to the Drum Track from the Browser.
While it is possible to preview Grooves in sync with the transport andeven to export them as MIDI or audio using only the Browser, theymust be loaded into the Palette to fully control them, trigger them viaMIDI or arrange them within the Drum Track.
The Palette and Drum Track are shown on the same page as theGroove Editor - click the Groove Editor button in BFD3's navigationbar to display it. It replaces the Key Map panel or mixer/Kit display/Effects Editor/Drum Editor if they were previously visible.
The Grooves Browser is part of the main BFD3 Browser - it is accessed by clicking the Grooves tab button atthe top of the Browser panel.
If the Palette is empty or no Groove is selected, a button is also shown in the middle of the screen which opensthe Grooves Browser.
Selecting and previewing Palettes and Grooves
There are 2 main areas in the Grooves Browser. The upper areadisplays a listing of all available Palettes. Click a Palette in the listing todisplay its constituent Grooves in the lower part of the Browser.
Grooves shown in the lower section can be selected in the same way asPalettes.
Information about each Palette or Groove can be seen by clicking the Info display button at the lower-left corner of the Grooves Browser.
Previewing Grooves
Each Palette and Groove displays an Audition preview button with themouse cursor hovered above it. Click the button to start previewing thePalette or Groove; click it again to stop the preview. If any Grooves arealready being previewed (or if there are Grooves already loaded andplaying in the Palette), they are muted when using the Auditionpreview function.
When previewing a Palette, playback steps through each of itscontained Grooves sequentially.
You can also click another Palette or Groove's Audition previewbutton to preview it instead.
Auditioned grooves play at the current tempo through the Drumscurrently loaded into BFD3. Note that if the previewed Groove containsevents for currently empty Drum slots, they do not produce any sound.If no Drums are loaded at all, previewing the Groove results in silence.
The Hold mouse button to preview setting in the Options menuresults in auditions only playing back while the mouse button is helddown on the audition preview buttons.
Automatic previews on selection
Using the Preview when clicking groove function in theOptions menu, Grooves are automatically previewedwhen selected in the Groove Browser, without having toclick its Audition preview button.
When Palettes are selected, playback steps through each of its constituent Grooves sequentially.
Previewed Grooves are looped and synchronized to your host tempo and transport.

BFD3 Operation Manual92
© 2017 FXpansion
Loading by drag & drop to the Palette
To load Palettes and Grooves into the Palette via drag & drop, the Palette panel at the right of the Groove Editorpage must be visible. Click the Palette button at the top-right of the Groove Editor page to display it if it iscurrently hidden.
Palettes
To load a Palette, drag it from the Browser to the Palette at the right of the Groove Editor page.
Any previous contents in the Palette and Drum Track are replaced.
Grooves
To load a single Groove, drag it to the desired slot in the Palette. This can also be achievedwith multiple selections: the Grooves are assigned to sequential slots starting from thedestination. Any previous contents in destination slots are replaced.
The loadedGroove
Using drag and drop to export Grooves directly from the Browser
This method can be used to export Grooves or a Palette as MIDI or audio directly to your host/DAW or to anoperating system file window or desktop. This function is described later in this chapter.

Using the Groove engine 93
© 2017 FXpansion
Loading using double-click
Palettes
Double-click any Palette to load it (replacing all currently loaded Grooves). Any previous contents within thedestination are replaced.
Grooves
First, click the desired destinationGroove slot in the Palette to select it.
Then, double-click the requiredGroove in the Browser.
The Groove is loaded to theselected slot in the Palette.
Loading using drag & drop to the Drum Track
Grooves or Palettes can be droppeddirectly from the Browser onto thedesired position in the Drum Track.
The Groove(s)/Palette is also loaded to the next free slot(s) startingfrom slot 60 in the Palette.
When dragging an entire Palette (or a multiple selection of Grooves) in this way, the Grooves within it arearranged sequentially in the Drum Track.
Loading multiple Grooves
To select multiple Grooves in the listing:
• CTRL-click on a Groove (Windows)
• COMMAND-click (Mac)
Adds the Groove to the current selection. If the Groove is already selected, it is de-selected.
• SHIFT-click
Selects all Grooves between the currently selected Groove and the lowest or highest selected Groove (acontiguous selection).
With the desired Grooves selected, click and drag the selection to the required destination slot in the Palette. TheGrooves are loaded into sequential slots starting from the destination slot, overwriting any previous contents ofthese slots.
A warning is displayed if the end of the Palette is reached and it is not possible to load all the selected Grooves.

BFD3 Operation Manual94
© 2017 FXpansion
Searching and filtering the Groove library
Using the Search, Filters and Favourites functions in the Grooves Browser involves exactly the same processesas the other Browser tabs - see the Browser Reference section for a guide to using these functions.
The following Filter categories are available in the Grooves Browser:
Favourites: show only specific Favourites groups
Library: show BFD1, BFD2, BFD3 or other libraries
Genre: filter Grooves by musical genres
BPM: filter Grooves by original tempo range
Time signature: filter Grooves by specific time signatures
Author: filter Grooves by specific authors
Other Groove Browser functions
Groove/Fill Filter
An additional filtering function exists for the lower part of the GrooveBrowser which shows a Palette's constituent Grooves. Using the Groove/Fill Filter menu, this part of the Browser can be set to showAll (Grooves and Fills), Fills (only Fills) or No Fills (only Grooves).
Groove Browser context menu
Right-click on any Palette or Groove in the Browser listing to display the Groove Browser context menu.
FiltersAdd to Favourite listShow in Finder (Mac)Show in Explorer (Windows)Change Library
These functions are described in the Browser Reference section.
In the Grooves Browser, the Filters sub-menu shows the Library, Genre, BPM, Time Sig and Author fieldsfor the Palette or Groove.
The Change Library function is only usable with user-generated Grooves and Palettes.
Remove from database
This function removes the Groove/Palette from the listing. No files are deleted - instead, the item is hidden untilthe next time the content location which includes them is rescanned.
To remove items permanently, their files must be deleted from disk. The location of each file can be seen usingthe Info display panel (see below) or the Show in Finder / Show in Explorer functions.
Also load: Associated Track
Palette files also store a Drum Track if it existed when the Palette wasoriginally saved. If the Also load Track button is deactivated, when aPalette is loaded, the Drum Track is initialized to an empty state.
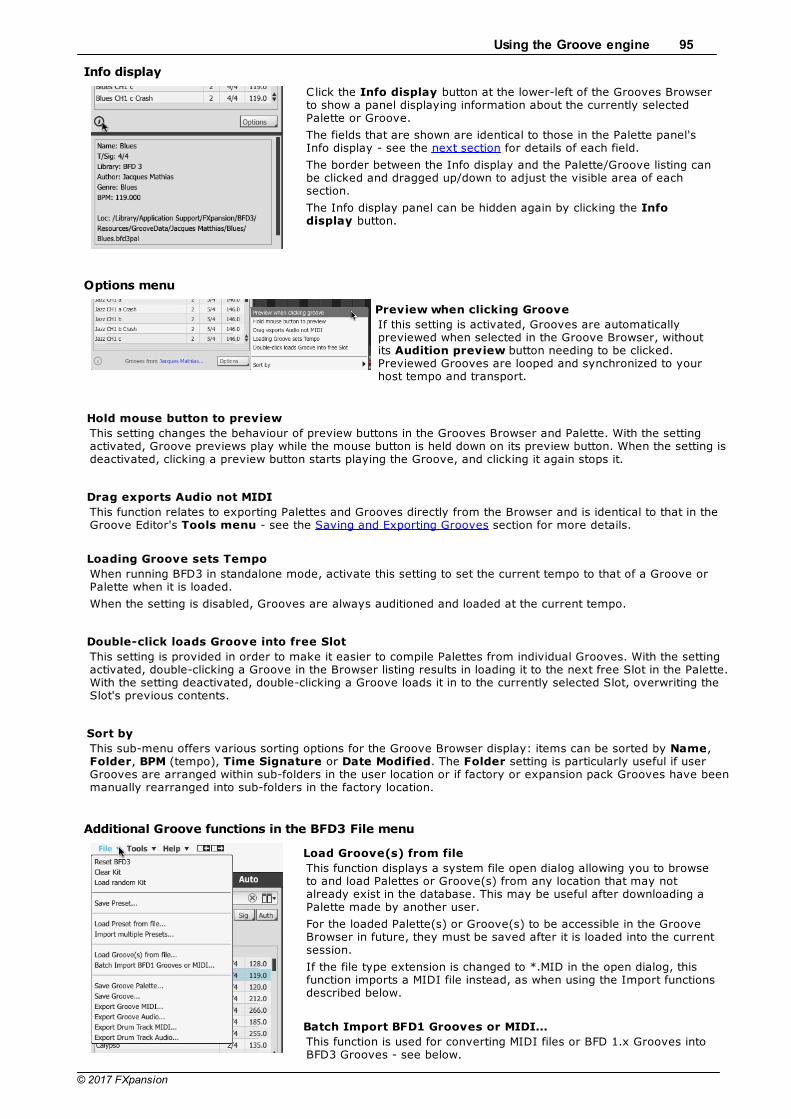
Using the Groove engine 95
© 2017 FXpansion
Info display
Click the Info display button at the lower-left of the Grooves Browserto show a panel displaying information about the currently selectedPalette or Groove.
The fields that are shown are identical to those in the Palette panel'sInfo display - see the next section for details of each field.
The border between the Info display and the Palette/Groove listing canbe clicked and dragged up/down to adjust the visible area of eachsection.
The Info display panel can be hidden again by clicking the Infodisplay button.
Options menu
Preview when clicking Groove
If this setting is activated, Grooves are automaticallypreviewed when selected in the Groove Browser, withoutits Audition preview button needing to be clicked.Previewed Grooves are looped and synchronized to yourhost tempo and transport.
Hold mouse button to preview
This setting changes the behaviour of preview buttons in the Grooves Browser and Palette. With the settingactivated, Groove previews play while the mouse button is held down on its preview button. When the setting isdeactivated, clicking a preview button starts playing the Groove, and clicking it again stops it.
Drag exports Audio not MIDI
This function relates to exporting Palettes and Grooves directly from the Browser and is identical to that in theGroove Editor's Tools menu - see the Saving and Exporting Grooves section for more details.
Loading Groove sets Tempo
When running BFD3 in standalone mode, activate this setting to set the current tempo to that of a Groove orPalette when it is loaded.
When the setting is disabled, Grooves are always auditioned and loaded at the current tempo.
Double-click loads Groove into free Slot
This setting is provided in order to make it easier to compile Palettes from individual Grooves. With the settingactivated, double-clicking a Groove in the Browser listing results in loading it to the next free Slot in the Palette.With the setting deactivated, double-clicking a Groove loads it in to the currently selected Slot, overwriting theSlot's previous contents.
Sort by
This sub-menu offers various sorting options for the Groove Browser display: items can be sorted by Name,Folder, BPM (tempo), Time Signature or Date Modified. The Folder setting is particularly useful if userGrooves are arranged within sub-folders in the user location or if factory or expansion pack Grooves have beenmanually rearranged into sub-folders in the factory location.
Additional Groove functions in the BFD3 File menu
Load Groove(s) from file
This function displays a system file open dialog allowing you to browseto and load Palettes or Groove(s) from any location that may notalready exist in the database. This may be useful after downloading aPalette made by another user.
For the loaded Palette(s) or Groove(s) to be accessible in the GrooveBrowser in future, they must be saved after it is loaded into the currentsession.
If the file type extension is changed to *.MID in the open dialog, thisfunction imports a MIDI file instead, as when using the Import functionsdescribed below.
Batch Import BFD1 Grooves or MIDI...
This function is used for converting MIDI files or BFD 1.x Grooves intoBFD3 Grooves - see below.

BFD3 Operation Manual96
© 2017 FXpansion
Importing MIDI files and BFD 1.x Grooves
The Groove Browser displays BFD 1.x format Grooves in the Browser if they are found in the scanned contentlocations. There are several other ways of getting BFD 1.x format Grooves and other MIDI files into BFD3 suchusing the File menu while the Groove Browser is visible.
When they are imported, a Key Map needs to be consulted in order to determine which MIDI notes to assign towhich BFD3 Drum articulations - this is specified using the Import MIDI Key Map setting in the Preferences (itcan also be set in the MIDI Import panel which appears when using the File menu import functions).
See the Importing MIDI section later in this chapter for more detailed information on these functions.

Using the Groove engine 97
© 2017 FXpansion
4.2 Palette
The Palette is central to the Groove engine in BFD3. It represents a'pool' of the Grooves stored in memory and is composed of 128individual slots.
To show the Palette, the Groove Editor must be visible - click theGroove Editor button in BFD3's navigation bar.
To show the Palette if it is currently hidden, click the Palette buttonnear the upper-right corner of the BFD3 interface.
Click the Palette button again to hide the Palette when required.
Any Groove used in BFD3 must be assigned to a slot in the Palette, regardless of which of the various playbackmethods are to be used.
Use the scrollbar or mousewheel to access the full range of the 128 slots in the Palette.
Selecting slots
Click a Groove slot to select it. If the slot contains a Groove, it is now shown in the Groove Editor (if visible) andits Slot Actions settings are shown below the Palette.

BFD3 Operation Manual98
© 2017 FXpansion
Actions and Fills
Actions
The Palette area contains 2 sets of controls above and below the list of slots,which let you define Actions, or playback characteristics.
The section above the Groove slots forms the Default Action controls whilethe section below shows the Slot Actions for the currently selected slot.
Unless Slot Actions are specified for individual slots, the behaviour of theGrooves in each slot follows the Default Action settings.
Note that Actions do not apply to Grooves on the Drum Track. Any structuringof Groove playback over time in the Drum Track must be created in the DrumTrack itself by arranging Parts within it using drag and drop.
Start Actions
The Start Action defines how a Groove should start playing when triggered.
Next Beat: the new Groove starts on the next beat.
Next Bar: the new Groove starts at the beginning of the next bar.
End of Groove: the new Groove starts at the end of the current Groove.
Play in Sync: the new Groove starts immediately from the position within it that corresponds to the currentplay position.
Immediate: the new Groove starts immediately from its beginning regardless of the current play position.
Default: this is available for the Slot Start Action only and specifies that the slot follows the Default StartAction.
End Actions
The End Action specifies what happens after a Groove completes playback.
Stop: the Groove stops (in effect, stopping Groove playback entirely).
Loop: the Groove repeats.
Random Groove: a random Groove in the Palette is played.
Random Groove/Fill: a random Groove or Fill in the Palette is played.
Down: the Groove in the next slot in the Palette is played.
Up: the Groove in the previous slot in the Palette is played.
Default: this is available for the Slot End Action only and specifies that the slot follows the Default EndAction.
Fill slots and Actions
The Slot Actions section contains the Fill setting. If this button is activated, thecurrent Groove slot is designated as a Fill slot and highlighted in green.
Designating a slot as a Fill means that it can be triggered if the RandomGroove/Fill End Action is specified on another slot (the Slot End Action of theFill slot should typically be set to Random Groove), or by the Auto-Fill buttonlocated in the Default Actions section.
When activated, the Auto-Fill function plays a Fill slot at random at a definable period (a number of barsdefined in the Preferences) during Groove playback.
Fill Slot End Actions
Fill slots feature the following Slot End Actions:
Stop: Groove playback is stopped.
Fill (Prev Groove): the Groove that was previously playing before the Fill isplayed again.
Random Groove: a random Groove in the Palette is played.
Previewing Grooves
The playback indicators on the right of each slot in the Palette double as Preview buttons. Click the button to play the Groove contained within the slot.
Once playback of a Groove has been started, it then follows the behaviourdefined by its Slot Actions settings. Click another slot's Preview button inorder to start playing the Groove within it instead. The method of transition isdictated by the Slot Start Action setting.

Using the Groove engine 99
© 2017 FXpansion
Stopping previews
Each Groove can be stopped by clicking its respective Preview button again.You can also use the Stop or Panic buttons in the Transport to stop playbackof all currently playing Grooves.
Preview mouse behaviour
Activating the Hold mouse button to preview setting in the Editor Tools menu results in previews beingactive only while the mouse button is held down on a Preview button. When the mouse button is released,playback stops.
Playing Grooves
Playing Grooves using Auto-play modes
The Auto-play mode function is crucial in determining how the Groove engine is used. It has 3 modes:
1. Palette
By default, BFD3 is in the Palette Auto-play mode. In this mode, BFD3 playsback Grooves in the Palette when the transport is started.
3 sub-modes exist for this mode, configurable in the Session Preferences with the Palette Auto-Play Modesetting:
Current
When playback is started the currently selectedGroove in the Palette is played according to thebehaviour defined by Slot Actions.
This is the default sub-mode for the PaletteAuto-Play mode.
Since the currently selected Groove is alsoshown in the Groove Editor, this mode is veryuseful when editing a Groove. Set theGroove's Slot End Action to Loop so that itkeeps looping while you edit.
Clicking on another Palette slot that contains aGroove causes it to start playing and stops theoriginal Groove.
Groove
In this sub-mode, you can specify a specific Groove to play when the transport is started. The desired Grooveslot is specified via the Palette Auto-Play Groove setting in the Session Preferences.
Random
In this sub-mode, a random Groove from the Palette is played when the transport is started.
2. Grv. Off
When the Auto-Play mode is set to Grv. Off, Grooves are only heard whenthey are played via MIDI notes, or when the Preview buttons are used tostart playback.
3. Track
Choosing the Track Auto-Play mode allows you to arrange a sequence of Grooves from the Palette withinBFD3's Drum Track.
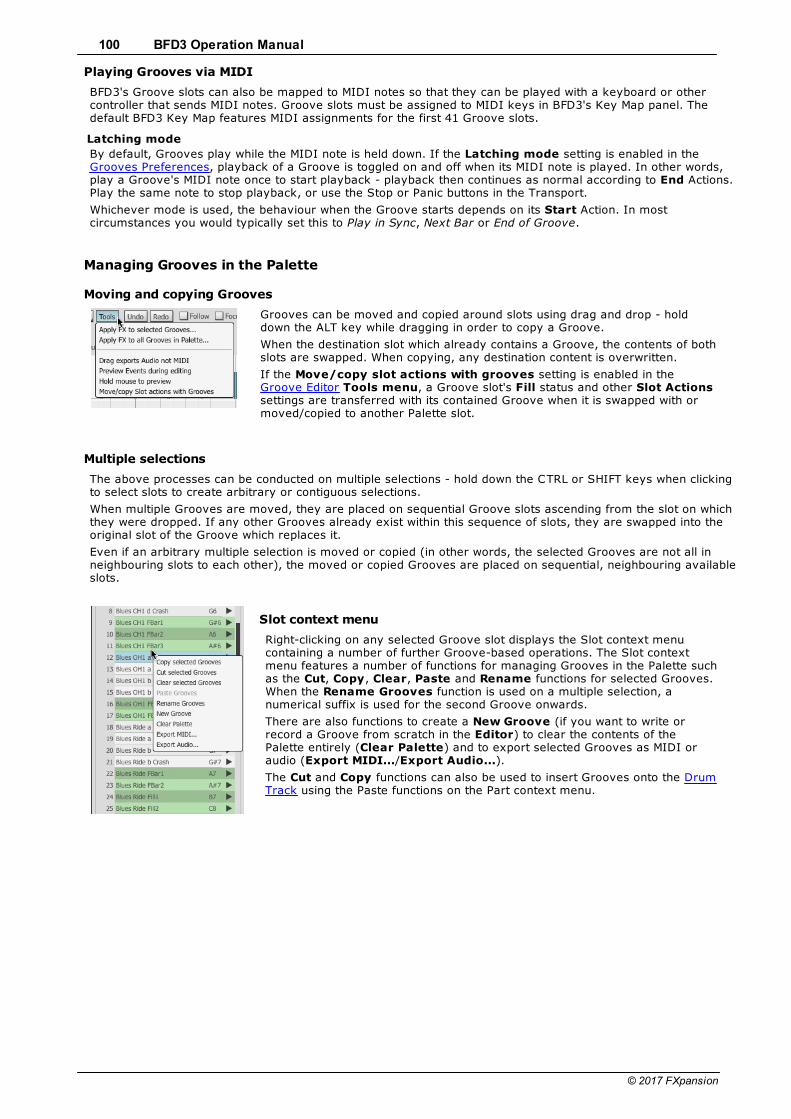
BFD3 Operation Manual100
© 2017 FXpansion
Playing Grooves via MIDI
BFD3's Groove slots can also be mapped to MIDI notes so that they can be played with a keyboard or othercontroller that sends MIDI notes. Groove slots must be assigned to MIDI keys in BFD3's Key Map panel. Thedefault BFD3 Key Map features MIDI assignments for the first 41 Groove slots.
Latching mode
By default, Grooves play while the MIDI note is held down. If the Latching mode setting is enabled in theGrooves Preferences, playback of a Groove is toggled on and off when its MIDI note is played. In other words,play a Groove's MIDI note once to start playback - playback then continues as normal according to End Actions.Play the same note to stop playback, or use the Stop or Panic buttons in the Transport.
Whichever mode is used, the behaviour when the Groove starts depends on its Start Action. In mostcircumstances you would typically set this to Play in Sync, Next Bar or End of Groove.
Managing Grooves in the Palette
Moving and copying Grooves
Grooves can be moved and copied around slots using drag and drop - holddown the ALT key while dragging in order to copy a Groove.
When the destination slot which already contains a Groove, the contents of bothslots are swapped. When copying, any destination content is overwritten.
If the Move/copy slot actions with grooves setting is enabled in theGroove Editor Tools menu, a Groove slot's Fill status and other Slot Actionssettings are transferred with its contained Groove when it is swapped with ormoved/copied to another Palette slot.
Multiple selections
The above processes can be conducted on multiple selections - hold down the CTRL or SHIFT keys when clickingto select slots to create arbitrary or contiguous selections.
When multiple Grooves are moved, they are placed on sequential Groove slots ascending from the slot on whichthey were dropped. If any other Grooves already exist within this sequence of slots, they are swapped into theoriginal slot of the Groove which replaces it.
Even if an arbitrary multiple selection is moved or copied (in other words, the selected Grooves are not all inneighbouring slots to each other), the moved or copied Grooves are placed on sequential, neighbouring availableslots.
Slot context menu
Right-clicking on any selected Groove slot displays the Slot context menucontaining a number of further Groove-based operations. The Slot contextmenu features a number of functions for managing Grooves in the Palette suchas the Cut, Copy, Clear, Paste and Rename functions for selected Grooves.When the Rename Grooves function is used on a multiple selection, anumerical suffix is used for the second Groove onwards.
There are also functions to create a New Groove (if you want to write orrecord a Groove from scratch in the Editor) to clear the contents of thePalette entirely (Clear Palette) and to export selected Grooves as MIDI oraudio (Export MIDI.../Export Audio...).
The Cut and Copy functions can also be used to insert Grooves onto the DrumTrack using the Paste functions on the Part context menu.

Using the Groove engine 101
© 2017 FXpansion
Info display
The Info display in the Palette allows you to view and edit additionalinformation for Grooves and the entire current Palette.
Palette Info display visibility
Click the Info display button to reveal the display at the lower part of thePalette panel. Click the button again to hide it and devote all available space tothe Palette.
The border between the Info display and the rest of the Palette can be clickedand dragged up/down to adjust the visible area of each section.
Info display fields
Click the Groove button to show the Groove Info display, and the Palettebutton to show the Palette Info display.
Any changes are stored with the Groove or Palette when it is next saved.
If you have assembled your own set of individual Grooves in the Palette(without starting from a loaded factory Palette), the Palette Info display's fieldsare empty.
Name
The name of the Groove/Palette is shown here and can be edited by clicking the field. If no name has beenentered, the filename of the Groove or Palette is shown.
Author
The name of the Groove/Palette author is shown here and can be edited by clicking the field.
BPM
This shows the recommended tempo of the Groove in beats per minute (BPM), and can be edited by clicking thefield.
Please note that Grooves are always played back at the current tempo, but this field shows what the authorconsiders is the best tempo for the Groove.
Time Sig
This shows the time signature of the Groove and can be edited using the drop-down menu or by clicking and typing in the field.
It is possible for the current time signature to be different to that of theindividual Groove itself. If this is the case part of the Groove may be looped ortruncated as necessary to fit the duration of the bar.
Genre
Choose the Genre of the current Groove/Palette using the drop-down menu.
Comment
An additional text field is provided for adding your own notes to the stored information for the Groove/Palette.

BFD3 Operation Manual102
© 2017 FXpansion
4.3 Groove Editor
Click the Groove Editor button in the main BFD3 navigation bar toopen the Groove Editor panel. This panel replaces any other controls inBFD3 with the exception of the Browser and the Global controls.
BFD3's Groove Editor is an advanced, fully functional environment forrecording, creating and editing events within Grooves. As well as theusual kinds of controls you'd expect for inserting, deleting, moving andcopying events, the Editor also features specially designed tools forpainting sequences of events in rhythmically meaningful ways.
Using the Editor
Click a Groove in the Palette to display its events in the Editor grid.
To start from scratch and create a new Groove, select a slot in the Palette and click the New Groove button, orright-click on a slot and use the New Groove function on the slot context menu that appears.
An empty 1-bar Groove is created and shown in the Editor grid.
Playing the currently edited Groove
When using the Editor, it can be useful to set the Auto-play mode to Palette (using the default Current sub-mode in the Preferences). This means that every time the BFD3 transport is started, the currently selectedGroove, and therefore the Groove shown in the Editor, is played. To continuously repeat the Groove, set its EndAction to Loop. For a guide to these settings, see the previous section.
It is crucial to be aware of the End Action settings - if the current Groove's End Action is set to play anotherGroove when it ends, then the next Groove plays while the previous Groove remains displayed in the Editor. Ifthe Focus button is activated, the next Groove is shown in the Editor when it starts playing.

Using the Groove engine 103
© 2017 FXpansion
Editor Grid
Edited Groove
This field displays the name of the currently edited Groove. The field can be clicked to enter a new name for theGroove.
Drum lanes
Each Drum slot features its own Drum lane in the editor. This lane shows all events for the Drum's articulationsin the current Groove.
Events can be created and edited on the Drum lane, but any newly created events are inserted on the firstarticulation lane. To edit events with full control, you must use individual articulation lanes.
Note: Some Drum lanes may not be visible with certain View menu settings - see below.
Loading Drums from the Browser onto Groove editor lanes
If a Drum is currently selected in the mixer, its Drum lane is highlighted. Drums can be loaded into the kit withinthe Grooves page either via drag and drop from the Drum Browser to a Drum lane or by double-clicking a Drumto add it to the currently selected Drum slot.
Articulation lanes
To the left of the Drum lane is its Expand/Collapse button. Click the button to expand the kit-piece lane toshow each articulation within it as a separate lane. Articulation lanes hold all events for the articulation in thecurrent Groove. These lanes can be collapsed again by clicking the Expand/Collapse button.
Click the Expand/Collapse button to the left of the Drum lane to display a lane for each articulation within theDrum. These lanes show and allow you to edit events for each individual articulation.
The articulation lanes for a Drum can be collapsed by clicking the Drum's Expand/Collapse button again.
ALT-click any kit-piece's Expand/Collapse button to expand or collapse all kit-pieces' articulation lanes, or usethe Expand All or Collapse All buttons.
Alternatively, activate the Auto collapse when expanding Event lanes option in the Editor's View menu.When this setting is active, expanding a Drum lane results in collapsing all other expanded Drum lanes.
Mute / Solo
Each Drum lane and all its individual articulation lanes feature Mute and Solo buttons. Mutes override Solos: if aDrum is muted, none of its articulations' events are heard, irrespective of their solo status. These buttons arenot shown when using the Paint tool as the area of the interface is used for displaying the indicator for thesecondary articulation - see the next section for details.

BFD3 Operation Manual104
© 2017 FXpansion
Events
Events are shown as 'diamonds' on each articulation lane that represent one-shot triggers - in other words, theyrepresent the beginning of each event. There is no way of controlling the duration of events – triggered soundsplay until they decay naturally.
The length of each event depends upon the triggered articulation itself and any damping and choke settings thatmay be active. A Drum's Choke articulation also stops any other articulations for the Drum that are playing.
High velocity events are darker in colour than low velocity events.
Selected events are shown with an outline.
Muted events are shown as solid white: these do not produce any sound until they are unmuted again.
Ruler and Groove length
The Ruler at the top of the Editor grid shows a timeline in bars and beats. The end of the Groove is representedby the Groove End marker.
To change the length of a Groove,click and drag the Groove Endmarker left or right. The cursorchanges to a horizontal arrow.
Click and drag at the right edge ofthe Ruler to increase the Groovelength beyond the current workspace.It may be necessary to decrease thecurrent zoom level in order to set thedesired length more easily.
The Len (Length) parameter can also be edited directly to change the Groove's length - see below.
The Ruler can also be used for zooming and scrolling - see below.
Velocity lane
The Velocity lane underneath the Ruler shows event velocities asvertical stalks, with higher stalks denoting high velocity events, whilelower velocity events are represented by shorter stalks.
Draw across the velocity lane in order to 'paint' velocity changes. Holddown the ALT key to shape a series of event velocities with a straightline.
If one or more events are selected, the velocity stalks of selected events are highlighted and using the aboveediting functions affects only the selection.
The Velocity tool can also be used for adjusting event velocities - see the next section.
Selection properties
The Selection properties area displays and allows you to directly edit anumber of properties for the currently selected event(s).
The Drum/Artic controls show the Drum and Articulation triggered by thecurrently selected event. Click the drop-down menus in order to move theevent to any other Drum/Articulation.
The Pos/Vel controls show the Position and Velocity of the selected event.Click each value to type a new value.
If multiple events are selected, the Drum control displays (multiple) - theevents can still be moved to a new Drum using the drop-down menu. Even ifthe selection involves multiple articulations from multiple Drums, all eventsare moved to the same Drum, with articulations matched if possible.
The Pos/Vel controls display values for the primary selection - by default, itis the first selected event, but clicking any event that is part of a multipleselection results in it becoming the primary selection.
Entering a new Pos value adjusts the Pos value for all selected events relative to the primary selected event.The primary selected event is moved to the newly-specified position with all other selected events moved by thesame amount.
Entering a new Vel value results in setting the velocity of all events to this value.
Editor Tools
This set of tools provides features for manipulating events directly on the editor grid using click and dragprocesses. See the next section for a full guide to using these tools.

Using the Groove engine 105
© 2017 FXpansion
Zoom and scrollbar controls
The Zoom in/out buttons at thebottom-right of the Editor gridcontrol the horizontal zoom level.
If the Zoom level results in part ofthe Groove not being visible in theEditor grid, use the Horizontalscrollbar to change the visiblearea. If there are too many kit-pieces or articulations to be visibleat once, use the Verticalscrollbar to change the visiblearea.
You can also use the mousewheelto scroll up and down in the Editorgrid. Hold down ALT while usingthe mousewheel in order to zoomin and out.
The Ruler can also be used for zooming and scrolling by clicking and dragging:
Click and drag down/up to zoom in/out.
Click and drag left/right to scroll when zoomed in.
The orientation of the zooming and scrolling can be altered in the Preferences, using the Invert Ruler Zoom Yand Invert Ruler Drag X settings.
Other Editor controls
Len (Length)
The Len setting specifies the length ofthe Groove in bars and beats of thecurrent Sig (time signature). Click thisvalue and enter a new numerical valuein the form of bars.beats in order tochange the length of the Groove.
Groove length can also be altered byclicking and dragging the Groove Endmarker in the Ruler.
Sig (Time Signature)
This control sets the time signature of the Groove - click the field to type a new value or use the drop-downmenu.
Follow
When zoomed into a Groove so that only part of it is visible, enabling the Follow function causes the display toscroll and follow the playback position indicator. This function also affects the Drum Track.
Focus
By default, the Editor shows the currently selected Groove. With the Focus button enabled, the Editor alwaysshows the currently playing Groove instead.
This means that if, for instance, a Groove's Slot End Action setting results in a transition to another Groove, thenew Groove is shown in the Editor when the transition takes place.
With this button disabled, the Editor only ever shows the currently selected Groove.
Snap
If this function is activated, event drawing and moving operations are snapped tothe currently selected grid resolution and to other events in the Groove.
With the Show Snap hints function activated in the View menu, a dotted lineindicates which other event in the Groove is being used as the snap reference.
Grid Type
This drop-down menu sets the grid resolution for quantizing and snapping. Straight, triplet and dotted note gridresolutions are available.

BFD3 Operation Manual106
© 2017 FXpansion
Swing (Grid Swing)
If a straight grid type is chosen, the Swing control moves every off-beat grid division so that events can beentered at or moved/copied to swung positions when the Snap function is enabled or when the Quantizefunction is used.
Rudiment
This function is used in conjunction with the Paint tool - see the next section for details.
Quantize
Clicking this button causes every selected event to be quantized towards the nearest grid division, the extent ofwhich is dictated by the Quantize strength setting. The Groove FX section allows non-destructive quantizing.
Quantize strength
This control sets the amount of Quantize that is applied. At 100%, events are fully quantized while at lowervalues, events are quantized proportionally between the original and ideal quantize position.
Shift Left
Click this button to move every selected event left (earlier in the Groove) by one grid division. Any event movedpast the start of the Groove cycles round to the end.
Shift Right
Click this button to move every selected event right (later in the Groove) by one grid division. Any event movedpast the end of the Groove cycles round to the start.
/2 (Halve Tempo)x2 (Double Tempo)
With no events selected, these functions halve or double the tempo between the Groove's events (in otherwords, the time between them is doubled or halved). With a selection of events, this process is applied only tothe selection.
If necessary, the Groove's length is increased to accommodate the new position of the affected events.
The Groove FX section features non-destructive versions of these functions.
Duplicate
With no events selected, clicking the Duplicate button doubles the length of the current Groove and duplicatesits contents to fill this extra period.
With a selection of events, the events are duplicated from the start of the next grid division. The length of theGroove is increased if necessary.
Mute
Activating the Mute button results in muting the selected event(s). This function can also be achieved using theMute tool.
Edit menu
The Edit menu provides several selection and editing functions. It is alsopossible to perform these operations using keyboard shortcuts although manyhosts do not allow all keyboard events to get through to BFD3.
As well as commands to Cut, Copy, Clear and Paste selected events, there isalso a function to Select all events in the current Groove.
When using the Paste events function with multiple events, the same rulesapply as when using the Selection properties controls (see above).
An additional function, Clear close Events, is useful when editing performances recorded from MIDI controllerhardware prone to double-triggering - electronic drumkits are often susceptible to this problem. The functionremoves unnecessary notes which are positioned very close together - higher velocity notes are prioritized andweaker velocity notes are cleared.
View menu
The View menu features a number of settings to customize various aspects ofthe Editor grid.
Show Snap Hints
As mentioned earlier in this section, the Show Snap Hints function, whenactivated, displays indicators to show when other Groove events are used as asnap reference.
Show expanded Groove FX
This function is discussed in the Groove FX section later in this chapter.
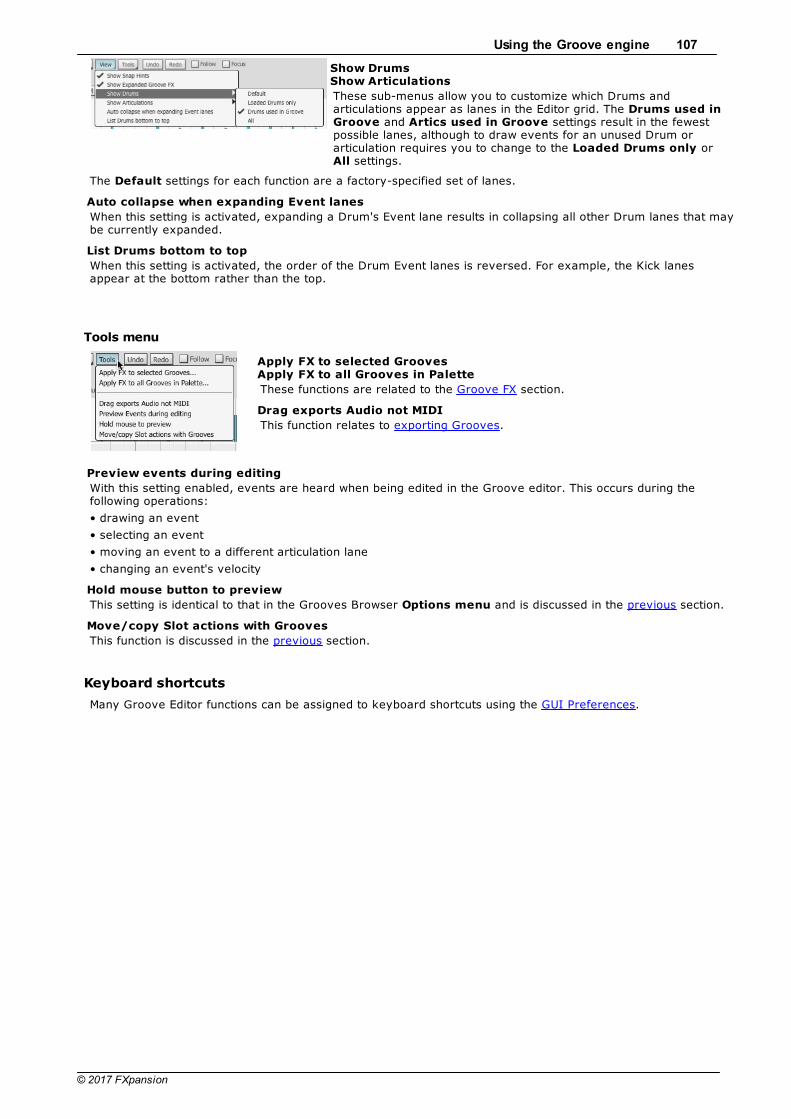
Using the Groove engine 107
© 2017 FXpansion
Show DrumsShow Articulations
These sub-menus allow you to customize which Drums andarticulations appear as lanes in the Editor grid. The Drums used inGroove and Artics used in Groove settings result in the fewestpossible lanes, although to draw events for an unused Drum orarticulation requires you to change to the Loaded Drums only orAll settings.
The Default settings for each function are a factory-specified set of lanes.
Auto collapse when expanding Event lanes
When this setting is activated, expanding a Drum's Event lane results in collapsing all other Drum lanes that maybe currently expanded.
List Drums bottom to top
When this setting is activated, the order of the Drum Event lanes is reversed. For example, the Kick lanesappear at the bottom rather than the top.
Tools menu
Apply FX to selected GroovesApply FX to all Grooves in Palette
These functions are related to the Groove FX section.
Drag exports Audio not MIDI
This function relates to exporting Grooves.
Preview events during editing
With this setting enabled, events are heard when being edited in the Groove editor. This occurs during thefollowing operations:
• drawing an event
• selecting an event
• moving an event to a different articulation lane
• changing an event's velocity
Hold mouse button to preview
This setting is identical to that in the Grooves Browser Options menu and is discussed in the previous section.
Move/copy Slot actions with Grooves
This function is discussed in the previous section.
Keyboard shortcuts
Many Groove Editor functions can be assigned to keyboard shortcuts using the GUI Preferences.

BFD3 Operation Manual108
© 2017 FXpansion
4.3.1 Editor Tools
Using the Editor tools
The Groove Editor provides a number of editing tools with which to manipulate events within the Editor grid'slanes.
Multi tool
The Multi tool is designed to provide the main functions from several editingtools.
Specialized editing tools: Select, Draw, Erase, Mute, Velocity, Humanize, Stretch, Paint
For more detailed editing work and certain functions which are not covered by the Multi tool, it may be moreconvenient to use the other specialized tools.
Dual-button tool operation
When using these individual tools, it is possible to assign a tool to each of the leftand right mouse buttons. When using a single-button mouse, [CTRL]-click can beused for right mouse button functionality.
Left-click on a tool to use it with the left mouse button.
Right-click on a tool to use with the right mouse button. The current right mouse button tool is highlighted bythe small 'R' indicator at the lower-right of the toolbar button.
Since the Multi tool itself features dual-button operation, it is not possible to use it in conjunction with othertools in this way.
The currently active tool(s) are retained between sessions – when BFD3 is reinitialized, the tools in use at theend of the previous session are still active.
Hearing events during editing
With the Preview events during editing setting enabled in the Groove Editor's Tools menu, the relevantarticulation is heard when entering, selecting, moving, unmuting and altering the velocity of events.
Multi tool
The Multi tool provides functions on the left and right mouse buttons. Itcombines functions of the Select tool, Erase tool and Velocity tool.
Left mouse button functions
Click an event to select it.
Hold down SHIFT while clicking on another event to add it to the current selection. SHIFT-clicking an eventwhich is already selected deselects it.
Drag the cursor from an empty area on the editor grid to create a selection of any notes enclosed by theresulting selection box. Hold down SHIFT during this operation to add to an existing selection. Any eventswhich are already selected are deselected.
Clicking an event within a multiple selection changes its status to the primary selection. This means that itsposition and velocity is shown in the Selection Properties section at the top-left of the Groove Editor page, andany adjustment of these values occurs relative to it (see the last section for more details of the SelectionProperties controls).
Hold down ALT while clicking in an empty part of a lane to draw an event. The position and Drum/articulationof the event can be altered by dragging the event before releasing the mouse button.

Using the Groove engine 109
© 2017 FXpansion
Moving selected events
Drag a selection left/right to keep it on the same articulation; drag up/down to move it to other Drum/articulation lanes.
If the Snap function is activated, moved events are snapped to the current Grid resolution or to other events inthe Groove – at the relevant grid division and at the original position between grid divisions. When this functionis disabled, selected events can be freely moved with no snapping.
When events are moved to different sets of articulations or Drums, BFD3 attempts to maintain the arrangement.If the target Drum contains fewer articulations than the original, or if the selection is dropped so that somearticulations fall outside the Drum's articulation lanes, the moved events are merged onto the Drum's availablelanes.
Copying selected events
Hold down the ALT key while moving a selection in order to copy it.
Right mouse button functions
Right-click an event to select it.
Hold down SHIFT while right-clicking on another event to add it to the current selection. SHIFT-clicking anevent which is already selected deselects it.
Right-click and drag the cursor from an empty area on the editor grid to create a selection of any notesenclosed by the resulting selection box. Hold down SHIFT during this operation to add to an existing selection.Any events which are already selected are deselected.
Right-click and drag up/down on a selection to adjust its velocity.
Hold down ALT while clicking an event to delete it.
Select tool
The Select tool operates identically to the Left mouse button functions in theMulti tool. It can, of course, be assigned to the right mouse button when notusing the Multi tool.
All events in the current Groove can be selected using the Select all Events function in the Edit menu or akeyboard shortcut if it is defined in the GUI Preferences.
Draw tool
Click on the grid with the Draw tool to create a new event at the cursorposition. The velocity of the previous edited event is used. After entering anevent, it becomes the current selection.
If the Snap function is enabled, the event's position is snapped to the nearestdivision at the current grid resolution or to other events in the Groove.
Drag left/right right before releasing the mouse button to reposition the event in time, snapping to griddivisions and other Groove events.
Drag up/down before releasing the mouse button to adjust the event's velocity.
Using Select tool processes while the Draw tool is active
When using the Draw tool, existing events can be clicked to select them (and SHIFT-clicked to add to anexisting selection).
While holding down the ALT key, click an empty area of the Editor grid and drag to create a selection of allevents enclosed by the resulting selection box.
Selections can also be moved or copied using drag & drop in the same way as the Select tool.
Erase tool
Click an event or selection of events with the Erase tool to erase it.
Click an empty area of the editor grid and drag to create a selection box: anyenclosed events are deleted.
Alternatively, a keyboard shortcut can be set up to erase the current selection when any Editor tool is active.
Mute tool
Click a selection of events with the Mute tool to mute the events. If an eventor selection is already muted, click it again to unmute it.
Click an empty area of the editor grid and drag to create a selection box: anyenclosed events are muted.

BFD3 Operation Manual110
© 2017 FXpansion
Clicking a selection which contains both muted and unmuted events results in their state being inverted.
Velocity tool
Click an event or selection of events and down and drag up/down to adjusttheir velocity: drag up to increase the velocity of the events; drag down todecrease it.
The Velocity tool can be used on a selection of events to increase their velocities by the same amount.However, trying to adjust values beyond the velocity range results in values being clipped at the minimum ormaximum value.
Event velocites can also be adjusted using the Velocity lane while any Editor tool is active - this function isdescribed in the previous section.
Using Select tool processes while the Velocity tool is active
When using the Velocity tool, events can be clicked to select them (and SHIFT-clicked to add to an existingselection).
Click an empty area of the editor grid and drag to create a selection of any events enclosed by the resultingselection box.
Selections can also be moved or copied using drag & drop in the same way as the Select tool.
Humanize tool
The Humanize tool creates subtle randomization which approximates thevariance in striking intensity and timing that can be displayed by a humandrummer.
Click and drag up/down on an event or selection of events to humanize thevelocity of events in the selection.
Click and drag left/right to humanize the timing of the events in the selection.
Using Select tool processes while the Humanize tool is active
When using the Humanize tool, events can be clicked to select them (and SHIFT-clicked to add to/removefrom an existing selection).
Click an empty area of the editor grid and drag to create a selection of any events enclosed by the resultingselection box.
Stretch tool
The Stretch tool allows you to stretch a selection of events so that they aregrouped more closely or further apart.
Before using the Stretch tool, it is usually necessary to click in the Ruler tocreate Stretch markers. These are used as anchors for the stretchingprocess, and stretching occurs relative to them.
Then, click and drag the first or last event in the selection towards the left orright to compress or stretch the events relative to the Stretch marker(s).
Any events that exist at the exact point of a Stretch marker are not moved during Stretch operations.
If no Stretch markers are created, all stretching occurs relative to the start of the Groove.

Using the Groove engine 111
© 2017 FXpansion
A selection of 3 events could be stretched as follows:
Click and drag the last note in the above selection to stretch the selection out as follows:
Click and drag the first event in the above selection to stretch the entire selection relative tothe Stretch marker:
Creating accelerando / decelerando effects
The Stretch tool allows you to create events that 'speed up' or 'slow down' within a period of time. This can beperformed with or without Stretch markers as follows:
First select some events (no Stretchmarkers are currently active).
Click/drag the events towards the rightwhile holding ALT to create a decelerandoeffect.
Click/drag the events towards the right whileholding down the ALT key to create anaccelerando effect within the bounds of theselection.
With Stretch markers active, the effect iscreated relative to the markers rather thanwithin the bounds of the selection.
Using Select tool processes while the Stretch tool is active
When using the Stretch tool, events can be clicked to select them (and SHIFT-clicked to add to/remove froman existing selection).
Click an empty area of the editor grid and drag to create a selection of any events enclosed by the resultingselection box.

BFD3 Operation Manual112
© 2017 FXpansion
Paint tool
The Paint tool, in conjunction with the Rudiments menu, offers an easy wayto create a rhythmically meaningful series of events in a single action - eventsare created with velocity and position data to create convincing rhythmic lineslike rolls, paradiddles and more.
Click the Rudiment button to show the Rudiments menu. This panel allowsyou to browse and select between various types of drumming pattern to'paint' onto 1 or 2 lanes in the Editor grid with the Paint tool.
Rudiments menu
The Rudiments menu displays a variety ofdrumming patterns or 'Rudiments' whichcan be selected to use with the Painttool.
The currently selected Rudiment ishighlighted in blue with its name listedunder the Selected heading on the rightside of the panel.
The cursor can be moved over any otherRudiment in order to highlight its Description and musical score pattern inthe displays on the right, with its namelisted under the Showing heading.
Each Rudiment displays a Preview buttonwhen it under the cursor. Click the buttonto hear a preview of the rudiment patternwith the currently loaded Snare.
The Tempo section at the lower part of the Rudiments panel allows you to adjust the rudiment pattern to Half(x1/2), Double (x2) or Quadruple (x4) the timing of the original pattern (x1).
This section also selects between Straight, Triplet and Dotted feels.
Click any Rudiment to select it as the current Rudiment, or click the Close button to exit the panel withoutchanging the currently selected Rudiment.
Painting with the selected Rudiment
To paint events onto 2 articulations, first right-click on the name of thedesired secondary articulation. This allows you to recreate typical left/righthand patterns on 2 Drum articulations. The secondary articulation can beconsidered as the 'left' hit for a right-handed drummer, or vice-versa.
This function should not be used if you intend to paint onto a singlearticulation.
Then, simply paint across the lane from the desired starting point for the desired articulation.Events are painted in the selected Rudiment pattern across the articulation lane(s).
After creating the first event, drag up/down to adjust the velocity of the event - all subsequentlypainted events' velocities are created relative to that of the first event.
The following additional actions are available before releasing the mouse button:
• Drag up/down to increase/decrease the event velocities over the course of the painted sequence.
• Drag up/down while holding down the ALT key to increase/decrease the velocity of each secondary eventwithin the pattern - these events would occur on the secondary articulation if one has been selected previously.

Using the Groove engine 113
© 2017 FXpansion
4.3.2 Saving and Exporting Grooves
Overview
Saving Grooves and Palettes
The currently selected Groove or the entire Palette can be saved using the Save Groove and Save GroovePalette functions in the BFD3 File menu. Grooves are stored in BFD3's own format - they are not MIDI files. Tocreate MIDI files from Grooves, it is necessary to use the Export features.
Exporting Grooves and the Drum Track using the File menu
The File menu contains the Export Groove MIDI, Export Groove audio, Export drum track MIDI andExport drum track audio functions.
Exporting Grooves using drag & drop
Grooves can also be exported via drag & drop, either to MIDI or audio tracks in your host/DAW or to an OS filewindow as MIDI or audio files.
Grooves can be dragged from Palette slots, or entire Palettes and Grooves can be dragged directly from theGrooves Browser.
If the Groove drags Audio not MIDI setting is activated (in the Groove Editor Tools menu or the GroovesBrowser Options menu), all drag and drop exports occur as audio rather than MIDI.
Saving Grooves and Palettes
To save an individual Groove, use the Save Groove... function inBFD3's File menu while the desired Groove is selected or, to save thecurrent Palette, use the Save Palette function.
This function opens a system file save dialog prompting for a locationand filename.
It is recommended to use the default location - <user location>/Grooves - so that it remains accessible from the Grooves Browserafter rescanning content locations. Subfolders within this folder can alsobe used. Wherever a Groove or Palette is saved, it is added to thecurrent BFD3 database.
The information specified in the Groove/Palette Info display is savedwith Palettes. Additionally, the Library field of saved Grooves/Palettes isset to User.
Naming the saved Groove or Palette file
The current name of the Groove or Palette, as defined in the Groove/Palette Info display, is the default filename shown when saving. Type adifferent filename if required and then hit ENTER or click the Savebutton in order to save the file. If a new filename is specified, you areprompted whether the name stored in the Groove or Palette Name fieldshould also be changed.
The Name field is used to label the Groove/Palette in BFD3's database, so setting the Name properly is importantfor locating the item in future.
BFD3 Groove format
When a Groove is saved in this way, it is stored in BFD3's proprietary Groove format – this is not a MIDI file.The reason for this is that Grooves contain events related directly to BFD3's articulations, meaning that accurateplayback is not dependent on a corresponding MIDI Key Map.
To save a Groove as a MIDI file, the Export Groove MIDI function should be used.
BFD3 Palette format
When a Palette is saved, the entire state of the Groove page is saved with it. In other words, it contains thefollowing:
• constituent Grooves • the currently selected Groove • settings for Default and individual Slot Groove Actions• Groove FX settings• settings in the Groove Editor (such as grid swing, view settings etc) • Auto-Play settings• the contents of the Drum Track
When reloaded, a Palette overwrites all current settings in the Groove engine.
If the Palette is intended for a certain Kit, mixer and Key Map setup, it is recommended that a BFD3 Preset issaved for easy recall – this saves the entire state of BFD3 to one file.

BFD3 Operation Manual114
© 2017 FXpansion
Exporting Grooves as MIDI
Exporting Grooves as MIDI using drag & drop
Single Grooves or multiple selections can be exported via dragand drop, either to a MIDI file or to a MIDI or audio instrumenttrack in your host sequencer. As mentioned earlier, the Groove drags Audio not MIDI setting must be deactivatedfor this to occur.
To initiate a drag & drop export, select either:
1 or more Grooves in the Palette and drag them outside theBFD3 window
1 or more Grooves or Palettes from the Grooves Browserand drag them outside the BFD3 window
Then proceed as follows:
Exporting to a MIDI file
If the selection is dropped onto a suitable save location – inother words, the desktop or a folder shown in a system filebrowser window – the Grooves are saved as individual MIDIfiles at the destination.
Exporting to a host MIDI track
If the Groove selection is dropped onto a MIDI or audioinstrument track in your host sequencer while running BFD3 asa plugin, each Groove is created as a MIDI part sequentiallyfrom the point at which they are dropped.
This functionality depends upon the host's level of support for MIDI file import via drag & drop. Some hosts maysupport drag & drop of single files but not multiple files, and others may not support drag & drop at all. Pleaseconsult your host's documentation or technical support services to determine how it reacts to drag & drop ofMIDI files.

Using the Groove engine 115
© 2017 FXpansion
Exporting Grooves as MIDI using the File menu
The BFD3 File menu provides the Export Groove MIDI... function, which displays a system file save dialogprompting for the location to which to export the current selection of Grooves as individual MIDI files.
The name of each Groove is used as the filename (with a .mid extension).
Exporting the Drum track as MIDI
The entire Drum Track can be exported as a MIDI file using the ExportDrum Track MIDI... function in the File menu menu.
A system file save dialog is displayed, prompting for a filename for thesaved MIDI file (saved with a .mid extension). If required, navigate to adifferent location before typing a filename, and then hit ENTER or click Save.
MIDI Export settings
The current MIDI Key Map is used for mapping Drum articulation events toMIDI notes when exporting Grooves or the Drum Track. If an articulation ismapped to more than one key, the lowest key to which it is mapped is usedfor its MIDI events in the exported file.
Using the MIDI export mode setting in the Grooves Preferences, exported MIDI files can be set to contain Onetrack for all Drums, One track per Drum or One track per articulation.
Exporting Grooves as Audio
Audio Export settings
The settings in the mixer's Export panel are used for the Export Folder, File Prefix, and Bit Depth, while theRecord-enable buttons on each mixer channel are used to determine which channels are exported – aseparate audio file is generated for each mixer channel enabled for recording. If you attempt to initiate anexport before a valid Export Folder has been set, an error message is displayed to inform you of this fact, andthe operation is cancelled.
If the File menu functions below are used and no channels are currently Record enabled in the mixer, BFD3'sbehaviour when performing the export function is dictated by the Auto-arm Mixer Channels for audioexport setting in the Grooves Preferences:
Manual
An additional panel is displayed with the Export panel settings so that it is not necessary to cancel the operationand switch to the mixer.
Master
The stereo Master channel is automatically Record enabled and the export function commences.
All
All mixer channels are automatically Record enabled and the export function commences.
Exporting Grooves as Audio using the File menu
The current selection of Grooves can be exported as audio files using the Export Groove Audio... function on BFD3's File menu. The resulting filesare cut to the exact length of the Groove at the current tempo, with anoptional tail that can be defined in the BFD3 preferences.
If multiple Grooves are selected, a separate set of audio files is saved in aseparate folder for each selected Groove.
Exporting the Drum track as audio using the File menu
The Export Drum Track Audio... function in the File menu performs anaudio export of the Grooves in the Drum Track, from the beginning to theend of the last part on the track.
Optionally, a tail can optionally be added in order to capture any lingeringdecays at the end of the track. The size of the tail is defined in thepreferences.
Exporting Grooves as Audio using drag and drop
Single Grooves or multiple selections can be exported via drag and drop, either to an audio file or to audiotracks in your host sequencer. As mentioned earlier, the Groove drags Audio not MIDI setting must beactivated for this to occur.

BFD3 Operation Manual116
© 2017 FXpansion
Grooves can be dragged from Palette slots, or entire Palettes and Grooves can be dragged directly from theGrooves Browser.
When performing a drag and drop export, the Export panel settings are not shown even when the Auto-armMixer Channels for audio export setting is set to Manual in the Preferences - the mixer's current Exportpanel settings are always used. If no channels are currently Record enabled, the export automatically Recordenables the stereo Master channel before starting the export operation.
To initiate a drag & drop export, select either:
1 or more Grooves in the Palette and drag them outside the BFD3 window
1 or more Grooves or Palettes from the Grooves Browser and drag them outside the BFD3 window
Then proceed as follows:
Exporting to an audio file
If the selection is dropped onto a suitable save location – in other words, the desktop or a system file browserwindow – the Grooves are saved as individual audio files at the destination.
Exporting to a host audio track
If the Groove selection is dropped onto an audio track in your host sequencer while running BFD3 as a plugin,Grooves are created as sequential audio clips from the point at which they are dropped.
If multiple channels are record enabled in the mixer, BFD3 instructs the host to create new tracks of the relevantmono/stereo types in order to import the audio. This functionality depends upon the host's level of support foraudio file import via drag & drop. Please consult your host's documentation or technical support services todetermine how it reacts to drag & drop of audio files.

Using the Groove engine 117
© 2017 FXpansion
4.4 Groove FX
Using the Groove FX section
The Groove FX section can apply a number of non-destructive real-time processes to change the feel of theGroove engine's output. As well as making Grooves sound more 'humanized' or more mechanical, you canadjust the dynamics, complexity and amount of swing-style syncopation.
The Power button enables ordisables the Groove FX section.
With the Power deactivated, Grooves are played exactly as their contents dictate.
Simple and Expanded views
By default the Groove FX section is shown with minimal controls. To display thefull set of Groove FX controls, activate the Show Expanded Groove FX setting inthe Groove Editor's View menu.
Expanded Groove FX controls
Quantize section
The Quantize section allows you to force events to a timing grid specified by the Quantize resolution drop-down menu. The setting of the Quantize control dictateshow much quantization is applied. With the control turned to the maximum setting,events are fully quantized. Lower settings can tighten the timing of events whileleaving some of the original feel intact.
The Q.Swing control applies a variable amount of swing to 1/8, 1/16, 1/32, 1/64 and1/128 settings in the Quantize resolution drop-down menu. This control should notbe confused with the Swing section elsewhere in the Groove FX.
Swing section
The Swing controls allow you to add classic drum-machine style swing/shuffle to theoutput of the Groove engine. The Swing Template drop-down menu sets the timinggrid, while the Swing control sets the amount of swing - values higher than the centreposition result in swung events occurring later, while values lower than the centremake swung events occur earlier.
When used in conjunction with each other, the Quantize and Swing sections allow youto neutralize the feel of a variety of Grooves and apply a totally different feel to them.Because of the number of variable controls in these two effects, a huge range ofdifferent timing feels can be achieved.
Timing section
The Double and Half buttons simply change the tempo of the Groove engine todouble-time or half-time. The Hum. Time (Humanize Time) control introduces randomvariations in timing which approximate the slight fluctuations in timing of a realdrummer.
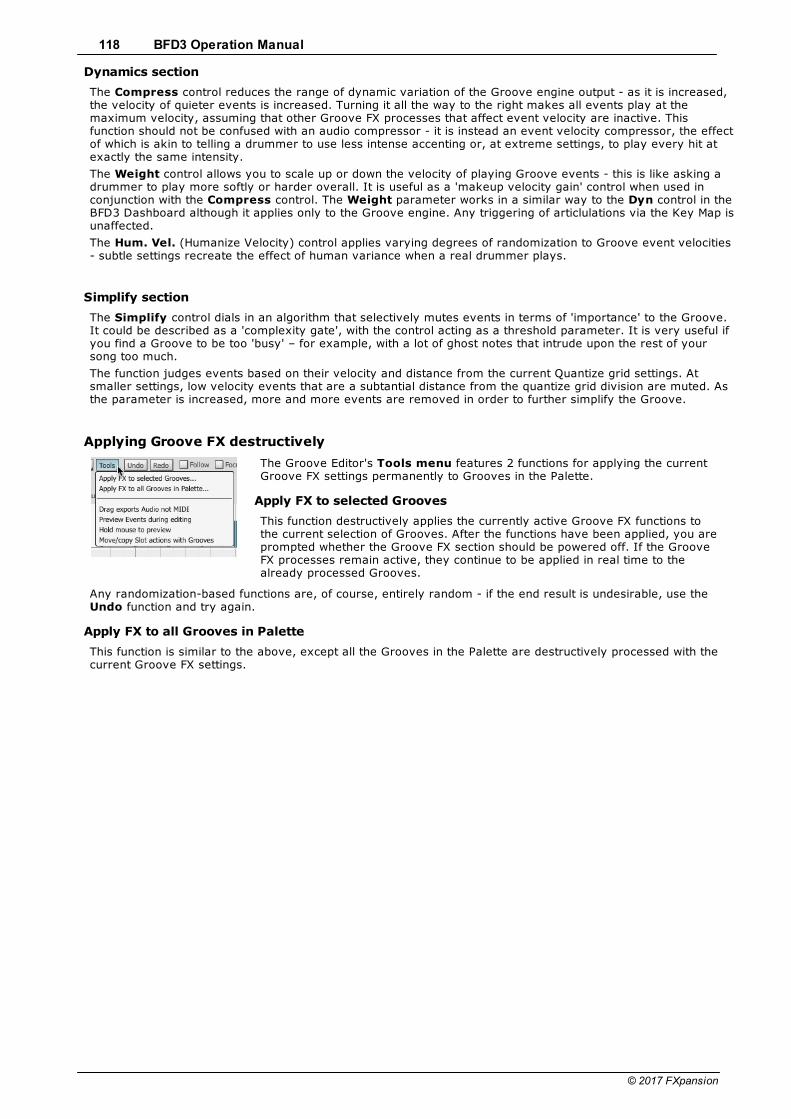
BFD3 Operation Manual118
© 2017 FXpansion
Dynamics section
The Compress control reduces the range of dynamic variation of the Groove engine output - as it is increased,the velocity of quieter events is increased. Turning it all the way to the right makes all events play at themaximum velocity, assuming that other Groove FX processes that affect event velocity are inactive. Thisfunction should not be confused with an audio compressor - it is instead an event velocity compressor, the effectof which is akin to telling a drummer to use less intense accenting or, at extreme settings, to play every hit atexactly the same intensity.
The Weight control allows you to scale up or down the velocity of playing Groove events - this is like asking adrummer to play more softly or harder overall. It is useful as a 'makeup velocity gain' control when used inconjunction with the Compress control. The Weight parameter works in a similar way to the Dyn control in theBFD3 Dashboard although it applies only to the Groove engine. Any triggering of articlulations via the Key Map isunaffected.
The Hum. Vel. (Humanize Velocity) control applies varying degrees of randomization to Groove event velocities- subtle settings recreate the effect of human variance when a real drummer plays.
Simplify section
The Simplify control dials in an algorithm that selectively mutes events in terms of 'importance' to the Groove.It could be described as a 'complexity gate', with the control acting as a threshold parameter. It is very useful ifyou find a Groove to be too 'busy' – for example, with a lot of ghost notes that intrude upon the rest of yoursong too much.
The function judges events based on their velocity and distance from the current Quantize grid settings. Atsmaller settings, low velocity events that are a subtantial distance from the quantize grid division are muted. Asthe parameter is increased, more and more events are removed in order to further simplify the Groove.
Applying Groove FX destructively
The Groove Editor's Tools menu features 2 functions for applying the currentGroove FX settings permanently to Grooves in the Palette.
Apply FX to selected Grooves
This function destructively applies the currently active Groove FX functions tothe current selection of Grooves. After the functions have been applied, you areprompted whether the Groove FX section should be powered off. If the GrooveFX processes remain active, they continue to be applied in real time to thealready processed Grooves.
Any randomization-based functions are, of course, entirely random - if the end result is undesirable, use the Undo function and try again.
Apply FX to all Grooves in Palette
This function is similar to the above, except all the Grooves in the Palette are destructively processed with thecurrent Groove FX settings.
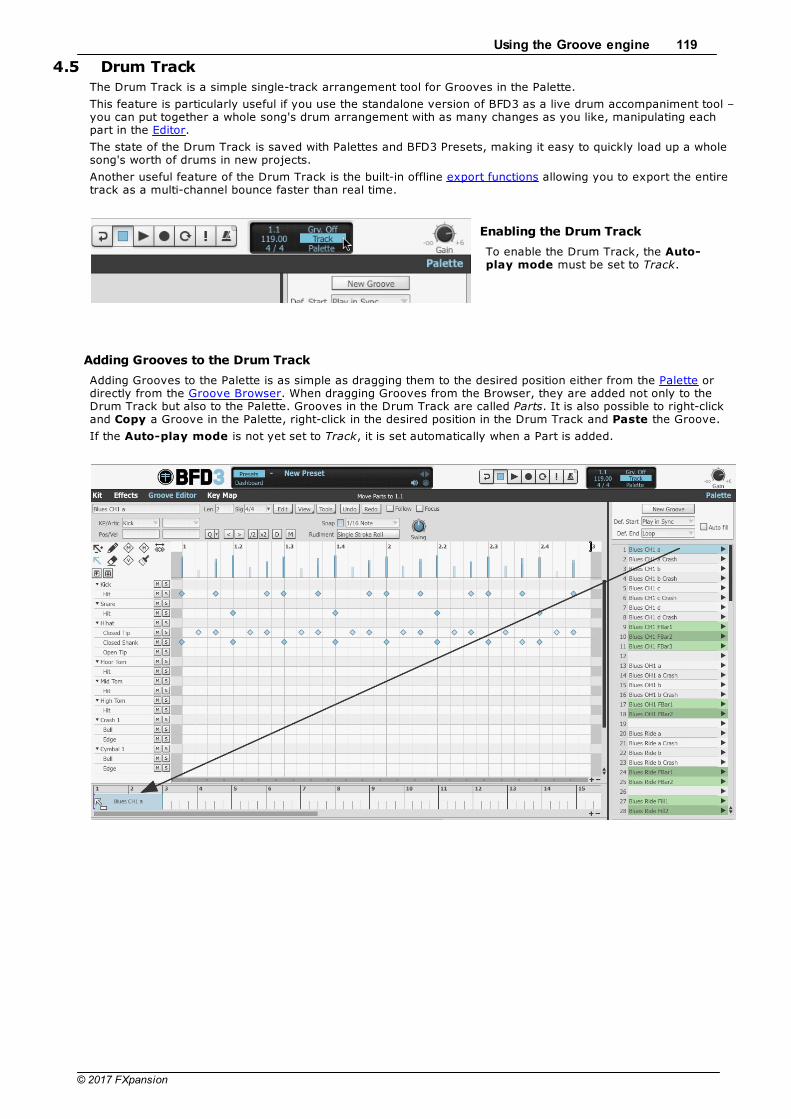
Using the Groove engine 119
© 2017 FXpansion
4.5 Drum Track
The Drum Track is a simple single-track arrangement tool for Grooves in the Palette.
This feature is particularly useful if you use the standalone version of BFD3 as a live drum accompaniment tool –you can put together a whole song's drum arrangement with as many changes as you like, manipulating eachpart in the Editor.
The state of the Drum Track is saved with Palettes and BFD3 Presets, making it easy to quickly load up a wholesong's worth of drums in new projects.
Another useful feature of the Drum Track is the built-in offline export functions allowing you to export the entiretrack as a multi-channel bounce faster than real time.
Enabling the Drum Track
To enable the Drum Track, the Auto-play mode must be set to Track.
Adding Grooves to the Drum Track
Adding Grooves to the Palette is as simple as dragging them to the desired position either from the Palette ordirectly from the Groove Browser. When dragging Grooves from the Browser, they are added not only to theDrum Track but also to the Palette. Grooves in the Drum Track are called Parts. It is also possible to right-clickand Copy a Groove in the Palette, right-click in the desired position in the Drum Track and Paste the Groove.
If the Auto-play mode is not yet set to Track, it is set automatically when a Part is added.

BFD3 Operation Manual120
© 2017 FXpansion
Parts
Once a Groove has been dropped onto the Drum Track, it is referred to as a Part. It is important to rememberseveral facts about Parts in the Drum Track:
Drum Track parts reference Palette Groove slots
Parts on the Track are actually instructions to play a Groove from the current palette.
If you attempt to clear a Palette Groove which is used in a Drum Track Part, the Part is also cleared from theDrum Track. You are prompted for confirmation before proceeding.
Default and Slot Groove Actions are ignored
Parts on the Drum Track do not follow the Default and Slot Groove Actions of their original Grooves. Anystructuring of Parts over time must be explicitly created in the track itself.
Only one Part can be played on the Drum Track at any one time
The Drum Track has a single 'layer' – it does not permit any type of layering of multiple Parts on top of eachother. Only one Part can be playing on the Drum Track at once.
Drum Track synchronization
Playback follows the host tempo and time signature if you are running BFD as a plugin within a host, andsynchronizes to its the host playback position when the host transport is running.
If you are using the standalone version of BFD3, or if the host transport is stopped, BFD3's internal transport canbe used.
It is not possible to create tempo or time signature changes in the BFD3 Drum Track. If you need suchfunctionality, you must use a host that is capable of this.
The Drum Track can, however, follow host tempo changes. It also tracks host time signature changes, but doesnot represent them graphically.
If you use tempo and time signature changes, it is recommended that you sequence BFD3's sounds entirely froma suitable DAW.
Drum Track interface
Track ruler and Track lane
The Track ruler represents the Drum Track timeline in bars and beats. Grooves are added as Parts into theTrack lane using drag & drop from the Palette or the Groove Browser. Only one Part can play on the Track atany one time.
Markers
Position marker
The Position marker indicates the current playback position when the Drum Track is playing.
Double-click in the Track ruler (outside any loop indicator) to set the blue position marker – if the Drum Trackis currently playing, the playback position immediately moves to this new position. This also results indisconnecting host sync when playing in sync with the host/DAW while running BFD3 as a plugin.
Insert marker
The Insert marker indicates the insertion point when adding a part to the Drum Track and when moving orcopying parts within it. It also specifies the point at which part split operations occur.
To change the position of the Insert marker, click the desired position in the Track lane.
Start marker
When in standalone mode or when the host transportis stopped, the white Start marker specifies thepoint at which playback starts. By default, the Startmarker is set at the start of the Drum Track.

Using the Groove engine 121
© 2017 FXpansion
To set the Start marker, ALT-click at the desired point in the Track ruler.
If the Position marker has passed the Start marker, clicking the Return to start button causes the playbackposition to return to the position specified by the Start marker.
If the Position marker has not yet reached the Start marker, clicking the Return to start button causes thethe playback position to return to the start of the Drum Track.
The Return to start button can be used during playback - the playback position shifts immediately to the Startmarker point with playback continuing. If this is performed while running BFD3 as a plugin in a host/DAW, thesame behaviour occurs but synchronization with the host is disconnected.
Loop start and end markers (Looped playback only)
When the Loop button is enabled on the BFD3 Transport, the Loop start and Loop end marker appear on theDrum Track ruler. When the position marker reaches the Loop end marker, playback loops back to the positionspecified by the Loop start marker.
Click and drag the Loop start and Loop end markers by clicking and dragging them left/right along the Trackruler.
Both the loop start and end markers can be moved simultaneously by click-dragging the red area in the rulerbetween the markers.
Zoom controls and scrollbar
The Zoom in/out buttons at the bottom-right of the Drum Track display control the horizontal zoom level of theDrum Track. If the zoom level results in part of the Drum Track not being visible, use the Scrollbar to changethe visible area.
The right or left edge of the Scrollbar can also be dragged left/right to change the zoom level. An overviewrepresentation of the Drum Track's Part arrangement is shown within the Scrollbar.
It is also possible to use your mousewheel to change the zoom level - hold down ALT while scrolling.
Editor controls relating to the Drum Track
The following buttons are located above the Groove Editor grid and also affect aspects of the Groove Editor'sbehaviour.
Focus
With the Focus button activated, the Editor shows the Groove that is currently playing in the Drum Track. Withthe button deactivated, the Editor always shows the selected Groove in the Palette.
Follow
When zoomed into the Drum Track so that only part of it is visible, activating the Follow button causes thedisplay to scroll, following the playback position indicator.

BFD3 Operation Manual122
© 2017 FXpansion
Working with the Drum Track
Adding Parts to the Track
Adding a part between 2 other parts
To add a part between 2 other parts, drag and dropthe part from the Palette or Browser to the Trackruler.
This technique also applies when moving or copyingParts within the Drum Track (see below).
Adding a part over another
Drag and drop a part over an existing Part to replaceit.
Existing Parts are shortened if they are only partiallyreplaced by the new Part - note the truncationindicator at the lower-right of the Part.
This behaviour also applies when moving or copying Parts within the Drum Track (see below).
Selecting Parts
Click on a Part to select it. Several adjacent Parts can be selected by clicking on the song background anddrawing a selection box over the desired Parts.
Any currently selected Parts are highlighted.
You can also multiple-select parts in the following ways:
• CTRL-click on a Part (Windows)• CMD-click on a Part (Mac)
Adds the Part to the current selection. If the Part is already selected, this process de-selects it.
• SHIFT-click on a Part
Creates a contiguous selection between two Parts.
Moving and copying Parts
Click a Part (or selection of Parts) and drag it left/right to move its position within the Track lane.
Hold down ALT during the drag & drop operation tocopy the Part(s).
Parts can also be dropped between or over existing Parts in the same way as the operations described above toadd Parts.
Additionally, it is also possible to use the Part context menu's Cut/Copy/Paste functions (see below).

Using the Groove engine 123
© 2017 FXpansion
Changing the size of Parts
It is possible to change the length of a Part by clicking and dragging its left and right edges. Any truncation isreflected in the Groove Editor display - any truncated areas are greyed out on the Editor grid.
Changing the size of Parts
Click and drag its left edge to the right in order toshorten a Part, changing its start point.
Drag the edge towards the left to lengthen an existingshortened Part.
Note the trunction indicator at the lower-left of thePart.
Click and drag the right edge to the left in order toshorten a Part, changing its end point.
Drag the edge towards the right to lengthen anexisting shortened Part.
Note the truncation indicator at the lower-right of thePart.
Click and drag the right edge to the left in order toshorten a Part, changing its end point.
Drag the edge towards the right to lengthen anexisting shortened Part.
Note the truncation indicator at the lower-right of thePart.
Parts can also be made longer, in which case theyloop throughout the duration of the Part.
If the lengthened Part begins/ends after or before theactual start/end of the Groove, truncation indicatorsare shown as above.
Part context menu
Right-clicking on the Drum Track displays a menu with several additional functions for manipulating Parts. Thefunctions available depend on whether an empty area of the track or a selection of Parts is under the cursorwhen invoking the menu.
Cut, Copy, Clear and Split Parts
The Cut Selected Parts and Copy Selected Parts functions addParts to the clipboard for use with the Paste functions (see below).The Clear selected Parts function removes the selection from theDrum Track without affecting the clipboard.
If you right-click on a part, you can split the part at the positionmarker with the Split Part at marker function.
When a part is split, the first of the resulting two Parts shows antruncation indicator at its lower-right to show that it has beenshortened.
The second of the resulting Parts shows a truncation indicator at its lower-left to show that its start point hasbeen moved later than the actual start of Groove.
Paste at marker/before selection/after selection
The Paste functions insert Parts stored in the clipboard as a result of using the Cut Selected Parts and CopySelected Parts functions.
The Paste at marker function can be used when right-clicking on an empty section of the Drum Track. Whenthe function is used, the Parts stored in the clipboard are inserted sequentially from the Insert marker in theiroriginal order. Their relative positions when they were originally Cut or Copied are not retained. If any existingParts are encountered before the end of the paste, they are shifted to the right as needed.
When right-clicking on an existing Part, the Paste before selection and Paste after selection functions areavailable - these functions insert the clipboard contents before or after the Part. Again, any existing Parts areshifted to the right as required.
Grooves can also be copied to the clipboard from the Palette's Slot context menu before insertion onto the DrumTrack using the above Paste functions.

BFD3 Operation Manual124
© 2017 FXpansion
Repeat selected parts
When one or more Grooves are selected, performing this operation results in inserting copies of the selectedParts immediately after the selection.
If there is an insufficient gap to accomodate the copied Parts between the last selected Part and any subsequentParts, all Parts after the selection are moved back by the length of the Groove selection.
Merge to New Part
The Merge to New Part function is available only when multiple contiguous Parts are selected. When used, itcombines all selected Parts into a new single Part.
Create variation of Parts
This function creates duplicates of Grooves in the Palette based on the currently selected Drum Track Parts, andchanges the selected Parts to reference the duplicated Grooves.
The duplicated Grooves are created sequentially in the next available Palette slots higher than the originalGroove.
If multiple selected Parts reference the same original Groove, only 1 duplicate Groove is created and all relevantparts are changed to reference this Groove.
This functionality is intended to make the creation of variations easier by avoiding the need to delete Parts anddrag new Grooves back into the Drum Track to replace them.
After performing this operation, simply edit the duplicated Grooves as desired to create the variations you need.
Clear All Parts
The Clear All Parts function clears the current contents of the Drum Track. The Grooves in the Palette remainunchanged. You are prompted for confirmation before proceeding.
Saving and loading Drum Track contents
The contents of the Drum Track cannot be saved in isolation since they are dependent on Grooves in the Palette.Therefore, the Drum track can only be saved and loaded along with the Palette. It is also possible to export thecontents of the Drum Track as MIDI or audio.
See the Saving and Exporting Grooves section for more details of these functions.

Using the Groove engine 125
© 2017 FXpansion
4.6 Recording Grooves with MIDI
BFD3 provides the ability to record Groove events into a new or existing Groove using MIDI input in real time.
All recording occurs into the currently selected Groove within the Palette. It is not possible to record directly ontothe Drum Track.
MIDI Key Map assignments
While BFD3's Groove engine does not require any MIDI note mappings in order to play back events, a Key Mapmust be set up for Drum articulation events to be recorded into Grooves via MIDI.
Note that even if an articulation is mapped to more than one MIDI key, all its recorded events are representedon a single articulation lane.
Likewise, if any MIDI notes containing multiple articulation mappings are recorded, each articulation is recordedto its specific articulation lane.
Initiating recording
1.To begin the recording process, select a Groove in the Palette, or create a new Groove and set it to thedesired length.
2.To arm MIDI recording, click the Record button on the BFD3transport. The record function is now ready to start recording whenthe transport is started. To hear a click, ensure the Metronomebutton is activated.
3.Press the Play button on the BFD3 transport to start recording instandalone mode, or when running in a host/DAW if you'd like torecord without the host playing in sync.
4.In order to record while the host plays in sync, press play in your host – BFD3's transport starts when the hosttransport is started.
5.Whichever of the above methods you use to start the transport when it is record-armed, the Record buttonstarts flashing and enters recording mode - any MIDI notes received are recorded as events for articulationsto which the notes are mapped.

BFD3 Operation Manual126
© 2017 FXpansion
Recording modes
Default recording mode
By default, when the positionreaches the end of the definedGroove length, recording continues,with the length of the Grooveincreasing, until the Stop button ispressed. When recording is stopped,the Groove length is setautomatically to accomodate therecorded events.
Loop record mode
Activate the Loop button on BFD3's transport to record in loop mode.This means that when the defined end of the Groove is reached, therecord position returns to the start of the Groove. Therefore elementscan be overdubbed until until the transport is stopped.
Loop commit record mode
Normally, clicking Undo after stopping recording would undoall events recorded during that take. However, if the Groovecommit record mode setting in the Grooves Preferences isset to At loop end, the events recorded on each loop cycle arestored as a separate Undo step.
After recording, the Undo button can be used repeatedly toregressively undo the events recorded during each loop cyclein the take.
The Undo button can even be used without leaving record mode. Try assigning the Undo button to a suitableMIDI note in the automation map.
Metronome settings
When the Metronome button in the transport is activated, a click is heardon every beat when recording.
The Metronome channel in BFD3's mixer allows you to adjust the level and Output routing of the metronome. Using the Tweaks channel mode,further adjustments can be made to the sound (Type) and behaviour(Mode) of the Metronome. These settings are also available in the GroovesPreferences. In addition, right-click the Metronome button itself for quickaccess to the Metronome's Mode and level.
Record lead-in
A lead-in time, in bars, can be set for recording. The number of bars is defined with the Record lead-in settingthe Grooves Preferences - the default setting is 2 bars.
If the Metronome button is enabled, it is heard during the lead-in period.

Using the Groove engine 127
© 2017 FXpansion
4.7 Importing MIDI files and BFD 1.5 Grooves
Importing MIDI files into the Palette
BFD3 allows you to import a MIDI file into a destination slot in the Palette and, using the MIDI Import panel,optionally split the file into smaller Grooves to be placed on ascending slots beginning with the destination slot.
Initiating MIDI import
There are two ways of initiating the MIDI import process - either of the following ways invokes the MIDI Importpanel:
Using drag & drop
Drag & drop the MIDI file(s) onto the destination Palette slot from a system file location such as the desktop or afolder window. When using this method, it is not possible to split the file into smaller Grooves - all controls in theMIDI Import panel are disabled except for the Import MIDI key map setting. Each file is created as an individualGroove in slots ascending from the destination slot.
Using the File menu (with the Groove Browser visible)
BFD3's File menu contains 2 functions for importing MIDI files - these functions display the MIDI Import panelwith all functions accessible, allowing you to split files into smaller Grooves:
The Load Groove(s) from file... function allows you to import files into the current session.
The Batch Import BFD1 Grooves or MIDI... function processes multiple files to create native BFD3versions which are imported into the database.
Import MIDI key map setting
MIDI files simply contain pitched notes - they do not contain any information about the BFD3 articulations thatshould be triggered. Therefore, a key map must be defined and used as a reference in order to assign a MIDIfile's note events to articulations within BFD3. The Import MIDI key map setting in the Grooves Preferencesand in the MIDI Import panel (see below) specifies the Key Map that is used for the import process. By default, itis set to the BFD 1.5 Key Map to allow loading BFD 1.x-format Grooves and Bundles (see below). It can,however, be changed to any other available key map, such as the General MIDI Key Map supplied in the factorydata. Alternatively, a new Key Map can be created in the Key Map panel and used instead.
By default, BFD3 ignores any MIDI notes encountered that are not defined in the referenced keymap. The Unmapped MIDI note mode setting in the Grooves Preferences can be set to to show a warning when thisoccurs instead of simply ignoring any unused notes.
MIDI Import panel
After initiating the MIDI import process using one of the two above methods, the MIDI Import panel appears.
MIDI file summary
The summary area displays an analysis of the imported MIDI file. The filename, tempo, time signature andlength in bars are shown.
MIDI import map
This setting is identical to the Import MIDI key map setting in the Grooves Preferences - it is also provided inthe MIDI Import panel for convenience. Note that when the setting is changed in the MIDI import panel, it is alsochanged in the Preferences.
Importing the MIDI file(s) as a single Groove
To import the entire MIDI file as a single Groove into a slot, no adjustments in the MIDI import panel arerequired – simply click the Import button.
Click the Cancel button or the ESC key to return to the main BFD3 interface without importing anything.
Splitting and importing a single MIDI file as multiple Grooves
The MIDI Import panel allows you to split the MIDI file into smaller Grooves of equal length, to be imported intoascending Palette slots beginning with the destination slot. The settings in the panel determine how this occurs:
Bars per Groove
This setting specifies the length of each smaller Groove in bars.
Grooves
This display shows the number of smaller Grooves that will be created with the current Bars per Groovesetting.
BFD3 Operation Manual128
© 2017 FXpansion
Import Groove
This pair of values allows you to set up a range of the smaller Grooves created to actually import to Paletteslots.
New name
This field allows you to enter a name for the Grooves to import. The named Grooves are numbered sequentiallyin the Palette.
Import & Cancel
Once the parameters above have been set, click the Import button. The MIDI file is split as specified and thedesired segments are imported into the Palette as Grooves, in ascending slots starting with the destination slot.
Click the Cancel button to return to main BFD3 interface without importing anything.
Importing BFD 1.5 Grooves
BFD3 Groove and Palette files are stored in a proprietary format which allows the software to associate eventswith specific articulations, and are therefore independent of MIDI mappings. The Palette can contain up to 128Grooves, while a saved Palette file includes these and also includes the state of the entire Grooves page.
On the other hand, BFD 1.x used MIDI files as Grooves, routing notes to articulations according to the defaultBFD key map. Up to 12 MIDI files were referenced from a text file called a Bundle file. The MIDI files exist in asubfolder with the same name as the Bundle file.
Accessing BFD 1.x Bundles in the Groove Browser
If BFD3's scanning process discovers BFD1.x format Grooves and Bundles, they are displayed in the GroovesBrowser in the same way as BFD3 Palettes and Grooves. When they are loaded, they are always loadedaccording to the current Import MIDI key map setting in the Grooves Preferences and MIDI Import panel.
Assembling Palettes from BFD1.5 bundles
Groove Bundle sets generally consist of one or two Groove Bundles and an accompanying Fill Bundle, eachconsisting of up to 12 MIDI files. In order to assemble these into a single BFD3 Palette, proceed as follows:
1. Load the first Groove Bundle from the Palettes section (upper half) of the Groove Browser, either with adouble-click or using drag and drop to the Palette area. When loading a Bundle as a Palette in this way, theGroove engine is reset and the Grooves from the Bundle are placed into ascending slots starting at slot 1.
2. Click on the second Bundle, if it exists, in the Palettes section (upper half) of the Groove Browser. Itscontained Grooves are shown in the Grooves section (the lower half of the Groove Browser).
3. Select and then drag and drop the Grooves to a destination empty slot in the Palette - the Grooves are placedon sequentially ascending Groove slots starting with the destination slot.
4. Repeat steps 2 and 3 for the Fills Bundle if it exists.
5. Select the slots containing Fills in the BFD3 Palette and Fill button in the Slot Groove Actions area. These slotsare now designated as Fills.
6. Save the assembled Palette to the BFD3 User location for future use.
Batch converting BFD 1.5 Grooves/Bundles and MIDI files to BFD3 format Grooves
If you prefer, MIDI files or BFD 1.5 format Grooves can be permanently converted and resaved in native BFD3format files and inserted into the database. Converted files are no longer dependent on the current ImportMIDI key map setting.
After ensuring that the Groove Browser is visible, use the Batch Import BFD1 Grooves or MIDI... function onBFD3's File menu.
This button brings up a system file open dialog allowing you to browse to and select a folder of MIDI files toconvert into BFD3 Groove files.
This function can be used either for MIDI files, BFD1.x Grooves (which are MIDI files) and Bundle files (in thecase of Bundles, all their referenced Grooves are imported).
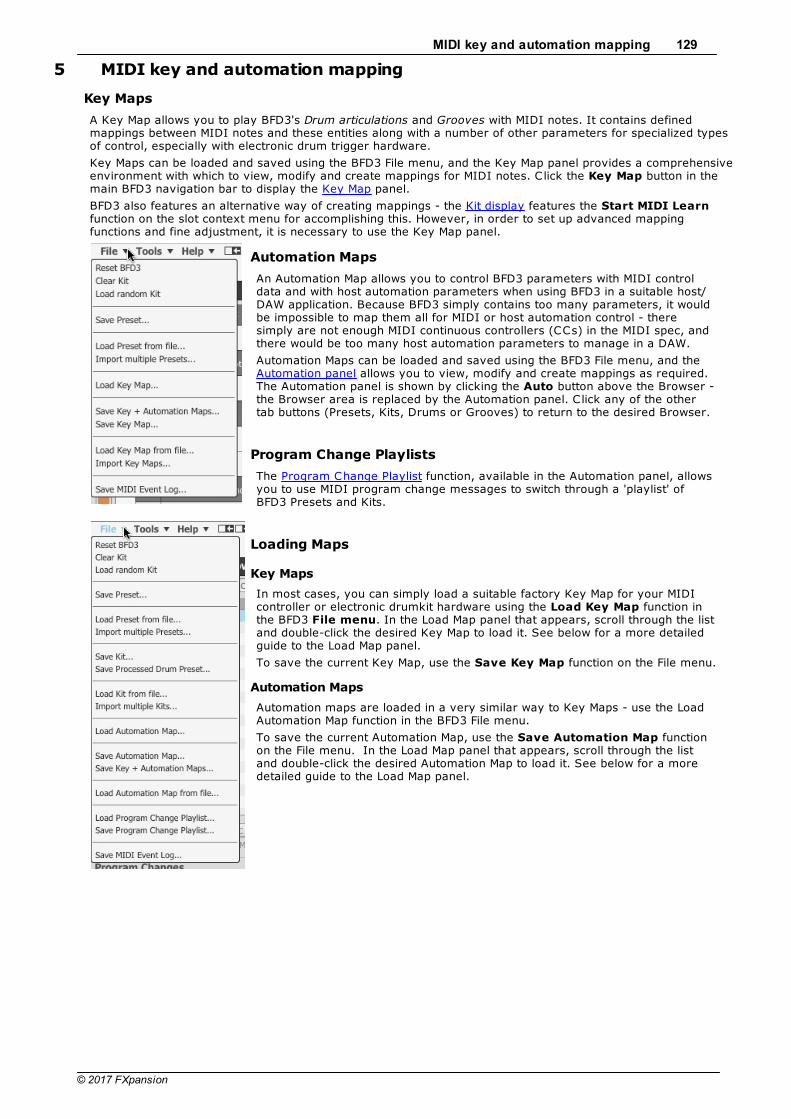
MIDI key and automation mapping 129
© 2017 FXpansion
5 MIDI key and automation mapping
Key Maps
A Key Map allows you to play BFD3's Drum articulations and Grooves with MIDI notes. It contains definedmappings between MIDI notes and these entities along with a number of other parameters for specialized typesof control, especially with electronic drum trigger hardware.
Key Maps can be loaded and saved using the BFD3 File menu, and the Key Map panel provides a comprehensiveenvironment with which to view, modify and create mappings for MIDI notes. Click the Key Map button in themain BFD3 navigation bar to display the Key Map panel.
BFD3 also features an alternative way of creating mappings - the Kit display features the Start MIDI Learnfunction on the slot context menu for accomplishing this. However, in order to set up advanced mappingfunctions and fine adjustment, it is necessary to use the Key Map panel.
Automation Maps
An Automation Map allows you to control BFD3 parameters with MIDI controldata and with host automation parameters when using BFD3 in a suitable host/DAW application. Because BFD3 simply contains too many parameters, it wouldbe impossible to map them all for MIDI or host automation control - theresimply are not enough MIDI continuous controllers (CCs) in the MIDI spec, andthere would be too many host automation parameters to manage in a DAW.
Automation Maps can be loaded and saved using the BFD3 File menu, and the Automation panel allows you to view, modify and create mappings as required.The Automation panel is shown by clicking the Auto button above the Browser -the Browser area is replaced by the Automation panel. Click any of the othertab buttons (Presets, Kits, Drums or Grooves) to return to the desired Browser.
Program Change Playlists
The Program Change Playlist function, available in the Automation panel, allowsyou to use MIDI program change messages to switch through a 'playlist' ofBFD3 Presets and Kits.
Loading Maps
Key Maps
In most cases, you can simply load a suitable factory Key Map for your MIDIcontroller or electronic drumkit hardware using the Load Key Map function inthe BFD3 File menu. In the Load Map panel that appears, scroll through the listand double-click the desired Key Map to load it. See below for a more detailedguide to the Load Map panel.
To save the current Key Map, use the Save Key Map function on the File menu.
Automation Maps
Automation maps are loaded in a very similar way to Key Maps - use the LoadAutomation Map function in the BFD3 File menu.
To save the current Automation Map, use the Save Automation Map functionon the File menu. In the Load Map panel that appears, scroll through the listand double-click the desired Automation Map to load it. See below for a moredetailed guide to the Load Map panel.

BFD3 Operation Manual130
© 2017 FXpansion
Load Key Map and Load Automation Map panels
The Load Key Map panel and Load Automation Mappanels are very similar in operation.
Map listing
The listing shows maps that exist within the factory mapsand the <user location>/Maps folder.
Search
The Search text-box allows you to type a keyword(s)with which to narrow down the listing. Click the Recentdrop-down menu to the left of the text-box to display alist of recent searches. Click the relevant search term toperform the search again.
Current Map indicator
The currently loaded map is shown by this indicator. Ifno map has been loaded, the factory default map isindicated.
If any modifications have been made to the current map since it was loaded, an asterisk is shown next to thisindicator.
Import multiple Maps
The Import multiple Key Maps and Import multiple Automation Maps functions create BFD3-format mapfiles within the database (saved into the user location) from one or more key map files which are currently notwithin BFD3's content locations. It may be useful to do this after downloading files created by another user.
The Import multiple Key Maps function can import maps from BFD 1.5 or BFD2 - their contents are recreated forBFD3 as closely as possible.
Load Map from file
The Load Key Map from file and Load Automation Map from file functions load a map file into the currentsession from locations in your system which are not within BFD3's content locations. It may be useful to do thisafter downloading a file created by another user. When loading the file, you are prompted whether the fileshould be saved in to the BFD3 database for future use.
This function can load maps from BFD 1.5 or BFD2 - their contents are recreated for BFD3 as closely as possible.
Include when loading
This button varies depending on whether you are using the Load Key Map or Load Automation Map panel.
In the Load Key Map panel, activate the Automation Map button - this loads any associated Automation Mapwith the same name along with the new Key Map.
In the Load Automation Map panel, activate the Key Map button - this loads any associated Key Map with thesame name along with the new Automation Map.
The corresponding map file must exist within the <user location>/Maps folder. If no corresponding mapexists, the settings in question remain unchanged.
Load / Close buttons
To load the currently selected key map, click the Load button. You can also load any key map in the listing bydouble-clicking it.
To return to the BFD3 interface without loading a new Key Map, click the Close button.
Maps loaded when BFD3 is launched
When an instance of BFD3 is launched, it reloads the last Key Map and Automation Map files that were loaded. Ifa load operation has never taken place, the BFD3 factory defaults are loaded.
However, if you have specified a startup preset in the Preferences, the mapping settings contained within itoverride the above.
If you create any of your own mappings, you must save your changes! See the guide to saving maps in each ofthe sections in this chapter.

MIDI key and automation mapping 131
© 2017 FXpansion
5.1 MIDI Key Maps
Click the Key Map button in the main BFD3 navigation bar to display the Key Map panel. This panel providesfunctions for mapping Drum articulations and Grooves to MIDI notes so that they can be played using MIDI noteinput. It is possible to modify and fine-tune existing Key Maps, add further assignments for additional Drums orcreate new Key Maps from scratch.
Mapping page layout and MIDI keyboard displays
MIDI channel
Key Map assignments can be created on any MIDI channel. By default, BFD3responds in Omni mode - in other words, on any MIDI channel. This can bechanged to a specific channel using the MIDI Channel drop-down menu.Alternatively, double-click the field and type a number between 0 and 16 (0= Omni).
Vertical and Horizontal keyboard layouts
The Key Map panel features 2 representations of the MIDIkeyboard range - horizontal and vertical. These essentially functionidentically to each other, although the horizontal keyboard lacksindividual note and name labels.
Click and drag the keyboard scroller to the left of the VerticalKeyboard to adjust its visible area, or use your mousewheel.
Click and drag above the keys on the Horizontal Keyboard toadjust its visible area (depending on the current width of the BFD3window, the entire keyboard may already be visible).
Key colouring (both keyboards)
Keys feature colour-coding to represent various states.
Orange
Green
Red
Dark Blue
Light Blue shading
Purple shading
One or more articulation mappings exist on the key
A Groove note exists on the key
A slot choke note exists on the key
Keys mapped to the currently selected Drum
Currently selected key
Destination slot during a mapping operation
Key labelling (vertical keyboard only)
Keys with an articulation are labelled with the current Drum loaded into the relevant slot along with thearticulation name. If the slot is empty, the default slot name is shown.
If multiple articulations exist on a key, multiple is shown.
Keys with Grooves always show the relevant Groove slot number.

BFD3 Operation Manual132
© 2017 FXpansion
Previews
Whenever a key on the keyboard is selected, it is previewed in the same way as it would be heard when beingplayed via MIDI. Previews are velocity sensitive depending on the click position on the key:
On the horizontal keyboard, the loudest velocity is heard towards the lower part of the keys.
On the vertical keyboard, the loudest velocity is heard towards the right of the keys.
To select a key without hearing a preview, click it while holding down the ALT key.
Follow MIDI
Activating the Follow MIDI button results in an incoming note selecting the relevant key in the keyboardlayout.
The last state of this button is used when launching a new instance of BFD3.
Articulations list
The Articulations list shows the available articulations for the currently selected Drum slot.
This list is only visible if the Show Grooves button is deactivated.
After one or more mappings have been created, the mapped MIDI note is shown under the Mapping column foreach Artic (Articulation) in the Articulations list.
The numbers shown after the MIDI note represent the velocity Input Range for the assignment. When multiplearticulations are mapped to a key, velocity split ranges can be set up using the Input Range control in theMapping Response panel - see below. This velocity readout is not available if the articulation has been mappedto more than 1 key.
Mapping Editor
The Mapping Editor provides a number of functions for the articulations on the currently selected Key. It featuresan Assignments list displaying the current assignments on the key, as well as the Mapping Response panelwhich provides advanced fine-tuning functions for mappings.
Show Grooves
Activating the Show Grooves button displays a list of the Groove Palette's 128 Groove slots in place of theArticulation list. This mode is used in order to assign Grooves to MIDI keys.
Show MIDI Log
Activating this button displays the MIDI Log at the lower-left part of the interface. The MIDI Log provides anoverview of incoming MIDI messages, useful for troubleshooting mapping operations. Click the Show MIDI Logbutton again to hide the panel.
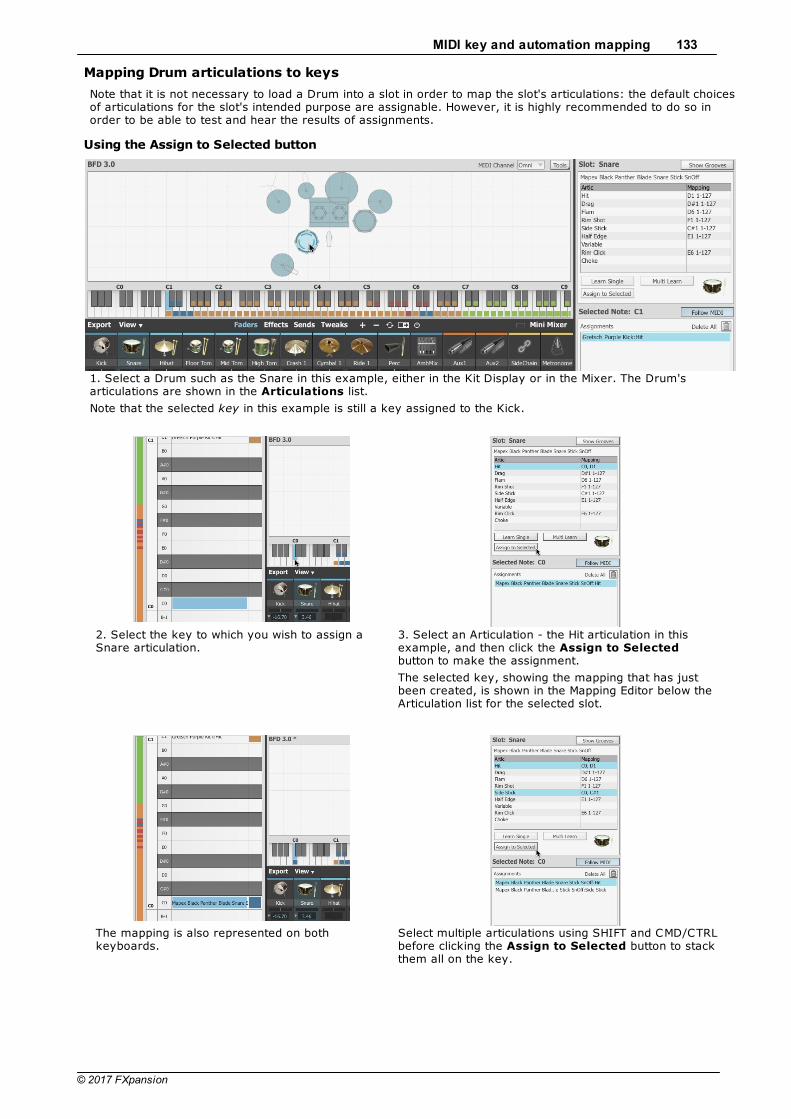
MIDI key and automation mapping 133
© 2017 FXpansion
Mapping Drum articulations to keys
Note that it is not necessary to load a Drum into a slot in order to map the slot's articulations: the default choicesof articulations for the slot's intended purpose are assignable. However, it is highly recommended to do so inorder to be able to test and hear the results of assignments.
Using the Assign to Selected button
1. Select a Drum such as the Snare in this example, either in the Kit Display or in the Mixer. The Drum'sarticulations are shown in the Articulations list.
Note that the selected key in this example is still a key assigned to the Kick.
2. Select the key to which you wish to assign aSnare articulation.
3. Select an Articulation - the Hit articulation in thisexample, and then click the Assign to Selectedbutton to make the assignment.
The selected key, showing the mapping that has justbeen created, is shown in the Mapping Editor below theArticulation list for the selected slot.
The mapping is also represented on bothkeyboards.
Select multiple articulations using SHIFT and CMD/CTRLbefore clicking the Assign to Selected button to stackthem all on the key.

BFD3 Operation Manual134
© 2017 FXpansion
Drag and drop to the Mapping Editor for the selected key
With a key selected, drag and dropthe desired articulation to theMapping Editor Assignments list.
Any previous assignments on thekey are replaced.
To stack another articulation to thekey, drag and drop an articulation(select a different Drum slot first ifrequired) onto the list while holdingdown the ALT key.
Multiple articulations from thesame Drum can be draggedsimultaneously to the same key'sAssignments list to stack them.
Drag and drop directly to any key(s)
Articulations can also be dragged to keys in thehorizontal or vertical keyboards.
If the key already contains any assignments, theyare replaced.
Hold down ALT to stack another articulation onto akey with existing assignment(s).
Drag multiple assignments to either keyboard to assignthem to sequential keys ascending from the destinationkey.
Use the Learn Single function
The Learn Single function is designed to allow you play a MIDI key towhich to assign the currently selected articulation.
To map an articulation to a key, first select the desired Drum andarticulation within it.
Then, click the Learn Single button.
Now play a note - in the above example, C0 hasbeen played (and selected as the Follow MIDIbutton is activated). The new mapping is shown inthe Assignments list.
The mapping is also represented on both keyboards.

MIDI key and automation mapping 135
© 2017 FXpansion
Use the Multi Learn function
The Multi Learn function lets you play multiple MIDI keys to map multiplearticulations from the currently selected Drum.
Select an articulation and then click the Multi Learn button - this functionwaits for multiple MIDI notes, assigning them to each of the subsequentarticulations in the Drum.
The process ends after the last articulation in the list, or when the MultiLearn button is clicked again.
The additional MIDI note that has just been mapped to each articulation is shown in the Articulations listalong with the original mappings. Due to limited space, the active velocity range cannot be shown if anarticulation has been mapped to multiple keys.
The mappings are also represented on both keyboard displays.
Stacking multiple articulations on a single key
As described above, articulations can be stacked, or layered, onto a single key. This offers more advancedDrum layering than the simple Drum Link function in the Kit display but is intended only for using MIDI notesrather than the Groove engine to play BFD3's sounds.
When articulations are stacked on a key, they simply play at the same time at the relevant velocity wheneverthe key is played.
It is also possible to create 'velocity splits' with layered articulations using the Mapping Response panel - seebelow.
Please note that Choke articulations cannot be stacked with other articulations. Attempting to assign a Chokearticulation results in it overwriting any previous contents on the key. Likewise, attempting to stack anyarticulation onto a key already containing a Choke, the existing Choke is overwritten.
Special articulations
Choke
Any playing articulation for a Drum can be choked by playing the slot's Choke articulation. This stops the decayof any Drum articulation according to its Choke Response settings (default settings exist in the BFD3Preferences, while settings for loaded Drums exist in the Drum Editor
Chokes can be stacked on the same key with other articulations - when triggering an articulation, it may beuseful to choke 1 or more other Drums which may be playing.
BFD3 can also choke cymbal slots with polyphonic aftertouch signals from electronic drumkits - see the nextsection.
Variable tip (hihat slot only)Variable shank (hihat slot only)
These articulations appear for the Hihat slot only and are intended for use with electronic drumkits - see the nextsection.
Variable snare (snares only)
This articulation appears for Snare slots only and is intended for use with electronic drumkits - see the nextsection.

BFD3 Operation Manual136
© 2017 FXpansion
Mapping Grooves
Click the Show Grooves button in order tomap Groove slots in the Palette to MIDI keys.The view on the right side of the Key Mappanel changes to show a list of all 128Groove slots.
Groove listing
Under the Groove column, The list of Grooveslots shows the name of the Groove currentlyin each slot if it exists alongside the slotnumber.
The Mapping column displays the currentMIDI note mapping for the Groove if it exists.
Creating mappings
Grooves are mapped to keys in exactly thesame ways as Drum articulations:
Drag and drop from the list of slots to akey or to the Mapping Editor list for thecurrently selected key
Select a key, select a Groove slot and thenclick the Assign to Selected button
Use the Learn Single or Learn Multifunctions
Mapping Editor
The Mapping Editor panel displays information and additional parameters for the mappings that exist on thecurrently selected key.
Assignments list
Each articulation that has been mapped to the key is shown in thearticulation list. Click any articulation to select it and edit its parameters.
Delete mapping
When the cursor is hovered above a mapping in the list whether it is aGroove or Drum articulation, a Delete mapping button ('X') is shown at theright. Click the button to delete the mapping.
Delete All
Click this button to delete all mappings on the currently selected key.

MIDI key and automation mapping 137
© 2017 FXpansion
Mapping Response panel
The Mapping Response panel cannot be visible at the same time as the Hihat or Snare Response panels - clickthe Response button to display the Mapping Response panel if it is not already visible.
Note that the Snare panel is only visible if a Variable Snare articulation exists on the currently selected key. TheHihat and Snare Response panels are described in the next section.
The Mapping Response panel features a number of functions for adjusting the way that incoming MIDI notevelocity is mapped to articulations.
This panel is only concerned with articulation mappings - its controls are not available if a Groove key iscurrently selected.
Input (Input Range)
This control defines the MIDI note velocity range to which the selected articulation responds. The primary use forthis control is for creating velocity-based splits for keys with multiple articulations, so that different velocityranges can trigger different articulations.
Output (Output Curve)
This control adjusts how input velocities are translated to the range of the articulation's velocity layer samples.
By default, a linear 1:1 mapping is used - the active range of MIDI input velocity (defined by the Input control) isdistributed proportionally across all available velocity layers for the articulation.
The graph allows you to change the lowest and highest velocity layer that is accessed by the velocity range ofthe input range, as well as vary the curve response from linear to exponential (drag down) or inverse-exponential (drag up).
Click and drag up/down at the leftside of the graph to set the lowestvelocity layer for the mapping.
Click and drag up/down at the rightside of the graph to set the highestvelocity layer for the mapping.
Click and drag up/down in thecentre of the graph to set theresponse curve of the range.
Gate
With the Gate setting activated, any incoming MIDI notes with velocities outside the input range are ignored forthe articulation mapping. This behaviour can be very useful when creating velocity splits or for eliminatingcrosstalk-related issues when playing BFD3 from an electronic drumkit.
With the Gate button deactivated, such notes trigger the articulation, with velocity values that are forced to theInput Range boundaries. For example, if the Input Range is set from 25 to 90 and an incoming note's velocityis 10, it is treated as a velocity of 25. If an incoming note's velocity is 100, it is treated as a velocity of 90.
Learn Velocity
This function is designed to analyze incoming MIDI note input and setthe Input Range accordingly. Activate the button and play a series oflow-velocity and high-velocity notes within the velocity range youintend to use with the articulation mapping.
The detected notes are analysed and the Input Range is set.

BFD3 Operation Manual138
© 2017 FXpansion
Setting up velocity splits
The Mapping Response panel functions can be used for setting up velocity splits for keys containing stackedarticulations.
The following examples demonstrates how to create a velocity split setup for a key mapped to Snare Hit andSideStick articulations.
1. Select the SideStick articulationin the Assignments list..
2. Set the upper limit for the InputRange control - this will be thehighest velocity that triggers theSideStick.
3. Activate the Gate button toignore velocities above the upperlimit.
4. Optionally, fine-tune the velocitylayer graph to set the lowest andhighest velocity layers that will betriggered.
5. Select the Hit articulation in the Assignments list.
6. Set the lower limit for the InputRange control to a value 1 higherthan the upper limit for theSideStick.
7. Optionally, fine-tune the velocity layer graph to set the lowest velocitylayer that will be triggered. In this example, the snare sound triggered byMIDI notes with velocities of or above 90 is from the upper part of thevelocity layer range, meaning that it is struck with high intensity.
Velocity splits can overlap each other if the Input Ranges are set up to doso, with both articulations being heard within the overlap areas.

MIDI key and automation mapping 139
© 2017 FXpansion
Additional controls
Tools menu
Clear all keys
This function clears all current key mappings, allowing youto build a Key Map entirely from scratch.
Allow multiple keys for an Articulation/Groove
With this setting deactivated, any articulation or Groovecan be mapped only to a single key. If an articulation orGroove is mapped again, the old assignment is lost.
Choke on Aftertouch
This function is intended to be used with electronic drumkits - see the next section.
Key context menu
Right-click on the horizontal or vertical keyboards to display the key context menu.
The menu allows you to Cut and Paste mappings between keys - use the SHIFT keyto select multiple sequential keys. Any assignments that already exist on keys affectedby a Paste operation are lost.
The Clear... function removes the mappings on the selected keys. You are promptedfor confirmation before proceeding.
MIDI event log
Click the Show MIDI Log button to display the MIDI Event Log panel. This panel displays a list of all MIDIevents received by BFD3's MIDI input and can be very useful for troubleshooting during mapping tasks.
Click the Show MIDI Log button again to hide the panel.
Note that this log is also provided as an auxiliary window: use the Show MIDI Log function in BFD3's Toolsmenu to open the external window.
The log displays incoming MIDI data in the following format:
MIDI Notes
Channel [1-16] Note On [C0 - G10] Velocity [1-127]
MIDI Continuous Controllers (CCs)
Channel [1-16] CC [0-127] Value [0-127]
Other MIDI messages (e.g. Pitchbend etc.)
Channel [1-16] Message [value]
Use the scrollbar to display earlier events in the log buffer and the ClearLog button to clear the buffer.
Saving in the Key Map panel
All the following functions can be found in BFD3's File menu.
Save Key Map
This function opens a system file save dialog prompting for a location and filename to save the current Key Map.
It is recommended to save the Key Map to the default location - <user location>/Maps - so that it isaccessible from the Load Key Map panel without further adding and scanning of data locations.
Save Key + Automation maps
This function saves the current Key Map and Automation Map with the same name (although the two resultingmap files have different file extensions – .bfd3map and .bfd3auto).
Save MIDI Event Log
This function saves the contents of the MIDI Log for diagnostic and troubleshooting reasons. Logs are saved withthe .log file extension.

BFD3 Operation Manual140
© 2017 FXpansion
5.2 Using Electronic Drumkits
BFD3 supports the use of electronic drumkits for triggering sounds, with pre-made maps provided for most kits.The Key Map panel provides a number of tools to customize mappings or response characteristics.
Most triggers/pads on electronic kits are fairly straightforward to map to BFD3's Drum articulations. Certaintypes of triggers which use more advanced control techniques may require some customization for your playingstyle, such as hihat and positional snare triggers when using kits capable of sending out MIDI CCs in order tocontrol articulation switching. BFD3 provides 'variable' hihat and snare articulations to use with these types ofcontrollers.
This section assumes that you are familiar with using the Key Map panel, explained in the previous section.
How electronic drumkits work
Electronic drumkits, or 'e-drums' usually consist of a number of pads which transmit trigger signals as controlvoltage over an audio connection. Additionally, a pedal mechanism that transmits the variable state of the pedalbetween open and closed, again using a control voltage over an audio connection.
The audio signals are routed to a converter box, commonly referred to as a 'drum brain', which translates audiosignals received from pads into MIDI messages. The brain often also has onboard sounds, which tend to berather limited due to memory constraints.
Common e-drum systems include D-Drums (formerly made by Clavia), Roland V-Drums, the Yamaha DT seriesand Alternate Mode Drumkat. Note that some budget e-drum systems such as the Ion kit do not support variablehihat pedals, instead using a switch pedal that simply changes between open and closed states. You cannotutilize variable hihat control with such kits.
Cross-talk between triggers and zones
It s very common to experience cross-talk symptoms when using e-drum systems – when a pad is struck, theresulting vibrations are picked up by other pads' trigger sensors.
This crosstalk problem is often compounded by the fact that most e-drum systems are supplied with a single-frame mounting system, resulting in little isolation for each pad. In addition to cross-talk between individualpads, substantial cross-talk also occurs between zones on multi-zone pads.
In practice, this is often not a major problem, as it reflects what would happen with real drumkit to some extent.However, when using BFD3, it can cause the following issues:
• Excess disk streaming due to more voices being triggered at once
• Problems when using MIDI learn for note assignments due to multiple notes being transmitted when striking apad or zone on a pad.
It can be more effective to manually assign notes in the Key Map pagerather than using Learn-based functions.
In order to do this, you will need documentation regarding the notestransmitted by each pad on your electronic kit. Alternatively, the brain itselfmay provide setup pages which provide this information.
There may be situations, however, when you may have to examine the MIDIoutput from your drum brain: BFD3's MIDI Event Log allows you to do this.
The Input Range and Gate functions in BFD3's Mapping Response panelcan be used to overcome the problems associated with crosstalk - see the previous section for details on using these functions.
Double-triggering: setting the Retrigger threshold
Another similar problem is 'double-triggering' and unwanted choking of sounds, especially when using dual-zonetriggers. Most drum brains feature configuration parameters for overcoming cross-talk and double-triggeringproblems.
The Retrigger threshold setting in the Engine Preferences adjusts for double-triggers in real time - it defines alength of time after each received note during which all further notes are ignored.
Note that it is usually preferable to eradicate these problems at the source. Please consult your e-drum systemdocumentation for information on how to minimize the effects of cross-talk and double-triggering with your kit.

MIDI key and automation mapping 141
© 2017 FXpansion
Latency
An inherent problem with computer-based digital audio systems is the concept of latency, meaning that BFD3may not respond as quickly as any onboard sounds in the drum brain.
It is important to remember that latency is NOT caused by BFD3. Any sources of latency issues lie elsewhere inyour system:
• Possible additional processing time required in the brain to create the MIDI output, as opposed to triggering theinternal sounds.
• Any inherent latency and timing inaccuracies involved with connecting the brain's MIDI output to thecomputer’s MIDI interface.
• Any latency involved in getting the data from the MIDI interface to BFD3. This varies with the quality of thehardware and drivers of the MIDI interface.
• Audio interface latency/buffer size - smaller buffer sizes result in lower latencies. However, they also requiremore CPU power and well-engineered audio interface hardware and drivers.
Bus traffic problems
You may find it particularly difficult to achieve low latencies on laptops and smaller machines with limitedexpansion potential – no ability to install dedicated internal drives or audio interfaces. This means you may needto chain devices on the same firewire or USB bus for example. This often leads to dropouts at lower latencies.
It is highly recommended to run the hard drive containing BFD3's sounds from a separate bus to the audiointerface.
Recommended systems for low latency
A high quality audio interface capable of reliably operation at 64 or 32 sample latency (1.5ms or 0.75ms at44.1 kHz) - a PCI, PCI-Express, Thunderbolt, CardBus or ExpressCard interface tends to achieve the bestresults
A reliable PCI, USB2 or USB3 MIDI interface
An internal SATA-connected 7200 RPM drive or SSD for the sounds is preferable – if this is not possible, usean external USB2 or USB3 drive on its own bus
A fast CPU, well set-up drivers and 8GB or more of RAM
If it is not possible to assemble a system capable of stable low latency operation, it may be best to record yourperformance while monitoring the sounds in your drum brain, and subsequently route the recorded MIDI toBFD3's sounds.
Simple hihat control
The easiest way to control hihats in BFD3 with an electronic kit is by ignoring the MIDI CC transmitted by thebrain according to the hihat pedal position and instead simply using the open, closed and pedal hihat notestransmitted by the brain.
The drum brain calculates whether to send out an open or closed hihat note depending on the state of the hihatpedal. Some brains that support multi-zone triggers are capable of sending out different open and closed notesfor tip (also known as bow) and shank (edge) triggers. A pedal note is usually transmitted when the hihat pedalcontroller is fully depressed.
Example: Roland TD-20
The following table shows how to map the notes transmitted by a Roland TD-20 to achieve non-variable hihatcontrol.
Roland note
Open Bow
Closed Bow
Open Edge
Closed Edge
Pedal
MIDI note* (note no.)
A#1 (46)
F#1 (42)
D0 (26)
A#-1 (22)
G#1 (44)
BFD3 mapping
open tip
closed tip
open shank
closed shank
pedal
* MIDI note oc taves are spec ified us ing -2 oc tave numbering (lowes t note is C -2)
It is highly recommended to remap A#1 and D0 to 1/2-open tip and 1/2-open shank, as these represent themost common type of open hat sound. The Open tip articulation in particular is more like a hihat bell sound, or asmall ride cymbal.
Advantages and disadvantages of non-variable hihat control
While it may be argued that using this method is less expressive than using the variable hihat control methoddescribed below, the resulting MIDI data is much easier to edit in a MIDI sequencer or DAW.

BFD3 Operation Manual142
© 2017 FXpansion
When using a MIDI CC for the hihat pedal position, reecorded CC values must be moved along with any noteswhen editing, which may be cumbersome.
With the simple hihat control method, any editing and quantizing required is much more straightforward as onlynotes are involved. The open notes can be moved to other hihat articulations after recording in order to makeparts more expressive.
BFD3's internal Groove recording function automatically converts any variable note/CC input that is received todiscrete articulations.
Variable hihat control
Overview
Electronic drumkits often use a hihat pedal controller which sends out MIDI continuous controller messages torepresent its position within open and closed states. BFD3 is capable of analyzing this controller data while ahihat trigger is received to determine which hihat articulation to play from those available: closed, 1/4-open,1/2-open, 3/4-open or fully open. For this to occur, hihat MIDI notes must be mapped to special 'Variable' hihatarticulations.
Important note
BFD3 allows variable hihat control only for the Hihat slot. You may load additional hihats in other slots andtrigger their articulations directly with MIDI notes, but variable hihat control is restricted to the Hihat slot only.
Assigning variable tip and variable shank articulations
Any hihat note transmitted by your electronic drumkit brain should beassigned to either a Variable tip or Variable shank articulation, with oneimportant exception. Almost all brains send out a 'pedal', or 'foot-chick',sound when the hihat control pedal is depressed fully: this note shouldalways be mapped to BFD3's Pedal articulation.
The Variable tip is used for the main surface or 'bow' of the hihat, whichshould be used if you only have a single-zone hihat trigger pad. 'Tip' refersto the fact that the surface of the hihat is struck with the tip of the stick.
The Variable shank is used for the edge of the hihat - this should be used inaddition to the variable tip if your hihat pad has a dual-zone trigger. 'Shank'refers to the fact that the edge of the hat is struck with the shank, or body,of the stick.
Example: Roland TD-20
A good example is the Roland V-Drums range of kits. Most Roland drum brain models send out the same set ofnotes for the hihat. The following table illustrates which notes to map to which articulation.
Roland note
Open Bow
Closed Bow
Open Edge
Closed Edge
Pedal**
MIDI note (note no.)
A#1 (46)
F#1 (42)
D0 (26)
A#-1 (22)
G#1 (44)
BFD3 mapping
Variable tip
Variable tip
Variable shank
Variable shank
Pedal
* MIDI note oc taves are spec ified us ing -2 oc tave numbering (lowes t note is C -2)
** The hihat pedal controller s ignal is transmitted via MIDI C C #4.
The Roland brain decides whether to send the 'open' or 'closed' note depending on the pedal controller value anda setting on the brain dictating the transition point between open and closed.
This distinction is unimportant to BFD3 because it contains additional 1/4-open, 1/2-open and 3/4-open sounds.Therefore the open and closed sounds should mapped to the same Variable articulation. BFD3 makes its owndecisions about which actual hihat articulation to play, depending on the value of the pedal controller and thesettings in the Hihat response panel in the Key Map page.
The pedal note, meanwhile, chokes any playing open sound and plays the hihat pedal articulation (the 'foot-chick' sound).

MIDI key and automation mapping 143
© 2017 FXpansion
Assigning the hihat pedal MIDI CC and adjusting its response
Hihat pedals in most electronic kits transmit a MIDI continuous controller(CC) in order to represent the position of the pedal between open andclosed. A value of 0 means that the pedal is open (fully up). As the pedal ismoved down, the value of the MIDI CC increases. The maximum possiblevalue is 127.
Usually, MIDI CC #4 is used for this purpose, and this is the default settingfor the Hihat MIDI CC in BFD3. The Hihat Response panel can be used tochange this to a different MIDI CC#, and to customize the response of BFD3to received pedal controller values.
Hihat Response panel
In order to view the Hihat Response panel, a key containing a Variable tipor Variable shank hihat articulation must first be selected using thekeyboard displays in the Key Map panel.
The controls in this panel allow you to define a number of settings for variable hihat control:
MIDI CC
This setting specifies the MIDI CC# to use for the hihat pedal. The setting used here depends on the valuetransmitted by your drum brain. To set the value, you can either:
Click the value, type a new number between 1 and 127 and hit ENTER.
Click the Learn button to the right of the setting and move your hihat pedal to detect the pedal CC. You mayneed to strike your hihat pad shortly before moving the pedal for the value to be transmitted.
Pedal transitions
The Pedal transitions control specifies the articulation transition pointsover the range of hihat height MIDI CC values.
This control features 4 adjustable points on a vertical slider, with each pointrepresenting the transitions between the hihat articulations over the pedalrange. These transition points form 5 'zones' for closed, 1/4-open, 1/2-open, 3/4-open and fully open articulations.
Each of the transition points displays a value from 0 to 127, whichcorresponds to the hihat pedal MIDI CC value at which the transition occurs.Click and drag the transition points up and down to adjust them.
When a Variable tip is triggered, the concurrent value of the hihat pedalMIDI CC is analyzed. The appropriate articulation is played depending inwhich 'zone' of values the MIDI CC falls.
For example, let's say that the points for the Variable tip articulation are set to values of 10, 50, 80, and 110.This means that the 'zones' of MIDI CC values translate to hihat articulations as follows:
0-9
10-49
50-79
80-109
110-127
open
3/4-open
1/2-open
1/4-open
closed
* MIDI note oc taves are spec ified us ing -2 oc tave numbering (lowes t note is C -2)
** The hihat pedal controller s ignal is transmitted via MIDI C C #4.
Therefore, if the CC value is 30 and the Variable tip articulation is triggered, a 3/4-open tip articulation is played.If it is 110, a closed tip is played, and so on.
Variable tip and Variable shank articulations have distinct Pedal transitions settings, although by default theyare linked with the Lock Tip & Shank setting.
When using a hihat with less than the maximum number of articulations, BFD3 intelligently remaps triggers toclosest appropriate articulation that does exist. This occurs if any articulations are unloaded in the Kit display, orwhen using hihats from other BFD3-compatible libraries which do not feature a full set of articulations.
The Pedal transitions settings can be used to overcome the common problem of hihat controller pedals notsending out the maximum possible range of MIDI CC values. For example, its maximum value (when fullyclosed) may be 90 instead of 127. If this is the case, adjust the transition point between closed and 1/4-open sothat its value is 90 or less - 80 would be a good starting point to try - and move the other sliders to appropriatepoints over the rest of the available range.
The MIDI Event Log can be very useful in examining the data transmitted by your controller pedal and drumbrain.

BFD3 Operation Manual144
© 2017 FXpansion
Lock Tip and Shank
If you don't need to separately adjust the Variable tip and Variable shank Pedal transitions response, you can activate the Lock Tip and Shankbutton. This locks the settings of both Variable articulations together, so thatthe Pedal transitions slider values are exactly the same for botharticulations. This setting is activated in the default BFD3 Key Map.
Auto pedal event
This setting is to be used when using variable hihat control with electronicdrum brains which do not send out a pedal (foot-chick) note automaticallywhen the hihat pedal is full depressed.
When the setting is activated, a pedal note is generated whenever the hihatpedal MIDI CC reaches the first value within the 'closed zone' defined withthe Pedal transitions control in the Hihat Response panel.
If your drum brain sends out a pedal note when the hihat pedal is fully depressed (Clavia D-Drum and Roland V-Drum brains fall into this category), then you should deactivate this setting if it is enabled.
Auto splash event
When using an electronic drumkit with variable hihat controller pedal, activating this setting results in an openhihat sound being generated if the hihat pedal is opened soon after a closed tip, closed shank or Pedalarticulation. The length of time within which this function operates is defined by the Hihat Reopen Thresholdsetting in the Preferences.
It is highly recommended to enable this setting when using some Roland drum brains such as the TD-20.
All Hihats variable
This setting represents a quick way of changing a set of regular hihat articulations into a variable hihat setup. Itworks by changing all hihat articulation mappings (with the exception of the pedal articulation) to variableequivalents.
To illustrate this using the Roland TD-20 example:
Roland note
Open Bow
Closed Bow
Open Edge
Closed Edge
Pedal**
MIDI note* (note no.)
A#1 (46)
F#1 (42)
D0 (26)
A#-1 (22)
G#1 (44)
BFD3 mapping
open tip
closed tip
open shank
closed shank
pedal
All Hihats variableenabled
Variable tip
Variable tip
Variable shank
Variable shank
Pedal
* MIDI note oc taves are spec ified us ing -2 oc tave numbering (lowes t note is C -2)
** The hihat pedal controller s ignal is transmitted via MIDI C C #4.
In the table above, the column to the extreme right shows the effective mappings with the setting enabled. Theoriginal mappings are not changed - you can return to normal by disabling the preference.
While the preference is enabled, hihat articulations display the relevant variable hihat controls in the Advancedmapping settings display instead of the standard settings, so you can customize hihat response as you wouldwhen dealing with variable tip and variable shank articulations.
Hihat Transition Mode
Activating this setting enables smooth transition modelling between hihat positions.

MIDI key and automation mapping 145
© 2017 FXpansion
Preference settings related to hihat control
Retrigger threshold (Engine Preferences/Synth Engine section)
As mentioned earlier, the Retrig Threshold setting in the Engine Preferences exists to combat double-triggering problems. Dual-zone hihats can be especially prone to this. Increasing this setting may help inovercoming such problems.
Hihat choke fade settings (Engine Preferences/Fades section)
The hihat has more choke fade settings than other Drum types because of its more complex nature. The defaultHihat choke fade settings should be adequate for most purposes, using both e-drums and more conventionalinput means.
The default values are as follows:
Hihat choke fade (base)
Hihat choke fade (range)
Hihat closed tip choke fade
Hihat pedal choke fade
0.500
0.500
0.050
0.050
These settings result in a fast choke on a hihat articulation that is currently playing if a pedal note (usually G#1)is received (it also performs a fast choke on closed tip articulations – see later). Most drum brains send out apedal note when the hihat pedal is fully depressed, in addition to the MIDI controller messages for pedalmovement.
All other articulations are choked more slowly, allowing more natural cymbal-style choking for open hihatsounds. This also means that that open hats will not be choked when drum brains send out spurious MIDI notesdue to cross-talk between zones etc.
Additionally, there is a separate choke fade setting for Closed Tip sounds. This is provided for keyboarddrummers and programmers who are accustomed to choking open hats with a closed hat due to unfamiliaritywith physical hihat behaviour.
You may find that your e-drum system is demonstrating a lot of cross-talk between hihat zones and perhapssending out undesired Closed Tip notes. If this is the case, try increasing the Hihat closed tip choke fadesetting to a larger value.
Please note that since the Closed Shank articulation is quite a splashy sound, not unlike a 1/4-open tip, it istreated as an 'open' articulation - it chokes open articulations with the standard Hihat choke fade times.
Hihat reopen threshold (Session Preferences/Hihat setup section)
This setting defines the length of time after a Closed or Pedal hihat articulation within which the Auto PedalSplash function, set in the Hihat Response panel, is active.
This setting is defined in musical notes, as the time required for this function typically varies according to thetempo. It is set at 1/64-note by default, which is optimal for most situations. However, if you need to adjust thisresponse, it can be set to between 1/128-note and 1/16-note.
Hihat transition fade time (Session Preferences/Hihat setup section)
This setting adjusts the amount of time for the transmuting processes associated with the Hihat TransitionMode and the Auto Pedal Splash settings.

BFD3 Operation Manual146
© 2017 FXpansion
Positional snare control
BFD3's snares, and those of many other compatible expansion packs, feature a Half Edge snare articulation, withthe head of the snare struck halfway between the centre and the edge. The regular Hit articulation, on the otherhand, is a result of the snare head being struck in the centre.
The Variable snare articulation allows you to access the Hit and Half Edge articulations using the positionalsensing of snares in electronic drumkits such as those by Roland.
Positional sensing works by the drum brain sending out a MIDI CC representing the distance from the centre(where the value is 0) and the edge (value 127).
Using positional snares in BFD3
In order to utilize this functionality, a variable snare articulation must be mapped in the Key Map page. Typically,you should assign it to the key normally assigned to the Hit articulation, usually D2. Please ensure that it is theonly articulation on the key – delete any articulations that may have originally existed.
Snare Response panel
After a Variable snare articulation has been mapped, select the key on which the mapping exists using thekeyboards in the Key Map panel and then click the Snare button in the Mapping Editor to show the SnareResponse panel.
MIDI CC
This setting specifies the MIDI CC# to use for the snare position. Thesetting used here depends on the value transmitted by your drum brain. OnRoland kits, this MIDI CC is usually CC #17. To set the value, you caneither:
Click the value, type a new number between 1 and 127 and hit ENTER.
Click the Learn button to the right of the setting and strike your snare - ifit transmits a CC for the position information, it is detected.
Snare transition
The Snare transition control is very similar in concept to the Pedaltransitions control in the Hihat Response panel. It specifies the articulationtransition point between Hit and Half Edge articulations over the range of thesnare position MIDI CC.
This control features an adjustable point on a vertical slider, with the point representing the transition betweenthe 2 articulation 'zones'. The transition point displays a value from 0 to 127, which corresponds to the snareposition MIDI CC value at which the transition occurs. Click and drag the point up and down to adjust it.
If the point is set at 55, this means that the two resulting zones are set as follows:
Hit
Half-edge
0-54
55-127
Controlling cymbals
Many electronic drumkits feature manual choking ofcymbals by 'grabbing' the cymbal trigger pad. Such cymbalpads usually involve a pressure controller that transmitspolyphonic aftertouch (poly pressure) messages associatedwith the cymbal MIDI notes.
This feature can be used in BFD3 by enabling the Chokewith aftertouch setting in the Key Map panel's Toolsmenu. Please note that aftertouch choking only works onCymbal slots.

MIDI key and automation mapping 147
© 2017 FXpansion
5.3 Automation Maps
The Automation panel allows you to view, create and modify MIDI and host automation assignments to BFD3parameters.
It also provides access to the Program Change Playlist - see the next section for details of this function.
The Automation panel is not visible at the same time as BFD3's Browser - to make it visible, click the Autobutton above the Browser.
To exit the Automation panel, click the Auto button again to hide it orclick any other Browser tab button to display it instead.
MIDI automation and host automation
MIDI and host automation both have their own advantages anddisadvantages:
Hardware MIDI controllers tend to be cheap and widely available whilehost automation controllers can tend to be less plentiful and moreexpensive. Despite this, it is usually possible to simply draw automationdata in terms of lines and curves directly in your host instead of usinghardware to create this data. It is also usually possible to draw MIDI CCautomation in a similar way. Please check your host's documentationfor more details on its support for MIDI CCs and host automation.
Host automation tends to offer greater resolution (although this varieswildly depending on your particular DAW's implementation) while MIDICCs are limited to 7-bit resolution (128 steps), which can lead tosmoother automation.
In the case of MIDI, BFD3 is capable of using both MIDI continuouscontrollers (CCs) and MIDI notes. The latter are particularly useful forautomating button-type controls.
Automation panel layout
MIDI channel
Automation Map assignments can be created on any MIDI channel. Bydefault, BFD3 responds in Omni mode - in other words, on any MIDIchannel. This can be changed to a specific channel from 1-16 using the MIDI Channel drop-down menu.
Automation assignments can exist on a separate MIDI channel to thatused for the Key Map - its MIDI channel setting is entirely distinct.Setting a different MIDI channel to that used for the Key Map is usefulwhen using significant numbers of MIDI note mappings.
The current MIDI Channel setting applies to all current automation assignments, regardless of the MIDI channelused when it was created.
Learn button
Activate this button to enter Learn mode, used for the process of mapping BFD3 parameters to automationcontrol sources. See the guide below for details of how to use this button.
Map to next free
These 3 buttons are also used in the mapping process - see the guide below for details.
Mapped parameters list
This list displays current automation mappings as well as programchanges for the program change playlist. Program changes are alwaysdisplayed underneath automation mappings. The Program Changeplaylist is discussed in the next section.
Each mapped Parameter is shown to the right of the Control sourceto which it is assigned.
Delete mapping
When the cursor is hovered above a mapping in the list, a Deletemapping button ('X') is shown at the right. Click the button to deletethe mapping.
Swap
These buttons swap the assignments of adjacent MIDI CCs/host automation parameters.
Mode
This setting is used to adjust the behaviour of the selected mapping in the Mapped paramater list. See below fora guide to using this setting.

BFD3 Operation Manual148
© 2017 FXpansion
Program Changes
This part of the panel is discussed in the next section.
MIDI Log
The MIDI Log provides an overview of incoming MIDI messages, useful for troubleshooting mapping operations.
Tools menu
Clear Automation Map
This function clears all current automation assignments of all types. Youare prompted for confirmation before this function is applied.
Clear Program Change Playlist
This function clears the Program Change Playlist, discussed in the nextsection.
Creating an automation assignment
1. First, display the Automationpanel if it is not currently visible,using the Auto button above theBrowser.
2. Then click the Learn button inthe Automation Panel.
The BFD3 interface changes tohighlight any controls that can beautomated. Any existingautomation mappings are labelledon the control.
In this state, you can use theinterface to display the desiredcontrol if it is not currently visible.
3. The assignment is then created in any of the following ways:
Learn an incoming message
Click the parameter within the BFD3 interfaceyou wish to assign to an automation controlsource.
Move/adjust the hardware knob/fader/key towhich you wish to map the BFD3 parameter.
Alternatively, suitable data can be drawn/painted within a track in your host/DAW andplayed into the BFD3 plugin. Usually, valuesare sent as they are drawn - please consultyour host's documentation for details onsending values for MIDI CCs, host automationparameters and MIDI notes.
The BFD3 parameter is now labelled with thelearned automation source to confirm that it isnow mapped.
The mapping is also shown in the Mapped parameters list in theAutomation panel.
MIDI assignments are shown abovehost automation assignments.
Use the Map to next free function
Click the parameter within the BFD3 interface you wish to assign to an automationcontrol source.

MIDI key and automation mapping 149
© 2017 FXpansion
Click one of the Map to next free buttons in the Automation panel to mapthe BFD3 parameter to the next unmapped CC, Note or Host automationsource.
The mapping is now shown on the BFD3 parameter and in the Mappedparameters list in the Automation panel.
Alternatively, right-click on the desired BFD3parameter and use the Map to next freefunctions on the menu that appears.
Adjusting automation behaviour for a mapping
The Mode setting changes the behaviour of the selected mapping in the Mapped paramater list. Click the buttonto display a drop-down menu of the 3 following settings:
Continuous (default for MIDI CCs)
This is the default mode and the most typically useful way to control a fader orknob – the fader or knob's value follows the MIDI CC values continuously.
Switch
This mode is intended to be used when controlling button parameters withMIDI CCs. The MIDI CC range is divided in two, with values of 0-64 triggeringan 'Off' state and values of 65-127 triggering an 'On' state.
This mode can also be used with MIDI notes - notes with a velocity between 0-64 switch the BFD3 parameter to an 'Off' state, while notes with a velocitybetween 65-127 switch the BFD3 parameter to an 'On' state.
Toggle
This mode is available for MIDI note assignments and sets the assignment to'latching'-style behaviour – play the note once and release it to trigger an 'On'state, and play/release the note again to return it to its 'Off' state.
This mode is recommended when assigning the Record/Loop transportbuttons to MIDI notes.
Momentary
This mode is available only for MIDI note assignments - the assigned BFD3 parameter is set to an 'On' statewhile the MIDI note is held down (when it sends a MIDI note on message).
Upon release of the MIDI note (when a MIDI note off message is received) the control returns to its 'Off' state.
This mode is recommended when assigning the Play/Stop/Return to Start transport controls.
Saving the Automation Map
All the following functions can be found in BFD3's File menu.
Save Automation Map
This function opens a system file save dialog prompting for a location and filename to save the currentAutomation Map.
It is recommended to save the Automation Map to the default location - <user location>/Maps - so that it isaccessible from the Load Automation Map panel without further adding and scanning of data locations.
Save Key + Automation mapsSave MIDI Event Log
See the MIDI Key Maps section for details on these functions.

BFD3 Operation Manual150
© 2017 FXpansion
5.4 Program Change playlist
The Program Change Playlist manages mappings between MIDI program change messages and BFD3 Presets.No mappings are set up by default but they can be created and saved in the Automation panel's ProgramChange Playlist section.
The Automation Map panel is not visible at the same time as BFD3's Browser - to make it visible, click the Autobutton above the Browser.
To exit the Automation panel, click any other Browser tab button - either the Presets, Kits, Drums or Groovesbuttons.
Creating program change entries in the playlist
Create a New playlist entry
Click the New button to create a new entry in the Program ChangePlaylist. A new entry appears named 'PC 0' under the Control columnof the Automation panel's Mapped parameter list, unless any entriesalready exist, in which case its name is PC n , where n is 1 higher thanthe last program change in the list.
Assign the playlist entry to a BFD3 Preset
Click a program change entry that has been newly createdusing the New button, under the Parameter column. A drop-down menu of the available Presets in the BFD3 database isshown. Simply scroll down to and click the required Preset tomake the assignment.
Managing program change playlists
Removing entries in the playlist
When the cursor is hovered above program change entry, a Deletemapping button ('X') is shown at the right. Click the button to deletethe mapping.
Re-ordering entries in the playlist
The Swap buttons allow you to re-order the program change playlist bymoving the selected playlist entry up or down in the list.
Click the playlist entry under the Control column in order to select itwithout displaying the drop-down menu of Presets.

MIDI key and automation mapping 151
© 2017 FXpansion
Using the playlist with MIDI or the Load Prev / Load Next buttons
To switch between the different playlist entries, you will need a MIDI controller capable of transmitting programchange messages. A good solution is a MIDI footswitch board – these are relatively easy and cheap to sourceand are commonly used to send program change messages. Other possibilities include the preset +/- buttons onmany keyboards, which often transmit program change messages from the MIDI output.
Alternatively you can use the Load Prev / Load Next buttons - these can be mapped to a MIDI or hostautomation source in order to cycle through program changes remotely.
Loading and Saving Program Change Playlists
It is important to note that Program Change Playlist is not saved with a BFD3 Preset - this part of BFD3 liesoutside the scope of the Preset since it switches between Presets.
The BFD3 File menu features the Load Program Change Playlist and Save Program Change Playlistfunctions - Both of these functions display a system file dialog for specifying a filename to load or save. Itdefaults to the <user location>/Playlists folder.
The Default Program Change Playlist setting in the Preferences allows you to define a Program ChangePlaylist to load whenever BFD3 is launched.

BFD3 Operation Manual152
© 2017 FXpansion
6 BFD3 Preferences
Preferences panel
The Preferences panel is displayed with the Show Preferences function inBFD3's Tools menu.
It features a number of functions to customize various aspects of BFD3'sperformance, resource usage, control behaviour and interface.
The panel features a number of pages:
Data Preferences: settings related to BFD3's content locations and various startup loading options
Grooves Preferences: settings related to the Groove engine
Session Preferences: settings which are loaded and saved with Presets and host/DAW sessionswhen running the BFD3 plugin
MIDI Preferences: settings related to MIDI input
Engine Preferences: settings related to BFD3's core engine, modelling and streaming functions
GUI Preferences: settings related to BFD3's graphical user interface
Health Preferences: settings which are designed for troubleshooting purposes when you requiresupport - please ignore this page unless instructed to use it by our technical support team
Profiles
The Preferences panel features a Profile system which loads/saves settings for all settings in theEngine Preferences page with the exception of the Simulation settings.
These profiles allow you to define different profiles for different situations - for example, low quality/detail level settings for composition work, and high-detail settings for mixdowns and exports.
Click the Load/Save button to display the Load Preference Profile... and Save PreferenceProfile... functions - use the latter function to save the current settings as a profile. Use the formerfunction to load a profile from any location on disk, or use the main drop-down menu to choosefrom the available profiles currently in the database.
The profile is also set using the BFD3 Setup Wizard,launched when using BFD3 for the first time or available atany time in BFD3's Help menu.

BFD3 Preferences 153
© 2017 FXpansion
6.1 Data Preferences
Program Bank section
Default Program Change Playlist
This setting specifies a default Program Change Playlist to load when BFD3 is launched. Click the Browse buttonto specify the desired file.
Preference and Database management section
RESET ALL PREFERENCES
Clicking this button, and agreeing to the subsequent confirmation dialog, results in all your preference settingsbeing trashed, reverting to factory default settings.
Data Paths section
Launch Content Paths Manager
This button opens the Content Locations panel, which can also be opened using the Set up content locationsfunction in BFD3's Tools menu.
Prompt for missing Data Paths
With this setting activated, BFD3 prompts for any missing content locations when it is launched. Typically, thesemay include external USB2/USB3 drives which are not yet connected and mounted.
Export section
Enable NFUZD Export features
This setting is provided for users of the NFUZD Audio NSPIRE electronic drumkit. When activated, 2 additionalfunctions are available in the Tools menu related to exporting kits and loop kits for standalone use with theNSPIRE module.
Startup section
Startup Preset
Any Preset currently in the database can be used as the Startup Preset - this is loaded whenever BFD3 islaunched. When this is set to Don't load anything, BFD3 is launched in its factory default state.

BFD3 Operation Manual154
© 2017 FXpansion
6.2 Grooves Preferences
MIDI Import section
Import MIDI key mapUnmapped MIDI note mode
These settings are described in the Importing MIDI files section.
MIDI & Audio Export section
MIDI export Mode
This setting specifies the track structure of exported MIDI files. It can be set to One track for all Drums, Onetrack per Drum or One track per articulation.
Export adds unmapped Key Map articulations
If this setting is activated, exporting a MIDI file from the Groove engine adds mappings to any unmappedarticulations automatically, so that the MIDI file sounds the same when played back with BFD3's sounds. It isadvisable to subsequently save a BFD3 Preset or a Key Map with the mappings in place if you intend to use theMIDI file in future.
Export prefers variable articulations
If this setting is activated, hihat events are converted to variable articulations along with accompanying hihatpedal controller MIDI CC data when Grooves are exported as MIDI. Variable articulation mappings and a hihatpedal MIDI CC must be specified in the Key Map used for the export.
With the setting deactivated, specific hihat articulations are exported.
Export tail length (seconds)
This setting specifies the size of the tail retained at the end of an audio export. The length of the tail is set inseconds. Retaining a tail at the end of exports makes sure that any lingering decays are captured.
When creating audio files that are an exact number of bars long (for example, when creating 'loops' with the Export Groove Audio function), set this preference to 0.
Auto-arm Mixer Channels for audio export
This function is described in the Saving and Exporting Grooves section.
Editor Preferences
Record lead-in (bars)Groove record commit mode
These functions are described in the Recording Grooves with MIDI section.
Maximum undo steps
This setting specifies the maximum number of undo steps in the Groove Editor's multi-stage Undo function. Moresteps use more RAM!
Cubase loop correction
This preference should be activated to achieve correct timing when using Cubase's loop function.
MIDI rec. quantization in PPQN (0 = none)
This setting adjusts the resolution of quantization when recording Groove events via MIDI, with the defaultsetting providing 960 PPQN resolution. With a setting of 0, no quantization is applied.
MIDI Start/Stop control enabled
With this setting activated, BFD3's transport responds to external MIDI start/stop commands.

BFD3 Preferences 155
© 2017 FXpansion
Max Drum Track length (bars)
This setting specifies the maximum possible length of the Drum Track, in bars. The default is 1000 - if yourequire longer drum tracks, increase this value.
Invert Ruler Zoom YInvert Ruler Zoom X
These functions invert the orientation of the zoom/scroll functions when clicking and dragging in the Ruler in theGroove Editor.
High-accuracy song position display
This setting is enabled by default and results in a highly accurate position marker in the Groove Editor grid. Thiscan cause more CPU usage on some systems so if you find you are experiencing audio artifacts when using theGroove Editor, try deactivating this setting.
Metronome section
Metronome volume
This setting allows you to specify a volume level for the metronome, and ranges between a maximum of 100and a mimimum of 1. The level of the metronome can also be set using the Metronome channel in the mixer - itmust be enabled with the View menu if it is currently hidden.
4 preset volume levels can be quickly accessed by right-clicking on the Metronome button in the Transport.
Metronome typeMetronome mode
These settings are discussed in the Recording Grooves with MIDI section.

BFD3 Operation Manual156
© 2017 FXpansion
6.3 Session Preferences
Session preferences are settings that are useful to save on a session-by-session basis.
To use custom Session preference settings on all new projects, a suitable Startup preset should be createdand saved in BFD3 and then specified in the Data preferences.
Session MIDI section
Notes MIDI channel Controller MIDI channel
These settings specify the MIDI channels on which BFD3 receives MIDI data for the following purposes:
• triggering articulations with MIDI notes
• automating BFD3 controls with MIDI CCs and MIDI notes
By default, both settings are specified as Omni, which means that the Key Map and MIDI automation functionsrespond on all MIDI channels.
Send MIDI OutMIDI Out channel
These settings relate to BFD3's MIDI Out function, which outputs events from the Groove engine for use withother MIDI-compatible instruments. Your host/DAW and plugin format must support this feature for it to operate.
Hihat setup section
Hihat transition fade timeHihat reopen threshold
These functions are related to playing the Hihat with an electronic drumkit.
Hihat tip tightenHihat tip tighten (amount) Hihat shank tightenHihat shank tighten (amount)
These settings are related mostly to controlling hihats from electronic drum systems when using the Tightencontrols in the Drum Editor for the current Hihat.
The Hihat tip tighten sets the amount of tightening for the start of the closed zone, with the Hihat tip tighten(amount) setting the amount of tightening for the highest value in the closed zone (i.e. fully closed). The sameapplies to Hihat shank tighten and Hihat shank tighten (amount).
However, even if you are not using an electronic drum system, the Hihat tip tighten and Hihat shank tightenvalues set the maximum amount of tightening applied by the controls in the Drum Editor's Hihat Tighten section.
Note that for these controls to have any effect, the Tighten controls for the loaded Hihat must be activated andincreased from their minimum settings in the Drum Editor.
Session Playback preferences
Revert to factory defaults
Click this button to revert to the factory defaults for the settings in the Session Playback section.
Auto-fill period
This setting specifies the number of bars between fills when using the Auto-fill function in the Groove Palette'sDefault Actions section.
Palette Auto-Play modePalette Auto-Play Groove
These settings are described in the Palette section.
Groove engine active
Deactivating this setting disables the Groove engine entirely if it not required (if you are only triggering BFD3with external MIDI notes).
Latching mode
When this setting is activated, Groove are started and stopped with a MIDI note on message, instead of theusual behaviour (MIDI note on to start a Groove, MIDI note off to stop it).
Each Groove's Start/End Actions still apply.

BFD3 Preferences 157
© 2017 FXpansion
Polyphonic mode
By default, BFD3 does not allow more than 1 Groove to play simultaneously. However, this can be changed byactivating the Polyphonic mode setting. In this mode, a newly-triggered Groove does not stop any otherGrooves that are already playing. This is useful for layering Grooves.

BFD3 Operation Manual158
© 2017 FXpansion
6.4 MIDI Preferences
MIDI display section
Octave numbering scheme
Some sequencers and MIDI controller devices use an octave numbering system which begins at C-2, ratherthan C0, while others use C-1 as the lowest key.
This setting allows you to set the note numbering convention according to your own preference. This setting canbe specified using the Main Host Application item in the BFD3 Setup Wizard.
Use MIDI numbers rather than notes
With this setting activated, MIDI note numbers between 0 and 127 are used instead of note/octave naming in theform of C-2, C-1, C0, C1 etc.
Program Change index starts at 0
With this setting activated, the Program Change Playlist's numbering starts from 0 rather than from 1.
Show low keys at keyboard bottom
This setting applies only to the vertical keyboard representation in the Key Map panel - with the settingdeactivated, the keyboard is inverted - the highest note is at the bottom rather than the top.
Key Mapping section
Prompt for Choke note overwrite
With this setting activated, attempting to map a slot Choke articulation to a key already containing otherarticulations results in a warning and request for confirmation.
MIDI Learn Note Wizard preferences
These settings control the behaviour of the MIDI Learn wizard in the Kit display.
MIDI learn wait mode default
This setting determines whether Wait mode is activated by default.
Only learn 1 note per articulation
When this setting is enabled, the MIDI note learn wizard does not allow the same key to be mapped to morethan 1 articulation. If this is attempted, the previous mapping is removed.
MIDI learn next slot mode default
This setting specifies whether Next slot mode is activated by default.
MIDI learn accept time (sec)
This setting defines the amount of time that is allowed after a Learn mapping has been created for an alternativenote to be played, in case the original note was played in error. The value of this setting is 5 seconds by default.
MIDI learn skip time (sec)
When Wait mode is deactivated in the wizard, this setting specifies the time delay before the wizard movesonto learning the next articulation (or the next Drum, if the current articulation is the last in the current Drumand Next slot mode is activated). The default value of this setting is 15 seconds.
BFD3 Preferences 159
© 2017 FXpansion
6.5 Engine Preferences
Streaming Engine section
RAM buffer
This value, in sample frames, is the size of the portion of each sound held in RAM to enable low latencyplayback, circumventing the inherent latency involved with disk seek times. The portion held in RAM plays whilethe streaming engine cues up the rest of the data from the hard disk. A larger value gives the hard drive longerto deliver the data, but is more demanding on RAM. If the setting is too low for your system, you are likely tosuffer from dropouts and other audio artifacts.
This value determines the length of each sound played when the Preview RAM audio only option is enabled.
Settings of 4096, 8192, 16384, 32768 and 65536 samples are possible, selectable via a drop-down menu. Asetting of 16384 or 32768 is fine for most systems, while fast newer machines may be able to run with settingsof 4096 or 8192.
Stream buffer
This is the size, in sample frames, of the buffers of data being streamed into RAM from the hard disk for eachvoice. Generally, hard drives are more efficient at reading fewer large chunks of data than many smallerchunks. However, a larger Stream buffer uses more RAM, and may be inefficient if not all the data is used, suchas when notes are choked.
Settings of 4096, 8192, 16384, 32768 and 65536 samples are possible, selectable via a drop-down menu.Settings of 8192, 16384 or 32768 are fine for most systems.
Load all to RAM
With this setting activated, the entire kit is loaded to RAM and no data is streamed from the disk duringplayback.
Please ensure you have enough RAM before using this option, and that you are running BFD3 within a suitableenvironment with the other engine preferences set to suitable values. Unless your system is fully 64-bit (64-bitplugin within a 64-bit host in a 64-bit OS) with a high amount of RAM, it is unlikely that you will be able to loadfull detail kits with Load all to RAM activated. In 32-bit environments, 16-bit mode should be activated andthe Max velocity layers setting reduced to a much smaller value.
16 bit mode
In this mode, sample data is loaded into RAM and streamed from disk at 16 bit instead of 24 bit. Because 24 bitdata is stored in memory as 32 bit floats, using 16 bit mode effectively halves the memory footprint required byBFD3.
Max voices
The Max voices setting dictates the maximum number of voices the BFD3 engine can play simultaneously. Ifthe voice limit is exceeded, an intelligent voice-stealing system is applied, based on the oldest voice which is stillplaying.
The number of voices required for a performance can be much larger than anticipated. For example, decayingcymbals and toms can raise polyphony requirements very significantly. 64 is a safe number to use for thissetting - voices do not consume a large amount of RAM when unused.
Max velocity layers
This setting limits the number of velocity layers used for each Drum articulation, thereby reducing the strain onthe hard disk and RAM but at the expense of detail.
If a Drum is loaded that has more layers than the number specified with this setting, only selected velocitylayers at proportional intervals over the range are loaded. The Drum's natural timbral variations are still heardbut with less 'resolution' over the velocity range.
Smaller values can be useful as an efficient preview mode while composing, especially with other RAM-intensiveplugins and instruments in your host/DAW project.
Simply increase the value and restart the engine before performing a final mixdown with full quality.
To change the setting, click the field and enter a new value between 1 and 256.
Note that the Detail section in the Engine Preferences allows further Detail settings for each Drum class - theseoperate as proportional reductions of the Max velocity layers setting.
Max cache buffers
This setting represents the maximum number of disk streaming buffers cached in RAM. If the same velocitylayer is triggered repeatedly, it is possible to avoid reading from the disk by reusing the disk streaming bufferswith the same data. This parameter determines how much RAM to devote to storing layers to play again.
BFD3 Operation Manual160
© 2017 FXpansion
With any kind of dynamics in a performance or when using the Anti-MachineGun functions, layers do not tend tobe reused very often so this setting can be reduced if you wish. Each voice does still require 1 cache buffer.
Preview RAM audio only
This setting forces the engine to play only the initial part of the sounds which are held in RAM without streamingthe remaining parts from disk.
This mode may be useful while composing in order to avoid disk usage, and reactivated during mixdown. Theactual amount of each sound stored in RAM is determined by the RAM Buffer setting.
Restart engine
If any of the following settings are changed, it is necessary to use the Restart engine button in order to makethem active:
• Load all to RAM
• 16 bit mode
• RAM buffer
• Stream buffer
• Max cache buffers
• Max velocity layers
If any Drums are currently loaded when this function is used, they are automatically reloaded after the engine isreinitialized with the new settings.
Enable BFD3 extended channels
When this setting is deactivated, only the OH, Room and Amb3 ambient channels are active - extra Mono andComp channels are ignored, meaning that kits use much less RAM.
When the setting is activated, all channels possessed by a Drum are loaded.
Synth Engine section
Drummer perspective
This preference provides the default setting for the Audience/Drummer switch in the Kit display.
Disable SideStick tuning
With this setting activated, the SideStick articulation is not affected by any tuning changes for the Snare. Thisresults in behaviour that more closely resembles how a real snare works.
Anti-MachineGun mode
This preference provides the default setting for the AMG button in the BFD3 Dashboard.
Retrigger threshold
This setting defines a period of time after each received MIDI note within which further received notes areignored. This setting is useful for trigger systems such as electronic kits that are prone to double triggering.
The value is set in seconds. The default value is 0.050 (50 milliseconds).

BFD3 Preferences 161
© 2017 FXpansion
Fades section
A choke fade, or fade, occurs if an articulation in a Drum is triggered before an older articulation from the sameDrum has finished decaying.
For example, when playing a high tom twice rapidly in succession, the first is faded out when the second istriggered. The fade settings allow you to adjust the duration of these fades that occur when using choking.
Fade times for each Drum slot are available within the Choke Response section of the Drum Editor (on theModel page).
The fade settings in the Preferences represent default settings to use in an empty launch state. Hihat, Tom andCymbal slots possess their own fade defaults in this section - the Default choke fade (base) and Defaultchoke fade (range) settings apply to all other Drum types.
How fades work
There are two components to choke fade times: fade (base) is the minimum fade time, while fade (range) isthe maximum additional time added to the (base) value, according to BFD3's 'dominant excitation preservation'algorithm. This algorithm allows longer fade times for louder events (higher velocities) when choked by quieterevents (lower velocities) and reduces the fade time when a low velocity event is choked by a subsequent highervelocity articulation. A quiet event choked by a loud event has a fade time of fade (base), whereas a loudevent choked by a quiet event has a fade time of fade (base) + fade (range). This approach achievesrealistic results while reducing the disk streaming load when possible.
Please note that adjusting fade settings to extreme values can achieve results which may sound unrealistic.Subtle use is advised if realistic results are desired. Extreme settings are, however, allowed as an aid toexperimentation.
Additional hihat fades
Hihats feature 2 additional fade times: Hihat closed tip choke fade and Hihat pedal choke fade.
The pedal is the only thing that chokes an open hihat when playing a drumkit. When playing BFD3's sounds froman electronic drumkit, the pedal note transmitted when the pedal is moved down fully is used to choke anyplaying open hihat articulation. It has also become conventional for sample-based drumkits to choke open hatswith a closed hat note.
Both of these settings should be set to low values, with the other fade times for the Hihat (which cover all openpositions and the Closed Shank articulation) set to higher values.
Additional snare fade
Snares feature an additional choke articulation and associated fade time for choking Drag articulations, allowingyou to shorten drag roll articulations. The fade time for this type of choke is set with the Snare drag chokefade setting. This setting is also available in the Drum Editor via the Special setting in the Choke Responsesection.
Detail section
The Detail settings specify the level of velocity layer detail for each Drum Class: Kicks, Snares, Hihats, Toms,Cymbals and Percussion.
These settings operate relative to the Max velocity layers setting, with proportional layer selection throughoutthe maximum range occurring in the same way.
Four detail level options are available for each Drum class:
Minimal
A single velocity layer is loaded for each articulation in the Drum class.
Small
Approximately 25% of the number of layers specified by the Max velocity layers setting are loaded.
Medium
Approximately 50% of the number of layers specified by the Max velocity layers setting are loaded.
Large
The maximum possible number of layers as specified by the Max velocity layers setting are loaded.
Simulation section
Kick to Tom SpillSnare to Tom SpillKick to Tom ResonanceSnare to Tom Resonance
These settings provide overall gain scaling levels for the Drum Editor's Res Trim and Spill Trim settings for theKick and Tom slots.

BFD3 Operation Manual162
© 2017 FXpansion
6.6 GUI Preferences
Mixer GUI section
Default mixer direct channel gainDefault mixer OH channel gainDefault mixer ambient channel gain
These settings provide default levels for direct Drum channels, the OH (OverHead) and other Ambient micchannels.
Create mixdown busses
With this setting deactivated, Kick, Snare and Ambient channels appear in the mixer without parent Kick/Snare/Ambient Mix channels. Note that this setting applies only to mixes created from default settings in future -existing presets still retain whatever mixer configuration with which they were saved.
Show Drum linking
With this setting activated, Drum linking setups are shown overlaid on Drum mixer channel images in addition towithin the Kit display.
Show mixer signal routingShow Export panelExport on rightShow ambient channelsShow aux channelsShow direct channelsShow metronome channelShow side chain input channelSimple channel viewShow mini mixerAnimate mixer hits
These preferences provide default settings for the corresponding functions in the mixer.
Animate mixer metersAnimate FX meters
These settings allow you to disable metering on mixer channels and in FX interfaces. While these settings areenabled by default, they are provided in case the metering graphics cause excess CPU usage on your system.
Show output names as numbers
With this setting activated, all outputs are shown as names rather than numbers in the mixer's Output selectorsand Export panel.
Control behaviour section
Startup Screen
This setting dictates which part of the BFD3 interface should be shown by default on launch. It can be set to showthe Kit display, Effects Editor or Groove Editor. Alternatively, the last panel in use (last used) can be specifiedinstead.
Startup Browser
This setting determines which Browser tab should be shown by default on launch. Alternatively, the last used tab(last used) can be specified instead.
Restore panel on load
If this setting is activated, the currently viewed panels remain in focus rather than being changed to those storedin Presets when they are loaded.
If the setting is deactivated, the panels in focus when a Preset was originally saved is recalled when it is loaded.
Circular knob motion
When this setting is activated, circular mouse movement is required to rotary knobs in BFD3's interface. Whenthe setting is deactivated, circuilar knobs are controlled by vertical mouse movement (drag up to increase, anddrag down to decrease).
The setting is deactivated by default.
Left-right velocity-scaled preview support
With this setting activated, the following preview hotspots feature low to high velocity previews from left to right(or from the top down in the case of the horizontal keyboard in the Key Map page):
Clicking Drum slots in the Kit display
ALT-clicking Drum mixer channel images

BFD3 Preferences 163
© 2017 FXpansion
Clicking items in the Drums Browser
Clicking keys in the Key Map page's vertical and horizontal keyboards
If the setting is disabled, clicking anywhere in these preview hotspots results in fixed velocity previews.
Display tool-tips
Enabling this setting results in a tool-tip – a short piece of context-sensitive help – appearing when the mousecursor hovers over a part of the user interface for a certain amount of time.
Tool-tip appear time
The amount of time required to hover over a control or other part of the interface can be defined with thissetting.
Tool-tip appear time
This setting specifies the time required to hover over a control or part of the user interface for a tool-tip toappear. The time is defined in animation frames. A setting of 23 is roughly equivalent to 1 second.
Kit page section
Colour scheme
This preference allows the colour scheme of the Kit display to be selected.
Select triggers preview
When this setting is activated, a preview is heard when clicking a Drum slot in the Kit display with the Select toolactive.
Animate hits
When this setting is activated, Drum slots in the Kit display are animated to represent incoming event triggers(from MIDI or from the Groove engine).
Keyboard Shortcuts section
This section allows you to set up keyboard shortcuts for various functions within BFD3. Please note that manyhosts/DAWs 'steal' keyboard input from any plugins - in such cases, it is not possible to use keyboard shortcutswith BFD3.
To ensure that no problems occur with hosts that do not handle plugin key commands well, all key commandsare disabled by default and must be set up manually.
If keyboard shortcuts are set up and you experience problems when working in any hosts, deactivate the Enable keyboard support setting.
Assigning shortcuts with the Learn and Learn Multi buttons
Shortcuts are assigned to functions by clicking the function in the list, and then clicking the Learn button abovethe list. Now press the desired key or key/modifier combination to assign it to the function. CTRL, SHIFT and ALTmodifiers are accepted.
Use the Learn Multi button to keep assigning keyboard shortcuts to the subsequent entries in the list, eitheruntil the end of the list is reached or until the Learn Multi button is deactivated.
Clearing shortcut assignments
To remove an assignment, select a function and click the Clear button.
Click the Clear All button to remove all current assignments.

BFD3 Operation Manual164
© 2017 FXpansion
7 BFD3 Key Map ReferenceThe following chart represents the default BFD3 Key Map assignments.
Note that the lowest note is shown at the bottom of the chart.
MIDI note names are shown with the Octave Numbering setting in the MIDI Preferences set to Normal (withC0 as the lowest note).
MIDI key(lowestkey C0)
C8 to G10
B7
A#7
A7
G#7
G7
F#7
F7
E7
D#7
D7
C#7
C7
B6
A#6
A6
G#6
G6
F#6
F6
E6
D#6
D6
C#6
C6
B5
A#5
A5
G#5
G5
F#5
F5
E5
D#5
D5
C#5
C5
MIDI keynumber
96-127
95
94
93
92
91
90
89
88
87
86
85
84
83
82
81
80
79
78
77
76
75
74
73
72
71
70
69
68
67
66
65
64
63
62
61
60
BFD3 articulation
Grooves 1-32
Perc 2: Hit
High Tom 2: Rim Click
High Tom: Rim Click
Mid Tom 2: Rim Click
Mid Tom: Rim Click
Floor Tom 2: Rim Click
Floor Tom: Rim Click
Snare: Rim Click
Ride 1: Choke
Snare: Flam
Cymbal 3: Choke
Kick: No Snare
Perc: Hit
Cymbal 2: Choke
Ride 1: Hit
Cymbal 1: Choke
Cymbal 3: Hit
Crash 2: Choke
Cymbal 2: Hit
Cymbal 1: Hit
Crash 1: Choke
Crash 2: Hit
High Tom 2: Rim Shot
Crash 1: Hit
Ride 1: Bell
High Tom: Rim Shot
Cymbal 3: Bell
Mid Tom 2: Rim Shot
Cymbal 2: Bell
Mid Tom: Rim Shot
Cymbal 1: Bell
Crash 2: Bell
Floor Tom 2: Rim Shot
Crash 1: Bell
Floor Tom: Rim Shot
Ride 1: Bow
MIDI key(lowestkey C0)
B4
A#4
A4
G#4
G4
F#4
F4
E4
D#4
D4
C#4
C4
B3
A#3
A3
G#3
G3
F#3
F3
E3
D#3
D3
C#3
C3
B2
A#2
A2
G#2
G2
F#2
F2
E2
D#2
D2
C#2
C2
MIDI keynumber
59
58
57
56
55
54
53
52
51
50
49
48
47
46
45
44
43
42
41
40
39
38
37
36
35
34
33
32
31
30
29
28
27
26
25
24
BFD3 articulation
Cymbal 3: Bow
Hihat: Bell Tip
Cymbal 2: Bow
Hihat: Splash
Cymbal 1: Bow
Hihat: 3/4 Shank
Crash 2: Bow
Crash 1: Bow
Hihat: 3/4 Tip
Ride 1: Edge
Hihat: Half Shank
Cymbal 3: Edge
Cymbal 2: Edge
Hihat: Half Tip
Cymbal 1: Edge
Hihat: 1/4 Shank
Crash 2: Edge
Hihat: 1/4 Tip
Crash 1: Edge
High Tom 2: Hit
Hihat: Open Shank
High Tom: Hit
Hihat: Closed Shank
Mid Tom 2: Hit
Mid Tom: Hit
Hihat: Open Tip
Floor Tom 2: Hit
Hihat: Pedal
Floor Tom: Hit
Hihat: Closed Tip
Snare: Rim Shot
Snare: Half Edge
Snare: Drag
Snare: Hit
Snare: Side Stick
Kick: Hit

Using the BFD3 standalone application 165
© 2017 FXpansion
8 Using the BFD3 standalone applicationThe standalone version of BFD3 is a minimal host application that loads the BFD3 plugin. On Mac OSX, thestandalone version of BFD3 can be found in your Applications folder. On Windows, it is located in yourProgram Files\FXpansion\BFD3 folder.
The standalone application allows you to change the Tempo and Time Signature settings.
Important
The following functions are available via the main operating system menus for the application - not the mainmenus on the BFD3 interface itself.
Audio preferences
On Mac, click the BFD3 menu item at the top of your screen (next to the 'Apple' menu), and choose OpenAudio Preferences from the Preferences sub-menu.
On Windows, click the Options menu on the BFD3 application's menu bar, and choose Open AudioPreferences.
To close the Audio preferences window, click the Finished button.
Audio settings
Samplerate
This setting dictates the samplerate of the BFD3 session. If your audio interface allows you to set the sampleratewithin its own control panel, this preference is set to the same samplerate.
Buffer size
The buffer size is set to the same value as that specified in your audio interface control panel. Note that someaudio interfaces' drivers will only permit you to change the buffer size in their own control panel – in thesecases, the BFD3 buffer size setting is not accessible.
Higher buffer sizes are less stressful for the CPU, but the latency is also higher as a result.
Output device (Mac OSX)ASIO device / Open ASIO panel (Windows)
On Mac OSX, simply select an Output device from the drop-down menu containing all available CoreAudiodevices detected in your system.
On Windows, select the appropriate ASIO device driver from the drop-down menu. Click the Open ASIO panelbutton to open the selected ASIO device’s control panel.
Inputs/Outputs
All outputs provided by the selected Output device or ASIO device are shown in these sections. Click a set ofinputs/outputs to activate it. To enable multi-output operation (if your audio interface has more than a singlestereo output), activate All outputs.
MIDI preferences
On Mac, click the BFD3 menu item at the top of your screen (next to the 'Apple' menu), and choose Open MIDIPreferences from the Preferences sub-menu.
On Windows, click the Options menu on the BFD3 application's menu bar, and choose Open MIDIPreferences.
To close the MIDI preferences window, click the Finished button.
Input devices
This section shows all MIDI input devices detected on your system - click the Refresh button to redetectdevices. At least 1 device must be enabled in order to route MIDI signals into BFD3.
Activate the checkbox on the right to route MIDI signals from the input into BFD3.
Activate the checkbox on the left to route MIDI clock signals into BFD3.
Click any activated checkbox again to deactivate it.
Output devices
This section shows all MIDI output devices detected on your system. A device must be activated in order to usethe MIDI output feature from BFD3. Click an output device to activate or deactivate it.
Sync to MIDI clock
When this setting is activated, the BFD3 standalone application is synchronized to an external MIDI clock. TheMIDI input device which carries the MIDI clock signal must be specified as described above.

BFD3 Operation Manual166
© 2017 FXpansion
9 DemoPacksDemoPacks provide a reduced-detail version of BFD3-compatible expansion packs in order to install and usewithin your sessions. This allows you to evaluate the sound of a pack within the context of your own projectsalthough it cannot satisfactorily convey the true experience of using the full-detail versions of the Drums withtheir true timbral variation over the full velocity range. However, it offers many advantages over isolatedpreview demo MP3s of expansion pack content.
DemoPack content can be used in the same way as any other licensed Drums within BFD3 - however, please beaware that DemoPacks are provided for evaluation purposes only. If you wish to use the sounds in yourproductions, please purchase the relevant expansion packs which provide the full-detail versions.
Please note that the DemoPack functionality is only available with an internetconnection available on the machine which is running BFD3. Unfortunately it is notpossible for us to provide an offline version of the process.
It is also possible to purchase expansion packs directly from the DemoPacks panel.
Open the DemoPacks panel using the Set up DemoPacks function in the Toolsmenu.
DemoPacks panel
Downloading, installing and DemoPacks
Each pack shown in the listing features a Download button, along with anindication of the size of the download. Click the button, as shown above, toinitiate the download and installation of the DemoPack.
An alert is shown, asking to confirm the download/install process for theDemoPack. Click Cancel to abort the process or OK to proceed.
The Download button is replaced by a progress bar for the download/install process, along with buttons to Pause or Stop the process.

DemoPacks 167
© 2017 FXpansion
After the DemoPack has been downloaded and installed, a Delete button is shown instead of the originalDownload button. Click this button to uninstall the DemoPack from your system.
Please also note the appearance of an Activate checkbox to the left of the DemoPack in the listing. If theActivate All checkbox at the top of the list is checked, then newly downloaded DemoPacks are activated bydefault. Uncheck the pack's Activate checkbox at any time to deactivate it. This does not uninstall theDemoPack - use the Delete button to uninstall it.
Sorting options
The Sorting options buttons allow the DemoPack list to be sorted according to Featured packs or by Name.Click each button repeatedly to toggle between ascending and descending sorting.
Info display
Click the Info display button to show detailed information about an expansion pack. It is also possible topurchase packs directly using the Buy button.
Click the button again to hide this information.
Tools menu
The Tools menu features various functions for managing DemoPacks.
Change DemoPack storage path
This setting allows the data path for installed DemoPacks to be changed - navigate toand select the desired location.
Reset DemoPack storage path
This function resets the data path used for DemoPacks to the factory default.
Mac: <user location>/Library/Application Support/FXpansion/BFD3/DemoCache
Windows: <user location>\AppData\Roaming\FXpansion\BFD3\DemoCache
Remove All DemoPacks
This function uninstalls all DemoPacks which are currently installed in the specifiedDemoPack storage path.
Remove Selected DemoPacks
This function removes selected DemoPacks in the listing - click a DemoPack to select it and use the following tocreate multiple selections:
• CTRL-click (Windows)• CMD-click (Mac)
Adds a DemoPack to the current selection.
• SHIFT-click
Selects all DemoPacks between the SHIFT-clicked channel and the existing selection.
Rescan Selected DemoPacksRescan All DemoPacks
These functions rescan a selection of or all DemoPacks installed in the currently specified DemoPack storagepath - they should not be needed in normal circumstances but may be required if encountering problems andinstructed to do so by technical support.
Show Log window
The Log window displays information about communication with the server for downloads and updatingDemoPack information, useful to consult if experiencing problems. It includes functions to Clear, Save or Copyto Clipboard the information in the Log window, as well as a checkbox to Show errors only.
Currency selector
Click the Euro (€), GB Pounds (£) or US Dollar ($) options in order to display expansion pack prices within theInfo display in the desired currency.
View menu
The View menu allows the DemoPack listing to be filtered to show only those which meet the following criteria:
DemoPacks where full pack not installed
Only DemoPacks for expansion packs not currently installed on your systemare shown.
DemoPacks not yet downloaded
Only DemoPacks which have not yet been downloaded and installed are shown.

BFD3 Operation Manual168
© 2017 FXpansion
Installed DemoPacks
Only DemoPacks which have been downloaded and installed are shown.
All DemoPacks
All available DemoPacks are shown.
Using DemoPacks after installation
To quickly see the available DemoPack Drums, usethe Library filter in the Drum Browser.
This adds the DemoPack filter to the Search barand narrows down the Browser listing accordingly.
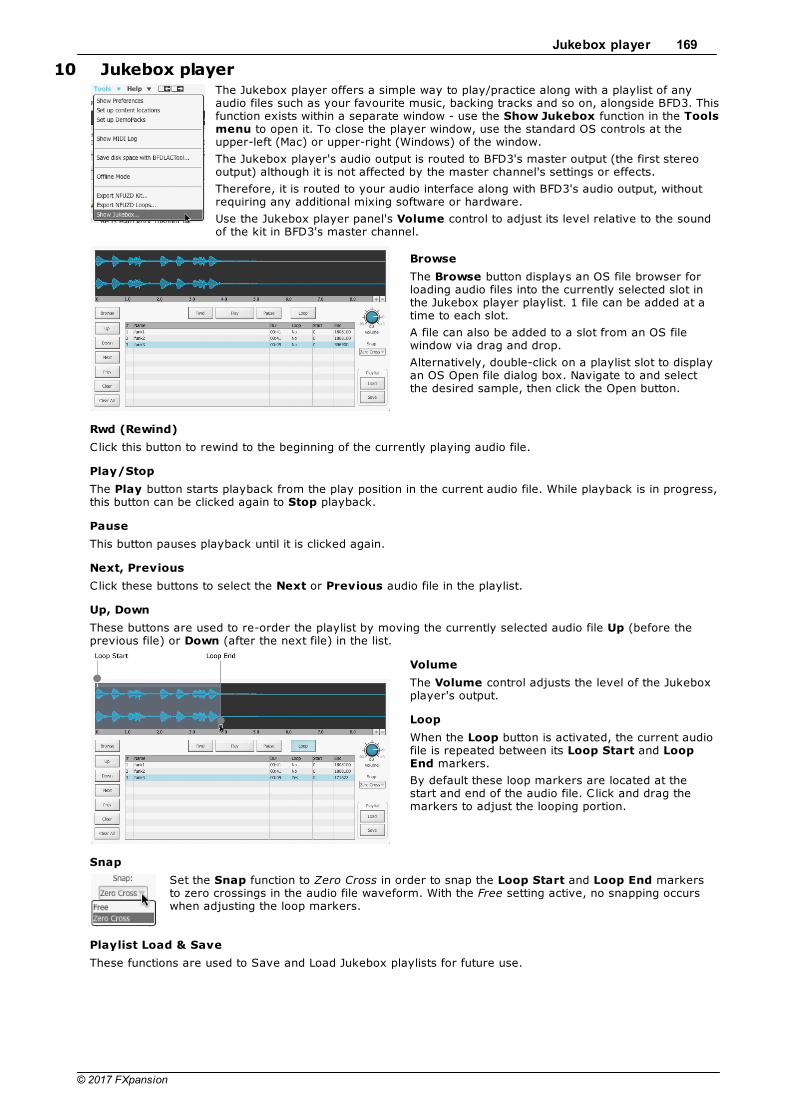
Jukebox player 169
© 2017 FXpansion
10 Jukebox playerThe Jukebox player offers a simple way to play/practice along with a playlist of anyaudio files such as your favourite music, backing tracks and so on, alongside BFD3. Thisfunction exists within a separate window - use the Show Jukebox function in the Toolsmenu to open it. To close the player window, use the standard OS controls at theupper-left (Mac) or upper-right (Windows) of the window.
The Jukebox player's audio output is routed to BFD3's master output (the first stereooutput) although it is not affected by the master channel's settings or effects.
Therefore, it is routed to your audio interface along with BFD3's audio output, withoutrequiring any additional mixing software or hardware.
Use the Jukebox player panel's Volume control to adjust its level relative to the soundof the kit in BFD3's master channel.
Browse
The Browse button displays an OS file browser forloading audio files into the currently selected slot inthe Jukebox player playlist. 1 file can be added at atime to each slot.
A file can also be added to a slot from an OS filewindow via drag and drop.
Alternatively, double-click on a playlist slot to displayan OS Open file dialog box. Navigate to and selectthe desired sample, then click the Open button.
Rwd (Rewind)
Click this button to rewind to the beginning of the currently playing audio file.
Play/Stop
The Play button starts playback from the play position in the current audio file. While playback is in progress,this button can be clicked again to Stop playback.
Pause
This button pauses playback until it is clicked again.
Next, Previous
Click these buttons to select the Next or Previous audio file in the playlist.
Up, Down
These buttons are used to re-order the playlist by moving the currently selected audio file Up (before theprevious file) or Down (after the next file) in the list.
Volume
The Volume control adjusts the level of the Jukeboxplayer's output.
Loop
When the Loop button is activated, the current audiofile is repeated between its Loop Start and LoopEnd markers.
By default these loop markers are located at thestart and end of the audio file. Click and drag themarkers to adjust the looping portion.
Snap
Set the Snap function to Zero Cross in order to snap the Loop Start and Loop End markersto zero crossings in the audio file waveform. With the Free setting active, no snapping occurswhen adjusting the loop markers.
Playlist Load & Save
These functions are used to Save and Load Jukebox playlists for future use.

BFD3 Operation Manual170
© 2017 FXpansion
11 NFUZD Export featuresBFD3 contains 2 additional features designed for the NFUZD Audio NSPIRE electronicdrumkit. The Enable NFUZD Export features setting must be activated in theData preferences for these functions to be available. Once this setting has beenactivated, the Export NFUZD Kit and Export NFUZD Loops functions areavailable in the Tools menu.
Export NFUZD Kit
The Export NFUZD Kit function in the Tools menu displays the Export kit to NFUZDpanel which provides an export function for NFUZD Audio NSPIRE series electronicdrum modules. This feature creates a mixed-down sample-bank file which can beloaded into any of 3 user soundbank 'slots' within the NSPIRE module.
Any 11 slots can be mixed down to create a kit - all sounds except those used for the NSPIRE cymbal triggersare mixed down to mono. All mixer and effects settings which are active are applied to the exported sounds.
Export kit to NFUZD panel
Target Soundbank
The NSPIRE drum module (and any USB key usedwith it) contains 3 slots for custom user soundbanks- specify which slot should be used for the bankusing this setting.
This setting is actually stored in the sample-bankfilename – BFD Bank 1 is bfd01.bin, BFD Bank 2 isbfd02.bin and BFD Bank 3 is bfd03.bin. These banknumbers can be changed afterwards by simplyrenaming each file.
Please note that a maximum of 3 user soundbanks – bfd01.bin, bfd02.bin and bfd03.bin – can exist on a singleUSB stick, or in any single folder, at any one time. If the specified bank number already exists within thespecified Export Folder, BFD3 warns that data will be overwritten.
To avoid this situation please delete existing soundbank .bin files as required or specify a new Export Folder.In the latter case, the file eventually needs to be copied to an NFUZD USB stick, renaming or deleting files asnecessary, so that it can be loaded into the NSPIRE module.
Please also note that when using the Export NFUZD Loops function, the set of exported loops replaces the 3rduser soundbank
(bfd03.bin).
Map BFD Drums to NFUZD Triggers
The NSPIRE drum module possesses 11 triggerinputs - . Since BFD3 is capable of creating kits withmore than 11 kit-pieces, it is necessary to specifywhich BFD3 slots should be used for creating theexported NFUZD kit.
Each of the 11 NSPIRE module trigger inputs isrepresented by a selector - click the selector todisplay a drop-down menu listing all currentlyavailable Drum slots within BFD3. Click the desiredslot in the menu to use it in the exported kit.
NFUZD Keyfile
BFD3 must have access to a USB stick which has been prepared in your NSPIRE drum module, or a file unique toyour NSPIRE module which is created during this process called NFUZD.key. The exported soundbank can beused only on the NSPIRE module which originally prepared the USB stick (i.e. the module which created the NFUZD.key file).
This setting defaults to the USB key path if it is found. Use the Browse button to specify the USB key path if it isnot found automatically or to specify any other folder on the system which contains the required NFUZD.key file.
Export Folder
The Export Folder setting specifies the location to which to export the soundbank. By default, this folder is setto the same location as the NFUZD Keyfile setting. However, using the Browse button it is possible to specifyany folder on the system (any exported banks must be subsequently copied to the USB stick to load into yourNSPIRE module).
Export
Click the Export button to begin the export operation. Please bepatient as the process may take a few minutes to be completed.

NFUZD Export features 171
© 2017 FXpansion
Cancel
Click the Cancel button to return to the main BFD3 interface without performing an export.
Export NFUZD Loops
The Export NFUZD Loops function in the Tools menu opens the Export Loops toNFUZD panel, providing an additional feature for exporting backing-loop WAVsamples to load into the NFUZD Audio NSPIRE drum module for practice purposes.
A set of up to 12 sample loops can be exported which is saved to the NSPIRE USBkey as a file called loops.bin – this replaces the bfd03.bin file for the 3rd exporteduser soundbank. If copying files to the USB key manually, please ensure that bfd03.bin does not exist if loops.bin is required – if bfd03.bin exists on the USBkey, then loops.bin is ignored.
Export Loops to NFUZD panel
Loop playlist
The Loop Playlist represents 12 slots for loopsamples which can be exported to a connectedNFUZD NSPIRE drum module.
Loading a loop sample
It is possible to load a loop sample using any of thefollowing 3 methods:
• Drag and drop a sample from any OS file browserwindow onto the desired slot within the Loop Playlist.
• Double-click on a Loop Playlist slot to display an OSOpen file dialog box. Navigate to and select thedesired sample, then click the Open button.
• Click a Loop Playlist slot to select it, then click the Choose button – this displays an OS Open file dialogbox for navigating to and selecting the desiredsample.
Play
Activate the Play button to play the currently selected loop in the playlist – the sample plays from the currentcursor position and continuously repeats according to its Loop markers.
Waveform display
The Waveform display shows a representation of the currently selected sample in the Loop playlist.
Adjusting loop points
By default, Loop markers are placed at the start and end of each sample. However, their positions can beadjusted on the waveform display: click and drag the Loop Start and Loop End markers left/right as desired.It is recommended to activate the Play button during this process.
Up / Down
Select a sample slot and click the Up or Down buttons to move the sample up or down the Loop playlist. Notethat if another sample already exists within the slot to which a sample is moved, the contents of the slots areswapped.
Clear / Clear All
Use the Clear button to remove the sample contents of the currently selected loop slot or use the Clear Allbutton to remove the contents of all 12 slots.
Load Set / Save Set
The Save Set button can be used to save the Loop playlists' current contents for later use. This function doesnot create the exported loop bank for the NSPIRE module – it only saves the state of the playlist to edit furtherand export at a later stage.
The Load Set button is used to load a previously saved playlist or to add a sample to the playlist as describedearlier.
NFUZD Key
BFD3 must have access to a USB stick which has been prepped in your NSPIRE drum module, or a file unique toyour NSPIRE module which is created during this process called NFUZD.key. The exported loop samples can beused only on the NSPIRE module which originally prepared the USB stick (i.e. the module which created the NFUZD.key file).
This setting defaults to the USB key path if it is found. Use the Browse button to specify the USB key path if it isnot found automatically or to specify any other folder on the system which contains the required NFUZD.key file.

BFD3 Operation Manual172
© 2017 FXpansion
Export Folder
This setting specifies the location to which to export the sample loops. By default, this folder is set to the samelocation as the NFUZD Key setting. However, using the Browse button it is possible to specify any folder on thesystem using this setting and subsequently copy exported banks to the USB stick to load into the NSPIREmodule.
Total Memory
This readout displays the total amount of RAM which will be used in the NSPIRE module by the all currentlyloaded loop samples when they are exported.
Export
Click the Export button to begin the export operation. Please be patient as the process may take a few minutesto be completed.
Cancel
Click the Cancel button to return to the main BFD3 interface without performing an export.

BFDLACTool 173
© 2017 FXpansion
12 BFDLACToolBFDLACTool is an external application supplied with BFD3 which allows older BFD3-compatible expansion packsto be re-compressed in BFD3's Lossless Audio Compression (.BFDLAC) format.
It also allows data to be refactored to lower bit-depths in order to conserve disk space if 24-bit quality is notrequired.
Note that BFDLACTool creates v2 BFDLAC format files - this means that all files created by BFDLACTool requireBFD3.1 or later - they are not usable in BFD3.0.
SourceBrowse
This setting specifies the location of the data to convert - click the Browse button to navigate to and select thedesired folder.
Dest (Destination)Browse
This setting specifies the location to which converted files are saved - click the Browse button to navigate to andselect the desired folder.
If specifying the same location for the Destination as for the Source, it is recommended to activate either theRemove WAV or Overwrite BFDLAC settings to remove the original source files leaving only the convertedversions.
Options
Overwrite BFDLAC
When this setting is activated, any existing BFDLAC files in the destination are overwritten. The setting isprovided for occasions when converting existing BFDLAC data to lower bit-depth BFDLAC data.
Remove WAV
Then this setting is activated, WAV files from the Source location are removed after the conversion process.This is especially useful when the Destination is set to the same location as the Source.
Output Bit Depth
This setting specifies the output bit depth of the converted files. The 20bit setting is often virtually transparentdue to the noise floor in the audio. The 16bit setting represents a slightly more noticeable quality loss but resultsin half the disk space usage of 24bit files.
Start
Click the Start button to begin the conversion process which can take a very long time, so please be patientwhile it completes. The display at the top of the interface, and the Log display in the main part of theBFDLACTool interface, show the progress of the conversion process while it is active.
To exit without performing any conversion, simply quit the BFDLACTool application.
Help
The Help button displays a summary of the BFDLACTool functions in the Log display area.
Clear Log
This function clears the contents of the Log display in the main part o the BFDLACTool interface.