Embed Size (px)
Citation preview
BERNINA 780

LOOKING FOR A NEW SEWING PROJECT?You can find what you want in “inspiration”, our sewing magazine. Thanks to great sewing patterns and detailed sewing instructions, every project succeeds right away.
* Not available in all countries.
Inspiration magazine
is available in German, English,
French and Dutch
1
Introduction
Dear BERNINA Customer
Congratulations! You have decided on BERNINA and therefore on a product which will delight you for years. For more than 100 years our family company has attached greatest importance to satisfied customers. As for me, it is a matter of personal concern to offer you Swiss development and precision at the height of perfection, future-orientated sewing technology and a comprehensive customer service.
The BERNINA 7-series consists of three ultramodern machines, whose development not only focused the highest demands on technique and the ease of use but also considered the design of the product. After all we sell our products to creative people like you, who do not only appreciate high quality but also form and design.
Enjoy the creative sewing, embroidering and quilting on your new BERNINA 780 and keep informed about the various accessories at www.bernina.com. On our homepage you will also find a lot of inspiring sewing instructions, to be downloaded for free.
Our highly trained BERNINA dealers will provide you with more information on service and maintenance offers.
I wish you lots of pleasure and many creative hours with your new BERNINA.
H.P. UeltschiOwnerBERNINA International AGCH-8266 Steckbornwww.bernina.com
3nd Edition
033804.52.04_2013-09_Manual_B780_EN
2
Safety Instructions
Safety InStructIonSImportant InformatIon When using an electrical appliance, basic safety precautions should always be followed, including the following:
Read all the instructions before using this sewing-/embroidery computer.
When the sewing-/embroidery computer is not in use, it should be disconnected from the electricity supply by removing the plug from the outlet.
DanGer! To reduce the risk of electrical shock:1. The sewing-/embroidery computer should
never be left unattended when plugged in.2. Always unplug this sewing-/embroidery
computer from the electrical outlet immediately after using and before cleaning.
3. LED Radiation – Do not view directly with optical instruments. Class 1M LED product.
WarnInG! To reduce the risk of burns, fire, electric shock or injury to persons:1. Use this sewing-/embroidery computer only
for purposes as described in this manual. Use only attachments, accessories and parts recommended by the manufacturer.
2. Do not allow this sewing-/embroidery computer to be used as a toy. Close attention is necessary when this sewing-/embroidery computer is used by or near children and infirm persons. The sewing-/embroidery computer is not intended for use by persons (including children) with reduced physical, sensory or mental capabilities or lack of experience and knowledge, unless they have been given supervision or instruction concerning use of the sewing-/embroidery computer by a person responsible for their safety. To ensure children do not play with
the sewing-/embroidery computer they must be supervised.
3. Never operate this sewing-/embroidery computer if: ⦁ it has a damaged cord or plug ⦁ it is not working properly ⦁ it has been dropped or damaged ⦁ it has fallen into water
Return the sewing-/embroidery computer to your local authorized BERNINA dealer for examination or repair.
4. Never operate the sewing-/embroidery computer with any air openings blocked. Keep ventilation openings of the sewing-/embroidery computer free from the accumulation of lint, dust and loose cloth.
5. Keep fingers away from all moving parts. Special care is required around the sewing needle.
6. Never insert any objects into any openings on the sewing-/embroidery computer.
7. Do not use the sewing-/embroidery computer outdoors.
8. Do not operate the sewing-/embroidery computer where aerosol products (sprays) or oxygen are being used or where oxygen is being administered.
9. Do not pull or push the fabric while stitching. This may deflect the needle, causing it to break.
10. Do not use bent needles.11. Always use the original BERNINA stitch plate.
The wrong stitch plate can cause needle breakage.
12. To disconnect, turn power switch to «0» (off), then remove the plug from the outlet. Do not unplug by pulling the cord, instead grasp the plug to pull it from the outlet.
13. Turn power switch to «0» (off) when making any adjustments in the needle area, such as changing the needle or the presser foot, etc.
14. Always unplug the sewing-/embroidery computer from the electrical outlet when carrying out cleaning or maintenance work or any other user servicing adjustments mentioned in this manual.
15. This sewing-/embroidery computer is provided with double insulation (except USA and Canada). Use only identical replacement parts. See instructions for servicing of double-insulated products.
033804.52.04_2013-09_Manual_B780_EN
3
Safety Instructions
environmental protectionBERNINA is committed to the protection of the environment. We strive to minimize the environmental impact of our products by continuously improving product design and our technology of manufacturing.
When your sewing computer won't be used anymore, dispose this product in an environmentally responsible way according to the national directive. Do not throw away this product with your household waste. In case of doubt, please contact your BERNINA dealer.
SerVIcInG DouBLe-InSuLateD proDuctSIn a double-insulated product two systems of insulation are provided instead of grounding. No grounding means is provided on a double-insulated product, nor should a means for grounding be added to the product. Servicing a double-insulated product requires extreme care and knowledge of the system and should be done only by qualified service personnel. Replacement parts for a double-insulated product must be identical to the original parts in the product. A double-insulated product is marked with the words: «DOUBLE INSULATION» or «DOUBLE INSULATED».
The symbol may also be marked on the product.
DIScLaImer No liability will be assumed for any possible damage which arises from misuse of this sewing-/embroidery computer.This sewing-/embroidery computer is intended for household use only.This sewing-/embroidery computer meets the European Standard 2004/108/EC concerning the electromagnetic tolerance.
SaVe tHeSe InStructIonS!
Please find the latest version of your instruction manual at www.bernina.com
If the sewing computer is stored in a cold room, it should be brought to a warm room about one hour before use.
033804.52.04_2013-09_Manual_B780_EN
4
Contents Sewing
Safety Instructions 2environmental protection 3
Key to Signs 8Glossary 8Breadcrumb navigation 8
accessory 9Standard accessories 9presser feet 10accessory box free standing 11
overview sewing computer 12front view 12Detail view 12
Important Sewing information 14thread 14needle, thread and fabric 14needles, threads 15 ⦁ Correct needle/Thread combination 15 ⦁ Too thin thread or too thick needle 15 ⦁ Too thick thread or too thin needle 15
overview needles 16
Sewing preparation 17power Switch/power cable 17magnetic holder for touchscreen pen 17foot control 17Slide-on table 18 ⦁ Seam guide 18
presser foot lifter 18Vertical spool pin 19Winding the lower thread 20 ⦁ Bobbin winding while sewing 20
Inserting a bobbin/threading lower thread 21 ⦁ Removing the bobbin from the bobbin case 21
removing/inserting bobbin case 21threading the upper thread 22changing the needle 22threading the double needle 23threading the triple needle 23thread needle 24changing the presser foot 24Stitch plate 25 ⦁ Marks on the stitch plate 25 ⦁ Removing the stitch plate 25 ⦁ Replacing the stitch plate 25
thread tension 26 ⦁ Altering upper thread tension 26 ⦁ Saving the upper thread tension 26 ⦁ Back to basic settings 26
Security program 27 ⦁ Display 27 ⦁ Selecting the needle 27 ⦁ Selecting the stitch plate 27 ⦁ Saving 27
needle chart 27 ⦁ Selecting needle 27
Selecting a presser foot 28 ⦁ Display 28 ⦁ Optional presser feet 28 ⦁ Saving 28 ⦁ Return to basic settings 28
altering presser foot pressure 29 ⦁ When sewing thick material, e.g. quilting 29 ⦁ Saving presser foot pressure 29 ⦁ Resetting the basic setting 29
feed dog and fabric feed 30feed dog lowered/ready to sew 30
functions 32overview «function»-buttons sewing 32 ⦁ «Start/Stop»-button 32 ⦁ «Presser foot position»-button 32 ⦁ «Automatic thread cutter»-button 32 ⦁ «Quick reverse»-button 32 ⦁ «Pattern begin»-button 32 ⦁ «Needle stop»-button 32 ⦁ Programmable «Pattern end-/Securing»-button 32 ⦁ Slide speed control 32 ⦁ «Automatic Securing Program»-button 33 ⦁ Stitch width and Stitch length Knobs (Multifunction) 33 ⦁ «Needle position»-buttons 33 ⦁ Needle stop position up and
«Quick reverse»-button 33 ⦁ Needle stop position down and
«Quick reverse»-button 33
Display 34overview main Display 34 ⦁ System settings 34 ⦁ External Functions/Views 34 ⦁ Menu Selection 34 ⦁ Selection 35 ⦁ Stitch Pattern Area 35 ⦁ Stitch Pattern Display 35
functions - Display 36Sewing functions overview 36General functions 36overview functions buttonholes 38overview functions alphabets 39overview functions combi mode 40
Setup program 44overview «Setup»-Display 44
contents Sewing
033804.52.04_2013-09_Manual_B780_EN

5
Contents Sewing
Sewing settings 45 ⦁ Altering Upper thread tension 45 ⦁ Sewing speed control 45 ⦁ Securing stitches at pattern begin 45 ⦁ Programming «Function»-buttons/«Function»-icon 46 ⦁ Hover position of the presser foot 46 ⦁ Automatic securing program 46 ⦁ Automatic thread cutter 46 ⦁ Raising the presser foot 46 ⦁ Automatic thread cutter and securing stitches 46 ⦁ Presser foot position with needle stop down 47 ⦁ Programming «Quick reverse» button 47 ⦁ Programming «Securing»-button 47
embroidery settings 48 ⦁ Calibrating the hoop 48 ⦁ Fabric Thickness 49 ⦁ Activating or deactiving securing stitches 49 ⦁ Automatic cut 49
personal settings 50 ⦁ Welcome text 50 ⦁ Deleting Welcome text 50 ⦁ Corrections 50
monitoring 50 ⦁ Upper-/Lower thread indicator 50
altering the acoustic signals 51 ⦁ Selecting Stitch Pattern/Function/BSR 51
Sewing computer settings 51 ⦁ Language selection 51 ⦁ Display settings 52 ⦁ Display Calibration 52 ⦁ Basic setting 53
cleaning/update 54 ⦁ Calibrating Buttonhole foot No. 3A 54 ⦁ Update 54 ⦁ Cleaning the thread catcher 55 ⦁ Lubricating the sewing-/embroidery computer 55 ⦁ Packing position 55
Information 56 ⦁ Version 56 ⦁ Dealer details 56 ⦁ Service data 56
tutorial 57overview tutorial 57
creative consultant 58overview creative consultant 58overview Sewing techniques/recommendations 58Leaving the creative consultant 58
Help program 59 ⦁ Stitch patterns 59 ⦁ Functions 59 ⦁ Leaving the Help Program 59
Balance 60practical and decorative stitches 60 ⦁ Corrections 60 ⦁ Sideways-motion patterns 60 ⦁ Vertical corrections 61 ⦁ Horizontal corrections 61 ⦁ Back to basic settings 61
eco description 62 ⦁ Activating eco 62 ⦁ Deactivating eco 62
practical stitches 64overview practical stitches 64Selecting stitch pattern 66 ⦁ Direct-Option 1 66 ⦁ Direct-Option 2 66 ⦁ By stitch number 66 ⦁ Cancelling 66
customizing stitch patterns individually 67personal memory temporary 67personal memory permanent 68altering stitch width and stitch length 69
application examples of practical Stitches 70Straight stitch 70triple Straight Stitch 70triple Zig-zag 71Zipper 72manual darning 73automatic Darning 74reinforced darning, automatic 75reinforced Darning program 75finishing edges 76Double overlock 76topstitching edges 77Blind Hems 78Visible Hem 78Securing program 79Basting Stitch 79flat joining seam 80Height compensation of uneven layers 81Sewing corners 81
Buttonholes 82overview Buttonholes 82Important information 83 ⦁ Marking the length of manual buttonholes 83 ⦁ Marking the length of automatic buttonholes 83 ⦁ Marking the length of keyhole buttonholes 83 ⦁ Test sample 83 ⦁ Adjusting the bead width 83 ⦁ Altering the stitch length 83
033804.52.04_2013-09_Manual_B780_EN
6
Contents Sewing
Stabilizer 84cord 85 ⦁ Ideal cords 85 ⦁ Cord with the automatic Buttonhole foot No. 3A 85 ⦁ Cord with the Buttonhole foot No. 3C
(optional accessory) 85 ⦁ Fixing the cord 85 ⦁ Cutting buttonholes open with the seam ripper 85 ⦁ Cutting open buttonholes with the buttonhole cutter
(optional accessory) 85altering the balance 86 ⦁ Balance with direct entry length buttonholes 86 ⦁ Balance with direct entry length keyhole or round
buttonholes 86 ⦁ Balance for manual keyhole or round buttonhole 86 ⦁ Balance for manual standard buttonhole 86 ⦁ Balance for stitch counter buttonhole 86 ⦁ Clear Balance 86
programming Buttonholes 87Standard and stretch buttonhole with auto-length, automatically 87automatic with Direct entry Length 88automatic with Button measuring 88automatic round and keyhole buttonhole 89Buttonhole with double pointed bartack and decorative buttonhole with double pointed bartack 90Heirloom Buttonhole 91Stitch counter Buttonhole 91Buttonhole in Long term memory 927- or 5-step Buttonhole, manually 94
Button sew-on program 95
eyelet program 96
Decorative Stitches 97overview Decorative Stitches 97application 97tapering 98 ⦁ Altering angle 98 ⦁ Programming the length of section 2 99 ⦁ Programming the length of section 2 by
Entering mm 99 ⦁ Manual setting the Length of Section 2 99 ⦁ Back 99
application examples of Decorative stitches 100cross Stitch 100pintucks 101Bobbin-play sewing 102
Quilt Stitches 103overview Quilt Stitches 103
application examples of Quilt stitches 104Handlook quilt stitch 104free-motion quilting 105
BSr (BernIna Stitch regulator) 106Quilting with BSr 106 ⦁ BSR-Function 106 ⦁ BSR function with straight stitch No. 1 106 ⦁ BSR function with zig-zag No. 2 106 ⦁ Two different BSR modes 106 ⦁ Preparation 107 ⦁ Remove presser foot sole 107 ⦁ Attaching the presser foot sole 107
functions in the BSr mode 108 ⦁ Needle stop down (standard) 108 ⦁ Needle stop up 108 ⦁ Raising or lowering the needle 108 ⦁ Securing with «Start/Stop»-button (only Mode 1) 108 ⦁ Securing function (only Mode 2) 108 ⦁ Free motion quilting (only Mode 2) 108 ⦁ Free motion quilting without BSR activation 108 ⦁ Beeper (audio signal) activation/deactivation 109 ⦁ Selecting sound for BSR in the Setup Program 109 ⦁ Selecting sound for BSR in the «BSR»-Display 109 ⦁ Activating BSR Sewing Function 110 ⦁ Deactivating BSR Sewing Function by using
«Start/Stop»-button 110 ⦁ BSR Function deactivation 110
BernIna Dual feed 111 ⦁ Presser Feet Selection 111 ⦁ Switching on BERNINA Dual Feed 111 ⦁ Switching off BERNINA Dual Feed 111
fabrics 112
alphabets 113overview alphabet 113 ⦁ Lettering 113 ⦁ Perfect stitch formation 113
combining characters 114 ⦁ Selecting the next letter 114 ⦁ Large view of the Display 114 ⦁ Corrections 114
correcting the combination 115 ⦁ Inserting character 115 ⦁ Deleting Letters 115
alphabet in combination with functions 115 ⦁ Selecting lower case letters 115 ⦁ Altering font size 115
monograms 116 ⦁ Monogram Sizes 117 ⦁ Balance 117
033804.52.04_2013-09_Manual_B780_EN
7
Contents Sewing
contents embroidery 129-130
cleaning 181-182
troubleshooting 183-187
Stitch patterns 188-198
embroidery motifs 199-209
alphabets 210
Index 211
personal program 118creating a personal Display 118preparing stitch patterns 118 ⦁ Programming/Saving first stitch pattern 118 ⦁ Programming/Saving second stitch pattern 119 ⦁ Stitch pattern selection in the Personal program 119 ⦁ Personal Display 119
altering/overwriting stitch patterns 120Deleting stitch patterns 121
combi mode 122creating Stitch pattern combinations 122 ⦁ Programming and saving 122
Deleting Stitch patterns 123 ⦁ Deleting individual stitches 123 ⦁ Deleting entire combination 123
overview combination 123opening a saved combination 124correcting a stitch pattern combination 125 ⦁ Inserting a stitch pattern 125 ⦁ Altering stitch patterns 125 ⦁ Adjusting the length within the combination 125 ⦁ Adjusting the width within the combination 126 ⦁ Mirroring complete combinations 126 ⦁ Combination subdivider 1 126 ⦁ Combination Subdivider 2 126 ⦁ Moving individual stitch patterns in a combination 127 ⦁ Moving multiple stitch patterns in a combination 127 ⦁ Sewing individual stitch patterns of a combination
in any direction 127 ⦁ Sewing the complete combination in any
direction 127Stitch pattern combination 128 ⦁ Overwriting 128 ⦁ Deleting 128
History 128
033804.52.04_2013-09_Manual_B780_EN
8
Key to Signs
DanGer!Very important! risk of injury!
attentIon!Very important! risk of damage!
Tips!
GlossaryBernIna uSB stick Mobile storage medium Balance Correcting abnormalities in stitch formation due to the fabricfabric fold Folded edge of materialBSr BERNINA-Stitch-regulator. Quilting with consistent stitch length within a certain speed clr Clear. Deleting settings or dataHook «Catches» the needle-thread loop, forming the stitch together with the lower threadLmS Length Measuring System for buttonholememory Long Term Memory Satin stitching Dense Zig-zagBartack Buttonhole-bead cross-connections
all rights reservedFor technical and product improvement reasons, the sewing computer's features, parts and accessory are subject to unannounced changes and alterations at any time. The accessory included can differ from country to country.
Key to Signs
Breadcrumb navigation
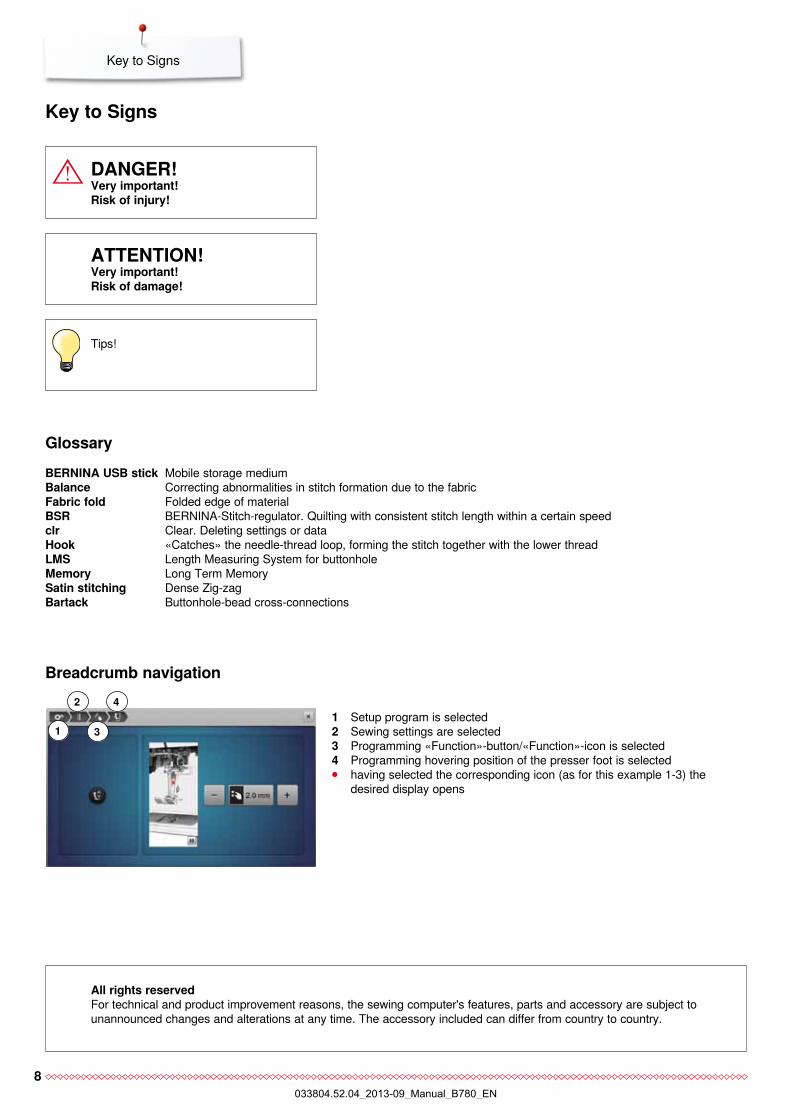
1 Setup program is selected2 Sewing settings are selected3 Programming «Function»-button/«Function»-icon is selected4 Programming hovering position of the presser foot is selected ⦁ having selected the corresponding icon (as for this example 1-3) the
desired display opens
1
2
3
4
033804.52.04_2013-09_Manual_B780_EN
9
Accessory
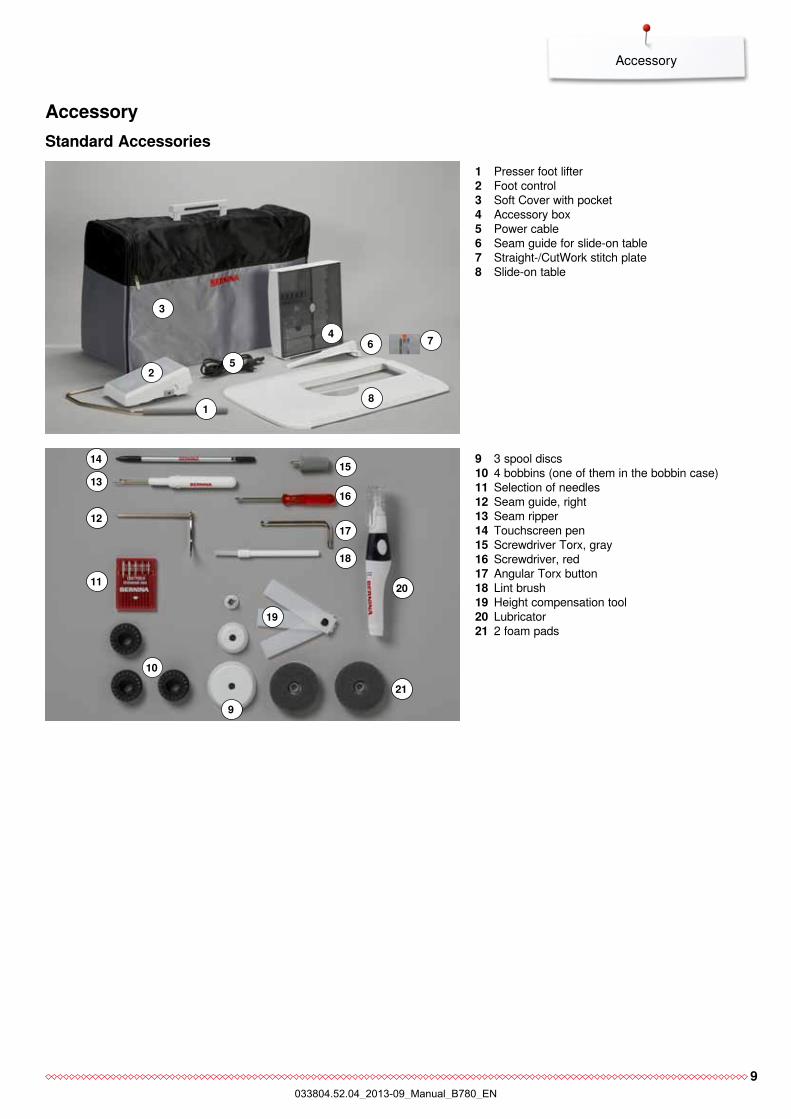
Standard accessories1 Presser foot lifter 2 Foot control3 Soft Cover with pocket4 Accessory box5 Power cable6 Seam guide for slide-on table7 Straight-/CutWork stitch plate8 Slide-on table
9 3 spool discs 10 4 bobbins (one of them in the bobbin case)11 Selection of needles12 Seam guide, right13 Seam ripper14 Touchscreen pen15 Screwdriver Torx, gray16 Screwdriver, red17 Angular Torx button18 Lint brush19 Height compensation tool20 Lubricator21 2 foam pads
accessory
9
12
1513
16
21
10
11
3
4
25
7
1
18
17
20
6
14
19
8
033804.52.04_2013-09_Manual_B780_EN
10
Accessory
presser feet
2 31
5
9
7
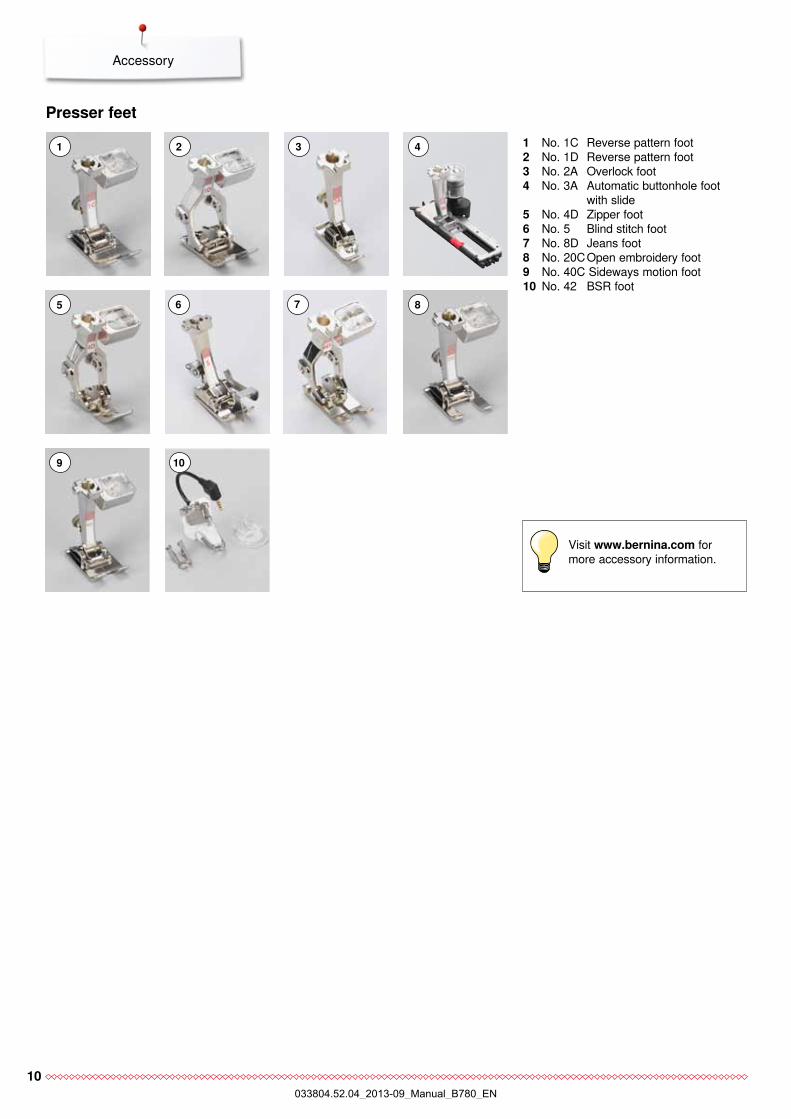
1 No. 1C Reverse pattern foot 2 No. 1D Reverse pattern foot3 No. 2A Overlock foot4 No. 3A Automatic buttonhole foot
with slide5 No. 4D Zipper foot6 No. 5 Blind stitch foot7 No. 8D Jeans foot8 No. 20C Open embroidery foot9 No. 40C Sideways motion foot10 No. 42 BSR foot
Visit www.bernina.com for more accessory information.
86
10
4
033804.52.04_2013-09_Manual_B780_EN
11
Accessory
accessory box free standing
Storage example
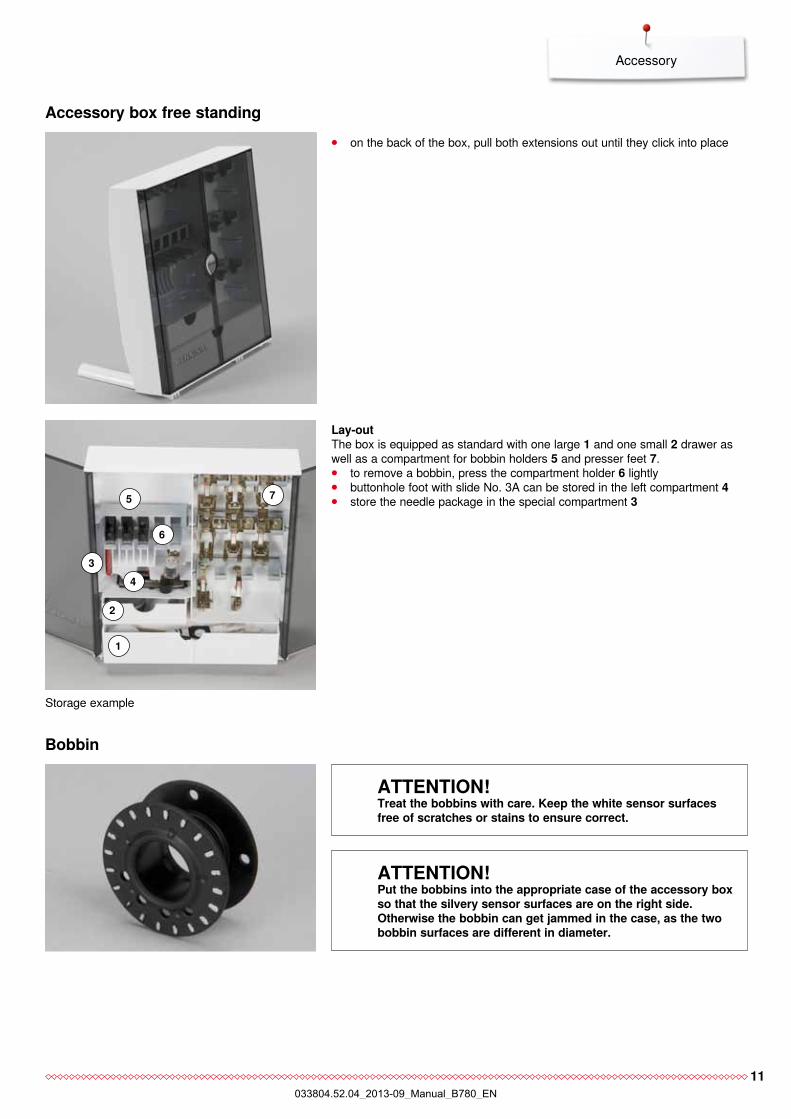
⦁ on the back of the box, pull both extensions out until they click into place
Lay-outThe box is equipped as standard with one large 1 and one small 2 drawer as well as a compartment for bobbin holders 5 and presser feet 7. ⦁ to remove a bobbin, press the compartment holder 6 lightly ⦁ buttonhole foot with slide No. 3A can be stored in the left compartment 4 ⦁ store the needle package in the special compartment 3
2
1
5 7
6
43
Bobbin
attentIon!treat the bobbins with care. Keep the white sensor surfaces free of scratches or stains to ensure correct.
attentIon!put the bobbins into the appropriate case of the accessory box so that the silvery sensor surfaces are on the right side. otherwise the bobbin can get jammed in the case, as the two bobbin surfaces are different in diameter.
033804.52.04_2013-09_Manual_B780_EN
12
Overview sewing computer
Detail view
overview sewing computerfront view
444
642
27
20
28
26
1
2 3
5
4
18
12
24
6
98
7
10
21
45
47
43
17
13
16
11
19
46
14
15 23 25
2232
033804.52.04_2013-09_Manual_B780_EN
13
Overview sewing computer
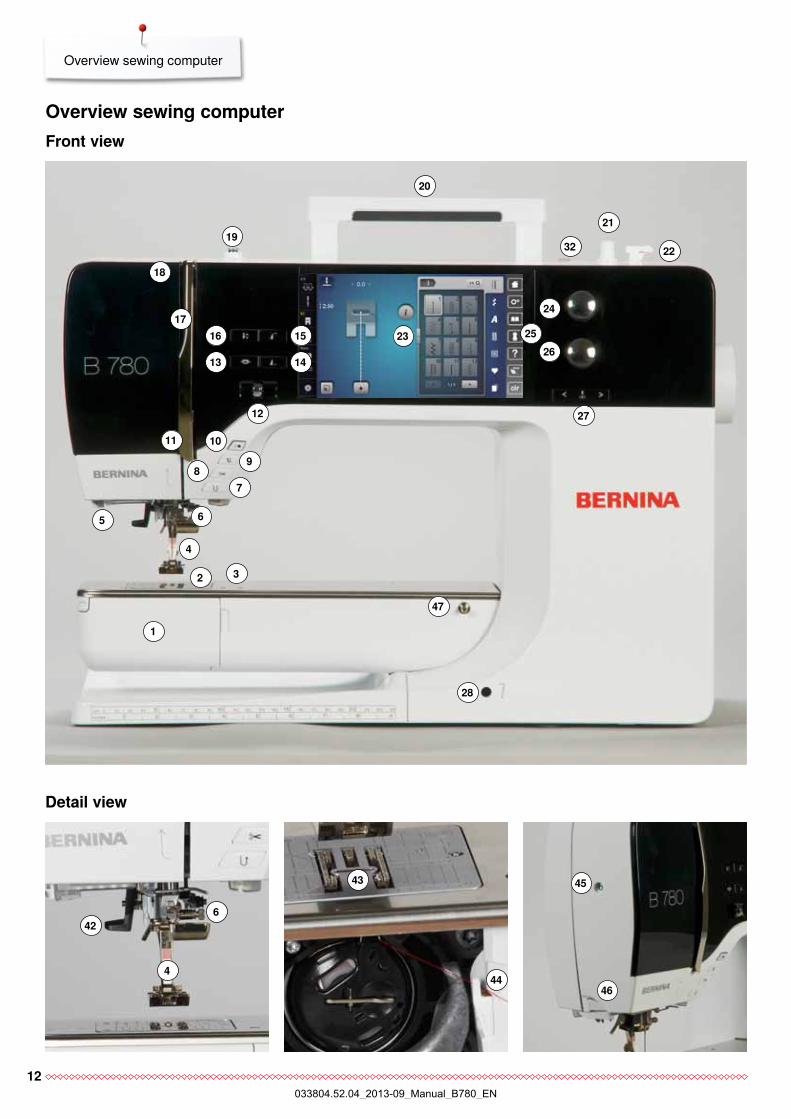
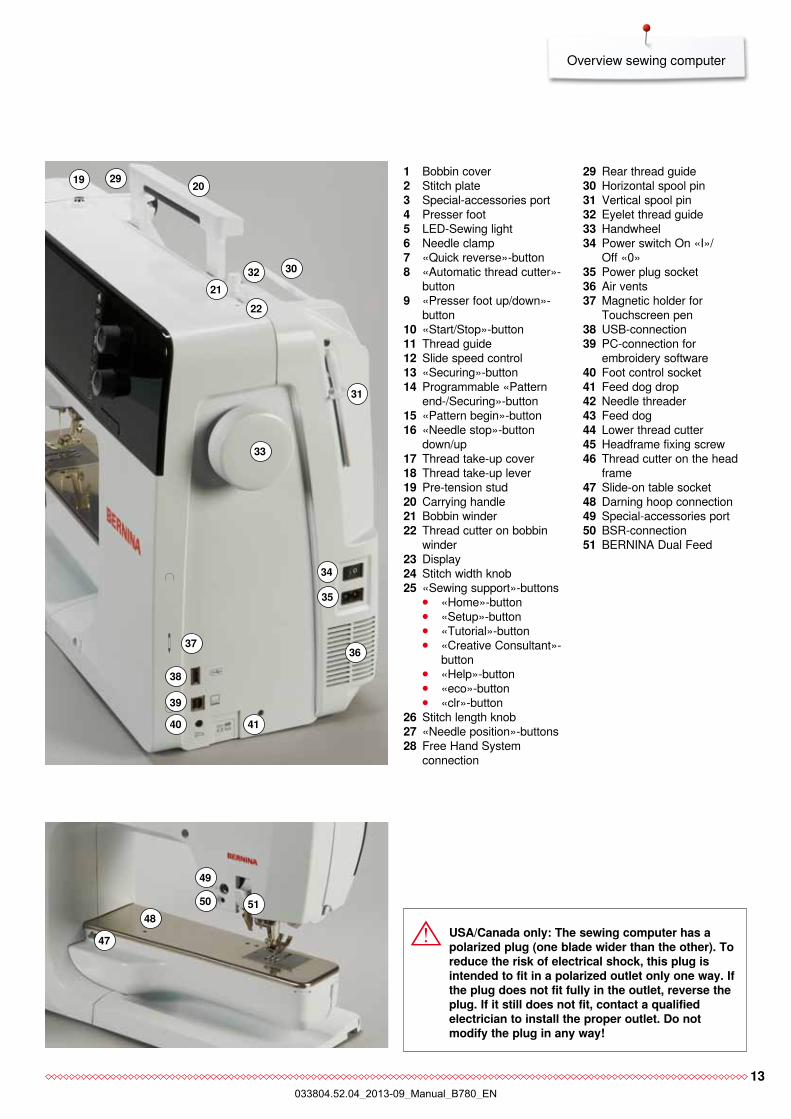
1 Bobbin cover2 Stitch plate3 Special-accessories port4 Presser foot5 LED-Sewing light6 Needle clamp7 «Quick reverse»-button8 «Automatic thread cutter»-
button9 «Presser foot up/down»-
button10 «Start/Stop»-button11 Thread guide12 Slide speed control13 «Securing»-button14 Programmable «Pattern
end-/Securing»-button15 «Pattern begin»-button16 «Needle stop»-button
down/up17 Thread take-up cover18 Thread take-up lever19 Pre-tension stud20 Carrying handle21 Bobbin winder22 Thread cutter on bobbin
winder23 Display24 Stitch width knob25 «Sewing support»-buttons
⦁ «Home»-button ⦁ «Setup»-button ⦁ «Tutorial»-button ⦁ «Creative Consultant»-
button ⦁ «Help»-button ⦁ «eco»-button ⦁ «clr»-button
26 Stitch length knob 27 «Needle position»-buttons28 Free Hand System
connection
29 Rear thread guide30 Horizontal spool pin31 Vertical spool pin32 Eyelet thread guide33 Handwheel34 Power switch On «I»/
Off «0»35 Power plug socket36 Air vents37 Magnetic holder for
Touchscreen pen38 USB-connection39 PC-connection for
embroidery software40 Foot control socket41 Feed dog drop42 Needle threader43 Feed dog44 Lower thread cutter45 Headframe fixing screw46 Thread cutter on the head
frame47 Slide-on table socket48 Darning hoop connection49 Special-accessories port50 BSR-connection51 BERNINA Dual Feed
21
29 20
31
30
33
34
35
36
41
22
32
38
39
40
37
19
uSa/canada only: the sewing computer has a polarized plug (one blade wider than the other). to reduce the risk of electrical shock, this plug is intended to fit in a polarized outlet only one way. If the plug does not fit fully in the outlet, reverse the plug. If it still does not fit, contact a qualified electrician to install the proper outlet. Do not modify the plug in any way!
49
485150
47
033804.52.04_2013-09_Manual_B780_EN
14
Important Sewing information
Important Sewing information
Be sure to select the appropriate thread type and weight for the fabric. For a perfect sewing result, thread and fabric quality play an important role. It is recommended to use quality brands.
cotton threads cotton threads have the advantage of being a natural fiber and therefore
are especially suitable for sewing cotton fabrics if cotton thread is mercerized, it has a slight sheen that is not lost with
washing
polyester threads polyester threads have a high tensile strength and is particularly colorfast polyester threads are more flexible and are recommended where a strong
and elastic seam is required
rayon threads rayon threads are made of natural fibers and have a brilliant sheen rayon threads are suitable for decorative stitches and achieve a more
beautiful effect
thread
needle, thread and fabric
Care must be taken when choosing needle and thread.
The correct needle size depends on the selected thread and fabric. The fabric weight and type determine the thread weight, needle size and point form.
attentIon! check the needle condition.as a guide: replace the needle before starting a new sewing project. a defective needle does not only damage the sewing project but also the sewing computer.
033804.52.04_2013-09_Manual_B780_EN
15
Important Sewing information
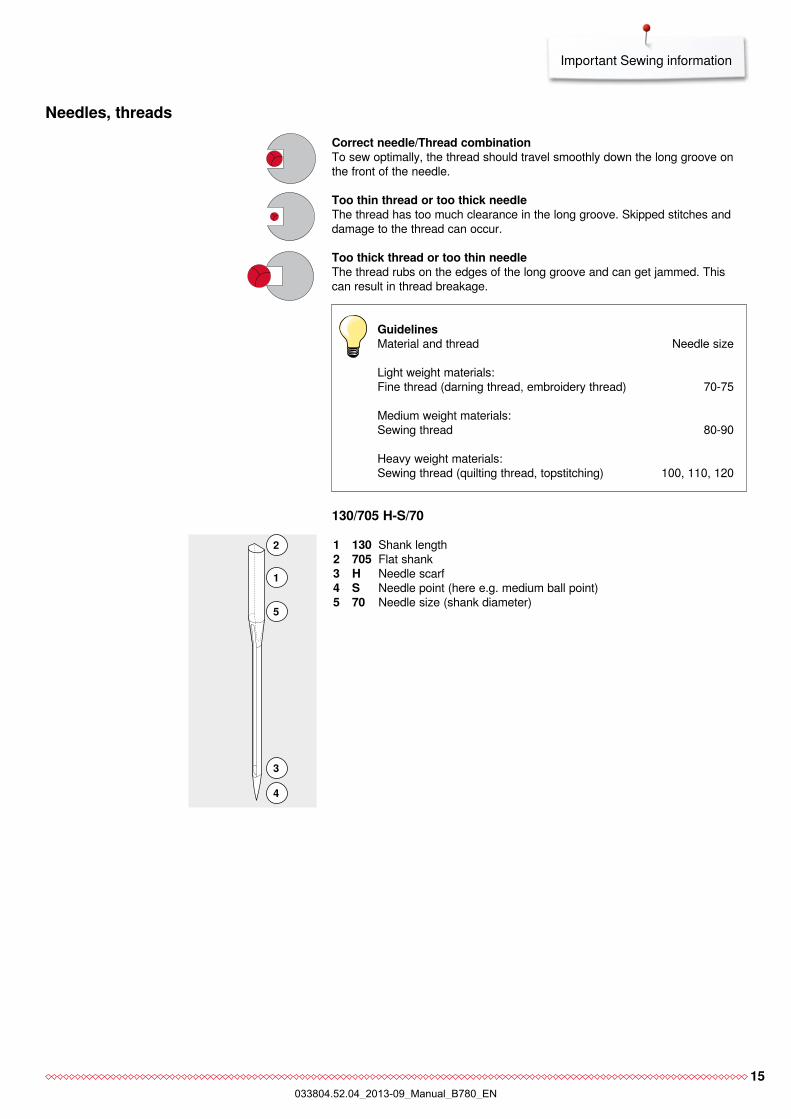
correct needle/thread combinationTo sew optimally, the thread should travel smoothly down the long groove on the front of the needle.
too thin thread or too thick needleThe thread has too much clearance in the long groove. Skipped stitches and damage to the thread can occur.
too thick thread or too thin needleThe thread rubs on the edges of the long groove and can get jammed. This can result in thread breakage.
needles, threads
130/705 H-S/70
1 130 Shank length2 705 Flat shank3 H Needle scarf 4 S Needle point (here e.g. medium ball point)5 70 Needle size (shank diameter)
1
2
4
5
3
Guidelines Material and thread Needle size
Light weight materials:Fine thread (darning thread, embroidery thread) 70-75 Medium weight materials:Sewing thread 80-90
Heavy weight materials: Sewing thread (quilting thread, topstitching) 100, 110, 120
033804.52.04_2013-09_Manual_B780_EN
16
Important Sewing information
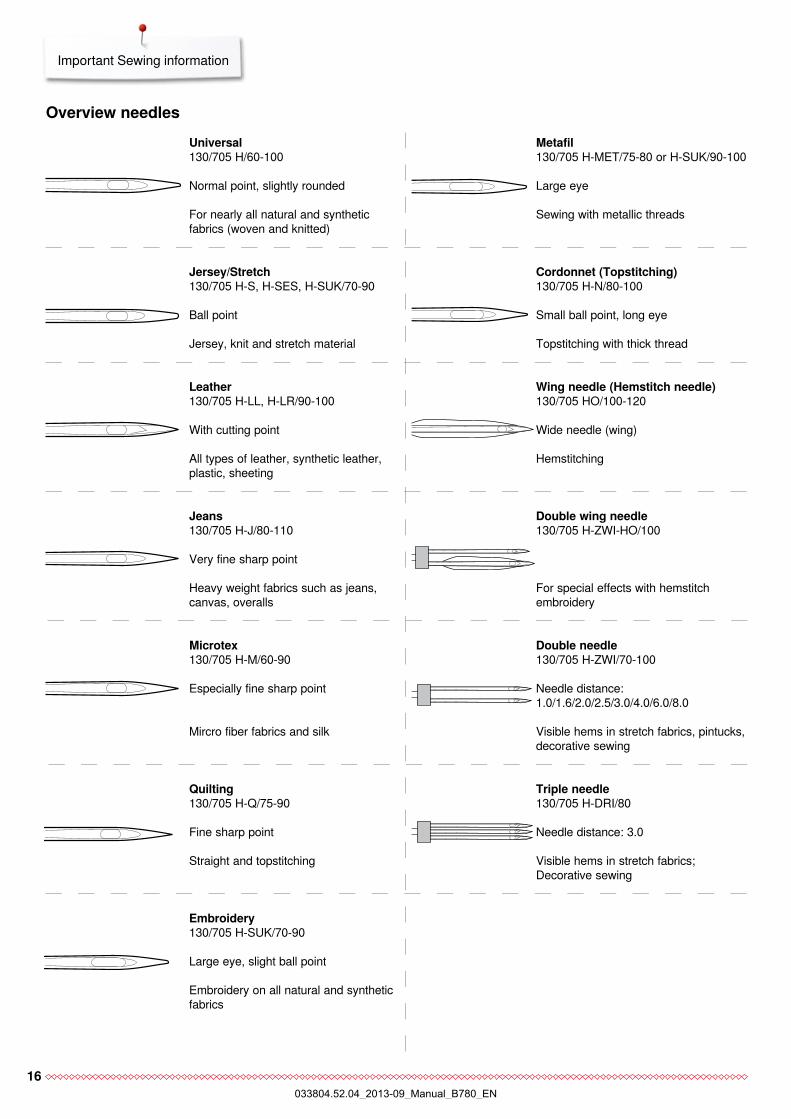
overview needlesuniversal130/705 H/60-100
Normal point, slightly rounded
For nearly all natural and synthetic fabrics (woven and knitted)
metafil130/705 H-MET/75-80 or H-SUK/90-100
Large eye
Sewing with metallic threads
Jersey/Stretch130/705 H-S, H-SES, H-SUK/70-90
Ball point
Jersey, knit and stretch material
cordonnet (topstitching)130/705 H-N/80-100
Small ball point, long eye
Topstitching with thick thread
Leather130/705 H-LL, H-LR/90-100
With cutting point
All types of leather, synthetic leather, plastic, sheeting
Wing needle (Hemstitch needle)130/705 HO/100-120
Wide needle (wing)
Hemstitching
Jeans130/705 H-J/80-110
Very fine sharp point
Heavy weight fabrics such as jeans, canvas, overalls
Double wing needle130/705 H-ZWI-HO/100
For special effects with hemstitch embroidery
microtex130/705 H-M/60-90
Especially fine sharp point
Mircro fiber fabrics and silk
Double needle130/705 H-ZWI/70-100
Needle distance: 1.0/1.6/2.0/2.5/3.0/4.0/6.0/8.0
Visible hems in stretch fabrics, pintucks, decorative sewing
Quilting130/705 H-Q/75-90
Fine sharp point
Straight and topstitching
triple needle130/705 H-DRI/80
Needle distance: 3.0
Visible hems in stretch fabrics; Decorative sewing
embroidery130/705 H-SUK/70-90
Large eye, slight ball point
Embroidery on all natural and synthetic fabrics
033804.52.04_2013-09_Manual_B780_EN
17
Important Sewing information
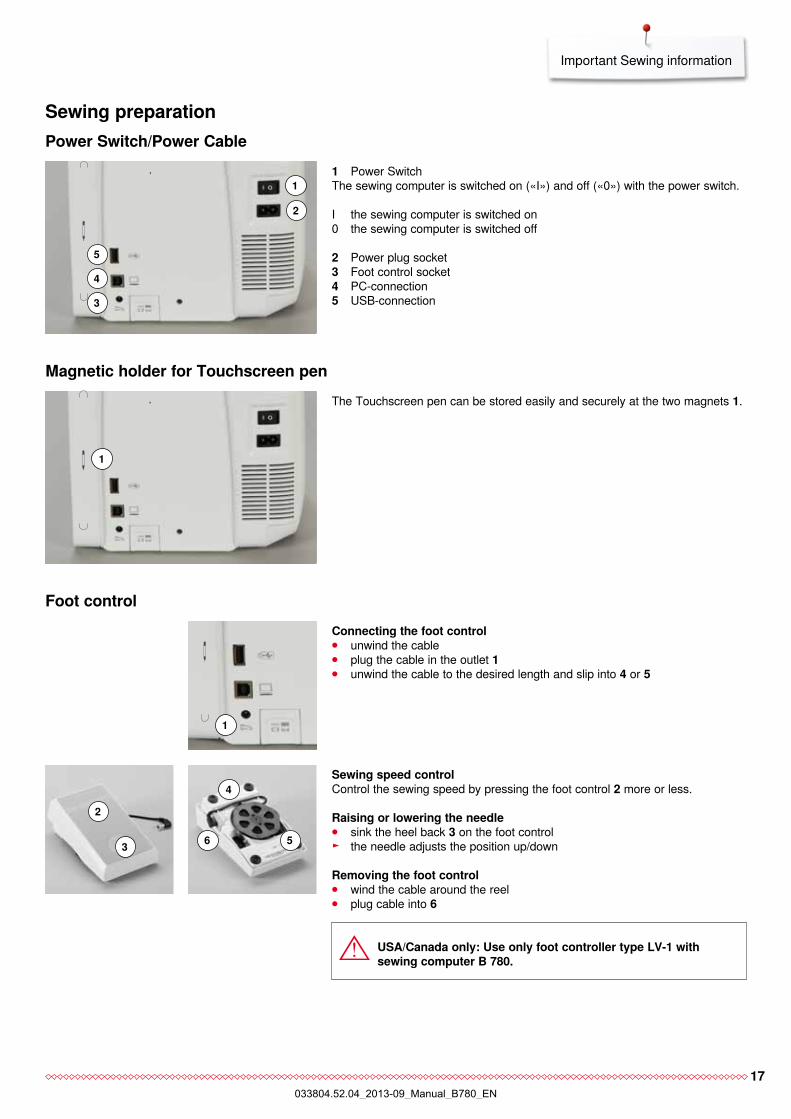
Sewing preparationpower Switch/power cable
1 Power SwitchThe sewing computer is switched on («I») and off («0») with the power switch.
I the sewing computer is switched on0 the sewing computer is switched off
2 Power plug socket3 Foot control socket4 PC-connection5 USB-connection
magnetic holder for touchscreen pen The Touchscreen pen can be stored easily and securely at the two magnets 1.
connecting the foot control ⦁ unwind the cable ⦁ plug the cable in the outlet 1 ⦁ unwind the cable to the desired length and slip into 4 or 5
foot control
Sewing speed controlControl the sewing speed by pressing the foot control 2 more or less.
raising or lowering the needle ⦁ sink the heel back 3 on the foot control ► the needle adjusts the position up/down
removing the foot control ⦁ wind the cable around the reel ⦁ plug cable into 6
4
6 5
2
3
1
1
1
2
5
4
3
uSa/canada only: use only foot controller type LV-1 with sewing computer B 780.
033804.52.04_2013-09_Manual_B780_EN

18
Sewing preparation
The slide-on table increases sewing surface.
attaching the slide-on table ⦁ turn the handwheel or press the «Needle stop»-button (see page 13) ► needle is raised ⦁ press «Presser Foot Position»-button ► presser foot is lifted ⦁ slide table to the right, over the free arm until it engages
removing the slide-on table ⦁ raise the needle and presser foot ⦁ press button 1 down ⦁ pull slide-on table to the left
Slide-on table
presser foot lifterRaising or lowering presser foot via FHS.
attaching the free Hand System ⦁ insert into the opening 1
raising and lowering the presser foot ⦁ with your knee push lever to the right ⦁ you should be able to operate the FHS with your knee in your normal sitting
position ► the presser foot is raised; the feed dog is lowered simultaneously. The
thread tension is released ► the feed dog is raised as soon as the first stitch is sewn
Your dealer can adjust the FHS if necessary.
Seam guide ⦁ press the release button and insert into the groove (underside of table) from
left or rightCan be moved over the entire table length.
1
1
033804.52.04_2013-09_Manual_B780_EN
19
Sewing preparation
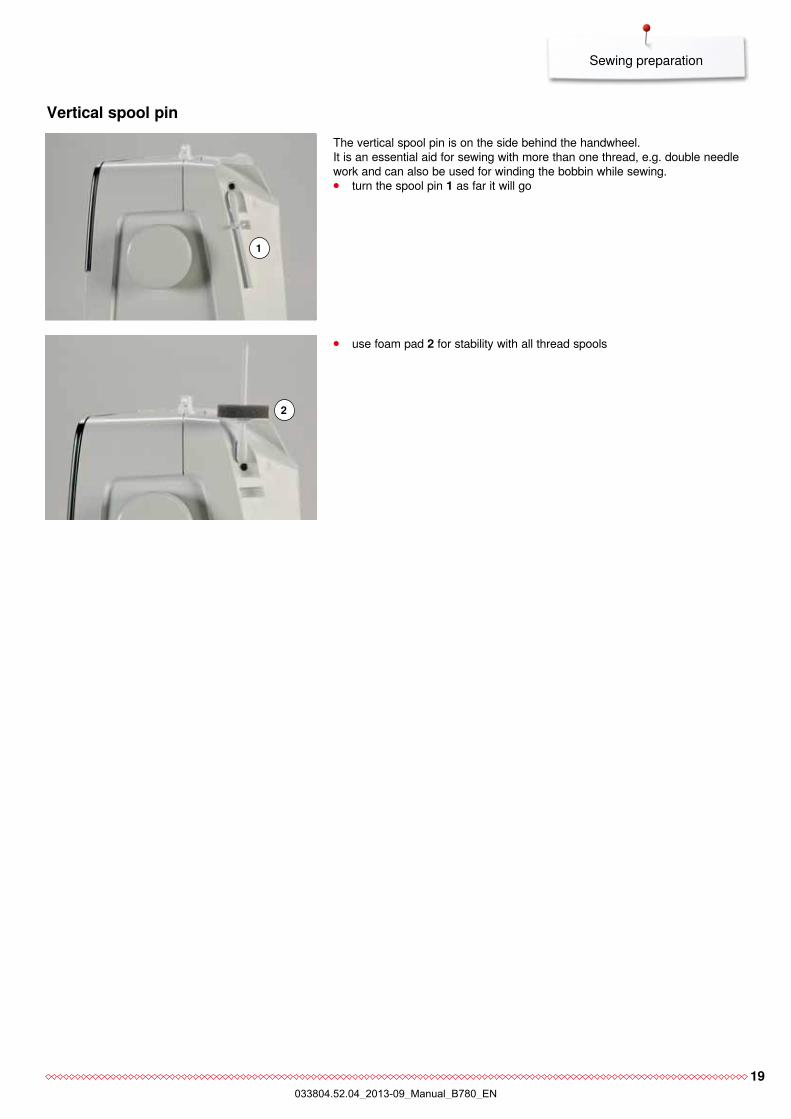
The vertical spool pin is on the side behind the handwheel.It is an essential aid for sewing with more than one thread, e.g. double needle work and can also be used for winding the bobbin while sewing. ⦁ turn the spool pin 1 as far it will go
Vertical spool pin
⦁ use foam pad 2 for stability with all thread spools
2
1
033804.52.04_2013-09_Manual_B780_EN
20
Sewing preparation
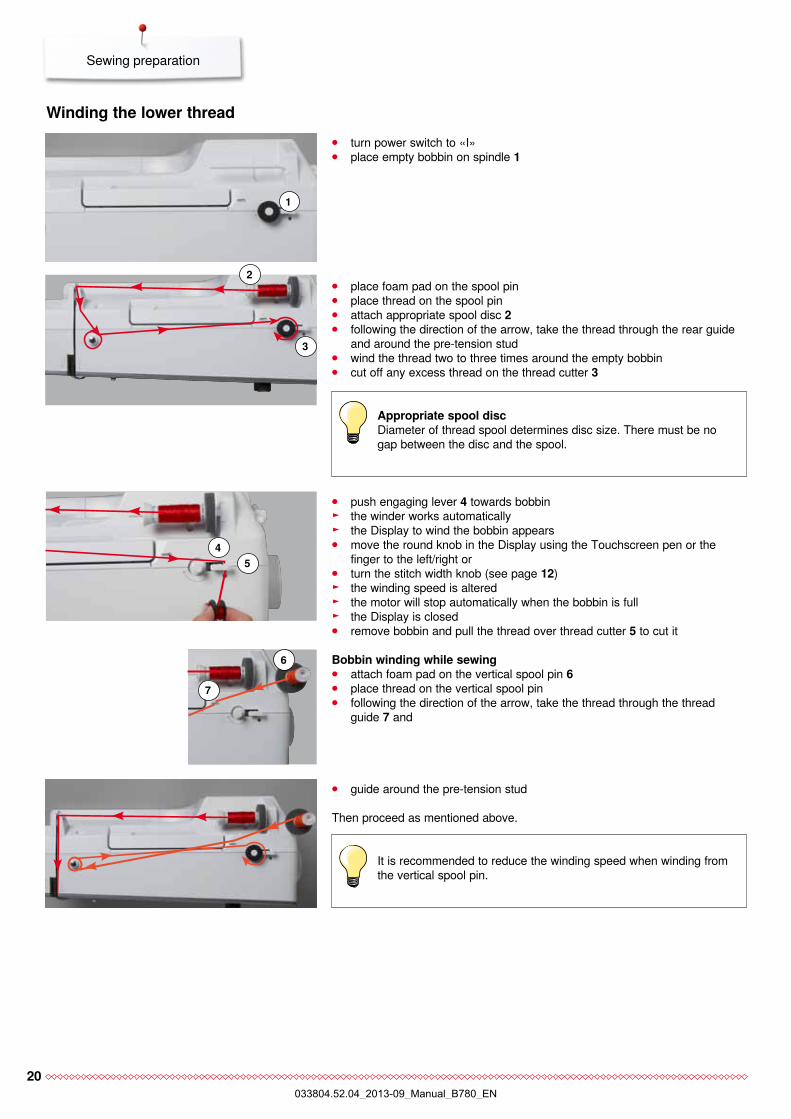
⦁ turn power switch to «I» ⦁ place empty bobbin on spindle 1
⦁ push engaging lever 4 towards bobbin ► the winder works automatically ► the Display to wind the bobbin appears ⦁ move the round knob in the Display using the Touchscreen pen or the
finger to the left/right or ⦁ turn the stitch width knob (see page 12) ► the winding speed is altered ► the motor will stop automatically when the bobbin is full ► the Display is closed ⦁ remove bobbin and pull the thread over thread cutter 5 to cut it
Winding the lower thread
Bobbin winding while sewing ⦁ attach foam pad on the vertical spool pin 6 ⦁ place thread on the vertical spool pin ⦁ following the direction of the arrow, take the thread through the thread
guide 7 and
⦁ place foam pad on the spool pin ⦁ place thread on the spool pin ⦁ attach appropriate spool disc 2 ⦁ following the direction of the arrow, take the thread through the rear guide
and around the pre-tension stud ⦁ wind the thread two to three times around the empty bobbin ⦁ cut off any excess thread on the thread cutter 3
appropriate spool discDiameter of thread spool determines disc size. There must be no gap between the disc and the spool.
⦁ guide around the pre-tension stud
Then proceed as mentioned above.
It is recommended to reduce the winding speed when winding from the vertical spool pin.
5
3
1
4
2
7
6
033804.52.04_2013-09_Manual_B780_EN
21
Sewing preparation
Inserting a bobbin/threading lower thread
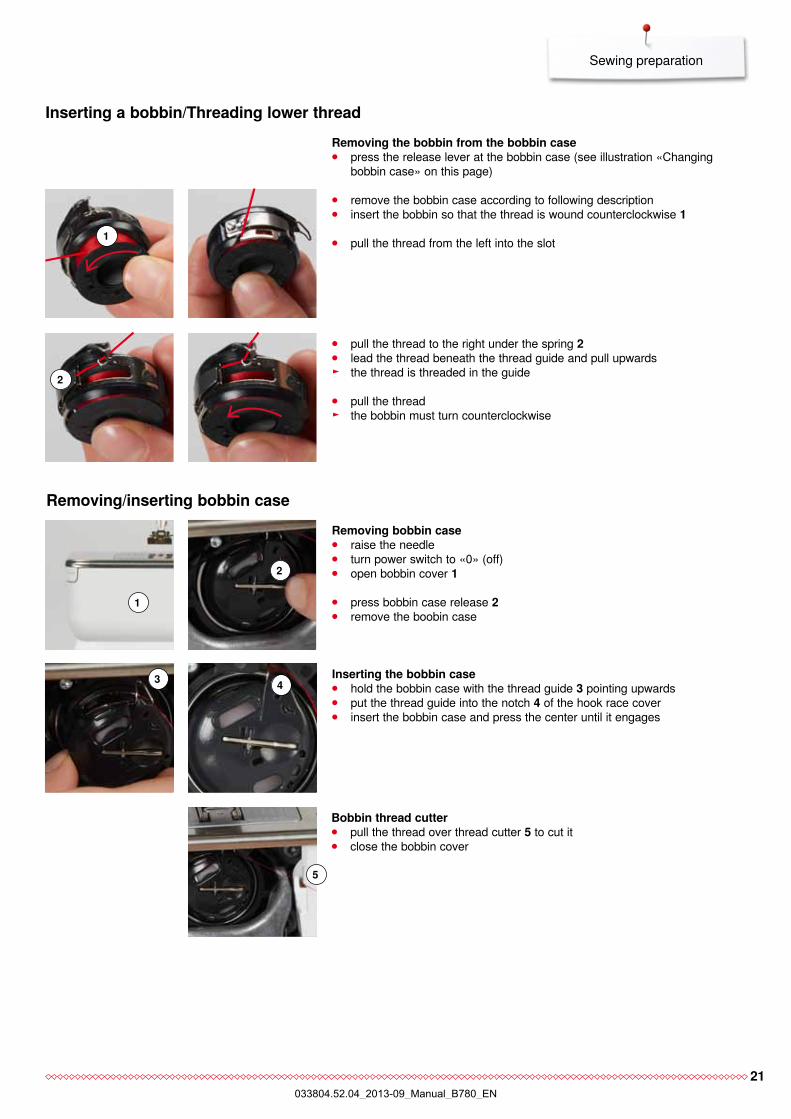
⦁ remove the bobbin case according to following description ⦁ insert the bobbin so that the thread is wound counterclockwise 1
⦁ pull the thread from the left into the slot
removing/inserting bobbin caseremoving bobbin case ⦁ raise the needle ⦁ turn power switch to «0» (off) ⦁ open bobbin cover 1
⦁ press bobbin case release 2 ⦁ remove the boobin case
Bobbin thread cutter ⦁ pull the thread over thread cutter 5 to cut it ⦁ close the bobbin cover
Inserting the bobbin case ⦁ hold the bobbin case with the thread guide 3 pointing upwards ⦁ put the thread guide into the notch 4 of the hook race cover ⦁ insert the bobbin case and press the center until it engages
⦁ pull the thread to the right under the spring 2 ⦁ lead the thread beneath the thread guide and pull upwards ► the thread is threaded in the guide
⦁ pull the thread ► the bobbin must turn counterclockwise
34
5
4
1
2
2
1
removing the bobbin from the bobbin case ⦁ press the release lever at the bobbin case (see illustration «Changing
bobbin case» on this page)
033804.52.04_2013-09_Manual_B780_EN
22
Sewing preparation
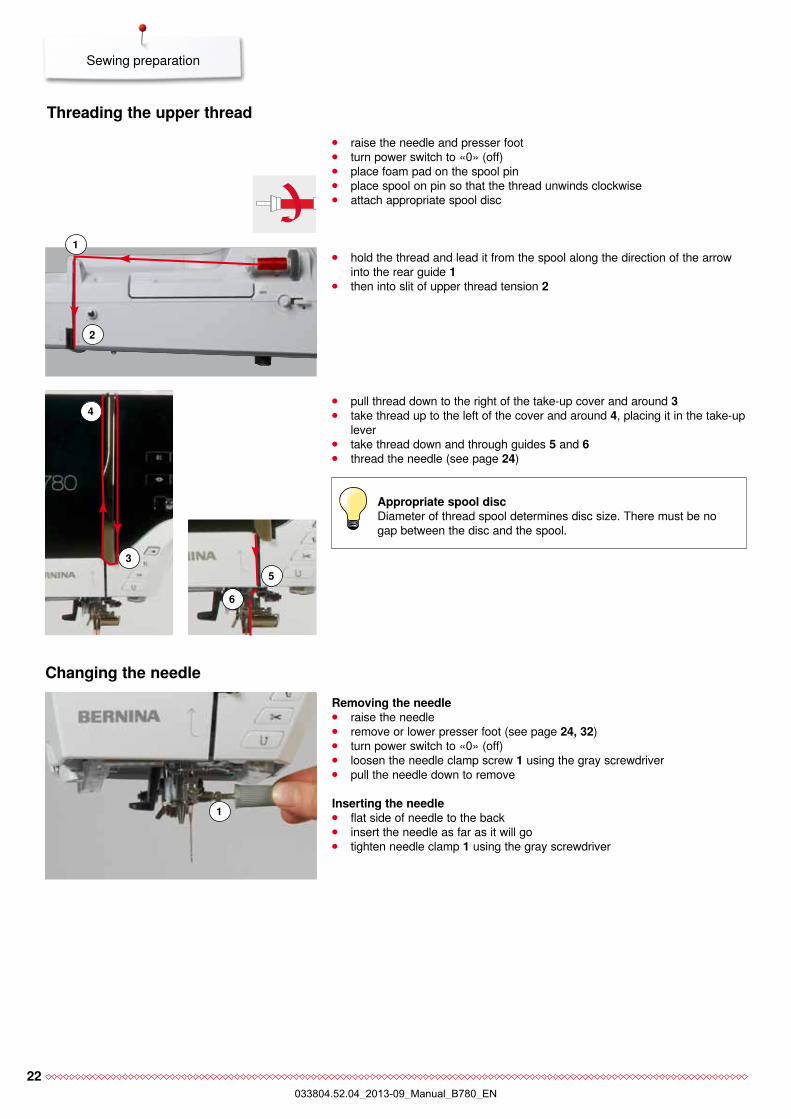
threading the upper thread ⦁ raise the needle and presser foot ⦁ turn power switch to «0» (off) ⦁ place foam pad on the spool pin ⦁ place spool on pin so that the thread unwinds clockwise ⦁ attach appropriate spool disc
removing the needle ⦁ raise the needle ⦁ remove or lower presser foot (see page 24, 32) ⦁ turn power switch to «0» (off) ⦁ loosen the needle clamp screw 1 using the gray screwdriver ⦁ pull the needle down to remove
Inserting the needle ⦁ flat side of needle to the back ⦁ insert the needle as far as it will go ⦁ tighten needle clamp 1 using the gray screwdriver
changing the needle
appropriate spool discDiameter of thread spool determines disc size. There must be no gap between the disc and the spool.
⦁ hold the thread and lead it from the spool along the direction of the arrow into the rear guide 1
⦁ then into slit of upper thread tension 2
⦁ pull thread down to the right of the take-up cover and around 3 ⦁ take thread up to the left of the cover and around 4, placing it in the take-up
lever ⦁ take thread down and through guides 5 and 6 ⦁ thread the needle (see page 24)
1
2
1
3
4
5
6
033804.52.04_2013-09_Manual_B780_EN
23
Sewing preparation
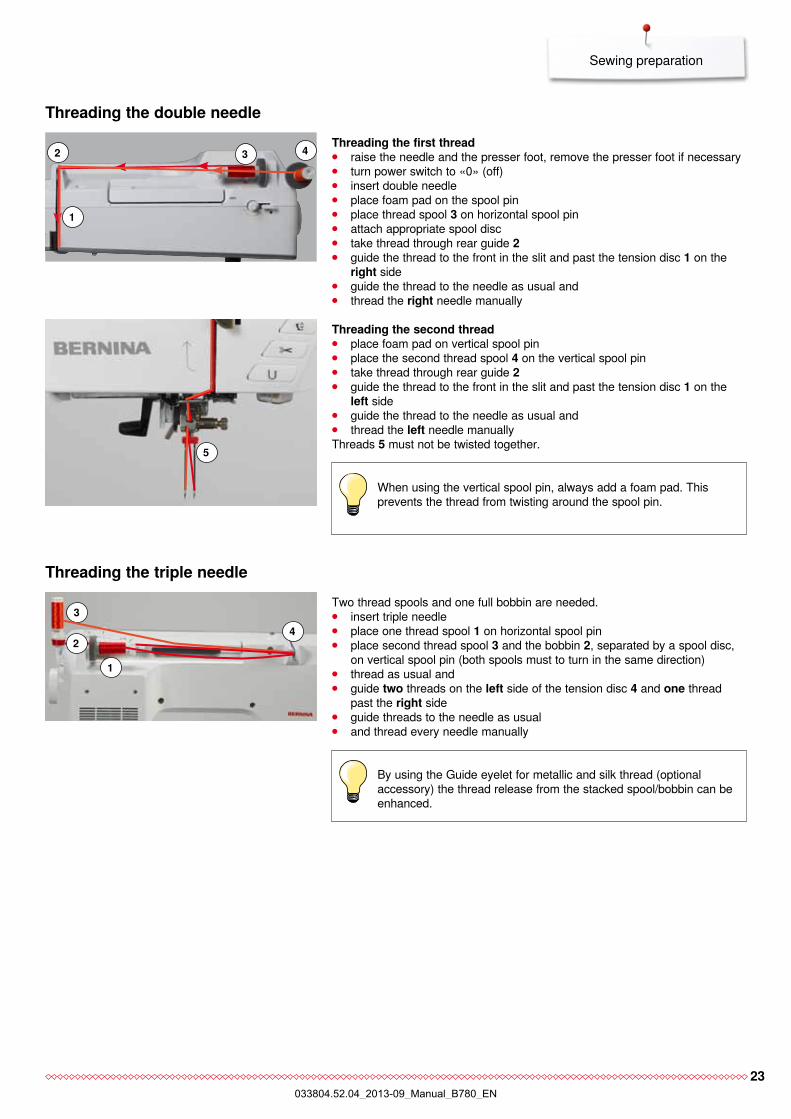
threading the first thread ⦁ raise the needle and the presser foot, remove the presser foot if necessary ⦁ turn power switch to «0» (off) ⦁ insert double needle ⦁ place foam pad on the spool pin ⦁ place thread spool 3 on horizontal spool pin ⦁ attach appropriate spool disc ⦁ take thread through rear guide 2 ⦁ guide the thread to the front in the slit and past the tension disc 1 on the
right side ⦁ guide the thread to the needle as usual and ⦁ thread the right needle manually
threading the second thread ⦁ place foam pad on vertical spool pin ⦁ place the second thread spool 4 on the vertical spool pin ⦁ take thread through rear guide 2 ⦁ guide the thread to the front in the slit and past the tension disc 1 on the
left side ⦁ guide the thread to the needle as usual and ⦁ thread the left needle manually
Threads 5 must not be twisted together.
threading the double needle
Two thread spools and one full bobbin are needed. ⦁ insert triple needle ⦁ place one thread spool 1 on horizontal spool pin ⦁ place second thread spool 3 and the bobbin 2, separated by a spool disc,
on vertical spool pin (both spools must to turn in the same direction) ⦁ thread as usual and ⦁ guide two threads on the left side of the tension disc 4 and one thread
past the right side ⦁ guide threads to the needle as usual ⦁ and thread every needle manually
When using the vertical spool pin, always add a foam pad. This prevents the thread from twisting around the spool pin.
By using the Guide eyelet for metallic and silk thread (optional accessory) the thread release from the stacked spool/bobbin can be enhanced.
4
1
3
2
5
32 4
1
threading the triple needle
033804.52.04_2013-09_Manual_B780_EN
24
Sewing preparation
thread needle
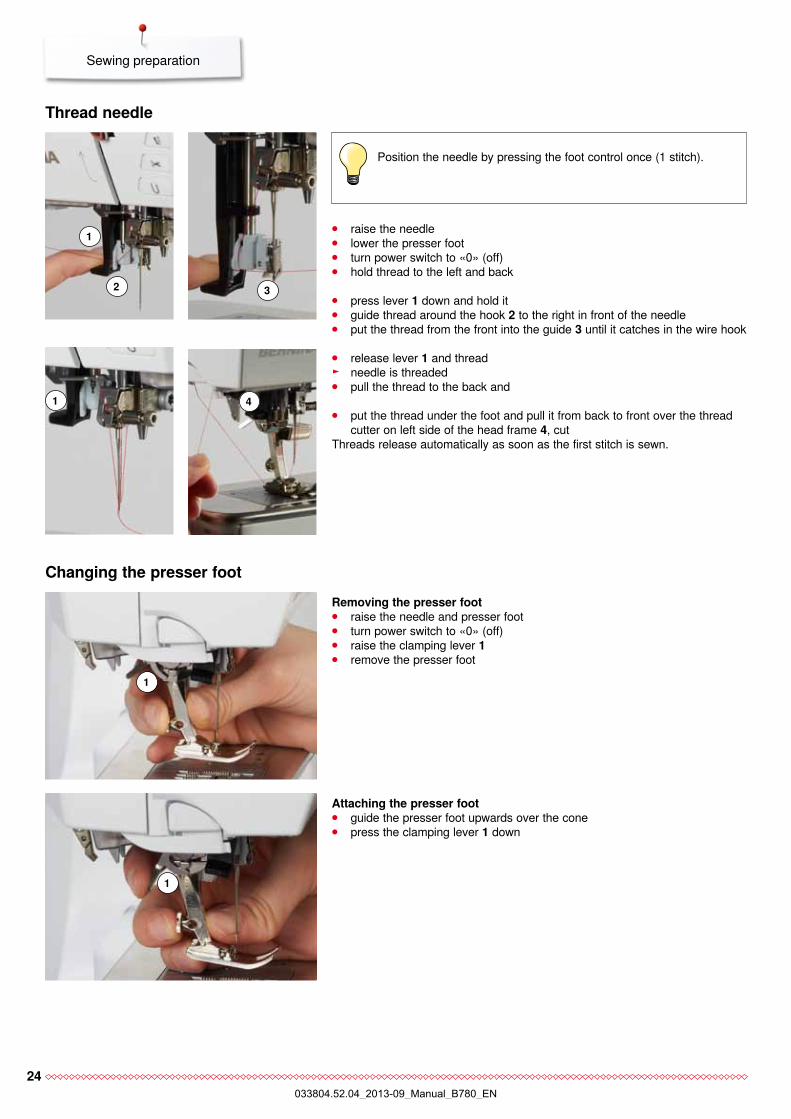
⦁ raise the needle ⦁ lower the presser foot ⦁ turn power switch to «0» (off) ⦁ hold thread to the left and back
⦁ press lever 1 down and hold it ⦁ guide thread around the hook 2 to the right in front of the needle ⦁ put the thread from the front into the guide 3 until it catches in the wire hook
⦁ release lever 1 and thread ► needle is threaded ⦁ pull the thread to the back and
⦁ put the thread under the foot and pull it from back to front over the thread cutter on left side of the head frame 4, cut
Threads release automatically as soon as the first stitch is sewn.
Position the needle by pressing the foot control once (1 stitch).
changing the presser footremoving the presser foot ⦁ raise the needle and presser foot ⦁ turn power switch to «0» (off) ⦁ raise the clamping lever 1 ⦁ remove the presser foot
attaching the presser foot ⦁ guide the presser foot upwards over the cone ⦁ press the clamping lever 1 down
4
2 3
1
1
1
1
033804.52.04_2013-09_Manual_B780_EN
25
Sewing preparation
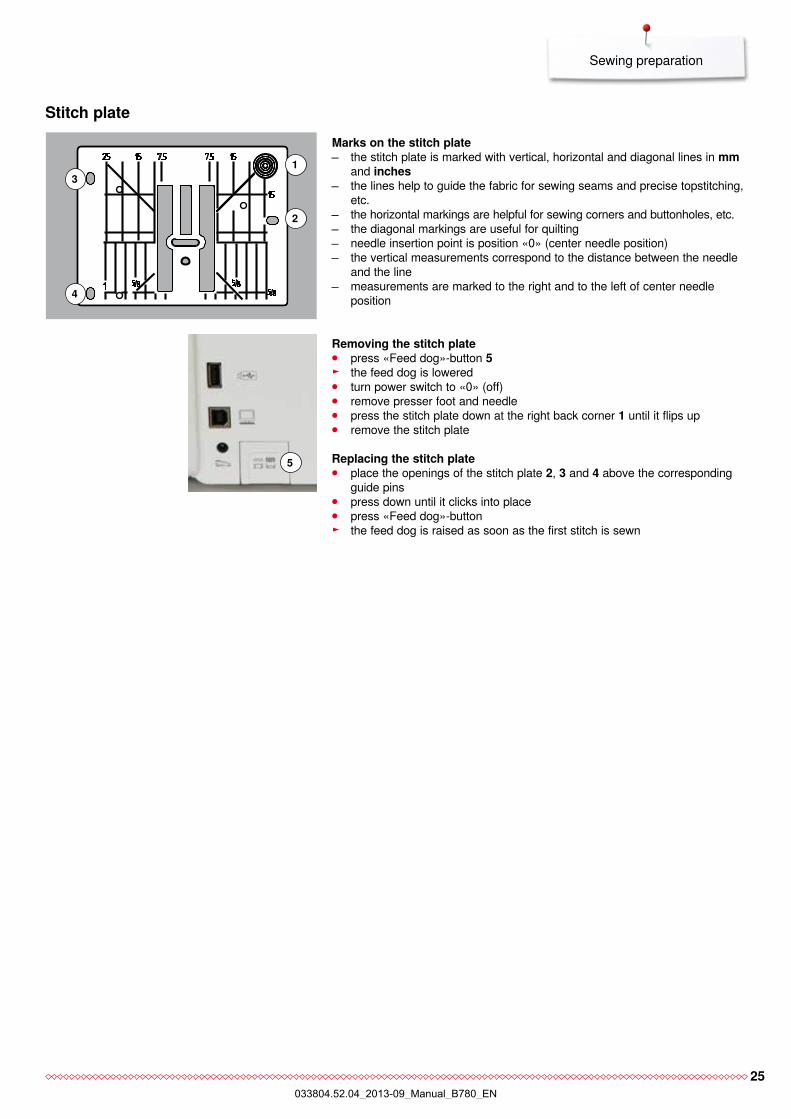
Stitch platemarks on the stitch plate the stitch plate is marked with vertical, horizontal and diagonal lines in mm
and inches the lines help to guide the fabric for sewing seams and precise topstitching,
etc. the horizontal markings are helpful for sewing corners and buttonholes, etc. the diagonal markings are useful for quilting needle insertion point is position «0» (center needle position) the vertical measurements correspond to the distance between the needle
and the line measurements are marked to the right and to the left of center needle
position
removing the stitch plate ⦁ press «Feed dog»-button 5 ► the feed dog is lowered ⦁ turn power switch to «0» (off) ⦁ remove presser foot and needle ⦁ press the stitch plate down at the right back corner 1 until it flips up ⦁ remove the stitch plate
replacing the stitch plate ⦁ place the openings of the stitch plate 2, 3 and 4 above the corresponding
guide pins ⦁ press down until it clicks into place ⦁ press «Feed dog»-button ► the feed dog is raised as soon as the first stitch is sewn
1
2
3
4
5
033804.52.04_2013-09_Manual_B780_EN
26
Sewing preparation
thread tension
Basic settings are applied automatically when a stitch pattern or program is selected.
the upper thread tension is set optimally at the BernIna factory and the sewing computer has been tested. metrosene-/Seralon thread size 100/2 (company mettler, Switzerland) is used for upper and lower thread.
In case of using other types of sewing or embroidery threads, the optimal tension may vary. Therefore it may be necessary to adjust the upper thread tension according to the fabric and the desired stitch pattern.
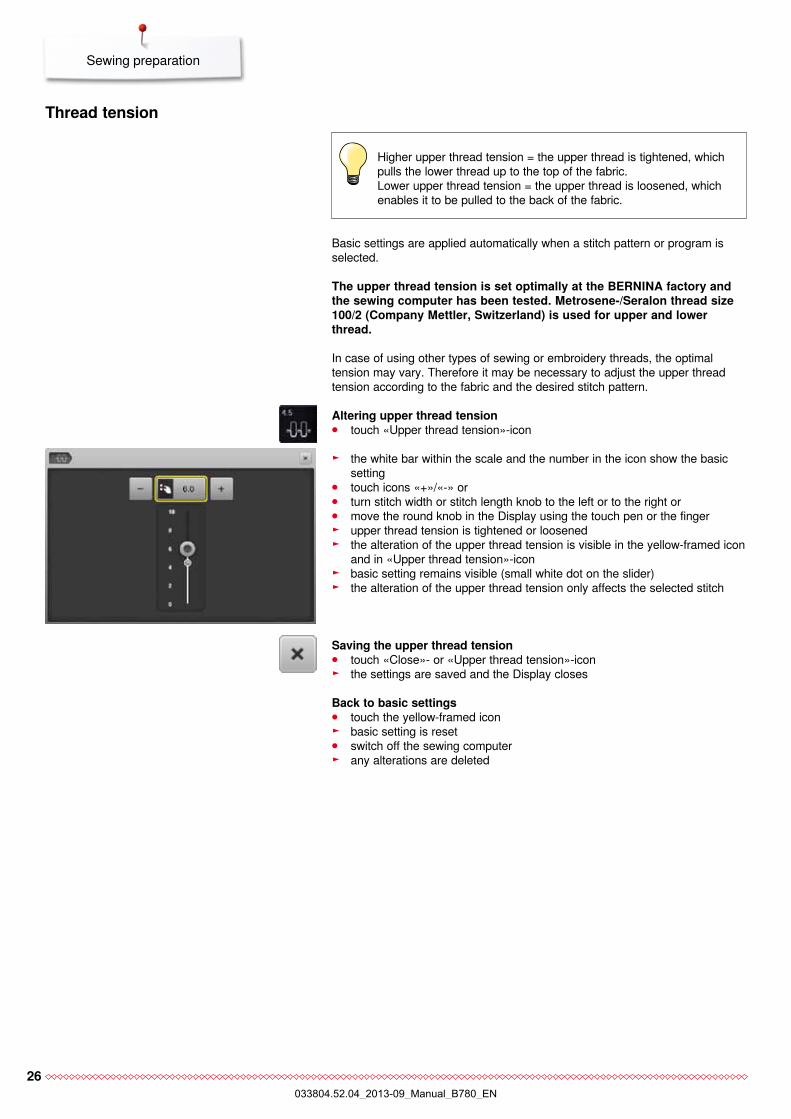
Higher upper thread tension = the upper thread is tightened, which pulls the lower thread up to the top of the fabric.Lower upper thread tension = the upper thread is loosened, which enables it to be pulled to the back of the fabric.
altering upper thread tension ⦁ touch «Upper thread tension»-icon
► the white bar within the scale and the number in the icon show the basic setting
⦁ touch icons «+»/«-» or ⦁ turn stitch width or stitch length knob to the left or to the right or ⦁ move the round knob in the Display using the touch pen or the finger ► upper thread tension is tightened or loosened ► the alteration of the upper thread tension is visible in the yellow-framed icon
and in «Upper thread tension»-icon ► basic setting remains visible (small white dot on the slider) ► the alteration of the upper thread tension only affects the selected stitch
Saving the upper thread tension ⦁ touch «Close»- or «Upper thread tension»-icon ► the settings are saved and the Display closes
Back to basic settings ⦁ touch the yellow-framed icon ► basic setting is reset ⦁ switch off the sewing computer ► any alterations are deleted
033804.52.04_2013-09_Manual_B780_EN
27
Sewing preparation
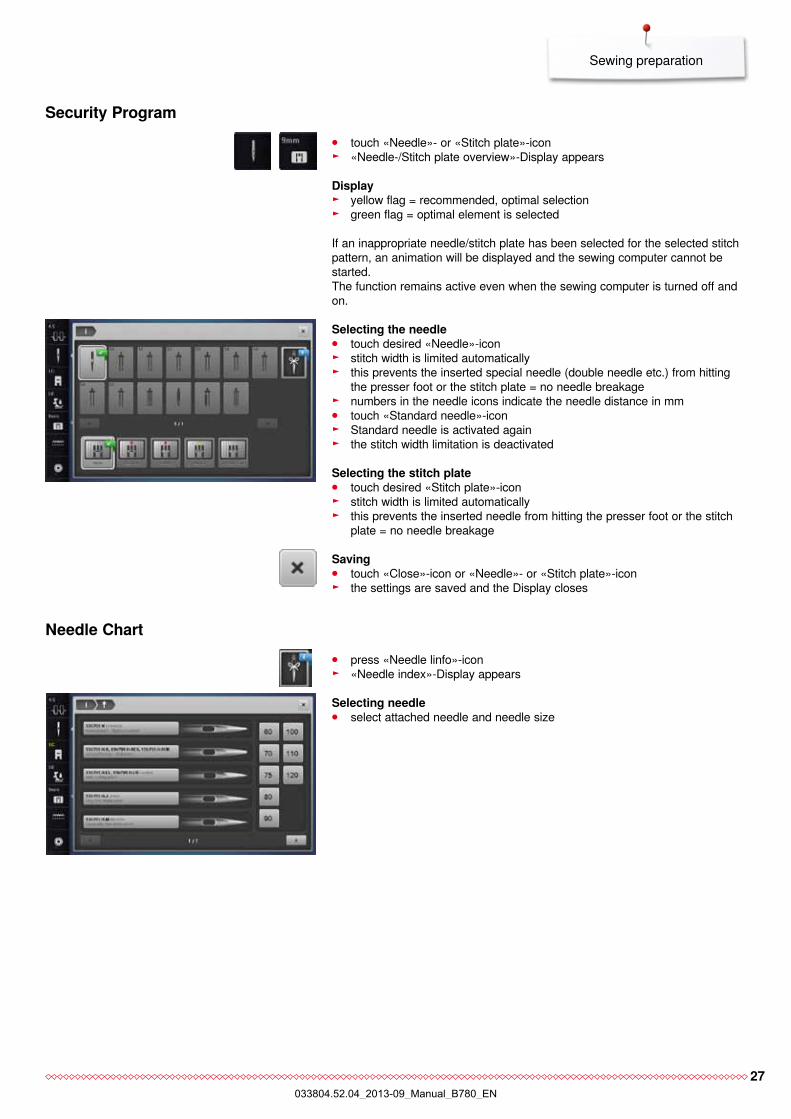
Security program ⦁ touch «Needle»- or «Stitch plate»-icon ► «Needle-/Stitch plate overview»-Display appears
Display ► yellow flag = recommended, optimal selection ► green flag = optimal element is selected
If an inappropriate needle/stitch plate has been selected for the selected stitch pattern, an animation will be displayed and the sewing computer cannot be started.The function remains active even when the sewing computer is turned off and on.
Selecting the needle ⦁ touch desired «Needle»-icon ► stitch width is limited automatically ► this prevents the inserted special needle (double needle etc.) from hitting
the presser foot or the stitch plate = no needle breakage ► numbers in the needle icons indicate the needle distance in mm ⦁ touch «Standard needle»-icon ► Standard needle is activated again ► the stitch width limitation is deactivated
Selecting the stitch plate ⦁ touch desired «Stitch plate»-icon ► stitch width is limited automatically ► this prevents the inserted needle from hitting the presser foot or the stitch
plate = no needle breakage
Saving ⦁ touch «Close»-icon or «Needle»- or «Stitch plate»-icon ► the settings are saved and the Display closes
needle chart ⦁ press «Needle linfo»-icon ► «Needle index»-Display appears
Selecting needle ⦁ select attached needle and needle size
033804.52.04_2013-09_Manual_B780_EN
28
Sewing preparation
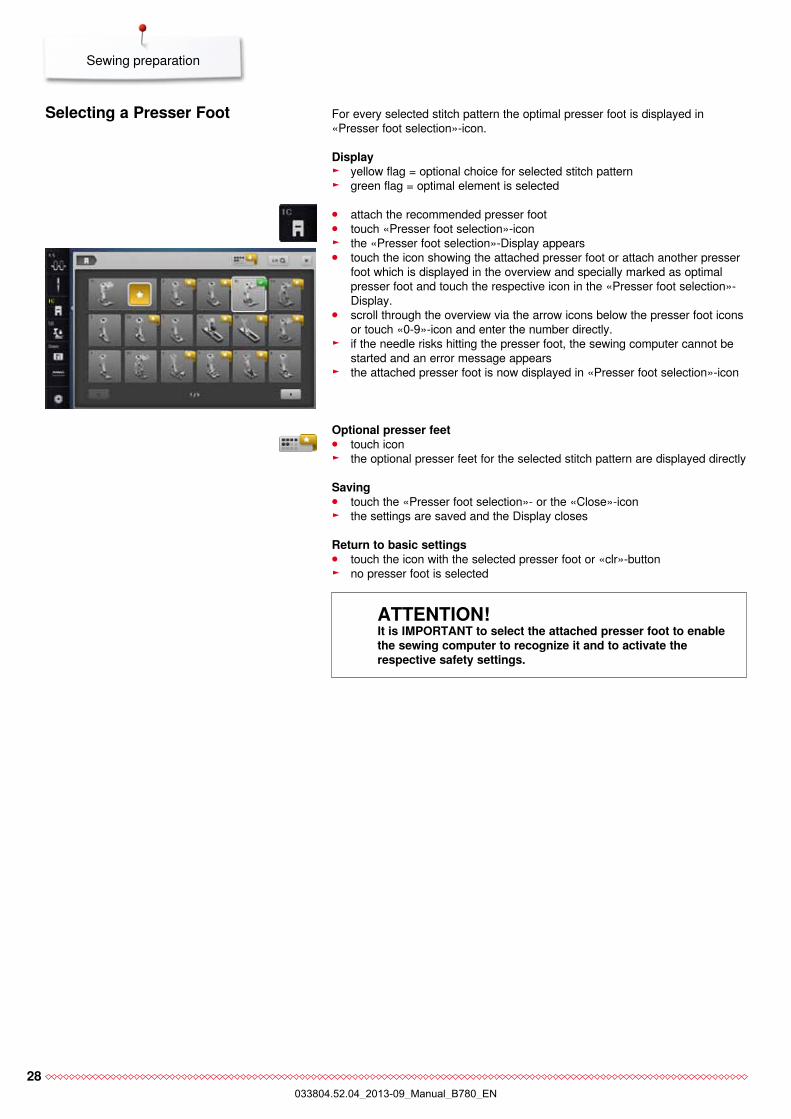
For every selected stitch pattern the optimal presser foot is displayed in «Presser foot selection»-icon.
Display ► yellow flag = optional choice for selected stitch pattern ► green flag = optimal element is selected
attentIon!It is Important to select the attached presser foot to enable the sewing computer to recognize it and to activate the respective safety settings.
Selecting a presser foot
optional presser feet ⦁ touch icon ► the optional presser feet for the selected stitch pattern are displayed directly
Saving ⦁ touch the «Presser foot selection»- or the «Close»-icon ► the settings are saved and the Display closes
return to basic settings ⦁ touch the icon with the selected presser foot or «clr»-button ► no presser foot is selected
⦁ attach the recommended presser foot ⦁ touch «Presser foot selection»-icon ► the «Presser foot selection»-Display appears ⦁ touch the icon showing the attached presser foot or attach another presser
foot which is displayed in the overview and specially marked as optimal presser foot and touch the respective icon in the «Presser foot selection»-Display.
⦁ scroll through the overview via the arrow icons below the presser foot icons or touch «0-9»-icon and enter the number directly.
► if the needle risks hitting the presser foot, the sewing computer cannot be started and an error message appears
► the attached presser foot is now displayed in «Presser foot selection»-icon
033804.52.04_2013-09_Manual_B780_EN
29
Sewing preparation
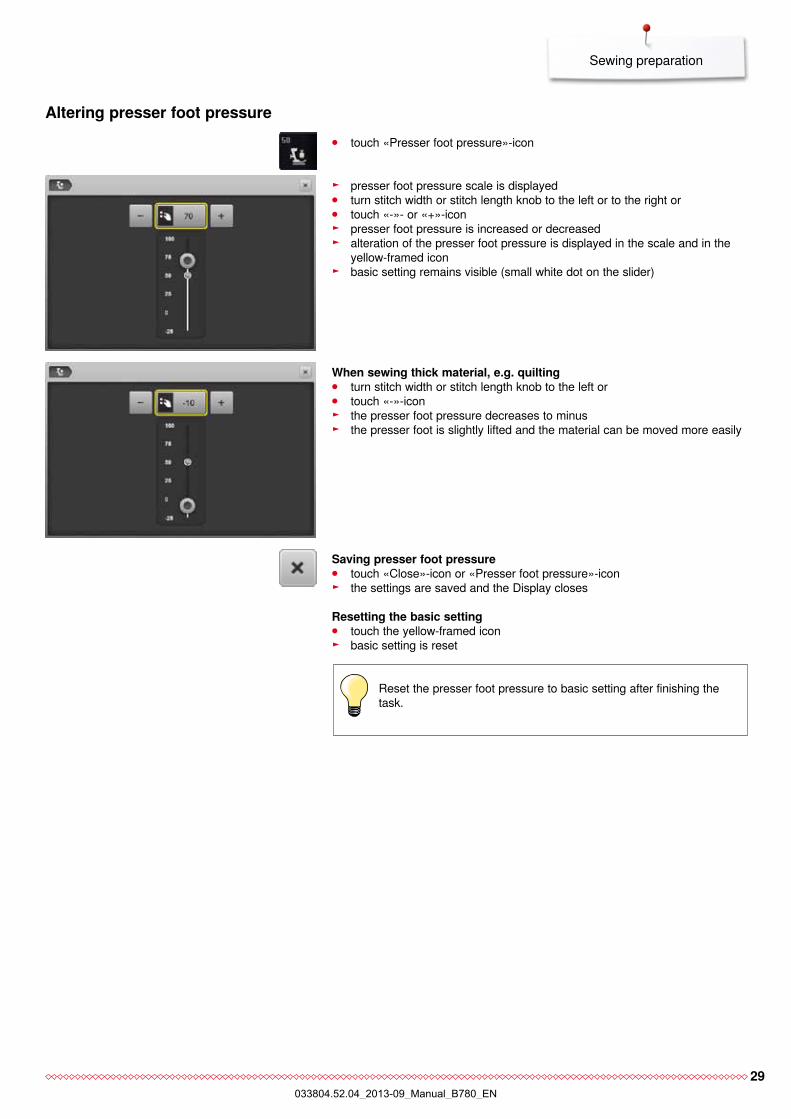
altering presser foot pressure ⦁ touch «Presser foot pressure»-icon
► presser foot pressure scale is displayed ⦁ turn stitch width or stitch length knob to the left or to the right or ⦁ touch «-»- or «+»-icon ► presser foot pressure is increased or decreased ► alteration of the presser foot pressure is displayed in the scale and in the
yellow-framed icon ► basic setting remains visible (small white dot on the slider)
When sewing thick material, e.g. quilting ⦁ turn stitch width or stitch length knob to the left or ⦁ touch «-»-icon ► the presser foot pressure decreases to minus ► the presser foot is slightly lifted and the material can be moved more easily
Saving presser foot pressure ⦁ touch «Close»-icon or «Presser foot pressure»-icon ► the settings are saved and the Display closes
resetting the basic setting ⦁ touch the yellow-framed icon ► basic setting is reset
Reset the presser foot pressure to basic setting after finishing the task.
033804.52.04_2013-09_Manual_B780_EN
30
Sewing preparation
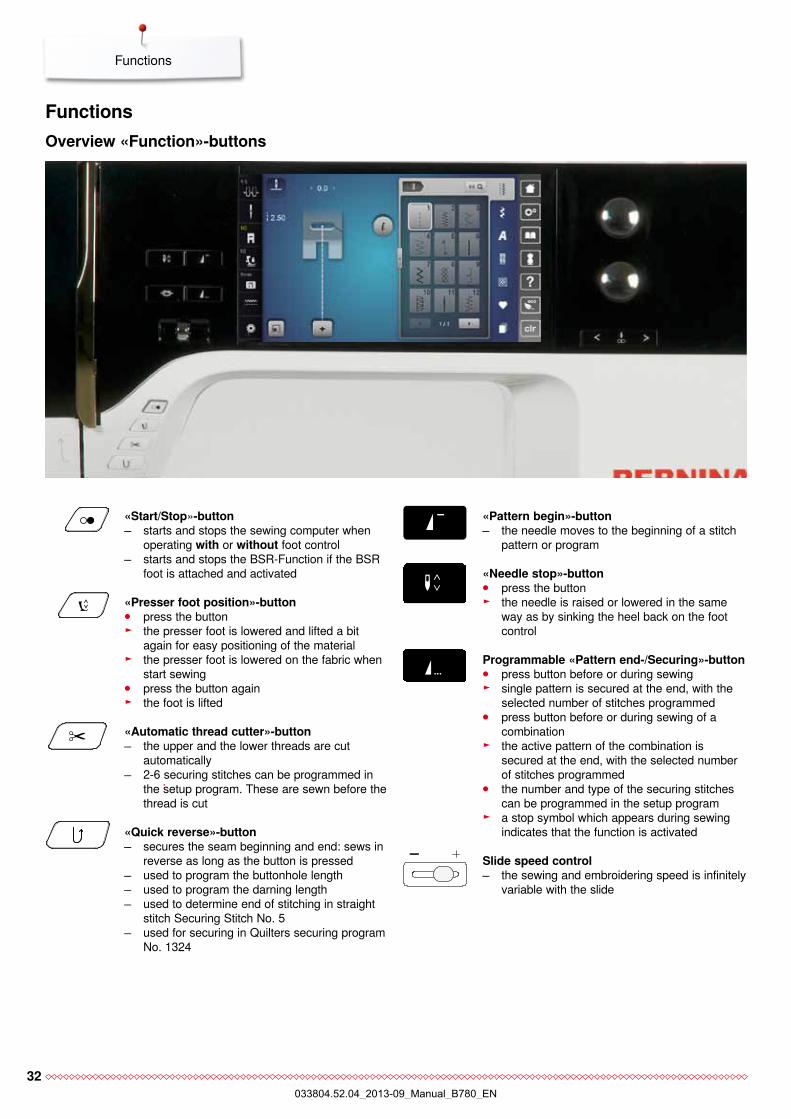
«Feed dog»-button 1 flush with housing. ► feed dog is ready to sew
Pulling, pushing or holding back the fabric will result in uneven stitches.
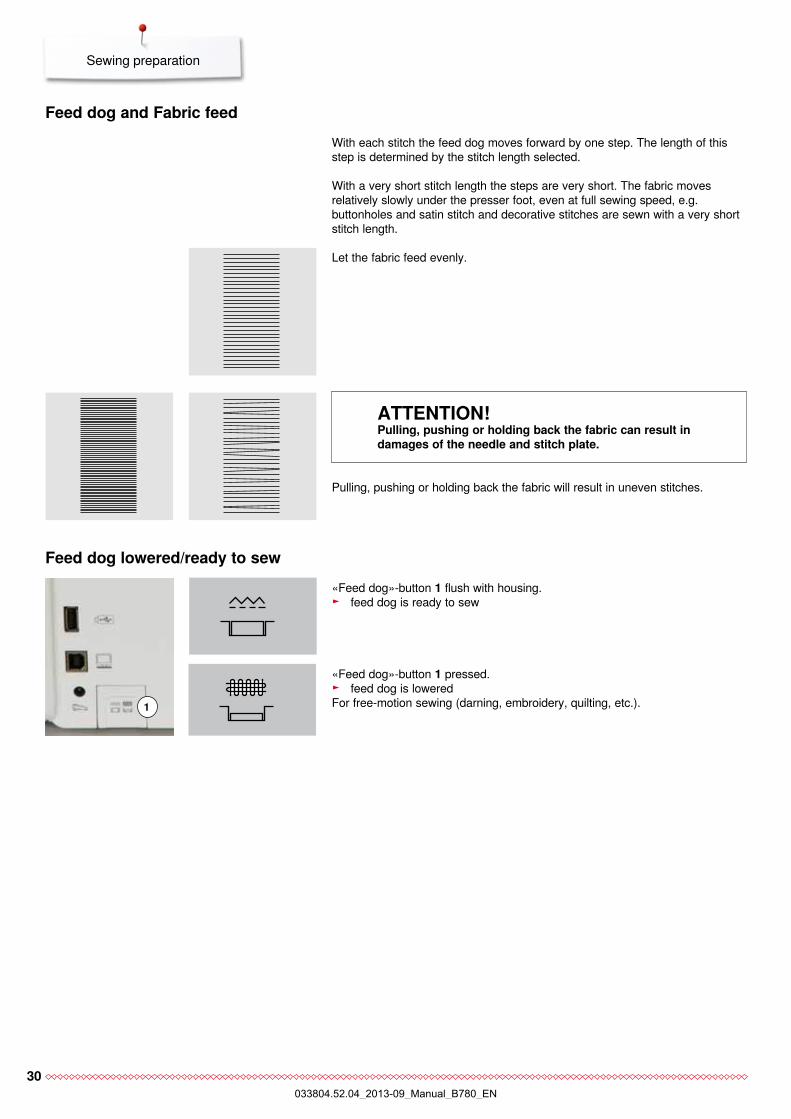
Let the fabric feed evenly.
With each stitch the feed dog moves forward by one step. The length of this step is determined by the stitch length selected.
With a very short stitch length the steps are very short. The fabric moves relatively slowly under the presser foot, even at full sewing speed, e.g. buttonholes and satin stitch and decorative stitches are sewn with a very short stitch length.
feed dog lowered/ready to sew
feed dog and fabric feed
attentIon!pulling, pushing or holding back the fabric can result in damages of the needle and stitch plate.
«Feed dog»-button 1 pressed. ► feed dog is lowered
For free-motion sewing (darning, embroidery, quilting, etc.).1
033804.52.04_2013-09_Manual_B780_EN

31
Notes
notes
033804.52.04_2013-09_Manual_B780_EN
32
Functions
functionsoverview «function»-buttons
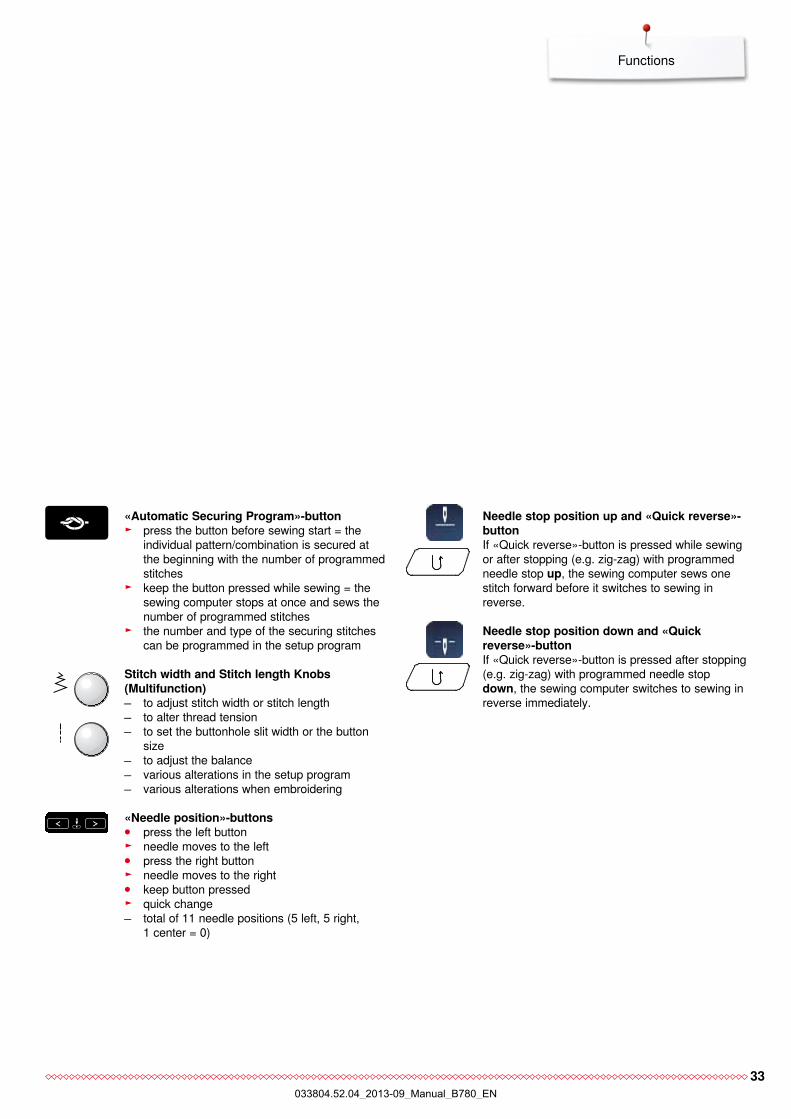
«Start/Stop»-button starts and stops the sewing computer when
operating with or without foot control starts and stops the BSR-Function if the BSR
foot is attached and activated
«presser foot position»-button ⦁ press the button ► the presser foot is lowered and lifted a bit
again for easy positioning of the material ► the presser foot is lowered on the fabric when
start sewing ⦁ press the button again ► the foot is lifted
«Quick reverse»-button secures the seam beginning and end: sews in
reverse as long as the button is pressed used to program the buttonhole length used to program the darning length used to determine end of stitching in straight
stitch Securing Stitch No. 5 used for securing in Quilters securing program
No. 1324
«automatic thread cutter»-button the upper and the lower threads are cut
automatically 2-6 securing stitches can be programmed in
the setup program. These are sewn before the thread is cut
Slide speed control the sewing and embroidering speed is infinitely
variable with the slide
«needle stop»-button ⦁ press the button ► the needle is raised or lowered in the same
way as by sinking the heel back on the foot control
programmable «pattern end-/Securing»-button ⦁ press button before or during sewing ► single pattern is secured at the end, with the
selected number of stitches programmed ⦁ press button before or during sewing of a
combination ► the active pattern of the combination is
secured at the end, with the selected number of stitches programmed
⦁ the number and type of the securing stitches can be programmed in the setup program
► a stop symbol which appears during sewing indicates that the function is activated
«pattern begin»-button the needle moves to the beginning of a stitch
pattern or program
033804.52.04_2013-09_Manual_B780_EN
33
Functions
Stitch width and Stitch length Knobs (multifunction) to adjust stitch width or stitch length to alter thread tension to set the buttonhole slit width or the button
size to adjust the balance various alterations in the setup program various alterations when embroidering
«needle position»-buttons ⦁ press the left button ► needle moves to the left ⦁ press the right button ► needle moves to the right ⦁ keep button pressed ► quick change total of 11 needle positions (5 left, 5 right,
1 center = 0)
«automatic Securing program»-button ► press the button before sewing start = the
individual pattern/combination is secured at the beginning with the number of programmed stitches
► keep the button pressed while sewing = the sewing computer stops at once and sews the number of programmed stitches
► the number and type of the securing stitches can be programmed in the setup program
needle stop position up and «Quick reverse»-buttonIf «Quick reverse»-button is pressed while sewing or after stopping (e.g. zig-zag) with programmed needle stop up, the sewing computer sews one stitch forward before it switches to sewing in reverse.
needle stop position down and «Quick reverse»-buttonIf «Quick reverse»-button is pressed after stopping (e.g. zig-zag) with programmed needle stop down, the sewing computer switches to sewing in reverse immediately.
033804.52.04_2013-09_Manual_B780_EN
34
Display
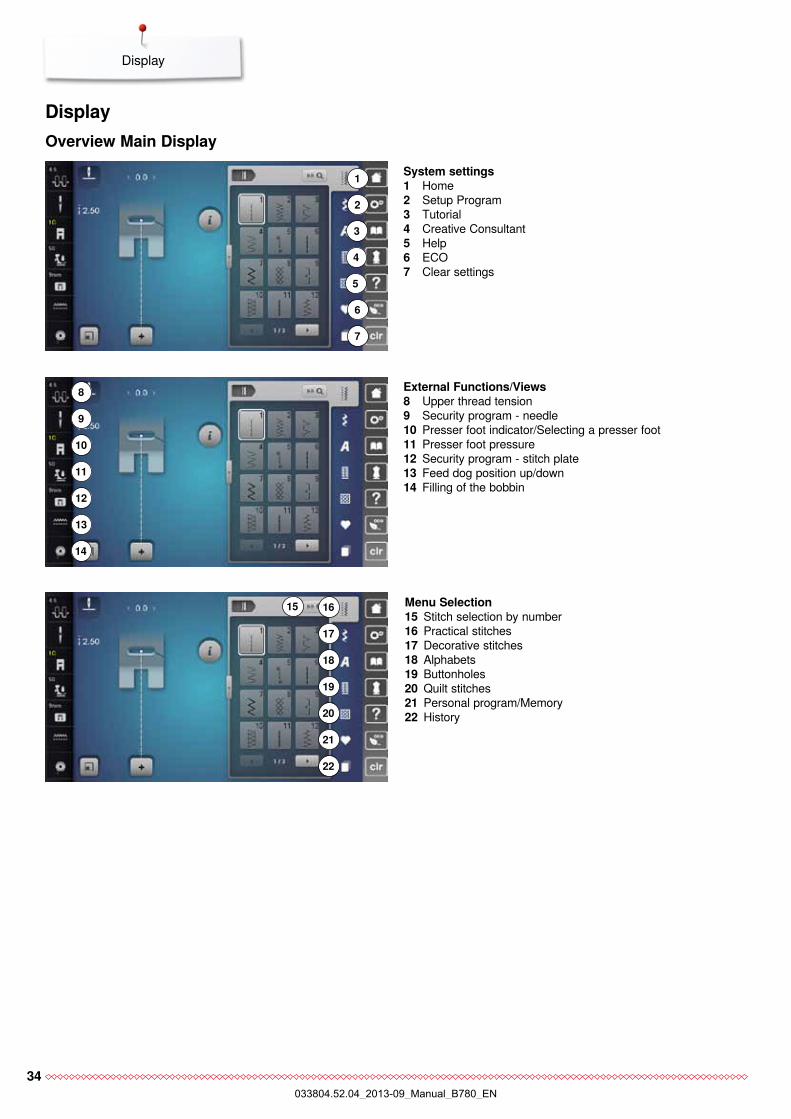
System settings1 Home2 Setup Program3 Tutorial4 Creative Consultant5 Help6 ECO7 Clear settings
Displayoverview main Display
2
1
3
4
5
6
7
10
17
8
15
11
18
12
19
13
14
20
21
22
9
16
external functions/Views8 Upper thread tension9 Security program - needle10 Presser foot indicator/Selecting a presser foot11 Presser foot pressure12 Security program - stitch plate13 Feed dog position up/down14 Filling of the bobbin
menu Selection15 Stitch selection by number 16 Practical stitches17 Decorative stitches 18 Alphabets19 Buttonholes20 Quilt stitches21 Personal program/Memory22 History
033804.52.04_2013-09_Manual_B780_EN
35
Display
2423
26
27
28
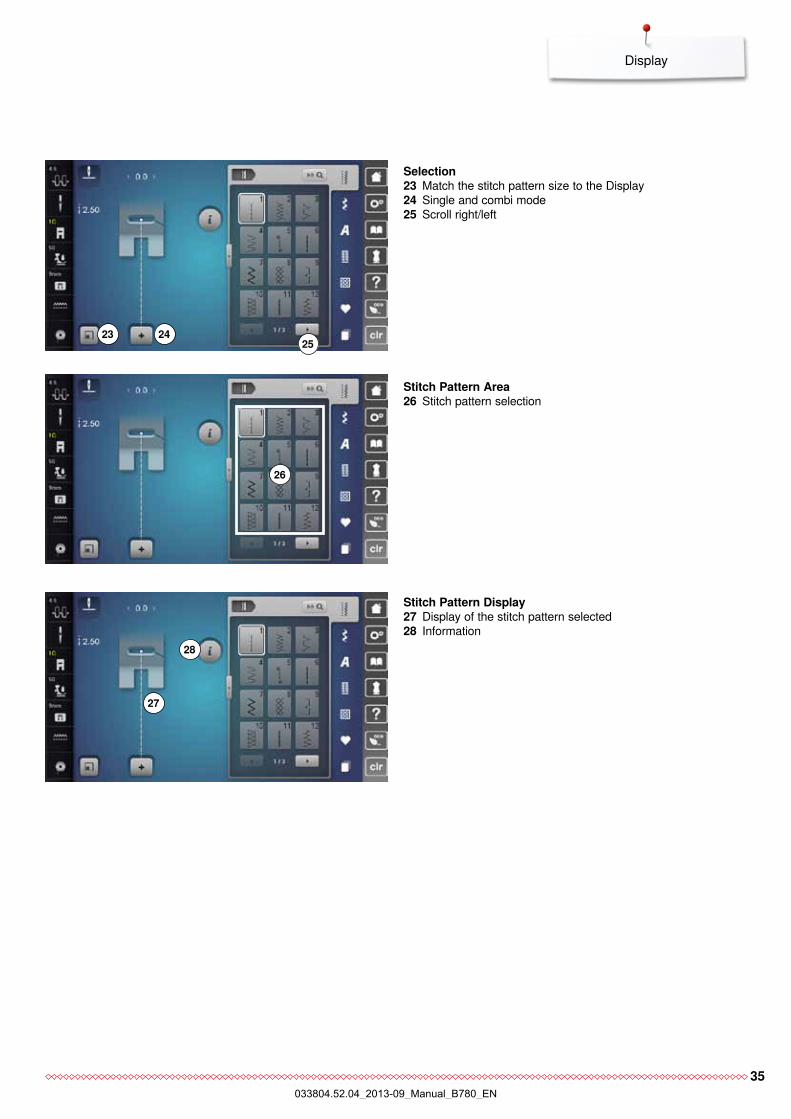
Selection 23 Match the stitch pattern size to the Display24 Single and combi mode25 Scroll right/left
Stitch pattern area26 Stitch pattern selection
Stitch pattern Display27 Display of the stitch pattern selected28 Information
25
033804.52.04_2013-09_Manual_B780_EN
36
Functions - Display
3
7
11
4 65
8 9
10 12 13
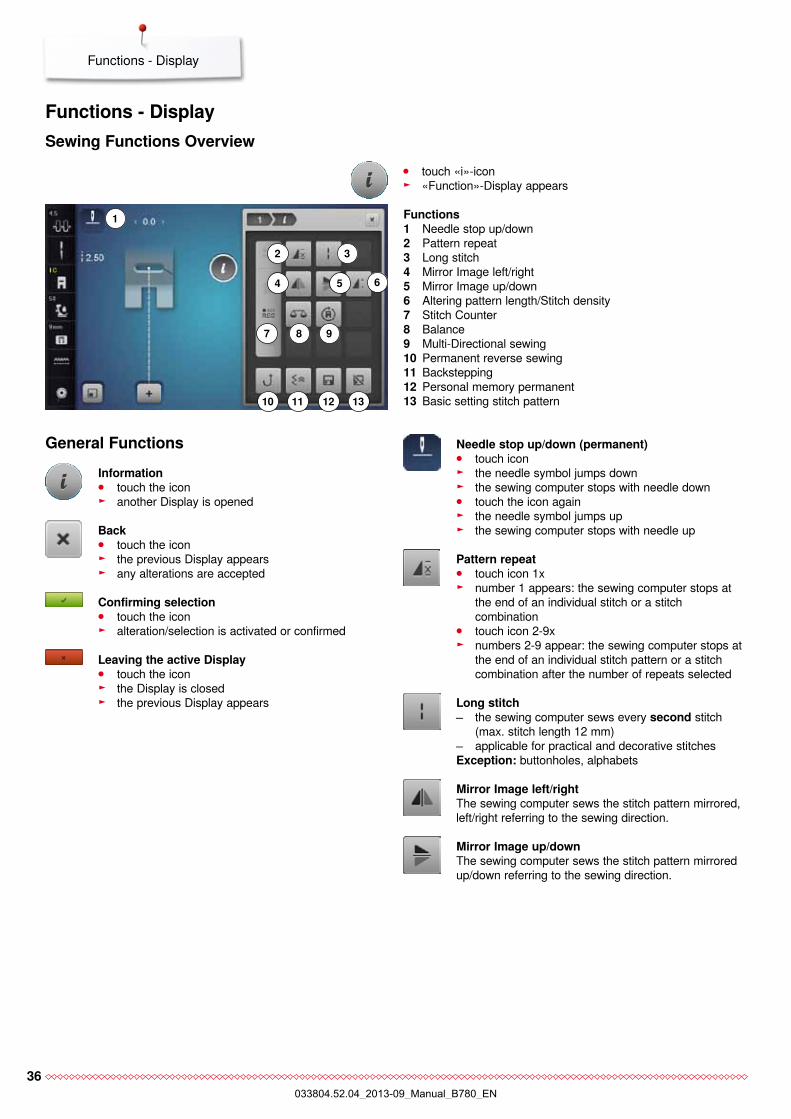
functions1 Needle stop up/down2 Pattern repeat3 Long stitch4 Mirror Image left/right5 Mirror Image up/down6 Altering pattern length/Stitch density7 Stitch Counter8 Balance9 Multi-Directional sewing10 Permanent reverse sewing11 Backstepping12 Personal memory permanent13 Basic setting stitch pattern
functions - DisplaySewing functions overview
⦁ touch «i»-icon ► «Function»-Display appears
needle stop up/down (permanent) ⦁ touch icon ► the needle symbol jumps down ► the sewing computer stops with needle down ⦁ touch the icon again ► the needle symbol jumps up ► the sewing computer stops with needle up
pattern repeat ⦁ touch icon 1x ► number 1 appears: the sewing computer stops at
the end of an individual stitch or a stitch combination
⦁ touch icon 2-9x ► numbers 2-9 appear: the sewing computer stops at
the end of an individual stitch pattern or a stitch combination after the number of repeats selected
Long stitch the sewing computer sews every second stitch
(max. stitch length 12 mm) applicable for practical and decorative stitches
exception: buttonholes, alphabets
mirror Image left/rightThe sewing computer sews the stitch pattern mirrored, left/right referring to the sewing direction.
mirror Image up/downThe sewing computer sews the stitch pattern mirrored up/down referring to the sewing direction.
2
1
General functionsInformation ⦁ touch the icon ► another Display is opened
Back ⦁ touch the icon ► the previous Display appears ► any alterations are accepted
confirming selection ⦁ touch the icon ► alteration/selection is activated or confirmed
Leaving the active Display ⦁ touch the icon ► the Display is closed ► the previous Display appears
033804.52.04_2013-09_Manual_B780_EN
37
Functions - Display
personal memory permanent ⦁ select a stitch pattern and alter e.g. stitch length or
stitch width ⦁ touch the icon ► the altered stitch pattern is saved
Basic setting of stitch pattern ⦁ touch the icon ► any alterations of the selected stitch pattern are
reset to basic setting
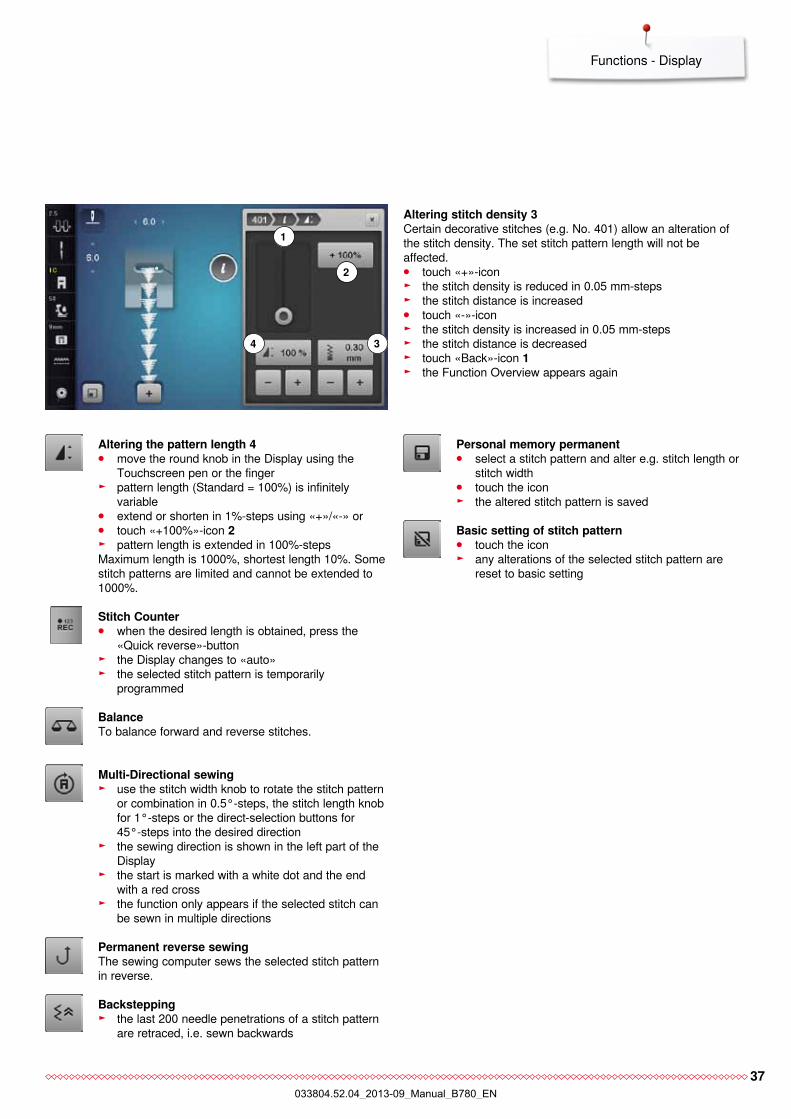
altering the pattern length 4 ⦁ move the round knob in the Display using the
Touchscreen pen or the finger ► pattern length (Standard = 100%) is infinitely
variable ⦁ extend or shorten in 1%-steps using «+»/«-» or ⦁ touch «+100%»-icon 2 ► pattern length is extended in 100%-steps
Maximum length is 1000%, shortest length 10%. Some stitch patterns are limited and cannot be extended to 1000%.
Stitch counter ⦁ when the desired length is obtained, press the
«Quick reverse»-button ► the Display changes to «auto» ► the selected stitch pattern is temporarily
programmed
BalanceTo balance forward and reverse stitches.
multi-Directional sewing ► use the stitch width knob to rotate the stitch pattern
or combination in 0.5°-steps, the stitch length knob for 1°-steps or the direct-selection buttons for 45°-steps into the desired direction
► the sewing direction is shown in the left part of the Display
► the start is marked with a white dot and the end with a red cross
► the function only appears if the selected stitch can be sewn in multiple directions
permanent reverse sewingThe sewing computer sews the selected stitch pattern in reverse.
Backstepping ► the last 200 needle penetrations of a stitch pattern
are retraced, i.e. sewn backwards
altering stitch density 3 Certain decorative stitches (e.g. No. 401) allow an alteration of the stitch density. The set stitch pattern length will not be affected. ⦁ touch «+»-icon ► the stitch density is reduced in 0.05 mm-steps ► the stitch distance is increased ⦁ touch «-»-icon ► the stitch density is increased in 0.05 mm-steps ► the stitch distance is decreased ► touch «Back»-icon 1 ► the Function Overview appears again
1
2
34
033804.52.04_2013-09_Manual_B780_EN
38
Functions - Display
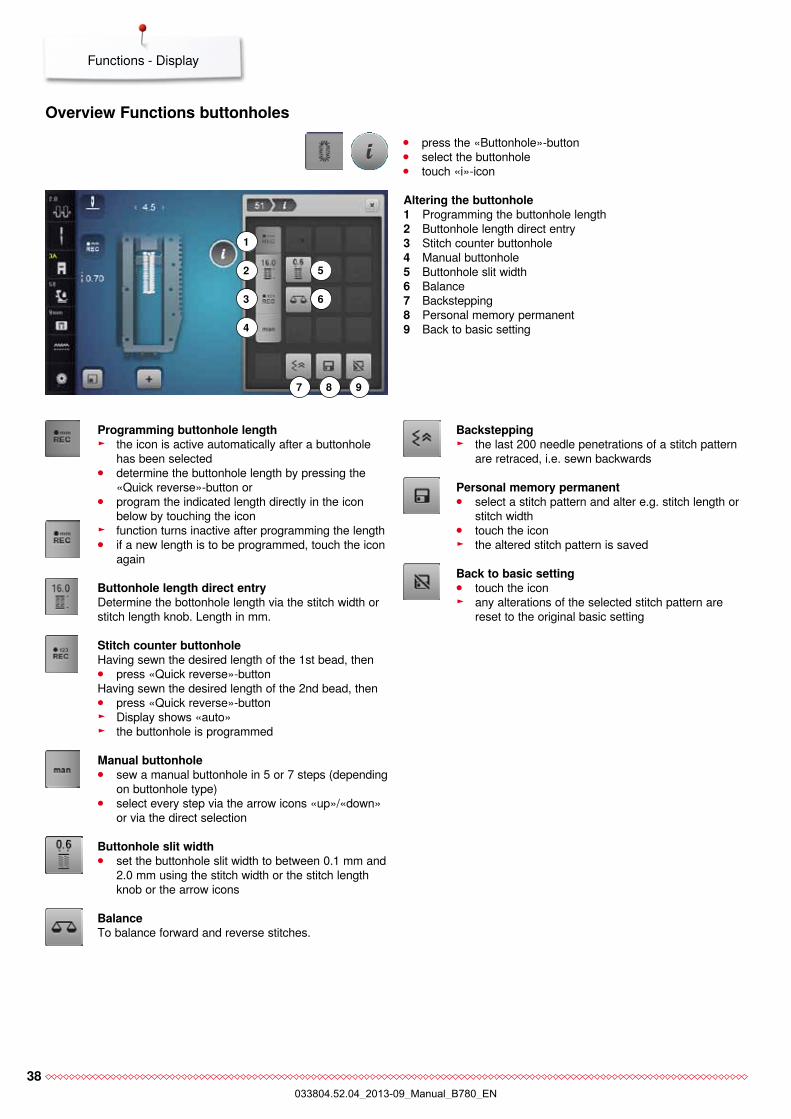
altering the buttonhole1 Programming the buttonhole length2 Buttonhole length direct entry3 Stitch counter buttonhole4 Manual buttonhole5 Buttonhole slit width6 Balance7 Backstepping8 Personal memory permanent9 Back to basic setting
⦁ press the «Buttonhole»-button ⦁ select the buttonhole ⦁ touch «i»-icon
programming buttonhole length ► the icon is active automatically after a buttonhole
has been selected ⦁ determine the buttonhole length by pressing the
«Quick reverse»-button or ⦁ program the indicated length directly in the icon
below by touching the icon ► function turns inactive after programming the length ⦁ if a new length is to be programmed, touch the icon
again
Buttonhole length direct entryDetermine the bottonhole length via the stitch width or stitch length knob. Length in mm.
Stitch counter buttonholeHaving sewn the desired length of the 1st bead, then ⦁ press «Quick reverse»-button
Having sewn the desired length of the 2nd bead, then ⦁ press «Quick reverse»-button ► Display shows «auto» ► the buttonhole is programmed
manual buttonhole ⦁ sew a manual buttonhole in 5 or 7 steps (depending
on buttonhole type) ⦁ select every step via the arrow icons «up»/«down»
or via the direct selection
Buttonhole slit width ⦁ set the buttonhole slit width to between 0.1 mm and
2.0 mm using the stitch width or the stitch length knob or the arrow icons
BalanceTo balance forward and reverse stitches.
Backstepping ► the last 200 needle penetrations of a stitch pattern
are retraced, i.e. sewn backwards
personal memory permanent ⦁ select a stitch pattern and alter e.g. stitch length or
stitch width ⦁ touch the icon ► the altered stitch pattern is saved
Back to basic setting ⦁ touch the icon ► any alterations of the selected stitch pattern are
reset to the original basic setting
overview functions buttonholes
1
2 5
8
63
7
4
9
033804.52.04_2013-09_Manual_B780_EN
39
Functions - Display
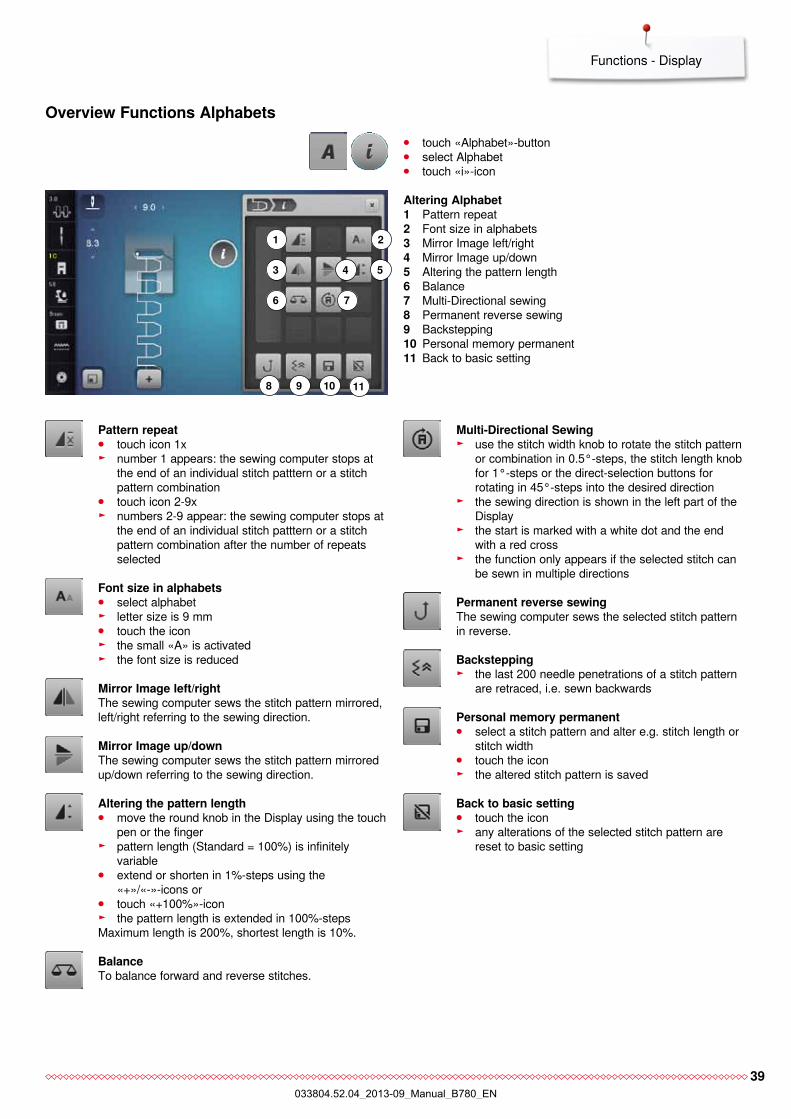
altering alphabet1 Pattern repeat2 Font size in alphabets3 Mirror Image left/right4 Mirror Image up/down5 Altering the pattern length6 Balance7 Multi-Directional sewing8 Permanent reverse sewing9 Backstepping10 Personal memory permanent11 Back to basic setting
⦁ touch «Alphabet»-button ⦁ select Alphabet ⦁ touch «i»-icon
overview functions alphabets
1
5
9
2
4
6 7
8 10 11
pattern repeat ⦁ touch icon 1x ► number 1 appears: the sewing computer stops at
the end of an individual stitch patttern or a stitch pattern combination
⦁ touch icon 2-9x ► numbers 2-9 appear: the sewing computer stops at
the end of an individual stitch patttern or a stitch pattern combination after the number of repeats selected
font size in alphabets ⦁ select alphabet ► letter size is 9 mm ⦁ touch the icon ► the small «A» is activated ► the font size is reduced
mirror Image left/rightThe sewing computer sews the stitch pattern mirrored, left/right referring to the sewing direction.
mirror Image up/downThe sewing computer sews the stitch pattern mirrored up/down referring to the sewing direction.
altering the pattern length ⦁ move the round knob in the Display using the touch
pen or the finger ► pattern length (Standard = 100%) is infinitely
variable ⦁ extend or shorten in 1%-steps using the
«+»/«-»-icons or ⦁ touch «+100%»-icon ► the pattern length is extended in 100%-steps
Maximum length is 200%, shortest length is 10%.
BalanceTo balance forward and reverse stitches.
multi-Directional Sewing ► use the stitch width knob to rotate the stitch pattern
or combination in 0.5°-steps, the stitch length knob for 1°-steps or the direct-selection buttons for rotating in 45°-steps into the desired direction
► the sewing direction is shown in the left part of the Display
► the start is marked with a white dot and the end with a red cross
► the function only appears if the selected stitch can be sewn in multiple directions
permanent reverse sewingThe sewing computer sews the selected stitch pattern in reverse.
Backstepping ► the last 200 needle penetrations of a stitch pattern
are retraced, i.e. sewn backwards
personal memory permanent ⦁ select a stitch pattern and alter e.g. stitch length or
stitch width ⦁ touch the icon ► the altered stitch pattern is saved
Back to basic setting ⦁ touch the icon ► any alterations of the selected stitch pattern are
reset to basic setting
3
033804.52.04_2013-09_Manual_B780_EN
40
Functions - Display
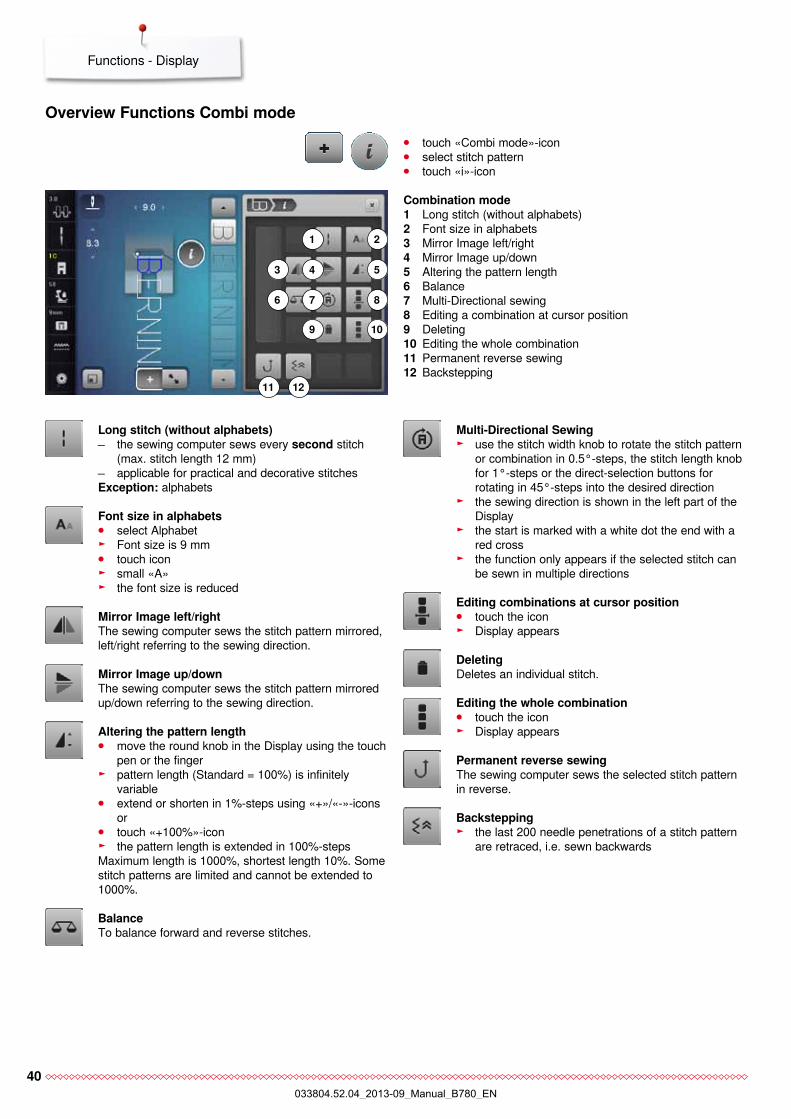
combination mode1 Long stitch (without alphabets) 2 Font size in alphabets3 Mirror Image left/right4 Mirror Image up/down5 Altering the pattern length6 Balance7 Multi-Directional sewing8 Editing a combination at cursor position9 Deleting10 Editing the whole combination 11 Permanent reverse sewing12 Backstepping
⦁ touch «Combi mode»-icon ⦁ select stitch pattern ⦁ touch «i»-icon
Long stitch (without alphabets) the sewing computer sews every second stitch
(max. stitch length 12 mm) applicable for practical and decorative stitches
exception: alphabets
font size in alphabets ⦁ select Alphabet ► Font size is 9 mm ⦁ touch icon ► small «A» ► the font size is reduced
mirror Image left/rightThe sewing computer sews the stitch pattern mirrored, left/right referring to the sewing direction.
mirror Image up/downThe sewing computer sews the stitch pattern mirrored up/down referring to the sewing direction.
altering the pattern length ⦁ move the round knob in the Display using the touch
pen or the finger ► pattern length (Standard = 100%) is infinitely
variable ⦁ extend or shorten in 1%-steps using «+»/«-»-icons
or ⦁ touch «+100%»-icon ► the pattern length is extended in 100%-steps
Maximum length is 1000%, shortest length 10%. Some stitch patterns are limited and cannot be extended to 1000%.
BalanceTo balance forward and reverse stitches.
multi-Directional Sewing ► use the stitch width knob to rotate the stitch pattern
or combination in 0.5°-steps, the stitch length knob for 1°-steps or the direct-selection buttons for rotating in 45°-steps into the desired direction
► the sewing direction is shown in the left part of the Display
► the start is marked with a white dot the end with a red cross
► the function only appears if the selected stitch can be sewn in multiple directions
editing combinations at cursor position ⦁ touch the icon ► Display appears
DeletingDeletes an individual stitch.
editing the whole combination ⦁ touch the icon ► Display appears
permanent reverse sewingThe sewing computer sews the selected stitch pattern in reverse.
Backstepping ► the last 200 needle penetrations of a stitch pattern
are retraced, i.e. sewn backwards
overview functions combi mode
1
4
7
2
3 5
6 8
9 10
11 12
033804.52.04_2013-09_Manual_B780_EN
41
Functions - Display
1
2
3
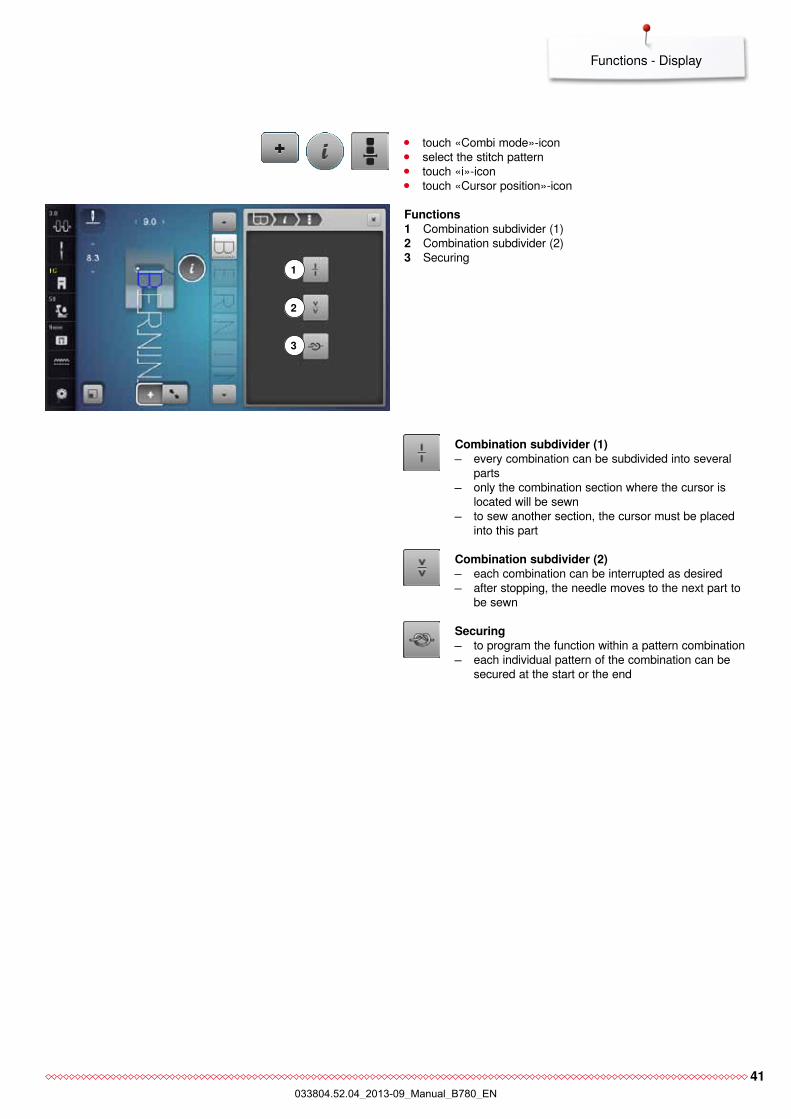
functions1 Combination subdivider (1)2 Combination subdivider (2)3 Securing
⦁ touch «Combi mode»-icon ⦁ select the stitch pattern ⦁ touch «i»-icon ⦁ touch «Cursor position»-icon
combination subdivider (1) every combination can be subdivided into several
parts only the combination section where the cursor is
located will be sewn to sew another section, the cursor must be placed
into this part
combination subdivider (2) each combination can be interrupted as desired after stopping, the needle moves to the next part to
be sewn
Securing to program the function within a pattern combination each individual pattern of the combination can be
secured at the start or the end
033804.52.04_2013-09_Manual_B780_EN
42
Functions - Display
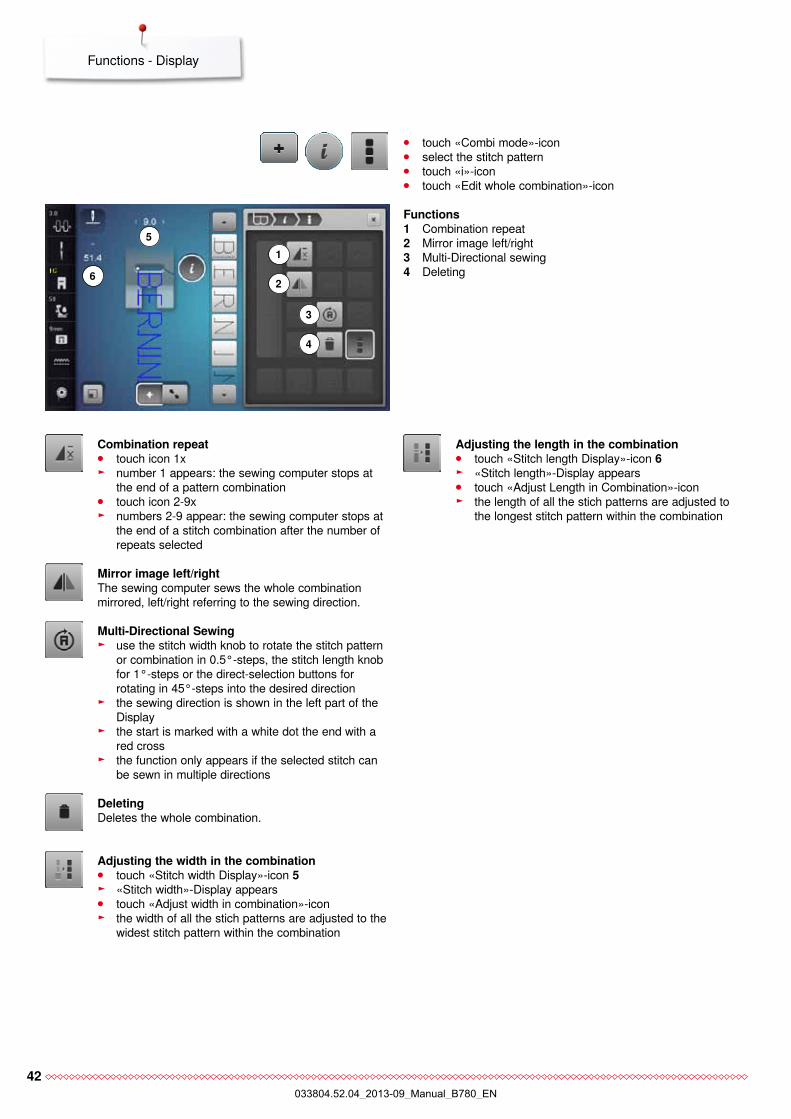
functions1 Combination repeat 2 Mirror image left/right3 Multi-Directional sewing4 Deleting
⦁ touch «Combi mode»-icon ⦁ select the stitch pattern ⦁ touch «i»-icon ⦁ touch «Edit whole combination»-icon
combination repeat ⦁ touch icon 1x ► number 1 appears: the sewing computer stops at
the end of a pattern combination ⦁ touch icon 2-9x ► numbers 2-9 appear: the sewing computer stops at
the end of a stitch combination after the number of repeats selected
mirror image left/rightThe sewing computer sews the whole combination mirrored, left/right referring to the sewing direction.
multi-Directional Sewing ► use the stitch width knob to rotate the stitch pattern
or combination in 0.5°-steps, the stitch length knob for 1°-steps or the direct-selection buttons for rotating in 45°-steps into the desired direction
► the sewing direction is shown in the left part of the Display
► the start is marked with a white dot the end with a red cross
► the function only appears if the selected stitch can be sewn in multiple directions
DeletingDeletes the whole combination.
adjusting the width in the combination ⦁ touch «Stitch width Display»-icon 5 ► «Stitch width»-Display appears ⦁ touch «Adjust width in combination»-icon ► the width of all the stich patterns are adjusted to the
widest stitch pattern within the combination
adjusting the length in the combination ⦁ touch «Stitch length Display»-icon 6 ► «Stitch length»-Display appears ⦁ touch «Adjust Length in Combination»-icon ► the length of all the stich patterns are adjusted to
the longest stitch pattern within the combination
1
2
3
4
5
6
033804.52.04_2013-09_Manual_B780_EN
43
Functions - Display
1 2
3
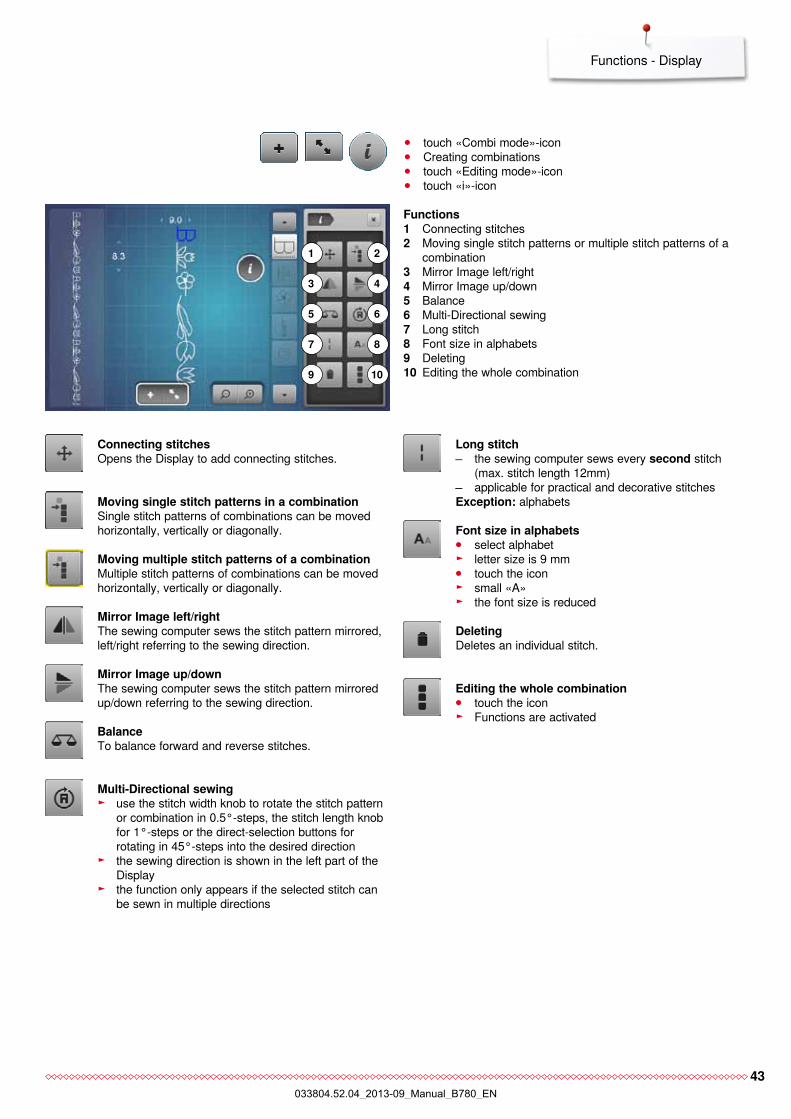
functions1 Connecting stitches 2 Moving single stitch patterns or multiple stitch patterns of a
combination 3 Mirror Image left/right4 Mirror Image up/down5 Balance6 Multi-Directional sewing7 Long stitch8 Font size in alphabets9 Deleting10 Editing the whole combination
⦁ touch «Combi mode»-icon ⦁ Creating combinations ⦁ touch «Editing mode»-icon ⦁ touch «i»-icon
connecting stitchesOpens the Display to add connecting stitches.
moving single stitch patterns in a combinationSingle stitch patterns of combinations can be moved horizontally, vertically or diagonally.
moving multiple stitch patterns of a combination Multiple stitch patterns of combinations can be moved horizontally, vertically or diagonally.
mirror Image left/rightThe sewing computer sews the stitch pattern mirrored, left/right referring to the sewing direction.
mirror Image up/downThe sewing computer sews the stitch pattern mirrored up/down referring to the sewing direction.
BalanceTo balance forward and reverse stitches.
multi-Directional sewing ► use the stitch width knob to rotate the stitch pattern
or combination in 0.5°-steps, the stitch length knob for 1°-steps or the direct-selection buttons for rotating in 45°-steps into the desired direction
► the sewing direction is shown in the left part of the Display
► the function only appears if the selected stitch can be sewn in multiple directions
Long stitch the sewing computer sews every second stitch
(max. stitch length 12mm) applicable for practical and decorative stitches
exception: alphabets
font size in alphabets ⦁ select alphabet ► letter size is 9 mm ⦁ touch the icon ► small «A» ► the font size is reduced
DeletingDeletes an individual stitch.
editing the whole combination ⦁ touch the icon ► Functions are activated
5 6
4
7 8
9 10
033804.52.04_2013-09_Manual_B780_EN
44
Setup Program
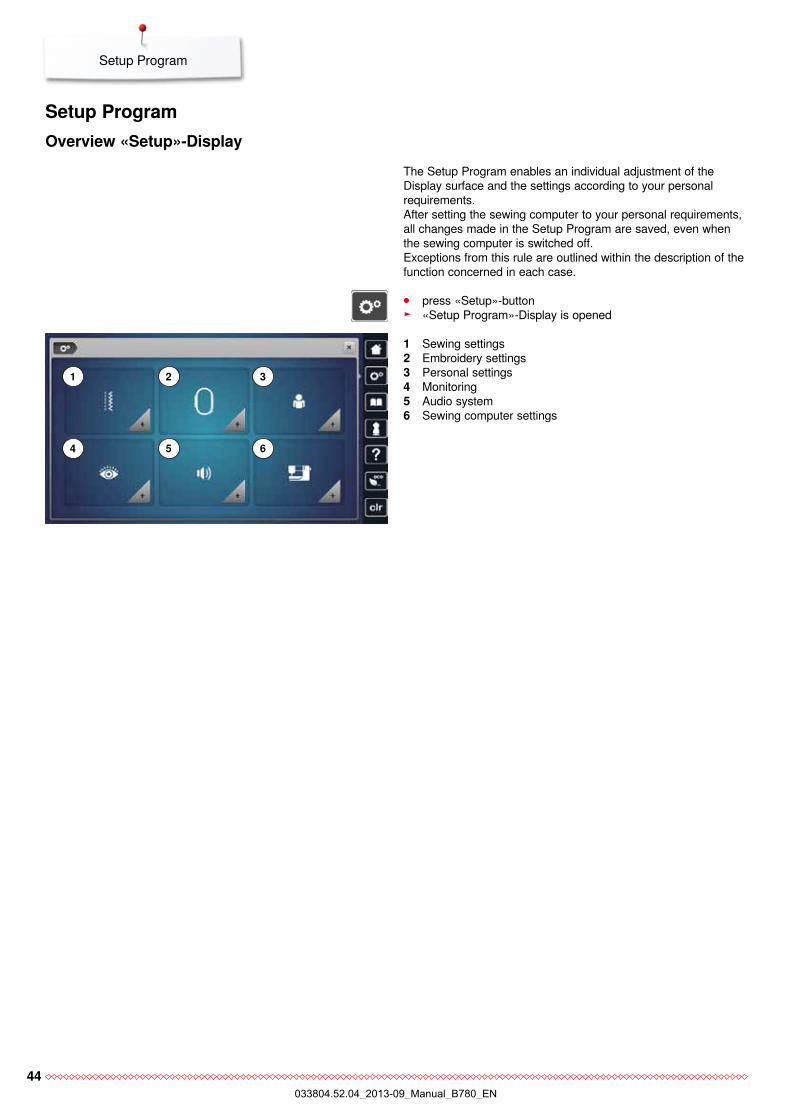
The Setup Program enables an individual adjustment of the Display surface and the settings according to your personal requirements.After setting the sewing computer to your personal requirements, all changes made in the Setup Program are saved, even when the sewing computer is switched off.Exceptions from this rule are outlined within the description of thefunction concerned in each case.
⦁ press «Setup»-button ► «Setup Program»-Display is opened
1 Sewing settings 2 Embroidery settings3 Personal settings4 Monitoring5 Audio system6 Sewing computer settings
21 3
5 64
Setup program overview «Setup»-Display
033804.52.04_2013-09_Manual_B780_EN
45
Setup Program
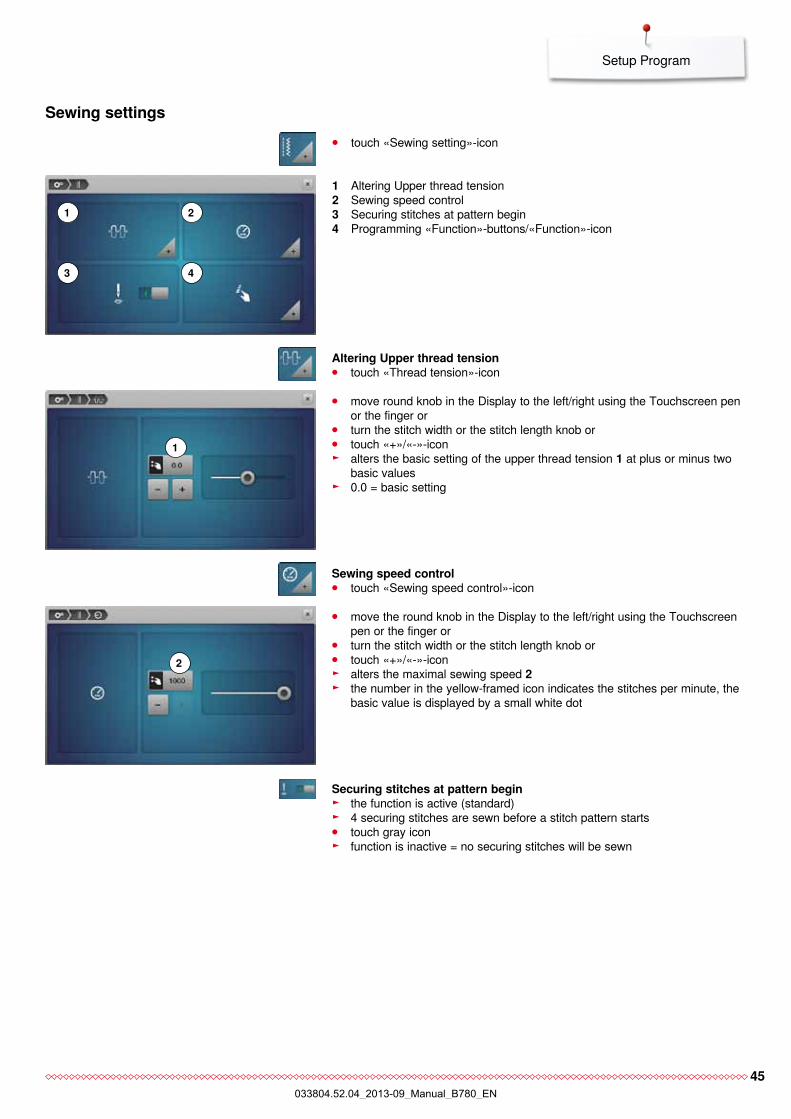
altering upper thread tension ⦁ touch «Thread tension»-icon
⦁ move round knob in the Display to the left/right using the Touchscreen pen or the finger or
⦁ turn the stitch width or the stitch length knob or ⦁ touch «+»/«-»-icon ► alters the basic setting of the upper thread tension 1 at plus or minus two
basic values ► 0.0 = basic setting
Sewing settings
Sewing speed control ⦁ touch «Sewing speed control»-icon
⦁ move the round knob in the Display to the left/right using the Touchscreen pen or the finger or
⦁ turn the stitch width or the stitch length knob or ⦁ touch «+»/«-»-icon ► alters the maximal sewing speed 2 ► the number in the yellow-framed icon indicates the stitches per minute, the
basic value is displayed by a small white dot
Securing stitches at pattern begin ► the function is active (standard) ► 4 securing stitches are sewn before a stitch pattern starts ⦁ touch gray icon ► function is inactive = no securing stitches will be sewn
1
2
1
3
2
4
1 Altering Upper thread tension2 Sewing speed control3 Securing stitches at pattern begin4 Programming «Function»-buttons/«Function»-icon
⦁ touch «Sewing setting»-icon
033804.52.04_2013-09_Manual_B780_EN
46
Setup Program
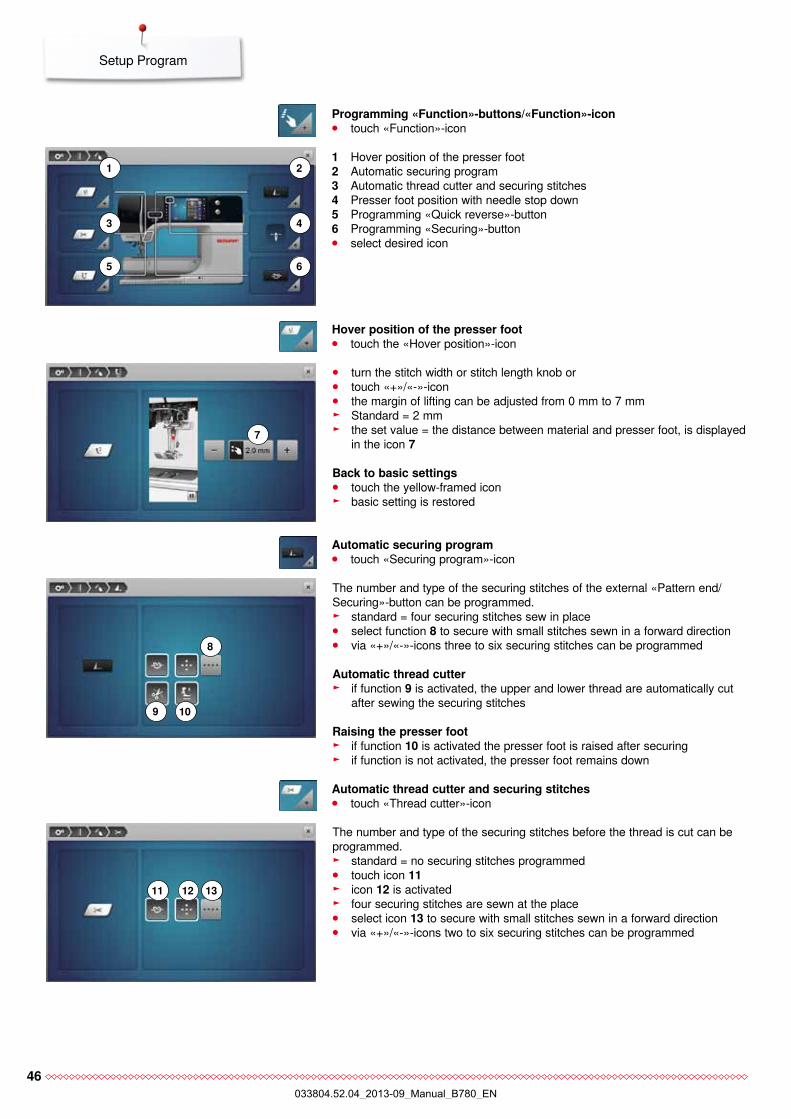
⦁ turn the stitch width or stitch length knob or ⦁ touch «+»/«-»-icon ⦁ the margin of lifting can be adjusted from 0 mm to 7 mm ► Standard = 2 mm ► the set value = the distance between material and presser foot, is displayed
in the icon 7
Back to basic settings ⦁ touch the yellow-framed icon ► basic setting is restored
The number and type of the securing stitches of the external «Pattern end/Securing»-button can be programmed.
► standard = four securing stitches sew in place ⦁ select function 8 to secure with small stitches sewn in a forward direction ⦁ via «+»/«-»-icons three to six securing stitches can be programmed
automatic thread cutter ► if function 9 is activated, the upper and lower thread are automatically cut
after sewing the securing stitches
raising the presser foot ► if function 10 is activated the presser foot is raised after securing ► if function is not activated, the presser foot remains down
The number and type of the securing stitches before the thread is cut can be programmed.
► standard = no securing stitches programmed ⦁ touch icon 11 ► icon 12 is activated ► four securing stitches are sewn at the place ⦁ select icon 13 to secure with small stitches sewn in a forward direction ⦁ via «+»/«-»-icons two to six securing stitches can be programmed
Hover position of the presser foot ⦁ touch the «Hover position»-icon
automatic securing program ⦁ touch «Securing program»-icon
automatic thread cutter and securing stitches ⦁ touch «Thread cutter»-icon
programming «function»-buttons/«function»-icon ⦁ touch «Function»-icon
1 Hover position of the presser foot 2 Automatic securing program3 Automatic thread cutter and securing stitches 4 Presser foot position with needle stop down 5 Programming «Quick reverse»-button6 Programming «Securing»-button ⦁ select desired icon
7
8
11
9
12
10
13
1
3
5
2
4
6
033804.52.04_2013-09_Manual_B780_EN
47
Setup Program
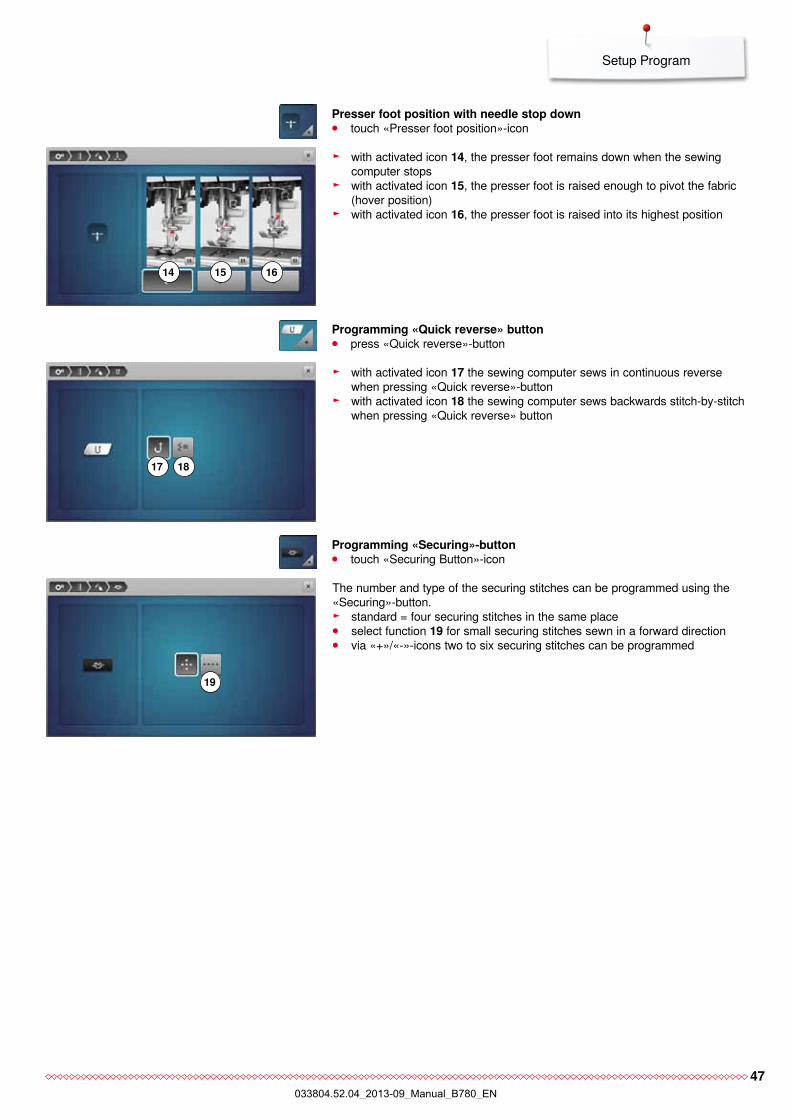
► with activated icon 14, the presser foot remains down when the sewing computer stops
► with activated icon 15, the presser foot is raised enough to pivot the fabric (hover position)
► with activated icon 16, the presser foot is raised into its highest position
► with activated icon 17 the sewing computer sews in continuous reverse when pressing «Quick reverse»-button
► with activated icon 18 the sewing computer sews backwards stitch-by-stitch when pressing «Quick reverse» button
The number and type of the securing stitches can be programmed using the «Securing»-button.
► standard = four securing stitches in the same place ⦁ select function 19 for small securing stitches sewn in a forward direction ⦁ via «+»/«-»-icons two to six securing stitches can be programmed
15
presser foot position with needle stop down ⦁ touch «Presser foot position»-icon
programming «Quick reverse» button ⦁ press «Quick reverse»-button
programming «Securing»-button ⦁ touch «Securing Button»-icon
14 15
17
19
18
16
033804.52.04_2013-09_Manual_B780_EN
48
Setup Program
embroidery settings
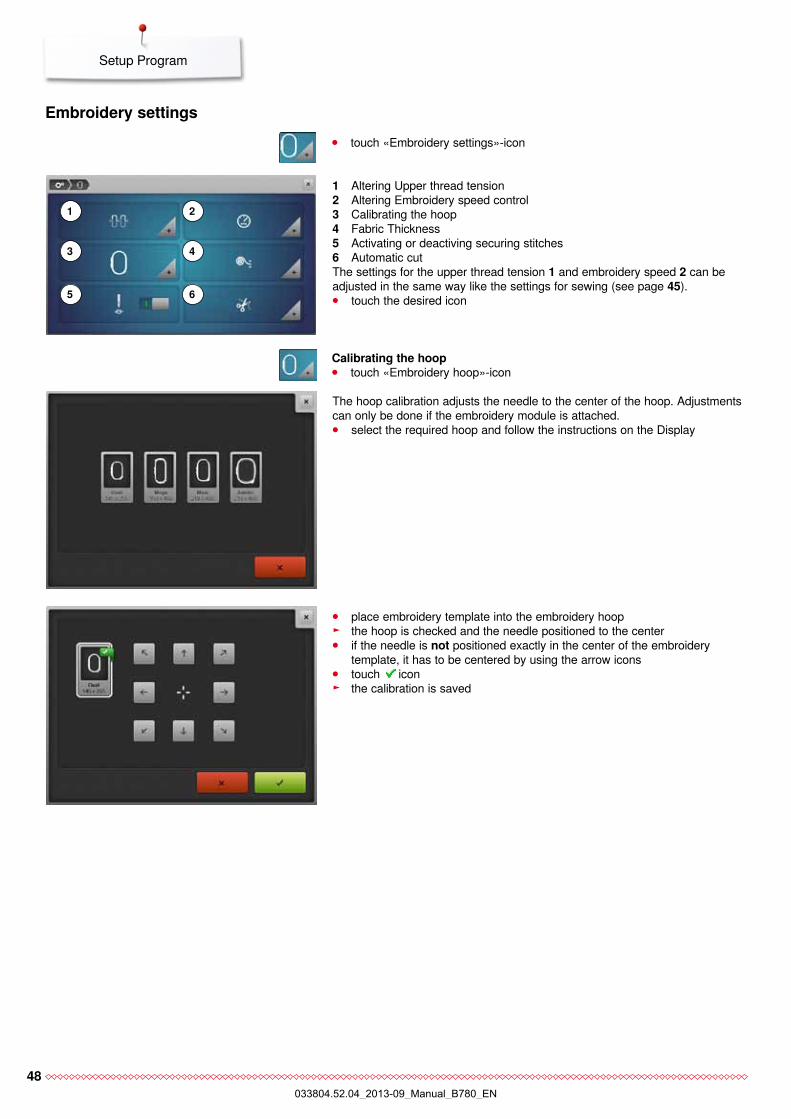
1 Altering Upper thread tension2 Altering Embroidery speed control3 Calibrating the hoop4 Fabric Thickness5 Activating or deactiving securing stitches6 Automatic cut The settings for the upper thread tension 1 and embroidery speed 2 can be adjusted in the same way like the settings for sewing (see page 45). ⦁ touch the desired icon
The hoop calibration adjusts the needle to the center of the hoop. Adjustments can only be done if the embroidery module is attached. ⦁ select the required hoop and follow the instructions on the Display
⦁ place embroidery template into the embroidery hoop ► the hoop is checked and the needle positioned to the center ⦁ if the needle is not positioned exactly in the center of the embroidery
template, it has to be centered by using the arrow icons ⦁ touch icon ► the calibration is saved
⦁ touch «Embroidery settings»-icon
calibrating the hoop ⦁ touch «Embroidery hoop»-icon
1
3
5
2
4
6
033804.52.04_2013-09_Manual_B780_EN
49
Setup Program
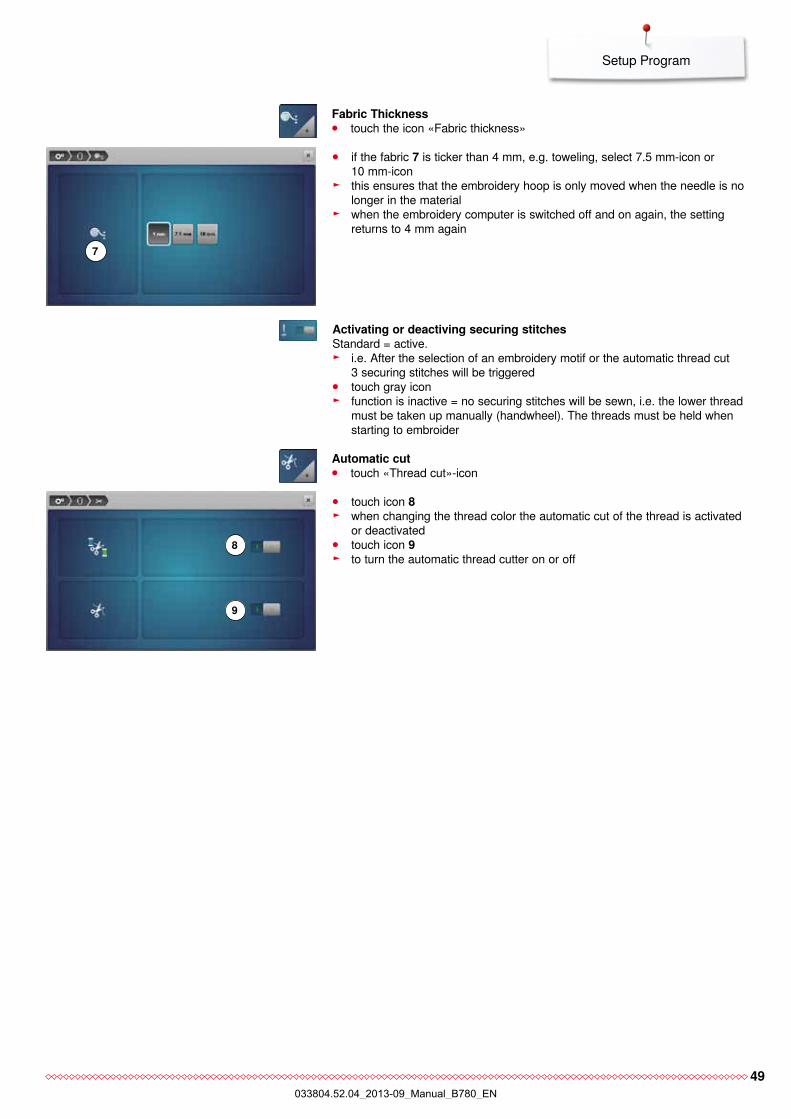
⦁ if the fabric 7 is ticker than 4 mm, e.g. toweling, select 7.5 mm-icon or 10 mm-icon
► this ensures that the embroidery hoop is only moved when the needle is no longer in the material
► when the embroidery computer is switched off and on again, the setting returns to 4 mm again
activating or deactiving securing stitchesStandard = active.
► i.e. After the selection of an embroidery motif or the automatic thread cut 3 securing stitches will be triggered
⦁ touch gray icon ► function is inactive = no securing stitches will be sewn, i.e. the lower thread
must be taken up manually (handwheel). The threads must be held when starting to embroider
⦁ touch icon 8 ► when changing the thread color the automatic cut of the thread is activated
or deactivated ⦁ touch icon 9 ► to turn the automatic thread cutter on or off
fabric thickness ⦁ touch the icon «Fabric thickness»
automatic cut ⦁ touch «Thread cut»-icon
8
9
7
033804.52.04_2013-09_Manual_B780_EN
50
Setup Program
personal settings
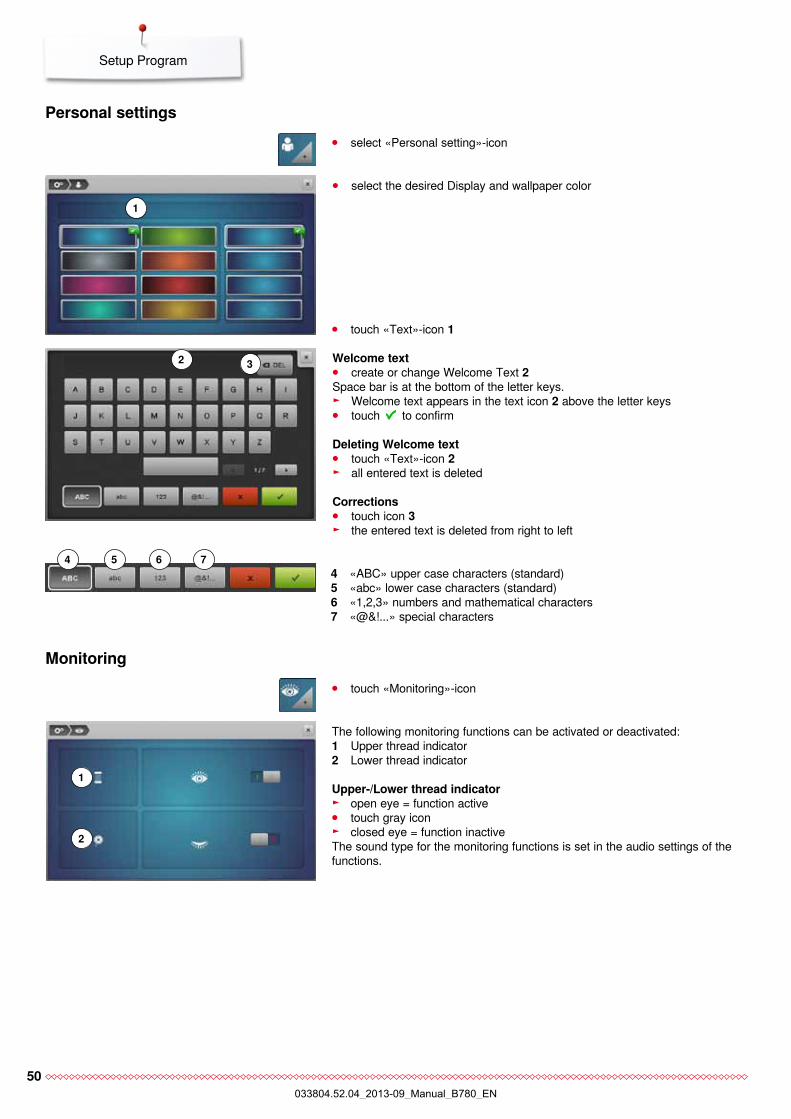
⦁ select the desired Display and wallpaper color
Welcome text ⦁ create or change Welcome Text 2
Space bar is at the bottom of the letter keys. ► Welcome text appears in the text icon 2 above the letter keys ⦁ touch to confirm
Deleting Welcome text ⦁ touch «Text»-icon 2 ► all entered text is deleted
corrections ⦁ touch icon 3 ► the entered text is deleted from right to left
⦁ select «Personal setting»-icon
⦁ touch «Text»-icon 1
monitoring
The following monitoring functions can be activated or deactivated:1 Upper thread indicator2 Lower thread indicator
upper-/Lower thread indicator ► open eye = function active ⦁ touch gray icon ► closed eye = function inactive
The sound type for the monitoring functions is set in the audio settings of the functions.
⦁ touch «Monitoring»-icon
1
2 3
1
2
4 «ABC» upper case characters (standard)5 «abc» lower case characters (standard)6 «1,2,3» numbers and mathematical characters7 «@&!...» special characters
4 765
033804.52.04_2013-09_Manual_B780_EN
51
Setup Program
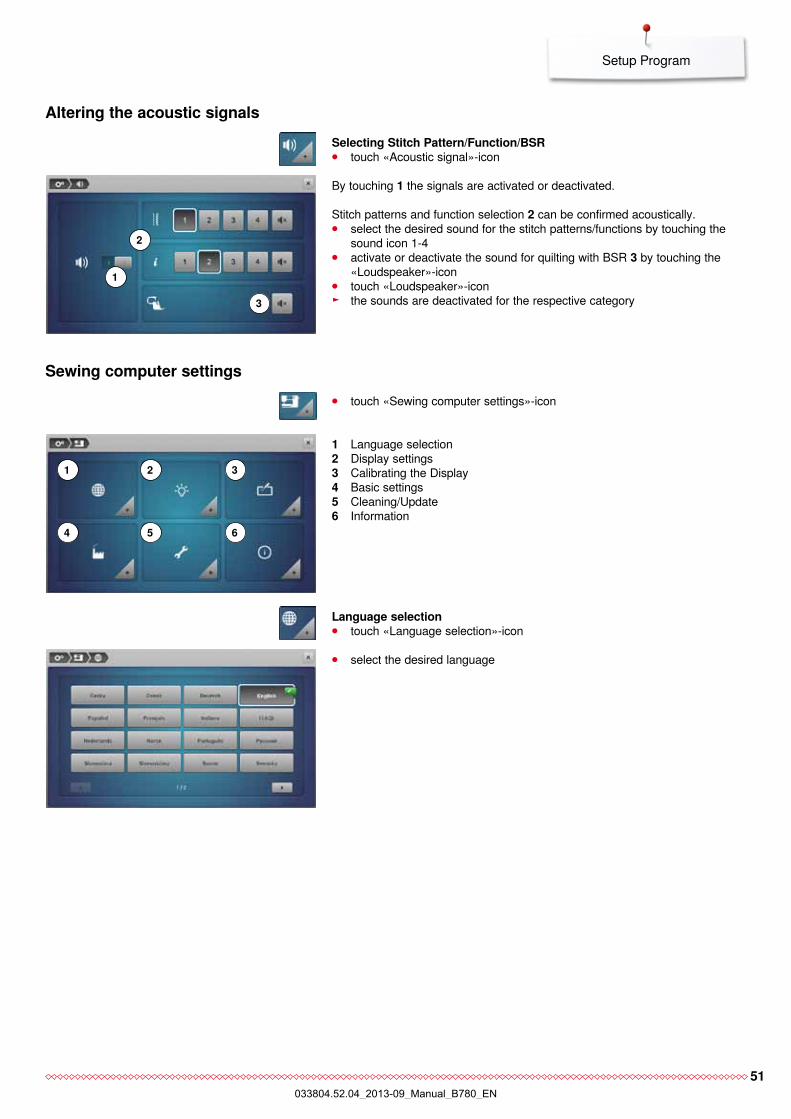
altering the acoustic signals
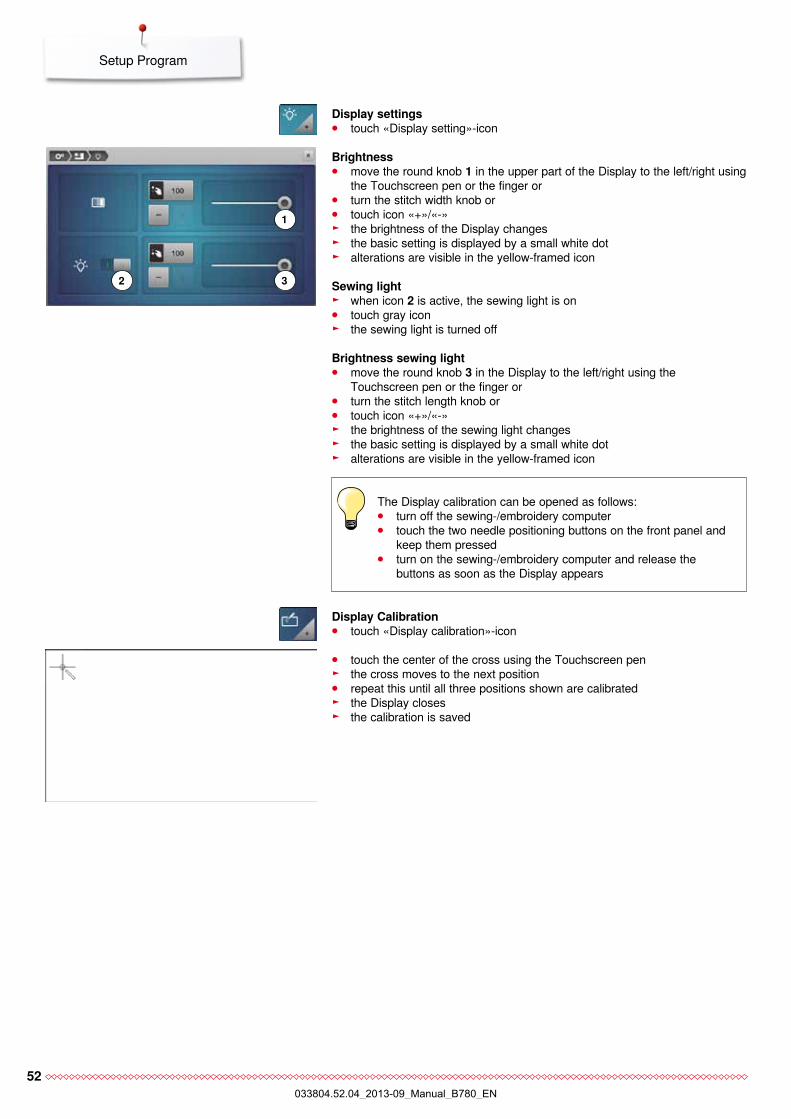
Sewing computer settings
By touching 1 the signals are activated or deactivated.
Stitch patterns and function selection 2 can be confirmed acoustically. ⦁ select the desired sound for the stitch patterns/functions by touching the
sound icon 1-4 ⦁ activate or deactivate the sound for quilting with BSR 3 by touching the
«Loudspeaker»-icon ⦁ touch «Loudspeaker»-icon ► the sounds are deactivated for the respective category
1 Language selection2 Display settings3 Calibrating the Display4 Basic settings5 Cleaning/Update6 Information
32
Selecting Stitch pattern/function/BSr ⦁ touch «Acoustic signal»-icon
⦁ touch «Sewing computer settings»-icon
4 5
1
6
⦁ select the desired language
Language selection ⦁ touch «Language selection»-icon
3
2
1
033804.52.04_2013-09_Manual_B780_EN
52
Setup Program
⦁ touch the center of the cross using the Touchscreen pen ► the cross moves to the next position ⦁ repeat this until all three positions shown are calibrated ► the Display closes ► the calibration is saved
Display calibration ⦁ touch «Display calibration»-icon
Brightness ⦁ move the round knob 1 in the upper part of the Display to the left/right using
the Touchscreen pen or the finger or ⦁ turn the stitch width knob or ⦁ touch icon «+»/«-» ► the brightness of the Display changes ► the basic setting is displayed by a small white dot ► alterations are visible in the yellow-framed icon
Sewing light ► when icon 2 is active, the sewing light is on ⦁ touch gray icon ► the sewing light is turned off
Brightness sewing light ⦁ move the round knob 3 in the Display to the left/right using the
Touchscreen pen or the finger or ⦁ turn the stitch length knob or ⦁ touch icon «+»/«-» ► the brightness of the sewing light changes ► the basic setting is displayed by a small white dot ► alterations are visible in the yellow-framed icon
Display settings ⦁ touch «Display setting»-icon
2
1
3
The Display calibration can be opened as follows: ⦁ turn off the sewing-/embroidery computer ⦁ touch the two needle positioning buttons on the front panel and
keep them pressed ⦁ turn on the sewing-/embroidery computer and release the
buttons as soon as the Display appears
033804.52.04_2013-09_Manual_B780_EN
53
Setup Program
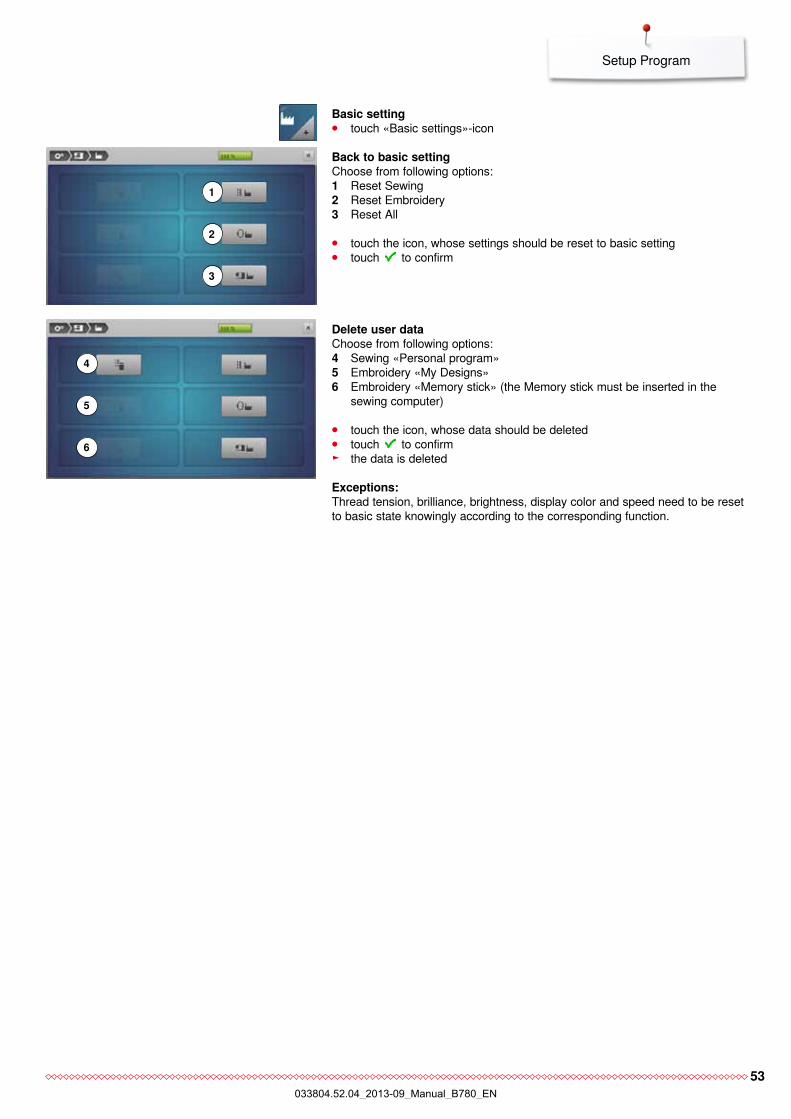
Back to basic setting Choose from following options:1 Reset Sewing2 Reset Embroidery3 Reset All
⦁ touch the icon, whose settings should be reset to basic setting ⦁ touch to confirm
Delete user data Choose from following options:4 Sewing «Personal program»5 Embroidery «My Designs»6 Embroidery «Memory stick» (the Memory stick must be inserted in the
sewing computer)
⦁ touch the icon, whose data should be deleted ⦁ touch to confirm ► the data is deleted
exceptions:Thread tension, brilliance, brightness, display color and speed need to be reset to basic state knowingly according to the corresponding function.
Basic setting ⦁ touch «Basic settings»-icon
1
2
3
4
5
6
033804.52.04_2013-09_Manual_B780_EN
54
Setup Program
cleaning/update
update
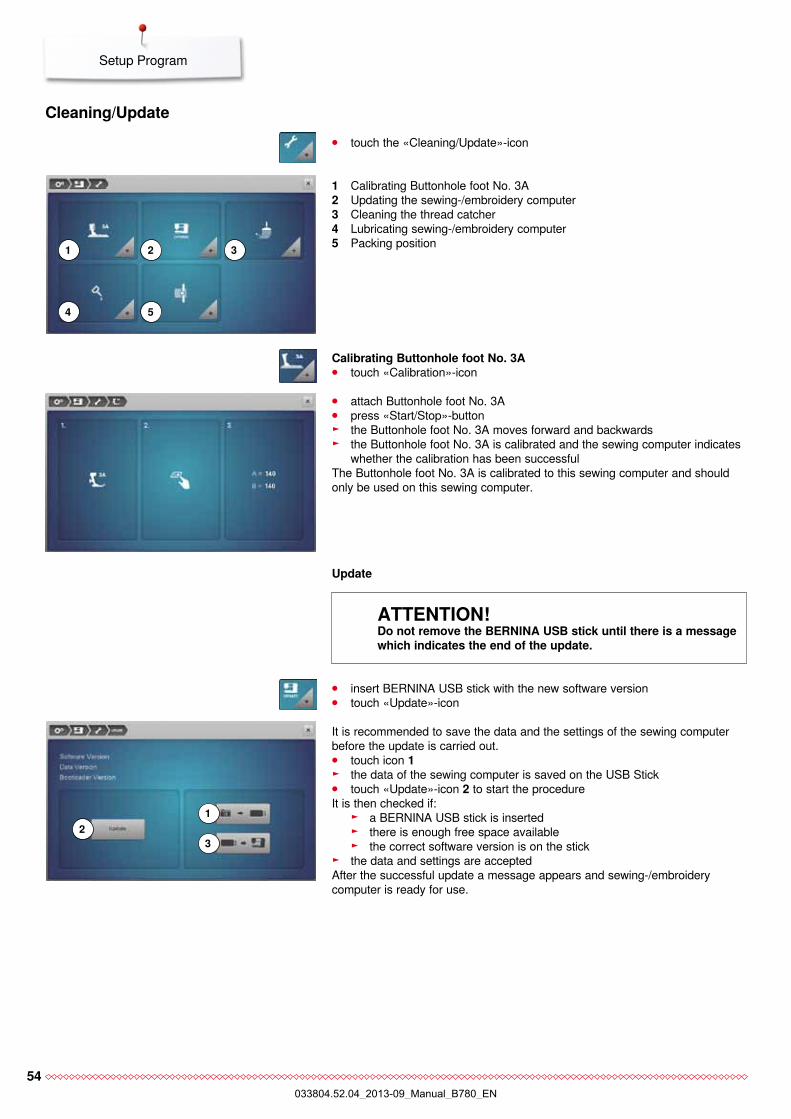
1 Calibrating Buttonhole foot No. 3A2 Updating the sewing-/embroidery computer3 Cleaning the thread catcher4 Lubricating sewing-/embroidery computer5 Packing position
⦁ attach Buttonhole foot No. 3A ⦁ press «Start/Stop»-button ► the Buttonhole foot No. 3A moves forward and backwards ► the Buttonhole foot No. 3A is calibrated and the sewing computer indicates
whether the calibration has been successfulThe Buttonhole foot No. 3A is calibrated to this sewing computer and should only be used on this sewing computer.
⦁ touch the «Cleaning/Update»-icon
calibrating Buttonhole foot no. 3a ⦁ touch «Calibration»-icon
attentIon! Do not remove the BernIna uSB stick until there is a message which indicates the end of the update.
21 3
4 5
It is recommended to save the data and the settings of the sewing computer before the update is carried out. ⦁ touch icon 1 ► the data of the sewing computer is saved on the USB Stick ⦁ touch «Update»-icon 2 to start the procedure
It is then checked if: ► a BERNINA USB stick is inserted ► there is enough free space available ► the correct software version is on the stick
► the data and settings are acceptedAfter the successful update a message appears and sewing-/embroidery computer is ready for use.
⦁ insert BERNINA USB stick with the new software version ⦁ touch «Update»-icon
1
32
033804.52.04_2013-09_Manual_B780_EN
55
Setup Program
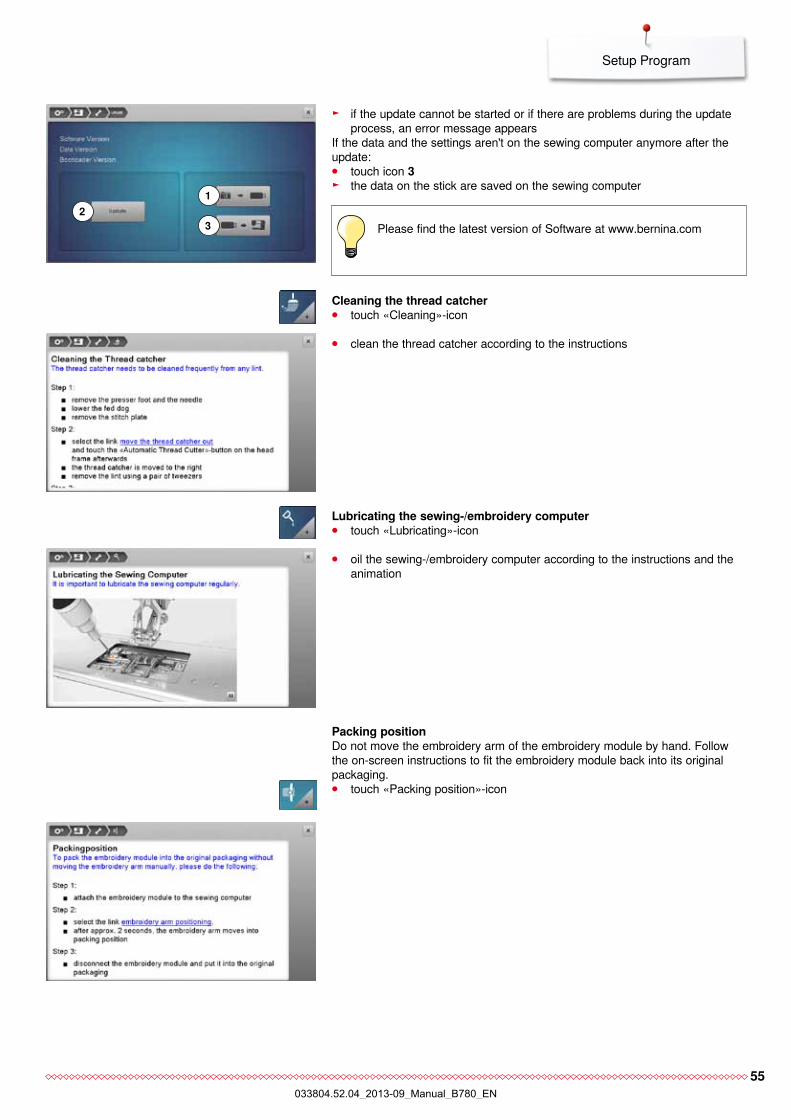
⦁ clean the thread catcher according to the instructions
⦁ oil the sewing-/embroidery computer according to the instructions and the animation
packing position Do not move the embroidery arm of the embroidery module by hand. Follow the on-screen instructions to fit the embroidery module back into its original packaging. ⦁ touch «Packing position»-icon
cleaning the thread catcher ⦁ touch «Cleaning»-icon
Lubricating the sewing-/embroidery computer ⦁ touch «Lubricating»-icon
► if the update cannot be started or if there are problems during the update process, an error message appears
If the data and the settings aren't on the sewing computer anymore after the update: ⦁ touch icon 3 ► the data on the stick are saved on the sewing computer
1
32
Please find the latest version of Software at www.bernina.com
033804.52.04_2013-09_Manual_B780_EN
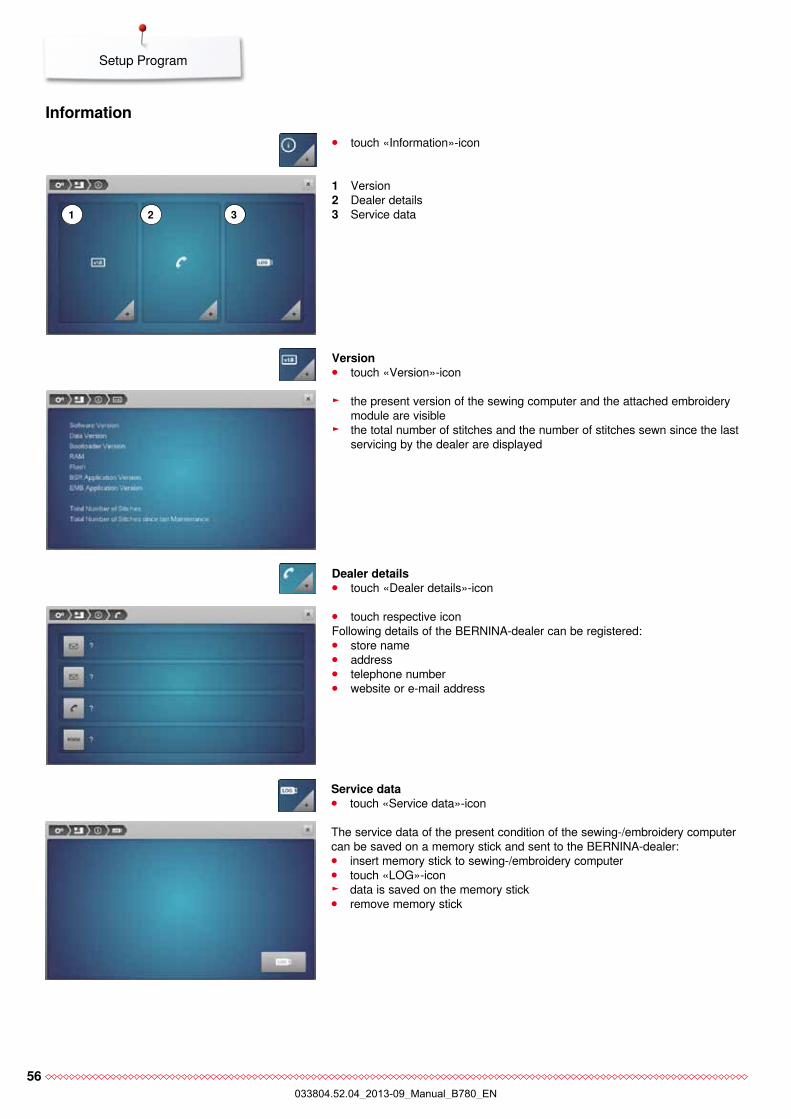
56
Setup Program
Information
1 Version2 Dealer details3 Service data
► the present version of the sewing computer and the attached embroidery module are visible
► the total number of stitches and the number of stitches sewn since the last servicing by the dealer are displayed
⦁ touch respective iconFollowing details of the BERNINA-dealer can be registered: ⦁ store name ⦁ address ⦁ telephone number ⦁ website or e-mail address
⦁ touch «Information»-icon
Version ⦁ touch «Version»-icon
Dealer details ⦁ touch «Dealer details»-icon
1 2 3
The service data of the present condition of the sewing-/embroidery computer can be saved on a memory stick and sent to the BERNINA-dealer: ⦁ insert memory stick to sewing-/embroidery computer ⦁ touch «LOG»-icon ► data is saved on the memory stick ⦁ remove memory stick
Service data ⦁ touch «Service data»-icon
033804.52.04_2013-09_Manual_B780_EN
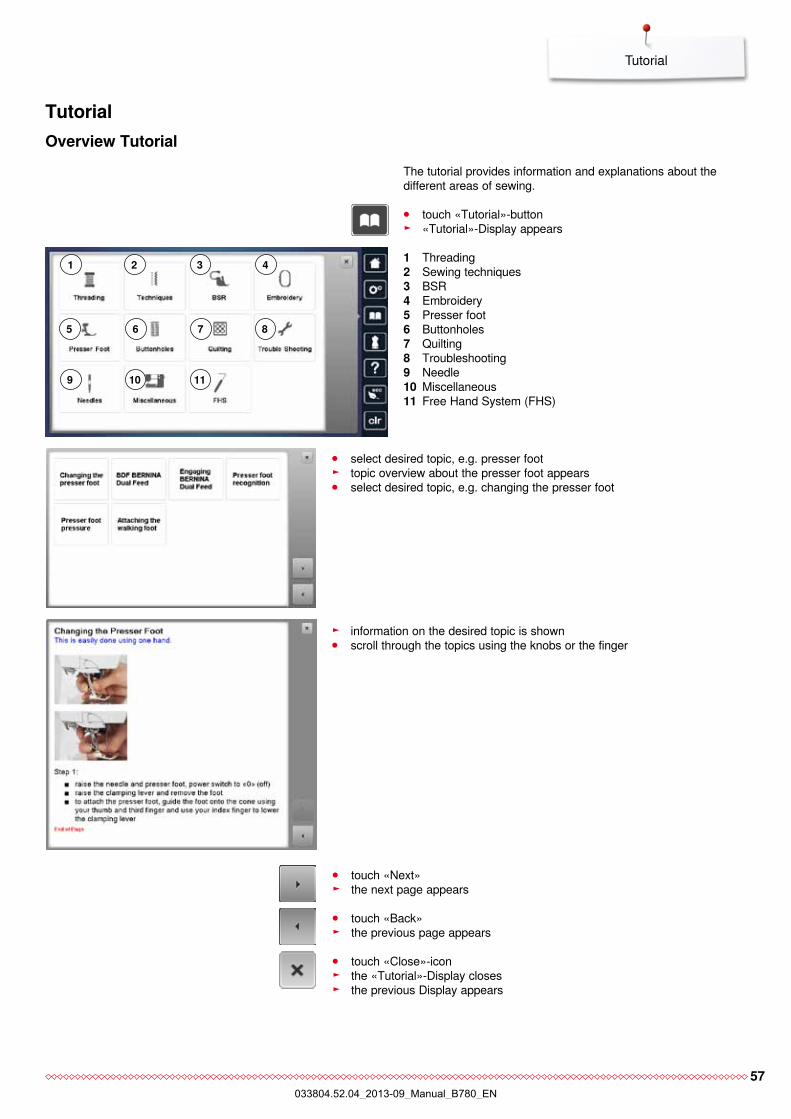
57
Tutorial
tutorialoverview tutorial
1 3
5
9
6
10
7
2
11
4
8
1 Threading2 Sewing techniques3 BSR4 Embroidery5 Presser foot6 Buttonholes 7 Quilting8 Troubleshooting9 Needle10 Miscellaneous11 Free Hand System (FHS)
⦁ select desired topic, e.g. presser foot ► topic overview about the presser foot appears ⦁ select desired topic, e.g. changing the presser foot
⦁ touch «Tutorial»-button ► «Tutorial»-Display appears
The tutorial provides information and explanations about the different areas of sewing.
► information on the desired topic is shown ⦁ scroll through the topics using the knobs or the finger
⦁ touch «Next» ► the next page appears
⦁ touch «Back» ► the previous page appears
⦁ touch «Close»-icon ► the «Tutorial»-Display closes ► the previous Display appears
033804.52.04_2013-09_Manual_B780_EN
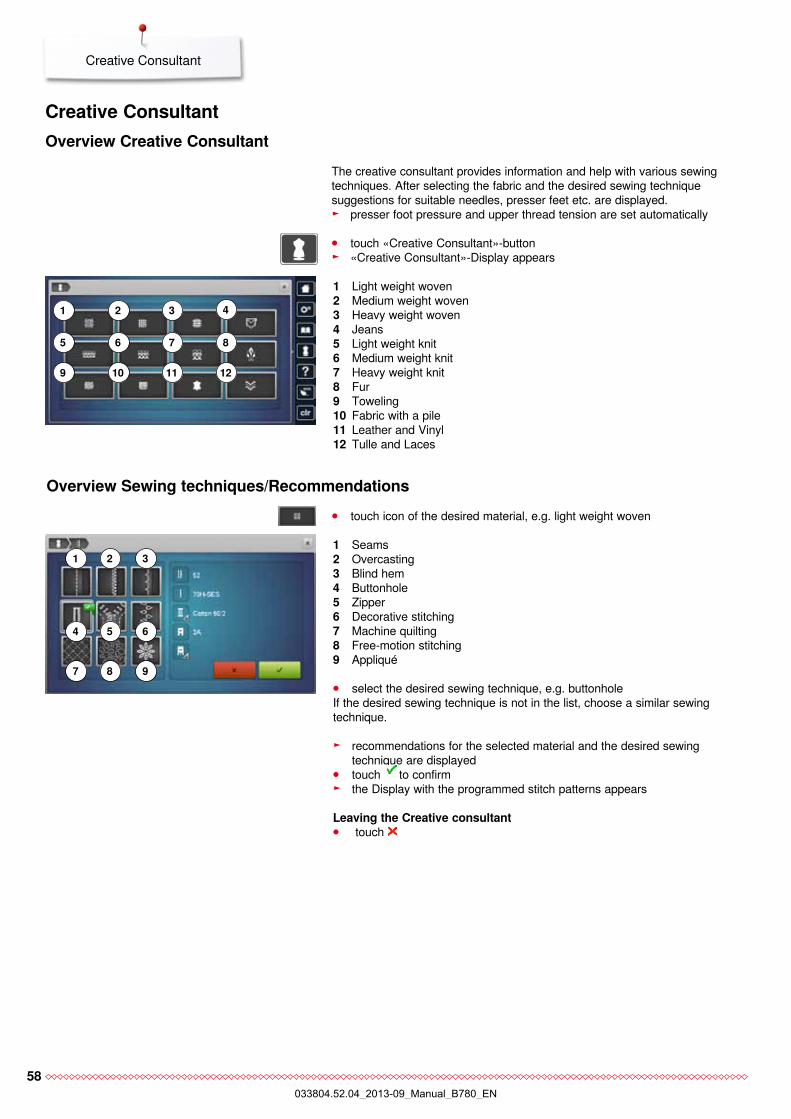
58
Creative Consultant
creative consultantoverview creative consultant
The creative consultant provides information and help with various sewing techniques. After selecting the fabric and the desired sewing technique suggestions for suitable needles, presser feet etc. are displayed.
► presser foot pressure and upper thread tension are set automatically
⦁ touch «Creative Consultant»-button ► «Creative Consultant»-Display appears
1
5
9
2
6
10
3
11
7
4
8
12
overview Sewing techniques/recommendations
1 Seams2 Overcasting3 Blind hem4 Buttonhole5 Zipper6 Decorative stitching7 Machine quilting8 Free-motion stitching9 Appliqué
► recommendations for the selected material and the desired sewing technique are displayed
⦁ touch to confirm ► the Display with the programmed stitch patterns appears
Leaving the creative consultant ⦁ touch
⦁ select the desired sewing technique, e.g. buttonholeIf the desired sewing technique is not in the list, choose a similar sewing technique.
1
5
2
6
3
7
4
8 9
⦁ touch icon of the desired material, e.g. light weight woven
1 Light weight woven2 Medium weight woven3 Heavy weight woven4 Jeans5 Light weight knit6 Medium weight knit7 Heavy weight knit8 Fur9 Toweling10 Fabric with a pile 11 Leather and Vinyl 12 Tulle and Laces
033804.52.04_2013-09_Manual_B780_EN
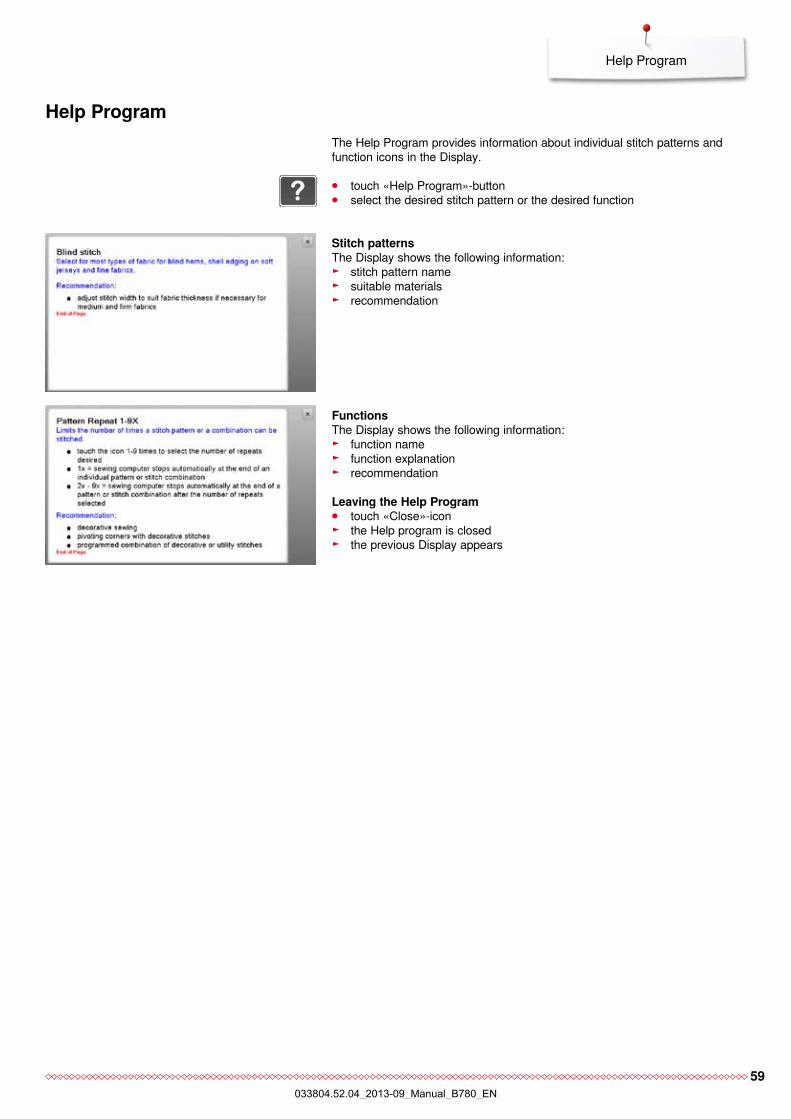
59
Help Program
⦁ touch «Help Program»-button ⦁ select the desired stitch pattern or the desired function
Stitch patterns The Display shows the following information:
► stitch pattern name ► suitable materials ► recommendation
Help program The Help Program provides information about individual stitch patterns and function icons in the Display.
functions The Display shows the following information:
► function name ► function explanation ► recommendation
Leaving the Help program ⦁ touch «Close»-icon ► the Help program is closed ► the previous Display appears
033804.52.04_2013-09_Manual_B780_EN
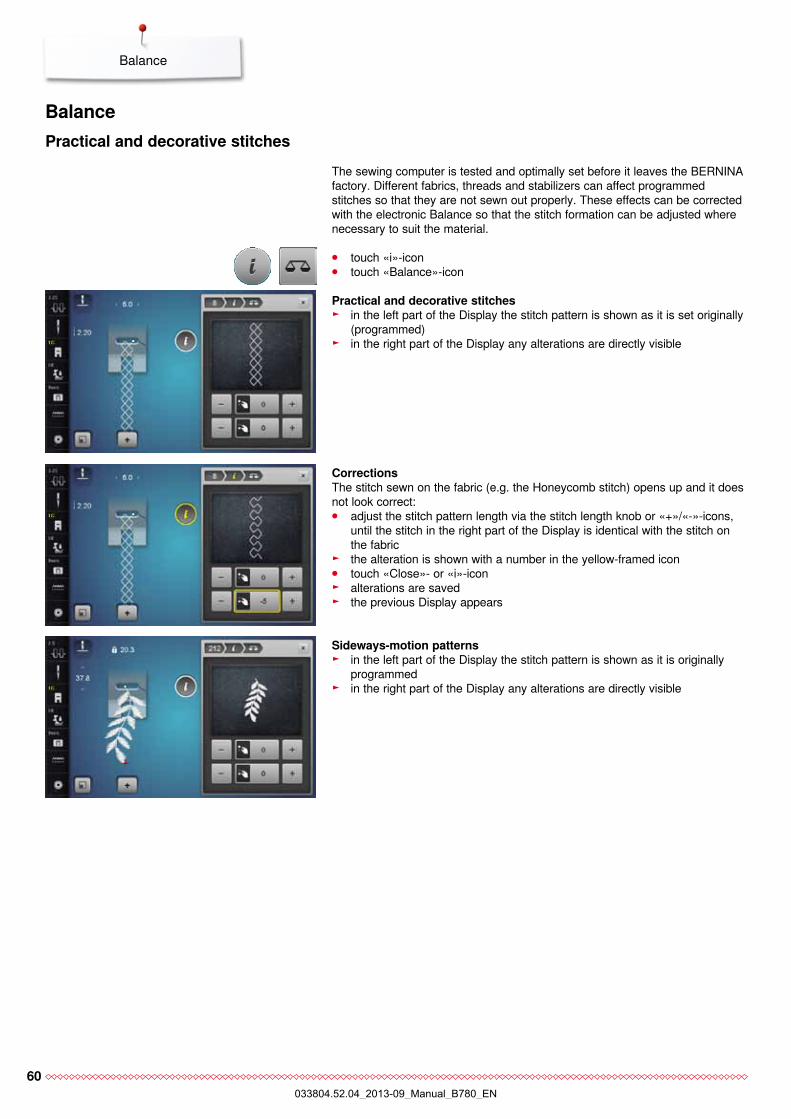
60
Balance
⦁ touch «i»-icon ⦁ touch «Balance»-icon
practical and decorative stitches ► in the left part of the Display the stitch pattern is shown as it is set originally
(programmed) ► in the right part of the Display any alterations are directly visible
Balancepractical and decorative stitches
The sewing computer is tested and optimally set before it leaves the BERNINA factory. Different fabrics, threads and stabilizers can affect programmed stitches so that they are not sewn out properly. These effects can be corrected with the electronic Balance so that the stitch formation can be adjusted where necessary to suit the material.
correctionsThe stitch sewn on the fabric (e.g. the Honeycomb stitch) opens up and it does not look correct: ⦁ adjust the stitch pattern length via the stitch length knob or «+»/«-»-icons,
until the stitch in the right part of the Display is identical with the stitch on the fabric
► the alteration is shown with a number in the yellow-framed icon ⦁ touch «Close»- or «i»-icon ► alterations are saved ► the previous Display appears
Sideways-motion patterns ► in the left part of the Display the stitch pattern is shown as it is originally
programmed ► in the right part of the Display any alterations are directly visible
033804.52.04_2013-09_Manual_B780_EN
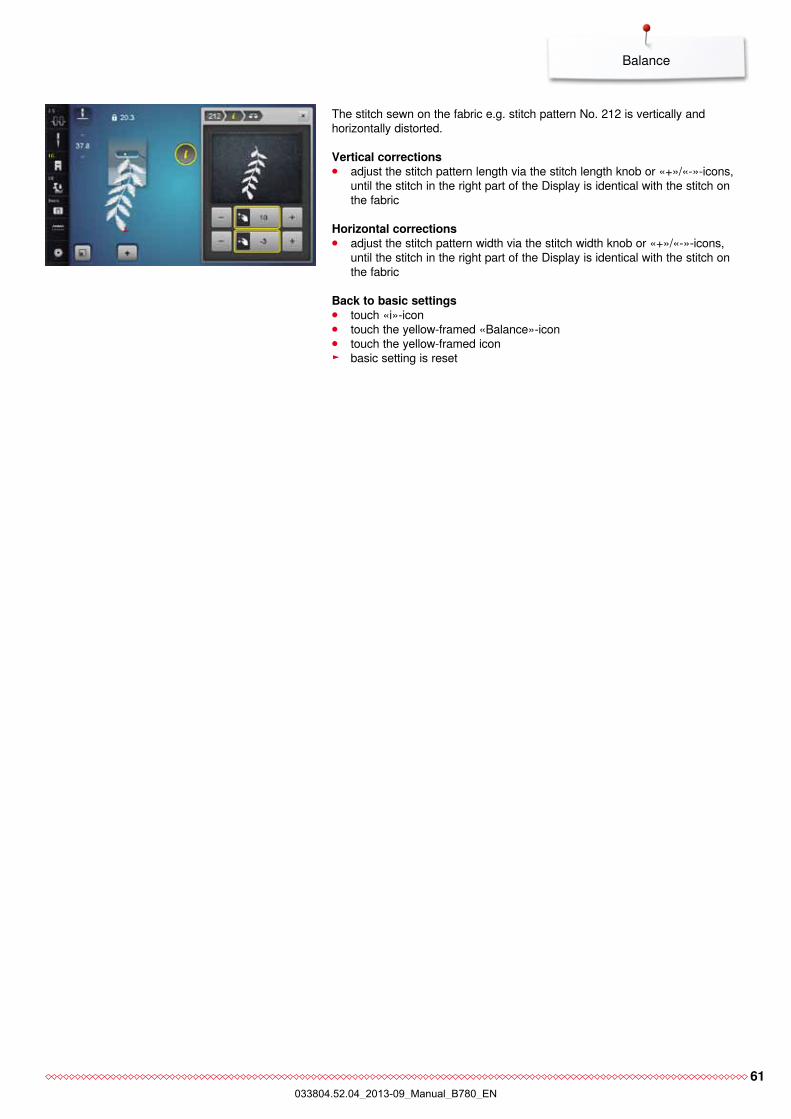
61
Balance
The stitch sewn on the fabric e.g. stitch pattern No. 212 is vertically and horizontally distorted.
Vertical corrections ⦁ adjust the stitch pattern length via the stitch length knob or «+»/«-»-icons,
until the stitch in the right part of the Display is identical with the stitch on the fabric
Horizontal corrections ⦁ adjust the stitch pattern width via the stitch width knob or «+»/«-»-icons,
until the stitch in the right part of the Display is identical with the stitch on the fabric
Back to basic settings ⦁ touch «i»-icon ⦁ touch the yellow-framed «Balance»-icon ⦁ touch the yellow-framed icon ► basic setting is reset
033804.52.04_2013-09_Manual_B780_EN

62
eco
activating eco ⦁ touch «eco»-button ► the Display gets dark ► power consumption is reduced and the sewing light turns off
The energy-saving mode also acts as a child safety feature. The Display is inactive and the sewing-/embroidery computer cannot be started.
Deactivating eco ⦁ touch «eco»-button ► the sewing-/embroidery computer is ready for use
eco descriptionWhen the work is interrupted for longer periods, the sewing-/embroidery computer can be put into energy-saving mode.
033804.52.04_2013-09_Manual_B780_EN
63
Notes
notes
033804.52.04_2013-09_Manual_B780_EN

64
Practical stitches
practical stitchesoverview practical stitches
⦁ touch «Practical stitch»-button ► the practical stitches are visible in the Display ⦁ further practical stitches are visible by scrolling
Straight stitch For non-elastic materials; all straight stitch work, such as seams, topstitching, sewing zippers
Zig-zag Zig-zag work such as overcasting edges, attaching elastic and lace
Vari overlockFor fine jerseys; stretch overlock seams, hems and stretch seams
running stitchMost types of fabric; mending, patching, reinforcing seams, etc.
Securing programFor all materials; secures the beginning and end of seams by straight stitching
triple straight stitchReinforced seams in heavy fabrics, visible seams and topstitching
Blind stitchFor most types of materials; Blind hems; shell edging effect on soft jerseys and fine material; decorative seams
Double overlockFor any knit materials; overlock seam = sewing and finishing in one step
Super stretch stitchFor highly elastic fabrics; highly elastic open seam for all types of clothing
Gathering stitchMost types of fabric; gathering with shirring elastic. Butted seams = butting two pressed edges and sewing together, decorative stitches
tricot stitch For jersey materials; visible hems, visible seams inlingerie, sweaters, mending jersey
triple Zig-zagReinforced seams in heavy fabrics; visible hems and seams
Honeycomb stitchFor all types of jersey and smooth materials; visible seams in lingerie, clothing, linen, mending etc
Stretch overlock For medium weight knits, toweling and firm woven; overlock seams, flat joining seams
033804.52.04_2013-09_Manual_B780_EN
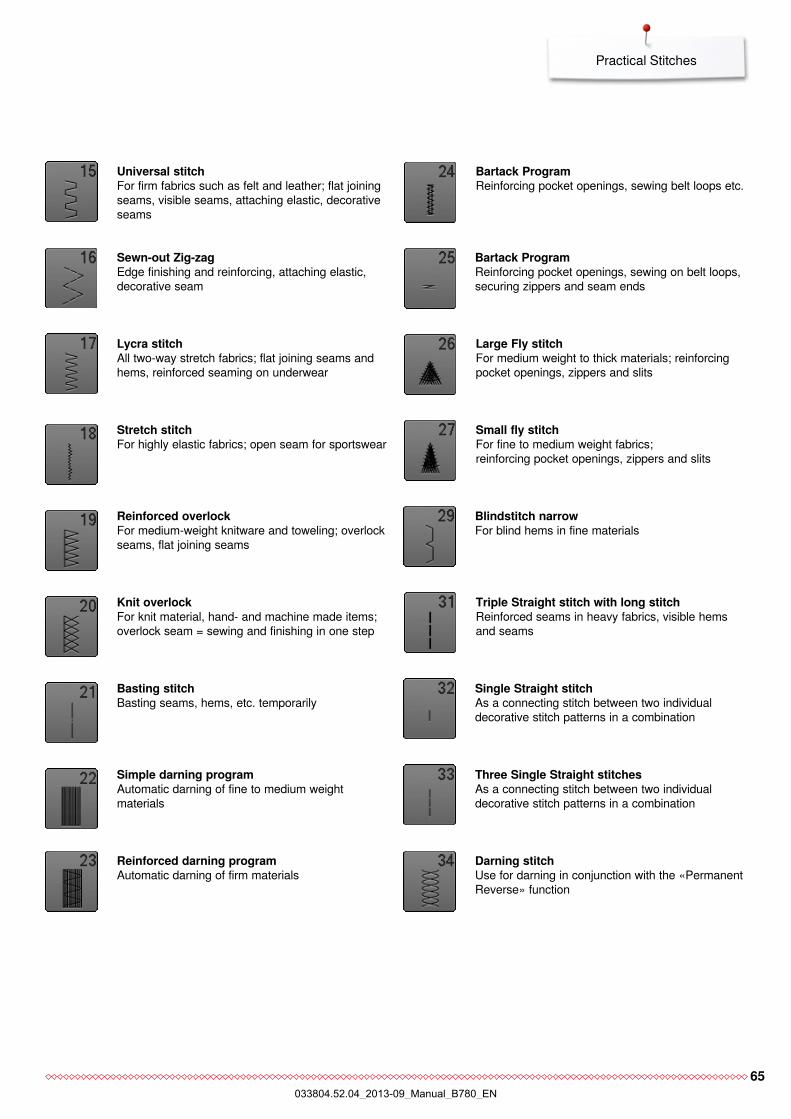
65
Practical Stitches
triple Straight stitch with long stitchReinforced seams in heavy fabrics, visible hems and seams
Bartack programReinforcing pocket openings, sewing belt loops etc.
Bartack programReinforcing pocket openings, sewing on belt loops, securing zippers and seam ends
Large fly stitchFor medium weight to thick materials; reinforcing pocket openings, zippers and slits
Blindstitch narrowFor blind hems in fine materials
three Single Straight stitchesAs a connecting stitch between two individual decorative stitch patterns in a combination
Single Straight stitchAs a connecting stitch between two individual decorative stitch patterns in a combination
Basting stitchBasting seams, hems, etc. temporarily
Lycra stitchAll two-way stretch fabrics; flat joining seams and hems, reinforced seaming on underwear
Stretch stitchFor highly elastic fabrics; open seam for sportswear
reinforced overlockFor medium-weight knitware and toweling; overlock seams, flat joining seams
Knit overlockFor knit material, hand- and machine made items; overlock seam = sewing and finishing in one step
Simple darning programAutomatic darning of fine to medium weight materials
universal stitchFor firm fabrics such as felt and leather; flat joining seams, visible seams, attaching elastic, decorative seams
Sewn-out Zig-zagEdge finishing and reinforcing, attaching elastic, decorative seam
reinforced darning programAutomatic darning of firm materials
Small fly stitchFor fine to medium weight fabrics;reinforcing pocket openings, zippers and slits
Darning stitchUse for darning in conjunction with the «Permanent Reverse» function
033804.52.04_2013-09_Manual_B780_EN
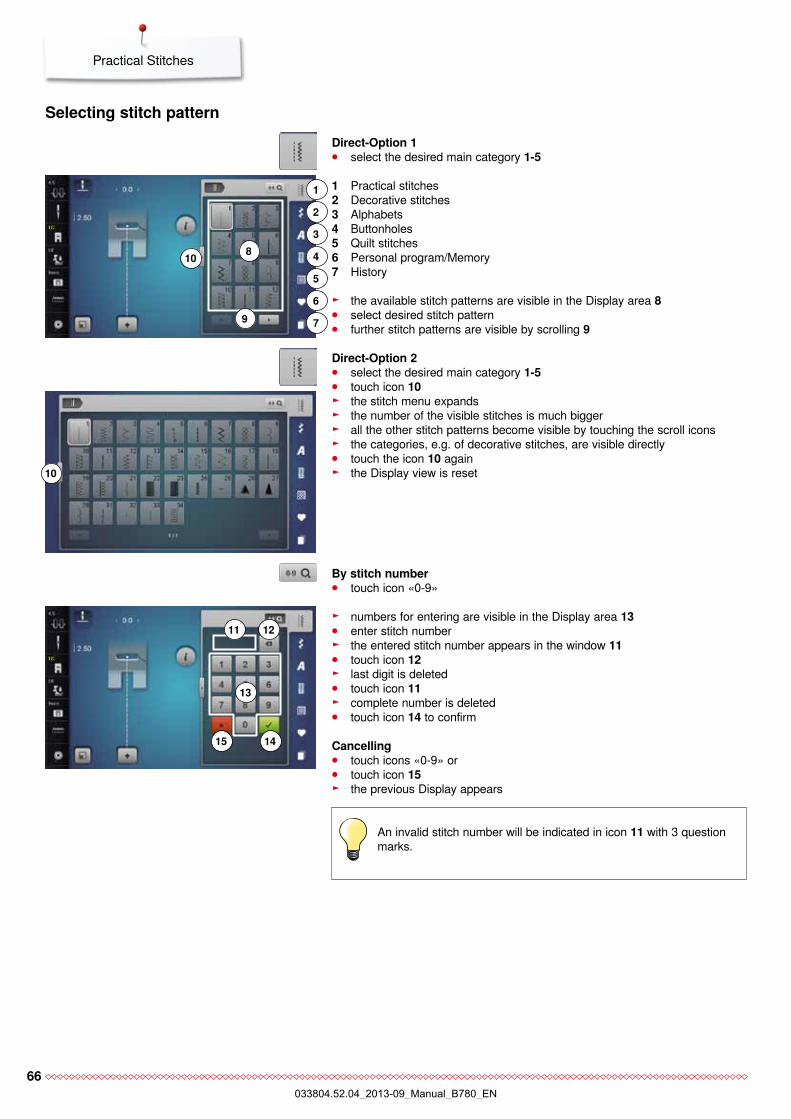
66
Practical Stitches
Selecting stitch pattern
1 Practical stitches2 Decorative stitches 3 Alphabets4 Buttonholes5 Quilt stitches6 Personal program/Memory7 History
► the available stitch patterns are visible in the Display area 8 ⦁ select desired stitch pattern ⦁ further stitch patterns are visible by scrolling 9
Direct-option 1 ⦁ select the desired main category 1-5
By stitch number ⦁ touch icon «0-9»
► numbers for entering are visible in the Display area 13 ⦁ enter stitch number ► the entered stitch number appears in the window 11 ⦁ touch icon 12 ► last digit is deleted ⦁ touch icon 11 ► complete number is deleted ⦁ touch icon 14 to confirm
cancelling ⦁ touch icons «0-9» or ⦁ touch icon 15 ► the previous Display appears
An invalid stitch number will be indicated in icon 11 with 3 question marks.
Direct-option 2 ⦁ select the desired main category 1-5 ⦁ touch icon 10 ► the stitch menu expands ► the number of the visible stitches is much bigger ► all the other stitch patterns become visible by touching the scroll icons ► the categories, e.g. of decorative stitches, are visible directly ⦁ touch the icon 10 again ► the Display view is reset
1
2
3
4
5
6
7
13
8
9
1415
10
10
1211
033804.52.04_2013-09_Manual_B780_EN
67
Practical Stitches
customizing stitch patterns individuallyA stitch pattern can be individually altered according to the fabric and the application. The adjustments described here are applicable for all practical and many decorative stitches.
temporary altered Stitch memoryAny altered stitch width and stitch length is automatically saved.
example: sew with an altered stitch (e.g. zig-zag) select and sew another stitch, e.g. straight stitch when selecting the individually altered zig-zag again, your alterations are
still active
return to basic settingsIndividual stitch patterns can be reverted to basic settings manually. ⦁ select the stitch width/stitch length Display and touch the yellow-framed
icon in the respective Display or ⦁ touch icon «-»/«+» or ⦁ move the round knob in the Display using the Touchscreen pen or the
finger or ⦁ press «clr»-button ► any altered values of the active stitch return to basic setting ⦁ switch off the sewing computer ► any alterations of all stitches are deleted
The personal memory is unlimited; it can hold as many stitch alterations as needed: Stitch length Stitch width Needle position Pattern extend Mirror images Long stitch function Thread tension Balance Pattern repeat 1-9x
033804.52.04_2013-09_Manual_B780_EN
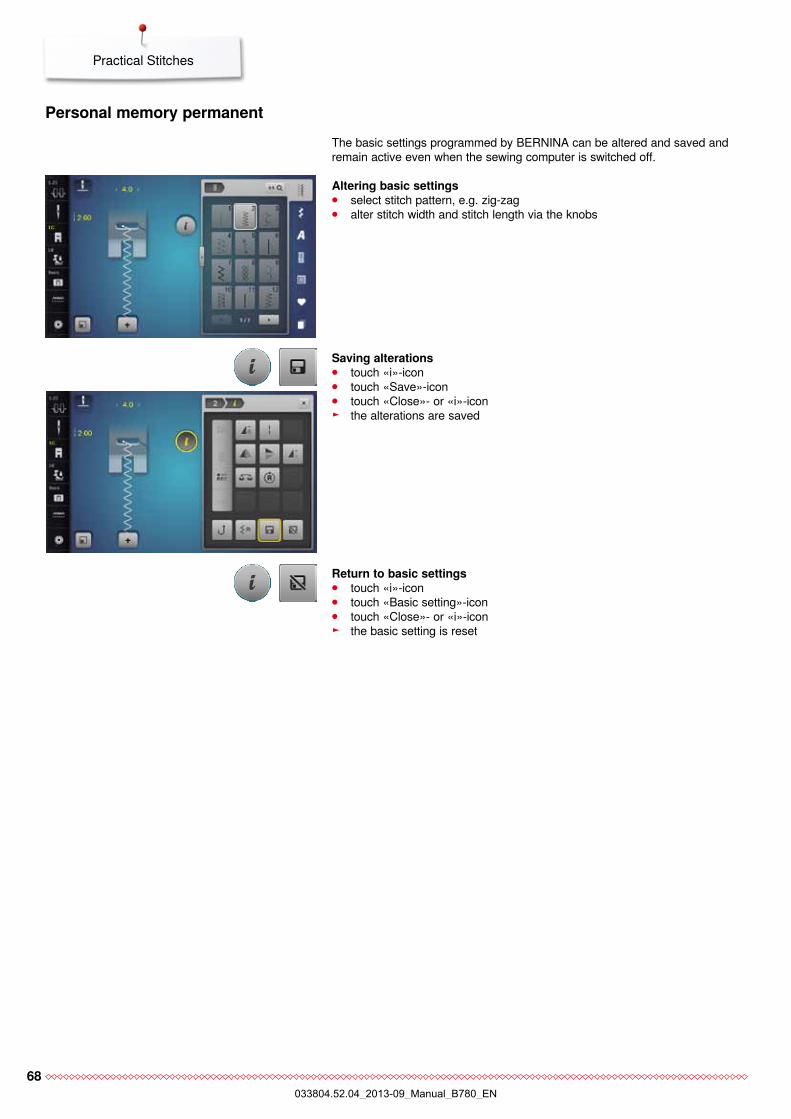
68
Practical Stitches
Saving alterations ⦁ touch «i»-icon ⦁ touch «Save»-icon ⦁ touch «Close»- or «i»-icon ► the alterations are saved
return to basic settings ⦁ touch «i»-icon ⦁ touch «Basic setting»-icon ⦁ touch «Close»- or «i»-icon ► the basic setting is reset
personal memory permanentThe basic settings programmed by BERNINA can be altered and saved and remain active even when the sewing computer is switched off.
altering basic settings ⦁ select stitch pattern, e.g. zig-zag ⦁ alter stitch width and stitch length via the knobs
033804.52.04_2013-09_Manual_B780_EN
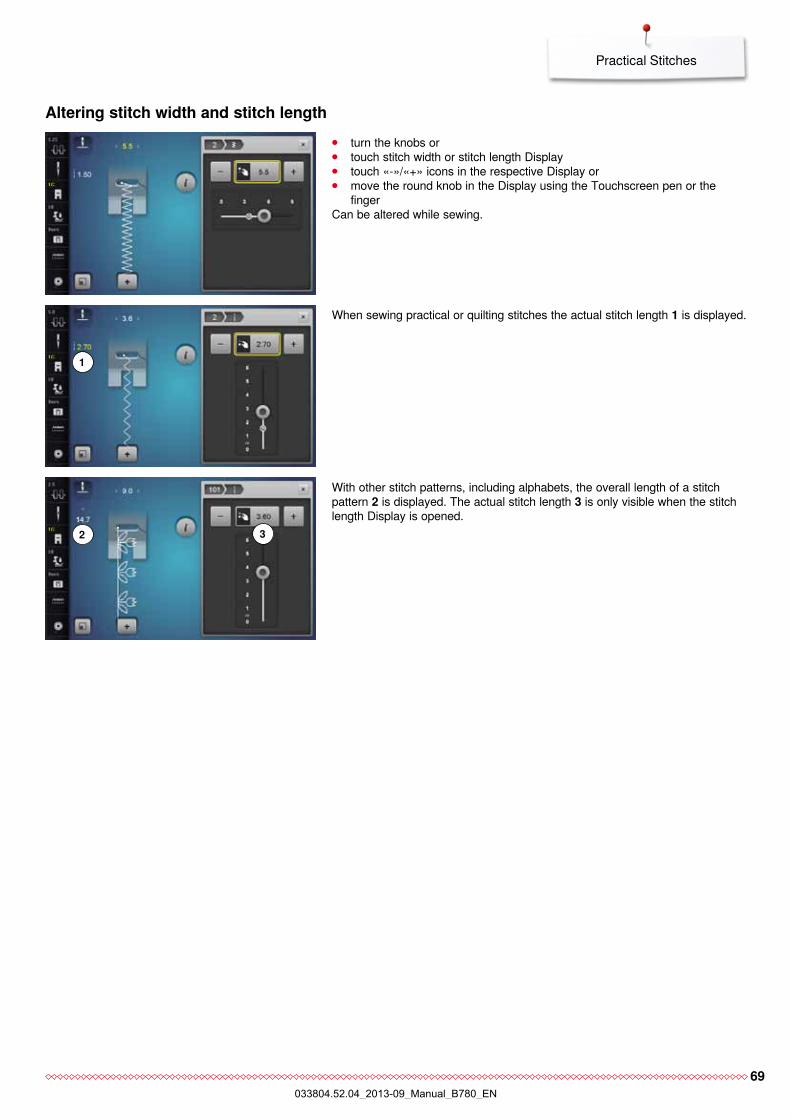
69
Practical Stitches
⦁ turn the knobs or ⦁ touch stitch width or stitch length Display ⦁ touch «-»/«+» icons in the respective Display or ⦁ move the round knob in the Display using the Touchscreen pen or the
finger Can be altered while sewing.
When sewing practical or quilting stitches the actual stitch length 1 is displayed.
With other stitch patterns, including alphabets, the overall length of a stitch pattern 2 is displayed. The actual stitch length 3 is only visible when the stitch length Display is opened.
1
2 3
altering stitch width and stitch length
033804.52.04_2013-09_Manual_B780_EN
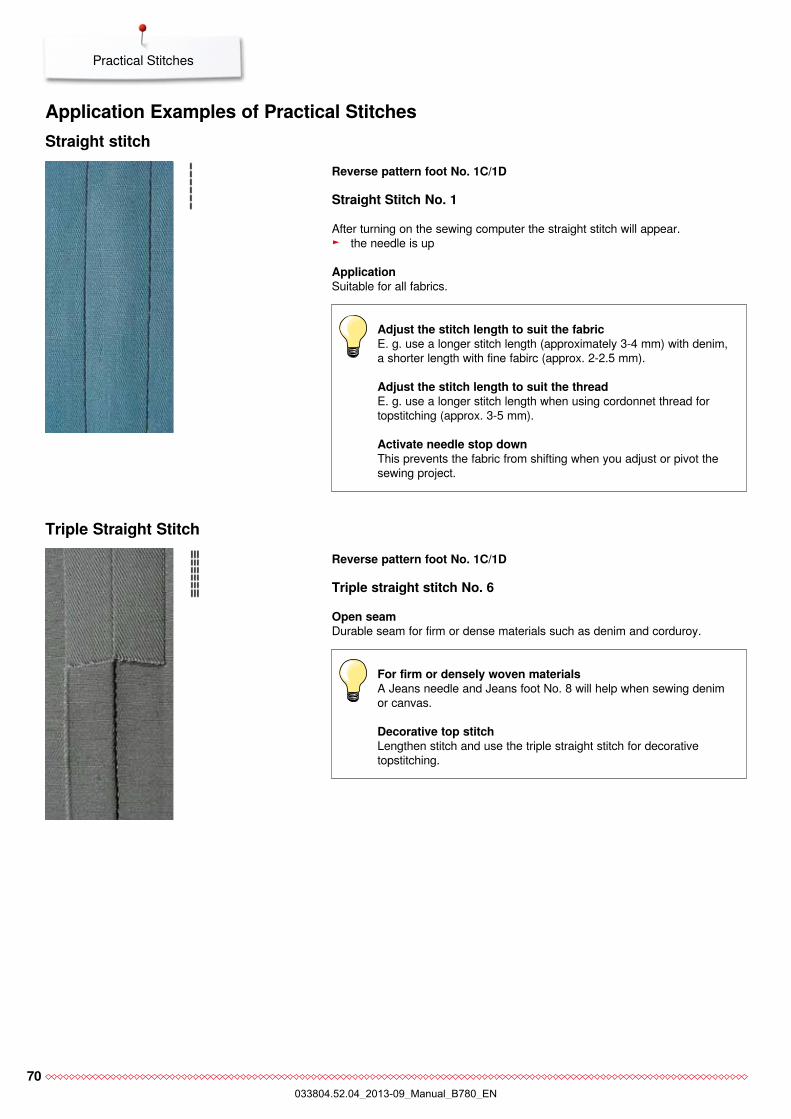
70
Practical Stitches
application examples of practical Stitches
reverse pattern foot no. 1c/1D
Straight Stitch no. 1
After turning on the sewing computer the straight stitch will appear. ► the needle is up
applicationSuitable for all fabrics.
reverse pattern foot no. 1c/1D
triple straight stitch no. 6
open seamDurable seam for firm or dense materials such as denim and corduroy.
adjust the stitch length to suit the fabricE. g. use a longer stitch length (approximately 3-4 mm) with denim, a shorter length with fine fabirc (approx. 2-2.5 mm).
adjust the stitch length to suit the threadE. g. use a longer stitch length when using cordonnet thread for topstitching (approx. 3-5 mm).
activate needle stop down This prevents the fabric from shifting when you adjust or pivot the sewing project.
for firm or densely woven materialsA Jeans needle and Jeans foot No. 8 will help when sewing denim or canvas.
Decorative top stitchLengthen stitch and use the triple straight stitch for decorative topstitching.
Straight stitch
triple Straight Stitch
033804.52.04_2013-09_Manual_B780_EN
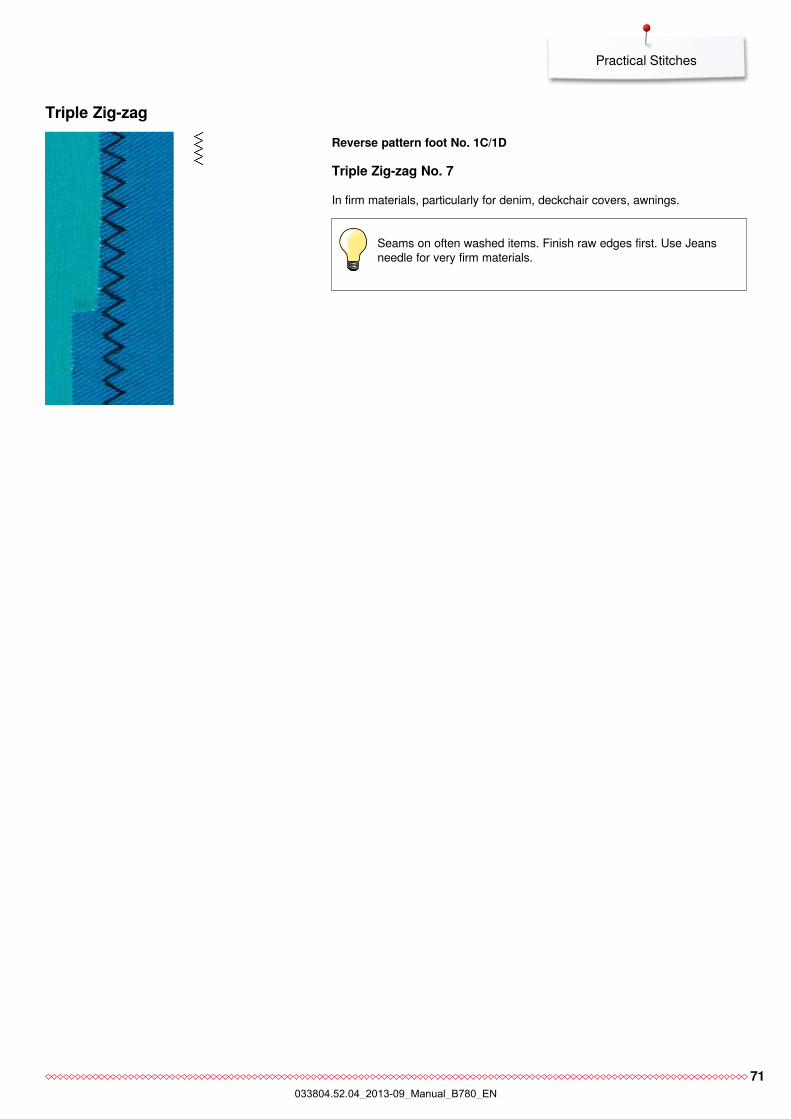
71
Practical Stitches
triple Zig-zagreverse pattern foot no. 1c/1D
triple Zig-zag no. 7
In firm materials, particularly for denim, deckchair covers, awnings.
Seams on often washed items. Finish raw edges first. Use Jeans needle for very firm materials.
033804.52.04_2013-09_Manual_B780_EN

72
Practical stitches
Zipper foot no. 4D
Straight stitch no. 1
preparation ⦁ close seam to the zipper beginning ⦁ sew securing stitches ⦁ baste seam closed and clean ⦁ finish the seam allowance ⦁ iron the seam ⦁ open the zipper ⦁ baste the zipper: baste or pin zipper in place so that fabric folded edges
meet over the center of the zipper
Sewing in the zipper ⦁ open zipper a little ⦁ move needle position to the right ⦁ start sewing from top left ⦁ position the foot so the needle stitches along the edge of the zipper coils ⦁ stop in front of the pull (needle position down) ⦁ raise the presser foot ⦁ close the zipper again ⦁ continue to sew, stop in front of the base of the zipper, needle position
down ⦁ raise the presser foot ⦁ turn the sewing project ⦁ sew across the seam, stop with needle position down ⦁ raise the presser foot ⦁ turn sewing project again ⦁ sew the second side from bottom to top
Variation: Sew both sides of zipper from bottom to topSuitable for all fabrics with nap or grain (e.g. velvet). ⦁ prepare zipper as described above ⦁ start sewing in the center of the seam at the end of the zipper, needle
position on the right ⦁ sew diagonal along the edge of the zipper coils ⦁ first side 1 sew from bottom to top ⦁ move needle position to the left ⦁ second side 2 sew in the same way from bottom to top
Sew around the zipper pull sew up to about 5 cm away from the zipper pull stop with the needle down, raise the presser foot, open the
zipper, finsih sewing (use Free Hand System)
Starting to sew hold thread firmly when starting to sew = pull fabric slightly to the
back (fewer stitches) or sew about 1-2 cm reverse first, and continue to sew as usual
Zipper or fabric is thick or densely wovenFor even stitch formation use a 90-100 needle.
Zipper
1
2
033804.52.04_2013-09_Manual_B780_EN
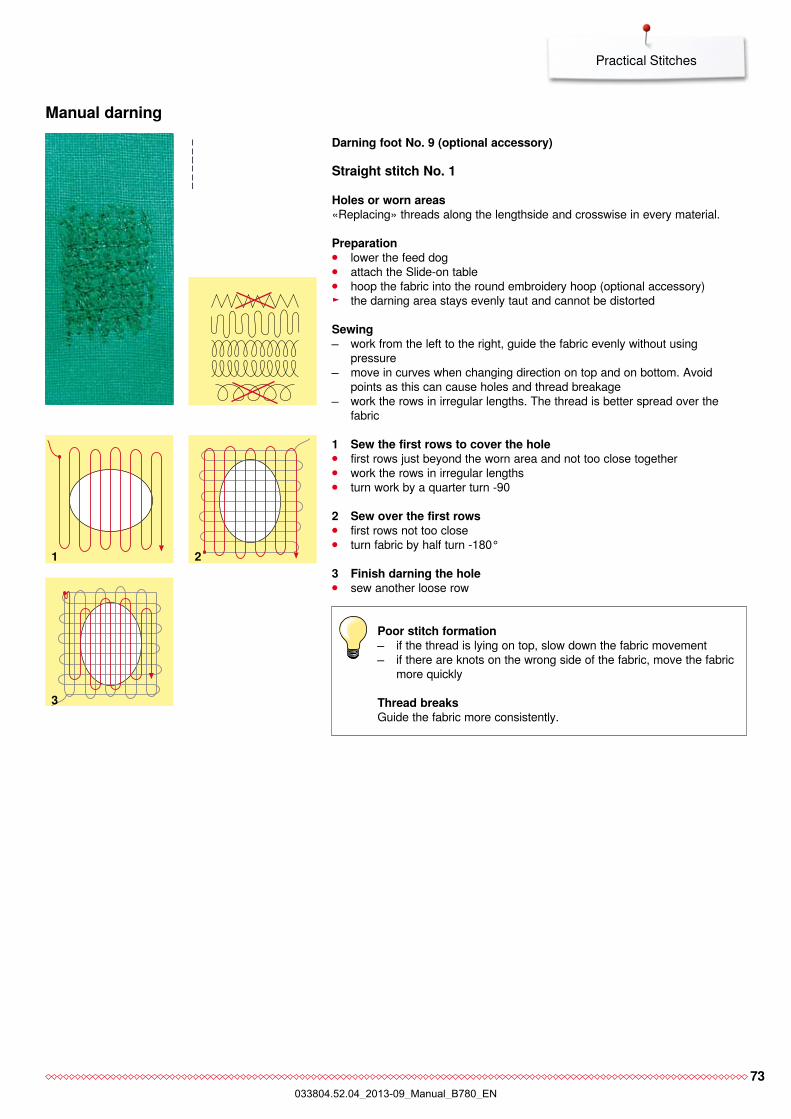
73
Practical Stitches
Darning foot no. 9 (optional accessory)
Straight stitch no. 1
Holes or worn areas«Replacing» threads along the lengthside and crosswise in every material.
preparation ⦁ lower the feed dog ⦁ attach the Slide-on table ⦁ hoop the fabric into the round embroidery hoop (optional accessory) ► the darning area stays evenly taut and cannot be distorted
Sewing work from the left to the right, guide the fabric evenly without using
pressure move in curves when changing direction on top and on bottom. Avoid
points as this can cause holes and thread breakage work the rows in irregular lengths. The thread is better spread over the
fabric
poor stitch formation if the thread is lying on top, slow down the fabric movement if there are knots on the wrong side of the fabric, move the fabric
more quickly
thread breaks Guide the fabric more consistently.
manual darning
1 Sew the first rows to cover the hole ⦁ first rows just beyond the worn area and not too close together ⦁ work the rows in irregular lengths ⦁ turn work by a quarter turn -90
2 Sew over the first rows ⦁ first rows not too close ⦁ turn fabric by half turn -180°
3 finish darning the hole ⦁ sew another loose row
3
1 2
033804.52.04_2013-09_Manual_B780_EN
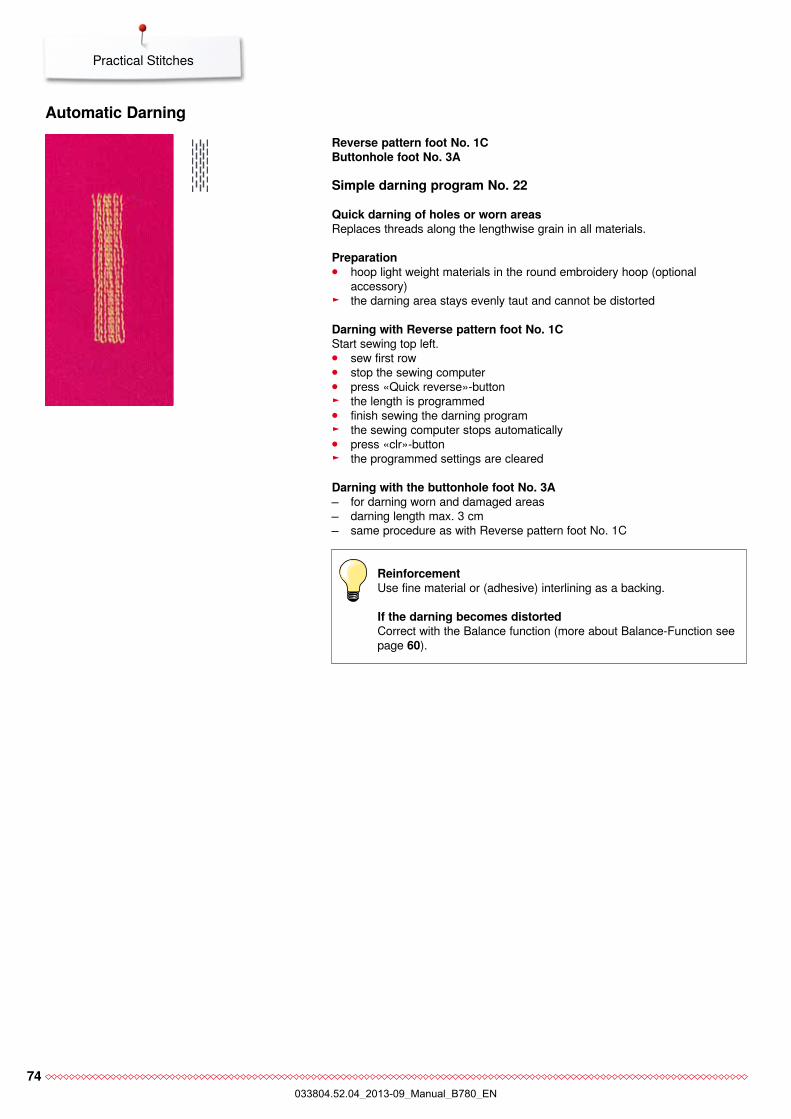
74
Practical Stitches
automatic Darningreverse pattern foot no. 1cButtonhole foot no. 3a
Simple darning program no. 22
Quick darning of holes or worn areasReplaces threads along the lengthwise grain in all materials.
preparation ⦁ hoop light weight materials in the round embroidery hoop (optional
accessory) ► the darning area stays evenly taut and cannot be distorted
Darning with reverse pattern foot no. 1cStart sewing top left. ⦁ sew first row ⦁ stop the sewing computer ⦁ press «Quick reverse»-button ► the length is programmed ⦁ finish sewing the darning program ► the sewing computer stops automatically ⦁ press «clr»-button ► the programmed settings are cleared
Darning with the buttonhole foot no. 3a for darning worn and damaged areas darning length max. 3 cm same procedure as with Reverse pattern foot No. 1C
reinforcement Use fine material or (adhesive) interlining as a backing.
If the darning becomes distorted Correct with the Balance function (more about Balance-Function see page 60).
033804.52.04_2013-09_Manual_B780_EN
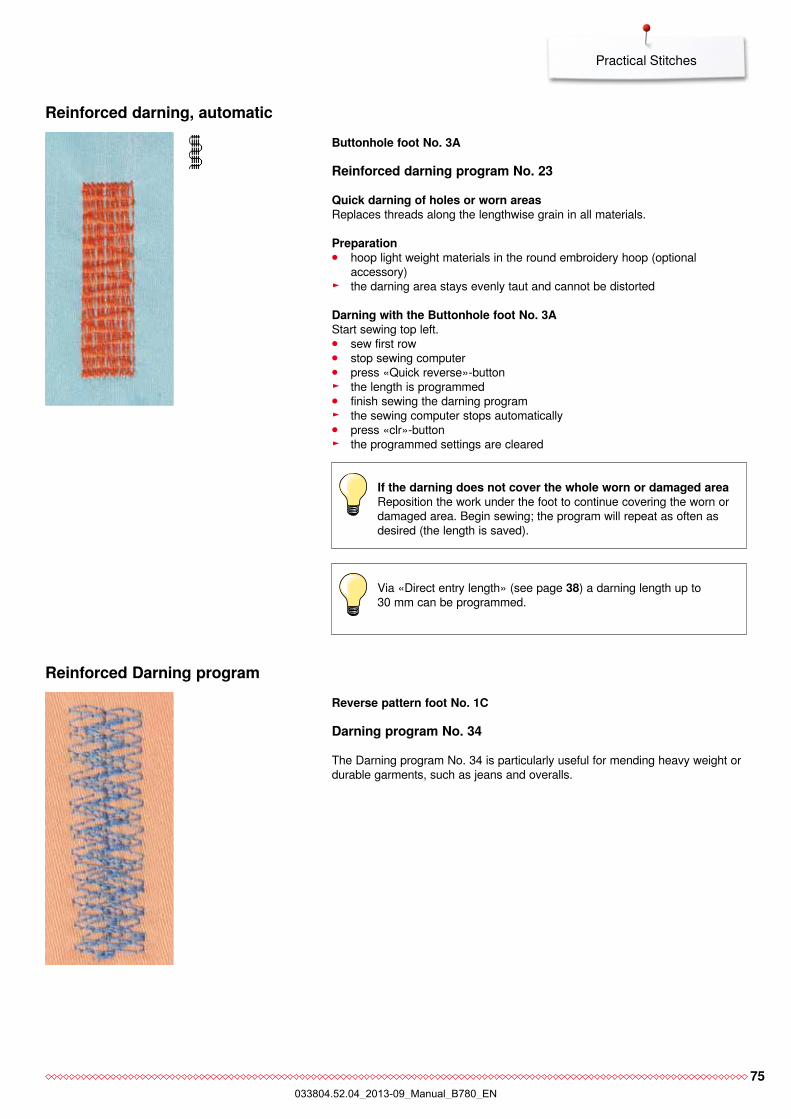
75
Practical Stitches
reinforced darning, automaticButtonhole foot no. 3a
reinforced darning program no. 23
Quick darning of holes or worn areasReplaces threads along the lengthwise grain in all materials.
preparation ⦁ hoop light weight materials in the round embroidery hoop (optional
accessory) ► the darning area stays evenly taut and cannot be distorted
Darning with the Buttonhole foot no. 3aStart sewing top left. ⦁ sew first row ⦁ stop sewing computer ⦁ press «Quick reverse»-button ► the length is programmed ⦁ finish sewing the darning program ► the sewing computer stops automatically ⦁ press «clr»-button ► the programmed settings are cleared
If the darning does not cover the whole worn or damaged area Reposition the work under the foot to continue covering the worn or damaged area. Begin sewing; the program will repeat as often as desired (the length is saved).
Via «Direct entry length» (see page 38) a darning length up to 30 mm can be programmed.
reverse pattern foot no. 1c
Darning program no. 34
The Darning program No. 34 is particularly useful for mending heavy weight or durable garments, such as jeans and overalls.
reinforced Darning program
033804.52.04_2013-09_Manual_B780_EN
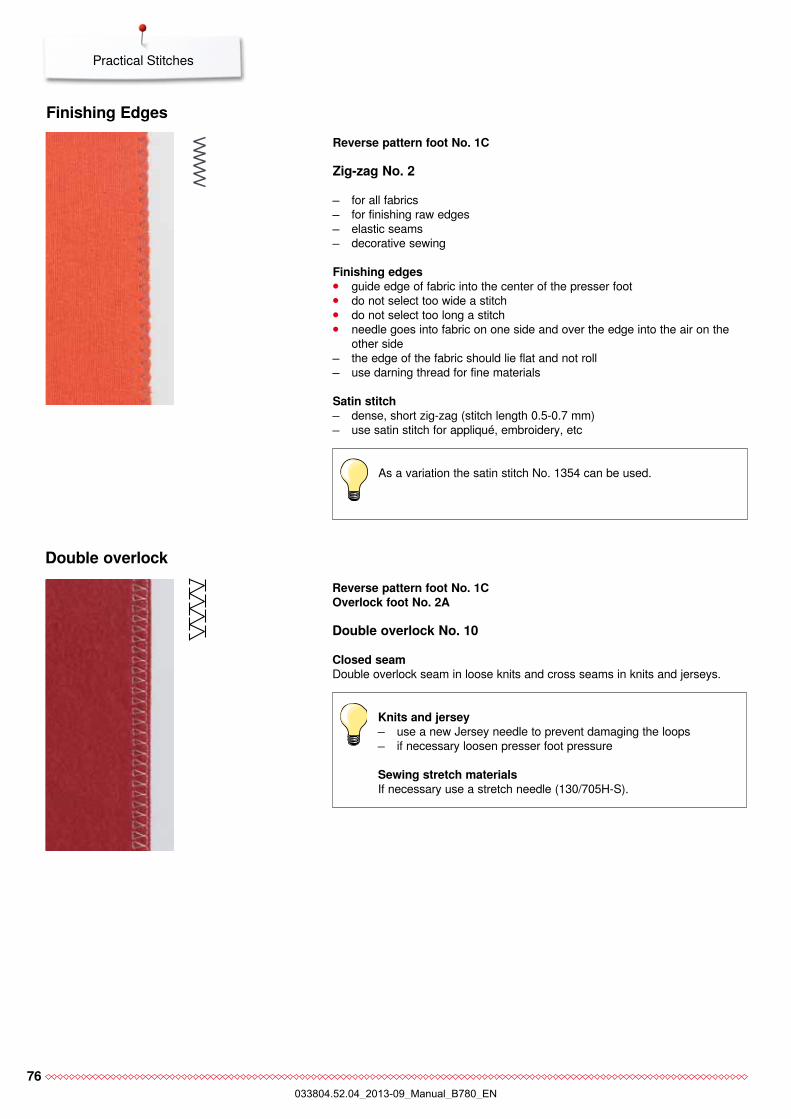
76
Practical Stitches
reverse pattern foot no. 1coverlock foot no. 2a
Double overlock no. 10
closed seamDouble overlock seam in loose knits and cross seams in knits and jerseys.
Double overlock
Knits and jersey use a new Jersey needle to prevent damaging the loops if necessary loosen presser foot pressure
Sewing stretch materialsIf necessary use a stretch needle (130/705H-S).
reverse pattern foot no. 1c
Zig-zag no. 2
for all fabrics for finishing raw edges elastic seams decorative sewing
finishing edges ⦁ guide edge of fabric into the center of the presser foot ⦁ do not select too wide a stitch ⦁ do not select too long a stitch ⦁ needle goes into fabric on one side and over the edge into the air on the
other side the edge of the fabric should lie flat and not roll use darning thread for fine materials
Satin stitch dense, short zig-zag (stitch length 0.5-0.7 mm) use satin stitch for appliqué, embroidery, etc
finishing edges
As a variation the satin stitch No. 1354 can be used.
033804.52.04_2013-09_Manual_B780_EN
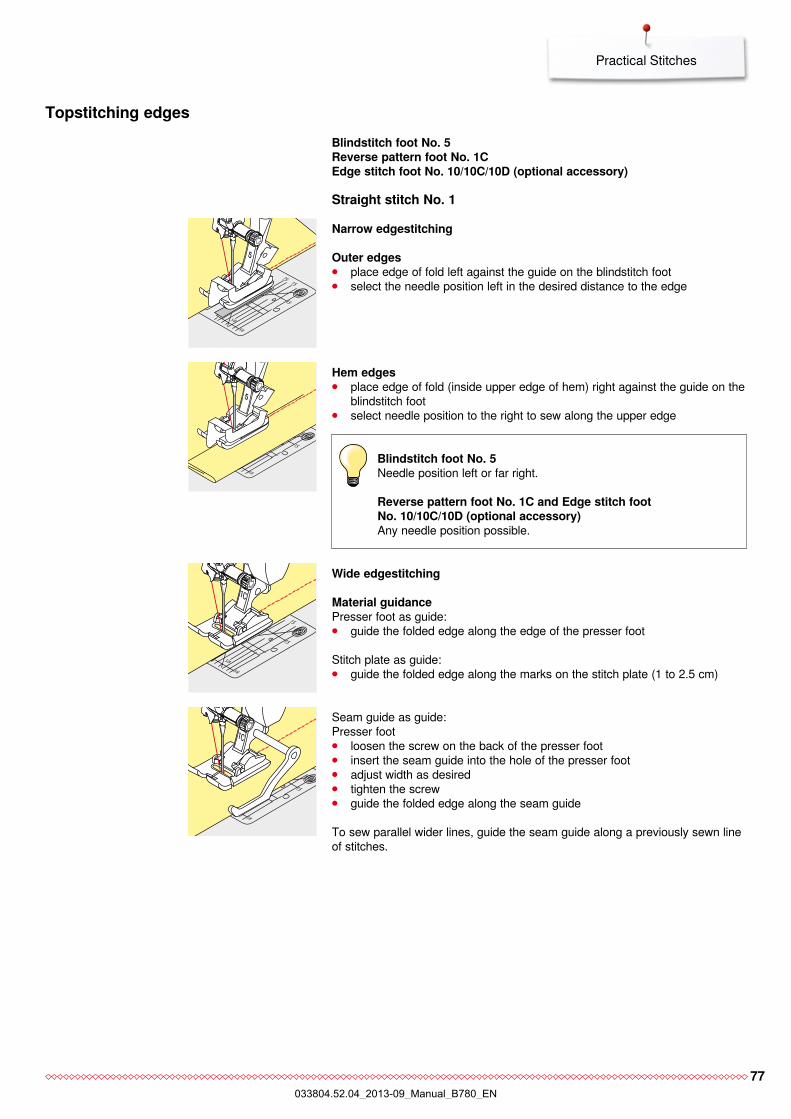
77
Practical Stitches
topstitching edgesBlindstitch foot no. 5reverse pattern foot no. 1cedge stitch foot no. 10/10c/10D (optional accessory)
Straight stitch no. 1
narrow edgestitching
outer edges ⦁ place edge of fold left against the guide on the blindstitch foot ⦁ select the needle position left in the desired distance to the edge
Wide edgestitching
material guidancePresser foot as guide: ⦁ guide the folded edge along the edge of the presser foot
Stitch plate as guide: ⦁ guide the folded edge along the marks on the stitch plate (1 to 2.5 cm)
Seam guide as guide:Presser foot ⦁ loosen the screw on the back of the presser foot ⦁ insert the seam guide into the hole of the presser foot ⦁ adjust width as desired ⦁ tighten the screw ⦁ guide the folded edge along the seam guide
To sew parallel wider lines, guide the seam guide along a previously sewn line of stitches.
Blindstitch foot no. 5Needle position left or far right.
reverse pattern foot no. 1c and edge stitch foot no. 10/10c/10D (optional accessory)Any needle position possible.
Hem edges ⦁ place edge of fold (inside upper edge of hem) right against the guide on the
blindstitch foot ⦁ select needle position to the right to sew along the upper edge
5/8
5/8
5/81
2515
15
15
7575
5/8
5/8
5/81
2515
15
15
7575
5/8
5/8
5/81
2515
15
15
7575
5/8
5/8
5/81
2515
15
15
7575
033804.52.04_2013-09_Manual_B780_EN
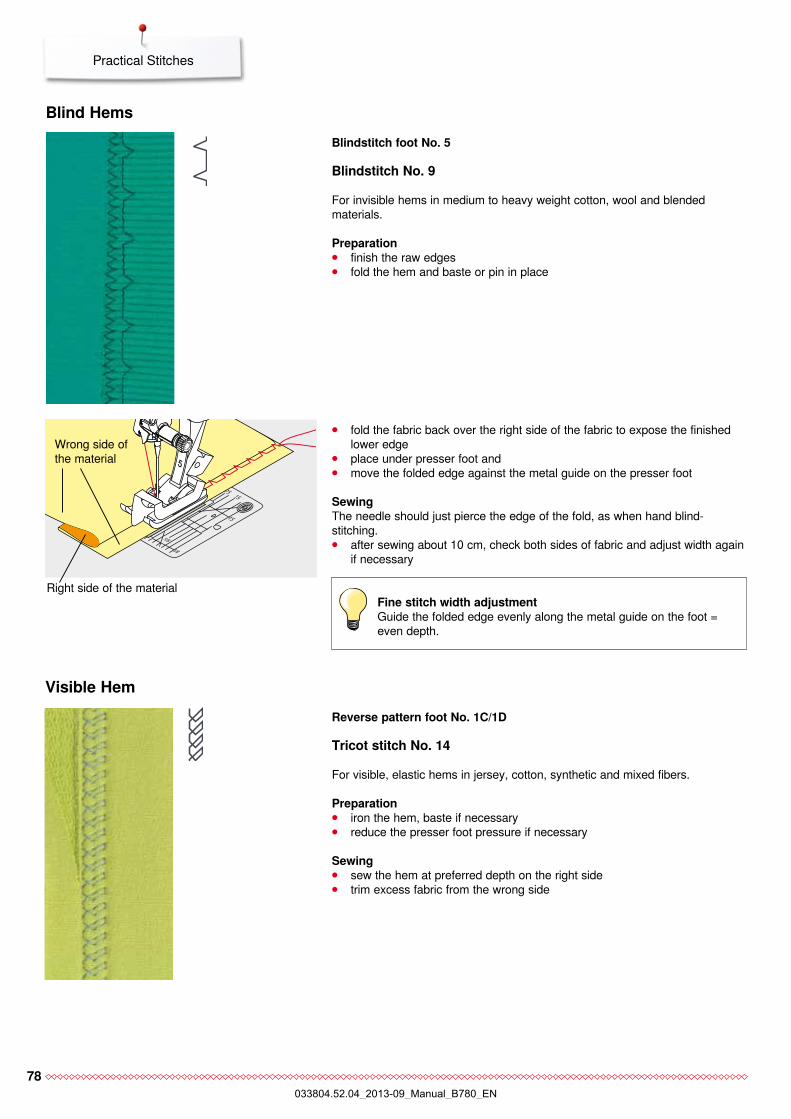
78
5/8
5/8
5/81
2515
15
15
7575
Practical Stitches
Blind HemsBlindstitch foot no. 5
Blindstitch no. 9
For invisible hems in medium to heavy weight cotton, wool and blended materials.
preparation ⦁ finish the raw edges ⦁ fold the hem and baste or pin in place
Right side of the material
Wrong side of the material
fine stitch width adjustmentGuide the folded edge evenly along the metal guide on the foot = even depth.
reverse pattern foot no. 1c/1D
tricot stitch no. 14
For visible, elastic hems in jersey, cotton, synthetic and mixed fibers.
preparation ⦁ iron the hem, baste if necessary ⦁ reduce the presser foot pressure if necessary
Sewing ⦁ sew the hem at preferred depth on the right side ⦁ trim excess fabric from the wrong side
Visible Hem
⦁ fold the fabric back over the right side of the fabric to expose the finished lower edge
⦁ place under presser foot and ⦁ move the folded edge against the metal guide on the presser foot
Sewing The needle should just pierce the edge of the fold, as when hand blind-stitching. ⦁ after sewing about 10 cm, check both sides of fabric and adjust width again
if necessary
033804.52.04_2013-09_Manual_B780_EN
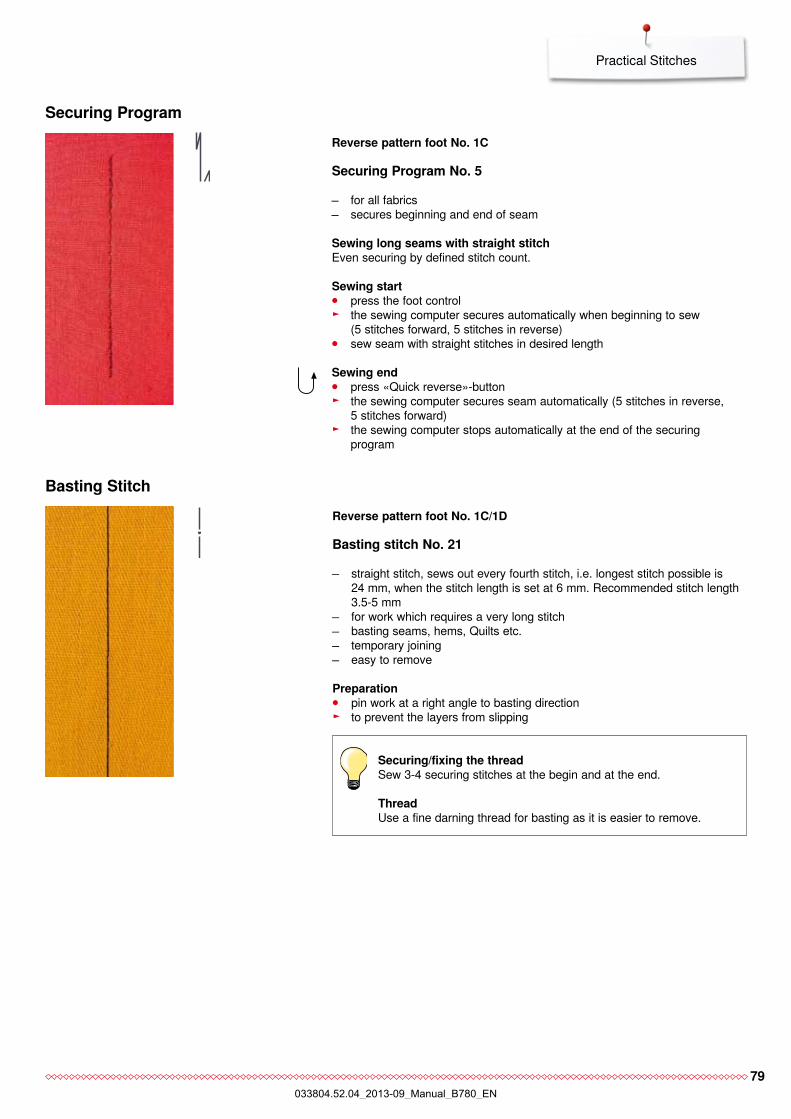
79
Practical Stitches
reverse pattern foot no. 1c
Securing program no. 5
for all fabrics secures beginning and end of seam
Sewing long seams with straight stitchEven securing by defined stitch count.
Sewing start ⦁ press the foot control ► the sewing computer secures automatically when beginning to sew
(5 stitches forward, 5 stitches in reverse) ⦁ sew seam with straight stitches in desired length
Sewing end ⦁ press «Quick reverse»-button ► the sewing computer secures seam automatically (5 stitches in reverse,
5 stitches forward) ► the sewing computer stops automatically at the end of the securing
program
Securing program
Securing/fixing the threadSew 3-4 securing stitches at the begin and at the end.
threadUse a fine darning thread for basting as it is easier to remove.
Basting Stitchreverse pattern foot no. 1c/1D
Basting stitch no. 21
straight stitch, sews out every fourth stitch, i.e. longest stitch possible is 24 mm, when the stitch length is set at 6 mm. Recommended stitch length 3.5-5 mm
for work which requires a very long stitch basting seams, hems, Quilts etc. temporary joining easy to remove
preparation ⦁ pin work at a right angle to basting direction ► to prevent the layers from slipping
033804.52.04_2013-09_Manual_B780_EN
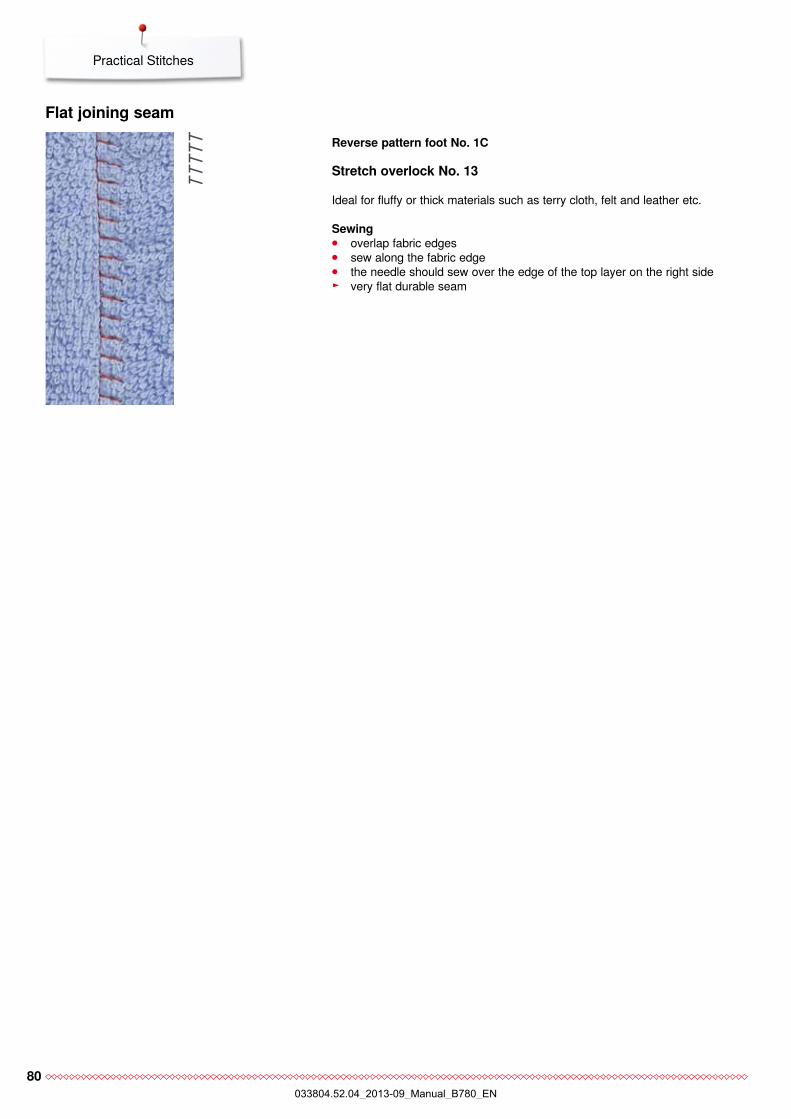
80
Practical Stitches
reverse pattern foot no. 1c
Stretch overlock no. 13
Ideal for fluffy or thick materials such as terry cloth, felt and leather etc.
Sewing ⦁ overlap fabric edges ⦁ sew along the fabric edge ⦁ the needle should sew over the edge of the top layer on the right side ► very flat durable seam
flat joining seam
033804.52.04_2013-09_Manual_B780_EN
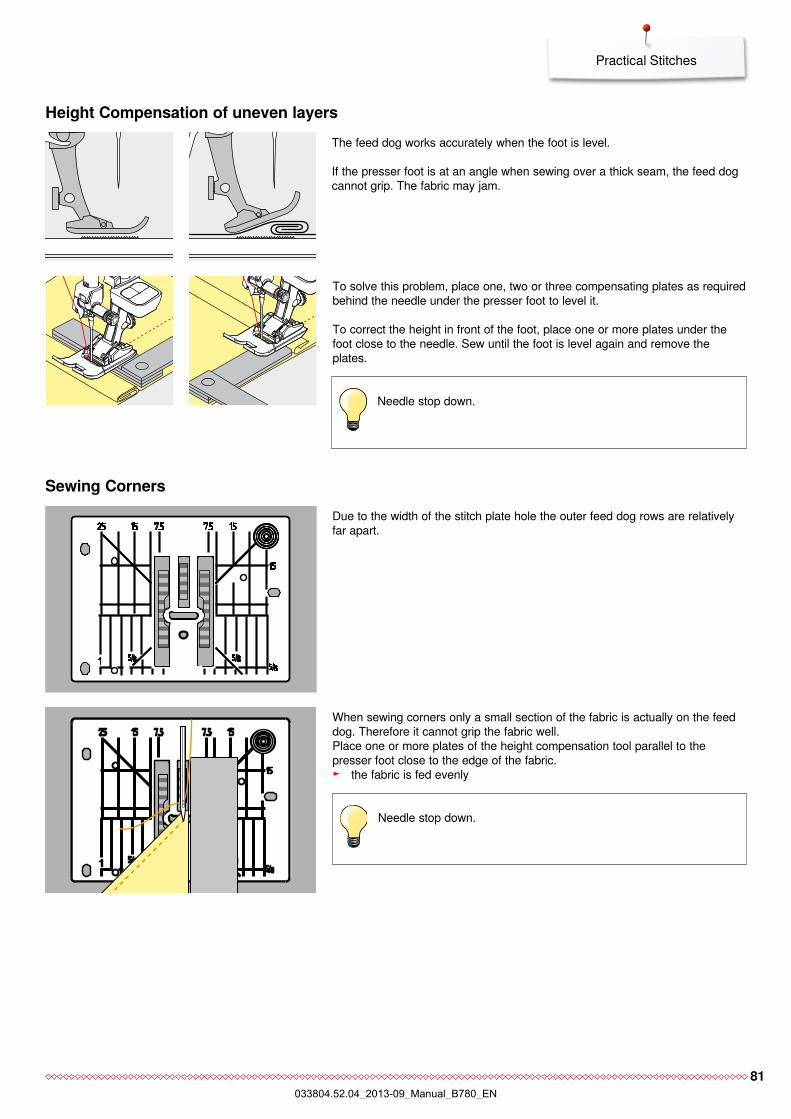
81
Practical Stitches
The feed dog works accurately when the foot is level.
If the presser foot is at an angle when sewing over a thick seam, the feed dog cannot grip. The fabric may jam.
To solve this problem, place one, two or three compensating plates as required behind the needle under the presser foot to level it.
To correct the height in front of the foot, place one or more plates under the foot close to the needle. Sew until the foot is level again and remove the plates.
Height compensation of uneven layers
Sewing corners
Needle stop down.
Needle stop down.
When sewing corners only a small section of the fabric is actually on the feed dog. Therefore it cannot grip the fabric well.Place one or more plates of the height compensation tool parallel to the presser foot close to the edge of the fabric.
► the fabric is fed evenly
Due to the width of the stitch plate hole the outer feed dog rows are relatively far apart.
033804.52.04_2013-09_Manual_B780_EN
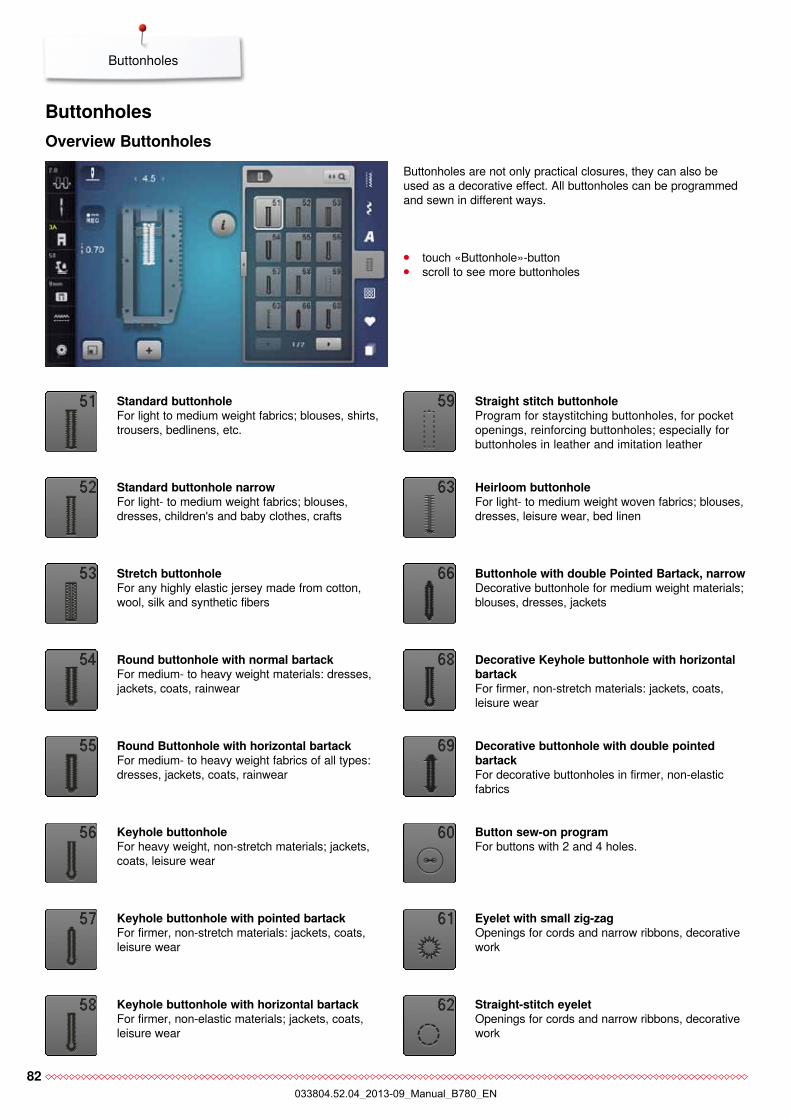
82
Buttonholes
Standard buttonhole For light to medium weight fabrics; blouses, shirts, trousers, bedlinens, etc.
Standard buttonhole narrowFor light- to medium weight fabrics; blouses, dresses, children's and baby clothes, crafts
Stretch buttonholeFor any highly elastic jersey made from cotton, wool, silk and synthetic fibers
round buttonhole with normal bartack For medium- to heavy weight materials: dresses, jackets, coats, rainwear
round Buttonhole with horizontal bartackFor medium- to heavy weight fabrics of all types: dresses, jackets, coats, rainwear
Keyhole buttonholeFor heavy weight, non-stretch materials; jackets, coats, leisure wear
Straight stitch buttonhole Program for staystitching buttonholes, for pocket openings, reinforcing buttonholes; especially for buttonholes in leather and imitation leather
Heirloom buttonholeFor light- to medium weight woven fabrics; blouses, dresses, leisure wear, bed linen
Button sew-on program For buttons with 2 and 4 holes.
eyelet with small zig-zagOpenings for cords and narrow ribbons, decorative work
Buttonholesoverview Buttonholes
⦁ touch «Buttonhole»-button ⦁ scroll to see more buttonholes
Buttonholes are not only practical closures, they can also be used as a decorative effect. All buttonholes can be programmed and sewn in different ways.
Straight-stitch eyeletOpenings for cords and narrow ribbons, decorative work
Keyhole buttonhole with pointed bartackFor firmer, non-stretch materials: jackets, coats, leisure wear
Keyhole buttonhole with horizontal bartackFor firmer, non-elastic materials; jackets, coats, leisure wear
Buttonhole with double pointed Bartack, narrowDecorative buttonhole for medium weight materials; blouses, dresses, jackets
Decorative Keyhole buttonhole with horizontal bartackFor firmer, non-stretch materials: jackets, coats, leisure wear
Decorative buttonhole with double pointed bartack For decorative buttonholes in firmer, non-elastic fabrics
033804.52.04_2013-09_Manual_B780_EN
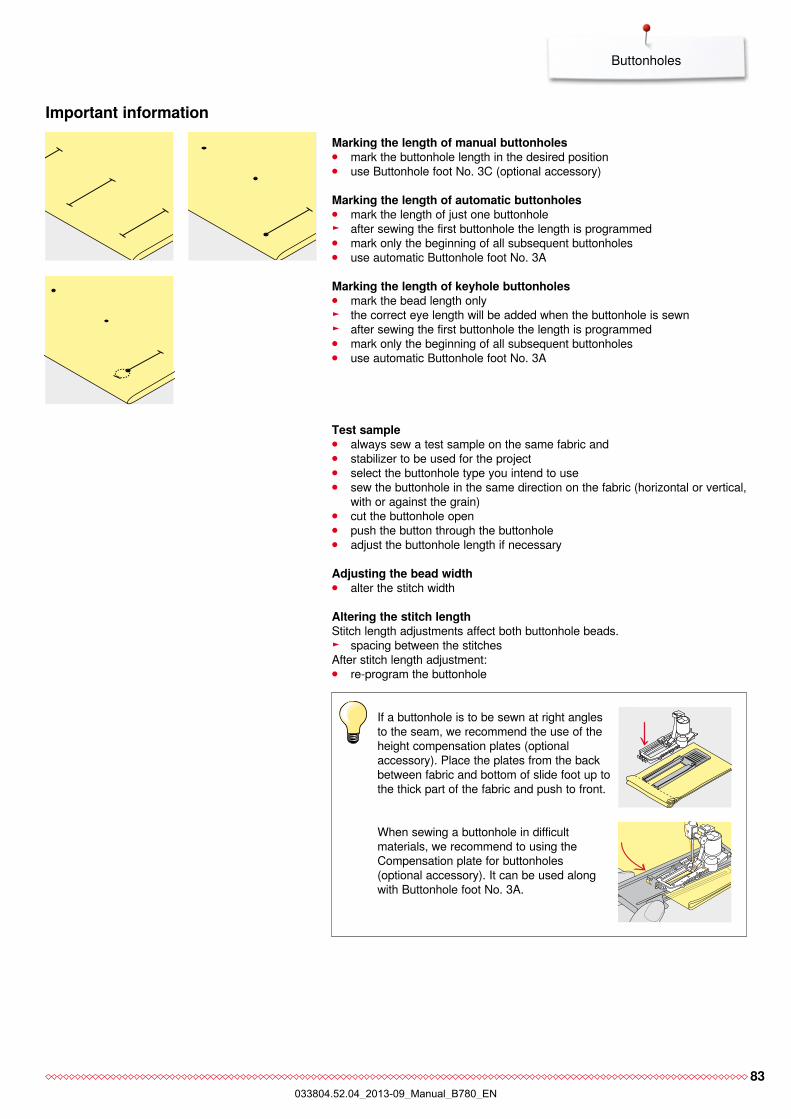
83
Buttonholes
Important informationmarking the length of manual buttonholes ⦁ mark the buttonhole length in the desired position ⦁ use Buttonhole foot No. 3C (optional accessory)
marking the length of automatic buttonholes ⦁ mark the length of just one buttonhole ► after sewing the first buttonhole the length is programmed ⦁ mark only the beginning of all subsequent buttonholes ⦁ use automatic Buttonhole foot No. 3A
marking the length of keyhole buttonholes ⦁ mark the bead length only ► the correct eye length will be added when the buttonhole is sewn ► after sewing the first buttonhole the length is programmed ⦁ mark only the beginning of all subsequent buttonholes ⦁ use automatic Buttonhole foot No. 3A
test sample ⦁ always sew a test sample on the same fabric and ⦁ stabilizer to be used for the project ⦁ select the buttonhole type you intend to use ⦁ sew the buttonhole in the same direction on the fabric (horizontal or vertical,
with or against the grain) ⦁ cut the buttonhole open ⦁ push the button through the buttonhole ⦁ adjust the buttonhole length if necessary
adjusting the bead width ⦁ alter the stitch width
altering the stitch lengthStitch length adjustments affect both buttonhole beads.
► spacing between the stitchesAfter stitch length adjustment: ⦁ re-program the buttonhole
If a buttonhole is to be sewn at right angles to the seam, we recommend the use of the height compensation plates (optional accessory). Place the plates from the back between fabric and bottom of slide foot up to the thick part of the fabric and push to front.
When sewing a buttonhole in difficult materials, we recommend to using the Compensation plate for buttonholes (optional accessory). It can be used along with Buttonhole foot No. 3A.
033804.52.04_2013-09_Manual_B780_EN
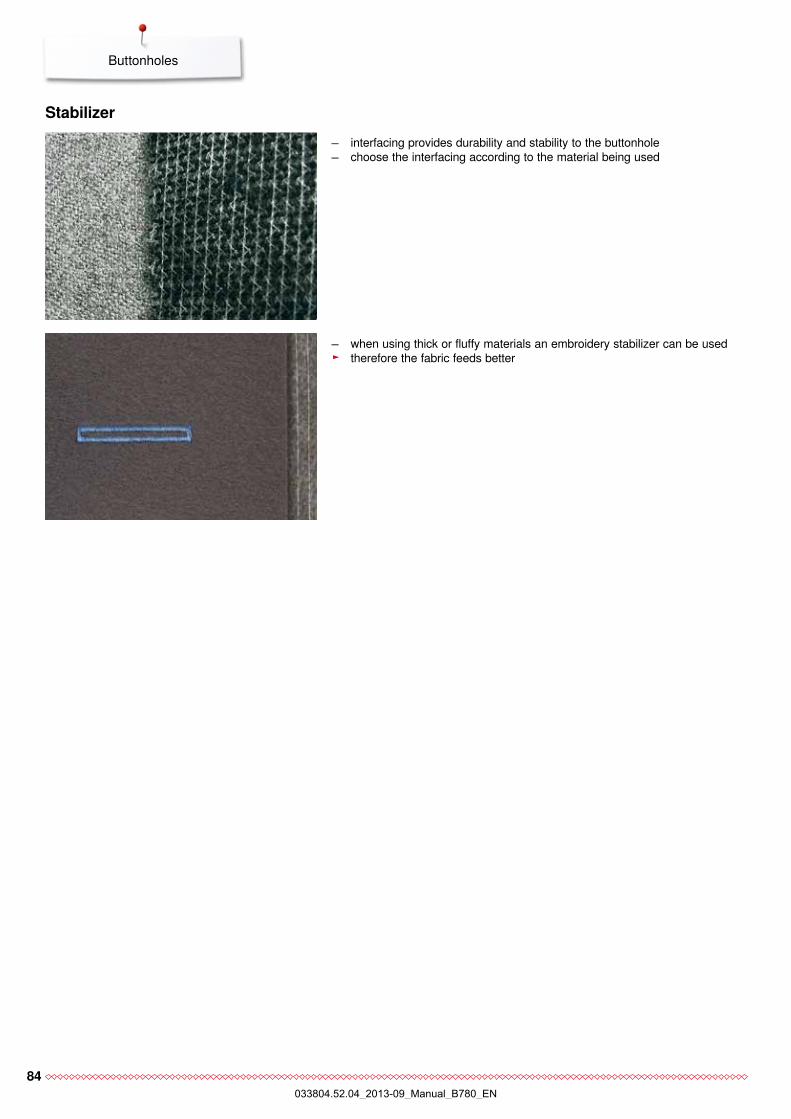
84
Buttonholes
Stabilizer interfacing provides durability and stability to the buttonhole choose the interfacing according to the material being used
when using thick or fluffy materials an embroidery stabilizer can be used ► therefore the fabric feeds better
033804.52.04_2013-09_Manual_B780_EN

85
Buttonholes
cord In general cords reinforce buttonholes and enhance their appearance mainly suitable for buttonhole No. 51 ⦁ position the work accordingly
Ideal cords Perle cotton No. 8 strong hand-sewing thread fine crochet yarn
cord with the automatic Buttonhole foot no. 3a ⦁ raise the Buttonhole foot No. 3A ⦁ insert the needle at the beginning of the buttonhole ⦁ guide the cord on the right side under the Buttonhole foot No. 3A ⦁ hook the cord over the pin at the back of the Buttonhole foot No. 3A ⦁ pull the cord on the left side under the Buttonhole foot No. 3A to the front ⦁ pull the cord ends into the slits ⦁ lower the Buttonhole foot No. 3A
Sewing ⦁ sew the buttonhole in the usual manner ⦁ do not hold the cord ► the buttonhole will sew over the cord, covering it
cord with the Buttonhole foot no. 3c (optional accessory) ⦁ raise the buttonhole foot ⦁ insert the needle at the beginning of the buttonhole ⦁ hook cord over the pin in the middle of the buttonhole foot (at the front) ⦁ pull both cord ends under the buttonhole foot sole to the back and ⦁ place both ends of the cord in the grooves on the sole ⦁ lower the buttonhole foot
Sewing ⦁ sew the buttonhole in the usual manner ⦁ do not hold the cord ► the buttonhole will sew over the cord, covering it
cutting buttonholes open with the seam ripper ⦁ cut the buttonhole from the ends to the middle
cutting open buttonholes with the buttonhole cutter (optional accessory) ⦁ place the fabric on the wood ⦁ place the cutter in the centre of the buttonhole ⦁ press down on the cutter with your hand
fixing the cord ⦁ pull the cord through the buttonhole until the loop disappears into the end of
it ⦁ pull the ends of the cord through to wrong side of the fabric, using a hand
stitching-needle ⦁ knot or secure with stitches
Before cutting the buttonhole openPlace a pin in each end of the buttonhole to avoid accidental cutting into ends of buttonhole.
033804.52.04_2013-09_Manual_B780_EN
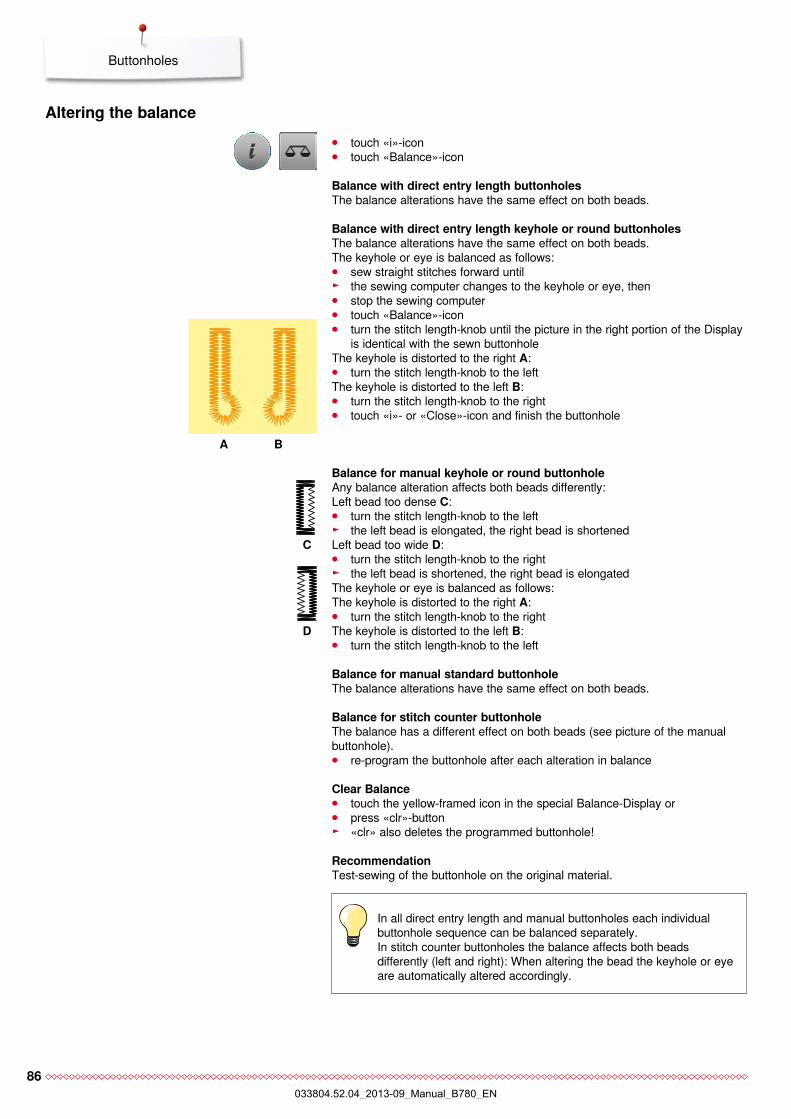
86
Buttonholes
Balance with direct entry length buttonholesThe balance alterations have the same effect on both beads.
Balance with direct entry length keyhole or round buttonholesThe balance alterations have the same effect on both beads.The keyhole or eye is balanced as follows: ⦁ sew straight stitches forward until ► the sewing computer changes to the keyhole or eye, then ⦁ stop the sewing computer ⦁ touch «Balance»-icon ⦁ turn the stitch length-knob until the picture in the right portion of the Display
is identical with the sewn buttonholeThe keyhole is distorted to the right a: ⦁ turn the stitch length-knob to the left
The keyhole is distorted to the left B: ⦁ turn the stitch length-knob to the right ⦁ touch «i»- or «Close»-icon and finish the buttonhole
altering the balance
In all direct entry length and manual buttonholes each individual buttonhole sequence can be balanced separately.In stitch counter buttonholes the balance affects both beads differently (left and right): When altering the bead the keyhole or eye are automatically altered accordingly.
a B
Balance for manual keyhole or round buttonholeAny balance alteration affects both beads differently:Left bead too dense c: ⦁ turn the stitch length-knob to the left ► the left bead is elongated, the right bead is shortened
Left bead too wide D: ⦁ turn the stitch length-knob to the right ► the left bead is shortened, the right bead is elongated
The keyhole or eye is balanced as follows:The keyhole is distorted to the right a: ⦁ turn the stitch length-knob to the right
The keyhole is distorted to the left B: ⦁ turn the stitch length-knob to the left
Balance for manual standard buttonholeThe balance alterations have the same effect on both beads.
Balance for stitch counter buttonholeThe balance has a different effect on both beads (see picture of the manual buttonhole). ⦁ re-program the buttonhole after each alteration in balance
clear Balance ⦁ touch the yellow-framed icon in the special Balance-Display or ⦁ press «clr»-button ► «clr» also deletes the programmed buttonhole!
recommendationTest-sewing of the buttonhole on the original material.
c
D
⦁ touch «i»-icon ⦁ touch «Balance»-icon
033804.52.04_2013-09_Manual_B780_EN
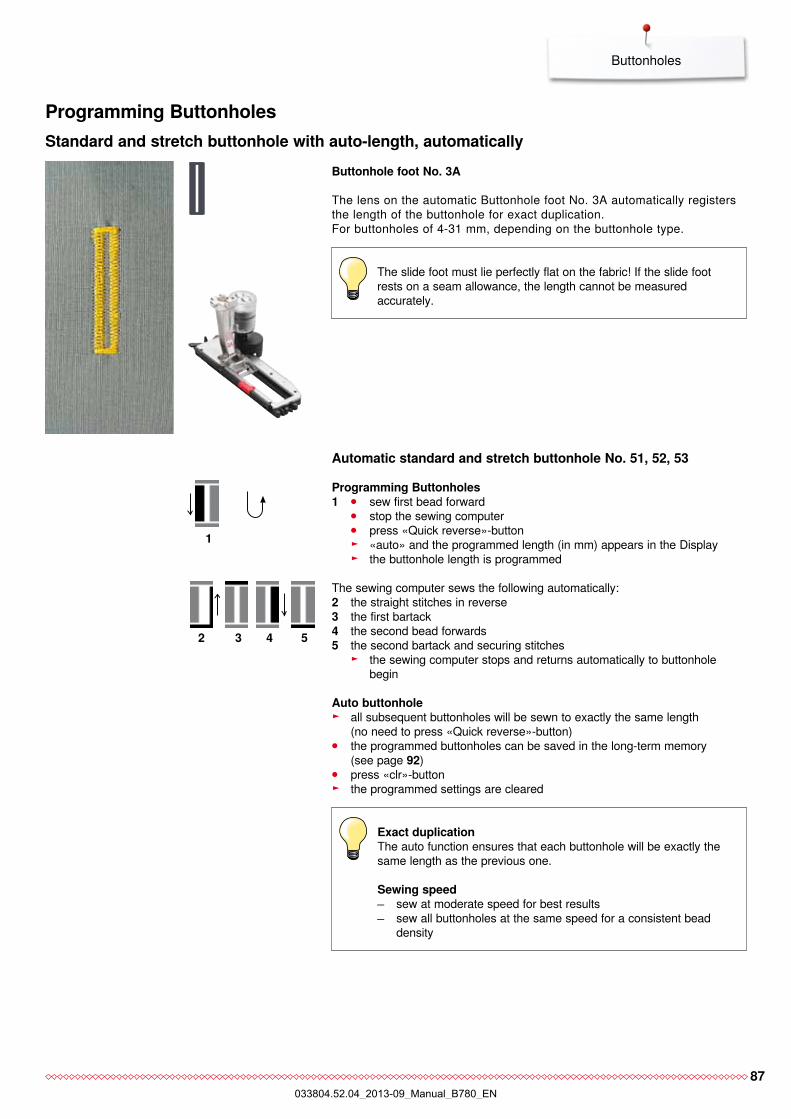
87
Buttonholes
Buttonhole foot no. 3a
The lens on the automatic Buttonhole foot No. 3A automatically registers the length of the buttonhole for exact duplication.For buttonholes of 4-31 mm, depending on the buttonhole type.
The slide foot must lie perfectly flat on the fabric! If the slide foot rests on a seam allowance, the length cannot be measured accurately.
5432
1
automatic standard and stretch buttonhole no. 51, 52, 53
programming Buttonholes1 ⦁ sew first bead forward
⦁ stop the sewing computer ⦁ press «Quick reverse»-button ► «auto» and the programmed length (in mm) appears in the Display ► the buttonhole length is programmed
The sewing computer sews the following automatically:2 the straight stitches in reverse3 the first bartack4 the second bead forwards5 the second bartack and securing stitches
► the sewing computer stops and returns automatically to buttonhole begin
auto buttonhole ► all subsequent buttonholes will be sewn to exactly the same length
(no need to press «Quick reverse»-button) ⦁ the programmed buttonholes can be saved in the long-term memory
(see page 92) ⦁ press «clr»-button ► the programmed settings are cleared
exact duplication The auto function ensures that each buttonhole will be exactly the same length as the previous one.
Sewing speed sew at moderate speed for best results sew all buttonholes at the same speed for a consistent bead
density
programming ButtonholesStandard and stretch buttonhole with auto-length, automatically
033804.52.04_2013-09_Manual_B780_EN
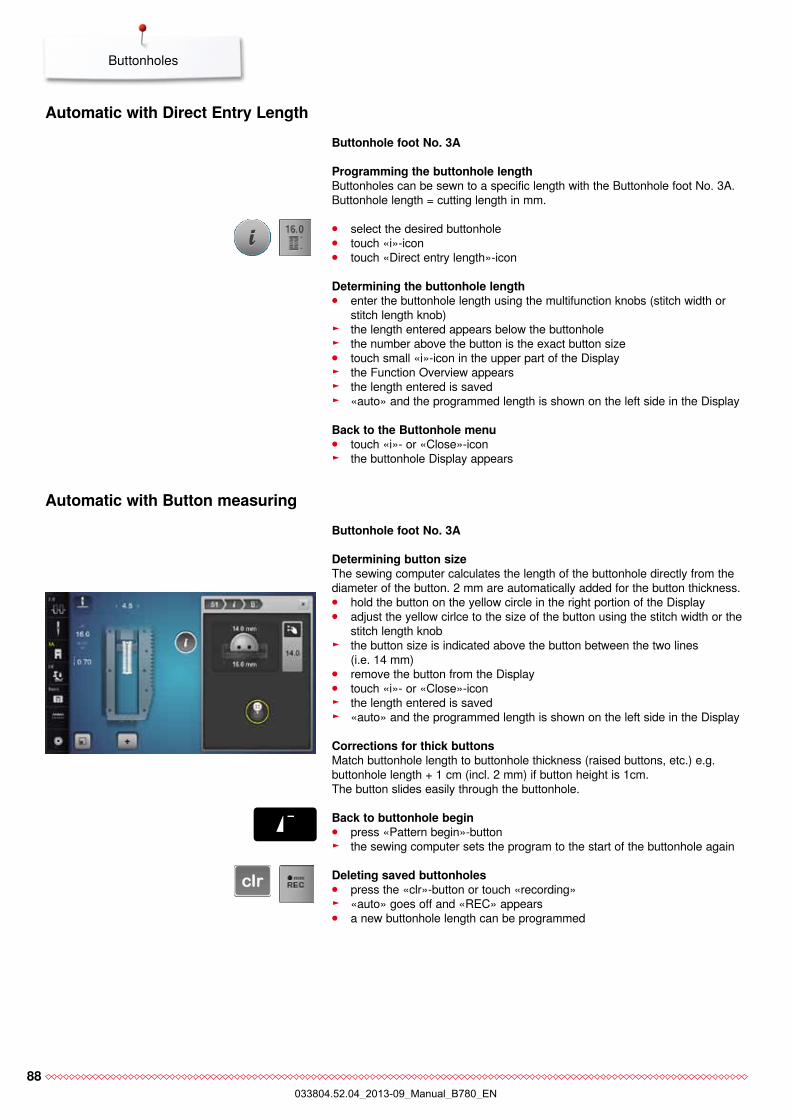
88
Buttonholes
automatic with Direct entry LengthButtonhole foot no. 3a
programming the buttonhole lengthButtonholes can be sewn to a specific length with the Buttonhole foot No. 3A.Buttonhole length = cutting length in mm.
⦁ select the desired buttonhole ⦁ touch «i»-icon ⦁ touch «Direct entry length»-icon
Determining the buttonhole length ⦁ enter the buttonhole length using the multifunction knobs (stitch width or
stitch length knob) ► the length entered appears below the buttonhole ► the number above the button is the exact button size ⦁ touch small «i»-icon in the upper part of the Display ► the Function Overview appears ► the length entered is saved ► «auto» and the programmed length is shown on the left side in the Display
Back to the Buttonhole menu ⦁ touch «i»- or «Close»-icon ► the buttonhole Display appears
Buttonhole foot no. 3a
Determining button sizeThe sewing computer calculates the length of the buttonhole directly from the diameter of the button. 2 mm are automatically added for the button thickness. ⦁ hold the button on the yellow circle in the right portion of the Display ⦁ adjust the yellow cirlce to the size of the button using the stitch width or the
stitch length knob ► the button size is indicated above the button between the two lines
(i.e. 14 mm) ⦁ remove the button from the Display ⦁ touch «i»- or «Close»-icon ► the length entered is saved ► «auto» and the programmed length is shown on the left side in the Display
corrections for thick buttonsMatch buttonhole length to buttonhole thickness (raised buttons, etc.) e.g. buttonhole length + 1 cm (incl. 2 mm) if button height is 1cm.The button slides easily through the buttonhole.
automatic with Button measuring
Back to buttonhole begin ⦁ press «Pattern begin»-button ► the sewing computer sets the program to the start of the buttonhole again
Deleting saved buttonholes ⦁ press the «clr»-button or touch «recording» ► «auto» goes off and «REC» appears ⦁ a new buttonhole length can be programmed
033804.52.04_2013-09_Manual_B780_EN
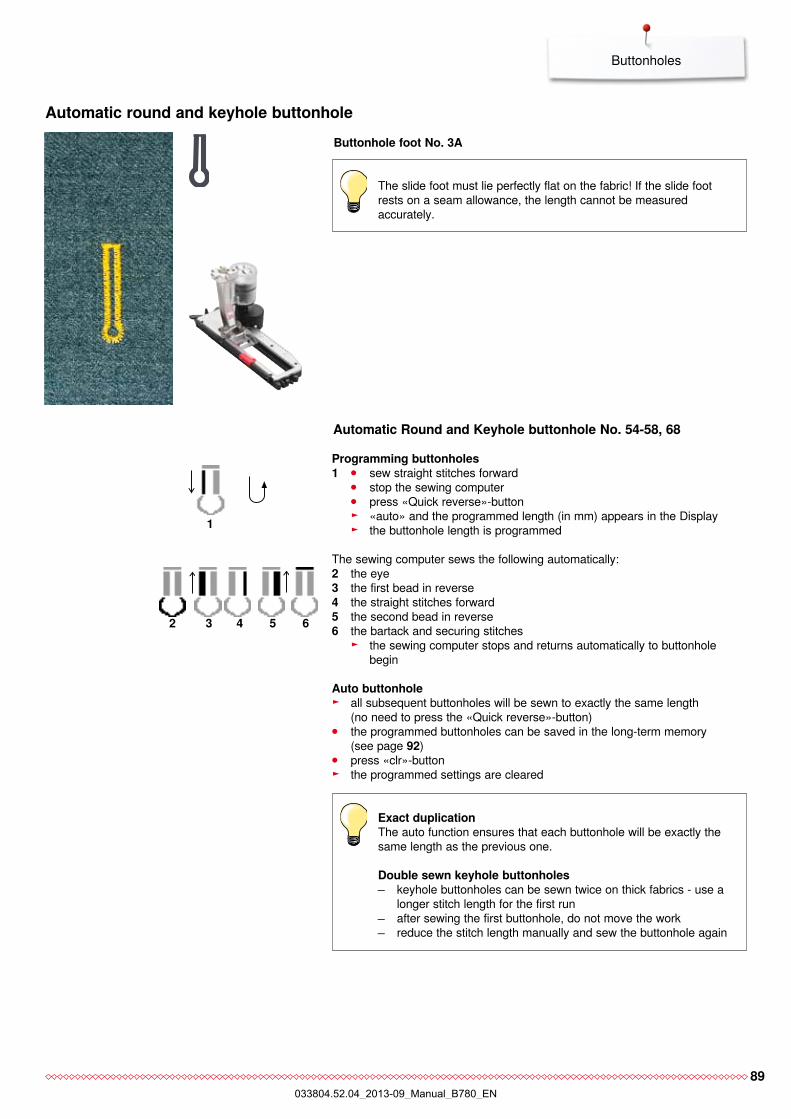
89
Buttonholes
Buttonhole foot no. 3a
automatic round and keyhole buttonhole
programming buttonholes1 ⦁ sew straight stitches forward
⦁ stop the sewing computer ⦁ press «Quick reverse»-button ► «auto» and the programmed length (in mm) appears in the Display ► the buttonhole length is programmed
The sewing computer sews the following automatically:2 the eye3 the first bead in reverse4 the straight stitches forward5 the second bead in reverse6 the bartack and securing stitches
► the sewing computer stops and returns automatically to buttonhole begin
auto buttonhole ► all subsequent buttonholes will be sewn to exactly the same length
(no need to press the «Quick reverse»-button) ⦁ the programmed buttonholes can be saved in the long-term memory
(see page 92) ⦁ press «clr»-button ► the programmed settings are cleared
exact duplication The auto function ensures that each buttonhole will be exactly the same length as the previous one.
Double sewn keyhole buttonholes keyhole buttonholes can be sewn twice on thick fabrics - use a
longer stitch length for the first run after sewing the first buttonhole, do not move the work reduce the stitch length manually and sew the buttonhole again
The slide foot must lie perfectly flat on the fabric! If the slide foot rests on a seam allowance, the length cannot be measured accurately.
65432
1
automatic round and Keyhole buttonhole no. 54-58, 68
033804.52.04_2013-09_Manual_B780_EN
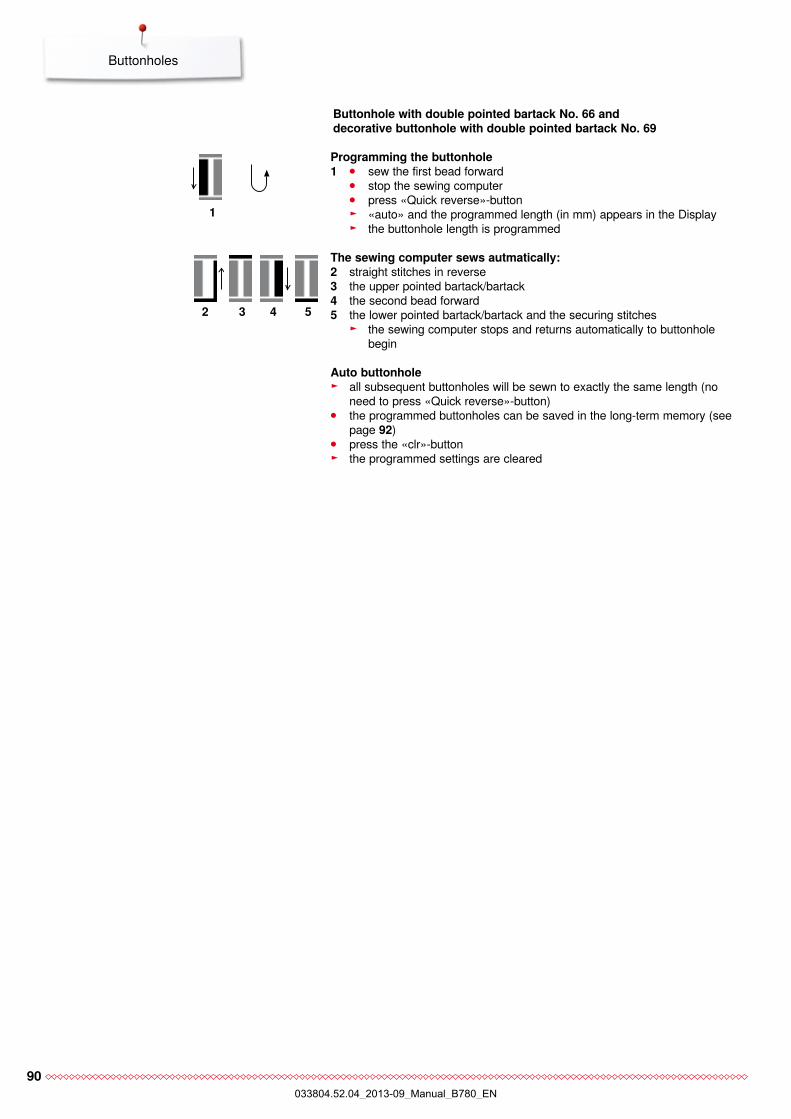
90
Buttonholes
Buttonhole with double pointed bartack no. 66 and decorative buttonhole with double pointed bartack no. 69
5432
1
programming the buttonhole1 ⦁ sew the first bead forward
⦁ stop the sewing computer ⦁ press «Quick reverse»-button ► «auto» and the programmed length (in mm) appears in the Display ► the buttonhole length is programmed
the sewing computer sews autmatically:2 straight stitches in reverse3 the upper pointed bartack/bartack4 the second bead forward5 the lower pointed bartack/bartack and the securing stitches
► the sewing computer stops and returns automatically to buttonhole begin
auto buttonhole ► all subsequent buttonholes will be sewn to exactly the same length (no
need to press «Quick reverse»-button) ⦁ the programmed buttonholes can be saved in the long-term memory (see
page 92) ⦁ press the «clr»-button ► the programmed settings are cleared
033804.52.04_2013-09_Manual_B780_EN
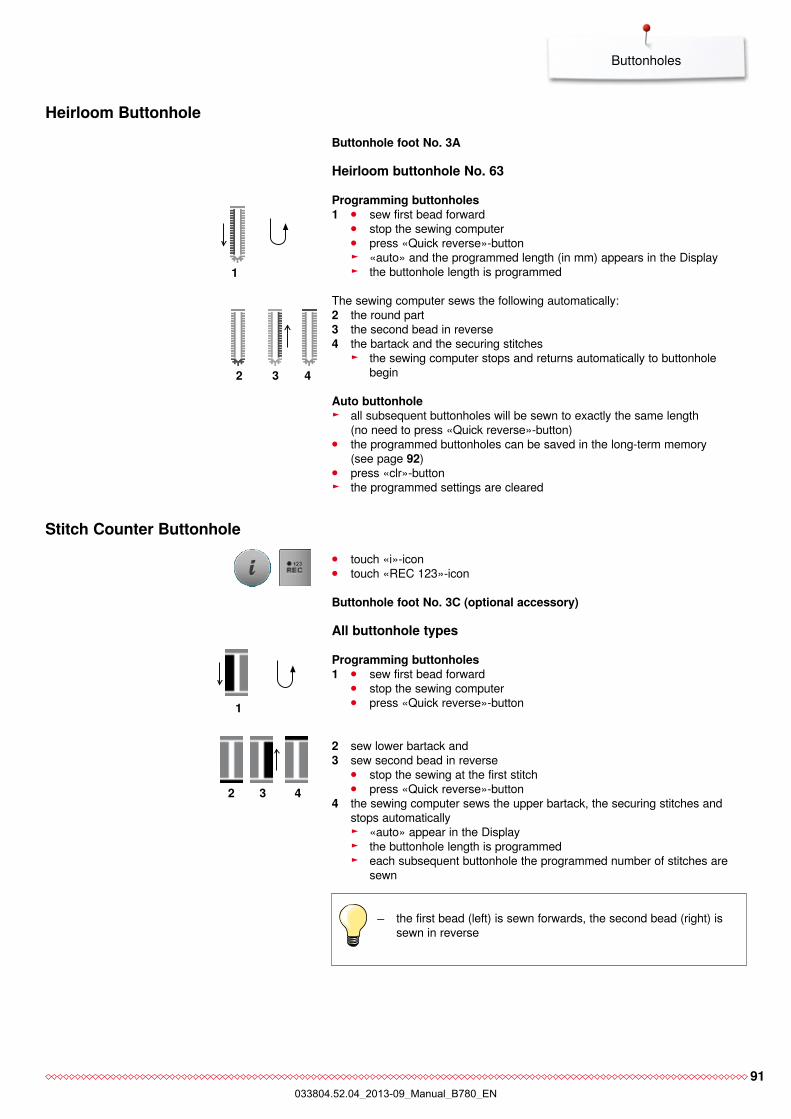
91
Buttonholes
Buttonhole foot no. 3a
Heirloom buttonhole no. 63
programming buttonholes1 ⦁ sew first bead forward
⦁ stop the sewing computer ⦁ press «Quick reverse»-button ► «auto» and the programmed length (in mm) appears in the Display ► the buttonhole length is programmed
The sewing computer sews the following automatically:2 the round part3 the second bead in reverse4 the bartack and the securing stitches
► the sewing computer stops and returns automatically to buttonhole begin
Heirloom Buttonhole
Stitch counter Buttonhole
auto buttonhole ► all subsequent buttonholes will be sewn to exactly the same length
(no need to press «Quick reverse»-button) ⦁ the programmed buttonholes can be saved in the long-term memory
(see page 92) ⦁ press «clr»-button ► the programmed settings are cleared
432
1
⦁ touch «i»-icon ⦁ touch «REC 123»-icon
Buttonhole foot no. 3c (optional accessory)
all buttonhole types
programming buttonholes1 ⦁ sew first bead forward
⦁ stop the sewing computer ⦁ press «Quick reverse»-button
432
1
the first bead (left) is sewn forwards, the second bead (right) is sewn in reverse
2 sew lower bartack and 3 sew second bead in reverse ⦁ stop the sewing at the first stitch
⦁ press «Quick reverse»-button4 the sewing computer sews the upper bartack, the securing stitches and stops automatically
► «auto» appear in the Display ► the buttonhole length is programmed ► each subsequent buttonhole the programmed number of stitches are
sewn
033804.52.04_2013-09_Manual_B780_EN
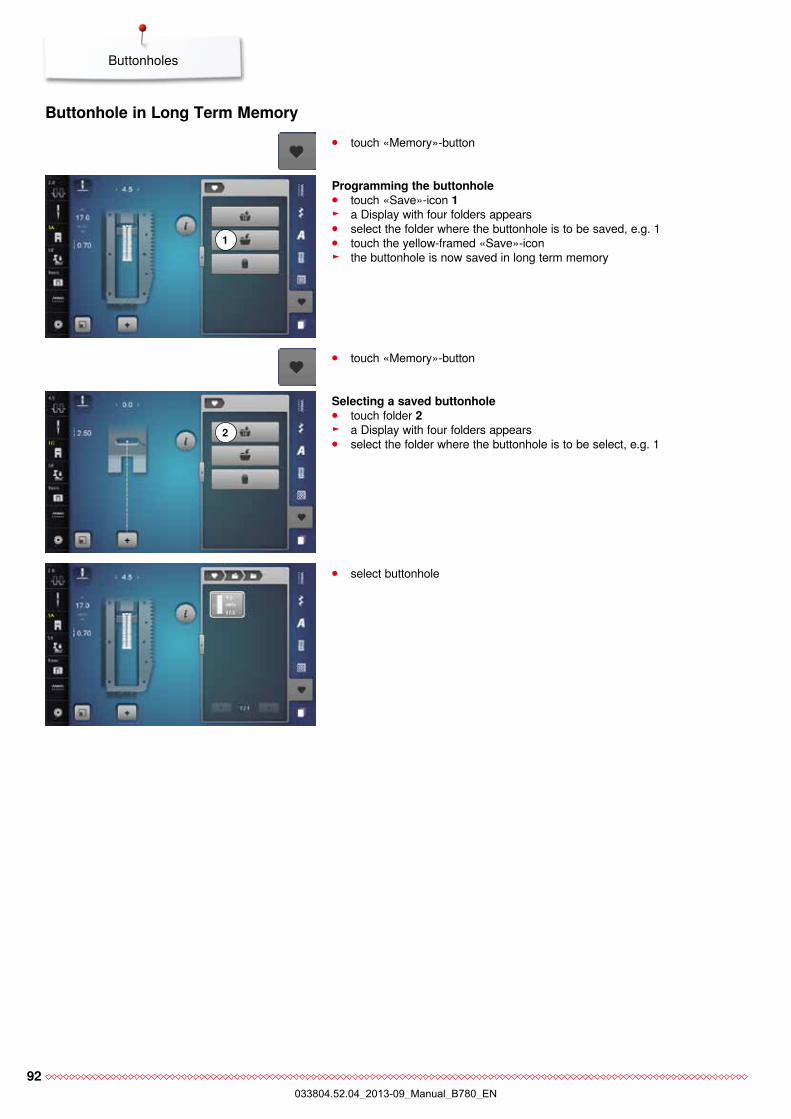
92
Buttonholes
Buttonhole in Long term memory
programming the buttonhole ⦁ touch «Save»-icon 1 ► a Display with four folders appears ⦁ select the folder where the buttonhole is to be saved, e.g. 1 ⦁ touch the yellow-framed «Save»-icon ► the buttonhole is now saved in long term memory
1
Selecting a saved buttonhole ⦁ touch folder 2 ► a Display with four folders appears ⦁ select the folder where the buttonhole is to be select, e.g. 1
2
⦁ select buttonhole
⦁ touch «Memory»-button
⦁ touch «Memory»-button
033804.52.04_2013-09_Manual_B780_EN
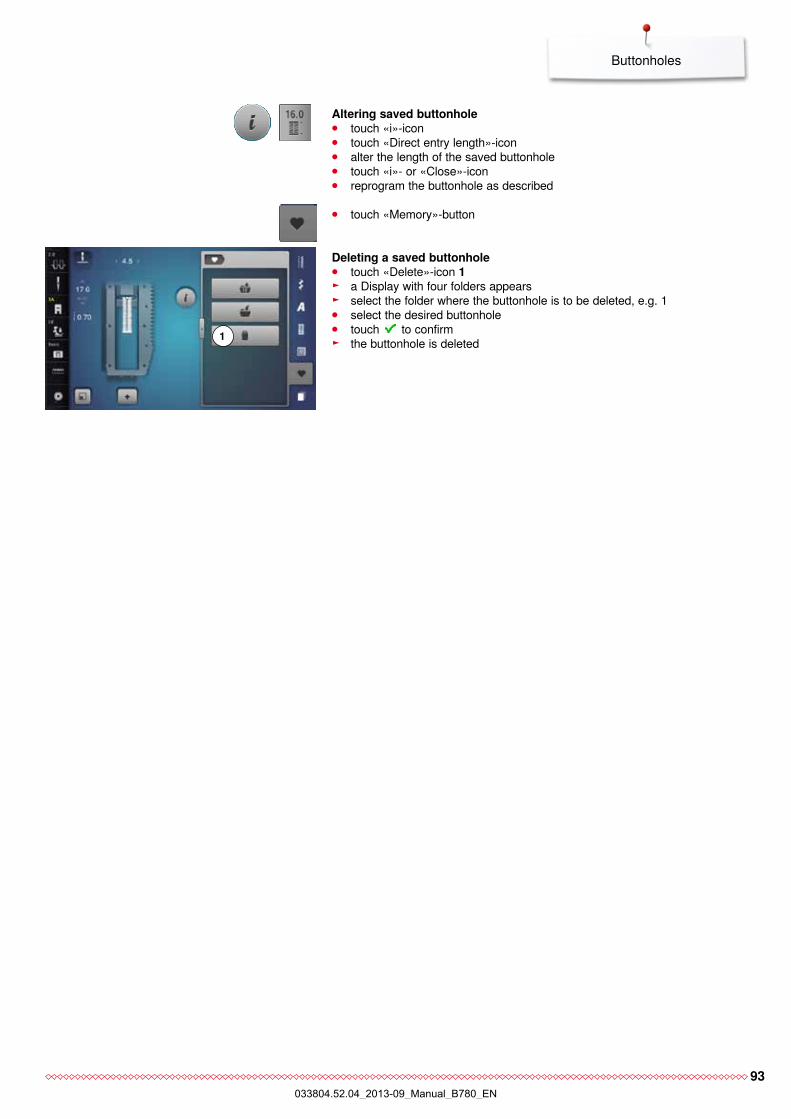
93
Buttonholes
⦁ alter the length of the saved buttonhole ⦁ touch «i»- or «Close»-icon ⦁ reprogram the buttonhole as described
altering saved buttonhole ⦁ touch «i»-icon ⦁ touch «Direct entry length»-icon
Deleting a saved buttonhole ⦁ touch «Delete»-icon 1 ► a Display with four folders appears ► select the folder where the buttonhole is to be deleted, e.g. 1 ⦁ select the desired buttonhole ⦁ touch to confirm ► the buttonhole is deleted
⦁ touch «Memory»-button
1
033804.52.04_2013-09_Manual_B780_EN

94
Buttonholes
7- or 5-step Buttonhole, manuallyButtonhole foot no. 3c (optional accessory)
⦁ select the desired buttonhole ⦁ touch «i»-icon ⦁ touch «man»-icon
Sewing 5-Step buttonhole ► step 1 is activated for buttonhole begin ► step 2 is activated when beginning to sew ⦁ sew first bead ⦁ stop the sewing computer at desired length of the bead or to the end of the
length marking ⦁ select step 3 ► the sewing computer sews the eye or the keyhole and stops
automatically ⦁ select step 4 ► the sewing computer sews the second bead in reverse ⦁ stop sewing computer at the height of the first stitch (buttonhole begin) ⦁ select step 5 ► sewing computer sews the top bartack and secures stitches automatically
Sewing 7-Step buttonhole ► step 1 is activated for buttonhole begin ► step 2 is activated when beginning to sew ⦁ sew first bead ⦁ stop the sewing computer at desired length of the bead or to the end of the
length marking ⦁ select step 3 ► sewing computer sews straight stitches in reverse ⦁ stop sewing computer at the height of the first stitch (buttonhole begin) ⦁ select step 4 ► the sewing computer sews top bartack and stops automatically ⦁ select step 5 ► the sewing computer sews the second bead ⦁ stop the sewing computer at the height of the first bead ⦁ select step 6 ► the sewing computer sews bottom bartack and stops automatically ⦁ select step 7 ► sewing computer secures stitches and stops automatically
Straight stitch buttonhole no. 59 The same programming procedure as with the auto buttonhole
program (see page 87) Buttonholes No. 59 with the straight stitch is recommended for
soft, loosely woven fabrics and for buttonholes that will receive excessive wear. The straight stitch buttonholes also reinforce, vinyl and felt
The length of the beads is manually determinded when sewing. Bartack, eye and securing stitches are pre-programmed. The individual steps can also be selected by scrolling, by using the arrow icons, by direct selection or by touching the «Quick reverse»-button.
033804.52.04_2013-09_Manual_B780_EN
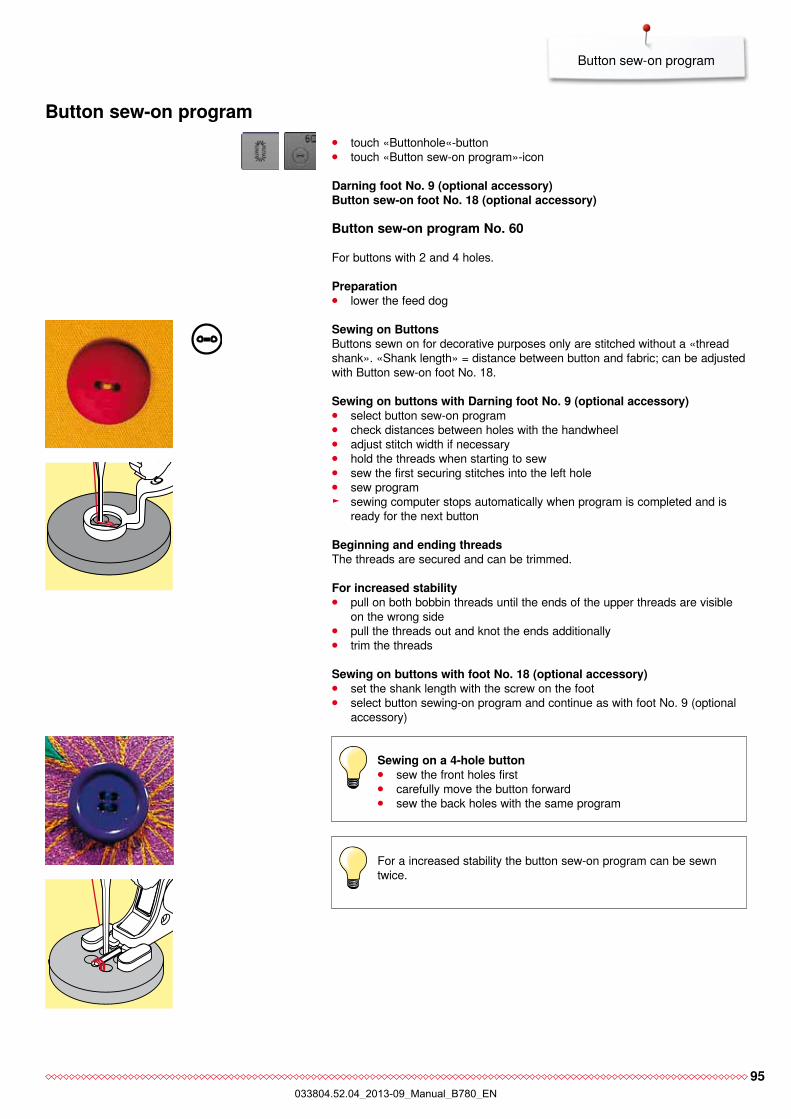
95
Button sew-on program
Darning foot no. 9 (optional accessory)Button sew-on foot no. 18 (optional accessory)
Button sew-on program no. 60
For buttons with 2 and 4 holes.
preparation ⦁ lower the feed dog
Sewing on a 4-hole button ⦁ sew the front holes first ⦁ carefully move the button forward ⦁ sew the back holes with the same program
For a increased stability the button sew-on program can be sewn twice.
Sewing on Buttons Buttons sewn on for decorative purposes only are stitched without a «thread shank». «Shank length» = distance between button and fabric; can be adjusted with Button sew-on foot No. 18.
Sewing on buttons with Darning foot no. 9 (optional accessory) ⦁ select button sew-on program ⦁ check distances between holes with the handwheel ⦁ adjust stitch width if necessary ⦁ hold the threads when starting to sew ⦁ sew the first securing stitches into the left hole ⦁ sew program ► sewing computer stops automatically when program is completed and is
ready for the next button
Beginning and ending threadsThe threads are secured and can be trimmed.
for increased stability ⦁ pull on both bobbin threads until the ends of the upper threads are visible
on the wrong side ⦁ pull the threads out and knot the ends additionally ⦁ trim the threads
Sewing on buttons with foot no. 18 (optional accessory) ⦁ set the shank length with the screw on the foot ⦁ select button sewing-on program and continue as with foot No. 9 (optional
accessory)
⦁ touch «Buttonhole«-button ⦁ touch «Button sew-on program»-icon
Button sew-on program
033804.52.04_2013-09_Manual_B780_EN
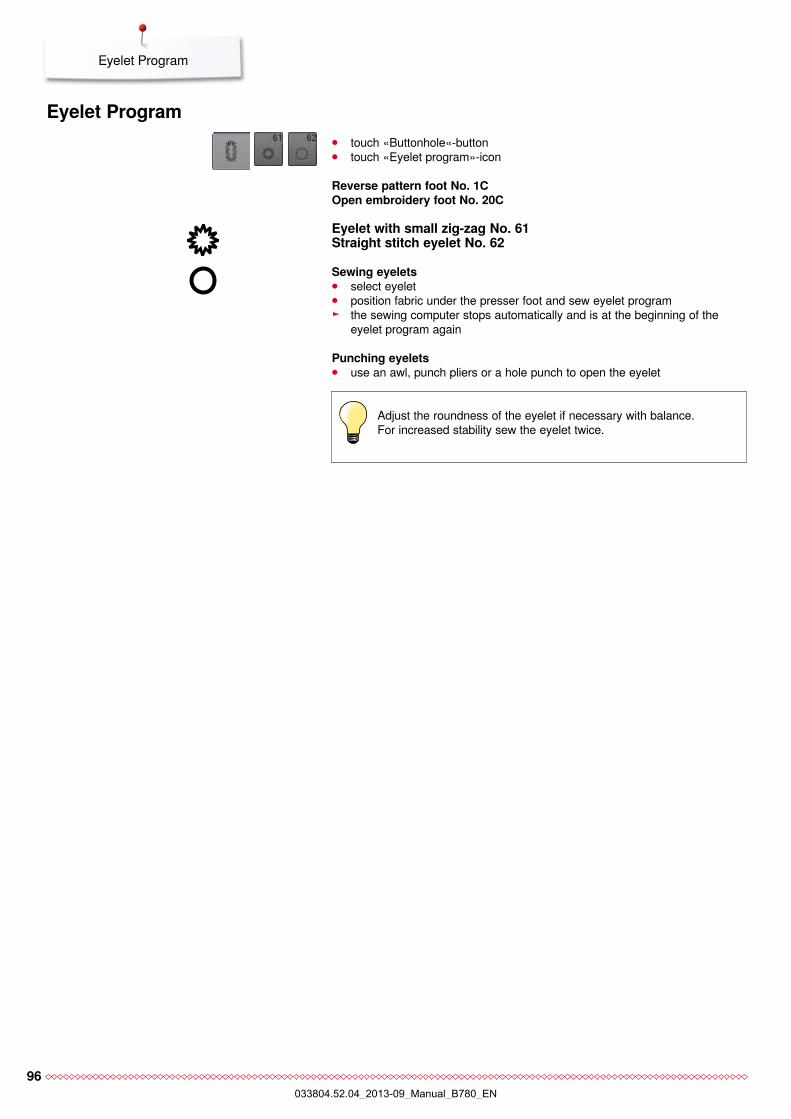
96
Eyelet Program
reverse pattern foot no. 1copen embroidery foot no. 20c
eyelet with small zig-zag no. 61 Straight stitch eyelet no. 62
Sewing eyelets ⦁ select eyelet ⦁ position fabric under the presser foot and sew eyelet program ► the sewing computer stops automatically and is at the beginning of the
eyelet program again
punching eyelets ⦁ use an awl, punch pliers or a hole punch to open the eyelet
⦁ touch «Buttonhole«-button ⦁ touch «Eyelet program»-icon
Adjust the roundness of the eyelet if necessary with balance.For increased stability sew the eyelet twice.
eyelet program
033804.52.04_2013-09_Manual_B780_EN
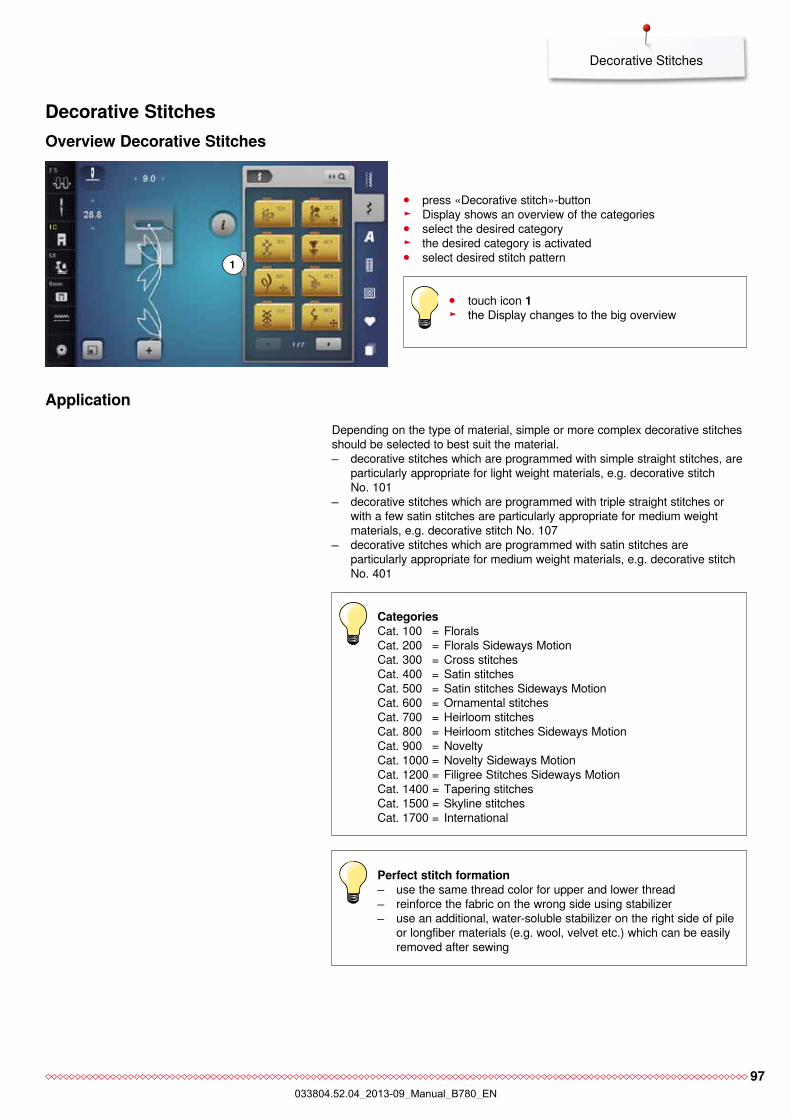
97
Decorative Stitches
Decorative Stitchesoverview Decorative Stitches
⦁ press «Decorative stitch»-button ► Display shows an overview of the categories ⦁ select the desired category ► the desired category is activated ⦁ select desired stitch pattern
categoriesCat. 100 = FloralsCat. 200 = Florals Sideways MotionCat. 300 = Cross stitchesCat. 400 = Satin stitchesCat. 500 = Satin stitches Sideways MotionCat. 600 = Ornamental stitchesCat. 700 = Heirloom stitchesCat. 800 = Heirloom stitches Sideways MotionCat. 900 = Novelty Cat. 1000 = Novelty Sideways MotionCat. 1200 = Filigree Stitches Sideways MotionCat. 1400 = Tapering stitchesCat. 1500 = Skyline stitchesCat. 1700 = International
perfect stitch formation use the same thread color for upper and lower thread reinforce the fabric on the wrong side using stabilizer use an additional, water-soluble stabilizer on the right side of pile
or longfiber materials (e.g. wool, velvet etc.) which can be easily removed after sewing
Depending on the type of material, simple or more complex decorative stitches should be selected to best suit the material. decorative stitches which are programmed with simple straight stitches, are
particularly appropriate for light weight materials, e.g. decorative stitch No. 101
decorative stitches which are programmed with triple straight stitches or with a few satin stitches are particularly appropriate for medium weight materials, e.g. decorative stitch No. 107
decorative stitches which are programmed with satin stitches are particularly appropriate for medium weight materials, e.g. decorative stitch No. 401
application
⦁ touch icon 1 ► the Display changes to the big overview
1
033804.52.04_2013-09_Manual_B780_EN
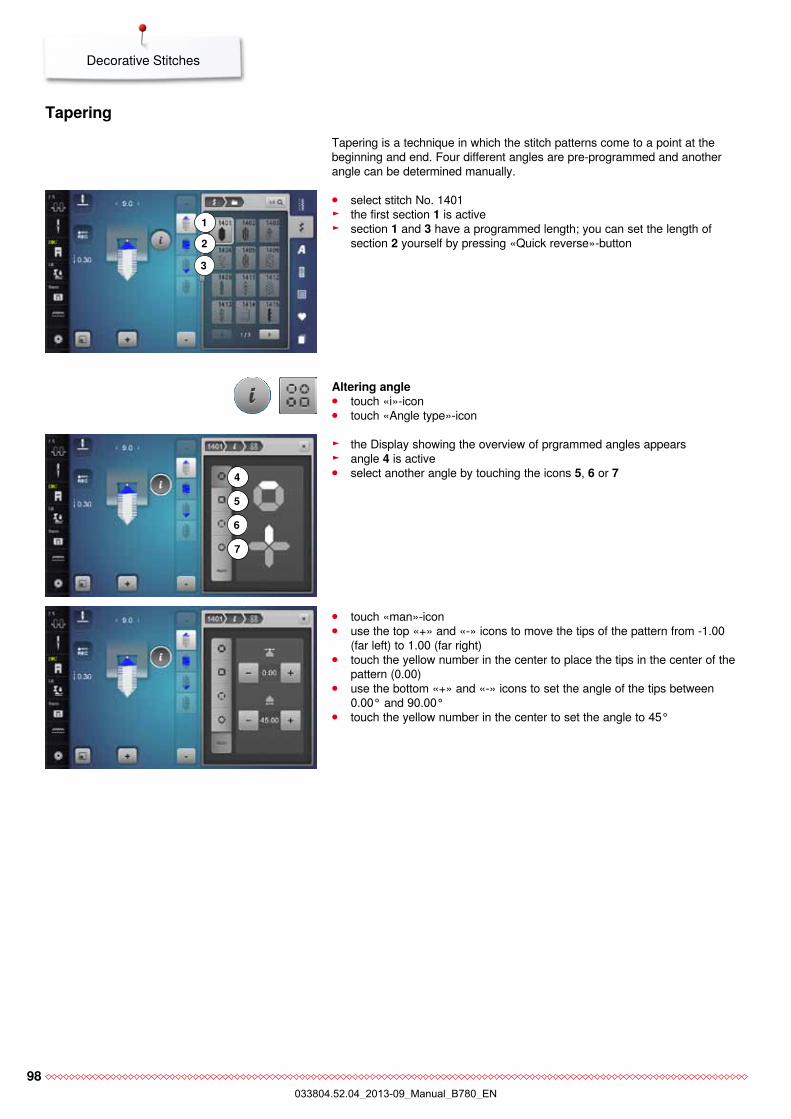
98
Decorative Stitches
taperingTapering is a technique in which the stitch patterns come to a point at the beginning and end. Four different angles are pre-programmed and another angle can be determined manually.
⦁ select stitch No. 1401 ► the first section 1 is active ► section 1 and 3 have a programmed length; you can set the length of
section 2 yourself by pressing «Quick reverse»-button
altering angle ⦁ touch «i»-icon ⦁ touch «Angle type»-icon
► the Display showing the overview of prgrammed angles appears ► angle 4 is active ⦁ select another angle by touching the icons 5, 6 or 7
⦁ touch «man»-icon ⦁ use the top «+» and «-» icons to move the tips of the pattern from -1.00
(far left) to 1.00 (far right) ⦁ touch the yellow number in the center to place the tips in the center of the
pattern (0.00) ⦁ use the bottom «+» and «-» icons to set the angle of the tips between
0.00° and 90.00° ⦁ touch the yellow number in the center to set the angle to 45°
2
3
1
5
6
4
7
033804.52.04_2013-09_Manual_B780_EN
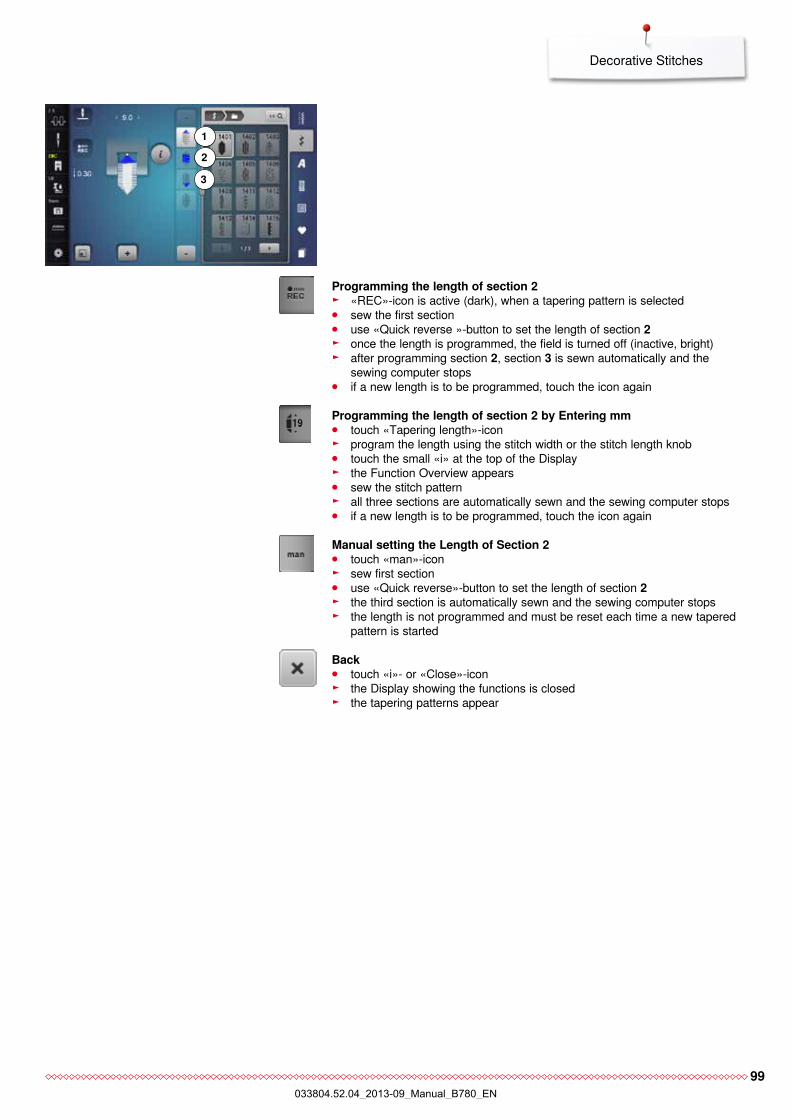
99
Decorative Stitches
programming the length of section 2 ► «REC»-icon is active (dark), when a tapering pattern is selected ⦁ sew the first section ⦁ use «Quick reverse »-button to set the length of section 2 ► once the length is programmed, the field is turned off (inactive, bright) ► after programming section 2, section 3 is sewn automatically and the
sewing computer stops ⦁ if a new length is to be programmed, touch the icon again
programming the length of section 2 by entering mm ⦁ touch «Tapering length»-icon ► program the length using the stitch width or the stitch length knob ⦁ touch the small «i» at the top of the Display ► the Function Overview appears ⦁ sew the stitch pattern ► all three sections are automatically sewn and the sewing computer stops ⦁ if a new length is to be programmed, touch the icon again
manual setting the Length of Section 2 ⦁ touch «man»-icon ► sew first section ⦁ use «Quick reverse»-button to set the length of section 2 ► the third section is automatically sewn and the sewing computer stops ► the length is not programmed and must be reset each time a new tapered
pattern is started
Back ⦁ touch «i»- or «Close»-icon ► the Display showing the functions is closed ► the tapering patterns appear
2
3
1
033804.52.04_2013-09_Manual_B780_EN
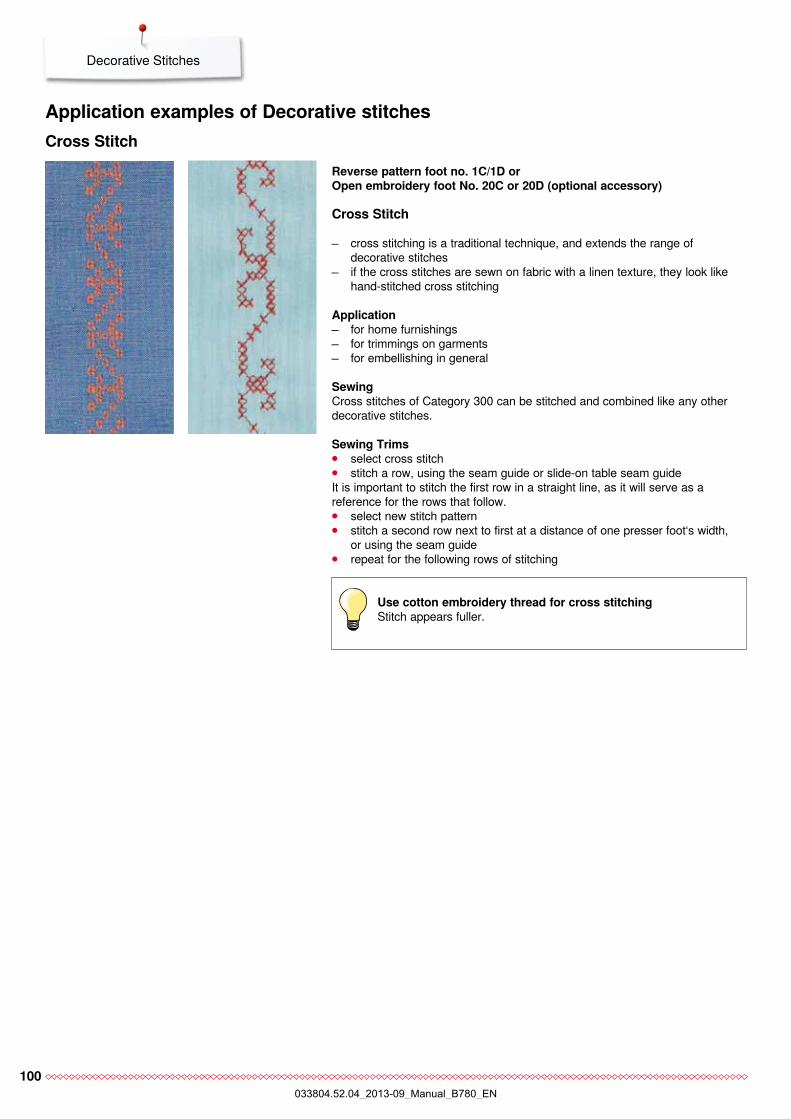
100
Decorative Stitches
application examples of Decorative stitches
reverse pattern foot no. 1c/1D oropen embroidery foot no. 20c or 20D (optional accessory)
cross Stitch
cross stitching is a traditional technique, and extends the range of decorative stitches
if the cross stitches are sewn on fabric with a linen texture, they look like hand-stitched cross stitching
application for home furnishings for trimmings on garments for embellishing in general
Sewing Cross stitches of Category 300 can be stitched and combined like any other decorative stitches.
Sewing trims ⦁ select cross stitch ⦁ stitch a row, using the seam guide or slide-on table seam guide
It is important to stitch the first row in a straight line, as it will serve as a reference for the rows that follow. ⦁ select new stitch pattern ⦁ stitch a second row next to first at a distance of one presser foot‘s width,
or using the seam guide ⦁ repeat for the following rows of stitching
cross Stitch
use cotton embroidery thread for cross stitchingStitch appears fuller.
033804.52.04_2013-09_Manual_B780_EN
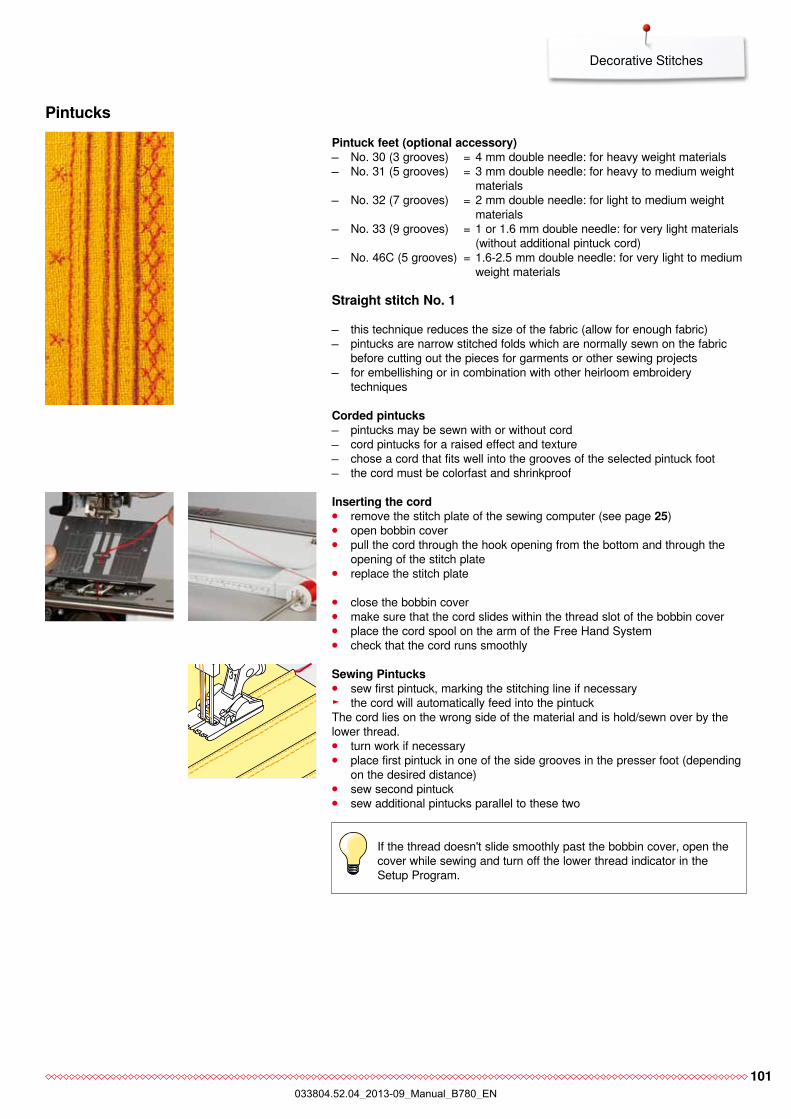
101
Decorative Stitches
pintuck feet (optional accessory) No. 30 (3 grooves) = 4 mm double needle: for heavy weight materials No. 31 (5 grooves) = 3 mm double needle: for heavy to medium weight
materials No. 32 (7 grooves) = 2 mm double needle: for light to medium weight
materials No. 33 (9 grooves) = 1 or 1.6 mm double needle: for very light materials
(without additional pintuck cord) No. 46C (5 grooves) = 1.6-2.5 mm double needle: for very light to medium
weight materials
Straight stitch no. 1
this technique reduces the size of the fabric (allow for enough fabric) pintucks are narrow stitched folds which are normally sewn on the fabric
before cutting out the pieces for garments or other sewing projects for embellishing or in combination with other heirloom embroidery
techniques
corded pintucks pintucks may be sewn with or without cord cord pintucks for a raised effect and texture chose a cord that fits well into the grooves of the selected pintuck foot the cord must be colorfast and shrinkproof
pintucks
Inserting the cord ⦁ remove the stitch plate of the sewing computer (see page 25) ⦁ open bobbin cover ⦁ pull the cord through the hook opening from the bottom and through the
opening of the stitch plate ⦁ replace the stitch plate
⦁ close the bobbin cover ⦁ make sure that the cord slides within the thread slot of the bobbin cover ⦁ place the cord spool on the arm of the Free Hand System ⦁ check that the cord runs smoothly
Sewing pintucks ⦁ sew first pintuck, marking the stitching line if necessary ► the cord will automatically feed into the pintuck
The cord lies on the wrong side of the material and is hold/sewn over by the lower thread. ⦁ turn work if necessary ⦁ place first pintuck in one of the side grooves in the presser foot (depending
on the desired distance) ⦁ sew second pintuck ⦁ sew additional pintucks parallel to these two
If the thread doesn't slide smoothly past the bobbin cover, open the cover while sewing and turn off the lower thread indicator in the Setup Program.
033804.52.04_2013-09_Manual_B780_EN
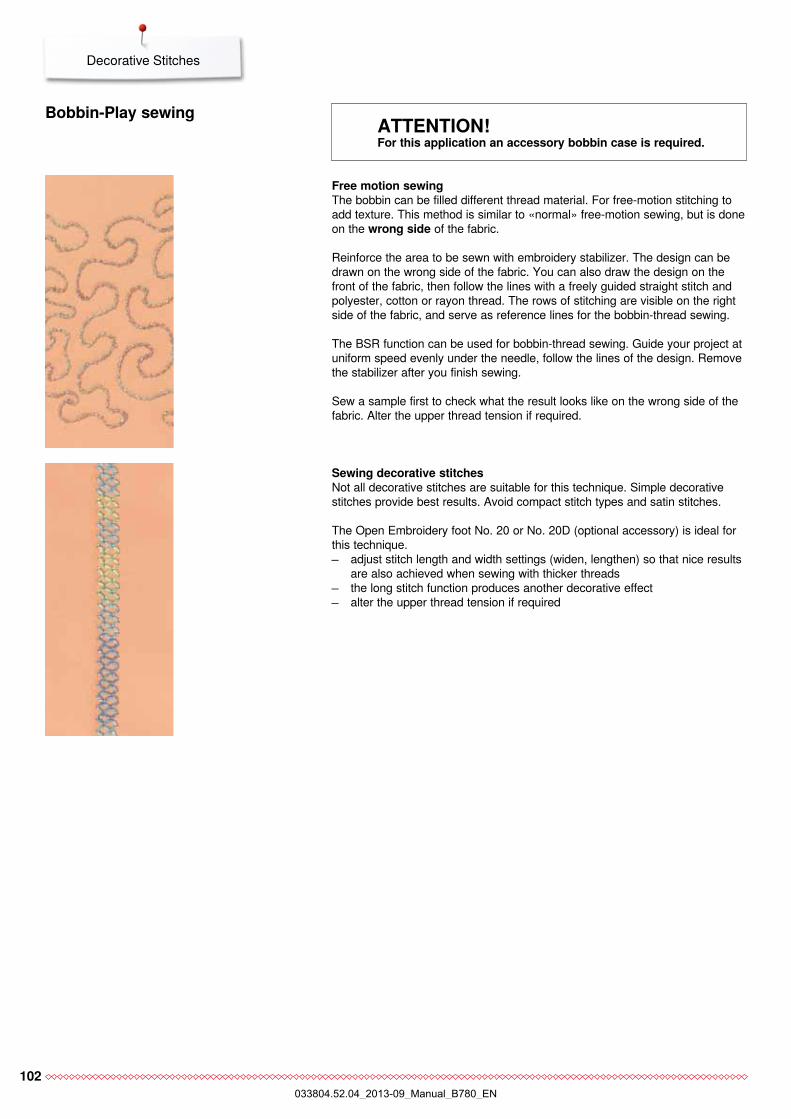
102
Decorative Stitches
free motion sewing The bobbin can be filled different thread material. For free-motion stitching to add texture. This method is similar to «normal» free-motion sewing, but is done on the wrong side of the fabric.
Reinforce the area to be sewn with embroidery stabilizer. The design can be drawn on the wrong side of the fabric. You can also draw the design on the front of the fabric, then follow the lines with a freely guided straight stitch and polyester, cotton or rayon thread. The rows of stitching are visible on the right side of the fabric, and serve as reference lines for the bobbin-thread sewing.
The BSR function can be used for bobbin-thread sewing. Guide your project at uniform speed evenly under the needle, follow the lines of the design. Remove the stabilizer after you finish sewing.
Sew a sample first to check what the result looks like on the wrong side of the fabric. Alter the upper thread tension if required.
Bobbin-play sewing
Sewing decorative stitchesNot all decorative stitches are suitable for this technique. Simple decorative stitches provide best results. Avoid compact stitch types and satin stitches.
The Open Embroidery foot No. 20 or No. 20D (optional accessory) is ideal for this technique. adjust stitch length and width settings (widen, lengthen) so that nice results
are also achieved when sewing with thicker threads the long stitch function produces another decorative effect alter the upper thread tension if required
attentIon!for this application an accessory bobbin case is required.
033804.52.04_2013-09_Manual_B780_EN
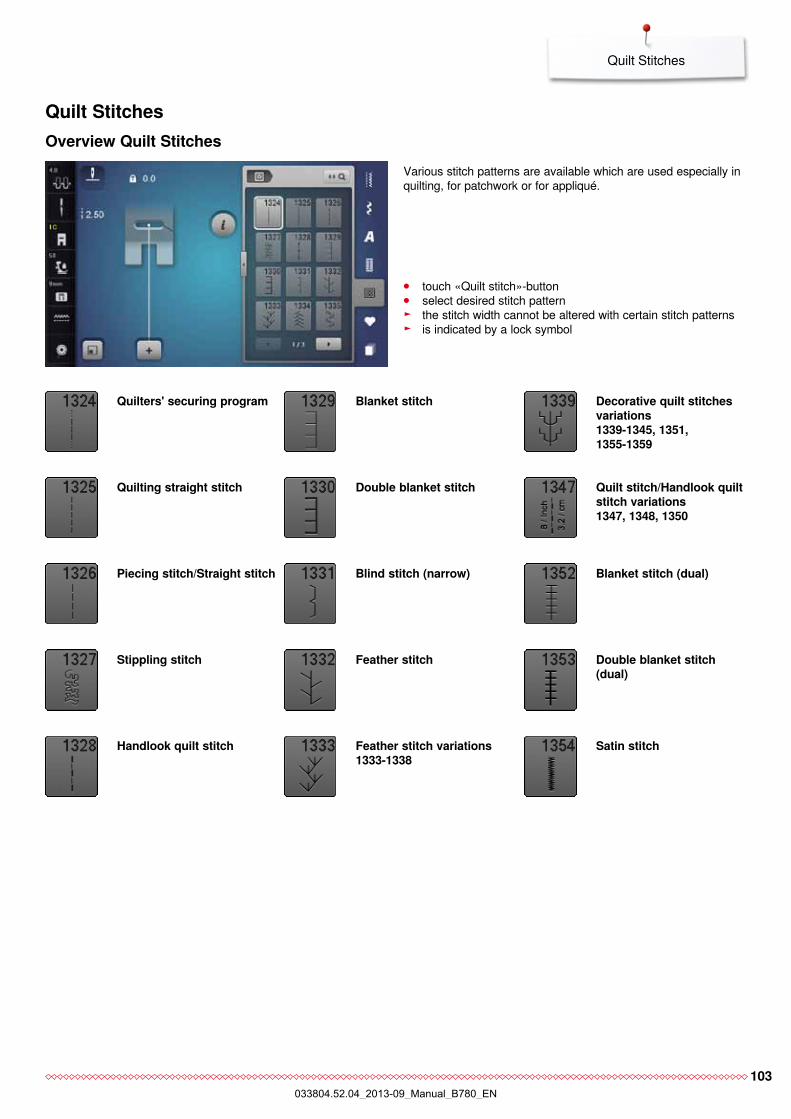
103
Quilt Stitches
Quilt Stitchesoverview Quilt Stitches
Various stitch patterns are available which are used especially in quilting, for patchwork or for appliqué.
⦁ touch «Quilt stitch»-button ⦁ select desired stitch pattern ► the stitch width cannot be altered with certain stitch patterns ► is indicated by a lock symbol
feather stitch
feather stitch variations1333-1338
Quilters' securing program
Quilting straight stitch
piecing stitch/Straight stitch
Stippling stitch
Handlook quilt stitch
Blanket stitch
Double blanket stitch
Blind stitch (narrow)
Decorative quilt stitches variations1339-1345, 1351, 1355-1359
Blanket stitch (dual)
Quilt stitch/Handlook quilt stitch variations1347, 1348, 1350
Satin stitch
Double blanket stitch (dual)
033804.52.04_2013-09_Manual_B780_EN
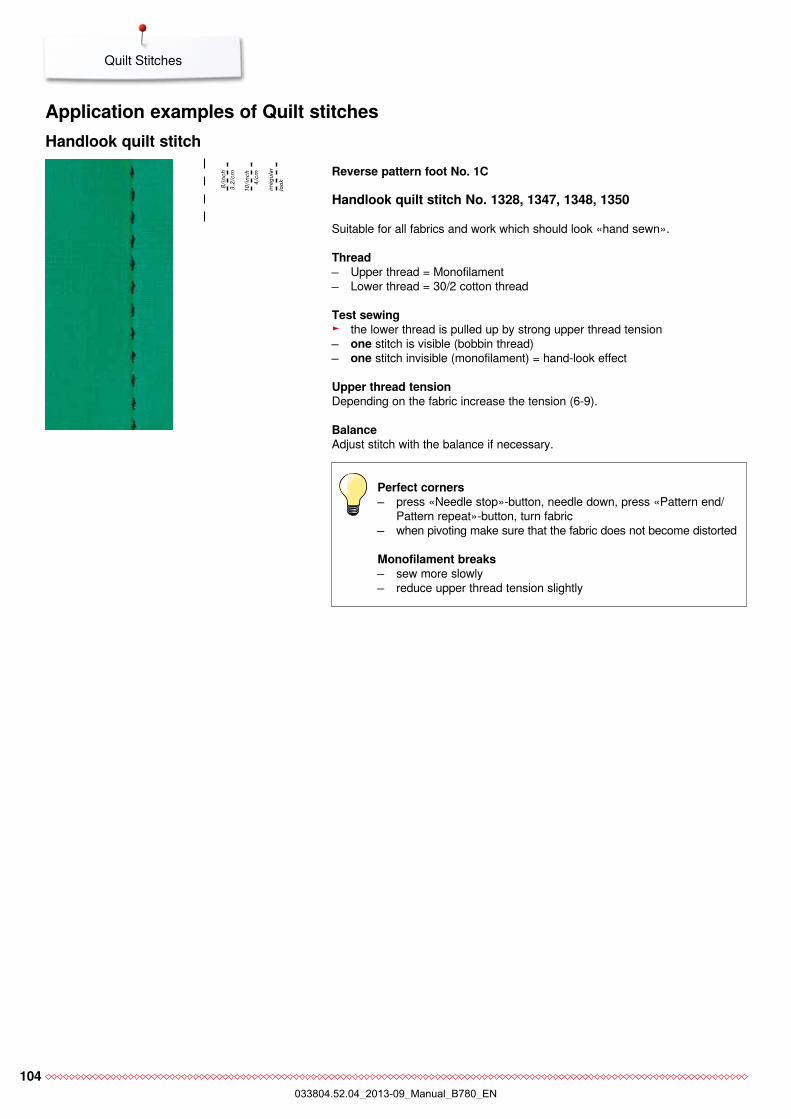
104
Quilt Stitches
reverse pattern foot no. 1c
Handlook quilt stitch no. 1328, 1347, 1348, 1350
Suitable for all fabrics and work which should look «hand sewn».
thread Upper thread = Monofilament Lower thread = 30/2 cotton thread
test sewing ► the lower thread is pulled up by strong upper thread tension one stitch is visible (bobbin thread) one stitch invisible (monofilament) = hand-look effect
upper thread tension Depending on the fabric increase the tension (6-9).
Balance Adjust stitch with the balance if necessary.
perfect corners press «Needle stop»-button, needle down, press «Pattern end/
Pattern repeat»-button, turn fabric when pivoting make sure that the fabric does not become distorted
monofilament breaks sew more slowly reduce upper thread tension slightly
application examples of Quilt stitchesHandlook quilt stitch
loo
k
irre
gu
lar
033804.52.04_2013-09_Manual_B780_EN
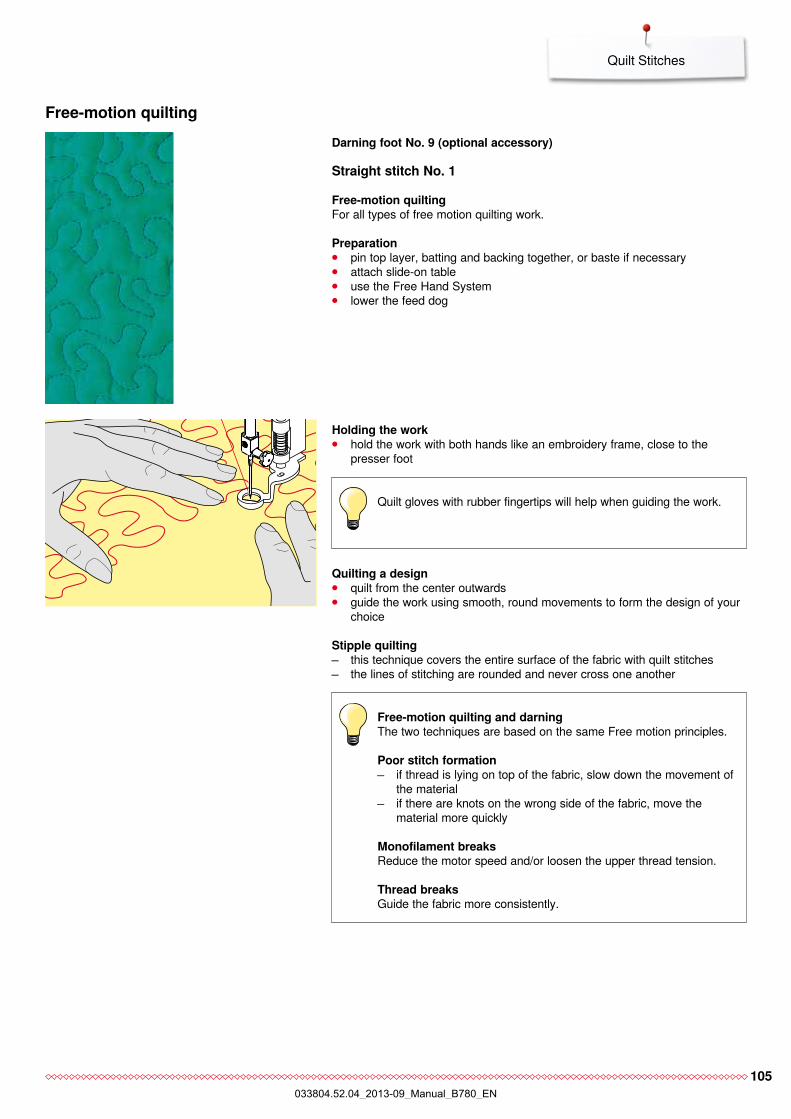
105
Quilt Stitches
free-motion quilting Darning foot no. 9 (optional accessory)
Straight stitch no. 1
free-motion quilting For all types of free motion quilting work.
preparation ⦁ pin top layer, batting and backing together, or baste if necessary ⦁ attach slide-on table ⦁ use the Free Hand System ⦁ lower the feed dog
free-motion quilting and darning The two techniques are based on the same Free motion principles.
poor stitch formation if thread is lying on top of the fabric, slow down the movement of
the material if there are knots on the wrong side of the fabric, move the
material more quickly
monofilament breaks Reduce the motor speed and/or loosen the upper thread tension.
thread breaksGuide the fabric more consistently.
Holding the work ⦁ hold the work with both hands like an embroidery frame, close to the
presser foot
Quilting a design ⦁ quilt from the center outwards ⦁ guide the work using smooth, round movements to form the design of your
choice
Stipple quilting this technique covers the entire surface of the fabric with quilt stitches the lines of stitching are rounded and never cross one another
Quilt gloves with rubber fingertips will help when guiding the work.
033804.52.04_2013-09_Manual_B780_EN
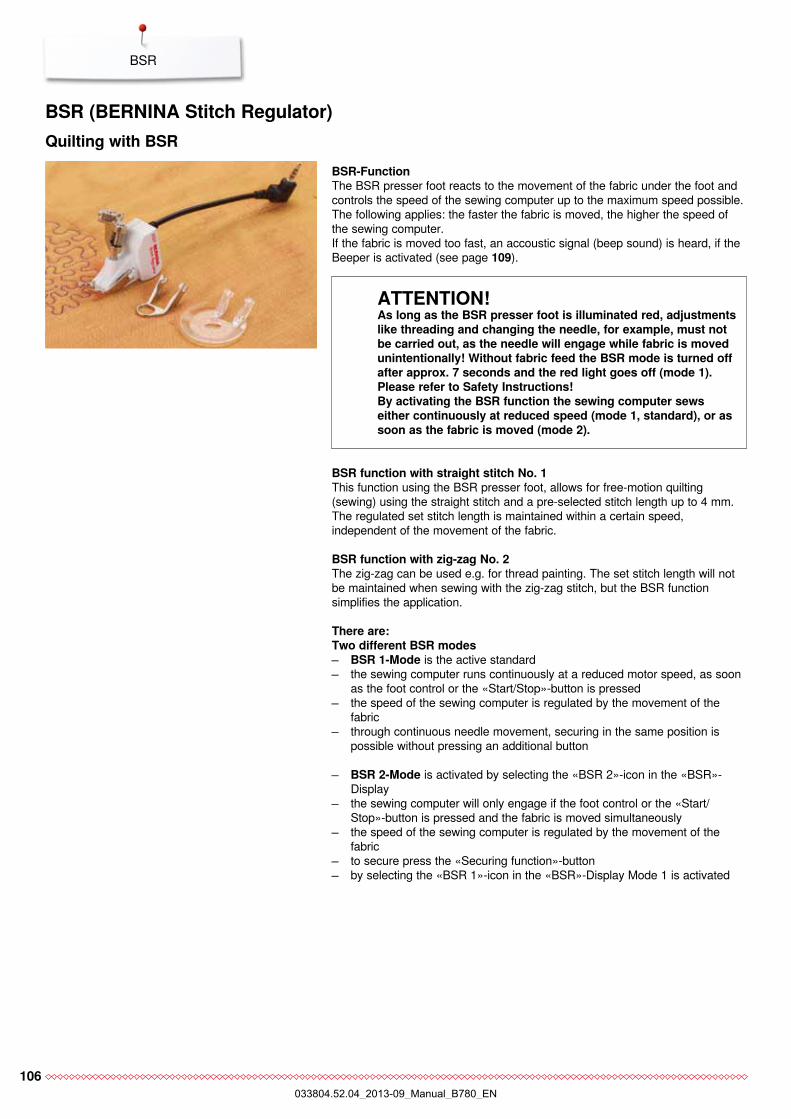
106
BSR
BSr (BernIna Stitch regulator)Quilting with BSr
BSr-functionThe BSR presser foot reacts to the movement of the fabric under the foot and controls the speed of the sewing computer up to the maximum speed possible. The following applies: the faster the fabric is moved, the higher the speed of the sewing computer.If the fabric is moved too fast, an accoustic signal (beep sound) is heard, if the Beeper is activated (see page 109).
BSr function with straight stitch no. 1This function using the BSR presser foot, allows for free-motion quilting (sewing) using the straight stitch and a pre-selected stitch length up to 4 mm. The regulated set stitch length is maintained within a certain speed, independent of the movement of the fabric.
BSr function with zig-zag no. 2The zig-zag can be used e.g. for thread painting. The set stitch length will not be maintained when sewing with the zig-zag stitch, but the BSR function simplifies the application.
there are: two different BSr modes BSr 1-mode is the active standard the sewing computer runs continuously at a reduced motor speed, as soon
as the foot control or the «Start/Stop»-button is pressed the speed of the sewing computer is regulated by the movement of the
fabric through continuous needle movement, securing in the same position is
possible without pressing an additional button
BSr 2-mode is activated by selecting the «BSR 2»-icon in the «BSR»-Display
the sewing computer will only engage if the foot control or the «Start/Stop»-button is pressed and the fabric is moved simultaneously
the speed of the sewing computer is regulated by the movement of the fabric
to secure press the «Securing function»-button by selecting the «BSR 1»-icon in the «BSR»-Display Mode 1 is activated
attentIon! as long as the BSr presser foot is illuminated red, adjustments like threading and changing the needle, for example, must not be carried out, as the needle will engage while fabric is moved unintentionally! Without fabric feed the BSr mode is turned off after approx. 7 seconds and the red light goes off (mode 1). please refer to Safety Instructions! By activating the BSr function the sewing computer sews either continuously at reduced speed (mode 1, standard), or as soon as the fabric is moved (mode 2).
033804.52.04_2013-09_Manual_B780_EN
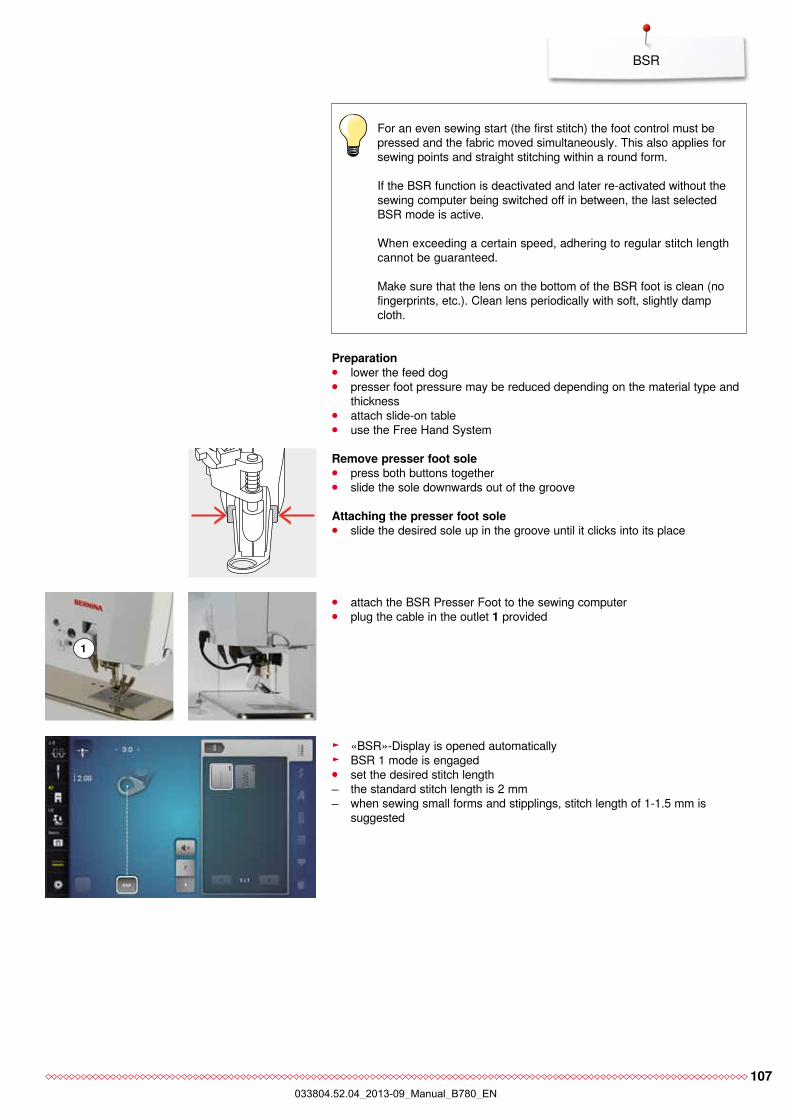
107
BSR
For an even sewing start (the first stitch) the foot control must be pressed and the fabric moved simultaneously. This also applies for sewing points and straight stitching within a round form.
If the BSR function is deactivated and later re-activated without the sewing computer being switched off in between, the last selected BSR mode is active.
When exceeding a certain speed, adhering to regular stitch length cannot be guaranteed.
Make sure that the lens on the bottom of the BSR foot is clean (no fingerprints, etc.). Clean lens periodically with soft, slightly damp cloth.
preparation ⦁ lower the feed dog ⦁ presser foot pressure may be reduced depending on the material type and
thickness ⦁ attach slide-on table ⦁ use the Free Hand System
⦁ attach the BSR Presser Foot to the sewing computer ⦁ plug the cable in the outlet 1 provided
► «BSR»-Display is opened automatically ► BSR 1 mode is engaged ⦁ set the desired stitch length the standard stitch length is 2 mm when sewing small forms and stipplings, stitch length of 1-1.5 mm is
suggested
remove presser foot sole ⦁ press both buttons together ⦁ slide the sole downwards out of the groove
attaching the presser foot sole ⦁ slide the desired sole up in the groove until it clicks into its place
1
033804.52.04_2013-09_Manual_B780_EN
108
BSR
functions in the BSr modeneedle stop down (standard)
► the arrow points down on «BSR»-Display ► the sewing computer stops with needle down, when taking foot off foot
control or when «Start/Stop»-button is pressed
needle stop up ⦁ touch «Needle stop»-icon in the Display ► the arrow points up ► the sewing computer stops with needle up, when taking foot off foot control
or when «Start/Stop»-button is pressed
raising or lowering the needle ⦁ press «Needle stop»-button ► to raise or to lower the needle
Securing with «Start/Stop»-button (only mode 1) ⦁ place the fabric under the presser foot ⦁ lower the presser foot ⦁ press «Needle stop»-button twice ► the lower thread is brought up ⦁ hold upper and lower thread ⦁ press «Start/Stop»-button ► BSR mode starts ⦁ sew 5-6 securing stitches ⦁ press «Start/Stop»-button ► BSR mode is stopped ⦁ cut threads ⦁ press «Start/Stop»-button ► BSR mode starts ⦁ continue the stitching process
Securing function (only mode 2) ⦁ press «Securing function»-button ⦁ press either the foot control or «Start/Stop»-button
By moving the fabric some short securing stitches are sewn, then the set stitch length will be activated and the securing function will be automatically deactivated.
free motion quilting (only mode 2) ► BSR mode is activated ⦁ freemotion quilting can be sewn ⦁ by touching the securing function button is pressed during free hand
quilting, a short securing stitch sequence is sewn and ► the sewing computer stops ► BSR mode is deactivated
free motion quilting without BSr activation ⦁ touch «BSR»-icon ⦁ BSR mode is deactivated
Normal freemotion quilting can now be sewn with the BSR foot, without automatic regular stitch length.
033804.52.04_2013-09_Manual_B780_EN
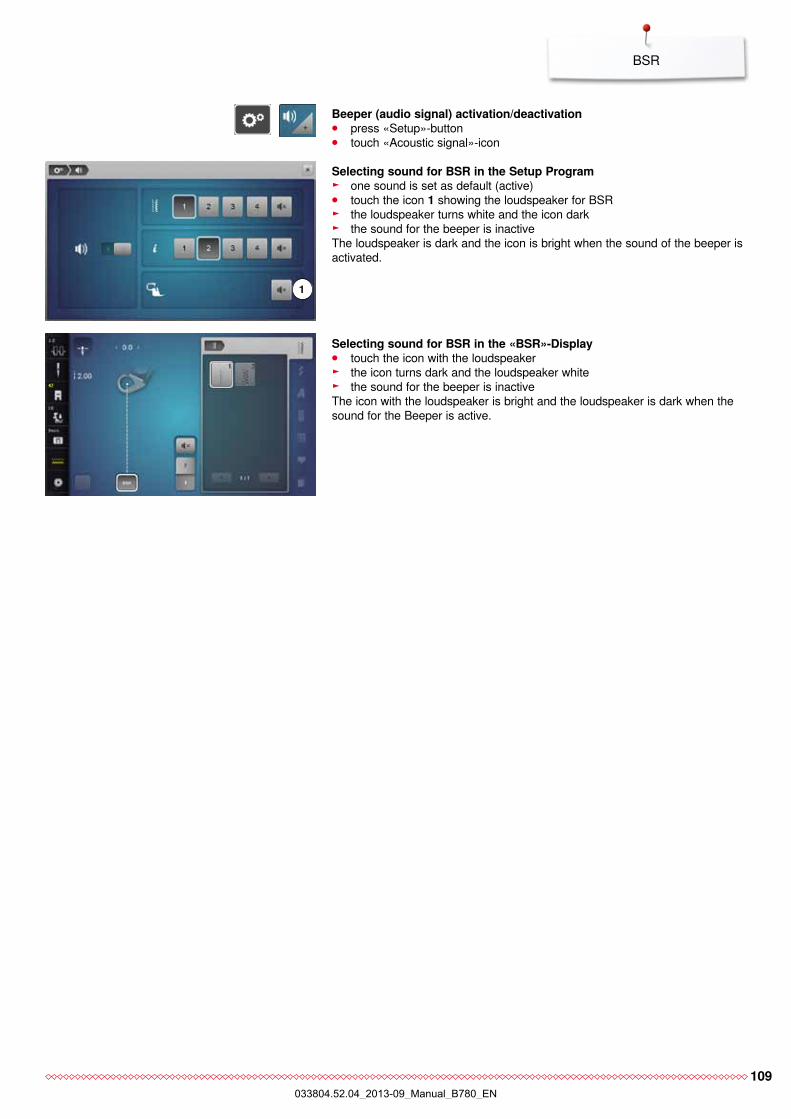
109
BSR
Beeper (audio signal) activation/deactivation ⦁ press «Setup»-button ⦁ touch «Acoustic signal»-icon
Selecting sound for BSr in the Setup program ► one sound is set as default (active) ⦁ touch the icon 1 showing the loudspeaker for BSR ► the loudspeaker turns white and the icon dark ► the sound for the beeper is inactive
The loudspeaker is dark and the icon is bright when the sound of the beeper is activated.
Selecting sound for BSr in the «BSr»-Display ⦁ touch the icon with the loudspeaker ► the icon turns dark and the loudspeaker white ► the sound for the beeper is inactive
The icon with the loudspeaker is bright and the loudspeaker is dark when the sound for the Beeper is active.
1
033804.52.04_2013-09_Manual_B780_EN
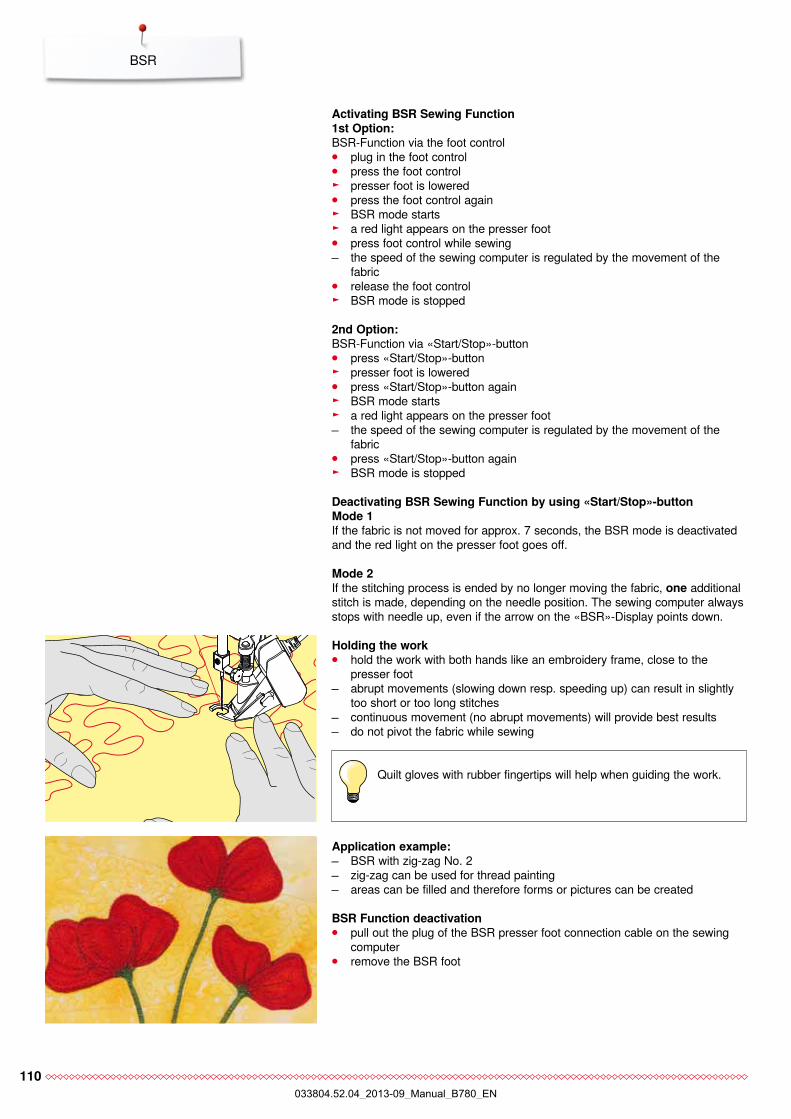
110
BSR
application example: BSR with zig-zag No. 2 zig-zag can be used for thread painting areas can be filled and therefore forms or pictures can be created
BSr function deactivation ⦁ pull out the plug of the BSR presser foot connection cable on the sewing
computer ⦁ remove the BSR foot
Holding the work ⦁ hold the work with both hands like an embroidery frame, close to the
presser foot abrupt movements (slowing down resp. speeding up) can result in slightly
too short or too long stitches continuous movement (no abrupt movements) will provide best results do not pivot the fabric while sewing
activating BSr Sewing function1st option: BSR-Function via the foot control ⦁ plug in the foot control ⦁ press the foot control ► presser foot is lowered ⦁ press the foot control again ► BSR mode starts ► a red light appears on the presser foot ⦁ press foot control while sewing the speed of the sewing computer is regulated by the movement of the
fabric ⦁ release the foot control ► BSR mode is stopped
2nd option: BSR-Function via «Start/Stop»-button ⦁ press «Start/Stop»-button ► presser foot is lowered ⦁ press «Start/Stop»-button again ► BSR mode starts ► a red light appears on the presser foot the speed of the sewing computer is regulated by the movement of the
fabric ⦁ press «Start/Stop»-button again ► BSR mode is stopped
Deactivating BSr Sewing function by using «Start/Stop»-buttonmode 1If the fabric is not moved for approx. 7 seconds, the BSR mode is deactivated and the red light on the presser foot goes off.
mode 2If the stitching process is ended by no longer moving the fabric, one additional stitch is made, depending on the needle position. The sewing computer always stops with needle up, even if the arrow on the «BSR»-Display points down.
Quilt gloves with rubber fingertips will help when guiding the work.
033804.52.04_2013-09_Manual_B780_EN
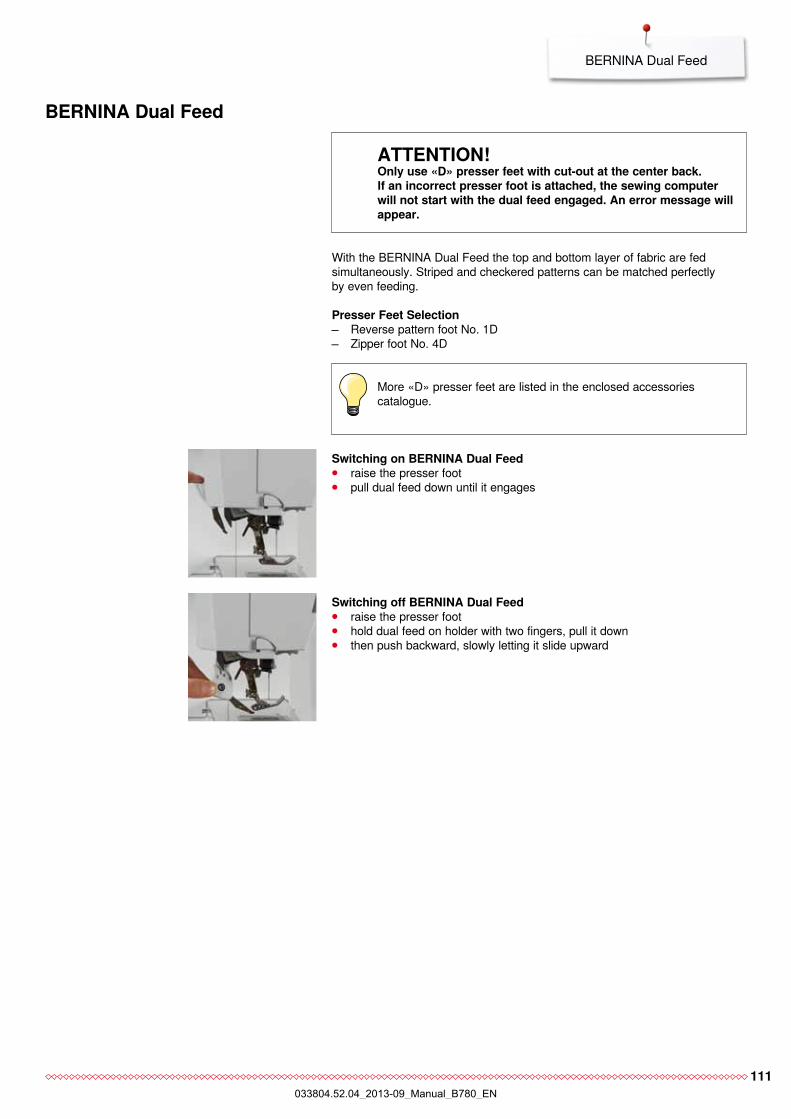
111
BERNINA Dual Feed
BernIna Dual feed
attentIon!only use «D» presser feet with cut-out at the center back.If an incorrect presser foot is attached, the sewing computer will not start with the dual feed engaged. an error message will appear.
More «D» presser feet are listed in the enclosed accessories catalogue.
With the BERNINA Dual Feed the top and bottom layer of fabric are fed simultaneously. Striped and checkered patterns can be matched perfectlyby even feeding.
presser feet Selection Reverse pattern foot No. 1D Zipper foot No. 4D
Switching on BernIna Dual feed ⦁ raise the presser foot ⦁ pull dual feed down until it engages
Switching off BernIna Dual feed ⦁ raise the presser foot ⦁ hold dual feed on holder with two fingers, pull it down ⦁ then push backward, slowly letting it slide upward
033804.52.04_2013-09_Manual_B780_EN
112
BERNINA Dual Feed
Difficult-to-work-with fabrics (with a nap, slippery, sticky etc.): velvet, normally sewn with the grain toweling Jersey, especially when sewing it crosswise to knit fake fur or coated fake fur fleece-types of fabrics batted fabrics stripes and checks curtain fabrics with pattern repeats
«Sticky» Fabrics: imitation leather, coated fabrics (Dual Feed presser foot with sliding sole)
applicationSewing: all sewing techniques on difficult fabrics, e.g. hems, zippers
Patchwork: accurate stripes and blocks decorative stitches up to 9 mm stitch width
Appliqué: open Embroidery foot No. 20D (optional accessory) sewing on ribbons and bias-binding
fabrics
presser foot pressure Adjust the presser foot pressure to the fabric. The thicker the fabric the lower the presser foot pressure.
033804.52.04_2013-09_Manual_B780_EN
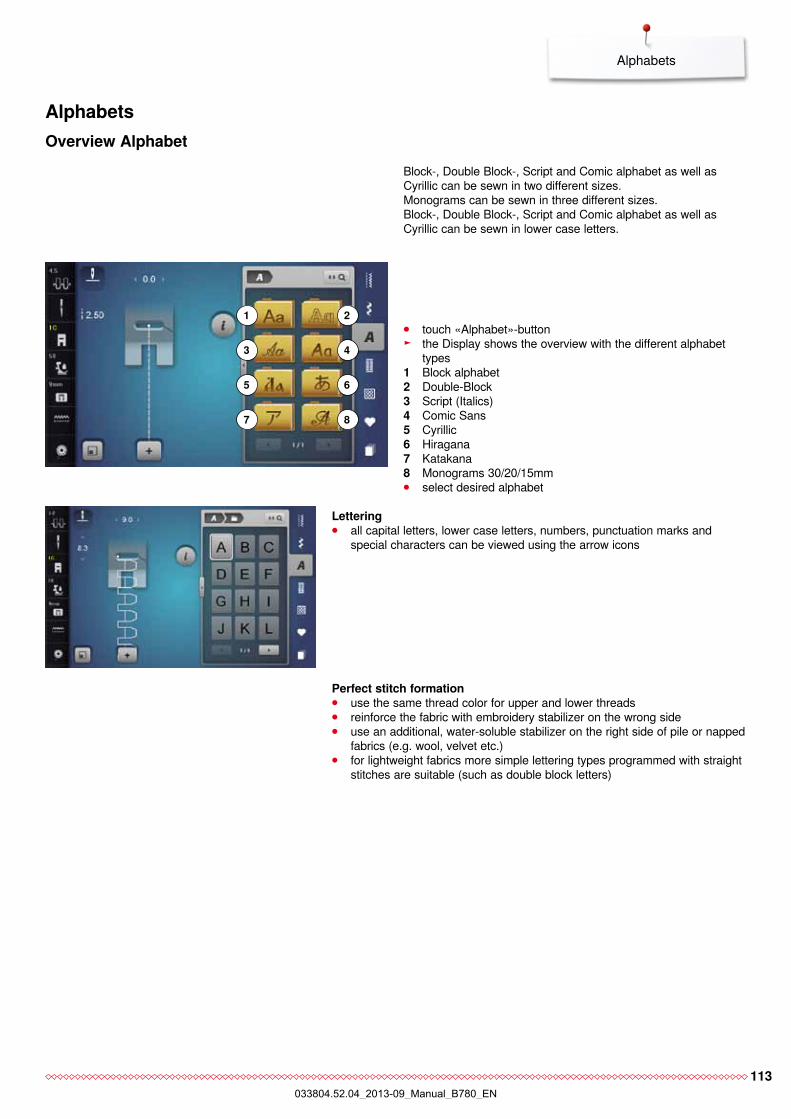
113
Alphabets
alphabetsoverview alphabet
Block-, Double Block-, Script and Comic alphabet as well as Cyrillic can be sewn in two different sizes.Monograms can be sewn in three different sizes.Block-, Double Block-, Script and Comic alphabet as well as Cyrillic can be sewn in lower case letters.
Lettering ⦁ all capital letters, lower case letters, numbers, punctuation marks and
special characters can be viewed using the arrow icons
⦁ touch «Alphabet»-button ► the Display shows the overview with the different alphabet
types1 Block alphabet2 Double-Block3 Script (Italics)4 Comic Sans5 Cyrillic6 Hiragana7 Katakana8 Monograms 30/20/15mm ⦁ select desired alphabet
perfect stitch formation ⦁ use the same thread color for upper and lower threads ⦁ reinforce the fabric with embroidery stabilizer on the wrong side ⦁ use an additional, water-soluble stabilizer on the right side of pile or napped
fabrics (e.g. wool, velvet etc.) ⦁ for lightweight fabrics more simple lettering types programmed with straight
stitches are suitable (such as double block letters)
1 2
5 6
3 4
7 8
033804.52.04_2013-09_Manual_B780_EN
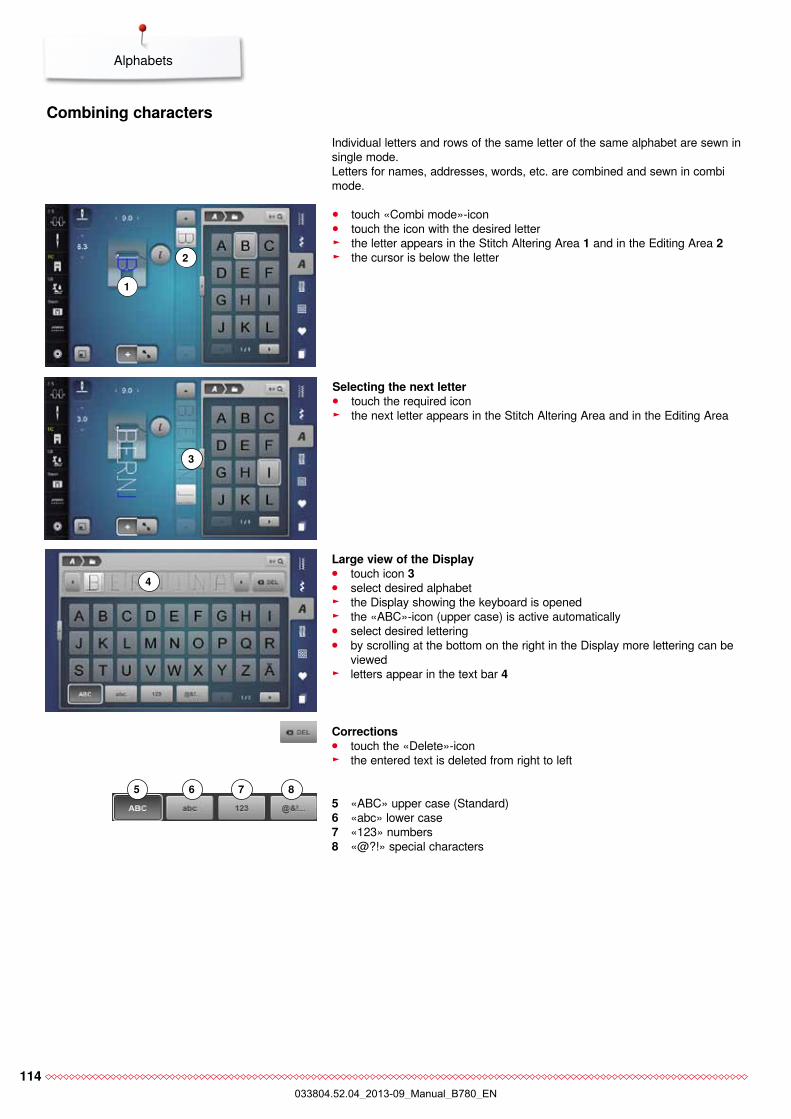
114
Alphabets
Large view of the Display ⦁ touch icon 3 ⦁ select desired alphabet ► the Display showing the keyboard is opened ► the «ABC»-icon (upper case) is active automatically ⦁ select desired lettering ⦁ by scrolling at the bottom on the right in the Display more lettering can be
viewed ► letters appear in the text bar 4
corrections ⦁ touch the «Delete»-icon ► the entered text is deleted from right to left
⦁ touch «Combi mode»-icon ⦁ touch the icon with the desired letter ► the letter appears in the Stitch Altering Area 1 and in the Editing Area 2 ► the cursor is below the letter
Selecting the next letter ⦁ touch the required icon ► the next letter appears in the Stitch Altering Area and in the Editing Area
Individual letters and rows of the same letter of the same alphabet are sewn in single mode.Letters for names, addresses, words, etc. are combined and sewn in combi mode.
combining characters
1
2
3
4
5 6 7 85 «ABC» upper case (Standard)6 «abc» lower case7 «123» numbers8 «@?!» special characters
033804.52.04_2013-09_Manual_B780_EN
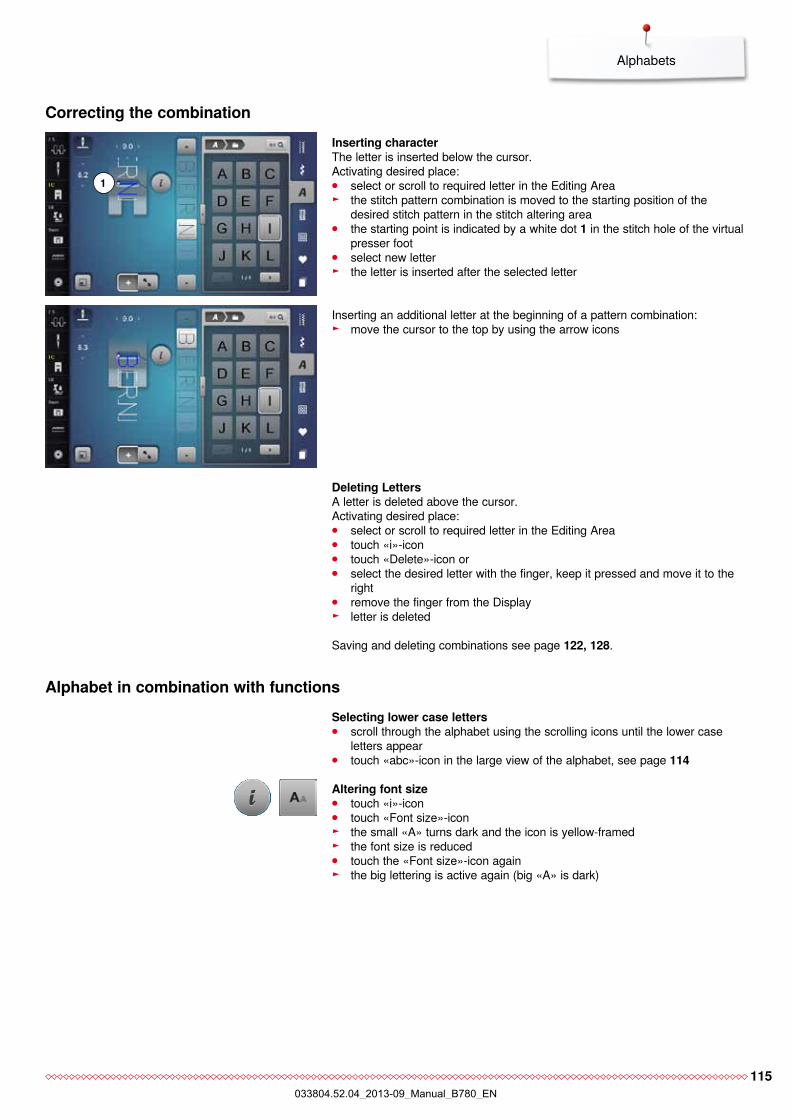
115
Alphabets
correcting the combinationInserting characterThe letter is inserted below the cursor.Activating desired place: ⦁ select or scroll to required letter in the Editing Area ► the stitch pattern combination is moved to the starting position of the
desired stitch pattern in the stitch altering area ⦁ the starting point is indicated by a white dot 1 in the stitch hole of the virtual
presser foot ⦁ select new letter ► the letter is inserted after the selected letter
Deleting LettersA letter is deleted above the cursor.Activating desired place: ⦁ select or scroll to required letter in the Editing Area ⦁ touch «i»-icon ⦁ touch «Delete»-icon or ⦁ select the desired letter with the finger, keep it pressed and move it to the
right ⦁ remove the finger from the Display ► letter is deleted
Saving and deleting combinations see page 122, 128.
Inserting an additional letter at the beginning of a pattern combination: ► move the cursor to the top by using the arrow icons
alphabet in combination with functions Selecting lower case letters ⦁ scroll through the alphabet using the scrolling icons until the lower case
letters appear ⦁ touch «abc»-icon in the large view of the alphabet, see page 114
altering font size ⦁ touch «i»-icon ⦁ touch «Font size»-icon ► the small «A» turns dark and the icon is yellow-framed ► the font size is reduced ⦁ touch the «Font size»-icon again ► the big lettering is active again (big «A» is dark)
1
033804.52.04_2013-09_Manual_B780_EN
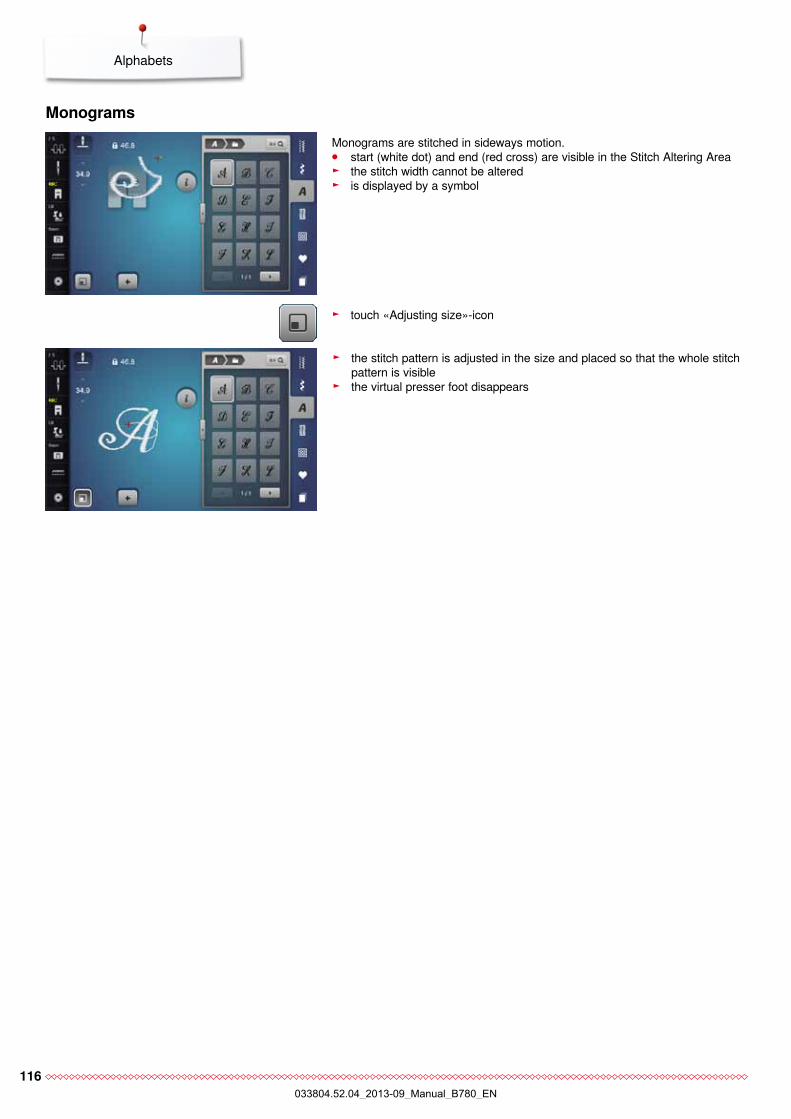
116
Alphabets
monogramsMonograms are stitched in sideways motion. ⦁ start (white dot) and end (red cross) are visible in the Stitch Altering Area ► the stitch width cannot be altered ► is displayed by a symbol
► touch «Adjusting size»-icon
► the stitch pattern is adjusted in the size and placed so that the whole stitch pattern is visible
► the virtual presser foot disappears
033804.52.04_2013-09_Manual_B780_EN
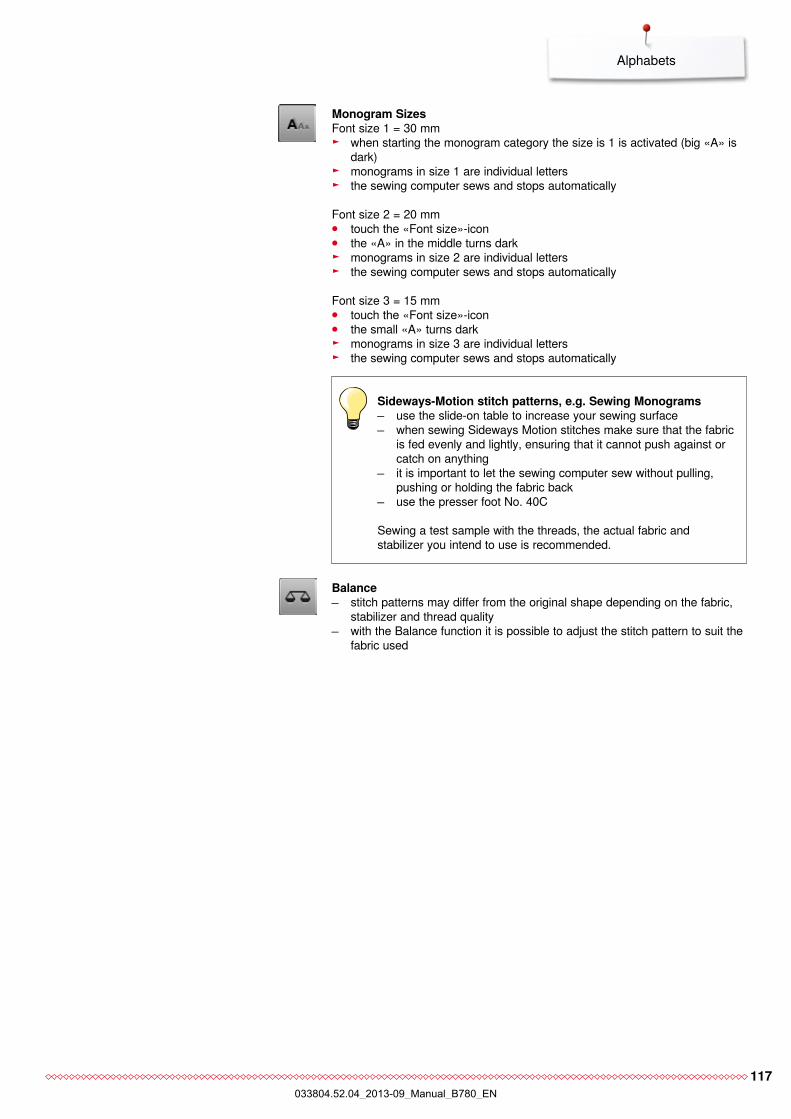
117
Alphabets
monogram Sizes Font size 1 = 30 mm
► when starting the monogram category the size is 1 is activated (big «A» is dark)
► monograms in size 1 are individual letters ► the sewing computer sews and stops automatically
Font size 2 = 20 mm ⦁ touch the «Font size»-icon ⦁ the «A» in the middle turns dark ► monograms in size 2 are individual letters ► the sewing computer sews and stops automatically
Font size 3 = 15 mm ⦁ touch the «Font size»-icon ⦁ the small «A» turns dark ► monograms in size 3 are individual letters ► the sewing computer sews and stops automatically
Sideways-motion stitch patterns, e.g. Sewing monograms use the slide-on table to increase your sewing surface when sewing Sideways Motion stitches make sure that the fabric
is fed evenly and lightly, ensuring that it cannot push against or catch on anything
it is important to let the sewing computer sew without pulling, pushing or holding the fabric back
use the presser foot No. 40C
Sewing a test sample with the threads, the actual fabric and stabilizer you intend to use is recommended.
Balance stitch patterns may differ from the original shape depending on the fabric,
stabilizer and thread quality with the Balance function it is possible to adjust the stitch pattern to suit the
fabric used
033804.52.04_2013-09_Manual_B780_EN
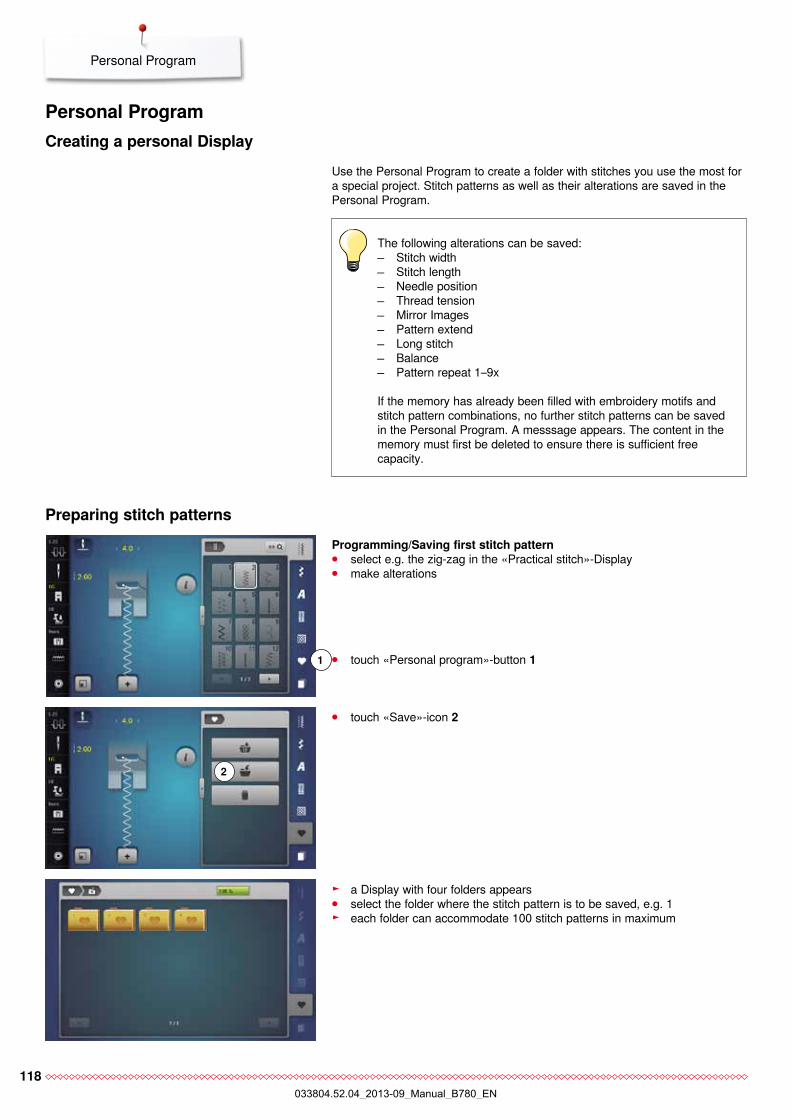
118
Personal Program
Use the Personal Program to create a folder with stitches you use the most for a special project. Stitch patterns as well as their alterations are saved in the Personal Program.
personal programcreating a personal Display
The following alterations can be saved: Stitch width Stitch length Needle position Thread tension Mirror Images Pattern extend Long stitch Balance Pattern repeat 1–9x
If the memory has already been filled with embroidery motifs and stitch pattern combinations, no further stitch patterns can be saved in the Personal Program. A messsage appears. The content in the memory must first be deleted to ensure there is sufficient free capacity.
programming/Saving first stitch pattern ⦁ select e.g. the zig-zag in the «Practical stitch»-Display ⦁ make alterations
⦁ touch «Personal program»-button 11
⦁ touch «Save»-icon 2
2
preparing stitch patterns
► a Display with four folders appears ⦁ select the folder where the stitch pattern is to be saved, e.g. 1 ► each folder can accommodate 100 stitch patterns in maximum
033804.52.04_2013-09_Manual_B780_EN
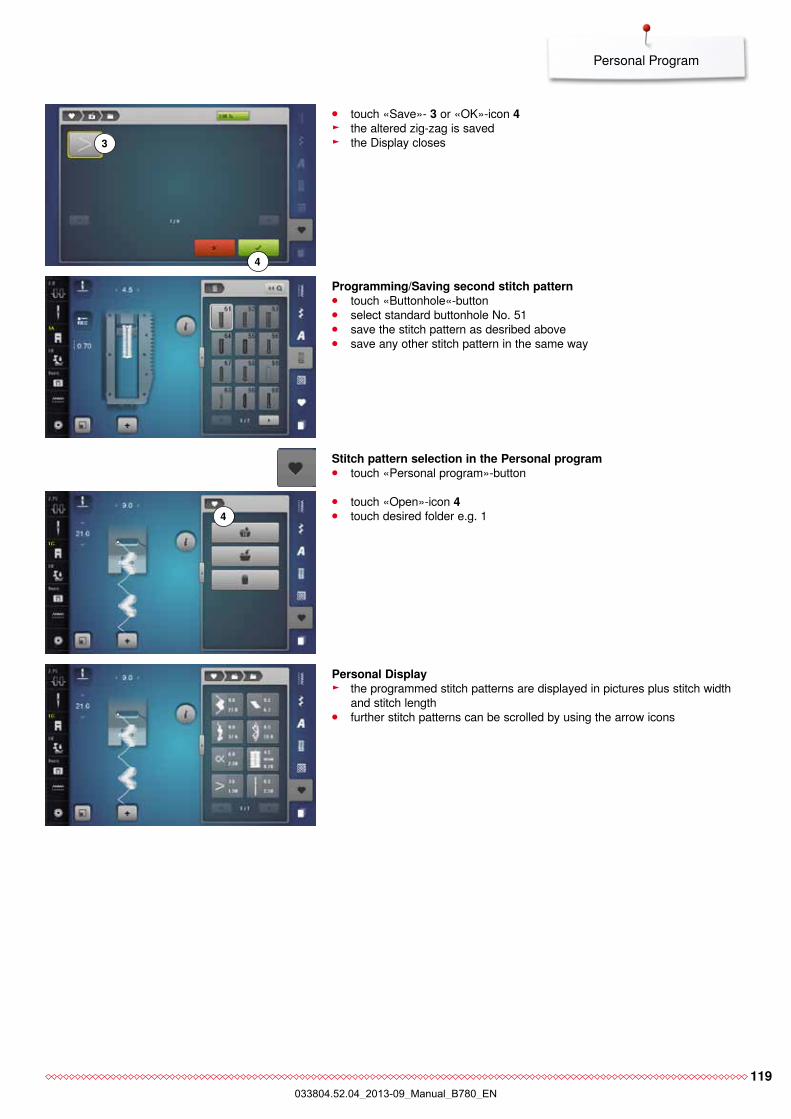
119
Personal Program
programming/Saving second stitch pattern ⦁ touch «Buttonhole«-button ⦁ select standard buttonhole No. 51 ⦁ save the stitch pattern as desribed above ⦁ save any other stitch pattern in the same way
Stitch pattern selection in the personal program ⦁ touch «Personal program»-button
⦁ touch «Open»-icon 4 ⦁ touch desired folder e.g. 14
3
⦁ touch «Save»- 3 or «OK»-icon 4 ► the altered zig-zag is saved ► the Display closes
personal Display ► the programmed stitch patterns are displayed in pictures plus stitch width
and stitch length ⦁ further stitch patterns can be scrolled by using the arrow icons
4
033804.52.04_2013-09_Manual_B780_EN
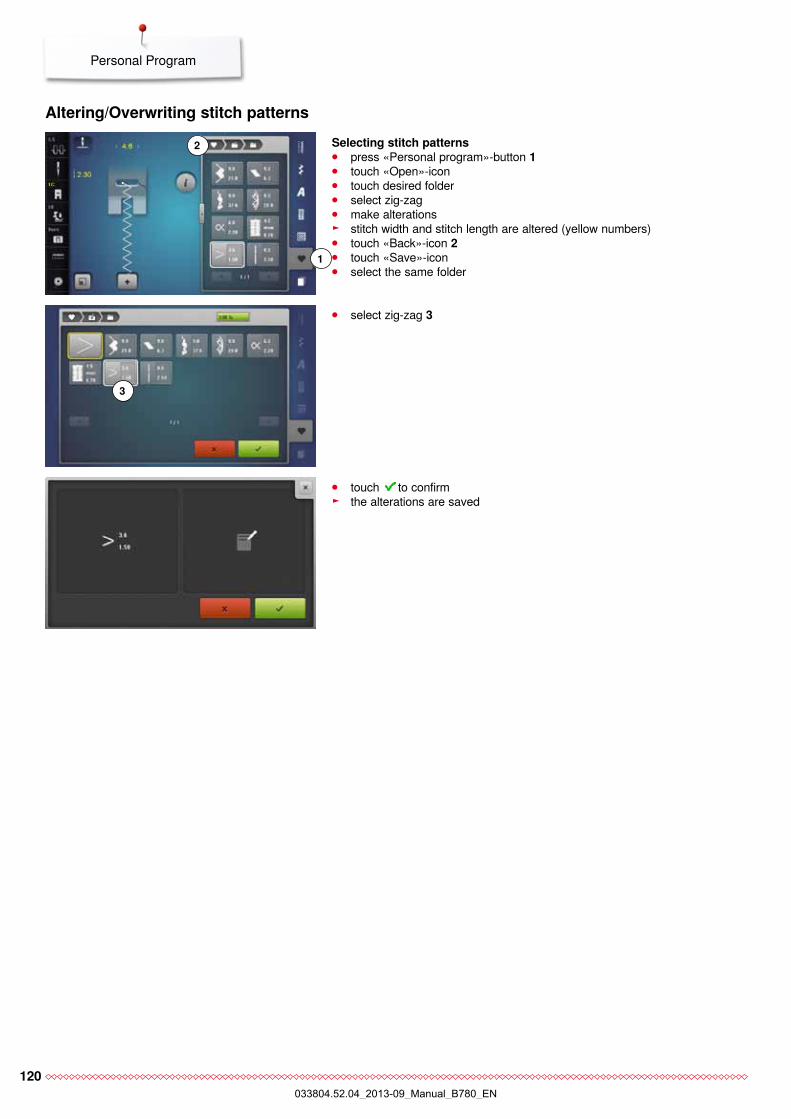
120
Personal Program
altering/overwriting stitch patternsSelecting stitch patterns ⦁ press «Personal program»-button 1 ⦁ touch «Open»-icon ⦁ touch desired folder ⦁ select zig-zag ⦁ make alterations ► stitch width and stitch length are altered (yellow numbers) ⦁ touch «Back»-icon 2 ⦁ touch «Save»-icon ⦁ select the same folder
⦁ select zig-zag 3
⦁ touch to confirm ► the alterations are saved
3
1
2
033804.52.04_2013-09_Manual_B780_EN

121
Personal Program
Deleting stitch patternsSelecting stitch patterns ⦁ touch «Personal program»-button ⦁ touch «Delete»-icon 1 ⦁ select the desired folder
⦁ select the stitch pattern to be deleted
⦁ touch to confirm ► stitch pattern is deleted ► the remaining stitch patterns are moved by one position
1
033804.52.04_2013-09_Manual_B780_EN
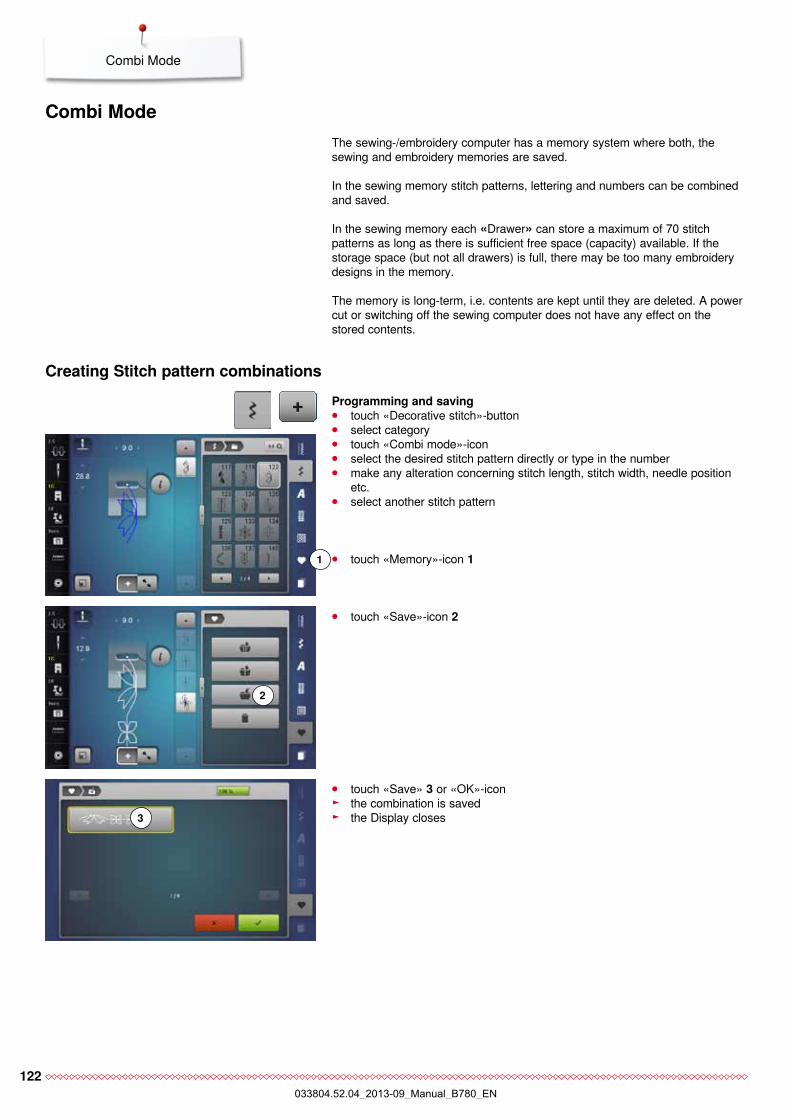
122
Combi Mode
combi mode
creating Stitch pattern combinationsprogramming and saving ⦁ touch «Decorative stitch»-button ⦁ select category ⦁ touch «Combi mode»-icon ⦁ select the desired stitch pattern directly or type in the number ⦁ make any alteration concerning stitch length, stitch width, needle position
etc. ⦁ select another stitch pattern
⦁ touch «Memory»-icon 11
⦁ touch «Save»-icon 2
2
⦁ touch «Save» 3 or «OK»-icon ► the combination is saved ► the Display closes
The sewing-/embroidery computer has a memory system where both, the sewing and embroidery memories are saved.
In the sewing memory stitch patterns, lettering and numbers can be combined and saved.
In the sewing memory each «Drawer» can store a maximum of 70 stitch patterns as long as there is sufficient free space (capacity) available. If the storage space (but not all drawers) is full, there may be too many embroidery designs in the memory.
The memory is long-term, i.e. contents are kept until they are deleted. A power cut or switching off the sewing computer does not have any effect on the stored contents.
3
033804.52.04_2013-09_Manual_B780_EN
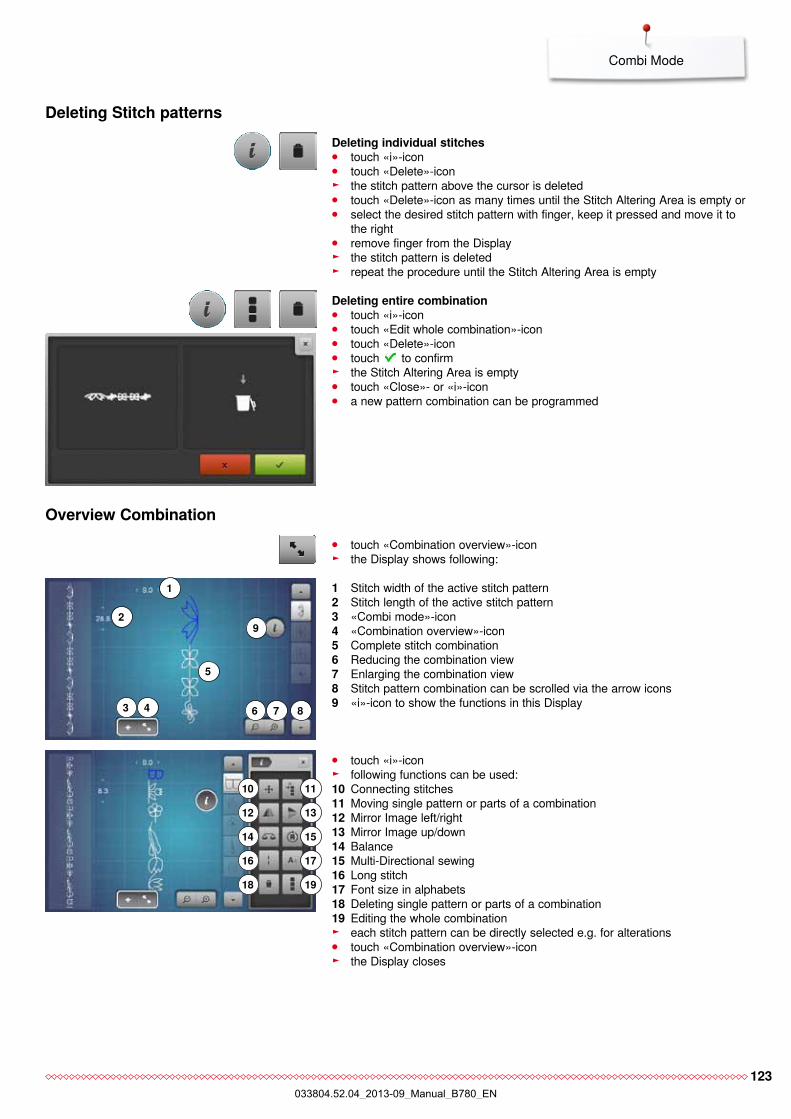
123
Combi Mode
Deleting Stitch patternsDeleting individual stitches ⦁ touch «i»-icon ⦁ touch «Delete»-icon ► the stitch pattern above the cursor is deleted ⦁ touch «Delete»-icon as many times until the Stitch Altering Area is empty or ⦁ select the desired stitch pattern with finger, keep it pressed and move it to
the right ⦁ remove finger from the Display ► the stitch pattern is deleted ► repeat the procedure until the Stitch Altering Area is empty
Deleting entire combination ⦁ touch «i»-icon ⦁ touch «Edit whole combination»-icon ⦁ touch «Delete»-icon ⦁ touch to confirm ► the Stitch Altering Area is empty ⦁ touch «Close»- or «i»-icon ⦁ a new pattern combination can be programmed
overview combination ⦁ touch «Combination overview»-icon ► the Display shows following:
1 Stitch width of the active stitch pattern2 Stitch length of the active stitch pattern3 «Combi mode»-icon4 «Combination overview»-icon5 Complete stitch combination6 Reducing the combination view7 Enlarging the combination view8 Stitch pattern combination can be scrolled via the arrow icons9 «i»-icon to show the functions in this Display
⦁ touch «i»-icon ► following functions can be used:
10 Connecting stitches 11 Moving single pattern or parts of a combination12 Mirror Image left/right13 Mirror Image up/down14 Balance15 Multi-Directional sewing16 Long stitch17 Font size in alphabets18 Deleting single pattern or parts of a combination19 Editing the whole combination
► each stitch pattern can be directly selected e.g. for alterations ⦁ touch «Combination overview»-icon ► the Display closes
1
2
3 4
5
9
76 8
10 11
12 13
14 15
16 17
18 19
033804.52.04_2013-09_Manual_B780_EN
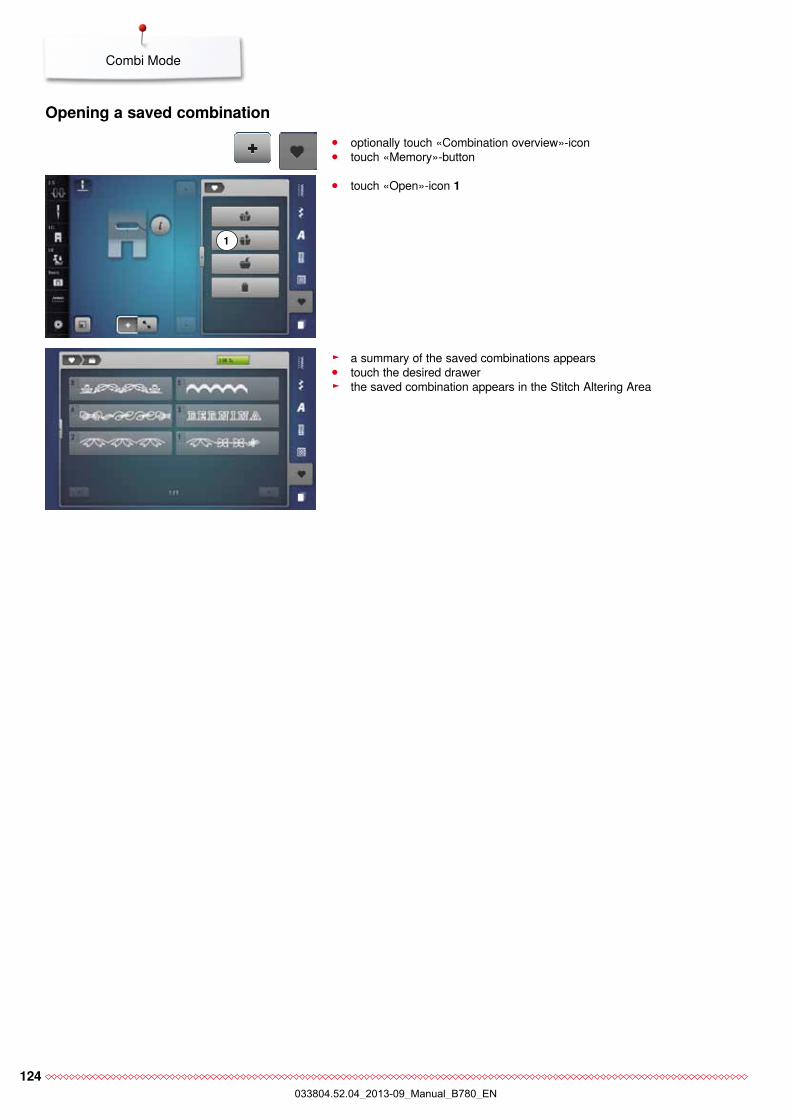
124
Combi Mode
⦁ optionally touch «Combination overview»-icon ⦁ touch «Memory»-button
⦁ touch «Open»-icon 1
1
► a summary of the saved combinations appears ⦁ touch the desired drawer ► the saved combination appears in the Stitch Altering Area
opening a saved combination
033804.52.04_2013-09_Manual_B780_EN

125
Combi Mode
correcting a stitch pattern combinationInserting a stitch pattern ⦁ select the desired position in the combination or in the Editing Area ⦁ select a new stitch pattern ► the new stitch pattern is inserted below the selected stitch pattern
To insert a stitch pattern at the beginning of a combination the cursor must be positioned above the first stitch pattern.
altering stitch patterns ⦁ select the desired stitch pattern in the combination ⦁ touch «i»-icon ⦁ select desired function, e.g. Mirror Image left/right ► the stitch pattern is mirrored left/right ⦁ touch «Close»- or «i»-icon
The alterations always affect the stitch above the cursor. Saved stitch combinations can be altered or corrected in the same way. To make corrections and alterations permanent, the combination must be saved again afterwards.
adjusting the length within the combinationThe length of all stitch patterns within a combination can be adjusted to the longest stitch pattern. ⦁ touch «i»-icon ⦁ touch «Edit whole combination»-icon ⦁ touch «Stitch length scale»-icon 1 ► the «Stitch length»-Display appears ⦁ touch «Length adjustment in combination»-icon 2 ► the length of all the stitch patterns is adjusted to the longest stitch pattern
within the combination
2
1
033804.52.04_2013-09_Manual_B780_EN
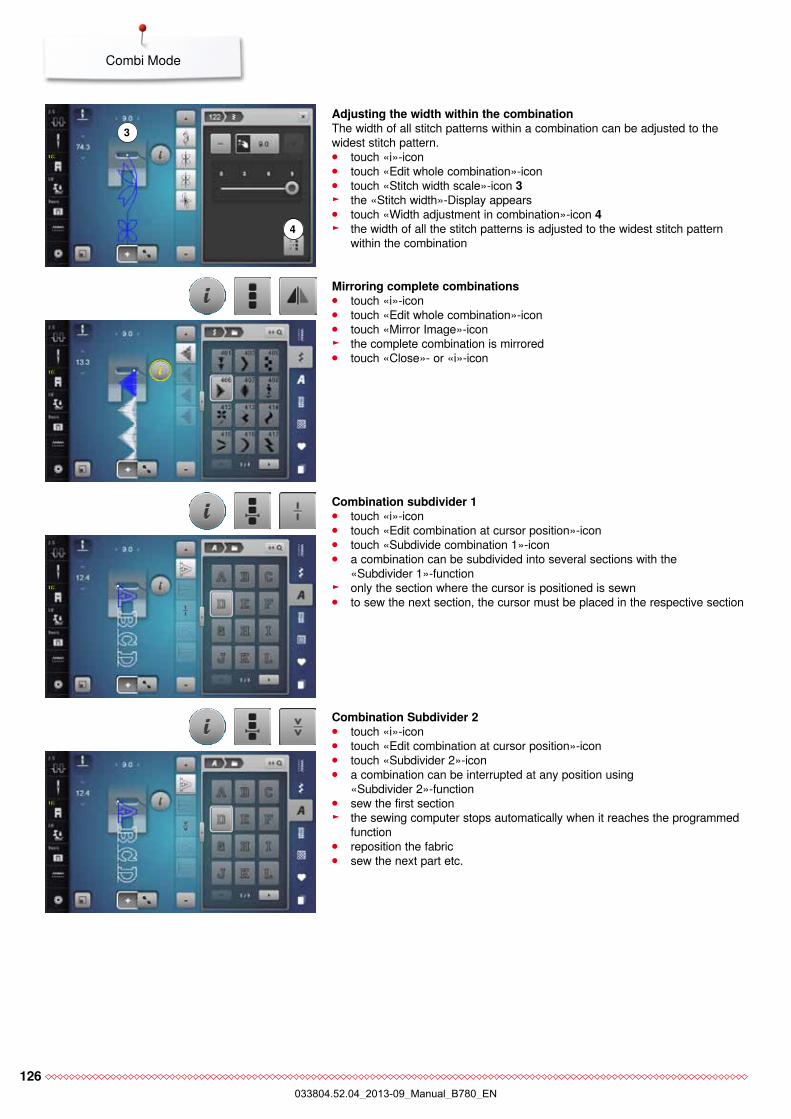
126
Combi Mode
mirroring complete combinations ⦁ touch «i»-icon ⦁ touch «Edit whole combination»-icon ⦁ touch «Mirror Image»-icon ► the complete combination is mirrored ⦁ touch «Close»- or «i»-icon
combination subdivider 1 ⦁ touch «i»-icon ⦁ touch «Edit combination at cursor position»-icon ⦁ touch «Subdivide combination 1»-icon ⦁ a combination can be subdivided into several sections with the
«Subdivider 1»-function ► only the section where the cursor is positioned is sewn ⦁ to sew the next section, the cursor must be placed in the respective section
combination Subdivider 2 ⦁ touch «i»-icon ⦁ touch «Edit combination at cursor position»-icon ⦁ touch «Subdivider 2»-icon ⦁ a combination can be interrupted at any position using
«Subdivider 2»-function ⦁ sew the first section ► the sewing computer stops automatically when it reaches the programmed
function ⦁ reposition the fabric ⦁ sew the next part etc.
adjusting the width within the combinationThe width of all stitch patterns within a combination can be adjusted to the widest stitch pattern. ⦁ touch «i»-icon ⦁ touch «Edit whole combination»-icon ⦁ touch «Stitch width scale»-icon 3 ► the «Stitch width»-Display appears ⦁ touch «Width adjustment in combination»-icon 4 ► the width of all the stitch patterns is adjusted to the widest stitch pattern
within the combination4
3
033804.52.04_2013-09_Manual_B780_EN
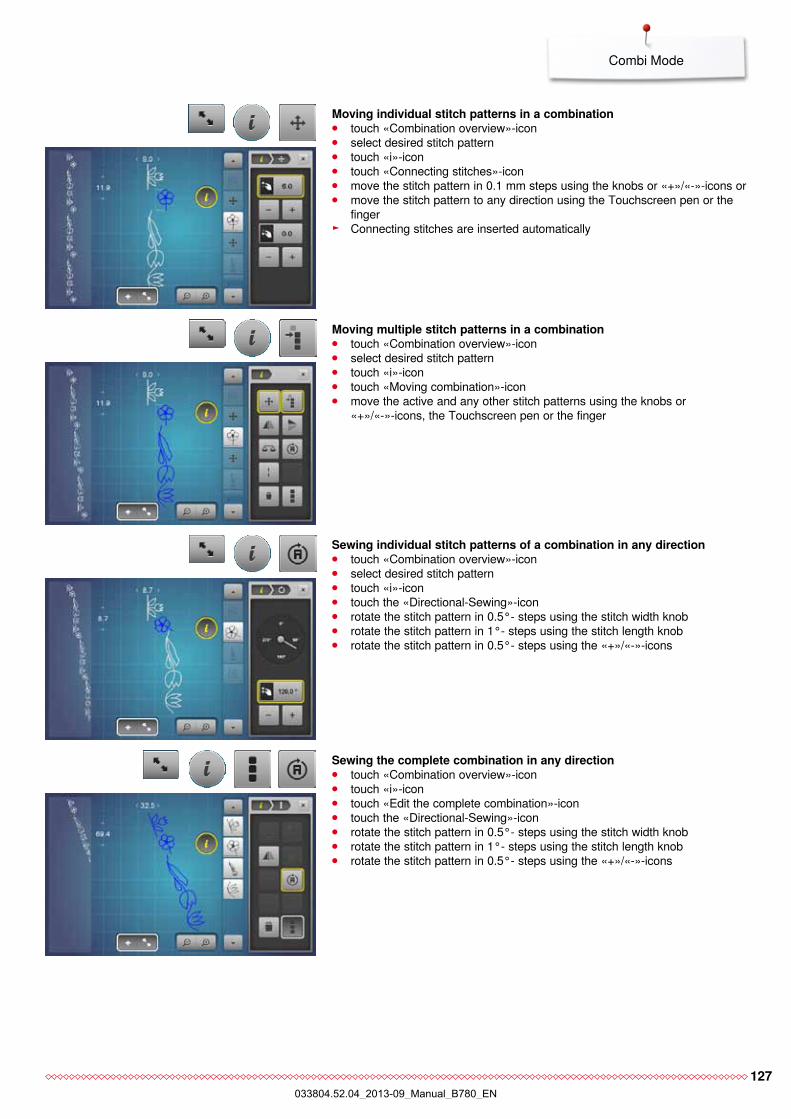
127
Combi Mode
moving multiple stitch patterns in a combination ⦁ touch «Combination overview»-icon ⦁ select desired stitch pattern ⦁ touch «i»-icon ⦁ touch «Moving combination»-icon ⦁ move the active and any other stitch patterns using the knobs or
«+»/«-»-icons, the Touchscreen pen or the finger
Sewing individual stitch patterns of a combination in any direction ⦁ touch «Combination overview»-icon ⦁ select desired stitch pattern ⦁ touch «i»-icon ⦁ touch the «Directional-Sewing»-icon ⦁ rotate the stitch pattern in 0.5°- steps using the stitch width knob ⦁ rotate the stitch pattern in 1°- steps using the stitch length knob ⦁ rotate the stitch pattern in 0.5°- steps using the «+»/«-»-icons
Sewing the complete combination in any direction ⦁ touch «Combination overview»-icon ⦁ touch «i»-icon ⦁ touch «Edit the complete combination»-icon ⦁ touch the «Directional-Sewing»-icon ⦁ rotate the stitch pattern in 0.5°- steps using the stitch width knob ⦁ rotate the stitch pattern in 1°- steps using the stitch length knob ⦁ rotate the stitch pattern in 0.5°- steps using the «+»/«-»-icons
moving individual stitch patterns in a combination ⦁ touch «Combination overview»-icon ⦁ select desired stitch pattern ⦁ touch «i»-icon ⦁ touch «Connecting stitches»-icon ⦁ move the stitch pattern in 0.1 mm steps using the knobs or «+»/«-»-icons or ⦁ move the stitch pattern to any direction using the Touchscreen pen or the
finger ► Connecting stitches are inserted automatically
033804.52.04_2013-09_Manual_B780_EN
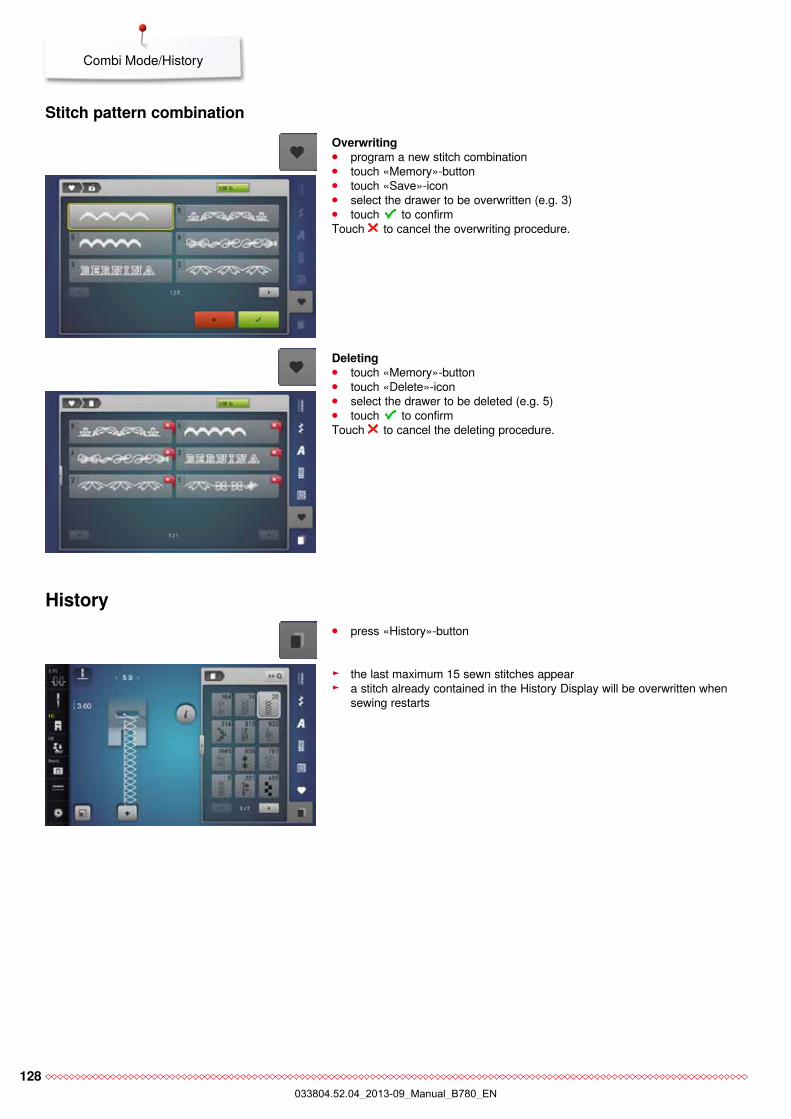
128
Combi Mode/History
Stitch pattern combinationoverwriting ⦁ program a new stitch combination ⦁ touch «Memory»-button ⦁ touch «Save»-icon ⦁ select the drawer to be overwritten (e.g. 3) ⦁ touch to confirm
Touch to cancel the overwriting procedure.
Deleting ⦁ touch «Memory»-button ⦁ touch «Delete»-icon ⦁ select the drawer to be deleted (e.g. 5) ⦁ touch to confirm
Touch to cancel the deleting procedure.
History
► the last maximum 15 sewn stitches appear ► a stitch already contained in the History Display will be overwritten when
sewing restarts
⦁ press «History»-button
033804.52.04_2013-09_Manual_B780_EN
129
Contents Embroidery
Accessory 131Standard Accessory 131
Embroidery module 132Detail view 132
Important Embroidery information 133Embroidery threads 133Lower threads 133Choosing the embroidery motif 134Embroidery test 134Scaling/Sizing motifs 134Different stitch types 135 ⦁ Underlay stitches 135 ⦁ Satin stitch 135 ⦁ Step stitch 135 ⦁ Connecting stitches 135
Preparing for embroidery 136Attaching the Module 136Embroidery foot/Embroidery needle 137Straight-/CutWork stitch plate 137Threading upper and bobbin thread 137Embroidery hoop 138 ⦁ Center determination 138 ⦁ Using the embroidery hoop 138 ⦁ Embroidery template 138 ⦁ Hooping the material 138
Stabilizers 139Stabilizers 139Adhesive Spray 139Iron-on interfacing 140 ⦁ Paper-backed adhesive stabilizer 140 ⦁ Water soluble stabilizer 140
Functions 141Overview «Function»-buttons embroidery computer 141 ⦁ «Start/Stop»-button 141 ⦁ «Presser foot position»-button 141 ⦁ «Automatic thread cutter»-button 141 ⦁ Stitch width and stitch length knob 141 ⦁ Speed control 141
Overview Display 142Entry to Embroidery mode 142Embroidery Alphabet 143BERNINA motifs 144BERNINA stitch patterns 144My Design 144Embroidery motif from USB-Stick (optional accessory) 145
«Edit»-display 146Overview «Edit»-Display 148Generel functions 148Overview Embroidery menu 152Overview Selection menu 153Overview Color Display 154
Embroidery motifs 155Selecting an embroidery motif 155Alphabets 155 ⦁ Selecting alphabet 155 ⦁ Entering/Correcting lettering 155 ⦁ Deleting lettering 155 ⦁ Corrections 155
BERNINA embroidery motifs 156 ⦁ Motif overview 156
Stitch patterns 156 ⦁ Stitch pattern overview 156
My Design 156 ⦁ Motif overview 156
Motifs in combination with functions 157Moving embroidery motifs 157Rotating embroidery motifs 157Altering embroidery motifs in height or width 157Altering embroidery motifs proportionally 158Mirroring motifs 158Select hoop 159 ⦁ Motif Center 159 ⦁ Grid 159
Absolute embroidery check 160 ⦁ Checking the motif size 160
Zoom 161 ⦁ Moving the embroidery motif 161
Motif size and embroidery time 161
Endless Embroidery 162
Combinations 164Creating combinations 164 ⦁ Adding embroidery motifs 164 ⦁ Duplicating a motif 164 ⦁ Duplicating a combination 164
Lettering 165 ⦁ Combining 165 ⦁ Positioning 165 ⦁ Further text lines 165
Lettering and embroidery motifs 166 ⦁ Combining 166 ⦁ Adjusting text to motif 166 ⦁ Lettering Manipulation 166 ⦁ Deleting stitch patterns/individual characters/text 166
Contents Embroidery
033804.52.04_2013-09_Manual_B780_EN

130
Contents Embroidery
Altering motif features 167Fill stitch types 168 ⦁ Changing stitch types 168
Motif colors 169 ⦁ Reallocating motif colors 169 ⦁ Changing the thread brand 169 ⦁ Embroidering the motif by color 170 ⦁ Reducing color changes 170 ⦁ Embroidering motifs in one color 170 ⦁ Embroidering lettering in multi colors 170 ⦁ Embroidering lettering in one colors 170
Basting 171 ⦁ Deactivating basting 171
Importing stitch patterns from the sewing mode 172
⦁ Selecting stitch patterns in the sewing mode 172 ⦁ Selecting stitch patterns in the embroidery mode 172
Saving embroidery motifs 173Memory Embroidery computer 173USB-Stick 173
Overwriting motifs 174
Deleting saved single motif 175 ⦁ Cancelling deleting 175
Deleting all saved motifs 176 ⦁ Cancelling deleting 176
Starting to embroider 177Select hoop 177 ⦁ Attaching the embroidery hoop 177 ⦁ Attach the hoop to the embroidery arm 177 ⦁ Removing the hoop 177
Embroidery menu 178Embroidering using the «Start/Stop»-button on the headframe 178 ⦁ Interrupting the process 178 ⦁ Completing the color 178 ⦁ Color change 178 ⦁ «Embroidery»-Display 178 ⦁ Embroidery speed 178 ⦁ End of embroidery 179
Embroidering with foot control 179 ⦁ Interrupting the process 179 ⦁ Completing the color 179 ⦁ Color change 179 ⦁ «Embroidery»-Display 179
Thread breakage when embroidering 180Upper or lower thread breaks 180
Embroidery sequence control when thread breaks 180 ⦁ Returning to original position 180 ⦁ Resuming embroidery 180
Cleaning 181
Troubleshooting 182
Overview Stitch patterns 188Practical stitches 188Buttonholes 188Decorative stitches 188Quilt stitches 191Alphabets 193
Overview Motifs 199Embellishment 199Quilting 201Borders and Lace 202Asia 203Flowers 204Seasons 205Children 206Sports and Hobby 207Animals 208Flowers outline 209Alphabets 210
Index 211
033804.52.04_2013-09_Manual_B780_EN
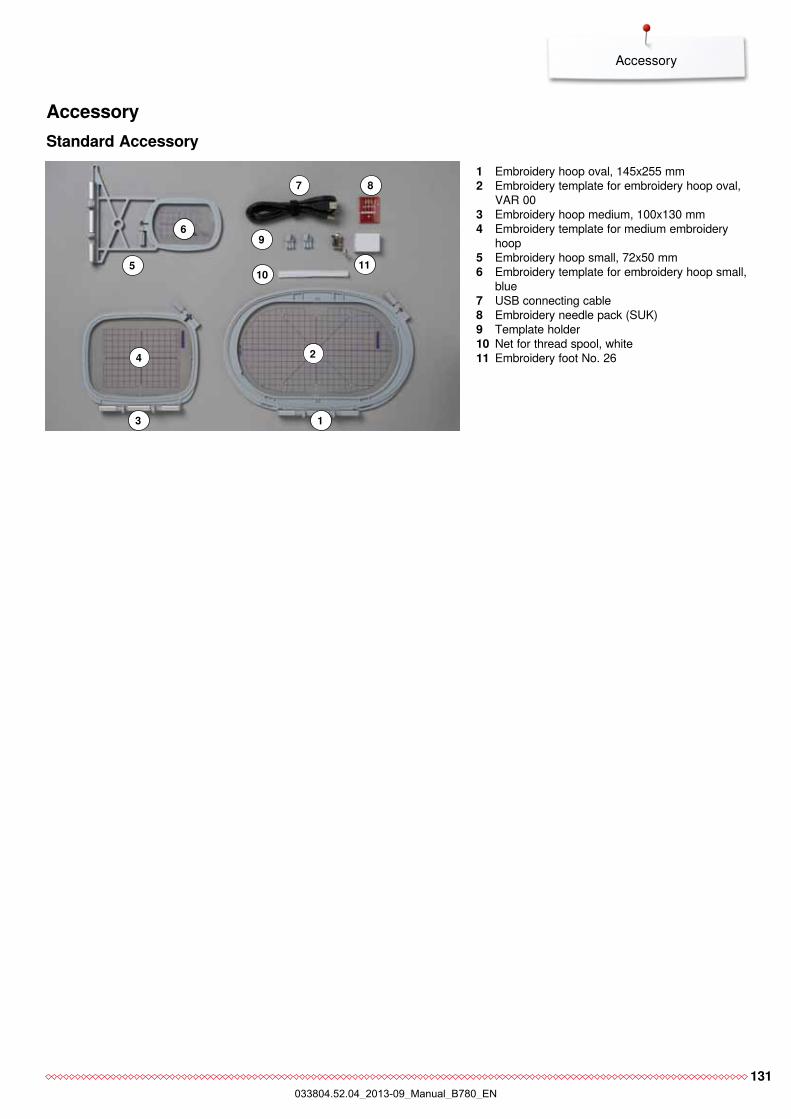
131
Accessory
AccessoryStandard Accessory
1 Embroidery hoop oval, 145x255 mm2 Embroidery template for embroidery hoop oval,
VAR 003 Embroidery hoop medium, 100x130 mm4 Embroidery template for medium embroidery
hoop5 Embroidery hoop small, 72x50 mm6 Embroidery template for embroidery hoop small,
blue7 USB connecting cable8 Embroidery needle pack (SUK)9 Template holder10 Net for thread spool, white11 Embroidery foot No. 26
1
2
3
4
5
6
7 8
1110
9
033804.52.04_2013-09_Manual_B780_EN
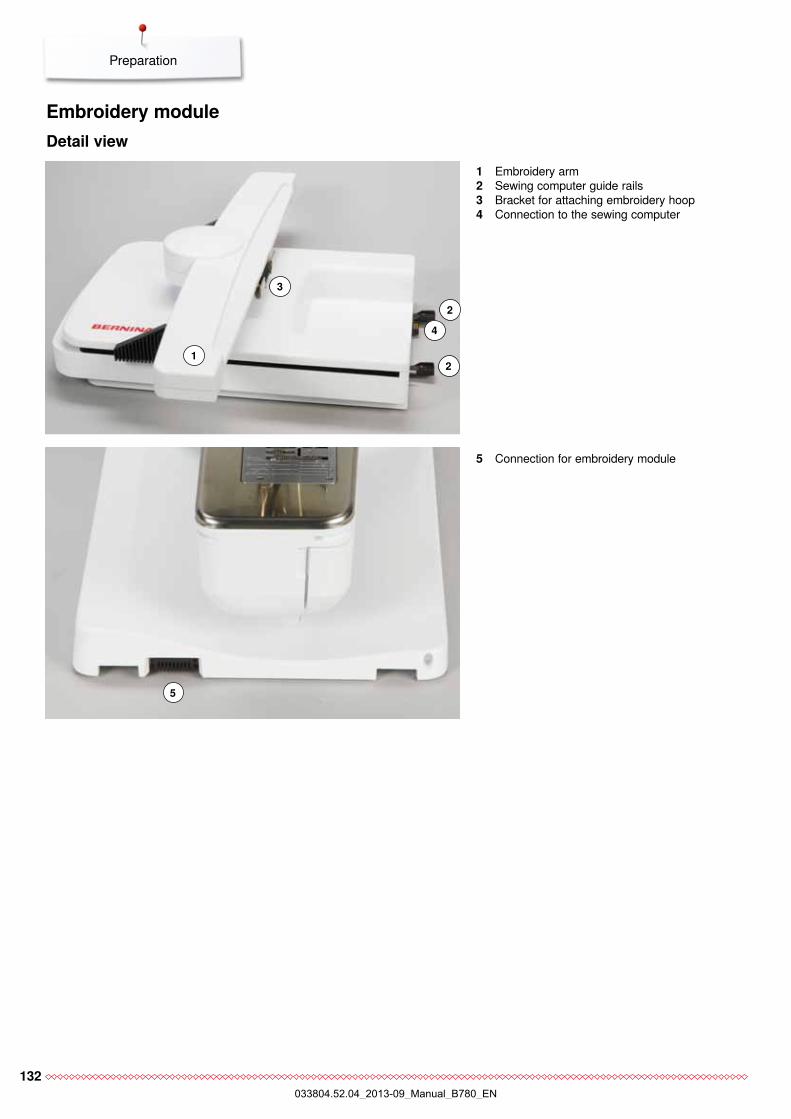
132
Preparation
1 Embroidery arm 2 Sewing computer guide rails3 Bracket for attaching embroidery hoop4 Connection to the sewing computer
5 Connection for embroidery module
3
1
2
4
Embroidery module Detail view
5
2
033804.52.04_2013-09_Manual_B780_EN
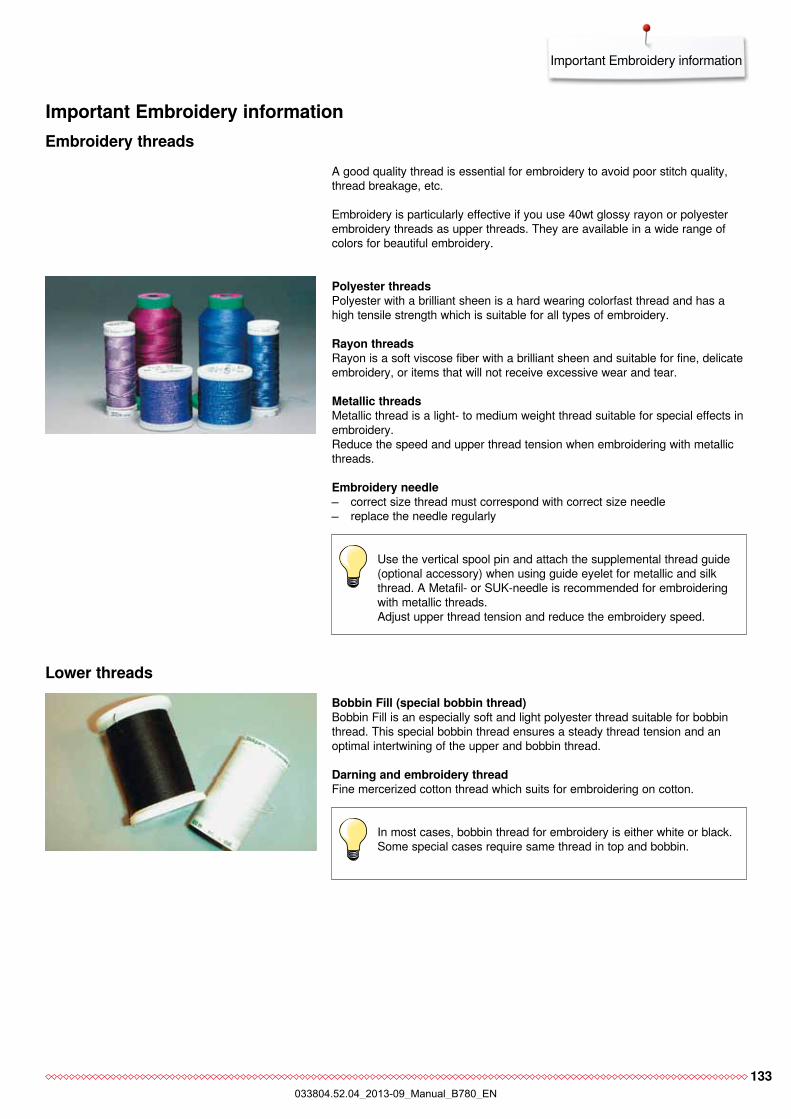
133
Important Embroidery information
Important Embroidery informationEmbroidery threads
A good quality thread is essential for embroidery to avoid poor stitch quality, thread breakage, etc.
Embroidery is particularly effective if you use 40wt glossy rayon or polyester embroidery threads as upper threads. They are available in a wide range of colors for beautiful embroidery.
Polyester threadsPolyester with a brilliant sheen is a hard wearing colorfast thread and has a high tensile strength which is suitable for all types of embroidery.
Rayon threadsRayon is a soft viscose fiber with a brilliant sheen and suitable for fine, delicate embroidery, or items that will not receive excessive wear and tear.
Metallic threadsMetallic thread is a light- to medium weight thread suitable for special effects in embroidery. Reduce the speed and upper thread tension when embroidering with metallic threads.
Embroidery needle correct size thread must correspond with correct size needle replace the needle regularly
Use the vertical spool pin and attach the supplemental thread guide (optional accessory) when using guide eyelet for metallic and silk thread. A Metafil- or SUK-needle is recommended for embroidering with metallic threads.Adjust upper thread tension and reduce the embroidery speed.
Lower threadsBobbin Fill (special bobbin thread)Bobbin Fill is an especially soft and light polyester thread suitable for bobbin thread. This special bobbin thread ensures a steady thread tension and an optimal intertwining of the upper and bobbin thread.
Darning and embroidery threadFine mercerized cotton thread which suits for embroidering on cotton.
In most cases, bobbin thread for embroidery is either white or black. Some special cases require same thread in top and bobbin.
033804.52.04_2013-09_Manual_B780_EN
134
Important Embroidery information
Simple motifs with a low stitch count are suitable for embroidery on fine material. Large-scale, densely embroidered motifs (e.g. with multiple color and embroidery direction changes) are suitable for medium and heavy weight material.
Always test stitch the embroidery motif on the same type material. Use the same stabilizer as will be used on the finished project. Changes colors, stabilizer type or needle if needed to suite the motif/fabric combination.
Motifs can be scaled/sized using the on-screen icons or with the BERNINA Embroidery Software on the PC. Increasing/decreasing in a range of +/- 20 % provides the best results.
Embroidery test
Scaling/Sizing motifs
Choosing the embroidery motif
033804.52.04_2013-09_Manual_B780_EN
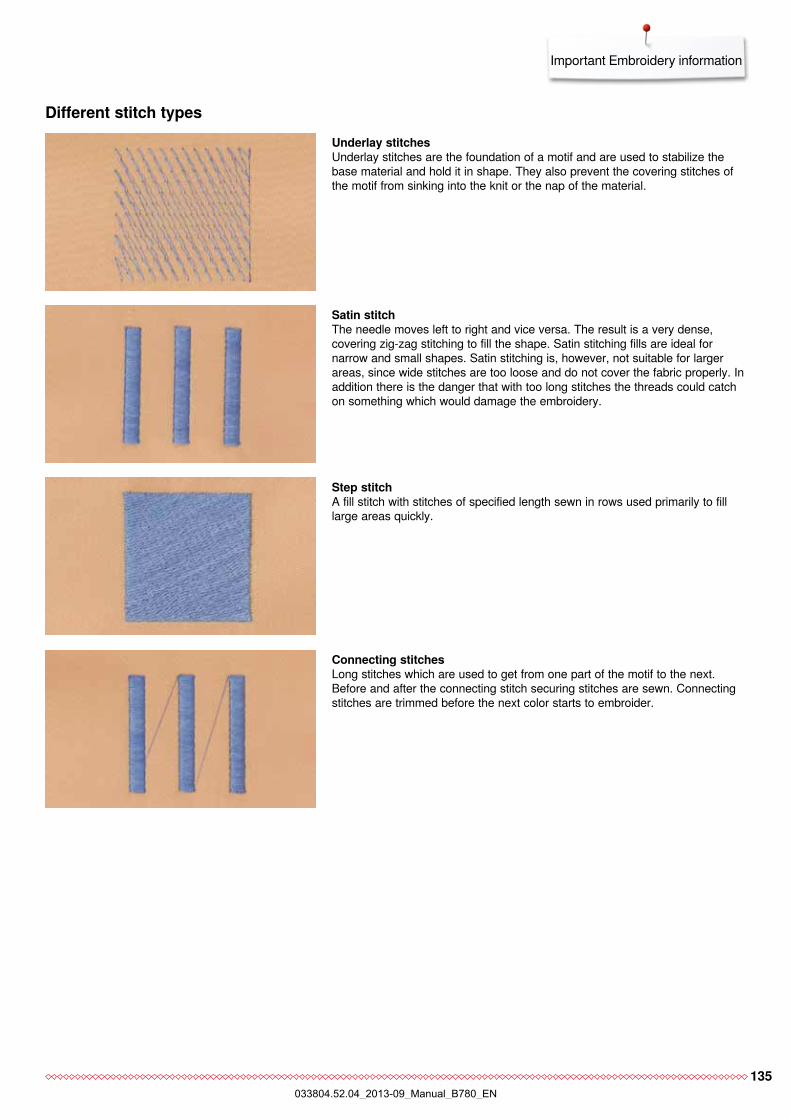
135
Important Embroidery information
Different stitch typesUnderlay stitchesUnderlay stitches are the foundation of a motif and are used to stabilize the base material and hold it in shape. They also prevent the covering stitches of the motif from sinking into the knit or the nap of the material.
Satin stitchThe needle moves left to right and vice versa. The result is a very dense, covering zig-zag stitching to fill the shape. Satin stitching fills are ideal for narrow and small shapes. Satin stitching is, however, not suitable for larger areas, since wide stitches are too loose and do not cover the fabric properly. In addition there is the danger that with too long stitches the threads could catch on something which would damage the embroidery.
Step stitchA fill stitch with stitches of specified length sewn in rows used primarily to fill large areas quickly.
Connecting stitchesLong stitches which are used to get from one part of the motif to the next. Before and after the connecting stitch securing stitches are sewn. Connecting stitches are trimmed before the next color starts to embroider.
033804.52.04_2013-09_Manual_B780_EN
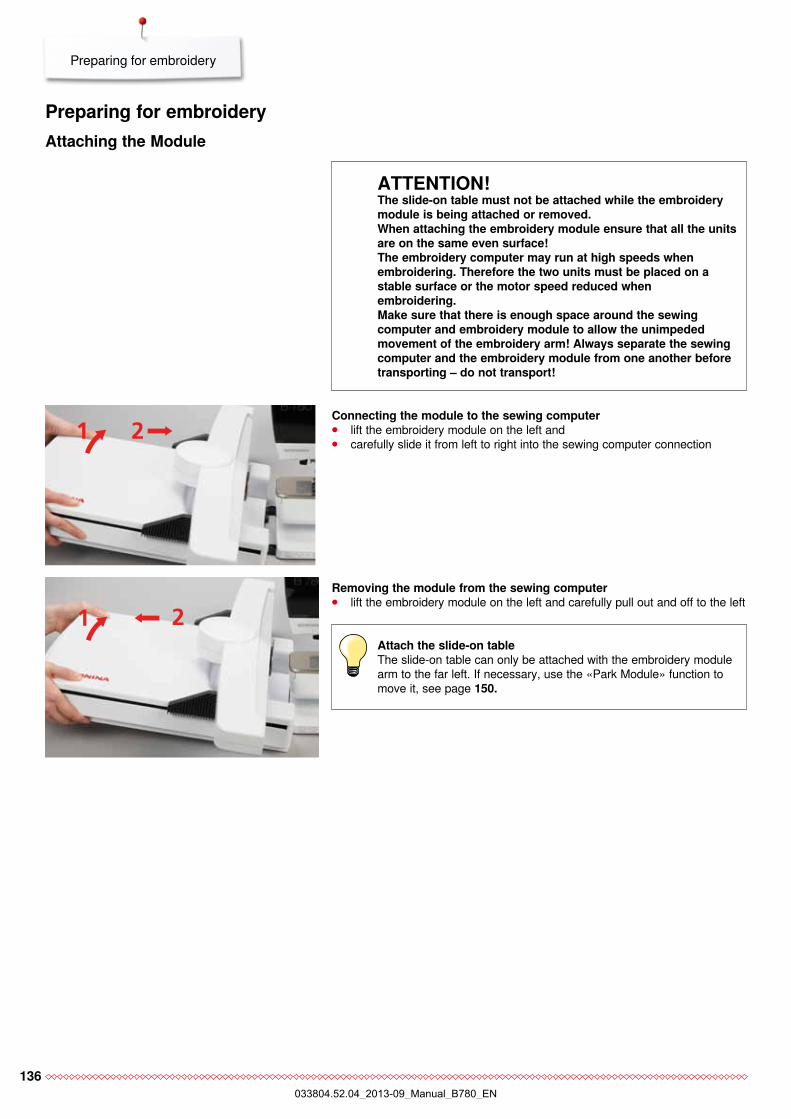
136
1 2
Preparing for embroidery
Preparing for embroidery Attaching the Module
Connecting the module to the sewing computer ⦁ lift the embroidery module on the left and ⦁ carefully slide it from left to right into the sewing computer connection
ATTENTION!The slide-on table must not be attached while the embroidery module is being attached or removed.When attaching the embroidery module ensure that all the units are on the same even surface! The embroidery computer may run at high speeds when embroidering. Therefore the two units must be placed on a stable surface or the motor speed reduced when embroidering.Make sure that there is enough space around the sewing computer and embroidery module to allow the unimpededmovement of the embroidery arm! Always separate the sewing computer and the embroidery module from one another before transporting – do not transport!
Attach the slide-on tableThe slide-on table can only be attached with the embroidery module arm to the far left. If necessary, use the «Park Module» function to move it, see page 150.
Removing the module from the sewing computer ⦁ lift the embroidery module on the left and carefully pull out and off to the left
1 2 121 2
033804.52.04_2013-09_Manual_B780_EN

137
Preparing for embroidery
Embroidery foot/Embroidery needleEmbroidery needleEmbroidery needles (130/705 H-SUK) provide a larger eye and are slightly rounded. This avoids thread abrasion when using Rayon- and cotton embroidery thread.
use SUK-needles depending on the embroidery thread use a size No. 70-SUK to No. 90-SUK
needle exchange the needle regularly
Preparation ⦁ attach Embroidery foot No. 26 to the embroidery computer ⦁ raise the presser foot ⦁ raise the needle
Lowering the feed dog ⦁ press «Feed dog»-button 1 ► the feed dog is lowered
Straight-/CutWork stitch plateThe Straight-/CutWork stitch plate has a small needle hole in the needle insertion area. The small needle hole supports the fabric. This optimizes the stitching results. ⦁ remove the standard stitch plate (see page 25) ⦁ replace it with the straight-/CutWork stitch plate
Threading upper and bobbin threadThreading upper thread ⦁ place foam pad on the spool holder ⦁ attach thread spool ⦁ when using Rayon or slippery embroidery threads, slip the net over the
upper thread spool ► this will feed the needle thread more evenly
Insert the bobbin case and close the bobbin cover to activate the lower thread indicator (must be activated in the Setup-Program).
Spool pinWhen using metallic or specialty threads, using the vertical spool pin and the guide eyelet (optional accessory) for metallic and silk threads.
Threading lower threadThread the lower thread for embroidering in the same way as for sewing, see page 21.
1
033804.52.04_2013-09_Manual_B780_EN
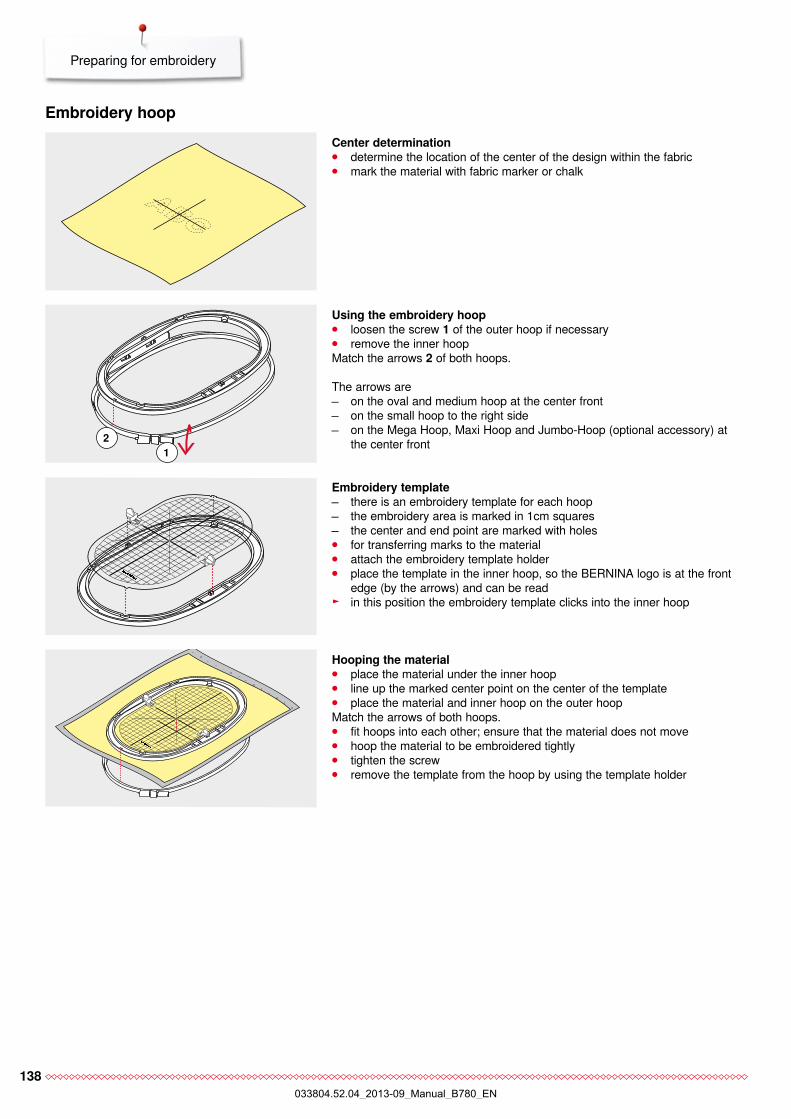
138
Preparing for embroidery
Embroidery hoopCenter determination ⦁ determine the location of the center of the design within the fabric ⦁ mark the material with fabric marker or chalk
Using the embroidery hoop ⦁ loosen the screw 1 of the outer hoop if necessary ⦁ remove the inner hoop
Match the arrows 2 of both hoops.
The arrows are on the oval and medium hoop at the center front on the small hoop to the right side on the Mega Hoop, Maxi Hoop and Jumbo-Hoop (optional accessory) at
the center front
Embroidery template there is an embroidery template for each hoop the embroidery area is marked in 1cm squares the center and end point are marked with holes ⦁ for transferring marks to the material ⦁ attach the embroidery template holder ⦁ place the template in the inner hoop, so the BERNINA logo is at the front
edge (by the arrows) and can be read ► in this position the embroidery template clicks into the inner hoop
Hooping the material ⦁ place the material under the inner hoop ⦁ line up the marked center point on the center of the template ⦁ place the material and inner hoop on the outer hoop
Match the arrows of both hoops. ⦁ fit hoops into each other; ensure that the material does not move ⦁ hoop the material to be embroidered tightly ⦁ tighten the screw ⦁ remove the template from the hoop by using the template holder
12
033804.52.04_2013-09_Manual_B780_EN
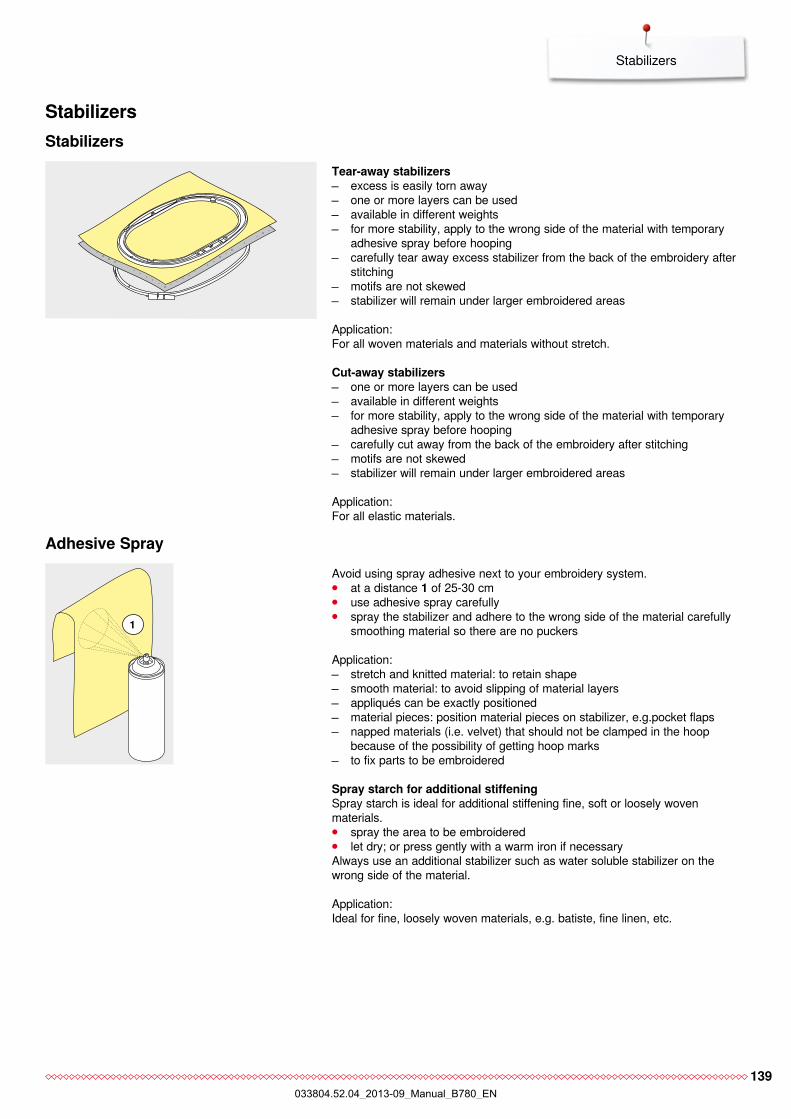
139
Stabilizers
StabilizersStabilizers
Tear-away stabilizers excess is easily torn away one or more layers can be used available in different weights for more stability, apply to the wrong side of the material with temporary
adhesive spray before hooping carefully tear away excess stabilizer from the back of the embroidery after
stitching motifs are not skewed stabilizer will remain under larger embroidered areas
Application:For all woven materials and materials without stretch.
Cut-away stabilizers one or more layers can be used available in different weights for more stability, apply to the wrong side of the material with temporary
adhesive spray before hooping carefully cut away from the back of the embroidery after stitching motifs are not skewed stabilizer will remain under larger embroidered areas
Application:For all elastic materials.
Avoid using spray adhesive next to your embroidery system. ⦁ at a distance 1 of 25-30 cm ⦁ use adhesive spray carefully ⦁ spray the stabilizer and adhere to the wrong side of the material carefully
smoothing material so there are no puckers
Application: stretch and knitted material: to retain shape smooth material: to avoid slipping of material layers appliqués can be exactly positioned material pieces: position material pieces on stabilizer, e.g.pocket flaps napped materials (i.e. velvet) that should not be clamped in the hoop
because of the possibility of getting hoop marks to fix parts to be embroidered
Spray starch for additional stiffeningSpray starch is ideal for additional stiffening fine, soft or loosely woven materials. ⦁ spray the area to be embroidered ⦁ let dry; or press gently with a warm iron if necessary
Always use an additional stabilizer such as water soluble stabilizer on the wrong side of the material.
Application:Ideal for fine, loosely woven materials, e.g. batiste, fine linen, etc.
1
Adhesive Spray
033804.52.04_2013-09_Manual_B780_EN
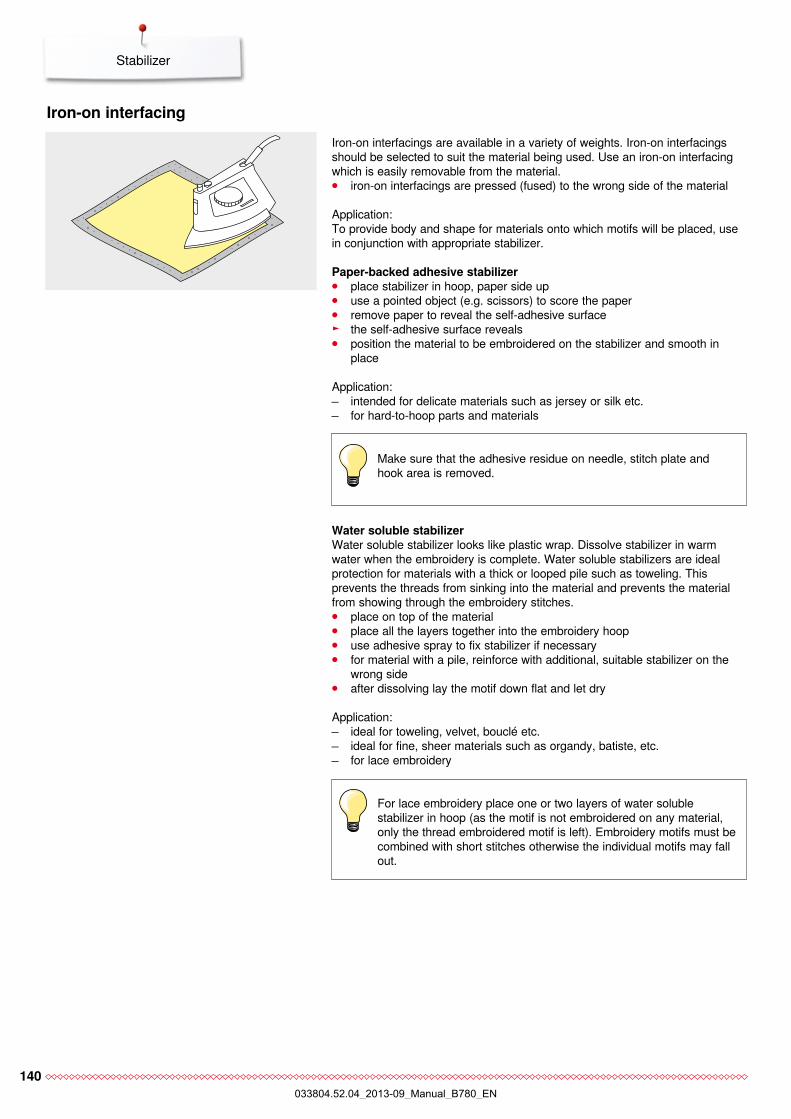
140
Stabilizer
Iron-on interfacings are available in a variety of weights. Iron-on interfacings should be selected to suit the material being used. Use an iron-on interfacing which is easily removable from the material. ⦁ iron-on interfacings are pressed (fused) to the wrong side of the material
Application:To provide body and shape for materials onto which motifs will be placed, use in conjunction with appropriate stabilizer.
Paper-backed adhesive stabilizer ⦁ place stabilizer in hoop, paper side up ⦁ use a pointed object (e.g. scissors) to score the paper ⦁ remove paper to reveal the self-adhesive surface ► the self-adhesive surface reveals ⦁ position the material to be embroidered on the stabilizer and smooth in
place
Application: intended for delicate materials such as jersey or silk etc. for hard-to-hoop parts and materials
Make sure that the adhesive residue on needle, stitch plate and hook area is removed.
For lace embroidery place one or two layers of water soluble stabilizer in hoop (as the motif is not embroidered on any material, only the thread embroidered motif is left). Embroidery motifs must be combined with short stitches otherwise the individual motifs may fall out.
Water soluble stabilizerWater soluble stabilizer looks like plastic wrap. Dissolve stabilizer in warm water when the embroidery is complete. Water soluble stabilizers are ideal protection for materials with a thick or looped pile such as toweling. This prevents the threads from sinking into the material and prevents the material from showing through the embroidery stitches. ⦁ place on top of the material ⦁ place all the layers together into the embroidery hoop ⦁ use adhesive spray to fix stabilizer if necessary ⦁ for material with a pile, reinforce with additional, suitable stabilizer on the
wrong side ⦁ after dissolving lay the motif down flat and let dry
Application: ideal for toweling, velvet, bouclé etc. ideal for fine, sheer materials such as organdy, batiste, etc. for lace embroidery
Iron-on interfacing
033804.52.04_2013-09_Manual_B780_EN
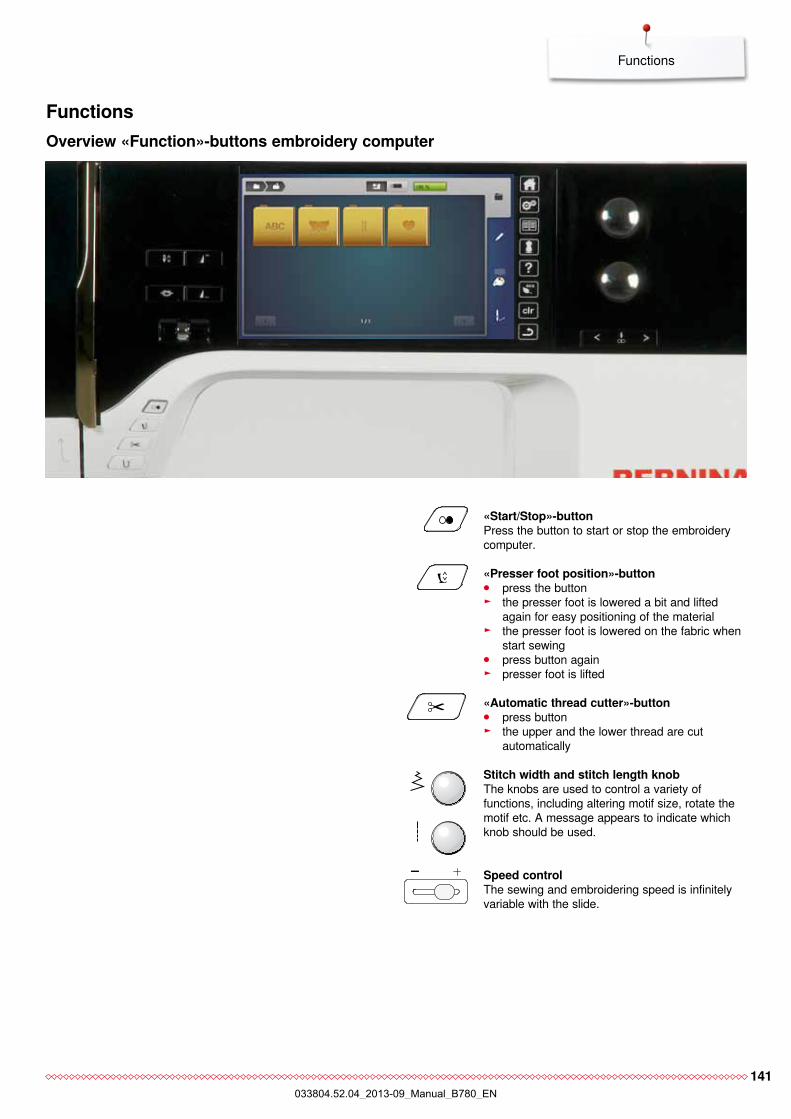
141
Functions
FunctionsOverview «Function»-buttons embroidery computer
«Start/Stop»-buttonPress the button to start or stop the embroidery computer.
«Presser foot position»-button ⦁ press the button ► the presser foot is lowered a bit and lifted
again for easy positioning of the material ► the presser foot is lowered on the fabric when
start sewing ⦁ press button again ► presser foot is lifted
«Automatic thread cutter»-button ⦁ press button ► the upper and the lower thread are cut
automatically
Stitch width and stitch length knobThe knobs are used to control a variety of functions, including altering motif size, rotate the motif etc. A message appears to indicate which knob should be used.
Speed controlThe sewing and embroidering speed is infinitely variable with the slide.
033804.52.04_2013-09_Manual_B780_EN
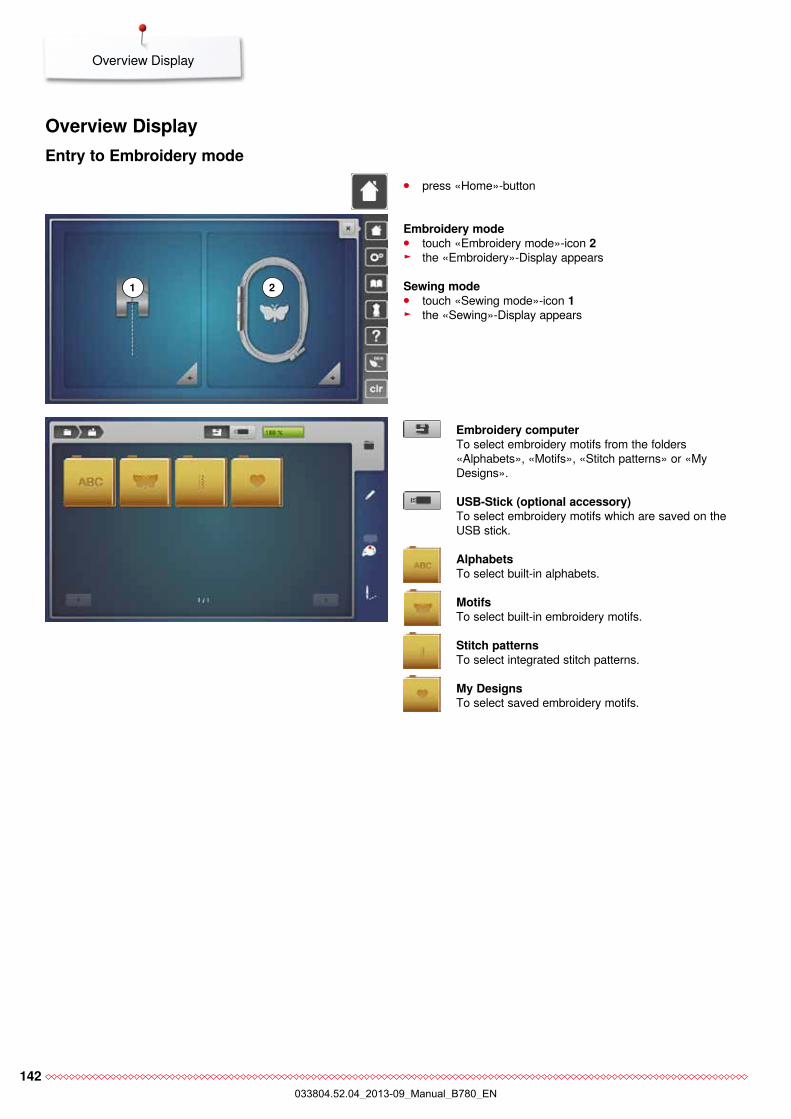
142
Overview Display
Overview DisplayEntry to Embroidery mode
Embroidery computerTo select embroidery motifs from the folders «Alphabets», «Motifs», «Stitch patterns» or «My Designs».
USB-Stick (optional accessory)To select embroidery motifs which are saved on the USB stick.
Alphabets To select built-in alphabets.
MotifsTo select built-in embroidery motifs.
Stitch patternsTo select integrated stitch patterns.
My DesignsTo select saved embroidery motifs.
⦁ press «Home»-button
Embroidery mode ⦁ touch «Embroidery mode»-icon 2 ► the «Embroidery»-Display appears
Sewing mode ⦁ touch «Sewing mode»-icon 1 ► the «Sewing»-Display appears
1 2
033804.52.04_2013-09_Manual_B780_EN
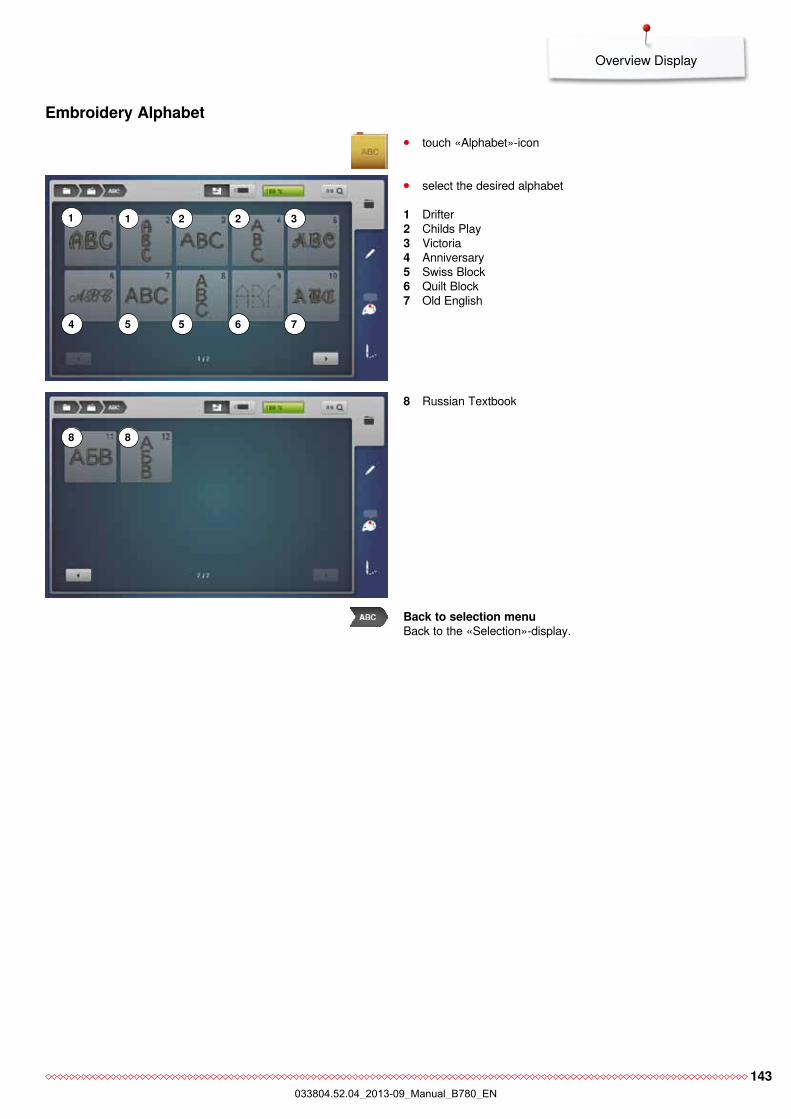
143
Overview Display
Embroidery Alphabet
Back to selection menuBack to the «Selection»-display.
1
8
4
1
8
5
2
5
2
6
3
7
⦁ touch «Alphabet»-icon
⦁ select the desired alphabet
1 Drifter2 Childs Play3 Victoria4 Anniversary5 Swiss Block6 Quilt Block7 Old English
8 Russian Textbook
033804.52.04_2013-09_Manual_B780_EN
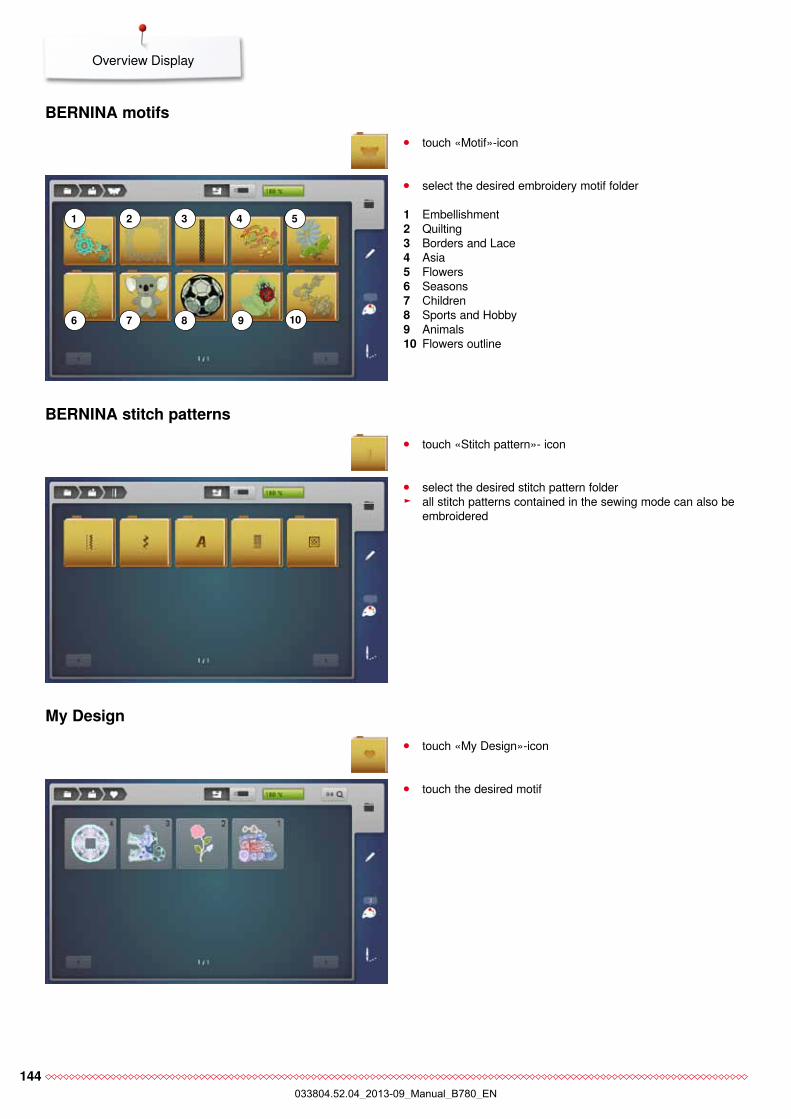
144
Overview Display
BERNINA motifs
BERNINA stitch patterns
My Design
⦁ select the desired stitch pattern folder ► all stitch patterns contained in the sewing mode can also be
embroidered
⦁ touch the desired motif
⦁ touch «Motif»-icon
⦁ touch «Stitch pattern»- icon
⦁ touch «My Design»-icon
⦁ select the desired embroidery motif folder
1 Embellishment2 Quilting3 Borders and Lace4 Asia5 Flowers6 Seasons7 Children8 Sports and Hobby9 Animals10 Flowers outline
1
6
2
7
3
8 9 10
4 5
033804.52.04_2013-09_Manual_B780_EN
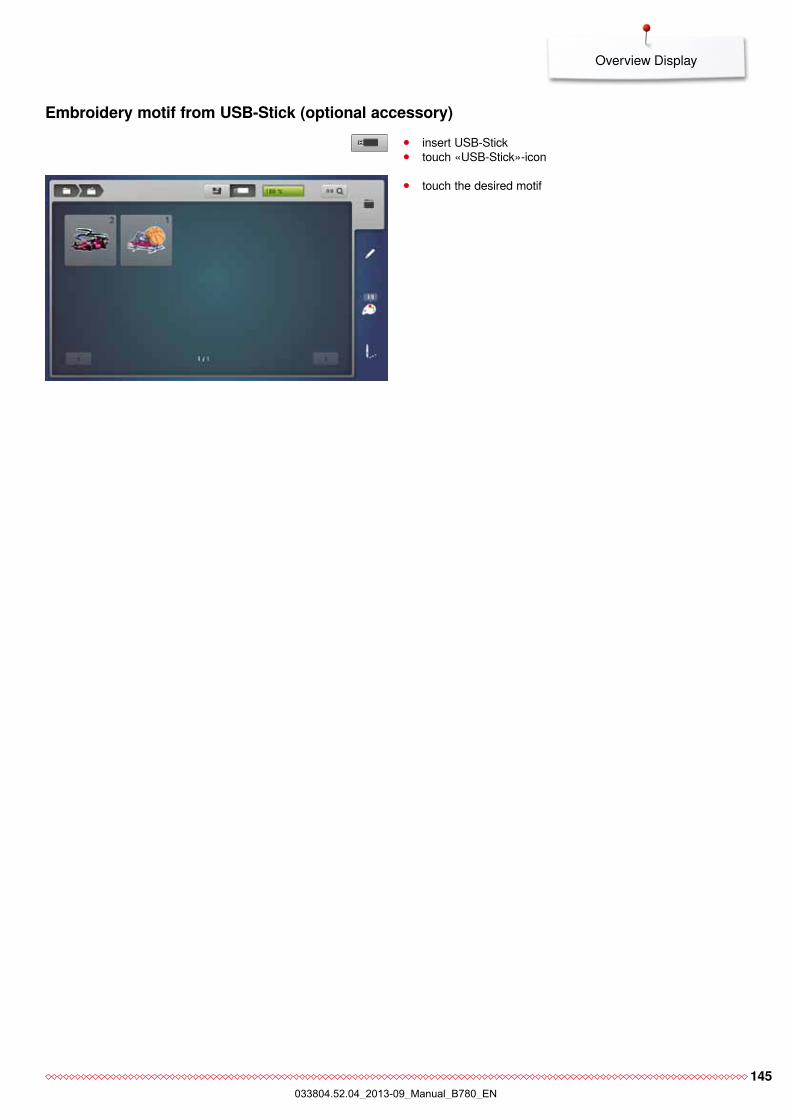
145
Overview Display
Embroidery motif from USB-Stick (optional accessory) ⦁ insert USB-Stick ⦁ touch «USB-Stick»-icon
⦁ touch the desired motif
033804.52.04_2013-09_Manual_B780_EN
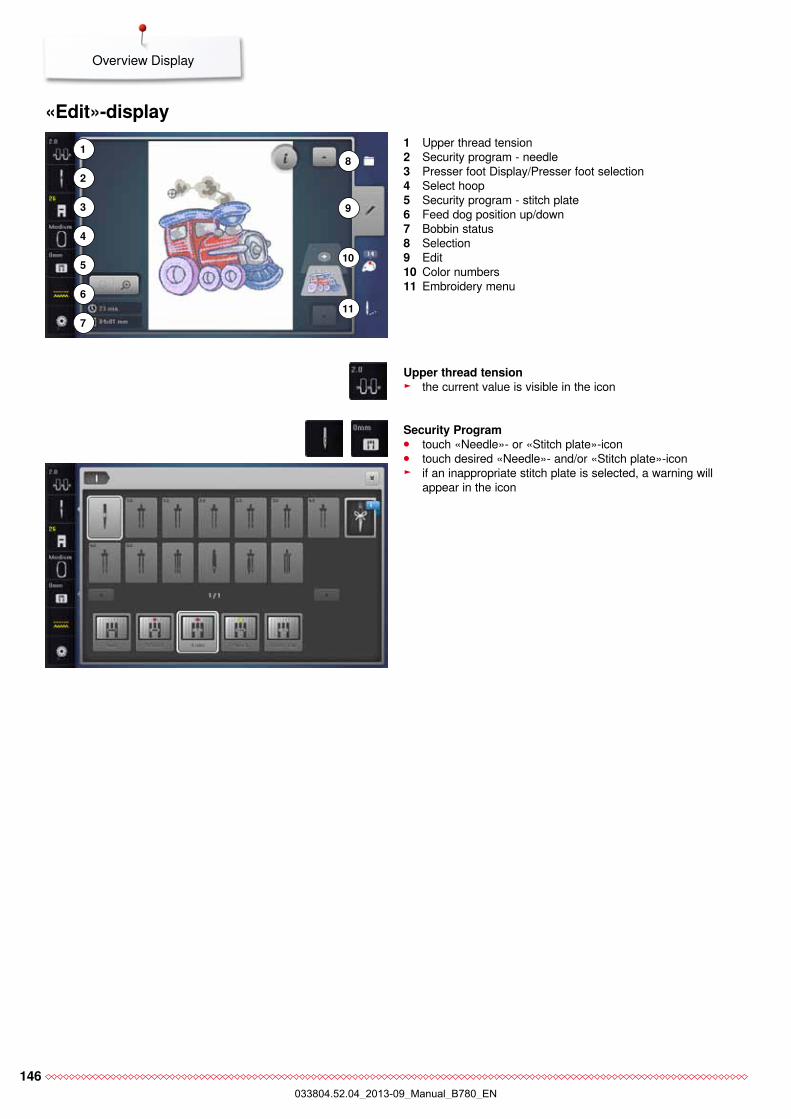
146
Overview Display
«Edit»-display1 Upper thread tension2 Security program - needle3 Presser foot Display/Presser foot selection4 Select hoop5 Security program - stitch plate6 Feed dog position up/down7 Bobbin status8 Selection9 Edit10 Color numbers11 Embroidery menu
2
18
9
Upper thread tension ► the current value is visible in the icon
Security Program ⦁ touch «Needle»- or «Stitch plate»-icon ⦁ touch desired «Needle»- and/or «Stitch plate»-icon ► if an inappropriate stitch plate is selected, a warning will
appear in the icon
3
4
5
6
7
10
11
033804.52.04_2013-09_Manual_B780_EN
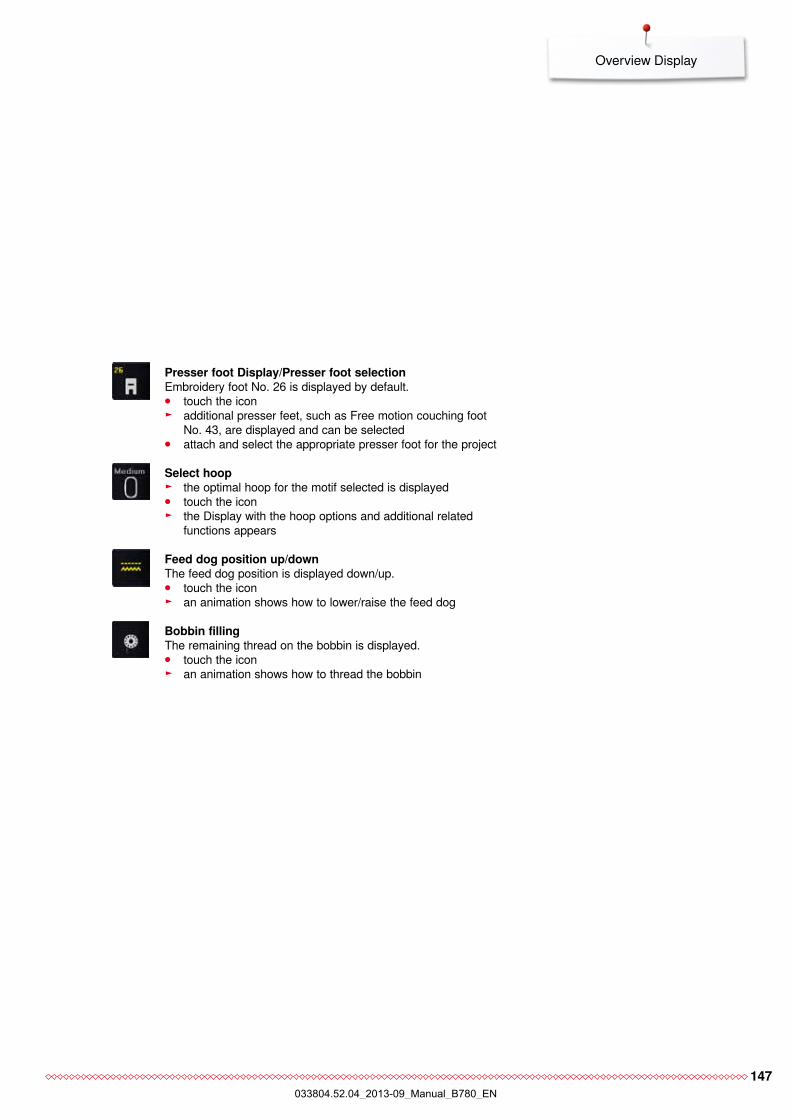
147
Overview Display
Presser foot Display/Presser foot selectionEmbroidery foot No. 26 is displayed by default. ⦁ touch the icon ► additional presser feet, such as Free motion couching foot
No. 43, are displayed and can be selected ⦁ attach and select the appropriate presser foot for the project
Select hoop ► the optimal hoop for the motif selected is displayed ⦁ touch the icon ► the Display with the hoop options and additional related
functions appears
Feed dog position up/downThe feed dog position is displayed down/up. ⦁ touch the icon ► an animation shows how to lower/raise the feed dog
Bobbin fillingThe remaining thread on the bobbin is displayed. ⦁ touch the icon ► an animation shows how to thread the bobbin
033804.52.04_2013-09_Manual_B780_EN
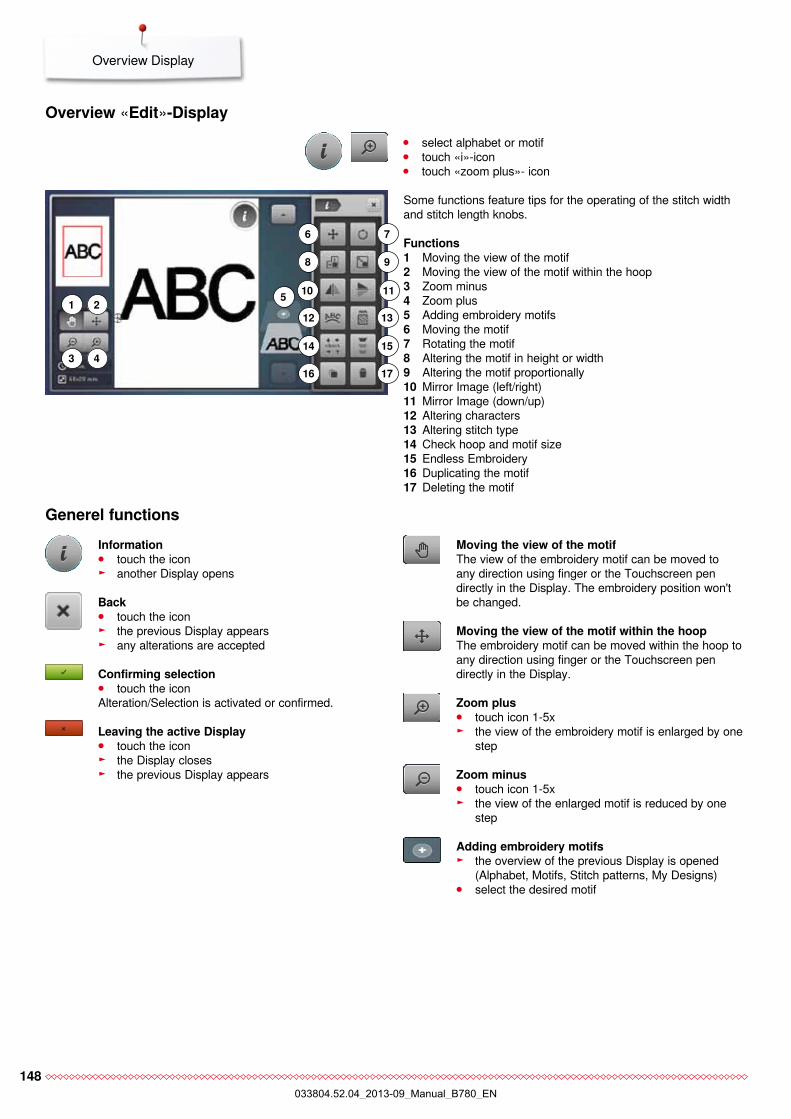
148
Overview Display
Overview «Edit»-Display ⦁ select alphabet or motif ⦁ touch «i»-icon ⦁ touch «zoom plus»- icon
Some functions feature tips for the operating of the stitch width and stitch length knobs.
Functions1 Moving the view of the motif2 Moving the view of the motif within the hoop3 Zoom minus4 Zoom plus5 Adding embroidery motifs6 Moving the motif7 Rotating the motif8 Altering the motif in height or width9 Altering the motif proportionally10 Mirror Image (left/right)11 Mirror Image (down/up)12 Altering characters13 Altering stitch type14 Check hoop and motif size15 Endless Embroidery16 Duplicating the motif17 Deleting the motif
Information ⦁ touch the icon ► another Display opens
Back ⦁ touch the icon ► the previous Display appears ► any alterations are accepted
Confirming selection ⦁ touch the icon
Alteration/Selection is activated or confirmed.
Leaving the active Display ⦁ touch the icon ► the Display closes ► the previous Display appears
Generel functions
Moving the view of the motif within the hoopThe embroidery motif can be moved within the hoop to any direction using finger or the Touchscreen pen directly in the Display.
Zoom plus ⦁ touch icon 1-5x ► the view of the embroidery motif is enlarged by one
step
Zoom minus ⦁ touch icon 1-5x ► the view of the enlarged motif is reduced by one
step
Moving the view of the motifThe view of the embroidery motif can be moved to any direction using finger or the Touchscreen pen directly in the Display. The embroidery position won't be changed.
Adding embroidery motifs ► the overview of the previous Display is opened
(Alphabet, Motifs, Stitch patterns, My Designs) ⦁ select the desired motif
2
4
6
9
10
7
8
1
3
11
12
14
16
13
15
17
5
033804.52.04_2013-09_Manual_B780_EN
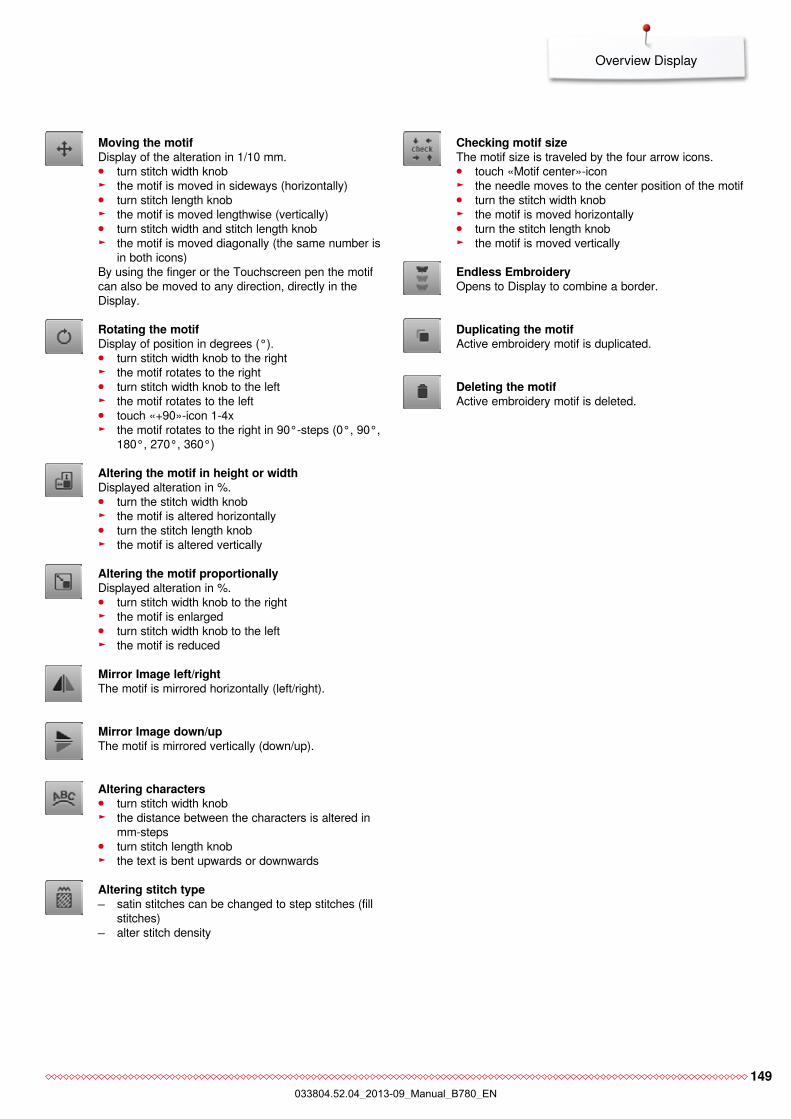
149
Overview Display
Moving the motifDisplay of the alteration in 1/10 mm. ⦁ turn stitch width knob ► the motif is moved in sideways (horizontally) ⦁ turn stitch length knob ► the motif is moved lengthwise (vertically) ⦁ turn stitch width and stitch length knob ► the motif is moved diagonally (the same number is
in both icons)By using the finger or the Touchscreen pen the motif can also be moved to any direction, directly in the Display.
Mirror Image left/rightThe motif is mirrored horizontally (left/right).
Altering the motif proportionallyDisplayed alteration in %. ⦁ turn stitch width knob to the right ► the motif is enlarged ⦁ turn stitch width knob to the left ► the motif is reduced
Mirror Image down/upThe motif is mirrored vertically (down/up).
Rotating the motifDisplay of position in degrees (°). ⦁ turn stitch width knob to the right ► the motif rotates to the right ⦁ turn stitch width knob to the left ► the motif rotates to the left ⦁ touch «+90»-icon 1-4x ► the motif rotates to the right in 90°-steps (0°, 90°,
180°, 270°, 360°)
Deleting the motifActive embroidery motif is deleted.
Altering the motif in height or widthDisplayed alteration in %. ⦁ turn the stitch width knob ► the motif is altered horizontally ⦁ turn the stitch length knob ► the motif is altered vertically
Altering characters ⦁ turn stitch width knob ► the distance between the characters is altered in
mm-steps ⦁ turn stitch length knob ► the text is bent upwards or downwards
Altering stitch type satin stitches can be changed to step stitches (fill
stitches) alter stitch density
Checking motif sizeThe motif size is traveled by the four arrow icons. ⦁ touch «Motif center»-icon ► the needle moves to the center position of the motif ⦁ turn the stitch width knob ► the motif is moved horizontally ⦁ turn the stitch length knob ► the motif is moved vertically
Endless EmbroideryOpens to Display to combine a border.
Duplicating the motifActive embroidery motif is duplicated.
033804.52.04_2013-09_Manual_B780_EN
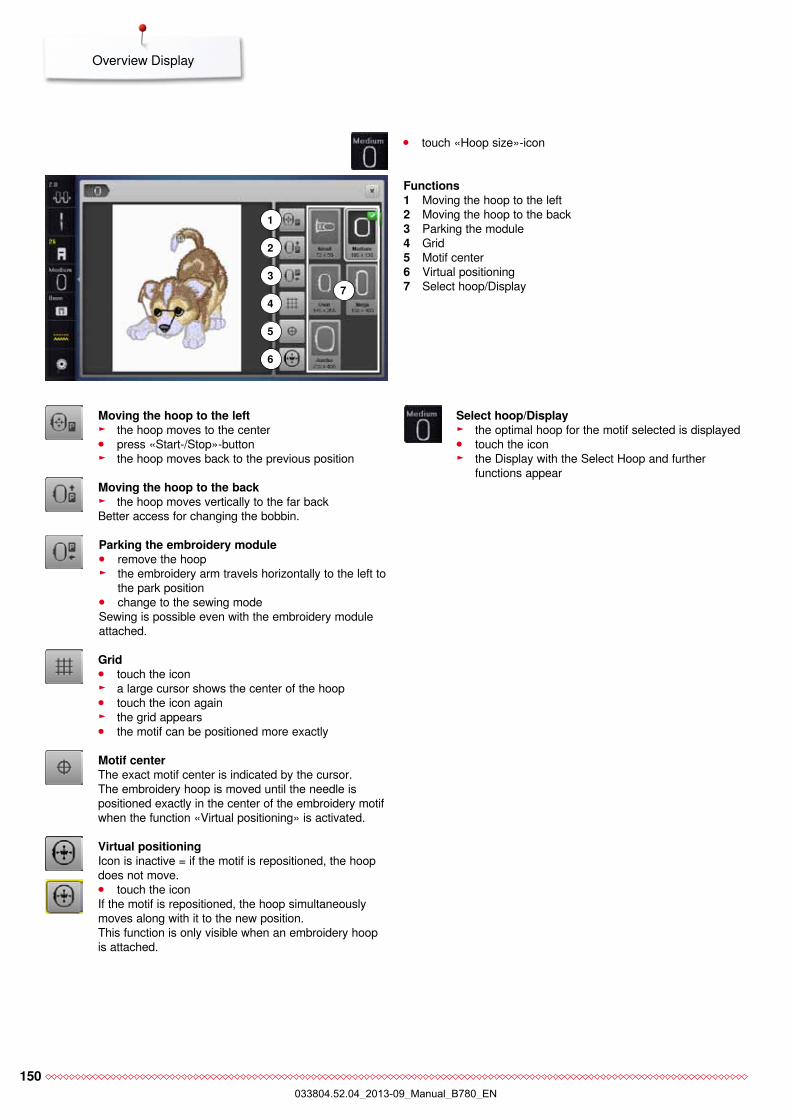
150
Overview Display
⦁ touch «Hoop size»-icon
Functions1 Moving the hoop to the left2 Moving the hoop to the back3 Parking the module4 Grid5 Motif center6 Virtual positioning7 Select hoop/Display
Select hoop/Display ► the optimal hoop for the motif selected is displayed ⦁ touch the icon ► the Display with the Select Hoop and further
functions appear
Motif centerThe exact motif center is indicated by the cursor.The embroidery hoop is moved until the needle ispositioned exactly in the center of the embroidery motifwhen the function «Virtual positioning» is activated.
Moving the hoop to the back ► the hoop moves vertically to the far back
Better access for changing the bobbin.
Virtual positioningIcon is inactive = if the motif is repositioned, the hoop does not move. ⦁ touch the icon
If the motif is repositioned, the hoop simultaneously moves along with it to the new position. This function is only visible when an embroidery hoop is attached.
Parking the embroidery module ⦁ remove the hoop ► the embroidery arm travels horizontally to the left to
the park position ⦁ change to the sewing mode
Sewing is possible even with the embroidery module attached.
2
5
3
4
1
6
7
Moving the hoop to the left ► the hoop moves to the center ⦁ press «Start-/Stop»-button ► the hoop moves back to the previous position
Grid ⦁ touch the icon ► a large cursor shows the center of the hoop ⦁ touch the icon again ► the grid appears ⦁ the motif can be positioned more exactly
033804.52.04_2013-09_Manual_B780_EN

151
Notes
Notes
033804.52.04_2013-09_Manual_B780_EN
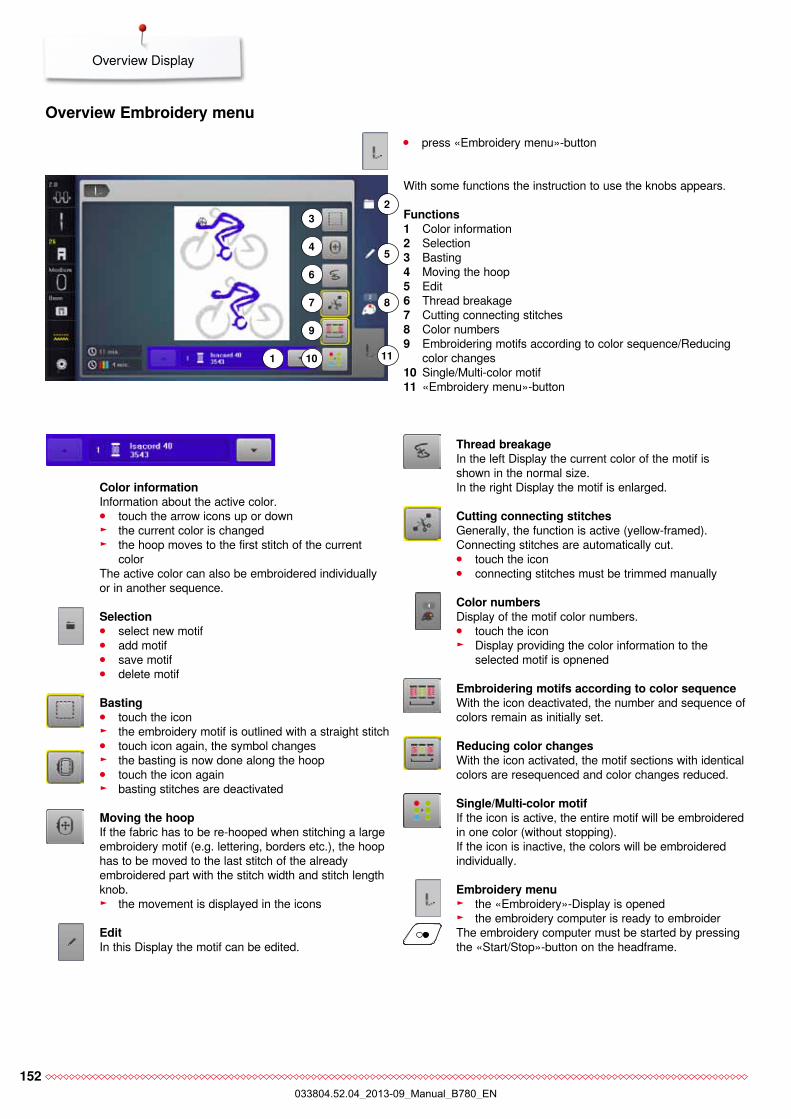
152
Overview Display
Overview Embroidery menu ⦁ press «Embroidery menu»-button
With some functions the instruction to use the knobs appears.
Functions1 Color information 2 Selection3 Basting4 Moving the hoop5 Edit6 Thread breakage7 Cutting connecting stitches8 Color numbers9 Embroidering motifs according to color sequence/Reducing
color changes10 Single/Multi-color motif11 «Embroidery menu»-button
Embroidery menu ► the «Embroidery»-Display is opened ► the embroidery computer is ready to embroider
The embroidery computer must be started by pressing the «Start/Stop»-button on the headframe.
Color informationInformation about the active color. ⦁ touch the arrow icons up or down ► the current color is changed ► the hoop moves to the first stitch of the current
colorThe active color can also be embroidered individually or in another sequence.
Selection ⦁ select new motif ⦁ add motif ⦁ save motif ⦁ delete motif
Thread breakageIn the left Display the current color of the motif is shown in the normal size. In the right Display the motif is enlarged.
EditIn this Display the motif can be edited.
Cutting connecting stitchesGenerally, the function is active (yellow-framed). Connecting stitches are automatically cut. ⦁ touch the icon ⦁ connecting stitches must be trimmed manually
Color numbersDisplay of the motif color numbers. ⦁ touch the icon ► Display providing the color information to the
selected motif is opnened
Single/Multi-color motifIf the icon is active, the entire motif will be embroidered in one color (without stopping).If the icon is inactive, the colors will be embroidered individually.
5
8
6
7
9
10
4
1
23
Basting ⦁ touch the icon ► the embroidery motif is outlined with a straight stitch ⦁ touch icon again, the symbol changes ► the basting is now done along the hoop ⦁ touch the icon again ► basting stitches are deactivated
Moving the hoopIf the fabric has to be re-hooped when stitching a large embroidery motif (e.g. lettering, borders etc.), the hoop has to be moved to the last stitch of the already embroidered part with the stitch width and stitch length knob.
► the movement is displayed in the icons
Embroidering motifs according to color sequenceWith the icon deactivated, the number and sequence of colors remain as initially set.
Reducing color changesWith the icon activated, the motif sections with identical colors are resequenced and color changes reduced.
11
033804.52.04_2013-09_Manual_B780_EN
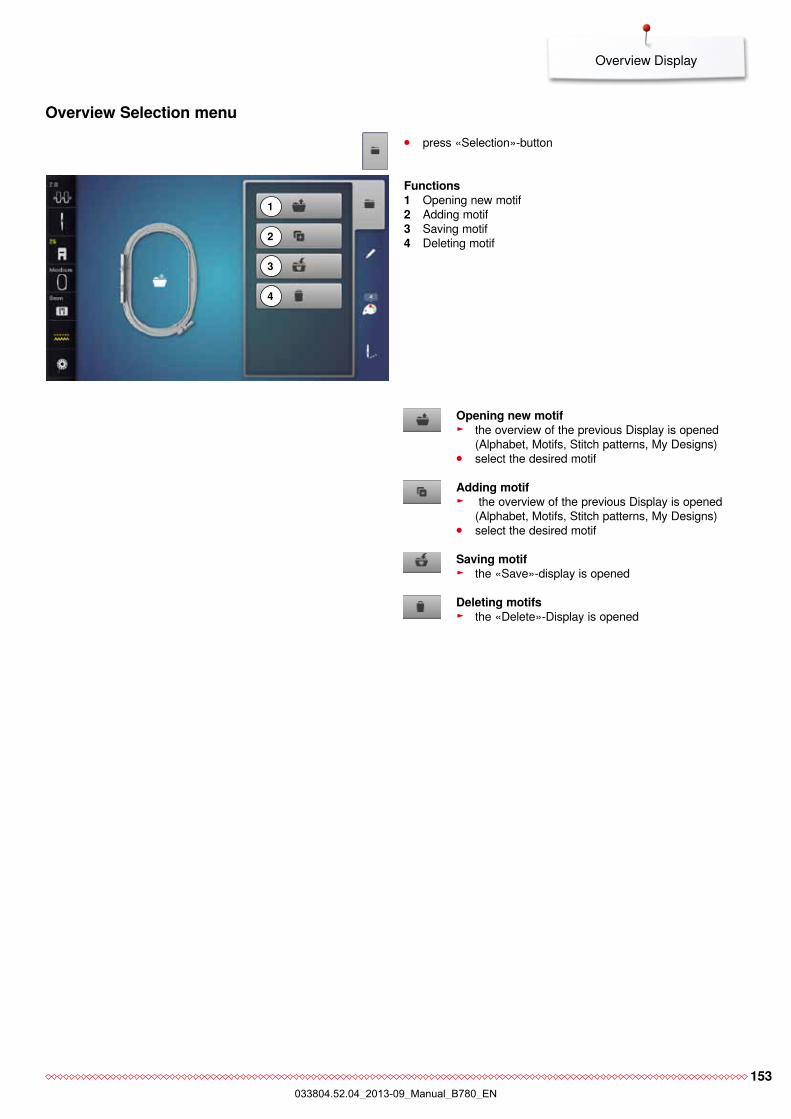
153
Overview Display
3
2
⦁ press «Selection»-button
1
Functions1 Opening new motif2 Adding motif3 Saving motif4 Deleting motif
Opening new motif ► the overview of the previous Display is opened
(Alphabet, Motifs, Stitch patterns, My Designs) ⦁ select the desired motif
Saving motif ► the «Save»-display is opened
Deleting motifs ► the «Delete»-Display is opened
4
Adding motif ► the overview of the previous Display is opened
(Alphabet, Motifs, Stitch patterns, My Designs) ⦁ select the desired motif
Overview Selection menu
033804.52.04_2013-09_Manual_B780_EN
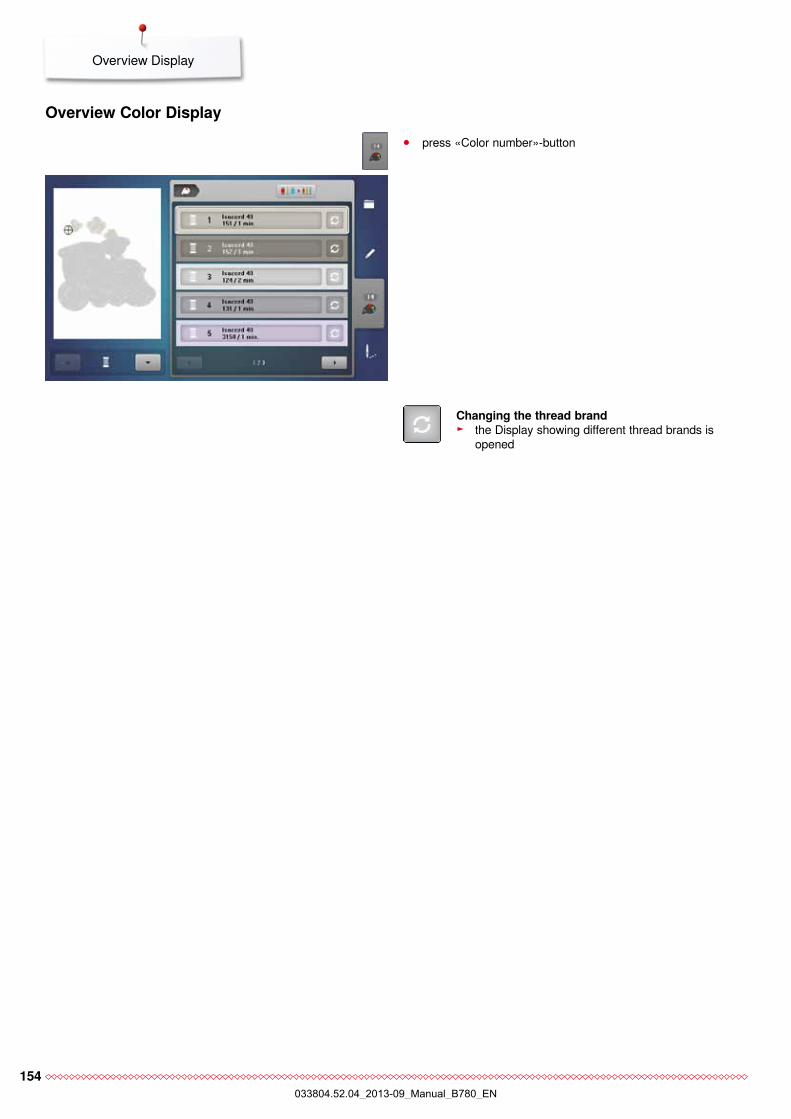
154
Overview Display
Changing the thread brand ► the Display showing different thread brands is
opened
⦁ press «Color number»-button
Overview Color Display
033804.52.04_2013-09_Manual_B780_EN
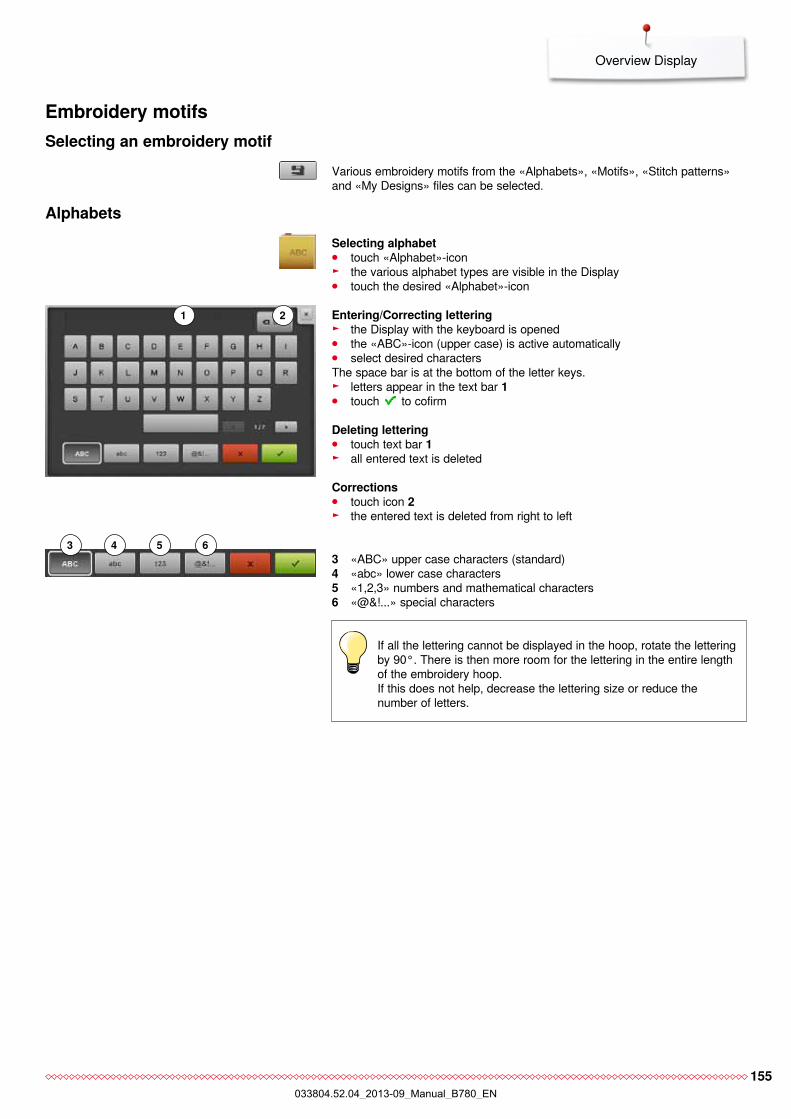
155
Overview Display
Embroidery motifs
Various embroidery motifs from the «Alphabets», «Motifs», «Stitch patterns» and «My Designs» files can be selected.
Selecting alphabet ⦁ touch «Alphabet»-icon ► the various alphabet types are visible in the Display ⦁ touch the desired «Alphabet»-icon
If all the lettering cannot be displayed in the hoop, rotate the lettering by 90°. There is then more room for the lettering in the entire length of the embroidery hoop. If this does not help, decrease the lettering size or reduce the number of letters.
Alphabets
Entering/Correcting lettering ► the Display with the keyboard is opened ⦁ the «ABC»-icon (upper case) is active automatically ⦁ select desired characters
The space bar is at the bottom of the letter keys. ► letters appear in the text bar 1 ⦁ touch to cofirm
Deleting lettering ⦁ touch text bar 1 ► all entered text is deleted
Corrections ⦁ touch icon 2 ► the entered text is deleted from right to left
1
Selecting an embroidery motif
2
3 «ABC» upper case characters (standard)4 «abc» lower case characters5 «1,2,3» numbers and mathematical characters6 «@&!...» special characters
3 4 5 6
033804.52.04_2013-09_Manual_B780_EN
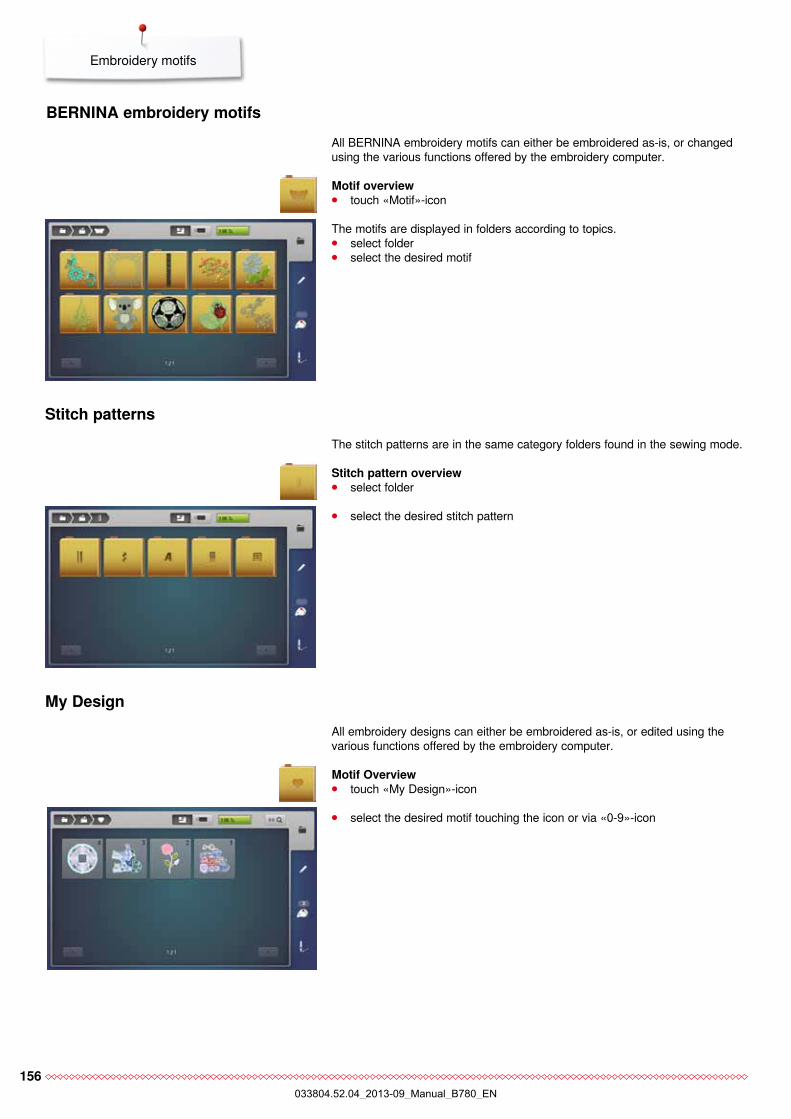
156
All embroidery designs can either be embroidered as-is, or edited using the various functions offered by the embroidery computer.
Motif Overview ⦁ touch «My Design»-icon
⦁ select the desired motif touching the icon or via «0-9»-icon
My Design
All BERNINA embroidery motifs can either be embroidered as-is, or changed using the various functions offered by the embroidery computer.
BERNINA embroidery motifs
The motifs are displayed in folders according to topics. ⦁ select folder ⦁ select the desired motif
Motif overview ⦁ touch «Motif»-icon
Stitch patterns The stitch patterns are in the same category folders found in the sewing mode.
Stitch pattern overview ⦁ select folder
⦁ select the desired stitch pattern
Embroidery motifs
033804.52.04_2013-09_Manual_B780_EN
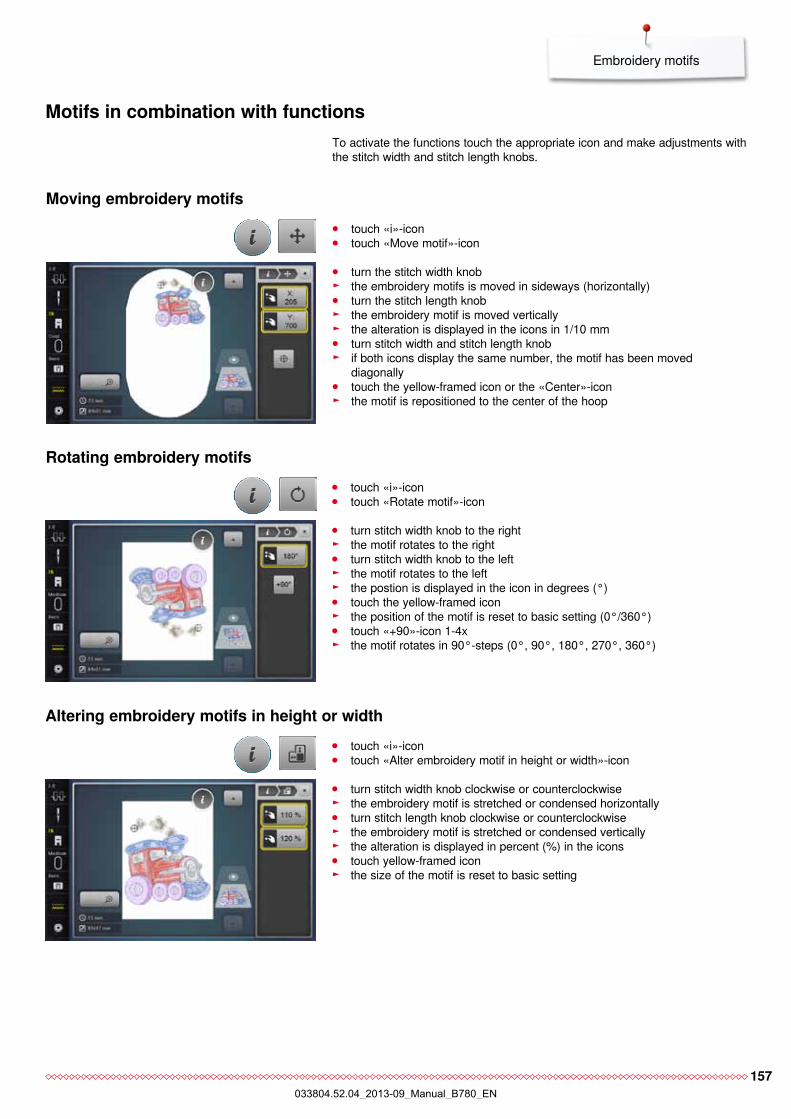
157
Embroidery motifs
Motifs in combination with functionsTo activate the functions touch the appropriate icon and make adjustments with the stitch width and stitch length knobs.
⦁ turn the stitch width knob ► the embroidery motifs is moved in sideways (horizontally) ⦁ turn the stitch length knob ► the embroidery motif is moved vertically ► the alteration is displayed in the icons in 1/10 mm ⦁ turn stitch width and stitch length knob ► if both icons display the same number, the motif has been moved
diagonally ⦁ touch the yellow-framed icon or the «Center»-icon ► the motif is repositioned to the center of the hoop
⦁ touch «i»-icon ⦁ touch «Move motif»-icon
Moving embroidery motifs
⦁ turn stitch width knob to the right ► the motif rotates to the right ⦁ turn stitch width knob to the left ► the motif rotates to the left ► the postion is displayed in the icon in degrees (°) ⦁ touch the yellow-framed icon ► the position of the motif is reset to basic setting (0°/360°) ⦁ touch «+90»-icon 1-4x ► the motif rotates in 90°-steps (0°, 90°, 180°, 270°, 360°)
⦁ touch «i»-icon ⦁ touch «Rotate motif»-icon
Rotating embroidery motifs
⦁ turn stitch width knob clockwise or counterclockwise ► the embroidery motif is stretched or condensed horizontally ⦁ turn stitch length knob clockwise or counterclockwise ► the embroidery motif is stretched or condensed vertically ► the alteration is displayed in percent (%) in the icons ⦁ touch yellow-framed icon ► the size of the motif is reset to basic setting
⦁ touch «i»-icon ⦁ touch «Alter embroidery motif in height or width»-icon
Altering embroidery motifs in height or width
033804.52.04_2013-09_Manual_B780_EN
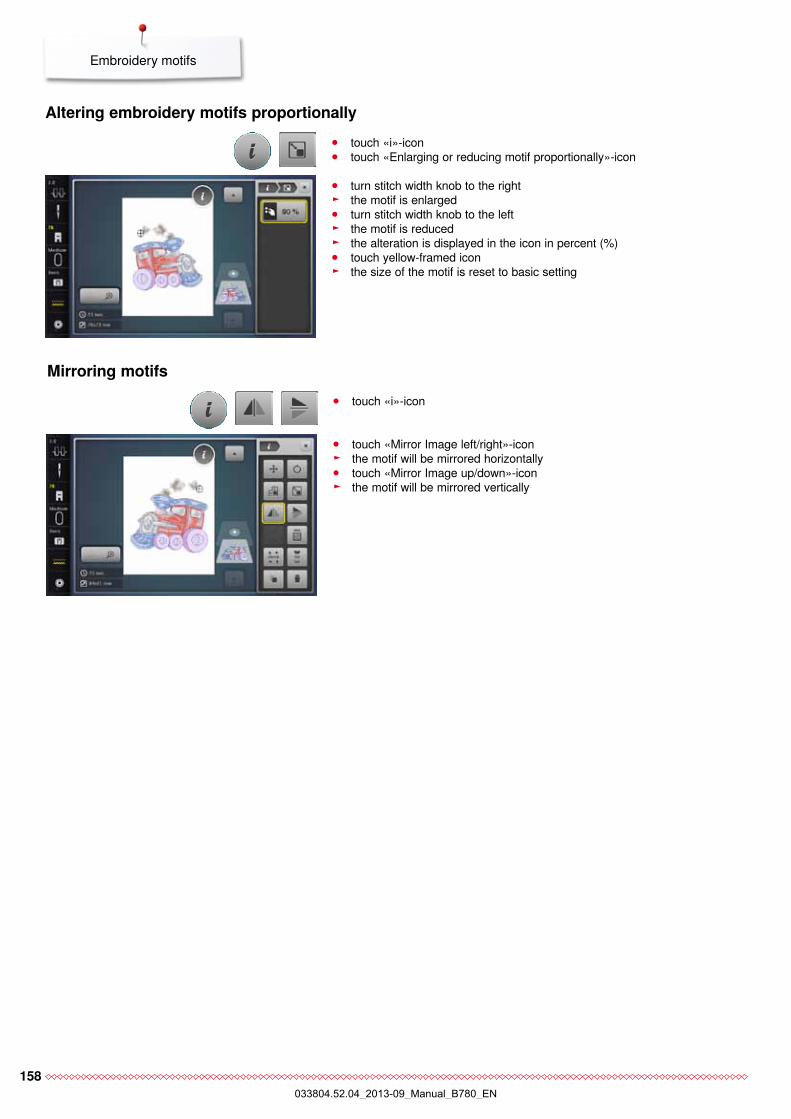
158
Embroidery motifs
⦁ turn stitch width knob to the right ► the motif is enlarged ⦁ turn stitch width knob to the left ► the motif is reduced ► the alteration is displayed in the icon in percent (%) ⦁ touch yellow-framed icon ► the size of the motif is reset to basic setting
⦁ touch «i»-icon ⦁ touch «Enlarging or reducing motif proportionally»-icon
Altering embroidery motifs proportionally
⦁ touch «Mirror Image left/right»-icon ► the motif will be mirrored horizontally ⦁ touch «Mirror Image up/down»-icon ► the motif will be mirrored vertically
⦁ touch «i»-icon
Mirroring motifs
033804.52.04_2013-09_Manual_B780_EN
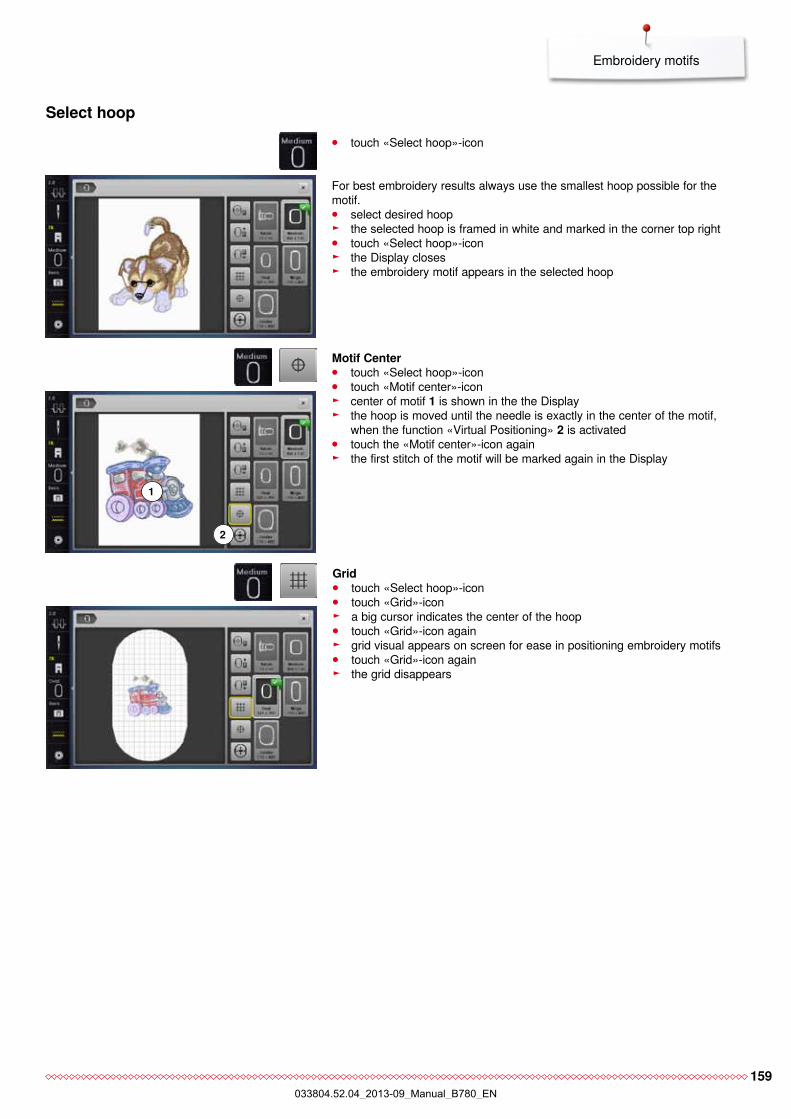
159
Embroidery motifs
For best embroidery results always use the smallest hoop possible for the motif. ⦁ select desired hoop ► the selected hoop is framed in white and marked in the corner top right ⦁ touch «Select hoop»-icon ► the Display closes ► the embroidery motif appears in the selected hoop
⦁ touch «Select hoop»-icon
Select hoop
Motif Center ⦁ touch «Select hoop»-icon ⦁ touch «Motif center»-icon ► center of motif 1 is shown in the the Display ► the hoop is moved until the needle is exactly in the center of the motif,
when the function «Virtual Positioning» 2 is activated ⦁ touch the «Motif center»-icon again ► the first stitch of the motif will be marked again in the Display
1
Grid ⦁ touch «Select hoop»-icon ⦁ touch «Grid»-icon ► a big cursor indicates the center of the hoop ⦁ touch «Grid»-icon again ► grid visual appears on screen for ease in positioning embroidery motifs ⦁ touch «Grid»-icon again ► the grid disappears
2
033804.52.04_2013-09_Manual_B780_EN
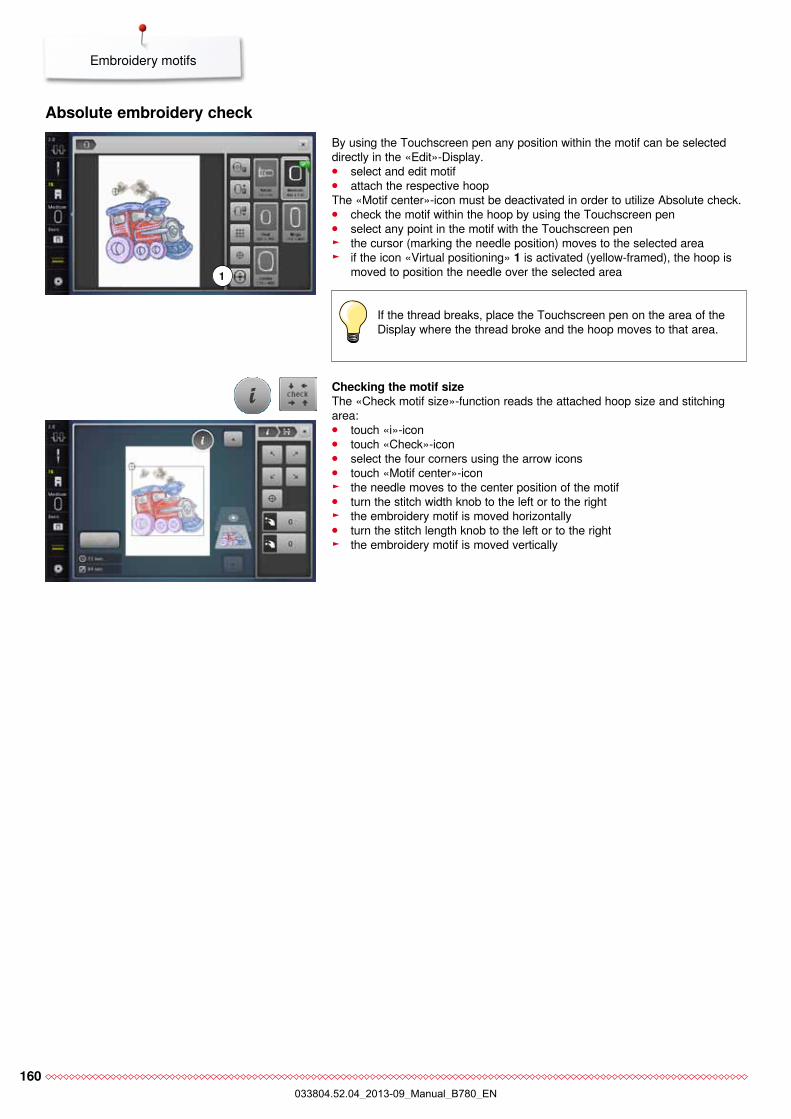
160
Embroidery motifs
By using the Touchscreen pen any position within the motif can be selected directly in the «Edit»-Display. ⦁ select and edit motif ⦁ attach the respective hoop
The «Motif center»-icon must be deactivated in order to utilize Absolute check. ⦁ check the motif within the hoop by using the Touchscreen pen ⦁ select any point in the motif with the Touchscreen pen ► the cursor (marking the needle position) moves to the selected area ► if the icon «Virtual positioning» 1 is activated (yellow-framed), the hoop is
moved to position the needle over the selected area
Absolute embroidery check
If the thread breaks, place the Touchscreen pen on the area of the Display where the thread broke and the hoop moves to that area.
1
Checking the motif sizeThe «Check motif size»-function reads the attached hoop size and stitching area: ⦁ touch «i»-icon ⦁ touch «Check»-icon ⦁ select the four corners using the arrow icons ⦁ touch «Motif center»-icon ► the needle moves to the center position of the motif ⦁ turn the stitch width knob to the left or to the right ► the embroidery motif is moved horizontally ⦁ turn the stitch length knob to the left or to the right ► the embroidery motif is moved vertically
033804.52.04_2013-09_Manual_B780_EN
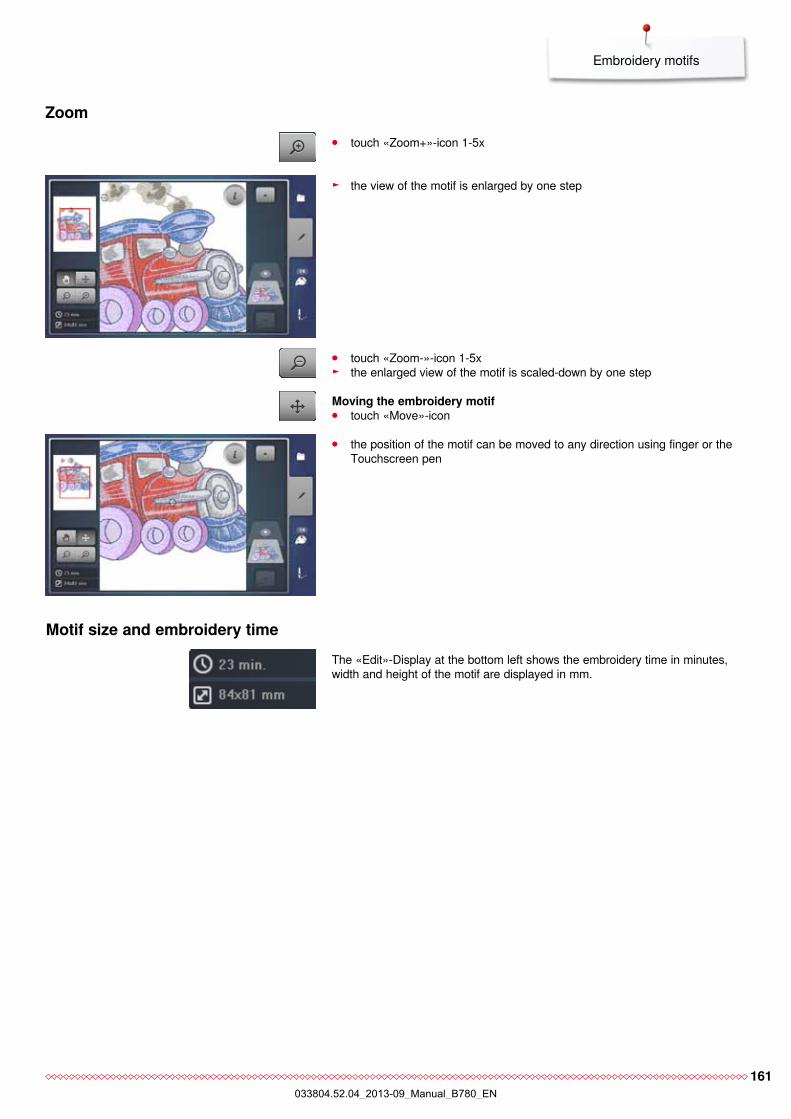
161
Embroidery motifs
► the view of the motif is enlarged by one step
⦁ touch «Zoom+»-icon 1-5x
⦁ touch «Zoom-»-icon 1-5x ► the enlarged view of the motif is scaled-down by one step
Zoom
The «Edit»-Display at the bottom left shows the embroidery time in minutes, width and height of the motif are displayed in mm.
Motif size and embroidery time
⦁ the position of the motif can be moved to any direction using finger or the Touchscreen pen
Moving the embroidery motif ⦁ touch «Move»-icon
033804.52.04_2013-09_Manual_B780_EN
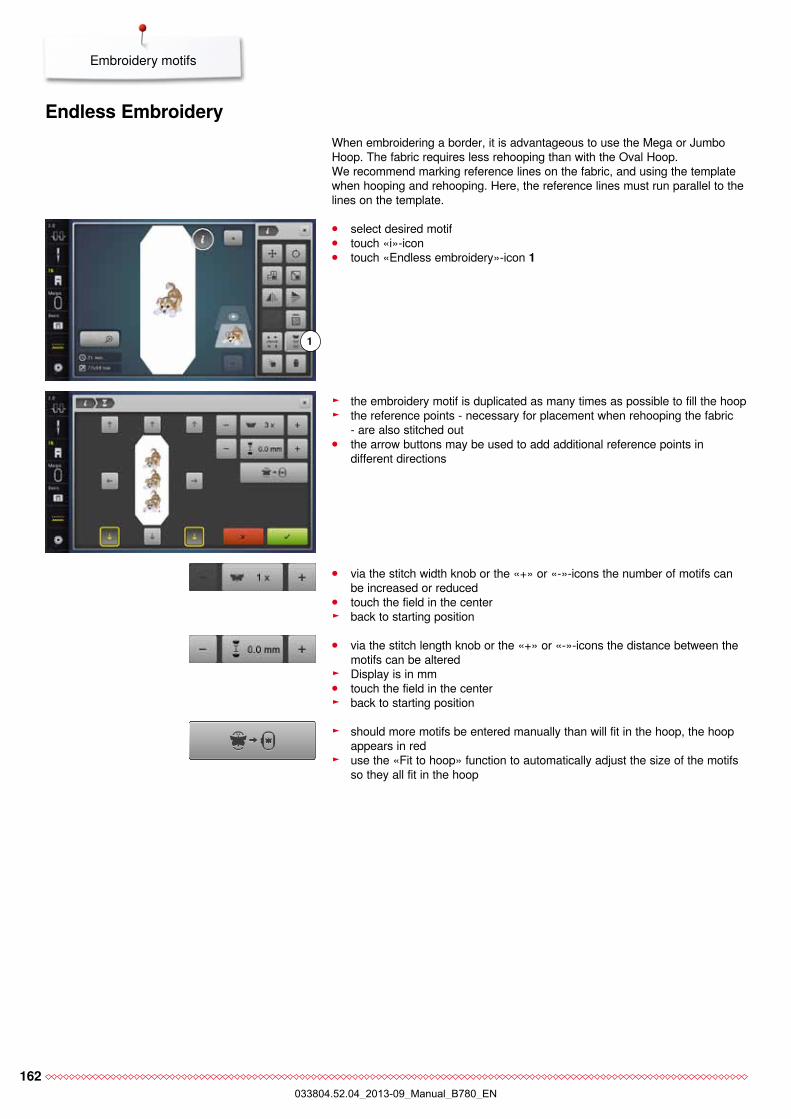
162
Embroidery motifs
Endless EmbroideryWhen embroidering a border, it is advantageous to use the Mega or Jumbo Hoop. The fabric requires less rehooping than with the Oval Hoop.We recommend marking reference lines on the fabric, and using the template when hooping and rehooping. Here, the reference lines must run parallel to the lines on the template.
⦁ select desired motif ⦁ touch «i»-icon ⦁ touch «Endless embroidery»-icon 1
► the embroidery motif is duplicated as many times as possible to fill the hoop ► the reference points - necessary for placement when rehooping the fabric
- are also stitched out ⦁ the arrow buttons may be used to add additional reference points in
different directions
⦁ via the stitch width knob or the «+» or «-»-icons the number of motifs can be increased or reduced
⦁ touch the field in the center ► back to starting position
⦁ via the stitch length knob or the «+» or «-»-icons the distance between the motifs can be altered
► Display is in mm ⦁ touch the field in the center ► back to starting position
► should more motifs be entered manually than will fit in the hoop, the hoop appears in red
► use the «Fit to hoop» function to automatically adjust the size of the motifs so they all fit in the hoop
1
033804.52.04_2013-09_Manual_B780_EN

163
Embroidery motifs
⦁ touch to confirm ► the «Edit»-Display appears ⦁ touch «i»-icon ► the function overview closes ⦁ change to the Embroidery Display and embroider the border
In the embroidery menu it‘s possible to change the embroidery speed.
⦁ after the reference points are stitched, touch the «Endless embroidery» icon
► an animation shows how to rehoop the material ⦁ rehoop the material so that the embroidered reference points are in the
upper part of the embroidery area in the hoop ⦁ when rehooping, make sure that the reference points do not lie too near the
edge of the hoop, or they will be out of the stitching area (at least 3 cm from the top edge of the hoop)
⦁ attach the embroidery hoop ⦁ touch
► the hoop is moved near the last stitch ⦁ using the stitch width and/or the stitch length knob, move the hoop until the
needle is over the last stitch ⦁ touch to change to the Embroidery Display and resume embroidering ⦁ repeat these steps until the border is the desired length ► «Auto» is activ, the hoop moves automatically to the last reference point ⦁ the arrow buttons can be used to specify on which side of the embroidered
section the next one is to be joined ⦁ hoop the material accordingly
033804.52.04_2013-09_Manual_B780_EN
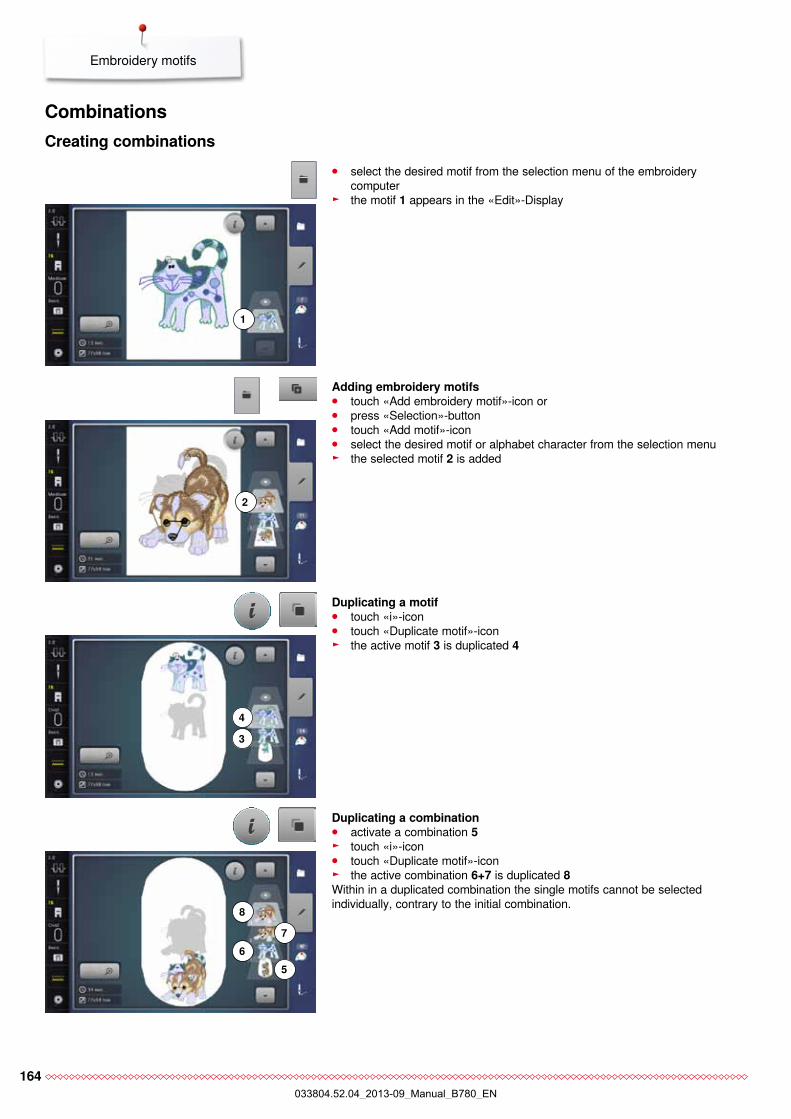
164
Embroidery motifs
CombinationsCreating combinations
Adding embroidery motifs ⦁ touch «Add embroidery motif»-icon or ⦁ press «Selection»-button ⦁ touch «Add motif»-icon ⦁ select the desired motif or alphabet character from the selection menu ► the selected motif 2 is added
⦁ select the desired motif from the selection menu of the embroidery computer
► the motif 1 appears in the «Edit»-Display
Duplicating a motif ⦁ touch «i»-icon ⦁ touch «Duplicate motif»-icon ► the active motif 3 is duplicated 4
2
4
3
1
Duplicating a combination ⦁ activate a combination 5 ► touch «i»-icon ⦁ touch «Duplicate motif»-icon ► the active combination 6+7 is duplicated 8
Within in a duplicated combination the single motifs cannot be selected individually, contrary to the initial combination.
5
8
67
033804.52.04_2013-09_Manual_B780_EN
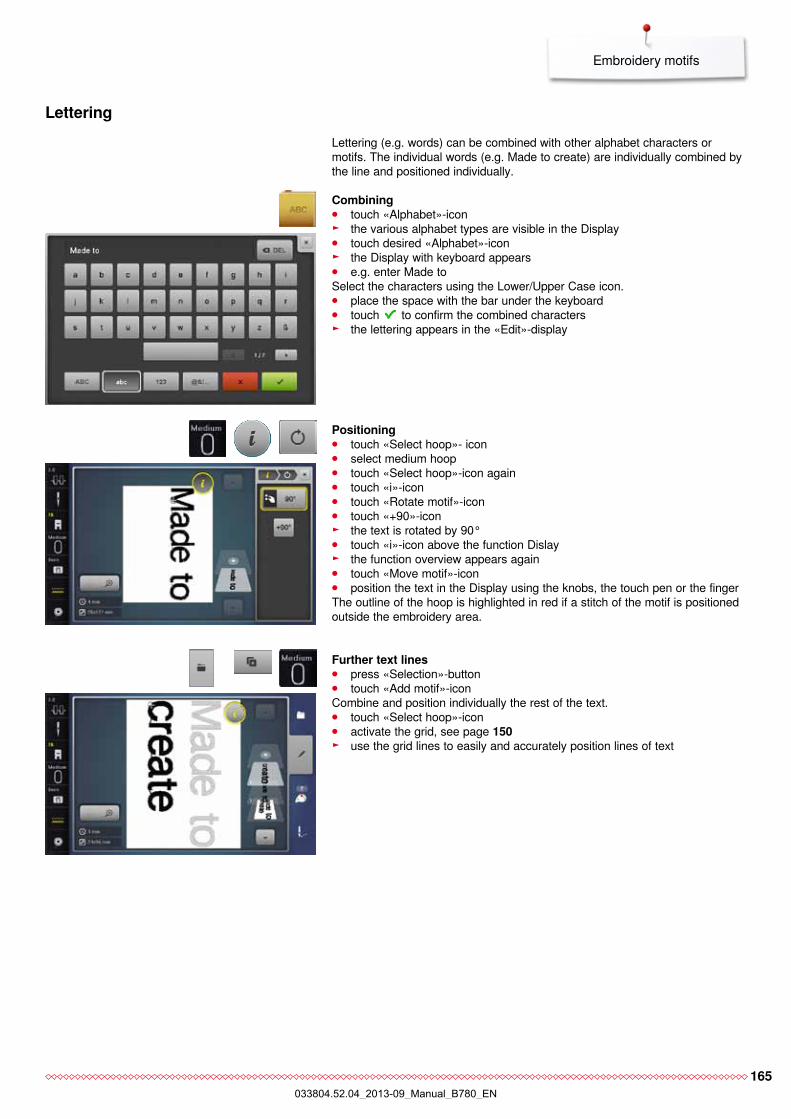
165
Embroidery motifs
Combining ⦁ touch «Alphabet»-icon ► the various alphabet types are visible in the Display ⦁ touch desired «Alphabet»-icon ► the Display with keyboard appears ⦁ e.g. enter Made to
Select the characters using the Lower/Upper Case icon. ⦁ place the space with the bar under the keyboard ⦁ touch to confirm the combined characters ► the lettering appears in the «Edit»-display
Lettering (e.g. words) can be combined with other alphabet characters or motifs. The individual words (e.g. Made to create) are individually combined by the line and positioned individually.
Lettering
Positioning ⦁ touch «Select hoop»- icon ⦁ select medium hoop ⦁ touch «Select hoop»-icon again ⦁ touch «i»-icon ⦁ touch «Rotate motif»-icon ⦁ touch «+90»-icon ► the text is rotated by 90° ⦁ touch «i»-icon above the function Dislay ► the function overview appears again ⦁ touch «Move motif»-icon ⦁ position the text in the Display using the knobs, the touch pen or the finger
The outline of the hoop is highlighted in red if a stitch of the motif is positioned outside the embroidery area.
Further text lines ⦁ press «Selection»-button ⦁ touch «Add motif»-icon
Combine and position individually the rest of the text. ⦁ touch «Select hoop»-icon ⦁ activate the grid, see page 150 ► use the grid lines to easily and accurately position lines of text
033804.52.04_2013-09_Manual_B780_EN
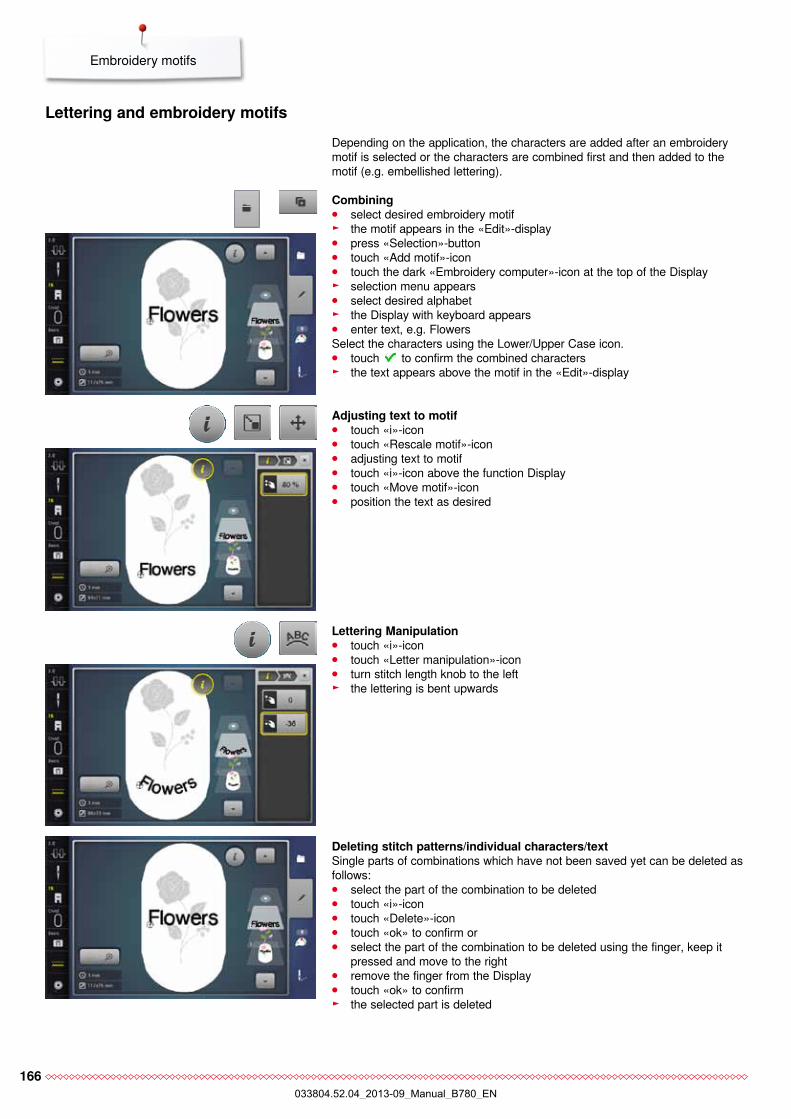
166
Embroidery motifs
Lettering and embroidery motifs
Combining ⦁ select desired embroidery motif ► the motif appears in the «Edit»-display ⦁ press «Selection»-button ⦁ touch «Add motif»-icon ⦁ touch the dark «Embroidery computer»-icon at the top of the Display ► selection menu appears ⦁ select desired alphabet ► the Display with keyboard appears ⦁ enter text, e.g. Flowers
Select the characters using the Lower/Upper Case icon. ⦁ touch to confirm the combined characters ► the text appears above the motif in the «Edit»-display
Depending on the application, the characters are added after an embroidery motif is selected or the characters are combined first and then added to the motif (e.g. embellished lettering).
Adjusting text to motif ⦁ touch «i»-icon ⦁ touch «Rescale motif»-icon ⦁ adjusting text to motif ⦁ touch «i»-icon above the function Display ⦁ touch «Move motif»-icon ⦁ position the text as desired
Lettering Manipulation ⦁ touch «i»-icon ⦁ touch «Letter manipulation»-icon ⦁ turn stitch length knob to the left ► the lettering is bent upwards
Deleting stitch patterns/individual characters/textSingle parts of combinations which have not been saved yet can be deleted as follows: ⦁ select the part of the combination to be deleted ⦁ touch «i»-icon ⦁ touch «Delete»-icon ⦁ touch «ok» to confirm or ⦁ select the part of the combination to be deleted using the finger, keep it
pressed and move to the right ⦁ remove the finger from the Display ⦁ touch «ok» to confirm ► the selected part is deleted
033804.52.04_2013-09_Manual_B780_EN
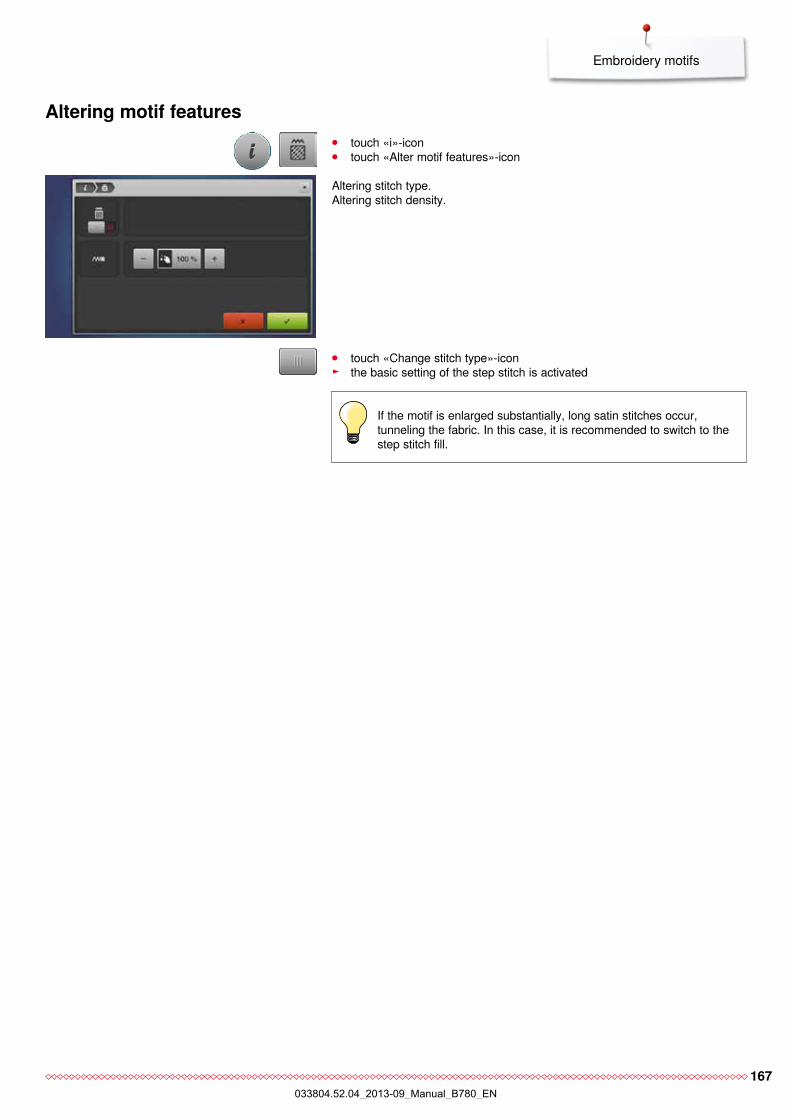
167
Embroidery motifs
Altering stitch type.Altering stitch density.
⦁ touch «i»-icon ⦁ touch «Alter motif features»-icon
⦁ touch «Change stitch type»-icon ► the basic setting of the step stitch is activated
If the motif is enlarged substantially, long satin stitches occur, tunneling the fabric. In this case, it is recommended to switch to the step stitch fill.
Altering motif features
033804.52.04_2013-09_Manual_B780_EN
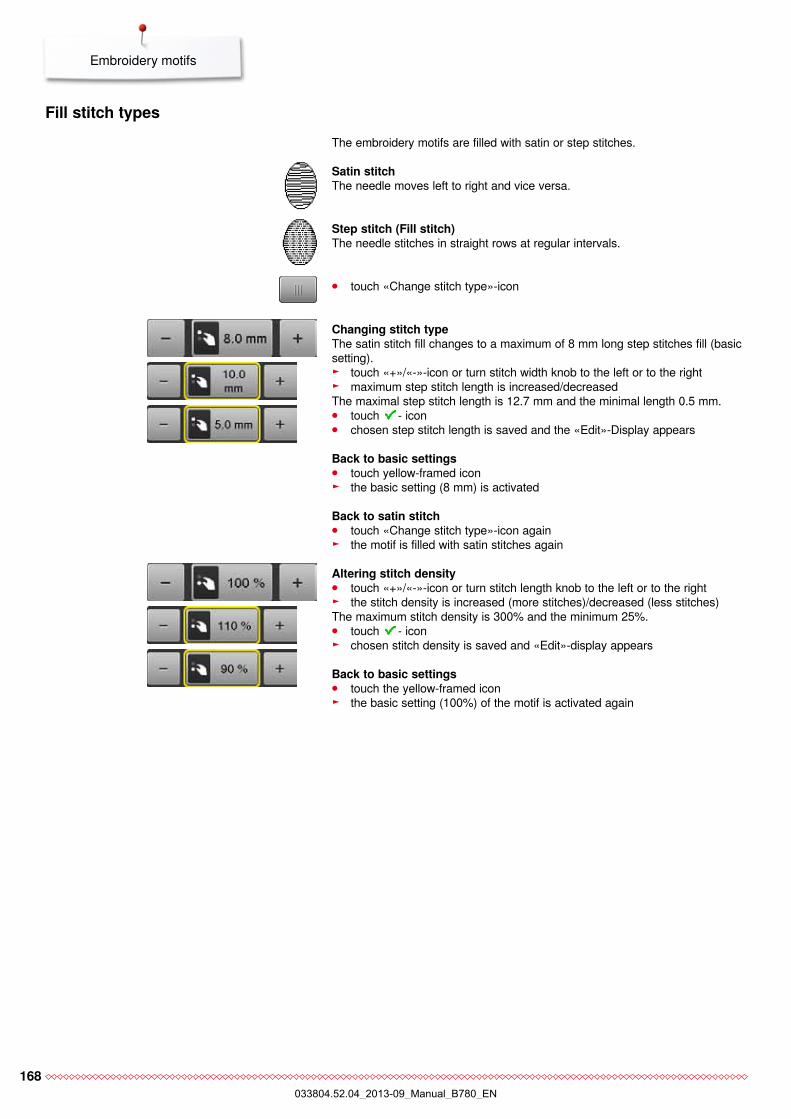
168
Embroidery motifs
Altering stitch density ⦁ touch «+»/«-»-icon or turn stitch length knob to the left or to the right ► the stitch density is increased (more stitches)/decreased (less stitches)
The maximum stitch density is 300% and the minimum 25%. ⦁ touch - icon ► chosen stitch density is saved and «Edit»-display appears
Back to basic settings ⦁ touch the yellow-framed icon ► the basic setting (100%) of the motif is activated again
Fill stitch typesThe embroidery motifs are filled with satin or step stitches.
Satin stitchThe needle moves left to right and vice versa.
Step stitch (Fill stitch)The needle stitches in straight rows at regular intervals.
⦁ touch «Change stitch type»-icon
Changing stitch typeThe satin stitch fill changes to a maximum of 8 mm long step stitches fill (basic setting).
► touch «+»/«-»-icon or turn stitch width knob to the left or to the right ► maximum step stitch length is increased/decreased
The maximal step stitch length is 12.7 mm and the minimal length 0.5 mm. ⦁ touch - icon ⦁ chosen step stitch length is saved and the «Edit»-Display appears
Back to basic settings ⦁ touch yellow-framed icon ► the basic setting (8 mm) is activated
Back to satin stitch ⦁ touch «Change stitch type»-icon again ► the motif is filled with satin stitches again
033804.52.04_2013-09_Manual_B780_EN
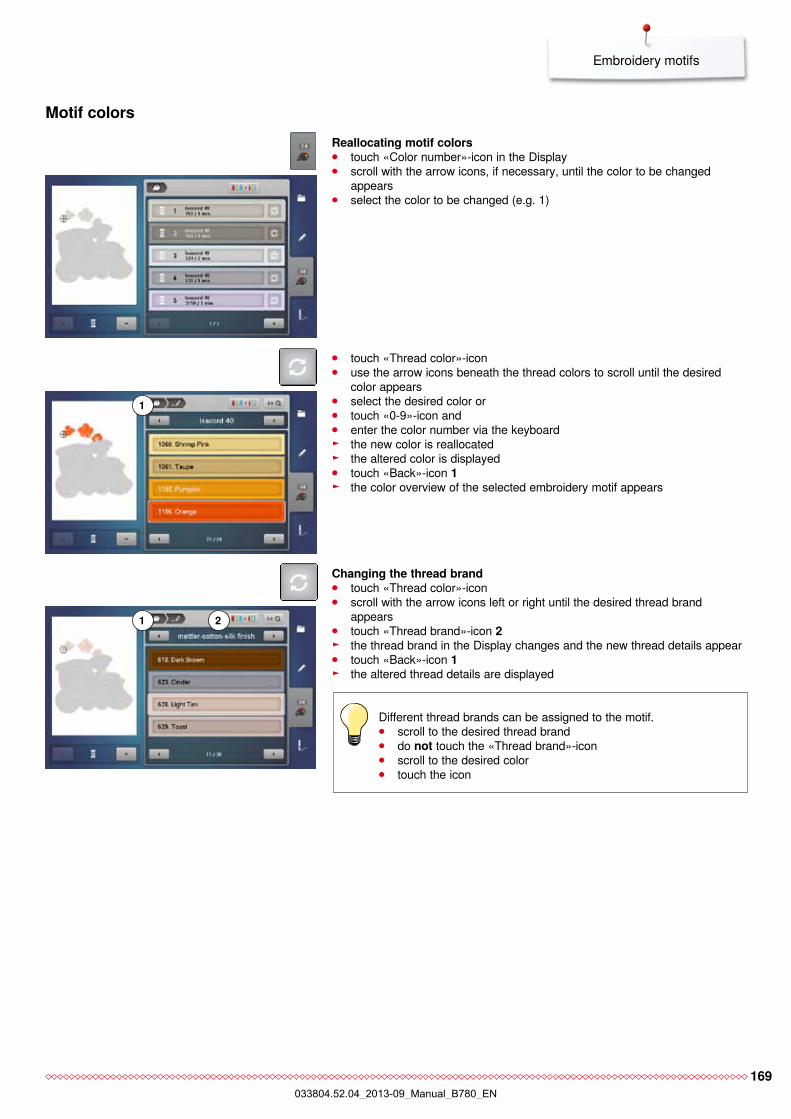
169
Embroidery motifs
Reallocating motif colors ⦁ touch «Color number»-icon in the Display ⦁ scroll with the arrow icons, if necessary, until the color to be changed
appears ⦁ select the color to be changed (e.g. 1)
Motif colors
⦁ touch «Thread color»-icon ⦁ use the arrow icons beneath the thread colors to scroll until the desired
color appears ⦁ select the desired color or ⦁ touch «0-9»-icon and ⦁ enter the color number via the keyboard ► the new color is reallocated ► the altered color is displayed ⦁ touch «Back»-icon 1 ► the color overview of the selected embroidery motif appears
1
Changing the thread brand ⦁ touch «Thread color»-icon ⦁ scroll with the arrow icons left or right until the desired thread brand
appears ⦁ touch «Thread brand»-icon 2 ► the thread brand in the Display changes and the new thread details appear ⦁ touch «Back»-icon 1 ► the altered thread details are displayed
Different thread brands can be assigned to the motif. ⦁ scroll to the desired thread brand ⦁ do not touch the «Thread brand»-icon ⦁ scroll to the desired color ⦁ touch the icon
1 2
033804.52.04_2013-09_Manual_B780_EN
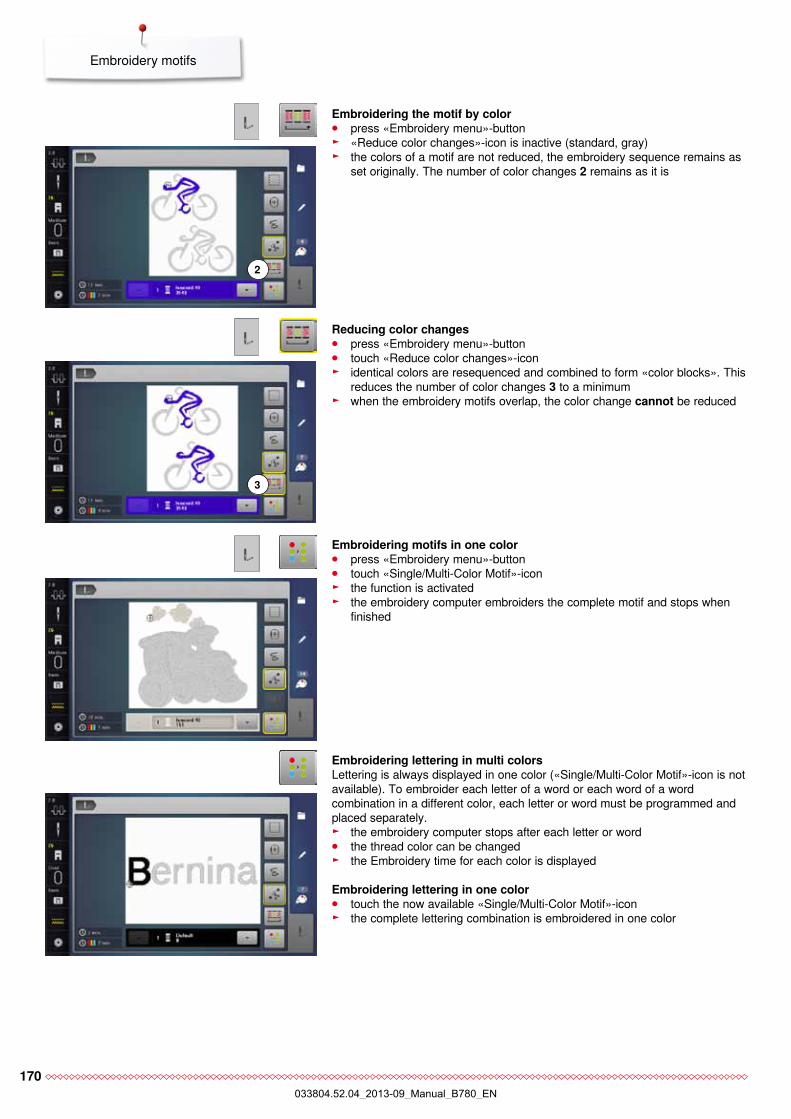
170
Embroidery motifs
Embroidering the motif by color ⦁ press «Embroidery menu»-button ► «Reduce color changes»-icon is inactive (standard, gray) ► the colors of a motif are not reduced, the embroidery sequence remains as
set originally. The number of color changes 2 remains as it is
2
Reducing color changes ⦁ press «Embroidery menu»-button ⦁ touch «Reduce color changes»-icon ► identical colors are resequenced and combined to form «color blocks». This
reduces the number of color changes 3 to a minimum ► when the embroidery motifs overlap, the color change cannot be reduced
3
Embroidering motifs in one color ⦁ press «Embroidery menu»-button ⦁ touch «Single/Multi-Color Motif»-icon ► the function is activated ► the embroidery computer embroiders the complete motif and stops when
finished
Embroidering lettering in multi colorsLettering is always displayed in one color («Single/Multi-Color Motif»-icon is not available). To embroider each letter of a word or each word of a word combination in a different color, each letter or word must be programmed and placed separately.
► the embroidery computer stops after each letter or word ⦁ the thread color can be changed ► the Embroidery time for each color is displayed
Embroidering lettering in one color ⦁ touch the now available «Single/Multi-Color Motif»-icon ► the complete lettering combination is embroidered in one color
033804.52.04_2013-09_Manual_B780_EN
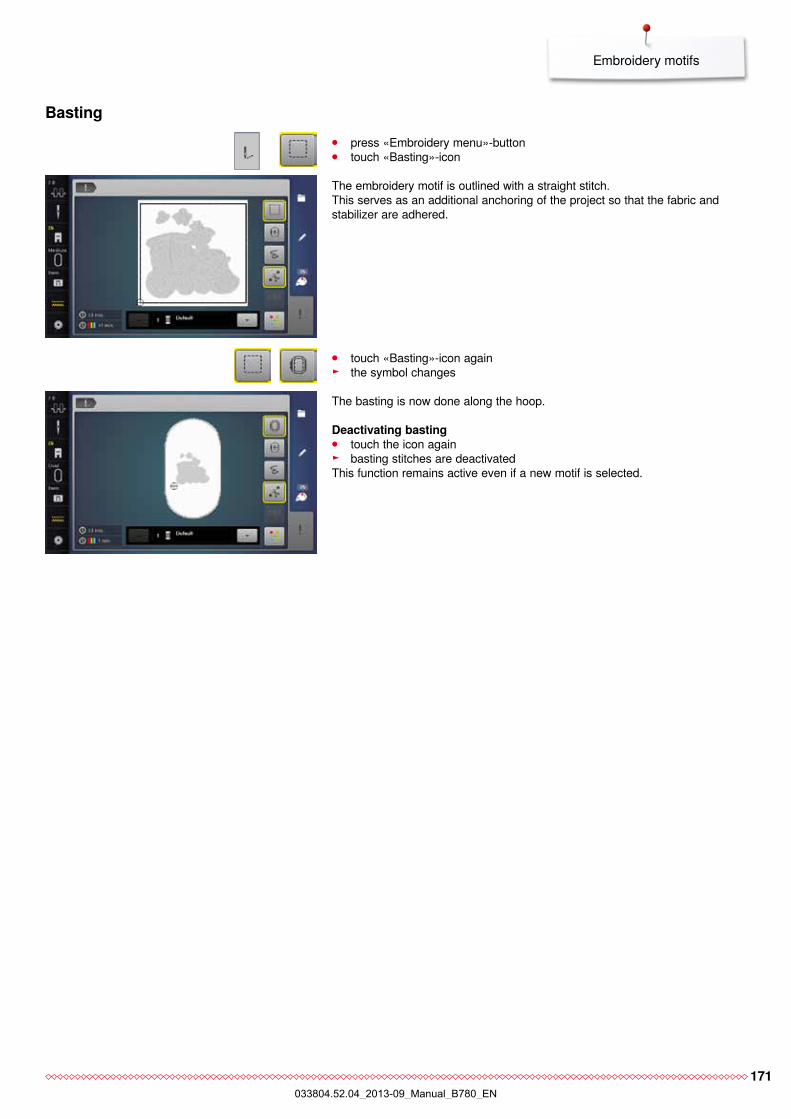
171
Embroidery motifs
⦁ press «Embroidery menu»-button ⦁ touch «Basting»-icon
The embroidery motif is outlined with a straight stitch.This serves as an additional anchoring of the project so that the fabric and stabilizer are adhered.
The basting is now done along the hoop.
Deactivating basting ⦁ touch the icon again ► basting stitches are deactivated
This function remains active even if a new motif is selected.
⦁ touch «Basting»-icon again ► the symbol changes
Basting
033804.52.04_2013-09_Manual_B780_EN

172
Embroidery motifs
Importing stitch patterns from the sewing mode
Stitch patterns or stitch pattern combinations can be imported from the sewing mode to the embroidery mode and they can be edited like embroidery motifs.Therefore e.g. endless embroidery patterns are combined, duplicated, mirrored etc. quickly and easily. Finally, these combinations can be saved as embroidery motifs in the folder «My Design».
When an imported stitch pattern is not saved in the embroidery mode, it will be overwritten by the next selected the stitch pattern.
Selecting stitch patterns in the sewing mode ⦁ select the stitch pattern No. 201 in the category 200 ⦁ touch the «Home»-button ⦁ touch «Embroidery mode»-icon
Selecting stitch patterns in the embroidery mode ⦁ touch «My Design»-icon 1
► the stitch pattern has been imported to the folder «My Design» ⦁ select the stitch pattern
► the stitch pattern appears in the «Edit»-display ► the stitch pattern can be edited by any available functions and embroidered
like an embroidery motif ► to remain the stitch pattern in the embroidery mode, it must be saved, see
page 173
1
033804.52.04_2013-09_Manual_B780_EN
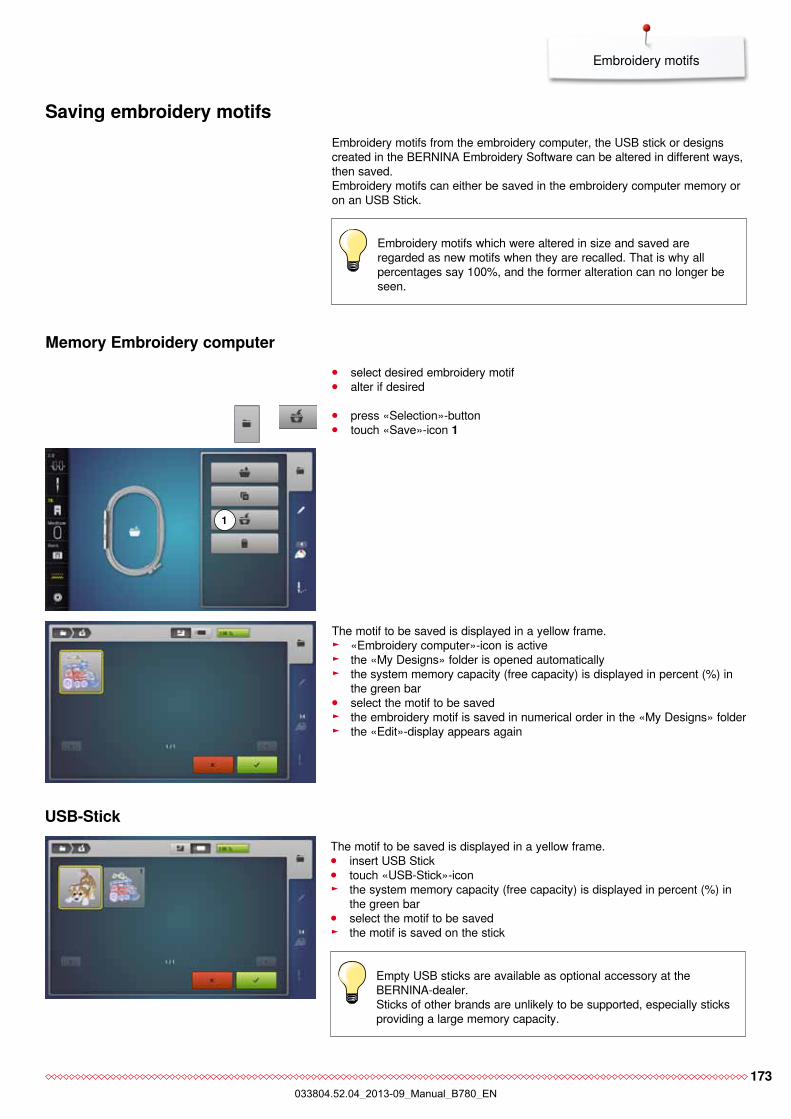
173
Embroidery motifs
Saving embroidery motifs
⦁ press «Selection»-button ⦁ touch «Save»-icon 1
Embroidery motifs from the embroidery computer, the USB stick or designs created in the BERNINA Embroidery Software can be altered in different ways, then saved.Embroidery motifs can either be saved in the embroidery computer memory or on an USB Stick.
Embroidery motifs which were altered in size and saved are regarded as new motifs when they are recalled. That is why all percentages say 100%, and the former alteration can no longer be seen.
⦁ select desired embroidery motif ⦁ alter if desired
The motif to be saved is displayed in a yellow frame. ► «Embroidery computer»-icon is active ► the «My Designs» folder is opened automatically ► the system memory capacity (free capacity) is displayed in percent (%) in
the green bar ⦁ select the motif to be saved ► the embroidery motif is saved in numerical order in the «My Designs» folder ► the «Edit»-display appears again
1
Memory Embroidery computer
The motif to be saved is displayed in a yellow frame. ⦁ insert USB Stick ⦁ touch «USB-Stick»-icon ► the system memory capacity (free capacity) is displayed in percent (%) in
the green bar ⦁ select the motif to be saved ► the motif is saved on the stick
Empty USB sticks are available as optional accessory at the BERNINA-dealer.Sticks of other brands are unlikely to be supported, especially sticks providing a large memory capacity.
USB-Stick
033804.52.04_2013-09_Manual_B780_EN
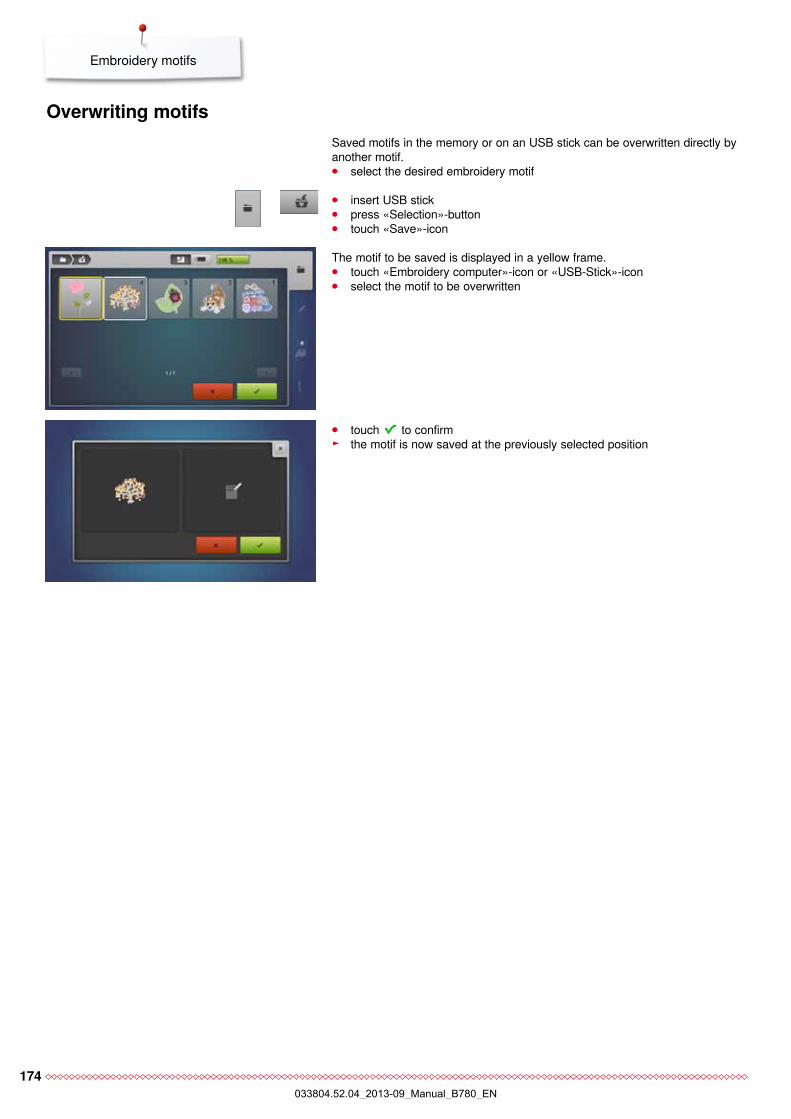
174
Embroidery motifs
Overwriting motifs Saved motifs in the memory or on an USB stick can be overwritten directly by another motif. ⦁ select the desired embroidery motif
⦁ insert USB stick ⦁ press «Selection»-button ⦁ touch «Save»-icon
The motif to be saved is displayed in a yellow frame. ⦁ touch «Embroidery computer»-icon or «USB-Stick»-icon ⦁ select the motif to be overwritten
⦁ touch to confirm ► the motif is now saved at the previously selected position
033804.52.04_2013-09_Manual_B780_EN
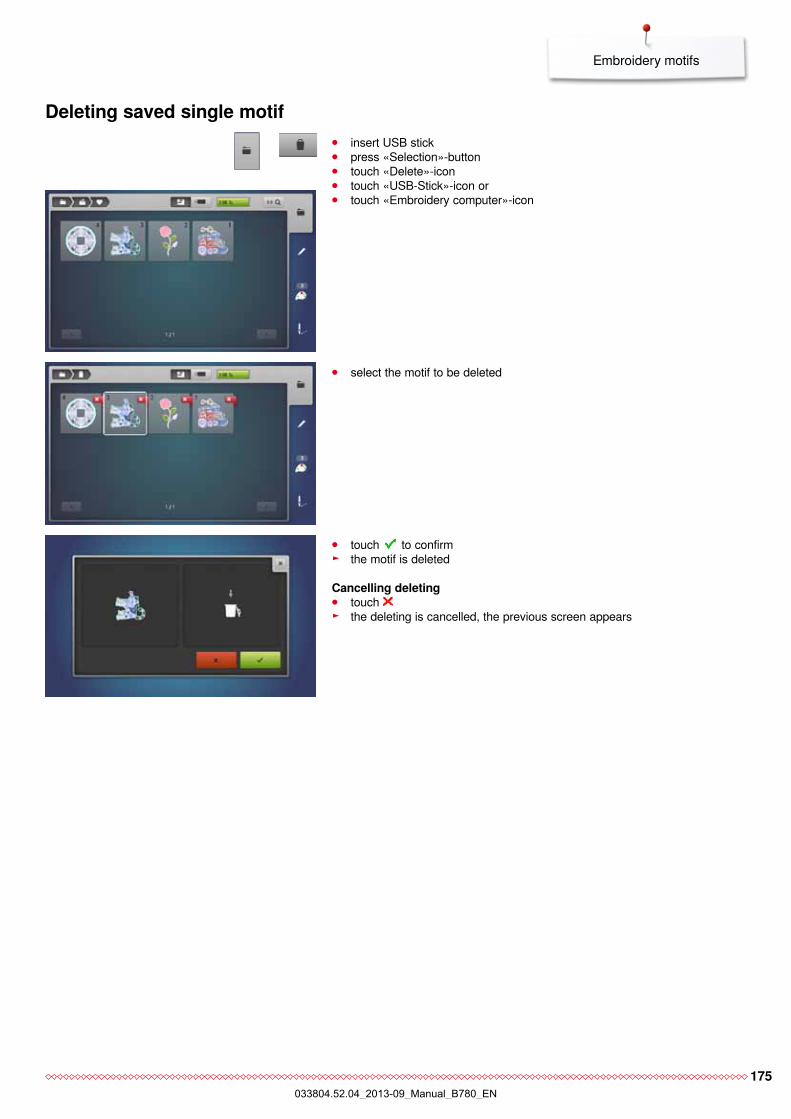
175
Embroidery motifs
Deleting saved single motif ⦁ insert USB stick ⦁ press «Selection»-button ⦁ touch «Delete»-icon ⦁ touch «USB-Stick»-icon or ⦁ touch «Embroidery computer»-icon
⦁ select the motif to be deleted
⦁ touch to confirm ► the motif is deleted
Cancelling deleting ⦁ touch ► the deleting is cancelled, the previous screen appears
033804.52.04_2013-09_Manual_B780_EN
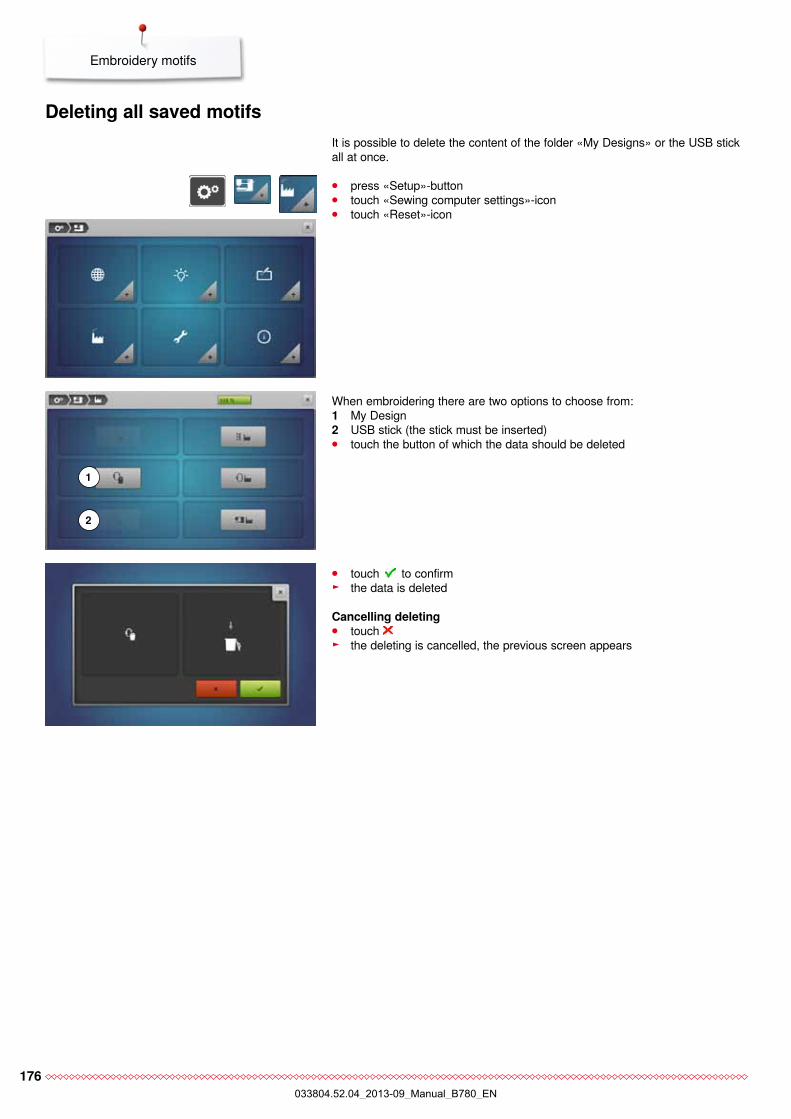
176
Embroidery motifs
Deleting all saved motifs
⦁ press «Setup»-button ⦁ touch «Sewing computer settings»-icon ⦁ touch «Reset»-icon
⦁ touch to confirm ► the data is deleted
Cancelling deleting ⦁ touch ► the deleting is cancelled, the previous screen appears
When embroidering there are two options to choose from:1 My Design2 USB stick (the stick must be inserted) ⦁ touch the button of which the data should be deleted
It is possible to delete the content of the folder «My Designs» or the USB stick all at once.
1
2
033804.52.04_2013-09_Manual_B780_EN
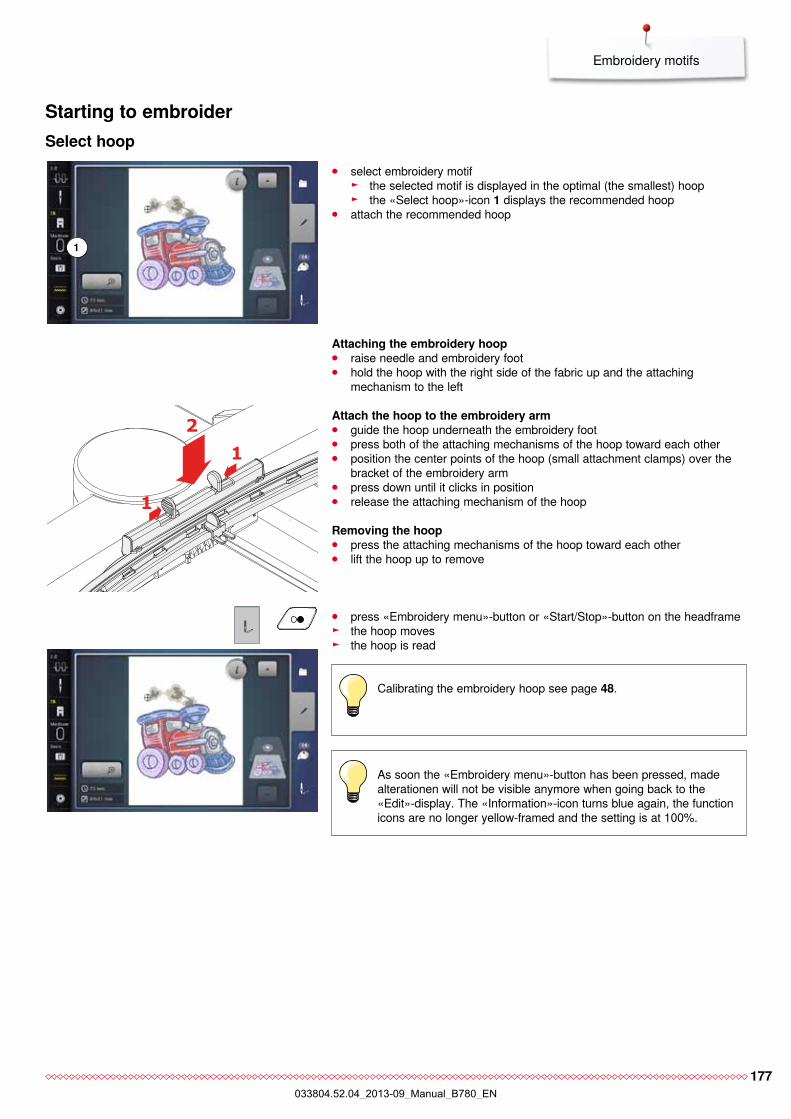
177
Embroidery motifs
Starting to embroiderSelect hoop
⦁ select embroidery motif ► the selected motif is displayed in the optimal (the smallest) hoop ► the «Select hoop»-icon 1 displays the recommended hoop
⦁ attach the recommended hoop
Attaching the embroidery hoop ⦁ raise needle and embroidery foot ⦁ hold the hoop with the right side of the fabric up and the attaching
mechanism to the left
Attach the hoop to the embroidery arm ⦁ guide the hoop underneath the embroidery foot ⦁ press both of the attaching mechanisms of the hoop toward each other ⦁ position the center points of the hoop (small attachment clamps) over the
bracket of the embroidery arm ⦁ press down until it clicks in position ⦁ release the attaching mechanism of the hoop
Removing the hoop ⦁ press the attaching mechanisms of the hoop toward each other ⦁ lift the hoop up to remove
⦁ press «Embroidery menu»-button or «Start/Stop»-button on the headframe ► the hoop moves ► the hoop is read
As soon the «Embroidery menu»-button has been pressed, made alterationen will not be visible anymore when going back to the «Edit»-display. The «Information»-icon turns blue again, the function icons are no longer yellow-framed and the setting is at 100%.
1
1
2
Calibrating the embroidery hoop see page 48.
1
033804.52.04_2013-09_Manual_B780_EN
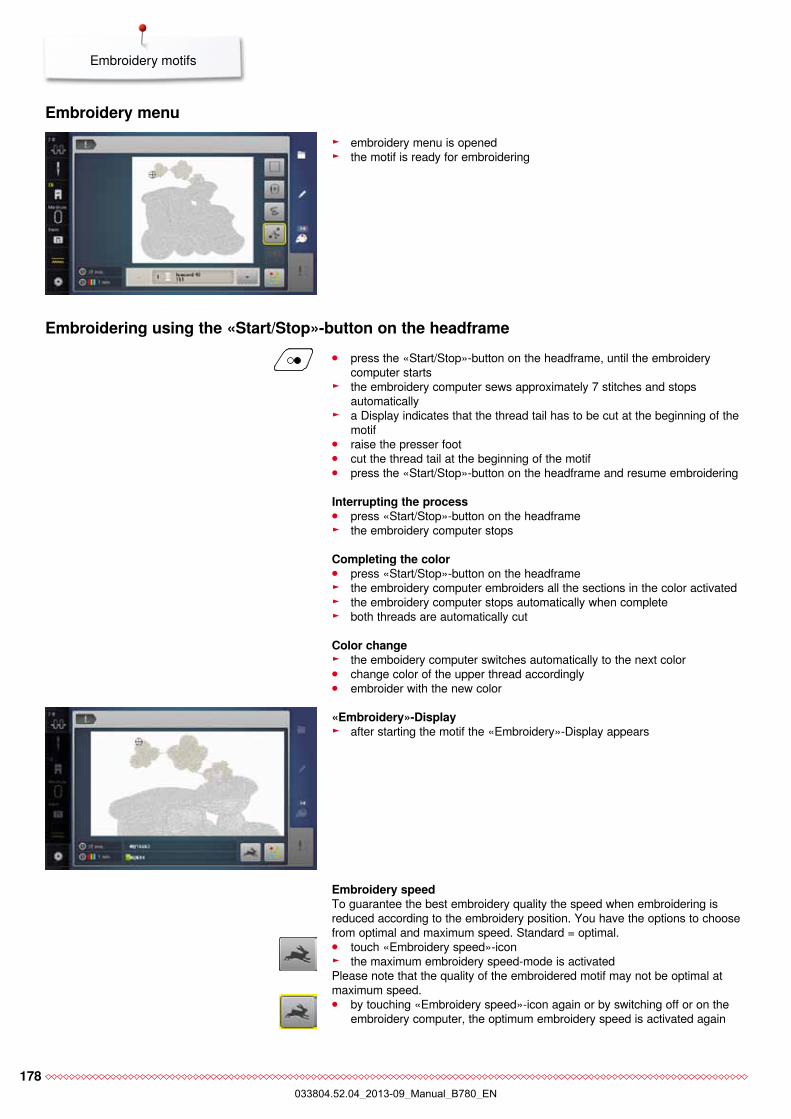
178
Embroidery motifs
► embroidery menu is opened ► the motif is ready for embroidering
⦁ press the «Start/Stop»-button on the headframe, until the embroidery computer starts
► the embroidery computer sews approximately 7 stitches and stops automatically
► a Display indicates that the thread tail has to be cut at the beginning of the motif
⦁ raise the presser foot ⦁ cut the thread tail at the beginning of the motif ⦁ press the «Start/Stop»-button on the headframe and resume embroidering
Interrupting the process ⦁ press «Start/Stop»-button on the headframe ► the embroidery computer stops
Completing the color ⦁ press «Start/Stop»-button on the headframe ► the embroidery computer embroiders all the sections in the color activated ► the embroidery computer stops automatically when complete ► both threads are automatically cut
Color change ► the emboidery computer switches automatically to the next color ⦁ change color of the upper thread accordingly ⦁ embroider with the new color
Embroidery menu
Embroidering using the «Start/Stop»-button on the headframe
«Embroidery»-Display ► after starting the motif the «Embroidery»-Display appears
Embroidery speedTo guarantee the best embroidery quality the speed when embroidering is reduced according to the embroidery position. You have the options to choose from optimal and maximum speed. Standard = optimal. ⦁ touch «Embroidery speed»-icon ► the maximum embroidery speed-mode is activated
Please note that the quality of the embroidered motif may not be optimal at maximum speed. ⦁ by touching «Embroidery speed»-icon again or by switching off or on the
embroidery computer, the optimum embroidery speed is activated again
033804.52.04_2013-09_Manual_B780_EN
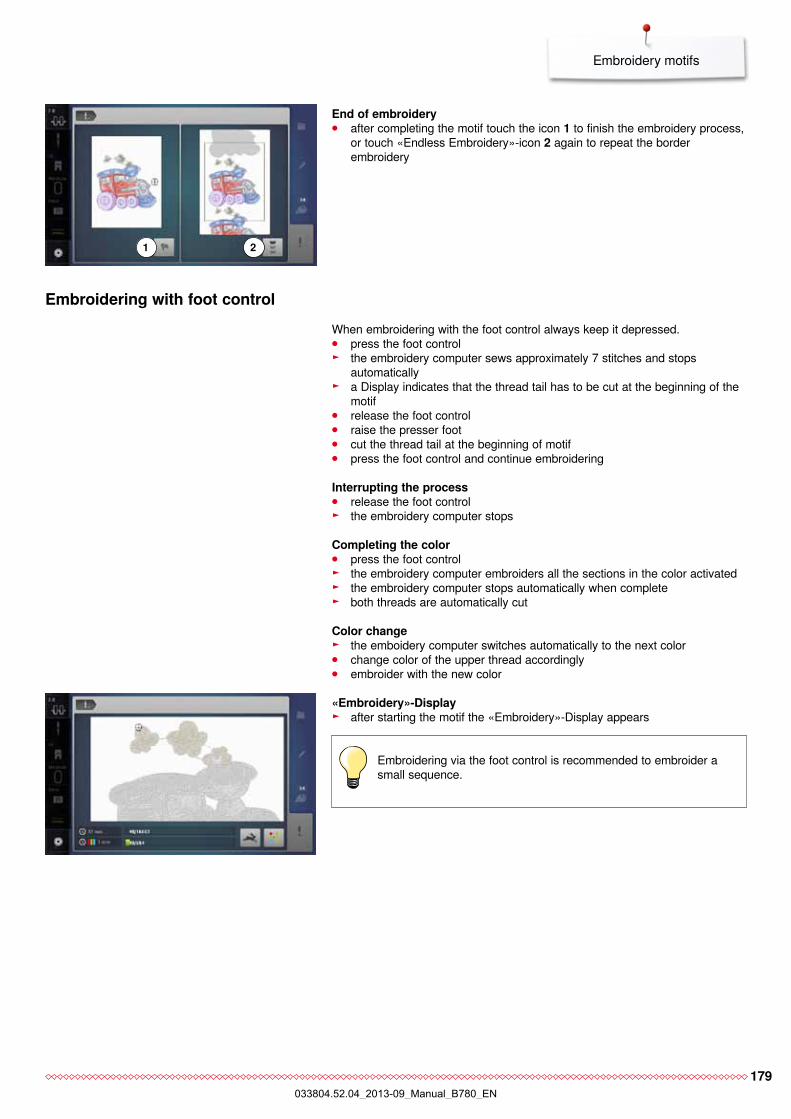
179
Embroidery motifs
End of embroidery ⦁ after completing the motif touch the icon 1 to finish the embroidery process,
or touch «Endless Embroidery»-icon 2 again to repeat the border embroidery
1 2
When embroidering with the foot control always keep it depressed. ⦁ press the foot control ► the embroidery computer sews approximately 7 stitches and stops
automatically ► a Display indicates that the thread tail has to be cut at the beginning of the
motif ⦁ release the foot control ⦁ raise the presser foot ⦁ cut the thread tail at the beginning of motif ⦁ press the foot control and continue embroidering
Interrupting the process ⦁ release the foot control ► the embroidery computer stops
Completing the color ⦁ press the foot control ► the embroidery computer embroiders all the sections in the color activated ► the embroidery computer stops automatically when complete ► both threads are automatically cut
Color change ► the emboidery computer switches automatically to the next color ⦁ change color of the upper thread accordingly ⦁ embroider with the new color
Embroidering with foot control
«Embroidery»-Display ► after starting the motif the «Embroidery»-Display appears
Embroidering via the foot control is recommended to embroider a small sequence.
033804.52.04_2013-09_Manual_B780_EN
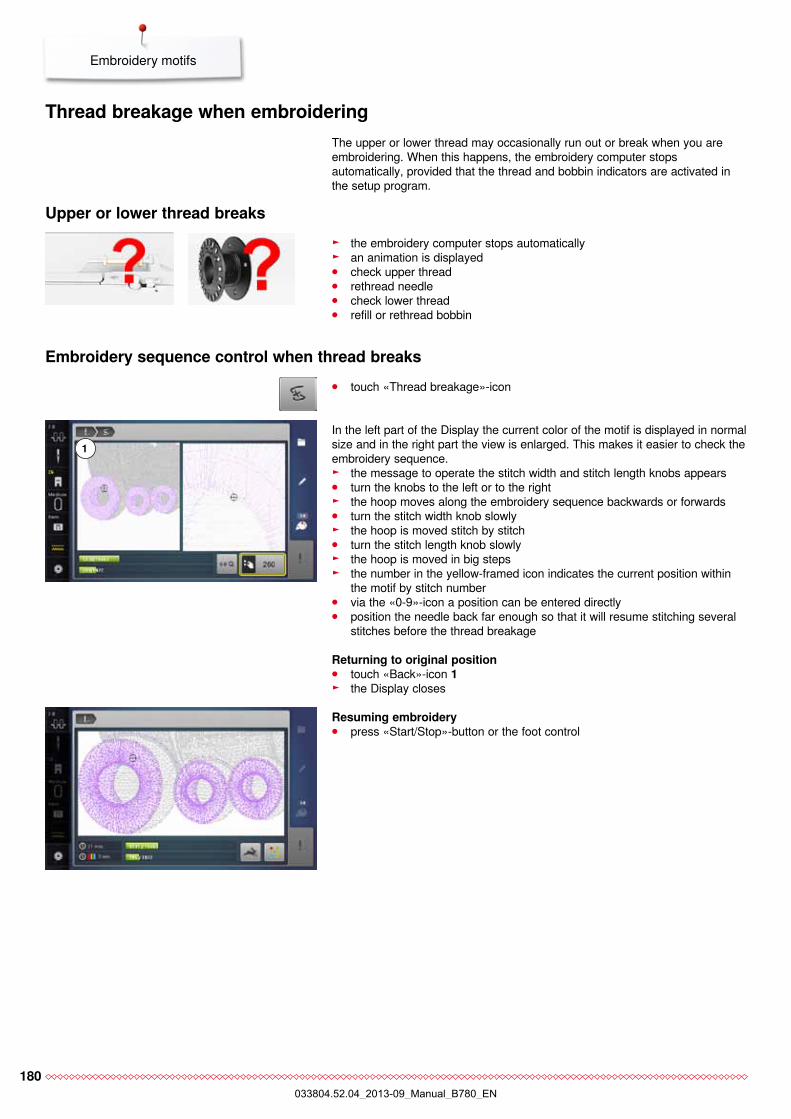
180
Embroidery motifs
The upper or lower thread may occasionally run out or break when you are embroidering. When this happens, the embroidery computer stops automatically, provided that the thread and bobbin indicators are activated in the setup program.
Thread breakage when embroidering
► the embroidery computer stops automatically ► an animation is displayed ⦁ check upper thread ⦁ rethread needle ⦁ check lower thread ⦁ refill or rethread bobbin
Upper or lower thread breaks
⦁ touch «Thread breakage»-icon
Embroidery sequence control when thread breaks
In the left part of the Display the current color of the motif is displayed in normal size and in the right part the view is enlarged. This makes it easier to check the embroidery sequence.
► the message to operate the stitch width and stitch length knobs appears ⦁ turn the knobs to the left or to the right ► the hoop moves along the embroidery sequence backwards or forwards ⦁ turn the stitch width knob slowly ► the hoop is moved stitch by stitch ⦁ turn the stitch length knob slowly ► the hoop is moved in big steps ► the number in the yellow-framed icon indicates the current position within
the motif by stitch number ⦁ via the «0-9»-icon a position can be entered directly ⦁ position the needle back far enough so that it will resume stitching several
stitches before the thread breakage
Returning to original position ⦁ touch «Back»-icon 1 ► the Display closes
Resuming embroidery ⦁ press «Start/Stop»-button or the foot control
1
033804.52.04_2013-09_Manual_B780_EN
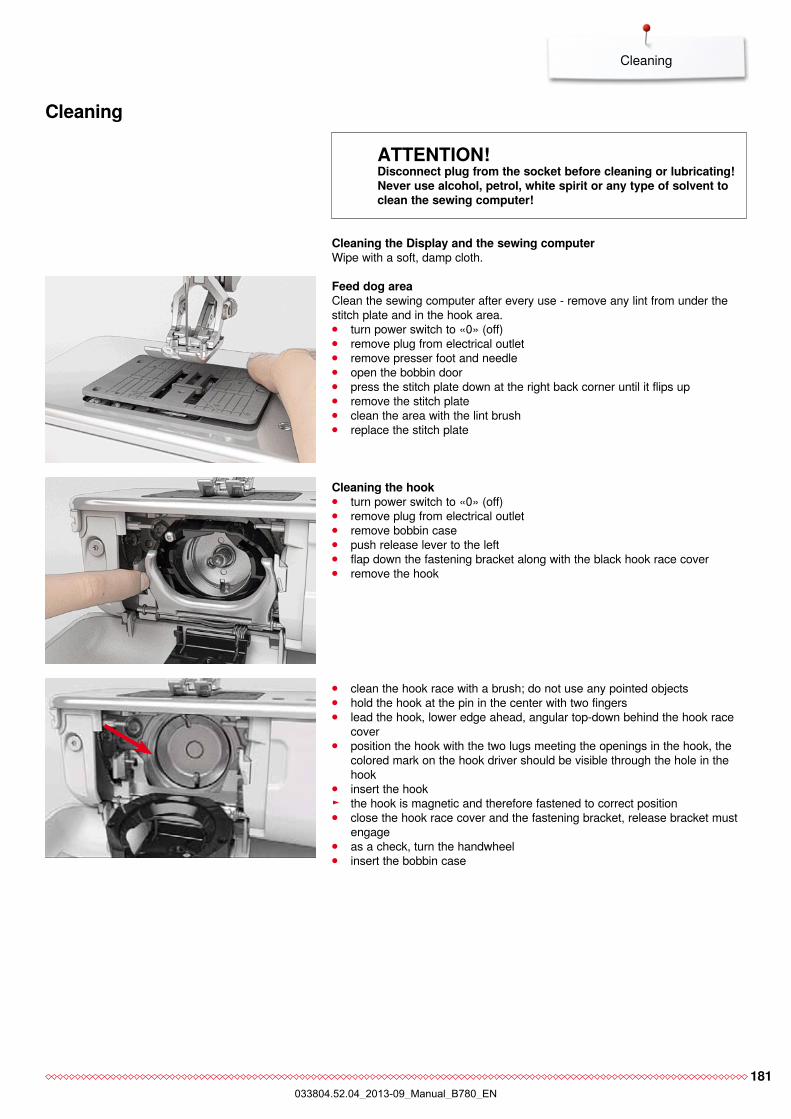
181
Cleaning
Cleaning
Cleaning the Display and the sewing computerWipe with a soft, damp cloth.
Feed dog areaClean the sewing computer after every use - remove any lint from under the stitch plate and in the hook area. ⦁ turn power switch to «0» (off) ⦁ remove plug from electrical outlet ⦁ remove presser foot and needle ⦁ open the bobbin door ⦁ press the stitch plate down at the right back corner until it flips up ⦁ remove the stitch plate ⦁ clean the area with the lint brush ⦁ replace the stitch plate
ATTENTION! Disconnect plug from the socket before cleaning or lubricating!Never use alcohol, petrol, white spirit or any type of solvent to clean the sewing computer!
⦁ clean the hook race with a brush; do not use any pointed objects ⦁ hold the hook at the pin in the center with two fingers ⦁ lead the hook, lower edge ahead, angular top-down behind the hook race
cover ⦁ position the hook with the two lugs meeting the openings in the hook, the
colored mark on the hook driver should be visible through the hole in the hook
⦁ insert the hook ► the hook is magnetic and therefore fastened to correct position ⦁ close the hook race cover and the fastening bracket, release bracket must
engage ⦁ as a check, turn the handwheel ⦁ insert the bobbin case
Cleaning the hook ⦁ turn power switch to «0» (off) ⦁ remove plug from electrical outlet ⦁ remove bobbin case ⦁ push release lever to the left ⦁ flap down the fastening bracket along with the black hook race cover ⦁ remove the hook
033804.52.04_2013-09_Manual_B780_EN
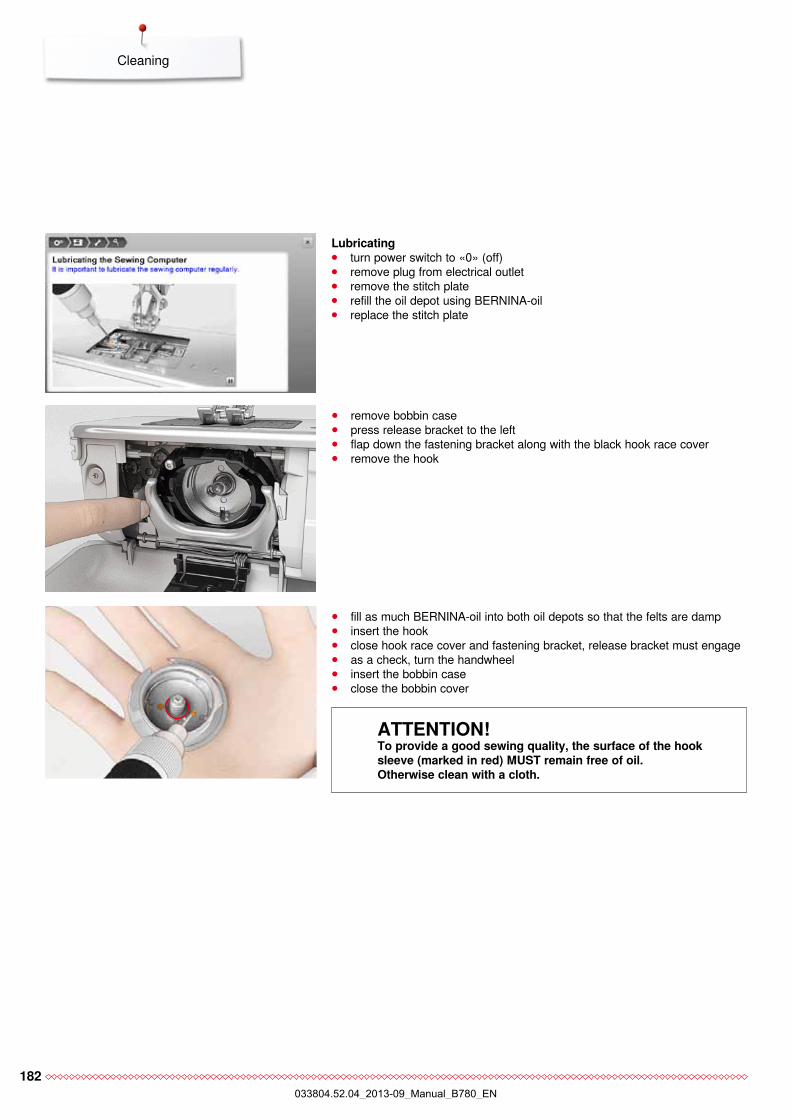
182
Cleaning
Lubricating ⦁ turn power switch to «0» (off) ⦁ remove plug from electrical outlet ⦁ remove the stitch plate ⦁ refill the oil depot using BERNINA-oil ⦁ replace the stitch plate
⦁ remove bobbin case ⦁ press release bracket to the left ⦁ flap down the fastening bracket along with the black hook race cover ⦁ remove the hook
⦁ fill as much BERNINA-oil into both oil depots so that the felts are damp ⦁ insert the hook ⦁ close hook race cover and fastening bracket, release bracket must engage ⦁ as a check, turn the handwheel ⦁ insert the bobbin case ⦁ close the bobbin cover
ATTENTION! To provide a good sewing quality, the surface of the hook sleeve (marked in red) MUST remain free of oil.Otherwise clean with a cloth.
033804.52.04_2013-09_Manual_B780_EN
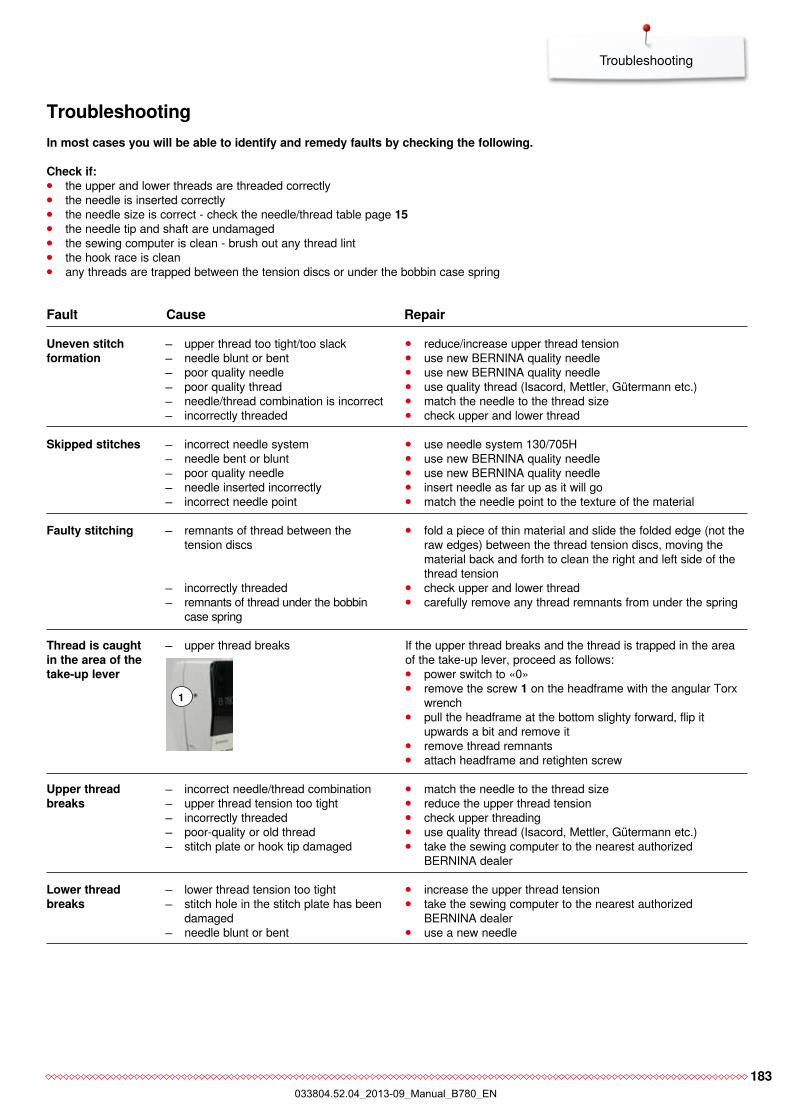
183
Troubleshooting
TroubleshootingIn most cases you will be able to identify and remedy faults by checking the following.
Check if: ⦁ the upper and lower threads are threaded correctly ⦁ the needle is inserted correctly ⦁ the needle size is correct - check the needle/thread table page 15 ⦁ the needle tip and shaft are undamaged ⦁ the sewing computer is clean - brush out any thread lint ⦁ the hook race is clean ⦁ any threads are trapped between the tension discs or under the bobbin case spring
Uneven stitch formation
upper thread too tight/too slack needle blunt or bent poor quality needle poor quality thread needle/thread combination is incorrect incorrectly threaded
⦁ reduce/increase upper thread tension ⦁ use new BERNINA quality needle ⦁ use new BERNINA quality needle ⦁ use quality thread (Isacord, Mettler, Gütermann etc.) ⦁ match the needle to the thread size ⦁ check upper and lower thread
Skipped stitches incorrect needle system needle bent or blunt poor quality needle needle inserted incorrectly incorrect needle point
⦁ use needle system 130/705H ⦁ use new BERNINA quality needle ⦁ use new BERNINA quality needle ⦁ insert needle as far up as it will go ⦁ match the needle point to the texture of the material
Thread is caught in the area of the take-up lever
upper thread breaks If the upper thread breaks and the thread is trapped in the area of the take-up lever, proceed as follows: ⦁ power switch to «0» ⦁ remove the screw 1 on the headframe with the angular Torx
wrench ⦁ pull the headframe at the bottom slighty forward, flip it
upwards a bit and remove it ⦁ remove thread remnants ⦁ attach headframe and retighten screw
Faulty stitching
Upper thread breaks
Lower thread breaks
remnants of thread between the tension discs
incorrectly threaded remnants of thread under the bobbin
case spring
incorrect needle/thread combination upper thread tension too tight incorrectly threaded poor-quality or old thread stitch plate or hook tip damaged
lower thread tension too tight stitch hole in the stitch plate has been
damaged needle blunt or bent
⦁ fold a piece of thin material and slide the folded edge (not the raw edges) between the thread tension discs, moving the material back and forth to clean the right and left side of the thread tension
⦁ check upper and lower thread ⦁ carefully remove any thread remnants from under the spring
⦁ match the needle to the thread size ⦁ reduce the upper thread tension ⦁ check upper threading ⦁ use quality thread (Isacord, Mettler, Gütermann etc.) ⦁ take the sewing computer to the nearest authorized
BERNINA dealer
⦁ increase the upper thread tension ⦁ take the sewing computer to the nearest authorized
BERNINA dealer ⦁ use a new needle
Fault Cause Repair
1
033804.52.04_2013-09_Manual_B780_EN
184
Troubleshooting
Fault Cause Repair
Sewing-/ Embroidery computer
LED sewing light does not light up at «Start-/Stop»-button
LED sewing light and free-arm light do not light up
Lower thread indicator reacts
Sewing-/ Embroidery computer
Upper thread indicator does not respond
Lower thread indicator does not respond
Update error
sewing-/embroidery computer fails to run or runs slowly
turn the power switch to «0»
LED defective
LED defective
deactivated in the Setup Program
thread used/broken
deleting or overwriting data
not activated in the Setup Program
not activated in the Setup Program
USB stick is not recognized Update process is blocked (hourglass
stays on Display) Update-data aren't identified
⦁ check the setting in the Setup Program ⦁ alter the speed control ⦁ place the sewing-/embroidery computer in a warm room one
hour before use ⦁ turn the power switch to «I» ⦁ take the sewing-/embroidery computer to the nearest
authorized BERNINA dealer
⦁ take the sewing-/embroidery computer to the nearest authorized BERNINA dealer
⦁ take the sewing-/embroidery computer to the nearest authorized BERNINA dealer
⦁ activate in the Setup Program
⦁ wind thread and thread
⦁ touch to confirm or touch to cancel
⦁ activate in the Setup Program
⦁ activate in the Setup Program
⦁ use a BERNINA USB stick ⦁ remove the stick and turn the sewing computer off and on
again. Proceed with the update as indicated by the message ⦁ don't save update-data in a folder ⦁ unzip update-data
General Explanation Repair Messages
Stitch width notadjustable
setting activated in the security program
⦁ deactivate setting
Display is inactive calibration data incorrect eco-function active
⦁ re-calibrate the Display in the Setup Program ⦁ turn off eco function
Needle breaks needle not correctly inserted fabric was pulled fabric was pushed when using thick
material
poor quality thread with knots
⦁ tighten the needle clamp screw ⦁ do not pull the fabric during sewing ⦁ use the correct presser foot for thick material (e.g. Jeans foot
No. 8) use height compensating tool when sewing over a thick seam
⦁ use quality thread (Isacord, Mettler, Gütermann etc.) ⦁ always remove the hook after a needle breakage and check
the magnetic back of the hook for broken off needle parts
033804.52.04_2013-09_Manual_B780_EN
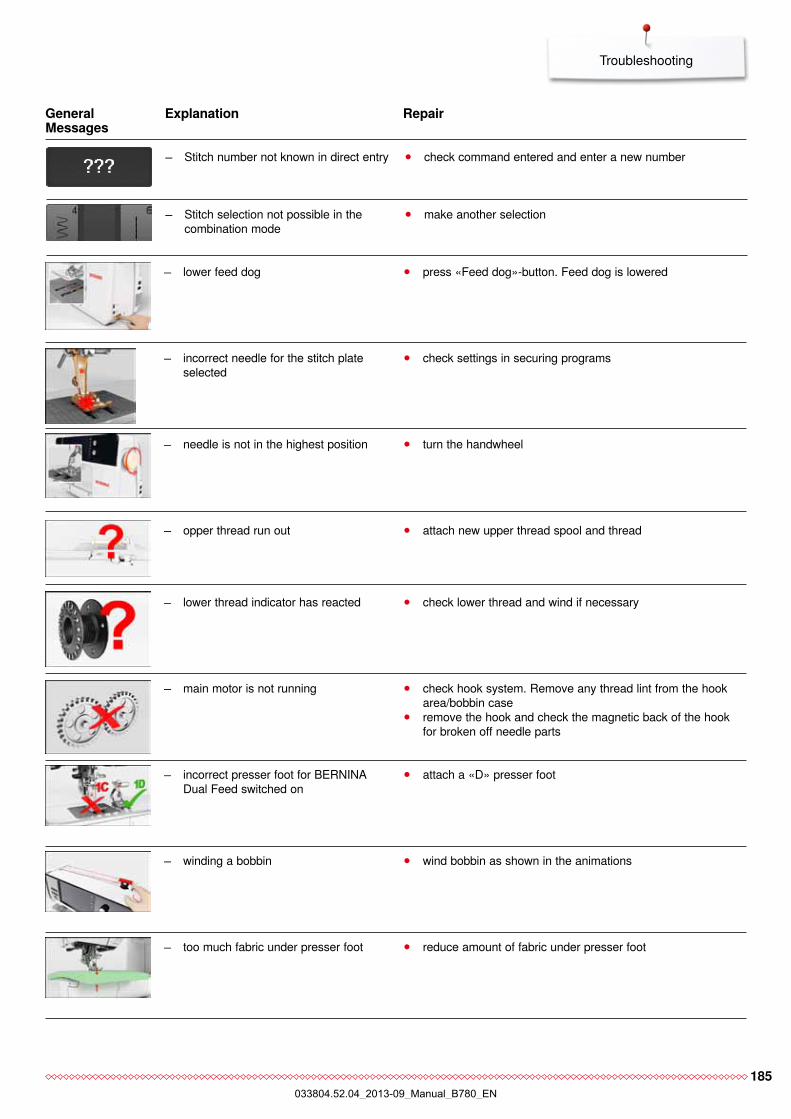
185
Troubleshooting
lower feed dog
incorrect presser foot for BERNINA Dual Feed switched on
winding a bobbin
too much fabric under presser foot
⦁ press «Feed dog»-button. Feed dog is lowered
⦁ attach a «D» presser foot
⦁ wind bobbin as shown in the animations
⦁ reduce amount of fabric under presser foot
incorrect needle for the stitch plate selected
needle is not in the highest position
main motor is not running
⦁ check settings in securing programs
⦁ turn the handwheel
⦁ check hook system. Remove any thread lint from the hook area/bobbin case
⦁ remove the hook and check the magnetic back of the hook for broken off needle parts
opper thread run out
lower thread indicator has reacted
⦁ attach new upper thread spool and thread
⦁ check lower thread and wind if necessary
Stitch number not known in direct entry
Stitch selection not possible in the combination mode
⦁ check command entered and enter a new number
⦁ make another selection
General Explanation Repair Messages
033804.52.04_2013-09_Manual_B780_EN
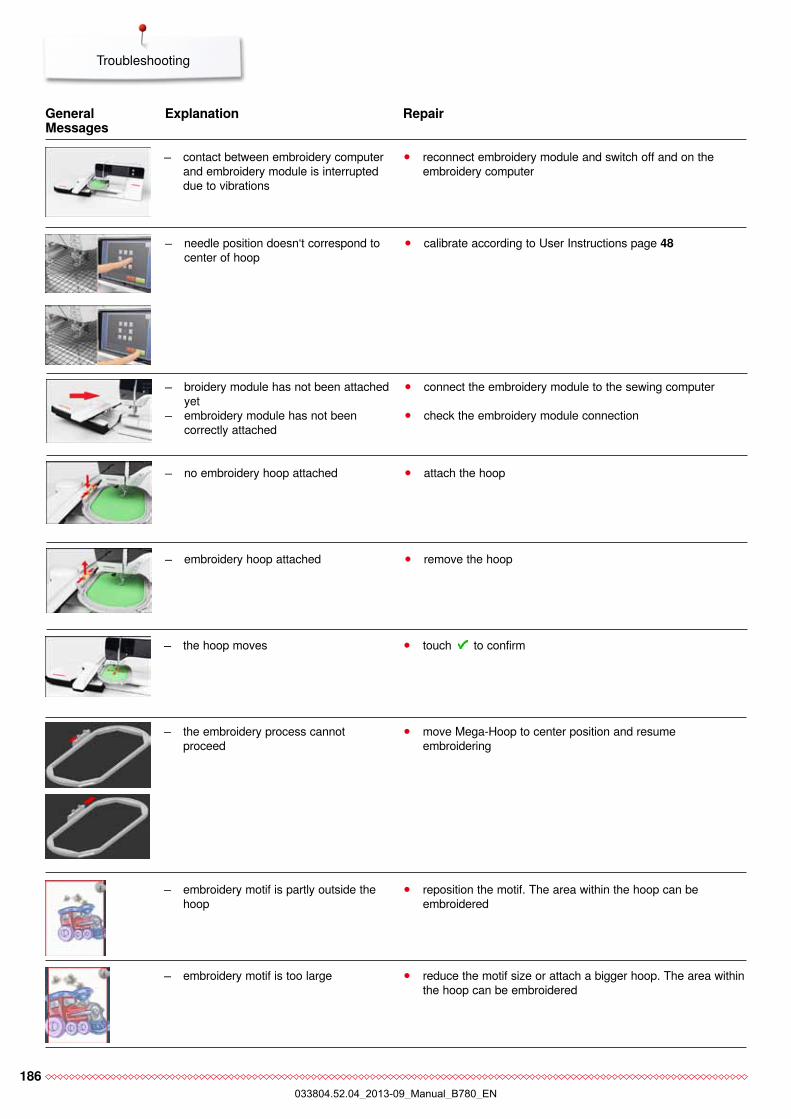
186
Troubleshooting
the hoop moves
contact between embroidery computer and embroidery module is interrupted due to vibrations
⦁ touch to confirm
⦁ reconnect embroidery module and switch off and on the embroidery computer
no embroidery hoop attached
embroidery hoop attached
broidery module has not been attached yet
embroidery module has not been correctly attached
needle position doesn‘t correspond to center of hoop
⦁ attach the hoop
⦁ remove the hoop
⦁ connect the embroidery module to the sewing computer
⦁ check the embroidery module connection
⦁ calibrate according to User Instructions page 48
embroidery motif is partly outside the hoop
embroidery motif is too large
⦁ reposition the motif. The area within the hoop can be embroidered
⦁ reduce the motif size or attach a bigger hoop. The area within the hoop can be embroidered
the embroidery process cannot proceed
⦁ move Mega-Hoop to center position and resume embroidering
General Explanation Repair Messages
033804.52.04_2013-09_Manual_B780_EN

187
Troubleshooting
the sewing computer must be cleaned/lubricated
⦁ when this message appears, the sewing computer must be cleaned/lubricated. This ensures proper functioning and a long operational life span of the sewing computer
it is time for the regular maintenance. Please contact your BERNINA dealer or your BERNINA service address
⦁ the sewing-/embroidery computer must be taken to an authorised BERNINA dealer/servicing shop. The announcement appears after completing the programmed service interval. The message can be deleted temporarily by touching the field «ESC» but will reappear when the sewing-/embroidery computer is next restarted. Having cleared the announcement via the «ESC» three times, the announcement will appear as recently as the next service interval has been completed. Having your sewing/embroidery computer cleaned and serviced properly at the appropriate times ensures its proper functioning and long service life. Failure to do so may adversely affect service life and limit the guarantee. The charge for servicing is nationally regulated – consult your dealer or servicing shop for details
no personal data available on the USB stick
during the update process personal data was not saved on the USB stick
BERNINA USB stick is not inserted
new SW Version is not available on the stick
⦁ check that the USB stick is inserted correctly and re-start the sewing computer
⦁ the software was correctly updated. Personal data could not be recovered
⦁ insert BERNINA USB stick and do not remove during the update process
⦁ save the new SW Version on the BERNINA USB stick and start the update again
Update successful ⦁ the sewing-/embroidery computer has been provided with the latest software version
less free space on the USB stick ⦁ delete data from USB stick
General Explanation Repair Messages
033804.52.04_2013-09_Manual_B780_EN
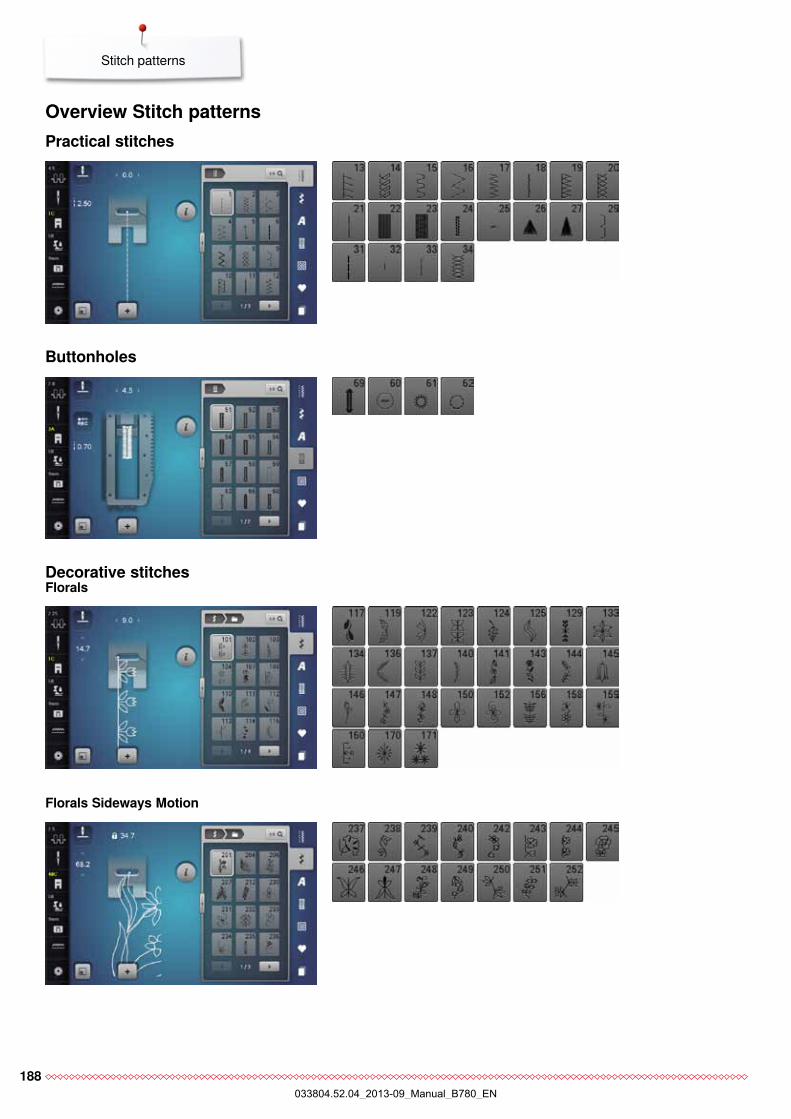
188
Stitch patterns
Overview Stitch patterns Practical stitches
Buttonholes
Decorative stitchesFlorals
Florals Sideways Motion
033804.52.04_2013-09_Manual_B780_EN
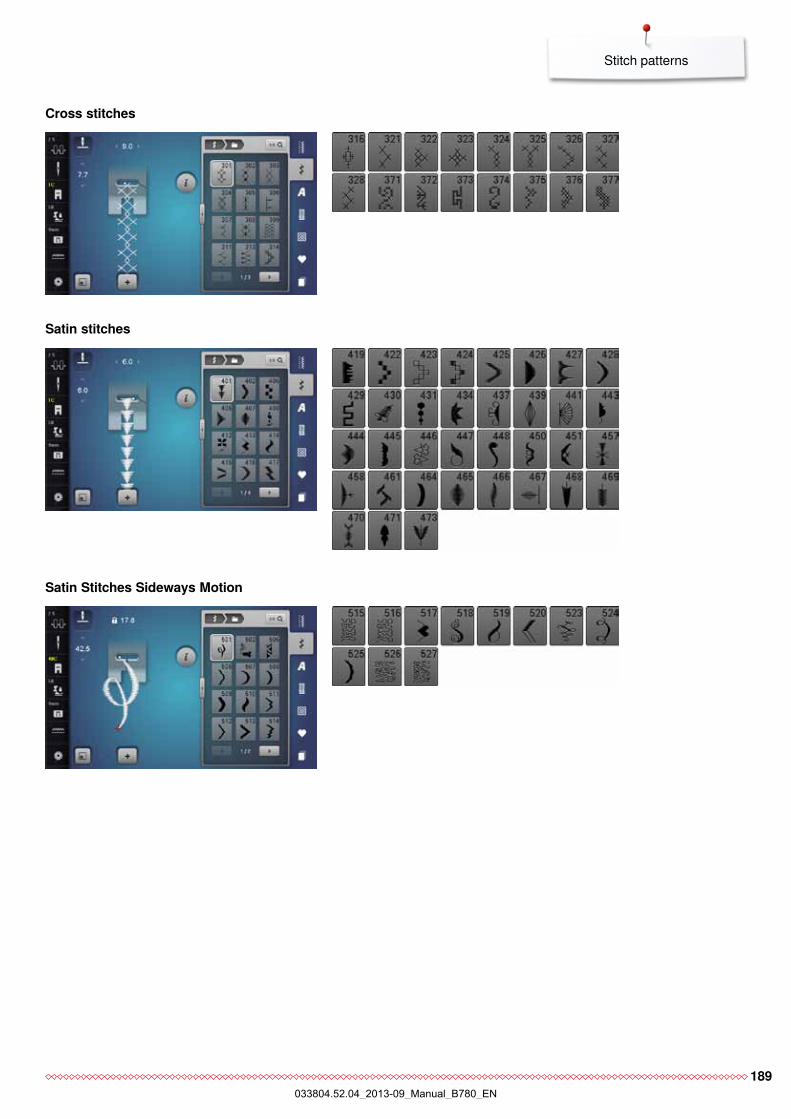
189
Stitch patterns
Cross stitches
Satin stitches
Satin Stitches Sideways Motion
033804.52.04_2013-09_Manual_B780_EN
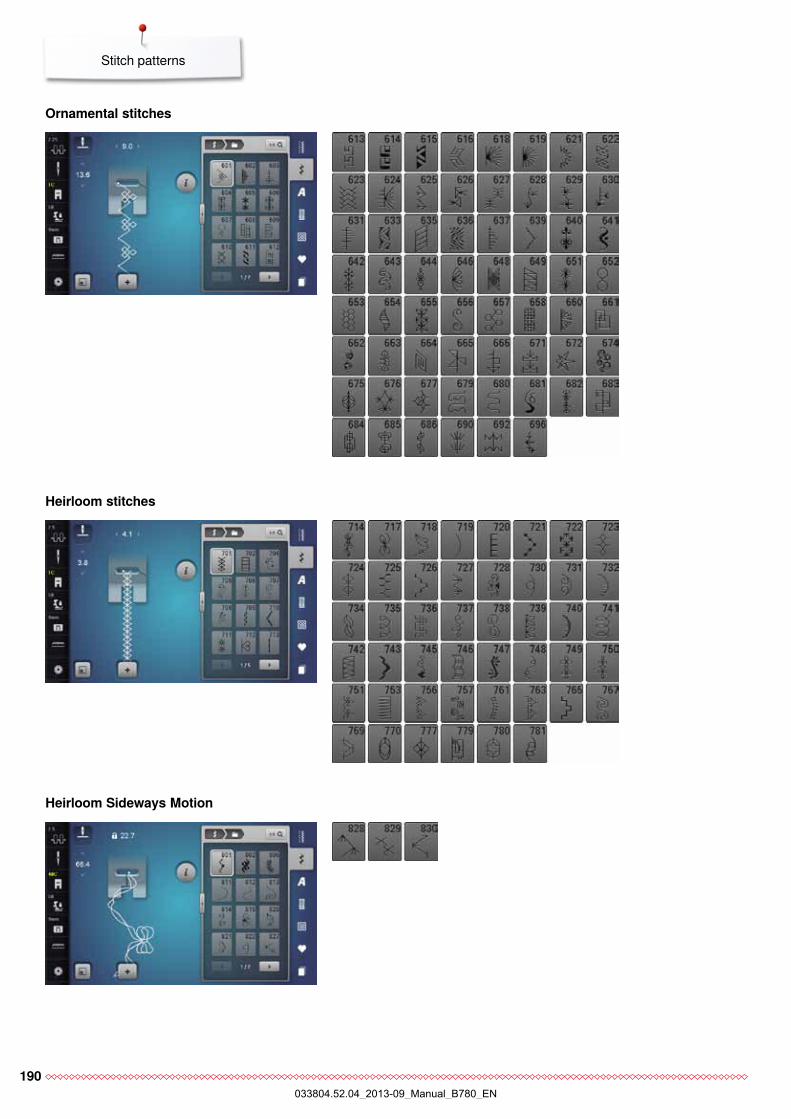
190
Stitch patterns
Heirloom stitches
Heirloom Sideways Motion
Ornamental stitches
033804.52.04_2013-09_Manual_B780_EN
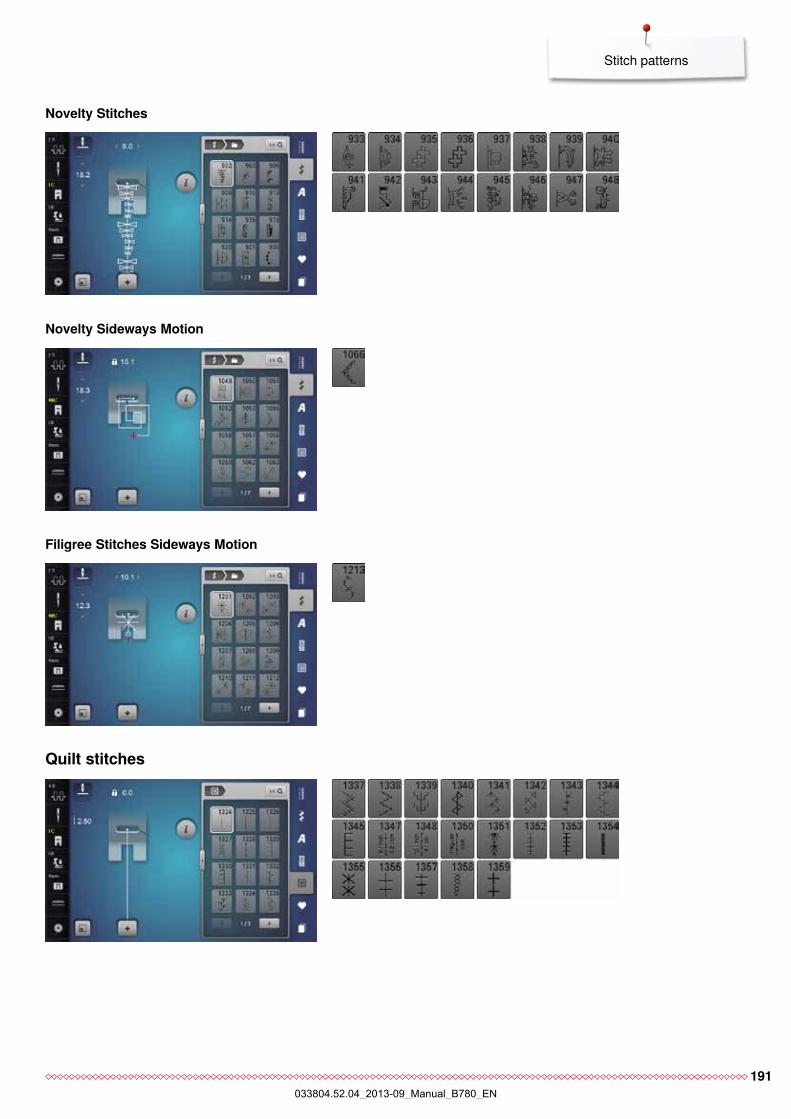
191
Stitch patterns
Quilt stitches
Novelty Stitches
Novelty Sideways Motion
Filigree Stitches Sideways Motion
033804.52.04_2013-09_Manual_B780_EN
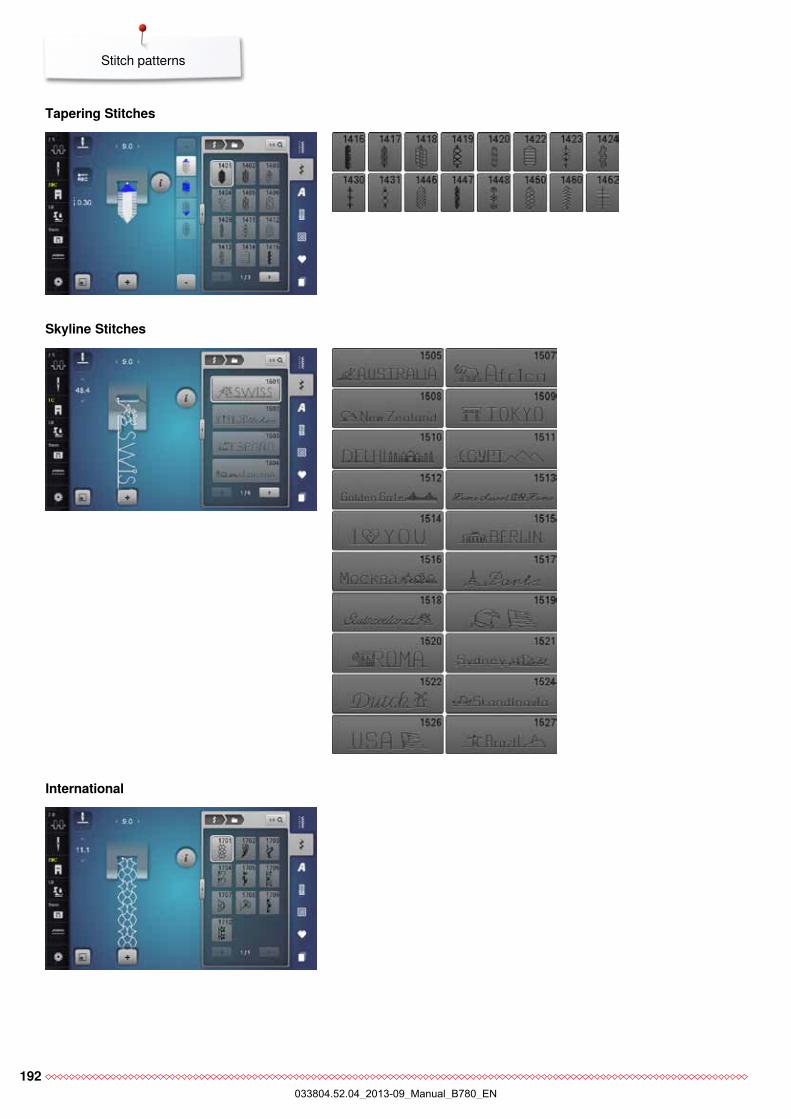
192
Stitch patterns
Tapering Stitches
Skyline Stitches
International
033804.52.04_2013-09_Manual_B780_EN
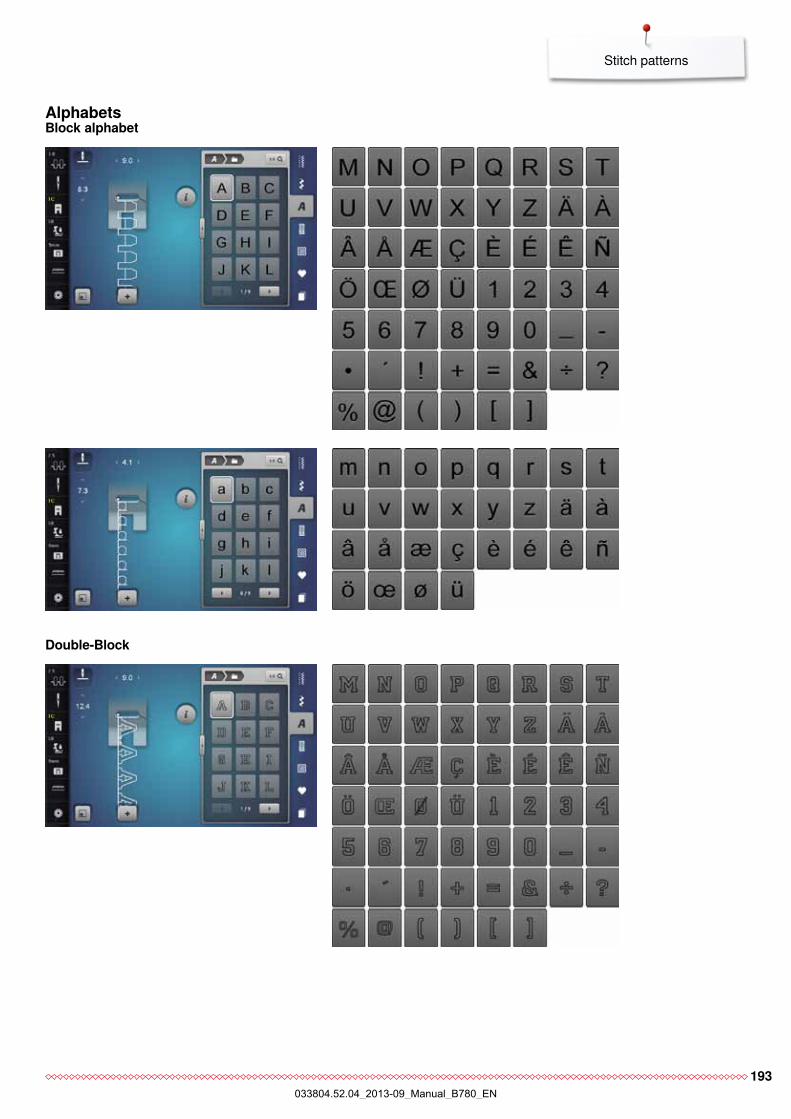
193
Stitch patterns
AlphabetsBlock alphabet
Double-Block
033804.52.04_2013-09_Manual_B780_EN
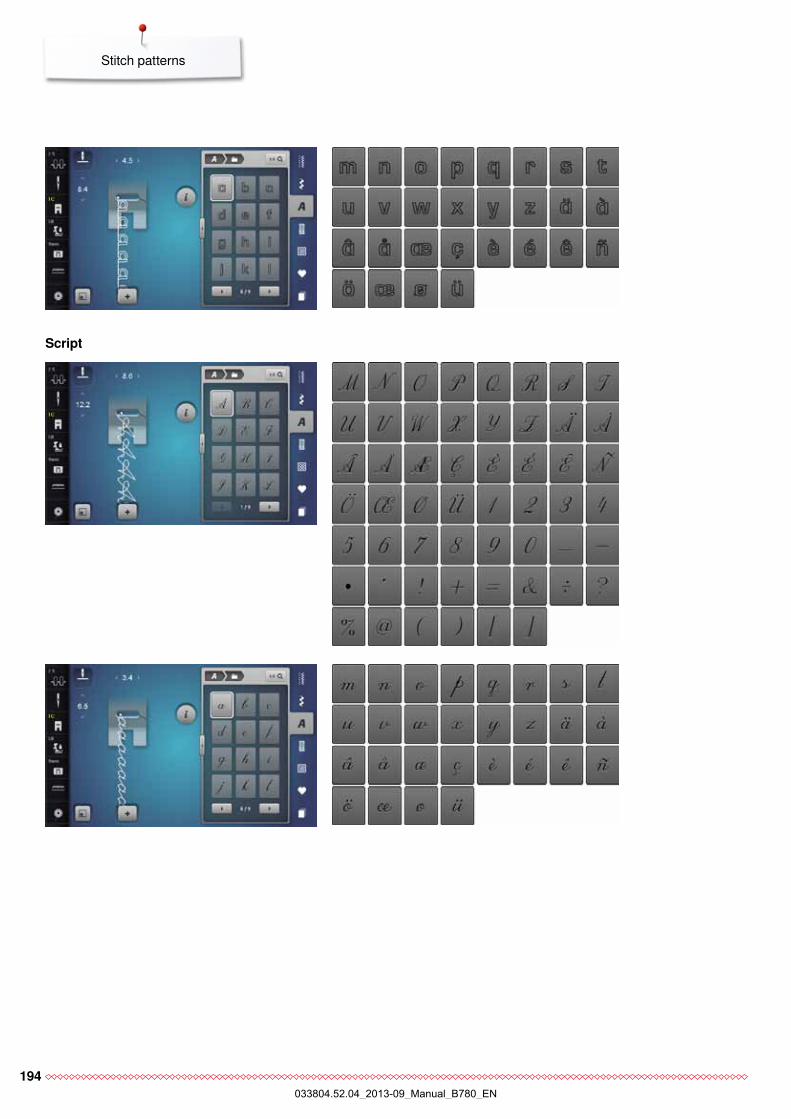
194
Stitch patterns
Script
033804.52.04_2013-09_Manual_B780_EN
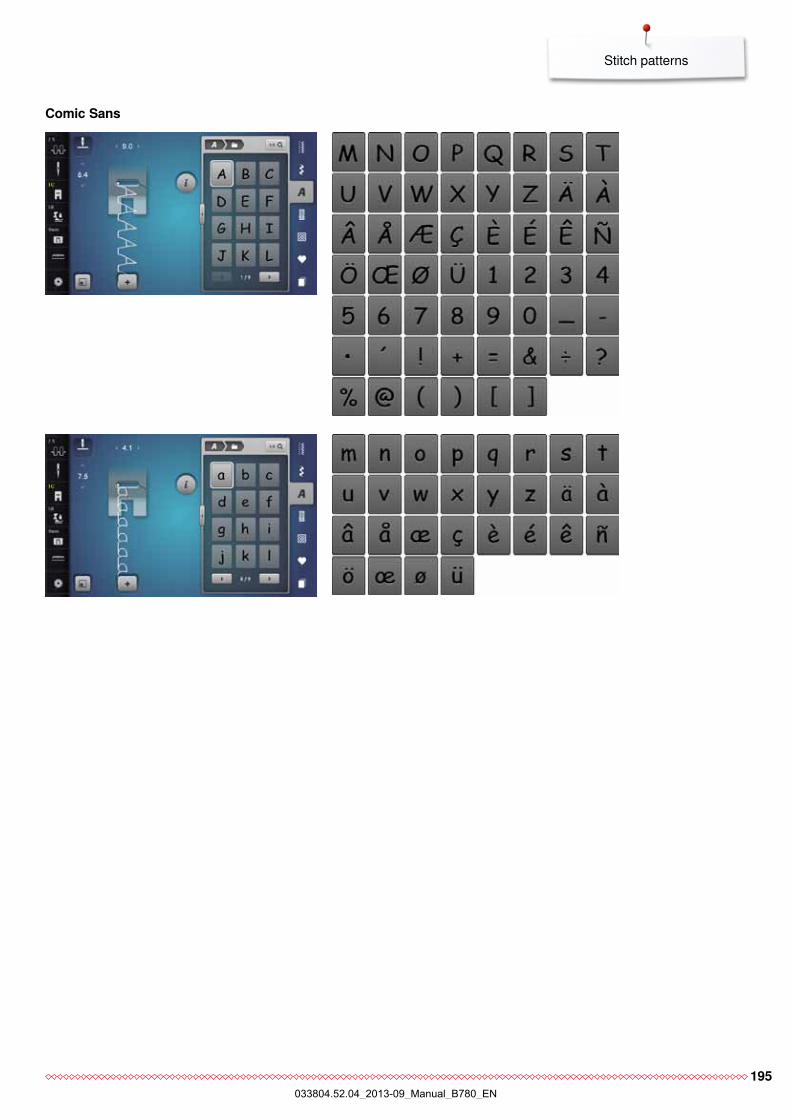
195
Stitch patterns
Comic Sans
033804.52.04_2013-09_Manual_B780_EN
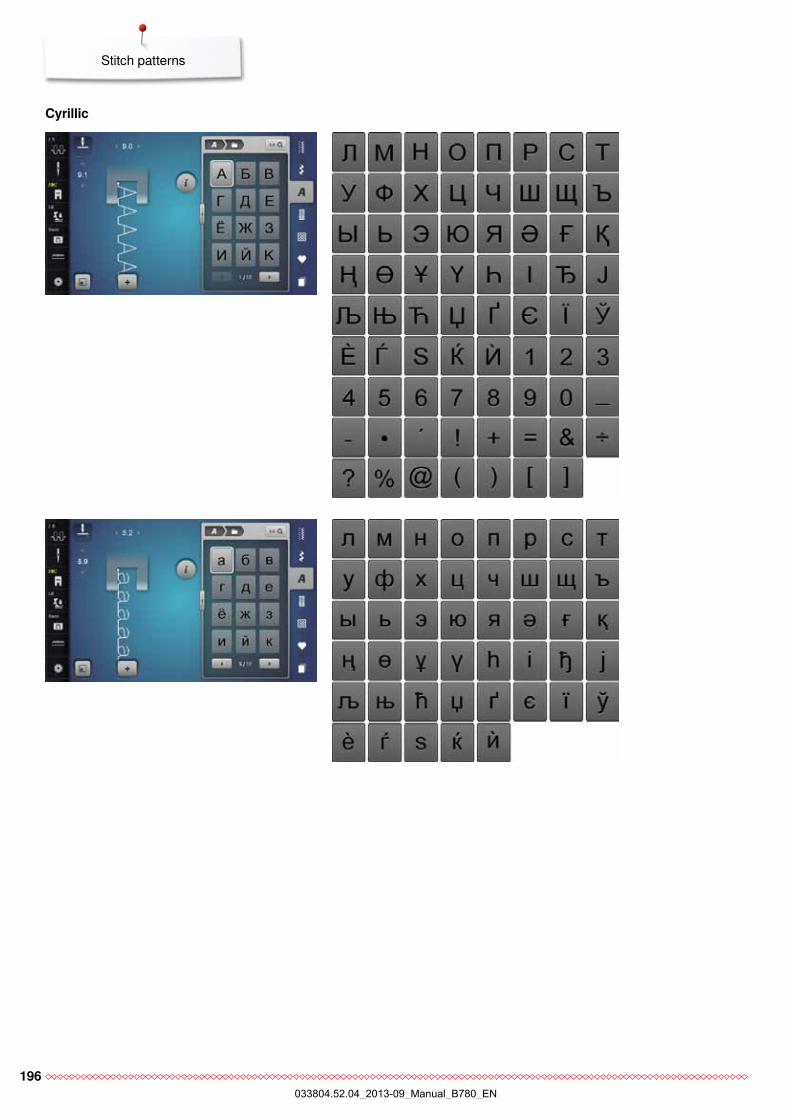
196
Stitch patterns
Cyrillic
033804.52.04_2013-09_Manual_B780_EN
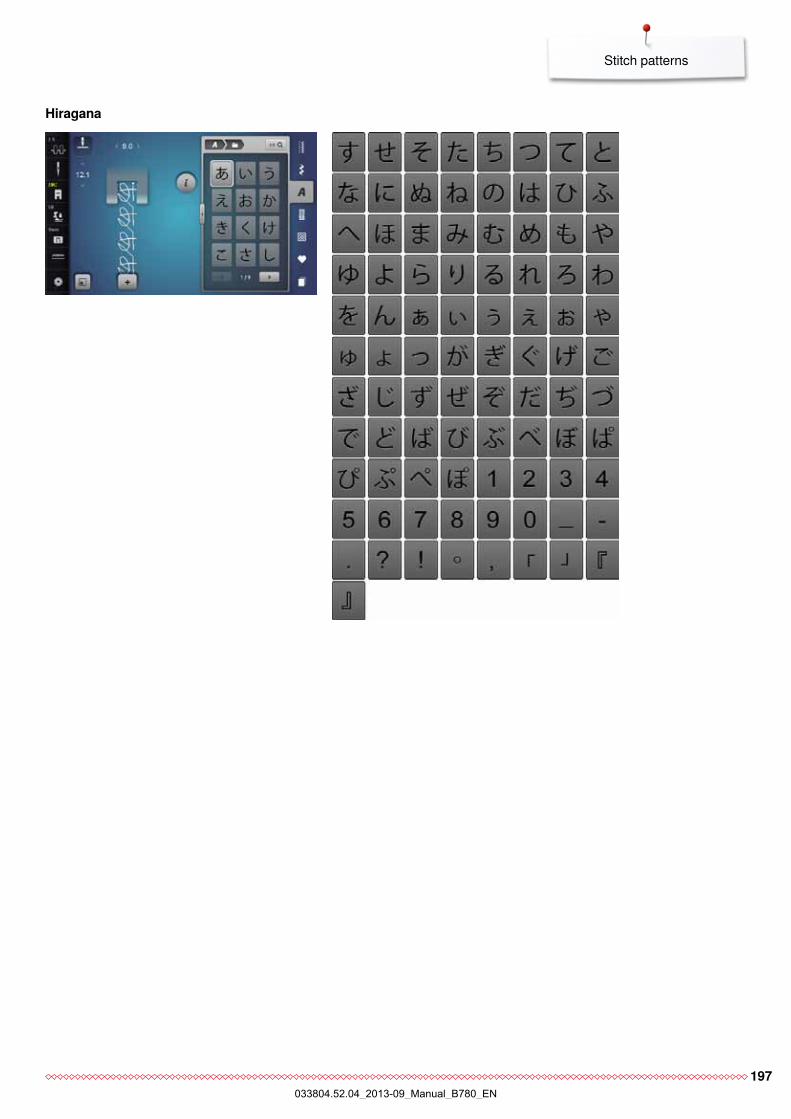
197
Stitch patterns
Hiragana
033804.52.04_2013-09_Manual_B780_EN
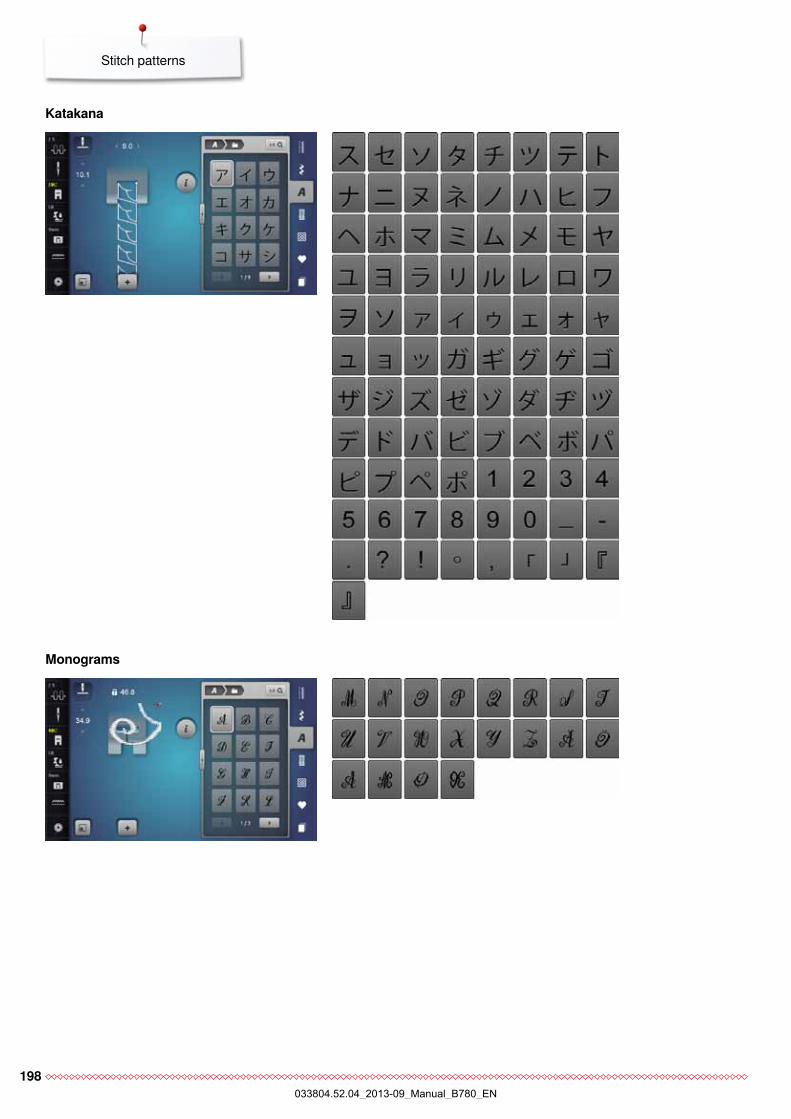
198
Stitch patterns
Monograms
Katakana
033804.52.04_2013-09_Manual_B780_EN
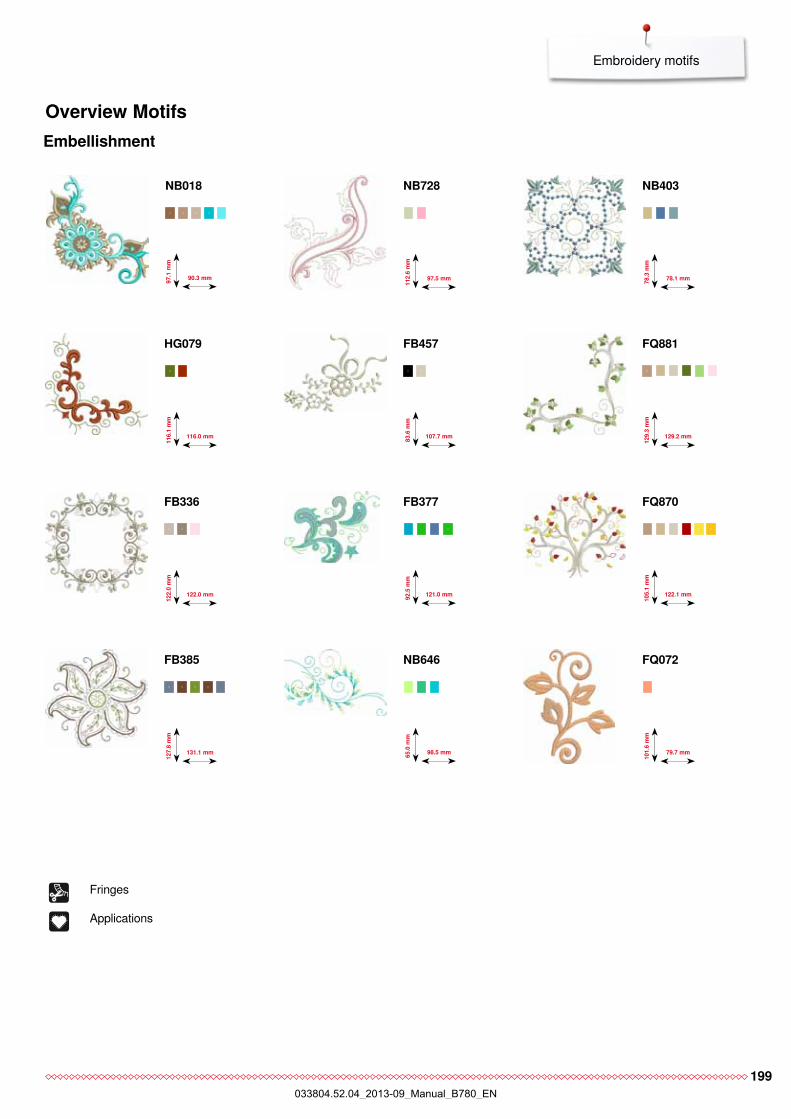
199
Embroidery motifs
Embellishment
90.3 mm97.1
mm
NB018
97.5 mm
112.
6 m
m
NB728
78.1 mm78.3
mm
NB403
116.0 mm
116.
1 m
m
HG079
107.7 mm83.6
mm
FB457
129.2 mm
129.
3 m
m
FQ881
122.0 mm
122.
0 m
m
FB336
121.0 mm92.5
mm
FB377
122.1 mm
105.
1 m
m
FQ870
131.1 mm
127.
8 m
m
FB385
98.5 mm65.0
mm
NB646
79.7 mm
101.
6 m
m
FQ072
Overview Motifs
Fringes
Applications
033804.52.04_2013-09_Manual_B780_EN

200
Embroidery motifs
137.8 mm
127.
7 m
m
NB708
99.3 mm99.2
mm
NB101
121.4 mm
176.
8 m
m
NB373
125.4 mm
248.
3 m
m
WS649
120.9 mm
120.
9 m
m
FB433
033804.52.04_2013-09_Manual_B780_EN
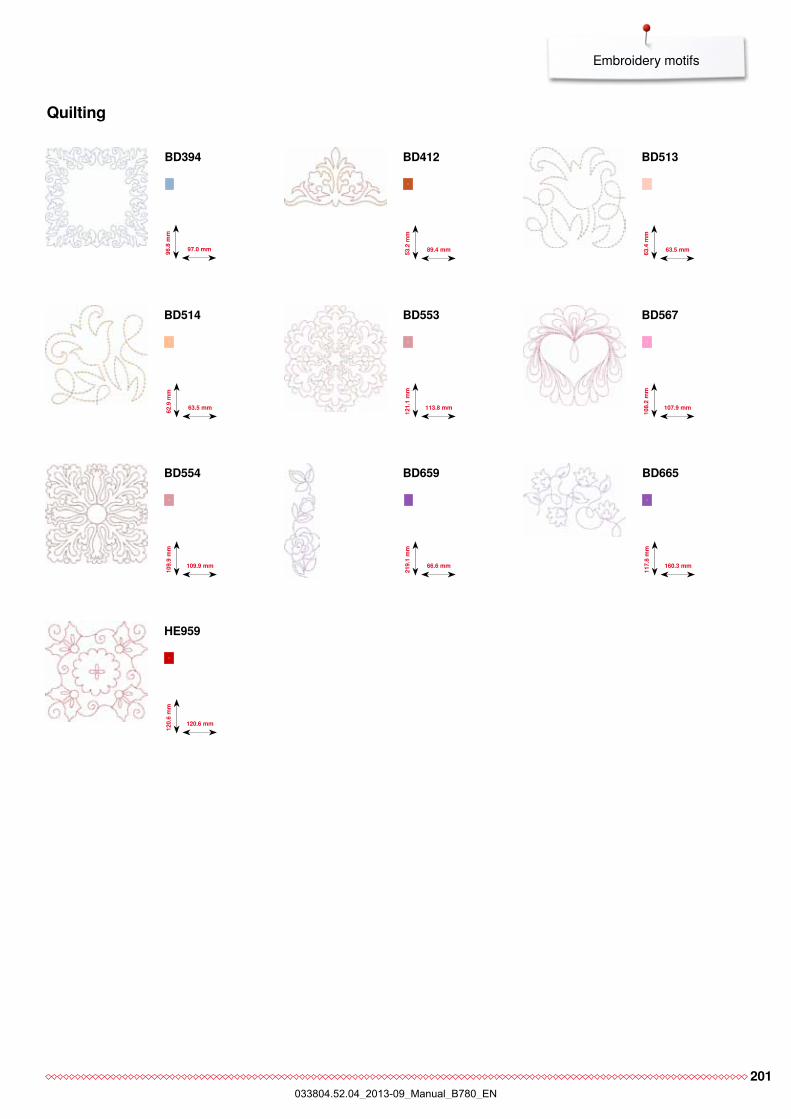
201
Embroidery motifs
Quilting
63.5 mm
109.9 mm
62.9
mm
109.
9 m
m
BD514
BD554
63.5 mm63.4
mm
BD513
113.8 mm12
1.1
mm
BD553
120.6 mm
120.
6 m
m
HE959
97.0 mm96.8
mm
BD394
89.4 mm53.2
mm
BD412
107.9 mm
108.
2 m
m
BD567
66.6 mm
219.
1 m
m
BD659
160.3 mm
117.
8 m
m
BD665
033804.52.04_2013-09_Manual_B780_EN
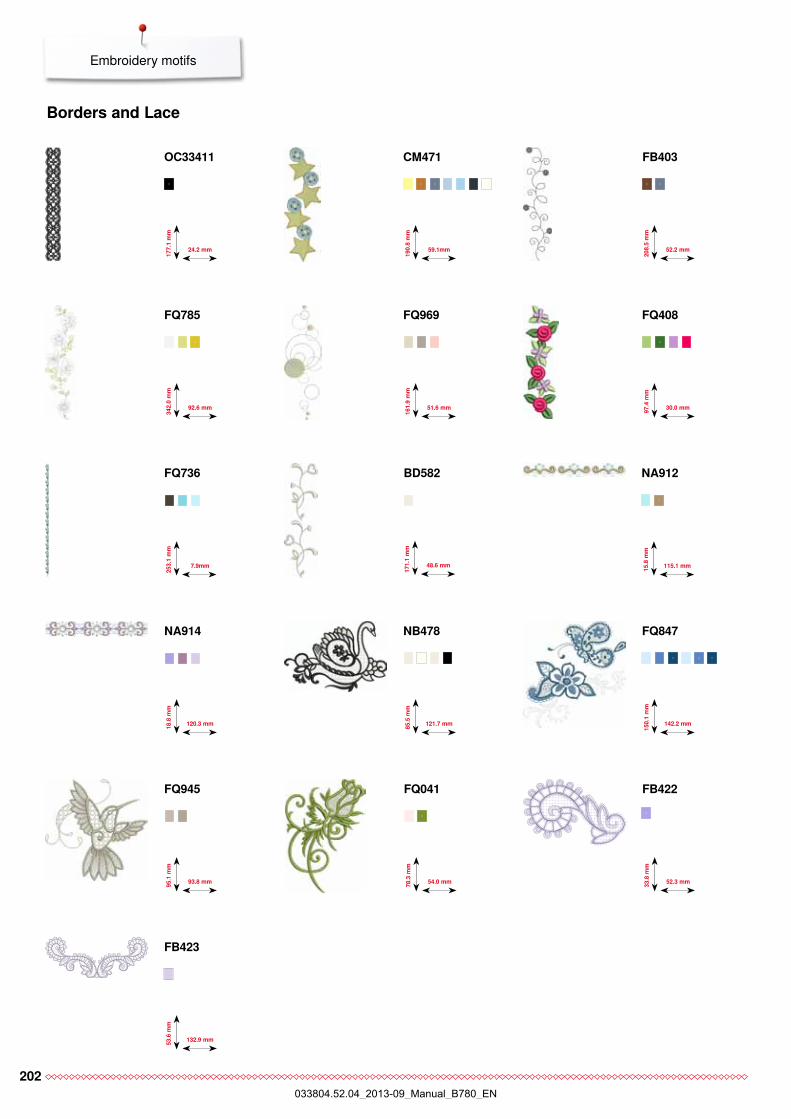
202
Embroidery motifs
Borders and Lace
59.1mm
190.
8 m
m
CM471
52.2 mm
208.
5 m
m
FB403
54.0 mm78.3
mm
FQ041
30.0 mm97.4
mm
FQ408
7.9mm
253.
1 m
m
FQ736
92.6 mm
342.
0 m
m
FQ785
142.2 mm
150.
1 m
m
FQ847
93.8 mm95.1
mm
FQ945
51.6 mm16
1.9
mm
FQ969
115.1 mm15.8
mm
NA912
120.3 mm18.8
mm
NA914
121.7 mm85.5
mm
NB478
24.2 mm
177.
1 m
mOC33411
48.6 mm
171.
1 m
m
BD582
52.3 mm33.8
mm
FB422
132.9 mm53.6
mm
FB423
033804.52.04_2013-09_Manual_B780_EN
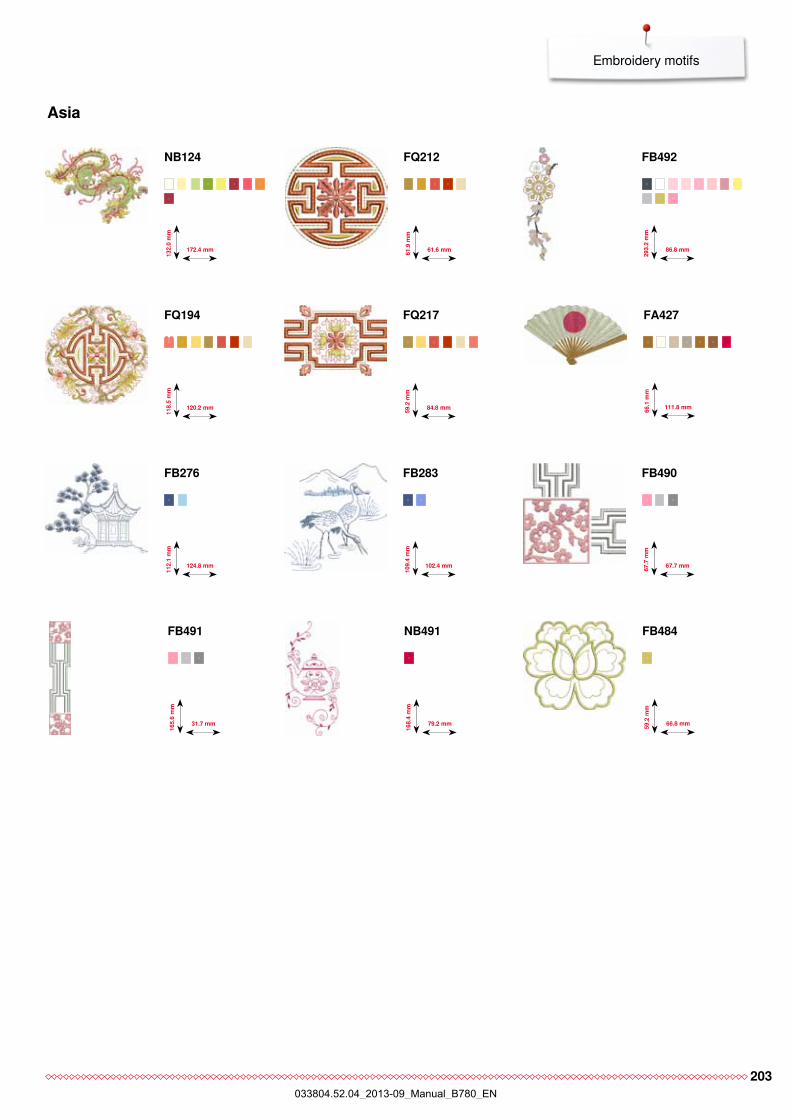
203
Embroidery motifs
Asia
111.8 mm66.1
mm
FA427
61.6 mm61.9
mm
FQ212
31.7 mm
165.
6 m
m
FB491
86.8 mm
293.
2 m
m
FB492
120.2 mm
118.
5 m
m
FQ194
124.8 mm
112.
1 m
m
FB276
84.8 mm59.2
mm
FQ217
172.4 mm
132.
0 m
mNB124
102.4 mm
109.
4 m
m
FB283
67.7 mm67.7
mm
FB490
79.2 mm
168.
4 m
m
NB491
66.8 mm59.2
mm
FB484
033804.52.04_2013-09_Manual_B780_EN
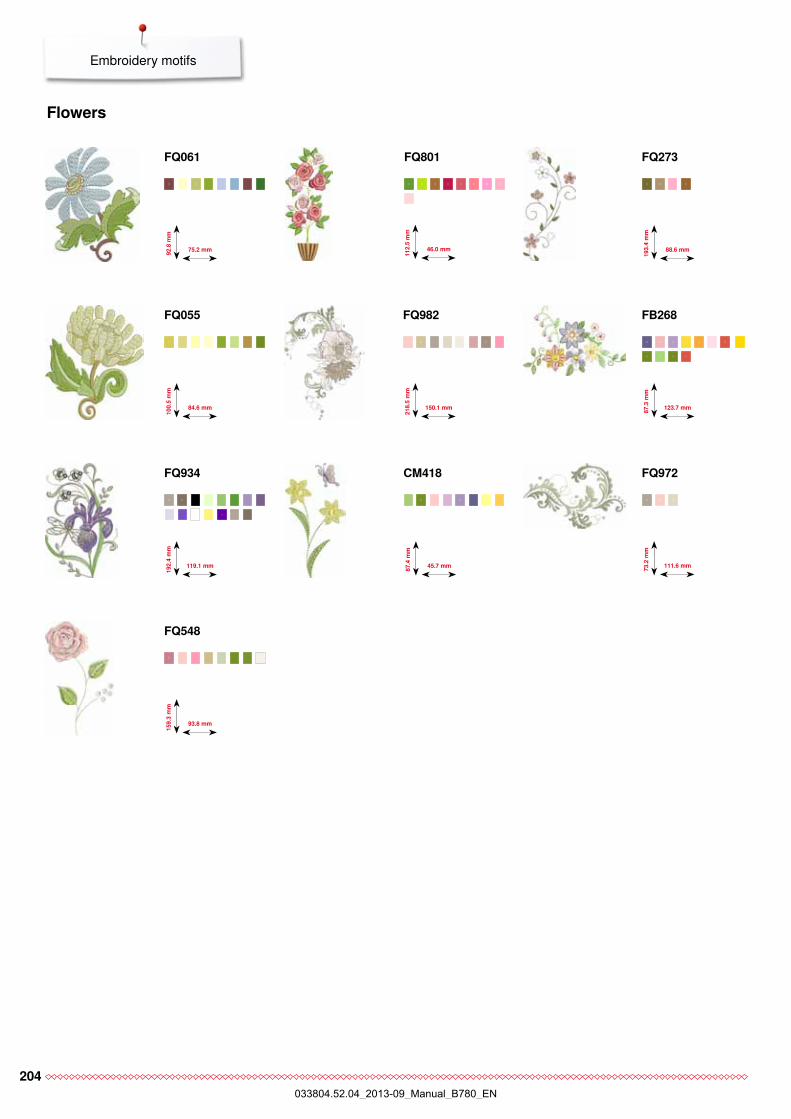
204
Embroidery motifs
Flowers
84.6 mm
100.
5 m
m
FQ055
88.6 mm
193.
4 m
m
FQ273
150.1 mm21
8.5
mm
FQ982
111.6 mm73.2
mm
FQ972
123.7 mm87.3
mm
FB268
119.1 mm
93.8 mm
192.
4 m
m15
9.3
mm
FQ934
FQ548
45.7 mm87.4
mm
CM418
46.0 mm
112.
5 m
m
FQ801
75.2 mm92.8
mm
FQ061
033804.52.04_2013-09_Manual_B780_EN
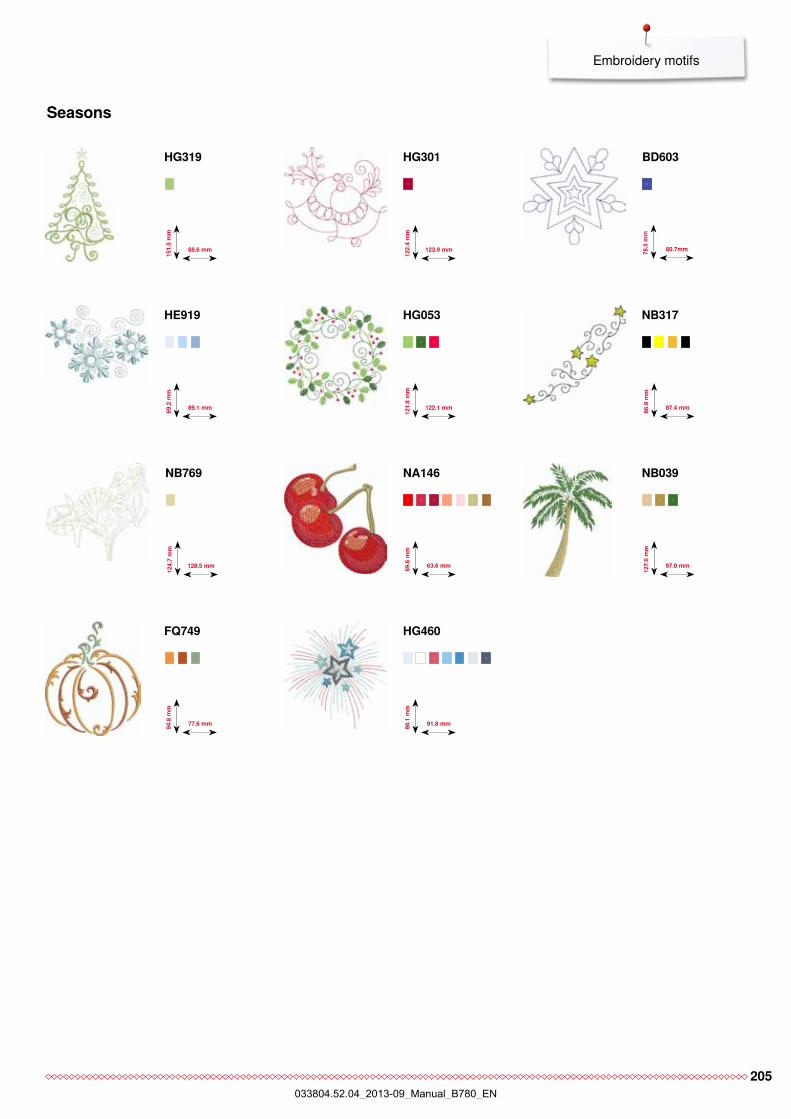
205
Embroidery motifs
Seasons
80.7mm78.3
mm
BD603
77.6 mm94.8
mm
FQ749
89.1 mm69.2
mm
HE919
122.1 mm12
1.8
mm
HG053
123.9 mm
122.
4 m
m
HG301
88.6 mm
151.
5 m
mHG319
63.6 mm69.6
mm
NA146
97.0 mm
127.
0 m
m
NB039
87.4 mm86.9
mm
NB317
128.5 mm
124.
7 m
m
NB769
91.8 mm98.1
mm
HG460
033804.52.04_2013-09_Manual_B780_EN

206
Embroidery motifs
Children
* This design has special effects. For more information please go to www.bernina.com/7series.
63.3mm63.1
mm
CM226*
113.3mm96.2
mm
NB193
78.2mm
106.
4mm
CM428
47.2mm
165.
4mm
CM404
77.4mm80.7
mm
CM384
70.2mm
140.
1mm
CM368
55.0mm99.6
mm
CM147
46.5mm47.0
mm
CM442
76.2mm92.0
mm
WP201
97.9mm82.4
mm
CM286
89.1mm97.1
mm
CM022
100.5mm99.0
mm
RC765
77.9mm94.0
mm
WP325
84.4mm81.6
mm
CK970
120.6mm
113.
0mm
CM362*
106.7mm
127.
4mm
CM193*
71.5mm71.8
mm
CM220*
033804.52.04_2013-09_Manual_B780_EN
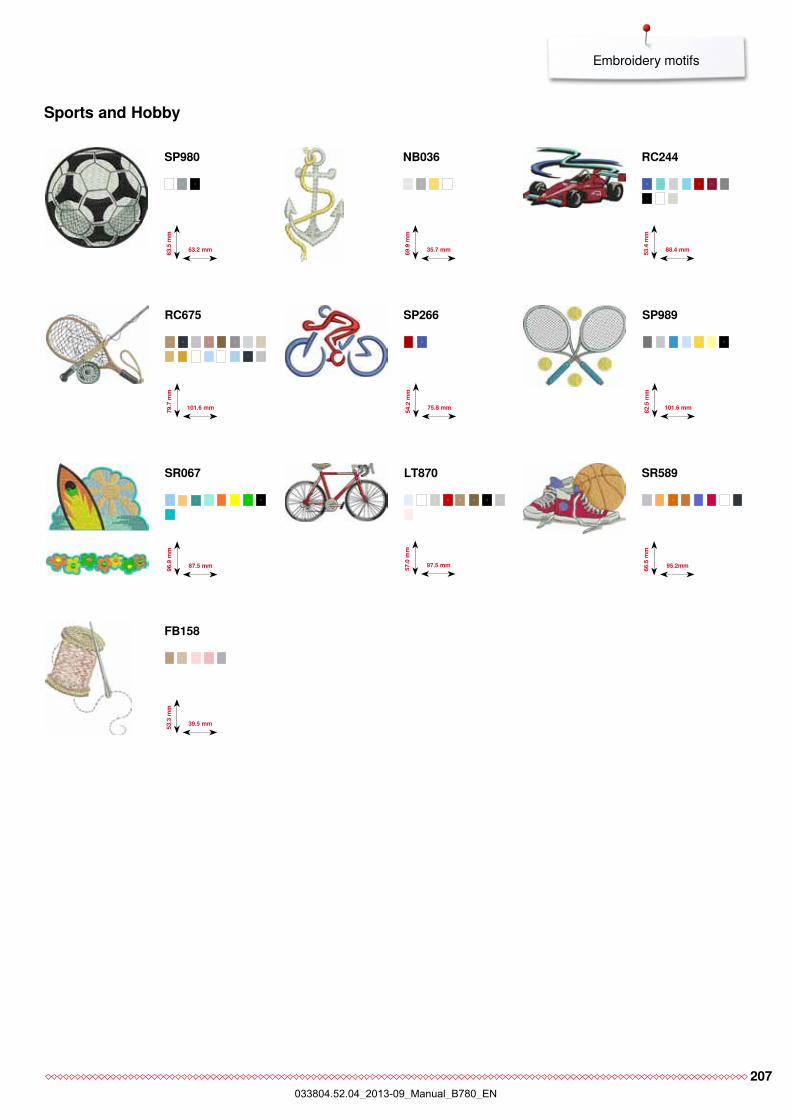
207
Embroidery motifs
Sports and Hobby
97.5 mm57.0
mm
LT870
35.7 mm69.9
mm
NB036
88.4 mm53.4
mm
RC244
75.8 mm54.2
mm
SP266
101.6 mm82.5
mm
SP989
87.5 mm96.9
mm
SR067
63.2 mm63.5
mm
SP980
95.2mm66.5
mm
SR589
101.6 mm79.7
mm
RC675
39.5 mm53.3
mm
FB158
033804.52.04_2013-09_Manual_B780_EN
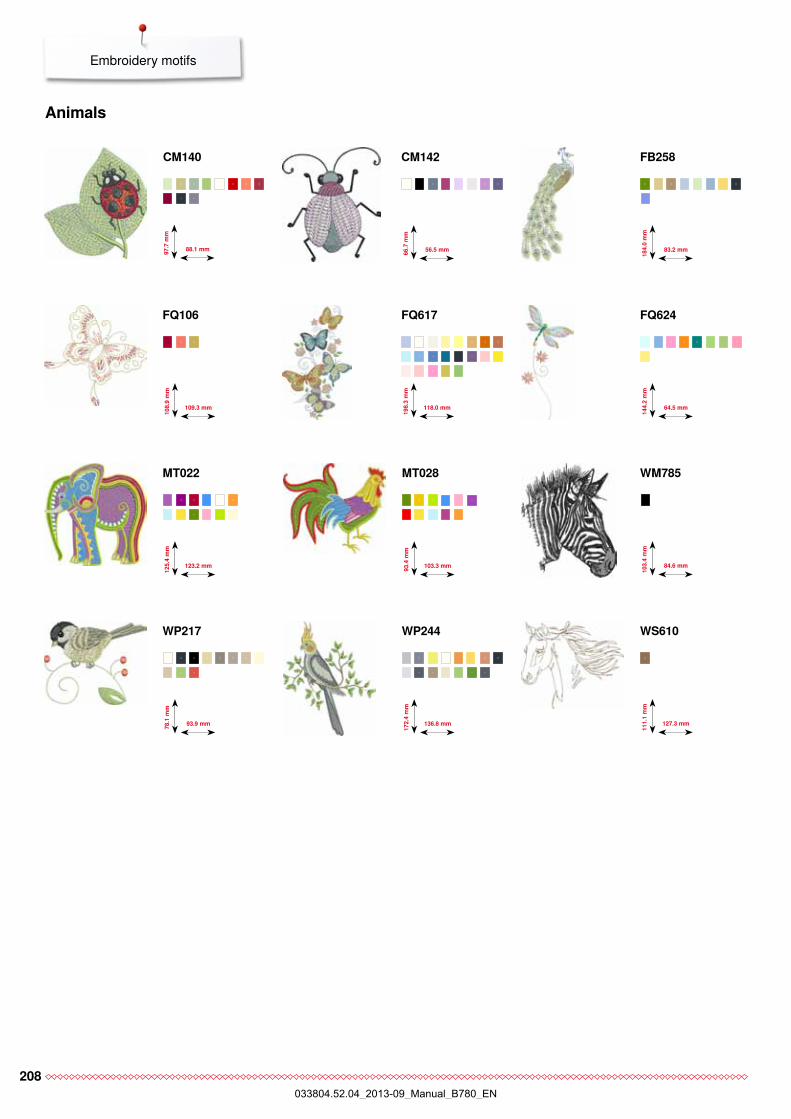
208
Embroidery motifs
Animals
109.3 mm
108.
9 m
m
FQ106
83.2 mm
184.
0 m
m
FB258
118.0 mm19
8.3
mm
FQ617
84.6 mm
127.3 mm
103.
4 m
m11
1.1
mm
WM785
WS610
88.1 mm97.7
mm
CM140
56.5 mm66.7
mm
CM142
64.5 mm
144.
2 m
m
FQ624
123.2 mm
93.9 mm
125.
4 m
m78
.1 m
m
MT022
WP217
103.3 mm
136.8 mm
93.4
mm
172.
4 m
m
MT028
WP244
033804.52.04_2013-09_Manual_B780_EN
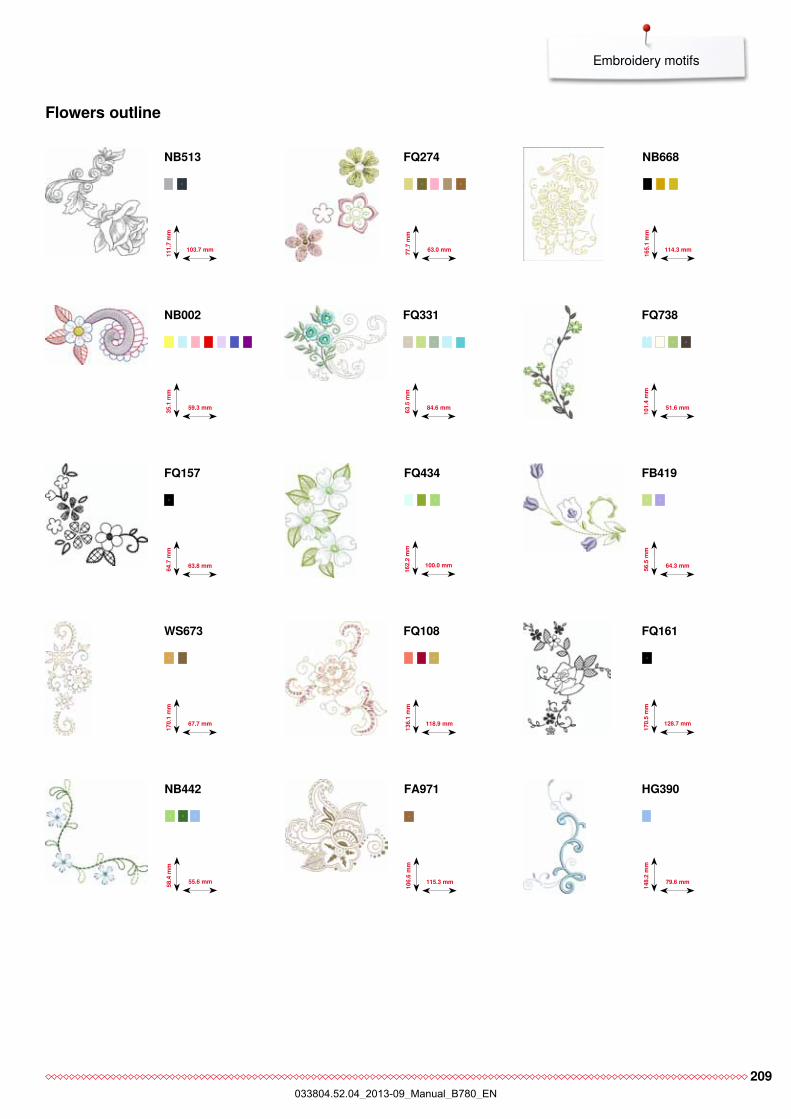
209
Embroidery motifs
Flowers outline
59.3 mm35.1
mm
NB002
114.3 mm
165.
1 m
m
NB668
84.6 mm63.5
mm
FQ331
64.3 mm
128.7 mm
56.5
mm
170.
5 m
m
FB419
FQ161
51.6 mm
101.
4 m
m
FQ738
63.8 mm
67.7 mm
79.6 mm
64.7
mm
170.
1 m
m
148.
2 m
m
FQ157
WS673
HG390
118.9 mm
136.
1 m
m
FQ108
100.0 mm
162.
2 m
m
FQ434
63.0 mm77.7
mm
FQ274
103.7 mm
111.
7 m
mNB513
115.3 mm
106.
6 m
m
FA971
55.6 mm58.4
mm
NB442
033804.52.04_2013-09_Manual_B780_EN
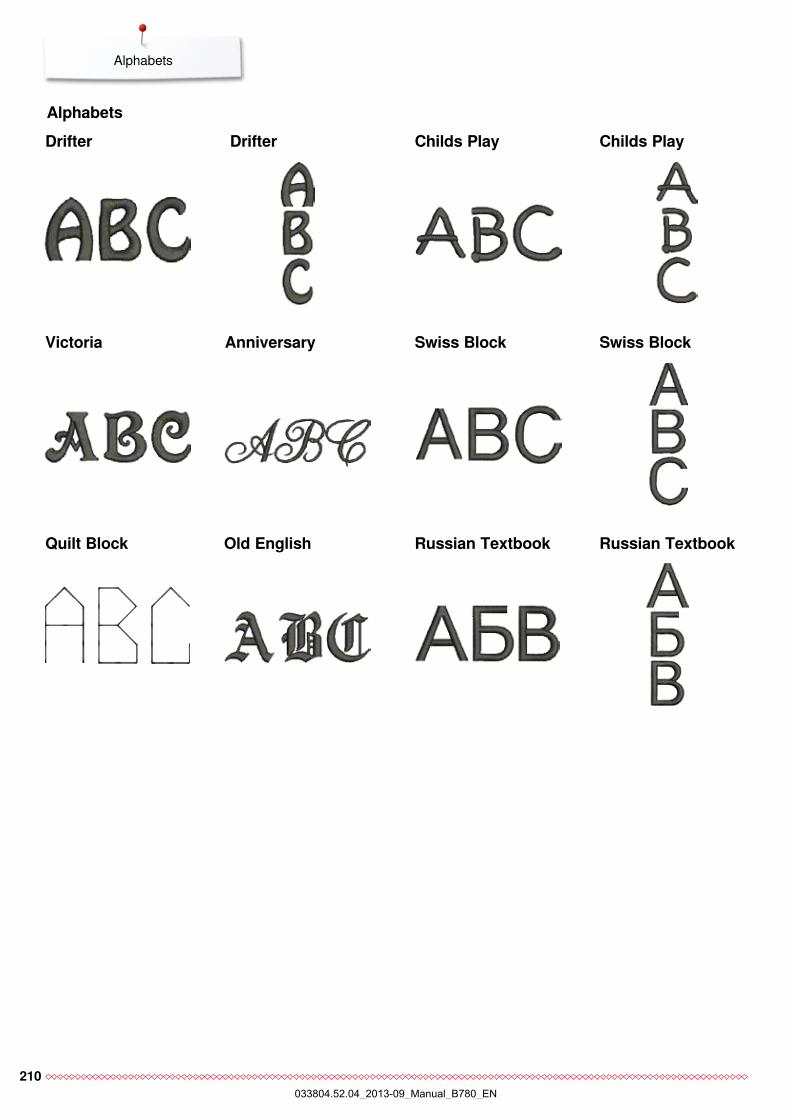
210
Alphabets
AlphabetsDrifter
Victoria Anniversary
Quilt Block
Drifter
Old English
Childs Play
Swiss Block
Russian Textbook
Childs Play
Swiss Block
Russian Textbook
033804.52.04_2013-09_Manual_B780_EN
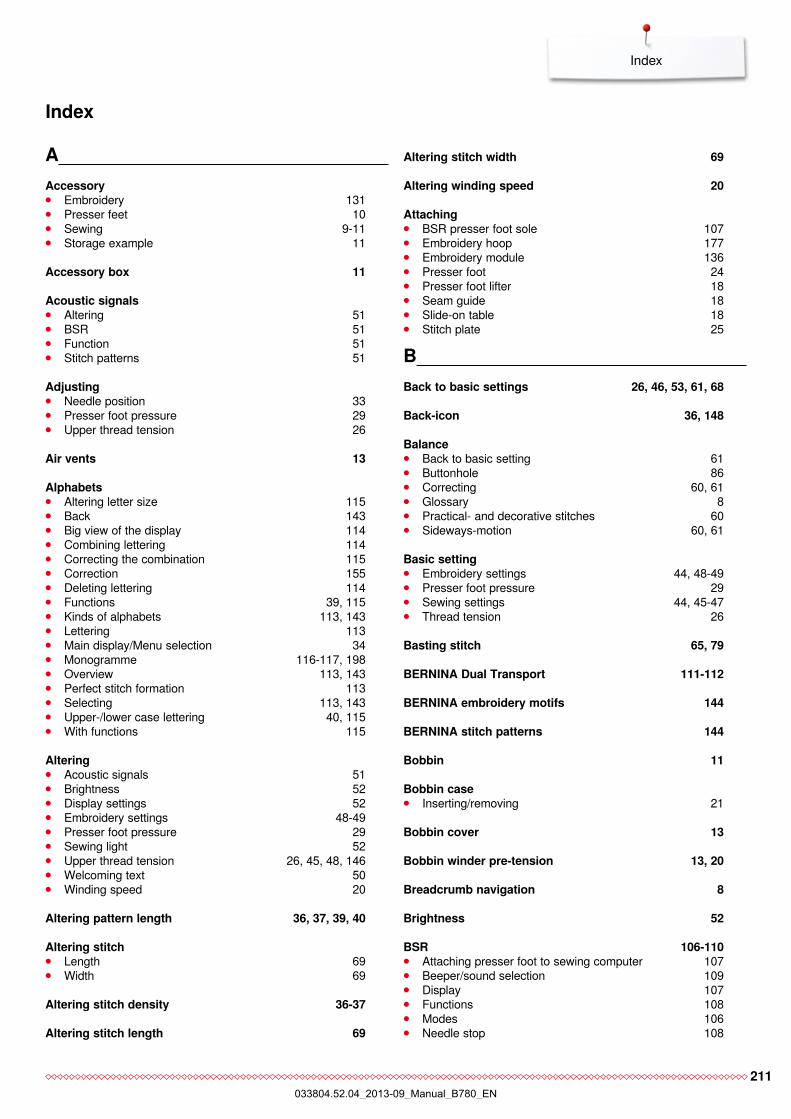
211
Index
Index
A Accessory ⦁ Embroidery 131 ⦁ Presser feet 10 ⦁ Sewing 9-11 ⦁ Storage example 11
Accessory box 11
Acoustic signals ⦁ Altering 51 ⦁ BSR 51 ⦁ Function 51 ⦁ Stitch patterns 51
Adjusting ⦁ Needle position 33 ⦁ Presser foot pressure 29 ⦁ Upper thread tension 26
Air vents 13
Alphabets ⦁ Altering letter size 115 ⦁ Back 143 ⦁ Big view of the display 114 ⦁ Combining lettering 114 ⦁ Correcting the combination 115 ⦁ Correction 155 ⦁ Deleting lettering 114 ⦁ Functions 39, 115 ⦁ Kinds of alphabets 113, 143 ⦁ Lettering 113 ⦁ Main display/Menu selection 34 ⦁ Monogramme 116-117, 198 ⦁ Overview 113, 143 ⦁ Perfect stitch formation 113 ⦁ Selecting 113, 143 ⦁ Upper-/lower case lettering 40, 115 ⦁ With functions 115
Altering ⦁ Acoustic signals 51 ⦁ Brightness 52 ⦁ Display settings 52 ⦁ Embroidery settings 48-49 ⦁ Presser foot pressure 29 ⦁ Sewing light 52 ⦁ Upper thread tension 26, 45, 48, 146 ⦁ Welcoming text 50 ⦁ Winding speed 20
Altering pattern length 36, 37, 39, 40
Altering stitch ⦁ Length 69 ⦁ Width 69
Altering stitch density 36-37
Altering stitch length 69
Altering stitch width 69
Altering winding speed 20
Attaching ⦁ BSR presser foot sole 107 ⦁ Embroidery hoop 177 ⦁ Embroidery module 136 ⦁ Presser foot 24 ⦁ Presser foot lifter 18 ⦁ Seam guide 18 ⦁ Slide-on table 18 ⦁ Stitch plate 25
B Back to basic settings 26, 46, 53, 61, 68
Back-icon 36, 148
Balance ⦁ Back to basic setting 61 ⦁ Buttonhole 86 ⦁ Correcting 60, 61 ⦁ Glossary 8 ⦁ Practical- and decorative stitches 60 ⦁ Sideways-motion 60, 61
Basic setting ⦁ Embroidery settings 44, 48-49 ⦁ Presser foot pressure 29 ⦁ Sewing settings 44, 45-47 ⦁ Thread tension 26
Basting stitch 65, 79
BERNINA Dual Transport 111-112
BERNINA embroidery motifs 144
BERNINA stitch patterns 144
Bobbin 11
Bobbin case ⦁ Inserting/removing 21
Bobbin cover 13
Bobbin winder pre-tension 13, 20
Breadcrumb navigation 8
Brightness 52
BSR 106-110 ⦁ Attaching presser foot to sewing computer 107 ⦁ Beeper/sound selection 109 ⦁ Display 107 ⦁ Functions 108 ⦁ Modes 106 ⦁ Needle stop 108
033804.52.04_2013-09_Manual_B780_EN
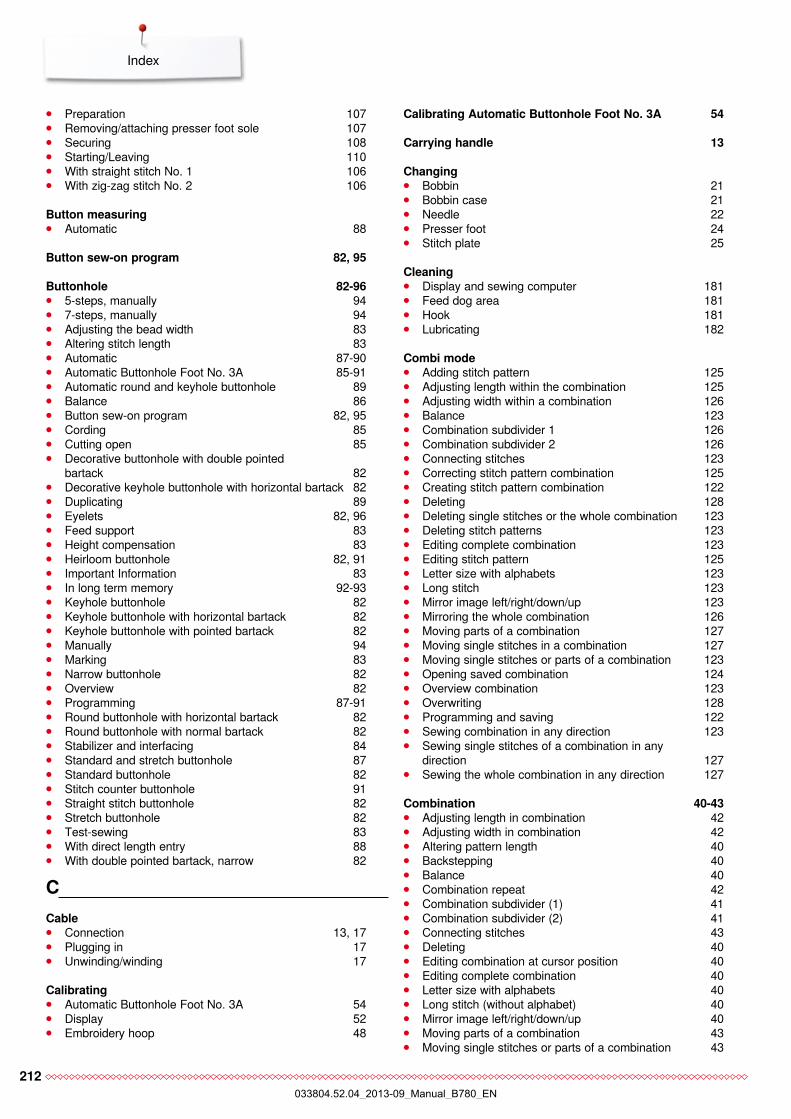
212
Index
⦁ Preparation 107 ⦁ Removing/attaching presser foot sole 107 ⦁ Securing 108 ⦁ Starting/Leaving 110 ⦁ With straight stitch No. 1 106 ⦁ With zig-zag stitch No. 2 106
Button measuring ⦁ Automatic 88
Button sew-on program 82, 95
Buttonhole 82-96 ⦁ 5-steps, manually 94 ⦁ 7-steps, manually 94 ⦁ Adjusting the bead width 83 ⦁ Altering stitch length 83 ⦁ Automatic 87-90 ⦁ Automatic Buttonhole Foot No. 3A 85-91 ⦁ Automatic round and keyhole buttonhole 89 ⦁ Balance 86 ⦁ Button sew-on program 82, 95 ⦁ Cording 85 ⦁ Cutting open 85 ⦁ Decorative buttonhole with double pointed
bartack 82 ⦁ Decorative keyhole buttonhole with horizontal bartack 82 ⦁ Duplicating 89 ⦁ Eyelets 82, 96 ⦁ Feed support 83 ⦁ Height compensation 83 ⦁ Heirloom buttonhole 82, 91 ⦁ Important Information 83 ⦁ In long term memory 92-93 ⦁ Keyhole buttonhole 82 ⦁ Keyhole buttonhole with horizontal bartack 82 ⦁ Keyhole buttonhole with pointed bartack 82 ⦁ Manually 94 ⦁ Marking 83 ⦁ Narrow buttonhole 82 ⦁ Overview 82 ⦁ Programming 87-91 ⦁ Round buttonhole with horizontal bartack 82 ⦁ Round buttonhole with normal bartack 82 ⦁ Stabilizer and interfacing 84 ⦁ Standard and stretch buttonhole 87 ⦁ Standard buttonhole 82 ⦁ Stitch counter buttonhole 91 ⦁ Straight stitch buttonhole 82 ⦁ Stretch buttonhole 82 ⦁ Test-sewing 83 ⦁ With direct length entry 88 ⦁ With double pointed bartack, narrow 82
CCable ⦁ Connection 13, 17 ⦁ Plugging in 17 ⦁ Unwinding/winding 17
Calibrating ⦁ Automatic Buttonhole Foot No. 3A 54 ⦁ Display 52 ⦁ Embroidery hoop 48
Calibrating Automatic Buttonhole Foot No. 3A 54
Carrying handle 13
Changing ⦁ Bobbin 21 ⦁ Bobbin case 21 ⦁ Needle 22 ⦁ Presser foot 24 ⦁ Stitch plate 25
Cleaning ⦁ Display and sewing computer 181 ⦁ Feed dog area 181 ⦁ Hook 181 ⦁ Lubricating 182
Combi mode ⦁ Adding stitch pattern 125 ⦁ Adjusting length within the combination 125 ⦁ Adjusting width within a combination 126 ⦁ Balance 123 ⦁ Combination subdivider 1 126 ⦁ Combination subdivider 2 126 ⦁ Connecting stitches 123 ⦁ Correcting stitch pattern combination 125 ⦁ Creating stitch pattern combination 122 ⦁ Deleting 128 ⦁ Deleting single stitches or the whole combination 123 ⦁ Deleting stitch patterns 123 ⦁ Editing complete combination 123 ⦁ Editing stitch pattern 125 ⦁ Letter size with alphabets 123 ⦁ Long stitch 123 ⦁ Mirror image left/right/down/up 123 ⦁ Mirroring the whole combination 126 ⦁ Moving parts of a combination 127 ⦁ Moving single stitches in a combination 127 ⦁ Moving single stitches or parts of a combination 123 ⦁ Opening saved combination 124 ⦁ Overview combination 123 ⦁ Overwriting 128 ⦁ Programming and saving 122 ⦁ Sewing combination in any direction 123 ⦁ Sewing single stitches of a combination in any
direction 127 ⦁ Sewing the whole combination in any direction 127
Combination 40-43 ⦁ Adjusting length in combination 42 ⦁ Adjusting width in combination 42 ⦁ Altering pattern length 40 ⦁ Backstepping 40 ⦁ Balance 40 ⦁ Combination repeat 42 ⦁ Combination subdivider (1) 41 ⦁ Combination subdivider (2) 41 ⦁ Connecting stitches 43 ⦁ Deleting 40 ⦁ Editing combination at cursor position 40 ⦁ Editing complete combination 40 ⦁ Letter size with alphabets 40 ⦁ Long stitch (without alphabet) 40 ⦁ Mirror image left/right/down/up 40 ⦁ Moving parts of a combination 43 ⦁ Moving single stitches or parts of a combination 43
033804.52.04_2013-09_Manual_B780_EN
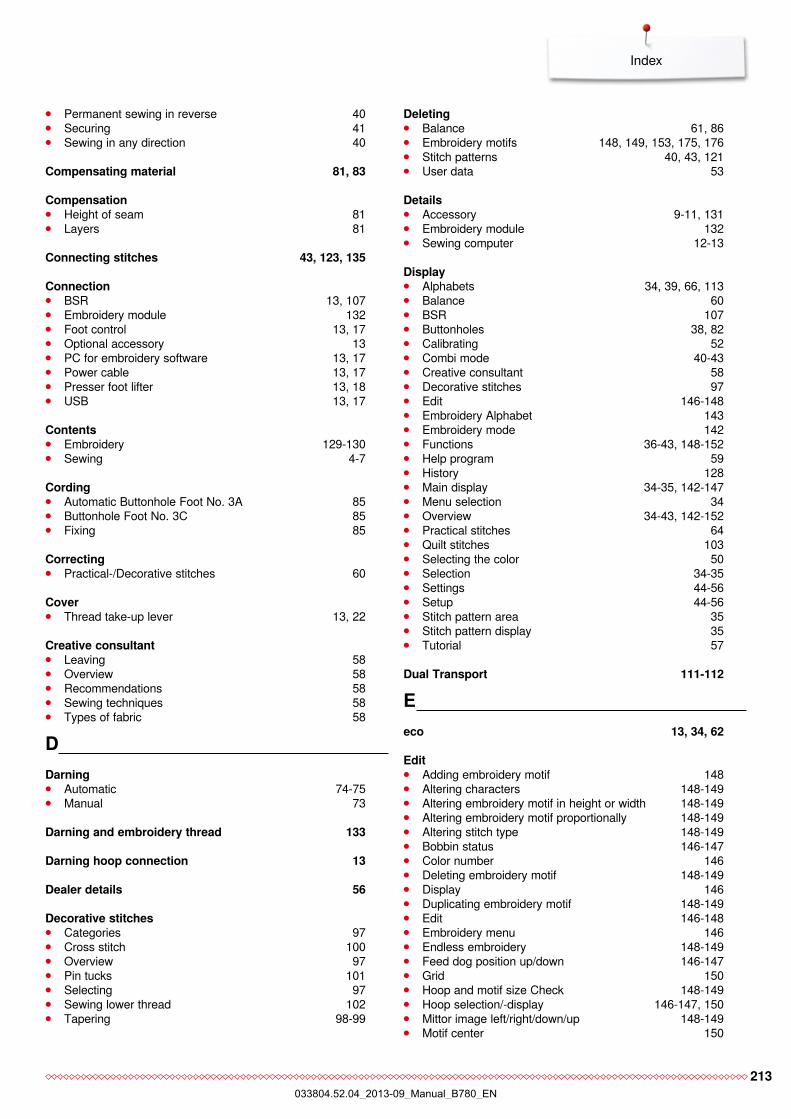
213
Index
⦁ Permanent sewing in reverse 40 ⦁ Securing 41 ⦁ Sewing in any direction 40
Compensating material 81, 83
Compensation ⦁ Height of seam 81 ⦁ Layers 81
Connecting stitches 43, 123, 135
Connection ⦁ BSR 13, 107 ⦁ Embroidery module 132 ⦁ Foot control 13, 17 ⦁ Optional accessory 13 ⦁ PC for embroidery software 13, 17 ⦁ Power cable 13, 17 ⦁ Presser foot lifter 13, 18 ⦁ USB 13, 17
Contents ⦁ Embroidery 129-130 ⦁ Sewing 4-7
Cording ⦁ Automatic Buttonhole Foot No. 3A 85 ⦁ Buttonhole Foot No. 3C 85 ⦁ Fixing 85
Correcting ⦁ Practical-/Decorative stitches 60
Cover ⦁ Thread take-up lever 13, 22
Creative consultant ⦁ Leaving 58 ⦁ Overview 58 ⦁ Recommendations 58 ⦁ Sewing techniques 58 ⦁ Types of fabric 58
D Darning ⦁ Automatic 74-75 ⦁ Manual 73
Darning and embroidery thread 133
Darning hoop connection 13
Dealer details 56
Decorative stitches ⦁ Categories 97 ⦁ Cross stitch 100 ⦁ Overview 97 ⦁ Pin tucks 101 ⦁ Selecting 97 ⦁ Sewing lower thread 102 ⦁ Tapering 98-99
Deleting ⦁ Balance 61, 86 ⦁ Embroidery motifs 148, 149, 153, 175, 176 ⦁ Stitch patterns 40, 43, 121 ⦁ User data 53
Details ⦁ Accessory 9-11, 131 ⦁ Embroidery module 132 ⦁ Sewing computer 12-13
Display ⦁ Alphabets 34, 39, 66, 113 ⦁ Balance 60 ⦁ BSR 107 ⦁ Buttonholes 38, 82 ⦁ Calibrating 52 ⦁ Combi mode 40-43 ⦁ Creative consultant 58 ⦁ Decorative stitches 97 ⦁ Edit 146-148 ⦁ Embroidery Alphabet 143 ⦁ Embroidery mode 142 ⦁ Functions 36-43, 148-152 ⦁ Help program 59 ⦁ History 128 ⦁ Main display 34-35, 142-147 ⦁ Menu selection 34 ⦁ Overview 34-43, 142-152 ⦁ Practical stitches 64 ⦁ Quilt stitches 103 ⦁ Selecting the color 50 ⦁ Selection 34-35 ⦁ Settings 44-56 ⦁ Setup 44-56 ⦁ Stitch pattern area 35 ⦁ Stitch pattern display 35 ⦁ Tutorial 57
Dual Transport 111-112
E eco 13, 34, 62
Edit ⦁ Adding embroidery motif 148 ⦁ Altering characters 148-149 ⦁ Altering embroidery motif in height or width 148-149 ⦁ Altering embroidery motif proportionally 148-149 ⦁ Altering stitch type 148-149 ⦁ Bobbin status 146-147 ⦁ Color number 146 ⦁ Deleting embroidery motif 148-149 ⦁ Display 146 ⦁ Duplicating embroidery motif 148-149 ⦁ Edit 146-148 ⦁ Embroidery menu 146 ⦁ Endless embroidery 148-149 ⦁ Feed dog position up/down 146-147 ⦁ Grid 150 ⦁ Hoop and motif size Check 148-149 ⦁ Hoop selection/-display 146-147, 150 ⦁ Mittor image left/right/down/up 148-149 ⦁ Motif center 150
033804.52.04_2013-09_Manual_B780_EN
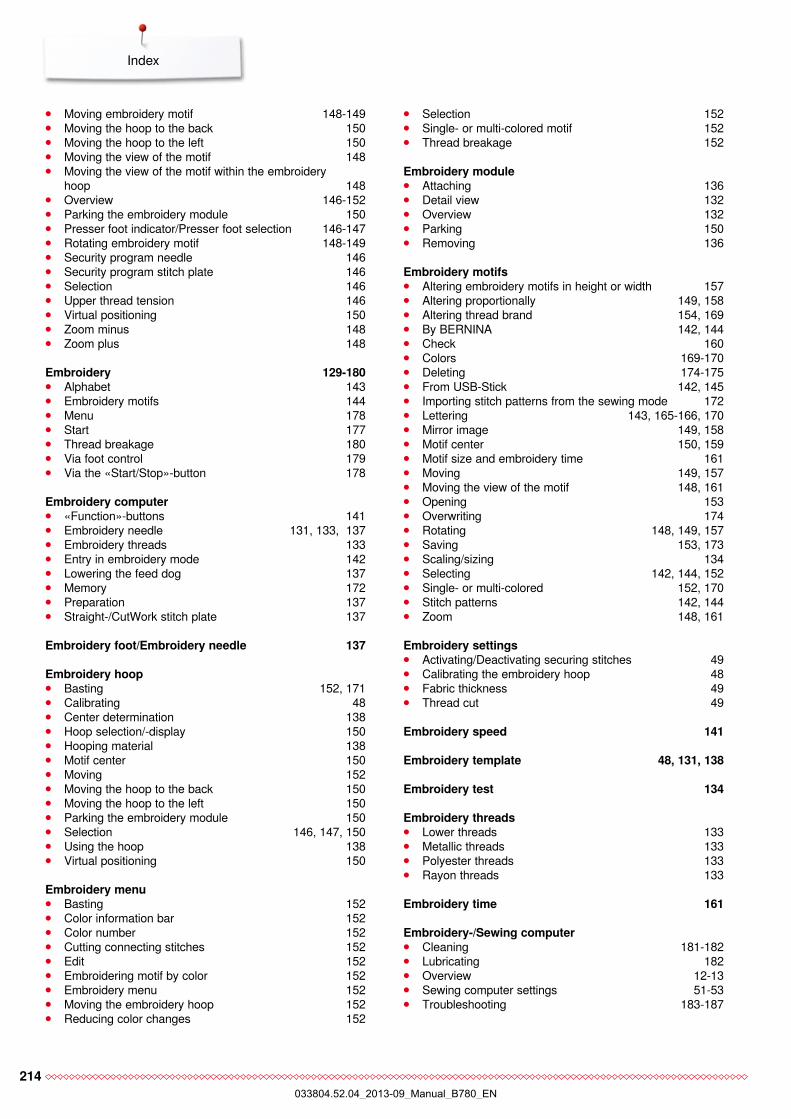
214
Index
⦁ Moving embroidery motif 148-149 ⦁ Moving the hoop to the back 150 ⦁ Moving the hoop to the left 150 ⦁ Moving the view of the motif 148 ⦁ Moving the view of the motif within the embroidery
hoop 148 ⦁ Overview 146-152 ⦁ Parking the embroidery module 150 ⦁ Presser foot indicator/Presser foot selection 146-147 ⦁ Rotating embroidery motif 148-149 ⦁ Security program needle 146 ⦁ Security program stitch plate 146 ⦁ Selection 146 ⦁ Upper thread tension 146 ⦁ Virtual positioning 150 ⦁ Zoom minus 148 ⦁ Zoom plus 148
Embroidery 129-180 ⦁ Alphabet 143 ⦁ Embroidery motifs 144 ⦁ Menu 178 ⦁ Start 177 ⦁ Thread breakage 180 ⦁ Via foot control 179 ⦁ Via the «Start/Stop»-button 178
Embroidery computer ⦁ «Function»-buttons 141 ⦁ Embroidery needle 131, 133, 137 ⦁ Embroidery threads 133 ⦁ Entry in embroidery mode 142 ⦁ Lowering the feed dog 137 ⦁ Memory 172 ⦁ Preparation 137 ⦁ Straight-/CutWork stitch plate 137
Embroidery foot/Embroidery needle 137
Embroidery hoop ⦁ Basting 152, 171 ⦁ Calibrating 48 ⦁ Center determination 138 ⦁ Hoop selection/-display 150 ⦁ Hooping material 138 ⦁ Motif center 150 ⦁ Moving 152 ⦁ Moving the hoop to the back 150 ⦁ Moving the hoop to the left 150 ⦁ Parking the embroidery module 150 ⦁ Selection 146, 147, 150 ⦁ Using the hoop 138 ⦁ Virtual positioning 150
Embroidery menu ⦁ Basting 152 ⦁ Color information bar 152 ⦁ Color number 152 ⦁ Cutting connecting stitches 152 ⦁ Edit 152 ⦁ Embroidering motif by color 152 ⦁ Embroidery menu 152 ⦁ Moving the embroidery hoop 152 ⦁ Reducing color changes 152
⦁ Selection 152 ⦁ Single- or multi-colored motif 152 ⦁ Thread breakage 152
Embroidery module ⦁ Attaching 136 ⦁ Detail view 132 ⦁ Overview 132 ⦁ Parking 150 ⦁ Removing 136
Embroidery motifs ⦁ Altering embroidery motifs in height or width 157 ⦁ Altering proportionally 149, 158 ⦁ Altering thread brand 154, 169 ⦁ By BERNINA 142, 144 ⦁ Check 160 ⦁ Colors 169-170 ⦁ Deleting 174-175 ⦁ From USB-Stick 142, 145 ⦁ Importing stitch patterns from the sewing mode 172 ⦁ Lettering 143, 165-166, 170 ⦁ Mirror image 149, 158 ⦁ Motif center 150, 159 ⦁ Motif size and embroidery time 161 ⦁ Moving 149, 157 ⦁ Moving the view of the motif 148, 161 ⦁ Opening 153 ⦁ Overwriting 174 ⦁ Rotating 148, 149, 157 ⦁ Saving 153, 173 ⦁ Scaling/sizing 134 ⦁ Selecting 142, 144, 152 ⦁ Single- or multi-colored 152, 170 ⦁ Stitch patterns 142, 144 ⦁ Zoom 148, 161
Embroidery settings ⦁ Activating/Deactivating securing stitches 49 ⦁ Calibrating the embroidery hoop 48 ⦁ Fabric thickness 49 ⦁ Thread cut 49
Embroidery speed 141
Embroidery template 48, 131, 138
Embroidery test 134
Embroidery threads ⦁ Lower threads 133 ⦁ Metallic threads 133 ⦁ Polyester threads 133 ⦁ Rayon threads 133
Embroidery time 161
Embroidery-/Sewing computer ⦁ Cleaning 181-182 ⦁ Lubricating 182 ⦁ Overview 12-13 ⦁ Sewing computer settings 51-53 ⦁ Troubleshooting 183-187
033804.52.04_2013-09_Manual_B780_EN
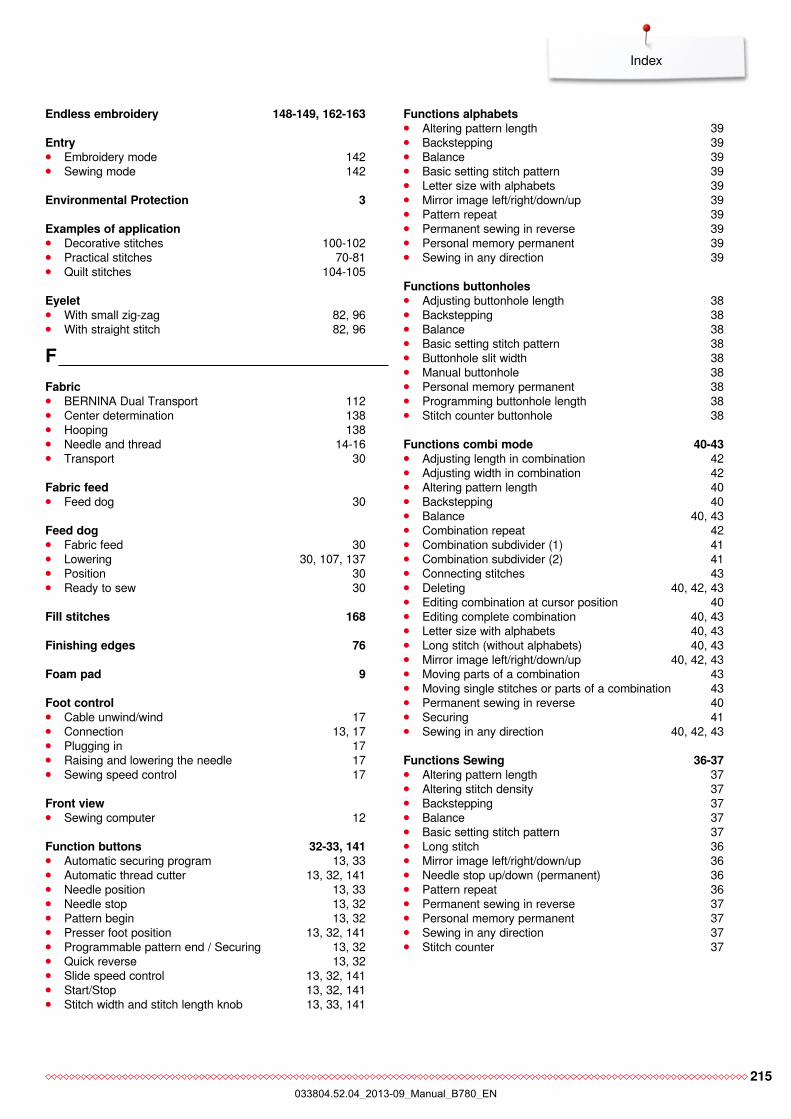
215
Index
Endless embroidery 148-149, 162-163
Entry ⦁ Embroidery mode 142 ⦁ Sewing mode 142
Environmental Protection 3
Examples of application ⦁ Decorative stitches 100-102 ⦁ Practical stitches 70-81 ⦁ Quilt stitches 104-105
Eyelet ⦁ With small zig-zag 82, 96 ⦁ With straight stitch 82, 96
F Fabric ⦁ BERNINA Dual Transport 112 ⦁ Center determination 138 ⦁ Hooping 138 ⦁ Needle and thread 14-16 ⦁ Transport 30
Fabric feed ⦁ Feed dog 30
Feed dog ⦁ Fabric feed 30 ⦁ Lowering 30, 107, 137 ⦁ Position 30 ⦁ Ready to sew 30
Fill stitches 168
Finishing edges 76
Foam pad 9
Foot control ⦁ Cable unwind/wind 17 ⦁ Connection 13, 17 ⦁ Plugging in 17 ⦁ Raising and lowering the needle 17 ⦁ Sewing speed control 17
Front view ⦁ Sewing computer 12
Function buttons 32-33, 141 ⦁ Automatic securing program 13, 33 ⦁ Automatic thread cutter 13, 32, 141 ⦁ Needle position 13, 33 ⦁ Needle stop 13, 32 ⦁ Pattern begin 13, 32 ⦁ Presser foot position 13, 32, 141 ⦁ Programmable pattern end / Securing 13, 32 ⦁ Quick reverse 13, 32 ⦁ Slide speed control 13, 32, 141 ⦁ Start/Stop 13, 32, 141 ⦁ Stitch width and stitch length knob 13, 33, 141
Functions alphabets ⦁ Altering pattern length 39 ⦁ Backstepping 39 ⦁ Balance 39 ⦁ Basic setting stitch pattern 39 ⦁ Letter size with alphabets 39 ⦁ Mirror image left/right/down/up 39 ⦁ Pattern repeat 39 ⦁ Permanent sewing in reverse 39 ⦁ Personal memory permanent 39 ⦁ Sewing in any direction 39
Functions buttonholes ⦁ Adjusting buttonhole length 38 ⦁ Backstepping 38 ⦁ Balance 38 ⦁ Basic setting stitch pattern 38 ⦁ Buttonhole slit width 38 ⦁ Manual buttonhole 38 ⦁ Personal memory permanent 38 ⦁ Programming buttonhole length 38 ⦁ Stitch counter buttonhole 38
Functions combi mode 40-43 ⦁ Adjusting length in combination 42 ⦁ Adjusting width in combination 42 ⦁ Altering pattern length 40 ⦁ Backstepping 40 ⦁ Balance 40, 43 ⦁ Combination repeat 42 ⦁ Combination subdivider (1) 41 ⦁ Combination subdivider (2) 41 ⦁ Connecting stitches 43 ⦁ Deleting 40, 42, 43 ⦁ Editing combination at cursor position 40 ⦁ Editing complete combination 40, 43 ⦁ Letter size with alphabets 40, 43 ⦁ Long stitch (without alphabets) 40, 43 ⦁ Mirror image left/right/down/up 40, 42, 43 ⦁ Moving parts of a combination 43 ⦁ Moving single stitches or parts of a combination 43 ⦁ Permanent sewing in reverse 40 ⦁ Securing 41 ⦁ Sewing in any direction 40, 42, 43
Functions Sewing 36-37 ⦁ Altering pattern length 37 ⦁ Altering stitch density 37 ⦁ Backstepping 37 ⦁ Balance 37 ⦁ Basic setting stitch pattern 37 ⦁ Long stitch 36 ⦁ Mirror image left/right/down/up 36 ⦁ Needle stop up/down (permanent) 36 ⦁ Pattern repeat 36 ⦁ Permanent sewing in reverse 37 ⦁ Personal memory permanent 37 ⦁ Sewing in any direction 37 ⦁ Stitch counter 37
033804.52.04_2013-09_Manual_B780_EN
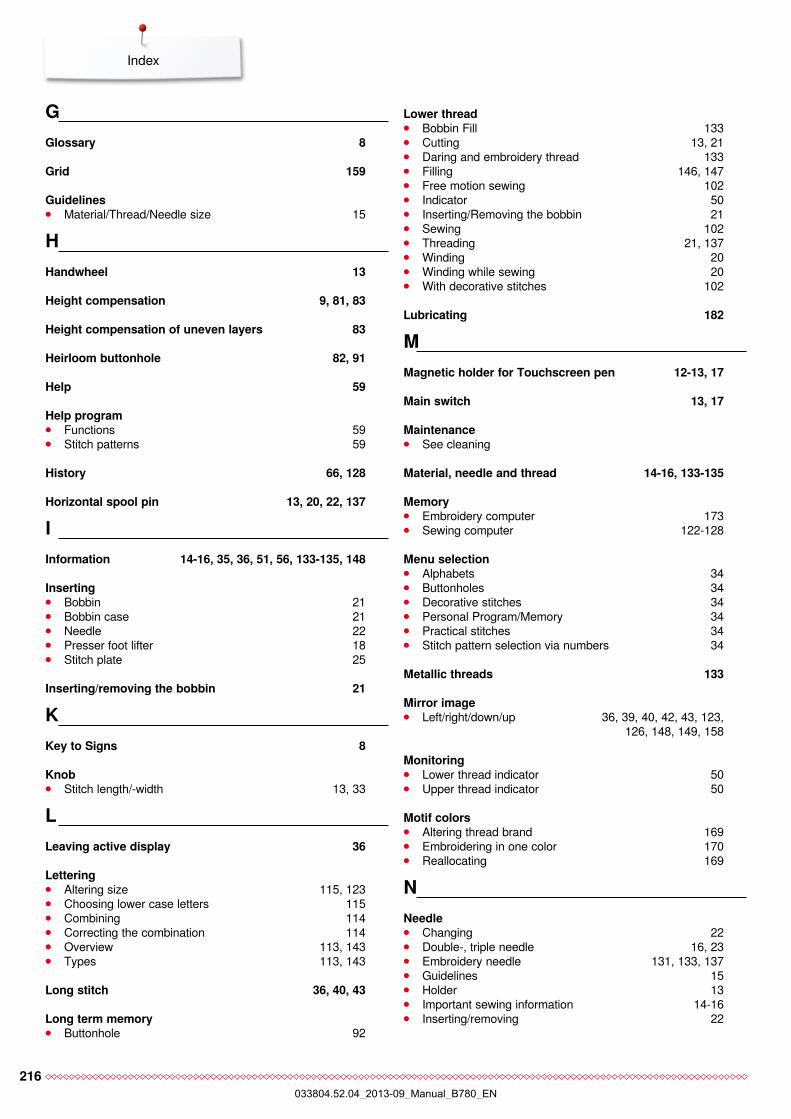
216
Index
G Glossary 8
Grid 159
Guidelines ⦁ Material/Thread/Needle size 15
H Handwheel 13
Height compensation 9, 81, 83
Height compensation of uneven layers 83
Heirloom buttonhole 82, 91
Help 59
Help program ⦁ Functions 59 ⦁ Stitch patterns 59
History 66, 128
Horizontal spool pin 13, 20, 22, 137
I Information 14-16, 35, 36, 51, 56, 133-135, 148
Inserting ⦁ Bobbin 21 ⦁ Bobbin case 21 ⦁ Needle 22 ⦁ Presser foot lifter 18 ⦁ Stitch plate 25
Inserting/removing the bobbin 21
K Key to Signs 8
Knob ⦁ Stitch length/-width 13, 33
L Leaving active display 36
Lettering ⦁ Altering size 115, 123 ⦁ Choosing lower case letters 115 ⦁ Combining 114 ⦁ Correcting the combination 114 ⦁ Overview 113, 143 ⦁ Types 113, 143
Long stitch 36, 40, 43
Long term memory ⦁ Buttonhole 92
Lower thread ⦁ Bobbin Fill 133 ⦁ Cutting 13, 21 ⦁ Daring and embroidery thread 133 ⦁ Filling 146, 147 ⦁ Free motion sewing 102 ⦁ Indicator 50 ⦁ Inserting/Removing the bobbin 21 ⦁ Sewing 102 ⦁ Threading 21, 137 ⦁ Winding 20 ⦁ Winding while sewing 20 ⦁ With decorative stitches 102
Lubricating 182
M Magnetic holder for Touchscreen pen 12-13, 17
Main switch 13, 17
Maintenance ⦁ See cleaning
Material, needle and thread 14-16, 133-135
Memory ⦁ Embroidery computer 173 ⦁ Sewing computer 122-128
Menu selection ⦁ Alphabets 34 ⦁ Buttonholes 34 ⦁ Decorative stitches 34 ⦁ Personal Program/Memory 34 ⦁ Practical stitches 34 ⦁ Stitch pattern selection via numbers 34
Metallic threads 133
Mirror image ⦁ Left/right/down/up 36, 39, 40, 42, 43, 123,
126, 148, 149, 158 Monitoring ⦁ Lower thread indicator 50 ⦁ Upper thread indicator 50
Motif colors ⦁ Altering thread brand 169 ⦁ Embroidering in one color 170 ⦁ Reallocating 169
N Needle ⦁ Changing 22 ⦁ Double-, triple needle 16, 23 ⦁ Embroidery needle 131, 133, 137 ⦁ Guidelines 15 ⦁ Holder 13 ⦁ Important sewing information 14-16 ⦁ Inserting/removing 22
033804.52.04_2013-09_Manual_B780_EN
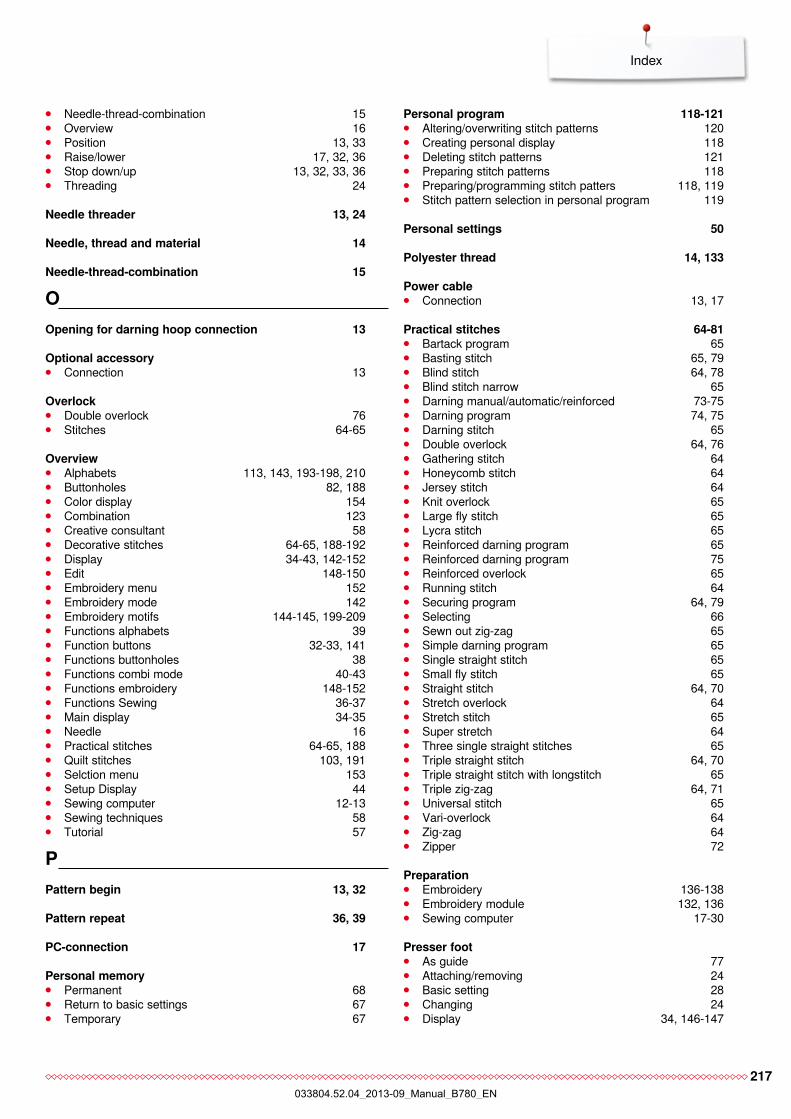
217
Index
⦁ Needle-thread-combination 15 ⦁ Overview 16 ⦁ Position 13, 33 ⦁ Raise/lower 17, 32, 36 ⦁ Stop down/up 13, 32, 33, 36 ⦁ Threading 24
Needle threader 13, 24
Needle, thread and material 14
Needle-thread-combination 15
O Opening for darning hoop connection 13
Optional accessory ⦁ Connection 13
Overlock ⦁ Double overlock 76 ⦁ Stitches 64-65
Overview ⦁ Alphabets 113, 143, 193-198, 210 ⦁ Buttonholes 82, 188 ⦁ Color display 154 ⦁ Combination 123 ⦁ Creative consultant 58 ⦁ Decorative stitches 64-65, 188-192 ⦁ Display 34-43, 142-152 ⦁ Edit 148-150 ⦁ Embroidery menu 152 ⦁ Embroidery mode 142 ⦁ Embroidery motifs 144-145, 199-209 ⦁ Functions alphabets 39 ⦁ Function buttons 32-33, 141 ⦁ Functions buttonholes 38 ⦁ Functions combi mode 40-43 ⦁ Functions embroidery 148-152 ⦁ Functions Sewing 36-37 ⦁ Main display 34-35 ⦁ Needle 16 ⦁ Practical stitches 64-65, 188 ⦁ Quilt stitches 103, 191 ⦁ Selction menu 153 ⦁ Setup Display 44 ⦁ Sewing computer 12-13 ⦁ Sewing techniques 58 ⦁ Tutorial 57
P Pattern begin 13, 32
Pattern repeat 36, 39
PC-connection 17
Personal memory ⦁ Permanent 68 ⦁ Return to basic settings 67 ⦁ Temporary 67
Personal program 118-121 ⦁ Altering/overwriting stitch patterns 120 ⦁ Creating personal display 118 ⦁ Deleting stitch patterns 121 ⦁ Preparing stitch patterns 118 ⦁ Preparing/programming stitch patters 118, 119 ⦁ Stitch pattern selection in personal program 119
Personal settings 50
Polyester thread 14, 133
Power cable ⦁ Connection 13, 17
Practical stitches 64-81 ⦁ Bartack program 65 ⦁ Basting stitch 65, 79 ⦁ Blind stitch 64, 78 ⦁ Blind stitch narrow 65 ⦁ Darning manual/automatic/reinforced 73-75 ⦁ Darning program 74, 75 ⦁ Darning stitch 65 ⦁ Double overlock 64, 76 ⦁ Gathering stitch 64 ⦁ Honeycomb stitch 64 ⦁ Jersey stitch 64 ⦁ Knit overlock 65 ⦁ Large fly stitch 65 ⦁ Lycra stitch 65 ⦁ Reinforced darning program 65 ⦁ Reinforced darning program 75 ⦁ Reinforced overlock 65 ⦁ Running stitch 64 ⦁ Securing program 64, 79 ⦁ Selecting 66 ⦁ Sewn out zig-zag 65 ⦁ Simple darning program 65 ⦁ Single straight stitch 65 ⦁ Small fly stitch 65 ⦁ Straight stitch 64, 70 ⦁ Stretch overlock 64 ⦁ Stretch stitch 65 ⦁ Super stretch 64 ⦁ Three single straight stitches 65 ⦁ Triple straight stitch 64, 70 ⦁ Triple straight stitch with longstitch 65 ⦁ Triple zig-zag 64, 71 ⦁ Universal stitch 65 ⦁ Vari-overlock 64 ⦁ Zig-zag 64 ⦁ Zipper 72
Preparation ⦁ Embroidery 136-138 ⦁ Embroidery module 132, 136 ⦁ Sewing computer 17-30
Presser foot ⦁ As guide 77 ⦁ Attaching/removing 24 ⦁ Basic setting 28 ⦁ Changing 24 ⦁ Display 34, 146-147
033804.52.04_2013-09_Manual_B780_EN
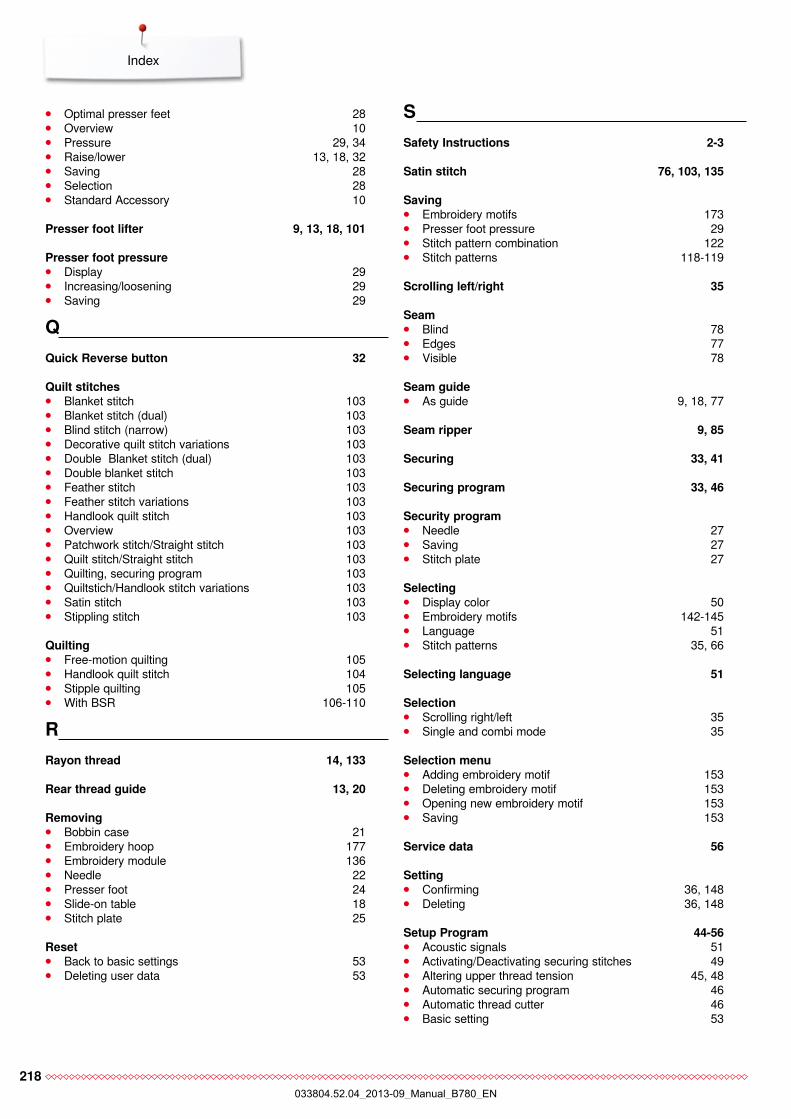
218
Index
⦁ Optimal presser feet 28 ⦁ Overview 10 ⦁ Pressure 29, 34 ⦁ Raise/lower 13, 18, 32 ⦁ Saving 28 ⦁ Selection 28 ⦁ Standard Accessory 10
Presser foot lifter 9, 13, 18, 101
Presser foot pressure ⦁ Display 29 ⦁ Increasing/loosening 29 ⦁ Saving 29
Q Quick Reverse button 32
Quilt stitches ⦁ Blanket stitch 103 ⦁ Blanket stitch (dual) 103 ⦁ Blind stitch (narrow) 103 ⦁ Decorative quilt stitch variations 103 ⦁ Double Blanket stitch (dual) 103 ⦁ Double blanket stitch 103 ⦁ Feather stitch 103 ⦁ Feather stitch variations 103 ⦁ Handlook quilt stitch 103 ⦁ Overview 103 ⦁ Patchwork stitch/Straight stitch 103 ⦁ Quilt stitch/Straight stitch 103 ⦁ Quilting, securing program 103 ⦁ Quiltstich/Handlook stitch variations 103 ⦁ Satin stitch 103 ⦁ Stippling stitch 103
Quilting ⦁ Free-motion quilting 105 ⦁ Handlook quilt stitch 104 ⦁ Stipple quilting 105 ⦁ With BSR 106-110
R Rayon thread 14, 133
Rear thread guide 13, 20
Removing ⦁ Bobbin case 21 ⦁ Embroidery hoop 177 ⦁ Embroidery module 136 ⦁ Needle 22 ⦁ Presser foot 24 ⦁ Slide-on table 18 ⦁ Stitch plate 25
Reset ⦁ Back to basic settings 53 ⦁ Deleting user data 53
S Safety Instructions 2-3
Satin stitch 76, 103, 135 Saving ⦁ Embroidery motifs 173 ⦁ Presser foot pressure 29 ⦁ Stitch pattern combination 122 ⦁ Stitch patterns 118-119
Scrolling left/right 35
Seam ⦁ Blind 78 ⦁ Edges 77 ⦁ Visible 78
Seam guide ⦁ As guide 9, 18, 77
Seam ripper 9, 85
Securing 33, 41
Securing program 33, 46
Security program ⦁ Needle 27 ⦁ Saving 27 ⦁ Stitch plate 27
Selecting ⦁ Display color 50 ⦁ Embroidery motifs 142-145 ⦁ Language 51 ⦁ Stitch patterns 35, 66
Selecting language 51
Selection ⦁ Scrolling right/left 35 ⦁ Single and combi mode 35
Selection menu ⦁ Adding embroidery motif 153 ⦁ Deleting embroidery motif 153 ⦁ Opening new embroidery motif 153 ⦁ Saving 153
Service data 56
Setting ⦁ Confirming 36, 148 ⦁ Deleting 36, 148
Setup Program 44-56 ⦁ Acoustic signals 51 ⦁ Activating/Deactivating securing stitches 49 ⦁ Altering upper thread tension 45, 48 ⦁ Automatic securing program 46 ⦁ Automatic thread cutter 46 ⦁ Basic setting 53
033804.52.04_2013-09_Manual_B780_EN
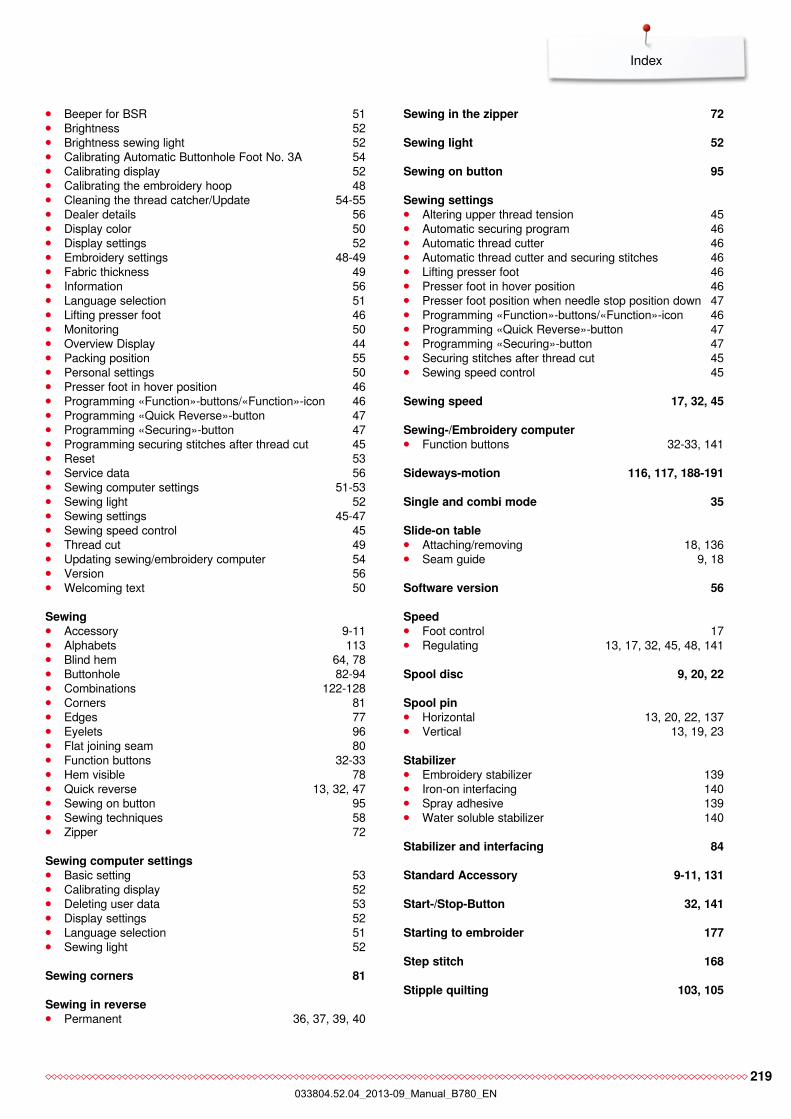
219
Index
⦁ Beeper for BSR 51 ⦁ Brightness 52 ⦁ Brightness sewing light 52 ⦁ Calibrating Automatic Buttonhole Foot No. 3A 54 ⦁ Calibrating display 52 ⦁ Calibrating the embroidery hoop 48 ⦁ Cleaning the thread catcher/Update 54-55 ⦁ Dealer details 56 ⦁ Display color 50 ⦁ Display settings 52 ⦁ Embroidery settings 48-49 ⦁ Fabric thickness 49 ⦁ Information 56 ⦁ Language selection 51 ⦁ Lifting presser foot 46 ⦁ Monitoring 50 ⦁ Overview Display 44 ⦁ Packing position 55 ⦁ Personal settings 50 ⦁ Presser foot in hover position 46 ⦁ Programming «Function»-buttons/«Function»-icon 46 ⦁ Programming «Quick Reverse»-button 47 ⦁ Programming «Securing»-button 47 ⦁ Programming securing stitches after thread cut 45 ⦁ Reset 53 ⦁ Service data 56 ⦁ Sewing computer settings 51-53 ⦁ Sewing light 52 ⦁ Sewing settings 45-47 ⦁ Sewing speed control 45 ⦁ Thread cut 49 ⦁ Updating sewing/embroidery computer 54 ⦁ Version 56 ⦁ Welcoming text 50
Sewing ⦁ Accessory 9-11 ⦁ Alphabets 113 ⦁ Blind hem 64, 78 ⦁ Buttonhole 82-94 ⦁ Combinations 122-128 ⦁ Corners 81 ⦁ Edges 77 ⦁ Eyelets 96 ⦁ Flat joining seam 80 ⦁ Function buttons 32-33 ⦁ Hem visible 78 ⦁ Quick reverse 13, 32, 47 ⦁ Sewing on button 95 ⦁ Sewing techniques 58 ⦁ Zipper 72
Sewing computer settings ⦁ Basic setting 53 ⦁ Calibrating display 52 ⦁ Deleting user data 53 ⦁ Display settings 52 ⦁ Language selection 51 ⦁ Sewing light 52
Sewing corners 81
Sewing in reverse ⦁ Permanent 36, 37, 39, 40
Sewing in the zipper 72
Sewing light 52
Sewing on button 95
Sewing settings ⦁ Altering upper thread tension 45 ⦁ Automatic securing program 46 ⦁ Automatic thread cutter 46 ⦁ Automatic thread cutter and securing stitches 46 ⦁ Lifting presser foot 46 ⦁ Presser foot in hover position 46 ⦁ Presser foot position when needle stop position down 47 ⦁ Programming «Function»-buttons/«Function»-icon 46 ⦁ Programming «Quick Reverse»-button 47 ⦁ Programming «Securing»-button 47 ⦁ Securing stitches after thread cut 45 ⦁ Sewing speed control 45
Sewing speed 17, 32, 45
Sewing-/Embroidery computer ⦁ Function buttons 32-33, 141
Sideways-motion 116, 117, 188-191 Single and combi mode 35
Slide-on table ⦁ Attaching/removing 18, 136 ⦁ Seam guide 9, 18
Software version 56
Speed ⦁ Foot control 17 ⦁ Regulating 13, 17, 32, 45, 48, 141
Spool disc 9, 20, 22
Spool pin ⦁ Horizontal 13, 20, 22, 137 ⦁ Vertical 13, 19, 23
Stabilizer ⦁ Embroidery stabilizer 139 ⦁ Iron-on interfacing 140 ⦁ Spray adhesive 139 ⦁ Water soluble stabilizer 140
Stabilizer and interfacing 84
Standard Accessory 9-11, 131
Start-/Stop-Button 32, 141
Starting to embroider 177
Step stitch 168
Stipple quilting 103, 105
033804.52.04_2013-09_Manual_B780_EN
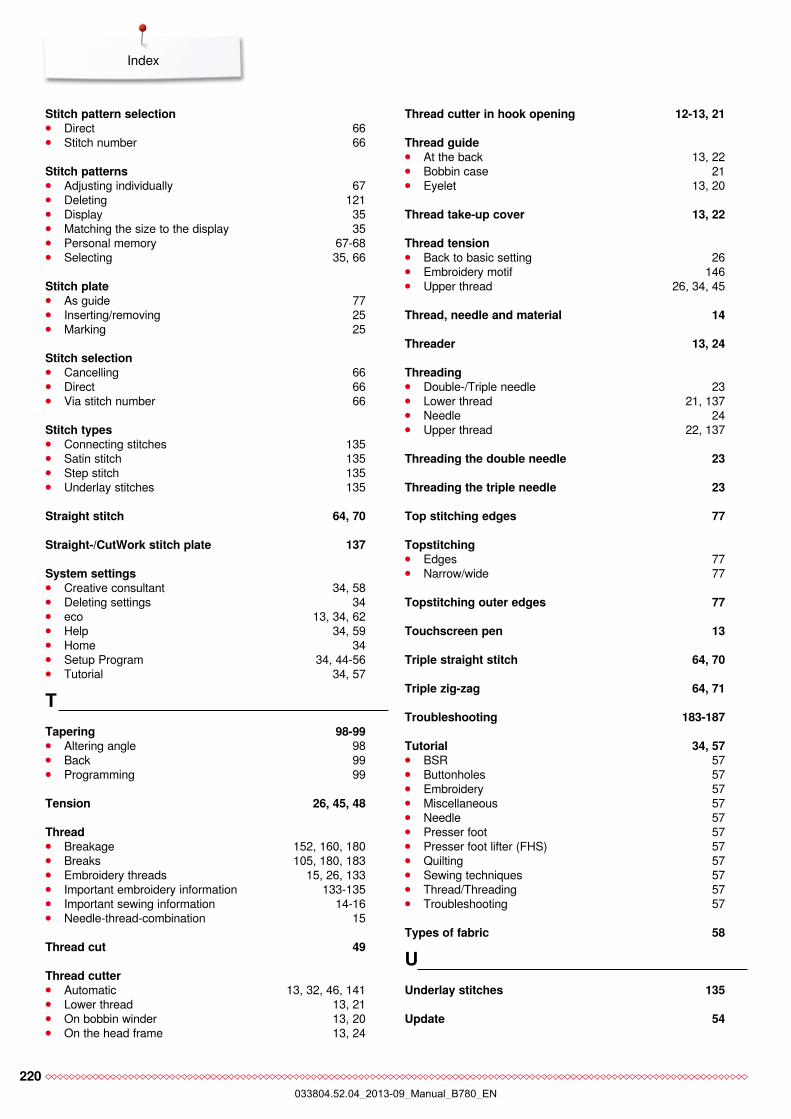
220
Index
Stitch pattern selection ⦁ Direct 66 ⦁ Stitch number 66
Stitch patterns ⦁ Adjusting individually 67 ⦁ Deleting 121 ⦁ Display 35 ⦁ Matching the size to the display 35 ⦁ Personal memory 67-68 ⦁ Selecting 35, 66
Stitch plate ⦁ As guide 77 ⦁ Inserting/removing 25 ⦁ Marking 25
Stitch selection ⦁ Cancelling 66 ⦁ Direct 66 ⦁ Via stitch number 66
Stitch types ⦁ Connecting stitches 135 ⦁ Satin stitch 135 ⦁ Step stitch 135 ⦁ Underlay stitches 135
Straight stitch 64, 70
Straight-/CutWork stitch plate 137
System settings ⦁ Creative consultant 34, 58 ⦁ Deleting settings 34 ⦁ eco 13, 34, 62 ⦁ Help 34, 59 ⦁ Home 34 ⦁ Setup Program 34, 44-56 ⦁ Tutorial 34, 57
T Tapering 98-99 ⦁ Altering angle 98 ⦁ Back 99 ⦁ Programming 99
Tension 26, 45, 48
Thread ⦁ Breakage 152, 160, 180 ⦁ Breaks 105, 180, 183 ⦁ Embroidery threads 15, 26, 133 ⦁ Important embroidery information 133-135 ⦁ Important sewing information 14-16 ⦁ Needle-thread-combination 15
Thread cut 49
Thread cutter ⦁ Automatic 13, 32, 46, 141 ⦁ Lower thread 13, 21 ⦁ On bobbin winder 13, 20 ⦁ On the head frame 13, 24
Thread cutter in hook opening 12-13, 21
Thread guide ⦁ At the back 13, 22 ⦁ Bobbin case 21 ⦁ Eyelet 13, 20
Thread take-up cover 13, 22
Thread tension ⦁ Back to basic setting 26 ⦁ Embroidery motif 146 ⦁ Upper thread 26, 34, 45
Thread, needle and material 14
Threader 13, 24
Threading ⦁ Double-/Triple needle 23 ⦁ Lower thread 21, 137 ⦁ Needle 24 ⦁ Upper thread 22, 137
Threading the double needle 23
Threading the triple needle 23
Top stitching edges 77
Topstitching ⦁ Edges 77 ⦁ Narrow/wide 77
Topstitching outer edges 77
Touchscreen pen 13
Triple straight stitch 64, 70
Triple zig-zag 64, 71
Troubleshooting 183-187
Tutorial 34, 57 ⦁ BSR 57 ⦁ Buttonholes 57 ⦁ Embroidery 57 ⦁ Miscellaneous 57 ⦁ Needle 57 ⦁ Presser foot 57 ⦁ Presser foot lifter (FHS) 57 ⦁ Quilting 57 ⦁ Sewing techniques 57 ⦁ Thread/Threading 57 ⦁ Troubleshooting 57
Types of fabric 58
U Underlay stitches 135
Update 54
033804.52.04_2013-09_Manual_B780_EN
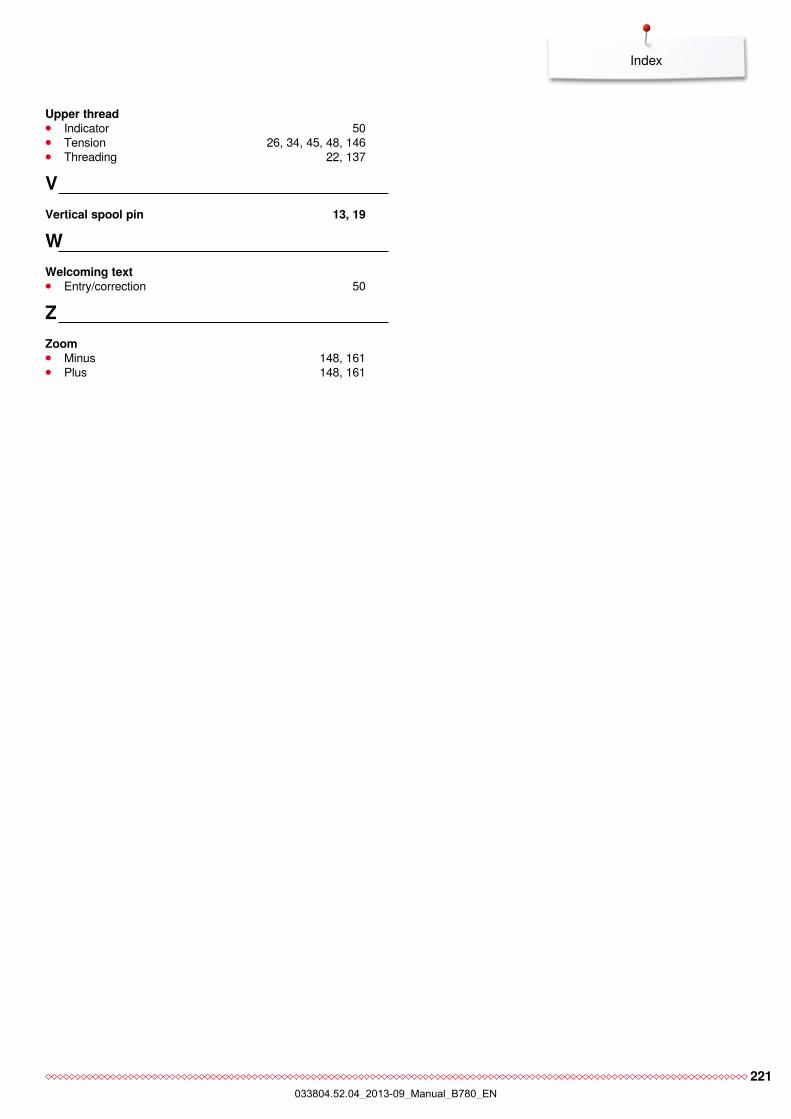
221
Index
Upper thread ⦁ Indicator 50 ⦁ Tension 26, 34, 45, 48, 146 ⦁ Threading 22, 137
V Vertical spool pin 13, 19
W Welcoming text ⦁ Entry/correction 50
Z Zoom ⦁ Minus 148, 161 ⦁ Plus 148, 161
033804.52.04_2013-09_Manual_B780_EN
222
Imprint
TextHerbert Stolz/Susanne Ribi
Graphicswww.sculpt.ch
PicturesPatrice Heilmann, CH-Winterthur
Typesetting, LayoutSusanne Ribi
Copyright2012 BERNINA International AG, CH-Steckborn
2014/02 en 033804.52.04
033804.52.04_2013-09_Manual_B780_EN
In partnership with


