Embed Size (px)
Citation preview
Owner’s Manual用戶手冊
AVH-X5850BTAVH-X4850DVDAVH-X2850BTAVH-X1850DVDDVD RDS AV RECEIVERDVD RDS AV接收機
English1< CRD4925-A >
English
中文
2
■ Theme menu ....................41Selecting the background display ...................41Setting the illumination colour ........................41Selecting the theme colour .............................42Selecting the clock image ..............................42
■ Setting up the video player ................................42
Setting the top-priority languages ..................42Setting the angle icon display .........................42Setting the aspect ratio ..................................42Setting parental lock ......................................43Displaying your DivX VOD registration
code ..........................................................43Displaying your DivX VOD deregistration
code ..........................................................43Automatic playback of DVDs ..........................43Setting the video signal for the rear view
camera ......................................................43
■ Favourite menu ................44Creating a shortcut ........................................44Selecting a shortcut .......................................44Removing a shortcut ......................................44
■ Common operations ........44Setting the time and date ...............................44Setting the “Sound Retriever” function ............45Changing the wide screen mode ....................45
■ Other functions ................45Restoring this product to the default
settings .....................................................45
■ Connection .......................46Precautions ....................................................46Precautions before connecting the system .....46Before installing this product ..........................46To prevent damage ........................................46Notice for the blue/white lead .........................47This product ...................................................47Power cord .....................................................47Speaker leads ................................................47Power amp (sold separately) ..........................48iPhone and smartphone .................................48iPhone with Lightning connector ....................48iPhone with 30-pin connector .........................49Android device ...............................................49
Thank you for buying this Pioneer product.Please read through these instructions so you will know how to operate your model properly. After you have finished reading the instruc-tions, keep this document in a safe place for future reference.
Important
The screens shown in the examples may differ from actual screens, which may be changed without notice for performance and function improvements.
■ Precaution ..........................4Licence, Warranty Disclaimer & Limitation of
Liability ........................................................4Important safety information ............................4To ensure safe driving ......................................4When using a display connected to V OUT ......5To avoid battery exhaustion ..............................5Rear view camera ............................................5Handling the USB connector ............................5In case of trouble..............................................5Visit our website ...............................................5Protecting the LCD panel and screen...............5Notes on internal memory ................................5About this manual ............................................6Use and care of the remote control ..................6
■ Basic operation ..................6Checking part names and functions .................6Remote control ................................................7Notes on using the LCD panel .........................7Adjusting the LCD panel angle .........................7Inserting/ejecting/connecting media.................7On first-time startup .........................................8How to use the screens ....................................9Supported AV source .....................................10Displaying the AV operation screen ................10Selecting a source .........................................10Changing the display order of sources ...........10Using the touch panel ....................................10
■ Registration and connection of Bluetooth® device ...............................11
Displaying the “Bluetooth” screen ...................11Registering your Bluetooth devices ................11Connecting a registered Bluetooth device
manually ...................................................11Switching visibility ..........................................12Entering the PIN code for Bluetooth wireless
connection ................................................12Displaying the device information ...................12Clearing the Bluetooth memory......................12Updating Bluetooth software ..........................12Displaying the Bluetooth software version ......12Switching the connected Bluetooth device .....12
■ Hands-free phoning .........13Displaying the Phone menu screen ................13Making a phone call .......................................13Receiving a phone call ...................................14Minimising the dial confirmation screen .........14Changing the phone settings .........................14Using the voice recognition function (for
iPhone) .....................................................14Setting phone book auto synchronisation ......14Notes for hands-free phoning .........................15
■ Setup for iPod / iPhone or smartphone ......................15
The basic flow of iPod / iPhone or smartphone setup .........................................................15
Setting the device connection method............15iPod compatibility ...........................................16Android™ device compatibility.........................16Information on the connections and functions
for each device ..........................................17
■ Radio ................................18Starting procedure .........................................18Searching by PTY information........................18Storing the strongest broadcast
frequencies ...............................................18Displaying the “Radio settings” screen ...........18Tuning into strong frequencies .......................18Setting the FM or AM tuning step ...................18Setting the alternative frequency search ........19Setting the Auto PI search ..............................19Limiting stations to regional programming ......19Receiving traffic announcements (TA) ............19Receiving news announcements....................19Receiving alarm broadcasts ...........................19
■ TV tuner ............................19
Starting procedure .........................................19Storing stations ..............................................20
■ Disc ...................................20Starting procedure .........................................21Selecting files from the file name list ..............21Switching the media file type ..........................21Searching for the part you want to play ..........22Operating the DVD menu ...............................22Switching the subtitle/audio language ............22Operating the DVD menu using touch panel
keys ..........................................................22
■Compressedfiles .............22Starting procedure (for Disc) ..........................24Starting procedure (for USB) ..........................24Operations common to all file types ...............25Audio file operations.......................................25Still image file operations ...............................25
■ iPod ..................................26Connecting your iPod .....................................26Starting procedure .........................................27Selecting song or video sources from the
playlist screen ...........................................27Using this product’s iPod function from your
iPod ...........................................................27Selecting a song from the list related to the
song currently playing (link search) ...........27
■ AppRadioMode ................27Using AppRadioMode ....................................27Using the audio mix function ..........................28
■ Spotify® .............................29Using Spotify with your Pioneer car audio/
video .........................................................30Starting procedure .........................................30Selecting a track or station from the list ..........30
■ Bluetooth audio player ....31Starting procedure .........................................31Selecting files from the file name list ..............31
■ AUX source ......................32Starting procedure .........................................32Setting the video signal ..................................32
■ AV input ............................32
Starting procedure .........................................32Setting the video signal ..................................32
■ MIXTRAX ..........................33MIXTRAX operation .......................................33MIXTRAX EZ operation..................................33Displaying the “MIXTRAX Settings” screen ....33Setting the flash pattern .................................34
■ System settings ...............34Displaying the “System” setting screen ..........34Setting the steering wheel control ..................34Setting Bluetooth audio source activation ......34Setting Spotify source activation ....................34Setting the ever scroll .....................................34Setting the beep tone .....................................35Setting the auto audio mix function ................35Setting the rear view camera ..........................35Setting the demo mode ..................................35Selecting the system language ......................35Setting the keyboard language with the
application for iPhone................................35Adjusting the response positions of the touch
panel (touch panel calibration) ..................35Setting the dimmer .........................................36Adjusting the picture ......................................36Displaying the firmware version .....................37Displaying the open source licences ..............37Updating firmware ..........................................37
■ Audio adjustments ..........37Displaying the “Audio” setting screen .............37Using fader/balance adjustment .....................37Switching sound muting/attenuation ..............37Adjusting source levels ..................................38Using the auto level control ............................38Adjusting loudness .........................................38Setting the subwoofer output..........................38Adjusting the cutoff frequency value ..............38Switching the rear speaker output ..................38Using BASS Boost .........................................38Selecting the listening position .......................38Adjusting the speaker output levels finely .......39Adjusting the time alignment ..........................39Switching the time alignment preset ...............39Using the equaliser ........................................39Adjusting the equaliser curve automatically
(Auto EQ) ..................................................40Saving the sound settings ..............................41Loading the sound settings ............................41
2 < CRD4925-A >< CRD4925-A >
Contents
3
■ Theme menu ....................41Selecting the background display ...................41Setting the illumination colour ........................41Selecting the theme colour .............................42Selecting the clock image ..............................42
■ Setting up the video player ................................42
Setting the top-priority languages ..................42Setting the angle icon display .........................42Setting the aspect ratio ..................................42Setting parental lock ......................................43Displaying your DivX VOD registration
code ..........................................................43Displaying your DivX VOD deregistration
code ..........................................................43Automatic playback of DVDs ..........................43Setting the video signal for the rear view
camera ......................................................43
■ Favourite menu ................44Creating a shortcut ........................................44Selecting a shortcut .......................................44Removing a shortcut ......................................44
■ Common operations ........44Setting the time and date ...............................44Setting the “Sound Retriever” function ............45Changing the wide screen mode ....................45
■ Other functions ................45Restoring this product to the default
settings .....................................................45
■ Connection .......................46Precautions ....................................................46Precautions before connecting the system .....46Before installing this product ..........................46To prevent damage ........................................46Notice for the blue/white lead .........................47This product ...................................................47Power cord .....................................................47Speaker leads ................................................47Power amp (sold separately) ..........................48iPhone and smartphone .................................48iPhone with Lightning connector ....................48iPhone with 30-pin connector .........................49Android device ...............................................49
Camera ..........................................................49External video component and the display .....50
■ Installation .......................50Precautions before installation .......................50Before installing .............................................50Installation notes ............................................50Installation using the screw holes on the side of
this product ...............................................51Installing the microphone ...............................51Mounting on the sun visor ..............................51Installation on the steering column .................51Adjusting the microphone angle .....................52
■ Appendix ..........................52Troubleshooting .............................................52Error messages .............................................53Handling and care of discs .............................54Playable discs ................................................55Detailed information for playable media .........55Bluetooth .......................................................58WMA ..............................................................58FLAC ..............................................................58DivX ...............................................................58AAC ...............................................................58Android™ ........................................................58Detailed information regarding connected iPod
devices ......................................................58Using app-based connected content ..............59Spotify® ..........................................................59Notice regarding video viewing ......................59Notice regarding DVD-Video viewing .............59Notice regarding MP3 file usage ....................59Using the LCD screen correctly ......................59Specifications.................................................60
Starting procedure .........................................32Setting the video signal ..................................32
■ MIXTRAX ..........................33MIXTRAX operation .......................................33MIXTRAX EZ operation..................................33Displaying the “MIXTRAX Settings” screen ....33Setting the flash pattern .................................34
■ System settings ...............34Displaying the “System” setting screen ..........34Setting the steering wheel control ..................34Setting Bluetooth audio source activation ......34Setting Spotify source activation ....................34Setting the ever scroll .....................................34Setting the beep tone .....................................35Setting the auto audio mix function ................35Setting the rear view camera ..........................35Setting the demo mode ..................................35Selecting the system language ......................35Setting the keyboard language with the
application for iPhone................................35Adjusting the response positions of the touch
panel (touch panel calibration) ..................35Setting the dimmer .........................................36Adjusting the picture ......................................36Displaying the firmware version .....................37Displaying the open source licences ..............37Updating firmware ..........................................37
■ Audio adjustments ..........37Displaying the “Audio” setting screen .............37Using fader/balance adjustment .....................37Switching sound muting/attenuation ..............37Adjusting source levels ..................................38Using the auto level control ............................38Adjusting loudness .........................................38Setting the subwoofer output..........................38Adjusting the cutoff frequency value ..............38Switching the rear speaker output ..................38Using BASS Boost .........................................38Selecting the listening position .......................38Adjusting the speaker output levels finely .......39Adjusting the time alignment ..........................39Switching the time alignment preset ...............39Using the equaliser ........................................39Adjusting the equaliser curve automatically
(Auto EQ) ..................................................40Saving the sound settings ..............................41Loading the sound settings ............................41
3< CRD4925-A >
Contents
4
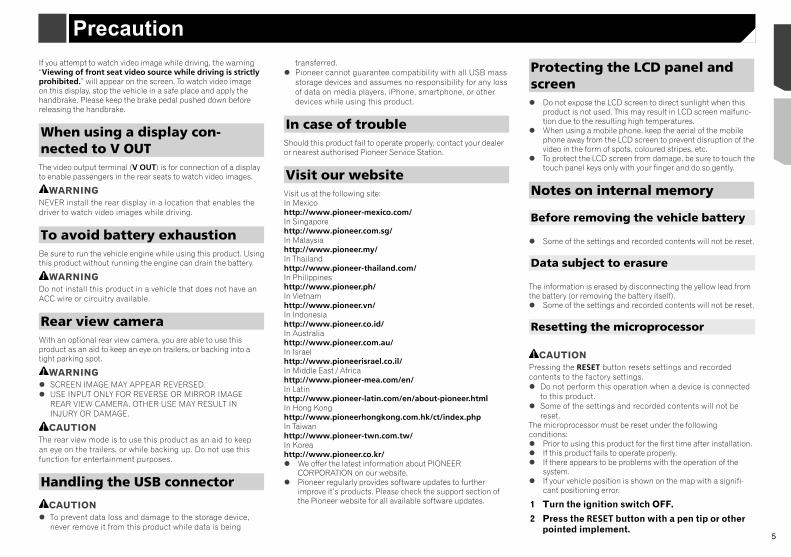
If you attempt to watch video image while driving, the warning “Viewing of front seat video source while driving is strictly prohibited.” will appear on the screen. To watch video image on this display, stop the vehicle in a safe place and apply the handbrake. Please keep the brake pedal pushed down before releasing the handbrake.
When using a display con-nected to V OUTThe video output terminal (V OUT) is for connection of a display to enable passengers in the rear seats to watch video images.
WARNINGNEVER install the rear display in a location that enables the driver to watch video images while driving.
To avoid battery exhaustionBe sure to run the vehicle engine while using this product. Using this product without running the engine can drain the battery.
WARNINGDo not install this product in a vehicle that does not have an ACC wire or circuitry available.
Rear view cameraWith an optional rear view camera, you are able to use this product as an aid to keep an eye on trailers, or backing into a tight parking spot.
WARNING SCREEN IMAGE MAY APPEAR REVERSED. USE INPUT ONLY FOR REVERSE OR MIRROR IMAGE
REAR VIEW CAMERA. OTHER USE MAY RESULT IN INJURY OR DAMAGE.
CAUTIONThe rear view mode is to use this product as an aid to keep an eye on the trailers, or while backing up. Do not use this function for entertainment purposes.
Handling the USB connector
CAUTION To prevent data loss and damage to the storage device,
never remove it from this product while data is being
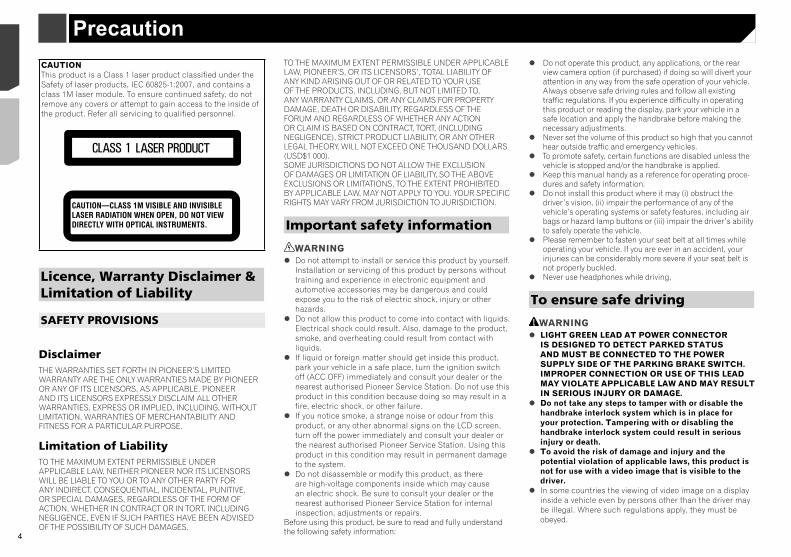
CAUTION This product is a Class 1 laser product classified under the Safety of laser products, IEC 60825-1:2007, and contains a class 1M laser module. To ensure continued safety, do not remove any covers or attempt to gain access to the inside of the product. Refer all servicing to qualified personnel.
CAUTION—CLASS 1M VISIBLE AND INVISIBLE LASER RADIATION WHEN OPEN, DO NOT VIEW DIRECTLY WITH OPTICAL INSTRUMENTS.
Licence, Warranty Disclaimer & Limitation of Liability
SAFETY PROVISIONS
DisclaimerTHE WARRANTIES SET FORTH IN PIONEER’S LIMITED WARRANTY ARE THE ONLY WARRANTIES MADE BY PIONEER OR ANY OF ITS LICENSORS, AS APPLICABLE. PIONEER AND ITS LICENSORS EXPRESSLY DISCLAIM ALL OTHER WARRANTIES, EXPRESS OR IMPLIED, INCLUDING, WITHOUT LIMITATION, WARRANTIES OF MERCHANTABILITY AND FITNESS FOR A PARTICULAR PURPOSE.
Limitation of LiabilityTO THE MAXIMUM EXTENT PERMISSIBLE UNDER APPLICABLE LAW, NEITHER PIONEER NOR ITS LICENSORS WILL BE LIABLE TO YOU OR TO ANY OTHER PARTY FOR ANY INDIRECT, CONSEQUENTIAL, INCIDENTAL, PUNITIVE, OR SPECIAL DAMAGES, REGARDLESS OF THE FORM OF ACTION, WHETHER IN CONTRACT OR IN TORT, INCLUDING NEGLIGENCE, EVEN IF SUCH PARTIES HAVE BEEN ADVISED OF THE POSSIBILITY OF SUCH DAMAGES.
TO THE MAXIMUM EXTENT PERMISSIBLE UNDER APPLICABLE LAW, PIONEER’S, OR ITS LICENSORS’, TOTAL LIABILITY OF ANY KIND ARISING OUT OF OR RELATED TO YOUR USE OF THE PRODUCTS, INCLUDING, BUT NOT LIMITED TO, ANY WARRANTY CLAIMS, OR ANY CLAIMS FOR PROPERTY DAMAGE, DEATH OR DISABILITY, REGARDLESS OF THE FORUM AND REGARDLESS OF WHETHER ANY ACTION OR CLAIM IS BASED ON CONTRACT, TORT, (INCLUDING NEGLIGENCE), STRICT PRODUCT LIABILITY, OR ANY OTHER LEGAL THEORY, WILL NOT EXCEED ONE THOUSAND DOLLARS (USD$1 000).SOME JURISDICTIONS DO NOT ALLOW THE EXCLUSION OF DAMAGES OR LIMITATION OF LIABILITY, SO THE ABOVE EXCLUSIONS OR LIMITATIONS, TO THE EXTENT PROHIBITED BY APPLICABLE LAW, MAY NOT APPLY TO YOU. YOUR SPECIFIC RIGHTS MAY VARY FROM JURISDICTION TO JURISDICTION.
Important safety information
WARNING Do not attempt to install or service this product by yourself.
Installation or servicing of this product by persons without training and experience in electronic equipment and automotive accessories may be dangerous and could expose you to the risk of electric shock, injury or other hazards.
Do not allow this product to come into contact with liquids. Electrical shock could result. Also, damage to the product, smoke, and overheating could result from contact with liquids.
If liquid or foreign matter should get inside this product, park your vehicle in a safe place, turn the ignition switch off (ACC OFF) immediately and consult your dealer or the nearest authorised Pioneer Service Station. Do not use this product in this condition because doing so may result in a fire, electric shock, or other failure.
If you notice smoke, a strange noise or odour from this product, or any other abnormal signs on the LCD screen, turn off the power immediately and consult your dealer or the nearest authorised Pioneer Service Station. Using this product in this condition may result in permanent damage to the system.
Do not disassemble or modify this product, as there are high-voltage components inside which may cause an electric shock. Be sure to consult your dealer or the nearest authorised Pioneer Service Station for internal inspection, adjustments or repairs.
Before using this product, be sure to read and fully understand the following safety information:
Do not operate this product, any applications, or the rear view camera option (if purchased) if doing so will divert your attention in any way from the safe operation of your vehicle. Always observe safe driving rules and follow all existing traffic regulations. If you experience difficulty in operating this product or reading the display, park your vehicle in a safe location and apply the handbrake before making the necessary adjustments.
Never set the volume of this product so high that you cannot hear outside traffic and emergency vehicles.
To promote safety, certain functions are disabled unless the vehicle is stopped and/or the handbrake is applied.
Keep this manual handy as a reference for operating proce-dures and safety information.
Do not install this product where it may (i) obstruct the driver’s vision, (ii) impair the performance of any of the vehicle’s operating systems or safety features, including air bags or hazard lamp buttons or (iii) impair the driver’s ability to safely operate the vehicle.
Please remember to fasten your seat belt at all times while operating your vehicle. If you are ever in an accident, your injuries can be considerably more severe if your seat belt is not properly buckled.
Never use headphones while driving.
To ensure safe driving
WARNING LIGHT GREEN LEAD AT POWER CONNECTOR
IS DESIGNED TO DETECT PARKED STATUS AND MUST BE CONNECTED TO THE POWER SUPPLY SIDE OF THE PARKING BRAKE SWITCH. IMPROPER CONNECTION OR USE OF THIS LEAD MAY VIOLATE APPLICABLE LAW AND MAY RESULT IN SERIOUS INJURY OR DAMAGE.
Do not take any steps to tamper with or disable the handbrake interlock system which is in place for your protection. Tampering with or disabling the handbrake interlock system could result in serious injury or death.
To avoid the risk of damage and injury and the potential violation of applicable laws, this product is not for use with a video image that is visible to the driver.
In some countries the viewing of video image on a display inside a vehicle even by persons other than the driver may be illegal. Where such regulations apply, they must be obeyed.
Precaution
4 < CRD4925-A >< CRD4925-A >
Precaution Precaution
5
If you attempt to watch video image while driving, the warning “Viewing of front seat video source while driving is strictly prohibited.” will appear on the screen. To watch video image on this display, stop the vehicle in a safe place and apply the handbrake. Please keep the brake pedal pushed down before releasing the handbrake.
When using a display con-nected to V OUTThe video output terminal (V OUT) is for connection of a display to enable passengers in the rear seats to watch video images.
WARNINGNEVER install the rear display in a location that enables the driver to watch video images while driving.
To avoid battery exhaustionBe sure to run the vehicle engine while using this product. Using this product without running the engine can drain the battery.
WARNINGDo not install this product in a vehicle that does not have an ACC wire or circuitry available.
Rear view cameraWith an optional rear view camera, you are able to use this product as an aid to keep an eye on trailers, or backing into a tight parking spot.
WARNING SCREEN IMAGE MAY APPEAR REVERSED. USE INPUT ONLY FOR REVERSE OR MIRROR IMAGE
REAR VIEW CAMERA. OTHER USE MAY RESULT IN INJURY OR DAMAGE.
CAUTIONThe rear view mode is to use this product as an aid to keep an eye on the trailers, or while backing up. Do not use this function for entertainment purposes.
Handling the USB connector
CAUTION To prevent data loss and damage to the storage device,
never remove it from this product while data is being
transferred. Pioneer cannot guarantee compatibility with all USB mass
storage devices and assumes no responsibility for any loss of data on media players, iPhone, smartphone, or other devices while using this product.
In case of troubleShould this product fail to operate properly, contact your dealer or nearest authorised Pioneer Service Station.
Visit our websiteVisit us at the following site:In Mexicohttp://www.pioneer-mexico.com/In Singaporehttp://www.pioneer.com.sg/In Malaysiahttp://www.pioneer.my/In Thailandhttp://www.pioneer-thailand.com/In Philippineshttp://www.pioneer.ph/In Vietnamhttp://www.pioneer.vn/In Indonesiahttp://www.pioneer.co.id/In Australiahttp://www.pioneer.com.au/In Israelhttp://www.pioneerisrael.co.il/In Middle East / Africahttp://www.pioneer-mea.com/en/In Latinhttp://www.pioneer-latin.com/en/about-pioneer.htmlIn Hong Konghttp://www.pioneerhongkong.com.hk/ct/index.phpIn Taiwanhttp://www.pioneer-twn.com.tw/In Koreahttp://www.pioneer.co.kr/ We offer the latest information about PIONEER
CORPORATION on our website. Pioneer regularly provides software updates to further
improve it’s products. Please check the support section of the Pioneer website for all available software updates.
Protecting the LCD panel and screen Do not expose the LCD screen to direct sunlight when this
product is not used. This may result in LCD screen malfunc-tion due to the resulting high temperatures.
When using a mobile phone, keep the aerial of the mobile phone away from the LCD screen to prevent disruption of the video in the form of spots, coloured stripes, etc.
To protect the LCD screen from damage, be sure to touch the touch panel keys only with your finger and do so gently.
Notes on internal memory
Before removing the vehicle battery
Some of the settings and recorded contents will not be reset.
Data subject to erasure
The information is erased by disconnecting the yellow lead from the battery (or removing the battery itself). Some of the settings and recorded contents will not be reset.
Resetting the microprocessor
CAUTIONPressing the RESET button resets settings and recorded contents to the factory settings. Do not perform this operation when a device is connected
to this product. Some of the settings and recorded contents will not be
reset.The microprocessor must be reset under the following conditions: Prior to using this product for the first time after installation. If this product fails to operate properly. If there appears to be problems with the operation of the
system. If your vehicle position is shown on the map with a signifi-
cant positioning error.
1 Turn the ignition switch OFF.
2 Press the RESET button with a pen tip or other pointed implement.
Do not operate this product, any applications, or the rear view camera option (if purchased) if doing so will divert your attention in any way from the safe operation of your vehicle. Always observe safe driving rules and follow all existing traffic regulations. If you experience difficulty in operating this product or reading the display, park your vehicle in a safe location and apply the handbrake before making the necessary adjustments.
Never set the volume of this product so high that you cannot hear outside traffic and emergency vehicles.
To promote safety, certain functions are disabled unless the vehicle is stopped and/or the handbrake is applied.
Keep this manual handy as a reference for operating proce-dures and safety information.
Do not install this product where it may (i) obstruct the driver’s vision, (ii) impair the performance of any of the vehicle’s operating systems or safety features, including air bags or hazard lamp buttons or (iii) impair the driver’s ability to safely operate the vehicle.
Please remember to fasten your seat belt at all times while operating your vehicle. If you are ever in an accident, your injuries can be considerably more severe if your seat belt is not properly buckled.
Never use headphones while driving.
To ensure safe driving
WARNING LIGHT GREEN LEAD AT POWER CONNECTOR
IS DESIGNED TO DETECT PARKED STATUS AND MUST BE CONNECTED TO THE POWER SUPPLY SIDE OF THE PARKING BRAKE SWITCH. IMPROPER CONNECTION OR USE OF THIS LEAD MAY VIOLATE APPLICABLE LAW AND MAY RESULT IN SERIOUS INJURY OR DAMAGE.
Do not take any steps to tamper with or disable the handbrake interlock system which is in place for your protection. Tampering with or disabling the handbrake interlock system could result in serious injury or death.
To avoid the risk of damage and injury and the potential violation of applicable laws, this product is not for use with a video image that is visible to the driver.
In some countries the viewing of video image on a display inside a vehicle even by persons other than the driver may be illegal. Where such regulations apply, they must be obeyed.
5< CRD4925-A >
Precaution Precaution
6
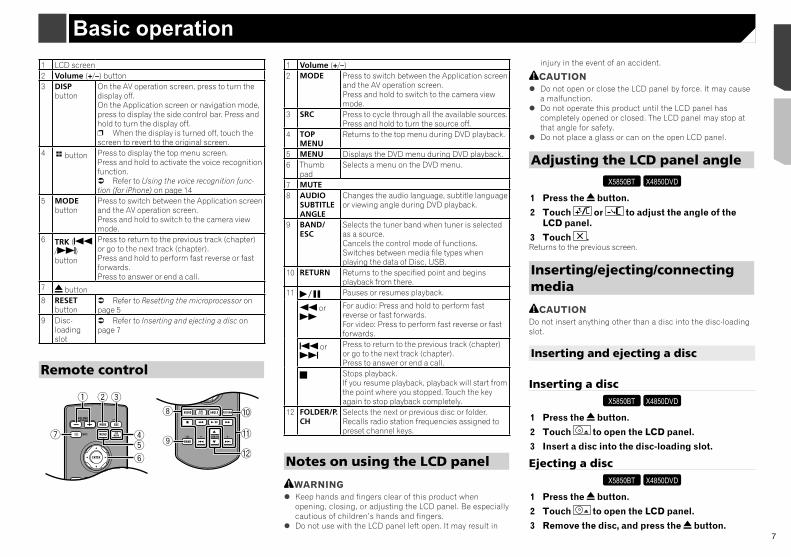
1 LCD screen2 Volume (+/–) button3 DISP
buttonOn the AV operation screen, press to turn the display off.On the Application screen or navigation mode, press to display the side control bar. Press and hold to turn the display off.p When the display is turned off, touch the screen to revert to the original screen.
4 button Press to display the top menu screen.Press and hold to activate the voice recognition function. Refer to Using the voice recognition func-tion (for iPhone) on page 14
5 MODE button
Press to switch between the Application screen and the AV operation screen.Press and hold to switch to the camera view mode.
6 TRK (/ ) button
Press to return to the previous track (chapter) or go to the next track (chapter).Press and hold to perform fast reverse or fast forwards.Press to answer or end a call.
7 button8 RESET
button Refer to Resetting the microprocessor on page 5
9 Disc-loading slot
Refer to Inserting and ejecting a disc on page 7
Remote control
6
4
a
b
c
1 2 3
7
8
95
Refer to Checking part names and functions on page 6Settings and recorded contents are reset to the factory settings.
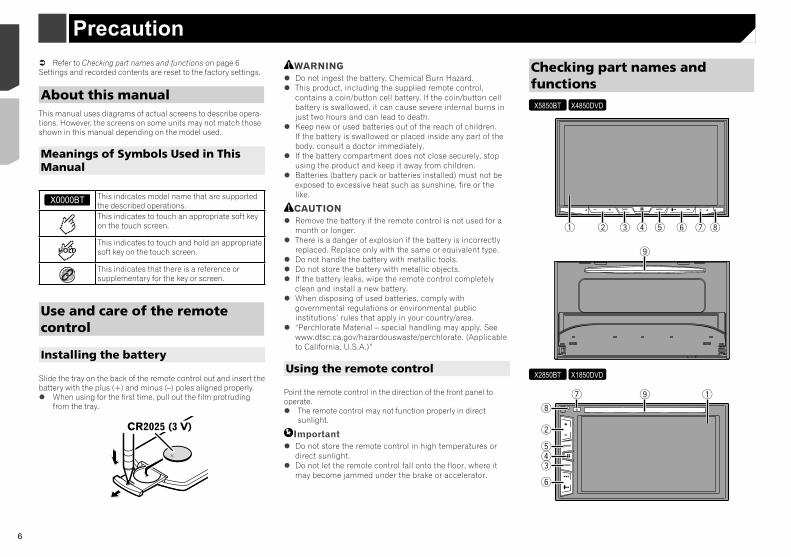
About this manualThis manual uses diagrams of actual screens to describe opera-tions. However, the screens on some units may not match those shown in this manual depending on the model used.
Meanings of Symbols Used in This Manual
X0000BT This indicates model name that are supported the described operations.This indicates to touch an appropriate soft key on the touch screen.
HOLDThis indicates to touch and hold an appropriate soft key on the touch screen.
This indicates that there is a reference or supplementary for the key or screen.
Use and care of the remote control
Installing the battery
Slide the tray on the back of the remote control out and insert the battery with the plus (+) and minus (–) poles aligned properly. When using for the first time, pull out the film protruding
from the tray.
WARNING Do not ingest the battery, Chemical Burn Hazard. This product, including the supplied remote control,
contains a coin/button cell battery. If the coin/button cell battery is swallowed, it can cause severe internal burns in just two hours and can lead to death.
Keep new or used batteries out of the reach of children. If the battery is swallowed or placed inside any part of the body, consult a doctor immediately.
If the battery compartment does not close securely, stop using the product and keep it away from children.
Batteries (battery pack or batteries installed) must not be exposed to excessive heat such as sunshine, fire or the like.
CAUTION Remove the battery if the remote control is not used for a
month or longer. There is a danger of explosion if the battery is incorrectly
replaced. Replace only with the same or equivalent type. Do not handle the battery with metallic tools. Do not store the battery with metallic objects. If the battery leaks, wipe the remote control completely
clean and install a new battery. When disposing of used batteries, comply with
governmental regulations or environmental public institutions’ rules that apply in your country/area.
“Perchlorate Material – special handling may apply. See www.dtsc.ca.gov/hazardouswaste/perchlorate. (Applicable to California, U.S.A.)”
Using the remote control
Point the remote control in the direction of the front panel to operate. The remote control may not function properly in direct
sunlight.
Important Do not store the remote control in high temperatures or
direct sunlight. Do not let the remote control fall onto the floor, where it
may become jammed under the brake or accelerator.
Checking part names and functionsX5850BT X4850DVD
1 2 3 4 5 6 7 8
9
X2850BT X1850DVD
2
345
6
8
97 1
Basic operation
6 < CRD4925-A >< CRD4925-A >
Precaution Basic operation
7
1 LCD screen2 Volume (+/–) button3 DISP
buttonOn the AV operation screen, press to turn the display off.On the Application screen or navigation mode, press to display the side control bar. Press and hold to turn the display off.p When the display is turned off, touch the screen to revert to the original screen.
4 button Press to display the top menu screen.Press and hold to activate the voice recognition function. Refer to Using the voice recognition func-tion (for iPhone) on page 14
5 MODE button
Press to switch between the Application screen and the AV operation screen.Press and hold to switch to the camera view mode.
6 TRK (/ ) button
Press to return to the previous track (chapter) or go to the next track (chapter).Press and hold to perform fast reverse or fast forwards.Press to answer or end a call.
7 button8 RESET
button Refer to Resetting the microprocessor on page 5
9 Disc-loading slot
Refer to Inserting and ejecting a disc on page 7
Remote control
6
4
a
b
c
1 2 3
7
8
95
1 Volume (+/–)2 MODE Press to switch between the Application screen
and the AV operation screen.Press and hold to switch to the camera view mode.
3 SRC Press to cycle through all the available sources.Press and hold to turn the source off.
4 TOP MENU
Returns to the top menu during DVD playback.
5 MENU Displays the DVD menu during DVD playback.6 Thumb
padSelects a menu on the DVD menu.
7 MUTE8 AUDIO
SUBTITLEANGLE
Changes the audio language, subtitle language or viewing angle during DVD playback.
9 BAND/ESC
Selects the tuner band when tuner is selected as a source.Cancels the control mode of functions.Switches between media file types when playing the data of Disc, USB.
10 RETURN Returns to the specified point and begins playback from there.
11 Pauses or resumes playback.
or For audio: Press and hold to perform fast reverse or fast forwards.For video: Press to perform fast reverse or fast forwards.
or Press to return to the previous track (chapter) or go to the next track (chapter).Press to answer or end a call.Stops playback.If you resume playback, playback will start from the point where you stopped. Touch the key again to stop playback completely.
12 FOLDER/P.CH
Selects the next or previous disc or folder.Recalls radio station frequencies assigned to preset channel keys.
Notes on using the LCD panel
WARNING Keep hands and fingers clear of this product when
opening, closing, or adjusting the LCD panel. Be especially cautious of children’s hands and fingers.
Do not use with the LCD panel left open. It may result in
injury in the event of an accident.
CAUTION Do not open or close the LCD panel by force. It may cause
a malfunction. Do not operate this product until the LCD panel has
completely opened or closed. The LCD panel may stop at that angle for safety.
Do not place a glass or can on the open LCD panel.
Adjusting the LCD panel angleX5850BT X4850DVD
1 Press the button.
2 Touch or to adjust the angle of the LCD panel.
3 Touch .Returns to the previous screen.
Inserting/ejecting/connecting media
CAUTIONDo not insert anything other than a disc into the disc-loading slot.
Inserting and ejecting a disc
Inserting a discX5850BT X4850DVD
1 Press the button.
2 Touch to open the LCD panel.
3 Insert a disc into the disc-loading slot.
Ejecting a discX5850BT X4850DVD
1 Press the button.
2 Touch to open the LCD panel.
3 Remove the disc, and press the button.
Checking part names and functionsX5850BT X4850DVD
1 2 3 4 5 6 7 8
9
X2850BT X1850DVD
2
345
6
8
97 1
Basic operation
7< CRD4925-A >
Precaution Basic operation
8
How to use the screens
Phone Book
abcdefghi
abcdefghi
abcdefghi
abcdefghi
abcdefghi
ABC
A
B
C
D
E
F
G
3abcdefghi...
iPod
48216/10
4821
Abcdefg Abcdefg Abcdefg Abcdefg Abcdefg
6/10
Month/Date d/m/y
12hour 24hour
m/d/y y/m/d
10 6 2016 21 48
Time Format
iPod 4821
AbcdefghiAbcdefghi
ABC Pops99999/99999
9999’99” -9999’99”
6/10
Source Select
4821
Abcdefg Abcdefg
Abcdefg Abcdefg
6/10
Disc AUX iPodBluetooth
Audio
RadioAV
48216/10
Radio
Camera View Source OFFSpotify
PowerOFF
TV
System
Top menu screen
Time and date setting screen
Setting menu screen
AV operation screen
Phone menu screen
AV source selection screen
Application operation screen
Application menu screen
favourite source icons Recent application icons
*4
*4
*1
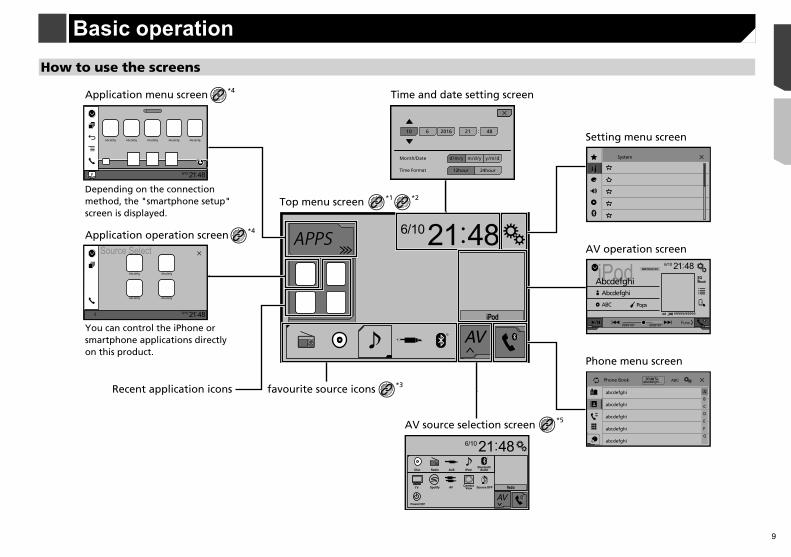
You can control the iPhone or smartphone applications directly on this product.
Depending on the connection method, the "smartphone setup" screen is displayed.
*2
*3
*5
Inserting a discX2850BT X1850DVD
1 Insert a disc into the disc-loading slot.
Ejecting a discX2850BT X1850DVD
1 Press button to eject a disc.
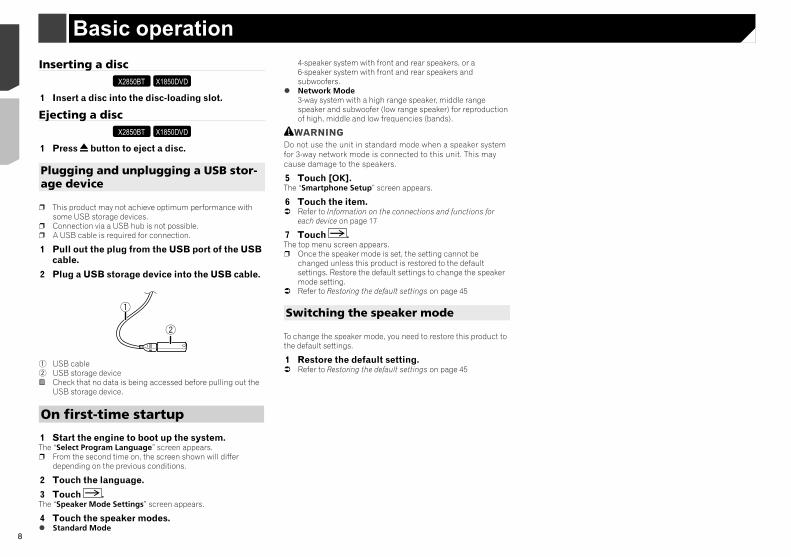
Plugging and unplugging a USB stor-age device
p This product may not achieve optimum performance with some USB storage devices.
p Connection via a USB hub is not possible.p A USB cable is required for connection.
1 Pull out the plug from the USB port of the USB cable.
2 Plug a USB storage device into the USB cable.
2
1
1 USB cable2 USB storage device
Check that no data is being accessed before pulling out the USB storage device.
On first-time startup
1 Start the engine to boot up the system.The “Select Program Language” screen appears.p From the second time on, the screen shown will differ
depending on the previous conditions.
2 Touch the language.
3 Touch .The “Speaker Mode Settings” screen appears.
4 Touch the speaker modes. Standard Mode
4-speaker system with front and rear speakers, or a 6-speaker system with front and rear speakers and subwoofers.
Network Mode3-way system with a high range speaker, middle range speaker and subwoofer (low range speaker) for reproduction of high, middle and low frequencies (bands).
WARNINGDo not use the unit in standard mode when a speaker system for 3-way network mode is connected to this unit. This may cause damage to the speakers.
5 Touch [OK].The “Smartphone Setup” screen appears.
6 Touch the item. Refer to Information on the connections and functions for
each device on page 17
7 Touch .The top menu screen appears.p Once the speaker mode is set, the setting cannot be
changed unless this product is restored to the default settings. Restore the default settings to change the speaker mode setting.
Refer to Restoring the default settings on page 45
Switching the speaker mode
To change the speaker mode, you need to restore this product to the default settings.
1 Restore the default setting. Refer to Restoring the default settings on page 45
8 < CRD4925-A >< CRD4925-A >
Basic operation Basic operation
9
How to use the screens
Phone Book
abcdefghi
abcdefghi
abcdefghi
abcdefghi
abcdefghi
ABC
A
B
C
D
E
F
G
3abcdefghi...
iPod
48216/10
4821
Abcdefg Abcdefg Abcdefg Abcdefg Abcdefg
6/10
Month/Date d/m/y
12hour 24hour
m/d/y y/m/d
10 6 2016 21 48
Time Format
iPod 4821
AbcdefghiAbcdefghi
ABC Pops99999/99999
9999’99” -9999’99”
6/10
Source Select
4821
Abcdefg Abcdefg
Abcdefg Abcdefg
6/10
Disc AUX iPodBluetooth
Audio
RadioAV
48216/10
Radio
Camera View Source OFFSpotify
PowerOFF
TV
System
Top menu screen
Time and date setting screen
Setting menu screen
AV operation screen
Phone menu screen
AV source selection screen
Application operation screen
Application menu screen
favourite source icons Recent application icons
*4
*4
*1
You can control the iPhone or smartphone applications directly on this product.
Depending on the connection method, the "smartphone setup" screen is displayed.
*2
*3
*5
9< CRD4925-A >
Basic operation Basic operation
10
Operating list screens
Playlist
Music
Video
Artist
Alburm
Songs
Podcast
Songs
abcdefghi
abcdefghi
abcdefghi
abcdefghi
abcdefghi
1 2
3
1 Touching an item on the list allows you to narrow down the options and proceed to the next operation.
2 Appears when all characters are not displayed on the display area.If you touch the key, the rest are scrolled for display.
3 Appears when items cannot be displayed on a single page.Drag the slider bar or the list to view any hidden items.
Operating the time bar
9999’99” -9999’99”
1
1 You can change the playback point by dragging the key.p Playback time corresponding to the position of the key is
displayed while dragging the key.
Switching the operation panel
1 Touch .The hidden function keys appears.p This key does not appear for some AV sources.
*1 The top menu screen of this manual is the screen when using the AppRadioMode. The items displayed on the screen may vary depending on the connecting device or mode. When you connect an iPhone via Bluetooth wireless technology or a smartphone via USB cable, “Smartphone Setup” screen appears by touching [APPS].
*2 By pressing the button on any screen you can display the Top menu screen.
*3 When you connect the external navigation system to this unit, the navigation mode key is displayed at the left bottom of the display.
*4 By pressing the MODE button you can switch between the Application screen and the AV operation screen.
*5 If you select “Power OFF”, you can turn off almost all functions. The “Power OFF” mode is released in the following cases: An incoming call is received. A rear view camera image is input when the vehicle back up. A button on this product is pressed. The ignition switch is turned off (ACC OFF), then turned on (ACC ON).
Supported AV sourceYou can play or use the following sources with this product. Radio CD ROM (compressed audio files) DVD-Video USBThe following sources can be played back or used by connecting an auxiliary device. iPod Spotify®
Bluetooth audio (AVH-X5850BT) (AVH-X2850BT) AV input (AV) AUX
Displaying the AV operation screen
1 Press .
2 Touch the AV operation key.
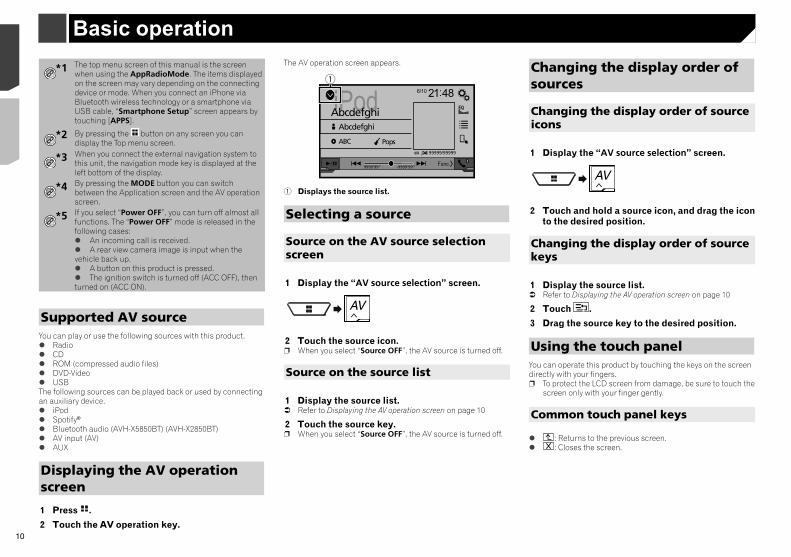
The AV operation screen appears.
iPod 4821
AbcdefghiAbcdefghi
ABC Pops99999/99999
9999’99” -9999’99”
6/10
1
1 Displays the source list.
Selecting a source
Source on the AV source selection screen
1 Display the “AV source selection” screen.
2 Touch the source icon.p When you select “Source OFF”, the AV source is turned off.
Source on the source list
1 Display the source list. Refer to Displaying the AV operation screen on page 10
2 Touch the source key.p When you select “Source OFF”, the AV source is turned off.
Changing the display order of sources
Changing the display order of source icons
1 Display the “AV source selection” screen.
2 Touch and hold a source icon, and drag the icon to the desired position.
Changing the display order of source keys
1 Display the source list. Refer to Displaying the AV operation screen on page 10
2 Touch .
3 Drag the source key to the desired position.
Using the touch panelYou can operate this product by touching the keys on the screen directly with your fingers.p To protect the LCD screen from damage, be sure to touch the
screen only with your finger gently.
Common touch panel keys
: Returns to the previous screen. : Closes the screen.
10 < CRD4925-A >< CRD4925-A >
Basic operation Basic operation

11
Operating list screens
Playlist
Music
Video
Artist
Alburm
Songs
Podcast
Songs
abcdefghi
abcdefghi
abcdefghi
abcdefghi
abcdefghi
1 2
3
1 Touching an item on the list allows you to narrow down the options and proceed to the next operation.
2 Appears when all characters are not displayed on the display area.If you touch the key, the rest are scrolled for display.
3 Appears when items cannot be displayed on a single page.Drag the slider bar or the list to view any hidden items.
Operating the time bar
9999’99” -9999’99”
1
1 You can change the playback point by dragging the key.p Playback time corresponding to the position of the key is
displayed while dragging the key.
Switching the operation panel
1 Touch .The hidden function keys appears.p This key does not appear for some AV sources.
X5850BT X2850BT
Displaying the “Bluetooth” screen
1 Press .
2 Touch , and then .The “Bluetooth” screen appears.
Registering your Bluetooth devicesp If three devices are already paired, “Memory Full” is dis-
played. Delete a paired device first. Refer to Deleting a registered device on page 11
1 Activate the Bluetooth wireless technology on your devices.
2 Display the “Bluetooth” screen. Refer to Displaying the “Bluetooth” screen on page 11
3 Touch [Connection].
4 Touch .The system searches for Bluetooth devices waiting for a connec-tion and displays them in the list if a device is found.
5 Touch the Bluetooth device name.After the device is successfully registered, a Bluetooth connec-tion is established by the system. Once the connection is estab-lished, the device name is displayed on the list.p If your device supports SSP (Secure Simple Pairing), a six-
digit number appears on the display of this product. Touch [Yes] to pair the device.
p The Bluetooth connection can be also made by detecting this product from the Bluetooth device. Before registration, make sure that “Visibility” in the “Bluetooth” menu is set to “On”. For details on a Bluetooth device operations, refer to the operating instructions supplied with the Bluetooth device. Refer to Switching visibility on page 12
p Two mobile phones can be connected to this product at the same time. Refer to Switching the connected Bluetooth device on page
12
p If you try to connect an unconnected mobile phone while two mobile phones are already connected, the first one of the two connected mobile phones will be disconnected and the unconnected mobile phone will be connected instead.
Setting Bluetooth device auto connection
This function connects the last connected Bluetooth device to this product automatically as soon as the two devices are less than a few metres apart.The default setting is “On”.p If two Bluetooth devices were connected the last time, the
two devices are connected to this product automatically in the order that they are registered in the device list.
1 Display the “Bluetooth” screen. Refer to Displaying the “Bluetooth” screen on page 11
2 Touch [Auto Connect] to switch “On” or “Off”.
Deleting a registered device
CAUTIONNever turn this product off while the paired Bluetooth device is being deleted.
1 Display the “Bluetooth” screen. Refer to Displaying the “Bluetooth” screen on page 11
2 Touch [Connection].
3 Touch .
Connecting a registered Bluetooth device manuallyConnect the Bluetooth device manually in the following cases: Two or more Bluetooth devices are registered, and you want
to manually select the device to be used. You want to reconnect a disconnected Bluetooth device. Connection cannot be established automatically for some
reason.
1 Activate the Bluetooth wireless technology on your devices.
Registration and connection of Bluetooth® device
Changing the display order of sources
Changing the display order of source icons
1 Display the “AV source selection” screen.
2 Touch and hold a source icon, and drag the icon to the desired position.
Changing the display order of source keys
1 Display the source list. Refer to Displaying the AV operation screen on page 10
2 Touch .
3 Drag the source key to the desired position.
Using the touch panelYou can operate this product by touching the keys on the screen directly with your fingers.p To protect the LCD screen from damage, be sure to touch the
screen only with your finger gently.
Common touch panel keys
: Returns to the previous screen. : Closes the screen.
11< CRD4925-A >
Basic operation Basic operation Registration and connection of Bluetooth® device
12
X5850BT X2850BT
Phone Book
abcdefghi
abcdefghi
abcdefghi
abcdefghi
abcdefghi
ABC
A
B
C
D
E
F
G
3abcdefghi...
*2
*3
*1
*4
*5
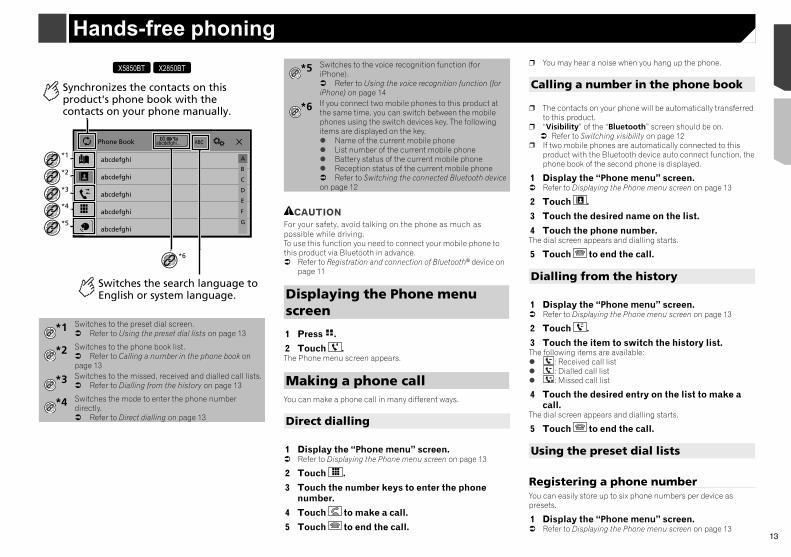
Switches the search language to English or system language.
Synchronizes the contacts on this product's phone book with the contacts on your phone manually.
*6
*1 Switches to the preset dial screen. Refer to Using the preset dial lists on page 13
*2 Switches to the phone book list. Refer to Calling a number in the phone book on page 13
*3 Switches to the missed, received and dialled call lists. Refer to Dialling from the history on page 13
*4 Switches the mode to enter the phone number directly. Refer to Direct dialling on page 13
Hands-free phoning
2 Display the “Bluetooth” screen. Refer to Displaying the “Bluetooth” screen on page 11
3 Touch [Connection].
4 Touch the name of the device.p To disconnect the device, touch the name of the connected
device in the list.
Switching visibilityThis function sets whether or not to make this product visible to the other device.The default setting is “On”.
1 Display the “Bluetooth” screen. Refer to Displaying the “Bluetooth” screen on page 11
2 Touch [Visibility] to switch “On” or “Off”.
Entering the PIN code for Bluetooth wireless connectionTo connect your Bluetooth device to this product, you need to enter a PIN code.You can change the PIN code with this function.p The default PIN code is “0000”.
1 Display the “Bluetooth” screen. Refer to Displaying the “Bluetooth” screen on page 11
2 Touch [PIN Code Input].
3 Touch [0] to [9] to input the pin code (up to 8 -digits).
4 Touch .
Displaying the device information
1 Display the “Bluetooth” screen. Refer to Displaying the “Bluetooth” screen on page 11
2 Touch [Device Information].The device name and address of the Bluetooth device on this product are displayed.
Clearing the Bluetooth memoryp This setting is available only when you stop your vehicle in a
safe place and apply the handbrake.
CAUTIONNever turn this product off while the Bluetooth memory is being cleared.
1 Display the “Bluetooth” screen. Refer to Displaying the “Bluetooth” screen on page 11
2 Touch [Bluetooth Memory Clear].
3 Touch [Clear].The confirmation screen appears.
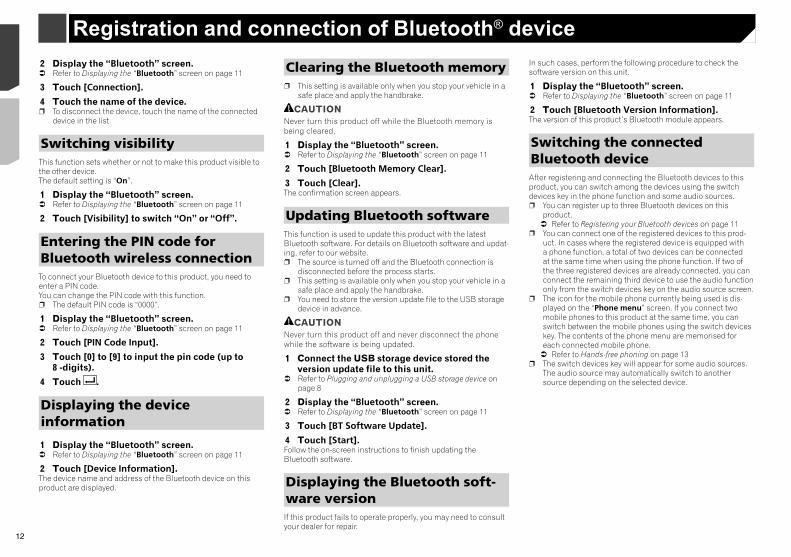
Updating Bluetooth softwareThis function is used to update this product with the latest Bluetooth software. For details on Bluetooth software and updat-ing, refer to our website.p The source is turned off and the Bluetooth connection is
disconnected before the process starts.p This setting is available only when you stop your vehicle in a
safe place and apply the handbrake.p You need to store the version update file to the USB storage
device in advance.
CAUTIONNever turn this product off and never disconnect the phone while the software is being updated.
1 Connect the USB storage device stored the version update file to this unit.
Refer to Plugging and unplugging a USB storage device on page 8
2 Display the “Bluetooth” screen. Refer to Displaying the “Bluetooth” screen on page 11
3 Touch [BT Software Update].
4 Touch [Start].Follow the on-screen instructions to finish updating the Bluetooth software.
Displaying the Bluetooth soft-ware versionIf this product fails to operate properly, you may need to consult your dealer for repair.
In such cases, perform the following procedure to check the software version on this unit.
1 Display the “Bluetooth” screen. Refer to Displaying the “Bluetooth” screen on page 11
2 Touch [Bluetooth Version Information].The version of this product’s Bluetooth module appears.
Switching the connected Bluetooth deviceAfter registering and connecting the Bluetooth devices to this product, you can switch among the devices using the switch devices key in the phone function and some audio sources.p You can register up to three Bluetooth devices on this
product. Refer to Registering your Bluetooth devices on page 11
p You can connect one of the registered devices to this prod-uct. In cases where the registered device is equipped with a phone function, a total of two devices can be connected at the same time when using the phone function. If two of the three registered devices are already connected, you can connect the remaining third device to use the audio function only from the switch devices key on the audio source screen.
p The icon for the mobile phone currently being used is dis-played on the “Phone menu” screen. If you connect two mobile phones to this product at the same time, you can switch between the mobile phones using the switch devices key. The contents of the phone menu are memorised for each connected mobile phone. Refer to Hands-free phoning on page 13
p The switch devices key will appear for some audio sources. The audio source may automatically switch to another source depending on the selected device.
12 < CRD4925-A >< CRD4925-A >
Registration and connection of Bluetooth® device Hands-free phoning
13
X5850BT X2850BT
Phone Book
abcdefghi
abcdefghi
abcdefghi
abcdefghi
abcdefghi
ABC
A
B
C
D
E
F
G
3abcdefghi...
*2
*3
*1
*4
*5
Switches the search language to English or system language.
Synchronizes the contacts on this product's phone book with the contacts on your phone manually.
*6
*1 Switches to the preset dial screen. Refer to Using the preset dial lists on page 13
*2 Switches to the phone book list. Refer to Calling a number in the phone book on page 13
*3 Switches to the missed, received and dialled call lists. Refer to Dialling from the history on page 13
*4 Switches the mode to enter the phone number directly. Refer to Direct dialling on page 13
*5 Switches to the voice recognition function (for iPhone). Refer to Using the voice recognition function (for iPhone) on page 14
*6 If you connect two mobile phones to this product at the same time, you can switch between the mobile phones using the switch devices key. The following items are displayed on the key. Name of the current mobile phone List number of the current mobile phone Battery status of the current mobile phone Reception status of the current mobile phone Refer to Switching the connected Bluetooth device on page 12
CAUTIONFor your safety, avoid talking on the phone as much as possible while driving.To use this function you need to connect your mobile phone to this product via Bluetooth in advance. Refer to Registration and connection of Bluetooth® device on
page 11
Displaying the Phone menu screen
1 Press .
2 Touch .The Phone menu screen appears.
Making a phone callYou can make a phone call in many different ways.
Direct dialling
1 Display the “Phone menu” screen. Refer to Displaying the Phone menu screen on page 13
2 Touch .
3 Touch the number keys to enter the phone number.
4 Touch to make a call.
5 Touch to end the call.
p You may hear a noise when you hang up the phone.
Calling a number in the phone book
p The contacts on your phone will be automatically transferred to this product.
p “Visibility” of the “Bluetooth” screen should be on. Refer to Switching visibility on page 12
p If two mobile phones are automatically connected to this product with the Bluetooth device auto connect function, the phone book of the second phone is displayed.
1 Display the “Phone menu” screen. Refer to Displaying the Phone menu screen on page 13
2 Touch .
3 Touch the desired name on the list.
4 Touch the phone number.The dial screen appears and dialling starts.
5 Touch to end the call.
Dialling from the history
1 Display the “Phone menu” screen. Refer to Displaying the Phone menu screen on page 13
2 Touch .
3 Touch the item to switch the history list.The following items are available: : Received call list : Dialled call list : Missed call list
4 Touch the desired entry on the list to make a call.
The dial screen appears and dialling starts.
5 Touch to end the call.
Using the preset dial lists
Registering a phone numberYou can easily store up to six phone numbers per device as presets.
1 Display the “Phone menu” screen. Refer to Displaying the Phone menu screen on page 13
Hands-free phoning
In such cases, perform the following procedure to check the software version on this unit.
1 Display the “Bluetooth” screen. Refer to Displaying the “Bluetooth” screen on page 11
2 Touch [Bluetooth Version Information].The version of this product’s Bluetooth module appears.
Switching the connected Bluetooth deviceAfter registering and connecting the Bluetooth devices to this product, you can switch among the devices using the switch devices key in the phone function and some audio sources.p You can register up to three Bluetooth devices on this
product. Refer to Registering your Bluetooth devices on page 11
p You can connect one of the registered devices to this prod-uct. In cases where the registered device is equipped with a phone function, a total of two devices can be connected at the same time when using the phone function. If two of the three registered devices are already connected, you can connect the remaining third device to use the audio function only from the switch devices key on the audio source screen.
p The icon for the mobile phone currently being used is dis-played on the “Phone menu” screen. If you connect two mobile phones to this product at the same time, you can switch between the mobile phones using the switch devices key. The contents of the phone menu are memorised for each connected mobile phone. Refer to Hands-free phoning on page 13
p The switch devices key will appear for some audio sources. The audio source may automatically switch to another source depending on the selected device.
13< CRD4925-A >
Registration and connection of Bluetooth® device Hands-free phoning
14
2 Touch [Phone Book Auto Synchronize] to switch “On” or “Off”.
Notes for hands-free phoning
General notes Connection to all mobile phones featuring Bluetooth wire-
less technology is not guaranteed. The line-of-sight distance between this product and your
mobile phone must be 10 metres or less when sending and receiving voice and data via Bluetooth technology.
With some mobile phones, the ring sound may not be output from the speakers.
If private mode is selected on the mobile phone, hands-free phoning may be disabled.
Registration and connection Mobile phone operations vary depending on the type of
mobile phone. Refer to the instruction manual that came with your mobile phone for detailed instructions.
When phone book transfer does not work, disconnect your phone and then perform pairing again from your phone to this product.
Making and receiving calls You may hear a noise in the following situations:
— When you answer the phone using the button on the phone.
— When the person on the other end of the line hangs up the phone.
If the person on the other end of the line cannot hear the conversation due to an echo, decrease the volume level for hands-free phoning.
With some mobile phones, even after you press the accept button on the mobile phone when a call comes in, hands-free phoning may not be performed.
The registered name will appear if the phone number is already registered in the phone book. When one phone number is registered under different names, only the phone number will be displayed.
The received call and the dialled number histories You cannot make a call to the entry of an unknown user (no
phone number) in the received call history. If calls are made by operating your mobile phone, no history
data will be recorded in this product.
Phone book transfers If there are more than 1 000 phone book entries on your
mobile phone, not all entries may download completely. Depending on the phone, this product may not display the
phone book correctly.
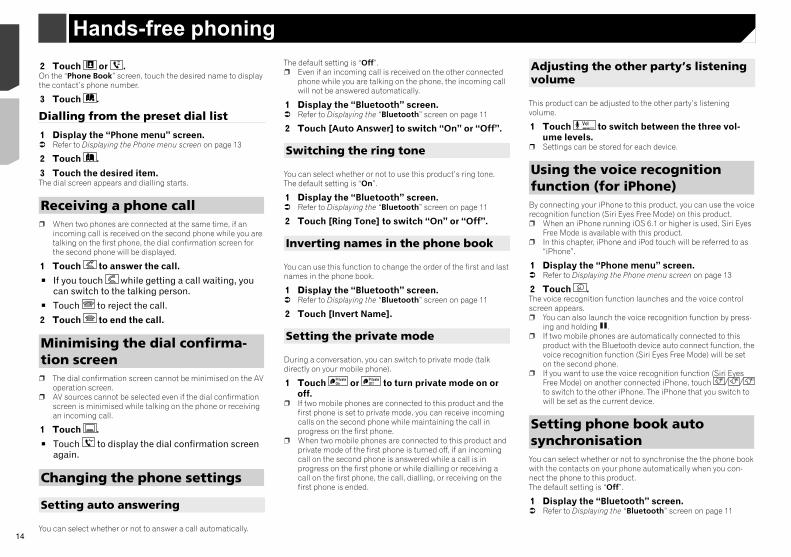
2 Touch or .On the “Phone Book” screen, touch the desired name to display the contact’s phone number.
3 Touch .
Dialling from the preset dial list
1 Display the “Phone menu” screen. Refer to Displaying the Phone menu screen on page 13
2 Touch .
3 Touch the desired item.The dial screen appears and dialling starts.
Receiving a phone callp When two phones are connected at the same time, if an
incoming call is received on the second phone while you are talking on the first phone, the dial confirmation screen for the second phone will be displayed.
1 Touch to answer the call.
If you touch while getting a call waiting, you can switch to the talking person.
Touch to reject the call.
2 Touch to end the call.
Minimising the dial confirma-tion screenp The dial confirmation screen cannot be minimised on the AV
operation screen.p AV sources cannot be selected even if the dial confirmation
screen is minimised while talking on the phone or receiving an incoming call.
1 Touch .
Touch to display the dial confirmation screen again.
Changing the phone settings
Setting auto answering
You can select whether or not to answer a call automatically.
The default setting is “Off”.p Even if an incoming call is received on the other connected
phone while you are talking on the phone, the incoming call will not be answered automatically.
1 Display the “Bluetooth” screen. Refer to Displaying the “Bluetooth” screen on page 11
2 Touch [Auto Answer] to switch “On” or “Off”.
Switching the ring tone
You can select whether or not to use this product’s ring tone.The default setting is “On”.
1 Display the “Bluetooth” screen. Refer to Displaying the “Bluetooth” screen on page 11
2 Touch [Ring Tone] to switch “On” or “Off”.
Inverting names in the phone book
You can use this function to change the order of the first and last names in the phone book.
1 Display the “Bluetooth” screen. Refer to Displaying the “Bluetooth” screen on page 11
2 Touch [Invert Name].
Setting the private mode
During a conversation, you can switch to private mode (talk directly on your mobile phone).
1 Touch or to turn private mode on or off.
p If two mobile phones are connected to this product and the first phone is set to private mode, you can receive incoming calls on the second phone while maintaining the call in progress on the first phone.
p When two mobile phones are connected to this product and private mode of the first phone is turned off, if an incoming call on the second phone is answered while a call is in progress on the first phone or while dialling or receiving a call on the first phone, the call, dialling, or receiving on the first phone is ended.
Adjusting the other party’s listening volume
This product can be adjusted to the other party’s listening volume.
1 Touch to switch between the three vol-ume levels.
p Settings can be stored for each device.
Using the voice recognition function (for iPhone)By connecting your iPhone to this product, you can use the voice recognition function (Siri Eyes Free Mode) on this product.p When an iPhone running iOS 6.1 or higher is used, Siri Eyes
Free Mode is available with this product.p In this chapter, iPhone and iPod touch will be referred to as
“iPhone”.
1 Display the “Phone menu” screen. Refer to Displaying the Phone menu screen on page 13
2 Touch .The voice recognition function launches and the voice control screen appears.p You can also launch the voice recognition function by press-
ing and holding .p If two mobile phones are automatically connected to this
product with the Bluetooth device auto connect function, the voice recognition function (Siri Eyes Free Mode) will be set on the second phone.
p If you want to use the voice recognition function (Siri Eyes Free Mode) on another connected iPhone, touch
1 2 3
to switch to the other iPhone. The iPhone that you switch to will be set as the current device.
Setting phone book auto synchronisationYou can select whether or not to synchronise the the phone book with the contacts on your phone automatically when you con-nect the phone to this product.The default setting is “Off”.
1 Display the “Bluetooth” screen. Refer to Displaying the “Bluetooth” screen on page 11
14 < CRD4925-A >< CRD4925-A >
Hands-free phoning Hands-free phoning
15
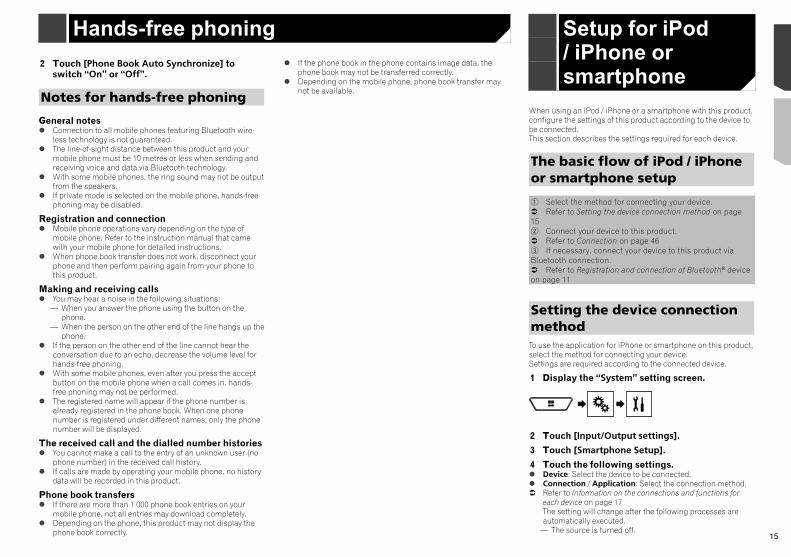
2 Touch [Phone Book Auto Synchronize] to switch “On” or “Off”.
Notes for hands-free phoning
General notes Connection to all mobile phones featuring Bluetooth wire-
less technology is not guaranteed. The line-of-sight distance between this product and your
mobile phone must be 10 metres or less when sending and receiving voice and data via Bluetooth technology.
With some mobile phones, the ring sound may not be output from the speakers.
If private mode is selected on the mobile phone, hands-free phoning may be disabled.
Registration and connection Mobile phone operations vary depending on the type of
mobile phone. Refer to the instruction manual that came with your mobile phone for detailed instructions.
When phone book transfer does not work, disconnect your phone and then perform pairing again from your phone to this product.
Making and receiving calls You may hear a noise in the following situations:
— When you answer the phone using the button on the phone.
— When the person on the other end of the line hangs up the phone.
If the person on the other end of the line cannot hear the conversation due to an echo, decrease the volume level for hands-free phoning.
With some mobile phones, even after you press the accept button on the mobile phone when a call comes in, hands-free phoning may not be performed.
The registered name will appear if the phone number is already registered in the phone book. When one phone number is registered under different names, only the phone number will be displayed.
The received call and the dialled number histories You cannot make a call to the entry of an unknown user (no
phone number) in the received call history. If calls are made by operating your mobile phone, no history
data will be recorded in this product.
Phone book transfers If there are more than 1 000 phone book entries on your
mobile phone, not all entries may download completely. Depending on the phone, this product may not display the
phone book correctly.
If the phone book in the phone contains image data, the phone book may not be transferred correctly.
Depending on the mobile phone, phone book transfer may not be available.
When using an iPod / iPhone or a smartphone with this product, configure the settings of this product according to the device to be connected.This section describes the settings required for each device.
The basic flow of iPod / iPhone or smartphone setup
1 Select the method for connecting your device. Refer to Setting the device connection method on page 152 Connect your device to this product. Refer to Connection on page 463 If necessary, connect your device to this product via Bluetooth connection. Refer to Registration and connection of Bluetooth® device on page 11
Setting the device connection methodTo use the application for iPhone or smartphone on this product, select the method for connecting your device.Settings are required according to the connected device.
1 Display the “System” setting screen.
2 Touch [Input/Output settings].
3 Touch [Smartphone Setup].
4 Touch the following settings. Device: Select the device to be connected. Connection / Application: Select the connection method. Refer to Information on the connections and functions for
each device on page 17The setting will change after the following processes are automatically executed.
— The source is turned off.
Setup for iPod / iPhone or smartphone
Adjusting the other party’s listening volume
This product can be adjusted to the other party’s listening volume.
1 Touch to switch between the three vol-ume levels.
p Settings can be stored for each device.
Using the voice recognition function (for iPhone)By connecting your iPhone to this product, you can use the voice recognition function (Siri Eyes Free Mode) on this product.p When an iPhone running iOS 6.1 or higher is used, Siri Eyes
Free Mode is available with this product.p In this chapter, iPhone and iPod touch will be referred to as
“iPhone”.
1 Display the “Phone menu” screen. Refer to Displaying the Phone menu screen on page 13
2 Touch .The voice recognition function launches and the voice control screen appears.p You can also launch the voice recognition function by press-
ing and holding .p If two mobile phones are automatically connected to this
product with the Bluetooth device auto connect function, the voice recognition function (Siri Eyes Free Mode) will be set on the second phone.
p If you want to use the voice recognition function (Siri Eyes Free Mode) on another connected iPhone, touch
1 2 3
to switch to the other iPhone. The iPhone that you switch to will be set as the current device.
Setting phone book auto synchronisationYou can select whether or not to synchronise the the phone book with the contacts on your phone automatically when you con-nect the phone to this product.The default setting is “Off”.
1 Display the “Bluetooth” screen. Refer to Displaying the “Bluetooth” screen on page 11
15< CRD4925-A >
Hands-free phoning Hands-free phoning Setup for iPod / iPhone or smartphone
16
Information on the connections and functions for each deviceThe settings and cables required for connecting each device, and the available sources are as follows.
iPod / iPhone with a 30-pin connectorDevice connection method When connecting via Bluetooth
(AVH-X5850BT) (AVH-X2850BT)When connecting via CD-IU201V (sold separately)
When connecting via CD-IU51 (sold separately)
Smartphone Setup Device iPhone / iPod iPhone / iPod iPhone / iPodConnection Wireless via BT USB USB
Bluetooth connection Bluetooth connection is required. — —Available sources iPod (audio)
iPod (video) — —Spotify
iPod / iPhone with a Lightning connectorDevice connection method When connecting via Bluetooth
(AVH-X5850BT) (AVH-X2850BT)When connecting via CD-IU52 (sold separately)
Smartphone Setup Device iPhone / iPod iPhone / iPodConnection Wireless via BT USB
Bluetooth connection Bluetooth connection is required. —Available sources iPod (audio)
iPod (video) — —Spotify AppRadioMode —
Android deviceDevice connection method When connecting via Bluetooth
(AVH-X5850BT) (AVH-X2850BT)When connecting via CD-MU200 (sold separately)
Smartphone Setup Device Others OthersApplication USB/MTP AppRadioMode
Bluetooth connection Bluetooth connection is required. —Available sources Spotify —
AppRadioMode — When “Application” of “Smartphone Setup” is set to “AppRadioMode”.
— AppRadioMode is exited.— The smartphone connection (USB and Bluetooth) is
disconnected.
iPod compatibilityThis product supports only the following iPod models and iPod software versions. Others may not work correctly. iPhone 4, 4s, 5, 5c, 5s, 6, 6 Plus: iOS 7.0 or later. iPhone 3GS: iOS 6.0.1 iPod touch (4th, 5th generation): iOS 6.0.1 iPod touch (3rd generation): iOS 5.1.1 iPod touch (2nd generation): iOS 4.2.1 iPod classic 160GB (2009): Ver. 2.0.4 iPod classic 160GB (2008): Ver. 2.0.1 iPod classic 80GB: Ver. 1.1.2 iPod nano (7th generation) iPod nano (6th generation): Ver. 1.2 iPod nano (5th generation): Ver. 1.0.2 iPod nano (4th generation): Ver. 1.0.4 iPod nano (3rd generation): Ver. 1.1.3p You can connect and control an iPod compatible with this
product by using separately sold connector cables.p Operation methods may vary depending on the iPod model
and the software version.p Depending on the software version of the iPod, it may not be
compatible with this product.For details about iPod compatibility with this product, refer to the information on our website.This manual applies to the following iPod models.iPod with 30-pin connector iPhone 3GS, 4, 4s iPod touch 2nd, 3rd, 4th generation iPod classic 80GB, 160GB iPod nano 3rd, 4th, 5th, 6th generationiPod with Lightning connector iPhone 6, 6 Plus iPhone 5, 5c, 5s iPod touch 5th generation iPod nano 7th generation
Android™ device compatibilityp Operation methods may vary depending on the Android
device and the software version of the Android OS.p Depending on the version of the Android OS, it may not be
compatible with this product.p Compatibility with all Android devices is not guaranteed.For details about Android device compatibility with this product, refer to the information on our website.
16 < CRD4925-A >< CRD4925-A >
Setup for iPod / iPhone or smartphone Setup for iPod / iPhone or smartphone

17
Information on the connections and functions for each deviceThe settings and cables required for connecting each device, and the available sources are as follows.
iPod / iPhone with a 30-pin connectorDevice connection method When connecting via Bluetooth
(AVH-X5850BT) (AVH-X2850BT)When connecting via CD-IU201V (sold separately)
When connecting via CD-IU51 (sold separately)
Smartphone Setup Device iPhone / iPod iPhone / iPod iPhone / iPodConnection Wireless via BT USB USB
Bluetooth connection Bluetooth connection is required. — —Available sources iPod (audio)
iPod (video) — —Spotify
iPod / iPhone with a Lightning connectorDevice connection method When connecting via Bluetooth
(AVH-X5850BT) (AVH-X2850BT)When connecting via CD-IU52 (sold separately)
Smartphone Setup Device iPhone / iPod iPhone / iPodConnection Wireless via BT USB
Bluetooth connection Bluetooth connection is required. —Available sources iPod (audio)
iPod (video) — —Spotify AppRadioMode —
Android deviceDevice connection method When connecting via Bluetooth
(AVH-X5850BT) (AVH-X2850BT)When connecting via CD-MU200 (sold separately)
Smartphone Setup Device Others OthersApplication USB/MTP AppRadioMode
Bluetooth connection Bluetooth connection is required. —Available sources Spotify —
AppRadioMode — When “Application” of “Smartphone Setup” is set to “AppRadioMode”.
17< CRD4925-A >
Setup for iPod / iPhone or smartphone Setup for iPod / iPhone or smartphone
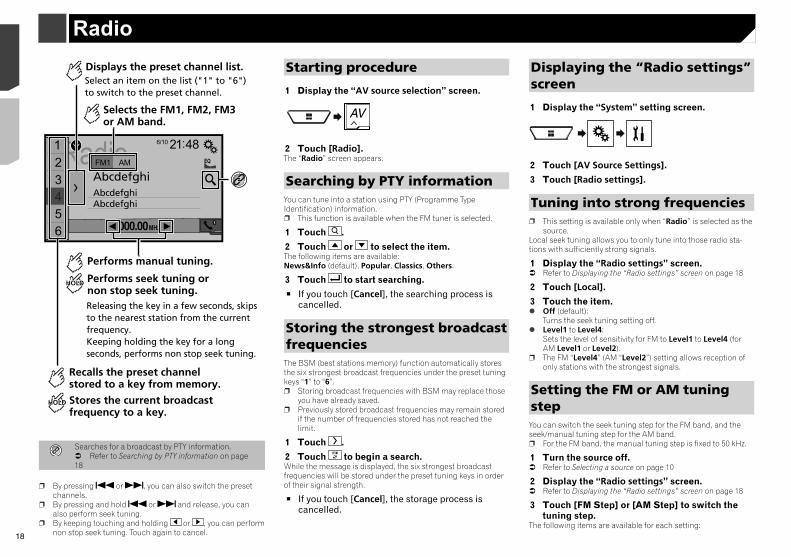
18
FM Step 100kHz(default) 50kHzAM Step 9kHz (default) 10kHz
Setting the alternative fre-quency searchWhen the tuner cannot get a good reception, tunes to another broadcast station that supports the same programme in the current network.The default setting is “Off”.
1 Display the “Radio settings” screen. Refer to Displaying the “Radio settings” screen on page 18
2 Touch [Alternative FREQ] to switch “On” or “Off”.
Setting the Auto PI searchWhen you switch to the broadcast station containing RDS data, searches for the same PI (Programme Identification) code broad-cast station from all frequency band automatically.The default setting is “Off”.
1 Display the “Radio settings” screen. Refer to Displaying the “Radio settings” screen on page 18
2 Touch [Auto PI] to switch “On” or “Off”.p Even if you set to “Off”, the PI search is automatically per-
formed when the tuner cannot get a good reception.
Limiting stations to regional programmingYou can switch whether the area code is checked during the auto PI search.The default setting is “On”.
1 Display the “Radio settings” screen. Refer to Displaying the “Radio settings” screen on page 18
2 Touch [Regional] to switch “On” or “Off”.
Radio 4821 123456
6/10
AMFM1
AbcdefghiAbcdefghi
000.00MHz
Abcdefghi
Selects the FM1, FM2, FM3 or AM band.
Performs manual tuning.
Performs seek tuning or non stop seek tuning.Releasing the key in a few seconds, skips to the nearest station from the current frequency.Keeping holding the key for a long seconds, performs non stop seek tuning.
Displays the preset channel list.Select an item on the list ("1" to "6") to switch to the preset channel.
Recalls the preset channel stored to a key from memory.
Stores the current broadcast frequency to a key.
HOLD
HOLD
Searches for a broadcast by PTY information. Refer to Searching by PTY information on page 18
p By pressing or , you can also switch the preset channels.
p By pressing and hold or and release, you can also perform seek tuning.
p By keeping touching and holding or , you can perform non stop seek tuning. Touch again to cancel.
Starting procedure
1 Display the “AV source selection” screen.
2 Touch [Radio].The “Radio” screen appears.
Searching by PTY informationYou can tune into a station using PTY (Programme Type Identification) information.p This function is available when the FM tuner is selected.
1 Touch .
2 Touch or to select the item.The following items are available:News&Info (default), Popular, Classics, Others.
3 Touch to start searching.
If you touch [Cancel], the searching process is cancelled.
Storing the strongest broadcast frequenciesThe BSM (best stations memory) function automatically stores the six strongest broadcast frequencies under the preset tuning keys “1” to “6”.p Storing broadcast frequencies with BSM may replace those
you have already saved.p Previously stored broadcast frequencies may remain stored
if the number of frequencies stored has not reached the limit.
1 Touch .
2 Touch to begin a search.While the message is displayed, the six strongest broadcast frequencies will be stored under the preset tuning keys in order of their signal strength.
If you touch [Cancel], the storage process is cancelled.
Displaying the “Radio settings” screen
1 Display the “System” setting screen.
2 Touch [AV Source Settings].
3 Touch [Radio settings].
Tuning into strong frequenciesp This setting is available only when “Radio” is selected as the
source.Local seek tuning allows you to only tune into those radio sta-tions with sufficiently strong signals.
1 Display the “Radio settings” screen. Refer to Displaying the “Radio settings” screen on page 18
2 Touch [Local].
3 Touch the item. Off (default):
Turns the seek tuning setting off. Level1 to Level4:
Sets the level of sensitivity for FM to Level1 to Level4 (for AM Level1 or Level2).
p The FM “Level4” (AM “Level2”) setting allows reception of only stations with the strongest signals.
Setting the FM or AM tuning stepYou can switch the seek tuning step for the FM band, and the seek/manual tuning step for the AM band.p For the FM band, the manual tuning step is fixed to 50 kHz.
1 Turn the source off. Refer to Selecting a source on page 10
2 Display the “Radio settings” screen. Refer to Displaying the “Radio settings” screen on page 18
3 Touch [FM Step] or [AM Step] to switch the tuning step.
The following items are available for each setting:
Radio
18 < CRD4925-A >< CRD4925-A >
Radio Radio
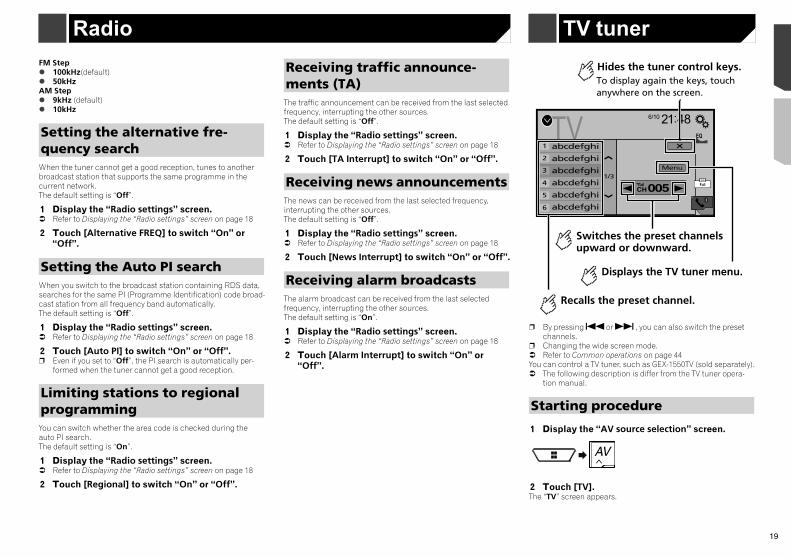
19
FM Step 100kHz(default) 50kHzAM Step 9kHz (default) 10kHz
Setting the alternative fre-quency searchWhen the tuner cannot get a good reception, tunes to another broadcast station that supports the same programme in the current network.The default setting is “Off”.
1 Display the “Radio settings” screen. Refer to Displaying the “Radio settings” screen on page 18
2 Touch [Alternative FREQ] to switch “On” or “Off”.
Setting the Auto PI searchWhen you switch to the broadcast station containing RDS data, searches for the same PI (Programme Identification) code broad-cast station from all frequency band automatically.The default setting is “Off”.
1 Display the “Radio settings” screen. Refer to Displaying the “Radio settings” screen on page 18
2 Touch [Auto PI] to switch “On” or “Off”.p Even if you set to “Off”, the PI search is automatically per-
formed when the tuner cannot get a good reception.
Limiting stations to regional programmingYou can switch whether the area code is checked during the auto PI search.The default setting is “On”.
1 Display the “Radio settings” screen. Refer to Displaying the “Radio settings” screen on page 18
2 Touch [Regional] to switch “On” or “Off”.
Receiving traffic announce-ments (TA)The traffic announcement can be received from the last selected frequency, interrupting the other sources.The default setting is “Off”.
1 Display the “Radio settings” screen. Refer to Displaying the “Radio settings” screen on page 18
2 Touch [TA Interrupt] to switch “On” or “Off”.
Receiving news announcementsThe news can be received from the last selected frequency, interrupting the other sources.The default setting is “Off”.
1 Display the “Radio settings” screen. Refer to Displaying the “Radio settings” screen on page 18
2 Touch [News Interrupt] to switch “On” or “Off”.
Receiving alarm broadcastsThe alarm broadcast can be received from the last selected frequency, interrupting the other sources.The default setting is “On”.
1 Display the “Radio settings” screen. Refer to Displaying the “Radio settings” screen on page 18
2 Touch [Alarm Interrupt] to switch “On” or “Off”.
TV005CH
Full
4821 6/10
abcdefghi
abcdefghi
abcdefghi
abcdefghi
abcdefghi
abcdefghi
1/3Menu
1
2
3
4
5
6
Switches the preset channels upward or downward.
Hides the tuner control keys.To display again the keys, touch anywhere on the screen.
Recalls the preset channel.
Displays the TV tuner menu.
p By pressing or , you can also switch the preset channels.
p Changing the wide screen mode. Refer to Common operations on page 44You can control a TV tuner, such as GEX-1550TV (sold separately). The following description is differ from the TV tuner opera-
tion manual.
Starting procedure
1 Display the “AV source selection” screen.
2 Touch [TV].The “TV” screen appears.
TV tuner
Displaying the “Radio settings” screen
1 Display the “System” setting screen.
2 Touch [AV Source Settings].
3 Touch [Radio settings].
Tuning into strong frequenciesp This setting is available only when “Radio” is selected as the
source.Local seek tuning allows you to only tune into those radio sta-tions with sufficiently strong signals.
1 Display the “Radio settings” screen. Refer to Displaying the “Radio settings” screen on page 18
2 Touch [Local].
3 Touch the item. Off (default):
Turns the seek tuning setting off. Level1 to Level4:
Sets the level of sensitivity for FM to Level1 to Level4 (for AM Level1 or Level2).
p The FM “Level4” (AM “Level2”) setting allows reception of only stations with the strongest signals.
Setting the FM or AM tuning stepYou can switch the seek tuning step for the FM band, and the seek/manual tuning step for the AM band.p For the FM band, the manual tuning step is fixed to 50 kHz.
1 Turn the source off. Refer to Selecting a source on page 10
2 Display the “Radio settings” screen. Refer to Displaying the “Radio settings” screen on page 18
3 Touch [FM Step] or [AM Step] to switch the tuning step.
The following items are available for each setting:
19< CRD4925-A >
Radio Radio TV tuner
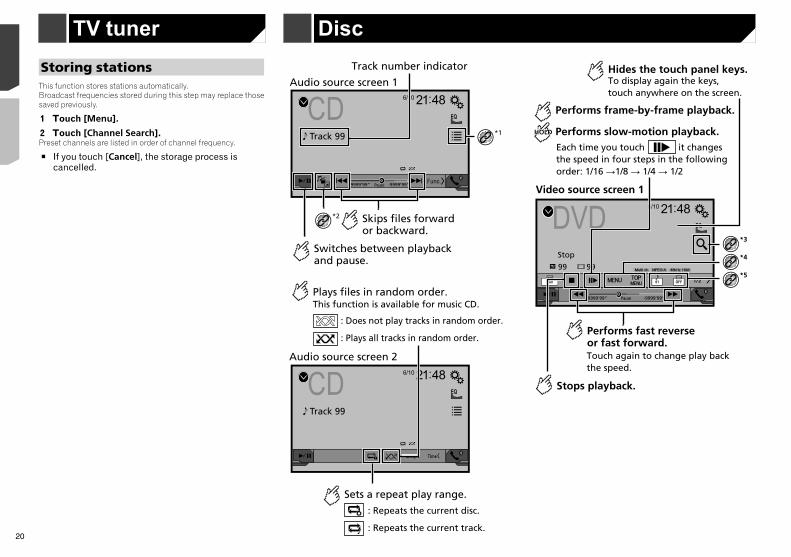
20
DVD 4821
Stop
99 99
9999’99” -9999’99”
01L+R
Pause
6/10
Video source screen 2
Selects the audio output from [L+R], [Left], [Right], [Mix].This function is available for Video-CDs and DVDs recorded with LPCM audio.
Changes the viewing angle (Multi-angle).This function is available for DVDs featuring multi-angle recordings.
Sets a repeat play range.: Repeats all files.
: Repeats the current chapter.
: Repeats the current title.
Storing stationsThis function stores stations automatically.Broadcast frequencies stored during this step may replace those saved previously.
1 Touch [Menu].
2 Touch [Channel Search].Preset channels are listed in order of channel frequency.
If you touch [Cancel], the storage process is cancelled.
CD 4821
Track 99
9999’99” -9999’99”Pause
6/10
Track number indicator
*1
Skips files forward or backward.
Switches between playback and pause.
*2
Audio source screen 1
CD 4821
Track 99
6/10
Audio source screen 2
Plays files in random order.
: Does not play tracks in random order.
: Plays all tracks in random order.
Sets a repeat play range.
: Repeats the current disc.
: Repeats the current track.
This function is available for music CD.
DVD 4821
Stop
99 99
9999’99” -9999’99”
OFFFull 01
Pause
6/10
Video source screen 1
*5
Performs fast reverse or fast forward.Touch again to change play back the speed.
Stops playback.
*4
*3
Performs frame-by-frame playback.
HOLD Performs slow-motion playback.Each time you touch it changes the speed in four steps in the following order: 1/16 →1/8 → 1/4 → 1/2
Hides the touch panel keys.To display again the keys, touch anywhere on the screen.
Disc
20 < CRD4925-A >< CRD4925-A >
TV tuner Disc Disc
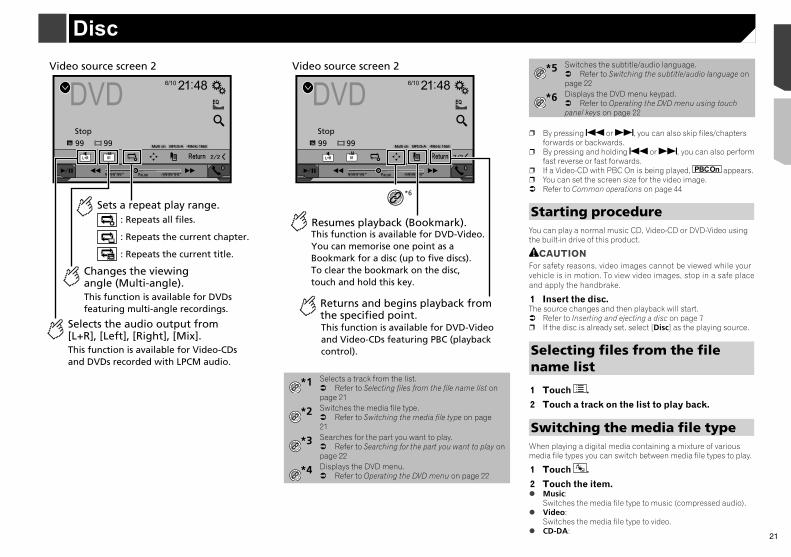
21
DVD 4821
Stop
99 99
9999’99” -9999’99”
01L+R
Pause
6/10
Video source screen 2
Selects the audio output from [L+R], [Left], [Right], [Mix].This function is available for Video-CDs and DVDs recorded with LPCM audio.
Changes the viewing angle (Multi-angle).This function is available for DVDs featuring multi-angle recordings.
Sets a repeat play range.: Repeats all files.
: Repeats the current chapter.
: Repeats the current title.
DVD 4821
Stop
99 99
9999’99” -9999’99”
01L+R
Pause
6/10
Video source screen 2
Resumes playback (Bookmark).This function is available for DVD-Video.You can memorise one point as a Bookmark for a disc (up to five discs).To clear the bookmark on the disc, touch and hold this key.
Returns and begins playback from the specified point.This function is available for DVD-Video and Video-CDs featuring PBC (playback control).
*6
*1 Selects a track from the list. Refer to Selecting files from the file name list on page 21
*2 Switches the media file type. Refer to Switching the media file type on page 21
*3 Searches for the part you want to play. Refer to Searching for the part you want to play on page 22
*4 Displays the DVD menu. Refer to Operating the DVD menu on page 22
*5 Switches the subtitle/audio language. Refer to Switching the subtitle/audio language on page 22
*6 Displays the DVD menu keypad. Refer to Operating the DVD menu using touch panel keys on page 22
p By pressing or , you can also skip files/chapters forwards or backwards.
p By pressing and holding or , you can also perform fast reverse or fast forwards.
p If a Video-CD with PBC On is being played, appears.p You can set the screen size for the video image. Refer to Common operations on page 44
Starting procedureYou can play a normal music CD, Video-CD or DVD-Video using the built-in drive of this product.
CAUTIONFor safety reasons, video images cannot be viewed while your vehicle is in motion. To view video images, stop in a safe place and apply the handbrake.
1 Insert the disc.The source changes and then playback will start. Refer to Inserting and ejecting a disc on page 7p If the disc is already set, select [Disc] as the playing source.
Selecting files from the file name list
1 Touch .
2 Touch a track on the list to play back.
Switching the media file typeWhen playing a digital media containing a mixture of various media file types you can switch between media file types to play.
1 Touch .
2 Touch the item. Music:
Switches the media file type to music (compressed audio). Video:
Switches the media file type to video. CD-DA:
DVD 4821
Stop
99 99
9999’99” -9999’99”
OFFFull 01
Pause
6/10
Video source screen 1
*5
Performs fast reverse or fast forward.Touch again to change play back the speed.
Stops playback.
*4
*3
Performs frame-by-frame playback.
HOLD Performs slow-motion playback.Each time you touch it changes the speed in four steps in the following order: 1/16 →1/8 → 1/4 → 1/2
Hides the touch panel keys.To display again the keys, touch anywhere on the screen.
21< CRD4925-A >
Disc Disc
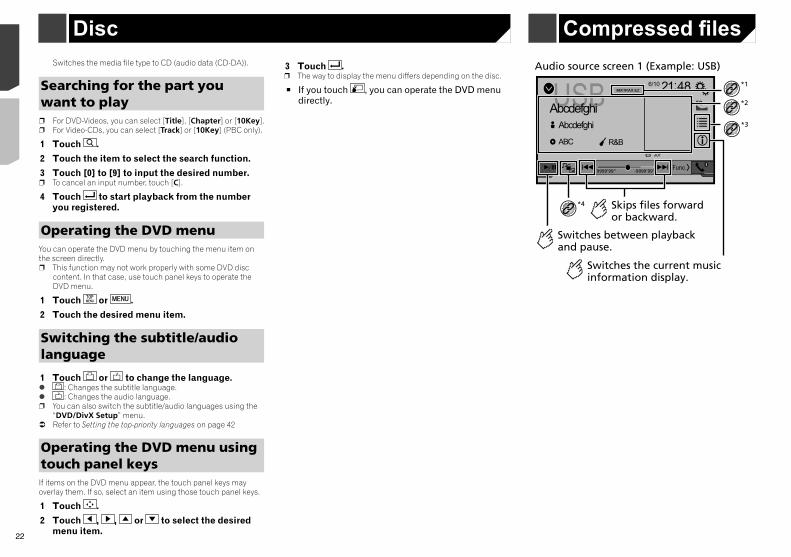
22
USB 4821 6/10
AbcdefghiAbcdefghi
ABC R&B
DB
Plays files in random order.: Does not play files in random order.
: Plays all files within the repeat range in random order.
Sets a repeat play range.or : Repeats all files.
: Repeats the current folder.
: Repeats the current file.
Selects the previous folder or the next folder.
Audio source screen 2 (Example: USB)
Constructs the database for using the Music Browse mode.This function is available only for USB.
Switches the media file type to CD (audio data (CD-DA)).
Searching for the part you want to playp For DVD-Videos, you can select [Title], [Chapter] or [10Key].p For Video-CDs, you can select [Track] or [10Key] (PBC only).
1 Touch .
2 Touch the item to select the search function.
3 Touch [0] to [9] to input the desired number.p To cancel an input number, touch [C].
4 Touch to start playback from the number you registered.
Operating the DVD menuYou can operate the DVD menu by touching the menu item on the screen directly.p This function may not work properly with some DVD disc
content. In that case, use touch panel keys to operate the DVD menu.
1 Touch or .
2 Touch the desired menu item.
Switching the subtitle/audio language
1 Touch or to change the language. : Changes the subtitle language. : Changes the audio language.p You can also switch the subtitle/audio languages using the
“DVD/DivX Setup” menu. Refer to Setting the top-priority languages on page 42
Operating the DVD menu using touch panel keysIf items on the DVD menu appear, the touch panel keys may overlay them. If so, select an item using those touch panel keys.
1 Touch .
2 Touch , , or to select the desired menu item.
3 Touch .p The way to display the menu differs depending on the disc.
If you touch , you can operate the DVD menu directly. USB 4821 6/10
AbcdefghiAbcdefghi
ABC R&B
9999’99” -9999’99”
*3
Skips files forward or backward.
Switches between playback and pause.
*4
Audio source screen 1 (Example: USB)
*1
*2
Switches the current music information display.
Compressed files
22 < CRD4925-A >< CRD4925-A >
Disc Compressed files Compressed files
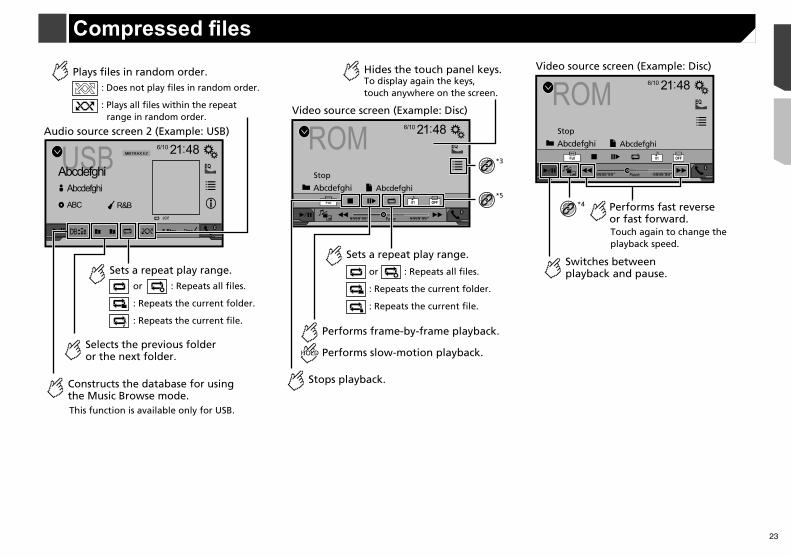
23
USB 4821 6/10
AbcdefghiAbcdefghi
ABC R&B
DB
Plays files in random order.: Does not play files in random order.
: Plays all files within the repeat range in random order.
Sets a repeat play range.or : Repeats all files.
: Repeats the current folder.
: Repeats the current file.
Selects the previous folder or the next folder.
Audio source screen 2 (Example: USB)
Constructs the database for using the Music Browse mode.This function is available only for USB.
ROM 4821
Stop
9999’99” -9999’99”
OFFFull 01
Pause
6/10
Abcdefghi Abcdefghi*5
Stops playback.
*3
Performs frame-by-frame playback.
Performs slow-motion playback.
Hides the touch panel keys.To display again the keys, touch anywhere on the screen.
Sets a repeat play range.
or : Repeats all files.
: Repeats the current folder.
: Repeats the current file.
Video source screen (Example: Disc)
HOLD
ROM 4821
Stop
9999’99” -9999’99”
OFFFull 01
Pause
6/10
Abcdefghi Abcdefghi
Touch again to change the playback speed.
Performs fast reverse or fast forward.
*4
Switches between playback and pause.
Video source screen (Example: Disc)
USB 4821 6/10
AbcdefghiAbcdefghi
ABC R&B
9999’99” -9999’99”
*3
Skips files forward or backward.
Switches between playback and pause.
*4
Audio source screen 1 (Example: USB)
*1
*2
Switches the current music information display.
Compressed files
23< CRD4925-A >
Compressed files Compressed files
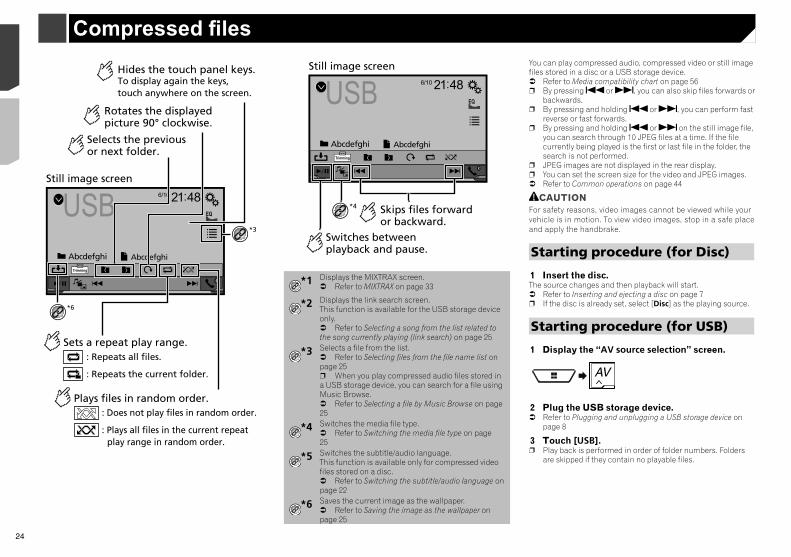
24
Operations common to all file types
Selecting files from the file name list
You can find files or folders to play back using the file name or folder name list.
1 Touch .
2 Touch a file on the list to play back.p Touching a folder on the list shows its contents. You can play
a file on the list by touching it.
Switching the media file type
When playing a digital media containing a mixture of various media file types you can switch between media file types to play.
1 Touch .
2 Touch the item. Music:
Switches the media file type to music (compressed audio). Video:
Switches the media file type to video. CD-DA:
Switches the media file type to CD (audio data (CD-DA)). Photo:
Switches the media file type to still image (JPEG data).
Audio file operations
Selecting a file by Music Browse
p This function is available for the USB storage device only.
1 Touch DB to create a database.Music Browse mode will be available after the database has been created.
2 Touch .
3 Touch the desired category to display the file list.
4 Touch the item.Refine the item until the desired song title or file name is dis-played on the list.
USB 4821
Abcdefghi Abcdefghi
6/10
Trimming
Still image screen
*3
*6
Sets a repeat play range.: Repeats all files.
: Repeats the current folder.
Plays files in random order.: Does not play files in random order.
: Plays all files in the current repeat play range in random order.
Selects the previous or next folder.
Rotates the displayed picture 90° clockwise.
Hides the touch panel keys.To display again the keys, touch anywhere on the screen. USB 4821
Abcdefghi Abcdefghi
6/10
Trimming
Skips files forward or backward.
Switches between playback and pause.
*4
Still image screen
*1 Displays the MIXTRAX screen. Refer to MIXTRAX on page 33
*2 Displays the link search screen.This function is available for the USB storage device only. Refer to Selecting a song from the list related to the song currently playing (link search) on page 25
*3 Selects a file from the list. Refer to Selecting files from the file name list on page 25p When you play compressed audio files stored in a USB storage device, you can search for a file using Music Browse. Refer to Selecting a file by Music Browse on page 25
*4 Switches the media file type. Refer to Switching the media file type on page 25
*5 Switches the subtitle/audio language.This function is available only for compressed video files stored on a disc. Refer to Switching the subtitle/audio language on page 22
*6 Saves the current image as the wallpaper. Refer to Saving the image as the wallpaper on page 25
You can play compressed audio, compressed video or still image files stored in a disc or a USB storage device. Refer to Media compatibility chart on page 56p By pressing or , you can also skip files forwards or
backwards.p By pressing and holding or , you can perform fast
reverse or fast forwards.p By pressing and holding or on the still image file,
you can search through 10 JPEG files at a time. If the file currently being played is the first or last file in the folder, the search is not performed.
p JPEG images are not displayed in the rear display.p You can set the screen size for the video and JPEG images. Refer to Common operations on page 44
CAUTIONFor safety reasons, video images cannot be viewed while your vehicle is in motion. To view video images, stop in a safe place and apply the handbrake.
Starting procedure (for Disc)
1 Insert the disc.The source changes and then playback will start. Refer to Inserting and ejecting a disc on page 7p If the disc is already set, select [Disc] as the playing source.
Starting procedure (for USB)
1 Display the “AV source selection” screen.
2 Plug the USB storage device. Refer to Plugging and unplugging a USB storage device on
page 8
3 Touch [USB].p Play back is performed in order of folder numbers. Folders
are skipped if they contain no playable files.
24 < CRD4925-A >< CRD4925-A >
Compressed files Compressed files

25
Operations common to all file types
Selecting files from the file name list
You can find files or folders to play back using the file name or folder name list.
1 Touch .
2 Touch a file on the list to play back.p Touching a folder on the list shows its contents. You can play
a file on the list by touching it.
Switching the media file type
When playing a digital media containing a mixture of various media file types you can switch between media file types to play.
1 Touch .
2 Touch the item. Music:
Switches the media file type to music (compressed audio). Video:
Switches the media file type to video. CD-DA:
Switches the media file type to CD (audio data (CD-DA)). Photo:
Switches the media file type to still image (JPEG data).
Audio file operations
Selecting a file by Music Browse
p This function is available for the USB storage device only.
1 Touch DB to create a database.Music Browse mode will be available after the database has been created.
2 Touch .
3 Touch the desired category to display the file list.
4 Touch the item.Refine the item until the desired song title or file name is dis-played on the list.
5 Touch the desired song title or file name to play back.
Selecting a song from the list related to the song currently playing (link search)
p If you touch the artwork, the list of songs in the album is displayed.
1 Touch DB .
2 Touch song information to open the list of songs.
3 Touch the song to play back.
Still image file operations
Saving the image as the wallpaper
You can save the currently displayed image in the memory of this product and set it as the wallpaper for the AV screen or the top menu screen.
1 Display an image on the screen. Refer to Starting procedure (for USB) on page 24 Refer to Operations common to all file types on page 25
2 Touch on the image.
3 Touch the following items. As AV Screen:
Saves the image as the wallpaper for the AV screen. As HomeScreen:
Saves the image as the wallpaper for the top menu screen. As Both:
Saves the image as the wallpaper for both the AV screen and top menu screen.
4 Touch “Yes” to overwrite the image.p If you save the new image, the current wallpaper is
overwritten.
Setting the slideshow interval
JPEG files can be viewed as a slideshow on this product. In this setting, the interval between each image can be set.The default setting is “10sec”.
p This setting is available during playback of the JPEG files.
1 Display the “Video Setup” screen.
2 Touch [Time Per Photo Slide].
3 Touch the item.The following items are available:5sec, 10sec, 15sec, Manual.
You can play compressed audio, compressed video or still image files stored in a disc or a USB storage device. Refer to Media compatibility chart on page 56p By pressing or , you can also skip files forwards or
backwards.p By pressing and holding or , you can perform fast
reverse or fast forwards.p By pressing and holding or on the still image file,
you can search through 10 JPEG files at a time. If the file currently being played is the first or last file in the folder, the search is not performed.
p JPEG images are not displayed in the rear display.p You can set the screen size for the video and JPEG images. Refer to Common operations on page 44
CAUTIONFor safety reasons, video images cannot be viewed while your vehicle is in motion. To view video images, stop in a safe place and apply the handbrake.
Starting procedure (for Disc)
1 Insert the disc.The source changes and then playback will start. Refer to Inserting and ejecting a disc on page 7p If the disc is already set, select [Disc] as the playing source.
Starting procedure (for USB)
1 Display the “AV source selection” screen.
2 Plug the USB storage device. Refer to Plugging and unplugging a USB storage device on
page 8
3 Touch [USB].p Play back is performed in order of folder numbers. Folders
are skipped if they contain no playable files.
25< CRD4925-A >
Compressed files Compressed files
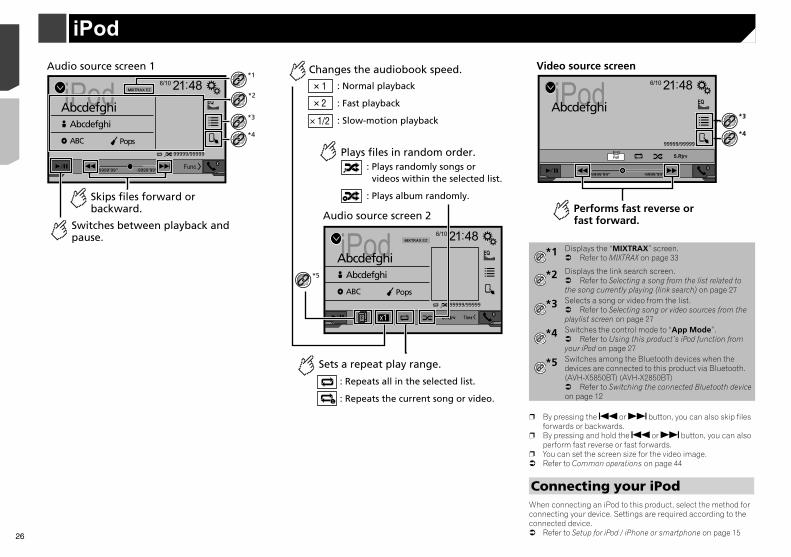
26
p The available sources vary depending on the selected method for connecting your device. Refer to Information on the connections and functions for
each device on page 17
CAUTIONFor safety reasons, video images cannot be viewed while your vehicle is in motion. To view video images, stop in a safe place and apply the handbrake.
Starting procedure
1 Connect your iPod. Refer to Connecting your iPod on page 26The source changes and then playback will start.p When connecting an iPhone or iPod touch, quit all applica-
tions before connecting the device.
2 Display the “AV source selection” screen.
3 Touch [iPod].
Selecting song or video sources from the playlist screenYou can search for the song or video you want to play from the playlist screen.
1 Touch .
2 Touch or to switch the music or video category list.
3 Touch the category.If you use English as the system language, the alphabet search function is available. Touch the initial search bar to use this function.
4 Touch the title of the list.If you can not find the desired song or video, try to search again according to the above steps.
5 Start playback of the selected list.p Depending on the generation or version of the iPod, some
functions may not be available.p You can play playlists created with the MusicSphere applica-
tion. The application is available on our website.
iPod 4821
AbcdefghiAbcdefghi
ABC Pops99999/99999
9999’99” -9999’99”
6/10
Audio source screen 1*1
*2
Switches between playback and pause.
Skips files forward or backward.
*3
*4
iPod 4821
AbcdefghiAbcdefghi
ABC Pops99999/99999
6/10
x1
Plays files in random order.
: Normal playback
: Fast playback
: Slow-motion playback
Audio source screen 2
: Plays randomly songs or videos within the selected list.
: Plays album randomly.
Sets a repeat play range.
: Repeats all in the selected list.
: Repeats the current song or video.
Changes the audiobook speed.
1
1/2
2
*5
iPod 4821
Abcdefghi
99999/99999
9999’99” -9999’99”
6/10
Full
Video source screen
*3
*4
Performs fast reverse or fast forward.
*1 Displays the “MIXTRAX” screen. Refer to MIXTRAX on page 33
*2 Displays the link search screen. Refer to Selecting a song from the list related to the song currently playing (link search) on page 27
*3 Selects a song or video from the list. Refer to Selecting song or video sources from the playlist screen on page 27
*4 Switches the control mode to “App Mode”. Refer to Using this product’s iPod function from your iPod on page 27
*5 Switches among the Bluetooth devices when the devices are connected to this product via Bluetooth.(AVH-X5850BT) (AVH-X2850BT) Refer to Switching the connected Bluetooth device on page 12
p By pressing the or button, you can also skip files forwards or backwards.
p By pressing and hold the or button, you can also perform fast reverse or fast forwards.
p You can set the screen size for the video image. Refer to Common operations on page 44
Connecting your iPodWhen connecting an iPod to this product, select the method for connecting your device. Settings are required according to the connected device. Refer to Setup for iPod / iPhone or smartphone on page 15
iPod
26 < CRD4925-A >< CRD4925-A >
iPod iPod
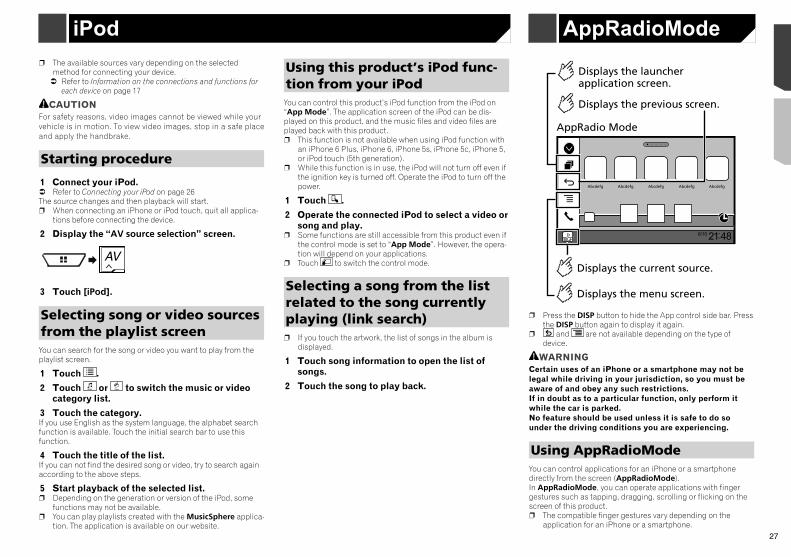
27
p The available sources vary depending on the selected method for connecting your device. Refer to Information on the connections and functions for
each device on page 17
CAUTIONFor safety reasons, video images cannot be viewed while your vehicle is in motion. To view video images, stop in a safe place and apply the handbrake.
Starting procedure
1 Connect your iPod. Refer to Connecting your iPod on page 26The source changes and then playback will start.p When connecting an iPhone or iPod touch, quit all applica-
tions before connecting the device.
2 Display the “AV source selection” screen.
3 Touch [iPod].
Selecting song or video sources from the playlist screenYou can search for the song or video you want to play from the playlist screen.
1 Touch .
2 Touch or to switch the music or video category list.
3 Touch the category.If you use English as the system language, the alphabet search function is available. Touch the initial search bar to use this function.
4 Touch the title of the list.If you can not find the desired song or video, try to search again according to the above steps.
5 Start playback of the selected list.p Depending on the generation or version of the iPod, some
functions may not be available.p You can play playlists created with the MusicSphere applica-
tion. The application is available on our website.
Using this product’s iPod func-tion from your iPodYou can control this product’s iPod function from the iPod on “App Mode”. The application screen of the iPod can be dis-played on this product, and the music files and video files are played back with this product.p This function is not available when using iPod function with
an iPhone 6 Plus, iPhone 6, iPhone 5s, iPhone 5c, iPhone 5, or iPod touch (5th generation).
p While this function is in use, the iPod will not turn off even if the ignition key is turned off. Operate the iPod to turn off the power.
1 Touch .
2 Operate the connected iPod to select a video or song and play.
p Some functions are still accessible from this product even if the control mode is set to “App Mode”. However, the opera-tion will depend on your applications.
p Touch to switch the control mode.
Selecting a song from the list related to the song currently playing (link search)p If you touch the artwork, the list of songs in the album is
displayed.
1 Touch song information to open the list of songs.
2 Touch the song to play back.
4821
Abcdefg Abcdefg Abcdefg Abcdefg Abcdefg
6/10
AppRadio Mode
Displays the launcher application screen.
Displays the previous screen.
Displays the menu screen.
Displays the current source.
p Press the DISP button to hide the App control side bar. Press the DISP button again to display it again.
p and are not available depending on the type of device.
WARNINGCertain uses of an iPhone or a smartphone may not be legal while driving in your jurisdiction, so you must be aware of and obey any such restrictions. If in doubt as to a particular function, only perform it while the car is parked. No feature should be used unless it is safe to do so under the driving conditions you are experiencing.
Using AppRadioModeYou can control applications for an iPhone or a smartphone directly from the screen (AppRadioMode).In AppRadioMode, you can operate applications with finger gestures such as tapping, dragging, scrolling or flicking on the screen of this product.p The compatible finger gestures vary depending on the
application for an iPhone or a smartphone.
AppRadioMode
iPod 4821
Abcdefghi
99999/99999
9999’99” -9999’99”
6/10
Full
Video source screen
*3
*4
Performs fast reverse or fast forward.
*1 Displays the “MIXTRAX” screen. Refer to MIXTRAX on page 33
*2 Displays the link search screen. Refer to Selecting a song from the list related to the song currently playing (link search) on page 27
*3 Selects a song or video from the list. Refer to Selecting song or video sources from the playlist screen on page 27
*4 Switches the control mode to “App Mode”. Refer to Using this product’s iPod function from your iPod on page 27
*5 Switches among the Bluetooth devices when the devices are connected to this product via Bluetooth.(AVH-X5850BT) (AVH-X2850BT) Refer to Switching the connected Bluetooth device on page 12
p By pressing the or button, you can also skip files forwards or backwards.
p By pressing and hold the or button, you can also perform fast reverse or fast forwards.
p You can set the screen size for the video image. Refer to Common operations on page 44
Connecting your iPodWhen connecting an iPod to this product, select the method for connecting your device. Settings are required according to the connected device. Refer to Setup for iPod / iPhone or smartphone on page 15
27< CRD4925-A >
iPod iPod AppRadioMode
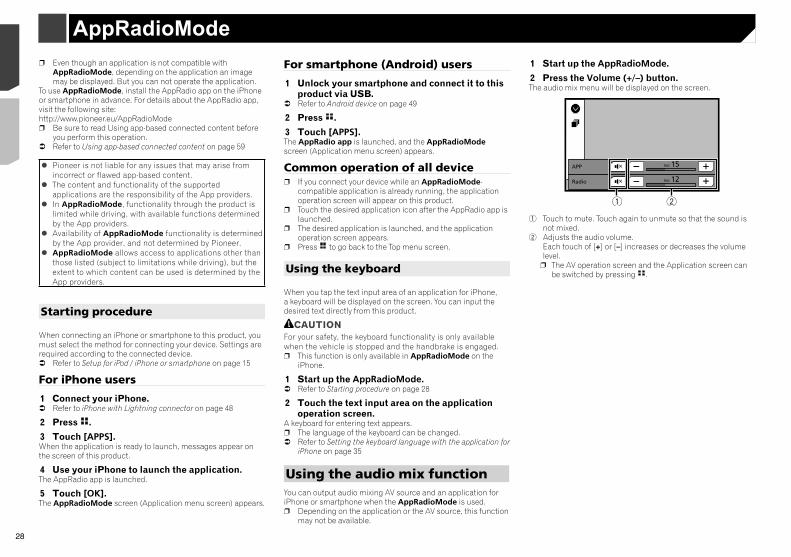
28
Spotify 4821 6/10
AbcdefghiAbcdefghi
ABC
9999’99” -9999’99”
Spotify
Skips tracks forward or backward.
Switches between playback and pause.
Playback screen 1 (Track)
*1
Saves or deletes the current song information to or from “Your Music”.
PLAYING FROM PLAYLIST 9999
Spotify®
p Even though an application is not compatible with AppRadioMode, depending on the application an image may be displayed. But you can not operate the application.
To use AppRadioMode, install the AppRadio app on the iPhone or smartphone in advance. For details about the AppRadio app, visit the following site:http://www.pioneer.eu/AppRadioModep Be sure to read Using app-based connected content before
you perform this operation. Refer to Using app-based connected content on page 59
Pioneer is not liable for any issues that may arise from incorrect or flawed app-based content.
The content and functionality of the supported applications are the responsibility of the App providers.
In AppRadioMode, functionality through the product is limited while driving, with available functions determined by the App providers.
Availability of AppRadioMode functionality is determined by the App provider, and not determined by Pioneer.
AppRadioMode allows access to applications other than those listed (subject to limitations while driving), but the extent to which content can be used is determined by the App providers.
Starting procedure
When connecting an iPhone or smartphone to this product, you must select the method for connecting your device. Settings are required according to the connected device. Refer to Setup for iPod / iPhone or smartphone on page 15
For iPhone users
1 Connect your iPhone. Refer to iPhone with Lightning connector on page 48
2 Press .
3 Touch [APPS].When the application is ready to launch, messages appear on the screen of this product.
4 Use your iPhone to launch the application.The AppRadio app is launched.
5 Touch [OK].The AppRadioMode screen (Application menu screen) appears.
For smartphone (Android) users
1 Unlock your smartphone and connect it to this product via USB.
Refer to Android device on page 49
2 Press .
3 Touch [APPS].The AppRadio app is launched, and the AppRadioMode screen (Application menu screen) appears.
Common operation of all devicep If you connect your device while an AppRadioMode-
compatible application is already running, the application operation screen will appear on this product.
p Touch the desired application icon after the AppRadio app is launched.
p The desired application is launched, and the application operation screen appears.
p Press to go back to the Top menu screen.
Using the keyboard
When you tap the text input area of an application for iPhone, a keyboard will be displayed on the screen. You can input the desired text directly from this product.
CAUTIONFor your safety, the keyboard functionality is only available when the vehicle is stopped and the handbrake is engaged.p This function is only available in AppRadioMode on the
iPhone.
1 Start up the AppRadioMode. Refer to Starting procedure on page 28
2 Touch the text input area on the application operation screen.
A keyboard for entering text appears.p The language of the keyboard can be changed. Refer to Setting the keyboard language with the application for
iPhone on page 35
Using the audio mix functionYou can output audio mixing AV source and an application for iPhone or smartphone when the AppRadioMode is used.p Depending on the application or the AV source, this function
may not be available.
1 Start up the AppRadioMode.
2 Press the Volume (+/–) button.The audio mix menu will be displayed on the screen.
HD Radio
15APP Vol.
12Vol. Radio
21
1 Touch to mute. Touch again to unmute so that the sound is not mixed.
2 Adjusts the audio volume.Each touch of [+] or [–] increases or decreases the volume level.
p The AV operation screen and the Application screen can be switched by pressing .
28 < CRD4925-A >< CRD4925-A >
AppRadioMode Spotify®
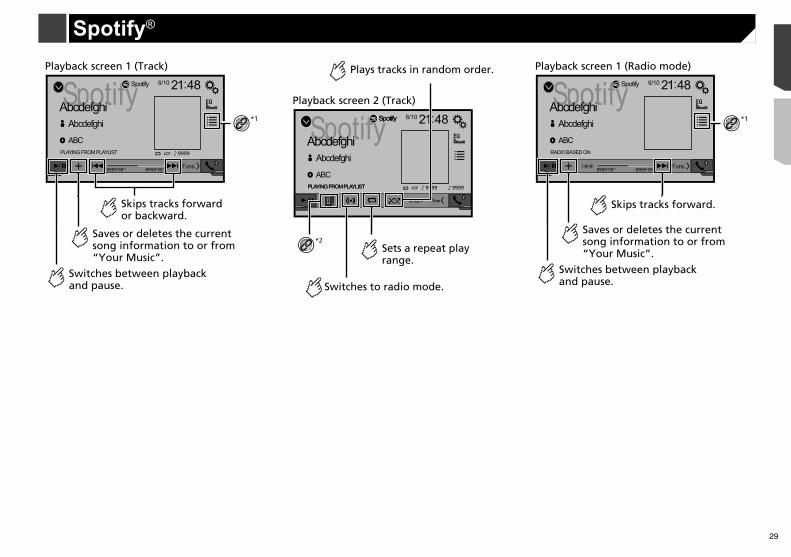
29
Spotify 4821 6/10
AbcdefghiAbcdefghi
ABC
9999’99” -9999’99”
Spotify
Skips tracks forward or backward.
Switches between playback and pause.
Playback screen 1 (Track)
*1
Saves or deletes the current song information to or from “Your Music”.
PLAYING FROM PLAYLIST 9999
Spotify 4821 6/10
AbcdefghiAbcdefghi
ABCPLAYING FROM PLAYLIST
Spotify
9999
Playback screen 2 (Track)
Switches to radio mode.
*2
PLAYING FROM PLAYLIST
Spotify
9999
Plays tracks in random order.
Sets a repeat play range.
Spotify 4821 6/10
AbcdefghiAbcdefghi
ABC
9999’99” -9999’99”
Spotify
Skips tracks forward.
Switches between playback and pause.
Playback screen 1 (Radio mode)
*1
Saves or deletes the current song information to or from “Your Music”.
RADIO BASED ON
Spotify®
1 Start up the AppRadioMode.
2 Press the Volume (+/–) button.The audio mix menu will be displayed on the screen.
HD Radio
15APP Vol.
12Vol. Radio
21
1 Touch to mute. Touch again to unmute so that the sound is not mixed.
2 Adjusts the audio volume.Each touch of [+] or [–] increases or decreases the volume level.
p The AV operation screen and the Application screen can be switched by pressing .
29< CRD4925-A >
AppRadioMode Spotify®
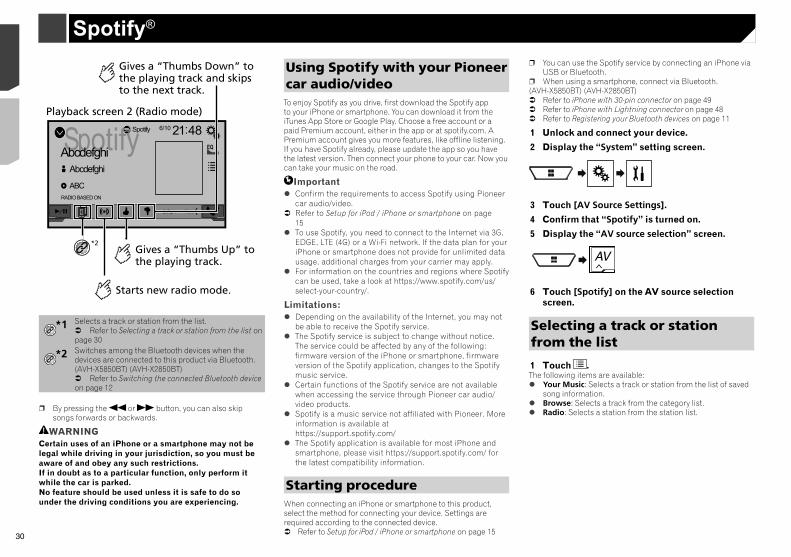
30
X5850BT X2850BT
Bluetooth9999
9999’99” -9999’99”
4821 6/10
AbcdefghiAbcdefghi
ABC House
Playback screen 1
Skips files forward or backward.
Track number indicator
*1
Bluetooth9999
4821 6/10
AbcdefghiAbcdefghi
ABC House
Plays files in random order.
Playback screen 2
Sets a repeat play range.
Switches between playback and pause.
*2
Bluetooth audio player
Spotify 4821 6/10
AbcdefghiAbcdefghi
ABC
Spotify
RADIO BASED ON
Playback screen 2 (Radio mode)
Gives a “Thumbs Down” to the playing track and skips to the next track.
Gives a “Thumbs Up” to the playing track.
Starts new radio mode.
*2
*1 Selects a track or station from the list. Refer to Selecting a track or station from the list on page 30
*2 Switches among the Bluetooth devices when the devices are connected to this product via Bluetooth.(AVH-X5850BT) (AVH-X2850BT) Refer to Switching the connected Bluetooth device on page 12
p By pressing the or button, you can also skip songs forwards or backwards.
WARNINGCertain uses of an iPhone or a smartphone may not be legal while driving in your jurisdiction, so you must be aware of and obey any such restrictions. If in doubt as to a particular function, only perform it while the car is parked. No feature should be used unless it is safe to do so under the driving conditions you are experiencing.
Using Spotify with your Pioneer car audio/videoTo enjoy Spotify as you drive, first download the Spotify app to your iPhone or smartphone. You can download it from the iTunes App Store or Google Play. Choose a free account or a paid Premium account, either in the app or at spotify.com. A Premium account gives you more features, like offline listening. If you have Spotify already, please update the app so you have the latest version. Then connect your phone to your car. Now you can take your music on the road.
Important Confirm the requirements to access Spotify using Pioneer
car audio/video. Refer to Setup for iPod / iPhone or smartphone on page
15 To use Spotify, you need to connect to the Internet via 3G,
EDGE, LTE (4G) or a Wi-Fi network. If the data plan for your iPhone or smartphone does not provide for unlimited data usage, additional charges from your carrier may apply.
For information on the countries and regions where Spotify can be used, take a look at https://www.spotify.com/us/select-your-country/.
Limitations: Depending on the availability of the Internet, you may not
be able to receive the Spotify service. The Spotify service is subject to change without notice.
The service could be affected by any of the following: firmware version of the iPhone or smartphone, firmware version of the Spotify application, changes to the Spotify music service.
Certain functions of the Spotify service are not available when accessing the service through Pioneer car audio/ video products.
Spotify is a music service not affiliated with Pioneer. More information is available at https://support.spotify.com/
The Spotify application is available for most iPhone and smartphone, please visit https://support.spotify.com/ for the latest compatibility information.
Starting procedureWhen connecting an iPhone or smartphone to this product, select the method for connecting your device. Settings are required according to the connected device. Refer to Setup for iPod / iPhone or smartphone on page 15
p You can use the Spotify service by connecting an iPhone via USB or Bluetooth.
p When using a smartphone, connect via Bluetooth.(AVH-X5850BT) (AVH-X2850BT) Refer to iPhone with 30-pin connector on page 49 Refer to iPhone with Lightning connector on page 48 Refer to Registering your Bluetooth devices on page 11
1 Unlock and connect your device.
2 Display the “System” setting screen.
3 Touch [AV Source Settings].
4 Confirm that “Spotify” is turned on.
5 Display the “AV source selection” screen.
6 Touch [Spotify] on the AV source selection screen.
Selecting a track or station from the list
1 Touch .The following items are available: Your Music: Selects a track or station from the list of saved
song information. Browse: Selects a track from the category list. Radio: Selects a station from the station list.
30 < CRD4925-A >< CRD4925-A >
Spotify® Bluetooth audio player
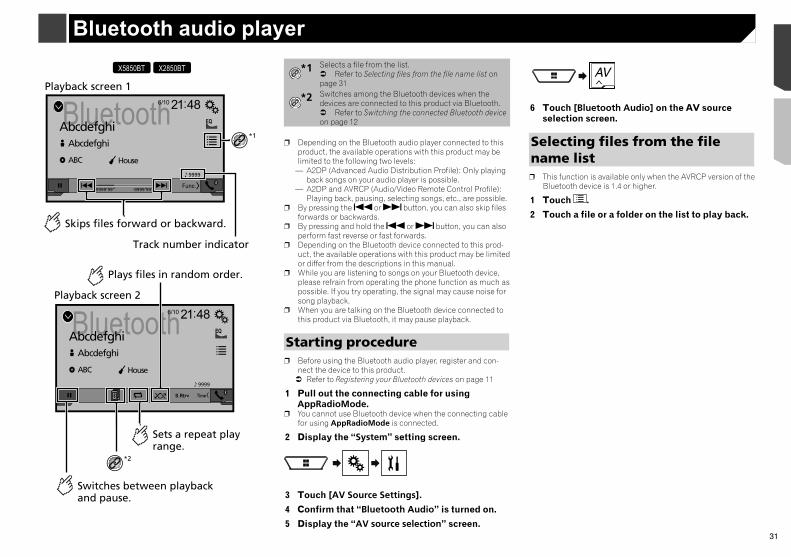
31
X5850BT X2850BT
Bluetooth9999
9999’99” -9999’99”
4821 6/10
AbcdefghiAbcdefghi
ABC House
Playback screen 1
Skips files forward or backward.
Track number indicator
*1
Bluetooth9999
4821 6/10
AbcdefghiAbcdefghi
ABC House
Plays files in random order.
Playback screen 2
Sets a repeat play range.
Switches between playback and pause.
*2
*1 Selects a file from the list. Refer to Selecting files from the file name list on page 31
*2 Switches among the Bluetooth devices when the devices are connected to this product via Bluetooth. Refer to Switching the connected Bluetooth device on page 12
p Depending on the Bluetooth audio player connected to this product, the available operations with this product may be limited to the following two levels:
— A2DP (Advanced Audio Distribution Profile): Only playing back songs on your audio player is possible.
— A2DP and AVRCP (Audio/Video Remote Control Profile): Playing back, pausing, selecting songs, etc., are possible.
p By pressing the or button, you can also skip files forwards or backwards.
p By pressing and hold the or button, you can also perform fast reverse or fast forwards.
p Depending on the Bluetooth device connected to this prod-uct, the available operations with this product may be limited or differ from the descriptions in this manual.
p While you are listening to songs on your Bluetooth device, please refrain from operating the phone function as much as possible. If you try operating, the signal may cause noise for song playback.
p When you are talking on the Bluetooth device connected to this product via Bluetooth, it may pause playback.
Starting procedurep Before using the Bluetooth audio player, register and con-
nect the device to this product. Refer to Registering your Bluetooth devices on page 11
1 Pull out the connecting cable for using AppRadioMode.
p You cannot use Bluetooth device when the connecting cable for using AppRadioMode is connected.
2 Display the “System” setting screen.
3 Touch [AV Source Settings].
4 Confirm that “Bluetooth Audio” is turned on.
5 Display the “AV source selection” screen.
6 Touch [Bluetooth Audio] on the AV source selection screen.
Selecting files from the file name listp This function is available only when the AVRCP version of the
Bluetooth device is 1.4 or higher.
1 Touch .
2 Touch a file or a folder on the list to play back.
Bluetooth audio player
p You can use the Spotify service by connecting an iPhone via USB or Bluetooth.
p When using a smartphone, connect via Bluetooth.(AVH-X5850BT) (AVH-X2850BT) Refer to iPhone with 30-pin connector on page 49 Refer to iPhone with Lightning connector on page 48 Refer to Registering your Bluetooth devices on page 11
1 Unlock and connect your device.
2 Display the “System” setting screen.
3 Touch [AV Source Settings].
4 Confirm that “Spotify” is turned on.
5 Display the “AV source selection” screen.
6 Touch [Spotify] on the AV source selection screen.
Selecting a track or station from the list
1 Touch .The following items are available: Your Music: Selects a track or station from the list of saved
song information. Browse: Selects a track from the category list. Radio: Selects a station from the station list.
31< CRD4925-A >
Spotify® Bluetooth audio player
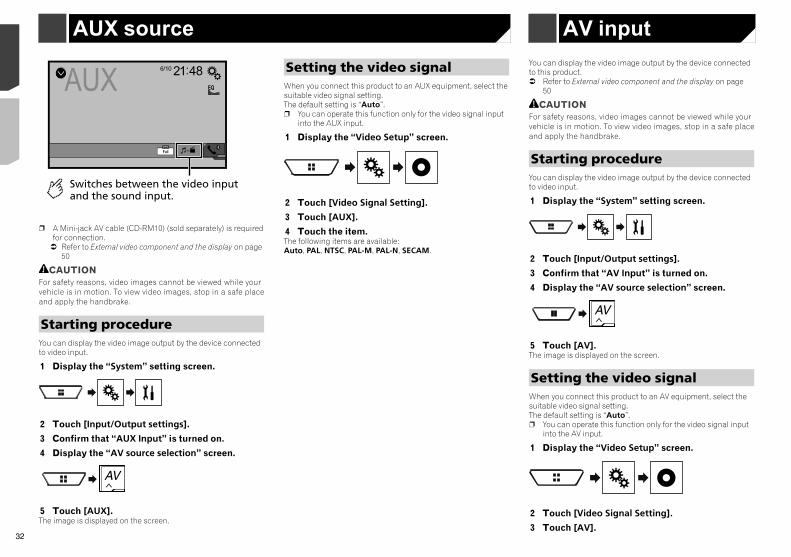
32
4 Touch the item.The following items are available:Auto, PAL, NTSC, PAL-M, PAL-N, SECAM.AUX 4821
Full
6/10
Switches between the video input and the sound input.
p A Mini-jack AV cable (CD-RM10) (sold separately) is required for connection. Refer to External video component and the display on page
50
CAUTIONFor safety reasons, video images cannot be viewed while your vehicle is in motion. To view video images, stop in a safe place and apply the handbrake.
Starting procedureYou can display the video image output by the device connected to video input.
1 Display the “System” setting screen.
2 Touch [Input/Output settings].
3 Confirm that “AUX Input” is turned on.
4 Display the “AV source selection” screen.
5 Touch [AUX].The image is displayed on the screen.
Setting the video signalWhen you connect this product to an AUX equipment, select the suitable video signal setting.The default setting is “Auto”.p You can operate this function only for the video signal input
into the AUX input.
1 Display the “Video Setup” screen.
2 Touch [Video Signal Setting].
3 Touch [AUX].
4 Touch the item.The following items are available:Auto, PAL, NTSC, PAL-M, PAL-N, SECAM.
You can display the video image output by the device connected to this product. Refer to External video component and the display on page
50
CAUTIONFor safety reasons, video images cannot be viewed while your vehicle is in motion. To view video images, stop in a safe place and apply the handbrake.
Starting procedureYou can display the video image output by the device connected to video input.
1 Display the “System” setting screen.
2 Touch [Input/Output settings].
3 Confirm that “AV Input” is turned on.
4 Display the “AV source selection” screen.
5 Touch [AV].The image is displayed on the screen.
Setting the video signalWhen you connect this product to an AV equipment, select the suitable video signal setting.The default setting is “Auto”.p You can operate this function only for the video signal input
into the AV input.
1 Display the “Video Setup” screen.
2 Touch [Video Signal Setting].
3 Touch [AV].
AUX sourceAV input
32 < CRD4925-A >< CRD4925-A >
AUX source AV input AV input
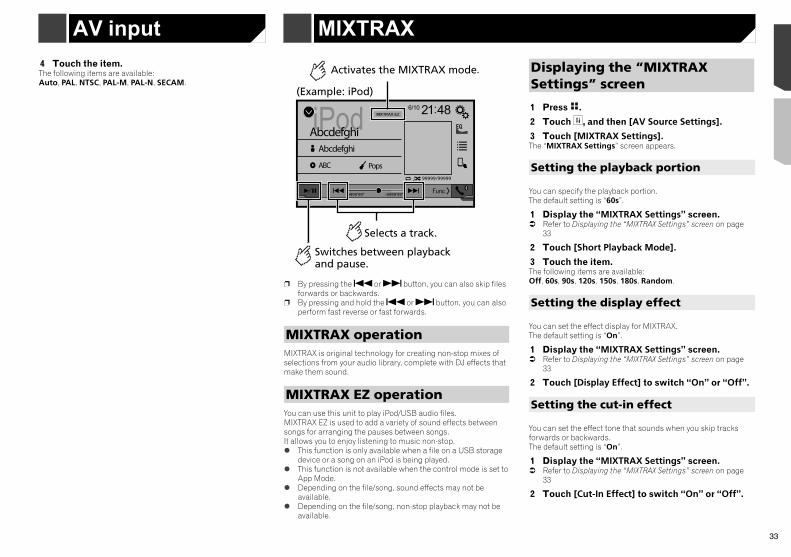
33
4 Touch the item.The following items are available:Auto, PAL, NTSC, PAL-M, PAL-N, SECAM.
iPod 4821
AbcdefghiAbcdefghi
ABC Pops99999/99999
9999’99” -9999’99”
6/10
Switches between playback and pause.
Activates the MIXTRAX mode.
Selects a track.
(Example: iPod)
p By pressing the or button, you can also skip files forwards or backwards.
p By pressing and hold the or button, you can also perform fast reverse or fast forwards.
MIXTRAX operationMIXTRAX is original technology for creating non-stop mixes of selections from your audio library, complete with DJ effects that make them sound.
MIXTRAX EZ operationYou can use this unit to play iPod/USB audio files.MIXTRAX EZ is used to add a variety of sound effects between songs for arranging the pauses between songs.It allows you to enjoy listening to music non-stop. This function is only available when a file on a USB storage
device or a song on an iPod is being played. This function is not available when the control mode is set to
App Mode. Depending on the file/song, sound effects may not be
available. Depending on the file/song, non-stop playback may not be
available.
Displaying the “MIXTRAX Settings” screen
1 Press .
2 Touch , and then [AV Source Settings].
3 Touch [MIXTRAX Settings].The “MIXTRAX Settings” screen appears.
Setting the playback portion
You can specify the playback portion.The default setting is “60s”.
1 Display the “MIXTRAX Settings” screen. Refer to Displaying the “MIXTRAX Settings” screen on page
33
2 Touch [Short Playback Mode].
3 Touch the item.The following items are available:Off, 60s, 90s, 120s, 150s, 180s, Random.
Setting the display effect
You can set the effect display for MIXTRAX.The default setting is “On”.
1 Display the “MIXTRAX Settings” screen. Refer to Displaying the “MIXTRAX Settings” screen on page
33
2 Touch [Display Effect] to switch “On” or “Off”.
Setting the cut-in effect
You can set the effect tone that sounds when you skip tracks forwards or backwards.The default setting is “On”.
1 Display the “MIXTRAX Settings” screen. Refer to Displaying the “MIXTRAX Settings” screen on page
33
2 Touch [Cut-In Effect] to switch “On” or “Off”.
MIXTRAX
You can display the video image output by the device connected to this product. Refer to External video component and the display on page
50
CAUTIONFor safety reasons, video images cannot be viewed while your vehicle is in motion. To view video images, stop in a safe place and apply the handbrake.
Starting procedureYou can display the video image output by the device connected to video input.
1 Display the “System” setting screen.
2 Touch [Input/Output settings].
3 Confirm that “AV Input” is turned on.
4 Display the “AV source selection” screen.
5 Touch [AV].The image is displayed on the screen.
Setting the video signalWhen you connect this product to an AV equipment, select the suitable video signal setting.The default setting is “Auto”.p You can operate this function only for the video signal input
into the AV input.
1 Display the “Video Setup” screen.
2 Touch [Video Signal Setting].
3 Touch [AV].
AV input
33< CRD4925-A >
AV input AV input MIXTRAX
34
2 Touch [Ever Scroll] to switch “On” or “Off”.
Setting the beep toneThe default setting is “On”.
1 Display the “System” setting screen. Refer to Displaying the “System” setting screen on page
34
2 Touch [Beep Tone] to switch “On” or “Off”.
Setting the auto audio mix functionYou can select whether or not to use the auto audio mix function.The default setting is “On”.
1 Display the “System” setting screen. Refer to Displaying the “System” setting screen on page
34
2 Touch [Auto Mix] to switch “On” or “Off”.
Setting the rear view cameraA separately sold rear view camera (e.g. ND-BC8) is required for utilising the rear view camera function. (For details, consult your dealer.)
Rear view cameraThis product features a function that automatically switches to the full-screen image of the rear view camera installed on your vehicle, when the gearstick is in the REVERSE (R) position.
Camera for Camera View modeCamera View mode also allows you to check what is behind you while driving.To display the camera image, touch [Camera View] on the “AV source selection” screen. Refer to Source on the AV source selection screen on page
10p To set the rear view camera as the camera for Camera View
mode, set “Back Camera Input” to “On”. Refer to Setting rear view camera activation on page 35
CAUTIONPioneer recommends the use of a camera which outputs mirror reversed images, otherwise the screen image may appear reversed.
Setting the MIXTRAX effect
You can set and play back the MIXTRAX effect that you want.The default setting is “Standard”.
1 Display the “MIXTRAX Settings” screen. Refer to Displaying the “MIXTRAX Settings” screen on page
33
2 Touch [Effect Setting].
3 Touch the item.The following items are available:Standard, Simple, Customp When you select “Custom”, check the effect that you want.
Setting the flash patternThe flashing colour changes with the changes in the sound and bass levels.
1 Display the “MIXTRAX Settings” screen. Refer to Displaying the “MIXTRAX Settings” screen on page
33
2 Touch [Flash Pattern].
3 Touch the item. Sound1 (default) to Sound6:
The flash pattern changes according to the sound level. Select a desired mode.
L-Pass1 to L-Pass6:The flash pattern changes according to the bass level. Select a desired mode.
Random1:The flash pattern changes randomly according to the sound level mode and low pass mode.
Random2:The flash pattern changes randomly according to the sound level mode.
Random3:The flash pattern changes randomly according to the low pass mode.
Off:The flash pattern does not flash.
Displaying the “System” set-ting screen
1 Press .
2 Touch , and then .The “System” setting screen appears.
Setting the steering wheel controlYou can set the steering wheel control on the display via a wired remote cable. Refer to Power cord on page 47p This setting is available only when you stop your vehicle in a
safe place and apply the handbrake.p This setting is available when turn all the sources off.This setting is required for using the steering wheel remote control function.p You can set a function key to more than one steering wheel
key.p You can set only one function key to a steering wheel key.p If you make a mistake after connecting this product with the
supplied wired remote cable, please reset it.p If this function does not work correctly, contact your dealer
or an authorised Pioneer Service Station.p When you start to set, all the default key settings is automati-
cally cleared.
For steering wheel control adapter for Pioneer users
1 Display the “System” setting screen. Refer to Displaying the “System” setting screen on page
34
2 Touch [Steering Wheel Control].
3 Touch [With Adapter].
4 Touch [OK].
Registering function to each key manually
1 Display the “System” setting screen.
Refer to Displaying the “System” setting screen on page 34
2 Touch [Steering Wheel Control].
3 Touch [W/o Adapter].
4 Touch the item to select the brand of your vehicle.
5 Touch the item to set.Follow the on-screen instructions to register the function setting.
If you touch [Clear], all the settings is cleared.
Setting Bluetooth audio source activation
X5850BT X2850BTThe default setting is “On”.
1 Display the “System” setting screen. Refer to Displaying the “System” setting screen on page
34
2 Touch [AV Source Settings].
3 Touch [Bluetooth Audio] to switch “On” or “Off”.
Setting Spotify source activationThe default setting is “On”.
1 Display the “System” setting screen. Refer to Displaying the “System” setting screen on page
34
2 Touch [AV Source Settings].
3 Touch [Spotify] to switch “On” or “Off”.
Setting the ever scrollWhen “Ever Scroll” is set to “On”, the recorded text information scrolls continuously in the display while the vehicle is stopped.The default setting is “Off”.
1 Display the “System” setting screen. Refer to Displaying the “System” setting screen on page
34
System settings
34 < CRD4925-A >< CRD4925-A >
MIXTRAX System settings System settings
35
2 Touch [Ever Scroll] to switch “On” or “Off”.
Setting the beep toneThe default setting is “On”.
1 Display the “System” setting screen. Refer to Displaying the “System” setting screen on page
34
2 Touch [Beep Tone] to switch “On” or “Off”.
Setting the auto audio mix functionYou can select whether or not to use the auto audio mix function.The default setting is “On”.
1 Display the “System” setting screen. Refer to Displaying the “System” setting screen on page
34
2 Touch [Auto Mix] to switch “On” or “Off”.
Setting the rear view cameraA separately sold rear view camera (e.g. ND-BC8) is required for utilising the rear view camera function. (For details, consult your dealer.)
Rear view cameraThis product features a function that automatically switches to the full-screen image of the rear view camera installed on your vehicle, when the gearstick is in the REVERSE (R) position.
Camera for Camera View modeCamera View mode also allows you to check what is behind you while driving.To display the camera image, touch [Camera View] on the “AV source selection” screen. Refer to Source on the AV source selection screen on page
10p To set the rear view camera as the camera for Camera View
mode, set “Back Camera Input” to “On”. Refer to Setting rear view camera activation on page 35
CAUTIONPioneer recommends the use of a camera which outputs mirror reversed images, otherwise the screen image may appear reversed.
p Immediately verify whether the display changes to a rear view camera image when the gearstick is moved to REVERSE (R) from another position.
p When the screen changes to full-screen rear view camera image during normal driving, switch to the opposite setting in “Camera Polarity”.
p If you touch while the camera image is displayed, the displayed image will turn off temporarily.
Setting rear view camera activation
The default setting is “Off”.
1 Display the “System” setting screen. Refer to Displaying the “System” setting screen on page
34
2 Touch [Camera settings].
3 Touch [Back Camera Input] to switch “On” or “Off”.
Setting the polarity of the rear view camera
p This function is available when “Back Camera Input” is “On”.
Refer to Setting rear view camera activation on page 35
1 Display the “System” setting screen. Refer to Displaying the “System” setting screen on page
34
2 Touch [Camera settings].
3 Touch [Camera Polarity]. Battery (default):
The polarity of the connected lead is positive. Ground:
The polarity of the connected lead is negative.
Setting the demo modeThe default setting is “On”.
1 Display the “System” setting screen. Refer to Displaying the “System” setting screen on page
34
2 Touch [Demo Mode] to switch “On” or “Off”.
Selecting the system language If the embedded language and the selected language setting
are not the same, text information may not display properly. Some characters may not be displayed properly.
1 Display the “System” setting screen. Refer to Displaying the “System” setting screen on page
34
2 Touch [System Language].
3 Touch the language.After the language is selected, the previous screen returns.
Setting the keyboard language with the application for iPhoneYou can use the keyboard in AppRadioMode by setting the language of the keyboard for iPhone.p This function is only available in AppRadioMode on the
iPhone.
1 Display the “System” setting screen. Refer to Displaying the “System” setting screen on page
34
2 Touch [Keyboard].
3 Touch the language.After the language is selected, the previous screen returns.
Adjusting the response posi-tions of the touch panel (touch panel calibration)If you feel that the touch panel keys on the screen deviate from the actual positions that respond to your touch, adjust the response positions of the touch panel screen.p This setting is available only when you stop your vehicle in a
safe place and apply the handbrake.p Do not use sharp pointed tools such as a ballpoint or
mechanical pen, which could damage the screen.p Do not turn off the engine while saving the adjusted position
data.
1 Display the “System” setting screen. Refer to Displaying the “System” setting screen on page
34
2 Touch [Touch panel calibration].
Refer to Displaying the “System” setting screen on page 34
2 Touch [Steering Wheel Control].
3 Touch [W/o Adapter].
4 Touch the item to select the brand of your vehicle.
5 Touch the item to set.Follow the on-screen instructions to register the function setting.
If you touch [Clear], all the settings is cleared.
Setting Bluetooth audio source activation
X5850BT X2850BTThe default setting is “On”.
1 Display the “System” setting screen. Refer to Displaying the “System” setting screen on page
34
2 Touch [AV Source Settings].
3 Touch [Bluetooth Audio] to switch “On” or “Off”.
Setting Spotify source activationThe default setting is “On”.
1 Display the “System” setting screen. Refer to Displaying the “System” setting screen on page
34
2 Touch [AV Source Settings].
3 Touch [Spotify] to switch “On” or “Off”.
Setting the ever scrollWhen “Ever Scroll” is set to “On”, the recorded text information scrolls continuously in the display while the vehicle is stopped.The default setting is “Off”.
1 Display the “System” setting screen. Refer to Displaying the “System” setting screen on page
34
35< CRD4925-A >
System settings System settings
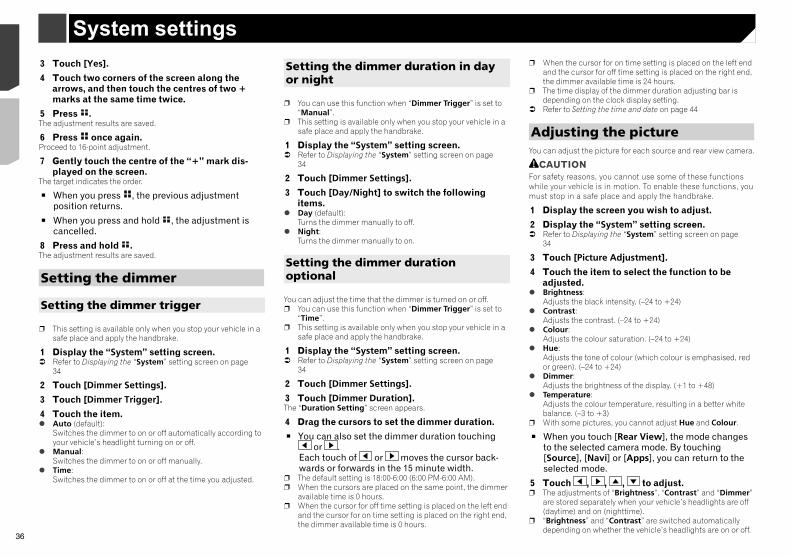
36
p “Dimmer” can be changed the setting or the time to switch it to on or off.
Refer to Setting the dimmer on page 36p The picture adjustment may not be available with some rear
view cameras.p The setting contents can be memorised separately.
Displaying the firmware version
1 Display the “System” setting screen. Refer to Displaying the “System” setting screen on page
34
2 Touch [System Information].
3 Touch [Firmware Information].The “Firmware Information” screen appears.
Displaying the open source licences
1 Display the “System” setting screen. Refer to Displaying the “System” setting screen on page
34
2 Touch [System Information].
3 Touch [Licence].The open source licences of the functions that this product is equipped with appear.
Updating firmware
CAUTION The USB storage device for updating must contain only the
correct update file. Never turn this product off, disconnect the USB storage
device while the firmware is being updated. You can only update the firmware when the vehicle is
stopped and the handbrake is engaged.
1 Download the firmware update files.
2 Connect a blank (formatted) USB storage device to your computer, and then locate the correct update file and copy it onto the USB storage device.
3 Touch [Yes].
4 Touch two corners of the screen along the arrows, and then touch the centres of two + marks at the same time twice.
5 Press .The adjustment results are saved.
6 Press once again.Proceed to 16-point adjustment.
7 Gently touch the centre of the “+” mark dis-played on the screen.
The target indicates the order.
When you press , the previous adjustment position returns.
When you press and hold , the adjustment is cancelled.
8 Press and hold .The adjustment results are saved.
Setting the dimmer
Setting the dimmer trigger
p This setting is available only when you stop your vehicle in a safe place and apply the handbrake.
1 Display the “System” setting screen. Refer to Displaying the “System” setting screen on page
34
2 Touch [Dimmer Settings].
3 Touch [Dimmer Trigger].
4 Touch the item. Auto (default):
Switches the dimmer to on or off automatically according to your vehicle’s headlight turning on or off.
Manual:Switches the dimmer to on or off manually.
Time:Switches the dimmer to on or off at the time you adjusted.
Setting the dimmer duration in day or night
p You can use this function when “Dimmer Trigger” is set to “Manual”.
p This setting is available only when you stop your vehicle in a safe place and apply the handbrake.
1 Display the “System” setting screen. Refer to Displaying the “System” setting screen on page
34
2 Touch [Dimmer Settings].
3 Touch [Day/Night] to switch the following items.
Day (default):Turns the dimmer manually to off.
Night:Turns the dimmer manually to on.
Setting the dimmer duration optional
You can adjust the time that the dimmer is turned on or off.p You can use this function when “Dimmer Trigger” is set to
“Time”.p This setting is available only when you stop your vehicle in a
safe place and apply the handbrake.
1 Display the “System” setting screen. Refer to Displaying the “System” setting screen on page
34
2 Touch [Dimmer Settings].
3 Touch [Dimmer Duration].The “Duration Setting” screen appears.
4 Drag the cursors to set the dimmer duration.
You can also set the dimmer duration touching or .
Each touch of or moves the cursor back-wards or forwards in the 15 minute width.
p The default setting is 18:00-6:00 (6:00 PM-6:00 AM).p When the cursors are placed on the same point, the dimmer
available time is 0 hours.p When the cursor for off time setting is placed on the left end
and the cursor for on time setting is placed on the right end, the dimmer available time is 0 hours.
p When the cursor for on time setting is placed on the left end and the cursor for off time setting is placed on the right end, the dimmer available time is 24 hours.
p The time display of the dimmer duration adjusting bar is depending on the clock display setting.
Refer to Setting the time and date on page 44
Adjusting the pictureYou can adjust the picture for each source and rear view camera.
CAUTIONFor safety reasons, you cannot use some of these functions while your vehicle is in motion. To enable these functions, you must stop in a safe place and apply the handbrake.
1 Display the screen you wish to adjust.
2 Display the “System” setting screen. Refer to Displaying the “System” setting screen on page
34
3 Touch [Picture Adjustment].
4 Touch the item to select the function to be adjusted.
Brightness:Adjusts the black intensity. (–24 to +24)
Contrast:Adjusts the contrast. (–24 to +24)
Colour:Adjusts the colour saturation. (–24 to +24)
Hue:Adjusts the tone of colour (which colour is emphasised, red or green). (–24 to +24)
Dimmer:Adjusts the brightness of the display. (+1 to +48)
Temperature:Adjusts the colour temperature, resulting in a better white balance. (–3 to +3)
p With some pictures, you cannot adjust Hue and Colour.
When you touch [Rear View], the mode changes to the selected camera mode. By touching [Source], [Navi] or [Apps], you can return to the selected mode.
5 Touch , , , to adjust.p The adjustments of “Brightness”, “Contrast” and “Dimmer”
are stored separately when your vehicle’s headlights are off (daytime) and on (nighttime).
p “Brightness” and “Contrast” are switched automatically depending on whether the vehicle’s headlights are on or off.
36 < CRD4925-A >< CRD4925-A >
System settings System settings
37
p “Dimmer” can be changed the setting or the time to switch it to on or off.
Refer to Setting the dimmer on page 36p The picture adjustment may not be available with some rear
view cameras.p The setting contents can be memorised separately.
Displaying the firmware version
1 Display the “System” setting screen. Refer to Displaying the “System” setting screen on page
34
2 Touch [System Information].
3 Touch [Firmware Information].The “Firmware Information” screen appears.
Displaying the open source licences
1 Display the “System” setting screen. Refer to Displaying the “System” setting screen on page
34
2 Touch [System Information].
3 Touch [Licence].The open source licences of the functions that this product is equipped with appear.
Updating firmware
CAUTION The USB storage device for updating must contain only the
correct update file. Never turn this product off, disconnect the USB storage
device while the firmware is being updated. You can only update the firmware when the vehicle is
stopped and the handbrake is engaged.
1 Download the firmware update files.
2 Connect a blank (formatted) USB storage device to your computer, and then locate the correct update file and copy it onto the USB storage device.
3 Connect the USB storage device to this product.
4 Turn the source off. Refer to Selecting a source on page 10
5 Display the “System” setting screen. Refer to Displaying the “System” setting screen on page
34
6 Touch [System Information].
7 Touch [Firmware Update].
8 Touch [Continue] to display the data transfer mode.
p Follow the on-screen instructions to finish updating the firmware.
p This product will reset automatically after the firmware update is completed if the update is successful.
p If an error message appears on the screen, touch the display and perform the above steps again.
Displaying the “Audio” setting screen
1 Press .
2 Touch , and then .The “Audio” setting screen appears.
Using fader/balance adjustment
1 Display the “Audio” setting screen. Refer to Displaying the “Audio” setting screen on page 37
2 Touch [Fader/Balance].p Only the balance can be adjusted when “Network Mode” is
selected as the speaker mode. Touch [Balance] and skip to step 4.
3 Touch or to adjust the front/rear speaker balance.
p Set “Front” and “Rear” to “0” when using a dual speaker system.
4 Touch or to adjust the left/right speaker balance.
You can also set the value by dragging the point on the displayed table.
Switching sound muting/attenuationYou can automatically mute or attenuate the AV source volume and the iPhone application volume when the navigation outputs the guidance voice.
1 Display the “Audio” setting screen. Refer to Displaying the “Audio” setting screen on page 37
2 Touch [Mute Level].
3 Touch the item. ATT (default):
The volume becomes 20 dB lower than the current volume. Mute:
The volume becomes 0. Off:
The volume does not change.
Audio adjustments
p When the cursor for on time setting is placed on the left end and the cursor for off time setting is placed on the right end, the dimmer available time is 24 hours.
p The time display of the dimmer duration adjusting bar is depending on the clock display setting.
Refer to Setting the time and date on page 44
Adjusting the pictureYou can adjust the picture for each source and rear view camera.
CAUTIONFor safety reasons, you cannot use some of these functions while your vehicle is in motion. To enable these functions, you must stop in a safe place and apply the handbrake.
1 Display the screen you wish to adjust.
2 Display the “System” setting screen. Refer to Displaying the “System” setting screen on page
34
3 Touch [Picture Adjustment].
4 Touch the item to select the function to be adjusted.
Brightness:Adjusts the black intensity. (–24 to +24)
Contrast:Adjusts the contrast. (–24 to +24)
Colour:Adjusts the colour saturation. (–24 to +24)
Hue:Adjusts the tone of colour (which colour is emphasised, red or green). (–24 to +24)
Dimmer:Adjusts the brightness of the display. (+1 to +48)
Temperature:Adjusts the colour temperature, resulting in a better white balance. (–3 to +3)
p With some pictures, you cannot adjust Hue and Colour.
When you touch [Rear View], the mode changes to the selected camera mode. By touching [Source], [Navi] or [Apps], you can return to the selected mode.
5 Touch , , , to adjust.p The adjustments of “Brightness”, “Contrast” and “Dimmer”
are stored separately when your vehicle’s headlights are off (daytime) and on (nighttime).
p “Brightness” and “Contrast” are switched automatically depending on whether the vehicle’s headlights are on or off.
37< CRD4925-A >
System settings System settings Audio adjustments
38
Adjusting the speaker output levels finelyFine adjustments of the speaker output level can be made by listening to audio output.p This function is available when “Subwoofer” is set to “On”. Refer to Setting the subwoofer output on page 38
1 Display the “Audio” setting screen. Refer to Displaying the “Audio” setting screen on page 37
2 Touch [Speaker Level].
3 Touch or to select the listening position if necessary.
The following items are available:Off, Front-L, Front-R, Front, All.p The default setting is “Off”.p “All” is not available when “Network Mode” is selected as
the speaker mode.p If you change the listening position setting, the output
levels of all the speakers will change in conjunction with the setting.
4 Touch or to adjust the speaker output level.
p “–24” dB to “10” dB is displayed as the level to be corrected is increased or decreased.
The following speakers are available:Standard Mode: Front Left, Front Right, Rear Left, Rear Right, SubwooferNetwork Mode: High Left, High Right, Mid Left, Mid Right, Subwooferp To use this function, the vehicle’s acoustics must be meas-
ured in advance.
Adjusting the time alignmentBy adjusting the distance from each speaker to the listening position, time alignment is able to correct the time required for sound to reach the listening position.
1 Measure the distance between the head of the listener and each speaker unit.
2 Display the “Audio” setting screen. Refer to Displaying the “Audio” setting screen on page 37
3 Touch [Time Alignment].
4 Touch or to select the listening position if necessary.
Adjusting source levelsSLA (source level adjustment) lets you adjust the volume level of each source to prevent radical changes in volume when switch-ing between sources.p Settings are based on the FM tuner volume level, which
remains unchanged.p This function is not available when the FM tuner is selected
as the AV source.
1 Compare the FM tuner volume level with the level of the source.
2 Display the “Audio” setting screen. Refer to Displaying the “Audio” setting screen on page 37
3 Touch [Source Level Adjuster].
4 Touch or to adjust the source volume.p If you directly touch the area where the cursor can be moved,
the SLA setting will be changed to the value of the touched point.
p “+4” to “–4” is displayed as the source volume is increased or decreased.
p The default setting is “0”.
Using the auto level controlThis function corrects automatically the audio level difference between the music files or the sources.
1 Display the “Audio” setting screen. Refer to Displaying the “Audio” setting screen on page 37
2 Touch [Automatic Level Control].
3 Touch the item. Off (default):
Turns the auto level control setting off. Mode1:
Corrects a little the audio level difference between the music files or the sources (for the narrow dynamic range audio signal).
Mode2:Corrects widely the audio level difference between the music files or the sources (for the wide dynamic range audio signal).
Adjusting loudnessThis function compensates for deficiencies in the low-frequency and high-frequency ranges at low volume.The default setting is “Off”.
p This function is not available while you make or receive a call using the hands-free function.
1 Display the “Audio” setting screen. Refer to Displaying the “Audio” setting screen on page 37
2 Touch [Loudness].
3 Touch the item.The following items are available:Off, Low, Mid, High.
Setting the subwoofer outputThis product is equipped with a subwoofer output mechanism, which can be turned on or off.The default setting is “On”.
1 Display the “Audio” setting screen. Refer to Displaying the “Audio” setting screen on page 37
2 Touch [Subwoofer] to switch “On” or “Off”.
Adjusting the cutoff frequency valueYou can adjust the cutoff frequency value of each speaker.The following speakers can be adjusted:Standard Mode: Front, Rear, Subwoofer.Network Mode: High, Mid, Subwoofer.p “Subwoofer Settings” is available only when “Subwoofer”
is “On”. Refer to Setting the subwoofer output on page 38
1 Display the “Audio” setting screen. Refer to Displaying the “Audio” setting screen on page 37
2 Touch [Crossover] or [Subwoofer Settings].
3 Touch or to switch the speaker.
4 Drag the graph line to set the cutoff position.
5 Drag the lowest point of the graph to set the cutoff slope.
p The following items can also be set. :
Switches the subwoofer phase between normal and reverse position.
LPF/HPF:Switches the LPF/HPF setting to “On” or “Off”.When it is turned off, the high-pass filter or low-pass filter of each speaker can also be turned on by touching the graph lines.
p This function is not available when adjusting the High speaker.
Switching the rear speaker outputp This function is available when “Standard Mode” is selected
as the speaker mode.The default setting is “Rear”.
1 Turn the source off. Refer to Selecting a source on page 10
2 Display the “Audio” setting screen. Refer to Displaying the “Audio” setting screen on page 37
3 Touch [Rear Speaker Output].
4 Touch to switch “Rear” or “Subwoofer”.
Using BASS Boost
1 Display the “Audio” setting screen. Refer to Displaying the “Audio” setting screen on page 37
2 Touch [Bass Boost].
3 Touch to select the bass boost level from 0 to +6.
Selecting the listening positionYou can select a listening position that you want to make as the centre of sound effects.The default setting is “Off”.
1 Display the “Audio” setting screen. Refer to Displaying the “Audio” setting screen on page 37
2 Touch [Listening Position].
3 Touch the desired position to change the lis-tening position.
The following items are available:Off, Front-L, Front-R, Front, All.p “All” is not available when “Network Mode” is selected as
the speaker mode.
38 < CRD4925-A >< CRD4925-A >
Audio adjustments Audio adjustments
39
Adjusting the speaker output levels finelyFine adjustments of the speaker output level can be made by listening to audio output.p This function is available when “Subwoofer” is set to “On”. Refer to Setting the subwoofer output on page 38
1 Display the “Audio” setting screen. Refer to Displaying the “Audio” setting screen on page 37
2 Touch [Speaker Level].
3 Touch or to select the listening position if necessary.
The following items are available:Off, Front-L, Front-R, Front, All.p The default setting is “Off”.p “All” is not available when “Network Mode” is selected as
the speaker mode.p If you change the listening position setting, the output
levels of all the speakers will change in conjunction with the setting.
4 Touch or to adjust the speaker output level.
p “–24” dB to “10” dB is displayed as the level to be corrected is increased or decreased.
The following speakers are available:Standard Mode: Front Left, Front Right, Rear Left, Rear Right, SubwooferNetwork Mode: High Left, High Right, Mid Left, Mid Right, Subwooferp To use this function, the vehicle’s acoustics must be meas-
ured in advance.
Adjusting the time alignmentBy adjusting the distance from each speaker to the listening position, time alignment is able to correct the time required for sound to reach the listening position.
1 Measure the distance between the head of the listener and each speaker unit.
2 Display the “Audio” setting screen. Refer to Displaying the “Audio” setting screen on page 37
3 Touch [Time Alignment].
4 Touch or to select the listening position if necessary.
The following items are available:Off, Front-L, Front-R, Front, All.p The default setting is “Off”.p “All” is not available when “Network Mode” is selected as
the speaker mode.p If you change the listening position setting, the output
levels of all the speakers will change in conjunction with the setting.
5 Touch or to input the distance between the selected speaker and the listening position.
p You can input the value every 2.5 cm (between 0 and 350 cm).
The following speakers are available:Standard Mode: Front Left, Front Right, Rear Left, Rear Right, SubwooferNetwork Mode: High Left, High Right, Mid Left, Mid Right, Subwooferp This function is available only when the listening position
setting is set to “Front-L” or “Front-R”.p To use this function, the vehicle’s acoustics must be meas-
ured in advance.
If you touch [TA On], the time alignment is turned off mandatorily.
Switching the time alignment preset
1 Display the “Audio” setting screen. Refer to Displaying the “Audio” setting screen on page 37
2 Touch [Time Alignment Preset].
3 Touch the item. Initial (default):
Sets to the initial setting value. ATA:
Reflects the result of “A-EQ&TA Measurement” to the setting value.
Off:Resets all setting values to 0.
Custom:Sets to the value adjusted at “Time Alignment”.
p When you adjust the time alignment, the preset item will switch automatically to “Custom”.
p “Custom” can be selected only when the listening position is set to “Front-L” or “Front-R”.
Using the equaliser
Recalling equaliser curves
There are seven stored equaliser curves that you can easily recall at any time. Here is a list of the equaliser curves: S.Bass is a curve in which only low-pitched sound is boosted. Powerful is a curve in which low- and high-pitched sounds
are boosted. Natural is a curve in which low- and high-pitched sounds
are slightly boosted. Vocal is a curve in which the midrange, which is the human
vocal range, is boosted. Flat is a flat curve in which nothing is boosted. Custom1 is an adjusted equaliser curve that you create. If
you select this curve, the effect is applied to all AV sources. Custom2 is an adjusted equaliser curve that you create. If
you select this curve, the effect is applied to all AV sources.p The default setting is “Powerful”.
1 Display the “Audio” setting screen. Refer to Displaying the “Audio” setting screen on page 37
2 Touch [Graphic EQ].
3 Touch the equaliser.
Customising the equaliser curves
You can adjust the currently selected equaliser curve setting as desired. Adjustments can be made with a 13-band graphic equaliser.p If you make adjustments when a curve “S.Bass”, “Powerful”,
“Natural”, “Vocal”, or “Flat” is selected, the equaliser curve settings will be changed to “Custom1” mandatorily.
p If you make adjustments when the “Custom2” curve is selected for example, the “Custom2” curve will be updated.
p “Custom1” and “Custom2” curves can be created common to all sources.
1 Display the “Audio” setting screen. Refer to Displaying the “Audio” setting screen on page 37
2 Touch [Graphic EQ].
3 Select a curve that you want to use as the basis of customising.
4 Touch the frequency for which you want to adjust the level.
p This function is not available when adjusting the High speaker.
Switching the rear speaker outputp This function is available when “Standard Mode” is selected
as the speaker mode.The default setting is “Rear”.
1 Turn the source off. Refer to Selecting a source on page 10
2 Display the “Audio” setting screen. Refer to Displaying the “Audio” setting screen on page 37
3 Touch [Rear Speaker Output].
4 Touch to switch “Rear” or “Subwoofer”.
Using BASS Boost
1 Display the “Audio” setting screen. Refer to Displaying the “Audio” setting screen on page 37
2 Touch [Bass Boost].
3 Touch to select the bass boost level from 0 to +6.
Selecting the listening positionYou can select a listening position that you want to make as the centre of sound effects.The default setting is “Off”.
1 Display the “Audio” setting screen. Refer to Displaying the “Audio” setting screen on page 37
2 Touch [Listening Position].
3 Touch the desired position to change the lis-tening position.
The following items are available:Off, Front-L, Front-R, Front, All.p “All” is not available when “Network Mode” is selected as
the speaker mode.
39< CRD4925-A >
Audio adjustments Audio adjustments
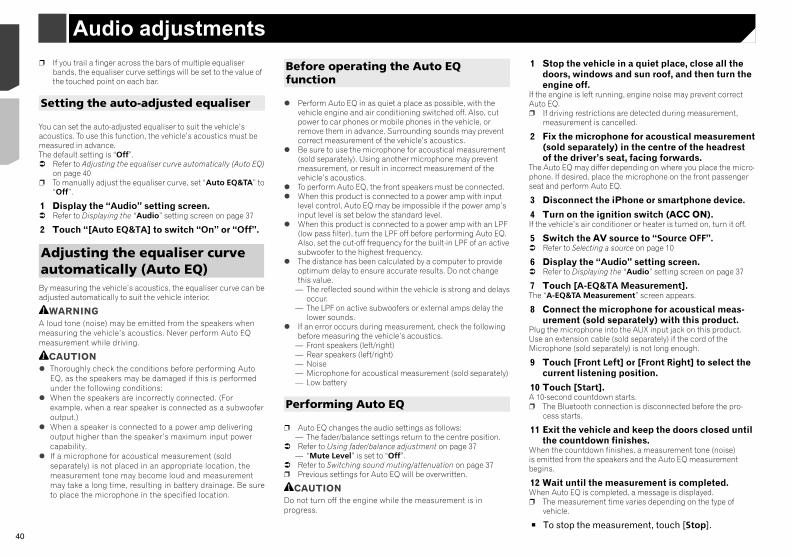
40
13 Store the microphone carefully in the glove box or another safe place.
If the microphone is subjected to direct sunlight for an extended period, high temperatures may cause distortion, colour change or malfunction.
Saving the sound settingsYou can save to recall the following current sound settings:bass boost, slope, subwoofer phase, speaker level, Graphic EQ, HPF/LPF, listening position, crossover, time alignment.
1 Display the “Audio” setting screen. Refer to Displaying the “Audio” setting screen on page 37
2 Touch [Save Settings].
3 Touch [OK].All of the current sound settings are saved.
When you touch [Cancel], return to the “Audio” setting screen.
Loading the sound settings
1 Display the “Audio” setting screen. Refer to Displaying the “Audio” setting screen on page 37
2 Touch [Load Settings].
3 Touch the item.The following items are available:AEQ Setting,Sound Setting.p “AEQ Setting” is available only when you have already
performed Auto EQ measurement. Refer to Adjusting the equaliser curve automatically (Auto EQ)
on page 40p “Sound Setting” is available only when you have already
saved the sound settings. Refer to Saving the sound settings on page 41
p If you trail a finger across the bars of multiple equaliser bands, the equaliser curve settings will be set to the value of the touched point on each bar.
Setting the auto-adjusted equaliser
You can set the auto-adjusted equaliser to suit the vehicle’s acoustics. To use this function, the vehicle’s acoustics must be measured in advance.The default setting is “Off”. Refer to Adjusting the equaliser curve automatically (Auto EQ)
on page 40p To manually adjust the equaliser curve, set “Auto EQ&TA” to
“Off”.
1 Display the “Audio” setting screen. Refer to Displaying the “Audio” setting screen on page 37
2 Touch “[Auto EQ&TA] to switch “On” or “Off”.
Adjusting the equaliser curve automatically (Auto EQ)By measuring the vehicle’s acoustics, the equaliser curve can be adjusted automatically to suit the vehicle interior.
WARNINGA loud tone (noise) may be emitted from the speakers when measuring the vehicle’s acoustics. Never perform Auto EQ measurement while driving.
CAUTION Thoroughly check the conditions before performing Auto
EQ, as the speakers may be damaged if this is performed under the following conditions:
When the speakers are incorrectly connected. (For example, when a rear speaker is connected as a subwoofer output.)
When a speaker is connected to a power amp delivering output higher than the speaker’s maximum input power capability.
If a microphone for acoustical measurement (sold separately) is not placed in an appropriate location, the measurement tone may become loud and measurement may take a long time, resulting in battery drainage. Be sure to place the microphone in the specified location.
Before operating the Auto EQ function
Perform Auto EQ in as quiet a place as possible, with the vehicle engine and air conditioning switched off. Also, cut power to car phones or mobile phones in the vehicle, or remove them in advance. Surrounding sounds may prevent correct measurement of the vehicle’s acoustics.
Be sure to use the microphone for acoustical measurement (sold separately). Using another microphone may prevent measurement, or result in incorrect measurement of the vehicle’s acoustics.
To perform Auto EQ, the front speakers must be connected. When this product is connected to a power amp with input
level control, Auto EQ may be impossible if the power amp’s input level is set below the standard level.
When this product is connected to a power amp with an LPF (low pass filter), turn the LPF off before performing Auto EQ. Also, set the cut-off frequency for the built-in LPF of an active subwoofer to the highest frequency.
The distance has been calculated by a computer to provide optimum delay to ensure accurate results. Do not change this value.
— The reflected sound within the vehicle is strong and delays occur.
— The LPF on active subwoofers or external amps delay the lower sounds.
If an error occurs during measurement, check the following before measuring the vehicle’s acoustics.
— Front speakers (left/right)— Rear speakers (left/right)— Noise— Microphone for acoustical measurement (sold separately)— Low battery
Performing Auto EQ
p Auto EQ changes the audio settings as follows:— The fader/balance settings return to the centre position.
Refer to Using fader/balance adjustment on page 37— “Mute Level” is set to “Off”.
Refer to Switching sound muting/attenuation on page 37p Previous settings for Auto EQ will be overwritten.
CAUTIONDo not turn off the engine while the measurement is in progress.
1 Stop the vehicle in a quiet place, close all the doors, windows and sun roof, and then turn the engine off.
If the engine is left running, engine noise may prevent correct Auto EQ.p If driving restrictions are detected during measurement,
measurement is cancelled.
2 Fix the microphone for acoustical measurement (sold separately) in the centre of the headrest of the driver’s seat, facing forwards.
The Auto EQ may differ depending on where you place the micro-phone. If desired, place the microphone on the front passenger seat and perform Auto EQ.
3 Disconnect the iPhone or smartphone device.
4 Turn on the ignition switch (ACC ON).If the vehicle’s air conditioner or heater is turned on, turn it off.
5 Switch the AV source to “Source OFF”. Refer to Selecting a source on page 10
6 Display the “Audio” setting screen. Refer to Displaying the “Audio” setting screen on page 37
7 Touch [A-EQ&TA Measurement].The “A-EQ&TA Measurement” screen appears.
8 Connect the microphone for acoustical meas-urement (sold separately) with this product.
Plug the microphone into the AUX input jack on this product.Use an extension cable (sold separately) if the cord of the Microphone (sold separately) is not long enough.
9 Touch [Front Left] or [Front Right] to select the current listening position.
10 Touch [Start].A 10-second countdown starts.p The Bluetooth connection is disconnected before the pro-
cess starts.
11 Exit the vehicle and keep the doors closed until the countdown finishes.
When the countdown finishes, a measurement tone (noise) is emitted from the speakers and the Auto EQ measurement begins.
12 Wait until the measurement is completed.When Auto EQ is completed, a message is displayed.p The measurement time varies depending on the type of
vehicle.
To stop the measurement, touch [Stop].
40 < CRD4925-A >< CRD4925-A >
Audio adjustments Audio adjustments
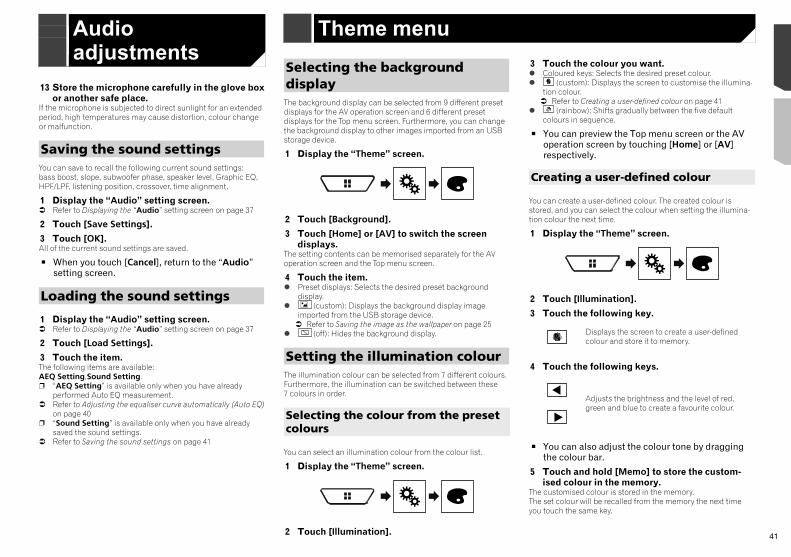
41
13 Store the microphone carefully in the glove box or another safe place.
If the microphone is subjected to direct sunlight for an extended period, high temperatures may cause distortion, colour change or malfunction.
Saving the sound settingsYou can save to recall the following current sound settings:bass boost, slope, subwoofer phase, speaker level, Graphic EQ, HPF/LPF, listening position, crossover, time alignment.
1 Display the “Audio” setting screen. Refer to Displaying the “Audio” setting screen on page 37
2 Touch [Save Settings].
3 Touch [OK].All of the current sound settings are saved.
When you touch [Cancel], return to the “Audio” setting screen.
Loading the sound settings
1 Display the “Audio” setting screen. Refer to Displaying the “Audio” setting screen on page 37
2 Touch [Load Settings].
3 Touch the item.The following items are available:AEQ Setting,Sound Setting.p “AEQ Setting” is available only when you have already
performed Auto EQ measurement. Refer to Adjusting the equaliser curve automatically (Auto EQ)
on page 40p “Sound Setting” is available only when you have already
saved the sound settings. Refer to Saving the sound settings on page 41
Selecting the background displayThe background display can be selected from 9 different preset displays for the AV operation screen and 6 different preset displays for the Top menu screen. Furthermore, you can change the background display to other images imported from an USB storage device.
1 Display the “Theme” screen.
2 Touch [Background].
3 Touch [Home] or [AV] to switch the screen displays.
The setting contents can be memorised separately for the AV operation screen and the Top menu screen.
4 Touch the item. Preset displays: Selects the desired preset background
display. (custom): Displays the background display image
imported from the USB storage device. Refer to Saving the image as the wallpaper on page 25
(off): Hides the background display.
Setting the illumination colourThe illumination colour can be selected from 7 different colours. Furthermore, the illumination can be switched between these 7 colours in order.
Selecting the colour from the preset colours
You can select an illumination colour from the colour list.
1 Display the “Theme” screen.
2 Touch [Illumination].
3 Touch the colour you want. Coloured keys: Selects the desired preset colour. (custom): Displays the screen to customise the illumina-
tion colour. Refer to Creating a user-defined colour on page 41
(rainbow): Shifts gradually between the five default colours in sequence.
You can preview the Top menu screen or the AV operation screen by touching [Home] or [AV] respectively.
Creating a user-defined colour
You can create a user-defined colour. The created colour is stored, and you can select the colour when setting the illumina-tion colour the next time.
1 Display the “Theme” screen.
2 Touch [Illumination].
3 Touch the following key.
Displays the screen to create a user-defined colour and store it to memory.
4 Touch the following keys.
Adjusts the brightness and the level of red, green and blue to create a favourite colour.
You can also adjust the colour tone by dragging the colour bar.
5 Touch and hold [Memo] to store the custom-ised colour in the memory.
The customised colour is stored in the memory.The set colour will be recalled from the memory the next time you touch the same key.
Theme menu
1 Stop the vehicle in a quiet place, close all the doors, windows and sun roof, and then turn the engine off.
If the engine is left running, engine noise may prevent correct Auto EQ.p If driving restrictions are detected during measurement,
measurement is cancelled.
2 Fix the microphone for acoustical measurement (sold separately) in the centre of the headrest of the driver’s seat, facing forwards.
The Auto EQ may differ depending on where you place the micro-phone. If desired, place the microphone on the front passenger seat and perform Auto EQ.
3 Disconnect the iPhone or smartphone device.
4 Turn on the ignition switch (ACC ON).If the vehicle’s air conditioner or heater is turned on, turn it off.
5 Switch the AV source to “Source OFF”. Refer to Selecting a source on page 10
6 Display the “Audio” setting screen. Refer to Displaying the “Audio” setting screen on page 37
7 Touch [A-EQ&TA Measurement].The “A-EQ&TA Measurement” screen appears.
8 Connect the microphone for acoustical meas-urement (sold separately) with this product.
Plug the microphone into the AUX input jack on this product.Use an extension cable (sold separately) if the cord of the Microphone (sold separately) is not long enough.
9 Touch [Front Left] or [Front Right] to select the current listening position.
10 Touch [Start].A 10-second countdown starts.p The Bluetooth connection is disconnected before the pro-
cess starts.
11 Exit the vehicle and keep the doors closed until the countdown finishes.
When the countdown finishes, a measurement tone (noise) is emitted from the speakers and the Auto EQ measurement begins.
12 Wait until the measurement is completed.When Auto EQ is completed, a message is displayed.p The measurement time varies depending on the type of
vehicle.
To stop the measurement, touch [Stop].
41< CRD4925-A >
Audio adjustments Audio adjustments
Theme menu
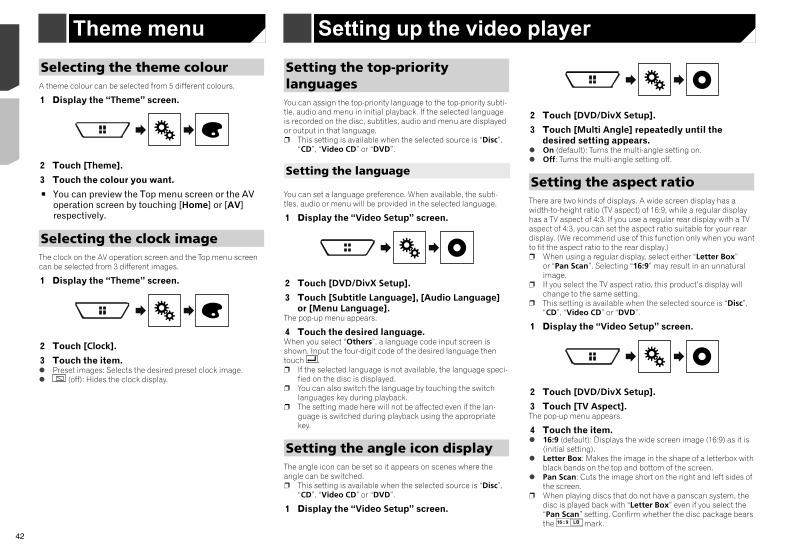
42
p The TV aspect ratio cannot be changed for some discs. For details, refer to the disc’s instructions.
Setting parental lockSome DVD-Video discs let you use parental lock to set restric-tions so that children cannot watch violent or adult-oriented scenes. You can set the parental lock level in steps as desired.p When you set a parental lock level and then play a disc fea-
turing parental lock, code number input indications may be displayed. In this case, playback will begin when the correct code number is input.
p This setting is available when the selected source is “Disc”, “CD”, “Video CD” or “DVD”.
Setting the code number and level
When you first use this function, register your code number. If you do not register a code number, the parental lock will not operate.
1 Display the “Video Setup” screen.
2 Touch [DVD/DivX Setup].
3 Touch [Parental].The “Parental” screen appears.
4 Touch [0] to [9] to input a four-digit code number.
5 Touch the following key.
Registers the code number, and you can now set the level.
6 Touch any number between [1] to [8] to select the desired level.
[8]: Enables playback of the entire disc (initial setting). [7] to [2]: Enables playback of discs for children and non-
adult oriented discs. [1]: Enables only playback of discs for children.
7 Touch the following key.
Selecting the theme colourA theme colour can be selected from 5 different colours.
1 Display the “Theme” screen.
2 Touch [Theme].
3 Touch the colour you want.
You can preview the Top menu screen or the AV operation screen by touching [Home] or [AV] respectively.
Selecting the clock imageThe clock on the AV operation screen and the Top menu screen can be selected from 3 different images.
1 Display the “Theme” screen.
2 Touch [Clock].
3 Touch the item. Preset images: Selects the desired preset clock image. (off): Hides the clock display.
Setting the top-priority languagesYou can assign the top-priority language to the top-priority subti-tle, audio and menu in initial playback. If the selected language is recorded on the disc, subtitles, audio and menu are displayed or output in that language.p This setting is available when the selected source is “Disc”,
“CD”, “Video CD” or “DVD”.
Setting the language
You can set a language preference. When available, the subti-tles, audio or menu will be provided in the selected language.
1 Display the “Video Setup” screen.
2 Touch [DVD/DivX Setup].
3 Touch [Subtitle Language], [Audio Language] or [Menu Language].
The pop-up menu appears.
4 Touch the desired language.When you select “Others”, a language code input screen is shown. Input the four-digit code of the desired language then touch .p If the selected language is not available, the language speci-
fied on the disc is displayed.p You can also switch the language by touching the switch
languages key during playback.p The setting made here will not be affected even if the lan-
guage is switched during playback using the appropriate key.
Setting the angle icon displayThe angle icon can be set so it appears on scenes where the angle can be switched.p This setting is available when the selected source is “Disc”,
“CD”, “Video CD” or “DVD”.
1 Display the “Video Setup” screen.
2 Touch [DVD/DivX Setup].
3 Touch [Multi Angle] repeatedly until the desired setting appears.
On (default): Turns the multi-angle setting on. Off: Turns the multi-angle setting off.
Setting the aspect ratioThere are two kinds of displays. A wide screen display has a width-to-height ratio (TV aspect) of 16:9, while a regular display has a TV aspect of 4:3. If you use a regular rear display with a TV aspect of 4:3, you can set the aspect ratio suitable for your rear display. (We recommend use of this function only when you want to fit the aspect ratio to the rear display.)p When using a regular display, select either “Letter Box”
or “Pan Scan”. Selecting “16:9” may result in an unnatural image.
p If you select the TV aspect ratio, this product’s display will change to the same setting.
p This setting is available when the selected source is “Disc”, “CD”, “Video CD” or “DVD”.
1 Display the “Video Setup” screen.
2 Touch [DVD/DivX Setup].
3 Touch [TV Aspect].The pop-up menu appears.
4 Touch the item. 16:9 (default): Displays the wide screen image (16:9) as it is
(initial setting). Letter Box: Makes the image in the shape of a letterbox with
black bands on the top and bottom of the screen. Pan Scan: Cuts the image short on the right and left sides of
the screen.p When playing discs that do not have a panscan system, the
disc is played back with “Letter Box” even if you select the “Pan Scan” setting. Confirm whether the disc package bears the mark.
Setting up the video player
42 < CRD4925-A >< CRD4925-A >
Theme menu Setting up the video player Setting up the video player
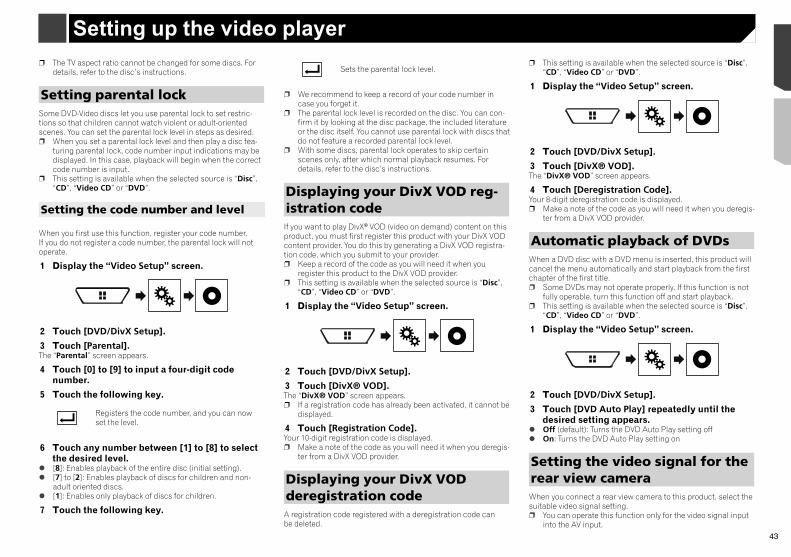
43
p The TV aspect ratio cannot be changed for some discs. For details, refer to the disc’s instructions.
Setting parental lockSome DVD-Video discs let you use parental lock to set restric-tions so that children cannot watch violent or adult-oriented scenes. You can set the parental lock level in steps as desired.p When you set a parental lock level and then play a disc fea-
turing parental lock, code number input indications may be displayed. In this case, playback will begin when the correct code number is input.
p This setting is available when the selected source is “Disc”, “CD”, “Video CD” or “DVD”.
Setting the code number and level
When you first use this function, register your code number. If you do not register a code number, the parental lock will not operate.
1 Display the “Video Setup” screen.
2 Touch [DVD/DivX Setup].
3 Touch [Parental].The “Parental” screen appears.
4 Touch [0] to [9] to input a four-digit code number.
5 Touch the following key.
Registers the code number, and you can now set the level.
6 Touch any number between [1] to [8] to select the desired level.
[8]: Enables playback of the entire disc (initial setting). [7] to [2]: Enables playback of discs for children and non-
adult oriented discs. [1]: Enables only playback of discs for children.
7 Touch the following key.
Sets the parental lock level.
p We recommend to keep a record of your code number in case you forget it.
p The parental lock level is recorded on the disc. You can con-firm it by looking at the disc package, the included literature or the disc itself. You cannot use parental lock with discs that do not feature a recorded parental lock level.
p With some discs, parental lock operates to skip certain scenes only, after which normal playback resumes. For details, refer to the disc’s instructions.
Displaying your DivX VOD reg-istration codeIf you want to play DivX® VOD (video on demand) content on this product, you must first register this product with your DivX VOD content provider. You do this by generating a DivX VOD registra-tion code, which you submit to your provider.p Keep a record of the code as you will need it when you
register this product to the DivX VOD provider.p This setting is available when the selected source is “Disc”,
“CD”, “Video CD” or “DVD”.
1 Display the “Video Setup” screen.
2 Touch [DVD/DivX Setup].
3 Touch [DivX® VOD].The “DivX® VOD” screen appears.p If a registration code has already been activated, it cannot be
displayed.
4 Touch [Registration Code].Your 10-digit registration code is displayed.p Make a note of the code as you will need it when you deregis-
ter from a DivX VOD provider.
Displaying your DivX VOD deregistration codeA registration code registered with a deregistration code can be deleted.
p This setting is available when the selected source is “Disc”, “CD”, “Video CD” or “DVD”.
1 Display the “Video Setup” screen.
2 Touch [DVD/DivX Setup].
3 Touch [DivX® VOD].The “DivX® VOD” screen appears.
4 Touch [Deregistration Code].Your 8-digit deregistration code is displayed.p Make a note of the code as you will need it when you deregis-
ter from a DivX VOD provider.
Automatic playback of DVDsWhen a DVD disc with a DVD menu is inserted, this product will cancel the menu automatically and start playback from the first chapter of the first title.p Some DVDs may not operate properly. If this function is not
fully operable, turn this function off and start playback.p This setting is available when the selected source is “Disc”,
“CD”, “Video CD” or “DVD”.
1 Display the “Video Setup” screen.
2 Touch [DVD/DivX Setup].
3 Touch [DVD Auto Play] repeatedly until the desired setting appears.
Off (default): Turns the DVD Auto Play setting off On: Turns the DVD Auto Play setting on
Setting the video signal for the rear view cameraWhen you connect a rear view camera to this product, select the suitable video signal setting.p You can operate this function only for the video signal input
into the AV input.
2 Touch [DVD/DivX Setup].
3 Touch [Multi Angle] repeatedly until the desired setting appears.
On (default): Turns the multi-angle setting on. Off: Turns the multi-angle setting off.
Setting the aspect ratioThere are two kinds of displays. A wide screen display has a width-to-height ratio (TV aspect) of 16:9, while a regular display has a TV aspect of 4:3. If you use a regular rear display with a TV aspect of 4:3, you can set the aspect ratio suitable for your rear display. (We recommend use of this function only when you want to fit the aspect ratio to the rear display.)p When using a regular display, select either “Letter Box”
or “Pan Scan”. Selecting “16:9” may result in an unnatural image.
p If you select the TV aspect ratio, this product’s display will change to the same setting.
p This setting is available when the selected source is “Disc”, “CD”, “Video CD” or “DVD”.
1 Display the “Video Setup” screen.
2 Touch [DVD/DivX Setup].
3 Touch [TV Aspect].The pop-up menu appears.
4 Touch the item. 16:9 (default): Displays the wide screen image (16:9) as it is
(initial setting). Letter Box: Makes the image in the shape of a letterbox with
black bands on the top and bottom of the screen. Pan Scan: Cuts the image short on the right and left sides of
the screen.p When playing discs that do not have a panscan system, the
disc is played back with “Letter Box” even if you select the “Pan Scan” setting. Confirm whether the disc package bears the mark.
43< CRD4925-A >
Setting up the video player Setting up the video player
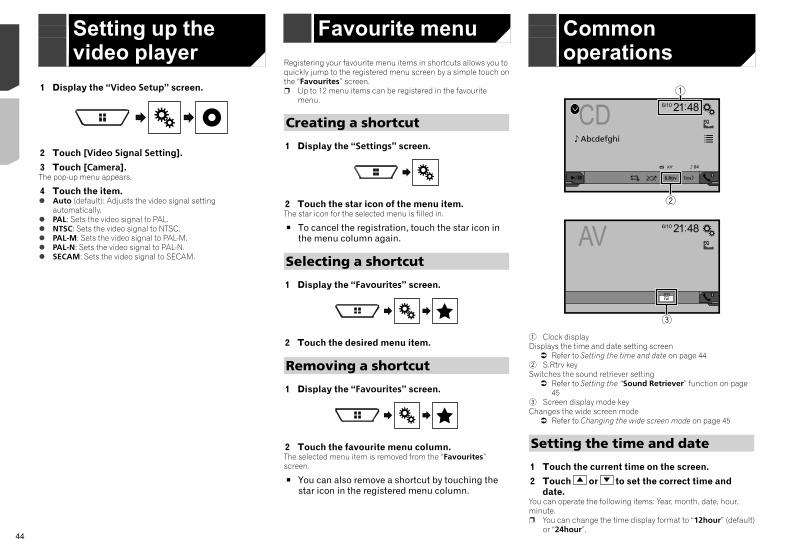
44
p You can change the order of date display format: Day-month-year, Month-day-year, Year-month-date.
Setting the “Sound Retriever” functionThe “Sound Retriever” function automatically enhances com-pressed audio and restores rich sound.
1 Touch to switch the settings. (Mode1) (default), (Mode2): Activates the
“Sound Retriever” function. (Off): Deactivates the “Sound Retriever” function.p Mode2 has a stronger effect than Mode1.
Changing the wide screen modeYou can set the screen size for the video and JPEG images.The default setting is “Full”, and for JPEG images is “Normal”.p The default setting is “Full”, and for JPEG images is
“Normal”.p JPEG can be set to either “Normal” or “Trimming” in wide
screen mode.
1 Touch the following key.p The appearance of this key changes according to the current
setting.
2 Touch the desired mode. Full:
A 4:3 picture is enlarged in the horizontal direction only, enabling you to enjoy an image without any omissions.
Zoom:A 4:3 picture is enlarged in the same proportion both verti-cally and horizontally.
Normal:A 4:3 picture is displayed normally, without changing its proportion.
TrimmingAn image is displayed across the entire screen with the horizontal-to-vertical ratio left as is. If the screen ratio differs from the image, the image may be displayed partly cut off either at the top/bottom or sides.
p This setting is for JPEG images only.p You cannot operate this function while driving.p Different settings can be stored for each video source.p When a video is viewed in a wide screen mode that does not
match its original aspect ratio, it may appear different.
1 Display the “Video Setup” screen.
2 Touch [Video Signal Setting].
3 Touch [Camera].The pop-up menu appears.
4 Touch the item. Auto (default): Adjusts the video signal setting
automatically. PAL: Sets the video signal to PAL. NTSC: Sets the video signal to NTSC. PAL-M: Sets the video signal to PAL-M. PAL-N: Sets the video signal to PAL-N. SECAM: Sets the video signal to SECAM.
Registering your favourite menu items in shortcuts allows you to quickly jump to the registered menu screen by a simple touch on the “Favourites” screen.p Up to 12 menu items can be registered in the favourite
menu.
Creating a shortcut
1 Display the “Settings” screen.
2 Touch the star icon of the menu item.The star icon for the selected menu is filled in.
To cancel the registration, touch the star icon in the menu column again.
Selecting a shortcut
1 Display the “Favourites” screen.
2 Touch the desired menu item.
Removing a shortcut
1 Display the “Favourites” screen.
2 Touch the favourite menu column.The selected menu item is removed from the “Favourites” screen.
You can also remove a shortcut by touching the star icon in the registered menu column.
CD 4821
04
Abcdefghi
6/10
2
1
AV 4821
Full
6/10
3
1 Clock displayDisplays the time and date setting screen Refer to Setting the time and date on page 44
2 S.Rtrv keySwitches the sound retriever setting Refer to Setting the “Sound Retriever” function on page
453 Screen display mode keyChanges the wide screen mode Refer to Changing the wide screen mode on page 45
Setting the time and date
1 Touch the current time on the screen.
2 Touch or to set the correct time and date.
You can operate the following items: Year, month, date, hour, minute.p You can change the time display format to “12hour” (default)
or “24hour”.
Favourite menuCommon operations
44 < CRD4925-A >< CRD4925-A >
Setting up the video player
Favourite menu Common operations
Common operations
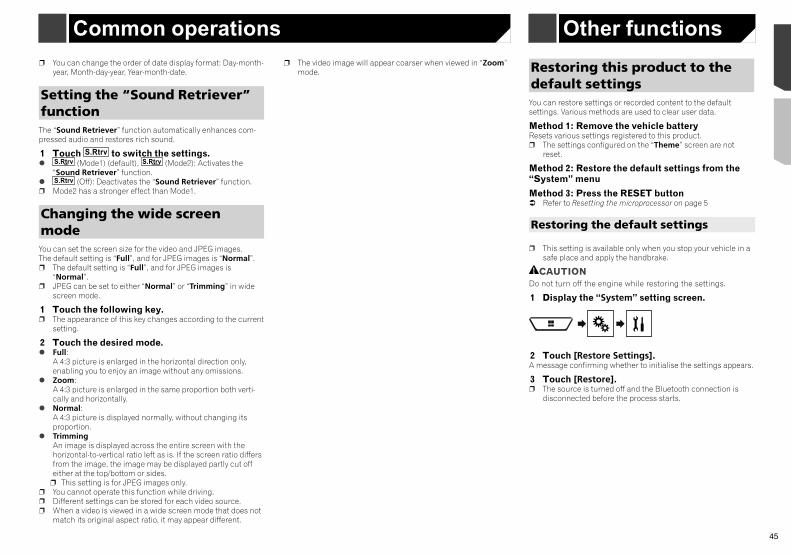
45
p You can change the order of date display format: Day-month-year, Month-day-year, Year-month-date.
Setting the “Sound Retriever” functionThe “Sound Retriever” function automatically enhances com-pressed audio and restores rich sound.
1 Touch to switch the settings. (Mode1) (default), (Mode2): Activates the
“Sound Retriever” function. (Off): Deactivates the “Sound Retriever” function.p Mode2 has a stronger effect than Mode1.
Changing the wide screen modeYou can set the screen size for the video and JPEG images.The default setting is “Full”, and for JPEG images is “Normal”.p The default setting is “Full”, and for JPEG images is
“Normal”.p JPEG can be set to either “Normal” or “Trimming” in wide
screen mode.
1 Touch the following key.p The appearance of this key changes according to the current
setting.
2 Touch the desired mode. Full:
A 4:3 picture is enlarged in the horizontal direction only, enabling you to enjoy an image without any omissions.
Zoom:A 4:3 picture is enlarged in the same proportion both verti-cally and horizontally.
Normal:A 4:3 picture is displayed normally, without changing its proportion.
TrimmingAn image is displayed across the entire screen with the horizontal-to-vertical ratio left as is. If the screen ratio differs from the image, the image may be displayed partly cut off either at the top/bottom or sides.
p This setting is for JPEG images only.p You cannot operate this function while driving.p Different settings can be stored for each video source.p When a video is viewed in a wide screen mode that does not
match its original aspect ratio, it may appear different.
p The video image will appear coarser when viewed in “Zoom” mode. Restoring this product to the
default settingsYou can restore settings or recorded content to the default settings. Various methods are used to clear user data.
Method 1: Remove the vehicle batteryResets various settings registered to this product.p The settings configured on the “Theme” screen are not
reset.
Method 2: Restore the default settings from the “System” menu
Method 3: Press the RESET button Refer to Resetting the microprocessor on page 5
Restoring the default settings
p This setting is available only when you stop your vehicle in a safe place and apply the handbrake.
CAUTIONDo not turn off the engine while restoring the settings.
1 Display the “System” setting screen.
2 Touch [Restore Settings].A message confirming whether to initialise the settings appears.
3 Touch [Restore].p The source is turned off and the Bluetooth connection is
disconnected before the process starts.
Other functions
CD 4821
04
Abcdefghi
6/10
2
1
AV 4821
Full
6/10
3
1 Clock displayDisplays the time and date setting screen Refer to Setting the time and date on page 44
2 S.Rtrv keySwitches the sound retriever setting Refer to Setting the “Sound Retriever” function on page
453 Screen display mode keyChanges the wide screen mode Refer to Changing the wide screen mode on page 45
Setting the time and date
1 Touch the current time on the screen.
2 Touch or to set the correct time and date.
You can operate the following items: Year, month, date, hour, minute.p You can change the time display format to “12hour” (default)
or “24hour”.
Common operations
45< CRD4925-A >
Common operations
Common operations Other functions
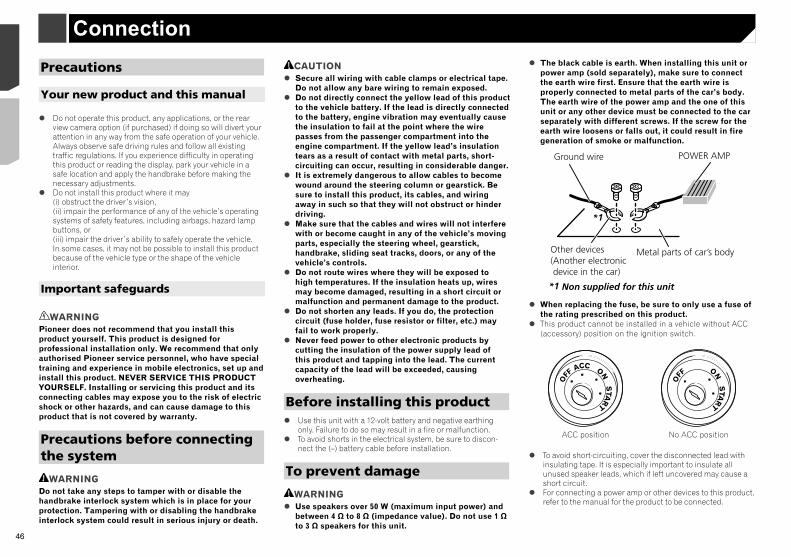
46
Notice for the blue/white lead When the ignition switch is turned on (ACC ON), a control
signal is output through the blue/white lead. Connect to an external power amp’s system remote control terminal, the auto-aerial relay control terminal, or the aerial booster power control terminal (max. 300 mA 12 V DC). The control signal is output through the blue/white lead, even if the audio source is switched off.
This product
12 3
4
678
5
9b a
1 Hideaway TV tuner (GEX-1550TV (sold separately))
2 RGB cable (supplied with Hideaway TV tuner)3 Microphone 4 m
(AVH-X5850BT) (AVH-X2850BT)4 This product5 Wired Remote Cable
Connect to steering wheel control interface of your vehicle. For more details, consult your dealer.
6 Aerial jack7 Power supply8 Fuse (10 A)9 Front output (STD)/High range output (NW)a Rear output (STD)/Middle range output (NW)b SubWoofer output (STD)/Low range output (NW)
Precautions
Your new product and this manual
Do not operate this product, any applications, or the rear view camera option (if purchased) if doing so will divert your attention in any way from the safe operation of your vehicle. Always observe safe driving rules and follow all existing traffic regulations. If you experience difficulty in operating this product or reading the display, park your vehicle in a safe location and apply the handbrake before making the necessary adjustments.
Do not install this product where it may (i) obstruct the driver’s vision, (ii) impair the performance of any of the vehicle’s operating systems of safety features, including airbags, hazard lamp buttons, or (iii) impair the driver’s ability to safely operate the vehicle. In some cases, it may not be possible to install this product because of the vehicle type or the shape of the vehicle interior.
Important safeguards
WARNINGPioneer does not recommend that you install this product yourself. This product is designed for professional installation only. We recommend that only authorised Pioneer service personnel, who have special training and experience in mobile electronics, set up and install this product. NEVER SERVICE THIS PRODUCT YOURSELF. Installing or servicing this product and its connecting cables may expose you to the risk of electric shock or other hazards, and can cause damage to this product that is not covered by warranty.
Precautions before connecting the system
WARNINGDo not take any steps to tamper with or disable the handbrake interlock system which is in place for your protection. Tampering with or disabling the handbrake interlock system could result in serious injury or death.
CAUTION Secure all wiring with cable clamps or electrical tape.
Do not allow any bare wiring to remain exposed. Do not directly connect the yellow lead of this product
to the vehicle battery. If the lead is directly connected to the battery, engine vibration may eventually cause the insulation to fail at the point where the wire passes from the passenger compartment into the engine compartment. If the yellow lead’s insulation tears as a result of contact with metal parts, short-circuiting can occur, resulting in considerable danger.
It is extremely dangerous to allow cables to become wound around the steering column or gearstick. Be sure to install this product, its cables, and wiring away in such so that they will not obstruct or hinder driving.
Make sure that the cables and wires will not interfere with or become caught in any of the vehicle’s moving parts, especially the steering wheel, gearstick, handbrake, sliding seat tracks, doors, or any of the vehicle’s controls.
Do not route wires where they will be exposed to high temperatures. If the insulation heats up, wires may become damaged, resulting in a short circuit or malfunction and permanent damage to the product.
Do not shorten any leads. If you do, the protection circuit (fuse holder, fuse resistor or filter, etc.) may fail to work properly.
Never feed power to other electronic products by cutting the insulation of the power supply lead of this product and tapping into the lead. The current capacity of the lead will be exceeded, causing overheating.
Before installing this product Use this unit with a 12-volt battery and negative earthing
only. Failure to do so may result in a fire or malfunction. To avoid shorts in the electrical system, be sure to discon-
nect the (–) battery cable before installation.
To prevent damage
WARNING Use speakers over 50 W (maximum input power) and
between 4 Ω to 8 Ω (impedance value). Do not use 1 Ω to 3 Ω speakers for this unit.
The black cable is earth. When installing this unit or power amp (sold separately), make sure to connect the earth wire first. Ensure that the earth wire is properly connected to metal parts of the car’s body. The earth wire of the power amp and the one of this unit or any other device must be connected to the car separately with different screws. If the screw for the earth wire loosens or falls out, it could result in fire generation of smoke or malfunction.
Ground wire
Metal parts of car’s body
POWER AMP
Other devices(Another electronic device in the car)
When replacing the fuse, be sure to only use a fuse of the rating prescribed on this product.
This product cannot be installed in a vehicle without ACC (accessory) position on the ignition switch.
ACC ONSTAR
T
OFF
ONSTAR
T
OFF
ACC position No ACC position
To avoid short-circuiting, cover the disconnected lead with insulating tape. It is especially important to insulate all unused speaker leads, which if left uncovered may cause a short circuit.
For connecting a power amp or other devices to this product, refer to the manual for the product to be connected.
Connection
46 < CRD4925-A >< CRD4925-A >
Connection Connection
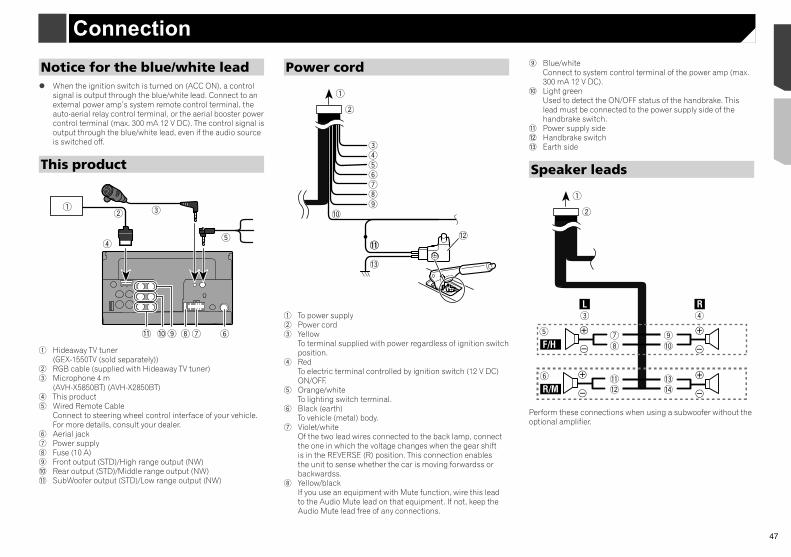
47
Notice for the blue/white lead When the ignition switch is turned on (ACC ON), a control
signal is output through the blue/white lead. Connect to an external power amp’s system remote control terminal, the auto-aerial relay control terminal, or the aerial booster power control terminal (max. 300 mA 12 V DC). The control signal is output through the blue/white lead, even if the audio source is switched off.
This product
12 3
4
678
5
9b a
1 Hideaway TV tuner (GEX-1550TV (sold separately))
2 RGB cable (supplied with Hideaway TV tuner)3 Microphone 4 m
(AVH-X5850BT) (AVH-X2850BT)4 This product5 Wired Remote Cable
Connect to steering wheel control interface of your vehicle. For more details, consult your dealer.
6 Aerial jack7 Power supply8 Fuse (10 A)9 Front output (STD)/High range output (NW)a Rear output (STD)/Middle range output (NW)b SubWoofer output (STD)/Low range output (NW)
Power cord
1
2
3456789
a
bc
b
d
1 To power supply2 Power cord3 Yellow
To terminal supplied with power regardless of ignition switch position.
4 Red To electric terminal controlled by ignition switch (12 V DC) ON/OFF.
5 Orange/white To lighting switch terminal.
6 Black (earth) To vehicle (metal) body.
7 Violet/white Of the two lead wires connected to the back lamp, connect the one in which the voltage changes when the gear shift is in the REVERSE (R) position. This connection enables the unit to sense whether the car is moving forwardss or backwardss.
8 Yellow/black If you use an equipment with Mute function, wire this lead to the Audio Mute lead on that equipment. If not, keep the Audio Mute lead free of any connections.
9 Blue/white Connect to system control terminal of the power amp (max. 300 mA 12 V DC).
a Light green Used to detect the ON/OFF status of the handbrake. This lead must be connected to the power supply side of the handbrake switch.
b Power supply sidec Handbrake switchd Earth side
Speaker leads
1
2
9a
de
7
43
5
6
8
bc
L R
F/H
R/M
Perform these connections when using a subwoofer without the optional amplifier.
The black cable is earth. When installing this unit or power amp (sold separately), make sure to connect the earth wire first. Ensure that the earth wire is properly connected to metal parts of the car’s body. The earth wire of the power amp and the one of this unit or any other device must be connected to the car separately with different screws. If the screw for the earth wire loosens or falls out, it could result in fire generation of smoke or malfunction.
Ground wire
Metal parts of car’s body
POWER AMP
Other devices(Another electronic device in the car)
When replacing the fuse, be sure to only use a fuse of the rating prescribed on this product.
This product cannot be installed in a vehicle without ACC (accessory) position on the ignition switch.
ACC ONSTAR
T
OFF
ONSTAR
T
OFF
ACC position No ACC position
To avoid short-circuiting, cover the disconnected lead with insulating tape. It is especially important to insulate all unused speaker leads, which if left uncovered may cause a short circuit.
For connecting a power amp or other devices to this product, refer to the manual for the product to be connected.
47< CRD4925-A >
Connection Connection

48
iPhone with 30-pin connector
Connecting via the AUX input
1
2
5
34
1 USB port2 AUX input3 USB cable 1.5 m4 USB interface cable for iPod / iPhone (CD-IU201V) (sold
separately)5 iPhone with 30-pin connector
Connecting via the USB port
1
4
2 3
1 USB port2 USB cable 1.5 m3 USB interface cable for iPod / iPhone (CD-IU51) (sold
separately)4 iPhone with 30-pin connector
de
43
f bc
L R
SW
b
c
g
e
d
h i
1 To power supply2 Power cord3 Left4 Right5 Front speaker (STD) or high range speaker (NW)6 Rear speaker (STD) or middle range speaker (NW)7 White8 White/black9 Greya Grey/blackb Greenc Green/blackd Violete Violet/blackf Subwoofer(4Ω)g Whenusingasubwooferof2Ω,besuretoconnectthe
subwoofer to the violet and violet/black leads of this unit. Do not connect anything to the green and green/black leads.
h Not used.i Subwoofer(4Ω)×2
When a subwoofer is connected to this product instead of a rear speaker, change the rear output setting in the initial setting. The subwoofer output of this product is monaural.
Refer to Switching the rear speaker output on page 38 With a two-speaker system, do not connect anything to the
speaker leads that are not connected to speakers.
Power amp (sold separately)
Without internal amp
ImportantThe speaker leads are not used when this connection is in use.
1
1
3
24
3
8
55
3
26
77
99
21
With internal amp
ImportantFront speaker and Rear speaker signals (STD) or middle range speaker and high range speaker signals (NW) are output from the speaker leads when this connection is in use.
1 3
28
99
1 System remote controlConnect to Blue/white cable.
2 Power amp (sold separately)3 Connect with RCA cable (sold separately)4 To Rear output (STD)
To middle range output (NW)5 Rear speaker (STD)
Middle range speaker (NW)
6 To Front output (STD) To high range output (NW)
7 Front speaker (STD) High range speaker (NW)
8 To subwoofer output (STD) To low range output (NW)
9 Subwoofer (STD) Low range speaker (NW)
Please select the appropriate speaker mode between stand-ard mode (STD) and network mode (NW).
Refer to On first-time startup on page 8
iPhone and smartphone For details on how to connect an external device using a
separately sold cable, refer to the manual for the cable. For details concerning the connection, operations and
compatibility of iPhone, refer to Setup for iPod / iPhone or smartphone on page 15.
For details concerning the connection and operations of Android device, refer to Setup for iPod / iPhone or smartphone on page 15.
iPhone with Lightning connector
Connecting via the USB port
1
2
4
3
1 USB port2 USB cable 1.5 m3 USB interface cable for iPod / iPhone (CD-IU52) (sold
separately)4 iPhone with Lightning connector
48 < CRD4925-A >< CRD4925-A >
Connection Connection
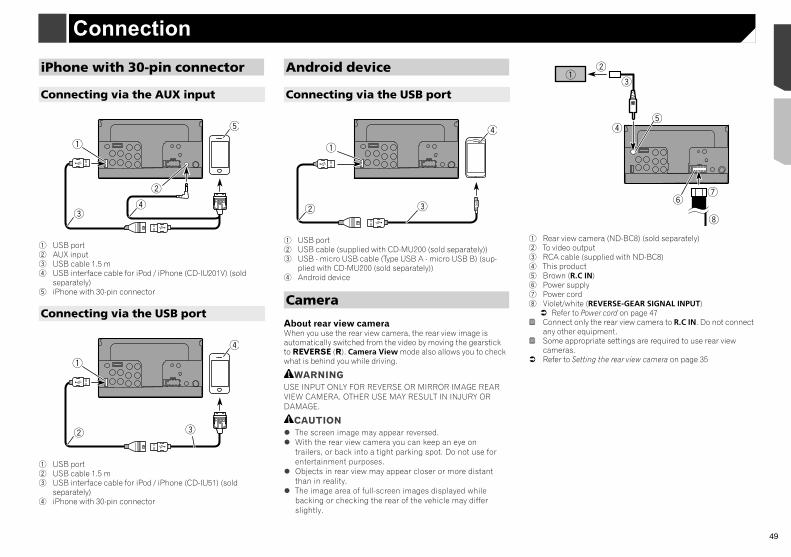
49
iPhone with 30-pin connector
Connecting via the AUX input
1
2
5
34
1 USB port2 AUX input3 USB cable 1.5 m4 USB interface cable for iPod / iPhone (CD-IU201V) (sold
separately)5 iPhone with 30-pin connector
Connecting via the USB port
1
4
2 3
1 USB port2 USB cable 1.5 m3 USB interface cable for iPod / iPhone (CD-IU51) (sold
separately)4 iPhone with 30-pin connector
Android device
Connecting via the USB port
2
1
4
3
1 USB port2 USB cable (supplied with CD-MU200 (sold separately))3 USB - micro USB cable (Type USB A - micro USB B) (sup-
plied with CD-MU200 (sold separately))4 Android device
Camera
About rear view cameraWhen you use the rear view camera, the rear view image is automatically switched from the video by moving the gearstick to REVERSE (R). Camera View mode also allows you to check what is behind you while driving.
WARNINGUSE INPUT ONLY FOR REVERSE OR MIRROR IMAGE REAR VIEW CAMERA. OTHER USE MAY RESULT IN INJURY OR DAMAGE.
CAUTION The screen image may appear reversed. With the rear view camera you can keep an eye on
trailers, or back into a tight parking spot. Do not use for entertainment purposes.
Objects in rear view may appear closer or more distant than in reality.
The image area of full-screen images displayed while backing or checking the rear of the vehicle may differ slightly.
12
3
45
67
8
1 Rear view camera (ND-BC8) (sold separately)2 To video output3 RCA cable (supplied with ND-BC8)4 This product5 Brown (R.C IN)6 Power supply7 Power cord8 Violet/white (REVERSE-GEAR SIGNAL INPUT) Refer to Power cord on page 47
Connect only the rear view camera to R.C IN. Do not connect any other equipment.
Some appropriate settings are required to use rear view cameras.
Refer to Setting the rear view camera on page 35
6 To Front output (STD) To high range output (NW)
7 Front speaker (STD) High range speaker (NW)
8 To subwoofer output (STD) To low range output (NW)
9 Subwoofer (STD) Low range speaker (NW)
Please select the appropriate speaker mode between stand-ard mode (STD) and network mode (NW).
Refer to On first-time startup on page 8
iPhone and smartphone For details on how to connect an external device using a
separately sold cable, refer to the manual for the cable. For details concerning the connection, operations and
compatibility of iPhone, refer to Setup for iPod / iPhone or smartphone on page 15.
For details concerning the connection and operations of Android device, refer to Setup for iPod / iPhone or smartphone on page 15.
iPhone with Lightning connector
Connecting via the USB port
1
2
4
3
1 USB port2 USB cable 1.5 m3 USB interface cable for iPod / iPhone (CD-IU52) (sold
separately)4 iPhone with Lightning connector
49< CRD4925-A >
Connection Connection
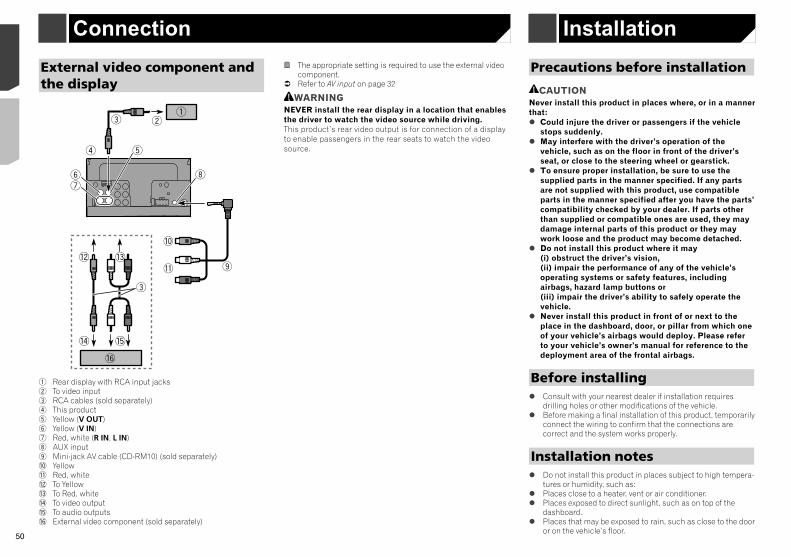
50
Install this product horizontally on a surface within 0 to 30 degrees tolerance (within 5 degrees to the left or right). Improper installation of the unit with the surface tilted more than these tolerances increases the potential for errors in the vehicle’s location display, and might otherwise cause reduced display performance.
30°
When installing, to ensure proper heat dispersal when using this unit, make sure you leave ample space behind the rear panel and wrap any loose cables so they are not blocking the vents.
Leave ample space 5 cm
5 cm
Installation using the screw holes on the side of this product
1 Fastening this product to the factory radio-mounting bracket.
Position this product so that its screw holes are aligned with the screw holes of the bracket, and tighten the screws at three locations on each side.
External video component and the display
123
8
9
a
b
3
c d
e f
g
54
67
1 Rear display with RCA input jacks2 To video input3 RCA cables (sold separately)4 This product5 Yellow (V OUT)6 Yellow (V IN)7 Red, white (R IN, L IN)8 AUX input9 Mini-jack AV cable (CD-RM10) (sold separately)a Yellowb Red, whitec To Yellowd To Red, whitee To video outputf To audio outputsg External video component (sold separately)
The appropriate setting is required to use the external video component.
Refer to AV input on page 32
WARNINGNEVER install the rear display in a location that enables the driver to watch the video source while driving.This product’s rear video output is for connection of a display to enable passengers in the rear seats to watch the video source.
Precautions before installation
CAUTIONNever install this product in places where, or in a manner that: Could injure the driver or passengers if the vehicle
stops suddenly. May interfere with the driver’s operation of the
vehicle, such as on the floor in front of the driver’s seat, or close to the steering wheel or gearstick.
To ensure proper installation, be sure to use the supplied parts in the manner specified. If any parts are not supplied with this product, use compatible parts in the manner specified after you have the parts’ compatibility checked by your dealer. If parts other than supplied or compatible ones are used, they may damage internal parts of this product or they may work loose and the product may become detached.
Do not install this product where it may (i) obstruct the driver’s vision, (ii) impair the performance of any of the vehicle’s operating systems or safety features, including airbags, hazard lamp buttons or (iii) impair the driver’s ability to safely operate the vehicle.
Never install this product in front of or next to the place in the dashboard, door, or pillar from which one of your vehicle’s airbags would deploy. Please refer to your vehicle’s owner’s manual for reference to the deployment area of the frontal airbags.
Before installing Consult with your nearest dealer if installation requires
drilling holes or other modifications of the vehicle. Before making a final installation of this product, temporarily
connect the wiring to confirm that the connections are correct and the system works properly.
Installation notes Do not install this product in places subject to high tempera-
tures or humidity, such as: Places close to a heater, vent or air conditioner. Places exposed to direct sunlight, such as on top of the
dashboard. Places that may be exposed to rain, such as close to the door
or on the vehicle’s floor.
Installation
50 < CRD4925-A >< CRD4925-A >
Connection Installation Installation
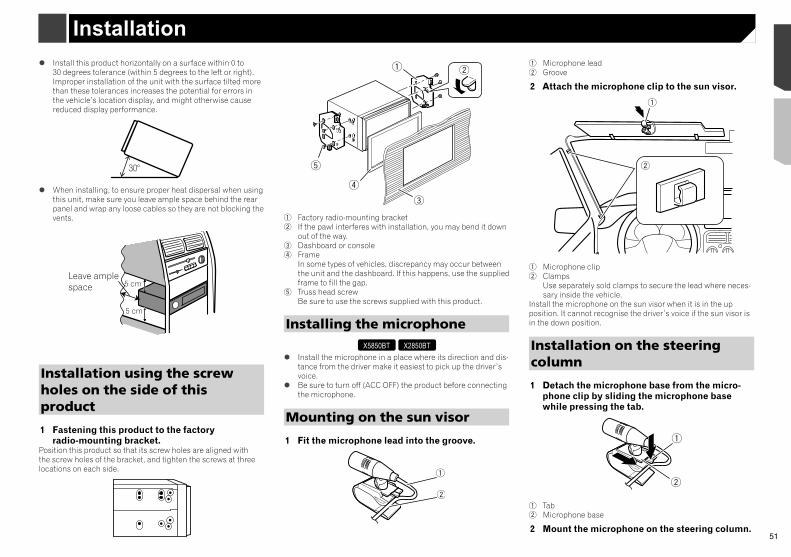
51
Install this product horizontally on a surface within 0 to 30 degrees tolerance (within 5 degrees to the left or right). Improper installation of the unit with the surface tilted more than these tolerances increases the potential for errors in the vehicle’s location display, and might otherwise cause reduced display performance.
30°
When installing, to ensure proper heat dispersal when using this unit, make sure you leave ample space behind the rear panel and wrap any loose cables so they are not blocking the vents.
Leave ample space 5 cm
5 cm
Installation using the screw holes on the side of this product
1 Fastening this product to the factory radio-mounting bracket.
Position this product so that its screw holes are aligned with the screw holes of the bracket, and tighten the screws at three locations on each side.
1
3
5
2
4
1 Factory radio-mounting bracket2 If the pawl interferes with installation, you may bend it down
out of the way.3 Dashboard or console4 Frame
In some types of vehicles, discrepancy may occur between the unit and the dashboard. If this happens, use the supplied frame to fill the gap.
5 Truss head screwBe sure to use the screws supplied with this product.
Installing the microphoneX5850BT X2850BT
Install the microphone in a place where its direction and dis-tance from the driver make it easiest to pick up the driver’s voice.
Be sure to turn off (ACC OFF) the product before connecting the microphone.
Mounting on the sun visor
1 Fit the microphone lead into the groove.
1
2
1 Microphone lead2 Groove
2 Attach the microphone clip to the sun visor.
1
2
1 Microphone clip2 Clamps
Use separately sold clamps to secure the lead where neces-sary inside the vehicle.
Install the microphone on the sun visor when it is in the up position. It cannot recognise the driver’s voice if the sun visor is in the down position.
Installation on the steering column
1 Detach the microphone base from the micro-phone clip by sliding the microphone base while pressing the tab.
1
2
1 Tab2 Microphone base
2 Mount the microphone on the steering column.
Precautions before installation
CAUTIONNever install this product in places where, or in a manner that: Could injure the driver or passengers if the vehicle
stops suddenly. May interfere with the driver’s operation of the
vehicle, such as on the floor in front of the driver’s seat, or close to the steering wheel or gearstick.
To ensure proper installation, be sure to use the supplied parts in the manner specified. If any parts are not supplied with this product, use compatible parts in the manner specified after you have the parts’ compatibility checked by your dealer. If parts other than supplied or compatible ones are used, they may damage internal parts of this product or they may work loose and the product may become detached.
Do not install this product where it may (i) obstruct the driver’s vision, (ii) impair the performance of any of the vehicle’s operating systems or safety features, including airbags, hazard lamp buttons or (iii) impair the driver’s ability to safely operate the vehicle.
Never install this product in front of or next to the place in the dashboard, door, or pillar from which one of your vehicle’s airbags would deploy. Please refer to your vehicle’s owner’s manual for reference to the deployment area of the frontal airbags.
Before installing Consult with your nearest dealer if installation requires
drilling holes or other modifications of the vehicle. Before making a final installation of this product, temporarily
connect the wiring to confirm that the connections are correct and the system works properly.
Installation notes Do not install this product in places subject to high tempera-
tures or humidity, such as: Places close to a heater, vent or air conditioner. Places exposed to direct sunlight, such as on top of the
dashboard. Places that may be exposed to rain, such as close to the door
or on the vehicle’s floor.
Installation
51< CRD4925-A >
Installation Installation
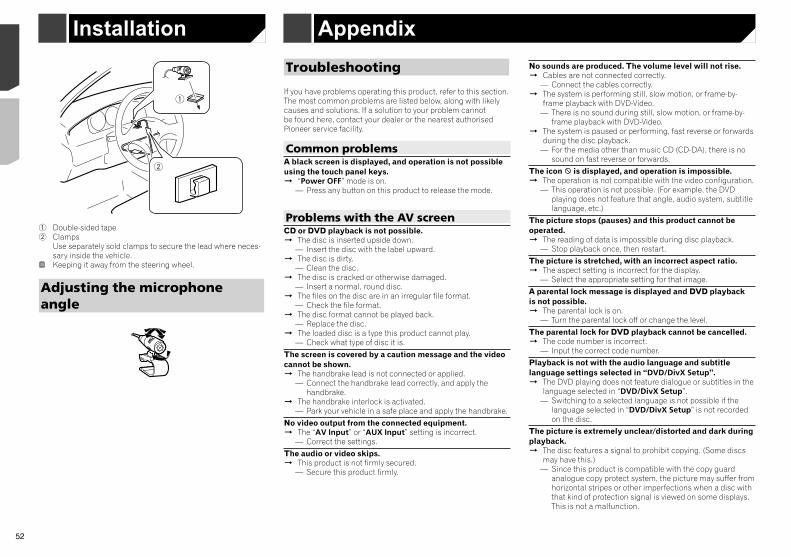
52
iPod cannot be operated. The iPod is frozen.
— Reconnect the iPod with the USB interface cable for iPod / iPhone.
— Update the iPod software version. An error has occurred.
— Reconnect the iPod with the USB interface cable for iPod / iPhone.
— Park your vehicle in a safe place, and turn off the engine. Turn the ignition key back to off (ACC OFF). Then restart the engine, and turn the power to this product back on.
— Update the iPod software version. Cables are not connected correctly.
— Connect the cables correctly.
Sound from the iPod cannot be heard. The audio output direction may switch automatically when
the Bluetooth and USB connections are used at the same time.
— Use the iPod to change the audio output direction.
Problems with the phone screenDialling is impossible because the touch panel keys for dialling are inactive. Your phone is out of range for service.
— Retry after re-entering the range for service. The connection between the mobile phone and this product
cannot be established now.— Perform the connection process.
Of the two mobile phones connected to this product at the same time, if the first phone is dialling, ringing or a call is in progress, dialling cannot be performed on the second phone.
— When the operation on the first of the two mobile phones is completed, use the switch devices key to switch to the second phone and then dial.
Problems with the Application screenA black screen is displayed. While operating an application, the application was ended
on the smartphone side.— Press to display the Top menu screen.
The smartphone OS may be awaiting screen operation.— Stop the vehicle in a safe place and check the screen on
the smartphone.
2
1
1 Double-sided tape2 Clamps
Use separately sold clamps to secure the lead where neces-sary inside the vehicle.
Keeping it away from the steering wheel.
Adjusting the microphone angle
Troubleshooting
If you have problems operating this product, refer to this section. The most common problems are listed below, along with likely causes and solutions. If a solution to your problem cannot be found here, contact your dealer or the nearest authorised Pioneer service facility.
Common problemsA black screen is displayed, and operation is not possible using the touch panel keys. “Power OFF” mode is on.
— Press any button on this product to release the mode.
Problems with the AV screenCD or DVD playback is not possible. The disc is inserted upside down.
— Insert the disc with the label upward. The disc is dirty.
— Clean the disc. The disc is cracked or otherwise damaged.
— Insert a normal, round disc. The files on the disc are in an irregular file format.
— Check the file format. The disc format cannot be played back.
— Replace the disc. The loaded disc is a type this product cannot play.
— Check what type of disc it is.
The screen is covered by a caution message and the video cannot be shown. The handbrake lead is not connected or applied.
— Connect the handbrake lead correctly, and apply the handbrake.
The handbrake interlock is activated.— Park your vehicle in a safe place and apply the handbrake.
No video output from the connected equipment. The “AV Input” or “AUX Input” setting is incorrect.
— Correct the settings.
The audio or video skips. This product is not firmly secured.
— Secure this product firmly.
No sounds are produced. The volume level will not rise. Cables are not connected correctly.
— Connect the cables correctly. The system is performing still, slow motion, or frame-by-
frame playback with DVD-Video.— There is no sound during still, slow motion, or frame-by-
frame playback with DVD-Video. The system is paused or performing, fast reverse or forwards
during the disc playback.— For the media other than music CD (CD-DA), there is no
sound on fast reverse or forwards.
The icon is displayed, and operation is impossible. The operation is not compatible with the video configuration.
— This operation is not possible. (For example, the DVD playing does not feature that angle, audio system, subtitle language, etc.)
The picture stops (pauses) and this product cannot be operated. The reading of data is impossible during disc playback.
— Stop playback once, then restart.
The picture is stretched, with an incorrect aspect ratio. The aspect setting is incorrect for the display.
— Select the appropriate setting for that image.
A parental lock message is displayed and DVD playback is not possible. The parental lock is on.
— Turn the parental lock off or change the level.
The parental lock for DVD playback cannot be cancelled. The code number is incorrect.
— Input the correct code number.
Playback is not with the audio language and subtitle language settings selected in “DVD/DivX Setup”. The DVD playing does not feature dialogue or subtitles in the
language selected in “DVD/DivX Setup”.— Switching to a selected language is not possible if the
language selected in “DVD/DivX Setup” is not recorded on the disc.
The picture is extremely unclear/distorted and dark during playback. The disc features a signal to prohibit copying. (Some discs
may have this.)— Since this product is compatible with the copy guard
analogue copy protect system, the picture may suffer from horizontal stripes or other imperfections when a disc with that kind of protection signal is viewed on some displays. This is not a malfunction.
Appendix
52 < CRD4925-A >< CRD4925-A >
Installation Appendix Appendix
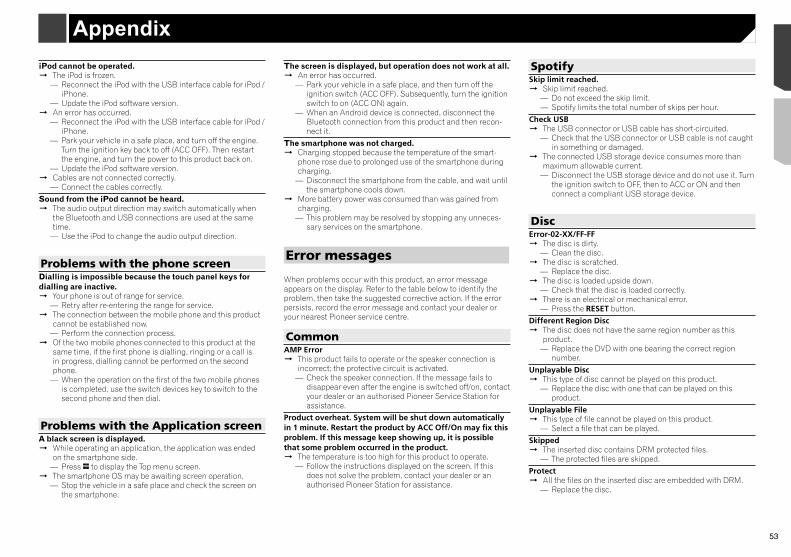
53
iPod cannot be operated. The iPod is frozen.
— Reconnect the iPod with the USB interface cable for iPod / iPhone.
— Update the iPod software version. An error has occurred.
— Reconnect the iPod with the USB interface cable for iPod / iPhone.
— Park your vehicle in a safe place, and turn off the engine. Turn the ignition key back to off (ACC OFF). Then restart the engine, and turn the power to this product back on.
— Update the iPod software version. Cables are not connected correctly.
— Connect the cables correctly.
Sound from the iPod cannot be heard. The audio output direction may switch automatically when
the Bluetooth and USB connections are used at the same time.
— Use the iPod to change the audio output direction.
Problems with the phone screenDialling is impossible because the touch panel keys for dialling are inactive. Your phone is out of range for service.
— Retry after re-entering the range for service. The connection between the mobile phone and this product
cannot be established now.— Perform the connection process.
Of the two mobile phones connected to this product at the same time, if the first phone is dialling, ringing or a call is in progress, dialling cannot be performed on the second phone.
— When the operation on the first of the two mobile phones is completed, use the switch devices key to switch to the second phone and then dial.
Problems with the Application screenA black screen is displayed. While operating an application, the application was ended
on the smartphone side.— Press to display the Top menu screen.
The smartphone OS may be awaiting screen operation.— Stop the vehicle in a safe place and check the screen on
the smartphone.
The screen is displayed, but operation does not work at all. An error has occurred.
— Park your vehicle in a safe place, and then turn off the ignition switch (ACC OFF). Subsequently, turn the ignition switch to on (ACC ON) again.
— When an Android device is connected, disconnect the Bluetooth connection from this product and then recon-nect it.
The smartphone was not charged. Charging stopped because the temperature of the smart-
phone rose due to prolonged use of the smartphone during charging.
— Disconnect the smartphone from the cable, and wait until the smartphone cools down.
More battery power was consumed than was gained from charging.
— This problem may be resolved by stopping any unneces-sary services on the smartphone.
Error messages
When problems occur with this product, an error message appears on the display. Refer to the table below to identify the problem, then take the suggested corrective action. If the error persists, record the error message and contact your dealer or your nearest Pioneer service centre.
CommonAMP Error This product fails to operate or the speaker connection is
incorrect; the protective circuit is activated.— Check the speaker connection. If the message fails to
disappear even after the engine is switched off/on, contact your dealer or an authorised Pioneer Service Station for assistance.
Product overheat. System will be shut down automatically in 1 minute. Restart the product by ACC Off/On may fix this problem. If this message keep showing up, it is possible that some problem occurred in the product. The temperature is too high for this product to operate.
— Follow the instructions displayed on the screen. If this does not solve the problem, contact your dealer or an authorised Pioneer Station for assistance.
SpotifySkip limit reached. Skip limit reached.
— Do not exceed the skip limit.— Spotify limits the total number of skips per hour.
Check USB The USB connector or USB cable has short-circuited.
— Check that the USB connector or USB cable is not caught in something or damaged.
The connected USB storage device consumes more than maximum allowable current.
— Disconnect the USB storage device and do not use it. Turn the ignition switch to OFF, then to ACC or ON and then connect a compliant USB storage device.
DiscError-02-XX/FF-FF The disc is dirty.
— Clean the disc. The disc is scratched.
— Replace the disc. The disc is loaded upside down.
— Check that the disc is loaded correctly. There is an electrical or mechanical error.
— Press the RESET button.
Different Region Disc The disc does not have the same region number as this
product.— Replace the DVD with one bearing the correct region
number.
Unplayable Disc This type of disc cannot be played on this product.
— Replace the disc with one that can be played on this product.
Unplayable File This type of file cannot be played on this product.
— Select a file that can be played.
Skipped The inserted disc contains DRM protected files.
— The protected files are skipped.
Protect All the files on the inserted disc are embedded with DRM.
— Replace the disc.
No sounds are produced. The volume level will not rise. Cables are not connected correctly.
— Connect the cables correctly. The system is performing still, slow motion, or frame-by-
frame playback with DVD-Video.— There is no sound during still, slow motion, or frame-by-
frame playback with DVD-Video. The system is paused or performing, fast reverse or forwards
during the disc playback.— For the media other than music CD (CD-DA), there is no
sound on fast reverse or forwards.
The icon is displayed, and operation is impossible. The operation is not compatible with the video configuration.
— This operation is not possible. (For example, the DVD playing does not feature that angle, audio system, subtitle language, etc.)
The picture stops (pauses) and this product cannot be operated. The reading of data is impossible during disc playback.
— Stop playback once, then restart.
The picture is stretched, with an incorrect aspect ratio. The aspect setting is incorrect for the display.
— Select the appropriate setting for that image.
A parental lock message is displayed and DVD playback is not possible. The parental lock is on.
— Turn the parental lock off or change the level.
The parental lock for DVD playback cannot be cancelled. The code number is incorrect.
— Input the correct code number.
Playback is not with the audio language and subtitle language settings selected in “DVD/DivX Setup”. The DVD playing does not feature dialogue or subtitles in the
language selected in “DVD/DivX Setup”.— Switching to a selected language is not possible if the
language selected in “DVD/DivX Setup” is not recorded on the disc.
The picture is extremely unclear/distorted and dark during playback. The disc features a signal to prohibit copying. (Some discs
may have this.)— Since this product is compatible with the copy guard
analogue copy protect system, the picture may suffer from horizontal stripes or other imperfections when a disc with that kind of protection signal is viewed on some displays. This is not a malfunction.
53< CRD4925-A >
Appendix Appendix
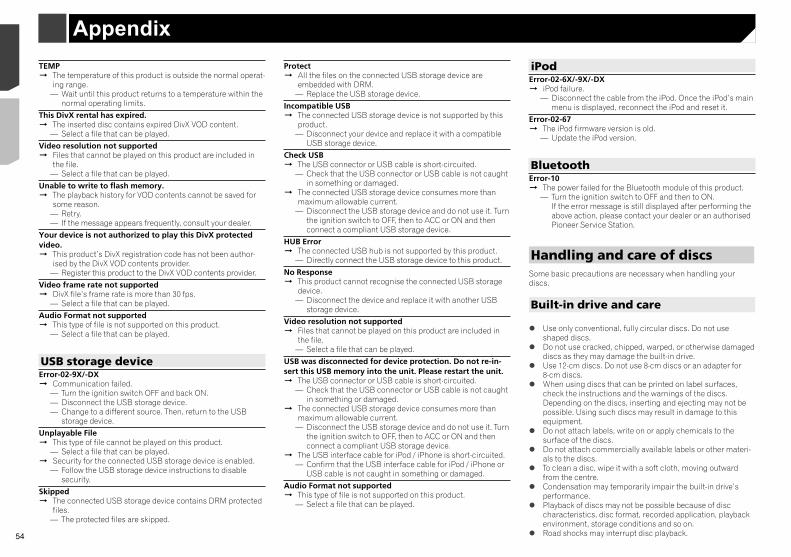
54
Read the precautions for discs before using them.
Ambient conditions for playing a disc
At extremely high temperatures, a temperature cutout protects this product by switching it off automatically.
Despite our careful design of the product, small scratches that do not affect actual operation may appear on the disc surface as a result of mechanical wear, ambient conditions for use or handling of the disc. This is not a sign of the malfunction of this product. Consider it to be normal wear and tear.
Playable discs
DVD-Video
is a trademark of DVD Format/Logo Licensing Corporation.
It is not possible to play DVD-Audio discs. This DVD drive may not be able to play all discs bearing the marks shown above.
CD
TEMP The temperature of this product is outside the normal operat-
ing range.— Wait until this product returns to a temperature within the
normal operating limits.
This DivX rental has expired. The inserted disc contains expired DivX VOD content.
— Select a file that can be played.
Video resolution not supported Files that cannot be played on this product are included in
the file.— Select a file that can be played.
Unable to write to flash memory. The playback history for VOD contents cannot be saved for
some reason.— Retry.— If the message appears frequently, consult your dealer.
Your device is not authorized to play this DivX protected video. This product’s DivX registration code has not been author-
ised by the DivX VOD contents provider.— Register this product to the DivX VOD contents provider.
Video frame rate not supported DivX file’s frame rate is more than 30 fps.
— Select a file that can be played.
Audio Format not supported This type of file is not supported on this product.
— Select a file that can be played.
USB storage deviceError-02-9X/-DX Communication failed.
— Turn the ignition switch OFF and back ON.— Disconnect the USB storage device.— Change to a different source. Then, return to the USB
storage device.
Unplayable File This type of file cannot be played on this product.
— Select a file that can be played. Security for the connected USB storage device is enabled.
— Follow the USB storage device instructions to disable security.
Skipped The connected USB storage device contains DRM protected
files.— The protected files are skipped.
Protect All the files on the connected USB storage device are
embedded with DRM.— Replace the USB storage device.
Incompatible USB The connected USB storage device is not supported by this
product.— Disconnect your device and replace it with a compatible
USB storage device.
Check USB The USB connector or USB cable is short-circuited.
— Check that the USB connector or USB cable is not caught in something or damaged.
The connected USB storage device consumes more than maximum allowable current.
— Disconnect the USB storage device and do not use it. Turn the ignition switch to OFF, then to ACC or ON and then connect a compliant USB storage device.
HUB Error The connected USB hub is not supported by this product.
— Directly connect the USB storage device to this product.
No Response This product cannot recognise the connected USB storage
device.— Disconnect the device and replace it with another USB
storage device.
Video resolution not supported Files that cannot be played on this product are included in
the file.— Select a file that can be played.
USB was disconnected for device protection. Do not re-in-sert this USB memory into the unit. Please restart the unit. The USB connector or USB cable is short-circuited.
— Check that the USB connector or USB cable is not caught in something or damaged.
The connected USB storage device consumes more than maximum allowable current.
— Disconnect the USB storage device and do not use it. Turn the ignition switch to OFF, then to ACC or ON and then connect a compliant USB storage device.
The USB interface cable for iPod / iPhone is short-circuited.— Confirm that the USB interface cable for iPod / iPhone or
USB cable is not caught in something or damaged.
Audio Format not supported This type of file is not supported on this product.
— Select a file that can be played.
iPodError-02-6X/-9X/-DX iPod failure.
— Disconnect the cable from the iPod. Once the iPod’s main menu is displayed, reconnect the iPod and reset it.
Error-02-67 The iPod firmware version is old.
— Update the iPod version.
BluetoothError-10 The power failed for the Bluetooth module of this product.
— Turn the ignition switch to OFF and then to ON. If the error message is still displayed after performing the above action, please contact your dealer or an authorised Pioneer Service Station.
Handling and care of discsSome basic precautions are necessary when handling your discs.
Built-in drive and care
Use only conventional, fully circular discs. Do not use shaped discs.
Do not use cracked, chipped, warped, or otherwise damaged discs as they may damage the built-in drive.
Use 12-cm discs. Do not use 8-cm discs or an adapter for 8-cm discs.
When using discs that can be printed on label surfaces, check the instructions and the warnings of the discs. Depending on the discs, inserting and ejecting may not be possible. Using such discs may result in damage to this equipment.
Do not attach labels, write on or apply chemicals to the surface of the discs.
Do not attach commercially available labels or other materi-als to the discs.
To clean a disc, wipe it with a soft cloth, moving outward from the centre.
Condensation may temporarily impair the built-in drive’s performance.
Playback of discs may not be possible because of disc characteristics, disc format, recorded application, playback environment, storage conditions and so on.
Road shocks may interrupt disc playback.
54 < CRD4925-A >< CRD4925-A >
Appendix Appendix
55
Read the precautions for discs before using them.
Ambient conditions for playing a disc
At extremely high temperatures, a temperature cutout protects this product by switching it off automatically.
Despite our careful design of the product, small scratches that do not affect actual operation may appear on the disc surface as a result of mechanical wear, ambient conditions for use or handling of the disc. This is not a sign of the malfunction of this product. Consider it to be normal wear and tear.
Playable discs
DVD-Video
is a trademark of DVD Format/Logo Licensing Corporation.
It is not possible to play DVD-Audio discs. This DVD drive may not be able to play all discs bearing the marks shown above.
CD
AVCHD recorded discs
This unit is not compatible with discs recorded in AVCHD (Advanced Video Codec High Definition) format. Do not insert AVCHD discs. If inserted, the disc may not be ejected.
Playing DualDisc
DualDiscs are two-sided discs that have a recordable CD for audio on one side and a recordable DVD for video on the other.
Playback of the DVD side is possible with this product. However, since the CD side of DualDiscs is not physically compatible with the general CD standard, it may not be possible to play the CD side with this product.
Frequent loading and ejecting of a DualDisc may result in scratches to the disc.
Serious scratches can lead to playback problems on this product. In some cases, a DualDisc may become stuck in the disc-loading slot and will not eject. To prevent this, we recommend you refrain from using DualDisc with this product.
Please refer to the manufacturer for more detailed informa-tion about DualDiscs.
Dolby Digital
This product will down-mix Dolby Digital signals internally and the sound will be output in stereo.p Manufactured under license from Dolby Laboratories.
Dolby and the double-D symbol are trademarks of Dolby Laboratories.
Detailed information for playa-ble media
Compatibility
Common notes about disc compatibility Certain functions of this product may not be available for
some discs. Compatibility with all discs is not guaranteed. It is not possible to playback DVD-ROM/DVD-RAM discs. Playback of discs may become impossible with direct expo-
sure to sunlight, high temperatures, or depending on the storage conditions in the vehicle.
DVD-Video discs DVD-Video discs that have incompatible region numbers
cannot be played on this DVD drive. The region number of the player can be found on this product’s chassis.
DVD-R/DVD-RW/DVD-R SL (Single Layer)/DVD-R DL (Dual Layer) discs Unfinalised discs which have been recorded with the Video
format (video mode) cannot be played back. Discs which have been recorded with the Video Recording
format (VR mode) cannot be played back. DVD-R DL (Dual Layer) discs which have been recorded with
Layer Jump recording cannot be played back. For detailed information about recording mode, please
contact the manufacturer of media, recorders, or writing software.
CD-R/CD-RW discs Unfinalised discs cannot be played back. It may not be possible to playback CD-R/CD-RW discs
recorded on a music CD recorder or a computer because of disc characteristics, scratches or dirt on the disc, or dirt, scratches or condensation on the lens of the built-in drive.
Playback of discs recorded on a computer may not be pos-sible, depending on the recording device, writing software, their settings, and other environmental factors.
Please record with the correct format. (For details, please contact manufacturer of media, recorders, or writing software.)
iPodError-02-6X/-9X/-DX iPod failure.
— Disconnect the cable from the iPod. Once the iPod’s main menu is displayed, reconnect the iPod and reset it.
Error-02-67 The iPod firmware version is old.
— Update the iPod version.
BluetoothError-10 The power failed for the Bluetooth module of this product.
— Turn the ignition switch to OFF and then to ON. If the error message is still displayed after performing the above action, please contact your dealer or an authorised Pioneer Service Station.
Handling and care of discsSome basic precautions are necessary when handling your discs.
Built-in drive and care
Use only conventional, fully circular discs. Do not use shaped discs.
Do not use cracked, chipped, warped, or otherwise damaged discs as they may damage the built-in drive.
Use 12-cm discs. Do not use 8-cm discs or an adapter for 8-cm discs.
When using discs that can be printed on label surfaces, check the instructions and the warnings of the discs. Depending on the discs, inserting and ejecting may not be possible. Using such discs may result in damage to this equipment.
Do not attach labels, write on or apply chemicals to the surface of the discs.
Do not attach commercially available labels or other materi-als to the discs.
To clean a disc, wipe it with a soft cloth, moving outward from the centre.
Condensation may temporarily impair the built-in drive’s performance.
Playback of discs may not be possible because of disc characteristics, disc format, recorded application, playback environment, storage conditions and so on.
Road shocks may interrupt disc playback.
55< CRD4925-A >
Appendix Appendix
56
CD-R/-RWFile extension: .wmaBit rate: 5 kbps to 320 kbps (CBR), VBRSampling frequency: 8 kHz to 48 kHz
DVD-R/-R SL/-R DL/ DVD-RWFile extension: .wmaBit rate: 5 kbps to 320 kbps (CBR), VBRSampling frequency: 8 kHz to 48 kHz
USB storage deviceFile extension: .wmaBit rate: 5 kbps to 320 kbps (CBR), VBRSampling frequency: 8 kHz to 48 kHz
WAV compatibility The sampling frequency shown in the display may be
rounded. WAV files on the CD-R/-RW, DVD-R/-RW/-R SL/-R DL cannot
be played.
USB storage deviceFile extension: .wavFormat: Linear PCM (LPCM)Sampling frequency: 16 kHz to 48 kHzQuantization bits: 8 bits and 16 bits
AAC compatibility This product plays back AAC files encoded by iTunes.
CD-R/-RWFile extension: .m4aBit rate: 8 kbps to 320 kbps (CBR)Sampling frequency: 8 kHz to 44.1 kHz
DVD-R/-R SL/-R DL/ DVD-RWFile extension: .m4aBit rate: 8 kbps to 320 kbps (CBR)Sampling frequency: 8 kHz to 44.1 kHz
USB storage deviceFile extension: .m4aBit rate: 8 kbps to 320 kbps (CBR)Sampling frequency: 8 kHz to 48 kHz
FLAC compatibility
USB storage deviceFile extension: .flacBit rate: 8 kbps, 16 kbps, 24 kbpsSampling frequency: 8 kHz to 48 kHz
Titles and other text information recorded on a CD-R/CD-RW disc may not be displayed by this product (in the case of audio data (CD-DA)).
Read the precautions with CD-R/CD-RW discs before using them.
Common notes about the USB storage device Do not leave the USB storage device in any location with
high temperatures. Depending on the kind of the USB storage device you use,
this product may not recognise the storage device or files may not be played back properly.
The text information of some audio and video files may not be correctly displayed.
File extensions must be used properly. There may be a slight delay when starting playback of files
on an USB storage device with complex folder hierarchies. Operations may vary depending on the kind of an USB
storage device. It may not be possible to play some music files from USB
because of file characteristics, file format, recorded applica-tion, playback environment, storage conditions, and so on.
USB storage device compatibility For details about USB storage device compatibility with this
product, refer to Specifications on page 60. Protocol: bulk You cannot connect a USB storage device to this product via a USB hub. Partitioned USB storage device is not compatible with this product. Firmly secure the USB storage device when driving. Do not
let the USB storage device fall onto the floor, where it may become jammed under the brake or accelerator.
There may be a slight delay when starting playback of audio files encoded with image data.
Some USB storage devices connected to this product may generate noise on the radio.
Do not connect anything other than the USB storage device.The sequence of audio files on USB storage deviceFor USB storage device, the sequence is different from that of USB storage device.
Handling guidelines and supplemental information This product is not compatible with the Multi Media Card
(MMC). Copyright protected files cannot be played back.
Common notes about DivX files
Notes specific to DivX files Only DivX files downloaded from DivX partner sites are guar-
anteed for proper operation. Unauthorised DivX files may not operate properly.
DRM rental files cannot be operated until playing back is started.
This product corresponds to a DivX file display of up to 1 590 minutes 43 seconds. Search operations beyond this time limit are prohibited.
DivX VOD file playback requires supplying the ID code of this product to the DivX VOD provider. Regarding the ID code, refer to Displaying your DivX VOD registration code on page 43.
For details on the Divx video versions that can be played on this product, refer to Specifications on page 60.
For more details about DivX, visit the following site:http://www.divx.com/
DivX subtitle files Srt format subtitle files with the extension “.srt” can be used. Only one subtitle file can be used for each DivX file. Multiple
subtitle files cannot be associated. Subtitle files that are named with the same character string
as the DivX file before the extension are associated with the DivX file. The character strings before the extension must be exactly the same. However, if there is only one DivX file and one subtitle file in a single folder, the files are associated even if the file names are not the same.
The subtitle file must be stored in the same folder as the DivX file.
Up to 255 subtitle files may be used. Any more subtitle files will not be recognised.
Up to 64 characters can be used for the name of the subtitle file, including the extension. If more than 64 characters are used for the file name, the subtitle file may not be recognised.
The character code for the subtitle file should comply with ISO-8859-1. Using characters other than ISO-8859-1 may cause the characters to be displayed incorrectly.
The subtitles may not be displayed correctly if the displayed characters in the subtitle file include control code.
For materials that use a high transfer rate, the subtitles and video may not be completely synchronised.
If multiple subtitles are programed to display within a very short time frame, such as 0.1 seconds, the subtitles may not be displayed at the correct time.
Media compatibility chart
General Maximum playback time of audio file stored in the disc: 60 h Maximum playback time of audio file stored on an USB
storage device: 7.5 h (450 minutes)
CD-R/-RWFile system: ISO9660 level 1.ISO9660 level 2.Romeo, Joliet.UDF 1.02/1.50/2.00/2.01/2.50Maximum number of folders: 700Maximum number of files: 999Playable file types: MP3, WMA, AAC, DivX, MPEG1, MPEG2, MPEG4
DVD-R/-R SL/-R DL/ DVD-RWFile system: ISO9660 level 1.ISO9660 level 2.Romeo, Joliet.UDF 1.02/1.50/2.00/2.01/2.50Maximum number of folders: 700Maximum number of files: 3 500Playable file types: MP3, WMA, AAC, DivX, MPEG1, MPEG2, MPEG4
USB storage deviceFile system: FAT16/FAT32Maximum number of folders: 1 500Maximum number of files: 15 000Playable file types: MP3, WMA, AAC, WAV, FLAC, H.264, MPEG4, JPEG
MP3 compatibility Ver. 2.x of ID3 tag is prioritised when both Ver. 1.x and Ver. 2.x
exist. This product is not compatible with the following: MP3i (MP3
interactive), mp3 PRO, m3u playlist
CD-R/-RWFile extension: .mp3Bit rate: 8 kbps to 320 kbps (CBR), VBRSampling frequency: 16 kHz to 48 kHz (32 kHz, 44.1 kHz,48 kHz for emphasis)ID3 tag: ID3 tag Ver. 1.0, 1.1, 2.2, 2.3
DVD-R/-R SL/-R DL/ DVD-RWFile extension: .mp3Bit rate: 8 kbps to 320 kbps (CBR), VBRSampling frequency: 16 kHz to 48 kHz (32 kHz, 44.1 kHz,48 kHz for emphasis)ID3 tag: ID3 tag Ver. 1.0, 1.1, 2.2, 2.3
USB storage deviceFile extension: .mp3Bit rate: 8 kbps to 320 kbps (CBR), VBRSampling frequency: 8 kHz to 48 kHzID3 tag: ID3 tag Ver. 1.0, 1.1, 2.2, 2.3, 2.4
WMA compatibility This product is not compatible with the following: Windows
Media™ Audio 9 Professional, Lossless, Voice
56 < CRD4925-A >< CRD4925-A >
Appendix Appendix
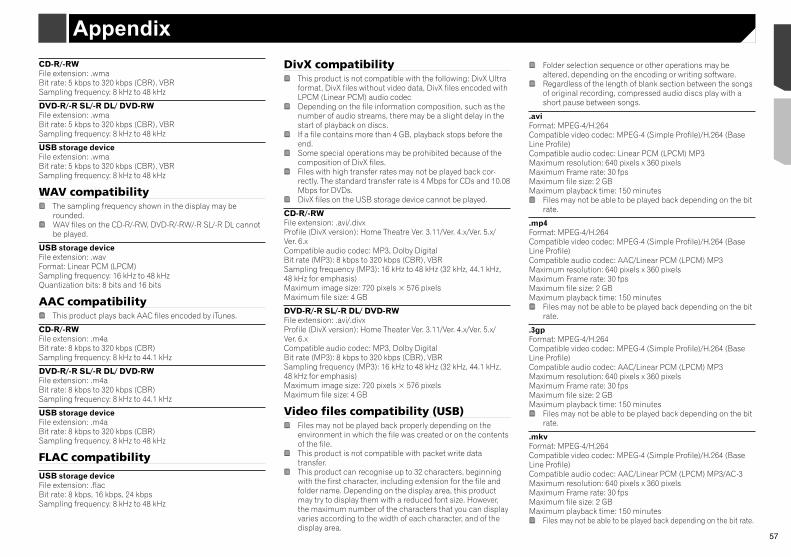
57
CD-R/-RWFile extension: .wmaBit rate: 5 kbps to 320 kbps (CBR), VBRSampling frequency: 8 kHz to 48 kHz
DVD-R/-R SL/-R DL/ DVD-RWFile extension: .wmaBit rate: 5 kbps to 320 kbps (CBR), VBRSampling frequency: 8 kHz to 48 kHz
USB storage deviceFile extension: .wmaBit rate: 5 kbps to 320 kbps (CBR), VBRSampling frequency: 8 kHz to 48 kHz
WAV compatibility The sampling frequency shown in the display may be
rounded. WAV files on the CD-R/-RW, DVD-R/-RW/-R SL/-R DL cannot
be played.
USB storage deviceFile extension: .wavFormat: Linear PCM (LPCM)Sampling frequency: 16 kHz to 48 kHzQuantization bits: 8 bits and 16 bits
AAC compatibility This product plays back AAC files encoded by iTunes.
CD-R/-RWFile extension: .m4aBit rate: 8 kbps to 320 kbps (CBR)Sampling frequency: 8 kHz to 44.1 kHz
DVD-R/-R SL/-R DL/ DVD-RWFile extension: .m4aBit rate: 8 kbps to 320 kbps (CBR)Sampling frequency: 8 kHz to 44.1 kHz
USB storage deviceFile extension: .m4aBit rate: 8 kbps to 320 kbps (CBR)Sampling frequency: 8 kHz to 48 kHz
FLAC compatibility
USB storage deviceFile extension: .flacBit rate: 8 kbps, 16 kbps, 24 kbpsSampling frequency: 8 kHz to 48 kHz
DivX compatibility This product is not compatible with the following: DivX Ultra
format, DivX files without video data, DivX files encoded with LPCM (Linear PCM) audio codec
Depending on the file information composition, such as the number of audio streams, there may be a slight delay in the start of playback on discs.
If a file contains more than 4 GB, playback stops before the end.
Some special operations may be prohibited because of the composition of DivX files.
Files with high transfer rates may not be played back cor-rectly. The standard transfer rate is 4 Mbps for CDs and 10.08 Mbps for DVDs.
DivX files on the USB storage device cannot be played.
CD-R/-RWFile extension: .avi/.divxProfile (DivX version): Home Theatre Ver. 3.11/Ver. 4.x/Ver. 5.x/Ver. 6.xCompatible audio codec: MP3, Dolby DigitalBit rate (MP3): 8 kbps to 320 kbps (CBR), VBRSampling frequency (MP3): 16 kHz to 48 kHz (32 kHz, 44.1 kHz, 48 kHz for emphasis)Maximumimagesize:720pixels×576pixelsMaximum file size: 4 GB
DVD-R/-R SL/-R DL/ DVD-RWFile extension: .avi/.divxProfile (DivX version): Home Theater Ver. 3.11/Ver. 4.x/Ver. 5.x/Ver. 6.xCompatible audio codec: MP3, Dolby DigitalBit rate (MP3): 8 kbps to 320 kbps (CBR), VBRSampling frequency (MP3): 16 kHz to 48 kHz (32 kHz, 44.1 kHz, 48 kHz for emphasis)Maximumimagesize:720pixels×576pixelsMaximum file size: 4 GB
Video files compatibility (USB) Files may not be played back properly depending on the
environment in which the file was created or on the contents of the file.
This product is not compatible with packet write data transfer.
This product can recognise up to 32 characters, beginning with the first character, including extension for the file and folder name. Depending on the display area, this product may try to display them with a reduced font size. However, the maximum number of the characters that you can display varies according to the width of each character, and of the display area.
Folder selection sequence or other operations may be altered, depending on the encoding or writing software.
Regardless of the length of blank section between the songs of original recording, compressed audio discs play with a short pause between songs.
.aviFormat: MPEG-4/H.264Compatible video codec: MPEG-4 (Simple Profile)/H.264 (Base Line Profile)Compatible audio codec: Linear PCM (LPCM) MP3Maximum resolution: 640 pixels x 360 pixelsMaximum Frame rate: 30 fpsMaximum file size: 2 GBMaximum playback time: 150 minutes
Files may not be able to be played back depending on the bit rate.
.mp4Format: MPEG-4/H.264Compatible video codec: MPEG-4 (Simple Profile)/H.264 (Base Line Profile)Compatible audio codec: AAC/Linear PCM (LPCM) MP3Maximum resolution: 640 pixels x 360 pixelsMaximum Frame rate: 30 fpsMaximum file size: 2 GBMaximum playback time: 150 minutes
Files may not be able to be played back depending on the bit rate.
.3gpFormat: MPEG-4/H.264Compatible video codec: MPEG-4 (Simple Profile)/H.264 (Base Line Profile)Compatible audio codec: AAC/Linear PCM (LPCM) MP3Maximum resolution: 640 pixels x 360 pixelsMaximum Frame rate: 30 fpsMaximum file size: 2 GBMaximum playback time: 150 minutes
Files may not be able to be played back depending on the bit rate.
.mkvFormat: MPEG-4/H.264Compatible video codec: MPEG-4 (Simple Profile)/H.264 (Base Line Profile)Compatible audio codec: AAC/Linear PCM (LPCM) MP3/AC-3Maximum resolution: 640 pixels x 360 pixelsMaximum Frame rate: 30 fpsMaximum file size: 2 GBMaximum playback time: 150 minutes
Files may not be able to be played back depending on the bit rate.
CD-R/-RWFile system: ISO9660 level 1.ISO9660 level 2.Romeo, Joliet.UDF 1.02/1.50/2.00/2.01/2.50Maximum number of folders: 700Maximum number of files: 999Playable file types: MP3, WMA, AAC, DivX, MPEG1, MPEG2, MPEG4
DVD-R/-R SL/-R DL/ DVD-RWFile system: ISO9660 level 1.ISO9660 level 2.Romeo, Joliet.UDF 1.02/1.50/2.00/2.01/2.50Maximum number of folders: 700Maximum number of files: 3 500Playable file types: MP3, WMA, AAC, DivX, MPEG1, MPEG2, MPEG4
USB storage deviceFile system: FAT16/FAT32Maximum number of folders: 1 500Maximum number of files: 15 000Playable file types: MP3, WMA, AAC, WAV, FLAC, H.264, MPEG4, JPEG
MP3 compatibility Ver. 2.x of ID3 tag is prioritised when both Ver. 1.x and Ver. 2.x
exist. This product is not compatible with the following: MP3i (MP3
interactive), mp3 PRO, m3u playlist
CD-R/-RWFile extension: .mp3Bit rate: 8 kbps to 320 kbps (CBR), VBRSampling frequency: 16 kHz to 48 kHz (32 kHz, 44.1 kHz,48 kHz for emphasis)ID3 tag: ID3 tag Ver. 1.0, 1.1, 2.2, 2.3
DVD-R/-R SL/-R DL/ DVD-RWFile extension: .mp3Bit rate: 8 kbps to 320 kbps (CBR), VBRSampling frequency: 16 kHz to 48 kHz (32 kHz, 44.1 kHz,48 kHz for emphasis)ID3 tag: ID3 tag Ver. 1.0, 1.1, 2.2, 2.3
USB storage deviceFile extension: .mp3Bit rate: 8 kbps to 320 kbps (CBR), VBRSampling frequency: 8 kHz to 48 kHzID3 tag: ID3 tag Ver. 1.0, 1.1, 2.2, 2.3, 2.4
WMA compatibility This product is not compatible with the following: Windows
Media™ Audio 9 Professional, Lossless, Voice
57< CRD4925-A >
Appendix Appendix
58
App Store
App Store is a service mark of Apple Inc.
iOS
iOS is a trademark on which Cisco holds the trademark right in the US and certain other countries.
iTunes
iTunes is a trademark of Apple Inc., registered in the U.S. and other countries.
Using app-based connected content
IMPORTANTRequirements to access app-based connected content services using this product: Latest version of the Pioneer compatible connected
content application(s) for the smartphone, available from the service provider, downloaded to your smartphone.
A current account with the content service provider. Smartphone Data Plan.
Note: if the Data Plan for your smartphone does not pro-vide for unlimited data usage, additional charges from your carrier may apply for accessing app-based connected content via 3G, EDGE and/or LTE (4G) networks.
Connection to the Internet via 3G, EDGE, LTE (4G) or Wi-Fi network. Optional Pioneer adapter cable connecting your iPhone to
this product.
Limitations: Access to app-based connected content will depend on the
availability of cellular and/or Wi-Fi network coverage for the purpose of allowing your smartphone to connect to the Internet.
Service availability may be geographically limited to the region. Consult the connected content service provider for additional information.
Ability of this product to access connected content is subject to change without notice and could be affected by any of the following: compatibility issues with future firmware versions of smartphone; compatibility issues with future versions of the connected content application(s) for the smartphone; changes to or discontinuation of the connected Content application(s) or service by its provider.
.movFormat: MPEG-4/H.264Compatible video codec: MPEG-4 (Simple Profile)/H.264 (Base Line Profile)Compatible audio codec: AAC/Linear PCM (LPCM) MP3Maximum resolution: 640 pixels x 360 pixelsMaximum Frame rate: 30 fpsMaximum file size: 2 GBMaximum playback time: 150 minutes
Files may not be able to be played back depending on the bit rate.
Example of a hierarchy This product assigns folder numbers. The user cannot
assign folder numbers.
Bluetooth
The Bluetooth® word mark and logos are registered trademarks owned by Bluetooth SIG, Inc. and any use of such marks by PIONEER CORPORATION is under license. Other trademarks and trade names are those of their respective owners.
WMAWindows Media is either a registered trademark or trademark of Microsoft Corporation in the United States and/or other countries.This product includes technology owned by Microsoft Corporation and cannot be used or distributed without a license from Microsoft Licensing, Inc.
FLACCopyright © 2000-2009 Josh CoalsonCopyright © 2011-2013 Xiph.Org FoundationRedistribution and use in source and binary forms, with or without modification, are permitted provided that the following conditions are met:— Redistributions of source code must retain the above copyright
notice, this list of conditions and the following disclaimer.
— Redistributions in binary form must reproduce the above copyright notice, this list of conditions and the following disclaimer in the documentation and/or other materials provided with the distribution.
— Neither the name of the Xiph.org Foundation nor the names of its contributors may be used to endorse or promote products derived from this software without specific prior written permission.
THIS SOFTWARE IS PROVIDED BY THE COPYRIGHT HOLDERS AND CONTRIBUTORS “AS IS” AND ANY EXPRESS OR IMPLIED WARRANTIES, INCLUDING, BUT NOT LIMITED TO, THE IMPLIED WARRANTIES OF MERCHANTABILITY AND FITNESS FOR A PARTICULAR PURPOSE ARE DISCLAIMED. IN NO EVENT SHALL THE FOUNDATION OR CONTRIBUTORS BE LIABLE FOR ANY DIRECT, INDIRECT, INCIDENTAL, SPECIAL, EXEMPLARY, OR CONSEQUENTIAL DAMAGES (INCLUDING, BUT NOT LIMITED TO, PROCUREMENT OF SUBSTITUTE GOODS OR SERVICES; LOSS OF USE, DATA, OR PROFITS; OR BUSINESS INTERRUPTION) HOWEVER CAUSED AND ON ANY THEORY OF LIABILITY, WHETHER IN CONTRACT, STRICT LIABILITY, OR TORT (INCLUDING NEGLIGENCE OR OTHERWISE) ARISING IN ANY WAY OUT OF THE USE OF THIS SOFTWARE, EVEN IF ADVISED OF THE POSSIBILITY OF SUCH DAMAGE.
DivX
DivX Certified® devices have been tested for high-quality DivX® (.divx, .avi) video playback. When you see the DivX logo, you know you have the freedom to play your favourite DivX movies.DivX®, DivX Certified® and associated logos are trademarks of DivX, LLC and are used under license.This DivX Certified® device has passed rigorous testing to ensure it plays DivX® video.To play purchased DivX movies, first register your device at vod.divx.com. Find your registration code in the DivX VOD section of your device setup menu. Refer to Displaying your DivX VOD registration code on page 43
AACAAC is short for Advanced Audio Coding and refers to an audio compression technology standard used with MPEG-2 and MPEG-4. Several applications can be used to encode AAC files, but file formats and extensions differ depending on the appli-cation which is used to encode. This unit plays back AAC files encoded by iTunes.
Android™
Android is a trademark of Google Inc.
Detailed information regarding connected iPod devices Pioneer accepts no responsibility for data lost from an
iPod, even if that data is lost while using this product. Please back up your iPod data regularly.
Do not leave the iPod in direct sunlight for extended amounts of time. Extended exposure to direct sunlight can result in iPod malfunction due to the resulting high temperature.
Do not leave the iPod in any location with high temperatures.
Firmly secure the iPod when driving. Do not let the iPod fall onto the floor, where it may become jammed under the brake or accelerator.
For details, refer to the iPod manuals.
iPhone and iPod
“Made for iPod” and “Made for iPhone” mean that an electronic accessory has been designed to connect specifically to iPod or iPhone, respectively, and has been certified by the developer to meet Apple performance standards.Apple is not responsible for the operation of this device or its compliance with safety and regulatory standards.Please note that the use of this accessory with iPod or iPhone may affect wireless performance.iPhone, iPod, iPod classic, iPod nano, and iPod touch are trade-marks of Apple Inc., registered in the U.S. and other countries.
Lightning
Lightning is a trademark of Apple Inc.
58 < CRD4925-A >< CRD4925-A >
Appendix Appendix
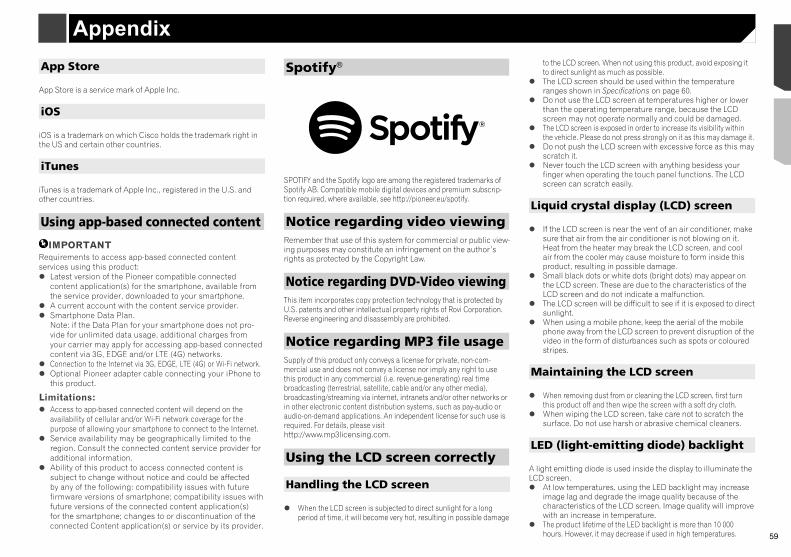
59
App Store
App Store is a service mark of Apple Inc.
iOS
iOS is a trademark on which Cisco holds the trademark right in the US and certain other countries.
iTunes
iTunes is a trademark of Apple Inc., registered in the U.S. and other countries.
Using app-based connected content
IMPORTANTRequirements to access app-based connected content services using this product: Latest version of the Pioneer compatible connected
content application(s) for the smartphone, available from the service provider, downloaded to your smartphone.
A current account with the content service provider. Smartphone Data Plan.
Note: if the Data Plan for your smartphone does not pro-vide for unlimited data usage, additional charges from your carrier may apply for accessing app-based connected content via 3G, EDGE and/or LTE (4G) networks.
Connection to the Internet via 3G, EDGE, LTE (4G) or Wi-Fi network. Optional Pioneer adapter cable connecting your iPhone to
this product.
Limitations: Access to app-based connected content will depend on the
availability of cellular and/or Wi-Fi network coverage for the purpose of allowing your smartphone to connect to the Internet.
Service availability may be geographically limited to the region. Consult the connected content service provider for additional information.
Ability of this product to access connected content is subject to change without notice and could be affected by any of the following: compatibility issues with future firmware versions of smartphone; compatibility issues with future versions of the connected content application(s) for the smartphone; changes to or discontinuation of the connected Content application(s) or service by its provider.
Spotify®
SPOTIFY and the Spotify logo are among the registered trademarks of Spotify AB. Compatible mobile digital devices and premium subscrip-tion required, where available, see http://pioneer.eu/spotify.
Notice regarding video viewingRemember that use of this system for commercial or public view-ing purposes may constitute an infringement on the author’s rights as protected by the Copyright Law.
Notice regarding DVD-Video viewingThis item incorporates copy protection technology that is protected by U.S. patents and other intellectual property rights of Rovi Corporation. Reverse engineering and disassembly are prohibited.
Notice regarding MP3 file usageSupply of this product only conveys a license for private, non-com-mercial use and does not convey a license nor imply any right to use this product in any commercial (i.e. revenue-generating) real time broadcasting (terrestrial, satellite, cable and/or any other media), broadcasting/streaming via internet, intranets and/or other networks or in other electronic content distribution systems, such as pay-audio or audio-on-demand applications. An independent license for such use is required. For details, please visithttp://www.mp3licensing.com.
Using the LCD screen correctly
Handling the LCD screen
When the LCD screen is subjected to direct sunlight for a long period of time, it will become very hot, resulting in possible damage
to the LCD screen. When not using this product, avoid exposing it to direct sunlight as much as possible.
The LCD screen should be used within the temperature ranges shown in Specifications on page 60.
Do not use the LCD screen at temperatures higher or lower than the operating temperature range, because the LCD screen may not operate normally and could be damaged.
The LCD screen is exposed in order to increase its visibility within the vehicle. Please do not press strongly on it as this may damage it.
Do not push the LCD screen with excessive force as this may scratch it.
Never touch the LCD screen with anything besidess your finger when operating the touch panel functions. The LCD screen can scratch easily.
Liquid crystal display (LCD) screen
If the LCD screen is near the vent of an air conditioner, make sure that air from the air conditioner is not blowing on it. Heat from the heater may break the LCD screen, and cool air from the cooler may cause moisture to form inside this product, resulting in possible damage.
Small black dots or white dots (bright dots) may appear on the LCD screen. These are due to the characteristics of the LCD screen and do not indicate a malfunction.
The LCD screen will be difficult to see if it is exposed to direct sunlight.
When using a mobile phone, keep the aerial of the mobile phone away from the LCD screen to prevent disruption of the video in the form of disturbances such as spots or coloured stripes.
Maintaining the LCD screen
When removing dust from or cleaning the LCD screen, first turn this product off and then wipe the screen with a soft dry cloth.
When wiping the LCD screen, take care not to scratch the surface. Do not use harsh or abrasive chemical cleaners.
LED (light-emitting diode) backlight
A light emitting diode is used inside the display to illuminate the LCD screen. At low temperatures, using the LED backlight may increase
image lag and degrade the image quality because of the characteristics of the LCD screen. Image quality will improve with an increase in temperature.
The product lifetime of the LED backlight is more than 10 000 hours. However, it may decrease if used in high temperatures.
Android™
Android is a trademark of Google Inc.
Detailed information regarding connected iPod devices Pioneer accepts no responsibility for data lost from an
iPod, even if that data is lost while using this product. Please back up your iPod data regularly.
Do not leave the iPod in direct sunlight for extended amounts of time. Extended exposure to direct sunlight can result in iPod malfunction due to the resulting high temperature.
Do not leave the iPod in any location with high temperatures.
Firmly secure the iPod when driving. Do not let the iPod fall onto the floor, where it may become jammed under the brake or accelerator.
For details, refer to the iPod manuals.
iPhone and iPod
“Made for iPod” and “Made for iPhone” mean that an electronic accessory has been designed to connect specifically to iPod or iPhone, respectively, and has been certified by the developer to meet Apple performance standards.Apple is not responsible for the operation of this device or its compliance with safety and regulatory standards.Please note that the use of this accessory with iPod or iPhone may affect wireless performance.iPhone, iPod, iPod classic, iPod nano, and iPod touch are trade-marks of Apple Inc., registered in the U.S. and other countries.
Lightning
Lightning is a trademark of Apple Inc.
59< CRD4925-A >
Appendix Appendix
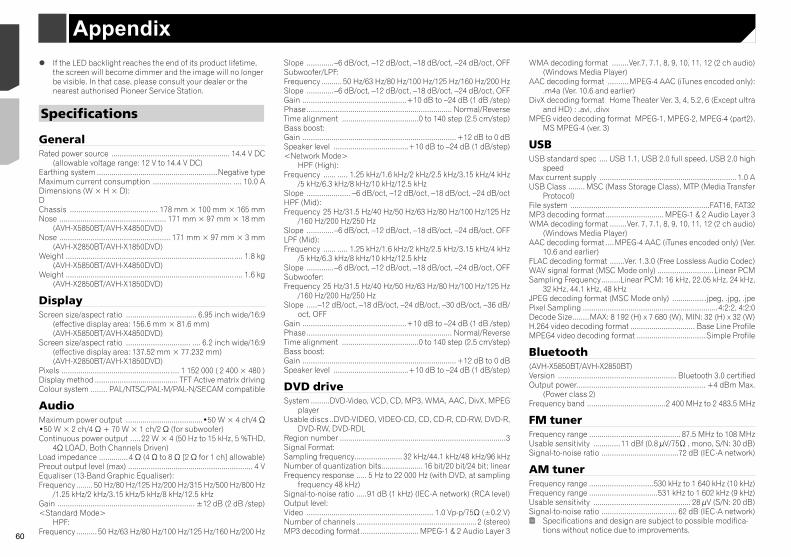
60
感謝您購買本先鋒產品。
請詳閱這些說明,瞭解如何正確操作產品。
說明閱讀完畢後,請妥善留存本文件,以供
日後參考。
重要事項
範例中顯示的畫面可能與實際畫面不同,如因效能及功能改善而有任何變更,恕不另行通知。
■ 注意事項 ............... 63授權、保固免責聲明和有限責任 ........... 63重要安全資訊 ........................... 63行駛安全注意事項 ....................... 63使用連接至 V OUT ....................... 63防止電瓶電量耗盡 ....................... 63後視攝影機 ............................. 63操作USB接頭 ............................ 63發生問題時 ............................. 64歡迎至本公司網站 ....................... 64保護液晶面板及螢幕 ..................... 64內部記憶體注意事項 ..................... 64關於本手冊 ............................. 64遙控器之使用與保養 ..................... 64
■ 基本操作 ............... 65檢查零件名稱及功能 ..................... 65遙控器 ................................. 65使用液晶面板的注意事項 ................. 66調整液晶面板角度 ....................... 66插入/退出/連接媒體 ................... 66首次啟動時 ............................. 66如何使用畫面 ........................... 67支援的AV來源 ........................... 68顯示AV操作畫面 ......................... 68選擇來源 ............................... 68變更來源的顯示順序 ..................... 68使用觸控面板 ........................... 68
■登錄及連接Bluetooth®裝置 .. 69顯示「藍牙」畫面 ....................... 69登錄您的藍牙裝置 ....................... 69手動連接登錄的藍牙裝置 ................. 69切換可視性 ............................. 69輸入藍牙無線連線的PIN碼 ................ 69顯示裝置資訊 ........................... 70
If the LED backlight reaches the end of its product lifetime, the screen will become dimmer and the image will no longer be visible. In that case, please consult your dealer or the nearest authorised Pioneer Service Station.
Specifications
GeneralRated power source ......................................................... 14.4 V DC
(allowable voltage range: 12 V to 14.4 V DC)Earthing system ..........................................................Negative typeMaximum current consumption ...................................... .... 10.0 ADimensions(W×H×D):DChassis ...................................... ....178mm×100mm×165mmNose ............................................... ....171mm×97mm×18mm
(AVH-X5850BT/AVH-X4850DVD)Nose ................................................. ....171mm×97mm×3mm
(AVH-X2850BT/AVH-X1850DVD)Weight ..................................................................................... 1.8 kg
(AVH-X5850BT/AVH-X4850DVD)Weight ..................................................................................... 1.6 kg
(AVH-X2850BT/AVH-X1850DVD)
DisplayScreen size/aspect ratio .................................. 6.95 inch wide/16:9
(effectivedisplayarea:156.6mm×81.6mm) (AVH-X5850BT/AVH-X4850DVD)
Screen size/aspect ratio ............................... .... 6.2 inch wide/16:9 (effectivedisplayarea:137.52mm×77.232mm) (AVH-X2850BT/AVH-X1850DVD)
Pixels .................................................... ....1152000(2400×480)Display method ........................................ TFT Active matrix drivingColour system ........ PAL/NTSC/PAL-M/PAL-N/SECAM compatible
AudioMaximum power output .....................................•50 W ×4ch /4Ω•50 W ×2ch /4Ω+70W ×1ch /2Ω(forsubwoofer)Continuous power output ..... 22 W ×4(50Hz to 15 kHz , 5 %THD,
4ΩLOAD,BothChannelsDriven)Load impedance ..............4Ω(4Ωto8Ω[2Ωfor1ch ] allowable)Preout output level (max) ............................................................ 4 VEqualiser (13-Band Graphic Equaliser):Frequency ........ 50 Hz /80 Hz /125 Hz /200 Hz /315 Hz /500 Hz /800 Hz
/1.25 kHz /2 kHz /3.15 kHz /5 kHz /8 kHz /12.5 kHz
Gain .................................................................. ±12 dB (2 dB /step)<Standard Mode>
HPF:Frequency .......... 50 Hz /63 Hz /80 Hz /100 Hz /125 Hz /160 Hz /200 Hz
Slope .............–6 dB /oct, –12 dB /oct, –18 dB /oct, –24 dB /oct, OFFSubwoofer/LPF:Frequency .......... 50 Hz /63 Hz /80 Hz /100 Hz /125 Hz /160 Hz /200 Hz
Slope .............–6 dB /oct, –12 dB /oct, –18 dB /oct, –24 dB /oct, OFFGain ..................................................+10 dB to –24 dB (1 dB /step)Phase ...................................................................... Normal/ReverseTime alignment .....................................0 to 140 step (2.5 cm/step)Bass boost:Gain ..........................................................................+12 dB to 0 dB
Speaker level ....................................+10 dB to –24 dB (1 dB /step)<Network Mode>
HPF (High):Frequency ...... ..... 1.25 kHz /1.6 kHz /2 kHz /2.5 kHz /3.15 kHz /4 kHz
/5 kHz /6.3 kHz /8 kHz /10 kHz /12.5 kHz
Slope ..................... –6 dB /oct, –12 dB /oct, –18 dB /oct, –24 dB /octHPF (Mid):Frequency 25 Hz /31.5 Hz /40 Hz /50 Hz /63 Hz /80 Hz /100 Hz /125 Hz
/160 Hz /200 Hz /250 Hz
Slope .............–6 dB /oct, –12 dB /oct, –18 dB /oct, –24 dB /oct, OFFLPF (Mid):Frequency ...... ..... 1.25 kHz /1.6 kHz /2 kHz /2.5 kHz /3.15 kHz /4 kHz
/5 kHz /6.3 kHz /8 kHz /10 kHz /12.5 kHz
Slope .............–6 dB /oct, –12 dB /oct, –18 dB /oct, –24 dB /oct, OFFSubwoofer:Frequency 25 Hz /31.5 Hz /40 Hz /50 Hz /63 Hz /80 Hz /100 Hz /125 Hz
/160 Hz /200 Hz /250 Hz
Slope .....–12 dB /oct, –18 dB /oct, –24 dB /oct, –30 dB /oct, –36 dB /oct, OFF
Gain ..................................................+10 dB to –24 dB (1 dB /step)Phase ...................................................................... Normal/ReverseTime alignment .....................................0 to 140 step (2.5 cm/step)Bass boost:Gain ..........................................................................+12 dB to 0 dB
Speaker level ....................................+10 dB to –24 dB (1 dB /step)
DVD driveSystem .........DVD-Video, VCD, CD, MP3, WMA, AAC, DivX, MPEG
playerUsable discs ..DVD-VIDEO, VIDEO-CD, CD, CD-R, CD-RW, DVD-R,
DVD-RW, DVD-RDLRegion number ................................................................................3Signal Format:Sampling frequency ....................... 32 kHz /44.1 kHz /48 kHz /96 kHz
Number of quantization bits.................... 16 bit/20 bit/24 bit; linearFrequency response ..... 5 Hz to 22 000 Hz (with DVD, at sampling
frequency 48 kHz )Signal-to-noise ratio .....91 dB (1 kHz ) (IEC-A network) (RCA level)Output level:Video ............................................................. 1.0 V p-p/75Ω(±0.2V )Number of channels ..........................................................2 (stereo)MP3 decoding format ............................ MPEG-1 & 2 A udio Layer 3
WMA decoding format ........Ver.7, 7.1, 8, 9, 10, 11, 12 (2 ch audio) (Windows Media Player)
AAC decoding format ..........MPEG-4 A AC (iTunes encoded only): .m4a (Ver. 10.6 and earlier)
DivX decoding format Home Theater Ver. 3, 4, 5.2, 6 (Except ultra and HD) : .avi, .divx
MPEG video decoding format MPEG-1, MPEG-2, MPEG-4 (part2), MS MPEG-4 (ver. 3)
USBUSB standard spec .... USB 1.1, USB 2.0 full speed, USB 2.0 high
speedMax current supply .................................................................. 1.0 A
USB Class ........ MSC (Mass Storage Class), MTP (Media Transfer Protocol)
File system ...................................................................FAT16, FAT32MP3 decoding format ............................ MPEG-1 & 2 A udio Layer 3WMA decoding format ........Ver. 7, 7.1, 8, 9, 10, 11, 12 (2 ch audio)
(Windows Media Player)AAC decoding format ....MPEG-4 A AC (iTunes encoded only) (Ver.
10.6 and earlier)FLAC decoding format .......Ver. 1.3.0 (Free Lossless Audio Codec)WAV signal format (MSC Mode only) ...........................Linear PCMSampling Frequency .........Linear PCM: 16 kHz , 22.05 kHz , 24 kHz ,
32 kHz , 44.1 kHz , 48 kHz
JPEG decoding format (MSC Mode only) ............... .jpeg, .jpg, .jpePixel Sampling .................................................................4:2:2, 4:2:0Decode Size ........MAX: 8 192 (H) x 7 680 (W), MIN: 32 (H) x 32 (W)H.264 video decoding format ............................... Base Line ProfileMPEG4 video decoding format ................................. Simple Profile
Bluetooth(AVH-X5850BT/AVH-X2850BT)Version ......................................................... Bluetooth 3.0 certifiedOutput power.............................................................. +4 dB m Max.
(Power class 2)Frequency band ......................................2 400 MHz to 2 483.5 MHz
FM tunerFrequency range ............................................ 87.5 MHz to 108 MHz
Usable sensitivity .............11 dBf (0.8µV/75Ω,mono,S/N:30dB )Signal-to-noise ratio .....................................72 dB (IEC-A network)
AM tunerFrequency range ...............................530 kHz to 1 640 kHz (10 kHz )Frequency range .................................531 kHz to 1 602 kHz (9 kHz )Usable sensitivity ............................................... 28 µV (S/N: 20 dB )Signal-to-noise ratio .................................... 62 dB (IEC-A network)
Specifications and design are subject to possible modifica-tions without notice due to improvements.
60 < CRD4925-A >< CRD4925-A >
Appendix
61
感謝您購買本先鋒產品。
請詳閱這些說明,瞭解如何正確操作產品。
說明閱讀完畢後,請妥善留存本文件,以供
日後參考。
重要事項
範例中顯示的畫面可能與實際畫面不同,如因效能及功能改善而有任何變更,恕不另行通知。
■ 注意事項 ............... 63授權、保固免責聲明和有限責任 ........... 63重要安全資訊 ........................... 63行駛安全注意事項 ....................... 63使用連接至 V OUT ....................... 63防止電瓶電量耗盡 ....................... 63後視攝影機 ............................. 63操作USB接頭 ............................ 63發生問題時 ............................. 64歡迎至本公司網站 ....................... 64保護液晶面板及螢幕 ..................... 64內部記憶體注意事項 ..................... 64關於本手冊 ............................. 64遙控器之使用與保養 ..................... 64
■ 基本操作 ............... 65檢查零件名稱及功能 ..................... 65遙控器 ................................. 65使用液晶面板的注意事項 ................. 66調整液晶面板角度 ....................... 66插入/退出/連接媒體 ................... 66首次啟動時 ............................. 66如何使用畫面 ........................... 67支援的AV來源 ........................... 68顯示AV操作畫面 ......................... 68選擇來源 ............................... 68變更來源的顯示順序 ..................... 68使用觸控面板 ........................... 68
■登錄及連接Bluetooth®裝置 .. 69顯示「藍牙」畫面 ....................... 69登錄您的藍牙裝置 ....................... 69手動連接登錄的藍牙裝置 ................. 69切換可視性 ............................. 69輸入藍牙無線連線的PIN碼 ................ 69顯示裝置資訊 ........................... 70
清除藍牙記憶 ........................... 70更新藍牙軟體 ........................... 70顯示藍牙軟體版本 ....................... 70切換已連接的藍牙裝置 ................... 70
■ 免持聽話 ............... 70顯示電話選單畫面 ....................... 71撥打電話 ............................... 71接聽電話來電 ........................... 71最小化撥號確認畫面 ..................... 71變更電話設定 ........................... 71使用語音辨識功能(適用於iPhone) ....... 72設定電話簿自動同步處理 ................. 72免持聽話的注意事項 ..................... 72
■ iPod / iPhone或智慧型手機設定 . 72
iPod / iPhone或智慧型手機設定的基本流程 .... 72
設定裝置連接方式 ....................... 72iPod相容性 ............................. 72Android™ 裝置相容性 .................... 73有關各裝置連接及功能的資訊 ............. 74
■ 廣播 ................... 75開始程序 ............................... 75依PTY資訊搜尋 .......................... 75儲存最強的廣播頻率 ..................... 75顯示「收音機設定」畫面 ................. 75調頻至訊號良好的頻率 ................... 75設定FM或AM調頻間隔 ..................... 75設定備用頻率搜尋 ....................... 75設定自動 PI搜尋 ........................ 76限制電台播放區域節目 ................... 76接收交通廣播(TA) ..................... 76接收新聞廣播 ........................... 76接收警報廣播 ........................... 76
■ 電視選台器 ............. 76開始程序 ............................... 76儲存頻道 ............................... 76
■ 碟片 ................... 77開始程序 ............................... 78從檔案名稱清單中選擇檔案 ............... 78切換媒體檔類型 ......................... 78搜尋要播放的部分 ....................... 78操作DVD選單 ............................ 78切換字幕/音訊語言 ..................... 78
使用觸控面板按鍵操作DVD選單 ............ 78
■ 壓縮檔案 ............... 79開始程序(適用碟片) ................... 81開始程序(適用USB) .................... 81所有檔案類型通用的操作 ................. 81音訊檔案操作 ........................... 81靜態影像檔案操作 ....................... 81
■ iPod ................... 82連接iPod ............................... 82開始程序 ............................... 83在播放清單畫面中選擇歌曲或視訊來源 ..... 83在您的iPod中使用本產品的iPod功能 ....... 83從目前播放歌曲的相關清單中選擇歌曲(
連結搜尋) .......................... 83
■ AppRadioMode ........... 83使用AppRadioMode ....................... 83使用音訊混音功能 ....................... 84
■ Spotify® ............... 84利用Pioneer汽車音訊/視訊使用Spotify ... 85開始程序 ............................... 86選擇清單中的曲目或電台 ................. 86
■ 藍牙音訊播放器 ......... 86開始程序 ............................... 86從檔案名稱清單中選擇檔案 ............... 86
■ AUX來源 ................ 87開始程序 ............................... 87設定視訊訊號 ........................... 87
■ AV輸入 ................. 88開始程序 ............................... 88設定視訊訊號 ........................... 88
■ MIXTRAX ................ 88MIXTRAX操作 ............................ 88MIXTRAX EZ操作 ......................... 88顯示「MIXTRAX Settings」畫面 .......... 88設定閃爍圖案 ........................... 89
■ 系統設定 ............... 89顯示「系統設定」設定畫面 ............... 89設定方向盤控制鍵 ....................... 89設定藍牙音訊來源啟用 ................... 89設定Spotify來源啟用 .................... 89
設定不斷捲動 ........................... 89設定嗶聲 ............................... 89設定自動音訊混音功能 ................... 89設定後視攝影機 ......................... 89設定示範模式 ........................... 90選擇系統語言 ........................... 90利用iPhone應用程式設定鍵盤語言 ......... 90調整觸控面板的回應位置(觸控面板校正) . 90設定調光器 ............................. 90調整影像 ............................... 91顯示韌體版本 ........................... 91顯示開放原始碼授權 ..................... 91更新韌體 ............................... 91
■ 音訊調整 ............... 92顯示「音頻」設定畫面 ................... 92使用淡化器/平衡調整 ................... 92切換靜音/衰減 ......................... 92調整來源音量 ........................... 92使用自動位準控制 ....................... 92調整響度 ............................... 92設定重低音揚聲器輸出 ................... 92調整截止頻率值 ......................... 92切換後揚聲器輸出 ....................... 92使用BASS Boost ......................... 92選擇聆聽位置 ........................... 93微調揚聲器輸出位準 ..................... 93調整時序校準 ........................... 93切換時序校準預設 ....................... 93使用等化器 ............................. 93自動調整等化器曲線(自動EQ) ........... 94儲存聲音設定 ........................... 94載入聲音設定 ........................... 94
■ 主題選單 ............... 95選擇背景顯示畫面 ....................... 95設定照明色彩 ........................... 95選擇主題色彩 ........................... 95選擇時鐘影像 ........................... 95
■ 設定視訊播放機 ......... 96設定第一優先語言 ....................... 96設定角度圖示顯示 ....................... 96設定長寬比 ............................. 96設定家長監控功能 ....................... 96顯示DivX VOD登錄碼 ..................... 96顯示DivX VOD取消登錄碼 ................. 97自動播放DVD ............................ 97設定後視攝影機的視訊訊號 ............... 97
WMA decoding format ........Ver.7, 7.1, 8, 9, 10, 11, 12 (2 ch audio) (Windows Media Player)
AAC decoding format ..........MPEG-4 A AC (iTunes encoded only): .m4a (Ver. 10.6 and earlier)
DivX decoding format Home Theater Ver. 3, 4, 5.2, 6 (Except ultra and HD) : .avi, .divx
MPEG video decoding format MPEG-1, MPEG-2, MPEG-4 (part2), MS MPEG-4 (ver. 3)
USBUSB standard spec .... USB 1.1, USB 2.0 full speed, USB 2.0 high
speedMax current supply .................................................................. 1.0 A
USB Class ........ MSC (Mass Storage Class), MTP (Media Transfer Protocol)
File system ...................................................................FAT16, FAT32MP3 decoding format ............................ MPEG-1 & 2 A udio Layer 3WMA decoding format ........Ver. 7, 7.1, 8, 9, 10, 11, 12 (2 ch audio)
(Windows Media Player)AAC decoding format ....MPEG-4 A AC (iTunes encoded only) (Ver.
10.6 and earlier)FLAC decoding format .......Ver. 1.3.0 (Free Lossless Audio Codec)WAV signal format (MSC Mode only) ...........................Linear PCMSampling Frequency .........Linear PCM: 16 kHz , 22.05 kHz , 24 kHz ,
32 kHz , 44.1 kHz , 48 kHz
JPEG decoding format (MSC Mode only) ............... .jpeg, .jpg, .jpePixel Sampling .................................................................4:2:2, 4:2:0Decode Size ........MAX: 8 192 (H) x 7 680 (W), MIN: 32 (H) x 32 (W)H.264 video decoding format ............................... Base Line ProfileMPEG4 video decoding format ................................. Simple Profile
Bluetooth(AVH-X5850BT/AVH-X2850BT)Version ......................................................... Bluetooth 3.0 certifiedOutput power.............................................................. +4 dB m Max.
(Power class 2)Frequency band ......................................2 400 MHz to 2 483.5 MHz
FM tunerFrequency range ............................................ 87.5 MHz to 108 MHz
Usable sensitivity .............11 dBf (0.8µV/75Ω,mono,S/N:30dB )Signal-to-noise ratio .....................................72 dB (IEC-A network)
AM tunerFrequency range ...............................530 kHz to 1 640 kHz (10 kHz )Frequency range .................................531 kHz to 1 602 kHz (9 kHz )Usable sensitivity ............................................... 28 µV (S/N: 20 dB )Signal-to-noise ratio .................................... 62 dB (IEC-A network)
Specifications and design are subject to possible modifica-tions without notice due to improvements.
61< CRD4925-A >
目錄Appendix
62
注意本產品根據IEC 60825-1:2007雷射產品安全性的分類,屬於類別1雷射產品,並內含1M級雷射模組。為了確保安全性,請勿拆下任何護蓋,或碰觸產品內部。所有維修工作都必須交由合格人員處理。
授權、保固免責聲明和有限責任
安全性條款
免責聲明
先鋒有限保固中的保證為先鋒與其任何適用授權者唯一承認的保證。其他任何明示或暗示保證,包括但不限於可銷售性保證與特定用途適用性保證,先鋒與其授權者明確表示概不承認。
有限責任
根據適用法令允許的最大範圍,先鋒及其授權人對於您或其他相關方造成之任何間接、從屬、意外、懲罰或特殊傷害,不論訴訟形式、在合約內或侵權行為,包括疏忽,即使該方已建議有該類傷害的可能性,一概不予負責。根據適用法令允許的最大範圍,先鋒或其授權人需負擔之任何類型的權利或相關使用產品的總責任費用,包括但不限於任何保固索賠,或任何財產損失、死亡或殘障索賠,不論使用場所及任何基於合約、侵權行為(包括但不限於)、產品嚴格責任或任何其他法令條文所提出的訴訟或索賠,均不得超過一千美元(USD$1000)。在某些司法管轄地區不允許排除傷害或有限責任,因此以上排除或限制情形,根據適用法律允許的最大範圍,可能不適用於您。您的特定權利可能因不同的司法管轄區而有不同。
注意事項
■ 最愛選單 ............... 97建立捷徑 ............................... 97選擇捷徑 ............................... 97移除捷徑 ............................... 97
■ 常用操作 ............... 98設定時間與日期 ......................... 98設定「Sound Retriever」功能 ............ 98變更寬螢幕模式 ......................... 98
■ 其他功能 ............... 98將本產品還原成預設設定 ................. 98
■ 連接 ................... 99注意事項 ............................... 99連接系統前的注意事項 ................... 99安裝本產品前 ........................... 99防止受損 ............................... 99藍/白導線注意事項 ..................... 99本產品 ................................. 99電源線 ................................ 100揚聲器導線 ............................ 100功率放大器(另售) .................... 100iPhone和智慧型手機 .................... 101具有Lightning接頭的iPhone ............. 101具備30針接腳的iPhone .................. 101Android裝置 ........................... 102攝影機 ................................ 102外部視訊組件及顯示器 .................. 102
■ 安裝 .................. 103安裝前注意事項 ........................ 103安裝前 ................................ 103安裝注意事項 .......................... 103使用本產品側邊螺絲孔安裝 .............. 103安裝麥克風 ............................ 104安裝在遮陽板上 ........................ 104安裝在轉向機柱上 ...................... 104調整麥克風角度 ........................ 104
■ 附錄 .................. 104故障排除 .............................. 104錯誤訊息 .............................. 105操作及保養碟片 ........................ 106可播放碟片 ............................ 107有關可播放媒體的詳細資訊 .............. 107Bluetooth............................. 109WMA................................... 109FLAC .................................. 109
DivX .................................. 109AAC................................... 109Android™ ............................. 109有關連接iPod裝置的詳細資訊 ............ 110使用應用程式架構連線內容 .............. 110Spotify® .............................. 110有關觀看視訊的注意事項 ................ 110有關觀看DVD-Video的注意事項 ........... 110有關使用MP3檔案的注意事項 ............. 110正確使用液晶螢幕 ...................... 110規格 .................................. 111
62 < CRD4925-A >< CRD4925-A >
目錄 注意事項
63
注意本產品根據IEC 60825-1:2007雷射產品安全性的分類,屬於類別1雷射產品,並內含1M級雷射模組。為了確保安全性,請勿拆下任何護蓋,或碰觸產品內部。所有維修工作都必須交由合格人員處理。
授權、保固免責聲明和有限責任
安全性條款
免責聲明
先鋒有限保固中的保證為先鋒與其任何適用授權者唯一承認的保證。其他任何明示或暗示保證,包括但不限於可銷售性保證與特定用途適用性保證,先鋒與其授權者明確表示概不承認。
有限責任
根據適用法令允許的最大範圍,先鋒及其授權人對於您或其他相關方造成之任何間接、從屬、意外、懲罰或特殊傷害,不論訴訟形式、在合約內或侵權行為,包括疏忽,即使該方已建議有該類傷害的可能性,一概不予負責。根據適用法令允許的最大範圍,先鋒或其授權人需負擔之任何類型的權利或相關使用產品的總責任費用,包括但不限於任何保固索賠,或任何財產損失、死亡或殘障索賠,不論使用場所及任何基於合約、侵權行為(包括但不限於)、產品嚴格責任或任何其他法令條文所提出的訴訟或索賠,均不得超過一千美元(USD$1000)。在某些司法管轄地區不允許排除傷害或有限責任,因此以上排除或限制情形,根據適用法律允許的最大範圍,可能不適用於您。您的特定權利可能因不同的司法管轄區而有不同。
重要安全資訊
警告 請勿嘗試自行安裝或維修本產品。若未經電子設備與汽車配
件方面的專門訓練,或具有相關的工作經驗即貿然安裝或維修本產品,則會有導致發生觸電、受傷或其他事故的危險。
請勿讓本產品接觸液體。可能會導致觸電。另外,接觸液體也可能會導致產品損壞、冒煙或過熱。
液體或異物進入本產品內部時,請將車輛停在安全位置,立即關閉點火開關(ACC OFF),並洽詢經銷商或就近的授權先鋒維修站。發生此情況後,請勿繼續使用本產品,以免造成起火、觸電或其他故障。
如果發現本產品冒煙,發出異聲或異味或LCD螢幕上出現任何其他異常現象,應立即關閉電源,並洽詢經銷商或就近的授權先鋒維修站。在此情況下使用本產品,可能導致系統永久損壞。
本產品內部具備高電壓元件,請勿拆卸或改裝本產品,以免觸電。進行內部檢查、調整或維修時,請務必洽詢經銷商或就近的授權先鋒維修站。
使用本產品前,請確實詳閱並瞭解下列安全資訊: 請勿在會造成您無法專心安全駕駛的情況下,操作本產品、
任何應用程式或後視攝影機選購配件(若購買)。務必遵守安全駕駛規則及所有現行交通法規。若無法順利操作本產品或看清顯示器,請將車輛停在安全位置並拉起/踩踏手煞車,再進行必要調整。
切勿將本產品的音量調得太高,而無法聽到車外交通與緊急車輛的動靜。
為提升安全,除非車輛已停妥及/或拉起/踩踏手煞車,否則會停用某些功能。
請將本手冊保存在隨手可取得的地方,以備查閱操作步驟及安全資訊。
請勿將本產品安裝在下列位置:(1)阻擋駕駛人員視線的地方;(2)影響車輛操作系統或安全功能(如氣囊或危險警告燈按鈕)的地方;或(3)影響駕駛人員安全駕駛的地方。
行駛時,請記得隨時繫上安全帶。否則,若在未繫妥安全帶的情況下發生事故,可能會大幅加重傷勢。
切勿在駕駛時使用耳機。
行駛安全注意事項
警告 電源接頭的淺綠色導線專為偵測駐車狀態所設計,必須連接至手煞車開關的電源供應側。不當連接或使用這條導線,可能會違反適用法律,並造成重傷或損壞。
為了您的安全起見,請勿任意改造或停用手煞車連動系統。改造或停用手煞車連動系統可能會造成重傷或死亡。
為避免發生損傷及誤觸相關法令,本產品未配備供駕駛觀看
的視訊影像。 在某些國家中,在車上觀看顯示器所播放的視訊影像可能受
到法令禁止,即使是駕駛以外的乘客亦是如此。如有這些法規,駕駛及乘客都必須遵守。
若要在行駛時觀看視訊影像,「行駛中嚴禁駕駛觀看前顯示幕節目。」的警告訊息會出現在畫面上。若要觀看視訊影像,請將車輛停在安全位置並拉起/踩踏手煞車。請在放開手煞車之前先踩住煞車踏板。
使用連接至 V OUT
視訊輸出端子(V OUT)用於連接顯示器,可讓後座的乘客觀看視訊影像。
警告不可將後顯示器安裝在駕駛人員駕車時可以看到視訊影像的位置。
防止電瓶電量耗盡
使用本產品時,請務必讓車輛引擎運轉。使用本產品時,若未讓引擎運轉,可能會使電瓶電量耗盡。
警告請勿將本產品安裝在無ACC電線或電路的車輛中。
後視攝影機
使用選購的後視攝影機時,您可以使用本產品作為注意拖車或倒車進入狹窄停車地點的輔助。
警告 畫面影像的顯示可能顛倒。 僅限使用顛倒或鏡射後視攝影機的輸入影像。使用其他輸入
影像可能導致受傷或損壞。
注意本產品的後視模式可作為注意拖車或倒車時的輔助工具。不可將本功能作為娛樂用途。
操作USB接頭
注意 為防止資料遺失並損及儲存裝置,切勿在傳輸資料時將接頭
從本產品中取出。 先鋒不保證本產品與所有USB大量儲存裝置的相容性,對於
使用本產品時導致媒體播放機、iPhone、智慧型手機或其他裝置上遺失的資料概不負責。
注意事項
63< CRD4925-A >
注意事項
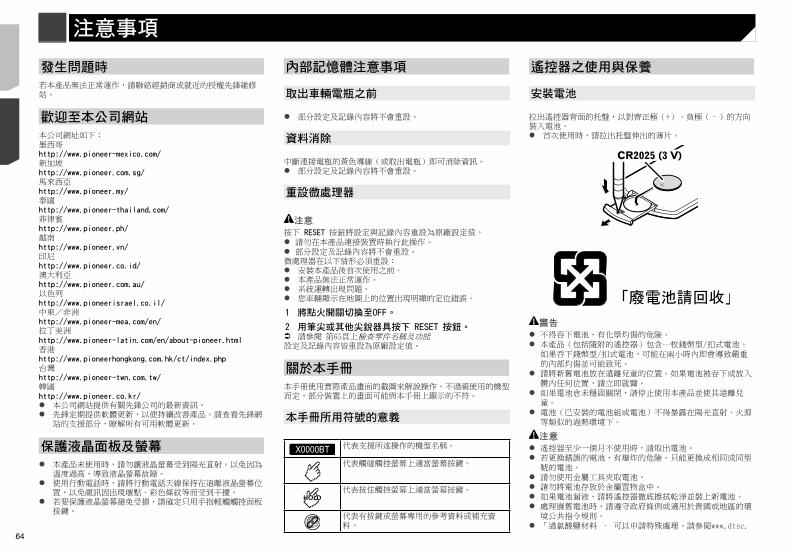
64
ca.gov/hazardouswaste/perchlorate。(適用於美國加洲)」
使用遙控器
將遙控器對著前面板進行操作。 遙控器在直射陽光下可能無法正常工作。
重要事項 請勿將遙控器保存在高溫條件或直射陽光下。 請勿讓遙控器墜落在地板上,否則它可能會卡在煞車或油門
之下。
發生問題時
若本產品無法正常運作,請聯絡經銷商或就近的授權先鋒維修站。
歡迎至本公司網站
本公司網址如下:墨西哥http://www.pioneer-mexico.com/新加坡http://www.pioneer.com.sg/馬來西亞http://www.pioneer.my/泰國http://www.pioneer-thailand.com/菲律賓http://www.pioneer.ph/越南http://www.pioneer.vn/印尼http://www.pioneer.co.id/澳大利亞http://www.pioneer.com.au/以色列http://www.pioneerisrael.co.il/中東/非洲http://www.pioneer-mea.com/en/拉丁美洲http://www.pioneer-latin.com/en/about-pioneer.html香港http://www.pioneerhongkong.com.hk/ct/index.php台灣http://www.pioneer-twn.com.tw/韓國http://www.pioneer.co.kr/ 本公司網站提供有關先鋒公司的最新資訊。 先鋒定期提供軟體更新,以便持續改善產品。請查看先鋒網
站的支援部分,瞭解所有可用軟體更新。
保護液晶面板及螢幕
本產品未使用時,請勿讓液晶螢幕受到陽光直射。以免因為溫度過高,導致液晶螢幕故障。
使用行動電話時,請將行動電話天線保持在遠離液晶螢幕位置,以免視訊因出現壞點、彩色條紋等而受到干擾。
若要保護液晶螢幕避免受損,請確定只用手指輕觸觸控面板按鍵。
內部記憶體注意事項
取出車輛電瓶之前
部分設定及記錄內容將不會重設。
資料消除
中斷連接電瓶的黃色導線(或取出電瓶)即可消除資訊。 部分設定及記錄內容將不會重設。
重設微處理器
注意按下 RESET 按鈕將設定與記錄內容重設為原廠設定值。 請勿在本產品連接裝置時執行此操作。 部分設定及記錄內容將不會重設。微處理器在以下情形必須重設: 安裝本產品後首次使用之前。 本產品無法正常運作。 系統運轉出現問題。 您車輛顯示在地圖上的位置出現明顯的定位錯誤。
1 將點火開關切換至OFF。
2 用筆尖或其他尖銳器具按下 RESET 按鈕。 請參閱 第65頁上檢查零件名稱及功能設定及記錄內容皆重設為原廠設定值。
關於本手冊
本手冊使用實際產品畫面的截圖來解說操作。不過視使用的機型而定,部分裝置上的畫面可能與本手冊上顯示的不符。
本手冊所用符號的意義
X0000BT 代表支援所述操作的機型名稱。
代表觸碰觸控螢幕上適當螢幕按鍵。
HOLD代表按住觸控螢幕上適當螢幕按鍵。
代表有按鍵或螢幕專用的參考資料或補充資料。
遙控器之使用與保養
安裝電池
拉出遙控器背面的托盤,以對齊正極(+)、負極(–)的方向裝入電池。 首次使用時,請拉出托盤伸出的薄片。
警告 不得吞下電池,有化學灼傷的危險。 本產品(包括隨附的遙控器)包含一枚錢幣型/扣式電池。
如果吞下錢幣型/扣式電池,可能在兩小時內即會導致嚴重的內部灼傷並可能致死。
請將新舊電池放在遠離兒童的位置。如果電池被吞下或放入體內任何位置,請立即就醫。
如果電池倉未穩固關閉,請停止使用本產品並使其遠離兒童。
電池(已安裝的電池組或電池)不得暴露在陽光直射、火源等類似的過熱環境下。
注意 遙控器至少一個月不使用時,請取出電池。 若更換錯誤的電池,有爆炸的危險。只能更換成相同或同型
號的電池。 請勿使用金屬工具夾取電池。 請勿將電池存放於金屬置物盒中。 如果電池漏液,請將遙控器徹底擦拭乾淨並裝上新電池。 處理廢舊電池時,請遵守政府條例或適用於貴國或地區的環
境公共指令規則。 「過氯酸鹽材料 – 可以申請特殊處理。請參閱www.dtsc.
64 < CRD4925-A >< CRD4925-A >
注意事項 注意事項
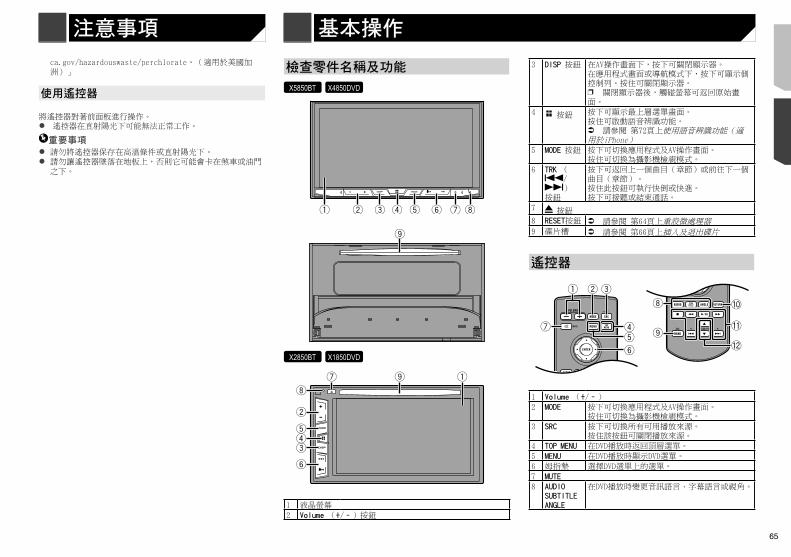
65
ca.gov/hazardouswaste/perchlorate。(適用於美國加洲)」
使用遙控器
將遙控器對著前面板進行操作。 遙控器在直射陽光下可能無法正常工作。
重要事項 請勿將遙控器保存在高溫條件或直射陽光下。 請勿讓遙控器墜落在地板上,否則它可能會卡在煞車或油門
之下。
檢查零件名稱及功能
X5850BT X4850DVD
1 2 3 4 5 6 7 8
9
X2850BT X1850DVD
2
345
6
8
97 1
1 液晶螢幕
2 Volume (+/–)按鈕
3 DISP 按鈕 在AV操作畫面下,按下可關閉顯示器。在應用程式畫面或導航模式下,按下可顯示側控制列。按住可關閉顯示器。p 關閉顯示器後,觸碰螢幕可返回原始畫面。
4 按鈕 按下可顯示最上層選單畫面。按住可啟動語音辨識功能。 請參閱 第72頁上使用語音辨識功能(適用於iPhone)
5 MODE 按鈕 按下可切換應用程式及AV操作畫面。按住可切換為攝影機檢視模式。
6 TRK (/)
按鈕
按下可返回上一個曲目(章節)或前往下一個曲目(章節)。按住此按鈕可執行快倒或快進。按下可接聽或結束通話。
7 按鈕
8 RESET按鈕 請參閱 第64頁上重設微處理器9 碟片槽 請參閱 第66頁上插入及退出碟片
遙控器
6
4
a
b
c
1 2 3
7
8
95
1 Volume (+/–)
2 MODE 按下可切換應用程式及AV操作畫面。按住可切換為攝影機檢視模式。
3 SRC 按下可切換所有可用播放來源。按住該按鈕可關閉播放來源。
4 TOP MENU 在DVD播放時返回頂層選單。
5 MENU 在DVD播放時顯示DVD選單。
6 姆指墊 選擇DVD選單上的選單。
7 MUTE
8 AUDIOSUBTITLEANGLE
在DVD播放時變更音訊語言、字幕語言或視角。
基本操作
遙控器之使用與保養
安裝電池
拉出遙控器背面的托盤,以對齊正極(+)、負極(–)的方向裝入電池。 首次使用時,請拉出托盤伸出的薄片。
警告 不得吞下電池,有化學灼傷的危險。 本產品(包括隨附的遙控器)包含一枚錢幣型/扣式電池。
如果吞下錢幣型/扣式電池,可能在兩小時內即會導致嚴重的內部灼傷並可能致死。
請將新舊電池放在遠離兒童的位置。如果電池被吞下或放入體內任何位置,請立即就醫。
如果電池倉未穩固關閉,請停止使用本產品並使其遠離兒童。
電池(已安裝的電池組或電池)不得暴露在陽光直射、火源等類似的過熱環境下。
注意 遙控器至少一個月不使用時,請取出電池。 若更換錯誤的電池,有爆炸的危險。只能更換成相同或同型
號的電池。 請勿使用金屬工具夾取電池。 請勿將電池存放於金屬置物盒中。 如果電池漏液,請將遙控器徹底擦拭乾淨並裝上新電池。 處理廢舊電池時,請遵守政府條例或適用於貴國或地區的環
境公共指令規則。 「過氯酸鹽材料 – 可以申請特殊處理。請參閱www.dtsc.
65< CRD4925-A >
注意事項 注意事項 基本操作
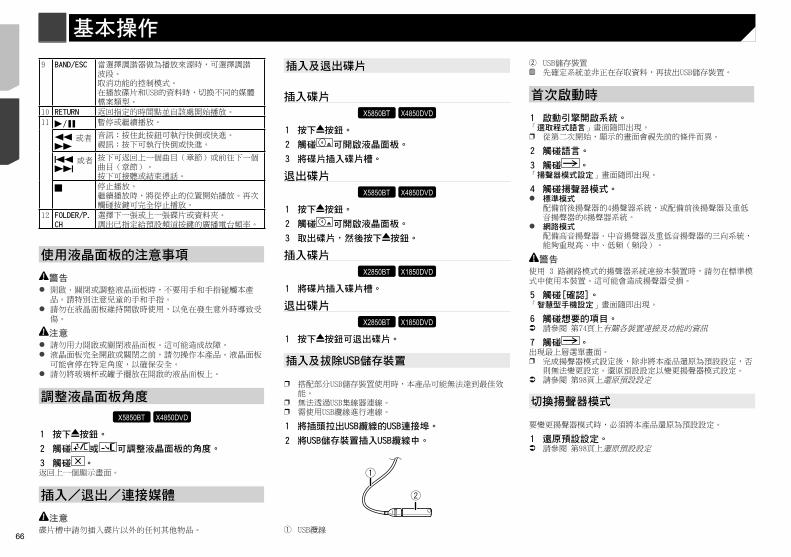
66
如何使用畫面
Phone Book
abcdefghi
abcdefghi
abcdefghi
abcdefghi
abcdefghi
ABC
A
B
C
D
E
F
G
3abcdefghi...
iPod
48216/10
4821
Abcdefg Abcdefg Abcdefg Abcdefg Abcdefg
6/10
Month/Date d/m/y
12hour 24hour
m/d/y y/m/d
10 6 2016 21 48
Time Format
iPod 4821
AbcdefghiAbcdefghi
ABC Pops99999/99999
9999’99” -9999’99”
6/10
Source Select
4821
Abcdefg Abcdefg
Abcdefg Abcdefg
6/10
Disc AUX iPodBluetooth
Audio
RadioAV
48216/10
Radio
Camera View Source OFFSpotify
PowerOFF
TV
System
AV
AV
*4
*4
*1
iPhone
*2
*3
*5
9 BAND/ESC 當選擇調諧器做為播放來源時,可選擇調諧波段。取消功能的控制模式。在播放碟片和USB的資料時,切換不同的媒體檔案類型。
10 RETURN 返回指定的時間點並自該處開始播放。
11 暫停或繼續播放。
或者 音訊:按住此按鈕可執行快倒或快進。視訊:按下可執行快倒或快進。
或者 按下可返回上一個曲目(章節)或前往下一個曲目(章節)。按下可接聽或結束通話。
停止播放。繼續播放時,將從停止的位置開始播放。再次觸碰按鍵可完全停止播放。
12 FOLDER/P.CH
選擇下一張或上一張碟片或資料夾。調出已指定給預設頻道按鍵的廣播電台頻率。
使用液晶面板的注意事項
警告 開啟、關閉或調整液晶面板時,不要用手和手指碰觸本產
品。請特別注意兒童的手和手指。 請勿在液晶面板維持開啟時使用,以免在發生意外時導致受
傷。
注意 請勿用力開啟或關閉液晶面板。這可能造成故障。 液晶面板完全開啟或關閉之前,請勿操作本產品。液晶面板
可能會停在特定角度,以確保安全。 請勿將玻璃杯或罐子擺放在開啟的液晶面板上。
調整液晶面板角度
X5850BT X4850DVD
1 按下 按鈕。
2 觸碰 或 可調整液晶面板的角度。
3 觸碰 。返回上一個顯示畫面。
插入/退出/連接媒體
注意碟片槽中請勿插入碟片以外的任何其他物品。
插入及退出碟片
插入碟片
X5850BT X4850DVD
1 按下 按鈕。
2 觸碰 可開啟液晶面板。
3 將碟片插入碟片槽。
退出碟片
X5850BT X4850DVD
1 按下 按鈕。
2 觸碰 可開啟液晶面板。
3 取出碟片,然後按下 按鈕。
插入碟片
X2850BT X1850DVD
1 將碟片插入碟片槽。
退出碟片
X2850BT X1850DVD
1 按下 按鈕可退出碟片。
插入及拔除USB儲存裝置
p 搭配部分USB儲存裝置使用時,本產品可能無法達到最佳效能。
p 無法透過USB集線器連線。p 需使用USB纜線進行連線。
1 將插頭拉出USB纜線的USB連接埠。
2 將USB儲存裝置插入USB纜線中。
2
1
1 USB纜線
2 USB儲存裝置 先確定系統並非正在存取資料,再拔出USB儲存裝置。
首次啟動時
1 啟動引擎開啟系統。「選取程式語言」畫面隨即出現。p 從第二次開始,顯示的畫面會視先前的條件而異。
2 觸碰語言。
3 觸碰 。「揚聲器模式設定」畫面隨即出現。
4 觸碰揚聲器模式。 標準模式
配備前後揚聲器的4揚聲器系統,或配備前後揚聲器及重低音揚聲器的6揚聲器系統。
網路模式配備高音揚聲器、中音揚聲器及重低音揚聲器的三向系統,能夠重現高、中、低頻(頻段)。
警告使用 3 路網路模式的揚聲器系統連接本裝置時,請勿在標準模式中使用本裝置。這可能會造成揚聲器受損。
5 觸碰[確認]。「智慧型手機設定」畫面隨即出現。
6 觸碰想要的項目。 請參閱 第74頁上有關各裝置連接及功能的資訊
7 觸碰 。出現最上層選單畫面。p 完成揚聲器模式設定後,除非將本產品還原為預設設定,否
則無法變更設定。還原預設設定以變更揚聲器模式設定。 請參閱 第98頁上還原預設設定
切換揚聲器模式
要變更揚聲器模式時,必須將本產品還原為預設設定。
1 還原預設設定。 請參閱 第98頁上還原預設設定
66 < CRD4925-A >< CRD4925-A >
基本操作 基本操作
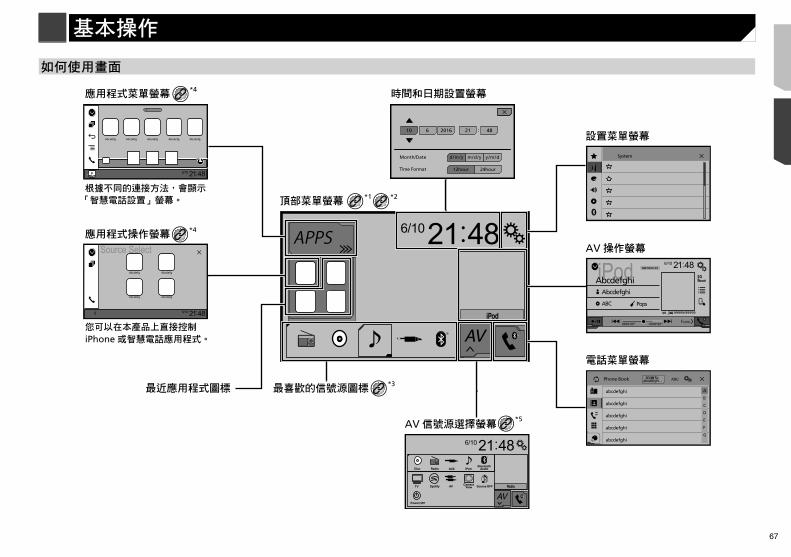
67
如何使用畫面
Phone Book
abcdefghi
abcdefghi
abcdefghi
abcdefghi
abcdefghi
ABC
A
B
C
D
E
F
G
3abcdefghi...
iPod
48216/10
4821
Abcdefg Abcdefg Abcdefg Abcdefg Abcdefg
6/10
Month/Date d/m/y
12hour 24hour
m/d/y y/m/d
10 6 2016 21 48
Time Format
iPod 4821
AbcdefghiAbcdefghi
ABC Pops99999/99999
9999’99” -9999’99”
6/10
Source Select
4821
Abcdefg Abcdefg
Abcdefg Abcdefg
6/10
Disc AUX iPodBluetooth
Audio
RadioAV
48216/10
Radio
Camera View Source OFFSpotify
PowerOFF
TV
System
AV
AV
*4
*4
*1
iPhone
*2
*3
*5
2 USB儲存裝置 先確定系統並非正在存取資料,再拔出USB儲存裝置。
首次啟動時
1 啟動引擎開啟系統。「選取程式語言」畫面隨即出現。p 從第二次開始,顯示的畫面會視先前的條件而異。
2 觸碰語言。
3 觸碰 。「揚聲器模式設定」畫面隨即出現。
4 觸碰揚聲器模式。 標準模式
配備前後揚聲器的4揚聲器系統,或配備前後揚聲器及重低音揚聲器的6揚聲器系統。
網路模式配備高音揚聲器、中音揚聲器及重低音揚聲器的三向系統,能夠重現高、中、低頻(頻段)。
警告使用 3 路網路模式的揚聲器系統連接本裝置時,請勿在標準模式中使用本裝置。這可能會造成揚聲器受損。
5 觸碰[確認]。「智慧型手機設定」畫面隨即出現。
6 觸碰想要的項目。 請參閱 第74頁上有關各裝置連接及功能的資訊
7 觸碰 。出現最上層選單畫面。p 完成揚聲器模式設定後,除非將本產品還原為預設設定,否
則無法變更設定。還原預設設定以變更揚聲器模式設定。 請參閱 第98頁上還原預設設定
切換揚聲器模式
要變更揚聲器模式時,必須將本產品還原為預設設定。
1 還原預設設定。 請參閱 第98頁上還原預設設定
67< CRD4925-A >
基本操作 基本操作
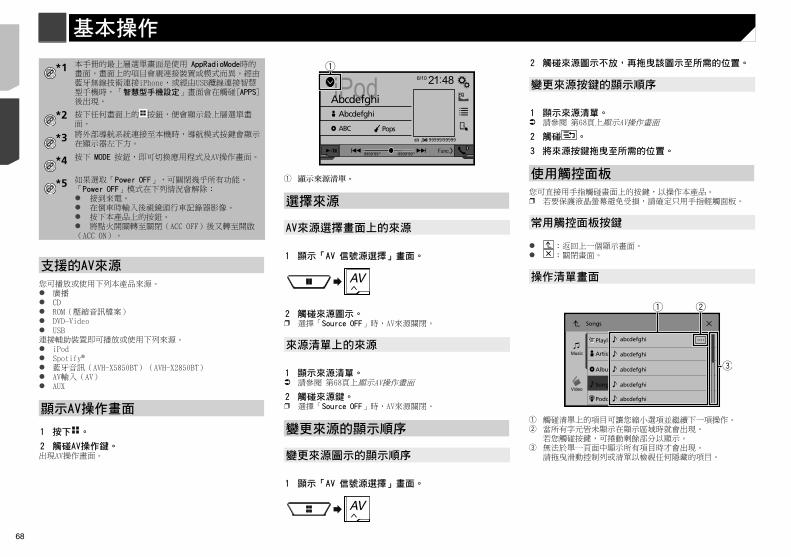
68
操作時間列
9999’99” -9999’99”
1
1 您可拖曳按鍵變更播放時間點。p 對應按鍵位置的播放時間會在拖曳按鍵時顯示。
切換操作面板
1 觸碰 。出現隱藏的功能按鍵。p 某些AV 來源不會出現此按鍵。
*1 本手冊的最上層選單畫面是使用 AppRadioMode時的畫面。畫面上的項目會視連接裝置或模式而異。經由藍牙無線技術連接iPhone,或經由USB纜線連接智慧型手機時,「智慧型手機設定」畫面會在觸碰[APPS]後出現。
*2 按下任何畫面上的 按鈕,便會顯示最上層選單畫面。
*3 將外部導航系統連接至本機時,導航模式按鍵會顯示在顯示器左下方。
*4 按下 MODE 按鈕,即可切換應用程式及AV操作畫面。
*5 如果選取「Power OFF」,可關閉幾乎所有功能。「Power OFF」模式在下列情況會解除: 接到來電。 在倒車時輸入後視鏡頭行車記錄器影像。 按下本產品上的按鈕。 將點火開關轉至關閉(ACC OFF)後又轉至開啟(ACC ON)。
支援的AV來源
您可播放或使用下列本產品來源。 廣播 CD ROM(壓縮音訊檔案) DVD-Video USB連接輔助裝置即可播放或使用下列來源。 iPod Spotify®
藍牙音訊(AVH-X5850BT)(AVH-X2850BT) AV輸入(AV) AUX
顯示AV操作畫面
1 按下 。
2 觸碰AV操作鍵。出現AV操作畫面。
iPod 4821
AbcdefghiAbcdefghi
ABC Pops99999/99999
9999’99” -9999’99”
6/10
1
1 顯示來源清單。
選擇來源
AV來源選擇畫面上的來源
1 顯示「AV 信號源選擇」畫面。
2 觸碰來源圖示。p 選擇「Source OFF」時,AV來源關閉。
來源清單上的來源
1 顯示來源清單。 請參閱 第68頁上顯示AV操作畫面
2 觸碰來源鍵。p 選擇「Source OFF」時,AV來源關閉。
變更來源的顯示順序
變更來源圖示的顯示順序
1 顯示「AV 信號源選擇」畫面。
2 觸碰來源圖示不放,再拖曳該圖示至所需的位置。
變更來源按鍵的顯示順序
1 顯示來源清單。 請參閱 第68頁上顯示AV操作畫面
2 觸碰 。
3 將來源按鍵拖曳至所需的位置。
使用觸控面板
您可直接用手指觸碰畫面上的按鍵,以操作本產品。p 若要保護液晶螢幕避免受損,請確定只用手指輕觸面板。
常用觸控面板按鍵
:返回上一個顯示畫面。 :關閉畫面。
操作清單畫面
Playlist
Music
Video
Artist
Alburm
Songs
Podcast
Songs
abcdefghi
abcdefghi
abcdefghi
abcdefghi
abcdefghi
1 2
3
1 觸碰清單上的項目可讓您縮小選項並繼續下一項操作。2 當所有字元皆未顯示在顯示區域時就會出現。
若您觸碰按鍵,可捲動剩餘部分以顯示。3 無法於單一頁面中顯示所有項目時才會出現。
請拖曳滑動控制列或清單以檢視任何隱藏的項目。
68 < CRD4925-A >< CRD4925-A >
基本操作 基本操作
69
操作時間列
9999’99” -9999’99”
1
1 您可拖曳按鍵變更播放時間點。p 對應按鍵位置的播放時間會在拖曳按鍵時顯示。
切換操作面板
1 觸碰 。出現隱藏的功能按鍵。p 某些AV 來源不會出現此按鍵。
X5850BT X2850BT
顯示「藍牙」畫面
1 按下 。
2 依序觸碰 、 。「藍牙」畫面隨即出現。
登錄您的藍牙裝置
p 若已經配對三部裝置,即顯示「記憶體已滿」。請先刪除已配對的裝置。
請參閱 第69頁上刪除已登錄的裝置
1 啟動您裝置上的藍牙無線技術。
2 顯示「藍牙」畫面。 請參閱 第69頁上顯示「藍牙」畫面
3 觸碰[連接]。
4 觸碰 。系統會搜尋等待連線的藍牙裝置,若找到裝置則會在清單中顯示。
5 觸碰藍牙裝置名稱。裝置登錄成功後,系統就會建立藍牙連線。建立連線後,裝置名稱便會顯示在清單上。p 若您的裝置支援SSP(安全簡易配對),本產品顯示器上就
會出現六位數數字。觸碰[是]配對裝置。p 亦可使用藍牙裝置偵測本產品,以建立藍牙連線。登錄之
前,請先確定「可見性」(位於「藍牙」選單中)已設為「開啟」。有關藍牙裝置操作的詳細資訊,請參閱藍牙裝置隨附的操作說明。 請參閱 第69頁上切換可視性
p 本產品可同時連接兩支行動電話。 請參閱 第70頁上切換已連接的藍牙裝置
p 若您在兩支行動電話已連接的情況下嘗試連接一支未連接的行動電話,已連接的兩支行動電話中的第一支將中斷連接,並被未連接的行動電話取代進行連接。
設定藍牙裝置自動連線
此功能可在兩部裝置彼此距離幾公尺時,自動將上次連線的藍牙裝置連線至本產品。預設設定為「開啟」。p 若兩個藍牙裝置在上次已進行過連接,這兩個裝置將會依登
錄在裝置清單中的順序自動與本產品連接。
1 顯示「藍牙」畫面。
請參閱 第69頁上顯示「藍牙」畫面
2 觸碰[自動連接]來切換「開啟」或「關閉」。
刪除已登錄的裝置
注意切勿在刪除已配對藍牙裝置時關閉本產品。
1 顯示「藍牙」畫面。 請參閱 第69頁上顯示「藍牙」畫面
2 觸碰[連接]。
3 觸碰 。
手動連接登錄的藍牙裝置
在下列情況下手動連接藍牙裝置: 已登錄兩部以上的藍牙裝置,且您想手動選擇要使用的裝
置。 您想重新連接已中斷的藍牙裝置。 因某些因素無法自動建立連線。
1 啟動您裝置上的藍牙無線技術。
2 顯示「藍牙」畫面。 請參閱 第69頁上顯示「藍牙」畫面
3 觸碰[連接]。
4 觸碰您要連接的裝置名稱。p 若要中止連接裝置,請觸碰清單中已連接裝置的名稱。
切換可視性
此功能可設定是否讓其他裝置也能看見本產品。預設設定為「開啟」。
1 顯示「藍牙」畫面。 請參閱 第69頁上顯示「藍牙」畫面
2 觸碰[可見性]來切換「開啟」或「關閉」。
輸入藍牙無線連線的PIN碼
若要將藍牙裝置連線至本產品,您必須輸入PIN碼。您可以透過此功能變更PIN碼。p 預設PIN碼為「0000」。
1 顯示「藍牙」畫面。 請參閱 第69頁上顯示「藍牙」畫面
2 觸碰[PIN碼輸入]。
登錄及連接Bluetooth®裝置
2 觸碰來源圖示不放,再拖曳該圖示至所需的位置。
變更來源按鍵的顯示順序
1 顯示來源清單。 請參閱 第68頁上顯示AV操作畫面
2 觸碰 。
3 將來源按鍵拖曳至所需的位置。
使用觸控面板
您可直接用手指觸碰畫面上的按鍵,以操作本產品。p 若要保護液晶螢幕避免受損,請確定只用手指輕觸面板。
常用觸控面板按鍵
:返回上一個顯示畫面。 :關閉畫面。
操作清單畫面
Playlist
Music
Video
Artist
Alburm
Songs
Podcast
Songs
abcdefghi
abcdefghi
abcdefghi
abcdefghi
abcdefghi
1 2
3
1 觸碰清單上的項目可讓您縮小選項並繼續下一項操作。2 當所有字元皆未顯示在顯示區域時就會出現。
若您觸碰按鍵,可捲動剩餘部分以顯示。3 無法於單一頁面中顯示所有項目時才會出現。
請拖曳滑動控制列或清單以檢視任何隱藏的項目。
69< CRD4925-A >
基本操作 基本操作 登錄及連接Bluetooth®裝置
70
若要使用此功能,您必須事先透過藍牙功能將行動電話連接至本產品。 請參閱 第69頁上登錄及連接Bluetooth®裝置
顯示電話選單畫面
1 按下 。
2 觸碰 。出現電話選單畫面。
撥打電話
您可使用各種不同的方式撥打電話。
直接撥號
1 顯示「電話菜單」畫面。 請參閱 第71頁上顯示電話選單畫面
2 觸碰 。
3 觸碰數字鍵即可輸入電話號碼。
4 觸碰 可撥打電話。
5 觸碰 可結束通話。p 掛斷電話時您可能會聽見雜訊。
撥打電話簿中的號碼
p 電話上的聯絡人會自動轉移至本產品。p 需要開啟「可見性」(於「藍牙」畫面)。 請參閱 第69頁上切換可視性
p 若兩支行動電話已透過藍牙裝置的自動連接功能連接至本產品,將顯示第二支行動電話中的電話簿。
1 顯示「電話菜單」畫面。 請參閱 第71頁上顯示電話選單畫面
2 觸碰 。
3 觸碰清單上所需的姓名。
4 觸碰電話號碼。出現撥號畫面並開始撥號。
5 觸碰 可結束通話。
3 觸碰[0]至[9]輸入PIN碼(最多 8 位數)。
4 觸碰 。
顯示裝置資訊
1 顯示「藍牙」畫面。 請參閱 第69頁上顯示「藍牙」畫面
2 觸碰[設備資訊]。隨即顯示本產品上的藍牙裝置名稱與位址。
清除藍牙記憶
p 此設定只有在您停妥車輛至安全位置並拉起/踩踏手煞車時才能使用。
注意清除藍牙記憶時,切勿關閉本產品電源。
1 顯示「藍牙」畫面。 請參閱 第69頁上顯示「藍牙」畫面
2 觸碰[清除藍牙記憶]。
3 觸碰[清除]。確認畫面出現。
更新藍牙軟體
此功能可將本產品的藍牙軟體更新成最新版。有關藍牙軟體及更新的詳細資訊,請參閱本公司網站。p 在處理程序開始前來源會關閉且藍牙連線會中斷。p 此設定只有在您停妥車輛至安全位置並拉起/踩踏手煞車時
才能使用。p 您必須事先將版本升級檔案儲存至USB儲存裝置。
注意更新軟體時,切勿關閉本產品電源及中斷電話連線。
1 將儲存版本升級檔案的USB儲存裝置連接至本機。 請參閱 第66頁上插入及拔除USB儲存裝置
2 顯示「藍牙」畫面。 請參閱 第69頁上顯示「藍牙」畫面
3 觸碰[藍牙軟體更新]。
4 觸碰[開始]。請依照畫面上的指示完成藍牙軟體更新。
顯示藍牙軟體版本
若本產品無法正常運作,請您向經銷商洽詢維修事宜。
在此情況下,請執行下列程序,查看本機的軟體版本。
1 顯示「藍牙」畫面。 請參閱 第69頁上顯示「藍牙」畫面
2 觸碰[藍牙版本資訊]。出現本產品的藍牙模組版本。
切換已連接的藍牙裝置
登錄及連接藍牙裝置至本產品後,您可以使用電話功能和一些音訊來源的切換裝置按鍵在裝置之間切換。p 您可以在本產品上登錄最多三個藍牙裝置。 請參閱 第69頁上登錄您的藍牙裝置
p 您可以將所登錄的其中一個藍牙裝置連接到本產品。若登錄的裝置配備有電話功能,則使用電話功能,可同時連接總共兩個裝置。在三個登錄的裝置中若有兩個已連接,您只能在音訊來源畫面中的切換裝置按鍵連接剩下的第三個裝置使用音訊功能。
p 目前在使用中的行動電話圖示會顯示在「電話菜單」畫面上。如果同時在本產品連接了兩支行動電話,可以透過切換裝置按鍵切換使用行動電話。系統會為每支已連接的行動電話記住電話選單的內容。 請參閱 第70頁上免持聽話
p 切換裝置按鍵會出現供某些音訊來源使用。視所選取的裝置而定,音訊來源會自動切換到其他來源。
X5850BT X2850BT
Phone Book
abcdefghi
abcdefghi
abcdefghi
abcdefghi
abcdefghi
ABC
A
B
C
D
E
F
G
3abcdefghi...
*2
*3
*1
*4
*5
*6
*1 切換至預設撥號畫面。 請參閱 第71頁上使用預設撥號清單
*2 切換至電話簿清單。 請參閱 第71頁上撥打電話簿中的號碼
*3 切換未接、已接和已撥電話清單。 請參閱 第71頁上從通話記錄中撥號
*4 切換模式以直接輸入電話號碼。 請參閱 第71頁上直接撥號
*5 切換為語音辨識功能(適用於iPhone)。 請參閱 第72頁上使用語音辨識功能(適用於iPhone)
*6 如果同時在本產品連接了兩支行動電話,可以透過切換裝置按鍵切換使用行動電話。以下項目會顯示在按鍵上。 目前行動電話的名稱 目前行動電話的清單編號 目前行動電話的電池狀態 目前行動電話的收訊狀態 請參閱 第70頁上切換已連接的藍牙裝置
注意為了您的安全起見,請盡可能避免在駕駛時使用電話交談。
免持聽話
70 < CRD4925-A >< CRD4925-A >
登錄及連接Bluetooth®裝置 免持聽話 免持聽話
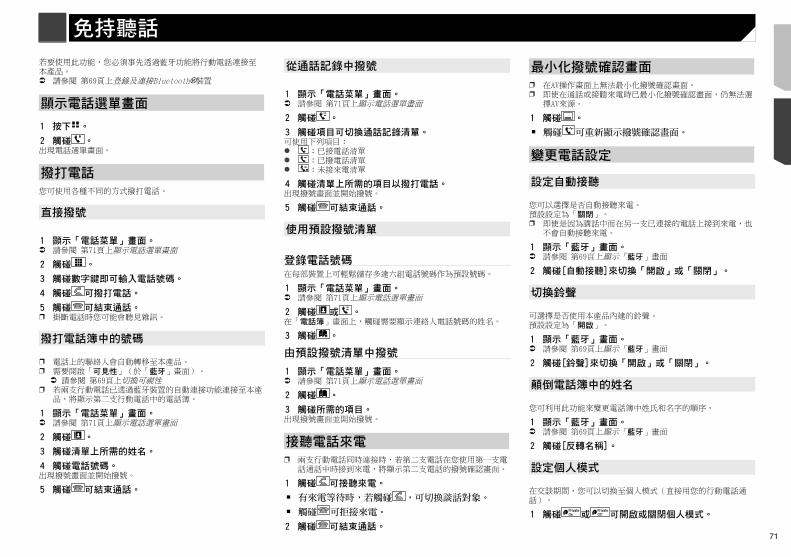
71
若要使用此功能,您必須事先透過藍牙功能將行動電話連接至本產品。 請參閱 第69頁上登錄及連接Bluetooth®裝置
顯示電話選單畫面
1 按下 。
2 觸碰 。出現電話選單畫面。
撥打電話
您可使用各種不同的方式撥打電話。
直接撥號
1 顯示「電話菜單」畫面。 請參閱 第71頁上顯示電話選單畫面
2 觸碰 。
3 觸碰數字鍵即可輸入電話號碼。
4 觸碰 可撥打電話。
5 觸碰 可結束通話。p 掛斷電話時您可能會聽見雜訊。
撥打電話簿中的號碼
p 電話上的聯絡人會自動轉移至本產品。p 需要開啟「可見性」(於「藍牙」畫面)。 請參閱 第69頁上切換可視性
p 若兩支行動電話已透過藍牙裝置的自動連接功能連接至本產品,將顯示第二支行動電話中的電話簿。
1 顯示「電話菜單」畫面。 請參閱 第71頁上顯示電話選單畫面
2 觸碰 。
3 觸碰清單上所需的姓名。
4 觸碰電話號碼。出現撥號畫面並開始撥號。
5 觸碰 可結束通話。
從通話記錄中撥號
1 顯示「電話菜單」畫面。 請參閱 第71頁上顯示電話選單畫面
2 觸碰 。
3 觸碰項目可切換通話記錄清單。可使用下列項目: :已接電話清單 :已撥電話清單 :未接來電清單
4 觸碰清單上所需的項目以撥打電話。出現撥號畫面並開始撥號。
5 觸碰 可結束通話。
使用預設撥號清單
登錄電話號碼在每部裝置上可輕鬆儲存多達六組電話號碼作為預設號碼。
1 顯示「電話菜單」畫面。 請參閱 第71頁上顯示電話選單畫面
2 觸碰 或 。在「電話簿」畫面上,觸碰需要顯示連絡人電話號碼的姓名。
3 觸碰 。
由預設撥號清單中撥號
1 顯示「電話菜單」畫面。 請參閱 第71頁上顯示電話選單畫面
2 觸碰 。
3 觸碰所需的項目。出現撥號畫面並開始撥號。
接聽電話來電
p 兩支行動電話同時連接時,若第二支電話在您使用第一支電話通話中時接到來電,將顯示第二支電話的撥號確認畫面。
1 觸碰 可接聽來電。
有來電等待時,若觸碰 ,可切換談話對象。
觸碰 可拒接來電。
2 觸碰 可結束通話。
最小化撥號確認畫面
p 在AV操作畫面上無法最小化撥號確認畫面。p 即使在通話或接聽來電時已最小化撥號確認畫面,仍無法選
擇AV來源。
1 觸碰 。
觸碰 可重新顯示撥號確認畫面。
變更電話設定
設定自動接聽
您可以選擇是否自動接聽來電。預設設定為「關閉」。p 即使是因為講話中而在另一支已連接的電話上接到來電,也
不會自動接聽來電。
1 顯示「藍牙」畫面。 請參閱 第69頁上顯示「藍牙」畫面
2 觸碰[自動接聽]來切換「開啟」或「關閉」。
切換鈴聲
可選擇是否使用本產品內建的鈴聲。預設設定為「開啟」。
1 顯示「藍牙」畫面。 請參閱 第69頁上顯示「藍牙」畫面
2 觸碰[鈴聲]來切換「開啟」或「關閉」。
顛倒電話簿中的姓名
您可利用此功能來變更電話簿中姓氏和名字的順序。
1 顯示「藍牙」畫面。 請參閱 第69頁上顯示「藍牙」畫面
2 觸碰[反轉名稱]。
設定個人模式
在交談期間,您可以切換至個人模式(直接用您的行動電話通話)。
1 觸碰 或 可開啟或關閉個人模式。
X5850BT X2850BT
Phone Book
abcdefghi
abcdefghi
abcdefghi
abcdefghi
abcdefghi
ABC
A
B
C
D
E
F
G
3abcdefghi...
*2
*3
*1
*4
*5
*6
*1 切換至預設撥號畫面。 請參閱 第71頁上使用預設撥號清單
*2 切換至電話簿清單。 請參閱 第71頁上撥打電話簿中的號碼
*3 切換未接、已接和已撥電話清單。 請參閱 第71頁上從通話記錄中撥號
*4 切換模式以直接輸入電話號碼。 請參閱 第71頁上直接撥號
*5 切換為語音辨識功能(適用於iPhone)。 請參閱 第72頁上使用語音辨識功能(適用於iPhone)
*6 如果同時在本產品連接了兩支行動電話,可以透過切換裝置按鍵切換使用行動電話。以下項目會顯示在按鍵上。 目前行動電話的名稱 目前行動電話的清單編號 目前行動電話的電池狀態 目前行動電話的收訊狀態 請參閱 第70頁上切換已連接的藍牙裝置
注意為了您的安全起見,請盡可能避免在駕駛時使用電話交談。
免持聽話
71< CRD4925-A >
免持聽話 免持聽話
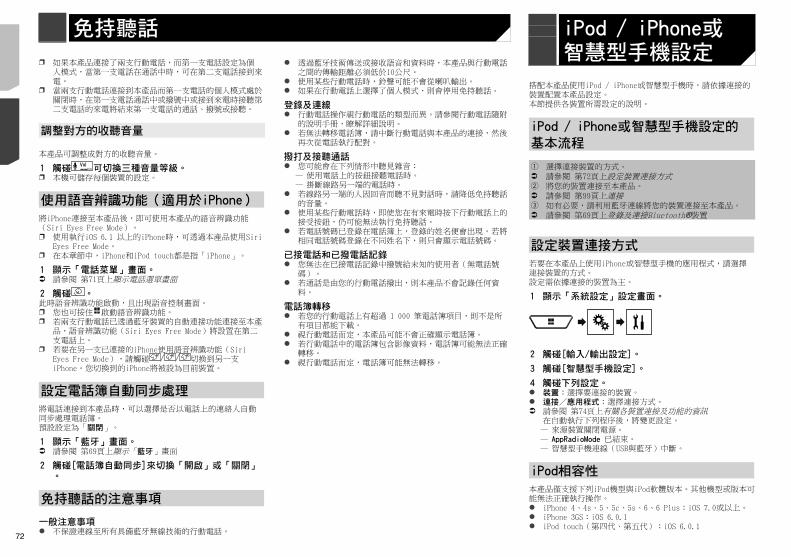
72
iPod touch(第三代):iOS 5.1.1 iPod touch(第二代):iOS 4.2.1 iPod classic 160GB (2009):版本 2.0.4 iPod classic 160GB (2008):版本 2.0.1 iPod classic 80GB:版本 1.1.2 iPod nano(第七代) iPod nano(第六代):版本 1.2 iPod nano(第五代):版本 1.0.2 iPod nano(第四代):版本 1.0.4 iPod nano(第三代):版本 1.1.3p 您無法使用另售的接頭纜線連接及控制相容本產品的iPod。p 操作方式視iPod機型和軟體版本而異。p 視iPod的軟體版本而定,iPod有可能不相容本產品。有關iPod與本產品之間的相容性資訊,請參閱我們網站上的資訊。本手冊可適用於下列iPod機型。有30針接腳的iPod iPhone 3GS、4、4s 第二、三、四代iPod touch iPod classic 80GB、160GB 第三、四、五、六代iPod nano有Lightning接頭的iPod iPhone 6、6 Plus iPhone 5、5c、5s 第五代iPod touch 第七代iPod nano
Android™ 裝置相容性
p 操作方式視Android裝置和Android OS的軟體版本而異。p 視Android OS的版本而定,有可能不會與本產品相容。p 不保證與所有Android裝置的相容性。有關Android裝置與本產品之間的相容性資訊,請參閱我們網站上的資訊。
p 如果本產品連接了兩支行動電話,而第一支電話設定為個人模式,當第一支電話在通話中時,可在第二支電話接到來電。
p 當兩支行動電話連接到本產品而第一支電話的個人模式處於關閉時,在第一支電話通話中或撥號中或接到來電時接聽第二支電話的來電將結束第一支電話的通話、撥號或接聽。
調整對方的收聽音量
本產品可調整成對方的收聽音量。
1 觸碰 可切換三種音量等級。p 本機可儲存每個裝置的設定。
使用語音辨識功能(適用於iPhone)
將iPhone連接至本產品後,即可使用本產品的語音辨識功能(Siri Eyes Free Mode)。p 使用執行iOS 6.1 以上的iPhone時,可透過本產品使用Siri
Eyes Free Mode。p 在本章節中,iPhone和iPod touch都是指「iPhone」。
1 顯示「電話菜單」畫面。 請參閱 第71頁上顯示電話選單畫面
2 觸碰 。此時語音辨識功能啟動,且出現語音控制畫面。p 您也可按住 啟動語音辨識功能。p 若兩支行動電話已透過藍牙裝置的自動連接功能連接至本產
品,語音辨識功能(Siri Eyes Free Mode)將設置在第二支電話上。
p 若要在另一支已連接的iPhone使用語音辨識功能(Siri Eyes Free Mode),請觸碰
1 2 3
切換到另一支iPhone。您切換到的iPhone將被設為目前裝置。
設定電話簿自動同步處理
將電話連接到本產品時,可以選擇是否以電話上的連絡人自動同步處理電話簿。預設設定為「關閉」。
1 顯示「藍牙」畫面。 請參閱 第69頁上顯示「藍牙」畫面
2 觸碰[電話簿自動同步]來切換「開啟」或「關閉」。
免持聽話的注意事項
一般注意事項 不保證連線至所有具備藍牙無線技術的行動電話。
透過藍牙技術傳送或接收語音和資料時,本產品與行動電話之間的傳輸距離必須低於10公尺。
使用某些行動電話時,鈴聲可能不會從喇叭輸出。 如果在行動電話上選擇了個人模式,則會停用免持聽話。
登錄及連線 行動電話操作視行動電話的類型而異。請參閱行動電話隨附
的說明手冊,瞭解詳細說明。 若無法轉移電話簿,請中斷行動電話與本產品的連接,然後
再次從電話執行配對。
撥打及接聽通話 您可能會在下列情形中聽見雜音:
— 使用電話上的按鈕接聽電話時。— 掛斷線路另一端的電話時。
若線路另一端的人因回音而聽不見對話時,請降低免持聽話的音量。
使用某些行動電話時,即使您在有來電時按下行動電話上的接受按鈕,仍可能無法執行免持聽話。
若電話號碼已登錄在電話簿上,登錄的姓名便會出現。若將相同電話號碼登錄在不同姓名下,則只會顯示電話號碼。
已接電話和已撥電話記錄 您無法在已接電話記錄中撥號給未知的使用者(無電話號
碼)。 若通話是由您的行動電話撥出,則本產品不會記錄任何資
料。
電話簿轉移 若您的行動電話上有超過 1 000 筆電話簿項目,則不是所
有項目都能下載。 視行動電話而定,本產品可能不會正確顯示電話簿。 若行動電話中的電話簿包含影像資料,電話簿可能無法正確
轉移。 視行動電話而定,電話簿可能無法轉移。
搭配本產品使用iPod / iPhone或智慧型手機時,請依據連接的裝置配置本產品設定。本節提供各裝置所需設定的說明。
iPod / iPhone或智慧型手機設定的基本流程
1 選擇連接裝置的方式。 請參閱 第72頁上設定裝置連接方式2 將您的裝置連接至本產品。 請參閱 第99頁上連接3 如有必要,請利用藍牙連線將您的裝置連接至本產品。 請參閱 第69頁上登錄及連接Bluetooth®裝置
設定裝置連接方式
若要在本產品上使用iPhone或智慧型手機的應用程式,請選擇連接裝置的方式。設定需依據連接的裝置為主。
1 顯示「系統設定」設定畫面。
2 觸碰[輸入/輸出設定]。
3 觸碰[智慧型手機設定]。
4 觸碰下列設定。 裝置:選擇要連接的裝置。 連接/應用程式:選擇連接方式。 請參閱 第74頁上有關各裝置連接及功能的資訊
在自動執行下列程序後,將變更設定。— 來源裝置關閉電源。— AppRadioMode 已結束。— 智慧型手機連線(USB與藍牙)中斷。
iPod相容性
本產品僅支援下列iPod機型與iPod軟體版本。其他機型或版本可能無法正確執行操作。 iPhone 4、4s、5、5c、5s、6、6 Plus:iOS 7.0或以上。 iPhone 3GS:iOS 6.0.1 iPod touch(第四代、第五代):iOS 6.0.1
iPod / iPhone或智慧型手機設定
72 < CRD4925-A >< CRD4925-A >
免持聽話 iPod / iPhone或智慧型手機設定
iPod / iPhone或智慧型手機設定
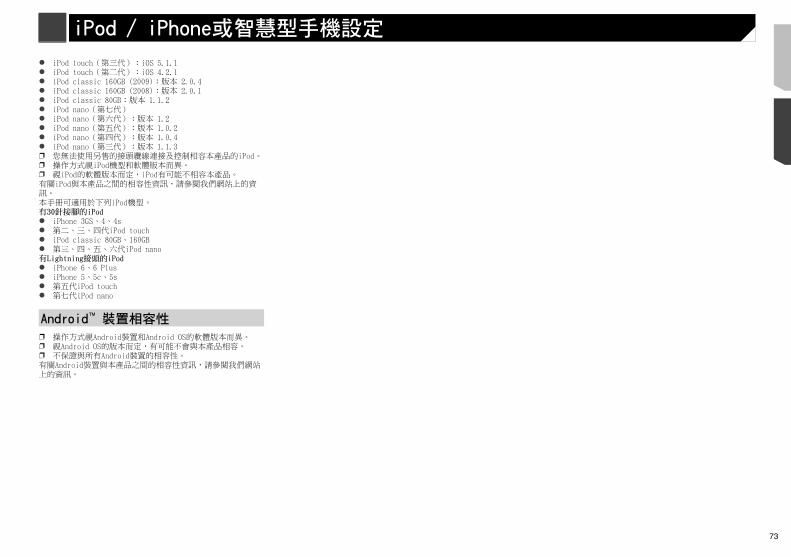
73
iPod touch(第三代):iOS 5.1.1 iPod touch(第二代):iOS 4.2.1 iPod classic 160GB (2009):版本 2.0.4 iPod classic 160GB (2008):版本 2.0.1 iPod classic 80GB:版本 1.1.2 iPod nano(第七代) iPod nano(第六代):版本 1.2 iPod nano(第五代):版本 1.0.2 iPod nano(第四代):版本 1.0.4 iPod nano(第三代):版本 1.1.3p 您無法使用另售的接頭纜線連接及控制相容本產品的iPod。p 操作方式視iPod機型和軟體版本而異。p 視iPod的軟體版本而定,iPod有可能不相容本產品。有關iPod與本產品之間的相容性資訊,請參閱我們網站上的資訊。本手冊可適用於下列iPod機型。有30針接腳的iPod iPhone 3GS、4、4s 第二、三、四代iPod touch iPod classic 80GB、160GB 第三、四、五、六代iPod nano有Lightning接頭的iPod iPhone 6、6 Plus iPhone 5、5c、5s 第五代iPod touch 第七代iPod nano
Android™ 裝置相容性
p 操作方式視Android裝置和Android OS的軟體版本而異。p 視Android OS的版本而定,有可能不會與本產品相容。p 不保證與所有Android裝置的相容性。有關Android裝置與本產品之間的相容性資訊,請參閱我們網站上的資訊。
搭配本產品使用iPod / iPhone或智慧型手機時,請依據連接的裝置配置本產品設定。本節提供各裝置所需設定的說明。
iPod / iPhone或智慧型手機設定的基本流程
1 選擇連接裝置的方式。 請參閱 第72頁上設定裝置連接方式2 將您的裝置連接至本產品。 請參閱 第99頁上連接3 如有必要,請利用藍牙連線將您的裝置連接至本產品。 請參閱 第69頁上登錄及連接Bluetooth®裝置
設定裝置連接方式
若要在本產品上使用iPhone或智慧型手機的應用程式,請選擇連接裝置的方式。設定需依據連接的裝置為主。
1 顯示「系統設定」設定畫面。
2 觸碰[輸入/輸出設定]。
3 觸碰[智慧型手機設定]。
4 觸碰下列設定。 裝置:選擇要連接的裝置。 連接/應用程式:選擇連接方式。 請參閱 第74頁上有關各裝置連接及功能的資訊
在自動執行下列程序後,將變更設定。— 來源裝置關閉電源。— AppRadioMode 已結束。— 智慧型手機連線(USB與藍牙)中斷。
iPod相容性
本產品僅支援下列iPod機型與iPod軟體版本。其他機型或版本可能無法正確執行操作。 iPhone 4、4s、5、5c、5s、6、6 Plus:iOS 7.0或以上。 iPhone 3GS:iOS 6.0.1 iPod touch(第四代、第五代):iOS 6.0.1
iPod / iPhone或智慧型手機設定
73< CRD4925-A >
iPod / iPhone或智慧型手機設定
iPod / iPhone或智慧型手機設定
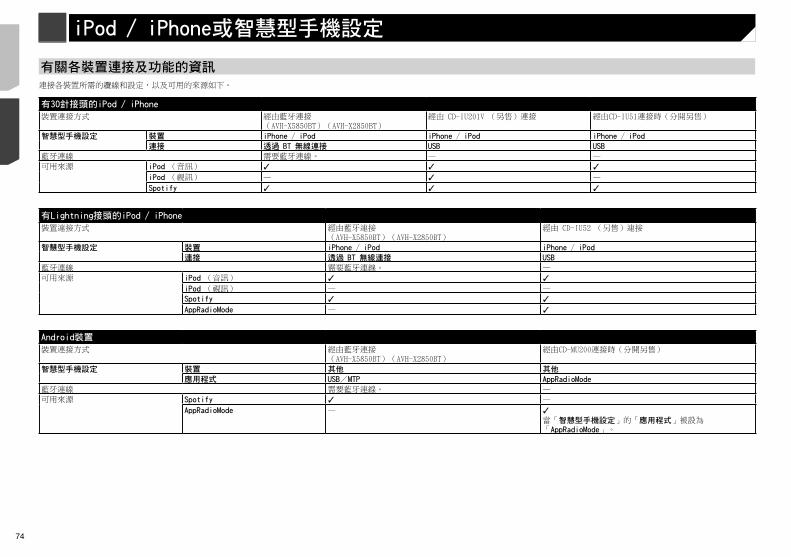
74
Radio 4821 123456
6/10
AMFM1
AbcdefghiAbcdefghi
000.00MHz
Abcdefghi
選擇 FM1、FM2、FM3或 AM頻段。
進行手動調諧。
進行搜索調諧或不間斷搜索調諧。
幾秒鐘後釋放該按鈕,從當前頻率跳至最近電臺。按住該按鈕幾秒鐘後,進行不間斷搜索調諧。
顯示預設頻道清單。從清單中選擇一個項目(「1」至「6」),切換到預設頻道。
從內存中調用存儲到一個按鈕中的預設頻道。
將當前廣播頻率存儲到一個按鈕。
HOLD
HOLD
依PTY資訊搜尋廣播。 請參閱 第75頁上依PTY資訊搜尋
p 按下 或 ,亦可切換預設頻道。p 按住 或 再放開,亦可搜尋調頻。p 持續按住 或 ,可不斷搜尋調頻。再觸碰一次即可取
消。
開始程序
1 顯示「AV 信號源選擇」畫面。
廣播
有關各裝置連接及功能的資訊
連接各裝置所需的纜線和設定,以及可用的來源如下。
有30針接頭的iPod / iPhone
裝置連接方式 經由藍牙連接(AVH-X5850BT)(AVH-X2850BT)
經由 CD-IU201V (另售)連接 經由CD-IU51連接時(分開另售)
智慧型手機設定 裝置 iPhone / iPod iPhone / iPod iPhone / iPod
連接 透過 BT 無線連接 USB USB
藍牙連線 需要藍牙連線。 — —
可用來源 iPod (音訊) iPod (視訊) — —
Spotify
有Lightning接頭的iPod / iPhone
裝置連接方式 經由藍牙連接(AVH-X5850BT)(AVH-X2850BT)
經由 CD-IU52 (另售)連接
智慧型手機設定 裝置 iPhone / iPod iPhone / iPod
連接 透過 BT 無線連接 USB
藍牙連線 需要藍牙連線。 —
可用來源 iPod (音訊) iPod (視訊) — —
Spotify AppRadioMode —
Android裝置
裝置連接方式 經由藍牙連接(AVH-X5850BT)(AVH-X2850BT)
經由CD-MU200連接時(分開另售)
智慧型手機設定 裝置 其他 其他
應用程式 USB/MTP AppRadioMode
藍牙連線 需要藍牙連線。 —
可用來源 Spotify —
AppRadioMode — 當「智慧型手機設定」的「應用程式」被設為「AppRadioMode」。
74 < CRD4925-A >< CRD4925-A >
iPod / iPhone或智慧型手機設定 廣播
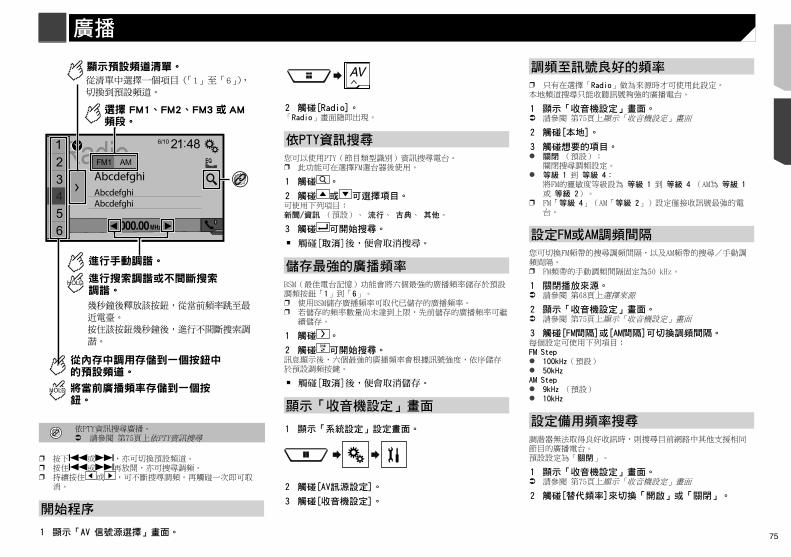
75
Radio 4821 123456
6/10
AMFM1
AbcdefghiAbcdefghi
000.00MHz
Abcdefghi
選擇 FM1、FM2、FM3或 AM頻段。
進行手動調諧。
進行搜索調諧或不間斷搜索調諧。
幾秒鐘後釋放該按鈕,從當前頻率跳至最近電臺。按住該按鈕幾秒鐘後,進行不間斷搜索調諧。
顯示預設頻道清單。從清單中選擇一個項目(「1」至「6」),切換到預設頻道。
從內存中調用存儲到一個按鈕中的預設頻道。
將當前廣播頻率存儲到一個按鈕。
HOLD
HOLD
依PTY資訊搜尋廣播。 請參閱 第75頁上依PTY資訊搜尋
p 按下 或 ,亦可切換預設頻道。p 按住 或 再放開,亦可搜尋調頻。p 持續按住 或 ,可不斷搜尋調頻。再觸碰一次即可取
消。
開始程序
1 顯示「AV 信號源選擇」畫面。
2 觸碰[Radio]。「Radio」畫面隨即出現。
依PTY資訊搜尋
您可以使用PTY(節目類型識別)資訊搜尋電台。p 此功能可在選擇FM選台器後使用。
1 觸碰 。
2 觸碰 或 可選擇項目。可使用下列項目:新聞/資訊 (預設)、 流行、 古典、 其他。
3 觸碰 可開始搜尋。
觸碰[取消]後,便會取消搜尋。
儲存最強的廣播頻率
BSM(最佳電台記憶)功能會將六個最強的廣播頻率儲存於預設調頻按鈕「1」到「6」。p 使用BSM儲存廣播頻率可取代已儲存的廣播頻率。p 若儲存的頻率數量尚未達到上限,先前儲存的廣播頻率可繼
續儲存。
1 觸碰 。
2 觸碰 可開始搜尋。訊息顯示後,六個最強的廣播頻率會根據訊號強度,依序儲存於預設調頻按鍵。
觸碰[取消]後,便會取消儲存。
顯示「收音機設定」畫面
1 顯示「系統設定」設定畫面。
2 觸碰[AV訊源設定]。
3 觸碰[收音機設定]。
調頻至訊號良好的頻率
p 只有在選擇「Radio」做為來源時才可使用此設定。本地頻道搜尋只能收聽訊號夠強的廣播電台。
1 顯示「收音機設定」畫面。 請參閱 第75頁上顯示「收音機設定」畫面
2 觸碰[本地]。
3 觸碰想要的項目。 關閉 (預設):
關閉搜尋調頻設定。 等級 1 到 等級 4:
將FM的靈敏度等級設為 等級 1 到 等級 4 (AM為 等級 1 或 等級 2)。
p FM「等級 4」(AM「等級 2」)設定僅接收訊號最強的電台。
設定FM或AM調頻間隔
您可切換FM頻帶的搜尋調頻間隔,以及AM頻帶的搜尋/手動調頻間隔。p FM頻帶的手動調頻間隔固定為50 kHz。
1 關閉播放來源。 請參閱 第68頁上選擇來源
2 顯示「收音機設定」畫面。 請參閱 第75頁上顯示「收音機設定」畫面
3 觸碰[FM間隔]或[AM間隔]可切換調頻間隔。每個設定可使用下列項目:FM Step 100kHz(預設) 50kHzAM Step 9kHz (預設) 10kHz
設定備用頻率搜尋
調諧器無法取得良好收訊時,則搜尋目前網路中其他支援相同節目的廣播電台。預設設定為「關閉」。
1 顯示「收音機設定」畫面。 請參閱 第75頁上顯示「收音機設定」畫面
2 觸碰[替代頻率]來切換「開啟」或「關閉」。
廣播
有關各裝置連接及功能的資訊
連接各裝置所需的纜線和設定,以及可用的來源如下。
有30針接頭的iPod / iPhone
裝置連接方式 經由藍牙連接(AVH-X5850BT)(AVH-X2850BT)
經由 CD-IU201V (另售)連接 經由CD-IU51連接時(分開另售)
智慧型手機設定 裝置 iPhone / iPod iPhone / iPod iPhone / iPod
連接 透過 BT 無線連接 USB USB
藍牙連線 需要藍牙連線。 — —
可用來源 iPod (音訊) iPod (視訊) — —
Spotify
有Lightning接頭的iPod / iPhone
裝置連接方式 經由藍牙連接(AVH-X5850BT)(AVH-X2850BT)
經由 CD-IU52 (另售)連接
智慧型手機設定 裝置 iPhone / iPod iPhone / iPod
連接 透過 BT 無線連接 USB
藍牙連線 需要藍牙連線。 —
可用來源 iPod (音訊) iPod (視訊) — —
Spotify AppRadioMode —
Android裝置
裝置連接方式 經由藍牙連接(AVH-X5850BT)(AVH-X2850BT)
經由CD-MU200連接時(分開另售)
智慧型手機設定 裝置 其他 其他
應用程式 USB/MTP AppRadioMode
藍牙連線 需要藍牙連線。 —
可用來源 Spotify —
AppRadioMode — 當「智慧型手機設定」的「應用程式」被設為「AppRadioMode」。
75< CRD4925-A >
iPod / iPhone或智慧型手機設定 廣播
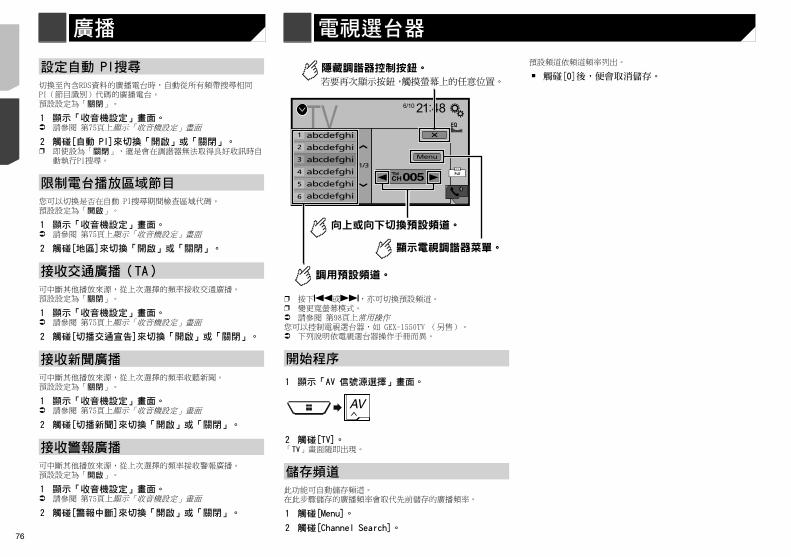
76
CD 4821
Track 99
9999’99” -9999’99”Pause
6/10
*1
*2
CD 4821
Track 99
6/10
碟片
設定自動 PI搜尋
切換至內含RDS資料的廣播電台時,自動從所有頻帶搜尋相同PI(節目識別)代碼的廣播電台。預設設定為「關閉」。
1 顯示「收音機設定」畫面。 請參閱 第75頁上顯示「收音機設定」畫面
2 觸碰[自動 PI]來切換「開啟」或「關閉」。p 即使設為「關閉」,還是會在調諧器無法取得良好收訊時自
動執行PI搜尋。
限制電台播放區域節目
您可以切換是否在自動 PI搜尋期間檢查區域代碼。預設設定為「開啟」。
1 顯示「收音機設定」畫面。 請參閱 第75頁上顯示「收音機設定」畫面
2 觸碰[地區]來切換「開啟」或「關閉」。
接收交通廣播(TA)
可中斷其他播放來源,從上次選擇的頻率接收交通廣播。預設設定為「關閉」。
1 顯示「收音機設定」畫面。 請參閱 第75頁上顯示「收音機設定」畫面
2 觸碰[切播交通宣告]來切換「開啟」或「關閉」。
接收新聞廣播
可中斷其他播放來源,從上次選擇的頻率收聽新聞。預設設定為「關閉」。
1 顯示「收音機設定」畫面。 請參閱 第75頁上顯示「收音機設定」畫面
2 觸碰[切播新聞]來切換「開啟」或「關閉」。
接收警報廣播
可中斷其他播放來源,從上次選擇的頻率接收警報廣播。預設設定為「開啟」。
1 顯示「收音機設定」畫面。 請參閱 第75頁上顯示「收音機設定」畫面
2 觸碰[警報中斷]來切換「開啟」或「關閉」。
TV005CH
Full
4821 6/10
abcdefghi
abcdefghi
abcdefghi
abcdefghi
abcdefghi
abcdefghi
1/3Menu
1
2
3
4
5
6
向上或向下切換預設頻道。
隱藏調諧器控制按鈕。若要再次顯示按鈕,觸摸螢幕上的任意位置。
調用預設頻道。
顯示電視調諧器菜單。
p 按下 或 ,亦可切換預設頻道。p 變更寬螢幕模式。 請參閱 第98頁上常用操作您可以控制電視選台器,如 GEX-1550TV (另售)。 下列說明依電視選台器操作手冊而異。
開始程序
1 顯示「AV 信號源選擇」畫面。
2 觸碰[TV]。「TV」畫面隨即出現。
儲存頻道
此功能可自動儲存頻道。在此步驟儲存的廣播頻率會取代先前儲存的廣播頻率。
1 觸碰[Menu]。
2 觸碰[Channel Search]。
預設頻道依頻道頻率列出。
觸碰[0]後,便會取消儲存。
電視選台器
76 < CRD4925-A >< CRD4925-A >
廣播 電視選台器 碟片
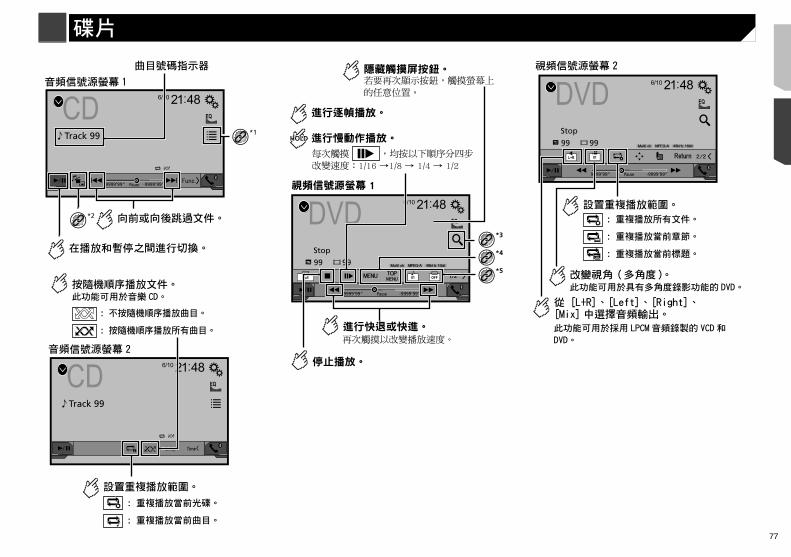
77
CD 4821
Track 99
9999’99” -9999’99”Pause
6/10
*1
*2
CD 4821
Track 99
6/10
DVD 4821
Stop
99 99
9999’99” -9999’99”
OFFFull 01
Pause
6/10
視頻信號源螢幕 1
*5
進行快退或快進。再次觸摸以改變播放速度。
停止播放。
*4
*3
進行逐幀播放。
HOLD 進行慢動作播放。
每次觸摸 ,均按以下順序分四步改變速度:1/16 →1/8 → 1/4 → 1/2
隱藏觸摸屏按鈕。若要再次顯示按鈕,觸摸螢幕上的任意位置。 DVD 4821
Stop
99 99
9999’99” -9999’99”
01L+R
Pause
6/10
碟片
預設頻道依頻道頻率列出。
觸碰[0]後,便會取消儲存。
77< CRD4925-A >
電視選台器 碟片

78
USB 4821 6/10
AbcdefghiAbcdefghi
ABC R&B
9999’99” -9999’99”
*3
*4
1 USB
*1
*2
壓縮檔案
DVD 4821
Stop
99 99
9999’99” -9999’99”
01L+R
Pause
6/10
*6
*1 選擇清單中的曲目。 請參閱 第78頁上從檔案名稱清單中選擇檔案
*2 切換媒體檔案類型。 請參閱 第78頁上切換媒體檔類型
*3 搜尋要播放的部分。 請參閱 第78頁上搜尋要播放的部分
*4 顯示DVD選單。 請參閱 第78頁上操作DVD選單
*5 切換字幕/音訊語言。 請參閱 第78頁上切換字幕/音訊語言
*6 顯示DVD選單鍵盤。 請參閱 第78頁上使用觸控面板按鍵操作DVD選單
p 按下 或 ,亦可向前或向後略過檔案/章節。p 按住 或 ,亦可快倒或快進。p 若正在播放開啟PBC的VCD,則 出現。
p 您可為視訊影像設定螢幕大小。 請參閱 第98頁上常用操作
開始程序
您可利用本產品的內建光碟機播放一般音樂CD、VCD或DVD-Video。
注意基於安全考量,行車時,無法觀看視訊影像。若要觀看視訊影像,請停在安全位置並拉起/踩踏手煞車。
1 放入碟片。此時來源會變更,然後將開始播放。 請參閱 第66頁上插入及退出碟片p 放入光碟後,選擇[Disc]作為播放來源。
從檔案名稱清單中選擇檔案
1 觸碰 。
2 觸碰清單上的曲目以播放。
切換媒體檔類型
播放含有多種媒體檔類型的數位媒體時,可切換要播放的媒體檔類型。
1 觸碰 。
2 觸碰想要的項目。 Music:
切換媒體檔案類型為音樂(壓縮音訊)。 Video:
切換媒體檔類型為視訊。 CD-DA:
切換媒體檔案類型為CD(音訊資料(CD-DA))。
搜尋要播放的部分
p 使用DVD-Video時,可選擇[Title]、[Chapter]或[10Key]。p 使用VCD時,可選擇[Track]或[10Key](僅限PBC)。
1 觸碰 。
2 觸碰項目以選擇搜尋功能。
3 觸碰[0]至[9]輸入所需的數字。p 若要取消輸入的數字,請觸碰[C]。
4 觸碰 可從已登錄的數字開始播放。
操作DVD選單
您可直接觸碰畫面上的選單項目操作DVD選單。p 使用特定DVD光碟內容時,此功能可能無法正常運作。此
時,請使用觸控面板按鍵操作DVD選單。
1 觸碰 或 。
2 觸碰所需的選單項目。
切換字幕/音訊語言
1 觸碰 或 可變更語言。 :變更字幕語言。 :變更音訊語言。p 若要切換字幕/音訊語言,也可以使用「DVD/DivX 設定」
選單。 請參閱 第96頁上設定第一優先語言
使用觸控面板按鍵操作DVD選單
DVD選單上的項目出現時,觸控面板按鍵會與項目重疊。此時,請使用觸控面板按鍵選擇項目。
1 觸碰 。
2 觸碰 、 、 或 可選擇所需的選單項目。
3 觸碰 。p 播放選單的方法視碟片而異。
若觸碰 ,即可直接操作DVD選單。
78 < CRD4925-A >< CRD4925-A >
碟片 壓縮檔案
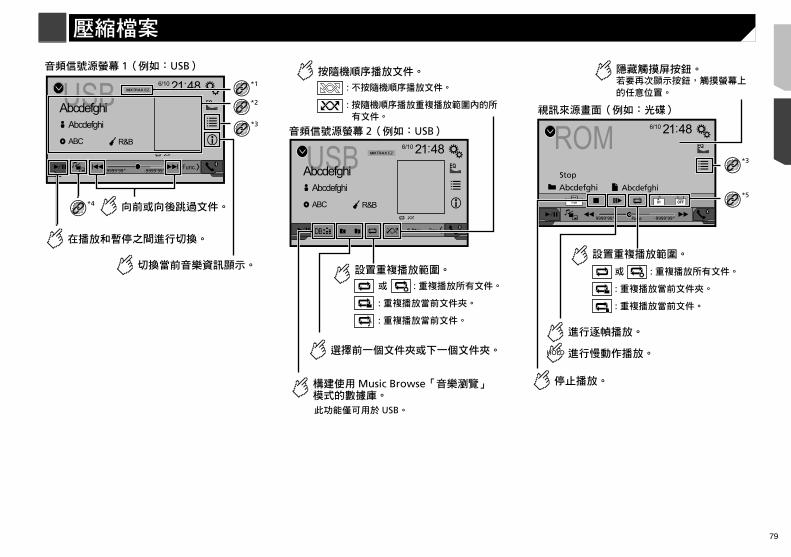
79
USB 4821 6/10
AbcdefghiAbcdefghi
ABC R&B
9999’99” -9999’99”
*3
*4
1 USB
*1
*2
USB 4821 6/10
AbcdefghiAbcdefghi
ABC R&B
DB
:
:
:
:
:
2 USB
Music Browse
USB
ROM 4821
Stop
9999’99” -9999’99”
OFFFull 01
Pause
6/10
Abcdefghi Abcdefghi*5
*3
:
:
:
HOLD
壓縮檔案
操作DVD選單
您可直接觸碰畫面上的選單項目操作DVD選單。p 使用特定DVD光碟內容時,此功能可能無法正常運作。此
時,請使用觸控面板按鍵操作DVD選單。
1 觸碰 或 。
2 觸碰所需的選單項目。
切換字幕/音訊語言
1 觸碰 或 可變更語言。 :變更字幕語言。 :變更音訊語言。p 若要切換字幕/音訊語言,也可以使用「DVD/DivX 設定」
選單。 請參閱 第96頁上設定第一優先語言
使用觸控面板按鍵操作DVD選單
DVD選單上的項目出現時,觸控面板按鍵會與項目重疊。此時,請使用觸控面板按鍵選擇項目。
1 觸碰 。
2 觸碰 、 、 或 可選擇所需的選單項目。
3 觸碰 。p 播放選單的方法視碟片而異。
若觸碰 ,即可直接操作DVD選單。
79< CRD4925-A >
碟片 壓縮檔案
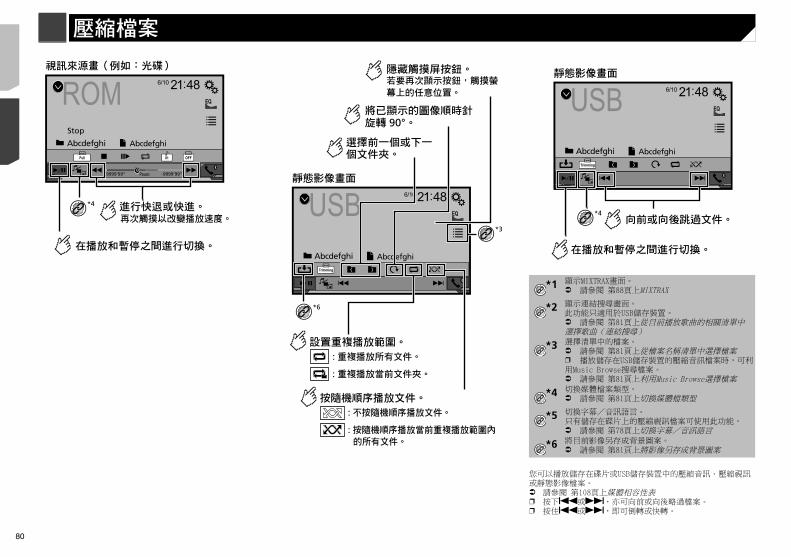
80
p 在靜態影像檔案上按住 或 ,可一次搜尋10個JPEG檔案。若目前播放的檔案是資料夾中的第一個或最後一個檔案,則不會執行搜尋。
p JPEG影像皆不會顯示在後側顯示器上。p 您可為視訊及JPEG影像設定螢幕大小。 請參閱 第98頁上常用操作
注意基於安全考量,行車時,無法觀看視訊影像。若要觀看視訊影像,請停在安全位置並拉起/踩踏手煞車。
開始程序(適用碟片)
1 放入碟片。此時來源會變更,然後將開始播放。 請參閱 第66頁上插入及退出碟片p 放入碟片後,選擇[Disc]作為播放來源。
開始程序(適用USB)
1 顯示「AV 信號源選擇」畫面。
2 插入USB儲存裝置。 請參閱 第66頁上插入及拔除USB儲存裝置
3 觸碰[USB]。p 依資料夾編號順序播放。若資料夾內沒有可播放檔案,則會
略過。
所有檔案類型通用的操作
從檔案名稱清單中選擇檔案
您可以利用檔案名稱或資料夾名稱清單,尋找檔案或資料夾。
1 觸碰 。
2 觸碰清單上的檔案進行播放。p 觸碰清單上的資料夾顯示其內容。 您可觸碰清單上的檔案
進行播放。
ROM 4821
Stop
9999’99” -9999’99”
OFFFull 01
Pause
6/10
Abcdefghi Abcdefghi
*4 USB 4821
Abcdefghi Abcdefghi
6/10
Trimming
*3
*6
:
:
:
:
90°USB 4821
Abcdefghi Abcdefghi
6/10
Trimming
*4
*1 顯示MIXTRAX畫面。 請參閱 第88頁上MIXTRAX
*2 顯示連結搜尋畫面。此功能只適用於USB儲存裝置。 請參閱 第81頁上從目前播放歌曲的相關清單中選擇歌曲(連結搜尋)
*3 選擇清單中的檔案。 請參閱 第81頁上從檔案名稱清單中選擇檔案p 播放儲存在USB儲存裝置的壓縮音訊檔案時,可利用Music Browse搜尋檔案。 請參閱 第81頁上利用Music Browse選擇檔案
*4 切換媒體檔案類型。 請參閱 第81頁上切換媒體檔類型
*5 切換字幕/音訊語言。只有儲存在碟片上的壓縮視訊檔案可使用此功能。 請參閱 第78頁上切換字幕/音訊語言
*6 將目前影像另存成背景圖案。 請參閱 第81頁上將影像另存成背景圖案
您可以播放儲存在碟片或USB儲存裝置中的壓縮音訊、壓縮視訊或靜態影像檔案。 請參閱 第108頁上媒體相容性表p 按下 或 ,亦可向前或向後略過檔案。p 按住 或 ,即可倒轉或快轉。
80 < CRD4925-A >< CRD4925-A >
壓縮檔案 壓縮檔案
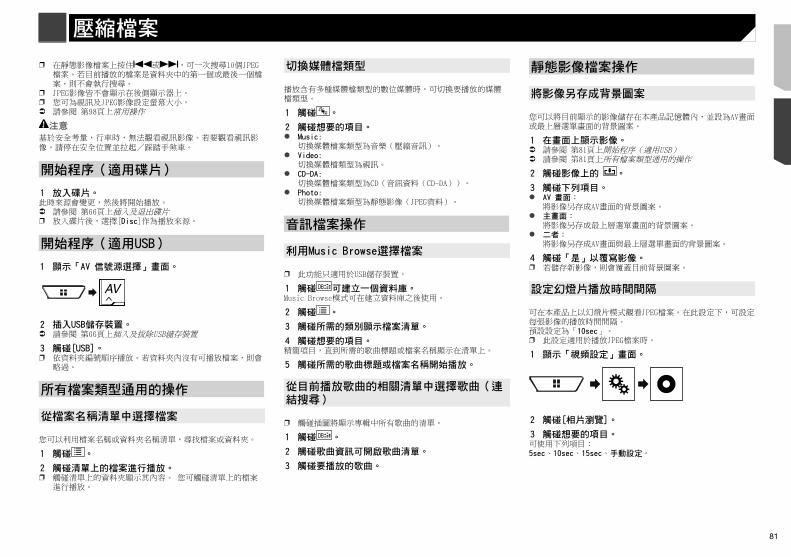
81
p 在靜態影像檔案上按住 或 ,可一次搜尋10個JPEG檔案。若目前播放的檔案是資料夾中的第一個或最後一個檔案,則不會執行搜尋。
p JPEG影像皆不會顯示在後側顯示器上。p 您可為視訊及JPEG影像設定螢幕大小。 請參閱 第98頁上常用操作
注意基於安全考量,行車時,無法觀看視訊影像。若要觀看視訊影像,請停在安全位置並拉起/踩踏手煞車。
開始程序(適用碟片)
1 放入碟片。此時來源會變更,然後將開始播放。 請參閱 第66頁上插入及退出碟片p 放入碟片後,選擇[Disc]作為播放來源。
開始程序(適用USB)
1 顯示「AV 信號源選擇」畫面。
2 插入USB儲存裝置。 請參閱 第66頁上插入及拔除USB儲存裝置
3 觸碰[USB]。p 依資料夾編號順序播放。若資料夾內沒有可播放檔案,則會
略過。
所有檔案類型通用的操作
從檔案名稱清單中選擇檔案
您可以利用檔案名稱或資料夾名稱清單,尋找檔案或資料夾。
1 觸碰 。
2 觸碰清單上的檔案進行播放。p 觸碰清單上的資料夾顯示其內容。 您可觸碰清單上的檔案
進行播放。
切換媒體檔類型
播放含有多種媒體檔類型的數位媒體時,可切換要播放的媒體檔類型。
1 觸碰 。
2 觸碰想要的項目。 Music:
切換媒體檔案類型為音樂(壓縮音訊)。 Video:
切換媒體檔類型為視訊。 CD-DA:
切換媒體檔案類型為CD(音訊資料(CD-DA))。 Photo:
切換媒體檔案類型為靜態影像(JPEG資料)。
音訊檔案操作
利用Music Browse選擇檔案
p 此功能只適用於USB儲存裝置。
1 觸碰 DB 可建立一個資料庫。Music Browse模式可在建立資料庫之後使用。
2 觸碰 。
3 觸碰所需的類別顯示檔案清單。
4 觸碰想要的項目。精簡項目,直到所需的歌曲標題或檔案名稱顯示在清單上。
5 觸碰所需的歌曲標題或檔案名稱開始播放。
從目前播放歌曲的相關清單中選擇歌曲(連結搜尋)
p 觸碰插圖將顯示專輯中所有歌曲的清單。
1 觸碰 DB 。
2 觸碰歌曲資訊可開啟歌曲清單。
3 觸碰要播放的歌曲。
靜態影像檔案操作
將影像另存成背景圖案
您可以將目前顯示的影像儲存在本產品記憶體內,並設為AV畫面或最上層選單畫面的背景圖案。
1 在畫面上顯示影像。 請參閱 第81頁上開始程序(適用USB) 請參閱 第81頁上所有檔案類型通用的操作
2 觸碰影像上的 。
3 觸碰下列項目。 AV 畫面:
將影像另存成AV畫面的背景圖案。 主畫面:
將影像另存成最上層選單畫面的背景圖案。 二者:
將影像另存成AV畫面與最上層選單畫面的背景圖案。
4 觸碰「是」以覆寫影像。p 若儲存新影像,則會覆蓋目前背景圖案。
設定幻燈片播放時間間隔
可在本產品上以幻燈片模式觀看JPEG檔案。在此設定下,可設定每張影像的播放時間間隔。預設設定為「10sec」。p 此設定適用於播放JPEG檔案時。
1 顯示「視頻設定」畫面。
2 觸碰[相片瀏覽]。
3 觸碰想要的項目。可使用下列項目:5sec、10sec、15sec、手動設定。
USB 4821
Abcdefghi Abcdefghi
6/10
Trimming
*4
*1 顯示MIXTRAX畫面。 請參閱 第88頁上MIXTRAX
*2 顯示連結搜尋畫面。此功能只適用於USB儲存裝置。 請參閱 第81頁上從目前播放歌曲的相關清單中選擇歌曲(連結搜尋)
*3 選擇清單中的檔案。 請參閱 第81頁上從檔案名稱清單中選擇檔案p 播放儲存在USB儲存裝置的壓縮音訊檔案時,可利用Music Browse搜尋檔案。 請參閱 第81頁上利用Music Browse選擇檔案
*4 切換媒體檔案類型。 請參閱 第81頁上切換媒體檔類型
*5 切換字幕/音訊語言。只有儲存在碟片上的壓縮視訊檔案可使用此功能。 請參閱 第78頁上切換字幕/音訊語言
*6 將目前影像另存成背景圖案。 請參閱 第81頁上將影像另存成背景圖案
您可以播放儲存在碟片或USB儲存裝置中的壓縮音訊、壓縮視訊或靜態影像檔案。 請參閱 第108頁上媒體相容性表p 按下 或 ,亦可向前或向後略過檔案。p 按住 或 ,即可倒轉或快轉。
81< CRD4925-A >
壓縮檔案 壓縮檔案
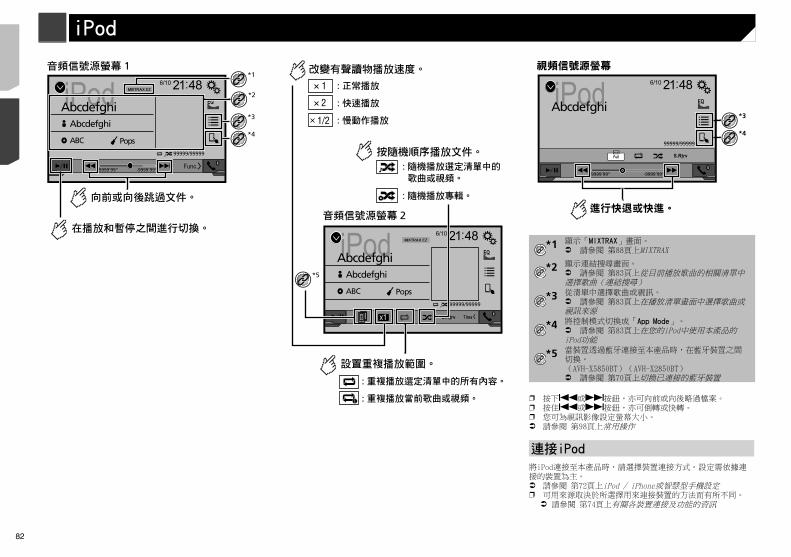
82
注意基於安全考量,行車時,無法觀看視訊影像。若要觀看視訊影像,請停在安全位置並拉起/踩踏手煞車。
開始程序
1 連接iPod。 請參閱 第82頁上連接iPod此時來源會變更,然後將開始播放。p 若連接iPhone或iPod touch,請在連接裝置之前先結束所有
應用程式。
2 顯示「AV 信號源選擇」畫面。
3 觸碰[iPod]。
在播放清單畫面中選擇歌曲或視訊來源
您可由播放清單畫面中搜尋要播放的歌曲或視訊。
1 觸碰 。
2 觸碰 或 可切換音樂或視訊類別清單。
3 觸碰類別。若選擇英文作為系統語言,也會提供字母搜尋功能。觸碰初始搜尋列以使用此功能。
4 觸碰清單標題。若找不到所需的歌曲或視訊,請試著按照上述步驟重新搜尋。
5 從所選擇的選單開始播放。p 視iPod的世代或版本而定,有些功能無法操作。p 您可以播放利用MusicSphere應用程式建立的播放清單。可
從本公司網站取得應用程式。
在您的iPod中使用本產品的iPod功能
在「App Mode」下,您可以使用iPod控制本產品的iPod功能。iPod的應用程式畫面可顯示在本產品上,音樂檔案和視訊檔案也會透過本產品播放。p 搭配iPhone 6 Plus、iPhone 6、iPhone 5s、iPhone
5c、iPhone 5或iPod touch(第五代)使用iPod功能時,無法使用此功能。
p 使用此功能時,即使關閉點火開關,iPod也不會關閉。請手動關閉iPod電源。
iPod 4821
AbcdefghiAbcdefghi
ABC Pops99999/99999
9999’99” -9999’99”
6/10
1*1
*2
*3
*4
iPod 4821
AbcdefghiAbcdefghi
ABC Pops99999/99999
6/10
x1
:
:
:
2
:
:
:
:
1
1/2
2
*5
iPod 4821
Abcdefghi
99999/99999
9999’99” -9999’99”
6/10
Full
視頻信號源螢幕
*3
*4
進行快退或快進。
*1 顯示「MIXTRAX」畫面。 請參閱 第88頁上MIXTRAX
*2 顯示連結搜尋畫面。 請參閱 第83頁上從目前播放歌曲的相關清單中選擇歌曲(連結搜尋)
*3 從清單中選擇歌曲或視訊。 請參閱 第83頁上在播放清單畫面中選擇歌曲或視訊來源
*4 將控制模式切換成「App Mode」。 請參閱 第83頁上在您的iPod中使用本產品的iPod功能
*5 當裝置透過藍牙連接至本產品時,在藍牙裝置之間切換。(AVH-X5850BT)(AVH-X2850BT) 請參閱 第70頁上切換已連接的藍牙裝置
p 按下 或 按鈕,亦可向前或向後略過檔案。p 按住 或 按鈕,亦可倒轉或快轉。p 您可為視訊影像設定螢幕大小。 請參閱 第98頁上常用操作
連接iPod
將iPod連接至本產品時,請選擇裝置連接方式。設定需依據連接的裝置為主。 請參閱 第72頁上iPod / iPhone或智慧型手機設定p 可用來源取決於所選擇用來連接裝置的方法而有所不同。 請參閱 第74頁上有關各裝置連接及功能的資訊
iPod
82 < CRD4925-A >< CRD4925-A >
iPod iPod
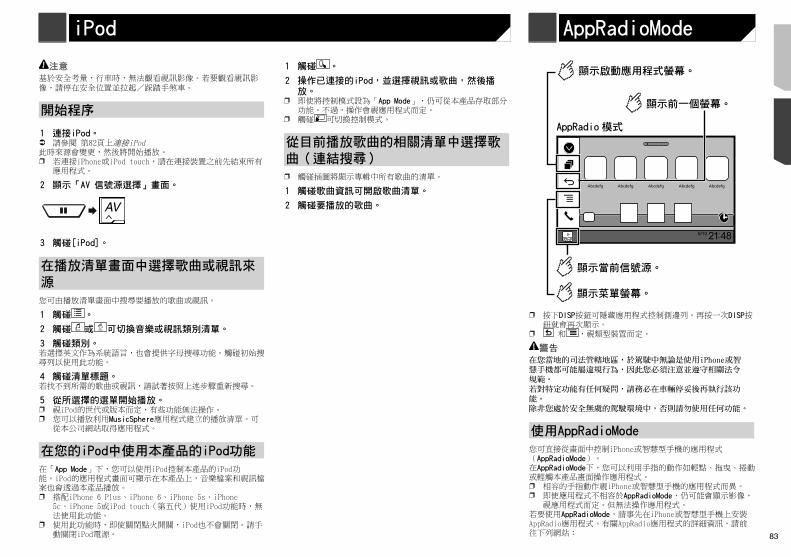
83
注意基於安全考量,行車時,無法觀看視訊影像。若要觀看視訊影像,請停在安全位置並拉起/踩踏手煞車。
開始程序
1 連接iPod。 請參閱 第82頁上連接iPod此時來源會變更,然後將開始播放。p 若連接iPhone或iPod touch,請在連接裝置之前先結束所有
應用程式。
2 顯示「AV 信號源選擇」畫面。
3 觸碰[iPod]。
在播放清單畫面中選擇歌曲或視訊來源
您可由播放清單畫面中搜尋要播放的歌曲或視訊。
1 觸碰 。
2 觸碰 或 可切換音樂或視訊類別清單。
3 觸碰類別。若選擇英文作為系統語言,也會提供字母搜尋功能。觸碰初始搜尋列以使用此功能。
4 觸碰清單標題。若找不到所需的歌曲或視訊,請試著按照上述步驟重新搜尋。
5 從所選擇的選單開始播放。p 視iPod的世代或版本而定,有些功能無法操作。p 您可以播放利用MusicSphere應用程式建立的播放清單。可
從本公司網站取得應用程式。
在您的iPod中使用本產品的iPod功能
在「App Mode」下,您可以使用iPod控制本產品的iPod功能。iPod的應用程式畫面可顯示在本產品上,音樂檔案和視訊檔案也會透過本產品播放。p 搭配iPhone 6 Plus、iPhone 6、iPhone 5s、iPhone
5c、iPhone 5或iPod touch(第五代)使用iPod功能時,無法使用此功能。
p 使用此功能時,即使關閉點火開關,iPod也不會關閉。請手動關閉iPod電源。
1 觸碰 。
2 操作已連接的iPod,並選擇視訊或歌曲,然後播放。
p 即使將控制模式設為「App Mode」,仍可從本產品存取部分功能。不過,操作會視應用程式而定。
p 觸碰 可切換控制模式。
從目前播放歌曲的相關清單中選擇歌曲(連結搜尋)
p 觸碰插圖將顯示專輯中所有歌曲的清單。
1 觸碰歌曲資訊可開啟歌曲清單。
2 觸碰要播放的歌曲。
4821
Abcdefg Abcdefg Abcdefg Abcdefg Abcdefg
6/10
p 按下DISP按鈕可隱藏應用程式控制側邊列。再按一次DISP按鈕就會再次顯示。
p 和 ,視類型裝置而定。
警告在您當地的司法管轄地區,於駕駛中無論是使用iPhone或智慧手機都可能屬違規行為,因此您必須注意並遵守相關法令規範。若對特定功能有任何疑問,請務必在車輛停妥後再執行該功能。 除非您處於安全無虞的駕駛環境中,否則請勿使用任何功能。
使用AppRadioMode
您可直接從畫面中控制iPhone或智慧型手機的應用程式(AppRadioMode)。在AppRadioMode下,您可以利用手指的動作如輕點、拖曳、捲動或輕觸本產品畫面操作應用程式。p 相容的手指動作視iPhone或智慧型手機的應用程式而異。p 即使應用程式不相容於AppRadioMode,仍可能會顯示影像,
視應用程式而定。但無法操作應用程式。若要使用AppRadioMode,請事先在iPhone或智慧型手機上安裝AppRadio應用程式。有關AppRadio應用程式的詳細資訊,請前往下列網站:
AppRadioMode
iPod 4821
Abcdefghi
99999/99999
9999’99” -9999’99”
6/10
Full
視頻信號源螢幕
*3
*4
進行快退或快進。
*1 顯示「MIXTRAX」畫面。 請參閱 第88頁上MIXTRAX
*2 顯示連結搜尋畫面。 請參閱 第83頁上從目前播放歌曲的相關清單中選擇歌曲(連結搜尋)
*3 從清單中選擇歌曲或視訊。 請參閱 第83頁上在播放清單畫面中選擇歌曲或視訊來源
*4 將控制模式切換成「App Mode」。 請參閱 第83頁上在您的iPod中使用本產品的iPod功能
*5 當裝置透過藍牙連接至本產品時,在藍牙裝置之間切換。(AVH-X5850BT)(AVH-X2850BT) 請參閱 第70頁上切換已連接的藍牙裝置
p 按下 或 按鈕,亦可向前或向後略過檔案。p 按住 或 按鈕,亦可倒轉或快轉。p 您可為視訊影像設定螢幕大小。 請參閱 第98頁上常用操作
連接iPod
將iPod連接至本產品時,請選擇裝置連接方式。設定需依據連接的裝置為主。 請參閱 第72頁上iPod / iPhone或智慧型手機設定p 可用來源取決於所選擇用來連接裝置的方法而有所不同。 請參閱 第74頁上有關各裝置連接及功能的資訊
83< CRD4925-A >
iPod iPod AppRadioMode
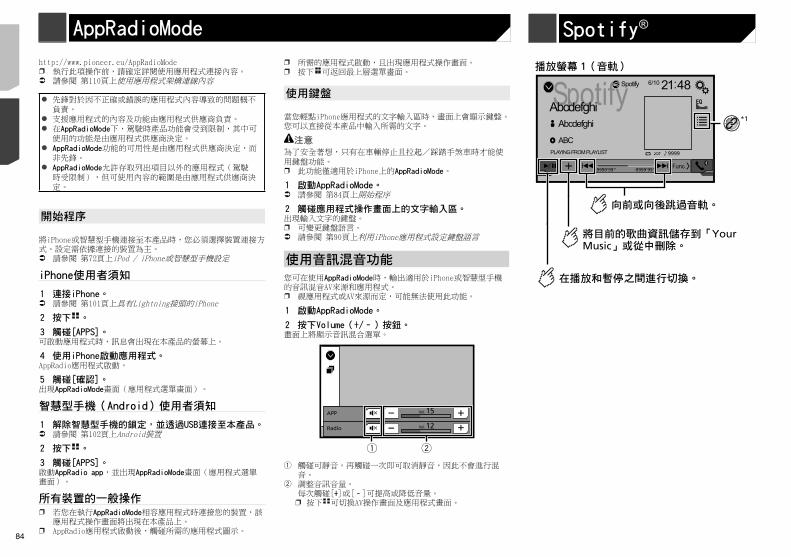
84
Spotify 4821 6/10
AbcdefghiAbcdefghi
ABCPLAYING FROM PLAYLIST
Spotify
9999
*2
PLAYING FROM PLAYLIST
Spotify
9999
2
http://www.pioneer.eu/AppRadioModep 執行此項操作前,請確定詳閱使用應用程式連接內容。 請參閱 第110頁上使用應用程式架構連線內容
先鋒對於因不正確或錯誤的應用程式內容導致的問題概不負責。
支援應用程式的內容及功能由應用程式供應商負責。 在AppRadioMode下,駕駛時產品功能會受到限制,其中可
使用的功能是由應用程式供應商決定。 AppRadioMode功能的可用性是由應用程式供應商決定,而
非先鋒。 AppRadioMode允許存取列出項目以外的應用程式(駕駛
時受限制),但可使用內容的範圍是由應用程式供應商決定。
開始程序
將iPhone或智慧型手機連接至本產品時,您必須選擇裝置連接方式。設定需依據連接的裝置為主。 請參閱 第72頁上iPod / iPhone或智慧型手機設定
iPhone使用者須知
1 連接iPhone。 請參閱 第101頁上具有Lightning接頭的iPhone
2 按下 。
3 觸碰[APPS]。可啟動應用程式時,訊息會出現在本產品的螢幕上。
4 使用iPhone啟動應用程式。AppRadio應用程式啟動。
5 觸碰[確認]。出現AppRadioMode畫面(應用程式選單畫面)。
智慧型手機(Android)使用者須知
1 解除智慧型手機的鎖定,並透過USB連接至本產品。 請參閱 第102頁上Android裝置
2 按下 。
3 觸碰[APPS]。啟動AppRadio app,並出現AppRadioMode畫面(應用程式選單畫面)。
所有裝置的一般操作p 若您在執行AppRadioMode相容應用程式時連接您的裝置,該
應用程式操作畫面將出現在本產品上。p AppRadio應用程式啟動後,觸碰所需的應用程式圖示。
p 所需的應用程式啟動,且出現應用程式操作畫面。p 按下 可返回最上層選單畫面。
使用鍵盤
當您輕點iPhone應用程式的文字輸入區時,畫面上會顯示鍵盤。您可以直接從本產品中輸入所需的文字。
注意為了安全著想,只有在車輛停止且拉起/踩踏手煞車時才能使用鍵盤功能。p 此功能僅適用於iPhone上的AppRadioMode。
1 啟動AppRadioMode。 請參閱 第84頁上開始程序
2 觸碰應用程式操作畫面上的文字輸入區。出現輸入文字的鍵盤。p 可變更鍵盤語言。 請參閱 第90頁上利用iPhone應用程式設定鍵盤語言
使用音訊混音功能
您可在使用AppRadioMode時,輸出適用於iPhone或智慧型手機的音訊混音AV來源和應用程式。p 視應用程式或AV來源而定,可能無法使用此功能。
1 啟動AppRadioMode。
2 按下Volume(+/–)按鈕。畫面上將顯示音訊混合選單。
HD Radio
15APP Vol.
12Vol. Radio
21
1 觸碰可靜音。再觸碰一次即可取消靜音,因此不會進行混音。
2 調整音訊音量。每次觸碰[+]或[–]可提高或降低音量。
p 按下 可切換AV操作畫面及應用程式畫面。
Spotify 4821 6/10
AbcdefghiAbcdefghi
ABC
9999’99” -9999’99”
Spotify
1
*1
Your Music
PLAYING FROM PLAYLIST 9999
Spotify®
84 < CRD4925-A >< CRD4925-A >
AppRadioMode Spotify® Spotify®
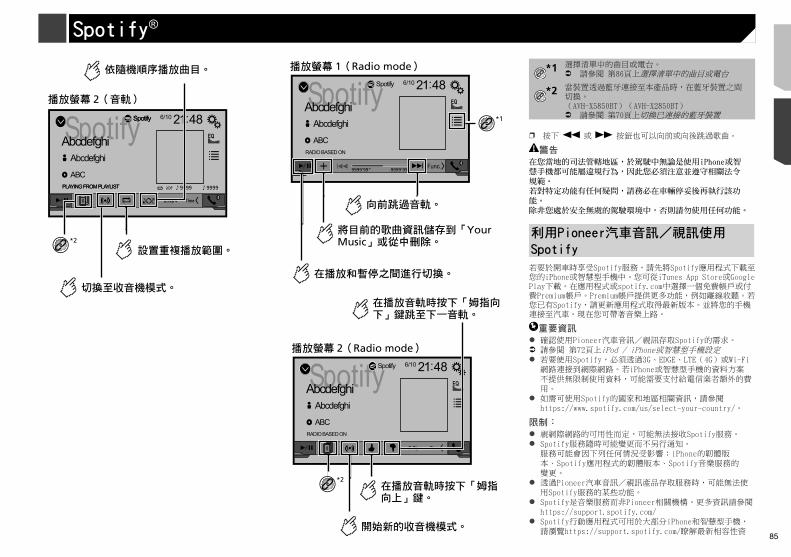
85
Spotify 4821 6/10
AbcdefghiAbcdefghi
ABCPLAYING FROM PLAYLIST
Spotify
9999
*2
PLAYING FROM PLAYLIST
Spotify
9999
2 Spotify 4821 6/10
AbcdefghiAbcdefghi
ABC
9999’99” -9999’99”
Spotify
1 Radio mode
*1
Your Music
RADIO BASED ON
Spotify 4821 6/10
AbcdefghiAbcdefghi
ABC
Spotify
RADIO BASED ON
2 Radio mode
*2
*1 選擇清單中的曲目或電台。 請參閱 第86頁上選擇清單中的曲目或電台
*2 當裝置透過藍牙連接至本產品時,在藍牙裝置之間切換。(AVH-X5850BT)(AVH-X2850BT) 請參閱 第70頁上切換已連接的藍牙裝置
p 按下 或 按鈕也可以向前或向後跳過歌曲。
警告在您當地的司法管轄地區,於駕駛中無論是使用iPhone或智慧手機都可能屬違規行為,因此您必須注意並遵守相關法令規範。若對特定功能有任何疑問,請務必在車輛停妥後再執行該功能。 除非您處於安全無虞的駕駛環境中,否則請勿使用任何功能。
利用Pioneer汽車音訊/視訊使用Spotify
若要於開車時享受Spotify服務,請先將Spotify應用程式下載至您的iPhone或智慧型手機中。您可從iTunes App Store或Google Play下載。在應用程式或spotify.com中選擇一個免費帳戶或付費Premium帳戶。Premium帳戶提供更多功能,例如離線收聽。若您已有Spotify,請更新應用程式取得最新版本。並將您的手機連接至汽車。現在您可帶著音樂上路。
重要資訊 確認使用Pioneer汽車音訊/視訊存取Spotify的需求。 請參閱 第72頁上iPod / iPhone或智慧型手機設定 若要使用Spotify,必須透過3G、EDGE、LTE(4G)或Wi-Fi
網路連接到網際網路。若iPhone或智慧型手機的資料方案不提供無限制使用資料,可能需要支付給電信業者額外的費用。
如需可使用Spotify的國家和地區相關資訊,請參閱https://www.spotify.com/us/select-your-country/。
限制: 視網際網路的可用性而定,可能無法接收Spotify服務。 Spotify服務隨時可能變更而不另行通知。
服務可能會因下列任何情況受影響:iPhone的韌體版本、Spotify應用程式的韌體版本、Spotify音樂服務的變更。
透過Pioneer汽車音訊/視訊產品存取服務時,可能無法使用Spotify服務的某些功能。
Spotify是音樂服務而非Pioneer相關機構。更多資訊請參閱 https://support.spotify.com/
Spotify行動應用程式可用於大部分iPhone和智慧型手機,請瀏覽https://support.spotify.com/瞭解最新相容性資
Spotify 4821 6/10
AbcdefghiAbcdefghi
ABC
9999’99” -9999’99”
Spotify
1
*1
Your Music
PLAYING FROM PLAYLIST 9999
Spotify®
85< CRD4925-A >
Spotify® Spotify®
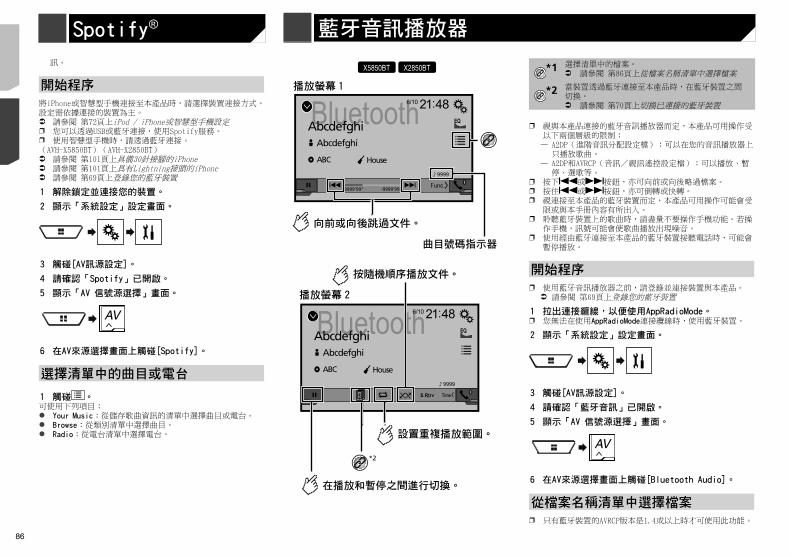
86
1 觸碰 。
2 觸碰清單上的檔案或資料夾進行播放。
訊。
開始程序
將iPhone或智慧型手機連接至本產品時,請選擇裝置連接方式。設定需依據連接的裝置為主。 請參閱 第72頁上iPod / iPhone或智慧型手機設定p 您可以透過USB或藍牙連接,使用Spotify服務。p 使用智慧型手機時,請透過藍牙連接。(AVH-X5850BT)(AVH-X2850BT) 請參閱 第101頁上具備30針接腳的iPhone 請參閱 第101頁上具有Lightning接頭的iPhone 請參閱 第69頁上登錄您的藍牙裝置
1 解除鎖定並連接您的裝置。
2 顯示「系統設定」設定畫面。
3 觸碰[AV訊源設定]。
4 請確認「Spotify」已開啟。
5 顯示「AV 信號源選擇」畫面。
6 在AV來源選擇畫面上觸碰[Spotify]。
選擇清單中的曲目或電台
1 觸碰 。可使用下列項目: Your Music:從儲存歌曲資訊的清單中選擇曲目或電台。 Browse:從類別清單中選擇曲目。 Radio:從電台清單中選擇電台。
X5850BT X2850BT
Bluetooth9999
9999’99” -9999’99”
4821 6/10
AbcdefghiAbcdefghi
ABC House
Bluetooth9999
4821 6/10
AbcdefghiAbcdefghi
ABC House
*2
*1 選擇清單中的檔案。 請參閱 第86頁上從檔案名稱清單中選擇檔案
*2 當裝置透過藍牙連接至本產品時,在藍牙裝置之間切換。 請參閱 第70頁上切換已連接的藍牙裝置
p 視與本產品連接的藍牙音訊播放器而定,本產品可用操作受以下兩個層級的限制:— A2DP(進階音訊分配設定檔):可以在您的音訊播放器上
只播放歌曲。— A2DP和AVRCP(音訊/視訊遙控設定檔):可以播放、暫
停、選歌等。p 按下 或 按鈕,亦可向前或向後略過檔案。p 按住 或 按鈕,亦可倒轉或快轉。p 視連接至本產品的藍牙裝置而定,本產品可用操作可能會受
限或與本手冊內容有所出入。p 聆聽藍牙裝置上的歌曲時,請盡量不要操作手機功能。若操
作手機,訊號可能會使歌曲播放出現噪音。p 使用經由藍牙連接至本產品的藍牙裝置接聽電話時,可能會
暫停播放。
開始程序
p 使用藍牙音訊播放器之前,請登錄並連接裝置與本產品。 請參閱 第69頁上登錄您的藍牙裝置
1 拉出連接纜線,以便使用AppRadioMode。p 您無法在使用AppRadioMode連接纜線時,使用藍牙裝置。
2 顯示「系統設定」設定畫面。
3 觸碰[AV訊源設定]。
4 請確認「藍牙音訊」已開啟。
5 顯示「AV 信號源選擇」畫面。
6 在AV來源選擇畫面上觸碰[Bluetooth Audio]。
從檔案名稱清單中選擇檔案
p 只有藍牙裝置的AVRCP版本是1.4或以上時才可使用此功能。
藍牙音訊播放器
86 < CRD4925-A >< CRD4925-A >
Spotify® 藍牙音訊播放器 藍牙音訊播放器

87
1 觸碰 。
2 觸碰清單上的檔案或資料夾進行播放。 AUX 4821
Full
6/10
p 需使用迷你插孔AV纜線(CD-RM10)(另售)進行連線。 請參閱 第102頁上外部視訊組件及顯示器
注意基於安全考量,行車時,無法觀看視訊影像。若要觀看視訊影像,請停在安全位置並拉起/踩踏手煞車。
開始程序
您可藉由將裝置連接視訊輸入,顯示視訊影像輸出。
1 顯示「系統設定」設定畫面。
2 觸碰[輸入/輸出設定]。
3 請確認「AUX 輸入」已開啟。
4 顯示「AV 信號源選擇」畫面。
5 觸碰[AUX]。影像顯示在畫面上。
設定視訊訊號
連接本產品與AUX設備時,請選擇適合的視訊訊號設定。預設設定為「自動」。
p 只有在視訊訊號輸入至AUX輸入時,才能操作此功能。
1 進入「視頻設定」畫面。
2 觸碰 [視頻信號設定]。
3 觸碰[AUX]。
4 觸碰想要的項目。可使用下列項目:自動、PAL、NTSC、PAL-M、PAL-N、SECAM。
AUX來源
*1 選擇清單中的檔案。 請參閱 第86頁上從檔案名稱清單中選擇檔案
*2 當裝置透過藍牙連接至本產品時,在藍牙裝置之間切換。 請參閱 第70頁上切換已連接的藍牙裝置
p 視與本產品連接的藍牙音訊播放器而定,本產品可用操作受以下兩個層級的限制:— A2DP(進階音訊分配設定檔):可以在您的音訊播放器上
只播放歌曲。— A2DP和AVRCP(音訊/視訊遙控設定檔):可以播放、暫
停、選歌等。p 按下 或 按鈕,亦可向前或向後略過檔案。p 按住 或 按鈕,亦可倒轉或快轉。p 視連接至本產品的藍牙裝置而定,本產品可用操作可能會受
限或與本手冊內容有所出入。p 聆聽藍牙裝置上的歌曲時,請盡量不要操作手機功能。若操
作手機,訊號可能會使歌曲播放出現噪音。p 使用經由藍牙連接至本產品的藍牙裝置接聽電話時,可能會
暫停播放。
開始程序
p 使用藍牙音訊播放器之前,請登錄並連接裝置與本產品。 請參閱 第69頁上登錄您的藍牙裝置
1 拉出連接纜線,以便使用AppRadioMode。p 您無法在使用AppRadioMode連接纜線時,使用藍牙裝置。
2 顯示「系統設定」設定畫面。
3 觸碰[AV訊源設定]。
4 請確認「藍牙音訊」已開啟。
5 顯示「AV 信號源選擇」畫面。
6 在AV來源選擇畫面上觸碰[Bluetooth Audio]。
從檔案名稱清單中選擇檔案
p 只有藍牙裝置的AVRCP版本是1.4或以上時才可使用此功能。
87< CRD4925-A >
藍牙音訊播放器 藍牙音訊播放器 AUX來源
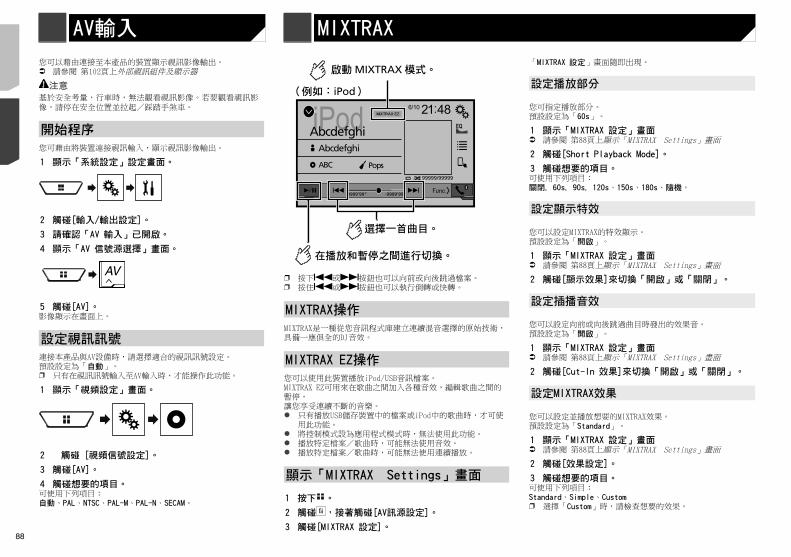
88
設定閃爍圖案
閃爍色彩會隨音量與低音位準而變化。
1 顯示「MIXTRAX 設定」畫面 請參閱 第88頁上顯示「MIXTRAX Settings」畫面
2 觸碰[閃爍模式]。
3 觸碰想要的項目。 聲音1(預設)至聲音6:
閃爍圖案隨音量而變化。請選擇想要的模式。 L-Pass1至L-Pass6:
閃爍圖案隨低音位準而變化。請選擇想要的模式。 隨機1:
閃爍圖案隨音量模式及低通模式而隨機變化。 隨機2:
閃爍圖案隨音量模式而隨機變化。 隨機3:
閃爍圖案隨低通模式而隨機變化。 關閉:
閃爍圖案不閃爍。
您可以藉由連接至本產品的裝置顯示視訊影像輸出。 請參閱 第102頁上外部視訊組件及顯示器
注意基於安全考量,行車時,無法觀看視訊影像。若要觀看視訊影像,請停在安全位置並拉起/踩踏手煞車。
開始程序
您可藉由將裝置連接視訊輸入,顯示視訊影像輸出。
1 顯示「系統設定」設定畫面。
2 觸碰[輸入/輸出設定]。
3 請確認「AV 輸入」已開啟。
4 顯示「AV 信號源選擇」畫面。
5 觸碰[AV]。影像顯示在畫面上。
設定視訊訊號
連接本產品與AV設備時,請選擇適合的視訊訊號設定。預設設定為「自動」。p 只有在視訊訊號輸入至AV輸入時,才能操作此功能。
1 顯示「視頻設定」畫面。
2 觸碰 [視頻信號設定]。
3 觸碰[AV]。
4 觸碰想要的項目。可使用下列項目:自動、PAL、NTSC、PAL-M、PAL-N、SECAM。
iPod 4821
AbcdefghiAbcdefghi
ABC Pops99999/99999
9999’99” -9999’99”
6/10
MIXTRAX
iPod
p 按下 或 按鈕也可以向前或向後跳過檔案。p 按住 或 按鈕也可以執行倒轉或快轉。
MIXTRAX操作
MIXTRAX是一種從您音訊程式庫建立連續混音選擇的原始技術,具備一應俱全的DJ音效。
MIXTRAX EZ操作
您可以使用此裝置播放iPod/USB音訊檔案。MIXTRAX EZ可用來在歌曲之間加入各種音效,編輯歌曲之間的暫停,讓您享受連續不斷的音樂。 只有播放USB儲存裝置中的檔案或iPod中的歌曲時,才可使
用此功能。 將控制模式設為應用程式模式時,無法使用此功能。 播放特定檔案/歌曲時,可能無法使用音效。 播放特定檔案/歌曲時,可能無法使用連續播放。
顯示「MIXTRAX Settings」畫面
1 按下 。
2 觸碰 ,接著觸碰[AV訊源設定]。
3 觸碰[MIXTRAX 設定]。
「MIXTRAX 設定」畫面隨即出現。
設定播放部分
您可指定播放部分。預設設定為「60s」。
1 顯示「MIXTRAX 設定」畫面 請參閱 第88頁上顯示「MIXTRAX Settings」畫面
2 觸碰[Short Playback Mode]。
3 觸碰想要的項目。可使用下列項目:關閉, 60s, 90s, 120s、150s、180s、隨機。
設定顯示特效
您可以設定MIXTRAX的特效顯示。預設設定為「開啟」。
1 顯示「MIXTRAX 設定」畫面 請參閱 第88頁上顯示「MIXTRAX Settings」畫面
2 觸碰[顯示效果]來切換「開啟」或「關閉」。
設定插播音效
您可以設定向前或向後跳過曲目時發出的效果音。預設設定為「開啟」。
1 顯示「MIXTRAX 設定」畫面 請參閱 第88頁上顯示「MIXTRAX Settings」畫面
2 觸碰[Cut-In 效果]來切換「開啟」或「關閉」。
設定MIXTRAX效果
您可以設定並播放想要的MIXTRAX效果。預設設定為「Standard」。
1 顯示「MIXTRAX 設定」畫面 請參閱 第88頁上顯示「MIXTRAX Settings」畫面
2 觸碰[效果設定]。
3 觸碰想要的項目。可使用下列項目:Standard、Simple、Customp 選擇「Custom」時,請檢查想要的效果。
AV輸入MIXTRAX
88 < CRD4925-A >< CRD4925-A >
AV輸入 MIXTRAX MIXTRAX
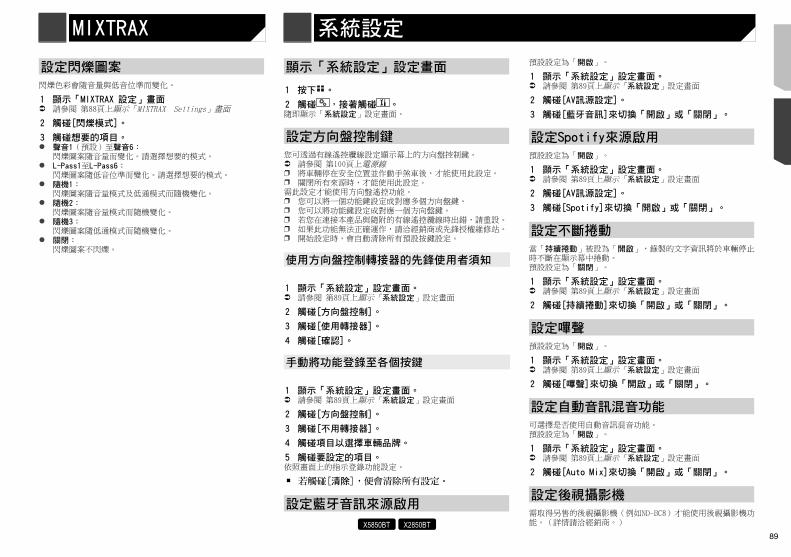
89
設定閃爍圖案
閃爍色彩會隨音量與低音位準而變化。
1 顯示「MIXTRAX 設定」畫面 請參閱 第88頁上顯示「MIXTRAX Settings」畫面
2 觸碰[閃爍模式]。
3 觸碰想要的項目。 聲音1(預設)至聲音6:
閃爍圖案隨音量而變化。請選擇想要的模式。 L-Pass1至L-Pass6:
閃爍圖案隨低音位準而變化。請選擇想要的模式。 隨機1:
閃爍圖案隨音量模式及低通模式而隨機變化。 隨機2:
閃爍圖案隨音量模式而隨機變化。 隨機3:
閃爍圖案隨低通模式而隨機變化。 關閉:
閃爍圖案不閃爍。
顯示「系統設定」設定畫面
1 按下 。
2 觸碰 ,接著觸碰 。隨即顯示「系統設定」設定畫面。
設定方向盤控制鍵
您可透過有線遙控纜線設定顯示幕上的方向盤控制鍵。 請參閱 第100頁上電源線p 將車輛停在安全位置並作動手煞車後,才能使用此設定。p 關閉所有來源時,才能使用此設定。需此設定才能使用方向盤遙控功能。p 您可以將一個功能鍵設定成對應多個方向盤鍵。p 您可以將功能鍵設定成對應一個方向盤鍵。p 若您在連接本產品與隨附的有線遙控纜線時出錯,請重設。p 如果此功能無法正確運作,請洽經銷商或先鋒授權維修站。p 開始設定時,會自動清除所有預設按鍵設定。
使用方向盤控制轉接器的先鋒使用者須知
1 顯示「系統設定」設定畫面。 請參閱 第89頁上顯示「系統設定」設定畫面
2 觸碰[方向盤控制]。
3 觸碰[使用轉接器]。
4 觸碰[確認]。
手動將功能登錄至各個按鍵
1 顯示「系統設定」設定畫面。 請參閱 第89頁上顯示「系統設定」設定畫面
2 觸碰[方向盤控制]。
3 觸碰[不用轉接器]。
4 觸碰項目以選擇車輛品牌。
5 觸碰要設定的項目。依照畫面上的指示登錄功能設定。
若觸碰[清除],便會清除所有設定。
設定藍牙音訊來源啟用
X5850BT X2850BT
預設設定為「開啟」。
1 顯示「系統設定」設定畫面。 請參閱 第89頁上顯示「系統設定」設定畫面
2 觸碰[AV訊源設定]。
3 觸碰[藍牙音訊]來切換「開啟」或「關閉」。
設定Spotify來源啟用
預設設定為「開啟」。
1 顯示「系統設定」設定畫面。 請參閱 第89頁上顯示「系統設定」設定畫面
2 觸碰[AV訊源設定]。
3 觸碰[Spotify]來切換「開啟」或「關閉」。
設定不斷捲動
當「持續捲動」被設為「開啟」,錄製的文字資訊將於車輛停止時不斷在顯示幕中捲動。預設設定為「關閉」。
1 顯示「系統設定」設定畫面。 請參閱 第89頁上顯示「系統設定」設定畫面
2 觸碰[持續捲動]來切換「開啟」或「關閉」。
設定嗶聲
預設設定為「開啟」。
1 顯示「系統設定」設定畫面。 請參閱 第89頁上顯示「系統設定」設定畫面
2 觸碰[嗶聲]來切換「開啟」或「關閉」。
設定自動音訊混音功能
可選擇是否使用自動音訊混音功能。預設設定為「開啟」。
1 顯示「系統設定」設定畫面。 請參閱 第89頁上顯示「系統設定」設定畫面
2 觸碰[Auto Mix]來切換「開啟」或「關閉」。
設定後視攝影機
需取得另售的後視攝影機(例如ND-BC8)才能使用後視攝影機功能。(詳情請洽經銷商。)
系統設定
「MIXTRAX 設定」畫面隨即出現。
設定播放部分
您可指定播放部分。預設設定為「60s」。
1 顯示「MIXTRAX 設定」畫面 請參閱 第88頁上顯示「MIXTRAX Settings」畫面
2 觸碰[Short Playback Mode]。
3 觸碰想要的項目。可使用下列項目:關閉, 60s, 90s, 120s、150s、180s、隨機。
設定顯示特效
您可以設定MIXTRAX的特效顯示。預設設定為「開啟」。
1 顯示「MIXTRAX 設定」畫面 請參閱 第88頁上顯示「MIXTRAX Settings」畫面
2 觸碰[顯示效果]來切換「開啟」或「關閉」。
設定插播音效
您可以設定向前或向後跳過曲目時發出的效果音。預設設定為「開啟」。
1 顯示「MIXTRAX 設定」畫面 請參閱 第88頁上顯示「MIXTRAX Settings」畫面
2 觸碰[Cut-In 效果]來切換「開啟」或「關閉」。
設定MIXTRAX效果
您可以設定並播放想要的MIXTRAX效果。預設設定為「Standard」。
1 顯示「MIXTRAX 設定」畫面 請參閱 第88頁上顯示「MIXTRAX Settings」畫面
2 觸碰[效果設定]。
3 觸碰想要的項目。可使用下列項目:Standard、Simple、Customp 選擇「Custom」時,請檢查想要的效果。
89< CRD4925-A >
MIXTRAX MIXTRAX 系統設定
90
可選擇調光器持續時間
您可以調整開啟或關閉調光器的時間。p 「調光器觸發器」設為「時間」時,可使用此功能。p 此設定只有在您停妥車輛至安全位置並拉起/踩踏手煞車時
才能使用。
1 顯示「系統設定」設定畫面。 請參閱 第89頁上顯示「系統設定」設定畫面
2 觸碰[調光器設定]。
3 觸碰[調光器持續時間]。隨即顯示「持續時間設定」畫面。
4 拖曳游標以設定調光器持續時間。
您也可以觸碰 或 來設定調光器持續時間。每觸碰一次 或 ,游標就會向後或向前移動15分鐘。
p 預設設定為18:00-6:00 (6:00 PM-6:00 AM)。p 如果游標位於同一點,調光器可用時間為0小時。p 如果關閉時間設定游標位於左端,開啟時間設定游標位於右
端,則調光器可用時間為0小時。p 如果開啟時間設定游標位於左端,關閉時間設定游標位於右
端,則調光器可用時間為24小時。p 調光器持續時間調整列的時間顯示以時鐘顯示設定為準。 請參閱 第98頁上設定時間與日期
調整影像
您可調整各來源及後視攝影機的影像。
注意基於安全考量,車輛行進時,無法使用其中的一些功能。若要啟用這些功能,必須將車子停在安全之處,並且作動手煞車。
1 顯示要調整的畫面。
2 顯示「系統設定」設定畫面。 請參閱 第89頁上顯示「系統設定」設定畫面
3 觸碰[畫面調整]。
4 觸碰項目以選擇要調整的功能。 亮度:
調整黑色濃度。(-24至+24) 對比度:
調整對比度。(-24至+24) 色濃度:
調整顏色飽和度。(-24至+24) 色調:
調整色調(偏紅或偏綠)。(-24至+24) 調光器:
後視攝影機本產品具備自動切換功能,排檔桿排入倒車(R)檔位時,會自動切換成車輛安裝之後視攝影機的全螢幕影像。
攝影機檢視模式的攝影機攝影機檢視模式也可讓您在行車時查看車後情況。若要顯示攝影機影像,請觸碰「AV 信號源選擇」畫面上的[攝影機檢視]。 請參閱 第68頁上AV來源選擇畫面上的來源p 若要設定後視攝影機為攝影機檢視模式的攝影機,請將「倒
車攝影機輸入」設為「開啟」。 請參閱 第90頁上設定後視攝影機啟動
注意先鋒建議使用輸出鏡像的攝影機,否則螢幕影像可能會顛倒。p 將排檔桿從其他檔位移至倒車(R)檔位後,請立即確認顯示
幕是否切換成後視攝影機影像。p 若畫面於正常行駛期間切換成全螢幕後視攝影機影像,請在
「攝影機設定」中切換成相反的設定。p 若顯示攝影機影像時觸碰 ,顯示的影像將暫時關閉。
設定後視攝影機啟動
預設設定為「關閉」。
1 顯示「系統設定」設定畫面。 請參閱 第89頁上顯示「系統設定」設定畫面
2 觸碰[攝影機設定]。
3 觸碰[倒車攝影機輸入]來切換「開啟」或「關閉」。
設定後視攝影機極性
p 「倒車攝影機輸入」為「開啟」時,可使用此功能。 請參閱 第90頁上設定後視攝影機啟動
1 顯示「系統設定」設定畫面。 請參閱 第89頁上顯示「系統設定」設定畫面
2 觸碰[攝影機設定]。
3 觸碰[攝影機設定]。 電池(預設):
連接的導線為正極。 接地:
連接的導線為負極。
設定示範模式
預設設定為「開啟」。
1 顯示「系統設定」設定畫面。 請參閱 第89頁上顯示「系統設定」設定畫面
2 觸碰[Demo模式]來切換「開啟」或「關閉」。
選擇系統語言
若內嵌的語言和選取的語言設定不同,便會無法正確顯示文字資訊。
某些字元可能無法正常顯示。
1 顯示「系統設定」設定畫面。 請參閱 第89頁上顯示「系統設定」設定畫面
2 觸碰[系統語言]。
3 觸碰語言。選擇語言後,將返回上一個畫面。
利用iPhone應用程式設定鍵盤語言
您可以設定iPhone鍵盤的語言,以便在AppRadioMode中使用鍵盤。p 此功能僅適用於iPhone上的AppRadioMode。
1 顯示「系統設定」設定畫面。 請參閱 第89頁上顯示「系統設定」設定畫面
2 觸碰[鍵盤]。
3 觸碰語言。選擇語言後,將返回上一個畫面。
調整觸控面板的回應位置(觸控面板校正)
如果感覺畫面上的觸控面板按鍵偏離回應觸碰的實際位置,請調整觸控面板畫面的回應位置。p 此設定只有在您停妥車輛至安全位置並拉起/踩踏手煞車時
才能使用。p 請勿使用尖頭工具(如原子筆或機械筆),以免損壞螢幕。p 儲存調整後的位置資料期間,請勿關閉引擎。
1 顯示「系統設定」設定畫面。 請參閱 第89頁上顯示「系統設定」設定畫面
2 觸碰[觸控面板校正]。
3 觸碰[是]。
4 沿箭頭觸碰畫面的兩個角落,然後同時觸碰兩個+號中心兩次。
5 按下 。儲存調整結果。
6 再按一次 。繼續進行16點調整。
7 輕觸畫面上顯示的「+」號中心。目標代表順序。
若按下 ,將返回上一個調整位置。
若按住 ,將取消調整。
8 按住 。儲存調整結果。
設定調光器
設定調光器觸發
p 此設定只有在您停妥車輛至安全位置並拉起/踩踏手煞車時才能使用。
1 顯示「系統設定」設定畫面。 請參閱 第89頁上顯示「系統設定」設定畫面
2 觸碰[調光器設定]。
3 觸碰[調光器觸發器]。
4 觸碰想要的項目。 自動(預設):
隨車輛頭燈的啟閉自動開啟或關閉調光器。 手動設定:
手動開啟或關閉調光器。 時間:
在您調整的時間開啟或關閉調光器。
設定日間或夜間的調光器持續時間
p 「調光器觸發器」設為「手動設定」時,可使用此功能。p 此設定只有在您停妥車輛至安全位置並拉起/踩踏手煞車時
才能使用。
1 顯示「系統設定」設定畫面。 請參閱 第89頁上顯示「系統設定」設定畫面
2 觸碰[調光器設定]。
3 觸碰[日/夜]可切換下列項目。 日(預設):
手動關閉調光器。 夜:
手動開啟調光器。
90 < CRD4925-A >< CRD4925-A >
系統設定 系統設定
91
可選擇調光器持續時間
您可以調整開啟或關閉調光器的時間。p 「調光器觸發器」設為「時間」時,可使用此功能。p 此設定只有在您停妥車輛至安全位置並拉起/踩踏手煞車時
才能使用。
1 顯示「系統設定」設定畫面。 請參閱 第89頁上顯示「系統設定」設定畫面
2 觸碰[調光器設定]。
3 觸碰[調光器持續時間]。隨即顯示「持續時間設定」畫面。
4 拖曳游標以設定調光器持續時間。
您也可以觸碰 或 來設定調光器持續時間。每觸碰一次 或 ,游標就會向後或向前移動15分鐘。
p 預設設定為18:00-6:00 (6:00 PM-6:00 AM)。p 如果游標位於同一點,調光器可用時間為0小時。p 如果關閉時間設定游標位於左端,開啟時間設定游標位於右
端,則調光器可用時間為0小時。p 如果開啟時間設定游標位於左端,關閉時間設定游標位於右
端,則調光器可用時間為24小時。p 調光器持續時間調整列的時間顯示以時鐘顯示設定為準。 請參閱 第98頁上設定時間與日期
調整影像
您可調整各來源及後視攝影機的影像。
注意基於安全考量,車輛行進時,無法使用其中的一些功能。若要啟用這些功能,必須將車子停在安全之處,並且作動手煞車。
1 顯示要調整的畫面。
2 顯示「系統設定」設定畫面。 請參閱 第89頁上顯示「系統設定」設定畫面
3 觸碰[畫面調整]。
4 觸碰項目以選擇要調整的功能。 亮度:
調整黑色濃度。(-24至+24) 對比度:
調整對比度。(-24至+24) 色濃度:
調整顏色飽和度。(-24至+24) 色調:
調整色調(偏紅或偏綠)。(-24至+24) 調光器:
調整顯示幕亮度。(+1至+48) 色溫:
調整色溫,以達更佳的白平衡。(-3至+3)p 在某些影像無法調整色調和色濃度。
觸碰[後方攝像]時,模式會切換成所選的攝影機模式。觸碰[訊源]、[導航]或[Apps]可回到所選的模式。
5 觸碰 、 、 、 以進行調整。p 車輛頭燈關閉(日間)和開啟(夜間)時對「亮度」、「對
比度」和「調光器」所做的調整會分開儲存。p 「亮度」和「對比度」會隨車輛頭燈的啟閉而自動切換。p 您可以變更開啟或關閉「調光器」的設定或時間。 請參閱 第90頁上設定調光器p 某些後視攝影機可能無法進行影像調整。p 設定內容可分開儲存。
顯示韌體版本
1 顯示「系統設定」設定畫面。 請參閱 第89頁上顯示「系統設定」設定畫面
2 觸碰[系統資訊]。
3 觸碰[韌體資訊]。隨即顯示「韌體資訊」畫面。
顯示開放原始碼授權
1 顯示「系統設定」設定畫面。 請參閱 第89頁上顯示「系統設定」設定畫面
2 觸碰[系統資訊]。
3 觸碰[授權]。本產品所配備功能的開放原始碼授權隨即出現。
更新韌體
注意 用來更新的USB儲存裝置只能含有正確的更新檔案。 更新韌體時,切勿關閉本產品電源或移除USB儲存裝置。 僅可在車輛停止且手煞車作動時更新韌體。
1 下載韌體更新檔案。
2 將空白(格式化)USB儲存裝置連接至電腦,找出正確的更新檔案,將檔案複製到USB儲存裝置。
3 將USB儲存裝置連接至本產品。
4 關閉來源。 請參閱 第68頁上選擇來源
5 顯示「系統設定」設定畫面。 請參閱 第89頁上顯示「系統設定」設定畫面
6 觸碰[系統資訊]。
7 觸碰[韌體升級]。
8 觸碰[繼續]以顯示資料傳輸模式。p 依照畫面上的指示完成韌體更新。p 韌體更新成功後,本產品會自動重設。p 如果畫面顯示錯誤訊息,請觸碰顯示幕,再次執行以上步
驟。
6 再按一次 。繼續進行16點調整。
7 輕觸畫面上顯示的「+」號中心。目標代表順序。
若按下 ,將返回上一個調整位置。
若按住 ,將取消調整。
8 按住 。儲存調整結果。
設定調光器
設定調光器觸發
p 此設定只有在您停妥車輛至安全位置並拉起/踩踏手煞車時才能使用。
1 顯示「系統設定」設定畫面。 請參閱 第89頁上顯示「系統設定」設定畫面
2 觸碰[調光器設定]。
3 觸碰[調光器觸發器]。
4 觸碰想要的項目。 自動(預設):
隨車輛頭燈的啟閉自動開啟或關閉調光器。 手動設定:
手動開啟或關閉調光器。 時間:
在您調整的時間開啟或關閉調光器。
設定日間或夜間的調光器持續時間
p 「調光器觸發器」設為「手動設定」時,可使用此功能。p 此設定只有在您停妥車輛至安全位置並拉起/踩踏手煞車時
才能使用。
1 顯示「系統設定」設定畫面。 請參閱 第89頁上顯示「系統設定」設定畫面
2 觸碰[調光器設定]。
3 觸碰[日/夜]可切換下列項目。 日(預設):
手動關閉調光器。 夜:
手動開啟調光器。
91< CRD4925-A >
系統設定 系統設定
92
選擇聆聽位置
您可以選擇作為音效中心的聆聽位置。預設設定為「關閉」。
1 顯示「音頻」設定畫面。 請參閱 第92頁上顯示「音頻」設定畫面
2 觸碰[聆聽位置]。
3 觸碰想要的位置以變更聆聽位置。可使用下列項目:關閉, 前左座、前右座、Front、全部。p 選擇「網路模式」作為揚聲器模式時,無法使用「全部」。
微調揚聲器輸出位準
您可以藉由聆聽音訊輸出來微調揚聲器輸出位準。p 「重低音」設為「開啟」時,可使用此功能。 請參閱 第92頁上設定重低音揚聲器輸出
1 顯示「音頻」設定畫面。 請參閱 第92頁上顯示「音頻」設定畫面
2 觸碰[揚聲器音壓]。
3 視需要觸碰 或 選擇聆聽位置。可使用下列項目:關閉, 前左座、前右座、Front、全部。p 預設設定為「關閉」。p 選擇「網路模式」作為揚聲器模式時,無法使用「全部」。p 若您變更聆聽位置設定,則所有揚聲器的輸出電平都將隨此
設定變更。
4 觸碰 或 調整揚聲器輸出位準。p 要修正等級的增加或減少的同時會顯示「–24」dB至「10」
dB。可選擇以下揚聲器:標準模式:左前、右前、左後、右後、重低音揚聲器網路模式:高左、高右、中左、中右、重低音揚聲器p 若要使用此功能,必須事先測量車輛的音響。
調整時序校準
時序校準可調整各揚聲器與聆聽位置的距離,修正聲音到達聆聽位置所需的時間。
1 測量聆聽者頭部與各揚聲器主機的距離。
2 顯示「音頻」設定畫面。 請參閱 第92頁上顯示「音頻」設定畫面
3 觸碰[聲音時序校準]。
4 視需要觸碰 或 選擇聆聽位置。
顯示「音頻」設定畫面
1 按下 。
2 觸碰 ,接著觸碰 。隨即顯示「音頻」設定畫面。
使用淡化器/平衡調整
1 顯示「音頻」設定畫面。 請參閱 第92頁上顯示「音頻」設定畫面
2 觸碰[Fader/Balance]。p 選擇「網路模式」為揚聲器模式時,只能調整平衡。觸碰
[Balance],跳到步驟4。
3 觸碰 或 調整前置/後置揚聲器平衡。p 使用雙揚聲器系統時,請將「Front」和「Rear」設為「0」
。
4 觸碰 或 調整左/右揚聲器平衡。
您也可以拖曳顯示桌台上的點設定該值。
切換靜音/衰減
導航輸出語音提示時,可自動靜音或削減AV來源音量和iPhone應用程式音量。
1 顯示「音頻」設定畫面。 請參閱 第92頁上顯示「音頻」設定畫面
2 觸碰[靜音等級]。
3 觸碰想要的項目。 衰減(預設):
音量變成比目前音量低20 dB。 靜音:
音量變為0。 關閉:
音量不變。
調整來源音量
SLA(來源音量調整)可讓您調整各個來源的音量,以免切換來源時音量出現劇烈變化。p 設定以FM調諧器的音量為準(保持不變)。p 選擇FM調諧器作為AV來源時,無法使用此功能。
1 比較FM調諧器音量與來源音量。
2 顯示「音頻」設定畫面。 請參閱 第92頁上顯示「音頻」設定畫面
3 觸碰[音訊電平調整]。
4 觸碰 或 調整來源音量。p 若直接觸碰可移動游標的區域,SLA設定會變更成觸碰位置
的值。p 調高或調低來源音量的同時,會顯示「+4」至「–4」。p 預設設定為「0」。
使用自動位準控制
此功能會自動修正音樂檔案或來源之間的聲音位準差異。
1 顯示「音頻」設定畫面。 請參閱 第92頁上顯示「音頻」設定畫面
2 觸碰[自動等級控制]。
3 觸碰想要的項目。 關閉(預設):
關閉自動位準控制設定。 模式 1:
小幅修正音樂檔案或來源之間的聲音位準差異(用於窄動態範圍聲音訊號)。
模式 2:大幅修正音樂檔案或來源之間的聲音位準差異(用於寬動態範圍聲音訊號)。
調整響度
此功能會在音量較低時補償低頻和高頻範圍的不足。預設設定為「關閉」。p 使用免持功能撥打或接聽電話時,無法使用此功能。
1 顯示「音頻」設定畫面。 請參閱 第92頁上顯示「音頻」設定畫面
2 觸碰[響度]。
3 觸碰想要的項目。可使用下列項目:關閉、低、中、高。
設定重低音揚聲器輸出
本產品配備可開關的重低音揚聲器輸出機構。預設設定為「開啟」。
1 顯示「音頻」設定畫面。 請參閱 第92頁上顯示「音頻」設定畫面
2 觸碰[重低音]來切換「開啟」或「關閉」。
調整截止頻率值
您可以調整各個揚聲器的截止頻率值。可調整下列揚聲器:標準模式:前、後、重低音揚聲器。網路模式:高音、中音、重低音揚聲器。p 「重低音」為「開啟」時,才能使用「重低音設定」。 請參閱 第92頁上設定重低音揚聲器輸出
1 顯示「音頻」設定畫面。 請參閱 第92頁上顯示「音頻」設定畫面
2 觸碰[分頻設定]或[重低音設定]。
3 觸碰 或 切換揚聲器。
4 拖曳圖形線來設定截止位置。
5 拖曳圖形最低點來設定截止斜率。p 您也可以設定下列項目。 :
將重低音揚聲器相位切換成正常或相反位置。 LPF/HPF:
將LPF/HPF設定切換成「開啟」或「關閉」。關閉時,每個揚聲器的高通濾波器或低通濾波器也都可以透過觸碰圖形線來開啟。
p 調整高音揚聲器時,無法使用此功能。
切換後揚聲器輸出
p 選擇「標準模式」作為揚聲器模式時,可使用此功能。預設設定為「Rear」。
1 關閉來源。 請參閱 第68頁上選擇來源
2 顯示「音頻」設定畫面。 請參閱 第92頁上顯示「音頻」設定畫面
3 觸碰[後揚聲器輸出]。
4 觸碰來切換「Rear」或「超重低音」。
使用BASS Boost
1 顯示「音頻」設定畫面。 請參閱 第92頁上顯示「音頻」設定畫面
2 觸碰[低音增強]。
3 觸碰以選擇低音增強等級,可選擇0到+6。
音訊調整
92 < CRD4925-A >< CRD4925-A >
音訊調整 音訊調整
93
選擇聆聽位置
您可以選擇作為音效中心的聆聽位置。預設設定為「關閉」。
1 顯示「音頻」設定畫面。 請參閱 第92頁上顯示「音頻」設定畫面
2 觸碰[聆聽位置]。
3 觸碰想要的位置以變更聆聽位置。可使用下列項目:關閉, 前左座、前右座、Front、全部。p 選擇「網路模式」作為揚聲器模式時,無法使用「全部」。
微調揚聲器輸出位準
您可以藉由聆聽音訊輸出來微調揚聲器輸出位準。p 「重低音」設為「開啟」時,可使用此功能。 請參閱 第92頁上設定重低音揚聲器輸出
1 顯示「音頻」設定畫面。 請參閱 第92頁上顯示「音頻」設定畫面
2 觸碰[揚聲器音壓]。
3 視需要觸碰 或 選擇聆聽位置。可使用下列項目:關閉, 前左座、前右座、Front、全部。p 預設設定為「關閉」。p 選擇「網路模式」作為揚聲器模式時,無法使用「全部」。p 若您變更聆聽位置設定,則所有揚聲器的輸出電平都將隨此
設定變更。
4 觸碰 或 調整揚聲器輸出位準。p 要修正等級的增加或減少的同時會顯示「–24」dB至「10」
dB。可選擇以下揚聲器:標準模式:左前、右前、左後、右後、重低音揚聲器網路模式:高左、高右、中左、中右、重低音揚聲器p 若要使用此功能,必須事先測量車輛的音響。
調整時序校準
時序校準可調整各揚聲器與聆聽位置的距離,修正聲音到達聆聽位置所需的時間。
1 測量聆聽者頭部與各揚聲器主機的距離。
2 顯示「音頻」設定畫面。 請參閱 第92頁上顯示「音頻」設定畫面
3 觸碰[聲音時序校準]。
4 視需要觸碰 或 選擇聆聽位置。
可使用下列項目:關閉, 前左座、前右座、Front、全部。p 預設設定為「關閉」。p 選擇「網路模式」作為揚聲器模式時,無法使用「全部」。p 若您變更聆聽位置設定,則所有揚聲器的輸出電平都將隨此
設定變更。
5 觸碰 或 輸入所選揚聲器與聆聽位置的距離。p 您可以用2.5 cm為單位來輸入數值(0到350 cm)。可選擇以下揚聲器:標準模式:左前、右前、左後、右後、重低音揚聲器網路模式:高左、高右、中左、中右、重低音揚聲器p 聆聽位置設定設為「前左座」或「前右座」時,才能使用此
功能。p 若要使用此功能,必須事先測量車輛的音響。
若觸碰[TA開啟],將強制關閉時序校準。
切換時序校準預設
1 顯示「音頻」設定畫面。 請參閱 第92頁上顯示「音頻」設定畫面
2 觸碰[時間調校預設]。
3 觸碰想要的項目。 初始(預設):
設定成初始設定值。 自動時間調校:
將「自動EQ&TA測定」的結果反映至設定值。 關閉:
將所有設定值重設為0。 自訂:
設定成在「聲音時序校準」調整的值。p 調整時序校準時,預設項目會自動切換成「自訂」。p 聆聽位置設定設為「前左座」或「前右座」時,才能使用「
自訂」。
使用等化器
調用等化器曲線
您可以隨時輕鬆調用儲存的七種等化器曲線。以下為等化器曲線清單: S.Bass為只增強低音調音效的曲線。 Powerful為增強低音調與高音調音效的曲線。 Natural為稍微增強低音調與高音調音效的曲線。 Vocal為增強中音(人聲範圍)的曲線。 Flat為平坦曲線,不增強任何部分。
Custom1為個人建立的自訂等化器曲線。若選擇此曲線,效果會套用至所有AV來源。
Custom2為個人建立的自訂等化器曲線。若選擇此曲線,效果會套用至所有AV來源。
p 預設設定為「Powerful」。
1 顯示「音頻」設定畫面。 請參閱 第92頁上顯示「音頻」設定畫面
2 觸碰[圖形EQ]。
3 觸碰等化器。
自訂等化器曲線
您可以任意調整目前選擇的等化器曲線設定。您可以透過13頻圖形等化器進行調整。p 若在選擇「S.Bass」、「Powerful」、「Natural」、
「Vocal」或「Flat」時進行調整,等化器曲線設定會強制變成「Custom1」。
p 若在選擇「Custom2」曲線時進行調整,則會更新「Custom2」。
p 您可以建立通用於所有來源的「Custom1」和「Custom2」曲線。
1 顯示「音頻」設定畫面。 請參閱 第92頁上顯示「音頻」設定畫面
2 觸碰[圖形EQ]。
3 選擇要作為自訂基礎的曲線。
4 觸碰要調整的頻率。p 若用手指劃過多個等化器頻段的長條,等化器曲線設定將設
為各長條觸碰點的值。
設定自動調整等化器
您可以設定自動調整等化器以配合汽車的音響。若要使用此功能,必須事先測量車輛的音響。預設設定為「關閉」。 請參閱 第94頁上自動調整等化器曲線(自動EQ)p 若要手動調整等化器曲線,請將「自動等化器與自動時間調
校」設為「關閉」。
1 顯示「音頻」設定畫面。 請參閱 第92頁上顯示「音頻」設定畫面
2 觸碰[自動等化器與自動時間調校]來切換「開啟」或「關閉」。
調整截止頻率值
您可以調整各個揚聲器的截止頻率值。可調整下列揚聲器:標準模式:前、後、重低音揚聲器。網路模式:高音、中音、重低音揚聲器。p 「重低音」為「開啟」時,才能使用「重低音設定」。 請參閱 第92頁上設定重低音揚聲器輸出
1 顯示「音頻」設定畫面。 請參閱 第92頁上顯示「音頻」設定畫面
2 觸碰[分頻設定]或[重低音設定]。
3 觸碰 或 切換揚聲器。
4 拖曳圖形線來設定截止位置。
5 拖曳圖形最低點來設定截止斜率。p 您也可以設定下列項目。 :
將重低音揚聲器相位切換成正常或相反位置。 LPF/HPF:
將LPF/HPF設定切換成「開啟」或「關閉」。關閉時,每個揚聲器的高通濾波器或低通濾波器也都可以透過觸碰圖形線來開啟。
p 調整高音揚聲器時,無法使用此功能。
切換後揚聲器輸出
p 選擇「標準模式」作為揚聲器模式時,可使用此功能。預設設定為「Rear」。
1 關閉來源。 請參閱 第68頁上選擇來源
2 顯示「音頻」設定畫面。 請參閱 第92頁上顯示「音頻」設定畫面
3 觸碰[後揚聲器輸出]。
4 觸碰來切換「Rear」或「超重低音」。
使用BASS Boost
1 顯示「音頻」設定畫面。 請參閱 第92頁上顯示「音頻」設定畫面
2 觸碰[低音增強]。
3 觸碰以選擇低音增強等級,可選擇0到+6。
93< CRD4925-A >
音訊調整 音訊調整
94
選擇背景顯示畫面
背景顯示共有9種AV操作畫面的預設顯示和6種最上層選單畫面的預設顯示可供選擇。此外,您也可以將背景顯示畫面變更成從USB儲存裝置匯入的其他影像。
1 顯示「主題」畫面。
2 觸碰[背景]。
3 觸碰[首頁]或[AV]切換畫面顯示。AV操作畫面及最上層選單畫面的設定內容可分別記憶。
4 觸碰想要的項目。 預設顯示畫面:選擇所需的預設背景顯示畫面。 (自訂):顯示從USB儲存裝置匯入的背景顯示影像。 請參閱 第81頁上將影像另存成背景圖案
(關閉):隱藏背景顯示畫面。
設定照明色彩
照明色彩共有7種可供選擇。此外,也可以依序切換這7種照明色彩。
從預設色彩中選擇色彩
您可以從色彩清單中選擇照明色彩。
1 顯示「主題」畫面。
2 觸碰[照明顏色]。
3 觸碰想要的色彩。 有色按鍵:選擇想要的預設色彩。 (自訂):顯示自訂照明色彩的畫面。 請參閱 第95頁上建立使用者定義色彩
(彩虹):依序變換五種預設色彩。
觸碰[首頁]或[AV]分別可預覽最上層選單畫面或AV操作畫面。
主題選單
自動調整等化器曲線(自動EQ)
藉由測量車輛音響,即可配合車內環境自動調整等化器曲線。
警告測量汽車音響時,揚聲器可能會發出響亮的聲音(噪音)。切勿在行車時執行自動EQ測量。
注意 執行自動EQ之前,請先進行徹底檢查。若在下列情況下執行
此功能,可能會導致揚聲器受損: 揚聲器連接方式錯誤。(例如將後置揚聲器連接到重低音揚
聲器輸出插孔。) 揚聲器連接到輸出高於揚聲器最大輸出功率能力的功率放大
器。 若未將聲音測量用麥克風(另售)置於適當位置,測量音可
能會變得較響亮,且測量可能要花很長的時間,導致耗用大量電力。請務必將麥克風放在指定的位置。
操作自動EQ功能之前
請盡可能在安靜的場所執行自動EQ,並且關閉引擎和空調。此外,請事先切斷車用電話或車內行動電話的電源,或從車內取出。周遭的聲音可能會導致無法正確測量車輛音響。
請務必使用聲音測量用麥克風(另售)。使用其他麥克風可能會無法測量,或導致車輛音響的測量結果不準確。
若要執行自動EQ,必須連接前置揚聲器。 將本產品連接至具輸入位準控制功能的功率放大器時,如果
功率放大器的輸入位準設定低於標準位準,可能會無法執行自動EQ。
將本產品連接至具LPF(低通濾波器)的功率放大器時,請先關閉LPF再執行自動EQ。此外,請將主動式重低音揚聲器內建LPF的截止頻率設定成最高頻率。
已由電腦計算出的距離可提供最佳延遲,確保精準的測量結果。請勿變更此值。— 車內的反射音很強,且會發生延遲。— 主動式重低音揚聲器的LPF或外部放大器會延遲低音。
若測量期間發生錯誤,請在測量車輛音響之前檢查下列項目。— 前置揚聲器(左/右)— 後置揚聲器(左/右)— 噪音— 聲音測量用麥克風(另售)— 低電量
執行自動EQ
p 自動EQ變更的音訊設定如下:— 淡化器/平衡設定返回中間位置。
請參閱 第92頁上使用淡化器/平衡調整— 「靜音等級」設為「關閉」。
請參閱 第92頁上切換靜音/衰減p 自動EQ之前的設定值會被覆寫。
注意測量進行時,請勿關閉引擎。
1 將車輛停放在安靜的地點,關上所有車門、車窗和天窗,然後將引擎熄火。
如果引擎仍在運轉,引擎噪音可能會妨礙自動EQ的正常進行。p 若在測量期間偵測到駕駛限制,將取消測量。
2 將聲音測量用麥克風(另售)固定於駕駛座的頭枕中央,面向前方。
自動EQ會隨麥克風的放置位置而異。如有需要,可將麥克風置於前乘客座並執行自動EQ。
3 移除iPhone或智慧型手機。
4 開啟點火開關(ACC ON)。若車輛空調或暖氣開啟,請加以關閉。
5 將AV來源切換至「Source OFF」。 請參閱 第68頁上選擇來源
6 顯示「音頻」設定畫面。 請參閱 第92頁上顯示「音頻」設定畫面
7 觸碰[自動EQ&TA測定]。隨即顯示「自動EQ&TA測定」畫面。
8 連接聲音測量用麥克風(另售)與本產品。將麥克風插入本產品的AUX輸入插孔。如果麥克風(另售)線不夠長,請使用延長線(另售)。
9 觸碰[左前方]或[右前方]選擇目前的聆聽位置。
10 觸碰[開始]。10秒倒數開始。p 程序開始之前,會先中斷藍牙連線。
11 離開車輛並關上車門,直到倒數結束。倒數結束時,揚聲器會發出測量音(噪音),而自動EQ測量開始。
12 請等候測量完成。自動EQ完成時會顯示訊息。p 測量時間因車輛類型而異。
若要停止測量,請觸碰[停止]。
13 請將麥克風妥善存放於置物箱或其他安全位置。如果麥克風長時間受到陽光直接照射,高溫可能會導致失真、變色或故障。
儲存聲音設定
您可以儲存目前的聲音設定,以便加以調用。可儲存的設定如下:低音增強、斜率、重低音揚聲器相位、揚聲器位準、圖形等化器、HPF/LPF、聆聽位置、交叉、時序校準。
1 顯示「音頻」設定畫面。 請參閱 第92頁上顯示「音頻」設定畫面
2 觸碰[儲存設定]。
3 觸碰[確認]。隨即儲存所有目前的聲音設定。
觸碰[取消]時,將回到「音頻」設定畫面。
載入聲音設定
1 顯示「音頻」設定畫面。 請參閱 第92頁上顯示「音頻」設定畫面
2 觸碰[載入設定]。
3 觸碰想要的項目。可使用下列項目:AEQ 設定、聲音設定。p 執行自動EQ測量後,才能使用「AEQ 設定」。 請參閱 第94頁上自動調整等化器曲線(自動EQ)p 儲存聲音設定後,才能使用「聲音設定」。 請參閱 第94頁上儲存聲音設定
94 < CRD4925-A >< CRD4925-A >
音訊調整 主題選單
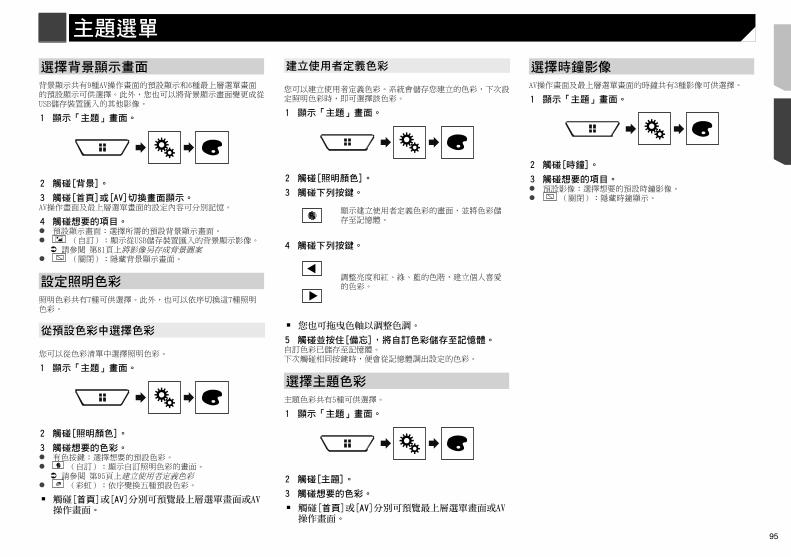
95
選擇背景顯示畫面
背景顯示共有9種AV操作畫面的預設顯示和6種最上層選單畫面的預設顯示可供選擇。此外,您也可以將背景顯示畫面變更成從USB儲存裝置匯入的其他影像。
1 顯示「主題」畫面。
2 觸碰[背景]。
3 觸碰[首頁]或[AV]切換畫面顯示。AV操作畫面及最上層選單畫面的設定內容可分別記憶。
4 觸碰想要的項目。 預設顯示畫面:選擇所需的預設背景顯示畫面。 (自訂):顯示從USB儲存裝置匯入的背景顯示影像。 請參閱 第81頁上將影像另存成背景圖案
(關閉):隱藏背景顯示畫面。
設定照明色彩
照明色彩共有7種可供選擇。此外,也可以依序切換這7種照明色彩。
從預設色彩中選擇色彩
您可以從色彩清單中選擇照明色彩。
1 顯示「主題」畫面。
2 觸碰[照明顏色]。
3 觸碰想要的色彩。 有色按鍵:選擇想要的預設色彩。 (自訂):顯示自訂照明色彩的畫面。 請參閱 第95頁上建立使用者定義色彩
(彩虹):依序變換五種預設色彩。
觸碰[首頁]或[AV]分別可預覽最上層選單畫面或AV操作畫面。
建立使用者定義色彩
您可以建立使用者定義色彩。系統會儲存您建立的色彩,下次設定照明色彩時,即可選擇該色彩。
1 顯示「主題」畫面。
2 觸碰[照明顏色]。
3 觸碰下列按鍵。
顯示建立使用者定義色彩的畫面,並將色彩儲存至記憶體。
4 觸碰下列按鍵。
調整亮度和紅、綠、藍的色階,建立個人喜愛的色彩。
您也可拖曳色軸以調整色調。5 觸碰並按住[備忘],將自訂色彩儲存至記憶體。自訂色彩已儲存至記憶體。下次觸碰相同按鍵時,便會從記憶體調出設定的色彩。
選擇主題色彩
主題色彩共有5種可供選擇。
1 顯示「主題」畫面。
2 觸碰[主題]。
3 觸碰想要的色彩。
觸碰[首頁]或[AV]分別可預覽最上層選單畫面或AV操作畫面。
選擇時鐘影像
AV操作畫面及最上層選單畫面的時鐘共有3種影像可供選擇。
1 顯示「主題」畫面。
2 觸碰[時鐘]。
3 觸碰想要的項目。 預設影像:選擇想要的預設時鐘影像。 (關閉):隱藏時鐘顯示。
主題選單
儲存聲音設定
您可以儲存目前的聲音設定,以便加以調用。可儲存的設定如下:低音增強、斜率、重低音揚聲器相位、揚聲器位準、圖形等化器、HPF/LPF、聆聽位置、交叉、時序校準。
1 顯示「音頻」設定畫面。 請參閱 第92頁上顯示「音頻」設定畫面
2 觸碰[儲存設定]。
3 觸碰[確認]。隨即儲存所有目前的聲音設定。
觸碰[取消]時,將回到「音頻」設定畫面。
載入聲音設定
1 顯示「音頻」設定畫面。 請參閱 第92頁上顯示「音頻」設定畫面
2 觸碰[載入設定]。
3 觸碰想要的項目。可使用下列項目:AEQ 設定、聲音設定。p 執行自動EQ測量後,才能使用「AEQ 設定」。 請參閱 第94頁上自動調整等化器曲線(自動EQ)p 儲存聲音設定後,才能使用「聲音設定」。 請參閱 第94頁上儲存聲音設定
95< CRD4925-A >
音訊調整 主題選單
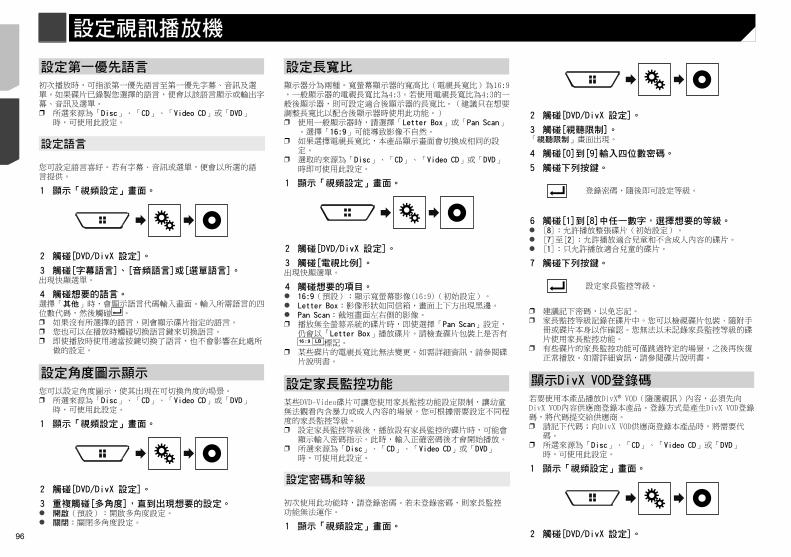
96
3 觸碰[DivX® VOD]。「DivX® VOD」畫面出現。p 若已啟動登錄碼,將不會顯示。
4 觸碰[註冊碼]。隨即顯示10位數登錄碼。p 請記下代碼;向DivX VOD供應商取消登錄時,將需要代碼。
顯示DivX VOD取消登錄碼
您可以刪除附有取消登錄碼的已登錄登錄碼。p 所選來源為「Disc」、「CD」、「Video CD」或「DVD」
時,可使用此設定。
1 顯示「視頻設定」畫面。
2 觸碰[DVD/DivX 設定]。
3 觸碰[DivX® VOD]。「DivX® VOD」畫面出現。
4 觸碰[註銷碼]。隨即顯示8位數取消登錄碼。p 請記下代碼;向DivX VOD供應商取消登錄時,將需要代碼。
自動播放DVD
插入有DVD選單的DVD碟片時,本產品將自動取消選單,然後從第一個標題的第一個章節開始播放。p 有些DVD可能無法正常播放。如果此功能無法完整運作,請
關閉此功能,然後開始播放。p 所選來源為「Disc」、「CD」、「Video CD」或「DVD」
時,可使用此設定。
1 顯示「視頻設定」畫面。
2 觸碰[DVD/DivX 設定]。
3 重複觸碰[DVD 自動播放],直到出現想要的設定。 關閉(預設):關閉DVD自動播放設定 開啟:開啟DVD自動播放設定
設定第一優先語言
初次播放時,可指派第一優先語言至第一優先字幕、音訊及選單。如果碟片已錄製您選擇的語言,便會以該語言顯示或輸出字幕、音訊及選單。p 所選來源為「Disc」、「CD」、「Video CD」或「DVD」
時,可使用此設定。
設定語言
您可設定語言喜好。若有字幕、音訊或選單,便會以所選的語言提供。
1 顯示「視頻設定」畫面。
2 觸碰[DVD/DivX 設定]。
3 觸碰[字幕語言]、[音頻語言]或[選單語言]。出現快顯選單。
4 觸碰想要的語言。選擇「其他」時,會顯示語言代碼輸入畫面。輸入所需語言的四位數代碼,然後觸碰 。p 如果沒有所選擇的語言,則會顯示碟片指定的語言。p 您也可以在播放時觸碰切換語言鍵來切換語言。p 即使播放時使用適當按鍵切換了語言,也不會影響在此處所
做的設定。
設定角度圖示顯示
您可以設定角度圖示,使其出現在可切換角度的場景。p 所選來源為「Disc」、「CD」、「Video CD」或「DVD」
時,可使用此設定。
1 顯示「視頻設定」畫面。
2 觸碰[DVD/DivX 設定]。
3 重複觸碰[多角度],直到出現想要的設定。 開啟(預設):開啟多角度設定。 關閉:關閉多角度設定。
設定長寬比
顯示器分為兩種。寬螢幕顯示器的寬高比(電視長寬比)為16:9,一般顯示器的電視長寬比為4:3。若使用電視長寬比為4:3的一般後顯示器,則可設定適合後顯示器的長寬比。(建議只在想要調整長寬比以配合後顯示器時使用此功能。)p 使用一般顯示器時,請選擇「Letter Box」或「Pan Scan」
。選擇「16:9」可能導致影像不自然。p 如果選擇電視長寬比,本產品顯示畫面會切換成相同的設
定。p 選取的來源為「Disc」、「CD」、「Video CD」或「DVD」
時即可使用此設定。
1 顯示「視頻設定」畫面。
2 觸碰[DVD/DivX 設定]。
3 觸碰[電視比例]。出現快顯選單。
4 觸碰想要的項目。 16:9(預設):顯示寬螢幕影像(16:9)(初始設定)。 Letter Box:影像形狀如同信箱,畫面上下方出現黑邊。 Pan Scan:截短畫面左右側的影像。p 播放無全螢幕系統的碟片時,即使選擇「Pan Scan」設定,
仍會以「Letter Box」播放碟片。請檢查碟片包裝上是否有標記。
p 某些碟片的電視長寬比無法變更。如需詳細資訊,請參閱碟片說明書。
設定家長監控功能
某些DVD-Video碟片可讓您使用家長監控功能設定限制,讓幼童無法觀看內含暴力或成人內容的場景。您可根據需要設定不同程度的家長監控等級。p 設定家長監控等級後,播放設有家長監控的碟片時,可能會
顯示輸入密碼指示。此時,輸入正確密碼後才會開始播放。p 所選來源為「Disc」、「CD」、「Video CD」或「DVD」
時,可使用此設定。
設定密碼和等級
初次使用此功能時,請登錄密碼。若未登錄密碼,則家長監控功能無法運作。
1 顯示「視頻設定」畫面。
2 觸碰[DVD/DivX 設定]。
3 觸碰[視聽限制]。「視聽限制」畫面出現。
4 觸碰[0]到[9]輸入四位數密碼。
5 觸碰下列按鍵。
登錄密碼,隨後即可設定等級。
6 觸碰[1]到[8]中任一數字,選擇想要的等級。 [8]:允許播放整張碟片(初始設定)。 [7]至[2]:允許播放適合兒童和不含成人內容的碟片。 [1]:只允許播放適合兒童的碟片。
7 觸碰下列按鍵。
設定家長監控等級。
p 建議記下密碼,以免忘記。p 家長監控等級記錄在碟片中。您可以檢視碟片包裝、隨附手
冊或碟片本身以作確認。您無法以未記錄家長監控等級的碟片使用家長監控功能。
p 有些碟片的家長監控功能可僅跳過特定的場景,之後再恢復正常播放。如需詳細資訊,請參閱碟片說明書。
顯示DivX VOD登錄碼
若要使用本產品播放DivX® VOD(隨選視訊)內容,必須先向DivX VOD內容供應商登錄本產品。登錄方式是產生DivX VOD登錄碼,將代碼提交給供應商。p 請記下代碼;向DivX VOD供應商登錄本產品時,將需要代
碼。p 所選來源為「Disc」、「CD」、「Video CD」或「DVD」
時,可使用此設定。
1 顯示「視頻設定」畫面。
2 觸碰[DVD/DivX 設定]。
設定視訊播放機
96 < CRD4925-A >< CRD4925-A >
設定視訊播放機 設定視訊播放機
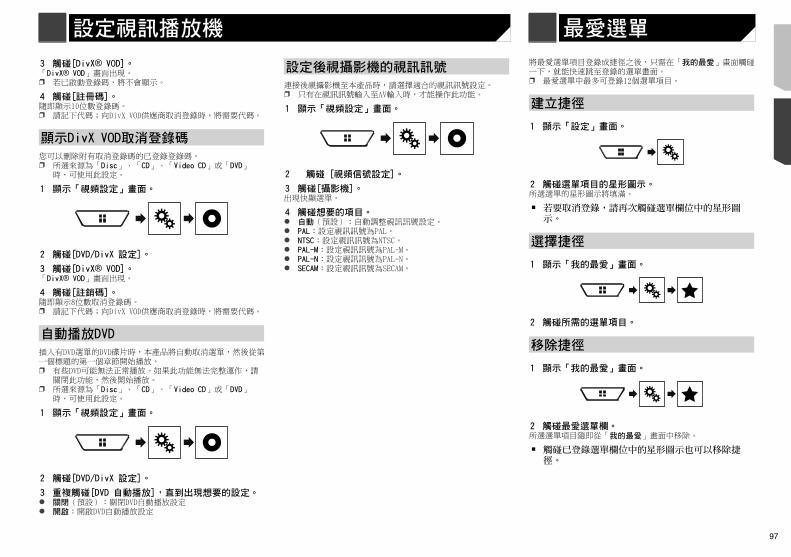
97
3 觸碰[DivX® VOD]。「DivX® VOD」畫面出現。p 若已啟動登錄碼,將不會顯示。
4 觸碰[註冊碼]。隨即顯示10位數登錄碼。p 請記下代碼;向DivX VOD供應商取消登錄時,將需要代碼。
顯示DivX VOD取消登錄碼
您可以刪除附有取消登錄碼的已登錄登錄碼。p 所選來源為「Disc」、「CD」、「Video CD」或「DVD」
時,可使用此設定。
1 顯示「視頻設定」畫面。
2 觸碰[DVD/DivX 設定]。
3 觸碰[DivX® VOD]。「DivX® VOD」畫面出現。
4 觸碰[註銷碼]。隨即顯示8位數取消登錄碼。p 請記下代碼;向DivX VOD供應商取消登錄時,將需要代碼。
自動播放DVD
插入有DVD選單的DVD碟片時,本產品將自動取消選單,然後從第一個標題的第一個章節開始播放。p 有些DVD可能無法正常播放。如果此功能無法完整運作,請
關閉此功能,然後開始播放。p 所選來源為「Disc」、「CD」、「Video CD」或「DVD」
時,可使用此設定。
1 顯示「視頻設定」畫面。
2 觸碰[DVD/DivX 設定]。
3 重複觸碰[DVD 自動播放],直到出現想要的設定。 關閉(預設):關閉DVD自動播放設定 開啟:開啟DVD自動播放設定
設定後視攝影機的視訊訊號
連接後視攝影機至本產品時,請選擇適合的視訊訊號設定。p 只有在視訊訊號輸入至AV輸入時,才能操作此功能。
1 顯示「視頻設定」畫面。
2 觸碰 [視頻信號設定]。
3 觸碰[攝影機]。出現快顯選單。
4 觸碰想要的項目。 自動(預設):自動調整視訊訊號設定。 PAL:設定視訊訊號為PAL。 NTSC:設定視訊訊號為NTSC。 PAL-M:設定視訊訊號為PAL-M。 PAL-N:設定視訊訊號為PAL-N。 SECAM:設定視訊訊號為SECAM。
將最愛選單項目登錄成捷徑之後,只需在「我的最愛」畫面觸碰一下,就能快速跳至登錄的選單畫面。p 最愛選單中最多可登錄12個選單項目。
建立捷徑
1 顯示「設定」畫面。
2 觸碰選單項目的星形圖示。所選選單的星形圖示將填滿。
若要取消登錄,請再次觸碰選單欄位中的星形圖示。
選擇捷徑
1 顯示「我的最愛」畫面。
2 觸碰所需的選單項目。
移除捷徑
1 顯示「我的最愛」畫面。
2 觸碰最愛選單欄。所選選單項目隨即從「我的最愛」畫面中移除。
觸碰已登錄選單欄位中的星形圖示也可以移除捷徑。
最愛選單
2 觸碰[DVD/DivX 設定]。
3 觸碰[視聽限制]。「視聽限制」畫面出現。
4 觸碰[0]到[9]輸入四位數密碼。
5 觸碰下列按鍵。
登錄密碼,隨後即可設定等級。
6 觸碰[1]到[8]中任一數字,選擇想要的等級。 [8]:允許播放整張碟片(初始設定)。 [7]至[2]:允許播放適合兒童和不含成人內容的碟片。 [1]:只允許播放適合兒童的碟片。
7 觸碰下列按鍵。
設定家長監控等級。
p 建議記下密碼,以免忘記。p 家長監控等級記錄在碟片中。您可以檢視碟片包裝、隨附手
冊或碟片本身以作確認。您無法以未記錄家長監控等級的碟片使用家長監控功能。
p 有些碟片的家長監控功能可僅跳過特定的場景,之後再恢復正常播放。如需詳細資訊,請參閱碟片說明書。
顯示DivX VOD登錄碼
若要使用本產品播放DivX® VOD(隨選視訊)內容,必須先向DivX VOD內容供應商登錄本產品。登錄方式是產生DivX VOD登錄碼,將代碼提交給供應商。p 請記下代碼;向DivX VOD供應商登錄本產品時,將需要代
碼。p 所選來源為「Disc」、「CD」、「Video CD」或「DVD」
時,可使用此設定。
1 顯示「視頻設定」畫面。
2 觸碰[DVD/DivX 設定]。
97< CRD4925-A >
設定視訊播放機 設定視訊播放機 最愛選單
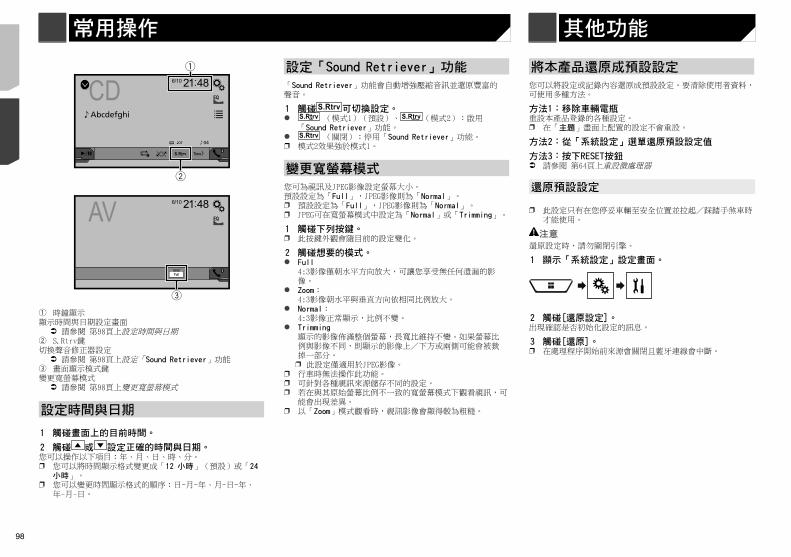
98
注意事項
本產品及本手冊
請勿在會造成您無法專心安全駕駛的情況下,操作本產品、任何應用程式或後視攝影機選購配件(若購買)。務必遵守安全駕駛規則及所有現行交通法規。若無法順利操作本產品或看清顯示器,請將車輛停在安全位置並拉起/踩踏手煞車,再進行必要調整。
請勿將本產品安裝在: (i)妨礙駕駛視線; (ii)影響車輛任何操作系統或安全功能之性能(包括氣囊、危險警告燈按鈕); (iii)影響駕駛安全操作車輛的位置。 在某些情況下,可能因車輛類型或車內形狀而無法安裝本產品。
重要安全措施
警告Pioneer不建議您自行安裝本產品。本產品僅限由專業人員安裝。建議僅由經過特殊訓練並熟悉車用電子產品的授權先鋒維修人員設定及安裝本產品。切勿自行維修本產品。安裝或維修本產品及其連接纜線可能會暴露在觸電或其他危險之下,並可能造成本產品遭到保固不理賠的損壞。
連接系統前的注意事項
警告為了您的安全起見,請勿任意改造或停用手煞車連動系統。改造或停用手煞車連動系統可能會造成重傷或死亡。
注意 以纜線固定夾或絕緣膠帶固定所有纜線。請勿讓裸露的纜線露出。
請勿將本產品的黃色導線直接連接汽車電瓶。若將該導線直接連接至電瓶,引擎震動可能會導致從乘客室穿至引擎室的纜線絕緣失效。若黃色導線的絕緣因接觸金屬零件而破損,可能會出現短路而導致相當大的危險。
讓纜線纏繞轉向機柱或排檔桿非常危險。請務必妥善安裝本產品及其纜線、佈線,以免妨礙或阻礙駕駛。
請確保纜線及電線不會干擾或卡在車輛的任何移動零件上,特別是方向盤、排檔桿、手煞車、座椅滑軌、車門或任何車輛操控裝置。
請勿將電線配置在會接觸高溫的位置。若絕緣變熱,電線可能會受損,導致短路或造成產品故障及永久性損壞。
連接
CD 4821
04
Abcdefghi
6/10
2
1
AV 4821
Full
6/10
3
1 時鐘顯示顯示時間與日期設定畫面 請參閱 第98頁上設定時間與日期
2 S.Rtrv鍵切換聲音修正器設定 請參閱 第98頁上設定「Sound Retriever」功能
3 畫面顯示模式鍵變更寬螢幕模式 請參閱 第98頁上變更寬螢幕模式
設定時間與日期
1 觸碰畫面上的目前時間。
2 觸碰 或 設定正確的時間與日期。您可以操作以下項目:年、月、日、時、分。p 您可以將時間顯示格式變更成「12 小時」(預設)或「24
小時」。p 您可以變更時間顯示格式的順序:日-月-年、月-日-年、
年-月-日。
設定「Sound Retriever」功能
「Sound Retriever」功能會自動增強壓縮音訊並還原豐富的聲音。
1 觸碰 可切換設定。 (模式1)(預設)、 (模式2):啟用
「Sound Retriever」功能。 (關閉):停用「Sound Retriever」功能。p 模式2效果強於模式1。
變更寬螢幕模式
您可為視訊及JPEG影像設定螢幕大小。預設設定為「Full」,JPEG影像則為「Normal」。p 預設設定為「Full」,JPEG影像則為「Normal」。p JPEG可在寬螢幕模式中設定為「Normal」或「Trimming」。
1 觸碰下列按鍵。p 此按鍵外觀會隨目前的設定變化。
2 觸碰想要的模式。 Full
4:3影像僅朝水平方向放大,可讓您享受無任何遺漏的影像。
Zoom:4:3影像朝水平與垂直方向依相同比例放大。
Normal:4:3影像正常顯示,比例不變。
Trimming顯示的影像佈滿整個螢幕,長寬比維持不變。如果螢幕比例與影像不同,則顯示的影像上/下方或兩側可能會被裁掉一部分。
p 此設定僅適用於JPEG影像。p 行車時無法操作此功能。p 可針對各種視訊來源儲存不同的設定。p 若在與其原始螢幕比例不一致的寬螢幕模式下觀看視訊,可
能會出現差異。p 以「Zoom」模式觀看時,視訊影像會顯得較為粗糙。
將本產品還原成預設設定
您可以將設定或記錄內容還原成預設設定。要清除使用者資料,可使用多種方法。
方法1:移除車輛電瓶重設本產品登錄的各種設定。p 在「主題」畫面上配置的設定不會重設。
方法2:從「系統設定」選單還原預設設定值
方法3:按下RESET按鈕 請參閱 第64頁上重設微處理器
還原預設設定
p 此設定只有在您停妥車輛至安全位置並拉起/踩踏手煞車時才能使用。
注意還原設定時,請勿關閉引擎。
1 顯示「系統設定」設定畫面。
2 觸碰[還原設定]。出現確認是否初始化設定的訊息。
3 觸碰[還原]。p 在處理程序開始前來源會關閉且藍牙連線會中斷。
常用操作其他功能
98 < CRD4925-A >< CRD4925-A >
常用操作 其他功能 連接
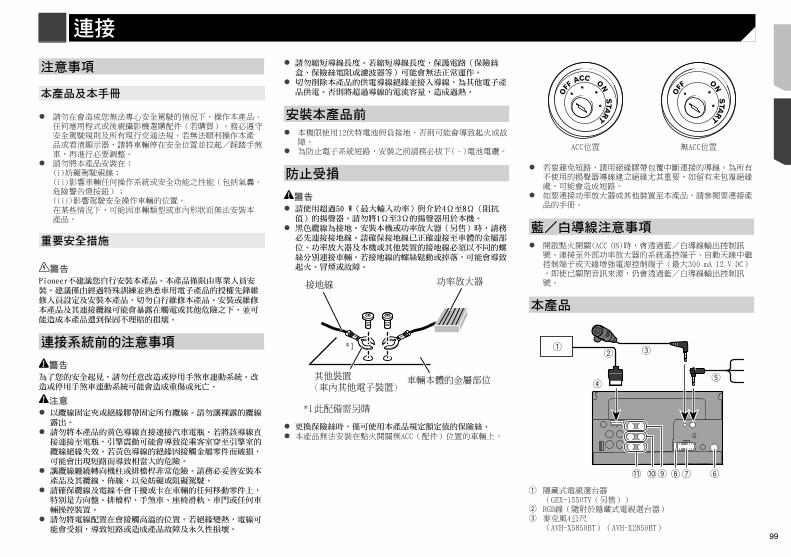
99
注意事項
本產品及本手冊
請勿在會造成您無法專心安全駕駛的情況下,操作本產品、任何應用程式或後視攝影機選購配件(若購買)。務必遵守安全駕駛規則及所有現行交通法規。若無法順利操作本產品或看清顯示器,請將車輛停在安全位置並拉起/踩踏手煞車,再進行必要調整。
請勿將本產品安裝在: (i)妨礙駕駛視線; (ii)影響車輛任何操作系統或安全功能之性能(包括氣囊、危險警告燈按鈕); (iii)影響駕駛安全操作車輛的位置。 在某些情況下,可能因車輛類型或車內形狀而無法安裝本產品。
重要安全措施
警告Pioneer不建議您自行安裝本產品。本產品僅限由專業人員安裝。建議僅由經過特殊訓練並熟悉車用電子產品的授權先鋒維修人員設定及安裝本產品。切勿自行維修本產品。安裝或維修本產品及其連接纜線可能會暴露在觸電或其他危險之下,並可能造成本產品遭到保固不理賠的損壞。
連接系統前的注意事項
警告為了您的安全起見,請勿任意改造或停用手煞車連動系統。改造或停用手煞車連動系統可能會造成重傷或死亡。
注意 以纜線固定夾或絕緣膠帶固定所有纜線。請勿讓裸露的纜線露出。
請勿將本產品的黃色導線直接連接汽車電瓶。若將該導線直接連接至電瓶,引擎震動可能會導致從乘客室穿至引擎室的纜線絕緣失效。若黃色導線的絕緣因接觸金屬零件而破損,可能會出現短路而導致相當大的危險。
讓纜線纏繞轉向機柱或排檔桿非常危險。請務必妥善安裝本產品及其纜線、佈線,以免妨礙或阻礙駕駛。
請確保纜線及電線不會干擾或卡在車輛的任何移動零件上,特別是方向盤、排檔桿、手煞車、座椅滑軌、車門或任何車輛操控裝置。
請勿將電線配置在會接觸高溫的位置。若絕緣變熱,電線可能會受損,導致短路或造成產品故障及永久性損壞。
請勿縮短導線長度。若縮短導線長度,保護電路(保險絲盒、保險絲電阻或濾波器等)可能會無法正常運作。
切勿削除本產品的供電導線絕緣並接入導線,為其他電子產品供電。否則將超過導線的電流容量,造成過熱。
安裝本產品前
本機限使用12伏特電池與負接地。否則可能會導致起火或故障。
為防止電子系統短路,安裝之前請務必拔下(–)電池電纜。
防止受損
警告 請使用超過50W(最大輸入功率)與介於4Ω至8Ω(阻抗值)的揚聲器。請勿將1Ω至3Ω的揚聲器用於本機。
黑色纜線為接地。安裝本機或功率放大器(另售)時,請務必先連接接地線。請確保接地線已正確連接至車體的金屬部位。功率放大器及本機或其他裝置的接地線必須以不同的螺絲分別連接車輛。若接地線的螺絲鬆動或掉落,可能會導致起火、冒煙或故障。
更換保險絲時,僅可使用本產品規定額定值的保險絲。 本產品無法安裝在點火開關無ACC(配件)位置的車輛上。
ACC ONSTAR
T
OFF
ONSTAR
T
OFF
ACC位置 無ACC位置
若要避免短路,請用絕緣膠帶包覆中斷連接的導線。為所有不使用的揚聲器導線建立絕緣尤其重要,如留有未包覆絕緣處,可能會造成短路。
如要連接功率放大器或其他裝置至本產品,請參閱要連接產品的手冊。
藍/白導線注意事項
開啟點火開關(ACC ON)時,會透過藍/白導線輸出控制訊號。連接至外部功率放大器的系統遙控端子、自動天線中繼控制端子或天線增強電源控制端子(最大300 mA 12 V DC)。即使已關閉音訊來源,仍會透過藍/白導線輸出控制訊號。
本產品
12 3
4
678
5
9b a
1 隱藏式電視選台器 (GEX-1550TV(另售))
2 RGB線(隨附於隱藏式電視選台器)3 麥克風4公尺
(AVH-X5850BT)(AVH-X2850BT)
連接
將本產品還原成預設設定
您可以將設定或記錄內容還原成預設設定。要清除使用者資料,可使用多種方法。
方法1:移除車輛電瓶重設本產品登錄的各種設定。p 在「主題」畫面上配置的設定不會重設。
方法2:從「系統設定」選單還原預設設定值
方法3:按下RESET按鈕 請參閱 第64頁上重設微處理器
還原預設設定
p 此設定只有在您停妥車輛至安全位置並拉起/踩踏手煞車時才能使用。
注意還原設定時,請勿關閉引擎。
1 顯示「系統設定」設定畫面。
2 觸碰[還原設定]。出現確認是否初始化設定的訊息。
3 觸碰[還原]。p 在處理程序開始前來源會關閉且藍牙連線會中斷。
其他功能
99< CRD4925-A >
其他功能 連接
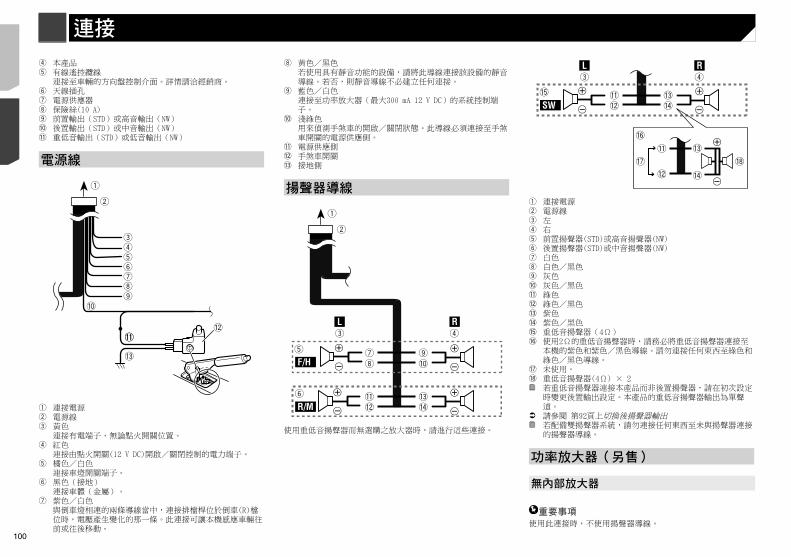
100
1
1
3
24
3
8
55
3
26
77
99
21
有內部放大器
重要事項使用此連接時,前置揚聲器/後置揚聲器訊號(STD)或中音/高音揚聲器訊號(NW)從揚聲器導線輸出。
1 3
28
99
1 系統遙控器連接至藍色/白色纜線。
2 功率放大器(另售)3 連接RCA線(另售)4 連接後置輸出(STD)
連接中音輸出(NW)5 後置揚聲器(STD)
中音揚聲器(NW)6 連接前置輸出(STD)
連接高音輸出(NW)7 前置揚聲器(STD)
高音揚聲器(NW)8 連接重低音揚聲器輸出(STD)
連接低音輸出(NW)9 重低音揚聲器(STD)
低音揚聲器(NW) 請在標準模式(STD)或網路模式(NW)之間選擇適當的揚聲器模式。
請參閱 第66頁上首次啟動時
4 本產品5 有線遙控纜線
連接至車輛的方向盤控制介面。詳情請洽經銷商。6 天線插孔7 電源供應器8 保險絲(10 A)9 前置輸出(STD)或高音輸出(NW)a 後置輸出(STD)或中音輸出(NW)b 重低音輸出(STD)或低音輸出(NW)
電源線
1
2
3456789
a
bc
b
d
1 連接電源2 電源線3 黃色
連接有電端子,無論點火開關位置。4 紅色
連接由點火開關(12 V DC)開啟/關閉控制的電力端子。5 橘色/白色
連接車燈開關端子。6 黑色(接地)
連接車體(金屬)。7 紫色/白色
與倒車燈相連的兩條導線當中,連接排檔桿位於倒車(R)檔位時,電壓產生變化的那一條。此連接可讓本機感應車輛往前或往後移動。
8 黃色/黑色 若使用具有靜音功能的設備,請將此導線連接該設備的靜音導線。若否,則靜音導線不必建立任何連接。
9 藍色/白色 連接至功率放大器(最大300 mA 12 V DC)的系統控制端子。
a 淺綠色 用來偵測手煞車的開啟/關閉狀態。此導線必須連接至手煞車開關的電源供應側。
b 電源供應側c 手煞車開關d 接地側
揚聲器導線
1
2
9a
de
7
43
5
6
8
bc
L R
F/H
R/M
使用重低音揚聲器而無選購之放大器時,請進行這些連接。
de
43
f bc
L R
SW
b
c
g
e
d
h i
1 連接電源2 電源線3 左4 右5 前置揚聲器(STD)或高音揚聲器(NW)6 後置揚聲器(STD)或中音揚聲器(NW)7 白色8 白色/黑色9 灰色a 灰色/黑色b 綠色c 綠色/黑色d 紫色e 紫色/黑色f 重低音揚聲器(4Ω)g 使用2Ω的重低音揚聲器時,請務必將重低音揚聲器連接至
本機的紫色和紫色/黑色導線。請勿連接任何東西至綠色和綠色/黑色導線。
h 未使用。i 重低音揚聲器(4Ω) × 2 若重低音揚聲器連接本產品而非後置揚聲器,請在初次設定時變更後置輸出設定。本產品的重低音揚聲器輸出為單聲道。
請參閱 第92頁上切換後揚聲器輸出 若配備雙揚聲器系統,請勿連接任何東西至未與揚聲器連接的揚聲器導線。
功率放大器(另售)
無內部放大器
重要事項使用此連接時,不使用揚聲器導線。
100 < CRD4925-A >< CRD4925-A >
連接 連接
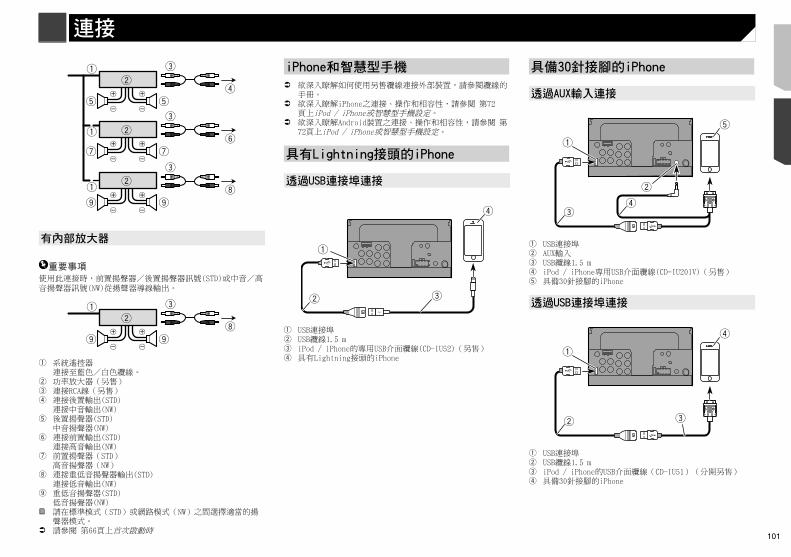
101
1
1
3
24
3
8
55
3
26
77
99
21
有內部放大器
重要事項使用此連接時,前置揚聲器/後置揚聲器訊號(STD)或中音/高音揚聲器訊號(NW)從揚聲器導線輸出。
1 3
28
99
1 系統遙控器連接至藍色/白色纜線。
2 功率放大器(另售)3 連接RCA線(另售)4 連接後置輸出(STD)
連接中音輸出(NW)5 後置揚聲器(STD)
中音揚聲器(NW)6 連接前置輸出(STD)
連接高音輸出(NW)7 前置揚聲器(STD)
高音揚聲器(NW)8 連接重低音揚聲器輸出(STD)
連接低音輸出(NW)9 重低音揚聲器(STD)
低音揚聲器(NW) 請在標準模式(STD)或網路模式(NW)之間選擇適當的揚聲器模式。
請參閱 第66頁上首次啟動時
iPhone和智慧型手機
欲深入瞭解如何使用另售纜線連接外部裝置,請參閱纜線的手冊。
欲深入瞭解iPhone之連接、操作和相容性,請參閱 第72頁上iPod / iPhone或智慧型手機設定。
欲深入瞭解Android裝置之連接、操作和相容性,請參閱 第72頁上iPod / iPhone或智慧型手機設定。
具有Lightning接頭的iPhone
透過USB連接埠連接
1
2
4
3
1 USB連接埠2 USB纜線1.5 m3 iPod / iPhone的專用USB介面纜線(CD-IU52)(另售)4 具有Lightning接頭的iPhone
具備30針接腳的iPhone
透過AUX輸入連接
1
2
5
34
1 USB連接埠2 AUX輸入3 USB纜線1.5 m4 iPod / iPhone專用USB介面纜線(CD-IU201V)(另售)5 具備30針接腳的iPhone
透過USB連接埠連接
1
4
2 3
1 USB連接埠2 USB纜線1.5 m3 iPod / iPhone的USB介面纜線(CD-IU51)(分開另售)4 具備30針接腳的iPhone
de
43
f bc
L R
SW
b
c
g
e
d
h i
1 連接電源2 電源線3 左4 右5 前置揚聲器(STD)或高音揚聲器(NW)6 後置揚聲器(STD)或中音揚聲器(NW)7 白色8 白色/黑色9 灰色a 灰色/黑色b 綠色c 綠色/黑色d 紫色e 紫色/黑色f 重低音揚聲器(4Ω)g 使用2Ω的重低音揚聲器時,請務必將重低音揚聲器連接至
本機的紫色和紫色/黑色導線。請勿連接任何東西至綠色和綠色/黑色導線。
h 未使用。i 重低音揚聲器(4Ω) × 2 若重低音揚聲器連接本產品而非後置揚聲器,請在初次設定時變更後置輸出設定。本產品的重低音揚聲器輸出為單聲道。
請參閱 第92頁上切換後揚聲器輸出 若配備雙揚聲器系統,請勿連接任何東西至未與揚聲器連接的揚聲器導線。
功率放大器(另售)
無內部放大器
重要事項使用此連接時,不使用揚聲器導線。
101< CRD4925-A >
連接 連接
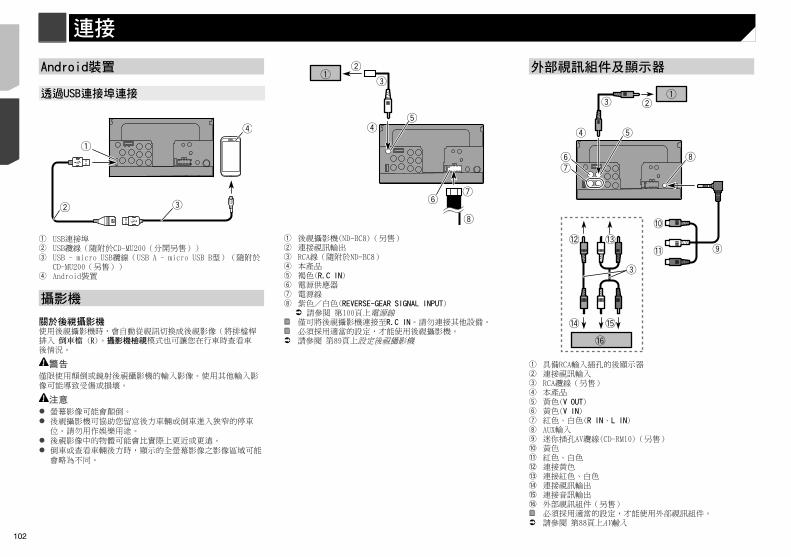
102
警告切勿將後顯示器安裝在駕駛人行車時可以觀看視訊來源的位置。本產品的後置視訊輸出用於連接顯示器,讓後座乘客觀看視訊來源。
Android裝置
透過USB連接埠連接
2
1
4
3
1 USB連接埠2 USB纜線(隨附於CD-MU200(分開另售))3 USB - micro USB纜線(USB A - micro USB B型)(隨附於
CD-MU200(另售))4 Android裝置
攝影機
關於後視攝影機使用後視攝影機時,會自動從視訊切換成後視影像(將排檔桿排入 倒車檔 (R)。攝影機檢視模式也可讓您在行車時查看車後情況。
警告僅限使用顛倒或鏡射後視攝影機的輸入影像。使用其他輸入影像可能導致受傷或損壞。
注意 螢幕影像可能會顛倒。 後視攝影機可協助您留意後方車輛或倒車進入狹窄的停車
位。請勿用作娛樂用途。 後視影像中的物體可能會比實際上更近或更遠。 倒車或查看車輛後方時,顯示的全螢幕影像之影像區域可能
會略為不同。
12
3
45
67
8
1 後視攝影機(ND-BC8)(另售)2 連接視訊輸出3 RCA線(隨附於ND-BC8)4 本產品5 褐色(R.C IN)6 電源供應器7 電源線8 紫色/白色(REVERSE-GEAR SIGNAL INPUT) 請參閱 第100頁上電源線
僅可將後視攝影機連接至R.C IN。請勿連接其他設備。 必須採用適當的設定,才能使用後視攝影機。 請參閱 第89頁上設定後視攝影機
外部視訊組件及顯示器
123
8
9
a
b
3
c d
e f
g
54
67
1 具備RCA輸入插孔的後顯示器2 連接視訊輸入3 RCA纜線(另售)4 本產品5 黃色(V OUT)6 黃色(V IN)7 紅色、白色(R IN、L IN)8 AUX輸入9 迷你插孔AV纜線(CD-RM10)(另售)a 黃色b 紅色、白色c 連接黃色d 連接紅色、白色e 連接視訊輸出f 連接音訊輸出g 外部視訊組件(另售) 必須採用適當的設定,才能使用外部視訊組件。 請參閱 第88頁上AV輸入
102 < CRD4925-A >< CRD4925-A >
連接 連接
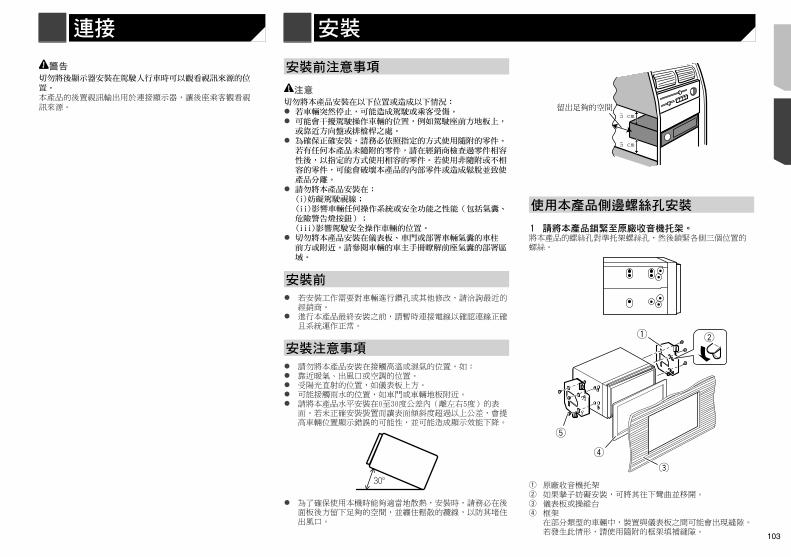
103
警告切勿將後顯示器安裝在駕駛人行車時可以觀看視訊來源的位置。本產品的後置視訊輸出用於連接顯示器,讓後座乘客觀看視訊來源。
安裝前注意事項
注意切勿將本產品安裝在以下位置或造成以下情況: 若車輛突然停止,可能造成駕駛或乘客受傷。 可能會干擾駕駛操作車輛的位置,例如駕駛座前方地板上,或靠近方向盤或排檔桿之處。
為確保正確安裝,請務必依照指定的方式使用隨附的零件。若有任何本產品未隨附的零件,請在經銷商檢查過零件相容性後,以指定的方式使用相容的零件。若使用非隨附或不相容的零件,可能會破壞本產品的內部零件或造成鬆脫並致使產品分離。
請勿將本產品安裝在:(i)妨礙駕駛視線; (ii)影響車輛任何操作系統或安全功能之性能(包括氣囊、危險警告燈按鈕); (iii)影響駕駛安全操作車輛的位置。
切勿將本產品安裝在儀表板、車門或部署車輛氣囊的車柱前方或附近。請參閱車輛的車主手冊瞭解前座氣囊的部署區域。
安裝前
若安裝工作需要對車輛進行鑽孔或其他修改,請洽詢最近的經銷商。
進行本產品最終安裝之前,請暫時連接電線以確認連線正確且系統運作正常。
安裝注意事項
請勿將本產品安裝在接觸高溫或濕氣的位置,如: 靠近暖氣、出風口或空調的位置。 受陽光直射的位置,如儀表板上方。 可能接觸雨水的位置,如車門或車輛地板附近。 請將本產品水平安裝在0至30度公差內(離左右5度)的表
面。若未正確安裝裝置而讓表面傾斜度超過以上公差,會提高車輛位置顯示錯誤的可能性,並可能造成顯示效能下降。
30°
為了確保使用本機時能夠適當地散熱,安裝時,請務必在後面板後方留下足夠的空間,並纏住鬆散的纜線,以防其堵住出風口。
5cm
使用本產品側邊螺絲孔安裝
1 請將本產品鎖緊至原廠收音機托架。將本產品的螺絲孔對準托架螺絲孔,然後鎖緊各側三個位置的螺絲。
1
3
5
2
4
1 原廠收音機托架2 如果摯子妨礙安裝,可將其往下彎曲並移開。3 儀表板或操縱台4 框架
在部分類型的車輛中,裝置與儀表板之間可能會出現縫隙。若發生此情形,請使用隨附的框架填補縫隙。
安裝
外部視訊組件及顯示器
123
8
9
a
b
3
c d
e f
g
54
67
1 具備RCA輸入插孔的後顯示器2 連接視訊輸入3 RCA纜線(另售)4 本產品5 黃色(V OUT)6 黃色(V IN)7 紅色、白色(R IN、L IN)8 AUX輸入9 迷你插孔AV纜線(CD-RM10)(另售)a 黃色b 紅色、白色c 連接黃色d 連接紅色、白色e 連接視訊輸出f 連接音訊輸出g 外部視訊組件(另售) 必須採用適當的設定,才能使用外部視訊組件。 請參閱 第88頁上AV輸入
103< CRD4925-A >
連接 連接 安裝

104
顯示圖示,且無法操作。 操作與視訊配置不相容。
— 無法操作。(例如DVD播放不提供該角度、音訊系統、字幕語言等。)
影像停止(暫停)且無法操作本產品。 播放碟片時無法讀取資料。
— 停止播放,再重新開始。
畫面拉長,且長寬比不正確。 顯示幕的長寬比設定不正確。
— 請為該影像選擇適當的設定。
顯示家長監控訊息,無法播放DVD。 家長監控功能開啟。
— 關閉家長監控功能或變更等級。
無法取消DVD播放的家長監控功能。 密碼錯誤。
— 請輸入正確的密碼。
播放未採用在「DVD/DivX 設定」中選擇的音訊語言和字幕語言設定。 DVD播放未採用在「DVD/DivX 設定」中選擇的對話或字幕語
言。— 如果碟片未錄製在「DVD/DivX 設定」中選擇的語言,則
無法切換至所選的語言。
播放時,影像非常不清晰/失真,而且偏暗。 碟片錄有防拷訊號。(有些碟片可能錄有此訊號。)
— 由於本產品相容於類比防拷系統,因此,使用某些顯示器觀看具有保護訊號的碟片時,影像可能會出現水平條紋或其他缺陷。此並非故障。
無法操作iPod。 iPod凍結。
— 使用iPod / iPhone專用USB介面纜線重新連接iPod。— 更新iPod軟體版本。
發生錯誤。— 使用iPod / iPhone專用USB介面纜線重新連接iPod。— 將車輛停在安全的位置並關閉引擎。將點火鑰匙轉回關閉
(ACC OFF)。然後重新啟動引擎,再開啟本產品的電源。— 更新iPod軟體版本。
纜線未正確連接。— 請以正確方式連接纜線。
聽不見iPod的聲音。 同時使用Bluetooth及USB連線時,音訊輸出方向可能會自動
切換。— 使用iPod變更音訊輸出方向。
5 扁頭螺絲請確定使用本產品隨附的螺絲。
安裝麥克風
X5850BT X2850BT 調整麥克風的方向和與駕駛的距離,將麥克風安裝在最容易
接收駕駛聲音的位置。 連接麥克風之前,請務必關閉(ACC OFF)產品電源。
安裝在遮陽板上
1 將麥克風導線裝入溝槽。
1
2
1 麥克風導線2 溝槽
2 將麥克風夾安裝在遮陽板上。
1
2
1 麥克風夾2 夾子
使用另售的夾子固定車輛內部的導線。遮陽板位於朝上位置時,將麥克風安裝至遮陽板上。若遮陽板位在朝下的位置,則無法識別駕駛的聲音。
安裝在轉向機柱上
1 滑動麥克風座並按壓突出部位,從麥克風夾拆下麥克風座。
1
2
1 突出部位2 麥克風座
2 將麥克風安裝在轉向機柱上。
2
1
1 雙面膠2 夾子
使用另售的夾子固定車輛內部的導線。 使其與方向盤保持距離。
調整麥克風角度
故障排除
若操作本產品時有問題,請參閱本節。常見問題以及可能原因和解決方法如下。若在此找不到問題的解決方法,請聯絡經銷商或最近的Pioneer授權服務中心。
常見問題顯示黑色畫面,並且無法使用觸控面板按鍵操作。 「Power OFF」模式已啟用。
— 按本產品上任何按鈕即可解除此模式。
AV畫面的問題無法播放CD或DVD。 碟片插入方向上下顛倒。
— 確定碟片標籤朝上後再插入。 碟片髒污。
— 清潔碟片。 碟片破裂或出現其他破損。
— 插入正常的圓形碟片。 碟片中的檔案屬於不支援的檔案格式。
— 檢查檔案格式。 無法播放碟片格式。
— 請更換碟片。 裝入的碟片屬於本產品無法播放的類型。
— 請檢查碟片類型。
畫面遭注意訊息覆蓋,無法顯示視訊。 手煞車導線未連接或未作動。
— 正確連接手煞車導線並作動手煞車。 手煞車連鎖啟動。
— 將車輛停在安全的位置並作動手煞車。
連接的設備未輸出視訊。 「AV 輸入」或「AUX 輸入」設定不正確。
— 修正設定。
音訊或視訊跳過。 本產品未確實固定。
— 請確實固定本產品。
未產生聲音。無法調高音量。 纜線未正確連接。
— 請以正確方式連接纜線。 系統正在執行DVD-Video靜態、慢動作或逐格播放。
— DVD-Video靜態、慢動作或逐格播放時,不會輸出聲音。 播放碟片時,系統暫停或執行、快速倒轉或前進。
— 如使用非音樂CD(CD-DA)的媒體,快速倒轉或前進時不會輸出聲音。
附錄
104 < CRD4925-A >< CRD4925-A >
安裝 附錄 附錄
105
顯示圖示,且無法操作。 操作與視訊配置不相容。
— 無法操作。(例如DVD播放不提供該角度、音訊系統、字幕語言等。)
影像停止(暫停)且無法操作本產品。 播放碟片時無法讀取資料。
— 停止播放,再重新開始。
畫面拉長,且長寬比不正確。 顯示幕的長寬比設定不正確。
— 請為該影像選擇適當的設定。
顯示家長監控訊息,無法播放DVD。 家長監控功能開啟。
— 關閉家長監控功能或變更等級。
無法取消DVD播放的家長監控功能。 密碼錯誤。
— 請輸入正確的密碼。
播放未採用在「DVD/DivX 設定」中選擇的音訊語言和字幕語言設定。 DVD播放未採用在「DVD/DivX 設定」中選擇的對話或字幕語
言。— 如果碟片未錄製在「DVD/DivX 設定」中選擇的語言,則
無法切換至所選的語言。
播放時,影像非常不清晰/失真,而且偏暗。 碟片錄有防拷訊號。(有些碟片可能錄有此訊號。)
— 由於本產品相容於類比防拷系統,因此,使用某些顯示器觀看具有保護訊號的碟片時,影像可能會出現水平條紋或其他缺陷。此並非故障。
無法操作iPod。 iPod凍結。
— 使用iPod / iPhone專用USB介面纜線重新連接iPod。— 更新iPod軟體版本。
發生錯誤。— 使用iPod / iPhone專用USB介面纜線重新連接iPod。— 將車輛停在安全的位置並關閉引擎。將點火鑰匙轉回關閉
(ACC OFF)。然後重新啟動引擎,再開啟本產品的電源。— 更新iPod軟體版本。
纜線未正確連接。— 請以正確方式連接纜線。
聽不見iPod的聲音。 同時使用Bluetooth及USB連線時,音訊輸出方向可能會自動
切換。— 使用iPod變更音訊輸出方向。
電話畫面的問題因無法使用觸控面板按鍵撥號,所以無法進行撥號。 電話超出服務範圍。
— 重新進入服務範圍後再重試。 目前無法建立行動電話與本產品之間的連線。
— 請執行連線程序。 在同時連接到本產品的兩支行動電話中,如果第一支電話在
撥號、響鈴或正在進行通話,則第二支電話就無法撥號。— 在兩支行動電話中的第一支操作完成之後,使用切換裝置
按鍵切換到第二支電話,然後再撥號。
應用程式畫面的問題顯示黑色畫面。 操作應用程式時,智慧型手機端的應用程式結束。
— 按下 顯示最上層選單畫面。 智慧型手機的作業系統可能在等待畫面操作。
— 將車輛停在安全的位置,檢查智慧型手機的畫面。
有顯示畫面,但完全無法操作。 發生錯誤。
— 將車輛停在安全的位置並關閉點火開關(ACC OFF)。接著再次開啟點火開關(ACC ON)。
— 連接Android裝置時,請先中斷本產品的Bluetooth連線,然後再重新連接。
智慧型手機未充電。 充電期間長時間使用智慧型手機,造成智慧型手機溫度上
升,所以充電停止。— 中斷智慧型手機與纜線的連接,並等候至智慧型手機冷
卻。 消耗的電量比充電電量還多。
— 停止智慧型手機上所有不必要的服務,即可解決此問題。
錯誤訊息
本產品發生問題時,顯示幕上會出現錯誤訊息。請參閱下表確認問題,然後採取建議的修正措施。若問題持續發生,請記下錯誤訊息並聯絡經銷商或最近的Pioneer服務中心。
常見故障AMP ERROR 本產品無法運作或揚聲器連線不正確;已啟動保護電路。
— 檢查揚聲器連線。若關閉/開啟引擎後訊息仍無法消失,請向經銷商或Pioneer授權服務中心尋求協助。
Product overheat. System will be shut down automatically in 1 minute. Restart the product by ACC Off/On may fix this problem. If this message keep showing up, it is possible that some problem occurred in the product. 本產品溫度過高,無法運作。
— 依照畫面上顯示的指示操作。若無法解決問題,請向經銷商或Pioneer授權服務中心尋求協助。
Spotify0 已達跳過上限。
— 請勿超過跳過上限。— Spotify會限制每小時可跳過的總數。
確認USB USB接頭或USB纜線發生短路。
— 檢查USB接頭或USB纜線是否卡住或損壞。 連接的USB儲存裝置消耗量超過最大允許電流。
— 移除並停用USB儲存裝置。將點火開關轉至OFF,再轉至ACC或ON,然後連接相容的USB儲存裝置。
碟片Error-02-XX/FF-FF 碟片髒污。
— 清潔碟片。 碟片有刮傷。
— 請更換碟片。 碟片裝入方向上下顛倒。
— 確定碟片的裝入方向正確。 存在電氣或機械錯誤。
— 按下RESET按鈕。
非本區域光碟 碟片和本產品的區碼不同。
— 請換上區碼正確的DVD。
無法判別碟片 本產品無法播放此類型的碟片。
— 請更換為本產品可播放的碟片。
無法判別檔案 本產品無法播放此類型的檔案。
— 請選擇可播放的檔案。
故障排除
若操作本產品時有問題,請參閱本節。常見問題以及可能原因和解決方法如下。若在此找不到問題的解決方法,請聯絡經銷商或最近的Pioneer授權服務中心。
常見問題顯示黑色畫面,並且無法使用觸控面板按鍵操作。 「Power OFF」模式已啟用。
— 按本產品上任何按鈕即可解除此模式。
AV畫面的問題無法播放CD或DVD。 碟片插入方向上下顛倒。
— 確定碟片標籤朝上後再插入。 碟片髒污。
— 清潔碟片。 碟片破裂或出現其他破損。
— 插入正常的圓形碟片。 碟片中的檔案屬於不支援的檔案格式。
— 檢查檔案格式。 無法播放碟片格式。
— 請更換碟片。 裝入的碟片屬於本產品無法播放的類型。
— 請檢查碟片類型。
畫面遭注意訊息覆蓋,無法顯示視訊。 手煞車導線未連接或未作動。
— 正確連接手煞車導線並作動手煞車。 手煞車連鎖啟動。
— 將車輛停在安全的位置並作動手煞車。
連接的設備未輸出視訊。 「AV 輸入」或「AUX 輸入」設定不正確。
— 修正設定。
音訊或視訊跳過。 本產品未確實固定。
— 請確實固定本產品。
未產生聲音。無法調高音量。 纜線未正確連接。
— 請以正確方式連接纜線。 系統正在執行DVD-Video靜態、慢動作或逐格播放。
— DVD-Video靜態、慢動作或逐格播放時,不會輸出聲音。 播放碟片時,系統暫停或執行、快速倒轉或前進。
— 如使用非音樂CD(CD-DA)的媒體,快速倒轉或前進時不會輸出聲音。
附錄
105< CRD4925-A >
附錄 附錄
106
可播放碟片
DVD-Video
是DVD Format/Logo Licensing Corporation 的商標。
本產品無法播放DVD-Audio碟片。本DVD光碟機可能無法播放所有附有以上標記的碟片。
CD
以AVCHD格式錄製的光碟
本機與以AVCHD(先進高畫質視訊編碼)格式錄製的光碟不相容。請勿插入AVCHD碟片。否則可能無法退出碟片。
播放雙面碟
雙面碟有兩面,一面為音訊的可燒錄CD,另一面為視訊的可燒錄DVD。
本產品可播放DVD面。然而,由於雙面碟的CD面不相容於一般CD標準,因此,本產品可能無法播放CD面。
經常載入和退出雙面碟可能會刮壞碟片。 嚴重刮傷會導致本產品出現播放問題。有時雙面碟可能會卡
在碟片槽中而無法退出。為防止這種情形發生,建議勿將雙面碟用於本產品。
如需關於雙面碟的詳細資訊,請洽詢製造商。
略過 插入的碟片包含受DRM保護的檔案。
— 已跳過受保護的檔案。
保護 插入之碟片中所有的檔案均內嵌DRM。
— 請更換碟片。
TEMP 本產品的溫度超出正常工作溫度範圍。
— 請等待本產品溫度回到正常工作溫度範圍內。
租賃已到期。 插入的碟片包含已到期的DivX VOD內容。
— 請選擇可播放的檔案。
Video resolution not supported 檔案中有本產品無法播放的檔案。
— 請選擇可播放的檔案。
無法寫入快閃記憶體。 因某些因素導致無法儲存VOD內容的播放記錄。
— 請重試。— 若訊息頻繁出現,請洽詢經銷商。
您的設備沒有被授權播放這個DivX加密的視頻。 本產品的DivX登錄碼尚未經過DivX VOD內容供應商授權。
— 請向DivX VOD內容供應商登錄本產品。
不支援此視頻更新率 DivX檔案的畫面播放速率超過30 fps。
— 請選擇可播放的檔案。
AUDIO FORMAT NOT SUPPORTED 本產品不支援此類型的檔案。
— 請選擇可播放的檔案。
USB儲存裝置Error-02-9X/-DX 通訊失敗。
— 將點火開關轉到OFF,然後再轉回ON。— 中斷USB儲存裝置的連接。— 切換至不同的來源。接著再切回USB儲存裝置。
無法判別檔案 本產品無法播放此類型的檔案。
— 請選擇可播放的檔案。 連接之USB儲存裝置的安全功能已啟用。
— 依照USB儲存裝置的說明停用安全功能。
略過 連接的USB儲存裝置包含受DRM保護的檔案。
— 已跳過受保護的檔案。
保護 連接的USB儲存裝置中所有的檔案均內嵌DRM。
— 更換USB儲存裝置。
無法相容USB 本產品不支援連接的USB儲存裝置。
— 移除裝置,更換成相容的USB儲存裝置。
確認USB USB接頭或USB纜線短路。
— 檢查USB接頭或USB纜線是否卡住或損壞。 連接的USB儲存裝置消耗量超過最大允許電流。
— 移除並停用USB儲存裝置。將點火開關轉至OFF,再轉至ACC或ON,然後連接相容的USB儲存裝置。
HUB 錯誤 本產品不支援連接的USB集線器。
— 將USB儲存裝置直接連接至本產品。
無回應 本產品無法辨識已連接的USB儲存裝置。
— 移除裝置,更換成其他USB儲存裝置。
Video resolution not supported 檔案中有本產品無法播放的檔案。
— 請選擇可播放的檔案。
為保護你的手持裝置,USB已經斷線。請勿插入任何USB裝置於USB端子。請重新開機。 USB接頭或USB纜線短路。
— 檢查USB接頭或USB纜線是否卡住或損壞。 連接的USB儲存裝置消耗量超過最大允許電流。
— 移除並停用USB儲存裝置。將點火開關轉至OFF,再轉至ACC或ON,然後連接相容的USB儲存裝置。
iPod / iPhone的USB介面纜線短路。— 檢查iPod / iPhone專用USB介面纜線或USB纜線是否卡住
或損壞。
AUDIO FORMAT NOT SUPPORTED 本產品不支援此類型的檔案。
— 請選擇可播放的檔案。
iPodError-02-6X/-9X/-DX iPod故障。
— 拔下iPod的纜線。顯示iPod主選單後,重新連接iPod並重設。
Error-02-67 iPod韌體版本過時。
— 更新iPod版本。
BluetoothError-10 本產品的Bluetooth模組電源故障。
— 將點火開關轉向OFF,然後轉向ON。 如果執行以上動作後仍顯示錯誤訊息,請聯絡經銷商或Pioneer授權服務中心。
操作及保養碟片
操作碟片時,必須牢記一些基本的注意事項。
內建光碟機及保養
僅限使用傳統的圓形碟片。請勿使用其他形狀的碟片。 請勿使用破裂、缺口、扭曲或有其他損壞的碟片,否則可能
會損壞內建光碟機。 請使用12-cm碟片。請勿使用8-cm碟片或8-cm碟片轉接器。 使用可在標籤表面上印刷的碟片時,請檢查碟片說明及警
告。視碟片而定,有可能無法插入及退出。使用此類碟片可能會導致本設備受損。
請勿在碟片表面黏貼標籤、書寫或塗抹化學物質。 請勿在碟片貼上市售標籤或其他物品。 若要清潔碟片,請用軟布從中心向外擦拭。 凝結可能會暫時影響內建光碟機的效能。 由於碟片特性、碟片格式、錄製的應用程式、播放環境及存
放條件等緣故,可能會無法播放碟片。 道路顛簸會中斷碟片的播放。 使用碟片之前,請閱讀注意事項。
播放碟片的環境條件
在極端的高溫下,過溫保護功能可自動關閉本產品電源以保護本產品。
儘管產品已經過精心設計,但因機械磨損、使用或操作碟片之環境條件的緣故,碟片表面仍會出現不影響實際運作的小型刮傷。這不是本產品故障的跡象。請視為正常磨損。
106 < CRD4925-A >< CRD4925-A >
附錄 附錄
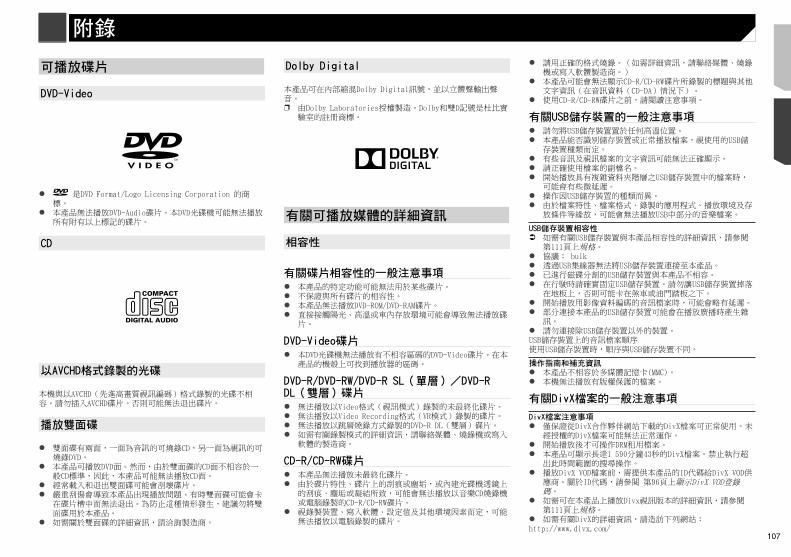
107
可播放碟片
DVD-Video
是DVD Format/Logo Licensing Corporation 的商標。
本產品無法播放DVD-Audio碟片。本DVD光碟機可能無法播放所有附有以上標記的碟片。
CD
以AVCHD格式錄製的光碟
本機與以AVCHD(先進高畫質視訊編碼)格式錄製的光碟不相容。請勿插入AVCHD碟片。否則可能無法退出碟片。
播放雙面碟
雙面碟有兩面,一面為音訊的可燒錄CD,另一面為視訊的可燒錄DVD。
本產品可播放DVD面。然而,由於雙面碟的CD面不相容於一般CD標準,因此,本產品可能無法播放CD面。
經常載入和退出雙面碟可能會刮壞碟片。 嚴重刮傷會導致本產品出現播放問題。有時雙面碟可能會卡
在碟片槽中而無法退出。為防止這種情形發生,建議勿將雙面碟用於本產品。
如需關於雙面碟的詳細資訊,請洽詢製造商。
Dolby Digital
本產品可在內部縮混Dolby Digital訊號,並以立體聲輸出聲音。p 由Dolby Laboratories授權製造。Dolby和雙D記號是杜比實
驗室的註冊商標。
有關可播放媒體的詳細資訊
相容性
有關碟片相容性的一般注意事項 本產品的特定功能可能無法用於某些碟片。 不保證與所有碟片的相容性。 本產品無法播放DVD-ROM/DVD-RAM碟片。 直接接觸陽光、高溫或車內存放環境可能會導致無法播放碟
片。
DVD-Video碟片 本DVD光碟機無法播放有不相容區碼的DVD-Video碟片。在本
產品的機殼上可找到播放器的區碼。
DVD-R/DVD-RW/DVD-R SL(單層)/DVD-R DL(雙層)碟片 無法播放以Video格式(視訊模式)錄製的未最終化碟片。 無法播放以Video Recording格式(VR模式)錄製的碟片。 無法播放以跳層燒錄方式錄製的DVD-R DL(雙層)碟片。 如需有關錄製模式的詳細資訊,請聯絡媒體、燒錄機或寫入
軟體的製造商。
CD-R/CD-RW碟片 本產品無法播放未最終化碟片。 由於碟片特性、碟片上的刮痕或塵垢,或內建光碟機透鏡上
的刮痕、塵垢或凝結所致,可能會無法播放以音樂CD燒錄機或電腦錄製的CD-R/CD-RW碟片。
視錄製裝置、寫入軟體、設定值及其他環境因素而定,可能無法播放以電腦錄製的碟片。
請用正確的格式燒錄。(如需詳細資訊,請聯絡媒體、燒錄機或寫入軟體製造商。)
本產品可能會無法顯示CD-R/CD-RW碟片所錄製的標題與其他文字資訊(在音訊資料(CD-DA)情況下)。
使用CD-R/CD-RW碟片之前,請閱讀注意事項。
有關USB儲存裝置的一般注意事項 請勿將USB儲存裝置置於任何高溫位置。 本產品能否識別儲存裝置或正常播放檔案,視使用的USB儲
存裝置種類而定。 有些音訊及視訊檔案的文字資訊可能無法正確顯示。 請正確使用檔案的副檔名。 開始播放具有複雜資料夾階層之USB儲存裝置中的檔案時,
可能會有些微延遲。 操作因USB儲存裝置的種類而異。 由於檔案特性、檔案格式、錄製的應用程式、播放環境及存
放條件等緣故,可能會無法播放USB中部分的音樂檔案。
USB儲存裝置相容性 如需有關USB儲存裝置與本產品相容性的詳細資訊,請參閱
第111頁上規格。 協議: bulk 透過USB集線器無法將USB儲存裝置連接至本產品。 已進行磁碟分割的USB儲存裝置與本產品不相容。 在行駛時請確實固定USB儲存裝置。請勿讓USB儲存裝置掉落
在地板上,否則可能卡在煞車或油門踏板之下。 開始播放用影像資料編碼的音訊檔案時,可能會略有延遲。 部分連接本產品的USB儲存裝置可能會在播放廣播時產生雜
訊。 請勿連接除USB儲存裝置以外的裝置。USB儲存裝置上的音訊檔案順序使用USB儲存裝置時,順序與USB儲存裝置不同。
操作指南和補充資訊 本產品不相容於多媒體記憶卡(MMC)。 本機無法播放有版權保護的檔案。
有關DivX檔案的一般注意事項
DivX檔案注意事項 僅保證從DivX合作夥伴網站下載的DivX檔案可正常使用。未
經授權的DivX檔案可能無法正常運作。 開始播放後才可操作DRM租用檔案。 本產品可顯示長達1 590分鐘43秒的DivX檔案。禁止執行超
出此時間範圍的搜尋操作。 播放DivX VOD檔案前,需提供本產品的ID代碼給DivX VOD供
應商。關於ID代碼,請參閱 第96頁上顯示DivX VOD登錄碼。
如需可在本產品上播放Divx視訊版本的詳細資訊,請參閱 第111頁上規格。
如需有關DivX的詳細資訊,請造訪下列網站:http://www.divx.com/
BluetoothError-10 本產品的Bluetooth模組電源故障。
— 將點火開關轉向OFF,然後轉向ON。 如果執行以上動作後仍顯示錯誤訊息,請聯絡經銷商或Pioneer授權服務中心。
操作及保養碟片
操作碟片時,必須牢記一些基本的注意事項。
內建光碟機及保養
僅限使用傳統的圓形碟片。請勿使用其他形狀的碟片。 請勿使用破裂、缺口、扭曲或有其他損壞的碟片,否則可能
會損壞內建光碟機。 請使用12-cm碟片。請勿使用8-cm碟片或8-cm碟片轉接器。 使用可在標籤表面上印刷的碟片時,請檢查碟片說明及警
告。視碟片而定,有可能無法插入及退出。使用此類碟片可能會導致本設備受損。
請勿在碟片表面黏貼標籤、書寫或塗抹化學物質。 請勿在碟片貼上市售標籤或其他物品。 若要清潔碟片,請用軟布從中心向外擦拭。 凝結可能會暫時影響內建光碟機的效能。 由於碟片特性、碟片格式、錄製的應用程式、播放環境及存
放條件等緣故,可能會無法播放碟片。 道路顛簸會中斷碟片的播放。 使用碟片之前,請閱讀注意事項。
播放碟片的環境條件
在極端的高溫下,過溫保護功能可自動關閉本產品電源以保護本產品。
儘管產品已經過精心設計,但因機械磨損、使用或操作碟片之環境條件的緣故,碟片表面仍會出現不影響實際運作的小型刮傷。這不是本產品故障的跡象。請視為正常磨損。
107< CRD4925-A >
附錄 附錄
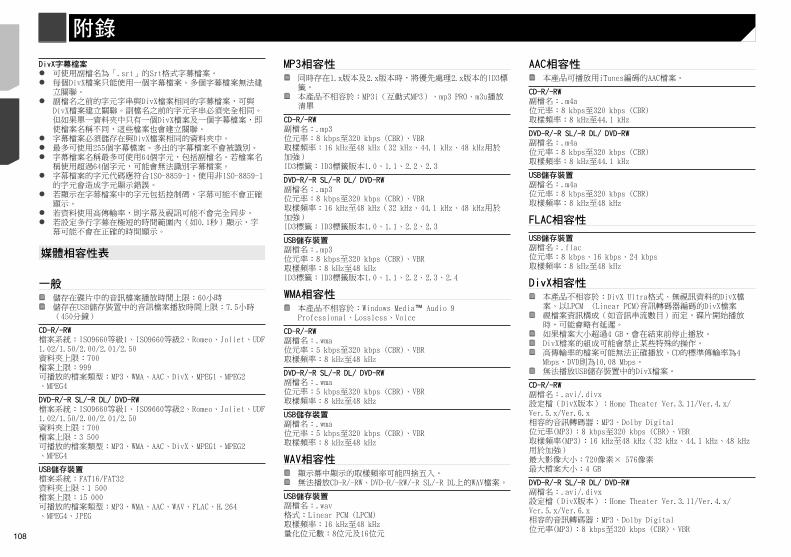
108
取樣頻率(MP3):16 kHz至48 kHz(32 kHz、44.1 kHz、48 kHz用於加強)最大影像大小:720像素× 576像素最大檔案大小:4 GB
視訊檔案相容性(USB) 視建立檔案的環境或檔案內容而定,檔案可能無法正確播放。
本產品不相容於封包寫入資料傳送。 本產品最多可識別32個字元(從第一個字元開始,包括副檔名及資料夾名稱)。視顯示區域而定,本產品會嘗試以縮小的字型大小顯示。然而,可顯示的字元數上限因各個字元及顯示區域的寬度而異。
資料夾選擇順序或其他操作可能會因編碼或寫入軟體而異。 無論原始錄製歌曲之間空白部分的長短,壓縮音訊碟片播放時,歌曲之間都會出現短暫的暫停。
.avi格式:MPEG-4/H.264相容的視訊轉碼器:MPEG-4(簡易設定檔)/H.264(基線設定檔)相容的音訊轉碼器:Linear PCM (LPCM) MP3最大解析度:640 像素 x 360 像素最大畫面播放速率:30 fps最大檔案大小:2 GB最長播放時間:150分鐘 視位元率而定,檔案可能無法播放。
.mp4格式:MPEG-4/H.264相容的視訊轉碼器:MPEG-4(簡易設定檔)/H.264(基線設定檔)相容的音訊轉碼器:AAC/Linear PCM (LPCM) MP3最大解析度:640 像素 x 360 像素最大畫面播放速率:30 fps最大檔案大小:2 GB最長播放時間:150分鐘 視位元率而定,檔案可能無法播放。
.3gp格式:MPEG-4/H.264相容的視訊轉碼器:MPEG-4(簡易設定檔)/H.264(基線設定檔)相容的音訊轉碼器:AAC/Linear PCM (LPCM) MP3最大解析度:640 像素 x 360 像素最大畫面播放速率:30 fps最大檔案大小:2 GB最長播放時間:150分鐘 視位元率而定,檔案可能無法播放。
.mkv格式:MPEG-4/H.264
DivX字幕檔案 可使用副檔名為「.srt」的Srt格式字幕檔案。 每個DivX檔案只能使用一個字幕檔案。多個字幕檔案無法建
立關聯。 副檔名之前的字元字串與DivX檔案相同的字幕檔案,可與
DivX檔案建立關聯。副檔名之前的字元字串必須完全相同。但如果單一資料夾中只有一個DivX檔案及一個字幕檔案,即使檔案名稱不同,這些檔案也會建立關聯。
字幕檔案必須儲存在與DivX檔案相同的資料夾中。 最多可使用255個字幕檔案。多出的字幕檔案不會被識別。 字幕檔案名稱最多可使用64個字元,包括副檔名。若檔案名
稱使用超過64個字元,可能會無法識別字幕檔案。 字幕檔案的字元代碼應符合ISO-8859-1。使用非ISO-8859-1
的字元會造成字元顯示錯誤。 若顯示在字幕檔案中的字元包括控制碼,字幕可能不會正確
顯示。 若資料使用高傳輸率,則字幕及視訊可能不會完全同步。 若設定多行字幕在極短的時間範圍內(如0.1秒)顯示,字
幕可能不會在正確的時間顯示。
媒體相容性表
一般 儲存在碟片中的音訊檔案播放時間上限:60小時 儲存在USB儲存裝置中的音訊檔案播放時間上限:7.5小時(450分鐘)
CD-R/-RW檔案系統:ISO9660等級1、ISO9660等級2、Romeo、Joliet、UDF 1.02/1.50/2.00/2.01/2.50資料夾上限:700檔案上限:999可播放的檔案類型:MP3、WMA、AAC、DivX、MPEG1、MPEG2、MPEG4
DVD-R/-R SL/-R DL/ DVD-RW檔案系統:ISO9660等級1、ISO9660等級2、Romeo、Joliet、UDF 1.02/1.50/2.00/2.01/2.50資料夾上限:700檔案上限:3 500可播放的檔案類型:MP3、WMA、AAC、DivX、MPEG1、MPEG2、MPEG4
USB儲存裝置檔案系統:FAT16/FAT32資料夾上限:1 500檔案上限:15 000可播放的檔案類型:MP3、WMA、AAC、WAV、FLAC、H.264、MPEG4、JPEG
MP3相容性 同時存在1.x版本及2.x版本時,將優先處理2.x版本的ID3標籤。
本產品不相容於:MP3i(互動式MP3)、mp3 PRO、m3u播放清單
CD-R/-RW副檔名:.mp3位元率:8 kbps至320 kbps (CBR)、VBR取樣頻率:16 kHz至48 kHz(32 kHz、44.1 kHz、48 kHz用於加強)ID3標籤:ID3標籤版本1.0、1.1、2.2、2.3
DVD-R/-R SL/-R DL/ DVD-RW副檔名:.mp3位元率:8 kbps至320 kbps (CBR)、VBR取樣頻率:16 kHz至48 kHz(32 kHz、44.1 kHz、48 kHz用於加強)ID3標籤:ID3標籤版本1.0、1.1、2.2、2.3
USB儲存裝置副檔名:.mp3位元率:8 kbps至320 kbps (CBR)、VBR取樣頻率:8 kHz至48 kHzID3標籤:ID3標籤版本1.0、1.1、2.2、2.3、2.4
WMA相容性 本產品不相容於:Windows Media™ Audio 9 Professional、Lossless、Voice
CD-R/-RW副檔名:.wma位元率:5 kbps至320 kbps (CBR)、VBR取樣頻率:8 kHz至48 kHz
DVD-R/-R SL/-R DL/ DVD-RW副檔名:.wma位元率:5 kbps至320 kbps (CBR)、VBR取樣頻率:8 kHz至48 kHz
USB儲存裝置副檔名:.wma位元率:5 kbps至320 kbps (CBR)、VBR取樣頻率:8 kHz至48 kHz
WAV相容性 顯示幕中顯示的取樣頻率可能四捨五入。 無法播放CD-R/-RW、DVD-R/-RW/-R SL/-R DL上的WAV檔案。
USB儲存裝置副檔名:.wav格式:Linear PCM (LPCM)取樣頻率:16 kHz至48 kHz量化位元數:8位元及16位元
AAC相容性 本產品可播放用iTunes編碼的AAC檔案。
CD-R/-RW副檔名:.m4a位元率:8 kbps至320 kbps (CBR)取樣頻率:8 kHz至44.1 kHz
DVD-R/-R SL/-R DL/ DVD-RW副檔名:.m4a位元率:8 kbps至320 kbps (CBR)取樣頻率:8 kHz至44.1 kHz
USB儲存裝置副檔名:.m4a位元率:8 kbps至320 kbps (CBR)取樣頻率:8 kHz至48 kHz
FLAC相容性
USB儲存裝置副檔名:.flac位元率:8 kbps、16 kbps、24 kbps取樣頻率:8 kHz至48 kHz
DivX相容性 本產品不相容於:DivX Ultra格式、無視訊資料的DivX檔案、以LPCM (Linear PCM)音訊轉碼器編碼的DivX檔案
視檔案資訊構成(如音訊串流數目)而定,碟片開始播放時,可能會略有延遲。
如果檔案大小超過4 GB,會在結束前停止播放。 DivX檔案的組成可能會禁止某些特殊的操作。 高傳輸率的檔案可能無法正確播放。CD的標準傳輸率為4 Mbps,DVD則為10.08 Mbps。
無法播放USB儲存裝置中的DivX檔案。
CD-R/-RW副檔名:.avi/.divx設定檔(DivX版本):Home Theater Ver.3.11/Ver.4.x/Ver.5.x/Ver.6.x相容的音訊轉碼器:MP3、Dolby Digital位元率(MP3):8 kbps至320 kbps (CBR)、VBR取樣頻率(MP3):16 kHz至48 kHz(32 kHz、44.1 kHz、48 kHz用於加強)最大影像大小:720像素× 576像素最大檔案大小:4 GB
DVD-R/-R SL/-R DL/ DVD-RW副檔名:.avi/.divx設定檔(DivX版本):Home Theater Ver.3.11/Ver.4.x/Ver.5.x/Ver.6.x相容的音訊轉碼器:MP3、Dolby Digital位元率(MP3):8 kbps至320 kbps (CBR)、VBR
108 < CRD4925-A >< CRD4925-A >
附錄 附錄
109
取樣頻率(MP3):16 kHz至48 kHz(32 kHz、44.1 kHz、48 kHz用於加強)最大影像大小:720像素× 576像素最大檔案大小:4 GB
視訊檔案相容性(USB) 視建立檔案的環境或檔案內容而定,檔案可能無法正確播放。
本產品不相容於封包寫入資料傳送。 本產品最多可識別32個字元(從第一個字元開始,包括副檔名及資料夾名稱)。視顯示區域而定,本產品會嘗試以縮小的字型大小顯示。然而,可顯示的字元數上限因各個字元及顯示區域的寬度而異。
資料夾選擇順序或其他操作可能會因編碼或寫入軟體而異。 無論原始錄製歌曲之間空白部分的長短,壓縮音訊碟片播放時,歌曲之間都會出現短暫的暫停。
.avi格式:MPEG-4/H.264相容的視訊轉碼器:MPEG-4(簡易設定檔)/H.264(基線設定檔)相容的音訊轉碼器:Linear PCM (LPCM) MP3最大解析度:640 像素 x 360 像素最大畫面播放速率:30 fps最大檔案大小:2 GB最長播放時間:150分鐘 視位元率而定,檔案可能無法播放。
.mp4格式:MPEG-4/H.264相容的視訊轉碼器:MPEG-4(簡易設定檔)/H.264(基線設定檔)相容的音訊轉碼器:AAC/Linear PCM (LPCM) MP3最大解析度:640 像素 x 360 像素最大畫面播放速率:30 fps最大檔案大小:2 GB最長播放時間:150分鐘 視位元率而定,檔案可能無法播放。
.3gp格式:MPEG-4/H.264相容的視訊轉碼器:MPEG-4(簡易設定檔)/H.264(基線設定檔)相容的音訊轉碼器:AAC/Linear PCM (LPCM) MP3最大解析度:640 像素 x 360 像素最大畫面播放速率:30 fps最大檔案大小:2 GB最長播放時間:150分鐘 視位元率而定,檔案可能無法播放。
.mkv格式:MPEG-4/H.264
相容的視訊轉碼器:MPEG-4(簡易設定檔)/H.264(基線設定檔)相容的音訊轉碼器:AAC/Linear PCM (LPCM) MP3/AC-3最大解析度:640 像素 x 360 像素最大畫面播放速率:30 fps最大檔案大小:2 GB最長播放時間:150分鐘 視位元率而定,檔案可能無法播放。
.mov格式:MPEG-4/H.264相容的視訊轉碼器:MPEG-4(簡易設定檔)/H.264(基線設定檔)相容的音訊轉碼器:AAC/Linear PCM (LPCM) MP3最大解析度:640 像素 x 360 像素最大畫面播放速率:30 fps最大檔案大小:2 GB最長播放時間:150分鐘 視位元率而定,檔案可能無法播放。
階層實例 本產品會指定資料夾編號。使用者無法指定資料夾編號。
Bluetooth
Bluetooth®文字商標及標誌為Bluetooth SIG, Inc.擁有之註冊商標,PIONEER CORPORATION已獲授權使用此類標記。其他商標及商業名稱為其各自擁有者所有。
WMA
Windows Media 是Microsoft Corporation於美國及/或其他國家的商標或註冊商標。本產品採用Microsoft Corporation開發之技術,未獲Microsoft Licensing, Inc.授權,不得使用或散佈此技術。
FLAC
Copyright © 2000-2009 Josh CoalsonCopyright © 2011-2013 Xiph.Org Foundation
無論修改與否,皆允許轉散佈及使用原始碼與二進位格式,前提為符合下列條件:— 轉散佈原始碼時,必須保留上述版權聲明、本條件清單及以
下免責聲明。— 轉散佈二進位格式時,必須在散佈版本隨附文件及/或其他
資料中複製上述版權聲明、本條件清單及以下免責聲明。— 事先未取得明確的書面許可,Xiph.org Foundation的名稱
及其貢獻者名稱皆不得用來背書或促銷由此軟體所衍生的產品。
本軟體是由著作權持有者及其貢獻者「原樣」提供,任何明示或默示保固,包括但不限於,默示的銷售性擔保和特定目的適用性擔保,一概不承擔。在任何情況下,對於因使用本軟體所致之任何直接、間接、附帶性、特殊性、懲罰性或衍生性損害(包括但不限於替代商品或服務之採購、無法使用、資料損失、利益損失或業務中斷),無論原因為何且無論基於契約、嚴格責任或侵權行為(包括過失等)之法理,基金會及貢獻者概不負責,即使獲知此類損害之可能性亦然。
DivX
DivX Certified®裝置已經過測試可進行高品質DivX®(.divx, .avi)視訊播放。看到DivX標誌時,即知您可自由播放最愛的DivX電影。DivX®、DivX Certified®和相關標誌是DivX, LLC的商標,必須取得授權才能使用。本DivX Certified®裝置已通過嚴格的測試,以確保可正常播放DivX®影片。如要播放購買的DivX電影,請先在vod.divx.com註冊您的裝置。從您裝置的設定選單,在 DivX VOD區段中找到您的註冊碼。 請參閱 第96頁上顯示DivX VOD登錄碼
AAC
AAC(Advanced Audio Coding,進階音訊編碼)是MPEG-2及MPEG-4使用的音訊壓縮技術標準。有多種應用程式可用來對AAC檔案進行編碼,但檔案格式與副檔名因用於編碼的應用程式而異。本機可播放由iTunes編碼的AAC檔案。
Android™
Android是Google Inc.的商標。
AAC相容性 本產品可播放用iTunes編碼的AAC檔案。
CD-R/-RW副檔名:.m4a位元率:8 kbps至320 kbps (CBR)取樣頻率:8 kHz至44.1 kHz
DVD-R/-R SL/-R DL/ DVD-RW副檔名:.m4a位元率:8 kbps至320 kbps (CBR)取樣頻率:8 kHz至44.1 kHz
USB儲存裝置副檔名:.m4a位元率:8 kbps至320 kbps (CBR)取樣頻率:8 kHz至48 kHz
FLAC相容性
USB儲存裝置副檔名:.flac位元率:8 kbps、16 kbps、24 kbps取樣頻率:8 kHz至48 kHz
DivX相容性 本產品不相容於:DivX Ultra格式、無視訊資料的DivX檔案、以LPCM (Linear PCM)音訊轉碼器編碼的DivX檔案
視檔案資訊構成(如音訊串流數目)而定,碟片開始播放時,可能會略有延遲。
如果檔案大小超過4 GB,會在結束前停止播放。 DivX檔案的組成可能會禁止某些特殊的操作。 高傳輸率的檔案可能無法正確播放。CD的標準傳輸率為4 Mbps,DVD則為10.08 Mbps。
無法播放USB儲存裝置中的DivX檔案。
CD-R/-RW副檔名:.avi/.divx設定檔(DivX版本):Home Theater Ver.3.11/Ver.4.x/Ver.5.x/Ver.6.x相容的音訊轉碼器:MP3、Dolby Digital位元率(MP3):8 kbps至320 kbps (CBR)、VBR取樣頻率(MP3):16 kHz至48 kHz(32 kHz、44.1 kHz、48 kHz用於加強)最大影像大小:720像素× 576像素最大檔案大小:4 GB
DVD-R/-R SL/-R DL/ DVD-RW副檔名:.avi/.divx設定檔(DivX版本):Home Theater Ver.3.11/Ver.4.x/Ver.5.x/Ver.6.x相容的音訊轉碼器:MP3、Dolby Digital位元率(MP3):8 kbps至320 kbps (CBR)、VBR
109< CRD4925-A >
附錄 附錄
110
保養液晶螢幕
清除液晶螢幕上的灰塵或清潔液晶螢幕時,請先關閉本產品電源,再用柔軟的乾布擦拭。
擦拭液晶螢幕時,請小心勿刮傷表面。請勿使用刺激性或腐蝕性的化學清潔劑。
LED(發光二極體)背光
發光二極體位於顯示幕內部,為液晶螢幕提供照明。 在低溫下使用LED背光可能會因為液晶螢幕特性而致使影像
延遲加劇及畫質降低。畫質會隨溫度增加而改善。 LED背光的產品使用壽命超過10 000小時。但若在高溫下使
用,使用壽命可能會縮短。 如果LED背光的使用壽命結束,螢幕將變暗,且看不見影
像。此時請洽詢經銷商或最近的Pioneer授權服務中心。
規格
一般額定電源 ................................... ....14,4V DC
(容許電壓範圍:12V至14,4V DC)接地系統 ......................................... 負極型最大電流消耗 ................................. ....10,0 A尺寸(寬x高x深):D機身 ......................... ....178 mmx100 mmx165 mm前端部分 ....................... ....171 mmx97 mmx18 mm
(AVH-X5850BT/AVH-X4850DVD)前端部分 ........................ ....171 mmx97 mmx3 mm
(AVH-X2850BT/AVH-X1850DVD)重量 ......................................... ....1,8 kg
(AVH-X5850BT/AVH-X4850DVD)重量 ......................................... ....1,6 kg
(AVH-X2850BT/AVH-X1850DVD)
顯示器螢幕尺寸/長寬比 ..................... ....6,95吋寬/16:9
(有效顯示區域:156,6 mmx81,6 mm) (AVH-X5850BT/AVH-X4850DVD)
螢幕尺寸/長寬比 ...................... ....6,2吋寬/16:9 (有效顯示區域:137,52 mmx77,232 mm) (AVH-X2850BT/AVH-X1850DVD)
像素 ..................... ....1 152 000 ( 2 400 × 480 )顯示方法 .............................. TFT主動式矩陣驅動色彩系統 ................. PAL/NTSC/PAL-M/PAL-N/SECAM相容
有關連接iPod裝置的詳細資訊
Pioneer對於iPod資料遺失概不負責,即使資料於使用本產品時遺失亦然。請定期備份iPod資料。
請勿讓iPod長時間處於直射陽光下。長時間暴露在直射陽光下可能會導致iPod因高溫而故障。
請勿將iPod放置在任何高溫位置。 開車時請牢牢固定iPod。請勿讓iPod掉落在地板上,否則可
能卡在煞車或油門踏板之下。 如需詳細資訊,請參閱iPod操作手冊。
iPhone與iPod
「Made for iPod」(專為iPod製造)及「Made for iPhone」(專為iPhone製造)表示該電子配件是專為連接至iPod或iPhone而設計,而且已通過開發廠商的認證以符合Apple的效能標準。對於本裝置的操作或是否符合安全與規範標準,Apple概不擔負任何責任。請注意,此配件與iPod或iPhone一起使用會影響無線電的性能。iPhone、iPod、iPod classic、iPod nano及iPod touch皆為Apple Inc.在美國及其他國家註冊的商標。
Lightning
Lightning是Apple Inc.的商標。
App Store
App Store是Apple Inc.的服務標記。
iOS
iOS是Cisco在美國及其他國家持有商標權之商標。
iTunes
iTunes為Apple Inc.在美國與其他國家註冊的商標。
使用應用程式架構連線內容
重要資訊使用本產品存取應用程式架構連線內容服務的需求: 適用於智慧型手機的Pioneer相容連線內容應用程式最新版
本,可自服務供應商處下載至智慧型手機。 有效的內容服務供應商帳戶。 智慧型手機行動數據方案。
註:若智慧型手機的行動數據方案未提供無限資料使用量,則電信業者將針對透過3G、EDGE及/或LTE (4G)網路存取應用程式架構連線內容收取額外費用。
透過3G、EDGE、LTE (4G)或Wi-Fi網路與網際網路連線。 連接iPhone與本產品的選購Pioneer轉接器纜線。
限制: 使用者能否存取應用程式架構連線內容,將視手機可用性
及/或Wi-Fi網路覆蓋範圍是否允許智慧型手機連線至網際網路而定。
服務可用性隨地區而異。如需更多資訊,請洽詢連線內容服務供應商。
本產品的連線內容存取功能如有變更,恕不另行通知。此功能可能受下列因素影響:與智慧型手機未來韌體版本的相容性問題;與智慧型手機連線內容應用程式未來版本的相容性問題;供應商變更或中斷連線內容應用程式或服務。
Spotify®
SPOTIFY與Spotify標誌屬於Spotify AB的註冊商標。需要相容的行動數位裝置與Premium訂閱可使用的地方,請參閱http://pioneer.eu/spotify。
有關觀看視訊的注意事項
請記住,若使用本系統從事商業或公開放映,可能會侵犯受著作權法保護的版權。
有關觀看DVD-Video的注意事項
本項目使用的防拷技術受美國專利及其他Rovi Corporation的智慧財產權保護。禁止反向工程及反組譯。
有關使用MP3檔案的注意事項
本產品僅針對私人、非商業用途提供授權許可;除此之外,並未提供授權許可,或暗示任何使用者具有將本產品用於任何商業(即創造營收)即時廣播(地面、衛星、有線和/或任何其他媒體)、透過網際網路、內部網路和/或其他網路的廣播/串流,或其他電子內容傳播系統(如付費音訊或隨選音訊應用程式)之權利。此類用途須另行授權許可。如需詳細資訊,請造訪http://www.mp3licensing.com。
正確使用液晶螢幕
操作液晶螢幕
若將液晶螢幕長時間置於直射陽光下,螢幕會變得非常燙,可能導致液晶螢幕損壞。不使用本產品時,請盡可能避免讓本產品接觸直射陽光。
液晶螢幕應在規定的溫度範圍內使用。請參閱 第111頁上規格。
請勿在高或低於工作溫度範圍的溫度之下使用液晶,因為液晶螢幕可能會無法正常運作並受損。
液晶螢幕露出,以提高其在車內的可視性。請勿用力擠壓,以免造成損壞。
請勿用力推按液晶螢幕,以免造成刮痕。 操作觸控面板功能時,切勿使用手指之外的任何物體觸碰液
晶螢幕。液晶螢幕容易刮傷。
液晶顯示(LCD)螢幕
若液晶螢幕靠近空調出風口,請勿使空調的出風方向對著液晶螢幕。暖氣的熱風會破壞液晶螢幕,而冷氣的冷風則會導致本產品內部形成溼氣,進而造成損壞。
液晶螢幕上可能會出現小黑點或白點(亮點)。這是液晶螢幕的特性所導致,並不代表故障。
若液晶螢幕受到陽光直射,會難以看清顯示的內容。 使用行動電話時,請讓行動電話天線與液晶螢幕保持距離,
以免視訊因斑點、彩色條紋等出現而受到干擾。
110 < CRD4925-A >< CRD4925-A >
附錄 附錄
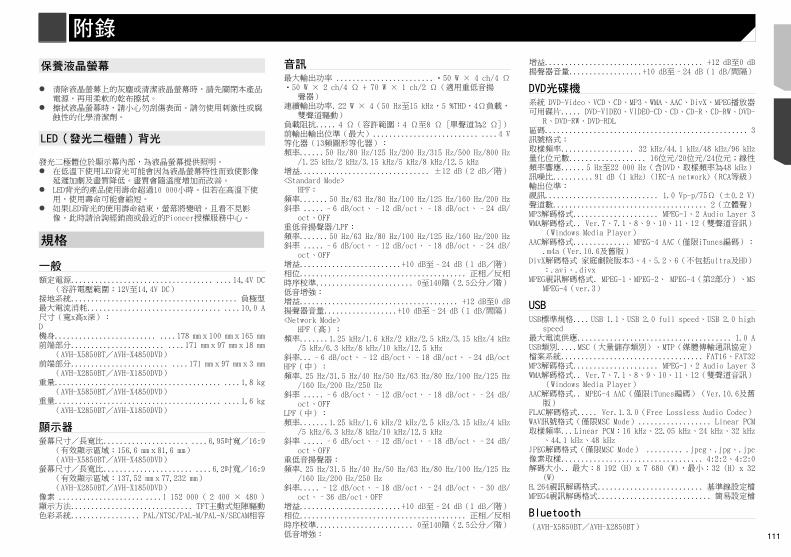
111
保養液晶螢幕
清除液晶螢幕上的灰塵或清潔液晶螢幕時,請先關閉本產品電源,再用柔軟的乾布擦拭。
擦拭液晶螢幕時,請小心勿刮傷表面。請勿使用刺激性或腐蝕性的化學清潔劑。
LED(發光二極體)背光
發光二極體位於顯示幕內部,為液晶螢幕提供照明。 在低溫下使用LED背光可能會因為液晶螢幕特性而致使影像
延遲加劇及畫質降低。畫質會隨溫度增加而改善。 LED背光的產品使用壽命超過10 000小時。但若在高溫下使
用,使用壽命可能會縮短。 如果LED背光的使用壽命結束,螢幕將變暗,且看不見影
像。此時請洽詢經銷商或最近的Pioneer授權服務中心。
規格
一般額定電源 ................................... ....14,4V DC
(容許電壓範圍:12V至14,4V DC)接地系統 ......................................... 負極型最大電流消耗 ................................. ....10,0 A尺寸(寬x高x深):D機身 ......................... ....178 mmx100 mmx165 mm前端部分 ....................... ....171 mmx97 mmx18 mm
(AVH-X5850BT/AVH-X4850DVD)前端部分 ........................ ....171 mmx97 mmx3 mm
(AVH-X2850BT/AVH-X1850DVD)重量 ......................................... ....1,8 kg
(AVH-X5850BT/AVH-X4850DVD)重量 ......................................... ....1,6 kg
(AVH-X2850BT/AVH-X1850DVD)
顯示器螢幕尺寸/長寬比 ..................... ....6,95吋寬/16:9
(有效顯示區域:156,6 mmx81,6 mm) (AVH-X5850BT/AVH-X4850DVD)
螢幕尺寸/長寬比 ...................... ....6,2吋寬/16:9 (有效顯示區域:137,52 mmx77,232 mm) (AVH-X2850BT/AVH-X1850DVD)
像素 ..................... ....1 152 000 ( 2 400 × 480 )顯示方法 .............................. TFT主動式矩陣驅動色彩系統 ................. PAL/NTSC/PAL-M/PAL-N/SECAM相容
音訊最大輸出功率 ........................•50 W × 4 ch /4 Ω•50 W × 2 ch /4 Ω + 70 W × 1 ch /2 Ω(適用重低音揚
聲器)連續輸出功率 . 22 W × 4(50 Hz 至15 kHz ,5 %THD,4Ω負載,
雙聲道驅動)負載阻抗 ..... 4 Ω(容許範圍:4 Ω至8 Ω [單聲道為2 Ω])前輸出輸出位準(最大) .......................... ....4 V等化器(13頻圖形等化器):頻率 ......50 Hz /80 Hz /125 Hz /200 Hz /315 Hz /500 Hz /800 Hz
/1.25 kHz /2 kHz /3.15 kHz /5 kHz /8 kHz /12.5 kHz
增益 ................................ ±12 dB (2 dB /階)<Standard Mode>
HPF:頻率 .......50 Hz /63 Hz /80 Hz /100 Hz /125 Hz /160 Hz /200 Hz
斜率 .....–6 dB /oct、–12 dB /oct、–18 dB /oct、–24 dB /oct、OFF
重低音揚聲器/LPF:頻率 .......50 Hz /63 Hz /80 Hz /100 Hz /125 Hz /160 Hz /200 Hz
斜率 .....–6 dB /oct、–12 dB /oct、–18 dB /oct、–24 dB /oct、OFF
增益 .........................+10 dB 至–24 dB (1 dB /階)相位 ......................................... 正相/反相時序校準 ........................ 0至140階(2.5公分/階)低音增強:增益 ....................................... +12 dB 至0 dB
揚聲器音量 ..................+10 dB 至–24 dB (1 dB /間隔)<Network Mode>
HPF(高):頻率 .......1.25 kHz /1.6 kHz /2 kHz /2.5 kHz /3.15 kHz /4 kHz
/5 kHz /6.3 kHz /8 kHz /10 kHz /12.5 kHz
斜率 ...–6 dB /oct、–12 dB /oct、–18 dB /oct、–24 dB /octHPF(中):頻率 .25 Hz /31.5 Hz /40 Hz /50 Hz /63 Hz /80 Hz /100 Hz /125 Hz
/160 Hz /200 Hz /250 Hz
斜率 .....–6 dB /oct、–12 dB /oct、–18 dB /oct、–24 dB /oct、OFF
LPF(中):頻率 .......1.25 kHz /1.6 kHz /2 kHz /2.5 kHz /3.15 kHz /4 kHz
/5 kHz /6.3 kHz /8 kHz /10 kHz /12.5 kHz
斜率 .....–6 dB /oct、–12 dB /oct、–18 dB /oct、–24 dB /oct、OFF
重低音揚聲器:頻率 .25 Hz /31.5 Hz /40 Hz /50 Hz /63 Hz /80 Hz /100 Hz /125 Hz
/160 Hz /200 Hz /250 Hz
斜率 .....–12 dB /oct、–18 dB /oct、–24 dB /oct、–30 dB /oct、–36 dB /oct、OFF
增益 .........................+10 dB 至–24 dB (1 dB /階)相位 ......................................... 正相/反相時序校準 ........................ 0至140階(2.5公分/階)低音增強:
增益 ....................................... +12 dB 至0 dB
揚聲器音量 ..................+10 dB 至–24 dB (1 dB /間隔)
DVD光碟機系統 DVD-Video、VCD、CD、MP3、WMA、AAC、DivX、MPEG播放器可用碟片 ..... DVD-VIDEO、VIDEO-CD、CD、CD-R、CD-RW、DVD-
R、DVD-RW、DVD-RDL區碼 .................................................. 3訊號格式:取樣頻率 .................. 32 kHz /44.1 kHz /48 kHz /96 kHz
量化位元數 ................... 16位元/20位元/24位元;線性頻率響應 ......5 Hz 至22 000 Hz (含DVD,取樣頻率為48 kHz )訊噪比 ..........91 dB (1 kHz ) (IEC-A network)(RCA等級)輸出位準:視訊 ............................ 1.0 V p-p/75Ω (±0.2 V )聲道數 ...................................... 2(立體聲)MP3解碼格式 ..................... MPEG-1、2 A udio Layer 3WMA解碼格式 .. Ver.7、7.1、8、9、10、11、12(雙聲道音訊)
(Windows Media Player)AAC解碼格式 .............. MPEG-4 A AC(僅限iTunes編碼):
.m4a(Ver.10.6及舊版)DivX解碼格式 家庭劇院版本3、4、5.2、6(不包括ultra及HD)
:.avi、.divxMPEG視訊解碼格式 . MPEG-1、MPEG-2、 MPEG-4(第2部分)、MS
MPEG-4(ver.3)
USBUSB標準規格 ....USB 1.1、USB 2.0 full speed、USB 2.0 high
speed最大電流供應 ...................................... 1.0 A
USB類別 .....MSC(大量儲存類別)、MTP(媒體傳輸通訊協定)檔案系統 ................................... FAT16、FAT32MP3解碼格式 ..................... MPEG-1、2 A udio Layer 3WMA解碼格式 .. Ver.7、7.1、8、9、10、11、12(雙聲道音訊)
(Windows Media Player)AAC解碼格式 .. MPEG-4 A AC(僅限iTunes編碼)(Ver.10.6及舊
版)FLAC解碼格式 ..... Ver.1.3.0(Free Lossless Audio Codec)WAV訊號格式(僅限MSC Mode) .................. Linear PCM取樣頻率 ...Linear PCM:16 kHz 、22.05 kHz 、24 kHz 、32 kHz
、44.1 kHz 、48 kHz
JPEG解碼格式(僅限MSC Mode) ......... .jpeg、.jpg、.jpe像素取樣 ................................... 4:2:2、4:2:0解碼大小 .. 最大:8 192 (H) x 7 680 (W),最小:32 (H) x 32
(W)H.264視訊解碼格式 .......................... 基準線設定檔MPEG4視訊解碼格式 ............................ 簡易設定檔
Bluetooth(AVH-X5850BT/AVH-X2850BT)
有關觀看視訊的注意事項
請記住,若使用本系統從事商業或公開放映,可能會侵犯受著作權法保護的版權。
有關觀看DVD-Video的注意事項
本項目使用的防拷技術受美國專利及其他Rovi Corporation的智慧財產權保護。禁止反向工程及反組譯。
有關使用MP3檔案的注意事項
本產品僅針對私人、非商業用途提供授權許可;除此之外,並未提供授權許可,或暗示任何使用者具有將本產品用於任何商業(即創造營收)即時廣播(地面、衛星、有線和/或任何其他媒體)、透過網際網路、內部網路和/或其他網路的廣播/串流,或其他電子內容傳播系統(如付費音訊或隨選音訊應用程式)之權利。此類用途須另行授權許可。如需詳細資訊,請造訪http://www.mp3licensing.com。
正確使用液晶螢幕
操作液晶螢幕
若將液晶螢幕長時間置於直射陽光下,螢幕會變得非常燙,可能導致液晶螢幕損壞。不使用本產品時,請盡可能避免讓本產品接觸直射陽光。
液晶螢幕應在規定的溫度範圍內使用。請參閱 第111頁上規格。
請勿在高或低於工作溫度範圍的溫度之下使用液晶,因為液晶螢幕可能會無法正常運作並受損。
液晶螢幕露出,以提高其在車內的可視性。請勿用力擠壓,以免造成損壞。
請勿用力推按液晶螢幕,以免造成刮痕。 操作觸控面板功能時,切勿使用手指之外的任何物體觸碰液
晶螢幕。液晶螢幕容易刮傷。
液晶顯示(LCD)螢幕
若液晶螢幕靠近空調出風口,請勿使空調的出風方向對著液晶螢幕。暖氣的熱風會破壞液晶螢幕,而冷氣的冷風則會導致本產品內部形成溼氣,進而造成損壞。
液晶螢幕上可能會出現小黑點或白點(亮點)。這是液晶螢幕的特性所導致,並不代表故障。
若液晶螢幕受到陽光直射,會難以看清顯示的內容。 使用行動電話時,請讓行動電話天線與液晶螢幕保持距離,
以免視訊因斑點、彩色條紋等出現而受到干擾。
111< CRD4925-A >
附錄 附錄
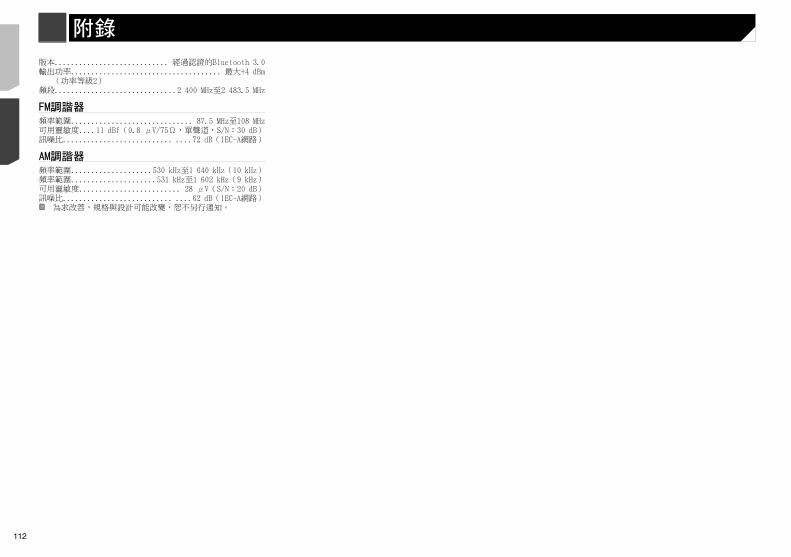
112
版本 ............................ 經過認證的Bluetooth 3.0輸出功率 ..................................... 最大+4 dB m
(功率等級2)頻段 ..............................2 400 MHz 至2 483.5 MHz
FM調諧器頻率範圍 .............................. 87.5 MHz 至108 MHz
可用靈敏度 ....11 dBf (0.8 µV/75Ω,單聲道,S/N:30 dB )訊噪比 ........................... ....72 dB (IEC-A網路)
AM調諧器頻率範圍 ....................530 kHz 至1 640 kHz (10 kHz )頻率範圍 .....................531 kHz 至1 602 kHz (9 kHz )可用靈敏度 ......................... 28 µV(S/N:20 dB )訊噪比 ........................... ....62 dB (IEC-A網路) 為求改善,規格與設計可能改變,恕不另行通知。
112< CRD4925-A > < CRD4925-A >
附錄

113
113< CRD4925-A >
附錄

114
114 < CRD4925-A >< CRD4925-A >

115
115< CRD4925-A >
© 2015 PIONEER CORPORATION. All rights reserved.
< KOKZ15I >
116< CRD4925-A >
< CRD4925-A > RC
PIONEER CORPORATION1-1, Shin-ogura, Saiwai-ku, Kawasaki-shi, Kanagawa 212-0031, JAPANPIONEER ELECTRONICS (USA) INC.P.O. Box 1540, Long Beach, California 90801-1540, U.S.A.TEL: (800) 421-1404PIONEER ELECTRONICS OF CANADA, INC.340 Ferrier Street, Unit 2, Markham, Ontario L3R 2Z5, CanadaTEL: 1-877-283-5901TEL: 905-479-4411PIONEER EUROPE NVHaven 1087, Keetberglaan 1, B-9120 Melsele, Belgium/BelgiqueTEL: (0) 3/570.05.11PIONEER ELECTRONICS ASIACENTRE PTE. LTD.253 Alexandra Road, #04-01, Singapore 159936TEL: 65-6472-7555PIONEER ELECTRONICS AUSTRALIA PTY. LTD.5 Arco Lane, Heatherton, Victoria, 3202, AustraliaTEL: (03) 9586-6300PIONEER ELECTRONICS DE MEXICO S.A. DE C.V.Blvd. Manuel Avila Camacho 138, 10 piso Col.Lomas de Chapultepec, Mexico, D.F. 11000Tel: 52-55-9178-4270, Fax: 52-55-5202-3714先鋒股份有限公司台北市內湖區瑞光路407號8樓電話:886-(0)2-2657-3588
先鋒電子(香港)有限公司香港九龍長沙灣道909號5樓電話:852-2848-6488


