Embed Size (px)
Citation preview

1
Attendance
&
Attendance
Letters
2
TERMS OF USE The information contained herein is licensed, trade-secret and proprietary and may not be used, disclosed or reproduced without permission of the licensing authorities, WSIPC and/or Skyward, Inc. As a condition of use, the User agrees to protect and keep the information from disclosure or falling into the public domain. The failure to comply with this agreement may result in the immediate termination of the User’s right to access the information. COPYRIGHT © Copyright 2017 WSIPC. All rights reserved. Reproduction of any part of this manual in any medium without the express and written permission of WSIPC is prohibited by law. This edition is printed in the United States of America. The contents may be corrected or modified by revisions without prior notice. Pages may be added, deleted, or changed as required. The WSIPC logo is a registered trademark of WSIPC. Skyward® is the registered trademark for Skyward, Inc. located in Stevens Point, Wisconsin
3
Attendance in Skyward
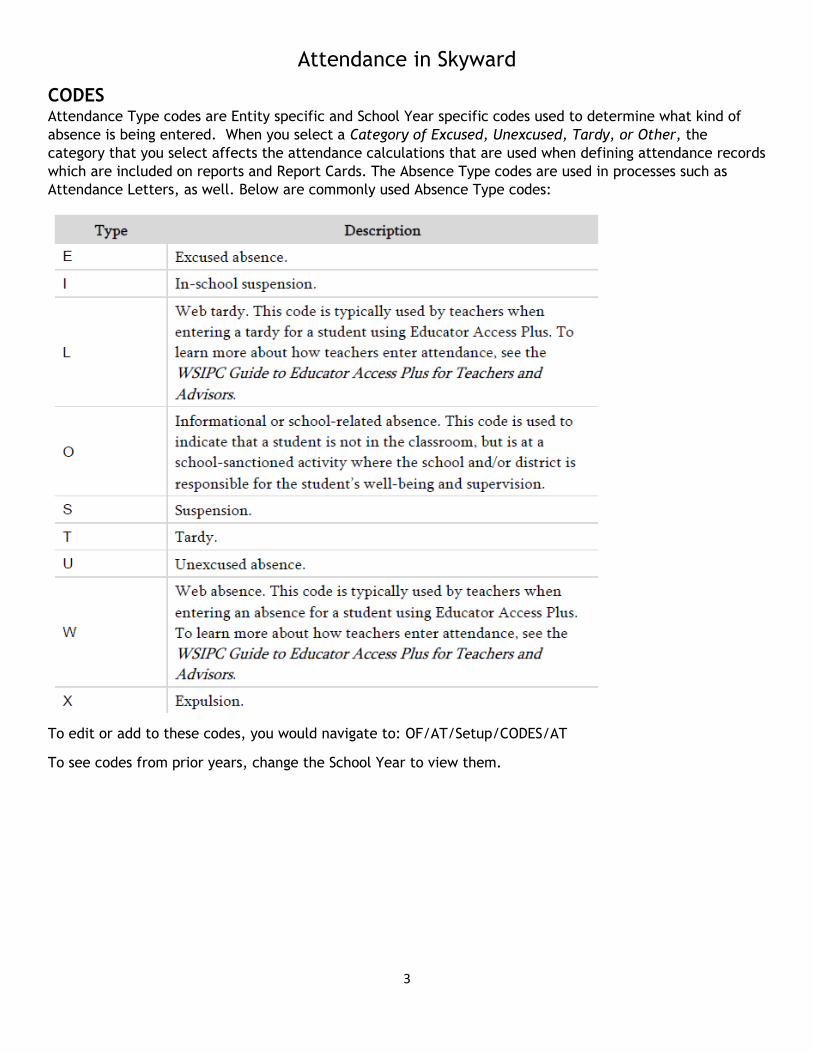
CODES Attendance Type codes are Entity specific and School Year specific codes used to determine what kind of
absence is being entered. When you select a Category of Excused, Unexcused, Tardy, or Other, the
category that you select affects the attendance calculations that are used when defining attendance records
which are included on reports and Report Cards. The Absence Type codes are used in processes such as
Attendance Letters, as well. Below are commonly used Absence Type codes:
To edit or add to these codes, you would navigate to: OF/AT/Setup/CODES/AT
To see codes from prior years, change the School Year to view them.

4
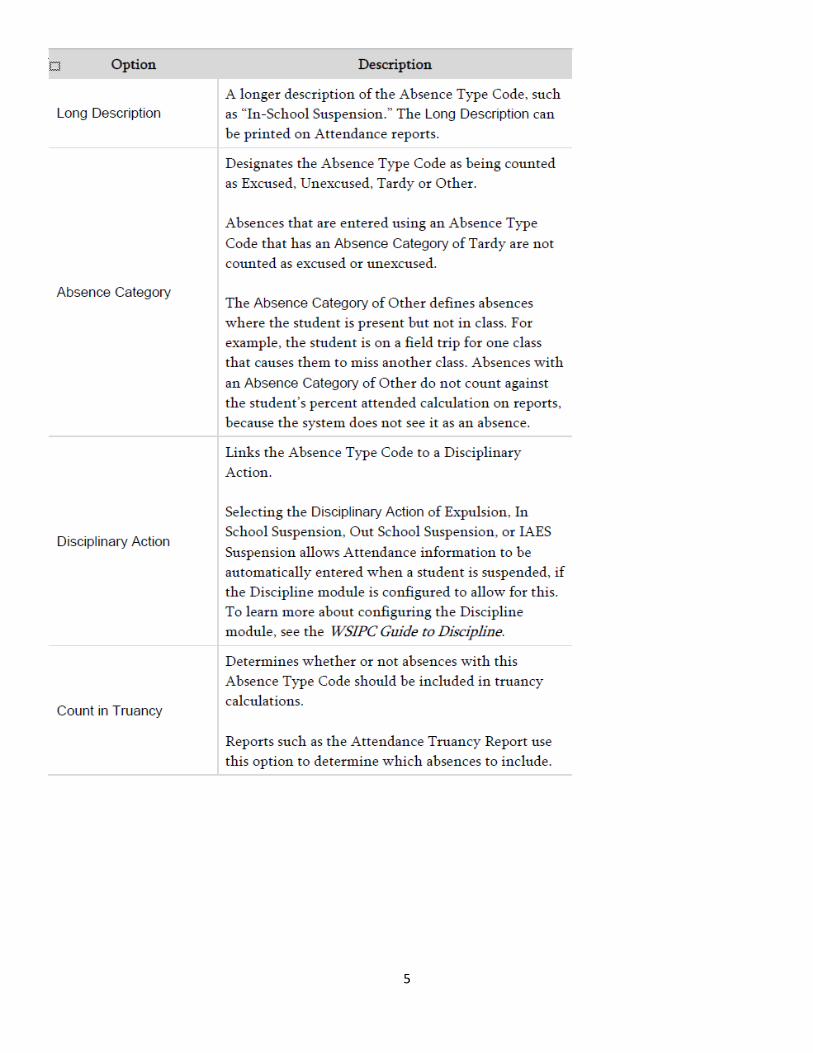
The Absence Type Maintenance screen below is where you set up the new codes. An explanation of what
the fields represent follows:
5
6
Using the Absence Category of Other The use of the Absence Category “Other” is for school-sanctioned events such as field trips, Health Room visits, Counseling office, meeting with school Administrators, school sporting events, Suspensions and/or Testing. Absences related to these events are not considered absent because even though the student may not be present in class OSPI considers these as School Related Activities. Buildings may still want to track when a student is not in classes, using the Other type allows this, yet does not report them as Absences.. The Absence Category of Other for out-of-school suspensions or expulsions may be used if the school is offering OSPI approved educational support while the student is not attending school. Absences for out-of-school suspensions and expulsions without educational support should use the E-Excused absent type.
Deleting an Existing Absence Type Code There may be times when you need to remove an existing Absence Type Code that is no longer in use. Although you cannot delete Absence Type Codes that are attached to students’ Attendance records during the school year, you can delete the codes prior to school starting for that school year. To delete an existing Absence Type Code:
1. Go to Student Management\Office\AT Setup\CO\AT. 2. If necessary, use Filter Options to change the School Year, then select a code and click Delete. The
following message appears: “Are you sure you want to delete record [X]? If Attendance Records don’t exist for this Entity and School Year, a report will be sent to your Print Queue that will show if the record was successfully deleted or not.”
3. Click OK. 4. The Processing Request window appears. When the report has finished processing, click View Report. If the code was deleted, the report reads, “Absence Type [X] was not being used and was successfully deleted.” If the code was not deleted, the report reads, “Absence Type [X] was not deleted because it is used in the following records.” The students for whom the Absence Type code is used appear on the report.
Absence Reason Codes Absence Reason codes are alphanumeric codes of up to two characters that are used to define the reason a student is absent or tardy. Absence Reason codes are both Entity specific and School Year specific, and may be cloned from one year to the next. The use of Absence Reason Codes is optional.
Adding or Editing an Absence Reason Code You can add and edit Absence Reason Codes as needed. To add or edit an Absence Reason Code:
1. Go to Student Management\Office\AT Setup\CO\AR. 2. Click Add or Edit. 3. Configure the Absence Reason Code Maintenance screen. To make the Absence Reason Code available to guardians for selection when they enter an Absent Request through Family Access, select Family Access Entry.
3. Click Save. You cannot delete a reason code if it is being used, only if it has not been used during the School Year. After the cloning Reason codes for the next school year, you can then delete any codes you will not be using. If at a later date you find you need to re-add the codes you deleted, you can add them again to the school year.
7
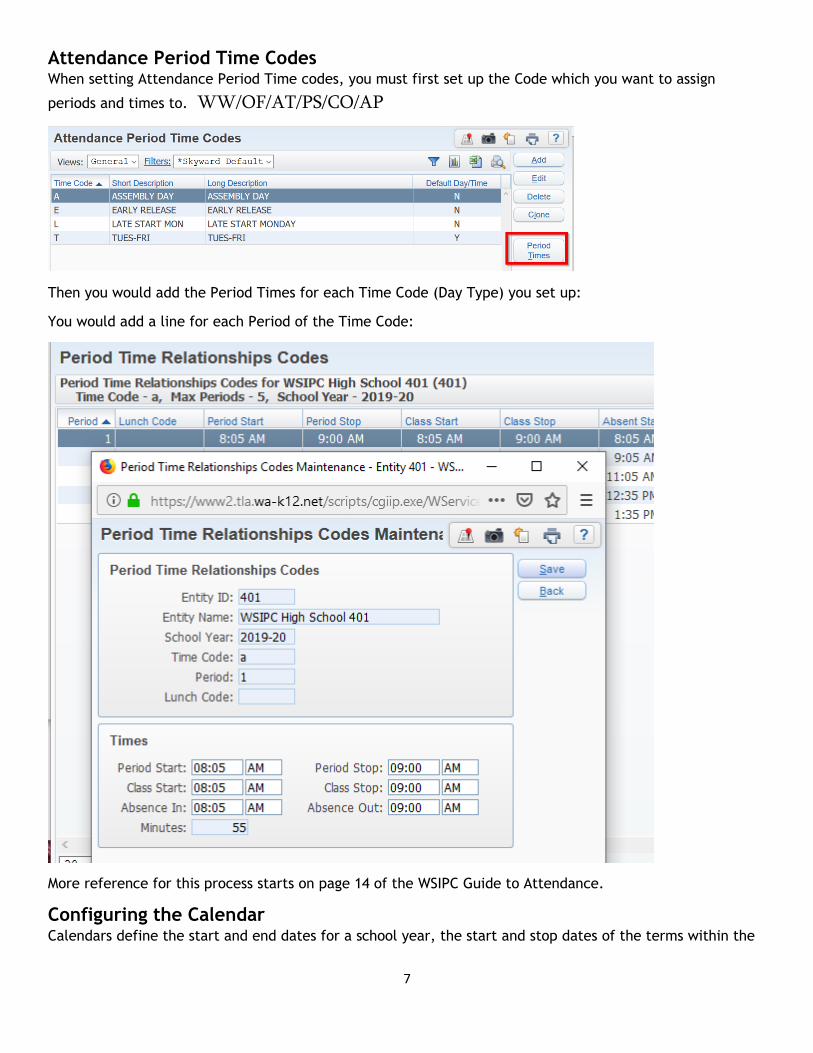
Attendance Period Time Codes When setting Attendance Period Time codes, you must first set up the Code which you want to assign
periods and times to. WW/OF/AT/PS/CO/AP
Then you would add the Period Times for each Time Code (Day Type) you set up:
You would add a line for each Period of the Time Code:
More reference for this process starts on page 14 of the WSIPC Guide to Attendance.
Configuring the Calendar Calendars define the start and end dates for a school year, the start and stop dates of the terms within the
8
school year, and the dates that classes are actually held. Calendars are Entity-specific and can only be
managed from within the Entity.
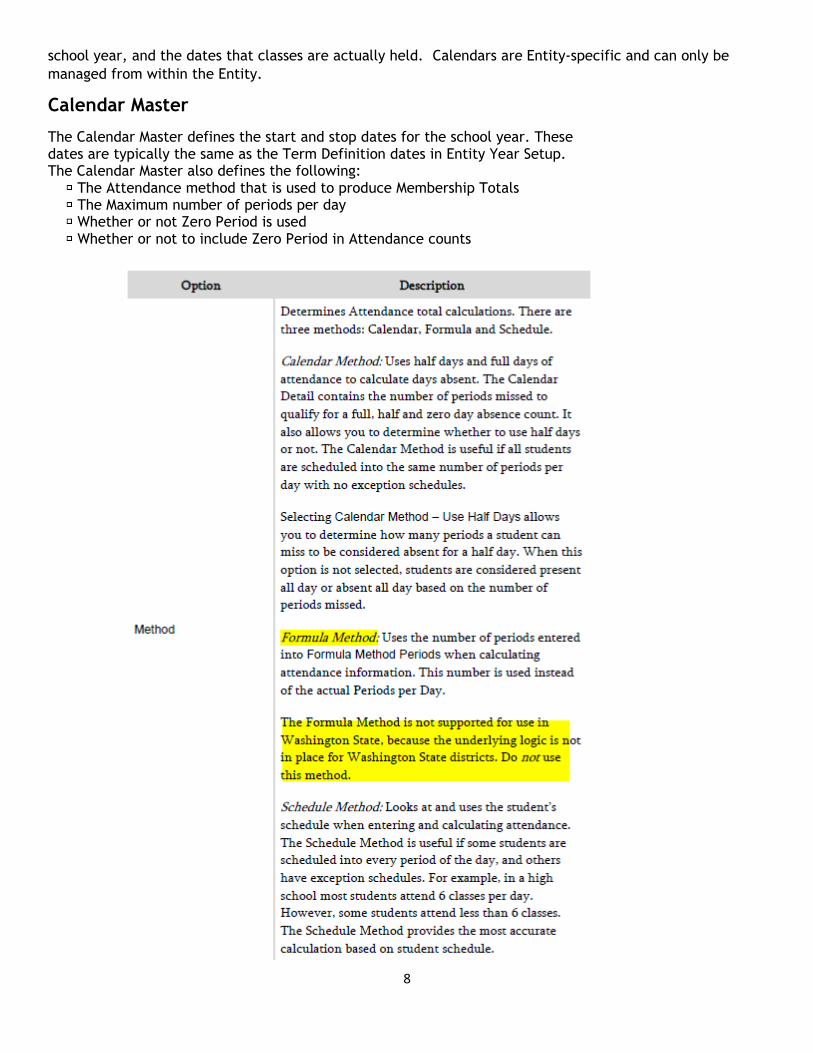
Calendar Master The Calendar Master defines the start and stop dates for the school year. These dates are typically the same as the Term Definition dates in Entity Year Setup. The Calendar Master also defines the following: The Attendance method that is used to produce Membership Totals The Maximum number of periods per day Whether or not Zero Period is used Whether or not to include Zero Period in Attendance counts
9
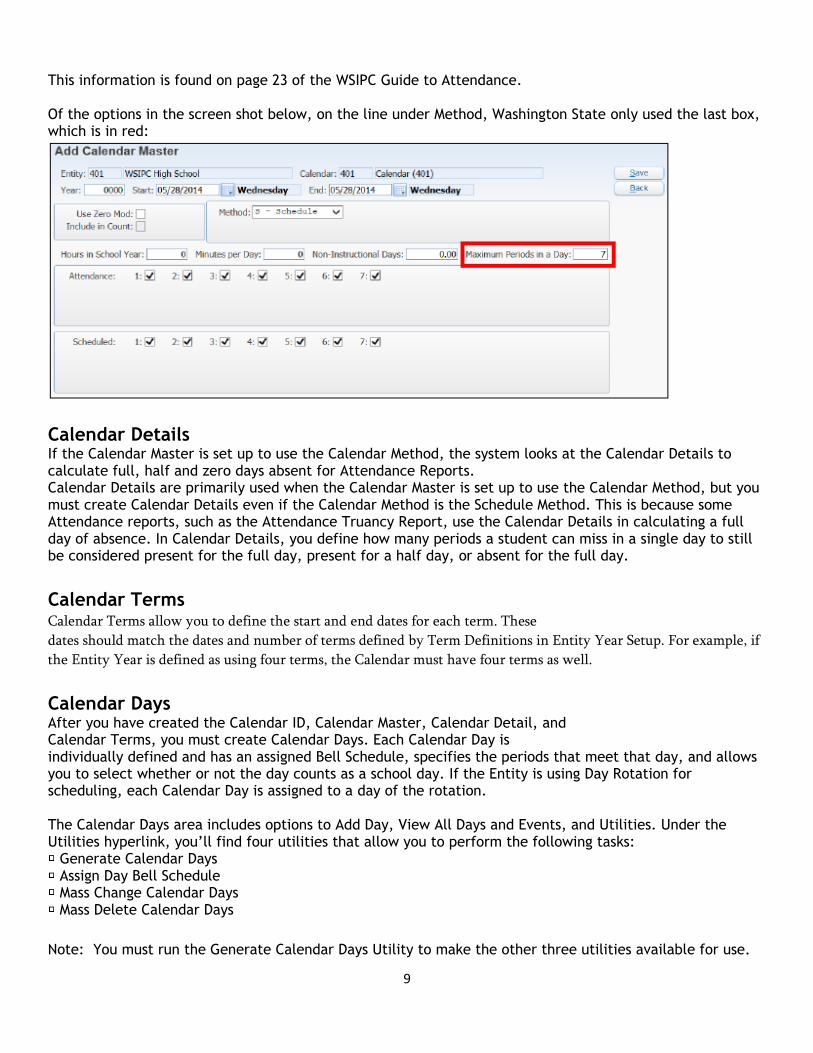
This information is found on page 23 of the WSIPC Guide to Attendance. Of the options in the screen shot below, on the line under Method, Washington State only used the last box, which is in red:
Calendar Details If the Calendar Master is set up to use the Calendar Method, the system looks at the Calendar Details to calculate full, half and zero days absent for Attendance Reports. Calendar Details are primarily used when the Calendar Master is set up to use the Calendar Method, but you must create Calendar Details even if the Calendar Method is the Schedule Method. This is because some Attendance reports, such as the Attendance Truancy Report, use the Calendar Details in calculating a full day of absence. In Calendar Details, you define how many periods a student can miss in a single day to still be considered present for the full day, present for a half day, or absent for the full day.
Calendar Terms Calendar Terms allow you to define the start and end dates for each term. These
dates should match the dates and number of terms defined by Term Definitions in Entity Year Setup. For example, if
the Entity Year is defined as using four terms, the Calendar must have four terms as well.
Calendar Days After you have created the Calendar ID, Calendar Master, Calendar Detail, and Calendar Terms, you must create Calendar Days. Each Calendar Day is individually defined and has an assigned Bell Schedule, specifies the periods that meet that day, and allows you to select whether or not the day counts as a school day. If the Entity is using Day Rotation for scheduling, each Calendar Day is assigned to a day of the rotation. The Calendar Days area includes options to Add Day, View All Days and Events, and Utilities. Under the Utilities hyperlink, you’ll find four utilities that allow you to perform the following tasks:
Generate Calendar Days Assign Day Bell Schedule Mass Change Calendar Days Mass Delete Calendar Days
Note: You must run the Generate Calendar Days Utility to make the other three utilities available for use.
10
Generate Calendar Days
The Generate Calendar Days Utility automatically generates all days from the Calendar Master Start Date to the End Date. You can configure the utility to exclude weekend days. To generate Calendar Days: 1. Go to Student Management\Office\AT Setup\CO\CC. 2. Expand the Calendar ID. 3. Expand the School Year. 4. Click Utilities and select Generate Calendar Days. 5. Configure the Calendar Day Generation. 6. Click Run ENTERING ATTENDANCE OPTIONS: WS/AT/setup/CF/expand Fill Periods of Attendance Based on Schedule If your Entity schedules students into classes, you may want to select Fill Periods of Attendance Based on Schedule to ensure that Attendance records are created only for those periods in which a student is scheduled into a class. The software references this option when you enter Attendance records through the following areas:
Entry by Date (Student Management\Office\AT\AE) Entry by Student (Student Management\Office\AT\BS) Attendance tab in Student Profile (Student Management\Students\ST\PR) Mass Add Attendance for a Single Day Utility (Student
Management\Office\AT Setup\UT\MA)
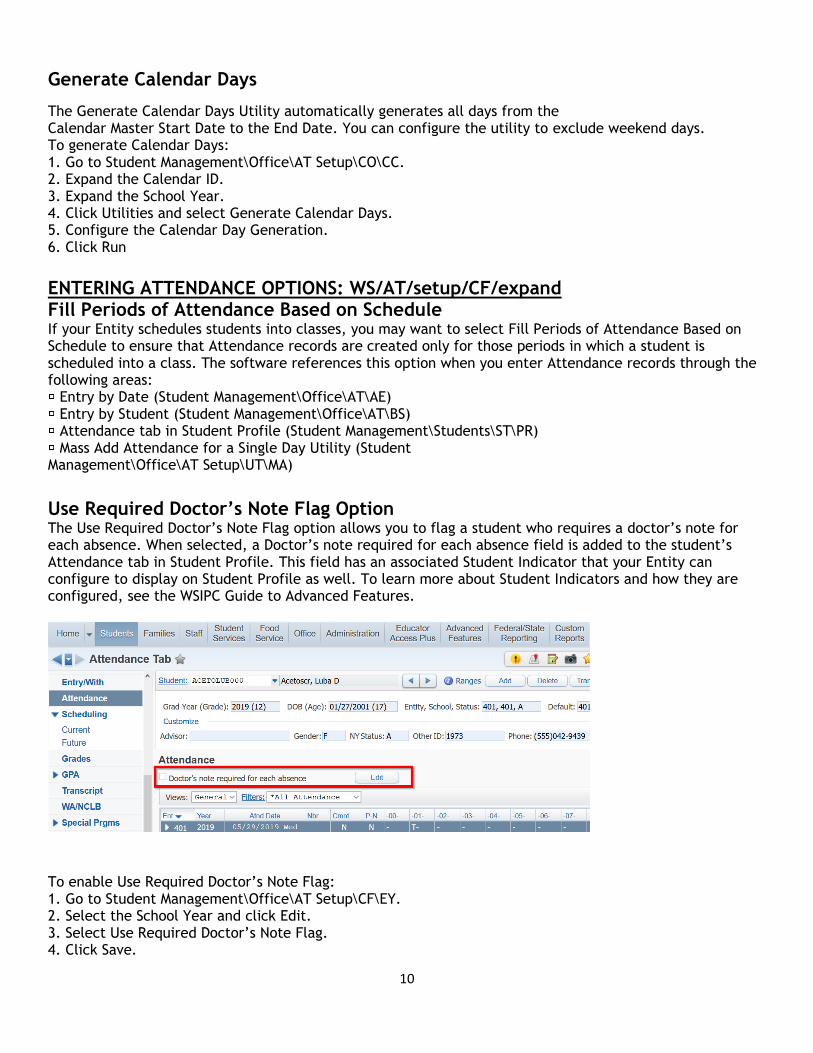
Use Required Doctor’s Note Flag Option The Use Required Doctor’s Note Flag option allows you to flag a student who requires a doctor’s note for each absence. When selected, a Doctor’s note required for each absence field is added to the student’s Attendance tab in Student Profile. This field has an associated Student Indicator that your Entity can configure to display on Student Profile as well. To learn more about Student Indicators and how they are configured, see the WSIPC Guide to Advanced Features.
To enable Use Required Doctor’s Note Flag: 1. Go to Student Management\Office\AT Setup\CF\EY. 2. Select the School Year and click Edit. 3. Select Use Required Doctor’s Note Flag. 4. Click Save.
11
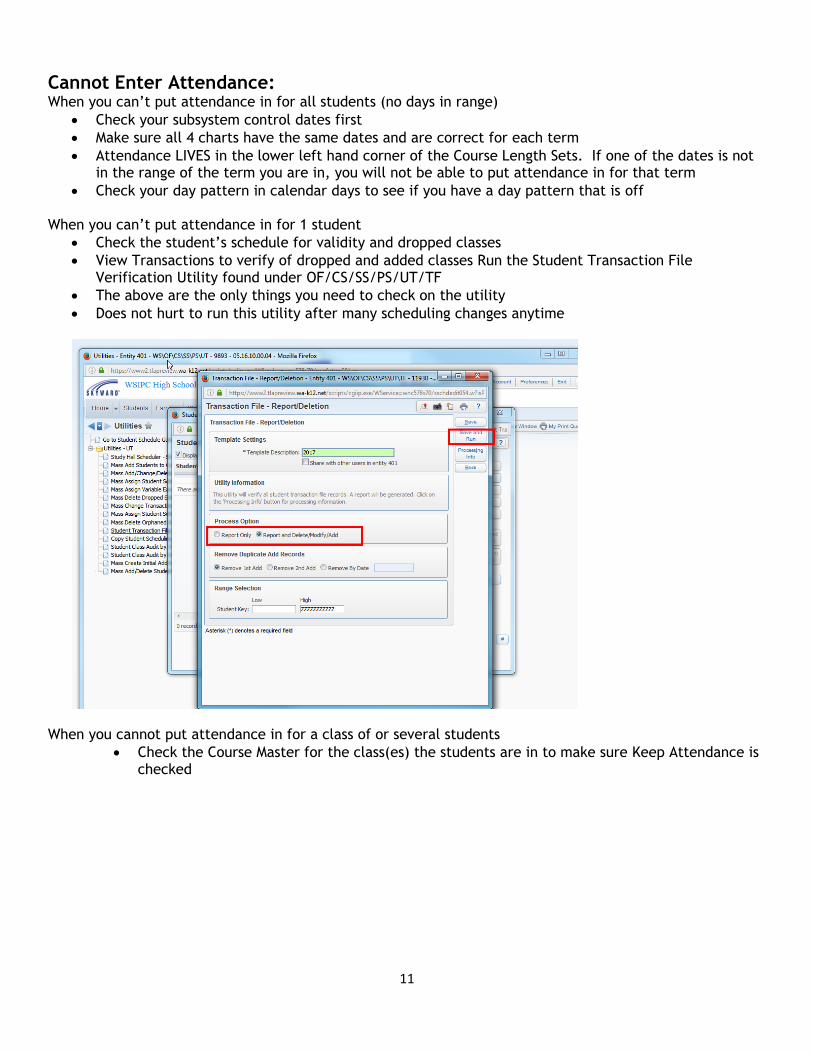
Cannot Enter Attendance: When you can’t put attendance in for all students (no days in range)
Check your subsystem control dates first
Make sure all 4 charts have the same dates and are correct for each term
Attendance LIVES in the lower left hand corner of the Course Length Sets. If one of the dates is not in the range of the term you are in, you will not be able to put attendance in for that term
Check your day pattern in calendar days to see if you have a day pattern that is off When you can’t put attendance in for 1 student
Check the student’s schedule for validity and dropped classes
View Transactions to verify of dropped and added classes Run the Student Transaction File Verification Utility found under OF/CS/SS/PS/UT/TF
The above are the only things you need to check on the utility
Does not hurt to run this utility after many scheduling changes anytime
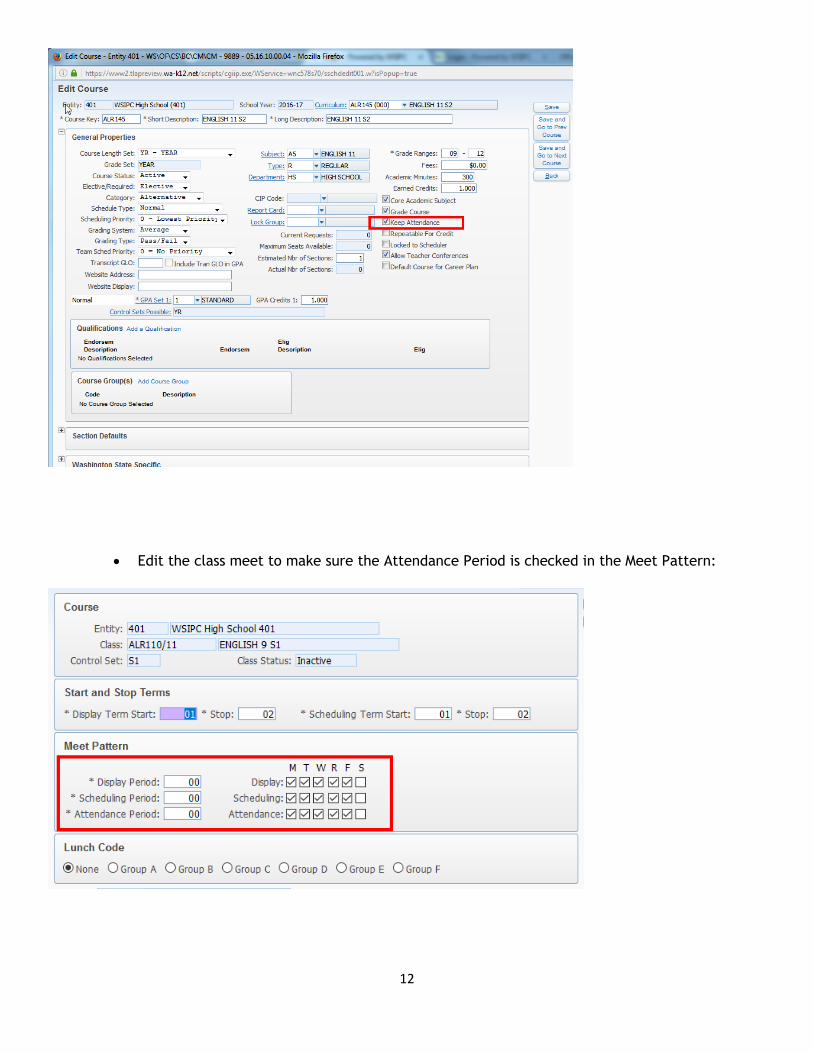
When you cannot put attendance in for a class of or several students
Check the Course Master for the class(es) the students are in to make sure Keep Attendance is checked
12
Edit the class meet to make sure the Attendance Period is checked in the Meet Pattern:
13
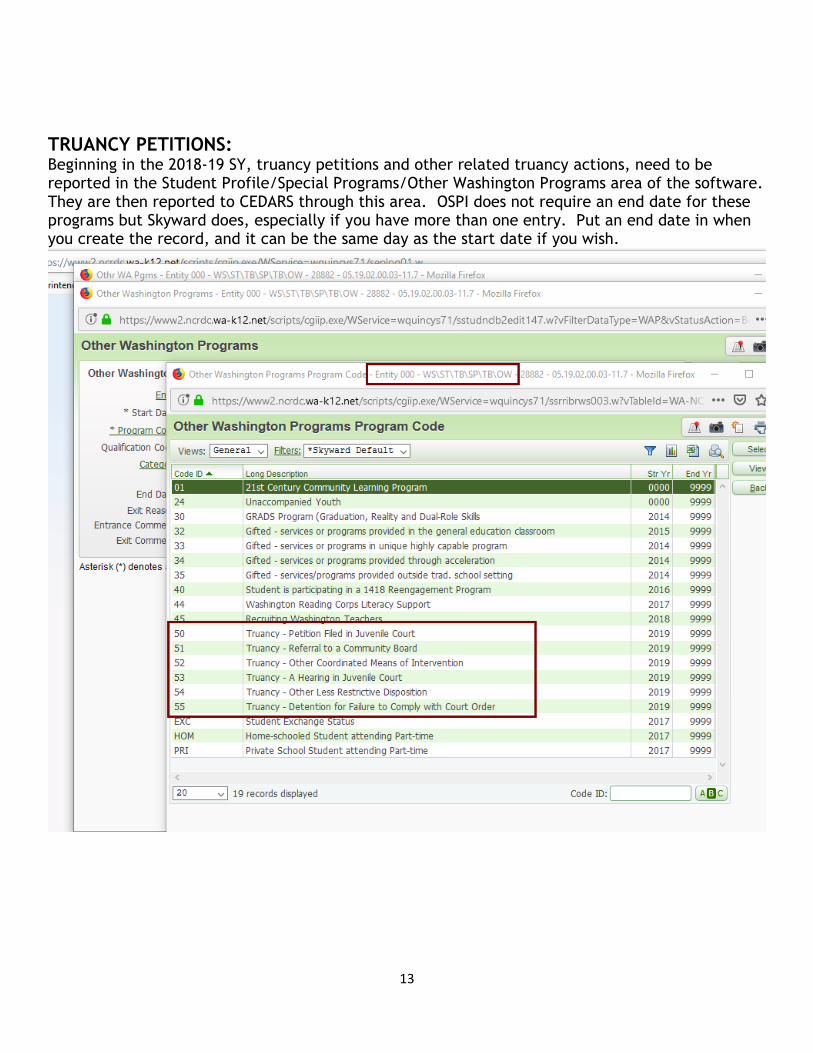
TRUANCY PETITIONS: Beginning in the 2018-19 SY, truancy petitions and other related truancy actions, need to be reported in the Student Profile/Special Programs/Other Washington Programs area of the software. They are then reported to CEDARS through this area. OSPI does not require an end date for these programs but Skyward does, especially if you have more than one entry. Put an end date in when you create the record, and it can be the same day as the start date if you wish.
14
REPORTS: Day Summary Unrecorded Class Attendance Monthly Quarterly Attendance Detail/Summary Consecutive Absences Absence Occurrence QUESTIONS OR SUGGESTIONS?
15
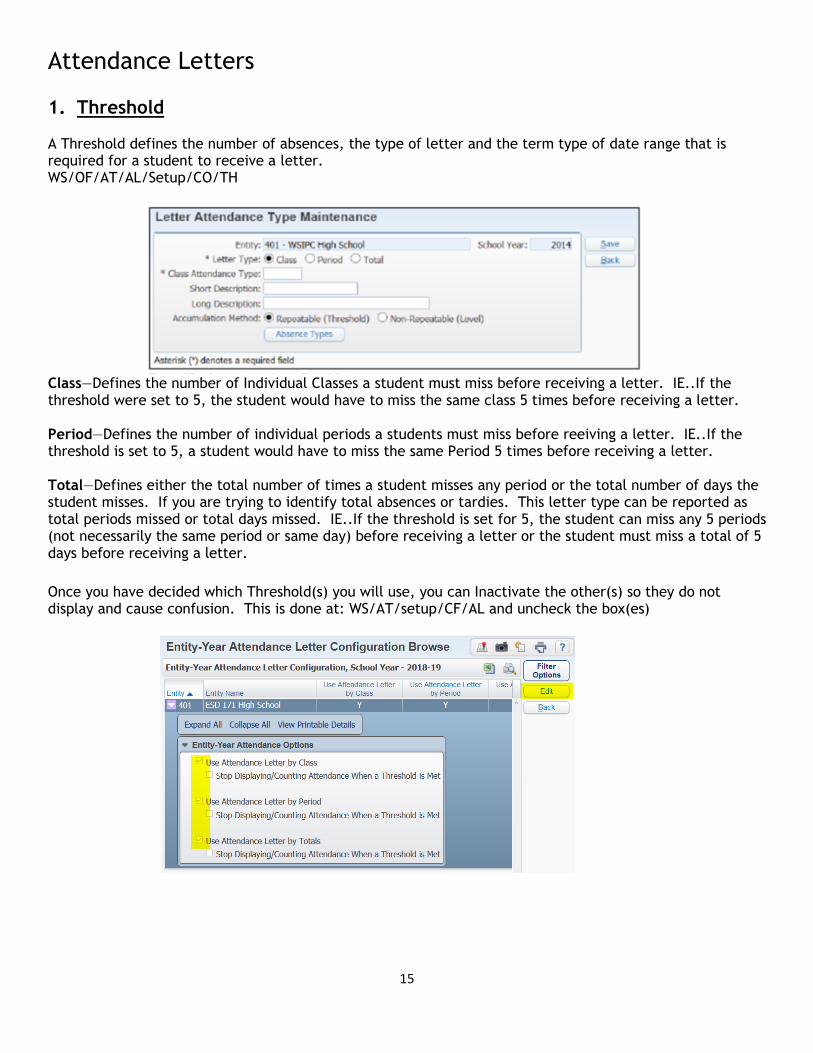
Attendance Letters 1. Threshold A Threshold defines the number of absences, the type of letter and the term type of date range that is required for a student to receive a letter. WS/OF/AT/AL/Setup/CO/TH
Class—Defines the number of Individual Classes a student must miss before receiving a letter. IE..If the threshold were set to 5, the student would have to miss the same class 5 times before receiving a letter. Period—Defines the number of individual periods a students must miss before reeiving a letter. IE..If the threshold is set to 5, a student would have to miss the same Period 5 times before receiving a letter. Total—Defines either the total number of times a student misses any period or the total number of days the student misses. If you are trying to identify total absences or tardies. This letter type can be reported as total periods missed or total days missed. IE..If the threshold is set for 5, the student can miss any 5 periods (not necessarily the same period or same day) before receiving a letter or the student must miss a total of 5 days before receiving a letter.
Once you have decided which Threshold(s) you will use, you can Inactivate the other(s) so they do not display and cause confusion. This is done at: WS/AT/setup/CF/AL and uncheck the box(es)
16
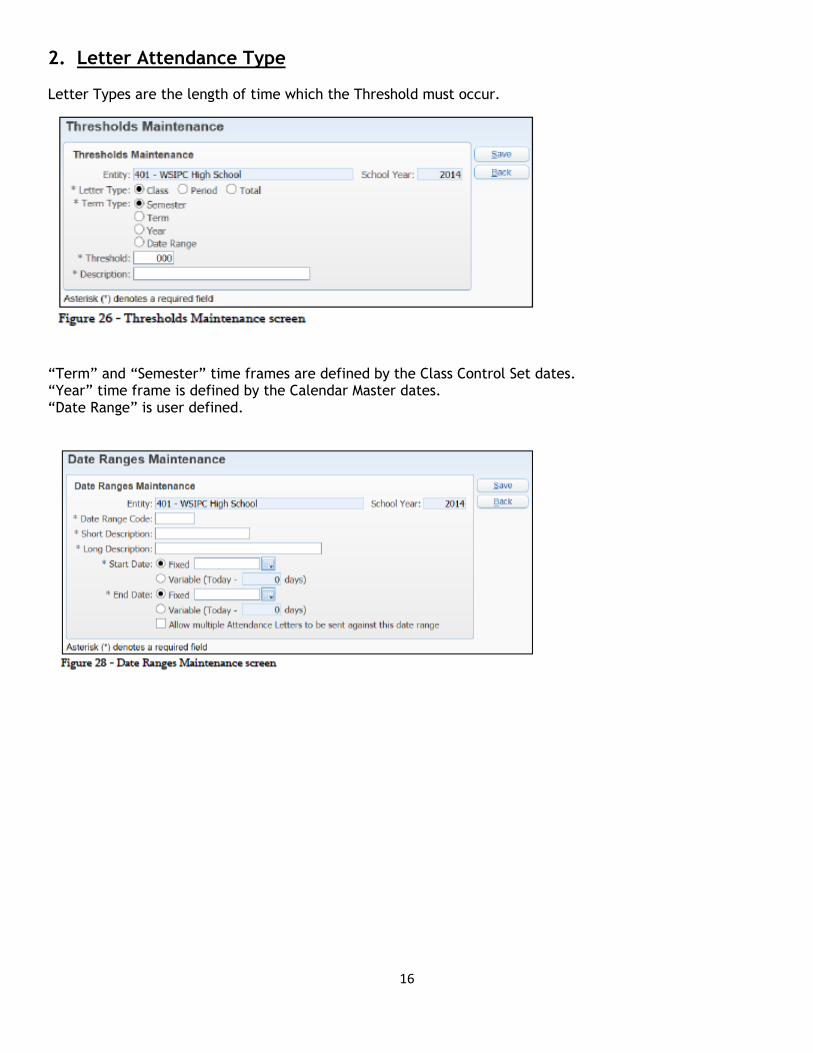
2. Letter Attendance Type
Letter Types are the length of time which the Threshold must occur.
“Term” and “Semester” time frames are defined by the Class Control Set dates. “Year” time frame is defined by the Calendar Master dates. “Date Range” is user defined.
17
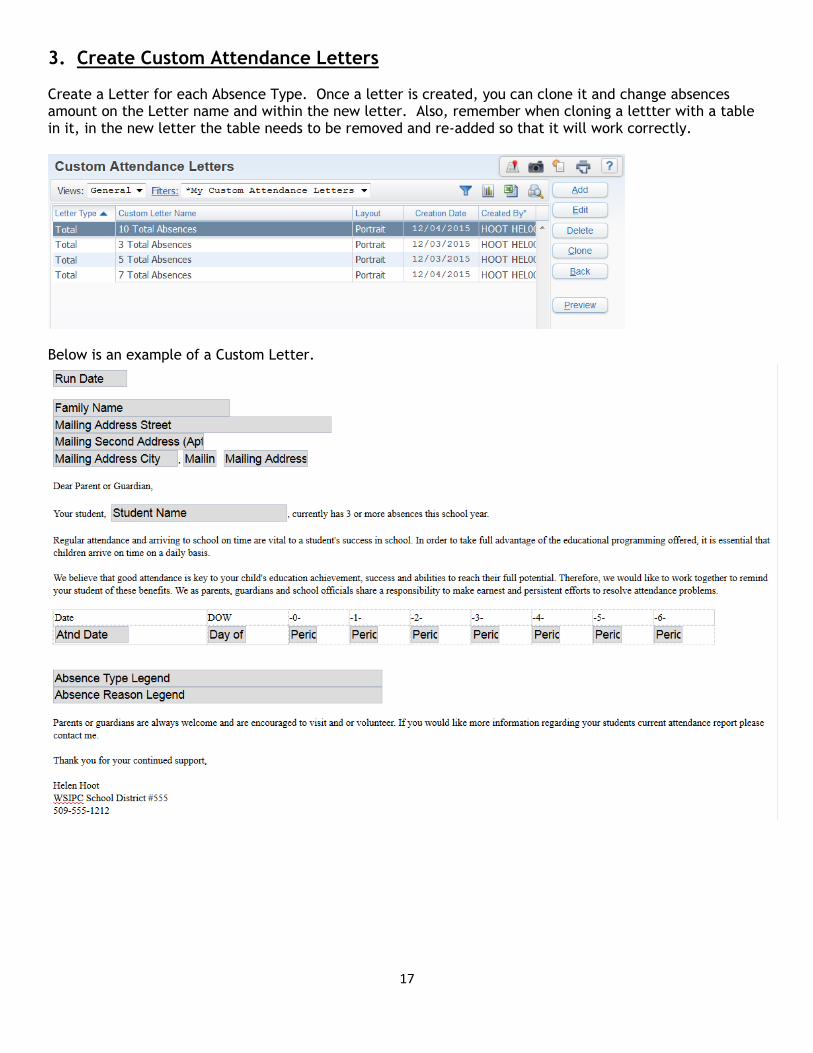
3. Create Custom Attendance Letters Create a Letter for each Absence Type. Once a letter is created, you can clone it and change absences amount on the Letter name and within the new letter. Also, remember when cloning a lettter with a table in it, in the new letter the table needs to be removed and re-added so that it will work correctly.
Below is an example of a Custom Letter.
18
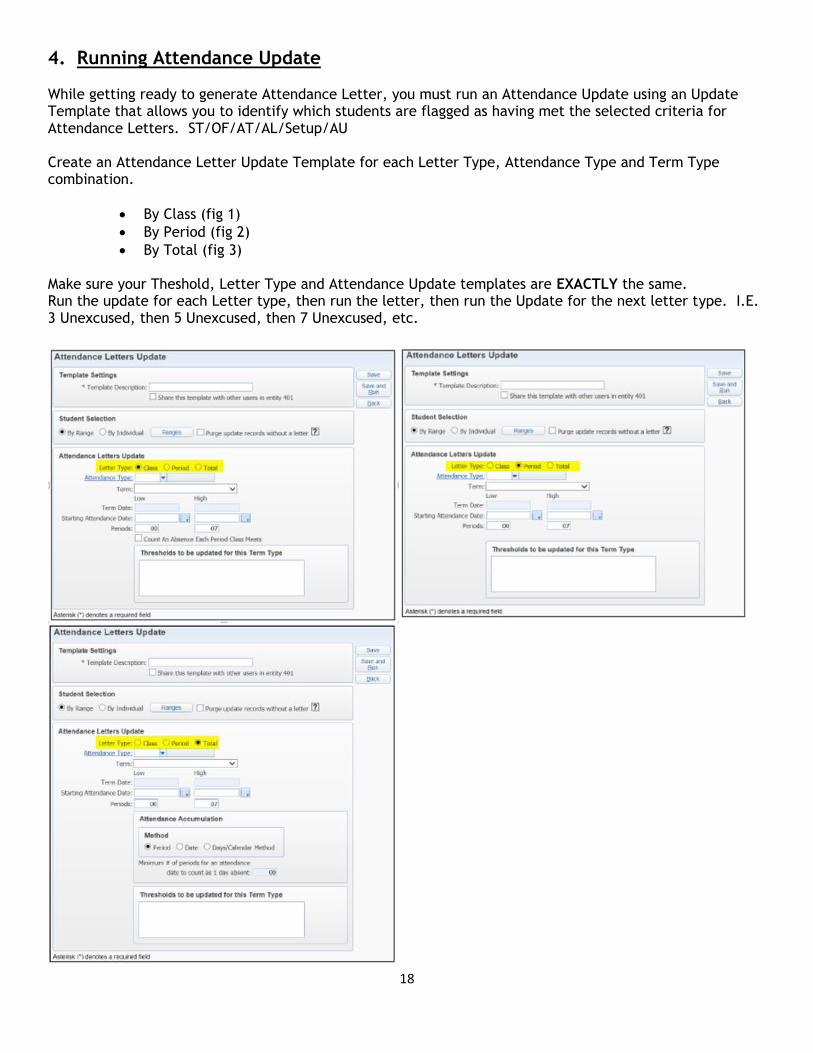
4. Running Attendance Update While getting ready to generate Attendance Letter, you must run an Attendance Update using an Update Template that allows you to identify which students are flagged as having met the selected criteria for Attendance Letters. ST/OF/AT/AL/Setup/AU
Create an Attendance Letter Update Template for each Letter Type, Attendance Type and Term Type combination.
By Class (fig 1)
By Period (fig 2)
By Total (fig 3)
Make sure your Theshold, Letter Type and Attendance Update templates are EXACTLY the same. Run the update for each Letter type, then run the letter, then run the Update for the next letter type. I.E. 3 Unexcused, then 5 Unexcused, then 7 Unexcused, etc.
19
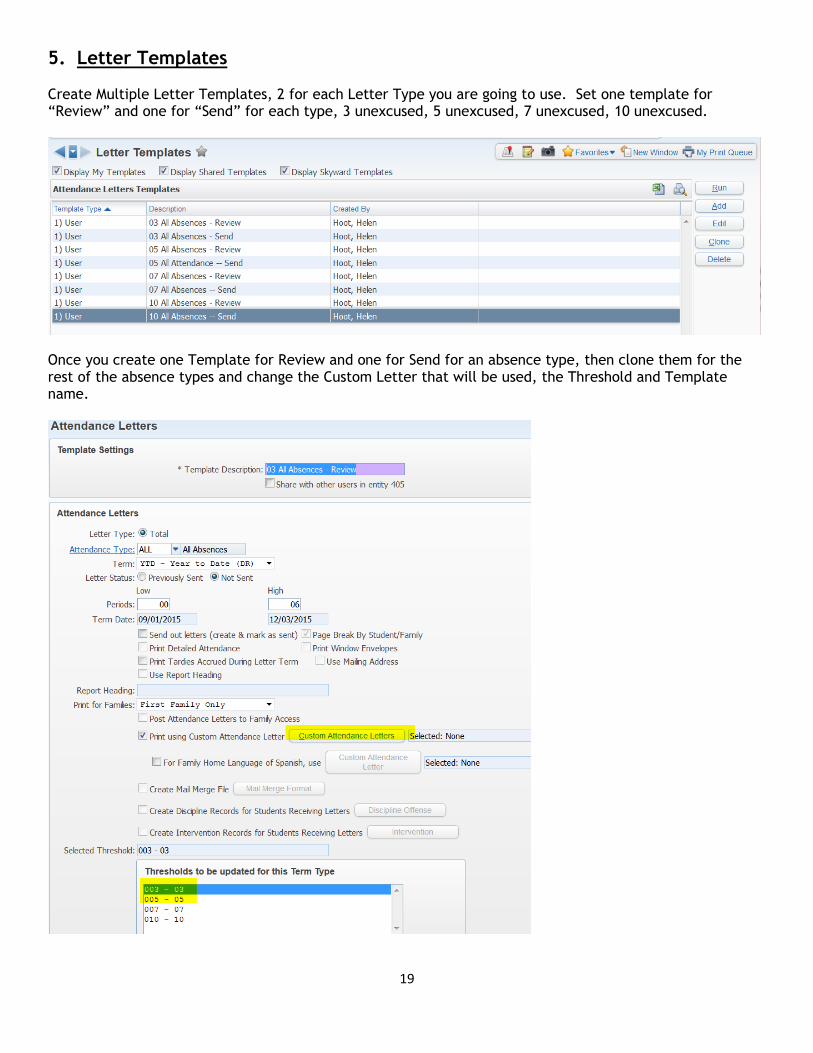
5. Letter Templates Create Multiple Letter Templates, 2 for each Letter Type you are going to use. Set one template for “Review” and one for “Send” for each type, 3 unexcused, 5 unexcused, 7 unexcused, 10 unexcused.
Once you create one Template for Review and one for Send for an absence type, then clone them for the rest of the absence types and change the Custom Letter that will be used, the Threshold and Template name.
20
6. Attendance Configuration
If you are using “Use Required Doctor's Note Flag Under (OF/AT/setup/CF/Entity Year Configuration, select the current school year and choose Edit, check the box and Save) You can also use a Student Indicator for these students.
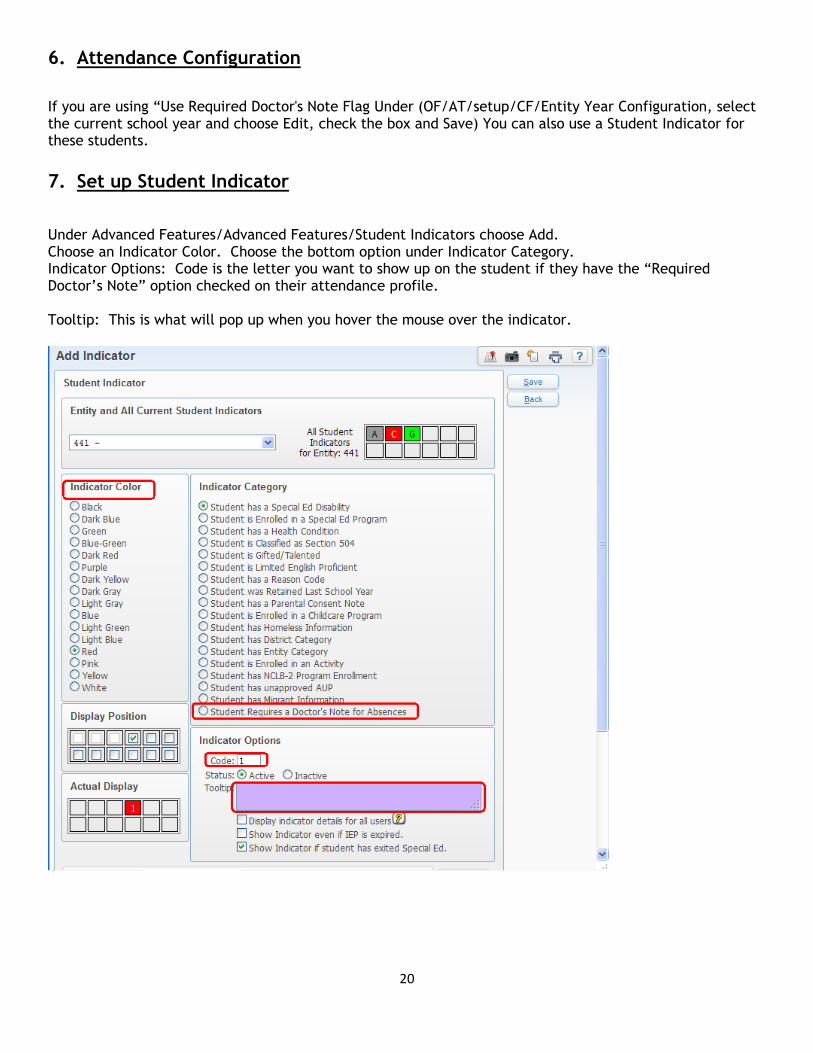
7. Set up Student Indicator
Under Advanced Features/Advanced Features/Student Indicators choose Add. Choose an Indicator Color. Choose the bottom option under Indicator Category. Indicator Options: Code is the letter you want to show up on the student if they have the “Required Doctor’s Note” option checked on their attendance profile. Tooltip: This is what will pop up when you hover the mouse over the indicator.


