Embed Size (px)
Citation preview

Asus Eee PC 1005HA Wifi Card ReplacementThis guide will show you step by step directions on how to repair a damaged Wifi card for Asus
Eee PC 1005HA good luck.
Written By: Maged Hanna
Asus Eee PC 1005HA Wifi Card Replace… Draft: 2019-09-26Guide ID: 24470 -
This document was generated on 2020-11-15 11:23:07 PM (MST).
© iFixit — CC BY-NC-SA www.iFixit.com Page 1 of 11

INTRODUCTION
Although there are several ways this task could be accomplished, this guide walks through the mostappropriate steps to complete the task without damaging the fragile components. Read instructionscarefully to reach success.
TOOLS:Spudger (1)iFixit Opening Tools (1)2.5 mm Flathead Screwdriver (1)
Asus Eee PC 1005HA Wifi Card Replace… Draft: 2019-09-26Guide ID: 24470 -
This document was generated on 2020-11-15 11:23:07 PM (MST).
© iFixit — CC BY-NC-SA www.iFixit.com Page 2 of 11

Step 1 — Keyboard
The first step is to remove the battery from the laptop.
Use a plastic opening tool to pull up the four metal latches in the battery cavity that is located onthe bottom of the laptop.
Do not apply too much pressure. The latches can not be removed and will bend if forced.
Asus Eee PC 1005HA Wifi Card Replace… Draft: 2019-09-26Guide ID: 24470 -
This document was generated on 2020-11-15 11:23:07 PM (MST).
© iFixit — CC BY-NC-SA www.iFixit.com Page 3 of 11

Step 2
Flip the laptop over, and open the display.
Use a plastic opening tool to lift the edge of the keyboard that is nearest to the screen.
Gently lift the keyboard and slide it toward the screen.
Do not remove the keyboard completely. This can damage the ribbon cable connecting theunderside of the keyboard to the laptop.
Step 3
Use a spudger tool to release thetabs on the ribbon cable ZIFconnector that is attached to theunderside of the keyboard.
Depending on the model, the tabson this ZIF connector will eitherflip up toward the display or pushout toward the display.
Once the ZIF connector tabshave been released, remove thekeyboard.
Asus Eee PC 1005HA Wifi Card Replace… Draft: 2019-09-26Guide ID: 24470 -
This document was generated on 2020-11-15 11:23:07 PM (MST).
© iFixit — CC BY-NC-SA www.iFixit.com Page 4 of 11

Step 4 — Wifi Antenna
Remove the (6.65 mm) screw next to the RAM.
Remove the RAM door cover.
Step 5
Remove (6.65 mm) screw next toRAM.
Identify and disconnect touch padribbon cable which can be seenthrough a window at the bottomedge of the metal part of the topcasing (in these photos theconnector shows blue).
Asus Eee PC 1005HA Wifi Card Replace… Draft: 2019-09-26Guide ID: 24470 -
This document was generated on 2020-11-15 11:23:07 PM (MST).
© iFixit — CC BY-NC-SA www.iFixit.com Page 5 of 11

Step 6
Turn computer right side up, and open it.
Remove 6 (5.5 mm) screws from inside covering.
Disconnect the touch pad ribbon cable.
Asus Eee PC 1005HA Wifi Card Replace… Draft: 2019-09-26Guide ID: 24470 -
This document was generated on 2020-11-15 11:23:07 PM (MST).
© iFixit — CC BY-NC-SA www.iFixit.com Page 6 of 11

Step 7
The palmrest plastic is fragile. Handle it carefully.
Two miniature LEDs will be exposed in the top edge of the bottom casing. Handle withcaution to avoid damage.
Detach each of the 5 plastic clips. Run a plastic opening tool along the underside of the top half.You will hear the 'clicks' of the clips coming undone.
After the clips are loose, disconnect the palmrest flatflex and remove it.
Asus Eee PC 1005HA Wifi Card Replace… Draft: 2019-09-26Guide ID: 24470 -
This document was generated on 2020-11-15 11:23:07 PM (MST).
© iFixit — CC BY-NC-SA www.iFixit.com Page 7 of 11

Step 8
Raise black pad to detach trackpadribbon if not done in step 4.
(Completing this step according tothe directions in step 4 reduces thepotential for damage.)
Step 9
Remove the hard drive ribbon by lifting the black clips upward.
Remove (4.6 mm) screws that hold the hard drive in place.
There may be only one of these screws, the one at bottom right. The upper position screw mayalready have been removed (The 4th red circle from the left in step 4).
Asus Eee PC 1005HA Wifi Card Replace… Draft: 2019-09-26Guide ID: 24470 -
This document was generated on 2020-11-15 11:23:07 PM (MST).
© iFixit — CC BY-NC-SA www.iFixit.com Page 8 of 11

Step 10
Gently pull the hard drive to the left by the black plastic ribbon. Slowly lift the hard drive up on theleft and then out.
When re-inserting, use caution to ensure that the WiFi antenna cable (visible as a black loop belowthe disk in the 2nd photo) is not trapped under the leg of the drive encasing.
Asus Eee PC 1005HA Wifi Card Replace… Draft: 2019-09-26Guide ID: 24470 -
This document was generated on 2020-11-15 11:23:07 PM (MST).
© iFixit — CC BY-NC-SA www.iFixit.com Page 9 of 11

Step 11
Lift the black clips using the plastic opening tool to detach the ribbon that connects the SD cardmodule.
Step 12
Remove the wifi antenna connectionusing the plastic opening tool.
Asus Eee PC 1005HA Wifi Card Replace… Draft: 2019-09-26Guide ID: 24470 -
This document was generated on 2020-11-15 11:23:07 PM (MST).
© iFixit — CC BY-NC-SA www.iFixit.com Page 10 of 11
To reassemble your device, follow these instructions in reverse order.
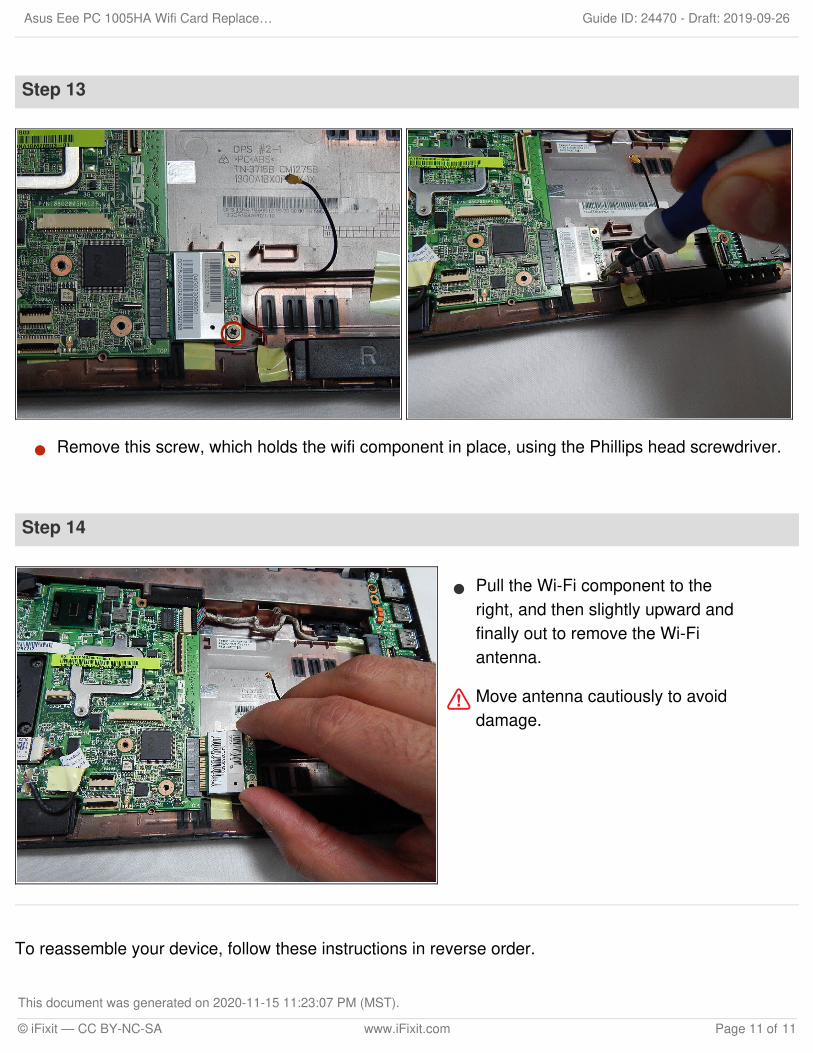
Step 13
Remove this screw, which holds the wifi component in place, using the Phillips head screwdriver.
Step 14
Pull the Wi-Fi component to theright, and then slightly upward andfinally out to remove the Wi-Fiantenna.
Move antenna cautiously to avoiddamage.
Asus Eee PC 1005HA Wifi Card Replace… Draft: 2019-09-26Guide ID: 24470 -
This document was generated on 2020-11-15 11:23:07 PM (MST).
© iFixit — CC BY-NC-SA www.iFixit.com Page 11 of 11


