Embed Size (px)
Citation preview
ALSO: Track cleaning Hardshell scenery Managing photos
STANDARD EDITION | PORTRAIT
DOWNLOAD TRYLANDSCAPE
ADVERTISEMENT
• INDEX• TABLE OF CONTENTS
MRHMAG.COM
Front Cover: Victor Rose-man begins an in-depth series on modeling Southern Pacific passenger trains. Victor starts off in this issue by looking at the classic Daylight train.
ISSN 2152-7423
Editorial StaffJoe D. Fugate, Publisher and EditorDon Hanley, Assistant Editor
ProductionPatty Fugate, pasteup and layout Joe Brugger, copy editing Mike Dodd, copy editing
Technical AssistantsJeff Shultz Jimmy Simmons
AdvertisingLes Halmos, Account ManagerDaniel Nava, Advertising AssistantJean-François Delisle, Marketing Assistant Published for the glory of God. What’s this?
Issue password: Jan2015
ColumnistsRichard Bale, News and eventsJeff Shultz, News and eventsLes Halmos, Modular railroadingLarry Smith, Narrow Gauge/ShortlinesBruce Petrarca, DCCKen Patterson, Reporter at large
Special CorrespondentsJoe Brugger, Questions & answersCharlie Comstock, Contributing editor
Model Railroad Hobbyist | January 2015 | #59
STAFF CREDITS
• INDEX• TABLE OF CONTENTS
MRHMAG.COM
A - G
Vendors: Get your clickable logo here ...
Model Railroad Hobbyist | January 2015 | #59
MRH SPONSORS
athearn.com
berretthill.com/trains
brassexpo.com
www.digitrax.com
modelrailroadexpo.com foxvalleymodels.com glxscalemodels.com
www.esu.eu/en www.handlaidtrack.com
fiferhobby.com
caboosehobbies.com coffmaneng.com
cvrco.com
blairline.com bowser-trains.com
www.atlasrr.com bachmanntrains.com bachrus.com
railroadhobbyshow.comwww.americanlimitedmodels.comacculites.com
blmamodels.com
archertransfers.com
con-cor.com
• INDEX• TABLE OF CONTENTS
MRHMAG.COM

Vendors: Get your clickable logo here ...
MRH SPONSORS | 2
H - S
www.hobby-on.com
microscale.com
mtalbert.com
www.pwrs.ca/main.php railmasterhobbies.com rapidotrains.comnickandnoradesigns.com
ringengineering.com
sanjuancarco.com
sodigi.com
scenicexpress.com signaturepress.com soundtraxx.com
rr-cirkits.com rslaserkits.com rustystumps.com
mthtrains.com ncedcc.comnano-oil.com/Model%20Raiload.html
model-trains-video.com modelrectifier.com stores.ebay.com/Motrak-Models
www.iascaled.com iwata-medea.com litchfieldstation.com
sunsetmodels.com
• INDEX• TABLE OF CONTENTS
MRHMAG.COM

T - Z
Looking for something? Check our Hobby Marketplace!
Take me there!
MRH SPONSORS | 3
Vendors: Get your clickable logo here ...
tamvalleydepot.com
trainworld.com truelinetrains.com tsgmultimedia.com
yankeedabbler.com
tcsdcc.com tonystrains.com traintekllc.com
walthers.com
• INDEX• TABLE OF CONTENTS
MRHMAG.COM
ADVERTISEMENT
• INDEX• TABLE OF CONTENTS
MRHMAG.COM
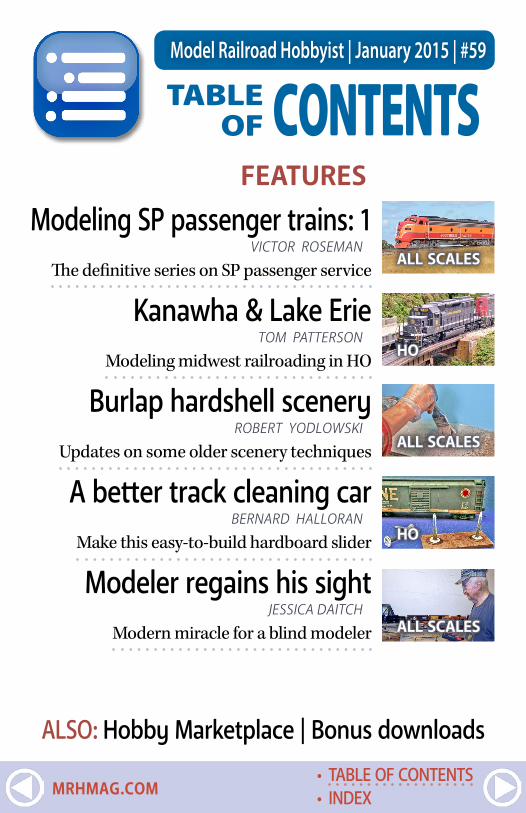
TABLE OF
ALSO: Hobby Marketplace | Bonus downloads
FEATURESModeling SP passenger trains: 1
VICTOR ROSEMAN
The definitive series on SP passenger service
Kanawha & Lake ErieTOM PATTERSON
Modeling midwest railroading in HO
Burlap hardshell sceneryROBERT YODLOWSKI
Updates on some older scenery techniques
A better track cleaning carBERNARD HALLORAN
Make this easy-to-build hardboard slider
Modeler regains his sightJESSICA DAITCH
Modern miracle for a blind modeler
HO
HO
ALL SCALES
ALL SCALES
ALL SCALES
Model Railroad Hobbyist | January 2015 | #59
CONTENTS
• INDEX• TABLE OF CONTENTS
MRHMAG.COM
COLUMNSMRH Q-A-T: Scale speeds, acrylic paint compiled by JOE BRUGGER
DCC Impulses: DCC Reversing loops BRUCE PETRARCA
Getting Real: Managing a photo collection JACK BURGESS
What’s Neat: Dynamic digital exhaust, and more! KEN PATTERSON
Photo feature: Yes, it’s a model compiled by DON HANLEY
Derailments: Bizarre facts & humor (supposedly) compiled by THE MRH STAFF
NEWS and EDITORIALPublisher’s musings: A thing called imagination
JOE FUGATE
Staff notes: MRH Gen3 - all about our new lookcompiled by THE MRH STAFF
News & Events: January 2015RICHARD BALE & JEFF SHULTZ
Reverse running: Are you a wise guy?JOE FUGATE
TABLE OF CONTENTS | 2
• INDEX• TABLE OF CONTENTS
MRHMAG.COM
ADVERTISEMENT
• INDEX• TABLE OF CONTENTS
MRHMAG.COM
Model Railroad Hobbyist | January 2015 | #59
PUBLISHER’S MUSINGSJOE FUGATE
A THING CALLED IMAGINATIONBEFORE I GET INTO THIS MONTH’S EDITORIAL, LET ME first acknowledge, MRH looks different this month! We’re call-ing this our new Gen3 look, to distinguish it from our previous major look-and-feel update in 2013 called Gen2.
For more on the Gen3 changes, see this month’s Staff Notes.
Imagineering: MRH’s new column?John Allen, the famous creator of the Gorre & Daphetid layout, once said:
“There is this little thing called imagination which must play an important part in any model railroad”.
In the last several decades, the hobby of model railroading has moved increasingly toward more accurate prototype model-ing. There’s no question realistic prototype and proto-freelance modeling is popular, and as a result the hobby press has focused ever more on accurate prototype modeling.
But the hobby of model railroading, even strict prototype mod-eling, takes some imagination to pull off well. We feel it’s time
editorial
• INDEX• TABLE OF CONTENTS
MRHMAG.COM
we acknowledge this more artistically creative side of the hobby as a nice counter to columns and articles about getting the most accurate rivet count.
To this end, we’d like to start a new column in MRH we’re call-ing: Imagineering: Exploring the creative sides of the hobby.
Like our “Getting Real” column about prototype modeling, we’re very interested in seeing the topic from the perspective of differ-ent hobbyists. In fact, the different hobbyists’ angle is a Model Railroad Hobbyist distinctive – realizing the hobby revolves around the people who do the hobby and how they’re each doing the hobby with some of their own flair and style.
So we’re looking for six columnists who rotate, similar to how “Getting Real” works now. What we’re looking for, however, are modelers who are interested in demonstrating how they do the artistic side of the hobby. Yes, we’re talking more about
PUBLISHER’S MUSINGS | 2
ADVERTISEMENT
• INDEX• TABLE OF CONTENTS
MRHMAG.COM
ADVERTISEMENT
• INDEX• TABLE OF CONTENTS
MRHMAG.COM
freelance modeling, but this doesn’t need to be limited to that.
Here’s how we define the different kinds of prototype and free-lance modeling we see in the hobby.These are just points on a line between strict prototypical accuracy and total fantasy. There are an infinite number of styles in between:1. Strict prototype - total accuracy2. Loose prototype - small variances to increase fun3. Strict proto-freelance - actual prototype practices with freelance elements4. Loose proto-freelance - no such prototype, but keep it plausible5. Strict freelance – somewhat fanciful, but still feels like “real” trains6. Loose freelance – anything goes as long as it’s trains and it’s fun
I would consider our current “Getting Real” column to focus mainly on 1, 2, and 3, with the most emphasis on 1 and 2.
PUBLISHER’S MUSINGS | 3
ADVERTISEMENT
Want to help keep MRH free?
Then click on Ads!
• INDEX• TABLE OF CONTENTS
MRHMAG.COM
ADVERTISEMENT
• INDEX• TABLE OF CONTENTS
MRHMAG.COM
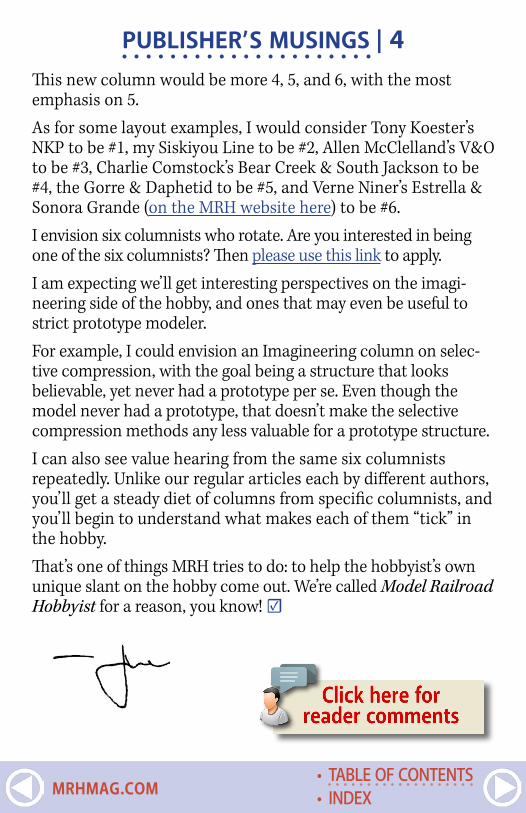
PUBLISHER’S MUSINGS | 4This new column would be more 4, 5, and 6, with the most emphasis on 5.As for some layout examples, I would consider Tony Koester’s NKP to be #1, my Siskiyou Line to be #2, Allen McClelland’s V&O to be #3, Charlie Comstock’s Bear Creek & South Jackson to be #4, the Gorre & Daphetid to be #5, and Verne Niner’s Estrella & Sonora Grande (on the MRH website here) to be #6.I envision six columnists who rotate. Are you interested in being one of the six columnists? Then please use this link to apply.I am expecting we’ll get interesting perspectives on the imagi-neering side of the hobby, and ones that may even be useful to strict prototype modeler.For example, I could envision an Imagineering column on selec-tive compression, with the goal being a structure that looks believable, yet never had a prototype per se. Even though the model never had a prototype, that doesn’t make the selective compression methods any less valuable for a prototype structure.I can also see value hearing from the same six columnists repeatedly. Unlike our regular articles each by different authors, you’ll get a steady diet of columns from specific columnists, and you’ll begin to understand what makes each of them “tick” in the hobby.That’s one of things MRH tries to do: to help the hobbyist’s own unique slant on the hobby come out. We’re called Model Railroad Hobbyist for a reason, you know! ☑
• INDEX• TABLE OF CONTENTS
MRHMAG.COM

ADVERTISEMENT
• INDEX• TABLE OF CONTENTS
MRHMAG.COM
ADVERTISEMENT
• INDEX• TABLE OF CONTENTS
MRHMAG.COM
Model Railroad Hobbyist | January 2015 | #59
STAFF NOTES
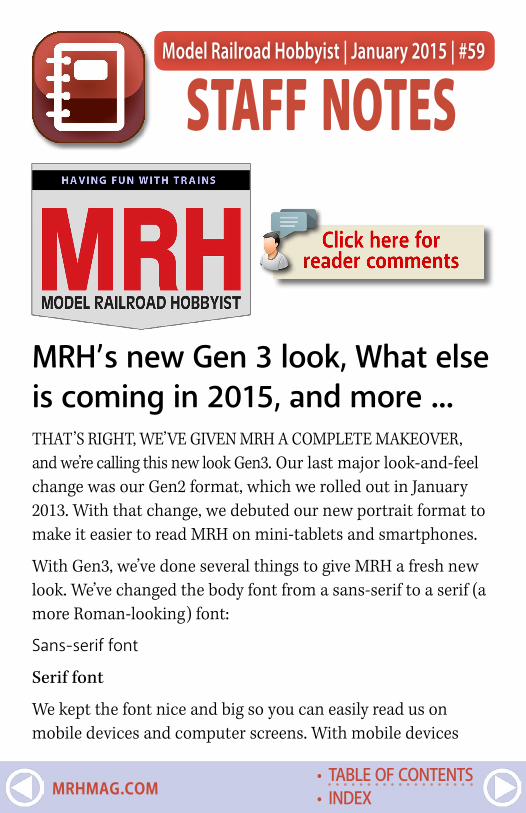
MRH’s new Gen 3 look, What else is coming in 2015, and more ...THAT’S RIGHT, WE’VE GIVEN MRH A COMPLETE MAKEOVER, and we’re calling this new look Gen3. Our last major look-and-feel change was our Gen2 format, which we rolled out in January 2013. With that change, we debuted our new portrait format to make it easier to read MRH on mini-tablets and smartphones.
With Gen3, we’ve done several things to give MRH a fresh new look. We’ve changed the body font from a sans-serif to a serif (a more Roman-looking) font:
Sans-serif font
Serif font
We kept the font nice and big so you can easily read us on mobile devices and computer screens. With mobile devices
• INDEX• TABLE OF CONTENTS
MRHMAG.COM
getting retina displays having pixel resolutions similar to print, type experts recommend a Roman-style body font as easier to read, so that’s what we’ve done.
The biggest change, however, is our new MRH shield logo. We felt it was time to move away from our stylized text logo to a more compact and bold logo. We engaged Scott Thornton, graphic designer and model railroader, to help us define much of this new look. Thanks, Scott, for a job well done!
In case you’re wondering how the old and new look compare, here’s a comparison [1]. The page width is a bit less because
STAFF NOTES | 21. (opposite) Here’s a side-by-side comparison of MRH’s new Gen3 look (top) to our previous Gen2 format (bottom).
. . . . . . . . . . . . . . . . . . . . . . . . . . . . . . . . . . . . . . . . . . . .
LAST ISSUE’S RATINGSThe top 5 rated articles in the December 2014 issue of Model Railroad Hobbyist are:.
4.7 DCC Impulses: A look at LokSound DCC4.5 What’s Neat: Christmas potpourri4.5 The moving of Aberfoyle Junction4.5 Adding sound to an N scale diesel4.4 Maintenance flags and signs
Issue overall: 4.4
Please rate the articles! Click the reader comments button on each article and select the star rating you think each article deserves. Thanks! . . . . . . . . . . . . . . . . . . . . . . . . . . . . . . . . . . . . . . . . . . . .
• INDEX• TABLE OF CONTENTS
MRHMAG.COM
STAFF NOTES | 4
ADVERTISEMENT
we’re using a standard paper size that will allow us to put the magazine to print if we wish (more on that later). The new format also uses a bit more margin at the top for a page number on each page instead of just on each spread as before.
The new body copy is a slightly heavier serif font and has more space between the lines, which helps give the page a less cramped look and makes it easier to read on smaller screens. That said, the new format does use smaller icons to make the page just a tad more compact.
Finally, the new format uses 300 DPI images, to allow you to zoom in and study them even better than before. We’d like to know if this makes things a problem for some, however, since this does make the magazine PDF file well over 50 MB where as before it was often in the 40 MB range.
• INDEX• TABLE OF CONTENTS
MRHMAG.COM
STAFF NOTES | 5
ADVERTISEMENT
What these changes allow us to doThis new facelift involves more than just putting a new face on MRH. There are also some important underlying reasons for the new changes. Let’s outline them here one at a time:
1. We can now offer an ePub version: The format changes make it easier than ever for us to make a reflowable ePub ver-sion of the magazine available, similar to how our eBooks work. Apple devices like an iPad or an iPhone display an ePub very nicely in iBooks, and so does a Mac.
With reflowable, it’s easier than ever to read MRH on a smart-phone or mini-tablet. You make the text as large as you need, and the text just reflows as needed around the images, but everything remains in about the same relative location in the text.
• INDEX• TABLE OF CONTENTS
MRHMAG.COM
ADVERTISEMENT
STAFF NOTES | 6For the moment, the ePub ver-sion of MRH is experimental, because we expect some prob-lems getting all the ad links to work. Expect the ePub version of the January issue to come out around January 15th.
Once we we’re satisfied we’ve resolved all the problems with the new ePub version, expect it to be released at the same time as the PDF version.
2. New MRH Mobile app: Later in the month of January we’ll also be rolling out our new MRH magazine app for mobile devices. This app will include a thumbnail of the latests posts on our website, recent posts on Facebook and Youtube, and what’s new on TrainMasters TV.
But most importantly, this new app will display MRH nicely on your device screen, and it will notify you automatically when a new issue is available.
• INDEX• TABLE OF CONTENTS
MRHMAG.COM
STAFF NOTES | 7
ADVERTISEMENT
3. Paper version of MRH: If you’d like to get a paper copy of Model Railroad Hobbyist, we will be making it available for you to order. It won’t be free, and because we’ll be doing such a small print run, it will cost more than a regular magazine.
You’ll have two options: color cover with B&W interior (cheaper) or a full color edition (more costly). More specific details will be forthcoming, but we expect each issue to have a nice square perfect-bound spine and be laid out landscape not unlike a coffee table book, and it will cost about what a hobby book you buy at the hobby shop costs.
We won’t be offering paper edition subscriptions. This will remain a singe issue special-order option that’s not free. You will pay for the printing costs and for the shipping. But if you absolutely must have a paper copy, then we’ll be offering it.
• INDEX• TABLE OF CONTENTS
MRHMAG.COM

What else is coming in 2015 ...There’s more goodies coming in 2015 as well: MRH’s new weekly video segment on TrainMasters TV: The MRH Help Desk.
Each week, Publisher Joe Fugate will present little-known tips that (in his opinion) do a superb job of solving common model railroader challenges. This new video segment will use a punchy, fast-paced presentation style: short, sweet, and to-the-point. But we’ll have a little fun along the way too. Watch for it!
What happened to John Wilkes second loader article?This issue of MRH just kept getting larger and larger, and finally we had to cut it off in order to make the January issue rollout deadline. So we’ve pushed John’s article to February.
STAFF NOTES | 8
ADVERTISEMENT
• INDEX• TABLE OF CONTENTS
MRHMAG.COM
STAFF NOTES | 9
Unclaimed article payments increasingYes, MRH pays for articles and recently, the number of unclaimed payments for these things has been increasing.
Some of our payment emails are bouncing as undeliverable because spam filters block us. This becomes especially frustrating when we get nasty emails back from the contributor wanting to know why we’ve stiffed them on their payment, and we can’t get a respose through!
So please, please, PLEASE include your phone number and mail-ing address as well as your email. That way if your spam filters eat our email, we can still get your payment to you! ☑
ADVERTISEMENT ADVERTISEMENT
• INDEX• TABLE OF CONTENTS
MRHMAG.COM
ADVERTISEMENT
• INDEX• TABLE OF CONTENTS
MRHMAG.COM

Model Railroad Hobbyist | January 2015 | #59
MRH Q-A-T
XMRH QUESTIONS, ANSWERS, AND TIPS
QUESTIONS AND ANSWERSIndustry databaseQ. Is there an online resource that lists various industries and the railroad-related traffic they use? I’m looking for a list that I can use to populate my waybills with legitimate traffic. Ideally this would include:
� Shipper (load origin, including city)
� Receiver (load destination, including city)
� Product (what is being shipped)
� Type of car used to move the product—DCSnr
A. You can find a large amount of industry data at opsig.org/reso/inddb.
Currently there are about 40,000 industries in the in-progress directory. Most industries listed are actual companies located
compiled byJOE BRUGGER
column
• INDEX• TABLE OF CONTENTS
MRHMAG.COM
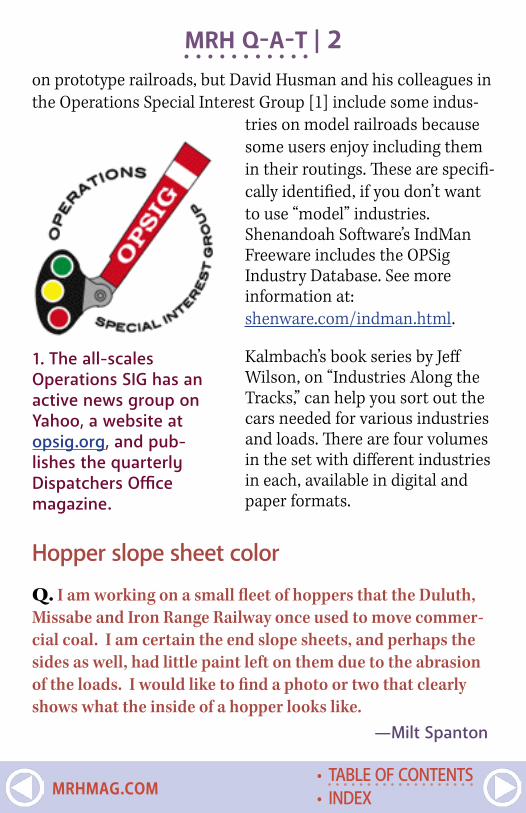
on prototype railroads, but David Husman and his colleagues in the Operations Special Interest Group [1] include some indus-
tries on model railroads because some users enjoy including them in their routings. These are specifi-cally identified, if you don’t want to use “model” industries.Shenandoah Software’s IndMan Freeware includes the OPSig Industry Database. See more information at: shenware.com/indman.html.
Kalmbach’s book series by Jeff Wilson, on “Industries Along the Tracks,” can help you sort out the cars needed for various industries and loads. There are four volumes in the set with different industries in each, available in digital and paper formats.
Hopper slope sheet color
Q. I am working on a small fleet of hoppers that the Duluth, Missabe and Iron Range Railway once used to move commer-cial coal. I am certain the end slope sheets, and perhaps the sides as well, had little paint left on them due to the abrasion of the loads. I would like to find a photo or two that clearly shows what the inside of a hopper looks like.
—Milt Spanton
MRH Q-A-T | 2
1. The all-scales Operations SIG has an active news group on Yahoo, a website at opsig.org, and pub-lishes the quarterly Dispatchers Office magazine.
• INDEX• TABLE OF CONTENTS
MRHMAG.COM

MRH Q-A-T | 3A. In some cases, the interior of cars like this are not painted at all. The steel develops a nice even coat of oxide (rust), except where the load rubs it down. The oxide changes color over time, from pale to dark. The dust left behind after the product is emptied will be the color of the product – black for coal, oxide red for iron ore pellets, gray for crushed rock, and so on.
Here’s a car used to haul gravel and crushed rock: canadian-freightcargallery.ca/cgi-bin/image.pl?i=wc34007&o=wc.
The Appalachian Railroad Modeling site has a great photo of the insides of several B&O hoppers at appalachianrailroadmodeling.com/bophotos.html and on the Rail Pictures.Net website [2] at railpictures.net/viewphoto.php?id=354381&nseq=39.
JohnB weathers hopper interiors, by airbrushing a coat of rail brown, then dusting it with rust-colored chalk powder and seal-ing it with a flat finish.
2. A Chesapeake & Ohio wreck, on Feb. 28, 1976 at Pearch, VA, gives a good look at the weathered interiors of coal hoppers. Stan Short photo
• INDEX• TABLE OF CONTENTS
MRHMAG.COM

Thanks to Chris van der Heide, Tom Patterson, JohnB, Peter F, Stan Short, and Russ Bellinis. —MRH
Scale speedsQ. I have noticed in some videos that scale speeds are some-times not observed in operating sessions, especially in the yards. Seems to me that not operating at scale speeds makes the train movements look toy-like. What is the common oper-ating practice? Observe scale speeds or not? If they are not observed, what is the reason? —Capt. Jim
A. Alan: I am not to that point yet but I plan to fully respect scale speeds. I agree that not operating at scale speeds makes the train look toy-like. In most instances trains move at rela-tively slow speeds. The CN main near my house being the excep-tion, but for the rest of the track modeled on my layout trains in real life rarely exceed 25 mph.
Pirosko: I run very slowly, to the point that some operators have even been annoyed. Operators who understand what I am doing really appreciate it. I even once “radioed” my engineer to come back and pick me up after I threw the last switch and he took off. He asked “really?” and I said “yes.” The layout owner was actually pleased. The engineer in the end also appreciated what we were trying to accomplish.
It’s not for everyone, but for me, we try to duplicate models, then add prototypical operations and signals, so why stop at prototype speeds? Besides, our layouts are so compressed that slowing down is almost a requirement to have some fun time. It’s not a race, and our lives are usually too fast to begin with.
MRH Q-A-T | 4
• INDEX• TABLE OF CONTENTS
MRHMAG.COM
Joe F: One thing you can do with DCC to enforce scale speed in the yard is set the top speed of the yard goat to 35 mph or so. (If you are running DC, you can also dial down the voltage avail-able to yard blocks). I’ve had yard operators at my Siskiyou Line op sessions who seem to get impatient and will “crank it up” when nobody’s looking, to save time. The cure is to adjust the yard goat’s speed curve, but watch out. If the hotshot yard guy can find another loco he can commandeer for switching that has a more normal speed curve, he’ll do it!
If you have a layout with 50-foot cars, you can use the 3-second rule to get a good approximation of speed. Pick a stationary point along the track, count “1001, 1002, 1003” and take note of how many 50-foot cars pass the point. Each car represents roughly 10
MRH Q-A-T | 5
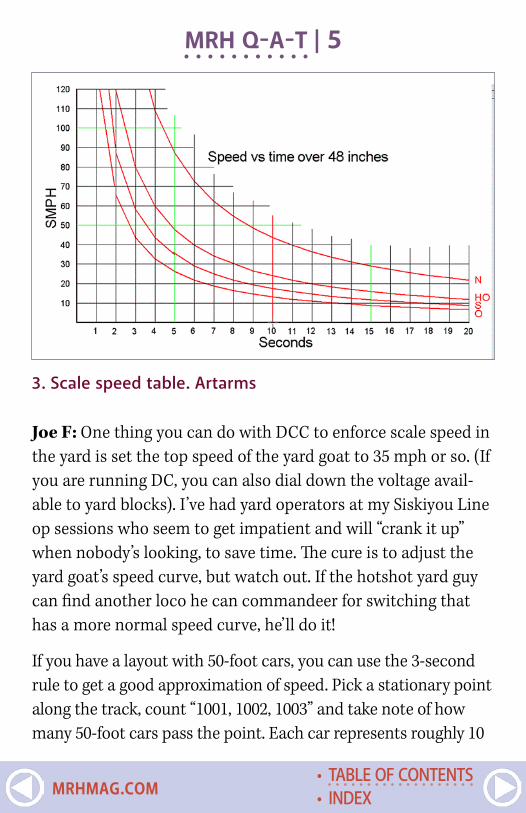
3. Scale speed table. Artarms
• INDEX• TABLE OF CONTENTS
MRHMAG.COM
mph. This is only approximate, but it’s close enough much of the time. If you have three cars pass, then you’re going about 30 mph. On my line, the standard speed limit is 25 mph, so you want two-and-a-half 50-footers to go by in that 3 seconds.
However, the railroad owner makes the rules.
George Booth: I’m not real enthusiastic about trying to run at scale speeds. I find that running slow, especially in a yard, puts a kink in operations. I enjoy seeing trains run on a layout, the more the merrier. If the yardmaster is poking around, running at 5 mph to assemble trains, it’s going to take a long time to get a train built and people will be standing around doing nothing. That’s not fun.
Slow is fine if you are doing “stunt switching” but when real work needs to be done, pick up the pace, please. With our relatively short mainline runs, the yard needs to move quickly to keep a number of trains running. Mainline speeds can still be rela-tively slow to get from point to point but yard work and switching should be a little quicker than some people think they should.
I was a guest operator once on a very small prototype industrial switching railroad. We had two cars to spot and it took three hours to do it. I would be bored to tears modeling something like that.
Artarms: It takes some experience to get good at running at scale speeds. Here is one tool [3] to help see the scale speed. Pick out a piece of track 48” long, mark the ends in some way, then run your trains through the section. Count the seconds and use this graph to see your scale speed. If you can’t find 48” of clear track, use 24” and double the time. You will soon get a feel for scale speed and will automatically run at that speed.
MRH Q-A-T | 6
• INDEX• TABLE OF CONTENTS
MRHMAG.COM

ADVERTISEMENT
• INDEX• TABLE OF CONTENTS
MRHMAG.COM
Pipopak: The late Frank Ellison had his layout marked with “smiles” (scale miles) that were about 1/10 of the scaled down real thing. Smileposts were located as needed. He also had “scale time” provided by fast clocks about six times faster than reality. Speeds were enforced accordingly. Timetable was law.
Speedy yard switchers can be either regeared (prototype practice, by the way) or elec-tronically limited.
I used to run several NWSL boxcars with a flywheel built in. Two or three of them would put a real drag on any train, both starting and braking! After a couple of spinning-wheels starts, you learned to be gentle with the throttle.
John Allen had another trick to slow a “hot rodder opera-tor:” the hot box car. It was a regular boxcar that had a set of rails and a steel ball to close
MRH Q-A-T | 7ADVERTISEMENT
• INDEX• TABLE OF CONTENTS
MRHMAG.COM
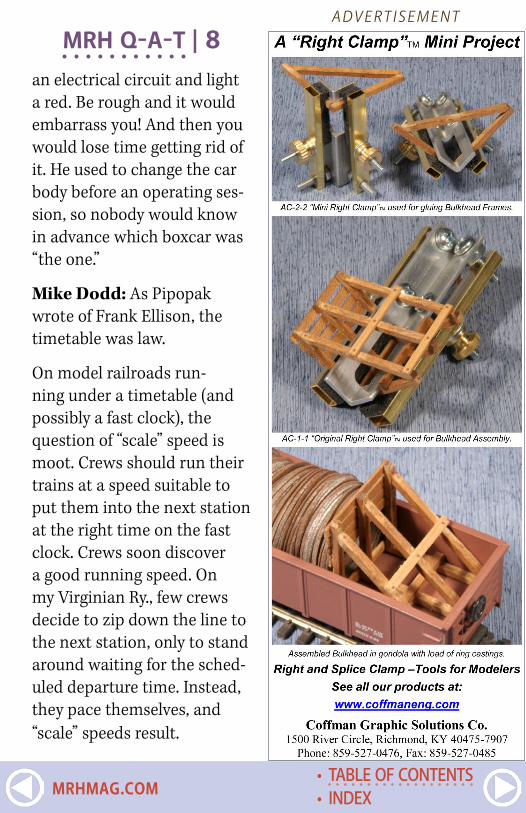
an electrical circuit and light a red. Be rough and it would embarrass you! And then you would lose time getting rid of it. He used to change the car body before an operating ses-sion, so nobody would know in advance which boxcar was “the one.”
Mike Dodd: As Pipopak wrote of Frank Ellison, the timetable was law.
On model railroads run-ning under a timetable (and possibly a fast clock), the question of “scale” speed is moot. Crews should run their trains at a speed suitable to put them into the next station at the right time on the fast clock. Crews soon discover a good running speed. On my Virginian Ry., few crews decide to zip down the line to the next station, only to stand around waiting for the sched-uled departure time. Instead, they pace themselves, and “scale” speeds result.
MRH Q-A-T | 8ADVERTISEMENT
• INDEX• TABLE OF CONTENTS
MRHMAG.COM
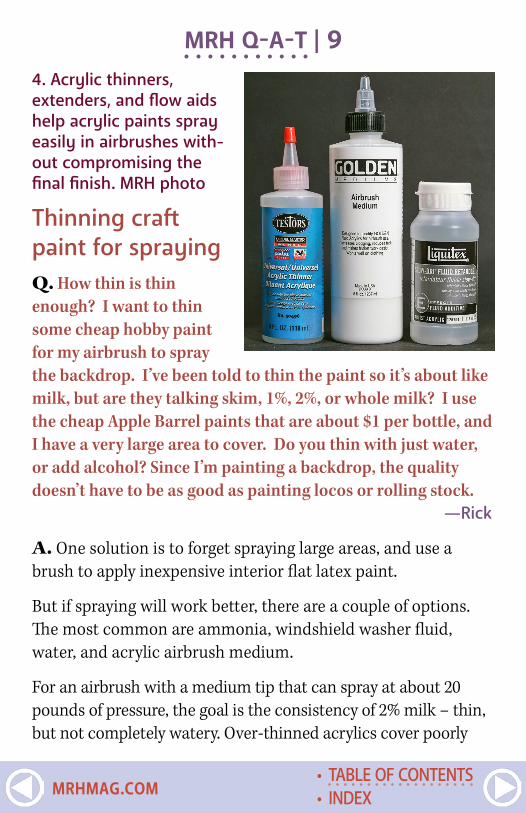
Thinning craft paint for sprayingQ. How thin is thin enough? I want to thin some cheap hobby paint for my airbrush to spray the backdrop. I’ve been told to thin the paint so it’s about like milk, but are they talking skim, 1%, 2%, or whole milk? I use the cheap Apple Barrel paints that are about $1 per bottle, and I have a very large area to cover. Do you thin with just water, or add alcohol? Since I’m painting a backdrop, the quality doesn’t have to be as good as painting locos or rolling stock. —Rick
A. One solution is to forget spraying large areas, and use a brush to apply inexpensive interior flat latex paint.
But if spraying will work better, there are a couple of options. The most common are ammonia, windshield washer fluid, water, and acrylic airbrush medium.
For an airbrush with a medium tip that can spray at about 20 pounds of pressure, the goal is the consistency of 2% milk – thin, but not completely watery. Over-thinned acrylics cover poorly
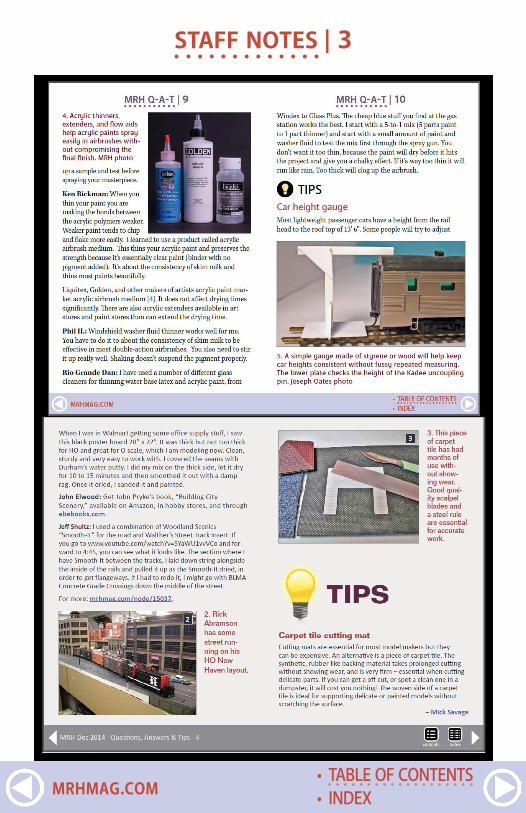
MRH Q-A-T | 94. Acrylic thinners, extenders, and flow aids help acrylic paints spray easily in airbrushes with-out compromising the final finish. MRH photo
• INDEX• TABLE OF CONTENTS
MRHMAG.COM
ADVERTISEMENT
• INDEX• TABLE OF CONTENTS
MRHMAG.COM
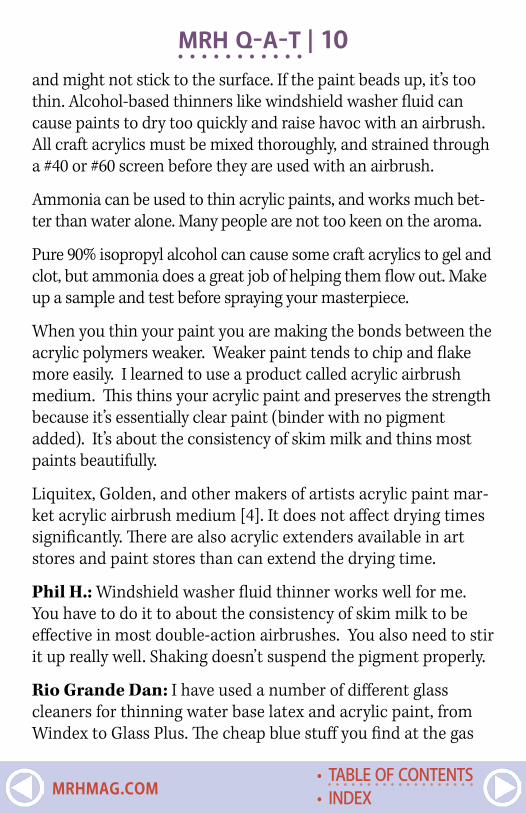
and might not stick to the surface. If the paint beads up, it’s too thin. Alcohol-based thinners like windshield washer fluid can cause paints to dry too quickly and raise havoc with an airbrush. All craft acrylics must be mixed thoroughly, and strained through a #40 or #60 screen before they are used with an airbrush.
Ammonia can be used to thin acrylic paints, and works much bet-ter than water alone. Many people are not too keen on the aroma.
Pure 90% isopropyl alcohol can cause some craft acrylics to gel and clot, but ammonia does a great job of helping them flow out. Make up a sample and test before spraying your masterpiece.
When you thin your paint you are making the bonds between the acrylic polymers weaker. Weaker paint tends to chip and flake more easily. I learned to use a product called acrylic airbrush medium. This thins your acrylic paint and preserves the strength because it’s essentially clear paint (binder with no pigment added). It’s about the consistency of skim milk and thins most paints beautifully.
Liquitex, Golden, and other makers of artists acrylic paint mar-ket acrylic airbrush medium [4]. It does not affect drying times significantly. There are also acrylic extenders available in art stores and paint stores than can extend the drying time.
Phil H.: Windshield washer fluid thinner works well for me. You have to do it to about the consistency of skim milk to be effective in most double-action airbrushes. You also need to stir it up really well. Shaking doesn’t suspend the pigment properly.
Rio Grande Dan: I have used a number of different glass cleaners for thinning water base latex and acrylic paint, from Windex to Glass Plus. The cheap blue stuff you find at the gas
MRH Q-A-T | 10
• INDEX• TABLE OF CONTENTS
MRHMAG.COM
station works the best. I start with a 5-to-1 mix (5 parts paint to 1 part thinner) and start with a small amount of paint and washer fluid to test the mix first through the spray gun. You don’t want it too thin, because the paint will dry before it hits the project and give you a chalky effect. If it’s way too thin it will run like rain. Too thick will clog up the airbrush.
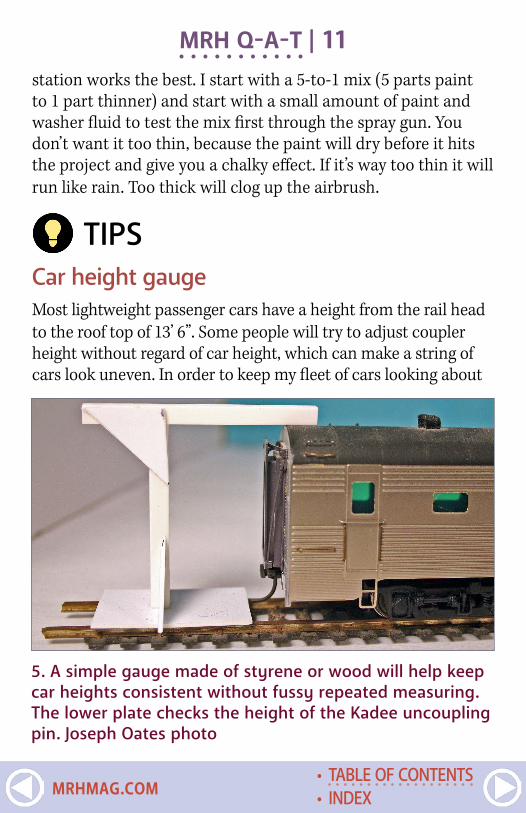
TIPSCar height gaugeMost lightweight passenger cars have a height from the rail head to the roof top of 13’ 6”. Some people will try to adjust coupler height without regard of car height, which can make a string of cars look uneven. In order to keep my fleet of cars looking about
MRH Q-A-T | 11
5. A simple gauge made of styrene or wood will help keep car heights consistent without fussy repeated measuring. The lower plate checks the height of the Kadee uncoupling pin. Joseph Oates photo
• INDEX• TABLE OF CONTENTS
MRHMAG.COM
. . . . . . . . . . . . . . . . . . . . . . . . . . . . . . . . . . . . . . . . . . . . GET PAID FOR YOUR TIP
We pay $25 per tip we publish, or $40 each if the tip also includes a photo or finished drawing. Click here and select article type TIP. . . . . . . . . . . . . . . . . . . . . . . . . . . . . . . . . . . . . . . . . . . . .
the same height, I built an easy gauge [5] out of styrene to check car height and the Kadee uncoupling pin height. —Joseph OatesDecal dishSometimes decals float off their backing paper while soaking, and can be very hard to see. If you like to leave decals in the water, here’s a tip: use a black frozen food container to soak decals. My wife does Jenny Craig, whose containers are black. Those tiny white numbers etc. are easy to see against the black background when they float off the backing sheet. Use a light-colored container for dark decals. —Rod Miller
Note: An alternative method is to leave the trimmed decal soaking in the water just long enough to saturate the backing. Then, until you’re ready to place it on the model, take the decal with its backing paper out of the water and place it on a hard surface that won’t absorb moisture. Both methods work.
—MRH
MRH Q-A-T | 12
• INDEX• TABLE OF CONTENTS
MRHMAG.COM
ADVERTISEMENT
• INDEX• TABLE OF CONTENTS
MRHMAG.COM
ADVERTISEMENT
• INDEX• TABLE OF CONTENTS
MRHMAG.COM

ADVERTISEMENT
• INDEX• TABLE OF CONTENTS
MRHMAG.COM

ADVERTISEMENT
• INDEX• TABLE OF CONTENTS
MRHMAG.COM
Model Railroad Hobbyist | January 2015 | #59
DCC IMPULSESBRUCE PETRARCA
DCC reversing loop | How DCC helps to automate reversing loops ...IN MY NOVEMBER 2014 COLUMN I DISCUSSED CIRCUIT protection, both bulbs and circuit breakers (mrhpub.com/2014-11-nov/land/#20) . This month, I’m going to start from the circuit breaker portion and discuss auto-reversers.
Reversing sections – real and modeledWhen the train travels down the track in one direction, with the one side facing an external observer and returns to the same section of track with the opposite side facing the observer, it has passed through a reversing section. Sounds simple.
column
X DCC TIPS, TRICKS, AND TECHNIQUES
• INDEX• TABLE OF CONTENTS
MRHMAG.COM

DCC IMPULSES | 2Prototype and model railroads each have reversing sections:
� Loops [1] � Wyes [2] � Turntables [3]
However, model railroads have another, frequently unexpected reversing section: a crossover on a “dog-bone” mainline [4].
I’m going to use the term “loop” generically to refer to any revers-ing section. Please understand that I’m referring to any situation where the polarity of the signal on the track needs to reverse to allow the train to exit. Loops are just the easiest to visualize.
Most track powered model railroads must deal with specialized wiring for loops. When the train enters a loop the polarity of the loop must match the incoming track. While the train is inside
ADVERTISEMENT
• INDEX• TABLE OF CONTENTS
MRHMAG.COM
DCC IMPULSES | 3the loop, the polarity must change to match the outgoing track. This is handled in different ways, depending upon what power source is being used.
With O-27, Marklin, and other 3-rail models, reversing sections do not present an electrical complication. The outside rails are always at the same polarity, so it doesn’t matter that they reverse.
However, with 2-rail DC or DCC, precautions must be taken when the track work physically reverses a loco or train. Unless the polarity of the loop reverses while the train is inside it, the train won’t exit. Instead, it will short out the power being sup-plied to it, as the leading wheels cross the interface.
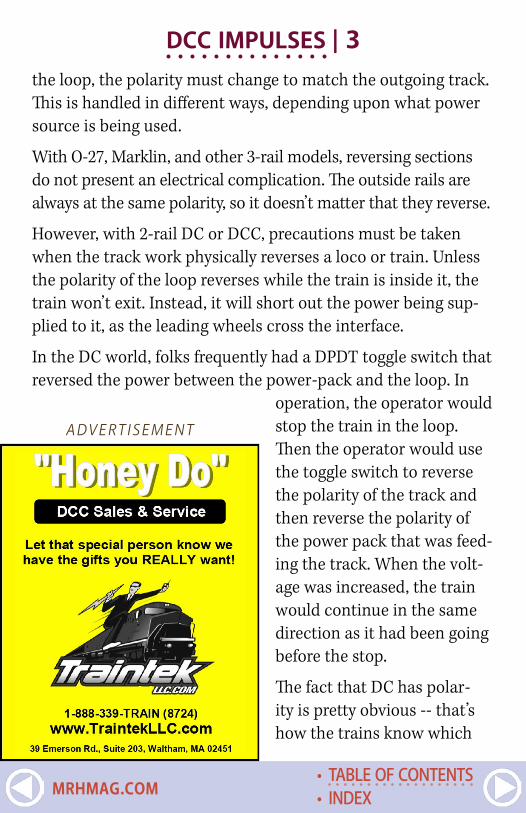
In the DC world, folks frequently had a DPDT toggle switch that reversed the power between the power-pack and the loop. In
operation, the operator would stop the train in the loop. Then the operator would use the toggle switch to reverse the polarity of the track and then reverse the polarity of the power pack that was feed-ing the track. When the volt-age was increased, the train would continue in the same direction as it had been going before the stop.
The fact that DC has polar-ity is pretty obvious -- that’s how the trains know which
ADVERTISEMENT
• INDEX• TABLE OF CONTENTS
MRHMAG.COM
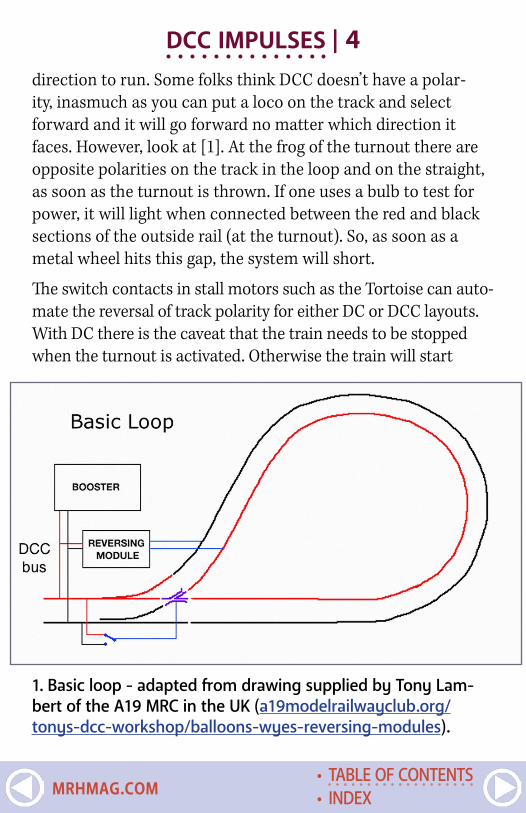
direction to run. Some folks think DCC doesn’t have a polar-ity, inasmuch as you can put a loco on the track and select forward and it will go forward no matter which direction it faces. However, look at [1]. At the frog of the turnout there are opposite polarities on the track in the loop and on the straight, as soon as the turnout is thrown. If one uses a bulb to test for power, it will light when connected between the red and black sections of the outside rail (at the turnout). So, as soon as a metal wheel hits this gap, the system will short.
The switch contacts in stall motors such as the Tortoise can auto-mate the reversal of track polarity for either DC or DCC layouts. With DC there is the caveat that the train needs to be stopped when the turnout is activated. Otherwise the train will start
DCC IMPULSES | 4
1. Basic loop - adapted from drawing supplied by Tony Lam-bert of the A19 MRC in the UK (a19modelrailwayclub.org/tonys-dcc-workshop/balloons-wyes-reversing-modules).
• INDEX• TABLE OF CONTENTS
MRHMAG.COM

2. Wye - adapted from drawing supplied by Tony Lambert of the A19 MRC in the UK (a19modelrailwayclub.org/tonys-dcc-workshop/balloons-wyes-reversing-modules).
running backwards as the turnout motor switch reverses the con-nection to the track. Understand, with DCC there will probably be a bit of hesitation for the short period of time while the switch motor contacts do not connect any power to the track.
In other reversing situations such as wyes, the use of switches tied to the turnouts isn’t nearly as simple and, therefore not recommended.
Turnouts have frogs. That is the name for the blue segments in [1] and [2] track work where the straight and diverging rails cross. It must be either electrically isolated (Peco calls them Insulfrog) or have its polarity change (Peco Electrofrog) depending upon which direction the train is headed, straight or diverging. It is the right rail in one case and the left rail in the other.
DCC IMPULSES | 5
• INDEX• TABLE OF CONTENTS
MRHMAG.COM

DCC IMPULSES | 6
3. Turntable at the Durango CO roundhouse, September 22, 2003. Bruce Petrarca photo.
ADVERTISEMENT
• INDEX• TABLE OF CONTENTS
MRHMAG.COM
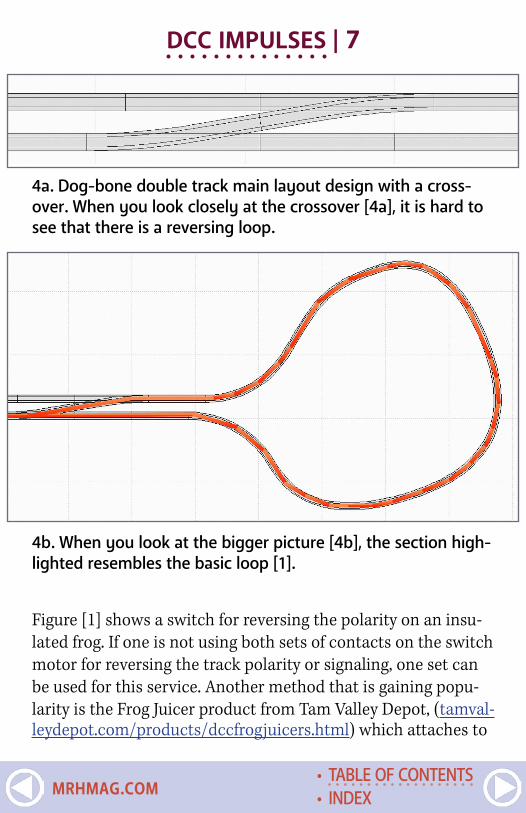
Figure [1] shows a switch for reversing the polarity on an insu-lated frog. If one is not using both sets of contacts on the switch motor for reversing the track polarity or signaling, one set can be used for this service. Another method that is gaining popu-larity is the Frog Juicer product from Tam Valley Depot, (tamval-leydepot.com/products/dccfrogjuicers.html) which attaches to
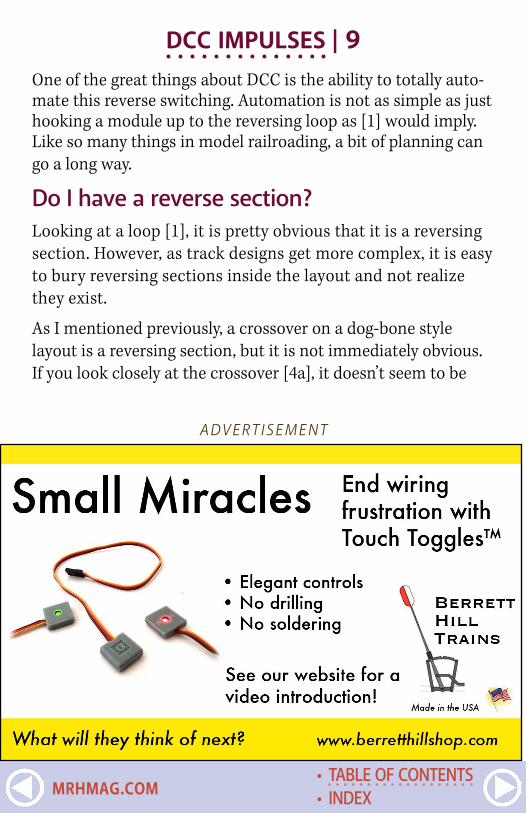
4a. Dog-bone double track main layout design with a cross-over. When you look closely at the crossover [4a], it is hard to see that there is a reversing loop.
4b. When you look at the bigger picture [4b], the section high-lighted resembles the basic loop [1].
DCC IMPULSES | 7
• INDEX• TABLE OF CONTENTS
MRHMAG.COM

the DCC bus and to the frog. It matches the polarity of the frog to whatever is needed when the loco crosses over it.
A wye [2] requires that one of the three legs be double gapped on the exit side of its turnout. In this example, the straight and diverging routes of the turnout on the right side of the wye are double gapped.
While model turntables can physically reverse a locomotive, and, perhaps, a single car, they may or may not reverse polarity as they turn. Some will designate a “dead zone” to be oriented where there are not tracks coming into the turntable. This is usually a giveaway that the turntable reverses polarity.
If the turntable does not reverse track polarity as it turns around, an auto-reverser will be needed. More information is on my web site at the bottom of the page on layout wiring (mrdccu.com/curriculum/wiring.htm).
Playback problems? Click here ...5. Testing a layout with a marked truck.
DCC IMPULSES | 8
• INDEX• TABLE OF CONTENTS
MRHMAG.COM
ADVERTISEMENT
• INDEX• TABLE OF CONTENTS
MRHMAG.COM
DCC IMPULSES | 9One of the great things about DCC is the ability to totally auto-mate this reverse switching. Automation is not as simple as just hooking a module up to the reversing loop as [1] would imply. Like so many things in model railroading, a bit of planning can go a long way.
Do I have a reverse section?Looking at a loop [1], it is pretty obvious that it is a reversing section. However, as track designs get more complex, it is easy to bury reversing sections inside the layout and not realize they exist.
As I mentioned previously, a crossover on a dog-bone style layout is a reversing section, but it is not immediately obvious. If you look closely at the crossover [4a], it doesn’t seem to be
ADVERTISEMENT
• INDEX• TABLE OF CONTENTS
MRHMAG.COM
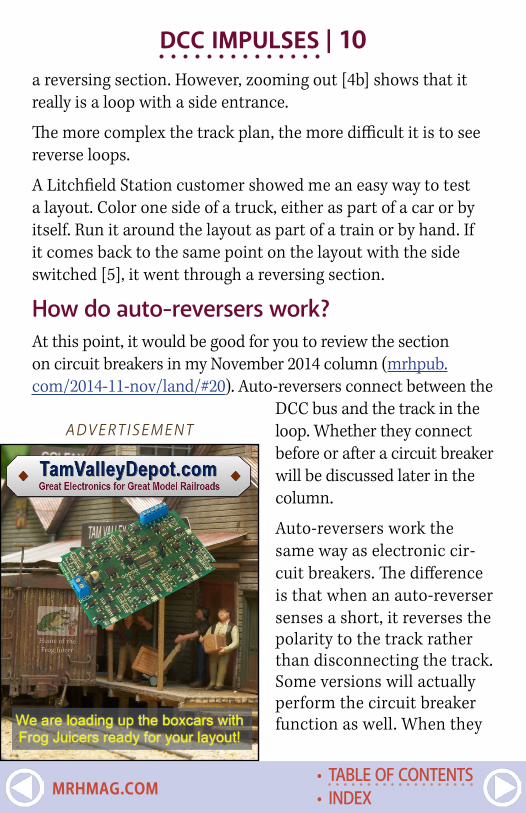
a reversing section. However, zooming out [4b] shows that it really is a loop with a side entrance.
The more complex the track plan, the more difficult it is to see reverse loops.
A Litchfield Station customer showed me an easy way to test a layout. Color one side of a truck, either as part of a car or by itself. Run it around the layout as part of a train or by hand. If it comes back to the same point on the layout with the side switched [5], it went through a reversing section.
How do auto-reversers work?At this point, it would be good for you to review the section on circuit breakers in my November 2014 column (mrhpub.com/2014-11-nov/land/#20). Auto-reversers connect between the
DCC bus and the track in the loop. Whether they connect before or after a circuit breaker will be discussed later in the column.
Auto-reversers work the same way as electronic cir-cuit breakers. The difference is that when an auto-reverser senses a short, it reverses the polarity to the track rather than disconnecting the track. Some versions will actually perform the circuit breaker function as well. When they
DCC IMPULSES | 10
ADVERTISEMENT
• INDEX• TABLE OF CONTENTS
MRHMAG.COM
sense a short they first reverse the polarity. If the short per-sists, then they will disconnect the track.
Hints and tricks for smooth operationLet’s talk about how to get smooth, bulletproof operation of a reversing section.
The first criteria is the loop must be longer than the longest pos-sible train. It will probably require its own bus – I call it a revers-ing sub-bus. Rolling stock should not be entering and leaving the section at the same time. If the auto-reverser sees short circuits
DCC IMPULSES | 11
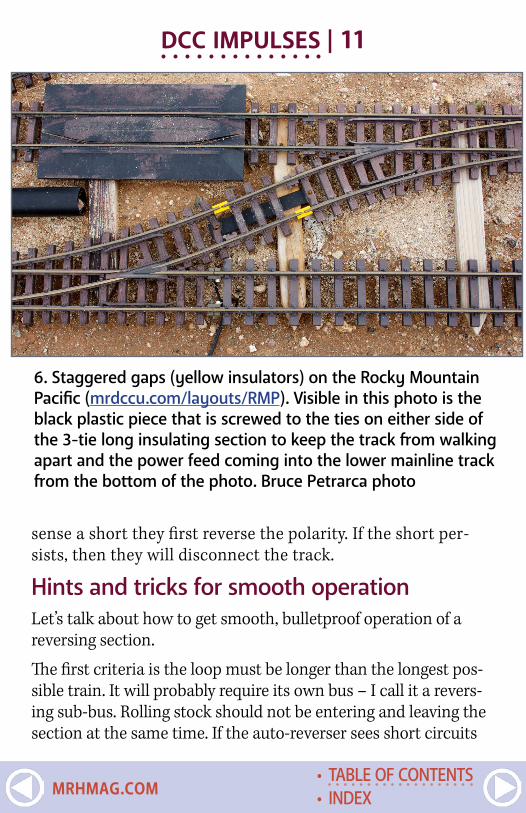
6. Staggered gaps (yellow insulators) on the Rocky Mountain Pacific (mrdccu.com/layouts/RMP). Visible in this photo is the black plastic piece that is screwed to the ties on either side of the 3-tie long insulating section to keep the track from walking apart and the power feed coming into the lower mainline track from the bottom of the photo. Bruce Petrarca photo
• INDEX• TABLE OF CONTENTS
MRHMAG.COM

ADVERTISEMENT
• INDEX• TABLE OF CONTENTS
MRHMAG.COM
DCC IMPULSES | 10
on both ends of the loop it will just toggle back and forth and get very confused.
There are lots of discussions on the web about how to cheat this, with plastic wheels, etc. But they are all just patches. If you truly want smooth and reliable operation, make sure that there is no possible way for a train to be entering and leaving the loop at the same time. Or for that matter, for a second train to be entering the loop when another is leaving.
Similarly, I’ve seen folks try to save a couple of bucks and run two different loops off the same auto-reverser. Not a good idea.
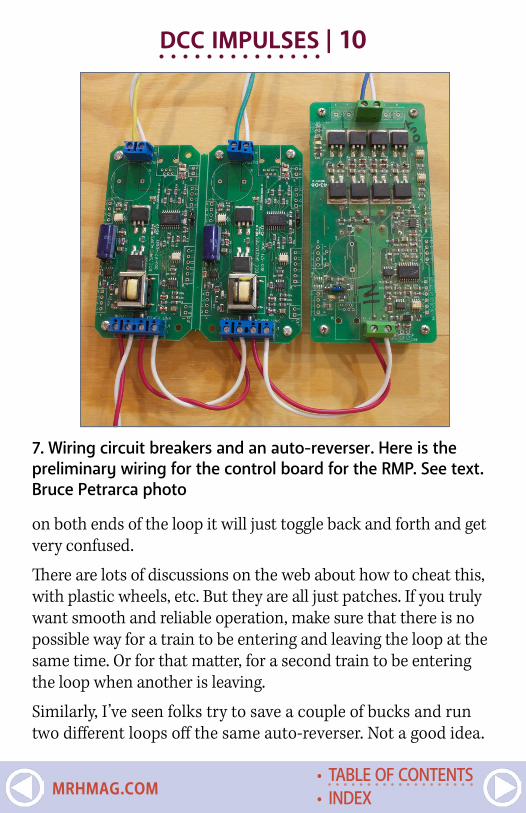
7. Wiring circuit breakers and an auto-reverser. Here is the preliminary wiring for the control board for the RMP. See text. Bruce Petrarca photo
• INDEX• TABLE OF CONTENTS
MRHMAG.COM
DCC IMPULSES | 11It is just a matter of time before two trains are competing for track controlled by the single module.
The next hint is how the double gapping is achieved. Many modelers get almost anal-retentive on getting the rail joiners directly across from each other. While this is an esthetic thing for conductive joiners, it is counterproductive when providing insulated gaps for auto-reversers.
If gaps are directly across from each other, the auto-reverser may be confused. If the wheels hit the gaps at slightly different times, the auto-reverser may sense the first short and reverse in time to catch the second short. The short may persist long enough to shut down a circuit breaker. Staggering the gaps makes it such that the first wheel to hit a gap activates the auto-reverser. It will be a bit of time before the opposite wheel hits the second gap. No problem.
ADVERTISEMENT
• INDEX• TABLE OF CONTENTS
MRHMAG.COM
DCC IMPULSES | 11So, I recommend staggering the gaps. The minimum I like to see is ½” in HO or smaller scale and an inch in larger scales. There is really no maximum distance – go for what is convenient. Just remember that the length of the loop is the distance between the closest gaps.
I have adopted a practice of offsetting gaps every time I need an insulated section. It doesn’t matter whether the gap is for district blocking or a reversing loop. Down the road, you may want to turn a block into a reversing loop. The gap shown in [6] is between power districts, not part of a reversing loop. I did the gaps for my loop the same way, though.
Another “gotcha” can come when adjacent districts are con-nected to auto-reversers. You need a section between loops that never changes polarity -- that is, wired to the bus not through
ADVERTISEMENT
• INDEX• TABLE OF CONTENTS
MRHMAG.COM
DCC IMPULSES | 12an auto-reverser. Think about floating boat docks. If you are trying to step from one floating dock to another, it is easier if you can go to a fixed dock in between. Similarly, if you have two reverser-wired sections next to each other, you can set up a war between the reversers, each one reversing and still seeing a short. Even a few inches of non-reversing track will help.
Choosing an auto-reverserIn my November 2014 column, I recommended placing circuit breakers between the booster bus and the track bus to protect the rolling stock. Similarly, I prefer to use auto-reversers that con-tain their own circuit breaker. Amazingly, many auto-reversers do not contain this easy-to-implement feature.
Auto-reversers with circuit protection are available from DCC Specialties, both the PSx-AR and the OG-AR units. I know of no other auto reverser that includes the circuit protection function, including units from Digitrax, Lenz, NCE, MRC or Tam Valley Depot.
In the photo of my RMP control board [7], on the left are two PSx circuit breaker modules. On the right is a PSx-AR auto-reverser. Since the PSx-AR combines the auto-reverse and circuit breaker functions, all are wired to the
ADVERTISEMENT
• INDEX• TABLE OF CONTENTS
MRHMAG.COM
(red & white) DCC booster output. The “daisy chain” feature of the PSx modules makes wiring simple.
Note: white is the common color here and will be wired to the same rail in normal running (outside). The white input is con-nected to the side of the PSx modules that are not interrupted. That is the trace that goes from the input to the output without interruption. Note, too: the wires are slightly twisted -- the small amount of capacitance created this way helps reduce interference to the DCC signal.
I hope you feel more confident in designing your layout and installing auto-reversers after this short introduction. Please join us in the discussion that comes out of these columns. Folks always seem to have additional ideas to share. Just click on the Reader Comments icon at the beginning or the end of the col-umn. While you are there, I encourage you to rate the column. “Awesome” is always appreciated. Thanks.
Until next month, I wish you green boards in all your endeavors. There will be no Mr. DCC’s Workbench segment this month. This entire column would qualify. ☑
DCC IMPULSES | 13
• INDEX• TABLE OF CONTENTS
MRHMAG.COM
ADVERTISEMENT
• INDEX• TABLE OF CONTENTS
MRHMAG.COM
ADVERTISEMENT
• INDEX• TABLE OF CONTENTS
MRHMAG.COM
ADVERTISEMENT
• INDEX• TABLE OF CONTENTS
MRHMAG.COM
ADVERTISEMENT
• INDEX• TABLE OF CONTENTS
MRHMAG.COM
Model Railroad Hobbyist | January 2015 | #59
GETTING REALJACK BURGESS
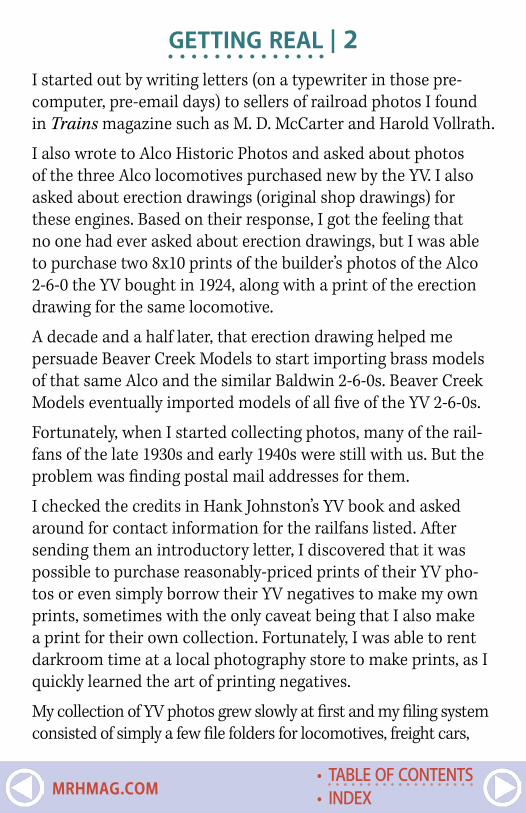
PHOTO COLLECTION IDEAS | Keeping track of photos ...MODELING A PROTOTYPE GENERALLY INCLUDES THE NEED to collect a certain amount of information about the railroad being modeled. Some railroads have been covered so thoroughly in books and historical journals or magazines that the only real research needed is finding copies of those resources. For the rest of us, one of our sub-hobbies might be collecting photos of our prototype.
When I began researching and modeling the Yosemite Valley Railroad over 45 years ago, I naively thought that the single available book about the YV (Hank Johnston’s Railroads of the Yosemite Valley) included all the photos of the railroad that existed. But a couple of years later, a friend gave me a couple of “new” YV photos. They weren’t very good prints, but it sent me on a quest for more photos, an addiction which continues to this day.
column
XMODELING REAL RAILROADS AND WHAT THEY DO
• INDEX• TABLE OF CONTENTS
MRHMAG.COM
I started out by writing letters (on a typewriter in those pre-computer, pre-email days) to sellers of railroad photos I found in Trains magazine such as M. D. McCarter and Harold Vollrath.
I also wrote to Alco Historic Photos and asked about photos of the three Alco locomotives purchased new by the YV. I also asked about erection drawings (original shop drawings) for these engines. Based on their response, I got the feeling that no one had ever asked about erection drawings, but I was able to purchase two 8x10 prints of the builder’s photos of the Alco 2-6-0 the YV bought in 1924, along with a print of the erection drawing for the same locomotive.
A decade and a half later, that erection drawing helped me persuade Beaver Creek Models to start importing brass models of that same Alco and the similar Baldwin 2-6-0s. Beaver Creek Models eventually imported models of all five of the YV 2-6-0s.
Fortunately, when I started collecting photos, many of the rail-fans of the late 1930s and early 1940s were still with us. But the problem was finding postal mail addresses for them.
I checked the credits in Hank Johnston’s YV book and asked around for contact information for the railfans listed. After sending them an introductory letter, I discovered that it was possible to purchase reasonably-priced prints of their YV pho-tos or even simply borrow their YV negatives to make my own prints, sometimes with the only caveat being that I also make a print for their own collection. Fortunately, I was able to rent darkroom time at a local photography store to make prints, as I quickly learned the art of printing negatives.
My collection of YV photos grew slowly at first and my filing system consisted of simply a few file folders for locomotives, freight cars,
GETTING REAL | 2
• INDEX• TABLE OF CONTENTS
MRHMAG.COM
GETTING REAL | 3
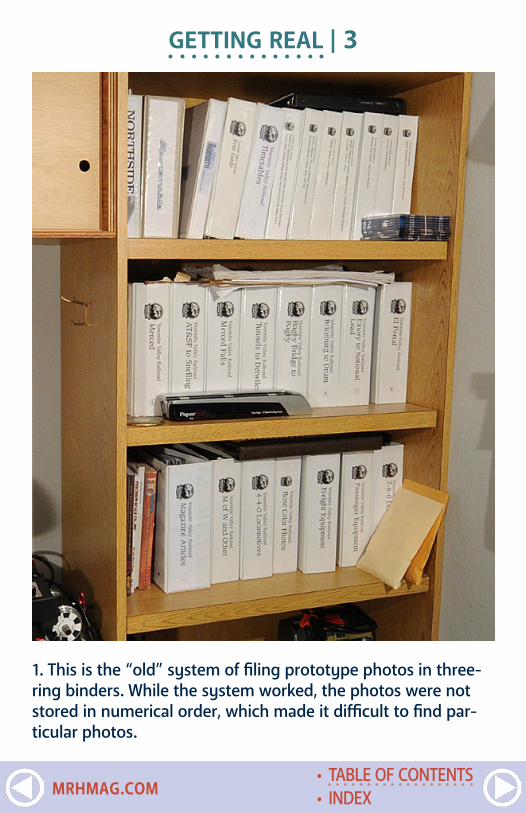
1. This is the “old” system of filing prototype photos in three-ring binders. While the system worked, the photos were not stored in numerical order, which made it difficult to find par-ticular photos.
• INDEX• TABLE OF CONTENTS
MRHMAG.COM
and locations along the railroad. The YV was only 77 miles long and only had 10 locomotives over its entire life. That made developing a filing system fairly simple using standard file folders.
But that initial simple folder system had an inherent problem, since it was too easy to remove photos from their folders for a modeling project, only to have them temporarily disappear on my model-ing workbench. There was also no real way of keeping track of the location, photographer, date taken, etc., for each photo, except for minimal notes penciled on the back of the prints.
I eventually converted my growing collection of photos and file folders into a system of binders with photos filed under a sys-tematic numbering system [1]. Each photo was given a five-digit number with the first two digits designating the subject and the following three digits a simple numerical counter.
GETTING REAL | 4
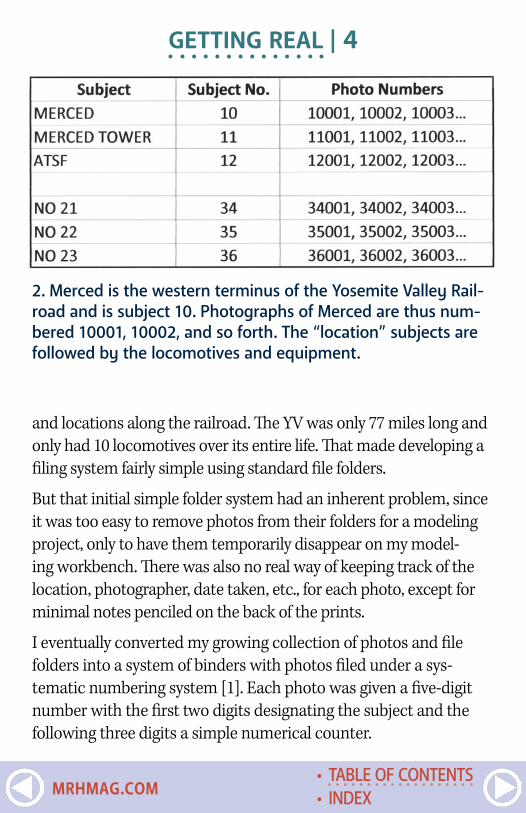
2. Merced is the western terminus of the Yosemite Valley Rail-road and is subject 10. Photographs of Merced are thus num-bered 10001, 10002, and so forth. The “location” subjects are followed by the locomotives and equipment.
• INDEX• TABLE OF CONTENTS
MRHMAG.COM
GETTING REAL | 5The basic system is illustrated by this graphic [2] which shows the subject number and how photos are numbered under each subject.
For example, Merced, at the western end of the railroad is 10 followed by 12 for the next location along the line, and so forth. The location subjects were followed by subject numbers for each locomotive on the line and each type of freight car, caboose, and passenger car.
This system seemed very logical at the time, but as my knowl-edge of the railroad grew, a shortcoming arose. For example, when I set up the system, I knew virtually nothing about one 13-mile section of the railroad which was inaccessible except by hiking or white-water rafting. So I used one subject number for all the photos from that section of the railroad, resulting in 160 photos for this section.
This made it more time-consuming to find photos of a particu-lar spot or location within this section. After I learned more about that section, I realized that I could have divided it into several different subjects.
A better system would have been to number the location fold-ers based on the first two digits of the closest milepost of the location. Thus, the folder for Merced would have been 00 and Merced Falls would have been 24, since it was near milepost 24. This would have allowed me to add locations as I gained more knowledge and photos.
Once I developed this system, I began storing my photos in binders with dividers for each subject. However, with funds for my hobby limited at the time, I tried to minimize the number of pages in these binders by filing 5x7 prints two to a page per side,
• INDEX• TABLE OF CONTENTS
MRHMAG.COM

GETTING REAL | 6
and 8x10 prints one to a page per side. Filing them numerically by photo number would have been more logical, but would have required more pages.
My method saved money but meant that finding a particular photo was more difficult, since the pages in each binder weren’t in numerical order. Partly as a result of this decision, my col-lection of binders grew to its current collection of 14 three-inch binders. Finding a photo within sections where there might be 200 or more photos, all out of order, could be frustrating.
Even so, this basic system has served me well for the past 30+ years as my collection has grown to over 3,000 historic photos. Surprisingly, I still have a pretty good recollection of all these photos, but have still occasionally purchased a “new” photo, only to later find that I already have a copy of it.
I initially set up a computer database to keep track of the date and photographer of each photograph, but I have since
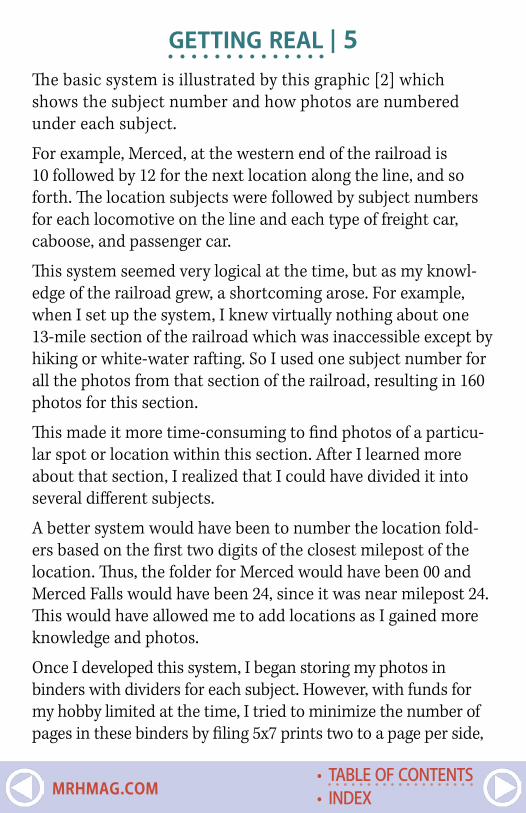
3. This is a portion of the Excel spreadsheet showing the information I track for each photograph when known. The heading “Primary Field” is due to importing the same information from an earlier database.
• INDEX• TABLE OF CONTENTS
MRHMAG.COM
GETTING REAL | 7converted that database to an Excel spreadsheet [3]. The spreadsheet seems to be easier to work with than the database.
Photo archivingComputer technology has evolved since I began collecting pho-tos, to the point that now allows for the implementation of a facet of historical research and collecting that never previously existed – computer photo archiving and actual enhancement of historical photos.
Early computer photo scanners had their limitations, but scanners have evolved to relatively economical models which can provide high resolution scans. That let me begin a program of scanning all the photos in my collection.
Before embarking on this project, I established a standard of scan-ning every photo so as to produce a 10" wide, 300 dpi (dots per inch) digital copy. Even if you only have a 4x6 photographic image, that standard is easy to achieve, as you will learn further along.
Scanning every photo also allows access to the metadata for each photo. Metadata is digital information “embedded” in a computer file. For example, the metadata automatically created for a Word document includes the title, author, and the dates it was created and later modified.
The metadata for a photo taken with one of today’s digital cameras includes the date and time that the photo was taken, the camera model, the f/stop, and with some cameras, the GPS coordinates of where the photo was taken.
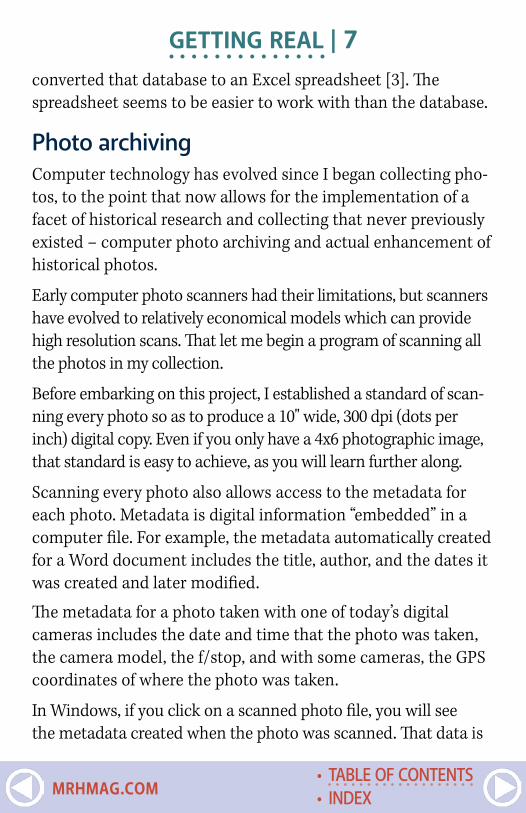
In Windows, if you click on a scanned photo file, you will see the metadata created when the photo was scanned. That data is
• INDEX• TABLE OF CONTENTS
MRHMAG.COM
initially limited to the date if was scanned/created, but there are a number of other data fields including subject, date, and author. I use the author data field for the name of the photographer.
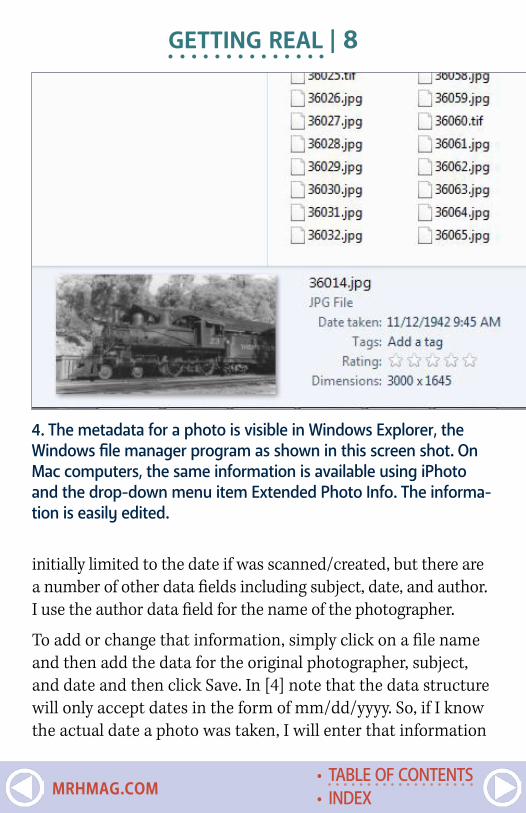
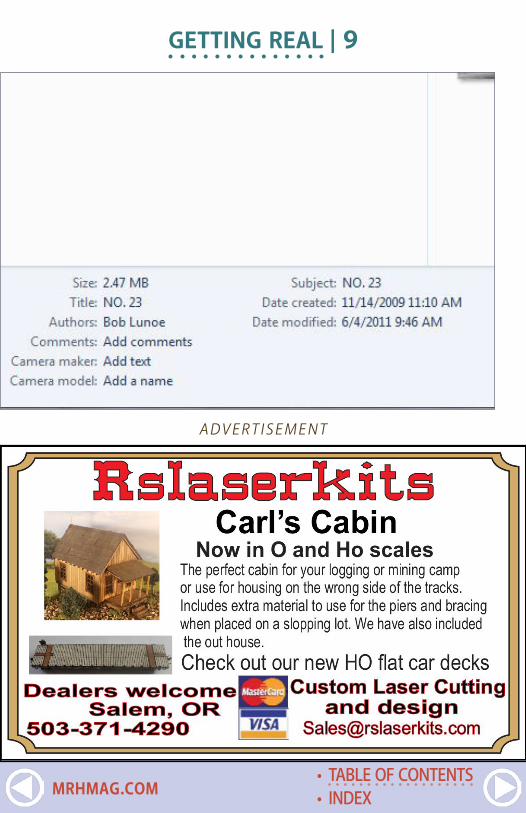
To add or change that information, simply click on a file name and then add the data for the original photographer, subject, and date and then click Save. In [4] note that the data structure will only accept dates in the form of mm/dd/yyyy. So, if I know the actual date a photo was taken, I will enter that information
GETTING REAL | 8
4. The metadata for a photo is visible in Windows Explorer, the Windows file manager program as shown in this screen shot. On Mac computers, the same information is available using iPhoto and the drop-down menu item Extended Photo Info. The informa-tion is easily edited.
• INDEX• TABLE OF CONTENTS
MRHMAG.COM
GETTING REAL | 9
ADVERTISEMENT
• INDEX• TABLE OF CONTENTS
MRHMAG.COM
along with the photographer (Author) and subject (based on my file system). If I know only the month and year the photo was taken, I’ll enter the date as mm/01/yyyy. If I know only the year, the date gets entered as 01/01/yyyy. This approach has its limitations, but works reasonably well.
The advantage of adding the metadata for a photo is that it stays with that image forever and is automatically available by simply clicking on a file name. That makes the informa-tion available in the future even for someone who doesn’t have access to my Excel spreadsheet with the same information.
Filing systemAs I scanned my photographic prints, I edited the metadata for each scan and then renamed the scan as the same photo number used my original filing system. Thus, a photo which was identified as 24015, once scanned, became 24105.jpg.
I also filed the scans under the same computer folder structure used in my original binder system. Thus, photos of Merced are filed in a folder named 10 Merced. Including the numeric tag as the first part of the folder name keeps the folders in the same order as my physical binders and dividers.
GETTING REAL | 10
“Computer technology has evolved to the point that now allows for photo archiving and actual enhancement of historical photos.”
• INDEX• TABLE OF CONTENTS
MRHMAG.COM
GETTING REAL | 11Multiple subjectsMany photos have a single subject. A photo of an engine with-out anything in the background would obviously be filed with either other photos of the same engine or with engines in the same class. But what about a photo with a main subject but another, sometimes more interesting, subject in the back-ground? In the “old days” before I began scanning my collec-tion, I tried different ways to keep track of photos with multiple subjects. I initially added fields in my database for secondary subjects with the idea that I could search the database on these additional fields. That worked but was cumbersome.
But the real solution became available once I began scanning my photo collection. Now it was easy to have the same photo in the primary folder but also saved in other folders. I no longer needed to remember that a photo of a locomotive at Merced included a portion of one of the YV’s elusive ballast cars. Instead, that scrapped engine photo is also in the same folder as other photos of the ballast cars.
Contact sheetsAs I completed scanning all of the photos for each subject, I used a nifty tool in Photoshop and Photoshop Elements to cre-ate contact sheets for each folder.
While I use Photoshop for all my photo manipulation needs, Photoshop Elements is an inexpensive version of the program, and will do everything you need to do. The following descrip-tion is based on using Photoshop Elements 6. Menu items might be slightly different in newer versions of the program.
In Photoshop Elements, click on File and then Automate/Contact Sheet. A dialog box lets you choose the layout of the
• INDEX• TABLE OF CONTENTS
MRHMAG.COM

GETTING REAL | 12contact sheet and whether file names will be included [5]. Remember to select Grayscale if you are making contact sheets for B/W images, or the resulting prints will have a slight color tint to them. When you have the options set, click on Choose and select the folder to be indexed.
Once the folder has been selected, click on OK. Photoshop Elements will then build the contact sheets and index all of the photos in the selected folder [6].
I print the contact sheets and place them in binders with dividers for each folder name. That makes for an easy way to quickly scan the contact sheets when looking for a particular photo. All of the contact sheets for each folder are saved in a separate folder.
Photos for modeling projectsOne of the real advantages to scanning a photo collection is being able to make 8x10 prints of the locomotive, piece of equipment, or building you want to model. It is also easy to print enlargements of just a portion of a subject. It is really nice to be working on a model and have several photos of the proto-type for constant reference during the build.
Improving the photos themselvesOne of the major benefits of scanning a collection of photos is the ability to actually improve them. To illustrate this advan-tage, I scanned a 5x7 print I made from an original negative back in my darkroom days.
The print looks reasonably good, but is somewhat dark (7). Since I want a 10" wide, 300-dpi digital copy (the standard for digital
• INDEX• TABLE OF CONTENTS
MRHMAG.COM

GETTING REAL | 13
5. These are the Photoshop Elements settings I use to create contact sheets for all of the scanned photos in each folder.
images for print media), I scanned the print at 600 dpi (you’ll see why in a minute) and opened the scan in Photoshop Elements.
If your scan isn’t square, zoom out so that there is a border around the image (click on the Navigator tab and use the slider to zoom-out) and then click on Select/All and then Image/Transform/Free Transform. Move the mouse pointer outside the photo at one of the corners of the image, which will result in the pointer turning into a two-headed pointer. That will allow you to rotate the image until it looks correct. Once you are satisfied, click on the checkmark or press Enter.
• INDEX• TABLE OF CONTENTS
MRHMAG.COM
GETTING REAL | 14
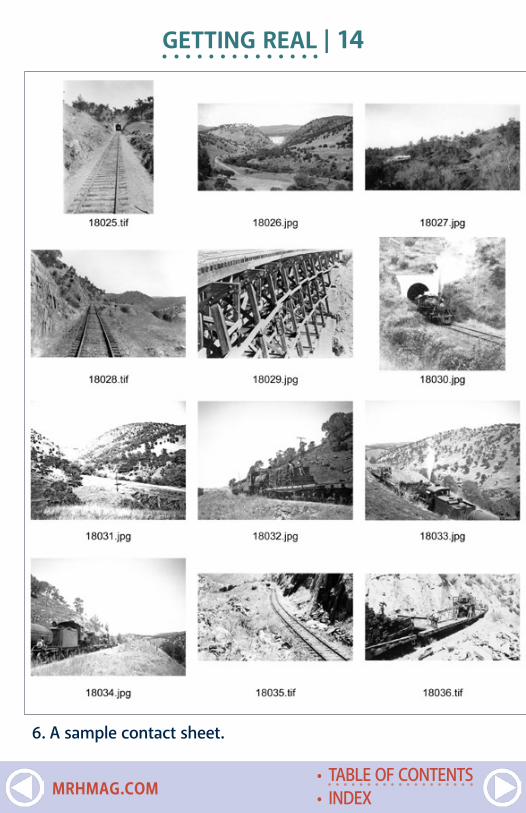
6. A sample contact sheet.
• INDEX• TABLE OF CONTENTS
MRHMAG.COM
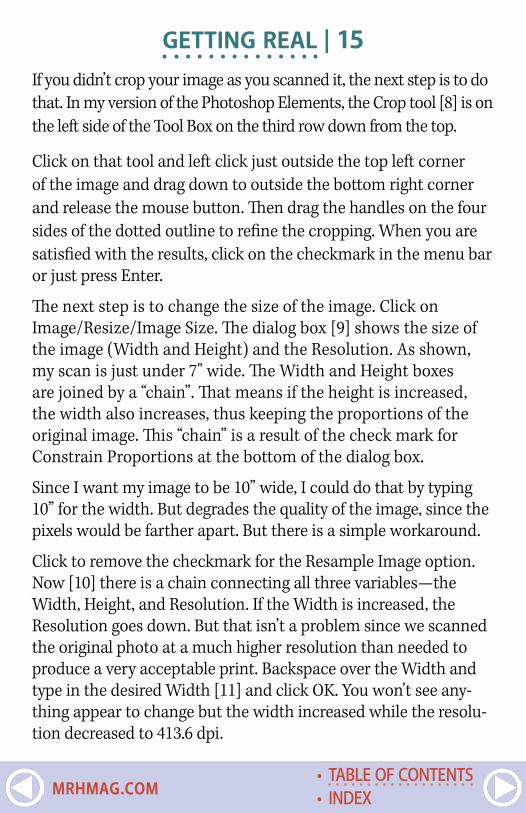
GETTING REAL | 15If you didn’t crop your image as you scanned it, the next step is to do that. In my version of the Photoshop Elements, the Crop tool [8] is on the left side of the Tool Box on the third row down from the top.
Click on that tool and left click just outside the top left corner of the image and drag down to outside the bottom right corner and release the mouse button. Then drag the handles on the four sides of the dotted outline to refine the cropping. When you are satisfied with the results, click on the checkmark in the menu bar or just press Enter.
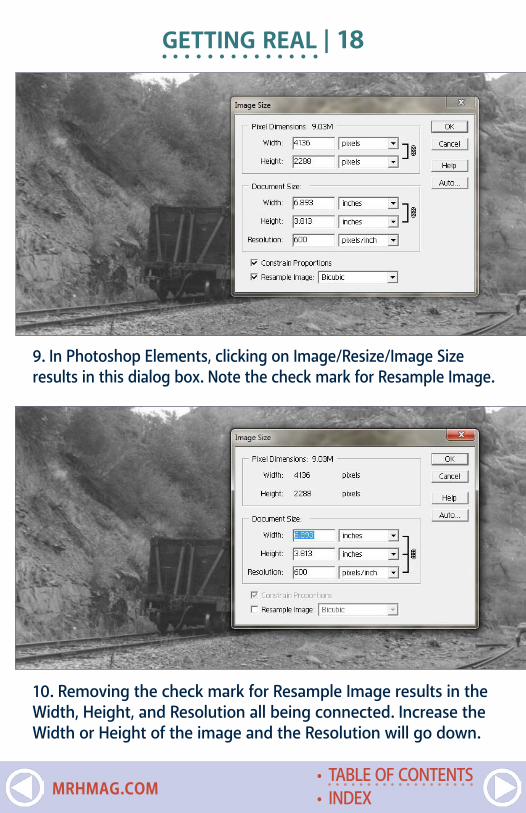
The next step is to change the size of the image. Click on Image/Resize/Image Size. The dialog box [9] shows the size of the image (Width and Height) and the Resolution. As shown, my scan is just under 7" wide. The Width and Height boxes are joined by a “chain”. That means if the height is increased, the width also increases, thus keeping the proportions of the original image. This “chain” is a result of the check mark for Constrain Proportions at the bottom of the dialog box.
Since I want my image to be 10” wide, I could do that by typing 10” for the width. But degrades the quality of the image, since the pixels would be farther apart. But there is a simple workaround.
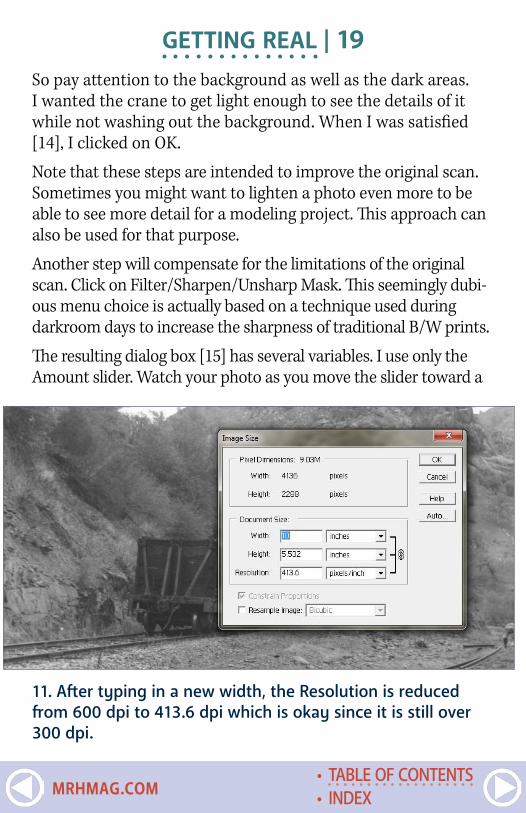
Click to remove the checkmark for the Resample Image option. Now [10] there is a chain connecting all three variables—the Width, Height, and Resolution. If the Width is increased, the Resolution goes down. But that isn’t a problem since we scanned the original photo at a much higher resolution than needed to produce a very acceptable print. Backspace over the Width and type in the desired Width [11] and click OK. You won’t see any-thing appear to change but the width increased while the resolu-tion decreased to 413.6 dpi.
• INDEX• TABLE OF CONTENTS
MRHMAG.COM
GETTING REAL | 16
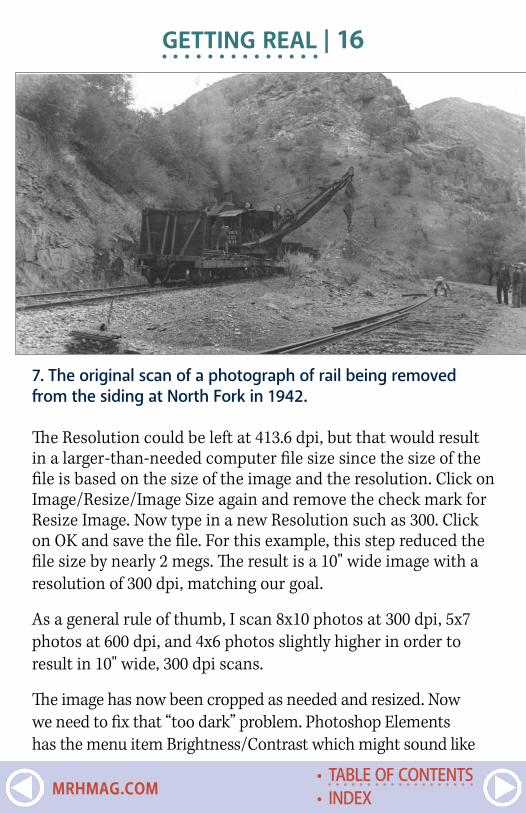
7. The original scan of a photograph of rail being removed from the siding at North Fork in 1942.
The Resolution could be left at 413.6 dpi, but that would result in a larger-than-needed computer file size since the size of the file is based on the size of the image and the resolution. Click on Image/Resize/Image Size again and remove the check mark for Resize Image. Now type in a new Resolution such as 300. Click on OK and save the file. For this example, this step reduced the file size by nearly 2 megs. The result is a 10" wide image with a resolution of 300 dpi, matching our goal.
As a general rule of thumb, I scan 8x10 photos at 300 dpi, 5x7 photos at 600 dpi, and 4x6 photos slightly higher in order to result in 10" wide, 300 dpi scans.
The image has now been cropped as needed and resized. Now we need to fix that “too dark” problem. Photoshop Elements has the menu item Brightness/Contrast which might sound like
• INDEX• TABLE OF CONTENTS
MRHMAG.COM
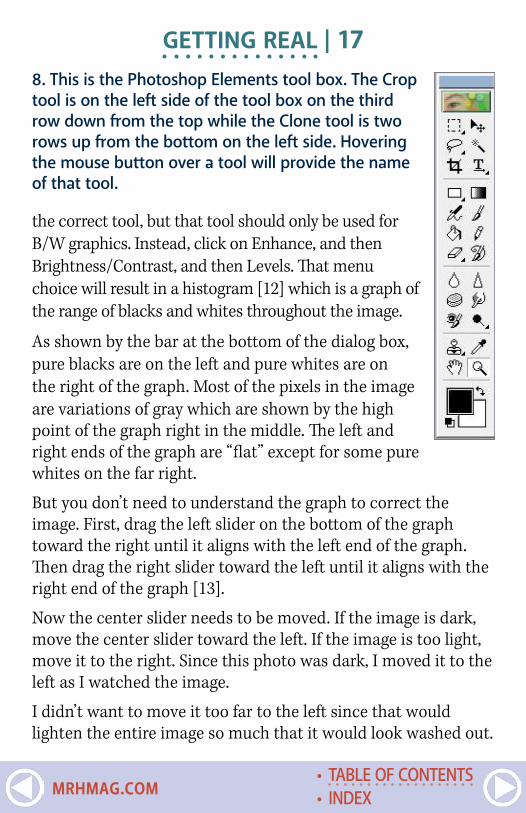
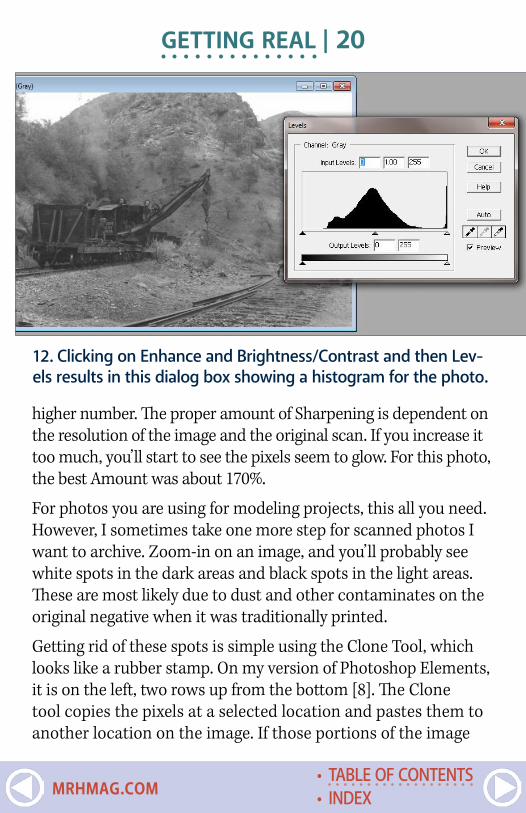
the correct tool, but that tool should only be used for B/W graphics. Instead, click on Enhance, and then Brightness/Contrast, and then Levels. That menu choice will result in a histogram [12] which is a graph of the range of blacks and whites throughout the image.
As shown by the bar at the bottom of the dialog box, pure blacks are on the left and pure whites are on the right of the graph. Most of the pixels in the image are variations of gray which are shown by the high point of the graph right in the middle. The left and right ends of the graph are “flat” except for some pure whites on the far right.
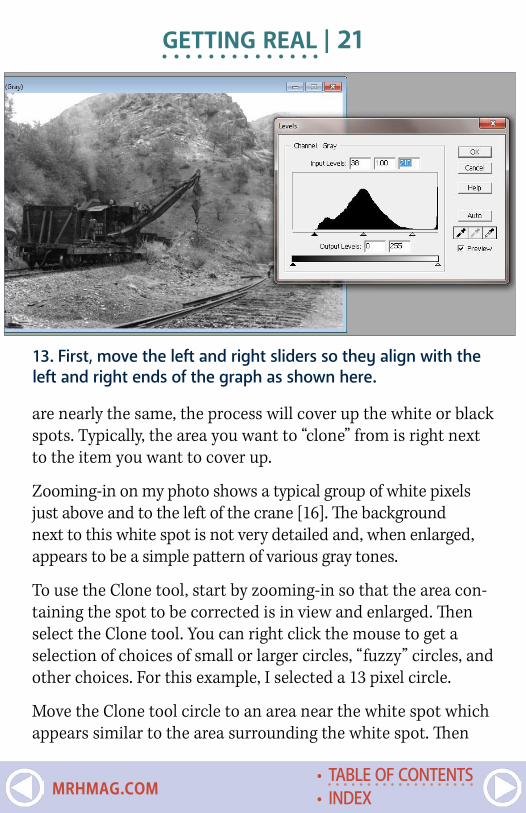
But you don’t need to understand the graph to correct the image. First, drag the left slider on the bottom of the graph toward the right until it aligns with the left end of the graph. Then drag the right slider toward the left until it aligns with the right end of the graph [13].
Now the center slider needs to be moved. If the image is dark, move the center slider toward the left. If the image is too light, move it to the right. Since this photo was dark, I moved it to the left as I watched the image.
I didn’t want to move it too far to the left since that would lighten the entire image so much that it would look washed out.
GETTING REAL | 178. This is the Photoshop Elements tool box. The Crop tool is on the left side of the tool box on the third row down from the top while the Clone tool is two rows up from the bottom on the left side. Hovering the mouse button over a tool will provide the name of that tool.
• INDEX• TABLE OF CONTENTS
MRHMAG.COM
GETTING REAL | 18
9. In Photoshop Elements, clicking on Image/Resize/Image Size results in this dialog box. Note the check mark for Resample Image.
10. Removing the check mark for Resample Image results in the Width, Height, and Resolution all being connected. Increase the Width or Height of the image and the Resolution will go down.
• INDEX• TABLE OF CONTENTS
MRHMAG.COM
GETTING REAL | 19
11. After typing in a new width, the Resolution is reduced from 600 dpi to 413.6 dpi which is okay since it is still over 300 dpi.
So pay attention to the background as well as the dark areas. I wanted the crane to get light enough to see the details of it while not washing out the background. When I was satisfied [14], I clicked on OK.
Note that these steps are intended to improve the original scan. Sometimes you might want to lighten a photo even more to be able to see more detail for a modeling project. This approach can also be used for that purpose.
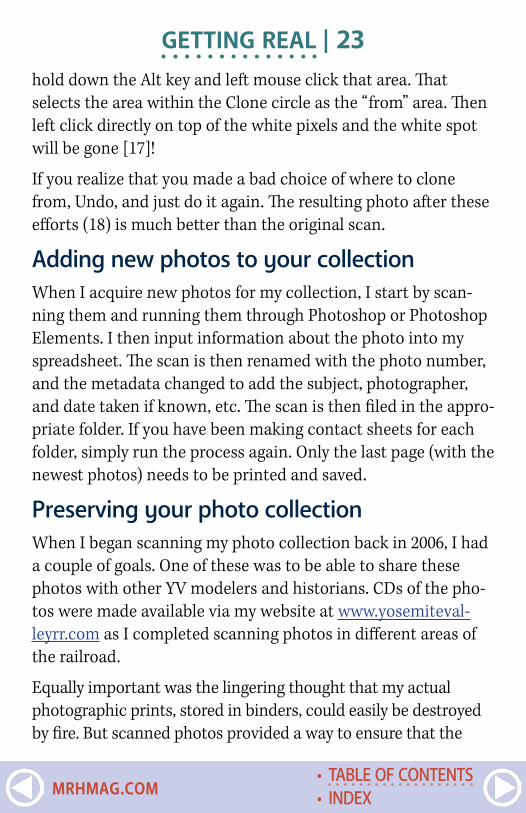
Another step will compensate for the limitations of the original scan. Click on Filter/Sharpen/Unsharp Mask. This seemingly dubi-ous menu choice is actually based on a technique used during darkroom days to increase the sharpness of traditional B/W prints.
The resulting dialog box [15] has several variables. I use only the Amount slider. Watch your photo as you move the slider toward a
• INDEX• TABLE OF CONTENTS
MRHMAG.COM
GETTING REAL | 20
12. Clicking on Enhance and Brightness/Contrast and then Lev-els results in this dialog box showing a histogram for the photo.
higher number. The proper amount of Sharpening is dependent on the resolution of the image and the original scan. If you increase it too much, you’ll start to see the pixels seem to glow. For this photo, the best Amount was about 170%.
For photos you are using for modeling projects, this all you need. However, I sometimes take one more step for scanned photos I want to archive. Zoom-in on an image, and you’ll probably see white spots in the dark areas and black spots in the light areas. These are most likely due to dust and other contaminates on the original negative when it was traditionally printed.
Getting rid of these spots is simple using the Clone Tool, which looks like a rubber stamp. On my version of Photoshop Elements, it is on the left, two rows up from the bottom [8]. The Clone tool copies the pixels at a selected location and pastes them to another location on the image. If those portions of the image
• INDEX• TABLE OF CONTENTS
MRHMAG.COM
GETTING REAL | 21
13. First, move the left and right sliders so they align with the left and right ends of the graph as shown here.
are nearly the same, the process will cover up the white or black spots. Typically, the area you want to “clone” from is right next to the item you want to cover up.
Zooming-in on my photo shows a typical group of white pixels just above and to the left of the crane [16]. The background next to this white spot is not very detailed and, when enlarged, appears to be a simple pattern of various gray tones.
To use the Clone tool, start by zooming-in so that the area con-taining the spot to be corrected is in view and enlarged. Then select the Clone tool. You can right click the mouse to get a selection of choices of small or larger circles, “fuzzy” circles, and other choices. For this example, I selected a 13 pixel circle.
Move the Clone tool circle to an area near the white spot which appears similar to the area surrounding the white spot. Then
• INDEX• TABLE OF CONTENTS
MRHMAG.COM
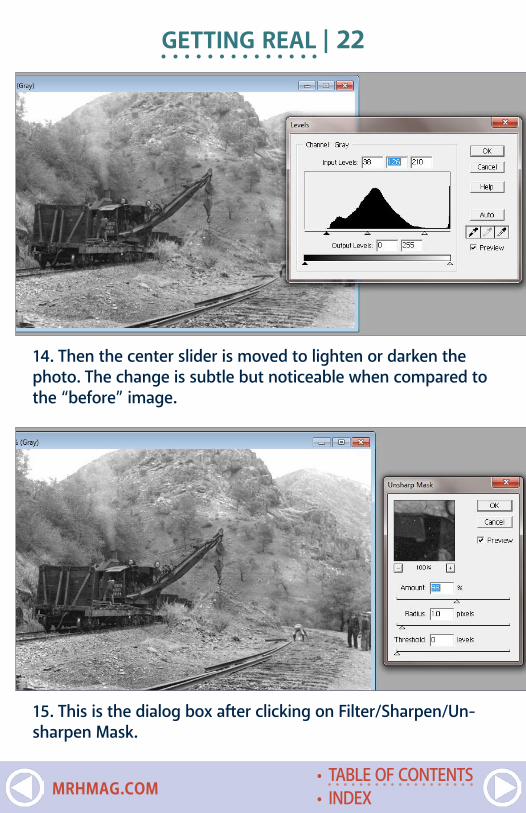
14. Then the center slider is moved to lighten or darken the photo. The change is subtle but noticeable when compared to the “before” image.
GETTING REAL | 22
15. This is the dialog box after clicking on Filter/Sharpen/Un-sharpen Mask.
• INDEX• TABLE OF CONTENTS
MRHMAG.COM
GETTING REAL | 23hold down the Alt key and left mouse click that area. That selects the area within the Clone circle as the “from” area. Then left click directly on top of the white pixels and the white spot will be gone [17]!
If you realize that you made a bad choice of where to clone from, Undo, and just do it again. The resulting photo after these efforts (18) is much better than the original scan.
Adding new photos to your collectionWhen I acquire new photos for my collection, I start by scan-ning them and running them through Photoshop or Photoshop Elements. I then input information about the photo into my spreadsheet. The scan is then renamed with the photo number, and the metadata changed to add the subject, photographer, and date taken if known, etc. The scan is then filed in the appro-priate folder. If you have been making contact sheets for each folder, simply run the process again. Only the last page (with the newest photos) needs to be printed and saved.
Preserving your photo collectionWhen I began scanning my photo collection back in 2006, I had a couple of goals. One of these was to be able to share these photos with other YV modelers and historians. CDs of the pho-tos were made available via my website at www.yosemiteval-leyrr.com as I completed scanning photos in different areas of the railroad.
Equally important was the lingering thought that my actual photographic prints, stored in binders, could easily be destroyed by fire. But scanned photos provided a way to ensure that the
• INDEX• TABLE OF CONTENTS
MRHMAG.COM
GETTING REAL | 24collection would remain available for decades to come. All 3,000+ scanned photos are stored on my main computer and backed up onto two other hard drives. One of those backup drives is stored in a fire-proof safe along with a set of CDs of the same photos. Since CDs don’t last forever, they are replaced every few years.
What about when technology changes? I’ll change with them. When I started using computers, the only storage medium was 5¼" floppy disks. They were soon replaced by hard drives and 3½" disks which eventually succumbed to CDs. Each time, it was a simple matter to copy data from one medium to the next. As the size of USB flash drives continues to increase, I’ll begin using them as backup drives.
More importantly, copies of my entire collection have been shared with several friends in various places through the United States and even Europe. These sets are updated once or twice a year so that they include the most recent additions. This decentralization provides insurance against natural disasters, computer crashes, and other unforeseen problems.
One additional suggestion if you have a large collection of pro-totype photos – what happens to that collection when you are no longer around? If the collection is centered on a prototype for which there is a popular following and an active historical society, the answer may be fairly simple.
My prototype doesn’t have such a following but I’ve already decided (and included provisions in our Trust) to have the entire collection donated to the California State Railroad Museum Library.
The fact that my prototype existed in California was partly a factor, but the fact that the Library stores its collections properly, indexes
• INDEX• TABLE OF CONTENTS
MRHMAG.COM

GETTING REAL | 25
16. White dots and blemishes are common when scanning old photographs. A typical white spot is obvious above the right corner of the log car.
17. A couple of clicks with the Clone tool and it is covered over.
• INDEX• TABLE OF CONTENTS
MRHMAG.COM
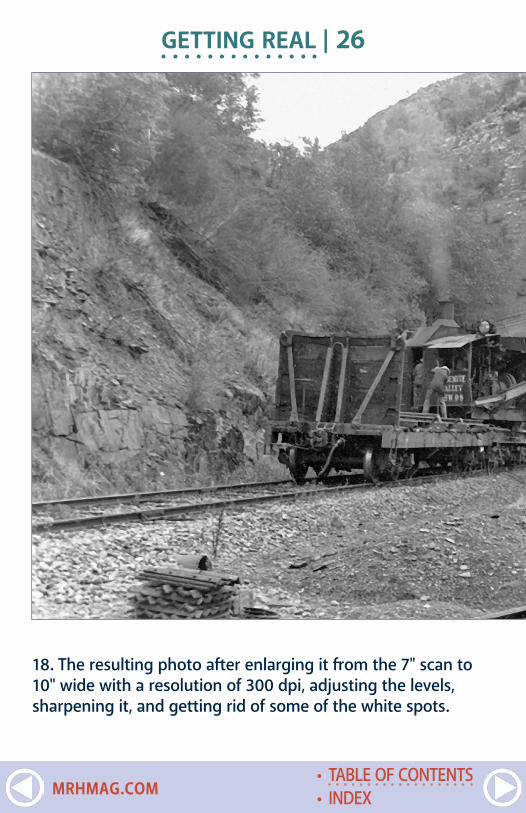
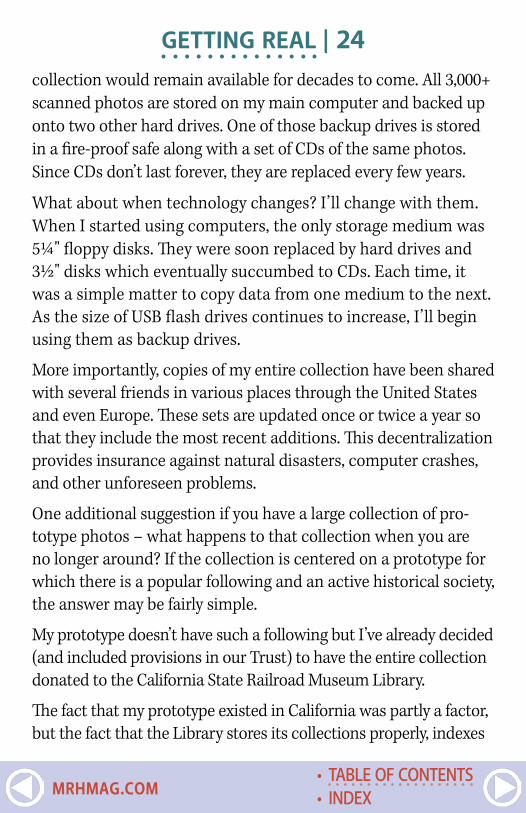
GETTING REAL | 26
18. The resulting photo after enlarging it from the 7" scan to 10" wide with a resolution of 300 dpi, adjusting the levels, sharpening it, and getting rid of some of the white spots.
• INDEX• TABLE OF CONTENTS
MRHMAG.COM

them, has a full-time professional staff, and makes the photos fully available to researchers, was also very important. Even if you photograph only current-day prototypes, keep in mind that those photos will be extremely valuable sometime in the near future.
GETTING REAL | 27
• INDEX• TABLE OF CONTENTS
MRHMAG.COM

GETTING REAL | 28SummaryMany prototype modelers may feel as I do that photographs of their chosen prototype are essential to accurately detailing a locomotive, or scratchbuilding or even kitbashing a structure. Hopefully, some of the ideas I have developed over the years will make those photo collections easier to access and share with future generations of modelers and researchers. ☑
ADVERTISEMENT
• INDEX• TABLE OF CONTENTS
MRHMAG.COM
ADVERTISEMENT
• INDEX• TABLE OF CONTENTS
MRHMAG.COM
ADVERTISEMENT
• INDEX• TABLE OF CONTENTS
MRHMAG.COM
Model Railroad Hobbyist | January 2015 | #59
WHAT’S NEATKEN PATTERSON
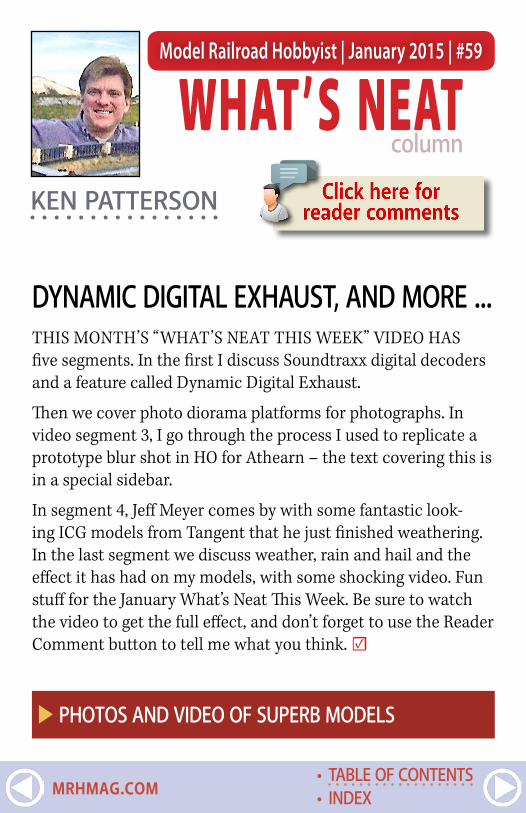
DYNAMIC DIGITAL EXHAUST, AND MORE ...THIS MONTH’S “WHAT’S NEAT THIS WEEK” VIDEO HAS five segments. In the first I discuss Soundtraxx digital decoders and a feature called Dynamic Digital Exhaust.
Then we cover photo diorama platforms for photographs. In video segment 3, I go through the process I used to replicate a prototype blur shot in HO for Athearn – the text covering this is in a special sidebar.
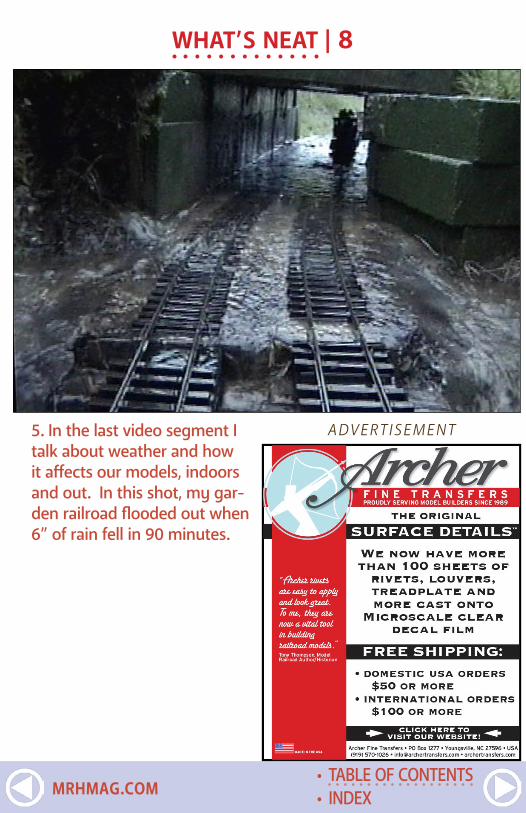
In segment 4, Jeff Meyer comes by with some fantastic look-ing ICG models from Tangent that he just finished weathering. In the last segment we discuss weather, rain and hail and the effect it has had on my models, with some shocking video. Fun stuff for the January What’s Neat This Week. Be sure to watch the video to get the full effect, and don’t forget to use the Reader Comment button to tell me what you think. ☑
column
X PHOTOS AND VIDEO OF SUPERB MODELS
• INDEX• TABLE OF CONTENTS
MRHMAG.COM
WHAT’S NEAT | 2
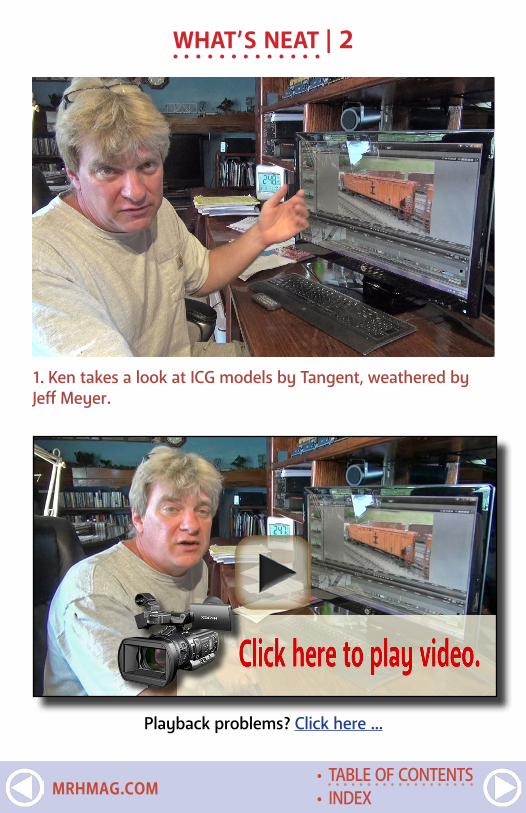
1. Ken takes a look at ICG models by Tangent, weathered by Jeff Meyer.
Playback problems? Click here ...
• INDEX• TABLE OF CONTENTS
MRHMAG.COM
WHAT’S NEAT | 3
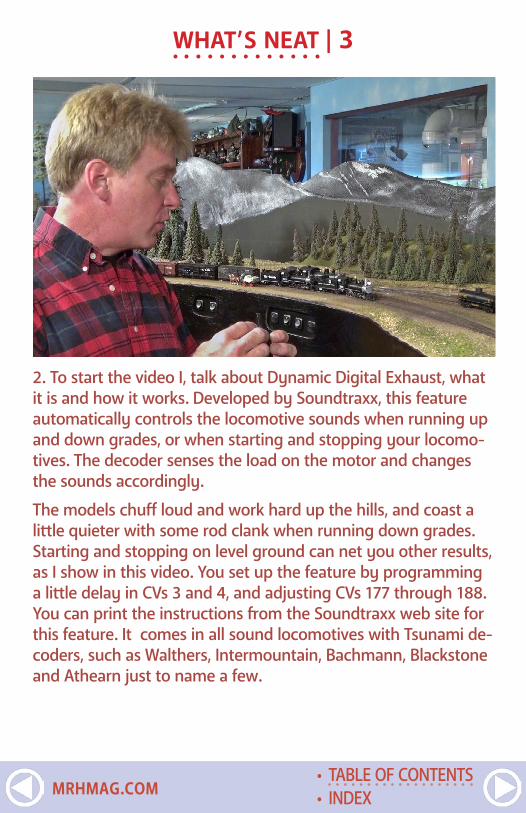
2. To start the video I, talk about Dynamic Digital Exhaust, what it is and how it works. Developed by Soundtraxx, this feature automatically controls the locomotive sounds when running up and down grades, or when starting and stopping your locomo-tives. The decoder senses the load on the motor and changes the sounds accordingly.
The models chuff loud and work hard up the hills, and coast a little quieter with some rod clank when running down grades. Starting and stopping on level ground can net you other results, as I show in this video. You set up the feature by programming a little delay in CVs 3 and 4, and adjusting CVs 177 through 188. You can print the instructions from the Soundtraxx web site for this feature. It comes in all sound locomotives with Tsunami de-coders, such as Walthers, Intermountain, Bachmann, Blackstone and Athearn just to name a few.
• INDEX• TABLE OF CONTENTS
MRHMAG.COM
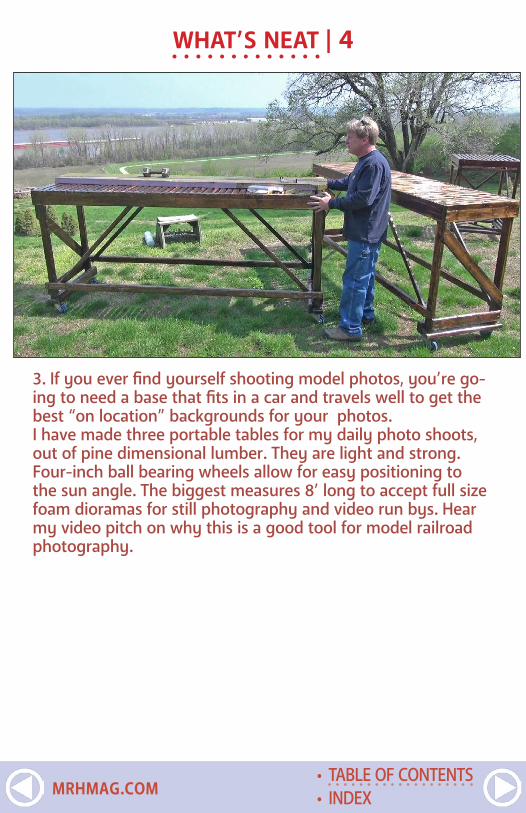
3. If you ever find yourself shooting model photos, you’re go-ing to need a base that fits in a car and travels well to get the best “on location” backgrounds for your photos. I have made three portable tables for my daily photo shoots, out of pine dimensional lumber. They are light and strong. Four-inch ball bearing wheels allow for easy positioning to the sun angle. The biggest measures 8’ long to accept full size foam dioramas for still photography and video run bys. Hear my video pitch on why this is a good tool for model railroad photography.
WHAT’S NEAT | 4
• INDEX• TABLE OF CONTENTS
MRHMAG.COM
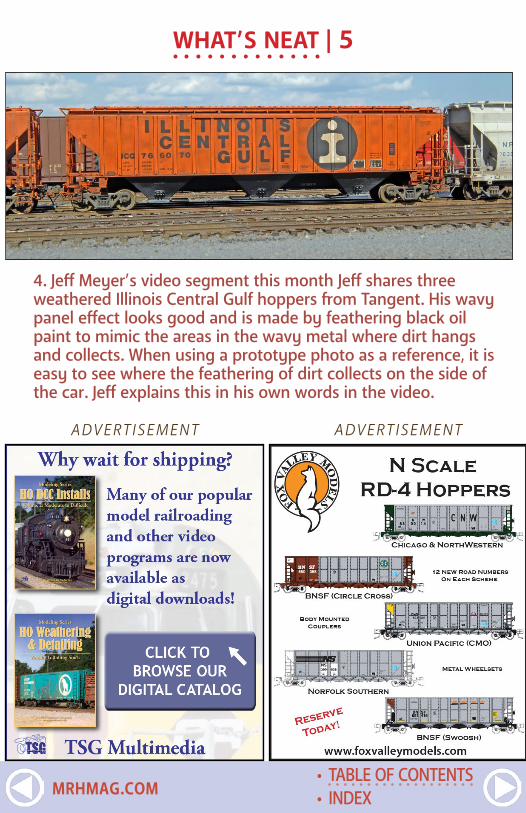
4. Jeff Meyer’s video segment this month Jeff shares three weathered Illinois Central Gulf hoppers from Tangent. His wavy panel effect looks good and is made by feathering black oil paint to mimic the areas in the wavy metal where dirt hangs and collects. When using a prototype photo as a reference, it is easy to see where the feathering of dirt collects on the side of the car. Jeff explains this in his own words in the video.
WHAT’S NEAT | 5
ADVERTISEMENT ADVERTISEMENT
• INDEX• TABLE OF CONTENTS
MRHMAG.COM
WHAT’S NEAT | 8
5. In the last video segment I talk about weather and how it affects our models, indoors and out. In this shot, my gar-den railroad flooded out when 6” of rain fell in 90 minutes.
ADVERTISEMENT
• INDEX• TABLE OF CONTENTS
MRHMAG.COM
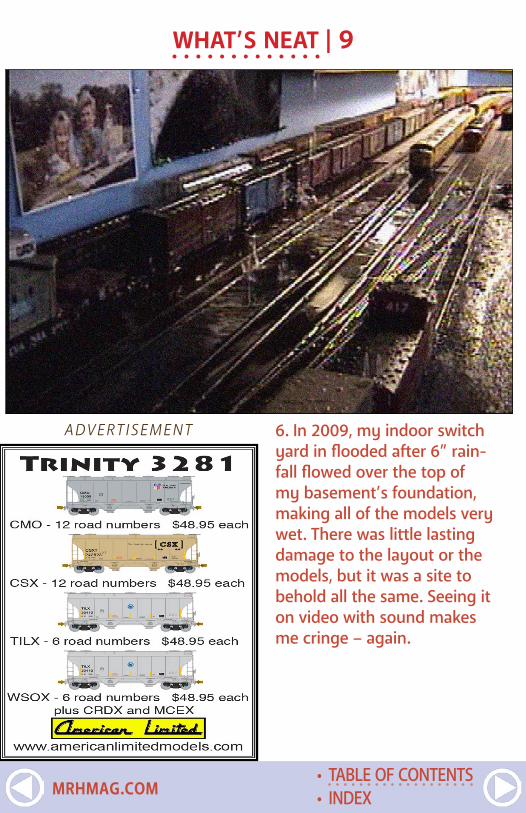
WHAT’S NEAT | 9
6. In 2009, my indoor switch yard in flooded after 6” rain-fall flowed over the top of my basement’s foundation, making all of the models very wet. There was little lasting damage to the layout or the models, but it was a site to behold all the same. Seeing it on video with sound makes me cringe – again.
ADVERTISEMENT
• INDEX• TABLE OF CONTENTS
MRHMAG.COM
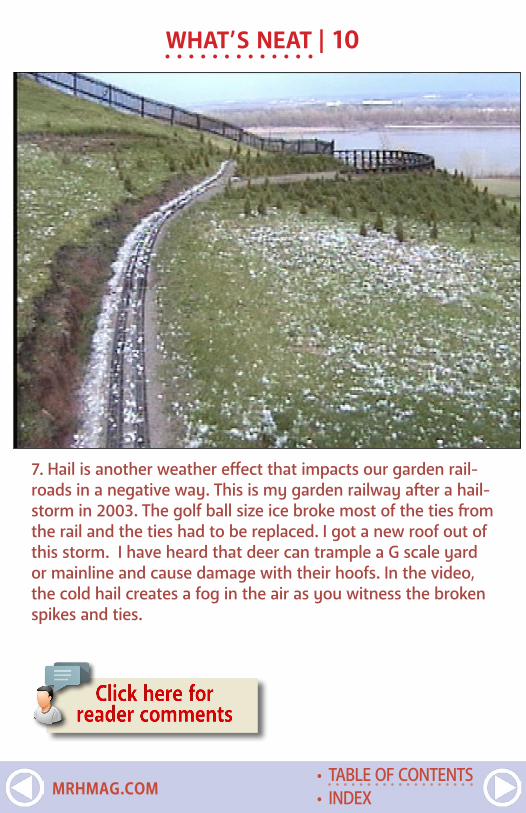
WHAT’S NEAT | 10
7. Hail is another weather effect that impacts our garden rail-roads in a negative way. This is my garden railway after a hail-storm in 2003. The golf ball size ice broke most of the ties from the rail and the ties had to be replaced. I got a new roof out of this storm. I have heard that deer can trample a G scale yard or mainline and cause damage with their hoofs. In the video, the cold hail creates a fog in the air as you witness the broken spikes and ties.
• INDEX• TABLE OF CONTENTS
MRHMAG.COM

WHAT’S NEAT | 11
8. I pulled this photo frame from the video. It is a nice sun-rise runby on the trestle with a pair of Bachmann K-27s. This month’s video also features a few runbys in the snow, on the garden railroad and the real tracks below the bluff – after all, its winter. Enjoy this January 2015 What’s Neat This Week.
ADVERTISEMENT
• INDEX• TABLE OF CONTENTS
MRHMAG.COM
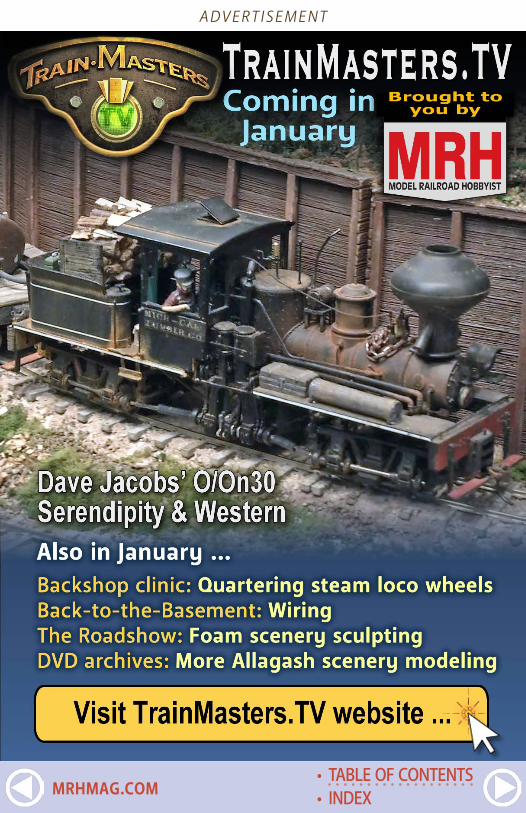
ADVERTISEMENT
• INDEX• TABLE OF CONTENTS
MRHMAG.COM
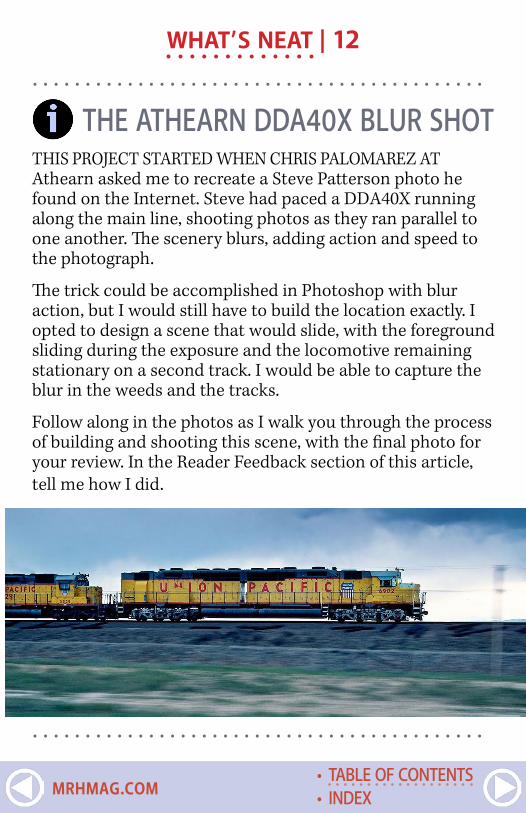
WHAT’S NEAT | 12. . . . . . . . . . . . . . . . . . . . . . . . . . . . . . . . . . . . . . . . . . .
THE ATHEARN DDA40X BLUR SHOTTHIS PROJECT STARTED WHEN CHRIS PALOMAREZ AT Athearn asked me to recreate a Steve Patterson photo he found on the Internet. Steve had paced a DDA40X running along the main line, shooting photos as they ran parallel to one another. The scenery blurs, adding action and speed to the photograph.
The trick could be accomplished in Photoshop with blur action, but I would still have to build the location exactly. I opted to design a scene that would slide, with the foreground sliding during the exposure and the locomotive remaining stationary on a second track. I would be able to capture the blur in the weeds and the tracks.
Follow along in the photos as I walk you through the process of building and shooting this scene, with the final photo for your review. In the Reader Feedback section of this article, tell me how I did.
. . . . . . . . . . . . . . . . . . . . . . . . . . . . . . . . . . . . . . . . . . .
• INDEX• TABLE OF CONTENTS
MRHMAG.COM
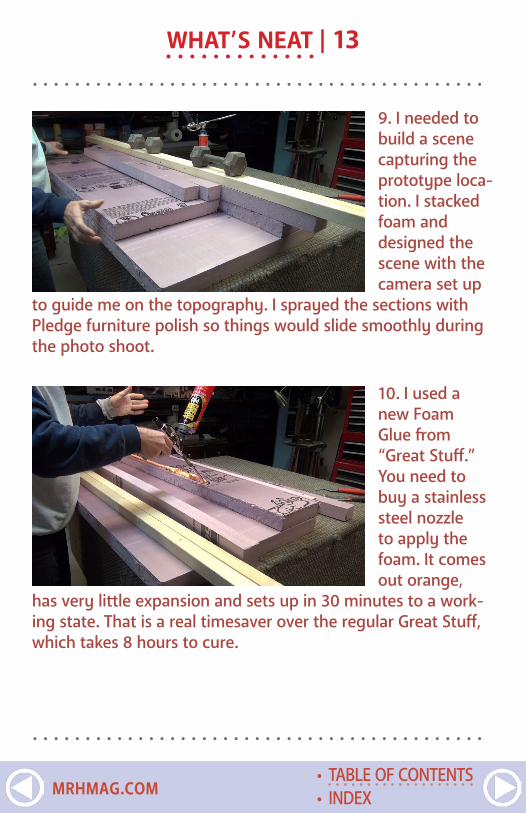
WHAT’S NEAT | 13. . . . . . . . . . . . . . . . . . . . . . . . . . . . . . . . . . . . . . . . . . .
. . . . . . . . . . . . . . . . . . . . . . . . . . . . . . . . . . . . . . . . . . .
9. I needed to build a scene capturing the prototype loca-tion. I stacked foam and designed the scene with the camera set up
to guide me on the topography. I sprayed the sections with Pledge furniture polish so things would slide smoothly during the photo shoot.
10. I used a new Foam Glue from “Great Stuff.” You need to buy a stainless steel nozzle to apply the foam. It comes out orange,
has very little expansion and sets up in 30 minutes to a work-ing state. That is a real timesaver over the regular Great Stuff, which takes 8 hours to cure.
• INDEX• TABLE OF CONTENTS
MRHMAG.COM
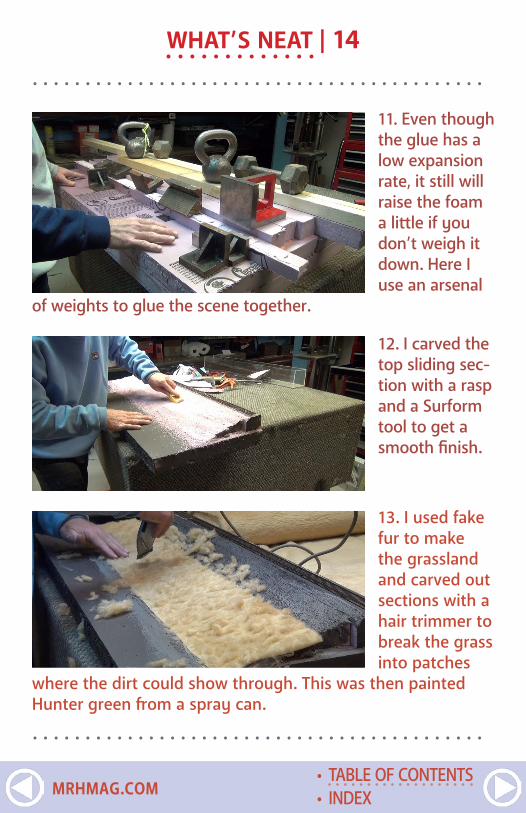
. . . . . . . . . . . . . . . . . . . . . . . . . . . . . . . . . . . . . . . . . . .
. . . . . . . . . . . . . . . . . . . . . . . . . . . . . . . . . . . . . . . . . . .
13. I used fake fur to make the grassland and carved out sections with a hair trimmer to break the grass into patches
where the dirt could show through. This was then painted Hunter green from a spray can.
11. Even though the glue has a low expansion rate, it still will raise the foam a little if you don’t weigh it down. Here I use an arsenal
of weights to glue the scene together.
WHAT’S NEAT | 14
12. I carved the top sliding sec-tion with a rasp and a Surform tool to get a smooth finish.
• INDEX• TABLE OF CONTENTS
MRHMAG.COM

. . . . . . . . . . . . . . . . . . . . . . . . . . . . . . . . . . . . . . . . . . .
. . . . . . . . . . . . . . . . . . . . . . . . . . . . . . . . . . . . . . . . . . .
15. Everything was covered with dirt. The grass was brushed so it would show through the dirt. I used gray ballast for the mainline
and weathered it with a black spray after it set up. I sprayed the entire scene with Woodland Scenics Scenery Cement to hold everything in place.
14. I used patching cement from the Home Depot paint department. It comes in a gal-lon bucket with blue text on the
sides “patching cement”. This stuff sets up in a day and always requires a seconded cote to fill cracks. Here you see me using a 4” putty knife to pull the road smooth. I used wood forms on each side about 1/8” high to keep the cement even. Two coats of India ink makes a perfect black top shade. Then I created a shoulder along the road from Woodland Scenics ballast.
WHAT’S NEAT | 15
• INDEX• TABLE OF CONTENTS
MRHMAG.COM
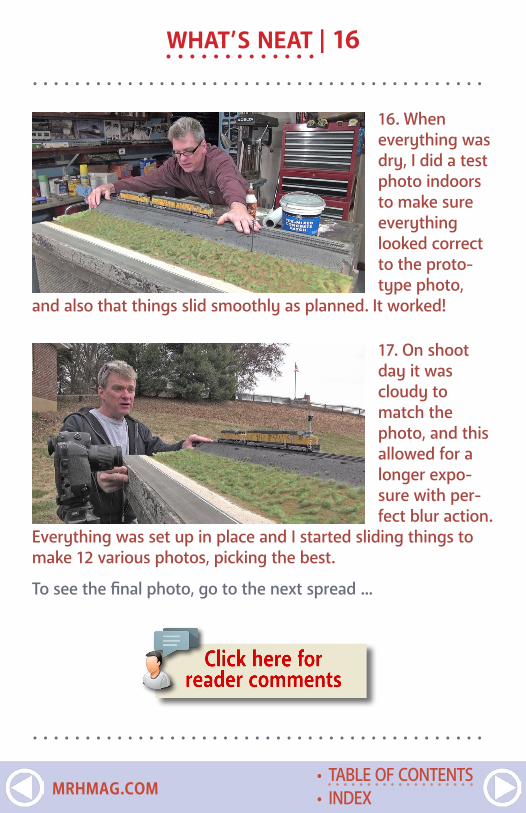
. . . . . . . . . . . . . . . . . . . . . . . . . . . . . . . . . . . . . . . . . . .
. . . . . . . . . . . . . . . . . . . . . . . . . . . . . . . . . . . . . . . . . . .
16. When everything was dry, I did a test photo indoors to make sure everything looked correct to the proto-type photo,
and also that things slid smoothly as planned. It worked!
WHAT’S NEAT | 16
17. On shoot day it was cloudy to match the photo, and this allowed for a longer expo-sure with per-fect blur action.
Everything was set up in place and I started sliding things to make 12 various photos, picking the best.
To see the final photo, go to the next spread ...
• INDEX• TABLE OF CONTENTS
MRHMAG.COM
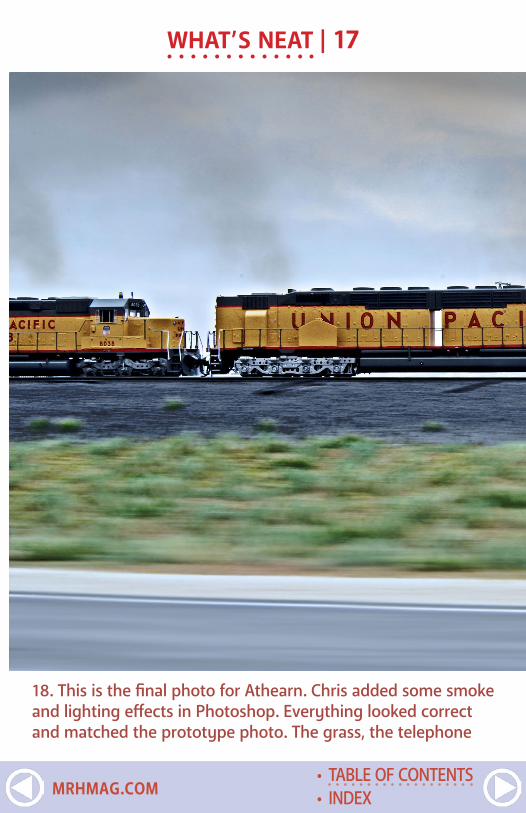
WHAT’S NEAT | 17
18. This is the final photo for Athearn. Chris added some smoke and lighting effects in Photoshop. Everything looked correct and matched the prototype photo. The grass, the telephone
• INDEX• TABLE OF CONTENTS
MRHMAG.COM
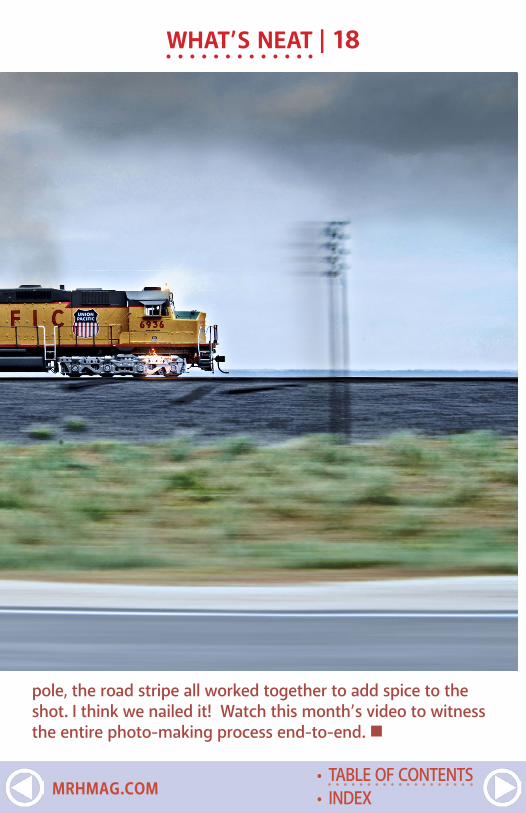
WHAT’S NEAT | 18
pole, the road stripe all worked together to add spice to the shot. I think we nailed it! Watch this month’s video to witness the entire photo-making process end-to-end.
• INDEX• TABLE OF CONTENTS
MRHMAG.COM
ADVERTISEMENT
• INDEX• TABLE OF CONTENTS
MRHMAG.COM

ADVERTISEMENT
• INDEX• TABLE OF CONTENTS
MRHMAG.COM
ADVERTISEMENT
• INDEX• TABLE OF CONTENTS
MRHMAG.COM
Model Railroad Hobbyist | January 2015 | #59
HOBBY MARKETPLACE
RULERS-of-the-WORLDScale Rulers $4 each
Over 200+ scales!Metric or Imperial
www.rulers-of-the-world.com
Precision Design Co.Custom Decals & Laser Cuttting
Laser Kitswww.pdc.ca
. . . . . . . . . . . . . . . . . . . . . . . . . . . . . . . . . . . . . . . . . .
• INDEX• TABLE OF CONTENTS
MRHMAG.COM
HOBBY MARKETPLACE | 2
• INDEX• TABLE OF CONTENTS
MRHMAG.COM
HOBBY MARKETPLACE | 3
• INDEX• TABLE OF CONTENTS
MRHMAG.COM
HOBBY MARKETPLACE | 4
CLICK HERE
Can’t remember which cars you’ve bought? Yard Boss
Model Train Inventory Software from DCC by Design
Under $15 Download free trial now www.dccbydesign.com
Hobby MarketplaceAds are
Economical andEffective.
Click to learn more ...
• INDEX• TABLE OF CONTENTS
MRHMAG.COM
HOBBY MARKETPLACE | 5ADVERTISEMENT
When talking to hobby vendors, please
remember to mention
MRH.
• INDEX• TABLE OF CONTENTS
MRHMAG.COM
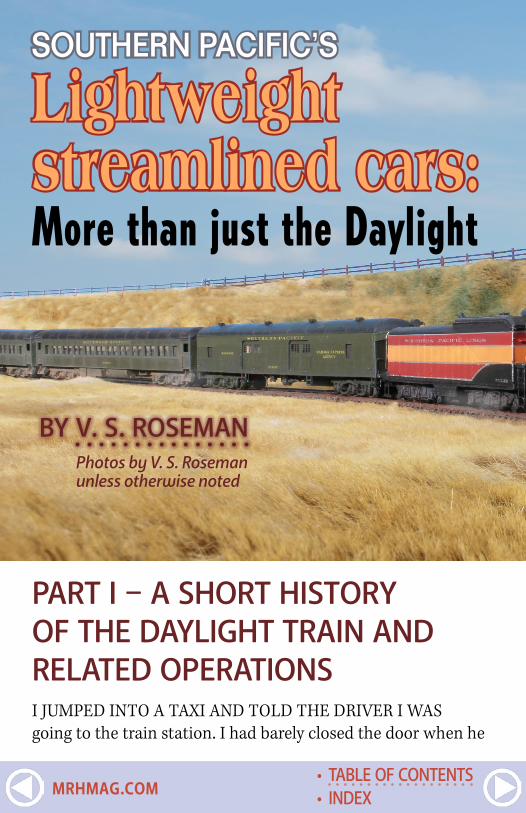
SOUTHERN PACIFIC’S
Lightweight streamlined cars:More than just the Daylight
BY V. S. ROSEMANPhotos by V. S. Roseman unless otherwise noted
PART I – A SHORT HISTORY OF THE DAYLIGHT TRAIN AND RELATED OPERATIONSI JUMPED INTO A TAXI AND TOLD THE DRIVER I WAS going to the train station. I had barely closed the door when he
• INDEX• TABLE OF CONTENTS
MRHMAG.COM
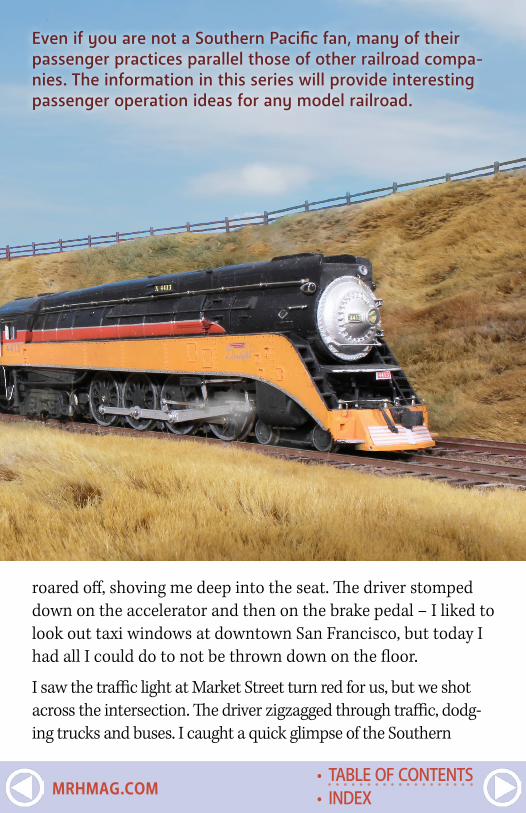
Even if you are not a Southern Pacific fan, many of their passenger practices parallel those of other railroad compa-nies. The information in this series will provide interesting passenger operation ideas for any model railroad.
roared off, shoving me deep into the seat. The driver stomped down on the accelerator and then on the brake pedal – I liked to look out taxi windows at downtown San Francisco, but today I had all I could do to not be thrown down on the floor.
I saw the traffic light at Market Street turn red for us, but we shot across the intersection. The driver zigzagged through traffic, dodg-ing trucks and buses. I caught a quick glimpse of the Southern
• INDEX• TABLE OF CONTENTS
MRHMAG.COM
Pacific station, looking like a big wedding cake, as the cab screeched to a stop inches behind another taxi at the station entrance.
Inside the station I checked the track numbers for the Daylight to Los Angeles. Some movie starlet was taking the Daylight, and she was posing for news photographers in the train concourse as the gate attendant checked my ticket and passed me through.
I looked for my car number as I walked down the platform alongside the shiny scarlet and orange streamliner referred to as the most beautiful train in the world.
Over the years I’ve had model passenger cars that were painted in Daylight colors, but now there are accurate ready-to-run replicas of the actual Daylight trains available in both HO and N scales.
In 1937, the first Southern Pacific streamlined Daylight trains began operation on the Coast Line, providing fast dawn to dusk service between San Francisco and Los Angeles.
With the success of the new Daylight, the railroad started up more streamliners, eventually assigning the new-type trains to every important passenger route on their system. These trains had several interesting operations that can be simu-lated on model railroads, and I have described a few of them in this monograph. Due in great part to the publications of the Southern Pacific Historical and Technical Society I had a veri-table tidal wave of information, and I recommend membership
Model Railroad Hobbyist | January 2015 | #59
• INDEX• TABLE OF CONTENTS
MRHMAG.COM

PART 1 – SP PASSENGER TRAINS | 4
in this group (www.sphts.org) that is preserving so much about trains and railroad operation.
In keeping each installment in this series to a readable size, I hope I haven’t omitted anyone’s favorite SP train, operation, or type of car. I’m working on additional material all the time, so what you see here is a work in progress.
What started as a single article has grown to be a multi-part series. This first article has the background of the Morning and Noon Daylight trains and the accompanying streamlined Sunbeam. The next article will document other SP streamliners.
The remaining parts of this series will have suggestions for modeling the cars needed to make up these trains. As I wrote
1. Key for train consist diagrams.
• INDEX• TABLE OF CONTENTS
MRHMAG.COM
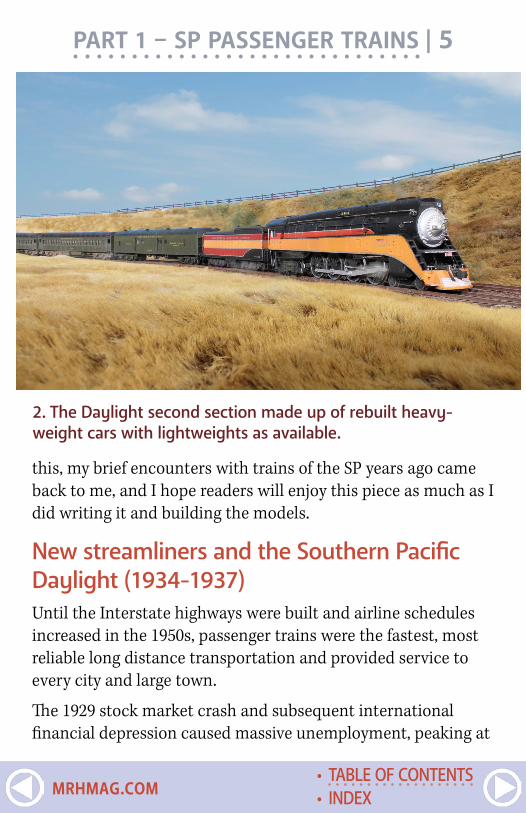
this, my brief encounters with trains of the SP years ago came back to me, and I hope readers will enjoy this piece as much as I did writing it and building the models.
New streamliners and the Southern Pacific Daylight (1934-1937) Until the Interstate highways were built and airline schedules increased in the 1950s, passenger trains were the fastest, most reliable long distance transportation and provided service to every city and large town.
The 1929 stock market crash and subsequent international financial depression caused massive unemployment, peaking at
PART 1 – SP PASSENGER TRAINS | 5
2. The Daylight second section made up of rebuilt heavy-weight cars with lightweights as available.
• INDEX• TABLE OF CONTENTS
MRHMAG.COM
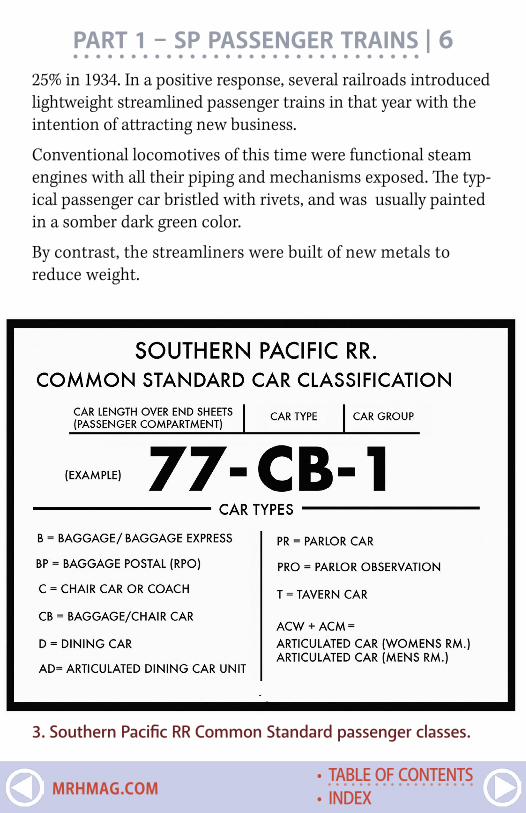
PART 1 – SP PASSENGER TRAINS | 6
3. Southern Pacific RR Common Standard passenger classes.
25% in 1934. In a positive response, several railroads introduced lightweight streamlined passenger trains in that year with the intention of attracting new business.
Conventional locomotives of this time were functional steam engines with all their piping and mechanisms exposed. The typ-ical passenger car bristled with rivets, and was usually painted in a somber dark green color.
By contrast, the streamliners were built of new metals to reduce weight.
• INDEX• TABLE OF CONTENTS
MRHMAG.COM
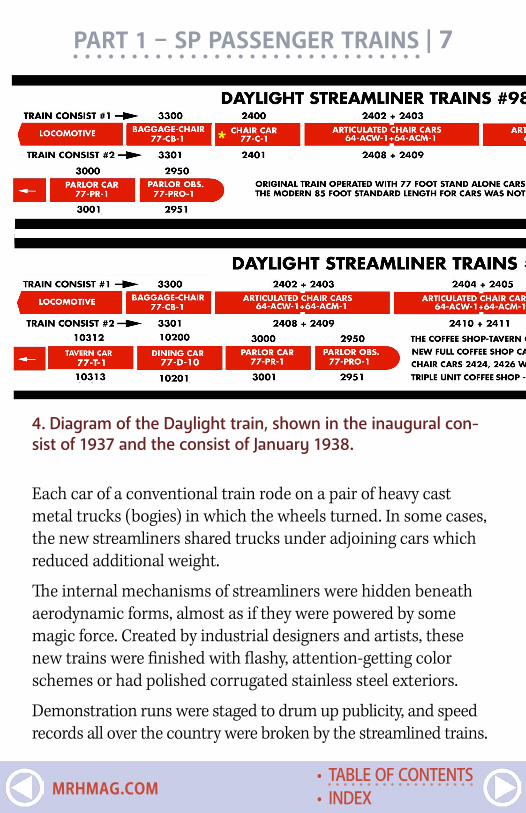
Each car of a conventional train rode on a pair of heavy cast metal trucks (bogies) in which the wheels turned. In some cases, the new streamliners shared trucks under adjoining cars which reduced additional weight.
The internal mechanisms of streamliners were hidden beneath aerodynamic forms, almost as if they were powered by some magic force. Created by industrial designers and artists, these new trains were finished with flashy, attention-getting color schemes or had polished corrugated stainless steel exteriors.
Demonstration runs were staged to drum up publicity, and speed records all over the country were broken by the streamlined trains.
PART 1 – SP PASSENGER TRAINS | 7
4. Diagram of the Daylight train, shown in the inaugural con-sist of 1937 and the consist of January 1938.
• INDEX• TABLE OF CONTENTS
MRHMAG.COM
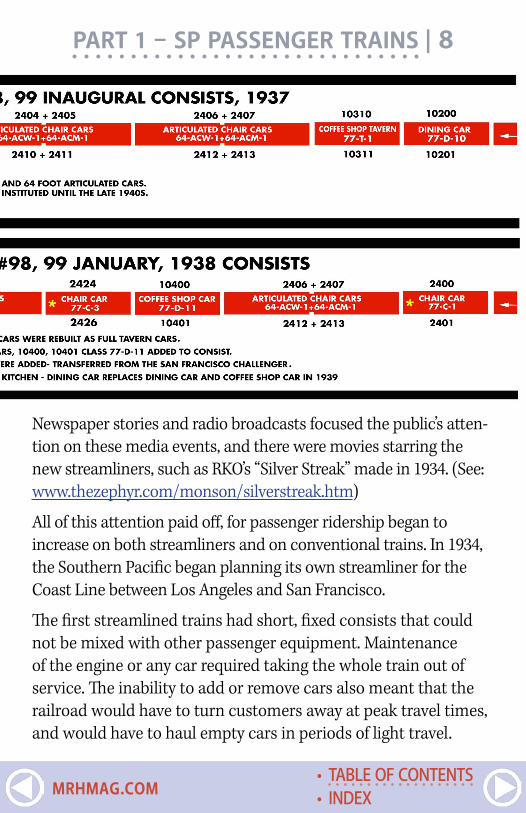
PART 1 – SP PASSENGER TRAINS | 8
Newspaper stories and radio broadcasts focused the public’s atten-tion on these media events, and there were movies starring the new streamliners, such as RKO’s “Silver Streak” made in 1934. (See: www.thezephyr.com/monson/silverstreak.htm)
All of this attention paid off, for passenger ridership began to increase on both streamliners and on conventional trains. In 1934, the Southern Pacific began planning its own streamliner for the Coast Line between Los Angeles and San Francisco.
The first streamlined trains had short, fixed consists that could not be mixed with other passenger equipment. Maintenance of the engine or any car required taking the whole train out of service. The inability to add or remove cars also meant that the railroad would have to turn customers away at peak travel times, and would have to haul empty cars in periods of light travel.
• INDEX• TABLE OF CONTENTS
MRHMAG.COM
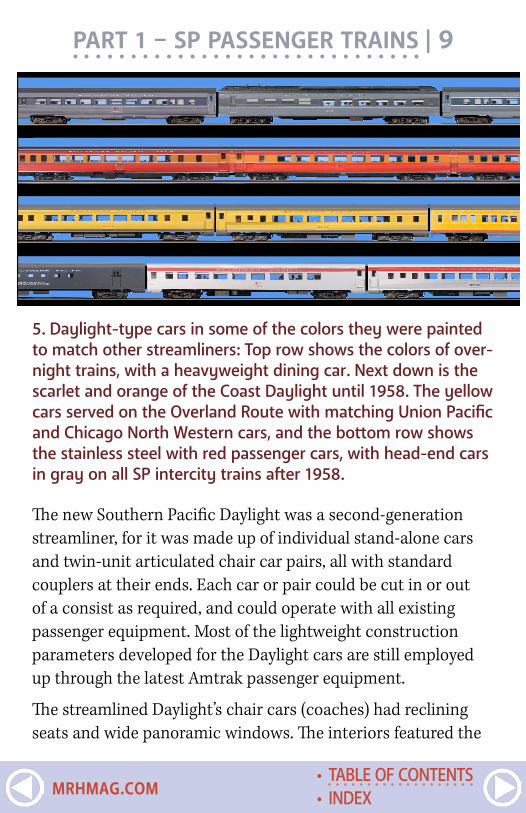
The new Southern Pacific Daylight was a second-generation streamliner, for it was made up of individual stand-alone cars and twin-unit articulated chair car pairs, all with standard couplers at their ends. Each car or pair could be cut in or out of a consist as required, and could operate with all existing passenger equipment. Most of the lightweight construction parameters developed for the Daylight cars are still employed up through the latest Amtrak passenger equipment.
The streamlined Daylight’s chair cars (coaches) had reclining seats and wide panoramic windows. The interiors featured the
PART 1 – SP PASSENGER TRAINS | 9
5. Daylight-type cars in some of the colors they were painted to match other streamliners: Top row shows the colors of over-night trains, with a heavyweight dining car. Next down is the scarlet and orange of the Coast Daylight until 1958. The yellow cars served on the Overland Route with matching Union Pacific and Chicago North Western cars, and the bottom row shows the stainless steel with red passenger cars, with head-end cars in gray on all SP intercity trains after 1958.
• INDEX• TABLE OF CONTENTS
MRHMAG.COM

PART 1 – SP PASSENGER TRAINS | 10
6. Second section of the Daylight as it ran circa 1940. From left to right: a pair of lightweight chair cars in dark olive, Daylight-painted chair car and coffee shop car, and a two-tone gray heavyweight dining car.
latest high-fashion styling, and the entire train was air condi-tioned, a very new feature at the time.
While most streamliners used internal combustion engines, the SP contracted Lima Locomotive Works to build GS-2 class steam engines with a 4-8-4 wheel arrangement. These were mechanically similar to the SP’s earlier 4-8-4s, but the new engines had functional sheet metal skyline casings that deflected smoke away from the cab in tunnels. There was also decorative side skirting and a nose cone. The engines were fin-ished in brilliant scarlet and orange to match the new train.
• INDEX• TABLE OF CONTENTS
MRHMAG.COM
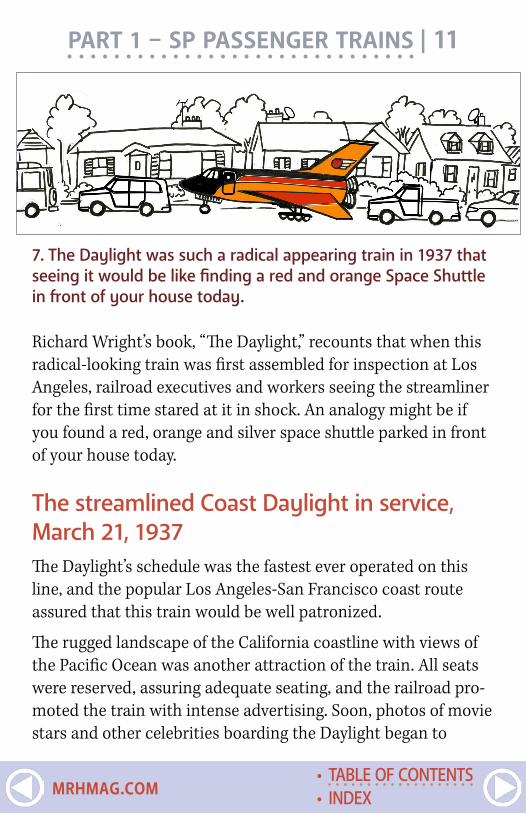
Richard Wright’s book, “The Daylight,” recounts that when this radical-looking train was first assembled for inspection at Los Angeles, railroad executives and workers seeing the streamliner for the first time stared at it in shock. An analogy might be if you found a red, orange and silver space shuttle parked in front of your house today.
The streamlined Coast Daylight in service, March 21, 1937The Daylight’s schedule was the fastest ever operated on this line, and the popular Los Angeles-San Francisco coast route assured that this train would be well patronized.
The rugged landscape of the California coastline with views of the Pacific Ocean was another attraction of the train. All seats were reserved, assuring adequate seating, and the railroad pro-moted the train with intense advertising. Soon, photos of movie stars and other celebrities boarding the Daylight began to
PART 1 – SP PASSENGER TRAINS | 11
7. The Daylight was such a radical appearing train in 1937 that seeing it would be like finding a red and orange Space Shuttle in front of your house today.
• INDEX• TABLE OF CONTENTS
MRHMAG.COM
PART 1 – SP PASSENGER TRAINS | 12
appear in newspapers, magazines and movie theater newsreels, all glamorizing the new train.
Over a three-month period, the Daylight broke all ridership records for single section long distance trains. Passengers were encouraged to walk about the train to visit the dining car, coffee shop or the tavern to help break up the all-day trip. First class passengers could also visit the parlor observation lounge fit-ted with rear-facing sofas to watch mile after mile of changing scenery at the rear of the train.
Summer months were peak travel periods, along with Christmas to New Years. To make full use of the new equipment,
8. Here’s an informative 30-minute Southern Pacific marketing film from the late 1930s promoting the new Daylight passen-ger train. Do excuse the diesel train sounds, however!
• INDEX• TABLE OF CONTENTS
MRHMAG.COM
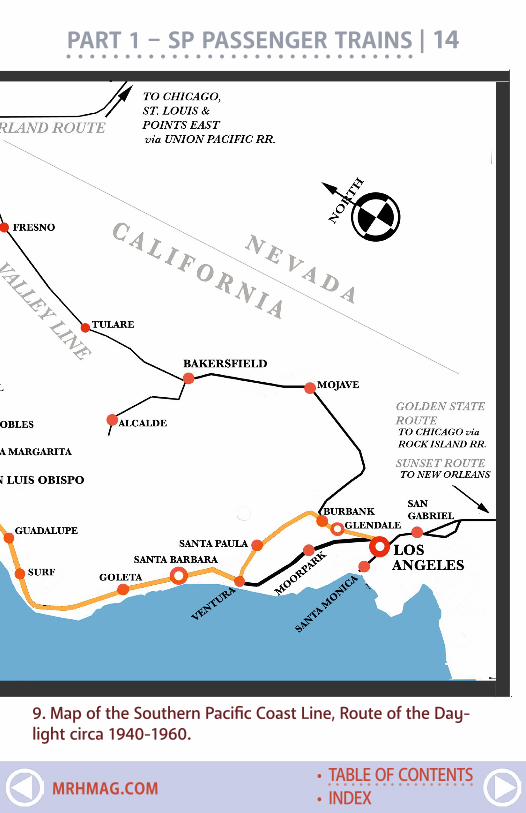
PART 1 – SP PASSENGER TRAINS | 14
9. Map of the Southern Pacific Coast Line, Route of the Day-light circa 1940-1960.
• INDEX• TABLE OF CONTENTS
MRHMAG.COM
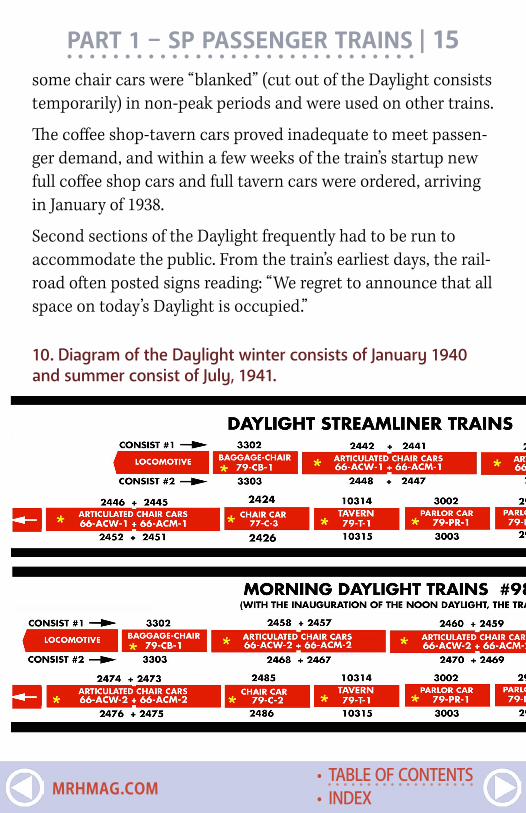
some chair cars were “blanked” (cut out of the Daylight consists temporarily) in non-peak periods and were used on other trains.
The coffee shop-tavern cars proved inadequate to meet passen-ger demand, and within a few weeks of the train’s startup new full coffee shop cars and full tavern cars were ordered, arriving in January of 1938.
Second sections of the Daylight frequently had to be run to accommodate the public. From the train’s earliest days, the rail-road often posted signs reading: “We regret to announce that all space on today’s Daylight is occupied.”
PART 1 – SP PASSENGER TRAINS | 15
10. Diagram of the Daylight winter consists of January 1940 and summer consist of July, 1941.
• INDEX• TABLE OF CONTENTS
MRHMAG.COM
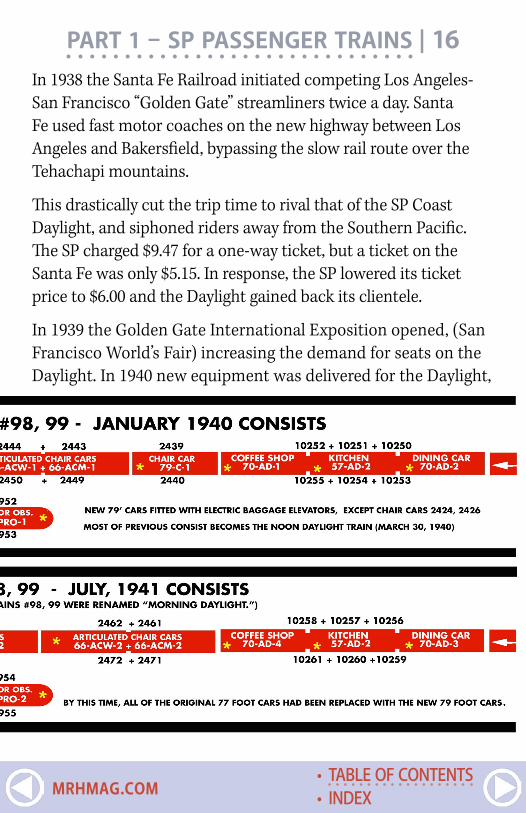
PART 1 – SP PASSENGER TRAINS | 16In 1938 the Santa Fe Railroad initiated competing Los Angeles-San Francisco “Golden Gate” streamliners twice a day. Santa Fe used fast motor coaches on the new highway between Los Angeles and Bakersfield, bypassing the slow rail route over the Tehachapi mountains.
This drastically cut the trip time to rival that of the SP Coast Daylight, and siphoned riders away from the Southern Pacific. The SP charged $9.47 for a one-way ticket, but a ticket on the Santa Fe was only $5.15. In response, the SP lowered its ticket price to $6.00 and the Daylight gained back its clientele.
In 1939 the Golden Gate International Exposition opened, (San Francisco World’s Fair) increasing the demand for seats on the Daylight. In 1940 new equipment was delivered for the Daylight,
• INDEX• TABLE OF CONTENTS
MRHMAG.COM
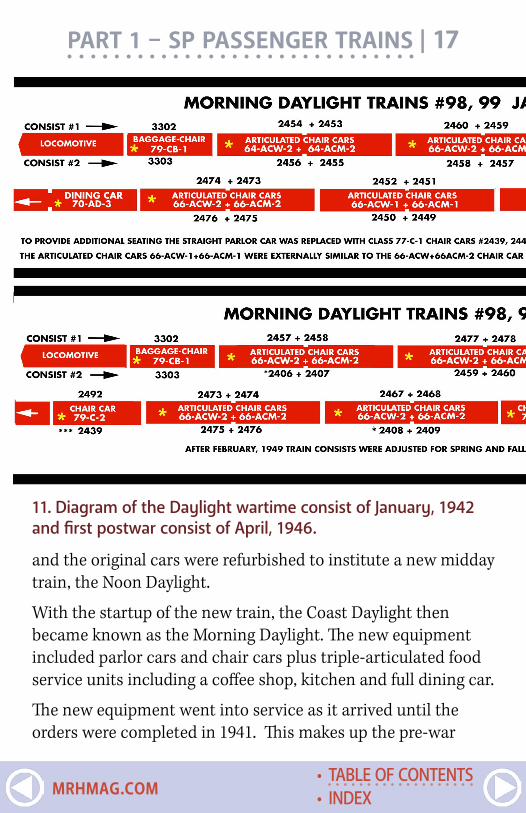
and the original cars were refurbished to institute a new midday train, the Noon Daylight.
With the startup of the new train, the Coast Daylight then became known as the Morning Daylight. The new equipment included parlor cars and chair cars plus triple-articulated food service units including a coffee shop, kitchen and full dining car.
The new equipment went into service as it arrived until the orders were completed in 1941. This makes up the pre-war
PART 1 – SP PASSENGER TRAINS | 17
11. Diagram of the Daylight wartime consist of January, 1942 and first postwar consist of April, 1946.
• INDEX• TABLE OF CONTENTS
MRHMAG.COM
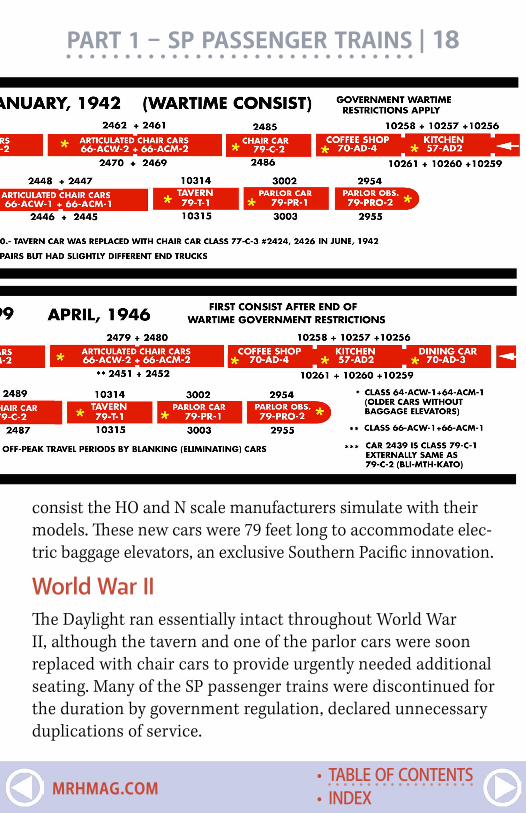
consist the HO and N scale manufacturers simulate with their models. These new cars were 79 feet long to accommodate elec-tric baggage elevators, an exclusive Southern Pacific innovation.
World War IIThe Daylight ran essentially intact throughout World War II, although the tavern and one of the parlor cars were soon replaced with chair cars to provide urgently needed additional seating. Many of the SP passenger trains were discontinued for the duration by government regulation, declared unnecessary duplications of service.
PART 1 – SP PASSENGER TRAINS | 18
• INDEX• TABLE OF CONTENTS
MRHMAG.COM
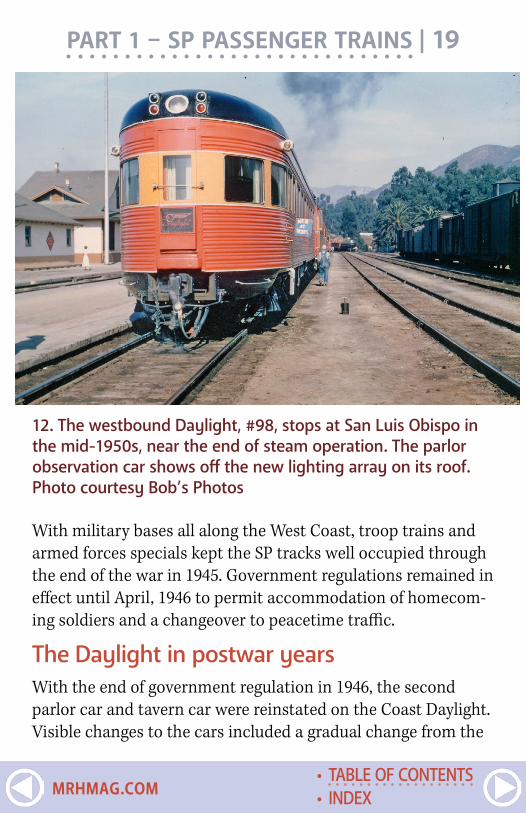
With military bases all along the West Coast, troop trains and armed forces specials kept the SP tracks well occupied through the end of the war in 1945. Government regulations remained in effect until April, 1946 to permit accommodation of homecom-ing soldiers and a changeover to peacetime traffic.
The Daylight in postwar yearsWith the end of government regulation in 1946, the second parlor car and tavern car were reinstated on the Coast Daylight. Visible changes to the cars included a gradual change from the
PART 1 – SP PASSENGER TRAINS | 19
12. The westbound Daylight, #98, stops at San Luis Obispo in the mid-1950s, near the end of steam operation. The parlor observation car shows off the new lighting array on its roof. Photo courtesy Bob’s Photos
• INDEX• TABLE OF CONTENTS
MRHMAG.COM
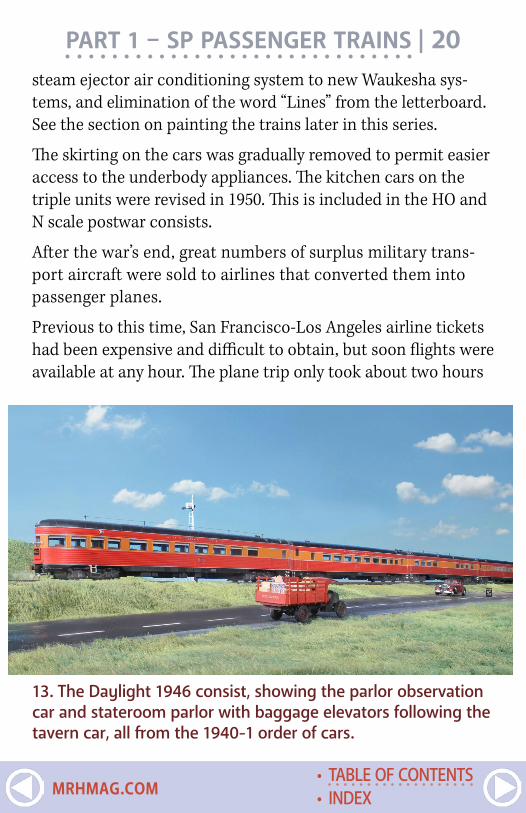
PART 1 – SP PASSENGER TRAINS | 20steam ejector air conditioning system to new Waukesha sys-tems, and elimination of the word “Lines” from the letterboard. See the section on painting the trains later in this series.
The skirting on the cars was gradually removed to permit easier access to the underbody appliances. The kitchen cars on the triple units were revised in 1950. This is included in the HO and N scale postwar consists.
After the war’s end, great numbers of surplus military trans-port aircraft were sold to airlines that converted them into passenger planes.
Previous to this time, San Francisco-Los Angeles airline tickets had been expensive and difficult to obtain, but soon flights were available at any hour. The plane trip only took about two hours
13. The Daylight 1946 consist, showing the parlor observation car and stateroom parlor with baggage elevators following the tavern car, all from the 1940-1 order of cars.
• INDEX• TABLE OF CONTENTS
MRHMAG.COM
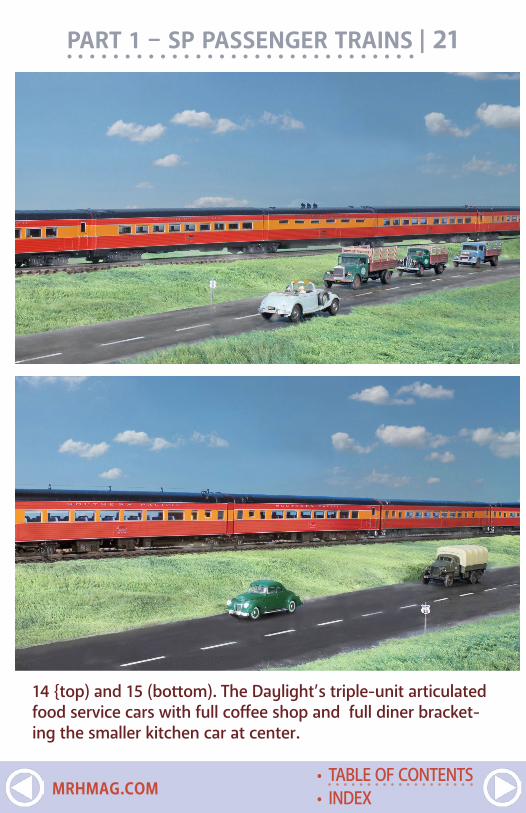
PART 1 – SP PASSENGER TRAINS | 21
14 {top) and 15 (bottom). The Daylight’s triple-unit articulated food service cars with full coffee shop and full diner bracket-ing the smaller kitchen car at center.
• INDEX• TABLE OF CONTENTS
MRHMAG.COM
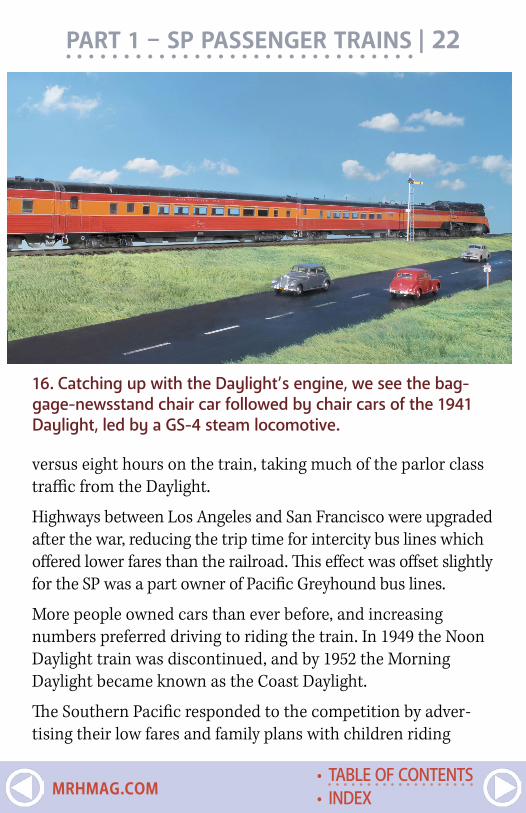
PART 1 – SP PASSENGER TRAINS | 22
versus eight hours on the train, taking much of the parlor class traffic from the Daylight.
Highways between Los Angeles and San Francisco were upgraded after the war, reducing the trip time for intercity bus lines which offered lower fares than the railroad. This effect was offset slightly for the SP was a part owner of Pacific Greyhound bus lines.
More people owned cars than ever before, and increasing numbers preferred driving to riding the train. In 1949 the Noon Daylight train was discontinued, and by 1952 the Morning Daylight became known as the Coast Daylight.
The Southern Pacific responded to the competition by adver-tising their low fares and family plans with children riding
16. Catching up with the Daylight’s engine, we see the bag-gage-newsstand chair car followed by chair cars of the 1941 Daylight, led by a GS-4 steam locomotive.
• INDEX• TABLE OF CONTENTS
MRHMAG.COM
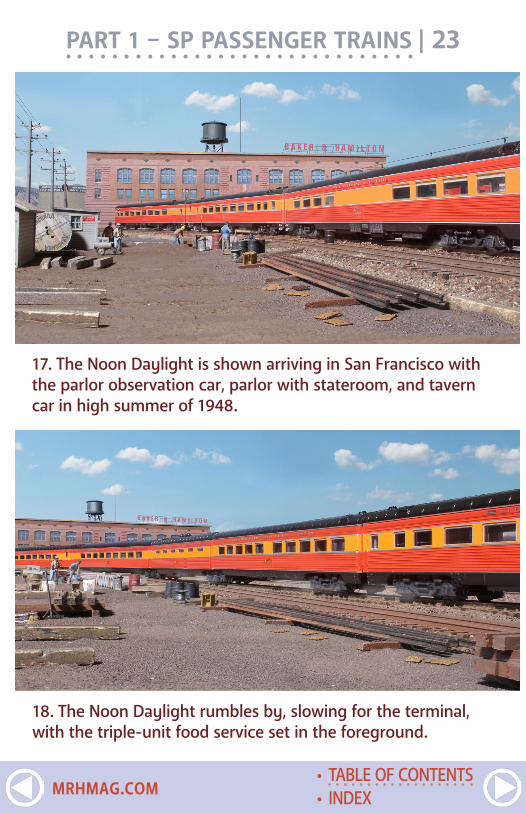
PART 1 – SP PASSENGER TRAINS | 23
18. The Noon Daylight rumbles by, slowing for the terminal, with the triple-unit food service set in the foreground.
17. The Noon Daylight is shown arriving in San Francisco with the parlor observation car, parlor with stateroom, and tavern car in high summer of 1948.
• INDEX• TABLE OF CONTENTS
MRHMAG.COM
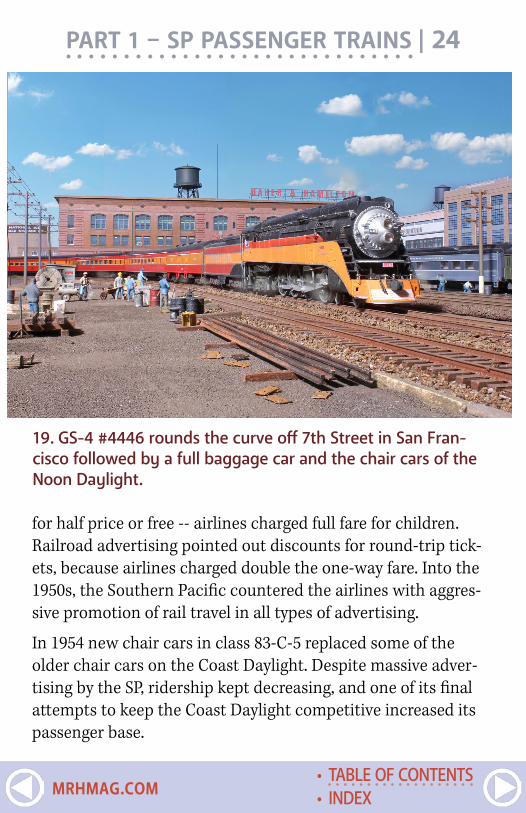
for half price or free -- airlines charged full fare for children. Railroad advertising pointed out discounts for round-trip tick-ets, because airlines charged double the one-way fare. Into the 1950s, the Southern Pacific countered the airlines with aggres-sive promotion of rail travel in all types of advertising.
In 1954 new chair cars in class 83-C-5 replaced some of the older chair cars on the Coast Daylight. Despite massive adver-tising by the SP, ridership kept decreasing, and one of its final attempts to keep the Coast Daylight competitive increased its passenger base.
PART 1 – SP PASSENGER TRAINS | 24
19. GS-4 #4446 rounds the curve off 7th Street in San Fran-cisco followed by a full baggage car and the chair cars of the Noon Daylight.
• INDEX• TABLE OF CONTENTS
MRHMAG.COM

PART 1 – SP PASSENGER TRAINS | 25
New markets for the Coast Daylight 1953-1960The schedule of the San Joaquin Daylight between Oakland, on the east side of San Francisco Bay, and Los Angeles was hours longer than the Coast Daylight. In January 1953, a through Oakland-Los Angeles car was added to the Coast Daylight. Operating eastbound on train #250 from Oakland, the car was switched into the Coast Daylight at San Jose. Westbound train #255 performed the same operation in the other direction.
Another untapped market was between Los Angeles and the developing suburbs around San Francisco. Adding stops would have increased the Daylight’s running time, so beginning in
20. Running with an off-peak consist, the Daylight has a pair of General Motors E7 diesels today.
• INDEX• TABLE OF CONTENTS
MRHMAG.COM
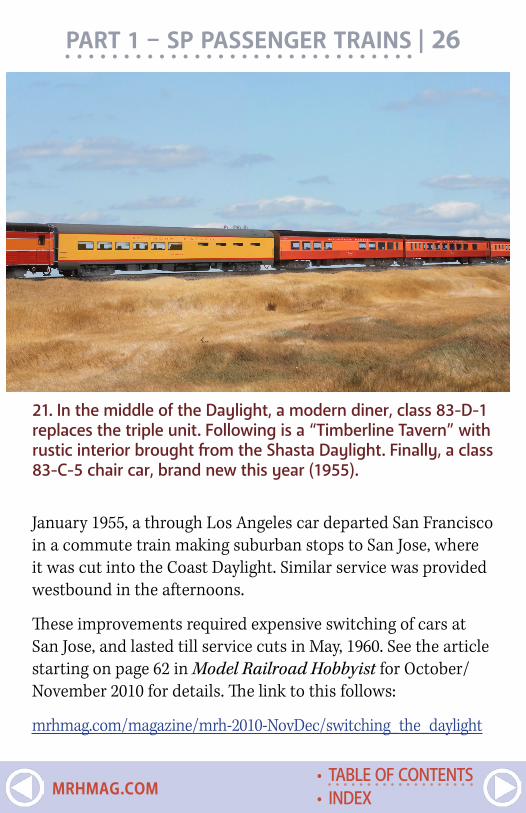
PART 1 – SP PASSENGER TRAINS | 26
January 1955, a through Los Angeles car departed San Francisco in a commute train making suburban stops to San Jose, where it was cut into the Coast Daylight. Similar service was provided westbound in the afternoons.
These improvements required expensive switching of cars at San Jose, and lasted till service cuts in May, 1960. See the article starting on page 62 in Model Railroad Hobbyist for October/November 2010 for details. The link to this follows: mrhmag.com/magazine/mrh-2010-NovDec/switching_the_daylight
21. In the middle of the Daylight, a modern diner, class 83-D-1 replaces the triple unit. Following is a “Timberline Tavern” with rustic interior brought from the Shasta Daylight. Finally, a class 83-C-5 chair car, brand new this year (1955).
• INDEX• TABLE OF CONTENTS
MRHMAG.COM
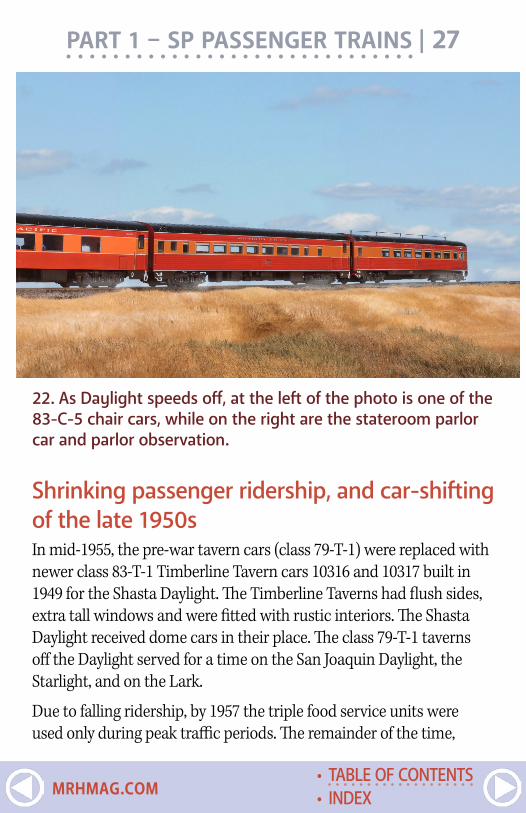
PART 1 – SP PASSENGER TRAINS | 27
Shrinking passenger ridership, and car-shifting of the late 1950sIn mid-1955, the pre-war tavern cars (class 79-T-1) were replaced with newer class 83-T-1 Timberline Tavern cars 10316 and 10317 built in 1949 for the Shasta Daylight. The Timberline Taverns had flush sides, extra tall windows and were fitted with rustic interiors. The Shasta Daylight received dome cars in their place. The class 79-T-1 taverns off the Daylight served for a time on the San Joaquin Daylight, the Starlight, and on the Lark.
Due to falling ridership, by 1957 the triple food service units were used only during peak traffic periods. The remainder of the time,
22. As Daylight speeds off, at the left of the photo is one of the 83-C-5 chair cars, while on the right are the stateroom parlor car and parlor observation.
• INDEX• TABLE OF CONTENTS
MRHMAG.COM
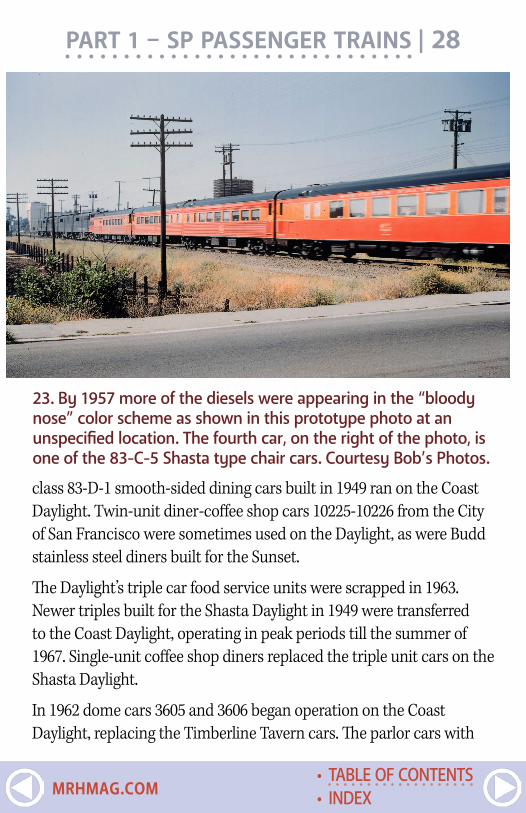
PART 1 – SP PASSENGER TRAINS | 28
class 83-D-1 smooth-sided dining cars built in 1949 ran on the Coast Daylight. Twin-unit diner-coffee shop cars 10225-10226 from the City of San Francisco were sometimes used on the Daylight, as were Budd stainless steel diners built for the Sunset.
The Daylight’s triple car food service units were scrapped in 1963. Newer triples built for the Shasta Daylight in 1949 were transferred to the Coast Daylight, operating in peak periods till the summer of 1967. Single-unit coffee shop diners replaced the triple unit cars on the Shasta Daylight.
In 1962 dome cars 3605 and 3606 began operation on the Coast Daylight, replacing the Timberline Tavern cars. The parlor cars with
23. By 1957 more of the diesels were appearing in the “bloody nose” color scheme as shown in this prototype photo at an unspecified location. The fourth car, on the right of the photo, is one of the 83-C-5 Shasta type chair cars. Courtesy Bob’s Photos.
• INDEX• TABLE OF CONTENTS
MRHMAG.COM
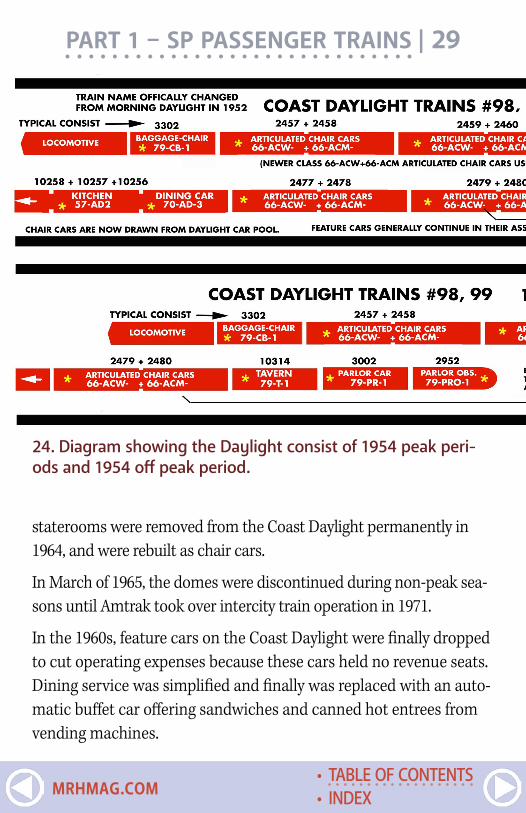
24. Diagram showing the Daylight consist of 1954 peak peri-ods and 1954 off peak period.
PART 1 – SP PASSENGER TRAINS | 29
staterooms were removed from the Coast Daylight permanently in 1964, and were rebuilt as chair cars.
In March of 1965, the domes were discontinued during non-peak sea-sons until Amtrak took over intercity train operation in 1971.
In the 1960s, feature cars on the Coast Daylight were finally dropped to cut operating expenses because these cars held no revenue seats. Dining service was simplified and finally was replaced with an auto-matic buffet car offering sandwiches and canned hot entrees from vending machines.
• INDEX• TABLE OF CONTENTS
MRHMAG.COM
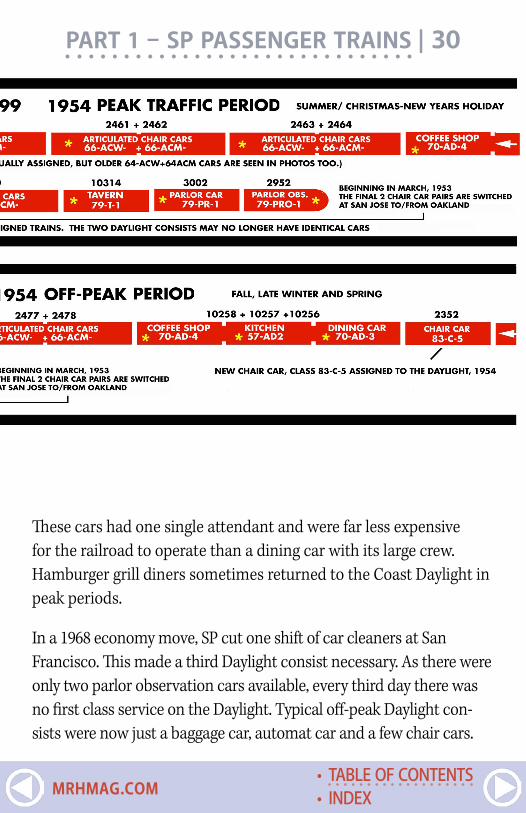
PART 1 – SP PASSENGER TRAINS | 30
These cars had one single attendant and were far less expensive for the railroad to operate than a dining car with its large crew. Hamburger grill diners sometimes returned to the Coast Daylight in peak periods.
In a 1968 economy move, SP cut one shift of car cleaners at San Francisco. This made a third Daylight consist necessary. As there were only two parlor observation cars available, every third day there was no first class service on the Daylight. Typical off-peak Daylight con-sists were now just a baggage car, automat car and a few chair cars.
• INDEX• TABLE OF CONTENTS
MRHMAG.COM
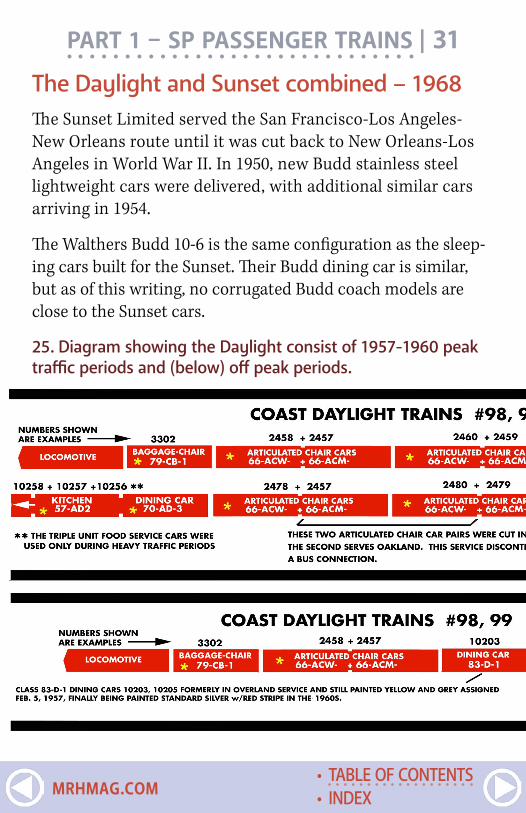
25. Diagram showing the Daylight consist of 1957-1960 peak traffic periods and (below) off peak periods.
PART 1 – SP PASSENGER TRAINS | 31
The Daylight and Sunset combined – 1968The Sunset Limited served the San Francisco-Los Angeles- New Orleans route until it was cut back to New Orleans-Los Angeles in World War II. In 1950, new Budd stainless steel lightweight cars were delivered, with additional similar cars arriving in 1954.
The Walthers Budd 10-6 is the same configuration as the sleep-ing cars built for the Sunset. Their Budd dining car is similar, but as of this writing, no corrugated Budd coach models are close to the Sunset cars.
• INDEX• TABLE OF CONTENTS
MRHMAG.COM
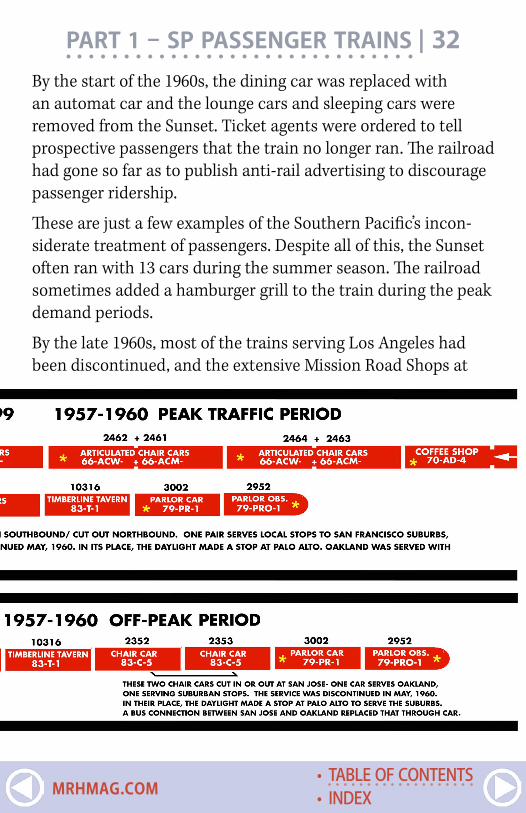
PART 1 – SP PASSENGER TRAINS | 32By the start of the 1960s, the dining car was replaced with an automat car and the lounge cars and sleeping cars were removed from the Sunset. Ticket agents were ordered to tell prospective passengers that the train no longer ran. The railroad had gone so far as to publish anti-rail advertising to discourage passenger ridership.
These are just a few examples of the Southern Pacific’s incon-siderate treatment of passengers. Despite all of this, the Sunset often ran with 13 cars during the summer season. The railroad sometimes added a hamburger grill to the train during the peak demand periods.
By the late 1960s, most of the trains serving Los Angeles had been discontinued, and the extensive Mission Road Shops at
• INDEX• TABLE OF CONTENTS
MRHMAG.COM
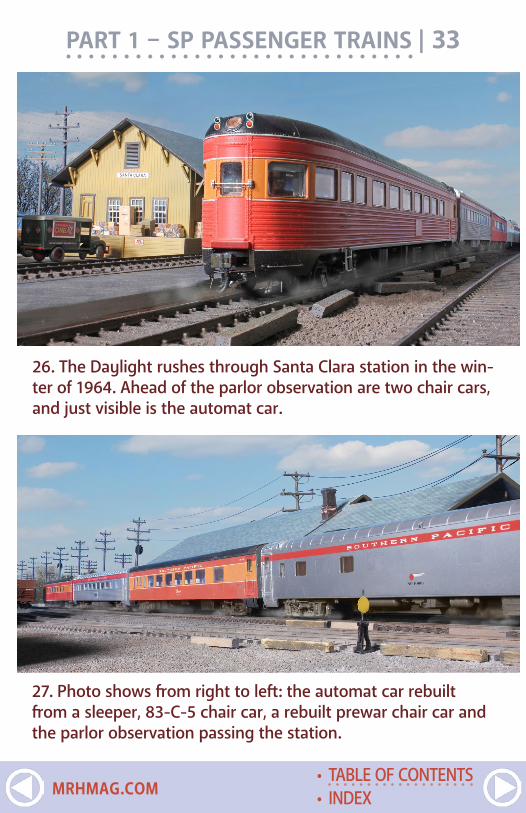
PART 1 – SP PASSENGER TRAINS | 33
26. The Daylight rushes through Santa Clara station in the win-ter of 1964. Ahead of the parlor observation are two chair cars, and just visible is the automat car.
27. Photo shows from right to left: the automat car rebuilt from a sleeper, 83-C-5 chair car, a rebuilt prewar chair car and the parlor observation passing the station.
• INDEX• TABLE OF CONTENTS
MRHMAG.COM
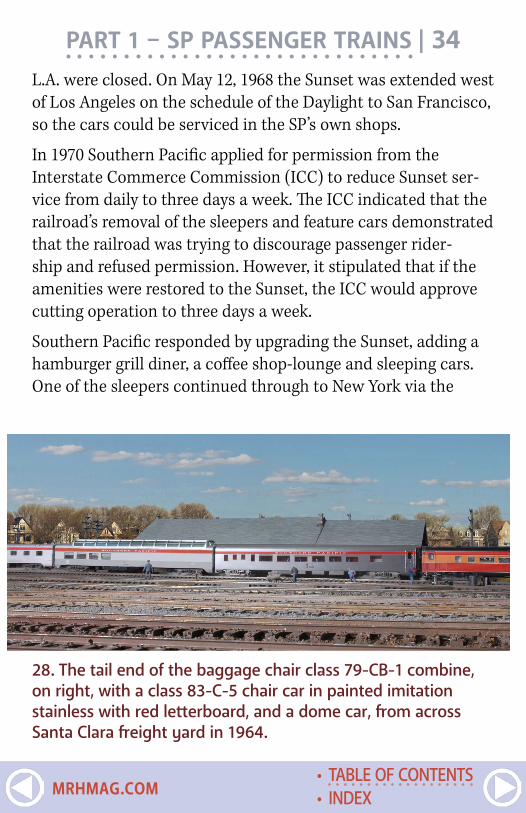
PART 1 – SP PASSENGER TRAINS | 34L.A. were closed. On May 12, 1968 the Sunset was extended west of Los Angeles on the schedule of the Daylight to San Francisco, so the cars could be serviced in the SP’s own shops.
In 1970 Southern Pacific applied for permission from the Interstate Commerce Commission (ICC) to reduce Sunset ser-vice from daily to three days a week. The ICC indicated that the railroad’s removal of the sleepers and feature cars demonstrated that the railroad was trying to discourage passenger rider-ship and refused permission. However, it stipulated that if the amenities were restored to the Sunset, the ICC would approve cutting operation to three days a week.
Southern Pacific responded by upgrading the Sunset, adding a hamburger grill diner, a coffee shop-lounge and sleeping cars. One of the sleepers continued through to New York via the
28. The tail end of the baggage chair class 79-CB-1 combine, on right, with a class 83-C-5 chair car in painted imitation stainless with red letterboard, and a dome car, from across Santa Clara freight yard in 1964.
• INDEX• TABLE OF CONTENTS
MRHMAG.COM

PART 1 – SP PASSENGER TRAINS | 35
29. A pair of Alco PA-2s in the “Bloody Nose” scheme bring Day-light train #99 toward San Francisco on this chilly November day in 1964. In the foreground are strings of sugar beet gondolas.
• INDEX• TABLE OF CONTENTS
MRHMAG.COM
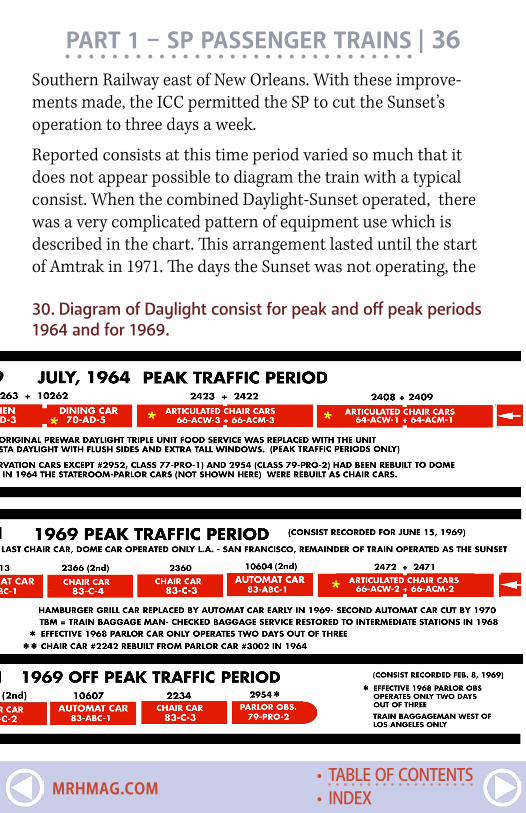
PART 1 – SP PASSENGER TRAINS | 36Southern Railway east of New Orleans. With these improve-ments made, the ICC permitted the SP to cut the Sunset’s operation to three days a week.
Reported consists at this time period varied so much that it does not appear possible to diagram the train with a typical consist. When the combined Daylight-Sunset operated, there was a very complicated pattern of equipment use which is described in the chart. This arrangement lasted until the start of Amtrak in 1971. The days the Sunset was not operating, the
30. Diagram of Daylight consist for peak and off peak periods 1964 and for 1969.
• INDEX• TABLE OF CONTENTS
MRHMAG.COM
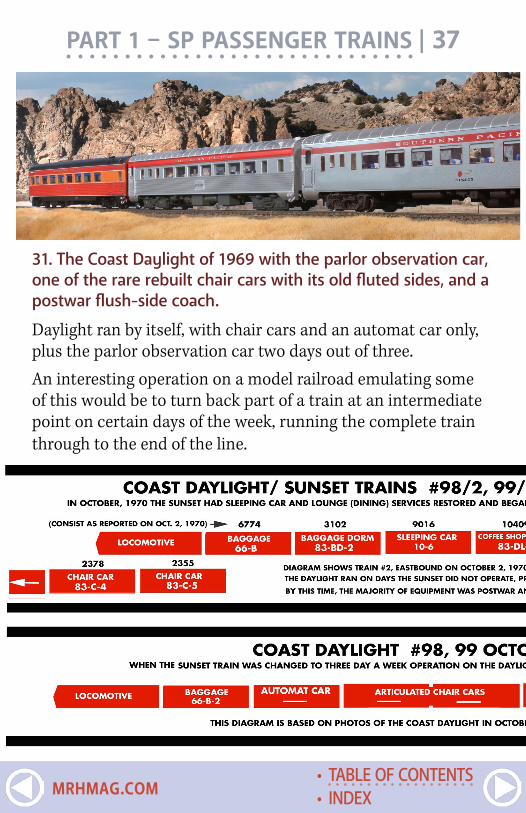
Daylight ran by itself, with chair cars and an automat car only, plus the parlor observation car two days out of three.An interesting operation on a model railroad emulating some of this would be to turn back part of a train at an intermediate point on certain days of the week, running the complete train through to the end of the line.
PART 1 – SP PASSENGER TRAINS | 37
31. The Coast Daylight of 1969 with the parlor observation car, one of the rare rebuilt chair cars with its old fluted sides, and a postwar flush-side coach.
• INDEX• TABLE OF CONTENTS
MRHMAG.COM
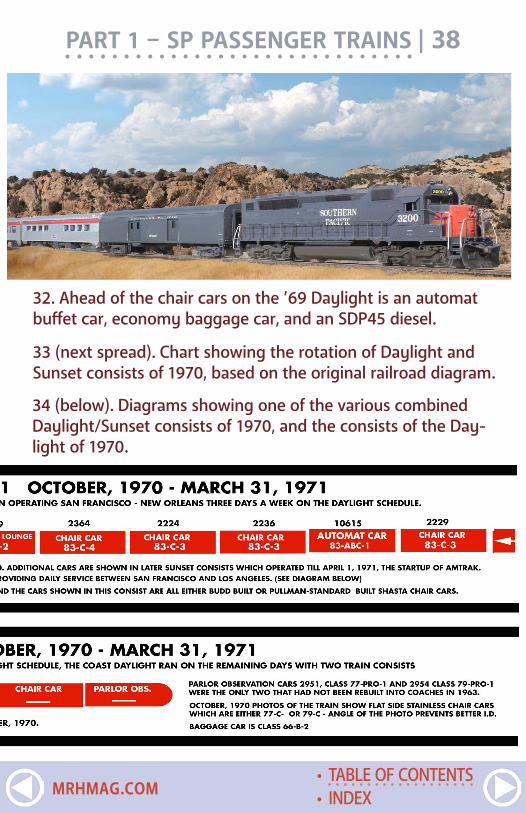
PART 1 – SP PASSENGER TRAINS | 38
32. Ahead of the chair cars on the ’69 Daylight is an automat buffet car, economy baggage car, and an SDP45 diesel.
33 (next spread). Chart showing the rotation of Daylight and Sunset consists of 1970, based on the original railroad diagram.
34 (below). Diagrams showing one of the various combined Daylight/Sunset consists of 1970, and the consists of the Day-light of 1970.
• INDEX• TABLE OF CONTENTS
MRHMAG.COM
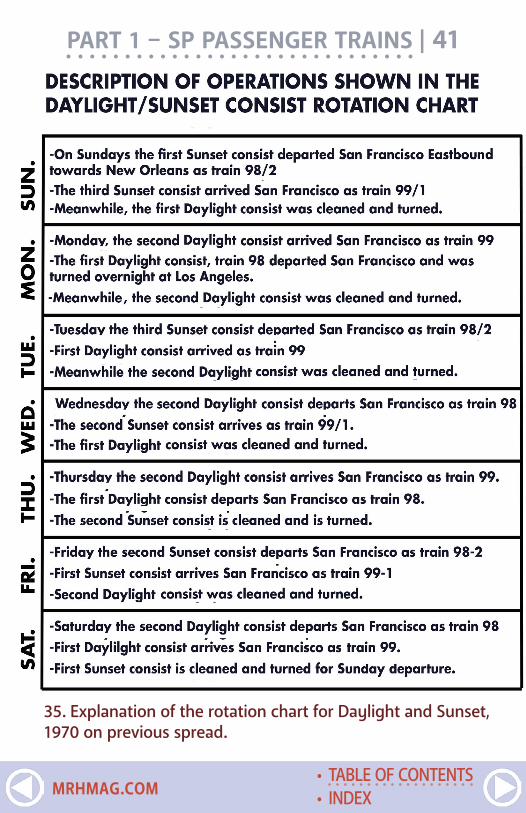
PART 1 – SP PASSENGER TRAINS | 41
35. Explanation of the rotation chart for Daylight and Sunset, 1970 on previous spread.
• INDEX• TABLE OF CONTENTS
MRHMAG.COM
The Coast Line todayIt is possible to enjoy riding the route of the Daylight today. Amtrak’s Coast Starlight train runs between Los Angeles and Seattle via San Jose, Oakland, and Portland daily. Passengers for San Francisco change to a motor coach at Oakland. Caltrain has frequent local train service between San Jose and San Francisco.
For a system map of Caltrain and more information, please click on the link: www.caltrain.com/stations/systemmap.html
The Noon DaylightFrom its inception in 1937, the frequent demand for more seat-ing on the Coast Daylight required a better solution than run-ning additional sections.
Beginning in 1940, the train was relieved with a Noon Daylight, #96 and #97 between San Francisco and Los Angeles, departing at midday with evening arrivals. Most of the train’s cars were from the original 1937 Daylight consist, making up a train with all the features of the morning schedule. A business traveler could put in a half day’s work before the noon depar-ture, and the Noon Daylight occasionally required second sec-tions to be run.
The train was discontinued in 1942 because of World War II government restrictions on duplicate services. The Noon Daylight was reinstated in 1946 when restrictions were lifted. The train gradually lost ridership after World War II due to com-petition from the airlines and improved highways. In 1949 the Noon Daylight was discontinued permanently.
PART 1 – SP PASSENGER TRAINS | 42
• INDEX• TABLE OF CONTENTS
MRHMAG.COM
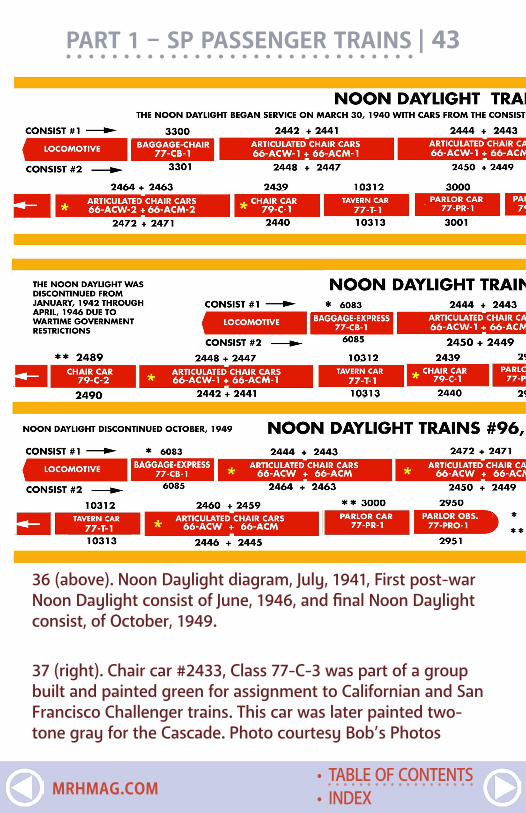
PART 1 – SP PASSENGER TRAINS | 43
36 (above). Noon Daylight diagram, July, 1941, First post-war Noon Daylight consist of June, 1946, and final Noon Daylight consist, of October, 1949.
37 (right). Chair car #2433, Class 77-C-3 was part of a group built and painted green for assignment to Californian and San Francisco Challenger trains. This car was later painted two-tone gray for the Cascade. Photo courtesy Bob’s Photos
• INDEX• TABLE OF CONTENTS
MRHMAG.COM
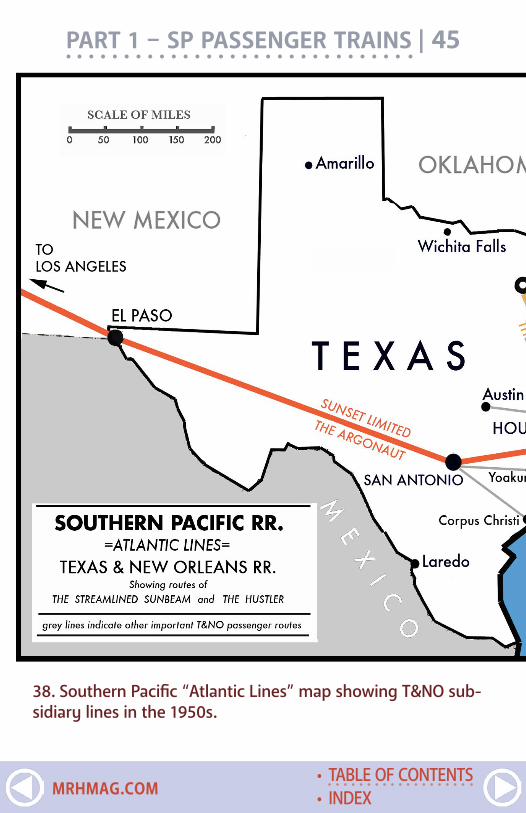
PART 1 – SP PASSENGER TRAINS | 45
38. Southern Pacific “Atlantic Lines” map showing T&NO sub-sidiary lines in the 1950s.
• INDEX• TABLE OF CONTENTS
MRHMAG.COM
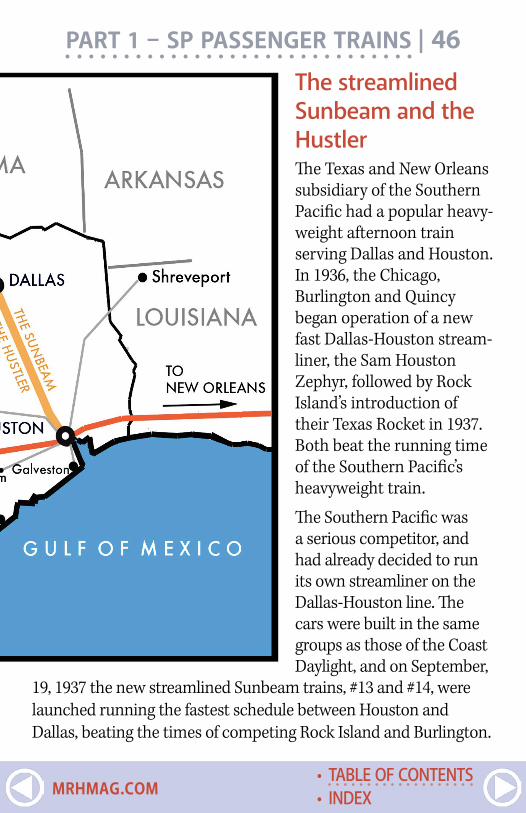
PART 1 – SP PASSENGER TRAINS | 46The streamlined Sunbeam and the HustlerThe Texas and New Orleans subsidiary of the Southern Pacific had a popular heavy-weight afternoon train serving Dallas and Houston. In 1936, the Chicago, Burlington and Quincy began operation of a new fast Dallas-Houston stream-liner, the Sam Houston Zephyr, followed by Rock Island’s introduction of their Texas Rocket in 1937. Both beat the running time of the Southern Pacific’s heavyweight train.
The Southern Pacific was a serious competitor, and had already decided to run its own streamliner on the Dallas-Houston line. The cars were built in the same groups as those of the Coast Daylight, and on September,
19, 1937 the new streamlined Sunbeam trains, #13 and #14, were launched running the fastest schedule between Houston and Dallas, beating the times of competing Rock Island and Burlington.
• INDEX• TABLE OF CONTENTS
MRHMAG.COM
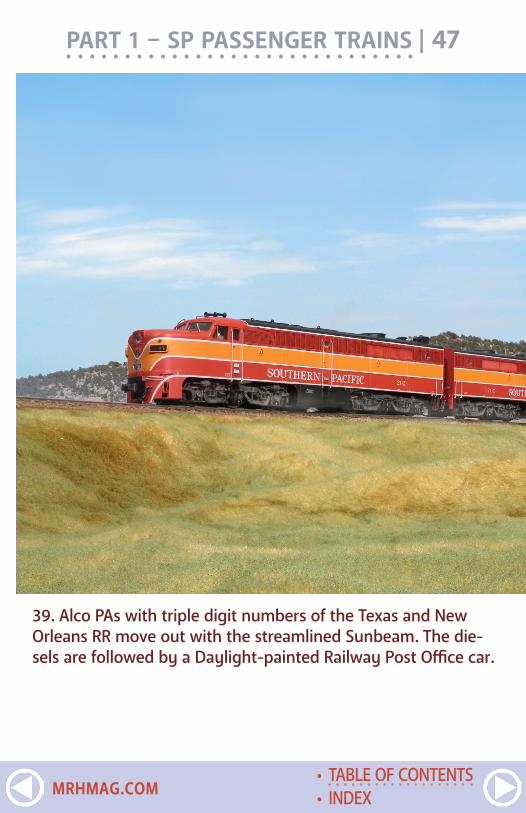
PART 1 – SP PASSENGER TRAINS | 47
39. Alco PAs with triple digit numbers of the Texas and New Orleans RR move out with the streamlined Sunbeam. The die-sels are followed by a Daylight-painted Railway Post Office car.
• INDEX• TABLE OF CONTENTS
MRHMAG.COM
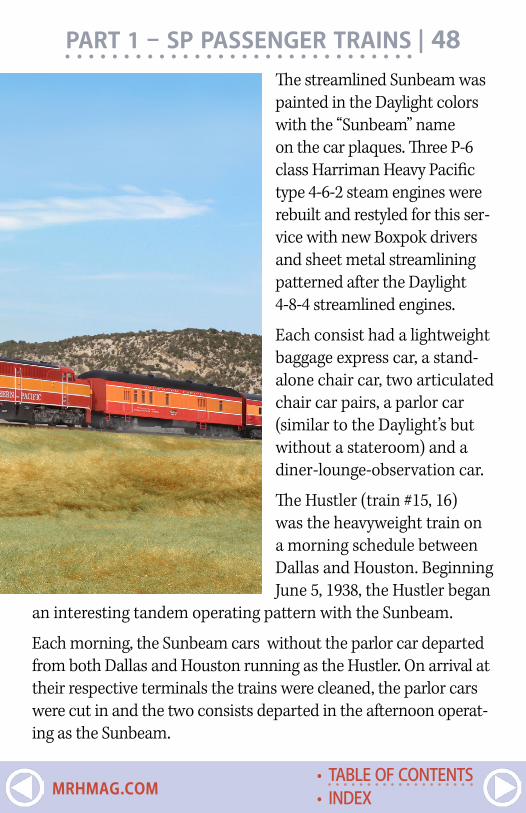
PART 1 – SP PASSENGER TRAINS | 48The streamlined Sunbeam was painted in the Daylight colors with the “Sunbeam” name on the car plaques. Three P-6 class Harriman Heavy Pacific type 4-6-2 steam engines were rebuilt and restyled for this ser-vice with new Boxpok drivers and sheet metal streamlining patterned after the Daylight 4-8-4 streamlined engines.
Each consist had a lightweight baggage express car, a stand-alone chair car, two articulated chair car pairs, a parlor car (similar to the Daylight’s but without a stateroom) and a diner-lounge-observation car.
The Hustler (train #15, 16) was the heavyweight train on a morning schedule between Dallas and Houston. Beginning June 5, 1938, the Hustler began
an interesting tandem operating pattern with the Sunbeam.
Each morning, the Sunbeam cars without the parlor car departed from both Dallas and Houston running as the Hustler. On arrival at their respective terminals the trains were cleaned, the parlor cars were cut in and the two consists departed in the afternoon operat-ing as the Sunbeam.
• INDEX• TABLE OF CONTENTS
MRHMAG.COM

PART 1 – SP PASSENGER TRAINS | 49
This operation upgraded the Hustler to a streamliner and freed up the heavyweight equipment, resulting in a far more efficient use of the expensive new lightweight cars.
On your model railroad, the morning local trains could pick up a parlor car or drop express cars to run afternoon services.
By 1950, passenger loadings on the T&NO trains fell off drasti-cally as new highways were completed. Travel by new airlines quickly drained off the first class passengers, resulting in the SP discontinuing most of their Texas services but leaving the Sunbeam and Hustler.
The cars were refinished in stainless steel with red letterboards in 1951. The Hustler ran until 1954, while the Sunbeam remained until 1955, after which its cars were sent to Pacific lines of the SP.
40. The Sunbeam’s baggage-express car is followed by chair cars identical to the ones on the Daylight.
• INDEX• TABLE OF CONTENTS
MRHMAG.COM

PART 1 – SP PASSENGER TRAINS | 50
41. The chair cars are followed by the full parlor car (without stateroom) and the observation-lounge car of the Sunbeam.
Train consist diagramsThe trains in these diagrams can be modeled with ready-to-run and kit form plastic models, plus either some brass cars or stand-ins. The diagrams show the changes that took place on Southern Pacific streamliners over the years.
The books, “Night Trains of the Southern Pacific Coast Route Vol. 1” and “Day Trains of the Southern Pacific Coast Route, Vol. 2” by Dennis Ryan and Joseph Shine have detailed descriptions of car assignments and photos through the history of these cars.
In the book “The Daylight, Volume 1” by Richard K. Wright, it is indicated that the railroad’s consist sheets only specified car num-bers in 1946, 1947 and 1948.
Before this time, the cars may have been locked into their assign-ments due to a lack of extra lightweight equipment. Orders of new
• INDEX• TABLE OF CONTENTS
MRHMAG.COM
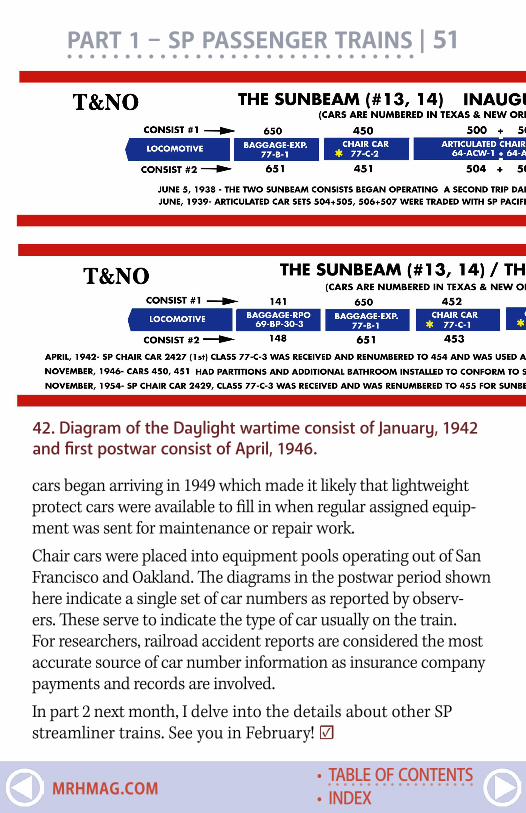
cars began arriving in 1949 which made it likely that lightweight protect cars were available to fill in when regular assigned equip-ment was sent for maintenance or repair work.Chair cars were placed into equipment pools operating out of San Francisco and Oakland. The diagrams in the postwar period shown here indicate a single set of car numbers as reported by observ-ers. These serve to indicate the type of car usually on the train. For researchers, railroad accident reports are considered the most accurate source of car number information as insurance company payments and records are involved.In part 2 next month, I delve into the details about other SP streamliner trains. See you in February! ☑
PART 1 – SP PASSENGER TRAINS | 51
42. Diagram of the Daylight wartime consist of January, 1942 and first postwar consist of April, 1946.
• INDEX• TABLE OF CONTENTS
MRHMAG.COM
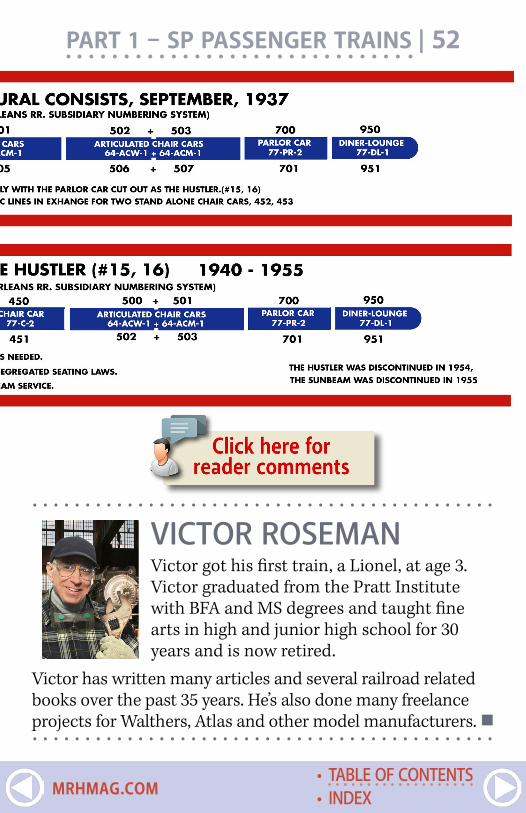
. . . . . . . . . . . . . . . . . . . . . . . . . . . . . . . . . . . . . . . . . . . .VICTOR ROSEMANVictor got his first train, a Lionel, at age 3. Victor graduated from the Pratt Institute with BFA and MS degrees and taught fine arts in high and junior high school for 30 years and is now retired.
Victor has written many articles and several railroad related books over the past 35 years. He’s also done many freelance projects for Walthers, Atlas and other model manufacturers. . . . . . . . . . . . . . . . . . . . . . . . . . . . . . . . . . . . . . . . . . . . .
PART 1 – SP PASSENGER TRAINS | 52
• INDEX• TABLE OF CONTENTS
MRHMAG.COM
ADVERTISEMENT
• INDEX• TABLE OF CONTENTS
MRHMAG.COM
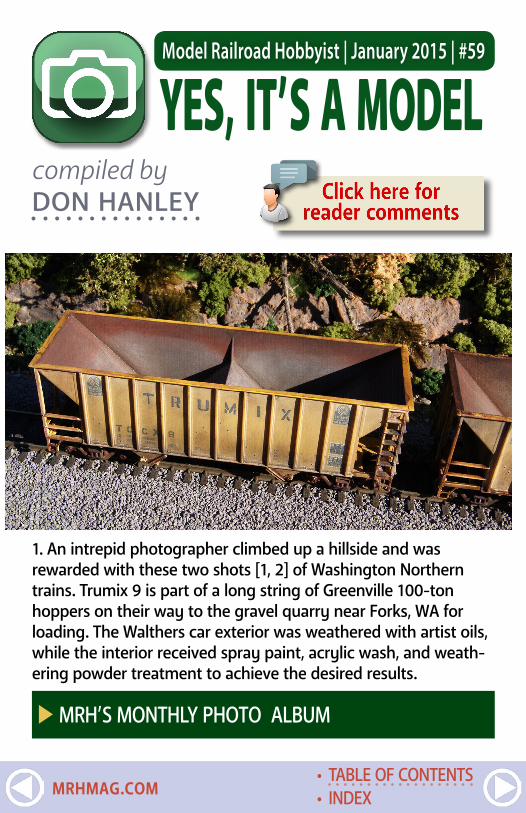
Model Railroad Hobbyist | January 2015 | #59
YES, IT’S A MODEL
XMRH’S MONTHLY PHOTO ALBUM
compiled byDON HANLEY
Model Railroad Hobbyist | January 2015 | #59
1. An intrepid photographer climbed up a hillside and was rewarded with these two shots [1, 2] of Washington Northern trains. Trumix 9 is part of a long string of Greenville 100-ton hoppers on their way to the gravel quarry near Forks, WA for loading. The Walthers car exterior was weathered with artist oils, while the interior received spray paint, acrylic wash, and weath-ering powder treatment to achieve the desired results.
• INDEX• TABLE OF CONTENTS
MRHMAG.COM

YES, IT’S A MODEL | 3
2. The second Washington Northern general merchandise freight rolls through the Hoh River Valley in brilliant summer sunshine. The roofs of these HO scale cars were weathered by building up light applications of artist oil colors Raw Sienna, Burnt Sienna, and Raw Umber using cosmetic sponges. Kevin Klettke photo-graphed both of these images [1, 2] outdoors on a 2’x2’ diorama.
• INDEX• TABLE OF CONTENTS
MRHMAG.COM
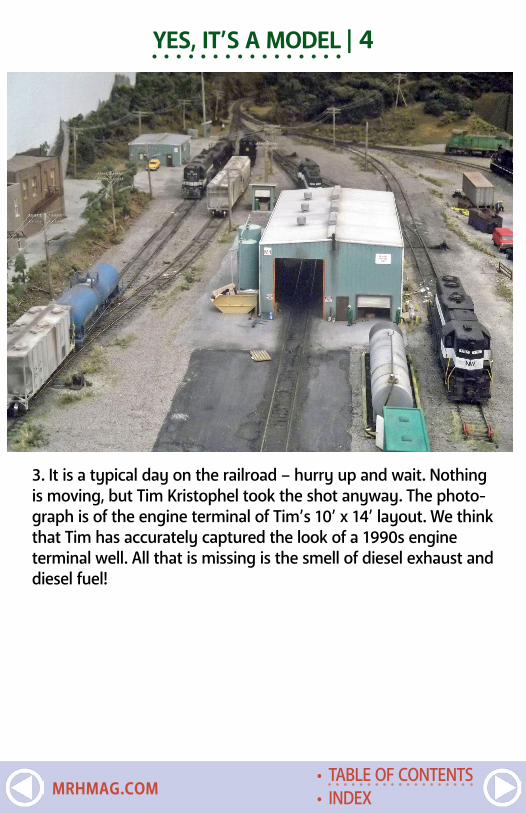
YES, IT’S A MODEL | 4
3. It is a typical day on the railroad – hurry up and wait. Nothing is moving, but Tim Kristophel took the shot anyway. The photo-graph is of the engine terminal of Tim’s 10’ x 14’ layout. We think that Tim has accurately captured the look of a 1990s engine terminal well. All that is missing is the smell of diesel exhaust and diesel fuel!
• INDEX• TABLE OF CONTENTS
MRHMAG.COM
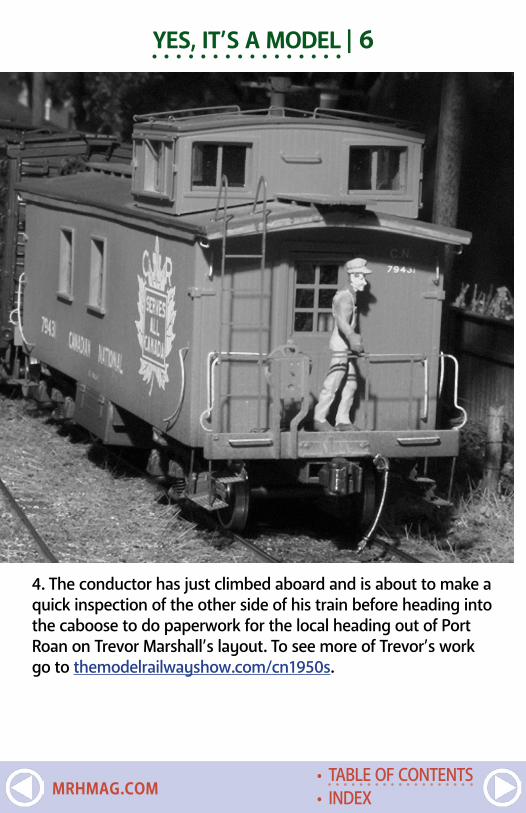
YES, IT’S A MODEL | 6
4. The conductor has just climbed aboard and is about to make a quick inspection of the other side of his train before heading into the caboose to do paperwork for the local heading out of Port Roan on Trevor Marshall’s layout. To see more of Trevor’s work go to themodelrailwayshow.com/cn1950s.
• INDEX• TABLE OF CONTENTS
MRHMAG.COM
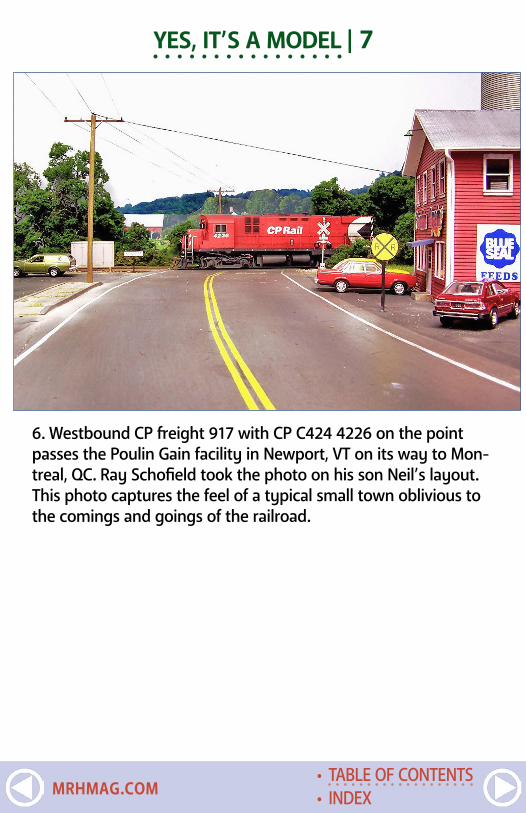
YES, IT’S A MODEL | 7
6. Westbound CP freight 917 with CP C424 4226 on the point passes the Poulin Gain facility in Newport, VT on its way to Mon-treal, QC. Ray Schofield took the photo on his son Neil’s layout. This photo captures the feel of a typical small town oblivious to the comings and goings of the railroad.
• INDEX• TABLE OF CONTENTS
MRHMAG.COM

YES, IT’S A MODEL | 8
7. L&N 105569 sits on a yard track awaiting its next assignment. Tom Patterson took this photo of a car on his layout. The car is an Athearn Genesis that he weathered using photos of similar L&N cars as a guide.
• INDEX• TABLE OF CONTENTS
MRHMAG.COM
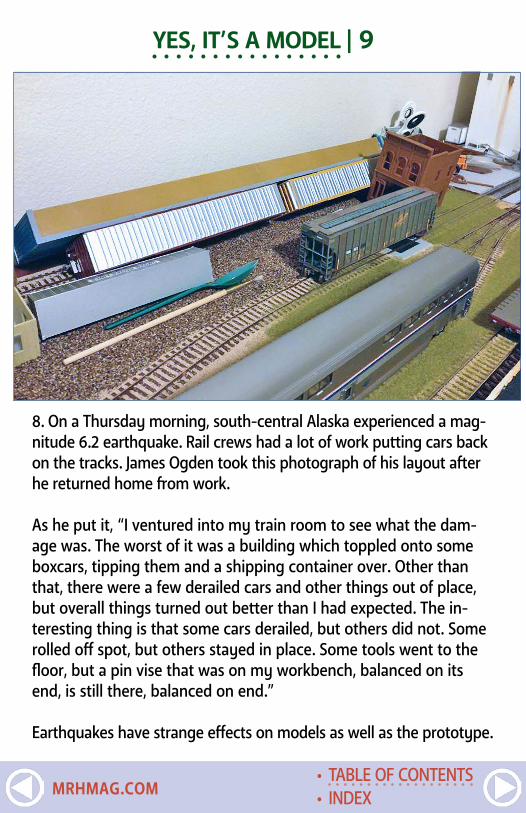
YES, IT’S A MODEL | 9
8. On a Thursday morning, south-central Alaska experienced a mag-nitude 6.2 earthquake. Rail crews had a lot of work putting cars back on the tracks. James Ogden took this photograph of his layout after he returned home from work.
As he put it, “I ventured into my train room to see what the dam-age was. The worst of it was a building which toppled onto some boxcars, tipping them and a shipping container over. Other than that, there were a few derailed cars and other things out of place, but overall things turned out better than I had expected. The in-teresting thing is that some cars derailed, but others did not. Some rolled off spot, but others stayed in place. Some tools went to the floor, but a pin vise that was on my workbench, balanced on its end, is still there, balanced on end.”
Earthquakes have strange effects on models as well as the prototype.
• INDEX• TABLE OF CONTENTS
MRHMAG.COM

. . . . . . . . . . . . . . . . . . . . . . . . . . . . . . . . . . . . . . . . . .
GET PAID FOR YOUR PHOTOWe pay $40 per photo we publish. If you’d like to get your modeling in our photo feature, just start posting your photos on the MRH website, especially in the Weekly Photo Fun thread created each weekend.
See mrhmag.com/help for more on how to post an image. You need to be an MRH subscriber to post photos to our website, and becoming a subscriber is free, just fill out this form here. . . . . . . . . . . . . . . . . . . . . . . . . . . . . . . . . . . . . . . . . . .
YES, IT’S A MODEL | 10
ADVERTISEMENT
• INDEX• TABLE OF CONTENTS
MRHMAG.COM
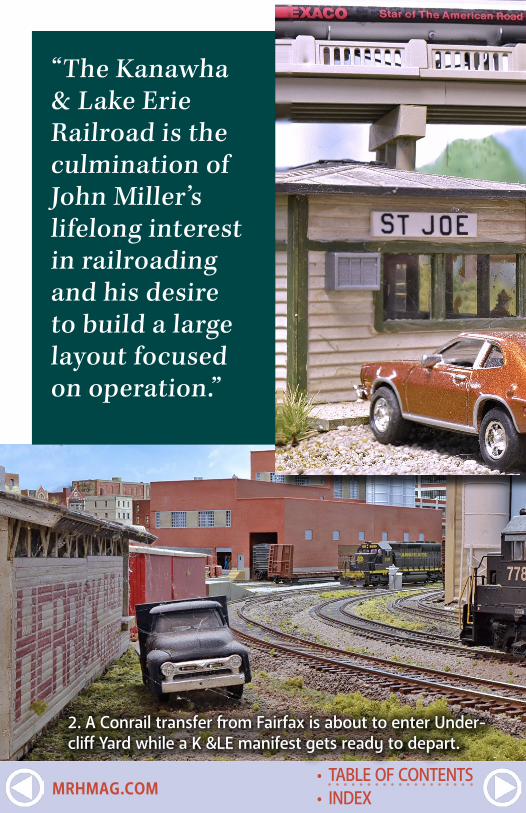
“The Kanawha & Lake Erie Railroad is the culmination of John Miller’s lifelong interest in railroading and his desire to build a large layout focused on operation.”
2. A Conrail transfer from Fairfax is about to enter Under-cliff Yard while a K &LE manifest gets ready to depart.
• INDEX• TABLE OF CONTENTS
MRHMAG.COM

Kanawha & Lake Erie
John Miller’s
BY TOM PATTERSONPhotos by Tom Patterson unless otherwise noted
1. Train 116, a St. Louis to Cincinnati manifest, heads eastbound past the east end of St. Joe Yard with 1608, a venerable F7, in the lead.
• INDEX• TABLE OF CONTENTS
MRHMAG.COM

FOR OVER 30 YEARS, JOHN MILLER HAS DEVELOPED THE K&LE concept, and this layout is the third to carry the name. While he was building his second layout, which featured a main line running from Charleston, WV northward along the Elk River, John realized that he really wanted to model the Midwest and a major metropolitan area.
With this layout, he focused on modeling the Greater Cincinnati area with the main line running east to his childhood home of Hillsboro, OH.
At one time, Cincinnati had eight railroads providing service to the area, including the Baltimore & Ohio, Chesapeake & Ohio, Louisville & Nashville, Norfolk & Western, Pennsylvania, New York Central, Southern, and the Detroit, Toledo and Ironton. Modeling this area gives John the opportunity to include equipment and transfer runs from all of these railroads.
HistoryWhile searching for a road name for his railroad, John came across a letter to his employer, a local phone company, from the Kanawha & West Virginia Railroad dated 1914. He liked the name, but it seemed to limit the railroad to a fairly small geographic area. So John changed the name to the Kanawha & Lake Erie in order to expand its reach. (Kanawha is pronounced Ka-NAW, not Ka-na-wha).
The actual Kanawha & West Virginia became the Hi-Top Branch of the NYC. The free-lanced K&LE includes the origi-nal line of Hi-Top Branch, along with a line from Charleston on to Morgantown, both in West Virginia, with connections to
Model Railroad Hobbyist | January 2015 | #59
• INDEX• TABLE OF CONTENTS
MRHMAG.COM
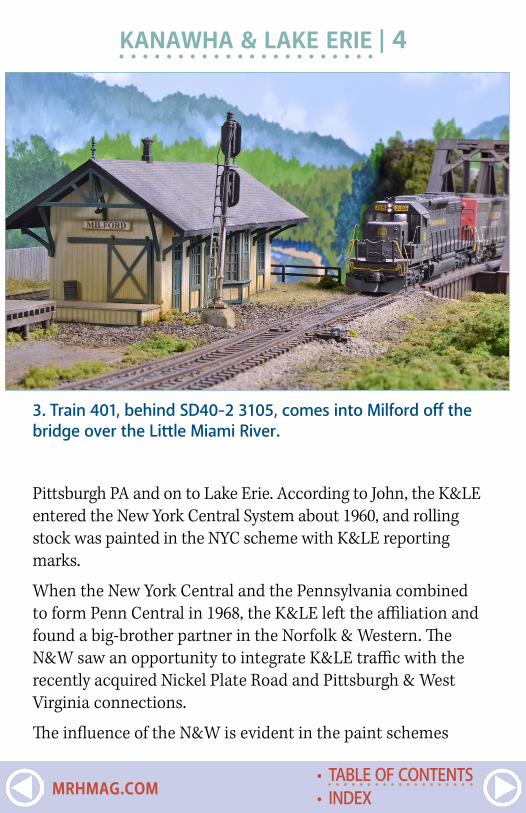
KANAWHA & LAKE ERIE | 4
3. Train 401, behind SD40-2 3105, comes into Milford off the bridge over the Little Miami River.
Pittsburgh PA and on to Lake Erie. According to John, the K&LE entered the New York Central System about 1960, and rolling stock was painted in the NYC scheme with K&LE reporting marks.
When the New York Central and the Pennsylvania combined to form Penn Central in 1968, the K&LE left the affiliation and found a big-brother partner in the Norfolk & Western. The N&W saw an opportunity to integrate K&LE traffic with the recently acquired Nickel Plate Road and Pittsburgh & West Virginia connections.
The influence of the N&W is evident in the paint schemes
• INDEX• TABLE OF CONTENTS
MRHMAG.COM

4. 116 traverses the elevated main line above the industrial “bottoms” by the river on the west side of Cincinnati.
KANAWHA & LAKE ERIE | 5
5. An L&N transfer run heads towards QC Interlocking, where it will cross over to the main and head into Undercliff Yard. At left are lower level industrial tracks serving the Hyde Park area.
• INDEX• TABLE OF CONTENTS
MRHMAG.COM

6. No. 116 has just passed St. Joe, a small yard in west Cincin-nati that serves the many barge-to-rail facilities in the area.
KANAWHA & LAKE ERIE | 6
7. A Virginian & Ohio local enters Hillsboro to switch industries. The old V&O mainline that used to run through town is to the right of the locomotive.
• INDEX• TABLE OF CONTENTS
MRHMAG.COM
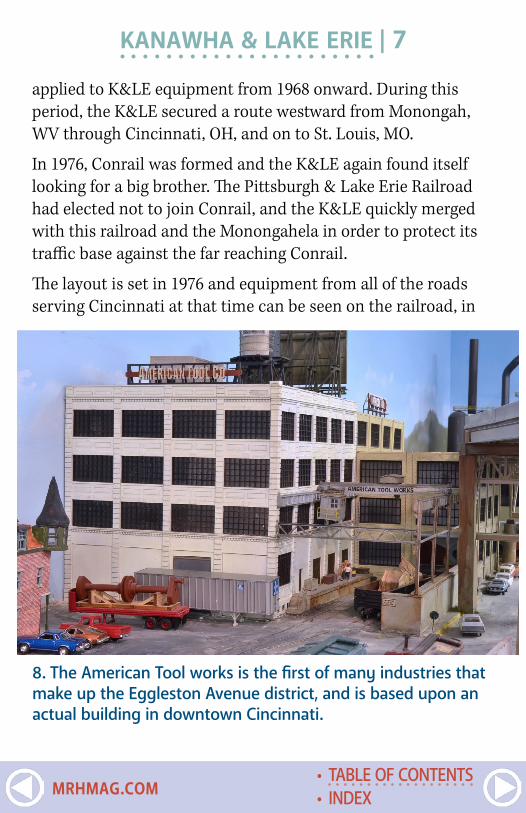
applied to K&LE equipment from 1968 onward. During this period, the K&LE secured a route westward from Monongah, WV through Cincinnati, OH, and on to St. Louis, MO.
In 1976, Conrail was formed and the K&LE again found itself looking for a big brother. The Pittsburgh & Lake Erie Railroad had elected not to join Conrail, and the K&LE quickly merged with this railroad and the Monongahela in order to protect its traffic base against the far reaching Conrail.
The layout is set in 1976 and equipment from all of the roads serving Cincinnati at that time can be seen on the railroad, in
KANAWHA & LAKE ERIE | 7
8. The American Tool works is the first of many industries that make up the Eggleston Avenue district, and is based upon an actual building in downtown Cincinnati.
• INDEX• TABLE OF CONTENTS
MRHMAG.COM
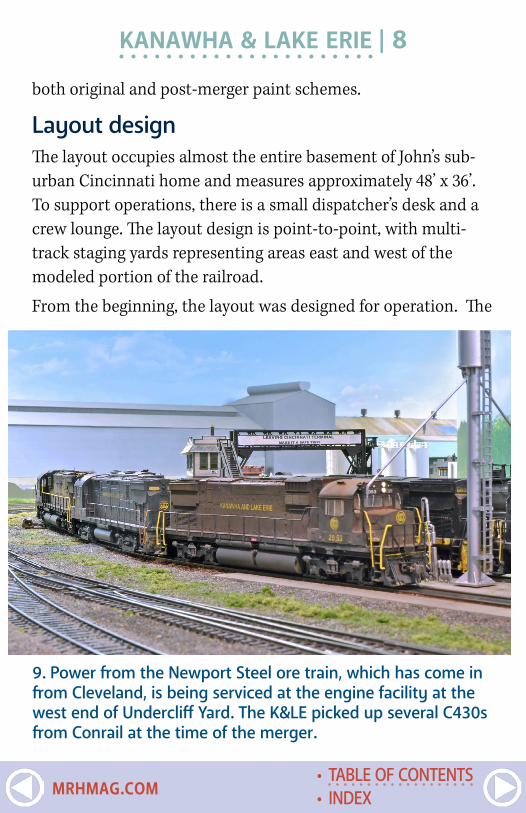
KANAWHA & LAKE ERIE | 8
9. Power from the Newport Steel ore train, which has come in from Cleveland, is being serviced at the engine facility at the west end of Undercliff Yard. The K&LE picked up several C430s from Conrail at the time of the merger.
both original and post-merger paint schemes.
Layout designThe layout occupies almost the entire basement of John’s sub-urban Cincinnati home and measures approximately 48’ x 36’. To support operations, there is a small dispatcher’s desk and a crew lounge. The layout design is point-to-point, with multi-track staging yards representing areas east and west of the modeled portion of the railroad.
From the beginning, the layout was designed for operation. The
• INDEX• TABLE OF CONTENTS
MRHMAG.COM
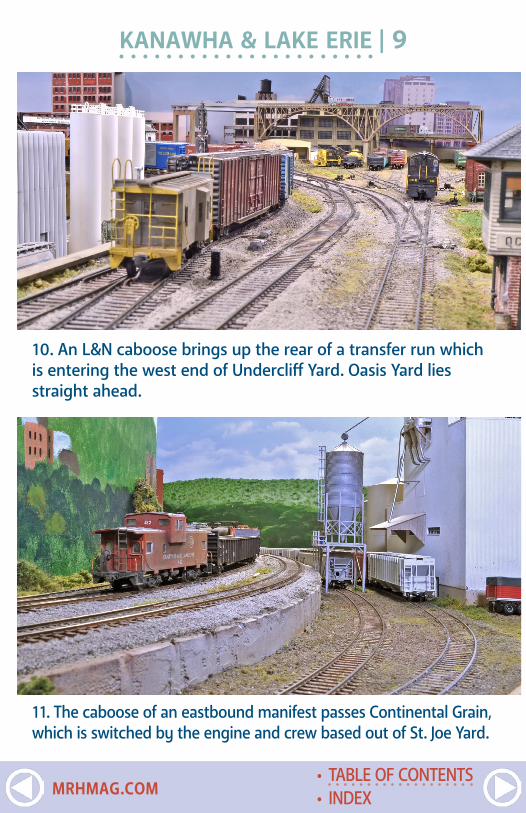
10. An L&N caboose brings up the rear of a transfer run which is entering the west end of Undercliff Yard. Oasis Yard lies straight ahead.
11. The caboose of an eastbound manifest passes Continental Grain, which is switched by the engine and crew based out of St. Joe Yard.
KANAWHA & LAKE ERIE | 9
• INDEX• TABLE OF CONTENTS
MRHMAG.COM
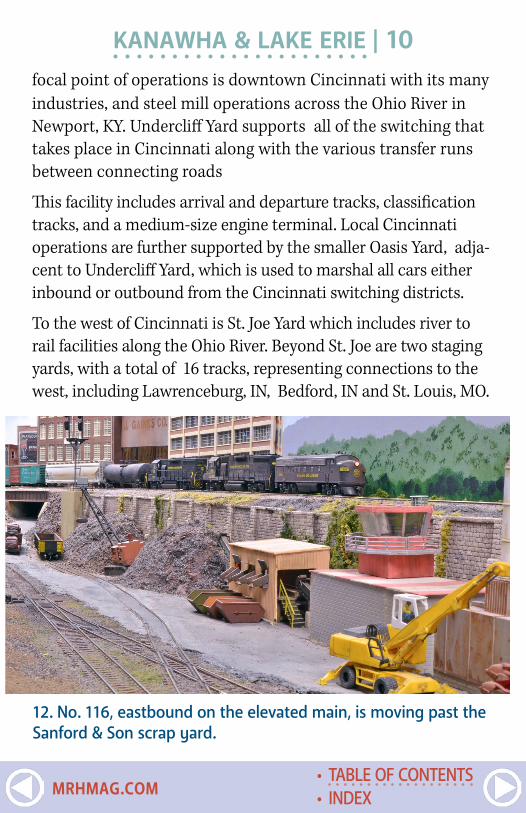
12. No. 116, eastbound on the elevated main, is moving past the Sanford & Son scrap yard.
KANAWHA & LAKE ERIE | 10focal point of operations is downtown Cincinnati with its many industries, and steel mill operations across the Ohio River in Newport, KY. Undercliff Yard supports all of the switching that takes place in Cincinnati along with the various transfer runs between connecting roads
This facility includes arrival and departure tracks, classification tracks, and a medium-size engine terminal. Local Cincinnati operations are further supported by the smaller Oasis Yard, adja-cent to Undercliff Yard, which is used to marshal all cars either inbound or outbound from the Cincinnati switching districts.
To the west of Cincinnati is St. Joe Yard which includes river to rail facilities along the Ohio River. Beyond St. Joe are two staging yards, with a total of 16 tracks, representing connections to the west, including Lawrenceburg, IN, Bedford, IN and St. Louis, MO.
• INDEX• TABLE OF CONTENTS
MRHMAG.COM

KANAWHA & LAKE ERIE | 11
The greater Cincinnati area on the layout consists of eight separate switching districts. These districts include the Ford transmission plant on the east side of Cincinnati, the produce yards and sup-porting infrastructure that existed down along the river front, the Eggleston Avenue district adjacent to downtown Cincinnati on the east side, and various industries on the near west side.All of the switching districts are worked by separate local crews during an operating session. In addition to the switch-ing districts, transfer runs from the B&O, Conrail, L&N, N&W, Southern and the Licking River Terminal Railroad come into Cincinnati from staging the during operating session and then return at the end of the session.Across the river from Cincinnati is Newport, KY. This area runs along two walls of the basement and is reached via a
13. A view of some of the business in Newport, KY above Yard A of the Newport Steel complex.
• INDEX• TABLE OF CONTENTS
MRHMAG.COM
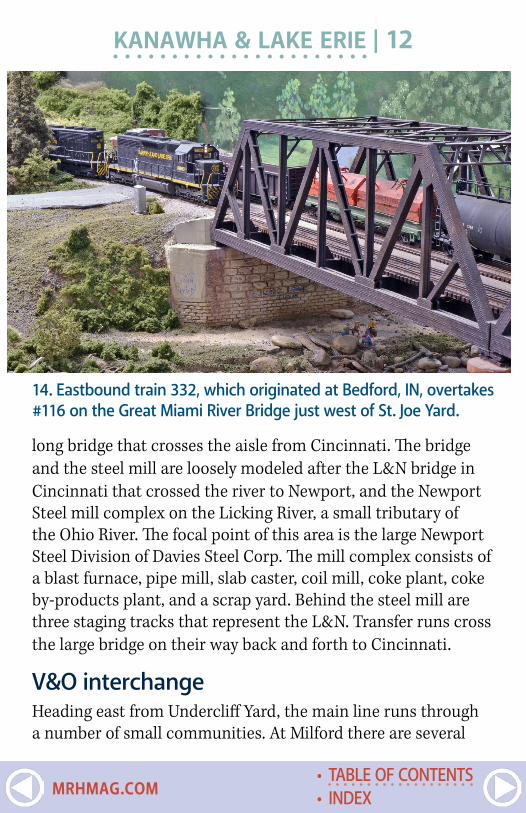
KANAWHA & LAKE ERIE | 12
long bridge that crosses the aisle from Cincinnati. The bridge and the steel mill are loosely modeled after the L&N bridge in Cincinnati that crossed the river to Newport, and the Newport Steel mill complex on the Licking River, a small tributary of the Ohio River. The focal point of this area is the large Newport Steel Division of Davies Steel Corp. The mill complex consists of a blast furnace, pipe mill, slab caster, coil mill, coke plant, coke by-products plant, and a scrap yard. Behind the steel mill are three staging tracks that represent the L&N. Transfer runs cross the large bridge on their way back and forth to Cincinnati.
V&O interchangeHeading east from Undercliff Yard, the main line runs through a number of small communities. At Milford there are several
14. Eastbound train 332, which originated at Bedford, IN, overtakes #116 on the Great Miami River Bridge just west of St. Joe Yard.
• INDEX• TABLE OF CONTENTS
MRHMAG.COM

KANAWHA & LAKE ERIE | 13
15. : A view of the old V&O station, MOW shed and abandoned boxcar in Hillsboro.
16. A local switching move heads past a long row of industries on the near west side of Cincinnati.
• INDEX• TABLE OF CONTENTS
MRHMAG.COM
KANAWHA & LAKE ERIE | 14small industries, including a coal dealer and a lumber yard. The main line then proceeds to Hillsboro where the K&LE inter-changes with the Virginian & Ohio. Like many railroad model-ers, John was highly influenced by Allen McClelland and his legendary V&O. The V&O line running east from Dayton passed through Hillsboro and John thought it would be fitting to have an interchange here with the K&LE. Ever the gracious indi-vidual that he is, Allen supplied John with several of sets of V&O decals for rolling stock and locomotives and gave his approval to model the interchange.
In Hillsboro, the old V&O main line crosses the K&LE, serv-ing a number of small industries and ends just east of town. In order to move its mainline traffic out of the center of Hillsboro, the V&O acquired trackage rights on the K&LE main through Hillsboro. The joint main line runs from just north of town to the east side of Hillsboro where the V&O leaves the K&LE for its own tracks east to Charleston, WV. In addition to the inter-change with the V&O in Hillsboro, the K&LE serves a number of industries on the west side of town.
From Hillsboro, the K&LE main line heads east to a nine track staging yard representing Chillicothe, OH and the railroad’s east terminus at Monongah, West Virginia. The V&O main line out of Hillsboro heads east to a three track staging yard represent-ing Charleston, WV.
ConstructionThe largest portion of the layout is built on free-standing benchwork which is primarily box frame benchwork, with some L-girder sections. The Eggleston Avenue switching district and
• INDEX• TABLE OF CONTENTS
MRHMAG.COM
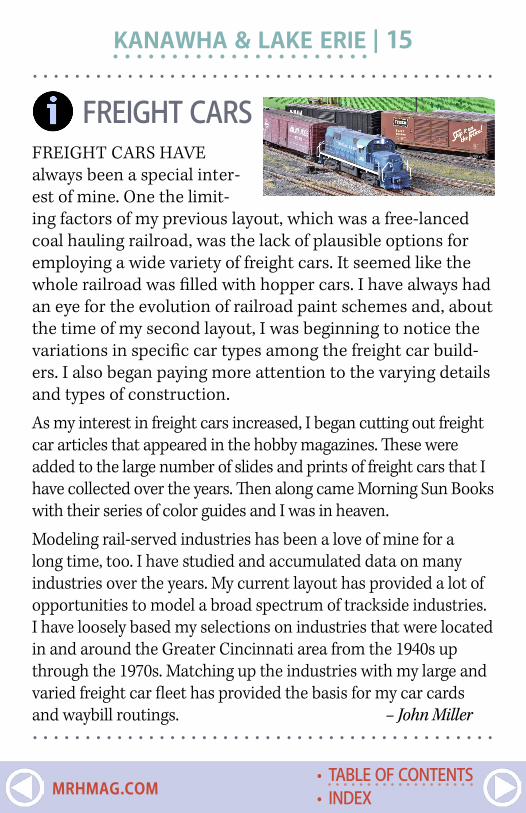
. . . . . . . . . . . . . . . . . . . . . . . . . . . . . . . . . . . . . . . . . . . .
FREIGHT CARSFREIGHT CARS HAVE always been a special inter-est of mine. One the limit-ing factors of my previous layout, which was a free-lanced coal hauling railroad, was the lack of plausible options for employing a wide variety of freight cars. It seemed like the whole railroad was filled with hopper cars. I have always had an eye for the evolution of railroad paint schemes and, about the time of my second layout, I was beginning to notice the variations in specific car types among the freight car build-ers. I also began paying more attention to the varying details and types of construction.As my interest in freight cars increased, I began cutting out freight car articles that appeared in the hobby magazines. These were added to the large number of slides and prints of freight cars that I have collected over the years. Then along came Morning Sun Books with their series of color guides and I was in heaven.
Modeling rail-served industries has been a love of mine for a long time, too. I have studied and accumulated data on many industries over the years. My current layout has provided a lot of opportunities to model a broad spectrum of trackside industries. I have loosely based my selections on industries that were located in and around the Greater Cincinnati area from the 1940s up through the 1970s. Matching up the industries with my large and varied freight car fleet has provided the basis for my car cards and waybill routings. – John Miller. . . . . . . . . . . . . . . . . . . . . . . . . . . . . . . . . . . . . . . . . . . .
KANAWHA & LAKE ERIE | 15
• INDEX• TABLE OF CONTENTS
MRHMAG.COM
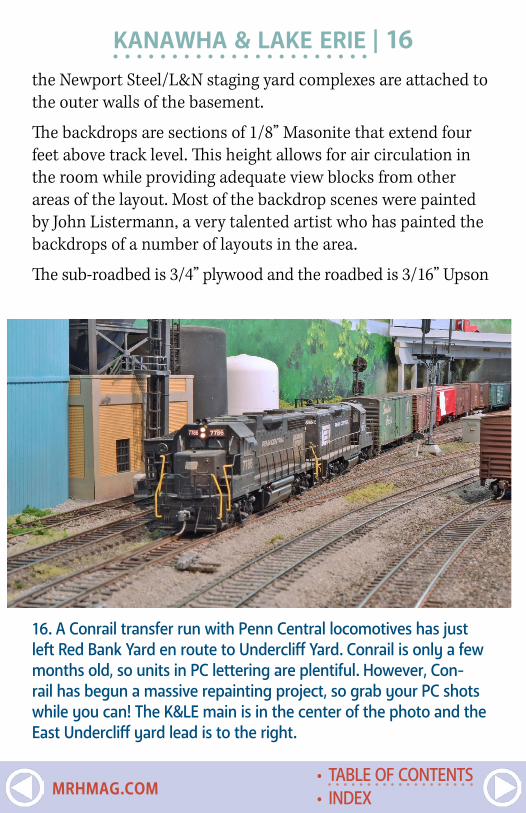
KANAWHA & LAKE ERIE | 16the Newport Steel/L&N staging yard complexes are attached to the outer walls of the basement.
The backdrops are sections of 1/8” Masonite that extend four feet above track level. This height allows for air circulation in the room while providing adequate view blocks from other areas of the layout. Most of the backdrop scenes were painted by John Listermann, a very talented artist who has painted the backdrops of a number of layouts in the area.
The sub-roadbed is 3/4” plywood and the roadbed is 3/16” Upson
16. A Conrail transfer run with Penn Central locomotives has just left Red Bank Yard en route to Undercliff Yard. Conrail is only a few months old, so units in PC lettering are plentiful. However, Con-rail has begun a massive repainting project, so grab your PC shots while you can! The K&LE main is in the center of the photo and the East Undercliff yard lead is to the right.
• INDEX• TABLE OF CONTENTS
MRHMAG.COM
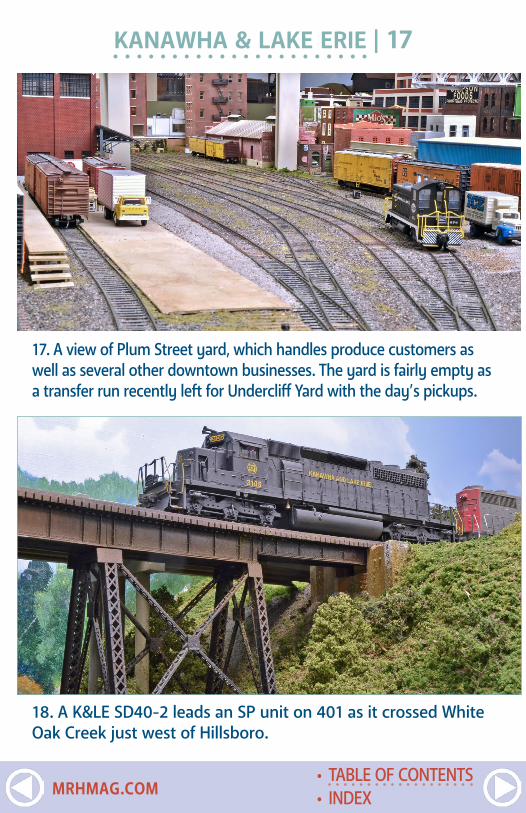
17. A view of Plum Street yard, which handles produce customers as well as several other downtown businesses. The yard is fairly empty as a transfer run recently left for Undercliff Yard with the day’s pickups.
18. A K&LE SD40-2 leads an SP unit on 401 as it crossed White Oak Creek just west of Hillsboro.
KANAWHA & LAKE ERIE | 17
• INDEX• TABLE OF CONTENTS
MRHMAG.COM
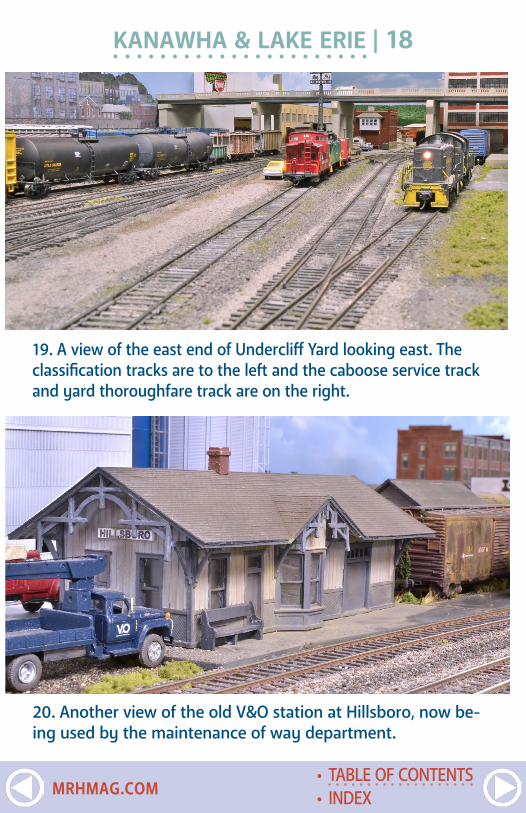
19. A view of the east end of Undercliff Yard looking east. The classification tracks are to the left and the caboose service track and yard thoroughfare track are on the right.
20. Another view of the old V&O station at Hillsboro, now be-ing used by the maintenance of way department.
KANAWHA & LAKE ERIE | 18
• INDEX• TABLE OF CONTENTS
MRHMAG.COM
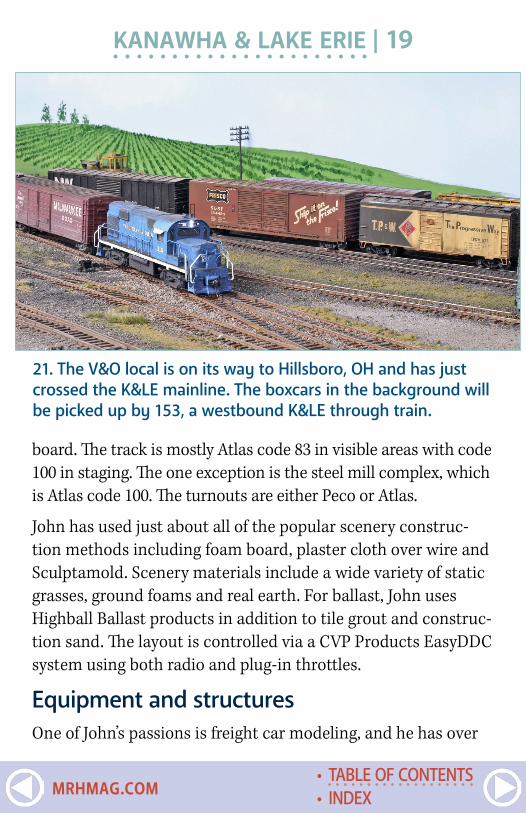
KANAWHA & LAKE ERIE | 19
board. The track is mostly Atlas code 83 in visible areas with code 100 in staging. The one exception is the steel mill complex, which is Atlas code 100. The turnouts are either Peco or Atlas.
John has used just about all of the popular scenery construc-tion methods including foam board, plaster cloth over wire and Sculptamold. Scenery materials include a wide variety of static grasses, ground foams and real earth. For ballast, John uses Highball Ballast products in addition to tile grout and construc-tion sand. The layout is controlled via a CVP Products EasyDDC system using both radio and plug-in throttles.
Equipment and structuresOne of John’s passions is freight car modeling, and he has over
21. The V&O local is on its way to Hillsboro, OH and has just crossed the K&LE mainline. The boxcars in the background will be picked up by 153, a westbound K&LE through train.
• INDEX• TABLE OF CONTENTS
MRHMAG.COM
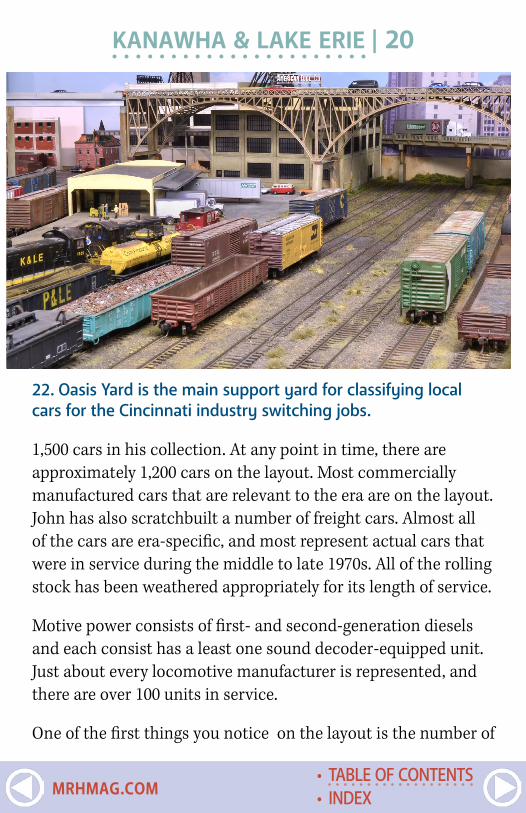
KANAWHA & LAKE ERIE | 20
1,500 cars in his collection. At any point in time, there are approximately 1,200 cars on the layout. Most commercially manufactured cars that are relevant to the era are on the layout. John has also scratchbuilt a number of freight cars. Almost all of the cars are era-specific, and most represent actual cars that were in service during the middle to late 1970s. All of the rolling stock has been weathered appropriately for its length of service.
Motive power consists of first- and second-generation diesels and each consist has a least one sound decoder-equipped unit. Just about every locomotive manufacturer is represented, and there are over 100 units in service.
One of the first things you notice on the layout is the number of
22. Oasis Yard is the main support yard for classifying local cars for the Cincinnati industry switching jobs.
• INDEX• TABLE OF CONTENTS
MRHMAG.COM
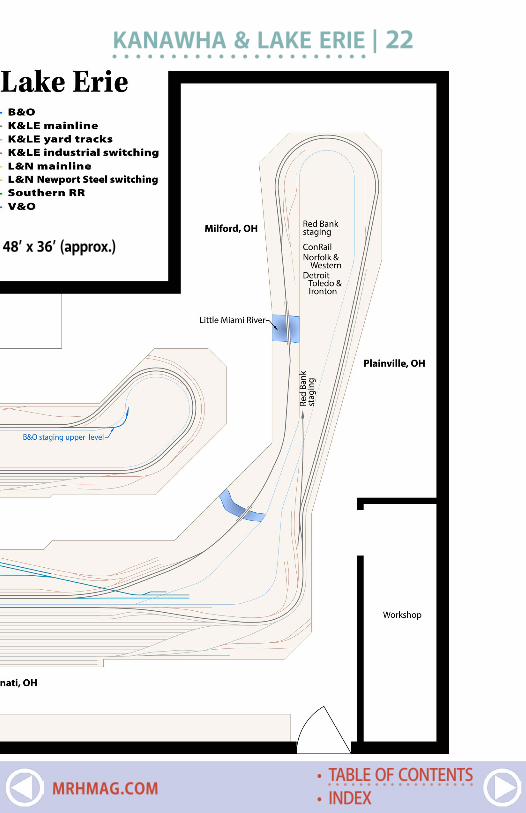
KANAWHA & LAKE ERIE | 22
48’ x 36’ (approx.)
• INDEX• TABLE OF CONTENTS
MRHMAG.COM
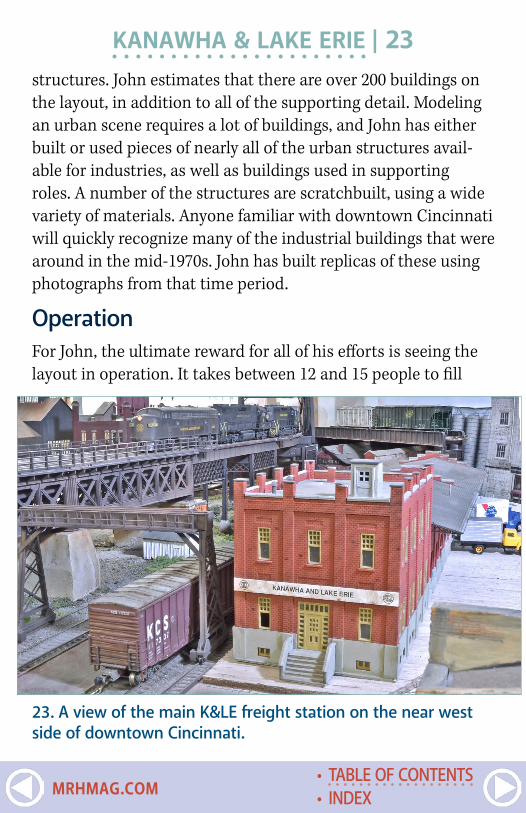
structures. John estimates that there are over 200 buildings on the layout, in addition to all of the supporting detail. Modeling an urban scene requires a lot of buildings, and John has either built or used pieces of nearly all of the urban structures avail-able for industries, as well as buildings used in supporting roles. A number of the structures are scratchbuilt, using a wide variety of materials. Anyone familiar with downtown Cincinnati will quickly recognize many of the industrial buildings that were around in the mid-1970s. John has built replicas of these using photographs from that time period.
OperationFor John, the ultimate reward for all of his efforts is seeing the layout in operation. It takes between 12 and 15 people to fill
KANAWHA & LAKE ERIE | 23
23. A view of the main K&LE freight station on the near west side of downtown Cincinnati.
• INDEX• TABLE OF CONTENTS
MRHMAG.COM
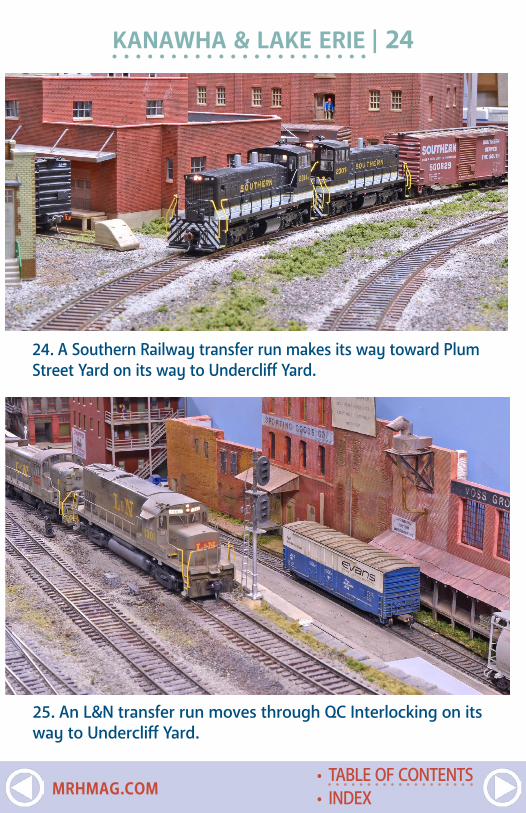
KANAWHA & LAKE ERIE | 24
24. A Southern Railway transfer run makes its way toward Plum Street Yard on its way to Undercliff Yard.
25. An L&N transfer run moves through QC Interlocking on its way to Undercliff Yard.
• INDEX• TABLE OF CONTENTS
MRHMAG.COM
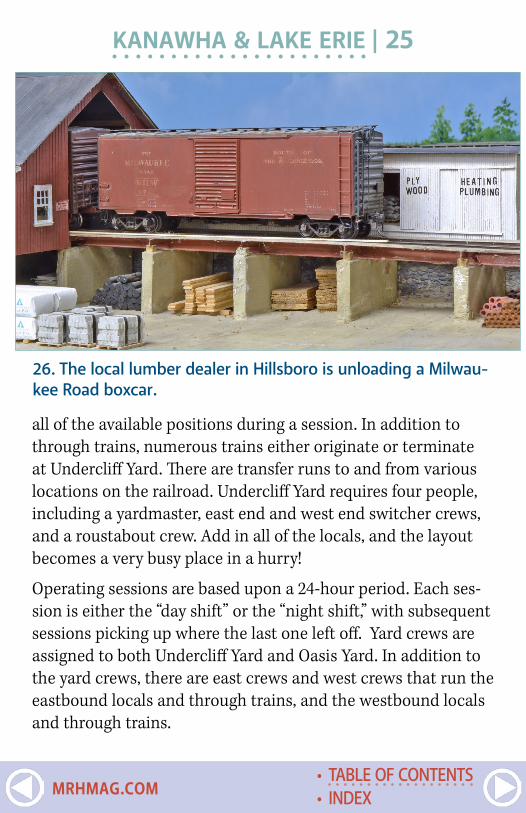
all of the available positions during a session. In addition to through trains, numerous trains either originate or terminate at Undercliff Yard. There are transfer runs to and from various locations on the railroad. Undercliff Yard requires four people, including a yardmaster, east end and west end switcher crews, and a roustabout crew. Add in all of the locals, and the layout becomes a very busy place in a hurry!
Operating sessions are based upon a 24-hour period. Each ses-sion is either the “day shift” or the “night shift,” with subsequent sessions picking up where the last one left off. Yard crews are assigned to both Undercliff Yard and Oasis Yard. In addition to the yard crews, there are east crews and west crews that run the eastbound locals and through trains, and the westbound locals and through trains.
KANAWHA & LAKE ERIE | 25
26. The local lumber dealer in Hillsboro is unloading a Milwau-kee Road boxcar.
• INDEX• TABLE OF CONTENTS
MRHMAG.COM
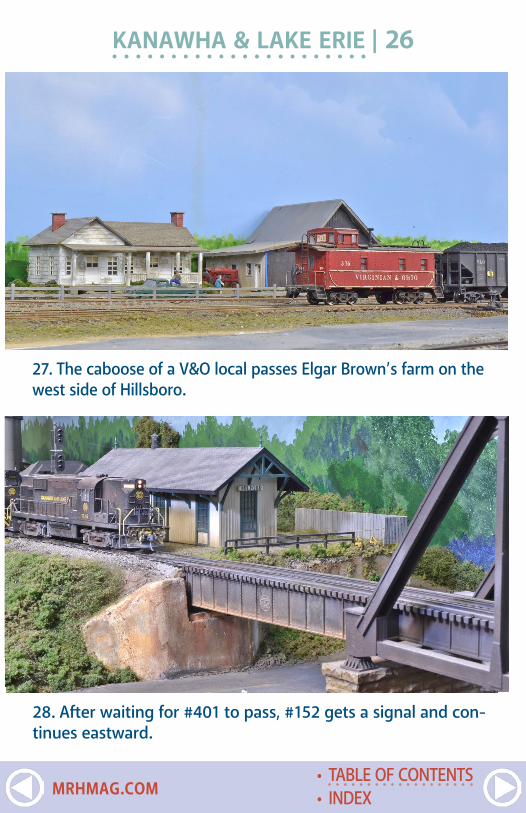
KANAWHA & LAKE ERIE | 26
27. The caboose of a V&O local passes Elgar Brown’s farm on the west side of Hillsboro.
28. After waiting for #401 to pass, #152 gets a signal and con-tinues eastward.
• INDEX• TABLE OF CONTENTS
MRHMAG.COM
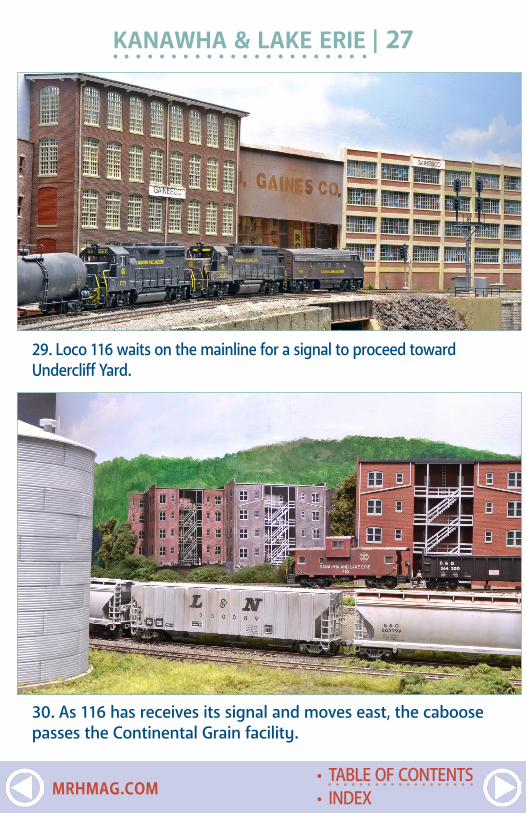
KANAWHA & LAKE ERIE | 27
29. Loco 116 waits on the mainline for a signal to proceed toward Undercliff Yard.
30. As 116 has receives its signal and moves east, the caboose passes the Continental Grain facility.
• INDEX• TABLE OF CONTENTS
MRHMAG.COM
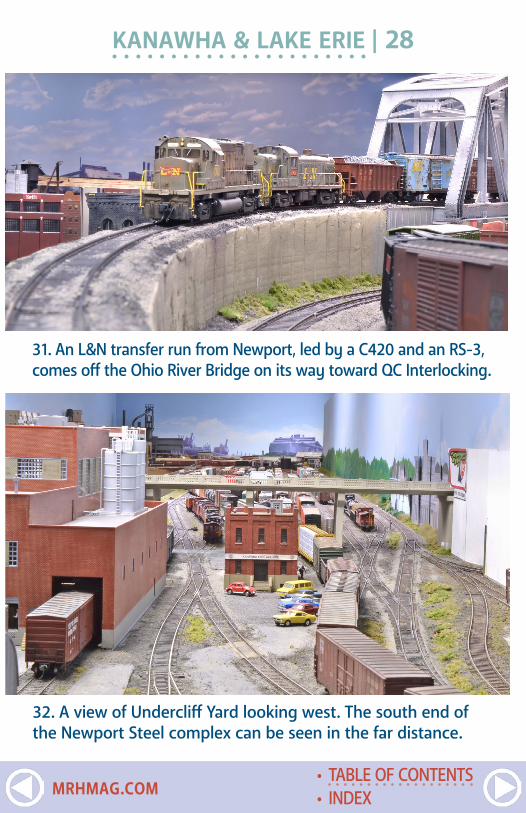
KANAWHA & LAKE ERIE | 28
31. An L&N transfer run from Newport, led by a C420 and an RS-3, comes off the Ohio River Bridge on its way toward QC Interlocking.
32. A view of Undercliff Yard looking west. The south end of the Newport Steel complex can be seen in the far distance.
• INDEX• TABLE OF CONTENTS
MRHMAG.COM
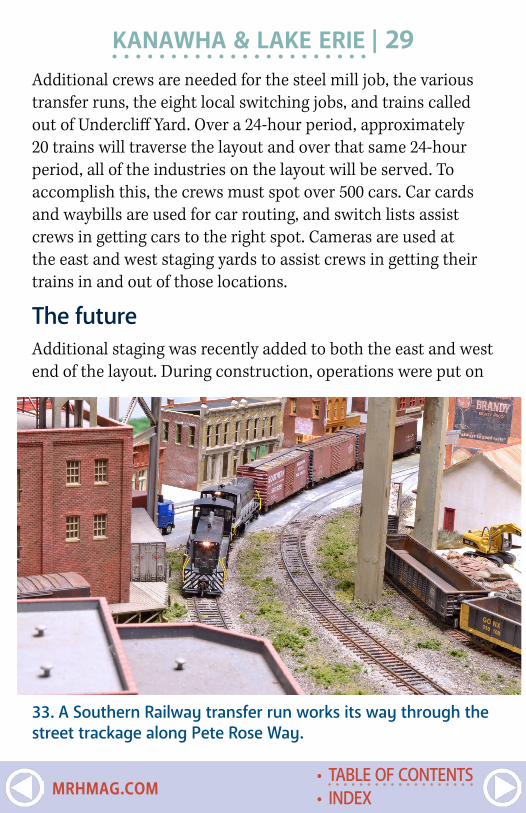
Additional crews are needed for the steel mill job, the various transfer runs, the eight local switching jobs, and trains called out of Undercliff Yard. Over a 24-hour period, approximately 20 trains will traverse the layout and over that same 24-hour period, all of the industries on the layout will be served. To accomplish this, the crews must spot over 500 cars. Car cards and waybills are used for car routing, and switch lists assist crews in getting cars to the right spot. Cameras are used at the east and west staging yards to assist crews in getting their trains in and out of those locations.
The futureAdditional staging was recently added to both the east and west end of the layout. During construction, operations were put on
KANAWHA & LAKE ERIE | 29
33. A Southern Railway transfer run works its way through the street trackage along Pete Rose Way.
• INDEX• TABLE OF CONTENTS
MRHMAG.COM
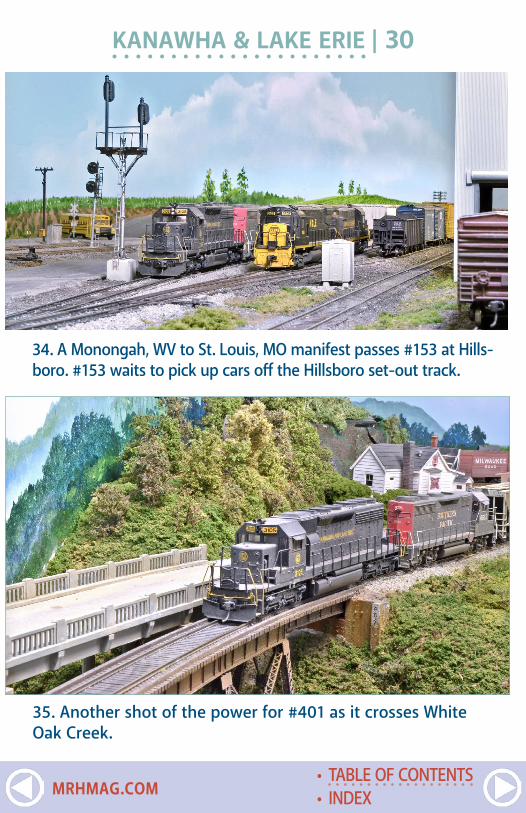
KANAWHA & LAKE ERIE | 30
34. A Monongah, WV to St. Louis, MO manifest passes #153 at Hills-boro. #153 waits to pick up cars off the Hillsboro set-out track.
35. Another shot of the power for #401 as it crosses White Oak Creek.
• INDEX• TABLE OF CONTENTS
MRHMAG.COM
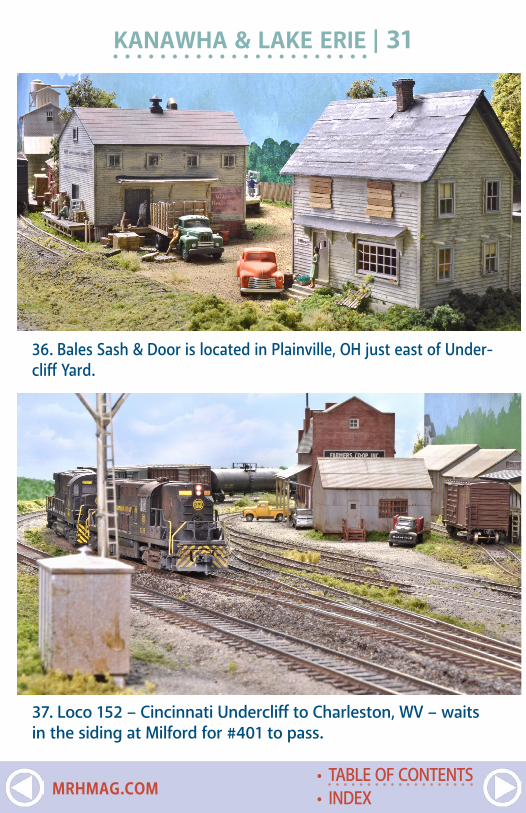
36. Bales Sash & Door is located in Plainville, OH just east of Under-cliff Yard.
37. Loco 152 – Cincinnati Undercliff to Charleston, WV – waits in the siding at Milford for #401 to pass.
KANAWHA & LAKE ERIE | 31
• INDEX• TABLE OF CONTENTS
MRHMAG.COM
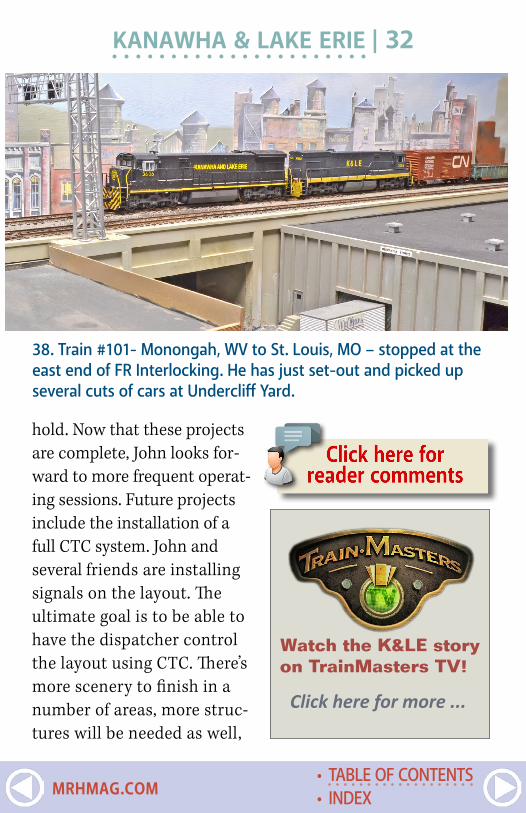
hold. Now that these projects are complete, John looks for-ward to more frequent operat-ing sessions. Future projects include the installation of a full CTC system. John and several friends are installing signals on the layout. The ultimate goal is to be able to have the dispatcher control the layout using CTC. There’s more scenery to finish in a number of areas, more struc-tures will be needed as well,
38. Train #101- Monongah, WV to St. Louis, MO – stopped at the east end of FR Interlocking. He has just set-out and picked up several cuts of cars at Undercliff Yard.
KANAWHA & LAKE ERIE | 32
Watch the K&LE story on TrainMasters TV!
Click here for more ...
• INDEX• TABLE OF CONTENTS
MRHMAG.COM
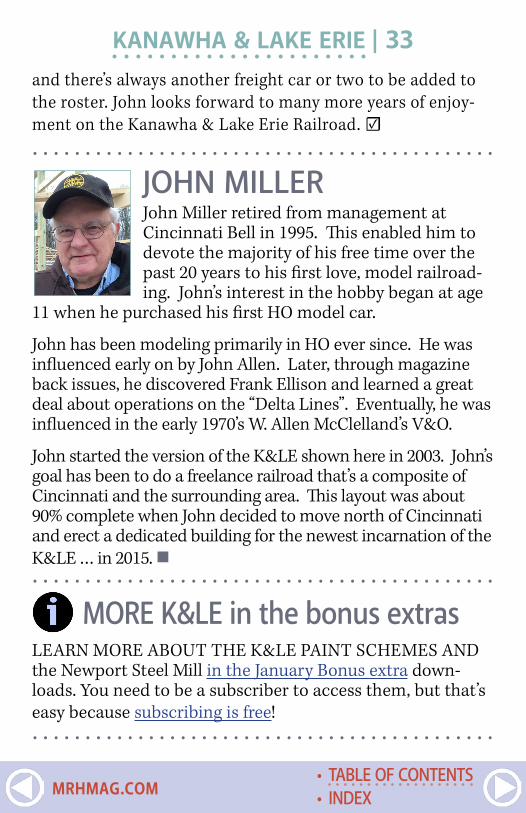
KANAWHA & LAKE ERIE | 33and there’s always another freight car or two to be added to the roster. John looks forward to many more years of enjoy-ment on the Kanawha & Lake Erie Railroad. ☑. . . . . . . . . . . . . . . . . . . . . . . . . . . . . . . . . . . . . . . . . . . .
JOHN MILLERJohn Miller retired from management at Cincinnati Bell in 1995. This enabled him to devote the majority of his free time over the past 20 years to his first love, model railroad-ing. John’s interest in the hobby began at age
11 when he purchased his first HO model car.
John has been modeling primarily in HO ever since. He was influenced early on by John Allen. Later, through magazine back issues, he discovered Frank Ellison and learned a great deal about operations on the “Delta Lines”. Eventually, he was influenced in the early 1970’s W. Allen McClelland’s V&O.
John started the version of the K&LE shown here in 2003. John’s goal has been to do a freelance railroad that’s a composite of Cincinnati and the surrounding area. This layout was about 90% complete when John decided to move north of Cincinnati and erect a dedicated building for the newest incarnation of the K&LE … in 2015. . . . . . . . . . . . . . . . . . . . . . . . . . . . . . . . . . . . . . . . . . . . .
MORE K&LE in the bonus extras LEARN MORE ABOUT THE K&LE PAINT SCHEMES AND the Newport Steel Mill in the January Bonus extra down-loads. You need to be a subscriber to access them, but that’s easy because subscribing is free!. . . . . . . . . . . . . . . . . . . . . . . . . . . . . . . . . . . . . . . . . . . .
• INDEX• TABLE OF CONTENTS
MRHMAG.COM

ADVERTISEMENT
• INDEX• TABLE OF CONTENTS
MRHMAG.COM
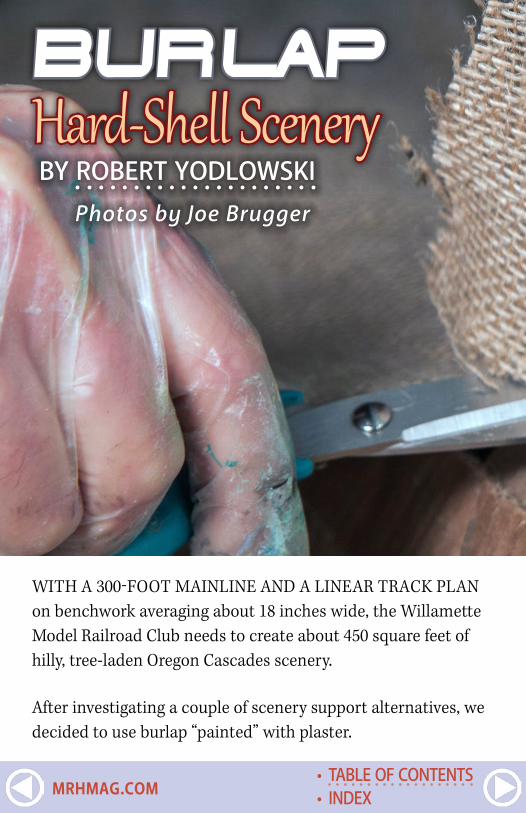
BurlapHard-Shell Scenery BY ROBERT YODLOWSKI Photos by Joe Brugger
WITH A 300-FOOT MAINLINE AND A LINEAR TRACK PLAN on benchwork averaging about 18 inches wide, the Willamette Model Railroad Club needs to create about 450 square feet of hilly, tree-laden Oregon Cascades scenery.
After investigating a couple of scenery support alternatives, we decided to use burlap “painted” with plaster.
• INDEX• TABLE OF CONTENTS
MRHMAG.COM

Burlap is fairly inexpensive, is sold in natural tan earth tones, cuts easily, and drapes smoothly when hot-glued over a lattice of corrugated cardboard strips.
The grade that works well is available at fabric and craft stores like Jo-Ann Fabrics. The price varies significantly depend-ing if there is a sale going on. We were lucky and bought an initial 10 yards for about $20 when it was on a 40% off
Fabric, cardboard, hot glue, scissors and
plaster are cheap and easy
See this layout at the Portland
NMRA Convention in August 2015
• INDEX• TABLE OF CONTENTS
MRHMAG.COM
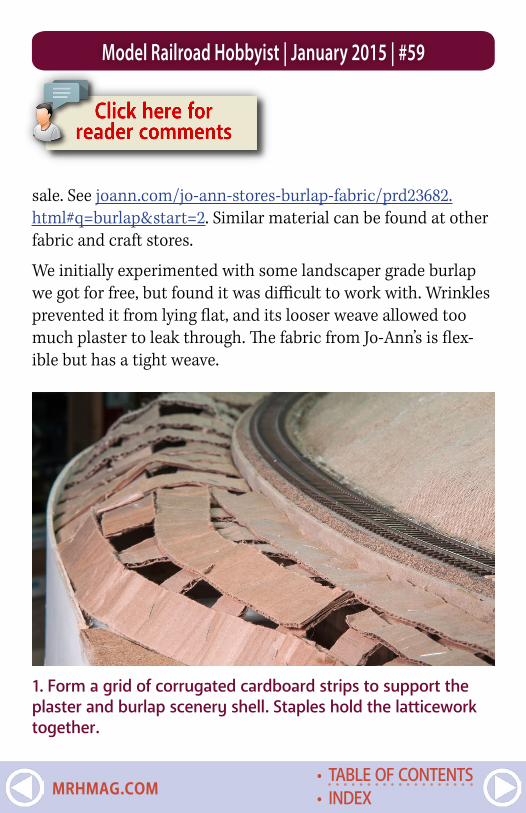
Model Railroad Hobbyist | January 2015 | #59
sale. See joann.com/jo-ann-stores-burlap-fabric/prd23682.html#q=burlap&start=2. Similar material can be found at other fabric and craft stores.
We initially experimented with some landscaper grade burlap we got for free, but found it was difficult to work with. Wrinkles prevented it from lying flat, and its looser weave allowed too much plaster to leak through. The fabric from Jo-Ann’s is flex-ible but has a tight weave.
1. Form a grid of corrugated cardboard strips to support the plaster and burlap scenery shell. Staples hold the latticework together.
• INDEX• TABLE OF CONTENTS
MRHMAG.COM
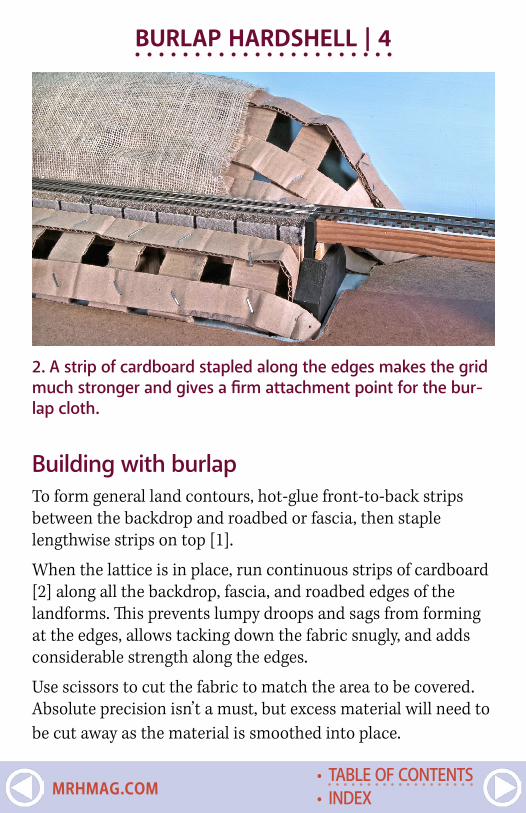
BURLAP HARDSHELL | 4
Building with burlapTo form general land contours, hot-glue front-to-back strips between the backdrop and roadbed or fascia, then staple lengthwise strips on top [1].
When the lattice is in place, run continuous strips of cardboard [2] along all the backdrop, fascia, and roadbed edges of the landforms. This prevents lumpy droops and sags from forming at the edges, allows tacking down the fabric snugly, and adds considerable strength along the edges.
Use scissors to cut the fabric to match the area to be covered. Absolute precision isn’t a must, but excess material will need to be cut away as the material is smoothed into place.
2. A strip of cardboard stapled along the edges makes the grid much stronger and gives a firm attachment point for the bur-lap cloth.
• INDEX• TABLE OF CONTENTS
MRHMAG.COM
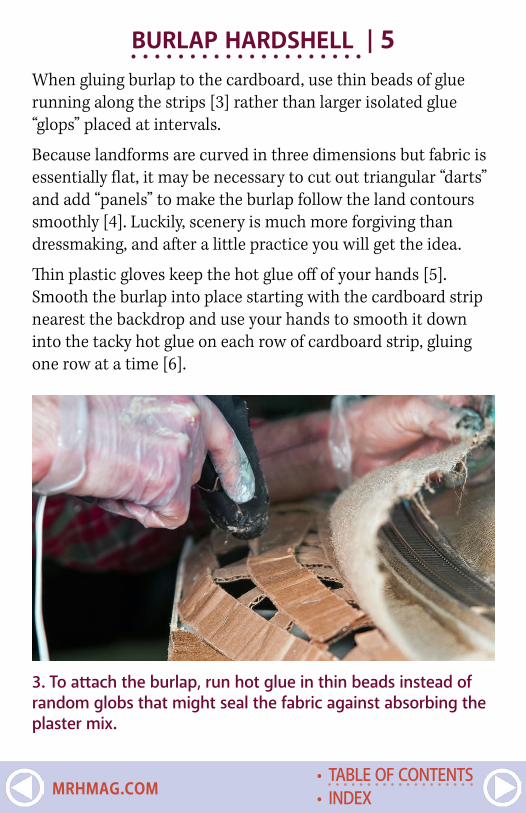
BURLAP HARDSHELL | 5When gluing burlap to the cardboard, use thin beads of glue running along the strips [3] rather than larger isolated glue “glops” placed at intervals.
Because landforms are curved in three dimensions but fabric is essentially flat, it may be necessary to cut out triangular “darts” and add “panels” to make the burlap follow the land contours smoothly [4]. Luckily, scenery is much more forgiving than dressmaking, and after a little practice you will get the idea.
Thin plastic gloves keep the hot glue off of your hands [5]. Smooth the burlap into place starting with the cardboard strip nearest the backdrop and use your hands to smooth it down into the tacky hot glue on each row of cardboard strip, gluing one row at a time [6].
3. To attach the burlap, run hot glue in thin beads instead of random globs that might seal the fabric against absorbing the plaster mix.
• INDEX• TABLE OF CONTENTS
MRHMAG.COM
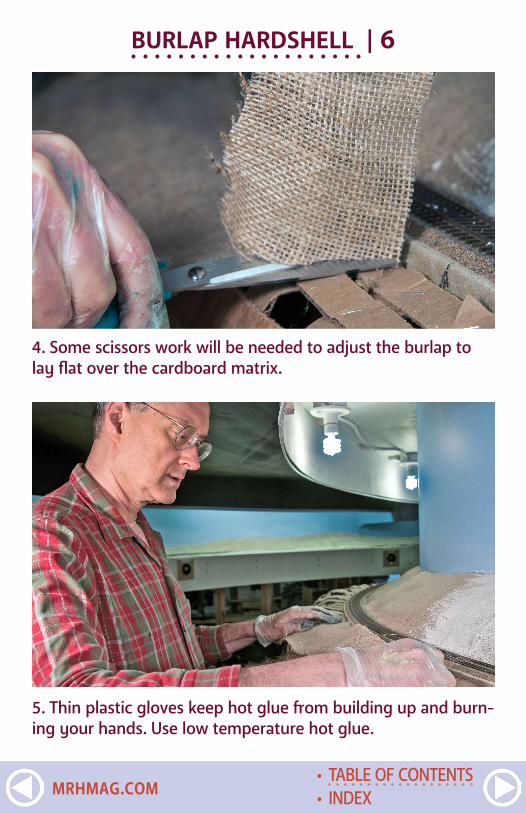
BURLAP HARDSHELL | 6
4. Some scissors work will be needed to adjust the burlap to lay flat over the cardboard matrix.
5. Thin plastic gloves keep hot glue from building up and burn-ing your hands. Use low temperature hot glue.
• INDEX• TABLE OF CONTENTS
MRHMAG.COM
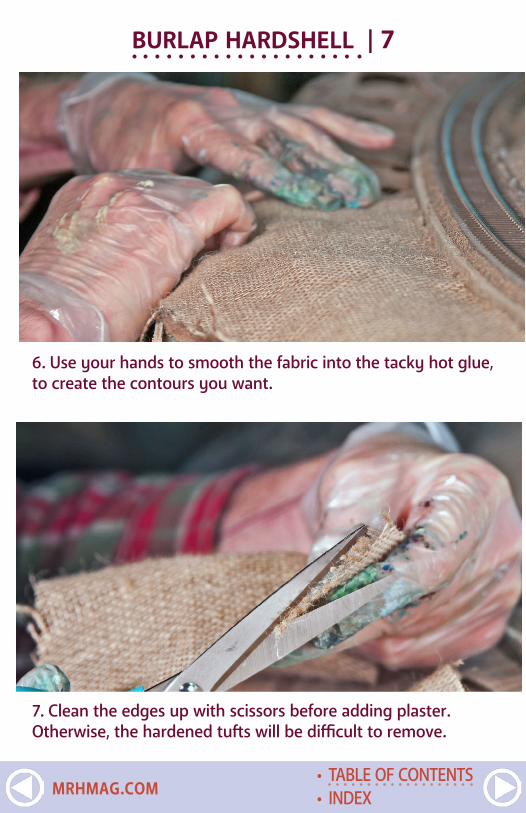
BURLAP HARDSHELL | 7
6. Use your hands to smooth the fabric into the tacky hot glue, to create the contours you want.
7. Clean the edges up with scissors before adding plaster. Otherwise, the hardened tufts will be difficult to remove.
• INDEX• TABLE OF CONTENTS
MRHMAG.COM
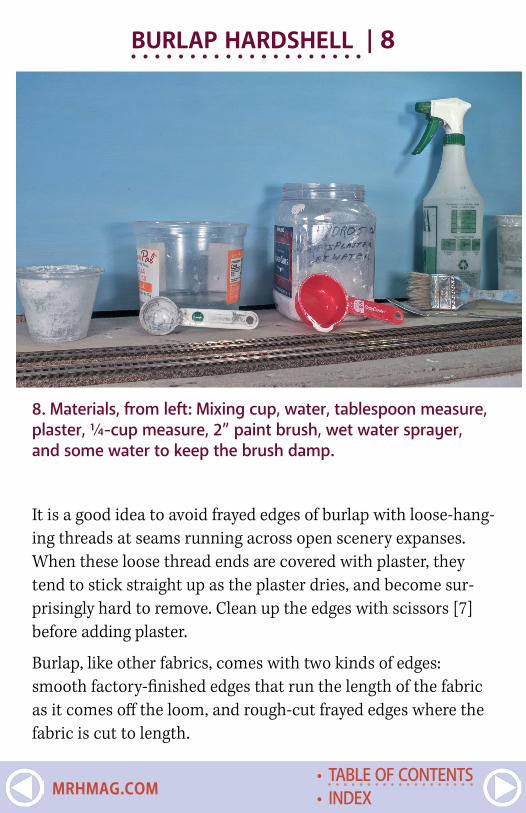
It is a good idea to avoid frayed edges of burlap with loose-hang-ing threads at seams running across open scenery expanses. When these loose thread ends are covered with plaster, they tend to stick straight up as the plaster dries, and become sur-prisingly hard to remove. Clean up the edges with scissors [7] before adding plaster.
Burlap, like other fabrics, comes with two kinds of edges: smooth factory-finished edges that run the length of the fabric as it comes off the loom, and rough-cut frayed edges where the fabric is cut to length.
BURLAP HARDSHELL | 8
8. Materials, from left: Mixing cup, water, tablespoon measure, plaster, ¼-cup measure, 2” paint brush, wet water sprayer, and some water to keep the brush damp.
• INDEX• TABLE OF CONTENTS
MRHMAG.COM

Reserve the smooth edges for joints running across open scen-ery, and hide the rougher edges along the backdrop, fascia. or roadbed. When this is impossible, carefully cut the fabric paral-lel to the threads and/or seal the edges with a little hot glue or white glue to prevent fraying.
Applying the plasterWe use US Gypsum’s USG Hydrostone plaster [8], because that’s what our local supplier carries. Other similar grades should do just as well. Contrary to model railroad lore, there is only one
BURLAP HARDSHELL | 9
9. Spraying the burlap with wet water primes it to accept the coat of creamy plaster and keeps it from drawing moisture out of the plaster too quickly.
• INDEX• TABLE OF CONTENTS
MRHMAG.COM

BURLAP HARDSHELL | 10
right way to mix plaster for optimum strength – which is accord-ing to the manufacturer’s directions! That comes to 1 part water to 3 parts plaster – by WEIGHT – for the plaster we use.
After making some density measurements, we found that a mix of ¼ cup of plaster added to 3 tablespoons of water follows the manufacturer’s recommendations fairly closely, and is a lot quicker than measuring by weight. This size batch is small enough that most modelers should have no trouble getting it down before the plaster starts to set up. With practice, we have found that a double-size batch is also practical but a triple-size batch is too big to apply easily before the plaster gets too thick.
When mixed correctly, the fresh plaster will be no thicker than light cream. This is ideal for brush application. The best way to apply the plaster is with a cheap 2” natural-bristle paint brush available from places like Home Depot or Dollar Tree. Be sure to
10. Sideways brush strokes, at a 45 degree angle to the weave, improve coverage and minimize plaster drips.
• INDEX• TABLE OF CONTENTS
MRHMAG.COM
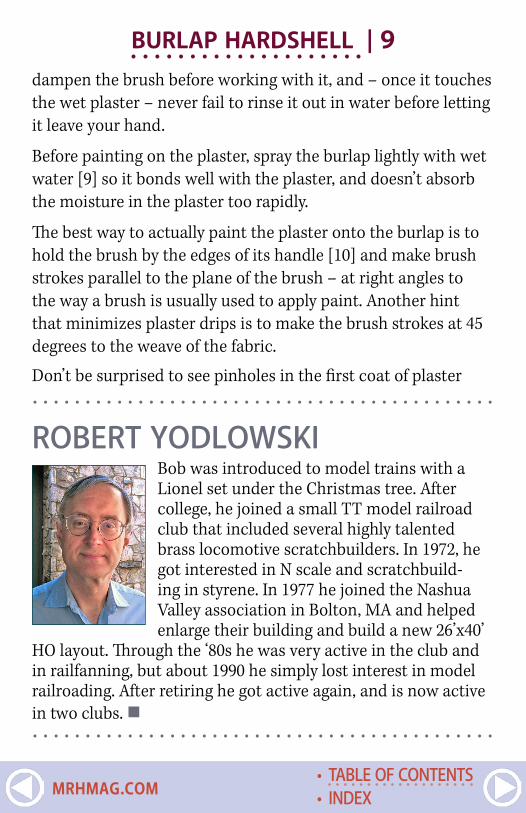
dampen the brush before working with it, and – once it touches the wet plaster – never fail to rinse it out in water before letting it leave your hand.
Before painting on the plaster, spray the burlap lightly with wet water [9] so it bonds well with the plaster, and doesn’t absorb the moisture in the plaster too rapidly.
The best way to actually paint the plaster onto the burlap is to hold the brush by the edges of its handle [10] and make brush strokes parallel to the plane of the brush – at right angles to the way a brush is usually used to apply paint. Another hint that minimizes plaster drips is to make the brush strokes at 45 degrees to the weave of the fabric.
Don’t be surprised to see pinholes in the first coat of plaster
BURLAP HARDSHELL | 9
. . . . . . . . . . . . . . . . . . . . . . . . . . . . . . . . . . . . . . . . . . . .
ROBERT YODLOWSKIBob was introduced to model trains with a Lionel set under the Christmas tree. After college, he joined a small TT model railroad club that included several highly talented brass locomotive scratchbuilders. In 1972, he got interested in N scale and scratchbuild-ing in styrene. In 1977 he joined the Nashua Valley association in Bolton, MA and helped enlarge their building and build a new 26’x40’
HO layout. Through the ‘80s he was very active in the club and in railfanning, but about 1990 he simply lost interest in model railroading. After retiring he got active again, and is now active in two clubs. . . . . . . . . . . . . . . . . . . . . . . . . . . . . . . . . . . . . . . . . . . . .
• INDEX• TABLE OF CONTENTS
MRHMAG.COM
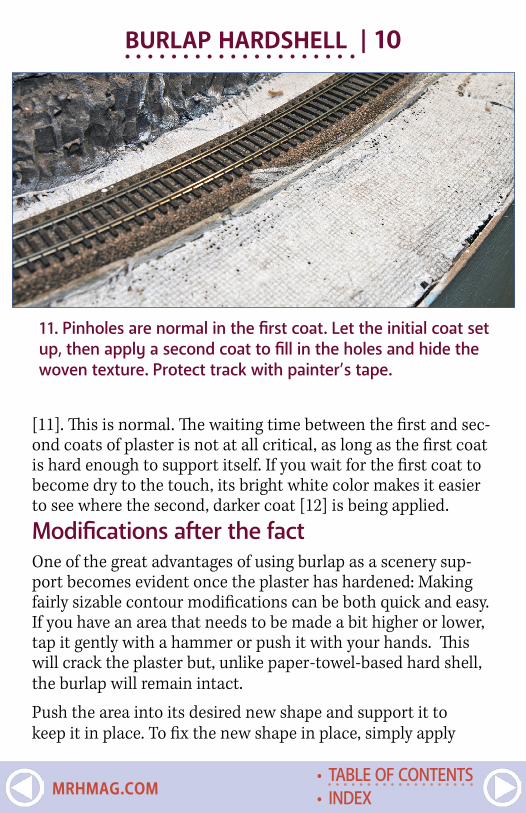
BURLAP HARDSHELL | 10
11. Pinholes are normal in the first coat. Let the initial coat set up, then apply a second coat to fill in the holes and hide the woven texture. Protect track with painter’s tape.
[11]. This is normal. The waiting time between the first and sec-ond coats of plaster is not at all critical, as long as the first coat is hard enough to support itself. If you wait for the first coat to become dry to the touch, its bright white color makes it easier to see where the second, darker coat [12] is being applied.
Modifications after the factOne of the great advantages of using burlap as a scenery sup-port becomes evident once the plaster has hardened: Making fairly sizable contour modifications can be both quick and easy. If you have an area that needs to be made a bit higher or lower, tap it gently with a hammer or push it with your hands. This will crack the plaster but, unlike paper-towel-based hard shell, the burlap will remain intact.
Push the area into its desired new shape and support it to keep it in place. To fix the new shape in place, simply apply
• INDEX• TABLE OF CONTENTS
MRHMAG.COM

BURLAP HARDSHELL | 11
12. The dried plaster contrasts with the second darker layer, allowing you to see where coverage is needed.
13. A coat of mud-colored latex paint seals the plaster-burlap shell and preps it for adding trees and ground cover. Masking nearby track is a good idea, not followed here.
• INDEX• TABLE OF CONTENTS
MRHMAG.COM

BURLAP HARDSHELL | 12
another coat or two of fresh plaster. The new plaster will seep in between the cracked plaster pieces and bond the pieces and the burlap permanently in place.
Planting treesAny model railroad running through the Oregon Cascades needs at least five important scenic features: trees, trees, trees, trees – and what was that last feature?... Oh yeah! More trees!
Burlap-based scenery support shell ends up being fairly thin, and initially we were worried about planting trees solidly enough to resist ordinary abuse. There can be a fair amount of torque on the scenery at the base of a 12” tree when that tree gets bumped.
In order to distribute the stress, 1½” blocks of bead board insu-lation material are hot-glued smooth side up under the scenery
14. Glue support wires to tree trunks to allow them to be poked through the hardshell to plant the trees.
• INDEX• TABLE OF CONTENTS
MRHMAG.COM

BURLAP HARDSHELL | 13beneath the site of each tree. A thin wooden support like a barbecue skewer, cotton swab handle sharpened on one end, or a long, round toothpick, is hot-glued to the back of each tree trunk. The support extends down about 1½ inches below the bottom of the tree trunk. Modelers who want even stronger tree supports may want to try pieces of coat hanger wire or, for ultimate strength, sharpen the ends of pieces of the heavy wire from excavation marker flags available from the Home Depot plumbing supply department.Planting trees becomes a three-step procedure: A foam block is glued to the underside of the scenery below the site of the tree, a small hole to accept the tree support is drilled or punched through the plaster layer above the foam block, and the tree sup-port is placed through the hole and into the foam block below.
15. Beaded foam plastic blocks hot-glued to the underside of the hardshell will hold the trees in place.
• INDEX• TABLE OF CONTENTS
MRHMAG.COM
Although model railroad-ers are accustomed to using higher quality plas-tic foam insulation for scenery work, they should not be tempted to use it for tree support blocks. The support wires, even if sharpened, will create large voids as they pen-etrate that type of plastic foam. The bead texture material allows the sup-port wires to penetrate cleanly and anchor firmly.
AcknowledgmentsThe authors would like to thank fellow club members Steve Cook and Dennis Markovich, who originally suggested and discussed using burlap for scenery support.
See us at the PDX-Express NMRA National Convention in Portland, OR in 2015!
More about the Willamette Model Railroad Club at mrh-mag.com/magazine/mrh-2013-02-feb. ☑
BURLAP HARDSHELL | 14ADVERTISEMENT
• INDEX• TABLE OF CONTENTS
MRHMAG.COM
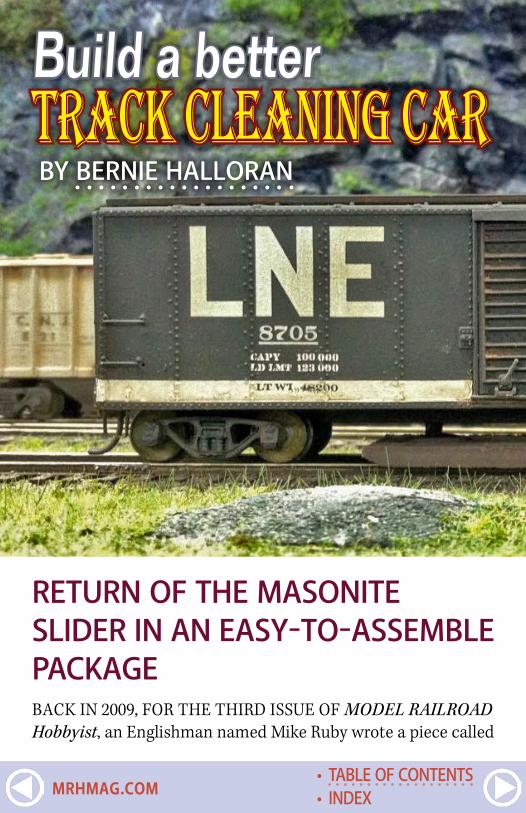
Build a better track cleaning car BY BERNIE HALLORAN
RETURN OF THE MASONITE SLIDER IN AN EASY-TO-ASSEMBLE PACKAGEBACK IN 2009, FOR THE THIRD ISSUE OF MODEL RAILROAD Hobbyist, an Englishman named Mike Ruby wrote a piece called
• INDEX• TABLE OF CONTENTS
MRHMAG.COM
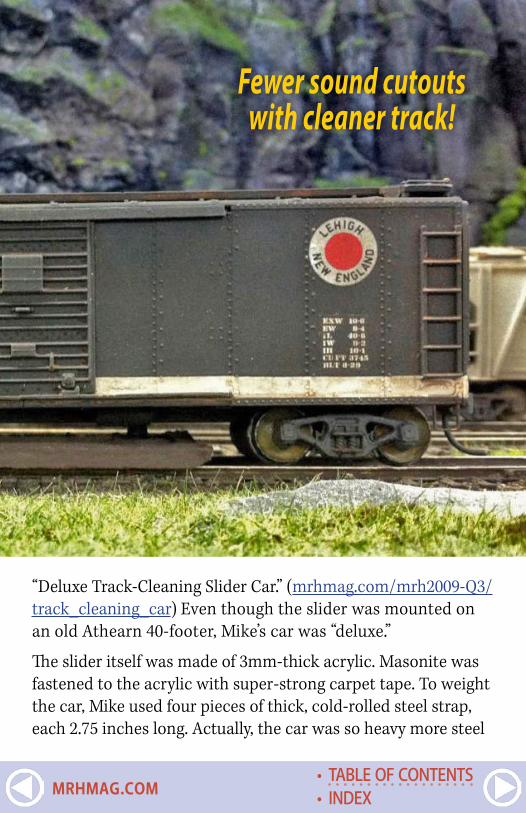
“Deluxe Track-Cleaning Slider Car.” (mrhmag.com/mrh2009-Q3/track_cleaning_car) Even though the slider was mounted on an old Athearn 40-footer, Mike’s car was “deluxe.”
The slider itself was made of 3mm-thick acrylic. Masonite was fastened to the acrylic with super-strong carpet tape. To weight the car, Mike used four pieces of thick, cold-rolled steel strap, each 2.75 inches long. Actually, the car was so heavy more steel
Fewer sound cutouts with cleaner track!
• INDEX• TABLE OF CONTENTS
MRHMAG.COM
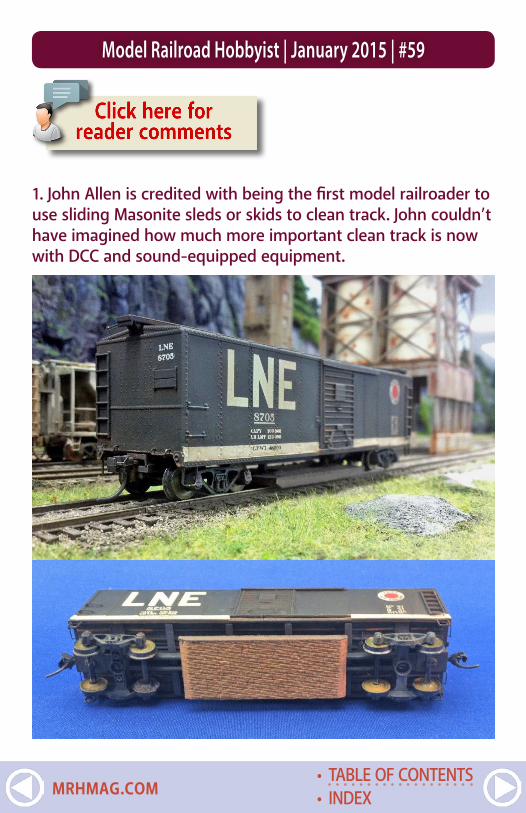
Model Railroad Hobbyist | January 2015 | #59
1. John Allen is credited with being the first model railroader to use sliding Masonite sleds or skids to clean track. John couldn’t have imagined how much more important clean track is now with DCC and sound-equipped equipment.
• INDEX• TABLE OF CONTENTS
MRHMAG.COM
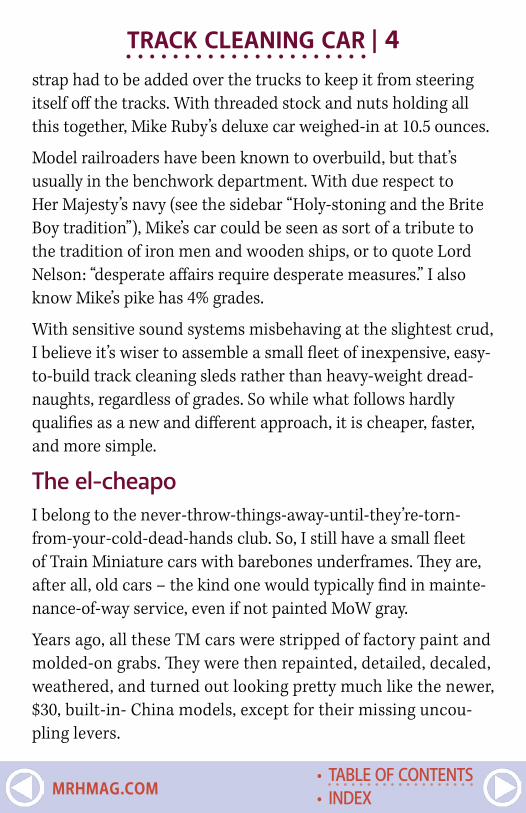
TRACK CLEANING CAR | 4strap had to be added over the trucks to keep it from steering itself off the tracks. With threaded stock and nuts holding all this together, Mike Ruby’s deluxe car weighed-in at 10.5 ounces.
Model railroaders have been known to overbuild, but that’s usually in the benchwork department. With due respect to Her Majesty’s navy (see the sidebar “Holy-stoning and the Brite Boy tradition”), Mike’s car could be seen as sort of a tribute to the tradition of iron men and wooden ships, or to quote Lord Nelson: “desperate affairs require desperate measures.” I also know Mike’s pike has 4% grades.
With sensitive sound systems misbehaving at the slightest crud, I believe it’s wiser to assemble a small fleet of inexpensive, easy-to-build track cleaning sleds rather than heavy-weight dread-naughts, regardless of grades. So while what follows hardly qualifies as a new and different approach, it is cheaper, faster, and more simple.
The el-cheapoI belong to the never-throw-things-away-until-they’re-torn-from-your-cold-dead-hands club. So, I still have a small fleet of Train Miniature cars with barebones underframes. They are, after all, old cars – the kind one would typically find in mainte-nance-of-way service, even if not painted MoW gray.
Years ago, all these TM cars were stripped of factory paint and molded-on grabs. They were then repainted, detailed, decaled, weathered, and turned out looking pretty much like the newer, $30, built-in- China models, except for their missing uncou-pling levers.
• INDEX• TABLE OF CONTENTS
MRHMAG.COM
. . . . . . . . . . . . . . . . . . . . . . . . . . . . . . . . . . . . . . . . . . .
HOLY-STONING AND THE BRITE BOY TRADITION
HOLY-STONING IS AN OLD NAVAL TRADITION. TO CLEAN their decks, sailors would get down on their knees with a piece of sandstone about the size of a brick, and rub the stone up and down the width of a single plank until told to move on.
Progress was grindingly slow. Inch-by-inch, shoulder-to-shoulder these long-suffering gobs would move in a weary line along the deck. Smaller pieces of sandstone or ‘prayer books’ and larger stones called ‘bibles’ were used every day to scrub off salt, grime and, oftentimes, blood.
Eventually, all this time spent on their knees paid off. Our sailors’ prayers were answered.
Somewhere, some labor-saving genius bored shallow holes in his ship’s stones. The idea caught on, and within decades – things move slowly in the sea service – broom handles were shoved into the stones making them true nautical tools. For the first time in centuries, sailors could get off their knees, but the scrubbing effort was the same and so was the pur-pose: clean, white, wooden decks.
Holy-stoning was a back-breaking drudgery that every midship-man and gob faced. But eventually it was banned in the United States Navy, not because it wasted sailors’ time when they could be chipping, grinding, and painting, but because it wore out decks. Or was it because steel replaced wooden decks?
TRACK CLEANING CAR | 5
• INDEX• TABLE OF CONTENTS
MRHMAG.COM
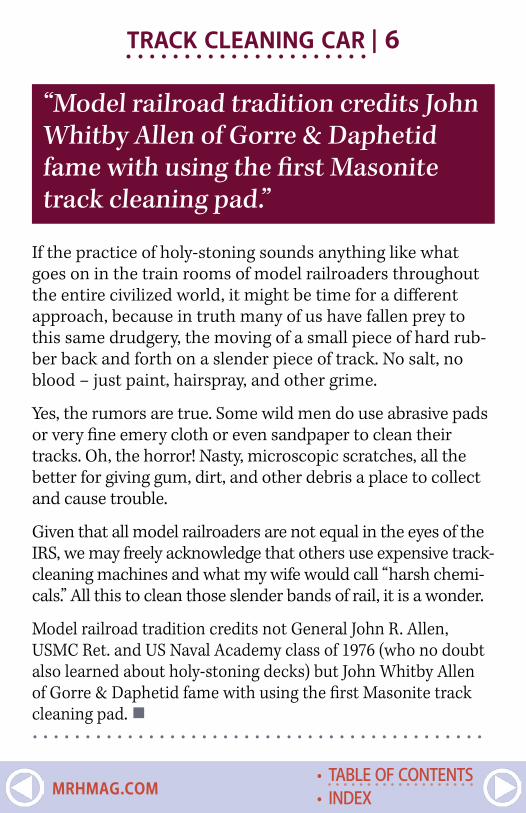
If the practice of holy-stoning sounds anything like what goes on in the train rooms of model railroaders throughout the entire civilized world, it might be time for a different approach, because in truth many of us have fallen prey to this same drudgery, the moving of a small piece of hard rub-ber back and forth on a slender piece of track. No salt, no blood – just paint, hairspray, and other grime.
Yes, the rumors are true. Some wild men do use abrasive pads or very fine emery cloth or even sandpaper to clean their tracks. Oh, the horror! Nasty, microscopic scratches, all the better for giving gum, dirt, and other debris a place to collect and cause trouble.
Given that all model railroaders are not equal in the eyes of the IRS, we may freely acknowledge that others use expensive track-cleaning machines and what my wife would call “harsh chemi-cals.” All this to clean those slender bands of rail, it is a wonder.
Model railroad tradition credits not General John R. Allen, USMC Ret. and US Naval Academy class of 1976 (who no doubt also learned about holy-stoning decks) but John Whitby Allen of Gorre & Daphetid fame with using the first Masonite track cleaning pad. . . . . . . . . . . . . . . . . . . . . . . . . . . . . . . . . . . . . . . . . . . .
TRACK CLEANING CAR | 6
“Model railroad tradition credits John Whitby Allen of Gorre & Daphetid fame with using the first Masonite track cleaning pad.”
• INDEX• TABLE OF CONTENTS
MRHMAG.COM
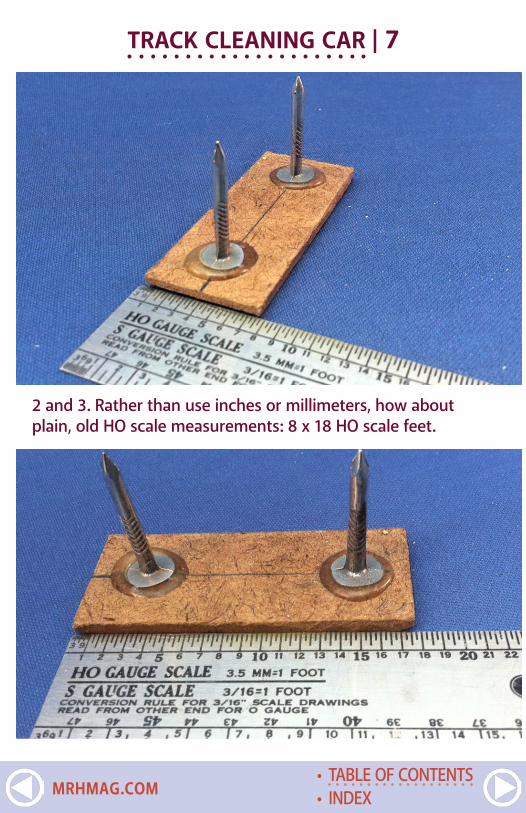
TRACK CLEANING CAR | 7
2 and 3. Rather than use inches or millimeters, how about plain, old HO scale measurements: 8 x 18 HO scale feet.
• INDEX• TABLE OF CONTENTS
MRHMAG.COM

To convert these cars into track-cleaners doesn’t require any extra weight, and certainly not cold-rolled steel. The only stuff needed: scrap 1/8 inch Masonite, short 1-1/2” roofing nails, five-minute epoxy, press-on starlock washers, a 3/16” drill bit, an electric drill, your trusty model railroad ruler, and maybe a compass for not-so-critical measurements, i.e. the kind no lon-ger used to measure distances on a nautical chart.
I do have a drill press, but that’s not necessary either. Lining up holes by eye works just fine. If you encounter a full-length steel weight, a little cutting oil helps.
The scrap 1/8” Masonite will be cut up into a stack of slid-ers measuring 8 x 18 HO-scale feet. Use a pusher stick, not your fingers, when cutting these little guys. After you’ve cut
TRACK CLEANING CAR | 8
4. Accuracy counts. These roofing nails are epoxied on-center with their points 12 scale feet apart.
• INDEX• TABLE OF CONTENTS
MRHMAG.COM
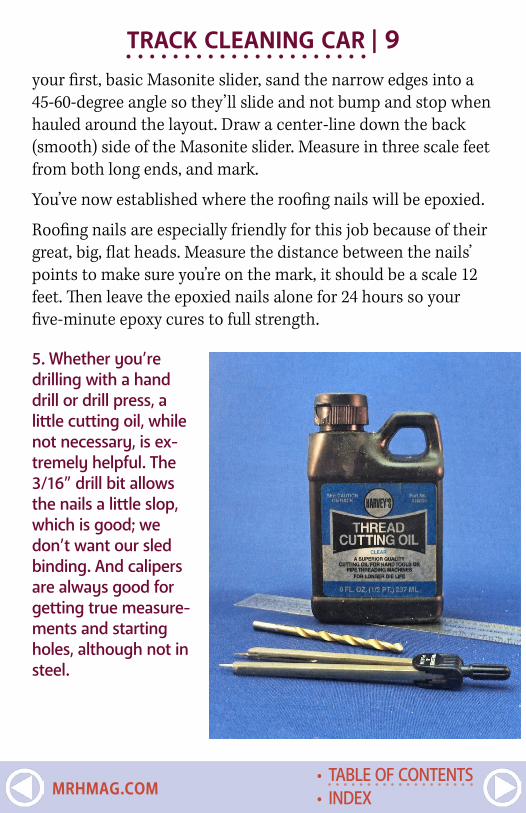
your first, basic Masonite slider, sand the narrow edges into a 45-60-degree angle so they’ll slide and not bump and stop when hauled around the layout. Draw a center-line down the back (smooth) side of the Masonite slider. Measure in three scale feet from both long ends, and mark.
You’ve now established where the roofing nails will be epoxied.
Roofing nails are especially friendly for this job because of their great, big, flat heads. Measure the distance between the nails’ points to make sure you’re on the mark, it should be a scale 12 feet. Then leave the epoxied nails alone for 24 hours so your five-minute epoxy cures to full strength.
TRACK CLEANING CAR | 9
5. Whether you’re drilling with a hand drill or drill press, a little cutting oil, while not necessary, is ex-tremely helpful. The 3/16” drill bit allows the nails a little slop, which is good; we don’t want our sled binding. And calipers are always good for getting true measure-ments and starting holes, although not in steel.
• INDEX• TABLE OF CONTENTS
MRHMAG.COM

TRACK CLEANING CAR | 10AssemblyPop off the car’s body. Unscrew the trucks, and turn the chas-sis over on its back. Measure or use your compass to find the centerline, and either scratch a mark or just use the compass to establish a 12-scale foot distance on the centerline. Chuck-up your 3/16” drill bit and drill away. The holes will be a little larger than the diameter of the roofing nails because we don’t want the nails binding, we want them “floating” in their holes.
As a finishing touch before final assembly, I spray the slider tops, nails, and sides – the parts that show – with the same brown camouflage paint I use to spray paint my track. The rough side, bottom, should remain au natural. Raw and rough, it’s got work to do.
Only after the epoxied nails have fully cured and reached their maximum strength, slide the nails through the holes in the bottom of your car. To hold this rig in place we do not need threaded stock, screws, nuts, bolts or any other over-the-top builder stuff. We only need starlock washers, which sell for about a dime each at places like Ace Hardware.
Push the starlock washers on over the nails, pop the body back on, and screw on the trucks and, voila, you now have a fully operational track-cleaning slider car or sled car. If you pick the car up, the slider stays attached. On the track, it will glide gen-tly, gobbling up filth.
However – and this is a major however – you must have smooth track. No minefields, booby-traps or actuating wires from Tortoise switch machines. If an actuating wire stands taller than the height of the rail, get out your trusty Dremel with a carbide
• INDEX• TABLE OF CONTENTS
MRHMAG.COM
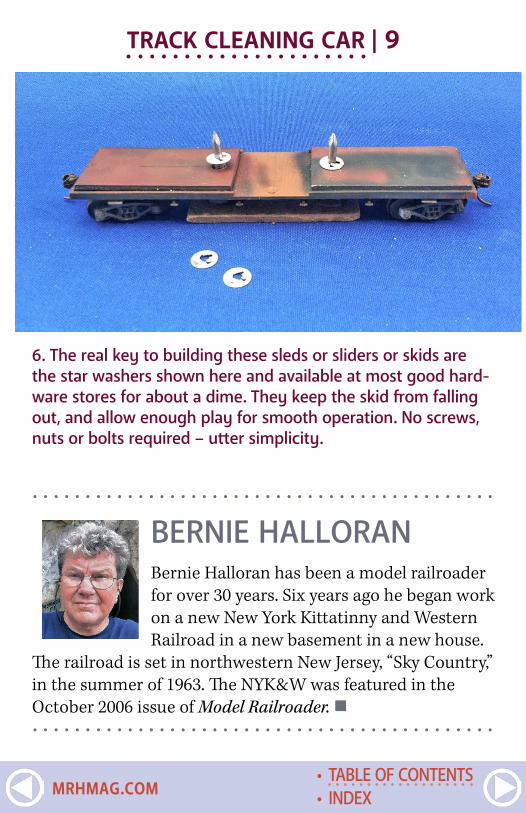
6. The real key to building these sleds or sliders or skids are the star washers shown here and available at most good hard-ware stores for about a dime. They keep the skid from falling out, and allow enough play for smooth operation. No screws, nuts or bolts required – utter simplicity.
. . . . . . . . . . . . . . . . . . . . . . . . . . . . . . . . . . . . . . . . . . . .
BERNIE HALLORANBernie Halloran has been a model railroader for over 30 years. Six years ago he began work on a new New York Kittatinny and Western Railroad in a new basement in a new house.
The railroad is set in northwestern New Jersey, “Sky Country,” in the summer of 1963. The NYK&W was featured in the October 2006 issue of Model Railroader. . . . . . . . . . . . . . . . . . . . . . . . . . . . . . . . . . . . . . . . . . . . .
TRACK CLEANING CAR | 9
• INDEX• TABLE OF CONTENTS
MRHMAG.COM
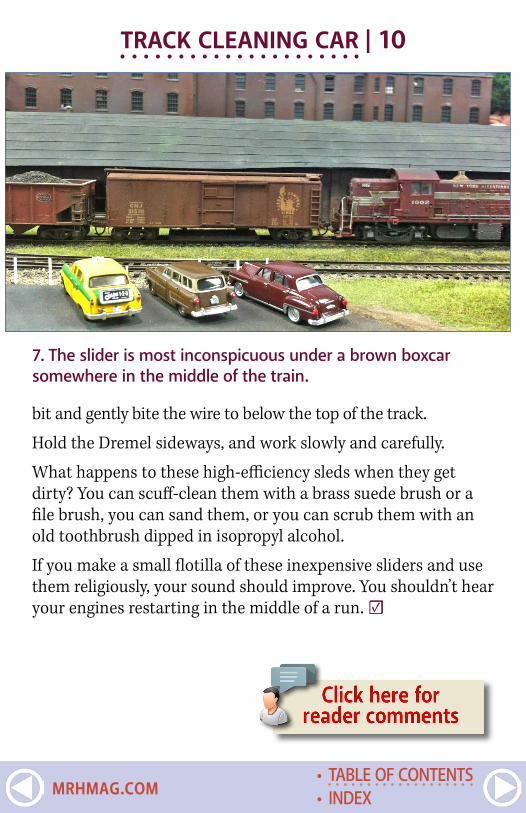
7. The slider is most inconspicuous under a brown boxcar somewhere in the middle of the train.
bit and gently bite the wire to below the top of the track.
Hold the Dremel sideways, and work slowly and carefully.
What happens to these high-efficiency sleds when they get dirty? You can scuff-clean them with a brass suede brush or a file brush, you can sand them, or you can scrub them with an old toothbrush dipped in isopropyl alcohol.
If you make a small flotilla of these inexpensive sliders and use them religiously, your sound should improve. You shouldn’t hear your engines restarting in the middle of a run. ☑
TRACK CLEANING CAR | 10
• INDEX• TABLE OF CONTENTS
MRHMAG.COM

regains his sight BY JESSICA DAITCH
ONCE BLIND, DEVOTED N SCALE HOBBYIST RETURNS TO HIS CRAFTEVEN THOUGH HIS SIGHT STARTED TO DETERIORATE gradually, Dan Dunbar, now 82, from Costa Mesa, CA was reluc-tant to give up building the N gauge trains he enjoyed working with his entire adult life. His wife kindly donated a large section of the basement to his hobby. But as he aged, his eyesight began to deteriorate, to the point that he had to switch from working with N gauge to O gauge just he could see proper connections.
In November 2004, Dan was diagnosed with geographic atrophy, the most advanced form of dry macular degeneration (AMD), the leading cause of blindness in older Americans over the age
• INDEX• TABLE OF CONTENTS
MRHMAG.COM
of 65. More than 15 million Americans are affected by some form of AMD, and more than two million seniors have an advanced form that can lead to severe visual impairment.
As explained by the Macular Degeneration Partnership, “the dis-ease attacks the macula of the eye, where our sharpest central vision occurs. Although it rarely results in complete blindness, it robs the individual of all but the outermost, peripheral vision, leaving only dim images or black holes at the center of vision.” Hence, people with AMD lose their ability to read, drive a car, recognize faces or colors, and see objects in fine detail, like N and HO scale trains. Until recently, patients with the advanced form of AMD have had few options and have been forced to readjust to life without central vision.
Dan says, “I realized I was having vision problems when I couldn’t fix the truck on my N gauge car after some kids had been playing with the trains. My vision was just too bad.”
But recently, Dan went from being legally blind to 20/50 vision, thanks to a remarkable procedure that, he says, “Not only restored my sight, but also restored my life!”
Tiny telescopeDan learned about a fairly new surgical treatment option – a tiny telescope – that is FDA-approved for patients with
Model Railroad Hobbyist | January 2015 | #59
• INDEX• TABLE OF CONTENTS
MRHMAG.COM
end-stage AMD. Smaller than a pea, the telescope implant uses micro-optical technology to magnify images which would nor-mally be seen in straight ahead, or central-vision. The images are projected onto the healthy portion of the retina not affected by the disease, making it possible for patients like Dan to see what’s in front of them.
After speaking with his retina specialist, a specially trained low vision optometrist, an ophthalmic surgeon and occupational therapists who are involved with telescope implant procedure and rehabilitation, respectively, Dan decided to move forward even though the device sounded more like science fiction than science fact.
The implantation procedure is performed on one eye only, and involves removing the eye’s natural lens and implanting the tiny telescope. The other eye remains as is to preserve peripheral vision, which is important for balance and orientation. This part of the treatment is done in an outpatient setting by a spe-cially trained ophthalmologist called a cornea/cataract surgeon.
Following the surgery, Dan recalls, “It took some practice to learn how to use the telescope and I did a wide variety of eye-strengthening exercises, but soon I was ready to get back to my trains. Like any telescope, images are magnified. This aspect really helped me to make connections and now I am back to using all my trains.”
What’s even more remarkable than Dan working with trains, is the fact that he can once again see the faces of his loved ones, including his wife, Jean, his three children and his grandchil-dren. Dan is also an enthusiastic downhill skier and has no trouble discerning the snowy slopes or distances ahead now that he has the telescope implant.
MODELER REGAINS SIGHT | 3
• INDEX• TABLE OF CONTENTS
MRHMAG.COM
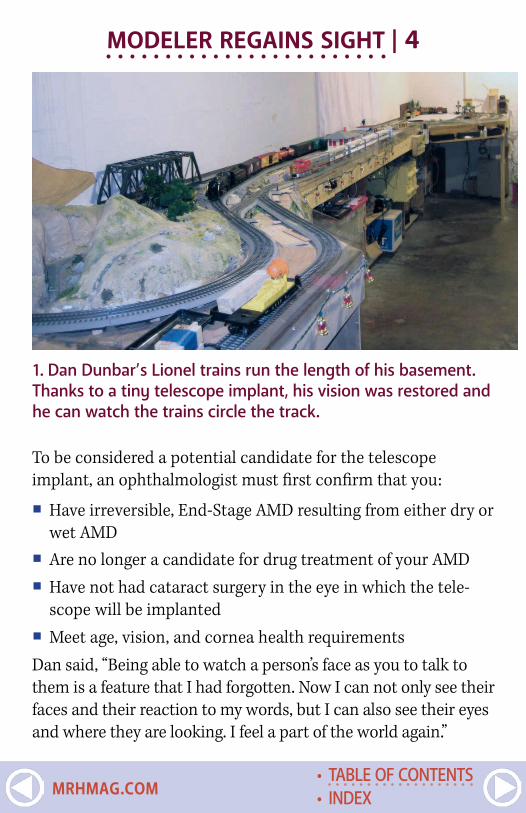
MODELER REGAINS SIGHT | 4
To be considered a potential candidate for the telescope implant, an ophthalmologist must first confirm that you:
� Have irreversible, End-Stage AMD resulting from either dry or wet AMD
� Are no longer a candidate for drug treatment of your AMD � Have not had cataract surgery in the eye in which the tele-scope will be implanted
� Meet age, vision, and cornea health requirementsDan said, “Being able to watch a person’s face as you to talk to them is a feature that I had forgotten. Now I can not only see their faces and their reaction to my words, but I can also see their eyes and where they are looking. I feel a part of the world again.”
1. Dan Dunbar’s Lionel trains run the length of his basement. Thanks to a tiny telescope implant, his vision was restored and he can watch the trains circle the track.
• INDEX• TABLE OF CONTENTS
MRHMAG.COM
For more information about the telescope implant, which is covered by Medicare, visit the CentraSight website at CentraSight.com. CentraSight is the program that guides people with end-stage AMD through the telescope implant evaluation, surgery and rehabilitation process. By calling 877-99-SIGHT, peo-ple can get an initial screening to see if they might be a candidate.
“I’ve been interested in trains since I was 10 years old. I like the sounds they make and watching their motions. Now I can see my Lionels from one end of my layout to the other, which is about 30 foot by 8 foot. Now I can see it all.” ☑
. . . . . . . . . . . . . . . . . . . . . . . . . . . . . . . . . . . . . . . . . . . .
JESSICA DAITCHJessica L. Daitch is a seasoned public relations consultant and freelance writer specializing in health and medical com-munications. In addition, she reviews novels for Publisher’s Weekly and pro-vides pro bono communications support
to the Women’s National Book Association. Jessica is based in Charlotte, NC. where she lives with her husband and two children. . . . . . . . . . . . . . . . . . . . . . . . . . . . . . . . . . . . . . . . . . . . .
MODELER REGAINS SIGHT | 5
• INDEX• TABLE OF CONTENTS
MRHMAG.COM

ADVERTISEMENT
• INDEX• TABLE OF CONTENTS
MRHMAG.COM

ADVERTISEMENT
• INDEX• TABLE OF CONTENTS
MRHMAG.COM
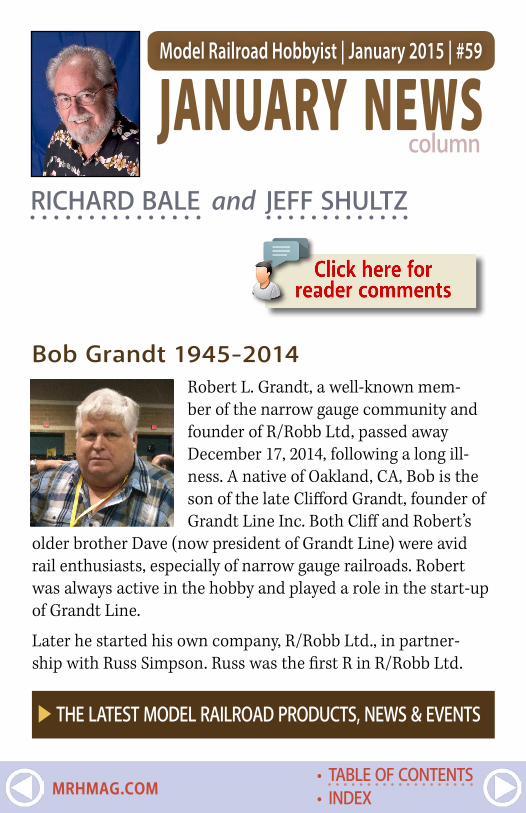
Model Railroad Hobbyist | January 2015 | #59
JANUARY NEWSRICHARD BALE and JEFF SHULTZ
Bob Grandt 1945-2014Robert L. Grandt, a well-known mem-ber of the narrow gauge community and founder of R/Robb Ltd, passed away December 17, 2014, following a long ill-ness. A native of Oakland, CA, Bob is the son of the late Clifford Grandt, founder of Grandt Line Inc. Both Cliff and Robert’s
older brother Dave (now president of Grandt Line) were avid rail enthusiasts, especially of narrow gauge railroads. Robert was always active in the hobby and played a role in the start-up of Grandt Line.
Later he started his own company, R/Robb Ltd., in partner-ship with Russ Simpson. Russ was the first R in R/Robb Ltd.
column
X THE LATEST MODEL RAILROAD PRODUCTS, NEWS & EVENTS
• INDEX• TABLE OF CONTENTS
MRHMAG.COM
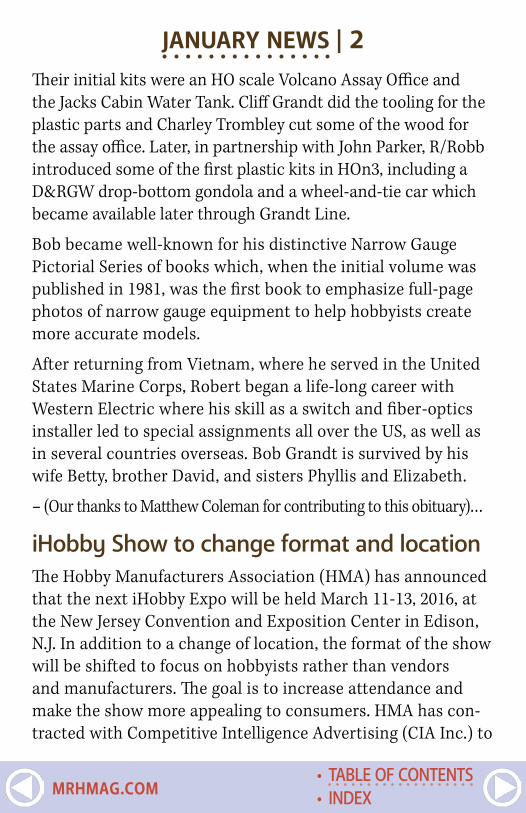
Their initial kits were an HO scale Volcano Assay Office and the Jacks Cabin Water Tank. Cliff Grandt did the tooling for the plastic parts and Charley Trombley cut some of the wood for the assay office. Later, in partnership with John Parker, R/Robb introduced some of the first plastic kits in HOn3, including a D&RGW drop-bottom gondola and a wheel-and-tie car which became available later through Grandt Line.
Bob became well-known for his distinctive Narrow Gauge Pictorial Series of books which, when the initial volume was published in 1981, was the first book to emphasize full-page photos of narrow gauge equipment to help hobbyists create more accurate models.
After returning from Vietnam, where he served in the United States Marine Corps, Robert began a life-long career with Western Electric where his skill as a switch and fiber-optics installer led to special assignments all over the US, as well as in several countries overseas. Bob Grandt is survived by his wife Betty, brother David, and sisters Phyllis and Elizabeth.
– (Our thanks to Matthew Coleman for contributing to this obituary)…
iHobby Show to change format and locationThe Hobby Manufacturers Association (HMA) has announced that the next iHobby Expo will be held March 11-13, 2016, at the New Jersey Convention and Exposition Center in Edison, N.J. In addition to a change of location, the format of the show will be shifted to focus on hobbyists rather than vendors and manufacturers. The goal is to increase attendance and make the show more appealing to consumers. HMA has con-tracted with Competitive Intelligence Advertising (CIA Inc.) to
JANUARY NEWS | 2
• INDEX• TABLE OF CONTENTS
MRHMAG.COM
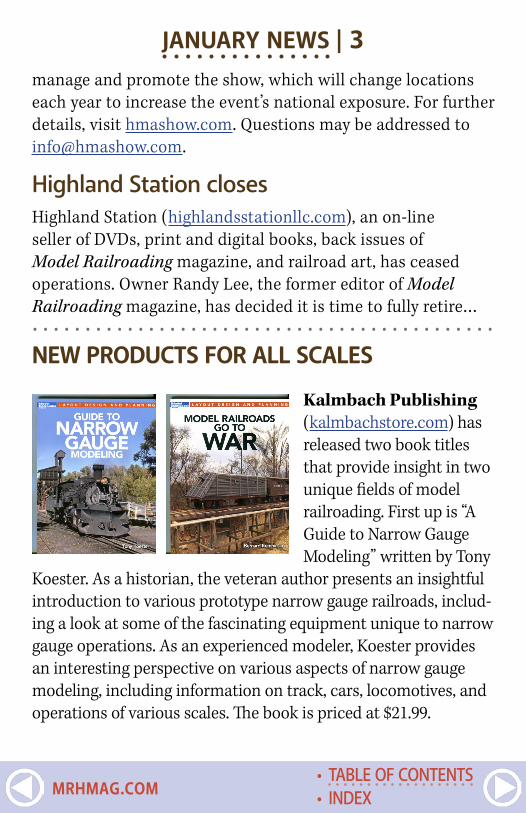
manage and promote the show, which will change locations each year to increase the event’s national exposure. For further details, visit hmashow.com. Questions may be addressed to [email protected].
Highland Station closesHighland Station (highlandsstationllc.com), an on-line seller of DVDs, print and digital books, back issues of Model Railroading magazine, and railroad art, has ceased operations. Owner Randy Lee, the former editor of Model Railroading magazine, has decided it is time to fully retire…. . . . . . . . . . . . . . . . . . . . . . . . . . . . . . . . . . . . . . . . . . . .NEW PRODUCTS FOR ALL SCALES
Kalmbach Publishing (kalmbachstore.com) has released two book titles that provide insight in two unique fields of model railroading. First up is “A Guide to Narrow Gauge Modeling” written by Tony
Koester. As a historian, the veteran author presents an insightful introduction to various prototype narrow gauge railroads, includ-ing a look at some of the fascinating equipment unique to narrow gauge operations. As an experienced modeler, Koester provides an interesting perspective on various aspects of narrow gauge modeling, including information on track, cars, locomotives, and operations of various scales. The book is priced at $21.99.
JANUARY NEWS | 3
• INDEX• TABLE OF CONTENTS
MRHMAG.COM
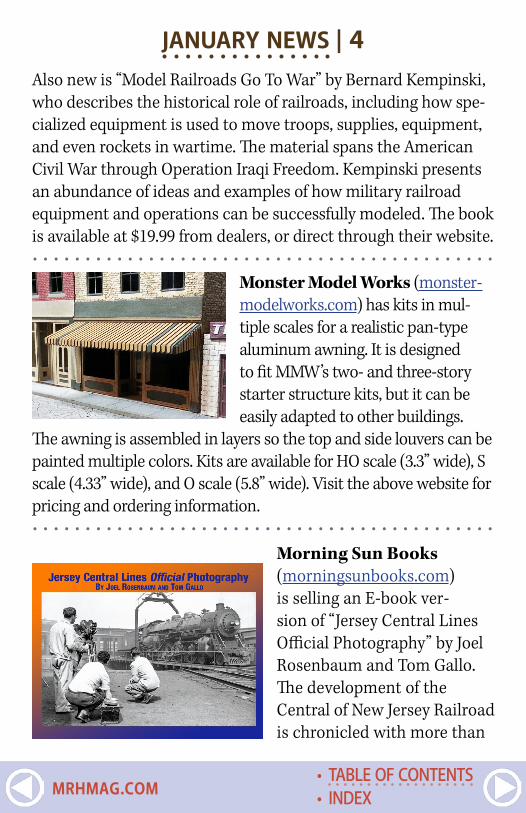
Also new is “Model Railroads Go To War” by Bernard Kempinski, who describes the historical role of railroads, including how spe-cialized equipment is used to move troops, supplies, equipment, and even rockets in wartime. The material spans the American Civil War through Operation Iraqi Freedom. Kempinski presents an abundance of ideas and examples of how military railroad equipment and operations can be successfully modeled. The book is available at $19.99 from dealers, or direct through their website.. . . . . . . . . . . . . . . . . . . . . . . . . . . . . . . . . . . . . . . . . . . .
Monster Model Works (monster-modelworks.com) has kits in mul-tiple scales for a realistic pan-type aluminum awning. It is designed to fit MMW’s two- and three-story starter structure kits, but it can be easily adapted to other buildings.
The awning is assembled in layers so the top and side louvers can be painted multiple colors. Kits are available for HO scale (3.3” wide), S scale (4.33” wide), and O scale (5.8” wide). Visit the above website for pricing and ordering information.. . . . . . . . . . . . . . . . . . . . . . . . . . . . . . . . . . . . . . . . . . . .
Morning Sun Books (morningsunbooks.com) is selling an E-book ver-sion of “Jersey Central Lines Official Photography” by Joel Rosenbaum and Tom Gallo. The development of the Central of New Jersey Railroad is chronicled with more than
JANUARY NEWS | 4
• INDEX• TABLE OF CONTENTS
MRHMAG.COM
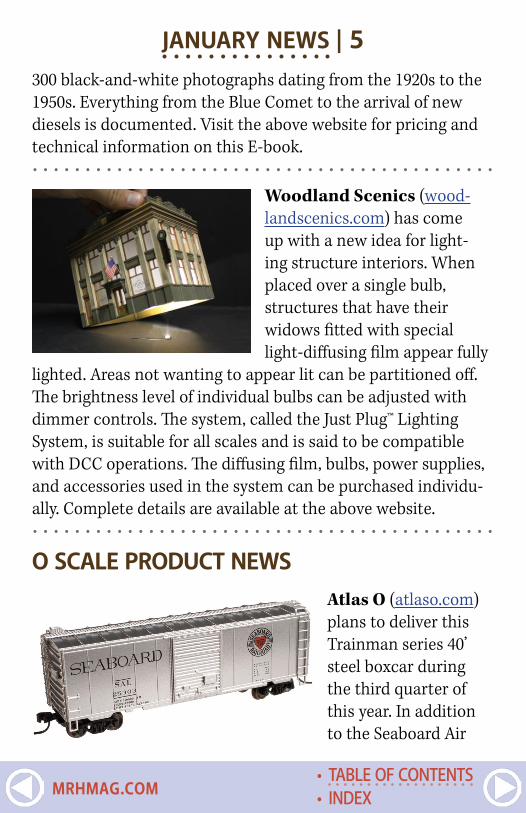
300 black-and-white photographs dating from the 1920s to the 1950s. Everything from the Blue Comet to the arrival of new diesels is documented. Visit the above website for pricing and technical information on this E-book.. . . . . . . . . . . . . . . . . . . . . . . . . . . . . . . . . . . . . . . . . . . .
Woodland Scenics (wood-landscenics.com) has come up with a new idea for light-ing structure interiors. When placed over a single bulb, structures that have their widows fitted with special light-diffusing film appear fully
lighted. Areas not wanting to appear lit can be partitioned off. The brightness level of individual bulbs can be adjusted with dimmer controls. The system, called the Just Plug™ Lighting System, is suitable for all scales and is said to be compatible with DCC operations. The diffusing film, bulbs, power supplies, and accessories used in the system can be purchased individu-ally. Complete details are available at the above website.. . . . . . . . . . . . . . . . . . . . . . . . . . . . . . . . . . . . . . . . . . . .O SCALE PRODUCT NEWS
Atlas O (atlaso.com) plans to deliver this Trainman series 40’ steel boxcar during the third quarter of this year. In addition to the Seaboard Air
JANUARY NEWS | 5
• INDEX• TABLE OF CONTENTS
MRHMAG.COM
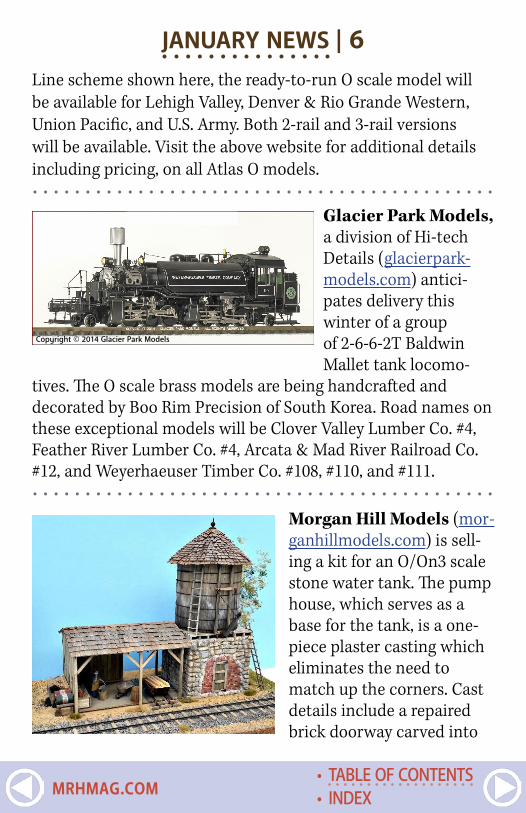
Line scheme shown here, the ready-to-run O scale model will be available for Lehigh Valley, Denver & Rio Grande Western, Union Pacific, and U.S. Army. Both 2-rail and 3-rail versions will be available. Visit the above website for additional details including pricing, on all Atlas O models.. . . . . . . . . . . . . . . . . . . . . . . . . . . . . . . . . . . . . . . . . . . .
Glacier Park Models, a division of Hi-tech Details (glacierpark-models.com) antici-pates delivery this winter of a group of 2-6-6-2T Baldwin Mallet tank locomo-
tives. The O scale brass models are being handcrafted and decorated by Boo Rim Precision of South Korea. Road names on these exceptional models will be Clover Valley Lumber Co. #4, Feather River Lumber Co. #4, Arcata & Mad River Railroad Co. #12, and Weyerhaeuser Timber Co. #108, #110, and #111.. . . . . . . . . . . . . . . . . . . . . . . . . . . . . . . . . . . . . . . . . . . .
Morgan Hill Models (mor-ganhillmodels.com) is sell-ing a kit for an O/On3 scale stone water tank. The pump house, which serves as a base for the tank, is a one-piece plaster casting which eliminates the need to match up the corners. Cast details include a repaired brick doorway carved into
Copyright © 2014 Glacier Park Models
JANUARY NEWS | 6
• INDEX• TABLE OF CONTENTS
MRHMAG.COM
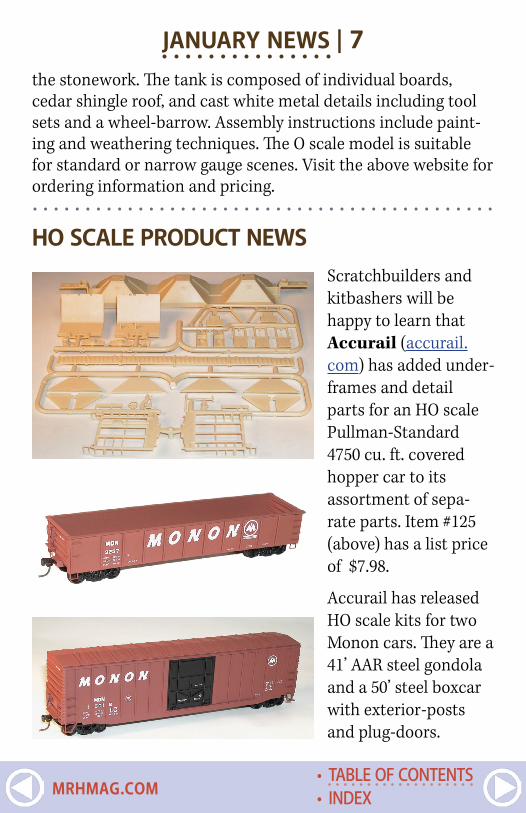
JANUARY NEWS | 7the stonework. The tank is composed of individual boards, cedar shingle roof, and cast white metal details including tool sets and a wheel-barrow. Assembly instructions include paint-ing and weathering techniques. The O scale model is suitable for standard or narrow gauge scenes. Visit the above website for ordering information and pricing.. . . . . . . . . . . . . . . . . . . . . . . . . . . . . . . . . . . . . . . . . . . .HO SCALE PRODUCT NEWS
Scratchbuilders and kitbashers will be happy to learn that Accurail (accurail.com) has added under-frames and detail parts for an HO scale Pullman-Standard 4750 cu. ft. covered hopper car to its assortment of sepa-rate parts. Item #125 (above) has a list price of $7.98.
Accurail has released HO scale kits for two Monon cars. They are a 41’ AAR steel gondola and a 50’ steel boxcar with exterior-posts and plug-doors.
• INDEX• TABLE OF CONTENTS
MRHMAG.COM
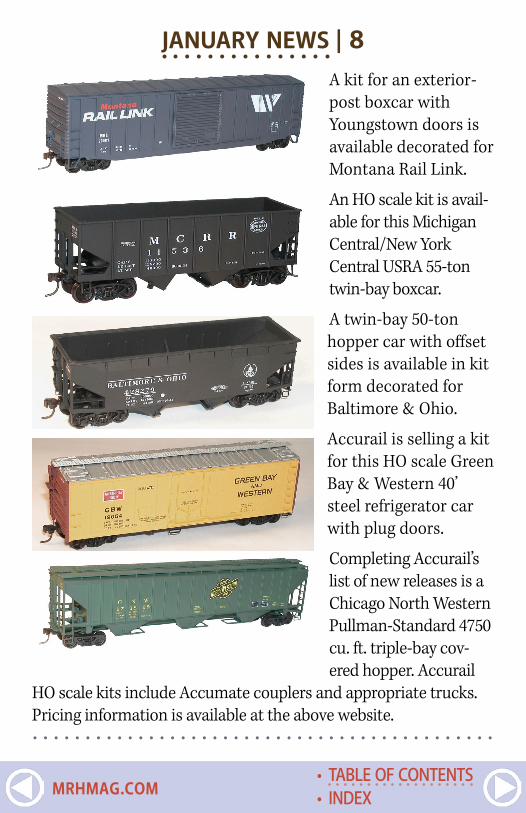
JANUARY NEWS | 8A kit for an exterior-post boxcar with Youngstown doors is available decorated for Montana Rail Link.
An HO scale kit is avail-able for this Michigan Central/New York Central USRA 55-ton twin-bay boxcar.
A twin-bay 50-ton hopper car with offset sides is available in kit form decorated for Baltimore & Ohio.
Accurail is selling a kit for this HO scale Green Bay & Western 40’ steel refrigerator car with plug doors.
Completing Accurail’s list of new releases is a Chicago North Western Pullman-Standard 4750 cu. ft. triple-bay cov-ered hopper. Accurail
HO scale kits include Accumate couplers and appropriate trucks. Pricing information is available at the above website.. . . . . . . . . . . . . . . . . . . . . . . . . . . . . . . . . . . . . . . . . . . .
• INDEX• TABLE OF CONTENTS
MRHMAG.COM

JANUARY NEWS | 9Albrae Models (albraemodels.com) plans to import brass versions of Southern Pacific maintenance-of-way water cars. The prototypes were positioned in strate-gic locations by SP as
standby water supplies for firefighting. The HO scale model will be available with upgraded steel grate walkways, as well as the original wood plank walkways used from the 1960s to the 1980s. Features of the limited-edition models include code 88 tread semi-finescale nickel silver wheelsets and Kadee® #158 Whisker© couplers. Delivery is expected late this year. Visit the above web-site for details, pricing, and reservation information.. . . . . . . . . . . . . . . . . . . . . . . . . . . . . . . . . . . . . . . . . . . .Athearn (athearn.com) is booking dealer reservations for sev-eral HO scale models that are scheduled for release next August. Visit the above website for full details including pricing. Here is a brief look at models in the August release.
Heading the list are four Genesis EMD F-unit diesels that will be available as A and matching A-B sets with all units powered. Although not shown in the above illustration, locomotives decorated for Sacramento Northern and Chicago, Burlington & Quincy will come with full skirts.
Rob Sarberenyi photo
• INDEX• TABLE OF CONTENTS
MRHMAG.COM
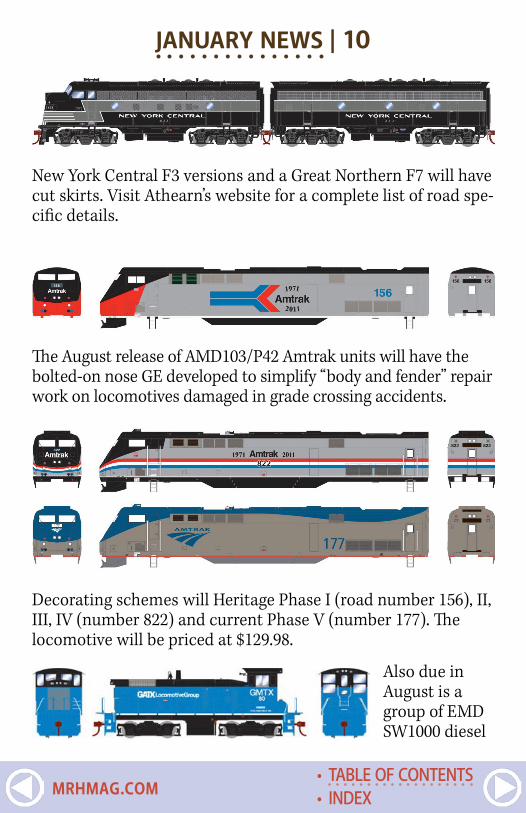
JANUARY NEWS | 10
New York Central F3 versions and a Great Northern F7 will have cut skirts. Visit Athearn’s website for a complete list of road spe-cific details.
The August release of AMD103/P42 Amtrak units will have the bolted-on nose GE developed to simplify “body and fender” repair work on locomotives damaged in grade crossing accidents.
Decorating schemes will Heritage Phase I (road number 156), II, III, IV (number 822) and current Phase V (number 177). The locomotive will be priced at $129.98.
Also due in August is a group of EMD SW1000 diesel
• INDEX• TABLE OF CONTENTS
MRHMAG.COM

JANUARY NEWS | 11switchers. Decorating schemes will include CB&Q, Burlington Northern (green), BNSF (orange), Coors Brewing Company, and GATX Locomotive Group as shown here. Pricing is $124.98.
An EMD-40 industrial “Critter” will be avail-able unlettered in blue, silver, yellow, orange,
black, and black with hot-rod flames.New rolling stock in the August release includes a 40’ tri-
ple-bay steel hopper car with offset sides. In addition to the B&O car shown, road names will include ATSF, Canadian Pacific (script), Erie, Norfolk & Western, and Nickel Plate Road. Nine different numbers will be offered for each road name. The model comes with a removable coal load.
A 50’ Evans dou-ble-door boxcar will be available
decorated for Missouri Pacific, Ogden Corporation, Burlington Northern (green), Chicago North Western, Northwest Hardwood, and SSW-Cotton Belt.
In addition to the D&M scheme shown here, Athearn’s PS-2 twin-bay 2600 cu. ft.
covered hopper car will be available for Burlington Northern, Baltimore & Ohio, Chicago North Western, Norfolk & Western,
• INDEX• TABLE OF CONTENTS
MRHMAG.COM

JANUARY NEWS | 12and Erie Lackawanna. Features include wire grab irons and a photo-etched roof walk.
Athearn’s August schedule includes a run of 20,900 gallon general service tank
cars based on a prototype built by Richmond Tank Car Company. Road names will be BNSF, Santa Fe, Celtran Inc., Dow Chemical, and PTLX-General Electric Rail Services.
Rounding out Athearn’s August releases is another run of the popular
Fruehauf 40’ Z-Van trailers. The HO scale models are produced from upgraded A-Line tooling and feature positionable land-ing gear and a working rear sliding bogie. Trailers will be avail-able decorated for Santa Fe, Chessie System, C&NW, Southern, Nacionales de México, and Union Pacific. Also in the mix is an unlettered owner-operator version.. . . . . . . . . . . . . . . . . . . . . . . . . . . . . . . . . . . . . . . . . . . .
Atlas Model Railroad Company (atlasrr.com) plans to release new paint schemes and road num-
bers for its Dash 8-40B/BW diesel locomotive during the second quarter of this year. The CSX YN3b version shown above will be available with new numbers.New paint schemes will be available for CSX (YN3 above), Arizona & Eastern, Minnesota Commercial, Saratoga & North
• INDEX• TABLE OF CONTENTS
MRHMAG.COM
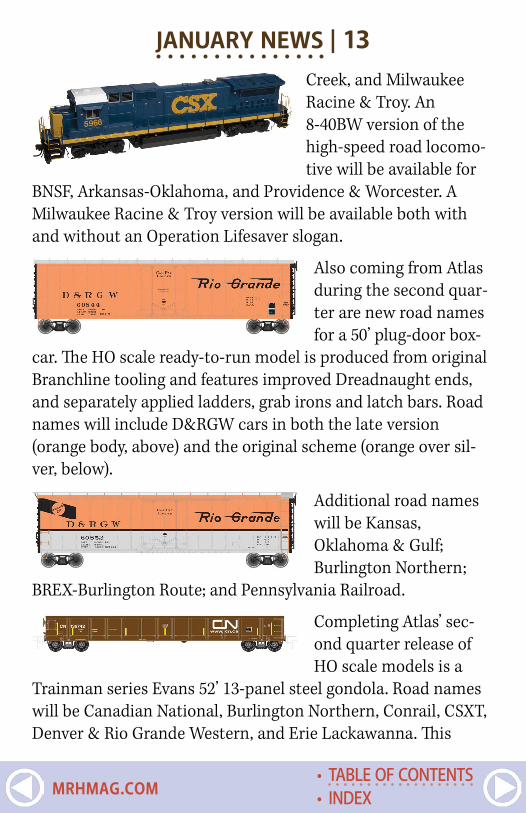
JANUARY NEWS | 13Creek, and Milwaukee Racine & Troy. An 8-40BW version of the high-speed road locomo-tive will be available for
BNSF, Arkansas-Oklahoma, and Providence & Worcester. A Milwaukee Racine & Troy version will be available both with and without an Operation Lifesaver slogan.
Also coming from Atlas during the second quar-ter are new road names for a 50’ plug-door box-
car. The HO scale ready-to-run model is produced from original Branchline tooling and features improved Dreadnaught ends, and separately applied ladders, grab irons and latch bars. Road names will include D&RGW cars in both the late version (orange body, above) and the original scheme (orange over sil-ver, below).
Additional road names will be Kansas, Oklahoma & Gulf; Burlington Northern;
BREX-Burlington Route; and Pennsylvania Railroad.
Completing Atlas’ sec-ond quarter release of HO scale models is a
Trainman series Evans 52’ 13-panel steel gondola. Road names will be Canadian National, Burlington Northern, Conrail, CSXT, Denver & Rio Grande Western, and Erie Lackawanna. This
• INDEX• TABLE OF CONTENTS
MRHMAG.COM
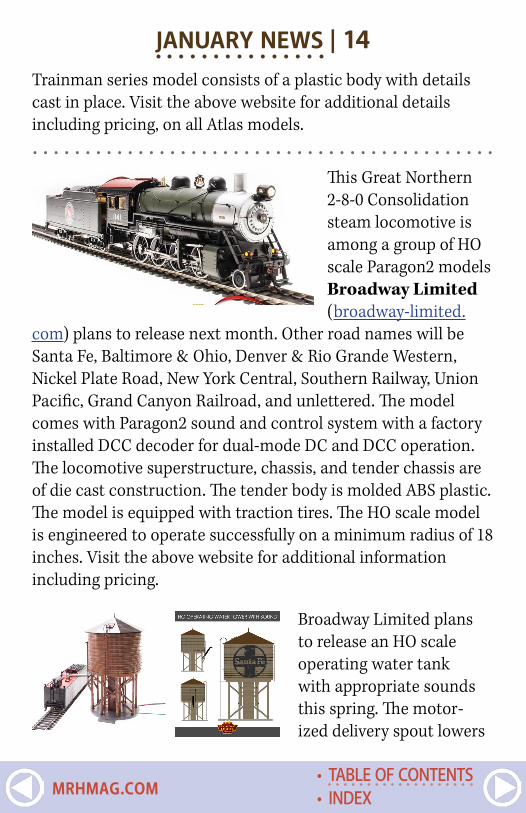
JANUARY NEWS | 14Trainman series model consists of a plastic body with details cast in place. Visit the above website for additional details including pricing, on all Atlas models.. . . . . . . . . . . . . . . . . . . . . . . . . . . . . . . . . . . . . . . . . . . .
This Great Northern 2-8-0 Consolidation steam locomotive is among a group of HO scale Paragon2 models Broadway Limited (broadway-limited.
com) plans to release next month. Other road names will be Santa Fe, Baltimore & Ohio, Denver & Rio Grande Western, Nickel Plate Road, New York Central, Southern Railway, Union Pacific, Grand Canyon Railroad, and unlettered. The model comes with Paragon2 sound and control system with a factory installed DCC decoder for dual-mode DC and DCC operation. The locomotive superstructure, chassis, and tender chassis are of die cast construction. The tender body is molded ABS plastic. The model is equipped with traction tires. The HO scale model is engineered to operate successfully on a minimum radius of 18 inches. Visit the above website for additional information including pricing.
Broadway Limited plans to release an HO scale operating water tank with appropriate sounds this spring. The motor-ized delivery spout lowers
• INDEX• TABLE OF CONTENTS
MRHMAG.COM
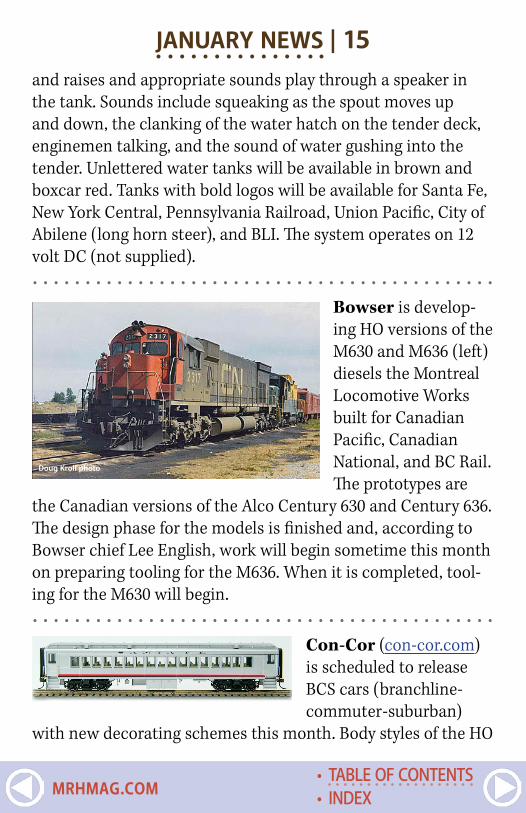
JANUARY NEWS | 15and raises and appropriate sounds play through a speaker in the tank. Sounds include squeaking as the spout moves up and down, the clanking of the water hatch on the tender deck, enginemen talking, and the sound of water gushing into the tender. Unlettered water tanks will be available in brown and boxcar red. Tanks with bold logos will be available for Santa Fe, New York Central, Pennsylvania Railroad, Union Pacific, City of Abilene (long horn steer), and BLI. The system operates on 12 volt DC (not supplied).. . . . . . . . . . . . . . . . . . . . . . . . . . . . . . . . . . . . . . . . . . . .
Bowser is develop-ing HO versions of the M630 and M636 (left) diesels the Montreal Locomotive Works built for Canadian Pacific, Canadian National, and BC Rail. The prototypes are
the Canadian versions of the Alco Century 630 and Century 636. The design phase for the models is finished and, according to Bowser chief Lee English, work will begin sometime this month on preparing tooling for the M636. When it is completed, tool-ing for the M630 will begin.. . . . . . . . . . . . . . . . . . . . . . . . . . . . . . . . . . . . . . . . . . . .
Con-Cor (con-cor.com) is scheduled to release BCS cars (branchline-commuter-suburban)
with new decorating schemes this month. Body styles of the HO
Doug Kroll photo
• INDEX• TABLE OF CONTENTS
MRHMAG.COM
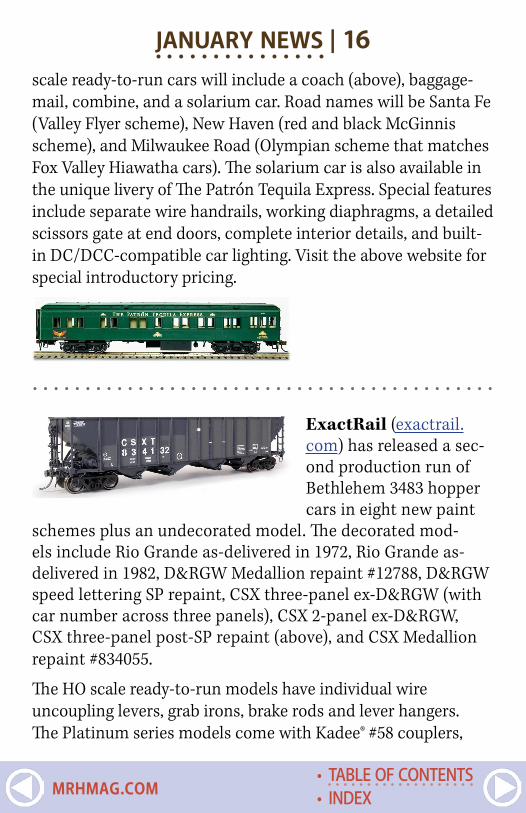
JANUARY NEWS | 16scale ready-to-run cars will include a coach (above), baggage-mail, combine, and a solarium car. Road names will be Santa Fe (Valley Flyer scheme), New Haven (red and black McGinnis scheme), and Milwaukee Road (Olympian scheme that matches Fox Valley Hiawatha cars). The solarium car is also available in the unique livery of The Patrón Tequila Express. Special features include separate wire handrails, working diaphragms, a detailed scissors gate at end doors, complete interior details, and built-in DC/DCC-compatible car lighting. Visit the above website for special introductory pricing.
. . . . . . . . . . . . . . . . . . . . . . . . . . . . . . . . . . . . . . . . . . . .ExactRail (exactrail.com) has released a sec-ond production run of Bethlehem 3483 hopper cars in eight new paint
schemes plus an undecorated model. The decorated mod-els include Rio Grande as-delivered in 1972, Rio Grande as-delivered in 1982, D&RGW Medallion repaint #12788, D&RGW speed lettering SP repaint, CSX three-panel ex-D&RGW (with car number across three panels), CSX 2-panel ex-D&RGW, CSX three-panel post-SP repaint (above), and CSX Medallion repaint #834055.
The HO scale ready-to-run models have individual wire uncoupling levers, grab irons, brake rods and lever hangers. The Platinum series models come with Kadee® #58 couplers,
• INDEX• TABLE OF CONTENTS
MRHMAG.COM
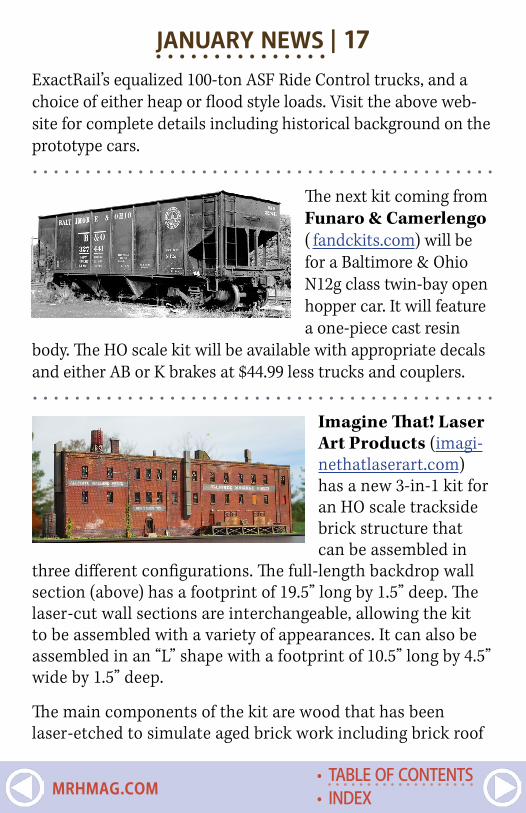
JANUARY NEWS | 17ExactRail’s equalized 100-ton ASF Ride Control trucks, and a choice of either heap or flood style loads. Visit the above web-site for complete details including historical background on the prototype cars.. . . . . . . . . . . . . . . . . . . . . . . . . . . . . . . . . . . . . . . . . . . .
The next kit coming from Funaro & Camerlengo ( fandckits.com) will be for a Baltimore & Ohio N12g class twin-bay open hopper car. It will feature a one-piece cast resin
body. The HO scale kit will be available with appropriate decals and either AB or K brakes at $44.99 less trucks and couplers.. . . . . . . . . . . . . . . . . . . . . . . . . . . . . . . . . . . . . . . . . . . .
Imagine That! Laser Art Products (imagi-nethatlaserart.com) has a new 3-in-1 kit for an HO scale trackside brick structure that can be assembled in
three different configurations. The full-length backdrop wall section (above) has a footprint of 19.5” long by 1.5” deep. The laser-cut wall sections are interchangeable, allowing the kit to be assembled with a variety of appearances. It can also be assembled in an “L” shape with a footprint of 10.5” long by 4.5” wide by 1.5” deep.
The main components of the kit are wood that has been laser-etched to simulate aged brick work including brick roof
• INDEX• TABLE OF CONTENTS
MRHMAG.COM
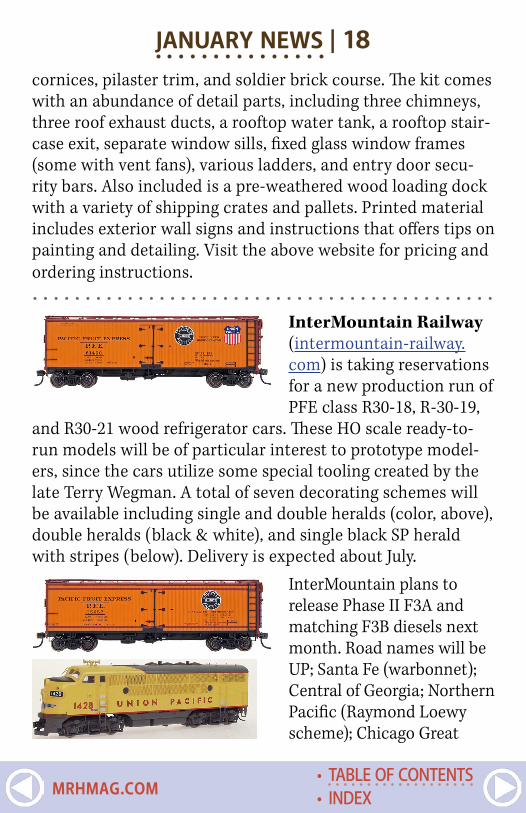
JANUARY NEWS | 18cornices, pilaster trim, and soldier brick course. The kit comes with an abundance of detail parts, including three chimneys, three roof exhaust ducts, a rooftop water tank, a rooftop stair-case exit, separate window sills, fixed glass window frames (some with vent fans), various ladders, and entry door secu-rity bars. Also included is a pre-weathered wood loading dock with a variety of shipping crates and pallets. Printed material includes exterior wall signs and instructions that offers tips on painting and detailing. Visit the above website for pricing and ordering instructions.. . . . . . . . . . . . . . . . . . . . . . . . . . . . . . . . . . . . . . . . . . . .
InterMountain Railway (intermountain-railway.com) is taking reservations for a new production run of PFE class R30-18, R-30-19,
and R30-21 wood refrigerator cars. These HO scale ready-to-run models will be of particular interest to prototype model-ers, since the cars utilize some special tooling created by the late Terry Wegman. A total of seven decorating schemes will be available including single and double heralds (color, above), double heralds (black & white), and single black SP herald with stripes (below). Delivery is expected about July.
InterMountain plans to release Phase II F3A and matching F3B diesels next month. Road names will be UP; Santa Fe (warbonnet); Central of Georgia; Northern Pacific (Raymond Loewy scheme); Chicago Great
• INDEX• TABLE OF CONTENTS
MRHMAG.COM
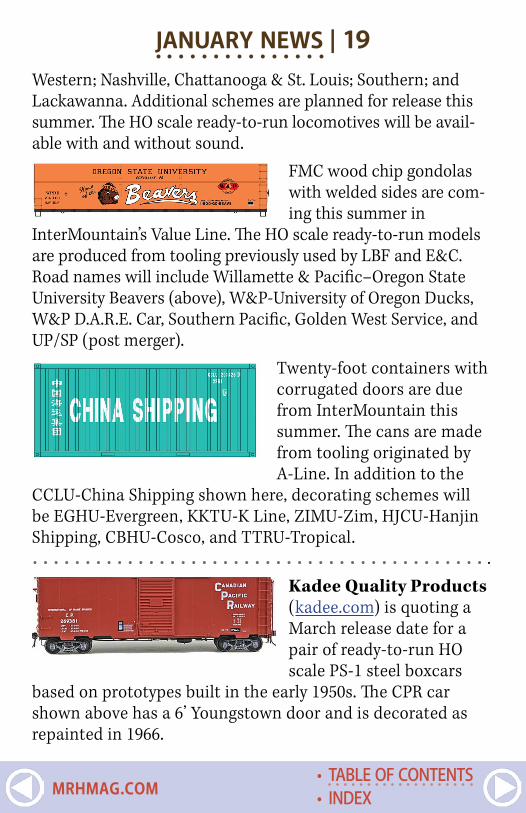
JANUARY NEWS | 19Western; Nashville, Chattanooga & St. Louis; Southern; and Lackawanna. Additional schemes are planned for release this summer. The HO scale ready-to-run locomotives will be avail-able with and without sound.
FMC wood chip gondolas with welded sides are com-ing this summer in
InterMountain’s Value Line. The HO scale ready-to-run models are produced from tooling previously used by LBF and E&C. Road names will include Willamette & Pacific–Oregon State University Beavers (above), W&P-University of Oregon Ducks, W&P D.A.R.E. Car, Southern Pacific, Golden West Service, and UP/SP (post merger).
Twenty-foot containers with corrugated doors are due from InterMountain this summer. The cans are made from tooling originated by A-Line. In addition to the
CCLU-China Shipping shown here, decorating schemes will be EGHU-Evergreen, KKTU-K Line, ZIMU-Zim, HJCU-Hanjin Shipping, CBHU-Cosco, and TTRU-Tropical.. . . . . . . . . . . . . . . . . . . . . . . . . . . . . . . . . . . . . . . . . . . .
Kadee Quality Products (kadee.com) is quoting a March release date for a pair of ready-to-run HO scale PS-1 steel boxcars
based on prototypes built in the early 1950s. The CPR car shown above has a 6’ Youngstown door and is decorated as repainted in 1966.
• INDEX• TABLE OF CONTENTS
MRHMAG.COM
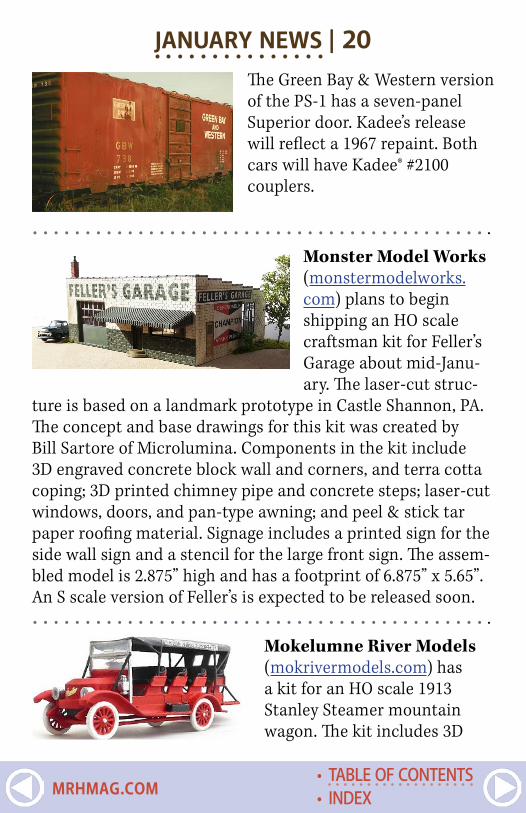
JANUARY NEWS | 20The Green Bay & Western version of the PS-1 has a seven-panel Superior door. Kadee’s release will reflect a 1967 repaint. Both cars will have Kadee® #2100 couplers.
. . . . . . . . . . . . . . . . . . . . . . . . . . . . . . . . . . . . . . . . . . . .Monster Model Works (monstermodelworks.com) plans to begin shipping an HO scale craftsman kit for Feller’s Garage about mid-Janu-ary. The laser-cut struc-
ture is based on a landmark prototype in Castle Shannon, PA. The concept and base drawings for this kit was created by Bill Sartore of Microlumina. Components in the kit include 3D engraved concrete block wall and corners, and terra cotta coping; 3D printed chimney pipe and concrete steps; laser-cut windows, doors, and pan-type awning; and peel & stick tar paper roofing material. Signage includes a printed sign for the side wall sign and a stencil for the large front sign. The assem-bled model is 2.875” high and has a footprint of 6.875” x 5.65”. An S scale version of Feller’s is expected to be released soon.. . . . . . . . . . . . . . . . . . . . . . . . . . . . . . . . . . . . . . . . . . . .
Mokelumne River Models (mokrivermodels.com) has a kit for an HO scale 1913 Stanley Steamer mountain wagon. The kit includes 3D
• INDEX• TABLE OF CONTENTS
MRHMAG.COM
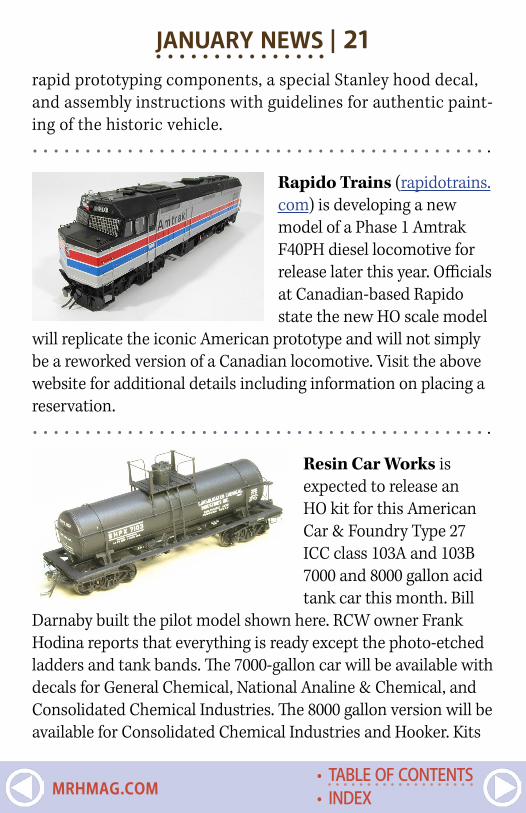
JANUARY NEWS | 21rapid prototyping components, a special Stanley hood decal, and assembly instructions with guidelines for authentic paint-ing of the historic vehicle.. . . . . . . . . . . . . . . . . . . . . . . . . . . . . . . . . . . . . . . . . . . .
Rapido Trains (rapidotrains.com) is developing a new model of a Phase 1 Amtrak F40PH diesel locomotive for release later this year. Officials at Canadian-based Rapido state the new HO scale model
will replicate the iconic American prototype and will not simply be a reworked version of a Canadian locomotive. Visit the above website for additional details including information on placing a reservation.. . . . . . . . . . . . . . . . . . . . . . . . . . . . . . . . . . . . . . . . . . . .
Resin Car Works is expected to release an HO kit for this American Car & Foundry Type 27 ICC class 103A and 103B 7000 and 8000 gallon acid tank car this month. Bill
Darnaby built the pilot model shown here. RCW owner Frank Hodina reports that everything is ready except the photo-etched ladders and tank bands. The 7000-gallon car will be available with decals for General Chemical, National Analine & Chemical, and Consolidated Chemical Industries. The 8000 gallon version will be available for Consolidated Chemical Industries and Hooker. Kits
• INDEX• TABLE OF CONTENTS
MRHMAG.COM
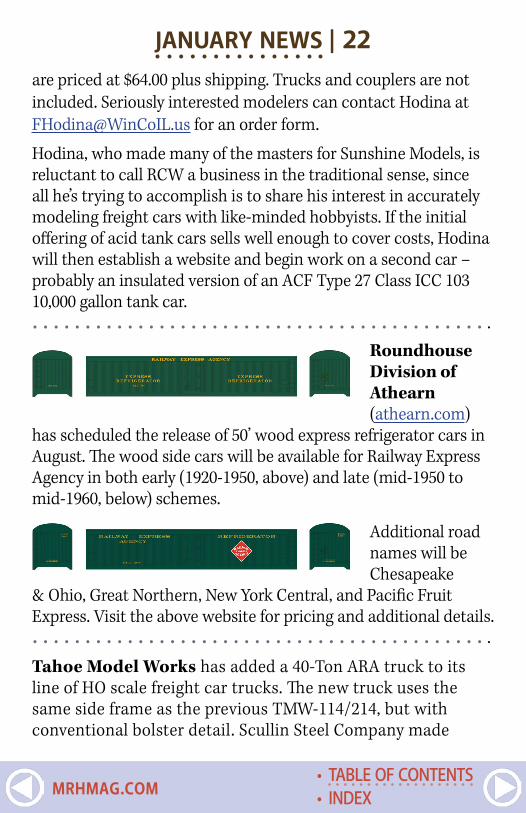
JANUARY NEWS | 22are priced at $64.00 plus shipping. Trucks and couplers are not included. Seriously interested modelers can contact Hodina at [email protected] for an order form.
Hodina, who made many of the masters for Sunshine Models, is reluctant to call RCW a business in the traditional sense, since all he’s trying to accomplish is to share his interest in accurately modeling freight cars with like-minded hobbyists. If the initial offering of acid tank cars sells well enough to cover costs, Hodina will then establish a website and begin work on a second car – probably an insulated version of an ACF Type 27 Class ICC 103 10,000 gallon tank car.. . . . . . . . . . . . . . . . . . . . . . . . . . . . . . . . . . . . . . . . . . . .
Roundhouse Division of Athearn (athearn.com)
has scheduled the release of 50’ wood express refrigerator cars in August. The wood side cars will be available for Railway Express Agency in both early (1920-1950, above) and late (mid-1950 to mid-1960, below) schemes.
Additional road names will be Chesapeake
& Ohio, Great Northern, New York Central, and Pacific Fruit Express. Visit the above website for pricing and additional details.. . . . . . . . . . . . . . . . . . . . . . . . . . . . . . . . . . . . . . . . . . . .
Tahoe Model Works has added a 40-Ton ARA truck to its line of HO scale freight car trucks. The new truck uses the same side frame as the previous TMW-114/214, but with conventional bolster detail. Scullin Steel Company made
• INDEX• TABLE OF CONTENTS
MRHMAG.COM

JANUARY NEWS | 23the prototype of Tahoe’s new truck throughout the 1920s. It’s a conventional ARA (American Railway Association) cast steel truck with spring plank. The model has a one-piece black
acetal plastic moldings with separate brake shoe detail. It is fit-ted with InterMountain non-magnetic, insulated metal RP-25 contour wheelsets. Semi-scale (.088” wide) wheels are also avail-able. See your favorite dealer for availability and pricing.. . . . . . . . . . . . . . . . . . . . . . . . . . . . . . . . . . . . . . . . . . . .
Union Terminal Imports (union-terminal-imports.com) is working on a project to import handcrafted brass mod-els of the Golden State, the extra-fare Chicago-Los Angeles streamliner that was jointly operated by the Rock Island and Southern Pacific Railroads. UTI will offer two complete eight-car sets of the Golden State; one with an RI theme and the other with an SP theme. The HO scale models will be based on details and finish of the 1955-56 and 1960s prototype. The models will be produced by Boo Rim Precision of South Korea. Interested parties should visit the above website for the name of participating dealers since production quantities will only be sufficient to meet pre-orders.. . . . . . . . . . . . . . . . . . . . . . . . . . . . . . . . . . . . . . . . . . . .
Walthers (walthers.com) is selling an HO scale wide-vision caboose. The Trainline series model fea-tures a molded plastic body with cast-in details. Road
• INDEX• TABLE OF CONTENTS
MRHMAG.COM
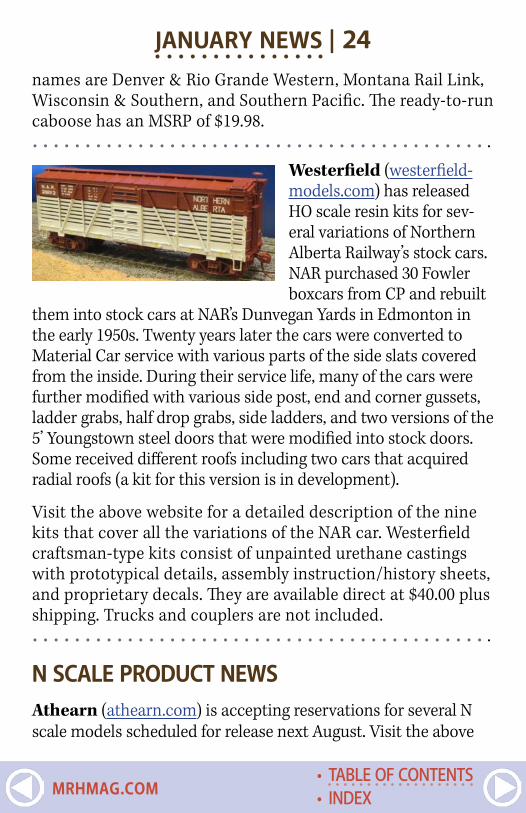
JANUARY NEWS | 24names are Denver & Rio Grande Western, Montana Rail Link, Wisconsin & Southern, and Southern Pacific. The ready-to-run caboose has an MSRP of $19.98.. . . . . . . . . . . . . . . . . . . . . . . . . . . . . . . . . . . . . . . . . . . .
Westerfield (westerfield-models.com) has released HO scale resin kits for sev-eral variations of Northern Alberta Railway’s stock cars. NAR purchased 30 Fowler boxcars from CP and rebuilt
them into stock cars at NAR’s Dunvegan Yards in Edmonton in the early 1950s. Twenty years later the cars were converted to Material Car service with various parts of the side slats covered from the inside. During their service life, many of the cars were further modified with various side post, end and corner gussets, ladder grabs, half drop grabs, side ladders, and two versions of the 5’ Youngstown steel doors that were modified into stock doors. Some received different roofs including two cars that acquired radial roofs (a kit for this version is in development).
Visit the above website for a detailed description of the nine kits that cover all the variations of the NAR car. Westerfield craftsman-type kits consist of unpainted urethane castings with prototypical details, assembly instruction/history sheets, and proprietary decals. They are available direct at $40.00 plus shipping. Trucks and couplers are not included.. . . . . . . . . . . . . . . . . . . . . . . . . . . . . . . . . . . . . . . . . . . .
N SCALE PRODUCT NEWSAthearn (athearn.com) is accepting reservations for several N scale models scheduled for release next August. Visit the above
• INDEX• TABLE OF CONTENTS
MRHMAG.COM
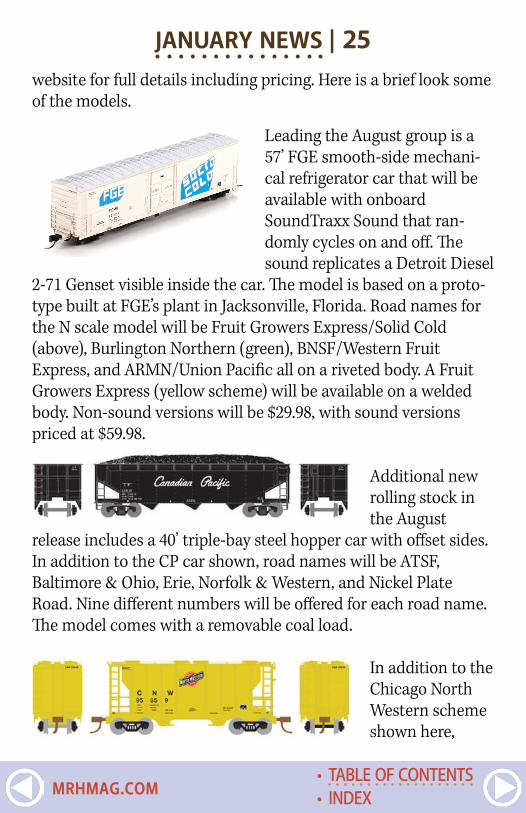
JANUARY NEWS | 25website for full details including pricing. Here is a brief look some of the models.
Leading the August group is a 57’ FGE smooth-side mechani-cal refrigerator car that will be available with onboard SoundTraxx Sound that ran-domly cycles on and off. The sound replicates a Detroit Diesel
2-71 Genset visible inside the car. The model is based on a proto-type built at FGE’s plant in Jacksonville, Florida. Road names for the N scale model will be Fruit Growers Express/Solid Cold (above), Burlington Northern (green), BNSF/Western Fruit Express, and ARMN/Union Pacific all on a riveted body. A Fruit Growers Express (yellow scheme) will be available on a welded body. Non-sound versions will be $29.98, with sound versions priced at $59.98.
Additional new rolling stock in the August
release includes a 40’ triple-bay steel hopper car with offset sides. In addition to the CP car shown, road names will be ATSF, Baltimore & Ohio, Erie, Norfolk & Western, and Nickel Plate Road. Nine different numbers will be offered for each road name. The model comes with a removable coal load.
In addition to the Chicago North Western scheme shown here,
• INDEX• TABLE OF CONTENTS
MRHMAG.COM
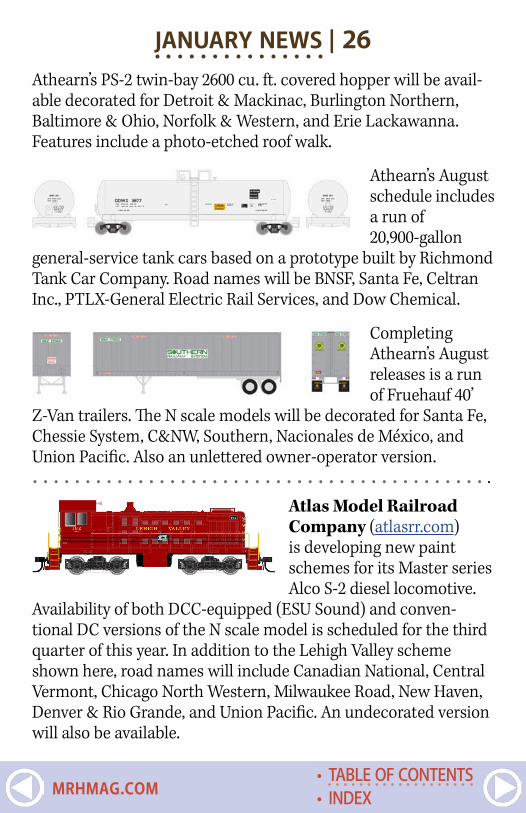
JANUARY NEWS | 26Athearn’s PS-2 twin-bay 2600 cu. ft. covered hopper will be avail-able decorated for Detroit & Mackinac, Burlington Northern, Baltimore & Ohio, Norfolk & Western, and Erie Lackawanna. Features include a photo-etched roof walk.
Athearn’s August schedule includes a run of 20,900-gallon
general-service tank cars based on a prototype built by Richmond Tank Car Company. Road names will be BNSF, Santa Fe, Celtran Inc., PTLX-General Electric Rail Services, and Dow Chemical.
Completing Athearn’s August releases is a run of Fruehauf 40’
Z-Van trailers. The N scale models will be decorated for Santa Fe, Chessie System, C&NW, Southern, Nacionales de México, and Union Pacific. Also an unlettered owner-operator version.. . . . . . . . . . . . . . . . . . . . . . . . . . . . . . . . . . . . . . . . . . . .
Atlas Model Railroad Company (atlasrr.com) is developing new paint schemes for its Master series Alco S-2 diesel locomotive.
Availability of both DCC-equipped (ESU Sound) and conven-tional DC versions of the N scale model is scheduled for the third quarter of this year. In addition to the Lehigh Valley scheme shown here, road names will include Canadian National, Central Vermont, Chicago North Western, Milwaukee Road, New Haven, Denver & Rio Grande, and Union Pacific. An undecorated version will also be available.
• INDEX• TABLE OF CONTENTS
MRHMAG.COM
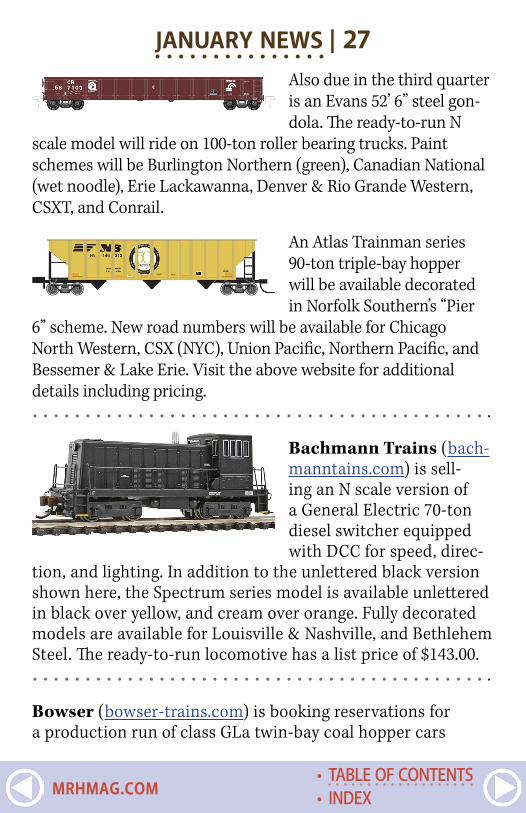
JANUARY NEWS | 27Also due in the third quarter is an Evans 52’ 6” steel gon-dola. The ready-to-run N
scale model will ride on 100-ton roller bearing trucks. Paint schemes will be Burlington Northern (green), Canadian National (wet noodle), Erie Lackawanna, Denver & Rio Grande Western, CSXT, and Conrail.
An Atlas Trainman series 90-ton triple-bay hopper will be available decorated in Norfolk Southern’s “Pier
6” scheme. New road numbers will be available for Chicago North Western, CSX (NYC), Union Pacific, Northern Pacific, and Bessemer & Lake Erie. Visit the above website for additional details including pricing.. . . . . . . . . . . . . . . . . . . . . . . . . . . . . . . . . . . . . . . . . . . .
Bachmann Trains (bach-manntains.com) is sell-ing an N scale version of a General Electric 70-ton diesel switcher equipped with DCC for speed, direc-
tion, and lighting. In addition to the unlettered black version shown here, the Spectrum series model is available unlettered in black over yellow, and cream over orange. Fully decorated models are available for Louisville & Nashville, and Bethlehem Steel. The ready-to-run locomotive has a list price of $143.00.. . . . . . . . . . . . . . . . . . . . . . . . . . . . . . . . . . . . . . . . . . . .
Bowser (bowser-trains.com) is booking reservations for a production run of class GLa twin-bay coal hopper cars
• INDEX• TABLE OF CONTENTS
MRHMAG.COM
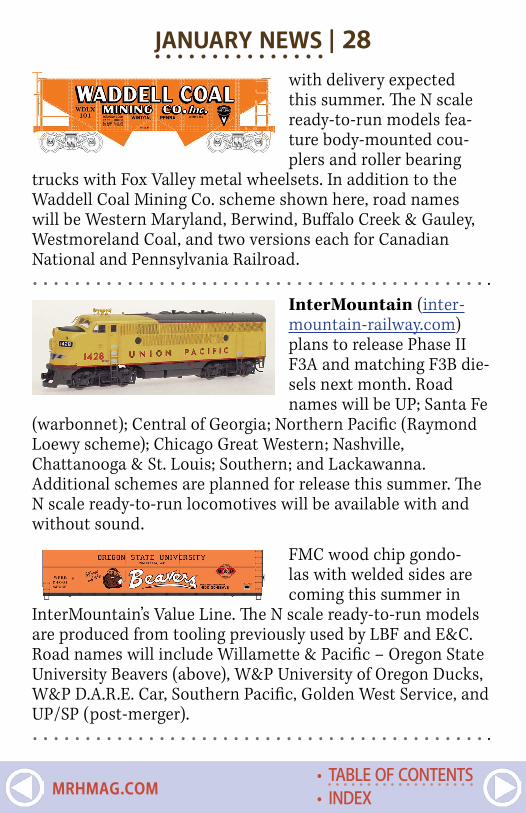
JANUARY NEWS | 28with delivery expected this summer. The N scale ready-to-run models fea-ture body-mounted cou-plers and roller bearing
trucks with Fox Valley metal wheelsets. In addition to the Waddell Coal Mining Co. scheme shown here, road names will be Western Maryland, Berwind, Buffalo Creek & Gauley, Westmoreland Coal, and two versions each for Canadian National and Pennsylvania Railroad.. . . . . . . . . . . . . . . . . . . . . . . . . . . . . . . . . . . . . . . . . . . .
InterMountain (inter-mountain-railway.com)plans to release Phase II F3A and matching F3B die-sels next month. Road names will be UP; Santa Fe
(warbonnet); Central of Georgia; Northern Pacific (Raymond Loewy scheme); Chicago Great Western; Nashville, Chattanooga & St. Louis; Southern; and Lackawanna. Additional schemes are planned for release this summer. The N scale ready-to-run locomotives will be available with and without sound.
FMC wood chip gondo-las with welded sides are coming this summer in
InterMountain’s Value Line. The N scale ready-to-run models are produced from tooling previously used by LBF and E&C. Road names will include Willamette & Pacific – Oregon State University Beavers (above), W&P University of Oregon Ducks, W&P D.A.R.E. Car, Southern Pacific, Golden West Service, and UP/SP (post-merger).. . . . . . . . . . . . . . . . . . . . . . . . . . . . . . . . . . . . . . . . . . . .
• INDEX• TABLE OF CONTENTS
MRHMAG.COM
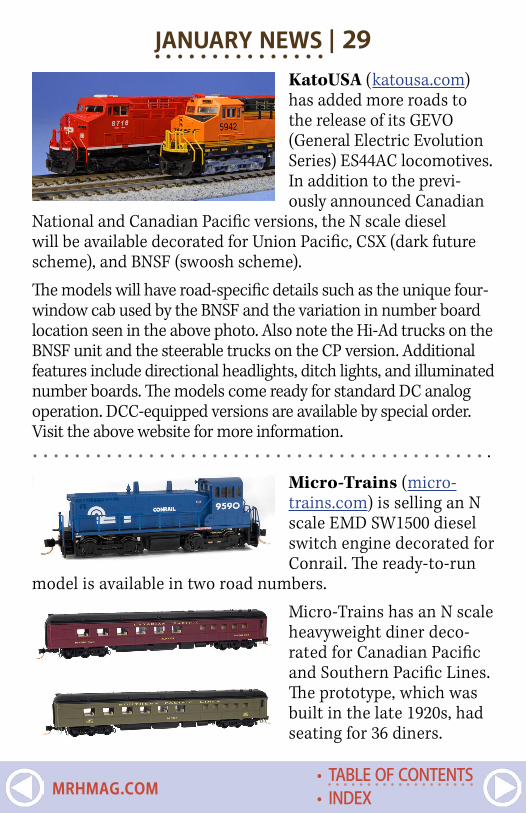
JANUARY NEWS | 29KatoUSA (katousa.com) has added more roads to the release of its GEVO (General Electric Evolution Series) ES44AC locomotives. In addition to the previ-ously announced Canadian
National and Canadian Pacific versions, the N scale diesel will be available decorated for Union Pacific, CSX (dark future scheme), and BNSF (swoosh scheme).
The models will have road-specific details such as the unique four-window cab used by the BNSF and the variation in number board location seen in the above photo. Also note the Hi-Ad trucks on the BNSF unit and the steerable trucks on the CP version. Additional features include directional headlights, ditch lights, and illuminated number boards. The models come ready for standard DC analog operation. DCC-equipped versions are available by special order. Visit the above website for more information.. . . . . . . . . . . . . . . . . . . . . . . . . . . . . . . . . . . . . . . . . . . .
Micro-Trains (micro-trains.com) is selling an N scale EMD SW1500 diesel switch engine decorated for Conrail. The ready-to-run
model is available in two road numbers.
Micro-Trains has an N scale heavyweight diner deco-rated for Canadian Pacific and Southern Pacific Lines. The prototype, which was built in the late 1920s, had seating for 36 diners.
• INDEX• TABLE OF CONTENTS
MRHMAG.COM

JANUARY NEWS | 30Great Northern used a dozen of these 40’ double-sheathed wood boxcars to transport casting sand. Although not shown in this
photo, the production version of the model will be fitted with roof hatches to facilitate the sand service.
Micro-Trains based the let-tering scheme of this 34’ wood-sheathed caboose on a car built by Haskell & Baker for Wisconsin Central in 1909. Later, WC
leased the caboose to Soo Line.The prototype of this Santa Fe 40’ Hy-Cube boxcar was built for Santa Fe by Transco in 1967. Excess-height cars were favored for high-volume low-weight
appliance loading. Visit the above website for additional infor-mation, including pricing, on all Micro-Trains products.. . . . . . . . . . . . . . . . . . . . . . . . . . . . . . . . . . . . . . . . . . . .
Rapido Trains (rapidotrains.com) is releasing a limited pro-duction run of N
scale Panorama passenger cars this month. Duplex sleepers will be available decorated for GN (above), Milwaukee Road, and Northern Pacific; E sleepers for Canadian National (1954 scheme), CN (wet noodle), and VIA Rail Canada; Dayniters
• INDEX• TABLE OF CONTENTS
MRHMAG.COM
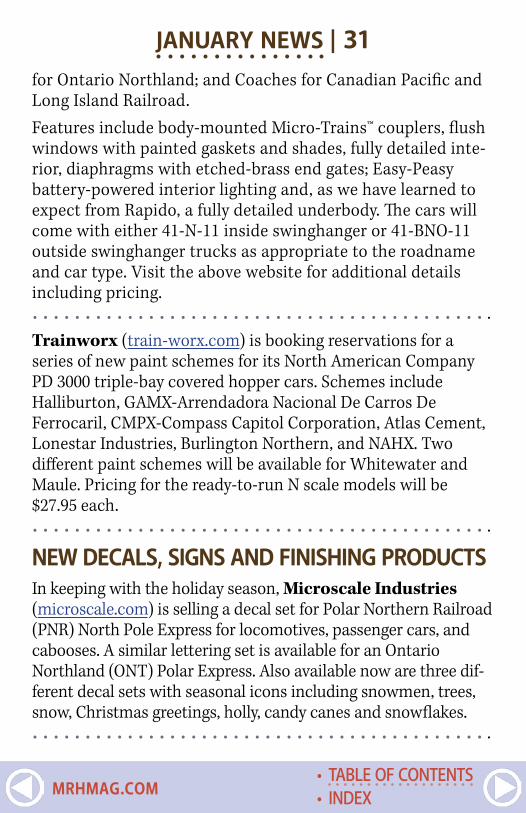
JANUARY NEWS | 31for Ontario Northland; and Coaches for Canadian Pacific and Long Island Railroad.Features include body-mounted Micro-Trains™ couplers, flush windows with painted gaskets and shades, fully detailed inte-rior, diaphragms with etched-brass end gates; Easy-Peasy battery-powered interior lighting and, as we have learned to expect from Rapido, a fully detailed underbody. The cars will come with either 41-N-11 inside swinghanger or 41-BNO-11 outside swinghanger trucks as appropriate to the roadname and car type. Visit the above website for additional details including pricing.. . . . . . . . . . . . . . . . . . . . . . . . . . . . . . . . . . . . . . . . . . . .Trainworx (train-worx.com) is booking reservations for a series of new paint schemes for its North American Company PD 3000 triple-bay covered hopper cars. Schemes include Halliburton, GAMX-Arrendadora Nacional De Carros De Ferrocaril, CMPX-Compass Capitol Corporation, Atlas Cement, Lonestar Industries, Burlington Northern, and NAHX. Two different paint schemes will be available for Whitewater and Maule. Pricing for the ready-to-run N scale models will be $27.95 each.. . . . . . . . . . . . . . . . . . . . . . . . . . . . . . . . . . . . . . . . . . . .
NEW DECALS, SIGNS AND FINISHING PRODUCTSIn keeping with the holiday season, Microscale Industries (microscale.com) is selling a decal set for Polar Northern Railroad (PNR) North Pole Express for locomotives, passenger cars, and cabooses. A similar lettering set is available for an Ontario Northland (ONT) Polar Express. Also available now are three dif-ferent decal sets with seasonal icons including snowmen, trees, snow, Christmas greetings, holly, candy canes and snowflakes.. . . . . . . . . . . . . . . . . . . . . . . . . . . . . . . . . . . . . . . . . . . .
• INDEX• TABLE OF CONTENTS
MRHMAG.COM
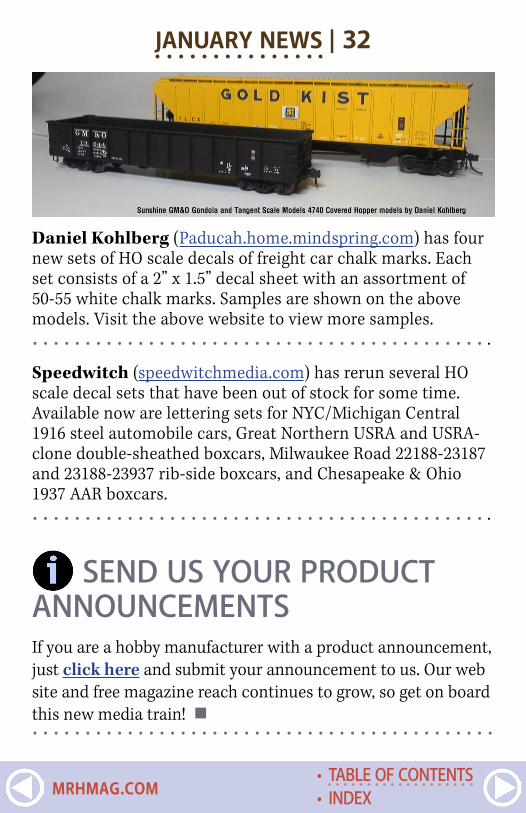
JANUARY NEWS | 32
Daniel Kohlberg (Paducah.home.mindspring.com) has four new sets of HO scale decals of freight car chalk marks. Each set consists of a 2” x 1.5” decal sheet with an assortment of 50-55 white chalk marks. Samples are shown on the above models. Visit the above website to view more samples.. . . . . . . . . . . . . . . . . . . . . . . . . . . . . . . . . . . . . . . . . . . .
Speedwitch (speedwitchmedia.com) has rerun several HO scale decal sets that have been out of stock for some time. Available now are lettering sets for NYC/Michigan Central 1916 steel automobile cars, Great Northern USRA and USRA-clone double-sheathed boxcars, Milwaukee Road 22188-23187 and 23188-23937 rib-side boxcars, and Chesapeake & Ohio 1937 AAR boxcars.. . . . . . . . . . . . . . . . . . . . . . . . . . . . . . . . . . . . . . . . . . . .
SEND US YOUR PRODUCT ANNOUNCEMENTSIf you are a hobby manufacturer with a product announcement, just click here and submit your announcement to us. Our web site and free magazine reach continues to grow, so get on board this new media train! . . . . . . . . . . . . . . . . . . . . . . . . . . . . . . . . . . . . . . . . . . . .
• INDEX• TABLE OF CONTENTS
MRHMAG.COM

JANUARY NEWS | 33
DISCLAIMER .....
The opinions expressed in this column are those of the writer and do not necessarily reflect the opinion of Model Railroad Hobbyist or its sponsors. Every effort is made to provide our readers with accurate and responsible news and information, however, neither Model Railroad Hobbyist or the writer of this column can be held respon-sible for any inaccuracies or typographical errors that may inadvertently appear in this column.
ADVERTISEMENT
• INDEX• TABLE OF CONTENTS
MRHMAG.COM
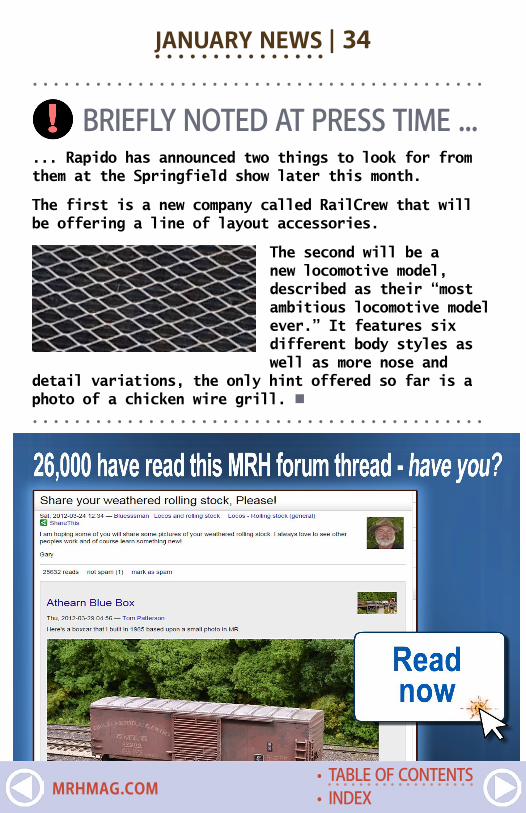
. . . . . . . . . . . . . . . . . . . . . . . . . . . . . . . . . . . . . . . . . . .
BRIEFLY NOTED AT PRESS TIME ...... Rapido has announced two things to look for from them at the Springfield show later this month.
The first is a new company called RailCrew that will be offering a line of layout accessories.
The second will be a new locomotive model, described as their “most ambitious locomotive model ever.” It features six different body styles as well as more nose and
detail variations, the only hint offered so far is a photo of a chicken wire grill. . . . . . . . . . . . . . . . . . . . . . . . . . . . . . . . . . . . . . . . . . . .
JANUARY NEWS | 34
• INDEX• TABLE OF CONTENTS
MRHMAG.COM

ADVERTISEMENT
. . . . . . . . . . . . . . . . . . . . . . . . . . . . . . . . . . . . . . . . . . . .
THIS MONTH’S BONUS EXTRAS MRH SUBSCRIBERS GET ACCESS TO FREE BONUS extras, but you do have to be a subscriber! That’s easy because subscribing is free (just click this link).
The bonus extras this month include:
� High quality versions of the issue videos � Special extra eBook addendum to the K&LE article
To access the bonus extras, click the link below:
BONUS DOWNLOADS FOR THIS ISSUE
. . . . . . . . . . . . . . . . . . . . . . . . . . . . . . . . . . . . . . . . . . . .
• INDEX• TABLE OF CONTENTS
MRHMAG.COM

ADVERTISEMENT
ADVERTISEMENT
• INDEX• TABLE OF CONTENTS
MRHMAG.COM

Model Railroad Hobbyist | January 2015 | #59
SELECTED EVENTSJanuary 2015(Please note that many events charge a fee. Check individual info website for details.)
CANADA, ONTARIO, WOODSTOCK, January 4, Woodstock Model Train Show and Sale, Southern Ontario’s largest model train show with over 150 vendor tables of model trains, equip-ment and accessories from Z to G scales. At Woodstock Fairgrounds, Oxford Auditorium & Mutual/Market Buildings, 875 Nellis Street.
ARIZONA, TUCSON, January 9-10, Winter Train Show & Meet featuring vendor tables and operating layouts of all popu-lar scales. Sponsored by Gadsden Pacific Division Toy Train Operating Museum, at Tucson Expo Center, 3750 East Irvington Road. Info at gpdToyTrainMuseum.com.
CALIFORNIA, ANAHEIM, January 10-11, The Great Train Show, a national traveling event that caters to model railroad hobbyists, with 200-400 tables of train dealers offering both new and used books, equipment, and accessories for all scales, at Anaheim Convention Center. Info at trainshow.com.
CALIFORNIA, NOVATO, January 23-25, Bay Area Layout Design & Operations Weekend, NMRA sponsored three-day meet with clinics, panels, design consulting and tours, at Best Western Plus Novato Oaks Inn, 215 Alameda del Prado. Membership in NMRA or PCR is not required. Info at pcrnmra.org/sigs.
• INDEX• TABLE OF CONTENTS
MRHMAG.COM
CALIFORNIA, RICHMOND, January 3-4, The Great Train Show, a national traveling event that caters to model railroad hobbyists, with 200-400 tables of train dealers offering both new and used books, equipment, and accessories for all scales, at Craneway Pavilion. Info at trainshow.com.
FLORIDA, COCOA BEACH, January 8-10, 2015, Prototype Rails RPM meet with over 80 clinics presented by a blue ribbon group of experts. Schedule includes Friends of the Freight Car lunch on Saturday. Event hosted by Mike Brock, at Cocoa Beach Hilton Hotel, 1550 North Atlantic Avenue. Info at prototyperails.com.
INDIANA, INDIANAPOLIS, January 3-4, The Great Train Show, a national traveling event that caters to model railroad hobbyists, with 200-400 tables of train dealers offering both new and used books, equipment, and accessories for all scales, at Indiana State Fairgrounds. Info at trainshow.com.
MARYLAND, BALTIMORE, January 4, 11, 18, and 25, Open tour of operating layouts at BSME - Baltimore Society of Model Engineers - the oldest exclusively model railroad club in the US (established 1932), with O and HO scale layouts includ-ing steam, diesel, and trolley operations. At 225 West Saratoga Street (3rd floor walk-up). Info at modelengineers.com.
NEW JERSEY, NORTH HALEDON, January 3-4, 57th Annual Model Railroad Show sponsored by Garden State Model railway Club, at 575 High Mountain Road. Includes timetable operation with Intermodal, coal trains, mixed freight, and passenger trains with both steam and diesel locomotives, plus Thomas and Santa Claus Express for children. Info at GSMRRClub.org.
SELECTED EVENTS | 2
• INDEX• TABLE OF CONTENTS
MRHMAG.COM
SELECTED EVENTS | 3OHIO, VERMILION, January 18, Winter Model Train Show at German’s Villa, 3330 Liberty Avenue, sponsored by Norwalk & Western Railroad. Info at norwalkandwesternrr.com.
OREGON, PORTLAND, January 24-25, The Great Train Show, a national traveling event that caters to model railroad hob-byists, with 200-400 tables of train dealers offering both new and used books, equipment, and accessories for all scales, at Portland Expo Center. Info at trainshow.com.
WASHINGTON, SEATTLE, January 17-19, 41st Annual Train Show, sponsored by NMRA 4th Division PNR, at Pacific Science Center, 200 Second Avenue North. Info at 4dpnr.org/PCSshow.htm.
February 2015CALIFORNIA, SANTA CLARA, February 5-7, O Scale West and S West 9 Convention, at Hyatt Regency Hotel, 5101 Great America Parkway. Hotel reservations at 800-233-1234. Details including vendor information at oscalewest.com.
KANSAS, WICHITA, February 7, Train Show and Swap Meet with 100 plus dealer tables plus model contests, clinics and switching contest, at the Cessna Activity Center, 2744 George Washington Blvd. Info from Phil at 316 259 5190 or email [email protected].
NORTH CAROLINA, February 21-22, 20th Annual Train Show sponsored by Carolina Coastal Railroaders, at The New Bern Riverfront Convention Center, 203 South Front Street.
OREGON, PORTLAND, February 14, Railroad Swap Meet, sponsored by Spokane, Portland & Seattle Railway Historical Society, at Holiday Inn Portland Airport, 8439 NE Columbia Blvd. Info from Jerry Pickellat at 360-735-0516.
• INDEX• TABLE OF CONTENTS
MRHMAG.COM
SELECTED EVENTS | 4WEST VIRGINIA, CHARLESTON, February 21-22, 10th Model Train Show sponsored by Kanawha Valley Railroad Association, at the Clubhouse in Coonskin Park. Info at kvrailroad.org.
Future 2015 (by location)AUSTRALIA, CANBERRA, March 28-29, 27th Annual Canberra Model Railway Expo, hosted by Canberra Model Railway Club, at University of Canberra High School, 104 Baldwin Drive. Info at canberra-model-railway-club.webs.com.
AUSTRALIA, NEW SOUTH WALES, BOWRAL, April 3-5, 12th Australian Narrow Gauge Convention, sponsored by NMRA, with hands-on workshops, contests, tours, and modeling clinics on NG prototypes from Fiji, US, UK, and Australia. Info at austnarrow-gaugeconvention.com.
ARIZONA, CLARKDALE, April 11, Rails Along The River, model railroad display and swap meet at Clark Memorial Clubhouse Auditorium, 9 North Ninth St. Also special rates available for trips on nearby Verde Canyon Railroad. Info from Wendy at [email protected].
CALIFORNIA, NEWARK, May 13-17, 2015, NMRA Pacific Coast Region Convention, at Newark-Fremont Double Tree by Hilton Hotel, 39900 Balentine Drive. Info at pcrnmra.org/conv2015.
ILLINOIS, NAPERVILLE, October 15-17, 22nd Annual Naperville RPM Conference, hosted by Joe D’elia, at Sheraton Lisle-Chicago Hotel, 3000 Warrenville Road, Lisle. Info at railroad-prototypemodelers.org/naper_meet.htm.
• INDEX• TABLE OF CONTENTS
MRHMAG.COM
SELECTED EVENTS | 5INDIANA, MARTINSVILLE, April 11, Spring Train Show and Meet, sponsored by NMRA Central Indiana Division, with operat-ing layouts, clinics, and vendor tables, at National Guard Armory, 1900 Hospital Drive. Info from Trevor Jones at [email protected], or Dan Goins at [email protected].
MARYLAND, TIMONIUM, April 11-12, Brass Expo in conjunc-tion with the Great Scale Model Train Show, presented by Howard Zane, at Maryland State Fairgrounds, 2200 York Road. Info at Brass Expo Train Show (brassexpo.com).
MASSACHUSETS, TAUNTON, April 12, Spring TRAINing - Annual Model Train Show, at Holiday Inn Taunton-Foxboro Hotel, 700 Myles Standish Blvd. Hosted by HUB Division of NMRA. Info at hubdiv.org.
MICHIGAN, MUSKEGON, April 26, Muskegon Railroad Historical Society Train & Hobby Show, onboard the USS LST 393, at Veterans Museum, 560 Mart Street. Info at mrhs-online.org.
OKLAHOMA, TULSA, March 20-22, 6th Annual Layout Design and Operations Meet, with clinics and noted speakers, plus oper-ating sessions at 13 layouts. Event at Shriner’s Temple, 28th & Sheridan. Special rates available at Hampton Inn and Suites, 3418 S. 79th East Avenue, phone: 918-779-4000. Info at ldopsigmeet.tulsanmra.org.
OREGON, PORTLAND, August 23-30, NMRA National Convention, at Double Tree by Hilton Hotel Portland. Info at nmra2015.org.
OREGON, PORTLAND, August 28-30, National Train Show, at Portland Expo Center. Info at nmra2015.org/trainshow.
• INDEX• TABLE OF CONTENTS
MRHMAG.COM
SELECTED EVENTS | 6PENNSYLVANIA, PHILADELPHIA, May 15-17, 22nd National Model Trolley Meet at Pennsylvania Convention Center, Exhibit Hall G, Broad and Race Streets. Event sponsored by East Penn Traction Club. Info at eastpenn.org/meet2015.html.
PENNSYLVANIA, SCRANTON, March 26-27, Fine Scale Model Railroad Expo, a specialty event dedicated to the art of craftsman kit structures and scenery building, with clinics, demonstrations, and displays. At Hilton Scranton Hotel & Conference Center, 100 Adams Avenue. Info at modelrailroadexpo.com.
TEXAS, HOUSTON, September 2-5, 35th National Narrow Gauge Convention. Info at nngc-2015.com.
VIRGINIA, FREDERICKSBURG, September 25-26, 3rd Annual Mid-Atlantic RPM Meet, at Wingate by Wyndham Fredericksburg, 20 Sanford Drive. Info at marpm.org.
WASHINGTON, BELLEVUE, April 16-18, 30th Annual Sn3 Symposium, at Bellevue Sheraton Hotel, 100 112th Ave NE. Info at sn3symposium-2015.com.
Future 2016 and beyond (by location)COLORADO, DENVER, 2017, National Narrow Gauge Convention.
INDIANA, INDIANAPOLIS, July 3-10, 2016, NMRA National Convention and National Train Show. Info at nmra2016.org.
MAINE, AUGUSTA, Sept. 7-10, 2016, 36th National Narrow Gauge Convention. Info at nngc2016.org.
• INDEX• TABLE OF CONTENTS
MRHMAG.COM
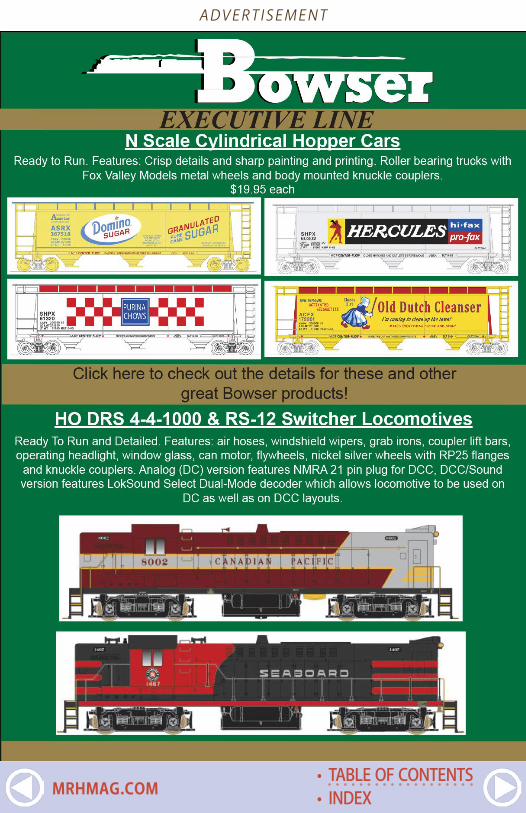
ADVERTISEMENT
• INDEX• TABLE OF CONTENTS
MRHMAG.COM
Clickable advertiser index – 1Accu-LitesAmerican Ltd (San Juan)Amherst ShowANE ModelsArcher Fine TransfersAtlas Model Railroad Co.AthearnBachmannBackdrop JunctionBerrett Hill TrainsBlair LineBLMABowserBrass Expo (Howard Zane Asc.)Caboose HobbiesCanyon Creek ScenicsCon-corClever ModelsCoastmans Scenic ProductsCoffman GraphicsCredit Valley RailwayDave’s Model Railway StuffDCC by DesignDeepwoods SoftwareDigitrax (2 page spread)ESU LokSoundFast TracksFifer Hobby SupplyFine Scale MR ExpoFox Valley ModelsGLX Scale ModelsGreat Decals
Hobby-On (MRS Hobby)Iowa Scaled EngineeringIwata-MedeaJelsma GraphicsKen Patterson.comLitchfield StationLogic Rail TechnologiesMicroscaleMinimalist Model RailroadModel Railroad Benchwork (1)Model Railroad Benchwork (2)Model Railroad TunnelsModel Rectifier CorporationMonroe ModelsMotrak ModelsMr. Detail PartsMRH Store (Model Trains Video) (1)MRH Store (Model Trains Video) (2)Mt. Albert Scale ModelsM.T.H.Nano-OilNCE (2 page spread)Nick & Nora DesignsPre-size Model SpecialitiesPrecision Design Co.RailMaster HobbiesRailroad ExplorerRapido (1)Rapido (2)Ring Engineering (1)Ring Engineering (2)RR-CirKits
• INDEX• TABLE OF CONTENTS
MRHMAG.COM

Clickable “other” index————————————————————————————————
Other – Bonus ExtrasOther – CoverOther – DerailmentsOther – Hobby MarketplaceOther – MRH SponsorsOther – Staff NotesOther – Table of Contents
Clickable advertiser index – 2RSlaserKits, Inc.Rulers-of-the-WorldRusty StumpsStreamlined BackshopScenic ExpressScotty Mason ShowSoundtraxxSouthern DigitalSunset ModelsTAM Valley DepotTCST-Kits
Tony’s Train ExchangeTrainMasters TVTraintekTrainWorldTrue Line TrainsTrue Scene ModelingTSG MultimediaWalthersWesterfield ModelsYankee DabblerYarmouth Model Works
• INDEX• TABLE OF CONTENTS
MRHMAG.COM

Model Railroad Hobbyist | January 2015 | #59
REVERSE RUNNINGRcommentary
X STEPPING OUTSIDE THE BOX WITH A CONTRARY VIEW
JOE FUGATE
ARE YOU A WISE GUY?THERE’S A SAYING I TOLD MY KIDS when they were growing up: “Smart people learn from their mistakes. Wise people learn from other people’s mistakes.”
Actually, that’s one of the huge benefits of the internet for any hobby these days: you
can quickly connect with others who share your interests and ask them what has worked and what has not. While it’s certainly pos-sible to waste time online arguing over minutia, if you’re wise you can also save yourself a lot of lost time by benefiting from what others have learned through experience by going online.
And really, isn’t that all experience is? There’s another saying about this: “Good judgement comes from experience, and expe-rience comes from poor judgement!”
We all love to hear from those who have lots of experience – but typically the more experienced are simply those who’ve gotten
• INDEX• TABLE OF CONTENTS
MRHMAG.COM
out of the armchair and tried more times – and found a lot of ways that did not work! But that poor judgement doesn’t need to be our own poor judgement, though, which bring us full circle back to the idea of learning from other people’s mistakes.
The Layout Design Special Interest Group (LD SIG) has the motto: “Make only new mistakes.” The LD SIG motto implies, however, that you’re aware of the other mistakes that have been made, so you’re not remaking the same old mistakes yourself. This means it’s important to be well-versed in the hobby: through books, vid-eos, through web posts on forums / blogs, and via local hobbyists.
But if you’re new to the hobby, where do you start? Or if you’re a seasoned modeler who’s been in the hobby for decades, how do you share your learnings with others, and as the LD SIG says, make only new mistakes?
Let’s look at a personal example. I’m starting to apprentice my 13-year old grandson, Bobby, in the hobby. I’m excited by all the various skills he’s learning: carpentry, wiring, electrical under-standing, hand-eye-coordination, mechanical skills, varied tool usage ... the list goes on and on.
As I teach Bobby, however, I’m being very deliberate to pull out and expose him to all the hobby sources I use so he can not only benefit from my own personal knowledge, but can learn how to find out more for himself. Rather than just give him a fish, I’m teaching Bobby to fish, as the saying goes.
And by showing Bobby how to search out and find these resources, I’m exposing him to others who are telling about their mistakes, and helping him become a wise modeler himself.
One thing we hope to do with MRH in 2015 is to help more of you become “a wise guy” in the hobby yourself and likewise make only new mistakes! ☑
• INDEX• TABLE OF CONTENTS
MRHMAG.COM
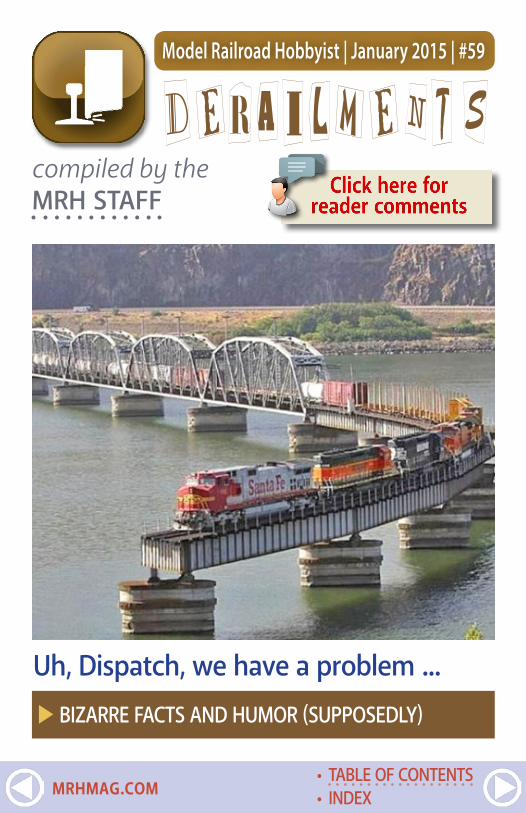
Model Railroad Hobbyist | January 2015 | #59
DERAILMENTScompiled by theMRH STAFF
X BIZARRE FACTS AND HUMOR (SUPPOSEDLY)
Uh, Dispatch, we have a problem ...
• INDEX• TABLE OF CONTENTS
MRHMAG.COM
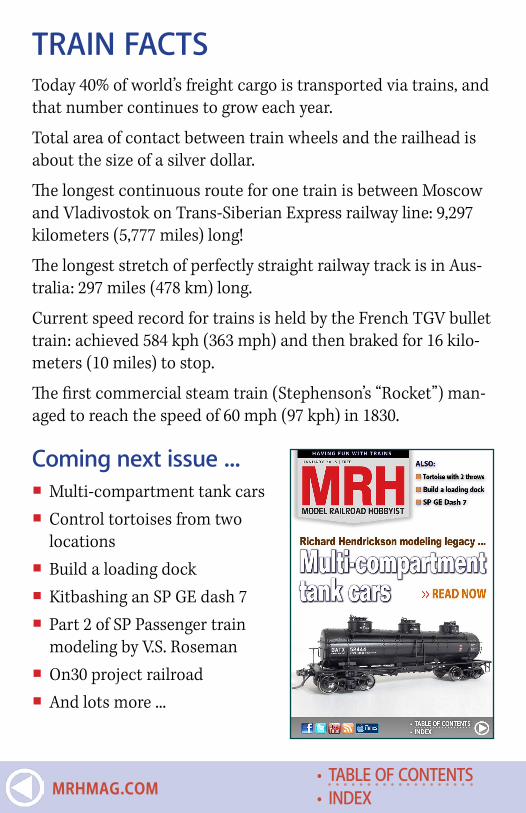
TRAIN FACTSToday 40% of world’s freight cargo is transported via trains, and that number continues to grow each year.
Total area of contact between train wheels and the railhead is about the size of a silver dollar.
The longest continuous route for one train is between Moscow and Vladivostok on Trans-Siberian Express railway line: 9,297 kilometers (5,777 miles) long!
The longest stretch of perfectly straight railway track is in Aus-tralia: 297 miles (478 km) long.
Current speed record for trains is held by the French TGV bullet train: achieved 584 kph (363 mph) and then braked for 16 kilo-meters (10 miles) to stop.
The first commercial steam train (Stephenson’s “Rocket”) man-aged to reach the speed of 60 mph (97 kph) in 1830.
Coming next issue ... � Multi-compartment tank cars � Control tortoises from two locations
� Build a loading dock � Kitbashing an SP GE dash 7 � Part 2 of SP Passenger train modeling by V.S. Roseman
� On30 project railroad � And lots more ...
• INDEX• TABLE OF CONTENTS
MRHMAG.COM