Embed Size (px)
Citation preview
MASSACHUSETTS INSTITUTE OF TECHNOLOGYARTIFICIAL INTELLIGENCE LABORATORY
A.I. Working Paper No. 298 February, 1988
The New Idiot's Guide to OZ
Liz A. Highleyman
ABSTRACT: This is a manual for complete beginners. It assumes no knowledge of theMIT computer systems. This guide will teach you how to log onto the computer called OZ,a DEC PDP-20 computer running the TWENEX (TOPS-20) operating system. You will learnhow to use various operating system features, send and receive electronic mail, create andedit files using EMACS, process text using YTeX, and print out your files. This manual hasa companion on-line directory on OZ, called <LIZ. GUIDE>, which contains sample programsand examples to use in conjunction with this guide.
@ Massachusetts Institute of Technology (1988)
A.I. Laboratory Working Papers are produced for internal circulation, and may containmaterial that is, for example, too preliminary, too detailed, or too site-specific for formalpublication. It is not intended that they should be considered suitable for reference inscientific papers.

CONTENTS
PREFACE ......................................................... 4
ACKNOWLEDGEMENTS .............................................. 4
1. GETTING STARTED .............................................. 5
1.1 Introduction ................................................. 51.2 Getting an Account on OZ ....................................... 51.3 Note on Terminals and Keyboards ................................... 51.4 Accessing OZ: the Concentrator .................................... 61.5 Logging on to OZ...............................................61.6 Some Special Features and Operations ................................ 7
a. Fail-Safe Key Commands ..................................... 7b. On-Line H elp .............................................. 8c. Using WATSON .............................................. 8d. The WHOIS and FINGER Commands .............................. 9
1.7 Detaching and Attaching ......................................... 91.8 Killing Jobs and Logging Out ..................................... 91.9 A Practice Session ............................................. 10
2. MANIPULATING FILES ........................................... 13
2.1 The Directory ................................................ 132.2 Creating, Editing, Saving, and Exiting Files ........................... 142.3 Deleting and Recovering Files ..................................... 152.4 Copying Files ................................................ 162.5 Restoring Files ............................................... 162.6 Using Subdirectories ........................................... 162.7 A Practice Session ............................................. 17
3. USING ELECTRONIC MAIL ........................................ 22
3.1 Introduction ................................................. 223.2 Using MM. .................................................... 22
a. The Basics....................................................22b. Sending Messages............................................ 22c. Reading Your M ail ........................................... 23
3.3 Using BABYL ................................................. 24a. The Basics ................................................ 24b. Sending Mail with BABYL ..................................... 25c. Using BABYL to Read Your Mail ................................. 26

d. Getting On-Line Help and Exiting BABYL ........................... 27e. Using BABYL from within EMACS ............................... 27
3.4 Maintaining Your Mail Files ...................................... 273.5 M ail Short Cuts ............................................... 283.6 Using M ailing Lists ............................................ 283.7 Long Distance: Using Networks .................................... 293.8 A Practice Session .................. .......................... 29
4. EDITING W ITH EMACS ........................................... 33
4.1 Introduction .................................................. 334.2 On-Line Help and the TEACH-EMACS Tutorial ........................... 334.3 Using Buffers ............................................... 334.4 Entering EMACS to Edit or Create a File ............................. 344.5 Using Windows Within EMACS .................................... 344.6 Basic Editing Commands ........................................ 35
a. The Status Line ............................................ 35b. Moving Within the File ....................................... 35c. Inserting and Transposing Text .................................. 36d. Deleting and Undeleting Text .................................. 36
4.7 Searching for Strings of Text ...................................... 364.8 Moving and Copying Blocks of Text ................................. 374.9 Some Special Character Commands ................................... 374.10 Extended ( M-X) Commands ..................................... 384.11 Using Keyboard Macros ........................................ 404.12 Saving the File and Exiting EMACS ................................ 404.13 A Practice Session ............................................. 40
5. TEXT FORMATTING WITH YTeX ..................................... 43
5.1 Introduction ................................................. 435.2 Using YTeX: The Basic Idea ...................................... 435.3 YTeX Opening Commands ....................................... 44
a. Setting Sizes ............................................... 44b. Inputting Auxiliary Files ....................................... 44c. Defining M acros ............................................ 44
5.4 Stylistic Commands ............................................ 45a. Layout Commands .......................................... 45b. Spacing Commands .......................................... 47c. Font Changing Commands ...................................... 47d. Special Characters .......................................... 48
5.5 Formatting Equations .......................................... 48
a. Horizontal Mode.............................................48b. Vertical Mode ............................................. 49
c. Some Basic Equation Commands ................................... 505.6 Creating Tables .............................................. 505.7 Closing Commands ............................................ 515.8 Running the YTeX Program and Debugging the Input File. ................. 51
a. Running YTeX ............................................. 51b. The .DVI and .LST Files .................................... 52c. Debugging the .YTEX File ..................................... 52
5.9 A Practice Session ............................................. 53
6. PRINTING FILES ............................................... 59
6.1 Printers Available at the A.I. Laboratory .............................. 596.2 Checking the Printer Status ...................................... 596.3 Printing a File ............................................... 60
a. Defining a Printer ........................................... 60b. Sending a Job to the Printer ................................... 60c. Stopping a Print Job ......................................... 60
6.4 Printing Errors ............................................... 616.5 A Practice Session ............................................. 61
7. APPENDICES .................................................. 64
7.A Command Summary ............................................ 647.B Glossary of Terms .............................................757.C Other Resources .............................................. 81
PREFACE
This is a manual for complete beginners. You will learn how to log onto the computercalled OZ, a DEC PDP-20 computer running the TWENEX (TOPS-20) operating system. Youwill learn how to use various operating system features, send and receive electronic mail,create and edit files using the EMACS editor, process text using YTeX, and print out your files.The EMACS editor and YTeX text formatting program will allow you to do advanced wordprocessing and acheive professional looking results. YTeX allows for the complex setting ofmathematical equations that is often necessary in scientific and technical papers.
This manual is organized so that topics are presented in the likely order in which youwill use them. For the sake of coherence, all material regarding a given topic has been kepttogether.
There are certain conventions you should keep in mind as you use this manual. Thecontrol key is represented by the symbol t. The meta key will be either the <pause> key orthe <escape> key, depending on your terminal. This key will be represented by an M-. Acarriage return is represented as <CR>. Computer commands, program names, file names,and computer output will be shown in typewriter font. Commands will be shown inCAPITAL LETTERS. OZ generally responds in the same way to both upper- and lower-caseletters; this convention is adopted to improve readability. [Square brackets] indicate thatthe words within should be replaced by something specific. For example [USERNAME] shouldbe replaced by the appropriate username, omitting the brackets. Italics indicate new words,which are defined in the glossary at the end of this guide.
At the end of each section you will find step-by-step instructions for going through apractice session using the files provided in the directory <LIZ. GUIDE>. Each practice sessionwill cover the new material presented in that section. The lines flush with the margin arewhat will appear on your screen. The lines indented and marked by an arrow (==>) indicateresponses to be entered by the user.
As a resource for beginners, this manual is necessarily incomplete. At the end of theguide you will find a list of more advanced manuals and sources that you may wish to useonce you have mastered the material in the New Idiot's Guide. Any errors found in thisguide or suggestions for improvement should be reported to LIZQOZ.
ACKNOWLEDGEMENTS
The original Idiot's Guide to OZ was written in 1984 by William Gilson, under theaegis of Whitman Richard's Natural Computation Group. The work on the original guidewas supported by grants provided by the NSF and AFOSR. Version 1 of The New Idiot'sGuide to OZ was written updated at the Artificial Intelligence Laboratory in August 1987.The guide was updated to Version 2 in February 1988. Many thanks to those who offeredadvice and comments, especially Claudia Smith for all her assistance.

1. GETTING STARTED
1.1 Introduction
OZ is a DEC PDP-20 computer located on the ninth floor of the A.I. Laboratory. Theoperating system on OZ, known as TWENEX, or TOPS-20, is the top level program that enablesmultiple users to work easily on the computer.
1.2 Getting an Account on OZ
Before you begin, you will need to get an account on OZ. This will give you a username,also known as a login name. You will choose your username when your account is set up.The username is most commonly the user's initials or nickname. You may also choose apassword, and a certain amount of memory space will be allocated for your use. Ask yoursupervisor or sponsor how to go about getting an account.
1.3 Note on Terminals and Keyboards
There are a number of different types of terminals in use at the A.I. Laboratory. Youmay be using one of the Ann Arbor terminals or a LISP Machine. The keyboard layouton these terminals varies quite a bit. Associated with your personal directory should be afile called LOGIN. CMD. This will contain commands to set the parameters specific to yourterminal. After you have learned about files (see Section 2), you can look at and copy thefile <LIZ .GUIDE>LOGIN.CMD into your own directory, or you can ask the person who setsup your account to initiate your LOGIN. CMD file. When you log in, your LOGIN. CMD file willautomatically be read and executed. If you wish to re-initialize your environment whilelogged in, type TAKE LOGIN. CMD <CR> to re-execute your LOGIN. CMD file.
There are certain special keys that you should be familiar with. The <delete> key,labelled <del> or <rubout> on some keyboards, will delete the text preceding the cursor.The <back space> key backs up the cursor without deleting any material.
Many commands require the use of the control key. This is to the left of the letterkeys on most terminals. In this manual, the control key is represented by the symbol T.TC indicates that you should press the control key, and simultaneously press the desiredletter key, in this case C.
Other special keys are the meta, alt, and escape keys. Use of these keys will vary withkeyboards. The meta key is used to give different meanings to letter commands. The AnnArbor Ambassador terminals use the <pause> key, located in the lower left-hand corner, asits meta key. The Ann Arbor XL keyboard uses the <escape> key, at the upper left, as itsmeta. In this guide, the meta key will be represented by the symbol M-. For example, M-v

indicates that you should either press the <pause> key or the <escape> key, and then thedesired letter, in this case v. If you are using an XL terminal, it will be necessary in somecases to press both the <escape> and <shift> keys. Do this if the letter following the M isshown in upper-case (M-X).
1.4 Accessing OZ: the Concentrator
You can access OZ from your terminal via the concentrator, a router that connects thedifferent terminals to the various computers at the lab.
When you first approach your terminal, you will see a message similar to this:
AI LAB NE43-7A-HUB MINUTES - Type ? for help.>
To access OZ, type 14TZ after the >. This tells the the concentrator which computer youwish to use.
If the computer responds with the message:
Trying...
it is likely that all the access lines are currently in use. The best thing to do is to wait a fewminutes and try again. To get back to the opening prompt, type t\k. If the system does notrespond after a number of tries, the computer may be down, and you will have to postponeyour session. Try to access OZ periodically, since most outages are of short duration and thecomputer will not give you a signal when it comes back up.
It is also possible to access OZ using the TELNET or SUPDUP protocols. At the opening> prompt, type ? to see the available computers and protocol options. Typing OT or 14Twill access OZ via the TELNET protocol. When using this protocol, you will be asked for yourpassword in order to complete the login process. If you are using a personal computer toaccess OZ, it may be necessary to use 14S, the SUPDUP protocol. If you are accessing OZ froma LISP Machine, type <select> <help> to list available options, and enter T for terminalmode.
You can also use the concentrator to access the weather computer. Type OW or 14W at theopening > prompt. The weather forecast will be displayed on your screen, and you will bereturned to the original prompt.
1.5 Logging on to OZ
Once you have accessed OZ, your screen prompt will be a (called the at-sign). The eindicates that you are at the ezec, or top level of OZ. Exec is the level at which you executejobs, or programs. To start your session, type [USERNAME] <CR> if you have logged in using

14TZ, or [USERNAME] [PASSWORD] <CR> if you have used the TELNET protocol (14T). Onceyou have logged on, you will see a notice on your screen saying how long the system hasbeen up and how many jobs are currently in progress. Your screen may also say -- Mags--.To see the system messages, type <CR>. If the messages do not all fit on the screen, you willsee -- Pause-- at the bottom. Hit the <space bar> to see the remainder. If you do notwish to see these messages, type N <CR> (for "No more"). After the messages have beendisplayed or skipped, you will be returned to the a prompt. You are now logged on to OZ.
Because of the academic environment at the A.I. Laboratory and the non-confidentialnature of most work, computer security at the lab is not strict. This policy assumes ofcourse, that users will not abuse this privilege by prying into or altering other users' files.You may wish to periodically change your password as a security measure. To do this, typePASSWD (CR> at the 0 prompt. OZ will ask you to type in your old (current) password, andthe new one twice.
1.6 Some Special Features and Operations
a. Fail-Safe Key Commands
If you ever type a command that OZ does not understand, it will reply: ?Eh. When thisoccurs, try re-entering your command, being careful to type it correctly.
For most of the commands you will use, there is a two or three letter abbreviation thatcan be used instead. For example, DEL can be used in place of DELETE. OZ also has a featurethat will complete your commands for you. Type enough letters of the command so thatit cannot be confused with any other, and press <escape>. The full command will appearon the screen. If it is correct, hit <CR> and the command will be executed. If not, use the<delete> or <rubout> key to amend it.
If at any time you want to exit whatever program you are working with and return tothe exec level, type TC. This will return you to the top level and you will see the a prompt.It is usually a good policy to try to use TC if you get stuck in a program. Try it a secondtime if you get no response.
If you wish to clear your video screen, type TL. This may be necessary if, for example,you receive mail in the middle of an editing session, or if odd messages appear. If you areat the top level, the screen will be cleared and the 6 prompt will appear at the top. If youare in the editor when this command is given, the text you are working on will be redrawnwithout the extraneous material.
If you have typed a command that you decide you do not wish to execute, type TU toerase the command and return to the 4.

If you get stuck, and if TC does not work and the screen remains frozen, this may be thesign of a system crash. The best thing to do is type t\k to return to the original > promptand try logging in again later.
b. On-Line Help
In learning to use OZ, you should know that there is much helpful information on-line,that is, within the computer itself. In general it is a good idea, when confronted with aproblem, to try to find the answer within the system, as this will save you the time andeffort of finding the appropriate manuals. It can also lead to some interesting discoveriesand helpful hints about using OZ.
At top level, type HELP <CR>. On the screen will be listed three possible starting points:1) HELP * <CR>; 2) HELP ? <CR>; and 3) HELP [TOPIC NAME] <CR>. The first will give youa listing of all topics for which on-line documentation is available. The second command willgive an abbreviated list, containing the more commonly requested topics. Once you havelooked at these lists, select the topic about which you would like more information and usethe third command, HELP [TOPIC NAME] <CR>, where [TOPIC NAME] is replaced with thedesired subject from the lists. The command HELP DOCUMENTATION <CR> will list some ofthe on-line documentation available.
Most programs, such as EMACS and the mail programs MM and BABYL, have their ownbuilt-in documentation. Often typing HELP <CR> or ?<CR> while within a program will showyou what kind of on-line documentation is available and how to get it.
c. Using WATSON
When you first log in as a new user, you should run the WATSON program (also knownas INQUIRE) and answer the questions it asks you. This will provide OZ with some basicinformation about yourself which will be useful to other users. To run this program, typeWATSON <CR> at the 4 prompt. The program is easy to use, and it provides fairly completeinstructions. Start by entering your username, then follow the directions as you go along.The program will ask for information such as your MIT address and phone extension,birthday, supervisor, and projects you are working on. The Remarks entry allows youto enter your own personal comment or witticism. If you get stuck, enter ?<CR>. This willgive you a list of the different possible entries. If you enter ALL <CR>, you will be askedto supply information for all the entries (although you may skip those you do not wish toanswer). When finished, type DONE <CR>, and WATSON will update your entry.

d. The WHOIS and FINGER Commands
To see the results of what you have typed into WATSON, type WHOIS [YOUR USERNAME]<CR> at the 0 prompt. You may use the WHOIS command with any person's username, andalso with a last name if the username is unknown.
If you type WHOIS <CR>, without a specific name, you will get a listing of all the userslogged on to OZ, their WATSON entries, and what programs they are currently running.
A simpler way to see who is logged in to OZ is to type FINGER <CR>. A list will appear onthe screen giving each person's username, their real name, the program they are running,and the location of their terminal. You can also type FINGER [USERNAME] <CR> to getthe same information about a specific user. The command SYS <CR> will give you similarinformation, but in a more abbreviated form.
1.7 Detaching and Attaching
When you leave your terminal idle for any length of time you may wish to detach yourjobs so that they will not be interfered with. To do this, type DETACH <CR> at the Q prompt.This will return the terminal to the opening > prompt and allow other users to log in tothe terminal. Upon returning, type 14TZ or 14T to access OZ and log on as you normallywould. When you do this, you will see the message on your screen: Attach your detachedjob? [Confirm]. Hit <CR> to re-attach. When you do this, the job you were previouslyworking on, and all features of your environment (except those affected by your LOGIN. CMDfile), will be returned to the state they were in when you detached. It may also be necessaryto re-attach your job after a system crash; do so if the prompt shown above appears onyour screen. If the prompt does not appear, you can re-attach your job by typing ATTACHEUSERNAME] <CR> at the top level.
1.8 Killing Jobs and Logging Out
When you have finished your session on OZ, you will need to kill any jobs that arecurrently in progress and log out. In order to see what jobs, or forks, are currently running,type the command INF FO <CR> ("INFormation about FOrk status"). The screen willdisplay a list of your existing jobs and their current status. When you return to the execlevel from a program, the program is not automatically killed. To kill a job, use the RESETcommand. For example, to kill an EMACS job, type RESET EMACS <CR>. To kill the mostrecent fork used, type RESET . <CR>. To kill all your current jobs at once, type RESET *<CR>. The * is a wildcard symbol, used to represent all possibilities.
When you have killed your jobs and are ready to leave the system, type LOGOUT <CR>or KK <CR>.
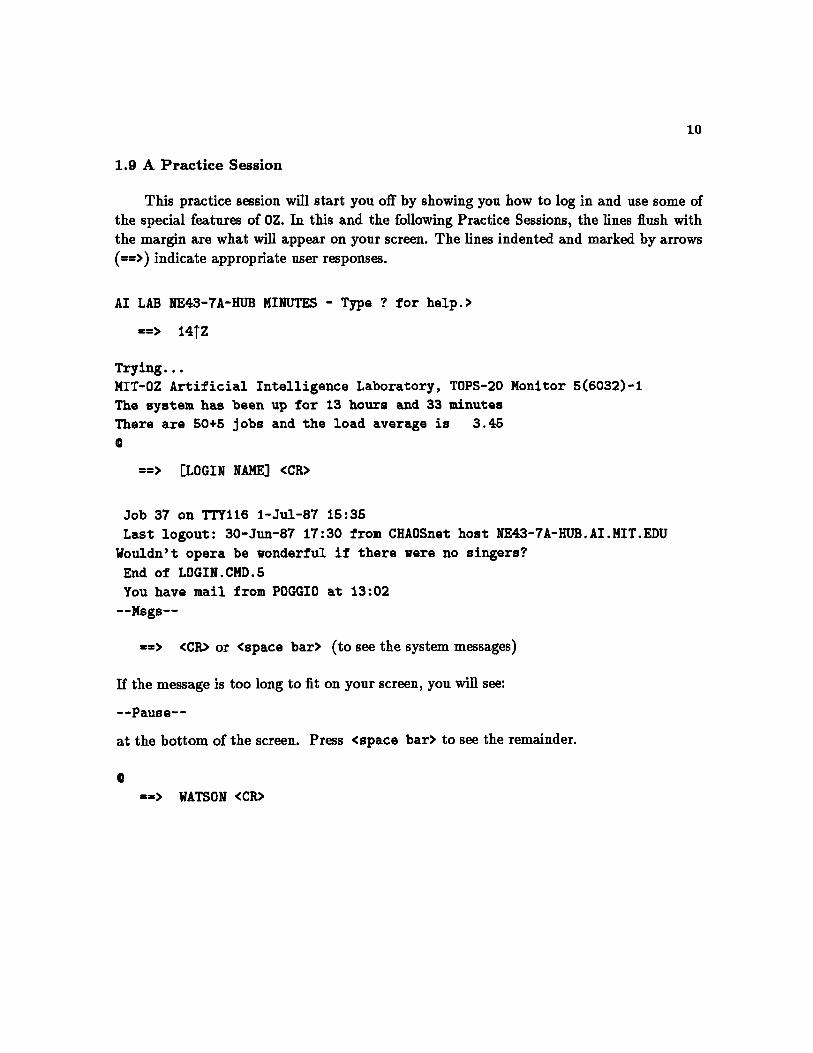
1.9 A Practice Session
This practice session will start you off by showing you how to log in and use some ofthe special features of OZ. In this and the following Practice Sessions, the lines flush withthe margin are what will appear on your screen. The lines indented and marked by arrows(==>) indicate appropriate user responses.
AI LAB NE43-7A-HUB MINUTES - Type ? for help.>
==> 14TZ
Trying...MIT-OZ Artificial Intelligence Laboratory, TOPS-20 Monitor 5(6032)-iThe system has been up for 13 hours and 33 minutesThere are 50+5 jobs and the load average is 3.45
==> [LOGIN NAME] <CR>
Job 37 on TTY116 1-Jul-87 15:35
Last logout: 30-Jun-87 17:30 from CHAOSnet host NE43-7A-HUB.AI.MIT.EDU
Wouldn't opera be wonderful if there were no singers?
End of LOGIN.CMD.5You have mail from POGGIO at 13:02
--Msgs--
==> <CR> or <space bar> (to see the system messages)
If the message is too long to fit on your screen, you will see:
--Pause--
at the bottom of the screen. Press <space bar> to see the remainder.
==> WATSON <CR>

Type your username. If you are intending to change your username,type the old one here. To select someone else, type her username.If you don't know how to use WATSON, type ?<RETURN>.Is this right for Username?
Old: [USERNAME]If so, hit <RETURN>. If not, type the correct entry and a <RETURN>.Type <ESCAPE> or <ALT> to clear the entry.
New:
==> <CR>
The USERNAME entry is for "Joe J. Username"If this isn't you, type <RETURN>. The LIST command prints all the
information on you specified so far.What next? (Type "?" for a list of commands, "HELP" for help with
this program, or "DONE" to exit and make these changes permanent.)WATSON>
==> ALL <CR>
NOTE: Here WATSON will run through all the categories. Supply the information requested,using <CR> to bypass any entries that you wish to leave blank or do not understand. Afteryou have gone through all the entries, WATSON will display the information that has beenprovided, and return to the prompt:
WATSON>
==> DONE <CR>
Sending update request to Daemon...OK
Thank you, and goodbye from Watson
==> WHOIS [YOUR USERNAME] <CR>
USERNAME A-Joe J. Username EMACS .116 NE43-7A-HUB (Chaos)(JOE) [usernameQOZ.AI.MIT.EDU] Hacking Vision for T. PoggioBirthday April 7; Work NE43-772; 3-6666Home 84 Rat Terrace, Boston; 555-1212
Time flies like the wind......Fruit flies like bananas
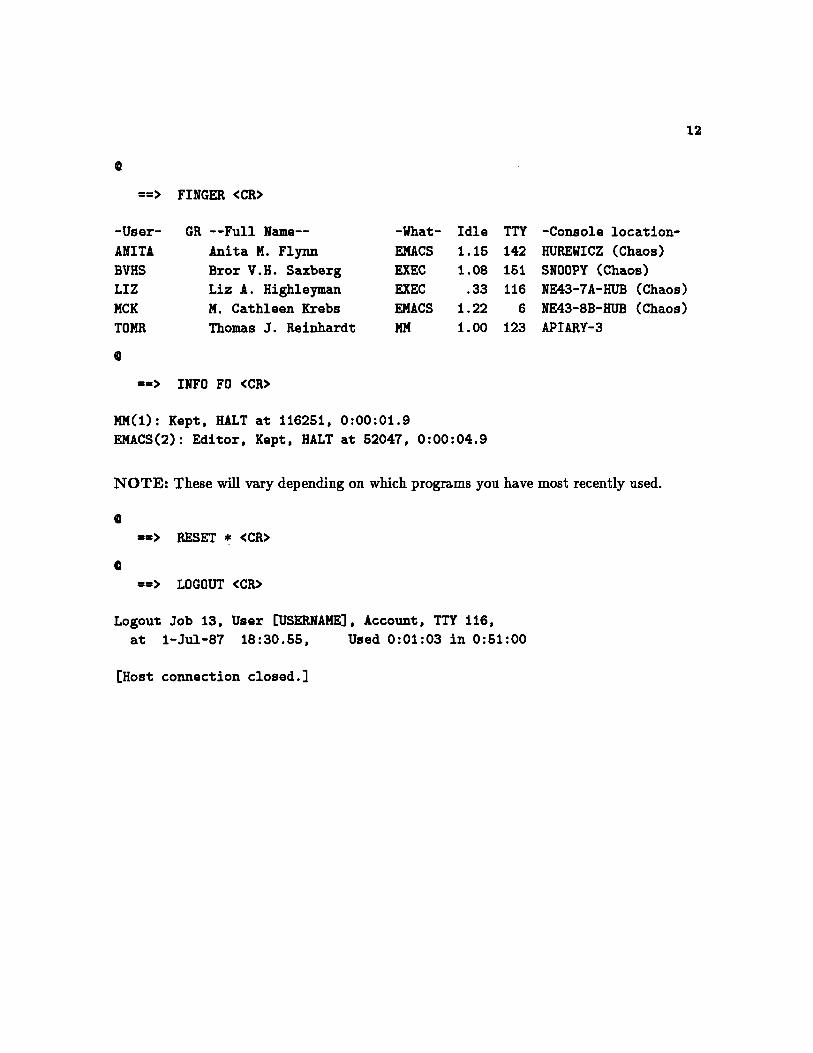
==> FINGER <CR>
GR --Full Name--
Anita M. FlynnBror V.H. SaxbergLiz A. HighleymanM. Cathleen KrebsThomas J. Reinhardt
-What-
EMACSEXECEXEC
EMACSMM
Idle1.151.08
.331.221.00
-Console location-HUREWICZ (Chaos)SNOOPY (Chaos)NE43-7A-HUB (Chaos)NE43-8B-HUB (Chaos)APIARY-3
==> INFO FO <CR>
MM(1): Kept, HALT at 116251, 0:00:01.9EMACS(2): Editor, Kept, HALT at 52047, 0:00:04.9
NOTE: These will vary depending on which programs you have most recently used.
-=> RESET * <CR>
==> LOGOUT <CR>
Logout Job 13, User [USERNAME], Account, TTY 116,at 1-Jul-87 18:30.55, Used 0:01:03 in 0:51:00
[Host connection closed.]
-User-
ANITA
BVHS
LIZ
MCK
TOMR

2. MANIPULATING FILES
2.1 The Directory
As a user with an account on OZ, you will have a directory associated with your user-name. Every user has a main, or home or root directory, which contains his files. The nameof a user's home directory is usually the same as his username. Users may also have anumber of associated subdirectories.
In order to see the contents of your directory, type DIRECTORY <CR>, or DIR <CR>. Youwill see a listing similar to the following:
OZ: < [USERNAME] >EXAMPLE. TXT. 1IDIOTS-GUIDE.YTEX.61,62,63LOGIN.CMD.1LOGOUT.CMD.1MAIL.TXT.1
EUSERNAME]. BABYL. 1WELCOME. TXT. 1
Total of 8 files
Most of the files in your own home directory will have different names than the ones listedabove. The directory listing will change every time you store or remove something fromOZ'•s memory.
Each file name has three parts, separated by dots. The first part gives an indicationof the contents of the file. The second part usually indicates the type of file. For example. TXT files contain text, .CMD files contain commands, and .LSP files contain LISP programs.Files containing commands to be used by one of the text formatting programs should havea suffix such as .YTEX. Formatted files will end with the suffix .DVI. You are free to nameyour files whatever you like, but following these conventions makes it easier to rememberthe file type. If you want to use more than one word in the first part of the file name,separate the words by dashes, as in IDIOTS-GUIDE. YTEX. The third part of the file name isthe version number. Each time you change one of your files, OZ will create a new version. OZwill usually keep three versions of each file. You do not need to include the version numberwhen you name a file; OZ will append this automatically. When editing or visiting a file, ifyou do not specify a version number, OZ will assume that you want the latest version.
If you wish to see a more detailed listing of your directory, you can use the commandVDI <CR> (for View DIrectory). Your listing of files will look like the following:
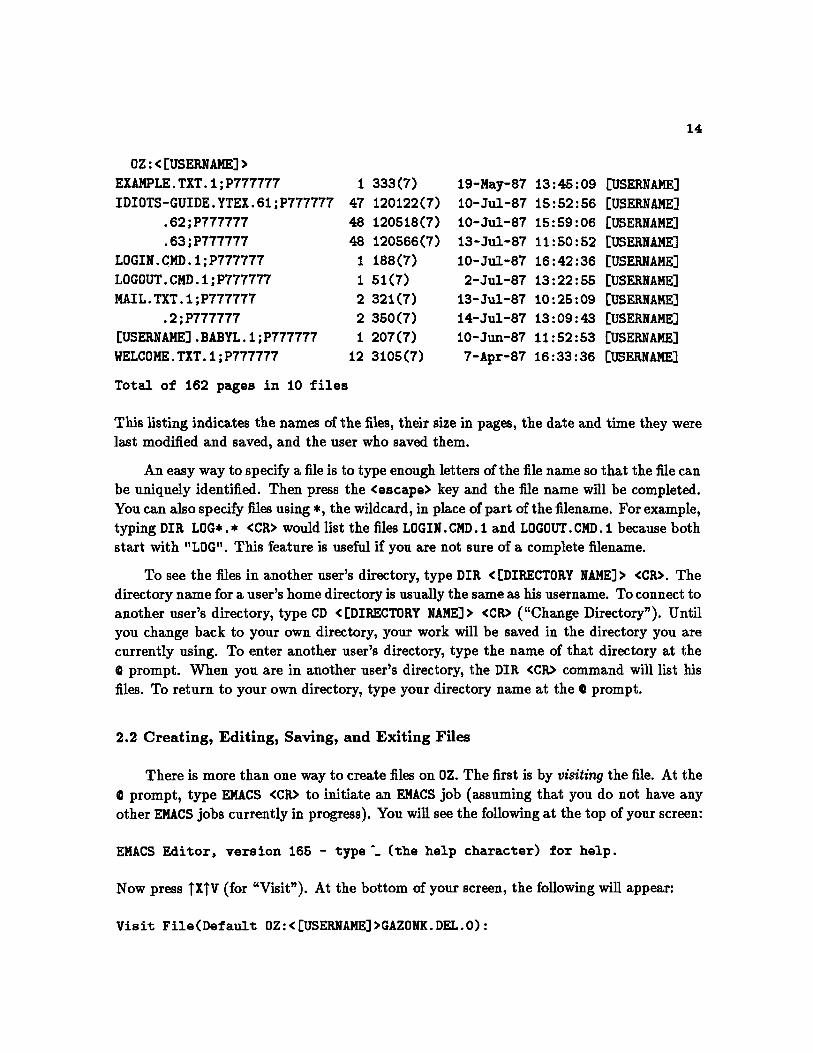
OZ:<[USERNAME)>
EXAMPLE.TXT.1;P777777
IDIOTS-GUIDE.YTEX.61;P777777.62;P777777.63;P777777
LOGIN.CMD.1;P777777
LOGOUT.CMD.1;P777777MAIL.TXT.I;P777777
.2;P777777
[USERNAME].BABYL.1;P777777WELCOME.TXT.1;P777777
333(7)
120122(7)
120518(7)
120566(7)
188(7)
51(7)
321(7)
350(7)
207(7)3105(7)
19-May-87
10-Jul-87
10-Jul-87
13-Jul-87
10-Jul-87
2-Jul-87
13-Jul-87
14-Jul-87
10-Jun-87
7-Apr-87
13:45:0915:52:5615:59:0611:50:5216:42:3613:22:5510:25:0913:09:4311:52:5316:33:36
[USERNAME][USERNAME][USERNAME][USERNAME]
[USERNAME][USERNAME][USERNAME][USERNAME][USERNAME][USERNAME]
Total of 162 pages in 10 files
This listing indicates the names of the files, their size in pages, the date and time they werelast modified and saved, and the user who saved them.
An easy way to specify a file is to type enough letters of the file name so that the file canbe uniquely identified. Then press the <escape> key and the file name will be completed.You can also specify files using *, the wildcard, in place of part of the filename. For example,typing DIR LOG*. * <CR> would list the files LOGIN. CMD. 1 and LOGOUT. CMD. 1 because bothstart with "LOG". This feature is useful if you are not sure of a complete filename.
To see the files in another user's directory, type DIR <[DIRECTORY NAME]> <CR>. Thedirectory name for a user's home directory is usually the same as his username. To connect toanother user's directory, type CD <[DIRECTORY NAME]> <CR> ("Change Directory"). Untilyou change back to your own directory, your work will be saved in the directory you arecurrently using. To enter another user's directory, type the name of that directory at thea prompt. When you are in another user's directory, the DIR <CR> command will list hisfiles. To return to your own directory, type your directory name at the 0 prompt.
2.2 Creating, Editing, Saving, and Exiting Files
There is more than one way to create files on OZ. The first is by visiting the file. At the0 prompt, type EMACS <CR> to initiate an EMACS job (assuming that you do not have anyother EMACS jobs currently in progress). You will see the following at the top of your screen:
EMACS Editor, version 165 - type ". (the help character) for help.
Now press TXTV (for "Visit"). At the bottom of your screen, the following will appear:
Visit File(Default OZ:<[USERNAME]>GAZONK.DEL.0):

After the colon, type the file name you wish to give the new file. (CAUTION: Do notgive the new file a name that is already in use. If you do this, you will write over whateverwas in the file that originally had that name.) Press <CR>, and the new file will be started.There will be a note at the bottom of the screen which gives the filename and says (NewFile). You will now be in the editor, and can type in whatever you wish (see Section 4on using the EMACS editor). When you are ready to exit, save the file by typing TXTS. Theversion number will change from 0 to 1, and the file will be written. Type IXTZ to leave theeditor. (Typing TZTZ will have the same effect.) If you decide not to create the file, justtype TX"Z to exit the editor without writing the file.
A simpler way to create a file is to type EMACS [NEW FILENAME] <CR> or EDIT [NEWFILENAME] <CR> at the e prompt. If any text is typed into the file, TXTS will save it, andtXtZ will take you out of the editor. If no text is entered, TXfZ will exit the editor withoutcreating the new file. If you type EMACS <CR> or EDIT <CR> without specifying a file name,you will be returned to the last file you worked on.
2.3 Deleting and Recovering Files
In order to remove a file you no longer need, type DELETE [FILE NAME] <CR>, or DEL[FILE NAME] <CR>. The name of the deleted file(s) will appear on your screen along withthe notation: [OK]. You will see when you list your directory using DIR <CR> that the deletedfiles no longer appear in your listing. They are not really gone from memory, however. Inorder to remove the files, type EXPUNGE <CR> at the 0 prompt. If you have deleted a fileby mistake but have not yet used EXPUNGE, the command UNDELETE [FILEMANE] <CR> willbring it back. If you ask OZ to delete a file without specifying a version number, it willdelete all versions of that file.
In order to conserve memory space on OZ, it is good policy to clean up your directoryperiodically to remove old versions and files you no longer need. The command PURGE <CR>will delete all but the latest version of each file. The command PURGE 2 <CR> will delete allbut the two most recent versions. It is a good idea to keep at least one backup version ofyour important files. When you use either command, you will be shown a list of all the filesthat have been marked for removal, and you will be asked if these files can be expunged. Ifyou do not want to keep any of the files, type Y. If you do wish to keep some of the files,type N, then UNDELETE [FILENAME] <CR> the desired files.
In some cases, it may be possible to recover files that have been expunged. Use thecommand GROVEL <CR> to enter a program that will help you to locate your files on backuptapes and restore them. Type HELP GROVEL <CR> for more information.
2.4 Copying Files
Copying files on OZ is a simple procedure. Type COPY [CURRENT FILE NAME] [NEWFILE NAME] <CR>. The current file name is the name of the file you want to copy. The newfile name is whatever you wish to name the duplicate file. Again, be sure that the name isone that is not already used in the directory.
When copying files within a single directory, you do not need to specify the directoryname. If you are copying from one directory to another, the copy command will be asfollows:
COPY <[DIRECTORY NAMEI)> [FILENAME] <[DIRECTORY NAME2> [FILENAME] <CR>.
2.5 Restoring Files
In order to keep 0Z's memory from filling up, files that have not been used for asubstantial amount of time will be taken offline. The DIR <CR> command will show you thestatus of your files. Migrated, or archived, files will have the designation ; OFFLINE followingthe filename. The command NDIR <CR> will show you when and where the migrated fileswere moved. These files have been backed up onto tapes. To restore off-line files, use thecommand RETRIEVE [FILENAME] <CR>. This adds your desired files to the retrieval queue,which is run a couple of times a week by the tape archivist. When the files are restored,the ;OFFLINE flag will disappear from your directory listing. Type HELP RETRIEVE <CR>for more information.
2.6 Using Subdirectories
Users who have a large number of files on the system often have them arranged insubdirectories. This is a good way to keep files organized. You will probably not haveany need for subdirectories until you have accumulated many files, but you may needto access the subdirectories of other users. A subdirectory name is of the form <[HOME-DIRECTORY]. [SUB-NAME]>, for example, <LIZ.GUIDE>. To see a list of the subdirectoriesassociated with a particular home directory, type DIR <[HOME-DIRECTORY] .*> <CR>. In anormal DIR listing, subdirectories will appear in the listing as [SUB-NAME] .DIRECTORY. 1.To enter a subdirectory, type the subdirectory name (including the home directory prefix)at the @ prompt.
To create a subdirectory, type the command BUILD [SUBDIRECTORY NAME] <CR> atthe 0 prompt. Your prompt will then be Q0. Type LIST <CR> to see the current attributesof the subdirectory. Typing ? <CR> will show you a list of possible commands. It willmost likely be necessary to increase your subdirectory capacity and memory (page quotas)in order to create subdirectories. Within your home directory, the command to increase
your subdirectory capacity is MAX <ESC> [NUMBER] <CR>; 100 should be sufficient. Withinyour home directory or a subdirectory, the commands to increase your page quotas are WORK[NUMBER] <CR> (for the working page quota) and PERM [NUMBER] <CR> (for the permanentquota). Set quotas at 500 to start. If you receive messages telling you that your quotahas been exceeded, increase your quotas further. To exit the BUILD program, type <CR>once more. It is also possible to create subdirectories within other subdirectories. For moreinformation, or if you lack the permissions necessary to create subdirectories, consult anexpert.
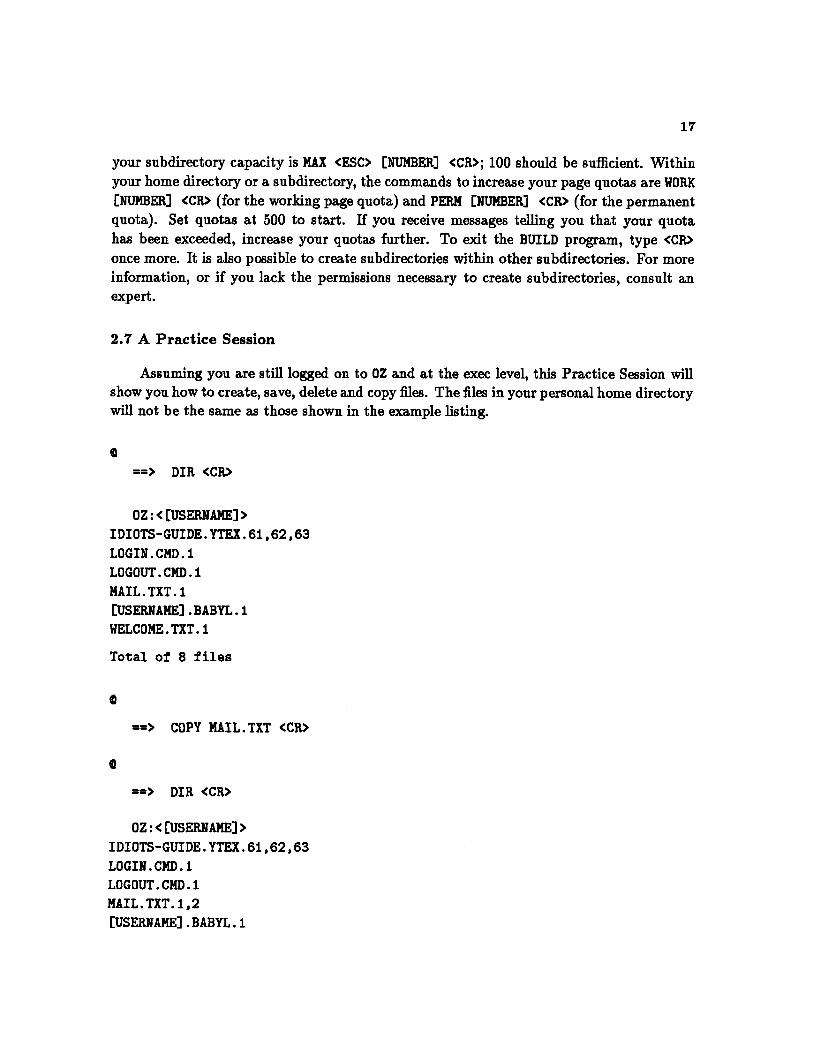
2.7 A Practice Session
Assuming you are still logged on to OZ and at the exec level, this Practice Session willshow you how to create, save, delete and copy files. The files in your personal home directorywill not be the same as those shown in the example listing.
==> DIR <CR>
OZ:<[USERNAME]>IDIOTS-GUIDE.YTEX.61,62,63LOGIN.CMD.1LOGOUT.CMD.1
MAIL.TXT.1EUSERNAME]. BABYL.1WELCOME.TXT.1
Total of 8 files
==> COPY MAIL.TXT <CR>
==> DIR <CR>
OZ:<[USERNAME] >IDIOTS-GUIDE.YTEX.61,62,63LOGIN.CMD.1LOGOUT. CMD.1
MAIL. TXT. 1,2EUSERNAME]. BABYL. 1

WELCOME. TXT.1
Total of 9 files
NOTE: Copying files (a) - You can see that there are now two versions of the fileMAIL. TXT, and that the file total has increased by one.
==> COPY WELCOME.TXT HELLO.TXT <CR>
OZ: <[USERNAME]>IDIOTS-GUIDE. YTEX .61,62,63HELLO .TXT.1LOGIN.CMD.1LOGOUT.CMD.1MAIL.TXT. ,2
[USERNAME] .BABYL. 1WELCOME.TXT.1
Total of 10 files
NOTE: Copying files (b) - There is now a new file, named HELLO.TXT.1. This file hasthe same contents as the file WELCOME.TXT. 1, so you can remove the old one.
==> DELETE WELCOME.TXT <CR>
WELCOME.TXT.1 [OK]
==> DIR <CR>
OZ: <EUSERNAME]>IDIOTS-GUIDE.YTEX.61,62,63HELLO .TXT.1
LOGIN.CMD.1LOGOUT.CMD.1
MAIL.TXT.1,2[USERNAME]. BABYL. 1
Total of 9 files
NOTE: Deleting a file
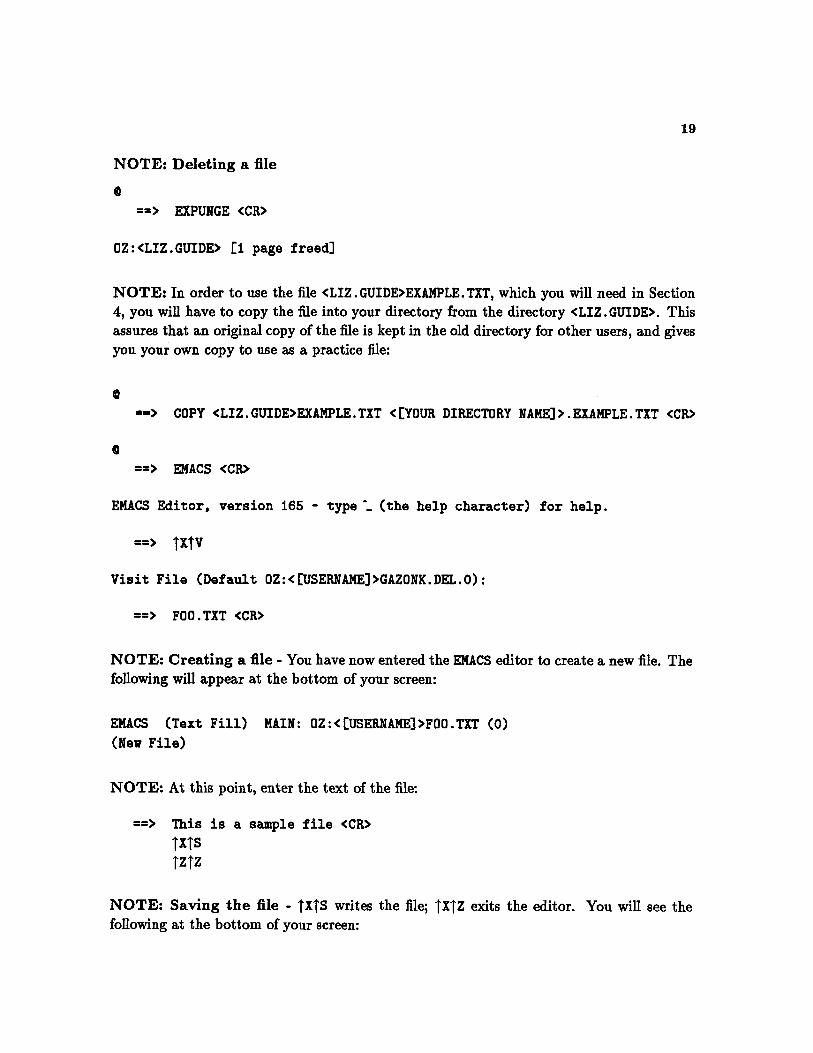
==> EXPUNGE <CR>
OZ:<LIZ.GUIDE> [1 page freed]
NOTE: In order to use the file <LIZ. GUIDE>EXAMPLE. TXT, which you will need in Section4, you will have to copy the file into your directory from the directory <LIZ.GUIDE>. Thisassures that an original copy of the file is kept in the old directory for other users, and gives
you your own copy to use as a practice file:
==> COPY <LIZ.GUIDE>EXAMPLE.TXT < [YOUR DIRECTORY NAME]>.EXAMPLE.TXT <CR>
==> EMACS <CR>
EMACS Editor, version 165 - type ~. (the help character) for help.
==> TXtv
Visit File (Default OZ:<[USERNAME]>GAZONK.DEL.O):
==> FOO.TXT <CR>
NOTE: Creating a file - You have now entered the EMACS editor to create a new file. Thefollowing will appear at the bottom of your screen:
EMACS (Text Fill) MAIN: OZ:<[USERNAME]>FOO.TXT (0)(New File)
NOTE: At this point, enter the text of the file:
==> This is a sample file <CR>
TxtsTzTz
NOTE: Saving the file - TXTS writes the file; TXTZ exits the editor. You will see thefollowing at the bottom of your screen:

Written: OZ:<[USERNAME]>FOO.TXT (1)
==> COPY FOO.TXT F002.TXT <CR>
==> DIR <CR>
OZ:< USERNAME >EXAMPLE. TXT. 1FOO.TXT.1FO02.TXT.1
IDIOTS-GUIDE.YTEX.61,62,63HELLO .TXT.1LOGIN.CMD.1LOGOUT.CMD.1
MAIL.TXT.1,2
[USERNAME] .BABYL. 1
Total of 12 files
NOTE: Deletion using a wilcard - Since the FOO files are just sample files, you can erasethem. Use the wildcard, *, to delete both at once:
==> DEL FOO*.* <CR>
FOO.TXT.1 [OK]F002.TXT.1 [OK]
==> EXPUNGE <CR>
OZ:<[USERNAME]> [2 pages freed]
==> PURGE <CR>
These are the deleted files for directory OZ:<[USERNAME]>:IDIOTS-GUIDE.YTEX.61 IDIOTS-GUIDE.YTEX.62 MAIL.TXT.1Total of 3 filesExpunge?

==> y
[OK -- 70 Pages Freed.]
Total Remaining Pages in Directory: 320
==> DIR <CR>
OZ:< USERNAME]>EXAMPLE.TXT.1IDIOTS-GUIDE. YTEX.63HELLO .TXT. 1LOGIN.CMD.1
LOGOUT.CMD.1MAIL.TXT.2[USERNAME). BABYL. i1
Total of 7 files
NOTE: Only the latest version of each file remains.

3. USING ELECTRONIC MAIL
3.1 Introduction
There are a variety of ways of receiving and sending mail on OZ. There are two mailprograms you will learn in this section, MM and BABYL. MM is easier to use, but BABYL is moresophisticated and has more features. You will also learn how to send mail from the execlevel, how to use mailing lists, and how to send long distance mail over the network.
3.2 Using MM
a. The Basics
To use the MM mail program, type MM at the top level (at the a prompt). This will putyou into the program and list any messages you have not yet read. Within the MM program,your prompt will be MM>. At this prompt, you can either type SEND <CR>, to enter thesending subprogram, or READ <CR>, to enter the reading subprogram.
Like many of the programs on OZ, MM has a certain amount of helpful on-line informationavailable to the user. Type ?<CR> at the MM> prompt. You will be shown a list of commandsavailable at this level of MM. If you are curious about what any one of them does, type HELP[COMMAND NAME] <CR>. Note that there is a general command available at this level of MMwhich gives some basic information: type HELP <CR>.
b. Sending Messages
At the MM> prompt, type SEND <CR> to enter the sending subprogram (this also willwork if you type MAIL <CR>). The computer will respond with the prompt To: Here, enterthe username (login name) of the person to whom you wish to send the message. Thecomputer will respond with cc: Enter the username of anyone to whom you wish to senda copy of the message (this can be yourself); if you do not wish to send copies, just press<CR>. (NOTE: This program will not work with a person's real name. You can use thecommand WHOIS [LAST NAME] <CR> at the top level to find out his username.) The nextprompt will be Subject: Type in a short description of the message content. After youhave done this, press <CR> and the following will appear on your screen:
Message (End with ESCAPE or CTRL/Z.Use CTRL/B to insert a file, CTRL/E to enter editor, CRL/K to redisplaymessage, CTRL/L to clear screen and redisplay, CTRL/N to abort.):
At this point, you can type in your message. It can be as long as you wish; use a <CR>between lines. When you have completed the message, type TZ. This will remove you from

the message portion of the program, and put you at the S> prompt. Type SEND <CR>. Thiswill send your message, and you will see a note on the screen telling you that the messagehas been queued, that is, put in the recipient's mail receiving file, and will be seen the nexttime she reads her mail.
If you wish to change your message, you can use TE to enter the editor. The editingcommands are the sme as those for EMACS, which you will learn about in Section 4.
If you decide not to send the message, type TN to kill it. The computer will respondwith: Abort?. Type Y, and you will be returned to the MM> prompt.
Once you are proficient at manipulating files (Section 2), you may find the TB commanduseful. Create a file containing your message; it is helpful to name this file FILENAME. SENDor FILENAME. MSG for mnemonic purposes. Enter the MM program, type SEND <CR> and enterthe heading information as described above. When you come to the message portion, type
TB. The computer will respond (Insert file: Type the filename. Once the file has beenread in completely, your screen will say EOF (for End Of File). At this point, you can enterany additional information you want to add, or just type TZ to end the message. TypeSEND <CR> at the S> prompt. This feature is useful if you want to send the same messagerepeatedly without retyping it. You can also use TB to transfer text files to other users.
c. Reading your Mail
Normally, when you enter the MM program, something like this will appear:
File: <EUSERNAME]>MAIL.TXT.1There are 2 additional messages
N 1) 1-Jul To: usernameQOZ.AI.M Paper wanted (235 chars)N 2) 1-Jul To: [email protected] Meeting today (365 chars)
Currently at message 1
The first time you use MM, or if you have somehow deleted your mail receiving file, you willsee a message like:
?Can't open message file "< EUSERNAME]>MAIL.TXT.1" - file does not exist
This means that you have not yet received any messages. A file will be created automaticallywhen an incoming message is received.
To read your messages, type READ <CR> at the MM> prompt. This will cause the firstmessage in your MAIL.TXT file to be displayed on the screen. Alternatively, if you have anumbered list of messages as shown above, you can type READ [NUMBER] <CR> to displayonly the specified message. After the first message is displayed, your prompt will be R>.This is the reply prompt. Here, you have some choices. If you wish to answer the message,
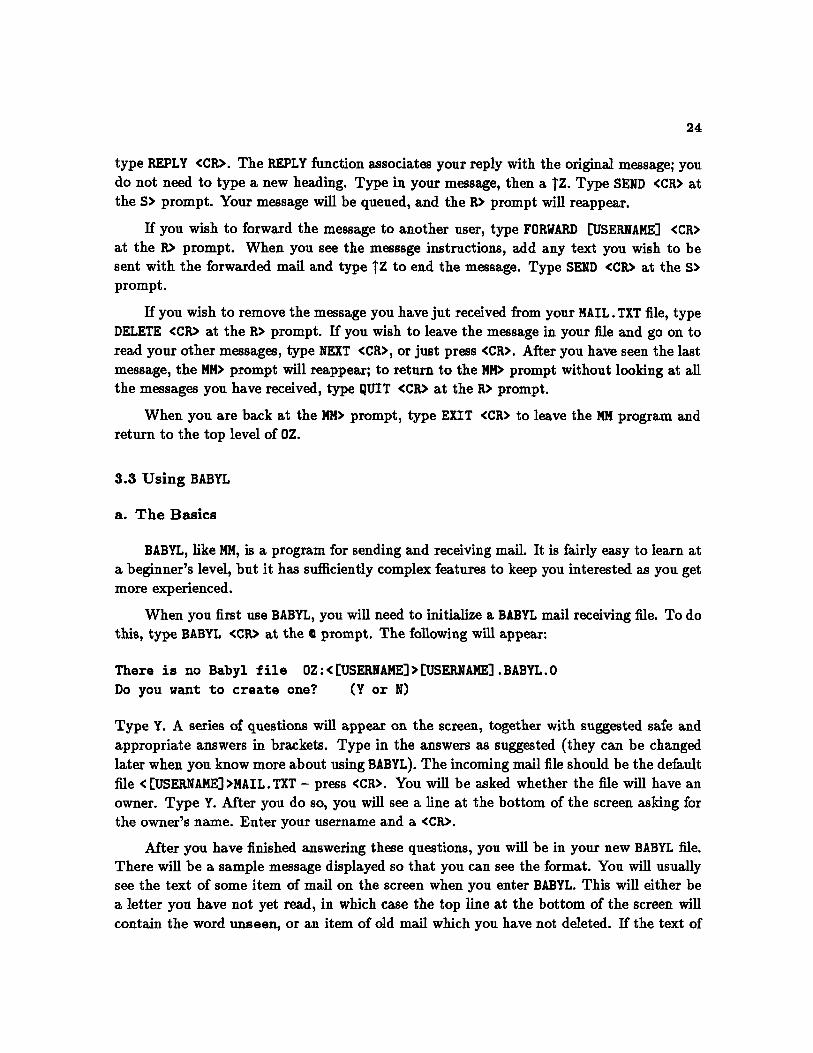
type REPLY <CR>. The REPLY function associates your reply with the original message; youdo not need to type a new heading. Type in your message, then a TZ. Type SEND <CR> atthe S> prompt. Your message will be queued, and the R> prompt will reappear.
If you wish to forward the message to another user, type FORWARD [USERNAME] <CR>at the R> prompt. When you see the messsge instructions, add any text you wish to besent with the forwarded mail and type TZ to end the message. Type SEND <CR> at the S>prompt.
If you wish to remove the message you have jut received from your MAIL. TXT file, typeDELETE <CR> at the R> prompt. If you wish to leave the message in your file and go on toread your other messages, type NEXT <CR>, or just press <CR>. After you have seen the lastmessage, the MM> prompt will reappear; to return to the MM> prompt without looking at allthe messages you have received, type QUIT <CR> at the R> prompt.
When you are back at the MM> prompt, type EXIT <CR> to leave the MM program andreturn to the top level of OZ.
3.3 Using BABYL
a. The Basics
BABYL, like MM, is a program for sending and receiving mail. It is fairly easy to learn ata beginner's level, but it has sufficiently complex features to keep you interested as you get
more experienced.
When you first use BABYL, you will need to initialize a BABYL mail receiving file. To dothis, type BABYL <CR> at the a prompt. The following will appear:
There is no Babyl file OZ:< [USERNAME]> [USERNAME].BABYL.0Do you want to create one? (Y or N)
Type Y. A series of questions will appear on the screen, together with suggested safe and
appropriate answers in brackets. Type in the answers as suggested (they can be changed
later when you know more about using BABYL). The incoming mail file should be the default
file <[USERNAME] >MAIL. TXT - press <CR>. You will be asked whether the file will have an
owner. Type Y. After you do so, you will see a line at the bottom of the screen asking for
the owner's name. Enter your username and a <CR>.
After you have finished answering these questions, you will be in your new BABYL file.
There will be a sample message displayed so that you can see the format. You will usually
see the text of some item of mail on the screen when you enter BABYL. This will either be
a letter you have not yet read, in which case the top line at the bottom of the screen will
contain the word unseen, or an item of old mail which you have not deleted. If the text of
the message fills more than one screen, the word -- More-- will appear at the bottom. Hit<space bar> to see the rest.
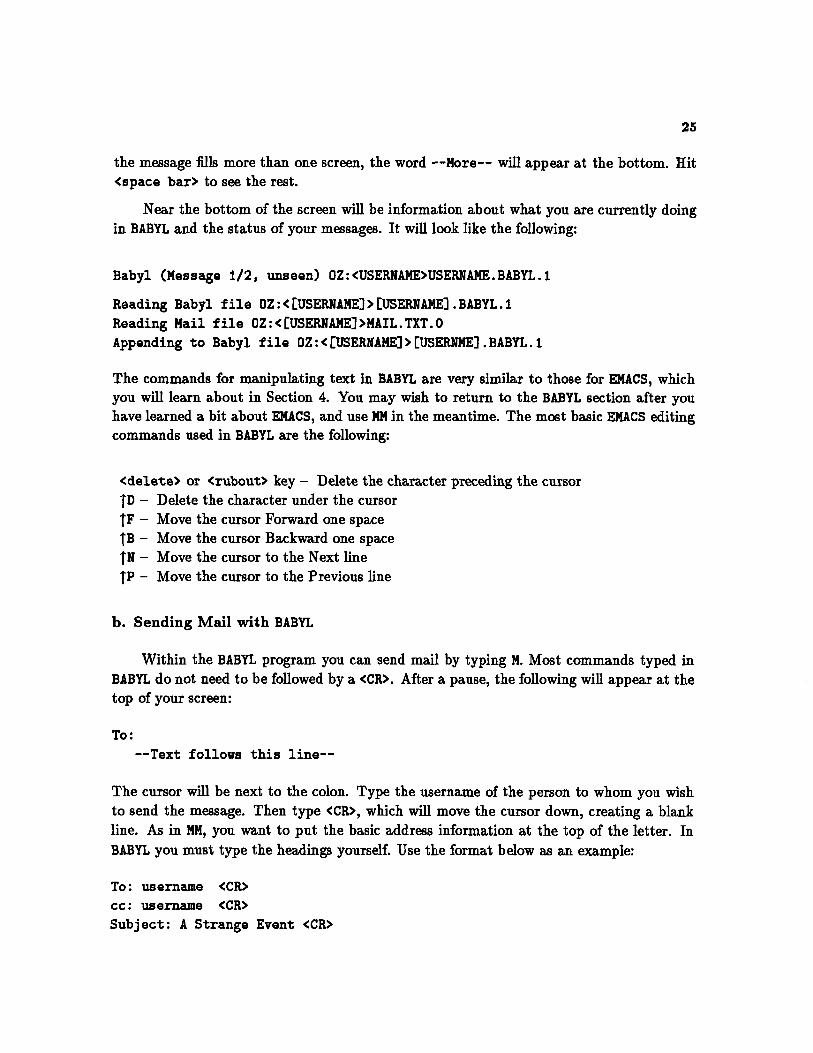
Near the bottom of the screen will be information about what you are currently doingin BABYL and the status of your messages. It will look like the following:
Babyl (Message 1/2, unseen) OZ:<USERNAME>USERNAME.BABYL.1
Reading Babyl file OZ: < USERNAME]> [USERNAME].BABYL.1Reading Mail file OZ:<[USERNAME]>MAIL.TXT.0Appending to Babyl file OZ:<[USERNAME]>[USERNME].BABYL.1
The commands for manipulating text in BABYL are very similar to those for EMACS, whichyou will learn about in Section 4. You may wish to return to the BABYL section after youhave learned a bit about EMACS, and use MM in the meantime. The most basic EMACS editingcommands used in BABYL are the following:
<delete> or <rubout> key - Delete the character preceding the cursor
TD - Delete the character under the cursor
TF - Move the cursor Forward one spaceTB - Move the cursor Backward one spaceTN - Move the cursor to the Next line
TP - Move the cursor to the Previous line
b. Sending Mail with BABYL
Within the BABYL program you can send mail by typing M. Most commands typed inBABYL do not need to be followed by a <CR>. After a pause, the following will appear at thetop of your screen:
To:--Text follows this line--
The cursor will be next to the colon. Type the username of the person to whom you wishto send the message. Then type <CR>, which will move the cursor down, creating a blankline. As in MM, you want to put the basic address information at the top of the letter. InBABYL you must type the headings yourself. Use the format below as an example:
To: username <CR>cc: username <CR>Subject: A Strange Event <CR>

If you wish to send a practice letter to yourself, put your username on both the To: andcc: lines. You don't need to put From: or a date; BABYL will do that automatically.
Now you are ready to write the text of your letter. Using the EMACS-like command TN,move the cursor below the line which says -- Text follows this line--, and type in yourmessage, separating the lines with a <CR>:
Today when I woke up, I discovered that I was in a room differentthan the one in which I had gone to sleep. This confused me, andI lay there awhile in bed trying to understand what had happened.
-Joe Username
After you finish entering your message, type TZfZ. There will be a delay, then the screen willread Queuing...Done, and the message (mail queued) will appear at the bottom. Thismeans that your letter has been sent. If you decide you do not want to send the message,type M-X Abort <CR>.
c. Using BABYL to Read Your Mail
When you enter the BABYL program, you can read any messages currently in your[USERNAME .BABYL file. The last message you have received will appear on the screenautomatically when you enter BABYL. The message will be in the following form:
Date: Monday, 20 June 1983 14:23-EDT
From: [USERNAME]To: Eusername]cc: Eusername]
Today when I woke up, I discovered that I was in a room differentthan the one in which I had gone to sleep. This confused me, andI lay there awhile in bed trying to understand what had happened.
-Joe Username
Babyl (Message 2/2, unseen) OZ:<USERNAME>USERNAME.BABYL.1
Reading Babyl file OZ:< [USERNAME]> [USERNAME].BABYL. 1Reading Mail file OZ:<[USERNAME]>MAIL.TXT.0Appending to Babyl file OZ: < [USERNAME] > [USERNAME] .BABYL. 1
You will also want to read the messages received prior to the one currently on your screen.Use the following commands:

B - List messages in [USERNAME]. BABYL file
D - Delete the current message
E - Expunge deleted messages from [USERNAME]. BABYL file
F - Enter editing mode
G - Get any mail that has come in since you started the BABYL sessionN - Go to the Next message
0 - Put the message into another file; you will be prompted for file name.
P - Go to the Previous messageQ - Quit the BABYL program
U - Undelete the previous message
d. Getting On-Line Help and Exiting BABYL
Like many programs, BABYL has a built-in help function. For a list of all BABYL com-mands, type ?. At the bottom of the screen you will see the message: Type a Babyl com-mand character to describe, "*" for all of them:. If you type * after the colon, alist of commands will appear, together with a short explanation of what each one does.Many of these may seem obscure, but you will only need a few to get along at first.
To get out of the BABYL program, type Q. After a short pause, the a prompt will reappearat the left margin. If you encounter a problem in BABYL, and Q does not work, type tC. Thiswill return you to the exec level of OZ and you can start over.
e. Using BABYL from within EMACS
You may also use the BABYL program to read your mail from within the EMACS editor.While in EMACS, type TX. At the bottom of your screen, you will see: C-X. At this point,enter R <CR>. This will put you into the BABYL program, and you can use the commandslisted in the previous sections. To return to your ENACS file, type Q.
3.4 Maintaining Your Mail Files
Both MM and BABYL require that you maintain mail receiving files. MM causes a file tobe created when a message is received, while BABYL asks you for information so that it cancreate a custom file for you. It is a good policy to delete all unimportant mail after youhave finished reading it. If you neglect to do so at the time the message is read, you can edityour actual files, MAIL. TXT. 1 (for MM) or [USERNAME]. BABYL, to remove unwanted messages.(See Section 2 on files.) When your mail file starts to fill up, you may wish to copy it into astorage file (named something like OLDMAIL. APRIL), so that your mail receiving file is keptclean, and so that you can find old messages if you need to look at them.

Each time you send mail, a file will be created called MAIL. CPY which will contain acopy of the message you sent. Feel free to delete these files if you do not want to keep them.
3.5 Mail Short Cuts
There are three short cut ways to send mail without entering the MM or BABYL programs.They can be used right from the top level of OZ.
From the Q prompt, you can type MAIL EUSERNAME] <CR>. You will then be asked forSubject: (there will be no To: or cc: prompts). Enter the subject, a <CR>, and type yourmessage when you see the Msg: prompt. After you have completed the message, type TZ.You will receive a note telling you that your message has been queued, indicating that ithas been put in the recipient's mail receiving file and will be seen when they next read theirmail. Another short cut method is to type SEND [USERNAME] <CR> at the 0 prompt. Youwill be prompted only for Msg:. Messages sent using this command will appear immediatelyon the recipient's video screen, and will not be put into their mail receiving file.
Because SEND messages appears immediately on the screen, you may occasionally missa message, especially if you are in the middle of a process when the message arrives. Tosee your previous SEND messages, type HUH <CR> or WHAT <CR>. Typing WHAT [NUMBER]<CR> allows you to see multiple past SEND messages. Replace [NUMBER] with the number ofmessages you wish to view. SEND messages will be put into a file named SENDS.TXT. Youmay read, edit and delete this file as you choose.
The final short cut for sending mail, to be used for brief, urgent messages that are ofgeneral interest, is the SHOUT command. Type SHOUT <CR> at the a prompt. You will beprompted for your message. Enter it (no longer than one line) and TZ. Messages sent usingSHOUT appear immediately on everyone's screen. SHOUT messages should be used sparingly.
There is also a short cut method for reading messages. Type RPMAIL <CR> at the toplevel. All awaiting messages will appear on your screen in succession. Hit <space bar>to see the remainder of long messages when you see -- Pause-- or -- More--. After all themessages have been scrolled on your screen, you will see at the bottom: Delete this mail?(Y or N). If you enter Y, all of the messages will be deleted. If you wish to save any ofthe messages, type N. This will cause the messages to be stored in your mail file for laterreading and removal.
3.6 Using Mailing Lists
There are many mailing lists available to use when you are sending mail to a large num-ber of people. Examples are "all-ai", "7-ai", "robotics-group", and "secretaries".You use these names just as you would a username. Make sure that you send to the majorgroups, such as "all-ai" only those messages that everyone must see.

There is a special mailing list called "bboard" for such things as seminar announce-ments, apartments for rent, etc. Everyone is on this list. You get messages sent to "bboard"when you log in, displayed under -- Msgs--.
There is a file on OZ containing all the available mailing lists. It is called MAILING-LISTS. TXT, in the directory <MAIL>. There are mailing lists for a wide range of interests.Do not make changes to this list until you are experienced at manipulating files and usingEMACS (see Sections 2 and 4). In the meantime, ask someone to put you on the mailing liststhat you will need to be on immediately (i.e., those related to your work). Once you havemastered files and EMACS, feel free to put yourself on the lists you find interesting. Thereare instructions at the beginning of the <MAIL>MAILING-LISTS .TXT file that will tell youhow to do this.
3.7 Long Distance: Using Networks
You may have noticed that the full mail address of OZ users, as it appears in mes-sage headings is: [USERNAME]QOZ.AI .MIT.EDU. This indicates that the user is logged intothe computer named OZ, at the A.I. Laboratory, at MIT. To send messages to other OZusers, the username alone is sufficient, since OZ is assumed if no other computer is spec-ified. To send messages to users on another computer at the lab, you must type MAILEUSERNAME][OCOMPUTER NAME] <CR>.
The suffix .EDU in the full address signifies that the computer is part of a nationwidenetwork of universities and research institutions. To send mail to users on this network, usean address of the form [USERNAME] 0 [COMPUTER NAME] . [DEPARTMENT] . [UNIVERSITY] . EDU.For example:
MAIL FREDQVAX.COG-SCI.USC.EDU <CR>
indicates a user named "Fred", using the computer "VAX" in the Cognitive Science Depart-ment at the University of Southern California.
There are other national and worldwide networks which can be accesssed from OZ. Themost commonly used are .ARPA (the Department of Defense research network), .BITNET,and . INTERNET. Addresses for these networks are similar, but not identical, to those for the.EDU net.
3.8 A Practice Session
This practice session will show you how to use MM. This session assumes you are alreadylogged on, and at the exec level of OZ. You will be sending messages to yourself, then readingthem.
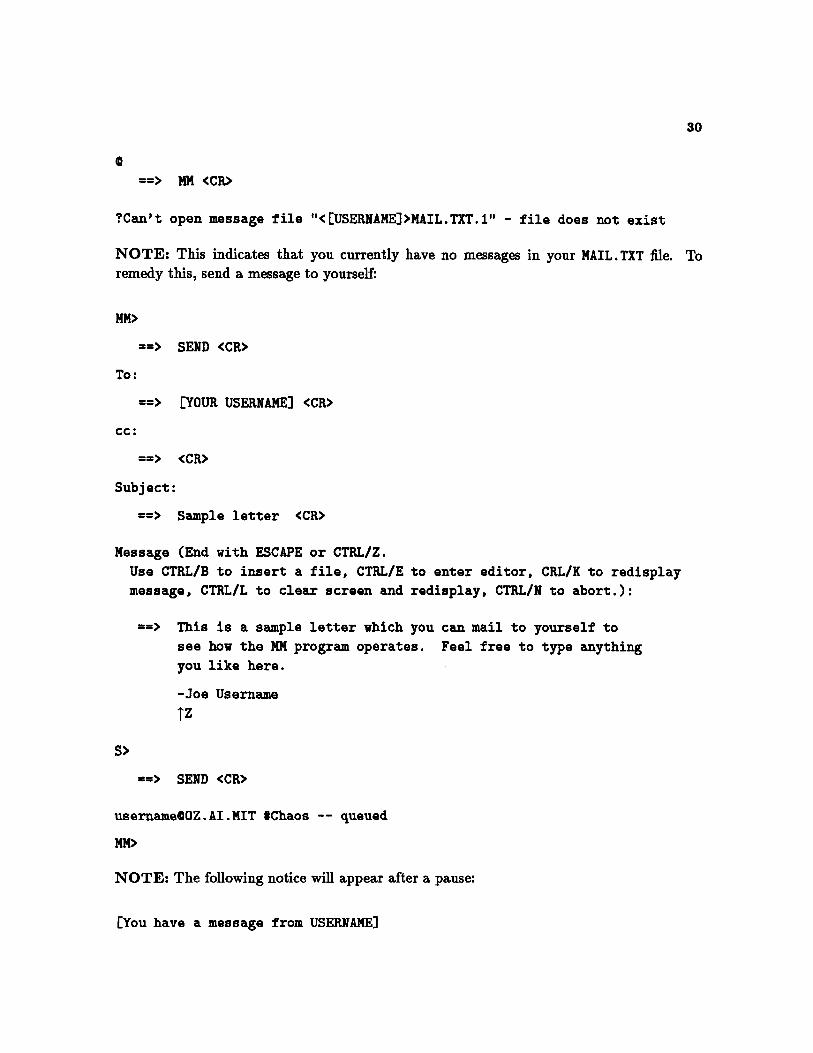
==> MM <CR>
?Can't open message file "<CUSERNAME]>MAIL.TXT. " - file does not exist
NOTE: This indicates that you currently have no messages in your MAIL.TXT file. Toremedy this, send a message to yourself:
MM>
==> SEND <CR>
To:
==> [YOUR USERNAME] <CR>
cc:
==> <CR>
Subject:
==> Sample letter <CR>
Message (End with ESCAPE or CTRL/Z.Use CTRL/B to insert a file, CTRL/E to enter editor, CRL/K to redisplaymessage, CTRL/L to clear screen and redisplay, CTRL/N to abort.):
=> This is a sample letter which yousee how the MM program operates.
you like here.
can mail to yourself toFeel free to type anything
-Joe Username
tz
S>
==> SEND <CR>
usernameCOZ.AI.MIT #Chaos -- queued
MM>
NOTE: The following notice will appear after a pause:
[You have a message from USERNAME)

==> <CR>
MM>
-=> READ <CR>
There is I additional message
N 1) 1-Jul To: usernameQOZ.AI.M Sample letter (335 chars)
Currently at message I
Message 1 (335 characters):Return-path: < USERNAME]MIT-OZ>Mail-From: EUSERNAME] created at 1-Jul-87 14:21:33Date:1 July 1987 1421-EDTFrom: Joe J. Username <[USERNAME]CMIT-OZ>Subject: Sample MessageTo: <[USERNAME] CMIT-OZ>
This is a sample letter which you can mail to yourself tosee how the MM program operates. Feel free to type anythingyou like here.
-Joe Username
R>
==> REPLY <CR>
Message (End with ESCAPE or CTRL/Z.Use CTRL/B to insert a file, CTRL/E to enter editor, CRL/K to redisplaymessage, CTRL/L to clear screen and redisplay, CTRL/N to abort.):
> Thank you for your sample letter!
tz
S>
==> SEND <CR>
usernameOZ.AI.MIT #Chaos -- queued
NOTE: The message below will appear. Remember that you are sending mail back andforth yourself, so the messages appear immediately.
[You have a message from USERNAME]

==> <CR>
There is i additional messageN 2) 1-Jul To: usernameQOZ.AI.M Re: Sample letter
Currently at message 2(225 chars)
MM>
==> READ <CR>
Message 2 (225 characters):Return-path:<[USERNAME]CMIT-OZ>Mail-From: USERNAME created at 1-Jul-87 14:23:30Date:1 July 1987 1423-EDTFrom: Joe J. Username <EUSERNAME])MIT-OZ>To: <[USERNAME]@MIT-OZ>Subject: Re: Sample MessageIn-reply-to: Msg of 1 Jul 87 14:21 EDT from USERNAME
Thank you for the sample letter!
R>==> DELETE <CR>
R>==> NEXT <CR>
NOTE: Use this command repeatedly until the MM> prompt reappears.
MM>
==> EXIT <CR>
Expunging deleted messages.

4. EDITING WITH EMACS
4.1 Introduction
EMACS is an editor, a program you can use to enter, move, and manipulate text. It hasmany features that allow you to do advanced word processing. In this section, you will learnabout the various commands needed to move and rearrange text, how to use M-X commandsto perform special functions, and how to design keyborad macros to simplify your editingwork.
The EMACS program has many commands, some of which perform quite complex func-tions. You will only need a small subset of commands to get started, and these are includedin this guide. As you gain proficiency with EMACS, you should consult one of the availablemanuals to learn more. The EMACS Manual for TWENEX Users, by Richard M.Stallman, A.I. Laboratory Memo 555, @ MIT (1983), is highly recommended, especially forits comprehensive command summary.
4.2 On-Line Help and the TEACH-EMACS Tutorial
EMACS contains extensive on-line documentation. The help character is I- (controlunderscore). When you type this command, you will see the help prompt: Doc (? forhelp): in the space at the bottom of your screen. Typing ?<CR> after the colon will giveyou some basic information. If you type a C at the colon, you will be prompted to enter acharacter command to be explained. If you type a D after the colon, you will be promptedfor a function to be described. Type TX I to enter a file that contains a tree-structuredlisting of EMACS information (type "X to exit). There are more complex methods of gettinghelp within EMACS; consult the EMACS Manual for more information.
There is also a training program called TEACH-EMACS which will take you through thebasics of using the EMACS editor. This program contains a sample file for you to practicewith. In order to use this program, type TEACH-EMACS <CR> at the a prompt.
4.3 Using Buffers
EMACS is designed to work with buffers. Buffers are unsaved files that contain work inprogress. Normally when you are editing, you will be working with only one buffer (the mainbuffer), but you may create and work with as many buffers as you choose. The contents ofa buffer will be lost when you logout (or if the system crashes) unless you explicitly savethe buffer as a file using TSTX. Buffers should not be confused with minibuffers, which areauxiliary buffers used for entering commands within EMACS. Use the following commands tolist and manipulate buffers. Consult the EMACS Manual for a more detailed explanationof buffers and their uses.
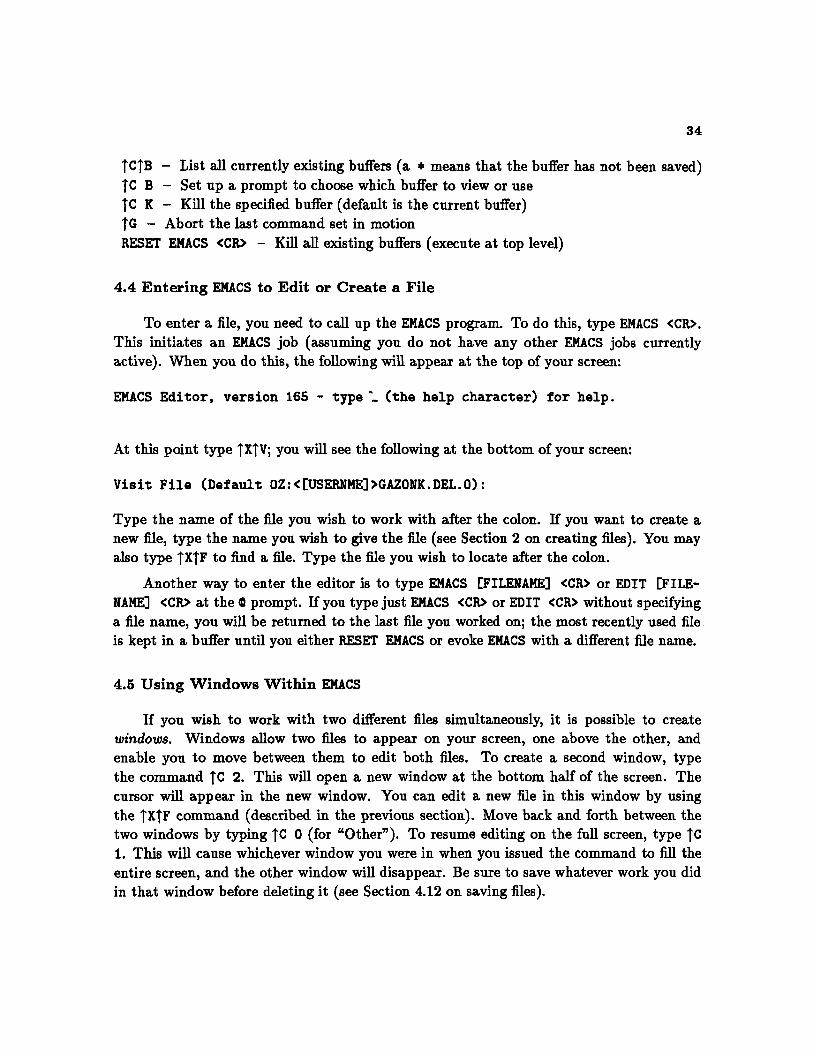
TCTB - List all currently existing buffers (a * means that the buffer has not been saved)TC B - Set up a prompt to choose which buffer to view or use
tC K - Kill the specified buffer (default is the current buffer)TG - Abort the last command set in motionRESET EMACS <CR> - Kill all existing buffers (execute at top level)
4.4 Entering EMACS to Edit or Create a File
To enter a file, you need to call up the EMACS program. To do this, type EMACS <CR>.This initiates an EMACS job (assuming you do not have any other EMACS jobs currentlyactive). When you do this, the following will appear at the top of your screen:
EMACS Editor, version 165 - type ̂ - (the help character) for help.
At this point type TTfV; you will see the following at the bottom of your screen:
Visit File (Default OZ:< [USERNME]>GAZONK.DEL.O0):
Type the name of the file you wish to work with after the colon. If you want to create anew file, type the name you wish to give the file (see Section 2 on creating files). You mayalso type 'XtF to find a file. Type the file you wish to locate after the colon.
Another way to enter the editor is to type EMACS [FILENAME] <CR> or EDIT [FILE-NAME] <CR> at the 0 prompt. If you type just EMACS <CR> or EDIT <CR> without specifyinga file name, you will be returned to the last file you worked on; the most recently used fileis kept in a buffer until you either RESET EMACS or evoke EMACS with a different file name.
4.5 Using Windows Within EMACS
If you wish to work with two different files simultaneously, it is possible to createwindows. Windows allow two files to appear on your screen, one above the other, andenable you to move between them to edit both files. To create a second window, typethe command TC 2. This will open a new window at the bottom half of the screen. Thecursor will appear in the new window. You can edit a new file in this window by usingthe TXTF command (described in the previous section). Move back and forth between thetwo windows by typing TC 0 (for "Other"). To resume editing on the full screen, type TC1. This will cause whichever window you were in when you issued the command to fill theentire screen, and the other window will disappear. Be sure to save whatever work you didin that window before deleting it (see Section 4.12 on saving files).
4.6 Basic Editing Commmands
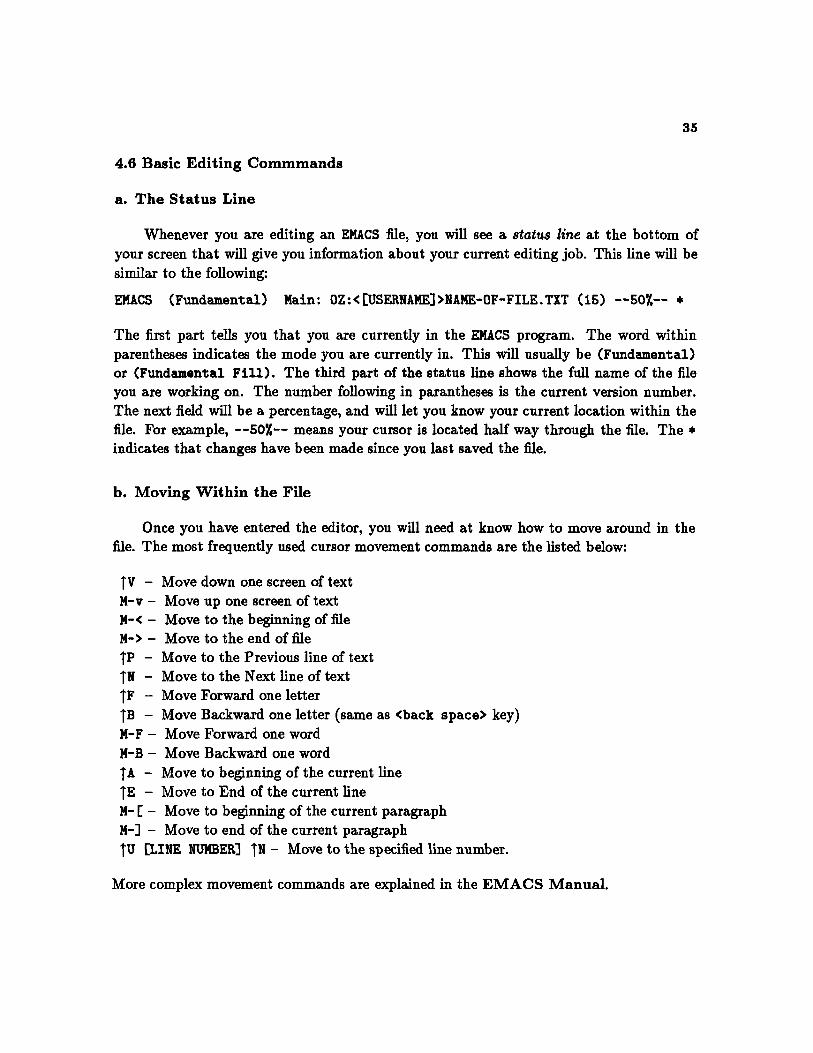
a. The Status Line
Whenever you are editing an EMACS file, you will see a status line at the bottom ofyour screen that will give you information about your current editing job. This line will besimilar to the following:
EMACS (Fundamental) Main: OZ:<[USERNAME]>NAME-OF-FILE.TXT (15) --50Y-- *
The first part tells you that you are currently in the EMACS program. The word withinparentheses indicates the mode you are currently in. This will usually be (Fundamental)or (Fundamental Fill). The third part of the status line shows the full name of the fileyou are working on. The number following in parantheses is the current version number.The next field will be a percentage, and will let you know your current location within thefile. For example, -- 50'/-- means your cursor is located half way through the file. The *indicates that changes have been made since you last saved the file.
b. Moving Within the File
Once you have entered the editor, you will need at know how to move around in thefile. The most frequently used cursor movement commands are the listed below:
TV - Move down one screen of textM-v - Move up one screen of textM-< - Move to the beginning of fileM-> - Move to the end of file
TP - Move to the Previous line of text
IN - Move to the Next line of text
TF - Move Forward one letter
TB - Move Backward one letter (same as <back space> key)M-F - Move Forward one wordM-B - Move Backward one word
TA - Move to beginning of the current line
TE - Move to End of the current lineM- [ - Move to beginning of the current paragraphM-] - Move to end of the current paragraph
TU [LINE NUMBER] IN - Move to the specified line number.
More complex movement commands are explained in the EMACS Manual.
c. Inserting and Transposing Text
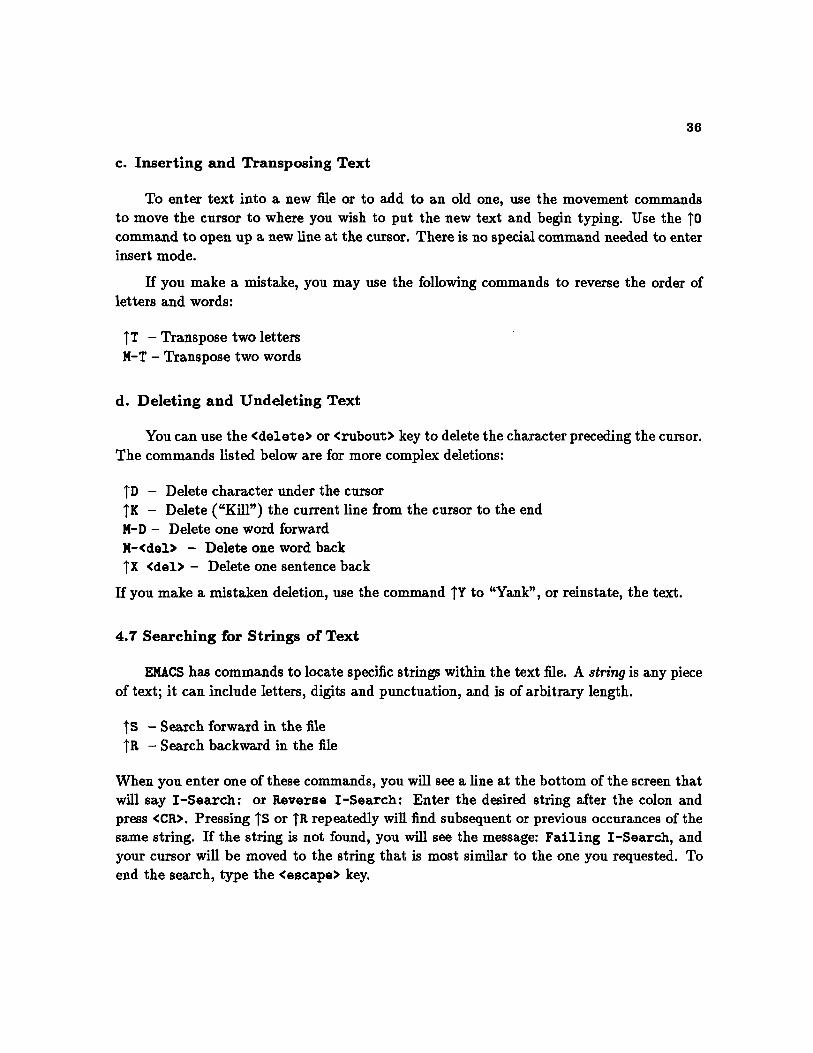
To enter text into a new file or to add to an old one, use the movement commandsto move the cursor to where you wish to put the new text and begin typing. Use the 10command to open up a new line at the cursor. There is no special command needed to enterinsert mode.
If you make a mistake, you may use the following commands to reverse the order ofletters and words:
IT - Transpose two lettersM-T - Transpose two words
d. Deleting and Undeleting Text
You can use the <delete> or <rubout> key to delete the character preceding the cursor.The commands listed below are for more complex deletions:
TD - Delete character under the cursor
TK - Delete ("Kill") the current line from the cursor to the endM-D - Delete one word forwardM-<del> - Delete one word back
TX <del> - Delete one sentence back
If you make a mistaken deletion, use the command TY to "Yank", or reinstate, the text.
4.7 Searching for Strings of Text
EMACS has commands to locate specific strings within the text file. A string is any pieceof text; it can include letters, digits and punctuation, and is of arbitrary length.
IS - Search forward in the fileTR - Search backward in the file
When you enter one of these commands, you will see a line at the bottom of the screen thatwill say I-Search: or Reverse I-Search: Enter the desired string after the colon andpress <CR>. Pressing IS or TR repeatedly will find subsequent or previous occurances of thesame string. If the string is not found, you will see the message: Failing I-Search, andyour cursor will be moved to the string that is most similar to the one you requested. Toend the search, type the <escape> key.
4.8 Moving and Copying Blocks of Text
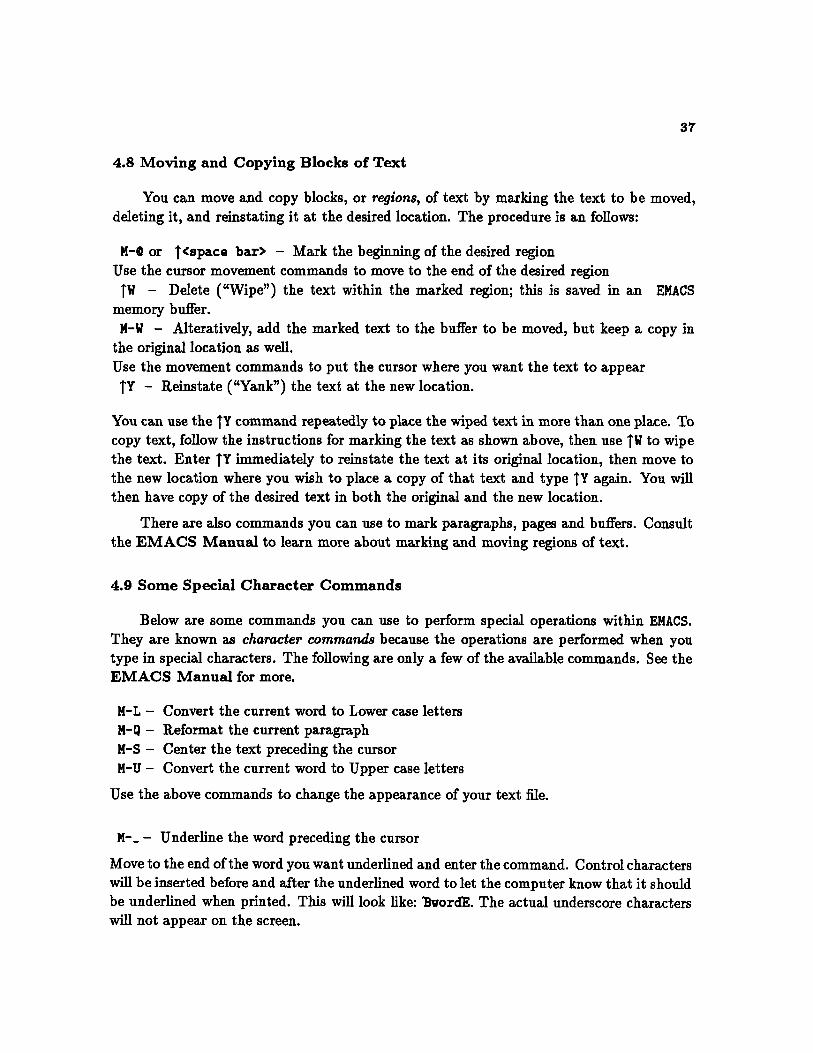
You can move and copy blocks, or regions, of text by marking the text to be moved,deleting it, and reinstating it at the desired location. The procedure is an follows:
M-e or T<space bar> - Mark the beginning of the desired regionUse the cursor movement commands to move to the end of the desired region
TW - Delete ("Wipe") the text within the marked region; this is saved in an EMACSmemory buffer.
M-W - Alteratively, add the marked text to the buffer to be moved, but keep a copy inthe original location as well.Use the movement commands to put the cursor where you want the text to appear
TY - Reinstate ("Yank") the text at the new location.
You can use the TY command repeatedly to place the wiped text in more than one place. Tocopy text, follow the instructions for marking the text as shown above, then use TW to wipethe text. Enter TY immediately to reinstate the text at its original location, then move tothe new location where you wish to place a copy of that text and type TY again. You willthen have copy of the desired text in both the original and the new location.
There are also commands you can use to mark paragraphs, pages and buffers. Consultthe EMACS Manual to learn more about marking and moving regions of text.
4.9 Some Special Character Commands
Below are some commands you can use to perform special operations within EMACS.They are known as character commands because the operations are performed when youtype in special characters. The following are only a few of the available commands. See theEMACS Manual for more.
M-L - Convert the current word to Lower case lettersn-Q - Reformat the current paragraphM-S - Center the text preceding the cursorM-U - Convert the current word to Upper case letters
Use the above commands to change the appearance of your text file.
M-. - Underline the word preceding the cursor
Move to the end of the word you want underlined and enter the command. Control characterswill be inserted before and after the underlined word to let the computer know that it shouldbe underlined when printed. This will look like: 'BvordE. The actual underscore characterswill not appear on the screen.
M-$ - Check the spelling of the previous word
Move the cursor so that it is on or after the word you wish to check and enter the commandabove. If the word is correct, you will see: Found it. at the bottom of your screen. If theword is incorrect, suggested correct spellings will appear at the top of the screen. You canchange the word by typing in the digit listed in front of the correct spelling. If you wishto leave the word as it is, type <space bar>. If a word is unknown to the computer (forexample a proper name), the message: Word not found. will appear at the bottom of thescreen.
4.10 Extended (M-X) Commands
There is a special feature of EMACS thats allows you to enter specialized commands andperform complex functions that cannot be done using the character commands alone. Theseare called extended (or M-X) commands. Below are some basic M-X commands. To executethese commands, type M-X anywhere within the file. Your cursor will reapear at the bottomof the screen; here you can enter the command word(s). To abort an M-X command if youchange your mind, type TG (twice if necessary). The command M-X Apropos will give youmore information about extended commands.
M-X AUTO FILL <CR> - Switch on and off Auto Fill Mode
EMACS can be set so that the text wraps around to the next line as you type. Typing thiscommand alternately turns Auto Fill Mode on and off. If it is on, the status line at thebottom of your screen will say (Fundamental Fill).
M-X CHECK MAIL <CR> - List the mail currently waiting to be read
M-X CORRECT SPELLING <CR> - Check and correct the spelling of the entire file
This command invokes the ISPELL program, which will search through the file, find mis-spelled words, and ask you whether you wish to change them. Enter this command at thebeginning of the file to be checked. The ISPELL program works in a manner similar to theM-$ command for individual words. Suggested correct spellings will be listed on the screen.Fix the misspelled word by typing the digit that corresponds to the spelling you prefer. Ifthe program makes no suggestions, or if you do not like the ones it makes, type R to replacethe misspelled word with one of your own choosing. Press <space bar> to leave the wordas it is
M-X DIRED <CR> - List the files in your directory from within EMACS.
M-X LISP MODE <CR> - Set <tab> key to properly indent LISP programs
Typing this command alternately turns LISP Mode on and off. When on, using the <tab> keyproduces indentation similar to pretty-printing and matching parentheses will be indicated.If LISP Mode is on, the status line of file will say (LISP).
M-X REAP <CR> - Delete all but the two most recent versions of each file
This command can be used to clean up your directory from within EMACS. You must stillreturn to the exec level to expunge the files, as shown in Section 2.
M-X REPLACE STRING <CR> - Replace all occurances of a string within the file
M-X QUERY REPLACE <CR> - Replace specific occurances of a string within a file
These commands will locate occurances of a string and replace them with a substitute string.After typing either of the commands above, press the <escape> key. A $ will appear afterthe command name. Type the string you wish to replace after the $ and hit <escape>again. Another $ will appear. Now type the string to be substituted. Hit <escape> oncemore, and then <CR>. If you use REPLACE STRING, all instances of the string throughoutthe file will be replaced immediately. If you use QUERY REPLACE, you will be presented inturn with each occurance of the original string. Typing <space bar> causes that instanceof the string to be replaced with the substitute string. Typing <delete> will leave it as itis. TG will stop the query replace process.
M-X LOAD LIBRARY SORT <CR> - Load the sort routine libraryM-X SORT LINES <CR> - Alpha-numerically sort the file by linesM-X SORT PARAGRAPHS <CR> - Sort the file by paragraphs
The LOAD command is used to access a library of sorting routines maintained by EMACS.To use the sort commands, set a mark by placing the cursor where you wish to begin thesort. Move the curser using TN to the point at which you which to end the sort. Thentype the appropriate command to sort either by lines or by paragraphs. The sort will bealpha-numeric, numbers preceding letters. Use TITS to save the sorted version.
M-X UNDO <CR> - Reinstate the most recently killed material
If you mistakenly delete some text, this command causes the most recently killed text tobe put back at the location from which it was removed. Enter the command and press<CR>. The prompt at the bottom will read: Undo the last kill (Y or N)?. Type Y toreinstate the text.
Consult the EMACS Manual for a full list of M-X commnds, along with a moredetailed description of how to use them.
4.11 Using Keyboard Macros
A keyboard macro is a special function you can define to abbreviate a sequence ofcommands. This will allow you to perform multi-command operations with a single charactercommand. The procedure on the following page will show you how to create simple macros.Such macros can also be named or stored as permanent user-defined commands. See theEMACS Manual for more details.
TX ( - Begin defining a keyboard macroType the commands you want to become a part of the current macro
TX ) - End the definition of the current keyboard macroTX E - Execute the most recently defined macro (this may be used repeatedly)TU [NUMBER] TX E - Execute the macro the specified number of timesTG - Abort the current macro
4.12 Saving the File and Exiting EMACS
When you are finished editing a file, save it by typing TXTS. A new version of the filewill be created that contains the changes you have just made, and the following will appearat the bottom of your screen:
Written: OZ: < [USERNAME] >NAME-OF-FILE.TXT.15
You may also save the changes you have made to any other file you specify. Type TXTW fromwithin EMACS, and enter the desired file name after the colon when prompted to do so.
It is recommended that you save your files frequently, every page or so. If the systemcrashes, any editing work done on the file before the last save is safe; you may lose changesmade after that time. The * in the status line indicates that there are modifications thathave been made to the file but not yet saved. If no changes have been made since the lastsave, you will see: (No changes need to be written) at the bottom of your screen whenyou attempt to write the file.
To exit the editor, type TXTZ (TZTZ will also work). To exit the editor without savingchanges, or to return to the top level of OZ at any time, type TC. When your editing sessionis finished, type RESET EMACS <CR> to kill any currently active EMACS jobs.
4.13 A Practice Session
There is a file in the directory <LIZ. GUIDE> that contains a file for you to practiceon. If you went through the Practice Session at the end of Section 2, you will have alreadycopied this file into your own directory. If not, type:
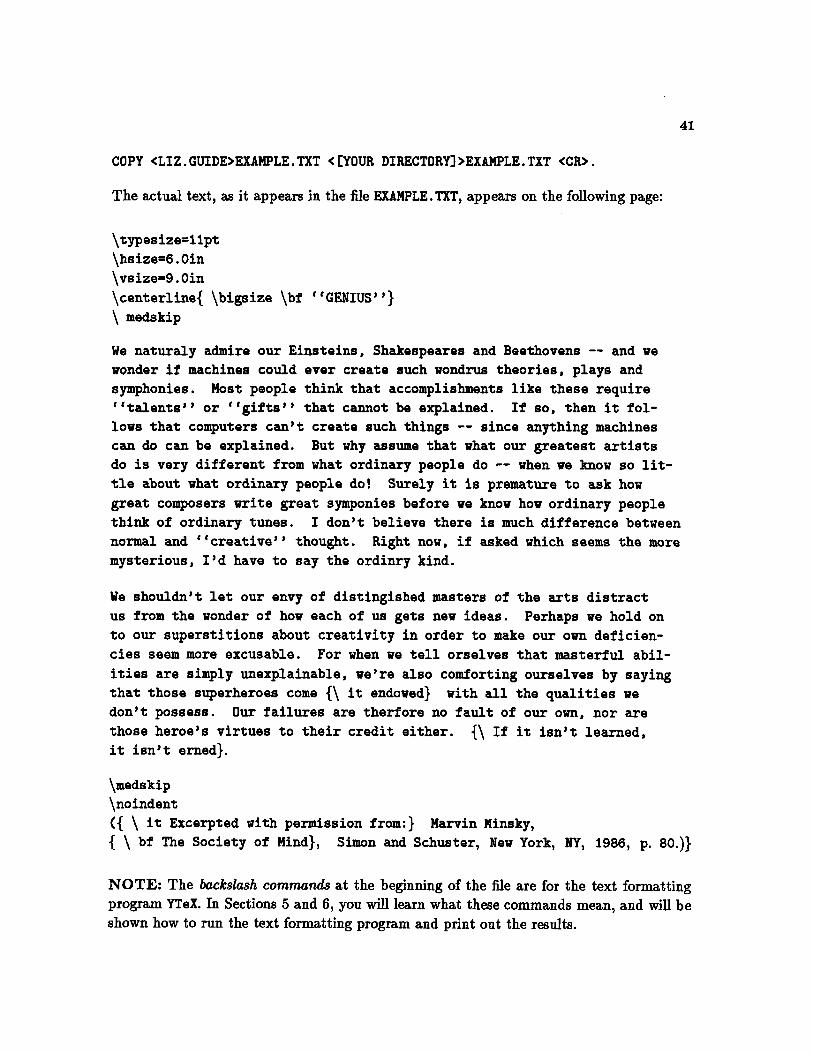
COPY <LIZ.GUIDE>EXAMPLE.TXT <[YOUR DIRECTORY)>EXAMPLE.TXT <CR>.
The actual text, as it appears in the file EXAMPLE.TXT, appears on the following page:
\typesize=11pt
\hsize=6.0in
\vsize=9.0in\centerline{ \bigsize \bf "GENIUS"}
\ medskip
We naturaly admire our Einsteins, Shakespeares and Beethovens -- and wewonder if machines could ever create such wondrus theories, plays andsymphonies. Most people think that accomplishments like these require"talents" or "gifts" that cannot be explained. If so, then it fol-lows that computers can't create such things -- since anything machinescan do can be explained. But why assume that what our greatest artistsdo is very different from what ordinary people do -- when we know so lit-tle about what ordinary people do! Surely it is premature to ask howgreat composers write great symponies before we know how ordinary peoplethink of ordinary tunes. I don't believe there is much difference betweennormal and "creative" thought. Right now, if asked which seems the moremysterious, I'd have to say the ordinry kind.
We shouldn't let our envy of distingished masters of the arts distractus from the wonder of how each of us gets new ideas. Perhaps we hold onto our superstitions about creativity in order to make our own deficien-cies seem more excusable. For when we tell orselves that masterful abil-ities are simply unexplainable, we're also comforting ourselves by sayingthat those superheroes come {\ it endowed} with all the qualities wedon't possess. Our failures are therfore no fault of our own, nor arethose heroe's virtues to their credit either. {\ If it isn't learned,it isn't erned}.
\medskip
\noindent({ \ it Excerpted with permission from:} Marvin Minsky,{ \ bf The Society of Mind), Simon and Schuster, New York, NY, 1986, p. 80.))
NOTE: The backslash commands at the beginning of the file are for the text formattingprogram YTeX. In Sections 5 and 6, you will learn what these commands mean, and will beshown how to run the text formatting program and print out the results.
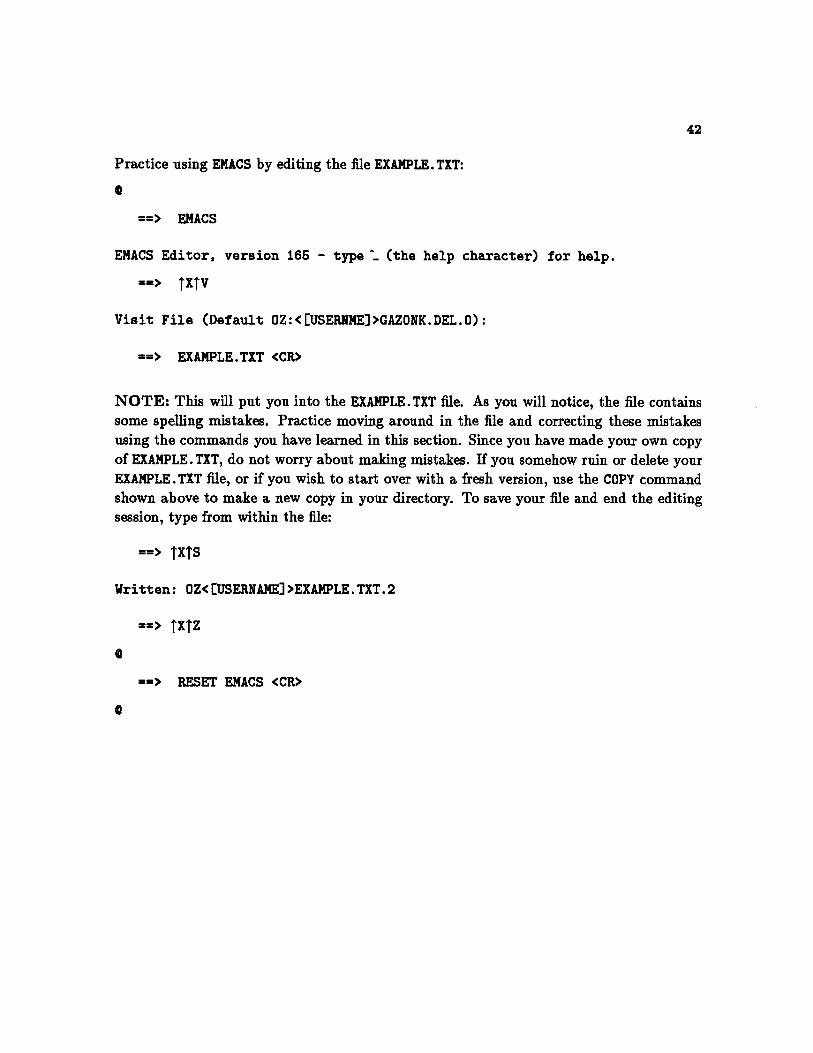
Practice using EMACS by editing the file EXAMPLE. TXT:
a
==> EMACS
EMACS Editor, version 165 - type 1^ (the help character) for help.
==> TXTV
Visit File (Default OZ:<[USERNME]>GAZONK.DEL.O):
==> EXAMPLE.TXT <CR>
NOTE: This will put you into the EXAMPLE.TXT file. As you will notice, the file contains
some spelling mistakes. Practice moving around in the file and correcting these mistakes
using the commands you have learned in this section. Since you have made your own copy
of EXAMPLE. TXT, do not worry about making mistakes. If you somehow ruin or delete yourEXAMPLE.TXT file, or if you wish to start over with a fresh version, use the COPY commandshown above to make a new copy in your directory. To save your file and end the editing
session, type from within the file:
==> TXTS
Written: OZ<[USERNAME]>EXAMPLE.TXT.2
==> TXTZ
==> RESET EMACS <CR>

5. TEXT FORMATTING WITH YTeX
5.1 Introduction
YTeX is a program which will read a file that you have prepared using EMACS andtranslate it into a set of instructions which will cause the printer to output the file in thestyle you have specified. This process is known as text formatting, or typesetting. Althoughit is possible to print a "raw" EMACS text file directly, formatted files have a much morepleasing appearance and allow a wider range of style options.
YTeX is not the only text formatting program available to you on OZ. Another popularformatting program is LaTeX. This guide will discuss only the YTeX program, because itis somewhat easier and more widely used. LaTeX is quite similar to YTeX, but includessome options that YTeX does not offer, such as table of contents and bibliographic databasepreparation, and a package called SliTeX for producing text for transparencies.
This guide will show you some of the basic features of YTeX, and the commands youwill need to format simple documents. For an overview of YTeX, a good resource is Howto Use YTeX, by Daniel Brotsky, A.I. Laboratory Working Paper 273, @ MassachusettsInstitute of Technology (1986). For complex typesetting of equations, see The TeXbook,by Donald Knuth, @ American Mathematical Society (1986). Although this book is basedon the original TeX program, you should find it quite helpful. If you prefer to use LaTeX, referto the manual LaTeX Document Preparation System: User's Guide and ReferenceManual, by Leslie Lamport, @ Addision-Wesley (1986). There are also a number of A.I.Laboratory memos and working papers that deal with these programs (see Appendix C).The text formatting prgrams are frequently modified and updated, so these memos are animportant source of up-to-the-minute information.
YTeX will probably seem quite confusing to you at first, especially if you are accustomedto working with a dedicated word processing system. Remember that you only need to befamiliar with a small subset of commands in order to get started. A good way to learn aboutYTeX is to compare a . YTEX file to the final formatted document and notice what does what.The file <LIZ. GUIDE>IDIOTS-GUIDE. YTEX contains the text of this guide in YTeX form; youcan compare this to the printed copy of the guide to see how the various stylistic featureswere produced.
5.2 Using YTeX: The Basic Idea
YTeX commands, also called backslash commands, are commands inserted throughoutthe text file to tell the printer what the final output should look like. These commandsalways begin with the character \, and should be typed in lower-case letters. Files thatcontain commands for YTeX will usually end in the suffix .YTEX. Once you have prepared

your . YTEX file, you can run the YTeX program on it to produce a new file that containsinstructions that can be interpreted by the printer.
In the course of preparing your .YTEX file, you may wish to insert comments into thefile as notes or reminders to yourself. This can be done anywhere within the file. To entera comment, type the character %' followed by the text of the comment.
5.3 YTeX Opening Commands
There are certain YTeX commands that must be included at the beginning of every.YTEX file. These commands tell the printer the general format of the document.
a. Setting Sizes
At the beginning of the file, you should enter the commands that will set the size ofthe type and of the margins that will appear throughout the formatted document:
\typesize=11pt\hsize=6.0in
\vsize=9.0in
The first command above indicates the size of the type you wish to use. 10pt is the sizeused by most typewriters; 11pt and 12pt are slightly larger.
The \hsize (horizontal size) command sets the width of the text to be printed. The\vsize (vertical size) command sets the length of the text on the page. If you are usingthe usual 8.5 x 11 inch paper, an \hsize of six inches (6.0in) and a \vsize of nine inches(9.0in) will produce attractive margins.
b. Inputting Auxiliary Files
If you frequently produce complex documents which have a similar format, you maywish to set up a file that contains the basic formatting commands you use instead of enteringthem anew each time you create a .YTEX file. This file, called < [USERNAME] >MACROS. YTEXor < [USERNAME]YTEX. LOCAL, can contain commands for sizing, page numbering, sectionnumbering, etc. Look in the file <LIZ. GUIDE>MACROS. YTEX to get an idea of what is con-tained in such a file. If you wish, you can copy this into your directory to create your ownMACROS. YTEX file.
When you run the YTeX program on a specific .YTEX document file, you will wantthe program to read the commands in the MACROS.YTEX file. To do this, use the \inputcommand:

\input <[username] >macros. ytex
The input command may also be used to input files of equation commands, references, oruser-defined macros (see below). Ask an experienced YTeX user how to do this.
c. Defining Macros
To simplify your editing work, you may wish to define macros, which are special user-defined functions. For example, you can define a command that will spell out a long stringwhen you enter an abbreviation. These commands are in the following form, and should beentered before you begin typing the text of your document:
\def\AIL{ Artificial Intelligence Laboratory}
After the above command is entered, typing \AIL within your text file will cause Artifi-cial Intelligence Laboratory to appear in your formatted output. It is also possible toarrange such definitions in a file that will be read each time you run the YTeX program.
There are more complex types of macros that you can define, such as letter and docu-ment formats. Refer to a YTeX reference manual or consult an expert for more information.
5.4 Stylistic Commands
a. Layout Commands
Normally, in a formatted . YTEX file text will be arranged so that it is right- and left-justified and all the lines are filled. If you type:
This is a line
of text. It will befilled and justified.
the following output will result:
This is a line of text. It will be filled and justified.
If you do not want your text filled in, use the following commands:
\beginnofill %Do not fill the following textText to beleft unfilled\endnofill .End non-fill mode
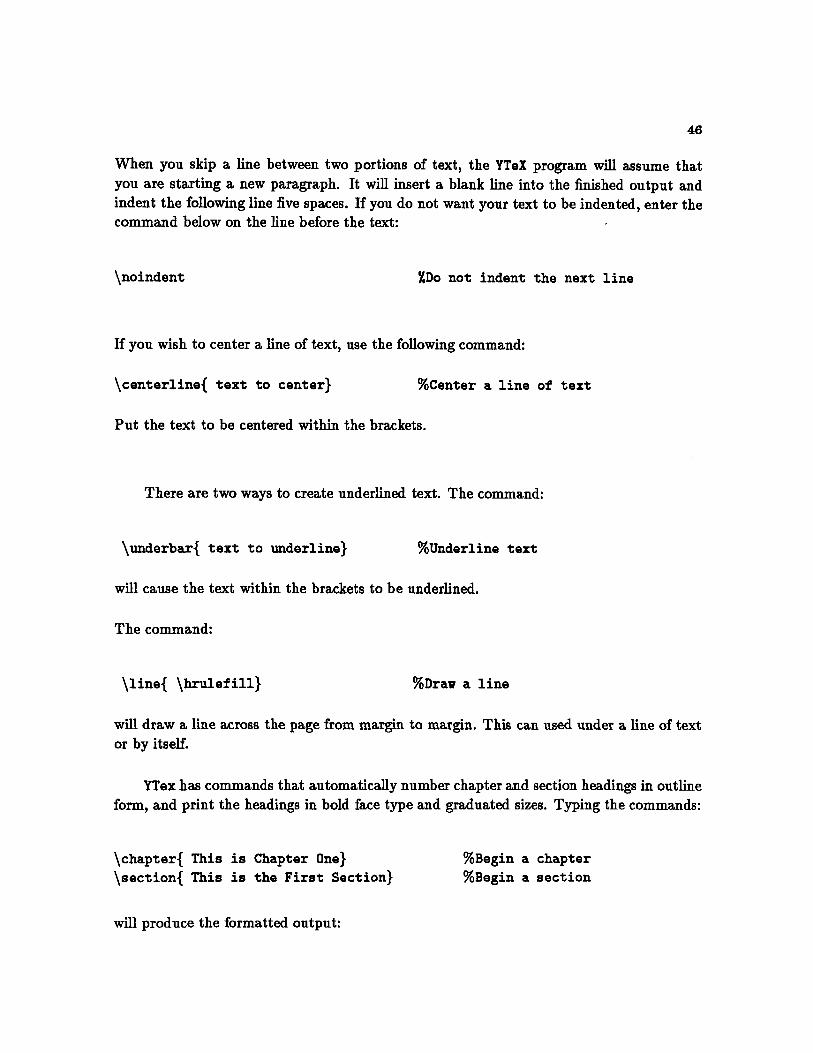
When you skip a line between two portions of text, the YTeX program will assume thatyou are starting a new paragraph. It will insert a blank line into the finished output andindent the following line five spaces. If you do not want your text to be indented, enter thecommand below on the line before the text:
\noindent YDo not indent the next line
If you wish to center a line of text, use the following command:
\centerline{ text to center} %Center a line of text
Put the text to be centered within the brackets.
There are two ways to create underlined text. The command:
\underbar{ text to underline) %Underline text
will cause the text within the brackets to be underlined.
The command:
\line{ \hrulefill) %Draw a line
will draw a line across the page from margin to margin. This can used under a line of textor by itself.
YTex has commands that automatically number chapter and section headings in outlineform, and print the headings in bold face type and graduated sizes. Typing the commands:
\chapter{ This is Chapter One)
\section{ This is the First Section}
will produce the formatted output:
%Begin a chapter%Begin a section

1. This is Chapter One
1.1. This is the First Section
Other commands are available in YTeX that will produce inverted paragraphs, bulletedparagraphs and more. Refer to The TeXbook for details.
b. Spacing Commands
When you are editing, inserting blank lines into the .YTEX file will not cause suchspacing to appear in the finished output. The ways to make blank lines appear in theformatted version are shown below:
\smallskip\medskip
\bigskip
YSmall Skip - about one half line skipped%Medium Skip - about one line skipped%Large Skip - about two lines skipped
Exact spacing will depend on the typesize and font you are using. You may have to experi-ment to achieve the spacing you desire.
To skip larger chunks of space, you can use the \vskip command. This command workswith measurements in inches or millimeters:
\vskip 0.5truein
\vskip 4.0mm
%Skip one half inch%Skip four millimeters
To double space your entire file or a part of it, use the following commands:
\doublespace
Text to be double spaced\singlespace
%Begin double spacing
/End double spacing
Normally, the YTeX program will break your document into pages properly. However, if youwish to override the YTeX pagination, use the command:
\vfil\eject %Start a new page
c. Font Changing Commands
One of the nice features of YTeX is that it allows you to use a variety of different fontsto improve the appearance of your documents.

For example, if you have set your typesize to 11pt, you may wish to have certain lines,such as titles, printed in a large or larger size type. To do this use the commands:
{\bigsize [text]} %Large size text{\biggsize [text]} %Larger text
These commands print text in increasingly larger type fonts. Put the text to be enlargedafter the command within the brackets (do not type the [ ]). You may have to experimentget the size you want.
If you wish to emphasize a string of text, you can put it in italics, bold face, slantedtype or typewriter font. Use the following commands, replacing [text] with the text tobe emphasized (omit the [ ]):
{\it [text]} %Italics{\bf [text]} %Bold face{\tt [text]} %Typewriter font{\sl [text]} %Slanted type
d. Special Characters
As you will see when you begin to format equations, many of the specialized YTeXcommands contain normally used symbols. For example, the equation delimiter is $. If youwish to actually print out a $, you will need to precede it with a backslash (\$). This alsotrue for the symbols #, & and others.
5.5 Formatting Equations
Using YTeX you will be able to typeset most complex equations. As the sample equationson the next page demonstrate, available features include Greek letters (upper and lowercase); varying sizes of parentheses, brackets, and braces; subscripts and superscripts; andsymbols for derivative, sum, square root, and vector, among others.
a. Horizontal Mode
There are two modes of equation formatting in YTeX. The first is called horizontal mode,also known as text style. In this mode, numbers, symbols, and short equations are insertedwithin a line of normal text. When typing, the equation should be preceded and followedby single dollar signs. Letters within the dollar signs will be italicized. For example, if youtype:

If $m=2$, then the solution is $J.2(f)$.
the formatted output will be:
If m = 2, then the solution is J2(f).
Horizontal mode can also be used to number refernces, as the following example shows.If you type:
This fact was also pointed out by Winograd$^{ [15],[23]} $.
the processed output will be:
This fact was also pointed out by Winograd[15] ,[23]
b. Vertical Mode
The second available math mode is called vertical mode, or display style, and is usedto produce more complex equations that are set off from the text, as shown by the sampleequations on the next page:
=3 - PS1 - qs 2 (1)
/1 + p+ q2
Jm(f) = (8 )2ddy (2)
S 4f -(3)
4-(f2 2)' 4-(f2+g2) (3)
Equations in vertical mode are delimited by double dollar signs in the . YTEX file. Theseequations may extend over several typed lines. As an example of how to use this mode, theinput below was used to produce Equation (1) above:
$$ \Omega(\mu,\nu) = {{ s3 - ps-l - qs2} \over{\sqrt{1 + p + q^2}}} \eqno(1.1)$$

c. Some Basic Equation Commands
There are too many equation typesetting commands to list in this manual, and most ofthem are only used for specialized purposes. Some of the more basic commands are shownbelow. All of these my be used in either horizontal or vertical mode. See The TeXbookfor a complete listing of the math mode commands and how to use them.
INPUT FORMATTED OUTPUT
\delta YLover case Greek letter
\Delta A XUpper case Greek letter
\int f %Integral sign
\infty oo %Infinity sign
x^2 X2 XSuperscript
y.3 Y3 YSubscript
\sqrt2 ' %Square root
\vec z F %Vector
x\le y\ne z X < Y xz Less than or equal to; not equal
5.6 Creating Tables
YTeX will allow you to construct fairly intricate tables. A normal table will fit entirelyon one page. To create this type of table, enter the command \begintable. A tablethat extends over page breaks is called an open table. Begin this type of table by typing\beginopentable. Directly after either of these opening commands will be an indicator ofthe table format, appearing in brackets (0). Indicators to use are 1, c, or r. These indicatethat the table columns should be left-justified, centered, or right-justified, respectively. Thenumber of indicator letters in the brackets will control the number of columns in the table.For example, [111] will create three left-justified columns. When typing the actual tabletext, use the & symbol to indicate that you wish to begin the next column. A \cr is used atthe end of each completed line of text. If used by itself, it will cause a line to be skipped. Usethe command \endtable or \endopentable to resume normal text editing. The followingcommands will create a simple table. See The TeXbook for more detail.
\line{\hrulefill}\begintable [lcr] %Begin a tableCOURSE TITLE &INSTRUCTOR &NUMBER \cr
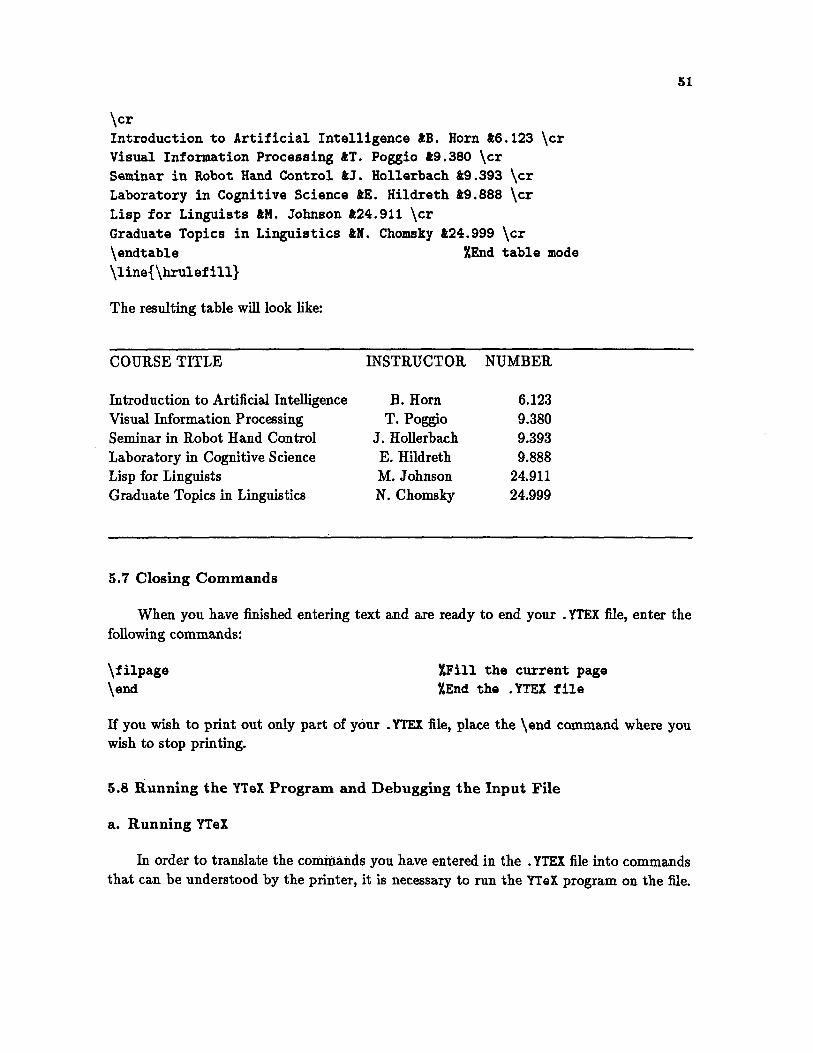
\crIntroduction to Artificial Intelligence tB. Horn &6.123 \crVisual Information Processing &T. Poggio &9.380 \crSeminar in Robot Hand Control &J. Hollerbach &9.393 \cr
Laboratory in Cognitive Science &E. Hildreth &9.888 \cr
Lisp for Linguists &M. Johnson &24.911 \cr
Graduate Topics in Linguistics &N. Chomsky &24.999 \cr\endtable %End table mode
\line{\hrulefill}
The resulting table will look like:
COURSE TITLE INSTRUCTOR NUMBER
Introduction to Artificial Intelligence B. Horn 6.123Visual Information Processing T. Poggio 9.380Seminar in Robot Hand Control J. Hollerbach 9.393Laboratory in Cognitive Science E. Hildreth 9.888Lisp for Linguists M. Johnson 24.911Graduate Topics in Linguistics N. Chomsky 24.999
5.7 Closing Commands
When you have finished entering text and are ready to end your . YTEX file, enter thefollowing commands:
\filpage\end
%Fill the current page%End the .YTEX file
If you wish to print out only part of your . YTEX file, place the \end command where youwish to stop printing.
5.8 Running the YTeX Program and Debugging the Input File
a. Running YTeX
In order to translate the commands you have entered in the . YTEX file into commandsthat can be understood by the printer, it is necessary to run the YTeX program on the file.
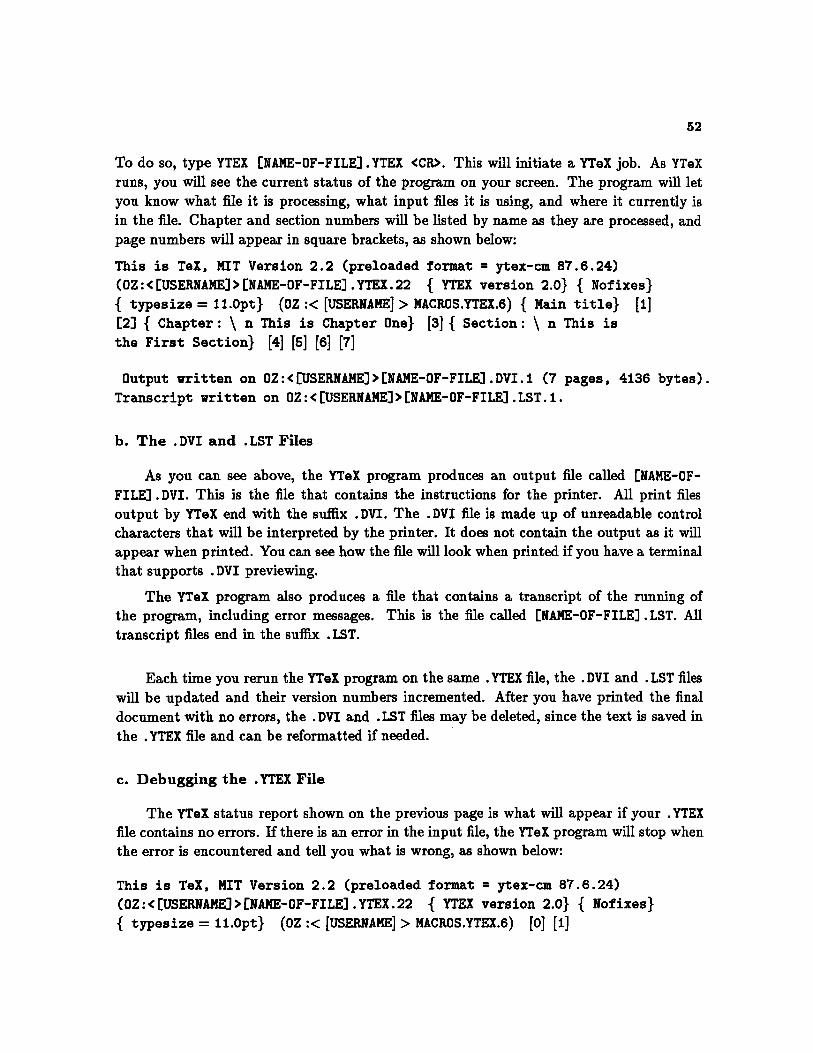
To do so, type YTEX [NAME-OF-FILE].YTEX <CR>. This will initiate a YTeX job. As YTeX
runs, you will see the current status of the program on your screen. The program will let
you know what file it is processing, what input files it is using, and where it currently is
in the file. Chapter and section numbers will be listed by name as they are processed, and
page numbers will appear in square brackets, as shown below:
This is TeX, MIT Version 2.2 (preloaded format = ytex-cm 87.6.24)(OZ:<[USERNAME]>[NAME-OF-FILE].YTEX.22 { YTEX version 2.0} { Nofixes}
{ typesize = 11.Opt} (OZ :< [USERNAME] > MACROS.YTEX.6) { Main title} [1][23 { Chapter: \ n This is Chapter One} [3] { Section: \ n This isthe First Section} [4] [5] [6] [7]
Output written on OZ:<[USERNAME]> [NAME-OF-FILE).DVI.1 (7 pages, 4136 bytes).Transcript written on OZ: < [USERNAME]> [NAME-OF-FILE]. LST.1.
b. The .DVI and .LST Files
As you can see above, the YTeX program produces an output file called [NAME-OF-FILE] .DVI. This is the file that contains the instructions for the printer. All print files
output by YTeX end with the suffix .DVI. The .DVI file is made up of unreadable control
characters that will be interpreted by the printer. It does not contain the output as it will
appear when printed. You can see how the file will look when printed if you have a terminal
that supports .DVI previewing.
The YTeX program also produces a file that contains a transcript of the running of
the program, including error messages. This is the file called [NAME-OF-FILE] .LST. Alltranscript files end in the suffix .LST.
Each time you rerun the YTeX program on the same .YTEX file, the . DVI and . LST files
will be updated and their version numbers incremented. After you have printed the final
document with no errors, the .DVI and .LST files may be deleted, since the text is saved in
the .YTEX file and can be reformatted if needed.
c. Debugging the .YTEX File
The YTeX status report shown on the previous page is what will appear if your .YTEX
file contains no errors. If there is an error in the input file, the YTeX program will stop when
the error is encountered and tell you what is wrong, as shown below:
This is TeX, MIT Version 2.2 (preloaded format = ytex-cm 87.6.24)(OZ:< [USERNAME] > [NAME-OF-FILE]. YTEX.22 { YTEX version 2.01 { Nofixes}{ typesize = 11.Opt} (OZ :< [USERNAME] > MACROS.YTEX.6) [0] [1]

! Undefined control sequence.
1.55 \\bigskip
Many of the YTeX error messages are cryptic, but with practice you will learn to interpretmost of them. In this case !Undefined control sequence means that YTeX did not under-
stand a command. The line beginning 1.55 tells you that the error occured on line number
55 of the file. As you can see, this line is broken after the \\. This is the point at which the
error occured. In this case, perhaps due to a typing error, the illegal sequence \\bigskipwas entered instead of the legal command \bigskip. At this point, the easiest thing to
do is to re-edit the .YTEX file to fix the error. To exit the YTeX program, type X after the
question mark. The following will appear:
No pages of output.
Transcript written on OZ:< [USERNAME]> [NAME-OF-FILE].LST.1.
Now you can re-enter EMACS to edit the .YTEX file. To do this just type EMACS <CR> at the* prompt if the .YTEX file was the last one worked on and is still in the buffer. If not, type
TXTF, then enter [NAME-OF-FILE]. YTEX <CR> after the colon.
To get to the line that contained the error, move the cursor to the beginning of the file
and type TU. Your cursor will reappear at the bottom of the screen. Here, type the numberof the line on which the error occured (shown in the YTeX error message), and press TN. Thecursor will then be moved to the line that contains the error. You can now fix the error,save the file, and run the YTeX program again. You may have to do this a number of times
before the file is error-free.
If you get an error message you do not understand, press <CR> at the question markfollowing the message. The YTeX program will usually skip over the error and continue
processing the input file. Most often YTeX will produce a .DVI file even if the input filecontains errors. If you print the .DVI file and look at the output, you may be able todetermine what the problem was from the appearance of the printed document. (Printingwill be covered in Section 6.)
5.9 A Practice Session
There are a number of ways to practice using the YTeX program. First, you can lookat the file <LIZ. GUIDE>IDIOTS-GUIDE. YTEX, compare it with this guide, and see what com-mands produced what features. (Please do not make changes to this file.)

Second, you can enter your file < EUSERNAME] >EXAMPLE.TXT, which you copied andworked with in previous Practice Sessions, and practice using some of the new commandsyou have learned. You may wish to try changing the commands in the file to vary size, font,etc. Run the YTeX program and see if it accepts your changes. If the fonts are unchanged,and if you fixed all the spelling errors during the Section 4 Practice Session, the file (ascopied from <LIZ. GUIDE>EXAMPLE. TXT) will produce the following output when formatted:
"GENIUS"
We naturally admire our Einsteins, Shakespeares and Beethovens - and we wonder ifmachines could ever create such wondrous theories, plays and symphonies. Most peoplethink that accomplishments like these require "talents" or "gifts" that cannot be explained.If so, then it follows that computers can't create such things - since anything machines cando can be explained. But why assume that what our greatest artists do is very different fromwhat ordinary people do - when we know so little about what ordinary people do! Surelyit is premature to ask how great composers write great symphonies before we know howordinary people think of ordinary tunes. I don't believe there is much difference betweennormal and "creative" thought. Right now, if asked which seems the more mysterious, I'dhave to say the ordinary kind.
We shouldn't let our envy of distinguished masters of the arts distract us from thewonder of how each of us gets new ideas. Perhaps we hold on to our superstitions aboutcreativity in order to make our own deficiencies seem more excusable. For when we tellourselves that masterful abilities are simply unexplainable, we're also comforting ourselvesby saying that those superheroes come endowed with all the qualities we don't possess. Ourfailures are therefore no fault of our own, nor are those heroes' virtues to their credit either.If it isn't learned, it isn't earned.
(Excerpted with permission from: Marvin Minsky, The Society of Mind, Simon andSchuster, New York, NY, 1986, p. 80.)
Third, run through the Practice Session below to create a .YTEX file that will producea short letter when formatted.
==> EMACS LETTER.YTEX <CR>
[EMACS 0]
EMACS (Fundamental) Main: OZ:<[USERNAME]>LETTER.YTEX (0) *(New file)

==> \typesize=11pt %Set typesize\input <liz.guide>macros.ytex %Input local YTeX command file
\def\AIL{ Artificial Intelligence Laboratory}
\nopagenumbers
\noheaders
\bigskip
\bigskip\bigskip\bginnofill
13 July 1987\medskip
Professor T. MacDuff
Department of Computer ScienceUniversity of Rochester
Rochester, NY 14627
\bigskip
Dear Professor MacDuff:
\medskip\endnofill
\noindent
%User - defined macro
%Do not number pages of letter
%Start six spaces down on page
%Put address heading in block style
%Skip some space
XSkip more space
%End non-filled mode
YDo not indent paragraph
I would be happy to have you visit our laboratory the next time youare in Boston. I will be out of town until {\it August 16}, but anytime after that would be fine. Let me know when you have finalizedyour plans.
\medskip\beginnofill
Yours sincerely,
\vskip .75inProfessor T. MacBeth
MIT \AIL\bigskipTM:lh\endnofill
\filpage
%Skip space
YEnter no fill mode again
XSkip 3/4 inch
%Use of abbreviation macro
%End no fill mode
%Fill page

\end
TxTz
Written OZ:<[USERNAME]>LETTER.YTEX.1
==> YTEX LETTER.YTEX <CR>
%End .YTEX file
This is TeX, MIT Version 2.2 (preloaded format=ytex-cm 87.6.24)
(OZ:<[USERNAME]>LETTER.YTEX.1 { YTEX version 2.0} { No fixes} { \typesize=11.Opt}
(OZ:<LIZ>MACROS.YTEX.6)
! Undefined control sequence.
1.13 \bginnofill
==> X <CR>
No pages of output.
Transcript written on 0Z:<[USERNAME]>LETTER.LST.1.
==> EMACS <CR>
NOTE: You will be returned to the. YTEX file. Press M-< to bring the cursor to the beginningof the file. Then press TU. At the bottom of your screen you will see:
C-U
==> 1 3 TN
NOTE: Your cursor will be moved to the line containing the error. You can see that thecommand \bginnofill is spelled incorrectly. Add an e between b and g, and save the file:
==> TXTSTxTz
Written OZ:<[USERNAME]>LETTER.YTEX.2
==> YTEX LETTER.YTEX <CR>
This is TeX, MIT Version 2.2 (preloaded format=ytex-cm 87.6.24)
(OZ:<[USERNAME]>LETTER.YTEX.2 { YTEX version 2.0} { No fixes} { \typesize=11.Opt}(OZ:<LIZ>MACROS.YTEX.6) [1]
Output written on OZ:< [USERNAME]>LETTER.DVI.1 (i page, 864 bytes).Transcript written on OZ:<[USERNAME] >LETTER.LST.2.
NOTE: The input file is now error free and has been accepted by the YTeX program, whichhas produced as output a .DVI print file and a .LST transcript file, as you will notice whenyou do a directory listing:
==> DIR <CR>
OZ:<[USERNAME]>IDIOTS-GUIDE. YTEX.61,62,63HELLO .TXT.1LETTER.DVI.1
.LST.2
.YTEX.3LOGIN.CMD.LOGOUT.CMD.IMAIL.TXT.1,2[USERNAME]. BABYL. 1
Total of 10 files
NOTE: Your formatted and printed output will look like the following page (you will learnhow to print your document in the next section):
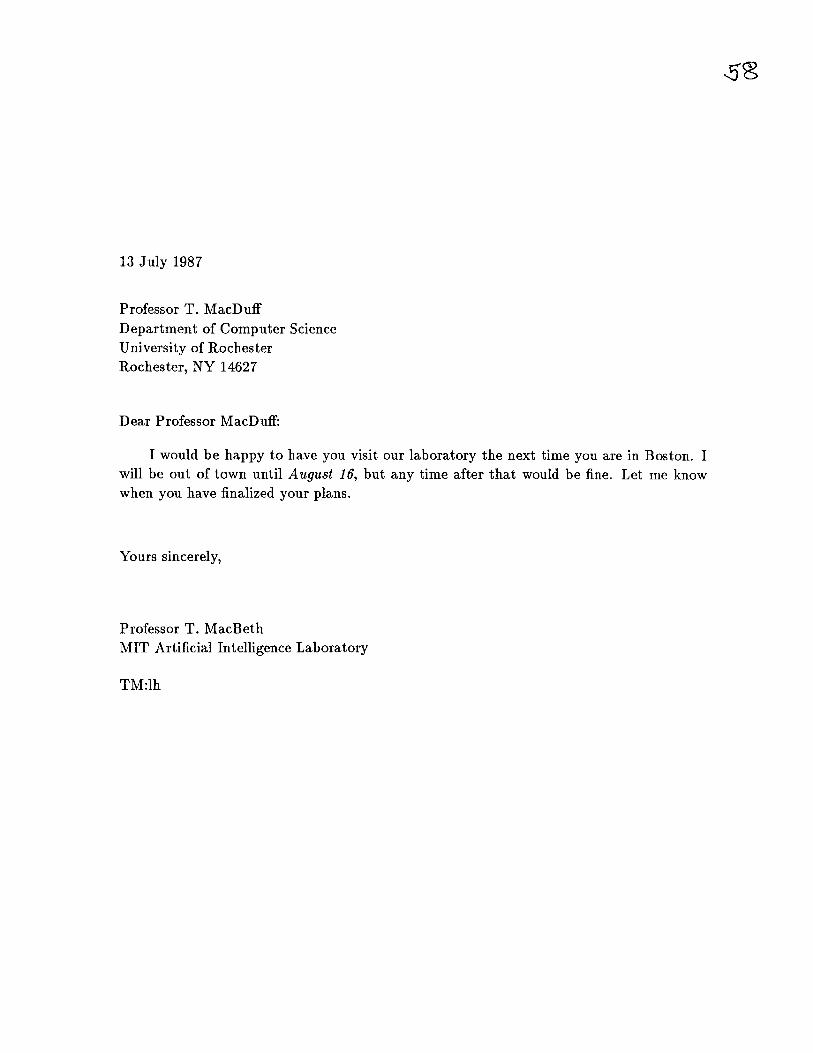
13 July 1987
Professor T. MacDuffDepartment of Computer Science
University of Rochester
Rochester, NY 14627
Dear Professor MacDuff:
I would be happy to have you visit our laboratory the next time you are in Boston. Iwill be out of town until August 16, but any time after that would be fine. Let me knowwhen you have finalized your plans.
Yours sincerely,
Professor T. MacBeth
MIT Artificial Intelligence Laboratory
TM:lh

6. PRINTING FILES
6.1 Printers Available at the A.I. Laboratory
There are a number of printers at the lab that can be accessed from OZ and used toprint either "raw" text files or .DVI formatted files. There are three large, fast QMS 2400printers that are capable of printing letter quality output on a variety of paper sizes. Thefourth printer is a QMS PS-800 LaserWriter. The output quality of this printer is somewhatbetter, but it is much slower, and limited in what it can do. Two of the QMS 2400's and theQMS PS-800 are PostScript printers. The various printers, their names, and their locationsare listed below:
7th Floor Laser Printer (PS-2400); Home: Xerox Room, 744; Name: PRAVDA
7th Floor LaserWriter (PS-800); Home: across hall from Room 707; Name: LE-MONDE
8th Floor Laser Printer (PS-2400); Home: Xerox Room, 800d; Name: DAILY-PLANET
9th Floor Laser Printer (2400); Home: near Machine Shop; Name: NATIONAL-ENQUIRER
6.2 Checking the Printer Status
To check the status of the printers, use the command LPQ <CR>. This command willlist the status of all the printers in building NE43, including the A.I. Laboratory. To see thestatus of a particular printer, type LPQ [PRINTER NAME] <CR>. The status report will tellyou whether the printer is currently working, what job it is now printing, and what otherjobs are in the queue waiting to be printed. A typical status report will look like this:
The DAILY-PLANET queue:8th Floor QMS is ready and printingTime Owner Job Files Size
*16:44 dejong 567 OZ:DZ:<DEJONG.THESIS>PRD.DVI.6 8368816:48 liz 570 OZ:OZ:<POGGIO.DRAFTS>PIRELLI.DVI.3 234516:50 liz 571 OZ:OZ:<LIZ>REMIND.TXT.45 1276516:55 little 573 Screen Hardcopy 8930
The most recent job printed was:16:42 djr PROJECT.DVI.4
The * will be beside the job that is currently printing. If there are no jobs in progress or inthe queue, you will see the following message:
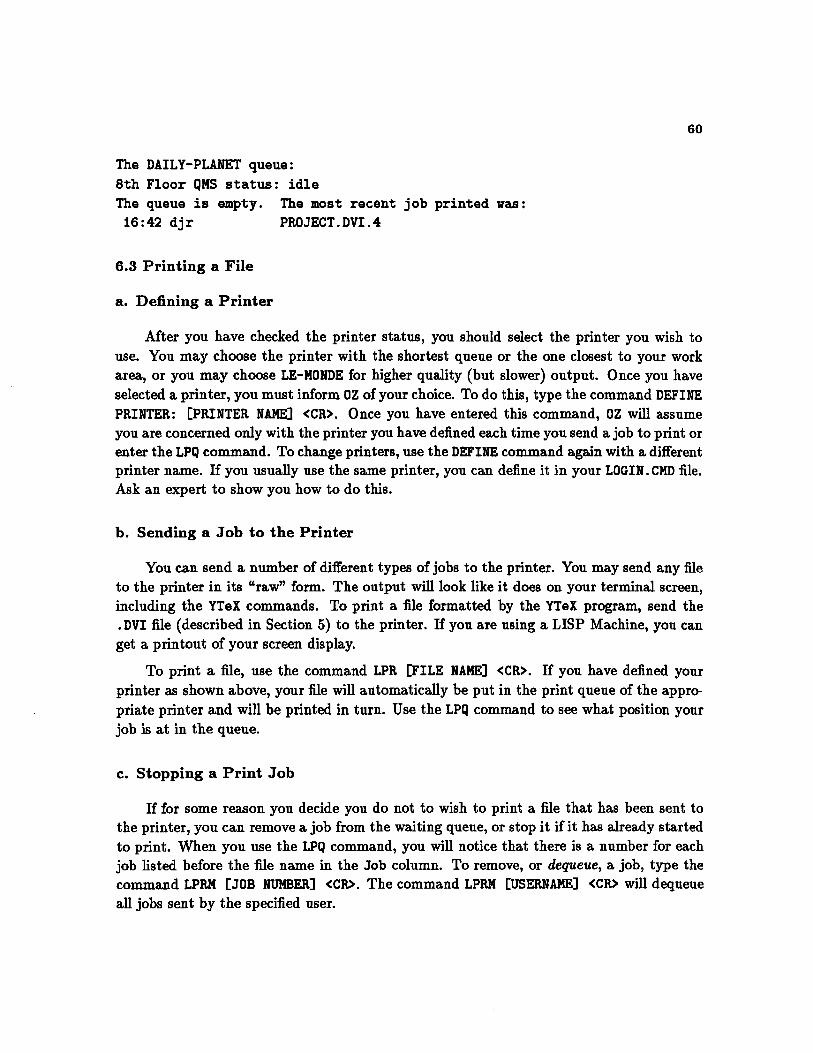
The DAILY-PLANET queue:
8th Floor QMS status: idleThe queue is empty. The most recent job printed was:16:42 djr PROJECT.DVI.4
6.3 Printing a File
a. Defining a Printer
After you have checked the printer status, you should select the printer you wish to
use. You may choose the printer with the shortest queue or the one closest to your work
area, or you may choose LE-MONDE for higher quality (but slower) output. Once you have
selected a printer, you must inform OZ of your choice. To do this, type the command DEFINE
PRINTER: [PRINTER NAME] <CR>. Once you have entered this command, OZ will assume
you are concerned only with the printer you have defined each time you send a job to print or
enter the LPQ command. To change printers, use the DEFINE command again with a differentprinter name. If you usually use the same printer, you can define it in your LOGIN. CMD file.
Ask an expert to show you how to do this.
b. Sending a Job to the Printer
You can send a number of different types of jobs to the printer. You may send any file
to the printer in its "raw" form. The output will look like it does on your terminal screen,including the YTeX commands. To print a file formatted by the YTeX program, send the
.DVI file (described in Section 5) to the printer. If you are using a LISP Machine, you can
get a printout of your screen display.
To print a file, use the command LPR [FILE NAME] <CR>. If you have defined your
printer as shown above, your file will automatically be put in the print queue of the appro-
priate printer and will be printed in turn. Use the LPQ command to see what position your
job is at in the queue.
c. Stopping a Print Job
If for some reason you decide you do not to wish to print a file that has been sent to
the printer, you can remove a job from the waiting queue, or stop it if it has already started
to print. When you use the LPQ command, you will notice that there is a number for each
job listed before the file name in the Job column. To remove, or dequeue, a job, type the
command LPRM [JOB NUMBER] <CR>. The command LPRM [USERNAME] <CR> will dequeue
all jobs sent by the specified user.

6.4 Printing Errors
Sometimes when you attempt to check the status or send a job to a printer, there willbe a pause and you will see the message: Host is not up. The host is a special computerthat routes jobs from the different computers to the various printers. The host for most ofthe printers is named PREP. If PREP is down, you will not be able to print your job. Usuallythese outages are of short duration; wait a few minutes and try to print the file again.
Once you have successfully sent your job to the printer, other types of messages mayappear on your screen if the printer gets an error while printing your file. These messagesare of the following form:
[Message from daemonQprep.ai.mit.edu 16-Jul-87 15:59:09]7th Floor LaserWriter needs paper.
These messages usually refer to a paper jam, an empty paper tray, or a similar physicalproblem. When this occurs, you will have to go to the printer to determine what is wrongand fix it. If the jobs in the queue seem to be taking an inordinately long time to print, it isa good idea to check the printer. Only the user whose job is currently printing will receivethe error messages.
If the printer has no clear mechanical problems and still will not print, the printer, orits host, is probably "wedged". When this occurs, there is a pair of commands you mayuse to attempt to fix it. These commands will work only for the printer that is currentlydefined. Type LPC ABORT <CR> to stop any current processes, immediately followed by LPCSTART <CR> to resume. If the printer still does not work, consult an expert or log a servicecall for repair.
6.5 A Practice Session
In this Practice Session, you will print out the EXAMPLE.TXT file you worked on inSection 4, and the letter you created in the Section 5 Practice Session. Before beginning,you should locate the different printers so you will know where to retrieve your output.
==> LPQ PRAVDA <CR>LPQ LE-MONDE <CR>LPQ DAILY-PLANET <CR>LPQ NATIONAL-ENQUIRER <CR>
NOTE: Use these commands to check the status of the different printers. DAILY-PLANETwill be used as an example:

DAILY-PLANET
8th Floor QMS
Time Owner
*16:44 dejong
queue:is ready and printing
Job Files567 OZ:OZ:<DEJONG.THESIS>PRO.DVI.6
The most recent job printed was:16:42 djr PROJECT.DVI.4
NOTE: You can see from the above status report that the printer is ready and printing,and has one job in progress. Select the printer you wish to use and inform OZ of your choice:
Q
==> DEFINE PRINTER: DAILY-PLANET <CR>
NOTE: Print your EXAMPLE.TXT file in both "raw" and processed form so that you cancompare how they look. First, the "raw", unprocessed file:
a
-=> LPR EXAMPLE.TXT <CR>
==> LPQ <CR>
DAILY-PLANET queue:8th Floor QMS is ready and printingTime Owner Job Files
*16:50 [username] 570 OZ:OZ:<[USERNAME]>EXAMPLE.TXT.4Size22342
The most recent job printed was:16:44 dejong OZ:OZ:<DEJONG.THESIS>PRO.DVI.6
NOTE: Your job is now being printed. Next, run the YTeX program on the file EXAMPLE. TXTto produce the formatted file EXAMPLE. DVI (see Section 5 on using YTeX), and print it also:
a
==> LPR EXAMPLE.DVI.2 <CR>
==> LPQ <CR>
DAILY-PLANET queue:
Size83688

8th Floor QMS is ready and printing
Time Owner Job Files Size*16:57 [username] 575 OZ:OZ:<[USERNAME]>EXAMPLE.DVI.2 24116
The most recent job printed was:
16:50 Eusername] OZ:OZ:< [USERNAME] >EXAMPLE.TXT.4
NOTE: You can see that EXAMPLE.TXT is now finished, and EXAMPLE.DVI is currentlyprinting. Assuming you ran the YTeX program on the LETTER. YTEX file in the PracticeSession for Section 5, you can now print the formatted file LETTER. DVI:
==> LPR LETTER.DVI.1 <CR>
==> LPQ <CR>
DAILY-PLANET queue:
8th Floor QMS is ready and printingTime Owner Job Files Size
*16:57 [username] 575 OZ:OZ:<[USERNAME]>EXAMPLE.DVI.2 2411617:02 [username] 578 OZ:OZ:<[USERNAME]>LETTER.DVI.1 3761
The most recent job printed was:16:50 [username OZ:OZ: < [USERNAME >EXAMPLE.TXT.4
NOTE: Notice that EXAMPLE. DVI is still printing, and LETTER. DVI is in the queue and willbe printed next.
When the printer is finished, go retrieve your output. Printouts will either be in theprinter output tray or in the bins near the printer, filed alphabetically by username. Ifyou do not like the way your output looks, make changes to your. YTEX file, run the YTeXprogram again, and print the new. DVI file that is produced.
When you are done printing, you will have finished the last Practice Session in theguide. Kill all your jobs and logout:
==> RESET * <CR>
==> LOGOUT <CR>
[Host connection closed.]

Appendix A
COMMAND SUMMARY
The commands in this summary are arranged in the order that they appear in the manual.Page numbers indicate where the command is introduced and explained.
Section 1 - Getting Started
Key Commands (p. 4, 5)
<control> (T) - (left of letter keys); hold down while you press letter or symbol keys.
<escape> - (upper left); press and release, then press letter key. Used in conjunction with<shift> key as a meta key on some keyboards.
<meta> (N-) - (location varies); press in conjunction with letter or symbol keys. Not availableon some keyboards; substitute keys are used.
<pause> - (lower left); hold down while pressing letter or symbol keys. Used as a meta keyon some keyboards.
<CR> - (large key at right of letter keys); carriage return; press to send commands or tomove down a line.
Accessing OZ and Logging In (p. 6)
14TZ - Type at the > (concentrator) prompt to access OZ.
14T or OT - Type at the concentrator prompt to access OZ using the TELNET protocol (requiresa password.
14S or OS - Type at the concentrator prompt to access OZ using the SUPDUP protocol (maybeused from a personal computer).
T - Select to access OZ from a Lisp Machine. Use the <select> and <help> keys to listavailable options.
[USERNAME] <CR> - Type at the first Q prompt to log in if using 14TZ.
[USERNAME] [PASSWORD] <CR> - Type at he first a prompt if using the TELNET protocol.
TAKE LOGIN.CMD <CR> - Re-read and re-execute your LOGIN.CMD file while logged in; re-initialize environment.

Fail Safe Key Commands (p. 7)
TC - Exit the current program and return to the top level. Press twice if once does notwork.
TL - Clear and redraw the video screen.
TU - Erase current command and return to Q.
T\k - Return to the initial > (concentrator) prompt.
On-Line Help (p. 8)
HELP <CR> - List all topics for which help is available on-line.
HELP ? <CR> - Show an abbreviated list of topics.
HELP [TOPIC NAME] <CR> - Replace [TOPIC NAME] with a subject from one of the lists.
Identifying Yourself and Other Users (p. 9)
WATSON <CR> or INQUIRE <CR> - Enter the WATSON program to enter or change personalinformation.
ALL <CR> - Request that WATSON ask about all entries.
DONE <CR> - End WATSON session and update personal information.
WHOIS <CR> - List information for all users currently logged onto OZ.
WHOIS [USERNAME] <CR> - List personal information for a specific user.
FINGER <CR> - List, without WATSON information, all users currently logged onto OZ.
FINGER [USERNAME] <CR> - Find a specific user and see what he is currently doing on OZ.
SYS <CR> - List information about users in an abbreviated form.
Detaching and Attaching (p. 9)
DETACH <CR> - Detach your current job and return to the opening a prompt.
ATTACH [USERNAME] <CR> - Re-attaches your job, retaining features of the environment.
<CR> - Type at the Attach your detached job? prompt to re-attach previous job.

Killing Jobs and Logging Out (p. 9)
INF FO <CR> - List all the jobs you currently have in progress.
RESET [JOB NAME] <CR> - Kill a specific job.
RESET . <CR> - Kill the last job used.
RESET * <CR> - Kill all of your currently active jobs.
LOGOUT <CR> or KK <CR> - Log off OZ; session completed.
Section 2 - Manipulating Files
Listing Your Directory (p. 13, 16)
DIR <CR> - Show a list of the files in the current directory.
VDI <CR> - Show a detailed listing of the files in the current directory.
NDIR <CR> - Show a listing of the directory indicating the status of off-line files.
CD [DIRECTORY NAME] <CR> - Change to another user's directory or a subdirectory.
Creating and Editing Files (p. 14)
EMACS <CR> - Initiate an EMACS job, if none is currently active, or return to the last fileedited.
TXTV - Visit a file; you will be asked for the name of the file to visit.
TXTF - Find a file; you will be asked for the name of the file to find.
EMACS [FILENAME] <CR> or EDIT [FILENAME] <CR> - Enter the editor to work on thespecified file.
Saving and Exiting Files (p. 14)
~lTS - Write ("Save") the changes made to the file.
"XTZ or fZTZ - Exit the editor and return to the top level.
Deleting, Recovering, and Restoring Files (p. 15, 16)
DELETE [FILENAME] <CR> - Remove the specified file.
EXPUNGE <CR> - Erase all deleted files from memory.
UNDELETE [FILENAME] <CR> - Recover a file that has been deleted but not yet expunged.
GROVEL <CR> - Enter the GROVEL program to recover from tape files that have been ex-punged.
HELP GROVEL <CR> - Get information about the GROVEL program.
RETRIEVE [FILENAME] <CR> - Restore files that have been archived on backup tapes.
Copying Files (p. 16)
COPY [OLD FILENAME] [NEW FILENAME] <CR> - Copy a file within the same directory.
COPY <[DIRECTORY NAME]> [OLD FILENAME] <[DIRECTORY NAME21> [NEW FILENAME] <CR>- Copy a file to or from another directory.
Using Subdirectories (p. 16)
DIR <[HOME DIRECTORY] . *> <CR> - List all subdirectories associated with a specific homedirectory.
BUILD [SUBDIRECTORY NAME] <CR> - Create a subdirectory associated with the currenthome directory.
LIST <CR> - List current attributes of directory or subdirectory.
? <CR> - List available options.
MAX <ESC> [NUMBER] <CR> - Set the limit of subdirectories allowed within the currentdirectory.
WORK [NUMBER] <CR> - Set the working page quota.
PERM [NUMBER] <CR> - Set the permanent page quota.
<CR> - Exit BUILD program.
Section 3 - Using Electronic Mail
Basic MM Commands (p. 22)
MM <CR> - Enter the MM mail program.
HELP <CR> - From within MM, get instructions on how to use the program.
EXIT <CR> - Leave MM and return to the top level (does not kill the program).RESET MM <CR> - Kill the MM program.
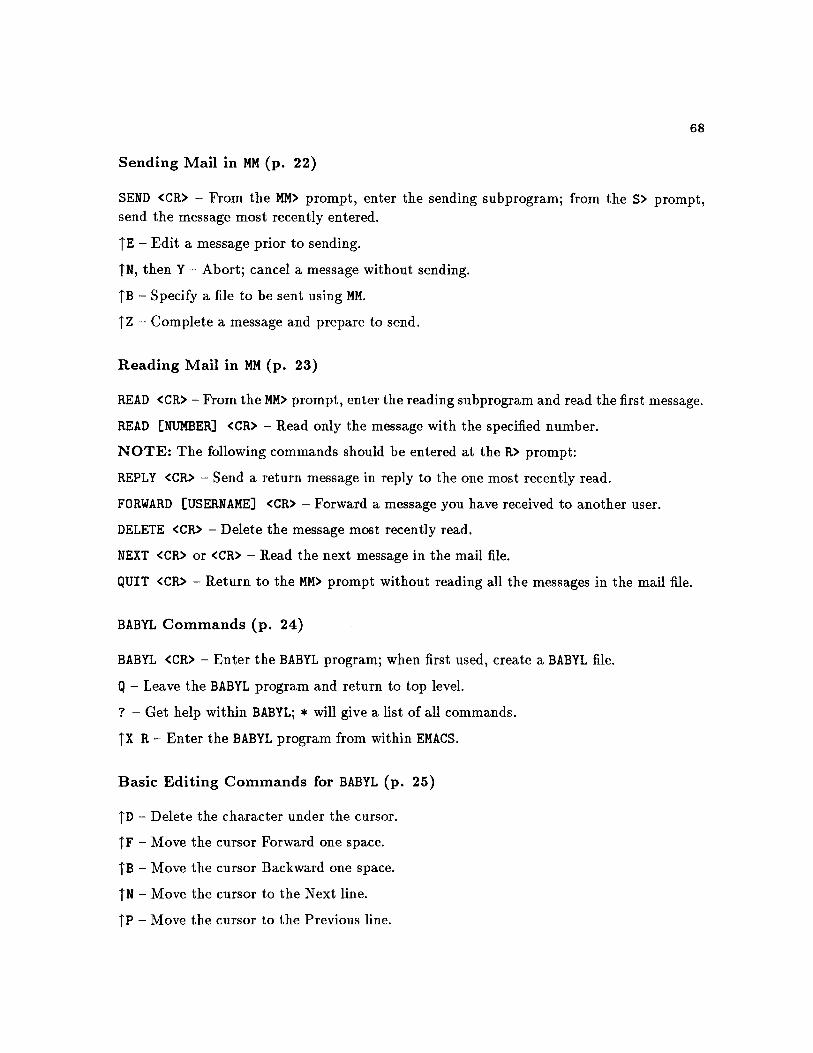
Sending Mail in MM (p. 22)
SEND <CR> - From the MM> prompt, enter the sending subprogram; from the S> prompt,send the message most recently entered.
TE - Edit a message prior to sending.
TN, then Y - Abort; cancel a message without sending.
IB - Specify a file to be sent using MM.
T Z - Complete a message and prepare to send.
Reading Mail in MM (p. 23)
READ <CR> - From the MM> prompt, enter the reading subprogram and read the first message.
READ [NUMBER] <CR> - Read only the message with the specified number.
NOTE: The following commands should be entered at the R> prompt:
REPLY <CR> - Send a return message in reply to the one most recently read.
FORWARD [USERNAME] <CR> - Forward a message you have received to another user.
DELETE <CR> - Delete the message most recently read.
NEXT <CR> or <CR> - Read the next message in the mail file.
QUIT <CR> - Return to the MM> prompt without reading all the messages in the mail file.
BABYL Commands (p. 24)
BABYL <CR> - Enter the BABYL program; when first used, create a BABYL file.
Q - Leave the BABYL program and return to top level.
? - Get help within BABYL; * will give a list of all commands.
TX R - Enter the BABYL program from within EMACS.
Basic Editing Commands for BABYL (p. 25)
TD - Delete the character under the cursor.
TF - Move the cursor Forward one space.
TB - Move the cursor Backward one space.
TN - Move the cursor to the Next line.
TP - Move the cursor to the Previous line.

Sending Mail with BABYL (p. 25)
M - Initiate a message to send.
TZTZ - Send the message just entered.
M-X Abort - Kill a BABYL message without sending.
Reading Mail in BABYL (p. 26)
B - List messages in [USERNAME] . BABYL file
D - Delete the current message.
E - Expunge deleted messages from [USERNAME] . BABYL file.
F - Enter editing mode.
G - Get any mail that has come in since you started theBABYL session.
N - Go to the Next message.
0 - Put the message into another file; you will be prompted for file name.
P - Go to the Previous message.
q - Quit the BABYL program.
U - Undelete the previous message.
Mail Short Cuts (p. 28)
MAIL EUSERNAME] <CR> - Send mail from the top level to recipient's mail file.
SEND [USERNAME] <CR> - Send mail from the top level; will appear immediately on recipi-ent's screen, and will not be put in mail file.
HUH <CR> or WHAT [NUMBER] <CR> - Look at the last SEND messages received. Using the[NUMBER] option allows you to see multiple past messages.
SHOUT <CR> - Send a one-line immediate message to all users.
RPMAIL <CR> - Read all your waiting mail messages at once; you will have the option ofdeleting or storing all the messages.
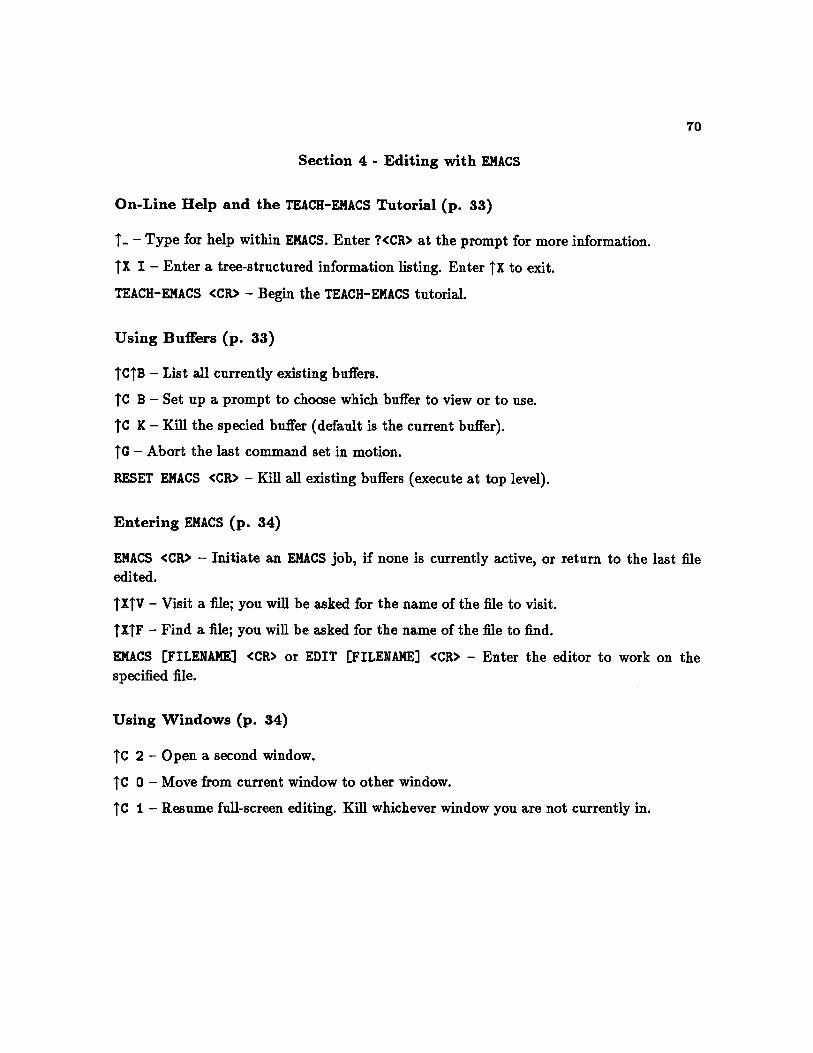
Section 4 - Editing with EMACS
On-Line Help and the TEACH-EMACS Tutorial (p. 33)
T- - Type for help within EMACS. Enter ?<CR> at the prompt for more information.
TX I - Enter a tree-structured information listing. Enter TX to exit.
TEACH-EMACS <CR> - Begin the TEACH-EMACS tutorial.
Using Buffers (p. 33)
TCTB - List all currently existing buffers.
TC B - Set up a prompt to choose which buffer to view or to use.
TC K - Kill the specied buffer (default is the current buffer).
IG - Abort the last command set in motion.
RESET EMACS <CR> - Kill all existing buffers (execute at top level).
Entering EMACS (p. 34)
EMACS <CR> - Initiate an EMACS job, if none is currently active, or return to the last fileedited.
TXTV - Visit a file; you will be asked for the name of the file to visit.
TXTF - Find a file; you will be asked for the name of the file to find.
EMACS [FILENAME] <CR> or EDIT [FILENAME] <CR> - Enter the editor to work on thespecified file.
Using Windows (p. 34)
TC 2 - Open a second window.
TC 0 - Move from current window to other window.
TC I - Resume full-screen editing. Kill whichever window you are not currently in.
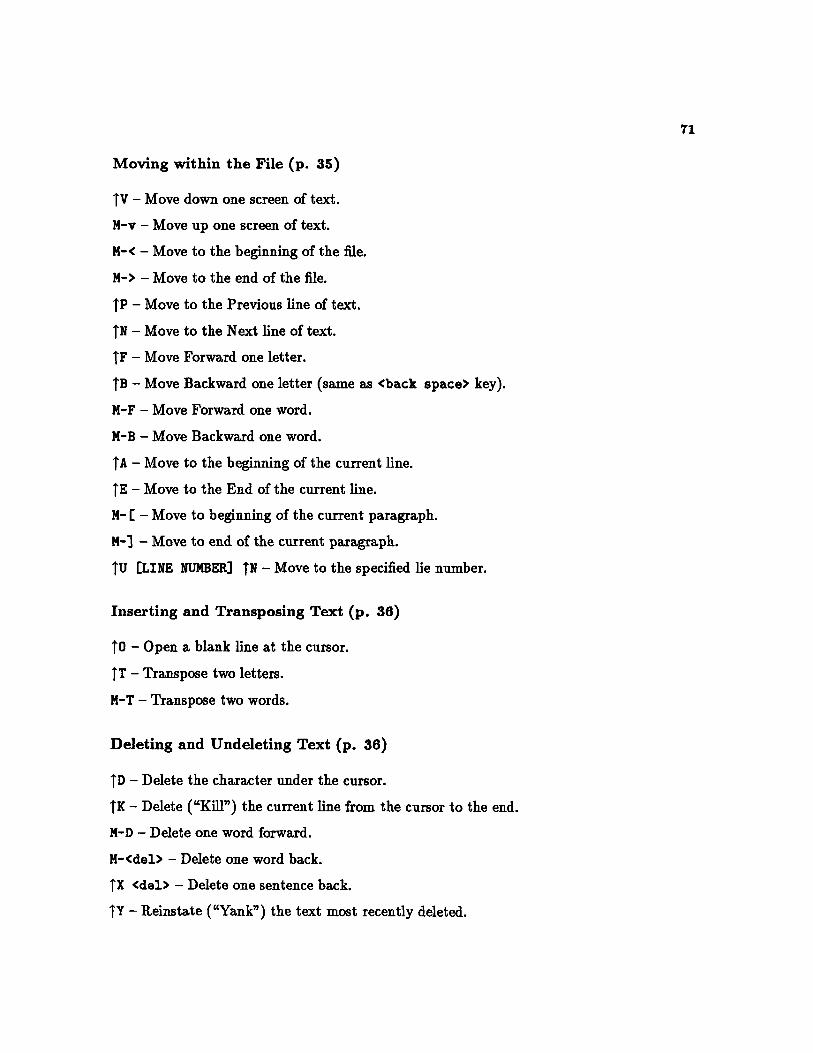
Moving within the File (p. 35)
TV - Move down one screen of text.
M-v - Move up one screen of text.
M-< - Move to the beginning of the file.
M-> - Move to the end of the file.
TP - Move to the Previous line of text.
TN - Move to the Next line of text.
TF - Move Forward one letter.
TB - Move Backward one letter (same as <back space> key).
M-F - Move Forward one word.
M-B - Move Backward one word.
TA - Move to the beginning of the current line.
TE - Move to the End of the current line.
M- [ - Move to beginning of the current paragraph.
N-3 - Move to end of the current paragraph.
TU [LINE NUMBER] TN - Move to the specified lie number.
Inserting and Transposing Text (p. 36)
To - Open a blank line at the cursor.
TT - Transpose two letters.
M-T - Transpose two words.
Deleting and Undeleting Text (p. 36)
TD - Delete the character under the cursor.
TK - Delete ("Kill") the current line from the cursor to the end.
M-D - Delete one word forward.
M-<del> - Delete one word back.
TX <del> - Delete one sentence back.
TY - Reinstate ("Yank") the text most recently deleted.
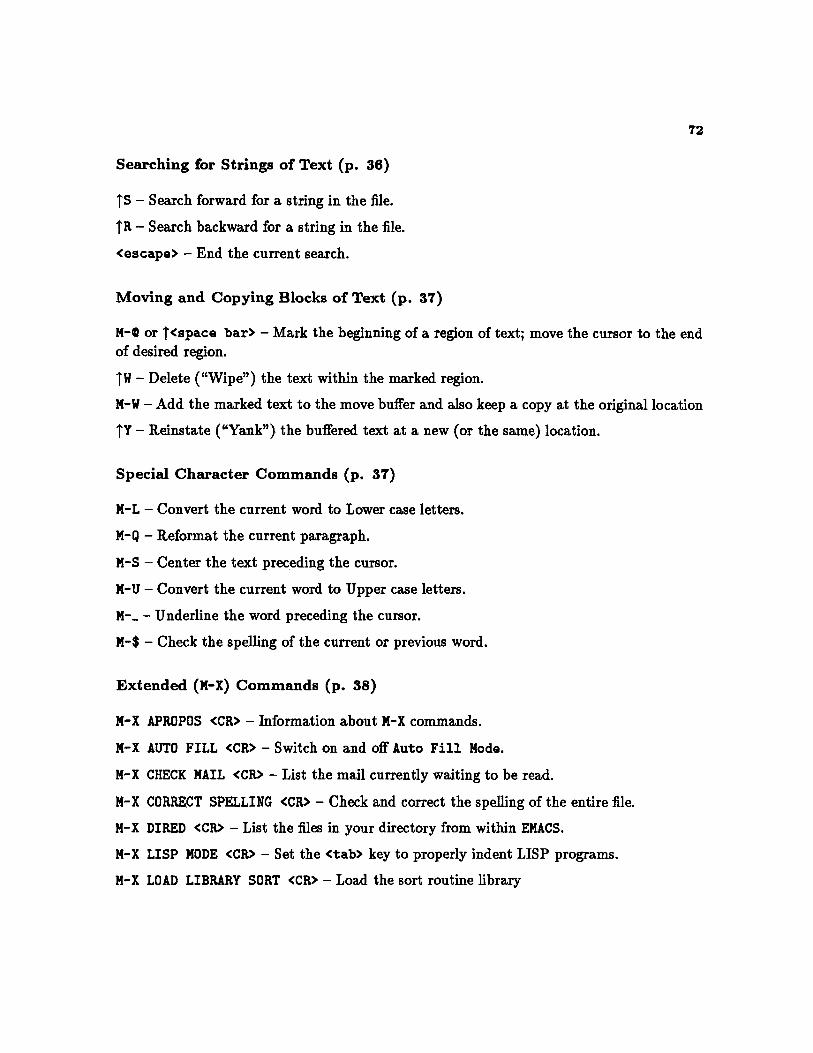
Searching for Strings of Text (p. 36)
TS - Search forward for a string in the file.
TR - Search backward for a string in the file.
<escape> - End the current search.
Moving and Copying Blocks of Text (p. 37)
M-0 or T<space bar> - Mark the beginning of a region of text; move the cursor to the endof desired region.
TW - Delete ("Wipe") the text within the marked region.
M-W - Add the marked text to the move buffer and also keep a copy at the original location
TY - Reinstate ("Yank") the buffered text at a new (or the same) location.
Special Character Commands (p. 37)
M-L - Convert the current word to Lower case letters.
M-Q - Reformat the current paragraph.
M-S - Center the text preceding the cursor.
M-U - Convert the current word to Upper case letters.
M-. - Underline the word preceding the cursor.
M-$ - Check the spelling of the current or previous word.
Extended (M-X) Commands (p. 38)
M-X APROPOS <CR> - Information about M-X commands.
M-X AUTO FILL <CR> - Switch on and off Auto Fill Mode.
M-X CHECK MAIL <CR> - List the mail currently waiting to be read.
M-X CORRECT SPELLING <CR> - Check and correct the spelling of the entire file.
M-X DIRED <CR> - List the files in your directory from within EMACS.
M-X LISP MODE <CR> - Set the <tab> key to properly indent LISP programs.
M-X LOAD LIBRARY SORT <CR> - Load the sort routine library
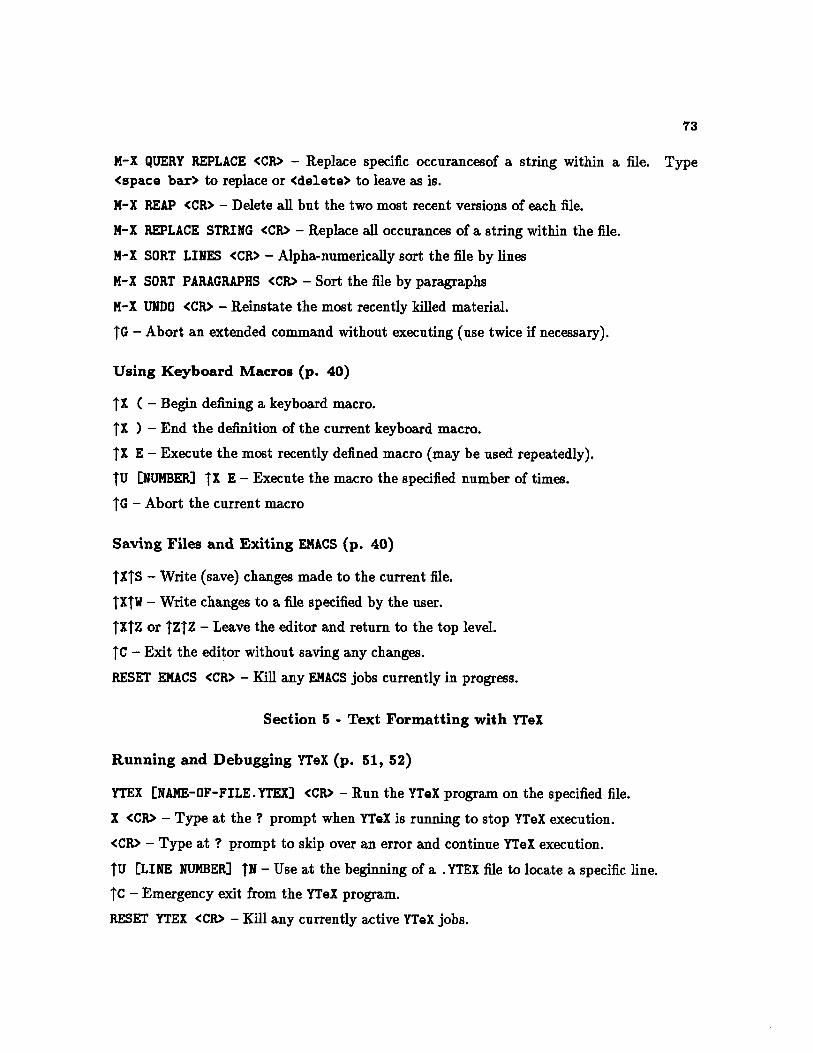
M-X QUERY REPLACE <CR> - Replace specific occurancesof a string within a file. Type<space bar> to replace or <delete> to leave as is.
M-X REAP <CR> - Delete all but the two most recent versions of each file.
M-X REPLACE STRING <CR> - Replace all occurances of a string within the file.
M-X SORT LINES <CR> - Alpha-numerically sort the file by lines
M-X SORT PARAGRAPHS <CR> - Sort the file by paragraphs
M-X UNDO <CR> - Reinstate the most recently killed material.
TG - Abort an extended command without executing (use twice if necessary).
Using Keyboard Macros (p. 40)
TX ( - Begin defining a keyboard macro.
TX ) - End the definition of the current keyboard macro.
TX E - Execute the most recently defined macro (may be used repeatedly).
TU [NUMBER] TX E - Execute the macro the specified number of times.
TG - Abort the current macro
Saving Files and Exiting EMACS (p. 40)
TfTS - Write (save) changes made to the current file.
TXTW - Write changes to a file specified by the user.
TXTZ or TfZZ - Leave the editor and return to the top level.
TC - Exit the editor without saving any changes.
RESET EMACS <CR> - Kill any EMACS jobs currently in progress.
Section 5 - Text Formatting with YTeX
Running and Debugging YTeX (p. 51, 52)
YTEX [NAME-OF-FILE.YTEX] <CR> - Run the YTeX program on the specified file.
X <CR> - Type at the ? prompt when YTeX is running to stop YTeX execution.
<CR> - Type at ? prompt to skip over an error and continue YTeX execution.
TU [LINE NUMBER] TN - Use at the beginning of a .YTEX file to locate a specific line.
TC - Emergency exit from the YTeX program.
RESET YTEX <CR> - Kill any currently active YTeX jobs.
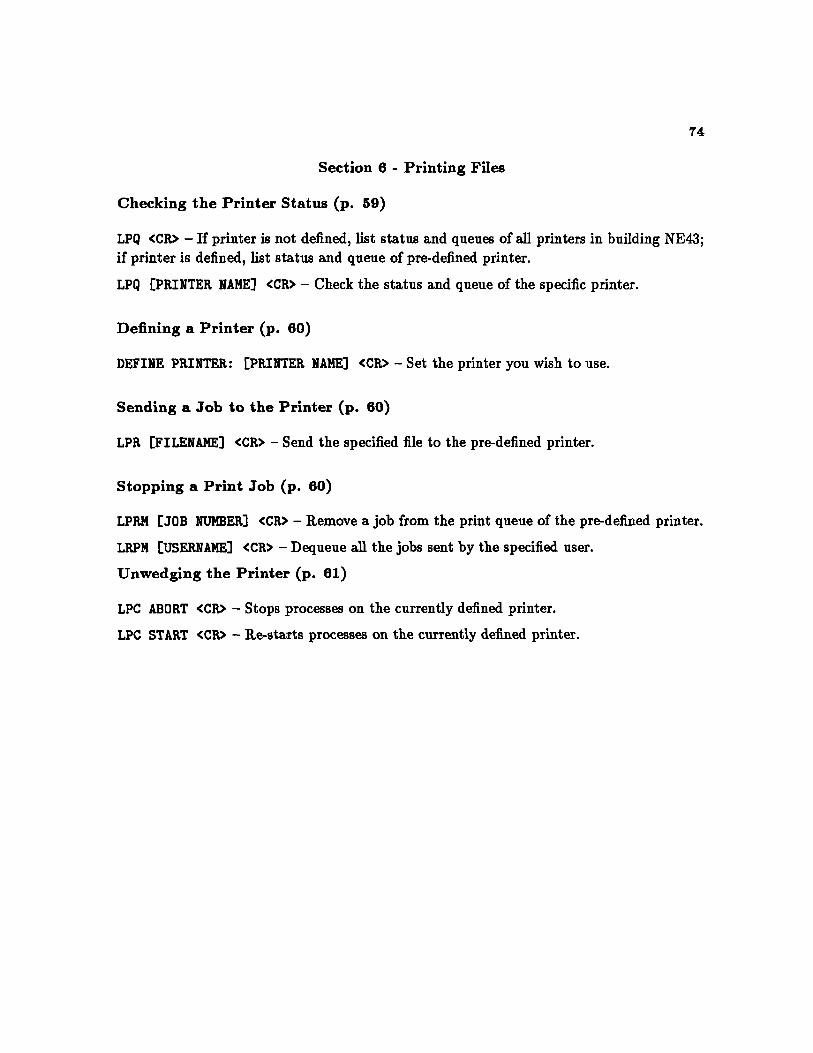
Section 6 - Printing Files
Checking the Printer Status (p. 59)
LPQ <CR> - If printer is not defined, list status and queues of all printers in building NE43;if printer is defined, list status and queue of pre-defined printer.
LPQ [PRINTER NAME] <CR> - Check the status and queue of the specific printer.
Defining a Printer (p. 60)
DEFINE PRINTER: [PRINTER NAME) <CR> - Set the printer you wish to use.
Sending a Job to the Printer (p. 60)
LPR [FILENAME] <CR> - Send the specified file to the pre-defined printer.
Stopping a Print Job (p. 60)
LPRM [JOB NUMBER] <CR> - Remove a job from the print queue of the pre-defined printer.
LRPM [USERNAME] <CR> - Dequeue all the jobs sent by the specified user.
Unwedging the Printer (p. 61)
LPC ABORT <CR> - Stops processes on the currently defined printer.
LPC START <CR> - Re-starts processes on the currently defined printer.

Appendix B
GLOSSARY OF TERMS
The following is a glossary of terms used within this manual. Terms printed in italics,both throughout the guide and within definitions, are listed and defined in this section. Someof these terms have a specific meaning in "OZ terminology" which should not be confusedwith their more common usage.
ACCOUNT - A user's means of access to OZ. An account provides you with a username(or login name), a password, and a certain amount of memory space. Some kinds ofaccounts give you greater privileges than others.
AT-SIGN - The a character. This is used as a prompt, and indicates that you are at theexec or top level on OZ. The 0 indicates that OZ is ready to receive input from the user.See also prompt.
BACKSLASH COMMANDS - Commands preceded by the character \. These areused in the text formatting programs YTeX and LaTeX to specify how the final documentshould look.
BUFFER - An unsaved file which holds work currently in progress. See also file, minibuffer.
CHAOSNET - A network system that allows communication between MIT computers,including most of those at the A.I. Laboratory.
CHARACTER COMMANDS - Commands that are entered by typing one of thespecial keys control or meta along with a letter or symbol. These are used to performspecial operation within the EMACS program.
COMMAND - An instruction which is given to OZ or to one of the programs it is running,to indicate what the computer should do.
COMMENTS - Strings of text entered as documentation, or as notes to the programmeror user. These are not interpreted by the computer. Comments are preceded by thecharacter ..
CONCENTRATOR - A router that connects the various terminals to the various com-puters in the A.I. Laboratory. The concentrator allows users to access more than onecomputer.
CONTROL KEY - A special key that gives alternate meanings to the letter and symbolkeys. The control key is usually to the left of the letter keys on the keyboard, and isused in many of OZ's operations and programs. Represented in this manual by thecharacter T. Also see meta key, escape key.
CRASH - Slang term for a computer malfunction. When a crash occurs, the computerwill be down, and all work must be postponed.
CURSOR - The small rectangle of light on the screen that indicates where the computeris currently directing its "attention". The cursor may be moved around in order toenter, remove, or manipulate characters and text.
DEQUEUE - To remove a file from the queue in which it is currently waiting.
DIRECTORY - A collection of files belonging to a specific user. Each user has a home orroot directory and possibly some associated subdirectories. The system of directoriesis the way the computer organizes the files belonging to various users.
DISPLAY STYLE - See vertical mode.
DOCUMENTATION - Explanations of how programs work and how to use them. Doc-umentation may be either on-line or contained in printed manuals.
DOWN - Adjective meaning "not working." The computer may be down due to a mal-function or for periodic maintenance. See also crash.
.DVI FILE - A file produced by the YTeX program. This file contains the instructionsthat will cause the printer to output the final document in the style you have specified.
EDITOR - A program that allows the user to enter, remove, and manipulate files of text.See also EMACS.
EMACS - The editor used on OZ and other A.I. Laboratory computers.
ESCAPE KEY - A key used to perform special functions on OZ. The escape key can beused for file or command name completion, and on some keyboards, it is used alongwith the <shift> key to represent the meta key. Also see control key, meta key.
EXEC - The highest level of the operating system, from which programs are initiated. Alsoknown loosely as top level.
EXTENDED COMMANDS - Commands used in EMACS to perform special operationsor functions. These commands are initiated by typing M-X followed by the commandword(s), and are also known as M-X commands.
FILE - A unit of stored information. Files may be "raw" (containing only text), or theymay be "processed" (run through a text formatting program). See also directory, buffer.
FORK - OZ terminology for program or job. For example, if you have an EMACS job running,you are said to have an EMACS fork.
HOME DIRECTORY - The main directory of a user's files. This usually has the samename as the person's username, and is allocated when an account is set up. Also knownas root directory. Contrast with subdirectory.
HORIZONTAL MODE - One of the two equation formatting modes in the YTeX pro-gram. Equations in horizontal mode are typed and appear within a line of text. Thisis also known as text style. Contrast with vertical mode.
HOST - A computer that allows another device to run. For example, the computer PREPis a host for the printers, and manages their flow of work.
JOB - See program and fork.
KEYBOARD MACRO - A function defined by the user that allows a sequence ofcommands to be executed by pressing a single character command.
KILL - To stop a particular program. A program should be killed when the user does notwish to use it any longer.
LaTeX - One of the text formatting programs available on OZ. See also YTeX.
LOGIN NAME - See username.
.LST FILE - A file produced by the YTeX program. This file contains a transcript of yourYTeX session, including error messages.
MACRO - A special function or operation that is defined by the user. Macros can beused in a variety of programs, and may be organized into files for regular use.
META KEY - Another special key used to change the meaning of letter and symbol keys.This is used especially within the ENACS program. The meta key may be representedby the <pause> key, or by a combination of the escape key and <shift> key, dependingon your keyboard. Represented in this manual by the letter M-. See also control key,escape key.
MIGRATED FILE -See off-line.
MINIBUFFER -An auxiliary buffer used for entering commands while in EMACS. See alsobuffer.
M-X COMMANDS - See extended commands.
OFF-LINE - Adjective referring to files that have been migrated, or taken off OZ andarchived on backup tapes. This is done to save space in OZ's memory. Archived filescan be restored when needed.
ON-LINE - An adjective meaning, loosely, "on the computer". Documentation is said tobe on-line if you can access it from your terminal.
OPEN TABLE - In YTeX, a table that extends over one or more page breaks.
OPERATING SYSTEM - The main program, or group of programs, which runs thecomputer, and which enables many people to use the computer at once to run a varietyof subsidiary programs. The operating system on OZ is called TWENEX, or TOPS-20.
OZ - The name of the computer used throughout this guide. OZ is a DEC PDP-10 computerlocated on the ninth floor of building NE43.
PASSWORD - A name or string of characters chosen by the user which verifies the user'sidentity to the computer. This is typed after the username when logging in.
PROGRAM - In general, a series of instructions to be performed by the computer. Theterm may refer to instructions written by a user in a computer language such as LISP,or to the powerful complex tools, such as EMACS and YTeX, which can be called upon toperform specific tasks. See also fork and job.
PROMPT - The symbol which appears at the left edge of your screen when the computeris waiting for user input. Different programs have different prompts. The exec prompton OZ is the at-sign, or 0.
QUEUE - A line in which files are waiting and advancing one at a time to be processed.For example, the print queue contains files waiting to be printed. Also used as a verbmeaning "to put into the queue". See also dequeue.
REGIONS - In EMACS, blocks or sections of text that are marked for moving, changing,or deleting.

ROOT DIRECTORY - See home directory.
STATUS LINE - In EMACS, the line at the bottom of the screen that tells you what youare currently working on and the current status of your file.
STRING - A group of letters, numbers, or symbols of arbitrary length.
SUBDIRECTORY - A directory that is created from the main, or home directory. Sub-directories are associated with a user's home directory, and are useful for organizing alarge number of files.
TEXT FORMATTING - A method of processing text to achieve professional lookingoutput. The text formatting programs YTeX and LaTeX operate on files containing back-slash commands. They process these files and return new files containing instructionsto be interpreted by the printer.
TEXT STYLE - See horizontal mode
TYPESETTING - See text formatting.
TOP LEVEL - Where you are when you are logged in but have not yet initiated anyprograms. See also exec.
UP - Adjective meaning that a computer, printer, etc. is operational. Contrast with down.
USERNAME - A name that uniquely identifies a user to the computer. The usernameis used to send and receive mail, and identifies the user's files and jobs. Also known aslogin name.
VERSION - The number assigned by the computer to a file indicating how many timesthat file has been stored. It does not mean that that many versions currently exist,since the earlier ones will have been deleted.
VERTICAL MODE - One of the equation formatting modes in YTeX. Equations invertical mode are set off from the text and may extend over several lines. This is alsoknown as display style. Contrast with horizontal mode.
VISITING - In EMACS, entering a file either to look at it or to make changes to it.
WEDGED - A slang term used to describe a machine that is down, especially one thatremains non-operational despite routine attempts to fix it.

80
WILDCARD - A character used to represent a variety of possibilities. This can be used,for example, to specify a number of file names that all have some word in common.The wildcard is represented by the character *, and may be used within a variety ofdifferent programs.
WINDOWS - A feature that allows you to view and work on more than one file, process,etc. simultaneously.
YTeX - The text formatting program explained in this manual. This program takes a.YTEX file containing backslash commands, processes it, and returns a .DVI file thatcontains instrutions for the printer. See also LaTeX.

Appendix C
OTHER RESOURCES
Sections 1 and 2
TOPS-20 User's Guide, Digital Equipment Corporation, Marlboro, MA, 1980. (Availableby mail from DEC).
Section 3
Stallman, Richard M., Lisp Machine ZMail Manual, A.I. Laboratory, MassachusettsInstitute of Technology, Cambridge, MA, 1983. (Available from the A.I. Laboratorypublications office).
Section 4
Stallman, Richard M., EMACS Manual for TWENEX Users, A.I. Laboratory Memo555, Massachusetts Institute of Technology, Cambridge, MA, 1983. (Available from theA.I. Laboratory publications office).
Stallman, Richard M., EMACS: The Extensible, Customizable, Self-DocumentingDisplay Editor, A.I. Laboratory Memo 519A, Massachusetts Institute of Technology,Cambridge, MA, 1981. (Available from the A.I. Laboratory publications office).
Section 5
Brotsky, Daniel, How to Use YTeX, A.I. Laboratory Working Paper 273, MassachusettsInstitute of Technology, Cambridge, MA, 1985 and 1986. (Available from the A.I.Laboratory publications office).
Knuth, Donald E., The TeXbook, Addison-Wesley Publishers, Reading, MA, 1984 and1986. (Available through the MIT Coop).
Lamport, Leslie, LaTeX Document Preparation System: User's Guide and Ref-erence Manual, Addison-Wesley Publishers, Reading, MA, 1986. (Available throughthe MIT Coop).
Lamport, Leslie, Using LaTeX on MIT-OZ, Version 2.08, Massachusetts Institute ofTechnology, Cambridge, MA, 1985. (Available from the A.I. Laboratory publicationsoffice).

Samuel, Arthur L., First Grade TeX: A Beginner's Manual, Report STAN-CS-83-985(Version 1), Stanford University Department of Computer Science, Stanford, CA, 1983.(Available by mail from Stanford University).
Using TeX on MIT-OZ, A.I. Laboratory, Massachusetts Institute of Technology, Cam-bridge, MA, 1985. (Available from the A.I. Laboratory publications office).
Section 6
Jones, Scott A., Printer Cheat Sheet, available for all A.I. Laboratory printers, Mas-sachusetts Institute of Technology, 1986. (Posted copy located on or near each printer;also available from the A.I. Laboratory publications office).
McCall, Bede B., MacDoc: An Introduction to Computational Resources at MITLCS and AI Lab, Version 2.0, Massachusetts Institute of Technology, 1986. (Availablefrom the Laboratory for Computer Science publications office).

IDIOT'S GUIDETO OZ
A MANUAL FOR THE COMPLETE BEGINNER,INTRODUCING
EMACS, THE WORD PROCESSING PROGRAM,AND
TEX, THE TEXT FORMATTING PROGRAM
William Gilson


