Embed Size (px)
Citation preview
27. Denture Processing27. Denture Processing
John Beumer III, DDS, MSJohn Beumer III, DDS, MSDivision of Advanced Division of Advanced
Prosthodontics, Biomaterials Prosthodontics, Biomaterials and Hospital Dentistryand Hospital Dentistry
UCLA School of DentistryUCLA School of Dentistry
This program of instruction is protected by copyright ©. No portion of this This program of instruction is protected by copyright ©. No portion of this program of instruction may be reproduced, recorded or transferred by any program of instruction may be reproduced, recorded or transferred by any means electronic, digital, photographic, mechanical etc., or by any means electronic, digital, photographic, mechanical etc., or by any information storage or retrieval system, without prior permission.information storage or retrieval system, without prior permission.

Preparing Dentures for ProcessingPreparing Dentures for Processing
Injection moldingInjection moldingWe recommend the SR Ivocap SystemWe recommend the SR Ivocap System• Less distortion during processingLess distortion during processing• Minimal pin opening Minimal pin opening
Result: Laboratory remount much simplifiedResult: Laboratory remount much simplified.
Preparing Dentures for ProcessingPreparing Dentures for Processing
Injection moldingInjection moldingWe recommend the SR Ivocap SystemWe recommend the SR Ivocap System• Less distortion during processingLess distortion during processing• Minimal pin opening Minimal pin opening

When festooning is completed . . . When festooning is completed . . .
. . . Seal the periphery Seal the periphery of the denture flange of the denture flange to the inner edge of to the inner edge of the land of the cast.the land of the cast.
FlaskingFlasking

After soaking the master casts and mountings in water for a After soaking the master casts and mountings in water for a few minutes, gently remove the casts from the mountings.few minutes, gently remove the casts from the mountings.
Both dentures Both dentures are sealed onto are sealed onto their respective their respective castscasts
FlaskingFlasking

Neither the master cast nor the mounting has Neither the master cast nor the mounting has been damaged. Following processing into heat been damaged. Following processing into heat cured acrylic resin the denture and casts can be cured acrylic resin the denture and casts can be precisely reattached to the mountingsprecisely reattached to the mountings .
FlaskingFlasking

Denture flasksDenture flasks.. Note Note that the trial dentures that the trial dentures and the master casts fit and the master casts fit easily within the flasks.easily within the flasks.
The denture flasks are partially filled The denture flasks are partially filled with stone and the casts arewith stone and the casts arethen positioned within the flask so then positioned within the flask so that the land of the cast and the that the land of the cast and the plaster is at about the same level plaster is at about the same level as the edge of the flask. The as the edge of the flask. The injection funnel is positioned after the injection funnel is positioned after the stone has set.stone has set.
FlaskingFlasking
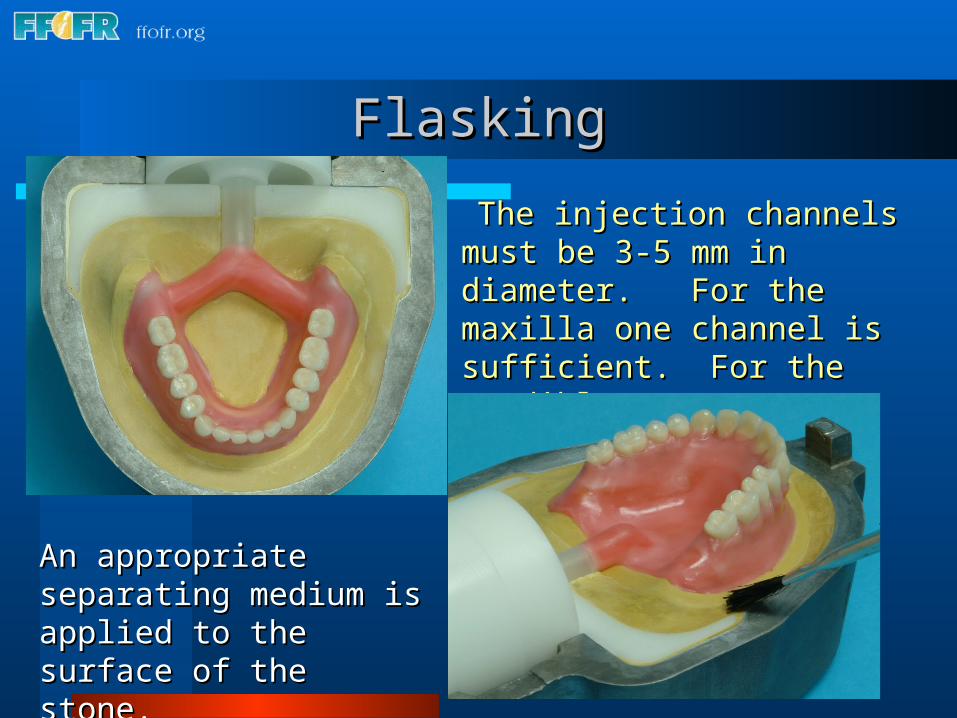
The injection channels must The injection channels must be 3-5 mm in diameter. For be 3-5 mm in diameter. For the maxilla one channel is the maxilla one channel is sufficient. For the mandible sufficient. For the mandible two are required.two are required.
FlaskingFlasking
An appropriate separating An appropriate separating medium is applied to the medium is applied to the surface of the stone.surface of the stone.

Note that the stone application is Note that the stone application is below the level of the upper half of below the level of the upper half of the flask.the flask.
A thin layer of improved A thin layer of improved dental stone is applied to dental stone is applied to the surface of the trial the surface of the trial denture.denture.
FlaskingFlasking

The flask is filled to the brim with stone and the lid positioned The flask is filled to the brim with stone and the lid positioned as shown.as shown.
FlaskingFlasking

The wax and the record The wax and the record bases have been removed bases have been removed by hot water washes. The by hot water washes. The denture teeth are imbedded denture teeth are imbedded in one side of the flask and in one side of the flask and the master casts are the master casts are imbedded in the other side.imbedded in the other side.
Boil Out Boil Out
After drying the stone, After drying the stone, both sides are covered by both sides are covered by a tin foil substitute. Avoid a tin foil substitute. Avoid coating the denture teeth coating the denture teeth with the tin foil substitute.with the tin foil substitute.

Capsule PreparationCapsule Preparation
Contents of the capsule: 20 grams Contents of the capsule: 20 grams polymer, 30 ml of monomer.polymer, 30 ml of monomer.
Remove the monomer capsule and break it open by twisting off the sealed end. Open the capsule and pour the monomer into it.

Mount the capsule in the Cap Mount the capsule in the Cap Vibrator, attach the securing Vibrator, attach the securing thong, and mix for 5 minutes thong, and mix for 5 minutes at room temperature.at room temperature.
Mixing the ResinMixing the Resin
When properly When properly mixed a ball of resin mixed a ball of resin forms within the forms within the capsule as shown.capsule as shown.
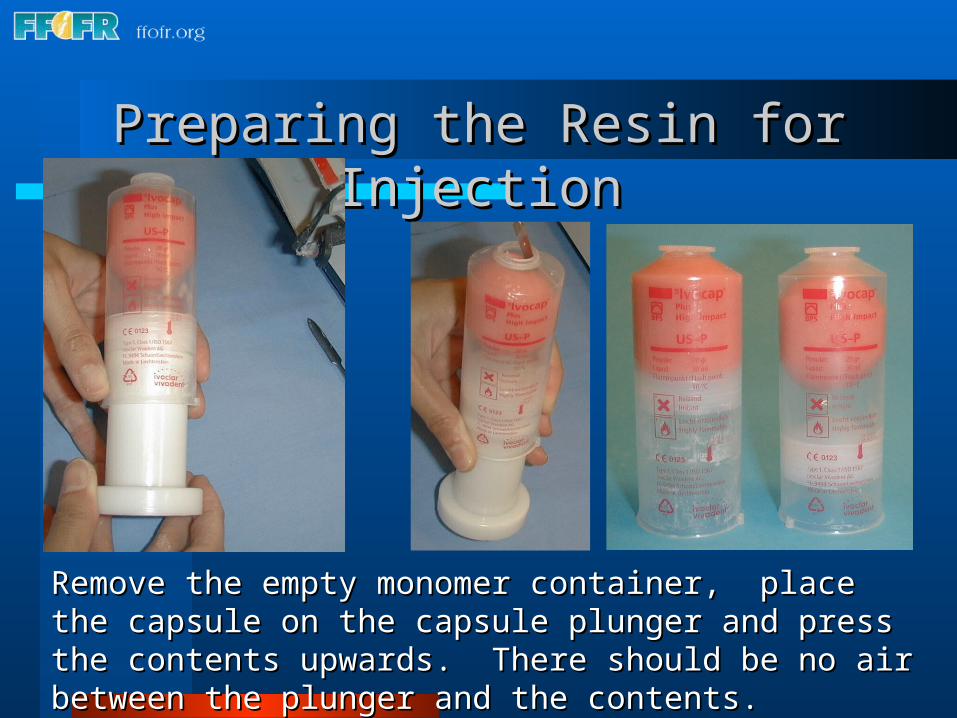
Remove the empty monomer container, place the capsule on Remove the empty monomer container, place the capsule on the capsule plunger and press the contents upwards. There the capsule plunger and press the contents upwards. There should be no air between the plunger and the contents.should be no air between the plunger and the contents.
Preparing the Resin for InjectionPreparing the Resin for Injection

Assemble and Clamp the FlaskAssemble and Clamp the Flask
Carefully bring the two halves of the Carefully bring the two halves of the flasks together and and slide them into flasks together and and slide them into the clamping frame. Push the ratchet and the clamping frame. Push the ratchet and clamp lever to the right (arrow) while clamp lever to the right (arrow) while applying the recommended pressure to applying the recommended pressure to the clamping frame. the clamping frame.

Inserting the SR Ivocap CapsulesInserting the SR Ivocap Capsules
Remove the cover Remove the cover from the capsule and from the capsule and fully insert the fully insert the capsule into the flaskcapsule into the flask.

Mounting the Pressure ApparatusMounting the Pressure Apparatus
Fully extend the plunger of the pressure apparatus, by pulling the piston rod when the compressed air locking valve is open.
Place the SR Ivocap pressure apparatus on the flask, lift the safety loop, and press the plunger into the capsule until the vise shanks are correctly positioned on the flask. Then pull down the safety loop until it snaps into place.

Polymerization of the Acrylic ResinPolymerization of the Acrylic Resin
Place the SR Ivocap assembly in Place the SR Ivocap assembly in the polymerization bath as shown. the polymerization bath as shown. The surface of the water should be The surface of the water should be covered by plastic floaters in order covered by plastic floaters in order to prevent unnecessary loss of to prevent unnecessary loss of heat. heat.
The water should boil during the entire cycle. The water level The water should boil during the entire cycle. The water level must reach the red mark on the clamping frame but not must reach the red mark on the clamping frame but not exceed this level. Polymerization takes 35 minutesexceed this level. Polymerization takes 35 minutes..

Polymerization of the Acrylic ResinPolymerization of the Acrylic Resin
The processed dentures are removed from the flasks The processed dentures are removed from the flasks taking special care to avoid injury to the master casts.taking special care to avoid injury to the master casts.