Embed Size (px)
DESCRIPTION
Well, let's start with our first JIM Prototyper Tutorial. We'll do a series, to try to show you what a powerful tool it can be, and what things you can do besides plain wireframes.
Citation preview
Well, let's start with our first JIM Prototyper Tutorial. We'll do a series, to try to show you what a powerful tool it can be, and what things you can do besides plain wireframes.
HOW TO DO A WIREFRAME WITH JUSTINMIND PROTOTYPER
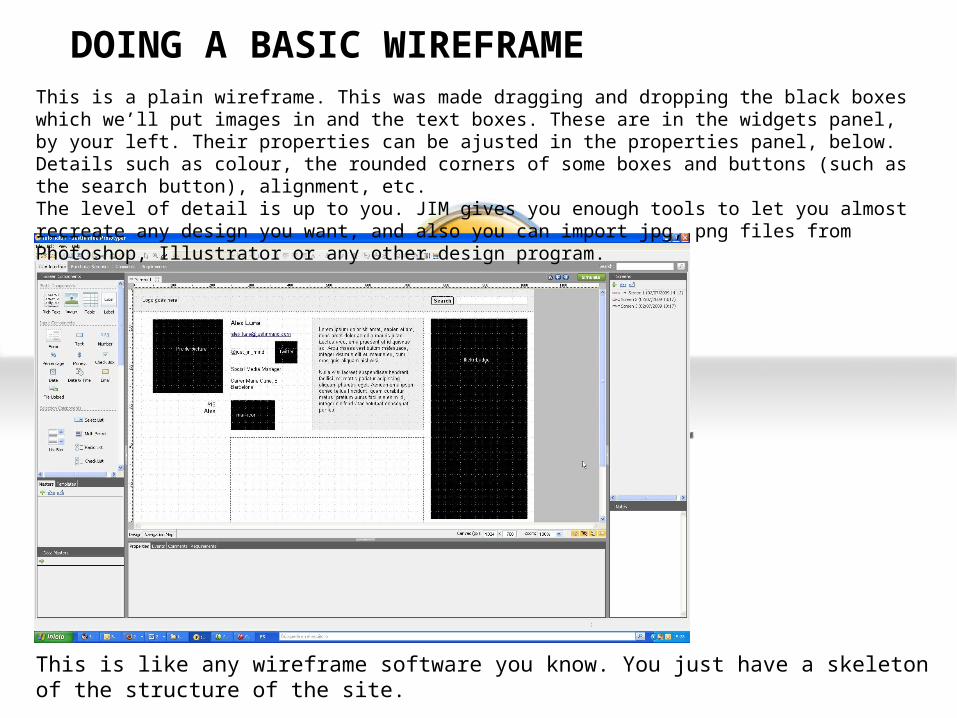
This is a plain wireframe. This was made dragging and dropping the black boxes which we’ll put images in and the text boxes. These are in the widgets panel, by your left. Their properties can be ajusted in the properties panel, below. Details such as colour, the rounded corners of some boxes and buttons (such as the search button), alignment, etc.The level of detail is up to you. JIM gives you enough tools to let you almost recreate any design you want, and also you can import jpg, png files from Photoshop, Illustrator or any other design program.
DOING A BASIC WIREFRAME
This is like any wireframe software you know. You just have a skeleton of the structure of the site.

MAKE IT LOOK AND FEEL LIKE A WEBSITEThen we replace the boxes for the real images with the images tool. You can drop the images inside the boxes to have them at the same size, or resize at will. Note that I used a grid to help me have the same sizes.The box on the right is not a banner. It’s a Flickr Badge made with HTML code. You can insert HTML such as that with the HTML widget on the left panel. So, when you simulate the prototype, you’ll have the same effect you should see on an actual website. Later, you’ll see that working on the final video.

THE LAYERED BOX: THIS YOU CANNOT DO WITH PAPER
Next step is using the Layered Box. It’s like having three different layers on the same site, and three buttons to navigate between them.

THE LAYERED BOX: THIS YOU CANNOT DO WITH PAPER
When you create a layered box, by default you have 3 layers, but you can create several others.

The three layers I created are called map, photos and messages. Now I have to create the navigation buttons that will make us go through the layers. So, I created three buttons, and put them on the left side of the rectangle. They’re called Where’s Alex, Photos of Alex and Leave a message to Alex. Now we need to teach JustInMind Prototyper how to shift through the layers.
Let’s click on Where’s Alex. The other buttons already have an icon over them, that indicates they will do an action. We’ll do the same to Where’s Alex.

After selecting the button, we go to the Events panel, down, and click on the icon with the “+” sign. It will create another event.
We choose the trigger, which is “onClick”, the option Hide/Show, and we select the layered box. It will highlight the three layer’s selectors. We have to choose the first one, and choose the option Show on the radio button below. This means that when you click on the label Where’s Alex, it will show the first layer, called Map, where I’ve placed the embbeded html code for the map.
Click ok.
Repeat the operation for each button, linking them to their specific layers. You have it working.
VIDEO OF PROTOTYPE WORKINGGo to the post of the tutorial and see a working video of the prototype:http://www.justinmind.com/blog/?p=42