Embed Size (px)
DESCRIPTION
Citrix Application Lifecycle Management
Citation preview
Page 1 of 46
Citrix Application Lifecycle Framework
BY BRIAN MURPHY
Page 2 of 46
TABLE OF CONTENTS SUMMARY .................................................................................................................................................................4
PHASE ONE ...............................................................................................................................................................5
THE DON’TS ..............................................................................................................................................................5 THE DO’S ..................................................................................................................................................................6 CORE COMPONENTS .................................................................................................................................................7 SERVICE LEVEL AGREEMENT GOALS ..........................................................................................................................7 IMMEDIATE GOALS .....................................................................................................................................................8 APPLICATION LIFECYCLE MANAGEMENT......................................................................................................................9 DEFINITION OF END USER EXPERIENCE (EUC) ........................................................................................................ 10
APPLICATION LIFECYCLE MANAGEMENT ........................................................................................................ 11
APPLICATION PACKAGING PROCESS FLOW DIAGRAM ............................................................................................... 12
APPLICATION PACKAGING ................................................................................................................................. 13
SETUP.EXE INSTALLATION FORMAT ......................................................................................................................... 13 VENDOR SUPPLIED MSI’S ....................................................................................................................................... 13 NO SETUP ROUTINE PROVIDED ............................................................................................................................... 13
STANDARDS AND PROCEDURES ....................................................................................................................... 14
GENERAL FUNDAMENTALS ...................................................................................................................................... 14 EXPLANATION OF ©WINDOWS INSTALLER FILE TYPES: ............................................................................................. 14 APPLICATION PACKAGE FOLDER ............................................................................................................................. 14 MERGE MODULES .................................................................................................................................................. 15
PATCHES ................................................................................................................................................................ 16
INTRODUCTION TO PATCH FILES .............................................................................................................................. 16 NAMING CONVENTION ............................................................................................................................................. 17
Standardized Naming Schema for Patches ..................................................................................................... 17 Transforms (MST) and Features ...................................................................................................................... 17
APPLICATION DEPENDENCIES AND REQUIREMENTS .................................................................................................. 17 SRM APPLICATIONS ............................................................................................................................................... 17 MSI PROPERTIES ................................................................................................................................................... 18 PACKAGING AND SECURITY EXCEPTIONS ................................................................................................................. 18
Files and Directories ......................................................................................................................................... 18 File and Directory Permissions ......................................................................................................................... 19 Registry Permissions ........................................................................................................................................ 19 Files and Directories ......................................................................................................................................... 19 File System Permissions .................................................................................................................................. 19 Registry Permissions ........................................................................................................................................ 19
NAMING CONVENTIONS ....................................................................................................................................... 20
SAMPLE PACKAGE PROCESS ............................................................................................................................ 21
WISE PACKAGE STUDIO......................................................................................................................................... 21 Install ©WISE Package Studio ......................................................................................................................... 21 SetupCapture ................................................................................................................................................... 22
SOFTWARE INSTALLATION PROCESS .............................................................................................................. 28
PACKAGER’S CHECKLIST ................................................................................................................................... 42

Page 3 of 46
REFERENCED DOCUMENTS ................................................................................................................................ 43
REFERENCED COPYRIGHTS ............................................................................................................................... 44
Reference Information ...................................................................................................................................... 44
DOCUMENT CONTROL SHEET ............................................................................................................................ 45
DOCUMENT NAME, LOCATION, AND OWNER ............................................................................................................. 45 CONTINUOUS IMPROVEMENT ................................................................................................................................... 45 DOCUMENT HISTORY .............................................................................................................................................. 45
DEFINITIONS .......................................................................................................................................................... 46
REFERENCES ......................................................................................................................................................... 46
Page 4 of 38
Summary
Application Lifecycle Deployment of new applications, updates, and software patches is one of the most common – and important – functions of any Citrix hosting framework. This framework maintains the reliability and stability of the XenApp hosting tier while providing internal or external application developers a proven and repeatable process. This document defines a framework for a repeatable, successful, deployment process to properly package, QA, UAT, and future updates relative to deployment of business applications to Citrix. Properly preparing software packages for deployment across an organization is a complex process involving multiple steps, including repackaging, customization, impact assessment, QA and UAT. The software packaging process can become exponentially more complex as a company’s size increases, especially when the organization has multiple offices and software packaging centers across the globe. Application Lifecycle Management must be centralized and utilize a best practice framework for success. Otherwise, different teams follow ad hoc processes; the entire organization suffers. Problems include: Costly Deployment Catastrophes – Deploying a poorly prepared software package can erase important files required by mission-critical software, causing those software programs to fail. The resulting downtime can force company productivity to a halt, increase IT help desk costs, and – depending on the importance of the application – potentially cost the organization millions in lost revenue opportunities. Software Rollout Delays – Without a clear, orderly process in place for preparing an application for deployment, bottlenecks and packaging issues can take far too long to resolve and software rollouts can suffer lengthy delays. Inefficient or Overloaded Packagers – Citrix Management cannot obtain accurate global view of who in IT is working on what projects, so packaging assignments are often unevenly distributed. This means that projects that might have been completed right away - if properly assigned - are instead overlooked, assigned to the wrong packager, or stuck in QA or UAT; for example. Duplicated Packaging Efforts – Lack of having a centralized Application Lifecycle Management for Business Applications results in disparate packaging teams, duplicate work streams, potential for multiple strategies when a single cohesive packaging initiative is required for success and Center of Excellence. Lost Application Data – Data generated by the software packaging process is invaluable for improving the way, AIGGS manage, package, and update applications. However, if the entire process is not centrally managed – or if the data remains scattered in various spreadsheets, documents, and email communications – it isn’t available to the global Application Lifecycle Management Team preventing a Center of Excellence for Citrix Application Deployment.
Page 5 of 38
Phase One
Primary focus for phase one is proper architecture of XenApp 6.5 Feature Release 2 while in parallel a strategy for migration of legacy applications to the new infrastructure. Citrix is a conduit for the business application. Strategy is highly focused on the business application and compatibility with performance as pertinent and primary goals for the new architecture. Prior to migration, all applications must:
1. Create an inventory as it resides on the local Citrix server to include; a. Application name b. Application version c. Application contact(s) d. Application local dependencies
i. Some applications require special fonts installed in C:\Windows\Fonts ii. Some applications require JRE – Java Run Time and specific versions
1. JRE 1.7 supported in new production iii. Some applications require ActiveX controls to run for printing or other purposes iv. Some applications require Oracle Client and corresponding ODBC and/or INI files v. Some applications require SQL Tools/Client installed with ODBC and/or INI files
e. Application client dependencies i. Some applications require special fonts installed in C:\Windows\Fonts
2. Create an application matrix mapping from application to middleware to backend database
The Don’ts
Not having an Application Lifecycle Management Plan – Application Center of Excellence
Not leveraging MSI and Windows Installer Best Practices to create clean, pristine application(s)
Not leveraging MSI and Windows Installer Best Practices to create clean, pristine application patches
Not leveraging MSI and Windows Installer Best Practices to create clean, pristine new releases
Not leveraging a centralized MSI application NAS or SMB share repository
Not testing the applications first before ordering hardware or architecture of Citrix
Not analysing application usage patterns before ordering hardware or architecture of Citrix
Not using ©Citrix XenApp 6.5 Feature Pack 2 to host your applications o Versus hosting in a virtual operating system aka virtual operating system (VDI/VOS)
Not using ©Citrix Provisioning Services to host a single read-only XenApp VDISK images o Cost save o Agility o Scale out not up o Dynamic capacity at demand
Not installing applications, AV, inventory agents in read-only XenApp Dynamic VDISKs o Cost save o Image is read-only, streamed, memory and write-cache disk only o Reality – no longer a typical server; read-only
One image to update, applications only, huge cost savings on agents
Not installing anything other than ©Citrix Universal Receiver
Not using ©Citrix AppDNA for MSI Packaging analysis and remediation steps o Streamlines application migrations from legacy platforms
Not using qualified packagers for Citrix / RDS environment o Standard desktop packaging does not apply to multi-user RDS/Citrix
Not providing adequate workstations, tools, and software for packagers o Tools combined with expertise equals success otherwise failure
Page 6 of 38
o Packaging applications utilize software such as Dell\Wyse Packaging Studio with Conflict Analysis is critical to stabilize the applications and future deployments of patches and new releases
The Do’s
Do create MSI databases with files extrapolated to a centralized share
Do import those MSI databases into a conflict analysis repository
Do utilize Wyse Package Studio
Do utilize packagers with expert knowledge of MSI packaging as it pertains to: o Windows Installer Service 5.0 (Windows Server 2008 R2) o Packaging for Remote Desktop Services in Microsoft Server 2008 R2 o Packaging for Citrix XenApp 6.5 / 7.0 / 7.1 / 7.X o Do utilize merge modules, triggers, coding where applicable
Do have a goal of 90% of applications packaged o 5% network hosted o 5% streamed to XenApp such as Microsoft App-V where applicable
Do centralize application packages to one share
Do run Citrix AppDNA against the MSI packages for QA o Produces list of Citrix specific remediation steps
Do create a list of “low hanging fruit” based on AppDNA results Do convert the users with the largest # of low hanging fruit first
Do analyse every remote site after applications o # of users per site o # of users per site on shift differentials o # of time zones domestic and abroad
Do analyse bandwidth per site o Consolidation has many benefits most of all the reduction of CIR rates per site equates to monthly OPEX
cost saves
Do analyse telecom per site o Telecom can be consolidated using ©Citrix XenApp 6.5 Feature Pack 2 and hosting the Cisco or Avaya
Softphone in XenApp 6.5 Feature Pack 2 – Been there and done it.
Do analyse license usage per application and look for concurrent cost saves by hosting the application in XenApp 6.5 Feature Pack 2 and hard coding usage based on worldwide usage patterns reducing the need for:
o COTS applications o Any concurrent license or non-named user license o SQL licensing if not processor based o Remote Desktop CALs’ o ©Citrix CALs’ o List goes on – many cost saves to be had by centralizing everything
Do leverage ©Citrix Branch Repeater for better WAN performance and possibly further reduction in CIR rates or bandwidth per site.
Do leverage ©Citrix Cloud Bridge for B2B connections (versus high cost private circuits).
Do leverage ©Citrix Netscaler with Content Switch and wild card certificates o Combined with Insight for Netscaler – web and HDX o Enable AppFlow on Netscaler to Insight devices
The intent of this document is to expose one of the most egregious errors when implementing XenApp 6.5 Feature Pack 2 (Published Application). Published Applications create agility and efficiency for IT Operations, Help Desk and most important – end users. All is lost without a defined “Application Lifecycle Management” or “Center Of Excellence” for application packaging, ongoing updates, patches, new releases. Published Application is merely a conduit for the business application and ultimately a way for all users to access their business applications needed to perform their jobs. Published Application allows users to do this from any device, from any location, and any time. The experience made consistent across device(s) utilizing:
1. ©Citrix Universal Receiver 4.X, 5.X, X.X 2. ©Citrix Storefront 2.X, 3.X, X.X
Page 7 of 38
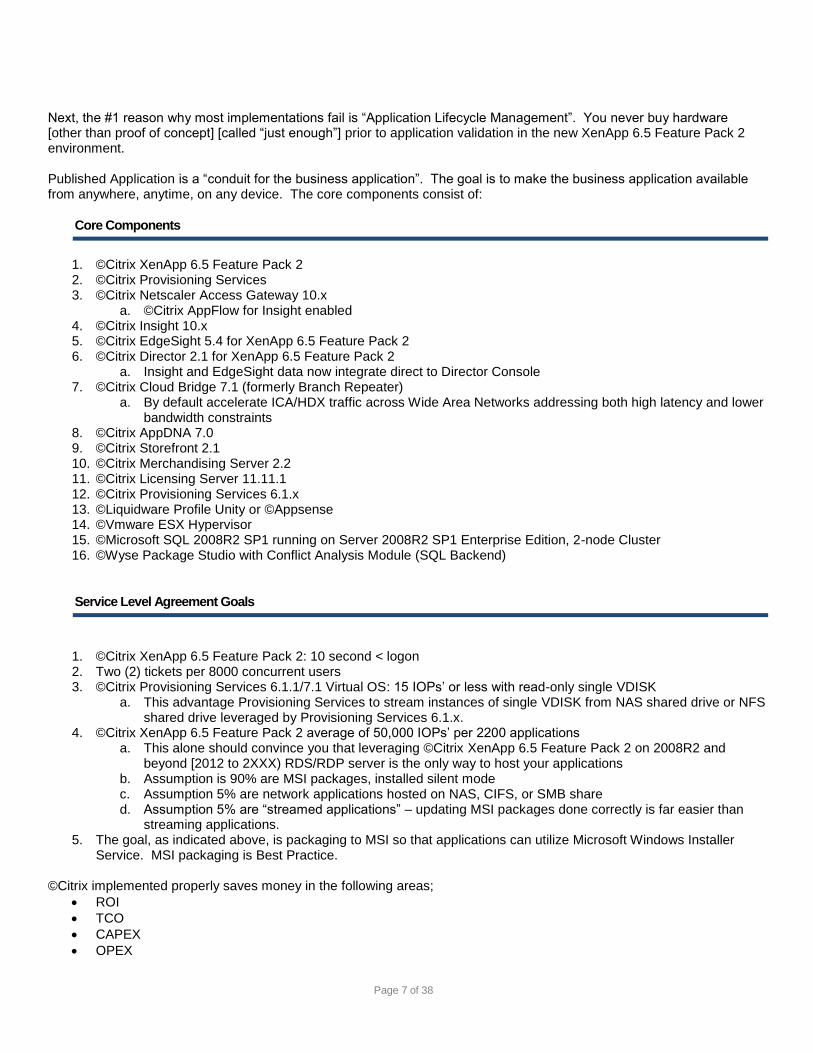
Next, the #1 reason why most implementations fail is “Application Lifecycle Management”. You never buy hardware [other than proof of concept] [called “just enough”] prior to application validation in the new XenApp 6.5 Feature Pack 2 environment. Published Application is a “conduit for the business application”. The goal is to make the business application available from anywhere, anytime, on any device. The core components consist of:
Core Components
1. ©Citrix XenApp 6.5 Feature Pack 2 2. ©Citrix Provisioning Services 3. ©Citrix Netscaler Access Gateway 10.x
a. ©Citrix AppFlow for Insight enabled 4. ©Citrix Insight 10.x 5. ©Citrix EdgeSight 5.4 for XenApp 6.5 Feature Pack 2 6. ©Citrix Director 2.1 for XenApp 6.5 Feature Pack 2
a. Insight and EdgeSight data now integrate direct to Director Console 7. ©Citrix Cloud Bridge 7.1 (formerly Branch Repeater)
a. By default accelerate ICA/HDX traffic across Wide Area Networks addressing both high latency and lower bandwidth constraints
8. ©Citrix AppDNA 7.0 9. ©Citrix Storefront 2.1 10. ©Citrix Merchandising Server 2.2 11. ©Citrix Licensing Server 11.11.1 12. ©Citrix Provisioning Services 6.1.x 13. ©Liquidware Profile Unity or ©Appsense 14. ©Vmware ESX Hypervisor 15. ©Microsoft SQL 2008R2 SP1 running on Server 2008R2 SP1 Enterprise Edition, 2-node Cluster 16. ©Wyse Package Studio with Conflict Analysis Module (SQL Backend)
Service Level Agreement Goals
1. ©Citrix XenApp 6.5 Feature Pack 2: 10 second < logon 2. Two (2) tickets per 8000 concurrent users 3. ©Citrix Provisioning Services 6.1.1/7.1 Virtual OS: 15 IOPs’ or less with read-only single VDISK
a. This advantage Provisioning Services to stream instances of single VDISK from NAS shared drive or NFS shared drive leveraged by Provisioning Services 6.1.x.
4. ©Citrix XenApp 6.5 Feature Pack 2 average of 50,000 IOPs’ per 2200 applications a. This alone should convince you that leveraging ©Citrix XenApp 6.5 Feature Pack 2 on 2008R2 and
beyond [2012 to 2XXX) RDS/RDP server is the only way to host your applications b. Assumption is 90% are MSI packages, installed silent mode c. Assumption 5% are network applications hosted on NAS, CIFS, or SMB share d. Assumption 5% are “streamed applications” – updating MSI packages done correctly is far easier than
streaming applications. 5. The goal, as indicated above, is packaging to MSI so that applications can utilize Microsoft Windows Installer
Service. MSI packaging is Best Practice. ©Citrix implemented properly saves money in the following areas;
ROI
TCO
CAPEX
OPEX
Page 8 of 38
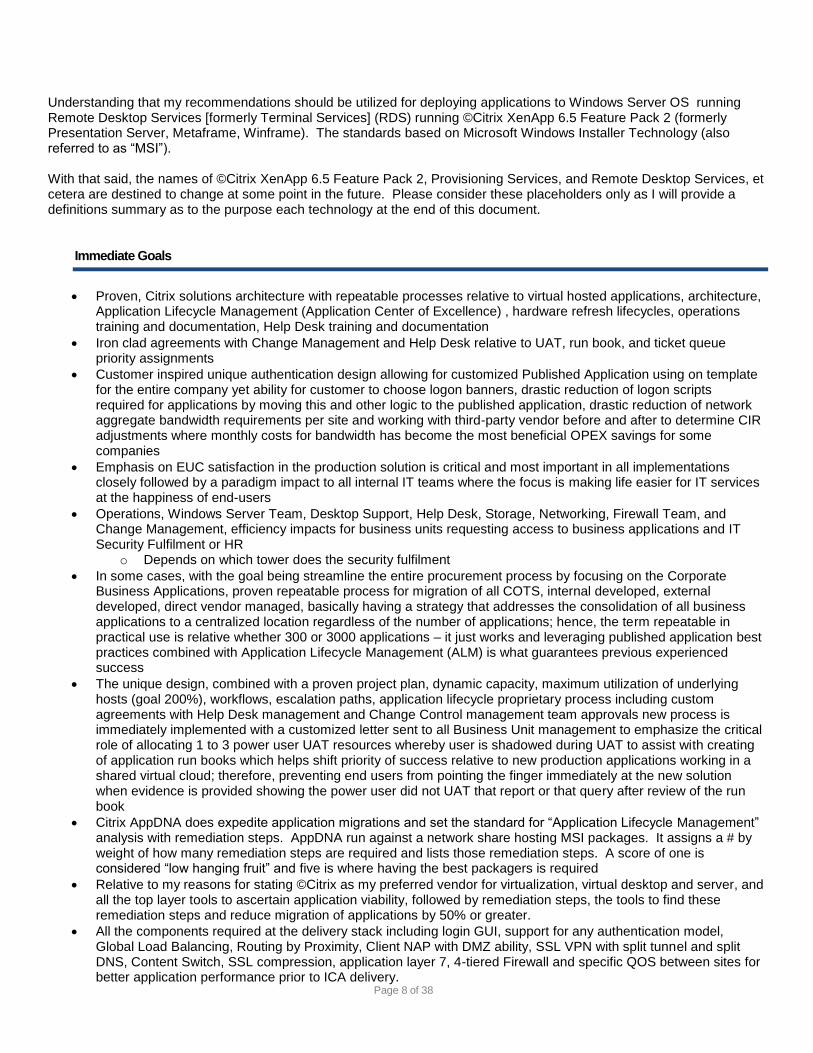
Understanding that my recommendations should be utilized for deploying applications to Windows Server OS running Remote Desktop Services [formerly Terminal Services] (RDS) running ©Citrix XenApp 6.5 Feature Pack 2 (formerly Presentation Server, Metaframe, Winframe). The standards based on Microsoft Windows Installer Technology (also referred to as “MSI”). With that said, the names of ©Citrix XenApp 6.5 Feature Pack 2, Provisioning Services, and Remote Desktop Services, et cetera are destined to change at some point in the future. Please consider these placeholders only as I will provide a definitions summary as to the purpose each technology at the end of this document.
Immediate Goals
Proven, Citrix solutions architecture with repeatable processes relative to virtual hosted applications, architecture, Application Lifecycle Management (Application Center of Excellence) , hardware refresh lifecycles, operations training and documentation, Help Desk training and documentation
Iron clad agreements with Change Management and Help Desk relative to UAT, run book, and ticket queue priority assignments
Customer inspired unique authentication design allowing for customized Published Application using on template for the entire company yet ability for customer to choose logon banners, drastic reduction of logon scripts required for applications by moving this and other logic to the published application, drastic reduction of network aggregate bandwidth requirements per site and working with third-party vendor before and after to determine CIR adjustments where monthly costs for bandwidth has become the most beneficial OPEX savings for some companies
Emphasis on EUC satisfaction in the production solution is critical and most important in all implementations closely followed by a paradigm impact to all internal IT teams where the focus is making life easier for IT services at the happiness of end-users
Operations, Windows Server Team, Desktop Support, Help Desk, Storage, Networking, Firewall Team, and Change Management, efficiency impacts for business units requesting access to business applications and IT Security Fulfilment or HR
o Depends on which tower does the security fulfilment
In some cases, with the goal being streamline the entire procurement process by focusing on the Corporate Business Applications, proven repeatable process for migration of all COTS, internal developed, external developed, direct vendor managed, basically having a strategy that addresses the consolidation of all business applications to a centralized location regardless of the number of applications; hence, the term repeatable in practical use is relative whether 300 or 3000 applications – it just works and leveraging published application best practices combined with Application Lifecycle Management (ALM) is what guarantees previous experienced success
The unique design, combined with a proven project plan, dynamic capacity, maximum utilization of underlying hosts (goal 200%), workflows, escalation paths, application lifecycle proprietary process including custom agreements with Help Desk management and Change Control management team approvals new process is immediately implemented with a customized letter sent to all Business Unit management to emphasize the critical role of allocating 1 to 3 power user UAT resources whereby user is shadowed during UAT to assist with creating of application run books which helps shift priority of success relative to new production applications working in a shared virtual cloud; therefore, preventing end users from pointing the finger immediately at the new solution when evidence is provided showing the power user did not UAT that report or that query after review of the run book
Citrix AppDNA does expedite application migrations and set the standard for “Application Lifecycle Management” analysis with remediation steps. AppDNA run against a network share hosting MSI packages. It assigns a # by weight of how many remediation steps are required and lists those remediation steps. A score of one is considered “low hanging fruit” and five is where having the best packagers is required
Relative to my reasons for stating ©Citrix as my preferred vendor for virtualization, virtual desktop and server, and all the top layer tools to ascertain application viability, followed by remediation steps, the tools to find these remediation steps and reduce migration of applications by 50% or greater.
All the components required at the delivery stack including login GUI, support for any authentication model, Global Load Balancing, Routing by Proximity, Client NAP with DMZ ability, SSL VPN with split tunnel and split DNS, Content Switch, SSL compression, application layer 7, 4-tiered Firewall and specific QOS between sites for better application performance prior to ICA delivery.
Page 9 of 38
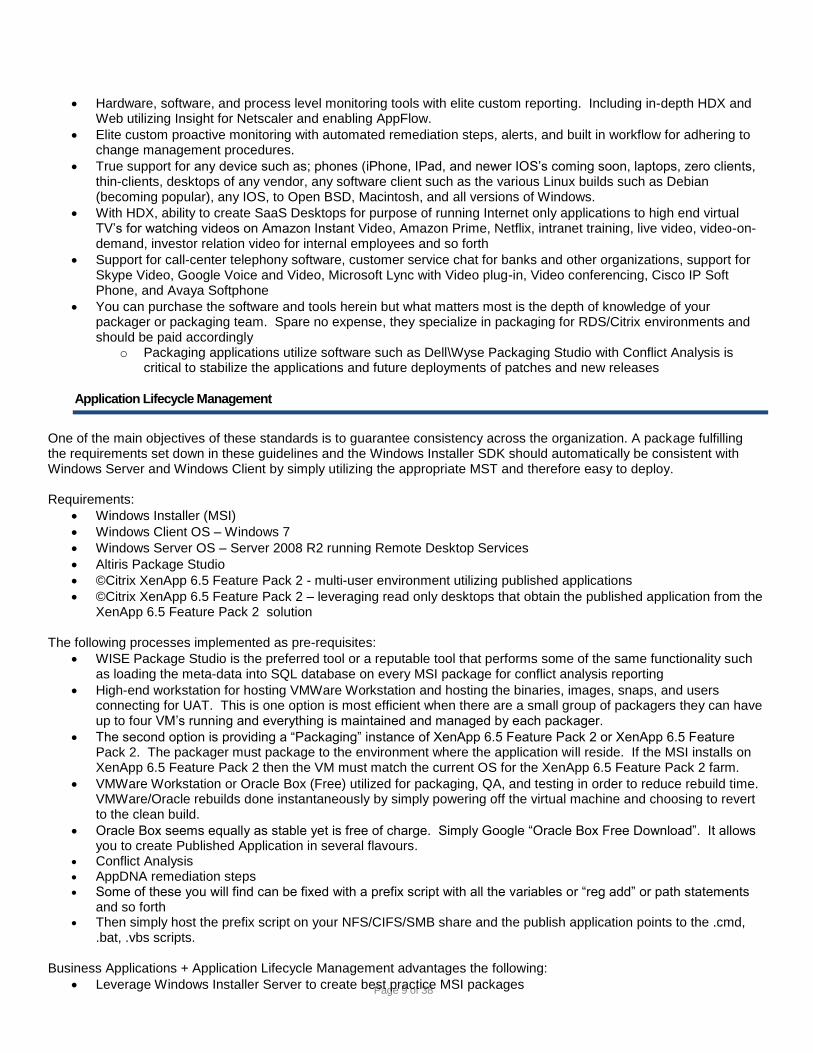
Hardware, software, and process level monitoring tools with elite custom reporting. Including in-depth HDX and Web utilizing Insight for Netscaler and enabling AppFlow.
Elite custom proactive monitoring with automated remediation steps, alerts, and built in workflow for adhering to change management procedures.
True support for any device such as; phones (iPhone, IPad, and newer IOS’s coming soon, laptops, zero clients, thin-clients, desktops of any vendor, any software client such as the various Linux builds such as Debian (becoming popular), any IOS, to Open BSD, Macintosh, and all versions of Windows.
With HDX, ability to create SaaS Desktops for purpose of running Internet only applications to high end virtual TV’s for watching videos on Amazon Instant Video, Amazon Prime, Netflix, intranet training, live video, video-on-demand, investor relation video for internal employees and so forth
Support for call-center telephony software, customer service chat for banks and other organizations, support for Skype Video, Google Voice and Video, Microsoft Lync with Video plug-in, Video conferencing, Cisco IP Soft Phone, and Avaya Softphone
You can purchase the software and tools herein but what matters most is the depth of knowledge of your packager or packaging team. Spare no expense, they specialize in packaging for RDS/Citrix environments and should be paid accordingly
o Packaging applications utilize software such as Dell\Wyse Packaging Studio with Conflict Analysis is critical to stabilize the applications and future deployments of patches and new releases
Application Lifecycle Management
One of the main objectives of these standards is to guarantee consistency across the organization. A package fulfilling the requirements set down in these guidelines and the Windows Installer SDK should automatically be consistent with Windows Server and Windows Client by simply utilizing the appropriate MST and therefore easy to deploy.
Requirements:
Windows Installer (MSI)
Windows Client OS – Windows 7
Windows Server OS – Server 2008 R2 running Remote Desktop Services
Altiris Package Studio
©Citrix XenApp 6.5 Feature Pack 2 - multi-user environment utilizing published applications
©Citrix XenApp 6.5 Feature Pack 2 – leveraging read only desktops that obtain the published application from the XenApp 6.5 Feature Pack 2 solution
The following processes implemented as pre-requisites:
WISE Package Studio is the preferred tool or a reputable tool that performs some of the same functionality such as loading the meta-data into SQL database on every MSI package for conflict analysis reporting
High-end workstation for hosting VMWare Workstation and hosting the binaries, images, snaps, and users connecting for UAT. This is one option is most efficient when there are a small group of packagers they can have up to four VM’s running and everything is maintained and managed by each packager.
The second option is providing a “Packaging” instance of XenApp 6.5 Feature Pack 2 or XenApp 6.5 Feature Pack 2. The packager must package to the environment where the application will reside. If the MSI installs on XenApp 6.5 Feature Pack 2 then the VM must match the current OS for the XenApp 6.5 Feature Pack 2 farm.
VMWare Workstation or Oracle Box (Free) utilized for packaging, QA, and testing in order to reduce rebuild time. VMWare/Oracle rebuilds done instantaneously by simply powering off the virtual machine and choosing to revert to the clean build.
Oracle Box seems equally as stable yet is free of charge. Simply Google “Oracle Box Free Download”. It allows you to create Published Application in several flavours.
Conflict Analysis
AppDNA remediation steps Some of these you will find can be fixed with a prefix script with all the variables or “reg add” or path statements
and so forth Then simply host the prefix script on your NFS/CIFS/SMB share and the publish application points to the .cmd,
.bat, .vbs scripts. Business Applications + Application Lifecycle Management advantages the following:
Leverage Windows Installer Server to create best practice MSI packages
Page 10 of 38
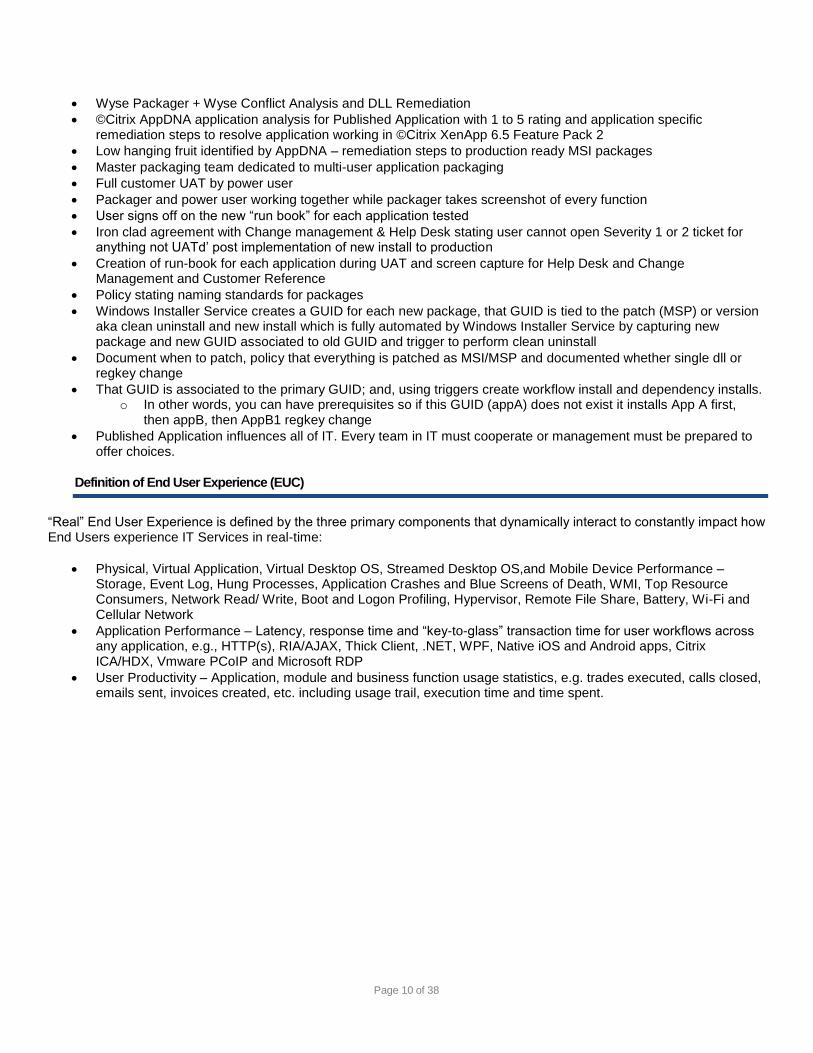
Wyse Packager + Wyse Conflict Analysis and DLL Remediation
©Citrix AppDNA application analysis for Published Application with 1 to 5 rating and application specific remediation steps to resolve application working in ©Citrix XenApp 6.5 Feature Pack 2
Low hanging fruit identified by AppDNA – remediation steps to production ready MSI packages
Master packaging team dedicated to multi-user application packaging
Full customer UAT by power user
Packager and power user working together while packager takes screenshot of every function
User signs off on the new “run book” for each application tested
Iron clad agreement with Change management & Help Desk stating user cannot open Severity 1 or 2 ticket for anything not UATd’ post implementation of new install to production
Creation of run-book for each application during UAT and screen capture for Help Desk and Change Management and Customer Reference
Policy stating naming standards for packages
Windows Installer Service creates a GUID for each new package, that GUID is tied to the patch (MSP) or version aka clean uninstall and new install which is fully automated by Windows Installer Service by capturing new package and new GUID associated to old GUID and trigger to perform clean uninstall
Document when to patch, policy that everything is patched as MSI/MSP and documented whether single dll or regkey change
That GUID is associated to the primary GUID; and, using triggers create workflow install and dependency installs. o In other words, you can have prerequisites so if this GUID (appA) does not exist it installs App A first,
then appB, then AppB1 regkey change
Published Application influences all of IT. Every team in IT must cooperate or management must be prepared to offer choices.
Definition of End User Experience (EUC)
“Real” End User Experience is defined by the three primary components that dynamically interact to constantly impact how End Users experience IT Services in real-time:
Physical, Virtual Application, Virtual Desktop OS, Streamed Desktop OS,and Mobile Device Performance – Storage, Event Log, Hung Processes, Application Crashes and Blue Screens of Death, WMI, Top Resource Consumers, Network Read/ Write, Boot and Logon Profiling, Hypervisor, Remote File Share, Battery, Wi-Fi and Cellular Network
Application Performance – Latency, response time and “key-to-glass” transaction time for user workflows across any application, e.g., HTTP(s), RIA/AJAX, Thick Client, .NET, WPF, Native iOS and Android apps, Citrix ICA/HDX, Vmware PCoIP and Microsoft RDP
User Productivity – Application, module and business function usage statistics, e.g. trades executed, calls closed, emails sent, invoices created, etc. including usage trail, execution time and time spent.
Page 11 of 38
Application Lifecycle Management
This document should be referred in conjunction with the Microsoft Windows Installer SDK. The SDK contains a wealth of detailed information and guidelines which this document does not duplicate. As a general principle, anything written in the SDK is valid in terms of packaging standards and procedures. The basic idea behind this is to make MSI packages portable and easy to support.
One of the main objectives of these standards is to guarantee consistency across the organization. A package fulfilling the requirements set down in these guidelines and the Windows Installer SDK should automatically be consistent with Windows Server and Windows Client by simply utilizing the appropriate MST and therefore easy to deploy.
It is assumed that the reader is technically proficient in the following areas;
Windows Installer (MSI)
Windows Client OS – Windows XP and Windows 7
Altiris Package Studio
©Citrix XenApp - multi-user environment utilizing published applications
©Citrix XenDesktop – leveraging read only desktops that obtain the published application from the XenApp solution
In order for this process to be used, the following processes should be implemented as pre-requisites:
WISE Package Studio is the preferred tool or a reputable tool that performs some of the same functionality such as loading the meta-data into SQL database on every MSI package for conflict analysis reporting
High end workstation for hosting VMWare Workstation and hosting the binaries, images, snaps, and users connecting for UAT. This is one option and generally the fastest when there are a small group of packagers they can have up to 4 VM’s running and everything is maintained and managed by each packager.
The second option is providing a “Packaging” instance of XenApp or XenDesktop. The packager must package to the environment where the application will reside. If the MSI installs on XenApp then the VM must match the current OS for the XenApp farm.
VMWare Workstation can be used for packaging, QA, and testing in order to reduce rebuild time. VMWare rebuilds are done instantaneously by simply powering off the virtual machine and choosing to revert to the clean build.
Oracle Box seems equally as stable yet is free of charge. Simply Google “Oracle Box Free Download”. It allows you to create VOSSKS in several flavours.
Conflict Analysis
AppDNA remediation steps Some of these you will find can be fixed with a prefix script with all the variables or “reg add” or path statements
and so forth Then simply host the prefix script on your NFS/CIFS/SMB share and the publish application points to the .cmd,
.bat, .vbs scripts. Business Applications + Application Lifecycle Management leverages the following:
Leverage Windows Installer Server to create best practice MSI packages
Wyse Packager + Wyse Conflict Analysis and DLL Remediation
©Citrix AppDNA application analysis for VOS with 1 to 5 rating and application specific remediation steps to resolve application working in ©Citrix XenApp
Low hanging fruit identified by AppDNA – remediation steps to production ready MSI packages
Master packaging team dedicated to multi-user application packaging
Full customer UAT by power user
Packager and power user working together while packager takes screenshot of every function
User signs off on the new “run book” for each application tested
Iron clad agreement with Change management & Help Desk stating user cannot open Severity 1 or 2 ticket for anything not UATd’ post implementation of new install to production
Creation of run-book for each application during UAT and screen capture for Help Desk and Change Management and Customer Reference
Page 12 of 38
Policy stating naming standards for packages
Windows Installer Service creates a GUID for each new package, that GUID is tied to the patch (MSP) or version aka clean uninstall and new install which is fully automated by Windows Installer Service by capturing new package and new GUID associated to old GUID and trigger to perform clean uninstall
Document when to patch, policy that everything is patched as MSI/MSP and documented whether single dll or regkey change
That GUID is associated to the primary GUID and using triggers create workflow install and dependency installs. o In other words, you can have prerequisites so if this GUID (appA) does not exist it installs App A first,
then appB, then AppB1 regkey change VOS impacts all of IT. Every team in IT must cooperate or management must be prepared to offer choices.
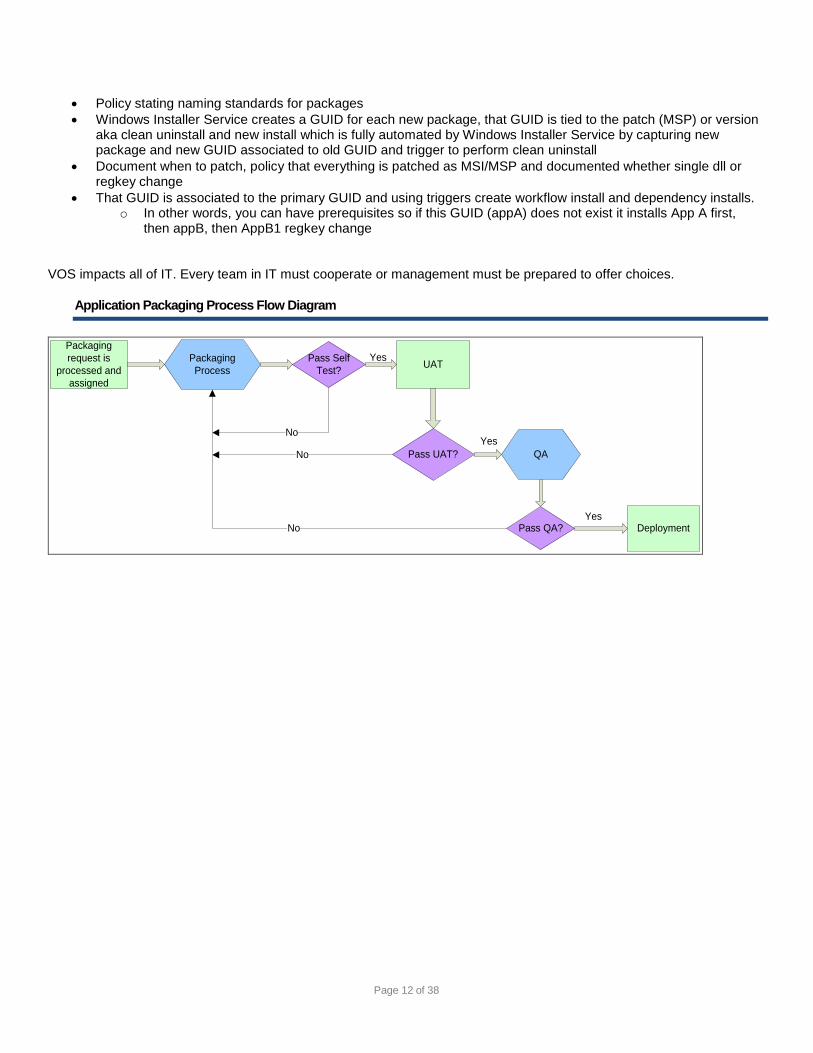
Application Packaging Process Flow Diagram
Packaging
request is
processed and
assigned
Packaging
Process
Pass Self
Test?UAT
Pass UAT? QA
Pass QA? Deployment
Yes
Yes
Yes
No
No
No
Page 13 of 38
Application Packaging
All packages should include a Microsoft ©Word document, based on the ‘Application Package Template’. This document is created by the packager when finished packaging an application. It will contain the following information:
Application Name
Version
Packager Details (Name and Contact Number)
Date
MSI Details (Product, Package and Upgrade Codes)
Installation Instructions
Technical Information
Special Instructions to Deployment Team (if any)
Dependency Information
SQL.INI, TNSNAMES.ORA Strings (if any)
ODBC information (if any)
Useful Contacts
©Citrix Deployment Info (if needed)
Verification Script Any section of the application package documentation that is left intentionally blank should be marked “N/A or None”. Once the document is complete it should be reviewed and edited as required.
Setup.exe Installation Format
This is where the installation source is provided by running a setup routine in a non-MSI format. Use ©Wise Setup
Capture and related tools to capture changes to the workstation.
Vendor Supplied MSI’s
It is preferred to use vendor-supplied MSI’s. However, there are cases where this creates problems due to custom
actions and poorly scripted MSI’s, etc. A snapshot of the MSI will be allowed, dependent on the integrator to decide on
the most suitable option.
No Setup Routine Provided
This can occur where the application is a set of files to be placed in a single directory or just an ODBC entry with few
registry keys. In such cases, create a new installation from within ©Wise or use ©Wise Setup Capture and related tools to
build the package.
Page 14 of 38
Standards and Procedures
General Fundamentals
All ©Windows Installer file types are supported (MSI, MSP, MST and MSM).
Variables (©Windows Installer or System) will be used to support single integrations.
No hard coded settings will be included in any package.
There will be one MSI file per package.
Multiple MSI files per package are not permitted. An application that requires several MSI files must be packaged using several packages.
Nested installations of MSI files are not permitted (i.e. one MSI file cannot call another).
All packages must support silent installation
Suppress Reboot on Installation. If Reboot is required, it must be listed in the QA Exceptions section of Application Document.
All packages should be thin MSI’s with external support files.
All Developer packages should be packaged to same standards as end-user packages excluding rights issues.
Where VB Script Custom Actions are required, the code must be viewable and editable within the ©Wise Package Studio tool.
Clean uninstallation of packages is required and must be tested prior to production deployment.
MST’s packaged against a vendor MSI should be considered a package, MST’s packaged against a produced MSI should be considered Localisation.
Transforms must be delivered under the same folder as the MSI file.
Automatic updates of applications from the Internet are forbidden.
It is not permitted to specify IP addresses anywhere in the package. The DNS representative value of the IP address should be entered instead.
If any of the standards in this standards document are not followed, an exception request should be made.
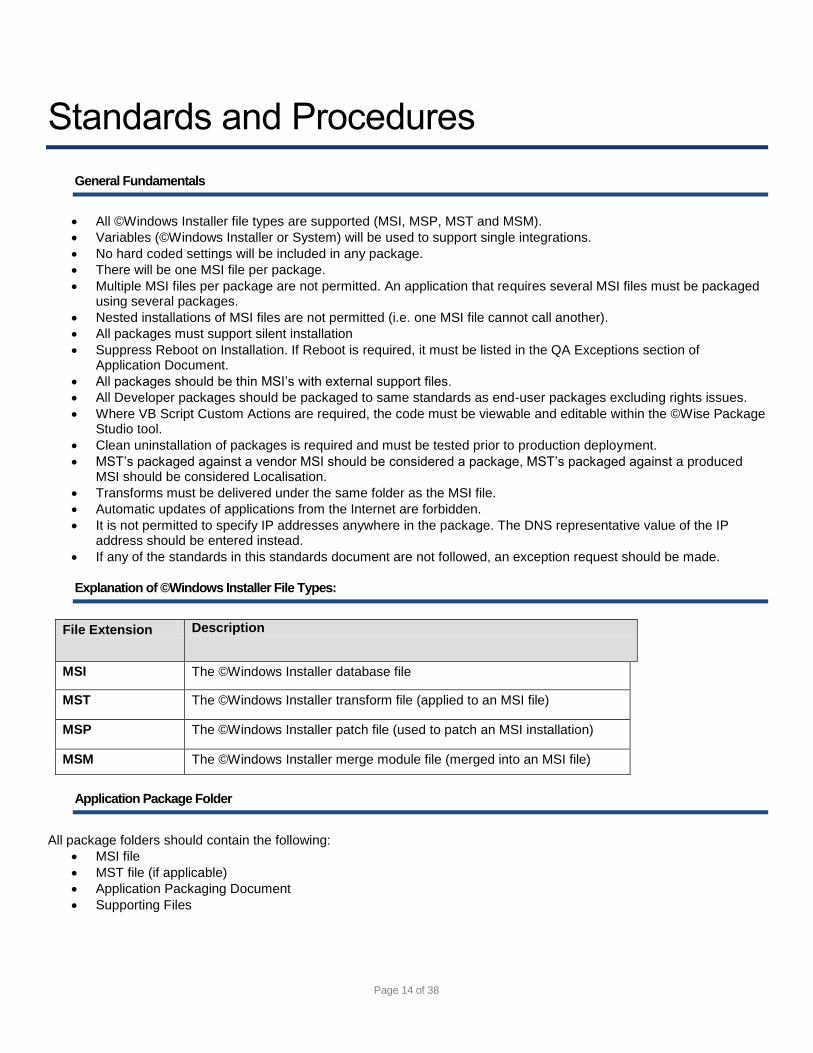
Explanation of ©Windows Installer File Types:
File Extension Description
MSI The ©Windows Installer database file
MST The ©Windows Installer transform file (applied to an MSI file)
MSP The ©Windows Installer patch file (used to patch an MSI installation)
MSM The ©Windows Installer merge module file (merged into an MSI file)
Application Package Folder
All package folders should contain the following:
MSI file
MST file (if applicable)
Application Packaging Document
Supporting Files
Page 15 of 38
Merge Modules
Merge modules are pre-compiled libraries of components (files, registry changes, and other system changes) that install a
discrete portion of your application. They cannot be run alone, but must be merged with a ©Windows Installer database
(MSI file). Merge modules give you flexibility in developing installations because you can break the installation of your
application into logical chunks and share merge modules between projects.
With ©Wise for ©Windows Installer the selection of a module to include in your installation is automatic. If your
application uses a resource that is included in a merge module a dialog box will appear asking you if you would like to
include the merge module with your application. Choose “yes” whenever this option is given. The module plus any
dependent modules are automatically integrated with your MSI file. All table entries etc. will automatically be updated with
the module specific information.
The ©Wise database of merge modules should be the trusted source of Vendor-supplied merge modules approved for Application Packaging and will be updated on a weekly basis. It is recommended that all sites should use the same merge modules to maintain consistency.
To download the latest Merge Modules, go to: www.wise.com
Page 16 of 38
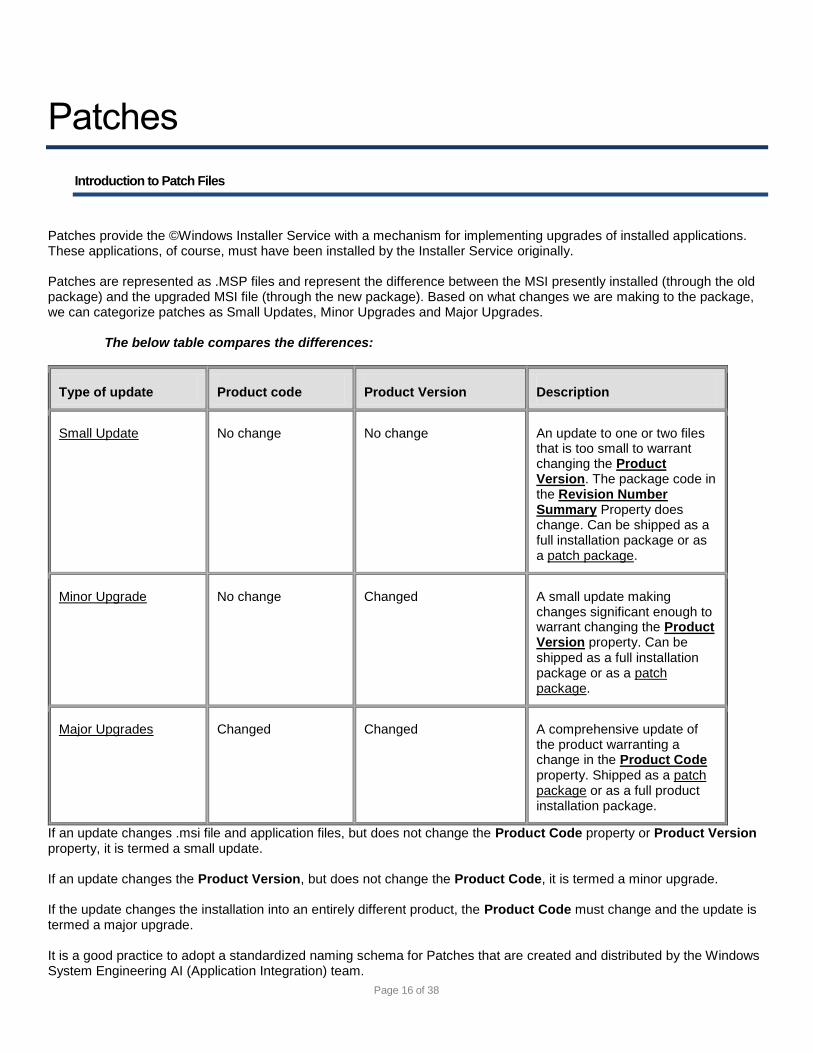
Patches
Introduction to Patch Files
Patches provide the ©Windows Installer Service with a mechanism for implementing upgrades of installed applications. These applications, of course, must have been installed by the Installer Service originally.
Patches are represented as .MSP files and represent the difference between the MSI presently installed (through the old package) and the upgraded MSI file (through the new package). Based on what changes we are making to the package, we can categorize patches as Small Updates, Minor Upgrades and Major Upgrades.
The below table compares the differences:
Type of update Product code Product Version Description
Small Update No change No change An update to one or two files that is too small to warrant changing the Product Version. The package code in the Revision Number Summary Property does change. Can be shipped as a full installation package or as a patch package.
Minor Upgrade No change Changed A small update making changes significant enough to warrant changing the Product Version property. Can be shipped as a full installation package or as a patch package.
Major Upgrades Changed Changed A comprehensive update of the product warranting a change in the Product Code property. Shipped as a patch package or as a full product installation package.
If an update changes .msi file and application files, but does not change the Product Code property or Product Version property, it is termed a small update.
If an update changes the Product Version, but does not change the Product Code, it is termed a minor upgrade.
If the update changes the installation into an entirely different product, the Product Code must change and the update is termed a major upgrade.
It is a good practice to adopt a standardized naming schema for Patches that are created and distributed by the Windows System Engineering AI (Application Integration) team.
Page 17 of 38
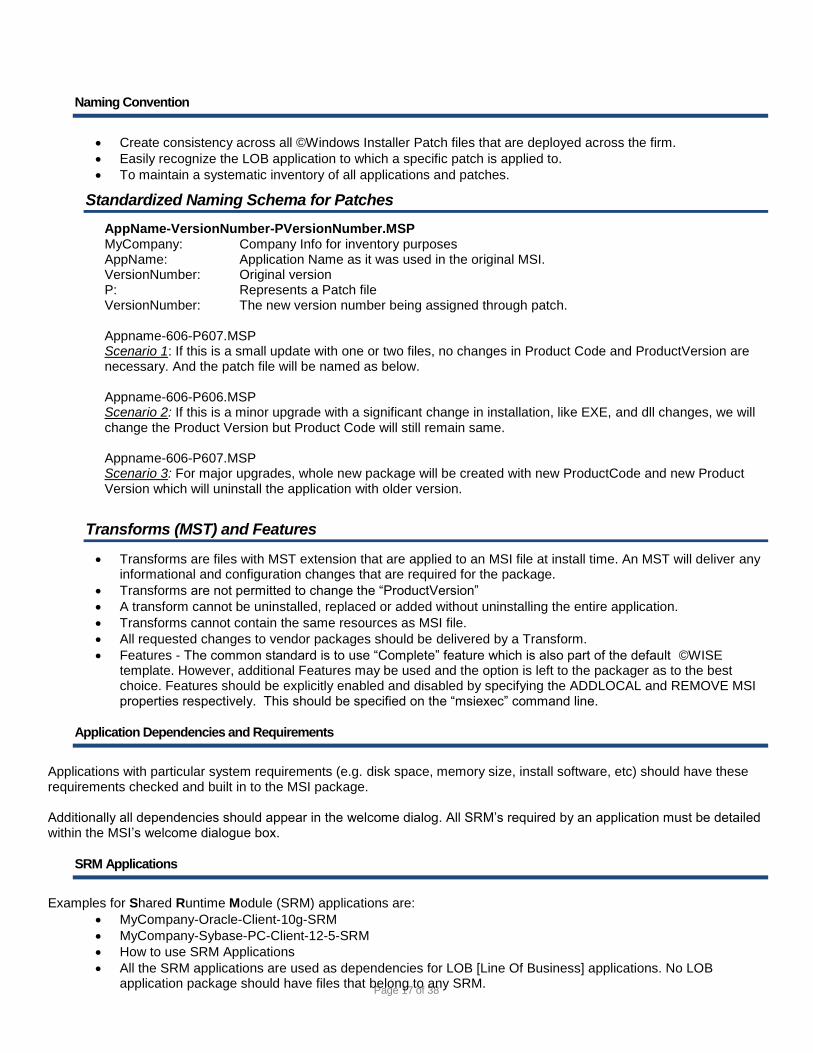
Naming Convention
Create consistency across all ©Windows Installer Patch files that are deployed across the firm.
Easily recognize the LOB application to which a specific patch is applied to.
To maintain a systematic inventory of all applications and patches.
Standardized Naming Schema for Patches
AppName-VersionNumber-PVersionNumber.MSP MyCompany: Company Info for inventory purposes AppName: Application Name as it was used in the original MSI. VersionNumber: Original version P: Represents a Patch file VersionNumber: The new version number being assigned through patch. Appname-606-P607.MSP Scenario 1: If this is a small update with one or two files, no changes in Product Code and ProductVersion are necessary. And the patch file will be named as below. Appname-606-P606.MSP Scenario 2: If this is a minor upgrade with a significant change in installation, like EXE, and dll changes, we will change the Product Version but Product Code will still remain same. Appname-606-P607.MSP Scenario 3: For major upgrades, whole new package will be created with new ProductCode and new Product Version which will uninstall the application with older version.
Transforms (MST) and Features
Transforms are files with MST extension that are applied to an MSI file at install time. An MST will deliver any informational and configuration changes that are required for the package.
Transforms are not permitted to change the “ProductVersion”
A transform cannot be uninstalled, replaced or added without uninstalling the entire application.
Transforms cannot contain the same resources as MSI file.
All requested changes to vendor packages should be delivered by a Transform.
Features - The common standard is to use “Complete” feature which is also part of the default ©WISE template. However, additional Features may be used and the option is left to the packager as to the best choice. Features should be explicitly enabled and disabled by specifying the ADDLOCAL and REMOVE MSI properties respectively. This should be specified on the “msiexec” command line.
Application Dependencies and Requirements
Applications with particular system requirements (e.g. disk space, memory size, install software, etc) should have these requirements checked and built in to the MSI package. Additionally all dependencies should appear in the welcome dialog. All SRM’s required by an application must be detailed within the MSI’s welcome dialogue box.
SRM Applications
Examples for Shared Runtime Module (SRM) applications are:
MyCompany-Oracle-Client-10g-SRM
MyCompany-Sybase-PC-Client-12-5-SRM
How to use SRM Applications
All the SRM applications are used as dependencies for LOB [Line Of Business] applications. No LOB application package should have files that belong to any SRM.
Page 18 of 38
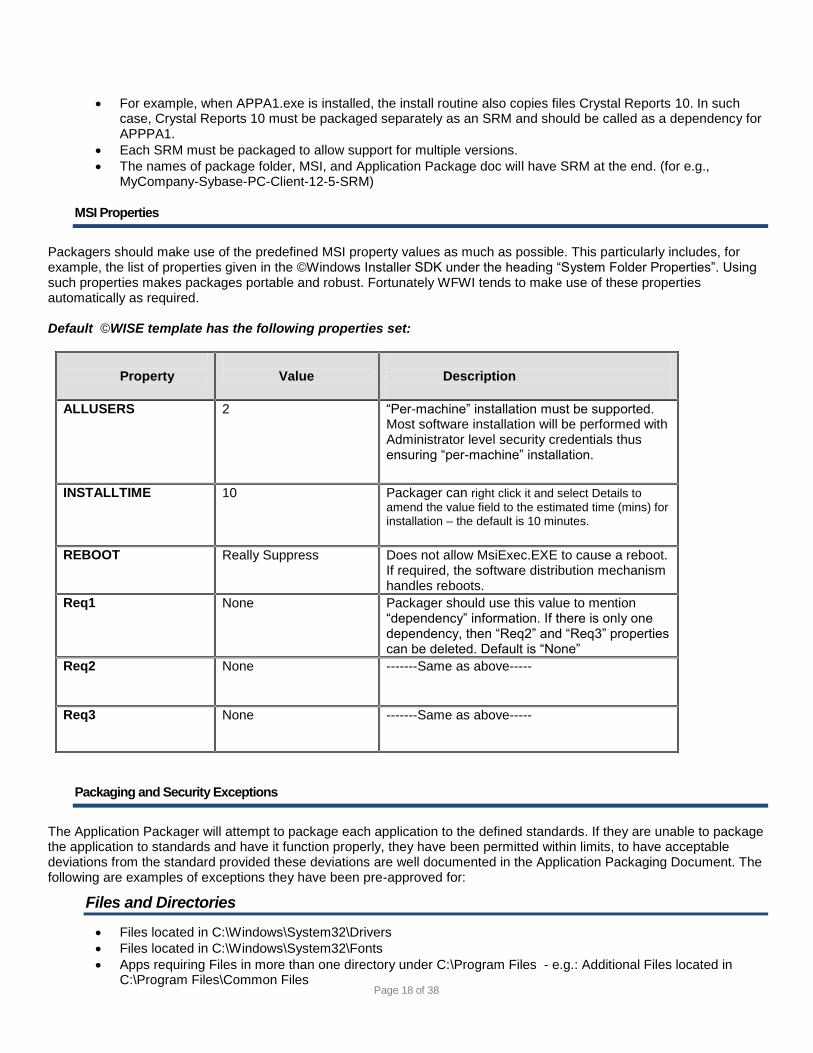
For example, when APPA1.exe is installed, the install routine also copies files Crystal Reports 10. In such case, Crystal Reports 10 must be packaged separately as an SRM and should be called as a dependency for APPPA1.
Each SRM must be packaged to allow support for multiple versions.
The names of package folder, MSI, and Application Package doc will have SRM at the end. (for e.g., MyCompany-Sybase-PC-Client-12-5-SRM)
MSI Properties
Packagers should make use of the predefined MSI property values as much as possible. This particularly includes, for example, the list of properties given in the ©Windows Installer SDK under the heading “System Folder Properties”. Using such properties makes packages portable and robust. Fortunately WFWI tends to make use of these properties automatically as required.
Default ©WISE template has the following properties set:
Property
Value
Description
ALLUSERS 2 “Per-machine” installation must be supported. Most software installation will be performed with Administrator level security credentials thus ensuring “per-machine” installation.
INSTALLTIME 10 Packager can right click it and select Details to
amend the value field to the estimated time (mins) for installation – the default is 10 minutes.
REBOOT Really Suppress Does not allow MsiExec.EXE to cause a reboot. If required, the software distribution mechanism handles reboots.
Req1 None Packager should use this value to mention “dependency” information. If there is only one dependency, then “Req2” and “Req3” properties can be deleted. Default is “None”
Req2 None -------Same as above-----
Req3 None -------Same as above-----
Packaging and Security Exceptions
The Application Packager will attempt to package each application to the defined standards. If they are unable to package the application to standards and have it function properly, they have been permitted within limits, to have acceptable deviations from the standard provided these deviations are well documented in the Application Packaging Document. The following are examples of exceptions they have been pre-approved for:
Files and Directories
Files located in C:\Windows\System32\Drivers
Files located in C:\Windows\System32\Fonts
Apps requiring Files in more than one directory under C:\Program Files - e.g.: Additional Files located in C:\Program Files\Common Files
Page 19 of 38
Add additional rights to directories from within the MSI – the rights should be added to the ‘everyone’ group.
File and Directory Permissions
Allowed to grant write permissions on files e.g.: C:\Program Files\App\myfile.ext
Allowed to grant write permissions on folders e.g.: C:\Program Files\App\Logs
Registry Permissions
Allowed to grant write permissions to the User Group to registry keys of the packaged application eg: HKLM\Software\MyApp
Allowed to grant write permissions to the User Group to registry values and data of the packaged application e.g.: HKLM\Software\MyApp\Setting1 | mydata
Setting Security on a Registry Value in a Package:
Select “Installation Expert” Tab
Select “Registry” in the Feature Details section on the left.
Select the desired feature (normally “Complete”) from the “Current Feature” dropdown box.
In the lower left hand pane, expand the registry tree display as needed and navigate to the desired registry key. (Note that if the desired key does not exist, it can be located in the upper left hand pane and dragged and dropped to the lower left pane)
Right click the value to be operated on from the lower right pane then click “Details”. (Note that if the desired value does not exist, it can be navigated to in the upper left and right hand panes and dragged and dropped to the lower right pane)
Select the “Permissions” Tab
Leave the “Domain” box empty and enter “Everyone” in the Box labelled “User”.
Check the boxes by the permissions you require on the file.
Click “Add”
Setting Security Permissions for a Registry value inside a Package is now complete.
Note: Though the packagers are allowed to make certain exceptions mentioned above, they have been given limits on how far they can
deviate from standards. For some standards there are hard and fast rules that may not be deviated from. The following is a list of
standard items AI packagers cannot violate during the packaging process. These deviations need prior approval from the senior level
Management.
Files and Directories
Not allowed to write files located in other directories to enable the application to function e.g.: C:\
Must document files located in C:\Windows
Must document files located in C:\Windows\System
Must document files located in C:\Windows\System32
File System Permissions
Not allow to grant write permissions to the User Group to the root of C:\ directory
Not allow to grant write permissions to the User Group to the root of C:\Windows and its’ children directories
Not allow to grant write permissions to the User Group to the C:\Program Files directory
Not allow to grant write permissions to the User Group to the C:\Program Files\Common Files directory
Not allowed to grant write permissions on files under C:\Windows directory.
Registry Permissions
Not allowed to grant write permissions to the User Group to any root hive
Not allowed to grant write permissions to the User Group to HKLM\Software.
Page 20 of 38
Naming Conventions
Name
Description
Examples
Package Folder Name of the package folder. This will have the same name as MSI.
MyCompany-MyApp-6-6
MSI Name of the MSI file, if not vendor provided. Every MSI name should contain the name of the app and version number. The name should start with MyCompany.
MyCompany-MyApp-6-6.msi
MST Name of the MST file. If the MSI is vendor provided, use this name as the base for all other names in this section. Multiple MSTs should be named to indicate the purpose of each MST.
MyCompany-MyApp-6-6.mst MyCompany-MyApp-6-6.msi
Name of the Application Package doc
Name of the AP document provided with the application package. For SRM packages, document’s name will have SRM at the end.
MyCompany-MyApp-6-6.doc
MyCompany-Oracle-Client-10g-SRM.doc
Destination Directory Capture the default directory the install routine creates. No version number required. Note: Some 32 bit applications should be installed in a short-name directory such as C:\Prod being default it would go to (x86) directory on 64 bit and some applications cannot “read” this type of path statement.
C:\Prod\MyApps\MyApp C:\Program Files\MyApp
Add/Remove programs in Control Panel
Only admin users will see this. The name appearing in the Add/Remove control panel is the name specified in the Product Details of the MSI. The name should be based on the MSI file name including the version and Release number (but without the '-'s).
MyCompany MyApp 6.6
Page 21 of 38
Sample Package Process
WISE Package Studio
This section is a sample only of a generic package preparation. These steps will be performed by Windows Systems Engineering to prepare the application package for testing and deployment.
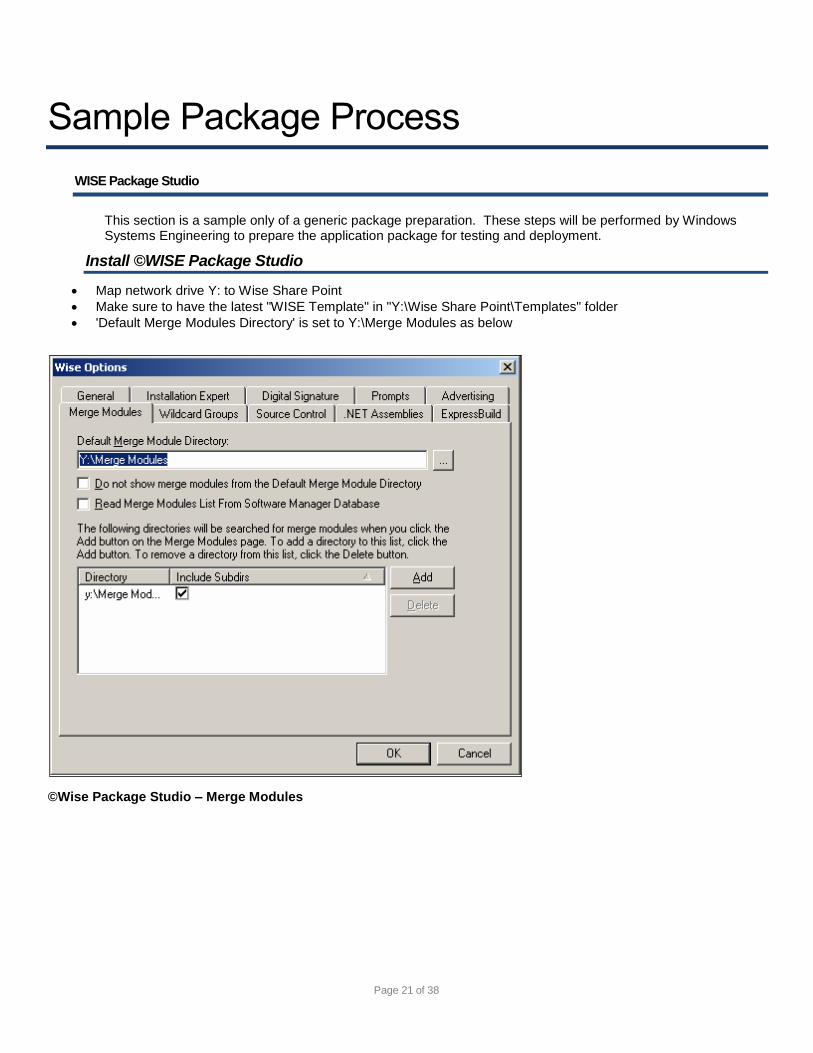
Install ©WISE Package Studio
Map network drive Y: to Wise Share Point
Make sure to have the latest "WISE Template" in "Y:\Wise Share Point\Templates" folder
'Default Merge Modules Directory' is set to Y:\Merge Modules as below
©Wise Package Studio – Merge Modules
Page 22 of 38
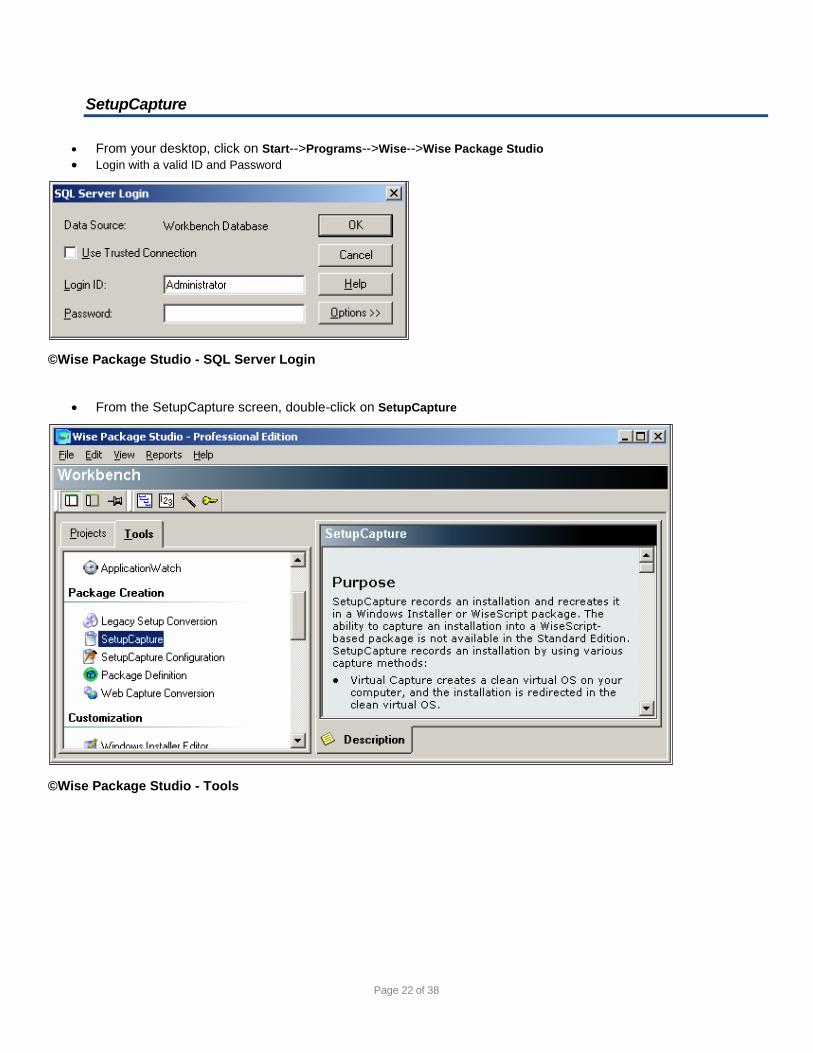
SetupCapture
From your desktop, click on Start-->Programs-->Wise-->Wise Package Studio
Login with a valid ID and Password
©Wise Package Studio - SQL Server Login
From the SetupCapture screen, double-click on SetupCapture
©Wise Package Studio - Tools
Page 23 of 38
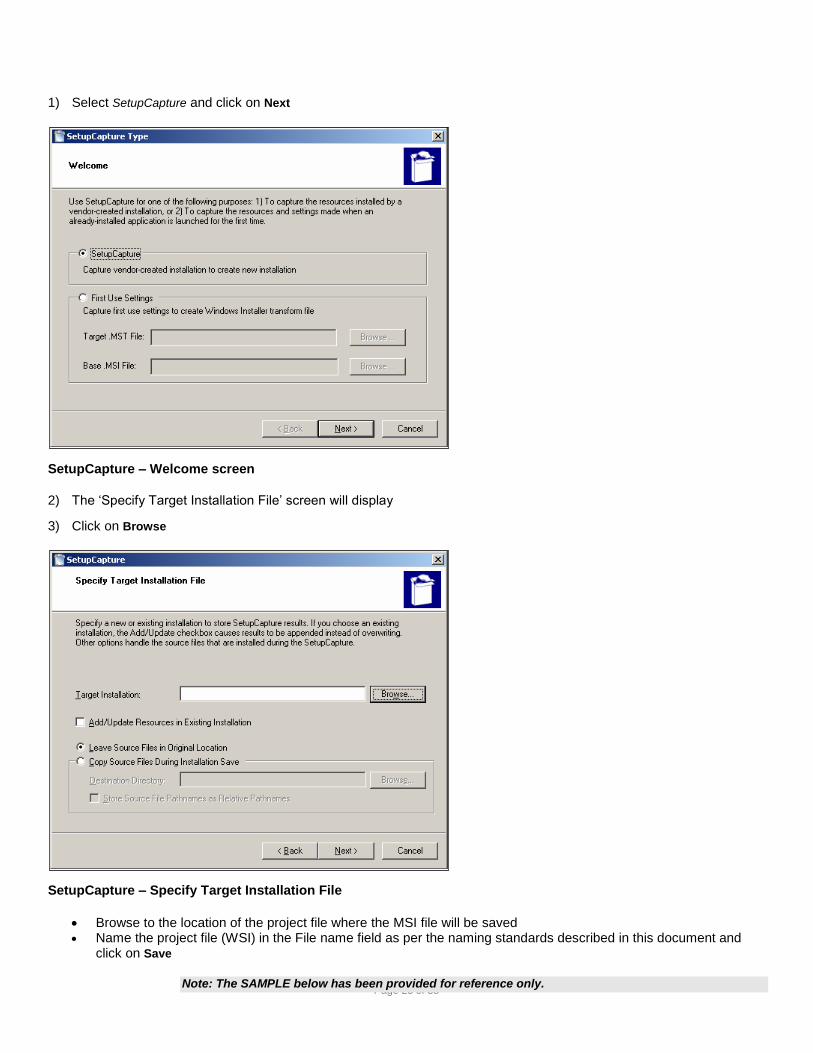
1) Select SetupCapture and click on Next
SetupCapture – Welcome screen
2) The ‘Specify Target Installation File’ screen will display
3) Click on Browse
SetupCapture – Specify Target Installation File
Browse to the location of the project file where the MSI file will be saved Name the project file (WSI) in the File name field as per the naming standards described in this document and
click on Save
Note: The SAMPLE below has been provided for reference only.
Page 24 of 38
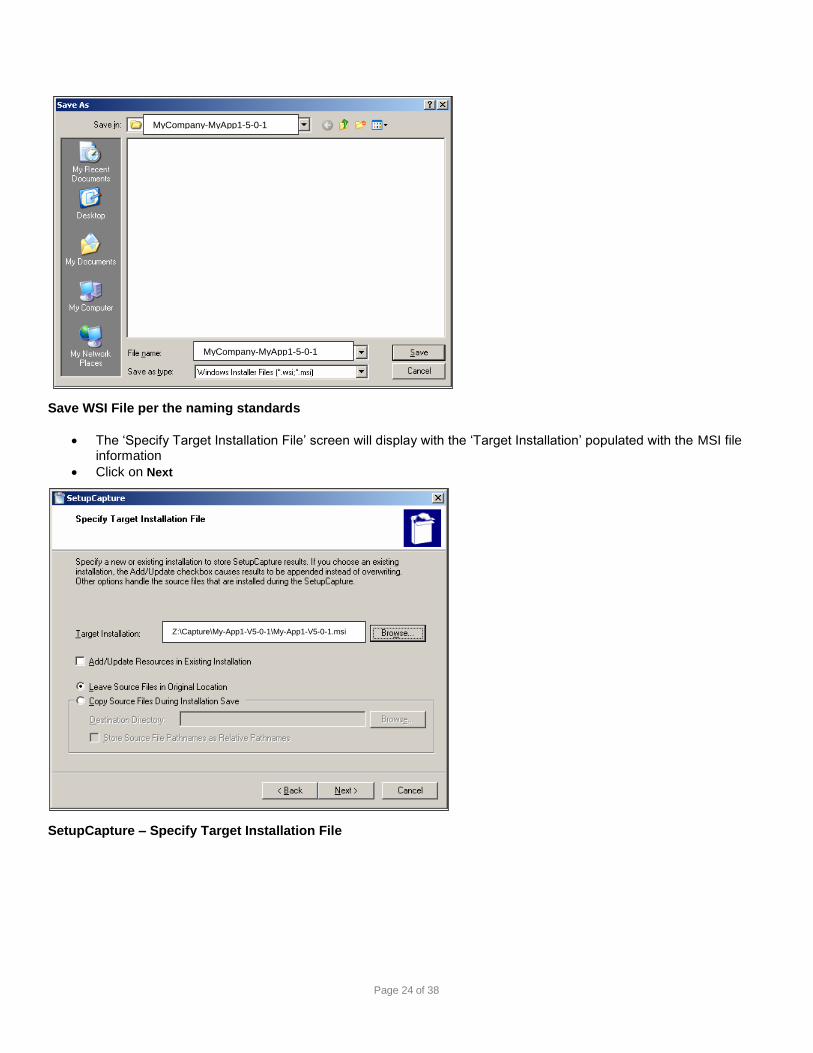
Save WSI File per the naming standards
The ‘Specify Target Installation File’ screen will display with the ‘Target Installation’ populated with the MSI file information
Click on Next
SetupCapture – Specify Target Installation File
MyCompany-MyApp1-5-0-1
Z:\Capture\My-App1-V5-0-1\My-App1-V5-0-1.msi
MyCompany-MyApp1-5-0-1
Page 25 of 38
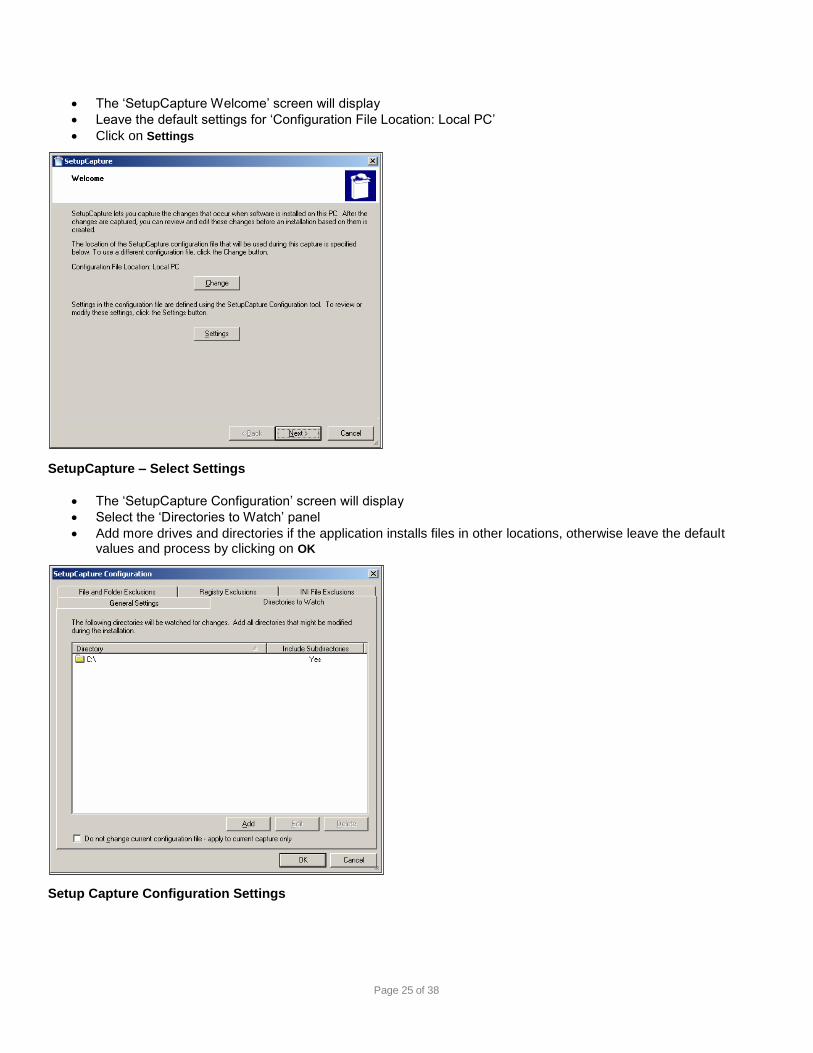
The ‘SetupCapture Welcome’ screen will display
Leave the default settings for ‘Configuration File Location: Local PC’
Click on Settings
SetupCapture – Select Settings
The ‘SetupCapture Configuration’ screen will display
Select the ‘Directories to Watch’ panel
Add more drives and directories if the application installs files in other locations, otherwise leave the default values and process by clicking on OK
Setup Capture Configuration Settings
Page 26 of 38
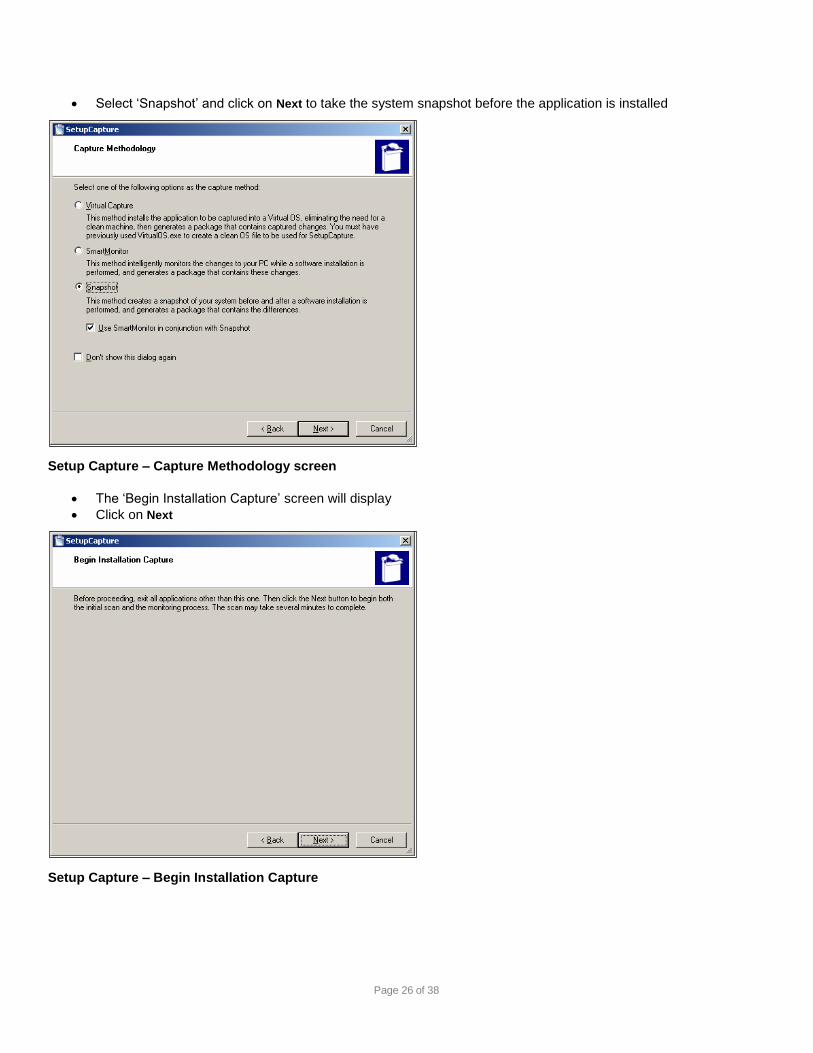
Select ‘Snapshot’ and click on Next to take the system snapshot before the application is installed
Setup Capture – Capture Methodology screen
The ‘Begin Installation Capture’ screen will display
Click on Next
Setup Capture – Begin Installation Capture
Page 27 of 38
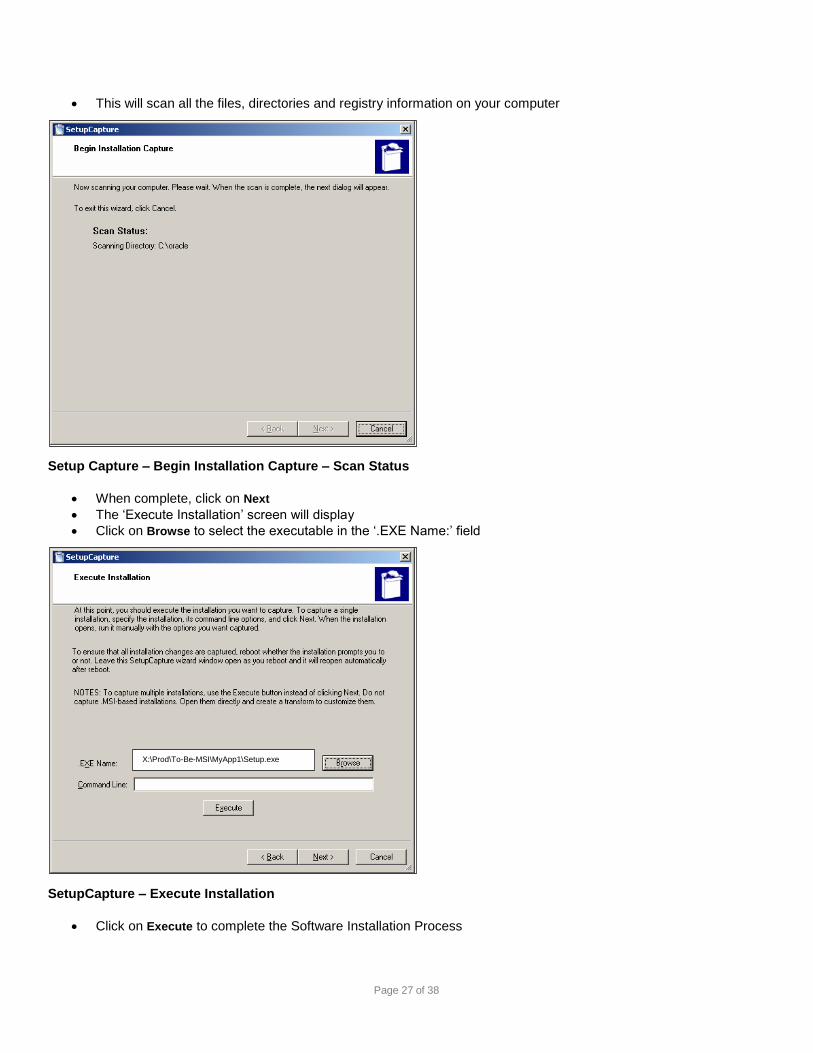
This will scan all the files, directories and registry information on your computer
Setup Capture – Begin Installation Capture – Scan Status
When complete, click on Next
The ‘Execute Installation’ screen will display
Click on Browse to select the executable in the ‘.EXE Name:’ field
SetupCapture – Execute Installation
Click on Execute to complete the Software Installation Process
X:\Prod\To-Be-MSI\MyApp1\Setup.exe

Page 28 of 38
Software Installation Process
Note: These steps may not be same for every application install
The ‘Setup’ screen will display
Click on Next
Software Installation Process – Setup Screen
Browse for the destination folder and click on Next
Setup – Choose Destination Location
C:\Prod\MyApp1\
Page 29 of 38
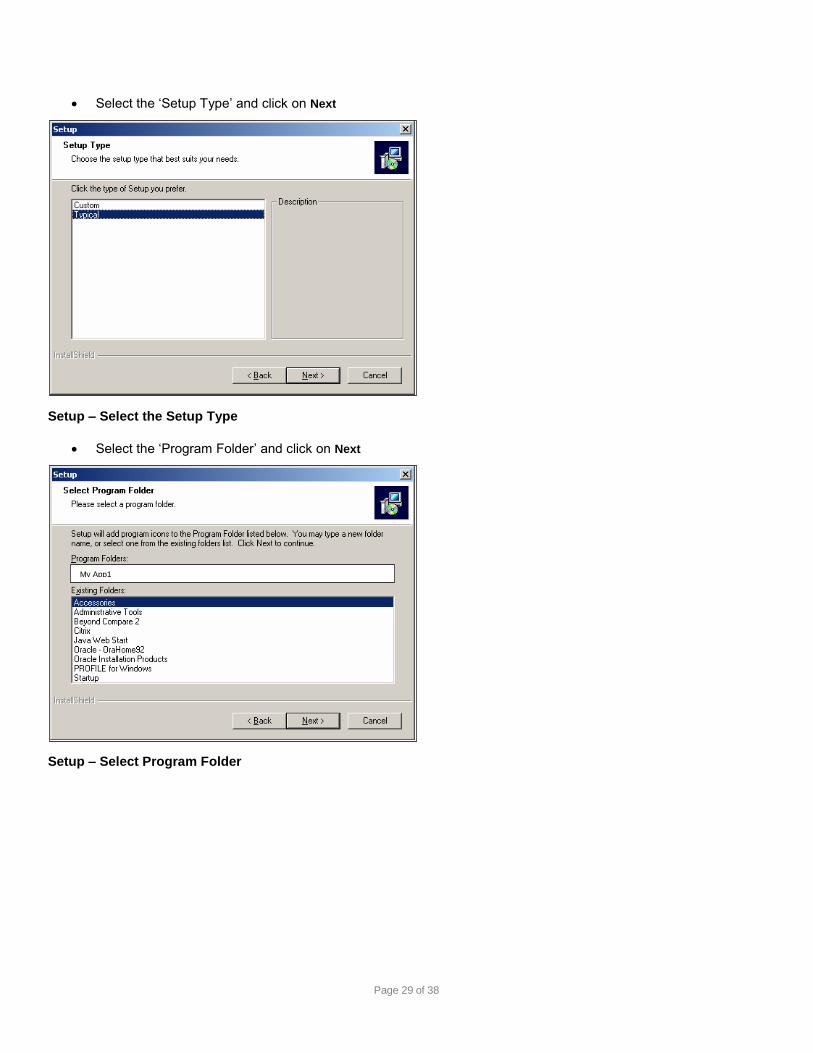
Select the ‘Setup Type’ and click on Next
Setup – Select the Setup Type
Select the ‘Program Folder’ and click on Next
Setup – Select Program Folder
My App1
Page 30 of 38
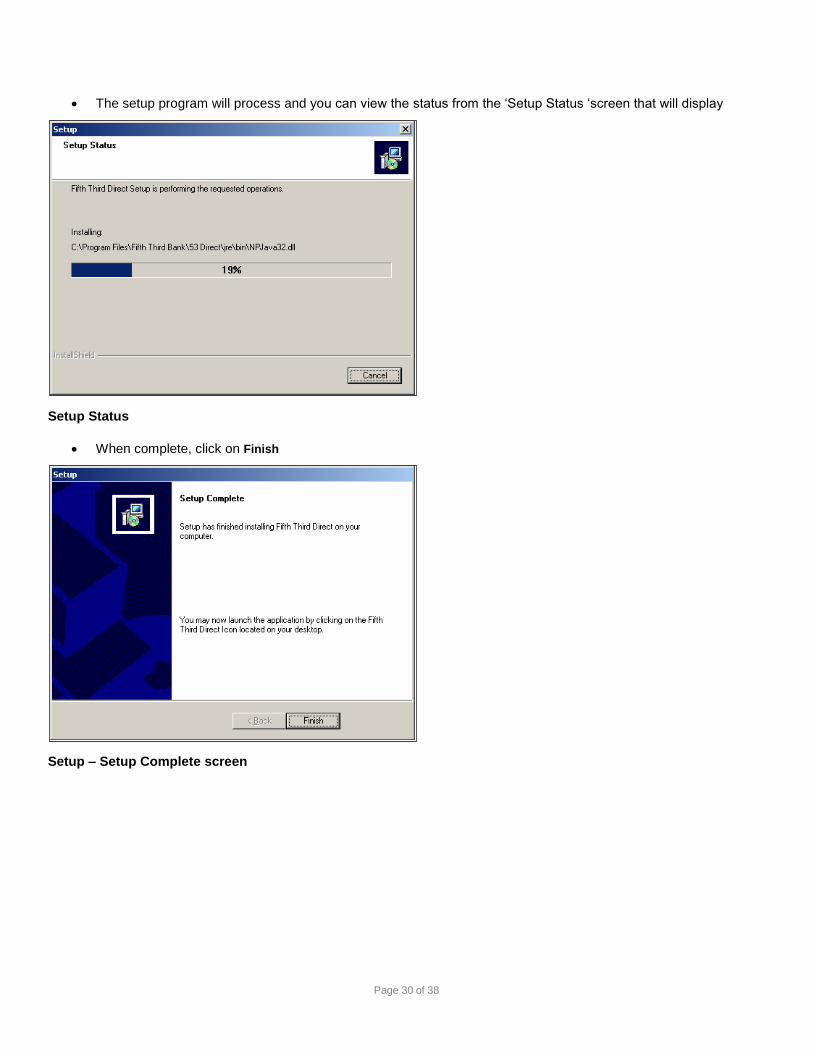
The setup program will process and you can view the status from the ‘Setup Status ‘screen that will display
Setup Status
When complete, click on Finish
Setup – Setup Complete screen
Page 31 of 38
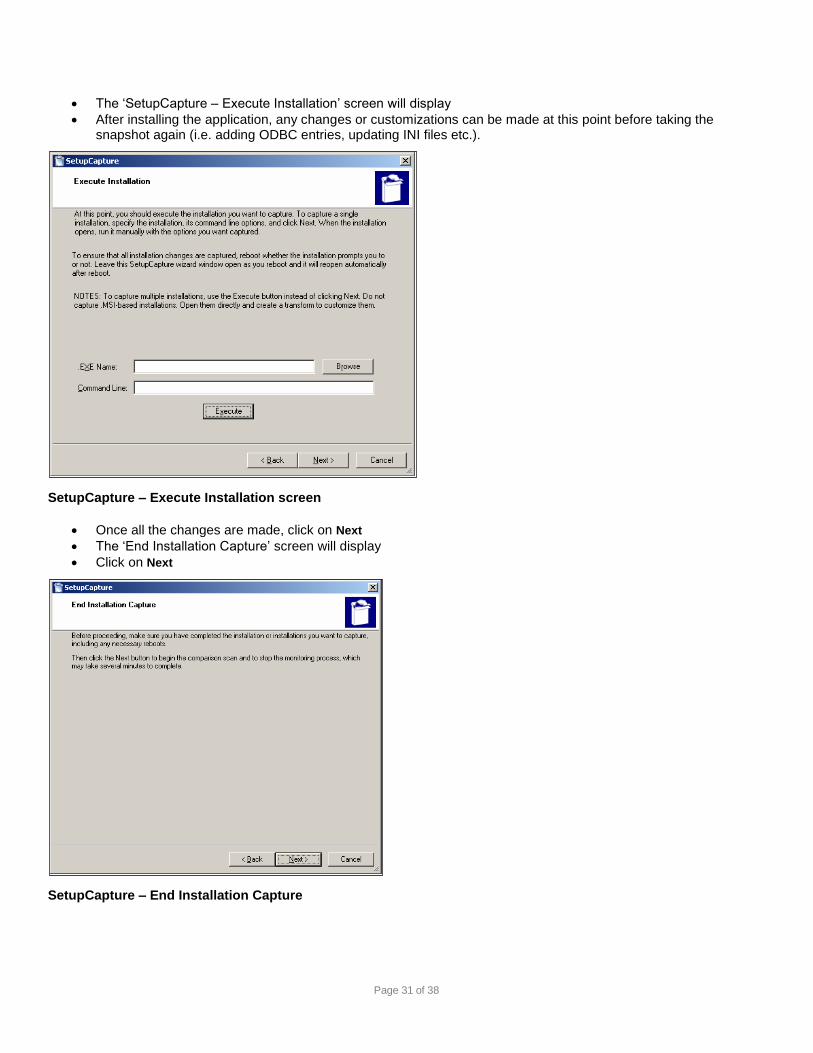
The ‘SetupCapture – Execute Installation’ screen will display
After installing the application, any changes or customizations can be made at this point before taking the snapshot again (i.e. adding ODBC entries, updating INI files etc.).
SetupCapture – Execute Installation screen
Once all the changes are made, click on Next
The ‘End Installation Capture’ screen will display
Click on Next
SetupCapture – End Installation Capture
Page 32 of 38
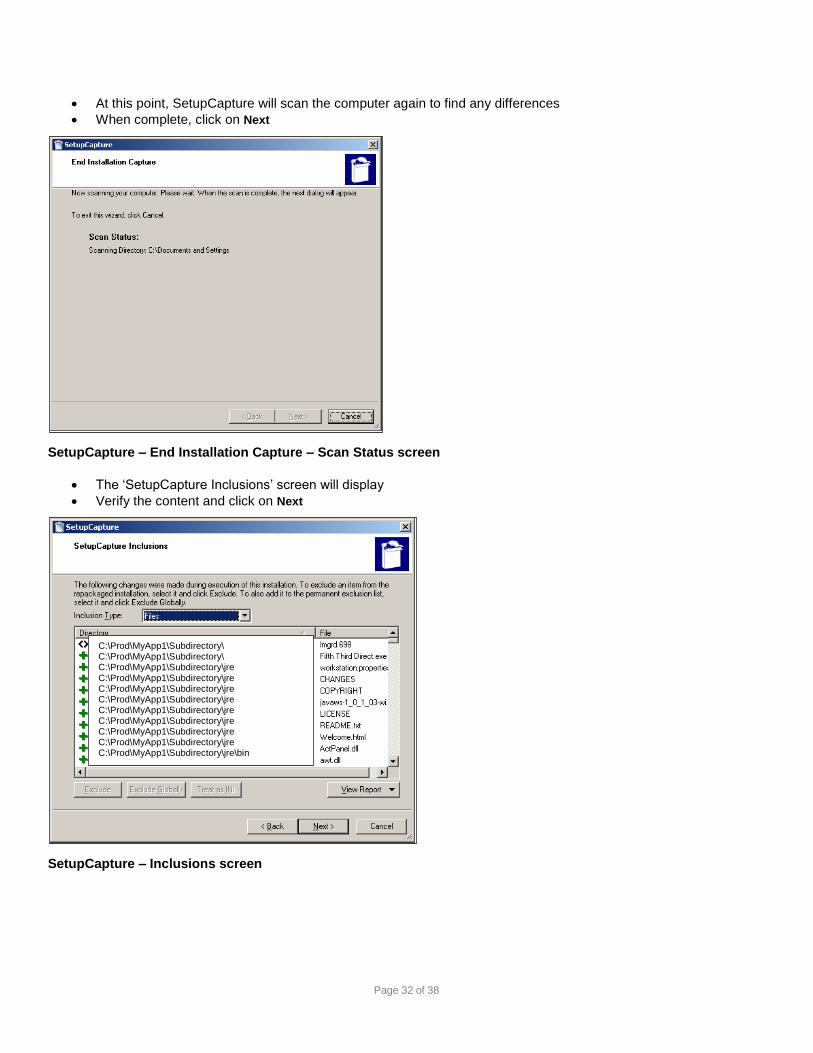
At this point, SetupCapture will scan the computer again to find any differences
When complete, click on Next
SetupCapture – End Installation Capture – Scan Status screen
The ‘SetupCapture Inclusions’ screen will display
Verify the content and click on Next
SetupCapture – Inclusions screen
C:\Prod\MyApp1\Subdirectory\ C:\Prod\MyApp1\Subdirectory\ C:\Prod\MyApp1\Subdirectory\jre C:\Prod\MyApp1\Subdirectory\jre C:\Prod\MyApp1\Subdirectory\jre C:\Prod\MyApp1\Subdirectory\jre C:\Prod\MyApp1\Subdirectory\jre C:\Prod\MyApp1\Subdirectory\jre C:\Prod\MyApp1\Subdirectory\jre C:\Prod\MyApp1\Subdirectory\jre C:\Prod\MyApp1\Subdirectory\jre\bin C:\Prod\MyApp1\Subdirectory\jre\bin
Page 33 of 38
The ‘SetupCapture Exclusions’ screen will display Verify the content and click on Next
SetupCapture – Exclusions screen
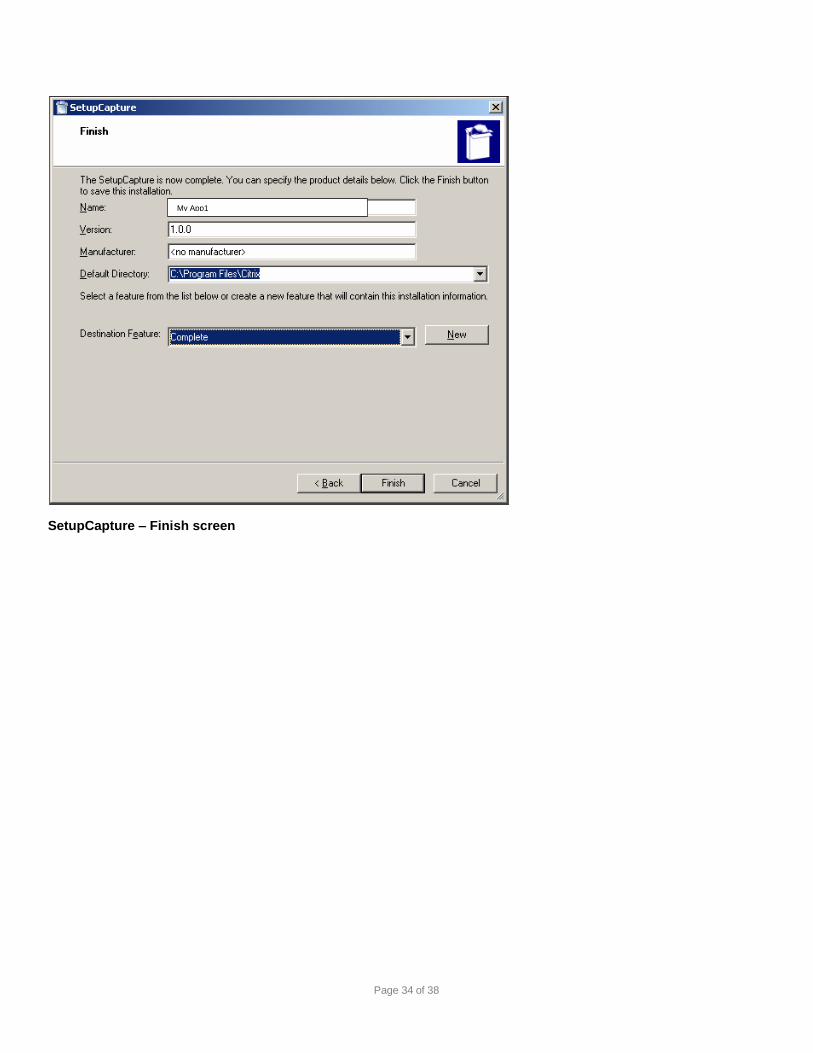
The ‘Finish’ screen will display.
Verify the default directories and click on Finish
Page 34 of 38
SetupCapture – Finish screen
My App1
Page 35 of 38
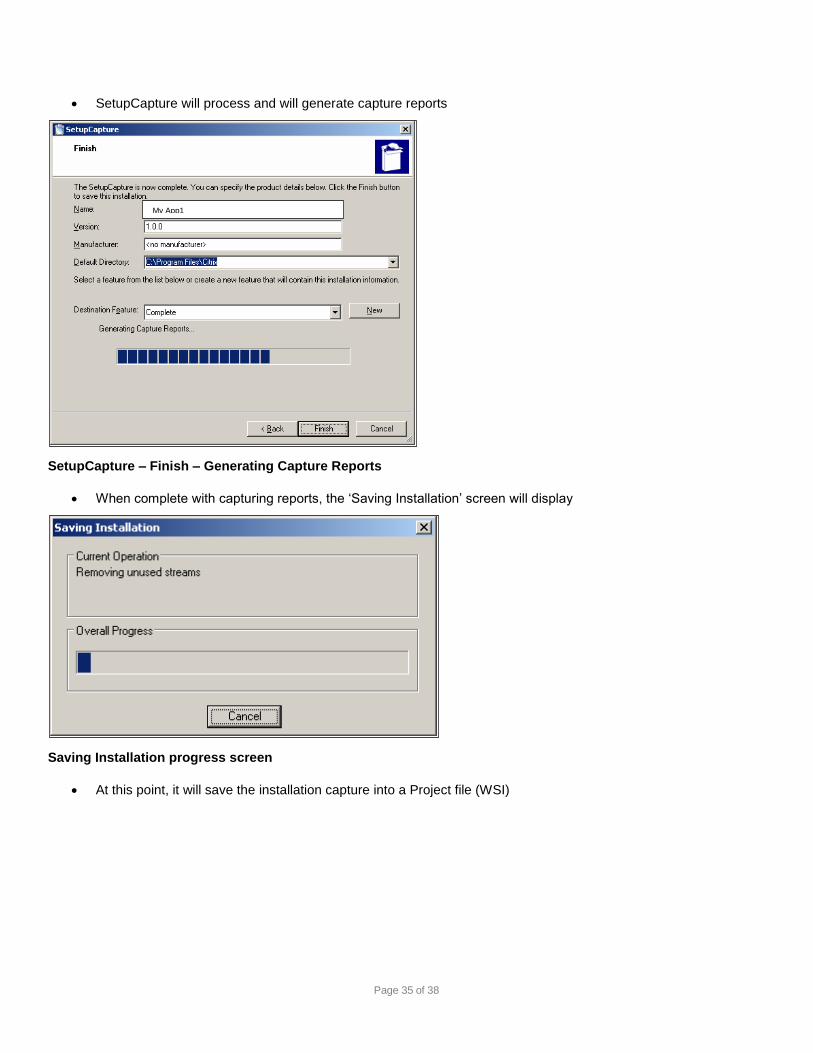
SetupCapture will process and will generate capture reports
SetupCapture – Finish – Generating Capture Reports
When complete with capturing reports, the ‘Saving Installation’ screen will display
Saving Installation progress screen
At this point, it will save the installation capture into a Project file (WSI)
My App1
Page 36 of 38
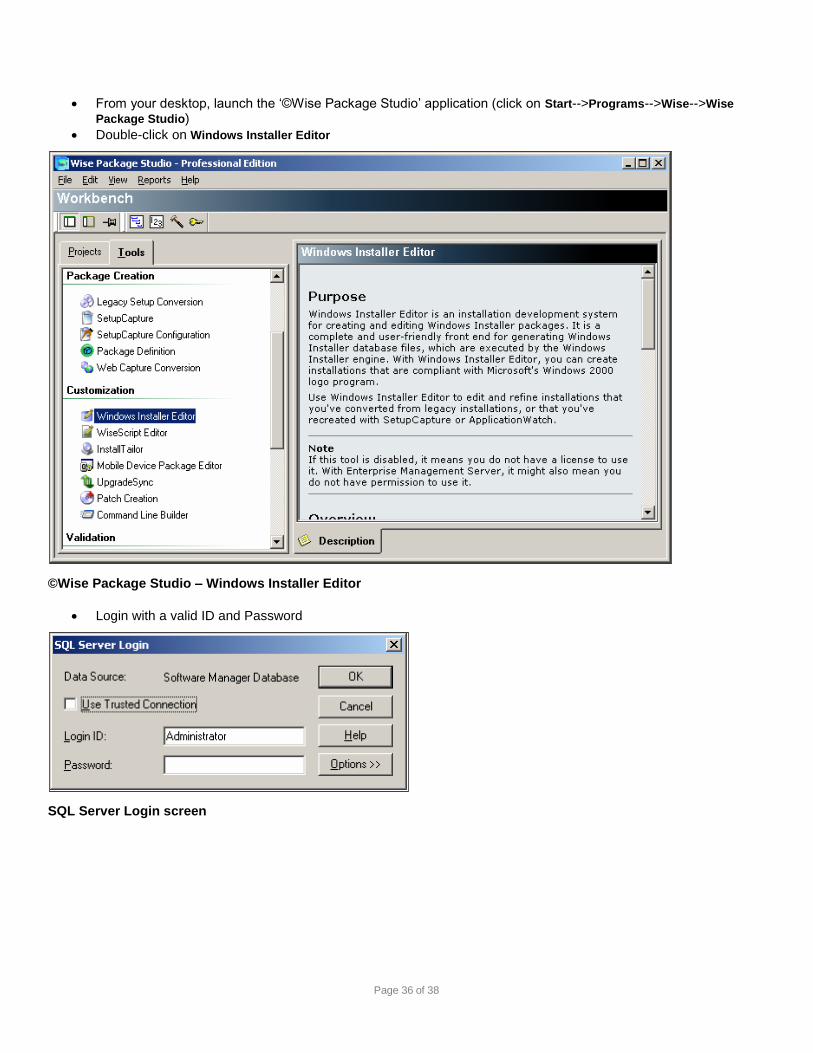
From your desktop, launch the ‘©Wise Package Studio’ application (click on Start-->Programs-->Wise-->Wise
Package Studio)
Double-click on Windows Installer Editor
©Wise Package Studio – Windows Installer Editor
Login with a valid ID and Password
SQL Server Login screen
Page 37 of 38
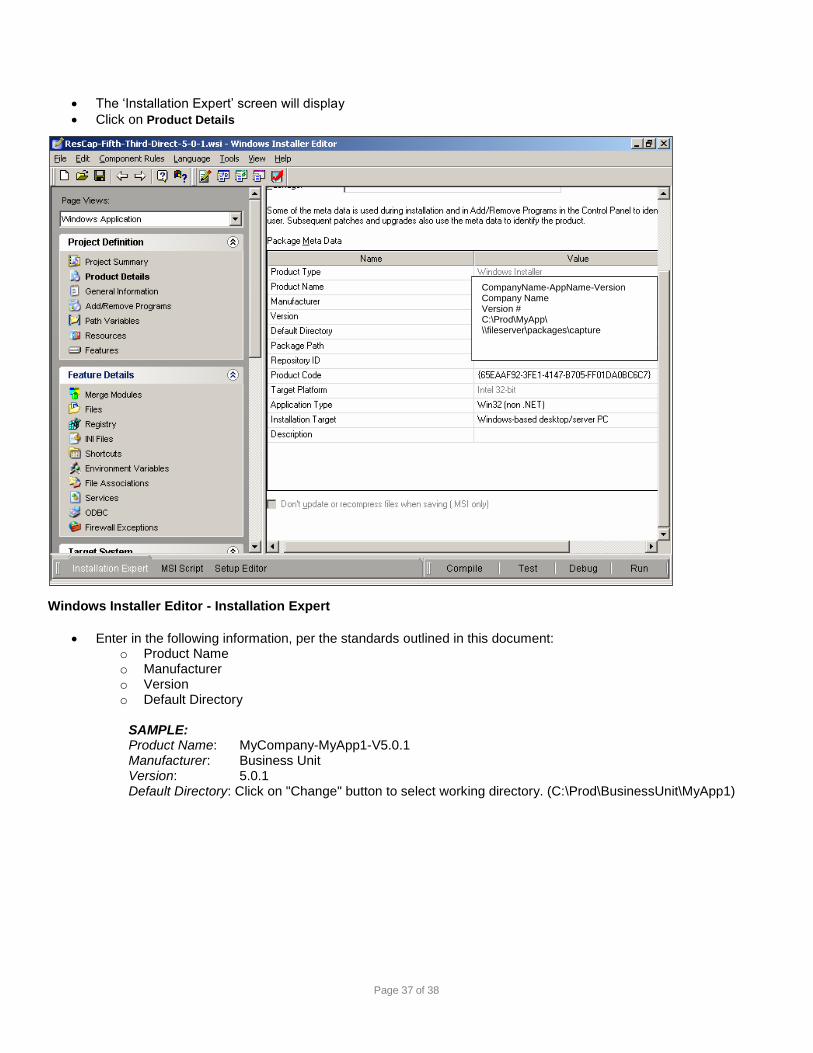
The ‘Installation Expert’ screen will display
Click on Product Details
Windows Installer Editor - Installation Expert
Enter in the following information, per the standards outlined in this document: o Product Name o Manufacturer o Version o Default Directory
SAMPLE: Product Name: MyCompany-MyApp1-V5.0.1 Manufacturer: Business Unit Version: 5.0.1 Default Directory: Click on "Change" button to select working directory. (C:\Prod\BusinessUnit\MyApp1)
CompanyName-AppName-Version Company Name Version # C:\Prod\MyApp\ \\fileserver\packages\capture
Page 38 of 38
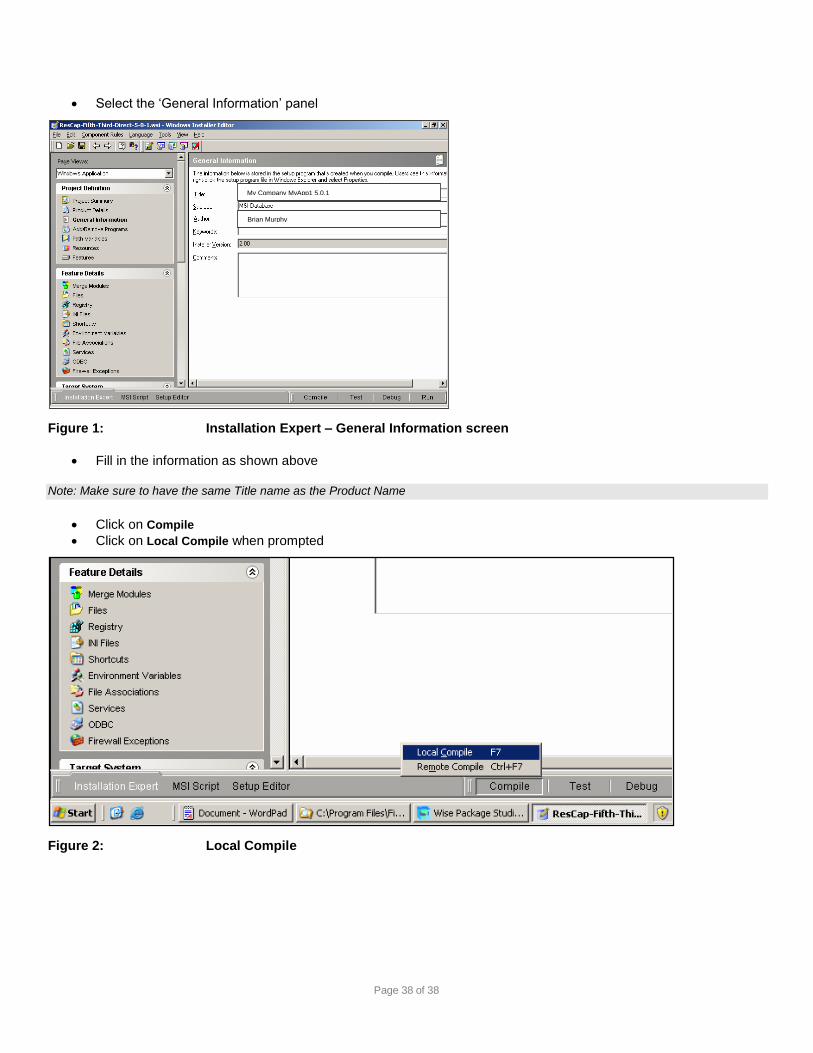
Select the ‘General Information’ panel
Figure 1: Installation Expert – General Information screen
Fill in the information as shown above
Note: Make sure to have the same Title name as the Product Name
Click on Compile
Click on Local Compile when prompted
Figure 2: Local Compile
My Company MyApp1 5.0.1
Brian Murphy
Page 39 of 38
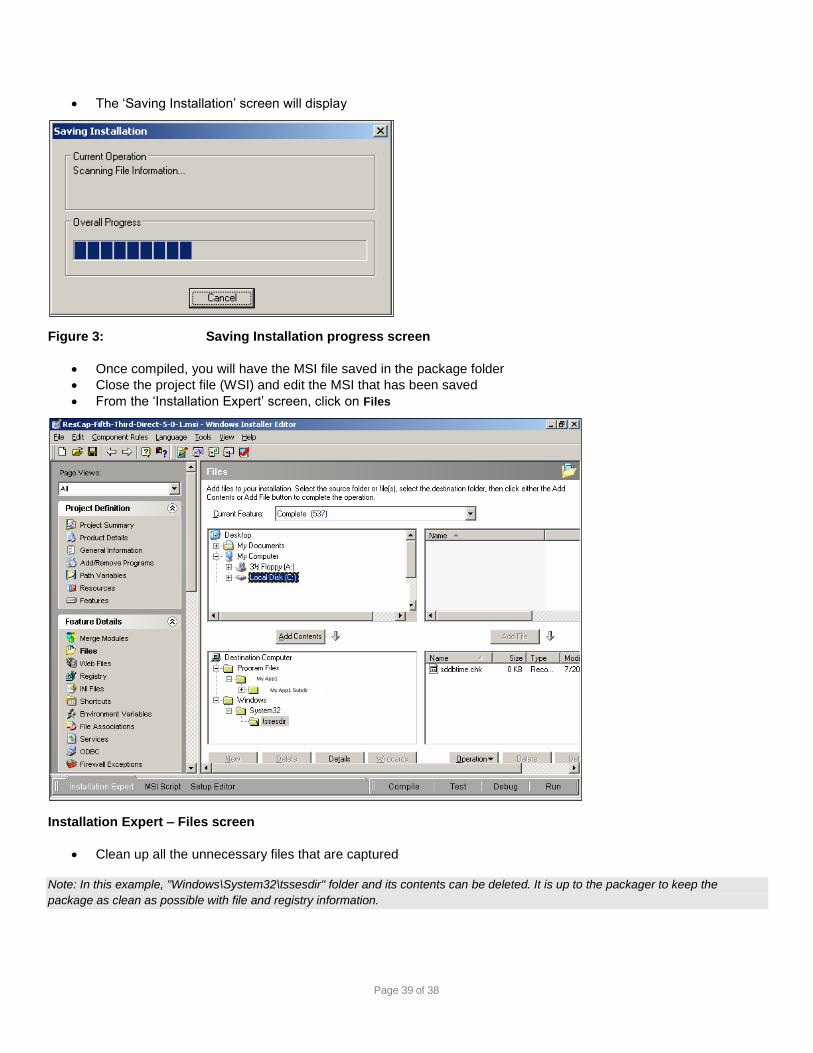
The ‘Saving Installation’ screen will display
Figure 3: Saving Installation progress screen
Once compiled, you will have the MSI file saved in the package folder
Close the project file (WSI) and edit the MSI that has been saved
From the ‘Installation Expert’ screen, click on Files
Installation Expert – Files screen
Clean up all the unnecessary files that are captured
Note: In this example, "Windows\System32\tssesdir" folder and its contents can be deleted. It is up to the packager to keep the
package as clean as possible with file and registry information.
My App1
My App1 Subdir
Page 40 of 38
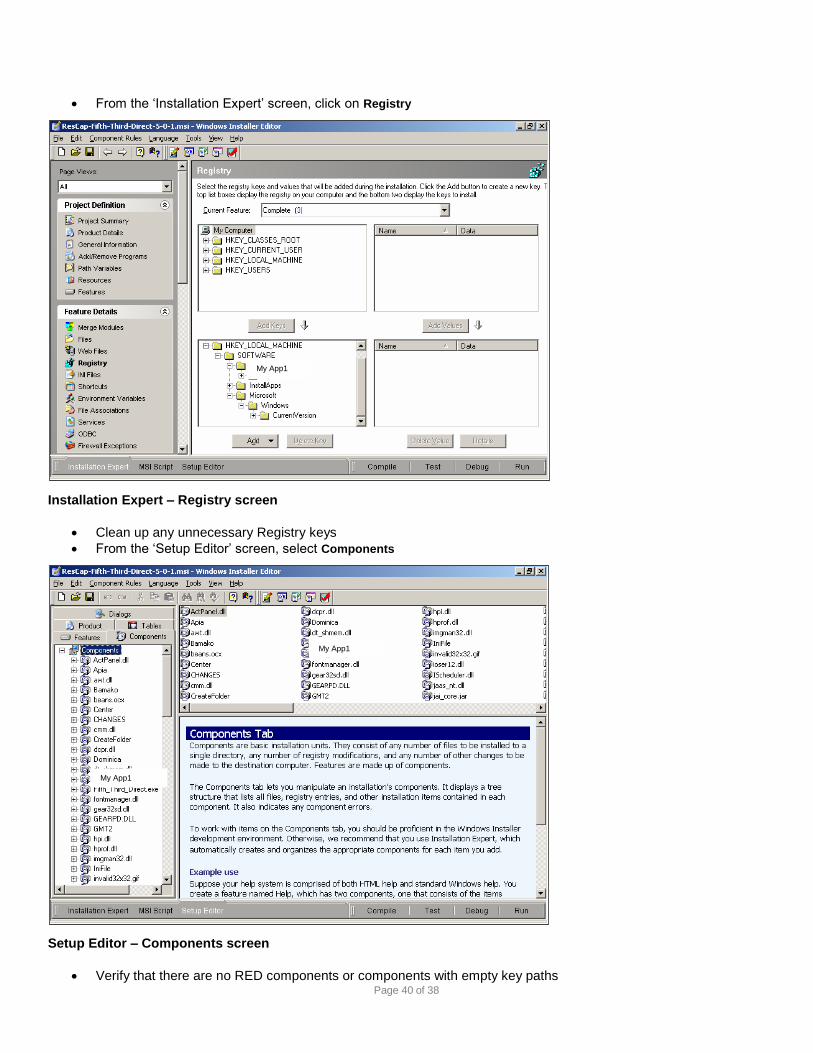
From the ‘Installation Expert’ screen, click on Registry
Installation Expert – Registry screen
Clean up any unnecessary Registry keys
From the ‘Setup Editor’ screen, select Components
Setup Editor – Components screen
Verify that there are no RED components or components with empty key paths
My App1
My App1
My App1
Page 41 of 38
Save the MSI file
Test the package by installing on a test machine
Page 42 of 38
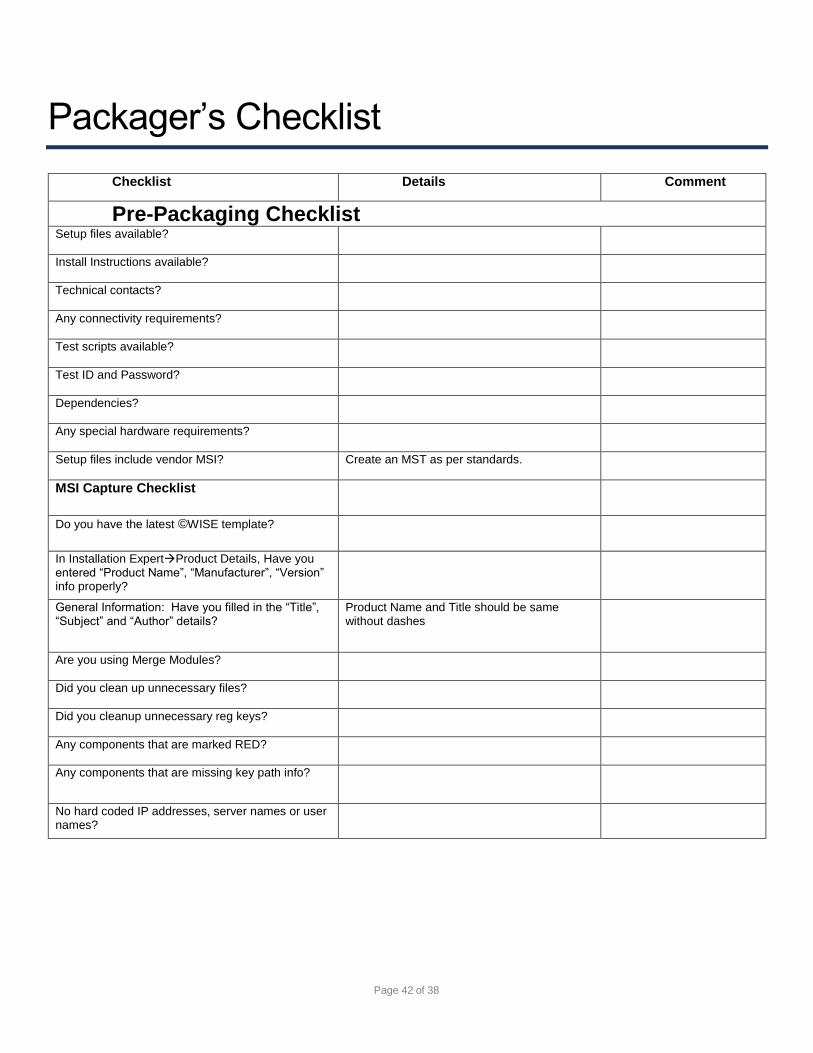
Packager’s Checklist
Checklist Details Comment
Pre-Packaging Checklist Setup files available?
Install Instructions available?
Technical contacts?
Any connectivity requirements?
Test scripts available?
Test ID and Password?
Dependencies?
Any special hardware requirements?
Setup files include vendor MSI?
Create an MST as per standards.
MSI Capture Checklist Do you have the latest ©WISE template?
In Installation ExpertProduct Details, Have you entered “Product Name”, “Manufacturer”, “Version” info properly?
General Information: Have you filled in the “Title”, “Subject” and “Author” details?
Product Name and Title should be same without dashes
Are you using Merge Modules?
Did you clean up unnecessary files?
Did you cleanup unnecessary reg keys?
Any components that are marked RED?
Any components that are missing key path info?
No hard coded IP addresses, server names or user names?
Page 43 of 38
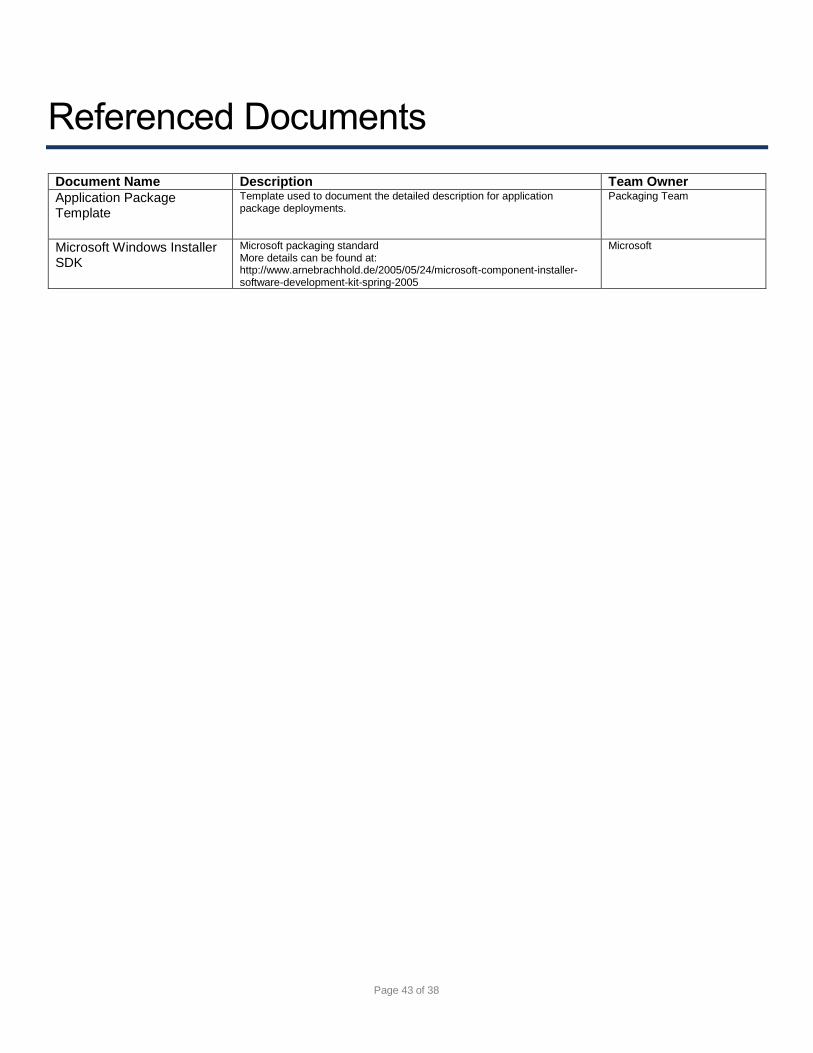
Referenced Documents
Document Name Description Team Owner
Application Package Template
Template used to document the detailed description for application package deployments.
Packaging Team
Microsoft Windows Installer SDK
Microsoft packaging standard More details can be found at: http://www.arnebrachhold.de/2005/05/24/microsoft-component-installer-software-development-kit-spring-2005
Microsoft
Page 44 of 38
Referenced Copyrights
Reference Information
Copyright ©Altiris Network America, Inc. All rights reserved. http://www.altirispro.com/Products/Altiris/index.html
Copyright ©Citrix ©Citrix Systems, Inc. All rights reserved. http://www.©Citrix.com/lang/English/home.asp
Copyright ©Windows Microsoft Corporation. All rights reserved. http://www.microsoft.com/
Copyright ©Word Microsoft Corporation. All rights reserved. http://www.microsoft.com/
Copyright ©VMWare VMware, Inc. All rights reserved. http://www.vmware.com/
Copyright ©Wise Altiris Corporation. All rights reserved. http://www.wise.com/ ** Altiris purchased Wise product line.
Copyright ©Altiris Altiris Corporation. All rights reserved. http://www.altiris.com/ ** Altiris purchased Wise product line.
Copyright ©Dell Dell Corporation. All rights reserved. http://www.dell.com/
Copyright ©Liquidware Labs Liquidware Labs Corporation. All rights reserved. http://www.liquidwarelabs.com/products/profileunity.asp ** Profile Unity
Page 45 of 38
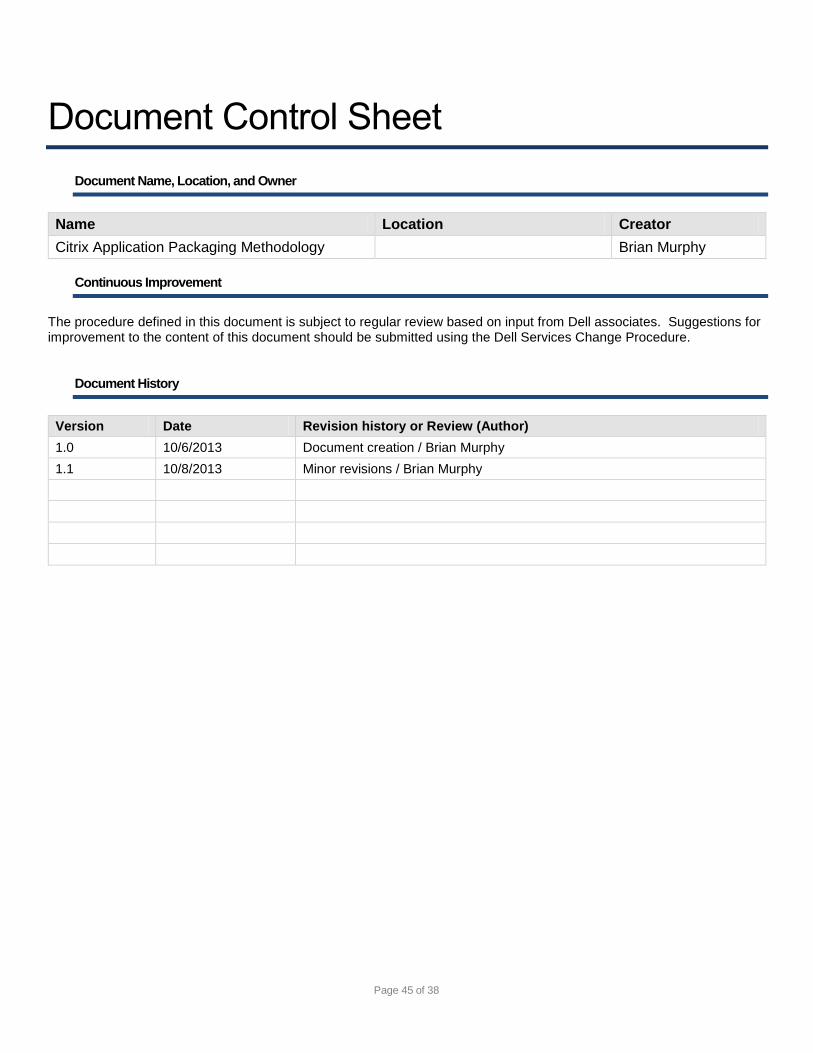
Document Control Sheet
Document Name, Location, and Owner
Name Location Creator
Citrix Application Packaging Methodology Brian Murphy
Continuous Improvement
The procedure defined in this document is subject to regular review based on input from Dell associates. Suggestions for improvement to the content of this document should be submitted using the Dell Services Change Procedure.
Document History
Version Date Revision history or Review (Author)
1.0 10/6/2013 Document creation / Brian Murphy
1.1 10/8/2013 Minor revisions / Brian Murphy
Page 46 of 38
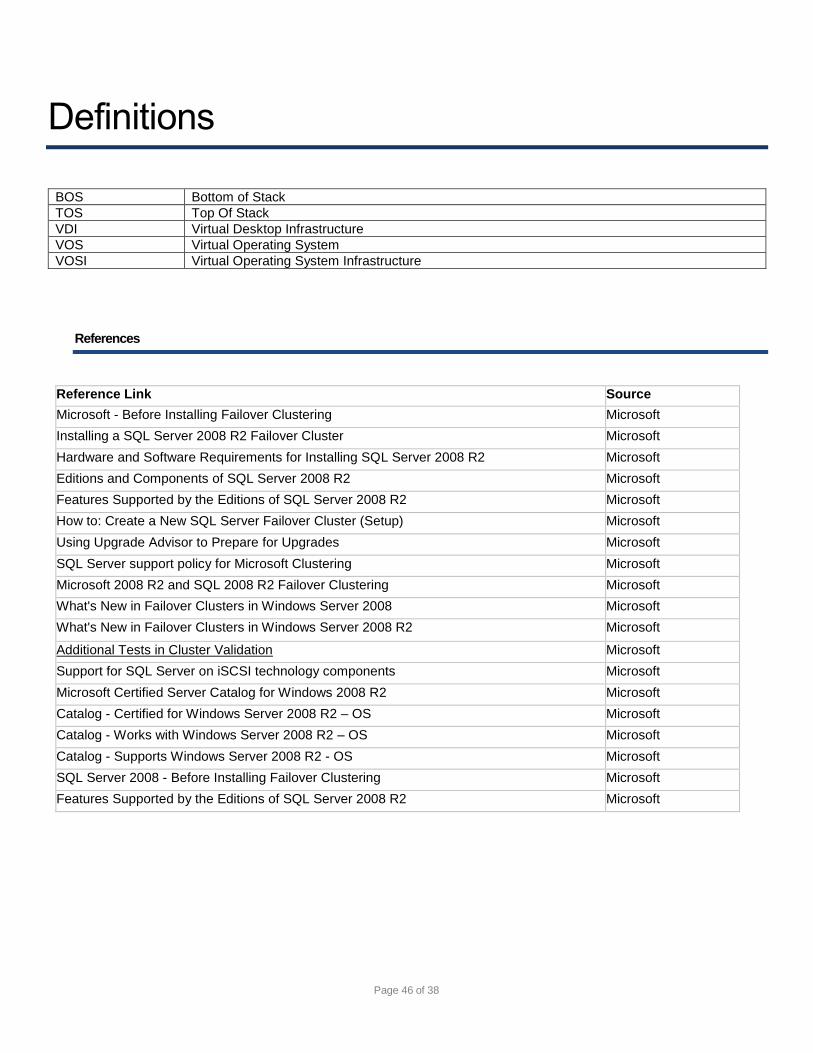
Definitions
BOS Bottom of Stack
TOS Top Of Stack
VDI Virtual Desktop Infrastructure
VOS Virtual Operating System
VOSI Virtual Operating System Infrastructure
References
Reference Link Source
Microsoft - Before Installing Failover Clustering Microsoft
Installing a SQL Server 2008 R2 Failover Cluster Microsoft
Hardware and Software Requirements for Installing SQL Server 2008 R2 Microsoft
Editions and Components of SQL Server 2008 R2 Microsoft
Features Supported by the Editions of SQL Server 2008 R2 Microsoft
How to: Create a New SQL Server Failover Cluster (Setup) Microsoft
Using Upgrade Advisor to Prepare for Upgrades Microsoft
SQL Server support policy for Microsoft Clustering Microsoft
Microsoft 2008 R2 and SQL 2008 R2 Failover Clustering Microsoft
What's New in Failover Clusters in Windows Server 2008 Microsoft
What's New in Failover Clusters in Windows Server 2008 R2 Microsoft
Additional Tests in Cluster Validation Microsoft
Support for SQL Server on iSCSI technology components Microsoft
Microsoft Certified Server Catalog for Windows 2008 R2 Microsoft
Catalog - Certified for Windows Server 2008 R2 – OS Microsoft
Catalog - Works with Windows Server 2008 R2 – OS Microsoft
Catalog - Supports Windows Server 2008 R2 - OS Microsoft
SQL Server 2008 - Before Installing Failover Clustering Microsoft
Features Supported by the Editions of SQL Server 2008 R2 Microsoft