Embed Size (px)
Citation preview

Log In
First of all, please visit https://www.facebook.com and log in to your Facebook account respectively.

HOME PAGE
Top menu
After landing on the home page or on any page, click on the “LOCK symbol” button located on top of the menu bar. A drop down menu will appear. Proceed to click on the “See More Settings” hyperlink to navigate to “Privacy Settings and Tools” page.

PRIVACY SETTINGS AND TOOLS
PART I: Who can see your stuff?
Now, you will find three sub menus under “Privacy Settings and Tools” page. Let us start with the first sub menu, which is “Who can see my stuff?” It contains three different settings that you can edit to suit your preference.

PRIVACY SETTINGS AND TOOLS
PART I: Who can see your stuff?
Click on each of the rows to display its editable settings accordingly.

PRIVACY SETTINGS AND TOOLS
PART I: Who can see your stuff?
a) Who can see your future posts? (Step 1 of 2)
Let us start with “Who can see your future posts?” Click on the “Edit” button, a drop-down setting will appear.

PRIVACY SETTINGS AND TOOLS
PART I: Who can see your stuff?
a) Who can see your future posts? (Step 2 of 2)
Now, click on the “Customs” button, you will find public, friends or friends of friends and only me, you can decide to allow which one of these groups to see your future posts. You can even customize and select your own group according to your preference too.
Note: Selecting “Public” will
allow any person, with or
without an account, to view
every posts on your timeline.
As long as the person has
your Facebook’s URL.
Select “Friends” or “Friends
of friends” if you do not wish
to publish private activities.

PRIVACY SETTINGS AND TOOLS
PART I: Who can see your stuff?
b) Review all your posts and things you’re tagged in. (Step 1 of 3)
Move on, you can manage and review all your posts and things you were tagged in by clicking “Use Activity Log” in the next row of setting.
PRIVACY SETTINGS AND TOOLS
PART I: Who can see your stuff?
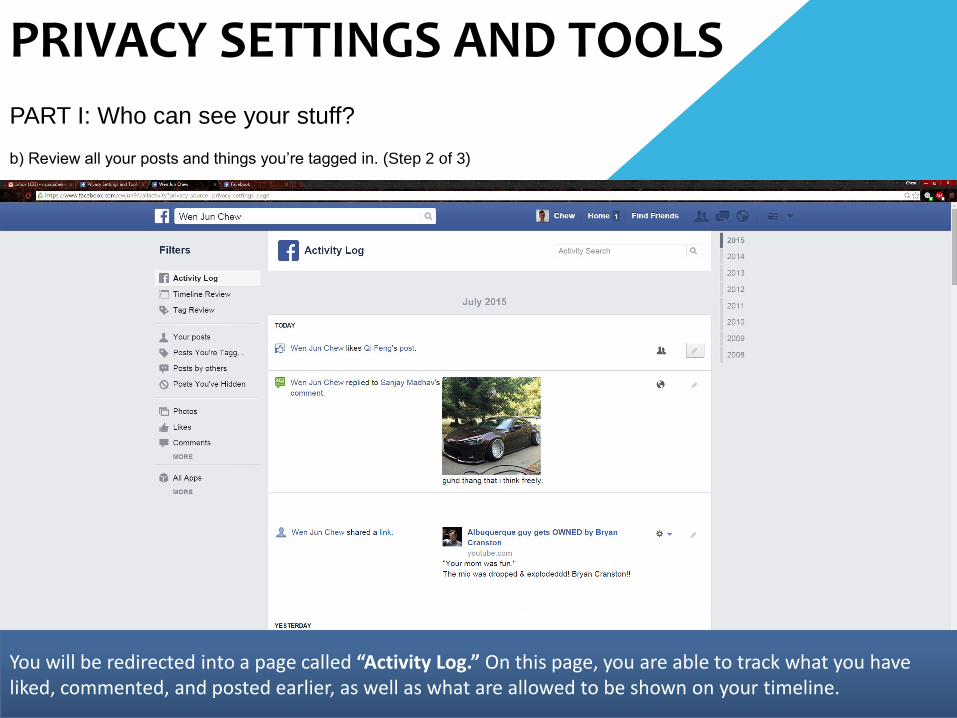
b) Review all your posts and things you’re tagged in. (Step 2 of 3)
You will be redirected into a page called “Activity Log.” On this page, you are able to track what you have liked, commented, and posted earlier, as well as what are allowed to be shown on your timeline.

PRIVACY SETTINGS AND TOOLS
PART I: Who can see your stuff?
b) Review all your posts and things you’re tagged in. (Step 3 of 3)
At the same time, you can perform actions such as unlike a comment or post, delete a comment or post, and highlight or hide a post from your timeline. These actions can be taken simply by clicking on the pencil symbol on the right side of each activity.

PRIVACY SETTINGS AND TOOLS
PART I: Who can see your stuff?
c) Limit the audience for posts you’ve shared with friends of friends or Public? (Step 1 of 1)
The third setting under this menu is to limit your past posts among friends of friends or the public, content on your timeline you've shared with friends of friends or Public will change to Friends. Click on the “Limit Past Posts” button, a drop-down notice will appear for those who are adjusting this for the first time.

PRIVACY SETTINGS AND TOOLS
PART I: Who can see your stuff?
c) Limit the audience for posts you’ve shared with friends of friends or Public? (Step 2 of 4)
Proceed to click on the “Limit Old Posts” button.

PRIVACY SETTINGS AND TOOLS
PART I: Who can see your stuff?
c) Limit the audience for posts you’ve shared with friends of friends or Public? (Step 3 of 4)
A warning pop-up will appear, click on the “Confirm” button to continue.

PRIVACY SETTINGS AND TOOLS
PART I: Who can see your stuff?
c) Limit the audience for posts you’ve shared with friends of friends or Public? (Step 4 of 4)
The setting is now applied, click “Close” button to exit.

PRIVACY SETTINGS AND TOOLS
PART II: Who can contact you?
a) Who can send you friend requests? (Step 1 of 1)
Let us get to the first setting of part two, which is who can contact you by friend request.

PRIVACY SETTINGS AND TOOLS
PART II: Who can contact you?
a) Who can send you friend requests? (Step 1 of 1)
Click on the “Edit” button, a drop-down setting will appear. On the drop-down setting, click on “Everyone”button, you will find either “Everyone” or “Friends of friends”, which you can allow who to add you on Facebook. By selecting “Friends of friends”, strangers without mutual friend(s) will not be able to add you.

PRIVACY SETTINGS AND TOOLS
PART II: Who can contact you?
b) Whose messages do you want filtered into your inbox? (Step 1 of 1)
Click on the “Edit” button to show the drop-down setting. You can choose between “Basic Filtering” or “Strict Filtering”. Basic filtering allows your friends and mutual friends’ messages to be sent right into your inbox, whereas strict filtering filters out messages from mutual friends and strangers into “Other” folder.

PRIVACY SETTINGS AND TOOLS
PART III: Who can look you up?
a) Who can look you up using the email address you provided? (Step 1 of 1)
Moving on to the first setting of “Who can you look up?”.

PRIVACY SETTINGS AND TOOLS
PART III: Who can look you up?
a) Who can look you up using the email address you provided? (Step 1 of 1)
Click on the “Edit” button, you can choose between “Everyone”, “Friends of friends”, or just “Friends”.
Note: Selecting “Everyone”
will allow any person, with
or without an account, to
search you with “Search
Toolbar” or as long as the
person acquires your
Facebook URL.
Select “Friends” or “Friends
of friends” if you do not
wish strangers to look for
you.

PRIVACY SETTINGS AND TOOLS
PART III: Who can look you up?
b) Who can look you up using the phone number you provided? (Step 1 of 1)
It goes the same for phone number, click on the “Edit” button to choose between “Everyone”, “Friends of friends”, or “Friends”. It works exactly the same like the previous one, which was the email address search. Choose wisely on who you allow to search for you with your phone number, if you have provided one.
Note: Selecting “Everyone”
will allow any person, with
or without an account, to
search you with “Search
Toolbar” if the person
acquires your phone
number.
Select “Friends” or “Friends
of friends” if you do not
wish strangers to look for
you.

PRIVACY SETTINGS AND TOOLS
PART III: Who can look you up?
b) Do you want other search engines to link to your Timeline? (Step 1 of 1)
Lastly, click on the “Edit” button if you would like to turn the search engine setting on or off, by checking or unchecking this box. When you turn it off, your Facebook profile or Timeline will not appear when someone searches your name with search engines like “Google”, “Yahoo” or “Bing!”. If turned on, it may take awhile for search engines to stop showing the link to your timeline in their results

END OF SLIDES
THANK YOU!


![Social Privacy Protector - Protecting Users’ Privacy in ... · can be exposed to third party Facebook applications [4]. Another privacy concern deals with existing privacy settings](https://img.dokumen.tips/doc/110x75/5e407ebf9221ec1a5c2c9688/social-privacy-protector-protecting-usersa-privacy-in-can-be-exposed-to.jpg)


