Embed Size (px)
Citation preview
Seeding Plants for the School Garden
An Overview
Seed Development
The seed is the most common method of plant reproduction for cone-bearing and flowering plants. Gymnosperms (conifers) and Angiosperms are the only two groups of plants that produce seeds. Ferns, mosses, club mosses and liverworts all reproduce by spores.
The name Gymnosperm means naked seed. Gymnosperms produce small, short-lived male cones that send out clouds of pollen. Once fertilized by this pollen, seeds develop inside the female cones. The cones are made of scales. They offer no protection once the seeds are ripe; the exposed seed is held on the surface of the cone. The mature seed consists of an embryo surrounded by a seed coat. It may also contain a stored supply of food. Coniferous trees, such as pines and tropical Cycads are both examples of Gymnosperms.
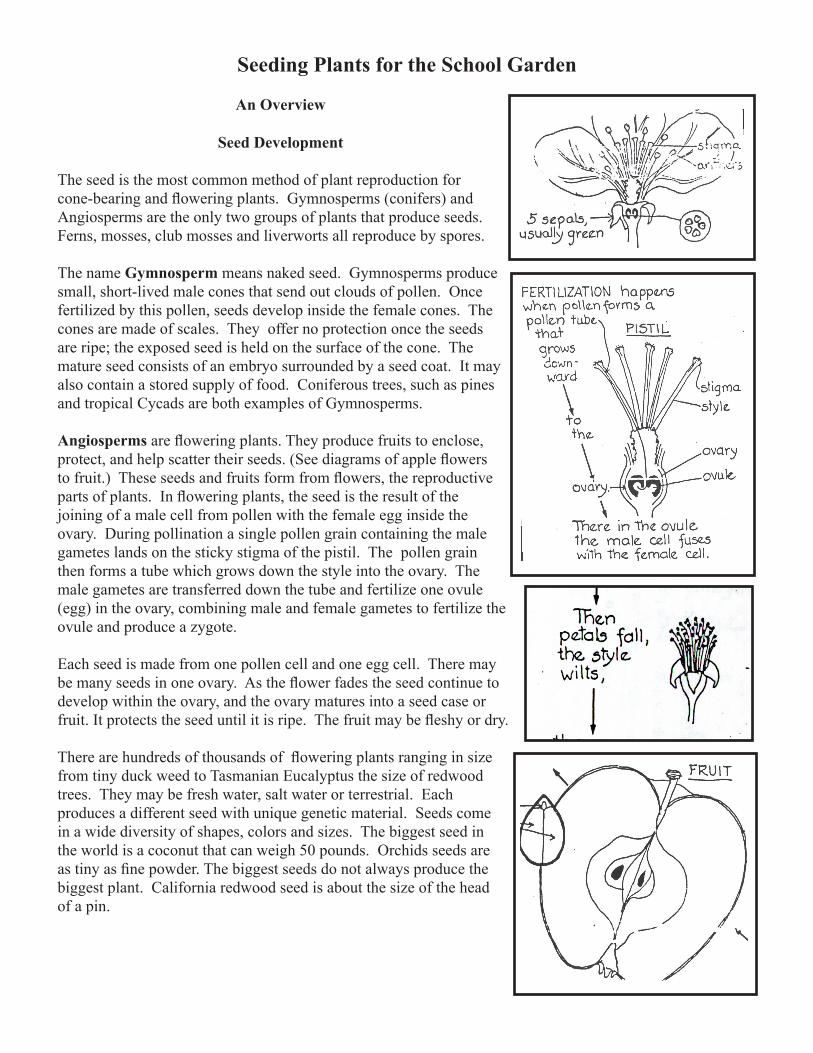
Angiosperms are flowering plants. They produce fruits to enclose, protect, and help scatter their seeds. (See diagrams of apple flowers to fruit.) These seeds and fruits form from flowers, the reproductive parts of plants. In flowering plants, the seed is the result of the joining of a male cell from pollen with the female egg inside the ovary. During pollination a single pollen grain containing the male gametes lands on the sticky stigma of the pistil. The pollen grain then forms a tube which grows down the style into the ovary. The male gametes are transferred down the tube and fertilize one ovule (egg) in the ovary, combining male and female gametes to fertilize the ovule and produce a zygote.
Each seed is made from one pollen cell and one egg cell. There may be many seeds in one ovary. As the flower fades the seed continue to develop within the ovary, and the ovary matures into a seed case or fruit. It protects the seed until it is ripe. The fruit may be fleshy or dry.
There are hundreds of thousands of flowering plants ranging in size from tiny duck weed to Tasmanian Eucalyptus the size of redwood trees. They may be fresh water, salt water or terrestrial. Each produces a different seed with unique genetic material. Seeds come in a wide diversity of shapes, colors and sizes. The biggest seed in the world is a coconut that can weigh 50 pounds. Orchids seeds are as tiny as fine powder. The biggest seeds do not always produce the biggest plant. California redwood seed is about the size of the head of a pin.
What Is a Seed?
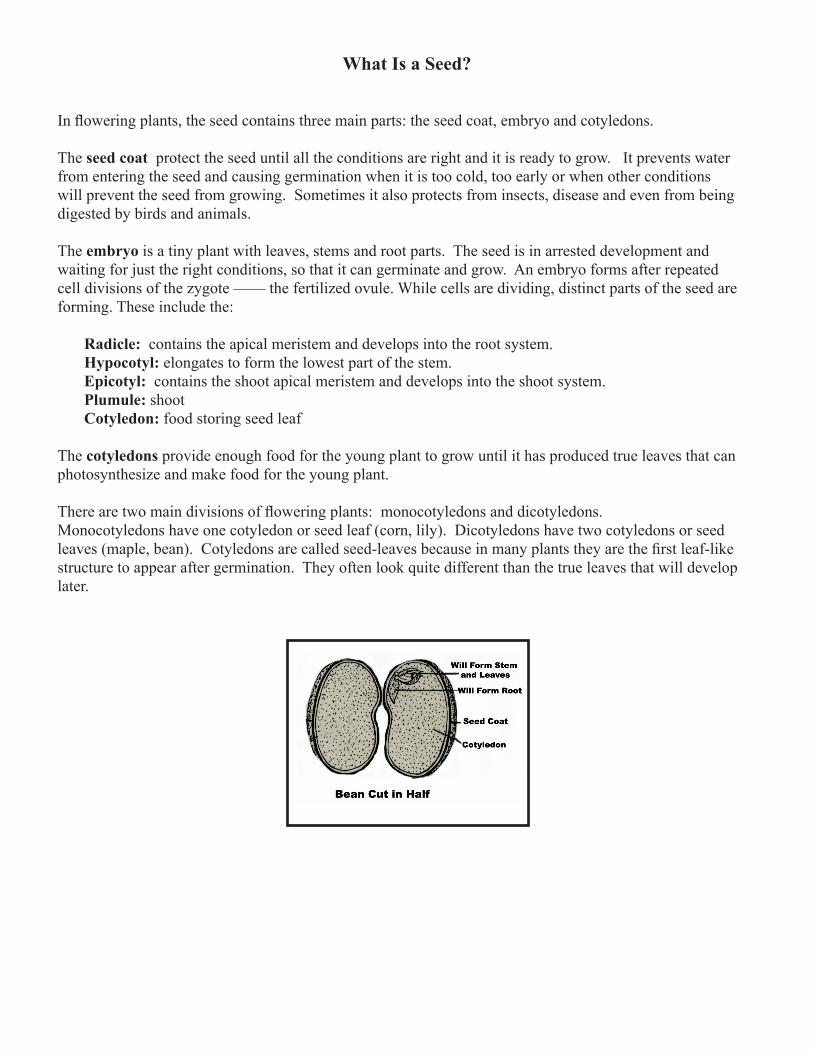
In flowering plants, the seed contains three main parts: the seed coat, embryo and cotyledons.
The seed coat protect the seed until all the conditions are right and it is ready to grow. It prevents water from entering the seed and causing germination when it is too cold, too early or when other conditions will prevent the seed from growing. Sometimes it also protects from insects, disease and even from being digested by birds and animals.
The embryo is a tiny plant with leaves, stems and root parts. The seed is in arrested development and waiting for just the right conditions, so that it can germinate and grow. An embryo forms after repeated cell divisions of the zygote —— the fertilized ovule. While cells are dividing, distinct parts of the seed are forming. These include the:
Radicle: contains the apical meristem and develops into the root system. Hypocotyl: elongates to form the lowest part of the stem. Epicotyl: contains the shoot apical meristem and develops into the shoot system.Plumule: shootCotyledon: food storing seed leaf
The cotyledons provide enough food for the young plant to grow until it has produced true leaves that can photosynthesize and make food for the young plant.
There are two main divisions of flowering plants: monocotyledons and dicotyledons. Monocotyledons have one cotyledon or seed leaf (corn, lily). Dicotyledons have two cotyledons or seed leaves (maple, bean). Cotyledons are called seed-leaves because in many plants they are the first leaf-like structure to appear after germination. They often look quite different than the true leaves that will develop later.
Dormancy
A plant species has the best chance of survival if seeds will germinate only when conditions are favorable, and will continue to be favorable. Many seeds go into a state of dormancy before or shortly after being dispersed. Dormancy protects seeds from germinating, even in a favorable conditions, preventing seeds from germinating during the late fall or winter when the freezing temperatures would kill the seedlings. It also prevents all of the seeds of a plant from germinating the same year, providing for a great chance of survival. This is especially important in harsh climates such as deserts or areas prone to flood and fire.
With most annual vegetables, herbs, and flowers, overcoming dormancy is a simple process. The majority of seeds of annuals and perennials will germinate as soon as they are ripe if placed under suitable conditions. The one exception is the seeds of peppers and tomatoes, which will show better germination if they are cured. Stored dry for at least two months at about 77 degrees F before germination.
Seeds of some perennial flowers and most trees and shrubs will not germinate until the following spring or summer. This is often due to the immaturity of the embryo, which has not yet developed fully. In other cases the seed coat is too hard, thick or water tight and must be softened or broken. Special treatment, such as exposing the seeds to a periods of cold temperature of scratching the seed coat. Some species require a combination of treatments.
Germination
Germination is the sprouting into growth of the embryo. In order for the seed to germinate the right conditions are required.
Seeds require adequate moisture, the correct temperature and oxygen in order to germinate. A few seeds, like lettuce, also need light. Once given water and the food stored in the cotyledons, the baby plant inside the seed will begin to grow.
Seeds also need soil, although they will germinate in water. They will not continue to grow without soil, which provides small amounts of several minerals they need.
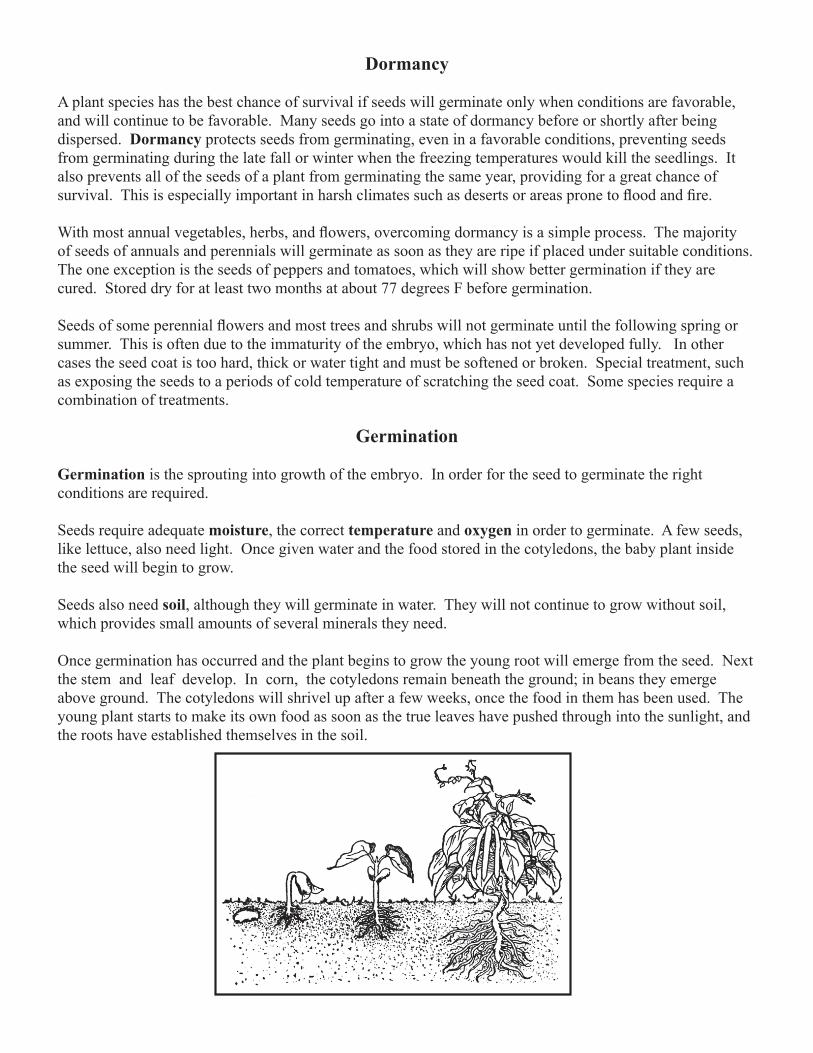
Once germination has occurred and the plant begins to grow the young root will emerge from the seed. Next the stem and leaf develop. In corn, the cotyledons remain beneath the ground; in beans they emerge above ground. The cotyledons will shrivel up after a few weeks, once the food in them has been used. The young plant starts to make its own food as soon as the true leaves have pushed through into the sunlight, and the roots have established themselves in the soil.
Human Intervention
Seeds, especially grains, are essential as a food source for people all over the world, both for themselves and for their animals. At first humans gathered seeds only as a source of food. Gradually they learned that it they planted seeds they could grow their own food and also save seeds to assure food the following year.
Over the thousands of years since farming began, farmers learned to save the best tasting and biggest seeds for planting, gradually creating stronger and better crops through seed selection. They also learned to cross-pollinate in order to produce different plants. Some of the seeds formed this way are improved crops that produce more food on less land, offer more nutrients or are resistant to insects and diseases. The business of seed companies emerged. They collected and package seed for sale, and also worked to develop new and better varieties.
They also learned to cross-pollinate in order to produce different plants. Some of the seed formed this way are improved crops that produce more food on less land, offer more nutrients or are resistant to insects and diseases. The business of seed companies emerged. They collected and package seed for sale, and also worked to develop new and better varieties.
Genes banks have also been established to protect genetic diversity Collections of seeds and plant material are housed in gene banks all over the world. These banks provide plant breeders with materials they need to improve food crop varieties, storing samples of both primitive and more recent varieties that are no longer in use, and related wild species.
Saving Seeds
A great fall activity is the collecting and saving of seeds from favorite annuals, perennial, trees and shrubs. Let students known that before seed companies were prevalent, people had to save all the seed they would need from year-to-year. When Thomas Jefferson sent letters to friends in Europe he would enclose a few seeds of favorite plants and would ask the friends to send seeds to him as well.
Most natural species, plants as they occur in the wild unimproved by hybridization or selective breeding, can be raised from seeds. Hybrid crosses, however, will not breed true to type and must be increased by vegetative means.
As soon as the seeds are ripe, they should be gathered and spread out to dry in a well-ventilated room. When they are completely dry, label the seeds with name and date and put them in a closed container. Store in a dry, cool frost-proof place for use next year.
The length of time that seeds will retain their vitality depends partly on how they were stored, as well as the type of seed. For most crop plants, average seed life ranges from three to five years. Some seeds, such as those of willow, only retain there ability to germinate for a few days, while the seed of Cassia, have been known to germinate after 80 years. Generally, oily seeds quickly lose their vitality and those with hard seed coats, especially members of the Pea family (Leguminaceae) are the longest lived. In tests, beans seeds have germinated after 149 years.
Store seeds in a dry, closed container in a cool place. The cooler the beeter. Most vegetables seeds can withstand freezing.
Seeding Annual Vegetables and Flowers: Overview
The most common way of raising vegetables and annual flowers is from seed. Always buy good-quality seed, preferably vacuum packed to preserve viability. Many of the best cultivars are F1 hybrids, bred by crossing two selected parents. Although expensive, they are very vigorous and productive. Vegetable seeds differ widely in their viability: to be safe, buy seed dated for the current year, or test a sample before sowing.
There are several methods for sowing. Some can be planted directly into the garden. Other will do best if started indoors and planted outside after all danger of frost has passed. Read seed packages and select the most suitable cultivar for the space available and the school garden season. Care in the early stages ensures healthier, more productive crops. Thin or transplant seedlings to their final position in the garden. Consider the following factors before planting seeds.
Moisture
Moisture is the element that is most essential for starting the germination process and for keeping the germinated seed alive. It is also the easiest to control. Constant adequate moisture during germination is far better than alternating periods of drying and saturation. Too much moisture can saturate the soil and decrease aeration. The seed embryo might suffocate or rot from lack of oxygen. Too little moisture and the medium may dry out and crust over stopping germination or causing tender seedlings to shrivel and dry.
Soil
Indoors in pots use a sterile medium that is suitable for seedlings. This can be purchased from a nursery or garden center. The soil should be fine and free of large pieces of bark and clumps.
Successful sowing outdoors requires warm, well prepared soil. Outdoors in the garden, digging should not be undertaken in the spring until the ground has begun to dry up and spring frosts are out of the soil Squeeze a handful of soil into a firm ball. If this ball under pressure from the fingers crumbles apart readily the soil is ready to work. If it tends to remain in a sticky mess, digging should not be attempted until it has further dried out.
Temperature
Common vegetable and annual flowers can be divided into three different categories depending on their need for soil temperature for germination. Germination occurs for most vegetables once soil temperatures are over 45 degrees F, so do not sow seed in cold soil, as they will tend to rot. However, some crops may require much higher soil temperatures for germination. These can be started indoors in pots.
Cold season, frost-resistant vegetables and flowers can be planted out in the garden early in the spring as soon as the soil can be worked. These plants can be seeded directly into the garden late March to mid April. Cold season crops include: beets, carrots, turnips, lettuce, onions (sets, plants or seeds) leeks, radishes, parsnips, salsify, witloof chickory and cabbage, broccoli and cauliflower, mustard, spinach and chard, parsley, early celery, peas and potatoes
Warm season crops can be planted outside after all danger of frost has passed, mid to late May. These include: beans, corn, tomatoes, eggplants, peppers, vine crops (squash, cucumbers, melon, pumpkins) okra and sweet potato.
Late Fall and Winter crops can be planted 4 to 8 weeks later, in late June or July when many crops for late fall and winter are sown. These include: bush beans, beets, carrots, turnips, rutabagas, lettuce, Chinese cabbage, cabbage, broccoli, Brussel sprouts and kale.
Depth of Seeding
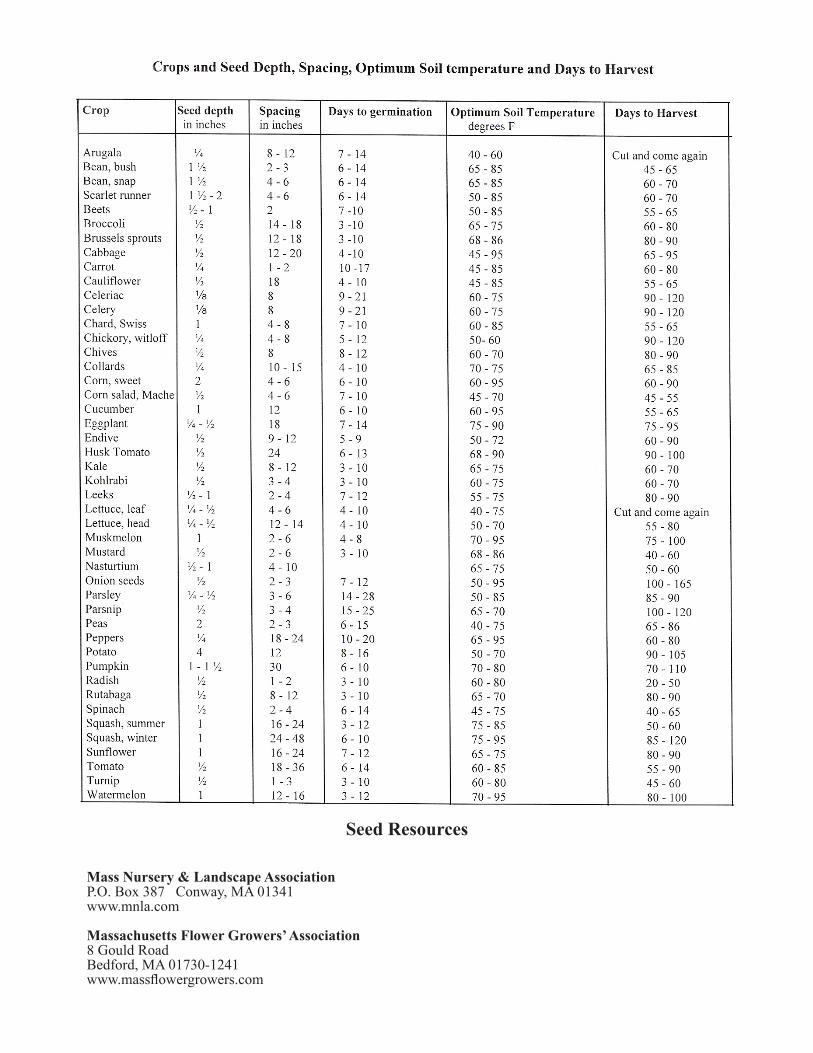
Seeds are sown at different depth according to their size. Read the seed package to determine the depth the seeds should be planted. A general rule of thumb is not more than two times the smallest diameter of the seed. Small seeds such as onions can be seeded about ½ inch deep, brassica’s ¾ inch deep, peas and sweet corn about 1 inch deep, and beans up to 2 inches deep. The most important requirement is to sow thinly so seedlings are not crowded in the early stages.
Sowing Directly into the Ground Outdoors
Sowing seeds directly into the ground works best for seeds that germinate quickly and for those that resent transplanting. You can either sow the seeds broadcast or in rows. Read the seed packet carefully, each seed has its own requirements for soil temperature, spacing and season. You can either sow the seeds broadcast or in rows.
Preparing the Ground: Before sowing the seed you need to prepare the ground. Dig the soil to one spade depth and turn it over. Cultivate the soil to remove stones and break up any clumps. Fork a balanced fertilizer into the soil. Then rake the surface until it has a fine texture (or tilth), removing any additional stones and breaking up any clods on the surface. The seed bed should be a smooth surface. Tip: rake when it is neither very wet and heavy nor very dry. If soil sticks to your shoes, delay until it has dried out a little, but not so much that it is dusty.
Broadcasting Seed
Broadcast means scattering the seeds on the surface. This method is particularly suitable for annuals that produce deep taproots. They are sown where they will grow, since they do not transplant easily. It can also be used when you have plenty of seed and plan to thin and eat the young seedlings such as beets, lettuces, mache, arugula, radish, etc.
Scatter the seeds thinly over the prepared soil area by hand or from a packet. Rake over the area lightly at right angles to cover the seeds so that they are disturbed as little as possible. Do not cover more than two to four times their own smallest diameter. Tip: lettuce requires light to germinate. Label, then water the area gently but thoroughly with a fine spray.
Sowing in Furrows
This is the most common method of sowing vegetables. Sowing them in rows is a good technique when you have limited space, or seed or when you want to separate plants by rows. Seeds sown in furrows produce seedlings growing in straight rows at regular intervals, so they are readily distinguished from weed seedlings which are randomly distributed.
For very straight rows you can use a string attached to two stick to mark the row before you dig the trench. Then make a furrow about 1 inch deep with a either a trowel tip or the corner of a hoe. Continue making shallow furrows 3 to 6 inch apart, depending on the seeds to be sown and their mature size.
Take a pinch of seed to scatter along the furrow in a straight line. Small seeds are usually sprinkled evenly along the row, large seed, like peas or beans are usually sown a few inches apart. You can also station sow at intervals in groups of three or four seeds to be thinned later to one seed per station. Space the stations half the required distance between the mature plants to allow for losses.
After sowing and labeling, cover the seed with soil by gently raking some soil back over the row, drawing it back lightly with a hoe or rake. If you allow a small trench to remain it will serve to collect water and keep the seeds moist. Firm the area gently, and water with a fine spray from a hose or watering can.
Care for young seedlings: Water regularly to keep the soil moist but not wet. This will assure germination and growth of the plant. Once planted the soil can also be covered with row covering, newspaper or plastic to protect it from drying out. This is useful in very warm weather or dry soil. Be sure to remove any covering as soon as the seedlings show above the soil surface.
Weed between rows and seedlings to remove competition. You may also need to thin plants if too many germinate to prevent plants from competing with each other and producing a poor crop.
Wet and Dry Soil: If sowing seeds in unavoidable in wet conditions, line the furrow before sowing with dry, light material such as sand or vermiculite. If conditions are very dry, water the drill before sowing, lightly press each seed into the soil. Then cover with dry soil. This slows the evaporation and helps the seeds to stay moist until they germinate. If working wet soil, be sure to place a board in the garden and stand on the board to protect soil texture.
Interplanting: Consider interplanting by sowing fast growing crops such as radishes between slow growing crops such as parsnip: the radishes are pulled up before the intervening space is needed for parsnips. Many leafy or salad vegetable may be sown for harvesting at the seedling stage when they are most nutritious. Once cut, they will resprout to produce a second or third crop. Utilize these greens for interplanting under or between slower maturing vegetables.
Wide Furrows: Use wide, flat furrows for plants that are grown closely together, such as peas, early carrots and seedling crops. Make each furrow up to 9 inches wide and to the required depth. Space the seeds evenly in the row, and cover carefully.
Successional Crops: Vegetables that grow fast but rapidly pass their prime or run to seed (lettuces, for example) should be sown little and often. To avoid both gluts and gaps in cropping, wait until one sowing has emerged before sowing the next crop. Short season annuals such as radishes, lettuces, greens and beans and peas can be sown outdoors in spring and again in the late summer for two season harvest.
Sowing Seeds Indoors
Vegetable seed may be sown indoors and grown in a sunny window, sun porch, cool greenhouse, or under lights. It is a good way of producing healthy seedlings and overcoming problems with germination, since the temperature is more easily controlled. Warmth applied beneath the soil in which the seeds are grown, as by placing on the refrigerator, radiator, heat mat will also hasten germination of tender of difficult seeds. If using the radiator insulate with a piece of cardboard from radiator.
Tomatoes, peppers, eggplants, early lettuce, sweet potatoes, celery, celeriac, early cabbage, early cauliflower, early broccoli, beets, parsley, and members of the cucumber family (cucumbers, melons, squash, watermelon) can all be started from seed indoors.
Cabbage, broccoli and beets started in February can be set out in early April. Tomatoes started at the same time are transplanted into individual pots and planted out after mid-May. Peppers and eggplants can be started in March and set out after frost. Members of the cucumber family should be planted in peat pots or net pots as they resent transplanting. They can be planted out in mid-May.
Choosing the Container
Trays: Trays are used for seedlings that you will later be planting up into single pots to go out into the garden. This works well for tomatoes, peppers and eggplants that will grow indoors until after frost has passed.
Individual Pots or Cell Packs: Individual pot and cell packs produces plants of high quality that grow on well. Seedlings have no competition and so develop a healthy root ball, which is hardly disturbed when planted out in the final position. They do, however, need more space and soil mix in early stages that those that are planted in trays.
Individual pots and cell packs are useful containers for direct seeding fast growing, frost-tolerant plants that will be set out in the garden early in the spring quickly. They are also useful for transplanting the seedlings from the seed trays.
Peat Pots and degradable soil block pots : Peat pots and soil block pots in degradable netting are also useful for seedlings that do not transplant well since the whole pot may be planted out without disturbing the roots. The whole pot can be planted out and roots can readily penetrate. This works well for members of the cucumber family as well as beans and plants with tap roots. Two or more seeds can be sown in one pot, then thin to leave the strongest. Water pots from the bottom. Tip: make sure that you tear the top rim off the peat pot so that the whole pot is beneath the soil surface. Otherwise it will wick water away from the roots of the plant.
Planting the seeds
Fill the chosen container to the rim with a standard seed soil mix that you have purchased from a nursery or garden center. Press lightly around the edges with fingertips to make sure that there are no air pockets. To settle the soil, tap the container against a hard surface, then gently firm it so that the top of the soil mix is slightly below the rim of the container. Water with a fine spray and leave for an hour to drain.
Sow the seeds evenly across the surface. Cover the seeds to about their own depth with sieved soil mix. Large or pelleted seeds can be sown individually in compartmentalized packs or spaced out in trays or pans. Very small seeds are easier to sow if they are mixed first with a small amount of fine sand to produce a more even distribution.
Water lightly, to avoid disturbing the seeds on the surface of the soil mix. For very fine seed: water from below placing the flat up to its rim in water until the surface of the soil mix is moist. Do not leave them soaking for too long as water logged soil may cause the seeds to rot before germination or encourage seedling diseases such as damping off. Keep the soil moist but not wet throughout the germination and seedling stages.
To maintain even humidity, place a piece of glass or clear plastic sheeting over the container. Do not let it touch the surface of the soil mix because this may disturb the seeds.
Seed and seedlings need warmth and protection from draughts. To hasten germination trays and pots may be placed on a heat mat, the top of the refrigerator, or even on a radiator (protect with cardboard under pots).
Once germination has occurred and the seedlings emerge above the surface, they need to be in bright light. Place the containers on a window sill, sunporch, greenhouse bench or under lights.
Strategies for Ease of Seeding
Pelleted seeds can be purchased from a nursery, garden center or seed catalog. These are useful for handling very small seed such as carrots. Each seed has been individually coated with clay to form tiny balls that are easier to sow evenly than naked seed. Pelleted seeds should be carefully placed in a the furrow one by one, which saves transplanting later. They are sown in the normal way, but the clay coating must be kept moist after germination.
Seed Tapes may be purchased from a nursery, garden center or seed catalog. Seed tapes are easy to handle and make spacing simple. The seed is embedded, evenly spaced, in paper sheets or tapes, that disintegrate in the soil after sowing. The tapes are laid in the furrow and covered with soil as for ordinary seed. The backing gives protection in the early stages of germination and reduces the need for thinning.
Pre-germinating of Seed is helpful when the seed might germinate slowly in cold soil and then rot after germination. It is also useful, if there is a fear that students may not consistently water after seeding. Space seeds on a damp paper towels and put them in a warm place. Keep them moist until germination, then sow them carefully in containers or in open ground. This method may also be used to test a sample of old seed.
Seed Icing: This flour paste method works well for those small seeds that are hard to plant evenly such as lettuce.
Supplies ½ cup flour 1 cup water plastic zip lock or sandwich bag scissors Small seeds of your choice such as lettuce. trowel or stick to make planting trench
Procedure
1. Mix flour and water into a paste. Add more flour if necessary. Mix in the small seeds. Try to mix in as evenly as possible. 2. Pour or spoon the mixture into the plastic bag. Take outside to a prepared garden bed.3. Make a shallow trench to plant in with your trowel, stick or other planting tool.4. Cut a small piece off the corner of your bag and squeeze out in a thin line.5. Cover and pat in as necessary for your kind of seed.6. Water in.
Saving Excess Seed
Packets may contain more seed than is required for the current season. To save excess seed and protect its viability, fold over the packet and seal it with tape. Put all excess seed packets in a jar or plastic container with a tight fitting lid. Add a stay-dry package (such as those that come with electronic equipment) to absorb moisture. Store the container in the coldest part of the refrigerator. Most vegetable seed can be frozen without any harm.
Seed Resources
Mass Nursery & Landscape AssociationP.O. Box 387 Conway, MA 01341www.mnla.com
Massachusetts Flower Growers’ Association8 Gould Road Bedford, MA 01730-1241www.massflowergrowers.com
NE Vegetable & Berry Growers Association125 Main Street P.O. Box 387Deerfield, MA 01342-0387
Eastern Native Seeds ConservancyP.O. Box 451 Great Barrington, MA 01230www.enscseeds.org
Seed Savers Exchangewww.seedsavers.org
American the Beautiful Fund - Free seeds725 15th Street, N.W. Suite 605Washington, D.C. 20005www.freeseeds.us
Massachusetts Agriculture in the Classroom Newsletter on Seedshttp://aginclassroom.org/Newsletter/spring2006.html
A Handful of Seeds: Seed Saving and Seed Study for EducatorsLessons linked to California Educational Standards Practical Information on Seed Saving for School Gardens History and Lore. On the web at: www.oaec.org/school-garden/handful-of- ?seeds
The American Horticultural Society Encyclopedia of Gardening: The Definitive Guide to Gardening Techniques, Planning and Maintenance, Edited by Christopher Brickell and Elvin McDonald, Dorling Kindersley, 1994
The Beginner’s Guide to Growing Heirloom Vegetables by Marie Iannotti (Timber Press) 2011.
The Complete Guide to Saving Seeds by Robert Gough and Cheryl Moore-Gough (Storey Publications) 2011.
10,000 Garden Questions Answered by 20 Experts, edited by Marjorie J. Dietz, Doubleday and Co. 1974.
The American Horticultural Society Illustrated Encyclopedia of Vegetables, The American Horticultural Society, Ortho Books, 1980.
Information for this resource guide was taken from the resources listed above.
P. O. Box 345 Seekonk, MA 02771www.aginclassroom.org
Please Visit the Massachusetts Agriculture in the Classroom Websiteto tell us how you used this Seeding Plants Resource for the School Garden.
This Seeding Plants Resource for the School Garden was funded by the Massachusetts Department of Agricultural Resources through a 2011
Specialty Crops Grant from the USDA