Embed Size (px)
DESCRIPTION
Citation preview
Lib
ra
ry s
ervic
es a
nd
re
so
urc
es f
or k
now
led
ge
bu
ild
ing
©Technology T
raining Support Services, University Libraries, Ball State University, Muncie Indiana 47306 All Rights Reserved - [email protected] - Pa
m Stant pstan
[email protected] - June 2006
Tools & Basics
June 2006
Adobe Photoshop CS2
PSCS2intro-tools.indd © Ball State University Libraries June 2006 Page �
Mac vs PC KeyboardsThe commands given here are geared toward both Mac and PC use. The key commands can be translated be-tween PC and Mac easily: ALT key (PC) is the same as
the Option key (Mac); CTRL Key (PC) is usually translated to Command [apple/flower] Key (MAC). [ Macintosh/Windows: Option /ALT Command / Ctrl ]
Pam StantTechnical Training Analyst
Technology Training Support ServicesBracken Library, Room 318
Ball State UniversityMuncie, Indiana 47306
[email protected] 285 8154
pstant.iweb.bsu.edu
© Copyright Ball State UniversityTechnology Training Support Services
[email protected] University LibrariesJune 2006 All Rights Reserved
Noteon.PSDFileType Native Photoshop (.psd) - While creating, editing and tweaking images, it is
best to save all your files in Photoshop’s native format, which is the default file format for newly created images. This encoded format (.psd) is the only format that supports all available Adobe Photoshop image modes (Bitmap, Grayscale, RGB, CMYK, etc.), channels and layers. This lets you use all the program’s editing tools, commands and filters. It also retains all the data until you decide to save a copy of the file in some other format for eventual use. A file can be opened in its own format, then converted to a Photoshop (.psd) document by using the SAVE AS command under the FILE menu, then select-ing PHOTOSHOP format. Using a slightly different filename will preserve the original file and save the copy to Photoshop format for the working process.
What’s New in CS2 .................................................................................... 3Overview.................................................................................................... 4Bitmaps versus Objects ............................................................................. 4Mac vs PC Keyboards ............................................................................... 5Starting the Photoshop Application............................................................ 5On-screen image size................................................................................ 5Color mode and background ..................................................................... 6Floating Palettes ........................................................................................ 6The Toolbox - Displaying and working with tools ....................................... 6Using the Options Bar ............................................................................... 8Understanding the Selection Process ....................................................... 9Toolbox Controls ...................................................................................... 10Using the Color Picker ............................................................................. 10Tool Descriptions ......................................................................................11Creating shape layers.............................................................................. 13Floating Palettes ...................................................................................... 14Workspaces ............................................................................................. 17
Contents
PSCS2intro-tools.indd © Ball State University Libraries June 2006 Page �
What’s new with CS2?
Timesaving file handling with Adobe BridgeSimplify file handling with Adobe Bridge, the next-generation File Browser, where you can process multiple camera raw images at once; resize, rate, and label thumbnails; quickly review images in Slideshow mode; search metadata; and more.
Multiple layer controlSelect and move, group, transform, and warp objects more intuitively by clicking and dragging directly on the canvas. Easily align objects with Smart Guides.
Smart ObjectsPerform nondestructive scaling, rotating, and warping of raster and vector graph-ics with Smart Objects. Even preserve the editability of high-resolution vector data from Adobe Illustrator® software.
Spot Healing BrushEffortlessly retouch photos — including 16-bit images — in a single click with the advanced power of the new Photoshop CS2 Spot Healing Brush.
One-Click Red-Eye CorrectionInstantly neutralize red eyes with the one-click red-eye correction tool, which sup-ports 16-bit images and lets you set pupil size and darkening level.
Color Replacement BrushColor Replacement Brush replaces color of painted area with foreground color overlay, not repaint. The ‘Contiguous’ setting replaces colors that are contiguous with the color immediately under the pointer
Blur FiltersThe Blur filters soften a selection or an entire image, and are useful for retouch-ing. They smooth transitions by averaging the pixels next to the hard edges of defined lines and shaded areas in an image. Blur filters Apply blur effects using new blur filters: Box Blur, Shape Blur, and Surface Blur.

PSCS2intro-tools.indd © Ball State University Libraries June 2006 Page �
OverviewAdobe Photoshop CS2 software is the world-standard image-editing, photo-retouching, and Web graphics program that lets you create high-quality digital images. The Photoshop CS2 program is virtually the same on either Macintosh or PC platforms. It combines a full range of selection tools, painting, drawing and editing tools, color-correction tools, and tremendous special effects capabilities. Photoshop CS2 offers more support for web graphics, a color correction brush (red eye plus), and many new painting and web support features.
Along with Photoshop is the Web utility program ImageReady CS2. This is a spe-cial graphics editor that allows you to convert and optimize graphics for web use and other purposes. ImageReady provides improved optimization and animation, as well as new advanced Web layout features, and creative tools to create special Web design effects such as slicing, rollovers and animation.
Bitmaps versus Objects Many image programs can be defined as “paint” programs, in which you draw a line, and the program converts this line to tiny square dots called “pixels.” Each pixel conforms to one “bit” of data. The painting itself is called a “bitmapped im-age.” Some examples are PC Paintbrush, Paintshop Pro, Superpaint, PixelPaint and Color It. Other graphic applications such as Adobe Illustrator and Freehand, Canvas, CorelDraw and others are in the category called drawing programs. Drawings comprise “objects” which are independent, mathematically-defined lines and shapes. For this reason, drawing programs are sometimes referred to as “object-oriented” or “vector-based.” Photoshop has both.
Painting and drawing applications have their own good and bad points. A paint program offers a direct approach to creating images. For example, while many Photoshop features are very complex, and require some time and practice to mas-ter, its basic painting tools are very simple to use. You simply draw and erase until you achieve the desired effect. Additionally, each of Photoshop’s basic paint tools are fully capable of being customized. So you, in effect, have access to an infinite variety of crayons, watercolors, pastels, colored pencils, airbrushes, etc. — all of which are completely erasable.
The downside of a painting program is that it is limited by its “resolution” op-tions. Bitmaps contain a fixed number of pixels, so the resolution of an image (the number of pixels per inch) is dependent upon the size at which the image is printed. For example, print a medium-sized image small, and the pixels become tiny, which increases the resolution, or quality of the final print. However, print the image larger than it’s drawn, and the pixels are larger, which decreases the resolution, and generally produces a choppy or jagged picture.
Some drawing tools, on the other hand, can be a bit harder to master, but make a clear, scalable graphic that has clean lines no matter how large or small you make it. So, as a beginner’s rule of thumb, to get a good resolution on a small graphic, create it big, print it small. How big and how small are variables that will differ with each image, and will become clearer with practice.
So when is it advisable to use bitmapped graphics and when to use vector graph-ics? Bitmapped graphic is best for scanned photos, photographic collages and embellishments; realistic artwork that utilizes naturalistic highlights and shadows; impressionist-type artwork and images; logos and display types using soft edges, reflections, or tapering shadows; and special effects that require the use of filters
Photoshop CS2 (Creative Suite 2)
PSCS2intro-tools.indd © Ball State University Libraries June 2006 Page �
and color enhancements. Vector graphics are better for more stylized art-work, such as poster art and other high-contrast graphics; architectural plans, product designs, or other precise line drawings; business graphics, such as charts and “infographics”; and traditional logos and text effects that require crisp, ultrasmooth edges, such as custom letters and symbols.
Mac vs PC KeyboardsThe commands given here are geared toward PC (Windows) use, however the key commands can be translated from PC to Mac easily: The ALT key on a PC is the same as the Option key on a Mac; The CTRL key on a PC is usually translated to the Command [apple/flower] key on a Mac.
[ Windows ALT = Mac Option Windows CTRL = Mac Command ]
Starting the Photoshop ApplicationOnce you’ve opened the application by clicking on the Photoshop icon, the menu changes to the Photoshop menu, and the Toolbox and various float-ing palettes appear. To create a new image, select FILE then NEW from the menu bar. (FILE > NEW) This opens a dialog box where you should make some initial decisions as to the name of the file, dimensions (measurement in pixels, inches, centimeters, millimeters, points, picas, or columns), resolution, color mode (bitmap, grayscale, RGB color, CMYK color or lab color); and if you want the beginning file to be filled with white, or the current background color, or transparent.
Measurement: For the beginner, inches may be easiest to use. Later, you may find that pixels or points give you a more precise measurement. By default, Photoshop assigns exactly 72 points per inch and 6 picas per inch, which equates to one point per screen pixel.
A seventh unit of measure, Column, is available from the Width pop-up menu. If you want to create an image that fits exactly within a certain num-ber of columns when it’s imported into a desktop publishing program, select the Column option. You can specify the width of a column and the gutter between columns by choosing Preferences > Units and Rulers and enter-ing values into the Column Size option boxes
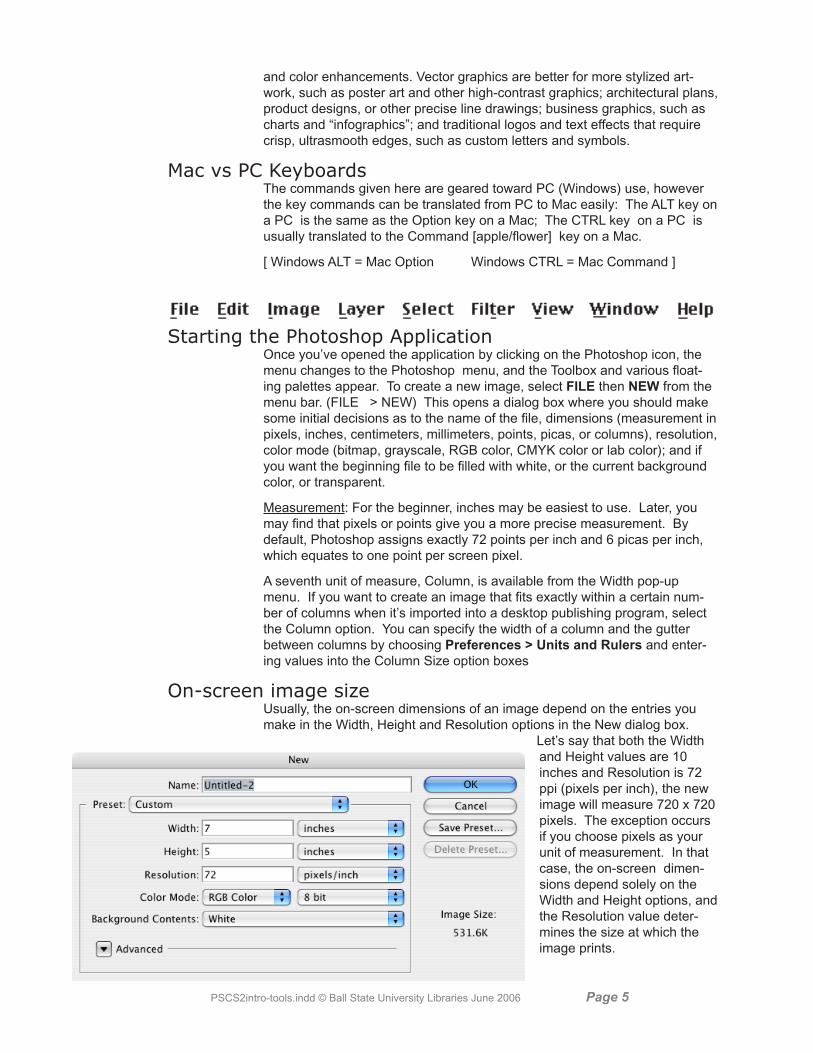
On-screen image sizeUsually, the on-screen dimensions of an image depend on the entries you make in the Width, Height and Resolution options in the New dialog box.
Let’s say that both the Width and Height values are 10 inches and Resolution is 72 ppi (pixels per inch), the new image will measure 720 x 720 pixels. The exception occurs if you choose pixels as your unit of measurement. In that case, the on-screen dimen-sions depend solely on the Width and Height options, and the Resolution value deter-mines the size at which the image prints.
PSCS2intro-tools.indd © Ball State University Libraries June 2006 Page �
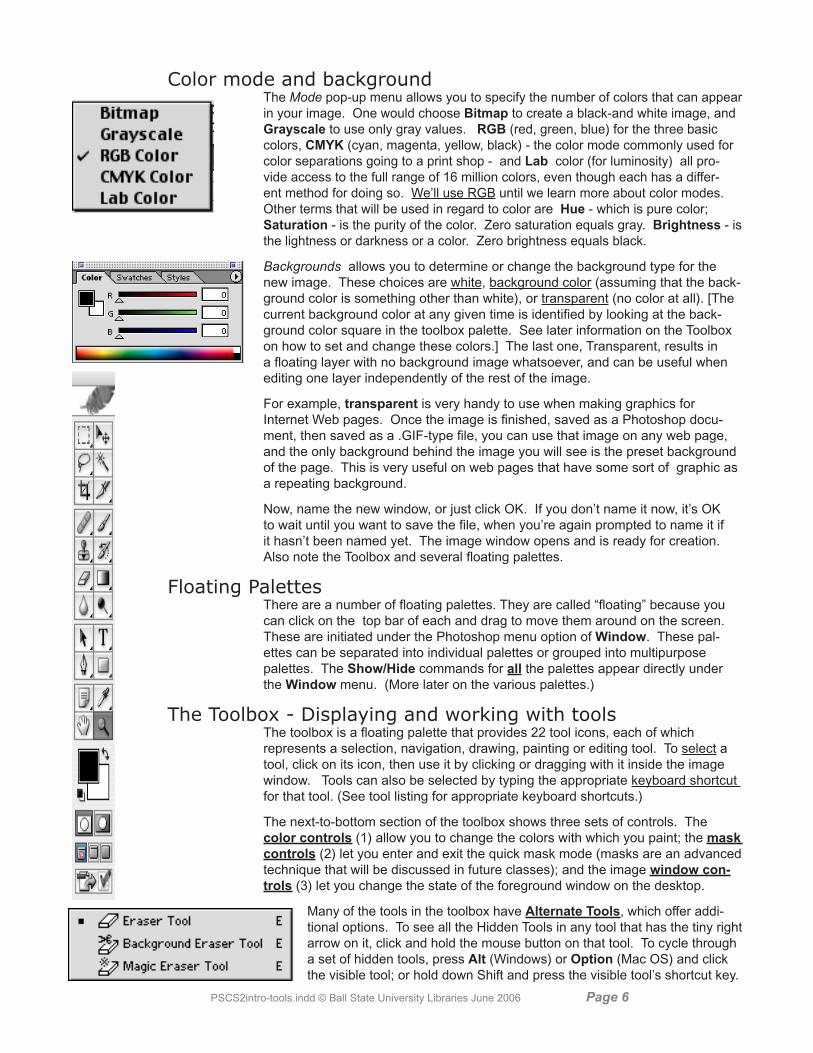
Color mode and backgroundThe Mode pop-up menu allows you to specify the number of colors that can appear in your image. One would choose Bitmap to create a black-and white image, and Grayscale to use only gray values. RGB (red, green, blue) for the three basic colors, CMYK (cyan, magenta, yellow, black) - the color mode commonly used for color separations going to a print shop - and Lab color (for luminosity) all pro-vide access to the full range of 16 million colors, even though each has a differ-ent method for doing so. We’ll use RGB until we learn more about color modes. Other terms that will be used in regard to color are Hue - which is pure color; Saturation - is the purity of the color. Zero saturation equals gray. Brightness - is the lightness or darkness or a color. Zero brightness equals black.
Backgrounds allows you to determine or change the background type for the new image. These choices are white, background color (assuming that the back-ground color is something other than white), or transparent (no color at all). [The current background color at any given time is identified by looking at the back-ground color square in the toolbox palette. See later information on the Toolbox on how to set and change these colors.] The last one, Transparent, results in a floating layer with no background image whatsoever, and can be useful when editing one layer independently of the rest of the image.
For example, transparent is very handy to use when making graphics for Internet Web pages. Once the image is finished, saved as a Photoshop docu-ment, then saved as a .GIF-type file, you can use that image on any web page, and the only background behind the image you will see is the preset background of the page. This is very useful on web pages that have some sort of graphic as a repeating background.
Now, name the new window, or just click OK. If you don’t name it now, it’s OK to wait until you want to save the file, when you’re again prompted to name it if it hasn’t been named yet. The image window opens and is ready for creation. Also note the Toolbox and several floating palettes.
Floating PalettesThere are a number of floating palettes. They are called “floating” because you can click on the top bar of each and drag to move them around on the screen. These are initiated under the Photoshop menu option of Window. These pal-ettes can be separated into individual palettes or grouped into multipurpose palettes. The Show/Hide commands for all the palettes appear directly under the Window menu. (More later on the various palettes.)
The Toolbox - Displaying and working with toolsThe toolbox is a floating palette that provides 22 tool icons, each of which represents a selection, navigation, drawing, painting or editing tool. To select a tool, click on its icon, then use it by clicking or dragging with it inside the image window. Tools can also be selected by typing the appropriate keyboard shortcut for that tool. (See tool listing for appropriate keyboard shortcuts.)
The next-to-bottom section of the toolbox shows three sets of controls. The color controls (1) allow you to change the colors with which you paint; the mask controls (2) let you enter and exit the quick mask mode (masks are an advanced technique that will be discussed in future classes); and the image window con-trols (3) let you change the state of the foreground window on the desktop.
Many of the tools in the toolbox have Alternate Tools, which offer addi-tional options. To see all the Hidden Tools in any tool that has the tiny right arrow on it, click and hold the mouse button on that tool. To cycle through a set of hidden tools, press Alt (Windows) or Option (Mac OS) and click the visible tool; or hold down Shift and press the visible tool’s shortcut key.
PSCS2intro-tools.indd © Ball State University Libraries June 2006 Page �
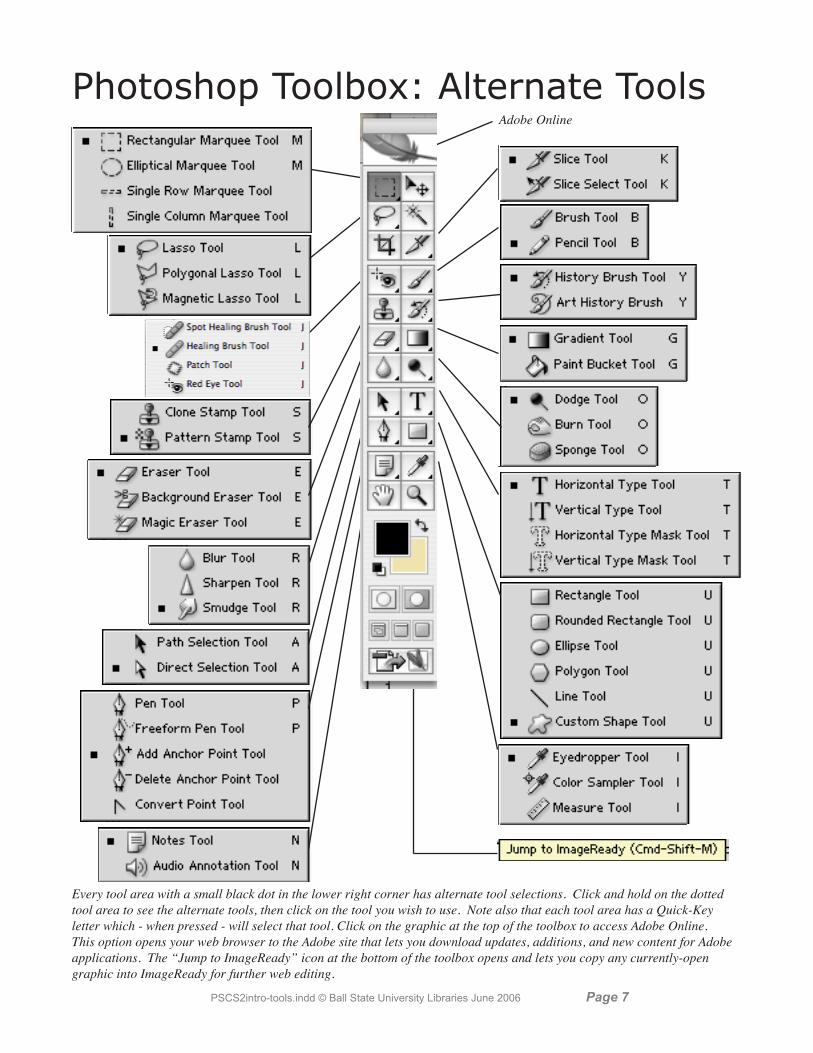
Every tool area with a small black dot in the lower right corner has alternate tool selections. Click and hold on the dotted tool area to see the alternate tools, then click on the tool you wish to use. Note also that each tool area has a Quick-Key letter which - when pressed - will select that tool. Click on the graphic at the top of the toolbox to access Adobe Online. This option opens your web browser to the Adobe site that lets you download updates, additions, and new content for Adobe applications. The “Jump to ImageReady” icon at the bottom of the toolbox opens and lets you copy any currently-open graphic into ImageReady for further web editing.
Photoshop Toolbox: Alternate ToolsAdobe Online
PSCS2intro-tools.indd © Ball State University Libraries June 2006 Page �
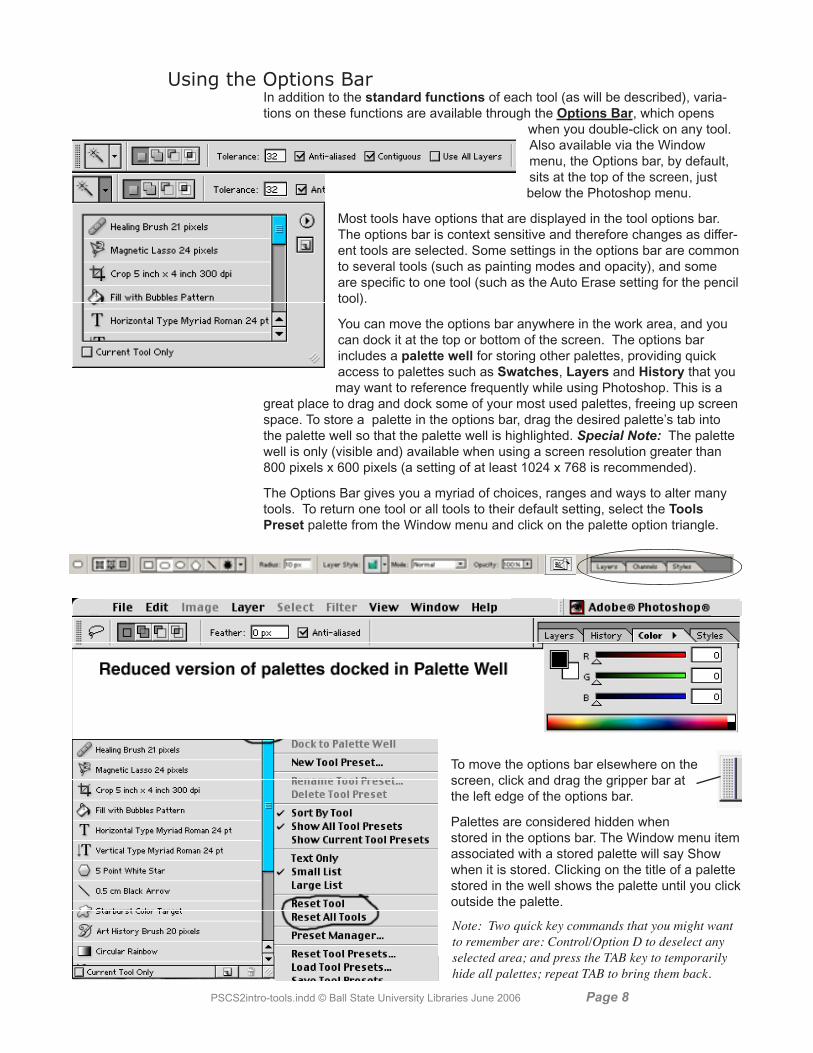
Using the Options BarIn addition to the standard functions of each tool (as will be described), varia-tions on these functions are available through the Options Bar, which opens
when you double-click on any tool. Also available via the Window menu, the Options bar, by default, sits at the top of the screen, just below the Photoshop menu.
Most tools have options that are displayed in the tool options bar. The options bar is context sensitive and therefore changes as differ-ent tools are selected. Some settings in the options bar are common to several tools (such as painting modes and opacity), and some are specific to one tool (such as the Auto Erase setting for the pencil tool).
You can move the options bar anywhere in the work area, and you can dock it at the top or bottom of the screen. The options bar includes a palette well for storing other palettes, providing quick access to palettes such as Swatches, Layers and History that you may want to reference frequently while using Photoshop. This is a
great place to drag and dock some of your most used palettes, freeing up screen space. To store a palette in the options bar, drag the desired palette’s tab into the palette well so that the palette well is highlighted. Special Note: The palette well is only (visible and) available when using a screen resolution greater than 800 pixels x 600 pixels (a setting of at least 1024 x 768 is recommended).
The Options Bar gives you a myriad of choices, ranges and ways to alter many tools. To return one tool or all tools to their default setting, select the Tools Preset palette from the Window menu and click on the palette option triangle.
To move the options bar elsewhere on the screen, click and drag the gripper bar at the left edge of the options bar.
Palettes are considered hidden when stored in the options bar. The Window menu item associated with a stored palette will say Show when it is stored. Clicking on the title of a palette stored in the well shows the palette until you click outside the palette.
Note: Two quick key commands that you might want to remember are: Control/Option D to deselect any selected area; and press the TAB key to temporarily hide all palettes; repeat TAB to bring them back.
PSCS2intro-tools.indd © Ball State University Libraries June 2006 Page �
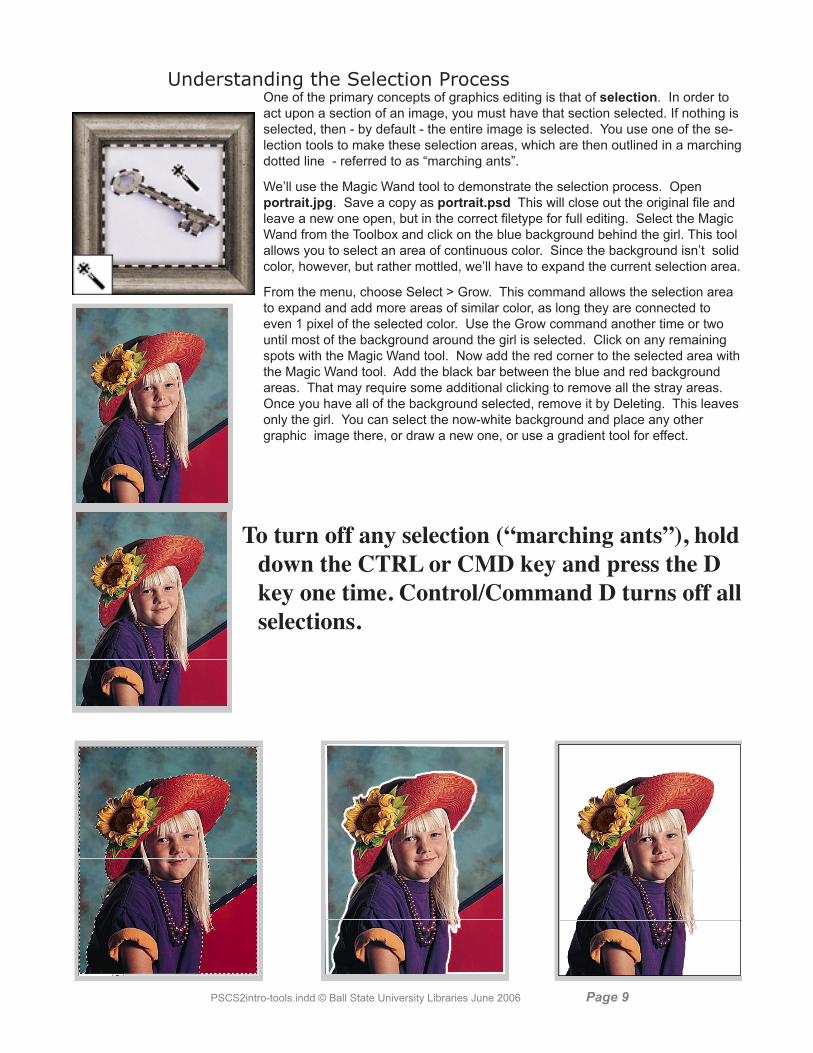
Understanding the Selection ProcessOne of the primary concepts of graphics editing is that of selection. In order to act upon a section of an image, you must have that section selected. If nothing is selected, then - by default - the entire image is selected. You use one of the se-lection tools to make these selection areas, which are then outlined in a marching dotted line - referred to as “marching ants”.
We’ll use the Magic Wand tool to demonstrate the selection process. Open portrait.jpg. Save a copy as portrait.psd This will close out the original file and leave a new one open, but in the correct filetype for full editing. Select the Magic Wand from the Toolbox and click on the blue background behind the girl. This tool allows you to select an area of continuous color. Since the background isn’t solid color, however, but rather mottled, we’ll have to expand the current selection area.
From the menu, choose Select > Grow. This command allows the selection area to expand and add more areas of similar color, as long they are connected to even 1 pixel of the selected color. Use the Grow command another time or two until most of the background around the girl is selected. Click on any remaining spots with the Magic Wand tool. Now add the red corner to the selected area with the Magic Wand tool. Add the black bar between the blue and red background areas. That may require some additional clicking to remove all the stray areas. Once you have all of the background selected, remove it by Deleting. This leaves only the girl. You can select the now-white background and place any other graphic image there, or draw a new one, or use a gradient tool for effect.
To turn off any selection (“marching ants”), hold down the CTRL or CMD key and press the D key one time. Control/Command D turns off all selections.

PSCS2intro-tools.indd © Ball State University Libraries June 2006 Page 10
Toolbox Controls Foreground color: [a] Click on the foreground color icon to bring up the Color Picker dialog box. Select a color from the huge palette of choices and press OK to change the foreground color, which is used by all painting tools except the eraser. ( Press [X] to switch colors , and [D] for default colors, which are black and white. )
Background color: [b] Click on the background color icon to display the Color Picker and change the background color, which is used by the eraser and gradi-ent tools. Photoshop also uses the background color to fill a selected area when you press the Delete key.
Switch colors: [c] (the quarter-curve with arrows on each end) Click on the “switch colors” curved arrow icon to exchange the foreground and background colors. A quick way to make the foreground color white is to click on the default colors icon and then click on the switch colors icon.
Default colors: [d] (The tiny black box overlapping the tiny white box.) Click on this icon to automatically change foreground color to black and the back-ground color to white.
Standard Mode (Marching Ants): [e] In the marching ants mode, Photoshop represents selection outlines as animated dotted lines that look like marching ants.
Quick Mask: [f] Clicking here enters the quick mask mode, which enables you to edit selection boundaries using painting tools. Quick Mask mode lets you view a mask and the image simultaneously. [Masking is a topic that will be discussed in a later class.]
Standard window: (1) Click here to display the foreground image in a standard win-dow, with a menu bar at the top and cross bars on the sides. This is the default mode.
Full screen with menu bar: (2) If you can’t see enough of your image inside a standard window, click on this icon. The title bar and scroll bars disappear, as do all background windows, but the menu bar and palettes are still visible. Scroll through the image using the hand tool or the Navigator palette.
Full screen without menu bar: (3) This creates a stark black background which blanks out everything on the screen but the image and palettes. Thus, no title bar, menu bar or scroll bars appear. Use the hand tool or the Navigator palette to
scroll through the image.
Jump to ImageReady: (4) Clicking this button lets you easily jump between Photoshop and ImageReady to use features in both applications when preparing graphics for the Web.
Using the Color Picker WindowTo use the color picker, first select the range of color you want by either clicking on or dragging the slider on the color slider (H).
Next, select the shade of color by dragging your pointer in the large color block on the left of the screen (A). Wherever your mouse stops, a tiny circle appears to indicate that is is the selected shade. Then click OK.
A. Picked color B. Original color C. Adjusted color D. Out-of-gamut alert icon E. Not Web-safe alert icon F. Web Colors option G. Color field H. Color slider I. Color values
1 2 3
4
PSCS2intro-tools.indd © Ball State University Libraries June 2006 Page 11
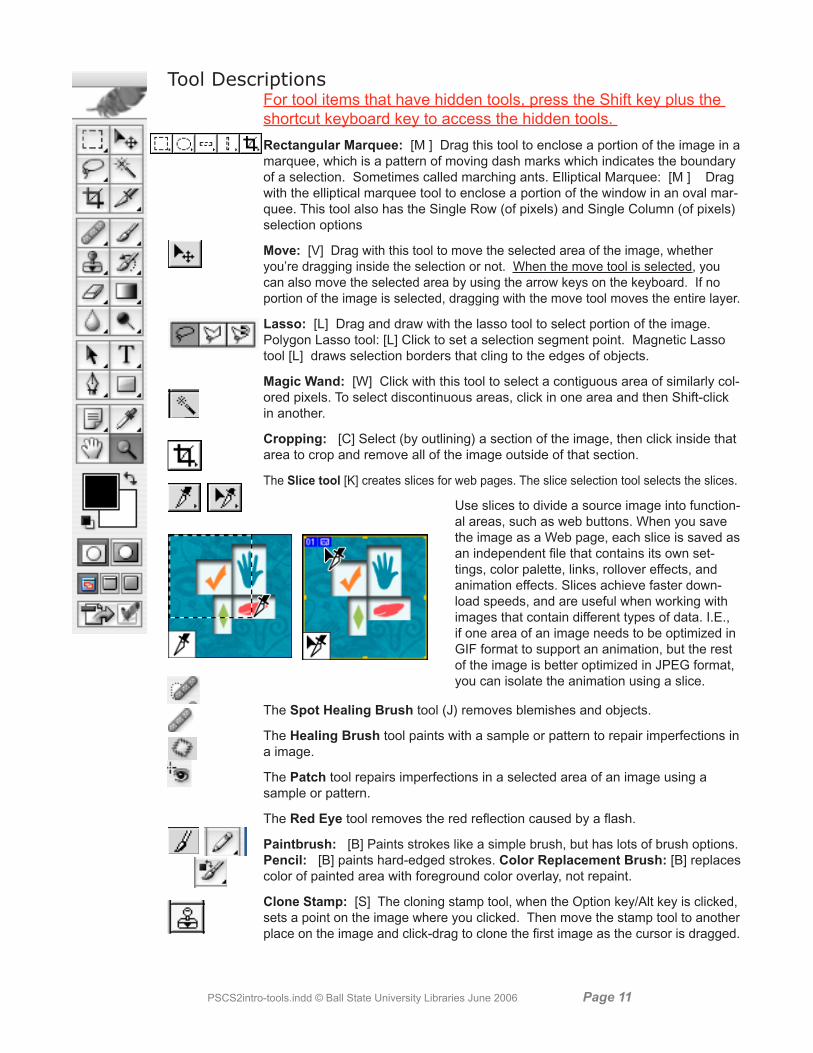
Tool DescriptionsFor tool items that have hidden tools, press the Shift key plus the shortcut keyboard key to access the hidden tools.
Rectangular Marquee: [M ] Drag this tool to enclose a portion of the image in a marquee, which is a pattern of moving dash marks which indicates the boundary of a selection. Sometimes called marching ants. Elliptical Marquee: [M ] Drag with the elliptical marquee tool to enclose a portion of the window in an oval mar-quee. This tool also has the Single Row (of pixels) and Single Column (of pixels) selection options
Move: [V] Drag with this tool to move the selected area of the image, whether you’re dragging inside the selection or not. When the move tool is selected, you can also move the selected area by using the arrow keys on the keyboard. If no portion of the image is selected, dragging with the move tool moves the entire layer.
Lasso: [L] Drag and draw with the lasso tool to select portion of the image. Polygon Lasso tool: [L] Click to set a selection segment point. Magnetic Lasso tool [L] draws selection borders that cling to the edges of objects.
Magic Wand: [W] Click with this tool to select a contiguous area of similarly col-ored pixels. To select discontinuous areas, click in one area and then Shift-click in another.
Cropping: [C] Select (by outlining) a section of the image, then click inside that area to crop and remove all of the image outside of that section.
The Slice tool [K] creates slices for web pages. The slice selection tool selects the slices.
The Spot Healing Brush tool (J) removes blemishes and objects.
The Healing Brush tool paints with a sample or pattern to repair imperfections in a image.
The Patch tool repairs imperfections in a selected area of an image using a sample or pattern.
The Red Eye tool removes the red reflection caused by a flash.
Paintbrush: [B] Paints strokes like a simple brush, but has lots of brush options.Pencil: [B] paints hard-edged strokes. Color Replacement Brush: [B] replaces color of painted area with foreground color overlay, not repaint.
Clone Stamp: [S] The cloning stamp tool, when the Option key/Alt key is clicked, sets a point on the image where you clicked. Then move the stamp tool to another place on the image and click-drag to clone the first image as the cursor is dragged.
Use slices to divide a source image into function-al areas, such as web buttons. When you save the image as a Web page, each slice is saved as an independent file that contains its own set-tings, color palette, links, rollover effects, and animation effects. Slices achieve faster down-load speeds, and are useful when working with images that contain different types of data. I.E., if one area of an image needs to be optimized in GIF format to support an animation, but the rest of the image is better optimized in JPEG format, you can isolate the animation using a slice.
PSCS2intro-tools.indd © Ball State University Libraries June 2006 Page 1�
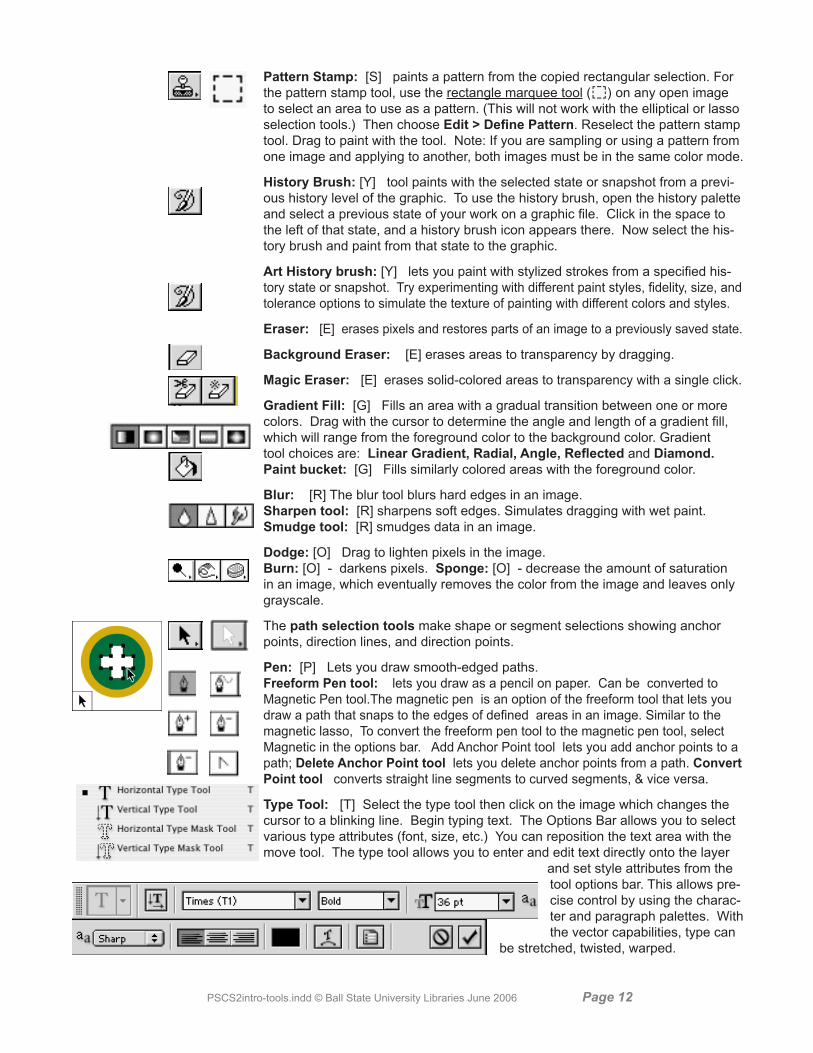
Pattern Stamp: [S] paints a pattern from the copied rectangular selection. For the pattern stamp tool, use the rectangle marquee tool ( ) on any open image to select an area to use as a pattern. (This will not work with the elliptical or lasso selection tools.) Then choose Edit > Define Pattern. Reselect the pattern stamp tool. Drag to paint with the tool. Note: If you are sampling or using a pattern from one image and applying to another, both images must be in the same color mode.
History Brush: [Y] tool paints with the selected state or snapshot from a previ-ous history level of the graphic. To use the history brush, open the history palette and select a previous state of your work on a graphic file. Click in the space to the left of that state, and a history brush icon appears there. Now select the his-tory brush and paint from that state to the graphic.
Art History brush: [Y] lets you paint with stylized strokes from a specified his-tory state or snapshot. Try experimenting with different paint styles, fidelity, size, and tolerance options to simulate the texture of painting with different colors and styles.
Eraser: [E] erases pixels and restores parts of an image to a previously saved state.
Background Eraser: [E] erases areas to transparency by dragging.
Magic Eraser: [E] erases solid-colored areas to transparency with a single click.
Gradient Fill: [G] Fills an area with a gradual transition between one or more colors. Drag with the cursor to determine the angle and length of a gradient fill, which will range from the foreground color to the background color. Gradient tool choices are: Linear Gradient, Radial, Angle, Reflected and Diamond. Paint bucket: [G] Fills similarly colored areas with the foreground color.
Blur: [R] The blur tool blurs hard edges in an image. Sharpen tool: [R] sharpens soft edges. Simulates dragging with wet paint. Smudge tool: [R] smudges data in an image.
Dodge: [O] Drag to lighten pixels in the image. Burn: [O] - darkens pixels. Sponge: [O] - decrease the amount of saturation in an image, which eventually removes the color from the image and leaves only grayscale.
The path selection tools make shape or segment selections showing anchor points, direction lines, and direction points.
Pen: [P] Lets you draw smooth-edged paths. Freeform Pen tool: lets you draw as a pencil on paper. Can be converted to Magnetic Pen tool.The magnetic pen is an option of the freeform tool that lets you draw a path that snaps to the edges of defined areas in an image. Similar to the magnetic lasso, To convert the freeform pen tool to the magnetic pen tool, select Magnetic in the options bar. Add Anchor Point tool lets you add anchor points to a path; Delete Anchor Point tool lets you delete anchor points from a path. Convert Point tool converts straight line segments to curved segments, & vice versa.
Type Tool: [T] Select the type tool then click on the image which changes the cursor to a blinking line. Begin typing text. The Options Bar allows you to select various type attributes (font, size, etc.) You can reposition the text area with the move tool. The type tool allows you to enter and edit text directly onto the layer
and set style attributes from the tool options bar. This allows pre-cise control by using the charac-ter and paragraph palettes. With the vector capabilities, type can
be stretched, twisted, warped.
PSCS2intro-tools.indd © Ball State University Libraries June 2006 Page 1�
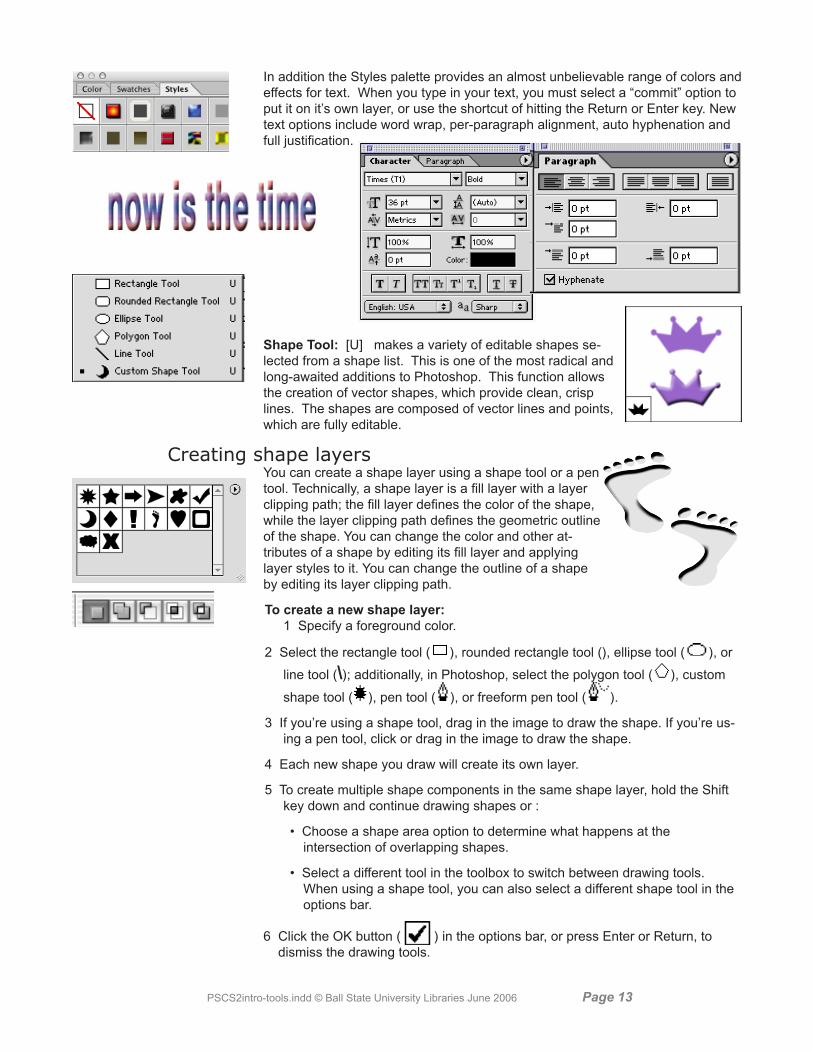
In addition the Styles palette provides an almost unbelievable range of colors and effects for text. When you type in your text, you must select a “commit” option to put it on it’s own layer, or use the shortcut of hitting the Return or Enter key. New text options include word wrap, per-paragraph alignment, auto hyphenation and full justification.
Shape Tool: [U] makes a variety of editable shapes se-lected from a shape list. This is one of the most radical and long-awaited additions to Photoshop. This function allows the creation of vector shapes, which provide clean, crisp lines. The shapes are composed of vector lines and points, which are fully editable.
Creating shape layersYou can create a shape layer using a shape tool or a pen tool. Technically, a shape layer is a fill layer with a layer clipping path; the fill layer defines the color of the shape, while the layer clipping path defines the geometric outline of the shape. You can change the color and other at-tributes of a shape by editing its fill layer and applying layer styles to it. You can change the outline of a shape by editing its layer clipping path.
To create a new shape layer: 1 Specify a foreground color.
2 Select the rectangle tool ( ), rounded rectangle tool (), ellipse tool ( ), or
line tool (\); additionally, in Photoshop, select the polygon tool ( ), custom
shape tool ( ), pen tool ( ), or freeform pen tool ( ).
3 If you’re using a shape tool, drag in the image to draw the shape. If you’re us-ing a pen tool, click or drag in the image to draw the shape.
4 Each new shape you draw will create its own layer.
5 To create multiple shape components in the same shape layer, hold the Shift key down and continue drawing shapes or :
• Choose a shape area option to determine what happens at the intersection of overlapping shapes.
• Select a different tool in the toolbox to switch between drawing tools. When using a shape tool, you can also select a different shape tool in the options bar.
6 Click the OK button ( ) in the options bar, or press Enter or Return, to dismiss the drawing tools.
PSCS2intro-tools.indd © Ball State University Libraries June 2006 Page 1�
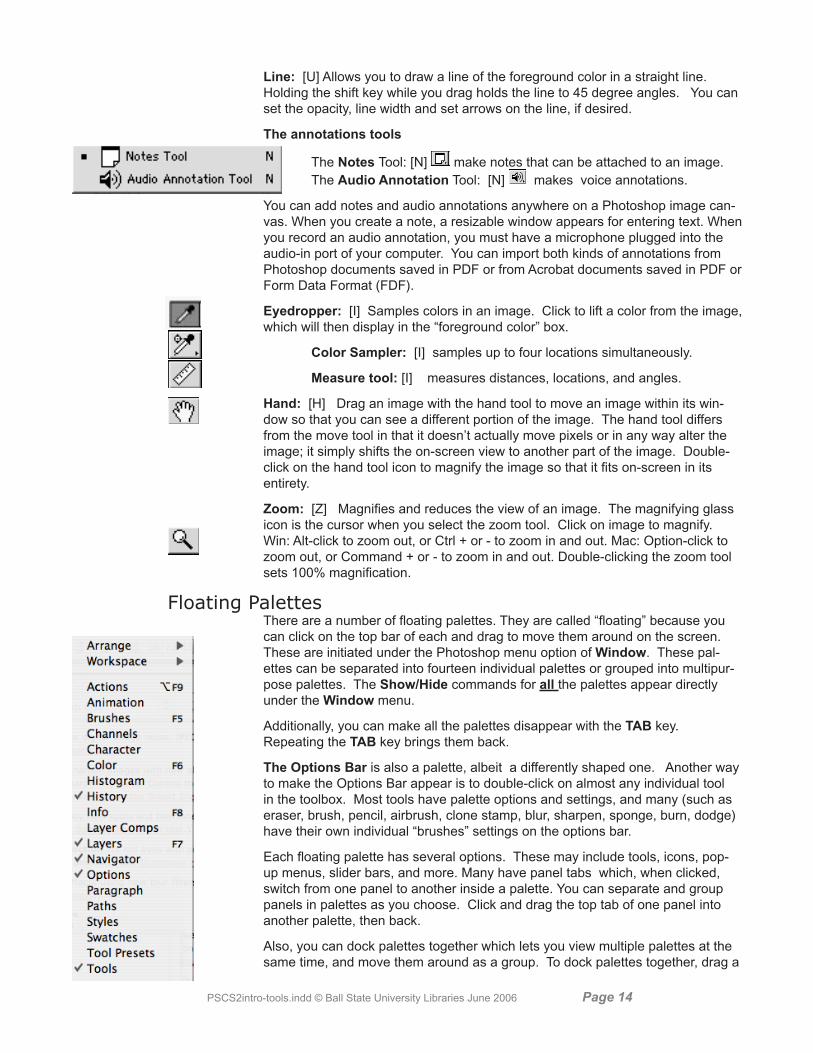
Line: [U] Allows you to draw a line of the foreground color in a straight line. Holding the shift key while you drag holds the line to 45 degree angles. You can set the opacity, line width and set arrows on the line, if desired.
The annotations tools
The Notes Tool: [N] make notes that can be attached to an image. The Audio Annotation Tool: [N] makes voice annotations.
You can add notes and audio annotations anywhere on a Photoshop image can-vas. When you create a note, a resizable window appears for entering text. When you record an audio annotation, you must have a microphone plugged into the audio-in port of your computer. You can import both kinds of annotations from Photoshop documents saved in PDF or from Acrobat documents saved in PDF or Form Data Format (FDF).
Eyedropper: [I] Samples colors in an image. Click to lift a color from the image, which will then display in the “foreground color” box.
Color Sampler: [I] samples up to four locations simultaneously.
Measure tool: [I] measures distances, locations, and angles.
Hand: [H] Drag an image with the hand tool to move an image within its win-dow so that you can see a different portion of the image. The hand tool differs from the move tool in that it doesn’t actually move pixels or in any way alter the image; it simply shifts the on-screen view to another part of the image. Double-click on the hand tool icon to magnify the image so that it fits on-screen in its entirety.
Zoom: [Z] Magnifies and reduces the view of an image. The magnifying glass icon is the cursor when you select the zoom tool. Click on image to magnify. Win: Alt-click to zoom out, or Ctrl + or - to zoom in and out. Mac: Option-click to zoom out, or Command + or - to zoom in and out. Double-clicking the zoom tool sets 100% magnification.
Floating PalettesThere are a number of floating palettes. They are called “floating” because you can click on the top bar of each and drag to move them around on the screen. These are initiated under the Photoshop menu option of Window. These pal-ettes can be separated into fourteen individual palettes or grouped into multipur-pose palettes. The Show/Hide commands for all the palettes appear directly under the Window menu.
Additionally, you can make all the palettes disappear with the TAB key. Repeating the TAB key brings them back.
The Options Bar is also a palette, albeit a differently shaped one. Another way to make the Options Bar appear is to double-click on almost any individual tool in the toolbox. Most tools have palette options and settings, and many (such as eraser, brush, pencil, airbrush, clone stamp, blur, sharpen, sponge, burn, dodge) have their own individual “brushes” settings on the options bar.
Each floating palette has several options. These may include tools, icons, pop-up menus, slider bars, and more. Many have panel tabs which, when clicked, switch from one panel to another inside a palette. You can separate and group panels in palettes as you choose. Click and drag the top tab of one panel into another palette, then back.
Also, you can dock palettes together which lets you view multiple palettes at the same time, and move them around as a group. To dock palettes together, drag a

PSCS2intro-tools.indd © Ball State University Libraries June 2006 Page 1�
palette’s tab to the bottom of another palette so that the bottom of the target pal-ette is highlighted. To move an entire docked group, drag its title bar. Remember also that you can dock palettes in the Palette Well on the Options Bar.
Navigator palette - lets you easily change the view and zoom level of an image. You can monitor and control the area of the image you want to view using the thumbnail preview, and you can change the magnification of the view using the zoom sliders and zoom buttons, or by entering a zoom percentage. To move the views of the image, drag the view box in the Navigator palette, or click in the thumbnail. The new view includes the area you click. To magnify or reduce the view, click the zoom out or zoom in button, or drag the zoom slider at the bottom of the palette, or enter the percentage of magnification or reduction you want, and press Return (Macintosh) or Enter (Windows).
Color/Swatches/Styles Palette: This allows you to view and define colors on the spot, without having to call up the Color Picker dialog box. The Color Palette allows you to change the Foreground color/background color. Click on the fore-ground or background icons (squares) in the Color palette to specify the color in which you want to edit. If you click on the foreground or background color icon when it’s already highlighted — as indicated by a double-line frame — Photoshop displays the full-size Color Picker dialog box. Color Palette Slider Bars: Drag the triangles in the slider controls to edit the highlighted color. By default, the sliders represent the red, green and blue primary colors. You can change the slider bars by choosing a different color model from the palette menu.
Alert triangle: Photoshop displays the alert triangle when a color falls outside the CMYK color gamut. The color swatch to the right of the triangle shows the closest CMYK equivalent. Click on the triangle or the color swatch to replace the current color with the CMYK equivalent. (Example - R:255, G:219,b:255 produces this alert. Clicking on the offered replacement changes the scales to 235/222/234.)
Color Bar: The bar along the bottom of the Color palette displays all colors con-tained in the CMYK spectrum. Click or drag inside the color bar to lift a color and make it the current foreground or background color (depending on whether the foreground or background icon is selected).
Swatches Palette: This contains 122 colors of the default Photoshop palette. Like other palettes, you can customize this by adding and deleting colors. The cursor, when moved over the color swatches, becomes an eyedropper. Clicking on a color selects that color for the foreground color selection box in the toolbox. If you already have a foreground color that you want to use again and is NOT on this palette, you can ADD TO the swatches palette by moving the cursor just past the last swatch and the icon changes from an eyedropper to a paintbucket. Click on the first empty space and the new sample will be saved in the palette for future use, even after you have closed and later reopened the Photoshop ap-plication. Clicking on the Brushes tab displays the Brushes palette, which allows you to set the brush size and shape you want to use.
PSCS2intro-tools.indd © Ball State University Libraries June 2006 Page 1�
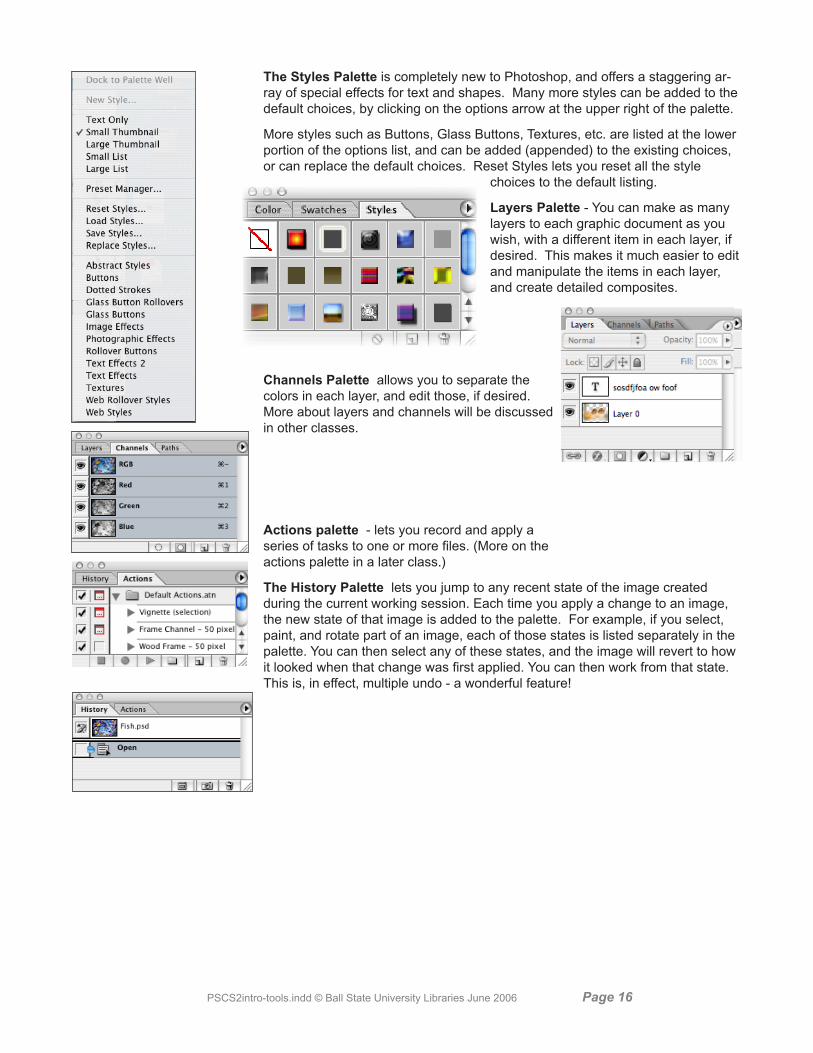
The Styles Palette is completely new to Photoshop, and offers a staggering ar-ray of special effects for text and shapes. Many more styles can be added to the default choices, by clicking on the options arrow at the upper right of the palette.
More styles such as Buttons, Glass Buttons, Textures, etc. are listed at the lower portion of the options list, and can be added (appended) to the existing choices, or can replace the default choices. Reset Styles lets you reset all the style
choices to the default listing.
Layers Palette - You can make as many layers to each graphic document as you wish, with a different item in each layer, if desired. This makes it much easier to edit and manipulate the items in each layer, and create detailed composites.
Channels Palette allows you to separate the colors in each layer, and edit those, if desired. More about layers and channels will be discussed in other classes.
Actions palette - lets you record and apply a series of tasks to one or more files. (More on the actions palette in a later class.)
The History Palette lets you jump to any recent state of the image created during the current working session. Each time you apply a change to an image, the new state of that image is added to the palette. For example, if you select, paint, and rotate part of an image, each of those states is listed separately in the palette. You can then select any of these states, and the image will revert to how it looked when that change was first applied. You can then work from that state. This is, in effect, multiple undo - a wonderful feature!
PSCS2intro-tools.indd © Ball State University Libraries June 2006 Page 1�
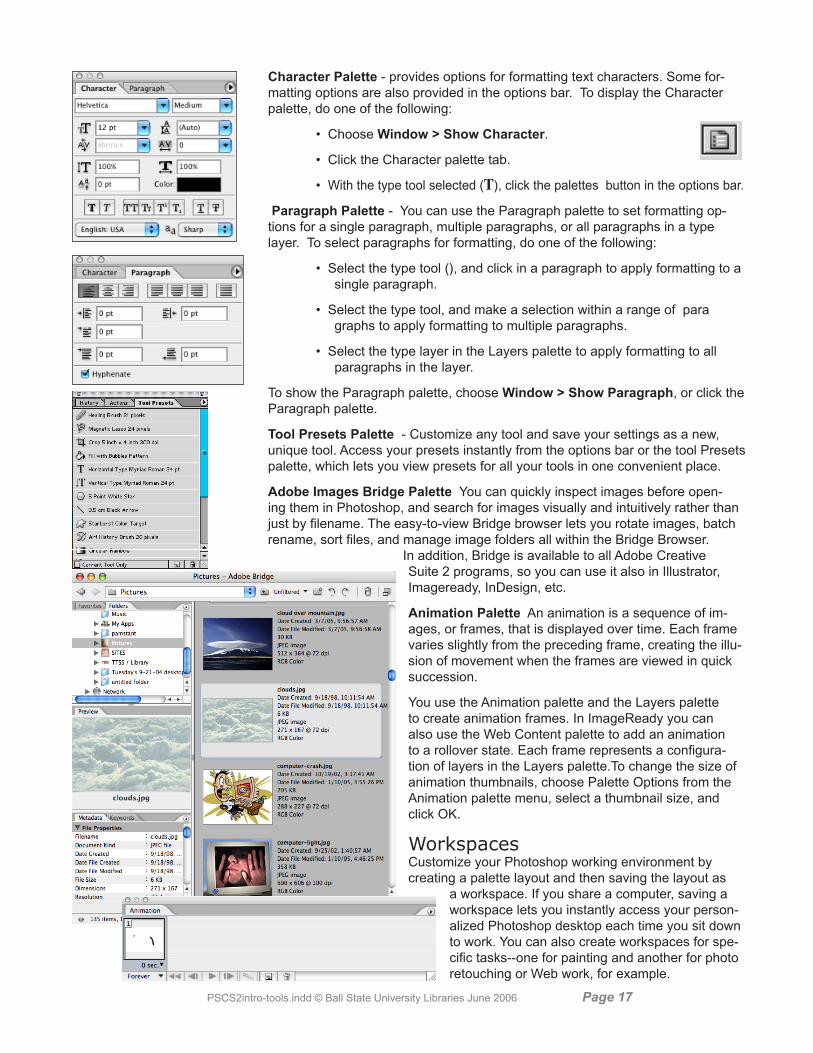
Character Palette - provides options for formatting text characters. Some for-matting options are also provided in the options bar. To display the Character palette, do one of the following:
• Choose Window > Show Character.
• Click the Character palette tab.
• With the type tool selected (T), click the palettes button in the options bar.
Paragraph Palette - You can use the Paragraph palette to set formatting op-tions for a single paragraph, multiple paragraphs, or all paragraphs in a type layer. To select paragraphs for formatting, do one of the following:
• Select the type tool (), and click in a paragraph to apply formatting to a single paragraph.
• Select the type tool, and make a selection within a range of para graphs to apply formatting to multiple paragraphs.
• Select the type layer in the Layers palette to apply formatting to all paragraphs in the layer.
To show the Paragraph palette, choose Window > Show Paragraph, or click the Paragraph palette.
Tool Presets Palette - Customize any tool and save your settings as a new, unique tool. Access your presets instantly from the options bar or the tool Presets palette, which lets you view presets for all your tools in one convenient place.
Adobe Images Bridge Palette You can quickly inspect images before open-ing them in Photoshop, and search for images visually and intuitively rather than just by filename. The easy-to-view Bridge browser lets you rotate images, batch rename, sort files, and manage image folders all within the Bridge Browser.
In addition, Bridge is available to all Adobe Creative Suite 2 programs, so you can use it also in Illustrator, Imageready, InDesign, etc.
Animation Palette An animation is a sequence of im-ages, or frames, that is displayed over time. Each frame varies slightly from the preceding frame, creating the illu-sion of movement when the frames are viewed in quick succession.
You use the Animation palette and the Layers palette to create animation frames. In ImageReady you can also use the Web Content palette to add an animation to a rollover state. Each frame represents a configura-tion of layers in the Layers palette.To change the size of animation thumbnails, choose Palette Options from the Animation palette menu, select a thumbnail size, and click OK.
WorkspacesCustomize your Photoshop working environment by creating a palette layout and then saving the layout as
a workspace. If you share a computer, saving a workspace lets you instantly access your person-alized Photoshop desktop each time you sit down to work. You can also create workspaces for spe-cific tasks--one for painting and another for photo retouching or Web work, for example.