Vendor Portal User guide
Version 1.7
Security Classification: Open - Status: Final Page 2 of 28
Contents 1 Ground rules .................................................................................................................. 3
2 Introduction and practical information ........................................................................ 3
3 How to handle Materials Purchase orders ................................................................... 4
3.1 How to Confirm Purchase Order ...................................................................................... 4
3.2 How to display the PO PDF in Vendor Portal................................................................... 6
3.3 How to update delivery date on confirmed PO ................................................................. 6
3.4 Phased Delivery – Delivery Times ................................................................................... 8
3.5 How to create Invoice ...................................................................................................... 9
3.6 Phased Delivery - Invoice ................................................................................................ 10
3.7 Status: Creation Completed ............................................................................................ 11
4 How to handle Service Purchase orders ..................................................................... 12
4.1 How to confirm services Purchase Order ........................................................................ 12
4.2 How to Create Service Entry ........................................................................................... 14
4.3 How to create service invoice .......................................................................................... 16
4.4 How to Create invoice against invoice certificate ............................................................. 17
4.5 How to create Credit Memo ............................................................................................. 18
4.6 Status: Creation Completed ............................................................................................ 20
5 User and company administration ............................................................................... 22
5.1 Maintain your own user ................................................................................................... 22
5.2 Receive Alerts – email notification settings ...................................................................... 23
5.3 Create new user .............................................................................................................. 24
5.4 Maintain user ................................................................................................................... 25
5.5 Set default tax code for invoice creation .......................................................................... 26
6 Statuses in Vendor portal ............................................................................................. 28
6.1 PO status in VP ............................................................................................................... 28
6.2 SES status in VP ............................................................................................................. 28
Security Classification: Open - Status: Final Page 3 of 28
1 Ground rules
• Maximum three employees per Vendor can hold the Administrator access.
• List off all internal users with name, roles, accesses shall be sent quarterly to Equinor.
o Send via email to [email protected]
• Leavers must be removed immediately and updated in the quarterly list to Equinor.
o Send via email to [email protected]
• Equinor can do verifications two weeks hereafter.
2 Introduction and practical information
This guide is for suppliers using Equinor's Vendor Portal (VP) at https://vendorportal.statoil.com (will be updated to
@equinor domain during fall 2018). A supplier that wants to use the portal must request this from a Equinor
contract manager.
Suppliers can do the following in the portal:
• Receive and confirm Purchase orders for materials and services
o Materials: You can update quantity and delivery date for goods
o Services: You can confirm the order without changes
• Submit Service Entry for approval by Equinor customer representative
• Submit invoices for materials and services
Questions and problems may be directed via email to [email protected] or on the phone to +47 51 99 92
22, press 1 for General IT, press 6 for Procurement support (includes Vendor Portal usage), press 7 for Financial
master data, invoicing and general accounting.
Reset of password can be done via: https://resetpassword.statoil.com/. (will be updated to @equinor domain
during fall 2018)
Security Classification: Open - Status: Final Page 4 of 28
3 How to handle Materials Purchase orders
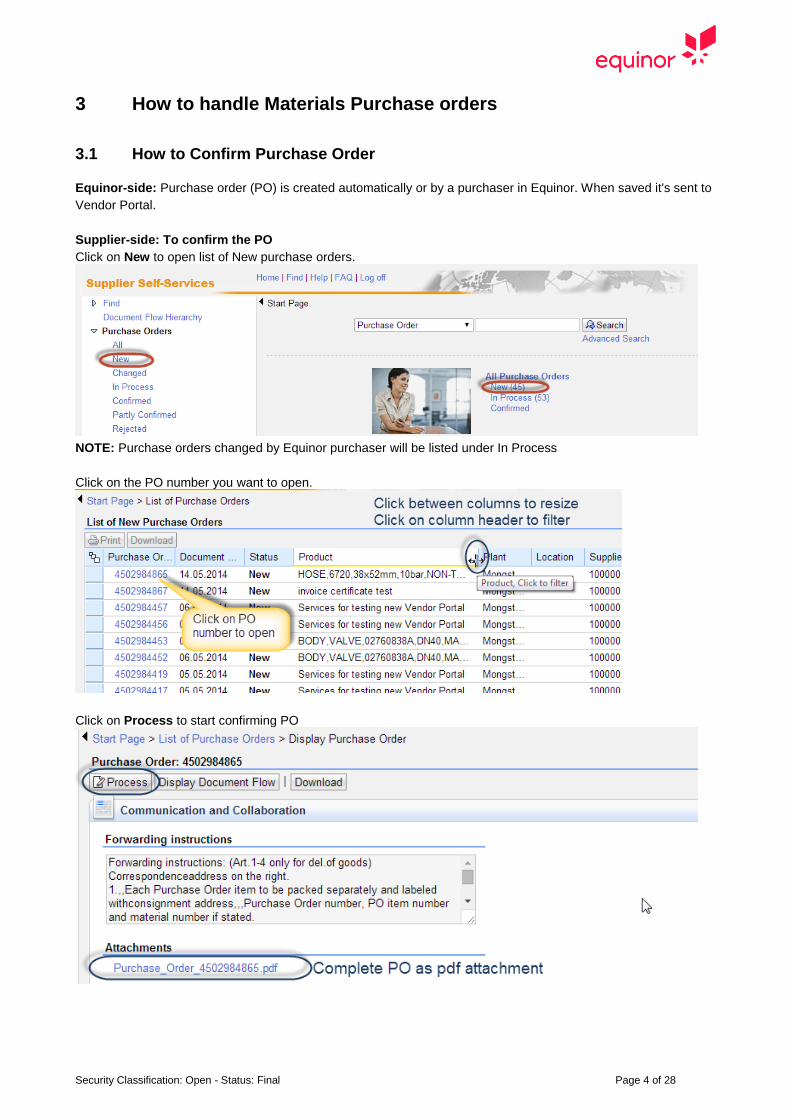
3.1 How to Confirm Purchase Order
Equinor-side: Purchase order (PO) is created automatically or by a purchaser in Equinor. When saved it's sent to
Vendor Portal.
Supplier-side: To confirm the PO
Click on New to open list of New purchase orders.
NOTE: Purchase orders changed by Equinor purchaser will be listed under In Process
Click on the PO number you want to open.
Click on Process to start confirming PO
Security Classification: Open - Status: Final Page 5 of 28
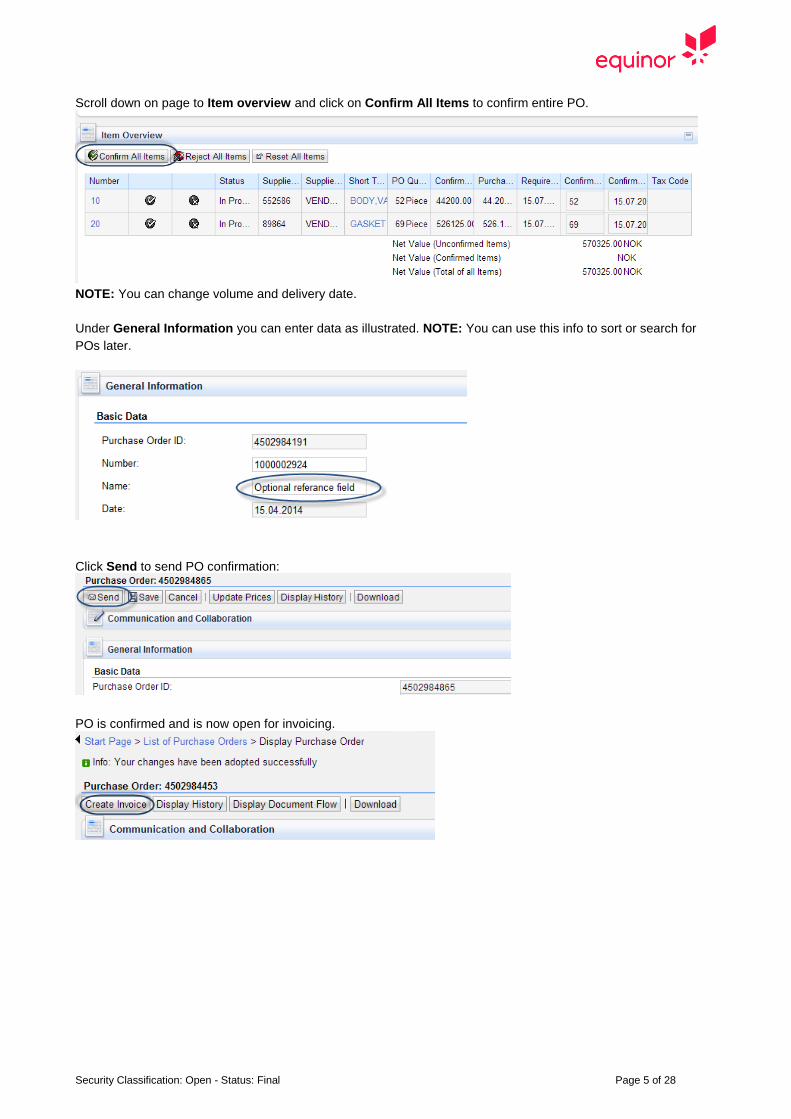
Scroll down on page to Item overview and click on Confirm All Items to confirm entire PO.
NOTE: You can change volume and delivery date.
Under General Information you can enter data as illustrated. NOTE: You can use this info to sort or search for
POs later.
Click Send to send PO confirmation:
PO is confirmed and is now open for invoicing.
Security Classification: Open - Status: Final Page 6 of 28
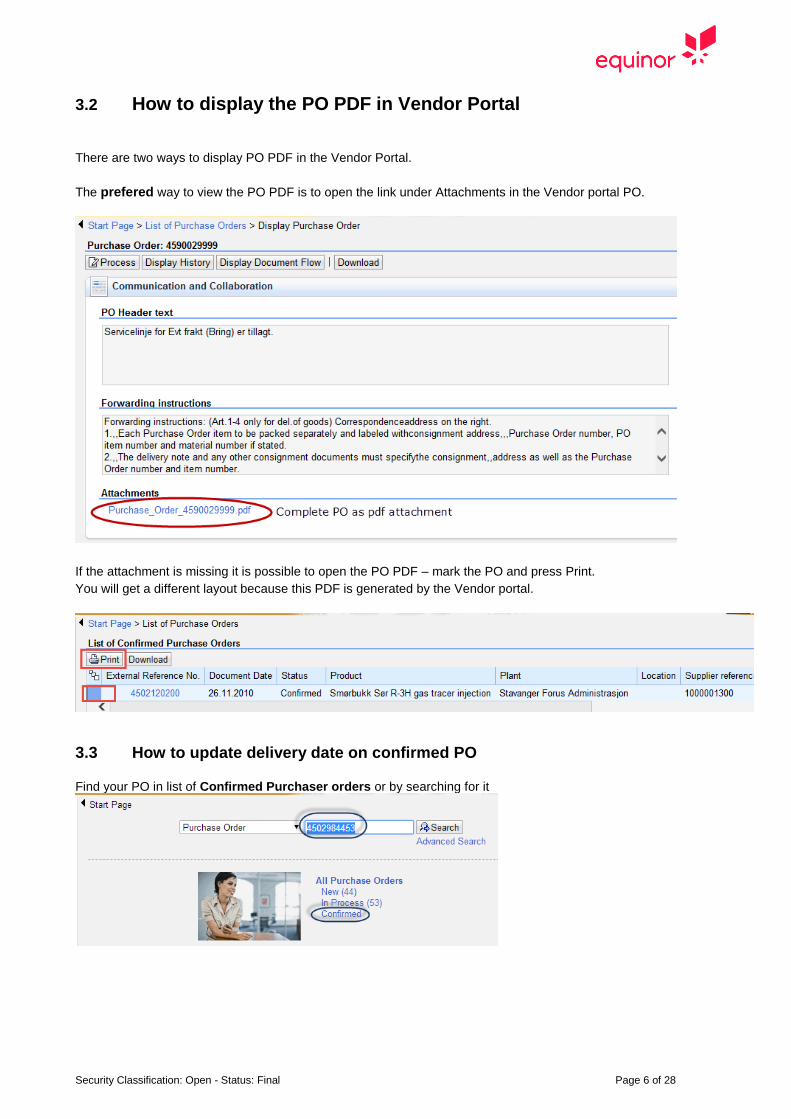
3.2 How to display the PO PDF in Vendor Portal
There are two ways to display PO PDF in the Vendor Portal.
The prefered way to view the PO PDF is to open the link under Attachments in the Vendor portal PO.
If the attachment is missing it is possible to open the PO PDF – mark the PO and press Print.
You will get a different layout because this PDF is generated by the Vendor portal.
3.3 How to update delivery date on confirmed PO
Find your PO in list of Confirmed Purchaser orders or by searching for it
Security Classification: Open - Status: Final Page 7 of 28
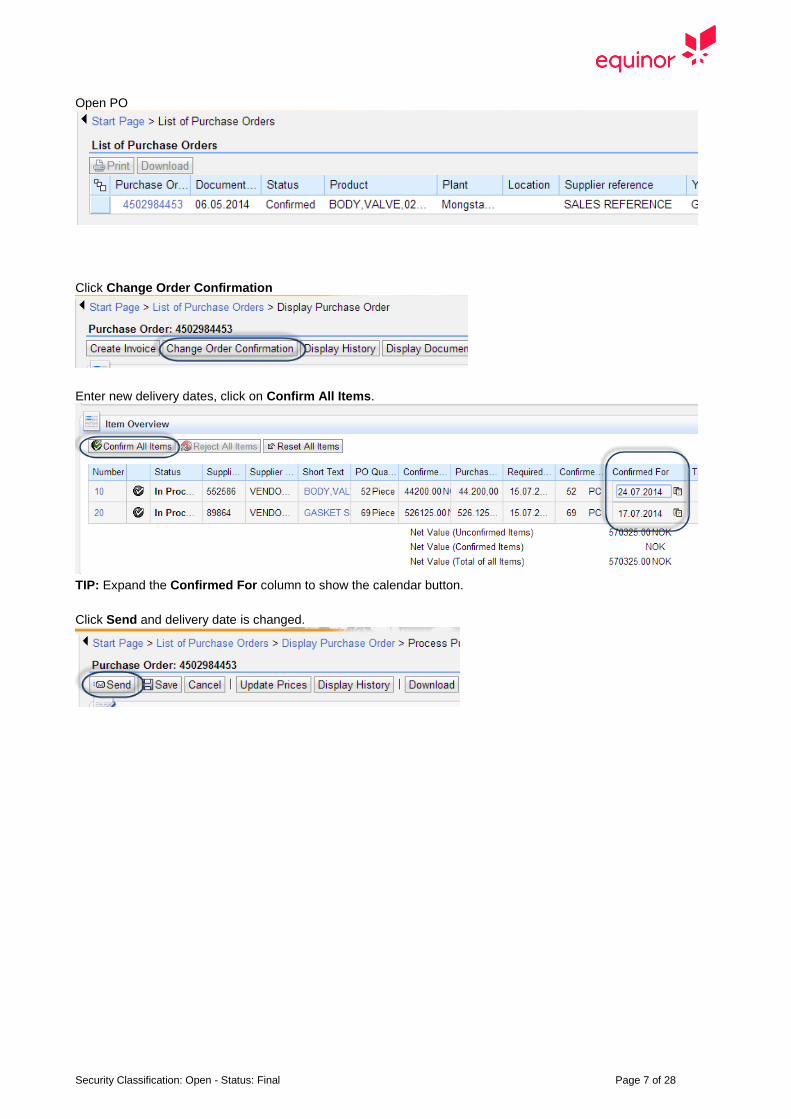
Open PO
Click Change Order Confirmation
Enter new delivery dates, click on Confirm All Items.
TIP: Expand the Confirmed For column to show the calendar button.
Click Send and delivery date is changed.
Security Classification: Open - Status: Final Page 8 of 28
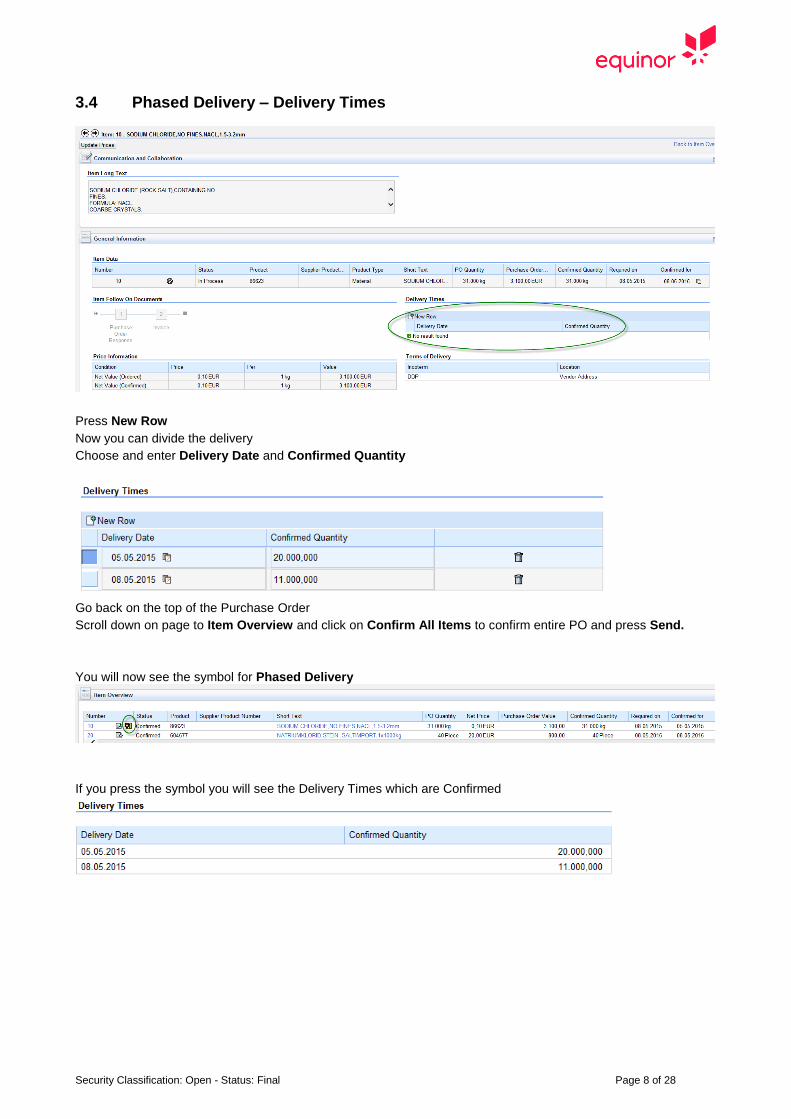
3.4 Phased Delivery – Delivery Times
Press New Row
Now you can divide the delivery
Choose and enter Delivery Date and Confirmed Quantity
Go back on the top of the Purchase Order
Scroll down on page to Item Overview and click on Confirm All Items to confirm entire PO and press Send.
You will now see the symbol for Phased Delivery
If you press the symbol you will see the Delivery Times which are Confirmed
Security Classification: Open - Status: Final Page 9 of 28
3.5 How to create Invoice
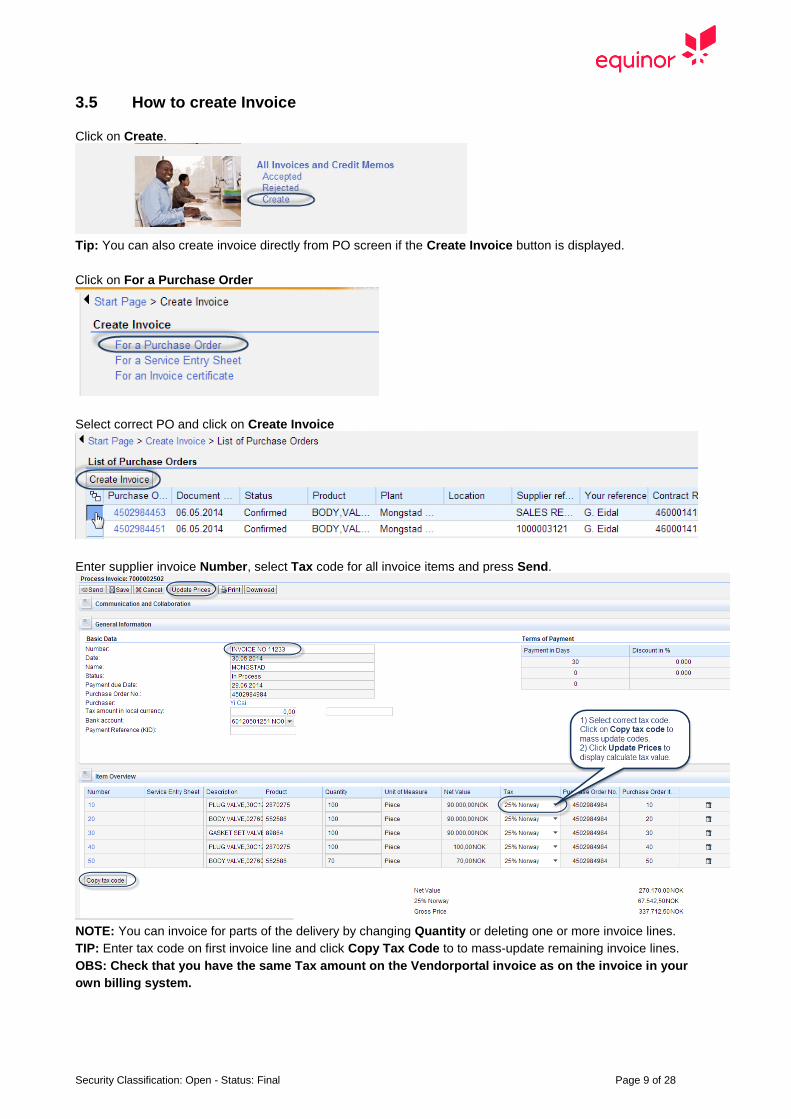
Click on Create.
Tip: You can also create invoice directly from PO screen if the Create Invoice button is displayed.
Click on For a Purchase Order
Select correct PO and click on Create Invoice
Enter supplier invoice Number, select Tax code for all invoice items and press Send.
NOTE: You can invoice for parts of the delivery by changing Quantity or deleting one or more invoice lines.
TIP: Enter tax code on first invoice line and click Copy Tax Code to to mass-update remaining invoice lines.
OBS: Check that you have the same Tax amount on the Vendorportal invoice as on the invoice in your
own billing system.
Security Classification: Open - Status: Final Page 10 of 28
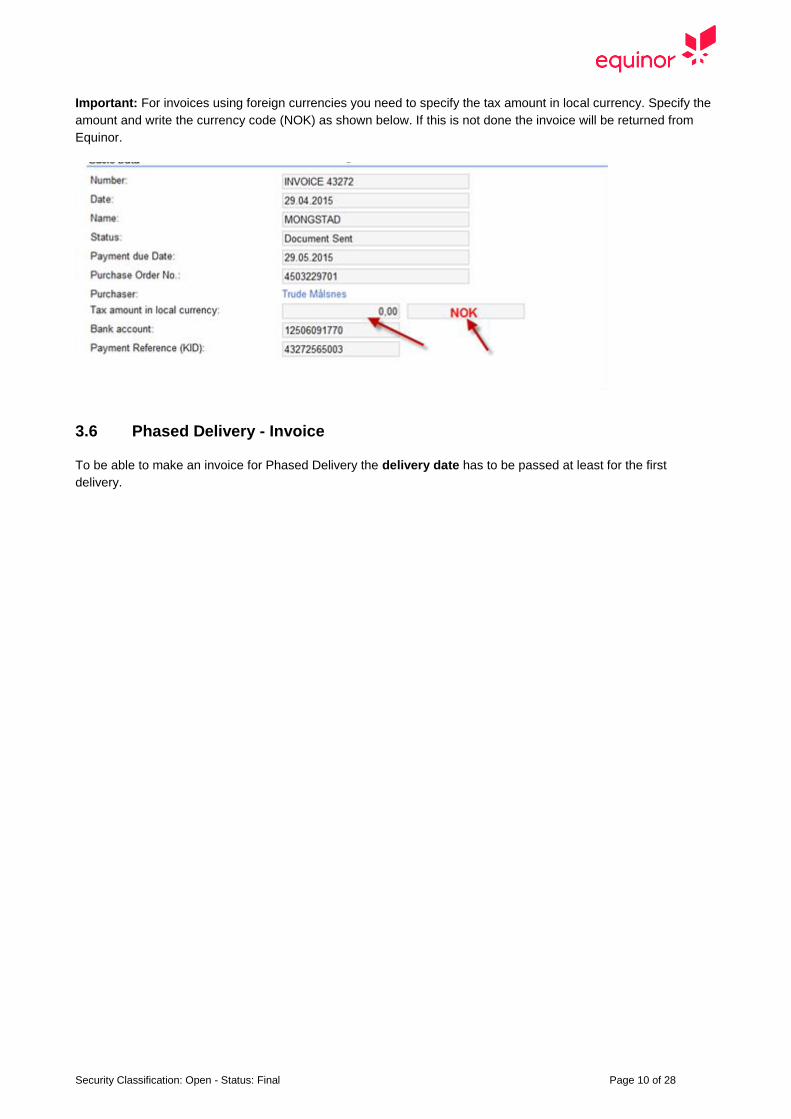
Important: For invoices using foreign currencies you need to specify the tax amount in local currency. Specify the
amount and write the currency code (NOK) as shown below. If this is not done the invoice will be returned from
Equinor.
3.6 Phased Delivery - Invoice
To be able to make an invoice for Phased Delivery the delivery date has to be passed at least for the first
delivery.
Security Classification: Open - Status: Final Page 11 of 28
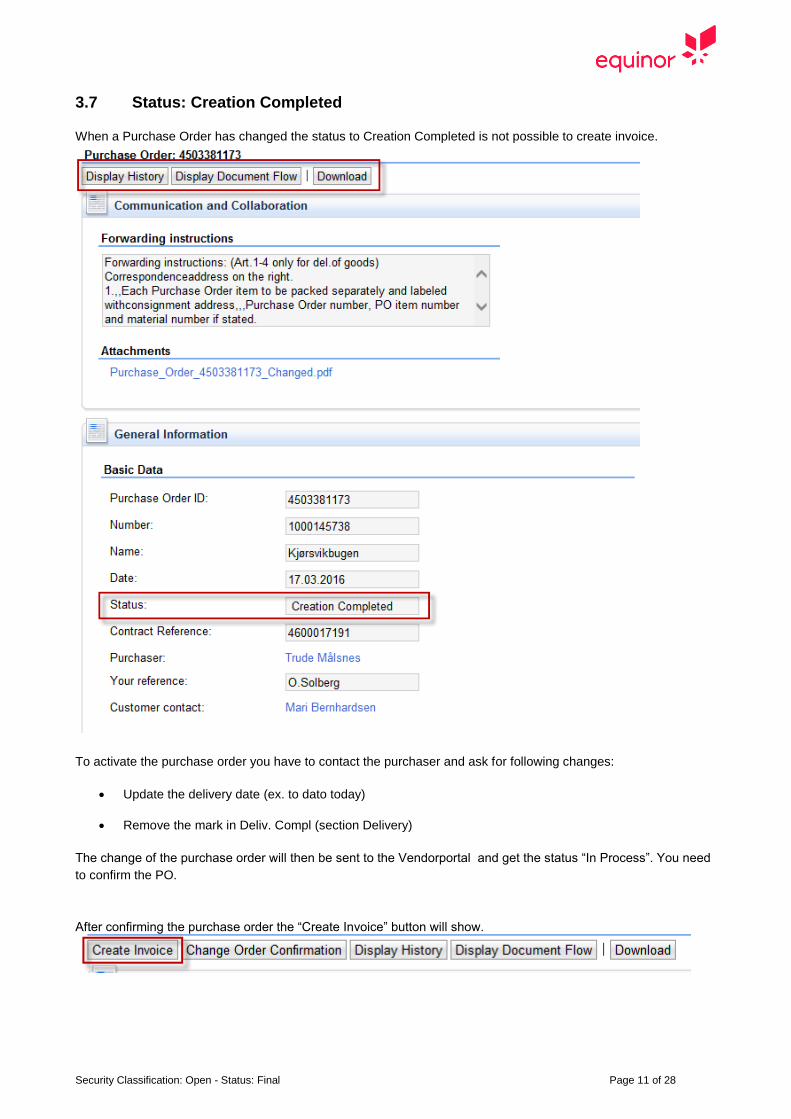
3.7 Status: Creation Completed
When a Purchase Order has changed the status to Creation Completed is not possible to create invoice.
To activate the purchase order you have to contact the purchaser and ask for following changes:
• Update the delivery date (ex. to dato today)
• Remove the mark in Deliv. Compl (section Delivery)
The change of the purchase order will then be sent to the Vendorportal and get the status “In Process”. You need
to confirm the PO.
After confirming the purchase order the “Create Invoice” button will show.
Security Classification: Open - Status: Final Page 12 of 28
4 How to handle Service Purchase orders
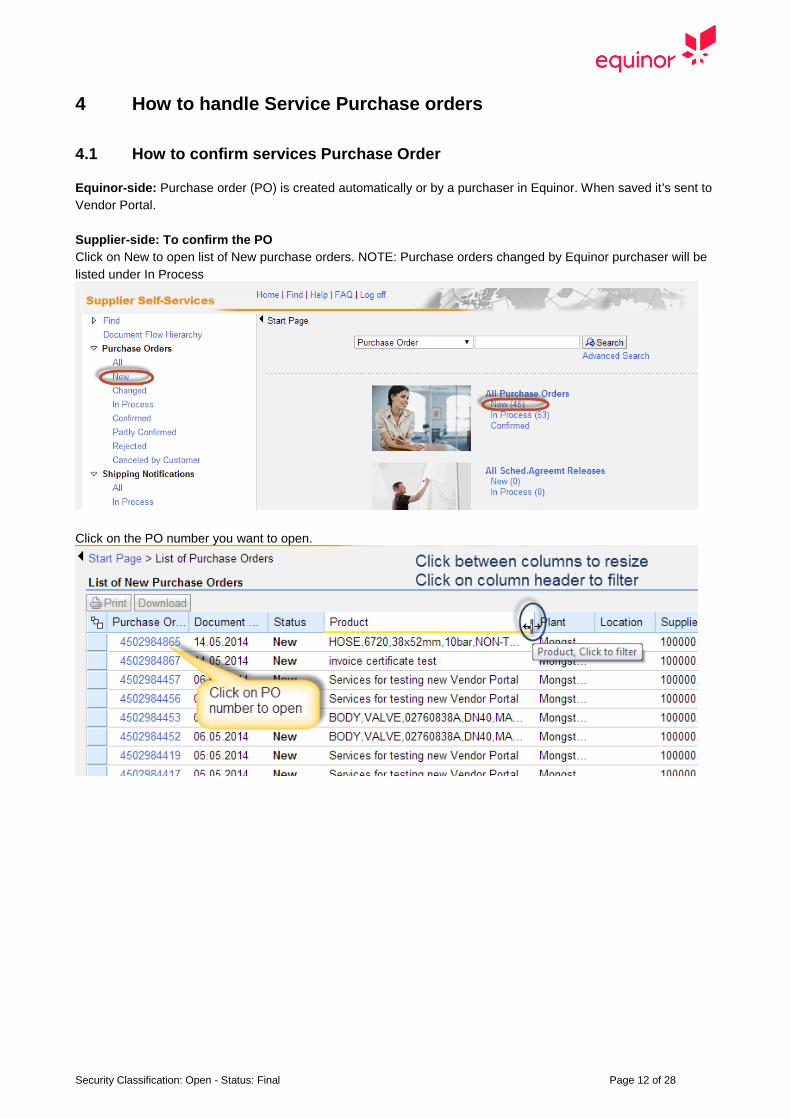
4.1 How to confirm services Purchase Order
Equinor-side: Purchase order (PO) is created automatically or by a purchaser in Equinor. When saved it's sent to
Vendor Portal.
Supplier-side: To confirm the PO
Click on New to open list of New purchase orders. NOTE: Purchase orders changed by Equinor purchaser will be
listed under In Process
Click on the PO number you want to open.
Security Classification: Open - Status: Final Page 13 of 28
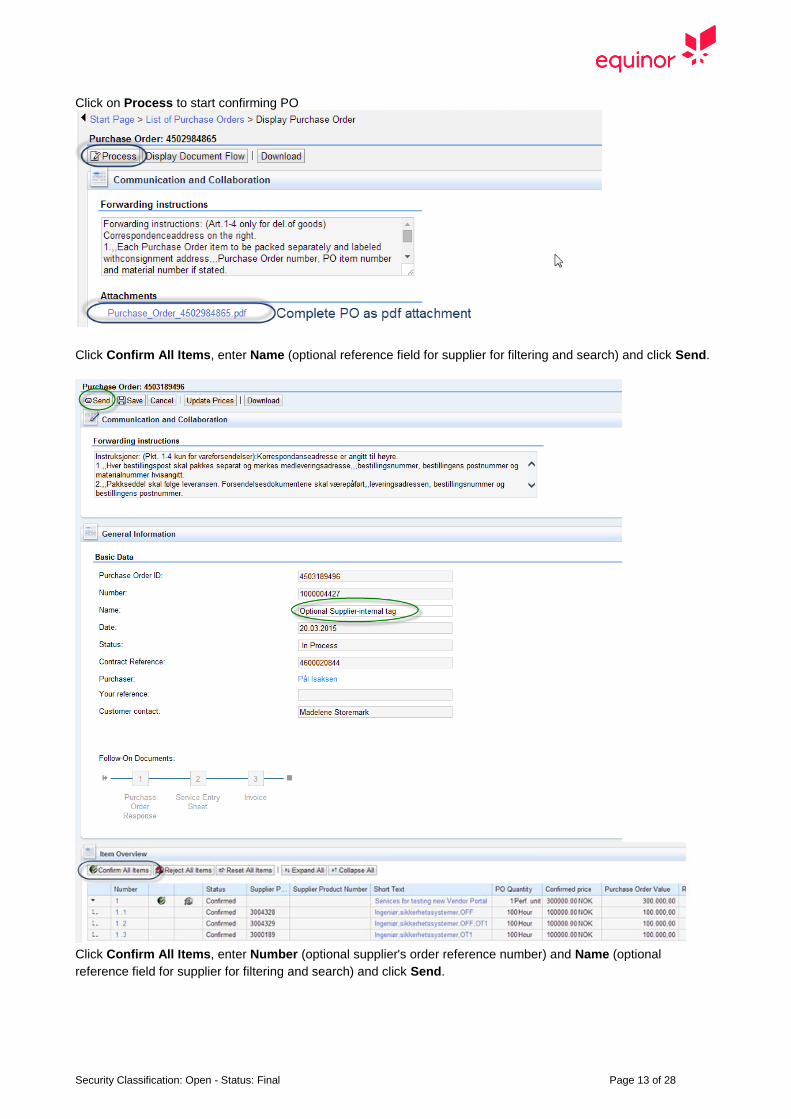
Click on Process to start confirming PO
Click Confirm All Items, enter Name (optional reference field for supplier for filtering and search) and click Send.
Click Confirm All Items, enter Number (optional supplier's order reference number) and Name (optional
reference field for supplier for filtering and search) and click Send.
Security Classification: Open - Status: Final Page 14 of 28
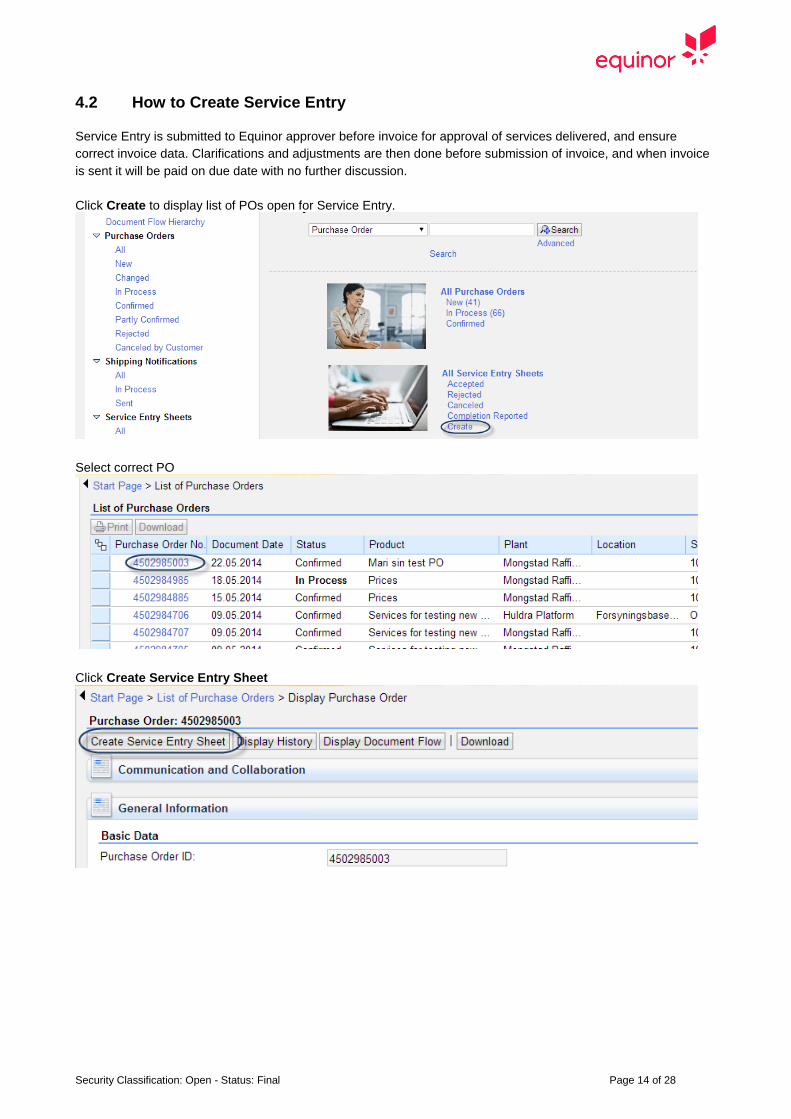
4.2 How to Create Service Entry
Service Entry is submitted to Equinor approver before invoice for approval of services delivered, and ensure
correct invoice data. Clarifications and adjustments are then done before submission of invoice, and when invoice
is sent it will be paid on due date with no further discussion.
Click Create to display list of POs open for Service Entry.
Select correct PO
Click Create Service Entry Sheet
Security Classification: Open - Status: Final Page 15 of 28
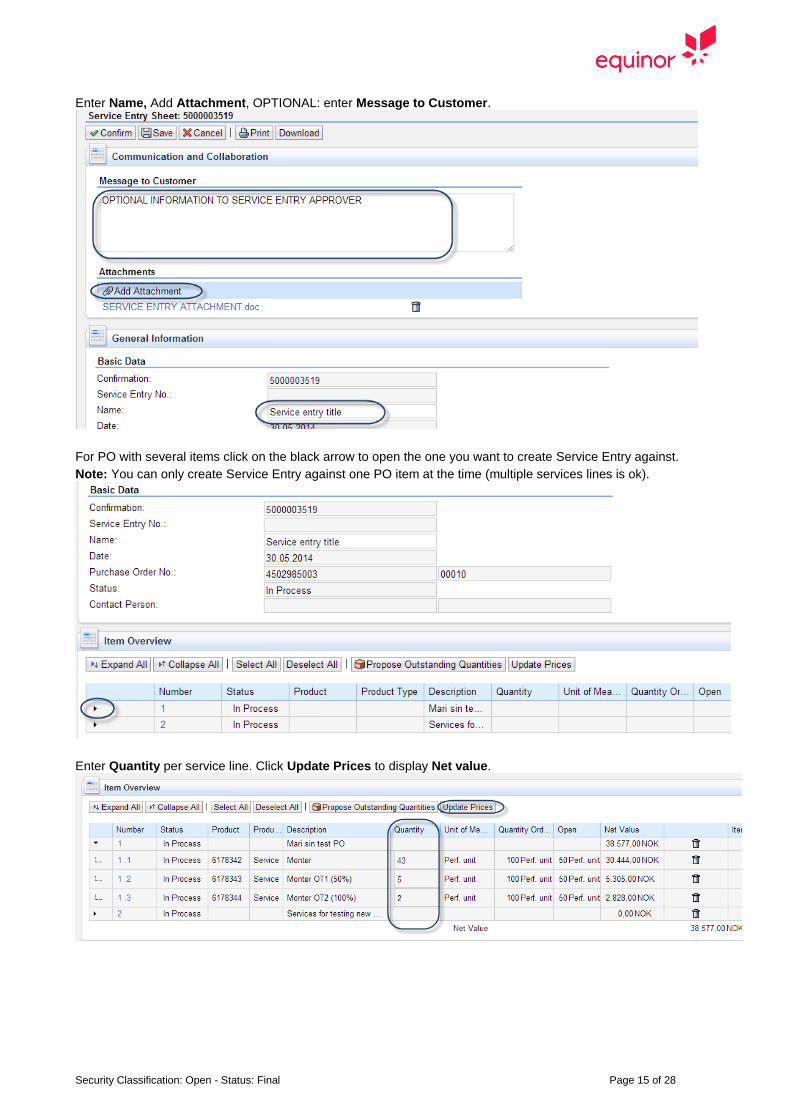
Enter Name, Add Attachment, OPTIONAL: enter Message to Customer.
For PO with several items click on the black arrow to open the one you want to create Service Entry against.
Note: You can only create Service Entry against one PO item at the time (multiple services lines is ok).
Enter Quantity per service line. Click Update Prices to display Net value.
Security Classification: Open - Status: Final Page 16 of 28
Some POs may have the section Account Assignment. If this is the case you need Equinor accounts to specify
where costs should be allocated. Contact Customer contact on PO if you don't have this information.
NOTE: Click Add Line to split cost between several accounts. Click Check Accounting to verify that the account
entered is valid.
Go back to top of screen and click Confirm to submit Service Entry for approval
NOTE: If approval of service entry is not received within reasonable time contact
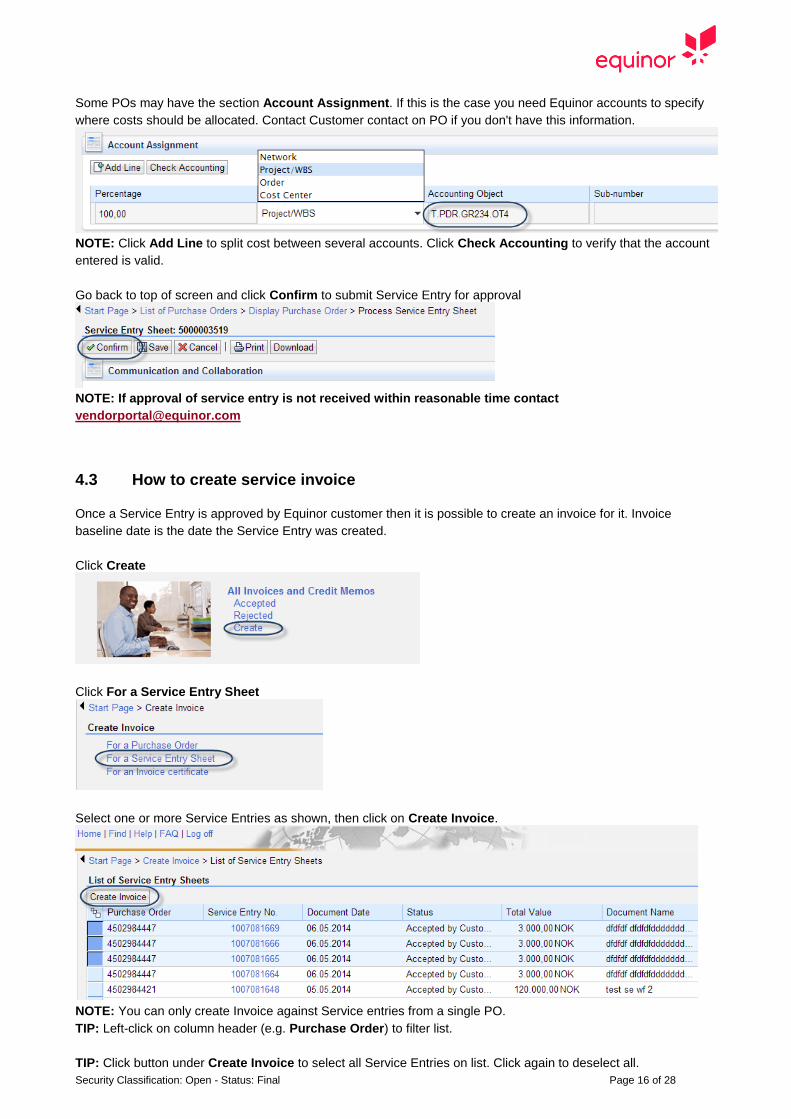
4.3 How to create service invoice
Once a Service Entry is approved by Equinor customer then it is possible to create an invoice for it. Invoice
baseline date is the date the Service Entry was created.
Click Create
Click For a Service Entry Sheet
Select one or more Service Entries as shown, then click on Create Invoice.
NOTE: You can only create Invoice against Service entries from a single PO.
TIP: Left-click on column header (e.g. Purchase Order) to filter list.
TIP: Click button under Create Invoice to select all Service Entries on list. Click again to deselect all.
Security Classification: Open - Status: Final Page 17 of 28
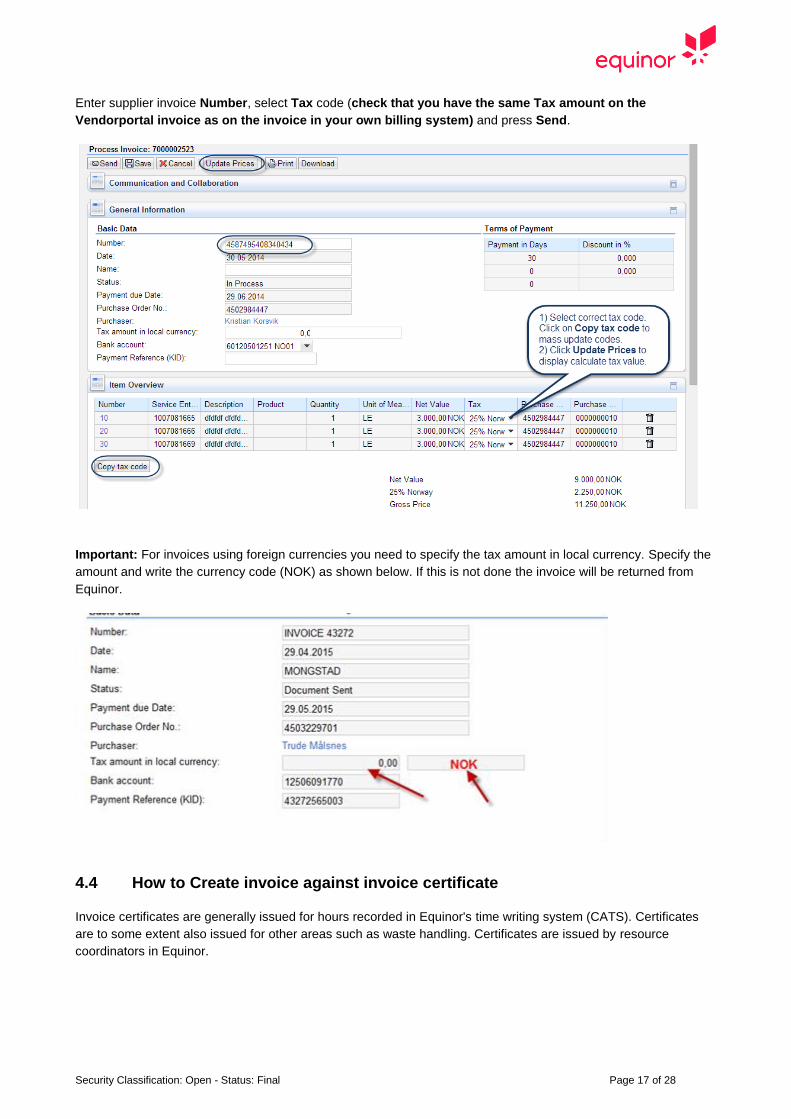
Enter supplier invoice Number, select Tax code (check that you have the same Tax amount on the
Vendorportal invoice as on the invoice in your own billing system) and press Send.
Important: For invoices using foreign currencies you need to specify the tax amount in local currency. Specify the
amount and write the currency code (NOK) as shown below. If this is not done the invoice will be returned from
Equinor.
4.4 How to Create invoice against invoice certificate
Invoice certificates are generally issued for hours recorded in Equinor's time writing system (CATS). Certificates
are to some extent also issued for other areas such as waste handling. Certificates are issued by resource
coordinators in Equinor.
Security Classification: Open - Status: Final Page 18 of 28
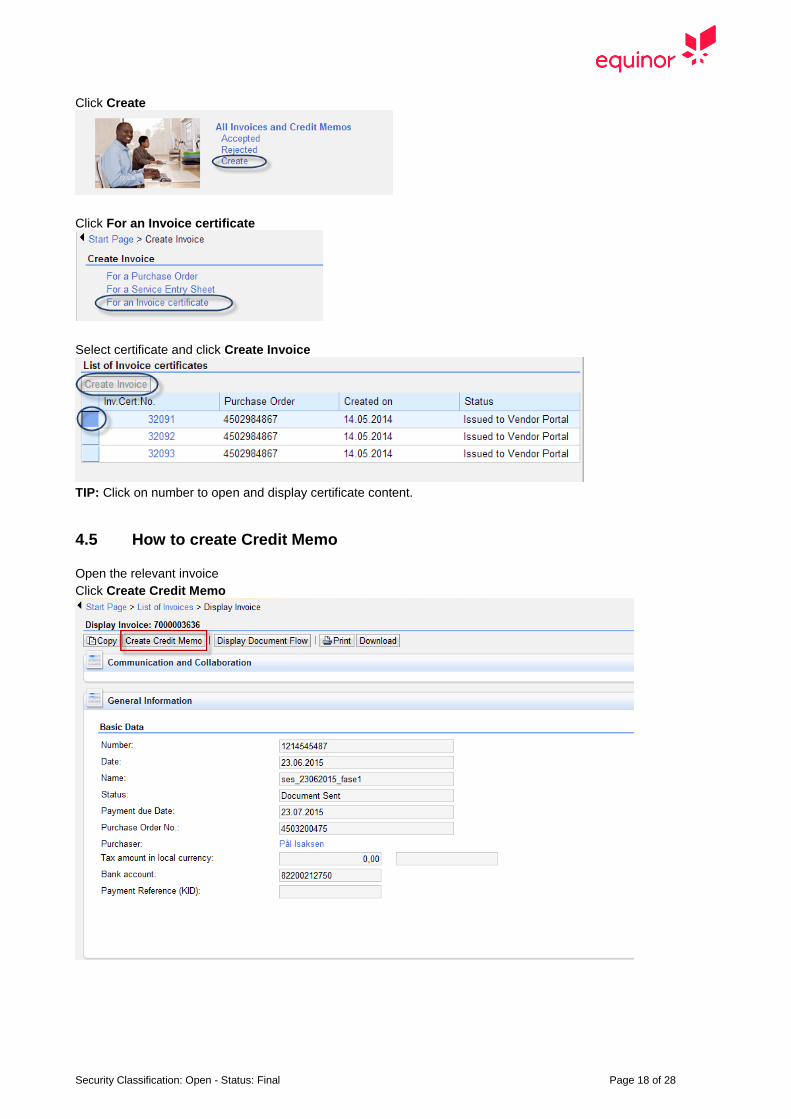
Click Create
Click For an Invoice certificate
Select certificate and click Create Invoice
TIP: Click on number to open and display certificate content.
4.5 How to create Credit Memo
Open the relevant invoice
Click Create Credit Memo
Security Classification: Open - Status: Final Page 19 of 28
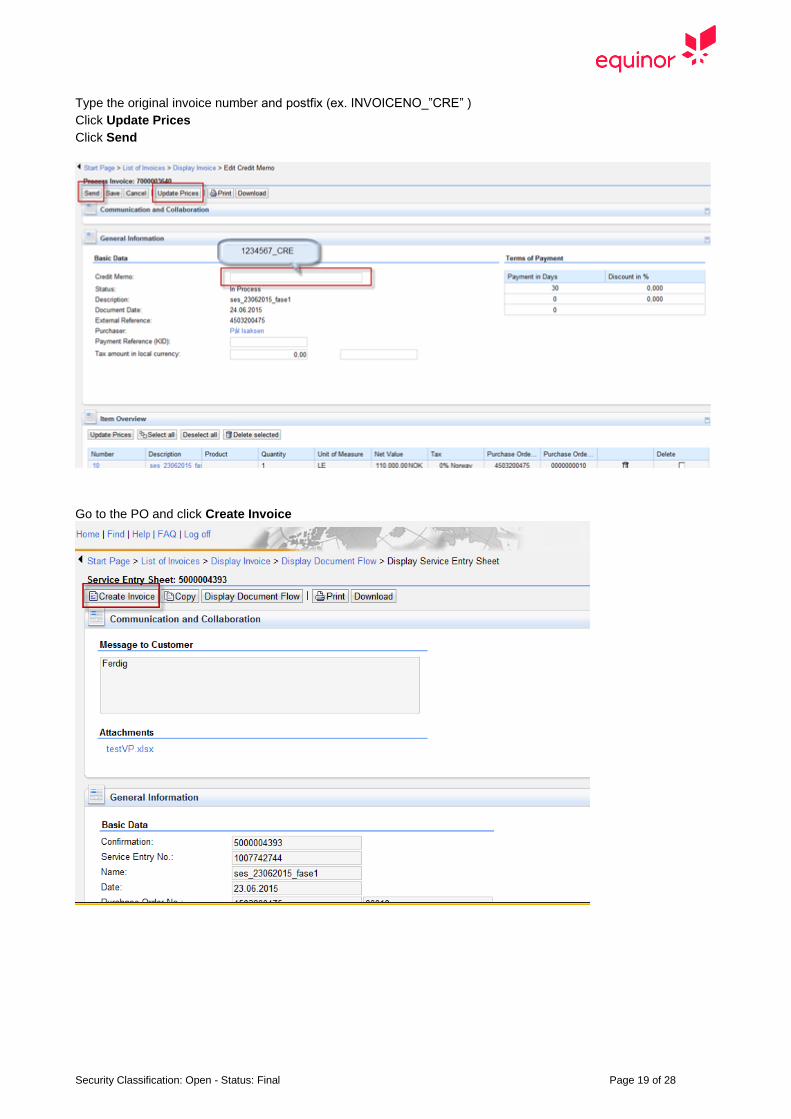
Type the original invoice number and postfix (ex. INVOICENO_”CRE” )
Click Update Prices
Click Send
Go to the PO and click Create Invoice

Security Classification: Open - Status: Final Page 20 of 28
4.6 Status: Creation Completed
When a Purchase Order has changed the status to Creation Completed it is not possible to create Service Entry.
To activate the purchase order you have to contact the purchaser and ask for following changes:
• Update the delivery date (ex. to dato today)
• Remove the mark in Deliv. Compl (section Delivery)
The change of the purchase order will then be sent to the Vendorportal and get the status “In Process”. You need
to confirm the PO.
Security Classification: Open - Status: Final Page 21 of 28
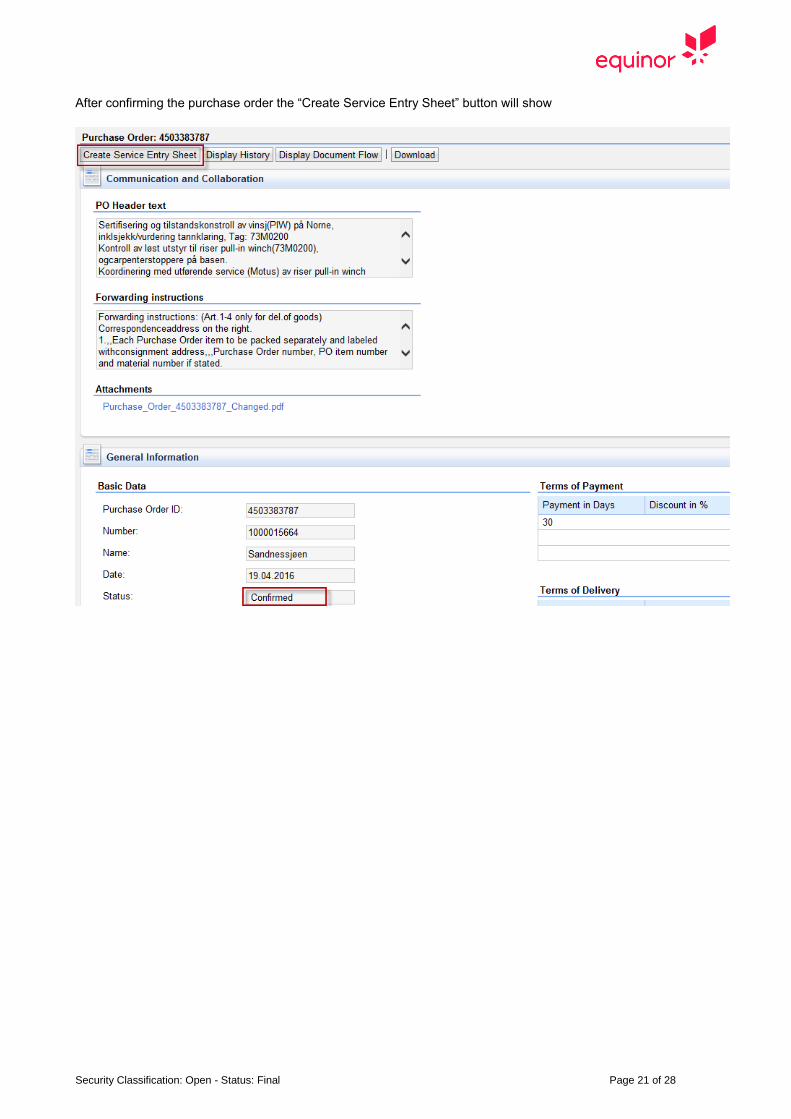
After confirming the purchase order the “Create Service Entry Sheet” button will show
Security Classification: Open - Status: Final Page 22 of 28
5 User and company administration
5.1 Maintain your own user
In Vendor Portal you can change your own name and phone number. If you are missing access to confirm
Purchase orders, submit Service Entries or submit invoices then you are missing one or more roles. You can get
this from the person in your company with administrator access to the portal. If you need to change your email
address then your administrator must delete your user and create a new one with the new email address. This is
because email is your user ID.
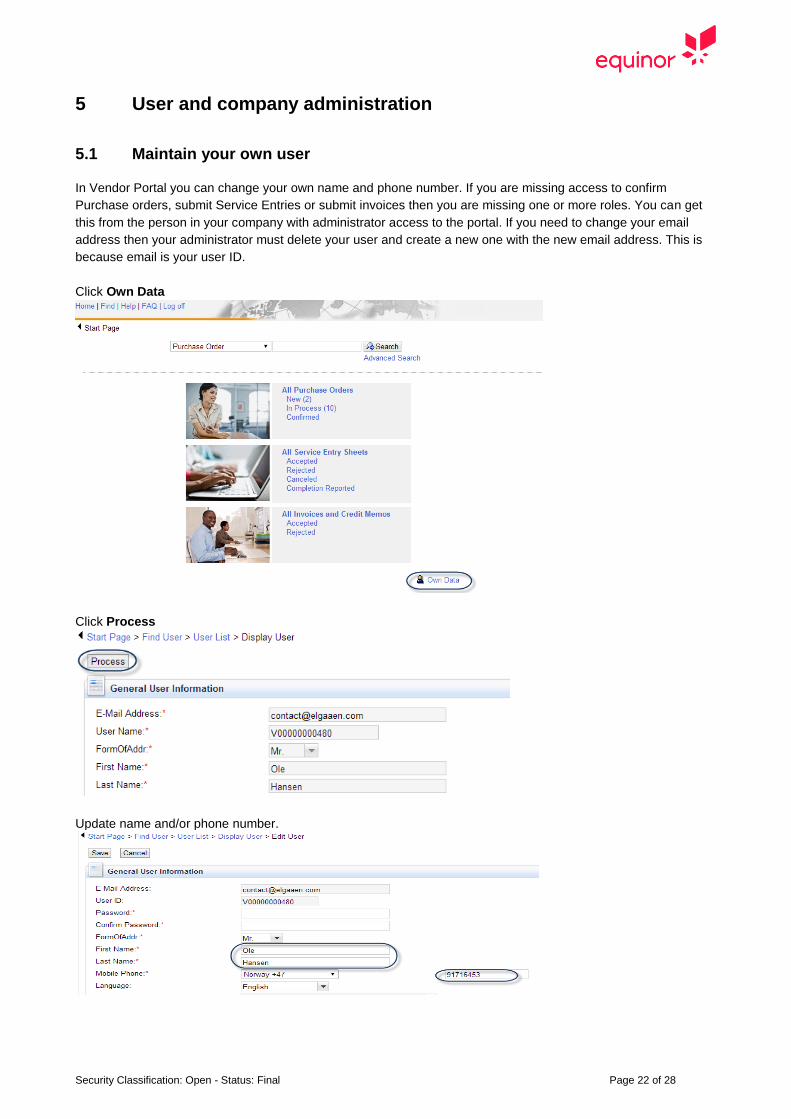
Click Own Data
Click Process
Update name and/or phone number.
Security Classification: Open - Status: Final Page 23 of 28
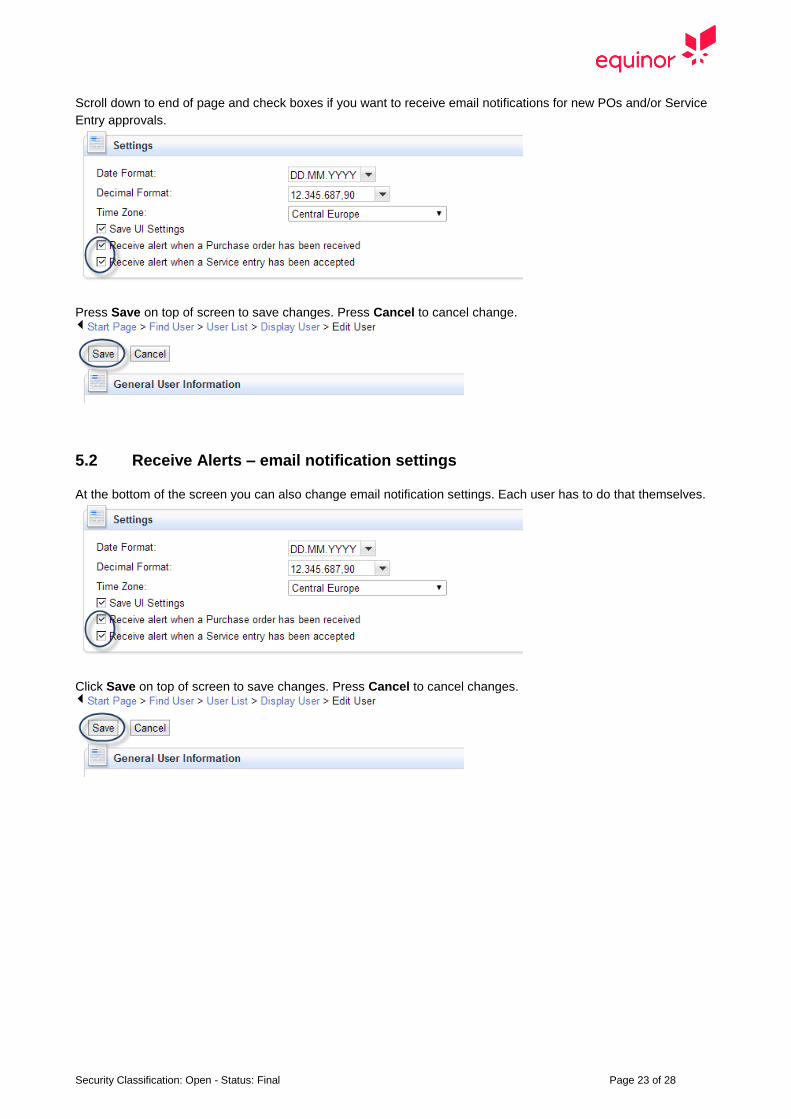
Scroll down to end of page and check boxes if you want to receive email notifications for new POs and/or Service
Entry approvals.
Press Save on top of screen to save changes. Press Cancel to cancel change.
5.2 Receive Alerts – email notification settings
At the bottom of the screen you can also change email notification settings. Each user has to do that themselves.
Click Save on top of screen to save changes. Press Cancel to cancel changes.
Security Classification: Open - Status: Final Page 24 of 28
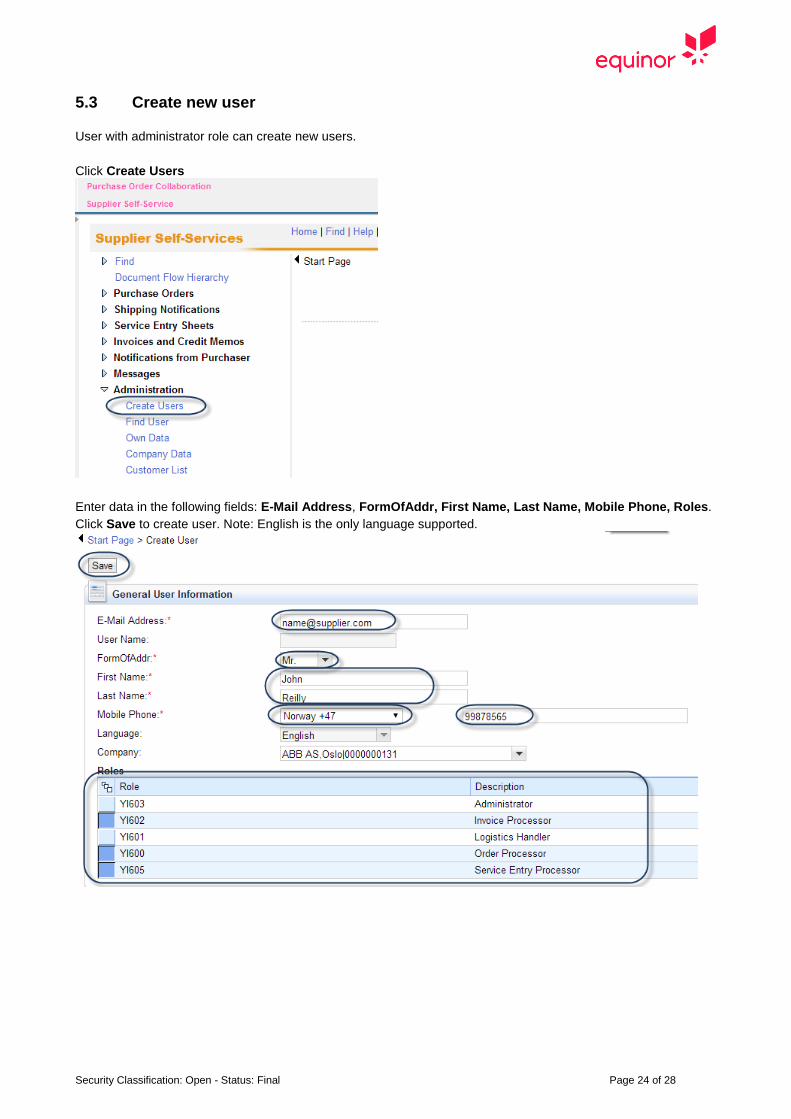
5.3 Create new user
User with administrator role can create new users.
Click Create Users
Enter data in the following fields: E-Mail Address, FormOfAddr, First Name, Last Name, Mobile Phone, Roles.
Click Save to create user. Note: English is the only language supported.
Security Classification: Open - Status: Final Page 25 of 28
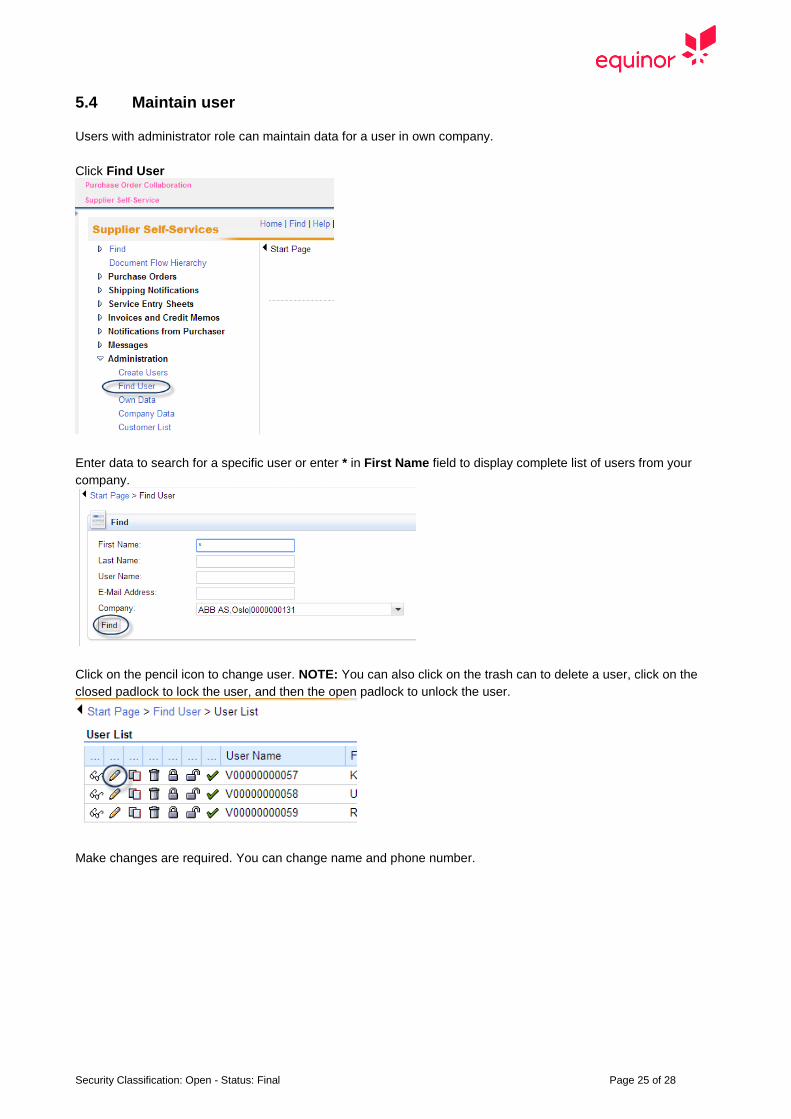
5.4 Maintain user
Users with administrator role can maintain data for a user in own company.
Click Find User
Enter data to search for a specific user or enter * in First Name field to display complete list of users from your
company.
Click on the pencil icon to change user. NOTE: You can also click on the trash can to delete a user, click on the
closed padlock to lock the user, and then the open padlock to unlock the user.
Make changes are required. You can change name and phone number.
Security Classification: Open - Status: Final Page 26 of 28
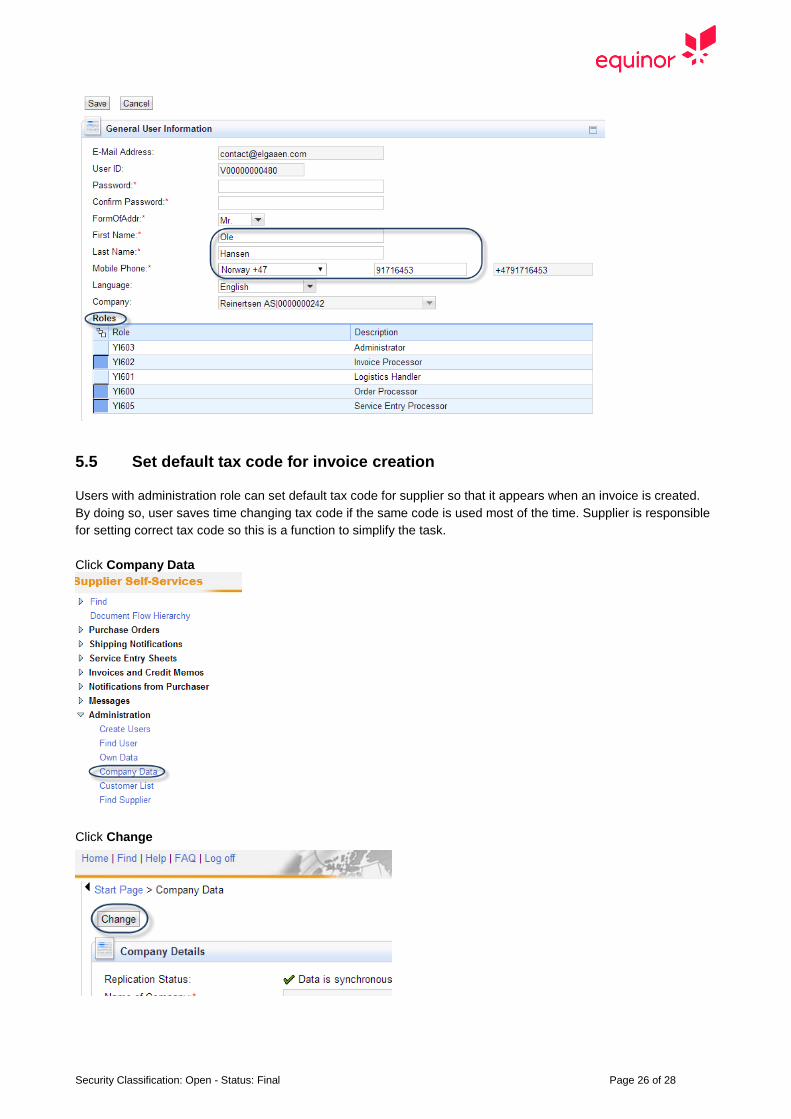
5.5 Set default tax code for invoice creation
Users with administration role can set default tax code for supplier so that it appears when an invoice is created.
By doing so, user saves time changing tax code if the same code is used most of the time. Supplier is responsible
for setting correct tax code so this is a function to simplify the task.
Click Company Data
Click Change
Security Classification: Open - Status: Final Page 27 of 28
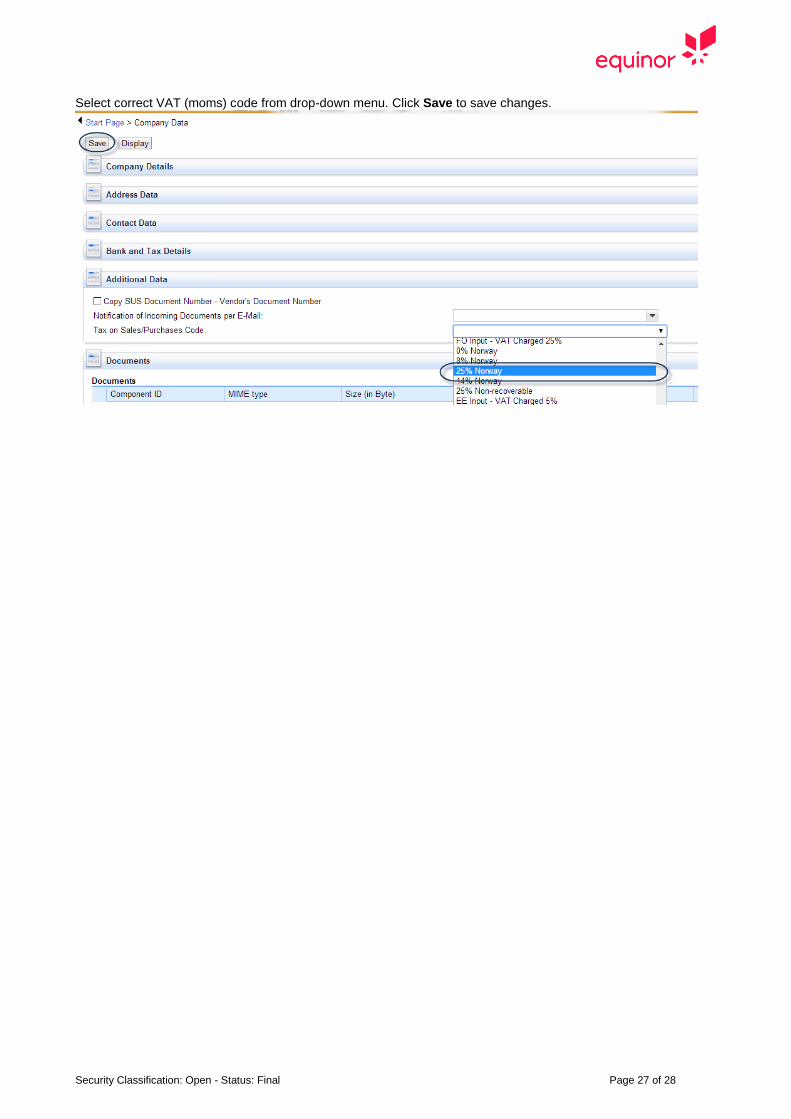
Select correct VAT (moms) code from drop-down menu. Click Save to save changes.
Security Classification: Open - Status: Final Page 28 of 28
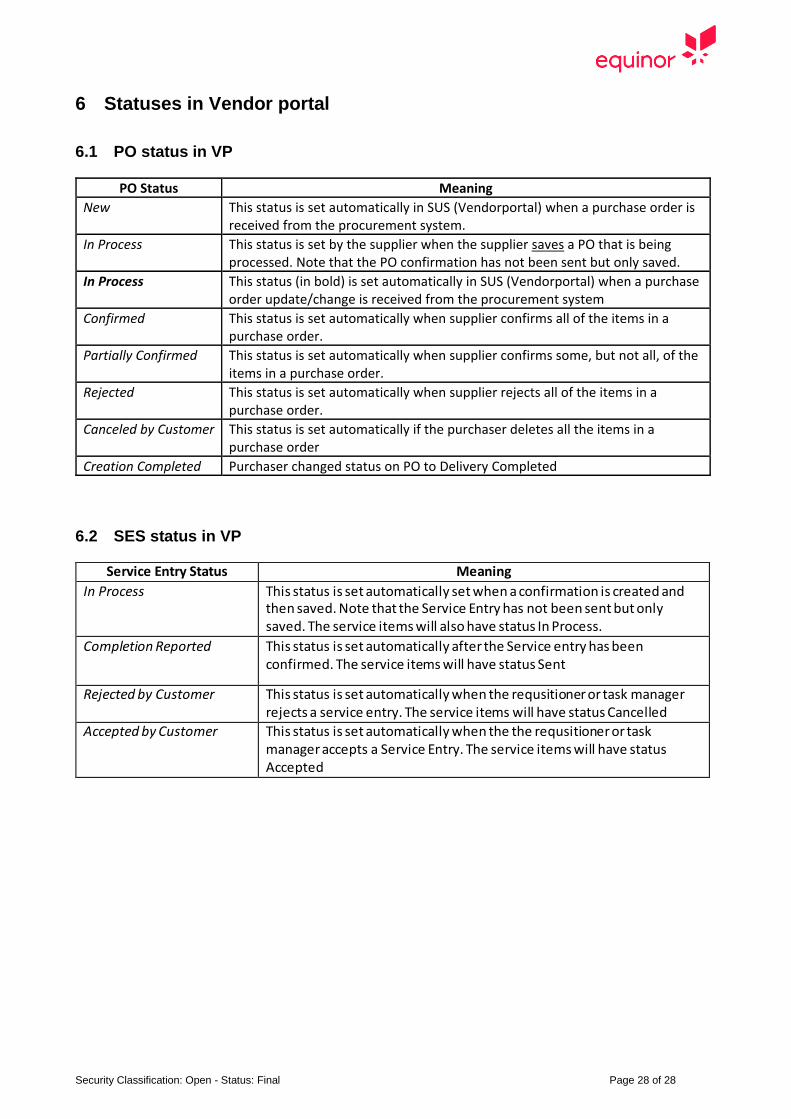
6 Statuses in Vendor portal
6.1 PO status in VP
PO Status Meaning
New This status is set automatically in SUS (Vendorportal) when a purchase order is received from the procurement system.
In Process This status is set by the supplier when the supplier saves a PO that is being processed. Note that the PO confirmation has not been sent but only saved.
In Process This status (in bold) is set automatically in SUS (Vendorportal) when a purchase order update/change is received from the procurement system
Confirmed This status is set automatically when supplier confirms all of the items in a purchase order.
Partially Confirmed This status is set automatically when supplier confirms some, but not all, of the items in a purchase order.
Rejected This status is set automatically when supplier rejects all of the items in a purchase order.
Canceled by Customer This status is set automatically if the purchaser deletes all the items in a purchase order
Creation Completed Purchaser changed status on PO to Delivery Completed
6.2 SES status in VP
Service Entry Status Meaning
In Process This status is set automatically set when a confirmation is created and then saved. Note that the Service Entry has not been sent but only saved. The service items will also have status In Process.
Completion Reported This status is set automatically after the Service entry has been confirmed. The service items will have status Sent
Rejected by Customer This status is set automatically when the requsitioner or task manager rejects a service entry. The service items will have status Cancelled
Accepted by Customer This status is set automatically when the the requsitioner or task manager accepts a Service Entry. The service items will have status Accepted
Recommended