ALP-001-007-LVBK.indd 2ALP-001-007-LVBK.indd 2 21/05/2014 16:1421/05/2014 16:14

MARK BAUER & ROSS HODDINOTT
ALP-001-007-LVBK.indd 3ALP-001-007-LVBK.indd 3 21/05/2014 16:1421/05/2014 16:14

First published 2014 byAmmonite PressAn imprint of AE Publications Ltd166 High Street, Lewes,East Sussex, BN7 1XU, UK
Text and photographs © Mark Bauer and Ross Hoddinott, 2014Copyright in the Work © AE Publications Ltd, 2014
All rights reserved
The rights of Mark Bauer and Ross Hoddinott to be identified as the authors of this work have been asserted in accordance with the Copyright, Designs and Patents Act 1988, sections 77 and 78.
No part of this publication may be reproduced, stored in a retrieval system or transmitted in any form or by any means without the prior permission of the publisher and copyright owner.
This book is sold subject to the condition that all designs are copyright and are not for commercial reproduction without the permission of the designer and copyright owner.
Whilst every effort has been made to obtain permission from the copyright holders for all material used in this book, the publishers will be pleased to hear from anyone who has not been appropriately acknowledged and to make the correction in future reprints.
The publishers and author can accept no legal responsibility for any consequences arising from the application of information, advice or instructions given in this publication.
A catalogue record for this book is available from the British Library.
Publisher Jonathan BaileyProduction Manager Jim BulleyManaging Editor Richard WilesSenior Project Editor Dominique PageEditor Chris GatcumManaging Art Editor Gilda PacittiDesigner Simon GogginCover Designer Robin Shields
Set in FrutigerColour origination by GMC Reprographics

ALP-001-007-LVBK.indd 5ALP-001-007-LVBK.indd 5 18/06/2014 11:3618/06/2014 11:36

Introduction 8
CHAPTER ONE > EQUIPMENT 10Camera formats 12Lenses 16Camera supports 21Filters 24Other essentials 30
CHAPTER TWO > SHOOTING TECHNIQUE 32Exposure 34Depth of fi eld 38Hyperfocal distance 42Diffraction 46Colour theory 48
CHAPTER THREE > BALANCE 52Visual balance 54Placing the main subject 56The rule of thirds 58The Golden Section 60Alternative methods for organizing the frame 64Symmetry 66The rule of odds 68Camera orientation 70
CHAPTER FOUR > DEPTH AND PERSPECTIVE 72Linear perspective 74The vanishing point 76Foreground interest 78Tilt and shift 82Light in defi ning depth 86Visual separation 88Other tips and tricks 90
CHAPTER FIVE > THE GEOMETRY OF COMPOSITION 92Lines 94Corners and ‘pointers’ 98Shapes 100Layers and planes 102Movement and fl ow 104Motion 106
CHAPTER SIX > LIGHT 108Direction of light 110Quality of light 112Seasons 114Shooting in poor light 116Low-light photography 118Thinking in black and white 122Silhouettes 124Spot lighting 126
CONTENTS
ALP-001-007-LVBK.indd 6ALP-001-007-LVBK.indd 6 18/06/2014 11:3618/06/2014 11:36

CHAPTER SEVEN > TYPES OF LANDSCAPE 128Coastal cliff tops 130Shoreline 132Hills and mountains 134Woodland interiors 136Rivers, streams and waterfalls 138Lakes and refl ections 140The miniature landscape 142
CHAPTER EIGHT > PROCESSING 144Software 146Cropping 148Creative sharpening 150Local enhancements 152Focus stacking 154Panoramic stitching 156Exposure blending 158Converting to black and white 160
CHAPTER NINE > DEVELOPING A PERSONAL STYLE 162Traditional composition 164Minimalism 166Impressionism 168Abstract 170Defi ning your style 172Analyzing the author’s personal style: Mark Bauer 176Analyzing the author’s personal style: Ross Hoddinott 178
Technical details 180Useful websites and downloads 185Glossary 186About the authors 188Index 189
ALP-001-007-LVBK.indd 7ALP-001-007-LVBK.indd 7 18/06/2014 11:3718/06/2014 11:37

THE ART OF LANDSCAPE PHOTOGRAPHY
8
Since its inception, there has been debate about whether or not
photography qualifi es as art. It is a debate that continues to this
day. Those who reject its status as art do so on the basis that it is
representational and relies on technology. However, if we accept
the above dictionary defi nition, it clearly meets many of the
criteria: it is a visual medium through which people express their
creativity; there is skill involved in the process of its creation; viewers
appreciate its beauty, and done well, it is capable of evoking
powerful emotional responses.
Skill is involved on two levels: in controlling the equipment
necessary to make photographs and in creating powerful
compositions. In our fi rst book on landscape photography,
The Landscape Photography Workshop, we took an overview of the
topic, covering everything from choosing equipment, the specifi c
techniques you need to master in order to create a technically sound
landscape photograph, and the basics of composition, through to
producing a digital print. In this book we assume a basic familiarity
with the technical elements and focus much more deeply on
aesthetics – on the art of landscape photography. This is not to say
that we are ignoring equipment and technique, but it is discussed
mostly with regard to how it impacts upon composition.
Of course, teaching and learning the technical aspects of
photography is relatively straightforward compared to teaching
and learning the creative side. Creativity is intensely personal,
and because it depends on what the individual wishes to express,
arguably it cannot be taught. That said, art has been practised and
analysed for centuries, so there are many widely accepted theories
on which elements work in a composition, which don’t, and what
innately appeals to the human sense of ‘beauty.’ In this book we will
examine the theory and practice of these principles, using our own
images to illustrate the points.
However, simply following established compositional guidelines
isn’t enough to guarantee good results. Done without consideration
it can produce images that are predictable, sterile and (ironically)
lacking in creativity. Once you have understood the theories of
composition you should be able to use them as a framework
for your own creative expression, so that composition ultimately
becomes an unconscious, instinctive, but considered process.
To be truly creative, an artist needs to establish a recognisable
personal style. This can be a long and challenging process, and while
no one else can do it for you, we have tried to give some pointers to
help you on your way. Establishing a personal style is not the end of
the journey, however, as your photography and style should evolve
and change over time.
We hope that this book will provide the inspiration for you to
begin your creative journey.
Mark Bauer and Ross Hoddinott
INTRODUCTIONART/a:t/ (Noun)The expression or application of human creative skill and imagination, typically in a visual
form such as painting or sculpture, producing works to be appreciated primarily for their
beauty or emotional power.
ALP-008-009-LVBK.indd 8ALP-008-009-LVBK.indd 8 21/05/2014 16:1821/05/2014 16:18

MISTY RIVERAn understanding of balance, harmony and what appeals to people’s aesthetic sense will help you to create images that evoke an emotional response in the viewer.
ALP-008-009-LVBK.indd 9ALP-008-009-LVBK.indd 9 21/05/2014 16:1821/05/2014 16:18

While the art of composition might be a creative one, a
photographer still requires the appropriate ‘hardware’ to
capture an image that truly encapsulates their skill and
vision. Your choice of camera, the type of lens you use
and the focal length will greatly influence the look and
feel of the final photograph. A good tripod is essential
for supporting your set-up and you also need to invest in
the right type of tripod head – one that will allow you to
make precise adjustments to fine-tune your composition.
Even in the digital age, a handful of in-camera filters
remain essential for both corrective and creative purposes
and there are other useful camera accessories that will aid
you while out in the field.
Therefore, before we progress to the more creative, artistic
and theoretical side of photography we shall first address
the practical considerations: the camera equipment you
need to become a landscape photographer.
CHAPTER ONE > EQUIPMENT
TECHNICAL ACCURACYAlthough photography is a creative art, don’t neglect the technical and practical side of taking photos. When I took this particular image, the light and conditions were truly magical. However, had I not selected the right focal length, fi ltration and support, I could have easily wasted the opportunity.
ALP-010-031-LVBK.indd 10ALP-010-031-LVBK.indd 10 21/05/2014 16:1921/05/2014 16:19

ALP-010-031-LVBK.indd 11ALP-010-031-LVBK.indd 11 21/05/2014 16:2021/05/2014 16:20

THE ART OF LANDSCAPE PHOTOGRAPHY
12
CAMERA FORMATSThere are several camera formats available to photographers. Simply
speaking, the camera format is based on the size of the sensor
– the light sensitive chip that is at the hub of a camera. Not only
will the size of the sensor affect the quality of the images you take,
but its dimensions will also determine the aspect ratio (see opposite)
of the photographs you take, which can have a signifi cant impact
on how you frame your pictures.
FULL-FRAME DIGITAL SLRSThe most popular type of camera among landscape photographers
is the single lens refl ex (SLR) camera. With this type of camera, the
photographer looks through the lens when they peer through
the viewfi nder. SLRs employ a mechanical mirror system and
pentaprism to direct light from the lens to an optical viewfi nder
at the rear of the camera.
Most professional and enthusiast landscape photographers
favour using a full-frame digital SLR, which is a camera that uses
a digital sensor that is approximately the same size as a traditional
35mm fi lm frame (36 x 24mm). This means a lens attached to it will
give the same fi eld of view that it would on a 35mm fi lm camera,
retaining the original characteristics of that lens type.
Full-frame digital SLRs are small enough to be easily portable,
yet the format is large enough to offer high image quality. Their
high ISO and low light performance is excellent; their handling and
ergonomics are superb; they offer a big, bright viewfi nder image
and Live View to aid precise focusing and composing, and they also
boast a wide dynamic range, which can be incredibly important for
landscape photography.
FULL-FRAME SLRS Larger sensors have larger light-gathering photosites, which enables them to capture images with less noise. As a result, images should be smoother, more detailed and sharper. For this reason, full frame digital SLRs such as Nikon’s D800E are a popular choice among landscape enthusiasts.
FORMATSA camera’s format is linked directly to the size of its sensor
(or fi lm). A full-frame camera is the traditional 35mm format
(36 x 24mm); an APS-C sensor is typically 25.1 x 16.7mm; the
Four Thirds and Micro Four Thirds standards are approximately
18 x 13.5mm. Anything bigger than full frame / 35mm is
medium format, until the frame size reaches 5 x 4in (127 x
102mm). This and larger sizes are known as large format.
Micro four thirds (18 x 13.5mm)
APS-C (25.1 x 16.7mm)
Full frame 36 x 24mm Not shown actual size
ALP-010-031-LVBK.indd 12ALP-010-031-LVBK.indd 12 24/06/2014 16:5524/06/2014 16:55

EQUIPMENT
13
CROPPED SENSOR DIGITAL SLRSMost consumer digital SLRs use a sensor that is smaller than full
frame. The most common format is known as APS-C, which is
approximately the same size as the Advanced Photo System fi lm
format of the same name. The size of an APS-C format sensor
can vary from 20.7 x 13.8mm to 28.7 x 19.1mm, depending on
the manufacturer.
Being smaller than the 35mm standard, this format is often
regarded as being a ‘cropped type’, as it effectively multiplies the
focal length of the lens attached. This is known as the camera’s
multiplication factor – or focal length multiplier – which ranges
from 1.3x to 1.6x depending on the specifi c size of the sensor.
As an example, a 24–70mm lens attached to a camera with a
multiplication factor of 1.5x would behave like a 36–105mm lens
on a full frame sensor. Depending on the subject of your image,
a camera’s multiplication factor can prove either advantageous
or disadvantageous.
FOUR THIRDS AND MICRO FOUR THIRDSCameras conforming to the Four Thirds standard employ a sensor
with a diagonal measurement of 21.63mm. The sensor is not
restricted to a specifi c shape or ratio, although most Four Thirds
cameras use a 17.3 x 13mm, 4:3 ratio sensor. This is squarer than
full frame and APS-C sensors (which typically have a 3:2 ratio), and
can infl uence how you compose your images. The small sensor also
effectively multiplies the focal length of an attached lens by a factor
of 2x, enabling manufacturers to produce compact, lighter lenses.
A more recent development is the Micro Four Thirds (MFT)
standard. This shares the Four Thirds sensor size, but as MFT
cameras are designed without a mirror and prism mechanism it
allows smaller, lighter and more portable cameras to be designed.
However, due to the lack of an optical viewfi nder, it is only possible
to compose images via an electronic viewfi nder (EVF), Live View
on the rear LCD screen or with a supplementary optical viewfi nder
(similar to a rangefi nder).
ASPECT RATIOThe 35mm fi lm format, full-frame SLRs and most cameras with an APS-C sized sensor have a native aspect ratio of 3:2, while Four Thirds is 4:3. This comparison helps illustrate the subtle, yet signifi cant difference between the two. The aspect ratio of your camera can greatly infl uence composition and impact – either negatively or positively – on how you frame a photograph.
However, you don’t need to adhere to your camera’s native aspect ratio. Most cameras allow you to change the format in-camera, and a choice of 3:2, 4:3, 16:9 and 1:1 aspect ratios is not uncommon. Alternatively, you can easily alter an image’s aspect ratio during processing by cropping the image, which can greatly enhance a photograph’s balance and impact. Be warned, though: changing the aspect ratio from the camera’s native format (either in-camera or during processing) will reduce the overall size of your image.
Aspect ratio 3:2 Aspect ratio 4:3
ALP-010-031-LVBK.indd 13ALP-010-031-LVBK.indd 13 21/05/2014 16:2021/05/2014 16:20

THE ART OF LANDSCAPE PHOTOGRAPHY
14
`
MEDIUM FORMATA camera with a sensor exceeding 36 x 24mm (full-frame)
is considered ‘medium format’. The key advantage of this
camera format is that, due to the larger physical size of the
sensor, it is able to produce high-resolution images with
smoother tonal transitions and extraordinary detail. Digital
medium format cameras typically have a resolution exceeding
40-megapixels. However, as sensor size increases, depth
of fi eld becomes shallow, as you have to use longer focal
lengths to maintain the same fi eld of view. While this can
naturally present opportunities for enhanced creativity, it
also means your technique and focusing must be fl awless.
Despite their undoubted quality, the cost and size of
medium format systems restricts their appeal to a relatively
small, select market.
ALP-010-031-LVBK.indd 14ALP-010-031-LVBK.indd 14 21/05/2014 16:2121/05/2014 16:21

`
EQUIPMENT
15
FULL-FRAME DIGITALMedium format and large format cameras offer the highest image quality, but the extra weight, cost and larger size of the system makes them less appealing. Instead, most professional landscape photographers use full frame digital SLRs, which are still capable of producing supremely high quality photographs.
ALP-010-031-LVBK.indd 15ALP-010-031-LVBK.indd 15 21/05/2014 16:2121/05/2014 16:21

THE ART OF LANDSCAPE PHOTOGRAPHY
16
Wide-angle lenses are particularly well suited to shooting ‘big
views’, or for when you wish to integrate key foreground elements
into your composition. Employed well, they can help you produce
truly striking results, with an enhanced feeling of depth. A word of
warning, though: if you fail to include suitable or strong foreground
interest in wide-angle images, you risk producing dull compositions
with large amounts of empty space.
LENSES One of the main benefi ts of the camera formats we’ve highlighted
is that they are all compatible with a wide range of interchangeable
lenses, making them truly versatile systems. Perhaps the most
important characteristic of a lens is its focal length. A lens’s focal
length determines the angle of view, which will not only infl uence
how you frame your subject, but also affect the look and feel of
the fi nal image. Focal length is measured in millimetres, with a low
number indicating a short focal length (wide angle of view) and
a high number representing a long focal length (narrow angle of
view). Over the following pages we will briefl y look at the most
useful lens types for landscape photography, together with their
key characteristics.
WIDE-ANGLE LENSESAny lens with a focal length shorter than 50mm (on 35mm/full
frame) is generally considered a wide-angle lens. This lens type is
an essential tool for landscape photography; while they don’t suit
every vista, you will probably fi nd that you capture the vast majority
of your landscape images using a wide-angle lens.
Due to the wide angle of view, wide-angle lenses can capture
large, sweeping views, but a key characteristic is the way in which
they appear to stretch – or distort – the relationship between
near and far elements. Using a short focal length enables you to
exaggerate the scale of foreground subjects, making them appear
more imposing. Consequently, it is possible to capture images with
a genuine three-dimensional feel. Wide-angle lenses also appear
to have an inherently large depth of fi eld (see page 38).
While a focal length in the region of 24–28mm is generally
considered to be a typical wide-angle focal length, more dynamic
results come from using a super wide-angle – a length of, or
equivalent to, 16–22mm. Although this might not seem like a
signifi cant shift in focal length, at this end of the spectrum just
a couple of millimetres difference can radically alter coverage and
the way in which you can frame your subject.
WIDE-ANGLE ZOOM A wide-angle zoom in the region of 16–35mm is an ideal and
versatile choice for landscape photography. However, if you
own a digital SLR with an APS-C sized sensor, you will require
a wider focal length to achieve a similar angle of view – a
10–24mm zoom would be broadly comparable on a camera
with a 1.5x crop factor. Most camera brands have a dedicated
lens range for cropped type SLRs, such as Canon’s EF-S lens
range and Nikon’s DX lens range.
ALP-010-031-LVBK.indd 16ALP-010-031-LVBK.indd 16 26/06/2014 16:1026/06/2014 16:10
17
EQUIPMENT
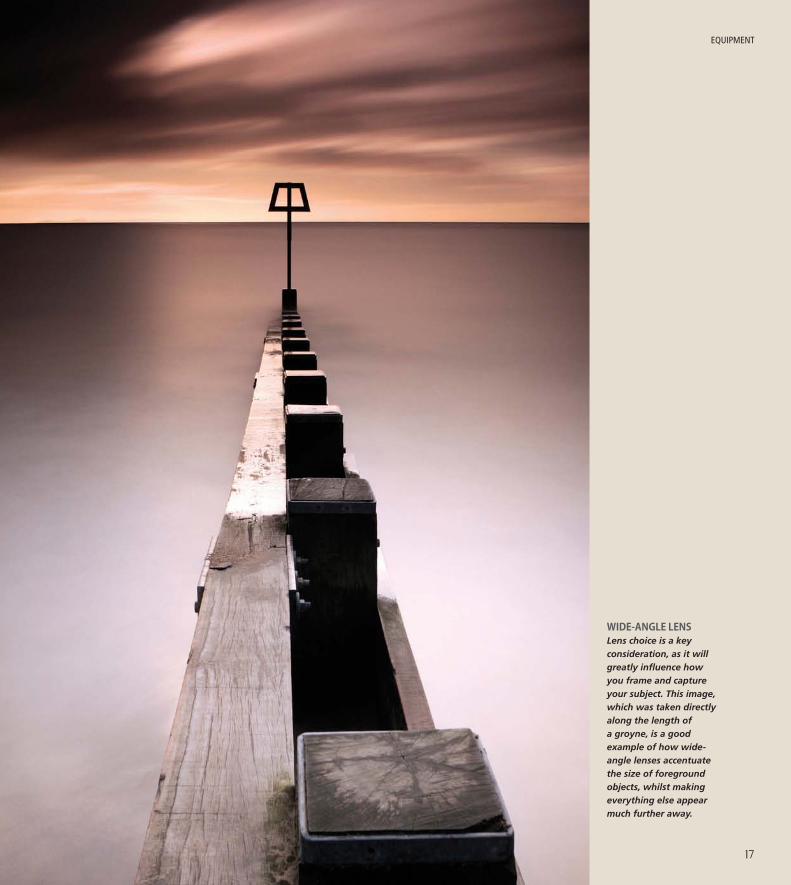
WIDE-ANGLE LENSLens choice is a key consideration, as it will greatly infl uence how you frame and capture your subject. This image, which was taken directly along the length of a groyne, is a good example of how wide-angle lenses accentuate the size of foreground objects, whilst making everything else appear much further away.
ALP-010-031-LVBK.indd 17ALP-010-031-LVBK.indd 17 21/05/2014 16:2121/05/2014 16:21

THE ART OF LANDSCAPE PHOTOGRAPHY
18
A standard lens is particularly suited to views where you want
to place the emphasis on background elements, or when you
simply wish to guard against foreground objects dominating your
composition. Prime standard lenses are typically fast, compact and
optically superb. They also tend to be relatively inexpensive, making
them a worthwhile addition to your kit bag.
STANDARD LENSESA ‘standard’ lens is one that has a focal length that approximately
matches the diagonal measurement of the sensor. On a full-frame
digital SLR this is 43mm, although a focal length of 50mm has
been largely accepted as ‘standard’. This lens type produces a fi eld
of view that is not dissimilar to the human eye, displaying minimal
distortion and providing a natural looking perspective.
Because they produce images that appear so ‘normal’,
standard lenses are often overlooked in preference of wider, more
dynamic focal lengths. However, they remain a good lens choice
for landscape photography, being suffi ciently wide to capture large
views, yet possessing a narrow enough angle of view to allow you
to record simple, precise compositions.
STANDARD FOCAL LENGTHAlthough often overlooked in favour of wide-angles, a standard focal length – in the region of 50mm (or its equivalent) – is an excellent lens choice for many landscapes. In this instance, I didn’t want to ‘push’ the little lighthouse further away from my chosen foreground by using a wide-angle lens: I wanted to capture the view with minimal distortion.
ALP-010-031-LVBK.indd 18ALP-010-031-LVBK.indd 18 18/06/2014 11:3918/06/2014 11:39

EQUIPMENT
19
WHAT IS ANGLE OF VIEW? ‘Angle of view’ is a measurement in degrees of the amount of
a scene that can be captured by a given focal length – usually
a diagonal measurement across the image area. Lenses with a
short focal length (28mm, for example) have a wide angle of
view, while longer focal lengths (such as 150mm) have a much
narrower angle of view. This means a 50mm lens on a full-frame
SLR has an angle of view of approximately 46 degrees, while
a 24mm lens on the same camera would have a much wider,
84-degree angle of view. Put simply, the wider the angle of view,
the more of the subject you can include within the frame.
TELEPHOTO LENSESFocal lengths longer than 50mm are considered telephoto. Using
longer focal lengths magnifi es the subject, making them appear
larger in the frame than would be possible using a wide-angle or
standard lens from the same distance. The relationship is geometric:
assuming the same subject-to-camera distance, doubling the lens’s
focal length will double the size of the subject within the frame.
One of the key characteristics of longer focal lengths is the
way they appear to foreshorten perspective. Because of the longer
working distance they make objects within the landscape appear
ZOOM LENSA 70–200mm zoom lens (or its equivalent) is perfect for picking out details in the landscape.
closer to one another than they actually are. This is a lens trait
that photographers can take advantage of creatively when
deciding what type of composition will suit the landscape best.
Short to medium telephoto lengths – in the region of 70–200mm
– are generally the most suited to landscape photography, as they are
ideal for isolating details and key elements within the landscape – a
skeletal tree, church tower or building, for example. Telephoto focal
lengths are also a good choice when shooting subjects in mist or fog,
as they exaggerate the conditions.
SIMPLICITY WORKSYou can easily overlook longer focal lengths when shooting scenery, but it is possible to capture eye-catching results using a telephoto. They allow you to place emphasis on a single, select element and produce wonderfully simple compositions free of distraction. In this instance, a telephoto was the ideal choice for isolating the castle against the colourful, dramatic dawn sky.
ALP-010-031-LVBK.indd 19ALP-010-031-LVBK.indd 19 26/06/2014 16:1026/06/2014 16:10

PRIME VS ZOOM As you will already be aware, there are two types of lens –
prime lenses and zoom lenses. Prime lenses have a specifi c
focal length that cannot be altered, while a zoom lens
covers a range of focal lengths; both have advantages and
drawbacks for landscape photography.
Prime lenses tend to have the edge in terms of optical
quality due to their simpler construction, and they also have
a fast maximum aperture, providing a brighter viewfi nder
image in low light. Some photographers favour prime lenses,
claiming that they make you think more carefully about
where and how you position yourself.
However, this means you have to work harder when
using prime lenses, as you can’t simply remain in one position
and zoom in and out to alter the composition. Because of
this, many photographers prefer zoom lenses due to their
enhanced versatility. Zooms reduce the frequency with which
you have to physically change lenses and conserve space
in your camera bag too. More importantly, they allow you
to be more spontaneous when taking photos. The ability to
quickly adjust the focal length allows very precise framing
and encourages creative and experimental compositions.
One of the disadvantages of zoom lenses is that they do not
have detailed depth-of-fi eld scales marked on the lens barrel,
making it trickier to set the hyperfocal distance (see page 42).
THE ART OF LANDSCAPE PHOTOGRAPHY
20
TILT AND SHIFTCanon and Nikon both have tilt and shift lenses in their respective ranges, although the specialist nature of the lens makes it an expensive proposition compared to a ‘normal’ lens of the same focal length.
TILT AND SHIFT LENSESTilt and shift (or ‘perspective control’) lenses are a specialist lens type
that offers a number of benefi ts to landscape photographers (also
see pages 82–5). With conventional optics, the axis of the lens is
mounted in a fi xed position, perpendicular to the sensor plane.
As a result, if you point your camera up or down, a degree of
subject distortion – known as ‘convergence’ – will occur. The design
also means that the focal plane is often different to the object
plane, so depth of fi eld is more limited.
Tilt and shift lenses are designed to overcome these issues by
allowing you to alter the plane of focus to control depth of fi eld
and correct converging verticals. The tilt and shift principal involves
two different types of movements – rotation of the lens (tilt) and
movement of the lens parallel to the image plane (shift). Tilting the
lens controls the orientation of the plane of focus and, as a result,
the area of the fi nal image that appears sharp. Shift is used to
control perspective, eliminating the convergence of parallel lines.
A tilt and shift lens is also well suited to creating seamless stitched
panoramic images. The advantage of using a tilt and shift design
(opposed to a conventional lens) is that you don’t have to move
the optical centre of the camera lens to adjust the framing.
As a result, you can avoid the problem of parallax error with
foreground subjects.
ALP-010-031-LVBK.indd 20ALP-010-031-LVBK.indd 20 18/06/2014 11:4018/06/2014 11:40

21
CAMERA SUPPORTSIn this age of in-camera and lens-based image stabilization,
newcomers to photography can wrongly assume that camera
supports are redundant today. However, a good quality tripod isn’t
a luxury for landscape photography – it’s an essential tool for the
job. Not only will a tripod eliminate the risk of ‘camera shake’,
but it is also a key compositional aid. Nothing will improve your
photography as dramatically as using a tripod, so your choice of
legs and head is an important one.
STABILITY A sturdy tripod is essential for keeping your camera stable and safe in windy conditions. I took this photo as the day neared its end; the light levels were low, so the exposure was naturally long. Thanks to the stability and weight of my tripod I was able to capture a bitingly sharp result, despite the conditions.
ALP-010-031-LVBK.indd 21ALP-010-031-LVBK.indd 21 21/05/2014 16:2221/05/2014 16:22

THE ART OF LANDSCAPE PHOTOGRAPHY
22
TRIPODIt is true that a tripod can be heavy and awkward to carry, but it is
false economy to invest in a good camera and then shoot handheld.
Equally, you will be wasting your money if you buy a lightweight or
fl imsy tripod – it simply won’t withstand the challenges of working
outdoors in all types of weather. Creative landscape photographers
will regularly want to employ slow shutter speeds, whether that’s
because they are working with small apertures, shooting in low light
or as a result of using fi lters. In situations like this it is impossible to
capture bitingly sharp results without the aid of good, supportive legs.
Although primarily designed for stability, a tripod will aid your
photography in other ways too. Crucially, using a support slows
down the picture-taking process, allowing your eye to wander
around the frame for longer. This means you tend to think more
about your composition and viewpoint and are far more likely to
adjust or fi ne-tune your framing than when you shoot hand-held.
With your camera in a fi xed position, it is also far easier to place
your focus precisely and it is easier to align graduated fi lters as well.
When investing in a new tripod, your budget, the weight you can
comfortably carry and your height will determine which model is right
for you. Leading brands, such as Giottos, Gitzo, Manfrotto and Really
Right Stuff, produce a wide range of models and designs. It is better
to buy your tripod legs and head separately, rather than purchasing
a one-piece tripod, as you can then choose your ideal combination.
Tripod legs can vary greatly in price, but if your budget allows,
carbon fi bre legs are the best option, as they are lighter and more
comfortable to carry than aluminium legs. Look for a design that
will allow you to easily select a low shooting angle for when you
wish to achieve a dynamic perspective, but also consider height:
buy a support that will extend to a height you will be comfortable
using, without having to extend the tripod’s centre column.
TRIPOD LEGS Top-of-the-range carbon fi bre tripod legs are costly, but you don’t have to invest huge sums in order to buy a good support for your camera. The weight, versatility and affordable price of Manfrotto’s 190 and 055 ranges make them a favourite among landscape photographers. To maximize stability, avoid raising the tripod’s centre column when possible and – if your tripod has a hook – hang your camera bag from it in blowy weather.
ALP-010-031-LVBK.indd 22ALP-010-031-LVBK.indd 22 21/05/2014 16:2221/05/2014 16:22

EQUIPMENT
23
L BRACKETMany tripod heads are designed with a quick release plate, which you screw onto the camera – via the tripod bush – so you can quickly attach and remove the camera. A variation of this is an L-Bracket, which allows you to quickly switch from horizontal to vertical orientation without recomposing your shot.
GEARED HEAD It is impossible to say which is the best tripod head to buy, as every photographer’s requirements and taste is different. However, geared heads – such as the Manfrotto 410 Junior – are particularly suited to shooting landscapes, as they allow you to make very fi ne adjustments to your composition.
TRIPOD HEADSYour choice of tripod head is arguably even more important than
the legs you buy: the wrong design will only frustrate and slow
you down, while the right one will allow you to frame your subject
freely and intuitively. There is such a wide range of designs available
that the choice can seem daunting at fi rst, but most are simply a
variation on a pan-and-tilt or a ball-and-socket design.
Ball-and-socket heads allow you to smoothly rotate the camera
around a sphere, and then lock it into position. They are easy to
operate, with the most sophisticated designs offering tension /
friction control, precision panning and a large locking knob for
smooth, precise control. Pistol grip versions are also available.
However, while some photographers like ball-and-socket
designs, others fi nd them fi ddly and frustrating – it is simply a
matter of taste. The alternative is a pan-and-tilt design, which
offers three separate axes of movement; left-right tilt, forward-back
tilt and horizontal panning. The best versions are geared, which
although more costly, allow you to make very fi ne adjustments
to composition. This is a great type of head for shooting static
subjects, and is highly recommended for landscapes.
As with your tripod legs, it is a good idea to try a variety of
designs in a shop before making your fi nal decision. Regardless
of type, be sure to select a head with a load capacity that will
adequately support your heaviest camera and lens combination.
ALP-010-031-LVBK.indd 23ALP-010-031-LVBK.indd 23 21/05/2014 16:2221/05/2014 16:22

THE ART OF LANDSCAPE PHOTOGRAPHY
24
FILTERSWhile it is true that the effect of most fi lters can be replicated in
post processing, the majority of photographers – your authors
included – still favour in-camera fi ltration. There is something hugely
satisfying about achieving the result or effect you want in-camera,
without needing to spend extra time on a computer. Somehow,
it feels more ‘real’ and authentic getting it right in the fi eld, and
fi lters allow photographers to do exactly that. They can be employed
creatively or for correction and continue to play an integral role in
the art of landscape photography.
FILTER SYSTEMSThere are two types of fi lter – called ‘slot-in’ and ‘screw-in’.
Screw-in versions attach directly to the front of the lens via
its fi lter thread, while square or rectangular slot-in fi lters
attach via a dedicated holder. A fi lter holder allows you to
easily combine fi lters and is an essential investment if you
are using graduated ND fi lters, as it allows you to adjust
the fi lter’s alignment.
There are a number of different holders available, from
manufacturers such as Cokin, Hitech, Kood and Lee Filters.
These vary in size, but the most popular among enthusiasts
are the 84/85mm and 100mm fi lter systems. If your budget
allows, we recommend you opt for the larger system. This is
because smaller holders are prone to vignetting (darkening
of the corner’s of the frame), especially when attached to
wide-angle lenses.
There are also a number of specialized holders available.
Lee Filters produce a smaller Seven5 fi lter system, for example,
which is designed for using with compact system cameras.
The same company also produces a larger 150mm system,
designed to work in combination with super-wide-angle
lenses, such as Nikon’s 14–24mm wide-angle zoom. FILTER HOLDERS The Lee Filters holder for 100mm fi lters is a particularly good design as it is customizable, so you can add or remove fi lter slots (up to a maximum of four).
TIP: Your camera’s ‘through the lens’ (TTL) metering will
automatically compensate for most fi lters, but with extreme ND
fi lters the exposure may exceed the camera’s longest automatic
shutter speed (usually 30 seconds). You then need to switch to
Bulb (B) mode and calculate the exposure time manually. Charts
and phone apps (such as ND Calc) are available to help.
ALP-010-031-LVBK.indd 24ALP-010-031-LVBK.indd 24 21/05/2014 16:2221/05/2014 16:22

25
NEUTRAL DENSITY FILTERS Solid neutral density (ND) fi lters are designed to absorb light, so you
can set artifi cially slow shutter speeds. This is a highly creative fi lter
type, as reducing the amount of light entering the camera allows you
to artistically blur subject movement, such as moving clouds, swaying
crops or water. This can add a feeling of motion and fl ow to images,
or be used to generate foreground interest or a powerful lead-in.
ND fi lters are available as both slot-in and screw-in fi lters, and
are produced in a range of densities, which is usually measured
in stops: the greater the density, the more light the fi lter absorbs.
Arguably, 3- and 4-stop ND fi lters are the most useful strengths.
To give you an example of their effect on exposure, if the original
recommended shutter speed is, say, 1/4 sec., the exposure time will
be lengthened to 1/2 sec. if you used a 1-stop ND; 1 second with
a 2-stop ND; or 2 seconds if a 3-stop ND fi lter is attached.
Extreme ND fi lters (with a strength of up to 13-stops) are also
available. The most popular extreme ND fi lter is Lee Filters’ Big
Stopper, which has a density of 10-stops. It is often possible to make
exposures last several minutes using one of these fi lters, which
can render drifting clouds as brushstrokes and make rough,
choppy water appear fl at and ethereal. These fi lters can also help
emphasize a subject’s shape and form and add mood and interest
to a scene that may otherwise seem ordinary. However, as an
extreme ND fi lter’s density is so great, you can hardly see through
them, so it is important to compose and focus your shot prior to
attaching the fi lter.
LONG EXPOSURE You either love the ‘blurry water’ effect or you hate it. Personally, I love it and the impression of motion can be a very powerful visual and compositional tool. In this instance, I wanted to blur the water rushing up and between the large fi ns of rock. This helps highlight the shape of the rock and also simplifi es the composition overall. I always carry a couple of ND fi lters in my kit bag – both 3- and 10-stop versions – and for this image I used a 10-stop extreme ND fi lter to increase the exposure time to 1 minute. I also attached a 2-stop graduated ND to ‘hold back’ the sky.
ALP-010-031-LVBK.indd 25ALP-010-031-LVBK.indd 25 18/06/2014 11:4018/06/2014 11:40

THE ART OF LANDSCAPE PHOTOGRAPHY
26
transition between the two areas. They work in a similar way to solid
neutral density fi lters, but are designed to block light from part of
the image, rather than all of it. They are brilliantly simple to apply.
With your fi lter holder attached, slide the graduated ND fi lter in from
the top and – while looking through the viewfi nder, or Live View –
align the fi lter’s transitional zone with the horizon. By using a fi lter
of an appropriate density, you can balance the contrast and bring the
entire scene within the sensor’s dynamic range, ensuring that detail is
retained in both the shadow and highlight areas.
As with plain ND fi lters, graduated ND fi lters are available in
different strengths (typically 1, 2 and 3 stops) and you can also buy
soft- or hard-edged fi lters. Soft grads have a feathered edge that
provides a gentle transition from clear to maximum density. They
are best suited to views with an interrupted or uneven horizon,
such as mountain peaks. Conversely, hard grads are designed so
that the transition from clear to full strength is more abrupt. As a
result, they can be aligned with far greater precision, but are much
less forgiving should you position the fi lter incorrectly.
GRADUATED ND FILTERSOne of the biggest problems facing landscape photographers in
the fi eld is the contrast between bright sky and darker foreground.
The difference in brightness can be high, and if it extends
beyond the sensor’s dynamic range (its ability to capture shadow
and highlight detail simultaneously) the resulting image will be
poorly exposed: if you expose for the landscape, the sky will be
overexposed; expose correctly for the sky and the foreground will
appear too dark. Of course, you could resolve this by altering your
viewpoint so you are shooting toward a less bright part of the
sky, but changing your composition is hardly a satisfactory option.
Instead, you need to be able to manage the contrast.
One solution is to make two exposures, one exposed correctly
for the land and one for the sky. You can then blend them together
during processing to form one correctly exposed fi nal image. If you
enjoy processing, this is a perfectly good option, but if you want to
minimize the time you spend on your computer, graduated neutral
density (ND) fi lters are a better option. Graduated ND fi lters are half
clear and half coated with a neutral density coating, with a gradual
ALP-010-031-LVBK.indd 26ALP-010-031-LVBK.indd 26 21/05/2014 16:2221/05/2014 16:22

EQUIPMENT
27
GRADUATED ND COMPARISON For coastal images like this, a hard-edged grad is almost always the best choice. The difference in brightness between the sky and land can be several stops when shooting towards a bright sky, so grads are particularly useful around sunrise and sunset. This comparison helps illustrate the difference that a graduated ND fi lter can make to a shot.
Without graduated fi lter With 2-stop ND graduated fi lter
ALP-010-031-LVBK.indd 27ALP-010-031-LVBK.indd 27 18/06/2014 11:4018/06/2014 11:40

28
POLARIZING FILTERS A polarizing fi lter is designed to reduce glare and refl ections and
restore natural colour saturation. It is best known for the effect
it can have on clear, blue skies and foliage and is undoubtedly one
of the most useful fi lter types. Its effect is also impossible to mimic
during processing.
A polarizing fi lter works by blocking polarized light. It is
constructed by sandwiching a thin foil of polarized material
between two pieces of optical glass. By rotating the front of the
fi lter, you can adjust the amount of polarized light passing through
it, and by doing so you will see refl ections come and go and the
REFLECTIONSA polarizing fi lter can not only be employed to eliminate refl ections, but also capable of enhancing them. Mirror-like refl ections can prove a great compositional aid, creating a feeling of symmetry. A polarizing fi lter also has a fi lter factor of up to 2 stops, meaning that exposure times are lengthened.
ALP-010-031-LVBK.indd 28ALP-010-031-LVBK.indd 28 18/06/2014 11:4118/06/2014 11:41

29
POLARIZING FILTERLee Filters’ fi lter holder allows you to add a polarizing fi lter ring, which enables you to attach a 105mm polarizing fi lter directly to the front of the system.
intensity of colours strengthen and fade – simply rotate the fi lter
until you achieve the effect you desire. A polarizing fi lter gives its
most pronounced effect when used at a 90-degree angle to the sun,
but beware of over-polarization, when blue skies appear artifi cially
dark. You should also be careful when using a polarizing fi lter with
a wide-angle lens, as the effect can appear uneven across the sky.
There are two types of polarizer – linear and circular. This has
nothing to do with the fi lter’s shape, but to the way in which it
polarizes light. Circular polarizers are designed for use with modern
AF cameras, so this is this type that you should opt for.
ALP-010-031-LVBK.indd 29ALP-010-031-LVBK.indd 29 18/06/2014 11:4118/06/2014 11:41

THE ART OF LANDSCAPE PHOTOGRAPHY
30
OTHER ESSENTIALSAside from cameras, lenses, supports and fi lters, there are a handful
of other accessories (not to mention camera functions) that will
assist you when capturing your landscape images. Some aid image
sharpness, while others are framing devices, but anything that helps
you maximize image quality or compose more precisely is worth
knowing about. Here we highlight these camera-related ‘essentials’.
REMOTE TRIGGERPhysically depressing the shutter-release button can generate a
small degree of camera vibration, even when you are using a tripod.
Although the effect is minimal, it can grow more obvious when the
image is enlarged. To maximize image sharpness it is therefore a
good idea to trigger the shutter remotely, either by using a remote
release cord or a wireless/infrared trigger.
A remote cord attaches to the camera via its remote release
terminal. Basic models are designed with a simple trigger button at
the end of a cable, while more sophisticated devices are equipped
with such things as an interval timer, back-lit control panel and
timer. Remote devices also allow you to lock open the camera’s
shutter in Bulb mode, enabling you to capture long exposures in
low light or when using ND fi lters.
HOTSHOE SPIRIT LEVELIt is usually important to keep the horizon level when framing a
landscape. Although a sloping horizon can be corrected during
post processing, it is always preferable to get things right in-camera.
Some cameras have a virtual horizon feature, or you can buy a
hotshoe-mounted spirit level. This simple accessory has a double-
axis spirit level and can prove particularly useful when capturing
multiple frames to create a panoramic stitch.
REMOTE DEVICE A remote release allows you to trigger the camera’s shutter remotely, without having to press any buttons that could, potentially, introduce a degree of movement. If you don’t have a remote release, consider using your camera’s self-timer facility instead.
LEVELLING AIDIf you are someone who struggles to keep the horizon perfectly level – as many photographers do – try using a levelling aid. In this instance I used my camera’s virtual horizon function to aid me. I also released the shutter using a remote release cord and locked the mirror up to help maximize image sharpness.
ALP-010-031-LVBK.indd 30ALP-010-031-LVBK.indd 30 18/06/2014 11:4118/06/2014 11:41

EQUIPMENT
31
FRAMING AIDA framing device should provide some focus and clarity when you are trying to select the best possible composition. Alternatively, you can form a basic frame using your index fi ngers and thumbs.
FRAMING DEVICESSome photographers fi nd a framing device helps them pre-visualize.
Basically, this is a movable frame, which you hold in front of you in
order to select part of the visual fi eld, while obscuring other parts,
and the idea is that the frame helps you ‘see’ the best composition.
The concept of visual framing is hardly a new one – artists have
used them throughout history. By moving the frame closer or
further away from your eye, you can alter the composition and
mimic different focal lengths. You can also use an adjustable frame
(or different-sized frames) to show the effect of using various aspect
ratios. You can easily make your own device with two L-shaped
pieces of card of the same size.
IN-CAMERA FEATURESThe latest digital cameras have a wide range of useful and
innovative features, some of which can greatly assist you
when you compose your images.
LIVE VIEW: Live View is a great framing and focusing aid,
which allows you to use your camera’s rear LCD screen as
a viewfi nder. By viewing the subject as a two-dimensional
image, Live View gives a very accurate preview of how the
fi nal composition will look.
GRID LINES: Many cameras allow you to display a ‘Rule
of Thirds’ grid in the viewfi nder and / or in Live View mode.
Enabling the grid can help you compose your images, and
allow you to carefully place key subject matter on ‘power
points’ – the point where the grid lines intersect.
VIRTUAL HORIZON: A virtual horizon is basically an
in-camera level. When enabled, a graphic is displayed on
the camera’s monitor, which will verify when the camera
is level, both horizontally and vertically. This is a great way
of ensuring your horizon is perfectly level.
MIRROR LOCK: By enabling this feature, you can ‘lock up’
your digital SLR’s refl ex mirror prior to making an exposure.
Doing so eliminates any internal vibrations created by ‘mirror
slap’ as the mirror fl ips up to allow the sensor to be exposed.
When using this function, two presses of the shutter-release
button are required to take a photograph: the fi rst locks the
mirror up, then the second makes the exposure.
ALP-010-031-LVBK.indd 31ALP-010-031-LVBK.indd 31 21/05/2014 16:2421/05/2014 16:24

Most photographers would describe themselves as ‘creative’
– artistic people who, through their camera, can allow
their inventiveness to show through. However, simply
being creative is not enough to guarantee that you will
capture great images with your camera. In order to capture
a photograph that closely resembles what you ‘see’ in your
mind’s eye will also require good shooting technique.
Some photographers enjoy and embrace the technical side
of photography, while others have little interest in f/stops
and ISO. However, like it or not, you must have a good
technical foundation in order to realize your creative potential.
If you do not properly understand such things as exposure,
colour theory or how to maximize image sharpness, then you
will undoubtedly end up taking more images that fail than
succeed. Good technique provides you with options; it arms
you with the knowledge and knowhow to maximize the
creative potential of any picture-taking opportunity.
CHAPTER TWO > SHOOTING TECHNIQUE
CREATIVE CONTROLGood images are rarely the result of luck. As sophisticated as modern cameras are, they are still only tools. While today’s technology certainly makes our lives as photographers easier, they cannot – and never will be able to – predict the effect we wish to achieve. It is important to retain creative control and fully understand the effect that certain shooting parameters have on the look and feel of the resulting image. Doing so will enable you to make good choices and apply the most appropriate settings. In this instance, I prioritized a slow shutter speed in order to blur the movement of the cloud and rising tide.
ALP-032-051-LVBK.indd 32ALP-032-051-LVBK.indd 32 21/05/2014 16:2621/05/2014 16:26

ALP-032-051-LVBK.indd 33ALP-032-051-LVBK.indd 33 18/06/2014 11:4218/06/2014 11:42

THE ART OF LANDSCAPE PHOTOGRAPHY
34
motion (see page 106) is recorded. This is a powerful aesthetic tool;
faster shutter speeds can be used to freeze motion, while slower
ones will blur it.
Shutter speed has a reciprocal relationship with the aperture,
meaning that a change to one will require an equal and opposite
adjustment to the other if you want to maintain the same level of
exposure overall.
ISO ISO (International Standards Organization) refers to a sensor’s
sensitivity to light. A low number, such as ISO 100, indicates lower
sensitivity, so the sensor requires a greater level of light to achieve
the correct exposure. Conversely, a high ISO, such as ISO 6400,
indicates high sensitivity to light, so less light is required to make
an exposure. Doubling the ISO speed halves the amount of light
required to produce the correct exposure, and vice versa.
With digital cameras it is possible to alter the sensor’s ISO
sensitivity from one frame to the next. Increasing ISO is an effective
way of generating a faster shutter speed, which is useful if you
wish to freeze subject movement or eliminate camera shake
when shooting hand-held. However, when practical, it is best
to employ low ISO settings, as image-degrading noise is more
prevalent at higher ISOs.
EXPOSUREExposure is the heartbeat of photography. Put simply, it is the
process of light striking – and exposing – a photosensitive material,
be it a piece of fi lm or a digital sensor. An exposure is controlled by
three variables – shutter speed, lens aperture and the photographic
material’s sensitivity to light (given as an ISO setting). Understanding
the role and relationship of these three variables is essential if you
wish to master landscape photography.
APERTUREAperture is the common term used for the iris diaphragm in a
lens. Quite simply, this is an adjustable hole through which light
can pass to expose the sensor (or fi lm). The numbers indicating
the size of the aperture are fractions, referred to as f/numbers or
f/stops. Aperture settings can be slightly confusing at fi rst, as a large
aperture is represented by a small number (such as f/2.8), while a
small aperture is indicated by a large number (such as f/22). When
a large aperture is used, more light can pass through; when the
aperture is smaller, less light passes through, however, the resulting
depth of fi eld (see page 38) is more extensive. Changes in aperture
– and shutter speed – are referred to in ‘stops’ (hence f/stop), with
one stop equal to a halving or doubling of the amount of light
reaching the sensor.
SHUTTER SPEEDThe shutter speed is the length of time that the camera’s mechanical
shutter remains open for during an exposure. If the shutter speed
is too short, the image will be too dark; if it is too long, too much
light will strike the sensor and the resulting image will be too light.
A camera’s metering system will help determine the correct shutter
length depending on the aperture, ISO sensitivity and available light.
While its primary function is to ensure the right amount of light is
allowed to reach the sensor, the shutter length also dictates how
TIP: Cameras have a choice of exposure modes, which off er varying levels of control. It is usually most important for
landscape photographers to be in control of the aperture, in
order to generate suffi cient depth of fi eld. Therefore, opt for
either Aperture Priority (A or Av) or Manual (M) mode.
ALP-032-051-LVBK.indd 34ALP-032-051-LVBK.indd 34 18/06/2014 11:4318/06/2014 11:43

35
SHOOTING TECHNIQUE
ADJUSTING EXPOSUREYou will often need to adjust exposure for either corrective or creative purposes. If you wish to make your images brighter, you can select a larger aperture (smaller f/number), slower shutter speed or increase the sensitivity of the ISO. To make your images darker, you could choose a smaller aperture (larger f/number), employ a faster shutter speed or reduce the ISO. In this instance, I’ve altered the level of exposure using photo-editing software, but you can see the effect that changing the exposure can have on the look and feel of a photograph.
-1 Exposure
+1 Exposure 0 Exposure
ALP-032-051-LVBK.indd 35ALP-032-051-LVBK.indd 35 21/05/2014 16:2621/05/2014 16:26

THE ART OF LANDSCAPE PHOTOGRAPHY
36
is the one that records the subject as our eyes saw it when we
triggered the shutter: if a picture is any lighter than that it is
overexposed; any darker and it is underexposed.
However, photography would be very boring if we always
had to capture things completely authentically. Therefore, a far
better way of defi ning ‘correct exposure’ is to simply say that it
is the exposure that achieves the precise effect that you – the
photographer – intended. Subsequently, the best result will not
always be the one that most closely resembles how your eyes
‘see’. High-key images, which are bright, full of light and comprise
mostly white tones, can appear very striking, while a degree of
underexposure can add drama to your photographs and make
the colours deeper.
In this regard, desired effect, and how you interpret a scene
is what really matters. This is why good shooting knowledge is so
essential: once you fully understand the mechanics of exposure, you
will be able to manipulate it in order to capture what you believe is
the best possible result.
CORRECT EXPOSURE VS DESIRED EFFECTAchieving the right level of exposure is easier than ever before.
Firstly, cameras have highly sophisticated Through The Lens (TTL)
metering systems with multi-area metering patterns that are
designed to evaluate a scene’s overall brightness and are rarely
deceived – only predominantly light, dark or contrasty subjects are
likely to cause them any problems. There is also the photograph’s
histogram to consult, which gives us all the information we require
to properly assess exposure. The graph either reassures us that
the original settings were correct, or prompts us to reshoot using
different settings. Finally, digital images – particularly Raw fi les,
which we recommend you shoot – are very fl exible and tolerant
to adjustment. Using image-editing software it is quick and easy to
‘tweak’ the brightness of a photograph. You can do this with great
impunity, as long as the shadow and / or highlight areas of
the original image aren’t ‘clipped’.
Yet while we have all of the tools required to get the exposure
right, time and time again, the big question is, ‘how do you defi ne
correct exposure’? It could be argued that the ‘correct’ exposure
THE ‘CORRECT’ EXPOSUREDue to the subjective nature of photography, defi ning ‘correct’ exposure seems like an impossible task. In truth, it is easy: the ‘correct’ exposure is simply the one that the photographer intended when triggering the shutter. Silhouettes (see page 124) are an excellent example of how exposure can be interpreted creatively. Effectively, contre jour images like this are the result of poor exposure – the subject is grossly underexposed, and devoid of colour and detail. However, as long as the result is the photographer’s desired effect, how could anyone possibly argue that the photo was anything but correctly exposed?
ALP-032-051-LVBK.indd 36ALP-032-051-LVBK.indd 36 18/06/2014 11:4318/06/2014 11:43

SHOOTING TECHNIQUE
37
HISTOGRAMS AND EXPOSING TO THE RIGHTA histogram is a graph that shows an image’s tonal
distribution. The horizontal axis represents the picture’s tonal
range from black (0, far left) to pure white (255, far right),
while the vertical axis represents how many pixels have
that particular value. By correctly interpreting an image’s
histogram, you should never make any signifi cant errors.
For example, a graph displaying a large number of pixels
pushed-up to either edge normally indicates poor exposure.
Peaks to the left may indicate underexposure; peaks to the
right, overexposure. When the pixels are ‘overfl owing’ off the
edge of the graph, a histogram is said to be ‘clipped’, which
means detail has been irretrievably lost. It is then normally best
to reshoot, applying exposure compensation. There is no such
thing as the perfect histogram, though – it will depend on the
brightness of the subject and how you’ve exposed the shot.
Histograms are an essential guide for when you are
‘exposing to the right’ (ETTR). This is a Raw technique designed
to maximize image quality. Sensors capture more tonal data
and information in the brightest areas, so by intentionally
exposing a scene so that the histogram is pushed as far to the
right as possible (but not so far that the highlights are clipped)
you will capture the maximum amount of information.
The only way to do this with any accuracy is to use
the histogram as a guide. ETTR results will typically look
washed-out and lack contrast, as they are effectively too light
and poorly exposed. However, by adjusting the exposure,
brightness and contrast during processing, the fi nal image
can be corrected and you will have a fi le containing maximum
tonal information with the minimum amount of noise for the
ISO setting. Modern photographers are not always looking
to achieve the ‘correct’ exposure in-camera: sometimes the
intention is to capture the optimum fi le for processing.
EXPOSING TO THE RIGHTThe idea of ETTR is to push the histogram as far to the right as possible, without clipping the highlights. Due to the linear design of sensors, doing so will capture more tonal information and the resulting image will exhibit less noise. With some scenes, you may only be able to push the exposure by a small amount – perhaps just 1/3 or 1/2 stop. However, with low contrast landscapes, such as this misty rural scene, you may be able to apply 2 or 3 stops of positive exposure compensation and capture most of the data in the right half of the histogram.
On your camera’s LCD, the resulting images will appear washed out and lacking contrast (top). However, once you import the image into your Raw converter and adjust exposure and contrast, the end photograph will resemble the original scene (bottom). While the technique requires more input from the photographer, the resulting image quality will be superior.
Unprocessed ETTR image
Unprocessed ETTR histogram
Processed ETTR image
Processed ETTR histogram
ALP-032-051-LVBK.indd 37ALP-032-051-LVBK.indd 37 21/05/2014 16:2821/05/2014 16:28

THE ART OF LANDSCAPE PHOTOGRAPHY
38
A small aperture should enable you to render everything from your
foreground interest to infi nity acceptably sharp, but you need to
select your point of focus with care. Depth of fi eld extends from
approximately one-third in front of the point you focus at, to around
two-thirds beyond it. Therefore, if you focus too near or far into
the frame, you risk wasting some of the available depth of fi eld.
Focusing approximately one third of the way into the frame is a
rough and ready (but quite effective) way of maximizing depth of
fi eld, but a far more reliable method is to focus at the hyperfocal
distance (see page 42).
While larger apertures aren’t so widely used for landscape
work, don’t overlook using a shallow depth of fi eld in your
photography. Having a narrow zone of focus is an effective way
to help your main subject, or focal point, stand out against its
surroundings. Turn to page 40 to discover more about depth
of fi eld’s creative potential.
DEPTH OF FIELDDepth of fi eld is the zone of acceptable sharpness within an image.
Although both focal length and camera-to-subject distance also
help determine depth of fi eld, aperture size is its overriding control.
By adjusting the aperture you not only alter the amount of light
passing through the lens, but you also determine the level of front-
to-back sharpness. Only by understanding depth of fi eld – and the
signifi cant role it plays in photography – will you be able to capture
the landscape as you envisaged.
Aperture choice is a key consideration when setting up your
landscape images, so defi nitely not a decision you can leave to your
camera. Insuffi cient depth of fi eld will result in parts of the image
being recorded out of focus, which – unless intentional – is likely
to ruin the photograph. At large apertures – f/2.8 or f/4 – depth
of fi eld is shallow; at small apertures – f/16 or f/22 – front-to-back
sharpness is extensive.
Typically, landscape photographers wish to capture images that
are acceptably sharp throughout. Doing so can give photographs a
lifelike quality, with an enhanced three-dimensional feel. Therefore,
more often than not, your priority will be to select a small aperture
to generate a large zone of sharpness. This is particularly effective
combined with a short focal length, as wide-angle lenses have an
inherently large depth of fi eld compared to longer focal lengths.
VISUAL IMPACT In order to exaggerate the size and visual impact of this little stream, I used a wide-angle lens and positioned my camera approximately 40cm from the water. To make sure that everything from the foreground boulders to the crooked cross and moorland was in focus I had to set a small aperture of f/20, and placed my focus carefully at the hyperfocal distance. By doing so, everything in the composition is bitingly sharp.
TIP: Shorter focal lengths appear to display a greater depth of fi eld than longer lenses. As a result, wide-angle lenses are
popular not only for their ability to capture large vistas, but also
for the way they can help ensure full front-to-back sharpness.
ALP-032-051-LVBK.indd 38ALP-032-051-LVBK.indd 38 18/06/2014 11:4318/06/2014 11:43

39
ALP-032-051-LVBK.indd 39ALP-032-051-LVBK.indd 39 21/05/2014 16:2821/05/2014 16:28

THE ART OF LANDSCAPE PHOTOGRAPHY
40
CREATIVE USE OF DEPTH OF FIELDWhile there is no ‘rule’ stating that landscape photographs must be
sharp from foreground through to infi nity, there is certainly a strong
tendency for landscape images to use that approach. A broad depth
of fi eld allows you to highlight a landscape’s design and complexity,
enabling you to draw attention to texture, shape, form and fi ne
detail throughout your composition to give the viewer a better
understanding of the location and its setting. However, a deep
depth of fi eld will not always produce the best, or most creative
result, so avoid selecting a small aperture simply through habit.
Instead you need to evaluate every scene individually, and then
select the aperture setting that will generate the most pleasing
and appropriate depth of fi eld.
WHAT IS THE BEST APERTURE? There is no simple or correct answer to this – it greatly depends
on the shooting situation, the result you desire and, to some
extent, the camera’s format. Depth of fi eld is inversely proportional
to the camera’s format size. A camera with a smaller sensor will
effectively provide a greater depth of fi eld than a camera with a
larger sensor if both are fi tted with the same equivalent focal length
lens, set at the same aperture. This means that you do not need to
select such a small aperture on a crop type camera as you would
on a full-frame camera in order to generate the same zone of focus.
When a large depth of fi eld is your priority, an aperture setting
in the region of f/11 or f/16 is a good starting point for SLR users.
It is no coincidence that the vast majority of the images illustrating
this book were captured using an f/stop in this region – it is a
range that offers signifi cant depth of fi eld, while remaining free
of diffraction (see page 46). A side effect of employing smaller
THE BEST APERTURE It is important to select the aperture that is best suited to the subject, rather than opting for a small aperture through habit. In this instance, I set the aperture to f/4 and used a longer focal length to further reduce the depth of fi eld.
ALP-032-051-LVBK.indd 40ALP-032-051-LVBK.indd 40 21/05/2014 16:2821/05/2014 16:28

SHOOTING TECHNIQUE
41
apertures is longer, corresponding shutter speeds. This can prove
advantageous when you wish blur subject motion, but if you are
shooting hand-held, be aware that the exposure will be slower and
the risk of camera shake is enhanced.
While you will tend to employ wider apertures less frequently,
don’t overlook the potential of using a shallow depth of fi eld. If you
wish to generate a shallower zone of focus, it is normally best to
combine a wider aperture with a longer focal length – a medium
telephoto, for example. In addition to its visual attractiveness, a
shallow depth of fi eld has the ability to direct your audience to the
key elements of your composition – a lone tree or building perhaps.
Using a shallow depth of fi eld can simplify complicated scenes
and promote serenity, but applied well it can also heighten the
impression of depth. Photographs are two-dimensional, so we
naturally rely on elements within the landscape to act as reference
points. When you capture an image using a wide aperture, you
can create a ‘slice’ of focus, with everything in front and behind it
appearing soft. Doing so will create a layered effect that will give
the viewer a ‘three-dimensional’ experience.
DEPTH OF FIELD PREVIEWTo aid viewing and focusing, cameras set the lens to its
widest (maximum) aperture setting to provide the brightest
possible viewfi nder image. Therefore, the level of depth of
fi eld you see through the viewfi nder rarely represents what
you will actually capture.
To help, many SLRs have a ‘Preview’ button to help you
assess whether the selected aperture will provide suffi cient
depth of fi eld or not. By pressing the button, the camera
stops the lens down to the chosen f/stop, so you can see the
depth of fi eld at the aperture setting that will be used to take
the photograph. Note that the viewfi nder image will darken,
and the smaller the aperture, the darker the preview will be.
It can be worthwhile adjusting the aperture gradually, stop by
stop, so that the shift in depth of fi eld appears more obvious.
If you fi nd you require more or less depth of fi eld, adjust the
aperture accordingly.
Live View makes it easier still to preview depth of fi eld,
although it works in different ways depending on the make
and model of camera. On some models, Live View always
gives a true representation of depth of fi eld at any given
aperture, while on others you need to use a depth of fi eld
preview button in conjunction with Live View to properly
assess depth of fi eld. Being able to preview how depth of
fi eld falls will help ensure you place your focus correctly,
and achieve just the result you desire.
TIP: When assessing sharpness and depth of fi eld on your
camera’s rear LCD screen, avoid viewing your images at 100%.
Viewing on screen at pixel level is the equivalent of looking at
a huge enlargement from close distance, so only objects on
the plane of focus will appear truly sharp. Viewing at 50% gives
a far better indication of how sharp the scene is.
ALP-032-051-LVBK.indd 41ALP-032-051-LVBK.indd 41 21/05/2014 16:2821/05/2014 16:28

THE ART OF LANDSCAPE PHOTOGRAPHY
42
only have 0.3m, 0.5m, 1m and infi nity marked on its barrel. This is
both unhelpful and infuriating should you need to focus, say, 3m
away. As a result, you will often need to apply a little guesswork
when adjusting focus. Typically, you will fi nd the hyperfocal distance
is relatively close-by – normally within 4–5m. Most people can judge
distances fairly accurately within this range, so if the hyperfocal
length is 2m, look for an object that you judge to be this distance
away from the camera and focus at that point.
You can do this using autofocus, by placing the active AF
sensor over the point you wish to focus on, or manually. Using Live
View can be helpful, as it allows you to zoom into the image and
place your focus with great precision. Having set the hyperfocal
distance, don’t be alarmed if you look through the viewfi nder and
see that only the immediate foreground appears to be in focus.
This is because you are looking through the lens at its brightest,
widest aperture setting. To get a true idea of depth of fi eld, press
your preview button, or assess it via Live View (see page 41).
While having to ‘guestimate’ the hyperfocal distance in this
way isn’t ideal, unless you are using prime lenses there is often no
other option. However, while the method might not be 100 per cent
accurate, it will prove close enough to be satisfactory. However, it is
worth allowing a little margin for error by focusing slightly beyond
the calculated distance.
It is good practice to apply hyperfocal focusing in order to
maximize image sharpness, especially when using larger resolution
sensors, which are less forgiving of poor technique. However, there
is no need to apply it to views where no immediate foreground is
included. While doing so wouldn’t necessarily lead to bad results,
it can mean that you are using depth of fi eld where you don’t
need it – in the foreground – and that the background, while
acceptably sharp, could actually be sharper. If the nearest object
to the camera is beyond the hyperfocal distance, it is better to focus
on that object instead, or just slightly beyond it.
HYPERFOCAL DISTANCEFront-to-back sharpness is a prerequisite for most landscape images.
A broad depth of fi eld will help you achieve this, but where you
focus within the frame is also very signifi cant. A lens can only focus
precisely at one given point – sharpness will gradually recede either
side of this distance. The hyperfocal distance is the point within the
scene that will maximize the available depth of fi eld for any given
aperture and focal length combination. By applying this shooting
technique, you can help ensure that you don’t ever waste any of
the depth of fi eld available to you.
MAXIMIZING SHARPNESSDepth of fi eld extends approximately one-third of the way in front
of the point of focus, and two-thirds beyond it. While focusing
roughly one-third into the frame is a logical approach to maximizing
sharpness, it is far from precise. When your composition includes
nearby foreground interest – meaning you will require extensive
depth of fi eld – it is important to calculate the hyperfocal length.
When a lens is correctly focused on this point, depth of fi eld will
extend from half this distance to infi nity.
This technique is not as complex as it might fi rst sound. If
you are using a prime lens, with good distance and depth-of-fi eld
scales on the lens barrel, it is in fact very easy to set: simply align
the infi nity mark against the aperture marking of the selected f/stop.
However, most photographers today work with zoom
lenses, which have rather defi cient distance scales. Therefore,
photographers need to calculate and estimate the distance
themselves. Thankfully, hyperfocal distance charts are readily
available online and there are also smartphone apps that will
calculate the hyperfocal distance if you enter the camera type,
aperture setting and focal length. Frustratingly, having used a chart
or app to determine the distance you should focus at, the rather
perfunctory distance scales found on modern optics can make it
hard to actually focus at that distance. For example, a lens might
ALP-032-051-LVBK.indd 42ALP-032-051-LVBK.indd 42 18/06/2014 11:4318/06/2014 11:43

SHOOTING TECHNIQUE
43
DEPTH OF FIELD CALCULATORIn this instance, it was essential to calculate and carefully focus on the hyperfocal distance – had I failed to do so, I would not have been able to achieve both acceptable sharpness in the foreground thrift and also the distant view. Personally, I fi nd a phone app is the most convenient type of depth of fi eld calculator.
ALP-032-051-LVBK.indd 43ALP-032-051-LVBK.indd 43 21/05/2014 16:2821/05/2014 16:28

THE ART OF LANDSCAPE PHOTOGRAPHY
44
HYPERFOCAL DISTANCE CHARTSAlthough the most convenient hyperfocal distance charts to use are
those found on phone apps, we’ve included two charts here, which
cover a range of the most popular focal lengths. You will note
that there are different charts for different camera formats. This is
because sensor size affects the equation used to calculate depth of
fi eld and hyperfocal distance.
You may want to copy the chart relevant to your camera type,
laminate it and keep it in your camera bag so it’s available when
composing your landscape images. When you have focused at the
predetermined distance, do not adjust the focal length or aperture
until you have taken the shot, otherwise you will need to recalculate
the distance. Remember, when using this technique, everything from
half the hyperfocal distance to infi nity should be acceptably sharp.
HYPERFOCAL DISTANCE (ft/m) – FULL-FRAME SENSORS
16mm 20mm 24mm 28mm 35mm 50mm
f/8 3.8/1.2 5.6/1.7 8/2.4 11/3.4 17/5.2 35/10.7
f/11 2.6/0.8 3.9/1.2 5.8/1.8 7.8/2.4 12/3.7 25/7.6
f/16 1.9/0.6 2.9/0.9 4/1.2 5.5/1.7 8.5/2.6 17.5/5.3
f/22 1.4/0.4 2/0.6 2.9/0.9 3.9/1.2 6/1.8 12.5/3.8
These charts show the hyperfocal
distance for each given sensor type,
focal length and aperture. After
focusing at the predetermined
distance, fi nish taking the shot
before you adjust focal length
or aperture. If you do make these
adjustments, you will need to
recalculate. Using this technique,
everything from half the hyperfocal
distance to infi nity will be recorded
in acceptably sharp focus.
HYPERFOCAL DISTANCE CHARTS
HYPERFOCAL DISTANCE (ft/m) – APS-C SENSORS
12mm 15mm 17mm 20mm 24mm 28mm 35mm 50mm
f/8 3.2/1 5/1.5 6.4/2 8.9/2.7 12.6/3.8 17/5.2 27/8.2 55/16.8
f/11 2.3/0.7 3.5/1.1 4.5/1.4 6.2/1.9 9/2.7 12/3.7 19/5.8 39/11.9
f/16 1.7/0.5 2.5/0.8 3.3/1 4.4/1.3 6.4/2 8.6/2.6 14.5/4.4 27/8.2
f/22 1.2/0.4 0.9/0.3 2.3/0.7 3.2/1 4.5/1.4 6/1.8 9.5/2.9 19.2/5.9
HYPERFOCAL DISTANCEThe wavy patterns in the sand drew me to this scene. However, in order to keep both them and the distant castle in focus, I knew I would have to place my point of focus with extreme care. I calculated the hyperfocal distance for a full-frame camera. A 32mm focal length set at f/16 resulted in a hyperfocal distance of 2.2m. I focused at a point I estimated to be this far away, knowing that everything from half that distance to infi nity would be acceptably in focus.
ALP-032-051-LVBK.indd 44ALP-032-051-LVBK.indd 44 21/05/2014 16:2921/05/2014 16:29

45
ALP-032-051-LVBK.indd 45ALP-032-051-LVBK.indd 45 24/06/2014 16:5524/06/2014 16:55

THE ART OF LANDSCAPE PHOTOGRAPHY
46
DIFFRACTIONYou might now understandably think that you simply need to
select the smallest available aperture and focus at the hyperfocal
distance in order to guarantee front-to-back sharpness. However,
it’s not quite that straightforward. As your demands as a landscape
photographer grow you will become more discerning. Capturing
images that are simply ‘in focus’ won’t be suffi cient – you will desire
critical sharpness, which is essential when you wish to make quality
enlargements of your photographs. The problem here is that while
small apertures generate more depth of fi eld, they do not produce
the sharpest results, due to an optical effect known as diffraction.
When image-forming light passes through the aperture,
the light striking the edges of the diaphragm blades scatters, or
‘diffracts’, which softens image quality. At wider aperture settings
the amount of diffracted light is proportionally quite small, but
as the aperture is stopped down (reduced in size), the amount
of diffracted light increases. Therefore, despite depth of fi eld
increasing, image sharpness actually decreases.
So, continuing on the theme of image sharpness, it is good
practice to avoid your lens’s smallest f/stops. Instead, try to rely on
its optimum apertures, which are the f/numbers that suffer least
from the effect. The precise settings can vary, depending on the
quality of the lens, but the more circular the aperture (determined
by the number of aperture blades), the less light will be scattered.
The aperture blades employed in high quality optics tend to be more
‘rounded’, which also reduces diffraction.
The only way to know how your lenses perform is to do your
own tests. We recommend you shoot a series of images, taken at
different aperture settings, and enlarge a small segment of each in
order to compare them. As a general guideline, users of cropped
type SLRs should try to avoid f/numbers smaller than f/11, and
full-frame users should go no smaller than f/16. An aperture in this
region should still provide suffi cient depth of fi eld for the majority
of viewpoints – particularly if you are hyperfocal focusing – while
keeping diffraction under control.
ALP-032-051-LVBK.indd 46ALP-032-051-LVBK.indd 46 21/05/2014 16:2921/05/2014 16:29

47
STARBURST EFFECTDue to the effect of diffraction, you will normally want to avoid your lens’s minimum aperture. There are always exceptions to the rule, though – when you wish to include fl are or a starburst effect in-camera, for example. Diffraction will cause a point source of light to become a starburst shape when it strikes the sensor. In the right situation, this can add interest and draw attention to the light source. For this shot, I set the aperture to f/22 to create a starburst effect around the rising sun.
ALP-032-051-LVBK.indd 47ALP-032-051-LVBK.indd 47 21/05/2014 16:2921/05/2014 16:29

THE ART OF LANDSCAPE PHOTOGRAPHY
48
COLOUR THEORYColour is an important factor in the vast majority of landscape
images. When you are deliberating over how best to compose your
shot, the infl uence of colour shouldn’t be overlooked. Colours can
be harmonious or confl icting; warm or cold; saturated or muted;
calming or unsettling. They will help determine a photograph’s
mood, impact and – crucially – your audience’s emotional response
to it. Obviously, as photographers we have no infl uence over the
colours found within the landscape, but we can choose what we
do and do not include within the frame.
EMOTIONAL IMPACTHow you employ and combine colours will help determine the
look and impact of your photographs. Therefore, it is important
to understand the visual and emotional effect of colour. In order
to do this, a little knowledge of colour theory is useful.
Different hues can imply different moods and evoke contrasting
reactions. For example, red can signify danger, warmth or excitement,
while blue is considered tranquil, calming or cold. Green is another
calming shade, which often implies freshness, vibrancy and vitality,
while yellow is a powerful colour that demands attention; it is often
considered happy and uplifting.
Some colours always stand out more than others, and are said
to carry more ‘visual weight’. For example, even a tiny splash of red
can dominate an entire composition, creating a key focal point, or
directing the viewer’s eye to the subject. If you include a foreground
element that is red within your composition – a poppy in a fi eld of
barley, for example – it will help create a greater perception of depth.
Red, yellow and orange are all considered ‘advancing colours’
that will shout out far louder than neighbouring shades, while green,
blue and purple are regarded as ‘receding colours’ that will normally
fall away into the background. To fully understand the relationship
between colours, it can be useful to look at a colour wheel.
COLOUR WHEELA colour wheel is designed to show the relationship between
primary, secondary and tertiary colours. Put simply, colours
next to each other are ‘harmonious’, while colours opposite
one another are ‘complementary’.
ALP-032-051-LVBK.indd 48ALP-032-051-LVBK.indd 48 26/06/2014 16:2226/06/2014 16:22
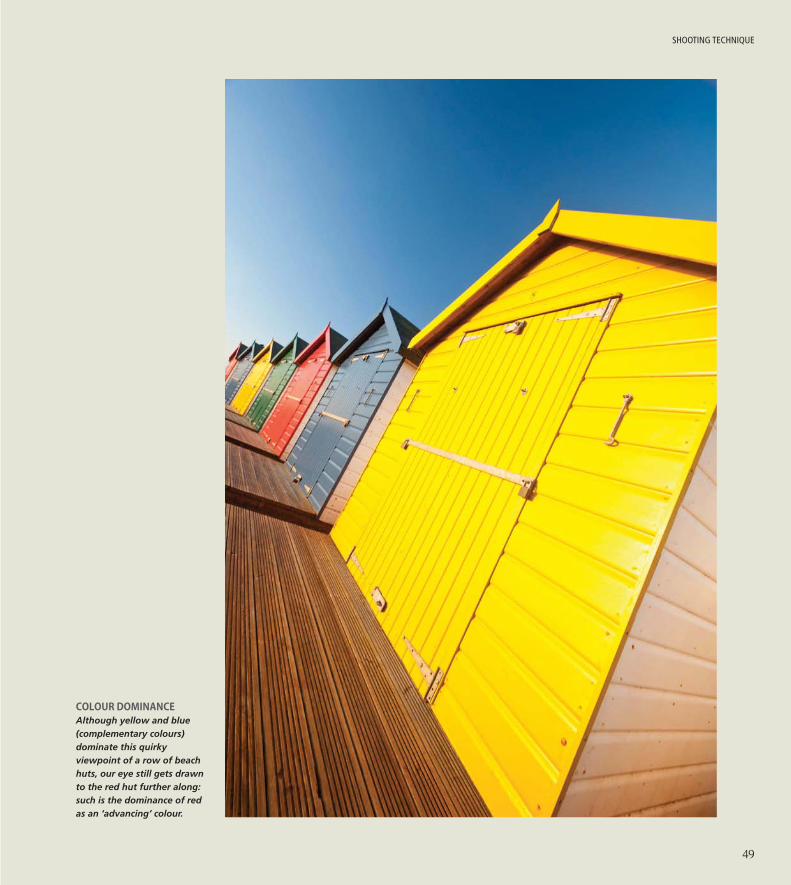
SHOOTING TECHNIQUE
49
COLOUR DOMINANCEAlthough yellow and blue (complementary colours) dominate this quirky viewpoint of a row of beach huts, our eye still gets drawn to the red hut further along: such is the dominance of red as an ‘advancing’ colour.
ALP-032-051-LVBK.indd 49ALP-032-051-LVBK.indd 49 21/05/2014 16:2921/05/2014 16:29

THE ART OF LANDSCAPE PHOTOGRAPHY
50
landscape, and often add a cool, blue hue that you can enhance
further through creative use of white balance. A juxtaposition of
harmonious colours might not have the same sudden impact as
strong, contrasting shades of colour, but they will generate a natural
sense of balance and order, and generate results that will look
pleasing to the eye.
It is even possible to create successful compositions using just
a single colour, or shades of one colour. For example, during the
‘blue hour’ – the twilight hours when the landscape is fl ooded with
cool, overcast light – your photographs will often be dominated
by varying shades of blue. Rather than reduce the image’s impact,
using a single overriding hue can actually enhance it.
Certain lighting conditions, such as strong backlighting, can
create an almost monochromatic look, with washed out colours.
Again, applied to the right scene this can produce beautiful results.
Removing colour altogether can also help produce dramatic, striking
and elegantly simple results (see page 122).
THE INFLUENCE OF COLOURHow you should or shouldn’t employ, combine or contrast colours
is tricky, if not impossible, to answer. Much will depend on the result
you wish to achieve. There are no defi nitive rules on working with
colour, but a little forethought about colour impact and harmony
can prove hugely benefi cial.
Your use of colour can be striking or subtle. Saturated colours
can certainly make for powerful, dynamic results, but in order to
produce saturated images you need to do more than simply adjust
the colour saturation slider during processing. If you wish to capture
images boasting strong, intense, but natural colours, you need to do
so at the picture-taking stage by shooting at the right time of day;
early morning and late evening, when the sun is low, produce more
intense colours than at any other time of the day.
The light’s direction is another consideration. Front light, rather
than side lighting, will lead to stronger colour reproduction and using
a polarizing fi lter (see page 28) will also improve saturation. Some
of the most intense, natural colour can be found looking toward the
sunrise and sunset, so timing and location is also a factor. However,
while strong, vibrant colours are seductive and often very appealing
to landscape photographers, they are not always desirable. Subtle,
muted, pastel tones can prove just as effective, with subdued
colours creating a calming, tranquil atmosphere. Weather conditions
can play a key role here as well: mist and fog will desaturate the
DIFFUSED DETAIL Photographers often try to maximize the colour in their images, but a more restrained outlook can often prove to be just as effective. Fog and mist desaturate the landscape, producing muted shades and diffused detail in images. Before the sun has risen, mist can add a natural, cool bluish tone to images that is hugely appealing.
ALP-032-051-LVBK.indd 50ALP-032-051-LVBK.indd 50 21/05/2014 16:2921/05/2014 16:29

SHOOTING TECHNIQUE
51
WHITE BALANCEEvery light source has a different colour temperature, which
is measured on the Kelvin scale (‘degrees Kelvin’ or ‘K’). Light
is considered to be ‘neutral’ at 5,500K, which is approximately
the colour temperature of daylight at mid-day with a clear sky.
Lower colour temperatures appear warmer (more orange),
while higher temperatures appear cooler (more blue).
In landscape photography the colour temperature
is generally lower at sunrise and sunset and higher in
overcast and shady conditions, and at higher altitudes, but
it changes throughout the day. Our eyes do a very good job
of compensating automatically for these changes, while a
similar role is performed by a digital camera’s automatic
white balance option, designed to neutralize colour casts produced
by different temperatures of light – just like the human eye. Most
cameras also have a number of preset white balance settings,
designed to mimic common lighting conditions – Daylight,
Cloudy and Shade. By matching the preset to the light you are
photographing under, you can achieve neutral-looking results.
However, white balance can have a dramatic effect on the
look, feel and mood of an image. Auto white balance is typically
very reliable, but it can inadvertently neutralize the warmth of early
morning or late evening light, for example, or reduce the coolness
of images captured at twilight. The most aesthetically pleasing result
is not always be the one that is ‘technically’ correct.
CREATIVE WHITE BALANCE Although designed for correction, white balance can also be employed creatively. This comparison illustrates how different white balance settings can affect the mood and look of an image.
ShadeDaylight Cloudy
ALP-032-051-LVBK.indd 51ALP-032-051-LVBK.indd 51 21/05/2014 16:2921/05/2014 16:29

It’s now time to progress from raw technique to the
aesthetic side of landscape photography. The concept
of balance is central to composition. Perhaps the most
fundamental decision we make when composing
a photograph is how we balance the different elements
in a scene to achieve a harmonious composition, or how
we do the opposite to create discord. The start of the
process is often to choose a focal point for the composition
and then decide where in the scene we want to place this
point of interest for maximum effect. This chapter will look
at the principles behind visual balance and different ways
of organizing elements within the frame to help achieve
this, such as the ‘rule of thirds’ and the ‘Golden Section’.
It’s worth bearing in mind, however, that many successful
compositions do not conform to these traditional
proportions, so while they should always be considered,
it’s sometimes good to just trust your instincts.
CHAPTER THREE > BALANCE
VISUAL BALANCECentring the main focal point often results in a rather static composition, so the choice in this instance was whether to place the castle to the left or right of centre. In some ways, placing it at the left was the more logical choice, because of the visual movement down the right hand slope of the hill. However, placing it on the right enabled me to include the rising sun as a counterpoint to the main point of interest.
ALP-052-071-LVBK.indd 52ALP-052-071-LVBK.indd 52 23/06/2014 11:3623/06/2014 11:36

ALP-052-071-LVBK.indd 53ALP-052-071-LVBK.indd 53 21/05/2014 16:3321/05/2014 16:33

THE ART OF LANDSCAPE PHOTOGRAPHY
54
VISUAL BALANCEFor some people, balance equates with symmetry, but this is only
one of several ways of achieving balance in a composition. Visual
balance is in many ways comparable to physical balance, and
making this comparison can help us to understand how it works.
If we place two objects of equal weight on a seesaw they will
need to be equidistant from the fulcrum in order to achieve balance.
If we translate this to visual balance, then we have symmetry, often
thought of as being harmonious, but somewhat static. If we take
two objects of different weights, the lighter object will need to be
further away from the fulcrum in order to balance them. In visual
terms, this would create an asymmetric balance, which would
normally be perceived as being more dynamic.
This is, of course, a simplifi cation. In reality, visual balance is
more complicated than this, but the basic principle is true. Clearly, in
a photograph we can’t consider the physical weight of focal points,
so what contributes to ‘visual weight’? Visual weight could be
defi ned as the ‘strength of visual impact’ and the factors that create
this include size, colour (and its relationship to the surrounding
areas), brightness, contrast, texture, shape and inherent interest.
Much of this is rather subjective, but there are some basic principles
that seem fairly consistent (see box, right).
The goal of most compositions is to achieve harmony and
balance, in which no one part of the composition seems signifi cantly
‘heavier’ than another; paying attention to the guidelines in the
box can go some way towards helping us achieve this. Of course,
harmony is not the only way to achieve a successful composition;
done properly, discord and ‘dynamic tension’ can be effective.
PRINCIPLES OF BALANCE• A small object further away from the ‘visual fulcrum’ will
balance a large object closer to it.
• A seemingly lighter shape further away from the fulcrum
will balance a heavier object closer to it.
• A small area of high contrast will balance a larger area
of low contrast.
• The eye is drawn to bright, saturated colours, so a small
area of bright colour can balance a larger area of neutral
or less saturated colour.
• Small, complex shapes can balance large, simple shapes;
for example a small, busy area can balance a large,
uncluttered area.
• Complex, high contrast texture on a small object can
balance a large object with smooth texture.
• Objects towards the top of the frame have more visual
weight than those near the centre. The top edge of the
frame can therefore be a good place for a counterpoint
that has less visual impact than a point of interest closer
to the frame’s centre.
ALP-052-071-LVBK.indd 54ALP-052-071-LVBK.indd 54 18/06/2014 11:4518/06/2014 11:45

55
BALANCE
BALANCING CONTRASTING POINTS There are two clear points of interest balancing each other in the picture above – the ruined church and the rising sun – which contrast in several ways: size, brightness / contrast, simplicity / complexity of shape and texture. The church is larger, simpler in shape and has more complex texture, whereas the sun is higher contrast and a more complex shape. It seemed natural to place the larger shape closer to the centre of the frame and have the sun further from it. However, because of its brightness and shape the sun has a lot of visual weight, so it is better for it not to be too close to the edge or top of the frame.
Clearly, as we are dealing with the natural world the placement of objects such as the sun can be a matter of chance, although some control is provided by changes in viewpoint. Careful planning, which means researching locations, working out possible compositions in advance and calculating the position of sunrise is therefore necessary.
Because of the extreme contrast range in this scene, two exposures were made. The highlights were then blended into the main picture using layer masks in Photoshop. A small aperture was set to encourage the ‘starburst’ effect on the bright light source.
USING IMPLIED MOVEMENT FOR BALANCEThe two main points of interest on the image below are the distant islands on the horizon, and the elliptical boulder at the bottom right hand corner. At fi rst sight, the placement might seem counter-intuitive, as the boulder is large, bright and textured, arguably carrying more visual weight than the islands, yet is placed further from the centre. However, the shape of the boulder generates movement within the frame, pointing inwards and directing the eye to the islands, which form the main focal point. Thus, the boulder, despite being larger and brighter, plays the supporting role in this composition.
ALP-052-071-LVBK.indd 55ALP-052-071-LVBK.indd 55 18/06/2014 11:4518/06/2014 11:45

THE ART OF LANDSCAPE PHOTOGRAPHY
56
to this – certain scenes lend themselves very much to symmetry,
for example (see page 66). Having decided to place the subject
off-centre, the question is where exactly to place it. Obvious positions
are on an intersection of thirds (see page 58) or an intersection in a
golden section grid (see page 60), but there are many other options.
An interesting exercise is to fi nd a single object, surrounded by a
large amount of negative space, and experiment with placing it in
different parts of the frame. What at fi rst sight would seem to be
a fairly straightforward experiment can prove surprisingly complex,
as there are many options, not only regarding where to place the
subject, but also how large in the frame it should be.
Creating a bold composition, with the subject in the corner
or at the edge of the frame can create an interesting result, as the
natural tendency is for the eye to seek out a counterpoint in another
part of the frame to create balance. If there is no other object in
the frame, then the negative space itself becomes the counterpoint,
creating a sense of isolation and perhaps unease. This works well if
the space has some intrinsic interest – a textured sky, for example –
but is an approach that should be taken with some caution. Bold,
unconventional placement only really works well if it done with
good reason.
A sense of movement also has an infl uence on the placement of
the subject. If the subject is moving – or movement is implied – then
it seems most natural to have the subject moving or pointing into the
frame rather than out of it. In these situations, placing the subject
too close to the centre, or even adhering too strictly to the rule of
thirds or golden section can also be a mistake, as it can leave wasted
space away from the direction of movement. Instead, the most
natural place for the subject is further towards the frame edge.
PLACING THE MAIN SUBJECTA landscape photograph may not have a single, obvious subject
in the conventional sense. It may well be that the view itself
becomes the subject, but most successful compositions contain
a strong point of interest or ‘focal point’, such as a tree, dominant
hill or building. Placing the main focal point centrally in the frame
usually results in a rather static composition, as the eye tends to
go straight to the subject and is not encouraged to travel around
the frame. Simply placing the focal point off-centre will immediately
create more interest and dynamism, although there are exceptions
A SINGLE SUBJECTDeciding on the placement of a single subject can be a remarkably complex process, as there are numerous options for what is a fairly simple end result. In this case, positioning the post towards the left edge of the frame seemed to suit the scene, as it is counterbalanced by the large expanse of soft, textured sky. The post itself is straight, but its refl ection in the sea and wet sand is angled into the frame; further encouragement for placing the subject close to the edge. A long exposure simplifi es the scene further by smoothing out the texture of the water.
ALP-052-071-LVBK.indd 56ALP-052-071-LVBK.indd 56 18/06/2014 11:4518/06/2014 11:45

BALANCE
57
PLACING A MOVING SUBJECT When this swan started approaching from downriver, my initial thought was that the ideal position for it would be moving into the composition from the bottom right hand corner. However, it failed to follow the course I’d hoped, so I pressed the shutter when it was swimming towards the left hand edge of the frame, just past one of the divisions of thirds. On refl ection, this works better than the position I had hoped for: if the swan were at the bottom right quarter of the frame, the composition would be biased too heavily to the right side of the frame. As it is, the other focal point – the church – is a good counterbalance, creating a sense of harmony.
ALP-052-071-LVBK.indd 57ALP-052-071-LVBK.indd 57 21/05/2014 16:3421/05/2014 16:34
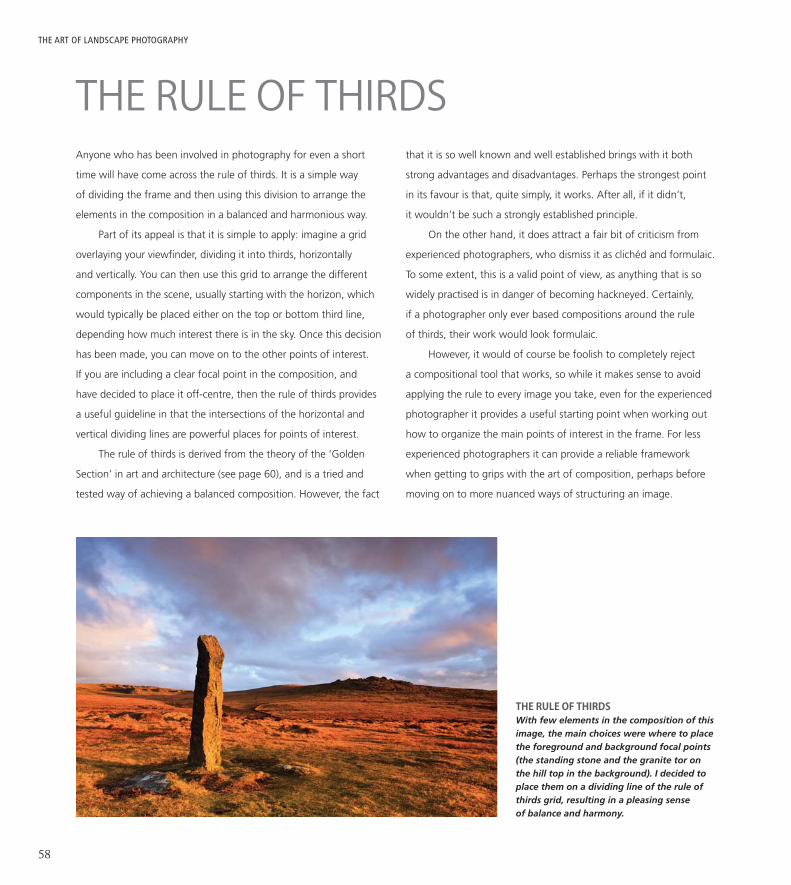
THE ART OF LANDSCAPE PHOTOGRAPHY
58
that it is so well known and well established brings with it both
strong advantages and disadvantages. Perhaps the strongest point
in its favour is that, quite simply, it works. After all, if it didn’t,
it wouldn’t be such a strongly established principle.
On the other hand, it does attract a fair bit of criticism from
experienced photographers, who dismiss it as clichéd and formulaic.
To some extent, this is a valid point of view, as anything that is so
widely practised is in danger of becoming hackneyed. Certainly,
if a photographer only ever based compositions around the rule
of thirds, their work would look formulaic.
However, it would of course be foolish to completely reject
a compositional tool that works, so while it makes sense to avoid
applying the rule to every image you take, even for the experienced
photographer it provides a useful starting point when working out
how to organize the main points of interest in the frame. For less
experienced photographers it can provide a reliable framework
when getting to grips with the art of composition, perhaps before
moving on to more nuanced ways of structuring an image.
THE RULE OF THIRDSAnyone who has been involved in photography for even a short
time will have come across the rule of thirds. It is a simple way
of dividing the frame and then using this division to arrange the
elements in the composition in a balanced and harmonious way.
Part of its appeal is that it is simple to apply: imagine a grid
overlaying your viewfi nder, dividing it into thirds, horizontally
and vertically. You can then use this grid to arrange the different
components in the scene, usually starting with the horizon, which
would typically be placed either on the top or bottom third line,
depending how much interest there is in the sky. Once this decision
has been made, you can move on to the other points of interest.
If you are including a clear focal point in the composition, and
have decided to place it off-centre, then the rule of thirds provides
a useful guideline in that the intersections of the horizontal and
vertical dividing lines are powerful places for points of interest.
The rule of thirds is derived from the theory of the ‘Golden
Section’ in art and architecture (see page 60), and is a tried and
tested way of achieving a balanced composition. However, the fact
THE RULE OF THIRDSWith few elements in the composition of this image, the main choices were where to place the foreground and background focal points (the standing stone and the granite tor on the hill top in the background). I decided to place them on a dividing line of the rule of thirds grid, resulting in a pleasing sense of balance and harmony.
ALP-052-071-LVBK.indd 58ALP-052-071-LVBK.indd 58 18/06/2014 11:4518/06/2014 11:45

BALANCE
59
the sun on the left third would have resulted in too little of the arch appearing in the frame and too much empty space at the right of it. If it had been positioned on the right third, there would be too much dark cliff at the left, too much empty beach and too little focus on the wave in the foreground. Therefore, in order to balance these features the only sensible option was to place the sun fairly centrally in the frame. With the clouds fanning out to the corners there is a certain symmetry to the top section of the frame, so this works quite well.
TIP: With modern digital SLRs and CSCs (compact system cameras) there
is no need to ‘imagine’ a rule of thirds
grid in the viewfi nder, as most have
an option that will overlay this (and
other grids) in the viewfi nder or on
the live view screen.
BREAKING THE RULE OF THIRDSNot all scenes will fi t neatly into a rule of thirds grid, or any other formal division of the frame. In this shot, the main focal point of the image is the sun, seen rising through the rock arch, which has been rendered as a starburst through the deliberate use of a small aperture.
Convention would have this point placed on an intersection of thirds, but there were other considerations when it came to composing this image. The arch, sky and the wave breaking on the shore are all key elements that need to be balanced. Placing
ALP-052-071-LVBK.indd 59ALP-052-071-LVBK.indd 59 21/05/2014 16:3521/05/2014 16:35

THE ART OF LANDSCAPE PHOTOGRAPHY
60
THE GOLDEN SECTIONThe rule of thirds (see page 58) is probably the best-known way of
dividing up the frame to achieve balance, but it is in fact derived
from a more complex ratio, which dates back to the ancient
Greeks, and was popularized in art during the Renaissance –
the Golden Ratio. The Golden Ratio is inherently harmonious,
occurring frequently in the natural world, and people of all cultural
backgrounds tend to fi nd attractive images and objects that
conform to the proportion. It is less widely known than the rule of
thirds and probably less well understood, but should (in theory at
least) provide an even more harmonious division. After all, the rule
of thirds is merely a simplifi ed version of it.
The Golden Ratio works like this: if you divide a line into
two parts so that the proportional relationship between the
smaller part and the longer part is the same as the proportional
relationship between the longer part and the whole length, then
you have divided the line according to the Golden Ratio. Expressed
mathematically, this proportion is approximately 1:1.618 – the
smaller and longer parts differ in length by a ratio of 1:1.618, as
do the longer part and the whole line. This ratio can be used to
divide the image frame. If you divide the frame into two rectangles,
so that the ratio of the small rectangle to the large one is the same
as that of the large one to the whole frame, you create a ‘Golden
Section’. This can be subdivided according to the same ratio, and the
result is a grid that looks something like a ‘squashed’ rule of thirds
grid. As with the rule of thirds, the intersections of the horizontal
and vertical lines are powerful places to position focal points.
The Golden Section is popular among artists, many of whom
will actually sketch the grid onto the canvas before they start
painting, but it’s a little harder for photographers to apply.
Firstly, the proportions are not as easy to visualize as a rule of thirds
grid. More importantly, even if you own a camera that allows you
to superimpose a Golden Section grid on the viewfi nder, you can
only work with what is in front of you: few scenes lend themselves
perfectly to a Golden Section arrangement.
THE GOLDEN RATIOThe proportional relationship between a and b is the same as between a and a+b – a ratio of 1:1.618.
THE GOLDEN SECTION GRIDThe image frame can be divided up according to the Golden Ratio to create a grid similar to the rule of thirds grid, with focal points being placed on the intersections of horizontal and vertical lines.
A
A+B
AB
A+BA
= = 1.618 =
B
Φ
ALP-052-071-LVBK.indd 60ALP-052-071-LVBK.indd 60 18/06/2014 11:4618/06/2014 11:46

61
BALANCE
GOLDEN SECTION IN PRACTICEThe key elements in this image are arranged according to the Golden Section. The division of land and sky is close to the upper horizontal dividing line and the white horse, spot-lit by the low sun, is almost exactly on an intersection of horizontal and vertical lines. This was not a conscious decision at the time of shooting, but was framed intuitively; it just looked ‘right’ in the viewfi nder.
ALP-052-071-LVBK.indd 61ALP-052-071-LVBK.indd 61 21/05/2014 16:3521/05/2014 16:35

THE ART OF LANDSCAPE PHOTOGRAPHY
62
However, being precise is not crucial; a composition can be
based loosely around the Golden Section and still be successful.
Alternatively, it can partly conform to the proportions. To a degree
we have control over where we place the focal points in an image,
and placing a focal point on an intersection of Golden Section lines
can create harmony, even if everything else in the composition does
not fi t exactly.
In many respects, it is probably best to treat the Golden
Section as an analytical tool. This is partly because of the diffi culty
involved in applying it consciously in the fi eld and also because
deliberately imposing it on a scene can result in ‘forced’ or contrived
compositions. Looking at a variety of images and seeing to what
extent they adhere to the proportions will naturally lead to a greater
familiarity with the proportions, with the likelihood that they will be
applied instinctively when composing images.
FIT THE GOLDEN SECTION While photographers can never have the same amount of control as painters do over where to place elements in the frame, careful selection of the viewpoint can have some infl uence. Through careful positioning of my tripod I was able to place two key components – the end of the headland and the end of the triangular group of rocks – very close to the vertical grid lines. The group of rocks at the bottom left of the frame also fall neatly into one of the sections of the grid, all of which makes for a harmonious arrangement.
ALP-052-071-LVBK.indd 62ALP-052-071-LVBK.indd 62 21/05/2014 16:3521/05/2014 16:35

63
BALANCE
ALP-052-071-LVBK.indd 63ALP-052-071-LVBK.indd 63 21/05/2014 16:3521/05/2014 16:35

THE ART OF LANDSCAPE PHOTOGRAPHY
64
THE FIBONACCI SEQUENCEIn the Fibonacci sequence you start with two numbers, 0 and 1.
Each subsequent number is the sum of the previous two, creating
the sequence 0, 1, 1, 2, 3, 5, 8, 13 and so on. The Fibonacci
sequence is closely connected to the Golden Ratio, in that the ratio
between any two consecutive numbers in the sequence is very close
to the Golden Ratio (for example, the ratio of 34 to 55 is 1:1.6176).
In fact, if you express the Golden Ratio as rational numbers, the
closest approximations are the numbers in the Fibonacci sequence.
It is possible to use the Fibonacci sequence to create an image
frame, as in the illustration shown here. This is very close to the 3:2
proportions of many digital SLR formats, making the grid very useful
for modern photographers when it comes to placing the elements in
a scene. It is claimed that the Fibonacci sequence occurs throughout
nature, which is why compositions based around it are inherently
ALTERNATIVE METHODS FOR ORGANIZING THE FRAMEThere are many valid possibilities for arranging the elements in
a composition beyond the rule of thirds and the Golden Section.
Two particularly interesting divisions, however, are closely related
to The Golden Ratio.
pleasing. However, there are those who argue that the frequency of
its appearance in the natural world is somewhat overstated. In any
case, the internal logic of a Fibonacci grid makes for an interesting
and harmonious arrangement.
THE FIBONACCI SPIRAL
If you use arcs to connect the opposite corners of the squares in
a Fibonacci grid, you get a Fibonacci spiral, as illustrated here. It
is also possible to create a spiral based around the Golden Ratio.
Although this is slightly different from the Fibonacci spiral, the two
are so similar as to be the same for all practical purposes. Again, this
is a shape that appears in nature (although perhaps not as often
as is claimed) and is an excellent way of organizing a composition,
particularly one that is based around arcs and curves.
3
5
8
2
1 1
ALP-052-071-LVBK.indd 64ALP-052-071-LVBK.indd 64 21/05/2014 16:3521/05/2014 16:35

BALANCE
65
THE GOLDEN TRIANGLEThe Golden Triangle is also related closely to the Golden Ratio.
Here you draw a line from the bottom corner of the frame to the
top. Lines are then drawn perpendicular to this line, into the other
corners. As a result, the frame is divided into two small and two
large triangles. The result is a frame division that works particularly
well if there are strong diagonal lines in the composition.
THE GOLDEN SPIRAL IN PRACTICE The ‘visual fl ow’ of this image correlates very closely to the Golden Spiral. The eye enters the image from the left and sweeps down around the bottom of the rock pool. It then explores the waves at the right hand side of the frame, before spiralling around to the background focal point – the sun rising over the ocean. Of course, the framing was intuitive and wasn’t planned around a Golden Spiral, but familiarity with the proportions helps make this sort of composition an instinctive choice.
A GOLDEN TRIANGLE GRID Golden Triangle grids work well when there are strong diagonal lines in a composition. In this image, the main diagonals of the channel and the cliffs broadly follow the diagonal lines of a Golden Triangle grid.
900
900
ALP-052-071-LVBK.indd 65ALP-052-071-LVBK.indd 65 18/06/2014 11:4618/06/2014 11:46

THE ART OF LANDSCAPE PHOTOGRAPHY
66
SYMMETRYBeginners in landscape photography (and photography in general)
are usually advised to avoid centring the main subject as this can
lead to dull, static images. However, symmetry is common in the
‘real world’, both in nature and in man-made objects, so it would
be a shame to ignore the compositional opportunities presented
by this type of balance.
Symmetry occurs when objects on one side of any imaginary
line are mirrored on the other side of the line. This line is often
referred to as the plane of symmetry. The human plane of symmetry
is vertical. As a result, we get a better feeling of balance from
images with a vertical plane of symmetry. That said, certain subjects
(such as refl ections in lakes) clearly lend themselves to symmetry
based around a horizontal plane. In minimalist images (see page
166) placing a single subject dead centre can work well, especially
when the image frame is square. Scenes with strong converging
lines (see page 94) are also very suited to symmetrical compositions,
especially if the lines converge on a single, strong subject.
When composing symmetrical images, precision is vital. If the
plane of symmetry is not properly centred, it will be immediately
obvious and discordant; there is no room for even the slightest
error. Furthermore, as well as the balance either side of the plane of
symmetry, we need to consider how the rest of the composition is
balanced. With a vertical line of symmetry, most images will appear
better balanced and more ‘stable’ if there is greater visual weight at
the bottom of the frame.
As well as horizontal and vertical symmetry, we can also fi nd
radial symmetry, where elements are arranged regularly around
a central axis. There are many examples of radial symmetry in the
natural world: the arrangement of petals on a fl ower, starfi sh
and sea anemones to name a few. It is far less common in the
landscape, but is worth looking out for, especially when framing
detail shots and ‘miniature landscapes’.
PLACING THE HORIZONPositioning the horizon so it runs across the centre of the
frame goes against the traditional guidelines of composition,
such as the rule of thirds and the Golden Section. There are,
however, occasions when it is perfectly natural to centre
it. One obvious example is when symmetry occurs along a
horizontal axis, as it does with refl ections in water.
It is also worth considering the psychological impact of
a centred horizon, as it can suggest stillness and tranquillity.
If there are other elements in the scene that convey this
atmosphere, such as the weather conditions, then a central
horizon is a good option.
When placing the horizon, you also need to consider
the overall balance of the composition and take a good
look around the frame to ensure the other components are
balanced. Sometimes this will only happen when the horizon
is centred, and this will be the best way to achieve overall
balance within the image.
ALP-052-071-LVBK.indd 66ALP-052-071-LVBK.indd 66 21/05/2014 16:3621/05/2014 16:36

67
NEAR SYMMETRYThe strong converging lines leading towards a central pole made a symmetrical composition the natural choice for this image. As with all images of this nature, it was important to be as accurate as possible with the framing. Using the grid lines on the camera’s LCD screen as a guide, I ensured that the pole was centred and that there was an equal amount of space between the railing posts and the left and right frame edges.
Other points had to be considered regarding the overall balance of the shot. Rather than centring the horizon, I placed it in the upper part of the frame, so that the pier would add weight at the bottom of the image, creating stability in the composition. The scene, of course, is not completely symmetrical (one bench is further away from the camera than the other), but this slight asymmetry works well, especially as the distant pier on the horizon provides a counterbalance to the nearest bench.
REFLECTIONS Refl ections in lakes and ponds lend themselves well to a symmetrical composition. This image is not truly symmetrical, however, as there is not an equal amount of space above the trees tops and below their refl ection. This was deliberate; I wanted to place a little more emphasis on the sky and the pre-dawn glow on the clouds, and liked the way the wispy clouds were drifting into the top corners of the frame.
ALP-052-071-LVBK.indd 67ALP-052-071-LVBK.indd 67 18/06/2014 11:4718/06/2014 11:47

THE ART OF LANDSCAPE PHOTOGRAPHY
68
by it. Unlike painters, who can add whatever number of objects
they want to a composition, photographers have to work with
what is there in front of them, which may be an even number.
The fundamental difference between composition in painting
and photography is that painting is an additive process, whereas
photography is subtractive: we start with everything that is in front
of us and then, via lens choice and viewpoint, try to exclude what
doesn’t benefi t the composition. While it may be possible to frame
a shot to crop out unwanted objects and follow the rule of odds,
doing so might upset the balance in other ways. Therefore it is
generally better to prioritize the arrangement of the elements in
the frame, even if this means ignoring the rule of odds.
THE RULE OF ODDSThe rule of odds is so straightforward that it’s surprising that it’s not
discussed more often in relation to photographic composition. Quite
simply, it states that odd numbers in a composition tend to be more
pleasing than even numbers. Of course, like all compositional ‘rules’,
it is not an absolute and there are plenty of examples of successful
images that ignore it. However, it’s worth spending a little time
examining the psychology behind it and considering why it might
be effective and when it is worth applying.
The rule of odds works because of the brain’s habit of trying
to fi nd shapes and patterns. One thing it will attempt to do is to
pair up objects. This is obviously not possible with an odd number,
which keeps the eyes moving around the image, resulting in a more
dynamic composition.
There’s a little bit more to it than odds and evens, though,
as certain numbers work better than others. Arranging objects
in threes works especially well, as in its quest to fi nd shapes, the
brain will usually join the points to make a triangle. Triangles are
particularly useful shapes in composition, as they invite the viewer
into the picture, encouraging the eye to explore and move around
the frame.
Depending on the arrangement, symmetry can also play a role
in the pleasing nature of odd-numbered objects. A central point
with evenly spaced objects around it creates a symmetrical balance,
and for this reason, framing a focal point with an even number of
objects can provide a satisfying balance.
Once the number of objects becomes too great the eye will
stop trying to arrange them into a single shape and will start to
perceive groups, patterns or lines. At this point odd numbers start
to lose their signifi cance and it becomes more important to look
at the overall shape or arrangement of objects than the number.
The rule of odds can be useful, but it’s advisable not to get obsessed
THREE ‒ THE MAGIC NUMBER Three is something of a ‘magic number’ in composition. In this instance, having two larger objects closer to the camera suggests a base for the triangle at the bottom of the frame. This helps to create greater visual stability, which is necessary with the strong sky above the stones. To see how important it is to have three standing stones rather than two, try covering the stone in the background and see how much weaker the composition becomes.
ALP-052-071-LVBK.indd 68ALP-052-071-LVBK.indd 68 21/05/2014 16:3621/05/2014 16:36

69
BALANCE
BREAKING THE RULE?The rule of odds is not one that can be adhered to particularly strictly, as so much is out of the photographer’s control – other than framing to exclude or include certain elements – and therefore is not worth obsessing about. In this instance, there were only two rock stacks in the scene, but it would have been ridiculous to have therefore decided not to take a shot. To balance the two stacks, I included a rock in the foreground, with a wave washing around it, which forms an implied triangle.
ALP-052-071-LVBK.indd 69ALP-052-071-LVBK.indd 69 18/06/2014 11:4718/06/2014 11:47

THE ART OF LANDSCAPE PHOTOGRAPHY
70
Using a portrait format works particularly well when there are acute
diagonal lines in the scene, as this orientation places emphasis on
these lines, creating a more dynamic composition. It is also the
simplest way of emphasizing a strong sky. If vertical movement is
present (or implied) in the scene, then portrait orientation would
again be the natural choice.
Of course, if you are in any doubt about whether to compose
a shot vertically or horizontally, the obvious thing to do is to shoot
both options. This is also a good habit to get into if you are working
professionally, as it gives options to picture editors and designers.
I have often found that when I’ve submitted portrait and landscape
versions of the same shot, the one that is chosen is not necessarily
the one that is stronger pictorially; from the designer’s point of
view, the best composition is the one that fi ts the available space.
CAMERA ORIENTATIONThe vast majority of photographs are taken with the camera in
a horizontal or ‘landscape’ orientation. The reasons for this are
simple: fi rst, the fi eld of human vision is horizontal and so this
way of framing a shot accords with our view of the world; second,
most cameras are designed to be held and operated in landscape
orientation (and in some cases are actually quite awkward and
uncomfortable to use in ‘portrait’ orientation). Of course, as
landscape photographers, our cameras will nearly always be
tripod-mounted, so this last point should be less of an issue.
If you only ever shoot in landscape orientation, not only will
your pictures become predictable and lack variety, but also you
will not always capture the scene in the most effective way – when
emphasis needs to be placed on foreground interest, for example.
However, as with all aspects of composition, turning your camera
on its side shouldn’t be something you do just for the sake of it.
It needs to be a considered decision, and there are many factors
that will infl uence whether a composition works better in landscape
or portrait format.
In general, a landscape format works best with a horizontal
subject; when there are strong horizontal lines in the composition;
or when there is horizontal movement (real or implied) in the frame.
As most landscape images feature a dominant horizontal line in
the form of the horizon, this is another reason why the majority are
framed horizontally. Landscape orientation also works best if you
are trying to suggest a sense of isolation and space in a composition
by placing a small subject in a large area of negative space.
Unsurprisingly, portrait format is more suited to vertically
oriented subjects or focal points, such as trees, tall buildings and
the like, or when there is a predominance of strong vertical lines
in the composition. However, vertical lines rarely exist in isolation,
and are often balanced in a scene by horizontal lines. In these
instances, landscape orientation can still provide a better balance.
VERTICAL MOVEMENTThis scene was a natural candidate for using a portrait orientation. With the strong vertical line of the main focal point, combined with the leading lines creating vertical movement through the frame, it is hard to imagine it otherwise.
ALP-052-071-LVBK.indd 70ALP-052-071-LVBK.indd 70 18/06/2014 11:4718/06/2014 11:47

BALANCE
71
LANDSCAPE OR PORTRAIT? My natural instinct when fi rst viewing this scene was to frame the image vertically. I was infl uenced by the strong leading line entering the frame from near the bottom left corner, implying vertical movement, as well as the strong vertical line of the side-lit church tower (the main subject). There was also a desire to make the most of the dramatic, stormy sky. As the light was so good, I decided to make sure that all options were covered, so experimented with different compositions, including one in landscape format.
On reviewing the images, I decided that the horizontal version had more appeal. Apart from the fact that the warmer light is slightly more attractive, there are some important compositional features that contribute to its success. Firstly, the shape of the hill is revealed better in the horizontal frame; the slope down to the bottom right corner is satisfying, and is cut off in portrait format. More importantly, there is a much better feeling of space in the landscape format composition. The vertical shot feels rather cramped, whereas the horizontal version emphasises the space around the church, showing it more fully in its dramatic location and creating a stronger feeling of isolation.
ALP-052-071-LVBK.indd 71ALP-052-071-LVBK.indd 71 21/05/2014 16:3721/05/2014 16:37

One of the fundamental challenges involved in being a
photographer is overcoming the fact that a photograph is
a two-dimensional representation of the three-dimensional
world: badly composed images can appear, quite literally,
‘flat’. However, our brain has to recreate three dimensions
from the two-dimensional image projected onto the eye’s
retina, so it is capable of doing the same thing when we
view a photograph. If we have a basic understanding of
how the human brain interprets perspective, then we can
use this knowledge to help us exploit these visual clues
in our photographs. In doing so, it will make it easier for
the viewer to perceive three dimensions on a flat print
or computer monitor. In this chapter we will look at the
different ways that we perceive depth, as well as how
viewpoint and lens choice can influence how we perceive
scale and depth in an image.
CHAPTER FOUR > DEPTH AND PERSPECTIVE
A SENSE OF DEPTH The impression of depth in this image is created in various ways. The most powerful of these is linear perspective, with the strong lines in the image converging towards a clear vanishing point on the horizon, marked by the distinctive shape of a rock stack. This has been exaggerated by getting in close to the nearest objects in the foreground with an extreme wide-angle focal length. The feeling of depth is also enhanced by the light-to-dark contrast, with lighter tones standing out from the dark shapes in the background, and also by the sense of movement created by the waves.
ALP-072-091-LVBK.indd 72ALP-072-091-LVBK.indd 72 21/05/2014 16:3821/05/2014 16:38

ALP-072-091-LVBK.indd 73ALP-072-091-LVBK.indd 73 21/05/2014 16:3821/05/2014 16:38

THE ART OF LANDSCAPE PHOTOGRAPHY
74
this can be counter-productive as it can introduce problems with
the amount of separation between elements in a composition.
The converging lines of linear perspective can be used to imply
movement into the frame, so linear perspective can be enhanced
by this feeling of movement: a fi gure coming in from a corner or
the fl ow of a river or a receding wave, for example, as in the picture
on page 73.
Closely related to linear perspective is ‘texture gradient’. Most
planes and surfaces, such as fi elds, oceans and roads, have texture.
As their surface gets further away from us, the texture appears to
become fi ner and smoother, providing a further depth cue. This
often combines with converging lines and planes to create a strong
impression of depth.
LINEAR PERSPECTIVELinear perspective is how the human eye judges distance, based on
the way in which elements in a scene apparently diminish in size the
further they are from us, and the angles at which lines and planes
seem to converge. Although lines that are parallel, such as railway
tracks or the sides of bridges, will appear to converge when viewing
them, we understand that they are in fact parallel.
Linear perspective is enhanced by the perception of diminishing
size (objects appear smaller the further away they are), so that if
you have a number of similar objects going away from the camera,
such as a line of trees, a strong impression of depth is created.
Closely related to this is the fact that the closer we are to objects,
the greater the distance between them appears to be. For example,
if there are two trees, one 10 metres behind the other, and we
stand one metre in front of the fi rst one, the gap between them will
seem quite signifi cant. However, if we view the same trees from 100
metres away they will appear much closer together.
We can use this effect to exaggerate linear perspective in a
photograph. By getting close to the nearest object in a scene and
using a wide-angle lens, the apparent distance between foreground
and distant objects will be greater than if we shoot the same scene
from further away with a telephoto focal length. Using a wide-angle
in this way creates a strong illusion of depth, and gives rise to
the notion that wide-angle lenses exaggerate perspective, while
telephoto lenses compress perspective. This is, however, untrue:
changing focal length simply changes the magnifi cation of objects
in the frame. It is the lens-to-subject distance that determines the
perceived relationship between the objects and thus the apparent
perspective, but in order to shoot a subject from closer in or further
away we need to change magnifi cation, which means changing
focal length.
Camera height also has an effect on linear perspective, as
the lower the camera, the greater the degree of convergence.
Therefore, the temptation is often to try and create a dramatic
perspective by attempting a ‘worm’s eye’ view of a scene. However,
WIDE-ANGLE PERSPECTIVEThere is strong linear perspective in this view of the end of a pier, created by two sets of converging lines – the railings and the bolt holes at the side of the plaques. The diminishing size of the plaques creates a strong sense of depth, enhanced by the extremely low camera angle. There is also a texture gradient, in both the planks, which become smoother the further they go into the distance, and the railings, whose pattern slowly takes on the appearance of fi ne mesh.
ALP-072-091-LVBK.indd 74ALP-072-091-LVBK.indd 74 18/06/2014 11:5618/06/2014 11:56

75
DEPTH AND PERSPECTIVE
TELEPHOTO COMPRESSIONAlthough there are elements of linear perspective in this shot, with the converging lines of the path leading into the middle distance, the overall impression is that it is ‘fl atter’ than the previous shot. This is largely because of the three layers of trees in the background. Although they form distinct planes, we get the impression there is very little distance between them. There is also very little apparent space between the trees and the foreground plane. This is because they have been photographed at a distance with a telephoto focal length. The choice of a longer-than-standard focal length has also magnifi ed the sun, making it loom large in the frame, which also creates the impression of the background being closer than it is.
ALP-072-091-LVBK.indd 75ALP-072-091-LVBK.indd 75 21/05/2014 16:3921/05/2014 16:39

THE ART OF LANDSCAPE PHOTOGRAPHY
76
THE VANISHING POINTFollowing on from linear perspective is the concept of the vanishing
point – the point at which parallel lines appear to converge. With the
camera level, horizontal lines will meet on the horizon and vertical
lines (if the camera is tilted upwards) will meet at a point in the
sky, possibly outside the image frame. Because of the traditions of
western art, most of us are familiar with vanishing point perspective
and it is a powerful way of conveying depth in two dimensions.
There are many examples of lines in the landscape that can be
used to create vanishing points: roads, paths, rivers, bridges, hedges
and plough lines in a fi eld to name just a few. Compositions can be
based around a single vanishing point or can include several, and
work well with either symmetrical framing or when based on the
rule of thirds or Golden Section grids. However, while vanishing
points can be useful for creating dynamic compositions, if they simply
lead the eye to a point on the horizon, the composition may not
maintain the viewer’s interest. It can be useful, therefore, to have
a strong focal point at, or slightly in front of, the vanishing point.
Wide-angle lenses can enhance linear perspective and this is
particularly true with vanishing point perspective, as they allow you
to include more of the lines in the foreground, as well as suggesting
greater distance between the foreground and the vanishing point.
Wide-angle distortion can also exaggerate the angles, further
emphasizing the feeling of depth.
Lines don’t have to be complete for the effect to work, either, as
the eye will usually continue to follow the lines to the vanishing point.
Nor do you always need physical lines; strong implied lines, such as a
row of trees, can also work in creating a distinct vanishing point.
FINDING A VANISHING POINT As well as roads and paths, bridges, jetties and piers make excellent subjects for vanishing point studies. In this case, the lines are not complete to the vanishing point, but from a compositional point of view it is preferable to have some separation between the end of the jetty and the refl ected mountains. There is no obvious single subject at the vanishing point, but there is plenty of interest on the distant shoreline to keep the viewer engaged and prevent the eye from wandering out of the frame. The symmetrical composition also helps: placing the vanishing point at the centre of the shoreline discourages the eye from moving out of the frame.
ALP-072-091-LVBK.indd 76ALP-072-091-LVBK.indd 76 21/05/2014 16:3921/05/2014 16:39

DEPTH AND PERSPECTIVE
77
HIGHLIGHTING THE FOCAL POINT In this shot, the converging lines are less strong. They are broken and fi nish somewhat short of the vanishing point, but there is a strong focal point in the distance, with the headland lit by the rising sun. Using an extreme wide-angle lens and a low viewpoint has focused attention on the lines in the immediate foreground, strengthening their visual impact. The eye is therefore quite happy to follow through to the vanishing point and focal point on the horizon. The focal point is further highlighted by the triangular shape of the dark cliff at the right of the frame, which acts as a strong ‘pointer’.
CONVERGING LINESBoth the cliff top and the narrow path provide converging lines in this image. The eye tends to follow the cliff top round to the right, rather than the converging lines towards the horizon, but the effect is powerful: a path leading to a sheer drop above the ocean suggests a ‘vanishing point’ of another kind.
ALP-072-091-LVBK.indd 77ALP-072-091-LVBK.indd 77 18/06/2014 11:5618/06/2014 11:56

THE ART OF LANDSCAPE PHOTOGRAPHY
78
the results are eye-catching, with a real sense of drama, so it is a
look that has been copied extensively – so much so that the ‘big
foreground’ landscape has more or less become a formal style.
Of course, the danger is that if this approach is followed
too often, the results become predictable and hackneyed.
Furthermore, it is not as simple as it fi rst seems. To apply it well
takes skill and attention to detail: it’s not just a case of fi nding the
nearest big rock and using it to fi ll the lower third of the frame.
A successful foreground has to complement the background while
the foreground, middle distance and background need to create
a cohesive whole.
When choosing a foreground focal point you need to pay
attention to the shape, size, angle, tone and texture of the object,
as well as any movement (actual or implied) in the frame. Bear
in mind that rectangular shapes tend to block the view, whereas
triangles encourage us to look into the picture. Foreground objects
FOREGROUND INTERESTA lot of space gets devoted to the subject of foreground interest
in books and magazine articles on landscape photography.
Understandably so, because the foreground is an important part of
composition: a good foreground can be one of the most effective
tools in our attempt to create the illusion of depth on a fl at surface.
The usual advice given is to ‘get in close to a strong foreground
element with a wide-angle lens to add depth and perspective’.
This seemingly straightforward piece of advice works well, because
this technique enhances linear perspective, as well as providing
an entry point into the composition for the eye. However, like all
compositional guidelines, it needs to be applied with a certain
amount of consideration.
It is a technique that was made popular by large format
photographers such as Joe Cornish, who exploited the movements
of their cameras to generate extreme depth of fi eld and get in
close to objects so they loomed large in the foreground. Done well,
LOW VIEWPOINTA low viewpoint places emphasis on the foreground, but can compress the middle distance and reduce the separation between key elements. In this case, getting down low causes none of these problems and was necessary to reduce the impact of a large expanse of emptiness in the middle distance. With the camera close to the foreground interest, linear perspective is enhanced and importance is given to the texture and pattern in the foreground, which helps lead the eye into the picture.
ALP-072-091-LVBK.indd 78ALP-072-091-LVBK.indd 78 21/05/2014 16:4021/05/2014 16:40

DEPTH AND PERSPECTIVE
79
work well if there is some tonal contrast with their surroundings,
and if they are angled so as to subtly lead into the frame and
highlight the background focal point. Objects that partially frame
the view are useful, as they help to direct attention into the image,
especially when there is a strong sky above.
Lines in the foreground can be particularly powerful, as they
can guide the eye and imply depth at the same time. Camera
height is also important. The temptation is often to get down
low, as this places more emphasis on the foreground, but it
increases the danger of making the foreground too dominant and
removing the separation between elements in the middle distance.
Therefore, it is important to remember that small changes of
viewpoint can have a big impact on how a foreground is conveyed
in a picture: experiment with variations in camera height and
distance from the subject until you fi nd the best balance.
THE ‘BIG ROCK’ FOREGROUND Rocks and boulders are a favourite foreground subject, especially for coastal shots, but it is necessary to give some thought as to how you compose a ‘big rock’ shot. In this case, without the water washing around the base of the rock, it would just be a dark mass in the foreground, lacking tonal separation from its surroundings. However, timing the shot so that a wave was washing back around the rock improves the foreground in three important ways: it provides tonal variation; it provides contrasting texture; and the fl ow of the water helps to compensate for the rather square rock, a shape that tends to block, rather than invite the viewer into the picture.
ALP-072-091-LVBK.indd 79ALP-072-091-LVBK.indd 79 18/06/2014 11:5718/06/2014 11:57

THE ART OF LANDSCAPE PHOTOGRAPHY
80
FOREGROUND OBSESSIONIt is easy to become obsessed by foreground interest. This is partly
because it is an easy compositional trick to get to grips with and
partly because the results can appear quite eye-catching when
done well.
However, it is a technique that is also easy to misapply.
A foreground element that doesn’t complement the background
adds nothing to a composition and, at worst, a poor foreground
can dominate an image, diverting attention from the view beyond.
There also seems to be an obsession with the ‘big’ foreground
– getting in as close as possible to an object and fi lling the frame
with it, often to the detriment of the rest of the image. It is always
worth reminding yourself that foregrounds don’t have to be big
to be effective, and that in the right circumstances it is not a
crime to leave the foreground empty – there are many other ways
of conveying depth and directing the eye into an image.
Certain images are better with less, rather than more
foreground. Panoramic images are perhaps the most obvious
example, as the eye will tend to scan across the frame, rather than
look into it from foreground to background. A sense of depth is
still important in panoramic images, but is perhaps better achieved
using other techniques. In scenes where there is little of interest
in the foreground, it is often better not to include it at all: if there
is a strong sky, a better option is to place emphasis here by tilting
the camera up.
Foregrounds don’t necessarily need to have an object in them
in order to contribute to the composition. Negative space can be
powerful, and in cases where there is appealing texture or a strong
refl ection it can actually be counterproductive to include a foreground
object, as this will break up the interest. The main thing is not to feel
obliged to place a focal point in the immediate foreground.THE SMALL FOREGROUNDIt is sometimes tempting to assume that foreground interest has to be big in order to be effective, but in this instance the foreground focal point is relatively small in the frame. However, without it, the eye wanders aimlessly around the foreground, without really settling and without paying much attention to the background focal point. As well as helping to provide a sense of scale and depth in the image, the shell also subtly directs the eye – the ridges on its surface guide our attention to the background focal point, the ‘dark sun’ rising through the clouds. The shell also ties together the background and foreground, by echoing the colours and tones present in the sky.
ALP-072-091-LVBK.indd 80ALP-072-091-LVBK.indd 80 18/06/2014 11:5718/06/2014 11:57

DEPTH AND PERSPECTIVE
81
CONVEYING DEPTHWe tend to scan across panoramic images, rather than look from front to back, so need to arrange the composition with this in mind. Having a clear focal point is particularly important, but the letterbox format doesn’t lend itself to having large objects close to the camera. Instead, depth needs to be conveyed using other means. In this case, a high viewpoint revealed the planes in the scene, and the mist lying in the valley helped to defi ne them. The impression of depth is there, even with the 3:1 aspect ratio.
EMPTY FOREGROUNDNot all foregrounds have to have an object or focal point. Here, I wanted to emphasize the snow on the beach – an unusual sight on the south coast of England. It might have been possible to hunt out a rock to use as foreground interest, but this would have broken up the expanse of snow, weakening the main point of the shot, so I opted to leave the foreground empty. A sense of depth is still conveyed in the image, though, even without a focal point in the foreground. The distinct layers in the image – snow, sand and sea – lead the eye through to the pier in the background, and the texture in the snow also helps to convey depth, as the texture becomes smoother further into the composition.
ALP-072-091-LVBK.indd 81ALP-072-091-LVBK.indd 81 21/05/2014 16:4121/05/2014 16:41

THE ART OF LANDSCAPE PHOTOGRAPHY
82
TILT AND SHIFTLarge format cameras allow you to use camera movements that can
help you gain extensive depth of fi eld and get in close to foreground
subjects in order to create the impression of depth. To make use of
the same perspective technique, users of smaller format cameras
need to shoot using small apertures and the hyperfocal distance.
There are, however, a couple of disadvantages to using a
small aperture and hyperfocal focusing, compared to using camera
movements. For a start, the use of a small aperture has an adverse
effect on image sharpness, due to diffraction (see page 46).
Also, while subjects at the extremes of the depth of fi eld will be
‘acceptably sharp’, this is not the same as being truly sharp, as only
objects on the plane of focus are truly sharp. There is an alternative
option for photographers using smaller formats, though: tilt and
shift lenses (see page 20) that replicate the movements of large
format cameras.
With a ‘normal’ lens, the plane of focus is parallel to the sensor
or fi lm plane and perpendicular to the lens axis. If the subject plane
is parallel to the plane of focus, then the whole subject can be
placed in focus, but if it isn’t then it is only truly in focus where the
two planes intersect.
With tilt and shift lenses (called tilt-shift lenses), however, it is
possible to use the Scheimpfl ug Principle (see box) to tilt the plane
of focus and place it along (or at least closer to) the subject plane.
In the case of most landscapes, the plane of focus needs be placed
on, or near to, the ground stretching out in front of the camera.
When a lens is tilted, a wedge-shaped depth of fi eld is created,
whose width increases further from the camera. By adjusting the
tilt and focus of the lens it is possible to ‘customize’ the location
of the depth of fi eld to suit the subject.
THE SCHEIMPFLUG PRINCIPLEA basic understanding of the Scheimpfl ug Principle, named
after its discoverer, Theodor Scheimpfl ug (1865-1911), will
help when it comes to using tilt-shift lenses accurately.
Put simply, if you tilt the lens, so that imaginary lines drawn
through the fi lm/sensor plane (A), the lens plane (B) and
the subject plane (C) meet at a single point, then everything
along the subject plane (C) will be in focus.
WITHOUT SCHEIMPFLUG
WITH SCHEIMPFLUG
Film/sensor plane
A B C
Subject plane
Depth of fi eld
Lens Plane
Film/sensor plane
A B C
Subject plane
Depth of fi eld
Lens plane
ALP-072-091-LVBK.indd 82ALP-072-091-LVBK.indd 82 21/05/2014 16:4121/05/2014 16:41

DEPTH AND PERSPECTIVE
83
TILT-SHIFT LENSES IN USEAlthough they have highly useful qualities, tilt-shift lenses can be
somewhat frustrating to use compared to using similar movements
with large format cameras (at least when using the tilt function).
In some situations, just a fraction of a degree of tilt can make a
signifi cant difference, but it is very diffi cult to adjust a lens by less
than half a degree with any accuracy. The easiest mistake to make
is setting too much tilt.
When calculating the amount of tilt necessary, you need to
know the perpendicular distance from the lens axis to where we
want to place the intersection of planes: the smaller the distance,
the greater the amount of tilt needed, and vice-versa. In real world
use, rather than measuring the distance, estimating it and then fi ne-
tuning by eye is probably the easiest way to go about things. There
are excellent depth of fi eld calculators for tilt-shift lenses online.
Having estimated the distance and set the required amount of tilt,
you can check the near and far points of focus using your camera’s
depth of fi eld preview, and fi ne tune tilt and focus as required. This
is most easily done by zooming in to a Live View image, rather than
trying to assess the effect through the viewfi nder.
SHARP FOREGROUND DETAILTilt-shift lenses allow you to get in close to foreground interest, while still keeping it sharp, in order to create an impression of depth and perspective in a photograph.
ALP-072-091-LVBK.indd 83ALP-072-091-LVBK.indd 83 21/05/2014 16:4121/05/2014 16:41

84
THE ART OF LANDSCAPE PHOTOGRAPHY
FRONT-TO-BACK SHARPNESS With tilt-shift lenses it is possible to keep the whole scene sharp, from the immediate foreground, through to infi nity, while shooting at or near to the lens’s optimum aperture setting. This makes it possible to get close to foreground interest and exploit linear perspective to suggest depth in a photograph, without having to compromise optical performance. These comparison shots show the difference between shooting at f/8 with no tilt (focusing at the hyperfocal distance), and at the same aperture with tilt applied.
Shooting at f/8, without tilt
ALP-072-091-LVBK.indd 84ALP-072-091-LVBK.indd 84 21/05/2014 16:4121/05/2014 16:41

85
DEPTH AND PERSPECTIVE
Shooting at the same aperture, tilt applied
ALP-072-091-LVBK.indd 85ALP-072-091-LVBK.indd 85 21/05/2014 16:4121/05/2014 16:41

THE ART OF LANDSCAPE PHOTOGRAPHY
86
COLOURPerspective can be intensifi ed through the use of colour and tone.
Warm tones seem to advance, whereas cool tones recede, so
choosing warm colours for foreground interest – especially if there
are cooler colours in the background – can increase the appearance
of depth. This effect can be strengthened further by having darker
tones in the foreground and lighter tones towards the horizon
(something that tends to occur naturally, due to aerial perspective).
LIGHT IN DEFINING DEPTHLinear perspective, foreground interest, relative size, texture gradient
and so on, all provide useful clues to help us perceive depth in
photographs, but their effects can be strengthened by shooting
in appropriate lighting and atmospheric conditions. In isolation,
light is not necessarily a strong indicator of depth, but when
combined with other perspective cues, a powerful impression
of depth can be created.
LIGHTWith fl at, diffused lighting there are no shadows, so the form and
volume of objects is hard to determine, making the scene appear
rather two-dimensional. Strong, directional light, however, casts
shadows that reveal texture and form, making objects appear more
three-dimensional. In a landscape, the distance between shadows
can help to suggest depth as well. Strong backlighting can also
work to convey depth by casting shadows in front of a subject;
these shadows can create converging lines that lead into the frame.
AERIAL PERSPECTIVEAlthough we consider the atmosphere to be invisible, this is not
really true. It contains fi ne particles of water vapour, dust and
pollution that scatter light, resulting in distant objects appearing
‘hazier’ – lower in contrast, brighter and with less colour saturation
– than near objects. This is known as ‘aerial’ or ‘atmospheric
perspective’ and it provides us with another means of suggesting
depth and distance in a photograph. The effect is stronger the
more distant the object is, and it can be enhanced by shooting
distant scenes with telephoto lenses. Again, it is subtle when used
as a perspective device on its own, but is particularly useful when
photographing compositions based around layers and planes
(see page 102).
VOLUME PERSPECTIVEObjects in photographs are given ‘volume’ – or a more three-dimensional look – when the light is directional. This is particularly true when photographing buildings in the landscape. In this shot of a chapel close to a cliff edge, the light is from the side and slightly in front of the building. The result is that the front of the chapel is lit and the side is in shadow, giving the structure a three-dimensional look. Depth in the composition is also suggested by the heavy sky; photographed with a wide-angle lens the clouds appear to funnel into the frame, towards the horizon.
ALP-072-091-LVBK.indd 86ALP-072-091-LVBK.indd 86 21/05/2014 16:4221/05/2014 16:42

DEPTH AND PERSPECTIVE
87
AERIAL PERSPECTIVEIn this photograph, the tones go from dark to light into the distance. Combined with atmospheric haze in the background this gives a strong feeling of depth, which is increased by the clear planes in the composition, the overlapping shapes and the strong directional lighting.
COLOUR PERSPECTIVEThe warm tones of the poppies in the foreground stand out from the green tones surrounding them, and the cooler tones on the horizon recede to subtly suggest a feeling of depth. Linear perspective is also exploited in this composition, through the use of converging lines that reach a vanishing point on the horizon.
ALP-072-091-LVBK.indd 87ALP-072-091-LVBK.indd 87 21/05/2014 16:4221/05/2014 16:42

THE ART OF LANDSCAPE PHOTOGRAPHY
88
on how the planes in a photograph are shown, especially with
wide-angle lenses: a high viewpoint reveals the planes and opens
up the middle distance, while a low viewpoint does the opposite.
With an empty middle distance, it can sometimes be useful to
reduce its impact by shooting from low down, but care must be
taken to ensure there is enough separation between the key points
of interest in the scene; if foreground and background elements
merge together, perspective effects are weakened.
Because of the popularity of the ‘big rock foreground’ style
of landscape, many photographers are in the habit of setting the
camera up very low, placing emphasis on the foreground, but in
many cases, a higher viewpoint will often provide better balance
and depth (if perhaps a little less drama).
Having decided on the best height to shoot from, it’s worth
taking a look around the frame to see if separation between any
other elements can be improved – sometimes a small movement
left or right can make a big difference. Of course, separation
can’t always be achieved, and not everything in the frame needs
it. Sometimes, overlapping forms can be used to suggest depth,
especially if they are similar shapes, such as a range of mountains.
VISUAL SEPARATIONComposition is largely about organizing the elements in the frame
so that balance and harmony are achieved. Fundamental to this is
making sure that each element sits in the right amount of space.
Camera height plays the major role in attaining this, especially when
it comes to achieving visual separation between key elements in the
scene. This might sound like a basic consideration, but failing to
achieve separation is a frequent error, especially among newcomers
to landscape photography.
Visual separation is related to depth perception because of
the two-dimensional nature of photographs; without separation it
is easy for objects on different planes to merge into one another.
We are all familiar with the phenomenon of a portrait photograph
with a tree or pole sprouting from the subject’s head. In landscape
images, the result of not separating the elements suffi ciently can
be a lack of depth in the composition.
Camera height is so important when it comes to effective
composition that it is surprising that it is not discussed more often.
In fact, apart from the advice occasionally given about adding
drama to a composition by shooting from a ‘worm’s eye’ viewpoint,
it rarely seems to crop up at all. However, it has a profound effect
VISUAL SEPARATIONFor this image, the camera height was critical: too high, and the middle distance would appear too empty, too low, and the top of the fence would merge with the refl ections of the mountains in the background. There were other considerations with the placement of the fence, which is necessary to create linear perspective and lead the eye into the frame. If it was not positioned far enough into the frame it would leave too much empty space in the middle; too far into the frame and it would lead the eye out of the shot on the left hand side. I therefore chose to place it fairly centrally, rather than on a third.
ALP-072-091-LVBK.indd 88ALP-072-091-LVBK.indd 88 21/05/2014 16:4221/05/2014 16:42

DEPTH AND PERSPECTIVE
LOW VIEWPOINT It is often tempting to take a low viewpoint, especially when there is interesting texture in the foreground. This isn’t always the best option, though, as these two images demonstrate. In the image on the left the rock merges with the woodland in the middle distance, reducing the feeling of depth in the composition. However, moving forward half a metre and raising the tripod just a few centimetres is all that it took to improve the separation between the foreground and middle distance in the image on the right, creating a far better sense of perspective.
Less depth Greater depth
89
ALP-072-091-LVBK.indd 89ALP-072-091-LVBK.indd 89 20/06/2014 12:2020/06/2014 12:20

THE ART OF LANDSCAPE PHOTOGRAPHY
90
USING NATURAL FRAMESFraming the main subject with a natural frame, such as overhanging
branches, is a popular technique, but it remains a useful way of
focusing attention on the subject, and keeping a composition tight.
Furthermore, by directing attention within the frame and providing
a separate foreground plane, it can enhance depth perception. The
right frame in the foreground can also provide linear perspective.
OTHER TIPS AND TRICKSWe have looked at the main ways of creating the illusion of depth
in photographs, with linear perspective being perhaps the most
powerful technique. There are, however, a few more ‘tips and tricks’
that are worth a mention.
CREATING A SENSE OF SCALEIt can sometimes be diffi cult for a photograph to convey the scale
of the landscape. This can be particularly true of mountainous
landscapes, where a lot of the drama depends on an understanding
of the size of the peaks. Including an object of a known size, such
as a tree, a building or a person, provides the viewer with a point
of reference that helps them to understand the scale. If the object
is at a distance, and small in the frame, the scale of the surrounding
landscape will be emphasized further.
A SENSE OF SCALEWhen shooting a sweeping vista with a wide-angle lens, it can be diffi cult for the viewer to understand the scale involved in the scene, especially with mountainous landscapes. Placing an object of a known size in the frame, such as the hawthorn tree in this shot, gives the viewer a point of reference. It was important to have the tree clearly separated from the background, so I waited for the mist in the valley to drift into the right position behind the tree before making the exposure.
ALP-072-091-LVBK.indd 90ALP-072-091-LVBK.indd 90 18/06/2014 11:5718/06/2014 11:57

91
USING LIVE VIEWMost digital SLRs now have Live View, where a real-time preview of
the image is provided on the rear LCD. This has several advantages
over using a traditional optical viewfi nder. As well as being useful
for accurate manual focusing and seeing the effects of exposure
adjustments, it also allows you to see your composition as a two-
dimensional image, rather than the three-dimensional view you
get through the viewfi nder. This allows you to judge how well
your composition will convey a sense of depth in the photograph
and gives you the opportunity to make adjustments and fi ne-tune
your framing before pressing the shutter. If your camera does not
have Live View, then image review allows you to make the same
assessment after the fact and re-compose and re-shoot if necessary.
FRAMES WITHIN THE FRAME The road running through the frame and the shadows in the immediate foreground creates linear perspective in this image. The overhanging branches force attention down onto the road, and also enhance the feeling of depth by creating a separate plane in the foreground. The tonal transition from a dark foreground to a light background provides a further perspective cue.
ALP-072-091-LVBK.indd 91ALP-072-091-LVBK.indd 91 21/05/2014 16:4321/05/2014 16:43

It may seem strange to think of geometry with regard to
landscape photography – geology or geography seem
much more relevant disciplines. However, geometry plays
a really important part in the composition of landscape
photographs. An understanding of the role of shapes and
angles is fundamental to composition; after all, the basis
of composing an image is creating order out of chaos, and
using shapes is one of the most effective ways of doing
this. Shapes, lines and angles help determine the mood
of an image, influencing whether an image is perceived
as dynamic or static, disturbing or restful, inviting
or distancing.
The landscape’s geometry can also be employed to
guide the eye through the picture, highlighting key parts
of the frame, yet the importance of such things is easily
overlooked. In this chapter we will explore how subtle
elements, such as lines, corners, shapes, layers, planes
and movement can enhance your landscape images.
CHAPTER FIVE > THE GEOMETRY OF COMPOSITION
GEOMETRY IN THE LANDSCAPEGeometry plays an integral role in the composition of this image. The path in the foreground is a strong, curving line, which pulls the eye into the heart of the picture. A combination of viewpoint and atmospheric conditions work together to defi ne the foreground as a separate plane, and the mist suggests further planes in the middle-distance and background. The trees at either side of the path help prevent the eye from wandering out of the sides of the frame, focusing attention back into the image.
ALP-092-107-LVBK.indd 92ALP-092-107-LVBK.indd 92 21/05/2014 16:4421/05/2014 16:44

ALP-092-107-LVBK.indd 93ALP-092-107-LVBK.indd 93 21/05/2014 16:4421/05/2014 16:44

THE ART OF LANDSCAPE PHOTOGRAPHY
94
needs consideration, as this has a powerful impact on how the eye
interprets the scene. How the lines within the frame are arranged
can imply tension or harmony, can contain the eye within its
boundaries or direct it outside.
While lines are one of the primary components of artistic and
photographic design, it is unusual for them to actually become
the subject of a composition, in the way that say, foreground
interest can. Attempts to do so often result in an image that seems
somehow unsatisfactory: whilst very strong supporting players, lines
are rarely suited to a leading role.
LINESWhen we compose a photograph, we usually have in our mind
– consciously or subconsciously – an idea of how we want the
viewer to look at the image. For example, we might expect them
to scan the image from left to right, or bottom to top, pausing at a
particular focal point before perhaps moving on to study the details
in the background.
While it’s not possible to force the viewer to look at an image
in a particular way, we can certainly encourage them to, and lines
are powerful tools that we can employ to achieve this. The eye will
seek out structure in an image and will naturally want to follow
lines, particularly if they lead to obvious focal points. The good
news is that lines are everywhere in the landscape. They can be
man-made, such as roads, paths and hedges, or natural, such as
rivers or the shoreline. Lines don’t necessarily have to be ‘real’,
either. Someone’s eye line can create an implied line: if there is
a person in the shot, we will tend to follow their gaze on the
assumption that what they are looking at must be interesting.
To an extent, we can also create lines with our choice of
equipment. The distortion of ultra wide-angle lenses in the corners
and at the edges of frames can stretch objects, exaggerating
angles and creating lines that perhaps the naked eye might not
perceive. To make the most of this effect, you need to get in close
and low to foreground objects.
There are different types of line, which create different
effects and contribute in different ways to the overall mood of a
composition; converging, vertical, diagonal, zig-zags, arcs, curves,
S-curves and so on. Depending on the nature of the line it can inject
energy into an image, or suggest feelings of tranquillity. Lines also
relate to a fundamental element of composition – contrast – as it is
usually contrast that defi nes them: contrast between light and dark,
one tone and another, or different textures.
Of course, the picture frame itself consists of four lines –
two horizontal and two vertical – and the way in which the lines
contained within the frame interact with it and each other also
LINES AS SUBJECTLines rarely make good subjects on their own, often resulting in a feeling of dissatisfaction. Perhaps it because of a sense of frustration that can be caused by being guided through the picture without being taken to a focal point for the eye to rest on, but points, rather than lines, generally make better subjects for a minimalist treatment.
ALP-092-107-LVBK.indd 94ALP-092-107-LVBK.indd 94 21/05/2014 16:4521/05/2014 16:45

95
THE GEOMETRY OF COMPOSITION
LEADING THE EYEThere are strong lines in this image, and at fi rst glance the design is straightforward: our gaze is drawn along the railings entering the frame at the bottom right hand corner, which lead us to the fi gure at the end of the pier. However, there is a little more going on. First, there is the implied eye line of the man on the pier, and we follow this to the sun, watching it as it just breaks the horizon. The rising sun is a small, but powerful focal point, which is subtly highlighted by the lamppost that seems to point towards it. The viewpoint and slight wide-angle distortion has created the illusion that the bar beneath the lamp is angled downwards, creating a line towards the man watching the sunrise. Therefore, the lamppost acts not only as a framing device, but also as a ‘pointer’ to highlight a key focal point.
There are numerous other lines in the image – horizontal, vertical and diagonal – many of which interact, with the horizontal and vertical lines working together to create a sense of equilibrium and balance. Attention has been paid to how the lines in the composition fi t together: for example, the street lamp sits perfectly between the upright railings of the pier, and where possible, the knobs on the foreground railings sit within the panels of the shelter.
ALP-092-107-LVBK.indd 95ALP-092-107-LVBK.indd 95 18/06/2014 12:0018/06/2014 12:00

THE ART OF LANDSCAPE PHOTOGRAPHY
96
DIAGONAL LINES
Diagonal lines work against the direction of the verticals and
horizontals of the picture frame, introducing a slight sense of tension
and dynamism into an image. Wide-angle lenses and viewpoint can
be used to exaggerate and exploit diagonal lines in a composition
– and even create them to some extent. As well as creating the
impression of speed and movement, diagonal lines also lead the
eye into a composition and imply depth and perspective. Being so
dynamic, they work best when leading the eye to a focal point;
otherwise the danger is that the eye is led quickly out of the frame.
Zig-zag lines are essentially diagonal lines with a change of
direction. They can be very powerful and dynamic, but again are
perhaps best used when guiding the eye to a strong focal point.
Converging lines are another diagonal line variant, which lead
the eye quickly into the frame and often to the ‘vanishing point’
of the composition. Again, they should be used with caution, as it
is very easy to lead the viewer straight out of the picture: having
suffi cient interest in key parts of the frame is important.
CURVES AND ARCS
Curves and arcs are more dynamic than horizontal lines, but gentler
and more fl owing than diagonals. They are excellent for taking the
viewer on a smoother, more serene journey through the frame,
where you would like them to be more inclined to pause and study
details along the way.
Like zig-zag lines, ‘S-shaped’ curves are particularly strong
graphic elements, which also add a sense of rhythm and movement
to a composition.
TYPES OF LINELines are excellent tools for guiding the eye through a picture and
drawing attention to key points in the image, but they can do far
more than that: they can enhance mood and atmosphere, and
suggest dynamism or stability. An awareness of how this works is
important, as lines can be made to work with other elements of
a composition.
HORIZONTAL LINES
Horizontal lines suggest stability and tranquillity. Our eyes naturally
scan horizontally and our fi eld of vision is biased towards the
horizontal, so horizontal lines in a composition complement this
and seem naturally restful. Furthermore, an expansive horizontal
line – the horizon – dominates most landscape scenes. Any other
horizontal lines in the composition will be in harmony with the
horizon, thus creating a feeling of calm.
VERTICAL LINES
The main connotations of vertical lines are growth – trees and
plants grow vertically upwards, for example – or strength and
power (an object fi ghting against the force of gravity, for example,
or columns supporting a structure). If the main subject is a strong
vertical, it is most natural to frame the shot vertically, although
a horizontal composition can also be effective, especially if there
is a horizontal line complementing the vertical. Where there is a
horizontal line as well, this can create a sense of balance, suggesting
support and stability. Complementary vertical and horizontal lines
can work well together in compositions based around the rule of
thirds or Golden Section.
ALP-092-107-LVBK.indd 96ALP-092-107-LVBK.indd 96 21/05/2014 16:4521/05/2014 16:45

97
THE GEOMETRY OF COMPOSITION
EQUILIBRIUM The dominant line in this shot is the strong vertical of the beech tree, but as this is balanced by the obvious horizon line and the horizontal lines of the hill-tops I decided that landscape orientation would be most appropriate. This also allowed me to include the sun in the frame as a distant focal point. Geography and viewpoint determined the composition to some extent – I couldn’t include both foreground and the top of the tree – so it wasn’t possible to arrange the composition strictly according to the rule of thirds. However, the tree is placed close to a vertical third, and the sun is also near an intersection of thirds. The strong sky makes the low-placed horizon a justifi able compositional choice.
ARCS Although this could be viewed as a collection of horizontal and vertical lines, the predominant shape of the structure is an arc. I positioned myself carefully to make the most of the shape, whilst aiming to keep some separation between the front three posts of the pier. Moving the camera to the right would have given more emphasis to the arc, but not enough separation of the posts, while moving further to the left would have make the arc more of a semi-circle, and the composition more static. As it is, the eye scans the arc and is then directed out of the frame, creating an air of mystery and romance that suits the decaying subject matter. A straight diagonal line would not work as effectively in this composition, as it would create too fast a movement through the frame; the eye needs to travel fairly slowly along the remains of the old pier.
ALP-092-107-LVBK.indd 97ALP-092-107-LVBK.indd 97 21/05/2014 16:4521/05/2014 16:45

THE ART OF LANDSCAPE PHOTOGRAPHY
98
CORNERS AND ‘POINTERS’With various ‘rules’ telling us to place important elements of an
image on specifi c lines or the intersection of lines, it can be very
easy to forget about other parts of the frame, including the corners.
However, in a well thought out composition, all parts of the frame
are important, and the corners can play a vital role in creating
balance and guiding the eye.
Generally speaking, we want people to look into the picture
frame, and having subtle guiding lines – or ‘pointers’ – at the
corners of images is one way to direct attention inwards. Foreground
elements such as stones, tree roots or wave patterns are easy
enough to fi nd, but it can be diffi cult to fi nd pointers for the top
corners of the frame. Tree branches and parts of structures can be
used, but much of the time, clouds are the only option. Patience and
anticipation are key here. Frame a scene with a view to how it will
work when the clouds have drifted into a particular position, and
then wait for that moment before pressing the shutter. Creative use
of exposure can help – extending the shutter speed by using an ND
fi lter can record cloud movement and enhance the shape of clouds
as they fi ll the corners of the frame.
Corners also become important if you compose a scene
according to the Golden Spiral, as the ‘sweet spot’ is close to the
corner – approximately one quarter of the way in from the frame
edge in both planes. In western culture, this spot towards the
bottom right corner is particularly signifi cant because we read left
to right and top to bottom, so this is where our eyes pause before
we turn a page. If we ‘read’ images in the same way that we read
text, then it is a natural place to position a strong focal point.EXPOSURE TIMEThe foreground interest in this shot is fairly obvious, with the rocky ledges leading in powerfully from the corners and directing attention towards the headland; the rock rising from the sea towards the right hand edge of the frame provides a counterpoint to the main focal point. Again, the sky has an important role in holding the composition together. The clouds provided plenty of interest and a useful contrast in texture to the water. The main diffi culty was in determining the best length of exposure – I wanted to blur the waves washing over the rocks, to create a contrast in texture, but if the exposure was too long, the clouds would move during the exposure and the mackerel sky would lose its shape.
ALP-092-107-LVBK.indd 98ALP-092-107-LVBK.indd 98 21/05/2014 16:4621/05/2014 16:46

THE GEOMETRY OF COMPOSITION
99
POINTING IN The boats at the bottom of the frame provide strong lines in this image, directing the eye into the frame. These lines are mirrored by the jetty and posts behind them. The darker clouds at the top corners of the frame also push the viewer’s attention inwards and towards the autumn colours on the trees and mist-shrouded mountains in the background.
ALP-092-107-LVBK.indd 99ALP-092-107-LVBK.indd 99 21/05/2014 16:4621/05/2014 16:46

THE ART OF LANDSCAPE PHOTOGRAPHY
100
TRIANGLESTriangles are probably the strongest shape in composition, and are
easy to fi nd or imply: if there are three points of interest, the eye
has a naturally tendency to see them as a triangle. Triangles are
very dynamic and are useful for leading the eye into the picture.
With the base at the bottom of the picture frame, they suggest
stability; with the apex at the bottom, they imply imbalance.
Similar to a triangle is the V-shape, which can be used as a
framing device at the bottom of the image. A little more subtle
than a ‘frame within the frame’, a V-shape can help draw
attention towards a focal point and create a sense of structure
and organization. The effect is increased if there is a strong sky
above the landscape to frame the view at the top.
CIRCLESCircles and ovals occur relatively frequently in the natural world –
in fl ower heads, ponds, rocks and pebbles, for example – although
they are diffi cult to imply. They create a certain amount of
movement, as the eye will travel around them, and psychologically
they suggest completion. Circles also have a ‘containing’ effect
that makes them a useful framing device. When using circles in
composition, it is generally best if they are complete, although
the eye will tend to complete an almost complete circle.
SHAPESExploiting shapes is a fairly obvious way of imposing structure within
a landscape scene. There will often be clearly identifi able shapes
in the landscape, but don’t restrict yourself to picking out these
– also look at the relationships between different objects and how
these can work together to imply shapes. As with lines, shapes
can help to guide the viewer around the image, but they also have
certain connotations that can infl uence the perceived atmosphere
of a photograph.
RECTANGLESRectangles are rare in nature, but common in man-made objects.
Therefore, you’re far more likely to fi nd yourself working with
rectangles when dealing with architecture or urban landscapes.
Rectangles can be useful for subdividing the frame to create a
‘frame within a frame’, as they echo the shape of the frame of
the photograph.
Psychologically, rectangles represent solidity. They are static
and unmoving, so a solid rectangle will block a view, rather than
encourage the eye into the picture. You should therefore be careful
of using a rectangular object in the foreground, but if you have to,
try to place it at an oblique angle so that it leads the viewer into the
frame. This can be very effective if you get in close and low with a
wide-angle lens.
Conversely, placing a rectangle in the background – front-on
to the camera – can be a useful way of stopping the eye travelling
out of the frame. This can be useful for controlling the effect of
powerful diagonal or converging lines.
IMPLIED TRIANGLEThis simple, but effective, composition is based around an implied triangle. Wide-angle perspective has created converging lines from the tracks in the fi eld, and the bottom edge of the frame makes up the base of the triangle. The bold, dynamic composition pulls the eye into the frame, but implies stability and solidity.
ALP-092-107-LVBK.indd 100ALP-092-107-LVBK.indd 100 21/05/2014 16:4621/05/2014 16:46

THE GEOMETRY OF COMPOSITION
101
TRIANGULAR ARRANGEMENTAlthough the foreshore is covered in round boulders, it is not circles that make up the dominant shape in this image. Instead, the water sitting in the foreground creates a triangular arrangement in the group of rocks, which results in a strong, graphic composition. The background focal point – the castle – sits inside a Golden Spiral (see page 64) and its rectangular shape prevents the eye from leaving the frame.
ALP-092-107-LVBK.indd 101ALP-092-107-LVBK.indd 101 21/05/2014 16:4621/05/2014 16:46

THE ART OF LANDSCAPE PHOTOGRAPHY
102
lenses. A high viewpoint can open up the planes in the middle
distance, potentially increasing separation, but can result in too
much empty space. One way of reducing the impact of an empty
middle distance is to shoot from a low viewpoint, but when doing
this care needs to be taken to keep enough separation between
the planes in the image.
Using the foreground as a framing device can also help to set
it apart as a separate plane, and both your choice of foreground
and camera height are important here. Seek out a foreground that
can be used to enclose the planes beyond – V-shapes and U-shapes
work well – and experiment with your camera height to see what
gives the best effect, keeping an eye on the impact this has on the
separation of other elements in the frame.
Layers are not always the same as planes: layers can be strips
of different colour or texture, or any elements stacked on top of
each other. In a more minimalist composition it could simply be the
layering of land, water and sky. In a wide-angle composition, the
different layers can help suggest depth, especially if there are other
perspective clues, but arguably this type of layering works best in
tightly framed, more abstract images.
LAYERS AND PLANESDividing the image into separate planes, or layers, is a technique
originally developed by landscape painters to create the impression
of depth and direct the eye. However, this technique translates well
to photography, and the effect can be enhanced by your choice of
viewpoint and focal length.
Layers can be created by overlapping shapes, such as ranges
of hills, or strong side lighting, which creates alternate bands of
light and shade. The stronger the tonal contrast, the more clearly
the planes will be separated. A dark foreground with a lighter
background creates the strongest impression of depth, as we
generally look at the foreground fi rst, but the eye is then drawn
to the lighter background, helping to suggest depth in the image.
Aerial perspective can enhance the look and the effect is strongest
in hazy, misty or foggy conditions. This is a technique that works
particularly well with longer focal lengths, which exaggerate the
layered effect by ‘stacking’ overlapping forms.
Camera height can be especially important when working
with layered images as it has a major impact on the separation
of the different elements in the frame (see page 88) including the
planes, and this is particularly true when shooting with wide-angle
SEPARATE PLANESThe mist has helped separate the planes in this image by creating bands of light and dark, while the 200mm focal length has helped to ‘stack’ the layers. The strip of foreground is important in the image – try covering it with your hand to see the difference its absence makes. The mist disconnects it from the background, making it a distinctly separate plane, but the amount of foreground is also important – too much and it dominates the image, too little and it fails to register as a plane. I experimented with many slightly different crops of this image, fi nally settling on the version seen here.
ALP-092-107-LVBK.indd 102ALP-092-107-LVBK.indd 102 21/05/2014 16:4721/05/2014 16:47

103
THE GEOMETRY OF COMPOSITION
FOREGROUND PLANE The drystone wall framing the view beyond creates a distinct plane in the foreground. The effect could have been heightened by dropping the camera down slightly lower, so that the wall rose slightly higher than the horizon, but I felt that this would not have left enough of the fi rst fi eld visible behind the wall. The lighting conditions have defi ned the planes further, with the fi eld lit and the hill behind in shade. Further layering in the image is created by the sky, which is divided into two distinct layers; the dark, stormy clouds sitting over the lighter band on the horizon.
ALP-092-107-LVBK.indd 103ALP-092-107-LVBK.indd 103 21/05/2014 16:4721/05/2014 16:47

THE ART OF LANDSCAPE PHOTOGRAPHY
104
In the west, we read text from left to right and top to bottom and
there is an argument that we should encourage the viewer to scan
images in the same way. However, there is also a tendency to look
fi rst at the foreground of a landscape, which is usually located at the
bottom of the frame, and for our eyes to then move upwards as they
scan through the middle distance towards the background.
For this reason, encouraging the eye to enter the picture at
the bottom left corner, and then sweep upwards and to the right,
can be very effective. However, a strong composition can lead
the viewer in any direction on the image, and working against
such natural tendencies can create a sense of tension that can be
successful in many compositions.
The judicious use of space and ‘negative space’ (see page
166) in the design of an image can also encourage eye movement,
especially if there is actual movement shown within the frame.
The eye will naturally follow the direction of the movement and
travel ahead of it into any space that is there. In coastal scenes,
waves are excellent for this, especially if you can catch the backwash
of a wave as it sweeps back towards the sea, leading the eye into
space in the middle distance.
MOVEMENT AND FLOWWhen describing composition, ‘movement’ does not necessarily
refer to how we capture motion in a still image (although this can
certainly be part of it), but rather to eye movement and how the
eye explores the image. Most of the time, artists and photographers
want the viewer’s eye to move smoothly through the composition,
without being interrupted, until it reaches a natural ‘stopping
point’. This is usually the main subject, or in a scenic shot where the
landscape itself is the subject, the focal point. To avoid confusion,
some people prefer the term ‘fl ow’, as it better describes how we
would like the viewer to see our compositions.
As you’ve seen, geometry plays an important role in directing
the eye and creating this visual fl ow, through the careful use and
placement of lines, arcs, shapes and planes. So, which path is the
best one to lead the viewer through an image? Of course, it is fi rstly,
extremely subjective, and secondly, entirely dependent on what is in
the scene in front of the camera: there is only so much that choice
of viewpoint, focal length and so on can achieve. Also, if you used
the same basic fl ow for every composition our images would soon
become repetitive and predictable. There are, however, some basic
principles that you can choose to follow – or ignore.
FOLLOWING A WATER FLOW Initially, the eye naturally follows the fl ow of the water in this photograph, starting at the top left corner and moving down and across, very much as we’d read a page of writing. The rocks at the bottom of the frame are important, as they prevent the eye from continuing its downward journey, and direct the viewer back into the frame. The eye then travels along the line of the waterfall to the background.
ALP-092-107-LVBK.indd 104ALP-092-107-LVBK.indd 104 18/06/2014 12:0018/06/2014 12:00

THE GEOMETRY OF COMPOSITION
105
LEADING THE EYE INThis image was framed with the intention of leading the eye in from the bottom left, following the strong curve of the rocky ledge, through the channel made by the rocks at the right. The eye follows the natural sweep of the ledge, and is then pulled back to the left side of the frame to the tower on the headland: with the bright lights shining out into the dusk it makes a powerful focal point. The lines in the cloud pattern at the top right corner also points into the frame towards the headland and tower.
ALP-092-107-LVBK.indd 105ALP-092-107-LVBK.indd 105 21/05/2014 16:4721/05/2014 16:47

THE ART OF LANDSCAPE PHOTOGRAPHY
106
(it will ensure you don’t add camera movement to that of the
subject), and most likely you will also require an ND fi lter to
artifi cially lengthen your exposures. However, be careful that the
exposure isn’t so long that important subject texture and detail
becomes lost.
The exposure time is the key ingredient with this technique
and the trick is to achieve enough motion that the effect looks
intentional and creative: too little or too much and the shot will fail.
A good starting point is an exposure time of around half a second,
but the optimum shutter speed will be determined by the speed and
direction of the movement and the effect you desire: to blur drifting
cloud, a shutter speed exceeding 10 seconds may be required, for
example. A good degree of trial and error is often needed, so don’t
be afraid to take a sequence of shots, using different exposure
times, in order to get ‘the shot’.
Timing can also be important. When photographing crops or
grasses, you need to release your shutter to coincide with gusts of
wind. Every frame you take will capture motion differently.
MOTIONAlthough a photograph is still, the landscape is a mixture of still
and mobile elements. This begs the question – should you freeze
movement, or blur it for creative effect? There is no simple answer
to this. Your decision should be based on the circumstances and
the type of result you desire. However, combined with the right
viewpoint, there can be no doubt that the impression of motion
can add interest, life and depth to your landscape images.
The impression of movement can prove a powerful aesthetic
and compositional tool. By intentionally blurring subject motion,
your images will appear less static and, potentially, more atmospheric.
Of course, this relies on a degree of movement within the landscape,
be it moving water, wind-blown foliage, crops or clouds.
Water is by far the most popular element to blur, and with
a lengthy exposure, crashing waves or a cascading waterfall can
be reduced to an ethereal milky blur. The effect is one you love
or hate, but even the ‘haters’ can’t deny that a degree of motion
blur will often enhance a landscape image’s impact and
atmosphere. As a result, it is a popular technique among the
majority of photographers.
The theory is simple: by selecting a slow shutter speed subject
movement will begin to blur, creating the impression of motion
in your photographs. Although water is the most obvious subject
to blur, the technique can be applied to any moving element. For
example, a fi eld of swaying corn can create a rhythmic, fl owing
pattern in your foreground, while scudding clouds can appear like
brushstrokes. Wind blown fl owers, grasses and leaves can also
provide interest.
Blurred elements in the foreground will have the most impact
on a composition and in some situations it is even possible to
use blurred movement to generate foreground interest: you can
employ motion in order to ‘create’ lines and shapes, for example.
It perhaps goes without saying that a sturdy tripod is essential
WATER BLURWith rain clouds fast approaching, I had to work quickly when composing this image. With each incoming wave, the water rushed and swirled around the holes and crevasses in the rock, emphasizing their shape and form. To capture this effect I opted for a slow shutter speed. Initially, I chose a half second exposure, but this proved too short so I used an ND fi lter to artifi cially extend the exposure to 4 seconds. I then waited for the next large wave before triggering the shutter again – this time I achieved exactly the effect I desired.
ALP-092-107-LVBK.indd 106ALP-092-107-LVBK.indd 106 21/05/2014 16:4821/05/2014 16:48

107
THE GEOMETRY OF COMPOSITION
MOTION IN CROPSWind is an important ingredient if you wish to photograph motion in crops or foliage. Key an eye on the weather and pick a day with a predicted wind speed of at least 15–20kph (9–12mph), as this should create a good level of motion. When taking this type of shot a slow shutter speed is your priority, so select your camera’s lowest ISO and a small aperture.
ALP-092-107-LVBK.indd 107ALP-092-107-LVBK.indd 107 21/05/2014 16:4821/05/2014 16:48

Light is at the heart of landscape imagery. It is the quality
of light that determines the mood of the photograph and
our emotional response to it, as well as influencing the
composition and helping to create a sense of depth.
The meaning of ‘photography’ is of course ‘painting with
light’. A successful image is a combination of light, subject
and composition.
The obvious difference between how landscape and studio
photographers use light is that in the studio, the photographer
is in complete control of how the subject is lit, whereas
when photographing the landscape, the only control that
can be applied is via filtration. However, good landscape
photographers will come to understand how natural light
works, what light will suit particular scenes and, to an extent,
how to anticipate those conditions using tools such as maps,
weather forecasts and sun compasses, or their modern
equivalents – smartphone and computer apps.
CHAPTER SIX > LIGHT
GOLDEN ARCHLow frontal lighting has resulted in highly saturated colours, with this rock arch in Dorset, England, taking on a golden hue at the end of the day. A passing shower has created a rainbow against a backdrop of dark, stormy clouds. The picture was framed so that my shadow would not intrude into the frame, and a polarizer was used to enhance the rainbow. Foreground interest was provided by the waves washing over the foreshore and the shot was timed to catch the backwash of the wave as it pulled back out to sea.
ALP-108-127-LVBK.indd 108ALP-108-127-LVBK.indd 108 21/05/2014 16:4921/05/2014 16:49

ALP-108-127-LVBK.indd 109ALP-108-127-LVBK.indd 109 21/05/2014 16:4921/05/2014 16:49

THE ART OF LANDSCAPE PHOTOGRAPHY
110
DIRECTION OF LIGHTThe direction of light – whether the subject is lit from the front, side
or back – has a major impact on the look of an image. Backlighting
can result in extreme contrast and silhouetted shapes, for example,
whereas sidelighting can help to reveal depth, form and texture.
Landscape photographers have no direct control over the lighting
conditions, so it is important to understand the effect of different
types of lighting, and know how you can get the most from
different situations.
In theory, there is no such thing as ‘the wrong light’ – it’s
really a case of fi nding a subject that best suits the conditions and
taking a suitable approach. That said, most photographers would
agree that strong overhead light (when the sun is high in the sky),
is probably the most diffi cult to work with.
FRONT LIGHTINGWith shadows falling behind the main subject, front lighting doesn’t
reveal texture and shape and can make a scene appear a little
‘fl at’. This might not sound like the ideal conditions for landscape
photography, but if the sun is low over the horizon, the result can
be naturally good colour saturation. From a compositional point
of view, the main problem presented by front lighting is the risk of
getting your own shadow in the shot when using wide-angle lenses.
BACKLIGHTINGBacklighting can be diffi cult to deal with, but it can provide
dramatic results, with shadows fanning out towards the camera,
and emphasis placed on shape and form. Look for strong shapes to
silhouette, and bold, graphic compositions. Backlit trees can look
very effective, with beams of light shining through the branches.
From a technical point of view, be prepared to add positive exposure
compensation, as backlighting can fool in-camera exposure meters
into underexposure.
REVEALING TEXTURESidelighting is excellent for highlighting texture in the landscape, as was the case here with the patterns left in the sand by the receding tide. As there was no other foreground interest it was important to make the most of this feature: the diagonal lines leading in from the bottom left corner and the texture gradient both suggest depth.
ALP-108-127-LVBK.indd 110ALP-108-127-LVBK.indd 110 21/05/2014 16:4921/05/2014 16:49

111
SIDELIGHTINGThis is the favourite type of lighting for many landscape
photographers, as shadows fall across the scene to reveal texture
and help suggest depth. Warm, low sidelighting from the rising or
setting sun has a modelling effect on the landscape, which can be
very fl attering. With the right scene, sidelighting can also create
a layered effect in the landscape, which greatly enhances the
impression of depth. The effects of sidelighting can be enhanced by
the use of a polarizing fi lter to boost colour saturation and increase
contrast (see page 28).
LOW FRONT LIGHTINGFront lighting can make scenes appear a little fl at, as there are no visible shadows to create depth. However, low front lighting can create strong colour saturation, as it has on the anvil-shaped rock that forms the main focal point of this composition. The sunlight is also skimming the tops of the grasses in the foreground, which helps add some depth to the image. Often with front lighting, it is diffi cult to keep your own shadow out the foreground, but in this case the foreground was mostly in shade to start with.
LAYERED SIDELIGHTING Sidelighting highlights shape, form and texture, and with the right landscape can create a ‘layering’ effect that increases the sense of depth. In this image, the light is from the side and slightly behind, catching the ridges of the hills. This has the effect of not only bringing out the texture in the scene, especially in the foreground, but also of creating alternating bands of light and dark, generating a layered look. With it, we get a feeling of depth to the composition.
ALP-108-127-LVBK.indd 111ALP-108-127-LVBK.indd 111 18/06/2014 12:0118/06/2014 12:01

THE ART OF LANDSCAPE PHOTOGRAPHY
112
QUALITY OF LIGHTThe intensity, clarity and colour temperature of light strongly
infl uences the atmosphere of a shot. The factors that affect the
quality of light are the time of day, the season and the weather.
As with the direction of light there is, in theory no ‘right’ or ‘wrong’
light, but most landscape photographers would agree that the light
at the beginning and end of the day is especially fl attering.
DAWN AND DUSKThese are the favourite times of day for many photographers, as
clouds are lit from below, which can produce colourful, dramatic
skies. The light at dawn and dusk is similar, but tends to be slightly
warmer at the end of the day, as there are more particles in the sky
to diffuse the warm light of the sun. With clearer air, containing
fewer particles, pre-dawn light tends to be cooler and bluer than
post-sunset. There will often be a glow in the sky before sunrise
and after sunset, so it’s worth setting up well before sunrise and
staying for some time after sunset.
A period of roughly 30 minutes after the sun rises and before
it sets are also popular times for landscape photographers, with
the low sun revealing texture and providing depth. As a result, the
hours around sunrise and sunset are often referred as the ‘golden
hours’. When shooting in the golden hours, it’s worth looking out
for strong foreground interest and objects that might silhouette
well. With dramatic skies, a bold composition can work well, with
the horizon low in the frame. This is especially true if there is some
foreground interest silhouetted against the colour. The temptation
is often to shoot towards the sun at these times of day, but this only
works well when the sun is very low in the sky or diffused by haze
or cloud. It is also worth bearing in mind that the best colour is not
always in the direction of the sunset or sunrise, so have a good look
in all directions.
THE GOLDEN HOURThis rural landscape was shot just as the sun reached the horizon and created a dramatic glow in the sky. That is what drew me to the scene, but I needed a strong foreground to balance the intense colours in the sky; the fl owering heather, being just about at its peak, was the obvious choice. A solid mass of purple would have been somewhat overwhelming, so I looked around for something to break up the colour, settling on this clump of orange and green bracken. The orange tones of the ferns provide a nice complement to the sunrise colours in the sky, while the mist in the valley simplifi es the scene in the middle distance.
ALP-108-127-LVBK.indd 112ALP-108-127-LVBK.indd 112 21/05/2014 16:5021/05/2014 16:50

113
CHANGING LIGHTThe golden hours are popular for a reason. After the sun has
risen, it’s surprising how quickly the light becomes harsh, with
little textural relief. This is not to say that landscape photography
is impossible outside of the golden hours, though: bold, graphic
compositions (especially those based around man-made structures)
can work well in the middle of the day, especially in monochrome.
If working in colour, primary colours can be quite intense, and will
polarize well.
On cloudy days, the light is more diffuse, making photography
in the middle of the day more possible, especially with the right
subject. Woodland can benefi t from these conditions, as the
extremes of highlight and shadow will be reduced, but with open
landscapes, black and white can again be the best choice.
THE BLUE HOURWith modern technology it is possible to get atmospheric images in quite extreme conditions. When this photograph was taken, it was almost completely dark and practically impossible to see with the naked eye, but the camera has recorded an impressive amount of detail. This type of shot, whilst not impossible with fi lm, is certainly extremely diffi cult. The composition is based primarily on shape and colour, and although there is no direct light on the landscape, what little light there is has helped to bring out texture in the foreground and middle distance. This, combined with the subtle lead-in lines created by the receding tide, has helped to create depth in the composition, even without any obvious foreground interest. The cool light present at this time of day – long after sunset or before sunrise – has led to it being known as ‘the blue hour’.
ALP-108-127-LVBK.indd 113ALP-108-127-LVBK.indd 113 21/05/2014 16:5021/05/2014 16:50

THE ART OF LANDSCAPE PHOTOGRAPHY
114
WINTERIt often surprises non-photographers when they learn that many
landscape photographers name winter as their favourite season
for photography. However, while it can be cold, wet, muddy and
uncomfortable, the benefi ts of winter outweigh the negatives.
The air is more humid and contains fewer particles, meaning that
there is a greater clarity of light at this time of year. The sun stays
low in the sky, meaning that directional light is available for most
of the day, and bare trees mean that we can pay more attention to
the shape and texture of the landscape itself. The weather can be
changeable and unpredictable, the result of which can be dramatic
conditions, especially at those times when one weather front is
passing and another coming. Snow or frost produces interesting
light, as they act like giant refl ectors. They also simplify the
landscape, hiding or reducing the impact of distracting elements.
SPRINGIn early spring the sun remains low for a large part of the day, and
the clarity of the light is still quite good. The landscape appears fresh
and green, as new leaves and foliage appear, while mist is common
on spring mornings after a cool, clear night. Mist adds a romantic
atmosphere to scenes, and can help to simplify them. Shooting
from high ground is a good approach, especially if trees and other
features are visible through the mist, or the tops are rising above it.
Rivers and lakes are also good places to go on a misty morning.
SUMMERIn many ways the light in summer is the least photogenic of the
year. Clarity can be poor, and with the high sun creating harsh
shadows, scenes can lack depth and texture. As the season
progresses, the landscape looks progressively less fresh as things
dry out. On the positive side, wild fl owers can add colour and
interest to the landscape, and if you get out early when the air
is clearer and often more still, you can get good results.
AUTUMNThe quality of light in autumn – especially later in the season – is
similar to spring and, like spring, it is often a season of misty
mornings. The landscape appears less fresh, though, as leaves are
turning colour and beginning to be shed from trees. To make the
most of autumn colour, try shooting when there is low backlighting,
with shadows racing towards the camera, or on a cloudy day when
the light is diffused. A polarizing fi lter can do an excellent job of
boosting colour saturation on autumn foliage, particularly with wet
leaves. Showers are common, and if the weather forecast is for
sunshine and showers, these are great days to head out with the
camera, as the light from a clearing shower can be some of
the most photogenic.
SEASONS
WEATHERYou will sometimes hear it said that there is no such thing as
bad weather for photography, and that it is possible to create
good images in all conditions. To some extent this is true, but
there are some conditions that defi nitely make it easier to
create pleasing and/or dramatic landscape photographs.
Some of the most dramatic light happens at times of
transition; from one season to another, from night to day,
from one weather system to another, and so on. These images
can be extremely powerful, especially when combined with
other transitional themes, such as the boundary between
land and water. This is one of the reasons why landscape
photographers favour changeable weather.
ALP-108-127-LVBK.indd 114ALP-108-127-LVBK.indd 114 21/05/2014 16:5021/05/2014 16:50

LIGHT
115
SUMMER COLOURSThe landscape doesn’t always look its best in summer; foliage has lost its freshness and the light can be harsh and lack clarity. However, the colour provided by wild fl owers can make up for this, especially towards the end of the season, when heather blooms, adding some much-needed vibrancy. The light is best fi rst thing in the morning, when there is greater clarity, so an early start was needed for this shot. I knew that sidelighting would suit the scene best, as it would reveal the texture of the heather and add depth, so I looked for a composition that would work when lit from the side. As well as the texture in the foreground there are subtle lines leading into the frame, and the colour of the clouds complements the heather. The still water provides a perfect refl ection of the sky, which spreads the colour a little further.
AUTUMN MISTMisty mornings create an air of mystery and romance, as well as simplifying scenes. The most photogenic conditions are when a low-lying ‘radiation fog’ forms after a cool, still night, as in this shot. Although the fog was thick at ground level, I didn’t have to climb too high to get above it to see the tops of the trees and the church tower rising above the mist. I composed the scene roughly according to the rule of thirds, with the church tower as the main focal point and the trees creating a layered look that stretched through to the background.
ALP-108-127-LVBK.indd 115ALP-108-127-LVBK.indd 115 21/05/2014 16:5121/05/2014 16:51

THE ART OF LANDSCAPE PHOTOGRAPHY
116
‘Poor’ light does not necessarily mean low light, which is, in fact,
very photogenic. Rather, it describes the quality of light: its clarity,
colour temperature, intensity and ‘modelling’ properties. What we
would consider to be poor for landscape photography might be
hazy, fl at, cold light that fails to highlight form and texture – the
kind of light we might experience on a dull, overcast or drizzly
day. While it is possible to create good images in this kind of light,
strong composition now becomes an even more important element.
Perhaps the only conditions when landscape photography becomes
truly impossible are in very heavy rain or extreme wind.
Getting good results in adverse conditions comes down to
a combination of choosing a suitable subject and taking the right
approach. Compositions that rely on the interplay of light and shade
to create depth and highlight texture won’t work, so it’s better to
look for structural subjects that will work well with a bold, graphic
approach. Coastal scenes are usually a good option. In particular, look
for architectural features such as piers, lighthouses, groynes, harbour
walls and so on, or natural features that have a strong structural feel
to them, such as rock stacks. Inland, you will fi nd that isolated trees,
buildings, paths and drystone walls make good subjects.
These types of subject work well if you take a minimalist
approach to composition, especially when this is combined with a
long exposure that contrasts moving elements such as waves and
clouds. In this instance, you will often fi nd that compositions work
better when there is more space around the subject than you might
normally allow: this leaves space for the moving elements in the
scene, and places attention on the texture of large areas of sky and
water. Long exposures transform the look of water and textured skies,
creating quite artistic effects. For this reason, extreme neutral density
fi lters (see page 25) have become very popular as ‘grey day’ fi lters.
Minimalist long exposures often make good monochrome
conversions, especially if they have been shot in fl at, dull lighting
conditions, as there is often little colour in the original scene to start
with, and attention can be placed on shapes, tones and contrast.
SHOOTING IN POOR LIGHT
LONG EXPOSURE SEASCAPE After an early start and a long walk in the dark, it was disappointing to be met by dull light and grey clouds. On the positive side, the sky was nicely textured and some big waves were washing around the rocks, creating the potential for capturing water movement and wave patterns. The rock stacks made a natural focal point in the background and I placed the larger one a third of the way into the frame. I didn’t want the waves washing over the foreground rocks to be completely smoothed out, and felt that an exposure longer than 15–20 seconds would result in the white water losing its texture. To prevent this from happening I selected an ISO and aperture that allowed me to keep the exposure shorter than this.
ALP-108-127-LVBK.indd 116ALP-108-127-LVBK.indd 116 21/05/2014 16:5121/05/2014 16:51

117
LIGHT
MINIMALIST SNOW SCENESnow isn’t always naturally photogenic and looks it best on a sunny day or under a pastel pink dawn sky. Unfortunately, it’s quite rare that we get to see it like this – more often than not, the sky above is fl at and grey. I found myself drawn to this scene, with the small clump of trees on the brow of a hill, surrounded by fresh, unspoilt snow, but unfortunately, the sky above was grey and textureless. I framed the shot anyway, keeping the composition as simple as possible, originally with the intention of producing a high-key black and white image. A small break in the clouds drifted over the trees, however, with the result that there was just enough texture and subtle blue tone in the sky for it to work in colour. The contrasting textures of the snow and sky add interest to the minimalist design, and intrigue is added with the indistinct horizon line: the blurring of the boundary between land and sky gives the trees the appearance of fl oating in space.
ALP-108-127-LVBK.indd 117ALP-108-127-LVBK.indd 117 21/05/2014 16:5121/05/2014 16:51

THE ART OF LANDSCAPE PHOTOGRAPHY
118
Some of the most interesting lighting conditions occur long before
sunrise and after sunset: the human eye may not be able to register
colour or detail in the landscape at twilight, but digital sensors can.
As camera technology has improved and the sensitivity of sensors
has increased, so has the popularity of low-light photography.
With the availability of clean images at high ISO settings, and
without the exposure complications caused by reciprocity failure,
digital photography has made low-light photography far more
accessible than it was with fi lm.
Even without direct light on the landscape, it’s surprising
how much modelling of shape and form occurs, but it’s still worth
concentrating on subjects that will refl ect the colour and light in the
sky – so coastal scenes, rivers, lakes and ponds are all good choices.
Look for strong shapes to include as foreground interest, as these
will often silhouette, and can look striking against a colourful sky.
Both pre-dawn and post-sunset are perfectly viable times for
low-light images, but it’s probably easier to work in the evening, as
it’s easier to calculate exposures in fading light than it is when it’s
getting brighter. Composition is also easier, as shots can be framed
while it is still light enough to see properly. Remember though, a
certain amount of pre-visualization is necessary, as what looks good
in directional light may not work so well in twilight. The colour will
usually be most intense at the point where the sun sets or rises, so
plan compositions around this.
Exposure time is not really an issue, as long as you have a
remote release and a sturdy tripod. Using your camera’s ‘Bulb’
setting will allow you to lock the shutter open for as long as you
need in order to get the correct exposure. However, long exposures
can generate quite a bit of noise, usually in the form of ‘hot’ pixels
that appear as bright red, green or blue dots in the image. To
counter this, most cameras have a long exposure noise reduction
setting, in which the camera takes a ‘dark frame’ of the same
duration as the shot just taken, and uses the information to
subtract the noise from the image. This works well, but effectively
doubles the length of the exposure. For this reason, some
photographers prefer to disable this feature and deal with the
noise during post-processing.
If you need to reduce the exposure time for creative reasons
(perhaps to reduce the amount of cloud movement, for example)
then increasing ISO is an option. Camera manufacturers and some
equipment reviewers make fairly extravagant claims about how high
the ISO can be pushed before having a negative impact on image
quality, but many modern cameras can produce acceptable images
up to ISO 1600 or even ISO 3200, especially if good noise reduction
software is used in post-processing. Exposing to the right (see page
37) will help keep noise levels to a minimum.
LOW-LIGHT PHOTOGRAPHY
LOW-LIGHT COLOUR Digital sensors are excellent at recording colour that the eye may not perceive. This image was taken in very low light, and while I could see the beginning of a pre-dawn glow on the horizon, the colour picked up by the camera was not all visible to the naked eye.
ALP-108-127-LVBK.indd 118ALP-108-127-LVBK.indd 118 21/05/2014 16:5121/05/2014 16:51

LIGHT
119
ALP-108-127-LVBK.indd 119ALP-108-127-LVBK.indd 119 18/06/2014 12:0118/06/2014 12:01

THE ART OF LANDSCAPE PHOTOGRAPHY
120
NIGHT PHOTOGRAPHYA natural extension of low-light photography is night
photography, and subjects such as the Milky Way and aurora
borealis are becoming increasingly popular. Done well, the
results can be stunning, but it demands excellent technique,
as you will be pushing your equipment to its limits.
Perhaps the most important thing to remember is that
good composition applies as much to night-time landscapes
as any other – a photograph of the night sky, however
dramatic, needs a well-composed landscape beneath it in
order to be a successful image. Fast, wide-angle lenses, while
not an absolute must, certainly make things simpler, as they
make it easier to compose in darkness. Composition can still
end up being a case of guesswork, though, so take a powerful
torch with you to shine around the scene while framing your
shot. A torch can also be shone as a source of light in the
foreground, but take care not to overdo this: done subtly it
can look like moonlight, but too much will appear unnatural.
Unless you are deliberately shooting star trails, exposures
need to be kept reasonably short so that there is no star
movement. The ‘300 rule’ is a useful guideline for determining
maximum exposure time – simply divide 300 by the focal
length of your lens. For example, if shooting with a 20mm
focal length, the longest exposure you can use without
getting noticeable streaks is 15 seconds (300/20).
Having worked out the maximum exposure time, adjust
the aperture and ISO so you can work within the limit, which
usually means setting a high ISO and wide aperture. Because
of the limited depth of fi eld you will probably fi nd that you
need to focus at infi nity to get the sky detail sharp, so the
foreground may be out of focus. To get round this, try ‘focus
stacking’ (page 154) or taking a second exposure with a
wider aperture and blend the sky and land. If working at
a particularly high ISO, a shot of the foreground at a lower
ISO to blend with the sky can give good results.
CONVERGING LINESWith a largely featureless landscape, as seen opposite, the best option for a strong composition in this instance was to use the converging lines of the road leading to a vanishing point. The main challenge with setting this up in near darkness was to make sure the shot was framed as symmetrically as possible.
CURVED LIGHTThe aurora borealis is a spectacular sight, as seen in the image on the left, but on its own it may not make a great image. Composition is still important, although this presents obvious diffi culties when working in the dark. This image was framed so that the lights curved into the frame from the left, leading to the background focal point of the mountain. The refl ections in the foreground make the most of the colour.
ALP-108-127-LVBK.indd 120ALP-108-127-LVBK.indd 120 18/06/2014 12:0218/06/2014 12:02

121
LIGHT
ALP-108-127-LVBK.indd 121ALP-108-127-LVBK.indd 121 21/05/2014 16:5221/05/2014 16:52

THE ART OF LANDSCAPE PHOTOGRAPHY
122
It could be argued that the popularity – or even the existence – of
black-and-white photography is very much a historical accident:
if the colour process had been invented fi rst, monochrome
might never have been devised. As it is, black and white was
established long before colour photography became practical,
and even in the digital era it remains a popular choice – there are
very few photographers who haven’t taken at least a handful of
monochrome images.
Part of the appeal of monochrome is that by stripping away
colour the emphasis is placed on composition, form, tone and
texture, allowing for a more artistic and less literal interpretation of
the world. The ease with which it is now possible to create digital
monochrome images, compared to the steep learning curve of
the analogue process, has encouraged many more people to
experiment with black and white in recent years.
However, although a basic monochrome conversion using
software is a relatively straightforward undertaking (see page
160), it is still helpful for a photographer to learn the skill of ‘seeing’
in black and white; knowing which scenes and subjects will suit
a monochrome approach and how to compose the image for
maximum effect without colour.
There are many factors to consider when deciding whether
a particular landscape will look good in black and white, and it’s
impossible to be defi nitive about what does and doesn’t work.
Generally speaking, a strong, ‘textured’ sky is a good start, as this
can add impact to the scene. Scenes with a full range of tones,
from deep shadows to bright highlights also tend to convert
well. Without colour in the scene, it can sometimes be diffi cult to
achieve separation between key elements, so fi nding a viewpoint
that enables this is essential, as is learning how colours translate to
shades of grey – red and green can look very similar, for example.
Without colour to aid the composition, you need to pay
attention to how shape, line, tonal contrast and texture work
together in the frame. Graphic, structural subjects work well,
such as steps, fences, paths, boats and so on. Perhaps even more
importantly than with colour, keeping compositions as simple as
possible, and reducing them to the essential elements, is often the
way to go.
Even with practice, it’s not always easy to know how well a
scene is going to translate into black and white, but technology
can help. Many modern cameras allow you to preview images in
black and white, either on the Live View screen or in the electronic
viewfi nder. Even if this facility is not available to you, most cameras
have a monochrome ‘picture style’, so you can shoot and then
review the picture to see how well it works. If your camera has
the facility to simulate different fi lter effects (red, green, orange,
etc.) then experiment with these, as tones can be recorded quite
differently depending on the fi ltration you use.
THINKING IN BLACK AND WHITE
TIP: Even if you intend the fi nal result to be in colour, it is sometimes worth setting your camera to preview the scene in
monochrome, as this can help with composition. By removing
the distraction of colour, your attention is forced onto the
graphic elements in the scene, which can help you to produce
a stronger image.
ALP-108-127-LVBK.indd 122ALP-108-127-LVBK.indd 122 21/05/2014 16:5221/05/2014 16:52

123
LIGHT
TEXTURED SKYMonochrome can be effective in light that would normally be considered unfl attering for landscape photography. There was strong directional light at the time this picture was taken, although it was on the harsh side. I chose black and white because of the strong, textured sky above the lighthouse. Subjects like this generally work well in mono, especially with plenty of space around them for moving elements such as clouds and water.
BAD WEATHER MONOIn dull weather, black and white is often the best option. For this shot, I wanted to keep the composition as simple as possible, so included just three elements in the frame: the outfl ow stream, the marker post and the headland in the background. The composition is based on shape, texture and contrast, with an extreme ND fi lter used to extend the exposure to smooth the texture of the water and simplify the scene. These fi lters are very popular with monochrome workers, and are often used for this purpose.
ALP-108-127-LVBK.indd 123ALP-108-127-LVBK.indd 123 26/06/2014 09:2326/06/2014 09:23

THE ART OF LANDSCAPE PHOTOGRAPHY
124
Silhouettes are more common in photography than other art forms,
largely due to the limitations of the fi lm or sensor’s dynamic range
(in order to preserve the highlights in strongly backlit landscapes
it is often necessary to underexpose the foreground). There are
ways around this – by using ND graduated fi lters, for example,
or blending two different exposures in post-processing – but
depending on the nature of the scene, this is not always possible.
In fact, it may not even be desirable, either, as silhouettes can be
striking, especially against a colourful sunset or sunrise.
When considering a silhouette, it is best to look for easily
identifi able shapes, such as trees, buildings and recognizable
landmarks, to avoid confusing the viewer. A single, isolated
subject is desirable, as again, there is less potential for confusion,
and try to fi nd objects with interesting shapes and lines, such as
windswept trees. When composing a silhouette, it’s worth asking
yourself if somebody not present at the scene is likely to recognize
what they are looking at and if not try and fi nd something with a
recognizable shape.
SILHOUETTES
ALP-108-127-LVBK.indd 124ALP-108-127-LVBK.indd 124 18/06/2014 12:0218/06/2014 12:02

LIGHT
125
SILHOUETTED TREE Having a recognizable shape is important with silhouetted subjects. On its own, the rock on the left would be a dark blob, and somewhat diffi cult to interpret. However, the windswept hawthorn on the right is instantly recognizable and gives coherence to the composition, so we understand the shape on the left must be a rock. It is, in fact, a granite tor, and those familiar with the landcape of the UK might well recognize the location as Dartmoor.
SILHOUETTED WINDMILLWith a colourful sunset sky and an uninspiring foreground, silhouetting the windmill seemed the obvious option. With so much interest in the sky it was possible to go for a bold composition and place the windmill low in the frame. The exposure was based on a spot meter reading taken from the sky, which gave a reading of around 18 seconds at f/11. I wanted a longer exposure, so the colourful clouds would streak across the frame, so fi tted a 4-stop ND fi lter and used Bulb mode to make a 5-minute exposure.
Having chosen a suitable subject, the technique is relatively
straightforward. Unlike most landscapes, where the aim is to
balance the brightness difference between sky and foreground,
for silhouettes you want to do the opposite. Therefore, it’s best to
avoid using graduated fi lters. The subject should be placed at a
key point in the frame, such as on a third, and the horizon is best
kept low in the frame. You will often fi nd that a low viewpoint helps
isolate the subject properly against the sky. There’s no need to worry
about distracting elements in the foreground, as it will be rendered
almost completely black, with very little detail. Using manual exposure
mode, take a meter reading from a bright part of the sky (but not
with the sun in the frame) then recompose and take the shot.
The resulting image will have a correctly exposed sky, but the
foreground and main subject will be heavily underexposed. You will
certainly not get the ‘perfect’ histogram with this type of shot – the
predominance of shadow tones will cause it to bunch up on the left,
which for most images would indicate quite severe underexposure.
However, in this case, the underexposure of a specifi c part of the
scene is quite deliberate.
ALP-108-127-LVBK.indd 125ALP-108-127-LVBK.indd 125 18/06/2014 12:0218/06/2014 12:02

THE ART OF LANDSCAPE PHOTOGRAPHY
126
Spot lighting is most commonly associated with the stage, being
used to draw attention to a performer, but it does occur in the
landscape in certain weather conditions and can be used to great
effect. Appropriately enough, spot lighting in the landscape is
rather theatrical and can add a sense of drama to a scene, as well
as helping to increase the perception of depth.
Spot lighting works well in photography, as the eye is naturally
drawn towards lighter areas of the image. Scenes that have an
obvious, strong focal point work best, especially if the focal point is
something structural, such as a building, a tree or distinct geological
feature. In the case of buildings, they may be literally spot lit at
night, and the contrast of artifi cial and ambient light can be very
attractive. Such images are best shot in the evening, before it is
completely dark, when there is still some light in the sky. At this
time, the sky will be rendered a rich, dark blue and the colour of
the building will depend on the type of lighting – sodium fl oodlights
produce a warm, orange colour, for example. Your camera’s
automatic white balance is easily confused by this type of mixed
lighting, so set the white balance to daylight or another preset value.
Under natural lighting, the chances that spot lighting will fall
in exactly the right place in a scene are fairly remote, but you
will increase your chances if you head out in the right weather
conditions – days when sunshine and showers are predicted are
ideal. Keep an eye on the movement of the clouds and try to
anticipate when the sun is likely to break through – sometimes you
can see a gap in the clouds moving towards the sun. When you do,
set up a suitable composition and wait.
The technical diffi culty here is that the camera’s metering
system is likely to take account of the dark areas around your
subject and overexpose. Taking a spot meter reading from the spot
lit area will prevent this, and as long as highlights are not clipped
the exposure can be tweaked in post-processing to make the most
of the lighting effect. It’s important to keep an eye on the histogram
and have the highlight alert set on the review screen.
This type of lighting is usually very fl eeting, lasting a matter of
seconds. Sometimes there is only the opportunity to expose a single
frame, so anticipation is key. Be well set up in advance, with your
composition fi ne-tuned and all cameras controls set ready to shoot.
SPOT LIGHTING
CASTLE AT SUNSETThis is a naturally beautiful view, with the grassy dunes making up the foreground and the castle overlooking the beach in the background. I found a spot where a path through the grass led into the frame, but the composition was a fairly simple matter: what it needed was the right light. I’d hoped for a dramatic sky, but there were few clouds above the castle, and a fairly thick bank of cloud behind me, blocking the sun. However, as the sun reached the horizon, it shone through a break in the clouds for a short time, casting a warm glow on the castle, while leaving most of the rest of the scene in shadow.
ALP-108-127-LVBK.indd 126ALP-108-127-LVBK.indd 126 18/06/2014 12:0218/06/2014 12:02

LIGHT
127
SPOTLIT ROCKS Geological features, such as this granite tor, are well suited to spot lighting. Without it, this scene would look pleasant enough, but it would lack the drama and depth that such lighting brings. It was a day of heavy showers, interspersed with sunny spells, so I anticipated there was a chance of the rocks being spot lit when a shower passed. It was a case of setting up and then waiting to see if the anticipated light arrived. The shot was composed so that the rocks at the bottom of the frame lead in to the shot and point towards the tor. At times like this, when it is likely to rain while you’re waiting for the light, a rain sleeve is a useful accessory for protecting the camera.
ALP-108-127-LVBK.indd 127ALP-108-127-LVBK.indd 127 21/05/2014 16:5321/05/2014 16:53

There are many different types of landscape. In fact, you
could argue that one of the biggest appeals of this ‘art’ is
the huge diversity we encounter while out shooting. The
coast, hills and mountains, woodland, lakes and moorland
are among the most popular and photogenic types of
landscape. In many ways, the general approach to shooting
different environments can remain greatly unchanged: the
core principles of composition and lighting can be applied
to almost any viewpoint with success.
However, it is important to recognize that different landscape
types have their own, individual qualities, which will present
you with unique opportunities and challenges. Truly great
images have the ability to properly communicate a location’s
character, mood and flavour. However, in order to do this, you
first have to understand and appreciate your surroundings.
You also need to know what ingredients to look for, and how
best to ‘tweak’ your shooting technique to suit the scene.
This chapter is designed to help you do exactly that.
CHAPTER SEVEN > TYPES OF LANDSCAPE
THE ESSENCE OF A VIEW Each type of landscape has its own individual qualities and appeal. Calm lochs and lakes can be tranquil; moorland and coastline is rugged; mountain views can be wild and dramatic. Our job, as landscape photographers, is to capture and convey the truth, essence, character and mood of the view before us – something you should be able to do by employing the skills you’ve gained from the previous chapters.
ALP-128-143-LVBK.indd 128ALP-128-143-LVBK.indd 128 21/05/2014 16:5421/05/2014 16:54

ALP-128-143-LVBK.indd 129ALP-128-143-LVBK.indd 129 21/05/2014 16:5421/05/2014 16:54

THE ART OF LANDSCAPE PHOTOGRAPHY
130
For many photographers (your authors included) the coast is their
favourite type of landscape. As humans, we tend to have a natural
affi nity with water, particularly to the sea. Throughout the seasons
it is an exhilarating place to be – an ever-changing landscape, full
of mood and motion. The coast can be wild and rugged, calm or
tranquil, with big open spaces and great opportunities for creative
thinking. The lure of shooting from sea level, close to the water’s
edge, is often so great that clifftop viewpoints can be overlooked.
However, the elevated, far-reaching views that coastal cliff tops offer
can provide some of the very best views for photography.
Shooting from coastal cliff tops is an exciting and contrasting
alternative to taking photographs at sea level. There is normally safe
and plentiful access to higher viewpoints, due to a good network of
coast-paths. While clifftop views might involve more legwork (and
often a steep climb), your reward will be breathtaking vistas along
the adjacent coastline. Elevated viewpoints like this enable you to
capture images with an enhanced feeling of scale and context –
they are also the best option when excessive spray makes sea-level
photography impractical.
When shooting from a clifftop vantage point, it is benefi cial
to have both wide-angle and telephoto lenses in your kit bag.
A wide-angle zoom in the region of 17–35mm will typically prove an
excellent choice when positioned above a vertical drop. By keeping
the camera tilted slightly downward you will be able to capture
the waves crashing on rocks below, together with the headland
disappearing off into the horizon. A wide-angle will also allow
you to exaggerate the scale and emphasis of foreground subjects.
Naturally, foreground choice is important, but rocky outcrops,
footpaths, walls and fences will all provide you with an entry
point or ‘lead-in’ to your composition.
The time of year can play a pivotal role in the look of your
coastal photographs. During spring and summer, headlands look
lush and green, while many cliff tops are carpeted with fl owers.
Flora provides colour, interest and foreground matter for wider
views, and clifftop views are typically at their best when wild fl owers
are blooming. A low and close composition – combined with a small
aperture to generate suffi cient depth of fi eld – will enable you to
incorporate coastal fl owers into your compositions.
By contrast, during winter, an elevated clifftop viewpoint will
allow you to capture fi erce, angry seas and large waves crashing
against headlands below. To capture this type of drama, a longer
focal length is often best, as it will appear to ‘stack’ cliffs on
top of one another. When shooting large, dramatic, crashing
waves, prioritize a faster shutter speed – maybe in the region of
1/250 second. This freezes the water’s motion. Alternatively, slow
movement right down using an ND fi lter to generate an exposure
of several seconds – long enough to render swirling and crashing
waves as ethereal white trails in a mysterious, brooding sea.
COASTAL CLIFF TOPS
TIP: Directional light is often important when shooting cliff top views, as it helps add contrast, defi nition and depth.
Low morning or evening light will shape the coastline best,
so consult a sun compass before planning your shoot.
ALP-128-143-LVBK.indd 130ALP-128-143-LVBK.indd 130 21/05/2014 16:5521/05/2014 16:55

TYPES OF LANDSCAPE
131
THE CLIFFTOP VIEWWhen you photograph the coast, the lure of shooting from sea level is often overwhelming, but clifftop viewpoints mustn’t be overlooked. They enable you to capture breathtaking and far-reaching vistas along miles of rugged coastline. Large rock stacks, breakwaters and lighthouses provide you with a focal point and scale, while seasonal changes can enhance images. Where I live, in South West England, the cliff tops are carpeted in thrift and vetch during early summer – perfect foreground interest in wider views. In this instance, soft evening light bathed the adjacent coastline and a low, close viewpoint allowed me to capture the fl owers in context.
ALP-128-143-LVBK.indd 131ALP-128-143-LVBK.indd 131 21/05/2014 16:5521/05/2014 16:55

THE ART OF LANDSCAPE PHOTOGRAPHY
132
Water can inject motion, depth, energy and life into landscape
images, so the sea is understandably a favourite among
photographers. In addition to the water’s natural appeal, beaches
are home to a wealth of photogenic subject matter, such as
refl ective pools, rocky outcrops, smooth boulders and wavy patterns
in virgin sand. You can capture large, open views, or photograph
the ‘miniature’ landscape by isolating key detail and interest.
PLANNINGThe shoreline is a diverse and ever-changing landscape that can
be interpreted in countless ways. Planning is important when
photographing any type of landscape – you should always be aware
of the weather, the direction of the light and the best viewpoint
for any given location before visiting – but it is even more essential
when shooting at sea level. The tide’s height can transform a coastal
scene; some locations work best at low tide, others at a mid or
high tide. Ideally, visit beforehand, but if this isn’t practical, do your
homework online fi rst.
A receding tide is normally preferable, as it will leave the beach
clean of distracting marks and footprints. A rising tide will require
you to regularly retreat and you are more likely to misjudge waves
and get wet feet. Knowing tide times is also important from a safety
aspect. It might sound obvious, but the coast can be a dangerous
place – it is easy to get cut off by an incoming tide when you are
engrossed with taking photos.
Always do a quick weather check before heading to the coast.
Clear skies are usually best avoided – a degree of cloud will help
add interest, depth and potentially drama to your photos. Check
the wind direction and strength too. The wind is a big factor when
taking photos at sea level. If the wind direction is directly from
the sea, and its strength is 20mph (32kph) or more, the level
of spray coating your lens will make close-to photography on
the beach impossible – you will be better off staying away and
looking for a clifftop viewpoint instead.
Traditionally, the most atmospheric seascapes tend to be captured
using an exposure that blurs the water’s movement. A sense of
movement is a powerful visual tool when shooting seascapes, and
smoothing out the water can create a feeling of calm.
Suitably slow shutter speeds can be generated by shooting in
low light conditions and / or using ND fi lters. Due to the popularity
of extreme ND fi lters, the current trend is to blur water motion
almost beyond recognition with exposures that exceed 30 seconds.
This technique can prove very striking, but often a shutter speed
closer to 1 second is a better option. This is long enough to generate
a level of subject blur, yet fast enough to retain detail and texture
within the water. By triggering the shutter just as the water drags
back toward the sea, you can capture the trails of water rushing
around foreground objects, helping defi ne their shape and adding
interest. Getting just the right level of motion will involve a degree of
trial and error, so experiment with your shutter speed and fi ltration.
Simplicity is often the key when shooting seascapes. There
are instances when all you need to capture a compelling image is a
slice of sand, sea and sky. Keep compositions clean and uncluttered.
Pools, beach streams and wet sand will refl ect the light and colour
of the sky above, and provide you with understated foreground
matter. Don’t overlook manmade objects either – groynes, slipways,
jetties and tide markers can all prove excellent compositional tools.
SHORELINE
TIP: To ensure good stability when shooting on the beach, push the feet of your tripod fi rmly into the sand. Regularly
check the front of your lens, or fi lters, for spray and keep a
lens cloth close to hand. Clean your kit thoroughly after a visit
to the beach and wash tripod legs with fresh water ‒ salt
water is corrosive.
ALP-128-143-LVBK.indd 132ALP-128-143-LVBK.indd 132 18/06/2014 12:0418/06/2014 12:04

TYPES OF LANDSCAPE
133
CAPTURING WATER TRAILSTiming is important when photographing moving water. Wait for the waves to drag back towards the sea before triggering the shutter – by doing so you will capture water trails. An exposure in the region of 1 second is often ideal. Not only will the water trails defi ne the shape of the objects they wash around, but they will also help draw the viewer’s eye into the composition.
LOW VIEWPOINTSLow viewpoints often work well for beach scenes, helping emphasize or exaggerate the shape or size of foreground rocks, pebbles or ripples in the sand. Water, wet sand and refl ective rocks refl ect the light above, so you can often continue shooting on the beach long after sunset, or before sunrise. Exposure times will naturally be lengthy at dawn and dusk, but this will help creatively blur the movement of the tide.
ALP-128-143-LVBK.indd 133ALP-128-143-LVBK.indd 133 21/05/2014 16:5521/05/2014 16:55

THE ART OF LANDSCAPE PHOTOGRAPHY
134
Mountain peaks and large, imposing hills are among the
most impressive and dramatic types of landscape you will ever
photograph. Looking towards mountainous or hilly landscapes
provides wonderful opportunities to capture breath-taking images,
while climbing to a summit will reward you with outstanding,
far-reaching views. There is no better environment for capturing
images that convey a proper sense of size, isolation, wilderness
or place than hills and mountains.
While the Rockies, Alps, Pyrenees and Dolomites might
be among the best known and photogenic mountainous
regions, there are countless more that offer equally good
photo opportunities. With travel being so quick and easy today,
truly remote, wild landscapes are now far more accessible to
photographers. Photography workshops, led by professional
guides, are an excellent and safe way to explore such areas.
Having reached your viewpoint, the key skill is to capture
images that properly communicate the view’s size – and convey a
true feeling of awe. One compositional trick is to include elements
of recognizable size within the frame, such as people, trees, a river
or a building. This element only needs to be small within the frame,
but including it will help provide a genuine sense of scale. Placing
such elements low in the composition, with steep hills or mountains
looming high above, will help generate a feeling of isolation.
A vertical composition tends to further exaggerate the feeling of
height, so can suit this type of environment.
The weather and lighting naturally have a signifi cant impact
on the look and mood of your images. At higher altitudes there is
more UV radiation, which can result in a cool, bluish cast to images.
You may need to fi ne-tune colour temperature – either in-camera
or during processing – to neutralize this. Sidelighting will emphasize
contours, texture and rugged detail.
Hills and mountains often exhibit their own peculiar weather
conditions, while fog, low cloud and heavy rain can quickly affect
visibility. Conditions can alter quickly, so don’t give up too easily.
One of the best times to visit high ground is during winter after
snowfall. Snow needs to be photographed while fresh, clean and
brilliant white. Look for shapes and patterns in the snow, created
by fi erce winds, and utilize these for foreground interest.
One fi nal consideration is the effectiveness of using graduated
ND fi lters to reduce the level of contrast between sky and land.
Using a ‘hard’ grad when photographing uneven skylines, such
as views of mountain peaks, will artifi cially darken the hilltops too.
A ‘soft’ ND grad will help disguise the use of the fi lter, but exposure
blending (see page 158) is usually a better option.
HILLS AND MOUNTAINS
SAFETYMany of the world’s best viewpoints involve a long, steep
climb. Appropriate clothing and footwear is essential if you
intend to photograph remote areas or shoot at altitude.
Capturing the best light will typically involve waiting for
long periods, so if you’re not warm, dry and comfortable,
you are far less likely to be creative or patient. If you are
walking any distance, it is best to be accompanied and tell
somebody where you are heading. The weather can quickly
and inexplicably change, so you need to be prepared:
carry a detailed map of the area, along with a compass or
navigational aid, such as a handheld GPS unit. In addition
to your standard camera kit and tripod, carry a phone, head
torch and high-energy snack bars.
ALP-128-143-LVBK.indd 134ALP-128-143-LVBK.indd 134 18/06/2014 12:0418/06/2014 12:04
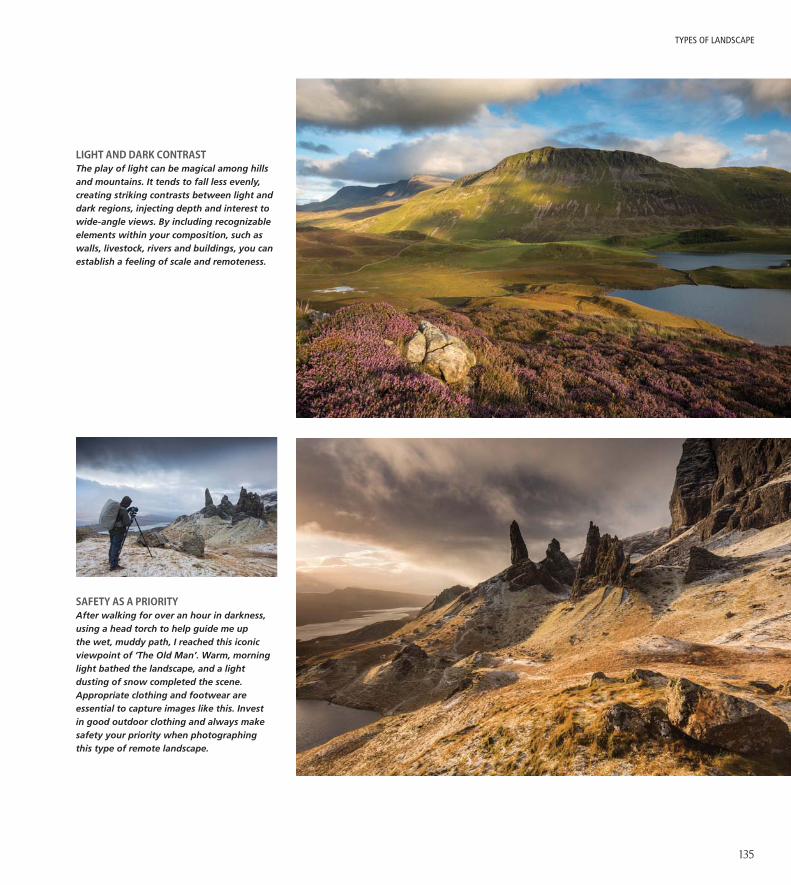
TYPES OF LANDSCAPE
135
LIGHT AND DARK CONTRASTThe play of light can be magical among hills and mountains. It tends to fall less evenly, creating striking contrasts between light and dark regions, injecting depth and interest to wide-angle views. By including recognizable elements within your composition, such as walls, livestock, rivers and buildings, you can establish a feeling of scale and remoteness.
SAFETY AS A PRIORITY After walking for over an hour in darkness, using a head torch to help guide me up the wet, muddy path, I reached this iconic viewpoint of ‘The Old Man’. Warm, morning light bathed the landscape, and a light dusting of snow completed the scene. Appropriate clothing and footwear are essential to capture images like this. Invest in good outdoor clothing and always make safety your priority when photographing this type of remote landscape.
ALP-128-143-LVBK.indd 135ALP-128-143-LVBK.indd 135 21/05/2014 16:5521/05/2014 16:55

THE ART OF LANDSCAPE PHOTOGRAPHY
136
WOODLAND INTERIORSFew types of landscape present more compositional challenges
than woodland interiors. It is a truly chaotic environment, so fi nding
compositions with balance, order and direction can prove tricky.
Without forethought and care, woodland images can appear
cluttered and lack focus – your choice of viewpoint and light will
either make or break your photos.
The appearance of woodland interiors can vary greatly
depending on the light’s direction and time of year. Spring and
autumn are typically the optimum time for woodland photography.
During spring, leaves and foliage are fresh and vibrant, while
swathes of wild fl owers may carpet woodland fl oors, adding colour
and obvious foreground interest to wider views. In autumn, foliage
turns from green to a wonderful array of warm tones in one of
nature’s best spectacles.
Autumnal colours are typically only at their best for a short
period, though, and this can vary from year to year and region
to region. Therefore, it is important to plan your visit to coincide
with the colours reaching their peak at the height of autumn – the
window of opportunity is often short.
Regardless of when you photograph the woodland, light is
key. While it might be less dramatic, one of the best light types is
actually bright, but overcast weather. The level of contrast is low
and manageable. As a result, the colour of foliage and woodland
plants appears richer, and a polarizing fi lter will further help you to
capture authentic colours. It is a good idea to avoid bright, overhead
sunlight: while sun-dappled woodland fl oors might look attractive
to the naked eye, the high level of contrast will typically exceed the
camera’s dynamic range. Highlights will burn out and results will
appear to have huge contrasts and be ugly.
On the other hand, low morning or evening light can produce
some of the best conditions for woodland photography. Beautifully
diffused low sunlight, backlighting foliage and fi ltering between
straight, thick trunks can create wonderfully atmospheric conditions.
The long, inky shadows of trees, cast on the woodland fl oor, can
provide strong, logical lead-in lines and implied depth.
Identifying the best viewpoint will often take time and
consideration. You need to organize the elements in order to
create a strong, logical composition. Paths, rivers, fallen trunks and
stumps are an example of the type of things that you can base your
composition around. Elements like this are often required in order
to create a key focal point, not to mention a perception of depth
and visual balance.
Longer focal lengths – in the region of 70–200mm – are often
better suited to woodland photography than wide-angle lenses, as
they allow you to isolate a smaller section of woodland, simplifying
the scene to allow a more compact composition.
TIP: Be experimental with your approach. Low shooting angles or a fi sheye perspective will distort and exaggerate a
tree’s height, making the woodland appear more imposing,
while moving the camera during an exposure can create
striking woodland abstracts.
ALP-128-143-LVBK.indd 136ALP-128-143-LVBK.indd 136 21/05/2014 16:5721/05/2014 16:57

137
TYPES OF LANDSCAPE
WOODLAND MISTDiffused light often suits woodland interiors. Trees can look particularly magical among mist or fog: the conditions simplify the environment, making it easier for you to identify strong, uncluttered compositions. During autumn, intentionally setting a warmer white balance setting will give the colours extra punch.
ALP-128-143-LVBK.indd 137ALP-128-143-LVBK.indd 137 21/05/2014 16:5721/05/2014 16:57

THE ART OF LANDSCAPE PHOTOGRAPHY
138
Water, in all its forms, plays a regular role in landscape photographs.
Moving water is a particularly dynamic compositional element,
with the ability to add energy and a three-dimensional feel to
a two-dimensional image. Waterfalls are found most often in
hilly and mountainous regions, while rivers and streams meander
through valleys, woodland and open countryside. Each river,
stream or waterfall tends to have its own character – something
you, as the photographer, need to identify, utilize and emphasize
in your photographs.
Rivers, streams and waterfalls are wonderful ingredients
for adding shape, fl ow and movement to scenic photographs.
The shape of a river or stream is particularly useful for directing the
eye into, and through, the frame. Slightly elevated viewpoints –
from a riverbank or bridge, for example – can prove effective when
photographing rivers, as it will help you capture its shape, especially
if it is snaking through the landscape or forming an attractive
‘S’ curve. The bend of a river tends to be a good place
to position yourself, with curves proving pleasing to the eye.
Positioning the waterway so that it enters the frame from
either the bottom left or right corner is particularly effective –
corners are very signifi cant parts of the frame from a compositional
viewpoint. Placing the river or stream so that it starts or ends at a
corner of the frame will not only help create an entry point, but
it will also pull the viewer’s eye into the shot toward a vanishing
point. This will result in an enhanced feeling of depth within the
landscape, and few other natural elements are as effective at doing
this. Normally, it is best to avoid shooting across a river or stream
– doing so can create rather static results that quickly direct the
viewer’s eye out of the image.
As with any type of movement within the landscape, how you
decide to record the water’s ‘motion’ will have a signifi cant impact
on the look of the fi nal image. Faster shutter speeds will suspend
motion and highlight the water’s power and strength, while slower
speeds will blur motion, producing more tranquil results. The type
of scene, and your personal taste, will dictate your technique. Many
photographers favour a shutter speed in the region of 1 second
when photographing waterfalls or cascading rivers, as this is slow
enough to create a visually interesting, attractive and intentional
level of water motion, but still quick enough to retain the texture
and energy of the water’s movement. You may need to take a
number of shots, using different shutter speeds, before you get
just the degree of movement you desire, so be prepared to ‘play’.
By adjusting the ISO and using ND fi lters you can regulate the
exposure time while still maintaining your chosen f/stop.
While elevated viewpoints might be best for highlighting the
shape, length and course of a river, a lower, waterside perspective
will produce more intimate and dynamic looking results. Take care
when setting up close to deep, fast-fl owing rivers, though, as
they can be dangerous. Often wide-angle focal lengths work best,
combined with getting close to the water’s surface. While a low
viewpoint will hide the river’s shape and length, you can create
the impression that the water is practically fl owing into the lens,
compelling the eye to follow it into the frame. Large or mossy
boulders, jutting up through the water, create natural foreground
interest, while frothy or swirling water can form interesting patterns.
RIVERS, STREAMS AND WATERFALLS
TIP: Flowing water such as rivers, streams and waterfalls are often best photographed after rainfall, when the fl ow is more
rapid and impressive. Mist can form over waterways after cool,
still nights, adding mood and character to your shots.
ALP-128-143-LVBK.indd 138ALP-128-143-LVBK.indd 138 21/05/2014 16:5721/05/2014 16:57

TYPES OF LANDSCAPE
139
FRAME WATERFALLSThe largest, highest waterfalls might be impressive to the eye, but they often prove challenging to shoot well. They can be long and narrow, effectively dissecting images in two, and generating large areas of empty space unless you frame them carefully. Small, shorter waterfalls tend to photograph better, allowing tighter, stronger compositions. Unsurprisingly, shooting with the camera in a vertical orientation typically suits waterfalls best.
CAREFUL EXPOSUREThe exposure time will play an important role in the look of your river and waterfall images. In this instance, I wanted to creatively blur the river’s rapid fl ow, but not so much that the water appeared overly smooth and milky and lost its texture and detail. In this instance, a shutter length of just over 1 second created just the look I was after.
ALP-128-143-LVBK.indd 139ALP-128-143-LVBK.indd 139 21/05/2014 16:5721/05/2014 16:57

THE ART OF LANDSCAPE PHOTOGRAPHY
140
Water is essential to life, which might just explain why we so enjoy
the sight, sound and feel of it. It is perhaps no great surprise that
water frequently plays a signifi cant role in our landscape images.
Large bodies of water, like lakes, lochs and fl ood plains, have
particular appeal. When still, water has a calming effect that can
greatly infl uence the atmosphere of our shots. Perfect, mirrorlike
refl ections add symmetry to compositions, and entice the eye. The
enhanced feeling of tranquillity can add a unique quality to images.
Photographers are intuitively drawn to water and you rarely
need to travel far to fi nd it within the landscape. Ripples on the
water’s surface will break up refl ections, so a still, windless day is
best for photography. Calm conditions tend to be more common at
dawn, while mist can form overnight and hang atmospherically over
the water’s surface. Large bodies of refl ective water typically suit
being the dominant compositional element. Mirror-like refl ections
are visually most striking when colour is evident: the natural cool
blue hues found during twilight, or the warm pastel shades of
sunrise and sunset, are ideally suited to taking photographs by the
water’s edge. Low shooting angles will often accentuate refl ections,
but simplicity is often key to creating a strong frame. We are so
often told to adhere to the rule of thirds and avoid a centred
horizon that it is easy to forget there are always exceptions to
the rule. When photographing refl ections, a centred horizon –
with the same amount of subject as refl ection – will produce
symmetrical looking results, enhancing the strength and visual
impact of the composition.
Foreground interest is certainly not a prerequisite when
photographing this type of landscape, but when you need to add
extra interest or scale to the refl ected scenery, rushes, rowing boats
and partly submerged rocks all work well as foreground elements.
Jetties can be particularly useful compositional tools, and by
positioning yourself either looking along a jetty, or from one side,
you can use its length to lead the eye into the frame and towards
the distant landscape.
Refl ections can be 1- or 2-stops darker than the ‘real’ object,
creating a visual imbalance. Therefore, you will either need to apply
fi ltration, or make adjustments during processing. If opting for
the fi ltration solution, align the transitional zone of your ND grad
with the shoreline. Doing so should produce a balanced exposure
and natural looking results.
LAKES AND REFLECTIONS
REEDS AND REFLECTIONWithout question, early morning is the best time of day to photograph water in the landscape. Conditions tend to be calmer, while mist can add a layer of visual interest and atmosphere. Although polarizing fi lters have the ability to eliminate refl ections, they can also help intensify them by removing the sheen from the water’s surface.
ALP-128-143-LVBK.indd 140ALP-128-143-LVBK.indd 140 21/05/2014 16:5721/05/2014 16:57

TYPES OF LANDSCAPE
SYMMETRY We can be so brainwashed into believing landscape images always require foreground interest to succeed that it is easy to include it just for the sake of it. However, when photographing a large body of refl ective water, you can actually dilute the image’s impact and mood by including unnecessary or unsuitable foreground elements. Simplicity is often the key to shooting this type of landscape, while a centred horizon will help generate a powerful feeling of symmetry.
ALP-128-143-LVBK.indd 141ALP-128-143-LVBK.indd 141 21/05/2014 16:5721/05/2014 16:57

THE ART OF LANDSCAPE PHOTOGRAPHY
142
Landscape photography isn’t simply about recording large, wide
views. There is no rulebook stating we have to capture a sense
of place or context in our pictures. Photographers such as David
Ward – renowned for his eye for shape, form and graphic simplicity
– have helped popularize the term ‘the miniature landscape’. This
photographic style involves taking a more intimate look at detail
found within the landscape, by swapping wide-angle focal lengths
for short telephoto or macro lenses that can emphasize texture,
shape and form.
There is no better provider of intriguing and fascinating detail
than nature. ‘Big landscapes’ are understandably seductive, but
do not overlook the many and varied photo opportunities found
beneath your feet. Using a short telephoto lens allows you to
capture a much narrower perspective and in doing so isolate and
highlight colour, texture, rhythm, symmetry, shape and form in
exquisite detail. Arguably, raw technique is less important than the
skill and vision to ‘see’ the image in the fi rst instance.
The coast is among the best environments to depict the
miniature landscape. Ripples in the sand, shells, pebbles, rock strata,
seaweed and even driftwood are the type of subject that neatly
lends itself to being explored in greater detail and clarity. Woodland
is another great place to seek out more intimate, abstract results.
Study your subject closely, and look for points of interest that you
can utilize to aid composition and direct the eye to your focal point.
You will fi nd repetitive shapes, curves, rough texture, and diagonal
lines are hugely photogenic.
Normally, a camera records a subject with a high degree of
realism. However, an object grows increasingly abstracted the
closer you get to it, which is why – when shooting texture, shape
and form – the subject itself is often less signifi cant. Your images
don’t have to render the subject recognizable – when shooting the
‘miniature landscape’, form is primary; content is irrelevant.
THE MINIATURE LANDSCAPE
PEBBLE The key to capturing exquisite detail and abstract compositions is the ability to previsualize. ‘Seeing’ the image is often the hardest task, and capturing it tends to be far less challenging – at least from a technical viewpoint. Training your eye to look at subjects more closely and creatively is not something you can do overnight, but with time and practice you will recognize how ordinary objects can be transformed when shot intimately.
ALP-128-143-LVBK.indd 142ALP-128-143-LVBK.indd 142 25/06/2014 11:1725/06/2014 11:17

143
TYPES OF LANDSCAPE
ICESeasonal changes create fresh and unique opportunities for intimate landscapes. Freezing conditions can transform the great outdoors during winter, for example, and frosted grasses, frozen pools and the texture of wind-blown snow should entice you to look closely. They might not be subjects you would ordinarily consider shooting, but highlighting graphic forms that normally go unnoticed may allow you to produce a fresh interpretation of an otherwise quite ordinary subject.
ALP-128-143-LVBK.indd 143ALP-128-143-LVBK.indd 143 21/05/2014 16:5821/05/2014 16:58

Processing is an incredibly important part of the digital
workflow, which is comparable to darkroom work in black-
and-white film photography. In fact, digital photography
gives colour photographers a level of control that was once
the preserve of highly skilled black and white printers (and
possibly an even greater level of control than that), so its
significance should not be underestimated.
Some photographers feel that carrying out any processing
work is somehow ‘cheating’, and that if you ‘get it right in
camera’ it shouldn’t be necessary to edit the image any
further. However, this is missing the point of processing,
as ‘getting it right in camera’ and editing images in software
packages such as Adobe Lightroom or Photoshop are not
mutually exclusive – they play an equally important role
in achieving a good result. They go hand in hand, in much
the same way as skill behind the camera and skill in the
darkroom do with black-and-white film photography.
For this reason, many photographers consider the Raw
file recorded by the camera to be a ‘digital negative’.
CHAPTER EIGHT > PROCESSING
ICE BEACHThe image-making process does not end when the shutter fi res. This image of a beach in Iceland, strewn with blocks of ice, was shot in Raw and several adjustments were made to the image before it was ready for publication. These mainly involved local contrast and brightness adjustments to help make the ice stand out from its surroundings. Despite this, the fi nal image remains faithful to the scene at the time, and to how the end result was previsualized.
ALP-144-161-LVBK.indd 144ALP-144-161-LVBK.indd 144 21/05/2014 17:0121/05/2014 17:01
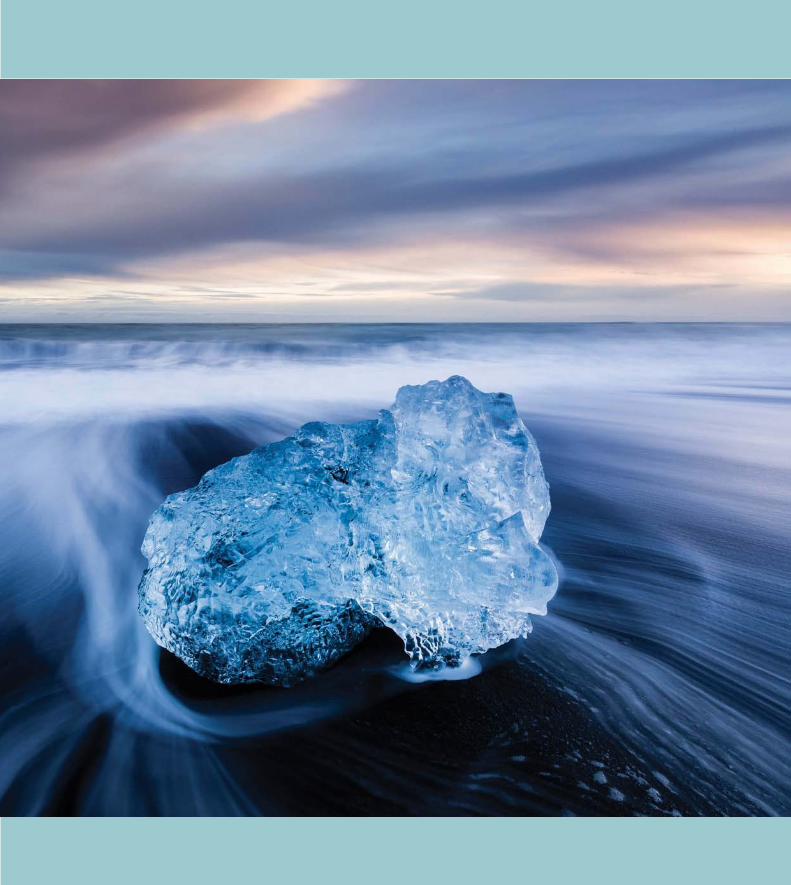
ALP-144-161-LVBK.indd 145ALP-144-161-LVBK.indd 145 21/05/2014 17:0121/05/2014 17:01

THE ART OF LANDSCAPE PHOTOGRAPHY
146
Post-processing is an essential part of digital photography, but it
would be impossible without the right software. There is a wide
array of applications available, ranging from free programs to those
costing considerable sums. The industry standard applications for
Raw processing and image enhancement are Adobe Photoshop,
Adobe Lightroom, Apple Aperture and Phase One Capture One,
but there are good alternatives, as well as excellent plug-ins that
can be used to expand the capabilities of your processing software.
ADOBE LIGHTROOMLightroom is a highly versatile program, designed specifi cally
for photographers. As such, it has impressive Raw processing
capabilities. Other than the ability to work with layers, there is very
little that Lightroom doesn’t offer. It is so well specifi ed that many
photographers work almost exclusively with it, rarely making the
trip to Photoshop.
As well as high quality Raw processing, Lightroom also has
an excellent Library module where you can organize and keyword
images; a Print module that includes soft-proofi ng, versatile page
layout facilities and effective output sharpening presets; and a Book
module from which you can create, design and order photo books.
SOFTWARE
ADOBE PHOTOSHOPPhotoshop is probably the world’s best-known graphics program,
and photographers have used it since the beginning of digital
photography. It has its own Raw converter, Adobe Camera Raw,
which utilizes the same processing engine as Lightroom, as well
as having the same functions and features as Lightroom’s Develop
module. Photoshop goes beyond Lightroom’s capabilities, however,
with a number of other features. For photographers, the most
important of these is arguably the ability to work with layers, which
makes techniques such as exposure blending, focus stacking and
stitching possible.
Since late 2013, Photoshop has only been available via a
monthly subscription, which may not suit all users. However,
Photoshop Elements is still available for a one-off payment.
Although it is a cut-down version of Photoshop, it has an
impressive feature set, including the facility to use layers. For many
photographers, the combination of Lightroom and Photoshop
Elements will cover pretty much everything they want to do.
ADOBE LIGHTROOMFrom within Lightroom, it is possible to organize, keyword and search for pictures, as well as produce high quality Raw conversions, photo books and prints. For some photographers that’s everything they need.
ALP-144-161-LVBK.indd 146ALP-144-161-LVBK.indd 146 18/06/2014 12:0618/06/2014 12:06

PROCESSING
147
APPLE APERTURELike Lightroom, Aperture combines Digital Asset Management
(DAM) features with a wide range of image manipulation tools.
Aperture is only available for Apple computers, but has proved very
popular with Mac users, and produces high-quality Raw conversions.
CAPTURE ONEPhase One’s Capture One software has an excellent reputation
for producing high quality conversions from Raw fi les and, like
Aperture and Lightroom, it also includes DAM features. Local
enhancements are possible, as is the ability to work with adjustment
layers. It is available in two versions: the fully featured (and more
expensive) Pro version and the Express version. Both are Mac or
Windows compatible.
FREE ALTERNATIVESAside from the industry standard applications noted previously,
there are other options, some of which are available for free. GIMP
(or GNU Image Manipulation Program, to give it its full title) is an
alternative to Photoshop that has many similar features, although
some users fi nd its interface somewhat unintuitive. RawTherapee is
a non-destructive Raw editor with a comprehensive set of processing
tools, including highlight detail recovery, and various methods of
sharpening and noise reduction.
PLUG-INSThere is little you can’t achieve in Lightroom and Photoshop, but
it can take time to master the skills necessary for advanced image
enhancement. Image-editing plug-ins can make this easier, by
providing you with pre-programmed routines that can transform
your images. One of the best known is the Nik Software Collection.
There are various plug-ins in the suite, including Silver Efex Pro 2,
which makes it easy to produce excellent monochrome conversions.
SILVER EFEX PRO 2Silver Efex Pro 2 is the favourite software of many black and white enthusiasts, with high quality conversions and a number of fi lm effects.
Many conversions simply involve choosing from one of the presets,
but these can also be tweaked quite heavily, and the look of
many popular fi lms can be recreated. Silver Efex Pro 2 features
Nik’s U-Point technology, where ‘Control Points’ can be placed on
the image, enabling you to make intelligent selections for local
enhancement. Nik’s Viveza plug-in uses the same control points for
making local adjustments to colour images and there are also plug-
ins for sharpening, noise reduction and HDR in the suite. Alien Skin
is another company that produces powerful image-editing plug-ins,
including Exposure, which allows you to simulate fi lm effects, create
custom colour effects and convert images to monochrome.
Pixel Genius also creates useful plug-ins for colour adjustment,
fi lm effects and creative sharpening, while for HDR images,
Photomatix Pro is the fi rst choice of many. For noise reduction,
Noiseware and Neat Image are both well-respected solutions.
ALP-144-161-LVBK.indd 147ALP-144-161-LVBK.indd 147 20/06/2014 15:0120/06/2014 15:01

THE ART OF LANDSCAPE PHOTOGRAPHY
148
Cropping is perhaps the most basic step in processing, but it can
have a profound effect on an image, altering the balance and mood
of a picture and the prominence of the main subject in the frame.
Cropping gives you the freedom to explore other compositional
possibilities, although severe cropping may not be possible unless
you are working with a very high resolution original. Therefore, it is
important to frame the shot as precisely as possible when taking the
image, but if in any doubt, it is better to frame slightly ‘loosely’ to
allow for cropping later.
Cropping also frees you from being restricted to the ‘native’
aspect ratio of your camera, which may not necessarily suit all
compositions. A 3:2 aspect ratio is the full frame standard, based
on 35mm fi lm, but less elongated formats, such as 5 x 4 and 6 x
7 (5:4 and 6:7) have been popular with landscape photographers
who shoot fi lm. Now, largely as a result of the Micro Four Thirds
system cameras, the 4:3 ratio is becoming increasingly favoured.
This slightly squarer format makes it easier to exploit foreground
interest in landscapes without the need to switch to portrait format
and it is more naturally suited to vertical orientation than the 3:2
ratio. The square format was a popular choice with roll-fi lm users,
partly because it can be cropped easily to a landscape or portrait
orientation, but it also has unique compositional properties as well.
A 1:1 aspect ratio is not always easy to work with, but it lends itself
very much to symmetrical compositions.
Minimalist compositions also work well in a square frame,
especially with the subject centred, or placed boldly towards
an edge or corner. The square aspect ratio also encourages
photographers to break away from the traditional ‘rules’ of
composition and place horizons across the middle of the frame.
With the resurgence of monochrome photography, and the trend
for minimalist long exposures, the square format is becoming an
increasingly popular option.
Of course, there is no reason for photographers to limit
themselves to cropping images to ‘standard’ aspect ratios:
photographs can be cropped to whatever format best suits the
scene, although you will generally get better results if you frame
the shot with a particular crop in mind, rather than simply relying
on cropping as a means of tidying up a poor composition.
CROPPING
MOUNTAINS I was drawn to this scene by the lighting conditions, which gave it the appearance of a pen and ink drawing. I sought out a viewpoint where the foreground rocks echoed the shape of the mountain range in the background, but found that it did not sit well within my camera’s 3:2 format: detail at the edge of the frame took attention away from the peak at the right, and there was too much empty space at the left. Simply zooming in did not solve the problem, so I composed with a 4:3 crop in mind using the guidelines available on my camera’s Live View screen.
ALP-144-161-LVBK.indd 148ALP-144-161-LVBK.indd 148 21/05/2014 17:0121/05/2014 17:01

149
LAKE REFLECTIONS Having too much interest stretching out at the sides of the frame would have diluted this bold, graphic composition, so it was framed with a square crop in mind. To keep the image as simple as possible, I opted for a long exposure to smooth out the ripples in the water and give the moving clouds a ‘brush-stroke’ quality. The camera height was important, as it was necessary to maintain visual separation between the tops of the foreground branch and the refl ections of the hills above it.
ALP-144-161-LVBK.indd 149ALP-144-161-LVBK.indd 149 21/05/2014 17:0221/05/2014 17:02

THE ART OF LANDSCAPE PHOTOGRAPHY
150
Sharpening is a necessary part of processing digital photographs.
It works by increasing the contrast along edges in an image.
The main controls available in most software packages are Radius,
which controls the size of the edges affected, and Amount, which
controls the overall strength of the sharpening. Threshold / Masking
allows you to sharpen more prominent edges, while ignoring subtler
edges, which can help to control noise that might otherwise be
exaggerated by overly aggressive sharpening. Some applications
also have a Detail slider that allows you to bias the sharpening
towards fi ne detail, which is clearly useful for landscapes.
It’s generally accepted that sharpening is a three-stage process.
The fi rst stage is ‘capture sharpening’, which is a small amount of
sharpening that is applied (usually with a small radius) to offset the
natural softness caused by the camera’s anti-aliasing fi lter (if it has
one), the demosaicing process and the lens. The precise amount will
depend on your camera, lens and the individual picture.
The fi nal stage, ‘output sharpening’, optimizes the image for
output. The amount needed depends on the image size, the output
device, the medium (glossy or matte paper, web use and so on)
and the nature of the image itself. It can be hard to judge the exact
amount on screen, but for those who print using Adobe Lightroom’s
Print Module, the default settings are very good.
Between theses two steps, lies ‘creative sharpening’, which
involves sharpening specifi c areas of a photograph. With landscapes,
it can be used to enhance fi ne detail in areas that contain foliage,
for example, and to bring out the texture in large surfaces. Applying
it selectively means that you can avoid over-sharpening areas such
as skies, where noise might be revealed.
This step-by-step guide to sharpening uses Adobe Lightroom
5, but similar results can be obtained using any application that has
comparable sharpening tools and the facility to use layer masks or a
history brush.
CREATIVE SHARPENING
1. For this shot, it was important to reveal the detail and texture in the poppy fi eld, but without making the sky too noisy or ‘rough’. My starting point was the Sharpen/Scenic preset in Lightroom. To locate this preset go to the Develop Module, and you will see the Presets tab on the left under the Navigator pane. Sharpen/Scenic is found under Lightroom General Presets. This gives values of Amount – 40, Radius – 0.8, Detail – 35, and Masking – 0. In this instance, it gave a pretty good result, but to preserve the soft nature of the sky, I decided to add some masking. Holding down the Option key (Mac) or Alt key (Windows) shows where the mask is applied.
TIP: If you are working with Photoshop rather than Lightroom, you can ‘paint on’ sharpening to specifi c areas
of the image using layer masks. For the less experienced
user, there are some useful plug-ins which will enable you to
achieve the same result. Photokit Sharpener, by Pixel Genius,
is one of the most popular.
ALP-144-161-LVBK.indd 150ALP-144-161-LVBK.indd 150 21/05/2014 17:0221/05/2014 17:02
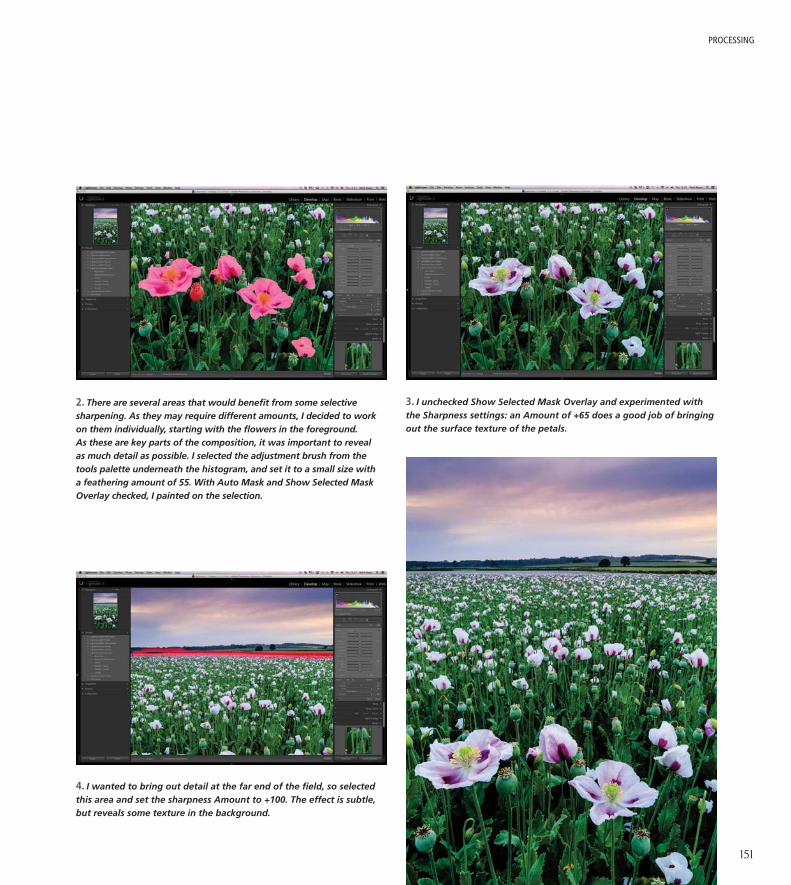
PROCESSING
151
2. There are several areas that would benefi t from some selective sharpening. As they may require different amounts, I decided to work on them individually, starting with the fl owers in the foreground. As these are key parts of the composition, it was important to reveal as much detail as possible. I selected the adjustment brush from the tools palette underneath the histogram, and set it to a small size with a feathering amount of 55. With Auto Mask and Show Selected Mask Overlay checked, I painted on the selection.
3. I unchecked Show Selected Mask Overlay and experimented with the Sharpness settings: an Amount of +65 does a good job of bringing out the surface texture of the petals.
4. I wanted to bring out detail at the far end of the fi eld, so selected this area and set the sharpness Amount to +100. The effect is subtle, but reveals some texture in the background.
ALP-144-161-LVBK.indd 151ALP-144-161-LVBK.indd 151 21/05/2014 17:0221/05/2014 17:02

THE ART OF LANDSCAPE PHOTOGRAPHY
152
There are various techniques you can use to guide the eye around
the picture and highlight the main subject or focal point, many
of which take place at the picture-taking stage. However, just as
darkroom workers will dodge and burn to highlight some areas of
LOCAL ENHANCEMENTSan image and hide others, there are a number of tricks that can be
applied during the processing of a digital image to achieve the same
effect. The following step-by-step guide uses the tools available in
Adobe Lightroom.
1. This image was shot on an atmospheric, misty morning, but out of the camera it seemed pale and lacking in contrast. This is partly because the image was ‘exposed to the right’ (see page 37) to capture as much tonal information as possible, which is refl ected in the histogram.
2. Basic processing steps include setting the white balance, black and white points and mid-tones. For this image, I didn’t set the black point too aggressively, as this would have added too much contrast and made the misty scene look unnatural. The white balance was tweaked from the Daylight setting it was shot at, to cool the image down slightly and remove a magenta cast. This atmospheric shot still lacks ‘punch’ though: the sky is washed out and the main focal point, the trees rising from the mist, needs greater clarity.
3. I pulled a Graduated Filter down over the sky, feathering it a moderate amount so that it didn’t interfere too obviously with the trees or the top of the hill (to do this you simply ‘grab’ one of the lines and pull it to adjust the amount of feathering). This mimics the effect of a soft-edged graduated fi lter. I then lowered the Exposure and Highlight sliders to darken the sky and reveal detail in the brighter areas.
To add defi nition to the clouds I increased the Clarity and Contrast. These sorts of adjustments can often reveal noise in the sky, so it’s worth checking for this and adding noise reduction to the fi ltered area if needed, although with this image, it proved unnecessary.
ALP-144-161-LVBK.indd 152ALP-144-161-LVBK.indd 152 21/05/2014 17:0221/05/2014 17:02

PROCESSING
153
4. With the sky improved, I wanted to increase the defi nition of the trees and the top of the hill. For this, I used the Radial fi lter tool (found on the tools palette underneath the histogram), drawing around the area I wanted to work on, then adjusting the shape of the fi lter by pulling on the squares at the outer edge. To adjust the orientation of the selection, hover the cursor over a line between the squares, then click and drag. By default, any adjustments will be applied outside the fi lter, so I clicked on Invert mask and set the Feathering to 65 so my adjustments would blend into the surrounding areas. I then increased the Clarity and Contrast and pulled down on the Shadows a little. These adjustments revealed a little noise, so I also added a touch of noise reduction.
5. The mist still looks slightly dull and grey, but this is easy to fi x with a Graduated Filter and/or the Adjustment Brush. This time, I pulled a Graduated Filter up from the bottom of the picture, making sure it didn’t affect the top of the hill, and then increased the exposure until the mist looked bright and clean.
6. This was a big improvement, but the mist at the left of the hill still looked a bit drab. The Graduated Filter wouldn’t work here, so a manual selection using a mask was needed. I clicked on Show Selected Mask Overlay so I could see where I was applying the mask, and checked Auto Mask so Lightroom would fi nd the edges of the hill, making applying the mask less painstaking.
7. I used a medium sized brush and set the Feathering to 100, and then painted over the area I wanted to work on. If at any point you paint over an area by mistake, you can undo the selection with the Eraser tool. I unchecked Show Selected Mask Overlay and increased the exposure to subtly brighten the area. Again, a touch of noise reduction was necessary, but beyond that it was just a case of tidying up – dust spotting and removing some distracting plane trails from the sky.
ALP-144-161-LVBK.indd 153ALP-144-161-LVBK.indd 153 18/06/2014 12:0618/06/2014 12:06

THE ART OF LANDSCAPE PHOTOGRAPHY
154
Sometimes, it isn’t possible to get the depth of fi eld you need for
a particular shot without using a tilt-shift lens. However, tilt-shift
lenses are beyond the fi nancial reach of many photographers,
they can be fi ddly to use and they are not available for all systems.
If this is the case, then another way of extending depth of fi eld
– which is achievable with any lens – is to use an image-blending
technique called ‘focus stacking’.
The principle is relatively straightforward: with your lens’s
aperture set at it’s optical ‘sweet spot’ (usually around f/5.6 – f/8),
you take a sequence of images, each focused at a different point in
the scene, and then merge them in software. The result is an image
that exhibits far greater depth of fi eld than would be achieved
in a single shot at the same aperture. The main problems when
employing this technique are that the camera must stay in the same
position during the sequence and there can be no movement in the
scene that can change radically from one shot to the next, such as
waves crashing on the shore. Cloud movement is less of an issue,
because if necessary, a single shot of the sky can be added after the
focus stacking sequence has been merged.
When you make your exposures you will need to focus manually
and the number of pictures required will depend on the focal length
you are using and your composition. The wider the lens and the
further away the nearest object is, the fewer shots you will need.
Often it is possible to focus stack with just three or four images, but
it is better to err on the side of caution and shoot too many, rather
than too few. When composing, allow a little extra space around
the edges of the composition, as the sides of the fi nal stacked image
are often slightly blurred, so you may need to crop the image.
Having captured your sequence, you will need to blend the
shots together in software. There are dedicated applications for
focus stacking, such as the paid-for Helicon Focus and the free
CombineZM, but it is also possible to carry out the process in
Photoshop, which is what I did here.
FOCUS STACKING
1. Open Photoshop and click on File > Scripts > Load fi les into stack. In the dialogue box that appears, select your fi les and click OK. Keep the fi les in the order they were shot in.
3. Click Edit > Auto-Blend Layers. Check Stack Images in the following dialogue box and click OK. Photoshop will now take the sharply focused parts from each layer and blend them to produce an image with enhanced depth of fi eld.
2. The fi les will be opened with each image forming a layer. Select all of the layers and choose Edit > Auto-Align Layers from the main menu. In the dialogue box, click Auto and wait for the layers to be aligned.
ALP-144-161-LVBK.indd 154ALP-144-161-LVBK.indd 154 21/05/2014 17:0221/05/2014 17:02

PROCESSING
155
4. If necessary, crop the image to remove any blurred edges, and then fl atten the layers and continue to make your usual image adjustments to contrast, colour balance, saturation and so on.
ALP-144-161-LVBK.indd 155ALP-144-161-LVBK.indd 155 21/05/2014 17:0321/05/2014 17:03

THE ART OF LANDSCAPE PHOTOGRAPHY
156
The panoramic format has always been popular with photographers,
largely because it replicates the way in which our eyes scan across
a scene. A well-executed panoramic photograph probably gives a
greater impression of actually being at the location than any other
format. Compositionally, panoramas work differently to squarer
aspect ratios, so look for scenes with strong horizontal planes that
encourage the eye to travel across the frame. A strong focal point,
such as a building, clump of trees or a hill, will help to break up the
horizon and slow the eye down on its journey across the image.
Over the years, there have been a number of specialist
panoramic fi lm cameras, such as the Fuji 617, with its truly ‘letterbox’
format 6:17 aspect ratio. There are very few digital options, and those
that exist are expensive. Cropping from a single frame to create a
panorama is an option, but it requires an extremely high resolution
fi le if you want to produce anything larger than a moderate sized
print. Because of this, most photographers prefer to take a series of
pictures across the scene and then stitch them together in software.
The key to successful stitching is aligning the pictures
successfully. To prevent parallax error, the camera needs to rotate
around the optical centre of its lens – the ‘nodal point’. There are
specialist panoramic tripod heads that allow this, but in practice,
parallax error is only really a problem if there is foreground interest
close to the camera. If you only make the occasional panorama, it is
probably not worth investing in specialist equipment; just make sure
you avoid close foreground interest in your compositions.
When shooting the sequence, you don’t want any variations in the
exposure, white balance and so on, between the frames. To prevent
this, take meter readings from the whole scene, average them out
and set exposure manually. White balance and focus should also be
set manually, and polarizing fi lters should be avoided, as the effect
will vary across the sequence. Use a spirit level to make sure that the
camera is completely level, so that vertical lines don’t converge and
the horizon is perfectly straight.
Many photographers prefer to shoot stitched panoramas in
portrait format, taking seven or eight images at a time. This not
only reduces the amount of distortion and makes it easier to
merge the pictures, but it also results in a higher resolution image
when the shots are stitched together. However, in practice, many
scenes will stitch together perfectly well from a horizontal sequence
of three or four images, and the advantage of doing this is there’s
less chance of conditions changing from one image to the next.
Regardless of the camera’s orientation, each frame in the
sequence should overlap by about 25 per cent, as this will make
them easier to line up. You should also shoot slightly wider than
you think is necessary, to allow some margin for error when lining
up the different frames, and to give yourself cropping options.
Once you have made your exposure sequence you can stitch it
together. There are dedicated stitching programs available for this,
such as PTGui, which has some particular advantages, but for this
step-by-step guide we’ll be using Photoshop.
PANORAMIC STITCHING
TIP: Getting the camera as level as possible is of paramount importance when shooting stitched panoramas. A geared
head, such as the Manfrotto 410 Junior, will make precise
levelling of the camera a much easier task.
ALP-144-161-LVBK.indd 156ALP-144-161-LVBK.indd 156 18/06/2014 12:0618/06/2014 12:06

PROCESSING
157
1. After shooting, download your image sequence and make basic adjustments, ensuring that these adjustments are exactly the same on each image. This is what my individual images look like all lined up together.
3. In the dialogue box that appears, choose your option for merging the images. In most instances, Auto will work well, but Cylindrical and Perspective are also effective; be prepared to experiment and see which works for you. Click on the Browse button, select your images and click OK.
5. Flatten the layers and carry out fi nal adjustments to colour balance, contrast, saturation and so on.
4. It can take a little while for Photoshop to process the images, but when they are merged each one is automatically placed on its own layer. There will be some blank space around the edges, as you can see in this example. This is a result of the way the images have been lined up, so select the Crop tool from the Tools palette and crop the image to remove the blank space.
2. Open Photoshop and choose File > Automate > Photomerge from the menu.
ALP-144-161-LVBK.indd 157ALP-144-161-LVBK.indd 157 21/05/2014 17:0321/05/2014 17:03

THE ART OF LANDSCAPE PHOTOGRAPHY
158
With the ever-increasing dynamic range of digital sensors, capturing
a full range of tones in a scene is becoming much easier. However,
there are still plenty of occasions when the contrast range of a
landscape exceeds the dynamic range of the sensor. In many cases,
graduated ND fi lters will solve the problem, but there are occasions
when this isn’t possible – either the contrast is just too great, or an
uneven horizon means that the transition line of the fi lter would be
obvious in the image. In these situations, taking two or more shots
of the same scene (usually one exposed for the sky and another
for the foreground), and then blending them can be the answer.
It is possible to blend bracketed shots automatically, using
software such as Photomatix Pro to create a High Dynamic Range
(HDR) image, but you have far more control and can get better results
by blending your images manually using layer masks. In this instance,
we have used Photoshop for this exposure blending step by step.
EXPOSURE BLENDING
1. Open the images in your Raw converter. One should have an underexposed foreground (left), with full detail in the sky, while the other should be correctly exposed for the foreground, but with no or little sky detail (right). Process the fi rst so that the sky looks correct, and the second so that the foreground looks good. It is best to do this by eye and ignore the histograms, as you will only be interested in a part of each image. When you have fi nished, convert the Raw images to TIFFs, and open them in Photoshop.
2. Click on the lighter of the two images. Select the Move tool from the Tools palette, and drag the lighter image over the darker one. Hold down the Shift key while dragging, to ensure that the two images line up precisely. The lighter image is added as a new layer in the Layers palette, on top of the darker image. Click on the Add Layer Mask icon at the bottom of the Layers palette to create a layer mask.
ALP-144-161-LVBK.indd 158ALP-144-161-LVBK.indd 158 21/05/2014 17:0321/05/2014 17:03

PROCESSING
159
3. Select the sky using either the Polyganol lasso tool or the Magnetic lasso tool. Feather the selection heavily. In this example, I have feathered it by 250 pixels (as you can see in the dialog box).
5. You may fi nd that you need to tidy up the edges of your selection – in this example, the tops of the cliff have gone a little too dark. To remedy this, deselect the sky, change the foreground colour to white and set the brush’s Opacity to around 25 per cent. Gradually paint back the lighter top layer in areas that need it. You can then make fi nal adjustments to the Levels, Curves, Saturation, etc. of the individual layers, and when you’re satisfi ed, fl atten the layers down.
4. Select the Brush tool from the Tools palette and set its Opacity to around 50 per cent. This will allow some control when painting in detail from the layer below. Next, choose a medium-sized, soft-edged brush. Set the foreground colour to black; this will allow you to brush away the top layer, revealing the darker layer beneath. Use multiple strokes to do this gradually. If you think you’ve overdone it at any point, change the foreground colour to white; this allows you to paint back the top layer.
ALP-144-161-LVBK.indd 159ALP-144-161-LVBK.indd 159 21/05/2014 17:0321/05/2014 17:03

THE ART OF LANDSCAPE PHOTOGRAPHY
160
Nearly all digital cameras have a monochrome mode, but even if
you know the fi nal image will be monochrome, it’s better to shoot
in colour (raw) and convert to black and white in post-processing.
This retains the maximum level of fl exibility, allowing you to carry
out the same level of enhancement as you would have when
printing a negative in a traditional darkroom.
There are dedicated programs for black and white conversion,
including the excellent Silver Efex Pro 2 from Nik Software, but both
Adobe Photoshop and Lightroom are capable of high quality mono
conversion. In Lightroom’s Develop Module, the ‘Basic’ panel on the
right offers the option of black and white treatment. Scrolling down
reveals the ‘Black and White Mix’ panel, where you can recreate
the effects of colour fi lters (e.g. a red fi lter for darkening blue skies)
with great precision. Alternatively, in the left pane of the Develop
module, there are also a number of presets which mimic the effects
of colour fi lters.
For those who wish to go a little further than basic monochrome
conversions, and enjoy the kind of control that darkroom workers
have, it is possible to make local adjustments to exposure and
contrast – the equivalent of darkroom ‘dodging’ and ‘burning’.
In Lightroom version 5 or newer, this can be done using the
graduated fi lter tool, radial fi lter tool and adjustment brush, all
located in the tools palette under the histogram on the right of the
Develop Module. I’ve used Lightroom (version 5) to demonstrate
this, as it works non-destructively on Raw fi les. Similar tools are
available in many other Raw converters.
CONVERTING TO BLACK AND WHITE
1. This is the original Raw fi le. The lighting is quite nice, and the sky has potential, but overall the shot lacks impact. A black and white conversion that adds contrast and burns in detail in the sky, could inject some much-needed drama.
2. There are several options for converting an image to black and white in Lightroom. You can click on Black and White in the Basic tools pane in the Develop module and then tweak tonal relationships using the Black and White Mix in the Hue, Saturation, Lightness tools pane; you can pull the Saturation down to -100; or you can try one of the B&W Presets in the panel at the left. It’s worth experimenting with the presets, as they often provide you with an excellent starting point. In this case, I opted for B&W Look 5, which gives a nice punchy look to the tower and foreground, but leaves the sky a little washed out.
ALP-144-161-LVBK.indd 160ALP-144-161-LVBK.indd 160 21/05/2014 17:0421/05/2014 17:04

PROCESSING
161
SILVER EFEX PRO 2For comparison, I converted the same image using Nik Silver Efex Pro 2. The end result is as good as – and perhaps better than – my Lightroom conversion, and it took a fraction of the time; just some very minor adjustments to one of the presets. If you do a lot of black and white photography, then Silver Efex, which works as a plug-in for Lightroom, Photoshop, Photoshop Elements and Apple Aperture, could be a worthwhile investment.
5. This is already a huge improvement, but the sky looks a little unbalanced, and the clouds just above the horizon need more work. I selected the area using the Radial Filter and checked Invert Mask so that any adjustments would be applied inside the circle. I reduced the Exposure and Highlights, and then make a similar adjustment to the clouds at the other side of the tower. The black and white version is defi nitely an improvement over the original colour image, with a lot more impact.
3. I wanted to ‘burn in’ the sky a little more, so pulled a heavily feathered Graduated Filter down over the sky. I then reduced the Exposure, Highlights and Shadows, while boosting Contrast and Clarity. This makes the top part of the sky a lot more dramatic, but also darkens the top of the tower.
4. The darkened tower needs ‘dodging’ (lightening) so I painted a mask with the Adjustment Brush and increased Exposure and Shadows.
ALP-144-161-LVBK.indd 161ALP-144-161-LVBK.indd 161 21/05/2014 17:0421/05/2014 17:04

Once you have mastered your equipment and have a good
grounding in composition, you will probably want to create
images that are recognizably yours; your own personal
style. Establishing this is no easy task, as it depends on
you developing a unique way of seeing the world and
understanding what it is you want to express through your
photography. A style should be identifiable and individual,
the product of the many choices that you make in the
process of creating a photograph. Whilst this will vary from
one image to another, most photographers tend to favour
certain types of lighting, viewpoint, angle of view and so on,
which will help them put their own stamp on their images.
A personal style is not the same as a broad style, such as
minimalism or Impressionism, but the chances are that your
work will fit into one of these categories – familiarity with
them will certainly help you to understand what is involved
in forming your personal style. Therefore, we begin this
chapter by examining some of the established landscape
photography styles.
CHAPTER NINE > DEVELOPING A PERSONAL STYLE
ICELANDIC SUNSETThis image bears many of the hallmarks of the author’s personal style. Shot with extensive depth of fi eld in dramatic light at the end of the day, a shutter speed of 5 seconds records movement in the water, adding texture to the foreground. The basic design of the image is straightforward, with strong diagonal lines leading through to the main focal point and a clean and uncluttered foreground. As far as possible, the shot was framed to position the shiny rocks to balance the large, refl ective area of sand and sea on the left.
ALP-162-179-LVBK.indd 162ALP-162-179-LVBK.indd 162 18/06/2014 12:0718/06/2014 12:07

ALP-162-179-LVBK.indd 163ALP-162-179-LVBK.indd 163 21/05/2014 17:0521/05/2014 17:05

THE ART OF LANDSCAPE PHOTOGRAPHY
164
Most photographic styles have their roots in a traditional or classical
style of composition, in which simplicity, order and regularity are
emphasized. Many of the ideas discussed in this book are drawn
from a traditional style, which is somewhat conservative and bases
compositions around what we subconsciously fi nd comfortable
to view. The aims of traditional style are harmony, balance and a
satisfying division of the image, often based around an established
framework such as the rule of thirds or Golden Section.
This possibly makes a traditional style of composition sound
rather dull and unchallenging, but it is arguable that it is more
diffi cult for photography to push the boundaries than it is for the
other visual arts. Photography is, after all, based in reality and does
not always provide the opportunity for creative interpretation of
a scene. This is particularly true of outdoor photography, where
the framing or placement of the main subject may be forced
upon the photographer by the available viewpoint and lighting.
Furthermore, classical composition pervades in landscape
photography, because the aim of the majority of landscape
images is, naturally enough, to appeal to the viewer’s sense of
harmony and beauty rather than to challenge and disturb.
Perhaps the exceptions to this are with regards to focusing,
camera movement and shutter speed, which all allow for more
creative expression. A traditional style of landscape photography
usually involves extensive depth of fi eld and front-to-back sharpness,
but in the right circumstances there is no reason not to choose a
narrow depth of fi eld. Intentional blurring of the subject or scene
can give a photograph an impressionistic look, and the availability
of extreme ND fi lters has encouraged many photographers to
experiment with the creative effects of movement.
TRADITIONAL COMPOSITION
CLASSICAL COMPOSITIONThis image exhibits many characteristics of a classical composition. It is a wide view, with extensive depth of fi eld and strong linear perspective created by the dominant foreground, converging lines and texture gradient. The frame is divided according to the Golden Section, with a clear focal point – the sun rising behind the peak – placed very closely to an intersection on the Golden Section grid. It is shot in dramatic light at sunrise, with the darker foreground forcing attention through to the lighter parts of the frame, where the main interest lies.
ALP-162-179-LVBK.indd 164ALP-162-179-LVBK.indd 164 18/06/2014 12:0818/06/2014 12:08

DEVELOPING A PERSONAL STYLE
165
An important sub-section of the traditional style (and arguably a
genre in its own right) is the ‘big foreground’ landscape developed
by large format landscape photographers, which combines strong
foreground interest with exaggerated perspective and extensive
depth of fi eld. These landscapes are usually shot with dramatic
lighting during the golden hours and the results are often striking.
It’s hardly surprising then, that many photographers have attempted
to recreate this look.
Digital SLRs have made this technique accessible, as it’s
relatively easy to get close to a subject with small-format wide-
angle lenses and get suffi cient depth of fi eld without the need for
camera movements. With the high-resolution capabilities of current
full-frame sensors, very large prints are now possible from digital
cameras, meaning that the ‘big foreground’ look is no longer the
preserve of those who shoot with large format fi lm. For those who
are really keen to make the most of this style, tilt-shift lenses can
help you get the ‘large format look’ without compromising image
quality by having to stop the lens down (see page 20).
THE BIG FOREGROUNDThe ‘big foreground’ has become something of a cliché in landscape photography, especially when big rocks are used as the foreground interest. However, when done well, this is still a perfectly valid technique. In this instance, it helps to provide an alternative view of a well-known landmark. This type of composition works best when its foreground complements the background and in this instance, the foreground rock was not chosen at random. As well as drawing the eye into the picture and helping to create perspective, it serves two other important purposes: it reduces the impact of the empty space in the middle distance, and the dip in the rocks provides a frame for the island and monastery in the background. The strong sidelighting adds depth to the background focal point and reveals texture in the foreground rocks.
ALP-162-179-LVBK.indd 165ALP-162-179-LVBK.indd 165 18/06/2014 12:0818/06/2014 12:08

THE ART OF LANDSCAPE PHOTOGRAPHY
166
Minimalism emerged in western art, architecture and design in the 1960s, although its
origins are slightly earlier than that, in the reductive trends of the Modernist movement.
The main thrust of minimalism is the belief that ‘less is more’ and it involves a stripping
down of composition or design to its bare essentials, utilizing clean, simple lines and shapes,
and placing an emphasis on ‘negative space’ (the space around and between the subject).
Simplicity is important in traditional composition, so minimalism could be viewed as an
extension of that. It is also a natural progression for photography, as composing an image
revolves around framing a scene to exclude what is unnecessary and distracting, paring
down a potentially chaotic scene so that there is a sense of order in what remains.
MINIMALISM
THE MINIMAL LANDSCAPEMinimalism is a relatively straightforward concept, but there is more to it than simply
not having much in the frame. When applying it to landscape photography, there are
a few things we need to consider. Your choice of subject is important. Geometric lines
and shapes are important in minimalism, so look for subjects that lend themselves to
this treatment. Many minimalist landscapes make use of man-made structures such as
barns, jetties, groynes and so on, but there are options from the natural world as well
– trees are one obvious example.
Long exposures are common (but not obligatory) in minimalist compositions,
as they can help simplify a scene by smoothing out texture in the sky and water.
Certain lighting and atmospheric conditions, such as mist and fog, have a similar effect.
Precise framing is clearly important, as it is with all composition. Identify the
key elements and exclude all others. In a minimalist composition, negative space
is as important as the main subject, so make sure it forms an interesting shape, with
consistent tone and texture. Minimalist images tend to have a muted palette with
little variation in colour and tone, so it’s a useful approach to take in bad weather.
Unsurprisingly, black and white features a lot in minimalist photography, with both
high and low contrast approaches working well.
MINIMALIST MONOCHROMEBlack and white is a natural medium for minimalist images. With an empty beach and rain sweeping towards the shore, the temptation at the time of taking the picture was to leave the frame completely empty, but the deck chair helps to tell a better story. As well as providing foreground interest, its clean lines help to direct the eye into the negative space in the middle distance and background and its presence adds to the overall mood of the picture. The texture of the negative space is important, so a long exposure was used to blur the boundary between the sea and the shore and to help create the smooth layers of clouds in the sky.
MINIMALIST SEASCAPESome scenes lend themselves strongly to a minimalist treatment, this empty beach being a case in point. With no obvious foreground interest and rather fl at lighting under an overcast sky, the best thing to do was to work with the restricted range of tones and open space to create a minimalist composition. To simplify the scene, the background focal point – the large rock – was silhouetted, and an extreme ND fi lter was used to generate a 3-minute exposure. This smoothed out the texture in the water, so the sea merged with the wet refl ective sand in the foreground. The clouds have moved towards the camera during the exposure, fanning out towards the corners of the frame, and this is refl ected in the foreground, which creates interesting texture throughout the negative space.
ALP-162-179-LVBK.indd 166ALP-162-179-LVBK.indd 166 21/05/2014 17:0621/05/2014 17:06

167
ALP-162-179-LVBK.indd 167ALP-162-179-LVBK.indd 167 21/05/2014 17:0621/05/2014 17:06

THE ART OF LANDSCAPE PHOTOGRAPHY
168
The term ‘Impressionism’ was fi rst coined in 1874 to describe the
work of a group of artists, including Monet, Renoir, Pissarro and
Degas, who were exhibiting in Paris. Although Impressionism is
now one of the best-loved art movements, at the time the movement
was not well-received by the conventional art community.
Impressionism is characterised by its use of pure, bright colours
and the fact that it shows visual effects rather than the details of
a scene. It is often concerned with movement and the changing
quality of light over time, and the impressionist painters often
worked with complementary colours to make colour appear richer.
The intention was to convey the experience of how we fi rst view
a scene, perceiving a mass of colour and light rather than detail.
There are many aspects of Impressionism that should appeal
to landscape photographers, such as the use of colour and light,
although Impressionism has never really gained the popularity it
might amongst landscape photographers. This is perhaps because
many photographers see their craft as representational, so place
greater importance on the rendering of fi ne detail. Nevertheless,
there is no reason not to experiment with Impressionism, even if
it is only occasionally. Impressionistic effects are easily achievable
in post-processing, but for many this is regarded as ‘cheating’.
Therefore, in-camera effects are more commonly seen.
A technique that was popular with fi lm photographers was
to use fast, grainy fi lm, often push-processed to enhance the grain,
in combination with a soft-focus fi lter or diffuser to soften the
image. This combination would reduce detail and give photographs
a soft, dreamy quality, especially when shot in appropriate lighting.
However, manufacturers were intent on reducing the
appearance of grain in their fi lms and with the advent of digital,
the range of fi lms available has been severely reduced, with many
of the grainy fi lms no longer available. For digital shooters, the
in-camera options are to use specialist lenses such as the Lens Baby,
double exposures where one shot is in focus and the other defocused
(the ‘Orton effect’) and intentional camera movement (see box).
IMPRESSIONISM
IMPRESSIONIST LAKE SCENEA combination of fi lm stock and fi ltration has given this lakeside scene a painterly quality that emphasizes shape, form and colour, rather than detail.
ALP-162-179-LVBK.indd 168ALP-162-179-LVBK.indd 168 21/05/2014 17:0621/05/2014 17:06

DEVELOPING A PERSONAL STYLE
169
INTENTIONAL CAMERA MOVEMENTIntentional Camera Motion – or ICM – is a hugely subjective style of photography, so you will
either love or hate the results. The idea is to move the camera during an exposure in order to
creatively blur static subjects. The results are Impressionistic and eye-catching, with a painterly
look that can convey mood and a sense of motion. It is a technique that is easy to replicate
and any focal length can work. To capture ICM images, a shutter speed in the region of half
a second is needed, but feel free to experiment with longer or shorter exposure times. Trigger
the shutter and move the camera during exposure. You can either do this handheld or with
a tripod, using a panning action to blur your subject. For smooth results, begin moving the
camera before opening the shutter and continue panning until after it shuts again.
Different types of motion will yield varying results: vertical and horizontal movement is
most popular, but moving the camera back and forth, panning diagonally and rotating the
camera can also create striking ICM images. Moving the camera parallel to existing lines and
edges within your composition will help emphasize them. You will fi nd no two results will
quite look the same – this is a real hit and miss technique. The fi nal image will not closely
resemble the subject itself, but instead it will be an abstract representation of it.
ICMIt is typically best to combine intentional camera movement with views containing strong shapes that will remain recognizable even when blurred – for example, woodland. Areas of strong colour, lines and contrast also suit this type of movement.
ALP-162-179-LVBK.indd 169ALP-162-179-LVBK.indd 169 21/05/2014 17:0621/05/2014 17:06
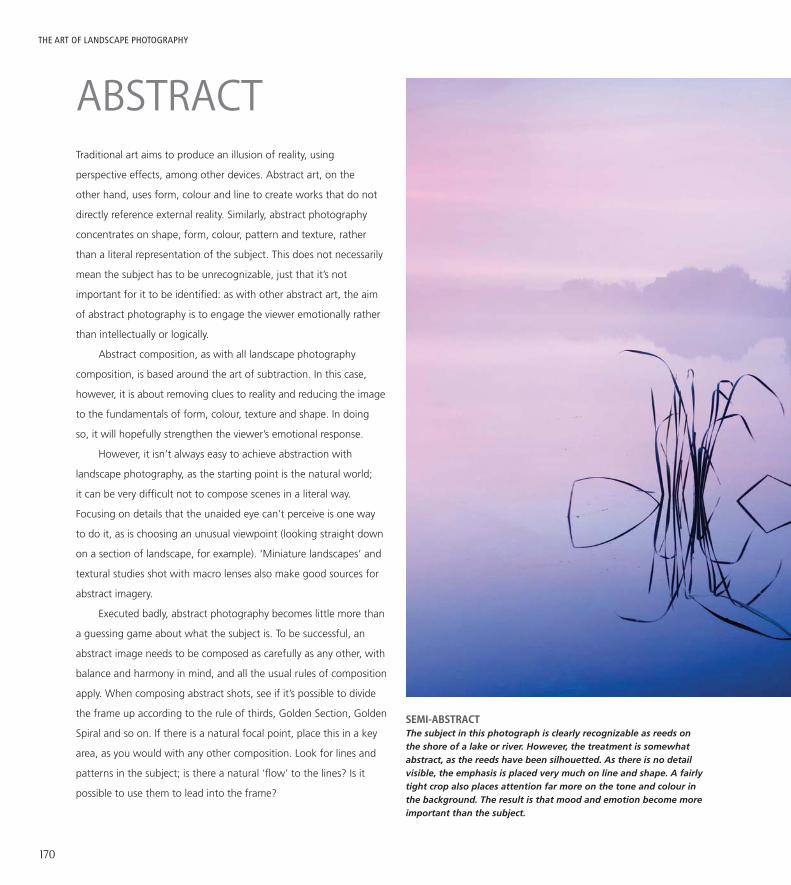
THE ART OF LANDSCAPE PHOTOGRAPHY
170
Traditional art aims to produce an illusion of reality, using
perspective effects, among other devices. Abstract art, on the
other hand, uses form, colour and line to create works that do not
directly reference external reality. Similarly, abstract photography
concentrates on shape, form, colour, pattern and texture, rather
than a literal representation of the subject. This does not necessarily
mean the subject has to be unrecognizable, just that it’s not
important for it to be identifi ed: as with other abstract art, the aim
of abstract photography is to engage the viewer emotionally rather
than intellectually or logically.
Abstract composition, as with all landscape photography
composition, is based around the art of subtraction. In this case,
however, it is about removing clues to reality and reducing the image
to the fundamentals of form, colour, texture and shape. In doing
so, it will hopefully strengthen the viewer’s emotional response.
However, it isn’t always easy to achieve abstraction with
landscape photography, as the starting point is the natural world;
it can be very diffi cult not to compose scenes in a literal way.
Focusing on details that the unaided eye can’t perceive is one way
to do it, as is choosing an unusual viewpoint (looking straight down
on a section of landscape, for example). ‘Miniature landscapes’ and
textural studies shot with macro lenses also make good sources for
abstract imagery.
Executed badly, abstract photography becomes little more than
a guessing game about what the subject is. To be successful, an
abstract image needs to be composed as carefully as any other, with
balance and harmony in mind, and all the usual rules of composition
apply. When composing abstract shots, see if it’s possible to divide
the frame up according to the rule of thirds, Golden Section, Golden
Spiral and so on. If there is a natural focal point, place this in a key
area, as you would with any other composition. Look for lines and
patterns in the subject; is there a natural ‘fl ow’ to the lines? Is it
possible to use them to lead into the frame?
ABSTRACT
SEMI-ABSTRACTThe subject in this photograph is clearly recognizable as reeds on the shore of a lake or river. However, the treatment is somewhat abstract, as the reeds have been silhouetted. As there is no detail visible, the emphasis is placed very much on line and shape. A fairly tight crop also places attention far more on the tone and colour in the background. The result is that mood and emotion become more important than the subject.
ALP-162-179-LVBK.indd 170ALP-162-179-LVBK.indd 170 21/05/2014 17:0721/05/2014 17:07

171
DEVELOPING A PERSONAL STYLE
By defi nition, patterns are regular and repetitive, and their nature
can often be enhanced by a symmetrical composition. Shape and
form are also important components in abstract compositions,
so look to see how they can be exploited. Are there recognizable
shapes that work well together? Do you want to include whole
shapes, or is there a more interesting composition to be made by
closing in further and concentrating on angles and curves?
Colour is another strong element in abstract images. It can be
used to draw the viewer’s attention to the subject, infl uence mood
and emotional response, and create harmony or disharmony, so try
to use colour as part of the composition and look for interesting
colour combinations.
REFLECTIONS Refl ections on water make great subjects for abstract studies. Ripples soften the image and distort shapes, making even everyday objects seem unfamiliar. This composition is based on texture, colour and lines. The colours are complementary, creating harmony and the dominant colour is blue, suggesting calm and tranquillity. The strong horizontal lines that run through the image enhance this mood.
Many abstract photographs reveal details that are not visible to the
naked eye. This can cause issues with limited depth of fi eld, but this
can also be used to further abstract the subject, by placing much of
it severely out of focus. If you prefer the whole image in focus, focus
stacking (see page 154) is always an option.
ALP-162-179-LVBK.indd 171ALP-162-179-LVBK.indd 171 18/06/2014 12:0818/06/2014 12:08

THE ART OF LANDSCAPE PHOTOGRAPHY
172
Trying to develop a personal style can be a daunting task. It is
certainly not a short process, nor is it an easy one, and it requires a
fair amount of introspection. The factors that shape our style are the
various choices that we make as photographers, including subject,
the equipment we use, the lighting we favour and how we process
our images. The obvious starting point on the road to developing
your own style is to examine the factors that can contribute to a
personal style and then analyzing how these infl uence your work.
SUBJECTTo some extent, this is independent of style, as your personal style
can theoretically be applied to any subject. However, we are all
drawn to certain subjects more strongly than others, whether it’s
trees, streams or waves crashing on the shore. What attracts us is
related to our personality and how we see the world, so it’s worth
identifying the subjects that most strongly motivate you to pick
up a camera.
EQUIPMENT AND MEDIUMWhether you favour fi lm or digital, 35mm, medium format, large
format, colour or black and white infl uences the ‘look’ of your
images. Your choice of format is part of your personal style: do
you tend to shoot in horizontal or vertical orientation? Do you like
panoramic or squarer formats?
Lens choice also has a big infl uence. Wide-angle lenses allow
greater depth of fi eld and the possibility to create an exaggerated
perspective, whereas longer focal lengths create a compressed,
’stacked’ look that can be useful for compositions based around
layers. Whether you use primes or zooms will also affect the way
you work: zooms allow very precise framing from your chosen
viewpoint, whereas primes require you to move to frame the shot
how you want, which may compromise viewpoint. On the other
hand, primes are generally sharper and resolve more detail than
zooms, although this is certainly not a universal truth – there are
some excellent zoom lenses available. Individual lenses will also have
variations in how they handle colour and contrast and how much
distortion they have, all of which will affect the look of your images.
LIGHTINGMost landscape photographers prefer shooting in the golden hours,
but there is no rule that says you have to restrict yourself to this type
of lighting and there are those whose work is recognisable precisely
because they favour overcast, diffused light in the middle of the
day or shooting long exposures in extremely low light, for example.
Direction of light is also closely related to style: do you prefer sidelit,
backlit or front-lit subjects?
EXPOSUREExposure is a powerful tool for creative expression. High-key
and low-key images have a completely different mood, and with
certain subjects your choice of shutter speed can also affect the
atmosphere; extremely long exposures give an ethereal look to some
scenes, whereas shorter exposures can produce images that appear
more powerful and dynamic.
DEFINING YOUR STYLE
YOUR PERSONAL STYLESubject, choice of equipment, use of foreground, line, shape and perspective, how you treat colour and how you expose your images are just some of the factors that contribute to your personal style.
ALP-162-179-LVBK.indd 172ALP-162-179-LVBK.indd 172 21/05/2014 17:0721/05/2014 17:07

173
ALP-162-179-LVBK.indd 173ALP-162-179-LVBK.indd 173 21/05/2014 17:0721/05/2014 17:07

THE ART OF LANDSCAPE PHOTOGRAPHY
174
APPROACHThis relates to how much planning you do. Some photographers
research their locations meticulously, checking the angle of the
sun and so forth, to make sure they visit the location in what
they consider to be the ‘best’ light (or at least their favoured type
of lighting). They will set up in advance and wait for the right
conditions, perhaps making multiple visits to the same location.
Once they’ve found their composition, they may only make slight
adjustments. This will mean they won’t get a huge variety of
images, but they will get the one that they want.
Others photographers prefer to be more spontaneous and
react to what they fi nd in front of them. They are more reactive,
and will hunt for the best light; if it’s not happening where they
are, they’ll move on and see if there’s something better elsewhere.
Once they feel they’ve nailed a shot, they’ll move on to try
something different. This type of photographer is likely to get
a greater variety of shots, but runs the risk of missing the best
combination of light and composition. However, both approaches
are equally valid, and both are strongly related to personality –
which are you? You may fi nd you combine elements of each.
SUBJECT CHOICE AND EXPOSUREAll photographers fi nd themselves drawn to certain types of subject, which can help to identify their personal style. In this case, the isolated object (often man-made, or at least very structural in nature) in an expanse of empty space is a typical choice of the author. An exposure time of 4 seconds, timed to capture the backwash of a wave, creates strong texture in the foreground, something else that typifi es the author’s work.
ALP-162-179-LVBK.indd 174ALP-162-179-LVBK.indd 174 21/05/2014 17:0721/05/2014 17:07

DEVELOPING A PERSONAL STYLE
175
FRAMINGFraming and composition are the most important factors in
determining personal style, so it’s worth looking at how you frame
your images and asking yourself the following questions: Do you
prefer a wide view or do you prefer to highlight details within the
scene? Do you go for extensive depth of fi eld? How do you treat
perspective? This relates strongly to lens choice, but there are other
factors as well – for example, do you like to show depth through
foreground interest or the use of guiding lines? Do you favour the
‘big’ foreground or something subtler? Where do you like to place
foreground interest – centred or to one side? How do you divide the
frame – following the rule of thirds, or something else? How do you
treat shape, line and form? Do you go for a ‘classical’ composition
or something different? Which colours do you favour? Do you
prefer complementary colours? How much colour saturation? What
sort of mood do you like to convey in your compositions? How do
you treat movement?
POST-PROCESSINGAnother way of putting your own stamp on your photography is via
post-processing, and your personal look can include how much colour
saturation you apply, how much contrast, how warm or cool your
images are and the amount of sharpening and clarity you prefer.
FRAMING AND LIGHTYour choice of framing and your preferred lighting help to identify your individual style. Here, the frame is divided very traditionally, close to the rule of thirds, with strong foreground interest. The shot is also characterized by low sidelighting, which reveals texture and gives volume and depth to the castle.
ALP-162-179-LVBK.indd 175ALP-162-179-LVBK.indd 175 18/06/2014 12:0818/06/2014 12:08

176
THE ART OF LANDSCAPE PHOTOGRAPHY
Having identifi ed the factors that defi ne a personal style, the logical
step is to use this to analyze your own images and identify the
essence of your style. From there you are in a position to develop
your personal style further. To demonstrate this process, we’ve
analyzed our own styles.
SUBJECTAny landscapes with big vistas, but Mark is especially drawn to
water and seascapes in particular, spending a lot of time near the
coast in Dorset, UK.
EQUIPMENT AND MEDIUMMark cut his teeth on 6 x 7cm medium-format cameras and that
continues to infl uence his work. He now uses a full-frame digital
SLR, shooting primarily with wide-angle zooms, but still prefers
a squarer aspect ratio to the 3:2 of his sensor.
LIGHTINGThe majority of Mark’s pictures are taken in the golden hours, but
he also favours twilight and pre-dawn light. He will use midday light
on overcast days for black and white and long exposure work, and
prefers sidelighting and backlighting to frontal lighting.
EXPOSURETexture is an important part of Mark’s compositions, so he likes
long exposures that capture movement in water and soften skies.
Although a number of shots feature ultra-long exposures to simplify
compositional elements, he generally prefers moderate exposure
times of 2–20 seconds, as this results in a more textured look and
can be used to create lines in foregrounds.
APPROACHMark is very much a planner, spending a lot of time looking at
weather forecasts and checking sunrise and sunset angles. On
location, once he’s found a composition he will often not change
much, just continuing to tweak it slightly until he’s absolutely
satisfi ed it can’t be improved further. Then it’s a case of waiting
for the light to be right.
FRAMINGMark generally favours a traditional style of composition, with a
strong minimalist infl uence. He likes extensive depth of fi eld and
strong perspective effects, but favours guiding lines and curves
rather than a ‘big foreground’ approach. Compositions are very
‘structured’, often featuring architectural elements in them and
Mark often tries to convey a tranquil, romantic mood.
POST-PROCESSINGProcessing will quite often involve a change of aspect ratio, and
having spent several years shooting with Fuji Velvia, Mark likes
saturated, punchy colours, and images with strong contrast.
ANALYZING THE AUTHOR’S PERSONAL STYLE:
MARK BAUER
MARK’S PERSONAL STYLEThis shot of a bridge crossing a river in Dorset in the UK illustrates many of the characteristics of Mark’s personal style. Shot on 6 x 7cm Velvia in the romantic light of a misty dawn, it is a very ‘structural’ composition, with strong lines creating a powerful sense of perspective through to a vanishing point. There is strong colour saturation and there is an overall mood of tranquillity.
ALP-162-179-LVBK.indd 176ALP-162-179-LVBK.indd 176 18/06/2014 12:0818/06/2014 12:08

ALP-162-179-LVBK.indd 177ALP-162-179-LVBK.indd 177 21/05/2014 17:0821/05/2014 17:08

178
THE ART OF LANDSCAPE PHOTOGRAPHY
SUBJECTRoss’s landscapes are a mixture of wide views and more detailed
shots. He is a macro specialist and this is refl ected in the way
he is attracted to details in the landscape. He grew up near the
coast, so it is no surprise that water plays a large part in many
of his compositions.
EQUIPMENT AND MEDIUMRoss worked for many years with 35mm transparency fi lm and was
an early adopter of digital cameras. He now shoots with a full-frame
digital SLR, almost exclusively in colour, and is very comfortable with
the fl exibility that the 3:2 aspect ratio offers.
LIGHTINGRoss’s preference is for sidelighting during the golden hours, but
he also works a lot in twilight and pre-dawn. He is not averse to
working in what might be thought of as ‘poor’ light, believing that
as long as there is some texture in the sky, there is the possibility of
making good images.
EXPOSURERoss’s exposures are often dominated by light tones, with soft
contrast, but he is also happy to let blacks record as pure black and
likes to emphasize form with silhouettes. When photographing
water he will often use a shutter speed that will create or highlight
the texture of breaking waves, waterfalls, and so on, but will
occasionally use ultra-long exposures to smooth out surfaces and
simplify compositions.
APPROACHCareful planning is evident is Ross’s work, and he spends time
researching tides, weather forecasts, sunrise and sunset angles
in order to choose the best time to visit locations. However, on
location he is happy to be fl exible and react to conditions, often
taking a wide variety of compositions.
FRAMINGRoss’s compositions follow a classical balance. He leans towards
simplicity (though rarely minimalism), with extensive depth of
fi eld, strong foregrounds, clean lines and bold shapes. Details and
textures are often prominent.
POST-PROCESSINGRoss aims for a ‘natural’ look with his processing, generally
processing his images less aggressively than co-author Mark Bauer,
and with slightly less contrast. He doesn’t like an overly warm white
balance, preferring coolish tones.
ANALYZING THE AUTHOR’S PERSONAL STYLE:
ROSS HODDINOTT
ROSS’S PERSONAL STYLEA simple, balanced composition and the naturally cool tones of twilight mark this as one of Ross’s images, taken in Slovakia. The classical division of the frame into thirds gives the picture a sense of harmony, and there is a clear focal point in the background. The strong foreground helps to convey a feeling of depth, with the blue hues, mist and smooth water create a sense of tranquillity.
ALP-162-179-LVBK.indd 178ALP-162-179-LVBK.indd 178 18/06/2014 12:0818/06/2014 12:08

179
ALP-162-179-LVBK.indd 179ALP-162-179-LVBK.indd 179 18/06/2014 12:0818/06/2014 12:08

TECHNICAL DETAILS
180
THE ART OF LANDSCAPE PHOTOGRAPHY
9 MISTY RIVERCamera: Canon EOS 5D Mk IILens: 70–200mm (at 163mm)Aperture: f/11Shutter speed: 6 sec.ISO: 100Filter(s): 4-stop ND
10 TECHNICAL ACCURACYCamera: Nikon D800ELens: 16–35mm (at 35mm)Aperture: f/16Shutter speed: 0.8 sec.ISO: 100Filter(s): 2-stop ND grad
13 ASPECT RATIOCamera: Nikon D800ELens: 16–35mm (at 18mm)Aperture: f/16Shutter speed: 1.3 sec.ISO: 100Filter(s): 2-stop ND
15 FULL-FRAME DIGITALCamera: Nikon D800Lens: 24–70mm (at 31mm)Aperture: f/11Shutter speed: 30 sec.ISO: 100Filter(s): 2-stop ND grad
17 WIDE-ANGLE LENSCamera: Nikon D300Lens: 10–24mm (at 20mm)Aperture: f/16Shutter speed: 180 sec.ISO: 100Filter(s): 10-stop ND, 3-stop ND grad, polarizer
18 STANDARD FOCAL LENGTHCamera: Nikon D800Lens: 50mmAperture: f/16Shutter speed: 0.4 sec.ISO: 100Filter(s): 2-stop ND grad
19 SIMPLICITY WORKSCamera: Nikon D800ELens: 70–200mm (at 110mm)Aperture: f/11Shutter speed: 1/100 sec.ISO: 100Filter(s): –
21 STABILITY Camera: Nikon D700Lens: 24–70mm (at 56mm)Aperture: f/11Shutter speed: 60 sec.ISO: 200Filter(s): 2-stop ND grad
25 LONG EXPOSURECamera: Nikon D800Lens: 17–35mm (at 19mm)Aperture: f/11Shutter speed: 60 sec.ISO: 100Filter(s): 10-stop ND, 2-stop ND grad
27 GRADUATED ND COMPARISONCamera: Nikon D800ELens: 16–35mm (at 22mm)Aperture: f/16Shutter speed: 5 sec.ISO: 100Filter(s): 2-stop ND grad (fi ltered)
28 REFLECTIONSCamera: Nikon D800Lens: 24–70mm (at 27mm)Aperture: f/16Shutter speed: 5 sec.ISO: 100Filter(s): Polarizer
30 LEVELLING AIDCamera: Nikon D800ELens: 16–35mm (at 16mm)Aperture: f/14Shutter speed: 6 sec.ISO: 100Filter(s): 2-stop ND grad
32 CREATIVE CONTROLCamera: Nikon D800ELens: 16–35mm (at 22mm)Aperture: f/11Shutter speed: 180 sec.ISO: 200Filter(s): 3-stop ND, 2-stop ND grad
35 ADJUSTING EXPOSURE Camera: Nikon D800ELens: 16–35mm (at 18mm)Aperture: f/11Shutter speed: 10 sec.ISO: 200Filter(s): 2-stop ND grad
36 THE ‘CORRECT’ EXPOSURE Camera: Nikon D800Lens: 24–70mm (at 45mm)Aperture: f/11Shutter speed: 30 sec.ISO: 100Filter(s): 3-stop ND, 2-stop ND grad
39 VISUAL IMPACT Camera: Nikon D300Lens: 10–24mm (at 10mm)Aperture: f/20Shutter speed: 30 sec.ISO: 100Filter(s): 3-stop ND grad
40 THE BEST APERTURECamera: Nikon D700Lens: 70–200mm (at 125mm)Aperture: f/4Shutter speed: 1/40 sec.ISO: 200Filter(s): –
43 DEPTH OF FIELD CALCULATORCamera: Nikon D800E Lens: 16-35mm (at 22mm) Aperture: f/16 Shutter speed: 20 secISO: 100 Filter(s): 0.6 ND grad, 0.9 ND
45 HYPERFOCAL DISTANCECamera: Nikon D800Lens: 24–70mm (at 32mm)Aperture: f/16Shutter speed: 30 sec.ISO: 100Filter(s): 3-stop ND, 2-stop ND grad
47 STARBURST EFFECTCamera: Nikon D700Lens: 17–35mm (at 17mm)Aperture: f/22Shutter speed: 10 sec.ISO: 200Filter(s): 3-stop ND, 3-stop ND grad
49 COLOUR DOMINANCECamera: Nikon D700Lens: 17–35mm (at 17mm)Aperture: f/11Shutter speed: 1/20 sec.ISO: 400Filter(s): Polarizer
50 DIFFUSED DETAILCamera: Nikon D800Lens: 70–200mm (at 122mm)Aperture: f/11Shutter speed: 50 sec.ISO: 200Filter(s): –
51 CREATIVE WHITE BALANCE Camera: Nikon D800ELens: 16–35mm (at 16mm)Aperture: f/11Shutter speed: 4 sec.ISO: 400Filter(s): 2-stop ND grad
52 VISUAL BALANCECamera: Canon EOS 5D Mk IIILens: 24–105mm (at 40mm)Aperture: f/16Shutter speed: 1/20 sec.ISO: 100Filter(s): 3-stop ND grad
ALP-180-184-LVBK.indd 180ALP-180-184-LVBK.indd 180 23/06/2014 11:3923/06/2014 11:39

181
TECHNICAL DETAILS
55 BALANCING CONTRASTING POINTS Camera: Canon EOS 5D Mk IIILens: 16–35mm (at 16mm)Aperture: f/22Shutter speed: 0.8 sec.ISO: 100Filter(s): 3-stop ND grad
55 IMPLIED MOVEMENT FOR BALANCECamera: Canon EOS 5D Mk IILens: 16–35mm (at 16mm)Aperture: f/16Shutter speed: 30 sec.ISO: 100Filter(s): 4-stop ND, 2-stop ND grad
56 A SINGLE SUBJECTCamera: Fuji X-E1Lens: 18–55mm (at 27mm)Aperture: f/16Shutter speed: 58 sec.ISO: 200Filter(s): 6-stop ND
57 PLACING A MOVING SUBJECT Camera: Canon EOS 5D Mk IIILens: 24–105mm (at 60mm)Aperture: f/11Shutter speed: 1/20 sec.ISO: 800Filter(s): –
58 THE RULE OF THIRDSCamera: Canon EOS 5D Mk IILens: 17–40mm (at 28mm)Aperture: f/16Shutter speed: 1.3 sec.ISO: 100Filter(s): Polarizer
59 BREAKING THE RULE OF THIRDSCamera: Canon EOS 5D Mk IIILens: 21mmAperture: f/22Shutter speed: 6 sec.ISO: 100Filter(s): 3-stop ND, 3-stop ND grad
61 GOLDEN SECTION IN PRACTICECamera: Canon EOS 5D Mk IILens: 24–105mm (at 35mm)Aperture: f/11Shutter speed: 1/50 sec.ISO: 100Filter(s): 2-stop ND grad, polarizer
63 FIT THE GOLDEN SECTION Camera: Canon EOS 5D Mk IIILens: 16–35mm (at 16mm)Aperture: f/11Shutter speed: 13 sec.ISO: 200Filter(s): 3-stop ND, 2-stop ND grad
65 THE GOLDEN SPIRAL IN PRACTICECamera: Canon EOS 5D Mk IIILens: 16–35mm (at 20mm)Aperture: f/16Shutter speed: 6 sec. (second exposure of 0.8 sec. for sky)ISO: 100Filter(s): 3-stop ND
65 A GOLDEN TRIANGLE GRID Camera: Canon EOS 5D Mk IIILens: 16–35mm (at 21mm)Aperture: f/16Shutter speed: 30 sec.ISO: 100Filter(s): 4-stop ND, 3-stop ND grad
67 NEAR SYMMETRYCamera: Canon EOS 5D Mk IIILens: 17–40mm (at 19mm)Aperture: f/16Shutter speed: 24 sec.ISO: 100Filter(s): 3-stop ND, 3-stop ND grad
67 REFLECTIONS Camera: Canon EOS 5D Mk IIILens: 16–35mm (at 29mm)Aperture: f/16Shutter speed: 3.2 sec.ISO: 100Filter(s): –
68 THREE – THE MAGIC NUMBER Camera: Canon EOS 1Ds Mk IILens: 24–105mm (at 35mm)Aperture: f/16Shutter speed: 1/4 sec.ISO: 100Filter(s): 3-stop ND grad
69 BREAKING THE RULE?Camera: Canon EOS 5D Mk IIILens: 24–105mm (at 24mm)Aperture: f/16Shutter speed: 6 sec.ISO: 200Filter(s): 4-stop ND fi lter, polarizer
70 VERTICAL MOVEMENTCamera: Canon EOS 5D Mk IILens: 21mmAperture: f/14Shutter speed: 20 sec.ISO: 100Filter(s): 3-stop ND, 3-stop ND grad
71 LANDSCAPE OR PORTRAIT?Camera: Canon EOS 5D Mk IILens: 17–40mm (at 20mm)Aperture: f/16Shutter speed: 0.5 sec.ISO: 100Filter(s): 3-stop ND grad
72 A SENSE OF DEPTH Camera: Canon EOS 5D Mk IILens: 17–40mm (at 17mm)Aperture: f/16Shutter speed: 15 sec.ISO: 100Filter(s): 4-stop ND, 2-stop ND
74 WIDE-ANGLE PERSPECTIVECamera: Canon EOS 5D Mk IILens: 17–40mm (at 17mm)Aperture: f/22Shutter speed: 5 sec.ISO: 100Filter(s): –
75 TELEPHOTO COMPRESSIONCamera: Canon EOS 5D Mk IILens: 24–105mm (at 80mm)Aperture: f/11Shutter speed: 1/8 sec.ISO: 100Filter(s): 3-stop ND grad
76 FINDING A VANISHING POINT Camera: Nikon D800ELens: 16–35mm (at 24mm)Aperture: f/11Shutter speed: 6 sec.ISO: 100Filter(s): 2-stop ND, polarizer
77 HIGHLIGHTING THE FOCAL POINT Camera: Canon EOS 5D Mk IILens: 17–40mm (at 17mm)Aperture: f/16Shutter speed: 4 sec.ISO: 100Filter(s): 3-stop ND grad
77 CONVERGING LINESCamera: Canon EOS 5D Mk IILens: 18mm Aperture: f/16Shutter speed: 40 sec.ISO: 100Filter(s): 4-stop ND, 3-stop ND grad
78 LOW VIEWPOINTCamera: Canon EOS 5D Mk IILens: 21mm Aperture: f/16Shutter speed: 30 sec.ISO: 100Filter(s): 4-stop ND, 2-stop ND grad
79 THE ‘BIG ROCK’ FOREGROUND Camera: Canon EOS 1Ds Mk IILens: 17–40mm (at 20mm)Aperture: f/20Shutter speed: 1.3 sec.ISO: 100Filter(s): 3-stop ND grad
80 THE SMALL FOREGROUNDCamera: Canon EOS 5DLens: 17–40mm (at 17mm)Aperture: f/22Shutter speed: 1/10 sec.ISO: 100Filter(s): 3-stop ND grad
81 CONVEYING DEPTHCamera: Hasselblad H5D-40Lens: 35–90mm (at 35mm)Aperture: f/16Shutter speed: 5 sec.ISO: 100Filter(s): –
81 EMPTY FOREGROUNDCamera: Canon EOS 5D Mk IILens: 24–105mm (at 28mm)Aperture: f/22Shutter speed: 4 sec.ISO: 100Filter(s): 4-stop ND, polarizer
ALP-180-184-LVBK.indd 181ALP-180-184-LVBK.indd 181 23/06/2014 11:4523/06/2014 11:45

182
THE ART OF LANDSCAPE PHOTOGRAPHY
83 SHARP FOREGROUND DETAILCamera: Canon EOS 5D Mk IIILens: 24mm TS-EAperture: f/8Shutter speed: 6 sec.ISO: 100Filter(s): 4-stop ND fi lter
84 FRONT-TO-BACK SHARPNESS (1) Camera: Canon EOS 5D Mk IILens: 24mm TS-EAperture: f/8Shutter speed: 1/8 sec.ISO: 100Filter(s): Polarizer
85 FRONT-TO-BACK SHARPNESS (2)Camera: Canon EOS 5D Mk IILens: 24mm TS-EAperture: f/8Shutter speed: 1/8 sec.ISO: 100Filter(s): Polarizer
86 VOLUME PERSPECTIVECamera: Canon EOS 5D Mk IILens: 16–35mm (at 16mm)Aperture: f/11Shutter speed: 1/13 sec.ISO: 100Filter(s): 3-stop ND grad
87 AERIAL PERSPECTIVECamera: Canon EOS 5DLens: 70–200mm (at 90mm)Aperture: f/11Shutter speed: 1/60 sec.ISO: 100Filter(s): 2-stop ND grad
87 COLOUR PERSPECTIVECamera: Canon EOS 5D Mk IILens: 24–105mm (at 24mm) Aperture: f/16Shutter speed: 1/8 sec.ISO: 400Filter(s): 2-stop ND grad
88 VISUAL SEPARATIONCamera: Canon EOS 5D Mk IIILens: 18mmAperture: f/11Shutter speed: 301 sec.ISO: 200Filter(s): 10-stop ND, 2-stop ND grad
89 LOW VIEWPOINT (1)Camera: Canon EOS 1Ds Mk IILens: 17–40mm (at 20mm)Aperture: f/16Shutter speed: 1/2 sec.ISO: 100Filter(s): 2-stop ND grad, polarizer
89 LOW VIEWPOINT (2)Camera: Canon EOS 1Ds Mk IILens: 17–40mm (at 20mm)Aperture: f/16Shutter speed: 1/5 sec.ISO: 100Filter(s): 2-stop ND grad, polarizer
90 A SENSE OF SCALECamera: Canon EOS 5D Mk IIILens: 24–105mm (at 24mm)Aperture: f/11Shutter speed: 1/3 sec.ISO: 100Filter(s): 2-stop ND grad
91 FRAMES WITHIN THE FRAME Camera: Pentax 67IILens: 105mmAperture: f/22Shutter speed: 1/8 sec.ISO: 50 (Fuji Velvia fi lm)Filter(s): –
92 GEOMETRY IN THE LANDSCAPECamera: Canon EOS 5D Mk IILens: 21mmAperture: f/11Shutter speed: 50 sec.ISO: 100Filter(s): 2-stop ND grad
94 LINES AS SUBJECTCamera: Canon EOS 5D Mk IILens: 24–105mm (at 24mm)Aperture: f/11Shutter speed: 437 sec.ISO: 400Filter(s): 10-stop ND, 2-stop ND grad
95 LEADING THE EYECamera: Pentax 67IILens: 45mmAperture: f/16Shutter speed: UnrecordedISO: 50 (Fuji Velvia fi lm)Filter(s): 3-stop ND grad
97 EQUILIBRIUM Camera: Canon EOS 5D Mk IILens: 21mm Aperture: f/16Shutter speed: 1/5 sec. (shot 1), 1/25 sec. (shot 2); images blendedISO: 100Filter(s): –
97 ARCS Camera: Canon EOS 5D Mk IILens: 24–105mm (at 28mm)Aperture: f/11Shutter speed: 311 sec.ISO: 200Filter(s): 10-stop ND, 2-stop ND grad
98 EXPOSURE TIMECamera: Canon EOS 5D Mk IILens: 21mmAperture: f/22Shutter speed: 46 sec.ISO: 100Filter(s): 4-stop ND, 3-stop ND grad
99 POINTING IN Camera: Canon EOS 5D Mk IIILens: 18mmAperture: f/16Shutter speed: 10 sec.ISO: 100Filter(s): 2-stop ND grad
101 TRIANGULAR ARRANGEMENTCamera: Canon EOS 5D Mk IIILens: 16–35mm (at 21mm)Aperture: f/16Shutter speed: 10 sec.ISO: 100Filter(s): 2-stop ND grad
101 IMPLIED TRIANGLECamera: Canon EOS 5D Mk IILens: 18mmAperture: f/16Shutter speed: 1/20 sec.ISO: 100Filter(s): 2-stop ND grad.
102 SEPARATE PLANESCamera: Canon EOS 5D Mk IILens: 70–200mm (at 200mm)Aperture: f/16Shutter speed: 0.4 sec.ISO: 100Filter(s): –
103 FOREGROUND PLANE Camera: Canon EOS 5D Lens: 17–40mm (at 21mm)Aperture: f/14Shutter speed: 1/8 sec.ISO: 400Filter(s): 2-stop ND grad
105 LEADING THE EYE INCamera: Canon EOS 5D Mk IILens: 21mmAperture: f/11Shutter speed: 363 sec.ISO: 200Filter(s): 2-stop ND grad
105 FOLLOWING A WATER FLOW Camera: Canon EOS 6DLens: 17–40mm (at 17mm)Aperture: f/16Shutter speed: 3.2 sec.ISO: 100Filter(s): 4-stop ND
107 WATER BLURCamera: Nikon D700Lens: 17–35mm (at 20mm)Aperture: f/16Shutter speed:ISO: 200Filter(s): 3-stop ND
107 MOTION IN CROPSCamera: Nikon D800Lens: 17–35mm (at 20mm)Aperture: f/16Shutter speed: 1.3 sec.ISO: 100Filter(s): 3-stop ND
108 GOLDEN ARCHCamera: Canon EOS 5D Mk IIILens: 16–35mm (at 21mm)Aperture: f/11Shutter speed: 2.5 sec.ISO: 125Filter(s): 3-stop ND, polarizer
ALP-180-184-LVBK.indd 182ALP-180-184-LVBK.indd 182 23/06/2014 11:5023/06/2014 11:50

183
TECHNICAL DETAILS
110 REVEALING TEXTURECamera: Canon EOS 5D Mk IILens: 24–105mm (at 24mm)Aperture: f/16Shutter speed: 80 sec.ISO: 100Filter(s): 10-stop ND
111 LOW FRONT LIGHTINGCamera: Canon EOS 5D Mk IILens: 21mmAperture: f/11Shutter speed: 170 sec.ISO: 100Filter(s): 10-stop ND, 2-stop ND grad
111 LAYERED SIDE LIGHTING Camera: Canon EOS 1Ds Mk IILens: 24–105mm (at 55mm)Aperture: f/16Shutter speed: 1 sec.ISO: 100Filter(s): 2-stop ND grad
112 THE GOLDEN HOURCamera: Canon EOS 5D Mk IIILens: 21mmAperture: f/20Shutter speed: 5 sec. (main exposure)ISO: 100Filter(s): 3-stop ND grad
113 THE BLUE HOURCamera: Canon EOS 5D Mk IILens: 21mmAperture: f/11Shutter speed: 479 sec.ISO: 200Filter(s): –
115 SUMMER COLOURSCamera: Canon EOS 5D Mk IILens: 18mmAperture: f/16Shutter speed: 2.5 sec.ISO: 100Filter(s): 3-stop ND, polarizer
115 AUTUMN MISTCamera: Canon EOS 5D Mk IILens: 24–105mm (at 105mm)Aperture: f/11Shutter speed: 1/125 sec.ISO: 100Filter(s): –
116 LONG EXPOSURE SEASCAPE Camera: Canon EOS 5D Mk IILens: 17–40mm (at 17mm)Aperture: f/11Shutter speed: 13 sec.ISO: 200Filter(s): –
117 MINIMALIST SNOW SCENECamera: Canon EOS 5D Mk IILens: 24–105mm (at 105mm)Aperture: f/11Shutter speed: 1/20 sec.ISO: 100Filter(s): Polarizer
119 LOW LIGHT COLOUR Camera: Canon EOS 5D Mk IILens: 21mmAperture: f/16Shutter speed: 120 sec.ISO: 100Filter(s): 2-stop ND grad
120 CURVED LIGHTCamera: Canon EOS 5D Mk IILens: 21mmAperture: f/2.8Shutter speed: 15 sec.ISO: 3200Filter(s): –
121 CONVERGING LINESCamera: Canon EOS 5D Mark IIILens: 16–35mm at 16mmAperture: f/2.8Shutter speed: 15 sec.ISO: 1600Filter(s): 2-stop ND grad
123 TEXTURED SKYCamera: Fuji X-E1Lens: 18–55mm (at 18mm)Aperture: f/11Shutter speed: 125 sec.ISO: 200Filter(s): 10-stop ND, polarizer
123 BAD WEATHER MONOCamera: Canon EOS 5D Mk IILens: 17–40mm (at 17mm)Aperture: f/16Shutter speed: 302 sec.ISO: 100Filter(s): 10-stop ND
124 SILHOUETTED WINDMILL Camera: Canon EOS 5D Mk IILens: 70–200mm (at 200mm)Aperture: f/11Shutter speed: 300 sec.ISO: 100Filter(s): 4-stop ND
125 SILHOUETTED TREE Camera: Nikon D700Lens: 70–200mm (at 100mm)Aperture: f/11Shutter speed: 1/30 sec.ISO: 200Filter(s): –
126 CASTLE AT SUNSETCamera: Canon EOS 5D Mk IIILens: 16–35mm (at 25mm)Aperture: f/16Shutter speed: 1/2 sec.ISO: 100Filter(s): 2-stop ND grad
127 SPOTLIT ROCKS Camera: Canon EOS 5D Mk IILens: 17–40mm (at 19mm)Aperture: f/16Shutter speed: 1/8 sec.ISO: 100Filter(s): Polarizer
128 THE ESSENCE OF A VIEWCamera: Nikon D800ELens: 16–35mm (at 18mm)Aperture: f/14Shutter speed: 8 sec.ISO: 100Filter(s): 2-stop ND grad
131 THE CLIFFTOP VIEWCamera: Nikon D700Lens: 17–35mm (at 19mm)Aperture: f/13Shutter speed: 30 sec.ISO: 100Filter(s): 2-stop ND grad
133 LOW VIEWPOINTSCamera: Nikon D800Lens: 17–35mm (at 19mm)Aperture: f/16Shutter speed: 10 sec.ISO: 100Filter(s): 2-stop ND grad
133 CAPTURING WATER TRAILSCamera: Nikon D800Lens: 16–35mm (at 22mm)Aperture: f/16Shutter speed: 0.8 sec.ISO: 100Filter(s): 2-stop ND grad
135 LIGHT AND DARK CONTRASTCamera: Nikon D800ELens: 16–35mm (at 26mm)Aperture: f/16Shutter speed: 1/4 sec.ISO: 100Filter(s): 2-stop ND grad, polarizer
135 SAFETY AS A PRIORITYCamera: Nikon D800ELens: 16–35mm (at 18mm)Aperture: f/11Shutter speed: 1/5 sec.ISO: 100Filter(s): 2-stop ND grad, polarizer
137 WOODLAND MISTCamera: Nikon D700Lens: 24–70mm (at 70mm)Aperture: f/11Shutter speed: 2 sec.ISO: 200Filter(s): –
139 FRAME WATERFALLSCamera: Nikon D800ELens: 24–70mm (at 42mm)Aperture: f/8Shutter speed: 3 sec.ISO: 200Filter(s): Polarizer
139 CAREFUL EXPOSURE Camera: Nikon D700Lens: 17–35mm (at 19mm)Aperture: f/18Shutter speed: 1.3 sec.ISO: 100Filter(s): Polarizer
ALP-180-184-LVBK.indd 183ALP-180-184-LVBK.indd 183 23/06/2014 11:5523/06/2014 11:55

THE ART OF LANDSCAPE PHOTOGRAPHY
184
141 SYMMETRY Camera: Nikon D800Lens: 24–70mm (at 24mm)Aperture: f/11Shutter speed: 8 sec.ISO: 100Filter(s): 2-stop ND grad
141 REEDS AND REFLECTIONCamera: Nikon D700Lens: 17–35mm (at 24mm)Aperture: f/11Shutter speed: 30 sec.ISO: 200Filter(s): 2-stop ND grad, polarizer
142 PEBBLE Camera: Nikon D800Lens: 105mm macroAperture: f/14Shutter speed: 0.8 sec.ISO: 100Filter(s): –
143 ICECamera: Nikon D300Lens: 105mm macroAperture: f/11Shutter speed: 1/20 sec.ISO: 200Filter(s): –
144 ICE BEACHCamera: Canon EOS 5D Mk IIILens: 16–35mm (at 18mm)Aperture: f/16Shutter speed: 4 sec.ISO: 200Filter(s): 3-stop ND, 3-stop ND grad, polarizer
148 MOUNTAINS Camera: Canon EOS 5D Mk IIILens: 24–105mm (at 80mm)Aperture: f/16Shutter speed: 1/5 sec.ISO: 100Filter(s): –
149 LAKE REFLECTIONS Camera: Canon EOS 5D Mk IIILens: 24–105mm (at 35mm)Aperture: f/16Shutter speed: 90 sec.ISO: 100Filter(s): 10-stop ND
151 CREATIVE SHARPENINGCamera: Canon EOS 5D Mk IIILens: 21mmAperture: f/22Shutter speed: 10 sec.ISO: 100Filter(s): 2-stop ND grad
153 LOCAL ENHANCEMENTSCamera: Canon EOS 5D Mk IIILens: 70–200mm at 98mmAperture: f/8Shutter speed: 0.5 sec.ISO: 100Filter(s): –
155 FOCUS STACKINGCamera: Canon EOS 5D Mk IIILens: 16–35mm at 29mmAperture: f/8Shutter speed: 8 sec.ISO: 100Filter(s): 4-stop ND fi lter
157 PANORAMIC STITCHIINGCamera: Canon 5D mark IILens:17–40mm at 17mmAperture: f/13Shutter speed: 1/25th secondy ISO: 100Filter(s): –
159 EXPOSURE BLENDINGCamera: Canon EOS 5D Mk IIILens: 16–35mm at 20mmAperture: f/16Shutter speed: 2 sec. on sky 15 sec. on foreground ISO: 100Filter(s): 4-stop ND fi lter
161 CONVERTING TO BLACK & WHITECamera: Canon 5D mark IIIILens: 170–200mm at 140mmAperture: f/9Shutter speed: 1/125th sec ISO: 100Filter(s): polariser
162 ICELANDIC SUNSETCamera: Canon EOS 5D Mk IIILens: 24–105mm (at 58mm)Aperture: f/16Shutter speed: 5 sec.ISO: 100Filter(s): 3-stop ND, 2-stop ND grad
164 CLASSICAL COMPOSITIONCamera: Canon EOS 5D Mk IIILens: 16–35mm (at 16mm)Aperture: f/11Shutter speed: 1/4 sec.ISO: 100Filter(s): 3-stop ND grad
165 THE BIG FOREGROUNDCamera: Nikon D300Lens: 12–24mm (at 15mm)Aperture: f/16Shutter speed: 10 sec.ISO: 200Filter(s): 3-stop ND, 2-stop ND grad
167 MINIMALIST SEASCAPECamera: Nikon D700Lens: 17–35mm (at 17mm)Aperture: f/8Shutter speed: 163 sec.ISO: 200Filter(s): 10-stop ND
167 MINIMALIST MONOCHROMECamera: Canon EOS 5D Mk IILens: 21mmAperture: f/16Shutter speed: 44 sec.ISO: 100Filter(s): 4-stop ND
168 IMPRESSIONIST LAKE SCENECamera: Nikon F4Lens: 24–50mm (at 24mm)Aperture: f/16Shutter speed: UnrecordedISO: 3200 (Fujichrome 1600 fi lm pushed 1 stop) Filter(s): Diffuser
169 ICMCamera: Nikon D800ELens: 70–200mm (at 200mm)Aperture: f/16Shutter speed: 1.3 sec.ISO: 100Filter(s): –
170 SEMI-ABSTRACTCamera: Nikon D300Lens: 17–50mm (at 50mm)Aperture: f/14Shutter speed: 13 sec.ISO: 100Filter(s): –
171 REFLECTIONS Camera: Nikon D200Lens: 80–400mm (at 400mm)Aperture: f/5.6Shutter speed: 1/160 sec.ISO: 100Filter(s): –
173 YOUR PERSONAL STYLECamera: Canon EOS 5D Mk IIILens: 24–105mm (at 67mm)Aperture: f/22Shutter speed: 15 sec.ISO: 100Filter(s): 4-stop ND
174 SUBJECT CHOICE AND EXPOSURECamera: Canon EOS 5D Mk IIILens: 16–35mm (at 18mm)Aperture: f/16Shutter speed: 4 sec.ISO: 100Filter(s): 4-stop ND grad
175 FRAMING AND LIGHTCamera: Canon EOS 5D Mk IIILens: 24–105mm (at 40mm)Aperture: f/16Shutter speed: 1/13 sec.ISO: 100Filter(s): 2-stop ND grad, polarizer
176 MARK’S PERSONAL STYLECamera: Pentax 67IILens: 45mm Aperture: f/22Shutter speed: UnrecordedISO: 50 (Fuji Velvia fi lm)Filter(s): 3-stop ND grad
179 ROSS’S PERSONAL STYLECamera: Nikon D800Lens: 17–35mm (at 35mm)Aperture: f/16Shutter speed: 120 sec.ISO: 200Filter(s): 2-stop ND grad
ALP-180-184-LVBK.indd 184ALP-180-184-LVBK.indd 184 23/06/2014 12:0323/06/2014 12:03

185
USEFUL WEBSITES AND DOWNLOADS
USEFUL WEBSITES AND DOWNLOADSCALIBRATION
ColorEyes Display:
www.integrated-color.com
ColorVision: www.colorvision.com
Xrite: www.xrite.com
CAMERA CARE
Giottos: www.giottos.com
Visible Dust: www.visibledust.com
DEPTH-OF-FIELD CALCULATOR
DOF Master: www.dofmaster.com
OUTDOOR EQUIPMENT
Ordnance Survey:
www.ordnancesurvey.co.uk
Paramo: www.paramo.co.uk
SatMap: www.satmap.com
PHOTOGRAPHERS
Mark Bauer:
www.markbauerphotography.com
Ross Hoddinott:
www.rosshoddinott.co.uk
PHOTOGRAPHIC EQUIPMENT
Canon: www.canon.com
Cokin: www.cokin.com
Fstop gear: www.fstopgear.com
Fujifi lm: www.fujifi lm.com
Gitzo: www.gitzo.com
Lee Filters: www.leefi lters.com
Lexar: www.lexar.com
Manfrotto: www.manfrotto.com
Nikon: www.nikon.com
Olympus: www.olympus.com
Pentax: www.pentaximaging.com
Really Right Stuff:
www.reallyrightstuff.com
Sigma: www.sigma-photo.com
Sony: www.sony.com
Tamron: www.tamron.com
PHOTOGRAPHY WORKSHOPS
Dawn 2 Dusk Photography:
www.dawn2duskphotography.com
PLANNING
The Photographer’s Ephemeris:
www.photoephemeris.com
PhotoPills: www.photopills.com
SOFTWARE
Adobe: www.adobe.com
Apple: www.apple.com/aperture
GIMP: www.gimp.org
Neat Image: www.neatimage.com
Nik Software: www.niksoftware.com
Noiseware: www.imagenomic.com
Photomatix Pro: www.hdrsoft.com
Pixel Genius: www.pixelgenius.com
RawTherapee: www.rawtherapee.com
WEATHER
AccuWeather: www.accuweather.com
Metcheck: www.metcheck.com
The Met offi ce: www.metoffi ce.gov.uk
XC Weather: www.xcweather.co.uk
Yr: www.yr.no
TIDE TIMES
Tide-Forecast: www.tide-forecast.com
ALP-185-192-LVBK.indd 185ALP-185-192-LVBK.indd 185 20/06/2014 15:0120/06/2014 15:01

THE ART OF LANDSCAPE PHOTOGRAPHY
186
Highlights The brightest areas of an image.
Histogram A graph used to represent the
distribution of tones in an image.
ISO (International Standards Organization) The sensitivity of the image sensor measured in
terms equivalent to the ISO rating of a fi lm.
JPEG (Joint Photographic Experts Group) A popular image fi le type, compressed to reduce
fi le size.
Landscape The visible features of an area
of land, including the physical elements of
landforms and water bodies, such as rivers, lakes
and the sea. Also, human elements, including
buildings and structures, and transitory elements
such as lighting and weather conditions.
LCD (Liquid Crystal Display) The fl at screen
on the back of a digital camera that allows the
user to playback and review digital images and
shooting information.
Lens The eye of the camera. The lens projects
the image it sees onto the camera’s imaging
sensor. The size of the lens is measured and
indicated as focal length.
Manual focus When focus is achieved through
manual rotation of the lens’s focusing ring.
Metering Using a camera or handheld
lightmeter to determine the amount of light
coming from a scene or falling on to it, in order
to calculate the required exposure.
Metering pattern The system used by the
camera to calculate the exposure.
Megapixel One million pixels equals one
megapixel.
Mirror lock-up Allows the refl ex mirror of an
SLR to be raised and held in the ‘up’ position,
before the exposure is made.
Depth of fi eld (DOF) The amount of an image
that appears acceptably sharp. This is primarily
controlled by the aperture setting: the smaller
the aperture, the greater the depth of fi eld.
Distortion Typically, when straight lines are not
rendered perfectly straight in a photograph.
Barrel and pincushion distortion are example
of types of lens distortion.
Dynamic range The ability of the camera’s
sensor to capture a full range of shadows
and highlights.
Electronic viewfi nder (EVF) A type of
viewfi nder where the image seen by the lens
is projected electronically.
Exposure The amount of light allowed to strike
and expose the image sensor, as controlled by
the aperture, shutter speed and ISO sensitivity.
Also the act of taking a photograph, as in
‘making an exposure’.
Exposure compensation A control that allows
intentional over- or underexposure.
Filter A piece of coloured, or coated, glass or
plastic placed in front of the lens for creative
or corrective use.
Focal length The distance, usually in
millimetres, from the optical centre of a lens
to its focal point, which signifi es its power.
Frame To arrange or compose. Also,
purposefully using objects within the landscape
to create a ‘frame’, or frame other elements.
F-stop / f-number Number assigned to a
particular lens aperture. Wide apertures are
denoted by small numbers (such as f/2.8) and
small apertures by large numbers (such as f/22).
Grad Graduated fi lter. A fi lter that is half-
coated, half-clear.
Angle of view The area of a scene that a lens
takes in, measured in degrees.
Aspect ratio The relative horizontal and vertical
measurements. For example, if an image has an
aspect ratio of 2:1, it means that the width is
twice the length of the height.
Aperture The opening in a camera lens
through which light passes to expose the
image sensor. The relative size of the aperture
is denoted by f/numbers.
Autofocus (AF) A through-the-lens focusing
system that allows accurate focus without the
user manually focusing the lens.
Camera shake Movement of the camera
during exposure that, particularly at slow
shutter speeds, can lead to blurred images.
Often caused by handholding the camera
or an unsteady support.
Colour temperature The colour of a light
source expressed in degrees Kelvin (K).
Composition The placement or arrangement
of visual elements. The term composition means
‘putting together’ and can apply to any work of
art. It is a term often used interchangeably with
design, form or visual ordering.
Context In composition, context refers to
surroundings and placing objects so that they
remain in keeping with their environment.
Contrast The range between the highlight
and shadow areas of an image, or a marked
difference in illumination between colours or
adjacent areas.
Cropping To remove part of the image, usually
in order to enhance the composition or balance.
GLOSSARY
ALP-185-192-LVBK.indd 186ALP-185-192-LVBK.indd 186 22/05/2014 09:0522/05/2014 09:05

187
Symmetry Corresponding in size, form and
arrangement on the opposite side of a plane,
line or point. Regularity of form or arrangement.
Telephoto lens A lens with a large focal length
and a narrow angle of view
TIFF (Tagged Image File Format) A universal
fi le format supported by virtually all image-
editing applications. TIFFS are uncompressed
digital fi les.
TTL (Through-The-Lens) metering A
metering system built into the camera that
measures light passing through the lens at
the time of shooting.
Underexposure A condition in which too little
light reaches the sensor. The resulting image
will be dark, possibly resulting in a loss of detail
in the shadow areas.
Vanishing point The point at which parallel
lines appear to converge in the rendering of
perspective – often on the horizon.
Viewfi nder An optical system used for
composing and sometimes focusing the subject.
Also known as OVF (optical viewfi nder) to
differentiate it from an EVF.
Vignetting Darkening of the corners of an
image caused either by the design of the lens
(optical vignetting) or the use of the incorrect
lens hood and / or multiple stacked fi lters
(mechanical vignetting).
White balance A function that allows the
correct colour balance to be recorded for any
given lighting situation.
Wide-angle lens A lens with a short focal
length that delivers a wide angle of view.
Zoom A lens that covers a range of
focal lengths.
Monochrome Image compromising only
of grey tones, from black to white.
Multiplication factor The amount the
focal length of a lens will be magnifi ed
when attached to a camera with a cropped
type sensor.
Negative space The empty space surrounding
the main subject in your photo – the subject
itself is known as ‘positive space’.
Noise Coloured image interference caused
by stray electrical signals.
Overexposure A condition when too much
light reaches the sensor. Images appear overly
bright and detail is lost in the highlights.
Perspective In context of visual perception, it
is the way in which objects appear to the eye
depending on their spatial attributes, or their
dimensions and the position of the eye relative
to the objects.
Photoshop A graphics editing program
developed and published by Adobe
Systems Incorporated. It is considered
the industry standard for editing and
processing photographs.
Pixel Abbreviation of ‘picture element’.
Pixels are the smallest bits of information
that combine to form a digital image.
Post-processing The use of software to make
adjustments to a digital fi le on a computer.
Prime A lens with a fi xed focal length lens.
RAW A versatile and widely used digital fi le
format whereby the shooting parameters are
attached to the fi le, rather than embedded
within it, enabling them to be reversed and
edited without a loss of image quality.
GLOSSARY
Remote release A device used to trigger the
shutter of a tripod-mounted camera to avoid
camera shake.
Resolution The number of pixels used to
capture an image or display it, usually expressed
in ppi. The higher the resolution, the fi ner
the detail.
RGB (Red, Green, Blue) Computers and other
digital devices understand colour information
as shades of red, green and blue.
Rule of thirds A compositional device that
places the key elements of a picture at points
along imagined lines that divide the frame
into thirds.
Saturation The intensity of the colours in
an image.
Shadow areas The darkest areas of a scene.
Silhouette The dark shape or outline of an
(underexposed) object cast against a brighter
background.
Shutter The mechanism that controls the
amount of light reaching the sensor by opening
and closing.
Shutter speed The length of time the sensor
is exposed to light; shutter speed determines
the duration of an exposure.
SLR (Single Lens Refl ex) A camera type that
allows the user to view the scene through the
lens, using a refl ex mirror.
Spot metering A metering system that places
importance on the intensity of light refl ected
by a very small percentage of the frame.
Standard lens A focal length similar to the
vision of the human eye. 50mm is considered
a standard lens on a 35mm / full frame camera.
ALP-185-192-LVBK.indd 187ALP-185-192-LVBK.indd 187 22/05/2014 09:0522/05/2014 09:05

THE ART OF LANDSCAPE PHOTOGRAPHY
188
unsociable and unpredictable. Photographers tend to be a moody
bunch – often grumpy when the weather isn’t playing ball or when a
deadline is fast approaching. Thank you for putting up with us and for
your unwavering support, encouragement, patience and belief.
Finally, a big thank you to all our workshop participants, who have
encouraged us to share our knowledge and experience to an even
wider audience through this book and our previous title, The Landscape
Photography Workshop. If you haven’t attended one of our Dawn 2
Dusk Photography Workshops yet, we hope you can join us soon…
ABOUT THE AUTHORS
MARK BAUERMark Bauer is a leading landscape
photographer and technical writer.
He is renowned for his evocative,
intimate images of the south-west
of England. Mark’s work is featured
in Landscape Photography Magazine,
Digital Photographer and similar
publications. He is a contributor to three leading picture libraries
and he has had a number of competition successes in the Landscape
Photographer of the Year, Outdoor Photographer of the Year and
International Garden Photographer of the Year competitions. He
also one of Manfrotto’s ‘Local Heroes’.
The Art of Landscape Photography is Mark’s fourth book and
follows on from The Landscape Photography Workshop, which
is also published by GMC Publications. He co-runs Dawn 2 Dusk
Photography with Ross Hoddinott. To fi nd out more about Mark
and his work, visit www.markbauerphotography.com.
ROSS HODDINOTTRoss Hoddinott is one of the UK’s
leading professional outdoor
photographers. He is a regular
contributor to a number of
photographic publications, including
Digital SLR Photography and Wild
Planet magazine. He is a multi-
award winner, having won the British Wildlife Photographer of the
Year competition in 2009, and been commended in the Wildlife
Photographer of the Year, International Garden Photographer of
the Year and Landscape Photographer of the Year competitions.
He is an Ambassador for Nikon UK, a Manfrotto ‘Local Hero’, and
was a member of the 2020VISION photo-team – the largest, most
ambitious multimedia conservation project ever staged in the UK.
The Art of Landscape Photography is Ross’s eighth photography
book. Previous titles include, The Digital Exposure Handbook and
The Landscape Photography Workshop. Together with Mark Bauer,
Ross runs Dawn 2 Dusk Photography, specializing in landscape
photography workshops in the UK. Find out more about Ross at
www.rosshoddinott.co.uk.
ACKNOWLEDGEMENTSThank you to everyone at GMC Publications for helping compile this
book. Particular thanks go to Jonathan Bailey, Gerrie Purcell, Dominique
Page, Chris Gatcum and Simon Goggin. Thank you also to Canon,
Lee Filters, Manfrotto, Nikon, Phase One and Really Right Stuff for
supplying suitable product images.
However, as you might expect, the biggest ‘thank you’ is reserved
for our long-suffering families – Mark’s wife Julie and son Harry;
and Ross’s wife Fliss and children Evie, Maya and Jude. Quite simply,
photographers are a nightmare to live with! The hours are long,
ALP-185-192-LVBK.indd 188ALP-185-192-LVBK.indd 188 18/06/2014 12:3418/06/2014 12:34

189
tilt and shift 82–85
vanishing points 76–77
visual separation 88–89
depth of fi eld 38–41, 43, 154–155
diagonal lines 96
diffraction 46–47
distortion 18, 20
dusk 112–113
dynamic range 12, 26, 124, 158
E
electronic viewfi nder (EVF) 13, 122
equipment
accessories 30–31
camera formats 12–15
clothing 134, 135
fi lters 24–29, 132
lenses 16–20, 132, 172
tripods/tripod heads 21–23, 132
exposing to the right (ETTR) 37
exposure 34–37, 172
exposure blending 158–159
exposure compensation 37, 110
F
f-stops/f-numbers 186
Fibonacci sequence 64–65
fi lters 24–29, 132
fl ow of composition 104–105
focal length
depth of fi eld 38
multipliers 13
standard 18
telephoto 19
woodlands 136–137
focal points
foreground 78–81
placing of 56–69
spot lighting 126–127
circles, in composition 101
circular polarizers 29
classical composition 164–165
cliff tops 130–131
clothing 134, 135
coastal landscapes 130–133
colour
emotional impact 48
infl uence of 50
low-light 119
perspective 86, 87
RGB (Red, Green, Blue) 187
saturation 28, 50, 110, 114, 175
visual balance 54
white balance 51
colour temperature 51, 112, 116, 134
colour wheel 48
composition styles 162–179
context 130, 131
contrast 55
converging lines
depth 72
linear perspective 74, 75
low-light 120–121
symmetry 66, 67
vanishing points 76, 96
corners, in composition 98–99
correct exposure 36
cropped sensor digital SLRS 13
cropping 148–149
curves, in composition 96, 120
D
dawn 112–113
depth
foreground focal points 78–81
and light 86–87
linear perspective 72, 74–75
sense of scale 90–91
INDEX
INDEXA
abstract composition 170–171
accessories 30–31 see also equipment
Adobe Lightroom 146, 152–153, 160–161
Adobe Photoshop 146, 150, 157
aerial perspective 86, 87
angle of view 16, 19
aperture 34, 40–41
Aperture (Apple) 147
Aperture Priority (A or Av) 34
APS-C format 12, 13, 16, 44
arcs 96, 97
aspect ratios 13, 148
Autofocus (AF) 42
Autumn 114, 115
B
backlighting 110
balance
camera orientation 70–71
Fibonacci sequence 64–65
Golden Section/Ratio 60–63
Golden Spiral 64–65
placing of subject 56–59
principles of 54
rule of odds 68–69
rule of thirds 58–59
symmetry 66–69
visual balance 52–55
Bauer, Mark 176–177, 188
black and white 122–123
converting to 160–161
in minimalism 166
C
camera formats 12–15
camera orientation 70–71
camera shake 21, 34, 41
Capture One 147
ALP-185-192-LVBK.indd 189ALP-185-192-LVBK.indd 189 20/06/2014 15:0120/06/2014 15:01

THE ART OF LANDSCAPE PHOTOGRAPHY
190
lines, in composition 94–97
Live View features 31, 41, 91
low-light 118–121
low viewpoints 78, 89, 102, 132–133
M
Manual (M) mode 34
medium format cameras 14–15
megapixels 186
metering 24, 34, 36
Micro Four Thirds standard format (MFT)
12, 13
miniature landscapes 142–143
minimalism 166–167
Mirror Lock 31
monochrome 122–123, 160–161, 166
motion 57, 106–107
mountains 134–135, 148
movement 55, 104–105
multiplication factors 13
N
negative space 56, 80, 166
neutral density (ND) fi lters 25
night-time 119
Nik Software Collection 147
noise 34, 37, 118, 147, 150
O
orientation 70–71
overexposure 37, 187
P
panoramic stitching 156–157
personal styles 162–179
perspective
foreground focal points 78–81
light 86–87
linear 72, 74–75
sense of scale 90–91
tilt and shift 82–85
vanishing points 76–77
visual separation 88–89
focus stacking 154–155
foreground, as focal point 78–81, 164
Four Thirds standard formats 12, 13
framing compositions 56–69, 175
framing devices 31
front lighting 110, 111
front-to-back sharpness 84
full-frame digital SLRS 12, 44
G
geometry of composition
corners 98–99
layers 102–103
lines 94–97
minimalism 166
motion 106–107
movement and fl ow 104–105
planes 102–103
pointers 98–99
shapes 100–101
GIMP software 147
GNU Image Manipulation Program 147
golden hour 112
Golden Section/Ratio 60–63
Golden Spiral 64–65
Golden Triangle 65
graduated neutral density (ND) fi lters
26–27
Grid Lines features 31
H
high viewpoints 88, 102, 130–131
highlight areas 26, 186
hills 134–135
histograms 37
Hoddinott, Ross 178–179, 188
horizon, placing of 66
horizontal lines, in composition 96
hotshoe spirit levels 30
hyperfocal distance 42–45
I
ICM (Intentional Camera Movement) 169
image sharpness
front-to-back sharpness 84
maximizing 42–45
viewing 41
Impressionism 168–169
in-camera features 31
Intentional Camera Motion (ICM) 169
ISO settings, role of 34
J
JPEG (Joint Photographic Experts Group)
fi les 186
L
lakes 140–141, 149
landscape orientation 70, 71
landscape types
coastal 130–133
hills and mountains 134–135, 148
lakes and refl ections 140–141, 149
miniature 142–143
rivers, streams and waterfalls 138–139
woodlands 136–137
large format cameras 15
layers, in composition 102–103, 111
LCD (Liquid Crystal Display) 186
lenses 16–20, 132, 172
levelling aids 30
light
black and white 122–123
depth 86–87
direction 50, 110–111
low 118–121
quality of 112–113, 116–117
seasonal 114–115
silhouettes 124–125
spot 126–127
lighting, and personal style 172
Lightroom 146, 152–153, 160–161
linear perspective 72, 74–75
linear polarizers 29
ALP-185-192-LVBK.indd 190ALP-185-192-LVBK.indd 190 20/06/2014 15:0120/06/2014 15:01

191
U
underexposure 36, 37, 187
V
vanishing points 76
vertical lines, in composition 96
viewpoints 78, 88, 89, 102, 130–133
vignetting 24, 187
Virtual Horizon features 31
visual balance 52–55
visual separation 88–89
volume perspective 86
W
waterfalls 138–139
weather
and black and white 123
and transition 114
white balance settings 51
wide-angle lenses 16–17
wide-angle perspective 74
Winter 114
woodlands 113, 136–137
Z
zig-zag lines, in composition 96
zoom lenses 20
Photoshop 146, 150, 157
Pixel Genius 147
pixels 187
planes, in composition 102–103
planning 174
plug-ins 147
pointers, in composition 98–99
polarizing fi lters 28–29
portrait orientation 70, 71
post-processing personal style 175
Preview features 41
prime lenses 20
processing
converting to back and white 160–161
cropping 148–149
exposure blending 158–159
focus stacking 154–155
local enhancements 152–153
panoramic stitching 156–157
personal style 175
sharpening 150–151
software 146–147
R
Raw fi les 36, 37, 144, 147, 160
RawTherapee 147
rectangles, in composition 100
refl ections 67, 140–141, 149
remote release devices 30
resolution 187
rivers 138–139
rule of odds 68–69
rule of thirds 31, 58–59
S
salt water 132
saturated colour 28, 50, 110, 114, 175
scale, creating 90–91
Scheimpfl ug Principle 82
screw-in fi lter systems 24
sensors 12–13
shadow areas 26, 187
shapes, in composition 100–101
INDEX
sharpening 150–151
sharpness of image
front-to-back sharpness 84
maximizing 42–45
viewing 41
shooting techniques
colour 48–51
depth of fi eld 38–41
diffraction 46–47
exposure 34–37
hyperfocal distance 42–45
shorelines 132–133
shutter speed, role of 34
sidelighting 110, 111
silhouettes 124–125
Silver Efex Pro 2 147, 161
slot-in fi lter systems 24
software 146–147
spot lighting 126–127
spot metering 187
Spring 114
standard focal length 18
standard lenses 18
starburst techniques 47
stitching panoramas 156–157
streams 138–139
styles of photography 162–179
subjects, placing of 56–69
Summer 114, 115
symmetry 66–67
T
telephoto compression 75
telephoto lenses 19
texture 110, 111, 122, 123
texture gradient 74
through the lens (TTL) metering 24, 36
TIFF (Tagged Image File Format) 187
tilt and shift lenses 20, 82–85
traditional composition 164–165
triangles, in composition 100, 101
tripods/tripod heads 21–23, 132
ALP-185-192-LVBK.indd 191ALP-185-192-LVBK.indd 191 20/06/2014 15:0120/06/2014 15:01

To order a book, or to request a catalogue, contact:
Ammonite Press
AE Publications Ltd, 166 High Street, Lewes,
East Sussex, BN7 1XU United Kingdom
Tel: +44 (0)1273 488006
www.ammonitepress.com
ALP-185-192-LVBK.indd 192ALP-185-192-LVBK.indd 192 20/06/2014 15:0120/06/2014 15:01
Recommended