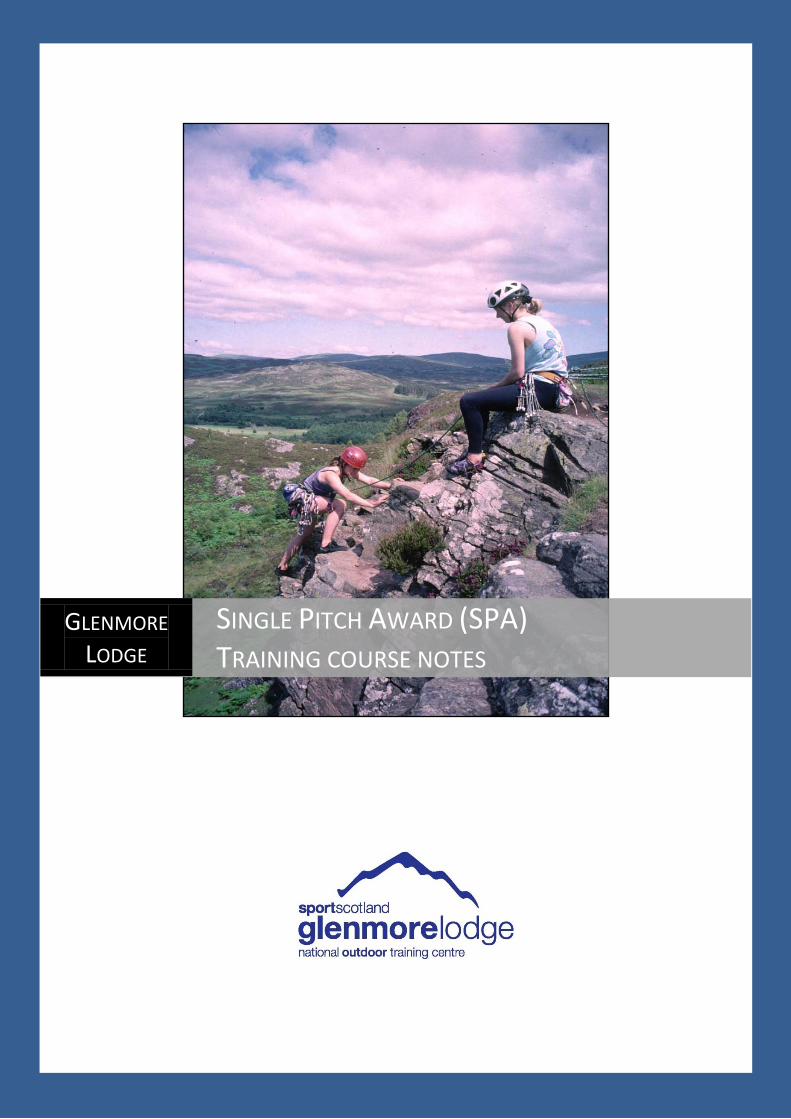
Page 1
GLENMORE
LODGE SINGLE PITCH AWARD (SPA)
TRAINING COURSE NOTES
Page 2
Contents The pages in this handbook are used to support the information delivered on the SPA training course. The information has been put together to support a variety of areas within the syllabus. There is an extensive bibliography at the back of the manual to help you with any further reading. Some of the images within this manual have been taken from ‘Rock climbing essential skills and techniques’ by MLTUK. This is the official handbook for the Single Pitch Award.
SPA Training Course Programme .............................................................................. 3 Planning Your Day ..................................................................................................... 5 Risk Assessment ........................................................................................................ 6 Environment Audit ...................................................................................................... 8 Rock Climbing – some bits and pieces ..................................................................... 10 Loading Anchors ...................................................................................................... 11 Belay Devices, Ropes and Humans ......................................................................... 12 A Top Rope System ................................................................................................. 13 A Bottom Rope System (or Top Rope Pulley) .......................................................... 14 A Releasable Abseil System .................................................................................... 15 Problem Solving – stuck climber / stuck abseiler ..................................................... 17 Warming Up, Stretching and Injury Avoidance ......................................................... 19 Legal Responsibilities When Teaching & Supervising Climbing ............................... 20 The Mountaineering Council of Scotland - Crag Code ............................................. 25 SPA Training Fun Quiz ............................................................................................. 28 Single Pitch Award – Self Appraisal ......................................................................... 30 Information Sources and Bibliography ...................................................................... 35
Page 3
SPA Training Course Programme The following programme is only intended as a provisional guide. Course content and order of sessions may vary according to the weather, crag conditions, participants needs etc. SPA TRAINING COURSE PROGRAMME The following programme is only intended as a provisional guide. Course content and order of sessions may vary according to the weather, crag conditions, participants needs etc.
DAY 1 Introduction Personal Introductions
About the SPA scheme
Logbooks
Discussion of Provisional programme
Personal Technical Skills
The day will primarily re-visit the personal technical skills required as a rock climbing leader. Equipment: Explore what equipment is suitable for personal use and evaluation of condition of personal climbing equipment. Anchors: Look at protection options and efficacy of placements and anchors. Belaying: Personal belay skills; use of variety of belay devices; lowering; Setting up sound belay systems to single and multi – point anchors. Personal Climbing Skills: Use of guidebooks and climbing ethics; choose routes appropriate to personal ability; Lead and protect rock climbs competently and efficiently. Abseiling: Setting up retrievable abseils: use of friction devices; Safeguard an abseil; solving/avoiding common problems. Review of day
Early Evening
“The Crag Environment” A slide talk/discussion looking at a variety of concerns involving the crag environment, climbers and organised groups.
Page 4
DAY 2 Group Technical Skills Part 1
This session will be based at a local crag and will concentrate on the technical skills appropriate to running an outdoor rock climbing session for a group.
The following skills will be looked at:- Top and bottom rope systems: Pros and cons when working with different groups at a variety of locations: avoidance of potential problems.
Problem Solving: Solving some simple and potential problems during use of both systems.
Both sessions will also deal with some simple group management strategies, safety consideration, environmental impact (Access Vs crag environment), and crag etiquette. Review of Session
Climbing Walls and Coaching Climbing Skills
This session will be based at a local climbing wall, and will focus on the use of walls by groups and coaching climbing and associated safety techniques. The following will be covered: Use of climbing walls: Design; Access and availability; suitability for groups. Running a warm up and mobilisation session to minimise risk of soft tissue injury. Coaching Movement Skills: Learning process, styles and coaching techniques; Foundations of movement focussing on Centre of Balance. Coaching movement session: practical session focussing on coaching movement skills using bouldering and bottom roping. Use of games.
Peer Belaying: teaching belaying; different levels of supervision; peer belaying methods and their pros and cons, consultation with wall staff before employing methods; holding falls and performing lowers using a bottom rope.
Early Evening Above sessions Cont.
DAY 3 Group Technical Skills Part 2
Review of Early evening Session.
This session will be based at a local crag and will continue on from day 2 exploring the technical skills appropriate to running an outdoor rock climbing session for a group.
Group Abseiling: Choice of site: appropriate system; methods of abseiling; solving common problems.
Consolidation and further practice of elements covered on Day 2.
Page 5
Review of Day
Course Review Between Training and Assessment: This short session will give participants guidance on how best to consolidate their experiences of the course, and incorporating new skills into their operation as potential single-pitch ward holders prior to presenting themselves for assessment.
Log books
Individual Debrief
Planning Your Day Is an environmental assessment an integral part of your daily planning process?
This page is based on extracts from the BMC “Peak Group booklet”:
Thoughtful planning, effective group management and an awareness of good practice can nip many potential problems in the bud. Choosing an appropriate crag should always be a primary consideration and this should balance your group’s size, structure and needs with the carrying capacity and environmental sensitivity of the crag. If necessary, the MC of S or BMC Access Reps can advise group leaders from outside the region on the suitability of their intended venues.
Choosing a Venue – What to Consider • Group size, needs & aspirations • Crag carrying capacity & environmental impact • Potential conflicts with other users • Access, parking, transport & toilet facilities • Crag options & indoor alternatives
Options & Alternatives • What are the realistic options (e.g. indoor walls, quarries, the great outdoors)? • Could I avoid busy crags at peak times (e.g. summer evenings & weekends)?
Crag Access Information • What are the current access arrangements? • Does the crag have a history of group use problems? • What are the walk-in options for getting there?
Training, Skills & Briefing • Could the skills training (ropework, harnesses & knots) be done at the centre or in the car park? • Are there any environmental education or interpretation facilities (e.g. countryside noticeboards)
available on site or nearby?
Page 6
Transport & Parking • Is there a realistic public transport option? • Is there sufficient parking available?
On The Rock • Is the crag suitable for abseiling, top-roping or leading? • Might the group damage any important routes? • How crowded will it be at the crag? • Could the group be split to reduce overcrowding? • Will the group come into conflict with other groups or individual climbers?
Toilet Facilities • Where are the nearest toilet facilities? • Are the group aware of the situation? • What is the advice for anyone who gets caught short?
(Extracts taken from the BMC “Peak Group booklet)
Risk Assessment
When deciding whether a crag might be suitable for running a rock climbing session with a group, it would be advantageous to make an evaluation of the existing risks at the site. It should be borne in mind that although a crag may be one you use on a regular basis weather conditions, experience of the group, other users or any other relevant factors can alter the level of risk significantly.
As an indication of the factors that may have to be taken into account you may wish to consider the following points:
• Altitude and aspect of crag – suitable in what weather? • Approach – parking, ease of access? (Also is it open access or is permission required?) • Routes available in grades and lengths as appropriate to the abilities of the group? • Nature of crag top:
o Availability of suitable anchors? o Loose rock/grass/stones etc. at the top?
• Descent routes – can your participants walk up or down safely? • Safe location for your group to wait? • Sheltered location for your group to wait? • Interference with/or from other crag users? • Availability of suitable abseil sites (high take off, anchors etc.)?
ENVIRONMENTAL ASSESSMENT In addition to assessing the inherent risks of a crag site, you should also consider the possible environmental impact of your presence:

Page 7
• Are there any restrictions in force at the crag – nesting raptors, rare flora etc.? • Is erosion a problem at the crag (crag bottom, top access paths)? • Will your presence excessively disturb any local wildlife? • Will your use of particular routes cause their degradation?
On completion of your assessment should you choose to use the site you should take all precautions to minimise your impact on the area.
NOTES

Page 8
Environment Audit
Environmental Issue Site Observations – Problems & Solutions Choice of venue. Suitable for aims of session – have you considered suitable alternatives?
Transport & Parking
Who uses the site?
Any evidence of heavy or frequent use? Who is responsible for this?
Any involvement of local or national organisations in the access & conservation of the site?
Is there guidebook advice & any local “guardianship”?
Detailed site evidence. Strong indicators & any particular actions that can be taken to minimise impacts & problems

Page 9
Environment Audit
Environmental Issue Site Observations – Problems & Solutions
NOTES
Page 10
Rock Climbing – some bits and pieces THE BASIC RACK Below is a suggested rack, which will get you by on most short climbs up to VS/HVS. THE VERY BASIC RACK 8ft sling (120cm circ) x 2 4ft sling (60cm circ) x 1 Belay Device Rocks on wires (Sizes 1-10) Roxcentrics 7,8 & 9 on tape Camming Devices size 1, 1.5 & 2 (optional) Assorted lengths of quick-draws (10cm-30cm circ) x 6 1 nut key 3 HMS / pear shaped krabs 2 Screw gate krabs 20 Snap link krabs ADDITIONAL EQUIPMENT For those long, knarly pitches your nerves may appreciate the following additions:- 12cm (circ) quick-draws x 4 8 Snap links 4ft sling (60cm circ) x 1 1 Screwgate krab Duplicate set of wired rocks Camming Devices size 0.5, through to size 3 (preferably flexible) You will of course require a climbing rope generally 10-11mm in diameter 50 – 60m in length, a harness, rock-shoes, and a helmet. A chalk bag is commonly seen as standard dress. CARRYING IT ALL – or RACKING You have several choices. A bandolier, the gear slings on your harness or a mix of the two. The bandolier allows easy pass over on stances, allows easier examination and selection of gear, and keeps your hexes from kneecapping you. However, it does mean that all the gear is in one big bunch, which means that on steep ground everything will swing behind you out of reach, which may result in some mental anguish when you can’t reach gear to place it. With racking your gear on your harness, it allows the weight to be spread around your waist. Such a system also allows a logical arrangement of gear e.g. wires on right front gear loop, belay plate and spare krabs on rear left gear loop etc. However if your gear loops are further round the back of your harness then this can pose the same problem as the bandolier. The only way around this predicament is to know where everything is on your rack with your eyes closed. The best system may be a compromise – quick-draws, roped hexes etc. on the bandolier, wires krabs etc. on the harness. Experiment, the main point is to always know where the appropriate bits are.

Page 11
Loading Anchors
NOTES
When equalising two anchors it is important to be aware of the angle between the anchors and the load point. You can assess this by the distance between the anchors and the length of rope / sling being used. It is very common for climbers to over estimate the angle between their anchors and their load point. For example climbers will commonly identify an angle of 30° being more like 45°. This is a good thing in that it is keeping to the side of caution.
Any set up with an angle up to 90° is commonly agreed as being acceptable. A set up with ever increasing angles does reach a saturation point. For example an angle of 120° is going to put up to double the load on each individual anchor when compared to a 60° angle.
An easy way to prevent the angle between two anchors falling within the critical zone of 120° is to place another anchor. So instead of a two anchor set up you have a three anchor set up. If you place the third anchor at the centre of your two main anchors then you have reduced one angle of 120° to two angles of 60°. For information on ‘Fall Factors’ and ‘Peak impact Force’ refer to the MLTUK Handbook. The Images opposite are taken from the above handbook.
Page 12
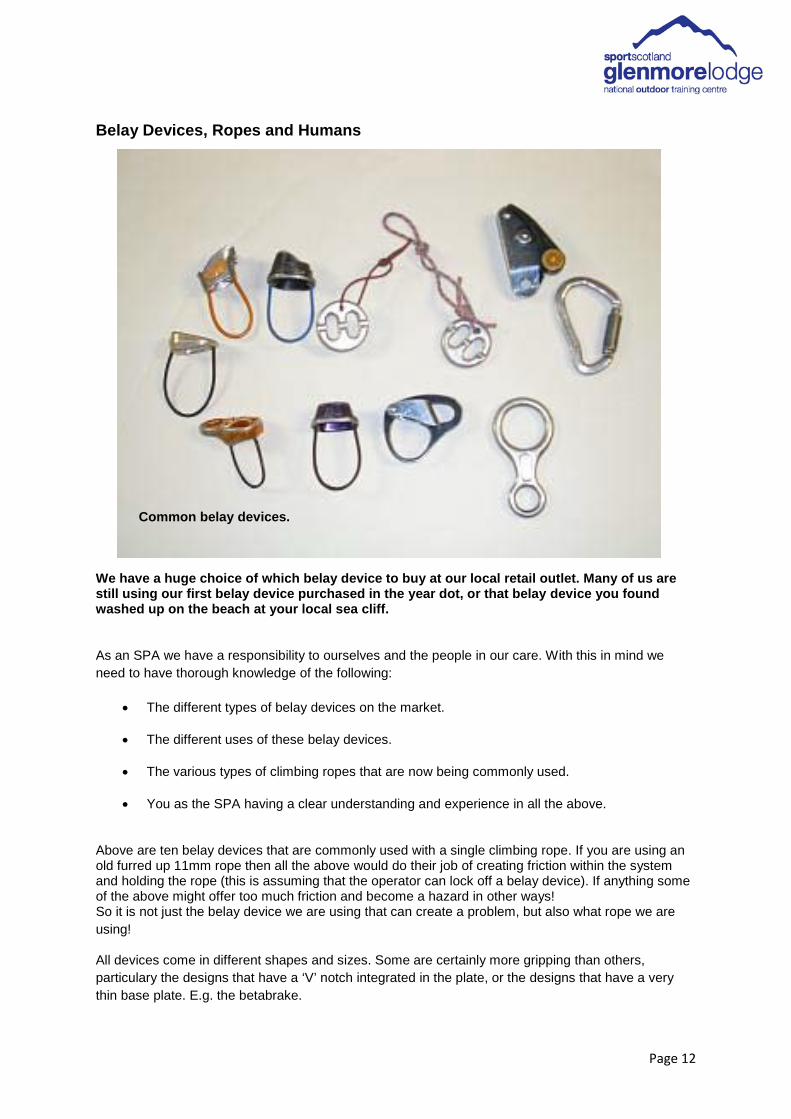
Belay Devices, Ropes and Humans We have a huge choice of which belay device to buy at our local retail outlet. Many of us are still using our first belay device purchased in the year dot, or that belay device you found washed up on the beach at your local sea cliff.
As an SPA we have a responsibility to ourselves and the people in our care. With this in mind we need to have thorough knowledge of the following:
• The different types of belay devices on the market.
• The different uses of these belay devices.
• The various types of climbing ropes that are now being commonly used.
• You as the SPA having a clear understanding and experience in all the above.
Above are ten belay devices that are commonly used with a single climbing rope. If you are using an old furred up 11mm rope then all the above would do their job of creating friction within the system and holding the rope (this is assuming that the operator can lock off a belay device). If anything some of the above might offer too much friction and become a hazard in other ways! So it is not just the belay device we are using that can create a problem, but also what rope we are using!
All devices come in different shapes and sizes. Some are certainly more gripping than others, particulary the designs that have a ‘V’ notch integrated in the plate, or the designs that have a very thin base plate. E.g. the betabrake.
Common belay devices.
Page 13
As with belay devices climbing ropes are now being made with different climbing functions in mind.
A single rope at the moment can be anywhere from 9.2mm to 11mm in diameter. As an SPA you must feel comfortable matching the correct belay device with the rope that you are using whether it be for work or pleasure.
You might be comfortable in picking up any belay device and using it with any rope. What you need to be aware of is a novice does not have this ability.
Group belaying & handing over responsibility
There are various techniques used by SPA holders to involve a group in belaying. Group belaying has many benefits in that it gets people involved in the activity, they are starting the process of learning a new skill, being given responsibility and gaining confidence. Many techniques are well documented in various climbing handbooks including the ‘MLTUK climbing handbook’. As an SPA, the difficult decision for you is when to start giving your group or individual members of the group more belaying responsibility. There are ways we can introduce different safety nets, for example – using a self locking device such as a gri gri, holding the dead end of the rope so backing up the belayer etc. To know when to let full responsibility over to the individual belayer can only come through experience, with coaching groups at single pitch venues with the ethos of individual belaying in mind. If your crag sessions are run using the techniques involved with group belaying, then your experience is less when deciding to let go of the novice belayers rope! Once responsibility has been handed over to the individual to belay their partner, do not hesitate to step back in if there has been a gap / break in the practice, or the individuals skills are breaking down.
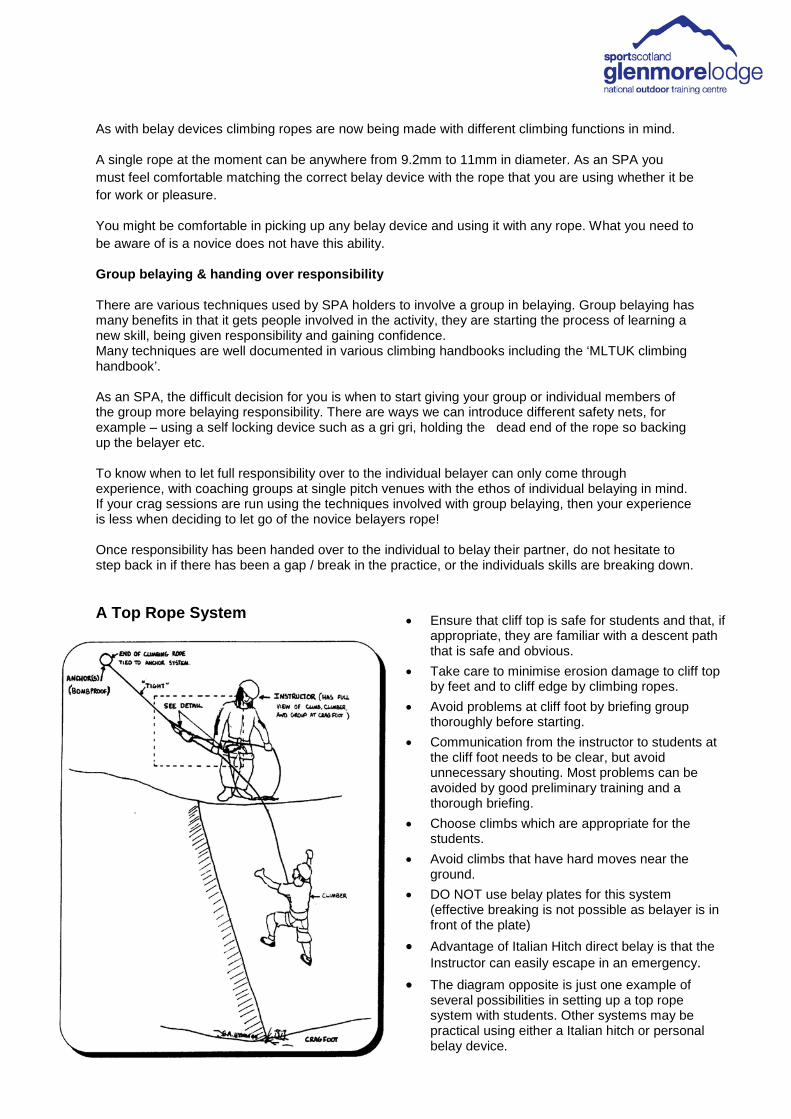
A Top Rope System
• Ensure that cliff top is safe for students and that, if appropriate, they are familiar with a descent path that is safe and obvious.
• Take care to minimise erosion damage to cliff top by feet and to cliff edge by climbing ropes.
• Avoid problems at cliff foot by briefing group thoroughly before starting.
• Communication from the instructor to students at the cliff foot needs to be clear, but avoid unnecessary shouting. Most problems can be avoided by good preliminary training and a thorough briefing.
• Choose climbs which are appropriate for the students.
• Avoid climbs that have hard moves near the ground.
• DO NOT use belay plates for this system (effective breaking is not possible as belayer is in front of the plate)
• Advantage of Italian Hitch direct belay is that the Instructor can easily escape in an emergency.
• The diagram opposite is just one example of several possibilities in setting up a top rope system with students. Other systems may be practical using either a Italian hitch or personal belay device.
Page 14
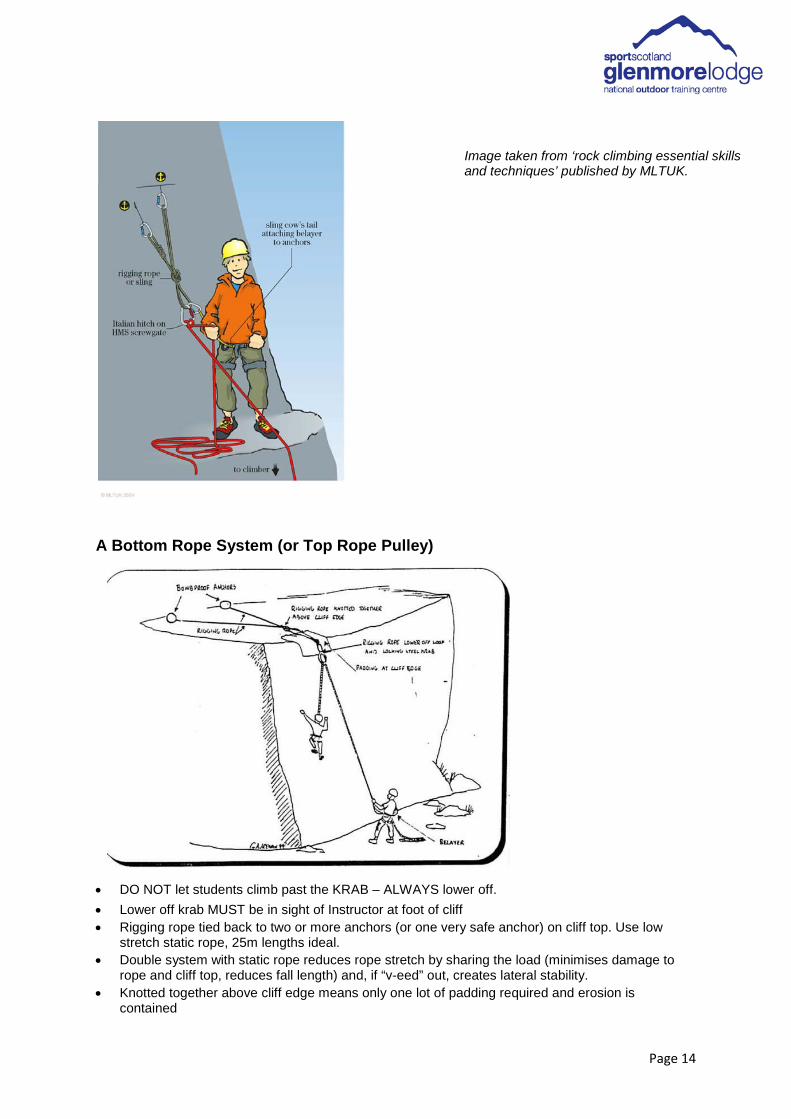
A Bottom Rope System (or Top Rope Pulley) • DO NOT let students climb past the KRAB – ALWAYS lower off. • Lower off krab MUST be in sight of Instructor at foot of cliff • Rigging rope tied back to two or more anchors (or one very safe anchor) on cliff top. Use low
stretch static rope, 25m lengths ideal. • Double system with static rope reduces rope stretch by sharing the load (minimises damage to
rope and cliff top, reduces fall length) and, if “v-eed” out, creates lateral stability. • Knotted together above cliff edge means only one lot of padding required and erosion is
contained
Image taken from ‘rock climbing essential skills and techniques’ published by MLTUK.
Page 15
• Padding (carpet, sac, rope protectors etc.) on cliff edge is essential to reduce wear/abrasion on rope and reduce the possibility of erosion damage to cliff edge.
• Lower off loop and krab should ideally be hanging free or with a BIG knot to keep off rock face: o Use locking steel krab (alloy wears quickly with heavy usage) o Keep gate away from rock face o Position krab with gate hinge at top – gravity then keeps the screw sleeve in locked
position despite vibration of running rope • Belayer at foot of cliff uses belay plate (or alternatives) attached to harness belay loop. If
necessary the belayer can be clipped with sling to second person for added weight, or anchored to ground.
• A second belayer can also be used with novices to hold the dead rope, increasing security and involving more students with the activity.
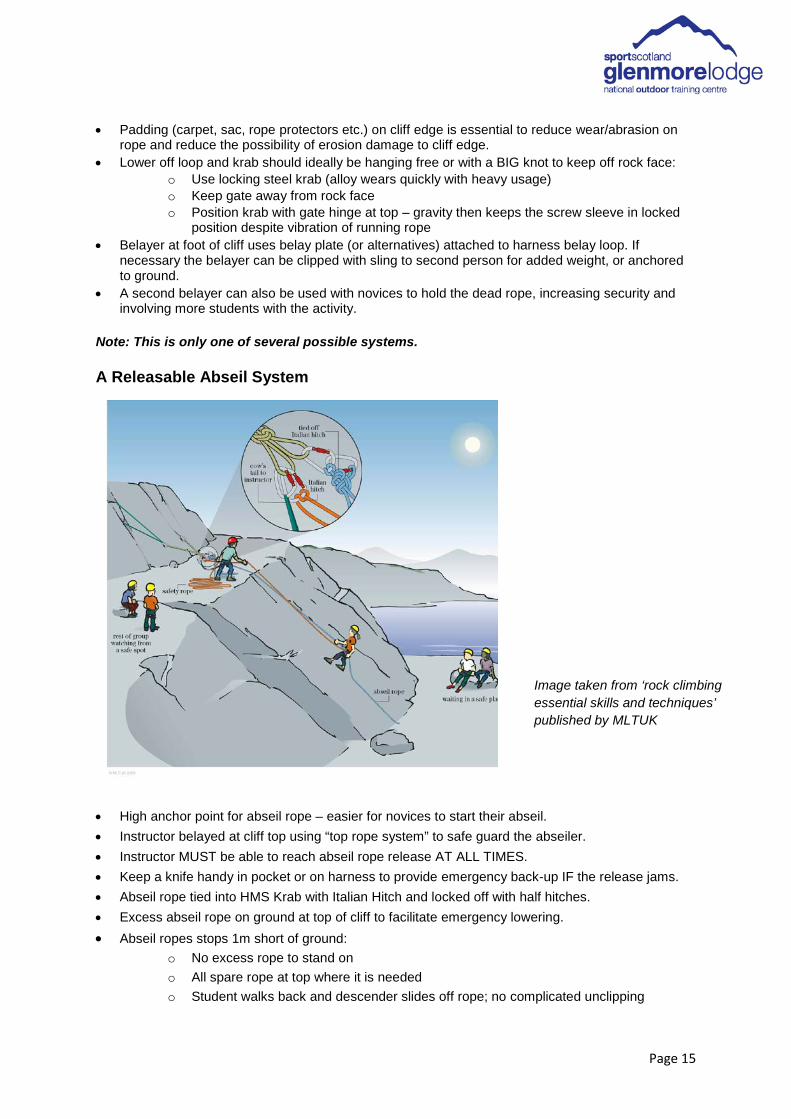
Note: This is only one of several possible systems. A Releasable Abseil System
• High anchor point for abseil rope – easier for novices to start their abseil. • Instructor belayed at cliff top using “top rope system” to safe guard the abseiler. • Instructor MUST be able to reach abseil rope release AT ALL TIMES. • Keep a knife handy in pocket or on harness to provide emergency back-up IF the release jams. • Abseil rope tied into HMS Krab with Italian Hitch and locked off with half hitches. • Excess abseil rope on ground at top of cliff to facilitate emergency lowering. • Abseil ropes stops 1m short of ground:
o No excess rope to stand on o All spare rope at top where it is needed o Student walks back and descender slides off rope; no complicated unclipping
Image taken from ‘rock climbing essential skills and techniques’ published by MLTUK
Page 16
• Problems to “stuck” abseiler can be solved easily and efficiently by: o Holding abseiler tight on safety rope (take in if necessary) o Releasing abseil rope o Lowering abseiler to ground on safety rope whilst feeding out SLACK abseil rope
(care if dropping end!) • Take care to minimise erosion damage to cliff top & avoid multi abseils down established climbs SUPPLEMENTARY NOTES BOTTOM ROPE SYSTEMS
POSITIVE
• This system allows an Instructor to move around freely and safely supervise more than one rope at the same time.
• It occupies several students without having to involve them in complex belaying arrangements and is easier for a novice to learn how to use the belay plates correctly.
• The Instructor is with all of his group and can thus control and talk to them in addition to being able to offer direct coaching and close encouragement to novices making their first moves on a climb.
• The problems of cliff top and descent path safety are removed.
• Students are not seen so obviously as failures if they fail to reach the top. Each can have their own “high point”.
• It can also reduce cliff top erosion and unsightly descent paths.
• Stuck novices can easily be rescued. NEGATIVE
• Each system takes time to rig correctly and the anchors are out of site (active cam units are not recommended in this situation unless there is no alternative and then only as part of a multiple belay).
• Anchors need to be bomb proof as loading can be at least 2x any force exerted by the climber.
• It prevents students from “topping out” and is against the traditional concept of the ascent.
• It also encourages bottom rope systems by copy cat climbers on routes that are too hard for them and the resultant monopolising and over working of those routes, possibly with cliff edge and soil erosion by use of poor systems (e.g. no rigging rope & lower off krab on top of, and back from, cliff edge)
• However, when operating on a 1:3 ratio or more it does produce greater involvement and success by students and is safer for them and less damaging to the environment if rigged correctly and sympathetically.
TOP ROPE SYSTEMS
POSITIVE
• Quick to rig and allows some limited adjustment of position whilst operating.
• Allows for traditional topping out and success is obvious.
• Normal type climbing; allows for progression towards multi pitch, and leading.
• Encourages communication between climbers
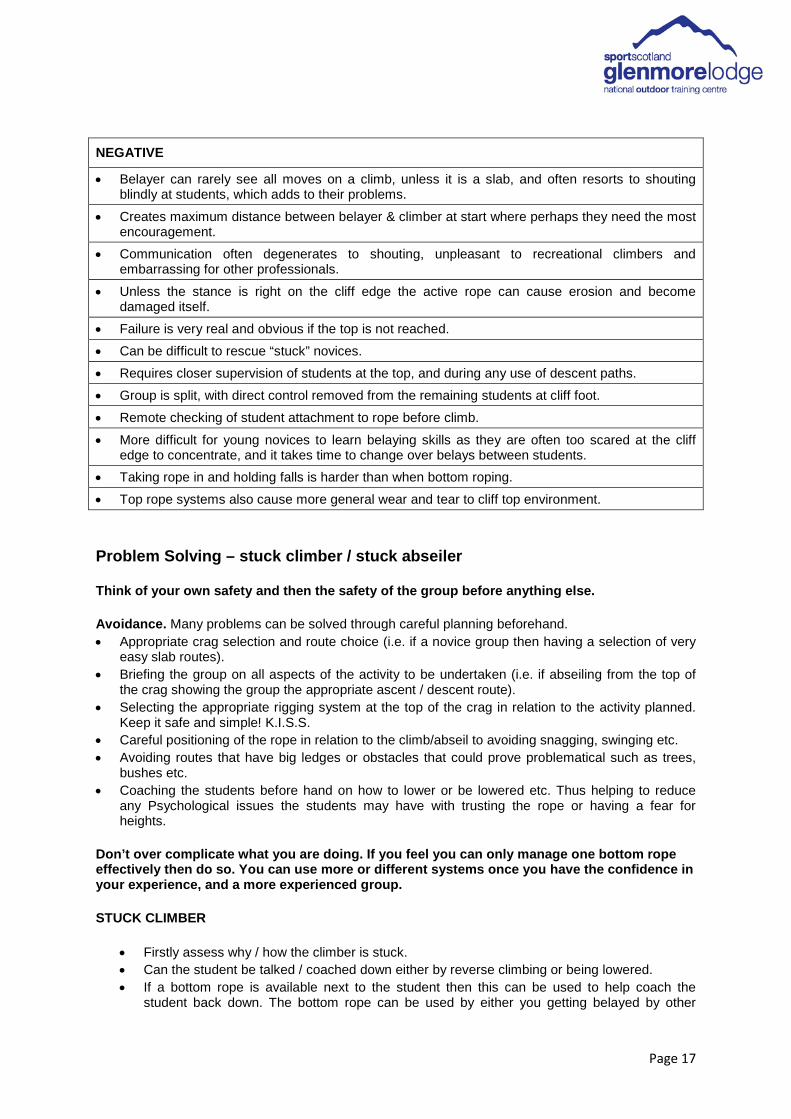
Page 17
NEGATIVE
• Belayer can rarely see all moves on a climb, unless it is a slab, and often resorts to shouting blindly at students, which adds to their problems.
• Creates maximum distance between belayer & climber at start where perhaps they need the most encouragement.
• Communication often degenerates to shouting, unpleasant to recreational climbers and embarrassing for other professionals.
• Unless the stance is right on the cliff edge the active rope can cause erosion and become damaged itself.
• Failure is very real and obvious if the top is not reached.
• Can be difficult to rescue “stuck” novices.
• Requires closer supervision of students at the top, and during any use of descent paths.
• Group is split, with direct control removed from the remaining students at cliff foot.
• Remote checking of student attachment to rope before climb.
• More difficult for young novices to learn belaying skills as they are often too scared at the cliff edge to concentrate, and it takes time to change over belays between students.
• Taking rope in and holding falls is harder than when bottom roping.
• Top rope systems also cause more general wear and tear to cliff top environment. Problem Solving – stuck climber / stuck abseiler Think of your own safety and then the safety of the group before anything else. Avoidance. Many problems can be solved through careful planning beforehand. • Appropriate crag selection and route choice (i.e. if a novice group then having a selection of very
easy slab routes). • Briefing the group on all aspects of the activity to be undertaken (i.e. if abseiling from the top of
the crag showing the group the appropriate ascent / descent route). • Selecting the appropriate rigging system at the top of the crag in relation to the activity planned.
Keep it safe and simple! K.I.S.S. • Careful positioning of the rope in relation to the climb/abseil to avoiding snagging, swinging etc. • Avoiding routes that have big ledges or obstacles that could prove problematical such as trees,
bushes etc. • Coaching the students before hand on how to lower or be lowered etc. Thus helping to reduce
any Psychological issues the students may have with trusting the rope or having a fear for heights.
Don’t over complicate what you are doing. If you feel you can only manage one bottom rope effectively then do so. You can use more or different systems once you have the confidence in your experience, and a more experienced group. STUCK CLIMBER
• Firstly assess why / how the climber is stuck. • Can the student be talked / coached down either by reverse climbing or being lowered. • If a bottom rope is available next to the student then this can be used to help coach the
student back down. The bottom rope can be used by either you getting belayed by other
Page 18
students, or if this is not possible or practical walking around the top and abseiling down the rope to help the student.
• If there is no rope available and the student refuses to come down then the only option available is for you to ascend their bottom rope, and do a counter balance abseil back to the ground.
STUCK ABSEILER
• Firstly assess why / how the abseiler is stuck. • Can the student be talked / coached back to the ground. • If they have something trapped or snagged in the rope, then simply releasing the abseil rope
of some slack should solve the problem. The student can then carry on abseiling to the ground.
• If the student is cragfast, i.e. they have either trapped something or refuse to move from a ledge, then you will need to go down and assist them to the ground. To do this simply tie the student off on the safety rope, then abseil down the students abseil rope. Once you reach the student, transfer them over to your abseil system ( y hang ) and both abseil to the ground.
Always remember think of your own safety and then the safety of the students. Constantly reassure the students in your care and act cool and confidently. Never leave a student un- belayed and always back them up. NOTES
Page 19
Warming Up, Stretching and Injury Avoidance
Introduction It has been well documented in many climbing articles and books about the benefits of warming up and stretching before going rock climbing. If you do not personally warm up etc then that is your choice, just don’t expect to get any sympathy from your physio when dealing with your chronic injury! When introducing novices to the sport of rock climbing then warming up and stretching should be the foundation of all your practical activities. The amount and the specifics of what you do in your foundation will vary depending on the type of group you have, but also the location of the crag or wall that you are using. So if you are operating out of your local climbing wall and the group consists of a dozen twelve year olds who have just skipped through the door squealing and shouting, then the foundation for them is going to be very different compared to a group of adults. Warming up Warming up is exactly what it says on the tin! Getting the pulse to accelerate, the heart and lungs working. Ways / ideas to approach this:
• The approach walk to the crag (if this is over a field or two). • Getting the group to help carry the equipment to the top/bottom of the crag. • A fun game at the gearing up spot (jungle book) • If at the wall, taking a jog around the block
As part of your warm up it is also a good idea to have some general mobility exercises in as well.
• Controlled hip and shoulder circles • Finger clenches (try and do 100) • Wrist circles • Elbow movements • Press ups and star bursts to finish
Stretching Don’t worry, we are not talking yoga style with scented sticks here! What you are looking at achieving is some low level basic stretches, concentrating on the specifics used in climbing. Individual stretches at this level and this stage should last around 8 – 12 seconds.
• Finger stretches • Elbow stretches • Shoulder stretches • Back stretches • Lower body stretches (if desired)
As a finisher to your foundation you may decide to do some very easy low level traversing (you can even do this by walking along the ground, and weighting handholds). Some easy scrambling or bouldering. This will then lead you into your rock session. Injury Avoidance By following the above we are helping our novice climbers with injury avoidance. There are plenty of articles out there to help you the rock monster with injury avoidance, Neil Gresham’s High performance climbing coaching articles are fantastic for this.
Page 20
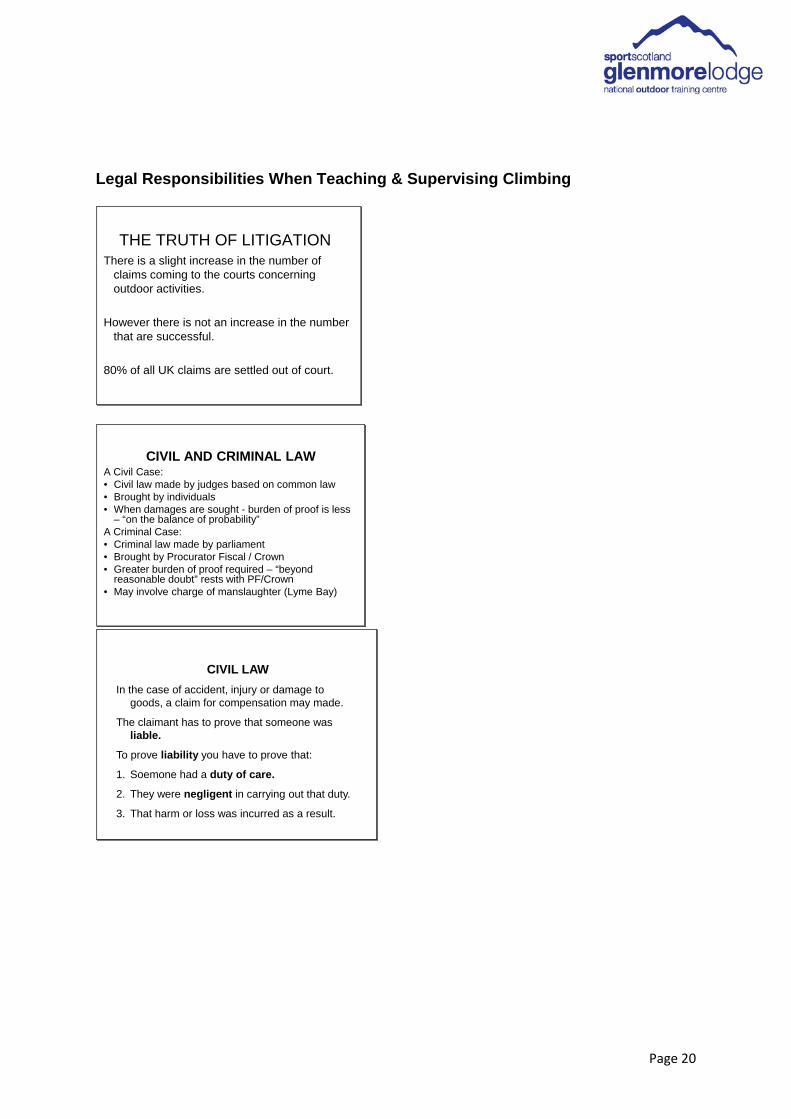
Legal Responsibilities When Teaching & Supervising Climbing
THE TRUTH OF LITIGATIONThere is a slight increase in the number of
claims coming to the courts concerning outdoor activities.
However there is not an increase in the number that are successful.
80% of all UK claims are settled out of court.
CIVIL AND CRIMINAL LAWA Civil Case:• Civil law made by judges based on common law• Brought by individuals• When damages are sought - burden of proof is less
– “on the balance of probability” A Criminal Case:• Criminal law made by parliament• Brought by Procurator Fiscal / Crown• Greater burden of proof required – “beyond
reasonable doubt” rests with PF/Crown• May involve charge of manslaughter (Lyme Bay)
CIVIL LAWIn the case of accident, injury or damage to
goods, a claim for compensation may made.
The claimant has to prove that someone was liable.
To prove liability you have to prove that:
1. Soemone had a duty of care.
2. They were negligent in carrying out that duty.
3. That harm or loss was incurred as a result.
Page 21
WHEN IS THERE A DUTY OF CARE? A Duty of care exists between recreational mountain users.
A designated leader of a group owes a duty of care to the members by accepting responsibility.
A Duty of care is owed by a qualified leader to a client.
An adult accepting responsibility, by consent or by action for a minor owes a duty of care.
(It does not matter whether you are paid, a volunteer, unemployed etc).
THE EXTENT OF THE DUTY OF CARE
• The level of care expected is largely dependent on the experience of the leader and the participants.
• The level of care is judged by what your peers would provide.
• The suitability of the activity, location, equipment etc all have a bearing as well.
• Essentially it is all about a sensible risk assessment.
“IN LOCO PARENTIS” (Common Law)The Duty of Care owed to under 18s in the outdoors can not be disclaimed.
The duty is - to take the care that one would expect reasonably prudent parents to take. The judgement of failure to exercise such care is : “What is reasonable”?
NEGLIGENCE
Negligence should not be seen as a minor oversight, it is usually blatant neglect that would be apparent to most people.
This is largely why so many claims fail.

Page 22
DEFENCE OF NEGLIGENCE Foreseeability - that the accident was unforeseeable.
Volenti Non Fit Injuria – no harm is done to he who consents. However: Consent had to be voluntary and informed, not applicable to U18s.
Contributory Negligence – participant is also at fault. (e.g. not following safety instructions etc).
A break in causation (e.g. someone goes to hospital for a minor injury but there is an error at the hospital).
Cost benefit - The risk of injury against the cost of precautions.
BE ABLE TO DEMONSTRATE A LEVEL OF CARE
•Demonstrate that good practice is being followed.
•Do manage and control the group actively.
•Assess the risks as an ongoing process
BE ABLE TO DEMONSTRATE A LEVEL OF CARE
• Be aware of typical incidents and how to respond.
• Operate appropriately for your level of training and experience and be prepared for foreseeable situations.
• Take normal decisions - what would respected peers do now?
• Use equipment in accepted ways.
• Ensure you have the relevant personal details of the participants.
Page 23
PARTICIPATION STATEMENTSYou cannot disclaim a duty of care.
Partial disclaimers can be used. It is important to warn everyone together as a group of the potential hazards. (As we do at the start of our courses).
The validity of participation statements will depend on the quality of information given about the risks and the evidence of reasonability of the advice given.
WHEN IT GOES WRONGIf you have an incident that you think could lead to a claim against you. Record all the detail you can there and then, include photos if appropriate.
Accident report – what are your employer guidelines/rules regarding this?
If self – employed/volunteer inform your insurance company otherwise they will not support you if a claim is put in at a later date.
INSURANCEMany attempts to establish negligence are brought as a result of the injured person’s need for financial help as a result of an accident.
Many personal accident insurances will not cover hazardous activities or a negligence claim.
Consider third party liability insurance, this comes with PAID UP affiliation to the MCofS/BMC, individual, through a club or through the Mountain Leader Training Association (MLTA).
For professional cover Perkins Slade or through IOL.
Page 24
RISK MANAGEMENT There can be no adventure if there is no risk.
We should actively manage the risks – travelling through and operating in the outdoor environment it will not be possible to eliminate the risk – we aim to manage it.
Good Supervision is not being in the right place to witness the accident, it is being in the right place to ensure it never happens.
GOOD PRACTICE?
Who am I doing this for?
What is the aim or purpose of the venture?
Why do it?
Where are you doing it?
When are you doing it?
Use your training and abilities to safely manage situations in the outdoors.
Operate within the remit of your award.
Continuing Professional Development
Page 25
The Mountaineering Council of Scotland - Crag Code The MCofS has developed a code of good practice on crags which is being issued as an Information Sheet. It is reproduced here and we hope members will take on board its advice, as well as letting us know if you have any comments on its content. Most of the code relies on a common sense approach. For convenience it has been split into several different headings, all interrelated and all equally important. A crag code In Scotland is needed in order to pre-empt difficulties that have already occurred in England. This has been on two fronts, one being erosion and the other concerning ethics. It is hoped that a code will clarify the wishes of the climbers in order that our crags, whether on low ground or in the mountains, remain as nearly unspoilt as can be possible; a primary concern is to ensure that the crag and its environment are used in a sensitive manner by climbers and that both the crag and the flora and fauna it might support are not damaged unnecessarily. Scottish climbing has always had an adventurous spirit and it is the wishes of climbers in general that this spirit remains intact for future generations. To that end it is hoped that this code can help assist climbers to keep that spirit alive.
1. Erosion
a. On the approach to a crag endeavour to use existing paths if they exist. This helps preserve the environment. On descent from the top, avoid short-cutting descent zigzags on existing paths and if no path exists then choose a line that avoids soft vegetation prone to erosion.
b. Do not deface the rock surface by chipping, arrows or other graffiti. The removal of loose blocks and flakes often happens by natural weathering through winter freeze / thaw. If you encounter loose blocks that can easily he dislodged by hand then do so with care.
c. Routes should not be marked by cairns, paint or scratches. It is far better to record them by an accurate route description for guide hooks.
d. If bottom roping is used ensure that both the crag edge and any trees used for belays are protected by suitable padding or slings long enough to drape over the edge. This ensures that rope grooves around trees or on soft rock can be avoided.
e. Try not to abseil down climbing routes if a better alternative is on offer;
2. Vegetation
a. Rockfaces can be home to rare species of plant and tree due to lack of grazing pressures. Flowers on crags make climbing more pleasurable and it is worth identifying the less common species in order that they can be protected.
b. Discretion should be used when gardening new routes with due consideration of the area in question. Landmarks such as trees and bushes must be left and care taken not to remove lichens which can be rare.
3. Birds
a. Many species of birds, their eggs and nests are protected by the Wildlife and Countryside Act 1951. It is an offence under this act to intentionally disturb them at their nests and climbers must be vigilant during the breeding season and adhere to any voluntary restrictions.
b. Avoiding disturbing nesting birds should be possible by climbing a distance away from a nest site. Many birds such as Peregrine Falcons become tolerant of climbers as long as direct disturbance does not occur and their presence in the area with spectacular flight displays offer added attractions.
If birds are disturbed, then you are too close and have to move farther away by law. Climbers can help the R.S.P.B. by keeping note of what type of birds nest on various crags a well as acting as a deterrent to potential egg thieves. {See the MCofS Information Paper "Nesting Birds and Climbers
Page 26
c. " for more detailed information and contact the MCofS office for updated voluntary restrictions on a yearly basis.
4. Sanitation
Follow the MCofS code on sanitation; avoid pollution either near water or on the crag itself.
5. Litter Do not leave litter lying. Remove yours and, if necessary, other peoples. The crag environment does not need rubbish of any sort and this includes cigarette litter.
6. Climbing Ethics
a. Chalk should he used sparingly, particularly on overhanging rock that rarely gets wet. Chalk can cake on such places and is unsightly, whilst also destroying route finding initiative. The use of chalk is universal in Scotland and the UK, but the use of resin is not. The two do not mix and resin should therefore be avoided.
b. Holds should never be chipped, enlarged or otherwise made 'easier'. It is the responsibility of the first ascensionist to minimise rock damage when cleaning and to report the climb truthfully. Softer rocks should not be wire-brushed as this can enlarge holds and can be considered as cheating.
c. In-situ protection. Bolts -The use of bolts on Scottish rock was debated widely by Scottish climbers. The resulting Scottish Bolts Policy is a consensus view to act as a guide to their use. It states that bolt protection is acceptable in the production of sports climbs only, on low-lying crags of a certain type. Sea cliffs and mountain crags are regarded as venues for bolt-free adventurous climbing. [Further detail is contained in the Bolts Policy]. Pegs - A minimalist approach should he adhered to, with a presumption against their use for belays or runners on first ascents. A pure ascent is one that uses only natural, removable protection. If it feels too bold for you on natural protection only, then consider leaving the line for future climbers to do in a pure style. Placing pegs during repeat ascents of established routes is entirely inappropriate. They should not be left at all on sea cliffs as salt in Seaspray causes rapid erosion. Slings and Wires -Leaving these types of protection in-situ offers only short-term protection. Tape slings deteriorate rapidly in ultra-violet light and cannot be relied upon. Wires hammered into cracks corrode to destruction within two years and can prevent further protection being placed.
7. Group Use
a. Large groups under instruction can create a monopoly situation, denying routes to others. This is true both climbing and in abseiling. Large groups are best split into several smaller ones. Groups should ideally choose crags or routes not likely to be popular and in particular avoid classic climbs, though this is admittedly not seen as always possible. Try not to overuse one venue and vary your selection.
b. In general, abseiling should be confined to areas of crag that are not usually climbed on or to crags that do not provide good routes. Many classic climbs have been damaged by repeated abseiling. Try to avoid sites with steep grass slopes at the top which, even after limited use, erode and send mud down the routes below.
c. Those wishing to lead a route should be given priority over top-roping or abseiling.
8. Transport
a. In the Highlands public transport is erratic requiring the use of a car. Climbers should be encouraged to share transport if visiting the same crag and to park in areas that do not form obstructions. An experimental car-share scheme advertised on the MCofS website will be available in the future.

Page 27
b. In lowland areas where public transport may be more plentiful, then its use should be encouraged.
9. Responsibilities
a. Climbing is a hazardous activity with a risk of personal injury or death. Climbers should be aware of and accept these risks and be responsible for their own actions. No liability can be attached to landowners for injuries received due to a climbers own or other climbers activity. The legal principle of volenti non fit injura, 'participating in full knowledge of the hazards', applies to all dangerous sports.
b. All climbers owe a duty of care in Civil Law towards their neighbours. This means being aware of any action which may affect a fellow climber and doing everything 'reasonable' to prevent injury that may arise out of that action.
c. Climbing Etiquette encompasses common-sense behaviour at a crag to help cut down the risk of injury to fellow climbers. It includes avoiding: Abseiling down a line whilst others are climbing up it; dislodging blocks from the crag or the ground at the top (or dropping items of gear) onto others below; creating an unnecessary level of noise; climbing across or above other climbers creating a risk of injury to the other party should either fall off.
d. Climbing in quarries has its own particular delights, not least the often unstable nature of the rock. Quarry owners are subject to the Health and Safety at Work Act (Quarries), which binds them to prevent accidental injury to the public. This usually means erecting safety notices and fencing around the perimeter. Climbers ignoring such notices do so at their own risk under the volenti non fit injura principle.
e. There is no substitute for experience and novices should seek advice from those more experienced. The MCofS has detailed information about safety, courses, and duty of care and liability.
10. Winter Climbing
a. It is the view of the overwhelming majority of Scottish climbers that bolts are not to be used in winter ascents in Scotland.
b. It is common practice to place and remove ones own peg runners and belays on a winter ascent. Repeated use of this sort will ultimately damage the rock and the use of pegs should therefore be kept to a minimum with all options for natural gear utilised first. It should be pointed out that camming devices are of limited use in winter and are useless in iced cracks.
c. During the winter ascent of summer rock routes there should be a presumption against the use of pegs. All attempts to find protection on such routes should mimic the summer equivalent.
d. Summer routes that are of good quality and in particular classic climbs, often have little vegetation or even ice. They should not be climbed in winter unless fully coated with snow and ice in order to prevent damage to the underlying rock.
e. Mixed routes are best climbed when the turf cover is well frozen and unlikely to be dislodged.
Page 28
SPA Training Fun Quiz
1. Name four sources of information you might use when researching an unfamiliar crag (4).
2. What is a S.S.S.I. and how might it affect our access as climbers? (2)
3. List three badly eroded crags and suggest how you could help control further erosion. (3)
4. Put the rock type with the climbing area. (4)
a. Limestone Reiff sea cliffs / North West
b. Granite Stoney Middleton / Peak
c. Rhyolite Chair Ladder / Cornwall
d. Sandstone Black crag, Borrowdale / Lakes
5. Who made the first ascent of the following routes? (4)
a. Robin Smith Coronation street / Cheddar Gorge
b. Pete Livesay Right Unconqurable / Stanage Edge
c. Joe Brown The Needle / Shelterstone crag
d. Chris Bonnington Bitter Oasis / Goat crag
6. Explain the difference between a dynamic rope and a static rope? (1)

Page 29
7. Name four types of belay device. (4)
8. How often should you re-place your climbing equipment. (2)
9. What does UIAA stand for? (1)
10. You arrive at your local crag with some friends to go climbing. Already at the crag is a very large group part way through a climb/abseil session that is being run by an SPA holder. The group is being very loud, plus the session is being run on the best wall for climbing on. What would you do? (5)
Total out of (30) __

Page 30
Single Pitch Award – Self Appraisal ASPECT A-D ACTION A=Competent B=Can Do C=Can Do With Supervision D=It’s All New To Me
PERSONAL CLIMBING SKILLS Can you climb confidently, in rock shoes up to Severe 4a standard?
Do you demonstrate controlled dynamic movement on steep rock with style; making good use of available holds?
Is your gear up to date, organised and appropriate for the climbs undertaken?
Is your rope work and protection safe and efficient, making good use of appropriate modern equipment?
Can you construct indirect multiple anchors systems and take a safe stance appropriate to the selected climb?
Is your belaying safe and efficient?
Do you have a basic knowledge of safety chains and fall factors
Can you interpret guidebooks effectively, and choose routes suited to your personal ability?
ANCHORS Can you make safe use of spikes and threads, blocks and trees for protection and anchors?
A=Competent B=Can Do C=Can Do With Supervision D=It’s All New To Me Can you make safe use of nuts and camming devices for protection and anchors?
Can you make safe use of in-situ
Page 31
pegs, bolts and stakes for protection and anchors?
BELAYING A-D ACTION Can you connect yourself and others to the rope?
Can you demonstrate the use of direct and indirect belays?
Can you use a variety of different belay techniques/devices competently and choose the most appropriate fro a given situation?
Can you hold falls and perform lowers?
ABSEILING Can you abseil without the use of a safety rope?
Set up fixed and releasable abseils.
Can you use a variety of different friction techniques and devices competently and choose appropriately for a given situation?
Can you safeguard a personal abseil?
Can you lock off during an abseil, and then continue?
A=Competent B=Can Do C=Can Do With Supervision D=It’s All New To Me Can you solve common abseil problems such as tangled ropes, inadvertent locking, pendules etc. quickly and efficiently?
Choose an appropriate abseiling site with due regard to ease of take off; loose rock; impact on the environment and climbing resource.
Page 32
Can you demonstrate methods for safeguarding a novice abseiling?
GROUP MANAGEMENT AND ORGANISATION
Can you organise a day’s programme of activities to take place at 1/ a crag and 2/ an artificial climbing structure taking into account the abilities and objectives of the group taking part?
Are you aware of your responsibilities to any authorised organisation, parents, individual group members, the group as whole and other site users?
Do you have a strategy for group management and safety, and can this be applied in a variety of crag situations?
Can you select suitable climbs and locations, appropriate to particular teaching situations?
Can you teach effective communication and safety procedures?
Can you manage time appropriately in relation to the plan, activity and conditions?
Do you know how to call for expert help in the case of an accident or injury?
A=Competent B=Can Do C=Can Do With Supervision D=It’s All New To Me
SUPERVISING THE SESSION Can you issue appropriate rock climbing equipment and check correct fitting and use?
Can you deliver good technical instruction to individuals and the group including choice and fitting of harnesses; attaching the rope to the harness; effective use of chosen belay devices?
Can you solve common problems such as a stuck abseiler or climber?
Page 33
Are you able to introduce bouldering safely as a group activity?
CLIMBING WALL Are you familiar with the different types of indoor climbing walls, including their particular risks?
Can organise, structure and perform warm up routines and stretching exercises?
Are you knowledgeable about soft tissue injury, its prevention and treatment?
THE CLIMBING ENVIRONMENT Are you familiar with current access and conservation guidelines?
Can you interpret and use the access information given in guidebooks and other sources of information?
Are you knowledgeable about environmental issues; and do you have suitable strategies for minimising your and your group’s impact on the crag environment?
A=Competent B=Can Do C=Can Do With Supervision D=It’s All New To Me Are you aware of your responsibilities to the general public, environmental agencies, local residents, landowners, and the climbing community?
Can you operate a flexible programme of activities so at to accommodate other site users and minimise the hazards you may present to each other?
Are you aware of the history, traditions and ethics of UK rock climbing/
LOG BOOK EXPERIENCE Is the logbook completed?

Page 34
Have you led a minimum of 40 climbs, outdoors on leader placed protection on a variety of rock types?
Have you assisted with the supervision of climbing for approximately 20 sessions at a variety of locations (session = 1/2 day or evening)
FIRST AID Do you have a valid and appropriate first aid certificate?
YOU MAY FIND IT USEFUL TO REFER TO THE SPA HANDBOOK FOR A MORE DETAILED BREAKDOWN OF THE SYLLABUS.
IN THE ACTION COLUMN YOU MAY FIND IT USEFUL FOR FUTURE REFERENCE TO BE VERY SPECIFIC.
Page 35
Information Sources and Bibliography Environment and access • The Scottish mountaineer – Membership magazine for the MC of S • Summit – Membership magazine for the BMC • Magazines such as Climber, High Mountain and OTE • Local area rock climbing guide books • Local climbing walls and climbing clubs • Local instructors, guides and outdoor centres Helping handbooks • ‘Rock Climbing Essential Skills & Techniques’ - MLTUK • ‘The Mountain Skills Training Handbook’ – Pete Hill & Stuart Johnston • ‘The Handbook of Climbing’ – Allen Fyffe & Iain Peter • ‘Further Modern Rope Techniques’ – Nigel Shepherd Useful Text • ‘Classic Rock’ – Compiled by Ken Wilson • ‘ Welsh Rock’ – Trevor Jones & Geoff Milburn • All SMC Guidebooks which have a historical chapter at the start • ‘Scottish Hill & Mountain Names’ – Drummond • Any literature that has information on the history of climbing in the UK Useful website addresses Access • www.glenmorelodge.org.uk (a good source for local access info) • www.snh.org.uk • www.outdooraccess-scotland.com National Governing Bodies • www.mltuk.org (The mountain leader training board) • www.mountaineering-scotland.org.uk (McofS website) • www.thebmc.co.uk Weather Forcasts • www.met-office.gov.uk • www.the very useful uk weather page .co.uk (excellent synoptic charts) • www.mwis.co.uk (very good mountain forcast) Climbing Info • www.planetfear.com (check out Neil Gresham’s performance climbing) Useful Sites • www.aala.org.uk (Adventure activities licensing authority) • www.outdoor-learning.org.uk (Useful outdoor ed info)

Page 36
NOTES
Recommended


![workbook [SPA] by XIMES (en)](https://img.dokumen.tips/doc/110x75/568c344d1a28ab02358ff191/workbook-spa-by-ximes-en.jpg)