
Pulse Secure Virtual Traffic Manager and Microsoft Skype for Business 2015
Deployment Guide

Pulse Secure Virtual Traffic Manager and Microsoft Skype for Business 2015 Deployment Guide Page 2
Copyright 2017 Pulse Secure, LLC. All rights reserved. Pulse Secure and the Pulse Secure logo are registered trademarks of Pulse Secure, LLC. All trademarks, service marks, registered marks, or registered service marks are the property of their respective owners.
Notice: This document is for informational purposes only and does not set forth any warranty, expressed or implied, concerning any equipment, equipment feature, or service offered or to be offered by Pulse Secure. Pulse Secure assumes no responsibility for any inaccuracies in the document. Pulse Secure reserves the right to change, modify, transfer, or otherwise revise this publication without notice. This informational document describes features that may not be currently available.
Contact Pulse Secure for information on feature and product availability. Export of technical data contained in this document may require an export license from the United States government.
The authors and Pulse Secure, LLC. assume no liability or responsibility to any person or entity with respect to the accuracy of this document or any loss, cost, liability, or damages arising from the information contained herein or the computer programs that accompany it.
The product described by this document may contain open source software covered by the GNU General Public License or other open source license agreements. To find out which open source software is included in Pulse Secure products, view the licensing terms applicable to the open source software, and obtain a copy of the programming source code, please visit https://www.pulsesecure.net/techpubs/licensing/attribution.

Page 3 Pulse Secure Virtual Traffic Manager and Microsoft Skype for Business 2015 Deployment Guide
Contents
Preface ................................................................................................................................... 7
About This Guide................................................................................................................ 7
Audience ......................................................................................................................... 7
Contacting Pulse Secure.................................................................................................... 7
Internet ............................................................................................................................ 7
Technical Support........................................................................................................... 7
Professional Services ................................................................................................... 88
Document History ............................................................................................................... 8
Chapter 1: Solution Overview ................................................................................................ 8
Virtual Traffic Manager Overview ...................................................................................... 8
Performance ................................................................................................................... 9
Reliability and Scalability ................................................................................................ 9
Advanced Scripting and Application Intelligence ........................................................... 9
Application Acceleration ................................................................................................. 9
Application-Layer Security.............................................................................................. 9
Why Pulse Secure Virtual Traffic Manager in Microsoft Skype for Business 2015? ........ 9
Application-Centric View .......................................................................................... 1010
Designed with Service Providers in Mind..................................................................... 10
Designed for Services .................................................................................................. 10
What’s New in Microsoft Skype for Business 2015? ....................................................... 10
Enhanced Front End Architecture ................................................................................ 10
Improved Front End Server Patching and Upgrade Process ...................................... 10
Improved Front End Pool Cold Start Capability ....................................................... 1111
SQL Server AlwaysOn Support for On-Premises Servers .......................................... 11
Multifactor Authentication ............................................................................................. 11
Chapter 2: Microsoft Skype for Business 2015 Architecture .............................................. 12
Chapter 3: Deploying Pulse Secure Virtual Traffic Manager and Microsoft Skype for Business 2015 ..................................................................................................................... 13
Requirements ................................................................................................................... 13
Internal Virtual Traffic Manager Configuration ................................................................. 13
General Internal Virtual Traffic Manager Configuration ............................................... 13
Creating Monitors ...................................................................................................... 13
Creating Persistence Classes .................................................................................. 14
Pulse Secure Virtual Traffic Manager and Microsoft Skype for Business 2015 Deployment Guide Page 4
Front End Service Configuration .................................................................................. 14
Traffic IP Groups Needed ......................................................................................... 15
Skype for Business Front End Pool .......................................................................... 15
Front End Pool Table of Services ............................................................................. 17
Creating the Front End Pool Virtual Servers ............................................................ 18
About the Skype for Business Edge Pool .................................................................... 19
Skype for Business Edge Internal Interface Service Configuration............................. 19
Creating a Traffic IP Group for the Edge Internal Interface Pool ............................. 20
Skype for Business Edge Internal Interface Pools ................................................... 20
Attaching the Session Persistence Class to a Pool ................................................. 21
Skype for Business Edge Internal Interface Service Table ...................................... 22
Internal Virtual Traffic Manager Configuration Summary ............................................ 22
External Virtual Traffic Manager Configuration ........................................................... 2424
General External Virtual Traffic Manager Configuration .............................................. 24
Creating Monitors ...................................................................................................... 24
Creating Persistence Classes .................................................................................. 24
Reverse Proxy Service Configuration .......................................................................... 25
Creating a Traffic IP Group for the Reverse Proxy Service Pool ............................. 26
Skype for Business Reverse Proxy Service Pools ................................................... 26
Attaching the Session Persistence Class to a Pool ................................................. 27
Skype for Business Reverse Proxy Service Configuration Table ........................ 2828
Creating the Reverse Proxy Service Virtual Servers ............................................... 28
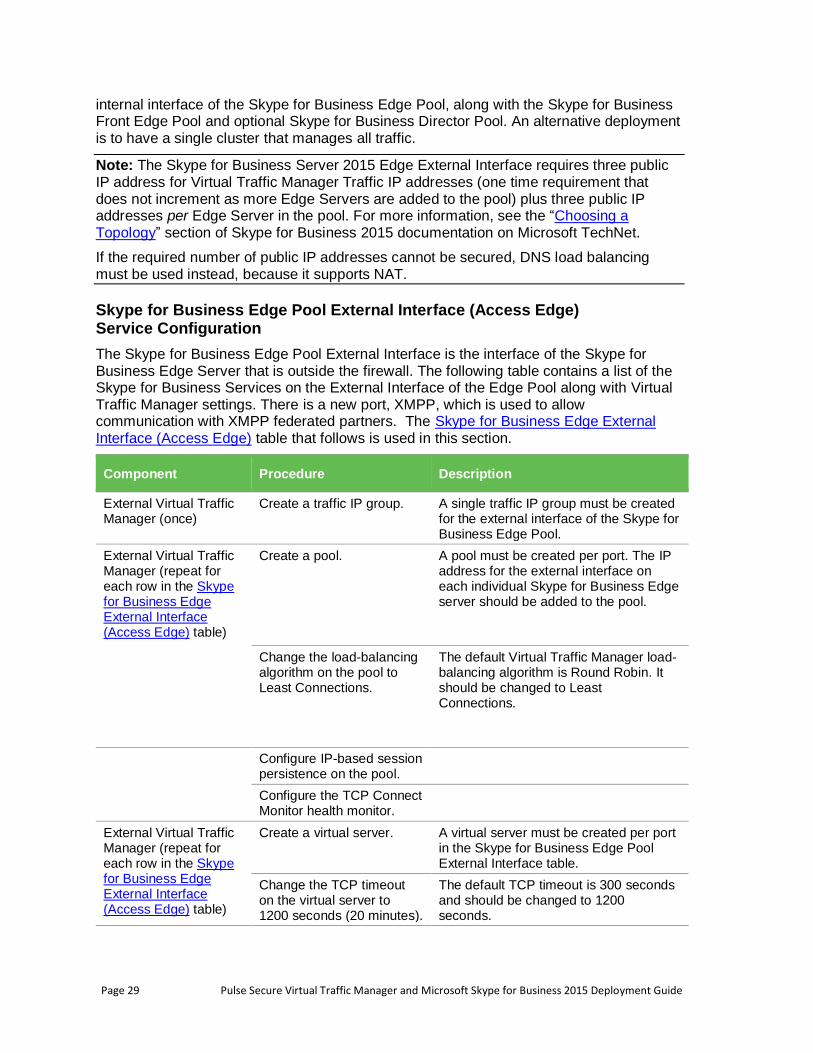
About Skype for Business Edge Pool External Interface (Access Edge) .................... 28
Skype for Business Edge Pool External Interface (Access Edge) Service Configuration ............................................................................................................ 2929
Creating a Traffic IP Group for the Skype for Business Edge Pool External Interface (Access Edge) Pool .............................................................................................. 3030
Skype for Business Edge Pool External Interface (Access Edge) Pools ................ 30
Attaching the Session Persistence Class to a Pool ............................................. 3131
Skype for Business Edge External Interface (Access Edge) Table ......................... 31
Creating the Skype for Business Edge External Interface (Access Edge) Virtual Servers ...................................................................................................................... 32
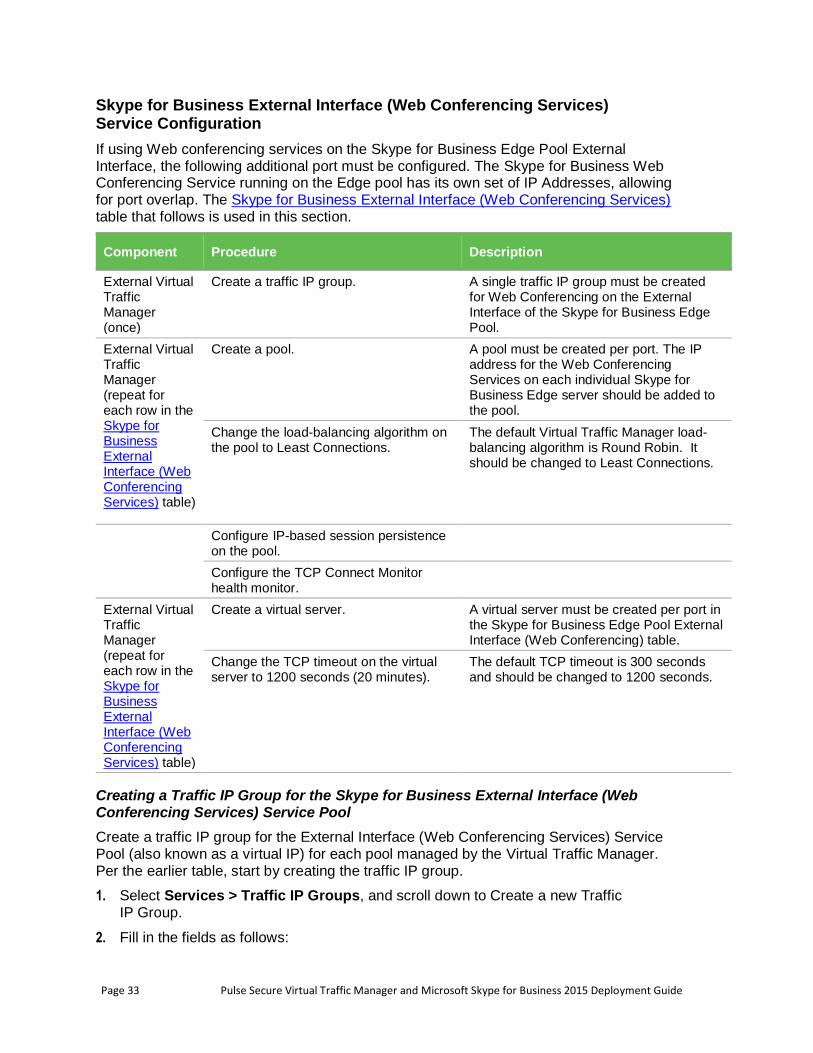
Skype for Business External Interface (Web Conferencing Services) Service Configuration ............................................................................................................ 3333
Creating a Traffic IP Group for the Skype for Business External Interface (Web Conferencing Services) Service Pool ....................................................................... 33
Page 5 Pulse Secure Virtual Traffic Manager and Microsoft Skype for Business 2015 Deployment Guide
Skype for Business External Interface (Web Conferencing Services) Service Pools................................................................................................................................... 34
Attaching the Session Persistence Class to a Pool ............................................. 3535
Skype for Business External Interface (Web Conferencing Services) Table .......... 35
Creating the Skype for Business Edge External Interface (Web Conferencing Services) Virtual Servers .......................................................................................... 35
Skype for Business External Interface (A/V Services) Service Configuration ........ 3636
Creating a Traffic IP Group for the Skype for Business External Interface (A/V Services) Service Pool .............................................................................................. 37
Skype for Business External Interface (A/V Services) Service Pools...................... 37
Skype for Business External Interface (A/V Services) Load Balancing ................... 37
Attaching the Session Persistence Class to a Pool ................................................. 38
Skype for Business External Interface (A/V Services) Table ................................... 38
Creating Skype for Business External Interface (A/V Services) Virtual Servers ..... 39
Skype for Business Director Pool Service Configuration ............................................ 39
Skype for Business Director Traffic IP Group .......................................................... 40
Skype for Business Director Pool ............................................................................. 40
Skype for Business Director Pool Table of Services ................................................ 41
Creating Skype for Business Director Pool Virtual Servers ..................................... 41
External Virtual Traffic Manager Configuration Summary ........................................... 42
Configuring SSL Decryption and Encryption ............................................................... 4343
Importing the Certificate ............................................................................................... 43
Enabling SSL Decryption on the Virtual Server ........................................................... 43
Enabling SSL Encryption on the Pool .......................................................................... 43
DNS Load Balancing ........................................................................................................ 43
Chapter 4: Configuring the Office Web Apps Server for Virtual Traffic Manager ............... 44
Creating a Traffic IP Group for Office Web Apps 2013 ................................................... 44
Creating a Pool That Contains Office Web Apps Servers ............................................... 45
Configuring Session Persistence for the Office Web Apps Pool..................................... 45
Creating a Virtual Server That Listens to the Office Web Apps Traffic IP Group ........... 45
Configuring SSL Decryption for SSL Offload................................................................... 46
Importing the Certificate ........................................................................................... 4646
Enabling SSL Decryption on the Virtual Server ........................................................... 46
Chapter 5: Using Virtual Traffic Manager to Enhance a Microsoft Skype for Business 2015 Deployment ................................................................................................................. 46
Service Level Monitoring .............................................................................................. 4747
Pulse Secure Virtual Traffic Manager and Microsoft Skype for Business 2015 Deployment Guide Page 6
Global Load Balancing ................................................................................................. 4747
Skype for Business Web Client Supported Web Browsers ............................................. 48
Configuring Clustering for Virtual Traffic Manager .......................................................... 48
Chapter 6: WAF ................................................................................................................... 49
Chapter 7: Common Troubleshooting Tips ......................................................................... 50
Common Deployment Issues ........................................................................................... 50
Check DNS Entries....................................................................................................... 50
Certificates .................................................................................................................... 50
Importing Certificates into Virtual Traffic Manager ...................................................... 51
Clients Are Connecting Directly to Skype for Business Servers ................................. 51
Virtual Traffic Manager Shows Some Pools as Error .................................................. 51
Other Troubleshooting Tips ............................................................................................. 52
Checking Connections to Virtual Traffic Manager ....................................................... 52
Session Persistence Error When Configuring a Persistence Class ............................ 53
Address in Use Error When Adding a Pool .................................................................. 53
Diagnose Tab in Virtual Traffic Manager ..................................................................... 54
Chapter 8: Conclusion ......................................................................................................... 54
Appendix A: Microsoft TechNet Resources ........................................................................ 55
Page 7 Pulse Secure Virtual Traffic Manager and Microsoft Skype for Business 2015 Deployment Guide
Preface
Welcome to the Pulse Secure Virtual Traffic Manager and Microsoft Skype for Business 2015 Deployment Guide. Read this preface for an overview of the information provided in this guide and for contact information. This preface includes the following sections:
• About This Guide
• Contacting
About This Guide
This guide describes how to configure Virtual Traffic Manager to load-balance and optimize Microsoft Skype for Business 2015. It includes information relevant to the following products:
• Pulse Secure Virtual Traffic Manager
• Microsoft Skype for Business 2015
Audience
This guide is written for network administrators, Microsoft Skype for Business administrators, and developer-operations (DevOps) professionals familiar with administering and managing both application delivery controllers (ADCs) and Microsoft Skype for Business.
You should also be familiar with:
• Microsoft Skype for Business 2015 Port Requirements for both Front End and Edge Pools.
• Microsoft Skype for Business 2015 Load Balancing Requirements for both Front End and Edge Pools.
• Installing and configuring a virtual appliance in VMware, Microsoft Hyper-V, or dedicated Linux environments.
For more details on the Pulse Secure vADC product family, see http://www.pulsesecure.net/vadc.
Contacting Pulse Secure
This section describes how to contact departments within Pulse Secure.
Internet
You can learn about Pulse Secure products through the company website: http://www.pulsesecure.net/.
Technical Support
If you have problems installing, using, or replacing Pulse Secure products, contact Pulse Secure Support or your channel partner who provides support. To contact Pulse Secure Support, see https://www.pulsesecure.net/support.
Pulse Secure Virtual Traffic Manager and Microsoft Skype for Business 2015 Deployment Guide Page 8
Professional Services
Pulse Secure Global Services has the expertise to help organizations build scalable and efficient cloud infrastructures. Leveraging 15 years of expertise in storage, networking, and virtualization, Pulse Secure Global Services delivers world- class professional services, technical support, and education services, enabling organizations to maximize their Pulse Secure investments, accelerate new technology deployments, and optimize the performance of networking infrastructures.
Document History
Date Description Version
Jan 2016 Re-branded from Riverbed document 1
Jan 2017 Added Web Accelerator & WAF contents
2
Chapter 1: Solution Overview
This chapter describes how Pulse Secure Virtual Traffic Manager provides advanced load balancing and application delivery controller (ADC) features for Microsoft Skype for Business 2015, the factors that you need to consider when designing your Virtual Traffic Manager deployment, and how and when to implement the most commonly used features.
This chapter includes the following sections:
• Virtual Traffic Manager Overview
• Why Pulse Secure Virtual Traffic Manager in Microsoft Skype for Business 2015?
• What’s New in Microsoft Skype for Business 2015?
Virtual Traffic Manager Overview
Pulse Secure Virtual Traffic Manager (vTM) is a software-based application delivery controller (ADC) that is designed to deliver faster and more reliable access to public websites and private applications. vTM frees applications from the constraints of legacy, proprietary, hardware-based load balancers, which enables them to run in any physical, virtual, or cloud environment. With vADC products from Pulse Secure, organizations can:
• Make applications more reliable with local and global load balancing.
• Scale application servers by up to 3x by offloading TCP and SSL connection overhead.
• Accelerate applications by up to 4x by using web content optimization (WCO).
• Secure applications from the latest application attacks, including SQL injection, XSS, and CSRF.
Page 9 Pulse Secure Virtual Traffic Manager and Microsoft Skype for Business 2015 Deployment Guide
• Control applications effectively with built-in application intelligence and a full-featured scripting engine.
Virtual Traffic Manager offers much more than basic load balancing. It controls and optimizes end-user services by inspecting, transforming, prioritizing, and routing application traffic. The powerful TrafficScript® engine facilitates the implementation of traffic management policies that are unique to an application by allowing organizations to build custom functionality or leverage existing features in Virtual Traffic Manager in a specialized way. With vTM, organizations can deliver the following.
Performance
Improve application performance for users by offloading encryption and compression from the web server by dynamic caching and by reducing the number of TCP sessions on the application.
Reliability and Scalability
Increase application reliability by load-balancing traffic across web and application servers, balancing load across multiple data centers (private or public clouds), monitoring the response time of servers in real-time to decide the fastest way to deliver a service, protecting against traffic surges, and managing the bandwidth and rate of requests used by different classes of traffic.
Advanced Scripting and Application Intelligence
Manage application delivery more easily with fine-grained control of users and services that use TrafficScript, an easy-to-use scripting language that can parse any user transaction and take specific, real-time action based on user, application, request, or other criteria. Development teams use TrafficScript to enable a point of control in distributed applications, and operations teams use it to quickly respond to changing business requirements or problems within an application before developers can fix it.
Application Acceleration
Dramatically accelerate web-based applications and websites in real-time with optional web content optimization (WCO) functionality. WCO dynamically groups activities for fewer long-distance round trips, resamples and uses image sprites to reduce bandwidth, and minifies JavaScript and combines style sheets to give the best possible response time for loading a web page on any browser or device.
Application-Layer Security
Enhance application security by filtering errors in web requests and protecting against external threats, with the option of a comprehensive Layer 7 firewall to defend against deliberate attacks.
Why Pulse Secure Virtual Traffic Manager in Microsoft Skype for Business 2015?
Virtual Traffic Manager has significant advantages over other ADCs for load-balancing and optimizing Microsoft Skype for Business 2015.
Pulse Secure Virtual Traffic Manager and Microsoft Skype for Business 2015 Deployment Guide Page 10
Application-Centric View
• Ability to deploy a separate ADC per application or tenant
• Ability to dynamically right-size the vTM deployment to fit the application needs
• Dynamic provisioning and scaling of ADC resources
Designed with Service Providers in Mind
• A 64-bit software design that can be deployed in a VMware or Hyper-V environment or as a dedicated software installation, instead of as a physical appliance
• Multicore packet processing for scalability
• Robust APIs for simple automated provisioning and management
Designed for Services
• Global load balancing, SSL offload, caching, service level management capabilities
• Application firewalling and web content optimization
• Robust and open APIs
What’s New in Microsoft Skype for Business 2015?
There are many new features and significant enhancements introduced in Microsoft Skype for Business 2015. The following is a list of notable changes in Microsoft Skype for Business 2015.
Enhanced Front End Architecture
The Enterprise Edition Front End Pool has shifted to a distributed systems architecture; real-time data is now stored on the Front End Pool. One Front End Server acts as the master for each user’s information, and two other Front End Servers serve as replicas. When the master Front End Server goes down, one of the replicas is automatically promoted to master. You can use only two Front End Servers, but Microsoft recommends including at least three Enterprise Edition Front End Servers in a Front End Pool. This deployment guide will take into consideration the new recommendation of Microsoft.
Improved Front End Server Patching and Upgrade Process
Skype for Business Server introduces two new cmdlets that help make upgrading or
patching Front End Servers much easier than in previous versions of Skype for Business
Server. When you need to apply a patch or perform any other maintenance to a Front End
Server, simply type Invoke-CsComputerFailOver and specify that server’s name. Skype
for Business Server moves that server’s workload temporarily to the other servers in the
pool. You can then perform the maintenance, and then use the Invoke-
CsComputerFailback cmdlet to bring that server back into service. If you need to patch
each server in a pool, simply follow this procedure for each server, one at a time. These
new cmdlets enable you to patch servers much more quickly than in previous versions,
with more reliability, and with a simpler workflow.
Page 11 Pulse Secure Virtual Traffic Manager and Microsoft Skype for Business 2015 Deployment Guide
Improved Front End Pool Cold Start Capability
Skype for Business Server introduces a new cmdlet that simplifies and improves the
process of cold-starting an entire Front End Pool. When you use the new Start-
CsPool cmdlet, it checks prerequisites for all Front End Servers in the pool and then
attempts to start each server. If it encounters problems, it diagnoses them and alerts you
with details and workarounds. In some cases, it enables you to start the pool even if some
individual servers are unable to start.
SQL Server AlwaysOn Support for On-Premises Servers
Skype for Business Server 2015 adds support for both SQL Server AlwaysOn Availability
Groups and SQL Server AlwaysOn Failover Cluster Instances. In addition to these
features, Skype for Business Server continues support for database mirroring and SQL
Server clustering, as in past versions of Skype for Business Server.
SQL Server AlwaysOn Availability Groups is a high availability and disaster recovery
solution in SQL Server 2012 and SQL Server 2014 that provides an alternative to
database mirroring. An availability group supports a failover environment for a discrete set
of databases (known as availability databases) that fail over together. An availability group
supports a set of read-write primary databases and one to four sets of corresponding
secondary databases. Optionally, secondary databases can be made available for read-
only access and for some backup operations.
For more information, see the Plan for high availability and disaster recovery in Skype for
Business Server 2015.
Multifactor Authentication
Multifactor authentication is a method of authentication that requires the use of more than one verification method and adds a critical second layer of security to user sign-ins and transactions. For example, requiring a user name and password, as well as a certificate. Skype for Business Server 2015 continues to build on the multifactor authentication features available in the Skype for Business Server 2013 Cumulative Updates. The significant changes in multifactor authentication are:
• Use of the Office 2013 SP1 Active Directory Authentication Library for integration with Exchange and SharePoint.
• Support for the multifactor authentication feature in the Skype for Business Web App client.
• With Skype for Business multifactor authentication, it is now possible to provide different authentication options based on geography.
For a complete list of the changes, refer to https://technet.microsoft.com/en-us/library/dn933785.aspx.
Pulse Secure Virtual Traffic Manager and Microsoft Skype for Business 2015 Deployment Guide Page 12
Chapter 2: Microsoft Skype for Business 2015 Architecture
This section describes the recommended deployment topology for the Virtual Traffic Manager placement in the Skype for Business architecture.
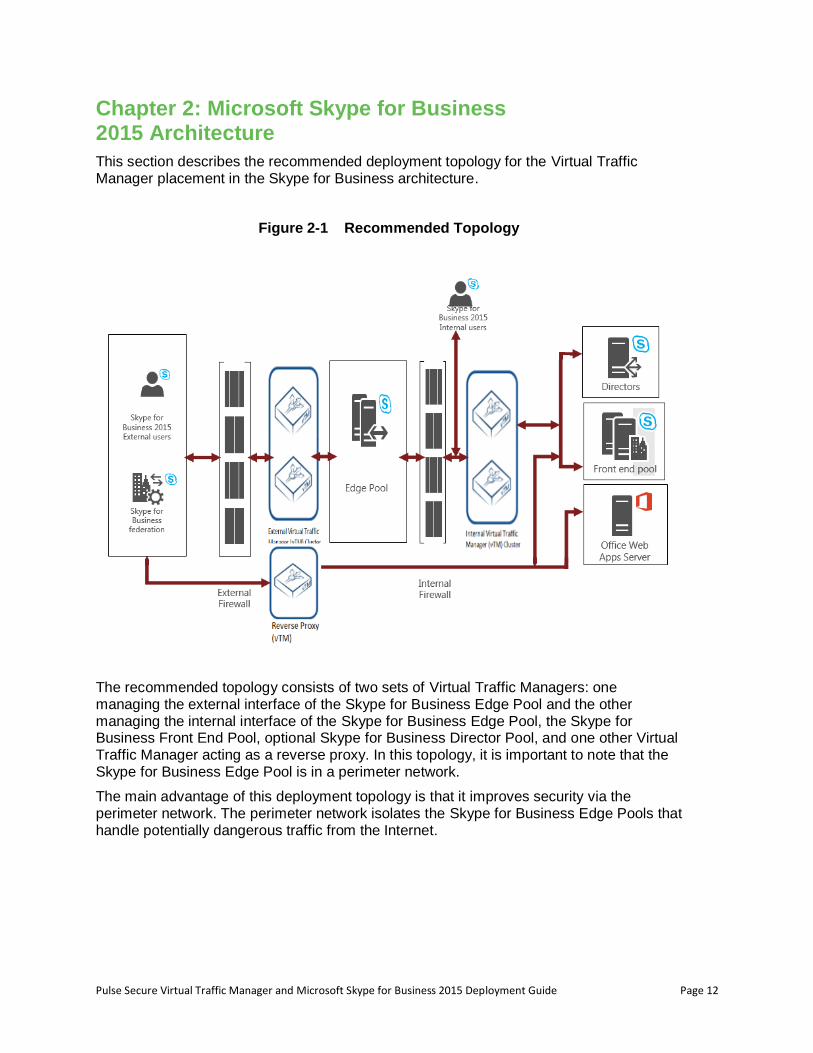
Figure 2-1 Recommended Topology
The recommended topology consists of two sets of Virtual Traffic Managers: one managing the external interface of the Skype for Business Edge Pool and the other managing the internal interface of the Skype for Business Edge Pool, the Skype for Business Front End Pool, optional Skype for Business Director Pool, and one other Virtual Traffic Manager acting as a reverse proxy. In this topology, it is important to note that the Skype for Business Edge Pool is in a perimeter network.
The main advantage of this deployment topology is that it improves security via the perimeter network. The perimeter network isolates the Skype for Business Edge Pools that handle potentially dangerous traffic from the Internet.
Page 13 Pulse Secure Virtual Traffic Manager and Microsoft Skype for Business 2015 Deployment Guide
Chapter 3: Deploying Pulse Secure Virtual Traffic Manager and Microsoft Skype for Business 2015
This chapter describes the procedures for deploying vTM for load-balancing and optimizing Microsoft Skype for Business 2015 servers. It includes the following sections:
• Requirements
• Internal Virtual Traffic Manager Configuration
• External Virtual Traffic Manager Configuration
• Configuring SSL Decryption and Encryption
• DNS Load Balancing
Requirements
• Pulse Secure Virtual Traffic Manager (10.1 or later)
• Microsoft Skype for Business 2015 Server Software
• IP address information for all Skype for Business Hosts and VIPs
Internal Virtual Traffic Manager Configuration
The following sections highlight the IP groups, pools, and VIPs that need to be created on the internal pair of clustered Virtual Traffic Managers.
General Internal Virtual Traffic Manager Configuration
First we must perform some general configuration to leverage during the configuration. Let’s start with the connection monitor.
Two different types of health monitors must be created for Skype for Business. The following sections detail the steps to create these health monitors.
Creating Monitors
Creating a TCP Connect Monitor
The basic TCP Connect monitor is used by most Skype for Business services.
1. Select Catalogs > Monitors.
2. Scroll down to Create new monitor.
3. Enter a Name for the new monitor. Set the Type to TCP Connect monitor and the Scope to Node.
4. Click Create Monitor.
Creating an HTTP Monitor
The HTTP monitor is used for port 8080 on the Skype for Business Front End Pool.
1. Select Catalogs > Monitors.
2. Scroll down to Create new monitor.
Pulse Secure Virtual Traffic Manager and Microsoft Skype for Business 2015 Deployment Guide Page 14
3. Enter a Name for the new monitor. Set the Type to HTTP and the Scope to Node.
4. Click Create Monitor.
5. In the subsequent configuration page, scroll down and change the Path to /Autodiscover/AutodiscoverService.svc/root.
6. Change body_regex to ″.*″
Creating Persistence Classes
Creating an IP-Based Persistence Class
A persistence class should be created for each desired persistence type and subnet. If you try to apply the same persistence class to different nodes on different subnets, an error occurs.
1. Select Catalogs > Persistence.
2. Scroll down and create a new session persistence class.
3. Enter a Name for the new persistence class (ideally include type and subnet, e.g., IP Based Persistence – 10.255.74.x).
4. Click Create Class.
5. Scroll down to Basic Settings.
6. Set the type to IP Based Persistence.
7. Click Update.
Front End Service Configuration
Each element that must be created for the Front End Pool is detailed in the following table.
Component Procedure Description
Internal Virtual Traffic Manager (once)
Create a traffic IP group. A single traffic IP group must be created to front the Skype for Business Front End Pool. This includes the internal VIP for the Front End Pool.
Internal Virtual Traffic Manager (repeat for each row in the Skype for Business Front End Pool table)
Create a pool. A pool must be created per port, 16 pools in total. The IP address of each individual Skype for Business Front End server should be added to the pool.
Change the load-balancing algorithm on the pool to Least Connections.
The default Virtual Traffic Manager load-balancing algorithm is Round Robin. It should be changed to Least Connections.
Configure IP-based session persistence on the pool.
Configure the TCP Connect Monitor health monitor.
Page 15 Pulse Secure Virtual Traffic Manager and Microsoft Skype for Business 2015 Deployment Guide
Component Procedure Description
Internal Virtual Traffic Manager (repeat for each row in the Skype for Business Front End Pool table)
Create a virtual server. A virtual server must be created per port in the Skype for Business Front End Pool table.
Change the TCP timeout on the virtual server to 1200 seconds (20 minutes).
The default TCP timeout is 300 seconds and should be changed to 1200 seconds.
Note: If retaining Lync 2010 servers and using port 8080, configure transparent session affinity instead of IP-based session persistence.
Traffic IP Groups Needed
For Skype for Business 2015, up to six unique traffic IP groups must be created, including:
• Front End Pool
• Director Pool
• Edge Pool: Internal Interface
• Edge Pool: External Interface
• Edge Pool: A/V Service
• Edge Pool: Web Conferencing Service
Creating a Traffic IP Group for the Front End Pool
Create a traffic IP group for the Front End Pool (also known as a virtual IP) for each pool managed by the Virtual Traffic Manager. Per the previous table, start by creating the traffic IP group:
1. Select Services > Traffic IP Groups, scroll down to Create a new Traffic IP Group, and fill in the fields as follows:
• Name: A descriptive name for the traffic IP group (e.g., sfb-fe-pool.company.com for the Front End Pool)
• IP Addresses: A list of IP addresses separated by commas
• IP Mode: How IP addresses are raised on the Virtual Traffic Managers
2. Click Create IP Traffic Group.
Skype for Business Front End Pool
Next create the Front End Pool. The Front End Pool manages many Skype for Business services and, as a result, uses many ports. The Skype for Business Front End Pool table that follows is used in this section. A pool must be created for each service/port managed by the Virtual Traffic Manager.
To create a new Pool:
1. Select Services > Pools, and scroll down to Create a new Pool.
2. Fill in the fields as follows:
Pulse Secure Virtual Traffic Manager and Microsoft Skype for Business 2015 Deployment Guide Page 16
• Pool Name: A descriptive name for the pool.
• Nodes: hostname (or IP address):port for each of the actual back-end nodes. The port is listed in the first column of the previous configuration tables. Multiple nodes can be entered with a space between them.
• Monitor: Set to TCP Connect Monitor (or for optional HTTP 8080, choose the custom HTTP monitor).
3. Repeat for each pool needed, for each port in the table that follows.
Once the pool is created, change the load-balancing algorithm for that pool. The default Virtual Traffic Manager load-balancing algorithm is Round Robin. All Skype for Business services require the load-balancing algorithm to be Least Connections.
1. Scroll down, click Load Balancing, and click Edit.
2. Set the loading-balancing algorithm to Least Connections.
3. Scroll down and click Session Persistence.
4. Choose the appropriate session persistence class based on the table.
Note: Multiple persistence classes may be created for pools that have differing nodes routing to different IP addresses. For example, the Edge External Access Edge Pools, Edge External Web Conferencing Services Pools, and the Edge External A/V Services Pools are all hosted on the same Virtual Traffic Manager and use IP-based persistence but route to different nodes. In this case, create three IP-based persistence classes, one for each, and use the corresponding persistence class for each. Attempting to assign only one IP-based persistence class is not allowed.
The following table contains a list of the Skype for Business Services on the Front End Pool along with the necessary Virtual Traffic Manager settings. You must create a pool for each port, with all nodes added to it (16 pools in total).
Page 17 Pulse Secure Virtual Traffic Manager and Microsoft Skype for Business 2015 Deployment Guide
Front End Pool Table of Services
Port Protocol Load Balancing
Persistence Health Monitor
IP Transparency
Notes
80 HTTP Least Connections
IP-based persistence
TCP Connect Monitor
No (Optional) Only used when port 443 is not used
135 Generic Client First
Least Connections
IP-based persistence
TCP Connect Monitor
No Required for Address Book
443 SSL (HTTPS)
Least Connections
IP-based persistence
TCP Connect Monitor
No Communication with web farm
444 SSL (HTTPS)
Least Connections
IP-based persistence
TCP Connect Monitor
No Communication with Focus
448 Generic Client First
Least Connections
IP-based persistence
TCP Connect Monitor
No (Optional) If using Call admission control
5061 SSL (Other)
Least Connections
IP-based persistence
TCP Connect Monitor
No SIP/TLS
5067 SSL (Other)
Least Connections
IP-based persistence
TCP Connect Monitor
No (Optional) If using collocated or standalone Mediation Pool
5068 Generic Client First
Least Connections
IP-based persistence
TCP Connect Monitor
No (Optional) If using collocated or standalone Mediation Pool
5070 Generic Client First
Least Connections
IP-based persistence
TCP Connect Monitor
No (Optional) If using collocated or standalone Mediation Pool
5071 Generic Client First
Least Connections
IP-based persistence
TCP Connect Monitor
No Response Group Application
5072 Generic Client First
Least Connections
IP-based persistence
TCP Connect Monitor
No (Optional) If using Microsoft Skype for Business 2015 Attendant

Pulse Secure Virtual Traffic Manager and Microsoft Skype for Business 2015 Deployment Guide Page 18
Port Protocol Load Balancing
Persistence Health Monitor
IP Transparency
Notes
5073 Generic Client First
Least Connections
IP-based persistence
TCP Connect Monitor
No (Optional) If using Skype for Business Server Conferencing Announcement service
5075 Generic Client First
Least Connections
IP-based persistence
TCP Connect Monitor
No Call Park application
5076 Generic Client First
Least Connections
IP-based persistence
TCP Connect Monitor
No Audio Test Service
5080 Generic Client First
Least Connections
IP-based persistence
TCP Connect Monitor
No Call admission control for A/V Edge TURN traffic
8080 HTTP Least Connections
IP-based persistence
or
Transparent session affinity (if deployment has Lync 2010 servers)
HTTP Monitor
No (Optional) Used by web components for external access.
Requires configuring SSL decryption and encryption if using transparent session affinity
Creating the Front End Pool Virtual Servers
Each pool must be associated with a virtual server. Up to 16 virtual servers (one to match each pool created in the previous section). To create a new virtual server:
1. Select Services > Virtual Servers, and scroll down to Create a new Virtual Server.
2. Fill in the fields as follows:
• Virtual Server Name: A descriptive name for the virtual server.
• Protocol: Listed in the second column of the previous configuration table.
• Port: Listed in the first column of the previous configuration table. This port matches the port configured in the corresponding pool.
• Traffic Pool: Select the pool created in the previous section that matches the port for this VIP.
3. Set Enabled to Yes.
4. Click the Update button to apply changes.
Page 19 Pulse Secure Virtual Traffic Manager and Microsoft Skype for Business 2015 Deployment Guide
The default Virtual Traffic Manager TCP timeout is 300 seconds (5 minutes). All Skype for Business TCP services require a TCP timeout of 1200 seconds (20 minutes).
1. Scroll down, select Connection Management, and click Edit.
2. Under Timeout Settings, change the timeout to 1200, and click Update.
About the Skype for Business Edge Pool
The Skype for Business Edge Pool allows users outside the corporate firewall to securely access Skype for Business without having to go through a VPN. The Skype for Business Edge Pool has two sets of interfaces: an external interface to communicate with external users and an internal interface to communicate with the Skype for Business Front End Pool.
In this topology, there are two sets of Virtual Traffic Manager clusters, one managing the external interface of the Skype for Business Edge Pool and the other managing the internal interface of the Skype for Business Edge Pool, along with the Skype for Business Front Edge Pool and optional Skype for Business Director Pool. An alternative deployment is to have a single cluster that manages all traffic.
Skype for Business Edge Internal Interface Service Configuration
The Skype for Business Edge Internal Interface is the interface of the Skype for Business Edge Server that is inside the firewall. The configuration for the internal interface of the Skype for Business Edge Pool is done on the Internal Virtual Traffic Manager.The Skype for Business Edge Internal Interface table that follows is used in this section.
Pulse Secure Virtual Traffic Manager and Microsoft Skype for Business 2015 Deployment Guide Page 20
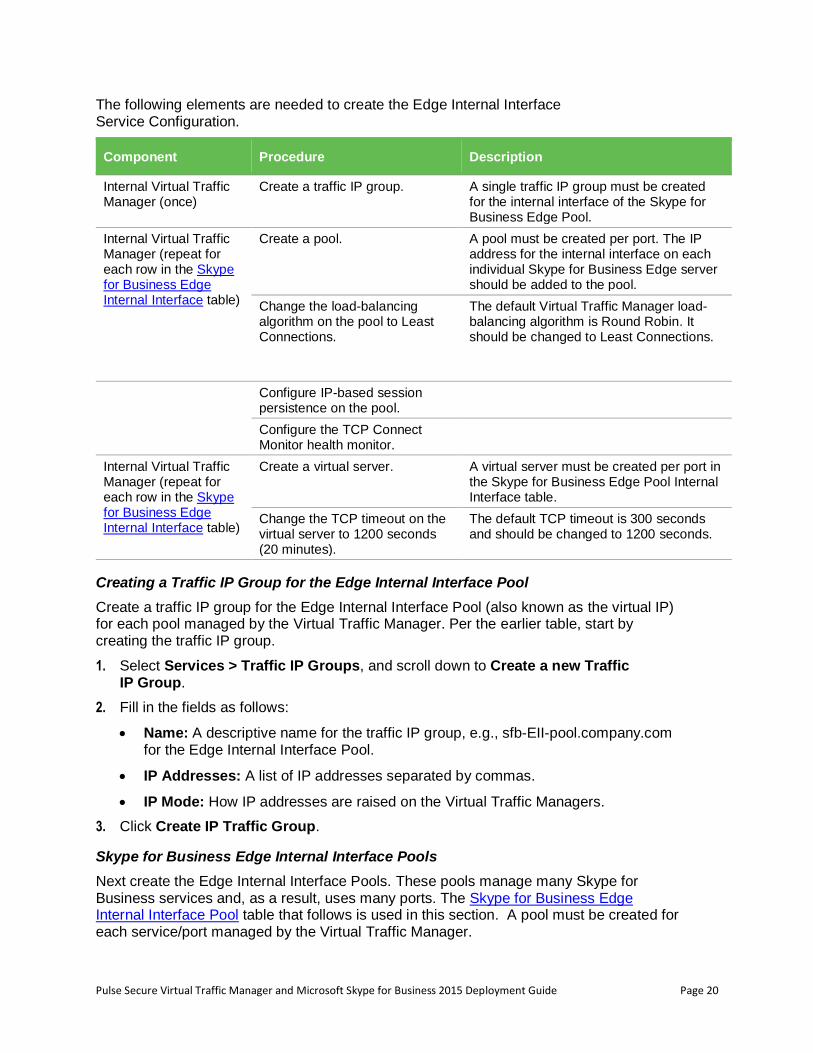
The following elements are needed to create the Edge Internal Interface Service Configuration.
Component Procedure Description
Internal Virtual Traffic Manager (once)
Create a traffic IP group. A single traffic IP group must be created for the internal interface of the Skype for Business Edge Pool.
Internal Virtual Traffic Manager (repeat for each row in the Skype for Business Edge Internal Interface table)
Create a pool. A pool must be created per port. The IP address for the internal interface on each individual Skype for Business Edge server should be added to the pool.
Change the load-balancing algorithm on the pool to Least Connections.
The default Virtual Traffic Manager load-balancing algorithm is Round Robin. It should be changed to Least Connections.
Configure IP-based session persistence on the pool.
Configure the TCP Connect Monitor health monitor.
Internal Virtual Traffic Manager (repeat for each row in the Skype for Business Edge Internal Interface table)
Create a virtual server. A virtual server must be created per port in the Skype for Business Edge Pool Internal Interface table.
Change the TCP timeout on the virtual server to 1200 seconds (20 minutes).
The default TCP timeout is 300 seconds and should be changed to 1200 seconds.
Creating a Traffic IP Group for the Edge Internal Interface Pool
Create a traffic IP group for the Edge Internal Interface Pool (also known as the virtual IP) for each pool managed by the Virtual Traffic Manager. Per the earlier table, start by creating the traffic IP group.
1. Select Services > Traffic IP Groups, and scroll down to Create a new Traffic IP Group.
2. Fill in the fields as follows:
• Name: A descriptive name for the traffic IP group, e.g., sfb-EII-pool.company.com for the Edge Internal Interface Pool.
• IP Addresses: A list of IP addresses separated by commas.
• IP Mode: How IP addresses are raised on the Virtual Traffic Managers.
3. Click Create IP Traffic Group.
Skype for Business Edge Internal Interface Pools
Next create the Edge Internal Interface Pools. These pools manage many Skype for Business services and, as a result, uses many ports. The Skype for Business Edge Internal Interface Pool table that follows is used in this section. A pool must be created for each service/port managed by the Virtual Traffic Manager.
Page 21 Pulse Secure Virtual Traffic Manager and Microsoft Skype for Business 2015 Deployment Guide
To create a new pool:
1. Select Services > Pools, and scroll down to Create a new Pool.
2. Fill in the fields as follows:
• Pool Name: A descriptive name for the pool.
• Nodes: hostname (or IP address):port for each of the actual back-end nodes. The port is listed in the first column of the configuration tables above. Multiple nodes can be entered with a space between them.
• Monitor: Set to TCP Connect Monitor (or for optional HTTP 8080, choose the custom HTTP monitor).
3. Repeat for each pool needed, for each port in the table that follows.
Once a pool is created, change the load-balancing algorithm for that pool. The default Virtual Traffic Manager load-balancing algorithm is Round Robin. All Skype for Business services require the load-balancing algorithm to be Least Connections.
1. Scroll down, click Load Balancing, and click Edit.
2. Set the loading-balancing algorithm to Least Connections, and click Update.
3. Scroll down and click Session Persistence.
4. Choose the appropriate session persistence class based on the table, and click Update.
Note: Multiple persistence classes may be created for pools that have differing nodes routing to different IP addresses. For example, the Edge External Access Edge Pools, Edge External Web Conferencing Services Pools, and the Edge External A/V Services Pools are all hosted on the same Virtual Traffic Manager and use IP-based persistence but route to different nodes. In this case, create three IP-based persistence classes, one for each, and use the corresponding persistence class for each. Attempting to assign only one IP-based persistence class is not allowed.
If you need to create additional persistence classes based on the note above, perform the following steps:
1. Select Catalogs > Persistence.
2. Scroll down and create a new session persistence class.
3. Set the type according to the entry in the configuration table.
Attaching the Session Persistence Class to a Pool
1. Select Services > Pools, and select the pool that the monitor will be attached to.
2. Scroll down and click Session Persistence.
3. Choose the appropriate session persistence class.
The table below contains a list of the Skype for Business Services on the Internal Interface of the Edge Pool along with the Virtual Traffic Manager settings. You must create a pool for each port, with all nodes added to it (6 pools in total).
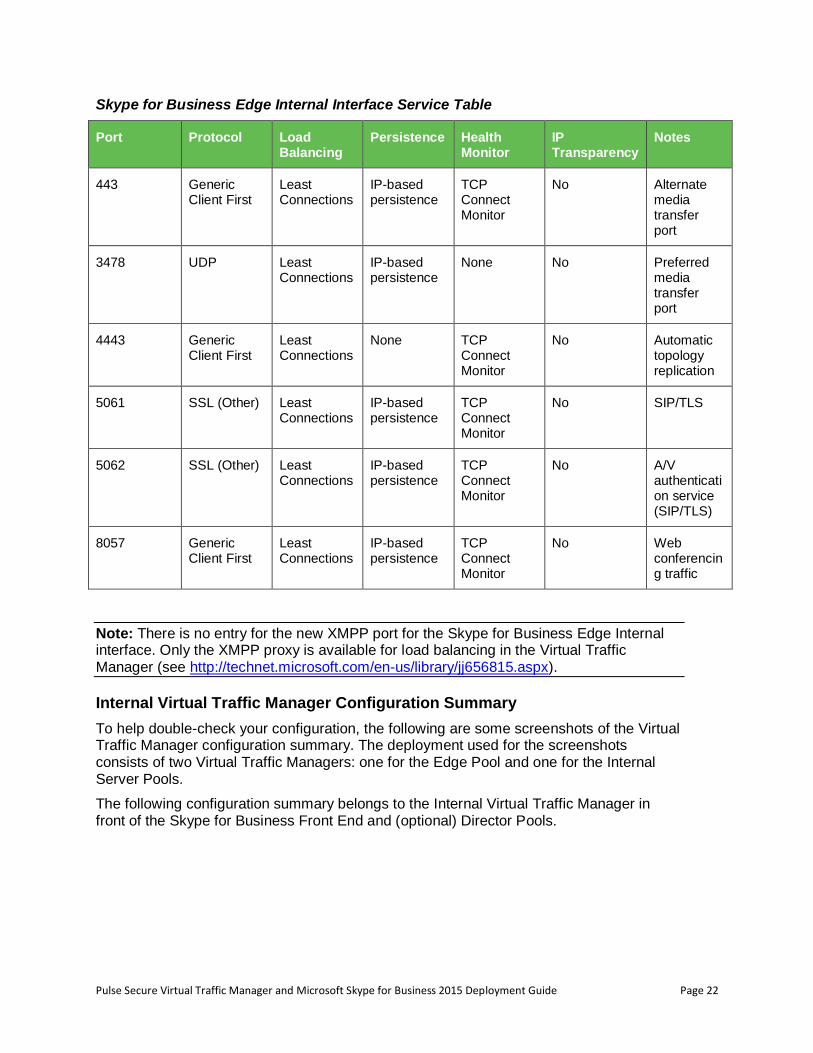
Pulse Secure Virtual Traffic Manager and Microsoft Skype for Business 2015 Deployment Guide Page 22
Skype for Business Edge Internal Interface Service Table
Port Protocol Load Balancing
Persistence Health Monitor
IP Transparency
Notes
443 Generic Client First
Least Connections
IP-based persistence
TCP Connect Monitor
No Alternate media transfer port
3478 UDP Least Connections
IP-based persistence
None No Preferred media transfer port
4443 Generic Client First
Least Connections
None TCP Connect Monitor
No Automatic topology replication
5061 SSL (Other) Least Connections
IP-based persistence
TCP Connect Monitor
No SIP/TLS
5062 SSL (Other) Least Connections
IP-based persistence
TCP Connect Monitor
No A/V authentication service (SIP/TLS)
8057 Generic Client First
Least Connections
IP-based persistence
TCP Connect Monitor
No Web conferencing traffic
Note: There is no entry for the new XMPP port for the Skype for Business Edge Internal interface. Only the XMPP proxy is available for load balancing in the Virtual Traffic Manager (see http://technet.microsoft.com/en-us/library/jj656815.aspx).
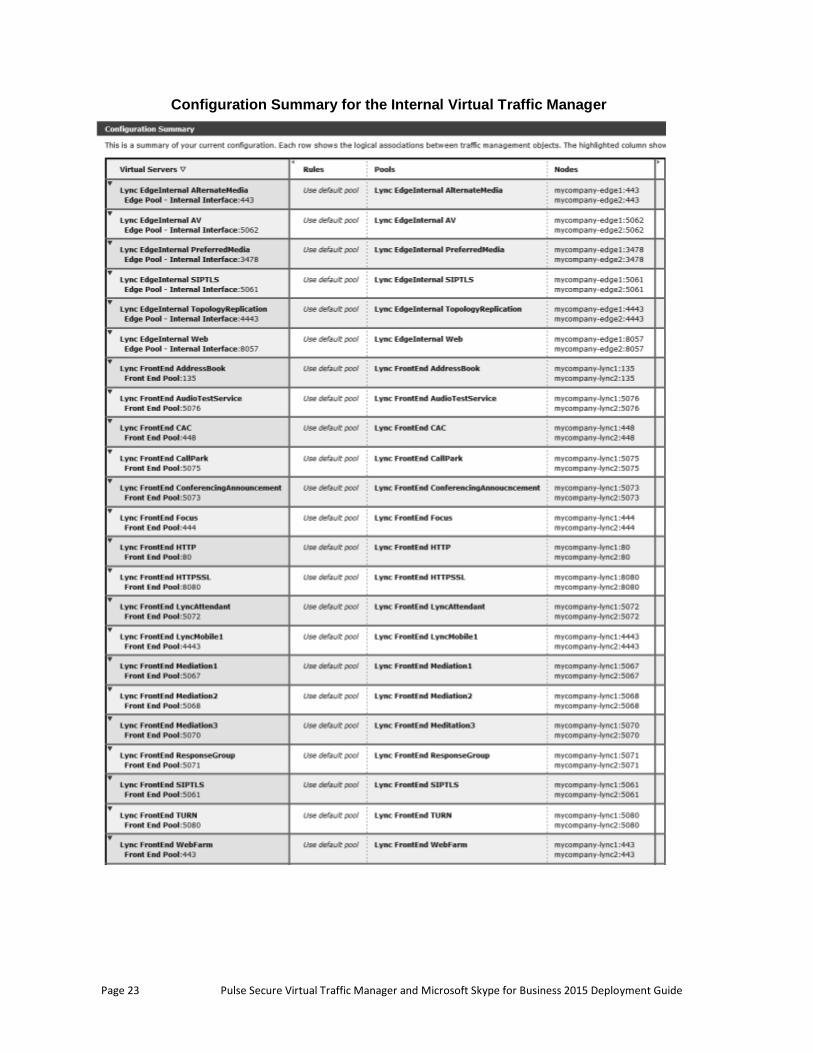
Internal Virtual Traffic Manager Configuration Summary
To help double-check your configuration, the following are some screenshots of the Virtual Traffic Manager configuration summary. The deployment used for the screenshots consists of two Virtual Traffic Managers: one for the Edge Pool and one for the Internal Server Pools.
The following configuration summary belongs to the Internal Virtual Traffic Manager in front of the Skype for Business Front End and (optional) Director Pools.
Page 23 Pulse Secure Virtual Traffic Manager and Microsoft Skype for Business 2015 Deployment Guide
Configuration Summary for the Internal Virtual Traffic Manager
Pulse Secure Virtual Traffic Manager and Microsoft Skype for Business 2015 Deployment Guide Page 24
External Virtual Traffic Manager Configuration
The following sections highlight the IP groups, pools, and VIPs that need to be created on the external pair of clustered Virtual Traffic Managers.
General External Virtual Traffic Manager Configuration
We need to create the same two health monitors that were created on the internal cluster. The following details the steps to create these health monitors.
Creating Monitors
Creating a TCP Connect Monitor
The basic TCP Connect monitor is used by most of the Skype for Business services.
1. Select Catalogs > Monitors.
2. Scroll down to Create new monitor.
3. Enter a Name for the new monitor. Set the Type to TCP Connect monitor and the Scope to Node.
4. Click Create Monitor.
Creating the HTTPS Monitor
The HTTPS monitor is used in case a reverse proxy is configured.
1. Select Catalogs > Monitors.
2. Scroll down to Create new monitor.
3. Enter a Name for the new monitor. Set the Type to HTTP and the Scope to Node.
4. Click Create Monitor.
5. In the subsequent configuration page, scroll down and set use_ssl to Yes.
6. Change the path to /groupexpansion/service.svc.
7. Set body_regex to “.*”
Creating Persistence Classes
Creating an IP-Based Persistence Class
Create a persistence class for each desired persistence type and subnet. If the same persistence class is applied to different nodes on different subnets, an error results.
1. Select Catalogs > Persistence.
2. Scroll down and create a new session persistence class.
3. Enter a Name for the new persistence class (ideally include type and subnet, e.g., IP Based Persistence – 10.255.74.x).
4. Click Create Class.
5. Scroll down to Basic Settings.
6. Set the type to IP Based Persistence.
Page 25 Pulse Secure Virtual Traffic Manager and Microsoft Skype for Business 2015 Deployment Guide
7. Click Update.
Creating a Transparent Session Affinity Persistence Class
A transparent session affinity persistence class must be created if deploying and retaining Lync Server 2010 servers. If retaining Lync 2010 servers and using port 8080, configure transparent session affinity instead of IP-based session persistence.
1. Select Catalogs > Persistence.
2. Scroll down and create a new session persistence class.
3. Enter a Name for the new persistence class (ideally include type and subnet, e.g., Transparent Session Affinity – 10.255.74.x).
4. Click Create Class.
5. Scroll down to Basic Settings.
6. Set the type to Transparent Session Affinity.
7. Click Update.
Reverse Proxy Service Configuration
If using a dual firewall DMZ deployment, an additional port must be added to the Virtual Traffic Manager. The port belongs to the Director Pool if that is configured; otherwise, it belongs to the Front End Pool. The Reverse Proxy table that follows is used in this section.
Each element that must be created for the Edge Internal Interface Service Configuration follows.
Component Procedure Description
Internal Virtual Traffic Manager (repeat for each row in the Reverse Proxy table)
Create a pool. A pool must be created per port. The IP address of each individual Skype for Business Director server (if used) or Skype for Business Front End server should be added to the pool.
Change the load-balancing algorithm on the pool to Least Connections.
The default Virtual Traffic Manager load-balancing algorithm is Round Robin. It should be changed to Least Connections.
Configure IP-based session persistence or transparent session affinity on the pool.
If retaining Lync Server 2010 servers, configure transparent session affinity on the pool; otherwise, configure IP-based session persistence.
Configure the HTTP Monitor health monitor.
Internal Virtual Traffic Manager (repeat for each row in the Reverse Proxy table)
Create a virtual server. A virtual server must be created per port in the Reverse Proxy table.
Change the TCP timeout on the virtual server to 1200 seconds (20 minutes).
The default TCP timeout is 300 seconds and should be changed to 1200 seconds.
Pulse Secure Virtual Traffic Manager and Microsoft Skype for Business 2015 Deployment Guide Page 26
Note: For Skype for Business Mobility in Skype for Business Server 2015, the mobility services use the reverse proxy and published services that are deployed on the Front End Servers. No changes are required to the Edge Servers. Outbound SIP/TCP/5061 is needed from the server that runs the Skype for Business Server Access Edge service.
Important: On the reverse proxy publishing rule for port 4443, set Forward Host Header to True on the Virtual Traffic Manager. This will ensure that the original URL is forwarded.
Creating a Traffic IP Group for the Reverse Proxy Service Pool
Create a traffic IP group for the Reverse Proxy Service Pool (also known as the virtual IP) for each pool managed by the Virtual Traffic Manager. Per the earlier table, start by creating the traffic IP group.
1. Select Services > Traffic IP Groups, and scroll down to Create a new Traffic IP Group.
2. Fill in the fields as follows:
• Name: A descriptive name for the traffic IP group, e.g., sfb-EII-pool.company.com for the Reverse Proxy Service Pool.
• IP Addresses: A list of IP addresses separated by commas.
• IP Mode: How IP addresses are raised on the Virtual Traffic Managers.
3. Click Create IP Traffic Group.
Skype for Business Reverse Proxy Service Pools
Next create the Reverse Proxy Service Pools. These pools manage many Skype for Business services and, as a result, use many ports. The Skype for Business Reverse Proxy Service Pool table that follows is used in this section. A pool must be created for each service/port managed by the Virtual Traffic Manager.
To create a new pool:
1. Select Services > Pools, and scroll down to Create a new Pool.
2. Fill in the fields as follows:
• Pool Name: A descriptive name for the pool.
• Nodes: hostname (or IP address):port for each of the actual back-end nodes. The port is listed in the first column of the earlier configuration tables. Multiple nodes can be entered with a space between them.
• Monitor: Set to TCP Connect Monitor (or for optional HTTP 8080, choose the custom HTTP monitor).
3. Repeat for each pool needed, for each port in the table that follows.
Page 27 Pulse Secure Virtual Traffic Manager and Microsoft Skype for Business 2015 Deployment Guide
Once a pool is created, change the load-balancing algorithm for that pool. The default Virtual Traffic Manager load-balancing algorithm is Round Robin. All Skype for Business services require the load-balancing algorithm to be Least Connections.
1. Scroll down, click Load Balancing, and click Edit.
2. Set the loading-balancing algorithm to Least Connections, and click Update.
3. Scroll down and click Session Persistence.
4. Choose the appropriate session persistence class based on the table, and click Update.
Note: Multiple persistence classes may be created for pools that have differing nodes routing to different IP addresses. For example, the Edge External Access Edge Pools, Edge External Web Conferencing Services Pools, and the Edge External A/V Services Pools are all hosted on the same Virtual Traffic Manager and use IP-based persistence but route to different nodes. In this case, create three IP-based persistence classes, one for each, and use the corresponding persistence class for each. Attempting to assign only one IP-based persistence class is not allowed.
If you need to create additional persistence classes based on the note above, perform the following steps:
1. Select Catalogs > Persistence.
2. Scroll down and create a new session persistence class.
3. Set the type according to the entry in the configuration table.
Attaching the Session Persistence Class to a Pool
1. Select Services > Pools, and select the pool that the monitor will be attached to.
2. Scroll down and click Session Persistence.
3. Choose the appropriate session persistence class.
The table that follows contains a list of the Skype for Business Services on the Reverse Proxy Service Pool along with the necessary Virtual Traffic Manager settings. You must create a pool for each port, with all nodes added to it (6 pools in total).
The table that follows contains a list of the Skype for Business Services on the internal interface of the Edge Pool along with the Virtual Traffic Manager settings.
Pulse Secure Virtual Traffic Manager and Microsoft Skype for Business 2015 Deployment Guide Page 28
Skype for Business Reverse Proxy Service Configuration Table
The following table contains a list of additional Skype for Business Services to be configured along with the Virtual Traffic Manager settings if a reverse proxy is used.
Port Protocol Load Balancing
Persistence Health Monitor
IP Transparency
Notes
4443 HTTP Least Connections
IP-based persistence
Or
Transparent session affinity (if deploying retaining Lync Server 2010 servers)
HTTPS monitor
No Traffic from reverse proxy
Requires configuring SSL decryption and encryption if using transparent session affinity
Creating the Reverse Proxy Service Virtual Servers
Each pool must be associated with a virtual server: one to match each pool created in the previous section. To create a new virtual server:
1. Select Services > Virtual Servers, and scroll down to Create a new Virtual Server.
2. Fill in the fields as follows:
• Virtual Server Name: A descriptive name for the virtual server.
• Protocol: Listed in the second column of the earlier configuration tables.
• Port: Listed in the first column of the earlier configuration tables. This will match the port configured in the corresponding pool.
• Default Traffic Pool: Select the pool created in the previous section that matches the port for this VIP.
3. Set Enabled to Yes.
4. Click the Update button to apply changes.
The default Virtual Traffic Manager TCP timeout is 300 seconds (5 minutes). All Skype for Business TCP services require a TCP timeout of 1200 seconds (20 minutes).
1. Scroll down, select Connection Management, and click Edit.
2. Under Timeout Settings, change timeout to 1200, and click Update.
About Skype for Business Edge Pool External Interface (Access Edge)
The Skype for Business Edge Pool allows users outside of the corporate firewall to securely access Skype for Business without having to go through a VPN. The Skype for Business Edge Pool has two sets of interfaces: an external interface to communicate with external users and an internal interface to communicate with the Front End Pool.
In this topology, there are two sets of Virtual Traffic Manager clusters, one managing the external interface of the Skype for Business Edge Pool and the other managing the
Page 29 Pulse Secure Virtual Traffic Manager and Microsoft Skype for Business 2015 Deployment Guide
internal interface of the Skype for Business Edge Pool, along with the Skype for Business Front Edge Pool and optional Skype for Business Director Pool. An alternative deployment is to have a single cluster that manages all traffic.
Note: The Skype for Business Server 2015 Edge External Interface requires three public IP address for Virtual Traffic Manager Traffic IP addresses (one time requirement that does not increment as more Edge Servers are added to the pool) plus three public IP addresses per Edge Server in the pool. For more information, see the “Choosing a Topology” section of Skype for Business 2015 documentation on Microsoft TechNet.
If the required number of public IP addresses cannot be secured, DNS load balancing must be used instead, because it supports NAT.
Skype for Business Edge Pool External Interface (Access Edge) Service Configuration
The Skype for Business Edge Pool External Interface is the interface of the Skype for Business Edge Server that is outside the firewall. The following table contains a list of the Skype for Business Services on the External Interface of the Edge Pool along with Virtual Traffic Manager settings. There is a new port, XMPP, which is used to allow communication with XMPP federated partners. The Skype for Business Edge External Interface (Access Edge) table that follows is used in this section.
Component Procedure Description
External Virtual Traffic Manager (once)
Create a traffic IP group. A single traffic IP group must be created for the external interface of the Skype for Business Edge Pool.
External Virtual Traffic Manager (repeat for each row in the Skype for Business Edge External Interface (Access Edge) table)
Create a pool. A pool must be created per port. The IP address for the external interface on each individual Skype for Business Edge server should be added to the pool.
Change the load-balancing algorithm on the pool to Least Connections.
The default Virtual Traffic Manager load-balancing algorithm is Round Robin. It should be changed to Least Connections.
Configure IP-based session persistence on the pool.
Configure the TCP Connect Monitor health monitor.
External Virtual Traffic Manager (repeat for each row in the Skype for Business Edge External Interface (Access Edge) table)
Create a virtual server. A virtual server must be created per port in the Skype for Business Edge Pool External Interface table.
Change the TCP timeout on the virtual server to 1200 seconds (20 minutes).
The default TCP timeout is 300 seconds and should be changed to 1200 seconds.
Pulse Secure Virtual Traffic Manager and Microsoft Skype for Business 2015 Deployment Guide Page 30
Creating a Traffic IP Group for the Skype for Business Edge Pool External Interface (Access Edge) Pool
Create a traffic IP group for the Edge Pool External Interface (Access Edge) Pool (also known as a virtual IP) for each pool managed by the Virtual Traffic Manager. Per the earlier table, start by creating the traffic IP group.
1. Select Services > Traffic IP Groups, and scroll down to Create a new Traffic IP Group.
2. Fill in the fields as follows:
• Name: A descriptive name for the traffic IP group, e.g., sfb-EII-pool.company.com for the Edge Pool External Interface (Access Edge) Pool.
• IP Addresses: A list of IP addresses separated by commas.
• IP Mode: How IP addresses are raised on the Virtual Traffic Managers.
3. Click Create IP Traffic Group.
Skype for Business Edge Pool External Interface (Access Edge) Pools
Next create the Edge Pool External Interface (Access Edge) Pools. These pools manage many Skype for Business services and, as a result, use many ports. The Skype for Business Edge Pool External Interface (Access Edge) Pool table that follows is used in this section. A pool must be created for each service/port managed by the Virtual Traffic Manager.
To create a new pool:
1. Select Services > Pools, and scroll down to Create a new Pool.
2. Fill in the fields as follows:
• Pool Name: A descriptive name for the pool.
• Nodes: hostname (or IP address):port for each of the actual back-end nodes. The port is listed in the first column of the configuration tables above. Multiple nodes can be entered with a space between them.
• Monitor: Set to TCP Connect Monitor (or for optional HTTP 8080, choose the custom HTTP monitor).
3. Repeat for each pool needed, for each port in the table that follows.
Once a pool is created, change the load-balancing algorithm for that pool. The default Virtual Traffic Manager load-balancing algorithm is Round Robin. All Skype for Business services require the load-balancing algorithm to be Least Connections.
1. Scroll down, click Load Balancing, and click Edit.
2. Set the loading-balancing algorithm to Least Connections, and click Update.
3. Scroll down and click Session Persistence.
4. Choose the appropriate session persistence class based on the table, and click Update.

Page 31 Pulse Secure Virtual Traffic Manager and Microsoft Skype for Business 2015 Deployment Guide
Note: Multiple persistence classes may be created for pools that have differing nodes routing to different IP addresses. For example, the Edge External Access Edge Pools, Edge External Web Conferencing Services Pools, and the Edge External A/V Services Pools are all hosted on the same Virtual Traffic Manager and use IP-based persistence but route to different nodes. In this case, create three IP-based persistence classes, one for each, and use the corresponding persistence class for each. Attempting to assign only one IP-based persistence class is not allowed.
If you need to create additional persistence classes based on the note above, perform the following steps:
1. Select Catalogs > Persistence.
2. Scroll down and create a new session persistence class.
3. Set the type according to the entry in the configuration table.
Attaching the Session Persistence Class to a Pool
1. Select Services > Pools, and choose the pool that the monitor will be attached to.
2. Scroll down and click Session Persistence.
3. Choose the appropriate session persistence class.
The following table contains a list of the Skype for Business Services on the Edge Pool External Interface (Access Edge) Pool along with the necessary Virtual Traffic Manager settings. You must create a pool for each port, with all nodes added to it (6 pools in total).
The table below contains a list of the Skype for Business Services on the Internal Interface of the Edge Pool along with the Virtual Traffic Manager settings.
Skype for Business Edge External Interface (Access Edge) Table
The following table contains a list of the Skype for Business Services on the External Interface of the Edge Pool along with the Virtual Traffic Manager settings. A new port, XMPP, is used to allow communication with XMPP federated partners.
Port Protocol Load Balancing
Persistence Health Monitor
IP Transparency
Notes
443 SSL (Other) Least Connections
IP-based persistence
TCP Connect Monitor
No SIP/TLS
5061 SSL (Other) Least Connections
IP-based persistence
TCP Connect Monitor
No SIP/TLS
5269 SSL (Other) Least Connections
IP-based persistence
TCP Connect Monitor
No (Optional) XMPP
Pulse Secure Virtual Traffic Manager and Microsoft Skype for Business 2015 Deployment Guide Page 32
Creating the Skype for Business Edge External Interface (Access Edge) Virtual Servers
Each pool must be associated with a virtual server, one to match each pool created in the previous section. To create a new virtual server:
1. Select Services > Virtual Servers, and scroll down to Create a new Virtual Server.
2. Fill in the fields as follows:
• Virtual Server Name: A descriptive name for the virtual server.
• Protocol: Listed in the second column of the configuration tables above.
• Port: Listed in the first column of the configuration tables above. This port matches the port configured in the corresponding pool.
• Default Traffic Pool: Select the pool created in the previous section that matches the port for this VIP.
3. Set Enabled to Yes.
4. Click the Update button to apply changes.
The default Virtual Traffic Manager TCP timeout is 300 seconds (5 minutes). All Skype for Business TCP services require a TCP timeout of 1200 seconds (20 minutes).
1. Scroll down, select Connection Management, and click Edit.
2. Under Timeout Settings, change timeout to 1200, and click Update.
Page 33 Pulse Secure Virtual Traffic Manager and Microsoft Skype for Business 2015 Deployment Guide
Skype for Business External Interface (Web Conferencing Services) Service Configuration
If using Web conferencing services on the Skype for Business Edge Pool External Interface, the following additional port must be configured. The Skype for Business Web Conferencing Service running on the Edge pool has its own set of IP Addresses, allowing for port overlap. The Skype for Business External Interface (Web Conferencing Services) table that follows is used in this section.
Component Procedure Description
External Virtual Traffic Manager (once)
Create a traffic IP group. A single traffic IP group must be created for Web Conferencing on the External Interface of the Skype for Business Edge Pool.
External Virtual Traffic Manager (repeat for each row in the Skype for Business External Interface (Web Conferencing Services) table)
Create a pool. A pool must be created per port. The IP address for the Web Conferencing Services on each individual Skype for Business Edge server should be added to the pool.
Change the load-balancing algorithm on the pool to Least Connections.
The default Virtual Traffic Manager load-balancing algorithm is Round Robin. It should be changed to Least Connections.
Configure IP-based session persistence on the pool.
Configure the TCP Connect Monitor health monitor.
External Virtual Traffic Manager (repeat for each row in the Skype for Business External Interface (Web Conferencing Services) table)
Create a virtual server. A virtual server must be created per port in the Skype for Business Edge Pool External Interface (Web Conferencing) table.
Change the TCP timeout on the virtual server to 1200 seconds (20 minutes).
The default TCP timeout is 300 seconds and should be changed to 1200 seconds.
Creating a Traffic IP Group for the Skype for Business External Interface (Web Conferencing Services) Service Pool
Create a traffic IP group for the External Interface (Web Conferencing Services) Service Pool (also known as a virtual IP) for each pool managed by the Virtual Traffic Manager. Per the earlier table, start by creating the traffic IP group.
1. Select Services > Traffic IP Groups, and scroll down to Create a new Traffic IP Group.
2. Fill in the fields as follows:
Pulse Secure Virtual Traffic Manager and Microsoft Skype for Business 2015 Deployment Guide Page 34
• Name: A descriptive name for the traffic IP group, e.g., sfb-EII-pool.company.com for the External Interface (Web Conferencing Services) Service Pool.
• IP Addresses: A list of IP addresses separated by commas.
• IP Mode: How IP addresses are raised on the Virtual Traffic Managers.
3. Click Create IP Traffic Group.
Skype for Business External Interface (Web Conferencing Services) Service Pools
Next create the External Interface (Web Conferencing Services) Service Pools. These pools manage many Skype for Business services and, as a result, use many ports. The Skype for Business External Interface (Web Conferencing Services) Service Pool table that follows is used in this section. A pool must be created for each service/port managed by the Virtual Traffic Manager.
To create a new pool:
1. Select Services > Pools, and scroll down to Create a new Pool.
2. Fill in the fields as follows:
• Pool Name: A descriptive name for the pool.
• Nodes: hostname (or IP address):port for each of the actual back-end nodes. The port is listed in the first column of the earlier configuration tables. Multiple nodes can be entered with a space between them.
• Monitor: Set to TCP Connect Monitor (or for optional HTTP 8080, choose the custom HTTP monitor).
3. Repeat for each pool needed, for each port in the table that follows.
Once a pool is created, change the load-balancing algorithm for that pool. The default Virtual Traffic Manager load-balancing algorithm is Round Robin. All Skype for Business services require the load-balancing algorithm to be Least Connections.
1. Scroll down, click Load Balancing, and click Edit.
2. Set the loading-balancing algorithm to Least Connections, and click Update.
3. Scroll down and click Session Persistence.
4. Choose the appropriate session persistence class based on the table, and click Update.
Note: Multiple persistence classes may be created for pools that have differing nodes routing to different IP addresses. For example, the Edge External Access Edge Pools, Edge External Web Conferencing Services Pools, and the Edge External A/V Services Pools are all hosted on the same Virtual Traffic Manager and use IP-based persistence but route to different nodes. In this case, create three IP-based persistence classes, one for each, and use the corresponding persistence class for each. Attempting to assign only one IP-based persistence class is not allowed.
If you need to create additional persistence classes based on the note above, perform the following steps:
1. Select Catalogs > Persistence.
2. Scroll down and create a new session persistence class.
Page 35 Pulse Secure Virtual Traffic Manager and Microsoft Skype for Business 2015 Deployment Guide
3. Set the type according to the entry in the configuration table.
Attaching the Session Persistence Class to a Pool
1. Select Services > Pools, and choose the pool that the monitor will be attached to.
2. Scroll down and click Session Persistence.
3. Choose the appropriate session persistence class.
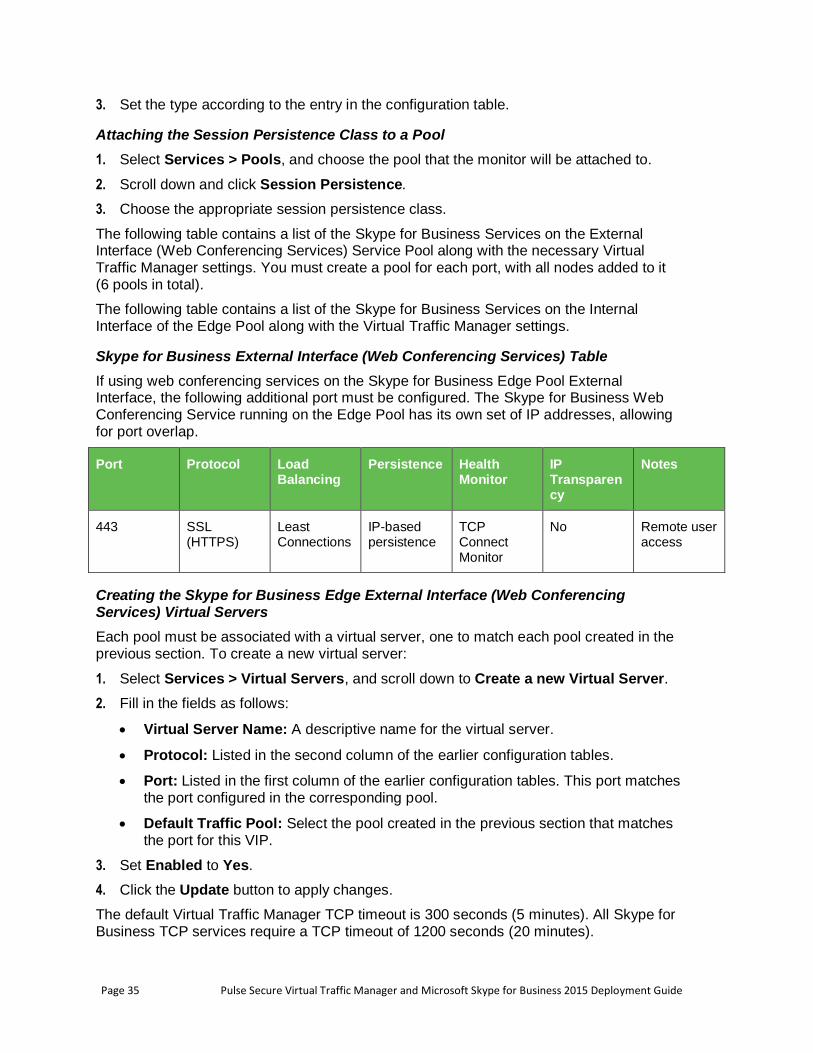
The following table contains a list of the Skype for Business Services on the External Interface (Web Conferencing Services) Service Pool along with the necessary Virtual Traffic Manager settings. You must create a pool for each port, with all nodes added to it (6 pools in total).
The following table contains a list of the Skype for Business Services on the Internal Interface of the Edge Pool along with the Virtual Traffic Manager settings.
Skype for Business External Interface (Web Conferencing Services) Table
If using web conferencing services on the Skype for Business Edge Pool External Interface, the following additional port must be configured. The Skype for Business Web Conferencing Service running on the Edge Pool has its own set of IP addresses, allowing for port overlap.
Port Protocol Load Balancing
Persistence Health Monitor
IP Transparency
Notes
443 SSL (HTTPS)
Least Connections
IP-based persistence
TCP Connect Monitor
No Remote user access
Creating the Skype for Business Edge External Interface (Web Conferencing Services) Virtual Servers
Each pool must be associated with a virtual server, one to match each pool created in the previous section. To create a new virtual server:
1. Select Services > Virtual Servers, and scroll down to Create a new Virtual Server.
2. Fill in the fields as follows:
• Virtual Server Name: A descriptive name for the virtual server.
• Protocol: Listed in the second column of the earlier configuration tables.
• Port: Listed in the first column of the earlier configuration tables. This port matches the port configured in the corresponding pool.
• Default Traffic Pool: Select the pool created in the previous section that matches the port for this VIP.
3. Set Enabled to Yes.
4. Click the Update button to apply changes.
The default Virtual Traffic Manager TCP timeout is 300 seconds (5 minutes). All Skype for Business TCP services require a TCP timeout of 1200 seconds (20 minutes).
Pulse Secure Virtual Traffic Manager and Microsoft Skype for Business 2015 Deployment Guide Page 36
1. Scroll down, select Connection Management, and click Edit.
2. Under Timeout Settings, change the timeout to 1200, and click Update.
Skype for Business External Interface (A/V Services) Service Configuration
IP transparency is disabled by default. Only ports 443 and 5061 of the Skype for Business A/V service must be modified.
1. Select Services > Pools, and choose the pool corresponding to port 443 or 5061.
2. When configuring ports 443 and 5061, scroll down, click Connection Management, and click Edit.
3. Under IP Transparency, set transport to Yes, and click Update.
If using A/V services on the Skype for Business Edge Pool External Interface, the following additional ports must be configured. The Skype for Business A/V Service running on the Edge Pool has its own set of IP addresses, allowing for port overlap. The Skype for Business External Interface (A/V Services) table that follows is used in this section.
Component Procedure Description
External Virtual Traffic Manager (once)
Create a traffic IP group. A single traffic IP group must be created for A/V Services on the External Interface of the Skype for Business Edge Pool.
External Virtual Traffic Manager (repeat for each row in the Skype for Business External Interface (A/V Services) table)
Create a pool. A pool must be created per port. The IP address for A/V Services on each individual Skype for Business Edge server should be added to the pool.
Change the load-balancing algorithm on the pool to Least Connections.
The default Virtual Traffic Manager load-balancing algorithm is Round Robin. It should be changed to Least Connections.
Configure IP-based session persistence on the pool.
(Only required for port 443) Configure the TCP Connect Monitor health monitor.
Enable IP transparency on the pool. Skype for Business A/V Services require IP transparency.
Create a virtual server. A virtual server must be created per port in the Skype for Business Edge Pool External Interface (A/V Services) table.
Change the TCP timeout on the virtual server to 1200 seconds (20 minutes).
The default TCP timeout is 300 seconds and should be changed to 1200 seconds.
Page 37 Pulse Secure Virtual Traffic Manager and Microsoft Skype for Business 2015 Deployment Guide
Creating a Traffic IP Group for the Skype for Business External Interface (A/V Services) Service Pool
Create a traffic IP group for the External Interface (A/V Services) Service Pool (also known as a virtual IP) for each pool managed by the Virtual Traffic Manager. Per the earlier table, start by creating the traffic IP group.
1. Select Services > Traffic IP Groups, and scroll down to Create a new Traffic IP Group.
2. Fill in the fields as follows:
• Name: A descriptive name for the traffic IP group, e.g., sfb-EII-pool.company.com for the External Interface (A/V Services) Service Pool.
• IP Addresses: A list of IP addresses separated by commas.
• IP Mode: How IP addresses are raised on the Virtual Traffic Managers.
3. Click Create IP Traffic Group.
Skype for Business External Interface (A/V Services) Service Pools
Next create the External Interface (A/V Services) Service Pools. These pools manage many Skype for Business services and, as a result, use many ports. The Skype for Business External Interface (A/V Services) Service Pool table that follows is used in this section. A pool must be created for each service/port managed by the Virtual Traffic Manager.
To create a new pool:
1. Select Services > Pools, and scroll down to Create a new Pool.
2. Fill in the fields as follows:
• Pool Name: A descriptive name for the pool.
• Nodes: hostname (or IP address):port for each of the actual back-end nodes. The port is listed in the first column of the earlier configuration tables. Multiple nodes can be entered with a space between them.
• Monitor: Set to TCP Connect Monitor (or for optional HTTP 8080, choose the custom HTTP monitor).
3. Repeat for each pool needed, for each port in the table that follows.
Skype for Business External Interface (A/V Services) Load Balancing
Once a pool is created, change the load-balancing algorithm for that pool. The default Virtual Traffic Manager load-balancing algorithm is Round Robin. All Skype for Business services require the load-balancing algorithm to be Least Connections.
1. Scroll down, click Load Balancing, and click Edit.
2. Set the loading-balancing algorithm to Least Connections, and click Update.
3. Scroll down and click Session Persistence.
4. Choose the appropriate session persistence class based on the table, and click Update.
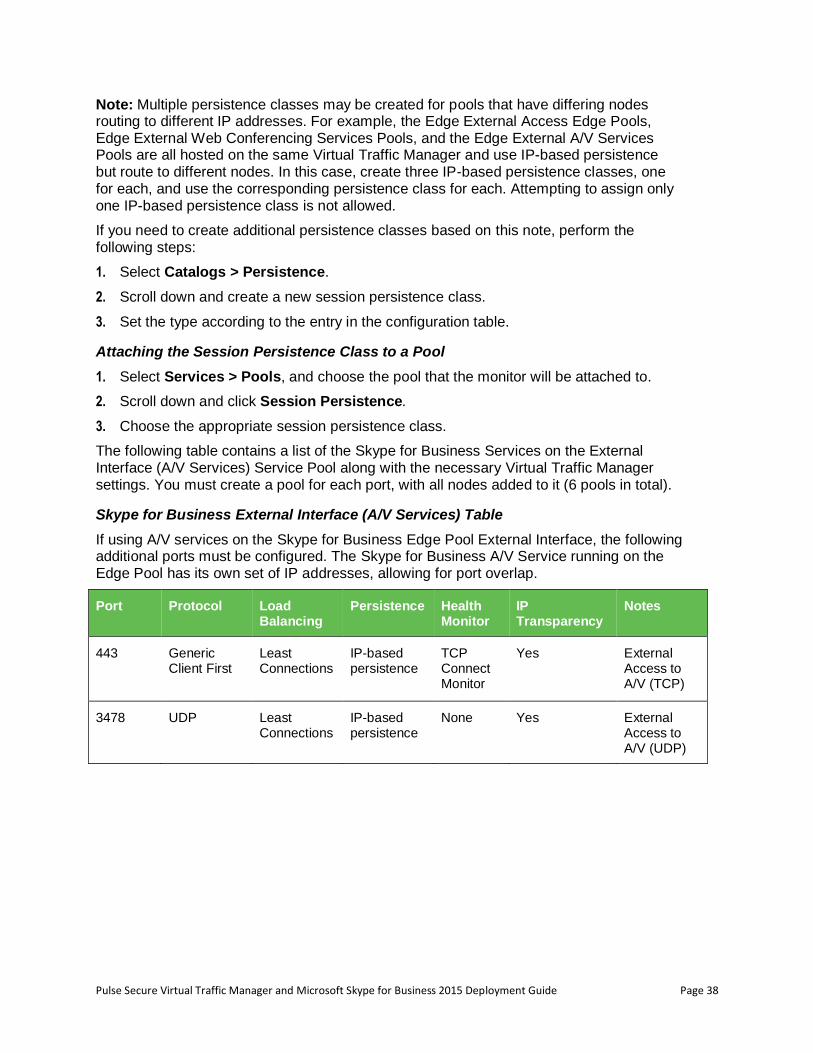
Pulse Secure Virtual Traffic Manager and Microsoft Skype for Business 2015 Deployment Guide Page 38
Note: Multiple persistence classes may be created for pools that have differing nodes routing to different IP addresses. For example, the Edge External Access Edge Pools, Edge External Web Conferencing Services Pools, and the Edge External A/V Services Pools are all hosted on the same Virtual Traffic Manager and use IP-based persistence but route to different nodes. In this case, create three IP-based persistence classes, one for each, and use the corresponding persistence class for each. Attempting to assign only one IP-based persistence class is not allowed.
If you need to create additional persistence classes based on this note, perform the following steps:
1. Select Catalogs > Persistence.
2. Scroll down and create a new session persistence class.
3. Set the type according to the entry in the configuration table.
Attaching the Session Persistence Class to a Pool
1. Select Services > Pools, and choose the pool that the monitor will be attached to.
2. Scroll down and click Session Persistence.
3. Choose the appropriate session persistence class.
The following table contains a list of the Skype for Business Services on the External Interface (A/V Services) Service Pool along with the necessary Virtual Traffic Manager settings. You must create a pool for each port, with all nodes added to it (6 pools in total).
Skype for Business External Interface (A/V Services) Table
If using A/V services on the Skype for Business Edge Pool External Interface, the following additional ports must be configured. The Skype for Business A/V Service running on the Edge Pool has its own set of IP addresses, allowing for port overlap.
Port Protocol Load Balancing
Persistence Health Monitor
IP Transparency
Notes
443 Generic Client First
Least Connections
IP-based persistence
TCP Connect Monitor
Yes External Access to A/V (TCP)
3478 UDP Least Connections
IP-based persistence
None Yes External Access to A/V (UDP)
Page 39 Pulse Secure Virtual Traffic Manager and Microsoft Skype for Business 2015 Deployment Guide
Creating Skype for Business External Interface (A/V Services) Virtual Servers
Each pool must be associated with a virtual server, one to match each pool created in the previous section. To create a new virtual server:
1. Select Services > Virtual Servers, and scroll down to Create a new Virtual Server.
2. Fill in the fields as follows:
• Virtual Server Name: A descriptive name for the virtual server.
• Protocol: Listed in the second column of the earlier configuration tables.
• Port: Listed in the first column of the earlier configuration tables. This port matches the port configured in the corresponding pool.
• Default Traffic Pool: Select the pool created in the previous section that matches the port for this VIP.
3. Set Enabled to Yes.
4. Click the Update button to apply changes.
The default Virtual Traffic Manager TCP timeout is 300 seconds (5 minutes). All Skype for Business TCP services require a TCP timeout of 1200 seconds (20 minutes).
1. Scroll down, select Connection Management, and click Edit.
2. Under Timeout Settings, change the timeout to 1200, and click Update.
Skype for Business Director Pool Service Configuration
The Skype for Business Director Pool can improve the performance of the Front End Pool by offloading user authentication. The Director role is now optional in Microsoft Skype for Business Server 2015 to reduce server count and other hardware requirements; however, it is still possible to load-balance the Director Pool if an administrator wants to take advantage of its role. The Skype for Business Director Pool Table of Services that follows is
used in this section.
Each of the following elements must be created for the Edge Internal Interface Service Configuration.
Component Procedure Description
Internal Virtual Traffic Manager (once)
Create a traffic IP group. A single traffic IP group must be created to front the Skype for Business Director Pool.
Internal Virtual Traffic Manager (repeat for each row in the Skype for Business Director Pool table)
Create a pool. A pool must be created per port. The IP address of each individual Skype for Business Director server should be added to the pool.
Change the load-balancing algorithm on the pool to Least Connections.
The default Virtual Traffic Manager load-balancing algorithm is Round Robin. It should be changed to Least Connections.
Pulse Secure Virtual Traffic Manager and Microsoft Skype for Business 2015 Deployment Guide Page 40
Configure IP-based session persistence on the pool.
Configure the TCP Connect Monitor health monitor.
Internal Virtual Traffic Manager (repeat for each row in the Skype for Business Director Pool table)
Create a virtual server. A virtual server must be created per port in the Skype for Business Director Pool table.
Change the TCP timeout on the virtual server to 1200 seconds (20 minutes).
The default TCP timeout is 300 seconds and should be changed to 1200 seconds.
Skype for Business Director Traffic IP Group
Creating a Traffic IP Group for the Director Pool
Create a traffic IP group for the Director Pool (also known as a virtual IP) for each pool managed by the Virtual Traffic Manager. Per the earlier table, start by creating the traffic IP group.
1. Select Services > Traffic IP Groups, and scroll down to Create a new Traffic IP Group.
2. Fill in the fields as follows:
• Name: A descriptive name for the traffic IP group, e.g., sfb-fe-pool.company.com for the Director Pool.
• IP Addresses: A list of IP addresses separated by commas.
• IP Mode: How IP addresses are raised on the Virtual Traffic Managers.
3. Click Create IP Traffic Group.
Skype for Business Director Pool
Next create the Director Pool. A pool must be created for each service/port managed by the Virtual Traffic Manager.
To create a new pool:
1. Select Services > Pools, and scroll down to Create a new Pool.
2. Fill in the fields as follows:
• Pool Name: A descriptive name for the pool.
• Nodes: hostname (or IP address):port for each of the actual back-end nodes. The port is listed in the first column of the earlier configuration tables. Multiple nodes can be entered with a space between them.
• Monitor: Set to TCP Connect Monitor (or for optional HTTP 8080, choose the custom HTTP monitor).
3. Repeat for each pool needed, for each port in the table that follows.
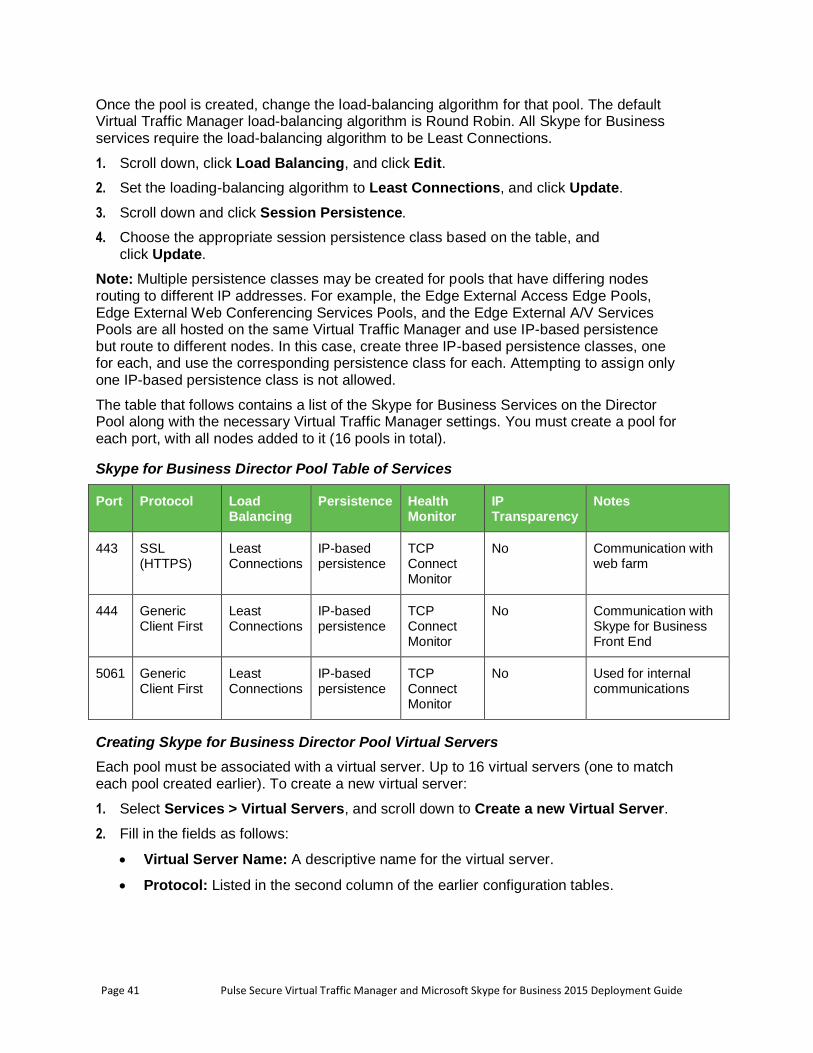
Page 41 Pulse Secure Virtual Traffic Manager and Microsoft Skype for Business 2015 Deployment Guide
Once the pool is created, change the load-balancing algorithm for that pool. The default Virtual Traffic Manager load-balancing algorithm is Round Robin. All Skype for Business services require the load-balancing algorithm to be Least Connections.
1. Scroll down, click Load Balancing, and click Edit.
2. Set the loading-balancing algorithm to Least Connections, and click Update.
3. Scroll down and click Session Persistence.
4. Choose the appropriate session persistence class based on the table, and click Update.
Note: Multiple persistence classes may be created for pools that have differing nodes routing to different IP addresses. For example, the Edge External Access Edge Pools, Edge External Web Conferencing Services Pools, and the Edge External A/V Services Pools are all hosted on the same Virtual Traffic Manager and use IP-based persistence but route to different nodes. In this case, create three IP-based persistence classes, one for each, and use the corresponding persistence class for each. Attempting to assign only one IP-based persistence class is not allowed.
The table that follows contains a list of the Skype for Business Services on the Director Pool along with the necessary Virtual Traffic Manager settings. You must create a pool for each port, with all nodes added to it (16 pools in total).
Skype for Business Director Pool Table of Services
Port Protocol Load Balancing
Persistence Health Monitor
IP Transparency
Notes
443 SSL (HTTPS)
Least Connections
IP-based persistence
TCP Connect Monitor
No Communication with web farm
444 Generic Client First
Least Connections
IP-based persistence
TCP Connect Monitor
No Communication with Skype for Business Front End
5061 Generic Client First
Least Connections
IP-based persistence
TCP Connect Monitor
No Used for internal communications
Creating Skype for Business Director Pool Virtual Servers
Each pool must be associated with a virtual server. Up to 16 virtual servers (one to match each pool created earlier). To create a new virtual server:
1. Select Services > Virtual Servers, and scroll down to Create a new Virtual Server.
2. Fill in the fields as follows:
• Virtual Server Name: A descriptive name for the virtual server.
• Protocol: Listed in the second column of the earlier configuration tables.
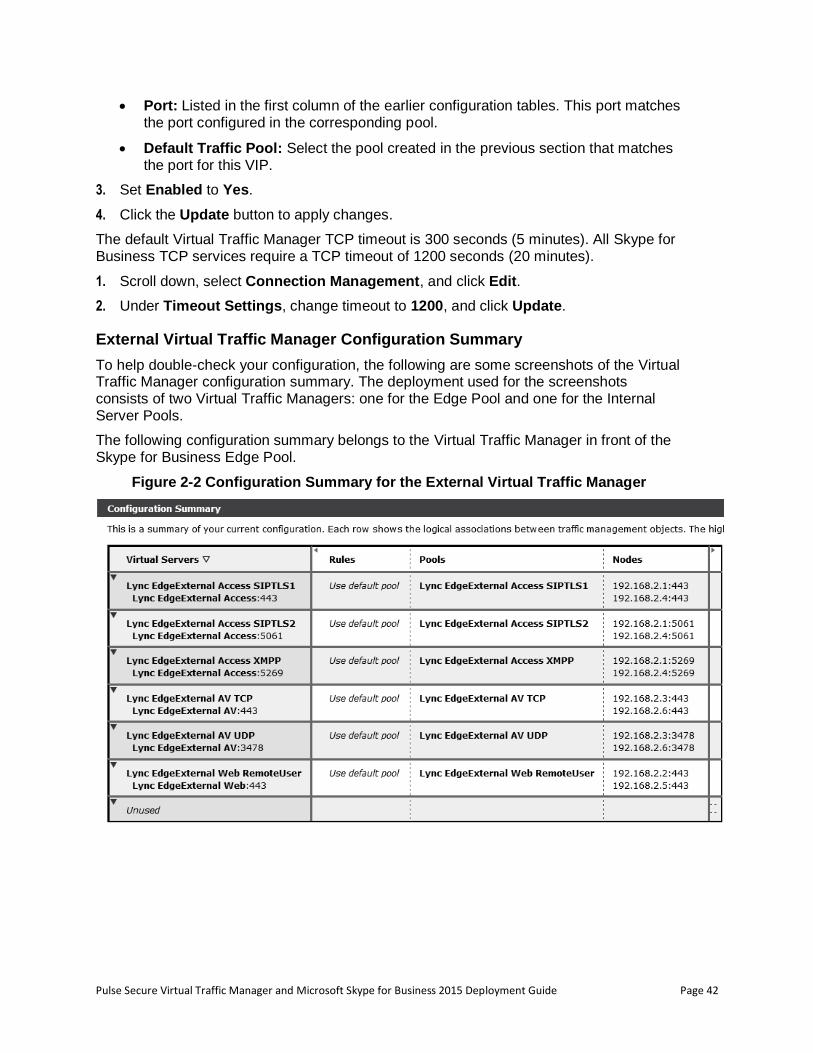
Pulse Secure Virtual Traffic Manager and Microsoft Skype for Business 2015 Deployment Guide Page 42
• Port: Listed in the first column of the earlier configuration tables. This port matches the port configured in the corresponding pool.
• Default Traffic Pool: Select the pool created in the previous section that matches the port for this VIP.
3. Set Enabled to Yes.
4. Click the Update button to apply changes.
The default Virtual Traffic Manager TCP timeout is 300 seconds (5 minutes). All Skype for Business TCP services require a TCP timeout of 1200 seconds (20 minutes).
1. Scroll down, select Connection Management, and click Edit.
2. Under Timeout Settings, change timeout to 1200, and click Update.
External Virtual Traffic Manager Configuration Summary
To help double-check your configuration, the following are some screenshots of the Virtual Traffic Manager configuration summary. The deployment used for the screenshots consists of two Virtual Traffic Managers: one for the Edge Pool and one for the Internal Server Pools.
The following configuration summary belongs to the Virtual Traffic Manager in front of the Skype for Business Edge Pool.
Figure 2-2 Configuration Summary for the External Virtual Traffic Manager
Page 43 Pulse Secure Virtual Traffic Manager and Microsoft Skype for Business 2015 Deployment Guide
Configuring SSL Decryption and Encryption
If configuring only Skype for Business Server 2015 deployments and subsequently using only IP-based persistence, there is no need to configure SSL decryption and encryption; however, if there are existing Lync Server 2010 servers in the Skype for Business Server 2015 deployment and transparent session affinity is used, it is necessary to configure SSL decryption and encryption. This configuration allows a cookie can be inserted to maintain session persistence. This section details the steps to perform SSL decryption and re-encryption.
Importing the Certificate
In order to perform SSL decryption, the certificate and the private key used by the Skype for Business server must be imported into the Virtual Traffic Manager.
1. Select Catalogs > SSL > SSL Server Certificates.
2. Click Import Certificate to import the appropriate certificate. Refer to troubleshooting section for more details on importing certificates to the Virtual Traffic Manager.
Enabling SSL Decryption on the Virtual Server
After importing the certificate, SSL decryption can now be enabled.
1. Select Services > Virtual Servers, and choose the virtual server that will be performing the SSL decryption.
2. Scroll down and click SSL Decryption.
3. Set ssl_decrypt to Yes.
4. Select the certificate imported earlier.
Enabling SSL Encryption on the Pool
This section details the steps to perform SSL encryption to re-encrypt the SSL session to the back-end node.
1. Select Services > Pools, and choose the pool for which SSL encryption will be enabled.
2. Scroll down and click SSL Settings.
3. Set ssl_encrypt to Yes.
DNS Load Balancing
Microsoft optimized Skype for Business 2015 to be used in conjunction with DNS load balancing and recommends this technology when load-balancing functionality is needed for an edge pool. DNS load balancing is defined as a method of load balancing where a list of IP addresses is returned in response to a DNS query. The client picks one of the provided IP addresses by random; however, there are three scenarios where DNS load balancing cannot provide a working solution. Microsoft therefore recommends the use of an application delivery controller, such as Pulse Secure’s Virtual Traffic Manager or a hardware load balancer to provide load balancing in the following scenarios:
• Federation with organizations using Office Communications Server 2007 R2 or Office Communications Server 2007
Pulse Secure Virtual Traffic Manager and Microsoft Skype for Business 2015 Deployment Guide Page 44
• Exchange UM for remote users using Exchange UM prior to Exchange 2010 with SP1
• Connectivity to public IM users
For further information about DNS load balancing and the specific scenarios for application delivery controller/hardware load balancer, refer to the links below:
• DNS Load Balancing
• Hardware Load Balancer Requirements
Chapter 4: Configuring the Office Web Apps Server for Virtual Traffic Manager
This section provides step-by-step instructions on configuring the Virtual Traffic Manager for Office Web Apps 2013. Microsoft Office Web Apps 2013 is a web-based version of the Microsoft Office suite that can integrate with Exchange, Skype for Business, and SharePoint. In a typical Skype for Business deployment, Office Web Apps servers are also deployed and integrated with Skype for Business 2015. Use this guide to configure the Virtual Traffic Manager to load-balance Office Web Apps 2013.
Microsoft Office Web Apps 2013 can be configured to allow SSL offloading. For more information, refer to the TechNet article at https://technet.microsoft.com/en-us/library/jj219435.aspx.
This chapter describes the following:
• Creating a Traffic IP Group for Office Web Apps 2013
• Creating a Pool That Contains Office Web Apps Servers
• Configuring Session Persistence for the Office Web Apps Pool
• Creating a Virtual Server That Listens to the Office Web Apps Traffic IP Group
• Configuring SSL Decryption for SSL Offload
Creating a Traffic IP Group for Office Web Apps 2013
Create a traffic IP group (also known as a virtual IP), which the virtual server will listen on.
1. Select Services > Traffic IP Groups, and scroll down to Create a new Traffic IP Group.
2. Fill in the fields as follows:
• Name: A descriptive name for the SharePoint farm site (e.g., officeweb.mycompany.com)
• IP Addresses: An IP address that is mapped to the FQDN of the SharePoint farm site
3. Click Create Traffic Group.
Page 45 Pulse Secure Virtual Traffic Manager and Microsoft Skype for Business 2015 Deployment Guide
Creating a Pool That Contains Office Web Apps Servers
A pool must be created for the Office Web Apps service managed by the Virtual Traffic Manager.
1. Select Services > Pools, and scroll down to Create a new Pool.
2. Fill in the fields as follows:
• Pool Name: A descriptive name for the pool (e.g., Office Web Apps)
• Nodes: hostname:80 or ipaddress:80 (Note: use port 443 if SSL offloading is not configured on Office Web Apps servers)
• Monitor: Full HTTP (Note: use Full HTTPS if SSL offloading is not configured on Office Web Apps servers)
3. In the next screen, click Load Balancing.
4. Under Algorithm, select Least Connections.
5. Click the Update button to apply changes.
Configuring Session Persistence for the Office Web Apps Pool
The section describes how to configure transparent-session-affinity-based session persistence on the pool created earlier.
1. Select Catalogs > Persistence.
2. Provide a descriptive name for the persistence class.
3. Click Create Class.
4. Select transparent session affinity under Basic Settings.
5. Click Update to apply changes.
6. Select Services > Pools, and choose the appropriate pool created earlier.
7. Select Session Persistence, and click Edit.
8. Select the session persistence class created, and click Update to apply changes.
Creating a Virtual Server That Listens to the Office Web Apps Traffic IP Group
Create a virtual server to handle all the view client traffic:
1. Select Services > Virtual Servers, and scroll down to Create a new Virtual Server.
2. Enter the following:
• Virtual Server Name: A descriptive name for the virtual server (e.g., sp.mycompany.com)
• Protocol: HTTP (Note: use SSL HTTPS if SSL offloading is not configured on Office Web Apps servers)
• Port: 443
• Default Traffic Pool: Any pool created in the previous section
Pulse Secure Virtual Traffic Manager and Microsoft Skype for Business 2015 Deployment Guide Page 46
3. Click Create Virtual Server.
4. In the next screen, under Listening on, select Traffic IP Groups, and check the appropriate traffic IP group created earlier.
5. Set Enabled to Yes.
6. Click the Update button to apply changes.
Configuring SSL Decryption for SSL Offload
Perform the tasks in this section only if SSL offload is configured for Office Web Apps servers.
Importing the Certificate
In order to perform SSL decryption, the certificate and the private key used for the virtual server created earlier must be imported into the Virtual Traffic Manager.
1. Select Catalogs > SSL > SSL Certificates.
2. Click Import Certificate to import the appropriate certificate.
Enabling SSL Decryption on the Virtual Server
After importing the certificate, enable SSL decryption on the virtual server created:
1. Select Services > Virtual Servers, and choose the virtual server created for the SharePoint farm website that will be performing SSL decryption.
2. Scroll down and click SSL Decryption.
3. Set ssl_decrypt to Yes.
4. Select the certificate imported earlier.
5. Scroll down to the bottom of the page, and click Update.
Chapter 5: Using Virtual Traffic Manager to Enhance a Microsoft Skype for Business 2015 Deployment
Pulse Secure’s Virtual Traffic Manager has additional capabilities beyond a legacy load balancer to enhance the performance and manageability of your Microsoft Skype for Business 2015 environment. Here are some common capabilities and best practices for deploying the Virtual Traffic Manager to enhance your Microsoft Skype for Business 2015 deployment.
This chapter includes the following sections:
• Service Level Monitoring
• Global Load Balancing
• Skype for Business Web Client Supported Web Browsers
• Configuring Clustering for Virtual Traffic Manager

Page 47 Pulse Secure Virtual Traffic Manager and Microsoft Skype for Business 2015 Deployment Guide
Service Level Monitoring
This feature monitors the responses of your SharePoint servers and can send alerts should these responses fall below an expected threshold of performance. In addition to sending alerts, a TrafficScript rule can be written and configured to remove the service or server from the pool until the performance issue has been remediated, to reprioritize traffic, and even to reallocate bandwidth. Essentially, by using a TrafficScript Rule for service level monitoring, services can be controlled and managed.
Global Load Balancing
Global load balancing enables clients to be distributed across multiple locations, either for Disaster Recovery or based on their geographic proximity to a data center. As a common issue when failing over to a DR location, services become unavailable until the DNS Time-to-Live (TTL) expires, so that clients can resolve the IP address of the DR location. Configuring the Virtual Traffic Manager for global load balancing using active/passive mode improves and utilizes failover Recovery Time Objective (RTO) because it is no longer constrained by the DNS TTL.
In the case of Skype for Business 2015, aside from DNS, additional PowerShell commands should be run on a Skype for Business Server to fail over to another active pool. This process can be automated by integrating Virtual Traffic Manager with PowerShell. One way to do so is to create custom health monitors for a traffic IP group and a virtual server, which PowerShell monitors.
#// Script for Monitoring TCP Port 80
$debug = 0; // Change value to 1 if debug needed
$sock = tcp.connect( "192.168.1.26", 80, 200);
if( ! $sock )
{
http.sendResponse("200 OK", "text/html", "NOK", "");
if ($debug > 0) { log.info("Send NOK");}
}
else
{
tcp.close( $sock );
http.sendResponse("200 OK", "text/html", "OK", "");
if ($debug > 0) { log.info("Send OK");}
}
Using PowerShell scripting and job monitoring, the process of moving clients to another active pool can be automated based on the response of the Virtual Traffic Manager: “OK” or “NOK” as shown in the previous example. The following is a sample PowerShell script that retrieves the response of the health monitor by accessing the FQDN of the traffic IP group.
$health = (new-object net.webclient).DownloadString("http://monitor.mycompany.com")
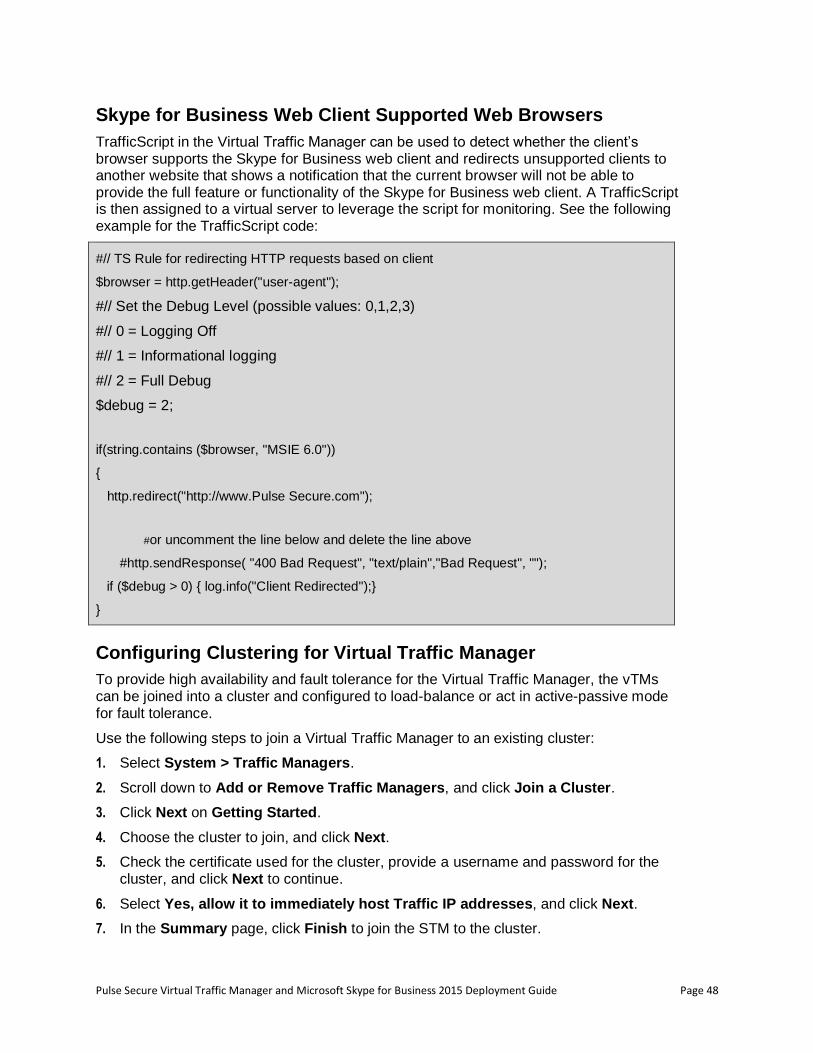
Pulse Secure Virtual Traffic Manager and Microsoft Skype for Business 2015 Deployment Guide Page 48
Skype for Business Web Client Supported Web Browsers
TrafficScript in the Virtual Traffic Manager can be used to detect whether the client’s browser supports the Skype for Business web client and redirects unsupported clients to another website that shows a notification that the current browser will not be able to provide the full feature or functionality of the Skype for Business web client. A TrafficScript is then assigned to a virtual server to leverage the script for monitoring. See the following example for the TrafficScript code:
#// TS Rule for redirecting HTTP requests based on client
$browser = http.getHeader("user-agent");
#// Set the Debug Level (possible values: 0,1,2,3)
#// 0 = Logging Off
#// 1 = Informational logging
#// 2 = Full Debug
$debug = 2;
if(string.contains ($browser, "MSIE 6.0"))
{
http.redirect("http://www.Pulse Secure.com");
#or uncomment the line below and delete the line above
#http.sendResponse( "400 Bad Request", "text/plain","Bad Request", "");
if ($debug > 0) { log.info("Client Redirected");}
}
Configuring Clustering for Virtual Traffic Manager
To provide high availability and fault tolerance for the Virtual Traffic Manager, the vTMs can be joined into a cluster and configured to load-balance or act in active-passive mode for fault tolerance.
Use the following steps to join a Virtual Traffic Manager to an existing cluster:
1. Select System > Traffic Managers.
2. Scroll down to Add or Remove Traffic Managers, and click Join a Cluster.
3. Click Next on Getting Started.
4. Choose the cluster to join, and click Next.
5. Check the certificate used for the cluster, provide a username and password for the cluster, and click Next to continue.
6. Select Yes, allow it to immediately host Traffic IP addresses, and click Next.
7. In the Summary page, click Finish to join the STM to the cluster.
Page 49 Pulse Secure Virtual Traffic Manager and Microsoft Skype for Business 2015 Deployment Guide
Chapter 6: WAF
Pulse Secure Virtual Web Application Firewall is a scalable security platform for off-the-shelf solutions and custom applications. It lets you apply business rules to online traffic, screening for attacks such as SQL injection and cross-site scripting (XSS), while securing outgoing traffic to help compliance with PCI-DSS and HIPAA. vWAF can be run as an add-on on the vTM to enable both load-balancing and application firewall services on a single instance.
Apart from custom rule configurations that are possible on the vWAF, there is a ruleset called baseline protection that protects applications from the most common application layer attacks existent today. That includes attack categories such as
• Path Traversal
• Shell Command Injection
• SQL Injection
• Code Injection
• Cross-site Scripting (XSS)
• Common Attacks
• LDAP Injection
• Scanner
• XPATH Injection
The following procedure documents the configuration of the Web Application Firewall for baseline protection of the Microsoft Skype for Business Application for the http services.
1) On the vTM, navigate to System > Application Firewall and click the radio button afm_enabled followed by update (ensure the confirm checkbox is checked).
2) Click on the Application Firewall Tab on the vTM.
3) Click on Administration and then select Baseline Management.
4) From this screen, either download the latest Virtual Web Application Firewall baseline signatures from Pulse Secure Communities and click Upload or click on the “Download from Server” option if your vTM+WAF has Internet connectivity.
5) In the Application Firewall UI, click on Application Control and select Application Creation Wizard
6) Enter a name for the application and click Continue
7) Choose Detection mode that will enable the firewall rules to be applied to production traffic. Choose Protection mode for not affecting production traffic and if you want to test the rules and check the logs for their accuracy. Click Continue
8) In the customer key screen, leave it to the default and click continue
9) In the hostname screen, enter the exact fqdn/IP address (typically, this is the TIP Group address) of how the application will be accessed by users/clients. You can enter multiple values for one application simply by clicking Add hostname after adding one. Click continue
10) In the next screen, leave the default logging level to reduced logging unless there is a need to monitor the complete logs. Click continue
11) In the next screen, choose the option to enable full request logging and selecting the number of days for data retention. If indefinite, leave it to the default 0. Click continue
Pulse Secure Virtual Traffic Manager and Microsoft Skype for Business 2015 Deployment Guide Page 50
12) In the next screen, choose to run the Baseline Protection Wizard. Click continue and then click Finish
13) In the Baseline Protection wizard, Click Next on the Overview screen.
14) Choose the Baseline Version to use. Click Next
15) Leave the rest of the screens to their defaults and finally click Finish.
16) Click on the tab Virtual Traffic Manager to go back to the vTM UI.
17) Select the Virtual Server on which WAF service needs to be enabled and select “enabled” for the option Application Firewall and Click Update.
Please reach out to the Pulse Secure support team for help on more advanced and customized configuration of the Web Application Firewall.
Chapter 7: Common Troubleshooting Tips
This chapter describes common deployment problems and solutions and includes the following sections:
• Common Deployment Issues
• Other Troubleshooting Tips
Common Deployment Issues
This section describes some common issues that can arise when deploying Microsoft Skype for Business 2015 along with Pulse Secure Virtual Traffic Manager and ways to resolve these issues.
Check DNS Entries
If the Skype for Business client cannot sign in, it is likely that DNS records are missing. A proper Skype for Business deployment requires a number of DNS entries.
1. Make sure that the DNS requirements for Skype for Business 2015 are completed. The DNS requirements can be found at https://technet.microsoft.com/en-us/library/dn951397.aspx.
2. In a default Skype for Business Server 2015 deployment, the DNS entries are configured to point directly to their corresponding pools such as the Front End Pool and the Edge Pool; however, for the Virtual Traffic Manager deployment, make sure that these DNS entries point to the virtual IP (traffic IP group) of the virtual server that load-balances the specific pool. This will ensure that the traffic goes to the Virtual Traffic Manager for load balancing.
Certificates
An invalid certificate on the Virtual Traffic Manager can also prevent the Skype for Business client from successfully signing in. If using a firewall/reverse proxy, the Virtual Traffic Manager must be able to decrypt SSL traffic, which requires a certificate along with a private key. If you are using an internal Certificate Authority (CA), Step 3 of the Skype for Business Server Deployment Wizard can automatically generate a certificate request to
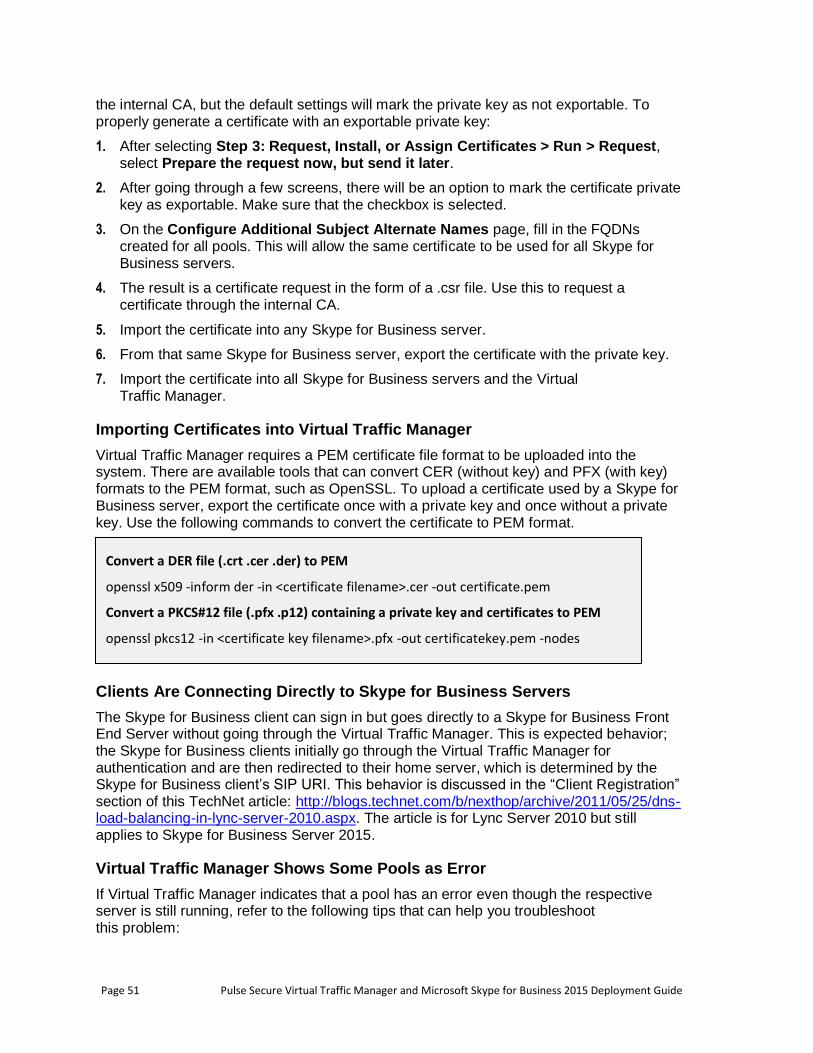
Page 51 Pulse Secure Virtual Traffic Manager and Microsoft Skype for Business 2015 Deployment Guide
the internal CA, but the default settings will mark the private key as not exportable. To properly generate a certificate with an exportable private key:
1. After selecting Step 3: Request, Install, or Assign Certificates > Run > Request, select Prepare the request now, but send it later.
2. After going through a few screens, there will be an option to mark the certificate private key as exportable. Make sure that the checkbox is selected.
3. On the Configure Additional Subject Alternate Names page, fill in the FQDNs created for all pools. This will allow the same certificate to be used for all Skype for Business servers.
4. The result is a certificate request in the form of a .csr file. Use this to request a certificate through the internal CA.
5. Import the certificate into any Skype for Business server.
6. From that same Skype for Business server, export the certificate with the private key.
7. Import the certificate into all Skype for Business servers and the Virtual Traffic Manager.
Importing Certificates into Virtual Traffic Manager
Virtual Traffic Manager requires a PEM certificate file format to be uploaded into the system. There are available tools that can convert CER (without key) and PFX (with key) formats to the PEM format, such as OpenSSL. To upload a certificate used by a Skype for Business server, export the certificate once with a private key and once without a private key. Use the following commands to convert the certificate to PEM format.
Clients Are Connecting Directly to Skype for Business Servers
The Skype for Business client can sign in but goes directly to a Skype for Business Front End Server without going through the Virtual Traffic Manager. This is expected behavior; the Skype for Business clients initially go through the Virtual Traffic Manager for authentication and are then redirected to their home server, which is determined by the Skype for Business client’s SIP URI. This behavior is discussed in the “Client Registration” section of this TechNet article: http://blogs.technet.com/b/nexthop/archive/2011/05/25/dns-load-balancing-in-lync-server-2010.aspx. The article is for Lync Server 2010 but still applies to Skype for Business Server 2015.
Virtual Traffic Manager Shows Some Pools as Error
If Virtual Traffic Manager indicates that a pool has an error even though the respective server is still running, refer to the following tips that can help you troubleshoot this problem:
Convert a DER file (.crt .cer .der) to PEM
openssl x509 -inform der -in <certificate filename>.cer -out certificate.pem
Convert a PKCS#12 file (.pfx .p12) containing a private key and certificates to PEM
openssl pkcs12 -in <certificate key filename>.pfx -out certificatekey.pem -nodes
Pulse Secure Virtual Traffic Manager and Microsoft Skype for Business 2015 Deployment Guide Page 52
Make sure that the firewall of the respective Skype for Business Server is not blocking the specified ports used by the service involved. Microsoft Skype for Business Server 2015 automatically configures these firewall settings; however, it is important to make sure that the necessary ports are opened. Refer to the following TechNet article for the complete list of ports needed by Skype for Business Server 2015: https://technet.microsoft.com/en-us/library/gg398833.aspx.
Make sure that the service is installed in Skype for Business Server 2015. There are some cases where some services are not installed properly. In order to check whether the service is running, go to the respective Skype for Business Server and check Services.msc.
You can also use SSH to connect to one of the Virtual Traffic Mangers and use the telnet command to see if a given service is reachable by the Virtual Traffic Manager. For example, you can run the following command: telnet <Skype for Business server IP> 5073 on a Virtual Traffic Manager directly to verify if one of the ports on the Skype for Business Front End Pool is running properly.
Other Troubleshooting Tips
This section contains some miscellaneous troubleshooting tips that are helpful when deploying Microsoft Skype for Business 2015 along with the Virtual Traffic Manager.
Checking Connections to Virtual Traffic Manager
Follow the tips below to check whether the Virtual Traffic Manager was configured correctly and is accepting traffic:
1. On the Virtual Traffic Manager, select Activity > Connections and see whether connections are being made to the virtual servers. If not, either the Skype for Business client is unable to reach the Virtual Traffic Manager or Skype for Business is directly connecting to the respective pools because of DNS entries. Activity connection monitoring is not enabled by default. To enable tracing for a virtual server:
a. Select Services > Virtual Server, and choose the virtual server where tracing will be enabled.
b. Set Request Tracing to Yes, and click Update.
c. Log configurations can be done via System > Global Settings Logging.
2. Install Wireshark on the Skype for Business client machine, and see how far the Skype for Business client gets. If it is sending out a DNS request for _sipinternaltls._tcp.<domain> or similar FQDNs and not getting responses, see the previous “Check DNS Entries” section.
3. Enable client-side logging on the Skype for Business Client. This logging is helpful for observing the connections that the Skype for Business Client tries to make as well as the errors that it encounters. To enable client-side logging, follow these steps:
a. In the upper right corner of the Skype for Business main window, click Options (gear icon).
Page 53 Pulse Secure Virtual Traffic Manager and Microsoft Skype for Business 2015 Deployment Guide
b. In the Skype for Business - Options dialog box, click General.
c. Under Logging, select the Turn on logging in Skype for Business and Turn on Windows Event logging for Skype for Business checkboxes.
d. Click OK.
e. Restart Skype for Business, and then try to reproduce the issue.
The logs can be found under the following location:
%userprofile%\AppData\Local\Microsoft\Office\15.0\Lync\Tracing. Check the Lync-UccApi-#.UccApilog file
Session Persistence Error When Configuring a Persistence Class
When configuring a session persistence class, the following error may be generated:
ERROR: This persistence class is being used by other pools with different node addresses, which can cause problems with session affinity. Please create a new persistence class and assign that instead.
This is because the pool that is trying to be used has completely different IP addresses than the one that this persistence class is already used for.
For example, if the node that is being balanced to has a 10.255.1.X/24 address and the other nodes in the same persistence class have a 10.255.2.X/24 address, then a persistence class must be created for the new node on a different subnet. In short, a persistence class must be created for each subnet.
If this is the case, create a new persistence class of type IP-Based, with a different name, and use that for the specific nodes on the alternate subnet:
1. Select Catalogs > Persistence.
2. Provide a descriptive name for the persistence class.
3. Click Create Class.
4. Select IP-Based Persistence under Basic Settings.
5. Click Update to apply changes.
6. Select Services > Pools, and choose the appropriate pool created earlier.
7. Select Session Persistence, and click Edit.
8. Select the session persistence class just created, and click Update to apply changes.
Address in Use Error When Adding a Pool
When turning on pools after creation, an error like the following may be produced:
port: Failed to bind to XXX.XXX.XXX.XXX:port# (Address already in use)
This error is produced because the VIP is trying to bind on a port and address that is already in use on the interface of the Virtual Traffic Manager. In this case, perform the following steps:
1. Select Home, and choose the virtual server in error.
2. Expand Basic Settings, and select Traffic IP Groups.
Pulse Secure Virtual Traffic Manager and Microsoft Skype for Business 2015 Deployment Guide Page 54
3. Check the Select checkbox that has the specific traffic IP group to be used with this IP group.
4. Click Update.
Note: These steps may need to be performed on both virtual servers that are failing to bind on the problematic port. These steps can also be performed on all virtual servers to specifically bind them to traffic IP groups.
Diagnose Tab in Virtual Traffic Manager
The Diagnose tab in Virtual Traffic Manager is a useful tool that shows a summary of all current problems in the configuration. Additionally, it shows a description for each specific error, making it easier to identify the problem.
Chapter 8: Conclusion
This document briefly discusses how to configure Virtual Traffic Manager to optimize the Microsoft Skype for Business 2015 deployment. Virtual Traffic Manager can make intelligent load-balancing decisions and improve the performance, security, reliability, and integrity of the traffic in this environment.
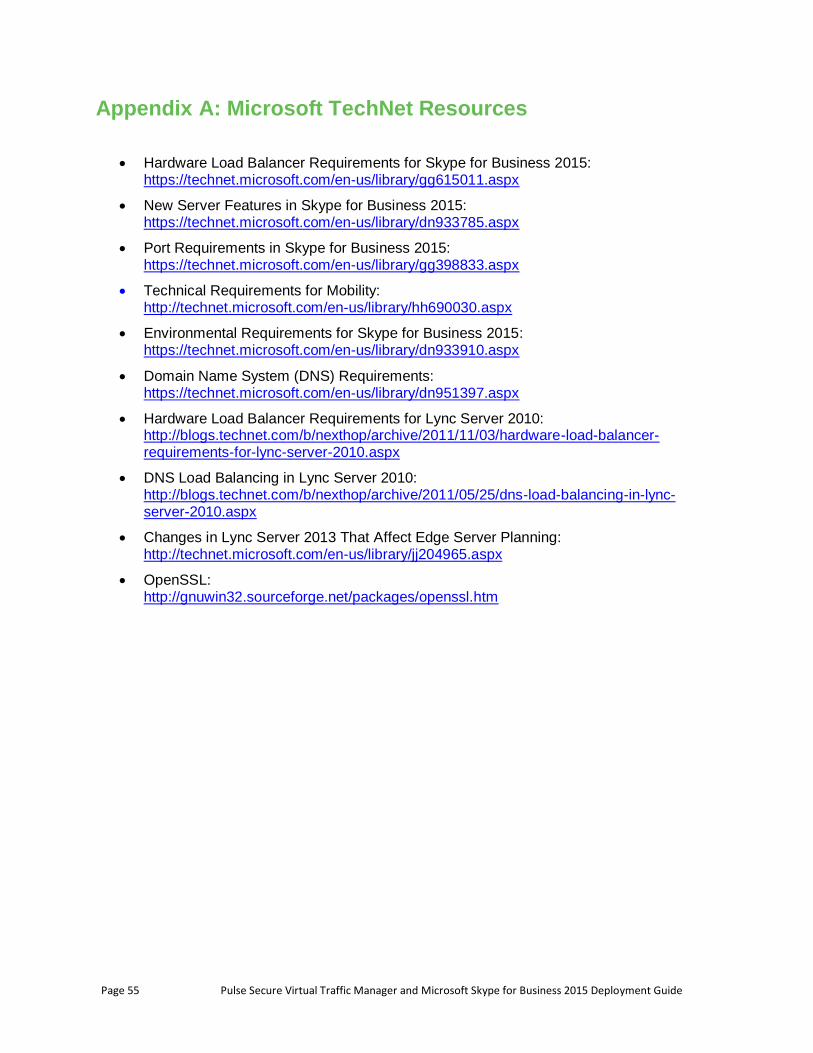
Page 55 Pulse Secure Virtual Traffic Manager and Microsoft Skype for Business 2015 Deployment Guide
Appendix A: Microsoft TechNet Resources
• Hardware Load Balancer Requirements for Skype for Business 2015: https://technet.microsoft.com/en-us/library/gg615011.aspx
• New Server Features in Skype for Business 2015: https://technet.microsoft.com/en-us/library/dn933785.aspx
• Port Requirements in Skype for Business 2015: https://technet.microsoft.com/en-us/library/gg398833.aspx
• Technical Requirements for Mobility: http://technet.microsoft.com/en-us/library/hh690030.aspx
• Environmental Requirements for Skype for Business 2015: https://technet.microsoft.com/en-us/library/dn933910.aspx
• Domain Name System (DNS) Requirements: https://technet.microsoft.com/en-us/library/dn951397.aspx
• Hardware Load Balancer Requirements for Lync Server 2010: http://blogs.technet.com/b/nexthop/archive/2011/11/03/hardware-load-balancer-requirements-for-lync-server-2010.aspx
• DNS Load Balancing in Lync Server 2010: http://blogs.technet.com/b/nexthop/archive/2011/05/25/dns-load-balancing-in-lync-server-2010.aspx
• Changes in Lync Server 2013 That Affect Edge Server Planning: http://technet.microsoft.com/en-us/library/jj204965.aspx
• OpenSSL: http://gnuwin32.sourceforge.net/packages/openssl.htm
Recommended