Oracle® Fusion MiddlewareUsing Oracle Managed File Transfer
12c Release (12.1.3)
E37983-08
May 2016
This document describes how to administer Oracle ManagedFile Transfer, how to design and monitor file transfers, andhow to integrate Oracle Managed File Transfer with otherapplications.

Oracle Fusion Middleware Using Oracle Managed File Transfer, 12c Release (12.1.3)
E37983-08
Copyright © 2014, 2016, Oracle and/or its affiliates. All rights reserved.
Primary Author: Oracle Corporation.
Contributing Authors: Oracle Corporation.
Contributors: Oracle MFT development, product management, and quality assurance teams
This software and related documentation are provided under a license agreement containing restrictions onuse and disclosure and are protected by intellectual property laws. Except as expressly permitted in yourlicense agreement or allowed by law, you may not use, copy, reproduce, translate, broadcast, modify, license,transmit, distribute, exhibit, perform, publish, or display any part, in any form, or by any means. Reverseengineering, disassembly, or decompilation of this software, unless required by law for interoperability, isprohibited.
The information contained herein is subject to change without notice and is not warranted to be error-free. Ifyou find any errors, please report them to us in writing.
If this is software or related documentation that is delivered to the U.S. Government or anyone licensing it onbehalf of the U.S. Government, then the following notice is applicable:
U.S. GOVERNMENT END USERS: Oracle programs, including any operating system, integrated software,any programs installed on the hardware, and/or documentation, delivered to U.S. Government end users are"commercial computer software" pursuant to the applicable Federal Acquisition Regulation and agency-specific supplemental regulations. As such, use, duplication, disclosure, modification, and adaptation of theprograms, including any operating system, integrated software, any programs installed on the hardware,and/or documentation, shall be subject to license terms and license restrictions applicable to the programs.No other rights are granted to the U.S. Government.
This software or hardware is developed for general use in a variety of information management applications.It is not developed or intended for use in any inherently dangerous applications, including applications thatmay create a risk of personal injury. If you use this software or hardware in dangerous applications, then youshall be responsible to take all appropriate fail-safe, backup, redundancy, and other measures to ensure itssafe use. Oracle Corporation and its affiliates disclaim any liability for any damages caused by use of thissoftware or hardware in dangerous applications.
Oracle and Java are registered trademarks of Oracle and/or its affiliates. Other names may be trademarks oftheir respective owners.
Intel and Intel Xeon are trademarks or registered trademarks of Intel Corporation. All SPARC trademarks areused under license and are trademarks or registered trademarks of SPARC International, Inc. AMD, Opteron,the AMD logo, and the AMD Opteron logo are trademarks or registered trademarks of Advanced MicroDevices. UNIX is a registered trademark of The Open Group.
This software or hardware and documentation may provide access to or information about content, products,and services from third parties. Oracle Corporation and its affiliates are not responsible for and expresslydisclaim all warranties of any kind with respect to third-party content, products, and services unlessotherwise set forth in an applicable agreement between you and Oracle. Oracle Corporation and its affiliateswill not be responsible for any loss, costs, or damages incurred due to your access to or use of third-partycontent, products, or services, except as set forth in an applicable agreement between you and Oracle.

Contents
Preface ................................................................................................................................................................ ix
Audience ....................................................................................................................................................... ix
Documentation Accessibility ..................................................................................................................... ix
Related Documents...................................................................................................................................... ix
Conventions................................................................................................................................................... x
1 Understanding Oracle Managed File Transfer
1.1 What You Can Do with Oracle Managed File Transfer ............................................................. 1-1
1.2 Oracle Managed File Transfer, Oracle Service Bus, and Oracle B2B........................................ 1-3
1.3 Oracle Managed File Transfer Functional Use Case Patterns ................................................... 1-3
1.3.1 Standalone Applications ..................................................................................................... 1-3
1.3.2 SOA Integration.................................................................................................................... 1-4
1.3.3 B2B Integration ..................................................................................................................... 1-4
1.3.4 Healthcare Integration......................................................................................................... 1-4
1.3.5 Oracle Service Bus Integration ........................................................................................... 1-4
1.3.6 Hybrid Integration ............................................................................................................... 1-5
1.4 Oracle Managed File Transfer Architecture................................................................................. 1-5
1.5 Components of Oracle Managed File Transfer ........................................................................... 1-6
1.5.1 Artifacts: Sources, Targets, and Transfers ........................................................................ 1-6
1.5.2 Embedded FTP and sFTP Servers...................................................................................... 1-6
1.5.3 Monitoring and Reports ...................................................................................................... 1-6
1.5.4 Security .................................................................................................................................. 1-7
1.5.5 Utilities ................................................................................................................................... 1-7
1.5.6 Repository.............................................................................................................................. 1-8
1.5.7 Interfaces................................................................................................................................ 1-8
1.6 Oracle Managed File Transfer User Roles.................................................................................... 1-8
1.6.1 File Handlers ......................................................................................................................... 1-8
1.6.2 Designers ............................................................................................................................... 1-8
1.6.3 Monitors................................................................................................................................. 1-8
1.6.4 Administrators...................................................................................................................... 1-9
1.7 Installing Oracle Managed File Transfer ...................................................................................... 1-9
1.8 Screen Navigation in Oracle Managed File Transfer.................................................................. 1-9
iii

1.8.1 Design, Monitoring, and Administration Pages.............................................................. 1-9
1.8.2 Using the Left Panel Navigator ........................................................................................ 1-10
1.8.3 Opening and Closing Dynamic Tabs............................................................................... 1-10
1.8.4 Dragging and Dropping Sources and Targets into Transfers...................................... 1-11
1.8.5 Expanding and Collapsing the Dashboard Regions ..................................................... 1-12
1.8.6 Setting Language, Time Zone, and Accessibility Preferences ..................................... 1-12
2 Designing Artifacts: Transfers, Sources, and Targets
2.1 About Designing Transfers ............................................................................................................ 2-1
2.1.1 Getting Ready to Create a Transfer ................................................................................... 2-1
2.1.2 Designing End-to-End Flows.............................................................................................. 2-2
2.2 Configuring a Transfer.................................................................................................................... 2-2
2.2.1 Adding a Source and Targets ............................................................................................. 2-3
2.2.2 Setting Up Content Filters................................................................................................... 2-4
2.2.3 Configuring Target-Specific Transfer Settings................................................................. 2-5
2.2.4 Setting Up Transfer Preprocessing and Postprocessing Actions .................................. 2-5
2.2.5 Duplicating an Existing Transfer ..................................................................................... 2-10
2.3 Creating a Source ........................................................................................................................... 2-11
2.3.1 Source Types ....................................................................................................................... 2-12
2.3.2 Setting Up Source Processing Actions............................................................................. 2-17
2.3.3 Archiving and Deleting Files Before Delivery ............................................................... 2-19
2.3.4 Duplicating an Existing Source ........................................................................................ 2-19
2.4 Creating a Target ........................................................................................................................... 2-20
2.4.1 Target Types........................................................................................................................ 2-21
2.4.2 Moving and Renaming Files After Delivery .................................................................. 2-25
2.4.3 Duplicating an Existing Target......................................................................................... 2-26
2.4.4 Retry Interval and Retry Count........................................................................................ 2-26
2.5 Setting Up Schedules..................................................................................................................... 2-26
2.5.1 Schedules with Polling Frequency and Minimum Age ............................................... 2-28
2.6 Deploying and Testing Transfers ................................................................................................ 2-29
2.6.1 Deploying a Source, Target, or Transfer ......................................................................... 2-29
2.6.2 How to Tell If a Transfer Is Successful ............................................................................ 2-29
2.7 Importing and Exporting Transfers ............................................................................................ 2-30
3 Processing Transfers with Custom Callouts
3.1 Understanding Custom Callouts................................................................................................... 3-1
3.2 Creating a Custom Callout: High-Level Steps ............................................................................ 3-2
3.3 Creating the Code ............................................................................................................................ 3-3
3.3.1 Java Code Requirements and Tips..................................................................................... 3-3
3.3.2 Java Code for the Newline Conversion Example ............................................................ 3-4
3.4 Creating the Callout Definition File.............................................................................................. 3-5
3.5 Locating the Callout Directory ...................................................................................................... 3-6
3.6 Running the createCallouts Command ........................................................................................ 3-6
iv

3.7 Testing the Callout........................................................................................................................... 3-7
3.7.1 Adding the Callout to a Source .......................................................................................... 3-7
3.7.2 Adding the Callout to a Target........................................................................................... 3-8
3.7.3 Viewing the Report to Verify the Callout Action ............................................................ 3-8
3.7.4 Updating the Callout ........................................................................................................... 3-9
3.8 Reference Files.................................................................................................................................. 3-9
3.8.1 PreCalloutPlugin Interface.................................................................................................. 3-9
3.8.2 PostCalloutPlugin Interface .............................................................................................. 3-10
3.8.3 Callout Definition Schema ................................................................................................ 3-10
3.9 Validating using Custom Callout................................................................................................ 3-13
4 Integrating Oracle Managed File Transfer with Other Products
4.1 Compatible Technologies and Integration Strategies................................................................. 4-1
4.2 Managing Domains ......................................................................................................................... 4-2
4.2.1 Specifying the Tracking URL.............................................................................................. 4-3
4.3 Integrating with Oracle SOA Suite................................................................................................ 4-4
4.3.1 Creating an MFT Reference for a SOA Source ................................................................. 4-4
4.3.2 Creating an MFT Service for a SOA Target ...................................................................... 4-4
4.3.3 Interlinked SOA and MFT Reports.................................................................................... 4-5
4.4 Integrating with Oracle Service Bus.............................................................................................. 4-5
4.4.1 Creating a Business Service for a Service Bus Source ..................................................... 4-5
4.4.2 Creating a Proxy Service for a Service Bus Target........................................................... 4-6
4.5 Integrating with B2B........................................................................................................................ 4-8
4.5.1 Creating a Remote Trading Partner Channel for a B2B Source..................................... 4-8
4.5.2 Configuring a B2B Domain for a B2B Target ................................................................... 4-8
4.5.3 Interlinked B2B and MFT Reports ..................................................................................... 4-9
4.6 Integrating with Healthcare ........................................................................................................... 4-9
4.6.1 Creating an Outbound Endpoint for a Healthcare Source............................................. 4-9
4.6.2 Creating an Inbound Endpoint for a Healthcare Target .............................................. 4-10
4.6.3 Interlinked Healthcare and MFT Reports....................................................................... 4-10
4.7 Integrating with Oracle Data Integrator..................................................................................... 4-10
4.7.1 Using the File System and FTP for ODI Integration ..................................................... 4-11
4.7.2 Invoking a Web Service for an ODI Source .................................................................... 4-11
4.7.3 Creating a Data Service for an ODI Target ..................................................................... 4-12
4.8 Integrating with Web Services..................................................................................................... 4-14
4.9 MFT WSDL Files ............................................................................................................................ 4-14
5 Monitoring Oracle Managed File Transfer
5.1 Monitoring Deployed Sources, Targets, and Transfers.............................................................. 5-1
5.1.1 Disabling Sources, Targets, and Transfers........................................................................ 5-2
5.1.2 Reenabling Sources, Targets, and Transfers..................................................................... 5-2
5.1.3 Undeploying Sources, Targets, and Transfers ................................................................. 5-3
5.1.4 Redeploying Sources, Targets, and Transfers .................................................................. 5-3
v

5.1.5 Versioning Sources, Targets, and Transfers ..................................................................... 5-3
5.2 Monitoring Transfer Flows Using the Main Dashboard............................................................ 5-4
5.2.1 Interpreting Main Dashboard Metrics .............................................................................. 5-4
5.2.2 Using the File Finder............................................................................................................ 5-5
5.2.3 Monitoring Active Deliveries ............................................................................................. 5-6
5.3 Interpreting Dashboards for All Transfers, Sources, or Targets ............................................... 5-6
5.3.1 Interpreting Instance Messages.......................................................................................... 5-7
5.3.2 Interpreting Dashboard Metrics......................................................................................... 5-8
5.4 Interpreting Single Artifact Transfer, Source, and Target Dashboards ................................... 5-8
5.4.1 Interpreting Artifact Instance Messages ........................................................................... 5-9
5.4.2 Interpreting Artifact Information....................................................................................... 5-9
5.4.3 Interpreting Artifact Dashboard Metrics ........................................................................ 5-10
5.5 Interpreting Source, Transfer, and Target Reports ................................................................... 5-11
5.5.1 Using the Flow Diagram ................................................................................................... 5-11
5.5.2 Source Reports .................................................................................................................... 5-12
5.5.3 Transfer Reports ................................................................................................................. 5-12
5.5.4 Target Reports..................................................................................................................... 5-13
5.6 Pause and Restart a Transfer........................................................................................................ 5-13
5.7 Resubmit a Transfer....................................................................................................................... 5-14
5.8 Diagnose File Delivery Failures................................................................................................... 5-14
5.9 Diagnose Transfer Errors.............................................................................................................. 5-15
5.9.1 Diagnosing Error Messages and Descriptions ............................................................... 5-15
6 Administering Oracle Managed File Transfer
6.1 Changing Server Properties ........................................................................................................... 6-1
6.1.1 General Server Configuration Properties ......................................................................... 6-2
6.1.2 Performance Properties ....................................................................................................... 6-3
6.1.3 High Availability Properties............................................................................................... 6-3
6.1.4 Advanced Delivery Properties ........................................................................................... 6-3
6.2 Importing and Exporting the MFT Configuration...................................................................... 6-4
6.3 Increasing Memory to Improve Performance of Large File Transfers..................................... 6-4
6.4 Oracle WebLogic Server Startup and Shutdown ........................................................................ 6-5
6.5 Transferring Files Through Firewalls Using the MFT FTP Proxy Server................................ 6-5
6.6 Managing Multiple Weblogic Servers and High Availability................................................... 6-6
6.6.1 Configuring High Availability ........................................................................................... 6-6
6.6.2 Preventing Cluster Startup Errors ..................................................................................... 6-7
6.6.3 Load Balancing in Oracle Managed File Transfer ........................................................... 6-7
6.7 Enabling Event Notifications ......................................................................................................... 6-7
6.7.1 Configuring an Email Driver for Notifications................................................................ 6-8
6.7.2 Configuring an SMS Driver for Notifications .................................................................. 6-9
6.8 MFTExceptionQueue .................................................................................................................... 6-10
6.9 Configuring Oracle Managed File Transfer Error Processor Queues .................................... 6-11
6.10 Configuring Oracle Managed File Transfer Loggers.............................................................. 6-13
vi

6.11 Oracle Managed File Transfer Loggers .................................................................................... 6-14
6.12 Viewing Oracle Managed File Transfer Log Messages.......................................................... 6-16
6.13 Moving Oracle Managed File Transfer to Another Environment ........................................ 6-17
7 Administering Oracle Managed File Transfer Embedded Servers
7.1 About Embedded FTP and sFTP Servers ..................................................................................... 7-1
7.1.1 Security .................................................................................................................................. 7-2
7.1.2 Archiving and Purging Transfers and Files ..................................................................... 7-2
7.2 Embedded Server Configuration................................................................................................... 7-2
7.2.1 Re-configuring the Port ....................................................................................................... 7-2
7.2.2 Path Separators for Remote FTP and sFTP Servers......................................................... 7-3
7.2.3 Other Embedded Server Settings....................................................................................... 7-3
7.3 Starting and Stopping Embedded Servers ................................................................................... 7-4
7.4 Managing Embedded Servers and High Availability ................................................................ 7-5
7.5 Supported FTP and sFTP Commands .......................................................................................... 7-5
8 Oracle Managed File Transfer Security
8.1 User Authentication and Authorization....................................................................................... 8-1
8.1.1 Configuring Users ................................................................................................................ 8-1
8.1.2 Oracle Managed File Transfer Console Access ................................................................ 8-3
8.1.3 Embedded Server User Access ........................................................................................... 8-3
8.1.4 Granting Payload Access..................................................................................................... 8-5
8.2 Embedded Server Security ............................................................................................................. 8-6
8.2.1 sFTP (SSH-FTP) .................................................................................................................... 8-7
8.2.2 FTPS (FTP Over SSL) ........................................................................................................... 8-7
8.3 Integrating with Oracle Access Manager 11g for Single Sign-On ............................................ 8-8
8.4 Message Encryption Using PGP.................................................................................................... 8-8
8.5 Managing Keystores........................................................................................................................ 8-8
8.5.1 Configuring the SSL Keystore ............................................................................................ 8-9
8.5.2 Configuring the SSH Keystore ......................................................................................... 8-10
8.5.3 Configuring the PGP Keystore ......................................................................................... 8-11
8.6 Enabling Security Audit Logging................................................................................................ 8-11
8.6.1 Using Fusion Middleware Control to Enable Audit Logging ..................................... 8-11
8.6.2 Using WLST to Enable Audit Logging............................................................................ 8-12
8.7 OWSM Security Policy Attachment ............................................................................................ 8-12
8.7.1 Using Fusion Middleware Control for Global Policy Attachment ............................. 8-13
8.7.2 Using WLST for Global Policy Attachment.................................................................... 8-15
8.7.3 Using the MFT Console for Local Policy Attachment................................................... 8-16
8.7.4 Using WLST for Local Policy Attachment...................................................................... 8-17
8.7.5 How the Policy Is Applied at Runtime ........................................................................... 8-18
8.7.6 Policies and Artifact Life Cycle Management ................................................................ 8-18
8.7.7 Verifying Policy Registration............................................................................................ 8-18
8.8 Configuring SSL only Domain for Oracle Managed File Transfer ......................................... 8-19
vii

8.8.1 Enabling SSL only Domain ............................................................................................... 8-19
9 Oracle Managed File Transfer Utilities
9.1 Running WLST Commands ........................................................................................................... 9-1
9.2 MFT WLST Command Summary.................................................................................................. 9-2
9.3 Oracle Managed File Transfer EJBs............................................................................................. 9-11
viii

Preface
This preface describes the intended audience, related documents, and conventionsused in this guide—Oracle Fusion Middleware Using Oracle Managed File Transfer.
AudienceThis document is intended for administrators, designers, deployers, and monitors offile deliveries implemented in Oracle Managed File Transfer. Familiarity with FTP(File Transfer Protocol) and web services is recommended for all users.
For administrators, familiarity with Oracle WebLogic Server and Oracle Databaseadministration is also recommended.
For designers, familiarity with integrating products such as Oracle SOA Suite, OracleService Bus, and Oracle B2B for Healthcare is also recommended.
Documentation AccessibilityFor information about Oracle's commitment to accessibility, visit the OracleAccessibility Program website at http://www.oracle.com/pls/topic/lookup?ctx=acc&id=docacc.
Access to Oracle Support
Oracle customers that have purchased support have access to electronic supportthrough My Oracle Support. For information, visit http://www.oracle.com/pls/topic/lookup?ctx=acc&id=info or visit http://www.oracle.com/pls/topic/lookup?ctx=acc&id=trs if you are hearing impaired.
Related DocumentsFor information about Oracle SOA Suite products, see the following:
• Oracle Fusion Middleware Developer's Guide for Oracle SOA Suite
• Oracle Fusion Middleware Administrator's Guide for Oracle SOA Suite and OracleBusiness Process Management Suite
• Oracle Fusion Middleware Installation Guide for Oracle SOA Suite
• Oracle Fusion Middleware User's Guide for Technology Adapters
• Oracle Fusion Middleware Performance Guide
ix

ConventionsThe following text conventions are used in this document:
Convention Meaning
boldface Boldface type indicates graphical user interface elements associatedwith an action, or terms defined in text or the glossary.
italic Italic type indicates book titles, emphasis, or placeholder variables forwhich you supply particular values.
monospace Monospace type indicates commands within a paragraph, URLs, codein examples, text that appears on the screen, or text that you enter.
x

1Understanding Oracle Managed File
Transfer
Oracle Managed File Transfer (MFT) is a high performance, standards-based, end-to-end managed file gateway. It features design, deployment, and monitoring of filetransfers using a lightweight web-based design-time console that includes fileencryption, scheduling, and embedded FTP and sFTP servers. This chapter describesbasic Oracle Managed File Transfer concepts.
This chapter includes the following sections:
• What You Can Do with Oracle Managed File Transfer
• Oracle Managed File Transfer_ Oracle Service Bus_ and Oracle B2B
• Oracle Managed File Transfer Functional Use Case Patterns
• Oracle Managed File Transfer Architecture
• Components of Oracle Managed File Transfer
• Oracle Managed File Transfer User Roles
• Installing Oracle Managed File Transfer
• Screen Navigation in Oracle Managed File Transfer
Note: Screens shown in this guide may differ from your implementation,depending on the skin used. Any differences are cosmetic.
1.1 What You Can Do with Oracle Managed File TransferThis topic describes the various operations that you can perform by using OracleManaged File Transfer.
Oracle Managed File Transfer lets you perform the following operations during thetransfer process:
• Scheduling
• Resubmitting
• Attaching inline or referencing
• Compression and decompression
• Encryption and decryption
• Archiving, renaming, and deletion
Understanding Oracle Managed File Transfer 1-1

• Purging transfer instances and files
• Pausing and resuming
For more information about resubmitting transfers, see Resubmit a Transfer. For moreinformation about the other operations, see Designing Artifacts: Transfers_ Sources_and Targets.
Oracle Managed File Transfer lets you track and troubleshoot file deliveries (transferinstances) based on the following:
• Success, frequency, and failure statistics
• Metrics, recent errors, file finder, and active deliveries
• Error information table
• Active delivery progress table
• Reports for individual deliveries
For more information, see Monitoring Oracle Managed File Transfer.
Oracle Managed File Transfer lets you transfer files to and from many endpoint types:
• File and FTP based endpoint types:
– File: Transfer files from or to directories accessible to the Oracle Managed FileTransfer server.
– FTP Embedded: Transfer files from the embedded MFT FTP (File TransferProtocol) or FTPS (FTP with Secure Socket Layer) server by copying the file intoone of the embedded server directories.
– sFTP Embedded: Transfer files from the embedded sFTP (Secure Shell FTP orSSH-FTP) server by copying the file into one of the embedded server directories.
– FTP Remote: Transfer files from or to a remote FTP or FTPS server.
– sFTP Remote: Transfer files from or to a remote sFTP server.
• SOAP web-services based endpoint types:
– SOAP: Transfer files from or to Simple Object Access Protocol web serviceendpoints inline or by reference to a folder location.
– SOA: Transfer files from or to Oracle SOA (Service-Oriented Architecture) webservice endpoints.
– Service Bus (OSB): Transfer files from or to Oracle Service Bus web serviceendpoints.
– ODI: Transfer files from or to Oracle Data Integrator web service endpoints.
• B2B based endpoint types:
– B2B: Transfer files from or to Oracle B2B (Business to Business) trading partners.
– Healthcare: Transfer files from or to Oracle B2B for Healthcare endpoints.
What You Can Do with Oracle Managed File Transfer
1-2 Using Oracle Managed File Transfer

For examples of some of these transfers in context, see Oracle Managed File TransferFunctional Use Case Patterns. For full details on how to create these transfers, see Designing Artifacts: Transfers_ Sources_ and Targets.
1.2 Oracle Managed File Transfer, Oracle Service Bus, and Oracle B2BOracle Managed File Transfer, Oracle SOA Suite, and B2B have overlapping features,but each excels at different file transfer scenarios.
Oracle Managed File Transfer is especially good for:
• Transfer of very large files limited in size only by the operating system andcapacity of the file system.
• Transfer from a single source with fan-out to a large number of targets.
• Detailed auditing and recording of all transfers.
• Advanced security for transfers.
• Advanced transfer management, such as restart and pause/resume.
• Use of an embedded FTP or sFTP server.
Oracle SOA Suite is especially good for:
• Orchestration or complex integration, such as fan-in from multiple sources.
• Integration with enterprise systems such as messaging or ERP.
• Manual tasks, content based routing, or transformations.
B2B is especially good for:
• Scenarios in which document format is relevant (for example, HL7, EDI, and so on).
• Scenarios in which additional semantics, such as AS2, are required.
1.3 Oracle Managed File Transfer Functional Use Case PatternsOracle Managed File Transfer can help integrate applications by transferring filesbetween them in complex use case patterns. This section describes some common usecase patterns.
For full details on how to integrate Oracle Managed File Transfer with otherapplications, see Integrating Oracle Managed File Transfer with Other Products.
1.3.1 Standalone ApplicationsFigure 1-1 shows how Oracle Managed File Transfer can transfer files on its own usingembedded FTP and sFTP servers and the file systems to which it has access.
Figure 1-1 Standalone Use Case Pattern
Oracle Managed File Transfer, Oracle Service Bus, and Oracle B2B
Understanding Oracle Managed File Transfer 1-3

A file transfer can have one or more targets. A multiple target use case pattern is calledfan-out. The target of one transfer can also use the same endpoint as the source ofanother transfer, creating a chain.
1.3.2 SOA IntegrationFigure 1-2 shows how Oracle Managed File Transfer can integrate with the webservice interfaces of SOA applications.
Figure 1-2 SOA Use Case Pattern
A SOA application can be the source or target of a transfer. A SOA application can alsobe the common endpoint for the target of one transfer and the source of another.
1.3.3 B2B IntegrationFigure 1-3 shows how Oracle Managed File Transfer can integrate with B2B tradingpartners.
Figure 1-3 B2B Use Case Pattern
A B2B application can be the source or target of a transfer. A B2B application can alsobe the common endpoint for the target of one transfer and the source of another.
1.3.4 Healthcare IntegrationFigure 1-4 shows how Oracle Managed File Transfer can integrate with Healthcareendpoints.
Figure 1-4 Healthcare Use Case Pattern
A Healthcare application can be the source or target of a transfer. A Healthcareapplication can also be the common endpoint for the target of one transfer and thesource of another.
1.3.5 Oracle Service Bus IntegrationFigure 1-5 shows how Oracle Managed File Transfer can integrate with Oracle ServiceBus web service interfaces.
Oracle Managed File Transfer Functional Use Case Patterns
1-4 Using Oracle Managed File Transfer

Figure 1-5 Oracle Service Bus Use Case Pattern
An Oracle Service Bus interface can be the source or target of a transfer. An OracleService Bus interface can also be the common endpoint for the target of one transferand the source of another.
1.3.6 Hybrid IntegrationFigure 1-6 shows how Oracle Managed File Transfer can integrate with multipleapplications.
Figure 1-6 Hybrid Use Case Pattern
Oracle Managed File Transfer can be one participant in a web of data transfers thatincludes multiple application types.
1.4 Oracle Managed File Transfer ArchitectureFigure 1-7 shows the main components of Oracle Managed File Transfer, whichinclude configuration data, the user-interface console, embedded FTP and sFTPservers, security, and interfaces to various types of file transfer endpoints. OracleManaged File Transfer can consist of multiple managed servers that provide highavailability.
Figure 1-7 Oracle Managed File Transfer Architecture
Oracle Managed File Transfer Architecture
Understanding Oracle Managed File Transfer 1-5

For details about the console, see Screen Navigation in Oracle Managed File Transfer.For details about the other components, see Components of Oracle Managed FileTransfer.
1.5 Components of Oracle Managed File TransferThis section explains most of the Oracle Managed File Transfer components shown in Figure 1-7 in more detail.
1.5.1 Artifacts: Sources, Targets, and TransfersWhen you create a file delivery structure using the Designer page of the OracleManaged File Transfer Console, you create three types of artifacts:
• A source, which defines an origin of files
• A target, which defines a destination of files
• A transfer, which associates a source with one or more targets
An artifact defines the configuration for parts of a file delivery structure. This is incontrast to a file delivery instance, which is an individual file delivery that follows thestructure.
Sources and targets can be reused in multiple transfers. When more than one transferuses the same source, this is called transfer fan-out. When a transfer uses more thanone target, this is called target fan-out. A source and all associated transfers andtargets are collectively called a flow.
Using various artifact properties, you can define additional file delivery behavior:
• Filters: Files with specific name and extension patterns can be included orexcluded.
• Schedules: Transfers can be limited to specific times or time windows.
• Preprocessing actions: Files can be compressed, decompressed, encrypted, ordecrypted.
• Postprocessing actions: Files can be decompressed.
• File operations: Files can be archived, renamed, moved, or deleted.
For information about creating artifacts, see Designing Artifacts: Transfers_ Sources_and Targets.
1.5.2 Embedded FTP and sFTP ServersTwo servers are embedded in Oracle Managed File Transfer: FTP and sFTP. These twoembedded servers can be source artifacts. You can configure various properties ofthese embedded servers, such as ports, security, and user access to directories. Theseservers are automatically deployed as part of the WebLogic Server Oracle ManagedFile Transfer deployment. For more information, see Administering Oracle ManagedFile Transfer Embedded Servers.
1.5.3 Monitoring and ReportsOracle Managed File Transfer provides a variety of tools in the Monitoring Dashboard:
Components of Oracle Managed File Transfer
1-6 Using Oracle Managed File Transfer

• Metrics: real-time displays of transfer status, including failure ratio, payload filesize, transfer speed and the total time of the transfer.
• File Finder: a table that shows either a source or target instance based on the searchtype.
• Recent Errors: a searchable table of errors that occurred during the transfer.
• Active Deliveries: a table of in-progress, and recently completed file deliveries.
• Reports: detailed information about individual file deliveries from the perspectiveof the source, transfer, or target.
For more information, see Monitoring Oracle Managed File Transfer.
1.5.4 SecurityOracle Managed File Transfer provides security by:
• Limiting user access to the Oracle Managed File Transfer console
• Limiting user access to embedded FTP and sFTP server directories
• Limiting user access to files in a specific transfer instance
• Securing HTTP endpoint access for web service source types
• Key-based authentication
• FTP over SSL and sFTP transport
• Encryption of files
For more information, see Oracle Managed File Transfer Security.
1.5.5 UtilitiesOracle Managed File Transfer provides WLST command-line utilities for performingmany of its functions. Command categories are:
• Artifact management
• Metadata management
• Key management
• Deployment history display
• Transfer management
• Embedded server management
• Callout management
• Event notification management
• Archiving of runtime instances and transferred files
• Purging of runtime instances and transferred files
For more information, see Oracle Managed File Transfer Utilities.
Components of Oracle Managed File Transfer
Understanding Oracle Managed File Transfer 1-7

1.5.6 RepositoryOracle Managed File Transfer stores configuration data in an Oracle MetadataRepository. You can edit, back up, and restore this configuration data. For moreinformation, see Administering Oracle Managed File Transfer.
1.5.7 InterfacesOracle Managed File Transfer uses a variety of standard interfaces to communicatewith source and target endpoint types, including:
• FTP/SSH: interface for FTP servers, sFTP servers, and file systems
• Web service: interface for SOAP, SOA, Oracle Service Bus, and ODI
• B2B: interface for B2B and Healthcare
1.6 Oracle Managed File Transfer User RolesOracle Managed File Transfer has four user roles: file handlers, designers, monitors,and administrators. For information about how to create users in these roles, see UserAuthentication and Authorization.
1.6.1 File HandlersFile handlers perform these tasks:
• Copy files to file transfer staging areas, which are called sources.
• Retrieve files from file transfer destinations, which are called targets.
File handlers have no permissions to access Oracle Managed File Transfer itself. Theyhave the permissions needed to access source and target directories and endpoints.
1.6.2 DesignersDesigners perform these tasks:
• Create, read, update and delete file transfer sources.
• Create, read, update and delete file transfer targets.
• Create, read, update and delete transfers, which link sources and targets incomplete file delivery flows.
• Deploy and test transfers.
1.6.3 MonitorsMonitors perform these tasks:
• Use the Dashboard and reports to ensure that transfer instances are successful.
• Pause and resume lengthy transfers.
• Troubleshoot errors and resubmit transfers.
• View artifact deployment details and history.
Oracle Managed File Transfer User Roles
1-8 Using Oracle Managed File Transfer

• View artifact dependence relationships.
• Enable and disable sources, targets, and transfers.
• Undeploy sources, targets, and transfers.
• Start and stop embedded FTP and sFTP servers.
1.6.4 AdministratorsAdministrators perform these tasks:
• All file handler tasks
• All designer tasks
• All monitor tasks
• Add other users and determine their roles
• Configure user directory permissions
• Configure the Oracle Managed File Transfer server
• Configure embedded FTP and sFTP servers, including security
• Configure B2B and Healthcare domains
• Back up and restore the Oracle Managed File Transfer configuration
• Purge transferred files and instance data
• Archive and restore instance data and payloads
• Import and export metadata
1.7 Installing Oracle Managed File TransferYou can install Oracle Managed File Transfer on its own or in the same OracleWebLogic Server domain as Oracle SOA Suite. For more information, see Installing andConfiguring Managed File Transfer.
Supported system configurations are listed on the Oracle Technology Network website at http://www.oracle.com/technetwork/middleware/ias/downloads/fusion-certification-100350.html.
1.8 Screen Navigation in Oracle Managed File TransferThe Oracle Managed File Transfer console allows you to open, close, hide, and expandareas so you can focus on a specific task. This section explains basic consoleoperations.
1.8.1 Design, Monitoring, and Administration PagesIn the center of the top banner of the console are links to the top-level pages. Which ofthese pages are accessible depends on your user role. For more information, see OracleManaged File Transfer User Roles. The top-level pages are:
Installing Oracle Managed File Transfer
Understanding Oracle Managed File Transfer 1-9

• Designer: Use this page to create, modify, delete, rename, and deploy sources,targets, and transfers.
• Monitoring: Use this page to monitor transfer statistics, progress, and errors. Youcan also use this page to disable, enable, and undeploy transfer deployments and topause, resume, and resubmit instances.
• Administration: Use this page to manage the Oracle Managed File Transferconfiguration, including embedded server configuration.
Figure 1-8 Design, Monitoring, and Administration Pages
1.8.2 Using the Left Panel NavigatorOn each top-level page, a navigation tree in the left panel displays the names of tasksyou can perform, most of which open tabs. A right facing arrow to the left of a nameindicates hidden subtasks. When you click on the arrow, it faces to the lower right andsubtasks are displayed.
For example, the Designer page has three main tasks: Transfer, Source, and Target. Anarrow to the left of Transfer indicates that at least one transfer has been created,likewise for Source and Target. Click on the Transfer arrow to display names oftransfers.
Figure 1-9 Left Panel Navigator on Designer Page
1.8.3 Opening and Closing Dynamic TabsTo open the tab for a task in the navigation tree, click the task. You can also select thetask and then select the Open icon. You can have up to 15 tabs open at once on eachtop-level page.
Screen Navigation in Oracle Managed File Transfer
1-10 Using Oracle Managed File Transfer

Figure 1-10 Opening a Tab
For example, on the Designer page, to create a new source, click Source, likewise forTransfer and Target. To edit an existing source, transfer, or target, click its name.
To close the active tab, click the Close icon on the right side of the top banner. To closeall tabs except the active tab, select Close Others from the drop-down menu to theright of the Close icon. To close all tabs, select Close All from this menu.
Figure 1-11 Options for Closing Tabs
1.8.4 Dragging and Dropping Sources and Targets into TransfersWhen you create a transfer and open its tab, <add source> and <add target> optionsare displayed. You can drag and drop a source icon and one or more target icons intothe respective regions on the target page. You must drag and drop the icon; using thename does not work.
Screen Navigation in Oracle Managed File Transfer
Understanding Oracle Managed File Transfer 1-11

Figure 1-12 Dragging a Source Icon to Add a Source
1.8.5 Expanding and Collapsing the Dashboard RegionsThe main tab on the Monitoring page is the Dashboard, which is always open. TheDashboard has four regions: Metrics, File Finder, Recent Errors, and Active Deliveries.In the top right corner of each region is an Expand icon. Clicking this icon expands theregion to fill the entire console and displays additional details. To return to theDashboard, click the Collapse icon in the top right corner of the expanded region.
Figure 1-13 Expanding and Collapsing a Monitoring Region
1.8.6 Setting Language, Time Zone, and Accessibility PreferencesThe steps for this process are:
Screen Navigation in Oracle Managed File Transfer
1-12 Using Oracle Managed File Transfer

1. On the right side of the top banner of Oracle Managed File Transfer, clickPreferences.
2. On the left side of the Preferences window, select Language.
3. Select a language from the Language drop-down list.
No Preference defaults to English.
Note:
You must log out and log in again for a language change to take effect.
4. Select a time zone for dashboards and alerts from the Time Zone drop-down list.
No Preference defaults to coordinated universal time (UTC).
5. On the left side of the Preferences window, select Accessibility.
You can also change accessibility settings from the login screen by clickingAccessibility in the upper right corner.
6. Select an option from the Mode Settings drop-down list:
• No Preference
• Enable screen reader mode
• Disable screen reader mode
No Preference defaults to screen reader mode disabled.
7. Select an option from the Contrast Settings drop-down list:
• No Preference
• Use high contrast
• Use normal contrast
No Preference defaults to normal contrast.
8. Select an option from the Font Settings drop-down list:
• No Preference
• Use large fonts
• Use normal fonts
No Preference defaults to normal fonts.
9. Click Apply, then click OK.
Oracle Enterprise Manager Fusion Middleware Control provides accessibility optionsfor the pages on which you monitor and manage Oracle Managed File Transfer.Fusion Middleware Control supports screen readers and provides standard shortcutkeys to support keyboard navigation. You can also view the console pages in highcontrast or with large fonts for better readability. For information and instructions on
Screen Navigation in Oracle Managed File Transfer
Understanding Oracle Managed File Transfer 1-13

configuring accessibility in Fusion Middleware Control, see "Using Oracle FusionMiddleware Accessibility Options" in Administering Oracle Fusion Middleware.
Screen Navigation in Oracle Managed File Transfer
1-14 Using Oracle Managed File Transfer

2Designing Artifacts: Transfers, Sources,
and Targets
This chapter describes how to design file delivery structures consisting of sources,targets, and transfers using Oracle Managed File Transfer.
This chapter includes the following sections:
• About Designing Transfers
• Configuring a Transfer
• Creating a Source
• Creating a Target
• Setting Up Schedules
• Deploying and Testing Transfers
• Importing and Exporting Transfers
2.1 About Designing TransfersBefore designing a file transfer using the Design page in the Oracle Managed FileTransfer console, you should design the transfer on paper or a whiteboard.
2.1.1 Getting Ready to Create a TransferTransfers are an artifact that links a single source to one or more targets. Transfers caninclude content filters and other actions that affect the transfer. Before you create atransfer, you should determine the details of what the transfer should do. Considerthese specifications:
• The origin location, from which files are transferred, called the source
• The destination locations, to which files are transferred, called the target
• Whether the origin and destinations are file system directories or web serviceendpoint URLs. The origin and destinations can also be in other applications suchas B2B or Healthcare.
• If the file is large, you might want to pass a reference to the web service destinationrather than the file.
• Access parameters for the origin and destinations: usernames, passwords, securitycertificates, and file system permissions
• The file format: binary, XML, or text
Designing Artifacts: Transfers, Sources, and Targets 2-1

• Whether some files must be included or excluded based on format or name
• Whether files must be compressed or decompressed
• Whether files must be encrypted or decrypted
• Whether files must be renamed, moved, archived, or deleted
• Whether files must be scheduled for delivery at specific times or time ranges
Note:
You can use the Artifacts Search tab to see if a source, target, or transfer existsthat you can reuse or recreate with modifications. For more information, see"Artifacts Search" in the Oracle Fusion Middleware MFT Online Help.
2.1.2 Designing End-to-End FlowsSources and targets can be reused in multiple transfers. When more than one transferuses the same source, this is called transfer fan-out. When a transfer uses more thanone target, this is called target fan-out. A source and all associated transfers andtargets are collectively called a flow.
You cannot use a source as a target or a target as a source. However, a target and asource can reference the same location. This allows the target of one transfer to be thesource of another, creating a transfer chain.
In addition to determining the specifications of each transfer, you should map out anyfan-outs and chains needed in the overall file delivery structure. For examples, see Oracle Managed File Transfer Functional Use Case Patterns.
2.2 Configuring a TransferYou can create a transfer before or after you create the source and targets. However,you cannot deploy a transfer without a source and at least one target.
The steps for this process are:
1. Create a transfer in one of these ways:
• Click Transfers in the left pane navigator.
• Select Transfers in the left pane navigator and click the Create icon.
• Right-click Transfers in the left pane navigator and select the Create command.
The Transfers dialog opens.
2. Type a Name for the transfer.
The name can include letters, numbers, dashes, and underscores.
3. Type a Description for the transfer.
The description is optional.
4. Click the OK button.
A tab for the transfer opens.
Configuring a Transfer
2-2 Using Oracle Managed File Transfer

To avoid creating a transfer, click Cancel.
5. Add a source and one or more targets.
See Adding a Source and Targets.
6. Add content filters.
This is optional. See Setting Up Content Filters.
7. Add users, groups, and roles who can access the transfer payload.
This is optional and applies only to web service pass by reference transfers. See Granting Payload Access.
8. Configure target-specific transfer settings.
This is optional. See Configuring Target-Specific Transfer Settings.
9. Add a schedule.
This is optional. See Setting Up Schedules.
10. Add preprocessing and postprocessing actions such as compression andencryption.
This is optional and applies only to targets. Source actions are added directly in thesource artifact. See Setting Up Transfer Preprocessing and Postprocessing Actions.
11. Click the Save button.
To undo all changes since the last save, click Revert.
12. Click the Deploy button after saving.
You can add an optional comment.
If the associated source and target have not been previously deployed, deployingthe transfer automatically deploys the associated source and target.
If an existing transfer has most of the desired properties, you can duplicate it. See Duplicating an Existing Transfer.
2.2.1 Adding a Source and TargetsThe steps for this process are:
1. Click the arrow to the left of Transfers in the left pane navigator.
The transfers are listed. Note that this step might have been completed in theprevious section when creating the transfer.
2. Click the transfer name or right-click it and then select the Open menu item.
The transfer tab opens.
3. Add a source in one of these ways:
• Click add source if you already created the source. Select the source to add, thenselect OK.
Configuring a Transfer
Designing Artifacts: Transfers, Sources, and Targets 2-3

• Click create source to create a new source. Begin at step 2 in Creating a Source.
• Drag and drop a source from the navigation pane.
See Dragging and Dropping Sources and Targets into Transfers for moreinformation.
4. Add targets in one of these ways:
• Click add target if you already created the target.
Select the target to add in the left column, then click the single arrow icon tomove it to the column on the right. You can add more than one target. To selectall targets, click the double arrow icon. Click OK.
• Click create target to create a new target. Begin at step 2 in Creating a Target.
• Drag and drop a target from the navigation pane.
See Dragging and Dropping Sources and Targets into Transfers for moreinformation.
5. Save and Deploy the transfer.
2.2.2 Setting Up Content FiltersContent filters specify file name and extension pattern criteria for transfer. If nocontent filters are defined, all files at the source endpoint are transferred.
The steps for this process are:
1. Click the arrow to the left of Transfers in the left pane navigator.
The transfers are listed.
2. Click the transfer name or select it and then click the Open icon.
The transfer tab opens.
3. Click the arrow to the left of Content Filters.
The Content Filters settings are displayed.
4. Select Wildcard or Regular Expression to determine how the filter string isinterpreted.
5. Type a pattern in the text field for the filter.
If you selected Wildcard, use * as a wildcard. For example, *.xml specifies thatXML files are transferred. To specify text or XML files, you can use *.(xml|XML|txt|TXT). For example, File = "TXT-20100505-XXXX.txt" where XXXX can be anyfour successive digits. Regexp Filter expression ="XT-20100505-\\d{4}\\.txt".
For more information about regular expressions, see The Java Tutorials: RegularExpressions.
The pattern is for file names only. Filtering on directory names is not supported.
6. Click add filter to add another filter.
Another text field is created and given a new number.
Configuring a Transfer
2-4 Using Oracle Managed File Transfer

7. Repeat steps 5 and 6 for each filter you want to add.
To delete a filter, click the red X to the right of the filter.
8. Use the up and down arrows to the right of each filter to change the filter order.
Lower numbered filters are performed first.
9. Save and Deploy the transfer.
2.2.3 Configuring Target-Specific Transfer SettingsDepending on the target type, different optional target-specific transfer settings aredisplayed when you open a transfer tab and click the arrow to the left of a target.
If the target type is File, FTP Remote, or sFTP Remote, the subfolder setting isdisplayed. This adds a transfer-specific subfolder to the target location.
If the target type is an HTTP SOA-based web service type (B2B, Healthcare, SOAP,SOA, Service Bus, or ODI), the following Delivery Preferences are displayed:
• Delivery Method: Specifies the delivery method: Inline or Reference (default). IfInline, the actual file is sent in the SOA message payload. If Reference, a link to thefile is sent.
• Reference Type: Specifies the reference type: FTP (default), File, or sFTP. Note thatinternal and external port numbers can be set in the Advanced Delivery Propertiesarea of the Administration Server Properties page.
• Max Inline Size: Specifies the maximum size in bytes for inline deliveries.
2.2.4 Setting Up Transfer Preprocessing and Postprocessing ActionsAfter you add a target to a transfer, you can edit the transfer to add preprocessingactions: compression, decompression (file type only), encryption or decryption. Youcan also add decompression as a postprocessing action for a target of type File.
You can configure preprocessing for the source; see Setting Up Source ProcessingActions.
You can also create custom preprocessing and postprocessing actions; see ProcessingTransfers with Custom Callouts.
Note:
Postprocessing occurs after file delivery. Therefore, the Active Deliveries andFile Finder views in the Dashboard tab on the Monitoring page show differentstatuses if file delivery succeeds but postprocessing fails. Specifically, theActive Deliveries view displays a Completed status but the File Finder viewdisplays a Failed status.
Configuring a Transfer
Designing Artifacts: Transfers, Sources, and Targets 2-5

Note:
If you add the same processing action to a source and a target that uses thesource, the action is performed twice. For example, if you add compression tothe source and the target, the transferred file is compressed twice.
Multiple file preprocessing decompression is only supported for the targettypes SOAP, SOA, Service Bus, and ODI. For other target types, apreprocessing decompression error occurs if a compressed file has multipleentries.
Note:
If you copy a binary file to the source location using an FTP client external toOracle Managed File Transfer, be sure to configure it for binary transfer.Otherwise the file might become corrupted. Processing actions such ascompression and encryption might not work properly.
2.2.4.1 Compression and Decompression Preprocessing Actions
You can compress or decompress a file prior to a transfer delivering it to a target. Youcan specify either action in the transfer configuration.
Multi-file decompression preprocessing is supported only for SOAP, SOA, ServiceBus, and ODI type targets in which the Delivery Method is set to Reference. In thiscase, the files inside the ZIP file are extracted to a unique random directory, and only areference to this directory is sent to the target. This directory is listed in the Target Pre-Processing section of the target report. See Target Reports for more information.
Note:
Any processing function added after the multi-file decompression is ignored.If the decompression preprocessing of other types of targets results in multiplefiles, the decompression action generates an error.
The steps for this process are:
1. Click the arrow to the left of Transfers in the left pane navigator.
The transfers are listed.
2. Click the transfer name or right-click it and then select the Open menu item.
The transfer tab opens.
3. Click the arrow to the left of the target.
The target settings are displayed.
4. Click add pre-processing actions.
The Pre-Processing Actions dialog opens.
5. Select Compress or Decompress from the All Actions drop-down list.
Configuring a Transfer
2-6 Using Oracle Managed File Transfer

6. Click Add to List.
To remove an action from the list, click the Delete icon to the right of the action.
7. If you selected Compress, select the compression level from the Level drop-downlist: Best Compression, Default Compression, or Best Speed. For more information,see the java.util.zip package, especially the Deflater class and the referencedspecifications.
8. Click OK.
To cancel adding actions, click Cancel.
9. Save and Deploy the transfer.
2.2.4.2 Encryption and Decryption Preprocessing Actions
You can encrypt or decrypt a file prior to transfer. You can specify either action in thetransfer configuration.
Note:
PGP keystores must be configured and certificates must be imported beforeyou add an encryption or decryption action.
If a payload is encrypted by a PGP tool outside of MFT using a key length oralgorithm that is restricted, MFT decryption will fail. These restrictions aremostly specified at the JRE level in the JAVA_HOME\jre7\lib\securitydirectory.
The steps for this process are:
1. Click the arrow to the left of Transfers in the left pane navigator.
The transfers are listed.
2. Click the transfer name or right-click it and then select the Open menu item.
The transfer tab opens.
3. Click the arrow to the left of the target.
The target settings are displayed.
4. Click add pre-processing actions.
The Pre-Processing Actions dialog opens.
5. Select PGP Encryption or PGP Decryption from the All Actions drop-down list.
6. Click Add to List.
To remove an action from the list, click the Delete icon to the right of the action.
7. If you selected PGP Encryption, select values from the Encryption Alias andArmored drop-down lists:
• Encryption Alias: the public key alias for encryption. For more informationabout key aliases, see Configuring the PGP Keystore.
Configuring a Transfer
Designing Artifacts: Transfers, Sources, and Targets 2-7

• Armored: Binary or ASCII. Use ASCII if non-printing characters might bestripped in transit.
8. If you selected PGP Decryption, select the Decryption Alias from the drop-downlist. This is the private key alias for decryption. For more information about keyaliases, see Configuring the PGP Keystore.
9. Click OK.
To cancel adding actions, click Cancel.
10. Save and Deploy the transfer.
2.2.4.2.1 Changing Encryption Algorithm for PGP
To change encryption algorithm for PGP, follow these steps:
1. Step A
a. Log in to Oracle Enterprise Manager Fusion Middleware Control.
b. Expand the SOA node and select the soa-infra node.
c. From the SOA Infrastructure menu, choose Administration > System MBeanBrowser . The System MBean Browser page is displayed.
d. Under Application Defined MBeans, expand the server -oracle.as.soainfra.config node. For example, oracle.as.mftinfra.config node.
e. Expand the Server: soa_server1 node For example, mft_server1 node.
f. Expand the MFTConfig node.
g. Click the MFT MBean. The properties of the MBean are displayed in the rightpane.
h. Click the Operations tab.
i. Click addProperty operation in the list. Enter values for the key, value, andoptional comments.
i. Set Key value to "pgpEncryptionAlgorithm"
ii. Set value. For example, set value as “2” for Triple DES, and click Invoke.
2. Step B
a. In MFT, to change the encryption algorithm for PGP, set the"pgpEncryptionAlgorithm" MBean for MFT. This Mbean accepts int value anddifferent values for the supported algorithms are listed below:
i. Triple DES = 2;
ii. CAST5 = 3;
iii. Blowfish = 4;
iv. DES = 6;
v. AES 128 = 7;
vi. AES 192 = 8;
vii. AES 256 = 9;
Configuring a Transfer
2-8 Using Oracle Managed File Transfer

viii. Twofish = 10;
b. In FIPS mode, when MBean property PGPEncryptionAlgorithm is not defined,then the default algorithm is AES 256. Supported algorithms are:
i.AES 128
ii.AES 192
iii.AES 256
c. In non-FIPS mode, when MBean property PGPEncryptionAlgorithm is notdefined, then the default algorithm is CAST5. Supported algorithms are:
i. Triple DES
ii. Blowfish
iii. DES
iv. AES 192
v. AES 128
vi. AES 256
vii.Twofish
2.2.4.3 Decompression Postprocessing
You can decompress a file after transfer only if the target type is File. You can specifythis action in the transfer configuration.
Multi-file decompression postprocessing is supported. In this case, the decompressedfiles are extracted to a directory under the target location having the name of the ZIPfile without the extension. For example, if the target location is /tmp/mft and thetransferred file with multiple entries is order.zip, decompressed files are extractedto /tmp/mft/order.
Note:
Any processing function added after the multi-file decompression is ignored.
The steps for this process are:
1. Click the arrow to the left of Transfers in the left pane navigator.
The transfers are listed.
2. Click the transfer name or right-click it and then select the Open menu item.
The transfer tab opens.
3. Click the arrow to the left of the target.
The target settings are displayed.
4. Click add post-processing actions.
The Post-Processing Actions dialog opens.
Configuring a Transfer
Designing Artifacts: Transfers, Sources, and Targets 2-9

5. Select Decompress from the All Actions drop-down list.
6. Click Add to List.
To remove an action from the list, click the Delete icon to the right of the action.
7. Click OK.
To cancel adding actions, click Cancel.
8. Save and Deploy the transfer.
2.2.5 Duplicating an Existing TransferYou can create a new file transfer by copying an existing one. The new transferreferences the same source and targets as the copied transfer.
The steps for this process are:
1. Duplicate a transfer in one of these ways:
• Select the transfer to copy and then the Duplicate icon in the left panenavigator.
• Right-click the transfer to copy in the left pane navigator and select theDuplicate command from the pop-up menu.
The Duplicate Transfer dialog appears.
2. Type a Name for the transfer.
The name can include letters, numbers, dashes, and underscores.
3. Click the Create button.
A tab for the transfer opens, providing additional settings you can edit. For moreinformation about these settings, see these sections:
• Adding a Source and Targets
• Setting Up Content Filters
• Granting Payload Access
• Configuring Target-Specific Transfer Settings
• Setting Up Schedules
• Setting Up Transfer Preprocessing and Postprocessing Actions
To avoid creating a transfer, click Cancel.
4. Click the Save button after editing.
To undo all changes since the last save, click Revert.
5. Click the Deploy button after saving.
Deploying a transfer deploys the associated source and target automatically.
Configuring a Transfer
2-10 Using Oracle Managed File Transfer

2.3 Creating a SourceYou can create a source with a minimum number of settings. After you create it, youcan edit it to add more settings.
The steps for this process are:
1. Create a source in one of these ways:
• Click create source in the transfer tab.
• Double click Sources in the left pane navigator.
• Select Sources in the left pane navigator and click the Create icon.
• Right-click Sources in the left pane navigator and select the Create command.
• Duplicate an existing source.
The Sources dialog opens.
2. Type a Name for the source.
The name can include letters, numbers, dashes, and underscores.
Note: In case of SOA/SOAP source, file names must not have spaces.
3. Type a Description for the source.
The description is optional.
4. Select the source Type.
This setting determines the other settings that appear. For more information aboutsource types and their settings, see Source Types.
5. Type a value for the source location. For most source types, this is either:
• The Folder setting, which specifies a file system directory. Ensure that the foldername does not exceed 60 characters.
• The URL setting, which specifies a web service endpoint.
The B2B and Healthcare source types have no source location setting in the Sourcesdialog. You must provide the source location after creating the source.
6. Type values for the required settings, which have blue asterisks next to them.
The only source types with required settings in addition to the source location arethe FTP Remote Source Type and sFTP Remote Source Type. Some of these settingshave defaults that you can accept and edit later.
7. Click the OK button.
A tab for the source opens, providing additional settings you can edit. For moreinformation about these settings, see the source type under Source Types, SettingUp Schedules, Setting Up Source Processing Actions, and Archiving and DeletingFiles Before Delivery.
To avoid creating a source, click Cancel.
Creating a Source
Designing Artifacts: Transfers, Sources, and Targets 2-11

8. Click the Save button after editing.
To undo all changes since the last save, click Revert.
9. Click the Deploy button after saving.
You can add an optional comment.
This step is optional. Deploying a transfer deploys the associated source and targetautomatically.
If an existing source has most of the desired properties, you can duplicate it. See Duplicating an Existing Source.
2.3.1 Source TypesOracle Managed File Transfer provides the following source types:
• FTP Embedded Source Type
• sFTP Embedded Source Type
• FTP Remote Source Type
• sFTP Remote Source Type
• File Source Type
• SOAP Web Service Source Type
• SOA Source Type
• Service Bus Source Type
• B2B Source Type
• Healthcare Source Type
• ODI Source Type
2.3.1.1 FTP Embedded Source Type
Using the FTP Embedded source type means uploading files to the FTP serverembedded by Oracle Managed File Transfer, which transfers the files. The onlyrequired setting is Folder, which specifies the embedded FTP server directory fromwhich to transfer files.
Note:
Files present in the embedded FTP source directory before the source isdeployed or enabled are ignored. Only files uploaded to the directory afterdeployment or enabling are picked and transferred.
For more information about other settings you can edit after you create the source, see"Source—FTP Embedded" in the Oracle Fusion Middleware MFT Composer Help OnlineHelp.
Creating a Source
2-12 Using Oracle Managed File Transfer

2.3.1.2 sFTP Embedded Source Type
Using the sFTP Embedded source type means uploading files to the sFTP serverembedded by Oracle Managed File Transfer, which transfers the files. The onlyrequired setting is Folder, which specifies the embedded sFTP server directory fromwhich to transfer files.
Note:
Files present in the embedded sFTP source directory before the source isdeployed or enabled are ignored. Only files uploaded to the directory afterdeployment or enabling are picked and transferred.
For more information about other settings you can edit after you create the source, see"Source—sFTP Embedded" in the Oracle Fusion Middleware MFT Composer Help OnlineHelp.
2.3.1.3 FTP Remote Source Type
Using the FTP Remote source type means transferring files from an FTP server outsideof Oracle Managed File Transfer. Table 2-1 lists the settings in the Sources dialogspecific to the FTP Remote type.
Table 2-1 Sources Dialog Settings for the FTP Remote Source Type
Setting Description
Host Name Specifies the host name.
Folder Specifies the directory from which files are transferred.
User Specifies the user accessing the source.
Password Specifies the user password.
Confirm Password Confirms the user password.
Control Port Specifies the port for the source.
SSL Specifies the use of SSL if checked. This is optional.
Implicit SSL Specifies the use of implicit SSL if checked. This is optional.
For more information about other settings you can edit after you create the source, see"Source—FTP Remote" in the Oracle Fusion Middleware MFT Composer Help Online Help.
2.3.1.3.1 FTP Remote Source Advance Properties for MVS Transfers
When creating a FTP Remote source type for MVS Mainframe systems, you need toselect MVS as List Parser Key in advance properties.
For MVS FTP response formats, MVS can be configured to use HFS (Unix style)response or MVS native response formats.
FTP Remote Source Settings for MVS Transfers
Configure the FTP Remote source type as shown in figure below:
Creating a Source
Designing Artifacts: Transfers, Sources, and Targets 2-13

Note: The following properties must be selected in the format listed below:
• Change Directory=”true”
• Content Folder is a mandatary and must be in the format: ”'FOLDER.'”
• FTP Path Separator = ””
• Absolute Path Begin = ””
• List Parser Key = MVS
2.3.1.4 sFTP Remote Source Type
Using the sFTP Remote source type means transferring files from an sFTP serveroutside of Oracle Managed File Transfer. Table 2-2 lists the settings in the Sourcesdialog specific to the sFTP Remote type.
Table 2-2 Sources Dialog Settings for the sFTP Remote Source Type
Setting Description
Host Name Specifies the host name.
Folder Specifies the directory from which files are transferred.
Creating a Source
2-14 Using Oracle Managed File Transfer

Table 2-2 (Cont.) Sources Dialog Settings for the sFTP Remote Source Type
Setting Description
User Specifies the user accessing the source.
Password Specifies the user password.
Note: MFT treats propertiesbeginning with $ as parameters. Adda backslash before the $ for sFTPpasswords that start with $. This isonly for a leading $. If there are other$s in the password, do not add morebackslashes. Example: for $xyz$123,enter the password as \$xyz$123.
Confirm Password Confirms the user password.
Control Port Specifies the port for the source.
Authentication Type Specifies the authentication type: Password or Public Key.
Note: For remote SFTP servers,private key passphrase is notsupported.
For more information about other settings you can edit after you create the source, see"Source—sFTP Remote" in the Oracle Fusion Middleware MFT Composer Help OnlineHelp.
2.3.1.5 File Source Type
Using the File source type means transferring files from the local file system or from anetwork-attached system. The only required setting is Folder, which specifies thedirectory from which to transfer files. This directory must be accessible from OracleManaged File Transfer.
Oracle Managed File Transfer uses the same file adapter used by Oracle SOA Suite.
For more information about other settings you can edit after you create the source, see"Source—File" in the Oracle Fusion Middleware MFT Composer Help Online Help.
2.3.1.6 SOAP Web Service Source Type
Using a SOAP web service type means transferring files from a web service endpoint.The only required setting is URL, which specifies the web service endpoint fromwhich to transfer files.
For more information about integrating with Oracle Managed File Transfer as a webservice, see Integrating with Web Services.
For more information about other settings you can edit after you create the source, see"Source—SOAP" in the Oracle Fusion Middleware MFT Composer Help Online Help.
Creating a Source
Designing Artifacts: Transfers, Sources, and Targets 2-15

2.3.1.7 SOA Source Type
Using the SOA source type means transferring files from the web service interface of aSOA application. The only required setting is the Location URL, which specifies thesuffix portion of the web service endpoint that SOA uses.
For example: http://<HOST:PORT/mftapp/services/transfer/<URL>?WSDL
For more information about integrating Oracle Managed File Transfer with OracleSOA Suite, see Integrating with Oracle SOA Suite.
For more information about other settings you can edit after you create the source, see"Source—SOA" in the Oracle Fusion Middleware MFT Composer Help Online Help.
2.3.1.8 Service Bus Source Type
Using the Service Bus source type means transferring files from the web serviceinterface of an Oracle Service Bus application. The only required setting is URL, whichspecifies the web service endpoint from which to transfer files.
For more information about integrating Oracle Managed File Transfer with OracleService Bus, see Integrating with Oracle Service Bus.
For more information about other settings you can edit after you create the source, see"Source—Service Bus" in the Oracle Fusion Middleware MFT Composer Help Online Help.
2.3.1.9 B2B Source Type
Using the B2B source type means transferring files from an Oracle B2B tradingpartner. No settings are required if B2B is collocated. The most important settings areTrading Partner Name, which specifies the endpoint from which to transfer files, andDomain Alias, which specifies the domain from which to transfer files.
To define a trading partner in Oracle Managed File Transfer, see Integrating with B2Band Managing Domains.
For more information about other settings you can edit after you create the source, see"Source—B2B" in the Oracle Fusion Middleware MFT Composer Help Online Help.
2.3.1.10 Healthcare Source Type
Using the Healthcare source type means transferring files from an Oracle B2B forHealthcare domain. The only required setting is Endpoint Name, which specifies theendpoint from which to transfer files. Another important setting is Domain Alias,which specifies the domain from which to retrieve files.
To define a Healthcare domain in Oracle Managed File Transfer, see Integrating withHealthcare and Managing Domains.
For more information about other settings you can edit after you create the source, see"Source—Healthcare" in the Oracle Fusion Middleware MFT Composer Help Online Help.
2.3.1.11 ODI Source Type
Using the ODI source type means transferring files from the web service interface ofan Oracle Data Integrator application. The only required setting is URL, whichspecifies the web service endpoint from which to transfer files.
To define an ODI domain in Oracle Managed File Transfer, see Integrating with OracleData Integrator and Managing Domains.
Creating a Source
2-16 Using Oracle Managed File Transfer

For more information about other settings you can edit after you create the source, see"Source—ODI" in the Oracle Fusion Middleware MFT Composer Help Online Help.
2.3.2 Setting Up Source Processing ActionsAfter you create a source, you can edit it to add processing actions such ascompression, decompression, encryption or decryption.
You can configure processing actions for the transfer; see Setting Up TransferPreprocessing and Postprocessing Actions.
You can also create custom preprocessing and postprocessing actions; see ProcessingTransfers with Custom Callouts.
Note:
If you add the same processing action to a source and a transfer that uses thesource, the action is performed twice. For example, if you add compression tothe source and the transfer, the transferred file is compressed twice.
A preprocessing decompression error occurs if a compressed file has multipleentries.
Note:
If you copy a binary file to the source location using an FTP client external toOracle Managed File Transfer, be sure to configure it for binary transfer.Otherwise the file might become corrupted. Processing actions such ascompression and encryption might not work properly.
2.3.2.1 Compression and Decompression at the Source
You can compress or decompress a file prior to transfer. You can specify either actionin the source configuration.
Note:
Multi-file decompression is not supported for sources. It is supported only forSOAP, SOA, Service Bus, or ODI type targets as a preprocessing action or forFile type targets as a postprocessing action.
The steps for this process are:
1. Click the arrow to the left of Sources in the left pane navigator.
The sources are listed.
2. Click the source name or right-click it and then select the Open menu item.
The source tab opens.
3. Click the arrow to the left of Actions.
The Actions section opens.
Creating a Source
Designing Artifacts: Transfers, Sources, and Targets 2-17

4. Click add processing actions.
The Processing Actions dialog opens.
5. Select Compress or Decompress from the All Actions drop-down list.
6. Click Add to List.
To remove an action from the list, click the Delete icon to the right of the action.
7. If you selected Compress, select the compression level from the Level drop-downlist: Best Compression, Default Compression, or Best Speed. For more information,see the java.util.zip package, especially the Deflater class and the referencedspecifications.
8. Click OK.
To cancel adding actions, click Cancel.
9. Save and optionally Deploy the source.
2.3.2.2 Encryption and Decryption at the Source
You can encrypt or decrypt a file prior to transfer. You can specify either action in thesource configuration. You can add a single encryption or decryption algorithm to thesource configuration.
Note:
PGP keystores must be configured and certificates must be imported beforeyou add an encryption or decryption action.
If a payload is encrypted by a PGP tool outside of MFT using a key length oralgorithm that is restricted, MFT decryption will fail. These restrictions aremostly specified at the JRE level in the JAVA_HOME\jre7\lib\securitydirectory.
The steps for this process are:
1. Click the arrow to the left of Sources in the left pane navigator.
The sources are listed.
2. Click the source name or right-click it and then select the Open menu item.
The source tab opens.
3. Click the arrow to the left of Actions.
The Actions section opens.
4. Click add processing actions.
The Processing Actions dialog opens.
5. Select PGP Encryption or PGP Decryption from the All Actions drop-down list.
6. Click Add to List.
To remove an action from the list, click the Delete icon to the right of the action.
Creating a Source
2-18 Using Oracle Managed File Transfer

7. If you selected PGP Encryption, select values from the Encryption Alias andArmored drop-down lists:
• Encryption Alias: the public key alias for encryption. For more informationabout key aliases, see Configuring the PGP Keystore.
• Armored: Binary or ASCII. Use ASCII if non-printing characters might bestripped in transit.
8. If you selected PGP Decryption, select the Decryption Alias from the drop-downlist. This is the private key alias for decryption. For more information about keyaliases, see Configuring the PGP Keystore.
9. Click OK.
To cancel adding actions, click Cancel.
10. Save and optionally Deploy the source.
2.3.3 Archiving and Deleting Files Before DeliveryAfter you create a source, you can edit it to add file operations: archiving and deleting.If a file is configured to be archived, it is copied to given physical target directory. Ifthe file is configured for deletion, it is deleted. Note that the archive or delete actionapplies to the target system copy of the file, not the Oracle Managed File Transfer copyof the file.
The steps for this process are:
1. Click the arrow to the left of Sources in the left pane navigator.
The sources are listed.
2. Click the source name or right-click it and then select the Open menu item.
The source tab opens.
3. Click the arrow to the left of Advanced Properties.
The Advanced properties section opens.
4. Click the Operation subtab.
The Operation subtab opens.
5. Select Archive, Delete, or Archive and Delete from the Action Type drop-down list.
6. If you selected Archive or Archive and Delete, type a path in the Physical TargetDirectory field.
7. Save and optionally Deploy the source.
2.3.4 Duplicating an Existing SourceYou can create a new source for file transfers by copying an existing one.
The steps for this process are:
1. Duplicate a source in one of these ways:
Creating a Source
Designing Artifacts: Transfers, Sources, and Targets 2-19

• Select the source to copy and then the Duplicate icon in the left pane navigator.
• Right-click the source to copy in the left pane navigator and select the Duplicatecommand from the pop-up menu.
The Duplicate Source dialog appears.
2. Type a Name for the source.
The name can include letters, numbers, dashes, and underscores.
3. Type values for the required non-duplicated settings, which have blue asterisksnext to them:
• Content Folder is required for sources of type File, FTP Remote, sFTP Remote,FTP Embedded, or sFTP Embedded.
URL is required for sources of type SOAP, SOA, Service Bus, or ODI.
Sources of type B2B or Healthcare have no required non-duplicated settings.
4. Click the Create button.
A tab for the source opens, providing additional settings you can edit. For moreinformation about these settings, see the source type under Source Types, SettingUp Source Processing Actions, and Archiving and Deleting Files Before Delivery.
To avoid creating a source, click Cancel.
5. Click the Save button after editing.
To undo all changes since the last save, click Revert.
6. Click the Deploy button after saving.
This step is optional. Deploying a transfer deploys the associated source and targetautomatically.
2.4 Creating a TargetYou can create a target with a minimum number of settings. After you create it, youcan edit it to add more settings.
The steps for this process are:
1. Create a target in one of these ways:
• Click create target in the transfer tab.
• Double click Targets in the left pane navigator.
• Select Targets in the left pane navigator and click the Create icon.
• Right-click Targets in the left pane navigator and select the Create command.
The Targets dialog opens.
2. Type a Name for the target.
The name can include letters, numbers, dashes, and underscores.
3. Type a Description for the target.
Creating a Target
2-20 Using Oracle Managed File Transfer

The description is optional.
4. Select the target Type.
This setting determines the other settings that appear. For more information abouttarget types and their settings, see Target Types.
5. Type a value for the target location. For most target types, this is either:
• The Folder setting, which specifies a file system directory. Ensure that the foldername does not exceed 60 characters.
• The URL setting, which specifies a web service endpoint.
Note: In case of SOA/SOAP target, file names must not have spaces.
The B2B and Healthcare target types have no target location setting in the Targetsdialog. You must provide the target location after creating the target.
6. Type values for the required settings, which have blue asterisks next to them.
The only target types with required settings in addition to the target location are FTP Remote Target Type and sFTP Remote Target Type. Some of these settingshave defaults that you can accept and edit later.
7. Click the OK button.
A tab for the target opens, providing additional settings you can edit. For moreinformation about these settings, see the target type under Target Types and Moving and Renaming Files After Delivery.
To avoid creating a target, click Cancel.
8. Click the Save button after editing.
To undo all changes since the last save, click Revert.
9. Click the Deploy button after saving.
You can add an optional comment.
This step is optional. Deploying a transfer deploys the associated source and targetautomatically.
If an existing target has most of the desired properties, you can duplicate it. See Duplicating an Existing Target.
2.4.1 Target TypesOracle Managed File Transfer provides the following target types:
• FTP Remote Target Type
• sFTP Remote Target Type
• File Target Type
• SOAP Web Service Target Type
• SOA Target Type
Creating a Target
Designing Artifacts: Transfers, Sources, and Targets 2-21

• Service Bus Target Type
• B2B Target Type
• Healthcare Target Type
• ODI Target Type
Oracle Managed File Transfer does not support embedded FTP or sFTP server targets.
2.4.1.1 FTP Remote Target Type
Using the FTP Remote target type means transferring files to an FTP server outside ofOracle Managed File Transfer. Table 2-3 lists the settings in the Targets dialog specificto the FTP Remote type.
Table 2-3 Targets Dialog Settings for the FTP Remote Target Type
Setting Description
Host Name Specifies the host name.
Folder Specifies the directory to which files are transferred.
User Specifies the user as whom to access the target.
Password Specifies the user password.
Confirm Password Confirms the user password.
Control Port Specifies the port for the target.
SSL Specifies the use of SSL if checked. This is optional.
Implicit SSL Specifies the use of implicit SSL if checked. This is optional.
For more information about other settings you can edit after you create the target, see"Target—FTP Remote" in the Oracle Fusion Middleware MFT Composer Help Online Help.
2.4.1.1.1 FTP Remote Target settings for MVS Transfers
When creating a FTP Remote target type for MVS Mainframe systems, you need toselect MVS as List Parser Key in advance properties.
For MVS FTP response formats, MVS can be configured to use HFS (Unix style)response or MVS native response formats. If the target type uses MVS HFS (Unixstyle), you can configure the advanced Properties as you do with any other Unixsystem. For example, using ”/” as the path separator. However, if the MVS systemuses a MVS native response format only, then you must configure the FTP Remotetarget type with following mandatory properties:
• The ”Content Folder” field is not used, however it is a mandatory field. You mustenter some text as a placeholder and cannot be left as blank filed. For example,Content Folder =”'FOLDER.'”
• The FTP Path Separator field must be left blank/empty. For example, FTP PathSeparator =””
• The ”File Naming Convention” field specifies the absolute path to the file. Youmust include the filename in the path, and enclose it in single quotes. This field
Creating a Target
2-22 Using Oracle Managed File Transfer

must be in the format, File Naming Convention=”MFTOUT.MFT%SEQ%.CSV”'.For example, 'QA.TEST.FILE '.
• Change the Default Date Format. For example, yyyy/mm/dd:
• Absolute Path Begin = ””
• List Parser Key = MVS
You can configure the advance properties as shown in the figure listed below:
2.4.1.2 sFTP Remote Target Type
Using the sFTP Remote target type means transferring files to an sFTP server outsideof Oracle Managed File Transfer. Table 2-4 lists the settings in the Targets dialogspecific to the sFTP Remote type.
Table 2-4 Targets Dialog Settings for the sFTP Remote Target Type
Setting Description
Host Name Specifies the host name.
Folder Specifies the directory to which files are transferred.
User Specifies the user as whom to access the target.
Password Specifies the user password.
Confirm Password Confirms the user password.
Control Port Specifies the port for the target.
Authentication Type Specifies the authentication type: Password or Public Key.
Creating a Target
Designing Artifacts: Transfers, Sources, and Targets 2-23

For more information about other settings you can edit after you create the target, see"Target—sFTP Remote" in the Oracle Fusion Middleware MFT Composer Help OnlineHelp.
2.4.1.3 File Target Type
Using the File target type means transferring files to the local file system or to anetwork-attached system. The only required setting is Folder, which specifies thedirectory to which to transfer files. This directory must be accessible from OracleManaged File Transfer.
Oracle Managed File Transfer uses the same file adapter used by Oracle SOA Suite.
For more information about other settings you can edit after you create the target, see"Target—File" in the Oracle Fusion Middleware MFT Composer Help Online Help.
2.4.1.4 SOAP Web Service Target Type
Using a SOAP web service type means transferring files to a web service. The onlyrequired setting is URL, which specifies the web service endpoint to which to transferfiles.
For more information about integrating with Oracle Managed File Transfer as a webservice, see Integrating with Web Services.
For more information about other settings you can edit after you create the target, see"Target—SOAP" in the Oracle Fusion Middleware MFT Composer Help Online Help.
2.4.1.5 SOA Target Type
Using the SOA target type means transferring files to the web service interface of aSOA application. The only required setting is URL, which specifies the web serviceendpoint to which to transfer files.
For more information about integrating Oracle Managed File Transfer with OracleSOA Suite, see Integrating with Oracle SOA Suite.
For more information about other settings you can edit after you create the target, see"Target—SOA" in the Oracle Fusion Middleware MFT Composer Help Online Help.
2.4.1.6 Service Bus Target Type
Using the Service Bus target type means transferring files to the web service interfaceof an Oracle Service Bus application. The only required setting is URL, which specifiesthe web service endpoint to which to transfer files.
For more information about integrating Oracle Managed File Transfer with OracleService Bus, see Integrating with Oracle Service Bus.
For more information about other settings you can edit after you create the target, see"Target—Service Bus" in the Oracle Fusion Middleware MFT Composer Help Online Help.
2.4.1.7 B2B Target Type
Using the B2B target type means transferring files to an Oracle B2B trading partner.No settings are required if B2B is collocated. The most important settings are TradingPartner Name, which specifies the endpoint to which to transfer files, and DomainAlias, which specifies the domain to which to transfer files.
To define a trading partner in Oracle Managed File Transfer, see Integrating with B2Band Managing Domains.
Creating a Target
2-24 Using Oracle Managed File Transfer

For more information about other settings you can edit after you create the target, see"Target—B2B" in the Oracle Fusion Middleware MFT Composer Help Online Help.
2.4.1.8 Healthcare Target Type
Using the Healthcare target type means transferring files to an Oracle B2B forHealthcare domain. The only required setting is Endpoint Name, which specifies theendpoint to which to transfer files. Another important setting is Domain Alias, whichspecifies the domain to which to transfer files.
To define a Healthcare domain in Oracle Managed File Transfer, see Integrating withHealthcare and Managing Domains.
For more information about other settings you can edit after you create the target, see"Target—Healthcare" in the Oracle Fusion Middleware MFT Composer Help Online Help.
2.4.1.9 ODI Target Type
Using the ODI target type means transferring files to the web service interface of anOracle Data Integrator application. The only required setting is URL, which specifiesthe web service endpoint to which to transfer files.
To define an ODI domain in Oracle Managed File Transfer, see Integrating with OracleData Integrator and Managing Domains.
For more information about other settings you can edit after you create the target, see"Target—ODI" in the Oracle Fusion Middleware MFT Composer Help Online Help.
2.4.2 Moving and Renaming Files After DeliveryAfter you create a File, FTP Remote, or sFTP Remote target, you can edit it to add fileoperations: moving and renaming.
The steps for this process are:
1. Click the arrow to the left of Targets in the left pane navigator.
The targets are listed.
2. Click the target name or right-click it and then select the Open menu item.
The target tab opens.
3. Click the arrow to the left of Advanced Properties.
The Advanced properties section opens.
4. Click the Operation subtab.
The Operation subtab opens.
5. Select Move, Rename, or Move and Rename from the Action Type drop-down list.
6. If you selected Move or Move and Rename, type a path in the Physical TargetDirectory field.
7. If you selected Rename or Move and Rename, type a file name pattern in the FileNaming Convention field.
You can use variables in the file name such as %yyMMddHHmmssSSS% for thetimestamp or %SEQ% for an incrementing integer. For example, File%SEQ%.txtnumbers files File1.txt, File2.txt, and so on. See "Specifying the Outbound
Creating a Target
Designing Artifacts: Transfers, Sources, and Targets 2-25

File Naming Convention" in Understanding Technology Adapters for moreinformation.
8. Save and optionally Deploy the target.
2.4.3 Duplicating an Existing TargetYou can create a new target for file transfers by copying an existing one.
The steps for this process are:
1. Duplicate a target in one of these ways:
• Select the target to copy and then the Duplicate icon in the left pane navigator.
• Right-click the target to copy in the left pane navigator and select the Duplicatecommand from the pop-up menu.
The Duplicate Target dialog appears.
2. Type a Name for the target.
The name can include letters, numbers, dashes, and underscores.
3. Click the Create button.
A tab for the target opens, providing additional settings you can edit. For moreinformation about these settings, see the target type under Target Types and Moving and Renaming Files After Delivery.
To avoid creating a target, click Cancel.
4. Click the Save button after editing.
To undo all changes since the last save, click Revert.
5. Click the Deploy button after saving.
This step is optional. Deploying a transfer deploys the associated source and targetautomatically.
2.4.4 Retry Interval and Retry CountAfter you create a target, you can edit the target type to add retry interval and retrycount.
• Retry Interval: This specifies the number of seconds between attempts to retrydelivery of a failed transfer.
• Retry Count: This specifies how many times retry of a failed transfer is attempted.
2.5 Setting Up SchedulesYou can schedule file deliveries so they occur only at specific times or time ranges. Ifno schedule is configured, the file is delivered as soon as it is processed by OracleManaged File Transfer. You can configure a source schedule as part of sourceconfiguration or a target schedule as part of transfer configuration.
If a schedule is defined for a listening source, the file is picked only when the scheduleexpires. For a non-listening source, the file is picked as soon as it arrives at the sourcelocation but remains with a status of Scheduled. When the schedule expires, the file is
Setting Up Schedules
2-26 Using Oracle Managed File Transfer

processed further and delivered. All transfers that reference the source happen onlywhen the source schedule expires.
If a schedule is defined for a target, the file is delivered only when the scheduleexpires. Before that it remains at the source location with a status of Scheduled.Targets referenced by the same transfer do not share schedules.
Note:
Before adding a schedule, test the transfer without one to ensure that it worksproperly. See Deploying and Testing Transfers.
Note:
Oracle Managed File Transfer interacts with Oracle Enterprise SchedulerService through the OracleSystemUser. Do not delete this user. If you do,clicking add schedule will result in an OracleSystemUser does notexist message, and Schedule Details may be blank in monitoring reports.For more information about users, see Configuring Users.
The steps for this process are:
1. Click the arrow to the left of Sources or Transfers in the left pane navigator.
The sources or transfers are listed.
2. Click the source or transfer name or right-click it and then select the Open menuitem.
The source or transfer tab opens.
3. If you don't see the add schedule option, you can display it. In the source tab, clickthe arrow to the left of Source Schedule. In the transfer tab, click the arrow to theleft of the target.
4. Click add schedule.
The Scheduler dialog opens.
5. Type a Name for the schedule.
6. Select a value from the Frequency drop-down list: Once, Hourly/Minute, Daily,Weekly, Monthly, Yearly, or Custom.
• If you selected Once, enter a date and time in the Start Date field.
• If you selected Hourly/Minute, specify the interval in hours and minutes. Entera Start Date and optionally an End Date.
• If you selected Daily, specify the interval in days. Enter a Start Date andoptionally an End Date.
• If you selected Weekly, specify the interval in weeks. Enter a Start Date andoptionally an End Date.
• If you selected Monthly, select a Repeat option:
Setting Up Schedules
Designing Artifacts: Transfers, Sources, and Targets 2-27

– By day: Select a Week of the Month and a Day of the Week. For the Weekof the Month, you can select Last.
– By date: Select a day of the month or Last day of month.
Enter a Start Date and optionally an End Date.
• If you selected Yearly, select a Month and a Repeat option:
– By day: Select a Week of the Month and a Day of the Week. For the Weekof the Month, you can select Last.
– By date: Select a day of the month or Last day of month.
Enter a Start Date and optionally an End Date.
Click the Date/Time icon to select a date and time instead of typing them or toselect a different time zone. Click Customize Times to edit individual deliverytimes.
7. If you selected Custom from the Frequency drop-down list or clicked CustomizeTimes, the Scheduler dialog expands and displays a table of times.
To add a time, click Add Time, specify a date and time in the Add Time dialog,and click OK. Repeat for each time you want to add.
To remove a time, click Remove Time. To restore a removed time, click Add Back.
If you clicked Customize Times, you can cancel adding custom times by clickingChange Frequency.
8. To specify a time range in which file deliveries can occur, check Use Duration.Specify the duration in hours and minutes. The duration must be less than theFrequency.
The duration is the range of time in which transfers occur. For example, if theFrequency is Weekly, the Start Date is a Monday at noon, and the Duration is onehour, then polling or transfers occur only on Mondays between noon and 1 pm.
9. Click OK.
To cancel adding a schedule, click Cancel.
10. Save and Deploy the source or transfer.
2.5.1 Schedules with Polling Frequency and Minimum AgeThe minimum age applies to the listening source types listed below:
• Remote sFTP
• Remote FTP
• File
• Storage Cloud Service
• Webcenter
If a schedule is defined for any of these source types, polling frequency and minimumage applies only to the schedule duration. If the schedule ends before the expiration ofpolling frequency, then the listening source types will not be polled.
Setting Up Schedules
2-28 Using Oracle Managed File Transfer

Upon each polling occurrence or schedule expiration, MFT downloads only the filesthat have a last modified time to a value that is larger than minimum age.
2.6 Deploying and Testing TransfersAfter you create a transfer and its associated source and targets, you deploy thetransfer to activate it, then test it to make sure it works as designed.
Note:
Before adding a schedule, test the transfer without one to ensure that it worksproperly. See Setting Up Schedules.
2.6.1 Deploying a Source, Target, or TransferEvery artifact tab has a Deploy button. Before a transfer can deliver files, it must bedeployed. You can deploy sources and targets separately to make them available foruse in multiple transfers.
The deployment process has three steps:
1. The deployment user interface displays the list of files to be deployed.
2. The files are validated.
3. If the validation is successful, the artifact is deployed.
Deploying a transfer for the first time automatically deploys the associated source andtargets if they have been saved but not deployed. However, after the initialdeployment, each artifact must be separately redeployed after any modifications.
Oracle Managed File Transfer maintains the version of the artifact. When an artifact isdeployed, the current version of the artifact is deployed. The Oracle Managed FileTransfer runtime engine operates only on the deployed version.
You can monitor, disable, and undeploy artifacts that have been deployed; see Monitoring Deployed Sources_ Targets_ and Transfers.
2.6.2 How to Tell If a Transfer Is SuccessfulTo test a deployed transfer, copy to the source location a test file of the type thetransfer is designed to deliver.
If you applied a content filter, you can also verify that a file of the wrong type is nottransferred. See Setting Up Content Filters.
Note:
If you copy a binary file to the source location using an FTP client external toOracle Managed File Transfer, be sure to configure it for binary transfer.Otherwise the file might become corrupted. Processing actions such ascompression and encryption might not work properly.
Deploying and Testing Transfers
Designing Artifacts: Transfers, Sources, and Targets 2-29

2.6.2.1 Locating Received Files
You can verify that the transfer worked by verifying that the test file arrived at thetarget location.
If you applied preprocessing or postprocessing actions such as compression orencryption, you can examine the delivered file to verify that these actions occurred.See Setting Up Source Processing Actions and Setting Up Transfer Preprocessing andPostprocessing Actions.
You can also verify that actions such as moving and renaming occurred. See Archivingand Deleting Files Before Delivery and Moving and Renaming Files After Delivery.
Watching Active Deliveries
If your test file is large, you can watch its progress on the Dashboard tab of theMonitoring page. See Monitoring Active Deliveries.
2.7 Importing and Exporting TransfersExporting a transfer saves the transfer configuration and its associated source andtarget configurations to a ZIP file. Sources and targets cannot be exported separately.
To export a transfer, click Export on the transfer tab and follow the file savingprocedure for your operating system.
You can import a transfer you have previously exported. The steps for this process are:
1. Open the Import/Export tab on the Administration page.
2. Click Browse.
An operating system file uploading dialog box opens.
3. Select the directory from which to upload the file.
4. Select the ZIP file to upload.
5. Click Open.
The full path to the file appears in the Import text box next to the Browse button.
6. Click Import.
This overwrites a transfer artifact with the same name, and overwrites any associatedsource and targets with the same names.
Importing and Exporting Transfers
2-30 Using Oracle Managed File Transfer

3Processing Transfers with Custom Callouts
This chapter describes how to create and use custom callouts for file transferpreprocessing and postprocessing in Oracle Managed File Transfer (MFT).
To create callouts, you must be familiar with Java and XML code and with creatingtransfers as described in Designing Artifacts: Transfers, Sources, and Targets.
This chapter includes the following sections:
• Understanding Custom Callouts
• Creating a Custom Callout: High-Level Steps
• Creating the Code
• Creating the Callout Definition File
• Locating the Callout Directory
• Running the createCallouts Command
• Testing the Callout
• Reference Files
• Validating Checksum on Custom Callout
3.1 Understanding Custom CalloutsOracle Managed File Transfer provides built-in compression, decompression,encryption, and decryption actions for transfer preprocessing and postprocessing. See Setting Up Transfer Preprocessing and Postprocessing Actions and Setting Up SourceProcessing Actions for details.
You can create new preprocessing and postprocessing actions, which are called customcallouts. Examples of custom callout uses are as follows:
• Adding copyright headers or footers
• Validating content
• Notifying a separate application in case of delivery success or failure
• Invoking a separate application in case of delivery success or failure
• Adding custom headers or properties, which are persisted in the MFT database
• Adding an alternative encryption technique
Processing Transfers with Custom Callouts 3-1
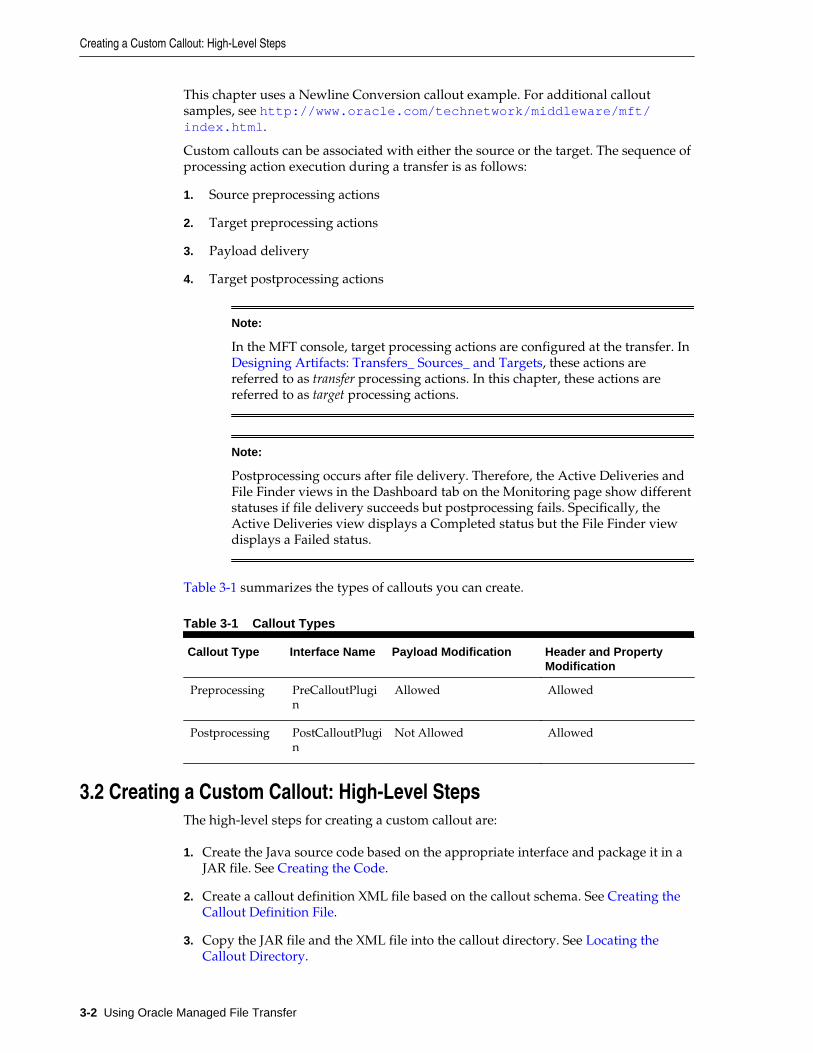
This chapter uses a Newline Conversion callout example. For additional calloutsamples, see http://www.oracle.com/technetwork/middleware/mft/index.html.
Custom callouts can be associated with either the source or the target. The sequence ofprocessing action execution during a transfer is as follows:
1. Source preprocessing actions
2. Target preprocessing actions
3. Payload delivery
4. Target postprocessing actions
Note:
In the MFT console, target processing actions are configured at the transfer. In Designing Artifacts: Transfers_ Sources_ and Targets, these actions arereferred to as transfer processing actions. In this chapter, these actions arereferred to as target processing actions.
Note:
Postprocessing occurs after file delivery. Therefore, the Active Deliveries andFile Finder views in the Dashboard tab on the Monitoring page show differentstatuses if file delivery succeeds but postprocessing fails. Specifically, theActive Deliveries view displays a Completed status but the File Finder viewdisplays a Failed status.
Table 3-1 summarizes the types of callouts you can create.
Table 3-1 Callout Types
Callout Type Interface Name Payload Modification Header and PropertyModification
Preprocessing PreCalloutPlugin
Allowed Allowed
Postprocessing PostCalloutPlugin
Not Allowed Allowed
3.2 Creating a Custom Callout: High-Level StepsThe high-level steps for creating a custom callout are:
1. Create the Java source code based on the appropriate interface and package it in aJAR file. See Creating the Code.
2. Create a callout definition XML file based on the callout schema. See Creating theCallout Definition File.
3. Copy the JAR file and the XML file into the callout directory. See Locating theCallout Directory.
Creating a Custom Callout: High-Level Steps
3-2 Using Oracle Managed File Transfer

4. Run the createCallouts WLST command to configure the callout in MFT. See Running the createCallouts Command.
5. Test the callout by using it in a file transfer. See Testing the Callout.
The following sections describe these steps in detail using a Newline Conversioncallout example. A newline, also known as a line break or end-of-line (EOL) marker, isa special character or sequence of characters signifying the end of a line of text. Unixoperating systems use different newline characters than DOS (and Windows)operating systems. Using this callout, you can convert newline characters from DOS toUnix or from Unix to DOS.
3.3 Creating the CodeThis section includes the following topics:
• Java Code Requirements and Tips
• Java Code for the Newline Conversion Example
3.3.1 Java Code Requirements and TipsThe Java code defines the callout actions. It must meet these minimum requirements:
• It must import the java.io.IOException, java.io.InputStream,java.io.OutputStream, and java.util.Map classes.
• It must import the PluginOutput and PluginContext classes in thecom.oracle.tip.mft.engine.processor.plugin package.
• It must implement the PreCalloutPlugin or PostCalloutPlugin interface inthe com.oracle.callout package.
See PreCalloutPlugin Interface or PostCalloutPlugin Interface for the contents ofthe interface.
• It must be packaged in a JAR file.
You can include multiple callouts in the same JAR file or package them in separateJAR files.
Javadoc pages for the PluginOutput and PluginContext classes and thePreCalloutPlugin and PostCalloutPlugin interfaces are available at http://www.oracle.com/technetwork/middleware/mft/index.html.
To make a callout set header variables, use code like this:
context.getCustomPropertyMap().put("name", "value");context.getTransportHeaderMap().put("name", "value");
To make a callout change the payload file name, use code like this:
PluginOutput pOutput = new PluginOutput(); pOutput.setNewFileName("abc.xyz"); return pOutput;
To make a callout perform different actions for source preprocessing, sourcepostprocessing, target preprocessing, and target postprocessing, use code like this:
if(message instanceof oracle.tip.mft.bean.SourceMessage){ // in case of source pre and post processing
Creating the Code
Processing Transfers with Custom Callouts 3-3
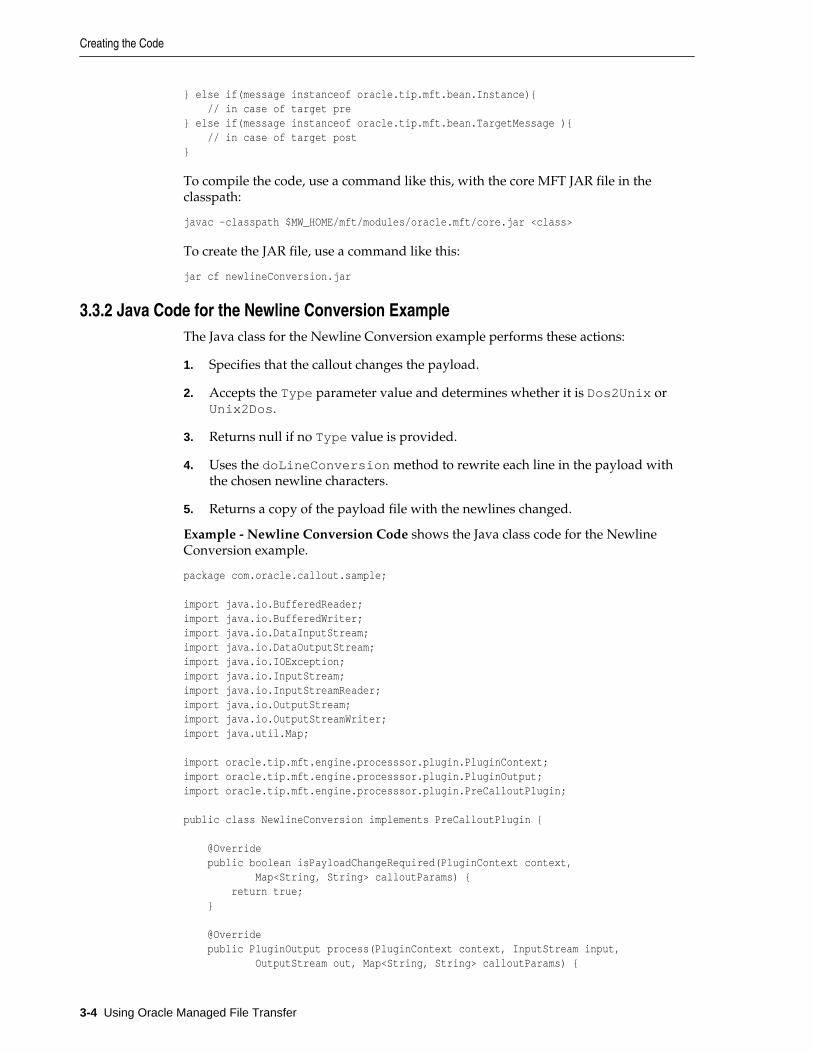
} else if(message instanceof oracle.tip.mft.bean.Instance){ // in case of target pre} else if(message instanceof oracle.tip.mft.bean.TargetMessage ){ // in case of target post}
To compile the code, use a command like this, with the core MFT JAR file in theclasspath:
javac -classpath $MW_HOME/mft/modules/oracle.mft/core.jar <class>
To create the JAR file, use a command like this:
jar cf newlineConversion.jar
3.3.2 Java Code for the Newline Conversion ExampleThe Java class for the Newline Conversion example performs these actions:
1. Specifies that the callout changes the payload.
2. Accepts the Type parameter value and determines whether it is Dos2Unix orUnix2Dos.
3. Returns null if no Type value is provided.
4. Uses the doLineConversion method to rewrite each line in the payload withthe chosen newline characters.
5. Returns a copy of the payload file with the newlines changed.
Example - Newline Conversion Code shows the Java class code for the NewlineConversion example.
package com.oracle.callout.sample;
import java.io.BufferedReader;import java.io.BufferedWriter;import java.io.DataInputStream;import java.io.DataOutputStream;import java.io.IOException;import java.io.InputStream;import java.io.InputStreamReader;import java.io.OutputStream;import java.io.OutputStreamWriter;import java.util.Map;
import oracle.tip.mft.engine.processsor.plugin.PluginContext;import oracle.tip.mft.engine.processsor.plugin.PluginOutput;import oracle.tip.mft.engine.processsor.plugin.PreCalloutPlugin;
public class NewlineConversion implements PreCalloutPlugin {
@Override public boolean isPayloadChangeRequired(PluginContext context, Map<String, String> calloutParams) { return true; }
@Override public PluginOutput process(PluginContext context, InputStream input, OutputStream out, Map<String, String> calloutParams) {
Creating the Code
3-4 Using Oracle Managed File Transfer

String type = calloutParams.get("Type"); boolean isDos = false; if ("Unix2Dos".equals(type)) { isDos = true; } doLineConversion(input, out, isDos); return new PluginOutput(); }
@Override public PluginOutput process(PluginContext context, InputStream input, Map<String, String> calloutParams) { return null; }
public static final String DOS_NEW_LINE = "\r\n"; public static final String UNIX_NEW_LINE = "\n";
private void doLineConversion(InputStream in, OutputStream out, boolean isDos) { String newLineChar = null; if (isDos) { newLineChar = DOS_NEW_LINE; } else { newLineChar = UNIX_NEW_LINE; } BufferedReader bufferIn = null; BufferedWriter bufferOut = null; try { DataInputStream dataIn = new DataInputStream(in); bufferIn = new BufferedReader(new InputStreamReader(dataIn)); DataOutputStream dataOut = new DataOutputStream(out); bufferOut = new BufferedWriter(new OutputStreamWriter(dataOut)); // For each line in the un-normalized file String line; while ((line = bufferIn.readLine()) != null) { // Write the original line plus the operating-system dependent // newline bufferOut.write(line); bufferOut.write(newLineChar); } } catch (Exception e) { throw new RuntimeException(e); } finally { try { bufferIn.close(); bufferOut.close(); } catch (IOException e) { throw new RuntimeException(e); } } }}
3.4 Creating the Callout Definition FileThe definition file specifies the callout structure in the MFT configuration. It mustmeet these requirements:
Creating the Callout Definition File
Processing Transfers with Custom Callouts 3-5

• It must conform to the XML format specified in the callout.xsd schema file. See Callout Definition Schema for the contents of the schema file.
You can include multiple callouts in the same definition file or package them inseparate definition files.
• The timeout attribute of the Callout element must have a value (in seconds) toprevent an insufficiently debugged callout with an infinite loop from running toolong.
• The implementationClass attribute of the Callout element must reference theJava class name, including the package name.
• The libraryName attribute of the Callout element must reference the JAR filename.
• If the Java class has input parameters, corresponding Parameter elements mustbe specified.
Example - Newline Conversion Callout Definition File shows the callout definitionfile for the Newline Conversion example.
Example - Newline Conversion Callout Definition File
<?xml version="1.0" encoding="UTF-8"?><mft:Callouts xmlns:mft="http://xmlns.oracle.com/mft" xmlns:xsi="http://www.w3.org/2001/XMLSchema-instance" xsi:schemaLocation="http://xmlns.oracle.com/mft callout.xsd "> <mft:Callout description="New line conversion" helpText="New line conversion" groupName="Source-pre,Target-pre" timeout="300" implementationClass="com.oracle.callout.sample.NewlineConversion" libraryName="newlineConversion.jar" name="New line conversion"> <mft:Parameter description="Type" mandatory="true" helpText="Type" name="Type" listValue="Dos2Unix,Unix2Dos" parameterType="string" defaultValue="Dos2Unix"/> </mft:Callout></mft:Callouts>
3.5 Locating the Callout DirectoryAfter you have created the JAR file and the definition file, you must copy them intothe MFT callout directory. The default location of this directory is as follows:
FMW_HOME/user_projects/domains/soainfra/mft/callouts
To verify the location, you can look at the MFT configuration.
The steps for this process are:
1. Go to the Administration page.
2. In the left navigation pane, click Server Properties.
3. Look at the Callout Directory setting near the top of the page.
3.6 Running the createCallouts CommandAfter you have copied the JAR file and the definition file into the MFT calloutdirectory, you must use the createCallouts command to upload the calloutdefinition to the MFT configuration.
Locating the Callout Directory
3-6 Using Oracle Managed File Transfer

The steps for this process are:
1. Start WLST using the steps described in Running WLST Commands.
2. Specify the full path to the callout definition file using the createCalloutscommand:
crtCalls('/home/user_projects/domains/soainfra/mft/callouts/Newline.xml')
The example uses the crtCalls abbreviation.
3. Verify that the callout has been added using the listCallouts command:
listCallouts()
4. Exit WLST using the steps described in Running WLST Commands.
For more information about MFT WLST commands, see MFT WLST CommandSummary and WLST Command Reference for SOA Suite.
3.7 Testing the CalloutAfter you create the callout and upload its definition, you must test it to be sure itworks as designed.
The high-level steps for testing a custom callout are:
1. Add the callout to a source or target and deploy the associated transfer. See Addingthe Callout to a Source or Adding the Callout to a Target.
2. After the transfer runs, look at the source or target report. See Viewing the Reportto Verify the Callout Action.
3. Update the callout if you need to correct errors or make improvements. See Updating the Callout.
Note:
If you were logged into the MFT console when you ran the createCalloutscommand, you must log out and log in again before you can add the callout toa source or target.
3.7.1 Adding the Callout to a SourceThe steps for adding the Newline Conversion callout to a source are:
1. Click the arrow to the left of Sources in the left pane navigator.
The sources are listed.
2. Click the source name or right-click it and then select the Open menu item.
The source tab opens.
3. Click the arrow to the left of Actions.
The Actions section opens.
Testing the Callout
Processing Transfers with Custom Callouts 3-7

4. Click add processing actions.
The Processing Actions dialog opens.
5. Select New line conversion from the All Actions drop-down list.
6. Click Add to List.
To remove an action from the list, click the Delete icon to the right of the action.
7. Type Dos2Unix or Unix2Dos in the Type text box.
8. Click OK.
To cancel adding actions, click Cancel.
9. Save and optionally Deploy the source.
10. Add the source to a transfer and Deploy the transfer.
See Deploying and Testing Transfers for more information.
3.7.2 Adding the Callout to a TargetThe steps for adding the Newline Conversion callout to a target are:
1. Click the arrow to the left of Transfers in the left pane navigator.
The transfers are listed.
2. Click the transfer name or right-click it and then select the Open menu item.
The transfer tab opens.
3. Click the arrow to the left of the target.
The target settings are displayed.
4. Click add preprocessing actions.
The Pre-Processing Actions dialog opens.
5. Select New line conversion from the All Actions drop-down list.
6. Click Add to List.
To remove an action from the list, click the Delete icon to the right of the action.
7. Type Dos2Unix or Unix2Dos in the Type text box.
8. Click OK.
To cancel adding actions, click Cancel.
9. Save and Deploy the transfer.
See Deploying and Testing Transfers for more information.
3.7.3 Viewing the Report to Verify the Callout ActionTo access the report for the source or target, go to the Monitoring page and see Interpreting Source_ Transfer_ and Target Reports.
Testing the Callout
3-8 Using Oracle Managed File Transfer

The New line conversion callout is listed in the Source Pre-Processing table in thesource report or the Target Pre-Processing table in the target report. The Status columnof either table shows the value Processed if the callout action was successful.
In addition, the Advanced section of the report includes payloadModified=yes inthe Message Property field if the callout action was successful.
See Source Reports or Target Reports for more information.
3.7.4 Updating the CalloutKeep these points in mind when updating callouts:
• No MFT server restart is needed when creating or updating callouts.
• If you change only the Java code, and the parameters are unchanged, all you needto do is copy the new JAR file into the callouts directory.
• If you change the definition file, and the parameters are unchanged, all you need todo is use the updateCallouts command to reload the callout definition.
• If you add, delete, or modify callout parameters, you must perform these steps:
1. Delete the callout using the deleteCallout command.
2. Recreate the callout using the createCallouts command.
3. Reconfigure the source or target to use the new callout version.
For more information about MFT WLST commands, see MFT WLST CommandSummary and WLST Command Reference for SOA Suite.
3.8 Reference FilesThis section lists the contents of the following files:
• PreCalloutPlugin Interface
• PostCalloutPlugin Interface
• Callout Definition Schema
3.8.1 PreCalloutPlugin InterfaceExample - PreCalloutPlugin Interface shows the Java code for thecom.oracle.callout.PreCalloutPlugin interface.
Example - PreCalloutPlugin Interface
public interface PreCalloutPlugin { /** * Depending on the return of this function output stream for changing the * pay load content will be passed. Only if the payload change is required * return true. * * @param context * @param calloutParams * @return */ public boolean isPayloadChangeRequired(final PluginContext context,
Reference Files
Processing Transfers with Custom Callouts 3-9

final Map<String, String> calloutParams); /** * This function will be called only if the isPayloadChangesRequired returns * true. This method must write final pay load content to the output stream. * Any custom properties or the header properties can be set at the context * level. * * @param context * @param input * @param out * @param calloutParams * @return */ public PluginOutput process(final PluginContext context, final InputStream input, OutputStream out, final Map<String, String> calloutParams); /** * This function will be called only if the isPayloadChangesRequired returns * false. Any custom properties or the header properties can be set at the * context level. * * @param context * @param input * @param out * @param calloutParams * @return */ public PluginOutput process(final PluginContext context, final InputStream input, final Map<String, String> calloutParams);}
3.8.2 PostCalloutPlugin InterfaceExample - PostCalloutPlugin Interface shows the Java code for thecom.oracle.callout.PostCalloutPlugin interface.
Example - PostCalloutPlugin Interface
public interface PostCalloutPlugin { /** * Any custom properties or the header properties can be set at the * context level. * * @param context * @param input * @param out * @param calloutParams * @return */ public PluginOutput process(final PluginContext context, final InputStream input, final Map<String, String> calloutParams);}
3.8.3 Callout Definition SchemaThe callout.xsd file defines the format of the callout definition XML file. Example -Callout Definition Schema shows its contents.
Reference Files
3-10 Using Oracle Managed File Transfer

Example - Callout Definition Schema
<?xml version="1.0" encoding="UTF-8"?><xsd:schema targetNamespace="http://xmlns.oracle.com/mft" xmlns="http://www.w3.org/2001/XMLSchema" xmlns:xsd="http://www.w3.org/2001/XMLSchema" xmlns:mft="http://xmlns.oracle.com/mft" elementFormDefault="qualified"> <xsd:element name="Callouts"> <xsd:complexType> <xsd:sequence> <xsd:element name="Callout" minOccurs="0" maxOccurs="unbounded"> <xsd:complexType> <xsd:sequence> <xsd:element minOccurs="0" maxOccurs="unbounded" ref="mft:Parameter"/> </xsd:sequence> <xsd:attribute name="name" use="required"> <xsd:simpleType> <xsd:restriction base="mft:non-empty-string"> <xsd:maxLength value="128"/> </xsd:restriction> </xsd:simpleType> </xsd:attribute> <!-- multiple values separated by comma are supported, possible values Source-pre, Target-pre, Target-post --> <xsd:attribute name="groupName" type="mft:non-empty-string" use="optional"/> <xsd:attribute name="implementationClass" type="mft:non-empty-string"/> <!-- jar name --> <xsd:attribute name="libraryName" type="mft:non-empty-string"/> <xsd:attribute name="timeout" type="xsd:integer" use="optional" default="30"/> <xsd:attribute name="description" type="mft:non-empty-string"/> <xsd:attribute name="helpText" type="mft:non-empty-string"/> </xsd:complexType> <xsd:unique name="Callout_UK"> <xsd:selector xpath="mft:Callout"/> <xsd:field xpath="@name"/> </xsd:unique> </xsd:element> </xsd:sequence> </xsd:complexType></xsd:element> <xsd:element name="Parameter"> <xsd:complexType> <xsd:attribute name="name" type="mft:non-empty-string" use="required"/> <xsd:attribute name="parameterType" type="mft:parameterTypeLOV" use="required"/> <xsd:attribute name="basic" type="boolean" use="optional" default="false"/> <xsd:attribute name="mandatory" type="boolean" use="optional" default="false"/> <xsd:attribute name="hidden" type="boolean" use="optional" default="false"/> <!-- multiple values separated by comma is supported --> <xsd:attribute name="groupName" type="mft:non-empty-string" use="optional"/> <!-- sub-groups can have multiple values separated by comma. -->
Reference Files
Processing Transfers with Custom Callouts 3-11

<xsd:attribute name="sub-groups" type="mft:non-empty-string" use="optional"/> <!-- VRule: defaultValue and parameterTypeLOV MUST match --> <xsd:attribute name="defaultValue" type="mft:non-empty-string" use="optional"/> <xsd:attribute name="listValue" type="mft:non-empty-string" use="optional"/> <xsd:attribute name="mapValue" type="mft:non-empty-string" use="optional"/> <!-- changed refValue from IDREF to non-empty-string as IDREF does not allow ",". In the future refValue can have value separated by ",". Ex: "xPathaParams, someOtherParams" --> <xsd:attribute name="refValue" type="mft:non-empty-string" use="optional"/> <!--attribute name="tpOverrideable" type="boolean" use="optional" default="true"/--> <xsd:attribute name="overrideLevel" type="mft:overrideLevelLOV" use="optional" default="all"/> <xsd:attribute name="displayName" type="mft:non-empty-string"/> <xsd:attribute name="description" type="mft:non-empty-string"/> <xsd:attribute name="helpText" type="mft:non-empty-string"/> </xsd:complexType> </xsd:element> <xsd:simpleType name="overrideLevelLOV"> <xsd:restriction base="string"> <xsd:enumeration value="admin"/> <xsd:enumeration value="tp"/> <xsd:enumeration value="host"/> <xsd:enumeration value="tpa"/> <xsd:enumeration value="all"/> </xsd:restriction></xsd:simpleType> <xsd:simpleType name="non-empty-string"> <xsd:restriction base="string"> <xsd:minLength value="1"/> </xsd:restriction></xsd:simpleType> <xsd:simpleType name="parameterTypeLOV"> <xsd:restriction base="string"> <xsd:enumeration value="float"/> <xsd:enumeration value="integer"/> <xsd:enumeration value="string"/> <xsd:enumeration value="boolean"/> <xsd:enumeration value="date"/> <xsd:enumeration value="SO"/> <xsd:enumeration value="MO"/> <xsd:enumeration value="credential"/> <xsd:enumeration value="list"/> <xsd:enumeration value="map"/> <xsd:enumeration value="ref"/> <xsd:enumeration value="hex"/> </xsd:restriction></xsd:simpleType></xsd:schema>
Reference Files
3-12 Using Oracle Managed File Transfer

3.9 Validating using Custom CalloutYou can validate a custom callout action. For example, when validating checksum,you can validate by setting the exception object in the plugin output in the calloutimplementation.
The code for validation is as follows:
public PluginOutput process(PluginContext context, InputStream input,Map<String, String> calloutParams) { PluginOutput res = new PluginOutput() ; boolean isValid = validateChecksum(context, input, calloutParams) ; if( ! isValid ){res.setException(new Exception("Checksum mismatch, corrupted payload.")) ;
} return res ; }
The checksum action status for the above example will be failed for the instance reportpage. The message status will be Failed[Pre-processing].
Validating using Custom Callout
Processing Transfers with Custom Callouts 3-13

Validating using Custom Callout
3-14 Using Oracle Managed File Transfer

4Integrating Oracle Managed File Transfer
with Other Products
This chapter describes how to use Oracle Managed File Transfer (MFT) in applicationintegrations.
This chapter includes the following sections:
• Compatible Technologies and Integration Strategies
• Managing Domains
• Integrating with Oracle SOA Suite
• Integrating with Oracle Service Bus
• Integrating with B2B
• Integrating with Healthcare
• Integrating with Oracle Data Integrator
• Integrating with Web Services
• MFT WSDL Files
4.1 Compatible Technologies and Integration StrategiesCompatible Technologies and Integration Strategies summarizes the technologiescompatible with Oracle Managed File Transfer and the basic strategies for integration.
Table 4-1 Compatible Technologies and Integration Strategies for Oracle ManagedFile Transfer
Technology Source and Target Types Integration Strategy
File system File, FTP Remote, sFTPRemote, FTP Embedded,sFTP Embedded
Use standard file management and FTPor sFTP commands.
Web services SOAP, SOA, Service Bus,ODI
Configure the integrating application torecognize the source or target as a webservice.
B2B B2B, Healthcare Configure the integrating application torecognize the source or target as atrading partner channel or endpoint.
Integrating Oracle Managed File Transfer with Other Products 4-1

Within each technology, each integrating application recognizes Oracle Managed FileTransfer differently. Here are some examples:
• A SOA source in Oracle Managed File Transfer corresponds to an MFT referencebinding component in SOA.
• A SOA target in Oracle Managed File Transfer corresponds to an MFT servicebinding component in SOA.
• A Service Bus source in Oracle Managed File Transfer corresponds to a businessservice in Oracle Service Bus.
• A Service Bus target in Oracle Managed File Transfer corresponds to a proxyservice in Oracle Service Bus.
Some integrating applications, such as SOA, recognize Oracle Managed File Transferwith a specific component or setting. Others, such as Oracle Service Bus, recognizeOracle Managed File Transfer generically according to the technology.
4.2 Managing DomainsYou must configure domains for SOA, Service Bus, B2B, Healthcare, and ODI sourcesand targets if these integrating applications are not collocated on the same OracleWebLogic Server instance or cluster with Oracle Managed File Transfer.
The steps for this process are:
1. Open the Domains tab on the Administration page.
2. Click the Add icon.
An empty row is added to the domain table.
3. Enter the following information in the table cells:
• Domain Alias: The host name for connecting to the domain.
The Domain Alias setting for a source or target maps to this alias.
• Connection URL: The service endpoint URL for connecting to B2B andHealthcare applications running on remote servers. These servers can be in thesame Oracle WebLogic Server domain as Oracle Managed File Transfer or in adifferent domain. It is used to send messages to B2B and Healthcare targets.
• User: The user as whom to access the domain.
• Password: The user password.
• Confirm Password: The user password confirmation.
• Tracking URL: The URL for the source or target location from or to which filesare transferred, if different from the Connection URL. See Specifying theTracking URL for more information.
• Type: The domain type, B2B, Healthcare, SOA, Service Bus, or ODI.
This is only an optional label. It does not determine which domains areavailable for which source and target types.
• Description: A text description of the domain.
Managing Domains
4-2 Using Oracle Managed File Transfer
• Example: t3://host:port (host and port details of the WLS Server where B2B isrunning).
4. Click Show Domain Details to display a list of referring sources and targets forthe selected domain.
By default, all source and target types are listed. You can uncheck B2B,Healthcare, SOA, Service Bus, or ODI to hide sources and targets of that type.
5. Click Save.
To delete a domain, select the table row and click the Delete icon. To cancel allchanges since you last saved, click Revert.
After you create sources and targets that reference the domain aliases, you can select adomain and click Show Domain Details to see the referring sources and targets.
4.2.1 Specifying the Tracking URLThe Tracking URL is the URL for the source or target location from or to which filesare transferred, if different from the Connection URL.
For all domain types, the tracking URL is the console URL used to access therespective reporting module for the product being integrated. This URL can be theload balancer IP or server address. It is used in generating the dynamic URL to openthe respective reporting page from the Oracle Managed File Transfer monitoringmodule. For examples, see Interlinked SOA and MFT Reports, Interlinked B2B andMFT Reports, and Interlinked Healthcare and MFT Reports
When you select a Domain Alias for a source or target, all configured domains areavailable for B2B and Healthcare targets, but only domains with a tracking URL areavailable for B2B and Healthcare sources and for SOA, Service Bus, and ODI sourcesand targets.
The connection URL for B2B remote integration points to the B2B managed server.However, remote B2B report integration may use the HTTP URL of a load balancerinstead, in which case you must specify a tracking URL.
The connection URL for Oracle SOA Suite points to the SOA managed server.However, because Oracle Enterprise Manager Fusion Middleware Control runs on theadministration server, the URL for flow trace navigation is different. Therefore, toensure that report interlinking works as described in Interlinked SOA and MFTReports, you must specify a tracking URL.
Tracking URL syntax is as follows:
http://host:port#domain_name#domain_type
The default for the optional domain_type is weblogic_domain.
For example, if the MFT console URL is mft.example.com:8001 and both MFT andFusion Middleware Control for SOA are in the same mft_domain, use this as thetracking URL:
http://mft.example.com:8001#mft_domain
If the Fusion Middleware Control console URL is soa.example.com:21374 andFusion Middleware Control is in the WLS_SOA domain, use this as the tracking URL:
http://soa.example.com:21374#WLS_SOA
Managing Domains
Integrating Oracle Managed File Transfer with Other Products 4-3

4.3 Integrating with Oracle SOA SuiteOracle JDeveloper provides a specialized MFT component under BPEL Services torepresent an Oracle Managed File Transfer source or target in a BPEL process. Afteryou create a source or target of type SOA in Oracle Managed File Transfer, you createa corresponding MFT component in your SOA application.
Integration between SOA and MFT uses several WSDL files. See MFT WSDL Files formore information.
You must configure a SOA domain in Oracle Managed File Transfer if Oracle SOASuite is not collocated with MFT. To ensure that report interlinking works as describedin Interlinked SOA and MFT Reports, you must specify a tracking URL. For moreinformation, see Specifying the Tracking URL.
4.3.1 Creating an MFT Reference for a SOA SourceA SOA source in Oracle Managed File Transfer corresponds to an MFT referencebinding component in SOA. The SOA application sends the file.
The steps for this process are:
1. Create a new SOA Application and project in Oracle JDeveloper.
2. With the project open, display the Technology section of the Component Palette.
3. Drag and drop the MFT component icon into the right Partner Link swimlane.The MFT Configuration Wizard opens.
4. On the MFT Adapter Reference page, specify a name or accept the default name ofmftReferencenumber. Reference is selected as the binding. Click Next.
5. On the Adapter Interface page, select Define using a new MFT Reference. ClickNext.
6. On the Service Connection page, select the connection to the Oracle WebLogicServer on which Oracle Managed File Transfer is installed from the AppServerConnection drop-down list. Select the managed server on which Oracle ManagedFile Transfer runs from the SOA Server drop-down list if it does not autofill. ClickTest MFT to test the communication with Oracle Managed File Transfer. ClickNext.
7. On the Reference Configuration page, select the MFT source name from theSource drop-down list. The endpoint location autofills in the Endpoint field. ClickFinish.
8. The MFT component appears in the BPEL process. Work with it as you would anyexternal reference.
4.3.2 Creating an MFT Service for a SOA TargetA SOA target in Oracle Managed File Transfer corresponds to an MFT service bindingcomponent in SOA. The SOA application receives the file.
The steps for this process are:
1. Create a new SOA Application and project in Oracle JDeveloper.
Integrating with Oracle SOA Suite
4-4 Using Oracle Managed File Transfer

2. With the project open, display the Technology section of the Component Palette.
3. Drag and drop the MFT component icon into the left Partner Link swimlane. TheMFT Configuration Wizard opens.
4. On the MFT Adapter Reference page, specify a name or accept the default name ofmftServicenumber. Service is selected as the binding. Click Finish.
5. The MFT component appears in the BPEL process. Work with it as you would anyexposed service.
4.3.3 Interlinked SOA and MFT ReportsAn Oracle Managed File Transfer instance report for a SOA source or target has aCorrelation Flow ID link. Clicking this link opens the corresponding Flow Trace pagein Oracle Enterprise Manager Fusion Middleware Control for the SOA instance.
Likewise, a Fusion Middleware Control Flow Trace for Oracle Managed File Transferhas a Managed File Transfer link in the Trace section. Clicking this link opens thecorresponding Oracle Managed File Transfer instance report.
To ensure that report interlinking works when Oracle SOA Suite is not collocated withMFT, you must specify a tracking URL. For more information, see Specifying theTracking URL.
See Interpreting Source_ Transfer_ and Target Reports for more information aboutOracle Managed File Transfer instance reports.
4.4 Integrating with Oracle Service BusOracle Service Bus uses a business service for outgoing data and a proxy service forincoming data. The corresponding endpoints in Oracle Managed File Transfer are aService Bus source and a Service Bus target, respectively.
You must configure a Service Bus domain in Oracle Managed File Transfer if OracleService Bus is not collocated with MFT. For more information, see Managing Domains.
4.4.1 Creating a Business Service for a Service Bus SourceA Service Bus source in Oracle Managed File Transfer corresponds to a businessservice in Oracle Service Bus. Oracle Service Bus calls Oracle Managed File Transferand Oracle Service Bus sends the file. You can create a business service from eitherOracle JDeveloper or the Oracle Service Bus console.
For more information, see Creating and Configuring Business Services in DevelopingServices with Oracle Service Bus.
4.4.1.1 Creating a Business Service in Oracle JDeveloper
The steps for this process are:
1. Open or create the application and project to which you want to add the businessservice.
2. In the Application Navigator, right-click the project and select New > BusinessService to display the Create Business Service wizard. On wizard pages notmentioned, you can accept the default values and click Next.
3. On the Business Service Create Service Page, type a name, and set the Definition toWSDL.
Integrating with Oracle Service Bus
Integrating Oracle Managed File Transfer with Other Products 4-5

4. Click Browse. Navigate to the WLS_Home/mft/integration/wsdl directoryand select the MFTSOAService.wsdl file. Click OK.
See MFT WSDL Files for more information about this file.
5. The WSDL settings appear on the Create Service Page. Click Next.
6. On the Business Service Transport Configuration Page, set the Protocol to http.Set the Endpoint URI to match the URL setting in the Service Bus source. ClickCreate.
7. The Business Service Definition Editor appears with the general configuration ofthe new business service displayed.
4.4.1.2 Creating a Business Service in the Oracle Service Bus Console
The steps for this process are:
1. Import the WSDL file for Oracle Managed File Transfer into your Oracle ServiceBus project. The full path to this file is WLS_Home/mft/integration/wsdl/MFTSOAService.wsdl.
See MFT WSDL Files for more information about this file.
For instructions on the Service Bus side, see Importing and Exporting Resourcesand Configurations in Developing Services with Oracle Service Bus.
2. In the Resource panel, select the project to which you want to add a businessservice, and then click the down arrow next to the Create icon.
3. Select Business Service to display the Create Business Service wizard.
4. In the Create Service section of the Create page, enter a name for the businessservice.
5. In the Service Definition section of the Create page, select WSDL Based Service.
6. Click the Search icon to search for a WSDL resource. With all fields blank, clickSearch. This finds all imported WSDL files. Select the WSDL file for OracleManaged File Transfer in the search results table. Click OK.
7. Once you specify the WSDL file, select the port or binding to use from the Port/Binding field. Click Next.
8. On the Transport Page, set the Protocol to http. Set the Endpoint URI to matchthe URL setting in the Service Bus target. Click Create.
9. The Business Service Definition Editor appears with the general configuration ofthe new business service displayed.
4.4.2 Creating a Proxy Service for a Service Bus TargetA Service Bus target in Oracle Managed File Transfer corresponds to a proxy service inOracle Service Bus. Oracle Managed File Transfer calls Oracle Service Bus and OracleService Bus receives the file. You can create a proxy service from either OracleJDeveloper or the Oracle Service Bus console.
For more information, see Creating and Configuring Proxy Services in DevelopingServices with Oracle Service Bus.
Integrating with Oracle Service Bus
4-6 Using Oracle Managed File Transfer

4.4.2.1 Creating a Proxy Service in Oracle JDeveloper
The steps for this process are:
1. Open or create the application and project to which you want to add the proxyservice.
2. In the Application Navigator, right-click the project and select New > ProxyService to display the Create Proxy Service wizard. On wizard pages notmentioned, you can accept the default values and click Next.
3. On the Proxy Service Create Service Page, type a name, and set the Definition toWSDL.
4. Click Browse. Navigate to the WLS_Home/mft/integration/wsdl directoryand select the MFTAnyTypeService.wsdl file. Click OK.
See MFT WSDL Files for more information about this file.
5. The WSDL settings appear on the Create Service Page. Click Next.
6. On the Proxy Service Transport Configuration Page, set the Protocol to ws. Set theEndpoint URI to match the URL setting in the Service Bus target. Click Create.
7. The Proxy Service Definition Editor appears with the general configuration of thenew proxy service displayed.
4.4.2.2 Creating a Proxy Service in the Oracle Service Bus Console
The steps for this process are:
1. Import the WSDL file for Oracle Managed File Transfer into your Oracle ServiceBus project. The full path to this file is WLS_Home/mft/integration/wsdl/MFTAnyTypeService.wsdl.
See MFT WSDL Files for more information about this file.
For instructions on the Service Bus side, see Importing and Exporting Resourcesand Configurations in Developing Services with Oracle Service Bus.
2. In the Resource panel, select the project to which you want to add a proxy service,and then click the down arrow next to the Create icon.
3. Select Proxy Service to display the Create Proxy Service wizard.
4. In the Create Service section of the Create page, enter a name for the proxy service.
5. In the Service Definition section of the Create page, select WSDL Based Service.
6. Click the Search icon to search for a WSDL resource. With all fields blank, clickSearch. This finds all imported WSDL files. Select the WSDL file for OracleManaged File Transfer in the search results table. Click OK.
7. Once you specify the WSDL file, select the port or binding to use from the Port/Binding field. Click Next.
8. On the Transport Page, set the Protocol to ws. Set the Endpoint URI to match theURL setting in the Service Bus target. Click Create.
Integrating with Oracle Service Bus
Integrating Oracle Managed File Transfer with Other Products 4-7

9. The Proxy Service Definition Editor appears with the general configuration of thenew proxy service displayed.
4.5 Integrating with B2BB2B recognizes Oracle Managed File Transfer as a Remote Trading Partner. B2B usesan external delivery channel to send files to Oracle Managed File Transfer. B2Brequires no special configuration to receive files. Instead, you configure a B2B domainin Oracle Managed File Transfer.
4.5.1 Creating a Remote Trading Partner Channel for a B2B SourceA B2B source in Oracle Managed File Transfer corresponds to an external deliverychannel for a Remote Trading Partner in B2B. You can either configure a B2B domainin Oracle Managed File Transfer (see Managing Domains) or configure a channel inB2B.
The steps for this process are:
1. Go to the Partners page in B2B.
2. Select the remote trading partner in the Partner pane, or create a new remotetrading partner.
3. Select the Channels tab.
4. Type a Name for the new channel.
5. Select Generic MFT-1.0 from the Protocol drop-down list.
6. On the Transport Control Parameters tab, set the following parameters:
• URL: The URL for connecting to Oracle Managed File Transfer.
• User name: The username for connecting to Oracle Managed File Transfer.
• Password, Confirm Password: The password for connecting to OracleManaged File Transfer.
• Source: The name of the B2B source in Oracle Managed File Transfer.
• Transfer: The name of the transfer associated with the B2B source. This isoptional.
• Target: The name of the target associated with the B2B source. This is optional.
Source is always required. URL, User name, and Password are required if B2Bmust connect to Oracle Managed File Transfer on a different server.
7. Click Save.
8. The external delivery channel is ready to send files to Oracle Managed FileTransfer.
For more information, see Configuring Channels in User's Guide for Oracle B2B.
4.5.2 Configuring a B2B Domain for a B2B TargetA B2B target in Oracle Managed File Transfer calls the EJB for the Host TradingPartner in B2B. No B2B configuration is needed. However, you must configure a B2B
Integrating with B2B
4-8 Using Oracle Managed File Transfer

domain in Oracle Managed File Transfer if B2B is not collocated. For moreinformation, see Managing Domains.
4.5.3 Interlinked B2B and MFT ReportsAn Oracle Managed File Transfer instance report for a B2B source or target has aCorrelation Flow ID link. Clicking this link opens the corresponding Business Messagereport for the B2B instance.
Likewise, a B2B Business Message report for Oracle Managed File Transfer has anMFT Flow link in the Flow Trace column of the Result table. Clicking this link opensthe corresponding Oracle Managed File Transfer instance report.
See Interpreting Source_ Transfer_ and Target Reports for more information aboutOracle Managed File Transfer instance reports.
4.6 Integrating with HealthcareOracle SOA Suite for healthcare integration (Healthcare) recognizes Oracle ManagedFile Transfer as a Remote Endpoint. Healthcare uses an outbound endpoint to sendfiles to Oracle Managed File Transfer and an inbound endpoint to receive files. Youmust also configure a Healthcare domain in Oracle Managed File Transfer.
You must configure a Healthcare domain in Oracle Managed File Transfer ifHealthcare is not collocated with MFT. For more information, see Managing Domains.
4.6.1 Creating an Outbound Endpoint for a Healthcare SourceA Healthcare source in Oracle Managed File Transfer corresponds to an outboundendpoint for a Remote Endpoint in Healthcare.
The steps for this process are:
1. In Healthcare, in the Configuration tab under the Design tab, click the Endpointfolder and then click the Create icon.
2. In the Create window, enter the following and click OK:
• Name: Type a name for the new endpoint.
• Transport Protocol: Select MFT.
• Direction: Select Outbound.
• Source: Type the MFT source name.
The endpoint is displayed in the right panel of the Healthcare user interface.
3. Find the document to be transferred under the Document Protocol folder.
4. Drag and drop the document to be transferred into the Document to Send table.
5. Save the endpoint.
For more information, see Working with Endpoints in Healthcare Integration User'sGuide for Oracle SOA Suite.
Integrating with Healthcare
Integrating Oracle Managed File Transfer with Other Products 4-9

4.6.2 Creating an Inbound Endpoint for a Healthcare TargetA Healthcare target in Oracle Managed File Transfer corresponds to an inboundendpoint for a Remote Trading Partner in Healthcare.
The steps for this process are:
1. In Healthcare, in the Configuration tab under the Design tab, click the Endpointfolder and then click the Create icon.
2. In the Create window, enter the following and click OK:
• Name: Type a name for the new endpoint.
• Transport Protocol: Select MFT.
• Direction: Select Inbound.
The endpoint is displayed in the right panel of the Healthcare user interface.
3. Click the Transport Details button.
4. In the Transport Protocol Parameters window, enter the following and click OK:
• Source: Type the MFT source name.
• URL: Type the URL of the MFT source.
• Username: Type the MFT username.
• Password, Confirm Password: Type the password for the MFT username.
The endpoint is updated.
5. Find the document to be transferred under the Document Protocol folder.
6. Drag and drop the document to be transferred into the Document to Receive table.
7. Save the endpoint.
For more information, see Working with Endpoints in Healthcare Integration User'sGuide for Oracle SOA Suite.
4.6.3 Interlinked Healthcare and MFT ReportsAn Oracle Managed File Transfer instance report for a Healthcare source or target hasa Correlation Flow ID link. Clicking this link opens the corresponding report for theHealthcare endpoint.
Likewise, a Healthcare endpoint instance report for Oracle Managed File Transfer hasan MFT source or target icon. Clicking this icon opens the corresponding OracleManaged File Transfer instance report.
See Interpreting Source_ Transfer_ and Target Reports for more information aboutOracle Managed File Transfer instance reports.
4.7 Integrating with Oracle Data IntegratorOracle Managed File Transfer can integrate with Oracle Data Integrator (ODI) in oneof two ways:
Integrating with Oracle Data Integrator
4-10 Using Oracle Managed File Transfer

• Through the file system, using FTP or sFTP if ODI is not collocated.
Using the file system is the simplest and most common integration method.
• Through web services, using the OdiInvokeWebService tool for ODI sources orconfiguring data services for ODI targets.
For the web service integration method, you must configure an ODI domain inOracle Managed File Transfer if Oracle Data Integrator is not collocated with MFT.For more information, see Managing Domains.
Using the file system is best for large files and batch processing, while using webservices is more suited to smaller payloads for updates or trickle feeds.
4.7.1 Using the File System and FTP for ODI IntegrationWhen you use the file system for ODI integration, you don't use ODI source or targettypes. The procedures are as follows:
ODI to MFT: ODI uses its file or FTP adapters to copy the payload to an MFT File,FTP Remote, sFTP Remote, FTP Embedded, or sFTP Embedded source location. MFTthen transfers the payload to one or more targets.
MFT to ODI: MFT transfers the payload to a File, FTP Remote, or sFTP Remote target.ODI uses its file or FTP adapters to read the file from the MFT target location.
These ODI transfers can use MFT features such as:
• Preprocessing, including encryption, decryption, and custom callouts that modifythe payload
• Scheduling
• Resubmission
4.7.2 Invoking a Web Service for an ODI SourceAn ODI source in Oracle Managed File Transfer is exposed as a web service that ODIcan invoke using the OdiInvokeWebService tool.
Using an ODI source has the following limitations:
• MFT doesn't support synchronous invocation.
• The response MFT sends to ODI includes only the MFT message ID.
• MFT doesn't notify ODI of whether the transfer was successful.
However, you can create a custom callout to send a notification. See ProcessingTransfers with Custom Callouts for more information.
The steps for this process are:
1. In MFT, create an ODI source and enter a URL for the location.
2. In ODI, in the Projects tree in the Designer Navigator, select the project andpackage that will send a file to MFT.
3. Create an OdiInvokeWebService tool step in the package and select it.
4. Click the General tab under Properties.
Integrating with Oracle Data Integrator
Integrating Oracle Managed File Transfer with Other Products 4-11

5. Specify values for the following parameters:
• WSDL URL — Specify the URL of the MFT ODI source WSDL file. This is theODI source URL with a ?WSDL suffix. For example:
http://www.example.com:7001/mftapp/services/transfer/odi-src-name?WSDL
See MFT WSDL Files for more information.
• Port Type — Specify MFTServicePortType.
• Operation — Specify submit.
• XML Request — Enter the web service payload, which includes SOAP headersand the file to be transferred.
6. Select File > Save to save the package.
See Using the OdiInvokeWebService Tool in Developing Data Integrations with OracleData Integrator for more information.
4.7.3 Creating a Data Service for an ODI TargetAn ODI target in Oracle Managed File Transfer corresponds to a data service in ODI.ODI data services are specialized web services that provide access to data indatastores. ODI generates these data services and deploys them to the web servicescontainer in Oracle WebLogic Server.
Using an ODI target has the following limitations:
• Input from the MFT source must adhere to the ODI data service schema.
• The message type must be XML and must match the ODI WSDL format. MFTcannot perform this validation.
• MFT doesn't support synchronous messaging.
• MFT cannot access data exposed by the ODI data services.
• The Attachment Payload Type and the By Reference Delivery Method are notsupported.
• Small payloads, not large files, are recommended.
The steps for this process are:
1. In ODI, in the Models tree in the Designer Navigator, select the model thatcontains the datastore.
2. Click the model to edit it.
3. Select Services.
4. Specify values for the following properties:
• Application server — Specify the Oracle WebLogic Server host and port. Forexample:
localhost:7003
• Namespace — Specify the MFT namespace:
Integrating with Oracle Data Integrator
4-12 Using Oracle Managed File Transfer

http://xmlns.oracle.com/fmw/mft/soap
• Package name — Specify the package name:
com.oracle.mft
• Name of Data Source — Enter a data source name.
• Name of Data Service — Enter a data service name.
• Active — Check the Active box next to the datastore to be exposed as a webservice.
Note the Web Service name and the Published entity. You need these toconfigure the MFT target.
5. Select File > Save to save the model.
See Generating and Deploying Data Services in Administering Oracle Data Integrator formore information.
After the data service is deployed in Oracle WebLogic Server, an MFT ODI target caninvoke the change operations exposed by the data service.
The steps for this process are:
1. In MFT, create a target of type ODI.
2. Specify the data service URL as the MFT target URL. For example:
http://www.example.com:15101/model-name/web-svc-name
3. Click the arrow to the left of Advanced Properties to display the properties.
4. Specify values for the following properties:
• Service — Specify the Web Service name from the ODI model.
• Port — Specify the port. By default, this is the Web Service name with aSoapPort suffix.
• Action — Specify the web service method used to retrieve the transferred file.By default, this is the Published entity from the ODI model with an add prefixand a List suffix.
You can display web service information in Oracle WebLogic Server or OracleEnterprise Manager Fusion Middleware Control. See Developing JAX-WS WebServices in Developing JAX-WS Web Services for Oracle WebLogic Server for moreinformation.
• Payload Type — Select Inline.
• Message Type — Select XML.
5. Save the target.
6. Add the target to a transfer.
7. In the transfer configuration, click the arrow to the left of Delivery Preferences todisplay the options.
8. Specify Inline as the Delivery Method.
Integrating with Oracle Data Integrator
Integrating Oracle Managed File Transfer with Other Products 4-13

9. Save and Deploy the transfer.
4.8 Integrating with Web ServicesAny application that can integrate with web services can integrate with OracleManaged File Transfer. Sources and targets of type SOAP are exposed as standardweb service endpoints. The source and target settings you specify in Oracle ManagedFile Transfer are also the settings you specify in the integrating application to allow itto recognize the source or target.
The file MFTAnyTypeService.wsdl is for any type of application that integrateswith web services. See MFT WSDL Files for more information.
For more information about web services, see Understanding Web Services.
4.9 MFT WSDL FilesOracle Managed File Transfer provides WSDL files, which integrating applications canuse to create web service interfaces to Oracle Managed File Transfer. These files arelocated in WLS_Home/mft/integration/wsdl. Table 4-2 describes these files.
Table 4-2 MFT WSDL Files
WSDL FileName
Purpose Operations Usage
MFTAnyTypeService.wsdl
Used in MFTSOAP sourcesand targets.Accepts SOAPmessages,includinggenericmessages.
submitReference
submitInline
Both operations respondwith the MFT Message IDand other trackingparameters.
For submitReference,the FTP or FILE referenceis required in theMFTServiceInputelement of the SOAPbody. TheTargetFileName andcontentIdentifierare optional.
For submitInline, thepayload can be any validXML code embeddeddirectly under the SOAPbody.
MFTService.wsdl
Used in MFTSOA sourcesand targets.Accepts SOAmessages.
submit
Responds with theMessage ID and othertracking parameters.
An FTP or FILE referenceor an inline or binarypayload is required in theMFTServiceInputelement of the SOAPbody. TheTargetFileName andcontentIdentifierare optional.
Integrating with Web Services
4-14 Using Oracle Managed File Transfer

Table 4-2 (Cont.) MFT WSDL Files
WSDL FileName
Purpose Operations Usage
MFTSOAService.wsdl
An abstractWSDL forOracleJDeveloperintegration.Used forcreating theMFT referenceWSDL.
submit
Responds with theMessage ID and othertracking parameters.
Same asMFTService.wsdl.
MFTDiscoveryService.wsdl
Used by OracleJDeveloper toquery all MFTSOA sources.Used duringMFT SOAsource selection,MFT SOAreference design,and SOAcompositeapplicationbuilding.
getSources
Responds with the list ofsources matching thetype.
A single string parameterrepresenting the sourcetype is required in theMFTServiceInputelement of the SOAPbody. Allowed values forMFTServiceInput areSOAP, SOA, OSB (forService Bus), or ODI.
MFTResubmitService.wsdl
Used to supportresubmission ofMFT source,transfer, andtarget instancemessages.
resubmitMessage
Responds with true orfalse indicating successor failure.
Required inputparameters areMessageType andMessageID. Allowedvalues for MessageTypeare SOURCE, TARGET, orTRANSFER. Usercomments are optional.
Headers of these WSDL files appear in the Source Report and Target Report for atransfer, which are accessible from the Monitoring page. For more information aboutthese reports, see Interpreting Source_ Transfer_ and Target Reports. For moreinformation about the WSDL file headers, see "Source Protocol Headers" and "TargetProtocol Headers" in the Oracle Fusion Middleware MFT Composer Help Online Help.
The MFT WSIL URL is as follows:
http://host:port/inspection.wsil/?appname=mft-app
The MFT Discovery Service URL is as follows:
http://host:port/mftapp/services/MFTDiscoveryService?WSDL
Note:
Some SOAP clients automatically generate an input tag in the WSDL file,which MFT interprets as a payload and appends to the transferred file. If thistag is not needed, you can delete it.
MFT WSDL Files
Integrating Oracle Managed File Transfer with Other Products 4-15

Note:
Make sure the WSDL file has a valid value for MFTServicePort or youmight see this error message:
oracle.jdeveloper.webservices.model.WebServiceException: Service MFTService_soap contains no SOAP ports and cannot be used.
MFT WSDL Files
4-16 Using Oracle Managed File Transfer

5Monitoring Oracle Managed File Transfer
This chapter explains the Monitoring page of the Oracle Managed File Transferconsole. This page displays information about deployments of source, target, andtransfer artifacts. This page also displays dashboards for all artifacts, for all artifacts ofa specific type (source, transfer, or target), or for an individual artifact. Dashboardsprovide information about in-progress and completed file delivery instances.
This chapter includes the following sections:
• Monitoring Deployed Sources_ Targets_ and Transfers
• Monitoring Transfer Flows Using the Main Dashboard
• Interpreting Dashboards for All Transfers_ Sources_ or Targets
• Interpreting Single Artifact Transfer_ Source_ and Target Dashboards
• Interpreting Source_ Transfer_ and Target Reports
• Pause and Restart a Transfer
• Resubmit a Transfer
• Diagnose File Delivery Failures
• Diagnose Transfer Errors
5.1 Monitoring Deployed Sources, Targets, and TransfersAfter you deploy source, transfer, or target artifacts, you can view them in theDeployments tab on the Monitoring page. You can select which artifacts to view:
• Order by time deployed, time updated, name, or artifact type, ascending ordescending.
• Select a range using Deployed or Updated and From or To with dates and times.
• Select, Unselect, or Invert All. Inverting means selecting unselected artifacts anddeselecting selected ones.
• Show Only Sources, Targets, or Transfers. You can show any or all types.
• Show Deployment Details shows labels and dependent artifacts for the selectedartifact. The label is the name of the deployment corresponding to the artifact onthe Oracle WebLogic Server managed server for Oracle Managed File Transfer.Artifacts associated with the same transfer are mutually dependent.
Monitoring Oracle Managed File Transfer 5-1

Note:
The Created timestamp refers to the creation of the label, not the artifact.Editing and redeploying an artifact creates a new label.
To refresh the display according to these selections, click the Filter or Go icon. The Goicon appears when you change these selections. To clear these selections and displayaccording to the defaults, click the Erase icon.
5.1.1 Disabling Sources, Targets, and TransfersAll deployed artifacts are enabled by default. Disabling an artifact makes it inactivewithout undeploying it.
The steps for this process are:
1. Check the box to the left of the artifact.
2. Click the Disable button.
The Disable Deployments dialog appears, showing dependent artifacts affected bythe proposed disabling. You can enter an optional comment.
3. Click the Yes button.
The Disable Deployments dialog shows whether disabling was successful.
4. Click the OK button.
If disabling was successful, the Status column entry for the artifact changes fromEnabled in green to Disabled in red. Dependent artifacts may also be shown asdisabled.
5.1.2 Reenabling Sources, Targets, and TransfersYou can reenable a disabled artifact.
The steps for this process are:
1. Check the box to the left of the artifact.
2. Click the Enable button.
The Enable Deployments dialog appears. You can enter an optional comment.
3. Click the Yes button.
The Enable Deployments dialog shows whether enabling was successful.
4. Click the OK button.
If enabling was successful, the Status column entry for the artifact changes fromDisabled in red to Enabled in green.
Note:
If dependent artifacts were disabled, you must reenable them separately. Forexample, if you disabled a source and the associated transfer was disabled,reenabling the source does not reenable the transfer.
Monitoring Deployed Sources, Targets, and Transfers
5-2 Using Oracle Managed File Transfer

5.1.3 Undeploying Sources, Targets, and TransfersIf you want to both inactivate and edit an artifact, undeploying it might be preferableto disabling it. Oracle Managed File Transfer maintains versions of its artifacts (source,transfer and target). When an artifact is deployed, the current version of the artifact isdeployed. These versions are stored for future auditing. When you undeploy anartifact, the following occurs:
• The artifact becomes eligible for purging using a WLST command as described in Oracle Managed File Transfer Utilities.
• That version cannot be deployed again. You cannot roll it back to previous version.
The steps for this process are:
1. Check the box to the left of the artifact.
2. Click the Undeploy button.
The Remove Deployments dialog appears. You can enter an optional comment.
3. Click the Yes button.
The Remove Deployments dialog shows whether undeployment was successful.
4. Click the OK button.
If undeployment was successful, the artifact is removed from the Deployments tab.
Note:
You cannot undeploy a source or target if the associated transfer is deployed.The Undeploy button remains grayed out.
5.1.4 Redeploying Sources, Targets, and TransfersTo redeploy an artifact, open its tab on the Design page and click Deploy. See Deploying a Source_ Target_ or Transfer.
5.1.5 Versioning Sources, Targets, and TransfersOracle MFT uses MDS to store metadata. The MDS Repository maintains versions ofthe documents in a database-based repository. Versioning allows changes to metadataobjects to be stored as separate versions rather than simply overwriting the existingdata in the metadata repository. It provides version history, as well as the ability tolabel versions so that you can access the set of metadata as it was at a given point intime. An artifact can modified after deployment, however the original version will beused at runtime until the newer version is deployed. To activate and apply the latestchanges, you must redeploy the artifact.
You can use WLST commands to perform the following operations on the MDSRepository.
• getSourceDeploymentHistory used to list all the deployment history.
• exportDeployedArtifact used to export the deployed versions of the artifact.
Monitoring Deployed Sources, Targets, and Transfers
Monitoring Oracle Managed File Transfer 5-3

• deleteArtifactDeployment used to delete the older deployment history.
For detailed information on using the MDS Repository see Managing the MetadataRepository in Administering Oracle Fusion Middleware
5.2 Monitoring Transfer Flows Using the Main DashboardThe Dashboard tab on the Monitoring page is always open. The Main Dashboarddisplays real-time and recent file-delivery data in four views:
• Metrics: See Interpreting Main Dashboard Metrics.
• File Finder: See Using the File Finder.
• Recent Errors: See Diagnose Transfer Errors.
• Active Deliveries: See Monitoring Active Deliveries.
You can expand each view to cover the entire tab by clicking the Expand icon in theupper right corner. To collapse the view and return to the Main Dashboard, click theRestore icon in the upper right corner of the expanded view.
The Design page and the Deployments tab show source, transfer, and target artifacts,which structure how file deliveries happen. In contrast, the Main Dashboard showssource, transfer, and target instances, which are the individual file deliveriesthemselves.
5.2.1 Interpreting Main Dashboard MetricsThe Metrics view displays a variety of statistics about recent transfers. You can usethese statistics to determine which transfers are used frequently, failing, or taking along time to complete.
To determine how recent the transfers are, select one of these interval values from theView Data drop-down list:
• Last Hour
• Last 6 Hours
• Last 24 Hours (default)
• Last 3 Days
• Last Week
The statistics displayed in the unexpanded view are:
• Transfers: Total, Completed, Active, and Failed
• Most Active Transfers: Transfers with the most instances in the selected interval
• Status: A pie chart of completed, active, and failed transfers
• Failure Ratio: The percentage of failed transfers
• Payload File Size: Average, Minimum, and Maximum in bytes
• Transfer Speed: Average, Minimum, and Maximum in bytes per second
• Total Time: Average, Minimum, and Maximum in milliseconds
Monitoring Transfer Flows Using the Main Dashboard
5-4 Using Oracle Managed File Transfer

The expanded view adds an All Transfers table with these columns:
• Transfer: Click on the name to open a transfer report. See Transfer Reports.
• Refresh: Refresh the page with updated data.
• Eraser Icon: Clears a selection from the transfer table. The icon is enabled if anysection of the pie chart is clicked causes the transfer table to be displayed.
• Sort By: Choose whether to sort by status or by name.
• Source: The source associated with the transfer. Click on the name to open a sourcereport. See Source Reports.
• Status: Active, Failed, or Completed
• Substatus: The transfer substatus. The substatuses of Active are:
– Delivery In Progress
– In Progress
– Paused
– Pending
– Pending Delivery
– Post Processing
– Pre Processing
– Retrying
– Scheduled
Substatuses of Failed are:
– Error
– Partial Error
– Post Processing
– Pre Processing
The only substatus of Completed is Successful.
• Initiation Time: The date and time that the transfer started
• Content Type: The type of the file transferred, for example, XML. Content filtersdefine content types. See Setting Up Content Filters.
5.2.2 Using the File FinderThe File Finder view provides a table that lets you search for transfer instances usingnames of associated files, sources, or targets as your search criteria.
In the unexpanded view, you can search for a file name, a source or target name, orboth. Searches are case-sensitive and use the Starts With operator. You can use % as awildcard. Table columns are:
Monitoring Transfer Flows Using the Main Dashboard
Monitoring Oracle Managed File Transfer 5-5

• Source or Target: Click on the name to open a source or target report. See SourceReports or Target Reports.
• Status: Active, Failed, or Completed
• Create Time: The date and time that the file was written to the source or targetlocation
• File: The name of the transferred file. The file might be renamed at the target; see Moving and Renaming Files After Delivery.
• Size: The size in bytes of the transferred file. Compression or encryption mightchange the file size at the target; see Setting Up Source Processing Actions and Setting Up Transfer Preprocessing and Postprocessing Actions.
The expanded view provides additional features:
• A choice of operators: Starts With, Exact Match, or Contains
• A Case Sensitive check box
• An icon you can use to clear all search parameters
• Two additional table columns:
– Type, with these possible values: B2B, SOA, Healthcare, OSB, ODI, SourceResubmit, or External
– Sender, the name of the user that initiated the transfer
• Search fields for each column
Note:
Postprocessing occurs after file delivery. Therefore, the Active Deliveries andFile Finder views show different statuses if file delivery succeeds butpostprocessing fails. Specifically, the Active Deliveries view displays aCompleted status but the File Finder view displays a Failed status.
5.2.3 Monitoring Active DeliveriesThe Active Deliveries view is the same unexpanded and expanded. For recent and in-progress deliveries, it displays:
• Transfer Name: Click on the name to open a transfer report. See Transfer Reports.
• Start Time: The date and time that the transfer started.
• Progress: The percent complete. If the progress is less than 100% and is notchanging, this might indicate that the transfer is paused or has failed. See Pauseand Restart a Transfer or Diagnose Transfer Errors.
• Refresh: Choose the refresh interval of active deliveries.
5.3 Interpreting Dashboards for All Transfers, Sources, or TargetsA source, transfer, or target dashboard displays real-time and recent data for filedeliveries, or instances, related to all artifacts of the same type. Unlike the Main
Interpreting Dashboards for All Transfers, Sources, or Targets
5-6 Using Oracle Managed File Transfer

Dashboard, an all-artifact dashboard must be opened. Click Transfer Instances,Source Instances, or Target Instances in the left pane navigator.
The views on an artifact dashboard are:
• Messages: See Interpreting Instance Messages.
• Summary Statistics: See Interpreting Dashboard Metrics.
Unlike the views on the Main Dashboard, the views on the artifact dashboards haveno Expand icons.
5.3.1 Interpreting Instance MessagesThe Messages view is a searchable table of file delivery instance messages for allartifact of the type for which the dashboard was opened. You can use % as a wildcard.This table displays:
• ID: Click on the ID link to open a single-artifact source, transfer, or targetdashboard. See Interpreting Single Artifact Transfer_ Source_ and TargetDashboards.
• Name: The name of the artifact.
• Status: Active, Failed, or Completed. Substatuses of Active are:
– Delivery In Progress
– In Progress
– Paused
– Pending
– Pending Delivery
– Post Processing
– Pre Processing
– Retrying
– Scheduled
Substatuses of Failed are:
– Error
– Partial Error
– Post Processing
– Pre Processing
The only substatus of Completed is Successful.
• URI: The URI for the source location, in the source dashboard only.
• Type: The source or target type, in the source and target dashboards only.
• Create Time: The date and time that the file was written to the source or targetlocation.
Interpreting Dashboards for All Transfers, Sources, or Targets
Monitoring Oracle Managed File Transfer 5-7

5.3.2 Interpreting Dashboard MetricsThe Summary Statistics view displays a variety of statistics about recent transfersrelated to the artifact type for which the dashboard was opened. You can use thesestatistics to determine whether these transfers are used frequently, failing, or taking along time to complete.
To determine how recent the transfers are, select one of these interval values from theView Data drop-down list:
• Last Hour
• Last 6 Hours
• Last 24 Hours (default)
• Last 3 Days
• Last Week
The statistics displayed are:
• Transfers: Total, Completed, Active, and Failed
• Status: A pie chart of completed, active, and failed transfers
• Most Active Artifacts: Names of the most active transfers, sources, or targets
• Failure Ratio: The percentage of failed transfers
• Payload File Size: Average, Minimum, and Maximum in bytes
• Transfer Speed: Average, Minimum, and Maximum in bytes per second
• Total Time: Average, Minimum, and Maximum in milliseconds
5.4 Interpreting Single Artifact Transfer, Source, and Target DashboardsA single-artifact source, transfer, or target dashboard displays real-time and recentdata for file deliveries, or instances, related to a specific artifact. Unlike the MainDashboard, an artifact dashboard must be opened.
The steps for this process are:
1. Click the arrow to the left of Transfer Instances, Source Instances, or TargetInstances in the left pane navigator.
The artifacts of that type are listed.
2. Click the artifact name or right-click it and then select the Open menu item.
The dashboard tab for the artifact opens.
The views on an artifact dashboard are:
• Messages: See Interpreting Artifact Instance Messages.
• Artifact Information: See Interpreting Artifact Information.
• Summary Statistics: See Interpreting Artifact Dashboard Metrics.
Interpreting Single Artifact Transfer, Source, and Target Dashboards
5-8 Using Oracle Managed File Transfer
Unlike the views on the Main Dashboard, the views on the artifact dashboards haveno Expand icons.
5.4.1 Interpreting Artifact Instance MessagesThe Messages view is a searchable table of file delivery instance messages for theartifact for which the dashboard was opened. You can use % as a wildcard. This tabledisplays:
• Report: Click on the report link to open a source, transfer, or target report. See Source Reports, Transfer Reports, or Target Reports.
• File Name: The name of the transferred file. The file might be renamed at the target;see Moving and Renaming Files After Delivery.
• Size: The size in bytes of the transferred file. Compression or encryption mightchange the file size at the target; see Setting Up Source Processing Actions and Setting Up Transfer Preprocessing and Postprocessing Actions.
• Create Time: The date and time that the file was written to the source or targetlocation.
• Status: Active, Failed, or Completed. Substatuses of Active are:
– Delivery In Progress
– In Progress
– Paused
– Pending
– Pending Delivery
– Post Processing
– Pre Processing
– Retrying
– Scheduled
Substatuses of Failed are:
– Error
– Partial Error
– Post Processing
– Pre Processing
The only substatus of Completed is Successful.
5.4.2 Interpreting Artifact InformationThe Artifact Information view displays the following information, if applicable, for theartifact for which the dashboard was opened. For sources, information aboutreferencing transfers is also displayed. For transfers, information about the referencedsource and targets is also displayed.
Interpreting Single Artifact Transfer, Source, and Target Dashboards
Monitoring Oracle Managed File Transfer 5-9

• Name: The artifact name.
• Category: The artifact category.
• URI: The endpoint location of a source or target.
• Binding Type: The source or target type. See Source Types and Target Types.
• Deployed: Whether the artifact is deployed, true or false. See Deploying aSource_ Target_ or Transfer.
• Label: The name of the deployed artifact on the Oracle WebLogic Server dedicatedto Oracle Managed File Transfer.
• Status: Whether the deployed artifact is Enabled or Disabled. See DisablingSources_ Targets_ and Transfers and Reenabling Sources_ Targets_ and Transfers.
• Version: The artifact version.
• Create Time: The date and time that the artifact was created.
To open the artifact for which the dashboard was opened in a tab on the Designerpage, click View Definition. See Creating a Source, Creating a Target, or Configuringa Transfer.
5.4.3 Interpreting Artifact Dashboard MetricsThe Summary Statistics view displays a variety of statistics about recent transfersrelated to the artifact for which the dashboard was opened. You can use these statisticsto determine whether these transfers are used frequently, failing, or taking a long timeto complete.
To determine how recent the transfers are, select one of these interval values from theView Data drop-down list:
• Last Hour
• Last 6 Hours
• Last 24 Hours (default)
• Last 3 Days
• Last Week
The statistics displayed are:
• Transfers: Total, Completed, Active, and Failed
• Status: A pie chart of completed, active, and failed transfers
• Failure Ratio: The percentage of failed transfers
• Payload File Size: Average, Minimum, and Maximum in bytes
• Transfer Speed: Average, Minimum, and Maximum in bytes per second
• Total Time: Average, Minimum, and Maximum in milliseconds
Interpreting Single Artifact Transfer, Source, and Target Dashboards
5-10 Using Oracle Managed File Transfer

5.5 Interpreting Source, Transfer, and Target ReportsA report provides a wealth of detailed information about the involvement of a source,transfer, or target in a specific file delivery instance. You can access a report from:
• The Transfer or Source column of the All Transfers table in the expanded Metricsview. See Interpreting Main Dashboard Metrics.
• The source or Target column in the File Finder view. See Using the File Finder.
• The Transfer Name column in the Active Deliveries view. See Monitoring ActiveDeliveries.
• The Report link in the Messages view of a source, transfer, or target dashboard. See Interpreting Artifact Instance Messages.
• Another report. See Using the Flow Diagram, Source Reports, Transfer Reports,and Target Reports.
You can also perform operations on transfers from reports. See Pause and Restart aTransfer and Resubmit a Transfer.
5.5.1 Using the Flow DiagramAt the top of every source, transfer, or target report is a flow diagram, which shows allartifacts related to the file delivery instance for which the report is generated. Figure5-1 shows a typical flow diagram.
Figure 5-1 Flow Diagram
The source is highlighted, indicating that this flow diagram is for a source report. Youcan click on the transfer or target icon to go to the transfer or target report. Eachartifact has a green check, which indicates successful file delivery at each stage.
A down arrow to the right of an artifact indicates a fan-out. A flow diagram for atransfer with more than one target shows a fan-out at the target. Figure 5-2 shows afan-out at the transfer, which means that more than one transfer uses the same source.
Figure 5-2 Flow Diagram with Fan-Out
The green gear on the source icon indicates that a preprocessing action, such ascompression or encryption, is being performed at the source.
To display a list of all the artifacts in the fan-out, click the down arrow as shown in Figure 5-3. You can then select from the list and go to the report for that artifact.
Interpreting Source, Transfer, and Target Reports
Monitoring Oracle Managed File Transfer 5-11

Figure 5-3 Flow Diagram with Fan-Out List
A flow diagram can also indicate warnings, errors, and resubmission attempts. Figure5-4 shows a flow diagram for a file delivery instance that was resubmitted at thesource.
Figure 5-4 Flow Diagram with Resubmission, Warning, and Error Icons
The green circle with the black arrow around it on the source icon indicates that aresubmit occurred. The yellow triangles with exclamation points indicate thatwarnings occurred at the source and transfer. The red circle with the exclamationpoint indicates that an error occurred at the target.
5.5.2 Source ReportsA source report includes the following sections:
• Flow Display and Control: The flow diagram, Refresh button, report title, andResubmit Source button
• Summary: The file name, source location, payload size, resubmission count, andother basic information
• Error: The error code, level, category, instance ID, timestamp, description, andother information about the error, if one occurred
• Resubmitted Instances: The instance ID, user comment, user name, timestamp, andother information about the source resubmission, if one occurred
• Transfer Instances: Information about transfers associated with the source. Click ona transfer name to go to the transfer report.
• Source Processing: Information about preprocessing actions such as compression,decompression, and encryption
• Advanced: Less commonly accessed information such as the source label andinternal ID
• Security: Information related to security, if applicable, such as algorithms,certificates, and encryption
For full details about the information displayed in source reports, see "Source Report"in the Oracle Fusion Middleware MFT Composer Help Online Help.
5.5.3 Transfer ReportsA transfer report includes the following sections:
Interpreting Source, Transfer, and Target Reports
5-12 Using Oracle Managed File Transfer

• Flow Display and Control: The flow diagram, Refresh button, report title, andResubmit Transfer button
• Summary: The file name, status, resubmission count, and other basic information
• Error: The error code, level, category, instance ID, timestamp, description, andother information about the error, if one occurred
• Resubmitted Instances: The instance ID, user comment, user name, timestamp, andother information about the transfer resubmission, if one occurred
• Target Delivery: Information about targets associated with the transfer. Click on atarget name to go to the target report.
• Advanced: Less commonly accessed information such as the internal ID
• Security: Information related to security, if applicable, such as algorithms,certificates, and encryption
For full details about the information displayed in transfer reports, see "TransferReport" in the Oracle Fusion Middleware MFT Composer Help Online Help.
5.5.4 Target ReportsA target report includes the following sections:
• Flow Display and Control: The flow diagram, Refresh button, report title, Pausebutton, Resume button, and Resubmit Target button
• Summary: The file name, target location, total time, resubmission count, and otherbasic information
• Error: The error code, level, category, instance ID, timestamp, description, andother information about the error, if one occurred
• Resubmitted Instances: The instance ID, user comment, user name, timestamp, andother information about the target resubmission, if one occurred
• Target Pre-Processing: Information about preprocessing actions such ascompression, decompression, and encryption
• Target Post-Processing: Information about postprocessing actions such asdecompression
• Advanced: Less commonly accessed information such as the transfer and targetlabels and internal target ID
• Security: Information related to security, if applicable, such as algorithms,certificates, and encryption
For full details about the information displayed in target reports, see "Target Report"in the Oracle Fusion Middleware MFT Composer Help Online Help.
5.6 Pause and Restart a TransferYou can pause an in-progress transfer from the target report. You can access the targetreport in these ways:
• In the File Finder view, change Search For to Target, search for the file or targetname, then click the name of the target to open the report.
Pause and Restart a Transfer
Monitoring Oracle Managed File Transfer 5-13

• In the Active Deliveries view, click the name of the transfer to open the transferreport, then click the target icon in the flow diagram to open the target report.
Note:
If a transfer has multiple targets, you must pause the transfer for each targetseparately.
From the target report, click Pause to pause the file delivery to the target. To restartfile delivery, click Resume.
5.7 Resubmit a TransferYou can resubmit a successful transfer to redeliver the file. You can resubmit it fromthe source, transfer, or target report. Click the Resubmit Source, Resubmit Transfer,or Resubmit Target button.
If a transfer has a status of Failed, you can resubmit it to try again. Whether youresubmit from the source, transfer, or target report depends on where the failureoccurred. For more information about errors, see Diagnose Transfer Errors.
Resubmission occurs immediately and any schedule defined in the parent artifact isignored. For example, if you resubmit from the target, any schedule defined at thetarget is ignored. However, if you resubmit from the source, a schedule defined at thetarget is still honored.
Note: You need to manually refresh the page to view the details of theresubmit status.
The Resubmit button may be disabled for a number of reasons, including:
• The file to be transferred has been deleted.
• The transfer is still in progress.
• The transfer has a schedule and the delivery time is in the future.
• The target artifact has been disabled.
• You don't have permission to perform resubmit actions.
• You don't have permission to resubmit this particular transfer.
5.8 Diagnose File Delivery FailuresSometimes no error occurs, but a file does not arrive at the target location as expected.If this occurs, check the following settings:
• Content filters may exclude some files from delivery. See Setting Up ContentFilters.
• Files may be moved or renamed after delivery. Look for Modified File Name orTarget File Name in the report. See Source Reports, Transfer Reports, or TargetReports and Moving and Renaming Files After Delivery.
Resubmit a Transfer
5-14 Using Oracle Managed File Transfer

• File deliveries may occur only at specific dates and times. Look for a Status ofScheduled in the report. See Source Reports, Transfer Reports, or Target Reportsand Setting Up Schedules.
5.9 Diagnose Transfer ErrorsThe unexpanded Recent Errors view on the Dashboard tab of the Monitoring pagedisplays error codes, messages with endpoints, and timestamps.
The expanded Recent Errors view is a searchable table of errors, with additionalinformation, including detailed descriptions, instance types (source, transfer, ortarget), levels, and severities. You can use % as a wildcard.
Clicking an error code in the unexpanded view or an error message in the expandedview opens the report for the source, transfer, or target at which the error occurred.The report includes an additional section with the error information. From the report,you can view additional information and resubmit the transfer; see Resubmit aTransfer.
5.9.1 Diagnosing Error Messages and DescriptionsFor more details about specific MFT error messages that can appear in the MFTConsole, such as in the Recent Errors view, on the WLS command line or in thediagnostic logs, see the chapter on MFT error Messages in Oracle Fusion MiddlewareError Messages.
Diagnose Transfer Errors
Monitoring Oracle Managed File Transfer 5-15

Diagnose Transfer Errors
5-16 Using Oracle Managed File Transfer

6Administering Oracle Managed File
Transfer
This chapter describes how to administer the Oracle WebLogic Server managed serverdedicated to Oracle Managed File Transfer.
This chapter includes the following sections:
• Changing Server Properties
• Importing and Exporting the MFT Configuration
• Increasing Memory to Improve Performance of Large File Transfers
• Oracle WebLogic Server Startup and Shutdown
• Transferring Files Through Firewalls Using the MFT FTP Proxy Server
• Managing Multiple Weblogic Servers and High Availability
• Enabling Event Notifications
• Configuring Oracle Managed File Transfer Error Processor Queues
• Oracle Managed File Transfer Loggers
• Viewing Oracle Managed File Transfer Log Messages
• Moving Oracle Managed File Transfer to Another Environment
For information about keystores, see Managing Keystores.
For information about domains, see Managing Domains.
For information about administering Oracle Managed File Transfer embedded FTPand sFTP servers, see Administering Oracle Managed File Transfer EmbeddedServers.
6.1 Changing Server PropertiesThe Server Properties tab on the Administration page is arranged in the followingsections:
• General Configuration Properties
• Performance Properties
• High Availability Properties
• Advanced Delivery Properties
Administering Oracle Managed File Transfer 6-1

To save changes to these properties, click Save. To cancel all changes since you lastsaved, click Revert.
6.1.1 General Server Configuration PropertiesThe Server Properties tab displays the following configurable fields:
• Payload Storage Directory: The directory location where the MFT payloads arestored. This has to be a shared location.
The default Payload Storage Directory is WLS_Home/user_projects/domains/base_domain/mft/storage. You must set it to a shared location ifmultiple Oracle WebLogic Server instances run in a cluster.
• Callout Directory: The shared directory location where custom callout JARs arestored. MFT loads the callout jars from this location. The callout processing will failif no required jar is present in the given location. The default location isWLS_Home/user_projects/domains/base_domain/mft/callouts.
• Store Inline Payload: The Store Inline Payload setting determines whether inlinepayloads are stored in the File System or a Database after transfer. You must selectone of the options.
If you select File System, the Payload Storage Directory specifies the FileSystem location. If the configured inline payload size is more, then File Systemis recommended.If you select Database, the payload is stored in the database that stores theOracle Managed File Transfer configuration.
• Store Reference Payload: The Store Reference Payload checkbox determineswhether referenced payloads are stored in the payload storage directory. If youcheck this box, the Payload Storage Directory specifies the file system location, ifyou do not select the checkbox, then no reference payload will be persisted.
To change the Payload Storage Directory:
1. Stop the Oracle WebLogic Server managed server(s) dedicated to OracleManaged File Transfer.
2. Change the Payload Storage Directory setting.
3. Move the directories and files under the Payload Storage Directory.
4. Restart the managed server(s).
See Re-configuring the Port for how to stop and start the managed server(s).
• Generate Checksum: The Generate Checksum setting helps you verify that all thebits in a file were successfully transferred. If this box is checked, Oracle ManagedFile Transfer generates a checksum for every payload before delivering it to targetand stores it in the database. This checksum can then be compared to verify that thefile was not corrupted during transfer.
Note: Checksum is necessary to validate the payload in the later stage. This isan optional field, if you do not need MFT to generate checksum, then do notselect this field. This will avoid additional checksum computation thusincreasing the performance.
Changing Server Properties
6-2 Using Oracle Managed File Transfer

6.1.2 Performance PropertiesThe Processors settings determine the number of processing threads dedicated to eachstage of file delivery. The default for all three settings is 2.
• Source Processors: determines the number of message processors required at thesource level. This handles transfer identification and source-level processingfunction execution.
• Instance Processors: determines the number of message processors required at thetransfer level. This handles target-level preprocessing function execution.
• Target Processors : determines the number of message processors required at thetarget level. This handles delivery and target-level postprocessing functionexecution.
In most cases, this number has to be more because much of load like target messageprocessing or delivery happens in this layer. So usually this can be higher thanother two types processors.
Based on the transfer configuration, processing functions defined, and expectedpayload pattern, you might want to increase of decrease the number of threadsassigned to each Processors setting. For example, if the time taken for targetpreprocessing is short compared to delivery, you might want to reduce the number ofInstance Processors and increase the number of Target Processors for optimalperformance.
Oracle Managed File Transfer uses the collision detection feature of the internal JCAadapter to prevent thread concurrency issues.
6.1.3 High Availability PropertiesThese settings are JCA adapter properties for high availability:
• Control Directory is the directory path which MFT File/FTP adapters require tohandle HA use cases. This field is required if the MFT is running in HAenvironment. You must set it to a shared location if multiple Oracle WebLogicServer instances run in a cluster, for example $DOMAIN_HOME/mft/control_di.
• Inbound Datasource is the inbound data source of MFT where the schemascorresponding to high availability are precreated. This field is required if theControl Directory is not provided. The default, established outside of OracleManaged File Transfer, is jdbc/MFTDataSource.
• Outbound Datasource is the outbound data source of MFT where the schemascorresponding to high availability are precreated. This field is required if theControl Directory is not provided. The default, established outside of OracleManaged File Transfer, is jdbc/MFTDataSource.
For more information, see Configuring Oracle File and FTP Adapters for HighAvailability in Understanding Technology Adapters.
6.1.4 Advanced Delivery PropertiesThe Advanced Delivery settings are required when Oracle WebLogic Server instancesare run with a load balancer. These settings capture the Internal Address and ExternalAddress (IP addresses) and the FTP, FTPS, and sFTP ports that the load balancer uses.Use this setting when Oracle Managed File Transfer sends a payload as an FTP or
Changing Server Properties
Administering Oracle Managed File Transfer 6-3

sFTP reference. If the values are set, they are used to construct the FTP reference (FTP/sFTP host address and ports).
Internal Address: Internal proxy address and ports needed for reference deliverycases.
External Address: External proxy address and ports needed for reference deliverycases.
If Oracle MFT is running behind internal and external proxies, then the Internal andExternal IP addresses are required.
For more information, see Load Balancing in a Cluster in Administering Clusters forOracle WebLogic Server.
6.2 Importing and Exporting the MFT ConfigurationA backup of the Oracle Managed File Transfer configuration (or repository) includesall Administration page settings and all Designer artifacts, excluding passwordsettings. The configuration is saved to a ZIP file, which you can restore later.
The steps for this process are:
1. Open the Import/Export tab on the Administration page.
2. Click Export.
An operating system dialog box opens asking what action to take with the fileexport.zip.
3. Select Save File and click OK.
An operating system file saving dialog box opens.
4. Select the directory to which to save the file.
5. Edit the file name. This is optional.
6. Click Save.
You can restore a backup of the Oracle Managed File Transfer configuration. Thisoverwrites the existing configuration except for password settings.
To import or export a single transfer artifact, see Importing and Exporting Transfers.
You can use the exportMftMetadata and importMFTMetadata WLST commandsto back up and restore the Oracle Managed File Transfer configuration. For moreinformation, see WLST Command Reference for SOA Suite.
Keystores are not part of the Oracle Managed File Transfer configuration. For moreinformation, see Managing Keystores.
6.3 Increasing Memory to Improve Performance of Large File TransfersIf transfers of large files are running slowly or out-of-memory exceptions occur,increase the memory (-Xms) or heap size (-Xmx) to 1 or 2 GB. For example, thefollowing command increases the memory to 1 GB and the heap size to 2 GB:
setenv USER_MEM_ARGS "-Xms1024m -Xmx2048m -XX:PermSize=256m -XX:MaxPermSize=768m"
Importing and Exporting the MFT Configuration
6-4 Using Oracle Managed File Transfer

6.4 Oracle WebLogic Server Startup and ShutdownYou can start, restart, or stop the Oracle WebLogic Server managed server(s) dedicatedto Oracle Managed File Transfer from the Oracle Managed File Transfer console.
Embedded servers are not the same thing as Oracle WebLogic Server managedservers. The MFT embedded FTP and sFTP servers are services that run on the OracleWebLogic Server managed server(s) dedicated to Oracle Managed File Transfer. TheMFT console page for embedded server ports management lists these managedservers and allows you to stop and start them.
The steps for this process are:
1. On the left pane of the Administration page, click the arrow to the left ofEmbedded Servers.
The Ports and User Access items appear.
2. Click Ports.
The Embedded Server Ports tab opens.
3. Select the Server Instance that you want to start, restart, or stop by checking itsbox in the table. To perform an operation on all servers, check the Select All box.
4. Look at the Server Status. You can stop or restart the server if it is RUNNING.You can start the server if it is STOPPED.
5. Click Start, Stop, or Restart.
6. Click the Refresh icon to update the table and verify the new Server Status.
The primary purpose of the Ports tab is updating embedded server ports. For details,see Re-configuring the Port.
To start and stop only the embedded FTP and sFTP servers, see Starting and StoppingEmbedded Servers.
For more information about how to manage Oracle WebLogic Server startup,shutdown, and failure recovery, see Administering Server Startup and Shutdown forOracle WebLogic Server.
6.5 Transferring Files Through Firewalls Using the MFT FTP Proxy ServerOracle Managed File Transfer includes the MFT FTP Proxy Server, which has thefollowing characteristics:
• Supports the FTP, sFTP, and FTPS protocols.
• Resides separately outside a firewall, eliminating the need to deploy MFT outsidethe firewall.
• Accepts external FTP requests and forwards them to MFT servers inside thefirewall.
• Typically connects to a single hardware load balancer.
• Supports standard gateway and reverse proxy use cases.
• Allows for configuration of ports and inbound server IP addresses.
Oracle WebLogic Server Startup and Shutdown
Administering Oracle Managed File Transfer 6-5

• Supports the use of any standard FTP client.
The following is a simple topology:
FTP Client > MFT FTP Proxy Server > Hardware Load Balancer > MFT Server Cluster
The files that comprise the MFT FTP Proxy Server are located in WLS_HOME/mft/applications/proxy/config. The Readme.txt file describes how to configureand deploy the MFT FTP Proxy Server.
For more information about setting up firewalls, see Security Options for ClusterArchitectures in Administering Clusters for Oracle WebLogic Server.
Remote SFTP with Proxy Server
When Transport Provider is set as Socket, connection to remote server is direct, it doesnot use the proxy definition. When Transport Provider is set as HTTP, the connectionto remote SFTP server is through a proxy server. If the proxy details are not entered oris invalid, then delivery will fail. When Transport Provider is set as HTTP and proxysettings are defined and are valid, MFT will deliver the file to target via proxy server.
6.6 Managing Multiple Weblogic Servers and High AvailabilityOracle Managed File Transfer runs on Oracle WebLogic Server. Therefore, setting uphigh availability for Oracle Managed File Transfer depends on setting up highavailability for Oracle WebLogic Server.
This section includes the following topics:
• Configuring High Availability
• Preventing Cluster Startup Errors
• Load Balancing in Oracle Managed File Transfer
6.6.1 Configuring High AvailabilityThe high-level steps for this process are:
1. Set up the JCA adapter properties for high availability during Oracle WebLogicServer configuration. You need these for setting High Availability Properties. Formore information, see Configuring Oracle File and FTP Adapters for HighAvailability in Understanding Technology Adapters.
2. Create a cluster of managed servers during the domain configuration step ofOracle Managed File Transfer installation. For more information, see Installing andConfiguring Managed File Transfer.
3. Install a software or hardware load balancer. Note the Internal Address andExternal Address (IP addresses) and the FTP, FTPS, and sFTP ports that the loadbalancer uses. You need these for setting Advanced Delivery Properties. For moreinformation, see the load balancer documentation.
4. Configure High Availability Properties and Advanced Delivery Properties inOracle Managed File Transfer and Save them.
5. Restart each managed server. See Oracle WebLogic Server Startup and Shutdown.
Managing Multiple Weblogic Servers and High Availability
6-6 Using Oracle Managed File Transfer

For more information about topics such as cluster topologies, virtual IP addresses,load balancing options, failover, and so on, see Administering Clusters for OracleWebLogic Server.
6.6.2 Preventing Cluster Startup ErrorsIf the Oracle WebLogic Server cluster uses unicast messaging, and the servers in thecluster don't synchronize right away, you might see a message such as the followingwhen the cluster restarts:
<Error> <oracle.soa.adapter.jms.inbound> <BEA-000000><JMSMessageConsumer_init:[destination =MFTJMSServer_auto_2@jms/mft/MFTSourceQueue(payload = 1)]:ERRJMS_ERR_CR_QUEUE_CONS.Unable to create Queue receiver due to JMSException.
You might see messages such as the following in a stack trace:
weblogic.jms.common.JMSException: could not find Server mft_server1
javax.naming.NameNotFoundException: Unable to resolve 'weblogic.messaging.dispatcher.S:mft_server1'. Resolved 'weblogic.messaging.dispatcher'; remaining name 'S:mft_server1'
You can usually ignore these messages, because server synchronization is retried andusually succeeds. If you prefer not to see this message, do one of the following:
• Set the Member Warmup Timeout Seconds MBean attribute to 30. This delayssynchronization, giving the servers in the cluster time to start up first.
• Use multicast messaging, which sets the default of Member Warmup TimeoutSeconds to 30.
For more information, see "Communications In a Cluster" in Administering Clusters forOracle WebLogic Server.
6.6.3 Load Balancing in Oracle Managed File TransferOracle Managed File Transfer has mechanisms to ensure that in a cluster, only oneOracle WebLogic Server managed server dedicated to Oracle Managed File Transferexecutes a particular file transfer instance. Load balancing of transfers is sticky.
If a managed server fails while a transfer is in progress, the transfer is automaticallyresubmitted when that managed server restarts.
6.7 Enabling Event NotificationsYou can notify specific users about Oracle Managed File Transfer events such as errorsor new artifact deployments. Oracle MFT uses UMS for notification.
To notify specific users about events, you configure notifications using WLSTcommands for Oracle Managed File Transfer, then you configure the email or SMSdriver. Notifications event types are as follows:
• RUNTIME_ERROR_EVENT — Errors during events such as message processing,server start-up, source error, or system event failure error.
• DELETE_ARTIFACT_EVENT — Deletion of a transfer, source, or target.
• DEPLOY_ARTIFACT_EVENT — Deployment of a transfer, source, or target.
Enabling Event Notifications
Administering Oracle Managed File Transfer 6-7

• EXPORT_IMPORT_EVENT — Import or export of the MFT configuration.
• PURGE_EVENT — Purging of runtime transfer instances or transfer payloads.
• ARCHIVE_RESTORE_EVENT — Archiving or restoring of runtime transfer instancesor transfer payloads.
All notification messages are sent to JMS MFTExceptionQueue, whether or not theyare enabled or there are contacts to be notified.. For more information about MFTException Queue, see MFTExceptionQueue.
The steps for enabling event notifications are:
By default all the event notifications are disabled. Use the following WLST commandsto enable the MFT Notifications. For information on WLST commands, see RunningWLST Commands.
1. Use following WLST commands to start:
• Start WLST console using command: $MW_HOME/mft/common/bin/wlst.sh
• Connect to MBean server:connect("adminusername","adminpassword","t3://localhost:mft–port"). Port is the configured port of mft server.
• Once connected, run following commands.
2. Create users, or contacts, to notify. For example: createContact('Email','[email protected]')
3. Associate contacts with the notification events. For example:addContactToNotification('DEPLOY_ARTIFACT_EVENT', 'Email','[email protected]')
4. Enable the notification event. For example:updateEvent('RUNTIME_ERROR_EVENT', true)
The notification is enabled for the run-time message processing errors. Anyruntime message error will be notified via email to specified email address.
For notifications of type EMAIL or SMS to work, you must configure an email or SMSdriver. See Configuring an Email Driver for Notifications or Configuring an SMSDriver for Notifications for more information.
For more information about WLST notification commands for Oracle Managed FileTransfer, see WLST Command Reference for SOA Suite.
6.7.1 Configuring an Email Driver for NotificationsUse Oracle Enterprise Manager Fusion Middleware Control to configure the emaildriver for event notifications.
Note: By default all User Messaging Service (UMS) channels are enabled withthe Oracle specific-settings (mail server). External customer need to changethese settings in the Enterprise Manager for notification to work.
The steps for this process are:
Enabling Event Notifications
6-8 Using Oracle Managed File Transfer

1. Log in to the Fusion Middleware Control console.
2. In the Target Navigation pane, expand the User Messaging Service node.
3. Expand the usermessagingdriver-email node.
4. Select the node for the Oracle WebLogic Server managed server dedicated toOracle Managed File Transfer. For example, this node might be namedusermessagingdriver-email (mft_server1).
5. In the usermessagingdriver-email page, select User Messaging Email Driver >Email Driver Properties to open the Email Driver Properties page.
6. On the Email Driver Properties page, enter values for your mail server for thefollowing (mandatory) Outgoing and (optional) Incoming Mail Server properties:
• Outgoing Mail Server
• Outgoing Mail Server Port
• Incoming Mail Server
• Incoming Mail Server Port
• Incoming Mail IDs
• Incoming User IDs
• Incoming Passwords
7. Click Apply.
8. Log out and log back in to the Fusion Middleware Control console and verify thatthese properties are saved correctly.
9. Restart the Oracle WebLogic Server managed server dedicated to Oracle ManagedFile Transfer if necessary. See Oracle WebLogic Server Startup and Shutdown.
The current defaultFromEmailAddressForNotification Mbean property tochange the default sender address used for notifications is [email protected].
For more information about configuring the email driver in Fusion MiddlewareControl, see Configuring the E-Mail Driver in Administering Oracle User MessagingService.
6.7.2 Configuring an SMS Driver for NotificationsUse Oracle Enterprise Manager Fusion Middleware Control to configure the SMS (orSMPP) driver for event notifications.
Note: By default all User Messaging Service (UMS) channels are enabled withthe Oracle specific-settings (mail server). External customer need to changethese settings in the Enterprise Manager for notification to work.
The steps for this process are:
1. Log in to the Fusion Middleware Control console.
Enabling Event Notifications
Administering Oracle Managed File Transfer 6-9

2. In the Target Navigation pane, expand the User Messaging Service node.
3. Expand the usermessagingdriver-smpp node.
4. Select the node for the Oracle WebLogic Server managed server dedicated toOracle Managed File Transfer. For example, this node might be namedusermessagingdriver-smpp (mft_server1).
5. In the usermessagingdriver-smpp page, select User Messaging SMPP Driver >SMPP Driver Properties to open the SMPP Driver Properties page.
6. On the SMPP Driver Properties page, click Create.
7. On the Create SMPP Driver Properties page, enter values for the followingproperties:
• SmsAccountId
• SmsServerHost
• TransmitterSystemId
• ReceiverSystemId
• TransmitterSystemType
• ReceiverSystemType
• DefaultSenderAddress
• ServerTransmitterPort
• TransmitterSystemPassword
8. Click OK.
9. Log out and log back in to the Fusion Middleware Control console and verify thatthese properties are saved correctly.
10. Restart the Oracle WebLogic Server managed server dedicated to Oracle ManagedFile Transfer if necessary. See Oracle WebLogic Server Startup and Shutdown.
For more information about configuring the SMS driver in Fusion MiddlewareControl, see Configuring the SMPP Driver in Administering Oracle User MessagingService.
6.8 MFTExceptionQueueWhen you install MFT, the MFT installer creates a JMS queue calledMFTExceptionQueue. This queue is used to trace events for notifications that are notconfigured. To trace events, the server checks if any notification is enabled for a event.If the notification is not enabled, then the same message is published in theMFTExceptionQueue.
By using JMS MFTExceptionQueue, you can track the following events:
Table 6-1 Events
MFTExceptionQueue
6-10 Using Oracle Managed File Transfer

Table 6-1 (Cont.) Events
Events Description
RUNTIME_ERROR_EVENT
This event tracks the errors occurred at runtime. For example:
• Any errors that occur during the message processing• Server start errors• System event failure errors
EXPORT_IMPORT_EVENT
This event tracks both export and import events. If notification isnot configured, MFT submits a message in exception queue.
For example, a sample message has a whole repository export.This message is submitted only when an event is successful.
DEPLOY_ARTIFACT_EVENT
This event tracks the artifact deployment events. If a notificationis not configured, MFT submits a message in exception queue.
For example, a sample message indicates a deployment event fora source, for example,“osbsrc1". This message is submitted onlyif the deployment is successful.
DELETE_ARTIFACT_EVENT
This event tracks tip metadata deletion.
For example, source, transfer and target deletion.
PURGE_EVENT This event tracks the runtime/payload purge. MFT submits amessage in exception queue when runtime/payload purge isexecuted. This message is submitted on successful completion ofpurge only if notifications are not configured.
For example, a sample message shows a runtime purge.
ARCHIVE_RESTORE_EVENT
This event tracks the runtime / payload archive and restore.MFT submits a message in exception queue when archive /restore is executed for runtime/payload data. This message issubmitted on successful completion of event only if notificationsare not configured.
For example, a sample message shows a runtime archive event.
6.9 Configuring Oracle Managed File Transfer Error Processor QueuesYou can configure JMS queues to receive MFT runtime error events using the OracleWebLogic Server Administration Console.
The preexisting MFT runtime processor queues are:
• MFTSourceQueue
• MFTInstanceQueue
• MFTTargetQueue
This section describes how to create corresponding error queues for each of theseruntime processor queues.
In MFT, messages are processed asynchronously. A single MFT message is processedby three different processors and for each of these processors, there is a correspondingqueue as listed below:
Table 6-2 Processors and Queues
Configuring Oracle Managed File Transfer Error Processor Queues
Administering Oracle Managed File Transfer 6-11

Table 6-2 (Cont.) Processors and Queues
Processors Queues
Source Processors MFTSourceQueue
Instance Processors MFTInstanceQueue
Target Processors MFTTargetQueue
Also, every MFT message corresponds to a JMS message for each of these processors.There can be exceptions to any of the error processor queues.
The expected and unexpected system-level errors are handled in the following way:
• Expected system-level errors: For every expected system-level errors such as filenot found there is a corresponding MFT message which is marked as “Error".
For delivery related expected errors such as remote server down, thecorresponding message is retried based on the retry settings in the target. For otherexpected errors, there are no retries.
• Unexpected system-level errors: If there are unexpected system-level errors such asrac failures or JMS failures, MFT retries the JMS message three times. If all retriesare exhausted, then the MFT messages are stuck in active status. The correspondingJMS message is purged or not depends on whether the JMS processor error queuesare associated with MFT processing queues.
By default, the error processing queues are not configured. If this is the case, theJMS messages are purged otherwise the JMS messages are redirected to configurederror queue.
If transfer instances are stuck in active status for a long time, you can check these errorqueues. The JMS messages in the error queues have the complete details of the transferinstances. You can search for the message ID in the MFT log files to find the root cause(error stack). Once the issue is resolved, you can re-send the JMS message tocorresponding runtime queue for reprocessing.
The steps for creating error queues are:
1. Access the Oracle WebLogic Server console using a URL that includes the OracleWebLogic Server hostname and the console port:
http://wls-hostname:console-port/console
For example:
http://localhost:7011/console
2. Log in using the Oracle WebLogic Server admin username and password.
3. In the left pane of the Oracle WebLogic Server Administration Console, expand theServices node and the Messaging node under it.
4. Select JMS Modules.
The Summary of JMS Modules page appears.
5. Select MFTJMSModule from the list of JMS modules.
Configuring Oracle Managed File Transfer Error Processor Queues
6-12 Using Oracle Managed File Transfer

The Settings for MFTJMSModule page appears.
Note that MFTSourceQueue, MFTInstanceQueue, and MFTTargetQueue are in theSummary of Resources list.
6. Click New.
The Create a New JMS System Module Resource page appears.
7. Select Queue and click Next.
8. Type a Name and a JNDI Name for the new queue and click Next.
For example, you could type MFTSourceErrorQueue for the Name andjms/mft/MFTSourceErrorQueue for the JNDI Name.
9. Select MFTSubDeployment from the Subdeployments drop-down list.
10. Select MFTJMSServer from the Targets list.
11. Click Finish.
The Settings for MFTJMSModule page reappears with the new queue added to theSummary of Resources list.
12. Select MFTSourceQueue from the Summary of Resources list.
The Settings for MFTSourceQueue page appears.
13. Select the Delivery Failure tab.
14. Select Redirect from the Expiration Policy drop-down list.
15. Select the new queue from the Error Destination drop-down list.
16. Click Save.
17. Select MFTJMSModule from the breadcrumb list at the top of the page.
The Settings for MFTJMSModule page reappears.
18. Repeat steps 6 through 17 to configure error queues for the MFTInstanceQueue andMFTTargetQueue JMS queues.
6.10 Configuring Oracle Managed File Transfer LoggersMFT component log messages are written to the log file at this location:
WLS_HOME/user_projects/domains/base_domain/servers/mft_server1/mft_server1-mft-diagnostic.log
MFT embedded server log messages are written to the log file at this location:
WLS_HOME/user_projects/domains/base_domain/servers/mft_server1/mft-es/mft_server1-mft-es-diagnostic.log
You can use Oracle Enterprise Manager Fusion Middleware Control to change thesizes of these log files and to set the log level for the various loggers that writemessages to these log files.
The steps for this process are:
Configuring Oracle Managed File Transfer Loggers
Administering Oracle Managed File Transfer 6-13

1. Log in to the Fusion Middleware Control console.
2. In the Target Navigation pane, expand the Weblogic Domain node.
3. Expand the node for the domain on which the Oracle WebLogic Server managedserver dedicated to Oracle Managed File Transfer is installed.
For example, the domain might be soainfra or base_domain.
4. Right-click on the MFT server.
For example, the MFT server might be mft_server1.
5. Select Logs > Log Configuration.
6. Select the Log Files tab.
7. Select odl-handler and click Edit Configuration.
8. Edit the Maximum Log File Size (MB) and Maximum Size of All Log Files (MB)values and click OK.
9. Select the Log Levels tab.
10. Expand the Root Logger node and any other nodes necessary to display theloggers for which to set log levels.
Table 6-3 lists the loggers relevant to MFT components. Table 6-4 lists the loggersrelevant to MFT embedded servers.
11. For each logger, select the desired Oracle Diagnostic Logging Level (Java Level):SEVERE+100, SEVERE, WARNING, INFO, CONFIG, FINE, FINER, or FINEST.The default is INFO.
12. Check Persist log level state across component restarts if necessary.
13. Click Apply.
6.11 Oracle Managed File Transfer Loggers
Table 6-3 MFT Component Loggers
Logger Name Logged Events DefaultLevel
Production Level
oracle.mft.ENGIN
E
Message processing,processing functions andcallouts, deploymentoperations
INFO SEVERE
oracle.mft.TRANS
PORT
Transport layer interactionoperations, system events
INFO SEVERE
oracle.mft.COMMO
N
Audit, notification, purge,archive, restore, server startup,common utility APIs
INFO SEVERE
oracle.mft.REPOS
ITORY
Java persistence operations INFO SEVERE
Oracle Managed File Transfer Loggers
6-14 Using Oracle Managed File Transfer

Table 6-3 (Cont.) MFT Component Loggers
Logger Name Logged Events DefaultLevel
Production Level
oracle.mft.METAD
ATA
WLST and EJB invoked APIhandling
INFO SEVERE
oracle.mft.SCHED
ULER
Schedule operations INFO SEVERE
oracle.mft.EMBED
DED_SERVER
Embedded servercommunication with the MFTserver
INFO SEVERE
oracle.mft.SECUR
ITY
Security operations, OWSMlocal policy
INFO SEVERE
oracle.mft.CONSO
LE_UI
Console operations INFO SEVERE
oracle.soa.adapt
er.file
See Understanding TechnologyAdapters
INFO SEVERE
oracle.soa.adapt
er.file.inbound
See Understanding TechnologyAdapters
INFO SEVERE
oracle.soa.adapt
er.file.outbound
See Understanding TechnologyAdapters
INFO SEVERE
oracle.soa.adapt
er.file.connecti
on
See Understanding TechnologyAdapters
INFO SEVERE
oracle.soa.adapt
er.file.transact
ion
See Understanding TechnologyAdapters
INFO SEVERE
oracle.soa.adapt
er.ftp
See Understanding TechnologyAdapters
INFO SEVERE
oracle.soa.adapt
er.ftp.inbound
See Understanding TechnologyAdapters
INFO SEVERE
oracle.soa.adapt
er.ftp.outbound
See Understanding TechnologyAdapters
INFO SEVERE
oracle.soa.adapt
er.ftp.connectio
n
See Understanding TechnologyAdapters
INFO SEVERE
oracle.soa.adapt
er.jms
See Understanding TechnologyAdapters
INFO SEVERE
oracle.soa.adapt
er.jms.inbound
See Understanding TechnologyAdapters
INFO SEVERE
Oracle Managed File Transfer Loggers
Administering Oracle Managed File Transfer 6-15
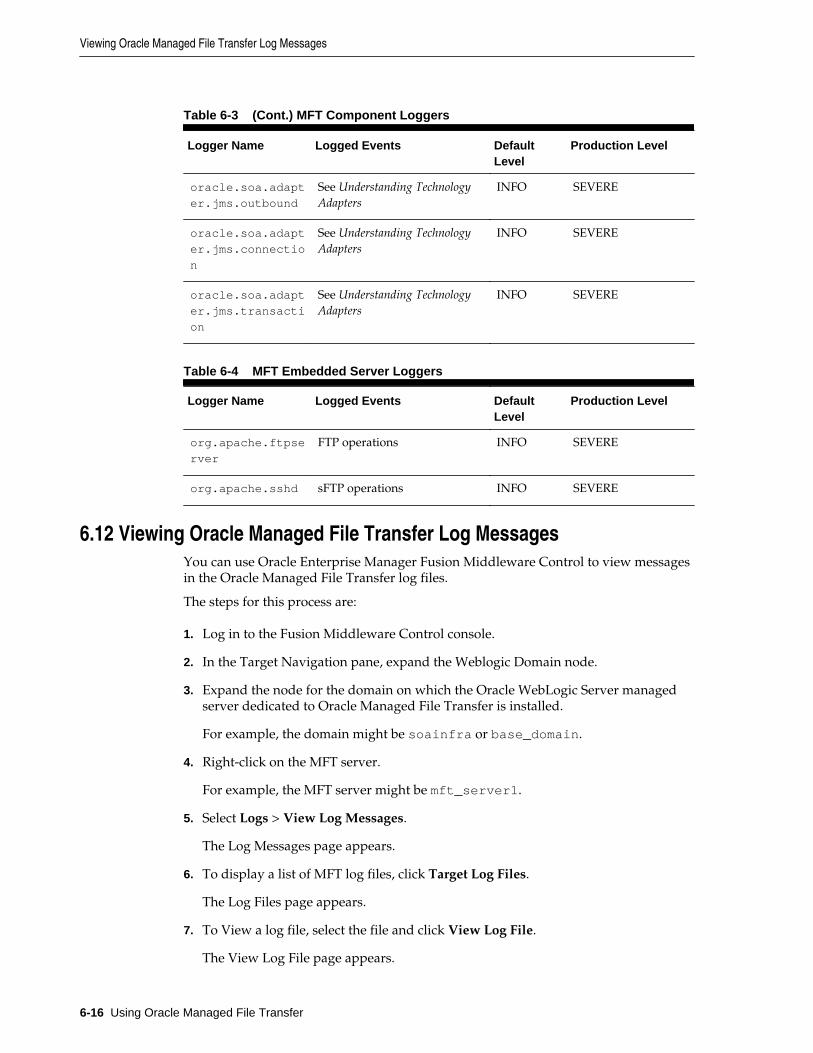
Table 6-3 (Cont.) MFT Component Loggers
Logger Name Logged Events DefaultLevel
Production Level
oracle.soa.adapt
er.jms.outbound
See Understanding TechnologyAdapters
INFO SEVERE
oracle.soa.adapt
er.jms.connectio
n
See Understanding TechnologyAdapters
INFO SEVERE
oracle.soa.adapt
er.jms.transacti
on
See Understanding TechnologyAdapters
INFO SEVERE
Table 6-4 MFT Embedded Server Loggers
Logger Name Logged Events DefaultLevel
Production Level
org.apache.ftpse
rver
FTP operations INFO SEVERE
org.apache.sshd sFTP operations INFO SEVERE
6.12 Viewing Oracle Managed File Transfer Log MessagesYou can use Oracle Enterprise Manager Fusion Middleware Control to view messagesin the Oracle Managed File Transfer log files.
The steps for this process are:
1. Log in to the Fusion Middleware Control console.
2. In the Target Navigation pane, expand the Weblogic Domain node.
3. Expand the node for the domain on which the Oracle WebLogic Server managedserver dedicated to Oracle Managed File Transfer is installed.
For example, the domain might be soainfra or base_domain.
4. Right-click on the MFT server.
For example, the MFT server might be mft_server1.
5. Select Logs > View Log Messages.
The Log Messages page appears.
6. To display a list of MFT log files, click Target Log Files.
The Log Files page appears.
7. To View a log file, select the file and click View Log File.
The View Log File page appears.
Viewing Oracle Managed File Transfer Log Messages
6-16 Using Oracle Managed File Transfer
8. To view specific types of messages, specify search criteria and click Search.
6.13 Moving Oracle Managed File Transfer to Another EnvironmentYou can move Oracle Managed File Transfer from a source environment, such as a testenvironment, to a target environment, such as a production environment. OracleFusion Middleware provides scripts to copy an Oracle home and domains, as well asthe configuration of Oracle Managed File Transfer, from one environment to another.As part of the procedure, you extract a move plan from the source environment, whichcontains properties that you can then edit to provide the values for the targetenvironment.
For more information, see Moving from a Test to a Production Environment inAdministering Oracle Fusion Middleware.
Moving Oracle Managed File Transfer to Another Environment
Administering Oracle Managed File Transfer 6-17

Moving Oracle Managed File Transfer to Another Environment
6-18 Using Oracle Managed File Transfer

7Administering Oracle Managed File
Transfer Embedded Servers
This chapter describes how to administer the FTP and sFTP (SSH-FTP) serversembedded by Oracle Managed File Transfer.
This chapter includes the following sections:
• About Embedded FTP and sFTP Servers
• Embedded Server Configuration
• Starting and Stopping Embedded Servers
• Managing Embedded Servers and High Availability
• Supported FTP and sFTP Commands
For information about administering the Oracle WebLogic Server managed serverdedicated to Oracle Managed File Transfer, see Administering Oracle Managed FileTransfer.
7.1 About Embedded FTP and sFTP ServersOracle Managed File Transfer includes built-in FTP and sFTP servers, which handlemany of the types of file transfers performed. To transfer a file using one of theembedded servers, upload the file into one of the embedded server directories.
These embedded servers have their own file system directories for sending andreceiving files. The default root directory location for both the FTP and sFTP servers isWLS_Home/user_projects/domains/base_domain/mft/ftp_root. To changethis location, see Other Embedded Server Settings.
The payloads directory under the root is for files accessed by external systems suchas SOA.
The FTP embedded server is enabled by default, but its security features are disabled.The sFTP server is disabled by default.
Oracle Managed File Transfer supports the use of any compliant FTP or sFTP client.
Note:
Files present in an embedded FTP or sFTP source directory before the sourceis deployed or enabled are ignored. Only files uploaded to the directory afterdeployment or enabling are picked and transferred.
Administering Oracle Managed File Transfer Embedded Servers 7-1

7.1.1 SecurityOracle Managed File Transfer embedded servers can restrict user access to the serverfile systems. For more information, see Embedded Server Security and EmbeddedServer User Access.
7.1.2 Archiving and Purging Transfers and FilesTo clear space in the embedded server file systems, you can use WLST commands toarchive and purge transfer instances and their associated files. For more information,see WLST Command Reference for SOA Suite.
Files uploaded to embedded server directories for which no sources are configuredcannot be purged or archived. Only files associated with a transfer instance can bepurged or archived.
7.2 Embedded Server ConfigurationEmbedded server configuration settings are in the Embedded Servers, EmbeddedServer Ports, and Embedded Server User Access tabs on the Administration page. Forinformation about these settings, see the following sections:
• For Embedded Server settings, see Embedded Server Security and OtherEmbedded Server Settings.
• For Embedded Server Ports settings, see Re-configuring the Port.
• For Embedded Server User Access settings, see Embedded Server User Access.
7.2.1 Re-configuring the PortYou can reconfigure the ports of the Oracle Managed File Transfer embedded servers.
Embedded servers are not the same thing as Oracle WebLogic Server managedservers. The MFT embedded FTP and sFTP servers are services that run on the OracleWebLogic Server managed server(s) dedicated to Oracle Managed File Transfer.
The steps for this process are:
1. On the left pane of the Administration page, click the arrow to the left ofEmbedded Servers.
The Ports and User Access items appear.
2. Click Ports.
The Embedded Server Ports tab opens.
3. Change the Configured Port value for each Server Instance and Service (FTP orsFTP) combination you want to reconfigure.
4. Click Save.
5. Click Restart, Start, or Stop.
6. Click the Refresh icon to update the table. Verify the that the new Server Status forall servers is RUNNING and that the new Running Port values are the values youconfigured.
Embedded Server Configuration
7-2 Using Oracle Managed File Transfer

7.2.2 Path Separators for Remote FTP and sFTP ServersIf the path separator on a remote FTP server is not the conventional forward slash (/),you must specify the FTP Path Separator when you configure FTP Remote or sFTPRemote sources and targets.
For more information about other settings you can edit after you create an FTP Remoteor sFTP Remote source or target, see the Oracle Fusion Middleware MFT Composer HelpOnline Help.
7.2.3 Other Embedded Server SettingsTable 7-1 lists the FTP embedded server settings not related to security. These settingsare on the Administration page, Embedded Servers tab, and FTP subtab.
Table 7-1 FTP Embedded Server Settings
Setting Description
Root Directory Specifies the root directory of the FTP server. The default isWLS_Home/user_projects/domains/base_domain/mft/ftp_root. You must set it to a shared location if multiple OracleWebLogic Server instances run in a cluster.
To change the root directory:
1. Stop the Oracle WebLogic Server managed server(s) dedicated toOracle Managed File Transfer.
2. Change the Root Directory setting.
3. Move the directories and files under the root directory.
4. Restart the managed server(s).
See Re-configuring the Port for how to stop and start the managedserver(s).
Enabled Enables the sFTP server if checked. The default is enabled (checked).
Maximum Logins Specifies the maximum number of concurrent users. The default is 10.
Maximum LoginFailures
Specifies the maximum number of login failures after which aconnection is closed. The default is 3.
MaximumConcurrent Requests
Specifies the maximum number of concurrent requests the sFTPserver can accept. The default is 10.
Idle Timeout Specifies the time in seconds that the server can be idle before theconnection ends and the user must log in again. The default is 600,equivalent to 10 minutes.
Active Connection:Port Range Start, PortRange End
In active mode, the client establishes the command channel. Theserver establishes the data channel between a server port in the rangefrom Port Range Start to Port Range End and a client port that theclient specifies using the PORT command.
Enable Enables the FTP server if checked. The MFT server does not start adisabled FTP server during initialization. The default is disabled(unchecked).
Embedded Server Configuration
Administering Oracle Managed File Transfer Embedded Servers 7-3

Table 7-1 (Cont.) FTP Embedded Server Settings
Setting Description
IP Check Finds out whether the IP address for the data connection is the sameas for the control socket if checked. FTP uses two channels betweenclient and server, which are separate TCP connections. The commandchannel is for commands and responses. The data channel is fortransferring files. The default is disabled (unchecked).
Passive Connection:Port Range Start, PortRange End
In passive mode, the client establishes both the command and datachannels. The server tells the client which port in the range from PortRange Start to Port Range End to use for the data channel.
Table 7-2 lists the sFTP embedded server settings not related to security. These settingsare on the Administration page, Embedded Servers tab, and sFTP subtab.
Table 7-2 sFTP Embedded Server Settings
Setting Description
Root Directory Specifies the root directory of the sFTP server. The default isWLS_Home/user_projects/domains/base_domain/mft/ftp_root. You must set it to a shared location if multiple OracleWebLogic Server instances run in a cluster.
To change the root directory:
1. Stop the Oracle WebLogic Server managed server(s) dedicated toOracle Managed File Transfer.
2. Change the Root Directory setting.
3. Move the directories and files under the root directory.
4. Restart the managed server(s).
See Re-configuring the Port for how to stop and start the managedserver(s).
Enabled Enables the sFTP server if checked. The default is enabled (checked).
MaximumConcurrent Requests
Specifies the maximum number of concurrent requests the sFTPserver can accept. The default is 10.
Maximum LoginFailures
Specifies the maximum number of login failures after which aconnection is closed. The default is 3.
Idle Timeout Specifies the time in seconds that the server can be idle before theconnection ends and the user must log in again. The default is 600,equivalent to 10 minutes.
For information about the embedded server settings related to security, see EmbeddedServer Security.
7.3 Starting and Stopping Embedded ServersYou can start or stop the Oracle Managed File Transfer embedded servers.
The steps for this process are:
Starting and Stopping Embedded Servers
7-4 Using Oracle Managed File Transfer

1. Open the Embedded Servers tab on the Administration page.
2. Select the FTP or sFTP subtab.
3. Look at the Start and Stop buttons. If Start is grayed out, the server is running andyou can Stop or Restart it. If Stop is grayed out, the server is not running and youcan Start it.
4. Click Start, Stop, or Restart.
To restart all embedded servers, click Restart All.
To start, restart, or stop the Oracle WebLogic Server managed server(s) dedicated toOracle Managed File Transfer, see Oracle WebLogic Server Startup and Shutdown.
7.4 Managing Embedded Servers and High AvailabilityWhen you set up high availability for Oracle Managed File Transfer, the embeddedservers participate in the load balancing, failover, and other features. For moreinformation, see Managing Multiple Weblogic Servers and High Availability.
7.5 Supported FTP and sFTP CommandsSupported FTP commands are:
• APPE: Appends data to the end of a file on the remote host.
• AUTH: Establishes SSL encrypted session. Only the SSL type is supported.
• CDUP: Changes to the parent directory.
• CWD: Changes the working directory. If the directory name is not specified, the rootdirectory (/) is assumed.
• LIST: Lists files. Must be preceded by a PORT or PASV command.
• MKD: Creates a directory.
• MLSD: Similar to LIST.
• NOOP: No operation.
• PASS: Specifies the password. Must be immediately preceded by USER.
• PASV: Listens on a data port.
• PORT: Specifies the data port.
• PROT: Specifies the data channel protection level.
• PWD: Returns the name of the current working directory.
• REST: Specifies the marker position from which the file transfer is to be restarted.
• RETR: Transfers a copy of the file specified as the argument.
• SIZE: Returns the size of the file in bytes.
• STOR: Accepts and stores the data received as a file.
Managing Embedded Servers and High Availability
Administering Oracle Managed File Transfer Embedded Servers 7-5

• TYPE: Specifies the file type, ascii (the default) or binary.
• USER: Specifies the user name.
• QUIT: Logs out.
• DELE: Deletes the file specified by the provided path.
• RMD: Removes a directory.
• RNFR: Renames from the specified name.
• RNTO: Renames to the specified name.
• STOU: Stores a unique file to this directory.
Supported sFTP commands are:
• cd: Changes the remote working directory.
• get: Downloads a file from a remote directory to a local directory.
• ls: Lists the contents of a remote directory.
• mkdir: Creates a remote directory.
• mv: Moves or renames a remote file.
• put: Uploads a file from a local directory to a remote directory.
• pwd: Prints a remote working directory.
• rm: Removes a remote file.
• rmdir: Removes a remote directory.
• quit, bye: Ends and disconnects a client or user session.
Oracle Managed File Transfer does not support shell command execution.
Supported FTP and sFTP Commands
7-6 Using Oracle Managed File Transfer

8Oracle Managed File Transfer Security
This chapter describes how to keep Oracle Managed File Transfer and its embeddedFTP and sFTP servers secure.
This chapter includes the following sections:
• User Authentication and Authorization
• Embedded Server Security
• Integrating with Oracle Access Manager 11g for Single Sign-On
• Message Encryption Using PGP
• Managing Keystores
• Enabling Security Audit Logging
• OWSM Security Policy Attachment
• Configuring SSL only Domain for Oracle Managed File Transfer
8.1 User Authentication and AuthorizationUsers can be configured, granted access to Oracle Managed File Transfer, and givenpermissions to embedded FTP and sFTP server directories and transfer payloads.
Note: If a user’s permissions have changed when the user is already loggedin, the changes will be effective only on the next login. Once a user isauthenticated, the permissions of the user will not change until the user logsout and logs in again. This is applicable for all the console, WLST, RESTful,and embedded server operations such as deploy, enable/disable, import/export or read/write embedded server operations.
8.1.1 Configuring UsersYou configure Oracle Managed File Transfer users and assign them to groups in theOracle WebLogic Server Administration Console.
Oracle Managed File Transfer Security 8-1

Note:
Oracle Managed File Transfer interacts with Oracle Enterprise SchedulerService through the OracleSystemUser. Do not delete this user. If you do,clicking add schedule in a transfer configuration will result in anOracleSystemUser does not exist message, and Schedule Detailsmay be blank in monitoring reports. For more information about transferschedules, see Setting Up Schedules.
The steps for this process are:
1. Access the Oracle WebLogic Server console using a URL that includes the OracleWebLogic Server hostname and the console port:
http://wls-hostname:console-port/console
For example:
http://localhost:7011/console
2. Log in using the Oracle WebLogic Server admin username and password.
3. In the left pane of the Oracle WebLogic Server Administration Console, selectSecurity Realms.
4. On the Summary of Security Realms page, select the name of the realm (forexample, myrealm).
5. On the Settings for Realm Name page, select Users and Groups > Users.
6. Click New.
7. In the Name field of the Create New User page, enter a unique alphanumeric namefor the user.
8. In the Description field, enter a description. The description might be the user's fullname. This is optional.
9. In the Provider drop-down list, select DefaultAuthenticator.
10. In the Password field, enter a password for the user.
The minimum password length is 8 characters. Do not use the username/passwordcombination weblogic/welcome1 in production.
11. Re-enter the password for the user in the Confirm Password field.
12. Click OK to save your changes.
13. Click the name of the new user in the User table.
14. On the Settings for User Name page, select Groups.
15. Select a group or groups from the Available list box and move them to the Chosenlist box. A user can be a member of more than one group.
See Table 8-1 for MFT console access groups and Table 8-2 for MFT embeddedserver access groups.
User Authentication and Authorization
8-2 Using Oracle Managed File Transfer

16. Click Save.
For complete details, see Create Users and Add Users to Groups in the Oracle WebLogicServer Administration Console Online Help.
8.1.2 Oracle Managed File Transfer Console AccessUsers log in to the Oracle Managed File Transfer console using the name andpassword assigned to them through the process described in Configuring Users. TheOracle Managed File Transfer page on which the user starts depends on the user'sgroup:
• Administrators start on the Administration page.
• Deployers start on the Designer page.
• Monitors start on the Monitoring page.
A user assigned to both the Deployers and Monitors groups starts on the Designerpage.
Table 8-1 lists the roles, groups, and permitted actions for user access to the MFTconsole. Console access is based only on roles. Embedded server access roles andgroups do not determine console access.
Table 8-1 MFT Console Roles, Groups, and Permissions
Role Groups with Role Console Actions Permitted
MFTAdmin Administrators,OracleSystemGroup
Import, Export, Purge, Design, Deploy,Monitor, Resubmit, Pause-Resume, Retry,Disable, Enable, StartES, StopES (all actions)
MFTMonitor Monitors Monitor, Resubmit, Pause-Resume, Retry,Disable, Enable, StartES, StopES
MFTDesigner Deployers Design, Deploy
8.1.3 Embedded Server User AccessYou can grant users access to embedded FTP and sFTP server directories.
To use WLST to configure embedded server user access, see Oracle Managed FileTransfer Utilities and WLST Command Reference for SOA Suite.
The steps for this process are:
1. On the left pane of the Administration page, click the arrow to the left ofEmbedded Server.
The Ports and User Access items appear.
2. Click User Access.
The Embedded Server User Access tab opens.
3. Select User, Group, or Role, then type a user, group, or role name in the text field.You must type at least three letters. Any matches are displayed below the textfield. Click the match you want to add.
User Authentication and Authorization
Oracle Managed File Transfer Security 8-3

You configure users, groups, and roles using the process described in ConfiguringUsers.
Note:
If Enable screen reader mode is selected in Accessibility Preferences, youmust type the full user, group, or role name. See Setting Language_ TimeZone_ and Accessibility Preferences for more information.
4. Click the Add Folder (+) icon.
The user's default folder is added to the table with Set As Home Folder selected.
5. To add other folders, click the Search icon.
a. Type a directory under which to search in the Available Folders text box.
b. Click the arrow to the right of the Available Folders text box.
Subdirectories of the search directory are displayed.
c. Click the arrow to the left of a directory to display further subdirectories.
d. To select a directory, check its box.
e. Click Add Selected.
6. Select Set As Home Folder to assign a different home folder. This is optional.
If Set as Home Folder is selected, the user is place in the Home Folder when theylog on to the embedded server. If the home folder does not exist, it is created atlogin.
7. Set the following permissions for each row. To set a permission for all rows, checkor uncheck the box in the column header.
• Access Subfolders: Applies the same permission settings to all subfolders.
• Read: Allows viewing of file contents.
• Write: Allows modification of file contents.
• Delete: Allows file deletion.
• List: Allows viewing of directory contents.
8. Click Save.
To undo all permission changes for a specific user since the last Save, click Reset All.To undo all changes for all users since the last Save, click Revert.
Table 8-2 lists the groups and default permitted actions for user access to MFTembedded server directories. Console access roles and groups do not determineembedded server access.
Table 8-2 MFT Embedded Server Groups and Permissions
User Authentication and Authorization
8-4 Using Oracle Managed File Transfer

Table 8-2 (Cont.) MFT Embedded Server Groups and Permissions
Group Members Actions Permitted Additional Notes
Administrators Any Enterpriseuser.
By default theuser namedweblogic is amember.
Read, Write, Delete, List(file operations)
createDir, renameDir,deleteDir, changeDir(directory operations)
By default all permissionsare granted to anymember.
MFTESAdmin Any Enterpriseuser.
By default theAdministratorsgroup is amember.
Read, Write, Delete, List(file operations)
createDir, renameDir,deleteDir, changeDir(directory operations)
This group is specificallyfor granting access to MFTembedded servers.
By default all permissionsare granted to anymember.
OracleSystemGroup
Any Enterpriseuser.
By default theuser namedOracleSystemUser is a member.
Read, Write, Delete, List(file operations)
Using this group foraccess provisioning is notrecommended, becausethis group is intended forinternal applications andsystem management.
Otherpreexistinggroups
Any Enterpriseuser.
Read, Write, Delete, List(file operations)
Examples of these groupsare Monitors andDeployers.
These groups and usersbelonging to them arelisted in the EmbeddedServer User Access tab.
User-createdgroups
Any Enterpriseuser.
Read, Write, Delete, List(file operations)
These groups and usersbelonging to them arelisted in the EmbeddedServer User Access tab.
User-createdroles
Any Enterpriseuser or group.
Based on member groups.If a role has theAdministrators group as amember, all operationsare allowed. Otherwiseonly file operations areallowed.
There is no preexistingrole for embedded serveraccess provisioning. Youcan create a role, assignmembers, and provisionaccess.
8.1.4 Granting Payload AccessYou can grant users, groups, and roles access to the payloads of transfers with thesecharacteristics:
• A SOAP, SOA, Service Bus, or ODI target type
• A Delivery Method value of Reference
User Authentication and Authorization
Oracle Managed File Transfer Security 8-5

• A Reference Type value of FTP
If you grant no specific access, then all users, groups, and roles have access to thetransfer payloads.
The steps for this process are:
1. Click the arrow to the left of Transfers in the left pane navigator.
The transfers are listed.
2. Click the transfer name or right-click it and then select the Open menu item.
The transfer tab opens.
3. Click the arrow to the left of Payload Access.
The Payload Access section opens.
4. Click add users, groups, and roles.
The Add Users dialog opens.
5. Select a category: User, Role, or Group.
6. Type part or all of a user, role, or group name in the Search field.
You must type at least three letters. Any matches are displayed below the Searchfield.
7. Select the matching name you want to add.
The selected name appears in the search field.
8. Click Add to List.
The name appears in the Selected Users, Groups, and Roles list.
To delete a user, role, or group from the list, click the red X to the right of it.
9. Repeat steps 5 through 8 for each user, role, or group you want to add.
10. Click Add Users.
To cancel adding users, click Cancel.
The Add Users dialog closes.
11. Verify that each user, role, or group you wanted to add is displayed in the PayloadAccess section of the transfer tab.
To delete a user, role, or group from the list, click the red X to the right of it.
12. Save and optionally Deploy the transfer.
For more information about configuring transfers, see Configuring a Transfer.
8.2 Embedded Server SecuritySecure embedded servers are of two types: sFTP (SSH-FTP) or FTPS (FTP over SSL).
Embedded Server Security
8-6 Using Oracle Managed File Transfer

The embedded servers support the following protocols: FTP RFC959, FTP RFC2228,sFTP, FTPS, SSH-2, TLS 1.1, and TLS 1.2.The SSH-1 protocol and SSHD (secure shell)are not supported.
8.2.1 sFTP (SSH-FTP)Table 8-3 lists the sFTP embedded server settings related to security. These settings areon the Administration page, Embedded Servers tab, and sFTP subtab. After changingany of these settings, you must Stop and Start the sFTP server to activate the settings.
Table 8-3 sFTP Embedded Server Security Settings
Setting Description
Authentication Type Specifies the authentication type: Password (default), Public Key,or Both.
Host Key Alias Specifies the alias of the SSH private key for authentication. Tocreate SSH keys, see Configuring the SSH Keystore.
8.2.2 FTPS (FTP Over SSL)Table 8-4 lists the FTP embedded server settings related to security. These settings areon the Administration page, Embedded Servers tab, and FTP subtab. After changingany of these settings, you must Stop and Start the FTP server to activate the settings.
Table 8-4 FTP Embedded Server Security Settings
Setting Description
Plain FTP Enables plain FTP, without Implicit or Explicit SSL support, on the FTP server.You can enable implicit or explicit SSL support, or both, in addition to plainFTP. The default is enabled (checked).
Implicit Requires the client to immediately challenge the FTPS server with a TLS/SSLClientHello message. A non-FTPS aware client cannot connect to an implicitSSL-enabled server. The default is enabled (checked).
Explicit Allows clients to explicitly request that the FTP server encrypt the session andmutually agree to an encryption method. This is known as explicit FTPS orFTPES. Explicit mode is legacy-compatible, so plain FTP clients can still connectto the FTP server. Common commands for invoking FTPS security includeAUTH TLS and AUTH SSL. The default is enabled (checked).
ClientAuthentication
Specifies the level of client authentication: Need, Want, or None. Applies onlyif Implicit or Explicit is checked.
• Need - The FTP server's SSL engine requires client authentication during thehandshake.
• Want - The FTP server's SSL engine requests client authentication during thehandshake.
• None - No client authentication is performed (default).
Protocol Specifies the security protocol: TLS (default) or SSL. Applies only if Implicit orExplicit is checked.
CipherSuite
Specifies the cipher suites to use. To use all available cipher suites, check All.Checking none uses a default list. Applies only if Implicit or Explicit ischecked.
Embedded Server Security
Oracle Managed File Transfer Security 8-7

Table 8-4 (Cont.) FTP Embedded Server Security Settings
Setting Description
CertificateAlias
Specifies the alias of the SSL private key for authentication. Applies only ifImplicit or Explicit is checked. To create SSL keys, see Configuring the SSLKeystore.
Note:
The message shown below is not an issue and is information logged toindicate that the FTPS service will not be started when there is no valid portavailable. This error information is not shown when implicit FTPS service isenabled.
{APP: mft-app] [partition-name: DOMAIN]oracle.mft.COMMON.<MFTServer.initFTPServer>:Invalid value for FTPS Port: [-1]. FTPS Service will fail to start.
8.3 Integrating with Oracle Access Manager 11g for Single Sign-OnYou can integrate the Oracle Managed File Transfer console URL with Oracle AccessManager 11g to achieve single-sign-on with other Enterprise web applications.
For general information about installing and configuring Oracle Access Manager, see "Configuring Oracle Access Manager (OAM)" in Oracle Fusion MiddlewareAdministrator's Guide for Oracle WebCenter Portal.
To protect the MFT console URL, follow the steps described in "Configuring theWebLogic Server Administration Console and Enterprise Manager for OAM" in OracleFusion Middleware Administrator's Guide for Oracle WebCenter Portal, except specify /mftconsole /mftconsole/* /mftconsole/.../* as the Resource URL.
8.4 Message Encryption Using PGPYou can encrypt or decrypt a file that is being transferred. For more information, see Encryption and Decryption at the Source or Encryption and Decryption Preprocessing.
For encryption, you must reference the public PGP key alias. For decryption, you mustreference the private PGP key alias.
To set up PGP keys and key aliases in the Oracle Managed File Transfer keystore, see Configuring the PGP Keystore.
8.5 Managing KeystoresOracle Managed File Transfer uses SSL and SSH keys for embedded server securityand PGP keys for message encryption. To manage keys in the Oracle Managed FileTransfer keystores, use the Oracle WebLogic Scripting Tool (WLST) and the OracleManaged File Transfer console, described in the following sections:
• Configuring the SSL Keystore
• Configuring the SSH Keystore
• Configuring the PGP Keystore
Integrating with Oracle Access Manager 11g for Single Sign-On
8-8 Using Oracle Managed File Transfer

You can use the MFT WLST keystore management commands to generate, import,export, delete, list, and update SSL, SSH, and PGP keys. For more information, see the WLST Command Reference for SOA Suite.
Note:
SSL keys in binary (DER) format are not supported. Use keys in BASE64 (PEMor CER) format. You can convert key formats using the openssl command.
Key lengths greater than 1024 bit are supported. However, there are someexport restrictions on key lengths greater than 1024 bit. These restrictions aremostly specified at the JRE level in the JAVA_HOME\jre7\lib\securitydirectory.
Note:
To create additional keystores, you can use WLST commands or the OracleEnterprise Manager Fusion Middleware Control console. See Managing Keysand Certificates with the Keystore Service in Securing Applications with OraclePlatform Security Services, Managing Keystores, Wallets, and Certificates inAdministering Oracle Fusion Middleware, and Managing the Credential Store inSecuring Applications with Oracle Platform Security Services for more informationabout Fusion Middleware Control.
8.5.1 Configuring the SSL KeystoreThe default keystore is used for storing Oracle MFT SSL keys and certificates. Toconfigure the default keystore, use WLST and the Oracle Managed File Transferconsole.
The steps for this process are:
1. Start WLST using the steps described in Running WLST Commands.
2. Access the Oracle Platform Security Services key store service:
svc = getOpssService(name='KeyStoreService')
3. Create the SSL keystore:
svc.createKeyStore(appStripe='<StripeName>', name='<StoreName>', password='<StorePassword>', permission=false/true)
4. Create the SSL keys:
svc.generateKeyPair(appStripe='StripeName', name='StoreName', password='StorePassword', dn='cn=CompanyURL', keysize='1024',alias='Alias', keypassword='KeyPassword')
For example:
svc.generateKeyPair(appStripe='mft', name='mftDefaultStore', password='P@s$W0rd', dn='cn=www.mycompany.org', keysize='1024',alias='mftssl', keypassword='P@s$W0rd2')
Managing Keystores
Oracle Managed File Transfer Security 8-9

Specify mft as the stripe name and mftDefaultStore as the store name. OracleManaged File Transfer uses these names by default. The store and key passwordsare optional.
When securing the FTP server, you reference the SSL private key alias configuredin this step. See the Certificate Alias description in FTPS (FTP Over SSL).
5. Exit WLST using the steps described in Running WLST Commands.
6. In the Oracle Managed File Transfer console, on the left pane of the Administrationpage, click Keystores.
7. If you specified key and store passwords in previous steps, you must enter them onthis page.
Enter the key password in the Private Key Password field and the store passwordin the Key Password field.
8. Click Save.
8.5.2 Configuring the SSH KeystoreTo configure the SSH keystore, use WLST and the Oracle Managed File Transferconsole.
The steps for this process are:
1. Start WLST using the steps described in Running WLST Commands.
2. Use the generateKeys WLST command to create a password-protected privateSSH key. The key type is RSA and the key size is 1024 bits. For example:
generateKeys('SSH', 'P@s$W0rd','/export/ssh/ssh-pvt-keys.ppk')
If you are an advanced user and want to set additional key parameters, you can usethe ssh-keygen command instead. For example:
ssh-keygen -t rsa -b 2048 -f /export/ssh/ssh-pvt-keys.ppk -N P@a$W0rd
For more information about ssh-keygen, see ssh-keygen(1) - Linux man page.
The password is optional for either command.
3. Use the importCSFKey WLST command to import and create an alias for the key.For example:
importCSFKey('SSH', 'PRIVATE', 'mftssh', '/export/ssh/ssh-pvt-keys.ppk')
When securing the sFTP server, you reference the SSH private key alias configuredin this step. See the Host Key Alias description in sFTP (SSH-FTP).
4. Exit WLST using the steps described in Running WLST Commands.
5. In the Oracle Managed File Transfer console, on the left pane of the Administrationpage, click Keystores.
6. If you specified a password in step 2, you must enter it in the SSH Private KeyPassword field.
7. Click Save.
Managing Keystores
8-10 Using Oracle Managed File Transfer

8.5.3 Configuring the PGP KeystoreTo configure the PGP keystore, use WLST and the Oracle Managed File Transferconsole.
Note:
If a payload is encrypted by a PGP tool outside of MFT using a key length oralgorithm that is restricted, MFT decryption will fail. These restrictions aremostly specified at the JRE level in the JAVA_HOME\jre7\lib\securitydirectory.
The steps for this process are:
1. Start WLST using the steps described in Running WLST Commands.
2. Use the generateKeys WLST command to create a password-protected PGP keypair. For example:
generateKeys('PGP', 'P@s$W0rd','/export/pgp', 'example<[email protected]>')
The password is optional.
3. Use the importCSFKey WLST command to import and create an alias for eachkey. For example:
importCSFKey('PGP', 'PUBLIC', 'mftpgppub', '/export/pgp/pub.asc')importCSFKey('PGP', 'PRIVATE', 'mftpgppri', '/export/pgp/secret.asc')
For encryption, you must reference the public PGP key alias. For decryption, youmust reference the private PGP key alias. For more information, see Encryptionand Decryption at the Source or Encryption and Decryption Preprocessing.
4. Exit WLST using the steps described in Running WLST Commands.
5. In the Oracle Managed File Transfer console, on the left pane of the Administrationpage, click Keystores.
6. If you specified a password in step 2, you must enter it in the PGP Private KeyPassword field.
7. Click Save.
8.6 Enabling Security Audit LoggingYou can enable audit logging for Oracle Managed File Transfer using OracleEnterprise Manager Fusion Middleware Control or the Oracle WebLogic ScriptingTool (WLST).
To generate reports of audit data, see Using Audit Analysis and Reporting in SecuringApplications with Oracle Platform Security Services.
8.6.1 Using Fusion Middleware Control to Enable Audit LoggingThe steps for this process are:
Enabling Security Audit Logging
Oracle Managed File Transfer Security 8-11

1. Log in to the Fusion Middleware Control console.
2. In the Target Navigation pane, expand the Weblogic Domain node.
3. Select the domain on which the Oracle WebLogic Server managed server dedicatedto Oracle Managed File Transfer is installed.
For example, the domain might be soainfra or base_domain.
4. Right-click on the domain and select Security > Audit Policy.
5. Select MFT from the Audit Component Name drop-down list.
If you do not see the MFT component, then restart the Oracle WebLogic Serveradmin server and managed servers. For more information, see Oracle WebLogicServer Startup and Shutdown.
6. Change the Audit Level to Medium.
7. Click Apply.
8. Restart the Oracle WebLogic Server admin server and managed servers. For moreinformation, see Oracle WebLogic Server Startup and Shutdown.
8.6.2 Using WLST to Enable Audit LoggingThe steps for this process are:
1. Start WLST using the steps described in Running WLST Commands.
2. Use the following WLST command to enable audit logging for MFT:
setAuditPolicy(componentType="MFT",filterPreset="None")
You can specify a filterPreset of Custom or Medium instead of None.
3. Exit WLST using the steps described in Running WLST Commands.
For more information about WLST commands for audit policies, see Manage AuditPolicies with WLST in Securing Applications with Oracle Platform Security Services.
8.7 OWSM Security Policy AttachmentOracle Managed File Transfer supports securing web service sources and targets withOracle Web Services Manager (OWSM) policies. Web service sources and targetsinclude those of type SOAP, SOA, Service Bus, and ODI.
Note:
WS-Security compliant policies are not supported.
You can attach one policy file per source or target. The policy file holds the attachedpolicies and overridden attributes.
You can attach policies globally using Oracle Enterprise Manager Fusion MiddlewareControl or the Oracle WebLogic Scripting Tool (WLST). You can attach policies locallyusing the MFT console or WLST.
Web services security can be divided into the following parts:
OWSM Security Policy Attachment
8-12 Using Oracle Managed File Transfer

• Design time — when policies are attached and registered for the source or target.
• Runtime — when the policies are enforced upon invoking the secured source ortarget.
• Life cycle — how policies are managed with respect to the life cycle of the source ortarget.
This section includes the following topics:
• Using Fusion Middleware Control for Global Policy Attachment
• Using WLST for Global Policy Attachment
• Using the MFT Console for Local Policy Attachment
• Using WLST for Local Policy Attachment
• How the Policy Is Applied at Runtime
• Policies and Artifact Life Cycle Management
• Verifying Policy Registration
8.7.1 Using Fusion Middleware Control for Global Policy AttachmentHow you attach a policy depends on whether the policy is inbound (for sources) oroutbound (for targets). In addition, some client policies require credentials.
8.7.1.1 Managing Policy Credentials
Some client policies, such as the user name token policy, require credentials. Beforeyou can attach such a policy using Oracle Enterprise Manager Fusion MiddlewareControl, you must create a map and key. For more information, see Managing theCredential Store in Securing Applications with Oracle Platform Security Services.
The steps for this process are:
1. Log in to the Fusion Middleware Control console.
2. In the Target Navigation pane, expand the Weblogic Domain node.
3. Select the domain on which the Oracle WebLogic Server managed server dedicatedto Oracle Managed File Transfer is installed.
For example, the domain might be soainfra or base_domain.
4. Right-click on the domain and select Security > Credentials.
The Credentials table appears.
5. Click Create Map.
6. In the Create Map dialog, type oracle.wsm.security in the Map Name field.Click OK.
The oracle.wsm.security credential appears in the Credentials table.
7. Select the oracle.wsm.security credential and click Create Key.
OWSM Security Policy Attachment
Oracle Managed File Transfer Security 8-13

8. In the Create Key dialog, type basic.credentials in the Key field. Type theuser information in the User Name, Password, and Confirm Password fields. ClickOK.
An expand arrow appears to the left of the oracle.wsm.security credential. Clickingthis arrow displays the basic.credentials key.
8.7.1.2 Creating a Policy Set for a Source
You can create a policy set and attach a policy for a source. For more information, see Managing Web Service Policies with Fusion Middleware Control in Securing WebServices and Managing Policies with Oracle Web Services Manager.
The steps for this process are:
1. Log in to the Fusion Middleware Control console.
2. In the Target Navigation pane, expand the Weblogic Domain node.
3. Select the domain on which the Oracle WebLogic Server managed server dedicatedto Oracle Managed File Transfer is installed.
For example, the domain might be soainfra or base_domain.
4. Right-click on the domain and select Web Services > WSM Policy Sets.
The WSM Policy Set Summary table appears.
5. Click Create.
6. On the Create Policy Set: Enter General Information page, enter a Name, checkEnabled, and select SOAP Web Service from the Type of Resource drop-down list.Click Next.
7. On the Create Policy Set: Enter Resource Scope page, type the followinginformation:
• Domain Name: Type the name of the domain on which the Oracle WebLogicServer managed server dedicated to Oracle Managed File Transfer is installed.
For example, the domain might be soainfra or base_domain.
• Application Name: Type *. or mftapp
• Application Module Name or Connection Name: Type *. or mftapp
• RESTful Application, Service, or Web Service Endpoint Name: This can be aSOA composite endpoint or an Oracle Managed File Transfer source. For asource, type {http://xmlns.oracle.com/fmw/mft/soap}MFTService_source-name.
• Port Name: Type MFTServicePort or the port name of a SOA composite (forexample submit_ptt).
8. Click Next. On the Create Policy Set: Enter Constraint page, click Next again.
9. On the Create Policy Set: Add Policy References page, select one or more policiesfrom the Available Policies list and click Attach. Click Next.
10. On the Create Policy Set: Summary page, click Save.
OWSM Security Policy Attachment
8-14 Using Oracle Managed File Transfer
8.7.1.3 Creating a Policy Set for a Target
You can create a policy set and attach a policy for a target. For more information, see Managing Web Service Policies with Fusion Middleware Control in Securing WebServices and Managing Policies with Oracle Web Services Manager.
The steps for this process are:
1. Log in to the Fusion Middleware Control console.
2. In the Target Navigation pane, expand the Weblogic Domain node.
3. Select the domain on which the Oracle WebLogic Server managed server dedicatedto Oracle Managed File Transfer is installed.
For example, the domain might be soainfra or base_domain.
4. Right-click on the domain and select Web Services > WSM Policy Sets.
The WSM Policy Set Summary table appears.
5. Click Create.
6. On the Create Policy Set: Enter General Information page, enter a Name, checkEnabled, and select SOAP Web Service Client from the Type of Resource drop-down list. Click Next.
7. On the Create Policy Set: Enter Resource Scope page, type the followinginformation:
• Domain Name: Type the name of the domain on which the Oracle WebLogicServer managed server dedicated to Oracle Managed File Transfer is installed.
For example, the domain might be soainfra or base_domain.
• Application Name: Type *
• Application Module Name or Connection Name: Type *
• RESTful Application, Service, or Web Service Endpoint Name: Specify a SOAcomposite endpoint name.
• Port Name: Port Name of the target SOA composite.
8. Click Next. On the Create Policy Set: Enter Constraint page, click Next again.
9. On the Create Policy Set: Add Policy References page, select one or more policiesfrom the Available Policies list and click Attach. Click Next.
10. On the Create Policy Set: Summary page, click Save.
8.7.2 Using WLST for Global Policy AttachmentUsing WLST, you can attach a policy to all web service endpoints in Oracle ManagedFile Transfer.
The steps for this process are:
1. Start WLST using the steps described in Running WLST Commands.
OWSM Security Policy Attachment
Oracle Managed File Transfer Security 8-15
2. Use the following WLST commands to create and attach a policy set:
beginRepositorySession())createPolicySet('mft', 'ws-service', 'Domain("*")')attachPolicySetPolicy('oracle/wss_username_token_service_policy')validatePolicySet()commitRepositorySession()displayPolicySet('mft')
The wss_username_token_service_policy is an example. You can attach adifferent policy.
3. Exit WLST using the steps described in Running WLST Commands.
You can also attach a policy to a specific web service endpoint, either a source ortarget.
The steps for this process are:
1. Start WLST using the steps described in Running WLST Commands.
2. Use the following WLST commands to create and attach a policy set:
beginRepositorySession())createPolicySet('mft', 'ws-service', 'Service("{http://xmlns.oracle.com/fmw/mft/soap}MFTService_SOAPSource")')attachPolicySetPolicy('oracle/wss_username_token_service_policy')validatePolicySet()commitRepositorySession()displayPolicySet('mft')
The SOAPSource is an example. You can create a policy set for a different sourceor target.
The wss_username_token_service_policy is an example. You can attach adifferent policy.
3. Exit WLST using the steps described in Running WLST Commands.
For more information about WLST commands for managing policy sets, see Policy SetManagement Commands in WLST Command Reference for Infrastructure Components.
8.7.3 Using the MFT Console for Local Policy AttachmentThe steps for this process are:
1. Create and deploy the SOAP, SOA, Service Bus, or ODI application correspondingto the MFT source or target. For a target, you must attach a policy to theapplication.
See Integrating Oracle Managed File Transfer with Other Products for moreinformation.
2. Create or open the source or target as described in Creating a Source or Creating aTarget.
3. Before clicking Save, click the arrow to the left of Policies.
The Selected Policies and Available Policies tables are displayed.
4. To search the Available Policies by name, type a full or partial name in the Searchfield and click the Search icon.
OWSM Security Policy Attachment
8-16 Using Oracle Managed File Transfer

5. Select one or more policies from the Available Policies list.
6. Click Attach.
The selected policies move to the Selected Policies list.
To detach one or more policies, select them and click Detach.
7. Click Save.
8. Add the source or target to a transfer as described in Configuring a Transfer.
9. Deploy the transfer as described in Deploying and Testing Transfers.
The attached policies are automatically registered in OWSM. To verify theregistration, see Verifying Policy Registration.
8.7.4 Using WLST for Local Policy AttachmentYou can attach a policy to a specific web service endpoint, either a source or target.
The steps for attaching a policy are:
1. Start WLST using the steps described in Running WLST Commands.
2. Use the following WLST commands to create and attach a policy set:
beginWSMSession()listWSMPolicySubjects('mft-app')selectWSMPolicySubject('/weblogic/soainfra/mft-app', '#SOAPSource', 'WSService({http://xmlns.oracle.com/fmw/mft/soap}MFTService_SOAPSource#MFTServicePort)')attachWSMPolicy('oracle/binding_authorization_denyall_policy')attachWSMPolicy('oracle/wss_username_token_service_policy')previewWSMEffectivePolicySet()commitWSMSession()
The SOAPSource is an example. You can create a policy set for a different sourceor target.
The wss_username_token_service_policy is an example. You can attach adifferent policy.
3. Exit WLST using the steps described in Running WLST Commands.
The steps for detaching a policy are:
1. Start WLST using the steps described in Running WLST Commands.
2. Use the following WLST commands to create and attach a policy set:
beginWSMSession()listWSMPolicySubjects('mft-app')selectWSMPolicySubject('/weblogic/soainfra/mft-app', '#SOAPSource', 'WSService({http://xmlns.oracle.com/fmw/mft/soap}MFTService_SOAPSource#MFTServicePort)')detachWSMPolicy('oracle/binding_authorization_denyall_policy')detachWSMPolicy('oracle/wss_username_token_service_policy')previewWSMEffectivePolicySet()commitWSMSession()
The SOAPSource is an example. You can create a policy set for a different sourceor target.
OWSM Security Policy Attachment
Oracle Managed File Transfer Security 8-17

The wss_username_token_service_policy is an example. You can attach adifferent policy.
3. Exit WLST using the steps described in Running WLST Commands.
For more information about WLST commands for managing policy sets, see Policy SetManagement Commands in WLST Command Reference for Infrastructure Components.
8.7.5 How the Policy Is Applied at RuntimeFor a source, the sending user must specify the policy and its required credentials withthe file to be transferred. Otherwise the file transfer will not succeed.
For a target, the receiving user does not need to specify the policy. This is theresponsibility of the sending user in the transfer. However, if the sending user doesnot specify the policy attached to the target and its required credentials, the filetransfer will not succeed.
Credentials that the policy requires can include a username, password, certificate, orother security information. See Managing Policy Credentials for more information.
8.7.6 Policies and Artifact Life Cycle ManagementA policy file is persisted in the MFT metadata store (MDS) and follows the exact lifecycle pattern of its parent source or target artifact, including the version.
• Create an artifact, and the policy file is created in the MDS and referenced by theartifact.
• Deploy an artifact, and the policy file is automatically registered in OWSM.
• Undeploy an artifact, and the policy file is de-registered.
• Enable an artifact, and the policy file is automatically registered in OWSM.
• Disable an artifact, and the policy file is de-registered.
• Delete an artifact, and the policy file is deleted from the MDS.
• Export an artifact, and the policy file is exported and linked to by the artifact exportfile.
• Import an artifact, and the linked policy file is also imported.
8.7.7 Verifying Policy RegistrationAfter you attach policies globally or locally, you can use WLST to verify that thesepolicies are registered in the OWSM repository as part of the effective policy set.
The steps for this process are:
1. Start WLST using the steps described in Running WLST Commands.
2. Use the following WLST commands to specify the MFT policy subject and displaythe effective policy set:
beginWSMSession()listWSMPolicySubjects('mft-app')selectWSMPolicySubject('/weblogic/soainfra/mft-app', '*', '*')displayWSMEffectivePolicySet()commitWSMSession()
OWSM Security Policy Attachment
8-18 Using Oracle Managed File Transfer

The output of the displayWSMEffectivePolicySet command should list thepolicies you attached.
3. Exit WLST using the steps described in Running WLST Commands.
For more information about the WLST commands for policy subjects, see "PolicySubject Commands" in WLST Command Reference for Infrastructure Components.
For general information about the OWSM repository, see Administering Web Services.
8.8 Configuring SSL only Domain for Oracle Managed File TransferCreate a SSL only domain in Oracle Managed File Transfer.
To configure SSL only domain:
1. Go to $DOMAIN_HOME/oracle_common/bin/ directory and run the followingcommand:
sh libovdconfig.sh -host <host> -port <port> -userName<wlsadminusername> -domainPath <AbsolutePathOfDomainHome> -createKeystore
2. Extract the certificate of AdminServer by connecting to http://host:port/console fromthe web browser and export the certificate to a file. Enter the certificate details.
The file format should be "Base 64 Encoded x.509".
Note: The above step is applicable only for integrated Weblogic LDAP(Default Authenticator). For other LDAPs, the certificate has to be exported byusing the appropriate LDAP commands.
3. Import the certificate exported in the above step to the created keystore byexecuting the following command.
keytool -importcert -keystore <DOMAIN_HOME>/config/fmwconfig/ovd/default/keystores/adapters.jks -storepass<password> -alias <alias> -file <filePath> -noprompt
The password is specified while generating the keystore and filepath is the filecontaining the exported certificate.
4. Choose any alias of your choice.
5. Perform the SSL related changes to create SSL only domain.
6. Restart the Weblogic Admin and Managed Servers.
After restarting the server, you will be able to login to MFT console and embeddedservers in SSL only domain.
After creating the domain, you need to enable the SSL domain. To enable SSL domain,see Enabling SSL only Domain.
8.8.1 Enabling SSL only Domain
After creating the SSL only domain, enable the domain by configuring SSL in differentuse cases by following the steps below:
Configuring SSL only Domain for Oracle Managed File Transfer
Oracle Managed File Transfer Security 8-19

Enabling SSL only Domain
Follow the steps below to set up Oracle MFT in an SSL only WebLogic domain.
1. Enable the SSL listening port at the time of of domain creation, in case of newdomains.
2. For existing domain, extend the domain and select the SSL listening port.
3. Start the AdminServer and disable the non-SSL listening port of the managedServer and AdminServer.
4. Start the managed server.
Invoking Webservice over SSL (HTTPS service)
Follow the steps below to invoke the SOA/SOAP targets over HTTP SSL protocol.
1. Export the SSL certificate of remote SSL webservice, for example, from Webbrowser to File.
2. Import the certificate to below stores:
a. jdk_home/jre/lib/security/cacerts
b. /wlserver/server/lib/cacerts
c. EM > Security > Keystore > System > Trust store, CA store
3. Restart the server.
Configuring remote SSL FTP server
Follow the steps below to connect from a Remote FTP(S) Source or Target to a remoteFTP Server. The remote FTP Server can be non-MFT FTP Server, or it could be MFTEmbedded FTP Server within another deployment of MFT.
1. Export the trusted certificate used for remote SSL FTP server to a file usingappropriate tools. In case of MFT FTPS remote server, do it via WLST with belowcommand:
svc.exportKeyStoreCertificate(appStripe='<stripe>',name='<store>',password='<storePassword>',alias='<certalias>',type='Certificate',filepath='<filePath>')
2. Import the trusted certificate to MFT using the below WLST command:
svc.importKeyStoreCertificate(appStripe='<Stripe>',name='<Store>',password='<StorePassword>',alias='<certAlias>',keypassword='<keyPassword>',type='TrustedCertificate',filepath='<filepath>')
Configuring SSL only Domain for Oracle Managed File Transfer
8-20 Using Oracle Managed File Transfer

9Oracle Managed File Transfer Utilities
This chapter summarizes WLST (Oracle WebLogic Scripting Tool) commands thatperform Oracle Managed File Transfer (MFT) operations.
This chapter includes the following sections:
• Running WLST Commands
• MFT WLST Command Summary
• Oracle MFT EJBs
For general information about WLST, see the WLST Command Reference for WebLogicServer.
For more detailed descriptions and examples of the MFT WLST commands, see the WLST Command Reference for SOA Suite.
9.1 Running WLST CommandsBefore you can run WLST commands, you must start WLST and connect to the OracleWebLogic Server managed server dedicated to MFT.
The steps for this process are:
1. Go to the Oracle WebLogic Server command directory for MFT:
cd ${MW_HOME}/mft/common/bin
2. Run the Oracle WebLogic Scripting Tool:
./wlst.sh
3. Connect to the Oracle WebLogic Server managed server dedicated to MFT:
connect("username","password","t3://hostname:port")
For example:
connect("weblogic","weblogic1","t3://localhost:7011")
4. Run WLST commands as needed.
Use this command to list MFT WLST commands:
help("mft")
Use this command to list short names for MFT WLST commands:
help("mft-shortcuts")
Oracle Managed File Transfer Utilities 9-1

The commands work in exactly the same way whether you use the long or shortnames.
5. Disconnect and exit.
disconnect()exit()
9.2 MFT WLST Command SummaryTable 9-1 summarizes the MFT WLST commands. It is intended as a quick referenceand not as a complete description of each command. For a complete description ofthese commands, see "Oracle Managed File Transfer Custom WLST Commands" inWLST Command Reference for SOA Suite.
Table 9-1 MFT WLST Command Summary
Command Shortcut Syntax Description
bulkDeployArtifact
buDepAFbulkDeployArtifact('TRANSFER|SOURCE|TARGET','artifact_names', 'comment')
Deploys a comma-separated list of source,transfer, or target artifactsor * for all. A comment isoptional.
createMftCredential createMftCredential(pas
sword, key)
Create the credential formftapp. Enter thepassword for whichcredential needs to becreated and the key forthe credential.
deleteArtifact
delAFdeleteArtifact('TRANSFER|SOURCE|TARGET','artifact_name')
Deletes a source, transfer,or target artifact.
deleteArtifactDeployment
delDepAFdeleteArtifactDeployment('TRANSFER|SOURCE|TARGET','artifact_name', 'label')
Deletes an undeployedsource, transfer, or targetartifact. Use ShowDeployment Details onthe Deployment tab toview the label.
deployArtifact
depAFdeployArtifact('TRANSFER|SOURCE|TARGET','artifact_name', 'comment')
Deploys a source, transfer,or target artifact. Acomment is optional.
disableArtifact
disAFdisableArtifact('TRANSFER|SOURCE|TARGET','artifact_name', 'comment')
Disables a deployed andpreviously enabledsource, transfer, or targetartifact. A comment isoptional.
MFT WLST Command Summary
9-2 Using Oracle Managed File Transfer

Table 9-1 (Cont.) MFT WLST Command Summary
Command Shortcut Syntax Description
enableArtifact
enAFenableArtifact('TRANSFER|SOURCE|TARGET','artifact_name', 'comment')
Enables a deployed andpreviously disabledsource, transfer, or targetartifact. A comment isoptional.
exportDeployedArtifact
expDepAFexportDeployedArtifact('TRANSFER|SOURCE|TARGET','artifact_name', 'label', 'archive_file_path')
Exports a deployedsource, transfer, or targetartifact to a ZIP file. UseShow DeploymentDetails on theDeployment tab to viewthe label. If you areconnecting to WLSTremotely, the ZIP file iscreated on the remoteserver.
isArtifactInMDS
isAFinMDSisArtifactInMDS('TRANSFER|SOURCE|TARGET','artifact_name')
Checks whether a source,transfer, or target artifactexists in the MDS(Metadata Store) andreturns TRUE or FALSE.
undeployArtifact
undepAFundeployArtifact('TRANSFER|SOURCE|TARGET','artifact_name', 'comment')
Undeploys a source,transfer, or target artifactwithout deleting it fromthe configuration. Acomment is optional.
exportMftMetadata
expMDexportMftMetadata('archive_file_path')
Exports the entire MFTconfiguration, excludingpasswords, to a ZIP file. Ifyou are connecting toWLST remotely, the ZIPfile is created on theremote server.
exportTransferMetadata
expXfrMDexportTransferMetadata('archive_file_path','transfer_name')
Exports a transfer artifactand related metadata to aZIP file. If you areconnecting to WLSTremotely, the ZIP file iscreated on the remoteserver.
importMetadata
impMDimportMetadata('archive_file_path')
Imports a previouslyexported MFTconfiguration from a ZIPfile.
MFT WLST Command Summary
Oracle Managed File Transfer Utilities 9-3

Table 9-1 (Cont.) MFT WLST Command Summary
Command Shortcut Syntax Description
resetMetadata
resMDresetMetadata('preserve_preferences')
Resets the MFTconfiguration, deleting allartifacts and resetting alladministrative settings totheir defaults, whilepreserving userpreferences if optionalpreserve_preferences is set to TRUE.
deleteCSFKey delKeydeleteCSFKey('SSH|PGP', 'PRIVATE|PUBLIC', 'alias')
Deletes a key alias fromthe MFT keystore.
exportCSFKey expKeyexportCSFKey('SSH|PGP', 'PRIVATE|PUBLIC', 'key_file_path')
Exports keys from theMFT keystore to a key file.
generateKeys genKeysgenerateKeys('SSH|PGP', 'password', 'key_file_path')
Generates keys and savesthem to one or more keyfiles. The key type is RSAand the key size is 1024bits. The private keypassword is optional.
For SSH, the path mustinclude the key file name.
For PGP, two files aregenerated under thespecified path: thesecret.asc file containsthe PGP private key, andthe pub.asc file containsthe PGP public key.
For additional keygeneration options thatare not supported bygenerateKeys, externalkey generationapplications like ssh-keygen or gpg arerecommended.
importCSFKey impKeyimportCSFKey('SSH|PGP', 'PRIVATE|PUBLIC', 'alias','key_file_path')
Imports a key to the MFTkeystore from a key fileand creates an alias.
MFT WLST Command Summary
9-4 Using Oracle Managed File Transfer

Table 9-1 (Cont.) MFT WLST Command Summary
Command Shortcut Syntax Description
listCSFKeyAliases
lsKeyAliaseslistCSFKeyAliases('SSH|PGP', 'PRIVATE|PUBLIC','alias')
Lists key aliases in theMFT keystore.
updateCSFKey updKeyupdateCSFKey('SSH|PGP', 'PRIVATE|PUBLIC', 'alias','key_file_path')
Deletes a key alias fromthe MFT keystore andgenerates a new key file.
getSourceDeploymentHistory
getSrcDHgetSourceDeploymentHistory('source_name')
Returns the deploymenthistory of a source artifact.
getTargetDeploymentHistory
getTrgtDHgetTargetDeploymentHistory('target_name')
Returns the deploymenthistory of a target artifact.
getTransferDeploymentHistory
getXfrDHgetTransferDeploymentHistory('transfer_name')
Returns the deploymenthistory of a transferartifact.
getTransferInfo
getXfrInfogetTransferInfo('transfer_name', 'label')
Returns information abouta transfer artifact. UseShow DeploymentDetails on theDeployment tab to viewthe label.
pauseTransfer
pauseXfrpauseTransfer('instance_id', 'comment')
Pauses an in-progresstransfer. Open theAdvanced section of thetarget report to view theinstance ID. Forinformation about thetarget report, see Interpreting Source_Transfer_ and TargetReports. A comment isoptional.
MFT WLST Command Summary
Oracle Managed File Transfer Utilities 9-5

Table 9-1 (Cont.) MFT WLST Command Summary
Command Shortcut Syntax Description
resubmit resubresubmit('resubmit_type', 'instance_ids','comment')
Resubmits a transfer. Theresubmit_type type isSOURCE,TRANSFER_INSTANCE,TARGET, orTARGET_INSTANCE.Openthe Advanced section ofthe target report to viewthe instance ID. Forinformation about thetarget report, see Interpreting Source_Transfer_ and TargetReports. A comment isoptional.
resumeTransfer
resXferresumeTransfer('instance_id', 'comment')
Resumes a pausedtransfer. Open theAdvanced section of thetarget report to view theinstance ID. Forinformation about thetarget report, see Interpreting Source_Transfer_ and TargetReports. A comment isoptional.
configureHomeDir
confHmDirconfigureHomeDir('directory_path', 'user_name')
Assigns the specifieddirectory to the user ashome directory where thatuser is located on login toembedded servers.
grantPermissionToDirectory
grPermDirgrantPermissionToDirectory('directory_path','principal_name', 'principal_type','permissions', 'server_type', 'include_subfolder')
Grants permission to anembedded serverdirectory. Users andgroups can be assigned aset of permissions to anexisting directory on anembedded server.
listAllPermissions
lsPermsgrantPermissionToDirectory('directory_path','server_type')
Lists all permissionsavailable for a givenprincipal and server type.The server type can beFTP or sFTP.
MFT WLST Command Summary
9-6 Using Oracle Managed File Transfer

Table 9-1 (Cont.) MFT WLST Command Summary
Command Shortcut Syntax Description
revokePermissionForDirectory
revPermDirrevokePermissionForDirectory('directory_path','principal_name', 'principal_type', 'permissions','server_type', 'include_subfolder')
Revokes a set ofpermissions from anembedded serverdirectory.
startEmbeddedServer
startESstartEmbeddedServer('FTP|FTPS|SFTP')
Starts an embedded FTP,FTPS (FTP over SSL), orsFTP (SSH-FTP) serverthat was stopped.
stopEmbeddedServer
stopESstopEmbeddedServer('FTP|FTPS|SFTP')
Stops an embedded FTP,FTPS (FTP over SSL), orsFTP (SSH-FTP) serverthat is running.
updatePorts updPortsupdatePorts('server_instance_name','FTP|FTPS|SFTP', 'port')
Updates the port for anembedded FTP, FTPS(FTP over SSL), or sFTP(SSH-FTP) server, whichis a service of an OracleWebLogic Servermanaged server dedicatedto MFT.
createCallouts
crtCallscreateCallouts('def_file_path')
Creates callouts based onan XML file that definesthem.
deleteCallout
delCallsdeleteCallout('callout_name')
Deletes a callout.
listCallouts lsCallslistCallouts()
Lists callouts.
updateCallouts
updCallsupdateCallouts('def_file_path')
Updates callouts with thesame names based on anXML file that definesthem.
MFT WLST Command Summary
Oracle Managed File Transfer Utilities 9-7

Table 9-1 (Cont.) MFT WLST Command Summary
Command Shortcut Syntax Description
addContactToNotification
addContNoteaddContactToNotification('event','Email|PHONE|FAX|SMS', 'value')
Adds a contact to aspecific event notification.The value is an emailaddress or phone number.
The event isRUNTIME_ERROR_EVENT,DELETE_ARTIFACT_EVENT,DEPLOY_ARTIFACT_EVENT,EXPORT_IMPORT_EVENT,PURGE_EVENT, orARCHIVE_RESTORE_EVENT.
createContact
crtContcreateContact('Email|PHONE|FAX|SMS', 'value')
Creates a contact for eventnotifications. The valueis an email address orphone number.
deleteContact
delContdeleteContact('Email|PHONE|FAX|SMS', 'value')
Deletes a contact. Thevalue is an email addressor phone number.
listContacts lsContslistContacts('Email|PHONE|FAX|SMS')
Lists contacts.
removeContactFromNotification
remContNoteremoveContactFromNotification('event','Email|PHONE|FAX|SMS', 'value')
Removes a contact from aspecific event notification.The value is an emailaddress or phone number.
The event isRUNTIME_ERROR_EVENT,DELETE_ARTIFACT_EVENT,DEPLOY_ARTIFACT_EVENT,EXPORT_IMPORT_EVENT,PURGE_EVENT, orARCHIVE_RESTORE_EVENT.
MFT WLST Command Summary
9-8 Using Oracle Managed File Transfer

Table 9-1 (Cont.) MFT WLST Command Summary
Command Shortcut Syntax Description
updateEvent updEvtupdateEvent('event', 'enabled')
Enables or disables aspecific event notification.Set enabled to TRUE orFALSE.
The event isRUNTIME_ERROR_EVENT,DELETE_ARTIFACT_EVENT,DEPLOY_ARTIFACT_EVENT,EXPORT_IMPORT_EVENT,PURGE_EVENT, orARCHIVE_RESTORE_EVENT.
archiveInstanceData
arcDataarchiveInstanceData(archiveFileName='filename',startDate='date', endDate='date',batchId='batchId', status='C|F|A|*',testMode='TRUE|FALSE', comments='text',runInSync='FALSE|TRUE',fsArchiveFolderPath='path')
Archives runtimeinstances to a .dmp file.The archiveFileNameis required. Dates are indd-MM-yyyy H:m:s:Sformat. The batchId isan identifier in the outputof a previousarchiveInstanceDatacommand. The status iscompleted (default),failed, active, or all. Toarchive runtime instances,set testMode=FALSE. SetrunInSync=TRUE to runimmediately and blockexecution of other WLSTcommands. ThefsArchiveFolderPathis required if archiving thecorresponding payloads.
restoreInstanceData
resDatarestoreInstanceData(archiveFilePath='path',fileNamePrefix='prefix', fsFolderPath='path',runInSync='FALSE|TRUE')
Restores previouslyarchived runtimeinstances. ThearchiveFilePath isrequired.ThefileNamePrefix(usually batchId) andfsFolderPath arerequired if restoring thecorresponding payloads.Set runInSync=TRUE torun immediately andblock execution of otherWLST commands.
MFT WLST Command Summary
Oracle Managed File Transfer Utilities 9-9

Table 9-1 (Cont.) MFT WLST Command Summary
Command Shortcut Syntax Description
archivePayloads
arcPLsarchivePayloads(batchId='batchId',archivePath='path', runInSync='FALSE|TRUE')
Archives payloadscorresponding to runtimeinstances tobatchId_n.zip files.The batchId is anidentifier in the output ofa previousarchiveInstanceDatacommand and is required.The archivePath to thepayload archive directoryis also required. SetrunInSync=TRUE to runimmediately and blockexecution of other WLSTcommands.
restorePayloadsByName
resPLbyNrestorePayloadsByName(fileNames='filename',folderPath='path', runInSync='FALSE|TRUE')
Restores previouslyarchived payloads by filename. The fileNamesargument (usuallybatchId) is required. ThefolderPath to thepayload archive directoryis also required. SetrunInSync=TRUE to runimmediately and blockexecution of other WLSTcommands.
restorePayloadsByPrefix
resPLbyPrestorePayloadsByPrefix(fileNamePrefix='prefix',folderPath='path', runInSync='FALSE|TRUE')
Restores previouslyarchived payloads by filename prefix. ThefileNamePrefixargument (usuallybatchId) is required. ThefolderPath to thepayload archive directoryis also required. SetrunInSync=TRUE to runimmediately and blockexecution of other WLSTcommands.
MFT WLST Command Summary
9-10 Using Oracle Managed File Transfer
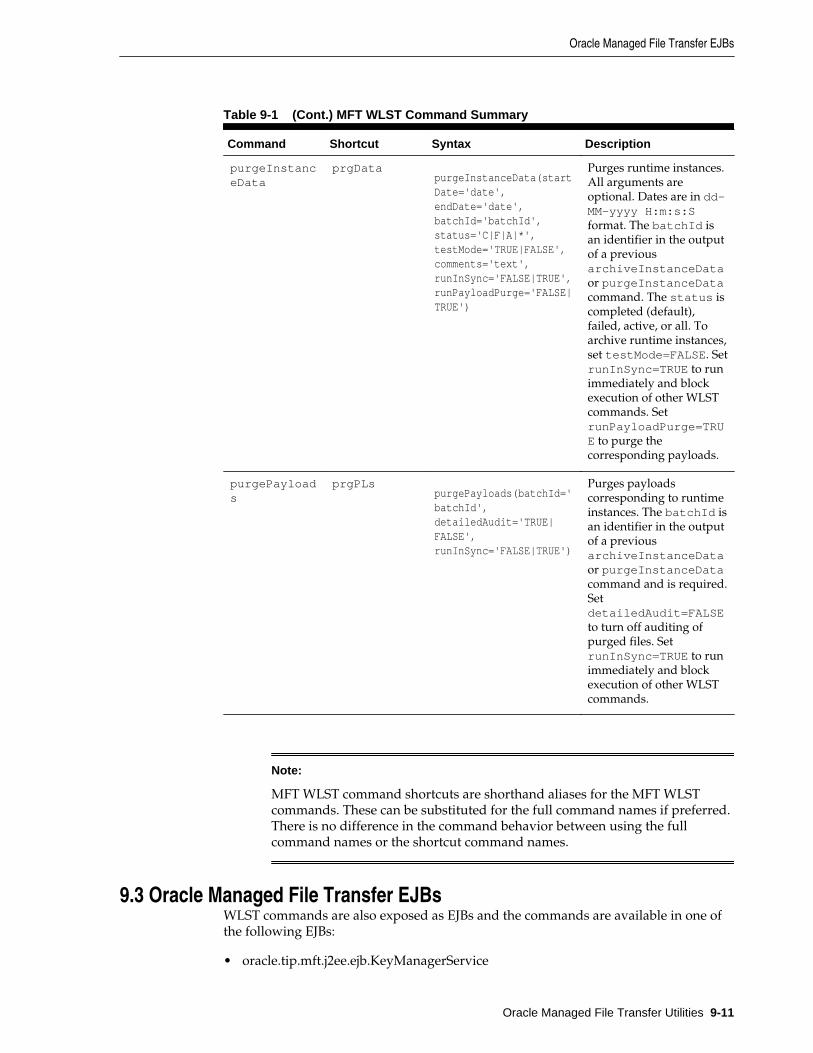
Table 9-1 (Cont.) MFT WLST Command Summary
Command Shortcut Syntax Description
purgeInstanceData
prgDatapurgeInstanceData(startDate='date',endDate='date', batchId='batchId',status='C|F|A|*', testMode='TRUE|FALSE',comments='text', runInSync='FALSE|TRUE',runPayloadPurge='FALSE|TRUE')
Purges runtime instances.All arguments areoptional. Dates are in dd-MM-yyyy H:m:s:Sformat. The batchId isan identifier in the outputof a previousarchiveInstanceDataor purgeInstanceDatacommand. The status iscompleted (default),failed, active, or all. Toarchive runtime instances,set testMode=FALSE. SetrunInSync=TRUE to runimmediately and blockexecution of other WLSTcommands. SetrunPayloadPurge=TRUE to purge thecorresponding payloads.
purgePayloads
prgPLspurgePayloads(batchId='batchId',detailedAudit='TRUE|FALSE',runInSync='FALSE|TRUE')
Purges payloadscorresponding to runtimeinstances. The batchId isan identifier in the outputof a previousarchiveInstanceDataor purgeInstanceDatacommand and is required.SetdetailedAudit=FALSEto turn off auditing ofpurged files. SetrunInSync=TRUE to runimmediately and blockexecution of other WLSTcommands.
Note:
MFT WLST command shortcuts are shorthand aliases for the MFT WLSTcommands. These can be substituted for the full command names if preferred.There is no difference in the command behavior between using the fullcommand names or the shortcut command names.
9.3 Oracle Managed File Transfer EJBsWLST commands are also exposed as EJBs and the commands are available in one ofthe following EJBs:
• oracle.tip.mft.j2ee.ejb.KeyManagerService
Oracle Managed File Transfer EJBs
Oracle Managed File Transfer Utilities 9-11

• oracle.tip.mft.j2ee.ejb.MDSService
• oracle.tip.mft.j2ee.ejb.RuntimeService
Oracle Managed File Transfer EJBs
9-12 Using Oracle Managed File Transfer
Recommended