1
DANGER If you smell gas: 1. Shut off gas to the appliance. 2. Extinguish any open flame. 3. Remove Saf-T-Cooker Stockpot
from Cooking Stand. 4. If odor continues, keep away from
the appliance, immediately call your gas supplier or your fire department.
Failure to follow these instructions could result in fire or explosion which could cause property damage, personal injury or death.
WARNING
HAZARDOUS FIRE OR EXPLOSION MAY RESULT IF INSTRUCTIONS ARE IGNORED. It is the consumer's responsibility to see that the Turkey cooker is properly assembled, installed and taken care of. Failure to follow instructions in this manual could result in bodily injury and /or property damage. THIS TURKEY COOKER IS ONLY SUITABLE FOR USE WITH DISPOSABLE PROPANE CYLINDER.
DANGER 1. Never operate this appliance unattended. 2. Never operate this appliance within 10ft (3m) of any
structure, combustible material or other gas cylinder. 3. Never operate this appliance within 25ft (7.5m) of any
flammable liquid. 4. Do not fill cooking vessel beyond maximum fill line. 5. Never allow oil or grease of get hotter than 400OF or
200oC. If the temperature exceed 400OF (200oC), or if oil begins to smoke, immediately turn the burner or gas supply OFF.
6. Heated liquids remain at scalding temperatures long after the cooking process. Never tough cooking appliance until liquids have cooled to 115oF(45oC) or less.
7. If a fire should occur, keep away from the appliance and immediately call your fire department. Do not attempt to extinguish an oil or grease fire with water.
Failure to follow this instruction could result in fire, explosion or burn hazard, which could cause property damage, personal injury or death.
CONTACT 1-866-NAO-GRILL (1-866-626-4745) FOR ASSISTANCE. DO NOT RETURN TO PLACE OF PURCHASE
Model BB12482G / TR-F-04-B-NCT-1 (Electric ignition system) Saf-T-Cooker
ASSEMBLY AND OPERATING INSTRUCTIONS
Read and follow instructions carefully before assembly or use. - Failure to follow these instructions could result in death, serious bodily
injury and / or property loss. - For household outdoor use only. Not for commercial use. - These instructions must be left with consumer and retained for future use.
2
This instruction manual contains important information necessary for the proper assembly and safe use of this applicance. Read and follow all warnings and instructions before assembling and using the applicance. Following all warnings and instructions when using the appliances. Keep this manual for future reference. 1. The installation must conform with local codes or in the absence of local codes, with the National
Fuel Gas Codes, ANSI Z223.1/NFPA 54,Storage and Handling of Liquefied Petroleum Gases, ANSI/NFPA 58; or Natural Gas and Propane Installation Code, CSA B149.1; Propane Storage and Handling, CSA B149.2.
2. This is an ATTENDED appliance. DO NOT leave this appliance unattended while heating oil, grease or water, cooking food or when hot after use [oil, grease or water above 100°F (38°C). Heated liquid can remain at scalding temperatures long after cooking has ended.
3. Keep children and pets away from the appliance at all times. 4. To prevent accidental fires, before using the appliance, ensure that the fuel supply hose is not
damaged and all joints and connections and regulator are not leaking by leaving the appliance valve closed, turn on the LP tank valve and apply a soapy solution to the joints and connections. If a continuous hissing sound is heard or if the soapy solution bubbles, there is a leak. Turn the LP tank valve off. DO NOT use the appliance if there is leak. Contact 1-866-626-4745 on how to obtain and replace the parts.
5. The use of alcohol, prescription or non-prescription drugs may impair your ability to properly assemble or safely operate this appliance.
6. This appliance is for OUTDOOR use only. DO NOT operate in a building, apartment, condominium balcony, deck, garage or any other enclosed area. DO NOT install, or operate in or on a recreational vehicle or boat.
7. This appliance is not intended for and should never be used as a heater. 8. DO NOT operate this appliance under ANY overhead construction, roof covering (car port), awning
or overhang. Keep a minimum clearance of 10 feet (3.05m) from all sides, front and back of the appliance to ANY structure or combustible material.
9. ALWAYS wear protective wear, shoes, apron, and safety glasses that will prevent burn hazards while attending to the appliance.
10. When cooking,the appliance must be one level stable , non-combustible surface in an area clear of combustible material , an asplate surface ( blacktop) may not be acceptable for this pupose.
11. Keep the fuel supply hose away from any heated or hot surfaces including burner body, burner element, legs, heat/wind shield, cooking vessel, and cooking liquid.
12. When cooking with oil or grease, the thermometer provided MUST be used. Follow instructions in this manual for proper installation and use of thermometer. If the thermometer supplied with this appliance been lost or damaged the replacement must be the one specified in this manual, contact 1-866-626-4745 on how to obtain a replacement.
13. The thermometer must be checked before each use by inserting it into a pot of boiling water and ensuring that it registers approximately 212±20℉(100±10℃). If it does not function properly, obtain a replacement thermometer specified by the manufacturer before using the appliance.
14. If the temperature exceeds 400℉(200℃) or if oil begins to smoke, immediately turn the burner or gas supply OFF and wait for the temperature to decrease to less than 350℉(175℃) before relighting burner according to the instructions in this manual. If there is a lid ( or hood) , do not remove the lid.
15. When cooking with oil or grease, fire-extinguishing materials like a Type ABC or BC Dry Chemical fire extinguisher a type BC or ABC fire extinguisher may in some circumstances contain the fire. shall be readily accessible. In the event of an oil or grease fire DO NOT attempt to extinguish with water. Immediately call the Fire Department or dial 911.
16. Food contaminated with chemical residue from a fire extinguisher should not be consumed. 17. Use only those accessories, such as cooking vessels and accessory attachments manufactured and
recommended for use with this appliance, to allow for safe and proper performance of this appliance. DO NOT use glass, ceramic or plastic cooking vessels on the burner.
18. DO NOT place an empty cooking vessel on the appliance while in operation. Use caution when placing anything in the cooking vessel while the appliance is in operation.
SAFETY PRECAUTIONS & WARNINGS
3
19. NEVER overfill the cooking pot with oil, grease or water. Follow instructions in this manual for establishing proper oil, grease or water levels.
20. Never use a cooking vessel larger than the capacity and diameter recommended by the manufacturer.
21. Introduction of water or ice from any source into the cooking oil/grease many cause overflow and sever burns from hot oil and water splatter. When frying with oil/grease, all food products MUST be completely thawed and towel dried to remove excess water before being immersed in the hot oil /grease.
22. Avoid bumping of or impacting with the appliance to prevent spillage or splashing of hot cooking liquid.
23. Do NOT drop food or accessories into the hot cooking liquid. Lower food and accessories slowly in the cooking liquid in order to prevent splashing and overflow.
24. To avoid accidental burns from burner flame or hot oil, turn OFF the burner before removing food from the appliance.
25. When removing food from the appliance, care shall be taken to avoid burns from hot cooking liquids. 26. The appliance will be hot during and after use. Using insulated oven mitts or gloves for protection from
hot surfaces or splatter from cooking liquids. 27. In the event of rain, snow, hail, sleet or other form of precipitation while cooking with oil or grease,
cover the cooking vessel immediately and turn off burner and gas supply. DO NOT attempt to move the appliance or the cooking vessel.
28. DO NOT move the appliance when in use or the oil is hot. Allow the cooking vessel to cool to 115℉(45℃) before moving or storing.
29. After using this appliance, always turn the LP tank control valve OFF first and then turn the regulator valve OFF second. If the appliance is not in use, the gas must be turned off at the LP tank.
30. Extinguish all open flames before connecting the gas supply to the Cooker and before checking for leaks. 31. DO NOT smoke while connecting the LP tank to the appliance and while checking for leaks. 32. DO NOT use this product for anything other than its intended purposes. This appliance is not
intended for commercial use. 33. DO NOT modify or alter this burner or its components. Modifications or alterations of this burner or its
components will void warranty and may cause serious personal injury, property damage, or death. 34. Perform the soapy water leak test every time you use this appliance. Do not light the burner until after
you have checked the hose, regulator, needle valve, and all LP gas connections for leaks. Check for leaks by spreading a thin layer of soapy water on each connection, regulator, needle valve, and the entire length of the hose. Leaks can be detected by bubbles that form in the soap film. Never operate this appliance when there are gas leaks.
35. Always clean and inspect the hose before each use of the appliance. If there is evidence of abrasion, wear, cuts or leaks, the hose must be replaced with the same hose shown in this manual. Do NOT use the appliance. Call 1-866-626-4745 for repalcement.
36. If you smell gas, shut off the propane tank and leave the area immediately. Propane is heavier than air and will accumulate in low places. Only return to the area after it has time to ventilate. If you still smell gas, call your local fire department for assistance.
37. DO NOTattach a LP tank, move, or alter fittings when the cooker or cooking liquid is hot. 38. DO NOT loosen or disconnect any gas fitting while the cooker is in use. 39. Always disconnect the appliance from the LP tank when not in use. 40. DO NOT use the lid while heating the oil or while deep-frying. 41. This appliance has an open flame so DO NOT lean over the burner and keep your hands, hair, face,
and clothing away from the burner at all times because they could catch on fire when lighting the burner or while the burner is in operation. In sunlight or other bright light, the flame may be almost invisible.
42. DO NOT conduct activities around this appliance during and after use until the burner, pot, and cooking liquid has cooled to room temperature. The burner, pot, and cooking liquid are extremely hot during use and remain extremely hot for a period of time following its use.
43. Use caution when removing food or a basket from the pot to avoid pulling the pot off of the burner. 44. If there is wind, locate the burner in an outdoor area that is protected from the wind. Always locate
the LP tank up wind from the burner.
4
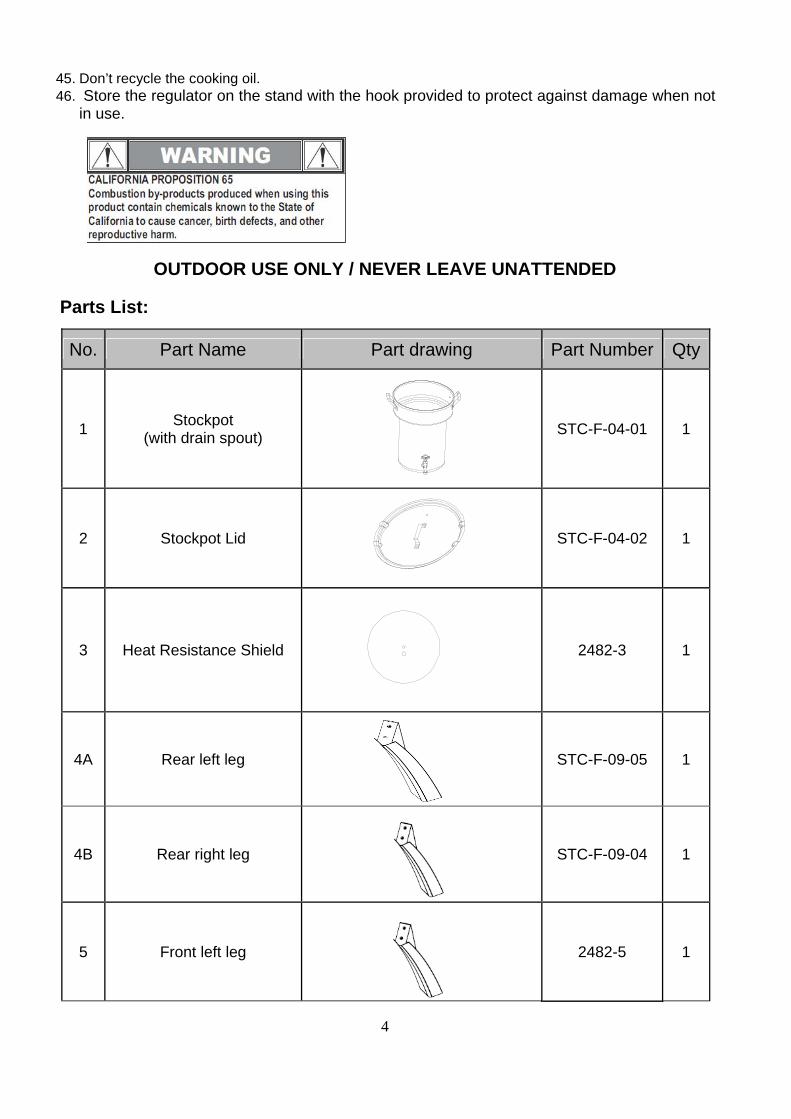
45. Don’t recycle the cooking oil. 46. Store the regulator on the stand with the hook provided to protect against damage when not
in use.
OUTDOOR USE ONLY / NEVER LEAVE UNATTENDED
Parts List:
No. Part Name Part drawing Part Number Qty
1 Stockpot (with drain spout)
STC-F-04-01 1
2 Stockpot Lid
STC-F-04-02 1
3 Heat Resistance Shield
2482-3 1
4A Rear left leg
STC-F-09-05 1
4B Rear right leg
STC-F-09-04 1
5 Front left leg
2482-5 1
5
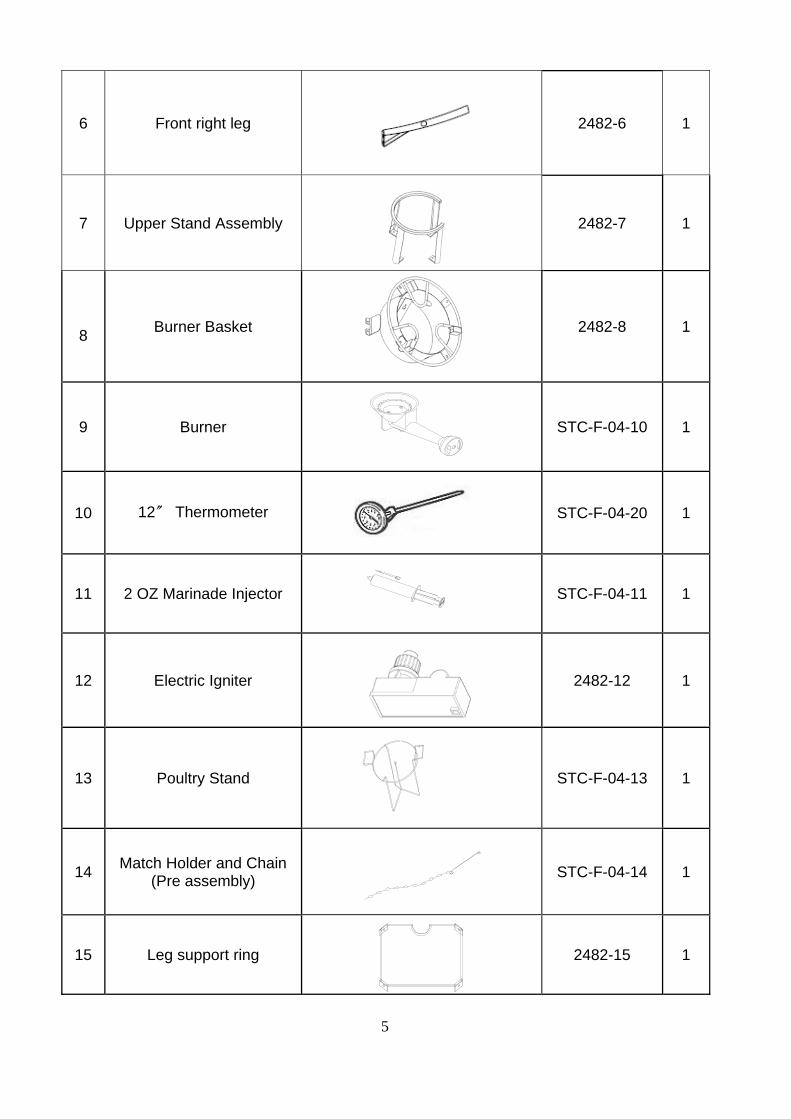
6 Front right leg
2482-6 1
7 Upper Stand Assembly
2482-7 1
8 Burner Basket
2482-8 1
9 Burner
STC-F-04-10 1
10 12〞 Thermometer
STC-F-04-20 1
11 2 OZ Marinade Injector
STC-F-04-11 1
12 Electric Igniter
2482-12 1
13 Poultry Stand
STC-F-04-13 1
14 Match Holder and Chain (Pre assembly)
STC-F-04-14 1
15 Leg support ring
2482-15 1
6
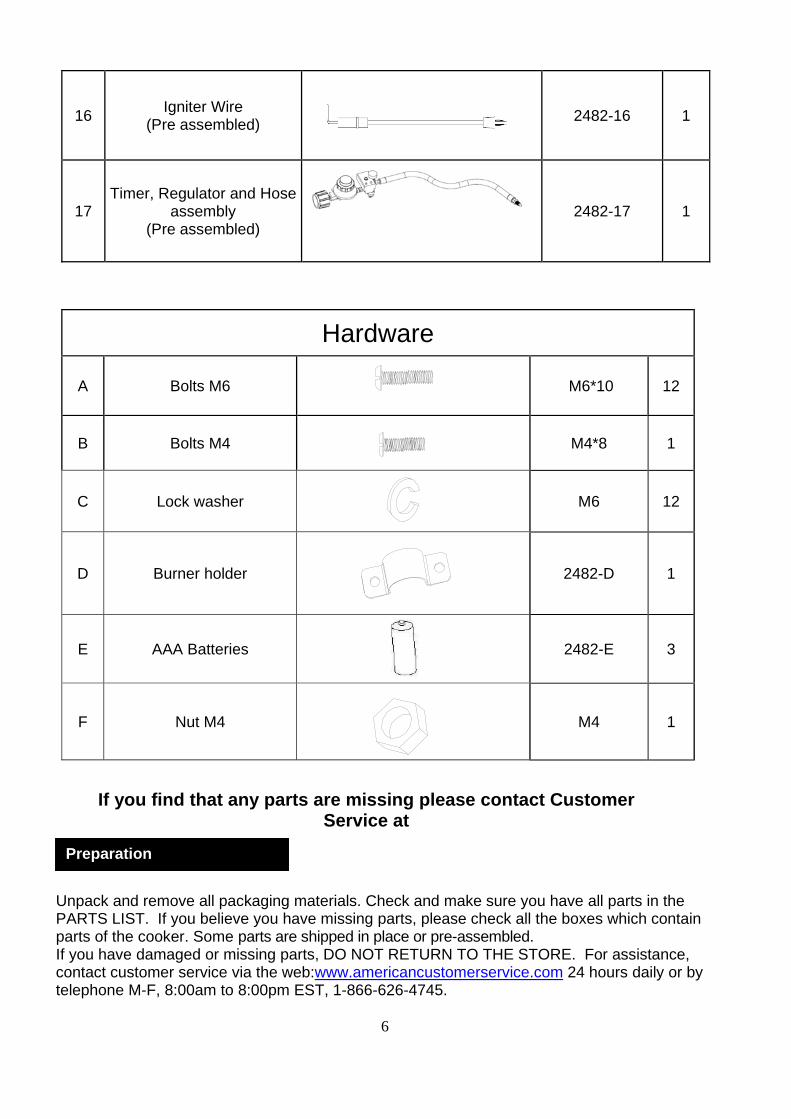
16 Igniter Wire (Pre assembled)
2482-16 1
17 Timer, Regulator and Hose
assembly (Pre assembled)
2482-17 1
Hardware
A Bolts M6
M6*10 12
B Bolts M4
M4*8 1
C Lock washer
M6 12
D Burner holder
2482-D 1
E AAA Batteries
2482-E 3
F Nut M4
M4 1
Unpack and remove all packaging materials. Check and make sure you have all parts in the PARTS LIST. If you believe you have missing parts, please check all the boxes which contain parts of the cooker. Some parts are shipped in place or pre-assembled. If you have damaged or missing parts, DO NOT RETURN TO THE STORE. For assistance, contact customer service via the web:www.americancustomerservice.com 24 hours daily or by telephone M-F, 8:00am to 8:00pm EST, 1-866-626-4745.
If you find that any parts are missing please contact Customer Service at
Preparation

7
Tools required: Philips #2 Screwdriver (not supplied)
Step 1 - Find and identify the Front and Rear legs (Parts 4a, 4b, 5, & 6). Note: The right front leg has a hole in it for the electric igniter. - Attach to the Leg support ring (15), as shown in Figure A, with 4 pcs Lock Washer (C) and 4 pcs Bolt (A).
Note: The 2 front legs have steel sheet tabs, one on the left leg and one on the right leg and both tabs should face front and inwards. The side of the Leg Support Ring with the U shape (burner support rest), should face the front.
Cooking Stand Assembly
Figure A
8
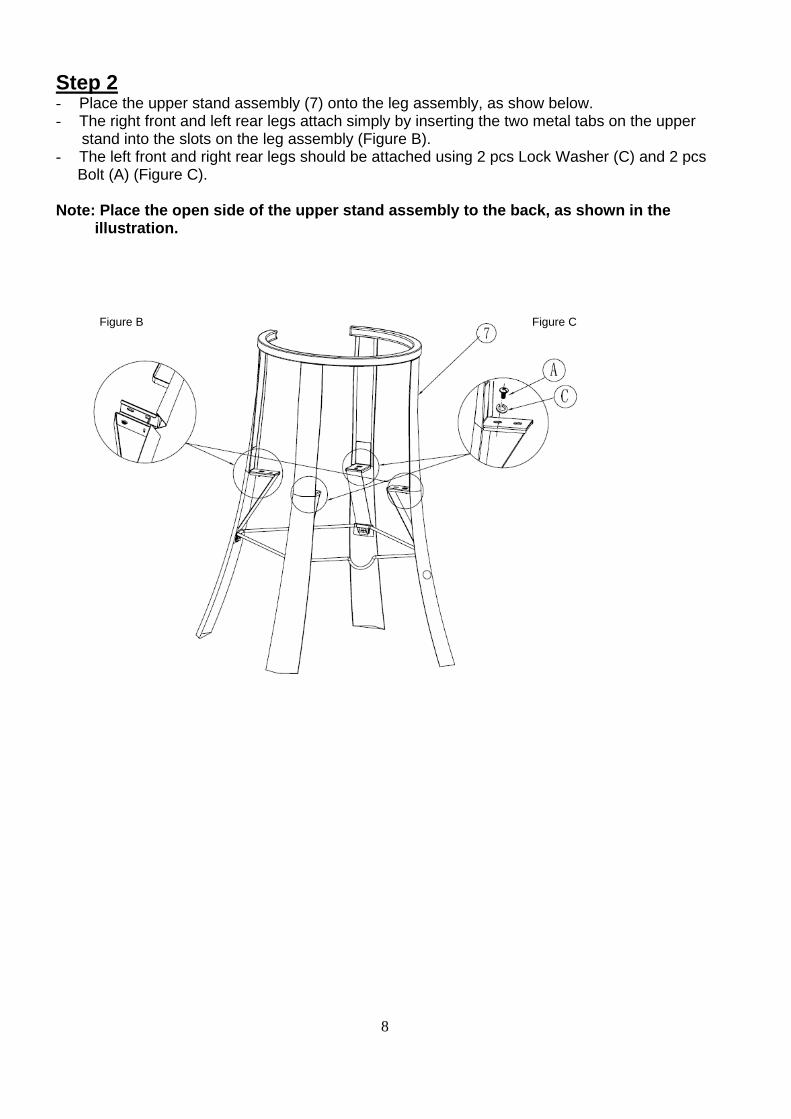
Step 2 - Place the upper stand assembly (7) onto the leg assembly, as show below. - The right front and left rear legs attach simply by inserting the two metal tabs on the upper stand into the slots on the leg assembly (Figure B). - The left front and right rear legs should be attached using 2 pcs Lock Washer (C) and 2 pcs Bolt (A) (Figure C). Note: Place the open side of the upper stand assembly to the back, as shown in the illustration.
Figure B Figure C
9
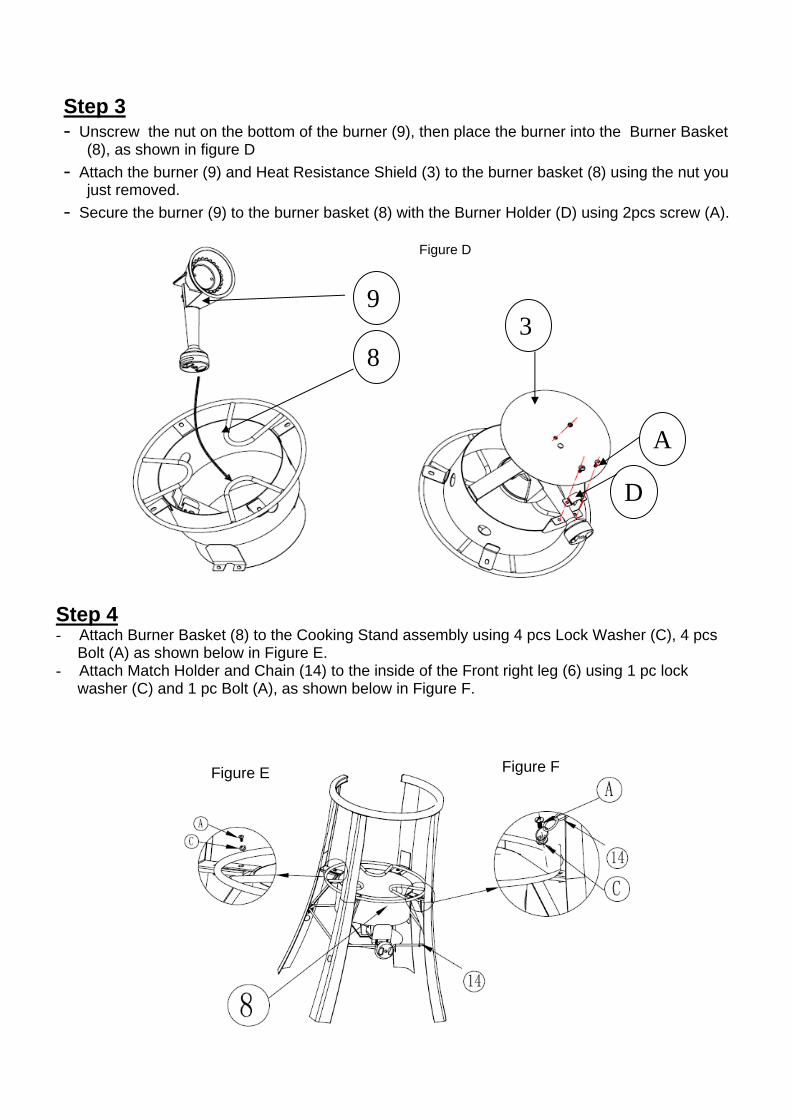
Step 3 - Unscrew the nut on the bottom of the burner (9), then place the burner into the Burner Basket
(8), as shown in figure D - Attach the burner (9) and Heat Resistance Shield (3) to the burner basket (8) using the nut you
just removed. - Secure the burner (9) to the burner basket (8) with the Burner Holder (D) using 2pcs screw (A).
Step 4 - Attach Burner Basket (8) to the Cooking Stand assembly using 4 pcs Lock Washer (C), 4 pcs Bolt (A) as shown below in Figure E. - Attach Match Holder and Chain (14) to the inside of the Front right leg (6) using 1 pc lock washer (C) and 1 pc Bolt (A), as shown below in Figure F.
9
8 3
A
D
Figure C
Figure D
Figure E Figure F
10
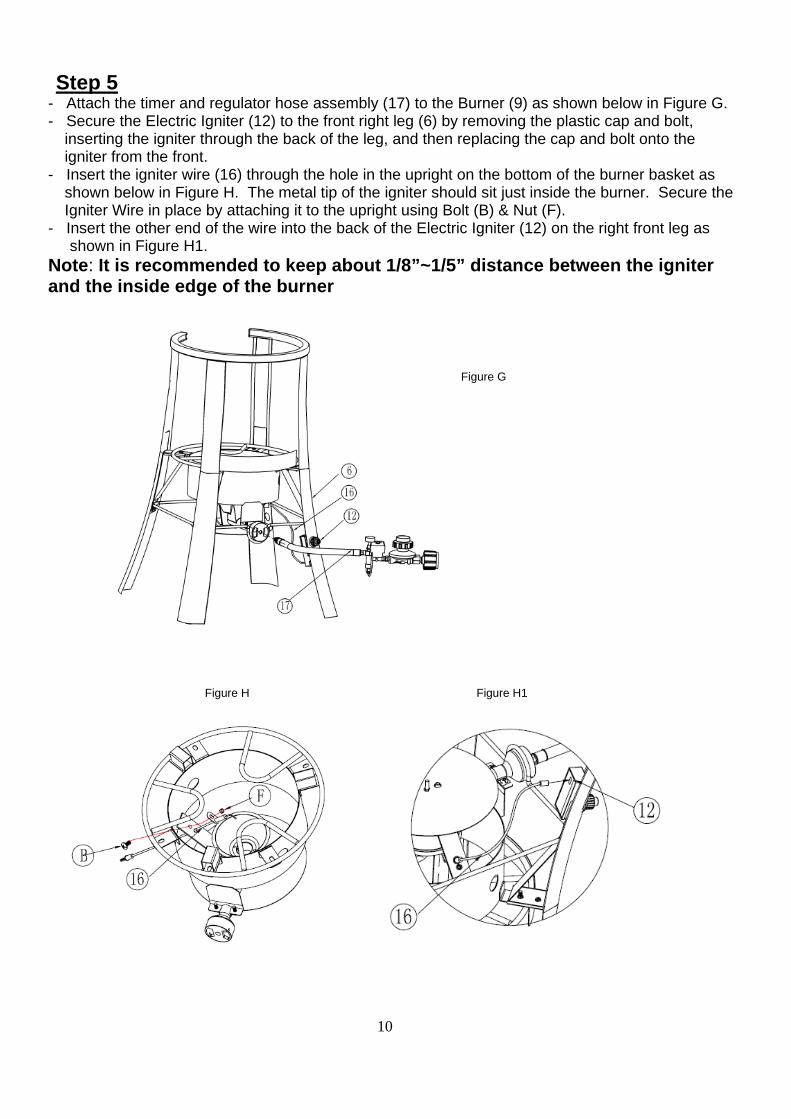
Step 5 - Attach the timer and regulator hose assembly (17) to the Burner (9) as shown below in Figure G. - Secure the Electric Igniter (12) to the front right leg (6) by removing the plastic cap and bolt,
inserting the igniter through the back of the leg, and then replacing the cap and bolt onto the igniter from the front.
- Insert the igniter wire (16) through the hole in the upright on the bottom of the burner basket as shown below in Figure H. The metal tip of the igniter should sit just inside the burner. Secure the Igniter Wire in place by attaching it to the upright using Bolt (B) & Nut (F).
- Insert the other end of the wire into the back of the Electric Igniter (12) on the right front leg as shown in Figure H1. Note: It is recommended to keep about 1/8”~1/5” distance between the igniter and the inside edge of the burner
Figure G
Figure H Figure H1
11
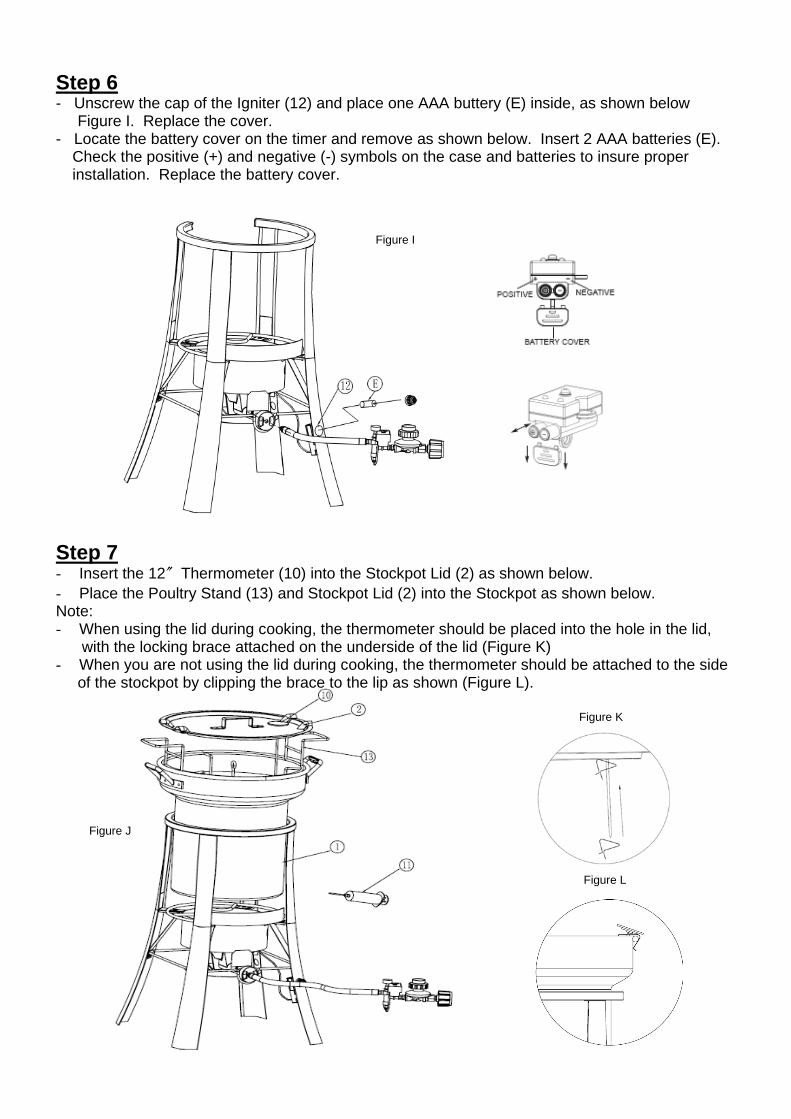
Step 6 - Unscrew the cap of the Igniter (12) and place one AAA buttery (E) inside, as shown below Figure I. Replace the cover. - Locate the battery cover on the timer and remove as shown below. Insert 2 AAA batteries (E).
Check the positive (+) and negative (-) symbols on the case and batteries to insure proper installation. Replace the battery cover.
Step 7 - Insert the 12〞Thermometer (10) into the Stockpot Lid (2) as shown below. - Place the Poultry Stand (13) and Stockpot Lid (2) into the Stockpot as shown below. Note: - When using the lid during cooking, the thermometer should be placed into the hole in the lid, with the locking brace attached on the underside of the lid (Figure K) - When you are not using the lid during cooking, the thermometer should be attached to the side of the stockpot by clipping the brace to the lip as shown (Figure L).
Figure L
Figure J
Figure K
Figure I
12
Instructions For Using Your Saf-T-Cooker:
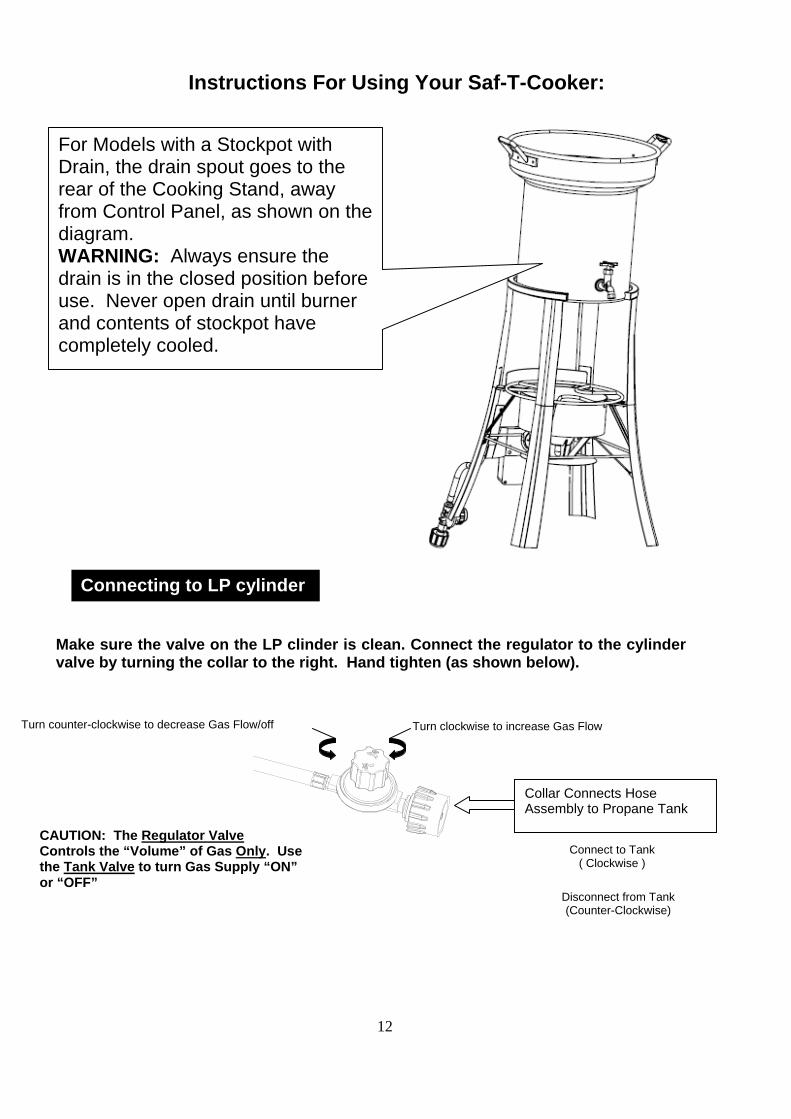
Make sure the valve on the LP clinder is clean. Connect the regulator to the cylinder valve by turning the collar to the right. Hand tighten (as shown below).
Collar Connects Hose Assembly to Propane Tank
Connect to Tank ( Clockwise )
Disconnect from Tank (Counter-Clockwise)
CAUTION: The Regulator Valve Controls the “Volume” of Gas Only. Use the Tank Valve to turn Gas Supply “ON” or “OFF”
Turn counter-clockwise to decrease Gas Flow/off
Connecting to LP cylinder
Turn clockwise to increase Gas Flow
For Models with a Stockpot with Drain, the drain spout goes to the rear of the Cooking Stand, away from Control Panel, as shown on the diagram. WARNING: Always ensure the drain is in the closed position before use. Never open drain until burner and contents of stockpot have completely cooled.
13
1. It is recommend to used a 20lbs LP-gas cylinder. 2. The LP-gas supply cylinder to be used must be constructed and marked in accordance with the
specification for LP-gas cylinders of the U.S. Department of Transportation (DOT) or the Standard for Cylinders, Spheres and Tubes for the Transportation of Drangerour Goods CAN/CSA-B339
3. The gas must be turned off if the supply cylinder is not in use. 4. The pressure regulator and hose assembly supplied with the appliance must be used.
Replacement pressure regulators and hose assemblies must be those specified by the appliance manufacturer.
5. The cylinder supply system must be arranged for vapor withdrawal. 6. It must include a collar to protect the cylinder valve. 7. Do not store a spare LP-gas cylinder under or near this appliance and never fill the cylinder beyond
80 percent full, otherwise, a fire causing death or serious injury may occur. 8. Place dust cap on cylinder valve outlet whenever the cylinder is not in use. Only install the type of
dust cap on the cylinder valve outlet that is provided with the cylinder valve. Other types of caps or plugs may result in leakage of propane.
( After assembly is complete, check for gas leaks before lighting.) FOR YOUR SAFETY
• A leak test must be repeated each time the LP tank is connected or reconnected. • Do not smoke during leak test. • Do not use an open flame to check for gas leaks. • The cooker must be leak tested outdoors in a well-ventilated area, away from ignition sources such as gas
fire or electrical appliances. During the leak test, keep the cooker away from open flames or sparks. TO TEST FOR A LEAK
1. Close the regulator valve. This shuts off the flow of gas from the regulator to the burner. 2. Be sure regulator is tightly connected to LP tank. 3. Open LP cylinder valve by 1/4 turn. This allows gas through the regulator. If you hear a rushing sound, turn
the gas off immediately. There is a major leak at the connection. Correct before proceeding. 4. Splash on a soapy liquid (ex. dishwashing liquid and water) on the connections around the regulator and POL-
cylinder connection.(figure# M) If “growing” bubbles appear, there is a leak. Close LP tank valve immediately. Retighten connections and repeat the leak test procedures. DO NOT use the cooker if any leak can not be stopped. Call 1-866-626-4745 for replacement of hoses.
5. Always close the LP tank valve after performing a leak test by turning the hand wheel clockwise.
LEAK TESTING
(Figure M)
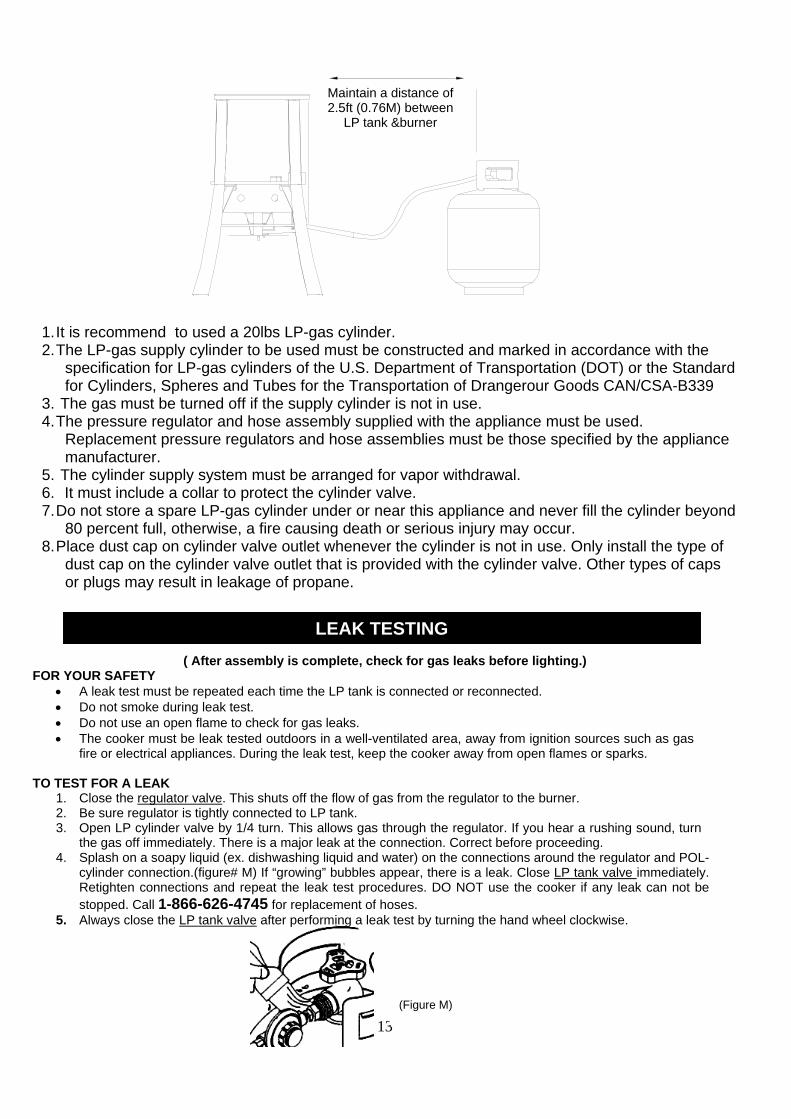
Maintain a distance of 2.5ft (0.76M) between
LP tank &burner
14
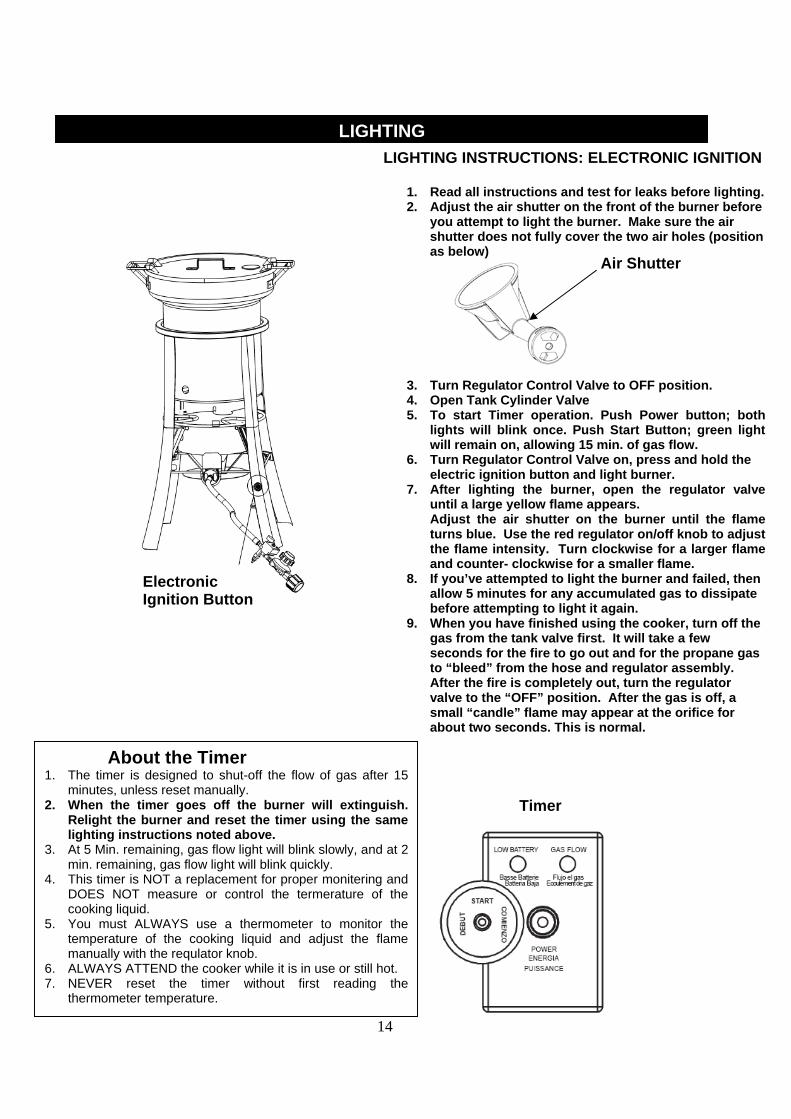
LIGHTING INSTRUCTIONS: ELECTRONIC IGNITION
1. Read all instructions and test for leaks before lighting.2. Adjust the air shutter on the front of the burner before
you attempt to light the burner. Make sure the air shutter does not fully cover the two air holes (position as below)
3. Turn Regulator Control Valve to OFF position. 4. Open Tank Cylinder Valve 5. To start Timer operation. Push Power button; both
lights will blink once. Push Start Button; green light will remain on, allowing 15 min. of gas flow.
6. Turn Regulator Control Valve on, press and hold the electric ignition button and light burner.
7. After lighting the burner, open the regulator valve until a large yellow flame appears. Adjust the air shutter on the burner until the flame turns blue. Use the red regulator on/off knob to adjust the flame intensity. Turn clockwise for a larger flame and counter- clockwise for a smaller flame.
8. If you’ve attempted to light the burner and failed, then allow 5 minutes for any accumulated gas to dissipate before attempting to light it again.
9. When you have finished using the cooker, turn off the gas from the tank valve first. It will take a few seconds for the fire to go out and for the propane gas to “bleed” from the hose and regulator assembly. After the fire is completely out, turn the regulator valve to the “OFF” position. After the gas is off, a small “candle” flame may appear at the orifice for about two seconds. This is normal.
Air Shutter
LIGHTING
About the Timer 1. The timer is designed to shut-off the flow of gas after 15
minutes, unless reset manually. 2. When the timer goes off the burner will extinguish.
Relight the burner and reset the timer using the same lighting instructions noted above.
3. At 5 Min. remaining, gas flow light will blink slowly, and at 2 min. remaining, gas flow light will blink quickly.
4. This timer is NOT a replacement for proper monitering and DOES NOT measure or control the termerature of the cooking liquid.
5. You must ALWAYS use a thermometer to monitor the temperature of the cooking liquid and adjust the flame manually with the requlator knob.
6. ALWAYS ATTEND the cooker while it is in use or still hot. 7. NEVER reset the timer without first reading the
thermometer temperature.
Electronic Ignition Button
Timer
15
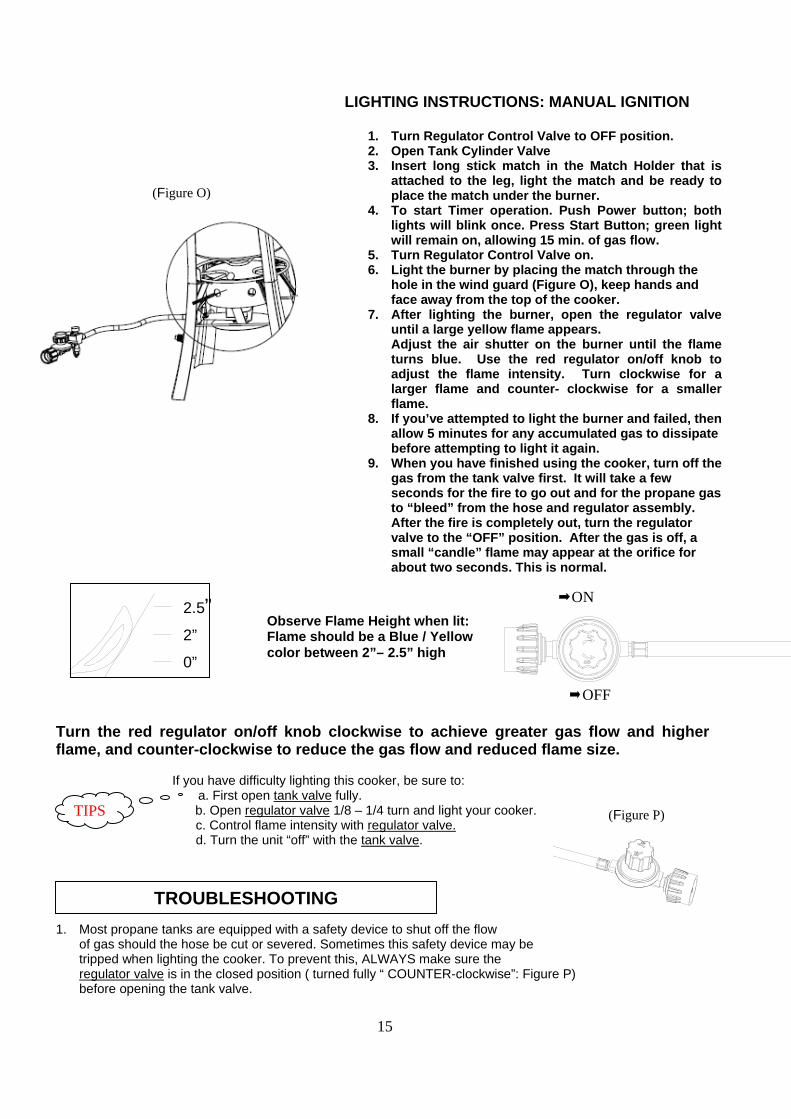
Turn the red regulator on/off knob clockwise to achieve greater gas flow and higher flame, and counter-clockwise to reduce the gas flow and reduced flame size.
If you have difficulty lighting this cooker, be sure to:
a. First open tank valve fully. b. Open regulator valve 1/8 – 1/4 turn and light your cooker.
c. Control flame intensity with regulator valve. d. Turn the unit “off” with the tank valve.
1. Most propane tanks are equipped with a safety device to shut off the flow of gas should the hose be cut or severed. Sometimes this safety device may be tripped when lighting the cooker. To prevent this, ALWAYS make sure the regulator valve is in the closed position ( turned fully “ COUNTER-clockwise”: Figure P) before opening the tank valve.
TROUBLESHOOTING
TIPS
Observe Flame Height when lit: Flame should be a Blue / Yellow color between 2”– 2.5” high
ON
(Figure O)
LIGHTING INSTRUCTIONS: MANUAL IGNITION
1. Turn Regulator Control Valve to OFF position. 2. Open Tank Cylinder Valve 3. Insert long stick match in the Match Holder that is
attached to the leg, light the match and be ready to place the match under the burner.
4. To start Timer operation. Push Power button; both lights will blink once. Press Start Button; green light will remain on, allowing 15 min. of gas flow.
5. Turn Regulator Control Valve on. 6. Light the burner by placing the match through the
hole in the wind guard (Figure O), keep hands and face away from the top of the cooker.
7. After lighting the burner, open the regulator valve until a large yellow flame appears. Adjust the air shutter on the burner until the flame turns blue. Use the red regulator on/off knob to adjust the flame intensity. Turn clockwise for a larger flame and counter- clockwise for a smaller flame.
8. If you’ve attempted to light the burner and failed, then allow 5 minutes for any accumulated gas to dissipate before attempting to light it again.
9. When you have finished using the cooker, turn off the gas from the tank valve first. It will take a few seconds for the fire to go out and for the propane gas to “bleed” from the hose and regulator assembly. After the fire is completely out, turn the regulator valve to the “OFF” position. After the gas is off, a small “candle” flame may appear at the orifice for about two seconds. This is normal.
2.5” 2”
0”
OFF
(Figure P)
16
***Before using for the first time, wash your pot in hot, soapy water. Dry immediately to prevent water spots. To prevent scratches, avoid using sharp utensils when cooking.
***Discoloration of the stainless steel will result if the pieces are allowed to overheat excessively. - For hard-to-clean stains or discoloration of the stainless steel, use a non-abrasive stainless steel cleaner. - Follow the directions on the containers using a clean, damp sponge or cloth. DO NOT scrub finish with a soap-filled steel wool pad or harsh abrasive cleanser, as scratching will occur.
*** Do NOT obstruct the flow of combustion and ventilation air. ***Should clean the pot after use everytime.
1. Store cooker in a cool dry place. 2. Spray WD-40 on the burner grid after it has cooled to prevent rust. 3. For long term storage, cover the cast iron burner, the hose and regulator assembly in a plastic bag. 4. Spiders and small insects have been known to spin webs inside the venturi tube of the cast iron burner.
Obstructions in the venturi tube interfere with the flow of air and gas throught the burner. This can cause a yellow flame or a flashback. If this happens, remove the cast burner from the frame and clean the venturi tube with a stiff, bent wire or screwdriver. We also advise cleaning inside the top ports as well.
5. Do not tamper with or attempt repairs on the burner, frame, valve, or LP cylinder. Allow only qualified LP gas dealers to make repairs.
6. Always close the tank valve first after use. Always use and store the LP cylinder in an upright position. Never store the LP cylinders in occupied enclosures.
a. Outdoor Use Only!! Never use inside a garage, porch, on a closed deck or near any building. Keep the cooker away from open flames, sparks and lit cigarettes. b. NEVER COVER THE STOCKPOT WITH THE LID WHEN FRYING WITH OIL. Always use a 12〞
Steel long stem thermometer when deep-frying. Do not allow the oil temperature to exceed 375° F. Risk of fire will occur if you exceed this temperature. Control the cooking temperature with the regulator valve.
c. Your Saf-T-Cooker is equipped with a timer to stop the flow of gas after 15 minutes, however this safety feature is not intended to allow you leave the Saf-T-Cooker unattended while it is in use. Always maintain a close watch of the cooking temperature as displayed on the included thermometer; if the oil temperature begins to exceed the 375° F maximum frying temperature, lower the temperature by turning the regulator valve counterclockwise.
d. Do not touch hot surfaces. Always wear long oven mitts to protect hands and forearms when lifting the lid during steaming and when lowering the poultry stand onto the stockpot for frying or the boil/steam basket for boiling. Use both hands to lift the poultry stand from the stockpot.
e. After cooking with your Saf-T-Cooker, allow it to cool down for two hours before moving it or attempting to drain the oil or other cooking liquid. Never attempt to move the cooker when in use. Be extremely careful when moving the pot if it contains hot oil or other liquids. Always allow the cooker to cool completely before attempting to move or clean it.
f. An approved fire extinguisher nearby is recommended – consult your local authority for recommended type and size.
g. After boiling seafood or peanuts, do not pour salt water onto your lawn. It will kill the grass!! Allow the water to cool and pour it down street drains.
h. Do not modify or alter this cooker or its components.
GENERAL CLEANING AND MAINTENANCE
TIPS
Some Useful Reminders

17
Thank you for your purchase of the Saf-T-Cooker outdoor cooking appliance. This product is built to last of rugged aluminum and steel, and other quality materials. Your Saf-T-Cooker will allow you to fry, steam, and boil meat, seafood, vegetables, and other foods. Maximum capacity is 20 pounds.
CAUTION: The Saf-T-Cooker unit is designed for use as a outdoor cooker only. Do not use any of its component parts indoors on a stove, range or other indoor cooking appliance. Be sure to read and follow all the instructions provided with your gas cooker and propane tank.
Step 1: The Equipment • Included in the unit carton is a high-pressure burner, cooking stand, electronic timer, and a 35 quart stockpot
with accessories to allow for frying, steaming and boiling. Accessories include a poultry rack, a 2 oz capacity marinade injector, and a vented lid.
• The included 12〞 long-stemmed deep fry thermometer must be used to maintain proper oil temperature at all times.
Step 2: Ingredients • The 35-quart stockpot is capable of frying a turkey up to 20 pounds. • Peanut oil or vegetable oil maybe use for frying. Peanut oil is the healthier choice for frying and also remains
clear longer for reuse. For a 10-16 pound turkey use 2-1/2 – 3 gallons. ( Larger size turkeys require less oil.) ** To determine the amount of oil needed, lower the turkey into the pot and cover with water.
Remove the turkey and meassure the amount of water. Use the same amount of oil in place of the water when frying the turkey.
• Seasonings: salt and pepper, poultry seasoning or Cajun seasoning. • Optional: Marinade for injecting into turkey. (Figure 1)
Step 3: Preparation: • Thaw the turkey completely. • Wash the turkey and pat dry with paper towels. Remove giblets, neck, and trim away all excess fat. Make
sure the opening around the neck is clear. • Make a 1-inch cut in the skin at the leg-thigh joints. ( This will allow oil to drain when turkey is done. ) • Coat the turkey inside and out with seasonings and/or use an injectable marinade. • Place turkey upside down on poultry rack, with legs facing up.
Step 4: Cooking • Follow the the instructions to set up the burner and fryer pot. • Place the burner and the fryer pot on a flat, level, non-combustible solid surface. • Pour peanut oil into the pot. Use the amount determined in Step 2. Attach the thermometer to the top edge,
making sure the stem of the thermometer is as far down as possible without touching the bottom of the pot. • Light the burner as per instructions and then adjust the flame higher. DO NOT adjust the flame to full blast. • Heat the oil to 350° F. Measure the temperature of the oil with the deep fryer thermometer. When the oil
reaches 325° F, reduce heat and allow the oil graduatlly up to 350° F. We do not recommend the frying temperature to exceed 375° F. Such a high frying temperature will overcook your turkey and the results will not be as pleasing as frying it with the lower recommended temperature 350° F.
• When the timer goes off the burner will extinguish. Relight the burner and reset the timer using the same lighting instructions noted above.
• Using both hands and with hands and arms protected by long oven mits very slowly and carefully lower the poultry rack into the Stockpot. After you lower the turkey into the hot oil the temperature will go down. Slowly increase and keep the temperature at constant 350°F. Fry the turkey about 3 to 4 minutes per pound.
• When the turkey is done, turn the cooker off at the tank. Leaving the pot on the cooker, use the oven mitts to
hold the poultry stand and lift the turkey out of the pot slowly and into another pan to drain and cool. Check the thigh joint temperature for doneness. Poultry should be at 180°F when completely cooked.
• Carefully remove the turkey from the poultry stand and place on platter…...Enjoy!!
PREPARATION AND COOKING INSTRUCTIONS
(Figure 1)
TIPS
18
LIMITED WARRANTY
Test Rite Products Corporation warrants this product against manufacturing defects in materials and workmanship, for a period of one year from the date of purchase. This warranty shall cover repairs or replacement parts for the product, in its original as-built configuration, in which shall be provided at the discretion of Test Rite Products Corporation. This warranty applies only to the original purchaser. Normal wear and tear of the product is not subject to warranty. In the event of misuse, abuse, alterations, improper set up, acts of god or any unauthorized modification of the product, this warranty shall be deemed void. Test Rite Products Corporation shall not be liable, in any event, for any incidental or consequential damages, either in the breach of this warranty or any other reason, resulting from the use of this product. Liability, in any event, shall be limited to the amount of the original purchase price of this product. NO OTHER WARRANTIES WHETHER EXPRESSED OR IMPLIED, INCLUDING MERCHANTABLITITY AND FITNESS FOR A PARTICULAR PURPOSE, SHALL APPLY TO THIS PRODUCT, OTHER THAN THAT STATED HEREIN. For service regarding this warranty, call our Customer Service Department at 1-866-626-4745. Proof of purchase in the form of an original receipt with date of purchase is required. DO NOT ship parts or units without a return authorization number. Upon receipt of an authorization number, the product must be shipped prepaid. This warranty gives you specific legal rights. You may also have other rights that vary from state to state.
DO NOT RETURN TO PLACE OF PURCHASE PLEASE CONTACT 1-866-NAO-GRIL(1-866-626-4745) CUSTOMER SERVICE FOR
ASSISTANCE,MONDAY THRU FRIDAY 8:00am-8:00 pm EST
CAUTION! Use extreme care and caution when frying whole turkeys, chickens, or any other foods. Grease fires can occur. To reduce the chance of injury and/or property damage, be sure to:
1. Use outdoors only! Never leave the cookers unattended!!
2. Use in an open area away from any building, decks, shrubbery, or trees.
3. Carefully read and follow all operation instructions provided with the gas cooker and the propane tank.
4. Should a grease fire occur, turn off the gas at the tank and cover the pot with the lid.
5. The poultry stand will be very hot after frying. Make sure to use the oven mitts to hold the poultry stand to lift the turkey.

19
This device complies with Part 15 of the FCC Rules. Operation is subject to the following two conditions: (1) This device may not cause harmful interference, and (2) this device must accept any interference received, including interference that may cause undesired operation. NOTE: This equipment has been tested and found to comply with the limits for Class B digital device, pursuant to part 15 of the FCC Rules. These limits are designed to provide reasonable protection against harmful interference in a residential installation. This equipment generates, uses and can radiate radio frequency energy and, if not installed and used in accordance with the instructions, may cause harmful interference to radio or television reception, which can be determined by turning the equipment off and on, the user is encouraged to try to correct the interference by one or more of the following measures: -Reorient or relocate the receiving antenna. -Increase the separation between the equipment and the receiver. -Connect the equipment into an outlet on a circuit different from that to which the receiver is connected. -Consult the dealer or an experienced radio/TV technician for help.
Recommended


![Ec5 Dossier Technique[1]](https://img.dokumen.tips/doc/110x75/5571fd60497959916998f48d/ec5-dossier-technique1.jpg)