8/12/2019 Making of S600
http://slidepdf.com/reader/full/making-of-s600 1/13
Mercedes S-Class MillauAli Ismail

8/12/2019 Making of S600
http://slidepdf.com/reader/full/making-of-s600 2/13
Mercedes S-Class Millau The Making Of
page 73www.3dcreativemag.com Issue 012 August 2006
Car Modeling overview
and tips
This is not exactly a step by step tutorial about
polygon car modeling, it’s more of an overview
of the process I use and some tips that might
help anyone having trouble modeling a car.
Although I work in 3dsmax, the process and
techniques can be applied to all 3d applications,
but this may not apply for one part about spline
modeling, which is used only to make the
basic polygon mesh, but you can just create
the polygons, extrude them or do it any wayyou like. Well for a start, and I can’t stress this
enough, but if anyone is just starting out or
wants to learn how to model a car then please
use good blueprints! It’s so important to use
them, if you are still starting out and can’t nd
blueprints for the car you like the most, check
sites such as www.smcars.net or just google it to
nd the blueprints for the car you want, or order
and download brochures from the ofcial sites
of the car company. Usually the blueprints come
in a single image, It doesn’t matter how you
extract each view, whether it was in Photoshop
or inside your 3d application it doesn’t matter, it
only matters that you have them in correct scale
to each other in your 3d application.
There are many tutorials which give good
guidelines about using blueprints. Also it’s very
important to setup the blueprints properly and as
accurately as possible, using reference objects
to assist you, light corners for example, wheel
badges etc…I may have exaggerated the box
reference objects slightly to give them funky
colours, but it’s only for the purpose of this
tutorial. Feel free to do any reference objects
in your 3d application as you like, this is only to
make sure the blueprints are placed correctly.
Some of you may be a bit angry at me for not
getting to the point yet, but seriously obtaining
blueprints and putting them together accurately
is such an important step that sometimes gets
neglected, so I must stress this now. Now after
you have the blueprints ready, you need to start
modeling, at last. This is the only part where it’s
max related but, as I said before, you can simply
create polygons or extrude edges or whatever
you like to get a similar basic mesh, as you
can see in the later image it’s only used to get
a mesh like that. Relax it’s really no big deal to
create a mesh like that in any 3d application,
just follow the blueprints and think of a decent
wire frame before you create the ploys and
you will get it, really it’s that simple! If you are
having any trouble just look at any nished car
wire frames and observe how the edge loops
are usually done, it’s easy to learn the tools and
procedures but it might take time to practice
that’s all.
8/12/2019 Making of S600
http://slidepdf.com/reader/full/making-of-s600 3/13
The Making Of Mercedes S-Class Millau
page 74www.3dcreativemag.com Issue 012 August 2006
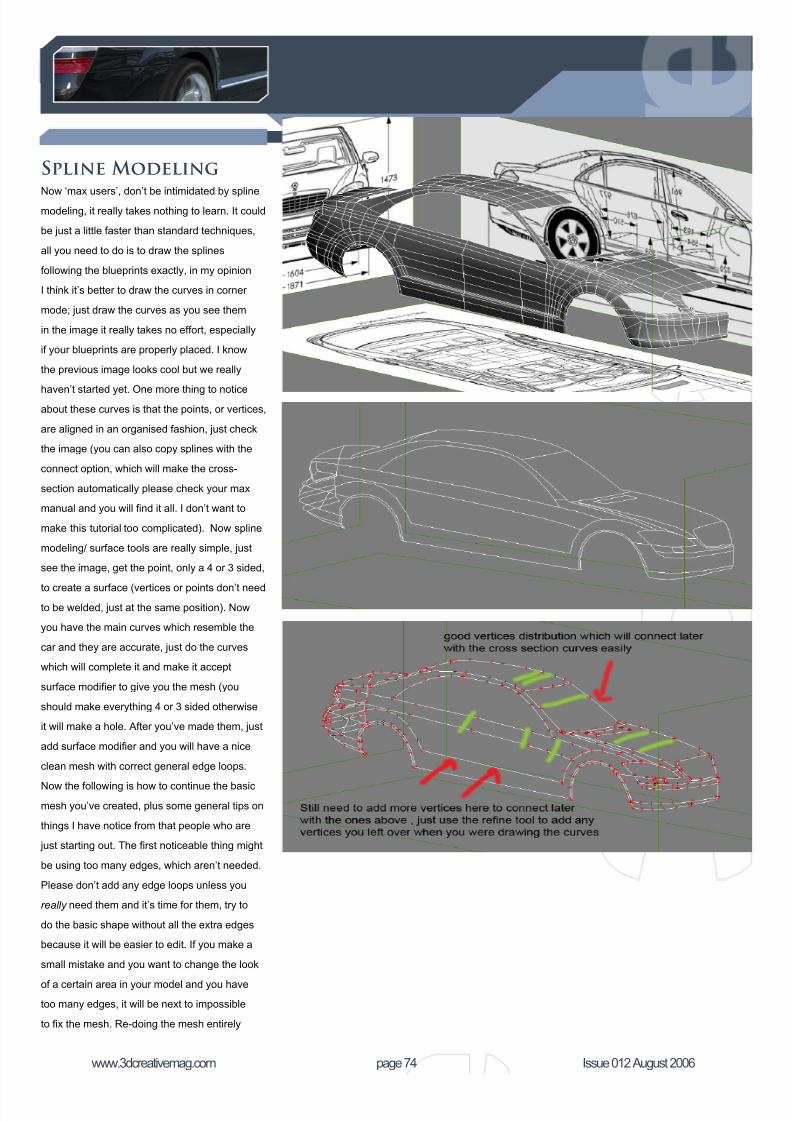
Spline Modeling
Now ‘max users’, don’t be intimidated by splinemodeling, it really takes nothing to learn. It could
be just a little faster than standard techniques,
all you need to do is to draw the splines
following the blueprints exactly, in my opinion
I think it’s better to draw the curves in corner
mode; just draw the curves as you see them
in the image it really takes no effort, especially
if your blueprints are properly placed. I know
the previous image looks cool but we really
haven’t started yet. One more thing to noticeabout these curves is that the points, or vertices,
are aligned in an organised fashion, just check
the image (you can also copy splines with the
connect option, which will make the cross-
section automatically please check your max
manual and you will nd it all. I don’t want to
make this tutorial too complicated). Now spline
modeling/ surface tools are really simple, just
see the image, get the point, only a 4 or 3 sided,
to create a surface (vertices or points don’t need
to be welded, just at the same position). Now
you have the main curves which resemble the
car and they are accurate, just do the curves
which will complete it and make it accept
surface modier to give you the mesh (you
should make everything 4 or 3 sided otherwise
it will make a hole. After you’ve made them, just
add surface modier and you will have a nice
clean mesh with correct general edge loops.
Now the following is how to continue the basic
mesh you’ve created, plus some general tips on
things I have notice from that people who are
just starting out. The rst noticeable thing might
be using too many edges, which aren’t needed.
Please don’t add any edge loops unless you
really need them and it’s time for them, try to
do the basic shape without all the extra edges
because it will be easier to edit. If you make a
small mistake and you want to change the look
of a certain area in your model and you have
too many edges, it will be next to impossible
to x the mesh. Re-doing the mesh entirely

8/12/2019 Making of S600
http://slidepdf.com/reader/full/making-of-s600 4/13
Mercedes S-Class Millau The Making Of
page 75www.3dcreativemag.com Issue 012 August 2006
in many cases could be faster than editing a
messed up mesh with too many edges. Also,
always check how your mesh looks after you
add ‘meshsmooth’, it helps you realise what you
are doing and if there are any mistakes. Let’s
say you managed to get a nice clean mesh but
it hasn’t got much details, only the basic form
that we have created, it could be made easily
by any 3d software even by creating each poly
and it’s very easy to do. Now some might leave
their mesh like that and add meshsmooth to it,
but it will scream “I am box modeled”, and it will
have no sharp edges, etc. The image below
shows why you need to add edge loops to get
the look you want. In most cases and I know the
previous image may look funny and very basic,
but I always get asked by people who want to
model a high res realistic car and they still don’t
test with the basics and keep asking why their
mesh looks like clay with no sharp edges at the
right places, so please forgive me for this.
8/12/2019 Making of S600
http://slidepdf.com/reader/full/making-of-s600 5/13
The Making Of Mercedes S-Class Millau
page 76www.3dcreativemag.com Issue 012 August 2006
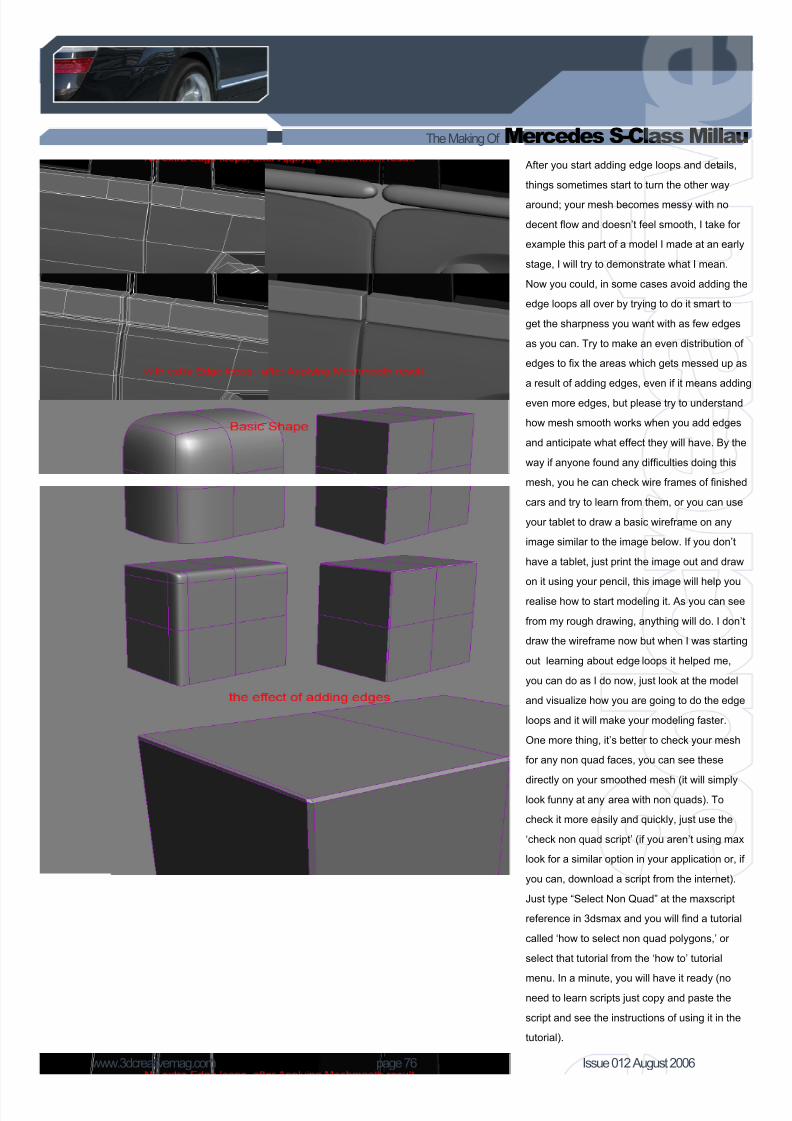
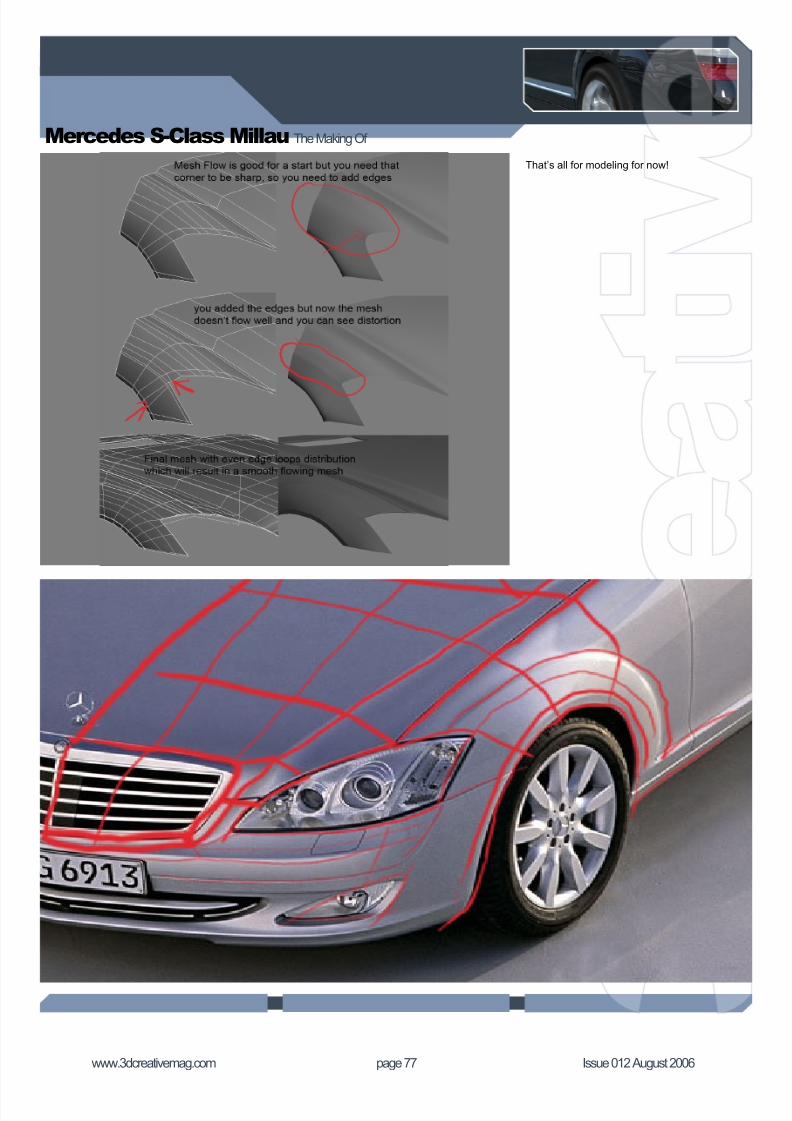
After you start adding edge loops and details,
things sometimes start to turn the other way
around; your mesh becomes messy with no
decent ow and doesn’t feel smooth, I take for
example this part of a model I made at an early
stage, I will try to demonstrate what I mean.
Now you could, in some cases avoid adding the
edge loops all over by trying to do it smart to
get the sharpness you want with as few edges
as you can. Try to make an even distribution of
edges to x the areas which gets messed up as
a result of adding edges, even if it means adding
even more edges, but please try to understand
how mesh smooth works when you add edges
and anticipate what effect they will have. By the
way if anyone found any difculties doing this
mesh, you he can check wire frames of nished
cars and try to learn from them, or you can use
your tablet to draw a basic wireframe on any
image similar to the image below. If you don’t
have a tablet, just print the image out and draw
on it using your pencil, this image will help you
realise how to start modeling it. As you can see
from my rough drawing, anything will do. I don’t
draw the wireframe now but when I was starting
out learning about edge loops it helped me,
you can do as I do now, just look at the model
and visualize how you are going to do the edge
loops and it will make your modeling faster.
One more thing, it’s better to check your mesh
for any non quad faces, you can see these
directly on your smoothed mesh (it will simply
look funny at any area with non quads). To
check it more easily and quickly, just use the
‘check non quad script’ (if you aren’t using max
look for a similar option in your application or, if
you can, download a script from the internet).
Just type “Select Non Quad” at the maxscript
reference in 3dsmax and you will nd a tutorial
called ‘how to select non quad polygons,’ or
select that tutorial from the ‘how to’ tutorial
menu. In a minute, you will have it ready (noneed to learn scripts just copy and paste the
script and see the instructions of using it in the
tutorial).
8/12/2019 Making of S600
http://slidepdf.com/reader/full/making-of-s600 6/13
Mercedes S-Class Millau The Making Of
page 77www.3dcreativemag.com Issue 012 August 2006
That’s all for modeling for now!
8/12/2019 Making of S600
http://slidepdf.com/reader/full/making-of-s600 7/13
The Making Of Mercedes S-Class Millau
page 78www.3dcreativemag.com Issue 012 August 2006
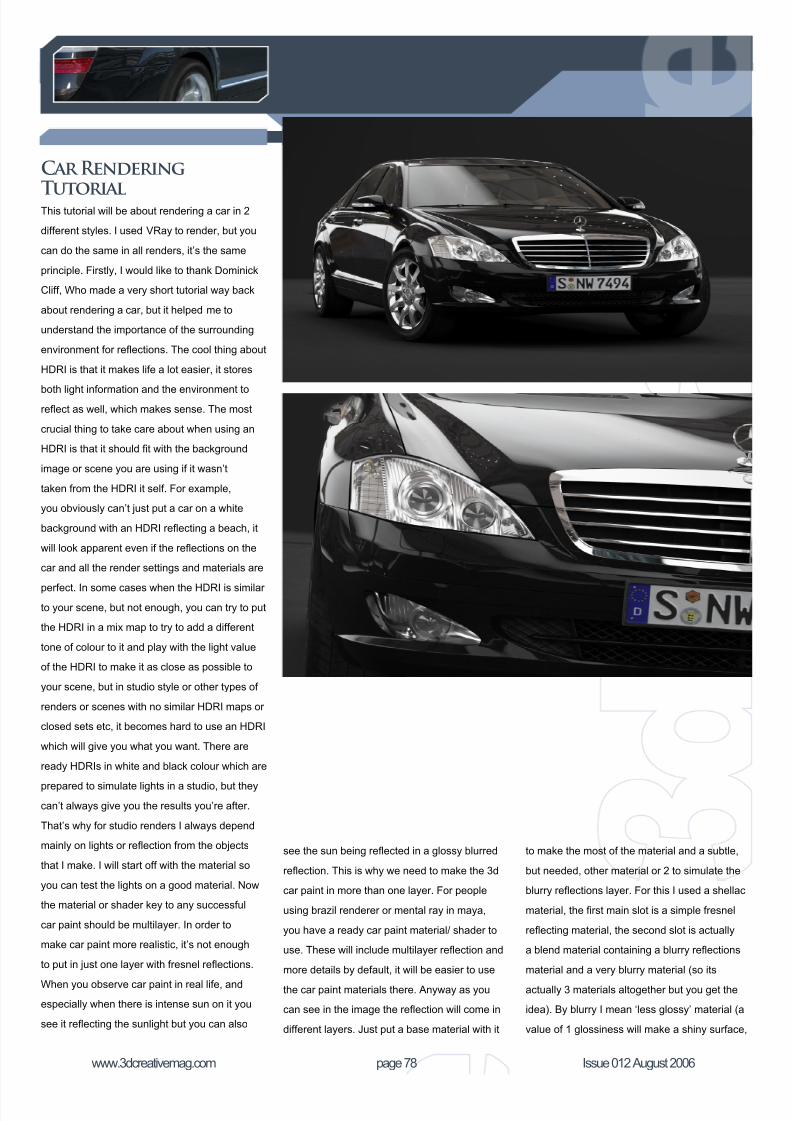
Car Rendering
Tutorial
This tutorial will be about rendering a car in 2
different styles. I used VRay to render, but you
can do the same in all renders, it’s the same
principle. Firstly, I would like to thank Dominick
Cliff, Who made a very short tutorial way back
about rendering a car, but it helped me to
understand the importance of the surrounding
environment for reections. The cool thing about
HDRI is that it makes life a lot easier, it stores
both light information and the environment toreect as well, which makes sense. The most
crucial thing to take care about when using an
HDRI is that it should t with the background
image or scene you are using if it wasn’t
taken from the HDRI it self. For example,
you obviously can’t just put a car on a white
background with an HDRI reecting a beach, it
will look apparent even if the reections on the
car and all the render settings and materials are
perfect. In some cases when the HDRI is similar
to your scene, but not enough, you can try to put
the HDRI in a mix map to try to add a different
tone of colour to it and play with the light value
of the HDRI to make it as close as possible to
your scene, but in studio style or other types of
renders or scenes with no similar HDRI maps or
closed sets etc, it becomes hard to use an HDRI
which will give you what you want. There are
ready HDRIs in white and black colour which are
prepared to simulate lights in a studio, but they
can’t always give you the results you’re after.
That’s why for studio renders I always depend
mainly on lights or reection from the objects
that I make. I will start off with the material so
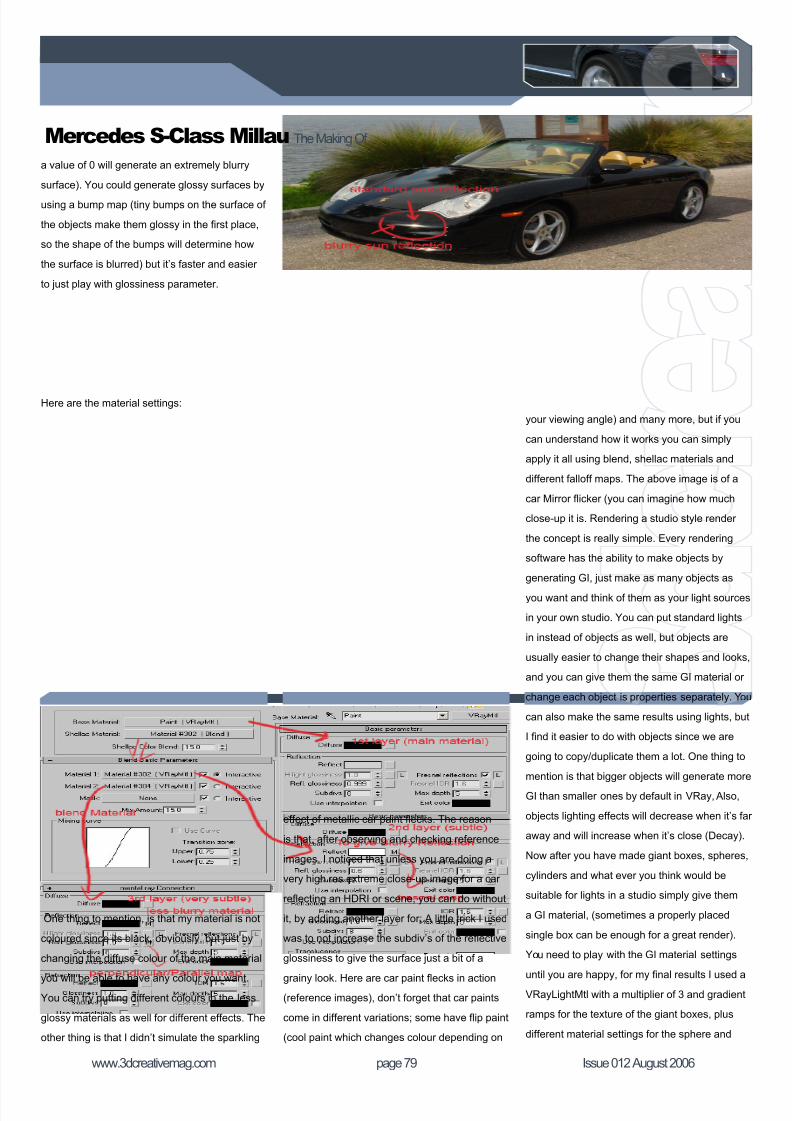
you can test the lights on a good material. Now
the material or shader key to any successful
car paint should be multilayer. In order to
make car paint more realistic, it’s not enough
to put in just one layer with fresnel reections.
When you observe car paint in real life, and
especially when there is intense sun on it you
see it reecting the sunlight but you can also
see the sun being reected in a glossy blurred
reection. This is why we need to make the 3d
car paint in more than one layer. For people
using brazil renderer or mental ray in maya,
you have a ready car paint material/ shader to
use. These will include multilayer reection and
more details by default, it will be easier to use
the car paint materials there. Anyway as you
can see in the image the reection will come in
different layers. Just put a base material with it
to make the most of the material and a subtle,
but needed, other material or 2 to simulate the
blurry reections layer. For this I used a shellac
material, the rst main slot is a simple fresnel
reecting material, the second slot is actually
a blend material containing a blurry reections
material and a very blurry material (so its
actually 3 materials altogether but you get the
idea). By blurry I mean ‘less glossy’ material (a
value of 1 glossiness will make a shiny surface,
8/12/2019 Making of S600
http://slidepdf.com/reader/full/making-of-s600 8/13
Mercedes S-Class Millau The Making Of
page 79www.3dcreativemag.com Issue 012 August 2006
a value of 0 will generate an extremely blurry
surface). You could generate glossy surfaces by
using a bump map (tiny bumps on the surface of
the objects make them glossy in the rst place,
so the shape of the bumps will determine how
the surface is blurred) but it’s faster and easier
to just play with glossiness parameter.
Here are the material settings:
One thing to mention, is that my material is not
coloured since its black, obviously, but just by
changing the diffuse colour of the main material
you will be able to have any colour you want.You can try putting different colours in the less
glossy materials as well for different effects. The
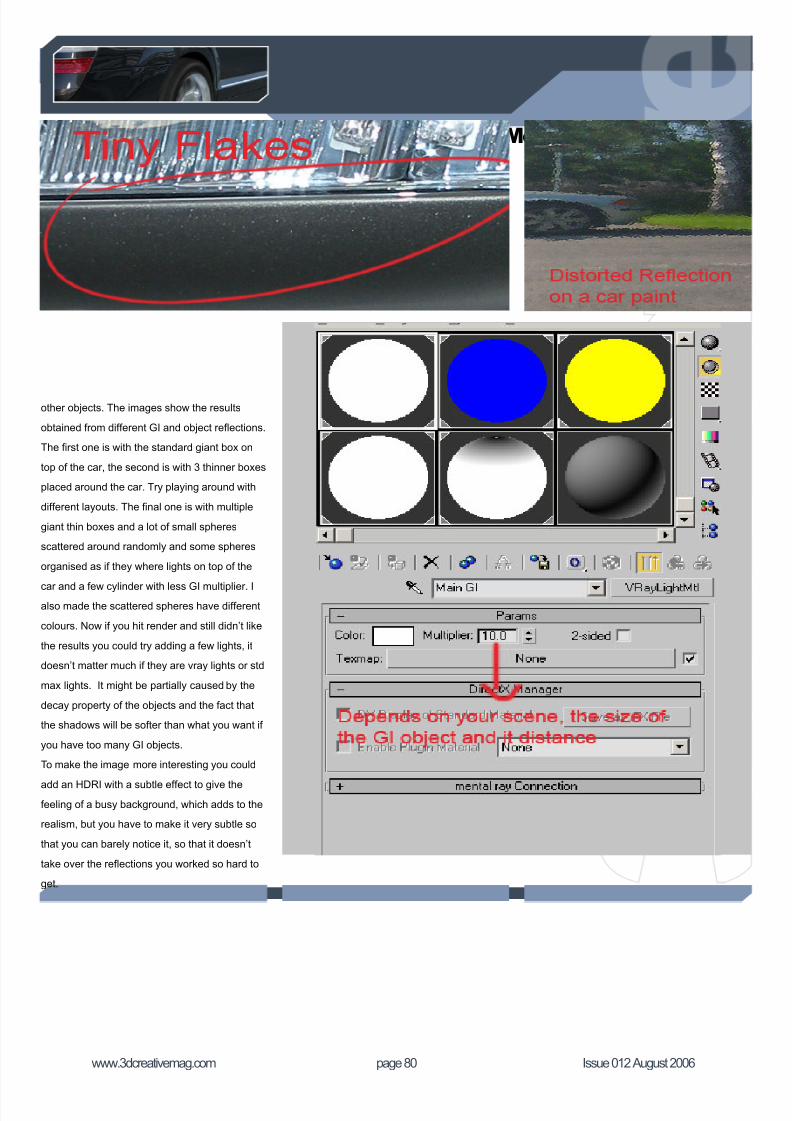
other thing is that I didn’t simulate the sparkling
effect of metallic car paint ecks. The reason
is that, after observing and checking reference
images, I noticed that unless you are doing a
very high res extreme close-up image for a car
reecting an HDRI or scene, you can do without
it, by adding another layer for: A little trick I used
was to not increase the subdiv’s of the reective
glossiness to give the surface just a bit of a
grainy look. Here are car paint ecks in action(reference images), don’t forget that car paints
come in different variations; some have ip paint
(cool paint which changes colour depending on
your viewing angle) and many more, but if you
can understand how it works you can simply
apply it all using blend, shellac materials and
different falloff maps. The above image is of a
car Mirror icker (you can imagine how much
close-up it is. Rendering a studio style render
the concept is really simple. Every rendering
software has the ability to make objects by
generating GI, just make as many objects as
you want and think of them as your light sources
in your own studio. You can put standard lights
in instead of objects as well, but objects are
usually easier to change their shapes and looks,
and you can give them the same GI material or
change each object is properties separately. You
can also make the same results using lights, but
I nd it easier to do with objects since we are
going to copy/duplicate them a lot. One thing to
mention is that bigger objects will generate more
GI than smaller ones by default in VRay, Also,
objects lighting effects will decrease when it’s far
away and will increase when it’s close (Decay).
Now after you have made giant boxes, spheres,
cylinders and what ever you think would be
suitable for lights in a studio simply give them
a GI material, (sometimes a properly placed
single box can be enough for a great render).
You need to play with the GI material settings
until you are happy, for my nal results I used a
VRayLightMtl with a multiplier of 3 and gradient
ramps for the texture of the giant boxes, plus
different material settings for the sphere and
8/12/2019 Making of S600
http://slidepdf.com/reader/full/making-of-s600 9/13
The Making Of Mercedes S-Class Millau
page 80www.3dcreativemag.com Issue 012 August 2006
other objects. The images show the results
obtained from different GI and object reections.
The rst one is with the standard giant box on
top of the car, the second is with 3 thinner boxes
placed around the car. Try playing around with
different layouts. The nal one is with multiple
giant thin boxes and a lot of small spheres
scattered around randomly and some spheres
organised as if they where lights on top of the
car and a few cylinder with less GI multiplier. I
also made the scattered spheres have different
colours. Now if you hit render and still didn’t like
the results you could try adding a few lights, it
doesn’t matter much if they are vray lights or std
max lights. It might be partially caused by the
decay property of the objects and the fact that
the shadows will be softer than what you want if
you have too many GI objects.
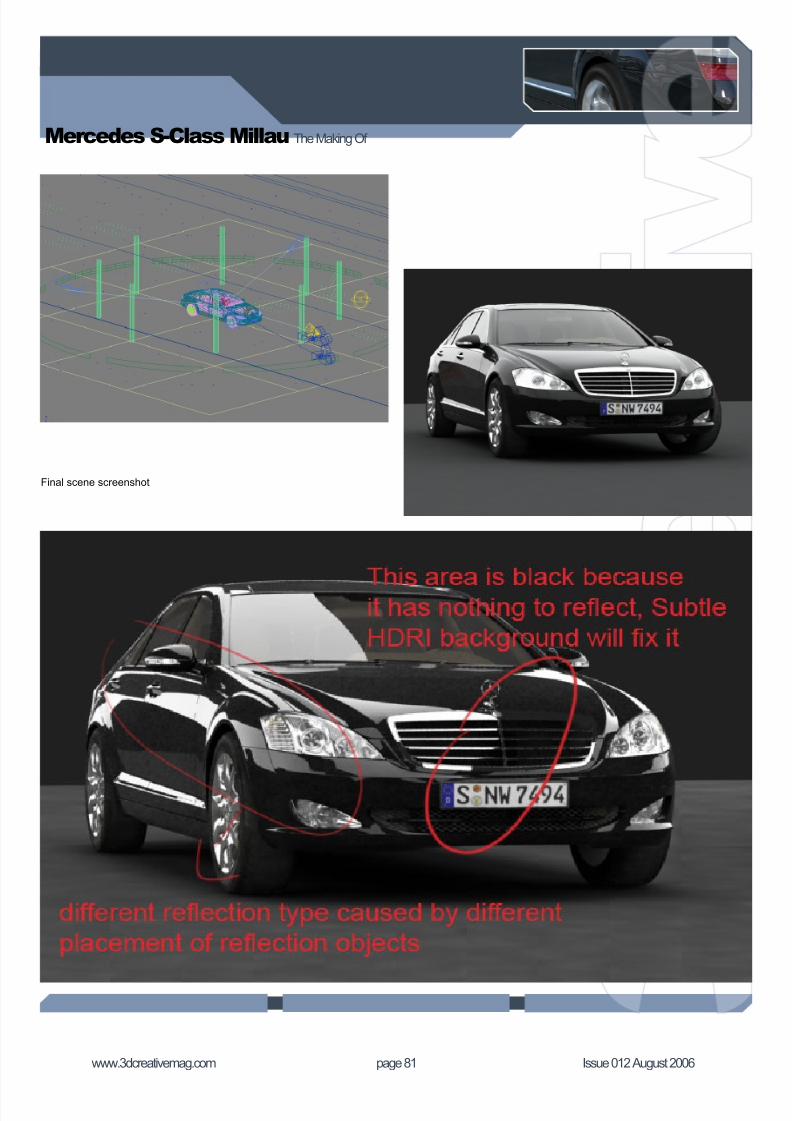
To make the image more interesting you could
add an HDRI with a subtle effect to give the
feeling of a busy background, which adds to the
realism, but you have to make it very subtle so
that you can barely notice it, so that it doesn’t
take over the reections you worked so hard to
get.
8/12/2019 Making of S600
http://slidepdf.com/reader/full/making-of-s600 10/13
Mercedes S-Class Millau The Making Of
page 81www.3dcreativemag.com Issue 012 August 2006
Final scene screenshot
8/12/2019 Making of S600
http://slidepdf.com/reader/full/making-of-s600 11/13
The Making Of Mercedes S-Class Millau
page 82www.3dcreativemag.com Issue 012 August 2006
rendering
a car in a scene
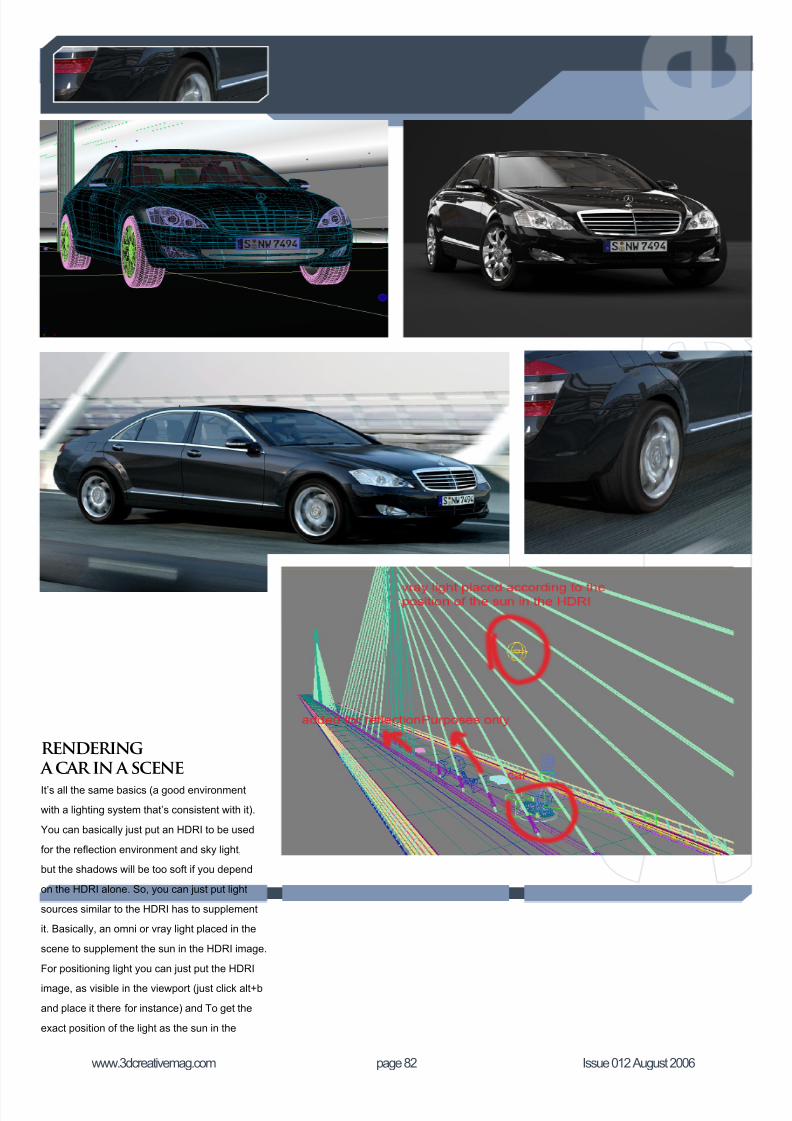
It’s all the same basics (a good environment
with a lighting system that’s consistent with it).
You can basically just put an HDRI to be used
for the reection environment and sky light,
but the shadows will be too soft if you depend
on the HDRI alone. So, you can just put light
sources similar to the HDRI has to supplement
it. Basically, an omni or vray light placed in the
scene to supplement the sun in the HDRI image.
For positioning light you can just put the HDRI
image, as visible in the viewport (just click alt+b
and place it there for instance) and To get the
exact position of the light as the sun in the
8/12/2019 Making of S600
http://slidepdf.com/reader/full/making-of-s600 12/13
Mercedes S-Class Millau The Making Of
page 83www.3dcreativemag.com Issue 012 August 2006
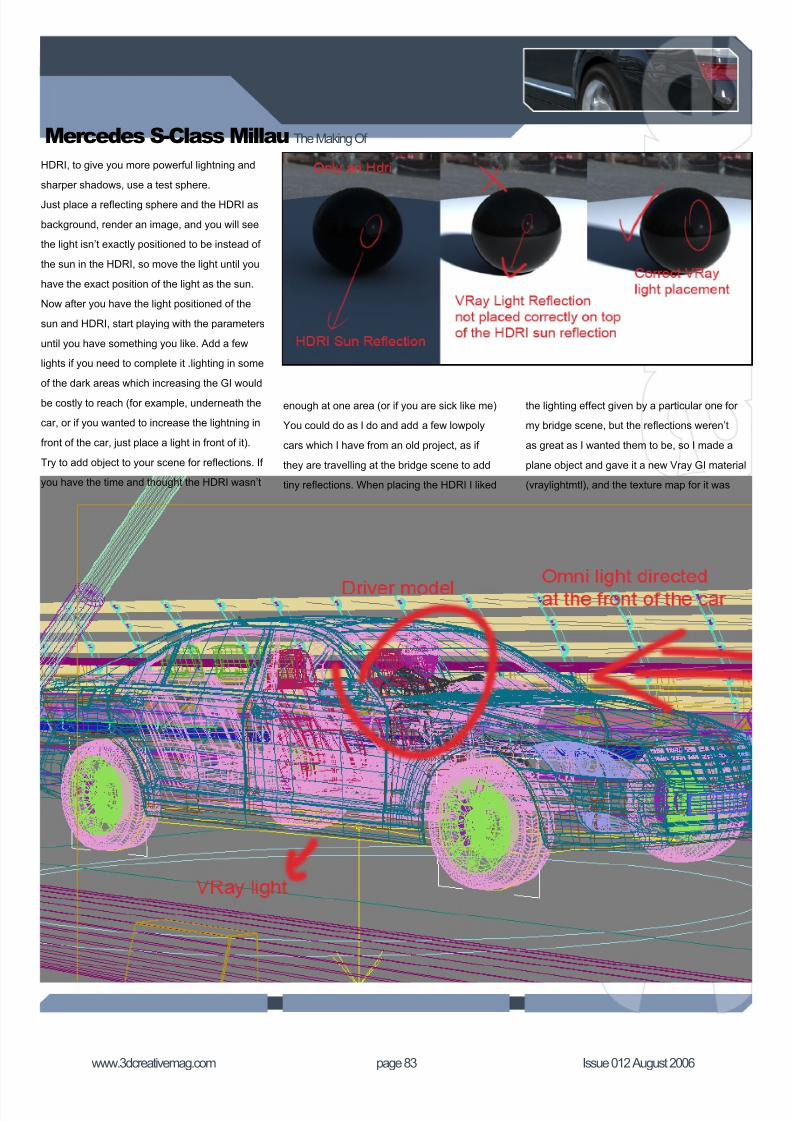
HDRI, to give you more powerful lightning and
sharper shadows, use a test sphere.
Just place a reecting sphere and the HDRI as
background, render an image, and you will see
the light isn’t exactly positioned to be instead of
the sun in the HDRI, so move the light until you
have the exact position of the light as the sun.
Now after you have the light positioned of the
sun and HDRI, start playing with the parameters
until you have something you like. Add a few
lights if you need to complete it .lighting in some
of the dark areas which increasing the GI would
be costly to reach (for example, underneath the
car, or if you wanted to increase the lightning in
front of the car, just place a light in front of it).
Try to add object to your scene for reections. If
you have the time and thought the HDRI wasn’t
enough at one area (or if you are sick like me)
You could do as I do and add a few lowpoly
cars which I have from an old project, as if
they are travelling at the bridge scene to add
tiny reections. When placing the HDRI I liked
the lighting effect given by a particular one for
my bridge scene, but the reections weren’t
as great as I wanted them to be, so I made a
plane object and gave it a new Vray GI material
(vraylightmtl), and the texture map for it was

8/12/2019 Making of S600
http://slidepdf.com/reader/full/making-of-s600 13/13
The Making Of Mercedes S-Class Millau
page 84www.3dcreativemag.com Issue 012 August 2006
another HDRI. I liked its reection, just as the
image, and I was very careful where to place
it so I can get it to reect on the car body, (you
can give it red material for example just to see
how its reecting then give it the texture back).
Unfortunately, in max or vray it’s still not
featured to get strong lights to reect and show
rays which would help increase the realism, but
for now you can try to add it in later post work.
Although the principle for rendering a car in a
scene or as a studio render are simple but what
makes the difference is each little parameter you
need to just keep comparing the renders you
have with a real photo with similar conditions to
compare and x what ever you think makes the
image look unrealistic.
Ali Ismail
For more work from this artist please visit:
www.aliismail.com or contact
Recommended