Integrating Oracle Commerce Cloud andOracle CPQ Cloud
E81286-07November 2019
Integrating Oracle Commerce Cloud and Oracle CPQ Cloud,
E81286-07
Copyright © 1997, 2019, Oracle and/or its affiliates. All rights reserved.
Primary Authors: (primary author), (primary author)
Contributing Authors: (contributing author), (contributing author)
Contributors: (contributor), (contributor)
This software and related documentation are provided under a license agreement containing restrictions onuse and disclosure and are protected by intellectual property laws. Except as expressly permitted in yourlicense agreement or allowed by law, you may not use, copy, reproduce, translate, broadcast, modify,license, transmit, distribute, exhibit, perform, publish, or display any part, in any form, or by any means.Reverse engineering, disassembly, or decompilation of this software, unless required by law forinteroperability, is prohibited.
The information contained herein is subject to change without notice and is not warranted to be error-free. Ifyou find any errors, please report them to us in writing.
If this is software or related documentation that is delivered to the U.S. Government or anyone licensing it onbehalf of the U.S. Government, then the following notice is applicable:
U.S. GOVERNMENT END USERS: Oracle programs, including any operating system, integrated software,any programs installed on the hardware, and/or documentation, delivered to U.S. Government end users are"commercial computer software" pursuant to the applicable Federal Acquisition Regulation and agency-specific supplemental regulations. As such, use, duplication, disclosure, modification, and adaptation of theprograms, including any operating system, integrated software, any programs installed on the hardware,and/or documentation, shall be subject to license terms and license restrictions applicable to the programs.No other rights are granted to the U.S. Government.
This software or hardware is developed for general use in a variety of information management applications.It is not developed or intended for use in any inherently dangerous applications, including applications thatmay create a risk of personal injury. If you use this software or hardware in dangerous applications, then youshall be responsible to take all appropriate fail-safe, backup, redundancy, and other measures to ensure itssafe use. Oracle Corporation and its affiliates disclaim any liability for any damages caused by use of thissoftware or hardware in dangerous applications.
Oracle and Java are registered trademarks of Oracle and/or its affiliates. Other names may be trademarks oftheir respective owners.
Intel and Intel Xeon are trademarks or registered trademarks of Intel Corporation. All SPARC trademarks areused under license and are trademarks or registered trademarks of SPARC International, Inc. AMD, Opteron,the AMD logo, and the AMD Opteron logo are trademarks or registered trademarks of Advanced MicroDevices. UNIX is a registered trademark of The Open Group.
This software or hardware and documentation may provide access to or information about content, products,and services from third parties. Oracle Corporation and its affiliates are not responsible for and expresslydisclaim all warranties of any kind with respect to third-party content, products, and services unless otherwiseset forth in an applicable agreement between you and Oracle. Oracle Corporation and its affiliates will not beresponsible for any loss, costs, or damages incurred due to your access to or use of third-party content,products, or services, except as set forth in an applicable agreement between you and Oracle.
Contents
1 Introduction
Objective 1-1
Audience 1-2
Prerequisites 1-2
Additional Resources 1-3
2 Configure the Integration
Configure the Integration Package 2-1
Configure the Oracle Commerce Cloud Connection 2-2
Activate the Integrations 2-3
Configure the Commerce Cloud Webhooks 2-4
Configure the Server Side Extensions 2-5
Enable the Integrations 2-10
3 Use the Integration Functionality
Configure an item 3-1
Request a Quote 3-2
Use multi-level items 3-3
Understand the Customer Account Model 3-7
Use Recurring Charge Items 3-9
Use Asset Based Ordering 3-10
A Appendix A: Configurator Flow
B Appendix B: Request for Quote Flow
Index
iii
1Introduction
This document is intended to provide instructions on how to implement the integrationbetween Oracle Commerce Cloud and Oracle CPQ Cloud.
Oracle Commerce Cloud is an eCommerce solution designed specifically to run inthe Oracle Cloud. The service provides you with a range of powerful tools to build aflexible, feature-rich storefront for your shoppers.
Activities you can perform with Oracle Commerce Cloud include the following:
• Customize the design and layout of your storefront pages and preview yourchanges
• Display your store content in different languages
• Create or import catalog items
• Manage inventory
• Offer promotions
• Manage shopper accounts
• Allow shoppers to set up wish lists
• View reports about your store
• Test the visual elements of your store to determine which design shoppers prefer
• Develop custom features for your store through the Oracle Commerce Cloud webservices API
Oracle CPQ Cloud is the only cloud solution to support the complete quote-to-cashprocess - from shopper inquiry to order fulfillment. It guides users to optimal productoptions and configurations from simple to complex, automatically applying discountsand relevant up-sell and cross-sell opportunities.
Integrating these solutions brings together the capabilities of Oracle Commerce Cloudand Oracle CPQ Cloud to provide a unified solution that enables businesses to offershoppers a method of interacting meaningfully with the business during the purchasingprocess, and to provide agents with the means to be flexible with shoppers, improvingtheir contact experience and maximizing shopper satisfaction.
ObjectiveThe integration of Oracle Commerce Cloud and Oracle CPQ Cloud targets support forthe following shopper commerce activity:
• Product configuration: The shopper or agent can configure any product that hasbeen identified as configurable in the product catalog.
• Shopper quote request: The shopper can request a quote for an order.
• Agent quote request: An agent dealing with a shopper contact can request aquote for a discount on behalf of the shopper.
1-1
• Asset Based Ordering - Asset based ordering (ABO) allows you to sell tangibleassets or subscription services delivered over a period of time; for example mobilephone call and data plans, television and broadband packages, cloud storageservice, music streaming service, etc.
This document provides instructions on how to set up an integration between OracleCommerce Cloud and Oracle CPQ Cloud so that relevant Commerce Cloudinformation is automatically passed to CPQ Cloud, ensuring that the decision processhas all the required information and increasing the speed at which a reply is deliveredto the shopper or agent.
This document describes the setup tasks that must be performed in Oracle CommerceCloud and Oracle Integration Cloud in order to use this integration flow. There areadditional setup tasks that must be performed in Oracle CPQ Cloud so that theintegration works as expected. Full information about these tasks that must beperformed in CPQ Cloud can be found in the Integrating Oracle Commerce Cloud andCPQ Cloud article on My Oracle Support.
Chapter 2 – Configuring the Integration: provides technical instructions on thefollowing topics:
• How to download the Oracle Integration Cloud Integration Flows.
• How to configure the Oracle Integration Cloud Integration Flows.
• How to setup the connection to Oracle CPQ Cloud.
• How to setup the connection to Oracle Commerce Cloud.
• How to configure the webhooks to trigger the integration flows.
• How to configure the SSEs (Side-Server Extension) necessary for the integrationflows.
Chapter 3 – Using the Integration Functionality: provides instructions on how to usethe functionality supported by this integration.
AudienceThis document is written for Oracle Commerce Cloud and Oracle CPQ Cloudadministrators who need to set up and configure the integration between these twosystems.
Readers of this document should have experience with Oracle Commerce Cloud,Oracle CPQ Cloud and Oracle Integration Cloud administration. This document doesnot provide instructions on configuring aspects other than the integration for OracleCommerce Cloud and Oracle CPQ Cloud.
PrerequisitesFor the purposes of this document, it is assumed that you already have:
• An Oracle Commerce Cloud account and access to the Oracle Commerce Cloud19.1 or later with necessary SSEs enabled (see sections that follow).
• An Oracle CPQ Cloud account and access to Oracle CPQ Cloud 19.1 or later.
• An Oracle Integration Cloud account and access to Oracle Integration CloudService 18.4.5 or later.
Chapter 1Audience
1-2
• A synchronized product catalog to ensure that products in the Commerce Cloudcatalog map to corresponding items in the CPQ Cloud catalog.
• Pricing Base pricing data which is synchronized from the master PIM (ProductInformation Management)/ERP (Enterprise Resource Planning system to bothCommerce and CPQ.
• Profiles Shopper/Account data which is synchronized from the master CRM(Customer Relationship Management) system to both Commerce and CPQ.
If you do not have one or more of these, please contact an Oracle sales representativefor information on how to acquire one: http://www.oracle.com/us/corporate/contact/index.html.
Additional ResourcesIf you require further information regarding Oracle Commerce Cloud, you can accessthe latest product documentation and training videos through the Oracle Help Centerpage for Oracle Commerce Cloud.
If you require further information regarding Oracle CPQ Cloud, you can access thelatest product documentation through the Oracle Help Center page for Oracle CPQCloud.
The documentation mentioned contains links to blogs, developer communities, andSupport. (Please note that some of these resources require an account for access.)
Chapter 1Additional Resources
1-3
2Configure the Integration
Five stages are required to configure this integration. Each stage is covered in thischapter.
Configure the Integration PackageThis section provides detail about where the integration package(s) can bedownloaded and how to import the integration package.
Importing the integration package in Oracle Integration Cloud (OIC) createsconnections to Oracle Commerce Cloud and Oracle CPQ Cloud in OIC. It also createsan integration between Commerce Cloud and CPQ Cloud with some default mappingsin place.
Download the integration package
Follow these steps to download the integration package:
1. Go to the Integrating Oracle Commerce Cloud and CPQ Cloud article on MyOracle Support.
2. If you want to implement the integration between Commerce Cloud and the CPQCloud Configurator, download OCCS-CPQ_CONFIGURATION_INTEGRATION_X.X.par to a location where it isaccessible from OIC.Note: _X.X.par refers to the most recent version of all downloadable filesdescribed.
3. If you want to implement the integration between Commerce Cloud and CPQCloud Quoting, download OCCS-CPQ_QUOTE_INTEGRATION_X.X.par to alocation that is accessible from OIC.
4. If you want to enable Asset Based Ordering (ABO) through the integrationbetween Commerce Cloud and CPQ Cloud, download the following packages to alocation that is accessible from OIC:
• OCCS_CPQ_ASSET_INTEGRATION_X.X.par
• OCCS_CPQ_GETCONFIGBOM_X.X.par
Import the integration package
Import the OIC Integration Package into OIC to create an integration betweenCommerce Cloud and CPQ Cloud in OIC.
To import the OIC Integration Package:
1. Log on to OIC as an admin user.
2. Click the Packages icon.
3. Click the Import button.
4. Click Browse to open a navigation pane.
2-1
5. Select the integration package archive (.PAR) file you want to import.
6. Click Import. The package is added to the Packages list.
The OCCS-CPQ_CONFIGURATION_INTEGRATION package includes the OCCS-CPQGet Configurations integration flow. This integration is required for the configurationflow and is available to import into OIC. The name of the target connection for thisintegration is “Oracle CPQ”. The target connection identifier is “Oracle_CPQ”, and thetarget connection description is “Oracle CPQ ICS Adapter Connection”.The OCCS-CPQ_QUOTE_INTEGRATION package includes the following threeintegration flows: OCCS-CPQ Create Quote, OCCS-CPQ Update Quote, and OCCS-CPQ Sync Quote.
• The OCCS-CPQ Create Quote integration sends quote request information toCPQ Cloud.
• The OCCS-CPQ Update Quote integration sends information to CPQ Cloudrelated to accepting, rejecting, or re-requesting a quote.
• The OCCS-CPQ Sync Quote integration allows CPQ Cloud to send information toCommerce Cloud at the end of the quoting process and synchronize thisinformation in Commerce Cloud. This ensures that the order information inCommerce Cloud matches the related order information in CPQ Cloud.
The OCCS_CPQ_ASSET_INTEGRATION package includes two integration flows:OCCS-CPQ Get Assets and OCCS-CPQ Asset Actions. This integration is required forAsset Based ordering.
Note: The OCCS-CPQ Get Assets integration returns information about assets andservices associated with the shopper’s account(s).
The OCCS_CPQ_GETCONFIGBOM package contains the following OIC integration flowswhich are also used in Asset Based ordering:
• GetConfigurations - This flow is invoked for retrieving a list of configurationIdsfrom CPQ of regular configured items (non-ABO items) and ABO items withactionCodes other than Suspend and Terminate.
• GetConfigBom - If an item is an ABO item with actionCode of Terminate orSuspend, getConfigBom calls are required to be made for each configuratorID ofthese filtered items to retrieve a saved Configuration BOM Instance of the item onCPQ.
Configure the Oracle Commerce Cloud ConnectionAn administrator must complete the following steps to configure the connection fromthe OIC integrations to Commerce Cloud.
1. Log on to OIC as an admin user.
2. Click the Connections icon.
3. Click the Oracle Commerce Cloud connection.
4. Click the Configure Connectivity button.
Chapter 2Configure the Oracle Commerce Cloud Connection
2-2
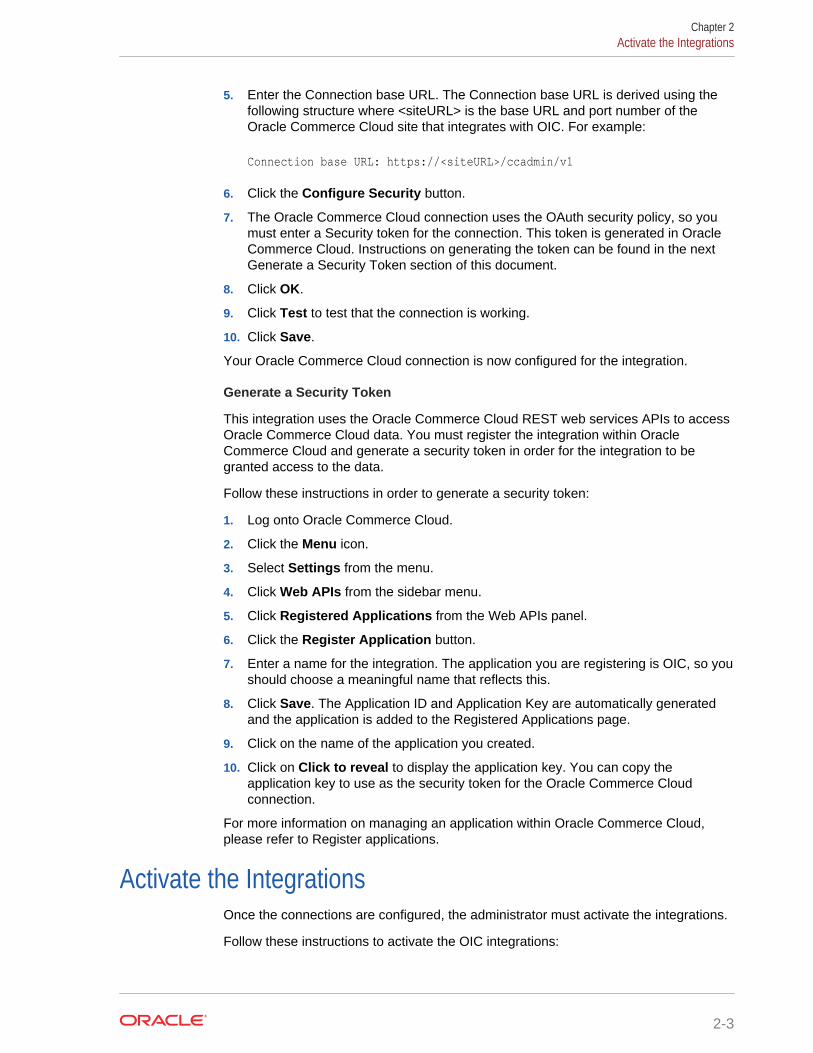
5. Enter the Connection base URL. The Connection base URL is derived using thefollowing structure where <siteURL> is the base URL and port number of theOracle Commerce Cloud site that integrates with OIC. For example:
Connection base URL: https://<siteURL>/ccadmin/v1
6. Click the Configure Security button.
7. The Oracle Commerce Cloud connection uses the OAuth security policy, so youmust enter a Security token for the connection. This token is generated in OracleCommerce Cloud. Instructions on generating the token can be found in the nextGenerate a Security Token section of this document.
8. Click OK.
9. Click Test to test that the connection is working.
10. Click Save.
Your Oracle Commerce Cloud connection is now configured for the integration.
Generate a Security Token
This integration uses the Oracle Commerce Cloud REST web services APIs to accessOracle Commerce Cloud data. You must register the integration within OracleCommerce Cloud and generate a security token in order for the integration to begranted access to the data.
Follow these instructions in order to generate a security token:
1. Log onto Oracle Commerce Cloud.
2. Click the Menu icon.
3. Select Settings from the menu.
4. Click Web APIs from the sidebar menu.
5. Click Registered Applications from the Web APIs panel.
6. Click the Register Application button.
7. Enter a name for the integration. The application you are registering is OIC, so youshould choose a meaningful name that reflects this.
8. Click Save. The Application ID and Application Key are automatically generatedand the application is added to the Registered Applications page.
9. Click on the name of the application you created.
10. Click on Click to reveal to display the application key. You can copy theapplication key to use as the security token for the Oracle Commerce Cloudconnection.
For more information on managing an application within Oracle Commerce Cloud,please refer to Register applications.
Activate the IntegrationsOnce the connections are configured, the administrator must activate the integrations.
Follow these instructions to activate the OIC integrations:
Chapter 2Activate the Integrations
2-3
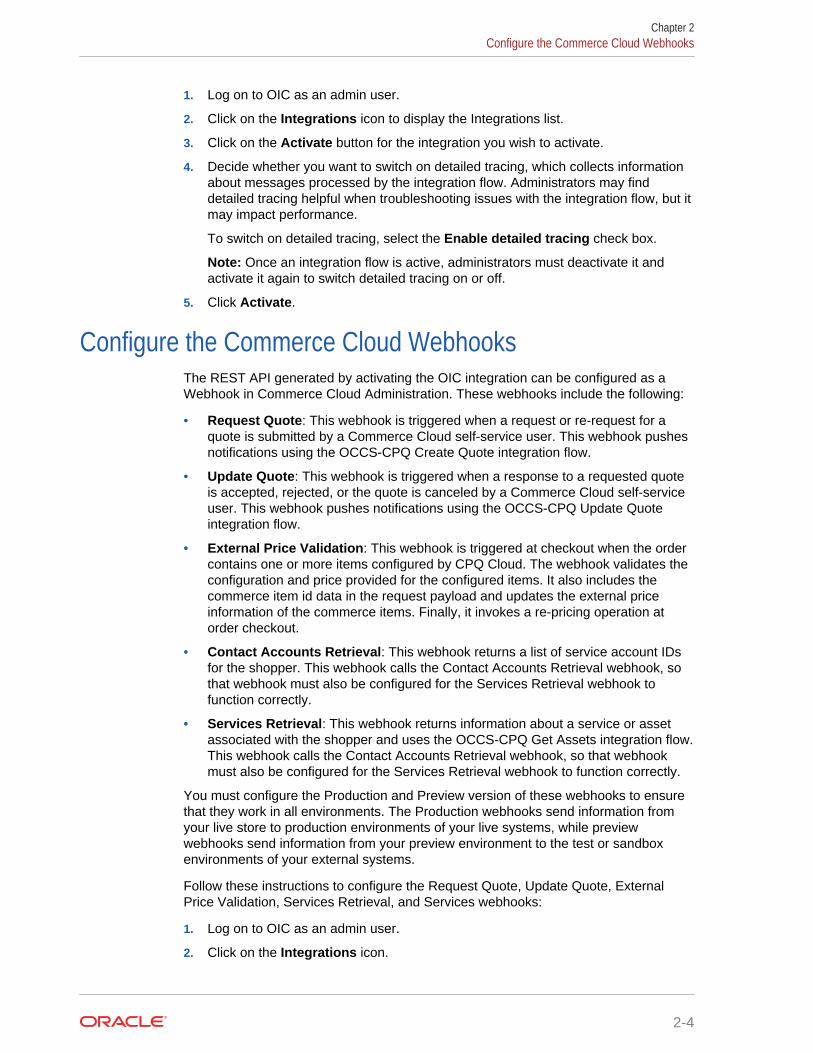
1. Log on to OIC as an admin user.
2. Click on the Integrations icon to display the Integrations list.
3. Click on the Activate button for the integration you wish to activate.
4. Decide whether you want to switch on detailed tracing, which collects informationabout messages processed by the integration flow. Administrators may finddetailed tracing helpful when troubleshooting issues with the integration flow, but itmay impact performance.
To switch on detailed tracing, select the Enable detailed tracing check box.
Note: Once an integration flow is active, administrators must deactivate it andactivate it again to switch detailed tracing on or off.
5. Click Activate.
Configure the Commerce Cloud WebhooksThe REST API generated by activating the OIC integration can be configured as aWebhook in Commerce Cloud Administration. These webhooks include the following:
• Request Quote: This webhook is triggered when a request or re-request for aquote is submitted by a Commerce Cloud self-service user. This webhook pushesnotifications using the OCCS-CPQ Create Quote integration flow.
• Update Quote: This webhook is triggered when a response to a requested quoteis accepted, rejected, or the quote is canceled by a Commerce Cloud self-serviceuser. This webhook pushes notifications using the OCCS-CPQ Update Quoteintegration flow.
• External Price Validation: This webhook is triggered at checkout when the ordercontains one or more items configured by CPQ Cloud. The webhook validates theconfiguration and price provided for the configured items. It also includes thecommerce item id data in the request payload and updates the external priceinformation of the commerce items. Finally, it invokes a re-pricing operation atorder checkout.
• Contact Accounts Retrieval: This webhook returns a list of service account IDsfor the shopper. This webhook calls the Contact Accounts Retrieval webhook, sothat webhook must also be configured for the Services Retrieval webhook tofunction correctly.
• Services Retrieval: This webhook returns information about a service or assetassociated with the shopper and uses the OCCS-CPQ Get Assets integration flow.This webhook calls the Contact Accounts Retrieval webhook, so that webhookmust also be configured for the Services Retrieval webhook to function correctly.
You must configure the Production and Preview version of these webhooks to ensurethat they work in all environments. The Production webhooks send information fromyour live store to production environments of your live systems, while previewwebhooks send information from your preview environment to the test or sandboxenvironments of your external systems.
Follow these instructions to configure the Request Quote, Update Quote, ExternalPrice Validation, Services Retrieval, and Services webhooks:
1. Log on to OIC as an admin user.
2. Click on the Integrations icon.
Chapter 2Configure the Commerce Cloud Webhooks
2-4
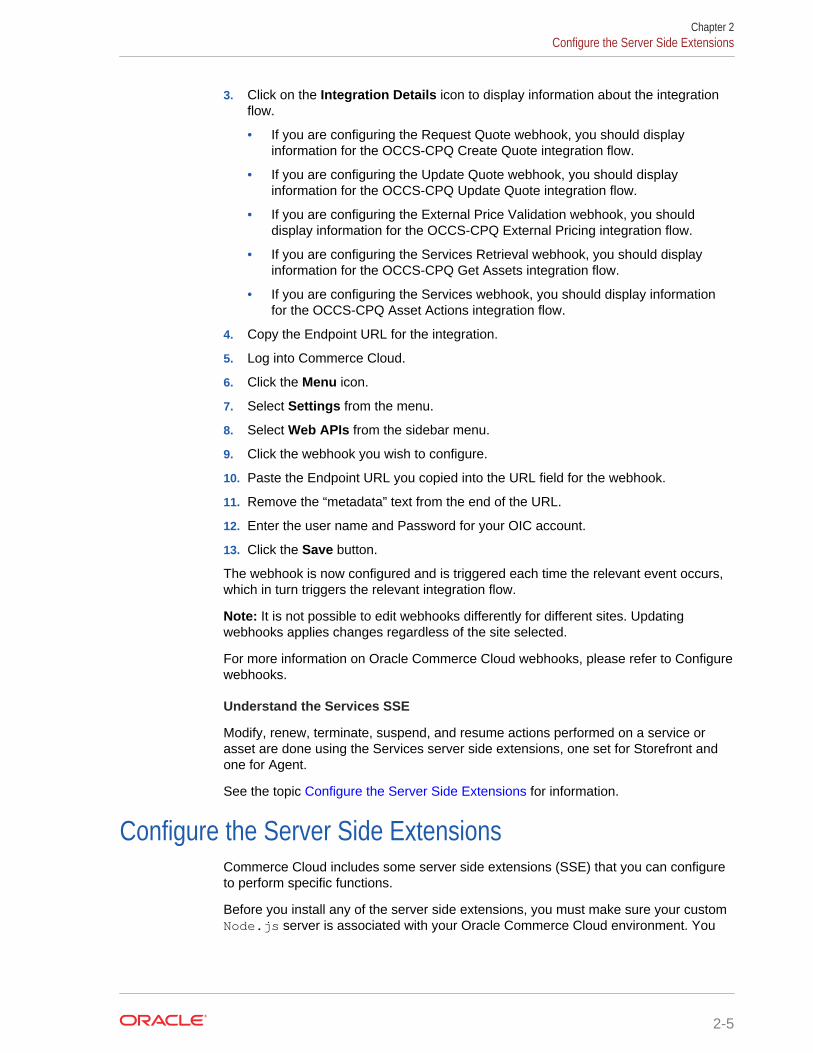
3. Click on the Integration Details icon to display information about the integrationflow.
• If you are configuring the Request Quote webhook, you should displayinformation for the OCCS-CPQ Create Quote integration flow.
• If you are configuring the Update Quote webhook, you should displayinformation for the OCCS-CPQ Update Quote integration flow.
• If you are configuring the External Price Validation webhook, you shoulddisplay information for the OCCS-CPQ External Pricing integration flow.
• If you are configuring the Services Retrieval webhook, you should displayinformation for the OCCS-CPQ Get Assets integration flow.
• If you are configuring the Services webhook, you should display informationfor the OCCS-CPQ Asset Actions integration flow.
4. Copy the Endpoint URL for the integration.
5. Log into Commerce Cloud.
6. Click the Menu icon.
7. Select Settings from the menu.
8. Select Web APIs from the sidebar menu.
9. Click the webhook you wish to configure.
10. Paste the Endpoint URL you copied into the URL field for the webhook.
11. Remove the “metadata” text from the end of the URL.
12. Enter the user name and Password for your OIC account.
13. Click the Save button.
The webhook is now configured and is triggered each time the relevant event occurs,which in turn triggers the relevant integration flow.
Note: It is not possible to edit webhooks differently for different sites. Updatingwebhooks applies changes regardless of the site selected.
For more information on Oracle Commerce Cloud webhooks, please refer to Configurewebhooks.
Understand the Services SSE
Modify, renew, terminate, suspend, and resume actions performed on a service orasset are done using the Services server side extensions, one set for Storefront andone for Agent.
See the topic Configure the Server Side Extensions for information.
Configure the Server Side ExtensionsCommerce Cloud includes some server side extensions (SSE) that you can configureto perform specific functions.
Before you install any of the server side extensions, you must make sure your customNode.js server is associated with your Oracle Commerce Cloud environment. You
Chapter 2Configure the Server Side Extensions
2-5
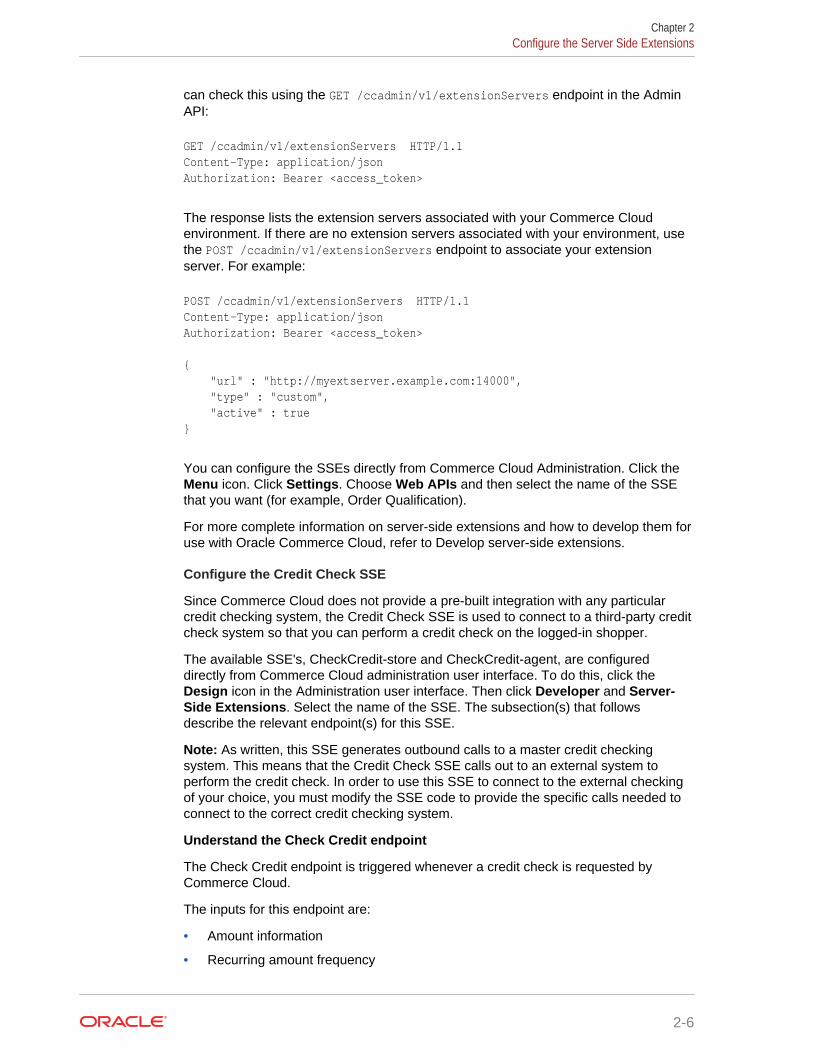
can check this using the GET /ccadmin/v1/extensionServers endpoint in the AdminAPI:
GET /ccadmin/v1/extensionServers HTTP/1.1Content-Type: application/jsonAuthorization: Bearer <access_token>
The response lists the extension servers associated with your Commerce Cloudenvironment. If there are no extension servers associated with your environment, usethe POST /ccadmin/v1/extensionServers endpoint to associate your extensionserver. For example:
POST /ccadmin/v1/extensionServers HTTP/1.1Content-Type: application/jsonAuthorization: Bearer <access_token>
{ "url" : "http://myextserver.example.com:14000", "type" : "custom", "active" : true}
You can configure the SSEs directly from Commerce Cloud Administration. Click theMenu icon. Click Settings. Choose Web APIs and then select the name of the SSEthat you want (for example, Order Qualification).
For more complete information on server-side extensions and how to develop them foruse with Oracle Commerce Cloud, refer to Develop server-side extensions.
Configure the Credit Check SSE
Since Commerce Cloud does not provide a pre-built integration with any particularcredit checking system, the Credit Check SSE is used to connect to a third-party creditcheck system so that you can perform a credit check on the logged-in shopper.
The available SSE's, CheckCredit-store and CheckCredit-agent, are configureddirectly from Commerce Cloud administration user interface. To do this, click theDesign icon in the Administration user interface. Then click Developer and Server-Side Extensions. Select the name of the SSE. The subsection(s) that followsdescribe the relevant endpoint(s) for this SSE.
Note: As written, this SSE generates outbound calls to a master credit checkingsystem. This means that the Credit Check SSE calls out to an external system toperform the credit check. In order to use this SSE to connect to the external checkingof your choice, you must modify the SSE code to provide the specific calls needed toconnect to the correct credit checking system.
Understand the Check Credit endpoint
The Check Credit endpoint is triggered whenever a credit check is requested byCommerce Cloud.
The inputs for this endpoint are:
• Amount information
• Recurring amount frequency
Chapter 2Configure the Server Side Extensions
2-6

• Recurring amount duration
• Recurring amount
• Contact information
• First Name
• Last Name
• Email Address
• Telephone Number
• Address information
• Address line 1
• Address line 2
• City
• State
• Country
• Postal code
The return for this endpoint is either a TRUE or FALSE value depending on whetherthe shopper passed the credit check or not.
Configure the Customer Account Model SSE
This SSE is used to return information about the customer account model for aregistered shopper or to update the customer account model when required.
You can configure the Customer Account Model SSE directly from Commerce CloudAdministration. To do this, click the Design icon in the Administration user interface.Then click Developer and Server-Side Extensions. Select the name of the SSE. Thesubsection(s) that follows describe the relevant endpoint(s) for this SSE.
Understand the Create Accounts endpoint
This endpoint is triggered if the Query Accounts endpoint does not return any accountsfor the shopper.
The inputs for this endpoint are:
• User Token for the logged-in shopper.
• Account Type
• Account Name
• Primary Contact
• Billing Profile(s)
• Address(es)
• Contact ID(s)
• Contact Role(s)
The returns for this endpoint are the accounts, roles, addresses, and business profilesnow associated with the shopper.
Understand the Create Contact endpoint
Chapter 2Configure the Server Side Extensions
2-7
This endpoint is triggered when a shopper logs in to Commerce Cloud.
The input for this endpoint is the User Token for the logged-in shopper.
The return for this endpoint is the new External Contact ID created for the shopper.
Understand the Query Accounts endpoint
This endpoint is triggered when a shopper logs in to Commerce Cloud and when theygo to Checkout for an order that contains service items.
The input for this endpoint is the User Token for the logged-in shopper.
The returns for this endpoint are the accounts, roles, addresses, and business profilesassociated with the shopper.
Understand the Query Contacts endpoint
This endpoint is triggered when a shopper logs in to Commerce Cloud.
The input for this endpoint is the User Token for the logged-in shopper.
The return for this endpoint is the External Contact ID for the shopper.
Understand the Update Accounts endpoint
This endpoint is triggered when a shopper saves an account address.
The inputs for this endpoint are:
• User Token for the logged-in shopper.
• The Account ID of the account to which the billing profile is linked.
• The new address as provided by the shopper.
The returns for this endpoint are the accounts, roles, addresses, and business profilesassociated with the shopper.
Configure the Order Qualification SSE
This SSE is used to perform any final checks on an order before payment isauthorized and the order is submitted to downstream systems for processing andfulfillment.
It also validates that for any item in the order which is based on a SKU where theconfigurable property is TRUE and the assetable property is TRUE the quantity mustbe 1 and, if not, return an error indicating that this item can only be purchased one at atime. This check is done by looking to see if the root item has an assetKey value. Formore information, see the Use Asset Based Ordering section.
You can configure the Order Qualification SSE directly from Commerce CloudAdministration. To do this, click the Design icon in the Administration user interface.Then click Developer and Server-Side Extensions. Select the name of the SSE. Thesubsection(s) that follows describe the relevant endpoint(s) for this SSE.
Understand the Order Qualification endpoint
This endpoint is triggered by the Order Validation webhook when any order containinga configured item is submitted.
The input for this endpoint is the order containing the configured item.
Chapter 2Configure the Server Side Extensions
2-8
The return for this endpoint is either a TRUE or FALSE value depending on whetherthe order passed the validation check or not. If the value is FALSE the return alsoincludes information about which item(s) in the order failed validation.
Configure the Order Qualification Pipeline SSE
This SSE is used to ensure that an order is valid. It enables an order qualification stepin the purchasing process that can be invoked via the Order Qualification webhook.The extension can be configured to execute custom order qualification processes suchas checking whether the shopper is eligible to purchase the items in the cart. Itcontains a pre-built algorithm to validate that the Customer, Billing, and Serviceaccounts as well as the Billing Profile assigned to the items in the cart are valid for thelogged in shopper.
The OrderQualificationPipeline SSE can be configured from the administrator’s userinterface. To do this, click the Design icon in the Administration user interface. Thenclick Developer and Server-Side Extensions. Select the name of the SSE.
Understand the Order Qualification endpoint
This endpoint is triggered when a shopper goes to checkout for an order that containsconfigured items.
The inputs for this endpoint are:
• Contact record for the shopper
• Order containing configured items.
The return for this endpoint is either a TRUE or FALSE value depending on whetherthe order passed the validation check or not. If the value is FALSE the return alsoincludes information about which item(s) in the order failed validation.
Configure the Order Validation Pipeline SSE
This SSE enables an order qualification step in the purchasing process that can beinvoked via the Order Validation webhook. The extension can be configured toexecute any final checks particular to the purchasing model before the order paymentis authorized and the order is submitted to the downstream systems for fulfillment andprovisioning.
The OrderValidationPipeline SSE can be configured from the administrator’s userinterface. To do this, click the Design icon in the Administration user interface. Thenclick Developer and Server-Side Extensions. Select the name of the SSE.
Configure the Services SSE
Services to perform modify, renew, terminate, suspend, and resume actions on aservice or asset are performed using server side extensions, one set for Storefront andone for Agent to perform.
There are two methods you can use to configure the Services SSE. The first methodlets you configure the SSE directly from the Commerce Cloud Administration userinterface. To do this, click Design in the Administration user interface. Then clickDeveloper and Server-Side Extensions. Select the name of the Services SSE.
The other method is to download the SSE and make the required changes (forexample, setting the config.json file in the SSE. Finally, zip up the modified SSE andupload the ZIP file. To upload the file, click Settings then Extensions. On the
Chapter 2Configure the Server Side Extensions
2-9
Extensions page, click Installed and then Upload Extension. Select the location andname of the ZIP file.
Understand the Services SSE endpoints
The Server Side Extension Endpoints for the Services SSE are the following:
• Modify
• Renew
• Terminate
• Suspend
• Resume
These endpoints are triggered when a user performs an operation on an asset.
The inputs for these endpoints are:
• Logged in User Token
• AssetKey, the unique ID for the asset for this operation. This may be a root, branchor leaf asset.
The returns for this endpoint are BOM (Bill of Materials) and Error.
Configure the Configuration Validation SSE
The Configuration Validation SSE (cpq-config-validation-app) plays an importantrole in Asset Based Ordering and validating asset configuration. This specific SSEperforms a configuration validation between items in a shopper's cart and the itemscaptured in response to configuration validation end points. For more completeinformation on Asset Based Ordering, refer to the Using the Integration Functionalitysection of this document.
To use this SSE, you should first have the External Pricing webhook set to /ccstorex/custom/v1/validateCPQConfigurations. This is done on the Settings pageof the Administration user interface.
You should also have the following endpoints configured:
• GET_CONFIGBOM_URI
• GET_CONFIG_URI
The GET_CONFIGBOM_URI URL gets triggered for the Suspend and Terminate Services.The GET_CONFIG_URI URL gets triggered for the Renew, Modify, and ResumeServices. The SSE does validation between items in cart and items captured in theresponse of these two end points
The SSE package is named cpq-config-validation-app and is downloadable by thisname from the Administration user interface.
Enable the IntegrationsYou must complete the procedures in this section to enable the CPQ CloudConfigurator integration, the CPQ Cloud Request For Quote integration, and the AssetBased Ordering (ABO) integration in Commerce Cloud.
Chapter 2Enable the Integrations
2-10
For additional information, refer to Appendix A: Configurator Flow and Appendix B:Request for Quote Flow.
Enable CPQ Cloud Configuration Integration
Follow these steps to enable the CPQ Configuration Integration within OracleCommerce Cloud:
1. Log on to Commerce Cloud.
2. Click on the Menu icon.
3. Select Settings from the menu.
4. Select Oracle Integrations from the sidebar menu.
5. Select CPQ Configuration from the dropdown menu.
6. Check the Enable Integration checkbox.
7. Enter the Configuration URL using the following structure:
https://<cpq_domain>/commerce/new_equipment/products/model_configs.jsp
8. Enter the Reconfiguration URL using the following structure. You must enter thesevalues for your production and preview environments.
https://<cpq_domain>/commerce/new_equipment/products/external_reconfig.jsp
9. Enter the Modification URL using the following structure. You must enter thesevalues for your production and preview environments.
https://<cpq_domain>/commerce/new_equipment/products/model_configs.jsp
10. Click the Save button.
If you are using multiple sites you must follow these instructions for each site that youoperate that uses the CPQ Configuration integration.
Identify Configurable Products in the Product Catalog
Before a Commerce Cloud self-service user can use the CPQ Cloud configurator toconfigure complex products for purchase in Commerce Cloud, you must identify theproducts as configurable in the product catalog. Before doing so, it is important to havea synchronized product catalog to ensure that products in the Commerce Cloudcatalog map to corresponding items in the CPQ Cloud catalog.
To identify a product as configurable:
1. Log in to Commerce Cloud.
2. Click on the Menu icon.
3. Select Catalog from the menu.
4. Select the product you wish to identify as configurable.
5. Click on the SKUs tab of the product detail pop-up frame.
6. Select the SKU you wish to identify as configurable.
Chapter 2Enable the Integrations
2-11
7. Check the Configurable checkbox. This displays three further fields you mustcomplete.
8. Enter the Model information. This should match the Model information of aconfigurable product in the CPQ Cloud catalog.
9. Enter the Product Line information. This should match the Product Lineinformation of a configurable product in the CPQ Cloud catalog.
10. Enter the Product Family information. This should match the Product Familyinformation of a configurable product in the CPQ Cloud catalog.
11. Click Save. This returns you to the SKU frame where the SKU you updated shouldbe marked with an asterisk to identify it as a configurable SKU.
Note: Administrators can also perform the above setup steps in bulk by using the SKUimport program. From the Catalog page in Commerce Cloud, click Manage Catalogand select Import. In the Import dialog, click Browse and locate the CSV file toimport. Click Upload File, click Validate, and then click Import.
Add Customize button to the Product Details Widget
Administrators must add a Customize button to the Product Details widget, so thebutton is visible to Commerce Cloud self-service users from the Product Details pagefor a customizable product.
To add a Customize button to the Product Details widget:
1. Log in to Commerce Cloud.
2. Click on the Menu icon.
3. Select Design from the menu.
4. Select Product Layout from the layout list.
5. Delete the Product Details widget from the layout.
6. Place a new product details widget on the layout.
7. Click the Settings icon for the new Product Details widget.
8. From the Element Library, place a Customize button on the new Product Detailswidget.
9. Publish the changes.
Enable CPQ Quoting Integration
Follow these steps to enable the CPQ Quoting Integration within Oracle CommerceCloud:
1. Log on to Commerce Cloud.
2. Click the Menu icon.
3. Select Settings from the menu.
4. Select Oracle Integrations from the sidebar menu.
5. Select CPQ Quoting from the dropdown box.
6. Check the Enable Integration checkbox.
Chapter 2Enable the Integrations
2-12
Add Quote Buttons to the Checkout and Order Details Pages
To make the CPQ Cloud quoting capability available to Commerce Cloud self-serviceusers, you must add the Request Quote widget to the Checkout layout and the QuoteDetails widget to the Order Details layout.
The Request Quote widget adds a Quote Notes text box and a Request Quote buttonto the Checkout layout.
The Quote Details widget adds a Quote Notes text box populated with any notesassociated with the order to the Order Detail layout. The widget also adds a RejectQuote, Request Re-Quote, and Accept Quote buttons to the to the Order Detail layout.
The Quote Details and Request Quote widgets do not display on the layouts bydefault. You must first make the widgets available and then place them on theCheckout and Order Detail pages.
To add quote buttons to the Checkout and Order Details pages:
1. Log in to Commerce Cloud.
2. Click the Menu icon.
3. Select Design from the menu.
4. Select the Components tab on the Design page.
5. Click the Show Hidden button.
6. Click the Show icon for the Quote Details Widget and the Request Quote Widget.
7. Within the Design page, select the Layouts tab.
8. From the layout list, select Checkout Layout.
9. Drag and drop the Request Quote widget from the Components menu to thedesired location on the Checkout layout.
10. From the layout list, select Order Details.
11. Drag and drop the Quote Details widget from the Components menu to thedesired location on the Order Details layout.
12. Publish the changes.
Enable Asset Based Ordering
To enable Asset Based Ordering, you must make sure that you have set up the rightintegration webhooks and/or SSEs mentioned in the Configure the Commerce CloudWebhooks and Configure the Server Side Extensions topics of this document.
Chapter 2Enable the Integrations
2-13
3Use the Integration Functionality
This chapter provides instruction on using the functionality in Oracle Commerce Cloudthat is supported by the integration with Oracle CPQ Cloud.
Configure an itemItems that have been marked as configurable in your catalog may be configured eitherby an agent via the Commerce Cloud Agent Console, or by a shopper via theCommerce Cloud Storefront. This section provides instructions for both methods ofconfiguring an item.
Configure an Item by an Agent
These instructions detail how an agent can configure an item via the Agent Console.
1. Log onto Commerce Cloud.
2. Using Agent Console, search for the shopper for whom you wish to create a neworder.
3. Click New to create a new order.
4. Select a configurable product from the catalog.
5. Click on the Configure button to open the CPQ iFrame.Note: The CPQ iFrame is optimized for desktop, laptop, or tablet-size devices andis not recommended for mobile devices. If you need to display on mobile devices,please contact your CPQ Implementation team and inquire about the CPQ MobileLayout.
6. Select the configuration options required for the order.
7. Click Add to Cart.
Once the configured item has been added to the cart, the agent can complete theorder by going through the normal checkout process.
There is a validation check before the order is processed to ensure that theconfiguration options selected are valid. If they are valid, the order process completesand the order is placed. If they are not valid, an error message is displayed to theagent telling them that the configuration is invalid and that the order cannot be placed.
Configure an Item by a Shopper
These instructions detail how a shopper can configure an item via Commerce CloudStorefront.
1. Shopper selects a configurable item from the product catalog.
2. Shopper clicks on the Customize button which opens the CPQ iFrame.
3. Shopper selects their desired configuration options for the item.
4. Shopper adds customized item to their cart.
3-1
5. Shopper goes to checkout and provides shipping and payment details.
There is a validation before the order is processed to ensure that the configurationoptions selected are valid. If they are valid, the order process completes and the orderis placed. If they are not valid, an error message is displayed to the shopper tellingthem that the configuration is invalid and that the order cannot be place. The shopperis then unable to place the order until the configuration options have been changedand the configured item passes the validation check.
Request a QuoteQuotes may be requested for one or more items on an order either by an agent fromwithin the Agent Console, or by a shopper from the checkout page for their order.
If you are also using CPQ Configuration functionality, the order may contain acombination of configured and non-configured items.
Request a Quote by an Agent
An agent can request a quote on one or more items in an order from the CommerceCloud Agent Console. The agent must follow these instructions to request a quote:
1. Log onto the Commerce Cloud Agent Console.
2. Search for the shopper for whom you wish to generate a new quote.
3. Click New to create a new order, or select an existing unfulfilled order for theshopper.
4. Once you have an order with items in the cart, click on the Request Quote link inthe order edit page. You can switch between the Request Quote page and theCreate Order page by clicking on the appropriate link.
5. Add text to the Quote Notes text box as desired.
6. Click on the Request Quote button.Once the agent has submitted the quote request, the Request Quote webhook istriggered and all relevant information is passed to CPQ Cloud for a decision on thequote. The order status is changed to “Pending quote”. When an order is inPending status, the agent cannot perform any operations on the order.
A confirmation email is sent to the shopper informing them of the status of theirorder.
7. Once a response is received, the order status changes to “This order is a quote”,and the agent then has a number of options about how to proceed. The agent can:The agent can:
• Accept the quote: If the shopper is satisfied with the quoted price returnedfrom CPQ Cloud, the agent can accept the quote on their behalf by clicking onthe Accept button and proceeding with the order as normal.Once payment information has been entered and the order placed the orderstatus changes to “Submitted for fulfillment”. At this point the Update Quotewebhook is triggered and CPQ Cloud is informed that the quote has beenaccepted.
At this stage the agent can click on the Edit Order button, but the only editsallowed to the quote are changes to the shipping group, or the application ofshipping discounts or promotions. The agent may not add or remove itemsfrom the cart, or change the quantities of items included in the order. The
Chapter 3Request a Quote
3-2

order status changes to “Order being amended” until the agent clicks on theComplete Order button.
• Request a requote: If desired, the agent can enter more details in theRequest Quote textbox and click on the Request Requote button to request anupdated quote. When the agent requests a requote the order status changesto “Pending quote”. When an order is in Pending status, the agent cannotperform any operations on the order.
• Reject the quote: The agent can click on the Reject Quote button to reject thequote. This cancels the shopper’s order and the order status changes to “thisquote has been rejected”.Note: The response to a quote request includes provision for an expiry datefor the quote. If the quote has expired the Accept Quote and Reject Quotebuttons are disabled, but an agent can request a requote for the order.
Once the agent responds to the quote a confirmation email is sent to theshopper informing them of the status of their quote.
Order statuses relating to quotes are included in the dropdown list of order statuses inthe Order Details section of the Order Search page.
Request a Quote by a Shopper
A shopper can request a quote on one or more items in an order from the checkoutpage. The shopper must follow these instructions to request a quote.
1. Add the desired items to the shopping cart.
2. Proceed to the checkout page.
3. On the checkout page, enter supporting details in the Request a Quote text box.
4. Click the Request Quote button.
Once the shopper has submitted their quote request, the Request Quote webhook istriggered and all relevant information is passed to CPQ Cloud for a decision on thequote.
When a decision is made about the quote, the order is updated and the shopper thenhas three options about how to proceed.
They can:
• Accept the quote: This means the shopper is satisfied with the quote and theymay continue through the purchase process with the prices provided. Thecheckout page is displayed and the shopper may enter their shipping details andproceed with payment.
• Reject the quote: This means that the shopper has rejected the quote providedby CPQ Cloud, and the order is canceled.
• Request a requote: The shopper can use the Request Requote text box toprovide further information and request an updated quote.
Use multi-level itemsThis integration provides support for a hierarchical structure for items available forshoppers to purchase. Commerce Cloud supports an “n-level” hierarchicalconfiguration model. This means that a configured item can contain sub-items that are
Chapter 3Use multi-level items
3-3
also configurable items and that can in turn contain sub-items that are configurableitems.
An example of this would be a bundled package for a cellphone. The bundle itselfwould be the top-level item. The cellphone would be a configurable sub-item, but thiscould then itself have configurable sub-items, such as an SD card. Commerce Cloudcan provide a top-level price for the bundle, but can also provide a price breakdown foreach configurable item within the bundle.
If a shopper adds a multi-level item to their cart, Commerce Cloud works with CPQCloud to display the information about the multi-level item in the shopper’s cart. Thecart displays a total price and an item price for any configurable sub-items. If theshopper changes any of the configurable sub-items, the price displayed for that sub-item changes and the total price is also amended accordingly.
When a shopper clicks on the Place Order button a validation check is carried out toensure that the prices displayed for the configured items is still applicable. If it is thenthe order can proceed. If it is not, a message explaining this is displayed to theshopper and the cart is reloaded with up-to-date price information included for theconfigured items.
You can create a multi-level hierarchy in your catalog using either a recommendeditems model or a bill of materials model. You must refer to the relevant CPQ Clouddocumentation for instructions on how to do this.
Use Quadplay/NPlay items
A standard, or single play, configured item represents a single service, such as MobilePhone or IPTV that has a single set of configuration information, i.e. is based on asingle configuration model in Oracle CPQ Cloud.
A Quadplay or NPlay configured item represents a package or bundle that combinesmultiple services in a single purchase and contains multiple sets of configurationinformation, i.e. is based on a single configuration model that also contains otherconfiguration models in CPQ.
As an example, consider a case where the configured bundle contains 4 separateservices (or ‘plays’) such as Landline, Internet, Mobile and IPTV. In this example, thebundle is called the Get4 Bundle. Unlike a standard configured item, the Get4 Bundle,as a Quadplay or NPlay configured item has configuration information at the followinglevels:
• Root level - in this example, the Get4 Bundle level.
• Branch level - in this example, the Landline, Internet, Mobile and IPTV levels.
With the support of Quadplay/NPlay configured items, the shopper adds the Get4Bundle to the Oracle Commerce Cloud cart as a standard multi-level hierarchicalconfigured item. This item also has the ability to be reconfigured if needed. The item isthen validated and checked out as usual. For more detailed information working withQuadplay and NPlay items, refer to CX Communications - How to Customize andExtend – Configure NPlay Bundles with CPQ System Configuration white paper on theMy Oracle Support site.
Understand Commerce Cloud Administration support for configuration metadata
In CPQ, a single model is also able to support multiple NPlay offers and additionalversions of those offers. For example the same Model, Product Line, and ProductFamily might contain 3 variations on the same NPlay bundle such as the following:
Chapter 3Use multi-level items
3-4
• Starter Home Bundle
• Total Home Bundle
• Friends and Family Bundle
The same model might also support multiple versions of those bundle variations such
• Starter Home Bundle
• Starter Home Bundle 2017
• Starter Home Bundle 2018and
• Total Home Bundle
• Total Home Bundle 2017
• Total Home Bundle 2018and
• Friends and Family Bundle
• Friends and Family Bundle 2017
• Friends and Family Bundle 2018
To work with these types of variations, when the shopper selects a version of a bundlein Commerce Cloud and chooses to configure it, the configuration request needs toinclude extra information to allow the configurator to load the correct version of theconfiguration model. This extra information is provided in what is called configurationmetadata. This data is passed along as a collection of key value pairs and aid inhelping to identify the correct bundle.
Understand configuration metadata details
Where a CPQ configuration model supports multiple products and product variations,this information may not be sufficient to pre-load the order iframe with the correctstarting point. In such cases extra information (i.e., configuration metadata) canincluded in the iframe URL created by Commerce Cloud.
Again, think of configuration metadata as a collection of one or more key value pairsthat identifies the correct starting point for the configuration model. Configurationmetadata can be static or dynamic. Static configuration metadata is manually enteredby the Commerce Cloud Administrator and stored on the SKU record in CommerceCloud. Dynamic configuration metadata can be captured by the PDP UI widget andcan be entirely implementation specific.
Note: Dynamic configuration metadata is not restricted to being captured on the PDPUI widget. The dynamic configuration can be derived from any relevant informationsuch as shopper profile.
This means that merchants can decide what dynamic key value pair data they want tocapture and pass in the configuration request for any SKU. Dynamic configurationmetadata can be mandatory or optional (i.e., in some cases the shopper MUST enter avalue for a key and in some cases they may optionally enter a value for a key).
Configuration metadata lets merchants define a single model for all variants of aconfigurable product and at purchase time pre-load the configuration model at theappropriate starting point based on the shopper’s selection in Commerce Cloud.
The configuration metadata feature builds on the already existing support of the NPlayfeature. Earlier there was support of the purchase of NPlay products but only where
Chapter 3Use multi-level items
3-5

there is a one-to-one relationship between product and model (i.e., each NPlayproduct had to have its own unique corresponding configuration model in CPQ).
Enter configuration metadata via the administration user interface
To provide the configuration metadata needed for processing an order, theconfigurationMetadata property is exposed so that you can enter the information inthe Commerce Cloud Administration interface. To get there click Catalogue thenProduct and finally SKU. This Administration panel lets you view, add, delete, and editthe Configuration Metadata values as required. Any request from Commerce Cloud toconfigure an item will include configuration metadata where it is available.
An example of using configuration metadata might be a case where a CommerceCloud Administrator receives an email from a colleague in CPQ to advise them thatthe configuration model with the correct configuration metadata for the Family Planproducts SKUs is now complete. The email contains the information to furtherconfigure the SKU. The SKU is called sku_fp_001 and the information provided is thefollowing:
• Product Family – mobile
• Product Line - bundles
• Model - sku_fp_001
• Bundle Version - 18.1
• Region - EMEA
The process for entering the configuration metadata via the Admin interface would gosomething like the following:
1. Navigate to the Commerce Cloud administration user interface panel and selectCatalog.
2. Select the Family Plan product and select the SKU sku_fp_001 which is currentlyflagged as inactive.
3. Click on Externally Configurable SKU. You see the text “CPQ Cloud canconfigure this as a part of a complex product.”Note: For any SKU where you want to add configuration metadata, you mustmake sure that Externally Configurable SKU is checked when you first beginentering data. A new input property will be displayed which will allow you to beginto enter one or more key value pairs of data.
4. Slide the panel down until you see the Product Family, Product Line, and Modelfields appear on the panel. Enter all of the correct metadata details (the ones sentto you in the email from your CPQ colleague) manually.
5. Slide the panel down to see the Configuration Metadata table, click the Add buttonto add a row.
6. Add Bundle Version to the Name field. In the field next to Bundle Version, add18.1 (as the bundle version number). You can press Tab or Enter to create avalue entry. Click the Add button when done. A new row in the metadata valuetable appears.
7. Add Region to the Name field. In the field next to Region, add EMEA. You canpress Tab or Enter to create the value entry.
8. Slide the panel back up to the top of the SKU ID panel, click Active, and then clickSave.
Chapter 3Use multi-level items
3-6
At this point, you have entered all of the details received from your CPQ contact. Thisinformation must be entered correctly. The details that are entered are not seen by thecustomer. The information is designed to populate the config iframe window with thecorrect information. As a final step you activate the SKU and save the details.
Note: Since the configuration metadata must be entered manually via the CommerceCloud administration console, keep in mind the following rules:
1. There is no support for versioning of configuration metadata so when an SKUrecord is imported, make sure it does not contain any configuration metadata thatshould replace any existing configuration metadata assigned to that SKU.
2. If the imported SKU record includes configuration metadata (columns present inthe import file) but there are no values included then any existing configurationmetadata will be deleted.
3. If the import SKU record does not include configuration metadata (no columnspresent in the import file), then any existing configuration metadata should beretained.
A Commerce Cloud administrator can view, delete, edit, or add ConfigurationMetadata key value pairs for any SKU where the _Externally Configurable SKU_property is selected. A Configuration request from Commerce Cloud to CPQ alwaysincludes the configuration metadata set in Commerce Cloud for that SKU.
To work with configuration metadata you must have the following prerequisites:
• Oracle Commerce Cloud account
• Oracle Integration Cloud account
• Oracle CPQ account
Understand the Customer Account ModelIf you are using the Customer Account Model SSE, there are a number of differentaccount types that can be associated with a shopper within Oracle Commerce Cloud.
To configure the Customer Account model, use the provided SSE. To do this, click theDesign icon in the Administration user interface. Then click Developer and Server-Side Extensions. Select the CustomerAccountModel-store SSE and/or theCustomerAccountModel-agent SSE.
Both SSEs enable integration with an external CRM system to retrieve and update thefollowing:
• Contacts
• Accounts (Customer Billing and Service accounts)
• Account Roles (Admin, Buyer and User)
• Billing Profiles
Finally, the SSEs serve as the API for the pre-built integration with OracleEngagement Cloud.
There are three account types available within Commerce Cloud relating to billableservices, Customer account, Service account, and Billing account.
The details for these three accounts are captured when an order is placed and theirrelationship with the service is maintained after an order has been fulfilled.
Chapter 3Understand the Customer Account Model
3-7
In many instances these three accounts may all refer to the same person ororganization, but there may also be instances when they differ, and it is important tounderstand the relationship between the different types of account.
In addition to the three account types, there is a Billing Profile, which includesinformation such as billing preferences.
All of the information required for the Customer, Service, and Billing accounts, and forthe Billing Profile is captured during the order process in Commerce Cloud.
Customer Account
This type of account represents the person or organization that owns the service. Itincludes basic customer information, such as name and address and can receive bothservices and bills.
Customer accounts are the highest level in the account hierarchy and can perform allcustomer, service, or billing functions.
Service Account
This type of account represents the person or organization that receives the service.
The address associated with the Service account defines the physical location wherethe service must be delivered. This address is used to verify service and orderingeligibility.
Service accounts are required when the location and/or party receiving the servicediffer from the Customer account. If a Service account is required, it is always a childof a Customer account. There can be multiple Service accounts associated with asingle Customer account.
A Service account cannot be used to perform any of the functions of a Customer orBilling account.
Billing Account
This type of account represents the person or organization that pays for the service.
Billing accounts are required when the location and/or party paying for a service differfrom the Customer account. If a Billing account is required, it is always a child of aCustomer account. There can be multiple Billing accounts associated with a singleCustomer account.
A Billing account cannot be used to perform any of the functions of a Customer orService account.
Billing Profile
A billing profile may be associated with either a Customer account or a Billing account.It captures information such as billing preferences, method of payment, and contactdetails. There may be more than one billing profile associated with a Customer orBilling account, and the shopper must choose which billing profile to use when placingan order for a service.
Chapter 3Understand the Customer Account Model
3-8
Use Recurring Charge ItemsThis integration enables you to provide items that come with a recurring chargeavailable for shoppers to purchase.
Examples of items that include a recurring charge include a service such as a data/callminutes/ text message bundle for a cellphone, or a subscription charge for a cabletelevision package.
Items that include a recurring charge may have just a recurring charge or may have arecurring charge and a price. If an item has a price and a recurring charge, it isassumed that the item is not a service or subscription item. In this case the pricerepresents an upfront payment and the recurring charge is the means by which theoutstanding balance is paid.
Identification of items that include a recurring charge must be carried out through yourCPQ Admin account. Please refer to the Synchronize CPQ Cloud Parts withCommerce Cloud SKUs section of the Implementation Guide contained in the Integrating Oracle Commerce Cloud and CPQ Cloud article on My Oracle Support.
If a shopper adds a recurring charge item to their cart, Commerce Cloud works withCPQ cloud to display full information about the recurring charges associated with theorder. This includes how much the recurring charge is for, the frequency of therecurring charge, and the duration for which the recurring charge will be made.
Note: The default value for frequency is monthly and the default value for duration isopen-ended. If either of these is not the right value for the item they must be correctedin the CPQ Cloud Part for the item.
Items with a recurring charge are not included in order sub-total passed to the shippingcalculator. If a cart contains only recurring charge items the order sub-total passed tothe shipping calculator is zero, which means that no shipping charge is applied to theorder.
Configure payment for recurring charge items
Commerce Cloud includes several built-in integrations with payment gateways that letyour store accept credit cards, debit cards, gift cards, and PayPal payments. However,these integrations do not currently support recurring charges. If you wish to sell itemswith recurring charges you must use one of the methods set out below to configureCommerce Cloud payment processing to support recurring charges.
Configure credit card payments
Follow these instructions to configure your credit card payment processing to handlerecurring charges:
1. Create a custom credit card payment extension.For detailed instructions about performing this step, refer to Create a credit cardextension.
2. Install the custom credit card payment extension.For detailed instructions about performing this step, refer to Install the extensionand configure the gateway.
3. Enable the payment gateway.
Chapter 3Use Recurring Charge Items
3-9
For detailed instructions about performing this task, refer to Create a Credit CardPayment Gateway Integration and Create a Generic Payment GatewayIntegration, .
4. Add custom properties to the Credit Card Payment webhook.For detailed instructions about performing this task, refer to Install the extensionand configure the gateway .
Note: This webhook is not site-specific. If you are running multiple sites on yourCommerce Cloud instance, the configuration you supply applies to all sites thatuse this webhook.
Configure non-credit card payments
Follow these instructions to configure your generic gateway payment processing tohandle recurring charges:
1. Create a custom generic payment extension.For detailed instructions on performing this task refer to the Supported paymentmethods and transaction types section of Create a Generic Payment GatewayIntegration.
2. Install the generic payment extension.For detailed instructions about performing this step, refer to the Install theextension section of Create a Generic Payment Gateway Integration.
3. Enable the payment gateway.For detailed instructions about performing this task, refer to Create a Credit CardPayment Gateway Integration and Create a Generic Payment GatewayIntegration.
4. Customize the payment details widget to capture payment information other thancard details.
5. Add custom properties to the Generic Payment webhook.For detailed instructions about performing this task, refer to Send customproperties to a payment gateway.
Note: This webhook is not site-specific. If you are running multiple sites on yourCommerce Cloud instance, the configuration you supply applies to all sites thatuse this webhook.
Use Asset Based OrderingThis integration supports an asset based ordering (ABO) model.
Understand asset definition and related properties
Asset based ordering lets you sell tangible assets or subscription services deliveredover a period of time; for example, mobile phone call and data plans, television andbroadband packages. When these orders are subsequently fulfilled, the fulfillmentsystem notifies CPQ via an asset API, and CPQ then creates an asset in the CPQasset repository. To better understand asset based ordering and its related services, itis important that you first understand asset definition and the related properties.
In the Commerce Cloud/Oracle CPQ Cloud integration, Commerce Cloud acts as thefirst point of contact for registered and account-based shoppers. Commerce Cloud letsa shopper review and select their purchases as needed.
Chapter 3Use Asset Based Ordering
3-10
In Telco-related purchases, CPQ Cloud acts as the Asset master system. CommerceCloud makes a call to CPQ Cloud to retrieve the assets for a particular profile oraccount. CPQ Cloud then manages the retrieval of assets from multiple systems ifnecessary.
One of the underlying features of any Telco solution is the ability for a self-servicechannel (in this case, Commerce Cloud) to retrieve and display the complete set ofassets owned by the shopper and then to allow the shopper to trigger operations onthose assets. In order for this to happen, Oracle Commerce Cloudsupports thefollowing asset-related information properties at the order item level:
• Asset Key - the assetKey property (formerly assetID) is a unique identifier that isassigned to potential assets when adding items to a cart. This value is usedthroughout the asset life cycle by fulfillment, asset management, and order capturesystems. In this case, the term "potential" is used meaning that not every itemadded to a cart gets completely fulfilled, a provisioning system may fail, etc. Forconfigured items, the assetKey value is assigned as part of the asset configurationprocess in CPQ Cloud.
• Parent Asset Key - Some configured items in an order may be many levels deep ina BOM structure. In order to ensure that the BOM hierarchy is consistentthroughout the asset life cycle, each item in the BOM hierarchy must be able toidentify its direct parent. The parentAssetKey property makes this possible. Forroot items in a BOM hierarchy, the parentAssetKey value is NULL.
• Root Asset Key - Again, some configured items in an order may be many levelsdeep in a BOM structure. In order to ensure that the BOM hierarchy is consistentthroughout the asset life cycle, each item in the BOM hierarchy must be able toidentify its root asset. The rootAssetKey property makes this possible. For rootitems in a BOM hierarchy, the assetKey and the rootAssetKey value is the same.
Understand the mapping of an asset key to an item
In Oracle Commerce Cloud, a configurable SKU may be flagged as "non-assetable"which means that when this item is configured and purchased it will not be assigned acustomer, billing, or service account and will not become an asset for the shopper.When this item is configured, however, CPQ Cloud returns asset key values for eachitem in the BOM by default.
Commerce Cloud only maps asset key values to commerce items that are actually"assetable." The rules used in this process are the following:
• If the SKU selected for configuration is based on a product where the propertyvalue for assetable = TRUE, map the asset key data.
• If the SKU selected for configuration is based on a product where the propertyvalue for assetable = FALSE do not map the asset key data.
Understand the Asset Root
It is also important to point out that when a shopper chooses to configure a SKU inCommerce Cloud, the root item of the BOM returned from CPQ Cloud may not alwaysbe that same SKU, that is, the root item part number may not map directly to theselected configurable SKU.
Say, for example, a mobile product bundle that is represented by the "Red Bundle"SKU in Commerce Cloud is configured several ways. At the initial step of theconfiguration process, the shopper may be asked to select either the Standard
Chapter 3Use Asset Based Ordering
3-11
Package, Student Package, or Value Package. Depending on the selection made, theroot item of the configuration will be different.
So, based on this example, it is possible that the SKU selected by the shopper toconfigure the item will be based on a product where _assetable _= TRUE but the rootitem for the resulting configuration may be based on a product where _assetable _=FALSE.
The rule that decides whether a configured item should be assigned _assetKey _property is based on whether the SKU that corresponds to the root item of theconfiguration is "assetable" and not on whether the item that the shopper selected tobe configured in OCC is "assetable".
Understand asset based ordering and related service operations
As already discussed, asset based ordering lets you sell assets or subscriptionservices delivered over a period of time. When these orders are subsequently fulfilled,the fulfillment system notifies CPQ via an asset API, and CPQ then creates an asset inthe CPQ asset repository.
Once created, assets can subsequently be reviewed by shoppers in the My Servicesmanagement area within the shopper account. The shopper can then administer anasset by creating and placing new commerce orders to perform a number of actionson the asset. These include the following:
• Modify
• Renew
• Terminate
• Suspend
• Resume
A Services-store SSE and the Services-agent SSE can be configured from theadministrator’s user interface. To do this, click the Design icon in the Administrationuser interface. Then click Developer and Server-Side Extensions. Select the nameof the SSE. Both SSEs enable integration with 3rd party asset management systemsto retrieve and execute operations and services on assets available to the shopper.They also serve as the API for the pre-built integration with Oracle CPQ assetmanagement.
For each of these operations the operation flow is basically the following:
• The shopper views their list of assets.
• The shopper selects an asset.
• The shopper selects the desired operation:
– For a Modify operation, the system loads the CPQ hosted iFrame, the shoppermakes their modifications, and selects to add to cart.This is the CPQ hosted iFrame presented to the shopper when they configurea new purchase prior to adding it the cart, reconfigure a new purchase prior tochecking out, or modify an existing asset.
– For all other operations, the system only makes a call to CPQ to execute theoperation.
• CPQ asset records are updated.
Chapter 3Use Asset Based Ordering
3-12
• CPQ returns the required JSON representation of the terminated/renewed/suspended/resumed/modified asset.
• OCC transforms the JSON returned to a commerce item and adds it the cart.
– For a Modify operation the transformation is executed in the OCC client layer.
– For all other operations the transformation occurs in the cpq-config-validation-app SSE. OIC flows, getConfigurations and getConfigBomreturn a flat structure of items and then the transformation and validation isdone in the cpq-config-validation-app SSE.
• The shopper continues shopping.
• The shopper checks out.
• The order items representing Asset Based Ordering operations are submitteddownstream and contain all of the information required to ensure that theoperation is fulfilled.
The specific Services actions are described in more detail later in this section. Theseactions are important for maintaining an efficient self-service channel. When a shopperperforms any one of these actions on an asset, the CPQ asset repository is updatedaccordingly.
Since Commerce Cloud serves as the first point of contact for shoppers, it allowsshoppers to review and select their purchases. In the case of a Telco commercesolution, the CPQ asset repository acts as the Asset Master system in whichCommerce Cloud makes a call to CPQ to retrieve the assets for a particular profile oraccount. CPQ manages the retrieval of assets from multiple systems.
The Commerce Cloud Telco solution gives the shopper the ability to retrieve anddisplay the complete set of Assets owned by the shopper/account as well as carry outthe mentioned administration operations that can be performed on those assets.
When a shopper opens the My Services management area within their account theyare presented with a list of the assets linked to their account. From here they canselect an asset and click on the Details button next to the desired asset to see thedetailed view of the service.
It is at this point that the shopper can choose between the Modify, Renew, Terminate,Suspend, and Resume actions.
Modify
If the shopper chooses Modify, Commerce Cloud loads the current configuration forthe service in question and opens a screen that allows the shopper to modify theservice as required. The new monthly charge for the service is updated automaticallyas the shopper makes their selections. The shopper can then add the modified serviceto their cart.
When the shopper goes through checkout and completes their order, CommerceCloud submits a service modification request to the fulfillment system.
As mentioned, earlier the steps in this operation are typically the following:
• The shopper views their list of assets.
• The shopper selects an asset.
Chapter 3Use Asset Based Ordering
3-13

• The shopper selects a Modify operation. For a Modify operation, the system loadsa CPQ hosted iFrame. The shopper makes their asset modifications and selects toadd it to cart.
• CPQ asset records are updated and CPQ returns the required JSONrepresentation the terminated/renewed/suspended/resumed/modified asset.
• OCC transforms the required JSON returned to a commerce item and adds it thecart. This transformation is executed in the OCC client layer.
• The shopper continues shopping and then checks out.
The order items representing ABO operations are submitted downstream and containall of the information required to ensure that the operation is fulfilled.
Renew
If the shopper chooses Renew, Commerce Cloud determines the configuration ID thatrepresents a renewal of the service in its current configuration and then adds arenewal instruction to the shopping cart and opens the Shopping Cart Details page.
When the shopper goes through checkout and completes their order, CommerceCloud submits a service renewal request to the fulfillment system.
Terminate a service
If the shopper chooses Terminate, a configuration ID is sent back by CPQ thatrepresents the termination of the service in question. A termination instruction is addedto the shopping cart and the Shopping Cart Details page is then opened.
When the shopper goes through checkout and completes their order, CommerceCloud then submits the service termination request to the fulfillment system.
Suspend a service
If the shopper chooses Suspend, it allows them to suspend a service. CommerceCloud provides an endpoint that is used to suspend a service. When a shopper selectsto suspend a service, they choose the Suspend action and then enter a valid suspenddate.
By clicking on the Suspend button, Commerce Cloud determines the configuration IDthat represents the suspension of the service in question, adds a suspensioninstruction to the shopping cart, and opens the Shopping Cart Details page. When theshopper goes through checkout and completes their order, Commerce Cloud submitsa service suspension request to the fulfillment system. Also, when the Suspend actionis chosen from the store user interface, the transaction date is set to current date (i.e.,the date that the shopper suspended the service. This suspension may be indefinite orfor set for a specific period of time by entering a date. A specific shopper use caseexample might be letting a shopper suspend a data plan for 30 days.
The Services SSEs support the Suspend operation which returns either a ConfiguredItem or an Error. Services is part of the Oracle Integrated Cloud flow.
The Services API has an endpoint called Suspend Service. The endpoint can betriggered when a shopper selects to suspend a service, enters a valid suspend dateand time, and selects to proceed. Inputs include the following:
• AssetKey
• Action - Suspend
Chapter 3Use Asset Based Ordering
3-14
• Transaction Date - The valid suspend date and time information that the shopperentered. The Suspend date is not equal to or later than the asset end date.
The API returns either a Configured Item or an Error.
Resume a Service
If the shopper chooses Resume, it allows them to resume a service that waspreviously suspended. Commerce Cloud provides an endpoint that is used to resumea service. When a shopper selects to resume a service, they choose the Resumeaction and then enter a valid resume date and time to resume the service.
By clicking on the Resume button, Commerce Cloud determines the configuration IDthat represents the service in question that is to be resumed, adds a resumeinstruction to the shopping cart, and opens the Shopping Cart Details page. When theshopper goes through checkout and completes their order, Commerce Cloud submitsa resume service request to the fulfillment system. Also, when the Resume action ischosen from the store user interface, the transaction date is set to current date (i.e.,the date that the shopper resumed the service).
The Services SSEs also support this Resume operation which returns either aConfigured Item or an Error. Services is part of the Oracle Integrated Cloud flow.
The Services API has an endpoint called Resume Service. The endpoint can betriggered when a shopper selects to resume a service, enters a valid resume date andtime and selects to proceed. Inputs include the following:
• AssetKey
• Action: Resume
• Transaction Date: The valid Resume date and time that the shopper entered. TheResume date is not equal to or later than the asset end date.
The API returns either a Configured Item or an Error.
Finally, each of these Asset Based Ordering services operations may be carried out bya shopper or by an agent acting on the shopper’s behalf.
Understand the Disable Reconfiguration feature
Regarding these operations, the Oracle Commerce Cloud and CPQ integration hasthe ability to prevent shoppers from attempting to reconfigure items in their cart thathave been added by any of the following operations:
• Renew
• Terminate
• Suspend
• Resume
To assist in disabling reconfiguration on already configured items added by any ofthese actions, an action code of Renew, Terminate, Suspend, and Resume isassigned to an item when that respective operation has been applied to that item.
This code is assigned to make sure that shoppers are prevented from attempting toreconfigure an asset. The purpose of the code is to make sure the reconfiguresession(s) fails, either at reconfiguration or order validation time.
Chapter 3Use Asset Based Ordering
3-15
Differentiate between new order items and ABO order items
To identify items in an order that are the result of an operation on an existing asset(i.e., Terminate, Renew, Suspend, Resume, Modify), Commerce Cloud has checked tosee if there was an assetId value. If there was, Commerce Cloud assumed that theitem is the result of an ABO and not a net new purchase. This approach worked on theassumption that an asset identifier would only be assigned when the asset record wascreated in CPQ.
Asset identifier values are now assigned at the time when a shopper adds an item tothe cart. To ensure that Commerce Cloud can always reliably differentiate betweennew order items and ABO order items when an ABO item is added to the cart, alineType property for each item in the configuration hierarchy is set to ASSET.
The rule used to differentiate between new order items and ABO order items is thefollowing: If assetKey value is present and _lineType = NULL then the item is a newpurchase and not an operation on an existing asset.
Retrieve assets for an order with an asset key
For the cancel in-flight feature, OCC needs a mechanism for retrieving all of the assetsderived from a particular order. Commerce Cloud used to retrieve the assets for aparticular order based on assetID (stored on the asset record in CPQ). CommerceCloud now uses the assetKey value.
For any given order Commerce Cloud queries the CPQ assets API to retrieve theassets for the order based on the collection of assetKey values. This query is limited tothe assetKey values for the root items in the order only
Understand restricting the quantity of assetable items
A shopper used to be able to increase the item quantity for a configured item in thecart in the same way as any other purchase. This action does not work where an assetkey value has been assigned.
Asset keys are assigned to net new purchases as part of the configuration process.CPQ Cloud assigns an assetKey for the root and all child items in the configuration. Ifan item has been assigned an asset key then this asset key is used to identity a singleinstance of this asset throughout the fulfillment, provisioning and asset managementprocesses. As a result, the quantity of an item cannot be greater than one.
Chapter 3Use Asset Based Ordering
3-16

AAppendix A: Configurator Flow
This appendix illustrates the flow between Commerce Cloud, OIC, and CPQ Cloudwhen using the Commerce Cloud-CPQ Configurator integration.
A-1
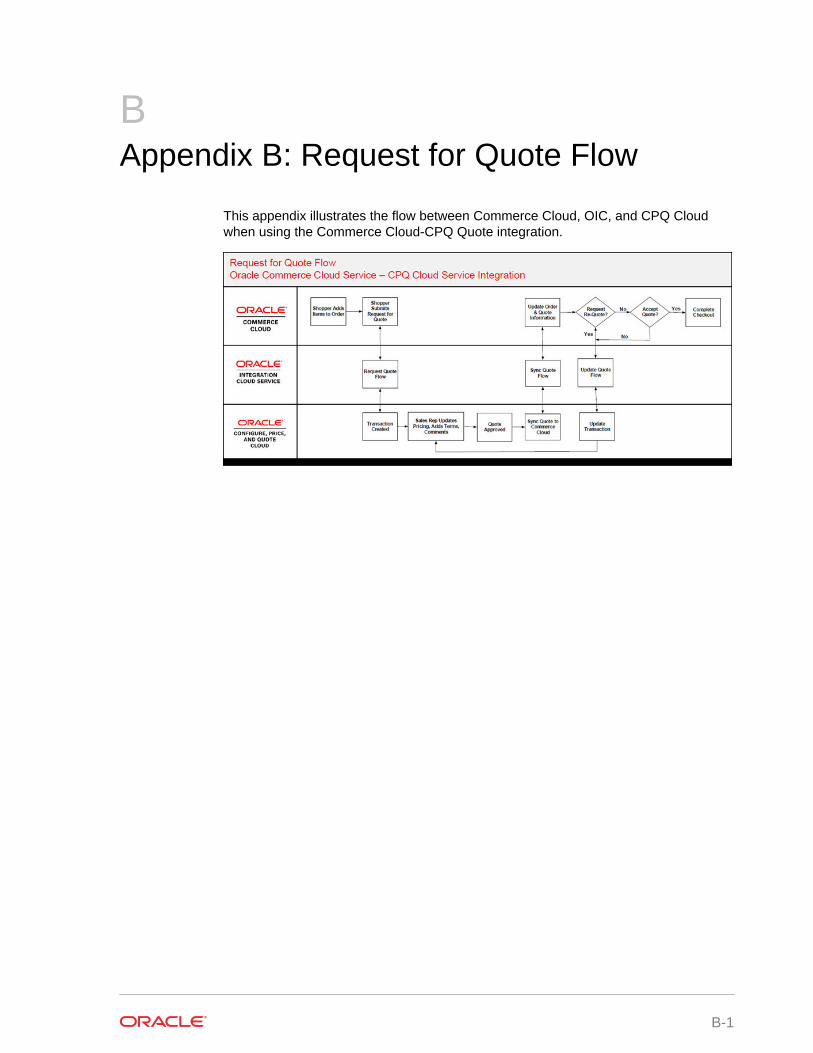
BAppendix B: Request for Quote Flow
This appendix illustrates the flow between Commerce Cloud, OIC, and CPQ Cloudwhen using the Commerce Cloud-CPQ Quote integration.
B-1
Glossary
Glossary-1
Recommended