Error: Macro TOC(None) failed
'NoneType' object has no attribute 'endswith'
back to Table of Contents
Chapter 5: Detailed Cluster Installation Procedure
5.1 Launching the OSCAR Installer
Change directory to the top-level OSCAR directory and start the OSCAR install wizard. If you placed the source in thelocation suggested in the earlier example, the commands to start the installer would be:
Execute as root oscar-config --bootstrap1. Execute as root system-sanity and make sure you address all the reported issues2. Execute as root oscar_wizard install3.
The oscar-config --bootstrap command will execute some setup / configuration steps, including (but not limited to):
installs prerequisite packages on the server,• installs all OSCAR server binary packages,• updates /etc/hosts with OSCAR aliases,• updates /etc/exports,• start/restarts system services needed by OSCAR.•
A lot of output will be displayed in the console window where you invoked oscar_wizard. This reflects normaloperational output from the various installation commands that OSCAR executes. The output is also saved in the file/var/log/oscar/oscar_wizard.log for later reference (particularly if something goes wrong during during theinstallation).
The wizard, as shown in Figure 1, is provided to guide you through the rest of the cluster installation. To use thewizard, you will complete a series of steps, with each step being initiated by the pressing of a button on the wizard. Donot go on to the next step until the instructions say to do so, as there are times when you may need to complete anaction outside of the wizard before continuing on with the next step. For each step, there is also a <Help> buttonlocated directly to the right of the step button. When pressed, the <Help> button displays a message box describing thepurpose of the step.
Figure 1: OSCAR Wizard.
Chapter 5: Detailed Cluster Installation Procedure 1
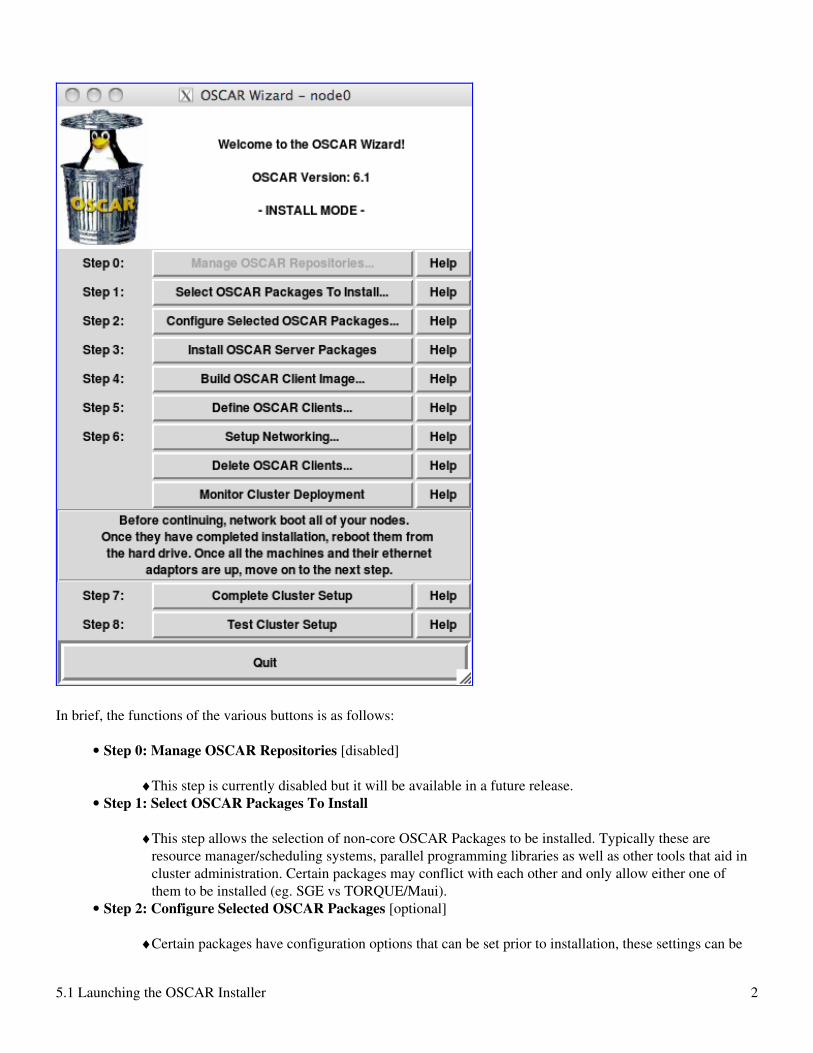
In brief, the functions of the various buttons is as follows:
Step 0: Manage OSCAR Repositories [disabled]
This step is currently disabled but it will be available in a future release.♦
•
Step 1: Select OSCAR Packages To Install
This step allows the selection of non-core OSCAR Packages to be installed. Typically these areresource manager/scheduling systems, parallel programming libraries as well as other tools that aid incluster administration. Certain packages may conflict with each other and only allow either one ofthem to be installed (eg. SGE vs TORQUE/Maui).
♦
•
Step 2: Configure Selected OSCAR Packages [optional]
Certain packages have configuration options that can be set prior to installation, these settings can be♦
•
5.1 Launching the OSCAR Installer 2
set during this step.Step 3: Install OSCAR Server Packages
This step would install all the selected packages (in Step 1) on the server (headnode) - this step isrepeatable.
♦
•
Step 4: Build OSCAR Client Image
This step allows the user to build an OS image using SystemInstaller. This image will then be pushedto the compute nodes as part of cluster installation.
♦
•
Step 5: Define OSCAR Clients
After image(s) are created, clients to be part of your cluster needs to be defined. The user can selecthostnames for your compute nodes, number of nodes, etc.
♦
•
Step 6: Setup Networking
This step allows the user to tie MAC addresses to defined clients (in the previous step) such that whenthey boot up, they will automatically be imaged. Installation mode is also set in this step - currentlyavailable modes are: systemimager-rsync (default), systemimager-multicast, systemimager-bt. Afterthis mode is set, the user should then configure DHCP Server and also select Setup Network Boot.
♦
•
Delete OSCAR Clients [hopefully unneccesary]
This button allows the user to delete OSCAR clients from the cluster. Services will be stopped on thenodes to be deleted and restarted on all the remaining nodes. The cluster will be re-configured withoutthe presence of the deleted node entries in ODA.
♦
•
Monitor Cluster Deployment [optional]
This step brings up the SystemImager monitoring widget si_monitortk which provides very usefulinformation regarding image progress. The user can also invoke the Virtual Console by double-clickingon a node and this will bring up a window with console messages during the installation.
♦
•
Step 7: Complete Cluster Setup
Perform this step after all your cluster nodes have successfully been imaged and rebooted. This stepwill initiate post-cluster installation fix-ups and get it ready for production.
♦
•
Step 8: Test Cluster Setup [optional]
OSCAR provides some tests for its packages and this step invokes all these testing harness to ensurethat your cluster is setup properly and ready for production runs.
♦
•
5.2 Manage OSCAR Repositories
Note: This step is disabled and it will be available in a future release.
5.3 Selecting Packages to Install
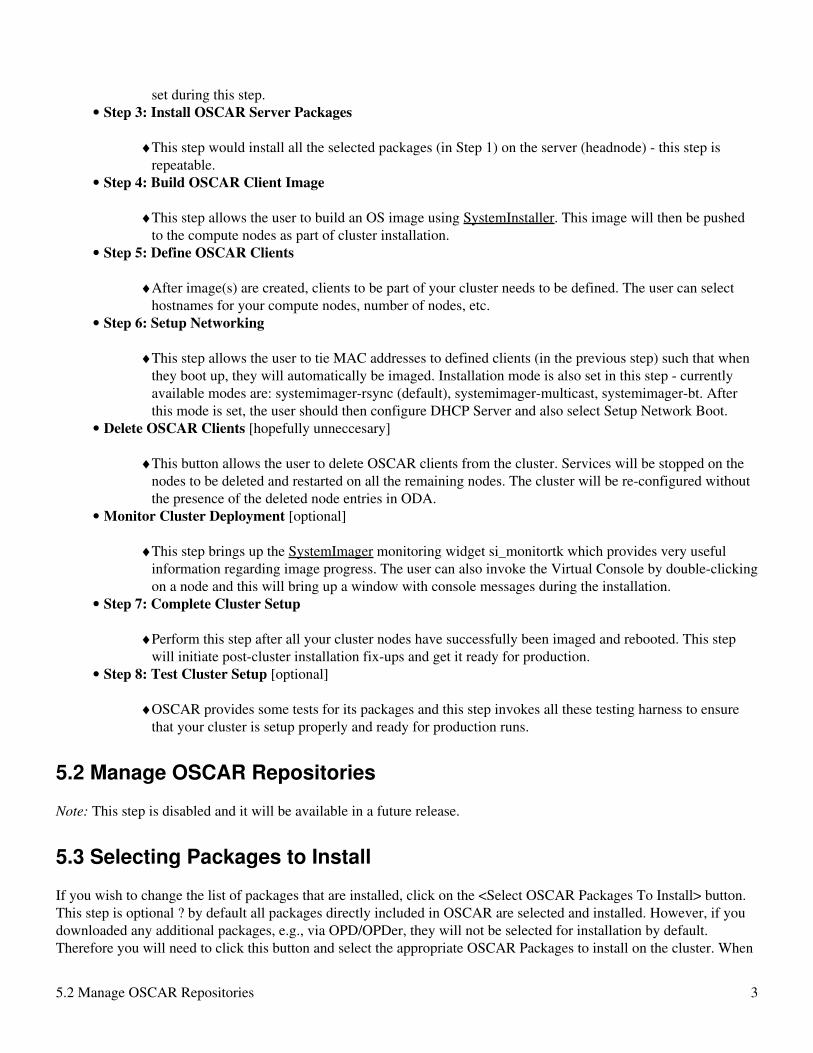
If you wish to change the list of packages that are installed, click on the <Select OSCAR Packages To Install> button.This step is optional ? by default all packages directly included in OSCAR are selected and installed. However, if youdownloaded any additional packages, e.g., via OPD/OPDer, they will not be selected for installation by default.Therefore you will need to click this button and select the appropriate OSCAR Packages to install on the cluster. When
5.2 Manage OSCAR Repositories 3
you click on the button, a window similar to the one shown in Figure 3 appears. Each of the packages that the OSCARinstaller has found are listed in the main frame. Core packages must be installed and cannot be unselected. Includedpackages can be unselected if desired.
Figure 3: OSCAR package selection.
Note that this window only shows OSCAR packages -- it does not show individual RPMs. Once you have a selected aset of OSCAR packages to install, click on the <Exit> button to save your selections and return to the main OSCARwindow. Note that closing the window yields the same result and there is no way of ?defaulting? to the originalsettings, so make sure your package list is complete before proceeding to the next step.
5.4 Configuring OSCAR Packages
Note: This step is optional.
Some OSCAR packages allow themselves to be configured. Clicking on the<Configure Selected OSCAR Packages>button will bring up a window listing all the packages that can be configured. Figure 3 shows a sample with only theEnvironment Switcher package listed. Clicking on any of the packages? <Config> button will bring up a panel for
5.3 Selecting Packages to Install 4
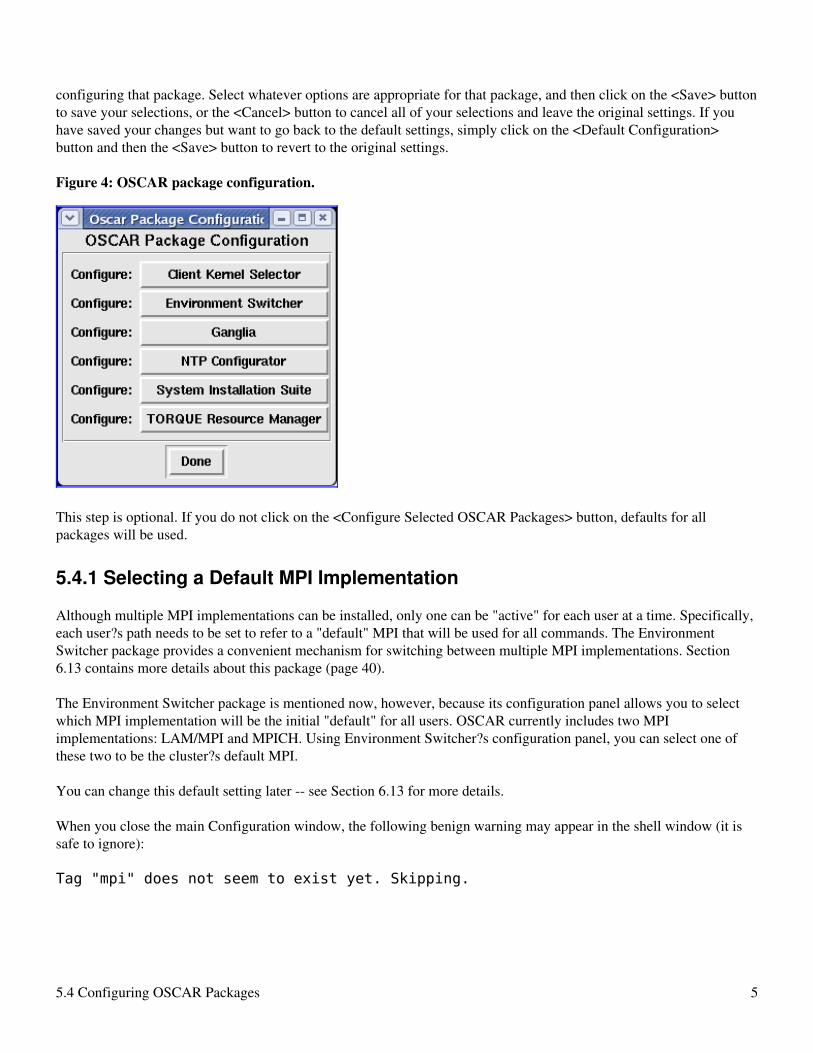
configuring that package. Select whatever options are appropriate for that package, and then click on the <Save> buttonto save your selections, or the <Cancel> button to cancel all of your selections and leave the original settings. If youhave saved your changes but want to go back to the default settings, simply click on the <Default Configuration>button and then the <Save> button to revert to the original settings.
Figure 4: OSCAR package configuration.
This step is optional. If you do not click on the <Configure Selected OSCAR Packages> button, defaults for allpackages will be used.
5.4.1 Selecting a Default MPI Implementation
Although multiple MPI implementations can be installed, only one can be "active" for each user at a time. Specifically,each user?s path needs to be set to refer to a "default" MPI that will be used for all commands. The EnvironmentSwitcher package provides a convenient mechanism for switching between multiple MPI implementations. Section6.13 contains more details about this package (page 40).
The Environment Switcher package is mentioned now, however, because its configuration panel allows you to selectwhich MPI implementation will be the initial "default" for all users. OSCAR currently includes two MPIimplementations: LAM/MPI and MPICH. Using Environment Switcher?s configuration panel, you can select one ofthese two to be the cluster?s default MPI.
You can change this default setting later -- see Section 6.13 for more details.
When you close the main Configuration window, the following benign warning may appear in the shell window (it issafe to ignore):
Tag "mpi" does not seem to exist yet. Skipping.
5.4 Configuring OSCAR Packages 5
5.5 Install OSCAR Server Packages
This is the first required step of the OSCAR installation.
Press the <Install OSCAR Server Packages> button. This will invoke the installation of various RPMs and auxiliaryconfiguration on the server node. Execution may take several minutes; text output and status messages will appear inthe shell window.
A popup will appear indicating the success or failure of this step. Click on the <Close> button to dismiss it.
5.6 Build OSCAR Client Image
Before pressing the <Build OSCAR Client Image>, ensure that the following conditions on the server are true:
Ensure that the SSH daemon?s configuration file (/etc/ssh/sshd config) on the headnode hasPermitRootLogin? set to yes. After the OSCAR installation, you may set this back to no (if you want), but itneeds to be yes during the install because the config file is copied to the client nodes, and root must be able tologin to the client nodes remotely.
•
By the same token, ensure that TCP wrappers settings are not "too tight". The /etc/hosts.allow and/etc/hosts.deny files should allow all traffic from the entire private subnet.
•
Also, beware of firewall software that restricts traffic in the private subnet. SELinux should also be deactivatedon the head node.
•
If these conditions are not met, the installation may fail during this step or later steps with unhelpful messages.
Press the <Build OSCAR Client Image> button. A dialog will be displayed. In most cases, the defaults will besufficient. You should verify that the disk partition file is the proper type for your client nodes. The sample files havethe disk type as the last part of the filename. You may also want to change the post installation action and the IPassignment methods. It is important to note that if you wish to use automatic reboot, you should make sure the BIOS oneach client is set to boot from the local hard drive before attempting a network boot by default. If you have to changethe boot order to do a network boot before a disk boot to install your client machines, you should not use automaticreboot.
Building the image may take several minutes; compared to previous OSCAR releases, there is progression bar (sincewe use online repository it is difficult to exactly know the current progression of the image creation). To follow theprogression, one may follow the output in the console window during the build. It is normal to see some warningmessages in the console. You can safely ignore these messages and wait for the final popup window announcing thesuccess or failure of the overall image build.
A sample dialog is shown in Figure 4.
Figure 4: Build the image.
5.5 Install OSCAR Server Packages 6

Customizing your image::
The defaults of this panel use the sample disk partition and RPM package files that can be found in theoscarsamples directory. You may want to customize these files to make the image suit your particularrequirements.
Disk partitioning::
The disk partition file contains a line for each partition desired, where each line is in the followingformat:
<partition> <size in megabytes> <type> <mount point> <options>
Here is a sample (for a SCSI disk):
/dev/sda1 24 ext3 /boot defaults/dev/sda5 128 swap/dev/sda6 * ext3 / defaultsnfs_oscar:/home - nfs /home rw
An * in the size column causes that partition to grow to fill the entire disk. You can create your ownpartition files, but make sure that you do not exceed the physical capacity of your client hardware. Alsobe careful to not specify duplicate filesystems as this will cause problems during the installation. Thesample listed above, and some others, are in the oscarsamples directory.
The disk partition file is auto-selected based on the type of disk(s) available on your headnode.However, SystemImager has the functionality where it can deploy images and be agnostic with thetarget client's disks, whether they are hda, sda, or other. In other words, even if you built your imagewith ide.disk, you can deploy the image to clients with SCSI/SATA hard disks and vice versa.
5.6 Build OSCAR Client Image 7

Package lists::
The package list is simply a list of RPM file names (one per line). Be sure to include all prerequisitesthat any packages you might add. You do not need to specify the version, architecture, or extension ofthe RPM filename. For example, bash-2.05-8.i386.rpm need only be listed as "bash".
Build the Image::
Once you are satisfied with the input, click the <Build Image> button. When the image completes, apopup window will appear indicating whether the build succeeded or failed. If successful, click the<Close> button to close the popup, and then press the <Close> button on the build image window. Youwill be back at the main OSCAR wizard menu.
If the build fails, look through the console output for some indication as to what happened to cause thefailure. Common causes include: prerequisite failure, ran out of disk space, and missing package files.Also see the Release Notes for this version of OSCAR in Chapter 3.
5.7 Define OSCAR Clients
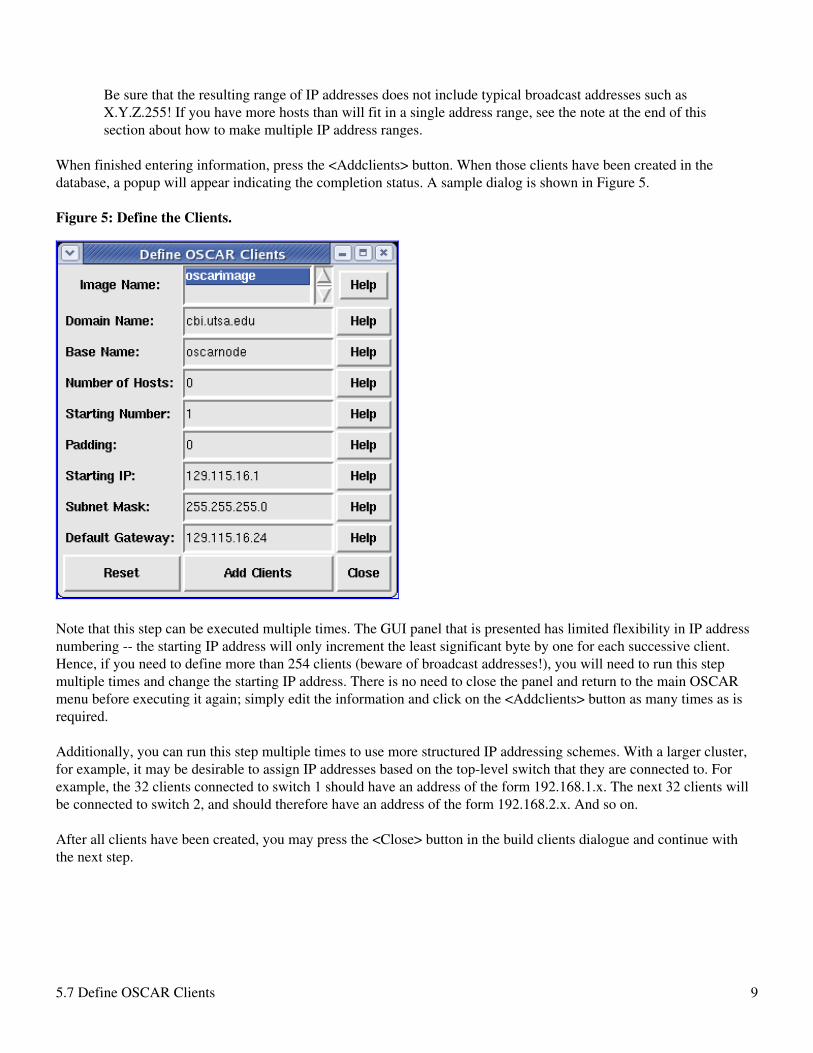
Press the <Define OSCAR Clients> button. In the dialog box that is displayed, enter the appropriate information.Although the defaults will be sufficient for most cases, you will need to enter a value in the Number of Hosts field tospecify how many clients you want to create.
The Image Name field should specify the image name that was used to create the image in the previous step.1. The Domain Name field should be used to specify the client?s IP domain name. It should contain the servernode?s domain (if it has one); if the server does not have a domain name, the default name oscardomain will beput in the field (although you may change it). This field must have a value -- it cannot be blank. Note thatespecially for compute nodes on a private network, the domain name does not necessarily matter much. Thedomain name supplied in this field is used to form the fullyqualified name of each host in the OSCAR cluster.For example: oscarnode1.oscardomain, oscarnode2.oscardomain, etc. If your compute nodes are on a publicnetwork, you may want to use the "real" domain name that is part of their fully-qualified domain names.
2.
The Base name field is used to specify the first part of the client name and hostname. It will have an indexappended to the end of it. This name cannot contain an underscore character "_" or a period ".".
3.
The Number of Hosts field specifies how many clients to create. This number must be greater than 0.4. The Starting Number specifies the index to append to the Base Name to derive the first client name. It will beincremented for each subsequent client.
5.
The Padding specifies the number of digits to pad the client names, e.g., 3 digits would yield oscarnode001.The default is 0 to have no padding between base name and number (index).
6.
The Starting IP specifies the IP address of the first client. It will be incremented for each subsequent client. SeeFootnote 3 on page 20 for more information on how to pick a starting IP address. Clients will be given IPaddresses starting with this IP address, and incrementing by 1 for each successive client. Ensure that the rangeof [starting ip, (starting ip+num clients)] does not conflict with the IP addresses of any other nodes on yournetwork.
7.
The Subnet Mask specifies the IP netmask for all clients. See Footnote 4 on page 20 for more information onhow to select a netmask for your cluster.
8.
The Default Gateway specifies the default route for all clients.9.
IMPORTANT NOTE::
5.7 Define OSCAR Clients 8
Be sure that the resulting range of IP addresses does not include typical broadcast addresses such asX.Y.Z.255! If you have more hosts than will fit in a single address range, see the note at the end of thissection about how to make multiple IP address ranges.
When finished entering information, press the <Addclients> button. When those clients have been created in thedatabase, a popup will appear indicating the completion status. A sample dialog is shown in Figure 5.
Figure 5: Define the Clients.
Note that this step can be executed multiple times. The GUI panel that is presented has limited flexibility in IP addressnumbering -- the starting IP address will only increment the least significant byte by one for each successive client.Hence, if you need to define more than 254 clients (beware of broadcast addresses!), you will need to run this stepmultiple times and change the starting IP address. There is no need to close the panel and return to the main OSCARmenu before executing it again; simply edit the information and click on the <Addclients> button as many times as isrequired.
Additionally, you can run this step multiple times to use more structured IP addressing schemes. With a larger cluster,for example, it may be desirable to assign IP addresses based on the top-level switch that they are connected to. Forexample, the 32 clients connected to switch 1 should have an address of the form 192.168.1.x. The next 32 clients willbe connected to switch 2, and should therefore have an address of the form 192.168.2.x. And so on.
After all clients have been created, you may press the <Close> button in the build clients dialogue and continue withthe next step.
5.7 Define OSCAR Clients 9
5.8 Setup Networking
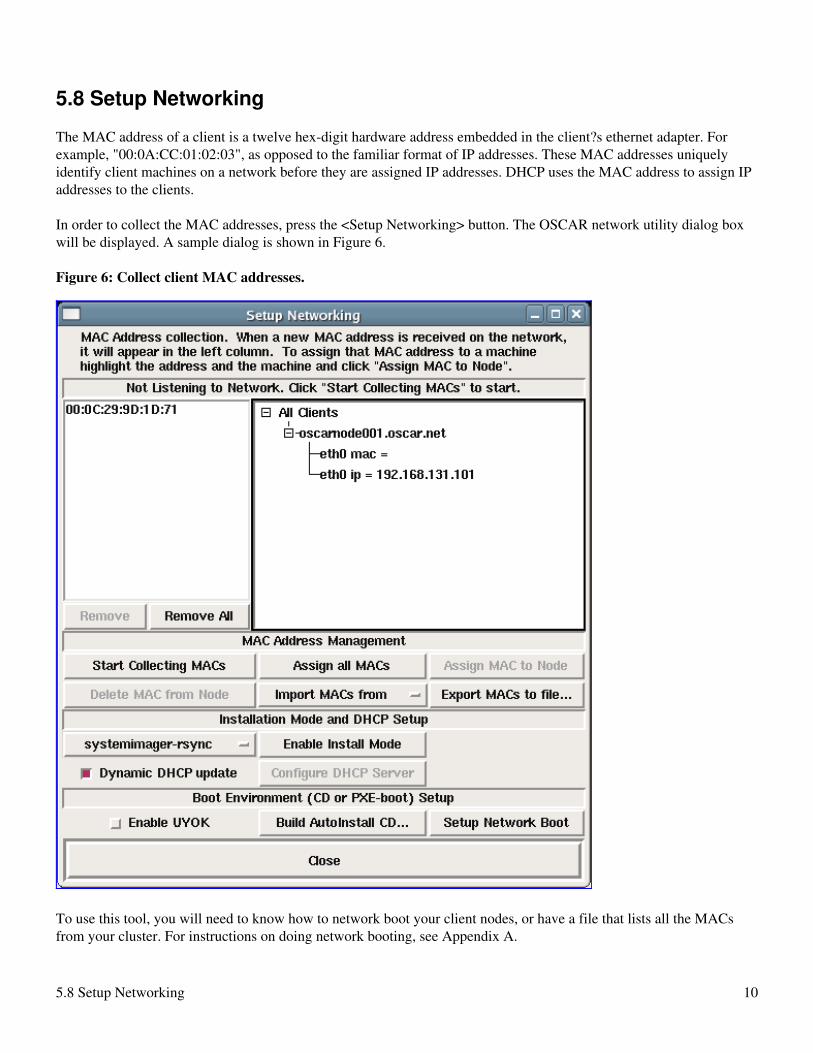
The MAC address of a client is a twelve hex-digit hardware address embedded in the client?s ethernet adapter. Forexample, "00:0A:CC:01:02:03", as opposed to the familiar format of IP addresses. These MAC addresses uniquelyidentify client machines on a network before they are assigned IP addresses. DHCP uses the MAC address to assign IPaddresses to the clients.
In order to collect the MAC addresses, press the <Setup Networking> button. The OSCAR network utility dialog boxwill be displayed. A sample dialog is shown in Figure 6.
Figure 6: Collect client MAC addresses.
To use this tool, you will need to know how to network boot your client nodes, or have a file that lists all the MACsfrom your cluster. For instructions on doing network booting, see Appendix A.
5.8 Setup Networking 10
5.8.1 Collect Client Node MAC Addresses
If you need to collect the MACs in your cluster, start the collection by pressing the <Collect MAC Address> button andthen network boot the first client. As the clients boot up, their MAC addresses will show up in the left hand window.You have multiple options for assigning MACs to nodes. You can either:
manually select MAC address and the appropriate client in the right side window. Click <Assign MAC toNode> to associate that MAC address with that node.
•
click <Assign all MACs> button to assign all the MACs in the left hand window to all the open nodes in theright hand window.
•
Some notes that are relevant to collecting MAC addresses from the network:
The <Dynamic DHCP Update> checkbox at the bottom right of the window controls refreshing the DHCPserver. If it is selected (the default), the DHCP server configuration will be refreshed each time a MAC isassigned to a node. Note that if the DHCP reconfiguration takes place quick enough, you may not need toreboot the nodes a second time (i.e., if the DHCP server answers the request quick enough, the node may startdownloading its image immediately). If this option is off, you will need to click the <Configure DHCP Server>(at least once) to give it the associations between MACs and IP addresses.
•
To remove extraneous MAC addresses from the left hand window (e.g., if the collector finds MACs that arenot part of your cluster), select the address and click on the <Remove> button. Or click on the <Remove All>button to remove all of them.
•
At any time, you may click on the <Export MACs to file...> button to save the MAC address list to a file. Ifyou need to re-run the OSCAR installation, you can later click on <Import MACs from file...> to import thisfile rather than re-collecting all the MACs.
•
When you have collected all of the MAC addresses, click the <Stop Collecting MACs> button.•
If you do not have <Dynamic DHCP update> selected, you need to click the <Configure DHCP Server> button toconfigure the DHCP server.
5.8.2 Select Installation Mode
SystemImager is the tool that OSCAR uses for deploying images to cluster nodes. It is part of a bigger suite of toolscalled the System Installation Suite (thus the package name in OSCAR is SIS).
SystemImager is responsible for deploying the OS image to your compute nodes over the network. It supports (as ofversion 3.7.3) three different transports: systemimager-rsync (default), systemimager-multicast (flamethrower), andsystemimager-bt (bittorrent).
By default, systemimager uses a program called rsync to push files to your client nodes. To use one of these otherinstallation modes click on the pull down list which by default displays "systemimager-rsync" and choose one of theother options. Then click the "Enable Install Mode" button to configure the server to use that method to install imageson the client nodes. Especially with the multicast option, please make sure your router supports your desired transportmethod.
In case you cannot get your nodes to image using one of these optional install modes and want to switch back to usingrsync, simply go back to the <Setup Networking> menu, select <systemimager-rsync> from the pull down list, andclick on <Enable Install Mode>.
5.8.1 Collect Client Node MAC Addresses 11
5.8.3 Setup Boot Environment
This menu also allows you to choose your remote boot method.
You must do one of two things in order for your client nodes to be able to get images from the master node:
The <Build Autoinstall CD> button will build an iso image for a bootable CD and gives a simple example forusing the cdrecord utility to burn the CD. This option is useful for client nodes that do not support PXEbooting. In a terminal, execute the command cdrecord -scanbus to list the drives cdrecord is aware of and theirdev number. Use this trio of numbers in place of dev=1,0,0 when you execute the command cdrecord -vspeed=2 dev=1,0,0 /tmp/oscar bootcd.iso.
•
The <Setup Network Boot> button will configure the server to answer PXE boot requests if your clienthardware supports it. See Appendix A for more details.
•
5.8.4 Use Your Own Kernel (UYOK)
SystemImager ships with its own kernel and ramdisk (initrd.img) used for starting up a minimal system for imagingyour nodes. Although the SystemImager developers try their best to keep this kernel up-to-date with new hardwaremodules support, this is not always possible. Therefore, starting in version 3.6.x, a new functionality calledUseYourOwnKernel? (UYOK) was introduced.
Let's say that you have installed a Linux distribution that supports your hardware on the server, UYOK allows you totake the running kernel (from the Linux distribution) and uses that as the SystemImager boot kernel. This, combinedwith a ramdisk generated on the fly from an architecture specific initrd_template package (eg.systemimager-i386initrd_template) allows the user to be able to boot and image a node as long as the target OS to bedeployed supports the hardware.
If you had to install any custom kernel modules to get your hardware to work after installing the operating system, or ifyou have trouble getting your nodes to boot after trying the stock systemimager kernel, click "Enable UYOK" button inthe "Setup Networking" step and then either select "Build AutoInstall? CD..." or "Setup Network Boot". ThenSystemImager will configure itself to use the kernel running on the head node.
Manual Setup for UYOK
If for some reason you wish to set up the UYOK functionality by hand, instead of using the wizard, please do thefollowing. This should not be neccesary if the hardware of your client nodes and head node are sufficiently similar.
First use UYOK to generate a kernel/ramdisk pair, execute the following command on the headnode:
# si_prepareclient --server servername --no-rsyncd
If you specify the --no-rsyncd argument, it will not restart rsyncd.
The resulting kernel and ramdisk will be stored in /etc/systemimager/boot. Now copy these files to/tftpboot if you are PXE-booting. Make sure to edit your /tftpboot/pxelinux.cfg/default file with asufficiently large ramdisk_size in the kernel append statement, eg.:
LABEL systemimagerKERNEL kernel
5.8.3 Setup Boot Environment 12
APPEND vga=extended initrd=initrd.img root=/dev/ram MONITOR_SERVER=192.168.0.2 MONITOR_CONSOLE=yes ramdisk_size=80000
Now SystemImager will use the UYOK boot package (which should recognize your hardware) to boot your nodes andsuccessfully image them.
5.9 Monitor Cluster Deployment
Note: This step is optional.
During the client installation phase it is possible to click on the <Monitor Cluster Deployment> button to bring up theSystemImager monitor GUI. This window will display real-time status of nodes as they request images from the servermachine and track their progress as they install.
5.10 Client Installations
During this phase, you will boot your client nodes and they will automatically be installed and configured. For adetailed explanation of what happens during client installation, see Appendix B.
The recommended method to perform client installations is via network boot. This is the most convenient way if thenetwork interface cards on your client nodes support PXE-boot. If the network cards do not support PXE-boot, you cancheck the Etherboot Project http://www.etherboot.org to see if you can generate a boot-ROM for your card. Once youhave generated a boot floppy, you can use that to network boot your nodes.
If your client nodes do not have a floppy drive, or you cannot generate a working ROM, then it is still possible to bootyour client nodes with an autoinstallation CD. Please refer to the documentation on the "Setup Networking" step forinformation on how to generate this CD.
If the network cards that come with your client nodes support PXE, then change the BIOS settings such that "Network"is always first in boot order. This ensures that your nodes always boot via the network and thus allows the NetworkBoot Manager to manage the boot order via software. Note that this tool may not work with etherboot generatedROMs.
Once your client nodes complete installation, its next boot action will be automatically changed to "LocalBoot?"meaning it will boot from hard disk. If for whatever reason this does not work, you can manually change this via thenetbootmgr widget.
This widget is available via the OSCAR Wizard in Manage mode, or via the command line as "netbootmgr".
5.10.1 Network boot the client nodes
See Appendix A for instructions on network booting clients.
Network boot all of your clients. As each machine boots, it will automatically start downloading and installing theOSCAR image from the server node.
Manual Setup for UYOK 13
5.10.2 Check completion status of nodes
After several minutes, the clients should complete the installation. You can use the <Monitor Cluster Deployment>functionality to monitor the progress. Depending on the Post Installation Action you selected when building the image,the clients will either halt, reboot, or beep incessantly when the installation is completed.
If you chose "reboot" as the post-install action for your nodes, you will be notified when the nodes are rebooted via the<Monitor Cluster Deployment> widget. The node entry will turn green and the "Progress" field will say"REBOOTED".
The time required for installation depends on the capabilities of your server, your clients, your network, and the numberof simultaneous client installations. Generally, it should complete within several minutes.
5.10.3 Reboot the client nodes
After confirming that a client has completed its installation, you should reboot the node from its hard drive. If youchose to have your clients reboot after installation (the default), they will do this on their own. If the clients are not setto reboot, you must manually reboot them. The filesystems will have been unmounted so it is safe to simply reset orpower cycle them.
Note: If the network cards that come with your client nodes do not support PXE, or has etherboot generated ROMs, youmay need to reset the boot order in the BIOS to boot from the local disk.
5.11 Complete the Cluster Setup
Ensure that all client nodes have fully booted before proceeding with this step.
Press the <Complete Cluster Setup> button. This will run the final installation configurations scripts from each OSCARsoftware package, and perform various cleanup and re-initialization functions. This step can be repeated shouldnetworking problems or other types of errors prevent it from being successful the first time.
A popup window will indicate the success or failure of this step. Press the <Close> button to dismiss it.
5.12 Test Cluster Setup
A simplistic test suite is provided in OSCAR to ensure that the key cluster components (OpenSSH, TORQUE, MPI,PVM, etc.) are functioning properly.
Press the <Test Cluster Setup> button. This will open a separate window to run the tests in. The cluster?s basic servicesare checked and then a set of root and user level tests are run.
A sample dialog is shown in Figure 8. If any of the test fail, then there may be problem with your installation.
Figure 8: Testing your cluster setup
5.10.2 Check completion status of nodes 14
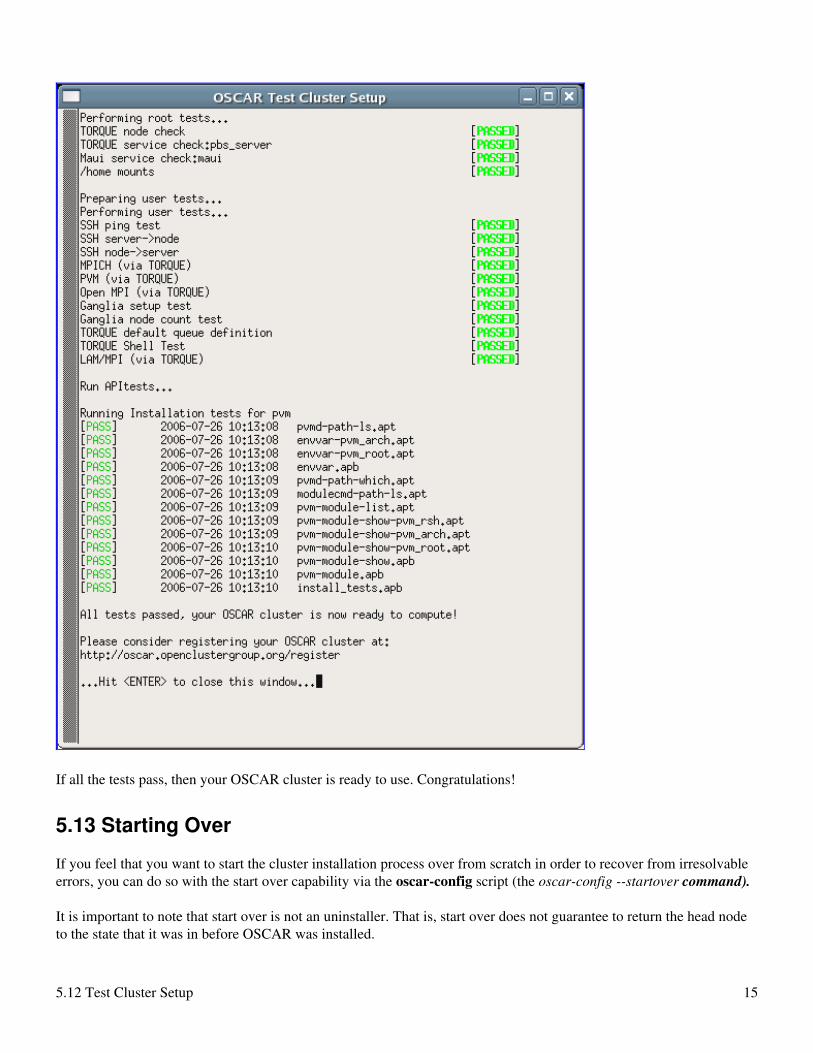
If all the tests pass, then your OSCAR cluster is ready to use. Congratulations!
5.13 Starting Over
If you feel that you want to start the cluster installation process over from scratch in order to recover from irresolvableerrors, you can do so with the start over capability via the oscar-config script (the oscar-config --startover command).
It is important to note that start over is not an uninstaller. That is, start over does not guarantee to return the head nodeto the state that it was in before OSCAR was installed.
5.12 Test Cluster Setup 15
The start_over script will try to delete all packages installed by OSCAR and drop the OSCAR database. It will also tryto delete the packages which depend on the OSCAR binary packages.
Another important fact to note before starting a new OSCAR installation after using the startover capability is that,because of the environment manipulation that was performed via switcher from the previous OSCAR install, it isnecessary to re-install OSCAR from a shell that was not tainted by the previous OSCAR installation. Specifically, thestartover capability can remove most files and packages that were installed by OSCAR, but it cannot chase down andpatch up any currently-running user environments that were tainted by the OSCAR environment manipulationpackages.
Ensuring to have an untainted environment can be done in one of two ways:
After starting over, completely logout and log back in again before re-installing. Simply launching a new shellmay not be sufficient (e.g., if the parent environment was tainted by the previous OSCAR install). This willcompletely erase the previous OSCAR installation?s effect on the environment in all user shells, and establish aset of new, untainted user environments.
1.
Use a shell that was established before the previous OSCAR installation was established. Although perhaps notentirely intuitive, this may include the shell was that initially used to install the previous OSCAR installation.
2.
Note that the logout/login method is strongly encouraged, as it may be difficult to otherwise absolutely guarantee that agiven shell/window has an untainted environment.
5.14 Deleting Clients
If for some reason you need to delete a node from the cluster durring installation, perhaps due to mistakes while addingthe client nodes or assigning a MAC address to the wrong node, you simply need to click on the "Delete OSCARClients" button on the OSCAR wizard main menu. Then when the sub menu appears, select the problematic nodes fromthe list and click delete. Multiple nodes can be deleted by selecting multiple names from the list.
Deleting node images
It is also sometimes useful to be able to delete one or more of the node images which OSCAR uses to provision theclient nodes or to change which image is sent to a node when it joins the cluster.
To delete an OSCAR image, you need to first unassign the image from the client(s) which are currently using thatimage and then run the command mksiimage.
There is currently no way to change which image is assigned to a node from within the OSCAR GUI, so first you willneed to delete the client node(s) if you wish to change which image is used on a particular node. It is not neccesary ifthe image simply changes, this procedure is only neccesary to completely change a node to use a different imageentirely. To do so, invoke the OSCAR Wizard and select "Delete OSCAR Clients...".
mksiimage is a command from SystemInstaller which is used to manage SIS images on the headnode (image server).
Assuming the name of your image is oscarimage, here are the steps you need to do to fully delete an OSCAR image.
First delete the client(s) associated with the image, then execute:
# mksiimage --delete --name oscarimage
5.13 Starting Over 16
If this command does not work for some reason, you can also use the command si_rmimage to delete the image, justpass it the name of the image as argument.
si_rmimage is a command from SystemImager, the system OSCAR uses to deploy images to the compute nodes.SystemImager images are typically stored in /var/lib/systemimager/images.
Note: If you want to use the si_rmimage command, execute the following commands to delete all data:
# si_rmimage oscarimage -force
5.14 Reimaging the Cluster
Often in the process of setting up an OSCAR cluster for the first time, or on new hardware, it is neccesary to re-imagethe cluster. Starting with OSCAR 5.x OSCAR uses the netboot manager to maintain a database of cluster states.Initially all nodes are marked for "Installation" but after it has been imaged successfully the state is marked so that if itis network booted it will boot from the local hard drive. This is a handy feature which allows system administrators tosimply leave the cluster nodes set to network boot all the time, which saves a lot of time fiddling around with the BIOS.However this means that if you network boot your cluster again and expect it to reimage itself as it had previously, youwill be disappointed.
In order to reimage your cluster it is a simple mater of loading up the net boot manager from your closeset xterm withthe "netbootmgr" cmd or loading up the management interface described in the OSCAR administration guide. For fulldetails about how the netbootmgr interface works, please refer to the administration guide.
To reimage your cluster, click on the "All" button under the "Selection" menu. Then under the "Next Boot Action"pulldown select "Install" and click on the "Set" button. That should reset the cluster nodes listed at the left hand pane toall say "Install" as their next boot action.
Deleting node images 17
Recommended