Instreamer to Exstreamer connection
Project Name: Instreamer to Exstreamer connection
Document Type: How To
Document Revision:
1.11
Date: 06.03.2013
How To
© 2013 Barix AG, all rights reserved. All information is subject to change without notice. All mentioned trademarks belong to their respective owners and are used for reference only.
Instreamer to Exstreamer connection How To
Table of Contents
1 Introduction 3
1.1 About This Document 3
1.2 Connection types 3
2 Setting up the link between devices on local networks 4
2.1 RTP Connection 5
2.2 BRTP Connection 7
2.3 HTTP Connection 9
3 Streaming connections over internet 11
3.1 RTP over Internet 12
3.2 BRTP over Internet 13
3.3 HTTP connection over Internet 14
4 Configuring routers & firewalls 15
4.1 Setting up port forwarding 15
4.2 Setting up a DMZ 16
4.3 Setting DNS 17
5 Legal Information 18
BARIX AG | 06.03.2013 | 2/18
Instreamer to Exstreamer connection How To
1 Introduction
1.1 About This Document
This document describes how to configure a Barix Instreamer and Exstreamer pair in order to be able to stream audio across an IP network. The document covers both LAN and Internet use cases.
The document assumes an Instreamer as the encoder and an Exstreamer of the 1xx or 2xx series, or an Exstreamer P5, as the decoder. Each device is assumed to have their factory-loaded firmware installed: Instreamer and Streaming Client respectively.
1.2 Connection types
There are several ways (protocols) that can be used to make the connection between the devices, each has it's own advantages. This document will cover:
RTP – Send audio from the encoder to the decoder (a 'Push' protocol). Low delay (latency) can be achieved.
BRTP – Barix RTP extended protocol, in this the decoder requests the audio stream from the encoder, which can have advantages when there are firewalls sitting between the encoder and decoder (a 'Pull' protocol).
HTTP – the listener (decoder) requests the stream from the encoder; HTTP streaming is based on the TCP protocol (a 'Pull' protocol) and typically uses larger buffers than RTP / BRTP, which introduces delay in the signal (latency). Also known as Internet Radio.
Select a connection type that best suits the environment that the devices will be used in. When connecting the devices over the internet, firewall and router configuration influences the connection protocol. Being able to configure one end of a link more easily than another is often the case:
– if the firewall/router at the Instreamer end cannot be easily configured, perhaps because it is maintained by a third party, then RTP mode where the Instreamer sends OUT through the firewall may be best, as there are typically fewer controls on outgoing traffic.
– if the firewall/router at the Exstreamer end cannot be easily configured, then BRTP or HTTP modes are better.
BARIX AG | 06.03.2013 | 3/18
Instreamer to Exstreamer connection How To
2 Setting up the link between devices on local networks
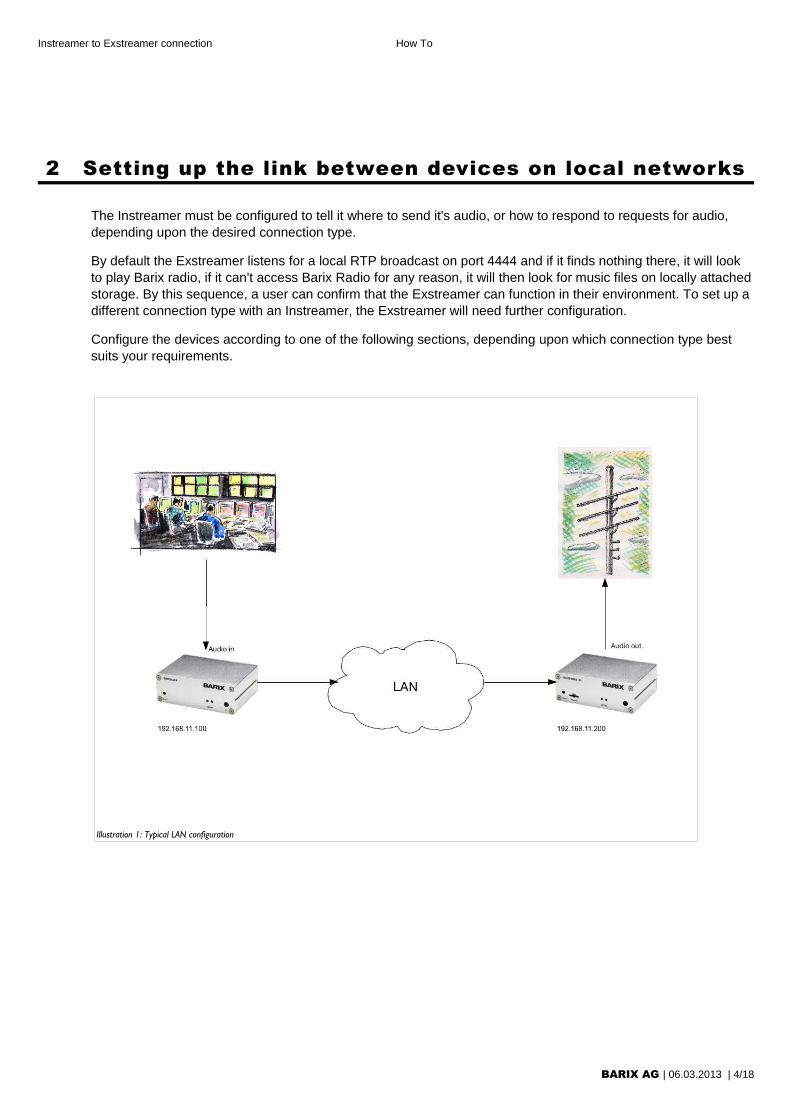
The Instreamer must be configured to tell it where to send it's audio, or how to respond to requests for audio, depending upon the desired connection type.
By default the Exstreamer listens for a local RTP broadcast on port 4444 and if it finds nothing there, it will look to play Barix radio, if it can't access Barix Radio for any reason, it will then look for music files on locally attached storage. By this sequence, a user can confirm that the Exstreamer can function in their environment. To set up a different connection type with an Instreamer, the Exstreamer will need further configuration.
Configure the devices according to one of the following sections, depending upon which connection type best suits your requirements.
BARIX AG | 06.03.2013 | 4/18
Illustration 1: Typical LAN configuration
Instreamer to Exstreamer connection How To
2.1 RTP Connection
Instreamer:
1 On the Instreamer web UI, the 'Configuration' button gives access to pages that control the device's behaviour.
2 Select the 'Advanced Settings' menu, then 'Audio'
3 Make sure that the '”Bit reservoir mode” is set to “kept empty”
4 If you made a change, “Apply” it; the device will reboot
5 Select the 'Advanced Settings' menu, then 'Streaming'
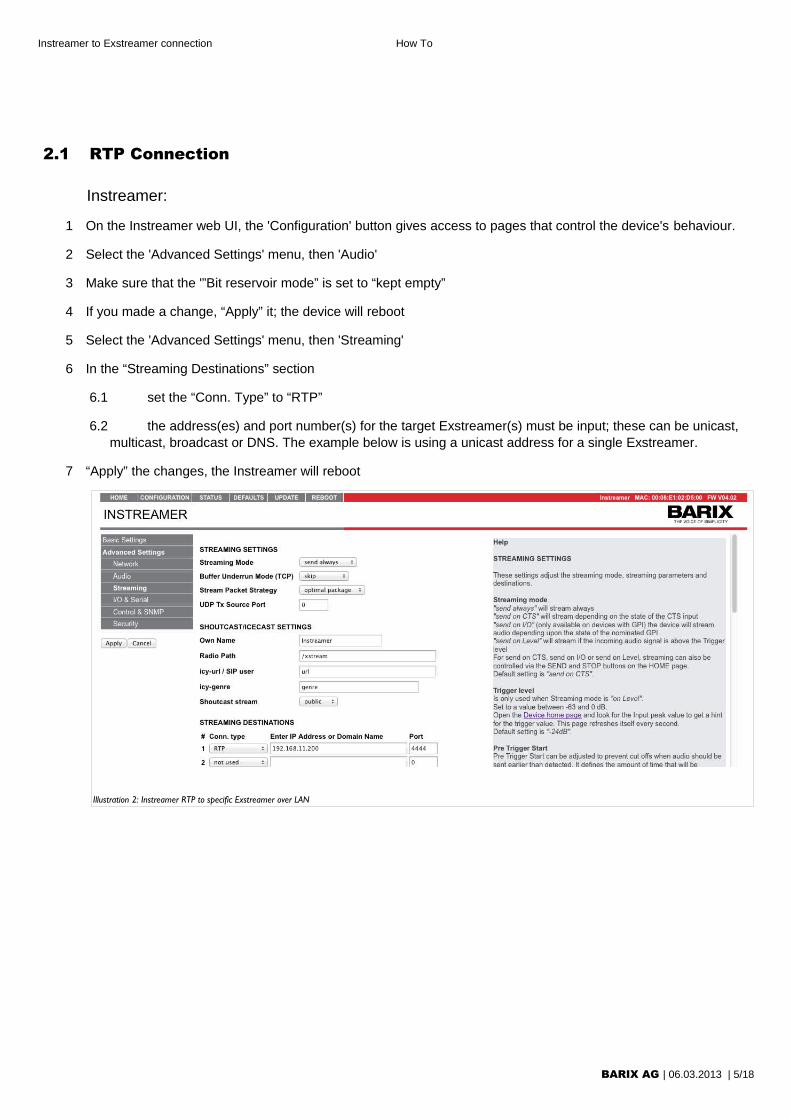
6 In the “Streaming Destinations” section
6.1 set the “Conn. Type” to “RTP”
6.2 the address(es) and port number(s) for the target Exstreamer(s) must be input; these can be unicast, multicast, broadcast or DNS. The example below is using a unicast address for a single Exstreamer.
7 “Apply” the changes, the Instreamer will reboot
Illustration 2: Instreamer RTP to specific Exstreamer over LAN
BARIX AG | 06.03.2013 | 5/18
Instreamer to Exstreamer connection How To
Exstreamer:
1 On the Exstreamer web UI, the 'Configuration' button gives access to pages that control the device's behaviour.
2 Select the 'Advanced Settings' menu, then 'Streaming'
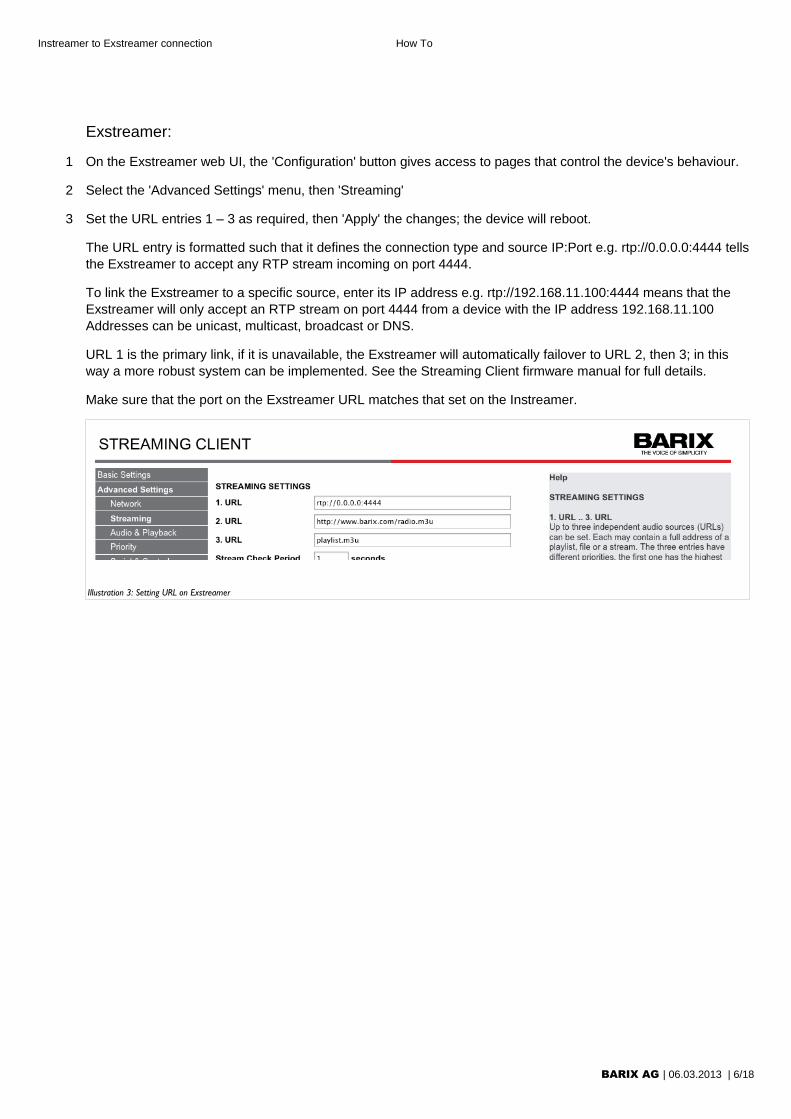
3 Set the URL entries 1 – 3 as required, then 'Apply' the changes; the device will reboot.
The URL entry is formatted such that it defines the connection type and source IP:Port e.g. rtp://0.0.0.0:4444 tells the Exstreamer to accept any RTP stream incoming on port 4444.
To link the Exstreamer to a specific source, enter its IP address e.g. rtp://192.168.11.100:4444 means that the Exstreamer will only accept an RTP stream on port 4444 from a device with the IP address 192.168.11.100 Addresses can be unicast, multicast, broadcast or DNS.
URL 1 is the primary link, if it is unavailable, the Exstreamer will automatically failover to URL 2, then 3; in this way a more robust system can be implemented. See the Streaming Client firmware manual for full details.
Make sure that the port on the Exstreamer URL matches that set on the Instreamer.
Illustration 3: Setting URL on Exstreamer
BARIX AG | 06.03.2013 | 6/18

Instreamer to Exstreamer connection How To
2.2 BRTP Connection
BRTP is a 'pulling mode' – the Instreamer only sends a stream when it is requested by the Exstreamer and can support up to 32 simultaneous connections in this mode (at a maximum of 128 kbps per stream)
Instreamer:
1 On the Instreamer web UI, the 'Configuration' button gives access to pages that control the device's behaviour.
2 Select the 'Advanced Settings' menu, then 'Audio'
3 Make sure that the '”Bit reservoir mode” is set to “kept empty”
4 “Apply” the change, the device will reboot
5 Select the 'Advanced Settings' menu, then 'Streaming'
6 In the “Streaming Destinations” section
6.1 set the “Conn. Type” to “BRTP”: BRTP must be set in the first entry, no others.
6.2 The IP address for the Streaming Destinations is not required. The port number should be set e.g. 4444 and this value should be used also by the Exstreamers requesting the stream.
7 “Apply” the changes, the device will reboot
Illustration 4: Instreamer BRTP settings on LAN
BARIX AG | 06.03.2013 | 7/18
Instreamer to Exstreamer connection How To
Exstreamer:
1 On the Exstreamer web UI, the 'Configuration' button gives access to pages that control the device's behaviour.
2 Select the 'Advanced Settings' menu, then 'Streaming'
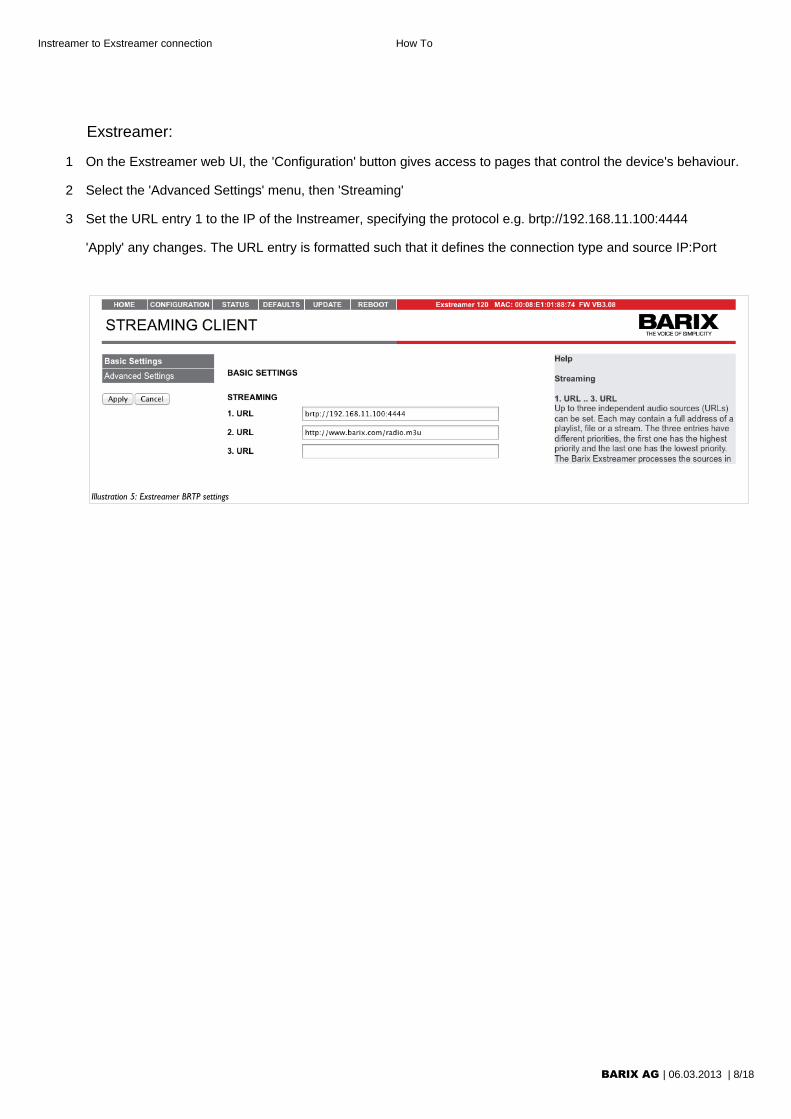
3 Set the URL entry 1 to the IP of the Instreamer, specifying the protocol e.g. brtp://192.168.11.100:4444
'Apply' any changes. The URL entry is formatted such that it defines the connection type and source IP:Port
Illustration 5: Exstreamer BRTP settings
BARIX AG | 06.03.2013 | 8/18
Instreamer to Exstreamer connection How To
2.3 HTTP Connection
Instreamer:
1 On the Instreamer web UI, the 'Configuration' button gives access to pages that control the device's behaviour.
2 Select the 'Advanced Settings' menu, then 'Streaming'
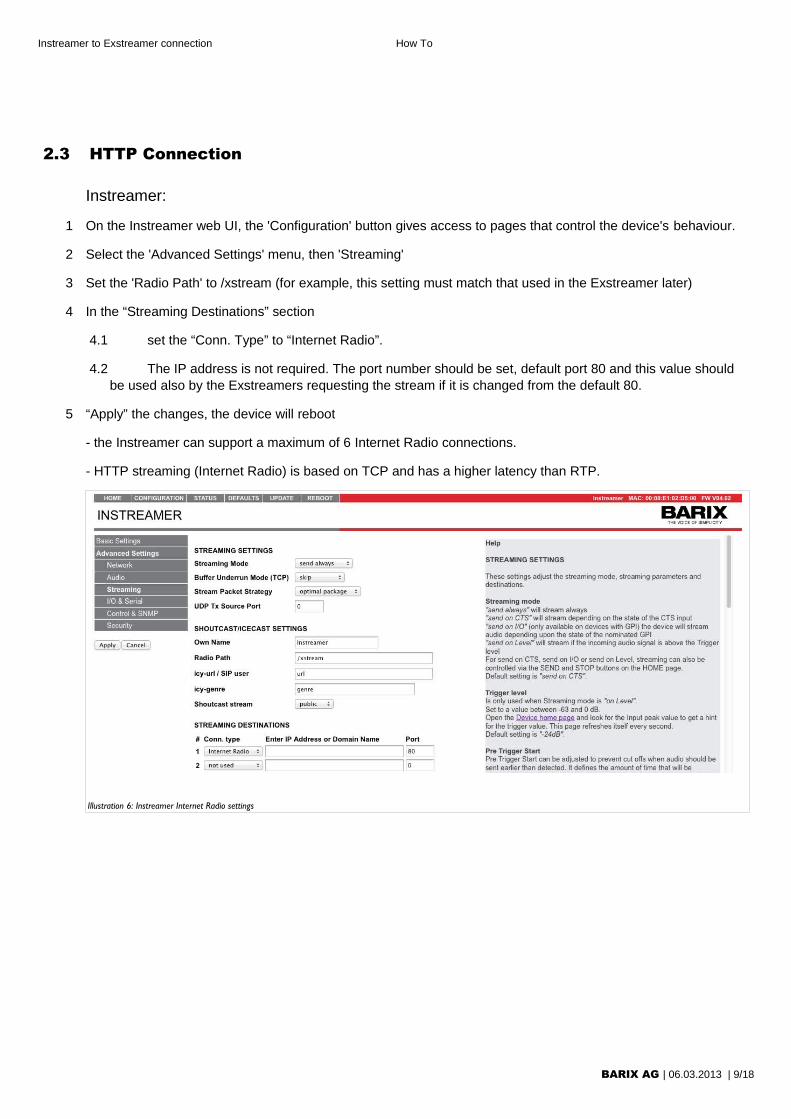
3 Set the 'Radio Path' to /xstream (for example, this setting must match that used in the Exstreamer later)
4 In the “Streaming Destinations” section
4.1 set the “Conn. Type” to “Internet Radio”.
4.2 The IP address is not required. The port number should be set, default port 80 and this value should be used also by the Exstreamers requesting the stream if it is changed from the default 80.
5 “Apply” the changes, the device will reboot
- the Instreamer can support a maximum of 6 Internet Radio connections.
- HTTP streaming (Internet Radio) is based on TCP and has a higher latency than RTP.
Illustration 6: Instreamer Internet Radio settings
BARIX AG | 06.03.2013 | 9/18
Instreamer to Exstreamer connection How To
Exstreamer:
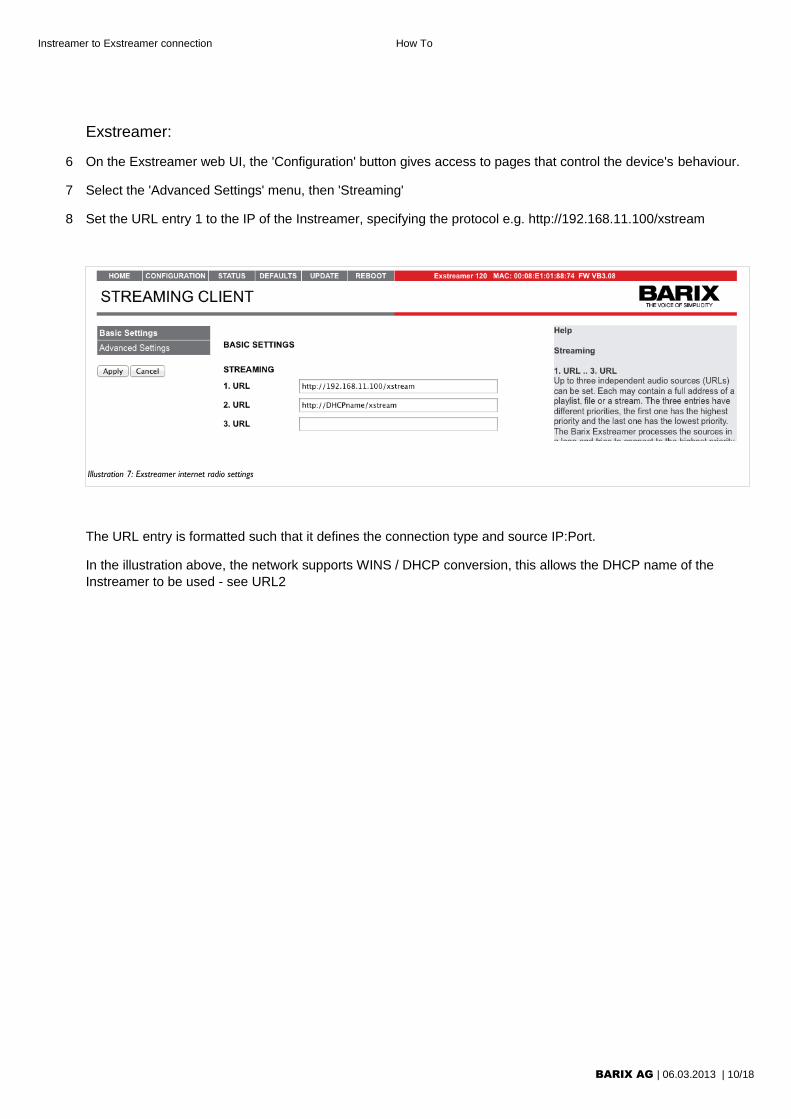
6 On the Exstreamer web UI, the 'Configuration' button gives access to pages that control the device's behaviour.
7 Select the 'Advanced Settings' menu, then 'Streaming'
8 Set the URL entry 1 to the IP of the Instreamer, specifying the protocol e.g. http://192.168.11.100/xstream
Illustration 7: Exstreamer internet radio settings
The URL entry is formatted such that it defines the connection type and source IP:Port.
In the illustration above, the network supports WINS / DHCP conversion, this allows the DHCP name of the Instreamer to be used - see URL2
BARIX AG | 06.03.2013 | 10/18
Instreamer to Exstreamer connection How To
3 Streaming connections over internet
The same 3 methods used on a LAN can also be used across public internet, but require extra configuration. In the majority of cases RTP/BRTP are best suited to make connections ,as the protocols are specifically designed for streaming audio.
Streaming across the internet means that we must pay attention to the routers and firewalls, which are a necessary part of the connections. Normally sending a stream OUT through a firewall is allowed without any special configuration (unless the security on site is especially strict) and similarly any REPLIES to an earlier outgoing message are passed through. It is INCOMING connections that are typically blocked, and this gives us some flexibility to choose which router we will configure:
• If the firewall/router on the Instreamer end of the connection cannot be easily configured, then it is best to use RTP for the connection, meaning that the Instreamer will be sending OUT through the firewall.
• If the firewall/router on the Exstreamer end of the connection cannot be easily configured, then it is best to use BRTP or HTTP for the connection, as with these protocols the Exstreamer sends a request OUT through the 'problem firewall' to the Instreamer, and since the Instreamer is replying to an earlier message, most firewalls will let the reply through, establishing the connection.
If one of the sites does not have a fixed IP address / DNS name, the same logic applies.
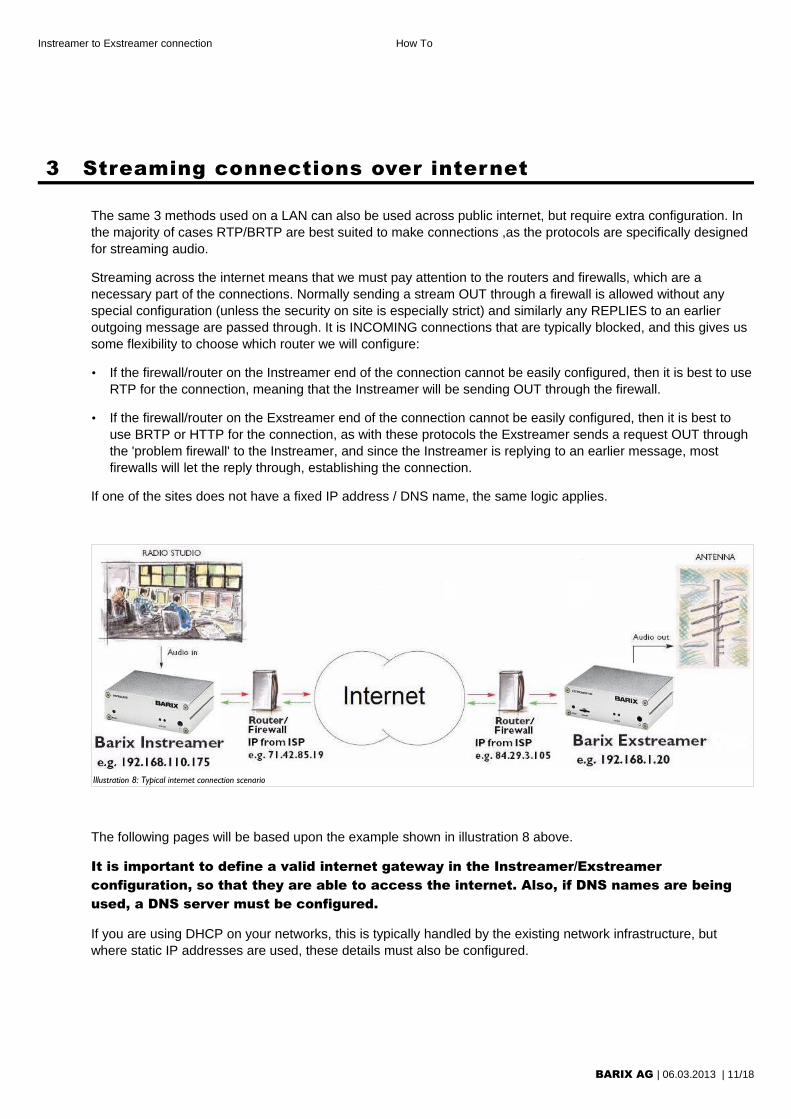
Illustration 8: Typical internet connection scenario
The following pages will be based upon the example shown in illustration 8 above.
It is important to define a valid internet gateway in the Instreamer/Exstreamer configuration, so that they are able to access the internet. Also, if DNS names are being used, a DNS server must be configured.
If you are using DHCP on your networks, this is typically handled by the existing network infrastructure, but where static IP addresses are used, these details must also be configured.
BARIX AG | 06.03.2013 | 11/18
Instreamer to Exstreamer connection How To
3.1 RTP over Internet
Instreamer: (192.168.110.175)
1 On the Instreamer web UI, the 'Configuration' button gives access to pages that control the device's behaviour.
2 Select the 'Advanced Settings' menu, then 'Audio'
3 Make sure that the '”Bit reservoir mode” is set to “kept empty”
4 “Apply” the change, the device will reboot
5 Select the 'Advanced Settings' menu, then 'Streaming'
6 In the “Streaming Destinations” section
6.1 set the “Conn. Type” to “RTP”
6.2 the public address and port number for the target Exstreamer's firewall must be input; this can be unicast, multicast, broadcast or DNS. In our example: 84.29.3.105:4444
7 “Apply” the changes, the device will reboot
Router at Exstreamer site (84.29.3.105)
1 The router at the Exstreamer will also require configuration; the firewall must be opened to the Instreamer's stream and a UDP port forwarding from the firewall to the Exstreamer must be set up – this is explained later in this document.
Exstreamer: (192.168.1.20)
1 On the Exstreamer web UI, the 'Configuration' button gives access to pages that control the device's behaviour.
2 Select the 'Advanced Settings' menu, then 'Streaming'
3 Set the URL entries 1 – 3 as required, then 'Apply' the changes; the device will reboot.
The URL entry is formatted such that it defines the connection type and source IP:Port e.g. rtp://0.0.0.0:4444 tells the Exstreamer to accept any RTP stream incoming on port 4444.
URL 1 is the primary link, if it is unavailable, the Exstreamer will automatically failover to URL 2, then 3; in this way a more robust system can be implemented. See the Streaming Client firmware manual for full details.
Make sure that the port on the Exstreamer URL matches that set on the Instreamer.
BARIX AG | 06.03.2013 | 12/18

Instreamer to Exstreamer connection How To
3.2 BRTP over Internet
Router at Instreamer site (71.42.85.19)
1 The router at the Instreamer requires the firewall to be opened for traffic from the Exstreamer (from its public IP address 84.29.3.105), and to make a UDP port forwarding from the firewall to the Instreamer.
BRTP is based on the UDP protocol and in this instance every listener requests the stream from the Instreamer, which means that a single configuration at the Instreamer is all that is required to support multiple Exstreamers, reducing the administrative overhead.
Instreamer: (192.168.110.175)
1 On the Instreamer web UI, the 'Configuration' button gives access to pages that control the device's behaviour.
2 Select the 'Advanced Settings' menu, then 'Audio'
3 Make sure that the '”Bit reservoir mode” is set to “kept empty”
4 “Apply” the change, the device will reboot
5 Select the 'Advanced Settings' menu, then 'Streaming'
6 In the “Streaming Destinations” section
6.1 set the “Conn. Type” to “BRTP”: BRTP must be set in the first entry, no others.
6.2 The IP address for the Streaming Destinations is not required. The port number should be set e.g. 4444 and this value should be used also by the Exstreamers requesting the stream.
7 “Apply” the changes, the device will reboot
Exstreamer: (192.168.1.20)
1 On the Exstreamer web UI, the 'Configuration' button gives access to pages that control the device's behaviour.
2 Select the 'Advanced Settings' menu, then 'Streaming'
3 Set the URL entry 1 to the public IP of the Instreamer's router, specifying the protocol, In our example: brtp://71.42.85.19:4444
71.42.85.19 is the public IP address of the router at the Instreamer site and 4444 is the port number that must be forwarded from the router to the Instreamer on the LAN (192.168.110.175).
In this example we are using the same port on the Router and on the Instreamer (4444), most routers can also support “cross” port forwarding, which helps when the port number we want to use on the Instreamer is already being used on the Router by a different application. With cross port forwarding the router maintains a table that allows it to translate the incoming port traffic from the internet to the appropriate IP address and port on the local network (and vice versa). So, for example, traffic to the Instreamer's Router 71.42.85.19:3030 can be automatically forwarded to the Instreamer 192.168.110.175:4444
The URL entry is formatted such that it defines the connection type and source IP:Port
BARIX AG | 06.03.2013 | 13/18
Instreamer to Exstreamer connection How To
3.3 HTTP connection over Internet
Router at Instreamer site (71.42.85.19)
1 The router at the Instreamer requires the firewall to be opened for traffic from the Exstreamer (from the Exstreamer's Router's public IP address 84.29.3.105), and to make a TCP port forwarding from the firewall to the Instreamer.
Instreamer: (e.g. 192.168.110.175)
1 On the Instreamer web UI, the 'Configuration' button gives access to pages that control the device's behaviour.
2 Select the 'Advanced Settings' menu, then 'Streaming'
3 Set the 'Radio Path' to /xstream (for example, this setting must match that used in the Exstreamer later)
Note: the 'Own Name' will be displayed on the Exstreamer as the 'Stream Title'
4 In the “Streaming Destinations” section
4.1 set the “Conn. Type” to “Internet Radio”.
4.2 The IP address for the Streaming Destinations is not required. The port number should be set, typically this stays at port 80 and this value should be used also by the Exstreamers requesting the stream if it is changed from the default 80.
5 “Apply” the changes, the device will reboot
Exstreamer: (e.g. 192.168.1.20)
1 On the Exstreamer web UI, the 'Configuration' button gives access to pages that control the device's behaviour.
2 Select the 'Advanced Settings' menu, then 'Streaming'
3 Set the URL entry 1 to the IP of the Instreamer's router, specifying the protocol, In our example: http://71.42.85.19/xstream
71.42.85.19 is the public IP address of the router at the Instreamer site
DNS names can also be used.
Note:
- the Instreamer can support a maximum of 6 internet radio connections.
- HTTP streaming is based on TCP and has a higher latency than RTP.
- HTTP assumes a default port 80. If a different port number is being used, it must be included here e.g. on the Exstreamer http://71.42.85.19:5555/xstream, and the same port must also be configured at the Instreamer's router / Instreamer.
BARIX AG | 06.03.2013 | 14/18
Instreamer to Exstreamer connection How To
4 Configuring routers & firewalls
Most ports on routers and firewalls are closed to incoming connections, which means that they must be configured to allow through the traffic of the Instreamer / Exstreamer connection; this is achieved via:
• a port forwarding: incoming traffic on a specific port (range) is passed to a specific IP address:port
• setting a DMZ (de-militarised zone) : all traffic is passed to a specific device; this option is NOT recommended.
To do either method, you must have access to the router's configuration UI.
4.1 Setting up port forwarding
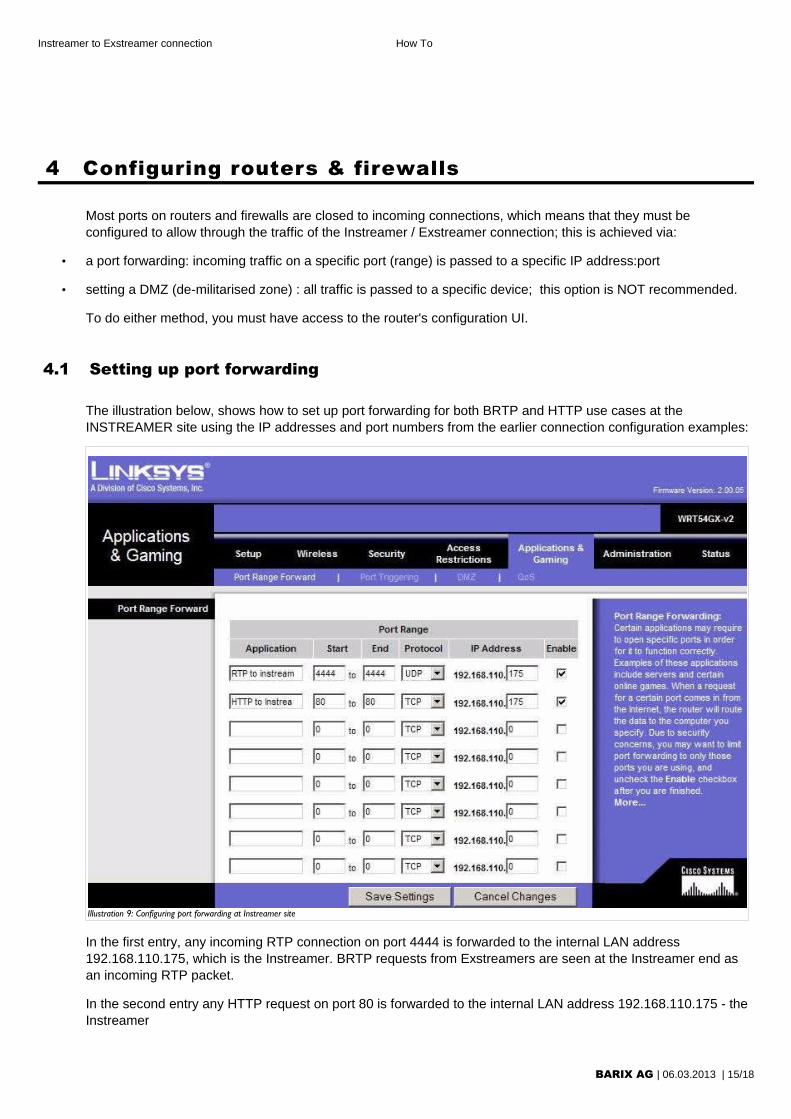
The illustration below, shows how to set up port forwarding for both BRTP and HTTP use cases at the INSTREAMER site using the IP addresses and port numbers from the earlier connection configuration examples:
Illustration 9: Configuring port forwarding at Instreamer site
In the first entry, any incoming RTP connection on port 4444 is forwarded to the internal LAN address 192.168.110.175, which is the Instreamer. BRTP requests from Exstreamers are seen at the Instreamer end as an incoming RTP packet.
In the second entry any HTTP request on port 80 is forwarded to the internal LAN address 192.168.110.175 - the Instreamer
BARIX AG | 06.03.2013 | 15/18
Instreamer to Exstreamer connection How To
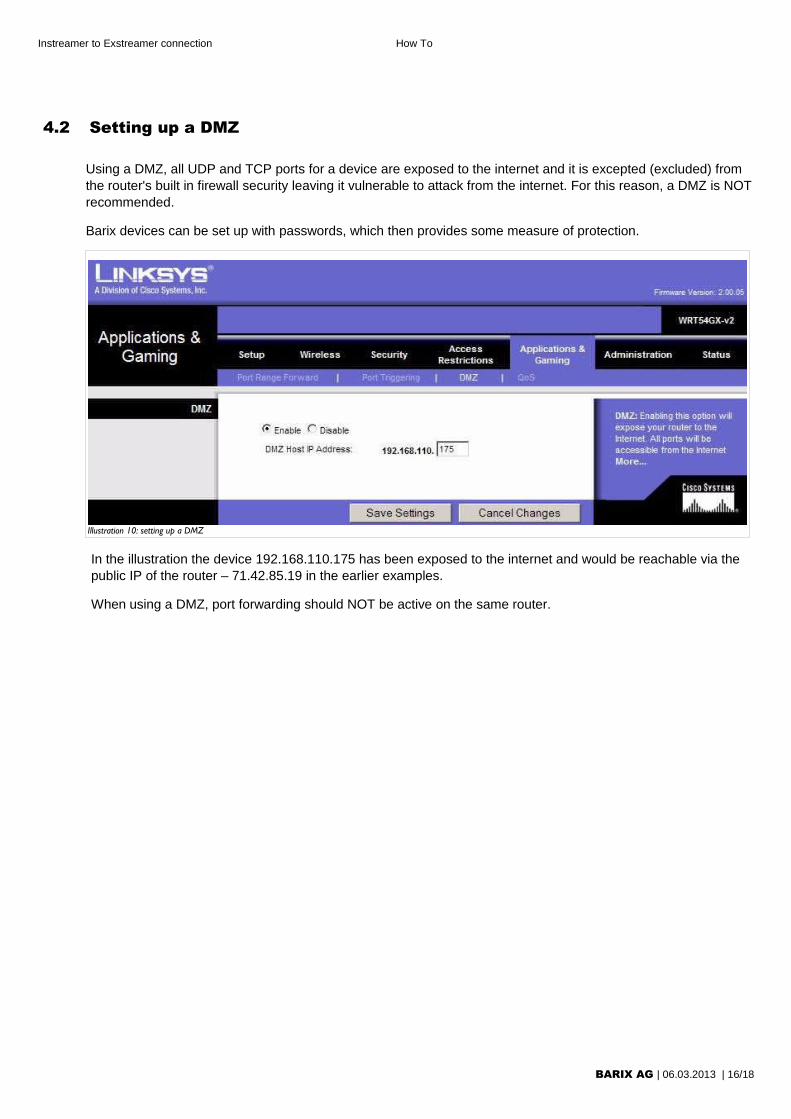
4.2 Setting up a DMZ
Using a DMZ, all UDP and TCP ports for a device are exposed to the internet and it is excepted (excluded) from the router's built in firewall security leaving it vulnerable to attack from the internet. For this reason, a DMZ is NOT recommended.
Barix devices can be set up with passwords, which then provides some measure of protection.
Illustration 10: setting up a DMZ
In the illustration the device 192.168.110.175 has been exposed to the internet and would be reachable via the public IP of the router – 71.42.85.19 in the earlier examples.
When using a DMZ, port forwarding should NOT be active on the same router.
BARIX AG | 06.03.2013 | 16/18

Instreamer to Exstreamer connection How To
4.3 Setting DNS
Unless specifically set up, most routers do not have a fixed internet-facing IP address. Typically an ISP will provide its customers with dynamic IP addresses, that change periodically, which would mean that to keep the Instreamer-Exstreamer connection, they would need to be continually re-configured.
This is clearly unacceptable.
Either one end of the connection should have a static internet IP address assigned (which typically costs a monthly fee), or the connection should be configured using DNS names. DNS names are registered by the user with a DNS registration authority and the chosen DNS name is associated with a dynamic IP address by the DNS authority and as the IP address changes, the association is updated. Devices do a look-up at the DNS authority to find the current IP address to use when communicating with the device using the DNS name.
DNS services are operated by many organisations, for example dyndns.org, easyDNS.com, no-IP.com, freeDNS.afraid.org etc; users must create an account and register their required DNS name, which must be unique.
Once an account has been created, the DNS name registered must be configured into the router e.g. at the Instreamer end.
Illustration 11: Configuring Dyn-DNS on the router
BARIX AG | 06.03.2013 | 17/18

Instreamer to Exstreamer connection How To
5 Legal Information
© 2013 Barix AG, Zurich, Switzerland.
All rights reserved.
All information is subject to change without notice.
All mentioned trademarks belong to their respective owners and are used for reference only.
Barix, Instreamer and Exstreamer are trademarks of Barix AG, Switzerland and are registered in certain countries.
For information about our devices and the latest version of this manual please visit www.barix.com.
Barix AGSeefeldstrasse 3038008 ZürichSWITZERLANDT +41 43 433 22 11F +41 44 274 28 49
[email protected]@barix.com
BARIX AG | 06.03.2013 | 18/18
Recommended


![With ])i Jay t )j~iez, V111])](https://img.dokumen.tips/doc/110x75/62b7a2476dca394792522072/with-i-jay-t-jiez-v111.jpg)