Guidebook for Hips and Knees
Guidebook for Hips and Knees
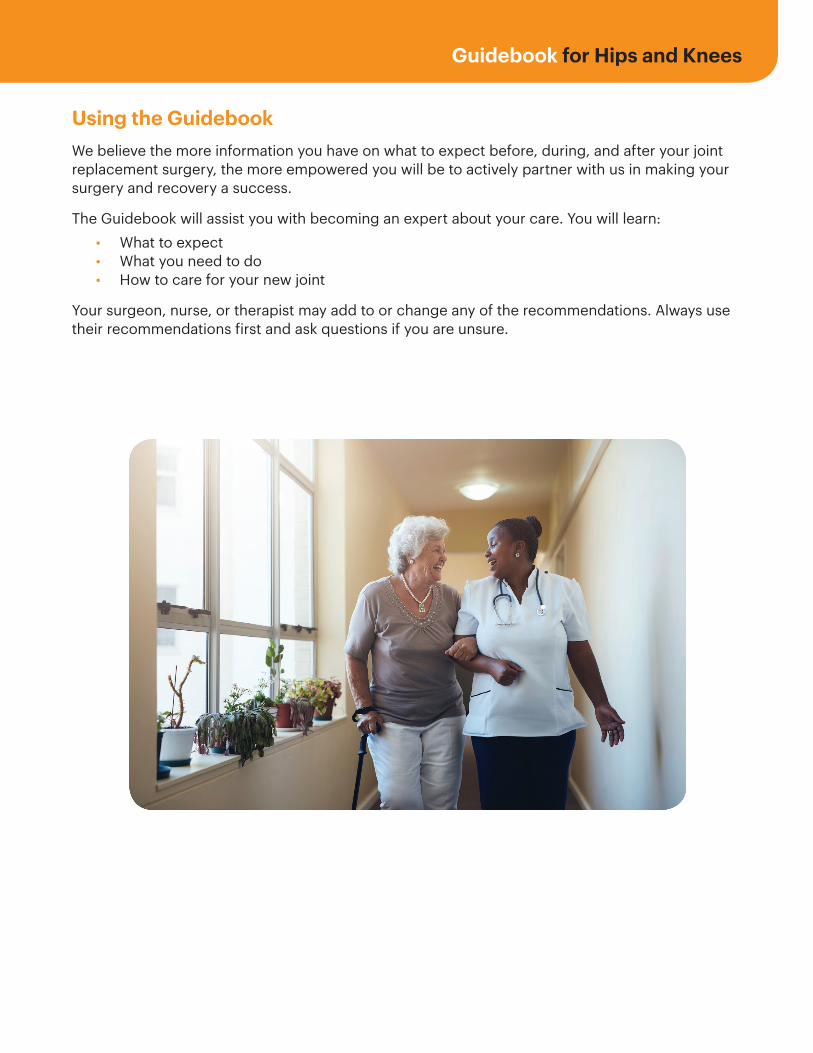
Using the GuidebookWe believe the more information you have on what to expect before, during, and after your joint replacement surgery, the more empowered you will be to actively partner with us in making your surgery and recovery a success.
The Guidebook will assist you with becoming an expert about your care. You will learn: • What to expect • What you need to do • How to care for your new joint
Your surgeon, nurse, or therapist may add to or change any of the recommendations. Always use their recommendations first and ask questions if you are unsure.
2 • piedmont.org/orthopedics
Table of Contents
Section One – Before SurgeryWelcome ..................................................................................................................................................... 5
Total Joint Replacement Center Overview ................................................................................................. 6
Reasons For Surgery .................................................................................................................................... 6
Goals of Surgery .......................................................................................................................................... 6
Your Care Team ............................................................................................................................................7
Understanding Hip Replacement ............................................................................................................... 8
Understanding Knee Replacement ...........................................................................................................10
Medication List ........................................................................................................................................... 12
Get Started - Six Weeks Before Surgery ....................................................................................................13
Plan for Leaving the Hospital ......................................................................................................................13
Care Team Call ...........................................................................................................................................13
Medical Clearance and Laboratory Tests ..................................................................................................14
Medications That Increase Bleeding ..........................................................................................................14
Herbal Medicine ..........................................................................................................................................14
Healthcare Decisions ..................................................................................................................................14
Start Pre-operative Hip Exercises ...............................................................................................................15
Start Pre-operative Knee Exercises .............................................................................................................17
Breathing Exercises .................................................................................................................................... 19
Surgery Timeline........................................................................................................................................ 20
Four Weeks Before ......................................................................................................................................20
Two to Three Weeks Before ........................................................................................................................20
Two Weeks Before ......................................................................................................................................20
Two Days Before .........................................................................................................................................20
Day Before.. ..................................................................................................................................................21
Night Before .................................................................................................................................................21
Day of Surgery .............................................................................................................................................21
Items to Take to the Hospital ......................................................................................................................21
Special Instructions .....................................................................................................................................21
Guidebook for Hips and Knees
piedmont.org/orthopedics • 3
Guidebook for Hips and Knees
Section Two – At the HospitalUnderstanding Anesthesia ........................................................................................................................ 22
Anesthesiologists ....................................................................................................................................... 22
Types of Anesthesia.................................................................................................................................... 22
Side Effects ................................................................................................................................................. 22
Understanding Pain ................................................................................................................................... 22
Pain Scale.................................................................................................................................................... 22
Taking Opioids or Narcotics .......................................................................................................................23
Hospital Care – What to Expect ................................................................................................................. 23
Before Surgery ............................................................................................................................................23
During Surgery ...........................................................................................................................................23
After Surgery ..............................................................................................................................................23
Post-op Day One ......................................................................................................................................... 24
Discharge Day ............................................................................................................................................. 24
Discharge Options ..................................................................................................................................... 25
Section Three – At Home After SurgeryDischarge Options .................................................................................................................................... 25
Going Directly Home .................................................................................................................................. 25 Going to a Sub-acute Rehabilitation Facility ............................................................................................. 25
Caring for Yourself at Home ...................................................................................................................... 26
Be Comfortable ..........................................................................................................................................26
Body Changes ............................................................................................................................................26
Blood Clots .................................................................................................................................................26
Leg Swelling .............................................................................................................................................. 27
Compression Stockings ............................................................................................................................. 27
Incision Care ............................................................................................................................................... 27
Dressing Change ........................................................................................................................................ 27
Recognizing Complications ...................................................................................................................... 28
Infection ...................................................................................................................................................... 28
Blood Clots ................................................................................................................................................. 28
Pulmonary Embolism.................................................................................................................................. 28
Table of Contents
4 • piedmont.org/orthopedics
Table of Contents
Section Three – At Home After SurgeryPost-operative Goals and Milestones ........................................................................................................ 29
Weeks One to Two ......................................................................................................................................29
Weeks Two to Four......................................................................................................................................29
Weeks Four to Six .......................................................................................................................................29
Weeks Six to Twelve ...................................................................................................................................30
Hip & Knee Precautions ............................................................................................................................30
Activities of Daily Living .............................................................................................................................31
Bed and Chair Transfers .............................................................................................................................31
Walking ........................................................................................................................................................31
Stair Climbing ..............................................................................................................................................31
Tub Transfers ...............................................................................................................................................31
Car Transfers ...............................................................................................................................................32
Special Equipment ..................................................................................................................................... 33
Getting Dressed ......................................................................................................................................... 34
Protect Your Joints ..................................................................................................................................... 35
Dos and Don’ts ........................................................................................................................................... 35
What to Do ..................................................................................................................................................35
Exercise .......................................................................................................................................................35
Exercise Classes .........................................................................................................................................36
Lifetime Follow-up Visits ........................................................................................................................... 36
Section Four – AppendixGlossary ..................................................................................................................................................... 37
Pre- and Post-op Exercises ........................................................................................................................ 38
At Home Exercises ......................................................................................................................................38
Frequently Asked Questions .....................................................................................................................40
Map of Hospitals ........................................................................................................................................ 42
Notes .......................................................................................................................................................... 43
Guidebook for Hips and Knees
piedmont.org/orthopedics • 5
Welcome
Welcome to Piedmont Healthcare. We are delighted you have chosen Piedmont for your joint replacement surgery. We are dedicated to making your healthcare experience the best it can be, returning you to independent living and to an improved quality of life. Congratulations, you are taking a great next step toward getting back on track to an active and healthy life. It is our pleasure to serve and guide you on this journey and our goal at Piedmont to provide you with the best experience possible. We pride ourselves on the high quality care that our skilled care teams and talented physicians provide to thousands of people per year across the southeast. The Joint Replacement Handbook is just one of the resources that we provide to you to help prepare you for your surgery. Each Piedmont hospital in your community has resources dedicated to helping you navigate our health system to provide a smooth experience. We hope that you take advantage of everything that we have to offer – from online classes and physical therapy demonstrations, to this handbook, to the in-person Joint School – and become an expert about your health and care in preparation for your surgery. Thank you for choosing Piedmont.
6 • piedmont.org/orthopedics
Total Joint Replacement Center Overview We offer a unique program to encourage discharge from the hospital one to two days after surgery.
Program features include: • Guidebook • Orthopedic Navigator who assists with pre-operative preparation and provides support throughout treatment • Joint School • Family and friends as “coaches” • Private rooms • Nurses and therapists trained to work with joint replacement patients
A Few Reasons for Hip or Knee Replacement SurgeryAn injury, disease or normal aging can cause articular cartilage to become thin, rough or worn.When it does, the two bones begin to rub together. This results in a slow wearing away of thebone surface, which can cause pain and stiffness.
ArthritisArthritis is a disease which affects over 43 million people. Arthritis is a “wearing away” of thejoint surface. There are 3 common types of arthritis that affect the hip or knee:
• Osteoarthritis occurs as the cartilage thins due to wear and tear that destroys the cartilage. This is the most common form of arthritis. This is not hereditary, but does tend to run in families. • Rheumatoid arthritis may affect many parts of the body including the synovial membrane in joints. The diseased membrane makes large amounts of fluid which thins the cartilage and causes the knee swell. • Traumatic arthritis may occur at any age. This type of arthritis is caused from an injury to the joint which damages the cartilage.
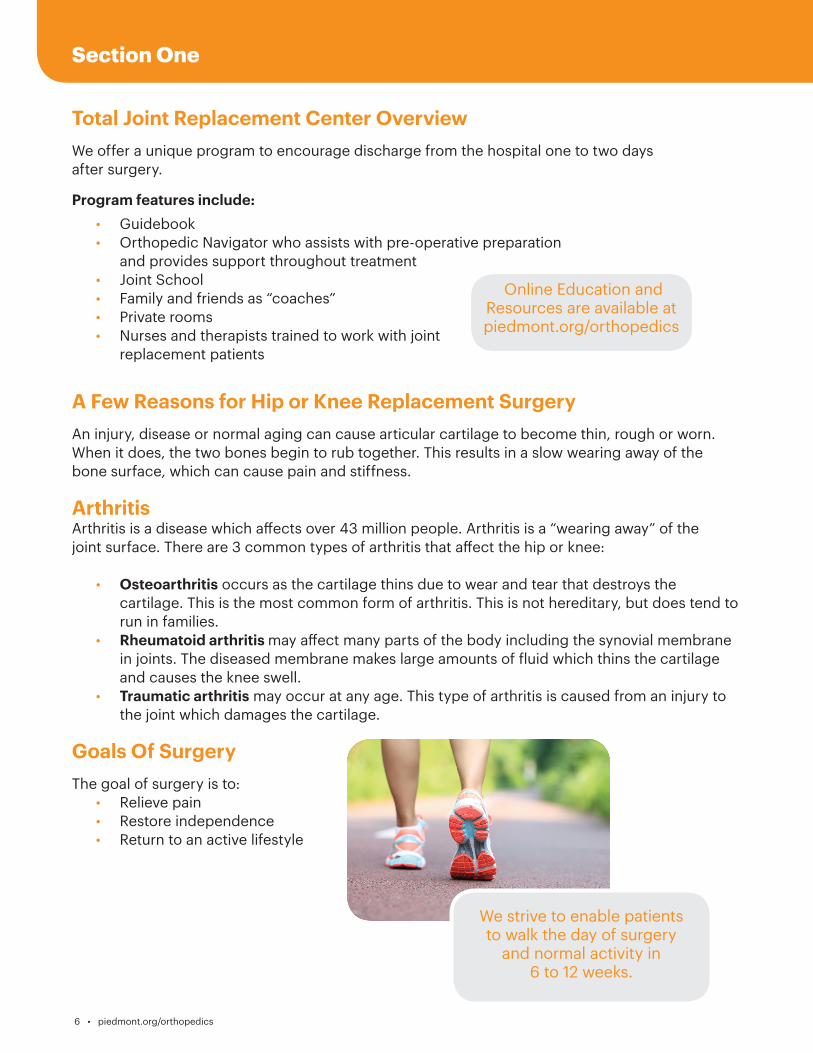
Goals Of SurgeryThe goal of surgery is to: • Relieve pain • Restore independence • Return to an active lifestyle
We strive to enable patients to walk the day of surgery
and normal activity in 6 to 12 weeks.
Online Education and Resources are available at piedmont.org/orthopedics
Section One
Guidebook for Hips and Knees
piedmont.org/orthopedics • 7
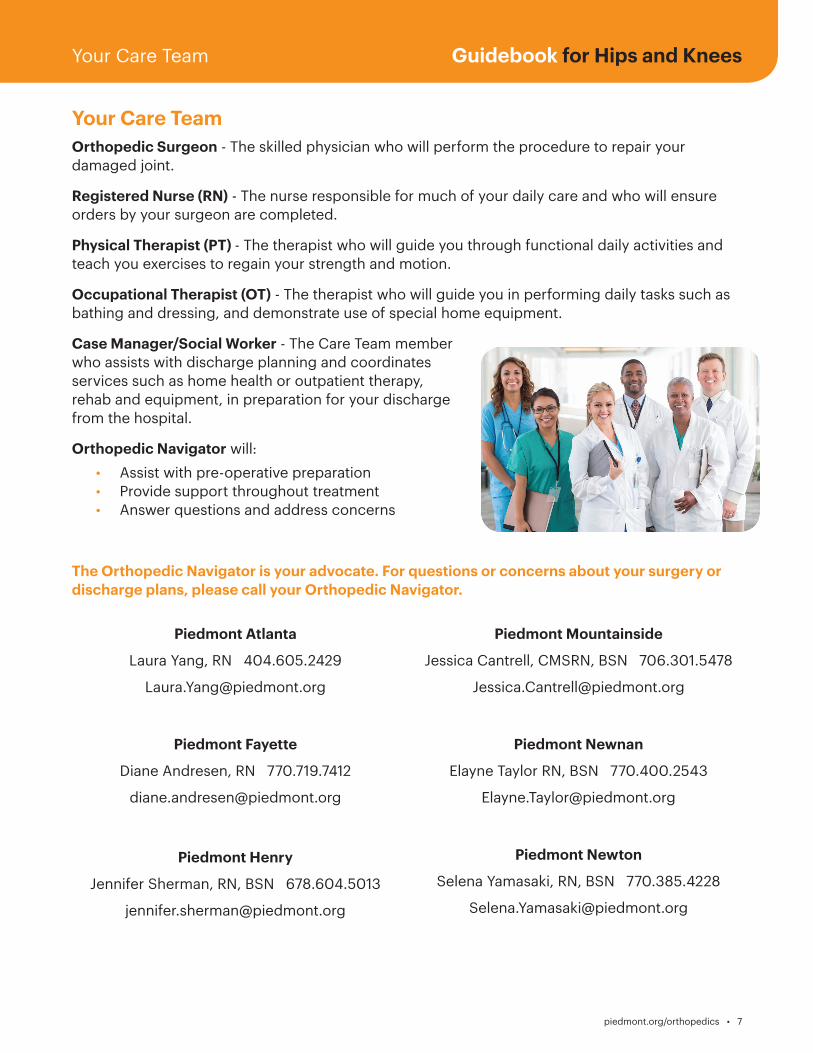
Your Care Team
Orthopedic Surgeon - The skilled physician who will perform the procedure to repair your damaged joint.
Registered Nurse (RN) - The nurse responsible for much of your daily care and who will ensure orders by your surgeon are completed.
Physical Therapist (PT) - The therapist who will guide you through functional daily activities and teach you exercises to regain your strength and motion.
Occupational Therapist (OT) - The therapist who will guide you in performing daily tasks such as bathing and dressing, and demonstrate use of special home equipment.
Case Manager/Social Worker - The Care Team member who assists with discharge planning and coordinates services such as home health or outpatient therapy, rehab and equipment, in preparation for your discharge from the hospital.
Orthopedic Navigator will: • Assist with pre-operative preparation • Provide support throughout treatment • Answer questions and address concerns
The Orthopedic Navigator is your advocate. For questions or concerns about your surgery or discharge plans, please call your Orthopedic Navigator.
Your Care Team
Piedmont Atlanta
Laura Yang, RN 404.605.2429
Piedmont Fayette
Diane Andresen, RN 770.719.7412
Piedmont Henry
Jennifer Sherman, RN, BSN 678.604.5013
Piedmont Mountainside
Jessica Cantrell, CMSRN, BSN 706.301.5478
Piedmont Newnan
Elayne Taylor RN, BSN 770.400.2543
Piedmont Newton
Selena Yamasaki, RN, BSN 770.385.4228
8 • piedmont.org/orthopedics
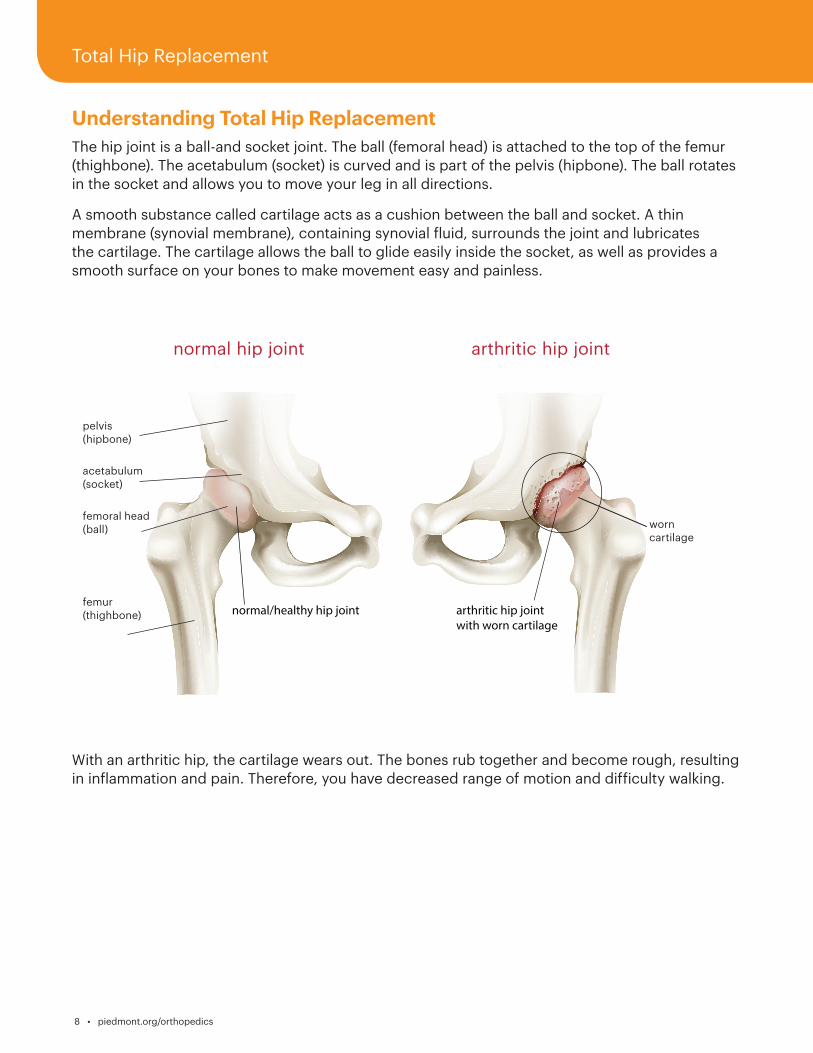
Understanding Total Hip Replacement
The hip joint is a ball-and socket joint. The ball (femoral head) is attached to the top of the femur (thighbone). The acetabulum (socket) is curved and is part of the pelvis (hipbone). The ball rotates in the socket and allows you to move your leg in all directions.
A smooth substance called cartilage acts as a cushion between the ball and socket. A thin membrane (synovial membrane), containing synovial fluid, surrounds the joint and lubricates the cartilage. The cartilage allows the ball to glide easily inside the socket, as well as provides a smooth surface on your bones to make movement easy and painless.
With an arthritic hip, the cartilage wears out. The bones rub together and become rough, resulting in inflammation and pain. Therefore, you have decreased range of motion and difficulty walking.
normal hip joint arthritic hip joint
pelvis (hipbone)
acetabulum (socket)
worn cartilage
femoral head (ball)
femur (thighbone)
Total Hip Replacement
Guidebook for Hips and Knees
piedmont.org/orthopedics • 9
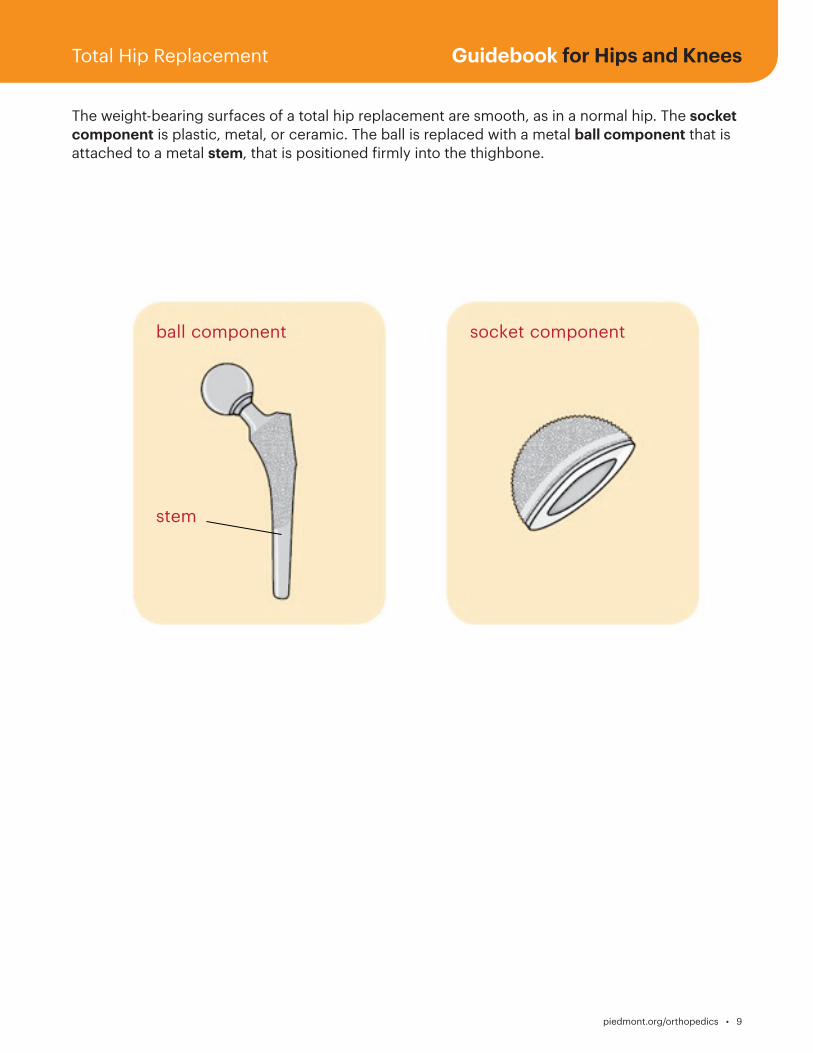
The weight-bearing surfaces of a total hip replacement are smooth, as in a normal hip. The socket component is plastic, metal, or ceramic. The ball is replaced with a metal ball component that is attached to a metal stem, that is positioned firmly into the thighbone.
Total Hip Replacement
socket componentball component
stem
10 • piedmont.org/orthopedics
Understanding Total Knee Replacement
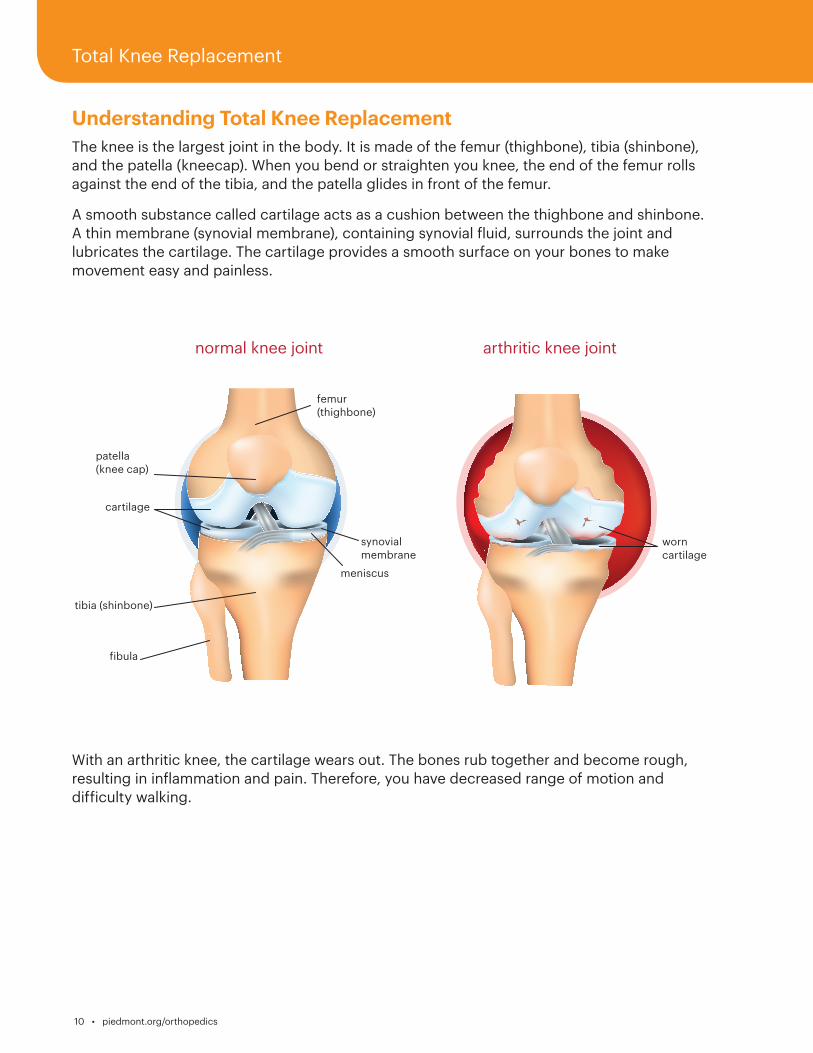
The knee is the largest joint in the body. It is made of the femur (thighbone), tibia (shinbone), and the patella (kneecap). When you bend or straighten you knee, the end of the femur rolls against the end of the tibia, and the patella glides in front of the femur.
A smooth substance called cartilage acts as a cushion between the thighbone and shinbone. A thin membrane (synovial membrane), containing synovial fluid, surrounds the joint and lubricates the cartilage. The cartilage provides a smooth surface on your bones to make movement easy and painless.
With an arthritic knee, the cartilage wears out. The bones rub together and become rough, resulting in inflammation and pain. Therefore, you have decreased range of motion and difficulty walking.
normal knee joint arthritic knee joint
femur (thighbone)
patella (knee cap)
tibia (shinbone)
synovial membrane
meniscus
cartilage
fibula
worn cartilage
Total Knee Replacement
Guidebook for Hips and Knees
piedmont.org/orthopedics • 11
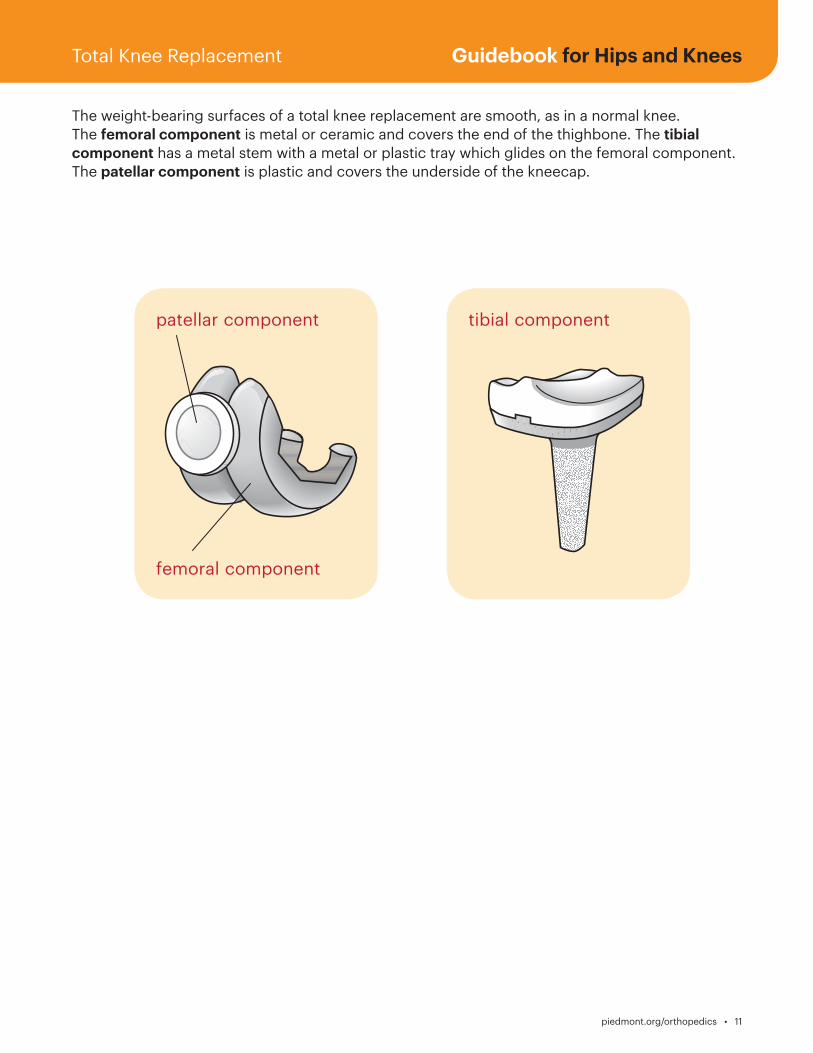
The weight-bearing surfaces of a total knee replacement are smooth, as in a normal knee. The femoral component is metal or ceramic and covers the end of the thighbone. The tibial component has a metal stem with a metal or plastic tray which glides on the femoral component. The patellar component is plastic and covers the underside of the kneecap.
Total Knee Replacement
tibial component
femoral component
patellar component
12 • piedmont.org/orthopedics
Medication List
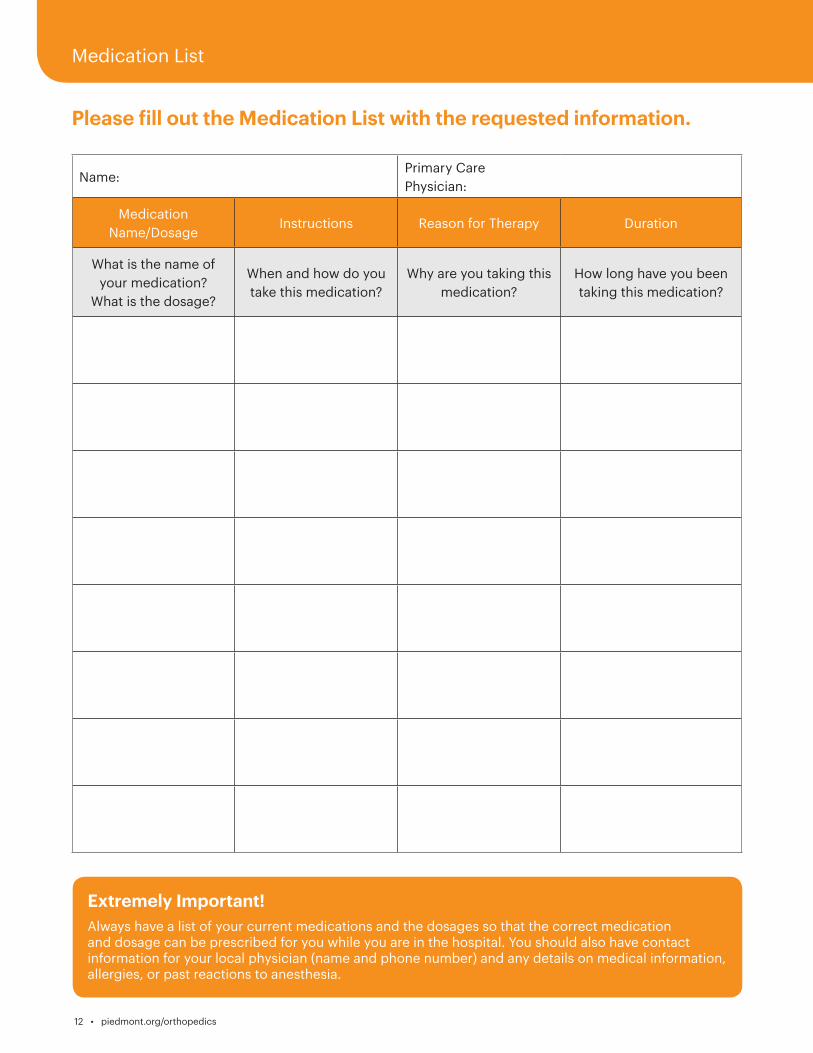
Please fill out the Medication List with the requested information.
Name:Primary Care Physician:
Medication Name/Dosage
Instructions Reason for Therapy Duration
What is the name of your medication?
What is the dosage?
When and how do you take this medication?
Why are you taking this medication?
How long have you been taking this medication?
Extremely Important!
Always have a list of your current medications and the dosages so that the correct medication and dosage can be prescribed for you while you are in the hospital. You should also have contact information for your local physician (name and phone number) and any details on medical information, allergies, or past reactions to anesthesia.
Guidebook for Hips and Knees
piedmont.org/orthopedics • 13
Plan for Leaving the Hospital Discharge planning starts the moment you decide to have surgery. Preparing a plan for discharge is very important for your recovery. The Care Team will assist you with a discharge plan that meets your needs. Most patients recover at home after leaving the hospital, as it is usually best to recover in the privacy and comfort of your own home. You will be discharged from the hospital when: • Your medical condition is stable. • You are able to tolerate your diet and urinate. • Your pain is controlled with oral pain medication. • Your discharge arrangements are complete. • You successfully met physical and occupational therapy goals.
Care Team CallAfter surgery has been scheduled, you will be contacted by a member of the Care Team to:
• Answer questions and direct you to hospital resources. • Verify appointments for medical testing. • Verify you have made an appointment, if necessary, with your primary care physician or a specialist, and have obtained pre-operative tests your surgeon ordered.
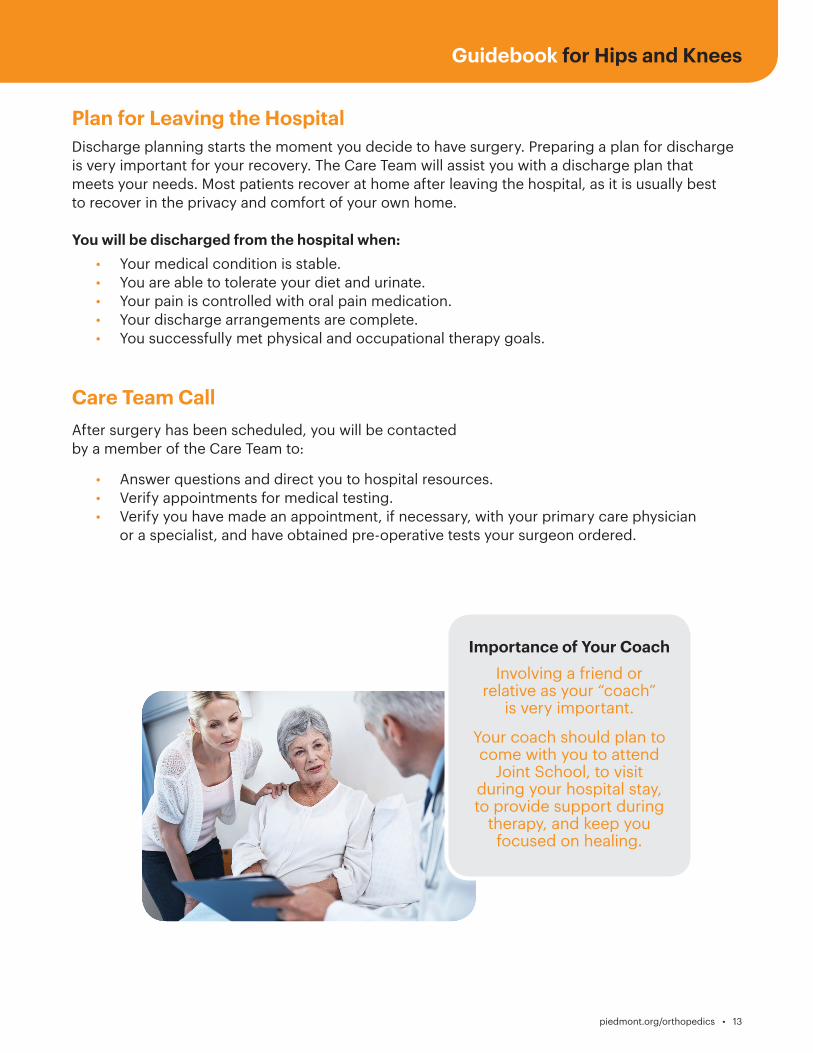
Importance of Your Coach
Involving a friend or relative as your “coach”
is very important.
Your coach should plan to come with you to attend
Joint School, to visit during your hospital stay, to provide support during
therapy, and keep you focused on healing.
14 • piedmont.org/orthopedics
Medical Clearance & Laboratory TestsAfter reviewing your medical history, your surgeon may instruct you to see your primary care physician or a specialist, for medical clearance before surgery. It is important, for your safety, that you follow all of the instructions provided.
Your surgeon will request pre-operative lab tests to be collected before your surgery. This will be done at the hospital, during your pre-admission testing appointment. It is important that you follow all of the instructions provided.
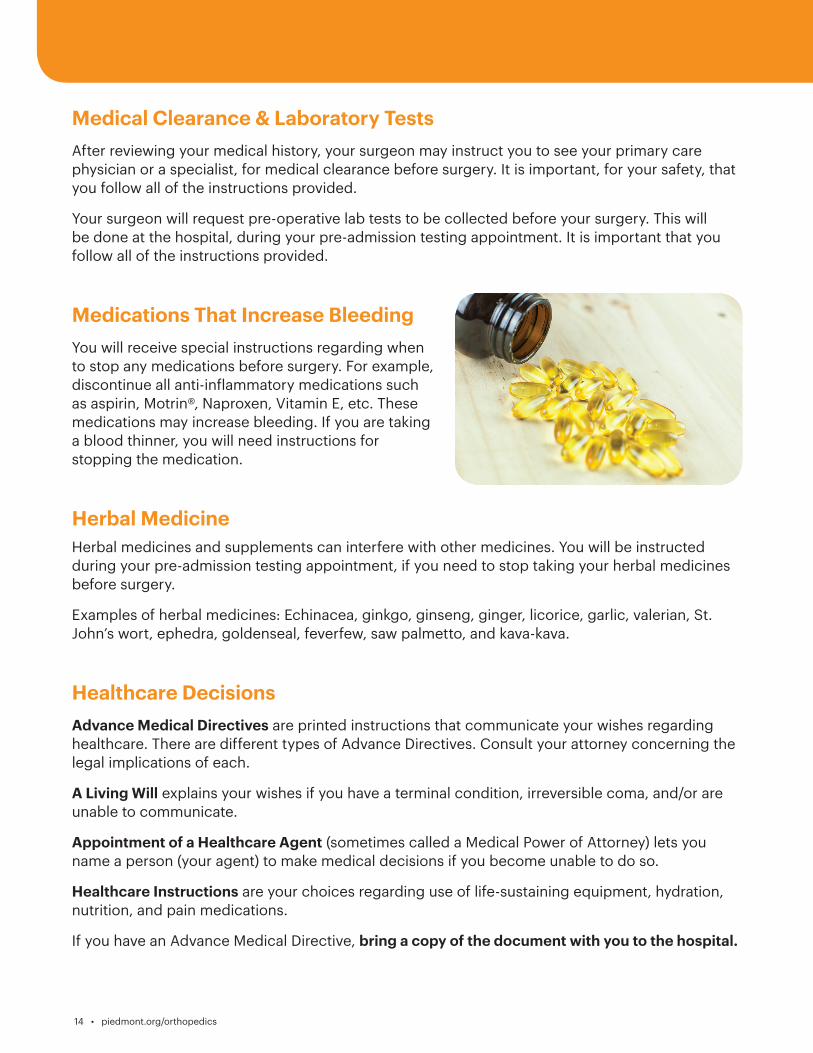
Medications That Increase BleedingYou will receive special instructions regarding when to stop any medications before surgery. For example, discontinue all anti-inflammatory medications such as aspirin, Motrin®, Naproxen, Vitamin E, etc. These medications may increase bleeding. If you are taking a blood thinner, you will need instructions for stopping the medication.
Herbal Medicine Herbal medicines and supplements can interfere with other medicines. You will be instructed during your pre-admission testing appointment, if you need to stop taking your herbal medicines before surgery.
Examples of herbal medicines: Echinacea, ginkgo, ginseng, ginger, licorice, garlic, valerian, St. John’s wort, ephedra, goldenseal, feverfew, saw palmetto, and kava-kava.
Healthcare DecisionsAdvance Medical Directives are printed instructions that communicate your wishes regarding healthcare. There are different types of Advance Directives. Consult your attorney concerning the legal implications of each.
A Living Will explains your wishes if you have a terminal condition, irreversible coma, and/or are unable to communicate.
Appointment of a Healthcare Agent (sometimes called a Medical Power of Attorney) lets you name a person (your agent) to make medical decisions if you become unable to do so.
Healthcare Instructions are your choices regarding use of life-sustaining equipment, hydration, nutrition, and pain medications.
If you have an Advance Medical Directive, bring a copy of the document with you to the hospital.
Guidebook for Hips and Knees
piedmont.org/orthopedics • 15
Pre-operative Exercises for Hips
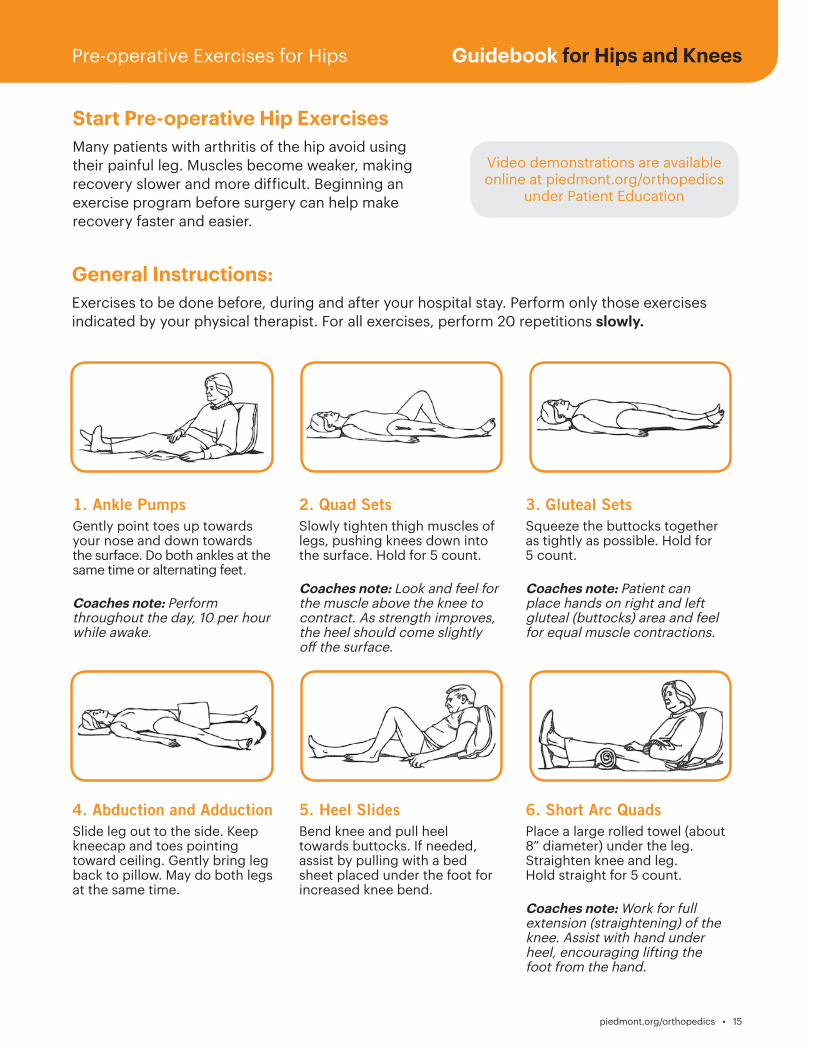
Start Pre-operative Hip Exercises
Many patients with arthritis of the hip avoid using their painful leg. Muscles become weaker, making recovery slower and more difficult. Beginning an exercise program before surgery can help make recovery faster and easier.
Video demonstrations are available online at piedmont.org/orthopedics
under Patient Education
1. Ankle PumpsGently point toes up towards your nose and down towards the surface. Do both ankles at the same time or alternating feet.
Coaches note: Perform throughout the day, 10 per hour while awake.
4. Abduction and AdductionSlide leg out to the side. Keep kneecap and toes pointing toward ceiling. Gently bring leg back to pillow. May do both legs at the same time.
5. Heel SlidesBend knee and pull heel towards buttocks. If needed, assist by pulling with a bed sheet placed under the foot for increased knee bend.
6. Short Arc QuadsPlace a large rolled towel (about 8” diameter) under the leg. Straighten knee and leg. Hold straight for 5 count.
Coaches note: Work for full extension (straightening) of the knee. Assist with hand under heel, encouraging lifting the foot from the hand.
2. Quad SetsSlowly tighten thigh muscles of legs, pushing knees down into the surface. Hold for 5 count.
Coaches note: Look and feel for the muscle above the knee to contract. As strength improves, the heel should come slightly off the surface.
3. Gluteal SetsSqueeze the buttocks together as tightly as possible. Hold for5 count.
Coaches note: Patient can place hands on right and left gluteal (buttocks) area and feel for equal muscle contractions.
General Instructions: Exercises to be done before, during and after your hospital stay. Perform only those exercises indicated by your physical therapist. For all exercises, perform 20 repetitions slowly.
16 • piedmont.org/orthopedics
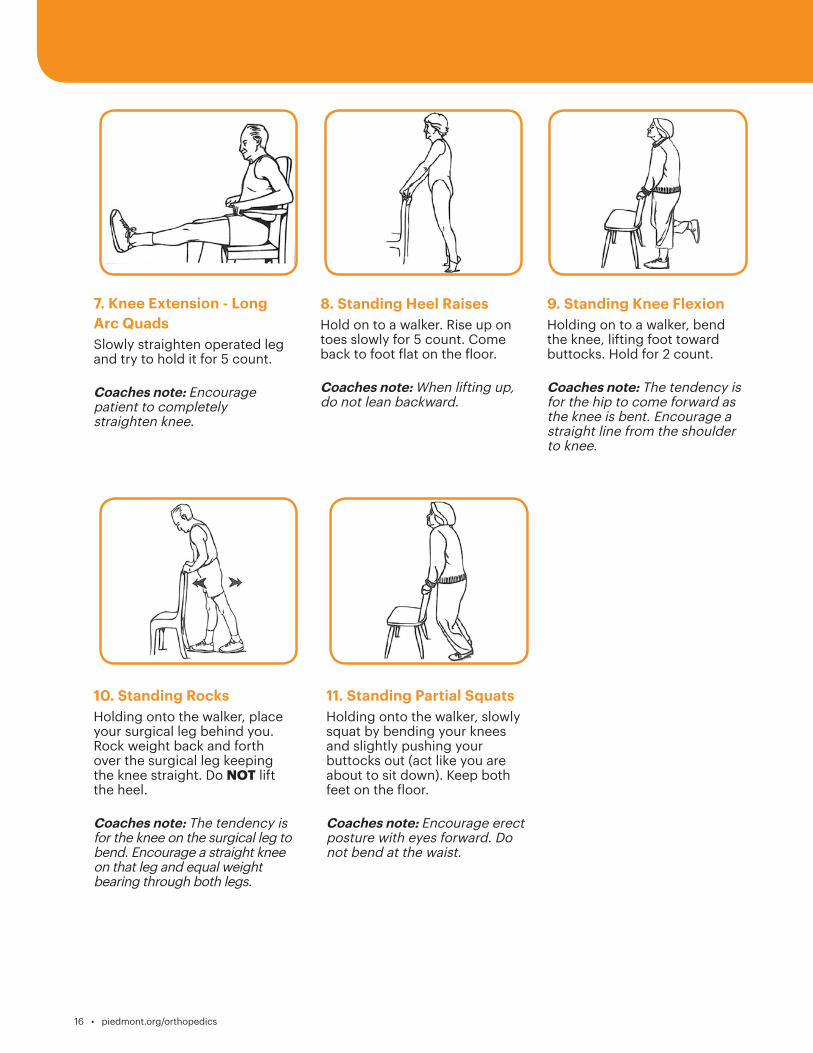
7. Knee Extension - Long Arc QuadsSlowly straighten operated leg and try to hold it for 5 count.
Coaches note: Encourage patient to completely straighten knee.
8. Standing Heel RaisesHold on to a walker. Rise up on toes slowly for 5 count. Come back to foot flat on the floor.
Coaches note: When lifting up, do not lean backward.
9. Standing Knee FlexionHolding on to a walker, bend the knee, lifting foot toward buttocks. Hold for 2 count.
Coaches note: The tendency is for the hip to come forward as the knee is bent. Encourage a straight line from the shoulder to knee.
10. Standing RocksHolding onto the walker, place your surgical leg behind you. Rock weight back and forth over the surgical leg keeping the knee straight. Do NOT lift the heel.
Coaches note: The tendency is for the knee on the surgical leg to bend. Encourage a straight knee on that leg and equal weight bearing through both legs.
11. Standing Partial SquatsHolding onto the walker, slowly squat by bending your knees and slightly pushing your buttocks out (act like you are about to sit down). Keep both feet on the floor.
Coaches note: Encourage erect posture with eyes forward. Do not bend at the waist.
Guidebook for Hips and Knees
piedmont.org/orthopedics • 17
Pre-operative Exercises for Knees
.
.
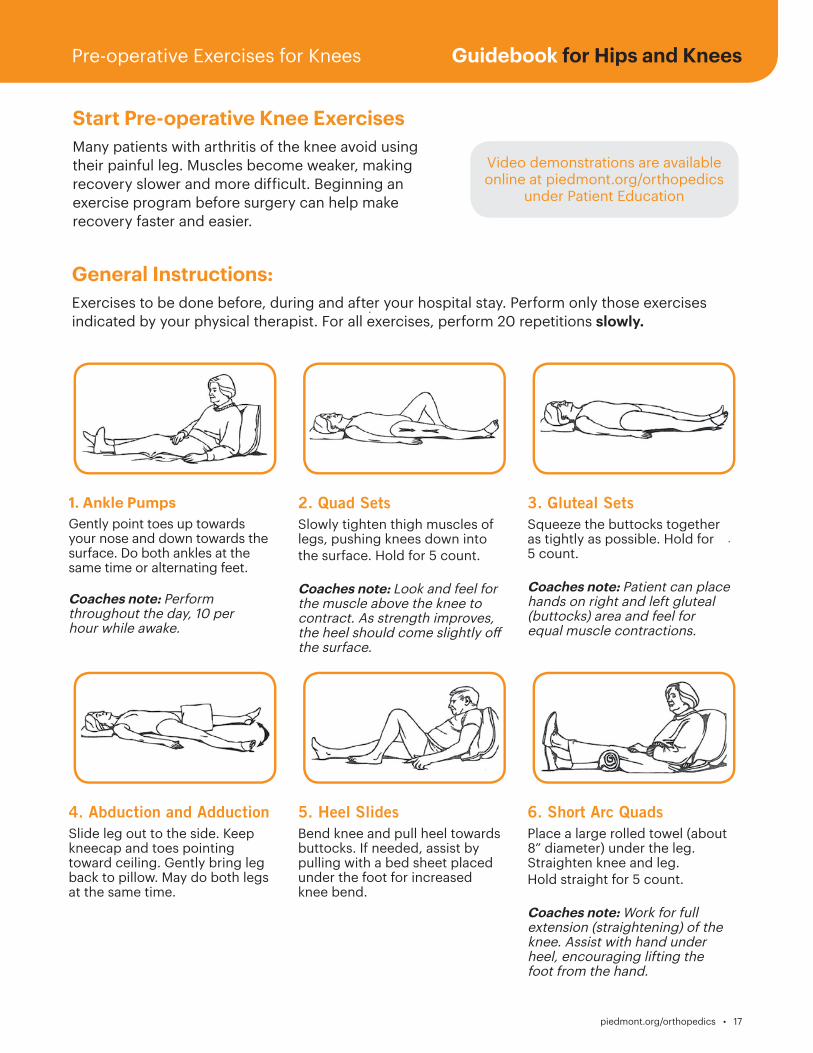
Start Pre-operative Knee Exercises
Many patients with arthritis of the knee avoid using their painful leg. Muscles become weaker, making recovery slower and more difficult. Beginning an exercise program before surgery can help make recovery faster and easier.
Video demonstrations are available online at piedmont.org/orthopedics
under Patient Education
1. Ankle PumpsGently point toes up towards your nose and down towards the surface. Do both ankles at the same time or alternating feet.
Coaches note: Perform throughout the day, 10 per hour while awake.
4. Abduction and AdductionSlide leg out to the side. Keep kneecap and toes pointing toward ceiling. Gently bring leg back to pillow. May do both legs at the same time.
5. Heel SlidesBend knee and pull heel towards buttocks. If needed, assist by pulling with a bed sheet placed under the foot for increased knee bend.
6. Short Arc QuadsPlace a large rolled towel (about 8” diameter) under the leg. Straighten knee and leg. Hold straight for 5 count.
Coaches note: Work for full extension (straightening) of the knee. Assist with hand under heel, encouraging lifting the foot from the hand.
2. Quad SetsSlowly tighten thigh muscles of legs, pushing knees down into the surface. Hold for 5 count.
Coaches note: Look and feel for the muscle above the knee to contract. As strength improves, the heel should come slightly off the surface.
3. Gluteal SetsSqueeze the buttocks together as tightly as possible. Hold for 5 count.
Coaches note: Patient can place hands on right and left gluteal (buttocks) area and feel for equal muscle contractions.
General Instructions: Exercises to be done before, during and after your hospital stay. Perform only those exercises indicated by your physical therapist. For all exercises, perform 20 repetitions slowly.
18 • piedmont.org/orthopedics
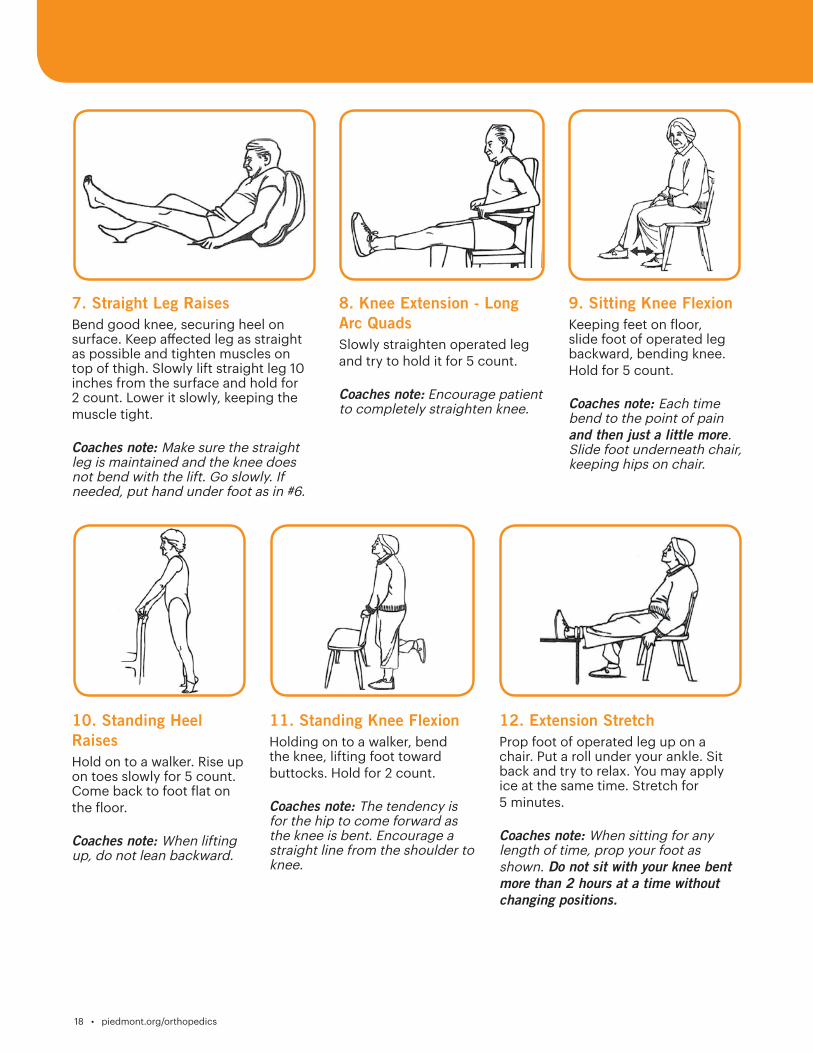
7. Straight Leg RaisesBend good knee, securing heel on surface. Keep affected leg as straight as possible and tighten muscles on top of thigh. Slowly lift straight leg 10 inches from the surface and hold for 2 count. Lower it slowly, keeping the muscle tight.
Coaches note: Make sure the straight leg is maintained and the knee does not bend with the lift. Go slowly. If needed, put hand under foot as in #6.
10. Standing Heel RaisesHold on to a walker. Rise up on toes slowly for 5 count. Come back to foot flat on the floor.
Coaches note: When lifting up, do not lean backward.
8. Knee Extension - Long Arc QuadsSlowly straighten operated leg and try to hold it for 5 count.
Coaches note: Encourage patient to completely straighten knee.
11. Standing Knee FlexionHolding on to a walker, bend the knee, lifting foot toward buttocks. Hold for 2 count.
Coaches note: The tendency is for the hip to come forward as the knee is bent. Encourage a straight line from the shoulder to knee.
9. Sitting Knee FlexionKeeping feet on floor, slide foot of operated leg backward, bending knee. Hold for 5 count.
Coaches note: Each time bend to the point of pain and then just a little more. Slide foot underneath chair, keeping hips on chair.
12. Extension StretchProp foot of operated leg up on a chair. Put a roll under your ankle. Sit back and try to relax. You may apply ice at the same time. Stretch for 5 minutes.
Coaches note: When sitting for any length of time, prop your foot as shown. Do not sit with your knee bent more than 2 hours at a time without changing positions.
Guidebook for Hips and Knees
piedmont.org/orthopedics • 19
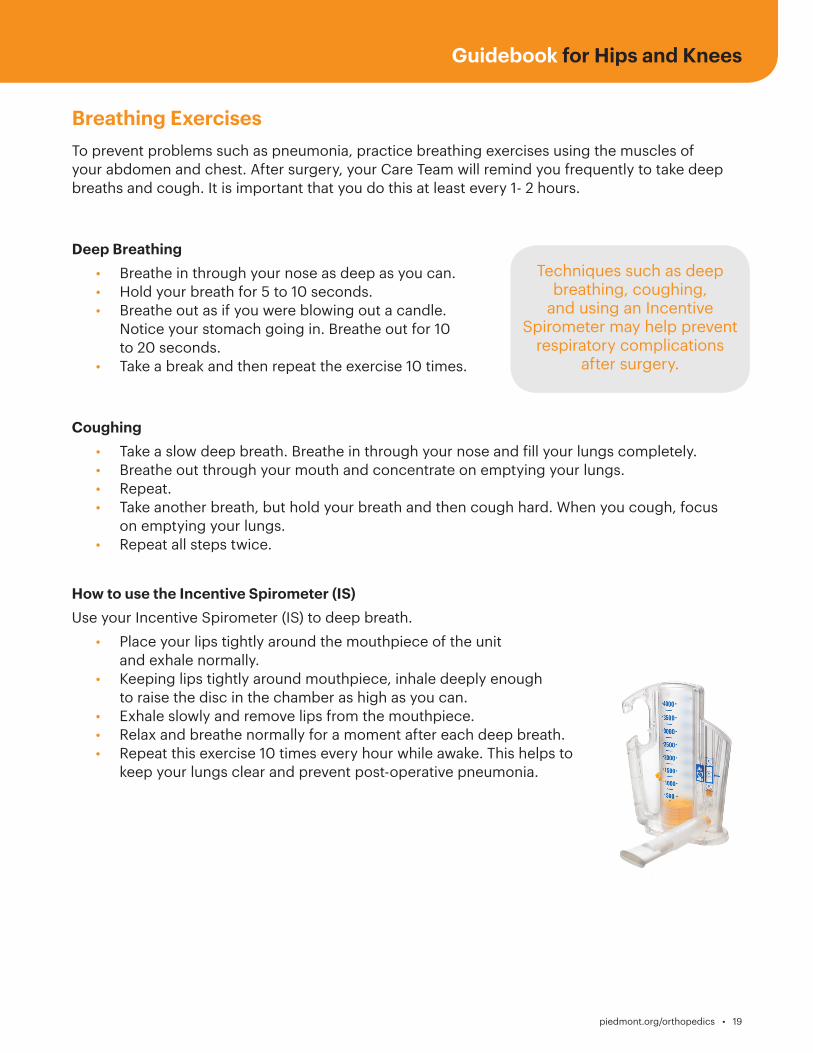
Breathing ExercisesTo prevent problems such as pneumonia, practice breathing exercises using the muscles of your abdomen and chest. After surgery, your Care Team will remind you frequently to take deep breaths and cough. It is important that you do this at least every 1- 2 hours.
Deep Breathing • Breathe in through your nose as deep as you can. • Hold your breath for 5 to 10 seconds. • Breathe out as if you were blowing out a candle. Notice your stomach going in. Breathe out for 10 to 20 seconds. • Take a break and then repeat the exercise 10 times.
Coughing • Take a slow deep breath. Breathe in through your nose and fill your lungs completely. • Breathe out through your mouth and concentrate on emptying your lungs. • Repeat. • Take another breath, but hold your breath and then cough hard. When you cough, focus on emptying your lungs. • Repeat all steps twice.
How to use the Incentive Spirometer (IS) Use your Incentive Spirometer (IS) to deep breath. • Place your lips tightly around the mouthpiece of the unit and exhale normally. • Keeping lips tightly around mouthpiece, inhale deeply enough to raise the disc in the chamber as high as you can. • Exhale slowly and remove lips from the mouthpiece. • Relax and breathe normally for a moment after each deep breath. • Repeat this exercise 10 times every hour while awake. This helps to keep your lungs clear and prevent post-operative pneumonia.
Techniques such as deep breathing, coughing,
and using an Incentive Spirometer may help prevent
respiratory complications after surgery.
20 • piedmont.org/orthopedics
Four Weeks Before Surgery
Importance of Your Coach
The people that are involved in your daily life, friends and family, are important. During your joint replacement journey, the involvement of a friend or relative participating as your “coach” is very important. Your coach will be with you from pre-admission testing, through your stay in the hospital, and even after your discharge to home. They are encouraged to attend Joint School, give support during your therapy sessions, and keep you focused on healing. They will ensure that you continue your exercises when you return home, and that your home remains safe during your recovery.
Start Vitamins, Iron
You may be instructed to take multivitamins, as well as iron. Iron helps build your blood count, which may help prevent the need for a blood transfusion.
Two to Three Weeks Before Surgery
Joint School
Attend a class for joint replacement surgery patients. Bring your coach. If you cannot attend, inform your Orthopedic Navigator and watch the joint school video online at www.piedmont.org/orthopedics .
Class outline:
- Understanding Your Procedure- What to Expect During the Hospital Stay- Physical/Occupational Therapy- Pain Management
- How to Care for Yourself at Home- Role of the Coach/Caregiver- Discharge Planning
Two Weeks Before Surgery
Pre-operative Visit to SurgeonYou should have a pre-operative visit in your surgeon’s office 2 to 3 weeks before surgery.
Two Days Before Surgery
Skin Prep Preparing your skin before surgery can reduce the risk of infection at the surgical site. Therefore, it is necessary to prepare your skin with a special soap or wipes before surgery. You will be given specific instructions on how to use the soap or wipes during your pre-admission testing appointment.
Guidebook for Hips and Knees
piedmont.org/orthopedics • 21
Day Before Surgery
Arrival Time to the HospitalArrival time for your surgery will be given to you at your pre-admission testing appointment, or you will be contacted by a member of the Care Team. If your surgery time changes, you will be notified the day prior to surgery.
Night Before Surgery
Do not eat or drink anything after midnight, EVEN WATER, unless otherwise instructed.
Day of Surgery
Come to the hospital two hours before surgery to give staff time to prepare you for surgery and answer any questions you may have. It is important that you arrive on time, as occasionally the surgery time is moved up.
Items to Take to the Hospital • Personal hygiene items (toothbrush, deodorant, battery-operated razor, etc.) • A list of all the medicine you take including the name of the medication, dosage, instructions, and reason for taking the medication • A list of any allergies you have (to food, clothing, medicine, etc.) and how you react to each one • Loose-fitting clothes (shorts, T-shirts) • Flat shoes with enclosed heels or tennis shoes with non-slip soles • Battery-operated items (NO electrical items) • Guidebook • Copy of Advance Medical Directives (if you have one) • Insurance card, driver’s license, or photo I.D. • Co-payment required by insurance company • CPAP Machine (if needed for sleep disorder) • Glasses (if needed for reading), hearing aids and any other items you use each day
Special Instructions • During your pre-admission testing appointment, you will receive special instructions regarding which medications you should and should not take the day of surgery. Do NOT take medication for diabetes on the day of surgery. • Leave jewelry, valuables, credit cards/cash, and medications at home. • No makeup • No nail polish and/or artificial nails. • No body lotion. No deodorant.
22 • piedmont.org/orthopedics
Understanding Anesthesia Anesthesiologists The Operating Room and Post Anesthesia Care Unit (PACU) at the hospital are staffed by board certified and board eligible anesthesiologists.
Types of Anesthesia • General anesthesia - produces temporary unconsciousness. • Regional anesthesia - involves the injection of a local anesthetic providing numbness, loss of pain, or loss of sensation to the body (spinal blocks, epidural blocks and leg blocks).
Side Effects Your anesthesiologist will discuss the risks and benefits associated with each anesthetic option, as well as complications or side effects that can occur.
You will be given medications to treat nausea and vomiting, which sometimes occurs with the anesthesia. The amount of discomfort you experience will depend on several factors, especially the type of surgery. Your discomfort should be minimal, but do not expect to be totally pain free. Staff will teach you the pain scale to assess your pain level.
Understanding PainRecovery from any surgery involves pain and discomfort. Pain management begins with you. Pain control following surgery is an important part of your care. The goal is to recognize and treat your pain quickly, which allows you to participate in the therapy program. Pain can be chronic (lasting a long time) or acute (lasting a short period of time) — and pain will change through the recovery process.
The goal is to transition you to oral pain medication, which is usually an opioid or narcotic. Sometimes, an anti-inflammatory medication will be ordered as well. This transition is usually smooth, enabling you to progress with your activities with minimal discomfort.
Regardless of which pain control regimen you are on, if your pain is not relieved, please notify your nurse promptly. We want you to be as comfortable as possible during your recovery. A goal of the recovery process is for you to participate in your own plan of care.
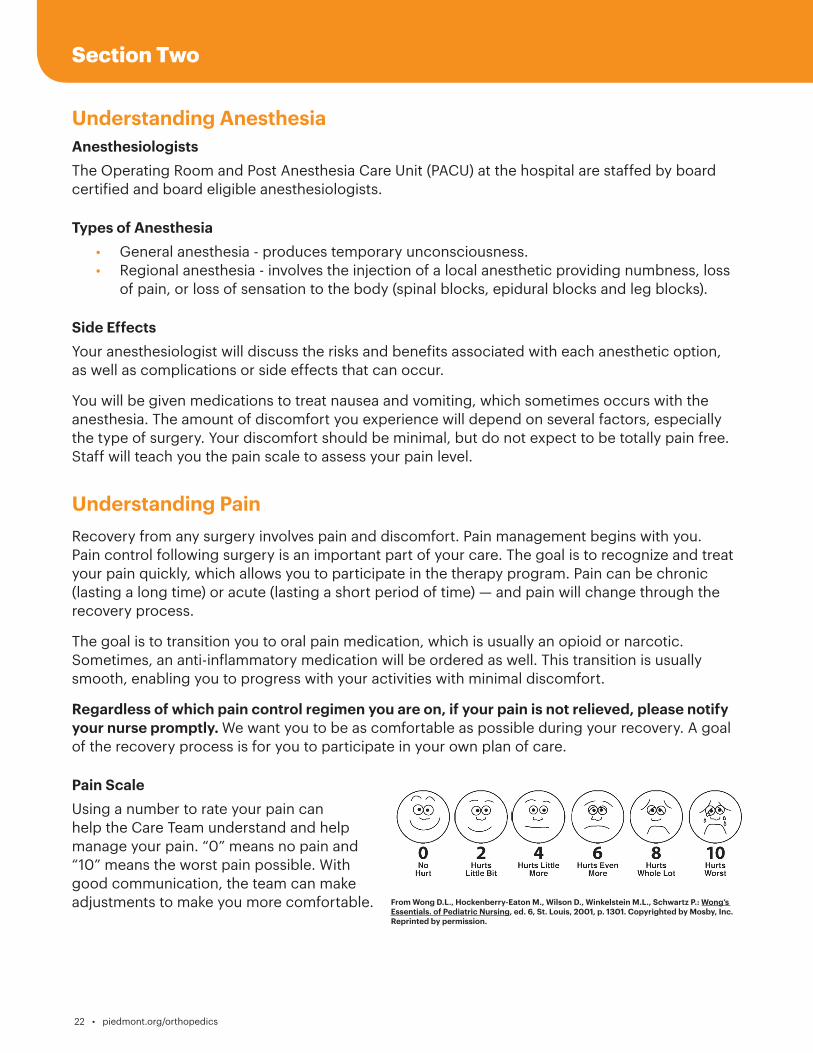
Pain Scale Using a number to rate your pain can help the Care Team understand and help manage your pain. “0” means no pain and “10” means the worst pain possible. With good communication, the team can make adjustments to make you more comfortable. From Wong D.L., Hockenberry-Eaton M., Wilson D., Winkelstein M.L., Schwartz P.: Wong’s
Essentials. of Pediatric Nursing, ed. 6, St. Louis, 2001, p. 1301. Copyrighted by Mosby, Inc. Reprinted by permission.
Section Two
Guidebook for Hips and Knees
piedmont.org/orthopedics • 23
Hospital Care - What to Expect
Before Surgery
• Your anesthesiologist will review your information to evaluate your general health to deter-mine the type of anesthesia best suited for you. This includes your medical history, laborato-ry test results, allergies, and current medications.
• Intravenous (IV) fluids will be started and pre-operative medications may be given.
During Surgery
• Before you receive the anesthesia, monitoring devices will be attached (blood pressure cuff, heart monitor, and other devices). Then you will receive your anesthesia and the surgery will begin. The anesthesiologist will be with you the entire time, monitoring your vital signs and IV fluid.
After Surgery
• You will be taken to the Post Anesthesia Care Unit (PACU). Your pain level will be assessed, vital signs monitored, and an x-ray of your new joint may be taken.
• Depending on the type of anesthesia used, you may experience blurred vision, dry mouth, and chills.
• You will then be taken to the Joint Replacement Center.
• Your nurse will frequently assess your pain level and review pain control options with you.
• Only one or two very close family members or friends should visit on surgery day.• At some point on this day, a Physical Therapist or member of the Care Team, will assist
you out of bed to walk, sit in a chair or dangle at the bedside. Mobility helps to relieve discomfort. It is important for you to begin ankle pumps to prevent blood clots from forming in your legs. Mobility Is Medicine!
• Begin using your Incentive Spirometer and doing the deep breathing exercises you learned.
Taking Opioids or Narcotics If you are worried about becoming addicted to pain medication, the risk of becoming addicted after surgery is very small. The bigger risk is a possible prolonged recovery if you avoid taking your pain medication, and cannot effectively do your required activities. If you are concerned about addiction, or have a history of substance abuse with alcohol or any drug, talk with your surgeon. Your surgeon will monitor you closely during your recovery. If issues arise, your surgeon will address them appropriately.
24 • piedmont.org/orthopedics
Post-op Day One
• Expect to be out of bed, bathed, dressed in your own clothes, and seated in a recliner. Shorts/ T-shirts are best; long pants can be restrictive.
• Your surgeon will visit.• Your Case Manager or Social Worker will visit.• The Care Team will assist you with your mobility needs. • Intravenous (IV) pain medication will be stopped; you will begin oral pain medication. • Physical Therapy and Occupational Therapy will work with you.• For patients being discharged today, you will walk in the halls and learn to go up/down
stairs.• Your coach is encouraged to be present and attend your therapy sessions. If you have
surgery at a Piedmont facility that has group therapy classes, your coach is encouraged to participate in your classes. Visitors are welcome late afternoon or evening.
Discharge Day
• Expect to be out of bed, bathed, dressed in your own clothes, and seated in a recliner. Shorts/T-shirts are best; long pants can be restrictive.
• You will walk the halls and learn to go up/down stairs.• Your coach is encouraged to be present and attend your therapy sessions. If you have
surgery at a Piedmont facility that has group therapy classes, your coach is encouraged to participate in your classes.
• The goal is for you to discharge after the AM or PM therapy session.
Fall SafetyPatients of all ages are at risk of falls because of a medical procedure or medications that may make them dizzy, weak or unsteady. You are encouraged to use the Nurse Call system when the need arises. Call Don’t Fall!
Guidebook for Hips and Knees
piedmont.org/orthopedics • 25
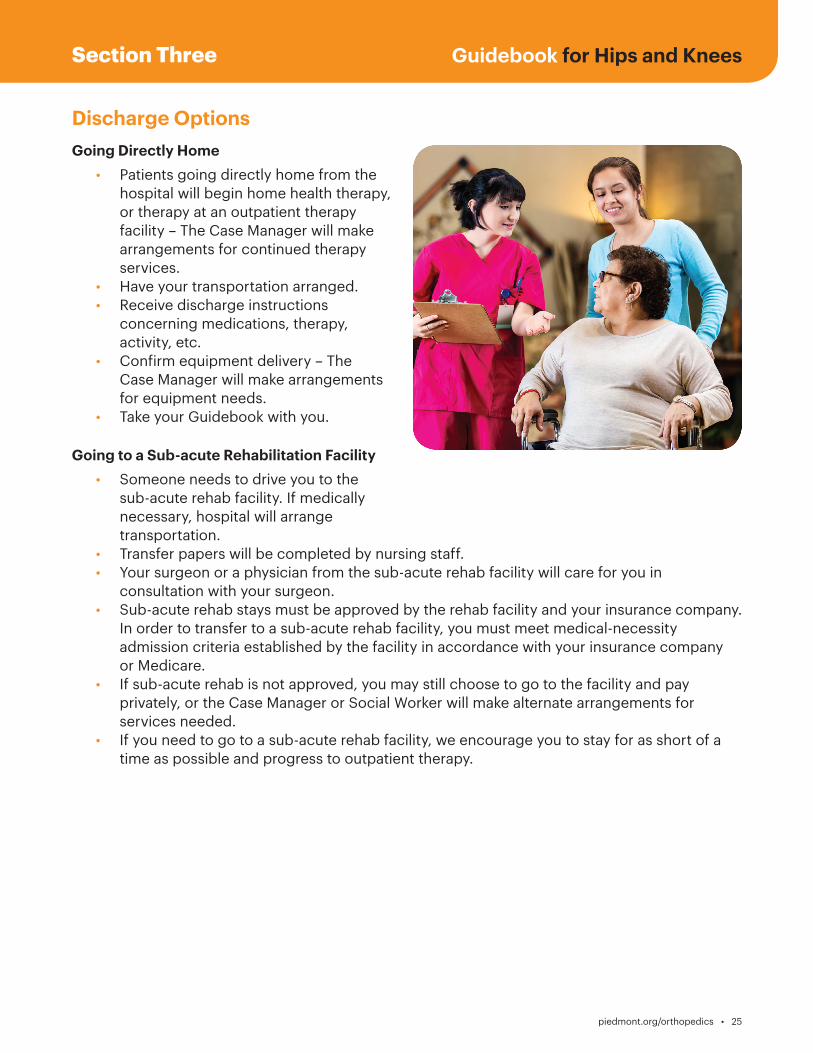
Discharge OptionsGoing Directly Home • Patients going directly home from the hospital will begin home health therapy, or therapy at an outpatient therapy facility – The Case Manager will make arrangements for continued therapy services. • Have your transportation arranged. • Receive discharge instructions concerning medications, therapy, activity, etc. • Confirm equipment delivery – The Case Manager will make arrangements for equipment needs. • Take your Guidebook with you.
Going to a Sub-acute Rehabilitation Facility • Someone needs to drive you to the sub-acute rehab facility. If medically necessary, hospital will arrange transportation. • Transfer papers will be completed by nursing staff. • Your surgeon or a physician from the sub-acute rehab facility will care for you in consultation with your surgeon. • Sub-acute rehab stays must be approved by the rehab facility and your insurance company. In order to transfer to a sub-acute rehab facility, you must meet medical-necessity admission criteria established by the facility in accordance with your insurance company or Medicare. • If sub-acute rehab is not approved, you may still choose to go to the facility and pay privately, or the Case Manager or Social Worker will make alternate arrangements for services needed. • If you need to go to a sub-acute rehab facility, we encourage you to stay for as short of a time as possible and progress to outpatient therapy.
Section Three
26 • piedmont.org/orthopedics
Caring for Yourself at HomeThings you need to know for safety, recovery, and comfort.
Be Comfortable • Take pain medicine at least 30 minutes before therapy. • If your pain medication is not effective or you are experiencing unpleasant side effects, do not hesitate to call your surgeon’s office. • To control pain, take your pain medication before the pain becomes severe and at least 30 minutes before your physical therapy session. • Gradually wean off prescription medication to non-prescription pain reliever. • Change position frequently (every 45 minutes – 1 hour) to prevent stiffness. • Apply an ice pack for 15-20 minutes at a time, a few times a day – when experiencing pain and before and after exercises.
Body Change • Appetite may be poor, but your desire for solid food will return. • Drink plenty of fluids. • You may have difficulty sleeping. • Energy level will be low– this will occur for at least four weeks. • Pain medication that contains narcotics will cause constipation. Use stool softeners or laxatives, if necessary. Contact your surgeon for any questions or concerns. • Proper nutrition and a balanced diet are important to stabilize your energy level and promote wound healing. Consult with your surgeon for additional information.
Blood Clots You will be given a blood-thinner to avoid blood clots in your legs and lungs. The length of time that you will take the blood-thinner will be determined by your surgeon. If you were given Coumadin, it will be necessary to do blood tests once or twice weekly to monitor the medication’s effectiveness and adjust the dose, if necessary. It is important, for your safety, that you follow all of the instructions provided.
• If discharged home on Coumadin and with home health services, a home health nurse will come out once or twice a week to draw a prothrombin time (bleeding time test). Results are called to your surgeon, who will adjust the dose of blood-thinner medication, if necessary.
• If you do NOT utilize home health nursing, you will go to an outpatient medical lab and have the prothrombin time drawn there. Your orthopedic surgeon or primary care physician will monitor your lab results and contact you to adjust the dose of blood-thinner medication, if necessary.
• If transferred to a sub-acute rehab facility, a physician will monitor your progress and adjust the dose of blood-thinner medication, if necessary. When discharged from the rehab facility, home health or outpatient blood monitoring will be arranged by the rehab facility staff.
Try not to nap during the day so you will
sleep at night.
Guidebook for Hips and Knees
piedmont.org/orthopedics • 27
Leg Swelling You may develop swelling in the operated leg. The swelling is normal and will usually resolve gradually over several weeks. Prolonged sitting with your foot in a down position tends to worsen the swelling.
Periods of walking should be alternated with periods of elevating the swollen leg.
To prevent or reduce leg and ankle swelling: • Elevate operated leg. • Avoid sitting for more than 30 to 45 minutes at a time. • Perform ankle pumps. • Apply an ice pack for 15-20 minutes at a time, a few times a day–when experiencing pain and before and after exercises.
Compression Stockings Your surgeon may order you to wear special stockings to compress veins in your legs. This helps keep swelling down and reduces the chance for blood clots.
• If swelling in operative leg is bothersome, elevate leg for short periods. Lie down and raise leg above heart level. • Wear stockings continuously, removing one to two hours twice a day. • Notify your surgeon if pain or swelling increases in either leg. • Wear stockings until your post-operative follow-up visit–ask your surgeon when you can discontinue.
Incision Care • Change your dressing as instructed by your surgeon. • Keep incision dry and covered with a light dressing until staples are removed at the follow-up visit with your surgeon (10 to 14 days after surgery). • You may take a sponge bath, but do not shower until instructed by your surgeon. • After showering, apply a dry bandage. • Notify your surgeon if increased drainage, redness, pain, odor and/or heat around the incision. • Take temperature if feeling warm or sick. Call your surgeon if temperature/fever exceeds 101.0 degrees Fahrenheit.
Dressing Change Procedure 1. Wash hands for 20 seconds with soap and warm water. 2. Open dressing supplies. 3. Remove old dressing. 4. Inspect incision for: • increased redness • increase in drainage • yellow/green drainage • odor • surrounding skin hot to touch 5. Apply new dressing.
28 • piedmont.org/orthopedics
Recognizing and Preventing Potential ComplicationsInfection
Signs
• Increased swelling and redness at incision site.• Change in color, amount, and odor of drainage.• Increased pain in knee.• Fever greater than 101.0 degrees Fahrenheit.
Prevention
• Take proper care of incision. • Notify your physician and dentist that you have a joint replacement.• Notify your dentist or physician before having dental work or other invasive
procedures – prophylactic antibiotics are generally prescribed.
Blood Clots Surgery may cause the blood to slow and thicken in veins of legs, creating a blood clot. If a clot occurs, call your surgeon promptly, as you may need to be admitted to the hospital to receive a blood-thinner.
Signs• Swelling in thigh, calf, or ankle that does not go down with elevation.• Pain, heat, and tenderness in calf, back of knee, or groin area. • Blood clots can form in either leg.
Prevention
• Perform ankle pumps.• Walk several times a day–avoid sitting for long periods.• Wear compression stockings, if ordered by your surgeon.• Take blood-thinners as directed.
Pulmonary EmbolismAn unrecognized blood clot could break away from the vein and travel to the lungs. This is an emergency — CALL 911.
Signs
• Sudden chest pain.• Difficult and/or rapid breathing.• Shortness of breath.• Sweating.• Confusion.
Prevention • Follow guidelines to prevent blood clot in legs.
Guidebook for Hips and Knees
piedmont.org/orthopedics • 29
Weeks One to Two
Goal is to discharge from the hospital within one to two days. Most patients go directly home, but some may go to a sub-acute rehab facility, if medically necessary. • Continue with walker unless otherwise instructed.• Walk at least 300 feet with walker or support.• If you have stairs, climb and descend flight of stairs (12-14 steps) with rail once a day.• Bend your knee at least 90 degrees.• Straighten knee completely.• Sponge bathe or shower (after staples are removed) as instructed and dress for the day.• Gradually resume homemaking tasks.• Do 20-30 minutes of home exercises twice a day, with or without the therapist–from the
program given to you.
Weeks Two to Four
Goal is to gain more independence. Follow home exercise program to achieve the best results. • Achieve one- to two-week goals.• Move to cane, as instructed by physical therapy.• Walk at least one-quarter mile.• Climb and descend flight of stairs (12-14 steps) more than once daily.• Bend your knee more than 90 degrees.• Straighten knee completely.• Independently shower and dress for the day.• Resume homemaking tasks.• Continue 20-30 minutes of home exercises twice a day, with or without the therapist–
from the program given to you. • Begin driving if left knee had surgery (NOTE: You need permission from your surgeon).
Weeks Four to Six
Goal is to recover to full independence. Home exercise program is important as you receive less supervised therapy. • Achieve one- to four-week goals.• Walk with cane.• Walk one-quarter to one-half mile.• Progress on a stair from one foot to regular stair climbing (foot over foot). • Actively bend knee 110 degrees.• Straighten knee completely.• Drive a car (regardless of which knee had surgery). • Continue home exercise program twice a day.
GOAL and Milestones
GOAL and Milestones
30 • piedmont.org/orthopedics
Weeks Six to Twelve
Goal is to resume all of your activities. • Achieve one- to six-week goals.• Walk without cane — and without a limp.• Climb and descend stairs in normal fashion (foot over foot).• Walk one-half to one mile. • Bend knee to 120 degrees.• Improve strength to 80%.• Resume activities including dancing, bowling, and golf.
Hip PrecautionsAfter hip replacement surgery, there are hip precautions that you will need to follow to help prevent dislocation of your new hip. Your Care Team will remind you often of your hip precautions. Ask your doctor how long you will need to follow these rules after your surgery.
Hip – Remember to give your new hip Tender, Loving, Care! – No Twisting – No Leaning forward past 90° – No Crossing legs
Reminders • When lying down, do NOT bend forward to pull blankets from around your feet. • Do NOT bend over to pick up object off the floor–use your reacher! • Avoid low toilets or chairs that would cause you to bend at your waist past 90° • Do NOT twist your body–pick your feet up and do step turns. • Do NOT turn your feet inward or outward–keep toes pointing forward. • Use a pillow between your legs at night to keep your hips properly aligned.
Knee PrecautionsDo NOT put a pillow or a roll directly under the knee. Always keep the knee out straight while lying down in bed.
Guidebook for Hips and Knees
piedmont.org/orthopedics • 31
Activities of Daily Living
Sit to stand–Bed/Chair:
Do NOT pull up on walker to stand! Sit in chair with armrests. 1. Scoot hips to edge of bed/chair. 2. Bend your non-surgical leg to assist in standing. 3. Extend surgical leg so knee is lower than hips. 4. Push up to standing position with both hands on bed or armrests of chair. Bring up one hand at a time and balance before grabbing walker. If a chair does not have an armrest, place one hand on walker while pushing off side of chair with other hand.
Stand to sit–Bed/Chair 1. Back up to center of bed/chair until the back of your knees are touching the bed/chair. 2. Slide out foot of surgical leg, keeping non-surgical leg close to chair for sitting. 3. Reach back for bed or armrest of chair one at a time. 4. Slowly lower body to bed/chair, keeping surgical leg forward as you sit.
If getting into bed: 5. Scoot hips around so you are facing foot of bed–sitting on a plastic bag may make it easier. 6. Lift leg into bed while scooting around–if surgical leg, you may use a cane, bed sheet, or belt to assist with lifting leg onto bed. 7. Continue to scoot hips to center of bed and lift other leg onto bed.
Walking: 1. Push rolling walker forward. 2. Step forward, placing foot of surgical leg in middle of walker area. 3. Step forward the non-surgical leg. Do NOT step past front wheels of walker.
Stair Climbing: 1. Begin climb (ascend) with non-surgical leg first (up with good). 2. Go down (descend) with surgical leg first (down with bad). 3. Always hold on to railing!
Tub Transfers - getting into tub using bath seat: 1. Place bath seat in tub, facing faucet. 2. Back up to tub until you feel it at back of knees. Be sure you are in line with bath seat. 3. Reach back with one hand for bath seat. Keep other hand in center of walker. 4. Slowly lower onto bath seat, keeping surgical leg out straight. Balance yourself before letting go of walker. 5. Lift legs over edge of tub, using leg lifter for surgical leg, if necessary. Hold onto shower seat or railing.
32 • piedmont.org/orthopedics
Tub transfers - getting out of tub using bath seat: 1. Lift legs over outside of tub. 2. Scoot to edge of bath seat. 3. Push up with one hand on back of bath seat and balance before grabbing walker with other hand.
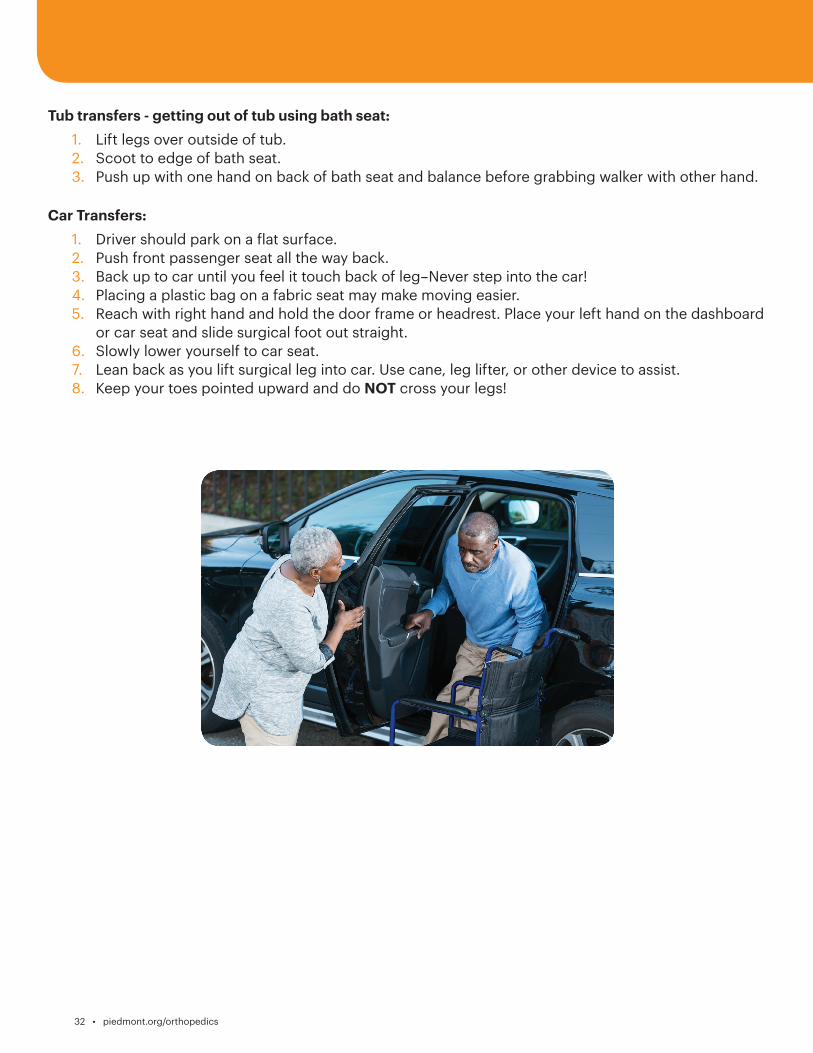
Car Transfers: 1. Driver should park on a flat surface. 2. Push front passenger seat all the way back. 3. Back up to car until you feel it touch back of leg–Never step into the car! 4. Placing a plastic bag on a fabric seat may make moving easier. 5. Reach with right hand and hold the door frame or headrest. Place your left hand on the dashboard or car seat and slide surgical foot out straight. 6. Slowly lower yourself to car seat. 7. Lean back as you lift surgical leg into car. Use cane, leg lifter, or other device to assist. 8. Keep your toes pointed upward and do NOT cross your legs!
Guidebook for Hips and Knees
piedmont.org/orthopedics • 33
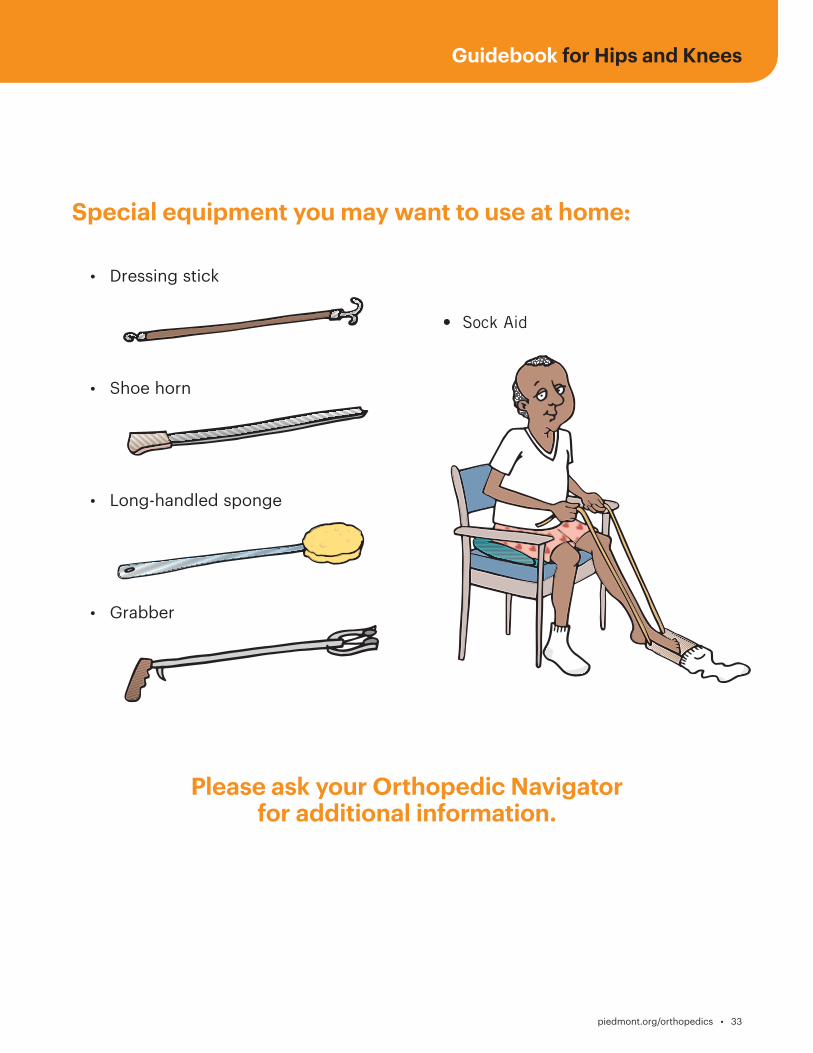
Special equipment you may want to use at home:
• Dressing stick
• Shoe horn
• Long-handled sponge
• Grabber
Please ask your Orthopedic Navigator for additional information.
• Sock Aid
34 • piedmont.org/orthopedics
Getting Dressed:
A reacher or dressing stick can help remove pants from foot and off floor.
Putting on pants and underwear: 1. Sit on edge of bed or chair with armrests. Put surgical leg in first, then non-surgical leg. Use reacher or dressing stick to guide waistband over foot. Make certain that the foot comes through clothing completely, so it does not slip off. 2. Pull pants/underwear up over knees. 3. Stand with walker in front to pull pants/underwear up.
Taking off pants and underwear: 1. Back up to chair or bed. 2. Unfasten pants and let them drop to floor. 3. Keeping one hand on walker, use other hand to lower clothing. Do not bend over. Only lower the clothing enough to be able to sit down without sitting on it. Push underwear down to knees. 4. Lower yourself down, keeping surgical leg out straight. Take non-surgical leg out first, then surgical leg. 5. Use a reacher or dressing stick to lower clothing to floor.
Using sock aid: 1. Slide sock onto sock aid. 2. Hold cord and lower sock aid to ground. Easier to do if knee is bent. 3. Slide foot into sock aid. 4. Straighten knee, point toe, and pull sock on by pulling up on cord until sock aid pulls out.
Using long-handled shoehorn: • Use reacher, dressing stick, or long-handled shoehorn to slide shoe in front of foot. • Place shoehorn inside shoe against back of heel. • Lean back as you lift leg and place toes in shoe. • Step down into shoe, sliding heel down shoehorn.
This can be performed sitting or standing. Wear slip on shoes or shoes with Velcro closures or elastic shoelaces. Do NOT wear high-heeled shoes or shoes without backs.
Guidebook for Hips and Knees
piedmont.org/orthopedics • 35
Protect Your Joints
Safety Tips and Avoiding Falls • Be aware of floor hazards such as pets, small objects, or uneven surfaces. • Do NOT get on knees to scrub floors or bathtub. Use mop and long-handled brushes. • Rise slowly from either sitting or lying position to avoid getting light-headed. • Do NOT lift heavy objects for first three months and then only with surgeon’s permission.
Dos and Don’ts for Rest of Your Life
What to Do • Notify your dentist or other physician/surgeon in advance if you are having dental work or other invasive procedures– cardiac cath, bladder exam, etc. Generally, prophylactic antibiotics are taken prior to procedure. • Although risks are low for post-operative infections, the risk remains. A prosthetic joint could possibly attract bacteria from an infection located in another part of your body. Call your primary care physician promptly if you have any signs of infection–urinary tract infection, abscessed teeth, etc. Early treatment is necessary. • If you develop a fever of more than 101.0 degrees Fahrenheit or sustain an injury such as a deep cut or wound, you should clean it as best you can, put a dressing or adhesive bandage on it, and notify your physician. The closer the injury is to your prosthesis, the greater the concern. Occasionally, antibiotics may be needed. Superficial scratches may be treated with topical antibiotic ointment. Notify your physician if area is painful or reddened. • When traveling, stop and change positions hourly to prevent the joint from tightening.
Exercise
Video demonstrations are available at piedmont.org/orthopedics .
With permission from your orthopedic surgeon and primary care physician, you should be on a regular exercise program three to four times per week, lasting 20 to 30 minutes. • High-impact activities such as running and singles tennis may put too much load on the joint and are generally not recommended. • High-risk activities such as downhill skiing are discouraged because of risk of fractures around the prosthesis and damage to the prosthesis itself.
Exercise – Do • Recommended exercise classes (right). • Home program outlined in Guidebook. • Regular one- to three-mile walks. • Home treadmill (for walking). • Stationary bike. • Aquatic exercises. • Regular exercise at a fitness center. • Low-impact activities such as golf, bowling, gardening, dancing, swimming, etc. • Consult surgeon or physical therapist about specific sport activities.
You need a regular exercise program to maintain the fitness
and health of muscles around your joints
36 • piedmont.org/orthopedics
Exercise – Don’t• Do NOT run or engage in high-impact activities or activities that require a lot of starts,
stops, turns, and twisting motions. • Do NOT participate in high-risk activities such as contact sports. • Do NOT take up new sports requiring strength and agility until you discuss it with surgeon or physical therapist.
Arthritis Foundation Exercise Program (AFEP)Developed by Arthritis Foundation, but not limited to individuals with arthritis. AFEP uses gentle activities to promote increased joint flexibility, range-of-motion, and maintain muscle strength. Advanced version helps increase overall stamina. Participants must be walking (ambulatory) and have their physician’s permission.
The Silver Sneakers Program at Piedmont Fayette is designed specifically for older adults. To learn more, please visit silversneakers.com or call 1.888.423.4632. Patients receiving therapy at the Piedmont Fayette or Piedmont Newnan Fitness Center will have the initiation fee waived.
Contact your local Piedmont Health and Fitness Center to learn more about class options.
Importance of Follow-up Visits
When should you follow-up with your surgeon? • Every year, or as instructed by your surgeon. • Anytime you have mild pain for more than a week. • Anytime you have moderate or severe pain.
There are reasons for routine follow-up visits with your orthopedic surgeon.
X-rays taken at follow-up visits can detect problems. New x-rays can be compared with previous films to make these determinations. This will be done in your surgeon’s office. If you are unsure how long it has been or when your next visit should be scheduled, call your surgeon.
Piedmont Atlanta Fitness Center2001 Peachtree Road, NE, Suite 100,Atlanta, Georgia 30309404.605.1966
Piedmont Fayette Fitness Center1250 Highway 54 West, Suite 200Fayetteville, Georgia 30214770.719.7290
Piedmont Newnan Fitness Center26 West Court SquareNewnan, Georgia 30265770-259-3550
Piedmont Newton Fitness Center5126 Hospital Drive NECovington, Georgia 30014770.259.3550

Guidebook for Hips and Knees
piedmont.org/orthopedics • 37
Glossary
Abdomen: Part of body commonly thought of as the stomach; it’s situated between hips and ribs.
Ambulating: Walking.
Assistive Devices: Walker, crutches, cane, or other device to help you walk.
Compression Stockings: Special stockings that encourage circulation.
Dorsiflexion: Bending back foot or toes.
Dressings: Bandages.
Pulmonary Embolus: Blood clot that becomes lodged in a blood vessel and blocks it.
Incentive Spirometer: Breathing tool to help exercise lungs.
Incision: Wound from surgery.
IV: Intravenous
OT: Occupational therapy.
Prothrombin: Protein component in blood that changes during clotting process.
PT: Physical therapy.
Piedmont Newnan Fitness Center 26 West Court Square Newnan, Georgia 30265 770-259-3550
Piedmont Newton Fitness Center 5126 Hospital Drive NE Covington, Georgia 30014 770.259.3550
38 • piedmont.org/orthopedics
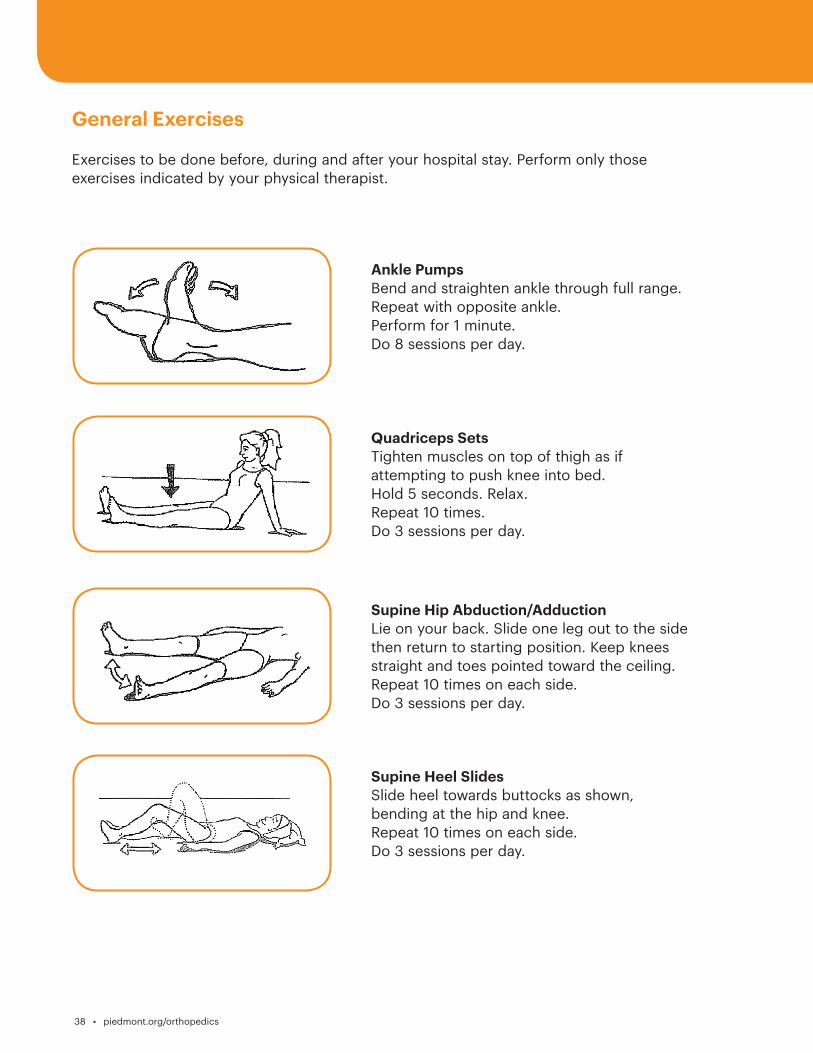
General Exercises
Exercises to be done before, during and after your hospital stay. Perform only those exercises indicated by your physical therapist.
Ankle PumpsBend and straighten ankle through full range. Repeat with opposite ankle.Perform for 1 minute.Do 8 sessions per day.
Quadriceps SetsTighten muscles on top of thigh as if attempting to push knee into bed.Hold 5 seconds. Relax.Repeat 10 times.Do 3 sessions per day.
Supine Hip Abduction/AdductionLie on your back. Slide one leg out to the side then return to starting position. Keep knees straight and toes pointed toward the ceiling. Repeat 10 times on each side.Do 3 sessions per day.
Supine Heel SlidesSlide heel towards buttocks as shown, bending at the hip and knee.Repeat 10 times on each side.Do 3 sessions per day.

Guidebook for Hips and Knees
piedmont.org/orthopedics • 39
Short Arc Quad in SupineLie on your back with a pillow or bolster under knee. Tighten thigh muscles to lift foot off the bed. Slowly return to the starting position.Repeat 10 times.Do 3 sessions per day.
Straight Leg Raise Lie on your back with one knee bent. Keep other knee straight and lift leg off the bed. Slowly lower leg to return to starting position. Repeat 10 times on each side. Do 3 sessions per day.
Knee Extension in SittingSit at edge of bed or in a chair with your feet on the floor. Slowly lift one foot until knee is straight. Slowly return to starting position.Repeat 10 times on each side.Do 3 sessions per day.
Standing Knee FlexionStand using a walker or counter for balance. Bend one knee up as far as possible. Repeat 10 times on each side.Do 3 sessions per day.
40 • piedmont.org/orthopedics
Frequently Asked QuestionsHow long will my new knee last and can a second replacement be done? An implants lifespan will vary patient to patient depending on an individual’s age, weight, activity level, and medical condition(s). There is no guarantee that your implant will last for any specified length of time.
What are the major risks? Most surgeries go well, without complications. However, infection and blood clots are two serious complications. To avoid these complications, your surgeon may use antibiotics and blood-thinners.
How long will I be in the hospital? Most patients will be hospitalized for one to two days after surgery. Patients are generally discharged once they are medically stable, their pain is controlled with oral pain medication, they are able to tolerate their diet and urinate, they have met all their therapy goals, and their discharge arrangements are complete.
Will surgery be painful? You may experience discomfort following surgery, but your nurse will frequently assess your pain level and review pain control options with you.
Will I need a walker, crutches, or a cane? Patients progress at their own rate. We recommend you use a rolling walker or a cane for four to six weeks. The Case Manager at the hospital will arrange for equipment as needed.
Where will I go after discharge from the hospital? Most patients recover at home after leaving the hospital. If medically necessary, some patients may transfer to a sub-acute rehab facility to gain the skills they need to safely return home. The Care Team will assist you with a discharge plan that meets your needs, and make necessary arrangements. Check with your insurance company to see if you have sub-acute rehab benefits.
What if I live alone? Options available to you: • Return home and receive help from a relative or friend. Home health physical therapy can provide therapy services in your home. • If medically necessary, stay in a sub-acute rehab facility following your hospital stay – this option requires approval from the rehab facility and your insurance company.
Guidebook for Hips and Knees
piedmont.org/orthopedics • 41
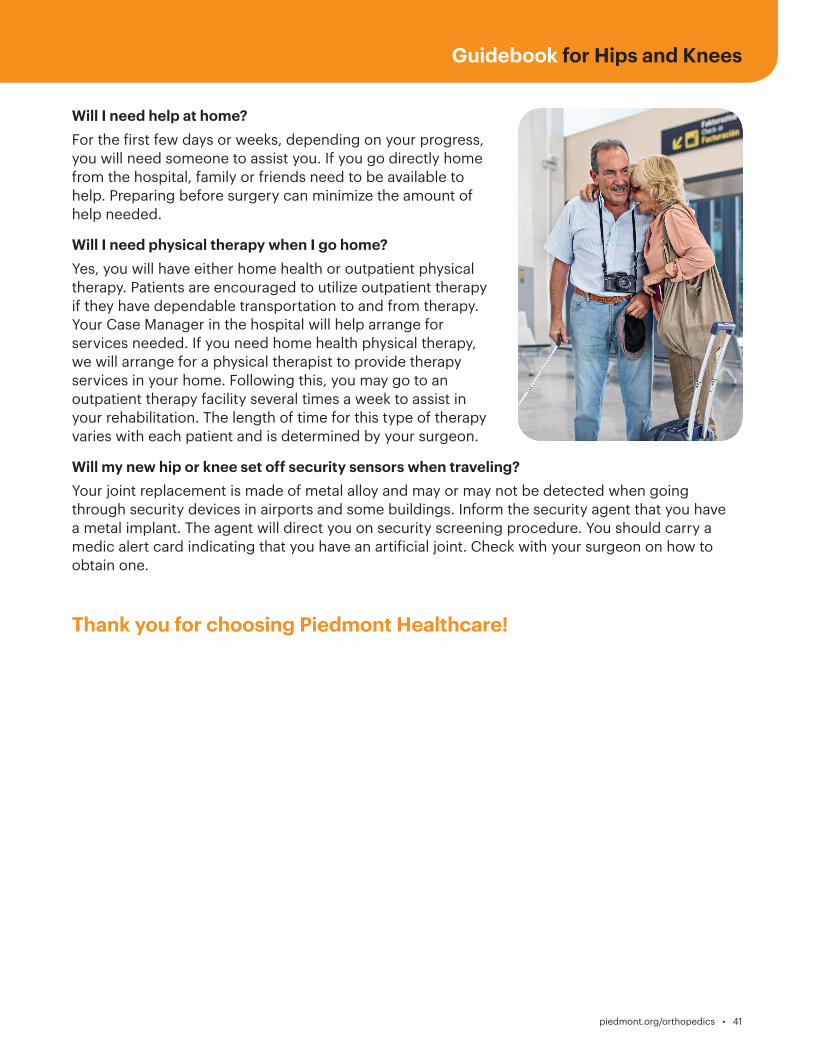
Will I need help at home? For the first few days or weeks, depending on your progress, you will need someone to assist you. If you go directly home from the hospital, family or friends need to be available to help. Preparing before surgery can minimize the amount of help needed.
Will I need physical therapy when I go home? Yes, you will have either home health or outpatient physical therapy. Patients are encouraged to utilize outpatient therapy if they have dependable transportation to and from therapy. Your Case Manager in the hospital will help arrange for services needed. If you need home health physical therapy, we will arrange for a physical therapist to provide therapy services in your home. Following this, you may go to an outpatient therapy facility several times a week to assist in your rehabilitation. The length of time for this type of therapy varies with each patient and is determined by your surgeon.
Will my new hip or knee set off security sensors when traveling? Your joint replacement is made of metal alloy and may or may not be detected when going through security devices in airports and some buildings. Inform the security agent that you have a metal implant. The agent will direct you on security screening procedure. You should carry a medic alert card indicating that you have an artificial joint. Check with your surgeon on how to obtain one.
Thank you for choosing Piedmont Healthcare!

42 • piedmont.org/orthopedics
Piedmont Atlanta
1968 Peachtree Road NW Atlanta, Georgia 30309
Piedmont Fayette
1255 Highway 54 West Fayetteville, Georgia 30214
Piedmont Henry
1133 Eagle’s Landing Parkway Stockbridge, Georgia 30281
Piedmont Mountainside
1266 Highway 515 Jasper, Georgia 30143
Piedmont Newnan
745 Poplar Road Newnan, Georgia 30265
Piedmont Newton
5126 Hospital Dr NE Covington, Georgia 30014

Guidebook for Hips and Knees
piedmont.org/orthopedics • 43
Notes

44 • piedmont.org/orthopedics

Recommended