EMC® InfoArchiveVersion 3.1
Installation Guide
EMC CorporationCorporate Headquarters
Hopkinton, MA 01748-91031-508-435-1000www.EMC.com
Legal Notice
Copyright © 2015 EMC Corporation. All Rights Reserved.
EMC believes the information in this publication is accurate as of its publication date. The information is subject to changewithout notice.
THE INFORMATION IN THIS PUBLICATION IS PROVIDED “AS IS.” EMC CORPORATIONMAKES NO REPRESENTATIONSOR WARRANTIES OF ANY KINDWITH RESPECT TO THE INFORMATION IN THIS PUBLICATION, AND SPECIFICALLYDISCLAIMS IMPLIED WARRANTIES OF MERCHANTABILITY OR FITNESS FOR A PARTICULAR PURPOSE.
Use, copying, and distribution of any EMC software described in this publication requires an applicable software license.
For the most up-to-date listing of EMC product names, see EMC Corporation Trademarks on EMC.com. Adobe and Adobe PDFLibrary are trademarks or registered trademarks of Adobe Systems Inc. in the U.S. and other countries. All other trademarksused herein are the property of their respective owners.
Documentation Feedback
Your opinion matters. We want to hear from you regarding our product documentation. If you have feedback about how we canmake our documentation better or easier to use, please send us your feedback directly at [email protected]
Table of Contents
Preface ................................................................................................................................ 5
Chapter 1 Overview ..................................................................................................... 7
Chapter 2 Prerequisites and Certified Configurations ................................................. 9Special Considerations for Content Server .......................................................... 10Special Considerations for Content Server 6.7 SP2........................................... 11Special Considerations for Content Server 7.1 ................................................. 11
Optional Components for InfoArchive ............................................................... 11
Chapter 3 Pre-Installation Tasks .................................................................................. 13Recommended RDBMS Settings ........................................................................ 14
Chapter 4 Installing InfoArchive .................................................................................. 15Modifying the Installation Properties File........................................................... 15Adding External Java Libraries and Resources.................................................... 17Installing InfoArchive Components and Packaging WAR/EAR Files..................... 17Installing InfoArchive on Multiple Hosts ........................................................... 17Installing Consuming Web Applications and Core Components onDifferent Hosts ............................................................................................. 18Installing xDB and Content Server on Different Hosts ..................................... 19
Deploying InfoArchive Web Services and GUI.................................................... 20Deploying InfoArchive Web Services and GUI on Apache Tomcat ................... 20Deploying InfoArchive Web Services and GUI on IBMWebSphere .................. 22Deploying InfoArchive Web Services and GUI on Oracle WebLogic ................. 23
Deploying DA Extension................................................................................... 23Deploying Records Client Extension ................................................................. 24Installing the Audit Holding ............................................................................. 24Restarting Documentum Java Method Server ..................................................... 25
Chapter 5 Upgrading InfoArchive ................................................................................ 27Preparing the Environment for Upgrade ............................................................ 27Installing InfoArchive 3.1 .................................................................................. 28Updating Changed Objects ............................................................................... 28dm_ca_store ................................................................................................. 28eas_cfg_pdi .................................................................................................. 29
Updating the xDB Backup Library Format ......................................................... 29
Chapter 6 Troubleshooting Installation ........................................................................ 31
3

Table of Contents
4
Preface
Intended AudienceThis document is intended for system administrators who are responsible for installing EMCInfoArchive.
To use this document, you must have the following:
• Administrative privileges on the host where you install EMC InfoArchive
• Working knowledge of the operating system on which you install EMC InfoArchive
• Working knowledge of EMC Documentum Content Server and EMC Documentum xDB
• Working knowledge of Apache Ant and web application servers, such as Apache Tomcat
Path ConventionsThis document uses the following path conventions:
Path Variable Description
INSTALL_DIR The temporary directory to which the EMC InfoArchive installationpackage is extracted
EAS_HOME The installation directory of EMC InfoArchive
DOCUMENTUM The installation directory of EMC Documentum Content Server
XHIVE_HOME The installation directory of EMC Documentum xDB
WEBSERVER_HOME The home directory for a web application server
Note: EMC InfoArchive was named Enterprise Archiving Solution (EAS) prior to the 3.0 release.Names of variables, properties, and object types still contain EAS or eas.
Related DocumentationThe following resources contain more information about EMC InfoArchive. These documents areavailable from EMC Online Support (https://support.emc.com).
• EMC InfoArchive Release Notes
• EMC InfoArchive Configuration and Administration Guide
• EMC InfoArchive Object Reference Guide
• EMC InfoArchive Development Guide
5

Preface
Revision History
Revision Date Description
December 2014 Initial publication
January 2015 Improve the Deploying InfoArchive Web Services and GUI section
6

Chapter 1Overview
EMC InfoArchive is a unified enterprise archiving platform that stores related structured data andunstructured content in a single and consolidated repository. InfoArchive enables corporations topreserve the value of enterprise information in a single, easily accessible, unified archive.
The following diagram illustrates InfoArchive components in an enterprise IT environment.
InfoArchive includes the following components:
• InfoArchive jobs: Consists of command line jobs and Content Server jobs. InfoArchive jobs referto a series of actions you take to archive data packages, to manage Content Server objects and xDBlibraries, and to perform administrative tasks for the archiving system.
• InfoArchive Web services: Web services expose InfoArchive functions, such as ingestion, query,and order, to consumers. You can develop your own web applications to access InfoArchive byconsuming InfoArchive Web services.
• InfoArchive GUI: InfoArchive GUI is a search application that ships with the InfoArchiveinstallation package. You can customize your own application based on this application.
7
Overview
You can install InfoArchive, Content Server, and xDB on a single host, or you can distributethem among several hosts based on security, licensing, or other operation considerations. EMCrecommends that you keep the InfoArchive installation architecture as simple as possible to avoidlatency in data transfer. Do not use a distributed installation unless you have an explicit reason todo so.
InfoArchive runs on Content Server and xDB. The following documents, available from EMC OnlineSupport, provide more information about installing Content Server and xDB.
• EMC Documentum Content Server Installation Guide
• EMC Documentum xDB Administration Guide
8

Chapter 2Prerequisites and CertifiedConfigurations
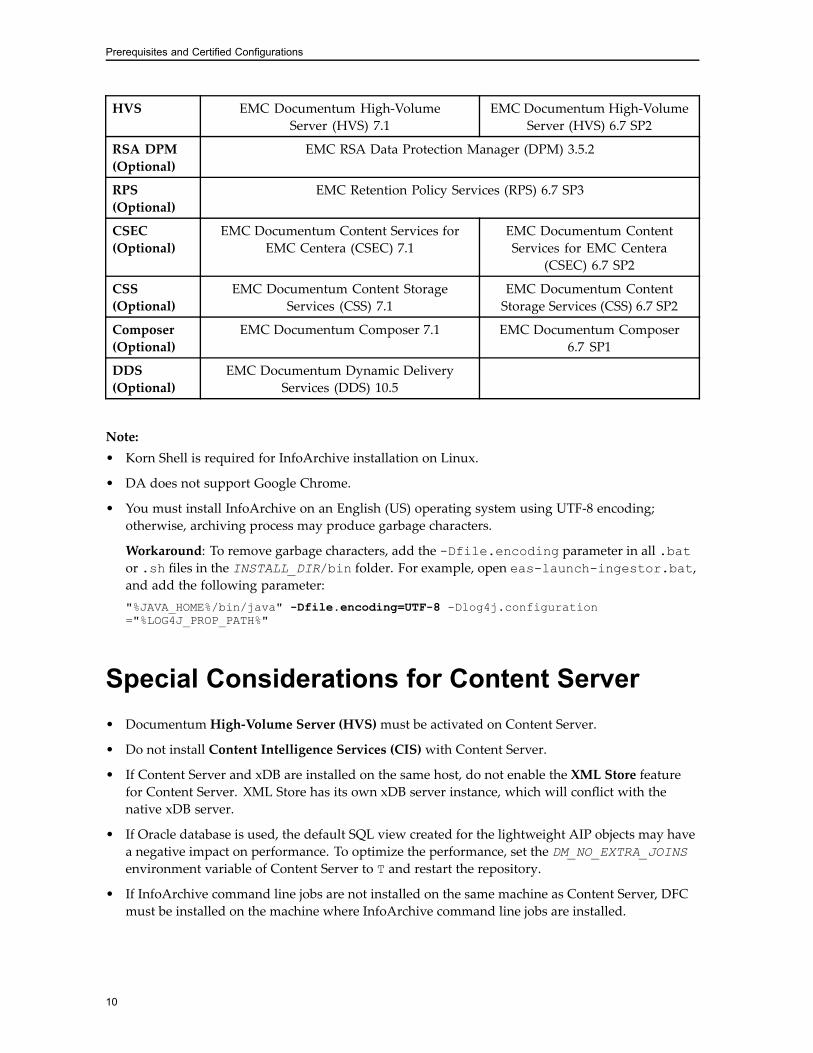
The following table lists prerequisites and certified configurations for InfoArchive installation. Fordetailed operating system and database requirements for the EMC Documentum platform, refer tothe corresponding version of the EMC Documentum Environment and System Requirements Guide.
Documen-tum Platform
EMC Documentum Content Server 7.1 EMC Documentum ContentServer 6.7 SP2
OperatingSystem
Windows Linux Solaris AIX
Database SQLServer
Oracle Oracle Oracle Oracle
JDK JDK 7
DA EMC Documentum Administrator 7.1 EMC Documentum Administrator6.7 SP2
xDB EMC Documentum xDB 10.5.8
Browser One of the following:
• Microsoft Internet Explorer 10, 11
• Mozilla Firefox ESR 24.6.x, 31.x
• Google Chrome 35
One of the following:
• Microsoft Internet Explorer 10,11
• Mozilla Firefox ESR 24.6.x, 31.x
WebApplicationServer
One of the following:
• Apache Tomcat 7.0.42, 7.0.53
• Pivotal Web Server 2.9.x (formerly knownas VMware vFabric)
• Oracle WebLogic Server 12c (12.1.3)
• WebSphere Application Server V8.5.5.x
One of the following:
• Oracle WebLogic Server 12c(12.1.3)
• WebSphere Application ServerV8.5.5.x
DFC EMC Documentum FoundationClasses (DFC) 7.1
9
Prerequisites and Certified Configurations
HVS EMC Documentum High-VolumeServer (HVS) 7.1
EMC Documentum High-VolumeServer (HVS) 6.7 SP2
RSA DPM(Optional)
EMC RSA Data Protection Manager (DPM) 3.5.2
RPS(Optional)
EMC Retention Policy Services (RPS) 6.7 SP3
CSEC(Optional)
EMC Documentum Content Services forEMC Centera (CSEC) 7.1
EMC Documentum ContentServices for EMC Centera
(CSEC) 6.7 SP2
CSS(Optional)
EMC Documentum Content StorageServices (CSS) 7.1
EMC Documentum ContentStorage Services (CSS) 6.7 SP2
Composer(Optional)
EMC Documentum Composer 7.1 EMC Documentum Composer6.7 SP1
DDS(Optional)
EMC Documentum Dynamic DeliveryServices (DDS) 10.5
Note:• Korn Shell is required for InfoArchive installation on Linux.
• DA does not support Google Chrome.
• You must install InfoArchive on an English (US) operating system using UTF-8 encoding;otherwise, archiving process may produce garbage characters.
Workaround: To remove garbage characters, add the -Dfile.encoding parameter in all .bator .sh files in the INSTALL_DIR/bin folder. For example, open eas-launch-ingestor.bat,and add the following parameter:"%JAVA_HOME%/bin/java" -Dfile.encoding=UTF-8 -Dlog4j.configuration="%LOG4J_PROP_PATH%"
Special Considerations for Content Server• Documentum High-Volume Server (HVS)must be activated on Content Server.
• Do not install Content Intelligence Services (CIS) with Content Server.
• If Content Server and xDB are installed on the same host, do not enable the XML Store featurefor Content Server. XML Store has its own xDB server instance, which will conflict with thenative xDB server.
• If Oracle database is used, the default SQL view created for the lightweight AIP objects may havea negative impact on performance. To optimize the performance, set the DM_NO_EXTRA_JOINSenvironment variable of Content Server to T and restart the repository.
• If InfoArchive command line jobs are not installed on the same machine as Content Server, DFCmust be installed on the machine where InfoArchive command line jobs are installed.
10
Prerequisites and Certified Configurations
Special Considerations for Content Server 6.7 SP2
• Content Server 6.7 SP2 Patch 09 or later is required.
• The Content Server build-in composer must use Java 6 to deploy DAR files. Therefore, inINSTALL_DIR/core/build.properties, you must set the value for JAVA_DAR to a pathto Java 6.
You can find the path to the embedded Java 6 in DOCUMENTUM/product/6.7/install/ComposerHeadless/dardeployer.ini .
Special Considerations for Content Server 7.1
• If you use Centera storage, Content Server 7.1 Patch 02 or later is required.
Optional Components for InfoArchiveYou can choose the following installation components to extend InfoArchive functions.
Component Description
EMC Retention Policy Services(RPS)
Retention Policy Services (RPS) is an application that isideally suited to manage disposition of your records froma legal standpoint. InfoArchive can utilize RPS to managelifecycle of AIP objects. Refer to the EMC InfoArchiveConfiguration and Administration Guide for more information.
EMC RSA Data Protection Manager(DPM)
RSA Data Protection Manager (RSA DPM) is an integratedsecurity solution that gives customers efficient andcomprehensive data protection. Refer to RSA resources onRSA website for more information.
Documentum Content Services forEMC Centera (CSEC)
With CSEC, you can use content-addressed storage areas, therepository representation of a Centera storage host.
Documentum Content StorageServices (CSS)
CSS allows you to create and use content storage andmigration policies.
11
Prerequisites and Certified Configurations
Component Description
Documentum Composer andlanguage packs
Documentum Composer provides tools to create andcustomize applications for Documentum Content Server.These applications specify how Content Server handlesdifferent types of content.
Documentum Dynamic DeliveryServices (DDS)
DDS allows you to create XML delivery applications withminimal development effort.
12
Chapter 3Pre-Installation Tasks
Complete the following tasks before installing InfoArchive:
Note: You must have Content Server and xDB installed, and you must have superuser accessprivilege to Content Server and xDB to perform pre-installation tasks.
1. Download and install Apache Ant 1.8.1 or later, which is required for running InfoArchiveinstallation scripts.
2. Create a repository for InfoArchive in Content Server and start the repository.
3. Modify the DFC property file at Content Server level by adding the following parameter toDOCUMENTUM/config/dfc.properties:
dfc.lwo.allow_propagating_changes=true
4. Create a database for InfoArchive in xDB.
5. If you are using Oracle HotSpot JVM, set theG1 Garbage Collector (GC) option for XHIVE_OPTSin XHIVE_HOME/conf/xdb.properties:XHIVE_OPTS=-server -XX:+UseG1GC
G1 Garbage Collector (GC) for xDB server JVM can improve xDB responsiveness to webapplication servers when there is a high load of requests, such as synchronous ingestion, andsearch.
6. Restart the repository and Java Method Server.
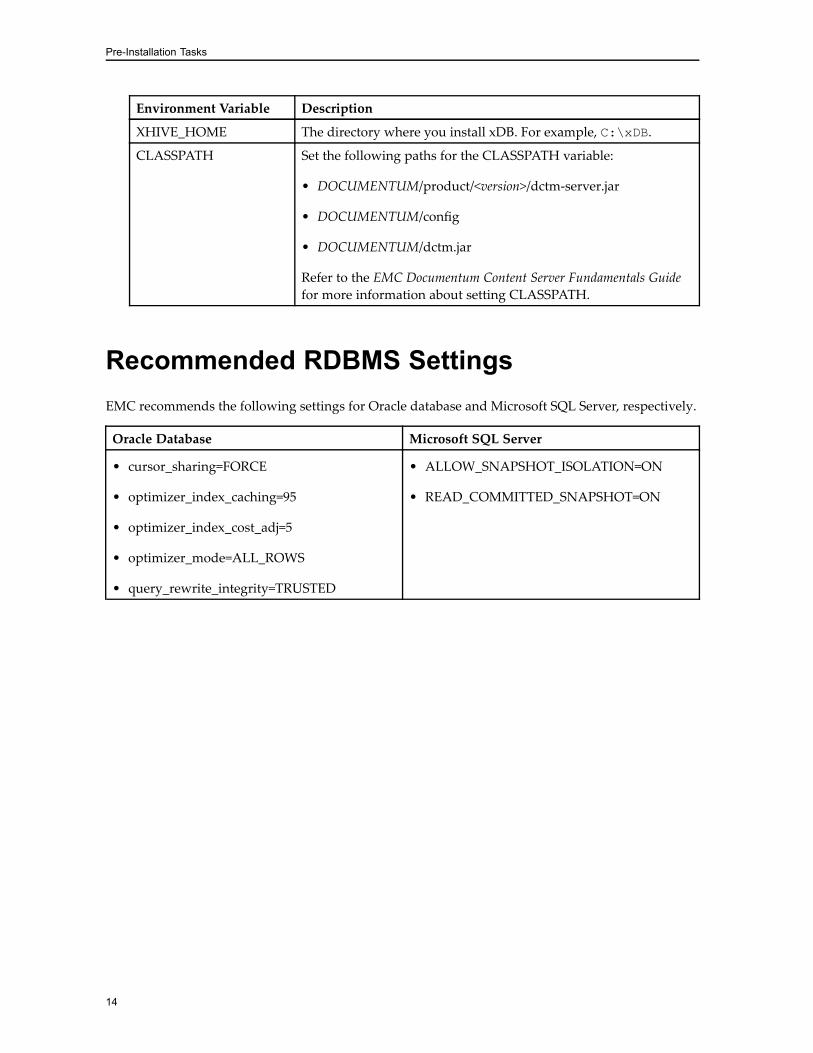
7. Make sure you have configured the following environment variables.
Environment Variable Description
DM_HOME The directory where a version specific Documentum is installed.For example, C:\Documentum\product\7.1.
DOCUMENTUM The directory where you install Documentum. For example,C:\Documentum.
DOCUMENTUM_SHARED
Linux only. The shared directory under DOCUMENTUM. Forexample, /opt/app/dctm71/shared.
13
Pre-Installation Tasks
Environment Variable Description
XHIVE_HOME The directory where you install xDB. For example, C:\xDB.
CLASSPATH Set the following paths for the CLASSPATH variable:
• DOCUMENTUM/product/<version>/dctm-server.jar
• DOCUMENTUM/config
• DOCUMENTUM/dctm.jar
Refer to the EMC Documentum Content Server Fundamentals Guidefor more information about setting CLASSPATH.
Recommended RDBMS SettingsEMC recommends the following settings for Oracle database and Microsoft SQL Server, respectively.
Oracle Database Microsoft SQL Server
• cursor_sharing=FORCE
• optimizer_index_caching=95
• optimizer_index_cost_adj=5
• optimizer_mode=ALL_ROWS
• query_rewrite_integrity=TRUSTED
• ALLOW_SNAPSHOT_ISOLATION=ON
• READ_COMMITTED_SNAPSHOT=ON
14
Chapter 4Installing InfoArchive
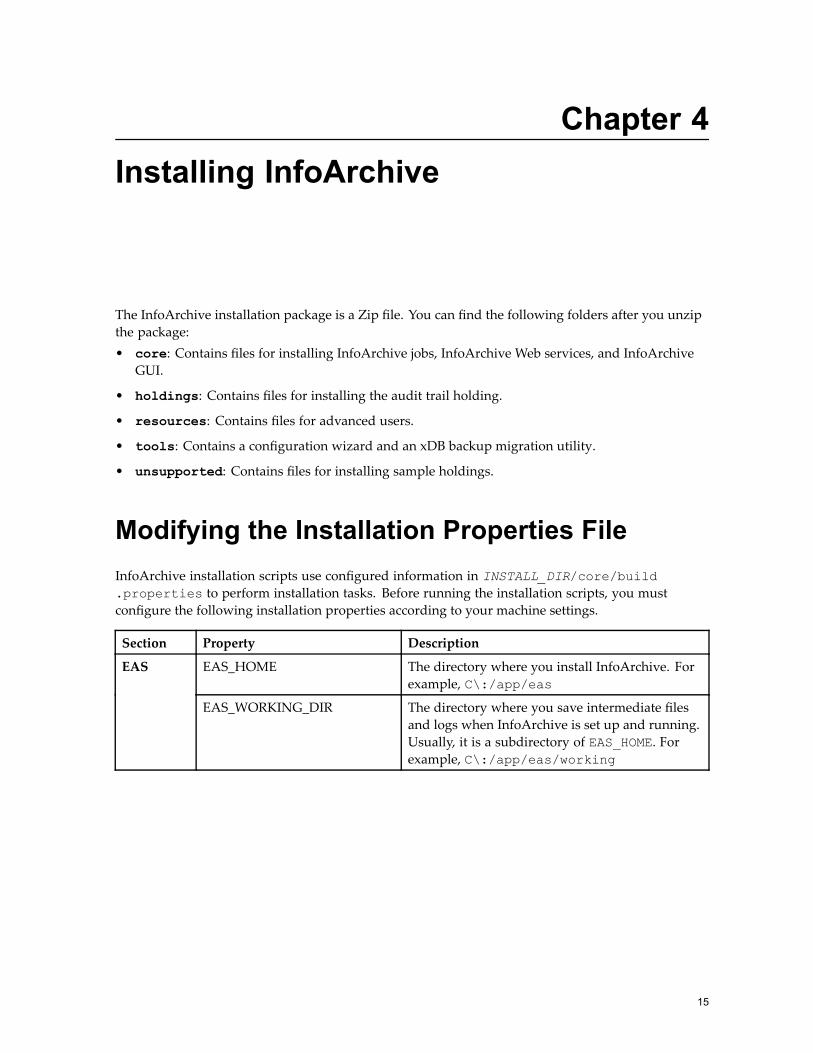
The InfoArchive installation package is a Zip file. You can find the following folders after you unzipthe package:• core: Contains files for installing InfoArchive jobs, InfoArchive Web services, and InfoArchiveGUI.
• holdings: Contains files for installing the audit trail holding.
• resources: Contains files for advanced users.
• tools: Contains a configuration wizard and an xDB backup migration utility.
• unsupported: Contains files for installing sample holdings.
Modifying the Installation Properties FileInfoArchive installation scripts use configured information in INSTALL_DIR/core/build.properties to perform installation tasks. Before running the installation scripts, you mustconfigure the following installation properties according to your machine settings.
Section Property Description
EAS_HOME The directory where you install InfoArchive. Forexample, C\:/app/eas
EAS
EAS_WORKING_DIR The directory where you save intermediate filesand logs when InfoArchive is set up and running.Usually, it is a subdirectory of EAS_HOME. Forexample, C\:/app/eas/working
15
Installing InfoArchive
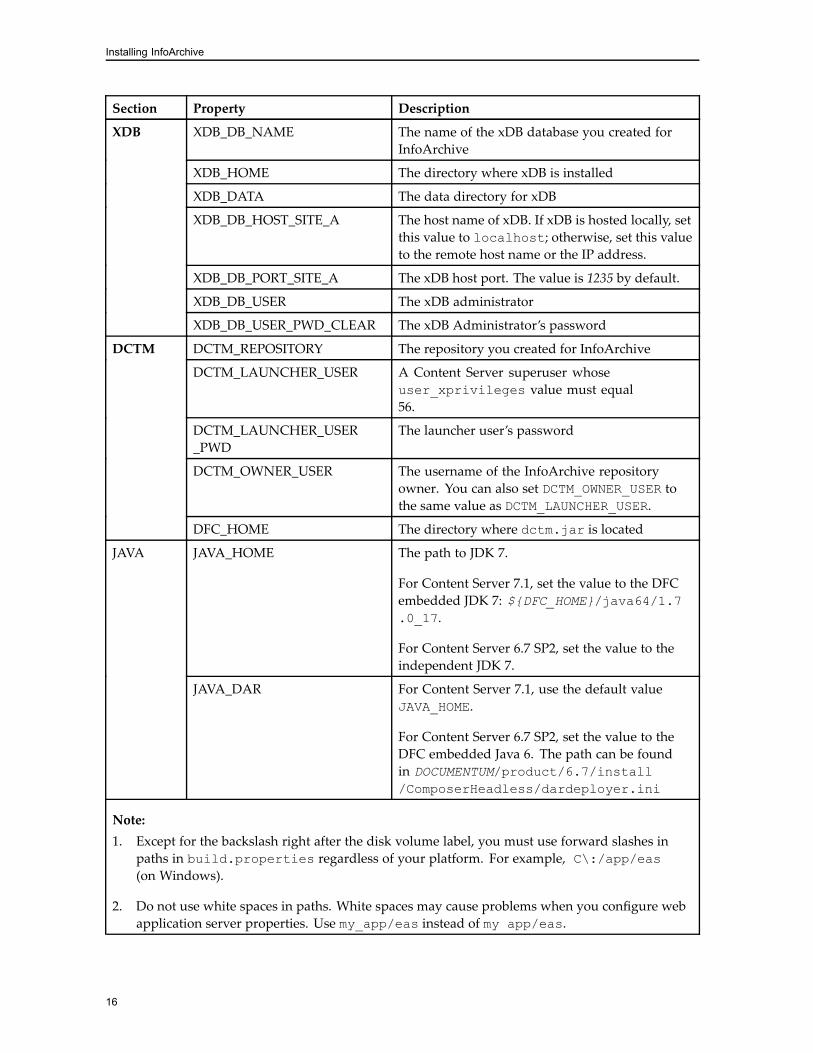
Section Property Description
XDB_DB_NAME The name of the xDB database you created forInfoArchive
XDB_HOME The directory where xDB is installed
XDB_DATA The data directory for xDB
XDB_DB_HOST_SITE_A The host name of xDB. If xDB is hosted locally, setthis value to localhost; otherwise, set this valueto the remote host name or the IP address.
XDB_DB_PORT_SITE_A The xDB host port. The value is 1235 by default.
XDB_DB_USER The xDB administrator
XDB
XDB_DB_USER_PWD_CLEAR The xDB Administrator’s password
DCTM_REPOSITORY The repository you created for InfoArchive
DCTM_LAUNCHER_USER A Content Server superuser whoseuser_xprivileges value must equal56.
DCTM_LAUNCHER_USER_PWD
The launcher user’s password
DCTM_OWNER_USER The username of the InfoArchive repositoryowner. You can also set DCTM_OWNER_USER tothe same value as DCTM_LAUNCHER_USER.
DCTM
DFC_HOME The directory where dctm.jar is located
JAVA_HOME The path to JDK 7.
For Content Server 7.1, set the value to the DFCembedded JDK 7: ${DFC_HOME}/java64/1.7.0_17.
For Content Server 6.7 SP2, set the value to theindependent JDK 7.
JAVA
JAVA_DAR For Content Server 7.1, use the default valueJAVA_HOME.
For Content Server 6.7 SP2, set the value to theDFC embedded Java 6. The path can be foundin DOCUMENTUM/product/6.7/install/ComposerHeadless/dardeployer.ini
Note:1. Except for the backslash right after the disk volume label, you must use forward slashes in
paths in build.properties regardless of your platform. For example, C\:/app/eas(on Windows).
2. Do not use white spaces in paths. White spaces may cause problems when you configure webapplication server properties. Use my_app/eas instead of my app/eas.
16
Installing InfoArchive
Adding External Java Libraries and ResourcesIf you use advanced InfoArchive features that require external Java libraries and resources, you mustadd them to INSTALL_DIR/core/template/home/external/.
Refer to the Configuring an Encryption-Enabled Holding section in the EMC InfoArchive Configuration andAdministration Guide for an example of using RSA DPM Java libraries and resources.
The following documents on RSA website provide detailed information about RSA DPM Java KeyClient installation and configuration:
• RSA Security Concepts
• RSA Data Protection Manager Client 3.5.2 Security Configuration Guide
• RSA Data Protection Manager Java™ Key Client 3.5.2 Installation Guide
Installing InfoArchive Components andPackaging WAR/EAR Files1. Launch a command prompt window.
2. Run cd INSTALL_DIR/core.
3. Run the ant command, and you can see the following:• An overview of InfoArchive installation
• The variables configured in build.properties
4. Enter yes for prompted questions if you want to execute all steps. Use lowercase for all letters.If a failure occurs, you can resume installation from the failed step instead of starting all over again.For example, if you install InfoArchive DAR files, run the ant install-dar command, then runcommands for all subsequent steps.
After the step of packaging WAR/EAR files is completed, BUILD SUCCESSFUL is displayed in thecommand prompt window. You can find a subfolder INSTALL_DIR/core/war, which contains filesto be deployed on the web application server.
For install-dar, install-dql, and install-xdb, log files are created inINSTALL_DIR/core/logs regardless of whether the step succeeded or failed.
During the installation process, new files and folders are created under INSTALL_DIR. If you want toclean temporary files and folders created during the installation, use the ant clean command todelete log, build, and war folders.
Installing InfoArchive on Multiple HostsThis section describes two distributed installation scenarios. These two scenarios are independent.You can choose either one of them. Alternatively, you can combine two scenarios into one InfoArchiveinstallation according to IT environment requirements. EMC recommends a simple installation.
17
Installing InfoArchive
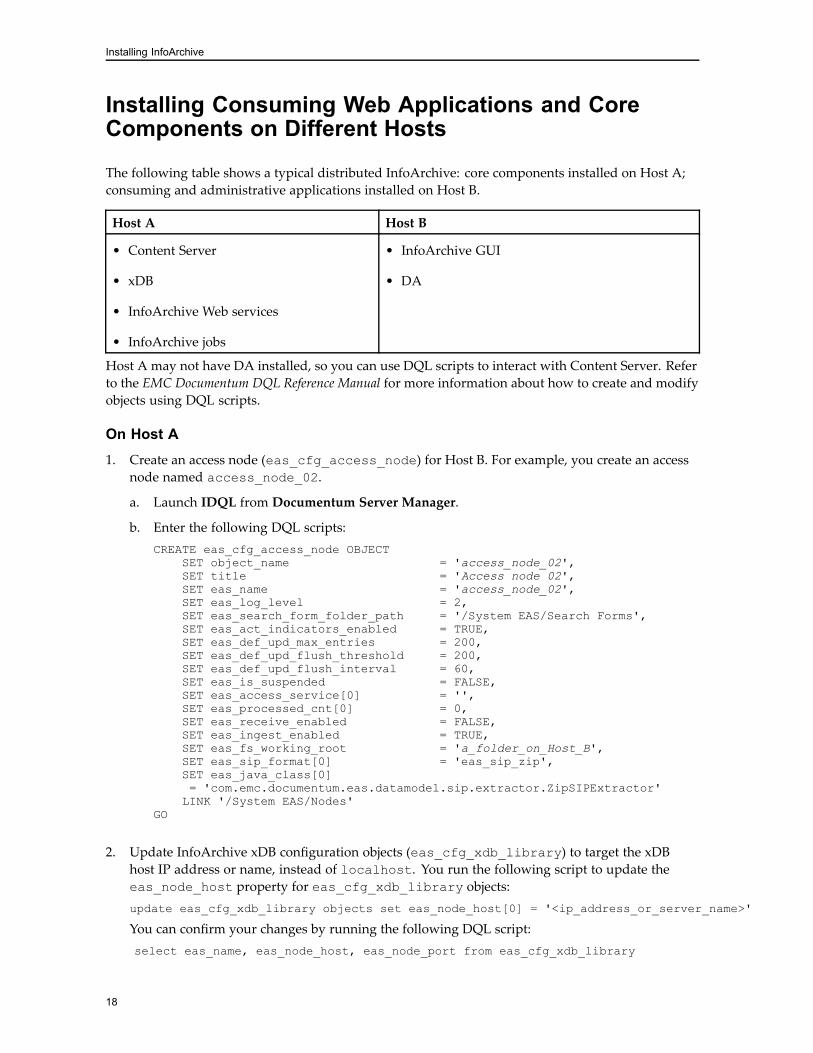
Installing Consuming Web Applications and CoreComponents on Different Hosts
The following table shows a typical distributed InfoArchive: core components installed on Host A;consuming and administrative applications installed on Host B.
Host A Host B
• Content Server
• xDB
• InfoArchive Web services
• InfoArchive jobs
• InfoArchive GUI
• DA
Host A may not have DA installed, so you can use DQL scripts to interact with Content Server. Referto the EMC Documentum DQL Reference Manual for more information about how to create and modifyobjects using DQL scripts.
On Host A1. Create an access node (eas_cfg_access_node) for Host B. For example, you create an access
node named access_node_02.
a. Launch IDQL from Documentum Server Manager.
b. Enter the following DQL scripts:CREATE eas_cfg_access_node OBJECT
SET object_name = 'access_node_02',SET title = 'Access node 02',SET eas_name = 'access_node_02',SET eas_log_level = 2,SET eas_search_form_folder_path = '/System EAS/Search Forms',SET eas_act_indicators_enabled = TRUE,SET eas_def_upd_max_entries = 200,SET eas_def_upd_flush_threshold = 200,SET eas_def_upd_flush_interval = 60,SET eas_is_suspended = FALSE,SET eas_access_service[0] = '',SET eas_processed_cnt[0] = 0,SET eas_receive_enabled = FALSE,SET eas_ingest_enabled = TRUE,SET eas_fs_working_root = 'a_folder_on_Host_B',SET eas_sip_format[0] = 'eas_sip_zip',SET eas_java_class[0]= 'com.emc.documentum.eas.datamodel.sip.extractor.ZipSIPExtractor'LINK '/System EAS/Nodes'
GO
2. Update InfoArchive xDB configuration objects (eas_cfg_xdb_library) to target the xDBhost IP address or name, instead of localhost. You run the following script to update theeas_node_host property for eas_cfg_xdb_library objects:update eas_cfg_xdb_library objects set eas_node_host[0] = '<ip_address_or_server_name>'
You can confirm your changes by running the following DQL script:select eas_name, eas_node_host, eas_node_port from eas_cfg_xdb_library
18
Installing InfoArchive
3. Modify the following properties in XHIVE_HOME/conf/xdb.properties to enable xDB hostto accept connections from remote hosts:XHIVE_SERVER_ADDRESS=*XHIVE_WEBSERVER_ADDRESS=*
4. Disable the firewall.
On Host B1. Copy INSTALL_HOME/core/war from Host A to Host B.
2. Open eas-services.properties in the conf folder, and modify the value ofeas_access_node to access_node_02, which is created on Host A in the previous step.
3. Open eas-gui.properties in the conf folder, and modify the value ofeas.webservice.location to http://<ip_address_or_server_name>:8080/eas-services/services/.
4. Make sure the path specified for eas_fs_working_root in the previous step exists on Host B.
Installing xDB and Content Server on Different Hosts
The following table shows a distributed installation of xDB and Content Server.
Host A Host B
• xDB • Content Server
To Install xDB and Content Server on Different Hosts:1. Make sure that the same version of xDB is installed on both Host A and Host B.
2. Modify the value for XDB_DB_HOST_SITE_A.
a. If you plan to install xDB and Content Server before installing InfoArchive, change the valuefor XDB_DB_HOST_SITE_A in INSTALL/core/build.properties to the IP addressof Host A.
b. If you plan to install xDB and Content Server for an existing InfoArchive installation, modifyeas_node_host property value of eas_cfg_xdb_library objects to the IP address ofHost A.
3. Modify the value for ACCESS_INGEST_ENABLED.
a. If you plan to install xDB and Content Server before installing InfoArchive, change the valuefor ACCESS_INGEST_ENABLED in INSTALL/core/build.properties to TRUE.
b. If you plan to install xDB and Content Server for an existing InfoArchive installation, selectSIP ingestion enabled checkbox on the Ingestion tab of the access node propertiesdialog.
19

Installing InfoArchive
Deploying InfoArchive Web Services and GUIIn the step of packaging InfoArchive WAR/EAR files, the following files and folder are created:
• eas-3.1.0000.build_number.ear
• eas-gui-3.1.0000.build_number.war
• eas-services-3.1.0000.build_number.war
• eas-da-3.1.0000.build_number.zip
• eas-records-3.1.0000.build_number.zip
• conf folder
You have two options when choosing a web application server:
• J2EE servers, such as Oracle WebLogic and IBM WebSphere. J2EE servers use EAR files todeploy web applications.
• Non-J2EE servers, such as Apache Tomcat. Non-J2EE servers use WAR files to deploy webapplications.
This guide uses Apache Tomcat, IBM WebSphere, and Oracle WebLogic for deploying InfoArchiveWeb services and GUI. For detailed information about deploying on other web application servers,refer to the documentation for the corresponding web application server.
Deploying InfoArchive Web Services and GUI onApache Tomcat1. Stop Tomcat if it is running.
2. Navigate to INSTALL_DIR/core/war.You can find the following files and a subfolder:• eas-gui-3.1.0000.build_number.war
• eas-services-3.1.0000.build_number.war
• conf folder
3. Copy eas-gui-3.1.0000.build_number.war and eas-services-3.1.0000.build_number.war to WEBSERVER_HOME/webapps.
4. Rename eas-gui-3.1.0000.build_number.war to eas-gui.war, andeas-services-3.1.0000.build_number.war to eas-services.war.
5. Specify paths to .properties files as JAVA_OPTIONS.
a. Copy eas-gui.properties and eas-services.properties fromINSTALL_DIR/core/war/conf to WEBSERVER_HOME/conf.
b. Copy dfc.properties from DOCUMENTUM/config to WEBSERVER_HOME/conf.
Note: If InfoArchive Web services and Content Server are not on the same host, you mustcopy dfc.properties from the Content Server host to WEBSERVER_HOME/conf.
20
Installing InfoArchive
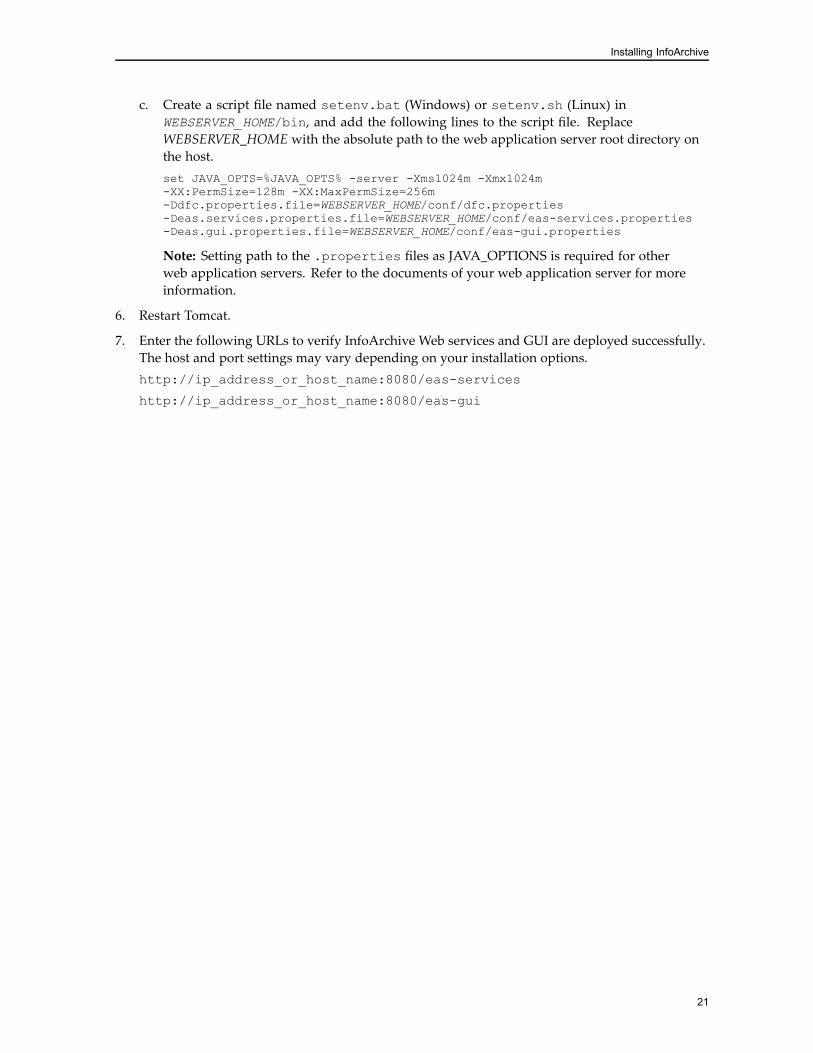
c. Create a script file named setenv.bat (Windows) or setenv.sh (Linux) inWEBSERVER_HOME/bin, and add the following lines to the script file. ReplaceWEBSERVER_HOME with the absolute path to the web application server root directory onthe host.set JAVA_OPTS=%JAVA_OPTS% -server -Xms1024m -Xmx1024m-XX:PermSize=128m -XX:MaxPermSize=256m-Ddfc.properties.file=WEBSERVER_HOME/conf/dfc.properties-Deas.services.properties.file=WEBSERVER_HOME/conf/eas-services.properties-Deas.gui.properties.file=WEBSERVER_HOME/conf/eas-gui.properties
Note: Setting path to the .properties files as JAVA_OPTIONS is required for otherweb application servers. Refer to the documents of your web application server for moreinformation.
6. Restart Tomcat.
7. Enter the following URLs to verify InfoArchive Web services and GUI are deployed successfully.The host and port settings may vary depending on your installation options.http://ip_address_or_host_name:8080/eas-services
http://ip_address_or_host_name:8080/eas-gui
21
Installing InfoArchive
Deploying InfoArchive Web Services and GUI on IBMWebSphere1. Log in toWebSphere Administrative Console.
2. Change WebSphere server settings.
a. In the left panel of the Console, select Servers > WebSphere application servers.
b. In the right panel, click server1 in the table.
c. In the right column of the Configuration tab, expandWeb Container Settings.
d. ClickWeb container.
e. Click Custom properties in the right column.
f. Click New and create the following custom properties, with all values set to true.• com.ibm.ws.webcontainer.initFilterBeforeInitServlet
• com.ibm.ws.webcontainer.invokeFilterInitAtStartup
• com.ibm.ws.webcontainer.invokeFiltersCompatibility
• com.ibm.ws.webcontainer.invokerequestlistenerforfilter
• com.ibm.ws.webcontainer.mapFiltersToAsterisk
3. Restart WebSphere to apply changes.
4. Deploy eas-3.1.0000.build_number.ear on WebSphere.
5. Customize web application settings.
a. In the left panel of the Console, select Applications > Application Types > WebSphereenterprise applications.
b. In the right panel, click EMC InfoArchive 3.1 in the table.
c. In the Configuration page, click Class loading and update detection.
d. In the Class loader order section, select Classes loaded with local class loader first (parentlast).
e. In the WAR class loader policy section, select Single class loader for application.
6. Customize application module settings.
a. In the left panel of the Console, select Applications > Application Types > WebSphereenterprise applications.
b. In the right panel, click EMC InfoArchive 3.1 in the table.
c. SelectManage Modules in theModules section.
d. ClickWeb services and web GUI hyperlinks in the table, select Classes loaded with localclass loader first (parent last) in Class loader order.
7. Follow step 5 described in Deploying on Apache Tomcat to copy eas-gui.properties,eas-services.properties, and dfc.properties to a designated folder and specify thepaths in the web application server.
8. Download JAX-WS RI 2.2.8 from JAX-WS website at https://jax-ws.java.net/.
22
Installing InfoArchive
9. Unzip the downloaded package, and copy the following files to EMC InfoArchive3.1.ear/eas-gui/WEB-INF/lib and EMC InfoArchive 3.1.ear/eas-services/WEB-INF/lib.• lib/jaxb-api.jar
• lib/jaxb-impl.jar
• lib/jaxws-api.jar
• lib/jaxb-core.jar
10. Start the deployed web application, and verify InfoArchive Web service and GUI by opening thefollowing URLs in your browser. The host and port settings in URLs may vary depending onyour server configuration.http://ip_address_or_host_name:9080/eas-services
http://ip_address_or_host_name:9080/eas-gui
Deploying InfoArchive Web Services and GUI on OracleWebLogic1. Go toWebLogic Admin Console, select domain_name > Web Applications.
2. Select Archived Real Path Enabled.
3. Follow step 5 described in Deploying on Apache Tomcat to copy eas-gui.properties,eas-services.properties, and dfc.properties to a designated folder and specify thepaths in the web application server.
4. Deploy the EAR package on WebLogic.
Deploying DA ExtensionIf DA is not deployed, you must first deploy a standard DA. The EMC Documentum AdministratorDeployment Guide provides detailed information about how to deploy DA.
Note: If this is the first time you deploy DA, you must manually modify configuration files inTomcat in order to use DA.
• Disable the enablePooling setting in WEBSERVER_HOME/conf/web.xml.
• Add the following property to WEBSERVER_HOME/conf/catalina.properties.
org.apache.jasper.compiler.Parser.STRICT_WHITESPACE=false
To Deploy DA Extension:1. Navigate to INSTALL_DIR/core/war/eas-da-3.1.0000.build_number.zip.
2. Unzip eas-da-3.1.0000.build_number.zip.
3. Copy DA extension folders to a standard DA directory or package.
23

Installing InfoArchive
If you do not have da.war under WEBSERVER_HOME/webapps, copy the subfolders to thedirectory where the standard DA is deployed.If you have da.war under WEBSERVER_HOME/webapps, you can copy the subfolders into theWAR package to update da.war, and then deploy the WAR package.
4. Restart Tomcat.
Deploying Records Client ExtensionIf you plan to use Documentum Retention Policy Services (RPS) with InfoArchive, you must deploy astandard Records Client and its extension. The EMC Documentum Records Client Deployment Guideprovides detailed information about how to deploy Records Client.
To Deploy Records Client Extension:1. Deploy Records Client records.war.
2. Navigate to INSTALL_DIR/core/war/eas-records.zip.
3. Unzip eas-records.zip.
4. Copy Records Client extension folders to the Records Client application root directory.
5. Copy dfc.properties from Documentum/config to EAS_HOME/conf.
6. Specify the path to dfc.properties. Follow instructions of step 5 in Deploying on ApacheTomcat.
7. Restart the web application server.After you deploy the Records Client extension, you can perform the following InfoArchive actions toAIP objects from shortcut menu in Records Client.
• Reject
• Invalidate
• Apply the purge lock
• Change retention
You can also access InfoArchive object property dialog boxes from Records Client, instead ofswitching back to DA.
Installing the Audit HoldingThe audit holding EAS-AUDIT-001 is used for archiving audit trail records. You install the auditholding by running ant scripts in the INSTALL_DIR/holdings/EAS-AUDIT-001 folder.
24
Installing InfoArchive
1. Open build.propertieswith a text editor and modify the values for the following parameters:• DCTM_REPOSITORY, refer to DCTM_REPOSITORY in the #DCTM section in
INSTALL_DIR/core/build.properties
• DCTM_USER, refer to DCTM_LAUNCHER_USER in the #DCTM section in INSTALL_DIR/core/build.properties
• DCTM_USER_PWD, refer to DCTM_LAUNCHER_USER_PWD in the #DCTM section inINSTALL_DIR/core/build.properties
2. Launch a command prompt window.
3. Run cd INSTALL_DIR/holdings/EAS-AUDIT-001.
4. Run the ant command.
5. Enter yes to the prompted question.
6. When you see BUILD SUCCESSFUL in the command prompt window, the audit holdinginstallation is completed.
The installation log is saved in INSTALL_DIR/holdings/EAS-AUDIT-001/logs, which providesdetailed information about the installation process.
Note: You may follow the same steps to install sample holdings in the unsupported folder. Sampleholdings help you get started with InfoArchive.
Restarting Documentum Java Method ServerYou must restart Java Method Server (JMS) to complete the installation process.
25

Installing InfoArchive
26

Chapter 5Upgrading InfoArchive
InfoArchive upgrade refers to migration of files, objects, and repositories, and a full installation ofInfoArchive 3.1. To upgrade InfoArchive, you must perform the following tasks:
1. Preparing the upgrade environment
2. Installing InfoArchive 3.1
3. Updating changed objects
4. Updating xDB backup library format
Preparing the Environment for UpgradeBefore upgrading InfoArchive, make sure that you perform the following action items:
• Check system requirements. Note that JDK 7 and xDB 10.5.8 are the new requirements for allinstall configurations of InfoArchive 3.1.
• Close all AIP parents (eas_aip_parent) and xDB pooled libraries (eas_cfg_xdb_pooled_library).
• Ensure all AIP objects are in one of the steady states:— Completed
— Waiting_Destruction
— Waiting_Confirmation
— Rejected
— Invalidated
To verify the status of objects, run the following DQL queries and ensure all queries return 0.select count(*) from eas_aip where eas_state_code not in
('COM','PUR-WCONF','PUR-WDEL','REJ-DONE','INV-DONE')or eas_is_in_unsteady_state = true;
select count(*) from eas_open_aip_parent_rel;select count(*) from eas_xdb_pooled_library where eas_close_date is nulldate;
27
Upgrading InfoArchive
• Run the following clean jobs to remove orphan objects, pruned objects, and obsolete folders.— eas_dctm_clean
— eas-launch-clean
— eas-launch-xdb-clean
Installing InfoArchive 3.1After you finish preparing the environment, you can proceed to the installation of InfoArchive 3.1following the steps described in this guide. You must deploy WAR packages again. When you deploythe DA extension, you must copy the extension files to a clean DA installation, instead of the DAinstallation used by InfoArchive 3.0.
Updating Changed ObjectsYou must update the objects that are changed for InfoArchive 3.1 to make holdings migrated from3.0 compatible with InfoArchive 3.1.
dm_ca_store
You create a dm_ca_store object when you save archived data on Content Addressable Storage(CAS) platforms, such as EMC Centera.
Remove the following attribute from an existing dm_ca_store object:
• eas_pdi_crypto_encoding
Add the following attributes to the existing dm_ca_store object:
• eas_crypto_encoding
• eas_pdi_crypto_hash_algo
• eas_pdi_crypto_hash_salt
• eas_pdi_crypto_iv
• eas_sip_crypto_iv
• eas_ci_crypto_iv
28

Upgrading InfoArchive
eas_cfg_pdi
You must update the XML content of the eas_cfg_pdi object in order to be compliant with the PDIXML Schema, including the following steps:
• Add a pdi.aiu.cnt data section into the XML:<data id="pdi.aiu.cnt">
<select.query xml:space="preserve">declare namespace n = "urn:eas-samples:en:xsd:phonecalls.1.0";
count(XPath_to_elements)</select.query>
</data>
• Remove the <count> element from the minmax data section.<data id="minmax"><count xml:space="preserve">declare namespace n = "urn:eas-samples:en:xsd:phonecalls.1.0";count(XPath_to_elements)</count></data>
• (Optional) Add new processors for InfoArchive 3.1. For example, pdi.aiu.id, pdi.ci.id. Refer tothe EMC InfoArchive Configuration and Administration Guide for more information about AIUID and Content ID.
Updating the xDB Backup Library FormatThe format of xDB backup library renditions is changed from eas_xdb_library/eas_xdb_library_gzip to eas_xdb_backup/eas_xdb_backup_gzip.
Use the xDBmigration command-line tool in INSTALL_DIR/tools/XdbBackupMigration/build/bin to change the format of xDB backup libraries to eas_xdb_backup/eas_xdb_backup_gzip.
Refer to Converting xDB Library (Pool) Backup Renditions in the EMC Documentum InfoArchiveConfiguration and Administration Guide for more information about how to update the xDB backuplibrary format.
29

Upgrading InfoArchive
30
Chapter 6Troubleshooting Installation
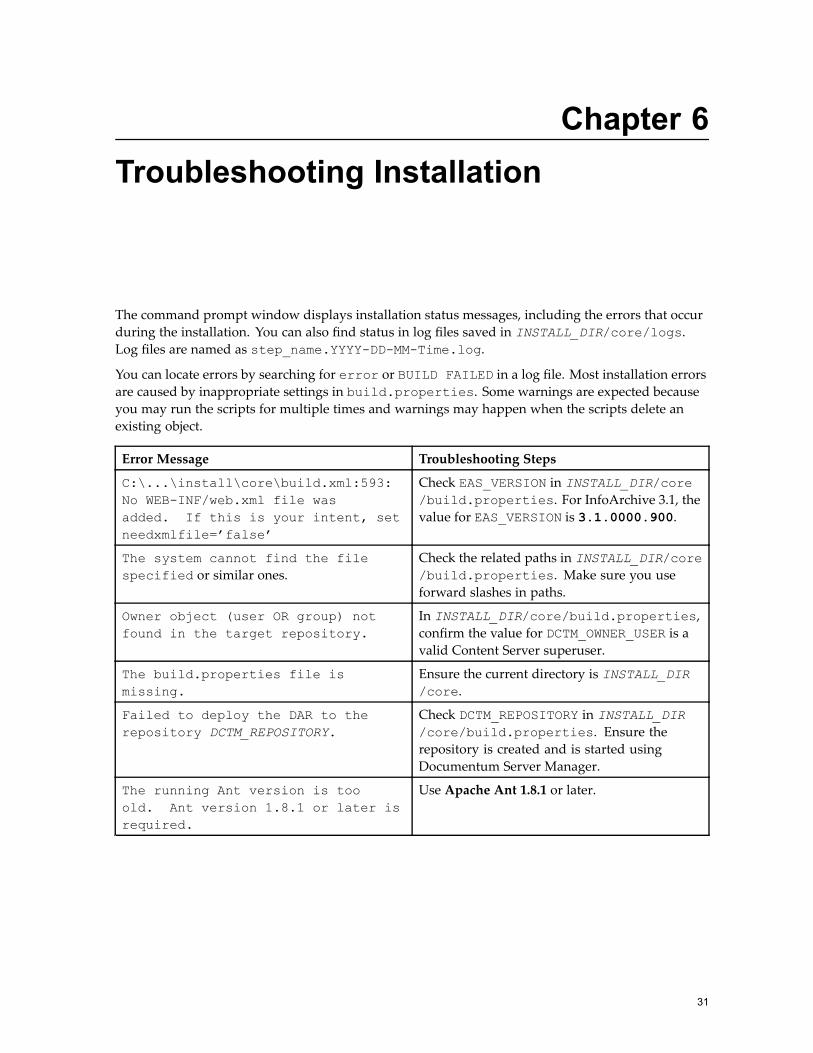
The command prompt window displays installation status messages, including the errors that occurduring the installation. You can also find status in log files saved in INSTALL_DIR/core/logs.Log files are named as step_name.YYYY-DD-MM-Time.log.
You can locate errors by searching for error or BUILD FAILED in a log file. Most installation errorsare caused by inappropriate settings in build.properties. Some warnings are expected becauseyou may run the scripts for multiple times and warnings may happen when the scripts delete anexisting object.
Error Message Troubleshooting Steps
C:\...\install\core\build.xml:593:No WEB-INF/web.xml file wasadded. If this is your intent, setneedxmlfile=’false’
Check EAS_VERSION in INSTALL_DIR/core/build.properties. For InfoArchive 3.1, thevalue for EAS_VERSION is 3.1.0000.900.
The system cannot find the filespecified or similar ones.
Check the related paths in INSTALL_DIR/core/build.properties. Make sure you useforward slashes in paths.
Owner object (user OR group) notfound in the target repository.
In INSTALL_DIR/core/build.properties,confirm the value for DCTM_OWNER_USER is avalid Content Server superuser.
The build.properties file ismissing.
Ensure the current directory is INSTALL_DIR/core.
Failed to deploy the DAR to therepository DCTM_REPOSITORY.
Check DCTM_REPOSITORY in INSTALL_DIR/core/build.properties. Ensure therepository is created and is started usingDocumentum Server Manager.
The running Ant version is tooold. Ant version 1.8.1 or later isrequired.
Use Apache Ant 1.8.1 or later.
31
Recommended