1
Chapter 1: Introduction to Wide-FieldAstrophotography
1.1 BeginningsThe word photography means “writing with light.” When we photographsomething, we use various physical properties of optics, electronics, andchemical reactions to capture the object’s image and record it on a medium,whether that medium is a transparent plastic carrier (the negative), paper (aprint), or a magnetic surface (digital imagery). When we apply these pro-cesses to celestial objects, we call it astrophotography.
Eventually almost everyone who owns a telescope is struck with thedesire to take celestial photographs. The beauty of the celestial sphere is toomuch to resist, and we succumb to the temptation of capturing the grandeurand spirit of what we see in the sky. If a person is already a shutterbug, hiscamera bag will likely have the needed gadgetry to begin photographicexplorations of the cosmos.
Photographing celestial objects through a telescope is one of the mostdemanding types of photography. Fortunately there is a way for novices toachieve success quickly and to capture on film the celestial delights that luretheir gaze upward: in wide-field astrophotography with ordinary cameras,often known as “piggyback” astrophotography, one can start modestly andbuild the skills needed for more ambitious projects, yet achieve satisfyingresults. Basic piggyback photography does not require a lot of fancy equip-ment: beginners can start with any camera capable of time exposures and anyequatorially mounted clock-driven telescope or tracking platform. If you donot already have a telescope, later in this chapter we will see how this can beaccomplished with a simple homemade, hand-operated star tracking device.
Astrophotography is full of surprises. With your camera, you may dis-cover a supernova millions of light years away, like Jack Newton in Victoria,British Columbia. Or, like Ed Szczepanski from Houston, Texas, you mightfind a new comet. Moreover, there is something special about starlight thathas traveled longer than recorded civilization, or has been streaming toward
2 Chapter 1: Introduction to Wide-Field Astrophotography
us since before humanity was on this planet: it carries a sense of immortality.If it went through such lengths to enter your camera, it deserves to be pre-served and admired.
Some authorities have suggested that special skills are required to pho-tograph the night sky successfully; they warn that celestial photography isdifficult and filled with such unusual jargon as “reciprocity law failure” and“hypersensitizing.” Yes, new skills are required. But celestial photographyis not especially difficult, it is just different from terrestrial photography.Indeed, the most important attribute for those entering the field of sky pho-tography is the patience to learn a new skill.
Beginners in the art of celestial photography should start simple andwork their way up. Even if money is no object, a beginner should not be mes-merized by the hype in magazine ads for the latest telescopic wizardry. Aswith any endeavor, diving in without first mastering the basics will quicklylead to frustration.
Astrophotography has two objectives: first, we want to record and share
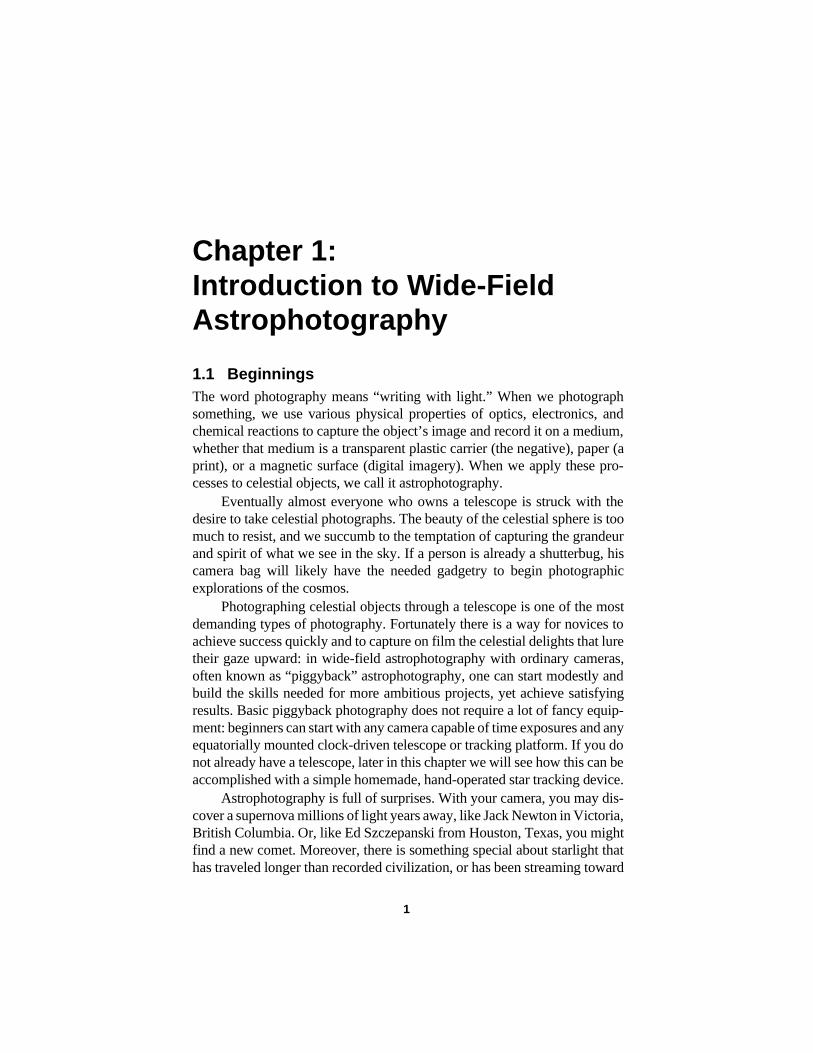
Figure 1-1: Is this a plate from Barnard’s classic Atlas of Selected Regions of the MilkyWay? No, this beautiful image of the Sagittarius Star Cloud and the “Great Galactic DarkHorse” was taken with an inexpensive 50-mm f/1.7 lens on a Minolta SRT102 camera andhypered Kodak Technical Pan. This image demonstrates the versatility of the common cam-eras available to the amateur astronomer. Photo by Alan Sifford.
4
Section 1.2: The Bare Basics 3
the beauty of the celestial vistas that we love; and second, we want to enjoythe technical challenge of mastering a new skill.
This book assumes that the budding astrophotographer already hassome experience with normal pictorial photography. Learning astrophotog-raphy will be much easier if the novice is already familiar with 35-mm cam-eras, interchangeable lenses, film speeds, and the techniques of filmprocessing.
1.2 The Bare BasicsWide-field skyshooting is astrophotography in its purest and original form,for it derives from the pioneering Milky Way photography in the late 1800sand early 1900s by Max Wolf and Edward Emerson Barnard. Theirequipment was the state of the art for their time, but today’s amateur astro-photographer can capture on film the same fascinating celestial targets thatWolf and Barnard did with today’s inexpensive and readily availableequipment.
Indeed, beginners can start their astrophoto adventures with little addi-tional equipment beyond that used for regular photography, and interestingsky pictures can be accumulated without having to shovel vast amounts ofcash into a new hobby. Because of the fast new color slide films, a darkroomis no longer necessary for quality astrophotography. Even electronicimaging does not have to be expensive for the beginner: if you have your pic-tures of celestial objects digitized onto a Kodak Photo CD, you can view andstudy them on your home computer.
The temptation for the beginner to do deep-sky photography—of gal-axies, for example—through a telescope should also be avoided. Nothingwill kill a novice’s enthusiasm faster than running into a wall of technicalunknowns. A ladder of experience must be climbed first through wide-fieldastrophotography. Fortunately, this ladder is short and good results can beachieved quickly. The concepts and techniques learned in wide-field workare critical to success in later, more complex astrophoto work. Basic wide-field astrophotography is often regarded as the first step in a learning processthat eventually leads to deep-sky photography. However, wide-field astro-photography can also be considered a field of specialization in itself.
Many experienced amateurs actually take better sky photos than profes-sional astronomers. Indeed, professionals no longer have the time or incen-tive to do film-based astrophotography. The field is in the hands of amateurs,many of whom are obtaining better images than observatories wereobtaining just 15 or 20 years ago. The fact is that state of the art professionalwork is routinely surpassed by amateurs with modest equipment. Not only
4 Chapter 1: Introduction to Wide-Field Astrophotography
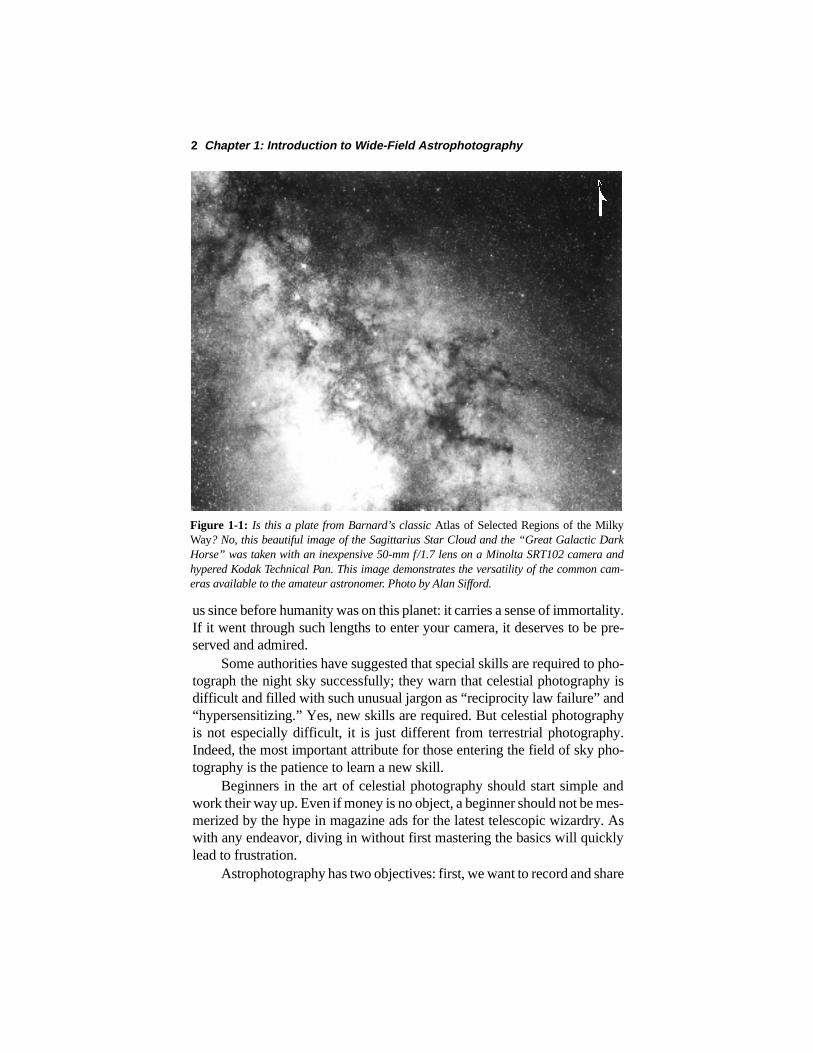
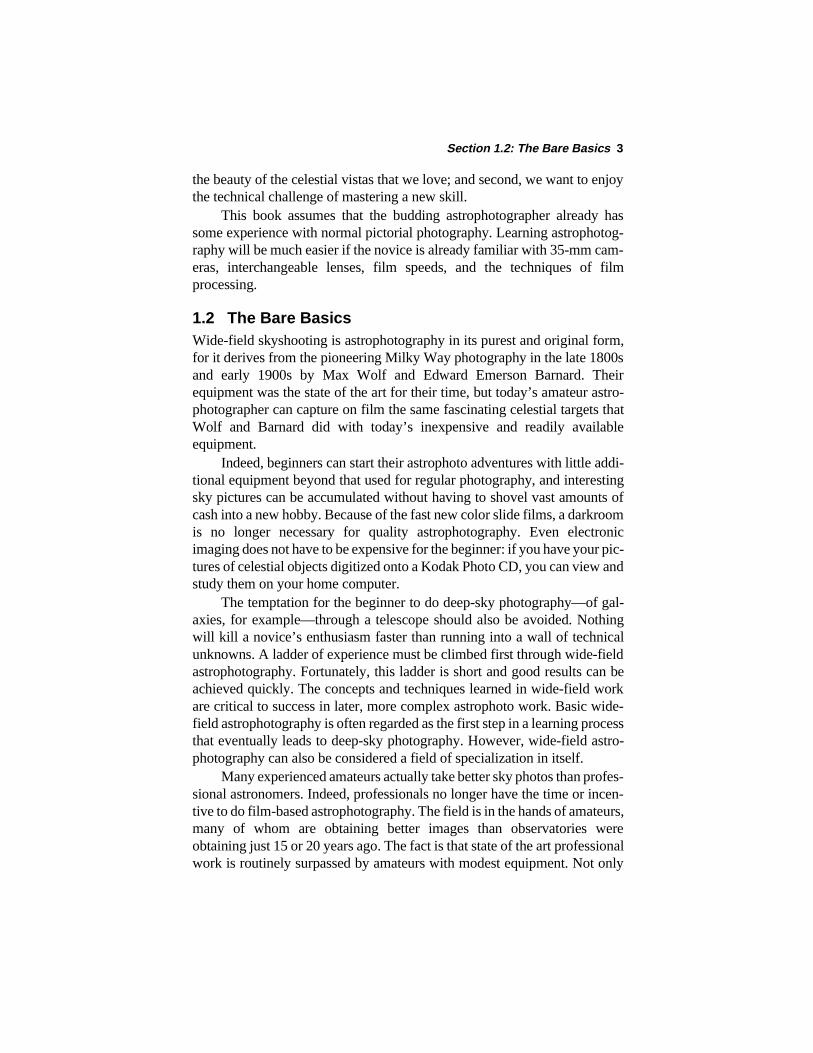
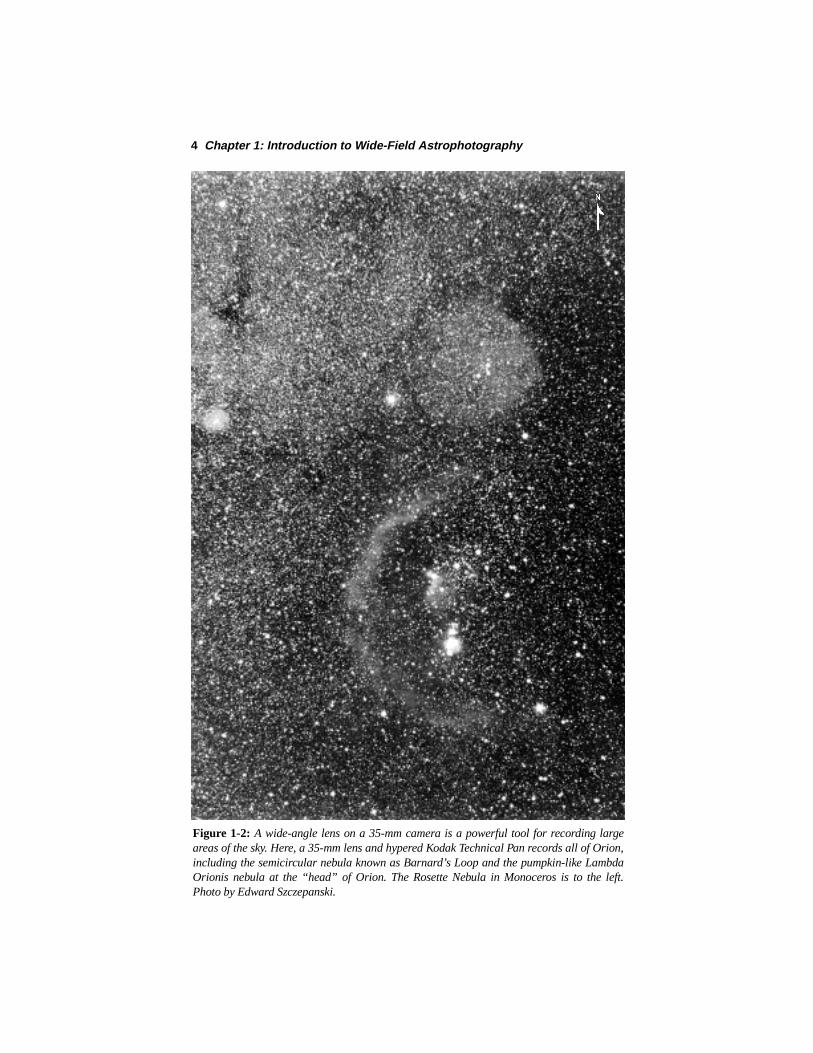
Figure 1-2: A wide-angle lens on a 35-mm camera is a powerful tool for recording largeareas of the sky. Here, a 35-mm lens and hypered Kodak Technical Pan records all of Orion,including the semicircular nebula known as Barnard’s Loop and the pumpkin-like LambdaOrionis nebula at the “head” of Orion. The Rosette Nebula in Monoceros is to the left.Photo by Edward Szczepanski.
4
Section 1.2: The Bare Basics 5
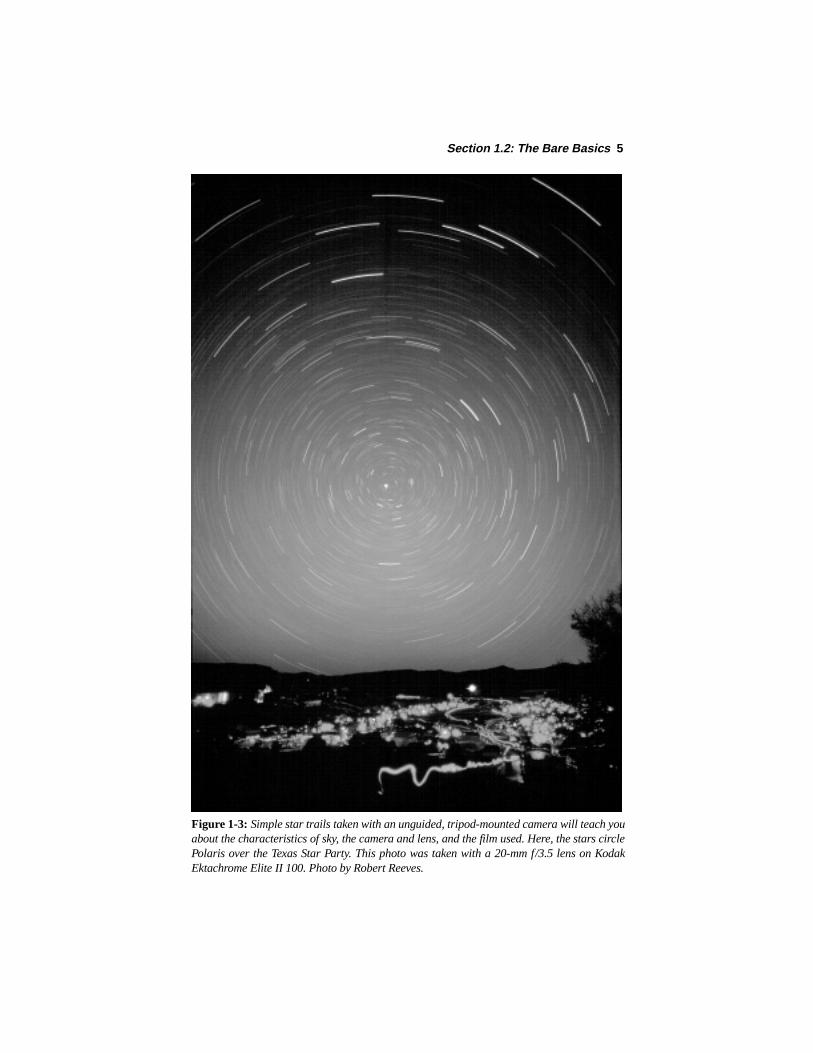
Figure 1-3: Simple star trails taken with an unguided, tripod-mounted camera will teach youabout the characteristics of sky, the camera and lens, and the film used. Here, the stars circlePolaris over the Texas Star Party. This photo was taken with a 20-mm f/3.5 lens on KodakEktachrome Elite II 100. Photo by Robert Reeves.
6 Chapter 1: Introduction to Wide-Field Astrophotography
that, amateurs are portable. They can travel to where the sky is clear, whileprofessional observatories are anchored to one location.
But if wide-field astrophotography is so simple, what is the purpose ofthe rest of this book? Like any endeavor, wide-field astrophotography hasmany levels. Amazing results can be achieved with simple equipment, butthere is much more that can be accomplished with advanced techniques. Thetheory and practical application of these will comprise the majority of thistext. The actual level of an individual’s involvement in this field is governedby one’s interest and available resources.
1.3 How I Got StartedI was inspired to begin celestial photography by a 1957 article in NationalGeographic Magazine about the then-ongoing Palomar Observatory SkySurvey (POSS) being conducted with the 48-inch Schmidt telescope there.
The giant Schmidt produced negatives 14 inches square encompassinga field of view six degrees on a side. The detail recorded on these plates wasastonishing. The infinite depth of space and the precision and beauty of theendless sweeping star vistas captured my imagination.
Inspired by the Palomar images, I took my family’s WWII-vintage Voi-ghtlander camera to the roof of the garage, pointed it at the brightest star inthe sky, braced it in place with blocks of wood, and snapped a one-secondexposure of what I later learned was the planet Jupiter. Emboldened by thisfirst step, I lengthened the exposures to a half-hour.
When I saw the prints from that first roll of 120-format VerichromePan, I discovered, to my joy and astonishment, that my initial images hadturned out well. With a maximum aperture of f/4.5, I had succeeded inrecording Jupiter with that first one-second snap. In fact, seemingly hun-dreds of stars piled up on the longer-exposed negatives, and I could clearlytrace the arcs of stars circling the celestial pole and identify the pattern ofconstellations as charted on star maps.
The attraction the Milky Way holds for me was summed up quite nicelyby Edward E. Barnard in the introduction to his classic work An Atlas ofSelected Regions of the Milky Way:
…the Milky Way reveals all its wonderful structure, which is somagnificent in photographs made with the portrait lens. Theobserver with the more powerful telescopes, and necessarilymore restricted field of view, has many things to compensate himfor his small field of view, but he loses essentially all the won-ders of the Milky Way…. It was these views of the great struc-tures in the Sagittarius region of the Milky Way that inspired mewith the desire to photograph these extraordinary features, and
Section 1.4: Why Do Astrophotography? 7
one of the greatest pleasures of my life was when this was suc-cessfully done at Lick Observatory in the summer of 1889.
Today, the Milky Way remains the magnet that draws me toward deepspace and is the heart and soul of my involvement with astronomical photog-raphy. It offers so many challenges and rewards that one can spend a lifetimedevoted to the photographic study of this stellar highway and never run outof material.After many years of portable telescope piggyback photography,I finally completed a domed observatory located far from city lights. Itbecame operational in 1987 and is devoted to long-exposure Schmidtcamera photography of the Milky Way. The dome helps protect the instru-ments from heavy summer dew as well as from buffeting by the cold winterwind.
I must admit that I don’t miss being buffeted by the wind. And theimages produced by the Schmidt are amazing. But I lost something when Iwent under the dome—the grandeur of the dark night sky. Astrophotography“indoors” with only a slice of the sky visible through the three-foot-widedome slot had made me homesick for the stars. Over the course of the hourbetween each succeeding exposure, the sky moves quite a bit: old friends setin the west and new ones rise to greet me in the east. I found it necessarybetween exposures simply to go outside and get reacquainted with thechanging stars.
Consequently I now look forward to skyshooting away from the dome.Astrophotography with ordinary 35-mm cameras and a portable telescopehas taken on a whole new joy for me after all these years because I can seethe stars again. Because manually guiding a simple wide-field shot is not asrigorous as guiding the Schmidt camera, I again have the opportunity to lookaround and enjoy the view. An ST-4 autoguider is still in the future for mebecause of the basically primitive equatorial mounts I use, so I remain“trapped” at the guiding eyepiece. But since I am outdoors again, I don’tmind. I can see the stars once more.
1.4 Why Do Astrophotography?One reason we chase the beauties of the sky with a camera is because photo-graphs communicate the astounding celestial majesty to others. We love thesky and wish to share it with others. Through photography we can capture theconstellations, the star clouds of the Milky Way, and delicate smudges andpuffs of nebulae and galaxies. This is a beauty we love, and with a camera wecan introduce it to a wider audience.
Photography extends past the brightness range the human eye can see.The average naked eye can detect stars down to the 6th magnitude, encom-
8 Chapter 1: Introduction to Wide-Field Astrophotography
passing 6000 stars with a brightness range of about 250 to 1. A one-inchaperture camera lens can extend this to include 5 million stars with a bright-ness range of about 60,000 to 1. Indeed, exposures of 20 seconds will showall the stars plotted on Sky Atlas 2000.0, and an exposure of 10 to 20 minuteswill chart all objects seen in average amateur telescopes.
The celestial objects that can be recorded with a standard 35-mmcamera are exciting. What seems so familiar to the eye becomes a thrillingnew area of discovery once you realize the camera can detect far more thanthe eye. When you see the results of your first astrophoto session, you willnot be able to wait to get out in the country again to further explore the skywith your camera.
The challenge of preserving and sharing the visible as well as recordingthe invisible is another of the great driving forces impelling the astrophotog-rapher. Successfully recording objects that are invisible to the eye leads to asense of discovery that is a great reward for the long hours at the telescope.
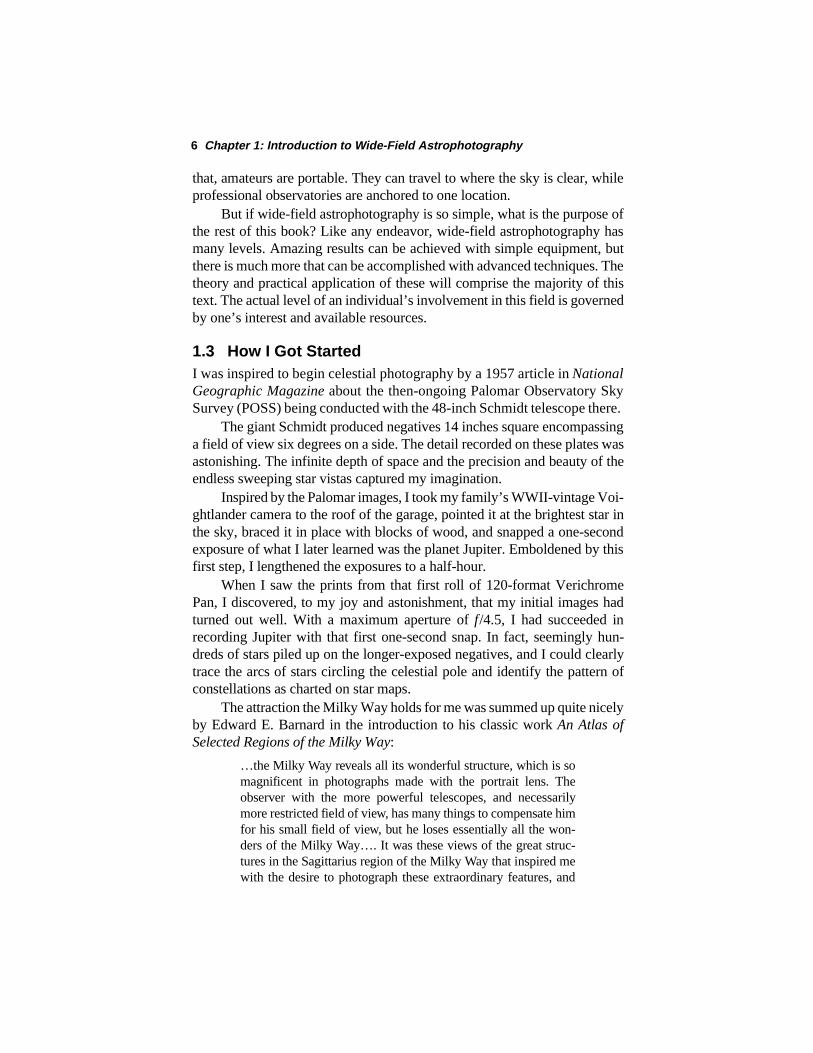
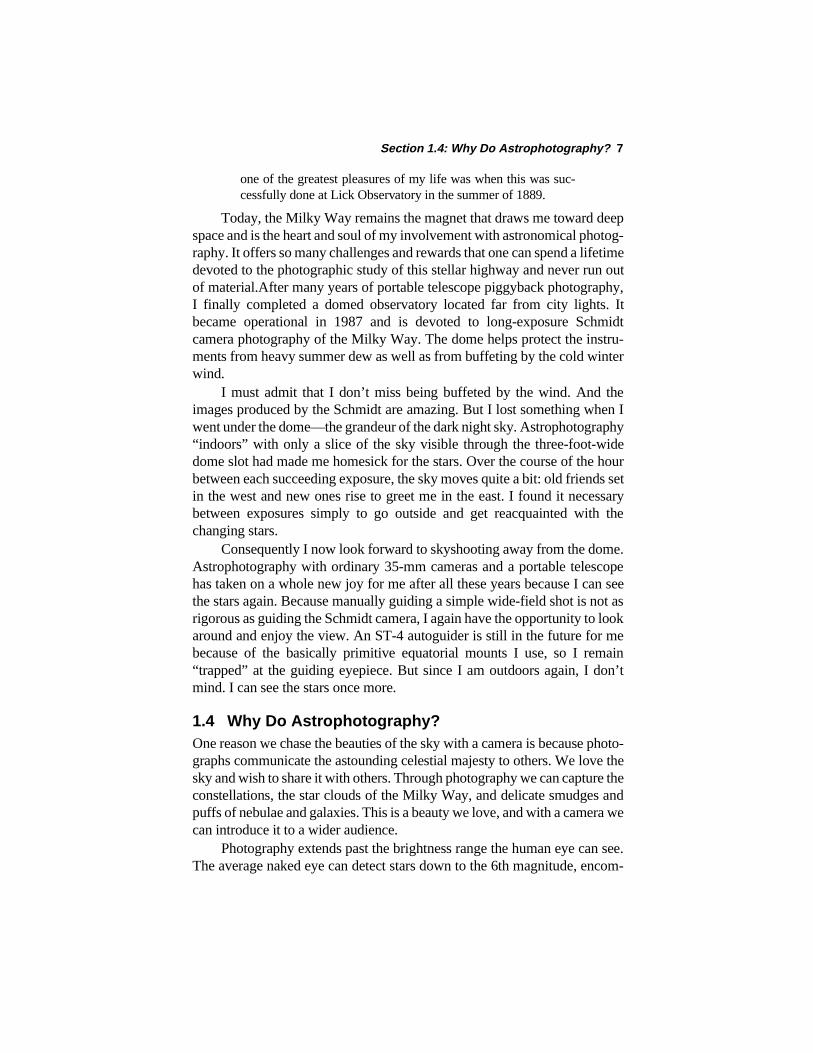
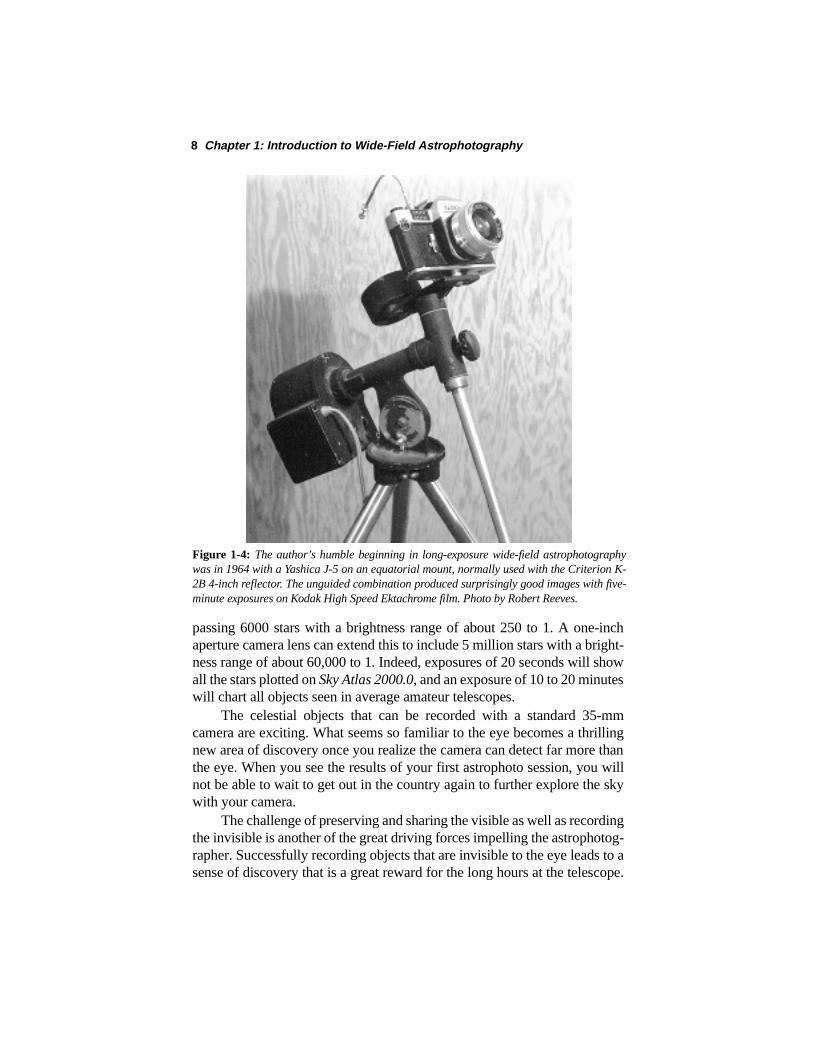
Figure 1-4: The author’s humble beginning in long-exposure wide-field astrophotographywas in 1964 with a Yashica J-5 on an equatorial mount, normally used with the Criterion K-2B 4-inch reflector. The unguided combination produced surprisingly good images with five-minute exposures on Kodak High Speed Ektachrome film. Photo by Robert Reeves.
Section 1.5: An Astrophoto Philosophy 9
Sharing the “discovery” with others is the icing on the cake.The joy of tinkering with scientific apparatus and the desire to master a
technical skill also promote a high degree of satisfaction. But in spite of allits technicalities, astrophotography can go beyond the nuts and bolts of hard-ware and be aesthetically satisfying as well. Shooting a unique record ofone’s favorite portion of the sky can be artistically very rewarding. There isa great deal of pride in displaying a fine photograph of the sky and knowing,“I did this, that is my picture.” A universe beyond description and imagina-tion awaits those who dare to reach for it.
1.5 An Astrophoto PhilosophyTo get the most out of photographing the sky, it is best to adopt a phi-losophy that will guide you toward your photographic goals. It should beyour own personal justification for pursuing an avocation that is not com-monly practiced by the average person. Moreover, your philosophy shouldnot only explain to you why you do astrophotography, but how you do itand how far you are willing to pursue it. You should believe in it or yourultimate photographic results will suffer from lack of commitment.
It does not take too much thought to realize that most of your co-workers and neighbors are not out under the stars at odd hours of the night,often facing uncomfortable weather or hungry insects, to chase a barely vis-
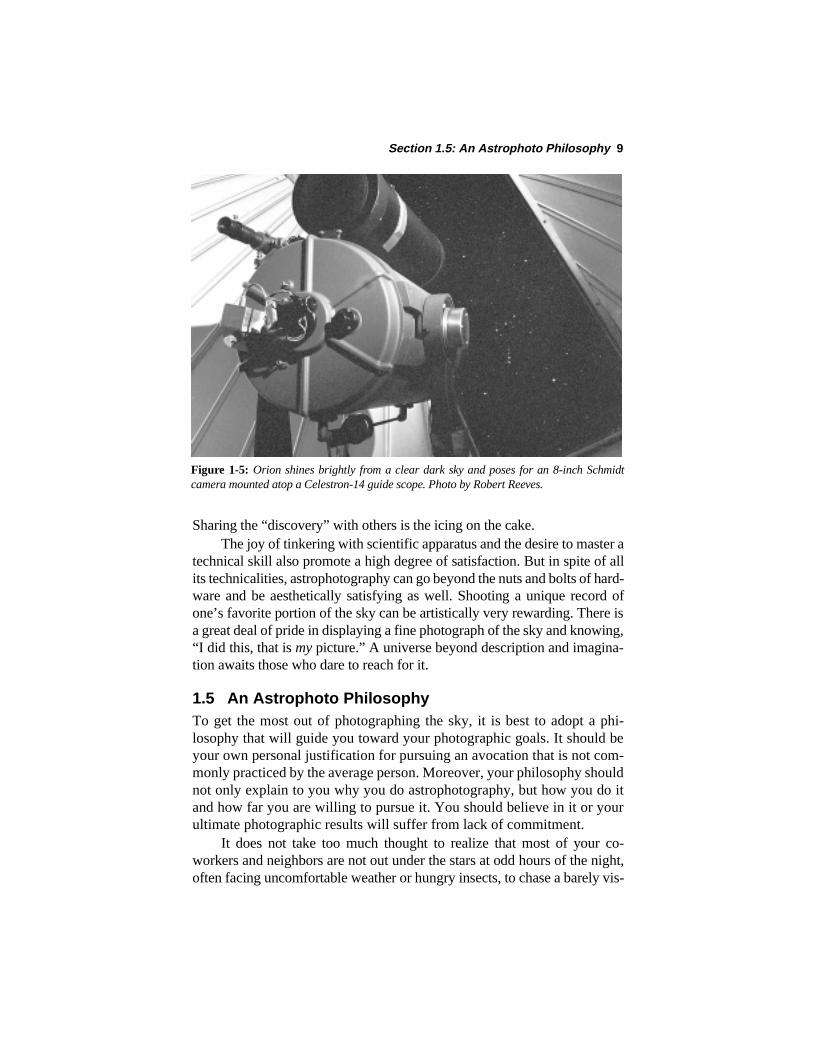
Figure 1-5: Orion shines brightly from a clear dark sky and poses for an 8-inch Schmidtcamera mounted atop a Celestron-14 guide scope. Photo by Robert Reeves.
10 Chapter 1: Introduction to Wide-Field Astrophotography
ible celestial object. Most of my acquaintances think I am thoroughly off myrocker for doing so. But I ignore their jests and do not bring up their televi-sion-addicted couch-potato life style. This is because my astronomical activ-ities are guided by a calling from within my soul. I do astronomy because Iwant to, not because it is a fad, a professional or educational obligation.
I do my astronomy primarily to satisfy one person—me! I want torecord the natural beauty of the constellations, to chart the river of stars thatmakes up our Milky Way galaxy, to see the unseen, and record these vistason film to enjoy again and again. If I am satisfied with what I do, there is atrickle-down effect. Others around me are exposed to new ideas and newworlds through my enthusiasm for astrophotography.
To succeed at astrophotography, my philosophy dictates that I pursueprojects that I can actually accomplish within the range of my equipment’scapability. This does not preclude experimenting to see what is possible withmy equipment; indeed, my philosophy encourages me to push the limits tosee what it is capable of. But realistic goals must be maintained as well. Abeginner with a short telephoto lens is not going to be able to match theachievements of an experienced person using a Schmidt astrograph.
Biting off more than you can chew is a sure way to become discouraged
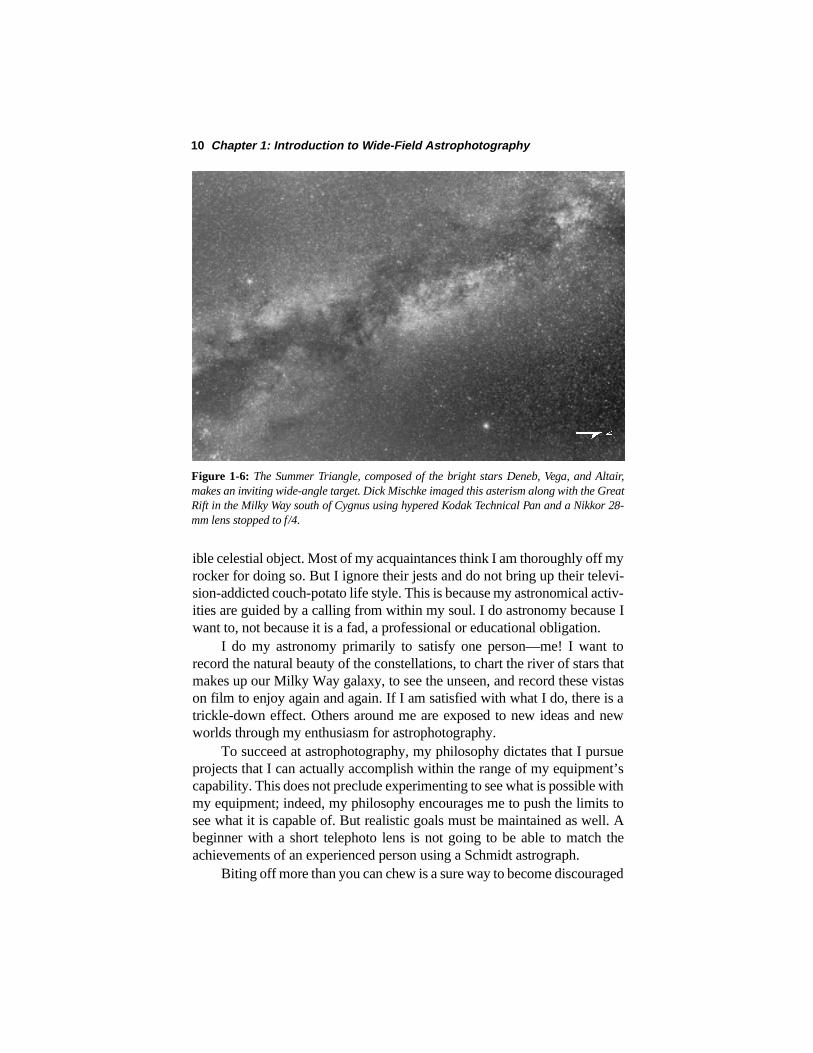
Figure 1-6: The Summer Triangle, composed of the bright stars Deneb, Vega, and Altair,makes an inviting wide-angle target. Dick Mischke imaged this asterism along with the GreatRift in the Milky Way south of Cygnus using hypered Kodak Technical Pan and a Nikkor 28-mm lens stopped to f/4.
4
Section 1.5: An Astrophoto Philosophy 11
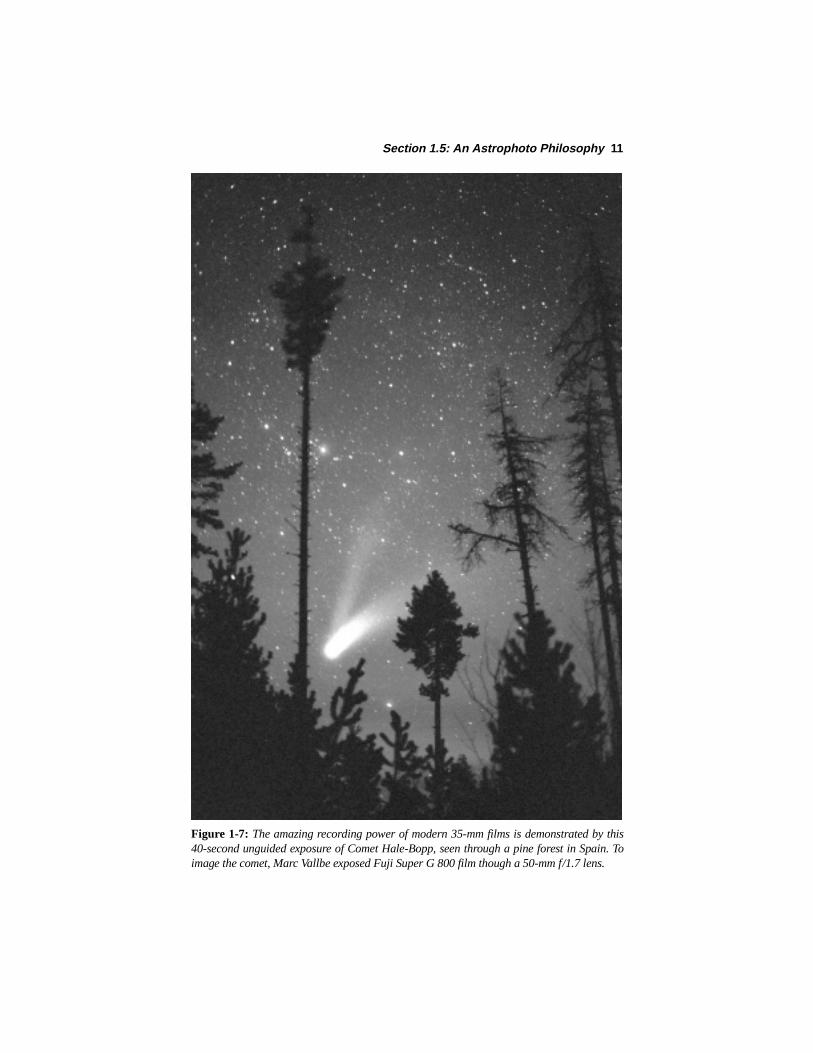
Figure 1-7: The amazing recording power of modern 35-mm films is demonstrated by this40-second unguided exposure of Comet Hale-Bopp, seen through a pine forest in Spain. Toimage the comet, Marc Vallbe exposed Fuji Super G 800 film though a 50-mm f/1.7 lens.
12 Chapter 1: Introduction to Wide-Field Astrophotography
in a new endeavor. It is my hope that this book will guide the reader throughthe initial experience-gaining steps and build his self-confidence to pursuethe full extent of his or her astrophotographic capability with whateverequipment he or she has. It must be realized that any new skill takes time tomaster. Simply spending money to buy fancy equipment does not automati-cally guarantee success. One must learn how to use that equipment effec-
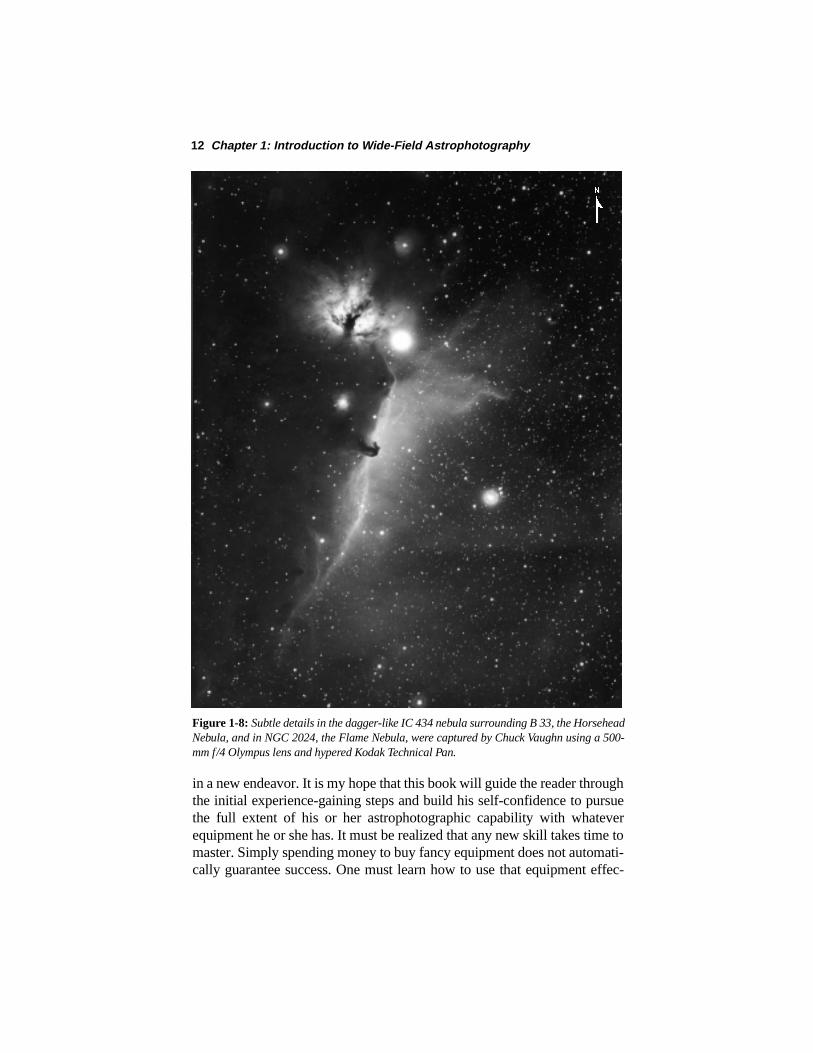
Figure 1-8: Subtle details in the dagger-like IC 434 nebula surrounding B 33, the HorseheadNebula, and in NGC 2024, the Flame Nebula, were captured by Chuck Vaughn using a 500-mm f/4 Olympus lens and hypered Kodak Technical Pan.
4
Section 1.5: An Astrophoto Philosophy 13
tively for the project one is doing.Critical analysis of the photographic results is also an important part of
my astrophoto philosophy. If something did not work, I have to figure outwhy in order to achieve success on another try. Bad results can be veryinstructive if carefully analyzed. Was it an equipment problem, a proceduralerror, or was the attempted photo simply beyond the capacity of the equip-
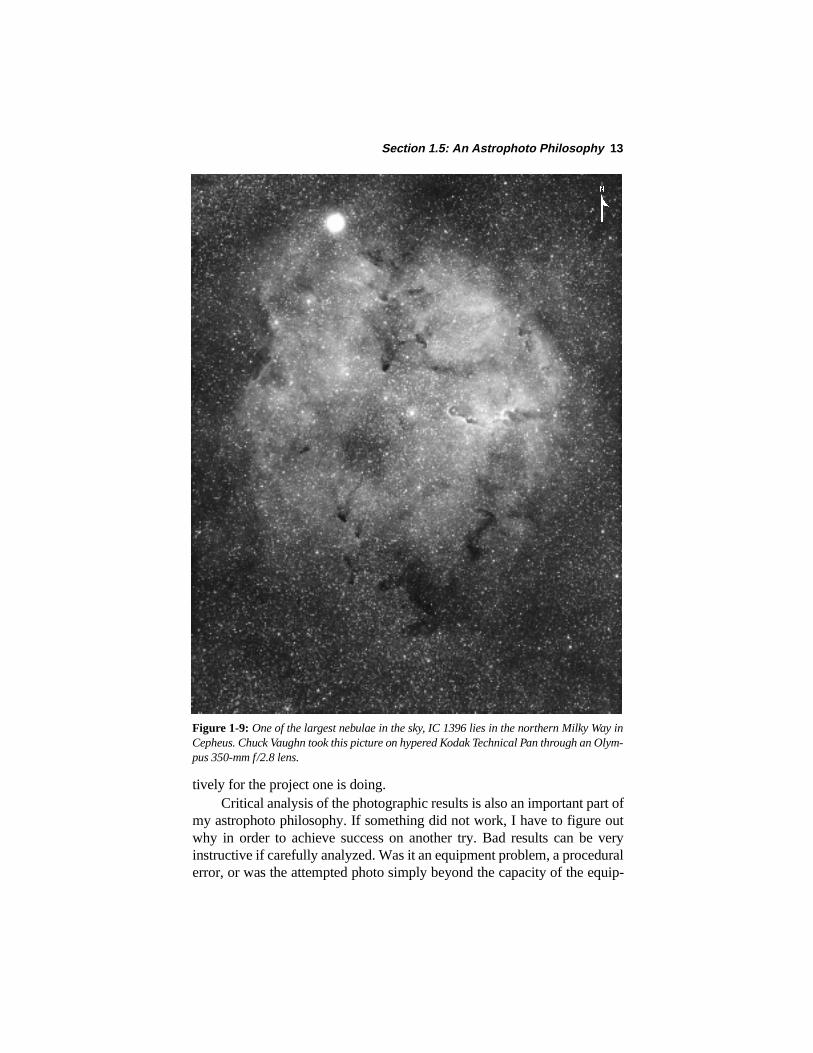
Figure 1-9: One of the largest nebulae in the sky, IC 1396 lies in the northern Milky Way inCepheus. Chuck Vaughn took this picture on hypered Kodak Technical Pan through an Olym-pus 350-mm f/2.8 lens.
4
14 Chapter 1: Introduction to Wide-Field Astrophotography
ment? Recognizing that I can make mistakes is important. Simply blamingthe film, the photo lab, or the camera for poor results will perpetuate therecurring error if I am the one who really made the mistake.
It is essential to persevere when the inevitable astrophoto failure rearsits unwelcome head. Good astrophotography is a learned technical skill.Time, patience, and practice are necessary to master any new skill. Publica-
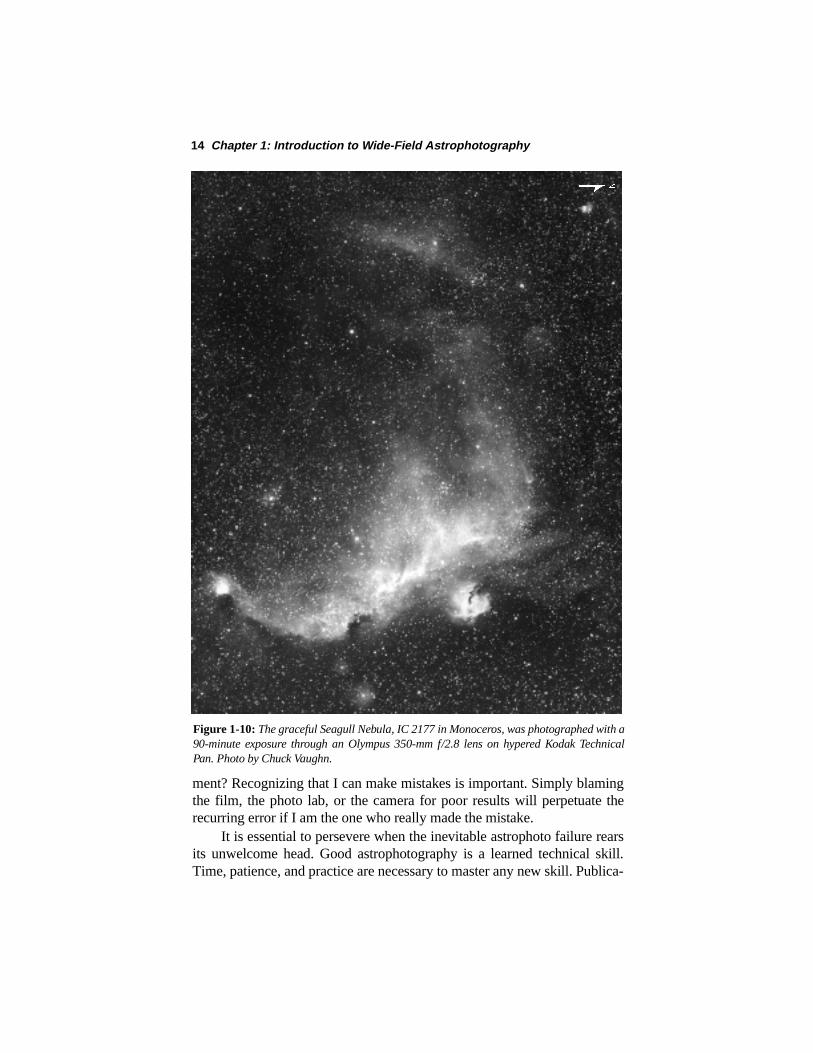
Figure 1-10: The graceful Seagull Nebula, IC 2177 in Monoceros, was photographed with a90-minute exposure through an Olympus 350-mm f/2.8 lens on hypered Kodak TechnicalPan. Photo by Chuck Vaughn.
4
Section 1.5: An Astrophoto Philosophy 15
tions and tutorials can show you what to do, but the experience gained bypractice is the real teacher.
One person’s great picture may be the next person’s disaster. I, for one,tend to seek out the faintest possible nebulosity in the deep reaches of theMilky Way. This renders familiar objects like the Lagoon or Eagle Nebula asoverexposed masses on the background of fainter nebulae. Some people findthese exposures unacceptable because they do not show the shape and beautyof familiar objects. On the other hand, their photos, exposed only long enoughto reveal the classic forms of popular sky targets, strike me as abysmallyunderexposed because they do not show the hidden detail that lurks betweenthe Messier classics. Their beauties are my disasters, and vice versa.
Even the most seasoned skyshooters make their share of mistakes. Mypersonal cross to bear was the seven separate 40-minute Schmidt cameraexposures of the North America Nebula required before obtaining the shot Iwas satisfied with. Over the course of two years, my battle included guidingerrors, fogged film, scratched film, and misframing or completely missing
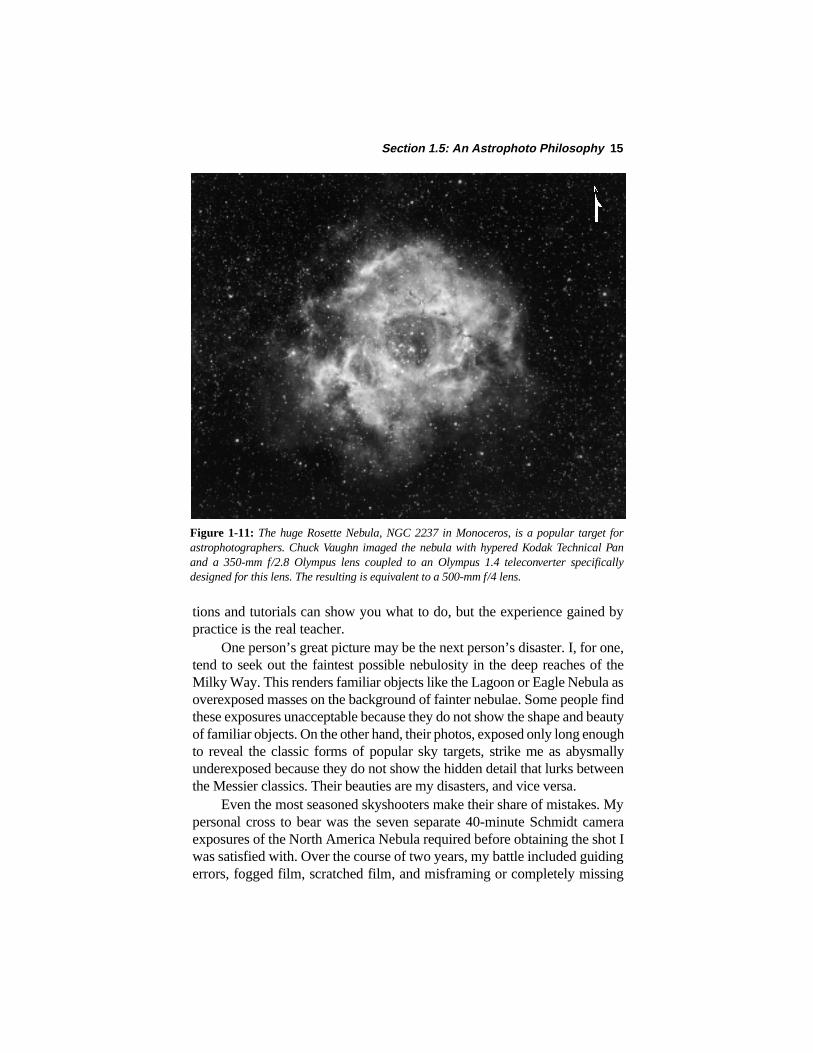
Figure 1-11: The huge Rosette Nebula, NGC 2237 in Monoceros, is a popular target forastrophotographers. Chuck Vaughn imaged the nebula with hypered Kodak Technical Panand a 350-mm f/2.8 Olympus lens coupled to an Olympus 1.4 teleconverter specificallydesigned for this lens. The resulting is equivalent to a 500-mm f/4 lens.
4
16 Chapter 1: Introduction to Wide-Field Astrophotography
the invisible target. But in the end, the effort was worth it. The resultingexposure rivals a Palomar Sky Survey photograph for recording faint nebu-losity (Figure 5-3 on page 154).
Even the best astrophoto is useless if it is not seen. Achieving photo per-fection on the negative is meaningless unless that image can be viewed, ana-lyzed for science, or simply enjoyed. When I succeed in capturing anexceptional view of the sky, my philosophy dictates that I share it withothers. If it is a good print, it is shown to audiences, it is displayed, posted onmy Internet web page, or illustrates an article. I encourage others to do thesame and not to be afraid of having their images “ripped off.” That is notlikely to happen, because the only realistic venue is publication in the rela-tively small amateur astronomy magazine and book market where eco-nomics dictate relatively little in the way of monetary reward.
Good astrophotography is a natural ambassador for astronomy and sci-ence in general. I have yet to see someone who was unmoved by a beautifulcolor portrait of our Milky Way. My efforts are thus geared toward capturingthe views of our universe and spreading the faith by sharing them with others.
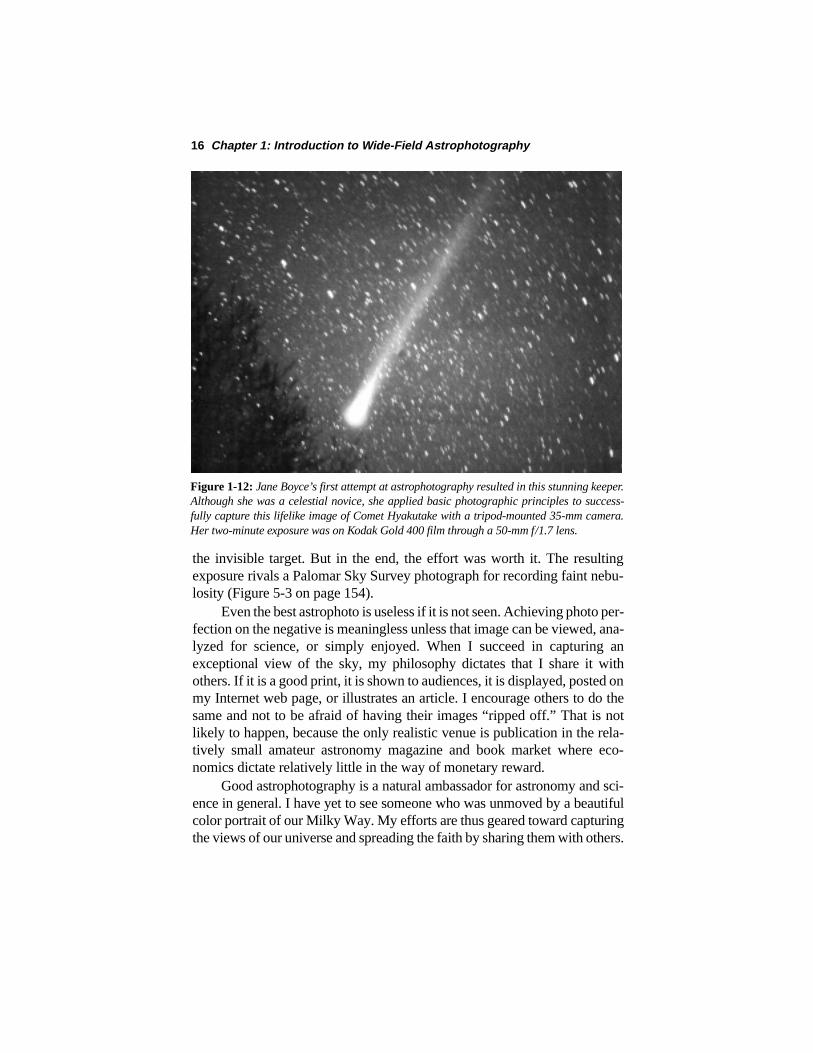
Figure 1-12: Jane Boyce’s first attempt at astrophotography resulted in this stunning keeper.Although she was a celestial novice, she applied basic photographic principles to success-fully capture this lifelike image of Comet Hyakutake with a tripod-mounted 35-mm camera.Her two-minute exposure was on Kodak Gold 400 film through a 50-mm f/1.7 lens.
Section 1.5: An Astrophoto Philosophy 17
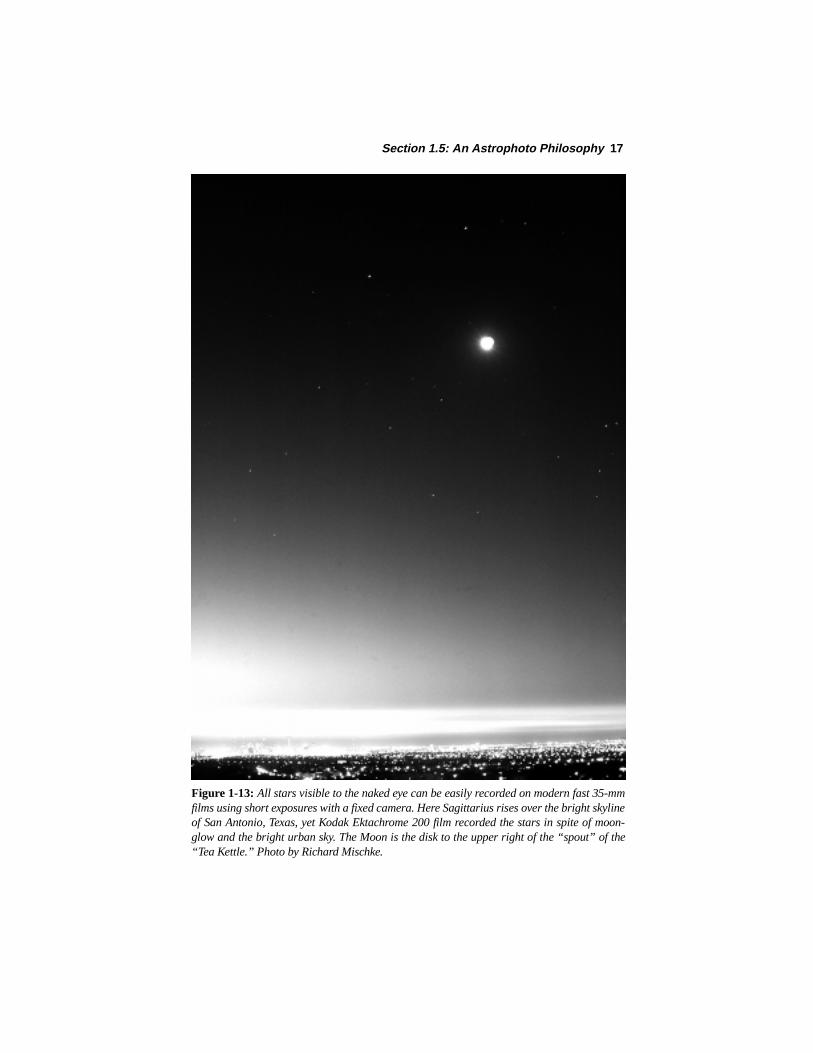
Figure 1-13: All stars visible to the naked eye can be easily recorded on modern fast 35-mmfilms using short exposures with a fixed camera. Here Sagittarius rises over the bright skylineof San Antonio, Texas, yet Kodak Ektachrome 200 film recorded the stars in spite of moon-glow and the bright urban sky. The Moon is the disk to the upper right of the “spout” of the“Tea Kettle.” Photo by Richard Mischke.
18 Chapter 1: Introduction to Wide-Field Astrophotography
1.6 Getting StartedA snapshot is generally regarded as a hand-held exposure lasting a fractionof a second, while a time exposure is longer than a second. Most of us arefamiliar with snapshooting terrestrial objects. However, crossing the lineto time exposures used in astronomy opens a whole new world of photo-graphic opportunities and their accompanying challenges.
The first step for the novice in wide-field astrophotography is takingstar trails with a camera on a fixed tripod. Shooting star trails is as much aninitiation rite as an educational experience. Everyone has seen pictures of theclassical swirl of stars circling Polaris. It is an image that is ingrained in themind of all amateur astronomers. The beginner can learn much about thecamera and film, the sky, and the motion of the sky by taking similar star trailphotographs.
An image of star trails gently arcing across the sky will demonstratecelestial motion better than anything else. But if a familiar object or land-mark is placed in the foreground, a good star trail photo can also be quitescenic. Using the same rules of composition that govern terrestrial photog-raphy, we can place our house, trees, or familiar landmarks in the photo andconvert a stark scientific photo into something beautiful and aestheticallypleasing. An example is a short exposure of Orion. In itself, the image is
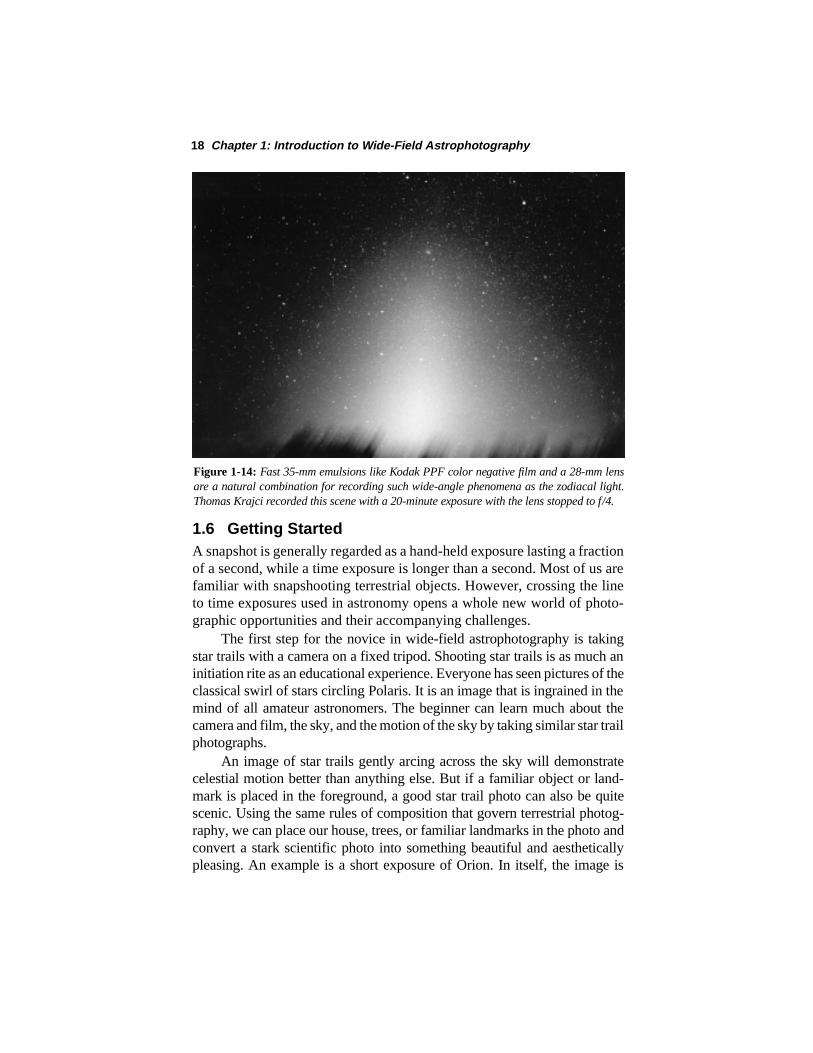
Figure 1-14: Fast 35-mm emulsions like Kodak PPF color negative film and a 28-mm lensare a natural combination for recording such wide-angle phenomena as the zodiacal light.Thomas Krajci recorded this scene with a 20-minute exposure with the lens stopped to f/4.
Section 1.7: If You Can See It, You Can Shoot It 19
interesting because it shows a star pattern we are familiar with. But if thesame star field is viewed out the dome of an observatory with the telescopeilluminated in the foreground, the image of Orion evokes the thrill ofastronomy and a feeling of imminent discovery (see Fig. 1-5).
1.7 If You Can See It, You Can Shoot ItWhen I became a serious astrophotographer in the early 1960s, theselection of color film was extremely limited and the most sensitive filmswere black-and-white emulsions in the ISO 400 (then called ASA 400)speed range. Kodak’s fastest color film was High Speed Ektachrome, witha rating of 160, and the fastest color emulsion available anywhere wasAnsco 500, an ISO 500 speed transparency film that does not even existtoday. Now we have both color transparency and print films with 800,1600, even 3200 speeds. Moreover, the color sensitivity of modern filmsshames their 1960s counterparts.
The fact is that with today’s 1600 and 3200 speed color films, abeginner can take better celestial images with unguided, tripod-mounted 30-second exposures than the advanced amateur could in the 1960s with half-hour, fully guided exposures. The sensitivity of today’s film is the key tothis; modern films suck up starlight like a sponge compared to those used 30years ago. Indeed, several seconds of exposure on 3200 speed film with anordinary 35-mm camera’s lens wide open will record more stars than thenaked eye can see, and 30-second exposures can capture more stars than areplotted on the Sky Atlas 2000.0 charts.
Introductory celestial photography has virtually been reduced to point-and-shoot by modern film technology. Those entering the arena of wide-field astrophotography do not need to worry about the advanced techniqueof film hypersensitization widely discussed in astronomy periodicals (and inChapter 11). Excellent results can be obtained with today’s off-the-shelffilms used right out of the box. If you can see the astronomical object, youcan photograph it with nothing more than a camera and tripod. Moreadvanced techniques marrying the camera to a tracking platform (in the formof a telescope) and using telephoto lenses will easily follow.
1.8 The Recipe for Beginner’s SuccessThe technique for astrophotography of such wide-field objects as comets orconstellation star-patterns is very straightforward. First, load your camerawith fast film, 400 speed or higher. Next, attach the camera to a sturdy tripod.Then compose the image the way you would arrange a terrestrial shot. Mostbright comets are close to the horizon, and a foreground object such as ascenic tree line or known building can frame the image and give a point of
20 Chapter 1: Introduction to Wide-Field Astrophotography
reference. The camera’s lens should be wide open, the focus set on infinity,and the shutter speed at “T” for time exposure (or “B” if the shutter has to beheld open with a locking cable release). Finally, expose the film for 15 to 30seconds, long enough to record a star-pattern or comet but not so long thatstar trails will be evident or the comet’s image blurred.
For those acquainted with casual snapshooting, the first three steps arenot a challenge. However, the final step, the time exposure, is the unknownfor novice astrophotographers. Be warned that longer is not necessarilybetter for a time exposure, even if you wish to record the long arcs of starscircling Polaris during the course of a night. At some point the exposure willbecome fogged from natural background sky brightness or light pollution.
1.9 Finding Your Sky Fog LimitThe maximum exposure time for an astrophoto is limited by sky fog.Beyond a certain exposure length, the brightness of the sky washes out thecelestial image. The exposure limits dictated by sky fog are something thatmust be determined by trail and error for each camera/film combination.
Four things naturally brighten even the dark country sky and can createsky fog on film if the exposure is too long: (1) air glow; (2) aurora activitythat varies in intensity with the sunspot cycle (and reaches its peak with thesunspot maximum); (3) zodiacal light, caused by interplanetary dustreflecting sunlight; and (4) the faint light from countless unresolved stars,nebulae, and galaxies.
Obviously someone shooting from an urban location with nearby streetlights will have to contend with artificial as well as natural light pollution andtherefore will reach the sky fog limit much more quickly than the photogra-pher in a country setting. In general, it can be assumed that with a fast film,400 speed or higher, we will be limited to about a 30 second exposure froman urban location, whereas in the country, reaching the sky fog limit maytake 5 to 20 minutes.
Most suburban locations have some areas of the sky that are brighterthan others. Similarly, a country location may have directions with differentsky fog limits if there is a nearby town or city.
To determine the maximum exposure possible without objectionablesky fog, load the camera with a roll of color slide film and place it on a tripod,compose the view to include a recognizable constellation, and snap off aseries of bracketed exposures of increasing length. By using slide film, theresults can be examined directly without the bias of corrections performedby automated printmaking machines.
If an urban location is being tested, begin with the lens aperture set wideopen and expose for 10, 20, 40, and 80 seconds. Then, as an experiment,
Section 1.10: Examining the Experiment 21
reduce the lens’s aperture first by one, then two f-stops, and repeat the seriesof exposures. We will see the reason for this in the next section. If a countrylocation is being tested, start with 1-minute, then 2-, 4-, 8-, and 16-minuteexposures, each with the lens wide open, then again with it closed down oneand two f-stops.
After the film has been processed, closely examine first the series ofexposures made with the lens wide open. Determine which exposure showsan image that is degraded by sky fog beyond the point of acceptability. Toget acceptable celestial images from this location using the same cameraunder similar sky conditions, the exposure must be no longer than the longesttest shot that was not ruined by sky fog. If you compare the full apertureseries with the series taken with the opening reduced one f-stop, you prob-ably will find the best urban results come with 1000 speed or faster film with15- to 20-second exposures and the lens stopped down one f-stop.
1.10 Examining the ExperimentLet’s go back and look at the series of sky fog test exposures made withthe aperture reduced by two f-stops. A slide projector will allow criticalanalysis of faint detail and grain structure, though it must be used toevaluate only small portions of the negative, because projector lensesrarely give a crisp, sharp view simultaneously over the entire field. If youdo not have a slide projector, view the film through a reversed 50-mm/35-mm camera lens—it will give you an excellent close-up of an entire 35-mm frame.
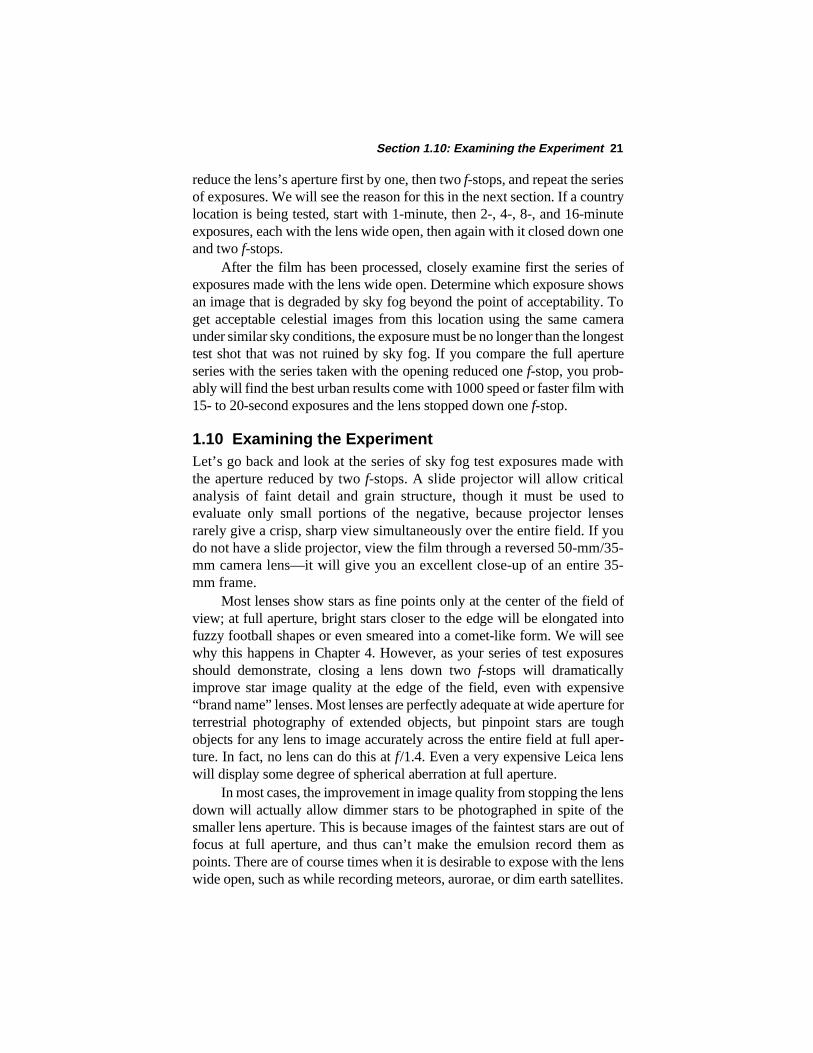
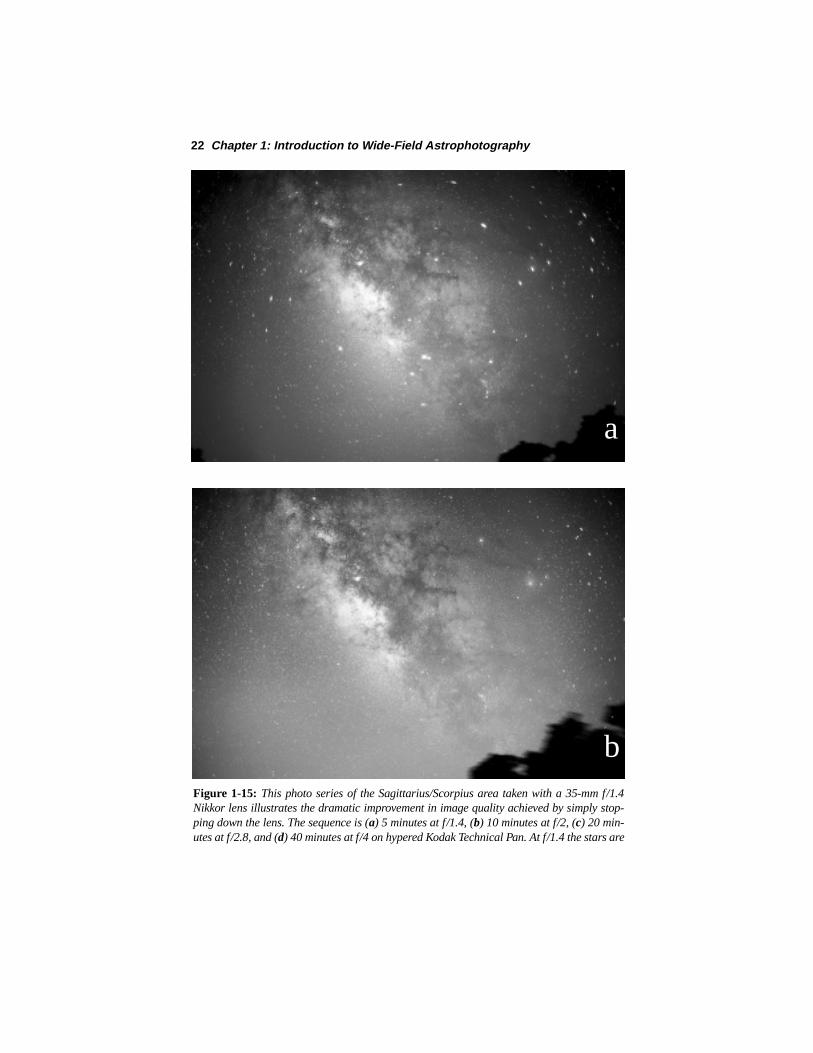
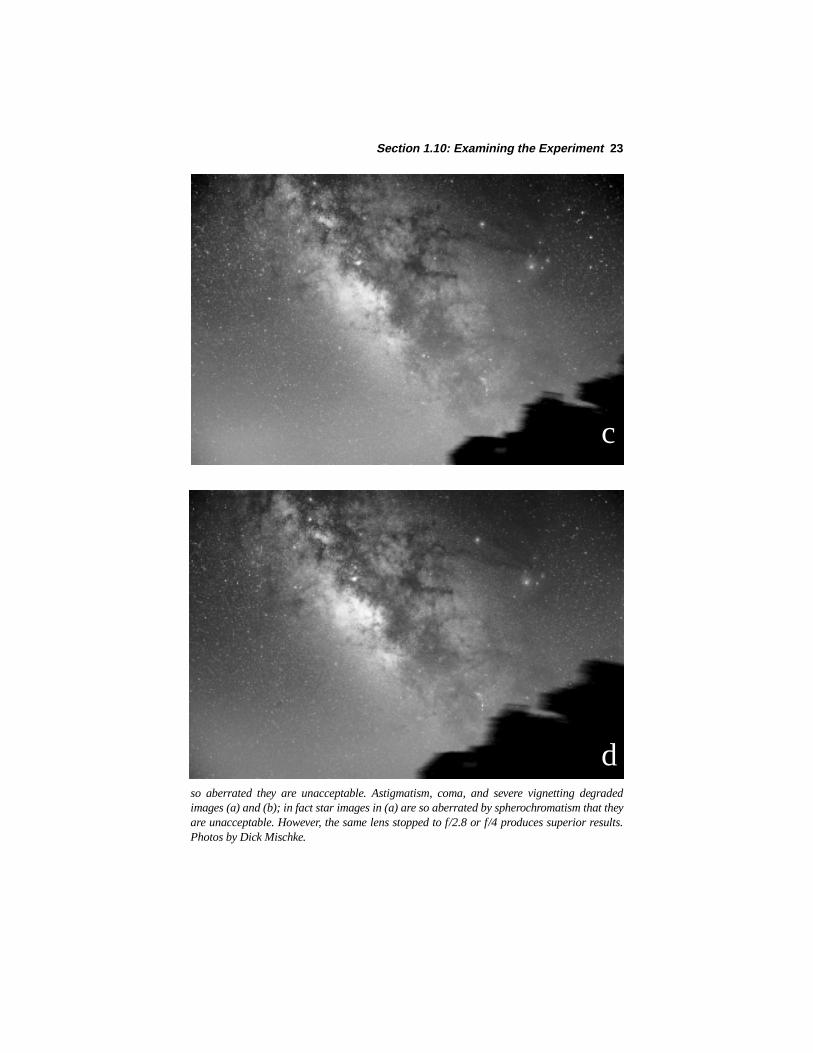
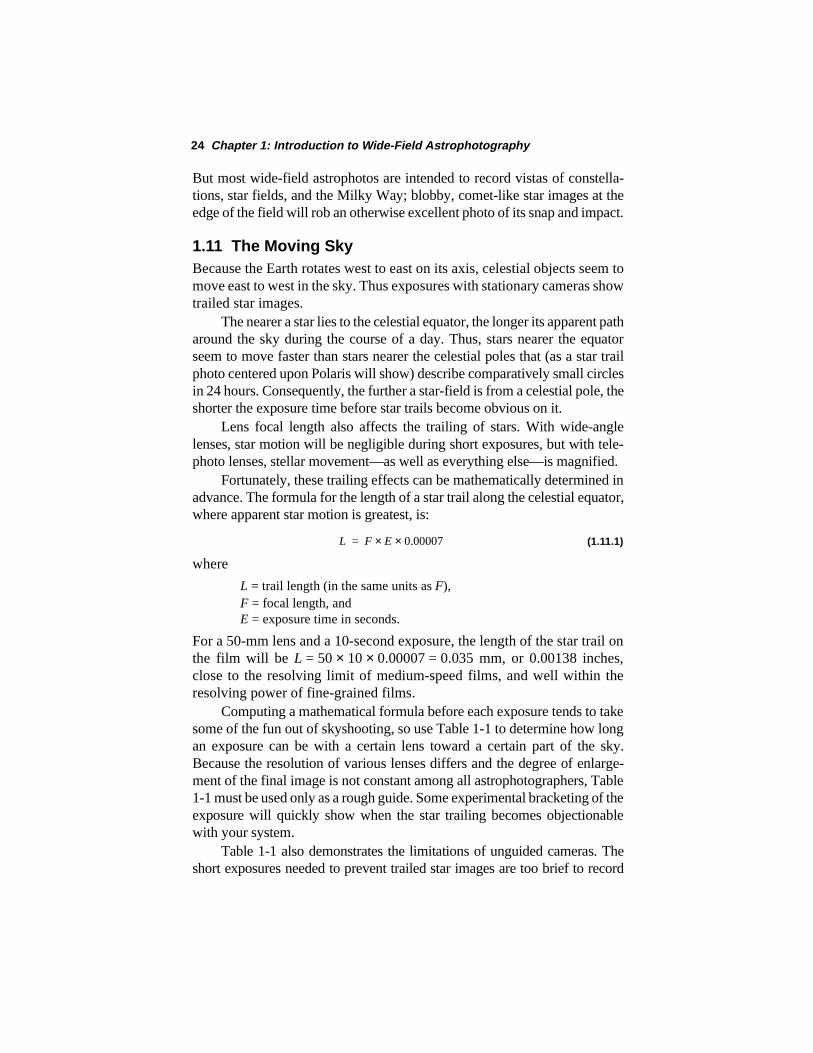
Most lenses show stars as fine points only at the center of the field ofview; at full aperture, bright stars closer to the edge will be elongated intofuzzy football shapes or even smeared into a comet-like form. We will seewhy this happens in Chapter 4. However, as your series of test exposuresshould demonstrate, closing a lens down two f-stops will dramaticallyimprove star image quality at the edge of the field, even with expensive“brand name” lenses. Most lenses are perfectly adequate at wide aperture forterrestrial photography of extended objects, but pinpoint stars are toughobjects for any lens to image accurately across the entire field at full aper-ture. In fact, no lens can do this at f/1.4. Even a very expensive Leica lenswill display some degree of spherical aberration at full aperture.
In most cases, the improvement in image quality from stopping the lensdown will actually allow dimmer stars to be photographed in spite of thesmaller lens aperture. This is because images of the faintest stars are out offocus at full aperture, and thus can’t make the emulsion record them aspoints. There are of course times when it is desirable to expose with the lenswide open, such as while recording meteors, aurorae, or dim earth satellites.
22 Chapter 1: Introduction to Wide-Field Astrophotography
Figure 1-15: This photo series of the Sagittarius/Scorpius area taken with a 35-mm f/1.4Nikkor lens illustrates the dramatic improvement in image quality achieved by simply stop-ping down the lens. The sequence is (a) 5 minutes at f/1.4, (b) 10 minutes at f/2, (c) 20 min-utes at f/2.8, and (d) 40 minutes at f/4 on hypered Kodak Technical Pan. At f/1.4 the stars are
b
a
Section 1.10: Examining the Experiment 23
c
dso aberrated they are unacceptable. Astigmatism, coma, and severe vignetting degradedimages (a) and (b); in fact star images in (a) are so aberrated by spherochromatism that theyare unacceptable. However, the same lens stopped to f/2.8 or f/4 produces superior results.Photos by Dick Mischke.
24 Chapter 1: Introduction to Wide-Field Astrophotography
But most wide-field astrophotos are intended to record vistas of constella-tions, star fields, and the Milky Way; blobby, comet-like star images at theedge of the field will rob an otherwise excellent photo of its snap and impact.
1.11 The Moving SkyBecause the Earth rotates west to east on its axis, celestial objects seem tomove east to west in the sky. Thus exposures with stationary cameras showtrailed star images.
The nearer a star lies to the celestial equator, the longer its apparent patharound the sky during the course of a day. Thus, stars nearer the equatorseem to move faster than stars nearer the celestial poles that (as a star trailphoto centered upon Polaris will show) describe comparatively small circlesin 24 hours. Consequently, the further a star-field is from a celestial pole, theshorter the exposure time before star trails become obvious on it.
Lens focal length also affects the trailing of stars. With wide-anglelenses, star motion will be negligible during short exposures, but with tele-photo lenses, stellar movement—as well as everything else—is magnified.
Fortunately, these trailing effects can be mathematically determined inadvance. The formula for the length of a star trail along the celestial equator,where apparent star motion is greatest, is:
(1.11.1)
where
L = trail length (in the same units as F),F = focal length, andE = exposure time in seconds.
For a 50-mm lens and a 10-second exposure, the length of the star trail onthe film will be L = 50× 10 × 0.00007 = 0.035 mm, or 0.00138 inches,close to the resolving limit of medium-speed films, and well within theresolving power of fine-grained films.
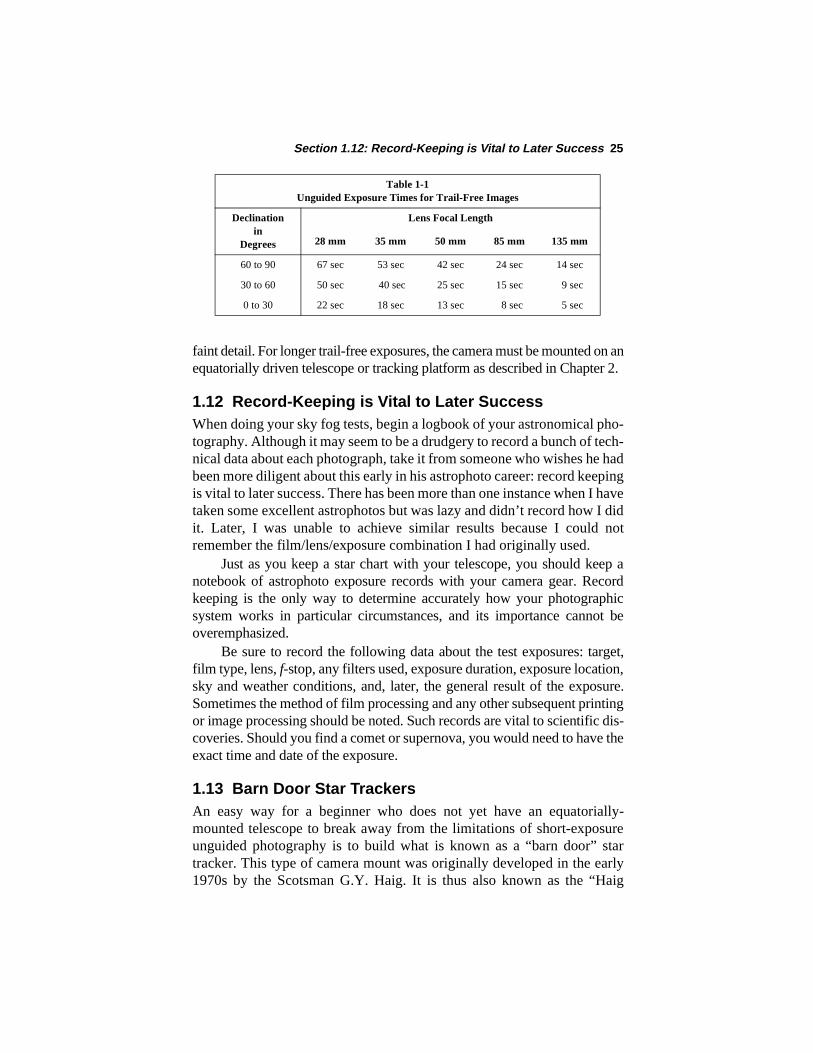
Computing a mathematical formula before each exposure tends to takesome of the fun out of skyshooting, so use Table 1-1 to determine how longan exposure can be with a certain lens toward a certain part of the sky.Because the resolution of various lenses differs and the degree of enlarge-ment of the final image is not constant among all astrophotographers, Table1-1 must be used only as a rough guide. Some experimental bracketing of theexposure will quickly show when the star trailing becomes objectionablewith your system.
Table 1-1 also demonstrates the limitations of unguided cameras. Theshort exposures needed to prevent trailed star images are too brief to record
L F E 0.00007××=
Section 1.12: Record-Keeping is Vital to Later Success 25
faint detail. For longer trail-free exposures, the camera must be mounted on anequatorially driven telescope or tracking platform as described in Chapter 2.
1.12 Record-Keeping is Vital to Later SuccessWhen doing your sky fog tests, begin a logbook of your astronomical pho-tography. Although it may seem to be a drudgery to record a bunch of tech-nical data about each photograph, take it from someone who wishes he hadbeen more diligent about this early in his astrophoto career: record keepingis vital to later success. There has been more than one instance when I havetaken some excellent astrophotos but was lazy and didn’t record how I didit. Later, I was unable to achieve similar results because I could notremember the film/lens/exposure combination I had originally used.
Just as you keep a star chart with your telescope, you should keep anotebook of astrophoto exposure records with your camera gear. Recordkeeping is the only way to determine accurately how your photographicsystem works in particular circumstances, and its importance cannot beoveremphasized.
Be sure to record the following data about the test exposures: target,film type, lens, f-stop, any filters used, exposure duration, exposure location,sky and weather conditions, and, later, the general result of the exposure.Sometimes the method of film processing and any other subsequent printingor image processing should be noted. Such records are vital to scientific dis-coveries. Should you find a comet or supernova, you would need to have theexact time and date of the exposure.
1.13 Barn Door Star TrackersAn easy way for a beginner who does not yet have an equatorially-mounted telescope to break away from the limitations of short-exposureunguided photography is to build what is known as a “barn door” startracker. This type of camera mount was originally developed in the early1970s by the Scotsman G.Y. Haig. It is thus also known as the “Haig
Table 1-1Unguided Exposure Times for Trail-Free Images
Declinationin
Degrees
Lens Focal Length
28 mm 35 mm 50 mm 85 mm 135 mm
60 to 90 67 sec 53 sec 42 sec 24 sec 14 sec
30 to 60 50 sec 40 sec 25 sec 15 sec 9 sec
0 to 30 22 sec 18 sec 13 sec 8 sec 5 sec
26 Chapter 1: Introduction to Wide-Field Astrophotography
mount.” Though deceptively simple and crude in appearance, a barn doortracker is a very effective mount for portable wide-field astrophotography.
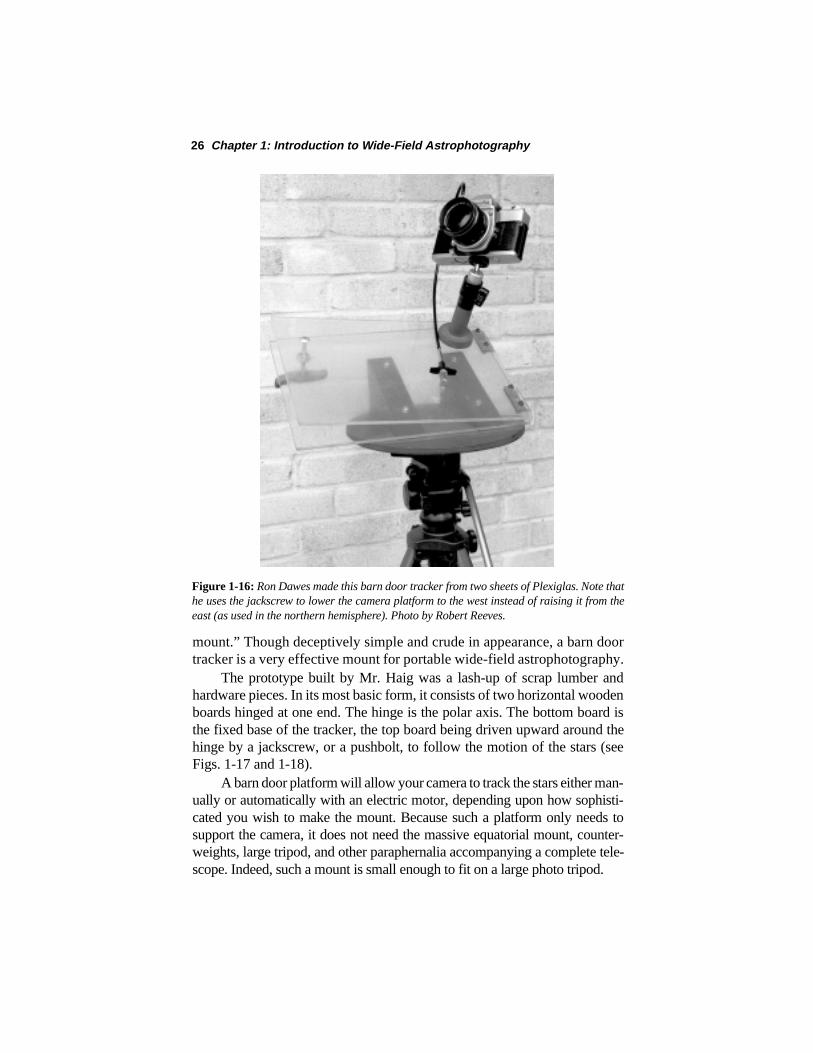
The prototype built by Mr. Haig was a lash-up of scrap lumber andhardware pieces. In its most basic form, it consists of two horizontal woodenboards hinged at one end. The hinge is the polar axis. The bottom board isthe fixed base of the tracker, the top board being driven upward around thehinge by a jackscrew, or a pushbolt, to follow the motion of the stars (seeFigs. 1-17 and 1-18).
A barn door platform will allow your camera to track the stars either man-ually or automatically with an electric motor, depending upon how sophisti-cated you wish to make the mount. Because such a platform only needs tosupport the camera, it does not need the massive equatorial mount, counter-weights, large tripod, and other paraphernalia accompanying a complete tele-scope. Indeed, such a mount is small enough to fit on a large photo tripod.
Figure 1-16: Ron Dawes made this barn door tracker from two sheets of Plexiglas. Note thathe uses the jackscrew to lower the camera platform to the west instead of raising it from theeast (as used in the northern hemisphere). Photo by Robert Reeves.
Section 1.13: Barn Door Star Trackers 27
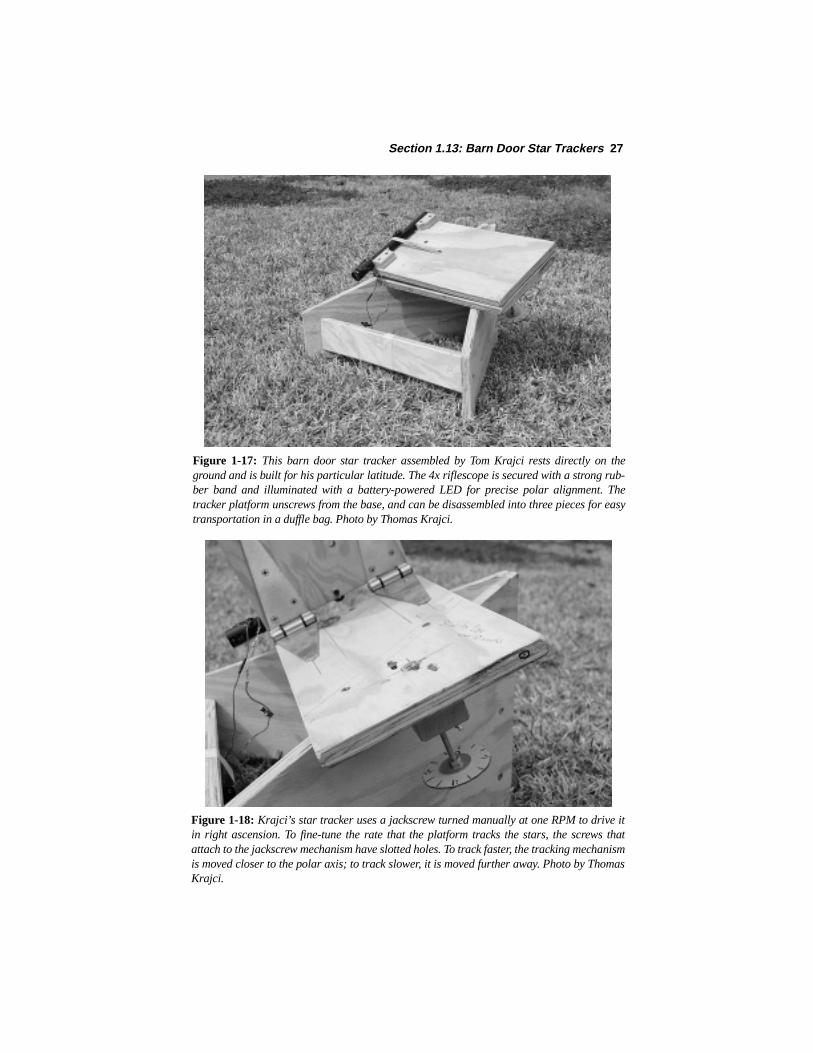
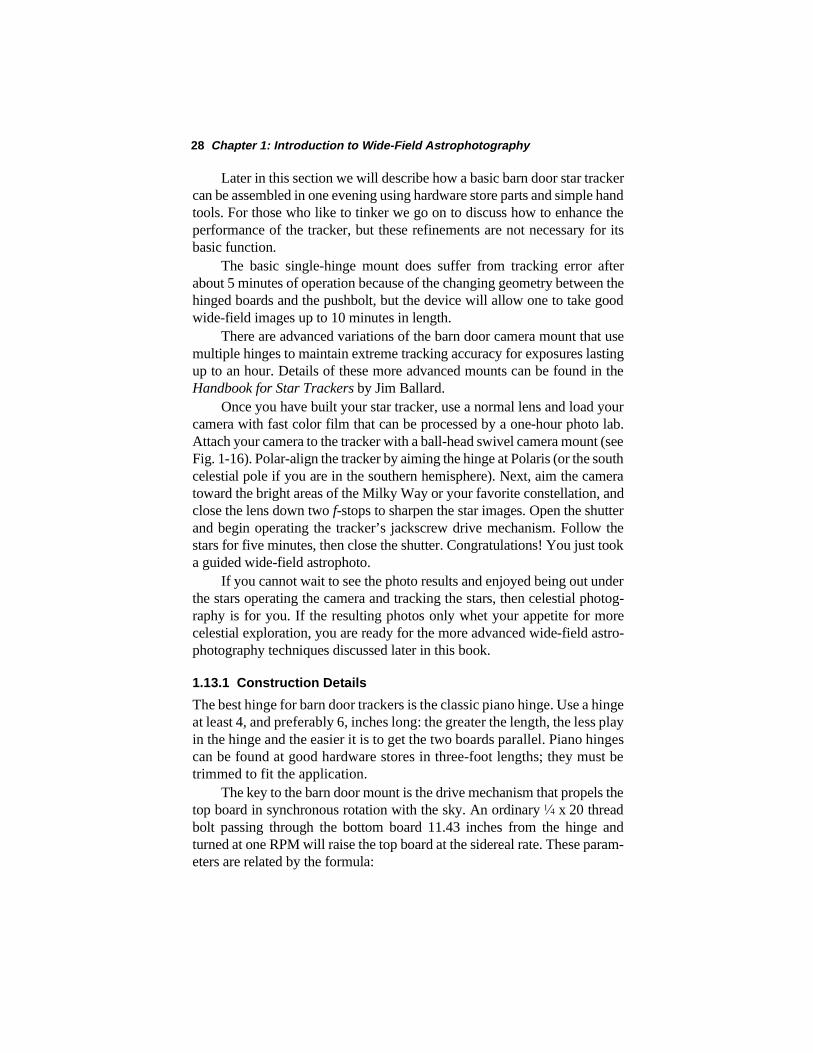
Figure 1-17: This barn door star tracker assembled by Tom Krajci rests directly on theground and is built for his particular latitude. The 4x riflescope is secured with a strong rub-ber band and illuminated with a battery-powered LED for precise polar alignment. Thetracker platform unscrews from the base, and can be disassembled into three pieces for easytransportation in a duffle bag. Photo by Thomas Krajci.
Figure 1-18: Krajci’s star tracker uses a jackscrew turned manually at one RPM to drive itin right ascension. To fine-tune the rate that the platform tracks the stars, the screws thatattach to the jackscrew mechanism have slotted holes. To track faster, the tracking mechanismis moved closer to the polar axis; to track slower, it is moved further away. Photo by ThomasKrajci.
28 Chapter 1: Introduction to Wide-Field Astrophotography
Later in this section we will describe how a basic barn door star trackercan be assembled in one evening using hardware store parts and simple handtools. For those who like to tinker we go on to discuss how to enhance theperformance of the tracker, but these refinements are not necessary for itsbasic function.
The basic single-hinge mount does suffer from tracking error afterabout 5 minutes of operation because of the changing geometry between thehinged boards and the pushbolt, but the device will allow one to take goodwide-field images up to 10 minutes in length.
There are advanced variations of the barn door camera mount that usemultiple hinges to maintain extreme tracking accuracy for exposures lastingup to an hour. Details of these more advanced mounts can be found in theHandbook for Star Trackers by Jim Ballard.
Once you have built your star tracker, use a normal lens and load yourcamera with fast color film that can be processed by a one-hour photo lab.Attach your camera to the tracker with a ball-head swivel camera mount (seeFig. 1-16). Polar-align the tracker by aiming the hinge at Polaris (or the southcelestial pole if you are in the southern hemisphere). Next, aim the cameratoward the bright areas of the Milky Way or your favorite constellation, andclose the lens down two f-stops to sharpen the star images. Open the shutterand begin operating the tracker’s jackscrew drive mechanism. Follow thestars for five minutes, then close the shutter. Congratulations! You just tooka guided wide-field astrophoto.
If you cannot wait to see the photo results and enjoyed being out underthe stars operating the camera and tracking the stars, then celestial photog-raphy is for you. If the resulting photos only whet your appetite for morecelestial exploration, you are ready for the more advanced wide-field astro-photography techniques discussed later in this book.
1.13.1 Construction Details
The best hinge for barn door trackers is the classic piano hinge. Use a hingeat least 4, and preferably 6, inches long: the greater the length, the less playin the hinge and the easier it is to get the two boards parallel. Piano hingescan be found at good hardware stores in three-foot lengths; they must betrimmed to fit the application.
The key to the barn door mount is the drive mechanism that propels thetop board in synchronous rotation with the sky. An ordinary !/4 x 20 threadbolt passing through the bottom board 11.43 inches from the hinge andturned at one RPM will raise the top board at the sidereal rate. These param-eters are related by the formula:
Section 1.13: Barn Door Star Trackers 29
(1.13.1)
where
D = distance from pushbolt to hinge in units of lengthRPM = jackscrew revolutions per minutePitch = length of one jackscrew thread in same units of length as D.
We can confirm that D should be 11.43 inches for one revolution perminute and a !/4 x 20 thread by making RPM = 1 and tpi = 20 in formula1.13.1. The formula will be helpful for computing the proper distance D ofthe pushbolt from the hinge when the barn door tracker is being propelledby a motor that delivers more or less than 1 RPM. For a motor that turnsthe pushbolt at 2 RPMs, for example, D would be 22.86 inches.
If need be, use a counterweight to prevent the weight on the drive screwfrom being too much for the motor to handle.
The precise 11.42-inch distance between hinge and screw necessarywith a !/4 x 20 bolt and a one RPM drive rate for a barn door tracker to followthe motion of the stars is almost impossible to achieve with hand wood-working tools. The next best thing is to make the jackscrew’s thrust locationadjustable. A slotted attachment point will allow the screw’s thrust point tobe moved to the ideal location (see Fig. 1-19). Thomas Krajci suggests thata laser pointer can be used as a test rig to determine the precise location ofthe thrust point. Attach the laser pointer to the tracker and shine it on a wallabout 50 feet away. Make sure the pointer is perpendicular to the wall. Withsome elementary trigonometry, you will be able to calculate the distance upthe wall the pointer spot should travel in one minute.
For example, the rate that the stars move is 15.04 degrees per hour, or0.250667 degrees per minute. To determine the distance the laser spotshould move up the wall, we multiply the tangent of the drive angle by thedistance from the hinge to the wall. In one minute of time the drive angle willbe 0.250667 degrees, the tangent of which is approximately 0.0044. Thus ata fifty-foot distance from the wall, the laser spot should travel 50× tan(0.250667) = 50× 0.0044 = 0.22 feet, or approximately 2.64 inches, in oneminute. A more easily measured distance would be 26.4 inches in ten min-utes. If the spot moves too slowly, adjust the thrust point closer to the hinge.If it moves too quickly, move it further away from the hinge.
With the laser pointer test, the tracker’s lag rate can be measured andcorrections applied at the proper time. For instance, for the first 12 minutes,the tracker may follow the stars just fine at one RPM, its lag being negligible.However, from 13 to 17 minutes, the bolt must be turned 366 degrees perminute; from 18 to 21 minutes, the turn rate is 372 degrees per minute;between minutes 22 and 23, it is 378 degrees per minute; and between min-
D RPM 228.56 Pitch××=
30 Chapter 1: Introduction to Wide-Field Astrophotography
utes 24 and 25, the rate advances to 384 degrees per minute. After 25 min-utes, the needed corrections begin to build so quickly that it becomesimpractical to attempt any corrective action.
Timing the turns of a manually driven right ascension pushbolt can beas simple as giving a quarter turn every 15 seconds as gauged by a watchsecond hand. On the other hand, one enhanced system uses a 12-pointclicking ratchet that is advanced one click every five seconds as timed bytape-recorded tick sounds. Star images made with a 50-mm or wider lens arequite forgiving of tracking errors. However, with even a short telephoto lensthe right ascension drive has to be corrected at 5-second intervals.
A H-inch T-nut on the bottom board will allow it to be attached directlyto a tripod tilt head. Latitude adjustment then can be made by tilting thetripod head upward until the hinge angle equals the local latitude. Anothervariation is an angle bracket matching your latitude, thus allowing the polarelevation to be set by a bubble level.
To refine the aim at the pole, a gunsight for aiming the polar hinge canbe made by spacing a 0.335-inch hole 12 inches from a peep sight. This willgive a 1.6-degree field of view. Align the peep sight axis so it is parallel tothe polar hinge. To align the platform on the true pole as accurately as pos-sible, place Polaris on the side of the sight hole opposite Alkaid, the end starin the handle of the Big Dipper.
My advice is just to build one of these simple devices and have funexperimenting with it. Sophistication is not necessary: barn door trackers cantake wonderful pictures with exposures of just five minutes. Precise trackingis not needed except with longer focal lengths.
Recommended