Ethernet Routing Switch 8600
Engineering
> Border Gateway Protocol (BGP-4) Technical Configuration Guide
Enterprise Solution Engineering Document Date: November, 2007 Document Number: NN48500-538 Document Version: 2.0

Border Gateway Protocol (BGP-4) TCG v2.0 NN48500-538
lNortel Confidential Information Copyright © 2007 Nortel Networks. All Rights Reserved. 1
<ExternalDistribution>
Nortel is a recognized leader in delivering communications capabilities that enhance the human experience, ignite and power global commerce, and secure and protect the world’s most critical information. Serving both service provider and enterprise customers, Nortel delivers innovative technology solutions encompassing end-to-end broadband, Voice over IP, multimedia services and applications, and wireless broadband designed to help people solve the world’s greatest challenges. Nortel does business in more than 150 countries. For more information, visit Nortel on the Web at www.nortel.com.
Copyright © 2007 Nortel Networks. All Rights Reserved. While the information in this document is believed to be accurate and reliable, except as otherwise expressly agreed to in writing NORTEL PROVIDES THIS DOCUMENT "AS IS" WITHOUT WARRANTY OR CONDITION OF ANY KIND, EITHER EXPRESS OR IMPLIED. The information and/or products described in this document are subject to change without notice. Nortel Networks, the Nortel Networks logo and the Globemark are trademarks of Nortel Networks.

Border Gateway Protocol (BGP-4) TCG v2.0 NN48500-538
lNortel Confidential Information Copyright © 2007 Nortel Networks. All Rights Reserved. 2
<ExternalDistribution>
Abstract This document provides examples on configuring BGP-4 on the ERS 8600. This document covers some of the more popular BGP commands and attributes and the command used to configure them.
Conventions
This section describes the text, image, and command conventions used in this document.
Symbols
Tip – Highlights a configuration or technical tip.
Note – Highlights important information to the reader.
Warning – Highlights important information about an action that may result in equipment damage, configuration or data loss.

Border Gateway Protocol (BGP-4) TCG v2.0 NN48500-538
lNortel Confidential Information Copyright © 2007 Nortel Networks. All Rights Reserved. 3
<ExternalDistribution>
Table of Contents
1. BORDER GATEWAY PROTOCOL (BGP) OVERVIEW......................................................... 7
2. BASIC BGP FUNDAMENTALS .............................................................................................. 9
2.1 BASIC BGP CONFIGURATION EXAMPLE ............................................................................. 10 2.1.1 Configure ERS8600-A ............................................................................................... 10 2.1.2 Verify Operations ....................................................................................................... 13
3. BGP TIMERS......................................................................................................................... 18
4. BGP NETWORK COMMAND ............................................................................................... 20
5. REDISTRIBUTION POLICIES............................................................................................... 21
5.1 BGP REDISTRIBUTION...................................................................................................... 21 5.2 OSPF AND BGP ROUTE DISTRIBUTION............................................................................. 22
5.2.1 Configuration.............................................................................................................. 22 5.3 CREATING POLICIES FOR ROUTE DISTRIBUTION: DIRECT, RIP OR STATIC ROUTES.............. 24
5.3.1 BGP Route Redistribution Configuration ................................................................... 24 5.4 CREATING A POLICY TO INJECT DEFAULT ROUTE WHEN USING OSPF AS AN INTERIOR GATEWAY PROTOCOL................................................................................................................... 26
5.4.1 Configuration.............................................................................................................. 26
6. CIDR AND AGGREGATE ADDRESSES.............................................................................. 28
6.1 CONFIGURATION EXAMPLE ............................................................................................... 28 6.1.1 Configuration.............................................................................................................. 28 6.1.2 Verify Operations ....................................................................................................... 29
7. EBGP MULTIHOP ................................................................................................................. 30
7.1 CONFIGURATION EXAMPLE – BGP MULTIHOP.................................................................... 30 7.1.1 ERS8600-A Configuration.......................................................................................... 30 7.1.2 Router-B (Juniper) Configuration ............................................................................... 31
8. EBGP LOAD BALANCE USING ECMP ............................................................................... 33
8.1 CONFIGURATION EXAMPLE ............................................................................................... 33 8.1.1 ERS8600-A Configuration.......................................................................................... 33
9. BGP SYNCHRONIZATION AND NEXT-HOP-SELF ............................................................ 35
9.1 CONFIGURATION EXAMPLE 1 – INITIAL CONFIGURATION ..................................................... 36 9.1.1 Configuration – With BGP Synchronization Enabled................................................. 36 9.1.2 Verify Operations ....................................................................................................... 39
9.2 HOW TO CORRECT THE NEXT HOP PROBLEM FROM STEP 9.1 ............................................ 40 9.2.1 Configuration – Enabling BGP Next Hop-Self and Synchronization.......................... 40 9.2.2 Verify Operations ....................................................................................................... 40 9.2.3 Verifying Operation .................................................................................................... 42
10. MD5 AUTHENTICATION CONFIGURATION EXAMPLE ................................................ 43
10.1 MD5 CONFIGURATION...................................................................................................... 43 10.1.1 Configure ERS8600 for MD-5 Authentication ........................................................ 43
11. BGP PEER GROUP CONFIGURATION EXAMPLE ........................................................ 45
11.1.1 BGP Peer Group Configuation............................................................................... 45
Border Gateway Protocol (BGP-4) TCG v2.0 NN48500-538
lNortel Confidential Information Copyright © 2007 Nortel Networks. All Rights Reserved. 4
<ExternalDistribution>
12. ROUTE SELECTION AND TRAFFIC MANAGEMENT – BGP PATH ATTRIBUTES ..... 47
12.1 ORIGIN ATTRIBUTE (TYPE 1) ............................................................................................. 48 12.1.1 Origin Attribute Configuration Example – Static Route Distribution....................... 48 12.1.2 Changing the Origin Type ...................................................................................... 50
12.2 AS PATH ATTRIBUTE (TYPE 2) .......................................................................................... 53 12.2.1 Config Example: Load Balance Approach using AS Path to Influence Inbound Traffic Flow............................................................................................................................. 53 12.2.2 Configuration Example: AS_Path Filtering ............................................................ 55 12.2.3 Alternative Configuration Method for ERS8600-A ................................................. 56
12.3 LOCAL PREFERENCE ATTRIBUTE (TYPE 5) CONFIGURATION EXAMPLE ................................ 57 12.3.1 Configuration : Local Preference ........................................................................... 58
12.4 CONFIGURATION EXAMPLE: ADDING PREFERENCE TO SPECIFIC ROUTES............................ 60 12.4.1 Configuration: Preference for Specific Routes....................................................... 60
12.5 MULTI-EXIT DISCRIMINATOR (MED) ATTRIBUTE (TYPE 4)................................................... 62 12.5.1 MED Configuration – Example 1............................................................................ 62
12.6 MED CONFIGURATION – EXAMPLE 2 ................................................................................. 63 12.6.1 Configuration.......................................................................................................... 64 12.6.2 Other MED Commands.......................................................................................... 65
12.7 COMMUNITY ATTRIBUTE (TYPE 8) ..................................................................................... 66 12.7.1 Community Attribute Configuration Example......................................................... 67 12.7.2 Verification ............................................................................................................. 69
13. EBGP SCALABILITY ISSUES.......................................................................................... 71
13.1 USING POLICIES TO LIMIT EBGP ROUTES ......................................................................... 71 13.1.1 Configuration Example : Using AS List to Limit Route Table Size ........................ 71
14. IBGP SCALABILITY ISSUES ........................................................................................... 75
14.1 BGP CONFEDERATIONS ................................................................................................... 75 14.2 CONFEDERATION CONFIGURATION EXAMPLE ..................................................................... 76
14.2.1 Configuration.......................................................................................................... 76 14.3 ROUTE REFLECTORS........................................................................................................ 80
14.3.1 Route Reflector Configuration Example................................................................. 80 14.4 CONFIGURATION EXAMPLE USING CLUSTER LIST ............................................................... 84
14.4.1 Configuration.......................................................................................................... 84
15. CONFIGURING EBGP ROUTE FLAP DAMPENING....................................................... 88
15.1 CONFIGURATION: ROUTE FLAP DAMPING........................................................................... 88 15.1.1 Enabling BGP Route Flap Damping ...................................................................... 88
15.2 VERIFICATION................................................................................................................... 88 15.2.1 Viewing Damping Configuration............................................................................. 88
15.3 BGP QUICK-START FEATURE ........................................................................................... 90
16. APPENDIX A ..................................................................................................................... 91
16.1 TRANSLATING CISCO TO NORTEL NETWORKS EQUIVALENTS............................................... 91 16.2 INTERPRETING THE CISCO TO NORTEL NETWORKS BGP TRANSLATION TABLE.................... 95 16.3 COMPARING CISCO AND NORTEL NETWORKS BGP OPERATIONAL COMMANDS ................... 97 16.4 INTERPRETING THE CISCO AND NORTEL NETWORKS BGP OPERATIONAL TABLE ................. 98 16.5 INTERPRETING THE CISCO AND NORTEL NETWORKS BGP OPERATIONAL TABLE ................. 99
17. APPENDIX B ................................................................................................................... 100
17.1 TRANSLATING JUNIPER TO NORTEL NETWORKS EQUIVALENTS ......................................... 100 17.2 INTERPRETING THE JUNIPER TO NORTEL NETWORKS BGP TRANSLATION TABLE............... 106 17.3 COMPARING JUNIPER AND NORTEL NETWORKS BGP OPERATIONAL COMMANDS .............. 108
Border Gateway Protocol (BGP-4) TCG v2.0 NN48500-538
lNortel Confidential Information Copyright © 2007 Nortel Networks. All Rights Reserved. 5
<ExternalDistribution>
17.4 INTERPRETING THE JUNIPER AND NORTEL NETWORKS BGP OPERATIONAL TABLE ............ 109 17.5 INTERPRETING THE JUNIPER AND NORTEL NETWORKS BGP OPERATIONAL TABLE ............ 110
18. APPENDIX C – BGP EVENTS........................................................................................ 111
19. APPENDIX D – JDM BGP COMMAND OPTIONS......................................................... 115
20. VENDOR COMPLIANCE ................................................................................................ 123
21. SOFTWARE BASELINE ................................................................................................. 125
22. REFERENCE DOCUMENTATION.................................................................................. 125
List of Figures Figure 1: BGP Fundamentals .......................................................................................................... 9 Figure 2: Inject Default Route Configuration Example .................................................................. 26 Figure 3: Aggregate Address Configuration Example ................................................................... 28 Figure 4: EBGP Configuration Example ........................................................................................ 30 Figure 5: EBGP Configuration Example ........................................................................................ 33 Figure 6: BGP Synchronization and Self Hop Configuration Example.......................................... 35 Figure 7: BGP MD5 Configuration Example .................................................................................. 43 Figure 8: BGP Peer Group Configuration Example ....................................................................... 45 Figure 9: BGP Origin Attribute Configuration Example ................................................................. 48 Figure 10: BGP AS Path Configuration Example .......................................................................... 53 Figure 11: BGP AS Path Filtering Example ................................................................................... 55 Figure 12: BGP Local Preference Configuration Example ............................................................ 57 Figure 13: BFP Local Preference to Specific Routes Configuration Example............................... 60 Figure 14: BGP MED Configuration Example................................................................................ 62 Figure 15: BFP MED Configuration Example 2 ............................................................................. 63 Figure 16: BGP Community Configuration Example ..................................................................... 67 Figure 17: BGP AS Path Filtering Example ................................................................................... 71 Figure 18: BGP Confederation Configuration Example................................................................. 76 Figure 19: BGP Route Reflector Configuration Example .............................................................. 80 Figure 20: BGP Route Reflector with Cluster List Configuration Example.................................... 84 Figure 21: BGP Route Flap Damping Configuration Example ...................................................... 88
Border Gateway Protocol (BGP-4) TCG v2.0 NN48500-538
lNortel Confidential Information Copyright © 2007 Nortel Networks. All Rights Reserved. 6
<ExternalDistribution>
List of Tables Table 1: BGP Timers Used on the ERS 8600 ............................................................................... 18
Table 2 Translating Cisco to ERS 8600 Equivalents ..................................................................... 91
Table 3: Cisco and Nortel Networks BGP Operational Commands .............................................. 97
Table 4: Cisco and Nortel Route Preference Comparison ............................................................ 99
Table 5: Translating Juniper to ERS 8600 Equivalents ............................................................... 100
Table 6: Juniper and Nortel Networks BGP Operational Commands.......................................... 108
Table 7: Route Preference Comparison ...................................................................................... 110
Table 8: JDM BGP Configuration Options ................................................................................... 115
Table 9: JDM BGP Peer Configuration Options .......................................................................... 119
Table 10: BGP Vendor Compliance............................................................................................. 123

Border Gateway Protocol (BGP-4) TCG v2.0 NN48500-538
lNortel Confidential Information Copyright © 2007 Nortel Networks. All Rights Reserved. 7
<ExternalDistribution>
1. Border Gateway Protocol (BGP) Overview
The Border Gateway Protocol (BGP) is an exterior gateway protocol that border routers use to exchange network reachability information with other BGP systems. BGP routers form peer relationships with other BGP routers. Using an entity called a BGP Speaker, BGP peers transmit and receive current routing information over a reliable transport layer connection, making periodic updates unnecessary. BGP can be used both within and between autonomous systems.
BGP peers exchange complete routing information only when they establish the peer connection. Thereafter, BGP peers exchange routing information in the form of routing updates. An update includes a network number, a list of autonomous systems that the routing information has passed through (the AS path), and other path attributes that describe the route to a set of destination networks. When multiple paths are available, BGP compares the path attributes to choose the preferred path.
In addition to exchanging BGP information between autonomous systems, you can use BGP to exchange BGP information between routers in the same AS. To differentiate between these uses, the latter is called interior BGP (IBGP).
Configuration Guidelines When configuring BGP parameters on the ERS 8600, at a minimum it must be configured with the following parameters
• Router ID • Local AS Number • Enable BGP Globally • BGP Neighbor Peer Session: remote IP addresses • BGP Neighbor Remote Peer AS • Enable BGP peer
In addition, BGP Policies can be added to the BGP peer configuration to influence route decisions as we will demonstrate later on in the document.
The BGP Router ID by default is automatically derived from the OSPF Router ID. It is recommended to configure a circuitless IP address (CLIP) and to use this address as the OSPF Router ID. The CLIP address can also be referred to as a loopback address.
It should be noted that once the ERS 8600 is configured for BGP, some parameter changes may require having either the BGP Global state or neighboring admin-state to be disabled/enabled. The CLI prompt will notify you if this is the case.
The BGP policies are dynamically modified. On the global level, the BGP redistribution has an apply command that causes the policy to be applied at that time. The BGP neighbor peer has a CLI command named ‘restart soft-reconfiguration <in> <out>’ that allows policies to be applied without bringing down the peer.
Border Gateway Protocol (BGP-4) TCG v2.0 NN48500-538
lNortel Confidential Information Copyright © 2007 Nortel Networks. All Rights Reserved. 8
<ExternalDistribution>
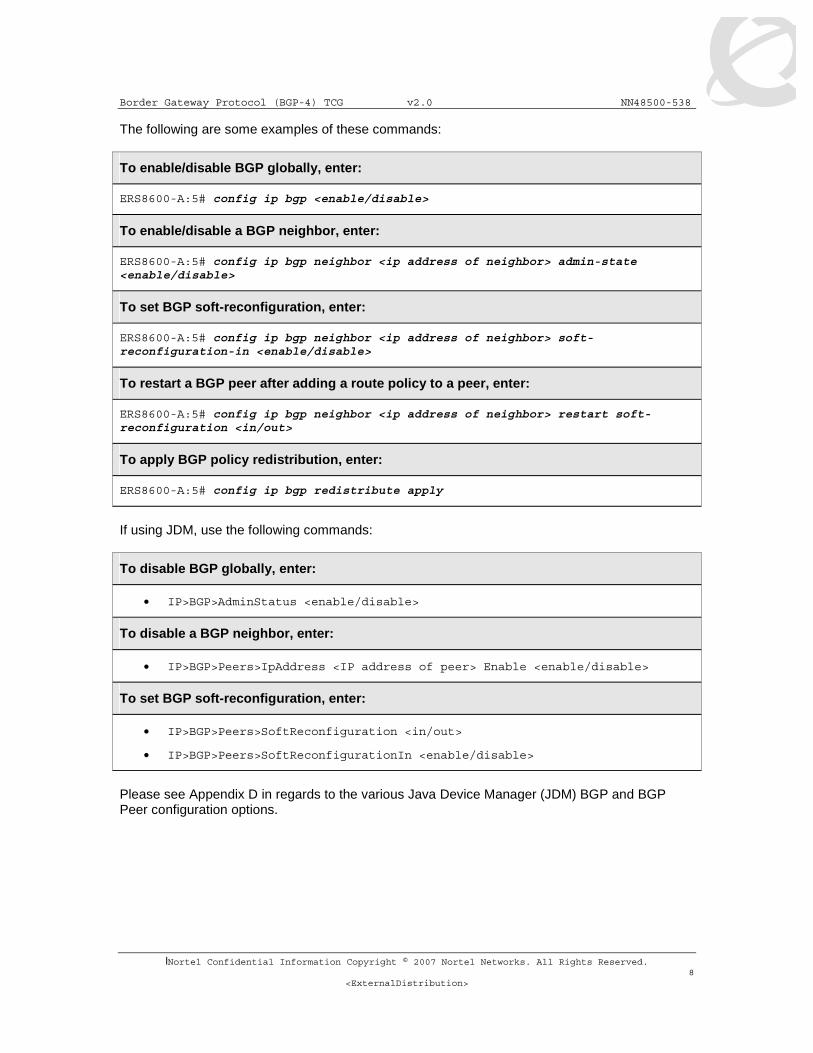
The following are some examples of these commands:
To enable/disable BGP globally, enter:
ERS8600-A:5# config ip bgp <enable/disable>
To enable/disable a BGP neighbor, enter:
ERS8600-A:5# config ip bgp neighbor <ip address of neighbor> admin-state <enable/disable>
To set BGP soft-reconfiguration, enter:
ERS8600-A:5# config ip bgp neighbor <ip address of neighbor> soft-reconfiguration-in <enable/disable>
To restart a BGP peer after adding a route policy to a peer, enter:
ERS8600-A:5# config ip bgp neighbor <ip address of neighbor> restart soft-reconfiguration <in/out>
To apply BGP policy redistribution, enter:
ERS8600-A:5# config ip bgp redistribute apply
If using JDM, use the following commands:
To disable BGP globally, enter:
• IP>BGP>AdminStatus <enable/disable>
To disable a BGP neighbor, enter:
• IP>BGP>Peers>IpAddress <IP address of peer> Enable <enable/disable>
To set BGP soft-reconfiguration, enter:
• IP>BGP>Peers>SoftReconfiguration <in/out>
• IP>BGP>Peers>SoftReconfigurationIn <enable/disable>
Please see Appendix D in regards to the various Java Device Manager (JDM) BGP and BGP Peer configuration options.
Border Gateway Protocol (BGP-4) TCG v2.0 NN48500-538
lNortel Confidential Information Copyright © 2007 Nortel Networks. All Rights Reserved. 9
<ExternalDistribution>
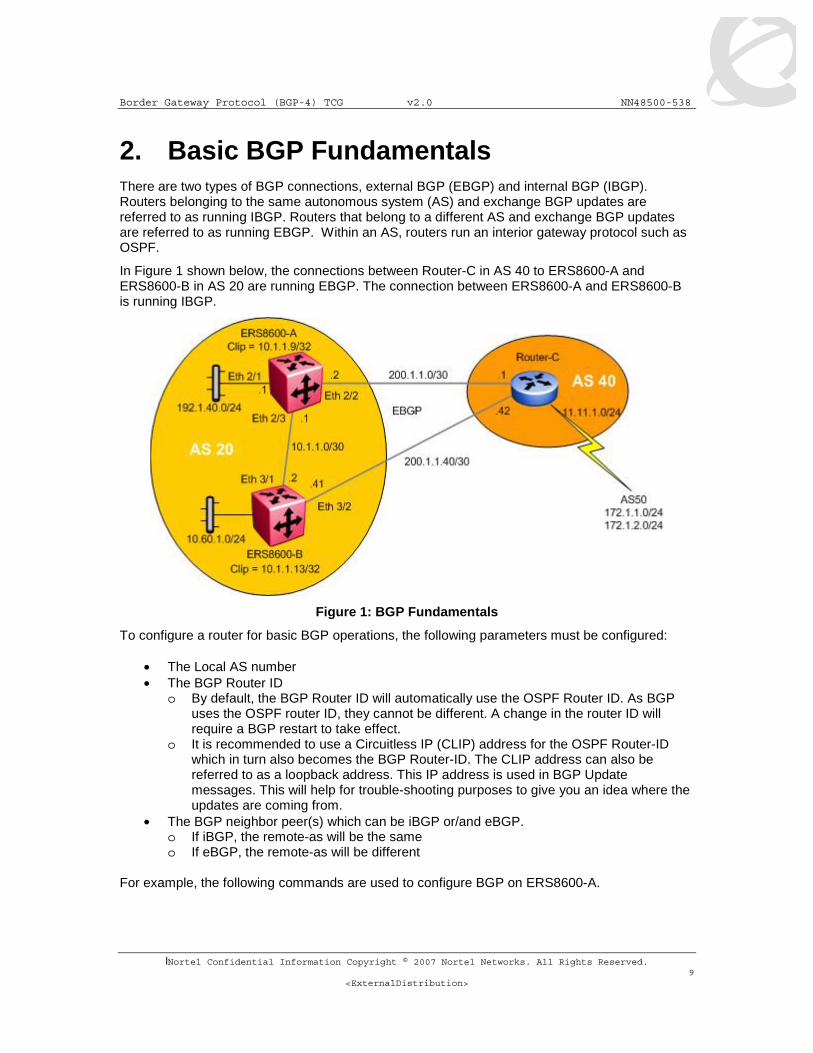
2. Basic BGP Fundamentals There are two types of BGP connections, external BGP (EBGP) and internal BGP (IBGP). Routers belonging to the same autonomous system (AS) and exchange BGP updates are referred to as running IBGP. Routers that belong to a different AS and exchange BGP updates are referred to as running EBGP. Within an AS, routers run an interior gateway protocol such as OSPF.
In Figure 1 shown below, the connections between Router-C in AS 40 to ERS8600-A and ERS8600-B in AS 20 are running EBGP. The connection between ERS8600-A and ERS8600-B is running IBGP.
Figure 1: BGP Fundamentals
To configure a router for basic BGP operations, the following parameters must be configured:
• The Local AS number • The BGP Router ID
o By default, the BGP Router ID will automatically use the OSPF Router ID. As BGP uses the OSPF router ID, they cannot be different. A change in the router ID will require a BGP restart to take effect.
o It is recommended to use a Circuitless IP (CLIP) address for the OSPF Router-ID which in turn also becomes the BGP Router-ID. The CLIP address can also be referred to as a loopback address. This IP address is used in BGP Update messages. This will help for trouble-shooting purposes to give you an idea where the updates are coming from.
• The BGP neighbor peer(s) which can be iBGP or/and eBGP. o If iBGP, the remote-as will be the same o If eBGP, the remote-as will be different
For example, the following commands are used to configure BGP on ERS8600-A.

Border Gateway Protocol (BGP-4) TCG v2.0 NN48500-538
lNortel Confidential Information Copyright © 2007 Nortel Networks. All Rights Reserved. 10
<ExternalDistribution>
2.1 Basic BGP Configuration Example
2.1.1 Configure ERS8600-A
2.1.1.1 Configure Circuitless IP (CLIP) on ERS8600-A
Up to 32 CLIP instances are supported on the ERS8600. For this example, we will simply select CLIP 1.
ERS8600-A: Step 1 – Add a CLIP address using CLIP instance 1
ERS8600-A:5# config ip circuitless-ip-int 1 create 10.1.1.9/32
ERS8600-A: Step 2 – Enable OSPF on the CLIP
ERS8600-A:5# config ip circuitless-ip-int 1 ospf enable
2.1.1.2 Configure ERS8600-A Ports with Appropriate IP Address
For this configuration example, we will use brouter ports.
ERS8600-A: Step 1 – Add IP address to port 2/2, 2/3, and 2/1
ERS8600-A:5# config ethernet 2/2 ip create 200.1.1.2/30 2090
ERS8600-A:5# config ethernet 2/3 ip create 10.1.1.1/30 2091
ERS8600-A:5# config ethernet 2/1 ip create 192.1.40.1/24 2092
In the configuration above, we are using ERS 8600 brouter ports as the BGP EBGP and IBGP interfaces. Hence, the reason VLAN ID’s of 2090, 2091, and 2092 are used. Either a brouter port or a VLAN can be configured as the BGP interface. To display the brouter port VLAN ID’s, use the following command:
• ERS-8606-A:5# show vlan info brouter-port
2.1.1.3 Enable OSPF Globally and on Brouter Ports 2/1, and 2/3
ERS8600-A: Step 1 – Assign ERS8600-A as an AS boundary router (ASBR)
ERS8600-A:5# config ip ospf as-boundary-router enable
ERS8600-A: Step 2 – Configure the OSPF router-id using the CLIP address
ERS8600-A:5# config ip ospf router-id 10.1.1.9
ERS8600-A: Step 3 – Enable OSPF globally

Border Gateway Protocol (BGP-4) TCG v2.0 NN48500-538
lNortel Confidential Information Copyright © 2007 Nortel Networks. All Rights Reserved. 11
<ExternalDistribution>
ERS8600-A:5# config ip ospf enable
ERS8600-A: Step 4 – Enable OSPF on brouter port 2/1, and 2/3
ERS8600-A:5# config ethernet 2/1,2/3 ip ospf enable
Please note that the BGP router-id is derived from the OSPF router-id. In this example, the BGP router-id will become the CLIP address of 10.1.1.9.
2.1.1.4 Configure BGP Globally on ERS8600-A
ERS8600-A: Step 1 – Assign ERS8600-A to local BGP AS20
ERS8600-A:5# config ip bgp local-as 20
ERS8600-A: Step 2 – Disable synchronization of ERS8600-A
ERS8600-A:5# config ip bgp synchronization disable
ERS8600-A: Step 3 – Enable BGP globally
ERS8600-A:5# config ip bgp enable
The BGP synchronization option is set to disable on ERS8600-A so that it does not require a match for a route prefix in the route table for an IBGP path. By default, BGP synchronization is enabled. Please see section 9 for more details regarding BGP Synchronization.
2.1.1.5 Configure BGP Peers
ERS8600-A: Step 1 – Assign neighboring router Router-C as an ERS8600-A peer
ERS8600-A:5# config ip bgp neighbor 200.1.1.1 create
ERS8600-A:5# config ip bgp neighbor 200.1.1.1 remote-as 40
ERS8600-A:5# config ip bgp neighbor 200.1.1.1 admin-state enable
ERS8600-A: Step 2 – Assign neighboring router ERS8600-B as an ERS8600-A peer
ERS8600-A:5# config ip bgp neighbor 10.1.1.2 create
ERS8600-A:5# config ip bgp neighbor 10.1.1.2 remote-as 20
ERS8600-A:5# config ip bgp neighbor 10.1.1.2 admin-state enable

Border Gateway Protocol (BGP-4) TCG v2.0 NN48500-538
lNortel Confidential Information Copyright © 2007 Nortel Networks. All Rights Reserved. 12
<ExternalDistribution>
2.1.1.6 Configure IGP Network Prefixes
Configure the BGP network prefixes that you want ERS8600-A to distribution. The “network” command is used for this purpose. The command format is as follows:
ERS8600-A: Step 1 – Add the appropriate networks which you wish to advertise via BGP
ERS8600-A:5# config ip bgp network 192.1.40.0/24 add
The networks must be present in the routing table before BGP will advertise them. Please see Section 4 for more details regarding the Network command.
By default, the ERS 8600 will summarize network routes based on class limits (for example, Class A, B, C networks). To disable this feature, use the following command.
• ERS8600-A:5# config ip bgp auto-summary disable
2.1.1.7 Specifying Number of Routes Learned – Max-Prefix
The BGP implementation for the ERS 8600 has a default number of routes that can be accepted per peer – the default value is 12,000 routes. In order to accept more than or less than 12,000 routes, you must change the max-prefix parameter value.
The max-prefix parameter controls the maximum number of routes that a peer can accept. The purpose is to prevent non M, R mode configurations from accepting more routes than it can forward to. Use a setting of 0 to accept an unlimited number of prefixes.
To modify the Max prefix use the following CLI Command:
ERS8600-A:5# config ip bgp neighbor <remote peer> max-prefix ?
config ip bgp neighbor max-prefix command Required parameters: <value> = max-prefix {0..999999} <add|del> = add or delete the configuration {add|del} Command syntax: max-prefix <value> <add|del>
Example: to allow an unlimited number of prefixes, enter the following command assuming the BGP peer address is 150.1.0.3:
• ERS8600-A:5# config ip bgp neighbor 150.1.0.3 max-prefix 0 add
Border Gateway Protocol (BGP-4) TCG v2.0 NN48500-538
lNortel Confidential Information Copyright © 2007 Nortel Networks. All Rights Reserved. 13
<ExternalDistribution>
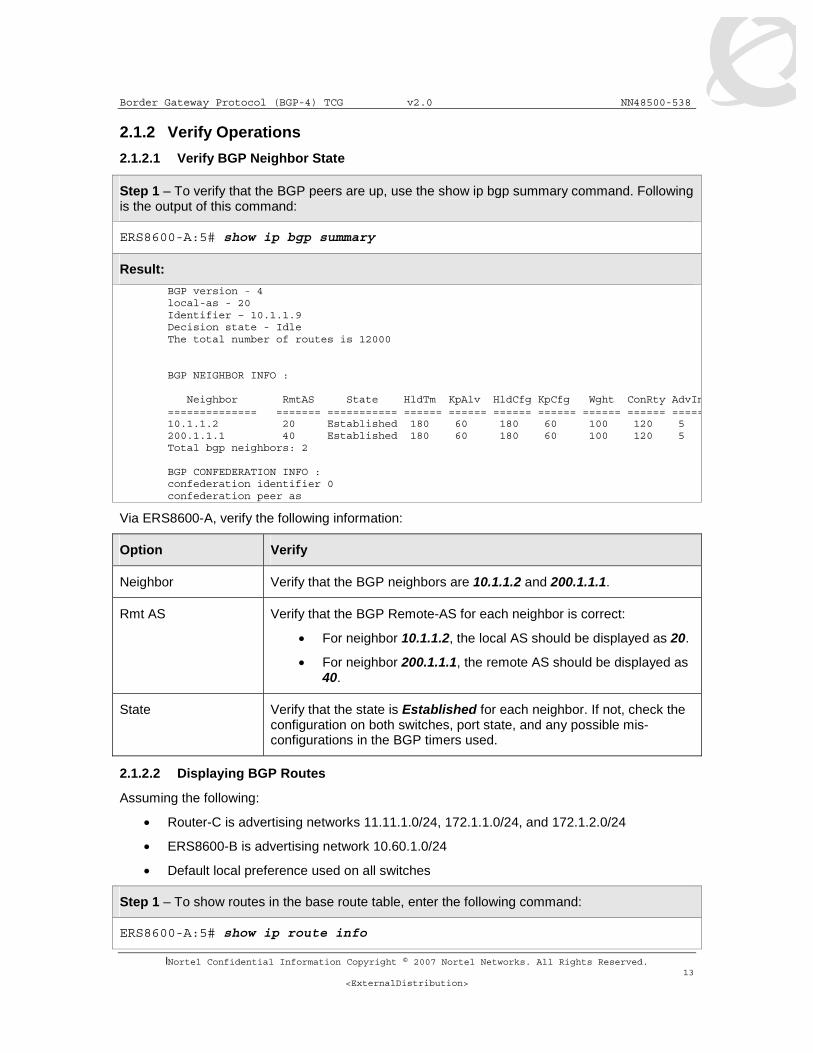
2.1.2 Verify Operations
2.1.2.1 Verify BGP Neighbor State
Step 1 – To verify that the BGP peers are up, use the show ip bgp summary command. Following is the output of this command:
ERS8600-A:5# show ip bgp summary
Result:
BGP version - 4 local-as - 20 Identifier – 10.1.1.9 Decision state - Idle The total number of routes is 12000 BGP NEIGHBOR INFO : Neighbor RmtAS State HldTm KpAlv HldCfg KpCfg Wght ConRty AdvIn============== ======= =========== ====== ====== ====== ====== ====== ====== =====10.1.1.2 20 Established 180 60 180 60 100 120 5 200.1.1.1 40 Established 180 60 180 60 100 120 5 Total bgp neighbors: 2 BGP CONFEDERATION INFO : confederation identifier 0 confederation peer as
Via ERS8600-A, verify the following information:
Option Verify
Neighbor Verify that the BGP neighbors are 10.1.1.2 and 200.1.1.1.
Rmt AS Verify that the BGP Remote-AS for each neighbor is correct:
• For neighbor 10.1.1.2, the local AS should be displayed as 20.
• For neighbor 200.1.1.1, the remote AS should be displayed as 40.
State Verify that the state is Established for each neighbor. If not, check the configuration on both switches, port state, and any possible mis-configurations in the BGP timers used.
2.1.2.2 Displaying BGP Routes
Assuming the following:
• Router-C is advertising networks 11.11.1.0/24, 172.1.1.0/24, and 172.1.2.0/24
• ERS8600-B is advertising network 10.60.1.0/24
• Default local preference used on all switches
Step 1 – To show routes in the base route table, enter the following command:
ERS8600-A:5# show ip route info

Border Gateway Protocol (BGP-4) TCG v2.0 NN48500-538
lNortel Confidential Information Copyright © 2007 Nortel Networks. All Rights Reserved. 14
<ExternalDistribution>
Result:
================================================================================ Ip Route ================================================================================ DST MASK NEXT COST VLAN PORT PROT AGE TYPE PRF -------------------------------------------------------------------------------- 10.1.1.0 255.255.255.252 10.1.1.1 1 - 2/1 LOC 0 DB 0 10.1.1.9 255.255.255.255 10.1.1.9 1 0 -/- LOC 0 DB 0 10.60.1.0 255.255.255.0 10.1.1.2 0 2091 2/1 BGP 0 IB 175 11.11.1.0 255.255.255.252 200.1.1.1 1 2090 4/5 BGP 0 IB 45 172.1.1.0 255.255.255.0 200.1.1.1 2 2090 4/5 BGP 0 IB 45 172.1.2.0 255.255.255.0 200.1.1.1 2 2090 4/5 BGP 0 IB 45 192.1.40.0 255.255.255.0 192.1.40.1 1 - 4/14 LOC 0 DB 0 200.1.1.0 255.255.255.252 200.1.1.2 1 - 4/5 LOC 0 DB 0 8 out of 8 Total Num of Route Entries, 8 Total Num of Dest Networks displayed. -------------------------------------------------------------------------------- TYPE Legend: I=Indirect Route, D=Direct Route, A=Alternative Route, B=Best Route, E=Ecmp Route , U=Unresolved Route, N=Not in HW
Step 2 – To display the full BGP route table, enter the following command:
ERS8600-A:5# show ip bgp route
Result:
The total number of routes is 8 Network/Mask Peer Rem Addr NextHop Address Org Loc Pref ------------------ --------------- --------------- --- ---------- 10.60.1.0/24 10.1.1.2 10.1.1.2 IGP 100 AS_PATH: path-is-empty 10.60.1.0/24 200.1.1.1 200.1.1.1 IGP 100 AS_PATH: (40) 11.11.1.0/30 200.1.1.1 200.1.1.1 IGP 100 AS_PATH: (40) 11.11.1.0/30 10.1.1.2 200.1.1.42 IGP 100 AS_PATH: (40) 172.1.1.0/24 200.1.1.1 200.1.1.1 IGP 100 AS_PATH: (40 50) 172.1.1.0/24 10.1.1.2 200.1.1.42 IGP 100 AS_PATH: (40 50) 172.1.2.0/24 200.1.1.1 200.1.1.1 IGP 100 AS_PATH: (40 50) 172.1.2.0/24 10.1.1.2 200.1.1.42 IGP 100 AS_PATH: (40 50)
Via ERS8600-A, verify the following information:
Option Verify
DST
Peer Rem Addr
NextHop Address
Verify that networks 10.60.1.0/24, 11.11.1.0/24, 172.1.1.0/24, and 172.1.2.0/24 are learned via BGP in the common route table. In the BGP route table, both route paths should be displayed with the appropriate NextHop address and AS Path.
PROT Verify that the BGP routes 10.60.1.0/24, 11.11.1.0/24, 172.1.1.0/24, and 172.1.2.0/24 are learned via BGP in the command route table.
NEXT
TYPE
Verify that all routes learned from AS40 (11.11.1.0/24, 172.1.1.0/24, and 172.1.2.0/24) are using the best path:
• Next = 200.1.1.1 and TYPE = IB (Indirect & Best)
Verify that all routes learned from within AS20 (10.60.1.0/24) are using

Border Gateway Protocol (BGP-4) TCG v2.0 NN48500-538
lNortel Confidential Information Copyright © 2007 Nortel Networks. All Rights Reserved. 15
<ExternalDistribution>
the best path:
• Next = 10.1.1.2 and TYPE = IB
2.1.2.3 Display BGP Routes Learned via BGP Neighbor
Step 1 – To show routes advertised from neighbor 200.1.1.1, use the following command:
ERS8600-A:5# show ip bgp neighbor route 200.1.1.1
Result:
The total number of accepted routes from the neighbor is 4 Network/Mask Peer Rem Addr NextHop Address Org Loc Pref Status ------------------ --------------- --------------- --- -------- ---- 10.60.1.0/24 200.1.1.1 200.1.1.1 IGP 100 Accepted AS_PATH: (40) 11.11.1.0/30 200.1.1.1 200.1.1.1 IGP 100 Used AS_PATH: (40) 172.1.1.0/24 200.1.1.1 200.1.1.1 IGP 100 Used AS_PATH: (40 50) 172.1.2.0/24 200.1.1.1 200.1.1.1 IGP 100 Used AS_PATH: (40 50)
Step 2 – To show routes advertised from neighbor 10.1.1.2, use the following command:
ERS8600-A:5# show ip bgp neighbor route 10.1.1.2
Result:
The total number of accepted routes from the neighbor is 4 Network/Mask Peer Rem Addr NextHop Address Org Loc Pref Status ------------------ --------------- --------------- --- -------- ---- 10.60.1.0/24 10.1.1.2 10.1.1.2 IGP 100 Used AS_PATH: path-is-empty 11.11.1.0/30 10.1.1.2 200.1.1.42 IGP 100 Accepted AS_PATH: (40) 172.1.1.0/24 10.1.1.2 200.1.1.42 IGP 100 Accepted AS_PATH: (40 50) 172.1.2.0/24 10.1.1.2 200.1.1.42 IGP 100 Accepted AS_PATH: (40 50)
Overview of the information displayed:
Option Verify
Network/Mask Displays the IP network and mask for the direct route. The best route should have it status displayed as Used as follows:
• For BGP peer 10.1.1.2, network 10.60.1.0/24 should be used
• For BGP peer 200.1.1.1, networks 11.11.1.0/24, 172.1.1.0/24,and 172.1.2.0/24 should be used.
Peer Rem Addr Displays, the peer remote address.
NextHop Address Displays the next-hop address IP address.

Border Gateway Protocol (BGP-4) TCG v2.0 NN48500-538
lNortel Confidential Information Copyright © 2007 Nortel Networks. All Rights Reserved. 16
<ExternalDistribution>
Org Well-known mandatory attribute that specifies the source of a route:
• IGP — the route is interior to the originating AS that inserts this route into the BGP table (0 = IGP).
• EGP — the route is learned via the Exterior Gateway Protocol (EGP) prior to being inserted into the BGP table (1 = BGP).
• Incomplete — the origin of the route is unknown or learned by some other means. For example, these routes could be learned through RIP, OSPF, or static routes (2 = Incomplete).
Local Pref Displays the local preference attribute.
Status Displays the route status which will be either Accepted, Best, Used, or Rejected. For this example:
• For BGP peer 10.1.1.2, network 10.60.1.0/24 should be displayed as Used
• For BGP peer 200.1.1.1, networks 11.11.1.0/24, 172.1.1.0/24,and 172.1.2.0/24 should be Used.
2.1.2.4 Verify BGP Networks
Step 1 – To display the networks configured, enter the following command:
ERS8600-A:5# show ip bgp networks
Result:
192.1.40.0 mask 255.255.255.0 metric 0
2.1.2.5 View the BGP Routes Sent out to a Specific Peer
Step 1 – To show routes advertised to a specific peer, in this case, 200.1.1.1, enter the following command:
ERS8600-A:5# show ip bgp neighbor advertised-route 200.1.1.1
Result:
Network/Mask NextHop Address Loc Pref Org Status ------------------ --------------- -------- ----- ------ 192.1.40.0/24 0.0.0.0 100 IGP import 10.60.1.0/24 10.1.1.2 100 IGP Used
Step 2 – To show routes advertised to a specific peer, in this case, 10.1.1.2, enter the following command:
ERS8600-A:5# show ip bgp neighbor advertised-route 10.1.1.2
Result:
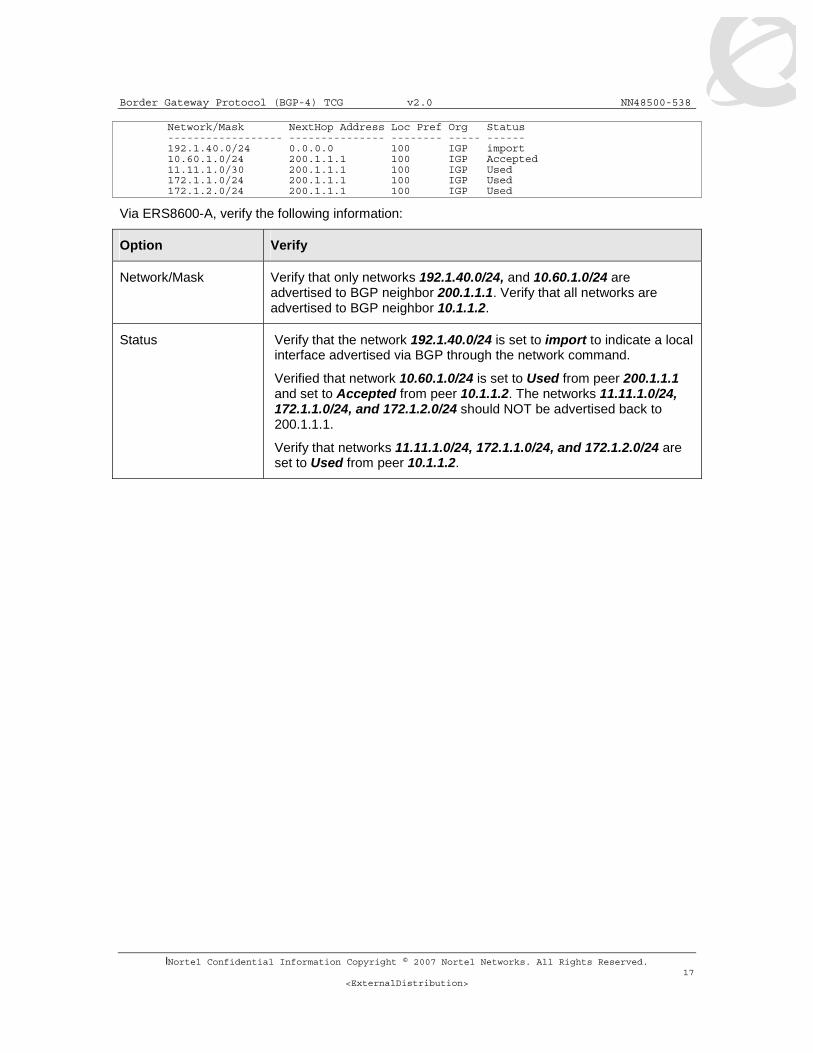
Border Gateway Protocol (BGP-4) TCG v2.0 NN48500-538
lNortel Confidential Information Copyright © 2007 Nortel Networks. All Rights Reserved. 17
<ExternalDistribution>
Network/Mask NextHop Address Loc Pref Org Status ------------------ --------------- -------- ----- ------ 192.1.40.0/24 0.0.0.0 100 IGP import 10.60.1.0/24 200.1.1.1 100 IGP Accepted 11.11.1.0/30 200.1.1.1 100 IGP Used 172.1.1.0/24 200.1.1.1 100 IGP Used 172.1.2.0/24 200.1.1.1 100 IGP Used
Via ERS8600-A, verify the following information:
Option Verify
Network/Mask Verify that only networks 192.1.40.0/24, and 10.60.1.0/24 are advertised to BGP neighbor 200.1.1.1. Verify that all networks are advertised to BGP neighbor 10.1.1.2.
Status Verify that the network 192.1.40.0/24 is set to import to indicate a local interface advertised via BGP through the network command.
Verified that network 10.60.1.0/24 is set to Used from peer 200.1.1.1 and set to Accepted from peer 10.1.1.2. The networks 11.11.1.0/24, 172.1.1.0/24, and 172.1.2.0/24 should NOT be advertised back to 200.1.1.1.
Verify that networks 11.11.1.0/24, 172.1.1.0/24, and 172.1.2.0/24 are set to Used from peer 10.1.1.2.
Border Gateway Protocol (BGP-4) TCG v2.0 NN48500-538
lNortel Confidential Information Copyright © 2007 Nortel Networks. All Rights Reserved. 18
<ExternalDistribution>
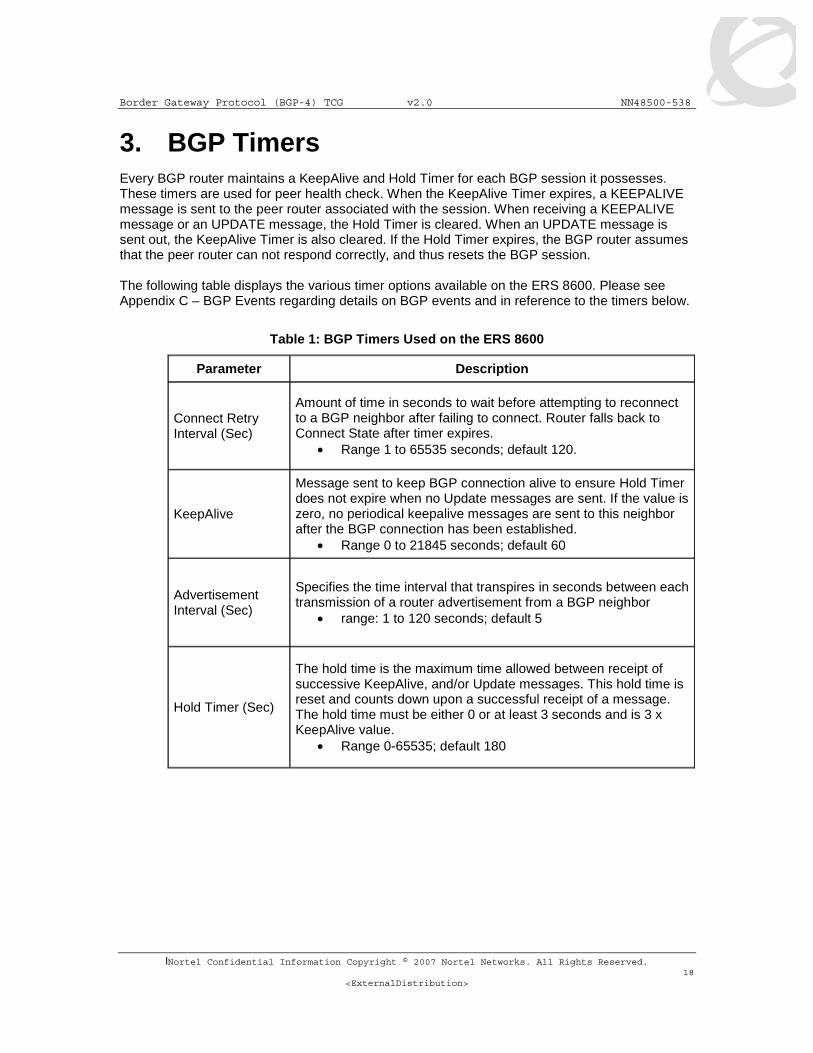
3. BGP Timers Every BGP router maintains a KeepAlive and Hold Timer for each BGP session it possesses. These timers are used for peer health check. When the KeepAlive Timer expires, a KEEPALIVE message is sent to the peer router associated with the session. When receiving a KEEPALIVE message or an UPDATE message, the Hold Timer is cleared. When an UPDATE message is sent out, the KeepAlive Timer is also cleared. If the Hold Timer expires, the BGP router assumes that the peer router can not respond correctly, and thus resets the BGP session.
The following table displays the various timer options available on the ERS 8600. Please see Appendix C – BGP Events regarding details on BGP events and in reference to the timers below.
Table 1: BGP Timers Used on the ERS 8600
Parameter Description
Connect Retry Interval (Sec)
Amount of time in seconds to wait before attempting to reconnect to a BGP neighbor after failing to connect. Router falls back to Connect State after timer expires.
• Range 1 to 65535 seconds; default 120.
KeepAlive
Message sent to keep BGP connection alive to ensure Hold Timer does not expire when no Update messages are sent. If the value is zero, no periodical keepalive messages are sent to this neighbor after the BGP connection has been established.
• Range 0 to 21845 seconds; default 60
Advertisement Interval (Sec)
Specifies the time interval that transpires in seconds between each transmission of a router advertisement from a BGP neighbor
• range: 1 to 120 seconds; default 5
Hold Timer (Sec)
The hold time is the maximum time allowed between receipt of successive KeepAlive, and/or Update messages. This hold time is reset and counts down upon a successful receipt of a message. The hold time must be either 0 or at least 3 seconds and is 3 x KeepAlive value.
• Range 0-65535; default 180
Border Gateway Protocol (BGP-4) TCG v2.0 NN48500-538
lNortel Confidential Information Copyright © 2007 Nortel Networks. All Rights Reserved. 19
<ExternalDistribution>
Changing the default timers is performed at the BGP neighbor level using the following commands.
To change the Hold Timer:
ERS8600-A:5# config ip bgp neighbor <neighbor ip addr> hold-time <0 | 3-65535> add
To change the KeepAlive Timer:
ERS8600-A:5# config ip bgp neighbor <neighbor ip addr> hold-time <0 | 3-65535> add
To change the Connect Retry Interval:
ERS8600-A:5# config ip bgp neighbor <neighbor ip addr> hold-time <0 | 3-65535> add
To change the Advertisement Interval:
ERS8600-A:5# config ip bgp neighbor <neighbor ip addr> hold-time <0 | 3-65535> add
The Hold Time is negotiated between peers during session establishment. The smaller value is used. The keepalive is not negotiated and is used at the set value unless the hold timer negotiated is less then the keepalive. Then the keepalive will be 1/3 the hold timer.
Border Gateway Protocol (BGP-4) TCG v2.0 NN48500-538
lNortel Confidential Information Copyright © 2007 Nortel Networks. All Rights Reserved. 20
<ExternalDistribution>
4. BGP Network Command The ERS 8600 uses the Network command to specify a list of IGP networks that are advertised as originating from an autonomous system.
The command format for the network command is as follows::
ERS8600-A:5# config ip bgp network <prefix/len> <add|del>
The prefix/len that is specified must match an active entry in the IP routing table. The route may be local to the ERS8600, configured as a static route, or dynamically learned via an IGP such as RIP or OSPF. The network command can not be used to aggregate or summarize BGP routes.
When the prefix originated by the Network command is advertised via BGP, its Route Origin attribute is set to “IGP”. This indicates that the route is interior to the originating AS.
For example, via ERS8600-A from Section 2.1, if we wish to originate the CLIP address 10.1.1.9./32, enter the following command:
• ERS8600-A:5# config ip bgp network 10.1.1.9/32 add
On Router C the BGP route table indicates that the network has been learned from ERS8600-A. Note that the Route Origin is “IGP”:
• ERS8600-C:5# show ip bgp route 10.1.1.9/32
Network/Mask Peer Rem Addr NextHop Address Org Loc Pref ------------------ --------------- --------------- --- ---------- 10.1.1.9/32 200.1.1.2 200.1.1.2 IGP 40 AS_PATH: (20)

Border Gateway Protocol (BGP-4) TCG v2.0 NN48500-538
lNortel Confidential Information Copyright © 2007 Nortel Networks. All Rights Reserved. 21
<ExternalDistribution>
5. Redistribution Policies Within an AS, BGP update information is distributed between BGP speakers using an Interior Gateway Protocol (IGP) that runs within the AS. The ERS 8600 supports either RIP or OSPF for IGP. Under normal operation, the IGP carries no BGP information. Each BGP speaker in an AS uses IBGP exclusively to determine reachability to external networks. In order to inject routes into the IGP, redistribution policies must be created to inject external routes within an AS. This section provides examples of the commands you use to create redistribution policies that can inject external routes within an AS.
If the AS is running OSPF, the border router must be configured as an AS boundary router (ASBR) in order to accept external routes.
5.1 BGP Redistribution The ERS 8600 can redistribute routes learned by RIP, OSPF, or static route configuration. In addition, it can also redistribute local or direct interfaces. The following command is used to configure BGP route distribution:
The following command is used to configure BGP route distribution:
ERS8600-A:5# config ip bgp redistribute <direct, ospf, rip, static> [apply, create, delete, disable, enable, info, metric <metric-value, route-policy <policy-name>]
For example, to redistribute direct interfaces, enter the commands shown below.
ERS8600-A:5# config ip bgp redistribute direct create
ERS8600-A:5# config ip bgp redistribute direct enable
ERS8600-A:5# config ip bgp redistribute direct apply
Note that when the routes are imported into the BGP route table, a route-policy may be applied in order to suppress specific routes or modify BGP route attributes. For example, this may be useful if you redistribute all “direct” (i.e. locally connected) routes but do not wish to advertise the IP prefixes of certain interfaces.
Also, the BGP “metric” attribute associated with each prefix, also known as MED, may also be set. Note that if the metric is also set via a route-policy, the route-policy specified metric takes precedence.
When the prefix originated by the “redistribute” command is advertised via BGP its Route Origin attribute is set to “INC”, or incomplete. When BGP selects the best path to a given destination a route with origin “IGP” takes priority over a route with origin “INC”. The following is an example of routes imported on an ERS8600 after BGP direct redistribute has been enable on a peer ERS 8600. Notice the Route Origin is “INC”.

Border Gateway Protocol (BGP-4) TCG v2.0 NN48500-538
lNortel Confidential Information Copyright © 2007 Nortel Networks. All Rights Reserved. 22
<ExternalDistribution>
• ERS8600-A:5# show ip bgp neighbor route 10.1.1.1 10.1.0.0/16 longer-prefixes
The total number of accepted routes from the neighbor is 6 Network/Mask Peer Rem Addr NextHop Address Org Loc Pref Status ------------------ --------------- --------------- --- -------- ---- 10.1.1.0/30 10.1.1.1 10.1.1.1 INC 100 Best AS_PATH: (100) 10.1.1.4/30 10.1.1.1 10.1.1.1 INC 100 Used AS_PATH: (100)
5.2 OSPF and BGP Route Distribution This section describes commands you use to create OSPF and BGP route distribution. The commands used are in reference to Figure 1 used in Section 2.1 above using ERS8600-A.
5.2.1 Configuration
To create OSPF and BGP route distribution policies, complete the following steps:
5.2.1.1 Configure OSPF on ERS8600-A
ERS8600-A: Step 1 – Configure ERS8600-A as an OSPF ASBR
ERS8600-A:5# config ip ospf as-boundary-router enable
ERS8600-A: Step 2 – Enable OSPF
ERS8600-A:5# config ip ospf admin-state enable
The ERS8600 must be configured as an OSPF Autonomous System Border Router (ASBR) in order to support other routing protocols other than OSPF.
5.2.1.2 Configure Route Policy to Redistribute BGP Routes into OSPF
ERS8600-A: Step 1 – Enable BGP into OSPF redistribution
ERS8600-A:5# config ip ospf redistribute bgp create
ERS8600-A:5# config ip ospf redistribute bgp enable
ERS8600-A:5# config ip ospf redistribute bgp apply
5.2.1.3 Configure Route Policy Redistribute OSPF Routes into BGP
ERS8600-A: Step 1 – Enable OSPF into BGP redistribution
ERS8600-A:5# config ip bgp redistribute ospf create
ERS8600-A:5# config ip bgp redistribute ospf enable
ERS8600-A:5# config ip bgp redistribute ospf apply
Border Gateway Protocol (BGP-4) TCG v2.0 NN48500-538
lNortel Confidential Information Copyright © 2007 Nortel Networks. All Rights Reserved. 23
<ExternalDistribution>
Be very careful enabling BGP redistribution. It could cause learned eBGP routes to be advertised out of your local AS. This would have the effect of other networks routing through the local AS. It is best not to enable this feature if you are peering to an ISP and do not wish to have traffic transit the local AS.
When redistributing OSPF into BGP, route priority will be in effect and you can create routing loops. BGP has a higher route preference than OSPF External 1 & 2. Thus if you redistribute OSPF external 1 & 2 routes into BGP then BGP routes will be used and this could cause a routing loop.
The BGP Router ID automatically uses the OSPF Router ID. If the OSPF Router ID is changed then BGP must be restarted to use the new value. Note that OSPF uses a random Router ID by default. The commands to disable and enable BGP globally are: ERS8600-A:5# config ip bgp disable ERS8600-A:5# config ip bgp enable

Border Gateway Protocol (BGP-4) TCG v2.0 NN48500-538
lNortel Confidential Information Copyright © 2007 Nortel Networks. All Rights Reserved. 24
<ExternalDistribution>
5.3 Creating Policies for Route Distribution: Direct, RIP or Static Routes
The above example shows a configuration example for distribution of BGP and OSPF routes. The ERS 8600 can be configured to distribute static, OSPF, direct and RIP routes. It should also be noted that route policies could also be used with a distribution policy.
The following example shows how to enter the appropriate commands for distributing Static routes to BGP:
5.3.1 BGP Route Redistribution Configuration
5.3.1.1 BGP Redistribution
To view the redistribution commands available, enter the following:
ERS8600-A:5# config ip bgp redistribute ?
Sub-Context: direct ospf rip static
Current Context:
Apply
To view redistribution commands available for static:
ERS8600-A:5# config ip bgp redistribute static ?
Sub-Context: Current Context: apply create disable delete enable info metric <metric-value> route-policy <policy name>
5.3.1.2 Example of Static Route Redistribution
Enable Static route redistribution.
ERS8600-A:5# config ip bgp redistribute static create
ERS8600-A:5# config ip bgp redistribute static enable
ERS8600-A:5# config ip bgp redistribute static apply

Border Gateway Protocol (BGP-4) TCG v2.0 NN48500-538
lNortel Confidential Information Copyright © 2007 Nortel Networks. All Rights Reserved. 25
<ExternalDistribution>
5.3.1.3 View Configuration Changes
Enter the following to view configuration changes
ERS8600-A:5# config ip bgp redistribute static info
create: delete: N/A enable: TRUE metric: 0 route-policy:
Notice the route-policy and metric settings. Both can be used to influence the route(s) advertised.
Border Gateway Protocol (BGP-4) TCG v2.0 NN48500-538
lNortel Confidential Information Copyright © 2007 Nortel Networks. All Rights Reserved. 26
<ExternalDistribution>
5.4 Creating a Policy to Inject Default Route When Using OSPF as an Interior Gateway Protocol
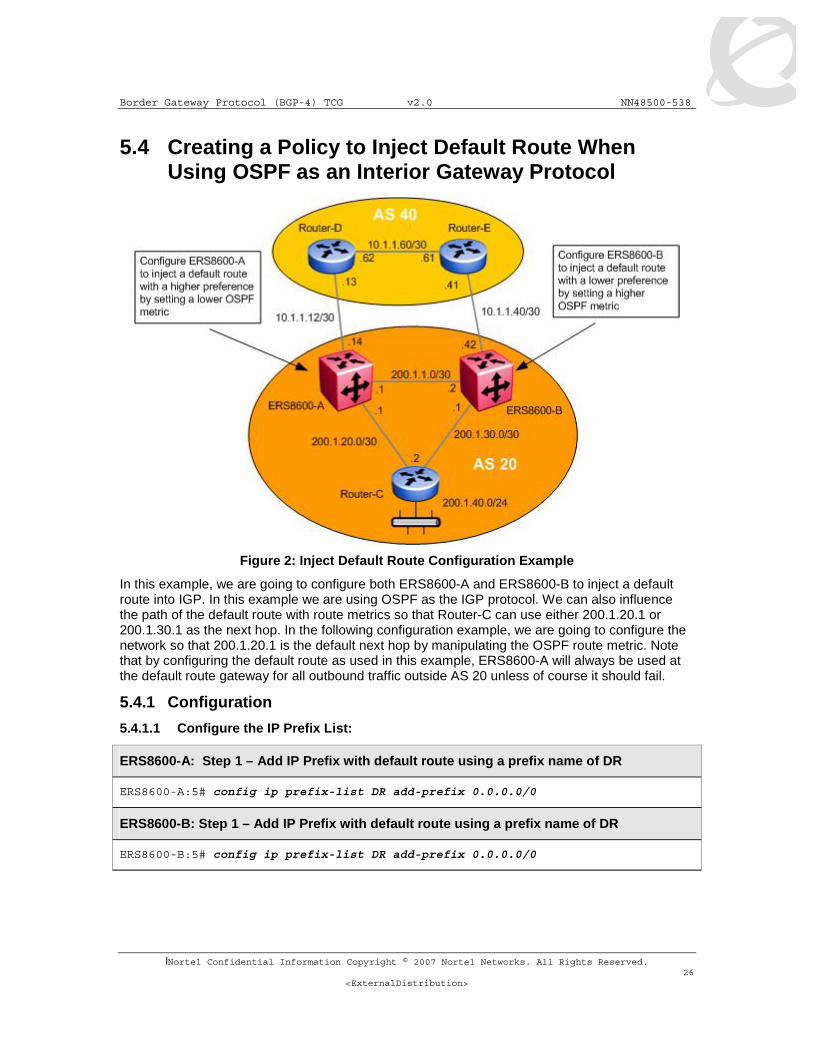
Figure 2: Inject Default Route Configuration Example
In this example, we are going to configure both ERS8600-A and ERS8600-B to inject a default route into IGP. In this example we are using OSPF as the IGP protocol. We can also influence the path of the default route with route metrics so that Router-C can use either 200.1.20.1 or 200.1.30.1 as the next hop. In the following configuration example, we are going to configure the network so that 200.1.20.1 is the default next hop by manipulating the OSPF route metric. Note that by configuring the default route as used in this example, ERS8600-A will always be used at the default route gateway for all outbound traffic outside AS 20 unless of course it should fail.
5.4.1 Configuration
5.4.1.1 Configure the IP Prefix List:
ERS8600-A: Step 1 – Add IP Prefix with default route using a prefix name of DR
ERS8600-A:5# config ip prefix-list DR add-prefix 0.0.0.0/0
ERS8600-B: Step 1 – Add IP Prefix with default route using a prefix name of DR
ERS8600-B:5# config ip prefix-list DR add-prefix 0.0.0.0/0

Border Gateway Protocol (BGP-4) TCG v2.0 NN48500-538
lNortel Confidential Information Copyright © 2007 Nortel Networks. All Rights Reserved. 27
<ExternalDistribution>
5.4.1.2 Configure the IP Route Policy
ERS8600-A: Step 1 – Add route policy named Default_OSPF using sequence 1, add the IP prefix named DR, and set the metric to 100
ERS8600-A:5# ip route-policy Default_OSPF seq 1 create
ERS8600-A:5# ip route-policy Default_OSPF seq 1 enable
ERS8600-A:5# ip route-policy Default_OSPF seq 1 action permit
ERS8600-A:5# ip route-policy Default_OSPF seq 1 set-injectlist DR
ERS8600-A:5# ip route-policy Default_OSPF seq 1 set-metric 100
ERS8600-B: Step 1 – Add route policy named Default_OSPF using sequence 1, add the IP prefix named DR, and set the metric to 300
ERS8600-B:5# ip route-policy Default_OSPF seq 1 create
ERS8600-B:5# ip route-policy Default_OSPF seq 1 enable
ERS8600-B:5# ip route-policy Default_OSPF seq 1 action permit
ERS8600-B:5# ip route-policy Default_OSPF seq 1 set-injectlist DR
ERS8600-B:5# ip route-policy Default_OSPF seq 1 set-metric 300
The policy set-metric value is what will influence the OSPF route decision. The lower the value the higher the route preference. For this example, ERS8600-A is set to a lower metric value than ERS8600-B, which results in a higher preference value.
5.4.1.3 Configure Route Redistribution:
ERS8600-A: Step 1 – Enable BGP redistribution into OSPF
ERS8600-A:5# config ip ospf redistribute bgp create
ERS8600-A:5# config ip ospf redistribute bgp route-policy Default_OSPF enable
ERS8600-A:5# config ip ospf redistribute bgp route-policy Default_OSPF apply
ERS8600-A:5# config ip ospf redistribute bgp enable
ERS8600-B: Step 1 – Enable BGP redistribution into OSPF
ERS8600-B:5# config ip ospf redistribute bgp create
ERS8600-B:5# config ip ospf redistribute bgp route-policy Default_OSPF enable
ERS8600-B:5# config ip ospf redistribute bgp route-policy Default_OSPF apply
ERS8600-B:5# config ip ospf redistribute bgp enable
The end result of this configuration is that Router-C will use the next hop to ERS8600-A for access to the Internet.
Border Gateway Protocol (BGP-4) TCG v2.0 NN48500-538
lNortel Confidential Information Copyright © 2007 Nortel Networks. All Rights Reserved. 28
<ExternalDistribution>
6. CIDR and Aggregate Addresses BGP4 supports Classless interdomain routing. (CIDR) is an addressing scheme (also known as supernetting) that eliminates the concept of classifying networks into class types. Earlier addressing schemes identified five classes of networks: Class A, Class B, Class C, Class D, and Class E. An example of CIDR would be an address of 192.3.0.0/16, which normally would be an illegal Class C address.
CIDR makes it easy to aggregate several different routes into a single route. This will considerably help reduce the routing table size.
6.1 Configuration Example
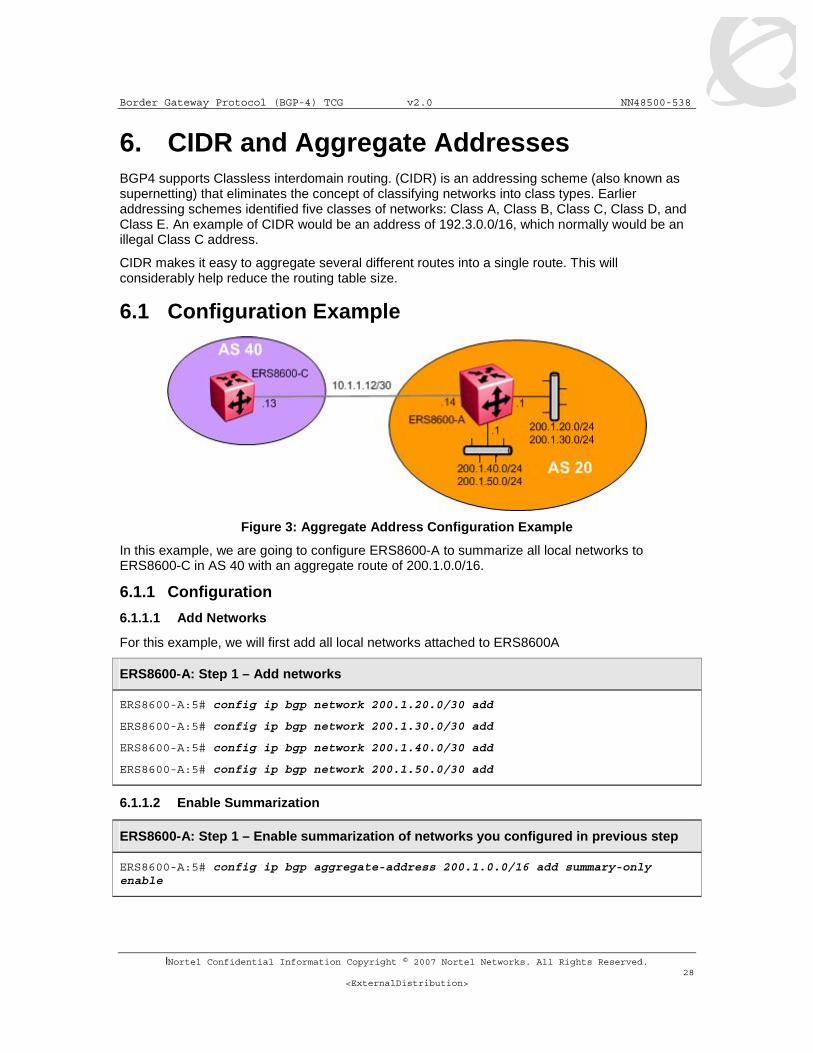
Figure 3: Aggregate Address Configuration Example
In this example, we are going to configure ERS8600-A to summarize all local networks to ERS8600-C in AS 40 with an aggregate route of 200.1.0.0/16.
6.1.1 Configuration
6.1.1.1 Add Networks
For this example, we will first add all local networks attached to ERS8600A
ERS8600-A: Step 1 – Add networks
ERS8600-A:5# config ip bgp network 200.1.20.0/30 add
ERS8600-A:5# config ip bgp network 200.1.30.0/30 add
ERS8600-A:5# config ip bgp network 200.1.40.0/30 add
ERS8600-A:5# config ip bgp network 200.1.50.0/30 add
6.1.1.2 Enable Summarization
ERS8600-A: Step 1 – Enable summarization of networks you configured in previous step
ERS8600-A:5# config ip bgp aggregate-address 200.1.0.0/16 add summary-only enable

Border Gateway Protocol (BGP-4) TCG v2.0 NN48500-538
lNortel Confidential Information Copyright © 2007 Nortel Networks. All Rights Reserved. 29
<ExternalDistribution>
6.1.1.3 Add BGP Neighbor to ERS8600-C
ERS8600-A: Step 1 – Enable BGP Peer to AS 40
ERS8600-A:5# config ip bgp neighbor 10.1.1.13 create
ERS8600-A:5# config ip bgp neighbor 10.1.1.13 remote-as 40
ERS8600-A:5# config ip bgp neighbor 10.1.1.13 admin-state enable
6.1.2 Verify Operations
Step 1 – If we look at ERS8600-C’s route table, prior to enable summarization, it should look like the following:
ERS8600-C:5# show ip bgp neighbor route 10.1.1.14 200.1.0.0/16 longer-prefixes
Result:
The total number of accepted routes from the neighbor is 6 Network/Mask Peer Rem Addr NextHop Address Org Loc Pref Status ------------------ --------------- --------------- --- -------- ---- 200.1.20.0/24 200.1.1.2 200.1.1.2 IGP 100 Used AS_PATH: (20) 200.1.30.0/24 200.1.1.2 200.1.1.2 IGP 100 Used AS_PATH: (20) 200.1.40.0/24 200.1.1.2 200.1.1.2 IGP 100 Used AS_PATH: (20) 200.1.50.0/24 200.1.1.2 200.1.1.2 IGP 100 Used AS_PATH: (20)
Step 2 – If we look at ERS8600-C’s route table, after enabling summarization on ERS8600-A, it should look like the following:
ERS8600-C:5# show ip bgp neighbor route 10.1.1.14 200.1.0.0/16 longer-prefixes
Result:
The total number of accepted routes from the neighbor is 3 Network/Mask Peer Rem Addr NextHop Address Org Loc Pref Status ------------------ --------------- --------------- --- -------- ---- 200.1.0.0/16 200.1.1.2 200.1.1.2 IGP 100 Used AS_PATH: (20) ATOMIC AGGREGATE AGGR-AS:20 AGGR-ADDR:200.1.1.2

Border Gateway Protocol (BGP-4) TCG v2.0 NN48500-538
lNortel Confidential Information Copyright © 2007 Nortel Networks. All Rights Reserved. 30
<ExternalDistribution>
7. EBGP Multihop When two EBGP speakers are directly connected, by default, BGP enforces the one-hop rule for BGP peers. In other words, the remote peer must be located on a directly attached network. However, there may be situations where you may not be able to use the address of the next-hop due to indirect connections such as peering to a circuitless IP address. In this case, BGP multihop is used.
BGP multihop is only used for eBGP connections, not for IBGP connections.
Because the bgp neighbor is not directly connected when using BGP multihop, static routes must also be configured.
By default, the multihop TTL is set for 255. Presently, there is no configuration command to change the TTL setting.
7.1 Configuration Example – BGP Multihop
Figure 4: EBGP Configuration Example
For this configuration example, we wish to create a BGP peer between ERS8600-A and Router-B. Since they are not directly attached, we will need to enable BGP multihop on ERS8600-A and Router-B. The following configuration steps provide the configuration commands for ERS8600-A and Router-B assuming Router-B is a Juniper router.
7.1.1 ERS8600-A Configuration
7.1.1.1 Enable CLIP Address
ERS8600-A: Step 1 – Add a CLIP address
ERS8600-A:5# config ip circuitless-ip-int 1 create 200.1.1.9/32
7.1.1.2 Configure BGP
ERS8600-A: Step 1 – Assign ERS8600-A to local BGP AS20
ERS8600-A:5# config ip bgp local-as 20
ERS8600-A: Step 2 – Enable BGP globally
ERS8600-A:5# config ip bgp enable
Border Gateway Protocol (BGP-4) TCG v2.0 NN48500-538
lNortel Confidential Information Copyright © 2007 Nortel Networks. All Rights Reserved. 31
<ExternalDistribution>
Configure BGP Peers
ERS8600-A: Step 1 – Assign neighboring router Router-B as an ERS8600-A peer and enable eBGP Multihop
ERS8600-A:5# config ip bgp neighbor 200.40.40.1 create
ERS8600-A:5# config ip bgp neighbor 200.40.40.1 remote-as 25
ERS8600-A:5# config ip bgp neighbor 200.40.40.1 ebgp-multihop enable
ERS8600-A:5# config ip bgp neighbor 200.40.40.1 admin-state enable
7.1.1.3 Configure IGP Network Prefixes
ERS8600-A: Step 1 – Add the appropriate networks which you wish to advertise via BGP
ERS8600-A:5# config ip bgp network 200.60.1/0/24
7.1.1.4 Add Static Route
ERS8600-A: Step 1 – Add required static route
ERS8600-A:5# config ip static-route create 200.0.0.0/0 next-hop 200.30.30.2 cost 2
7.1.2 Router-B (Juniper) Configuration
Router-B (Juniper) Configuration:
} interfaces { ge-0/1/0 { unit 0 { family inet { address 200.40.40.1/30; } } } routing-options { static { route 200.0.0.0/8 { next-hop 200.40.40.2; retain; no-readvertise; } } router-id 200.1.1.5; autonomous-system 25; } protocols { bgp { group ebgp_nortel { type external;

Border Gateway Protocol (BGP-4) TCG v2.0 NN48500-538
lNortel Confidential Information Copyright © 2007 Nortel Networks. All Rights Reserved. 32
<ExternalDistribution>
multihop { ttl 255; } local-address 200.40.40.1; hold-time 180; peer-as 20; local-as 25; neighbor 200.30.30.1; } } }

Border Gateway Protocol (BGP-4) TCG v2.0 NN48500-538
lNortel Confidential Information Copyright © 2007 Nortel Networks. All Rights Reserved. 33
<ExternalDistribution>
8. EBGP Load Balance Using ECMP Equal Cost Multipath (ECMP) can be used on the ERS8600 to provide load-balance of traffic over 2 to 4 paths. A good example of using ECMP is in a dual-home configuration with two connections to two separate routers.
8.1 Configuration Example
Figure 5: EBGP Configuration Example
In this example, we will configure ERS8600-A to perform EBGP load balance to Router-A and Router-B using ECMP.
8.1.1 ERS8600-A Configuration
8.1.1.1 Enable CLIP Address
ERS8600-A: Step 1 – Add a CLIP address
ERS8600-A:5# config ip circuitless-ip-int 1 create 200.1.1.9/32
8.1.1.2 Configure BGP
ERS8600-A: Step 1 – Assign ERS8600-A to local BGP AS20
ERS8600-A:5# config ip bgp local-as 20
ERS8600-A: Step 2 – Set the equal cost path value, for this configuration example, we have two paths
ERS8600-A:5# config ip bgp max-equalcost-route 2 enable
ERS8600-A: Step 3 – Enable BGP
ERS8600-A:5# config ip bgp enable

Border Gateway Protocol (BGP-4) TCG v2.0 NN48500-538
lNortel Confidential Information Copyright © 2007 Nortel Networks. All Rights Reserved. 34
<ExternalDistribution>
8.1.1.3 Enable ECMP
ERS8600-A: Step 1 – Enable ECMP
ERS8600-A:5# config ip ecmp enable
8.1.1.4 Configure BGP Peers
ERS8600-A: Step 1 – Assign neighboring router Router-B as an ERS8600-A peer
ERS8600-A:5# config ip bgp neighbor 200.30.30.1 create
ERS8600-A:5# config ip bgp neighbor 200.30.30.1 remote-as 25
ERS8600-A:5# config ip bgp neighbor 200.30.30.1 admin-state enable
ERS8600-A: Step 2 – Assign neighboring router Router-C as an ERS8600-A peer
ERS8600-A:5# config ip bgp neighbor 200.30.30.9 create
ERS8600-A:5# config ip bgp neighbor 200.30.30.9 remote-as 25
ERS8600-A:5# config ip bgp neighbor 200.30.30.9 admin-state enable
8.1.1.5 Configure IGP Network Prefixes
ERS8600-A: Step 1 – Add the appropriate networks which you wish to advertise via BGP
ERS8600-A:5# config ip bgp network 200.60.1/0/24

Border Gateway Protocol (BGP-4) TCG v2.0 NN48500-538
lNortel Confidential Information Copyright © 2007 Nortel Networks. All Rights Reserved. 35
<ExternalDistribution>
9. BGP Synchronization and Next-Hop-Self BGP synchronization, depending on if it is enabled or not, either enables or disables the router from accepting or forwarding routes from BGP peers without waiting for an update from the IGP. It is used when there are routers in the AS not running BGP. With synchronization enabled, the router should not advertise a route until all the routers in the AS have learned the route via IGP. Normally synchronization should be enabled unless the AS is a stub AS and does not pass traffic from one AS to another or all the routers in the AS run BGP. In other words, if all the routers in your AS are running BGP, there is no need to enable BGP Synchronization. If there are routers in the AS not running BGP, BGP Synchronization should normally be left enabled. When BGP Synchronization is enabled, a BGP router will wait to learn routes from an IGP, such as OSPF, before advertising routes learned by BGP. If all the routers within AS are expected to forward traffic outside the local AS to other AS’s, BGP should be redistributed into the IGP so that the router(s) not running BGP will learn how to forward traffic to the external networks. Note that redistributing BGP routes info IGP should only be done for networks where it is a limited number of eBGP routes that need to be redistributed. Redistributing thousands of routes into IGP, such as OSPF, consumes both CPU and memory resources. For example, looking at the figure 6 below, assuming the AS20 consists of Router-C not running BGP. There is an iBGP peer between ERS8600-A and ERS8600-B with Synchronization disabled on both routers, and BGP redistribution into OSPF enabled. When ERS8600-B learns a route via eBGP from Router-F, ERS8600-B will propagate this route to ERS8600-A using iBGP. If ERS8600-A now propagates this route to Router-E before Router-C within AS20 has learned this route, then Router-E could start sending traffic for this route before Router-C is ready to forward this traffic. Enabling Synchronization solves this problem by preventing a BGP speaker from advertising a route over eBGP until all routes within an AS have learned the route.
Figure 6: BGP Synchronization and Self Hop Configuration Example
Border Gateway Protocol (BGP-4) TCG v2.0 NN48500-538
lNortel Confidential Information Copyright © 2007 Nortel Networks. All Rights Reserved. 36
<ExternalDistribution>
9.1 Configuration Example 1 – Initial Configuration In this example, we will show the effects of enabling and disabling BGP synchronization and next hop-self by performing the following:
• Enabling BGP synchronization on both ERS8600-A and ERS8600-B
• Remove the connection between ERS8600-B and Router-F to see how this affects ERS8600-A
BGP route distribution into OSPF is not enabled on either ERS8600-A or ERS8600-B. Router-C is not running BGP, only OSPF as an IGP.
9.1.1 Configuration – With BGP Synchronization Enabled
9.1.1.1 Enable OSPF Interface Using Brouter Ports
For this configuration example, brouter ports are used. Either VLAN or brouter ports can be used.
ERS8600-A: Step 1 – Configure an OSPF interface using port 1/2
ERS8600-A:5# config ethernet 2/1 ip create 200.1.20.1/30
ERS8600-A:5# config ethernet 2/1 ip ospf enable
ERS8600-B: Step 1 – Configure an OSPF interface using port 2/2
ERS8600-B:5# config ethernet 2/2 ip create 200.1.30.1/30
ERS8600-B:5# config ethernet 2/2 ip ospf enable
9.1.1.2 Configure CLIP
ERS8600-A: Step 1 – Add CLIP and enable OSPF
ERS8600-A:5# config ip circuitless-ip-int 1 create 200.1.1.9/32
ERS8600-A:5# config ip circuitless-ip-int 1 ospf enable
ERS8600-B: Step 1 – Enable OSPF on CLIP interface
ERS8600-B:5# config ip circuitless-ip-int 1 create 200.1.1.5/32
ERS8600-B:5# config ip circuitless-ip-int 1 ospf enable
9.1.1.3 Configure OSPF
ERS8600-A: Step 1 – Enable OSPF ASBR
ERS8600-A:5# config ip ospf as-boundary-router enable
ERS8600-B: Step 1 – Enable OSPF ASBR
ERS8600-B:5# config ip ospf as-boundary-router enable
ERS8600-A: Step 2 – Enable OSPF Router-ID using the CLIP address

Border Gateway Protocol (BGP-4) TCG v2.0 NN48500-538
lNortel Confidential Information Copyright © 2007 Nortel Networks. All Rights Reserved. 37
<ExternalDistribution>
ERS8600-A:5# config ip ospf router-id 200.1.1.9
ERS8600-B: Step 2 – Enable OSPF Router-ID using the CLIP address
ERS8600-B:5# config ip ospf router-id 200.1.1.5
ERS8600-A: Step 1 – Enable OSPF Globally
ERS8600-A:5# config ip ospf enable
ERS8600-B: Step 1 – Enable OSPF Globally
ERS8600-B:5# config ip ospf enable
9.1.1.4 Configure BGP Globally
ERS8600-A: Step 1 – Assign ERS8600-A to BGP AS20
ERS8600-A:5# config ip bgp local-as 20
ERS8600-B: Step 1 – Assign ERS8600-B to BGP AS20
ERS8600-B:5# config ip bgp local-as 20
ERS8600-A: Step 2 – Enable BGP Synchronization. This feature prevents ERS8600-A from advertising a route until all routers in the AS have learned the route(s) through the IGP
ERS8600-A:5# config ip bgp synchronization enable
ERS8600-B: Step 2 – Enable BGP Synchronization.
ERS8600-B:5# config ip bgp synchronization enable
ERS8600-A: Step 3 – Enable BGP
ERS8600-A:5# config ip bgp enable
ERS8600-B: Step 3 – Enable BGP
ERS8600-B:5# config ip bgp enable
9.1.1.5 Add BGP Network Prefixes
ERS8600-A: Step 1 – Add BGP Network Prefixes
ERS8600-A:5# config ip bgp network 10.1.1.12/30 add
ERS8600-A:5# config ip bgp network 200.1.20.0/30 add
ERS8600-B: Step 1 – Add BGP Network Prefixes
ERS8600-B:5# config ip bgp network 10.1.1.40/30 add

Border Gateway Protocol (BGP-4) TCG v2.0 NN48500-538
lNortel Confidential Information Copyright © 2007 Nortel Networks. All Rights Reserved. 38
<ExternalDistribution>
ERS8600-B:5# config ip bgp network 200.1.30.0/30 add
Add BGP peers
ERS8600-A: Step 1 – Configure BGP peer interfaces to neighbor ERS8600-B in AS20
ERS8600-A:5# config ip bgp neighbor 200.1.30.1 create
ERS8600-A:5# config ip bgp neighbor 200.1.30.1 remote-as 20
ERS8600-A:5# config ip bgp neighbor 200.1.30.1 admin-state enable
ERS8600-B: Step 1 – Configure BGP peer interfaces to neighbor ERS8600-A in AS20
ERS8600-B:5# config ip bgp neighbor 200.1.20.1 create
ERS8600-B:5# config ip bgp neighbor 200.1.20.1 remote-as 20
ERS8600-B:5# config ip bgp neighbor 200.1.20.1 admin-state enable
ERS8600-A: Step 2 – Configure BGP peer interfaces to neighbor ERS8600-E in AS40
ERS8600-A:5# config ip bgp neighbor 10.1.1.13 create
ERS8600-A:5# config ip bgp neighbor 10.1.1.13 remote-as 40
ERS8600-A:5# config ip bgp neighbor 10.1.1.13 admin-state enable
ERS8600-B: Step 2 – Configure BGP peer interfaces to neighbor Router-F in AS60
ERS8600-B:5# config ip bgp neighbor 10.1.1.41 create
ERS8600-B:5# config ip bgp neighbor 10.1.1.41 remote-as 60
ERS8600-B:5# config ip bgp neighbor 10.1.1.41 admin-state enable

Border Gateway Protocol (BGP-4) TCG v2.0 NN48500-538
lNortel Confidential Information Copyright © 2007 Nortel Networks. All Rights Reserved. 39
<ExternalDistribution>
9.1.2 Verify Operations
9.1.2.1 Viewing the BGP Route Table on ERS8600-B
The following results show the affect of what happens to route table on ERS8600-A when the connection between ERS8600B and Router-F is broken.
Step 1 – If the connection between ERS8600-B and Router-F is removed, by using the show ip bgp route command, the following routes are displayed:
ERS8600-B:5# show ip bgp route
Result:
The total number of routes is 11 Network/Mask Peer Rem Addr NextHop Address Org Loc Pref ------------------ --------------- --------------- --- ---------- 11.11.1.0/30 200.1.20.1 10.1.1.13 IGP 100 AS_PATH: (40) 10.1.1.12/30 200.1.20.1 200.1.20.1 IGP 100 AS_PATH: path-is-empty 14.14.14.0/24 200.1.20.1 10.1.1.13 IGP 100 AS_PATH: (40 60) 10.1.1.40/30 200.1.20.1 10.1.1.13 IGP 100 AS_PATH: (40 60) 10.1.1.60/30 200.1.20.1 10.1.1.13 IGP 100 AS_PATH: (40) 172.1.1.0/24 200.1.20.1 10.1.1.13 IGP 100 AS_PATH: (40 80) 172.1.2.0/30 200.1.20.1 10.1.1.13 IGP 100 AS_PATH: (40 80) 192.1.1.0/24 200.1.20.1 10.1.1.13 IGP 100 AS_PATH: (40 60 200) 200.1.1.9/32 200.1.20.1 200.1.20.1 IGP 100 AS_PATH: path-is-empty 200.20.20.0/24 200.1.20.1 200.1.20.1 IGP 100 AS_PATH: path-is-empty 200.1.20.0/30 200.1.20.1 200.1.20.1 IGP 100 AS_PATH: path-is-empty
Step 2 – Notice that because the connection to Router-F is down, all external routes via the next hop address of 10.1.1.13 are available. If we now look at the regular route table as shown below, notice is no external route information. None of the BGP entries are in the route table because the next hop (10.1.1.13) for these entries is unreachable and are not learned through OSPF.
ERS8600-B:5# show ip route info
Result:
================================================================================ Ip Route ================================================================================ DST MASK NEXT COST VLAN PORT PROT AGE TYPE PRF -------------------------------------------------------------------------------- 200.1.1.4 255.255.255.252 200.1.1.5 1 0 -/- LOC 0 DB 0 200.1.1.8 255.255.255.252 200.1.30.2 111 2065 1/2 OSPF 0 IB 2 0 200.1.20.0 255.255.255.252 200.1.30.2 101 2065 1/2 OSPF 0 IB 2 0 200.1.20.4 255.255.255.252 200.1.30.2 101 2065 1/2 OSPF 0 IB 2 0
Border Gateway Protocol (BGP-4) TCG v2.0 NN48500-538
lNortel Confidential Information Copyright © 2007 Nortel Networks. All Rights Reserved. 40
<ExternalDistribution>
200.1.30.0 255.255.255.252 200.1.30.1 1 - 1/2 LOC 0 DB 0 5 out of 5 Total Num of Dest Networks,5 Total Num of Route Entries displayed. -------------------------------------------------------------------------------- TYPE Legend: I=Indirect Route, D=Direct Route, A=Alternative Route, B=Best Route, E=Ecmp Rout e, U=Unresolved Route, N=Not in HW
Correcting the Next Hop Problem One method to get around the next hop problem is to enable the BGP next hop-self command. Another alternative method would be to enable OSPF passive on the ERS8600-A interface connecting to ERS8600-C.
9.2 How to Correct the Next Hop Problem from Step 9.1 This section describes how to resolve the next hop problem pointed out in the previous section.
To resolve this problem, complete the following steps.
9.2.1 Configuration – Enabling BGP Next Hop-Self and Synchronization
9.2.1.1 Configure ERS8600-A for Next Hop-Self
ERS8600-A: Step 1 – Disable the administration state for ERS8600-A peer
ERS8600-A:5# config ip bgp neighbor 200.1.30.1 admin-state disable
ERS8600-A: Step 2 – Enable the nexthop-self parameter:
ERS8600-A:5# config ip bgp neighbor 200.1.30.1 nexthop-self enable
ERS8600-A: Step 3 – Enable the administration state:
ERS8600-A:5# config ip bgp neighbor 200.1.30.1 admin-state enable
9.2.2 Verify Operations
9.2.2.1 Viewing the BGP Route Table on ERS8600-B
Step 1 – If you now view the bgp route table on ERS8600-B, it will look like the following:
ERS8600-B:5# show ip bgp route
Result:
The total number of routes is 10 Network/Mask Peer Rem Addr NextHop Address Org Loc Pref ------------------ --------------- --------------- --- ---------- 11.11.1.0/30 200.1.20.1 200.1.20.1 IGP 100 AS_PATH: (40) 10.1.1.12/30 200.1.20.1 200.1.20.1 IGP 100 AS_PATH: path-is-empty 14.14.14.0/24 200.1.20.1 200.1.20.1 IGP 100 AS_PATH: (40 60) 10.1.1.60/30 200.1.20.1 200.1.20.1 IGP 100 AS_PATH: (40)
Border Gateway Protocol (BGP-4) TCG v2.0 NN48500-538
lNortel Confidential Information Copyright © 2007 Nortel Networks. All Rights Reserved. 41
<ExternalDistribution>
172.1.1.0/24 200.1.20.1 200.1.20.1 IGP 100 AS_PATH: (40 80) 172.1.2.0/30 200.1.20.1 200.1.20.1 IGP 100 AS_PATH: (40 80) 192.1.1.0/24 200.1.20.1 200.1.20.1 IGP 100 AS_PATH: (40 60 200) 200.1.1.9/32 200.1.20.1 200.1.20.1 IGP 100 AS_PATH: path-is-empty 200.20.20.0/24 200.1.20.1 200.1.20.1 IGP 100 AS_PATH: path-is-empty 200.1.20.0/30 200.1.20.1 200.1.20.1 IGP 100 AS_PATH: path-is-empty
Step 2– Notice that now the next hop contains the next of 200.1.20.1 for all routes. However, if we look the IP route table, it still will not have changed:
ERS8600-B:5# show ip route info
Result:
The total number of routes is 10 ================================================================================ Ip Route ================================================================================ DST MASK NEXT COST VLAN PORT PROT AGE TYPE PRF -------------------------------------------------------------------------------- 200.1.1.4 255.255.255.252 200.1.1.5 1 0 -/- LOC 0 DB 0 200.1.1.8 255.255.255.252 200.1.30.2 111 2065 1/2 OSPF 0 IB 2 0 200.1.20.0 255.255.255.252 200.1.30.2 101 2065 1/2 OSPF 0 IB 2 0 200.1.20.4 255.255.255.252 200.1.30.2 101 2065 1/2 OSPF 0 IB 2 0 200.1.30.0 255.255.255.252 200.1.30.1 1 - 1/2 LOC 0 DB 0 5 out of 5 Total Num of Dest Networks,5 Total Num of Route Entries displayed. -------------------------------------------------------------------------------- TYPE Legend: I=Indirect Route, D=Direct Route, A=Alternative Route, B=Best Route, E=Ecmp Rout
e, U=Unresolved Route, N=Not in HW
As you will notice from the route table above, the BGP entries still do not appear in the IP routing table. In order to get the BGP routes to appear in the IP routing table, BGP synchronization must be disabled. Since IGP is not synchronized with BGP, BGP entries are not put into the IP forwarding table.
9.2.2.2 Disabling Synchronization on ERS8600-B and ERS8600-A
ERS8600-A: Step 1 –Disable BGP on ERS8600-A
ERS8600-A:5# config ip bgp disable
ERS8600-B: Step 1 – Disable BGP on ERS8600-B
ERS8600-B:5# config ip bgp disable
ERS8600-A: Step 2 –Disable synchronization on ERS8600-A.
Border Gateway Protocol (BGP-4) TCG v2.0 NN48500-538
lNortel Confidential Information Copyright © 2007 Nortel Networks. All Rights Reserved. 42
<ExternalDistribution>
ERS8600-A:5# config ip bgp synchronization disable
ERS8600-B: Step 2 – Disable synchronization on ERS8600-B.
ERS8600-B:5# config ip bgp synchronization disable
ERS8600-A: Step 3 – Enable BGP
ERS8600-A:5# config ip bgp enable
ERS8600-B: Step 3 – Enable BGP
ERS8600-B:5# config ip bgp enable
9.2.3 Verifying Operation
9.2.3.1 Viewing the BGP Route Table on ERS8600-B
Step 1 – If you now view the ip route table on ERS8600-B, it will look like the following:
ERS8600-B:5# show ip route info
Result:
================================================================================ Ip Route ================================================================================ DST MASK NEXT COST VLAN PORT PROT AGE TYPE PRF -------------------------------------------------------------------------------- 10.1.1.12 255.255.255.252 200.1.30.2 0 2065 1/2 BGP 0 IB 4 5 10.1.1.60 255.255.255.252 200.1.30.2 1 2065 1/2 BGP 0 IB 4 5 11.11.1.0 255.255.255.252 200.1.30.2 1 2065 1/2 BGP 0 IB 4 5 14.14.14.0 255.255.255.0 200.1.30.2 2 2065 1/2 BGP 0 IB 4 5 172.1.1.0 255.255.255.0 200.1.30.2 2 2065 1/2 BGP 0 IB 4 5 172.1.2.0 255.255.255.252 200.1.30.2 2 2065 1/2 BGP 0 IB 4 5 192.1.1.0 255.255.255.0 200.1.30.2 3 2065 1/2 BGP 0 IB 4 5 200.1.1.4 255.255.255.252 200.1.1.5 1 0 -/- LOC 0 DB 0 200.1.1.9 255.255.255.255 200.1.30.2 111 2065 1/2 OSPF 0 IB 2 0 200.1.20.0 255.255.255.252 200.1.30.2 101 2065 1/2 OSPF 0 IB 2 0 200.1.20.4 255.255.255.252 200.1.30.2 101 2065 1/2 OSPF 0 IB 2 0 200.1.30.0 255.255.255.252 200.1.30.1 1 - 1/2 LOC 0 DB 0 200.20.20.0 255.255.255.0 200.1.30.2 0 2065 1/2 BGP 0 IB 4 5 13 out of 13 Total Num of Dest Networks,13 Total Num of Route Entries displayed. -------------------------------------------------------------------------------- TYPE Legend: I=Indirect Route, D=Direct Route, A=Alternative Route, B=Best Route, E=Ecmp Rout e, U=Unresolved Route, N=Not in HW
We have solved the route table problem in ERS8600-B, however; it may still not be able to get to any of the external networks. This is because Router-C has no knowledge of these external routes. One method to correct this problem is to enable BGP to OSPF redistribution. Another method is to enable BGP on Router-E. Please see example above on how to redistribute BGP routes into OSPF.

Border Gateway Protocol (BGP-4) TCG v2.0 NN48500-538
lNortel Confidential Information Copyright © 2007 Nortel Networks. All Rights Reserved. 43
<ExternalDistribution>
10. MD5 Authentication Configuration Example
MD5 Authentication is a method to securing TCP connections that support BGP sessions. MD5 assigns an authentication key to each BGP router, which then attaches a computed MD5 signature to each BGP packet.
Figure 7: BGP MD5 Configuration Example
In the configuration example below, we will configure MD-5 authentication between ERS8600-A and ERS8600-B
10.1 MD5 Configuration
10.1.1 Configure ERS8600 for MD-5 Authentication
10.1.1.1 Configure ERS8600 for MD-5 Authentication
ERS8600-A: Step 1 – Disable the administration state for the ERS8600-B peer
ERS8600-A:5# config ip bgp neighbor 200.1.1.2 admin-state disable
ERS8600-A: Step 1 – Disable the administration state for the ERS8600-A peer
ERS8600-B:5# config ip bgp neighbor 200.1.1.1 admin-state disable
10.1.1.2 Enable MD5 authentication
ERS8600-A: Step 1 –Enable MD5 authentication to the ERS8600-B peer
ERS8600-A:5# ip bgp neighbor 200.1.1.2 MD5-authentication enable
ERS8600-B: Step 1 –Enable MD5 authentication to the ERS8600-A peer

Border Gateway Protocol (BGP-4) TCG v2.0 NN48500-538
lNortel Confidential Information Copyright © 2007 Nortel Networks. All Rights Reserved. 44
<ExternalDistribution>
ERS8600-B:5# ip bgp neighbor 200.1.1.1 MD5-authentication enable
ERS8600-A: Step 2 – Enter a password (the secret key) for the ERS8600-B peer
ERS8600-A:5# config ip bgp neighbor 200.1.1.2 Password <name> add
ERS8600-B: Step 2 – Enter a password (the secret key) for the ERS8600-a peer
ERS8600-B:5# config ip bgp neighbor 200.1.1.1 Password <name> add
ERS8600-A: Step 3 – Enable the administration state
ERS8600-A:5# config ip bgp neighbor 200.1.1.2 admin-state enable
ERS8600-B: Step 3 – Enable the administration state
ERS8600-B:5# config ip bgp neighbor 200.1.1.1 admin-state enable
The MD5 password can have a string length of up to 1536 characters.
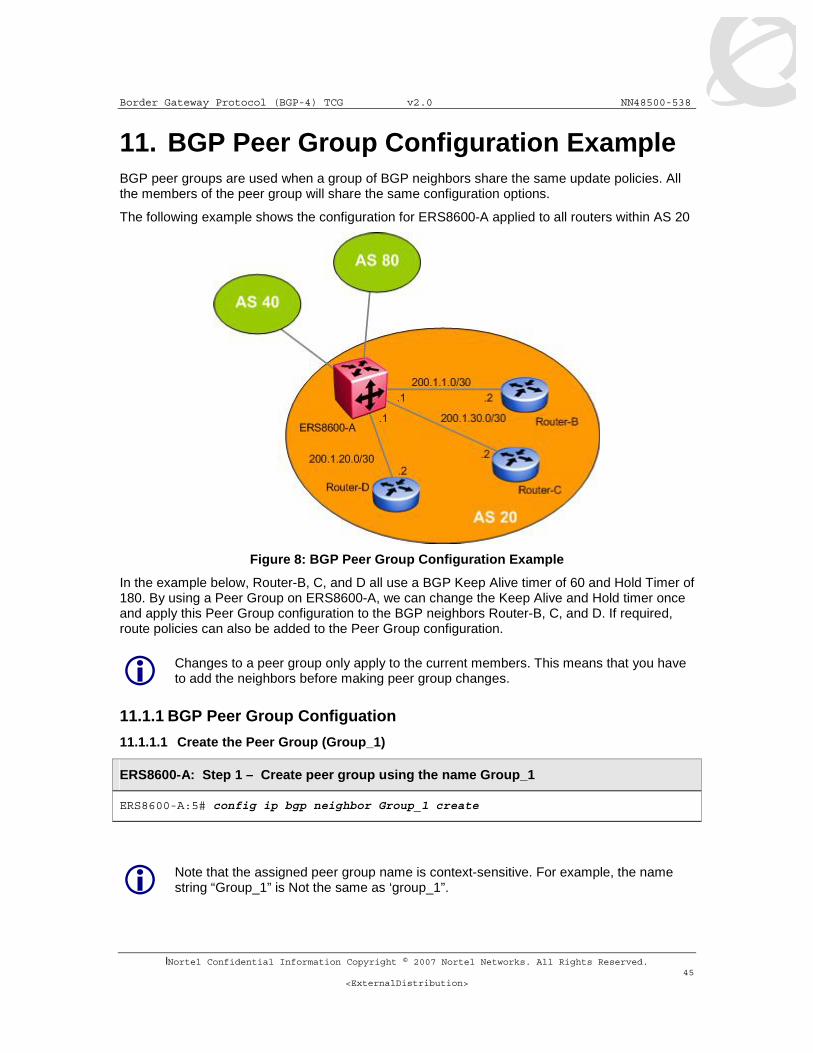
Border Gateway Protocol (BGP-4) TCG v2.0 NN48500-538
lNortel Confidential Information Copyright © 2007 Nortel Networks. All Rights Reserved. 45
<ExternalDistribution>
11. BGP Peer Group Configuration Example BGP peer groups are used when a group of BGP neighbors share the same update policies. All the members of the peer group will share the same configuration options.
The following example shows the configuration for ERS8600-A applied to all routers within AS 20
Figure 8: BGP Peer Group Configuration Example
In the example below, Router-B, C, and D all use a BGP Keep Alive timer of 60 and Hold Timer of 180. By using a Peer Group on ERS8600-A, we can change the Keep Alive and Hold timer once and apply this Peer Group configuration to the BGP neighbors Router-B, C, and D. If required, route policies can also be added to the Peer Group configuration.
Changes to a peer group only apply to the current members. This means that you have to add the neighbors before making peer group changes.
11.1.1 BGP Peer Group Configuation
11.1.1.1 Create the Peer Group (Group_1)
ERS8600-A: Step 1 – Create peer group using the name Group_1
ERS8600-A:5# config ip bgp neighbor Group_1 create
Note that the assigned peer group name is context-sensitive. For example, the name string “Group_1” is Not the same as ‘group_1”.

Border Gateway Protocol (BGP-4) TCG v2.0 NN48500-538
lNortel Confidential Information Copyright © 2007 Nortel Networks. All Rights Reserved. 46
<ExternalDistribution>
11.1.1.2 Create BGP Peers
ERS8600-A: Step 1 –Create BGP peers to Router B, C and D
ERS8600-A:5# config ip bgp neighbor 200.1.1.2 create
ERS8600-A:5# config ip bgp neighbor 200.1.20.2 create
ERS8600-A:5# config ip bgp neighbor 200.1.30.2 create
11.1.1.3 Add Peers as Member of Group_1
ERS8600-A: Step 1 –Add peer to peer group Group_1
ERS8600-A:5# config ip bgp neighbor 200.1.1.2 peer-group Group_1 add
ERS8600-A:5# config ip bgp neighbor 200.1.20.2 peer-group Group_1 add
ERS8600-A:5# config ip bgp neighbor 200.1.30.2 peer-group Group_1 add
11.1.1.4 Assign Peer Group to AS 20
ERS8600-A: Step 1 – Assign Group_1 to remote_as 20
ERS8600-A:5# config ip bgp neighbor Group_1 remote-as 20
11.1.1.5 Assign Variables to Peer Group
ERS8600-A: Step 1 –Change the peer group Group_1 BGP keep-alive timer to 60 seconds and the BGP hold-down time to 180 seconds
ERS8600-A:5# config ip bgp neighbor Group_1 keepalive-time 60 add
ERS8600-A:5# config ip bgp neighbor Group_1 hold-time 180 add
11.1.1.6 Assigning Policies to Peer Group
If required, you can assign a policy to a peer group. Assuming you have an existing policy named Pref_20, enter the following command to add this policy to the peer group Group_1
ERS8600-A: Step 1 – If required, add an existing policy (Pref_20) to Group_1
ERS8600-A:5# config ip bgp neighbor Group_1 route-policy in Pref_AS20 add
BGP Peer Groups are used to apply changes to all group members. You can still enter specific settings for each peer directly. Unless you set the parameter again in the peer group, it will not be overwritten on the peer.

Border Gateway Protocol (BGP-4) TCG v2.0 NN48500-538
lNortel Confidential Information Copyright © 2007 Nortel Networks. All Rights Reserved. 47
<ExternalDistribution>
12. Route Selection and Traffic Management – BGP Path Attributes
The ERS 8600 uses route policies to control traffic flow. By using policies, traffic can be controlled over multiple connections for inbound traffic from other ASs and outbound traffic that comes from outside a particular AS.
Overall, policies are created to control routes, work with default routing, control specific and aggregated routes, and manipulate BGP attributes. The rest of this section deals with BGP Path Attributes.
Path attributes fall into four separate categories
1. Well-known mandatory
• Attributes are mandatory and must be included in every UPDATE message 2. Well-know discretionary
• Discretionary may or may not be sent in a particular UPDATE message 3. Optional transitive
• Optional transitive attribute is accepted and passed along to other BGP peers 4. Optional non-transitive
• Optional non-transitive attribute must be accepted or ignored and not passed along to other BGP peers.
Path attributes help the border routers to select among paths using built-in algorithms or manually configured polices.
Various attributes are used to decide the path a BGP router will take. The following attributes are used by BGP in deciding what path to take.
1. Origin
(well-known mandatory) 2. AS_path
(well-known mandatory) 3. Next Hop
(well-known mandatory) 4. Multi-Exit Discriminator Attribute
(optional non-transitive) 5. Local Preference
(well-known discretionary) 6. Atomic Aggregate
(well-known discretionary) 7. Aggregator
(optional transitive) 8. Community Attribute
(optional transitive)
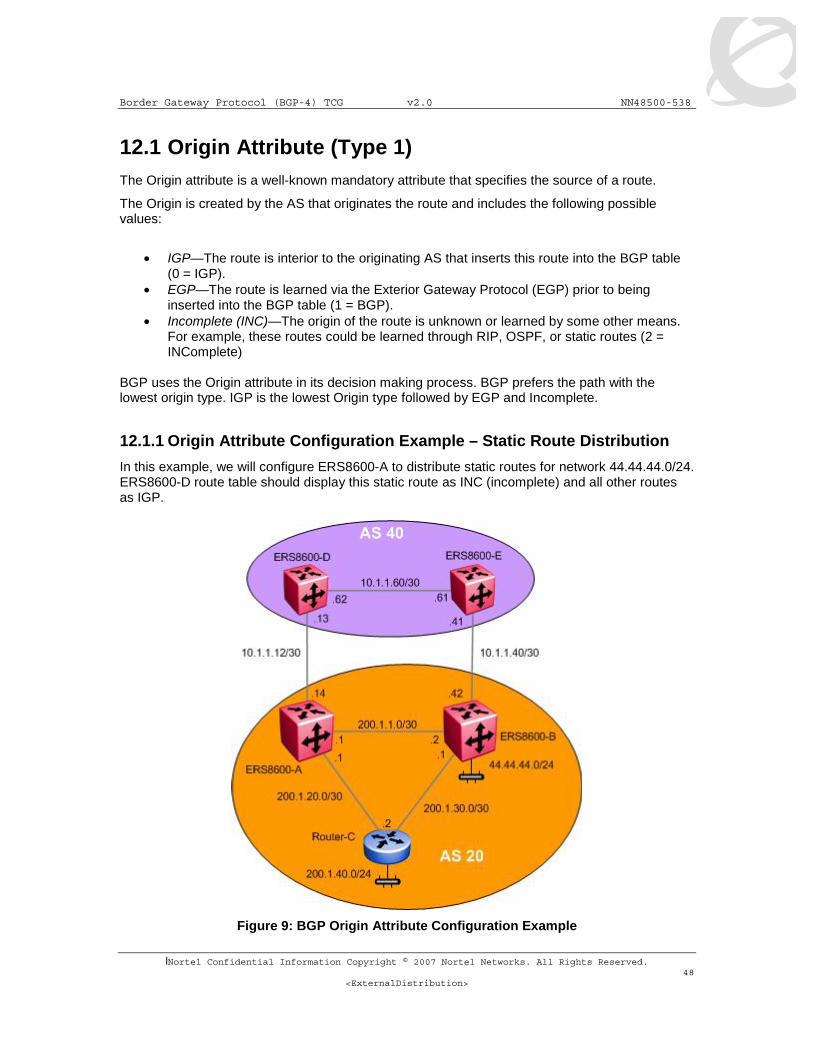
Border Gateway Protocol (BGP-4) TCG v2.0 NN48500-538
lNortel Confidential Information Copyright © 2007 Nortel Networks. All Rights Reserved. 48
<ExternalDistribution>
12.1 Origin Attribute (Type 1) The Origin attribute is a well-known mandatory attribute that specifies the source of a route.
The Origin is created by the AS that originates the route and includes the following possible values:
• IGP—The route is interior to the originating AS that inserts this route into the BGP table
(0 = IGP). • EGP—The route is learned via the Exterior Gateway Protocol (EGP) prior to being
inserted into the BGP table (1 = BGP). • Incomplete (INC)—The origin of the route is unknown or learned by some other means.
For example, these routes could be learned through RIP, OSPF, or static routes (2 = INComplete)
BGP uses the Origin attribute in its decision making process. BGP prefers the path with the lowest origin type. IGP is the lowest Origin type followed by EGP and Incomplete.
12.1.1 Origin Attribute Configuration Example – Static Route Distribution
In this example, we will configure ERS8600-A to distribute static routes for network 44.44.44.0/24. ERS8600-D route table should display this static route as INC (incomplete) and all other routes as IGP.
Figure 9: BGP Origin Attribute Configuration Example

Border Gateway Protocol (BGP-4) TCG v2.0 NN48500-538
lNortel Confidential Information Copyright © 2007 Nortel Networks. All Rights Reserved. 49
<ExternalDistribution>
12.1.1.1 Configuration
12.1.1.1.1 Add a Static Route to Network 44.44.44.0/24
ERS8600-A: Step 1 – Create an IP static route on ERS8600-A
ERS8600-A:5# config ip static-route create 44.44.44.0/24 next-hop 200.1.1.2 cost 1 preference 5
12.1.1.1.2 Create a Static Route Redistribution Policy
ERS8600-A: Step 1 – Create static route redistribution policy
ERS8600-A:5# config ip bgp redistribute static create
ERS8600-A:5# config ip bgp redistribute static enable
ERS8600-A:5# config ip bgp redistribute static apply
12.1.1.1.3 Add BGP Networks you Wish to Advertise
ERS8600-A: Step 1 – In this example, we will only advertise the network 200.1.1.0/30 via BGP
ERS8600-A:5# config ip bgp network 200.1.1.0/30 add
12.1.1.2 Verification
12.1.1.2.1 Verify Static Route Redistribution via ERS8600-D
Step 1 – If we go to ERS8600-D and view its route table, it should display the static route advertised from ERS8600-B with a BGP attribute of INC as shown below and the network 200.1.1.0/30 as IGP:
ERS8600-D:5# show bgp route
Result:
show bgp routes May 28, 2002 09:59:28 [GMT] Network/Mask Peer Rem Addr NextHop Address Org Loc Pref B/U Sl ------------------ --------------- --------------- --- ---------- --- -- 10.1.1.12/30 10.1.1.62 10.1.1.62 IGP 10 B/U 4 As Path: 10.1.1.40/30 10.1.1.42 10.1.1.42 IGP 100 B 4 As Path: <20> 10.1.1.40/30 10.1.1.62 10.1.1.62 IGP 0 4 As Path: 10.1.1.60/30 10.1.1.62 10.1.1.62 IGP 0 B 4 As Path: 11.11.1.0/30 10.1.1.62 10.1.1.62 IGP 0 B/U 4 As Path: 44.44.44.0/24 10.1.1.42 10.1.1.42 INC 0 4 As Path: <20> 172.1.1.0/24 10.1.1.62 11.11.1.2 IGP 10 4 As Path: <80> 172.1.2.0/30 10.1.1.62 11.11.1.2 IGP 10 4 As Path: <80> 192.1.1.0/24 14.14.14.2 14.14.14.2 IGP 100 B/U 4 As Path: <200>
Border Gateway Protocol (BGP-4) TCG v2.0 NN48500-538
lNortel Confidential Information Copyright © 2007 Nortel Networks. All Rights Reserved. 50
<ExternalDistribution>
200.1.1.0/30 10.1.1.42 10.1.1.42 IGP 100 B/U 4 As Path: <20> 200.1.1.0/30 10.1.1.62 10.1.1.14 IGP 10 4 As Path: <20> 200.1.20.0/30 10.1.1.62 10.1.1.14 IGP 10 4 As Path: <20> 200.1.30.0/30 10.1.1.42 10.1.1.42 IGP 100 B/U 4 As Path: <20> 200.1.30.0/30 10.1.1.62 10.1.1.14 IGP 10 4 As Path: <20>
12.1.2 Changing the Origin Type
When using the BGP network command, the origin should show up as IGP on each of the remote peers. In some cases, you may wish to change the origin to a lower priority origin type such as INC to influence the route decision at a remote peer. A path with the lowest origin type will be selected, where IGP is lower than EGP and EGP is lower than INComplete.
For example, let’s assume we wish to take the path from ERS8600-B to ERS8600-E to get to network 200.1.40.0/24. To do so, we will configure a route policy on ERS8600-A to advertise network 200.1.40.0/24 with an origin of INC and apply this to the BGP peer containing neighbor 10.1.1.13 or ERS8600-D.
If we look at the BGP route table on ERS8600-D, you will notice the path to 200.1.40.0/24 has two paths both with an origin of IGP with the preferred route via 10.1.1.14.
• ERS8600-D# show ip bgp route 200.1.40.0/24
The total number of routes is 22 Network/Mask Peer Rem Addr NextHop Address Org Loc Pref ------------------ --------------- --------------- --- ---------- 200.1.40.0/24 10.1.1.14 10.1.1.14 IGP 100 AS_PATH: (1) 200.1.40.0/24 10.1.1.61 10.1.1.42 IGP 100 AS_PATH: (1)
• ERS8600-D# show ip route info -s 200.1.40.0/24
================================================================================= Ip Route ================================================================================= DST MASK NEXT COST VLAN PORT PROT AGE TYPE PRF --------------------------------------------------------------------------------- 200.1.40.0 255.255.255.0 10.1.1.14 1 2171 4/6 BGP 0 IB 45 1 out of 14 Total Num of Route Entries, 14 Total Num of Dest Networks displayed. --------------------------------------------------------------------------------- TYPE Legend: I=Indirect Route, D=Direct Route, A=Alternative Route, B=Best Route, E=Ecmp Route , U=Unresolved Route, N=Not in HW
In the configuration steps that follow, we will configure a route policy to advertise from ERS8600-A to ERS8600-D the route to 200.1.40.0/24 with an origin of INC. This will result in ERS8600-D using the next-hop of 10.1.1.61 (via ERS8600-E) to get to network 200.1.40.0/24.
12.1.2.1 Configuration – Changing the Origin Type
12.1.2.1.1 Configure an IP Prefix Named 200.1.40.0 and add IP Prefix 200.1.40.0/24
ERS8600-A: Step 1 – Configure the IP prefix list named 200.1.40.0
ERS8600-A:5# config ip prefix-list 200.1.40.0 add-prefix 200.1.40.0/24

Border Gateway Protocol (BGP-4) TCG v2.0 NN48500-538
lNortel Confidential Information Copyright © 2007 Nortel Networks. All Rights Reserved. 51
<ExternalDistribution>
12.1.2.1.2 Configure an IP Policy
ERS8600-A: Step 1 – Configure the IP route policy named BGP_org_routerb and add sequence 1
ERS8600-A:5# config ip route-policy BGP_org_routerd seq 1 create
ERS8600-A: Step 2 – Enable sequence 1 to match any protocol
ERS8600-A:5# config ip route-policy BGP_org_routerd seq 1 match-protocol any
ERS8600-A: Step 3 – Add the IP prefix ‘200.1.40.0’ to sequence 1.
ERS8600-A:5# config ip route-policy BGP_org_routerd seq 1 match-network 200.1.40.0
ERS8600-A: Step 4 – Configure sequence 1 with an origin of imcomplete.
ERS8600-A:5# config ip route-policy BGP_org_routerd seq 1 set-origin incomplete
12.1.2.1.3 Add the Policy to the BGP Peer Router-D
ERS8600-A: Step 1 – Add this policy to the BGP peer Router-D
ERS8600-A:5# config ip bgp neighbor 10.1.1.13 route-policy out BGP_org_routerd add
12.1.2.1.4 Soft Start BGP Peer
ERS8600-A: Step 1 – Soft restart the BGP peer
ERS8600-A:5# config ip bgp neighbor 10.1.1.13 restart soft-reconfiguration out
12.1.2.2 Verify Operations
12.1.2.2.1 Verify Route to 200.1.400/24 via ERS8600-D
Step 1 – Once the policy has been added, the route 200.1.40.0/24 from ERS8600-D’s perspective for peer 10.1.1.14 has been changed to INC. Hence, the path to 200.1.40.0/24 should now be via ERS8600-E:
ERS8600-D:5# show ip bgp route 200.1.40.0/24
Result:
The total number of routes is 13 Network/Mask Peer Rem Addr NextHop Address Org Loc Pref ------------------ --------------- --------------- --- ---------- 200.1.40.0/24 10.1.1.61 10.1.1.42 IGP 100 AS_PATH: (1) 200.1.40.0/24 10.1.1.14 10.1.1.14 INC 100 AS_PATH: (1)
Border Gateway Protocol (BGP-4) TCG v2.0 NN48500-538
lNortel Confidential Information Copyright © 2007 Nortel Networks. All Rights Reserved. 52
<ExternalDistribution>
Step 2 – Once the policy has been added, the route 200.1.40.0/24 from ERS8600-D’s perspective for peer 10.1.1.14 has been changed to INC. Hence, the path to 200.1.40.0/24 is now via ERS8600-E:
ERS8600-D:5# show ip route info -s 200.1.40.0/24
Result:
================================================================================ Ip Route ================================================================================ DST MASK NEXT COST VLAN PORT PROT AGE TYPE PRF -------------------------------------------------------------------------------- 200.1.40.0 255.255.255.0 10.1.1.61 1 2170 4/1 BGP 0 IB 175 1 out of 13 Total Num of Route Entries, 13 Total Num of Dest Networks displayed. -------------------------------------------------------------------------------- TYPE Legend: I=Indirect Route, D=Direct Route, A=Alternative Route, B=Best Route, E=Ecmp Route , U=Unresolved Route, N=Not in HW

Border Gateway Protocol (BGP-4) TCG v2.0 NN48500-538
lNortel Confidential Information Copyright © 2007 Nortel Networks. All Rights Reserved. 53
<ExternalDistribution>
12.2 AS Path Attribute (Type 2) Whenever a route passes through one AS to another, the new AS prepends its AS number to the update. The ordered list is called the AS Sequence.
The AS Path attribute helps to ensure a loop-free topology. IBGP connections do not change the AS Path as these connections reside within a specific AS.
BGP always prefers the shortest path. Hence, by manipulating the AS Path to a remote EBGP peer, we can influence the incoming route selection where there is more than one path to the local AS.
12.2.1 Config Example: Load Balance Approach using AS Path to Influence Inbound Traffic Flow
Figure 10: BGP AS Path Configuration Example
In this example, ERS8600-A will advertise the network 200.1.40.0 unchanged. ERS8600-B will be setup to have its internal AS number inserted into the AS Path multiple times. This should influence all inbound traffic destined for the 200.1.40.0 over ERS8600-A.
12.2.1.1 Configure an IP Prefix Named 200.1.40.0 and Add IP Prefix 200.1.40.0/24 on ERS8600-B
ERS8600-B: Step 1 – Configure the IP prefix list named 200.1.40.0
ERS8600-B:5# config ip prefix-list 200.1.40.0 add-prefix 200.1.40.0/24

Border Gateway Protocol (BGP-4) TCG v2.0 NN48500-538
lNortel Confidential Information Copyright © 2007 Nortel Networks. All Rights Reserved. 54
<ExternalDistribution>
12.2.1.2 Add IP AS List
ERS8600-B: Step 1 – Configure IP AS list to advertise AS 20 multiple times, For this example, we will use as-list 1 and advertise AS20 three times.
ERS8600-B:5# config ip as-list 1 add-as-path 1 permit “20 20 20”
12.2.1.3 Add a Route Policy
ERS8600-B: Step 1 – Configure the IP route policy named AS_Prepend and add sequence 1 to match on network 200.1.40.0 and then append AS path 1 (AS path ’20 20 20’)
ERS8600-B:5# config ip route-policy AS_Prepend seq 1 create
ERS8600-B:5# config ip route-policy AS_Prepend seq 1 enable
ERS8600-B:5# config ip route-policy AS_Prepend seq 1 action permit
ERS8600-B:5# config ip route-policy AS_Prepend seq 1 match-network 200.1.40.0
ERS8600-B:5# config ip route-policy AS_Prepend seq 1 set-as-path 1
12.2.1.4 Add Policy to BGP Peer Router-D
ERS8600-B: Step 1 – Add the policy to the BGP peer Router-D
ERS8600-B:5# config ip bgp neighbor 10.1.1.41 route-policy out AS_Prepend add

Border Gateway Protocol (BGP-4) TCG v2.0 NN48500-538
lNortel Confidential Information Copyright © 2007 Nortel Networks. All Rights Reserved. 55
<ExternalDistribution>
12.2.2 Configuration Example: AS_Path Filtering
Figure 11: BGP AS Path Filtering Example
In this example, we will set up an access list to deny any updates on ERS8600-A from AS 200 but allows updates from AS 40 and AS 80 only.
12.2.2.1 Configure an IP AS List on ERS8600-A
The following commands set up an access list that denies updates from AS200 but still allowing updates from AS40 and AS80
ERS8600-A: Step 1 – Create as-list 2 to deny AS 200.
ERS8600-A:5# config ip as-list 2 create
ERS8600-A:5# config ip as-list 2 add-as-path 1 deny 200
ERS8600-A: Step 2 – Create as-list 3 to allow AS 40.
ERS8600-A:5# config ip as-list 3 create
ERS8600-A:5# config ip as-list 3 add-as-path 1 permit 40
ERS8600-A: Step 3 – Create as-list 3 to allow AS 80.
ERS8600-A:5# config ip as-list 3 create
ERS8600-A:5# config ip as-list 3 add-as-path 1 permit 80
12.2.2.2 Configure an IP Route Policy Named AS
ERS8600-A: Step 1 – Add sequence 1 to match as-list 2 to deny AS 200
ERS8600-A:5# config ip route-policy AS seq 1 create
ERS8600-A:5# config ip route-policy AS seq 1 enable
ERS8600-A:5# config ip route-policy AS seq 1 action deny
ERS8600-A:5# config ip route-policy AS seq 1 match-as-path 2

Border Gateway Protocol (BGP-4) TCG v2.0 NN48500-538
lNortel Confidential Information Copyright © 2007 Nortel Networks. All Rights Reserved. 56
<ExternalDistribution>
ERS8600-A: Step 2 – Add sequence 2 to match as-list 3 to allow AS 40
ERS8600-A:5# config ip route-policy AS seq 2 create
ERS8600-A:5# config ip route-policy AS seq 2 enable
ERS8600-A:5# config ip route-policy AS seq 2 action permit
ERS8600-A:5# config ip route-policy AS seq 2 match-as-path 3
ERS8600-A: Step 3 – Add sequence 3 to match as-list 3 to allow AS 80
ERS8600-A:5# config ip route-policy AS seq 3 create
ERS8600-A:5# config ip route-policy AS seq 3 enable
ERS8600-A:5# config ip route-policy AS seq 3 action permit
ERS8600-A:5# config ip route-policy AS seq 3 match-as-path 4
12.2.2.3 Add Policy to BGP Peer Router-B
ERS8600-A: Step 1 – Add the policy to the BGP peer Router-D
ERS8600-A:5# config ip bgp neighbor 10.1.1.41 route-policy in AS add
12.2.3 Alternative Configuration Method for ERS8600-A
The above configuration example is just one method of AS Path configuration. The same configuration can also be accomplished by using the following commands:
12.2.3.1 Configure an IP AS List on ERS8600-A
ERS8600-A: Step 1 – Create as-list 2 to deny AS 200, allow AS 40 and AS 80.
ERS8600-A:5# config ip as-list 2 create
ERS8600-A:5# config ip as-list 2 add-as-path 1 deny 200
ERS8600-A:5# config ip as-list 2 add-as-path 2 permit 40
ERS8600-A:5# config ip as-list 2 add-as-path 2 permit 80
12.2.3.2 Configure an IP Route Policy Named AS
ERS8600-A: Step 1 – Add sequence 1 to match as-list 2
ERS8600-A:5# config ip route-policy AS seq 1 create
ERS8600-A:5# config ip route-policy AS seq 1 enable
ERS8600-A:5# config ip route-policy AS seq 1 action deny
ERS8600-A:5# config ip route-policy AS seq 1 match-as-path 2
12.2.3.3 Add Policy to BGP Peer Router-B
ERS8600-A: Step 1 – Add the policy to the BGP peer Router-D

Border Gateway Protocol (BGP-4) TCG v2.0 NN48500-538
lNortel Confidential Information Copyright © 2007 Nortel Networks. All Rights Reserved. 57
<ExternalDistribution>
ERS8600-A:5# config ip bgp neighbor 10.1.1.41 route-policy in AS add
12.3 Local Preference Attribute (Type 5) Configuration Example
Local Preference is a well known non-transitive attribute that influences the flow of outbound traffic by setting the exit point of an AS. Border routers within an AS calculate Local Preference if the attribute is not configured in a BGP accept policy.
The Local Preference attribute is local to ASs and is exchanged between iBGP peers only; e.g. it does not have any effect on the internal IGP protocol being used.
When BGP must select the best route and there are multiple paths to the same destination, the path with the larger preference is preferred.
In this example, we want to influence the traffic so the link from ERS8600-C to ERS8600-A is used as the preferred path and the link from ERS8600-D to ERS8600-B is used for back up only. ERS8600-A is set with a higher Local Preference while ERS8600-B is set for a lower local preference. We will also configure ERS8600-A to inject a default route with a lower OSPF metric than ERS8600-B resulting in ERS8600-A having a higher preference. With this configuration, all traffic leaving AS 40 will exit via the customer AS will exit via ERS8600-C.
Local Preference can also be used to load balance outbound traffic based on CIDR or network address groups.
Figure 12: BGP Local Preference Configuration Example
Border Gateway Protocol (BGP-4) TCG v2.0 NN48500-538
lNortel Confidential Information Copyright © 2007 Nortel Networks. All Rights Reserved. 58
<ExternalDistribution>
12.3.1 Configuration : Local Preference
Please note that in regards to the OSPF configuration, this configuration example only provides the steps to add an OSPF route policy and enable distribution of BGP into OSPF. The interface and VLAN configuration steps are not included.
12.3.1.1 Local Preference Configuration for iBGP
ERS8600-A: Step 1 – Configure a local preference value for ERS8600-A such that the value is higher that the local preference value you set for ERS8600-B
ERS8600-A:5# config ip bgp default-local-pref 100 add
ERS8600-A: Step 1 – Configure a local preference value for ERS8600-B such that the value is lower that the local preference value you set for ERS8600-A
ERS8600-B:5# config ip bgp default-local-pref 10 add
ERS8600-C: Step 1 – Configure a local preference value for ERS8600-C such that the value is higher that the local preference value you set for ERS8600-D
ERS8600-C:5# config ip bgp default-local-pref 100 add
ERS8600-D: Step 1 – Be sure to set the local preference value for ERS8600-D to a value that is lower than the local preference value you set for ERS8600-C
ERS8600-D:5# config ip bgp default-local-pref 10 add
12.3.1.2 Configure the IP Prefix List for the Default Route on ERS8600-A and ERS8600-B
ERS8600-A: Step 1 – Configure an prefix list, in this example named DR, and add the default route prefix of 0.0.0.0/0
ERS8600-A:5# config ip prefix-list DR add-prefix 0.0.0.0/0
ERS8600-B: Step 1 – Configure an prefix list, in this example named DR, and add the default route prefix of 0.0.0.0/0
ERS8600-B:5# config ip prefix-list DR add-prefix 0.0.0.0/0

Border Gateway Protocol (BGP-4) TCG v2.0 NN48500-538
lNortel Confidential Information Copyright © 2007 Nortel Networks. All Rights Reserved. 59
<ExternalDistribution>
12.3.1.3 Configure the IP Route Policy on ERS8600A and ERS8600-B
ERS8600-A: Step 1 – Configure the IP route policy named Default_OSPF and add sequence 1 to inject a default with a metric of 100
ERS8600-A:5# config ip route-policy Default_OSPF seq 1 create
ERS8600-A:5# config ip route-policy Default_OSPF seq 1 enable
ERS8600-A:5# config ip route-policy Default_OSPF seq 1 action permit
ERS8600-A:5# config ip route-policy Default_OSPF seq 1 set-injectlist DR
ERS8600-A:5# config ip route-policy seq 1 set-metric 100
ERS8600-B: Step 1 – Configure the IP route policy named Default_OSPF and add sequence 1 to inject a default with a metric of 300
ERS8600-B:5# config ip route-policy Default_OSPF seq 1 create
ERS8600-B:5# config ip route-policy Default_OSPF seq 1 enable
ERS8600-B:5# config ip route-policy Default_OSPF seq 1 action permit
ERS8600-B:5# config ip route-policy Default_OSPF seq 1 set-injectlist DR
ERS8600-B:5# config ip route-policy seq 1 set-metric 300
The set-metric value directly influences the OSPF route decision. For this example, ERS8600-A is set to a lower metric value than ERS8600-B, which results in a higher preference value.
12.3.1.4 Configure Route Redistribution on ERS8600-A to Redistribute BGP into OSPF Using the Route Policy to Inject a Default Route
ERS8600-A: Step 1 – Enable BGP redistribution into OSPF and apply the route policy to inject a default route with a metric of 100
ERS8600-A:5# config ip ospf redistribute bgp create
ERS8600-A:5# config ip ospf redistribute bgp route-policy Default_OSPF enable
ERS8600-A:5# config ip ospf redistribute bgp route-policy Default_OSPF apply
ERS8600-B: Step 1 – Enable BGP redistribution into OSPF and apply the route policy to inject a default route with a metric of 300
ERS8600-B:5# config ip ospf redistribute bgp create
ERS8600-B:5# config ip ospf redistribute bgp route-policy Default_OSPF enable
ERS8600-B:5# config ip ospf redistribute bgp route-policy Default_OSPF apply
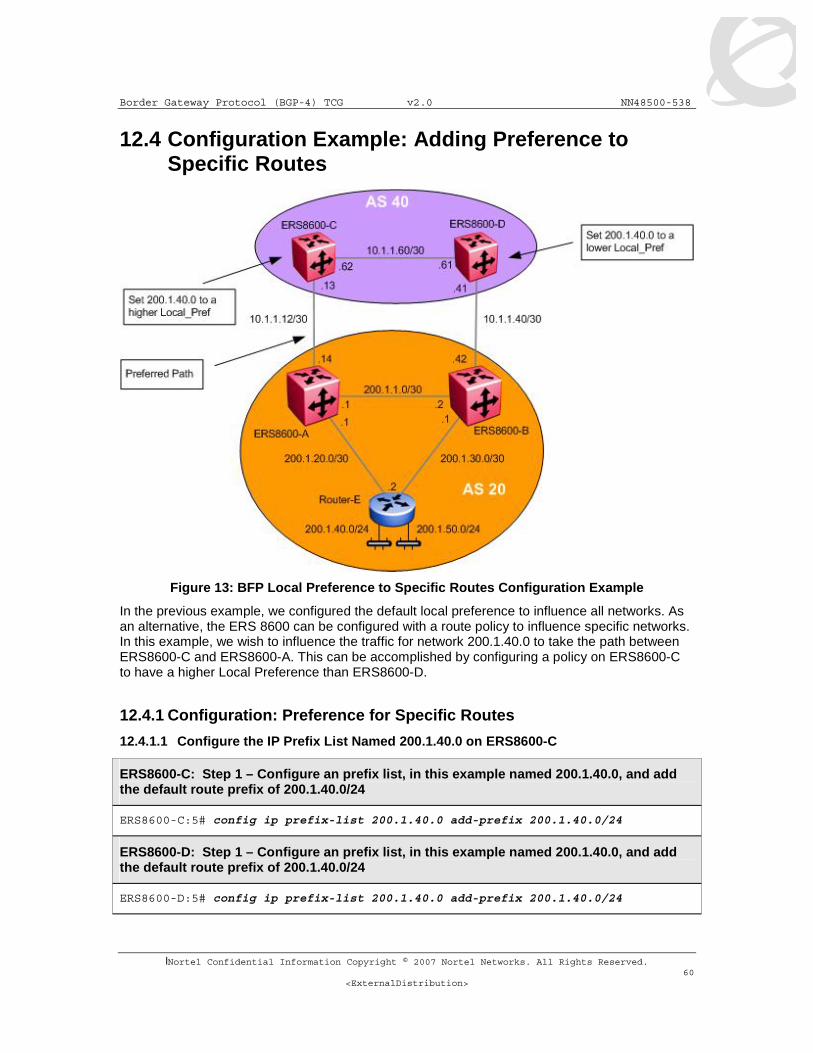
Border Gateway Protocol (BGP-4) TCG v2.0 NN48500-538
lNortel Confidential Information Copyright © 2007 Nortel Networks. All Rights Reserved. 60
<ExternalDistribution>
12.4 Configuration Example: Adding Preference to Specific Routes
Figure 13: BFP Local Preference to Specific Routes Configuration Example
In the previous example, we configured the default local preference to influence all networks. As an alternative, the ERS 8600 can be configured with a route policy to influence specific networks. In this example, we wish to influence the traffic for network 200.1.40.0 to take the path between ERS8600-C and ERS8600-A. This can be accomplished by configuring a policy on ERS8600-C to have a higher Local Preference than ERS8600-D.
12.4.1 Configuration: Preference for Specific Routes
12.4.1.1 Configure the IP Prefix List Named 200.1.40.0 on ERS8600-C
ERS8600-C: Step 1 – Configure an prefix list, in this example named 200.1.40.0, and add the default route prefix of 200.1.40.0/24
ERS8600-C:5# config ip prefix-list 200.1.40.0 add-prefix 200.1.40.0/24
ERS8600-D: Step 1 – Configure an prefix list, in this example named 200.1.40.0, and add the default route prefix of 200.1.40.0/24
ERS8600-D:5# config ip prefix-list 200.1.40.0 add-prefix 200.1.40.0/24

Border Gateway Protocol (BGP-4) TCG v2.0 NN48500-538
lNortel Confidential Information Copyright © 2007 Nortel Networks. All Rights Reserved. 61
<ExternalDistribution>
12.4.1.2 Configure the IP Route Policy Named Policy with Sequence 1 to Match Prefix-List 200.1.40.0
ERS8600-C: Step 1 – Add a route policy to match the prefix list 200.1.40.0 and set the local preference to 900
ERS8600-C:5# config ip route-policy Policy seq 1 create
ERS8600-C:5# config ip route-policy Policy seq 1 enable
ERS8600-C:5# config ip route-policy Policy seq 1 action permit
ERS8600-C:5# config ip route-policy Policy seq 1 match-network 200.1.40.0
ERS8600-C:5# config ip route-policy Policy seq 1 set-local-pref 900
ERS8600-D: Step 1 – Add a route policy to match the prefix list 200.1.40.0 and set the local preference to 200
ERS8600-D:5# config ip route-policy Policy seq 1 create
ERS8600-D:5# config ip route-policy Policy seq 1 enable
ERS8600-D:5# config ip route-policy Policy seq 1 action permit
ERS8600-D:5# config ip route-policy Policy seq 1 match-network 200.1.40.0
ERS8600-D:5# config ip route-policy Policy seq 1 set-local-pref 200
12.4.1.3 Assign the Route Policy to the Appropriate BGP Peer
ERS8600-C: Step 1 – Assign the route policy ‘Policy’ to the BGP peer 10.1.1.14
ERS8600-C:5# config ip bgp neighbor 10.1.1.14 route-policy in Policy add
ERS8600-D: Step 1 – Assign the route policy ‘Policy’ to the BGP peer 10.1.1.42
ERS8600-D:5# config ip bgp neighbor 10.1.1.42 route-policy in Policy add
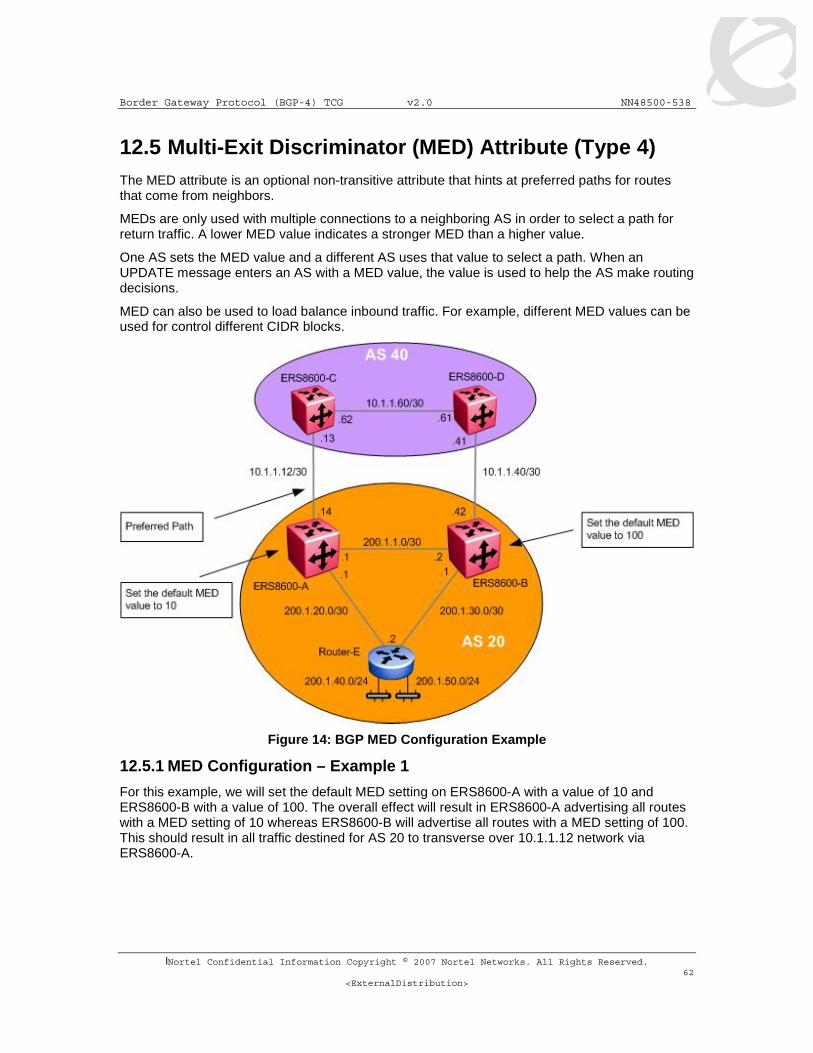
Border Gateway Protocol (BGP-4) TCG v2.0 NN48500-538
lNortel Confidential Information Copyright © 2007 Nortel Networks. All Rights Reserved. 62
<ExternalDistribution>
12.5 Multi-Exit Discriminator (MED) Attribute (Type 4) The MED attribute is an optional non-transitive attribute that hints at preferred paths for routes that come from neighbors.
MEDs are only used with multiple connections to a neighboring AS in order to select a path for return traffic. A lower MED value indicates a stronger MED than a higher value.
One AS sets the MED value and a different AS uses that value to select a path. When an UPDATE message enters an AS with a MED value, the value is used to help the AS make routing decisions.
MED can also be used to load balance inbound traffic. For example, different MED values can be used for control different CIDR blocks.
Figure 14: BGP MED Configuration Example
12.5.1 MED Configuration – Example 1
For this example, we will set the default MED setting on ERS8600-A with a value of 10 and ERS8600-B with a value of 100. The overall effect will result in ERS8600-A advertising all routes with a MED setting of 10 whereas ERS8600-B will advertise all routes with a MED setting of 100. This should result in all traffic destined for AS 20 to transverse over 10.1.1.12 network via ERS8600-A.

Border Gateway Protocol (BGP-4) TCG v2.0 NN48500-538
lNortel Confidential Information Copyright © 2007 Nortel Networks. All Rights Reserved. 63
<ExternalDistribution>
12.5.1.1 Set MED Value
Configure a MED value for ERS8600-A to a value that is lower than the MED value assigned to ERS8600-B.
ERS8600-A: Step 1 – Set the MED value to 10
ERS8600-A:5# config ip bgp default-metric 10 add
ERS8600-B: Step 1 – Set the MED value to 100
ERS8600-B:5# config ip bgp default-metric 100 add
A lower MED value indicates a stronger path preference than a higher MED value.
12.6 MED Configuration – Example 2 For this example, we will set a policy so that ERS8600-A will advertise the 200.1.40.0/24 network with a MED setting of 10 and 200.1.50.0/24 with a MED setting of 100. ERS8600-B will be configured with a policy to advertise 200.1.40.0/24 with a MED setting of 100 and 200.1.50.0/24 with a MED setting of 10. This should result in all traffic destined for network 200.1.40.0/24 to transverse over ERS8600-A while 200.1.50.0/24 will transverse over ERS8600-B.
Figure 15: BFP MED Configuration Example 2

Border Gateway Protocol (BGP-4) TCG v2.0 NN48500-538
lNortel Confidential Information Copyright © 2007 Nortel Networks. All Rights Reserved. 64
<ExternalDistribution>
12.6.1 Configuration
12.6.1.1 Configure the IP Prefix List Named 200.1.40.0 and 200.1.50.0
ERS8600-A: Step 1 – Add a prefix list for network 200.1.40.0/24
ERS8600-A:5# config ip prefix-list 200.1.40.0 add-prefix 200.1.40.0/24
ERS8600-B: Step 1 – Add a prefix list for network 200.1.40.0/24
ERS8600-B:5# config ip prefix-list 200.1.40.0 add-prefix 200.1.40.0/24
ERS8600-A: Step 2 – Add a prefix list for network 200.1.50.0/24
ERS8600-A:5# config ip prefix-list 200.1.50.0 add-prefix 200.1.50.0/24
ERS8600-B: Step 2 – Add a prefix list for network 200.1.50.0/24
ERS8600-B:5# config ip prefix-list 200.1.50.0 add-prefix 200.1.50.0/24
12.6.1.2 Configure the IP Route Policy Name MED
ERS8600-A: Step 1 – Add a route policy named MED to match network 200.1.40.0 and set the MED value to 10
ERS8600-A:5# config ip route-policy MED seq 1 create
ERS8600-A:5# config ip route-policy MED seq 1 enable
ERS8600-A:5# config ip route-policy MED seq 1 action permit
ERS8600-A:5# config ip route-policy MED seq 1 match-network 200.1.40.0
ERS8600-A:5# config ip route-policy MED seq 1 set-metric 10
ERS8600-B: Step 1 – Add a route policy named MED to match network 200.1.40.0 and set the MED value to 100
ERS8600-B:5# config ip route-policy MED seq 1 create
ERS8600-B:5# config ip route-policy MED seq 1 enable
ERS8600-B:5# config ip route-policy MED seq 1 action permit
ERS8600-B:5# config ip route-policy MED seq 1 match-network 200.1.40.0
ERS8600-B:5# config ip route-policy MED seq 1 set-metric 100
ERS8600-A: Step 2 – Add a second sequence to the policy named MED to match network 200.1.50.0 and set the MED value to 100
ERS8600-A:5# config ip route-policy MED seq 2 create
ERS8600-A:5# config ip route-policy MED seq 2 enable
ERS8600-A:5# config ip route-policy MED seq 2 action permit
ERS8600-A:5# config ip route-policy MED seq 2 match-network 200.1.50.0
ERS8600-A:5# config ip route-policy MED seq 2 set-metric 100

Border Gateway Protocol (BGP-4) TCG v2.0 NN48500-538
lNortel Confidential Information Copyright © 2007 Nortel Networks. All Rights Reserved. 65
<ExternalDistribution>
ERS8600-B: Step 2 – Add a second sequence to the policy named MED to match network 200.1.50.0 and set the MED value to 10
ERS8600-B:5# config ip route-policy MED seq 2 create
ERS8600-B:5# config ip route-policy MED seq 2 enable
ERS8600-B:5# config ip route-policy MED seq 2 action permit
ERS8600-B:5# config ip route-policy MED seq 2 match-network 200.1.50.0
ERS8600-B:5# config ip route-policy MED seq 2 set-metric 10
12.6.2 Other MED Commands
12.6.2.1 Always Compare MED
In the configuration examples in this section, the AlwaysCompareMed setting was left to the default setting of disable. When disabled, the MEDs are only compared among paths from the same autonomous system. In the two examples above, since we only have two autonomous systems, the default setting can be used. If you have multiple autonomous systems, this parameter should be enabled to allow MED to compare among paths among multiple autonomous systems. To enable or disable this parameter, enter the following command:
• ERS8600-A:5# config ip bgp always-cmp-med <enable/disable>
12.6.2.2 Deterministic-med
The BGP deterministic MED command is used to compare MED variable of different routes that are advertised by peers in the same autonomous system (AS). When this command is enabled, only routes from the same AS are considered, and the route with the lowest MED is used.
The CLI syntax for this command is:
• ERS8600-A:5# config ip bgp deterministic-med <enable|disable>
By default it is disabled. This feature is not supported in Device Manager.
Example
Consider the following routes received for the network 200.1.40.0/24 from different peers:
route-1 :AS Path (40), Peer 200.1.1.1, MED 100
route-2 :AS Path (50), Peer 172.10.1.1, MED 110
route-3 :AS Path (40), Peer 10.12.1.4, MED 80
In this example, route-2 is from a different AS, and is the only one in its group. Thus, it is chosen as the best from its group. Route-1 and route-3 are grouped together, and route-3 is chosen because it has the lowest MED. In the comparison between route-2 and route-3, the MED is ignored, and the best entry is chosen based on other factors.
12.6.2.3 No MED Path is Worst
When set to enable (the default value), BGP treats an update that is missing, a multi-exit discriminator (MED) attribute, as the worst path. To enable or disable this parameter, enter the following command:
• ERS8600-A:5# config ip bgp no-med-path-is-worst <enable|disable>

Border Gateway Protocol (BGP-4) TCG v2.0 NN48500-538
lNortel Confidential Information Copyright © 2007 Nortel Networks. All Rights Reserved. 66
<ExternalDistribution>
12.6.2.4 MED Compare within a Confederation
When enabled, allows you to compare multi-exit discriminator (MED) attributes within a confederation. The default value is disabled. To enable to disable this parameter, enter the following command:
• ERS8600-A:5# config ip bgp comp-bestpath-med-confed <enable|disable>
12.7 Community Attribute (Type 8) Community is an optional transitive attribute that groups destinations into communities to simplify policy administration in a BGP network. A community is a group of destinations that share a common administrative property.
With the Community attribute, customers can control their own routing policies with respect to destinations. Communities are a common practice in cases where a customer has more than one destination and wishes to share some common attribute.
The following are specific community types:
• Internet – Advertise this route to the Internet community.
• No-export – do not advertise any destinations outside of a BGP confederation
• No Advertise – do not advertise to any BGP peer including IBGP peers
• No Export Subconfed – do not advertise to external BGP peers even within the same confederation.
For the community type ‘no export subconfed’, the ERS 8600 uses a setting of ‘local-as’.
By using the community attribute, you can control what routing information to accept, prefer, or distribute to other BGP neighbors. If you specify the append option in the route policy, the specified community value is added to the existing value of the community attribute. Otherwise, the specified community value replaces any community value that was set previously.
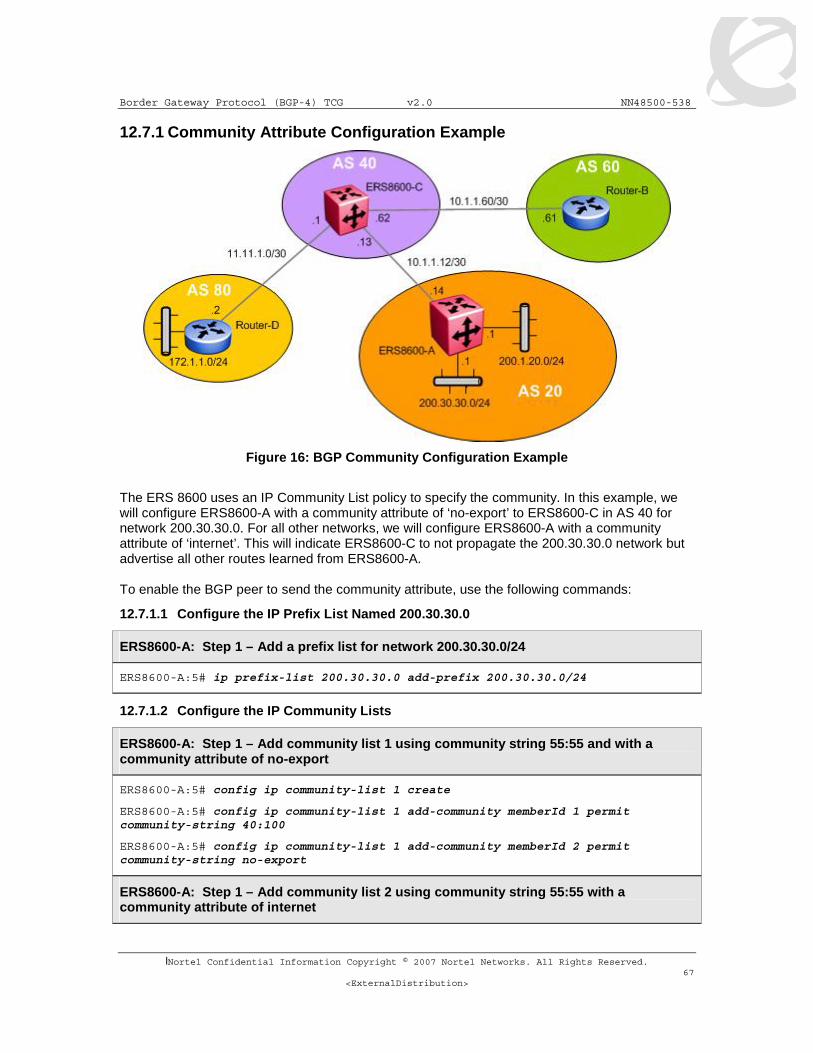
Border Gateway Protocol (BGP-4) TCG v2.0 NN48500-538
lNortel Confidential Information Copyright © 2007 Nortel Networks. All Rights Reserved. 67
<ExternalDistribution>
12.7.1 Community Attribute Configuration Example
Figure 16: BGP Community Configuration Example
The ERS 8600 uses an IP Community List policy to specify the community. In this example, we will configure ERS8600-A with a community attribute of ‘no-export’ to ERS8600-C in AS 40 for network 200.30.30.0. For all other networks, we will configure ERS8600-A with a community attribute of ‘internet’. This will indicate ERS8600-C to not propagate the 200.30.30.0 network but advertise all other routes learned from ERS8600-A. To enable the BGP peer to send the community attribute, use the following commands:
12.7.1.1 Configure the IP Prefix List Named 200.30.30.0
ERS8600-A: Step 1 – Add a prefix list for network 200.30.30.0/24
ERS8600-A:5# ip prefix-list 200.30.30.0 add-prefix 200.30.30.0/24
12.7.1.2 Configure the IP Community Lists
ERS8600-A: Step 1 – Add community list 1 using community string 55:55 and with a community attribute of no-export
ERS8600-A:5# config ip community-list 1 create
ERS8600-A:5# config ip community-list 1 add-community memberId 1 permit community-string 40:100
ERS8600-A:5# config ip community-list 1 add-community memberId 2 permit community-string no-export
ERS8600-A: Step 1 – Add community list 2 using community string 55:55 with a community attribute of internet

Border Gateway Protocol (BGP-4) TCG v2.0 NN48500-538
lNortel Confidential Information Copyright © 2007 Nortel Networks. All Rights Reserved. 68
<ExternalDistribution>
ERS8600-A:5# config ip community-list 2 create
ERS8600-A:5# config ip community-list 2 add-community memberId 1 permit community-string 40:100
ERS8600-A:5# config ip community-list 2 add-community memberId 2 permit community-string internet
The community-string is an alphanumeric string value with a string length between 0 and 1536 characters (asnum:community-value) or (well-known community string).
12.7.1.3 Configure the IP Route policy name community
ERS8600-A: Step 1 – Add a route policy named community to match network 200.30.30.0 and add community list 1 with a mode of additive. This will have the effect of annoucing network 200.30.30.0/24 with a community attribute of no-export.
ERS8600-A:5# config ip route-policy community seq 1 create
ERS8600-A:5# config ip route-policy community seq 1 enable
ERS8600-A:5# config ip route-policy community seq 1 action permit
ERS8600-A:5# config ip route-policy community seq 1 match-network 200.30.30.0
ERS8600-A:5# config ip route-policy community seq set-community 1
ERS8600-A:5# config ip route-policy community seq set-community-mode additive
ERS8600-A: Step 1 – Add sequence 2 to policy named community with a community mode of additive. This will have the effect of announcing all other routes with a community attribute of internet
ERS8600-A:5# config ip route-policy community seq 2 create
ERS8600-A:5# config ip route-policy community seq 2 enable
ERS8600-A:5# config ip route-policy community seq 2 action permit
ERS8600-A:5# config ip route-policy community seq 2 set-community 2
ERS8600-A:5# config ip route-policy community seq 2 set-community-mode additive
The following options are available for the set-community-mode in a route policy:
• config ip route-policy <name> seq <#> set-community-mode <unchanged|additive|none>
o unchanged — do not change an exiting community
o additive — append the community to the exiting community
o none — remove the community
Border Gateway Protocol (BGP-4) TCG v2.0 NN48500-538
lNortel Confidential Information Copyright © 2007 Nortel Networks. All Rights Reserved. 69
<ExternalDistribution>
12.7.1.4 Assign ERS8600-C as a Peer to ERS8600-A Enable Community
ERS8600-A: Step 1 – Add ERS8600-C as a peer
ERS8600-A:5# config ip bgp neighbor 10.1.1.13 admin-state disable
ERS8600-A: Step 2 – Enable send community
ERS8600-A:5# config ip bgp neighbor 10.1.1.13 send-community enable
ERS8600-A: Step 3 – Add the route policy named ‘community’ to the BGP peer
ERS8600-A:5# config ip bgp neighbor 10.1.1.13 route-policy out community add
ERS8600-A: Step 4 – Enable the BGP peer administrative state
ERS8600-A:5# config ip bgp neighbor 10.1.1.13 admin-state enable
12.7.2 Verification
If we look at the route table on ERS8600-C:
Step 1 – To verify that the BGP community operation, via ERS8600-C, enter the following command:
ERS8600-C:5# show ip bgp route community enable
Result:
The total number of routes is 11 Network/Mask Peer Rem Addr NextHop Address Org Loc Pref ------------------ --------------- --------------- --- ---------- 16.16.16.16/30 10.1.1.61 10.1.1.61 IGP 100 AS_PATH: (60) COMMUNITY: no-community-attr 10.1.1.12/30 10.1.1.14 10.1.1.14 IGP 100 AS_PATH: (20) COMMUNITY: 40:100 internet 14.14.14.0/24 10.1.1.61 10.1.1.61 IGP 100 AS_PATH: (60) COMMUNITY: no-community-attr 10.1.1.40/30 10.1.1.61 10.1.1.61 IGP 100 AS_PATH: (60) COMMUNITY: no-community-attr 172.1.2.0/30 11.11.1.2 11.11.1.2 IGP 100 AS_PATH: (80) COMMUNITY: no-community-attr 192.1.1.0/24 10.1.1.61 10.1.1.61 IGP 100 AS_PATH: (60 200) COMMUNITY: no-community-attr 200.30.30.0/24 10.1.1.14 10.1.1.14 IGP 100 AS_PATH: (20) COMMUNITY: 40:100 no-export 200.1.1.4/30 10.1.1.61 10.1.1.61 IGP 100 AS_PATH: (60 20) COMMUNITY: no-community-attr 200.1.30.0/30 10.1.1.61 10.1.1.61 IGP 100 AS_PATH: (60 20)

Border Gateway Protocol (BGP-4) TCG v2.0 NN48500-538
lNortel Confidential Information Copyright © 2007 Nortel Networks. All Rights Reserved. 70
<ExternalDistribution>
COMMUNITY: no-community-attr 200.1.20.0/24 10.1.1.14 10.1.1.14 IGP 100 AS_PATH: (20)
COMMUNITY: 40:100 internet
The end result is, network 200.30.30.0 will not be advertised outside AS 40 while the 200.1.20.0 will be advertised outside AS 40.

Border Gateway Protocol (BGP-4) TCG v2.0 NN48500-538
lNortel Confidential Information Copyright © 2007 Nortel Networks. All Rights Reserved. 71
<ExternalDistribution>
13. EBGP Scalability Issues As of software release 4.1, using R-modules, the maximum number of BGP forwarding routes that can be accepted is 150,000. For classic modules all except the non-E and and E modules, up to 125,000 BGP forwarding routes can be accepted.
13.1 Using Policies to Limit EBGP Routes Route policies can be used to limit the number of EBGP routes to reduce the number of BGP forwarding routes. Within a customer AS, a default route can be injected into the local IGP by the EBGP peering router or routers to reduce the route table size for all non-BGP routers.
13.1.1 Configuration Example : Using AS List to Limit Route Table Size
Figure 17: BGP AS Path Filtering Example
ERS8600 is connected to three separate AS’s all supplying full internet routes. Assuming ERS8600-A is using all R-modules and configured in R-mode, as of software release 4.1, the maximum number of forwarding routes that can be accepted is 140,000. Hence, we will have to reduce the number of routes accepted from each EBGP connection on switch ERS8600A. One method to do this is to apply a policy to each EBGP connection with an IP prefix list to suppress routes. For example, if we add a route policy with an IP prefix list mask length of 18 bits to each EBGP connection, this will reduce the number of routes on each connection to approximately 22,000 routes for a total of 66,000 routes.
For this example, three route policies will be added. We will add a route policy to inject a default route into AS 22000 assuming the IGP is OSPF. Another route policy will be added and applied to each EBGP peer to reduce the number of routes learned by applying an IP prefix with a mask length of 18. In addition, we will add another policy to block ERS8600-A from sending out any routing information from any of the three EBGP peers; we do not want ERS8600-A from becoming a transit router for the other ASs.

Border Gateway Protocol (BGP-4) TCG v2.0 NN48500-538
lNortel Confidential Information Copyright © 2007 Nortel Networks. All Rights Reserved. 72
<ExternalDistribution>
Please note that the VLAN and/or brouter port and OSPF configuration is not provided for this configuration example.
13.1.1.1 Configure an IP Prefix List
The following commands add an IP prefix list for a default route and another to limit the prefix mask length to 18 bits
ERS8600-A: Step 1 – Create prefix list named default
ERS8600-A:5# config ip prefix-list default add prefix 0.0.0.0/0
ERS8600-A: Step 2 – Create a prefix list named limit_18 to limit the prefix mask length to 18 bits
ERS8600-A:5# config ip prefix-list limit_18 add prefix 0.0.0.0/0 maskLenFrom 0 maskLenTo 18
13.1.1.2 Configure AS List
ERS8600-A: Step 1 – Add AS 1 to deny AS 100, 200, and 300
ERS8600-A:5# config ip as-list 1 create
ERS8600-A:5# config ip as-list 1 add-as-path 1 deny 100
ERS8600-A:5# config ip as-list 1 add-as-path 2 deny 200
ERS8600-A:5# config ip as-list 1 add-as-path 3 deny 300
13.1.1.3 Configure IP Route Policies
ERS8600-A: Step 1 – Add a route policy named DR to inject a default route
ERS8600-A:5# config ip route-policy DR seq 1 create
ERS8600-A:5# config ip route-policy DR seq 1 enable
ERS8600-A:5# config ip route-policy DR seq 1 action permit
ERS8600-A:5# config ip route-policy DR seq 1 set-injectlist default
ERS8600-A: Step 2 – Add a route policy named sub_18 to match on the IP prefix list named limit_18 and match on protocol EBGP
ERS8600-A:5# config ip route-policy sub_18 seq 1 create
ERS8600-A:5# config ip route-policy sub_18 seq 1 enable
ERS8600-A:5# config ip route-policy sub_18 seq 1 action permit
ERS8600-A:5# config ip route-policy sub_18 seq 1 match-network limit_18
ERS8600-A:5# config ip route-policy sub_18 seq match-protocol ebgp
ERS8600-A: Step 3 – Add a route policy named as_out to deny routes learned from AS 100, 200 and 300 by matching AS list 1
ERS8600-A:5# config ip route-policy as_out seq 1 create
Border Gateway Protocol (BGP-4) TCG v2.0 NN48500-538
lNortel Confidential Information Copyright © 2007 Nortel Networks. All Rights Reserved. 73
<ExternalDistribution>
ERS8600-A:5# config ip route-policy as_out seq 1 enable
ERS8600-A:5# config ip route-policy as_out seq 1 action deny
ERS8600-A:5# config ip route-policy as_out seq 1 match-as-path 1
ERS8600-A:5# config ip route-policy as_out seq 2 create
ERS8600-A:5# config ip route-policy as_out seq 2 enable
ERS8600-A:5# config ip route-policy as_out seq 2 action permit
13.1.1.4 Configure BGP Globally on ERS8600-A
ERS8600-A: Step 1 – Assign ERS8600-A to local BGP AS 22000
ERS8600-A:5# config ip bgp local-as 22000
ERS8600-A: Step 2 – Disable synchronization of ERS8600-A
ERS8600-A:5# config ip bgp synchronization disable
ERS8600-A: Step 3 – Enable BGP globally
ERS8600-A:5# config ip bgp enable
13.1.1.5 Add BGP Networks
ERS8600-A: Step 1 – Add networks you wish ERS8600A to advertise
ERS8600-A:5# config ip bgp network 200.30.30.0/24 add
13.1.1.6 Add BGP Peers
ERS8600-A: Step 1 – Enable a BGP peer to neighbor Router-A, add in policy sub_18 and out policy as_out
ERS8600-A:5# config ip bgp neighbor 201.80.1.1 create
ERS8600-A:5# config ip bgp neighbor 201.80.1.1 remote-as 100
ERS8600-A:5# config ip bgp neighbor 201.80.1.1 max-prefix 0 add
ERS8600-A:5# config ip bgp neighbor 201.80.1.1 route-policy in sub_18 add
ERS8600-A:5# config ip bgp neighbor 201.80.1.1 route-policy out as_out add
ERS8600-A: Step 2 – Enable a BGP peer to neighbor Router-B, add in policy sub_18 and out policy as_out
ERS8600-A:5# config ip bgp neighbor 132.1.1.61 create
ERS8600-A:5# config ip bgp neighbor 132.1.1.61 remote-as 100
ERS8600-A:5# config ip bgp neighbor 132.1.1.61 max-prefix 0 add
ERS8600-A:5# config ip bgp neighbor 132.1.1.61 route-policy in sub_18 add
Border Gateway Protocol (BGP-4) TCG v2.0 NN48500-538
lNortel Confidential Information Copyright © 2007 Nortel Networks. All Rights Reserved. 74
<ExternalDistribution>
ERS8600-A:5# config ip bgp neighbor 132.1.1.61 route-policy out as_out add
ERS8600-A: Step 3 – Enable a BGP peer to neighbor Router-C, add in policy sub_18 and out policy as_out
ERS8600-A:5# config ip bgp neighbor 80.101.1.13 create
ERS8600-A:5# config ip bgp neighbor 80.101.1.13 remote-as 100
ERS8600-A:5# config ip bgp neighbor 80.101.1.13 max-prefix 0 add
ERS8600-A:5# config ip bgp neighbor 80.101.1.13 route-policy in sub_18 add
ERS8600-A:5# config ip bgp neighbor 80.101.1.13 route-policy out as_out add
13.1.1.7 Enable OSPF Redistribution of BGP
ERS8600-A: Step 1 – Enable BGP redistribution into OSPF
ERS8600-A:5# config ip ospf redistribute bgp create
ERS8600-A:5# config ip ospf redistribute bgp route-policy DR enable
ERS8600-A:5# config ip ospf redistribute bgp route-policy DR apply
ERS8600-A:5# config ip ospf redistribute bgp enable

Border Gateway Protocol (BGP-4) TCG v2.0 NN48500-538
lNortel Confidential Information Copyright © 2007 Nortel Networks. All Rights Reserved. 75
<ExternalDistribution>
14. IBGP Scalability Issues In order to preserve and update BGP attributes, IBGP connections between border routers must be “fully-meshed”. Any external routing information must be re-distributed to all other routers within the AS. As the number of IBGP speaker’s increases, this full mesh requirement does not scale very well. With many border routers and 1,000s of routes, IBGP peering can become an issue for resources such as CPU, bandwidth, and configuration management.
Because of scalability, BGP speakers within an AS must maintain n*(n-1)/2 unique IBGP sessions.
Route reflectors and BGP Confederations can be used to eliminate the full-mesh scaling problem by minimizing the number of necessary peer sessions.
14.1 BGP Confederations Confederations reduce the number of peers required within the AS. BGP confederations are used to divide an AS into multiple smaller ASs and assign these sub-system ASs to a confederation. The IBGP speakers within the sub-system AS only need to establish peer sessions with the other speakers in their own sub-system and one speaker from each sub-system establishes EBGP peer sessions with a speaker from each of the other sub-systems.
Although there is multiple smaller sub system ASs with the BGP confederation, to the outside world, the confederation looks like a single AS.
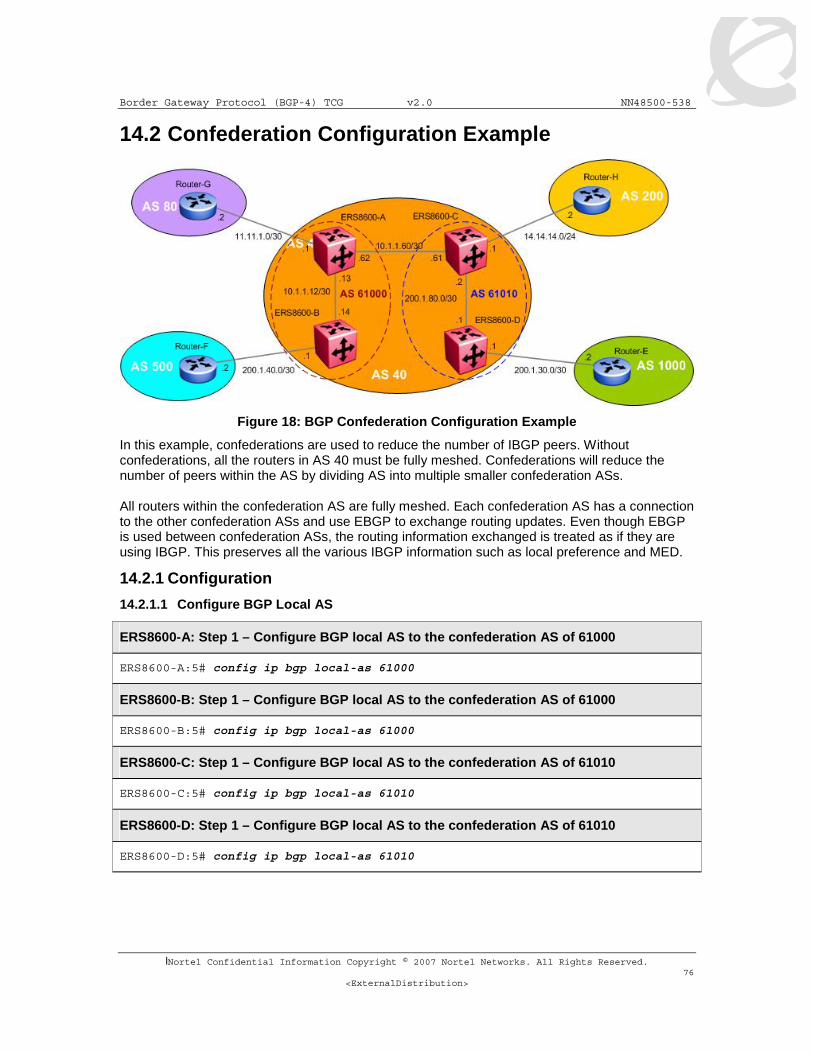
Border Gateway Protocol (BGP-4) TCG v2.0 NN48500-538
lNortel Confidential Information Copyright © 2007 Nortel Networks. All Rights Reserved. 76
<ExternalDistribution>
14.2 Confederation Configuration Example
Figure 18: BGP Confederation Configuration Example
In this example, confederations are used to reduce the number of IBGP peers. Without confederations, all the routers in AS 40 must be fully meshed. Confederations will reduce the number of peers within the AS by dividing AS into multiple smaller confederation ASs. All routers within the confederation AS are fully meshed. Each confederation AS has a connection to the other confederation ASs and use EBGP to exchange routing updates. Even though EBGP is used between confederation ASs, the routing information exchanged is treated as if they are using IBGP. This preserves all the various IBGP information such as local preference and MED.
14.2.1 Configuration
14.2.1.1 Configure BGP Local AS
ERS8600-A: Step 1 – Configure BGP local AS to the confederation AS of 61000
ERS8600-A:5# config ip bgp local-as 61000
ERS8600-B: Step 1 – Configure BGP local AS to the confederation AS of 61000
ERS8600-B:5# config ip bgp local-as 61000
ERS8600-C: Step 1 – Configure BGP local AS to the confederation AS of 61010
ERS8600-C:5# config ip bgp local-as 61010
ERS8600-D: Step 1 – Configure BGP local AS to the confederation AS of 61010
ERS8600-D:5# config ip bgp local-as 61010
Border Gateway Protocol (BGP-4) TCG v2.0 NN48500-538
lNortel Confidential Information Copyright © 2007 Nortel Networks. All Rights Reserved. 77
<ExternalDistribution>
14.2.1.2 Configure BGP Confederation
ERS8600-A: Step 1 – Assign local AS 40 as the confederation identifier and add the peer AS 61010 to the confederation configuration
ERS8600-A:5# config ip bgp confederation identifier 40 add
ERS8600-A:5# config ip bgp confederation peers 61010
ERS8600-A:5# config ip bgp confederation enable
ERS8600-B: Step 1 – Assign local AS 40 as the confederation identifier
ERS8600-B:5# config ip bgp confederation identifier 40 add
ERS8600-B:5# config ip bgp confederation enable
ERS8600-C: Step 1 – Assign local AS 40 as the confederation identifier and add the peer AS 61000 to the confederation configuration
ERS8600-C:5# config ip bgp confederation identifier 40 add
ERS8600-C:5# config ip bgp confederation peers 61000
ERS8600-C:5# config ip bgp confederation enable
ERS8600-D: Step 1 – Assign local AS 40 as the confederation identifier
ERS8600-D:5# config ip bgp confederation identifier 40 add
ERS8600-D:5# config ip bgp confederation enable
14.2.1.3 Enable BGP
ERS8600-A: Step 1 – Enable BGP Globally
ERS8600-A:5# config ip bgp enable
ERS8600-B: Step 1 – Enable BGP Globally
ERS8600-B:5# config ip bgp enable
ERS8600-C: Step 1 – Enable BGP Globally
ERS8600-C:5# config ip bgp enable
ERS8600-D: Step 1 – Enable BGP Globally
ERS8600-D:5# config ip bgp enable

Border Gateway Protocol (BGP-4) TCG v2.0 NN48500-538
lNortel Confidential Information Copyright © 2007 Nortel Networks. All Rights Reserved. 78
<ExternalDistribution>
14.2.1.4 Assign BGP Peers
ERS8600-A: Step 1 – Assign neighboring router (Router-G) as an ERS8600-A peer
ERS8600-A:5# config ip bgp neighbor 11.11.1.2 create
ERS8600-A:5# config ip bgp neighbor 11.11.1.2 remote-as 80
ERS8600-A:5# config ip bgp neighbor 11.11.1.2 admin-state enable
ERS8600-A: Step 2 – Assign neighboring router (ERS8600-C) as an ERS8600-A peer
ERS8600-A:5# config ip bgp neighbor 10.1.1.61 create
ERS8600-A:5# config ip bgp neighbor 10.1.1.61 remote-as 61010
ERS8600-A:5# config ip bgp neighbor 10.1.1.61 admin-state enable
ERS8600-A: Step 3 – Assign neighboring router (ERS8600-B) as an ERS8600-A peer
ERS8600-A:5# config ip bgp neighbor 10.1.1.14 create
ERS8600-A:5# config ip bgp neighbor 10.1.1.14 remote-as 61000
ERS8600-A:5# config ip bgp neighbor 10.1.1.14 admin-state enable
ERS8600-B: Step 1 –Assign neighboring router (Router-A) as an ERS8600-B peer
ERS8600-B:5# config ip bgp neighbor 10.1.1.13 create
ERS8600-B:5# config ip bgp neighbor 10.1.1.13 remote-as 61000
ERS8600-B:5# config ip bgp neighbor 10.1.1.13 admin-state enable
ERS8600-B: Step 1 –Assign neighboring router (Router-f) as an ERS8600-B peer
ERS8600-B:5# config ip bgp neighbor 200.1.40.2 create
ERS8600-B:5# config ip bgp neighbor 200.1.40.2 remote-as 500
ERS8600-B:5# config ip bgp neighbor 200.1.40.2 admin-state enable
ERS8600-C: Step 1 – Assign neighboring router (Router-H) as an ERS8600-C peer
ERS8600-C:5# config ip bgp neighbor 14.14.14.2 create
ERS8600-C:5# config ip bgp neighbor 14.14.14.2 remote-as 200
ERS8600-C:5# config ip bgp neighbor 14.14.14.2 admin-state enable
ERS8600-C: Step 2 – Assign neighboring router (ERS8600-A) as an ERS8600-C peer
ERS8600-C:5# config ip bgp neighbor 10.1.1.62 create
ERS8600-C:5# config ip bgp neighbor 10.1.1.62 remote-as 61000
ERS8600-C:5# config ip bgp neighbor 10.1.1.62 admin-state enable
ERS8600-C: Step 3 – Assign neighboring router (ERS8600-D) as an ERS8600-C peer
ERS8600-C:5# config ip bgp neighbor 200.1.80.1 create

Border Gateway Protocol (BGP-4) TCG v2.0 NN48500-538
lNortel Confidential Information Copyright © 2007 Nortel Networks. All Rights Reserved. 79
<ExternalDistribution>
ERS8600-C:5# config ip bgp neighbor 200.1.80.1 remote-as 61010
ERS8600-C:5# config ip bgp neighbor 200.1.80.1 admin-state enable
ERS8600-D: Step 1 –Assign neighboring router (Router-C) as an ERS8600-D peer
ERS8600-D:5# config ip bgp neighbor 200.1.80.2 create
ERS8600-D:5# config ip bgp neighbor 200.1.80.2 remote-as 61010
ERS8600-D:5# config ip bgp neighbor 200.1.80.2 admin-state enable
ERS8600-D: Step 1 –Assign neighboring router (Router-E) as an ERS8600-D peer
ERS8600-D:5# config ip bgp neighbor 200.1.30.2 create
ERS8600-D:5# config ip bgp neighbor 200.1.30.2 remote-as 1000
ERS8600-D:5# config ip bgp neighbor 200.1.30.2 admin-state enable
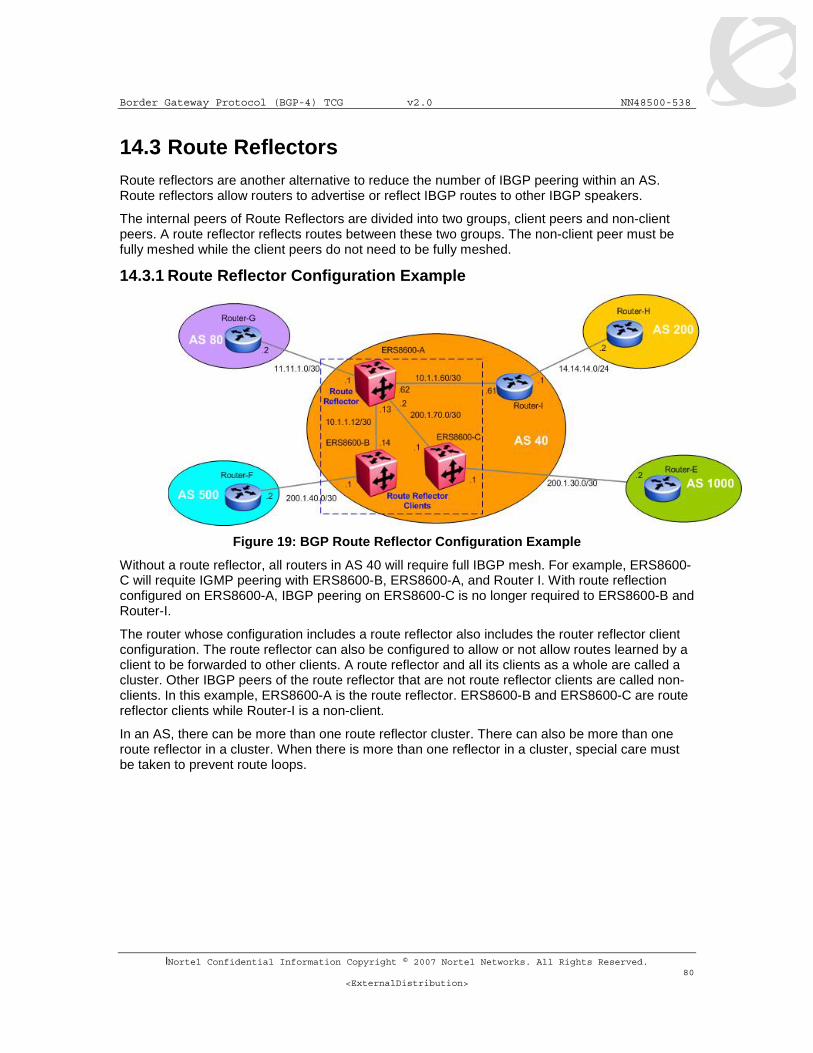
Border Gateway Protocol (BGP-4) TCG v2.0 NN48500-538
lNortel Confidential Information Copyright © 2007 Nortel Networks. All Rights Reserved. 80
<ExternalDistribution>
14.3 Route Reflectors Route reflectors are another alternative to reduce the number of IBGP peering within an AS. Route reflectors allow routers to advertise or reflect IBGP routes to other IBGP speakers.
The internal peers of Route Reflectors are divided into two groups, client peers and non-client peers. A route reflector reflects routes between these two groups. The non-client peer must be fully meshed while the client peers do not need to be fully meshed.
14.3.1 Route Reflector Configuration Example
Figure 19: BGP Route Reflector Configuration Example
Without a route reflector, all routers in AS 40 will require full IBGP mesh. For example, ERS8600-C will requite IGMP peering with ERS8600-B, ERS8600-A, and Router I. With route reflection configured on ERS8600-A, IBGP peering on ERS8600-C is no longer required to ERS8600-B and Router-I.
The router whose configuration includes a route reflector also includes the router reflector client configuration. The route reflector can also be configured to allow or not allow routes learned by a client to be forwarded to other clients. A route reflector and all its clients as a whole are called a cluster. Other IBGP peers of the route reflector that are not route reflector clients are called non-clients. In this example, ERS8600-A is the route reflector. ERS8600-B and ERS8600-C are route reflector clients while Router-I is a non-client.
In an AS, there can be more than one route reflector cluster. There can also be more than one route reflector in a cluster. When there is more than one reflector in a cluster, special care must be taken to prevent route loops.
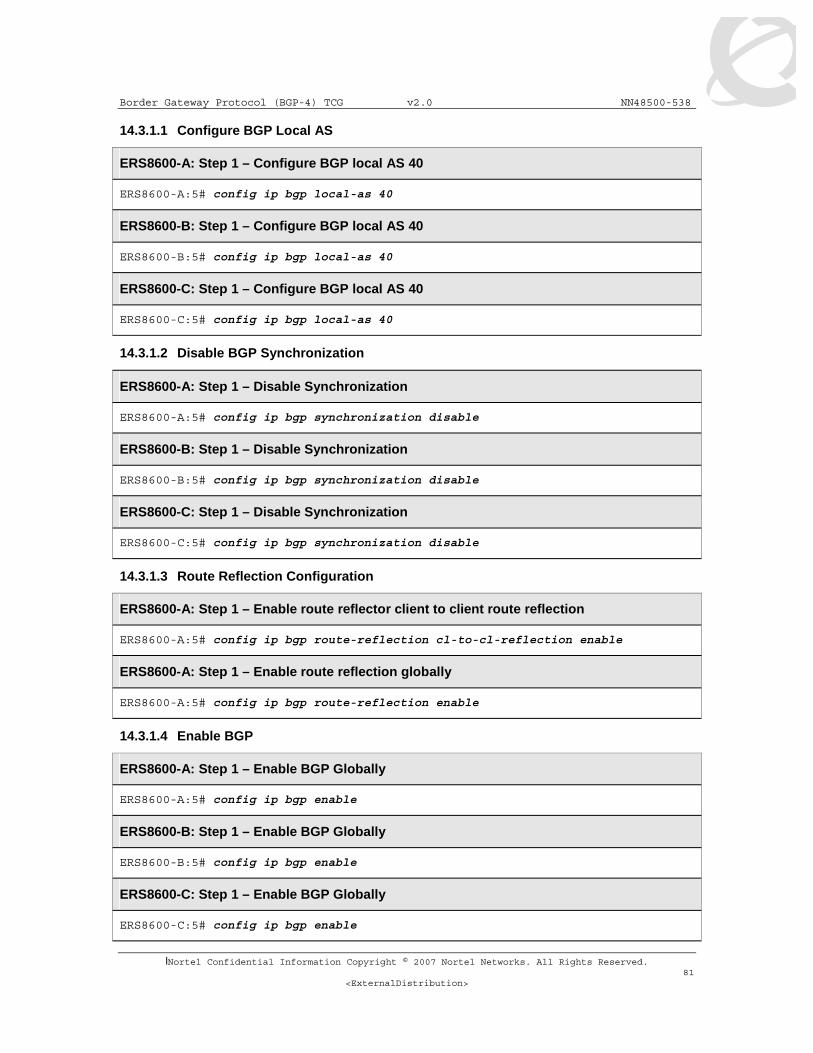
Border Gateway Protocol (BGP-4) TCG v2.0 NN48500-538
lNortel Confidential Information Copyright © 2007 Nortel Networks. All Rights Reserved. 81
<ExternalDistribution>
14.3.1.1 Configure BGP Local AS
ERS8600-A: Step 1 – Configure BGP local AS 40
ERS8600-A:5# config ip bgp local-as 40
ERS8600-B: Step 1 – Configure BGP local AS 40
ERS8600-B:5# config ip bgp local-as 40
ERS8600-C: Step 1 – Configure BGP local AS 40
ERS8600-C:5# config ip bgp local-as 40
14.3.1.2 Disable BGP Synchronization
ERS8600-A: Step 1 – Disable Synchronization
ERS8600-A:5# config ip bgp synchronization disable
ERS8600-B: Step 1 – Disable Synchronization
ERS8600-B:5# config ip bgp synchronization disable
ERS8600-C: Step 1 – Disable Synchronization
ERS8600-C:5# config ip bgp synchronization disable
14.3.1.3 Route Reflection Configuration
ERS8600-A: Step 1 – Enable route reflector client to client route reflection
ERS8600-A:5# config ip bgp route-reflection cl-to-cl-reflection enable
ERS8600-A: Step 1 – Enable route reflection globally
ERS8600-A:5# config ip bgp route-reflection enable
14.3.1.4 Enable BGP
ERS8600-A: Step 1 – Enable BGP Globally
ERS8600-A:5# config ip bgp enable
ERS8600-B: Step 1 – Enable BGP Globally
ERS8600-B:5# config ip bgp enable
ERS8600-C: Step 1 – Enable BGP Globally
ERS8600-C:5# config ip bgp enable

Border Gateway Protocol (BGP-4) TCG v2.0 NN48500-538
lNortel Confidential Information Copyright © 2007 Nortel Networks. All Rights Reserved. 82
<ExternalDistribution>
14.3.1.5 Assign BGP Peers
ERS8600-A: Step 1 – Assign neighboring router (Router-B) as an ERS8600-A peer and enable the peer as an route reflector client
ERS8600-A:5# config ip bgp neighbor 10.1.1.14 create
ERS8600-A:5# config ip bgp neighbor 10.1.1.14 remote-as 40
ERS8600-A:5# config ip bgp neighbor 10.1.1.14 route-reflector-client enable
ERS8600-A:5# config ip bgp neighbor 10.1.1.14 admin-state enable
ERS8600-A: Step 2 – Assign neighboring router (ERS8600-C) as an ERS8600-A peer and enable the peer as an route reflector client
ERS8600-A:5# config ip bgp neighbor 200.1.70.1 create
ERS8600-A:5# config ip bgp neighbor 200.1.70.1 remote-as 40
ERS8600-A:5# config ip bgp neighbor 200.1.70.1 route-reflector-client enable
ERS8600-A:5# config ip bgp neighbor 200.1.70.1 admin-state enable
ERS8600-A: Step 3 – Assign neighboring router (ERS8600-G) as an ERS8600-A peer
ERS8600-A:5# config ip bgp neighbor 11.11.1.2 create
ERS8600-A:5# config ip bgp neighbor 11.11.1.2 remote-as 80
ERS8600-A:5# config ip bgp neighbor 11.11.1.2 admin-state enable
ERS8600-A: Step 4 – Assign neighboring router (ERS8600-I) as an ERS8600-A peer
ERS8600-A:5# config ip bgp neighbor 10.1.1.61 create
ERS8600-A:5# config ip bgp neighbor 10.1.1.61 remote-as 40
ERS8600-A:5# config ip bgp neighbor 10.1.1.61 admin-state enable
ERS8600-B: Step 1 –Assign neighboring router (Router-A) as an ERS8600-B peer
ERS8600-B:5# config ip bgp neighbor 10.1.1.13 create
ERS8600-B:5# config ip bgp neighbor 10.1.1.13 remote-as 40
ERS8600-B:5# config ip bgp neighbor 10.1.1.13 admin-state enable
ERS8600-B: Step 1 –Assign neighboring router (Router-F) as an ERS8600-B peer
ERS8600-B:5# config ip bgp neighbor 200.1.40.2 create
ERS8600-B:5# config ip bgp neighbor 200.1.40.2 remote-as 500
ERS8600-B:5# config ip bgp neighbor 200.1.40.2 admin-state enable
ERS8600-C: Step 1 – Assign neighboring router (Router-A) as an ERS8600-C peer
ERS8600-C:5# config ip bgp neighbor 200.1.70.2 create
ERS8600-C:5# config ip bgp neighbor 200.1.70.2 remote-as 40
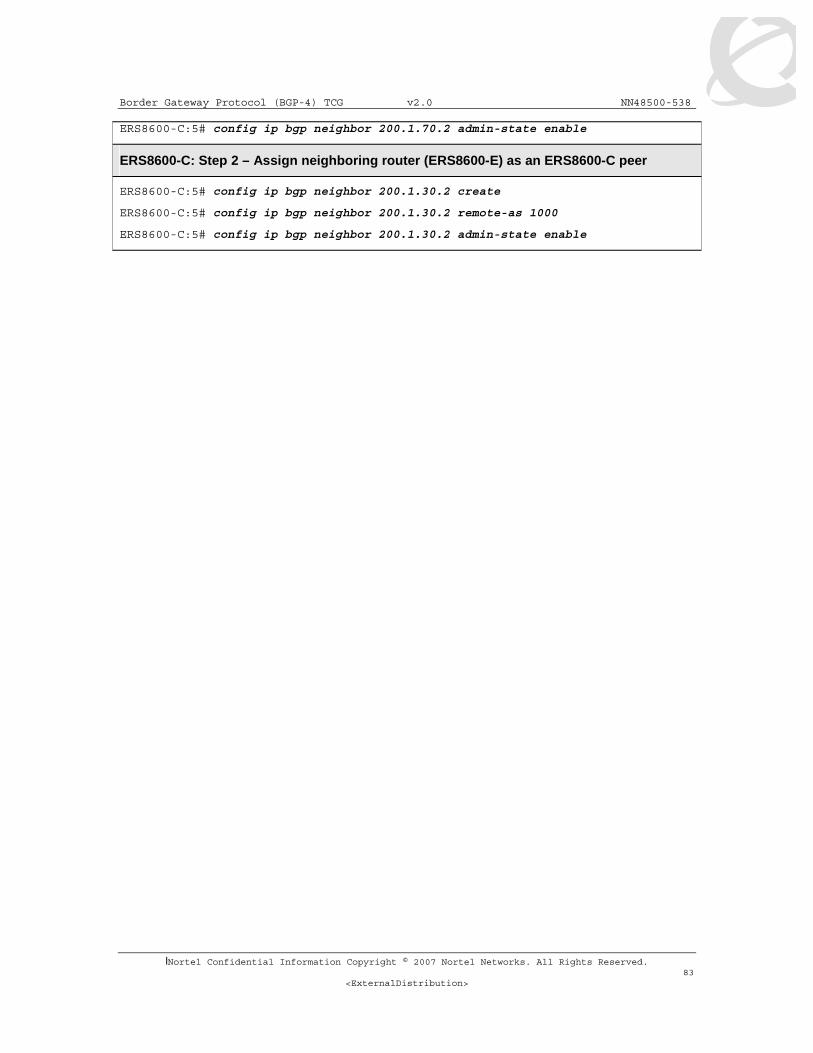
Border Gateway Protocol (BGP-4) TCG v2.0 NN48500-538
lNortel Confidential Information Copyright © 2007 Nortel Networks. All Rights Reserved. 83
<ExternalDistribution>
ERS8600-C:5# config ip bgp neighbor 200.1.70.2 admin-state enable
ERS8600-C: Step 2 – Assign neighboring router (ERS8600-E) as an ERS8600-C peer
ERS8600-C:5# config ip bgp neighbor 200.1.30.2 create
ERS8600-C:5# config ip bgp neighbor 200.1.30.2 remote-as 1000
ERS8600-C:5# config ip bgp neighbor 200.1.30.2 admin-state enable

Border Gateway Protocol (BGP-4) TCG v2.0 NN48500-538
lNortel Confidential Information Copyright © 2007 Nortel Networks. All Rights Reserved. 84
<ExternalDistribution>
14.4 Configuration Example using Cluster List Normally, in a route reflector cluster there is only one route reflector and is identified by the router ID. To increase resilience, a second route reflector can be installed. When installing more than one route reflector in a cluster, the cluster must be configured with a 4-octet cluster ID. The cluster ID allows the router reflectors to recognize updates from other route reflectors in the same cluster. The cluster ID is also appended to all routes sent outside its cluster. If a route reflector receives an update with a cluster ID the same as the local customer ID the update is dropped, hence preventing route loops.
Figure 20: BGP Route Reflector with Cluster List Configuration Example
14.4.1 Configuration
14.4.1.1 Configure BGP Local AS
ERS8600-A: Step 1 – Configure BGP local AS
ERS8600-A:5# config ip bgp local-as 40
ERS8600-B: Step 1 – Configure BGP local AS
ERS8600-B:5# config ip bgp local-as 40
ERS8600-C: Step 1 – Configure BGP local AS
ERS8600-C:5# config ip bgp local-as 40
ERS8600-D: Step 1 – Configure BGP local AS
ERS8600-D:5# config ip bgp local-as 40
14.4.1.2 Disable Synchronization
ERS8600-A: Step 1 – Disable Synchronization
ERS8600-A:5# config ip bgp synchronization disable
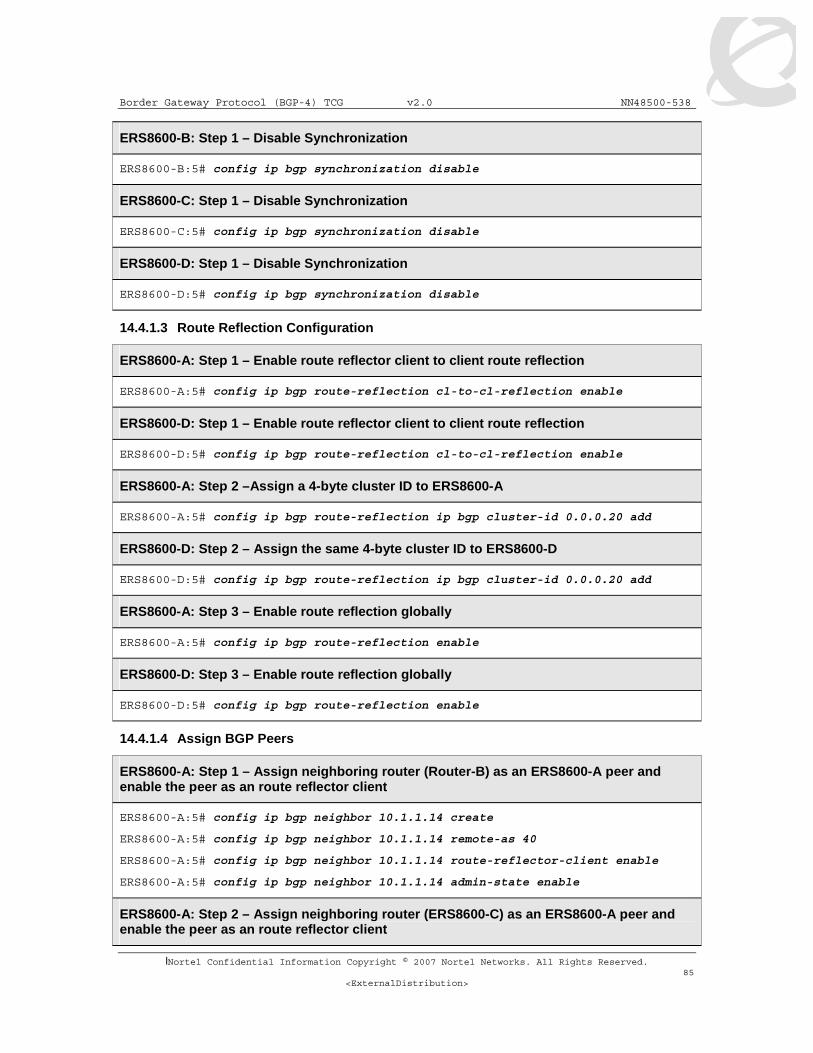
Border Gateway Protocol (BGP-4) TCG v2.0 NN48500-538
lNortel Confidential Information Copyright © 2007 Nortel Networks. All Rights Reserved. 85
<ExternalDistribution>
ERS8600-B: Step 1 – Disable Synchronization
ERS8600-B:5# config ip bgp synchronization disable
ERS8600-C: Step 1 – Disable Synchronization
ERS8600-C:5# config ip bgp synchronization disable
ERS8600-D: Step 1 – Disable Synchronization
ERS8600-D:5# config ip bgp synchronization disable
14.4.1.3 Route Reflection Configuration
ERS8600-A: Step 1 – Enable route reflector client to client route reflection
ERS8600-A:5# config ip bgp route-reflection cl-to-cl-reflection enable
ERS8600-D: Step 1 – Enable route reflector client to client route reflection
ERS8600-D:5# config ip bgp route-reflection cl-to-cl-reflection enable
ERS8600-A: Step 2 –Assign a 4-byte cluster ID to ERS8600-A
ERS8600-A:5# config ip bgp route-reflection ip bgp cluster-id 0.0.0.20 add
ERS8600-D: Step 2 – Assign the same 4-byte cluster ID to ERS8600-D
ERS8600-D:5# config ip bgp route-reflection ip bgp cluster-id 0.0.0.20 add
ERS8600-A: Step 3 – Enable route reflection globally
ERS8600-A:5# config ip bgp route-reflection enable
ERS8600-D: Step 3 – Enable route reflection globally
ERS8600-D:5# config ip bgp route-reflection enable
14.4.1.4 Assign BGP Peers
ERS8600-A: Step 1 – Assign neighboring router (Router-B) as an ERS8600-A peer and enable the peer as an route reflector client
ERS8600-A:5# config ip bgp neighbor 10.1.1.14 create
ERS8600-A:5# config ip bgp neighbor 10.1.1.14 remote-as 40
ERS8600-A:5# config ip bgp neighbor 10.1.1.14 route-reflector-client enable
ERS8600-A:5# config ip bgp neighbor 10.1.1.14 admin-state enable
ERS8600-A: Step 2 – Assign neighboring router (ERS8600-C) as an ERS8600-A peer and enable the peer as an route reflector client

Border Gateway Protocol (BGP-4) TCG v2.0 NN48500-538
lNortel Confidential Information Copyright © 2007 Nortel Networks. All Rights Reserved. 86
<ExternalDistribution>
ERS8600-A:5# config ip bgp neighbor 200.1.70.1 create
ERS8600-A:5# config ip bgp neighbor 200.1.70.1 remote-as 40
ERS8600-A:5# config ip bgp neighbor 200.1.70.1 route-reflector-client enable
ERS8600-A:5# config ip bgp neighbor 200.1.70.1 admin-state enable
ERS8600-A: Step 3 – Assign neighboring router (ERS8600-G) as an ERS8600-A peer
ERS8600-A:5# config ip bgp neighbor 11.11.1.2 create
ERS8600-A:5# config ip bgp neighbor 11.11.1.2 remote-as 80
ERS8600-A:5# config ip bgp neighbor 11.11.1.2 admin-state enable
ERS8600-A: Step 4 – Assign neighboring router (ERS8600-D) as an ERS8600-A peer
ERS8600-A:5# config ip bgp neighbor 10.1.1.61 create
ERS8600-A:5# config ip bgp neighbor 10.1.1.61 remote-as 40
ERS8600-A:5# config ip bgp neighbor 10.1.1.61 admin-state enable
ERS8600-B: Step 1 –Assign neighboring router (Router-A) as an ERS8600-B peer
ERS8600-B:5# config ip bgp neighbor 10.1.1.13 create
ERS8600-B:5# config ip bgp neighbor 10.1.1.13 remote-as 40
ERS8600-B:5# config ip bgp neighbor 10.1.1.13 admin-state enable
ERS8600-B: Step 1 –Assign neighboring router (Router-F) as an ERS8600-B peer
ERS8600-B:5# config ip bgp neighbor 200.1.40.2 create
ERS8600-B:5# config ip bgp neighbor 200.1.40.2 remote-as 500
ERS8600-B:5# config ip bgp neighbor 200.1.40.2 admin-state enable
ERS8600-C: Step 1 – Assign neighboring router (Router-A) as an ERS8600-C peer
ERS8600-C:5# config ip bgp neighbor 200.1.70.2 create
ERS8600-C:5# config ip bgp neighbor 200.1.70.2 remote-as 40
ERS8600-C:5# config ip bgp neighbor 200.1.70.2 admin-state enable
ERS8600-C: Step 2 – Assign neighboring router (ERS8600-E) as an ERS8600-C peer
ERS8600-C:5# config ip bgp neighbor 200.1.30.2 create
ERS8600-C:5# config ip bgp neighbor 200.1.30.2 remote-as 1000
ERS8600-C:5# config ip bgp neighbor 200.1.30.2 admin-state enable
ERS8600-C: Step 3 – Assign neighboring router (ERS8600-D) as an ERS8600-C peer
ERS8600-C:5# config ip bgp neighbor 200.1.80.2 create
ERS8600-C:5# config ip bgp neighbor 200.1.80.2 remote-as 40
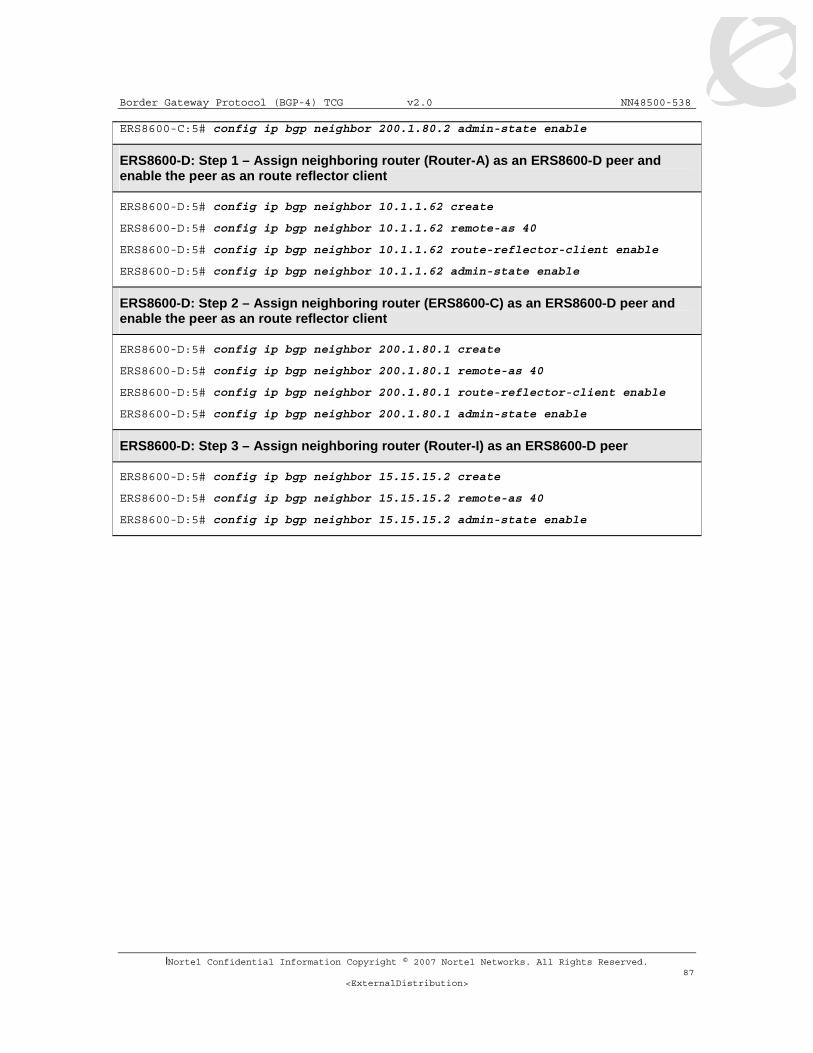
Border Gateway Protocol (BGP-4) TCG v2.0 NN48500-538
lNortel Confidential Information Copyright © 2007 Nortel Networks. All Rights Reserved. 87
<ExternalDistribution>
ERS8600-C:5# config ip bgp neighbor 200.1.80.2 admin-state enable
ERS8600-D: Step 1 – Assign neighboring router (Router-A) as an ERS8600-D peer and enable the peer as an route reflector client
ERS8600-D:5# config ip bgp neighbor 10.1.1.62 create
ERS8600-D:5# config ip bgp neighbor 10.1.1.62 remote-as 40
ERS8600-D:5# config ip bgp neighbor 10.1.1.62 route-reflector-client enable
ERS8600-D:5# config ip bgp neighbor 10.1.1.62 admin-state enable
ERS8600-D: Step 2 – Assign neighboring router (ERS8600-C) as an ERS8600-D peer and enable the peer as an route reflector client
ERS8600-D:5# config ip bgp neighbor 200.1.80.1 create
ERS8600-D:5# config ip bgp neighbor 200.1.80.1 remote-as 40
ERS8600-D:5# config ip bgp neighbor 200.1.80.1 route-reflector-client enable
ERS8600-D:5# config ip bgp neighbor 200.1.80.1 admin-state enable
ERS8600-D: Step 3 – Assign neighboring router (Router-I) as an ERS8600-D peer
ERS8600-D:5# config ip bgp neighbor 15.15.15.2 create
ERS8600-D:5# config ip bgp neighbor 15.15.15.2 remote-as 40
ERS8600-D:5# config ip bgp neighbor 15.15.15.2 admin-state enable
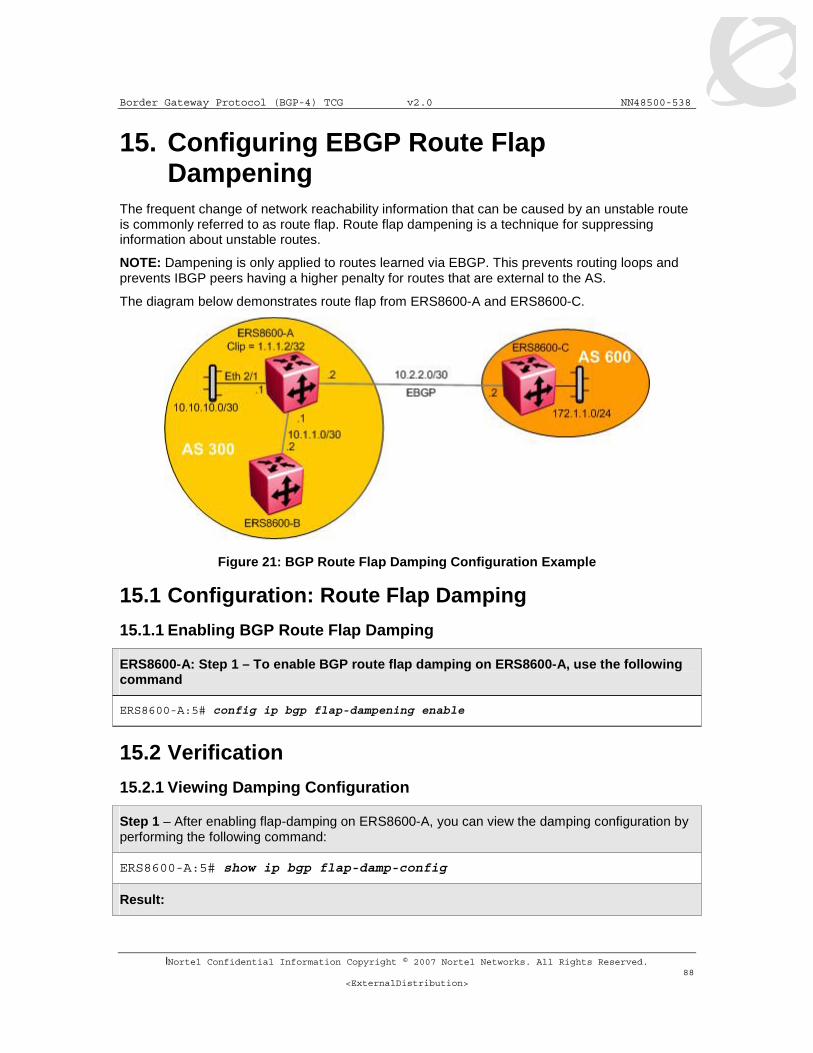
Border Gateway Protocol (BGP-4) TCG v2.0 NN48500-538
lNortel Confidential Information Copyright © 2007 Nortel Networks. All Rights Reserved. 88
<ExternalDistribution>
15. Configuring EBGP Route Flap Dampening
The frequent change of network reachability information that can be caused by an unstable route is commonly referred to as route flap. Route flap dampening is a technique for suppressing information about unstable routes.
NOTE: Dampening is only applied to routes learned via EBGP. This prevents routing loops and prevents IBGP peers having a higher penalty for routes that are external to the AS.
The diagram below demonstrates route flap from ERS8600-A and ERS8600-C.
Figure 21: BGP Route Flap Damping Configuration Example
15.1 Configuration: Route Flap Damping
15.1.1 Enabling BGP Route Flap Damping
ERS8600-A: Step 1 – To enable BGP route flap damping on ERS8600-A, use the following command
ERS8600-A:5# config ip bgp flap-dampening enable
15.2 Verification
15.2.1 Viewing Damping Configuration
Step 1 – After enabling flap-damping on ERS8600-A, you can view the damping configuration by performing the following command:
ERS8600-A:5# show ip bgp flap-damp-config
Result:

Border Gateway Protocol (BGP-4) TCG v2.0 NN48500-538
lNortel Confidential Information Copyright © 2007 Nortel Networks. All Rights Reserved. 89
<ExternalDistribution>
************************************************ Global Flap Dampening Configuration ************************************************ Status - enable PolicyName - N/A CutoffThreshold - 1536 ReuseThreshold - 512 Decay - 2 MaxHoldDown – 180
Step 2 – Initially, assuming the EBGP link is stable between ERS8600-A and ERS8600-C, performing the following command should display no dampened paths:
ERS8600-A:5# show ip bgp dampened-paths 10.2.2.2
Result:
Network/Mask Peer Rem Addr NextHop Address Org Loc Pref ------------------ --------------- --------------- --- ----------
Step 3 – To simulate a route flap, enter the following commands are entered on ERS8600-C:
ERS8600-C:5# config ip bgp neighbor 10.2.2.1 admin-state disable
ERS8600-C:5# config ip bgp neighbor 10.2.2.1 admin-state enable
Step 4 – Now, because the 172.1.1.0 route to ERS8600-C has flapped, the command “show ip bgp dampened-paths <ipaddr> show display this fact::
ERS8600-A:5# show ip bgp dampened-paths 10.2.2.2
Result:
Network/Mask Peer Rem Addr NextHop Address Org Loc Pref ------------------ --------------- --------------- --- ---------- 172.1.1.0/24 10.2.2.2 N/A IGP 0 AS_PATH: no-AS_PATH-attr MED:0 DAMPEN INFO:Penalty:1024 Count:1 Status:announced hist-del time:set:180, remain:173
Via ERS8600-A, verify the following information:
Option Verify
Count The value shown indicates the number of times this route has flapped. If we perform another admin-state disable/enable on ERS8600-C, the count will go up to 2.
Remain This value indicates the amount of hold down time left. Notice when we displayed the flap damped configuration, the maximum hold down time displayed a value of 180 seconds – this is initially set upon a new route flap. This counter will continue to count down to zero unless of course there is another flap in which case the counter will go back up to 180 and count down again.

Border Gateway Protocol (BGP-4) TCG v2.0 NN48500-538
lNortel Confidential Information Copyright © 2007 Nortel Networks. All Rights Reserved. 90
<ExternalDistribution>
Penalty If the penalty count is greater than the Cut Off Threshold, the route will be suppressed even if the route is up.
15.3 BGP Quick-Start Feature The ERS8600 has a BGP quick-start feature which, when enabled, avoids flap penalty on the peers. This feature will force the peers to transition from IDLE state immediately when the ERS8600 is reset. This will result in no flap penalty imposed on the peers. The default setting is set to disable by default. To enable or disable this feature, enter the command below:
To enable or disable this feature, enter the command below:
ERS8600-A:5# config ip bgp quick-start <enable|disable>

Border Gateway Protocol (BGP-4) TCG v2.0 NN48500-538
lNortel Confidential Information Copyright © 2007 Nortel Networks. All Rights Reserved. 91
<ExternalDistribution>
16. Appendix A 16.1 Translating Cisco to Nortel Networks Equivalents
This appendix shows you how to translate Cisco commands and functions into their Nortel Networks equivalents. Configuration Command Equivalents Table 2 lists the Nortel Networks CLI and Device Manager equivalents for Cisco router configuration commands. In this table, Bold text indicates variables that the user supplies. The items in the list following the table describe the functions that the correspondingly numbered row configures.
Table 2 Translating Cisco to ERS 8600 Equivalents
Item Cisco Configuration Nortel CLI Command Device Manager Logical Steps
1 router bgp 333 neighbor 1.1.1.2 remote-as 444
config ip bgp <enter> local-as 333 enable ** config ip bgp neighbor 1.1.1.2 <enter> create remote-as 444 admin-state enable ** If changing local-as, disable BGP first – config ip bgp disable
IP_Routing>BGP LocalAS: 333 AdminStatus: Enable IP_Routing>BGP>Peers>Insert IpAddress: 1.1.1.2 RemoteAs: 444 Insert
2 network 1.1.1.0 mask 255.255.255.0
config ip bgp network 1.1.1.0/24 add
IP_Routing>BGP>Nework>Insert NetworkAddr: 1.1.1.0 NetworkMask: 255.255.255.0
3 neighbor 1.1.1.1 distribute-list 5 out …access list 5 deny 128.1.0.0 0.0.255.255 …access list 5 permit 0.0.0.0 255.255.255.255
config ip prefix-list 128.1.0.0 add-prefix 128.1.0.0/16 config ip route-policy distribute <enter> seq 1 create enable action deny match-network 128.1.0.0 config ip route-policy distribute <enter> seq 2 create enable action permit config ip bgp neighbor 1.1.1.1 route-policy out distribute add
IP_Routing>Policy>Prefix List>Insert Id: 1 Prefix: 128.1.0.0 PrefixMaskLen: 24 IP_Routing>Policy>Route Policy>Insert Id: 1 SequenceNumber: 1 Name: distribute Enable Mode: Permit MatchNetwork: 128.1.0.0 IP_Routing>Policy>Route Policy>Insert Id: 1 SequenceNumber: 2 Name: distribute Enable Mode: Permit IP_Routing>BGP>Peers>Insert IpAddress: 1.1.1.1 RemoteAs: 444 RoutePolicyOut: distribute Insert
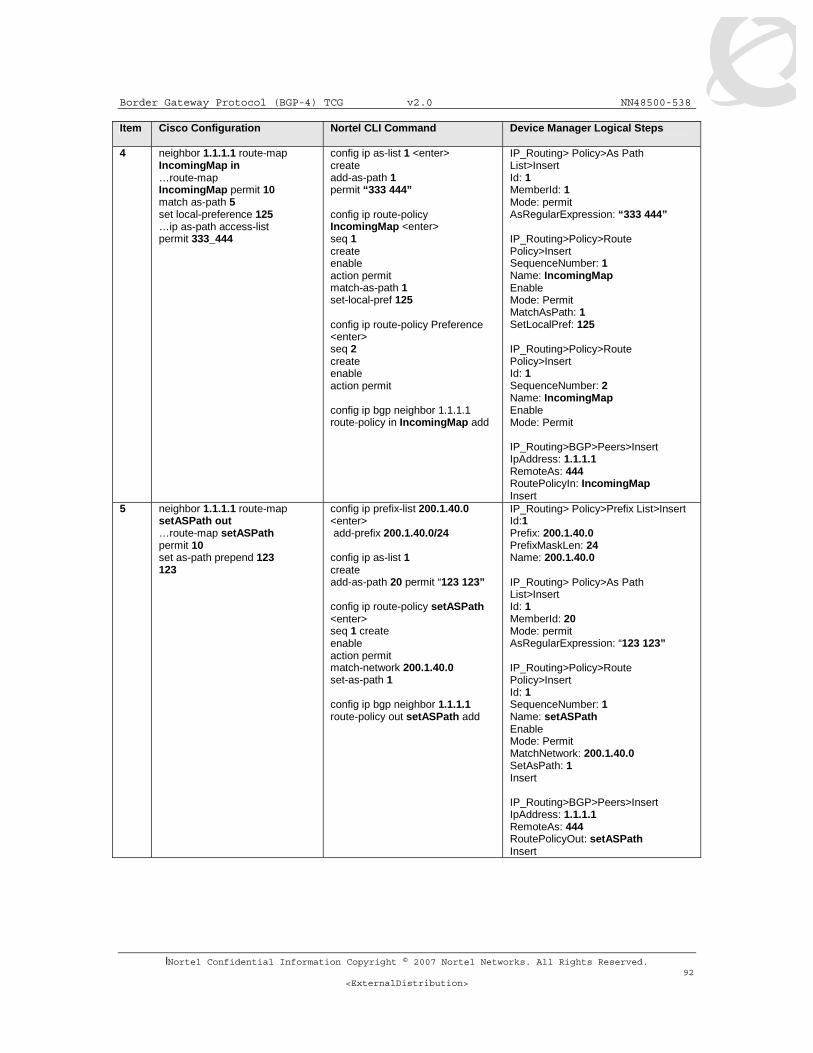
Border Gateway Protocol (BGP-4) TCG v2.0 NN48500-538
lNortel Confidential Information Copyright © 2007 Nortel Networks. All Rights Reserved. 92
<ExternalDistribution>
Item Cisco Configuration Nortel CLI Command Device Manager Logical Steps
4 neighbor 1.1.1.1 route-map IncomingMap in …route-map IncomingMap permit 10 match as-path 5 set local-preference 125 …ip as-path access-list permit 333_444
config ip as-list 1 <enter> create add-as-path 1 permit “333 444” config ip route-policy IncomingMap <enter> seq 1 create enable action permit match-as-path 1 set-local-pref 125 config ip route-policy Preference <enter> seq 2 create enable action permit config ip bgp neighbor 1.1.1.1 route-policy in IncomingMap add
IP_Routing> Policy>As Path List>Insert Id: 1 MemberId: 1 Mode: permit AsRegularExpression: “333 444” IP_Routing>Policy>Route Policy>Insert SequenceNumber: 1 Name: IncomingMap Enable Mode: Permit MatchAsPath: 1 SetLocalPref: 125 IP_Routing>Policy>Route Policy>Insert Id: 1 SequenceNumber: 2 Name: IncomingMap Enable Mode: Permit IP_Routing>BGP>Peers>Insert IpAddress: 1.1.1.1 RemoteAs: 444 RoutePolicyIn: IncomingMap Insert
5 neighbor 1.1.1.1 route-map setASPath out …route-map setASPath permit 10 set as-path prepend 123 123
config ip prefix-list 200.1.40.0 <enter> add-prefix 200.1.40.0/24 config ip as-list 1 create add-as-path 20 permit “123 123” config ip route-policy setASPath <enter> seq 1 create enable action permit match-network 200.1.40.0 set-as-path 1 config ip bgp neighbor 1.1.1.1 route-policy out setASPath add
IP_Routing> Policy>Prefix List>Insert Id:1 Prefix: 200.1.40.0 PrefixMaskLen: 24 Name: 200.1.40.0 IP_Routing> Policy>As Path List>Insert Id: 1 MemberId: 20 Mode: permit AsRegularExpression: “123 123” IP_Routing>Policy>Route Policy>Insert Id: 1 SequenceNumber: 1 Name: setASPath Enable Mode: Permit MatchNetwork: 200.1.40.0 SetAsPath: 1 Insert IP_Routing>BGP>Peers>Insert IpAddress: 1.1.1.1 RemoteAs: 444 RoutePolicyOut: setASPath Insert

Border Gateway Protocol (BGP-4) TCG v2.0 NN48500-538
lNortel Confidential Information Copyright © 2007 Nortel Networks. All Rights Reserved. 93
<ExternalDistribution>
Item Cisco Configuration Nortel CLI Command Device Manager Logical Steps
6 neighbor 1.1.1.1 route-map AdvertiseMap out …route-map AdvertiseMap permit 10 match ip address 1 set metric 100 route-map AdvertiseMap permit 20 set metric 50 …access-list 1 permit 192.10.20.0 0.0.0.255
config ip prefix-list 192.10.20.0 <enter> add-prefix 192.10.20.0/24 config ip route-policy AdvertiseMap <enter> seq 1 create enable action permit match-network 192.10.20.0 set-metric 100 config ip route-policy AdvertiseMap <enter> seq 2 create enable action permit set-metric 50 config ip bgp neighbor 1.1.1.1 route-policy out AdvertiseMap add
IP_Routing> Policy>Prefix List>Insert Id:1 Prefix: 192.10.20.0 PrefixMaskLen: 24 Name: 192.10.20.0 IP_Routing>Policy>Route Policy>Insert Id: 1 SequenceNumber: 1 Name: AdvertiseMap Enable Mode: Permit MatchNetwork: 192.10.20.0 SetMetric: 1 Insert IP_Routing>BGP>Peers>Insert IpAddress: 1.1.1.1 RemoteAs: 444 RoutePolicyOut: AdvertiseMap Insert
7 neighbor MyPeers peer-group neighbor MyPeers remote-as 333 neighbor MyPeers route-map AdvertiseMap out neighbor MyPeers route-map FilterMap in neighbor 1.1.1.1 peer-group MyPeers neighbor 2.2.2.2 peer-group MyPeers
config ip bgp neighbor MyPeers <enter> remote-as 333 ebgp-multihop disable route-policy in FilterMap add route-policy out AdvertiseMap add config ip bgp neighbor 1.1.1.1 peer-group MyPeers add config ip bgp neighbor 2.2.2.2 peer-group MyPeers add
IP_Routing>BGP>Peer Groups>Insert Index: 1 GroupName: MyPeers EbgpMultiHop: disable IP_Routing>BGP>Peers>Insert IpAddress: 1.1.1.1 GroupName: MyPeers Insert IP_Routing>BGP>Peers>Insert IpAddress: 2.2.2.2 GroupName: MyPeers Insert
8 aggregate-address 195.89.8.0 255.255.248.0
Config ip bgp aggregate-address 195.89.8.0/20 add
IP_Routing>BGP>Aggregates>Insert Address: 195.89.8.0 Mask: 255.255.248.0
9 aggregate-address 172.1.1.0 255.255.255.0 summary-only
Config ip bgp aggregate-address 195.89.8.0/20 add summary-only enable
IP_Routing>BGP>Aggregates>Insert Address: 195.89.8.0 Mask: 255.255.248.0 SummaryOnly: Enable
10 router ospf 101 redistribute bgp 2000
config ip ospf redistribute bgp <enter> create enable ** Prior to enabling ospf redistribution, make sure the ERS 8600 is configured for ospf ASBR. config ip ospf <enter) as-boundary-router enable admin-state enable area 0.0.0.0 create redistribute bgp create ena apply
IP_Routing>OSPF>Redistribute>Insert RouteSource: bgp Enable IP_Routing>OSPF>General RouterId: <ipaddr> AdminStat: enabled ASBdrRtrStatus: checked

Border Gateway Protocol (BGP-4) TCG v2.0 NN48500-538
lNortel Confidential Information Copyright © 2007 Nortel Networks. All Rights Reserved. 94
<ExternalDistribution>
Item Cisco Configuration Nortel CLI Command Device Manager Logical Steps
11 router bgp 2000 redistribute ospf 101 redistribute static
config ip bgp redistribute ospf <enter> create enable config ip bgp redistribute static <enter> create enable apply
IP_Routing>BGP>Redistribute>Insert RouteSource: ospf Enable: enabled IP_Routing>BGP>Redistribute>Insert RouteSource: static Enable: enabled
12 timers bgp 60 180
config ip bgp neighbor 1.1.1.1 <enter> admin-state disable keepalive-time 60 add hold-time 180 add admin-state: enable
IP_Routing>BGP>Peers>1.1.1.1 Enable: disable HoldTimeConfigured: 180 KeepAliveConfigured: 60 Enable: enable
13 interface loopback0 ip address 1.1.1.1 255.255.255.255
config ip circuitless-ip-int 1 <enter> create 1.1.1.1/32 ** To enable circuitless-ip for ospf distribution, enter area <ipaddr> ospf enable
IP_Routing>IP>Circuitless IP>Insert Interface: 1 Ip Address: 1.1.1.1 Net Mask: 255.255.255.255 OSPF: enable (click on tab)
14 ip subnet zero
Passport has no parameter for zero subnet, already enabled.
Passport has no parameter for zero subnet, already enabled.
15 router bgp 4001 Bgp confederation identifier 5 bgp confederation peers 4002 4003 4004 neighbor 1.2.3.4 remote-as 4002 neighbor 3.4.5.6 remote-as 510
config ip bgp <enter> local-as 4001 confederation identifier 5 add confederation peers “4002 4003 4004” config ip bgp neighbor 1.2.3.4 <enter> create remote-as 4002 admin-state enable config ip bgp neighbor 3.4.5.6 <enter> create remote-as 510 admin-state enable
IP_Routing>BGP>Generals AdminStatus: disable LocalAS: 4001 ConfederationIdentifier: 5 ConfederationPeers: “4002 4003 4004” AdminStatus: enable IP_Routing>BGP>Peers>Insert IpAddress: 1.2.3.4 RemoteAs: 4002 IP_Routing>BGP>Peers>Insert IpAddress: 3.4.5.6 RemoteAs: 510
16 router bgp 1000 neighbor 132.245.10.2 password bla4u00=2nkq
config ip bgp neighbor 132.245.10.2 <enter> password bla4u00=2nkq add MD5-authentication enable Password
IP_Routing>BGP>Peers>Insert IpAddress: 132.245.10.2 Password: bla4u00=2nkq MD5Authentication: enable
17 neighbor 1.1.1.1 remote-as 100 neighbor 1.1.1.1 remote-as 100 route-reflector-client
config ip bgp <enter> local-as 100 route-reflection enable cl-to-cl-reflection enable enable config ip bgp neighbor 1.1.1.1 <enter> create remote-as 100 route-reflector-client enable admin-state enable
IP_Routing>BGP>Generals AdminStatus: disable LocalAS: 100 RouteReflectionEnable: enable ReflectorClientToClientReflection: enable AdminStatus: enable IP_Routing>BGP>Peers>Insert IpAddress: 1.1.1.1 RemoteAs: 100 RouteReflectoinClient: checked off

Border Gateway Protocol (BGP-4) TCG v2.0 NN48500-538
lNortel Confidential Information Copyright © 2007 Nortel Networks. All Rights Reserved. 95
<ExternalDistribution>
Item Cisco Configuration Nortel CLI Command Device Manager Logical Steps
18 neighbor 5.5.5.5 remote-as 100 neighbor 1.1.1.1 remote-as 100 route-reflector-client bgp cluster-id 10
config ip bgp <enter> local-as 100 route-reflection enable cl-to-cl-reflection enable cluster-id 0.0.0.10 add|del enable config ip bgp neighbor 5.5.5.5 <enter> create remote-as 100 admin-state enable config ip bgp neighbor 1.1.1.1 <enter> create remote-as 100 route-reflector-client enable admin-state enable
IP_Routing>BGP>Generals AdminStatus: disable LocalAS: 100 RouteReflectionEnable: enable RouteReflectorClusterId: 0.0.0.10 ReflectorClientToClientReflection: enable AdminStatus: enable IP_Routing>BGP>Peers>Insert IpAddress: 5.5.5.5 RemoteAs: 100 IP_Routing>BGP>Peers>Insert IpAddress: 1.1.1.1 RemoteAs: 100 RouteReflectoinClient: checked off
16.2 Interpreting the Cisco to Nortel Networks BGP Translation Table
The numbers in the following list correspond to the item numbers in Table 2. Each numbered item in this list describes the function of the commands in the corresponding row of that table.
1. Enable the Border Gateway Protocol (BGP) routing process and identify the local router autonomous system (AS), 333. Activate a BGP session with peer router, IP address, 1.1.1.2 that belongs to AS 444. If the local and remote AS numbers are the same, the BGP session is internal otherwise it is an external BGP session.
2. Advertise network 1.1.1.0 mask 255.255.255.0 and originate it from my AS. Note that network 1.1.1.0 must be present in the IP routing table for Cisco’s BGP network command to advertise the route.
3. Deny incoming advertisement of network 128.1.0.0, mask 255.255.0.0 from peer IP address, 1.1.1.1, as specified by Cisco access list 5 or Nortel Networks policy name distribute.
4. Accept incoming advertisements, from peer 1.1.1.1, match on AS-Path that contain either AS “333 444” or 345 and set Local Preference to 125, as specified by Cisco route-map and Nortel Networks policy name IncomingMap.
5. Announce advertisements to peer 1.1.1.1 and append AS-Path <123 123> to all outgoing updates, as specified by Cisco route-map and Nortel Networks policy name setASPath.
6. Announce advertisement of network 192.10.20.0 mask 255.255.255.0 to peer IP address 1.1.1.1, setting multi-exit discriminator (MED) to 100 as specified by Cisco route-map and Nortel Networks policy name AdvertiseMap. In addition, advertise any other networks with MED set to 50.
7. Accept incoming advertisements from peer 1.1.1.1, of AS-Path that contain either exactly AS 1000 or 5000 as specified by Cisco as-path access-list 5 and Nortel Networks policy name AS_Filter.
Border Gateway Protocol (BGP-4) TCG v2.0 NN48500-538
lNortel Confidential Information Copyright © 2007 Nortel Networks. All Rights Reserved. 96
<ExternalDistribution>
8. Announce advertisements to peer 1.1.1.1 if the update includes an AS-Path that matches <350 400> and deny updates of AS-Path that contain <350 400 500> as specified by Cisco as-path access-list 5 and Nortel Networks policy names Deny_AS.
9. Create a peer group named MyPeers with the following elements: peer router AS is 333, advertise networks as specified by route-map AdvertiseMap and accept incoming networks as specified by FilterMap. Assign peer routers 1.1.1.1 and 2.2.2.2 to peer group MyPeers
10. Advertise the aggregate address 195.89.8.0 mask 255.255.248.0 (195.89.8.0/21) as well as the more specific addresses i.e. 195.89.8.0 - 195.89.15.0.
11. Advertise the aggregate address 195.89.8.0 mask 255.255.248.0 (195.89.8.0/21) only.
12. To redistribute BGP routes into OSPF.
13. To redistribute OSPF and static routes into BGP.
14. Keepalive timer is used between BGP peers as a periodic check of the TCP connection between them. Holddown timer is the amount of elapsed time before the BGP peering session is declared dead. RFC 1771 suggests values of 30 and 90 seconds respectively. Holddown timer is suggested to be three times the amount of the keepalive timer.
15. Cisco’s loopback interface and Nortel Networks circuitless IP interface is useful in BGP environments to use as peer interfaces. It is highly recommended using loopback interfaces for BGP as it eliminates the dependency that would otherwise occur when you use the IP address of a physical interface.
16. Enable the use of subnet zero for interface addresses and routing updates.
17. Enable Confederations for IBGP full mesh reduction. In this example, the outside world sees this as a single AS, number 5, but within the AS it is divided into autonomous systems 4001, 4002, 4003 and 4004. This router's confederation ID is 4001. It has a peer 1.2.3.4 within its routing confederation domain and another peer 3.4.5.6 outside.
18. Enables MD5 authentication on the TCP connection between the two BGP peers (132.245.10.1 and 132.245.10.2). In this example, the MD5 key is bla4u00=2nkq.
19. Enable Route Reflectors for IBGP full mesh reduction. The ERS 8600 is also configured to allow router reflector client to client route distribution.
20. Enable Route Reflectors with two route reflectors for redundancy. A cluster id must be configured when there are two or more router reflectors in a cluster.

Border Gateway Protocol (BGP-4) TCG v2.0 NN48500-538
lNortel Confidential Information Copyright © 2007 Nortel Networks. All Rights Reserved. 97
<ExternalDistribution>
16.3 Comparing Cisco and Nortel Networks BGP Operational Commands
Table 3 compares the corresponding Cisco and Nortel Networks operational commands. The itemized list following this table describes the function of the commands in the corresponding row of this table.
Table 3: Cisco and Nortel Networks BGP Operational Commands
Item Cisco Nortel Networks 1 no synchronization Synchronization disabled 2 Route reflector Route reflection enable 3 Bgp damping Flap-damping enable 4 Confederation Confederation
BGP Monitoring Commands 5 show ip route bgp show ip bgp route 6 show ip bgp neighbors show ip bgp sum 7 show ip bgp neighbors 1.1.1.2 show ip bgp neighbor info 1.1.1.2 8 show ip bgp neighbors 1.1.1.2 show ip bgp neighbor stats 1.1.1.2 9 show ip bgp neighbors 1.1.1.2 show ip bgp neighbor route 1.1.1.2 10 clear ip bgp neighbor-ip-address config ip bgp
enable disable config ip bgp neighbor 1.1.1.1 admin-state enable admin-state disable
11 show ip route show ip route info 12 trace 1.1.1.1 traceroute 1.1.1.1 13 debug ip bgp Through the local console port on a
ERS 8600 various debug commands that can configured for displaying bgp state, events, and more. Use the following command for bgp global debug: config ip bgp global-debug mask <value> List of mask values include: none, all, error, packet, event, trace, warning, state, init, filter, update Use the following command for bgp neighbor debug: config ip bgp neighbor-debug-all mask <value> List of mask values include: none, all, error, packet, event, trace, warning, state, init, filter, update

Border Gateway Protocol (BGP-4) TCG v2.0 NN48500-538
lNortel Confidential Information Copyright © 2007 Nortel Networks. All Rights Reserved. 98
<ExternalDistribution>
config ip bgp debug-screen on This will output the debug information to the console. NOTE: excessive messages to the console will affect CPU performance.
16.4 Interpreting the Cisco and Nortel Networks BGP Operational Table
The following list describes the function of the Cisco and Nortel Networks operational commands in the corresponding row of Table 3.
1. Do not synchronize between BGP and IGP; this enables a router to advertise a BGP network to an external peer without having that network exist in the IP routing table.
2. Route reflection is a method to alleviate the need for “full mesh” IBGP by allowing an internal BGP speaker to reflect (or re-advertise) routes learned through an IBGP connection to another IBGP peer.
3. Minimize the instability caused by route flapping.
4. Confederations are used to reduce the number of peers in an AS by breaking the network into multiple (smaller) ASs.
5. Show BGP routing table.
6. Show status of BGP peers.
7. Show the router’s BGP timers. Within Cisco’s show ip bgp neighbor command the keepalive, hold-down and external advertisement timers are displayed.
8. Display the router’s statistics.
9. Cisco’s show ip bgp neighbor command displays the router’s incoming and outgoing route filters. The Nortel Networks show ip bgp neighbor route command display incoming routes from peer 1.1.1.2.
10. Reset a neighbor’s BGP connection.
11. Display the IP routing table.
12. Discover the routes the router’s packets take when traveling to destination 1.1.1.1.
13. Display BGP updates/changes/events as they occur.

Border Gateway Protocol (BGP-4) TCG v2.0 NN48500-538
lNortel Confidential Information Copyright © 2007 Nortel Networks. All Rights Reserved. 99
<ExternalDistribution>
16.5 Interpreting the Cisco and Nortel Networks BGP Operational Table
Table 4 compares the Cisco and Nortel Networks route preference.
Table 4: Cisco and Nortel Route Preference Comparison
Route Type Cisco –Pref. value
P8600 – Pref.value
Directly connected 0 0
Static 1 5
EBGP 20 45
OSPF Intra 110 20
OSPF Inter 25
BGP 20 30
RIP 120 100
OSPF External 1 120
OSPF External 2 125
IBGP 200 175
show ip route preference info ============================================================================== Ip Route Preference ============================================================================== PROTOCOL DEFAULT CONFIG ------------------------------------------------------------------------------ LOCAL 0 0 STATIC 5 5 OSPF_INTRA 20 20 OSPF_INTER 25 25 EBGP 45 45 RIP 100 100 OSPF_E1 120 120 OSPF_E2 125 125 IBGP 175 175
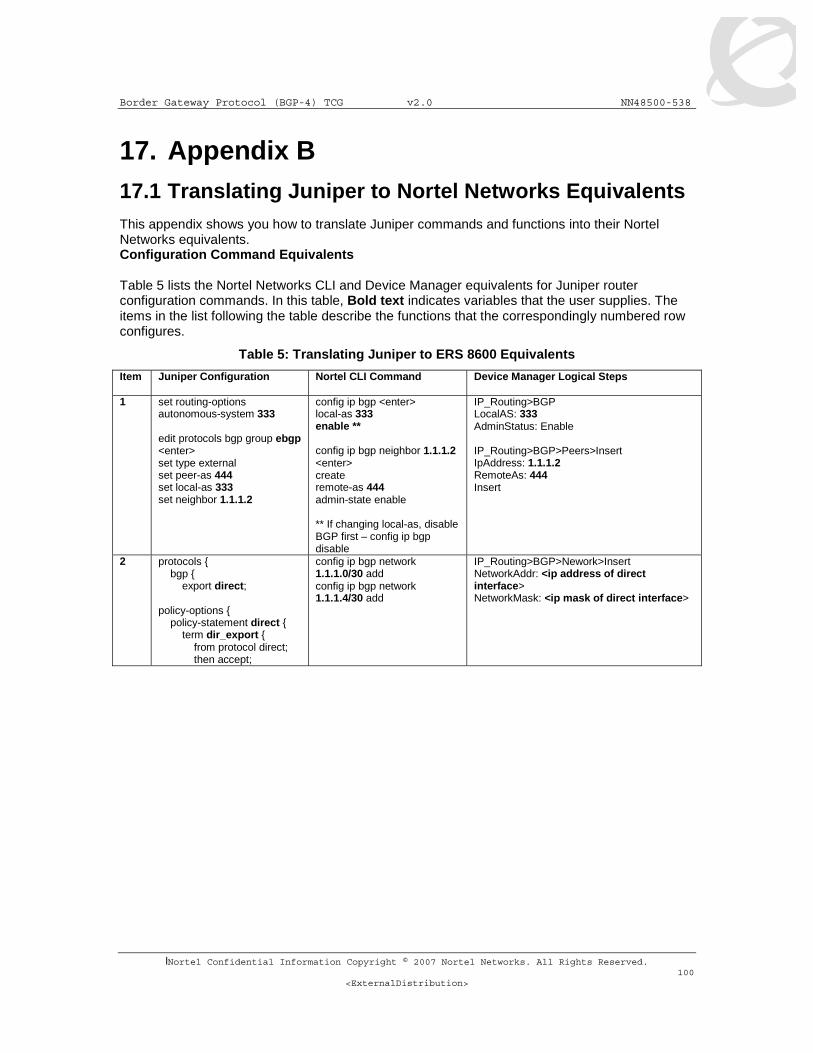
Border Gateway Protocol (BGP-4) TCG v2.0 NN48500-538
lNortel Confidential Information Copyright © 2007 Nortel Networks. All Rights Reserved. 100
<ExternalDistribution>
17. Appendix B 17.1 Translating Juniper to Nortel Networks Equivalents This appendix shows you how to translate Juniper commands and functions into their Nortel Networks equivalents. Configuration Command Equivalents Table 5 lists the Nortel Networks CLI and Device Manager equivalents for Juniper router configuration commands. In this table, Bold text indicates variables that the user supplies. The items in the list following the table describe the functions that the correspondingly numbered row configures.
Table 5: Translating Juniper to ERS 8600 Equivalents
Item Juniper Configuration Nortel CLI Command Device Manager Logical Steps
1 set routing-options autonomous-system 333 edit protocols bgp group ebgp <enter> set type external set peer-as 444 set local-as 333 set neighbor 1.1.1.2
config ip bgp <enter> local-as 333 enable ** config ip bgp neighbor 1.1.1.2 <enter> create remote-as 444 admin-state enable ** If changing local-as, disable BGP first – config ip bgp disable
IP_Routing>BGP LocalAS: 333 AdminStatus: Enable IP_Routing>BGP>Peers>Insert IpAddress: 1.1.1.2 RemoteAs: 444 Insert
2 protocols { bgp { export direct; policy-options { policy-statement direct { term dir_export { from protocol direct; then accept;
config ip bgp network 1.1.1.0/30 add config ip bgp network 1.1.1.4/30 add
IP_Routing>BGP>Nework>Insert NetworkAddr: <ip address of direct interface> NetworkMask: <ip mask of direct interface>

Border Gateway Protocol (BGP-4) TCG v2.0 NN48500-538
lNortel Confidential Information Copyright © 2007 Nortel Networks. All Rights Reserved. 101
<ExternalDistribution>
Item Juniper Configuration Nortel CLI Command Device Manager Logical Steps
3 protocols { bgp { group ebgp { type external; export drop; peer-as 300; neighbor 1.1.1.1; policy-options { policy-statement drop { term list { from { protocol bgp; route-filter 128.1.0.0/16 exact reject; } then accept;
config ip prefix-list 128.1.0.0 add-prefix 128.1.0.0/16 config ip route-policy distribute <enter> seq 1 create enable action deny match-network 128.1.0.0 config ip route-policy distribute <enter> seq 2 create enable action permit config ip bgp neighbor 1.1.1.1 <enter> remote-as 300 route-policy out distribute add
IP_Routing>Policy>Prefix List>Insert Id: 1 Prefix: 128.1.0.0 PrefixMaskLen: 24 IP_Routing>Policy>Route Policy>Insert Id: 1 SequenceNumber: 1 Name: distribute Enable Mode: Permit MatchNetwork: 128.1.0.0 IP_Routing>Policy>Route Policy>Insert Id: 1 SequenceNumber: 2 Name: distribute Enable Mode: Permit IP_Routing>BGP>Peers>Insert IpAddress: 1.1.1.1 RemoteAs: 444 RoutePolicyOut: distribute Insert
4 policy-options { policy-statement IncomingMap { term as { from { neighbor 1.1.1.1; as-path aslist; } then { local-preference 125; } } } as-path aslist 333-444; protocols { bgp { import IncomingMap;
config ip as-list 1 <enter> create add-as-path 1 permit “333 444” config ip route-policy IncomingMap <enter> seq 1 create enable action permit match-as-path 1 set-local-pref 125 config ip route-policy Preference <enter> seq 2 create enable action permit config ip bgp neighbor 1.1.1.1 route-policy in IncomingMap add
IP_Routing> Policy>As Path List>Insert Id: 1 MemberId: 1 Mode: permit AsRegularExpression: “333 444” IP_Routing>Policy>Route Policy>Insert SequenceNumber: 1 Name: IncomingMap Enable Mode: Permit MatchAsPath: 1 SetLocalPref: 125 IP_Routing>Policy>Route Policy>Insert Id: 1 SequenceNumber: 2 Name: IncomingMap Enable Mode: Permit IP_Routing>BGP>Peers>Insert IpAddress: 1.1.1.1 RemoteAs: 444 RoutePolicyIn: IncomingMap Insert

Border Gateway Protocol (BGP-4) TCG v2.0 NN48500-538
lNortel Confidential Information Copyright © 2007 Nortel Networks. All Rights Reserved. 102
<ExternalDistribution>
Item Juniper Configuration Nortel CLI Command Device Manager Logical Steps
5 policy-options { policy-statement setASPath { term ASList { from { route-filter 200.1.40.0/24 exact; } then as-path-prepend "123 123"; protocols { bgp { group ebgp { type external; export setASPath; peer-as 300; neighbor 1.1.1.1; }
config ip prefix-list 200.1.40.0 <enter> add-prefix 200.1.40.0/24 config ip as-list 1 <enter> create add-as-path 20 permit 123 123 config ip route-policy setASPath <enter> seq 1 create enable action permit match-network 200.1.40.0 set-as-path 1 config ip bgp neighbor 1.1.1.1 <enter> remote-as 300 route-policy out setASPath add
IP_Routing> Policy>Prefix List>Insert Id:1 Prefix: 200.1.40.0 PrefixMaskLen: 24 Name: 200.1.40.0 IP_Routing> Policy>As Path List>Insert Id: 1 MemberId: 20 Mode: permit AsRegularExpression: 123 123 IP_Routing>Policy>Route Policy>Insert Id: 1 SequenceNumber: 1 Name: setASPath Enable Mode: Permit MatchNetwork: 200.1.40.0 SetAsPath: 1 Insert IP_Routing>BGP>Peers>Insert IpAddress: 1.1.1.1 RemoteAs: 444 RoutePolicyOut: setASPath Insert
6 policy-options { policy-statement AdvertiseMap { term seq1 { from { route-filter 192.10.20.0/24 exact; } then { metric 100; accept; } } term seq2 { from { route-filter 0.0.0.0/0 orlonger; } then { metric 50; accept; protocols { bgp { group ebgp { type external; export AdvertiseMap; peer-as 300; neighbor 1.1.1.1;
config ip prefix-list 192.10.20.0 <enter> add-prefix 192.10.20.0/24 config ip route-policy AdvertiseMap <enter> seq 1 create enable action permit match-network 192.10.20.0 set-metric 100 config ip route-policy AdvertiseMap <enter> seq 2 create enable action permit set-metric 50 config ip bgp neighbor 1.1.1.1 <enter> remote-as 300 route-policy out AdvertiseMap add
IP_Routing> Policy>Prefix List>Insert Id:1 Prefix: 192.10.20.0 PrefixMaskLen: 24 Name: 192.10.20.0 IP_Routing>Policy>Route Policy>Insert Id: 1 SequenceNumber: 1 Name: AdvertiseMap Enable Mode: Permit MatchNetwork: 192.10.20.0 SetMetric: 1 Insert IP_Routing>BGP>Peers>Insert IpAddress: 1.1.1.1 RemoteAs: 444 RoutePolicyOut: AdvertiseMap Insert

Border Gateway Protocol (BGP-4) TCG v2.0 NN48500-538
lNortel Confidential Information Copyright © 2007 Nortel Networks. All Rights Reserved. 103
<ExternalDistribution>
Item Juniper Configuration Nortel CLI Command Device Manager Logical Steps
7 protocols { bgp { group ibgp { type internal; export NHS peer-as 333; neighbor 1.1.1.1; neighbor 2.2.2.2; policy-options { policy-statement NHS { term next-hop { from { protocol bgp; } then { next-hop self;
config ip bgp neighbor NHS <enter> create remote-as 333 nexthop-self enable ebgp-multihop disable config ip bgp neighbor 1.1.1.1 peer-group NHS add config ip bgp neighbor 2.2.2.2 peer-group NHS add
IP_Routing>BGP>Peer Groups>Insert Index: 1 GroupName: MyPeers EbgpMultiHop: disable IP_Routing>BGP>Peers>Insert IpAddress: 1.1.1.1 GroupName: MyPeers Insert IP_Routing>BGP>Peers>Insert IpAddress: 2.2.2.2 GroupName: MyPeers Insert
8 policy-options { policy-statement agg-add { term agg { from { route-filter 195.89.8.0/20 orlonger; } then accept;
config ip bgp aggregate-address 195.89.8.0/20 add
IP_Routing>BGP>Aggregates>Insert Address: 195.89.8.0 Mask: 255.255.248.0
9 policy-options { policy-statement agg-add { term agg { from { route-filter 195.89.8.0/20 exact; } then accept;
config ip bgp aggregate-address 195.89.8.0/20 add summary-only enable
IP_Routing>BGP>Aggregates>Insert Address: 195.89.8.0 Mask: 255.255.248.0 SummaryOnly: Enable
10 protocols { ospf { export bgp_routes; area 0.0.0.0 { interface 20.1.1.1 { metric 200; policy-options { policy-statement bgp_routes { from protocol bgp; then accept;
config ip ospf redistribute bgp <enter> metric 200 create enable ** Prior to enabling ospf redistribution, make sure the ERS 8600 is configured for ospf ASBR. config ip ospf <enter) as-boundary-router enable admin-state enable area 0.0.0.0 create
IP_Routing>OSPF>Redistribute>Insert RouteSource: bgp Enable IP_Routing>OSPF>General RouterId: <ipaddr> AdminStat: enabled ASBdrRtrStatus: checked
11 protocols { bgp { export ospf_into_bgp; policy-options { policy-statement ospf_into_bgp { term ospf-only { from protocol ospf; then accept;
config ip bgp redistribute ospf <enter> create enable
IP_Routing>BGP>Redistribute>Insert RouteSource: ospf Enable: enabled IP_Routing>BGP>Redistribute>Insert RouteSource: static Enable: enabled

Border Gateway Protocol (BGP-4) TCG v2.0 NN48500-538
lNortel Confidential Information Copyright © 2007 Nortel Networks. All Rights Reserved. 104
<ExternalDistribution>
Item Juniper Configuration Nortel CLI Command Device Manager Logical Steps
12 protocols { bgp { group ebgp { type external; hold-time 180; peer-as 300; local-as 100; neighbor 1.1.1.1; **JUNOS software defaults a Keepalive time of always one-third the HoldTime. In this example, the HoldTime is set for 180 so the KeepAlive will default to 60.
config ip bgp neighbor 1.1.1.1 <enter> admin-state disable keepalive-time 60 add hold-time 180 add admin-state: enable
IP_Routing>BGP>Peers>1.1.1.1 Enable: disable HoldTimeConfigured: 180 KeepAliveConfigured: 60 Enable: enable
13 interfaces { lo0 { unit 0 { family inet { address 1.1.1.1/32;
config ip circuitless-ip-int 1 <enter> create 1.1.1.1/32 ** To enable circuitless-ip for ospf distribution, enter area <ipaddr> ospf enable
IP_Routing>IP>Circuitless IP>Insert Interface: 1 Ip Address: 1.1.1.1 Net Mask: 255.255.255.255 OSPF: enable (click on tab)
14 Synchronization Disabled. In JUNOS software, synchronization is disabled by default. There is no option to enable or disable synchronization.
config ip bgp synchronization disable
IP_Routing>BGP>Generals>Synchronization: disable
15 routing-options { autonomous-system 4001; confederation 5 members [ 4002 4003 4004 ] protocols { bgp { group 1234 { type external; peer-as 4002; neighbor 1.2.3.4; } group 3456 { type external; peer-as 510; neighbor 3.4.5.6;
config ip bgp <enter> local-as 4001 confederation identifier 5 add confederation peers “4002 4003 4004” config ip bgp neighbor 1.2.3.4 <enter> create remote-as 4002 admin-state enable config ip bgp neighbor 3.4.5.6 <enter> create remote-as 510 admin-state enable
IP_Routing>BGP>Generals AdminStatus: disable LocalAS: 4001 ConfederationIdentifier: 5 ConfederationPeers: “4002 4003 4004” AdminStatus: enable IP_Routing>BGP>Peers>Insert IpAddress: 1.2.3.4 RemoteAs: 4002 IP_Routing>BGP>Peers>Insert IpAddress: 3.4.5.6 RemoteAs: 510
16 set protocols bgp group ebgp authentication-key bla4u00=2nkq
config ip bgp neighbor 132.245.10.2 <enter> password bla4u00=2nkq add MD5-authentication enable Password
IP_Routing>BGP>Peers>Insert IpAddress: 132.245.10.2 Password: bla4u00=2nkq MD5Authentication: enable
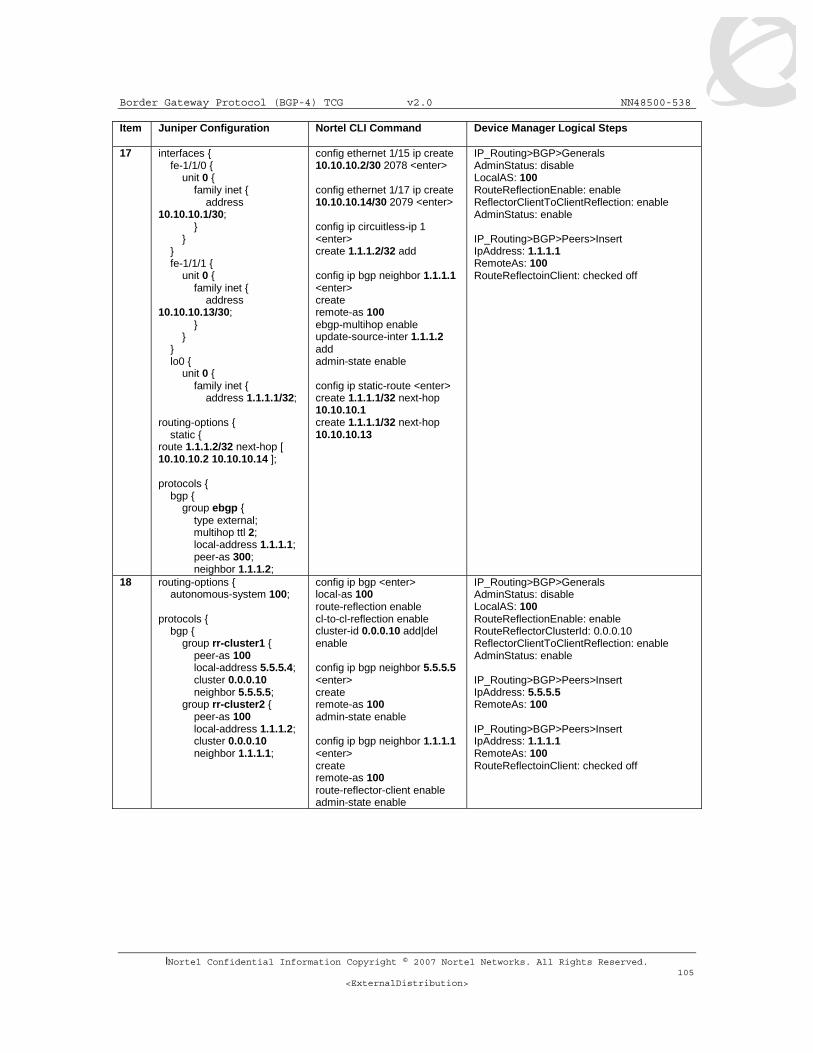
Border Gateway Protocol (BGP-4) TCG v2.0 NN48500-538
lNortel Confidential Information Copyright © 2007 Nortel Networks. All Rights Reserved. 105
<ExternalDistribution>
Item Juniper Configuration Nortel CLI Command Device Manager Logical Steps
17 interfaces { fe-1/1/0 { unit 0 { family inet { address 10.10.10.1/30; } } } fe-1/1/1 { unit 0 { family inet { address 10.10.10.13/30; } } } lo0 { unit 0 { family inet { address 1.1.1.1/32; routing-options { static { route 1.1.1.2/32 next-hop [ 10.10.10.2 10.10.10.14 ]; protocols { bgp { group ebgp { type external; multihop ttl 2; local-address 1.1.1.1; peer-as 300; neighbor 1.1.1.2;
config ethernet 1/15 ip create 10.10.10.2/30 2078 <enter> config ethernet 1/17 ip create 10.10.10.14/30 2079 <enter> config ip circuitless-ip 1 <enter> create 1.1.1.2/32 add config ip bgp neighbor 1.1.1.1 <enter> create remote-as 100 ebgp-multihop enable update-source-inter 1.1.1.2 add admin-state enable config ip static-route <enter> create 1.1.1.1/32 next-hop 10.10.10.1 create 1.1.1.1/32 next-hop 10.10.10.13
IP_Routing>BGP>Generals AdminStatus: disable LocalAS: 100 RouteReflectionEnable: enable ReflectorClientToClientReflection: enable AdminStatus: enable IP_Routing>BGP>Peers>Insert IpAddress: 1.1.1.1 RemoteAs: 100 RouteReflectoinClient: checked off
18 routing-options { autonomous-system 100; protocols { bgp { group rr-cluster1 { peer-as 100 local-address 5.5.5.4; cluster 0.0.0.10 neighbor 5.5.5.5; group rr-cluster2 { peer-as 100 local-address 1.1.1.2; cluster 0.0.0.10 neighbor 1.1.1.1;
config ip bgp <enter> local-as 100 route-reflection enable cl-to-cl-reflection enable cluster-id 0.0.0.10 add|del enable config ip bgp neighbor 5.5.5.5 <enter> create remote-as 100 admin-state enable config ip bgp neighbor 1.1.1.1 <enter> create remote-as 100 route-reflector-client enable admin-state enable
IP_Routing>BGP>Generals AdminStatus: disable LocalAS: 100 RouteReflectionEnable: enable RouteReflectorClusterId: 0.0.0.10 ReflectorClientToClientReflection: enable AdminStatus: enable IP_Routing>BGP>Peers>Insert IpAddress: 5.5.5.5 RemoteAs: 100 IP_Routing>BGP>Peers>Insert IpAddress: 1.1.1.1 RemoteAs: 100 RouteReflectoinClient: checked off
Border Gateway Protocol (BGP-4) TCG v2.0 NN48500-538
lNortel Confidential Information Copyright © 2007 Nortel Networks. All Rights Reserved. 106
<ExternalDistribution>
17.2 Interpreting the Juniper to Nortel Networks BGP Translation Table
The numbers in the following list correspond to the item numbers in Table 4. Each numbered item in this list describes the function of the commands in the corresponding row of that table.
1. Enable the Border Gateway Protocol (BGP) routing process and identify the local router autonomous system (AS), 333. Activate a BGP session with peer router, IP address, 1.1.1.2 that belongs to AS 444. If the local and remote AS numbers are the same, the BGP session is internal, otherwise it is an external BGP session.
2. Advertise network 1.1.1.0 and 1.1.1.4 mask 255.255.255.252 that are direct interfaces on the ERS 8600 and originate it from my AS. Note that by default Juniper will advertise all learned routes and the BGP Network command is not used. A policy statement can be added, as shown in this configuration example, in order for the Juniper router to advertise it’s direct interfaces.
3. Deny incoming advertisement of network 128.1.0.0, mask 255.255.0.0 from peer IP address, 1.1.1.1, as specified by Juniper policy-statement drop or Nortel Networks policy name distribute.
4. Accept incoming advertisements, from peer 1.1.1.1, match on AS-Path that contain either AS “333 444” or 345 and set Local Preference to 125, as specified by Juniper policy-statement IncomingMap and Nortel Networks policy name IncomingMap.
5. Announce advertisements to peer 1.1.1.1 and append AS-Path <123 123> to all outgoing updates, as specified by Juniper policy-statement setASPath route-map and Nortel Networks policy name setASPath.
6. Announce advertisement of network 192.10.20.0 mask 255.255.255.0 to peer IP address 1.1.1.1, setting multi-exit discriminator (MED) to 100 as specified by Juniper policy-statement AdvertiseMap and Nortel Networks policy name AdvertiseMap. In addition, advertise any other networks with MED set to 50.
7. Accept incoming advertisements from peer 1.1.1.1, of AS-Path that contain either exactly AS 1000 or 5000 as specified by Juniper policy-statement AS_Filter and Nortel Networks policy name AS_Filter.
8. Announce advertisements to peer 1.1.1.1 if the update includes an AS-Path that matches <350 400> and deny updates of AS-Path that contain <350 400 500> as specified by Juniper policy-statement Deny_AS and Nortel Networks policy name Deny_AS.
9. Create a peer group named NHS with the following elements: nexthop-self enabled. Assign peer routers 1.1.1.1 and 2.2.2.2 to peer group MyPeers. Similar functionality is performed on Juniper by using the policy-statement NHS.
10. Advertise the aggregate address 195.89.8.0 mask 255.255.248.0 (195.89.8.0/21) as well as the more specific addresses i.e. 195.89.8.0 - 195.89.15.0.
11. Advertise the aggregate address 195.89.8.0 mask 255.255.248.0 (195.89.8.0/21) only.
12. To redistribute BGP routes into OSPF.
13. To redistribute OSPF into BGP.

Border Gateway Protocol (BGP-4) TCG v2.0 NN48500-538
lNortel Confidential Information Copyright © 2007 Nortel Networks. All Rights Reserved. 107
<ExternalDistribution>
14. Keepalive timer is used between BGP peers as a periodic check of the TCP connection between them. Holddown timer is the amount of elapsed time before the BGP peering session is declared dead. RFC 1771 suggests values of 30 and 90 seconds respectively. Holddown timer is suggested to be three times the amount of the keepalive timer.
15. Juniper’s loopback interface and Nortel Networks circuitless IP interface is useful in BGP environments to use as peer interfaces. It is highly recommended using loopback interfaces for BGP as it eliminates the dependency that would otherwise occur when you use the IP address of a physical interface.
16. Disable synchronization on the ERS 8600. By default, synchronization is disabled on Juniper and there is no option to enable or disable this functionality.
17. Enable Confederations for IBGP full mesh reduction. In this example, the outside world sees this as a single AS, number 5, but within the AS it is divided into autonomous systems 4001, 4002, 4003 and 4004. This router's confederation ID is 4001. It has a peer 1.2.3.4 within its routing confederation domain and another peer 3.4.5.6 outside.
18. Enables MD5 authentication on the TCP connection between the two BGP peers (132.245.10.1 and 132.245.10.2). In this example, the MD5 key is bla4u00=2nkq.
19. Enable EBGP multihop load balancing. The EBGP peering is between the loopback interface on Juniper and the circuitless ip on Nortel. On each router, static routes to the remote peer’s loopback address must be configured for each data link connection.
20. Enable Route Reflectors for IBGP full mesh reduction. A cluster id is always used by Juniper and must be configured on ERS 8600 when there are two or more router reflectors in a cluster.

Border Gateway Protocol (BGP-4) TCG v2.0 NN48500-538
lNortel Confidential Information Copyright © 2007 Nortel Networks. All Rights Reserved. 108
<ExternalDistribution>
17.3 Comparing Juniper and Nortel Networks BGP Operational Commands
Table 6 compares the corresponding Juniper and Nortel Networks operational commands. The itemized list following this table describes the function of the commands in the corresponding row of this table.
Table 6: Juniper and Nortel Networks BGP Operational Commands
Item Juniper Nortel Networks 1 no synchronization Synchronization disabled 2 Route reflector Route reflector 3 Bgp damping Bgp damping 4 Confederation Confederation
BGP Monitoring Commands 5 show route protocol bgp show ip bgp route 6 show bgp summary show ip bgp sum 7 show bgp neighbor 1.1.1.2 show ip bgp neighbor info 1.1.1.2 8 show bgp neighbor 1.1.1.2 show ip bgp neighbor stats 1.1.1.2 9 show route advertising-protocol
bgp 1.1.1.2 show ip bgp neighbor route 1.1.1.2
10 clear bgp neighbor <ip address> config ip bgp enable disable config ip bgp neighbor 1.1.1.1 admin-state enable admin-state disable
11 show route show ip route info 12 traceroute 1.1.1.1 traceroute 1.1.1.1 13 a) show log messages
b) configure the following: [edit protocols bgp] set traceoptions file bgp-log size 1m files 10 then use the following command: show log bgp-log
Through the local console port on a ERS 8600 various debug commands that can configured for displaying bgp state, events, and more. Use the following command for bgp global debug: config ip bgp global-debug mask <value> List of mask values include: none, all, error, packet, event, trace, warning, state, init, filter, update Use the following command for bgp neighbor debug: config ip bgp neighbor-debug-all mask <value> List of mask values include: none, all, error, packet, event, trace, warning, state, init, filter, update

Border Gateway Protocol (BGP-4) TCG v2.0 NN48500-538
lNortel Confidential Information Copyright © 2007 Nortel Networks. All Rights Reserved. 109
<ExternalDistribution>
17.4 Interpreting the Juniper and Nortel Networks BGP Operational Table
The following list describes the function of the Juniper and Nortel Networks operational commands in the corresponding row of Table 6.
1. Do not synchronize between BGP and IGP; this enables a router to advertise a BGP network to an external peer without having that network exist in the IP routing table.
2. Route reflection is a method to alleviate the need for “full mesh” IBGP by allowing an internal BGP speaker to reflect (or re-advertise) routes learned through an IBGP connection to another IBGP peer.
3. Minimize the instability caused by route flapping.
4. Confederations are used to reduce the number of peers in an AS by breaking the network into multiple (smaller) ASs.
5. Show BGP routing table.
6. Show status of BGP peers.
7. Show the router’s BGP neighbor information.
8. Display the router’s statistics.
9. Juniper’s show route advertising-protocol bgp command displays the router’s incoming and outgoing routes. The Nortel Networks show ip bgp neighbor route command display incoming routes from peer 1.1.1.2.
10. Reset a neighbor’s BGP connection.
11. Display the IP routing table.
12. Discover the routes the router’s packets take when traveling to destination 1.1.1.1.
13. Display BGP updates/changes/events as they occur.

Border Gateway Protocol (BGP-4) TCG v2.0 NN48500-538
lNortel Confidential Information Copyright © 2007 Nortel Networks. All Rights Reserved. 110
<ExternalDistribution>
17.5 Interpreting the Juniper and Nortel Networks BGP Operational Table
Table 7 compares the Cisco and Nortel Networks route preference.
Table 7: Route Preference Comparison
Route Type Juniper –Pref. value
P8600 – Pref.value
Directly connected 0 0
Static 5 5
EBGP 170 12
OSPF Intra 10 15
OSPF Inter 150 17
BGP 170 30
RIP 100 100
OSPF External 1 150 120
OSPF External 2 150 125
IBGP 170 200
Border Gateway Protocol (BGP-4) TCG v2.0 NN48500-538
lNortel Confidential Information Copyright © 2007 Nortel Networks. All Rights Reserved. 111
<ExternalDistribution>
18. Appendix C – BGP Events BGP State Transitions and Actions: This Appendix discusses the transitions between states in response to BGP events. The following is the list of these states and events when the negotiated Hold Time value is non-zero. BGP States: 1 - Idle 2 - Connect 3 - Active 4 - OpenSent 5 - OpenConfirm 6 - Established BGP Events: 1 - BGP Start 2 - BGP Stop 3 - BGP Transport connection open 4 - BGP Transport connection closed 5 - BGP Transport connection open failed 6 - BGP Transport fatal error 7 - ConnectRetry timer expired 8 - Hold Timer expired 9 - KeepAlive timer expired 10 - Receive OPEN message 11 - Receive KEEPALIVE message 12 - Receive UPDATE messages 13 - Receive NOTIFICATION message

Border Gateway Protocol (BGP-4) TCG v2.0 NN48500-538
lNortel Confidential Information Copyright © 2007 Nortel Networks. All Rights Reserved. 112
<ExternalDistribution>
Event Actions Message Sent Next State -------------------------------------------------------------------- Idle (1) 1 Initialize resources none 2 Start ConnectRetry timer Initiate a transport connection others none none 1 Connect(2) 1 none none 2 3 Complete initialization OPEN 4 Clear ConnectRetry timer 5 Restart ConnectRetry timer none 3 7 Restart ConnectRetry timer none 2 Initiate a transport connection others Release resources none 1 Active (3) 1 none none 3 3 Complete initialization OPEN 4 Clear ConnectRetry timer 5 Close connection 3 Restart ConnectRetry timer 7 Restart ConnectRetry timer none 2 Initiate a transport connection others Release resources none 1 OpenSent(4) 1 none none 4 4 Close transport connection none 3 Restart ConnectRetry timer 6 Release resources none 1 10 Process OPEN is OK KEEPALIVE 5 Process OPEN failed NOTIFICATION 1 others Close transport connection NOTIFICATION 1 Release resources OpenConfirm (5) 1 none none 5 4 Release resources none 1 6 Release resources none 1 9 Restart KeepAlive timer KEEPALIVE 5 11 Complete initialization none 6 Restart Hold Timer 13 Close transport connection 1 Release resources others Close transport connection NOTIFICATION 1 Release resources Established (6) 1 none none 6 4 Release resources none 1 6 Release resources none 1 9 Restart KeepAlive timer KEEPALIVE 6 11 Restart Hold Timer KEEPALIVE 6
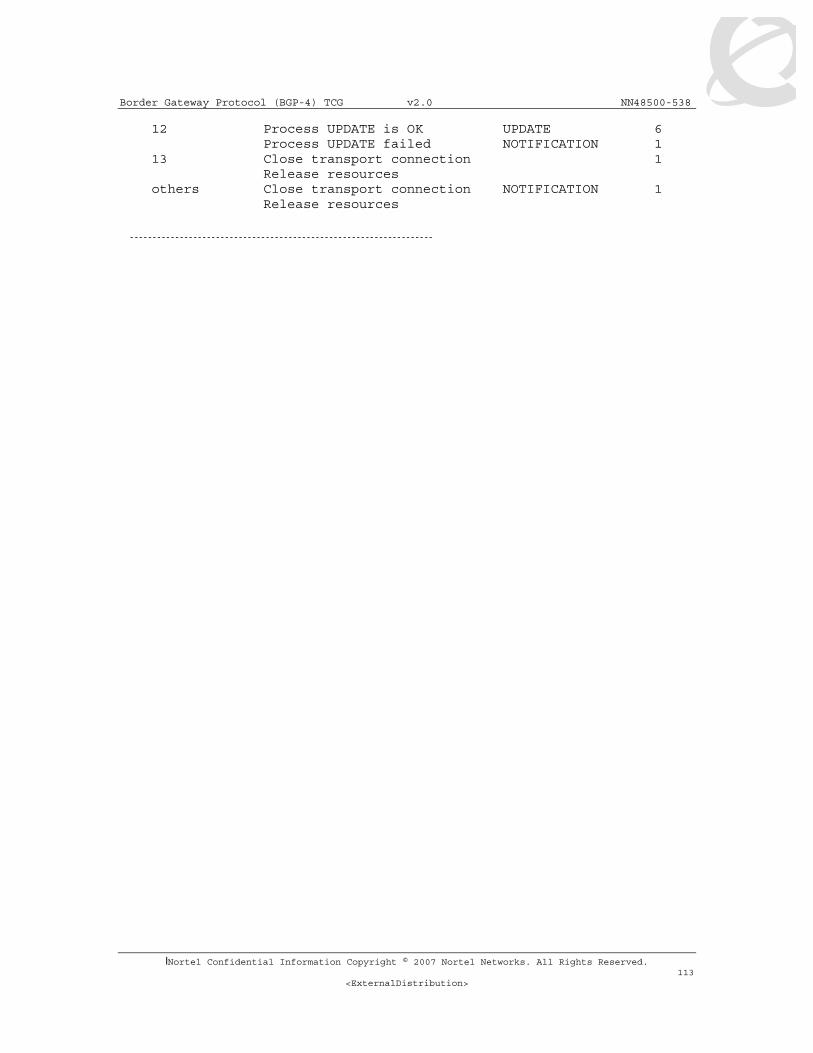
Border Gateway Protocol (BGP-4) TCG v2.0 NN48500-538
lNortel Confidential Information Copyright © 2007 Nortel Networks. All Rights Reserved. 113
<ExternalDistribution>
12 Process UPDATE is OK UPDATE 6 Process UPDATE failed NOTIFICATION 1 13 Close transport connection 1 Release resources others Close transport connection NOTIFICATION 1 Release resources
-------------------------------------------------------------------
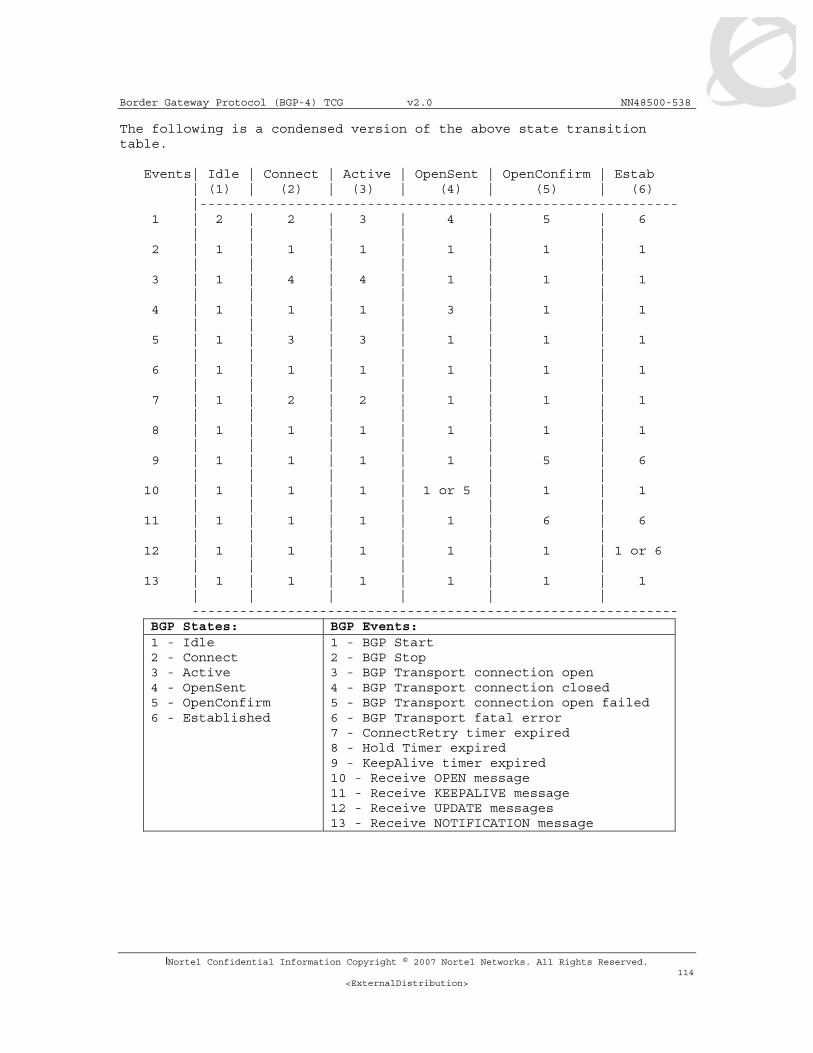
Border Gateway Protocol (BGP-4) TCG v2.0 NN48500-538
lNortel Confidential Information Copyright © 2007 Nortel Networks. All Rights Reserved. 114
<ExternalDistribution>
The following is a condensed version of the above state transition table. Events| Idle | Connect | Active | OpenSent | OpenConfirm | Estab | (1) | (2) | (3) | (4) | (5) | (6) |------------------------------------------------------------ 1 | 2 | 2 | 3 | 4 | 5 | 6 | | | | | | 2 | 1 | 1 | 1 | 1 | 1 | 1 | | | | | | 3 | 1 | 4 | 4 | 1 | 1 | 1 | | | | | | 4 | 1 | 1 | 1 | 3 | 1 | 1 | | | | | | 5 | 1 | 3 | 3 | 1 | 1 | 1 | | | | | | 6 | 1 | 1 | 1 | 1 | 1 | 1 | | | | | | 7 | 1 | 2 | 2 | 1 | 1 | 1 | | | | | | 8 | 1 | 1 | 1 | 1 | 1 | 1 | | | | | | 9 | 1 | 1 | 1 | 1 | 5 | 6 | | | | | | 10 | 1 | 1 | 1 | 1 or 5 | 1 | 1 | | | | | | 11 | 1 | 1 | 1 | 1 | 6 | 6 | | | | | | 12 | 1 | 1 | 1 | 1 | 1 | 1 or 6 | | | | | | 13 | 1 | 1 | 1 | 1 | 1 | 1 | | | | | | -------------------------------------------------------------
BGP States: BGP Events:1 - Idle 2 - Connect 3 - Active 4 - OpenSent 5 - OpenConfirm 6 - Established
1 - BGP Start 2 - BGP Stop 3 - BGP Transport connection open 4 - BGP Transport connection closed 5 - BGP Transport connection open failed 6 - BGP Transport fatal error 7 - ConnectRetry timer expired 8 - Hold Timer expired 9 - KeepAlive timer expired 10 - Receive OPEN message 11 - Receive KEEPALIVE message 12 - Receive UPDATE messages 13 - Receive NOTIFICATION message
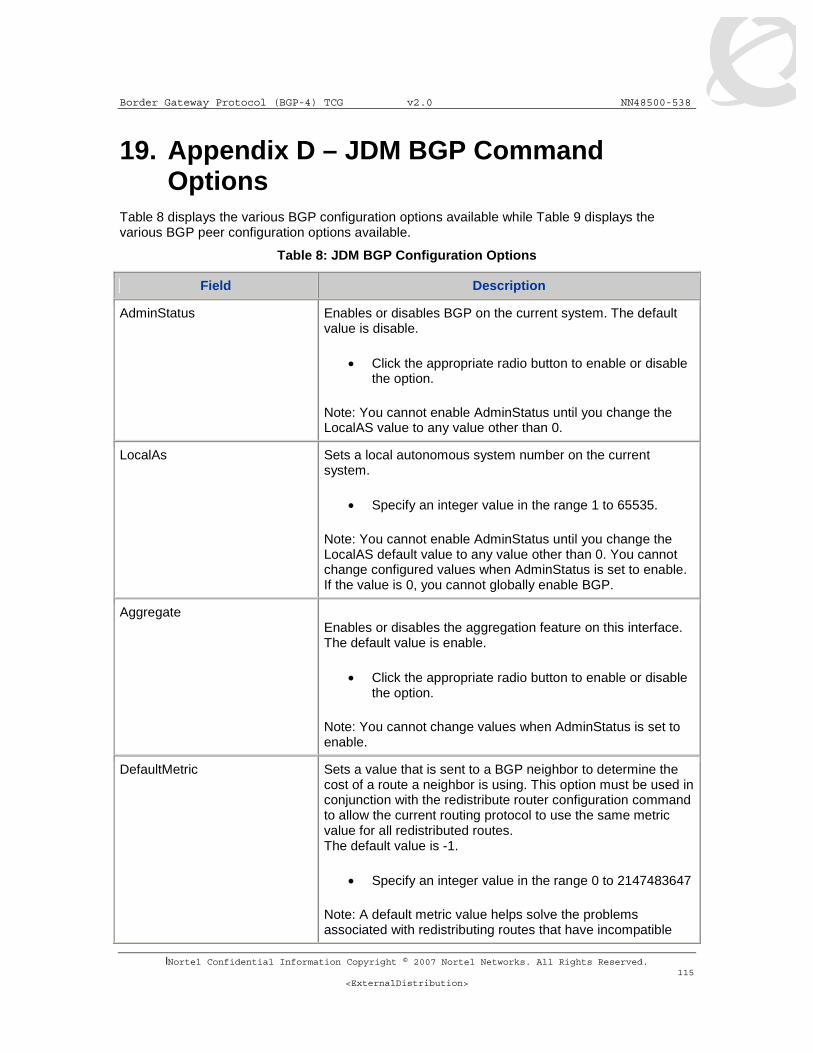
Border Gateway Protocol (BGP-4) TCG v2.0 NN48500-538
lNortel Confidential Information Copyright © 2007 Nortel Networks. All Rights Reserved. 115
<ExternalDistribution>
19. Appendix D – JDM BGP Command Options
Table 8 displays the various BGP configuration options available while Table 9 displays the various BGP peer configuration options available.
Table 8: JDM BGP Configuration Options
Field Description
AdminStatus Enables or disables BGP on the current system. The default value is disable.
• Click the appropriate radio button to enable or disable the option.
Note: You cannot enable AdminStatus until you change the LocalAS value to any value other than 0.
LocalAs Sets a local autonomous system number on the current system.
• Specify an integer value in the range 1 to 65535.
Note: You cannot enable AdminStatus until you change the LocalAS default value to any value other than 0. You cannot change configured values when AdminStatus is set to enable. If the value is 0, you cannot globally enable BGP.
Aggregate Enables or disables the aggregation feature on this interface. The default value is enable.
• Click the appropriate radio button to enable or disable the option.
Note: You cannot change values when AdminStatus is set to enable.
DefaultMetric Sets a value that is sent to a BGP neighbor to determine the cost of a route a neighbor is using. This option must be used in conjunction with the redistribute router configuration command to allow the current routing protocol to use the same metric value for all redistributed routes. The default value is -1.
• Specify an integer value in the range 0 to 2147483647
Note: A default metric value helps solve the problems associated with redistributing routes that have incompatible

Border Gateway Protocol (BGP-4) TCG v2.0 NN48500-538
lNortel Confidential Information Copyright © 2007 Nortel Networks. All Rights Reserved. 116
<ExternalDistribution>
Field Description
metrics. For example, whenever metrics do not convert, using a default metric provides a reasonable substitute and allows the redistribution to proceed.
DefaultLocalPreference Specifies the default value of the local preference attribute. The default value is 100.
• Specify an integer value in the range 0 to 2147483647
Note: You cannot change the default value when AdminStatus is set to enable.
DefaultInformationOriginate Checkbox-- When checked (enabled), allows the redistribution of network 0.0.0.0 into BGP. The default value is disable (not checked).
AlwaysCompareMed Enables or disables the comparison of the multi-exit discriminator (MED) parameter for paths from neighbors in different autonomous systems. A path with a lower MED is preferred over a path with a higher MED. The default value is disable. Note: When this option is set to disable (the default value) during the best-path selection process, the MEDs are compared only among paths from the same autonomous system. If you enable this option, the MEDs are compared among paths received from any other autonomous systems.
DeterministicMed Enables or disables the deterministic MED feature, used to compare the MED values when choosing routes advertised by different peers in the same autonomous system. The default value is disable.
AutoPeerRestart Enables or disables the process that automatically restarts a connection to a BGP neighbor. The default value is enable.
AutoSummary When enabled, allows BGP to summarize networks based on class limits (For example, Class A, B, C networks). The default value is enable.
NoMedPathIsWorst
When set to enable (the default value), BGP treats an update that is missing a multi-exit discriminator (MED) attribute, as the worst path.
BestPathMedConfed When enabled, allows you to compare multi-exit discriminator (MED) attributes within a confederation. The default value is disable.
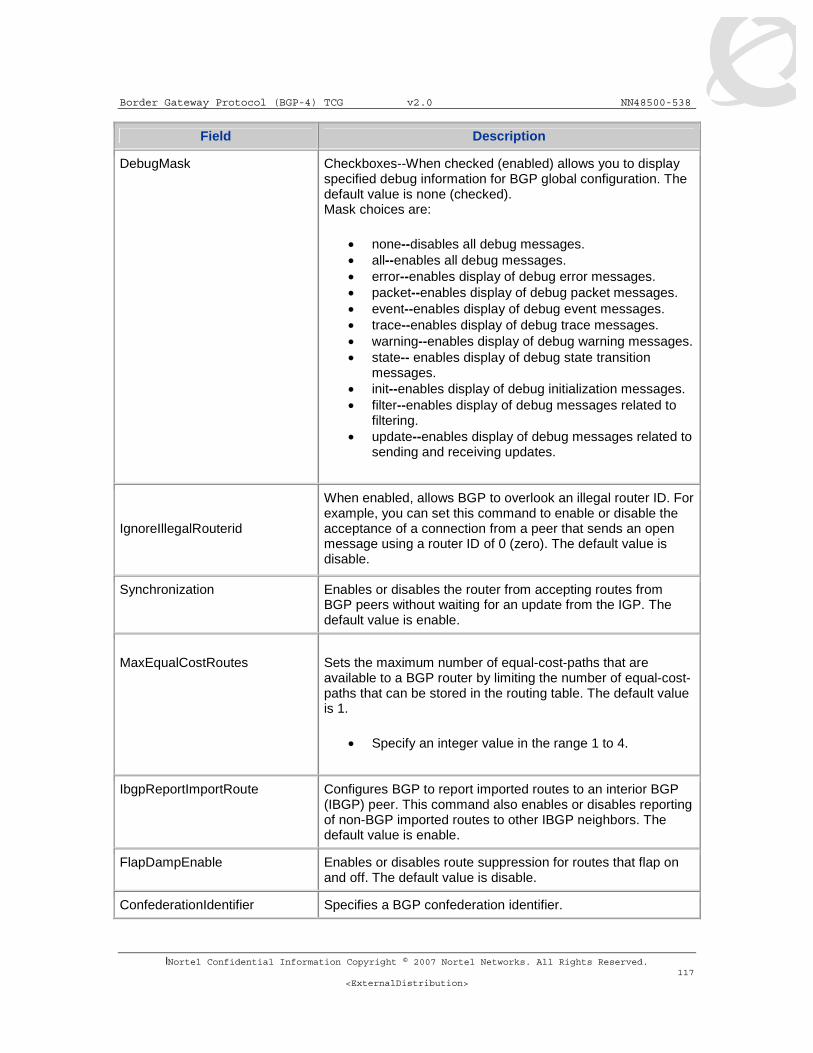
Border Gateway Protocol (BGP-4) TCG v2.0 NN48500-538
lNortel Confidential Information Copyright © 2007 Nortel Networks. All Rights Reserved. 117
<ExternalDistribution>
Field Description
DebugMask Checkboxes--When checked (enabled) allows you to display specified debug information for BGP global configuration. The default value is none (checked). Mask choices are:
• none--disables all debug messages. • all--enables all debug messages. • error--enables display of debug error messages. • packet--enables display of debug packet messages. • event--enables display of debug event messages. • trace--enables display of debug trace messages. • warning--enables display of debug warning messages. • state-- enables display of debug state transition
messages. • init--enables display of debug initialization messages. • filter--enables display of debug messages related to
filtering. • update--enables display of debug messages related to
sending and receiving updates.
IgnoreIllegalRouterid
When enabled, allows BGP to overlook an illegal router ID. For example, you can set this command to enable or disable the acceptance of a connection from a peer that sends an open message using a router ID of 0 (zero). The default value is disable.
Synchronization Enables or disables the router from accepting routes from BGP peers without waiting for an update from the IGP. The default value is enable.
MaxEqualCostRoutes
Sets the maximum number of equal-cost-paths that are available to a BGP router by limiting the number of equal-cost-paths that can be stored in the routing table. The default value is 1.
• Specify an integer value in the range 1 to 4.
IbgpReportImportRoute Configures BGP to report imported routes to an interior BGP (IBGP) peer. This command also enables or disables reporting of non-BGP imported routes to other IBGP neighbors. The default value is enable.
FlapDampEnable Enables or disables route suppression for routes that flap on and off. The default value is disable.
ConfederationIdentifier Specifies a BGP confederation identifier.

Border Gateway Protocol (BGP-4) TCG v2.0 NN48500-538
lNortel Confidential Information Copyright © 2007 Nortel Networks. All Rights Reserved. 118
<ExternalDistribution>
Field Description
• Specify an integer value in the range 0 to 65535.
Note: You cannot configure this value when AdminStatus is set to enable.
ConfederationPeers Lists adjoining ASs that are part of the confederation.
• Specify a list of ASs separated by commas (5500,65535,0,10,...,...).
RouteReflectionEnable Enables or disables the reflection of routes from IBGP neighbors. The default value is disable.
RouteReflectorClusterId Sets a cluster ID. This option is applicable only if the RouteReflectionEnable value is set to enable, and if multiple route reflectors are in a cluster.
ReflectorClienToClientReflection Enables or disables route reflection between two route reflector clients. This option is applicable only if the RouteReflectionEnable value is set to enable. The default value is disable.
QuickStart
Enables or disables the Quick Start feature, which forces the BGP speaker to begin establishing peers immediately, instead of waiting for the peer's auto-restart timer to expire. The default value is disable.
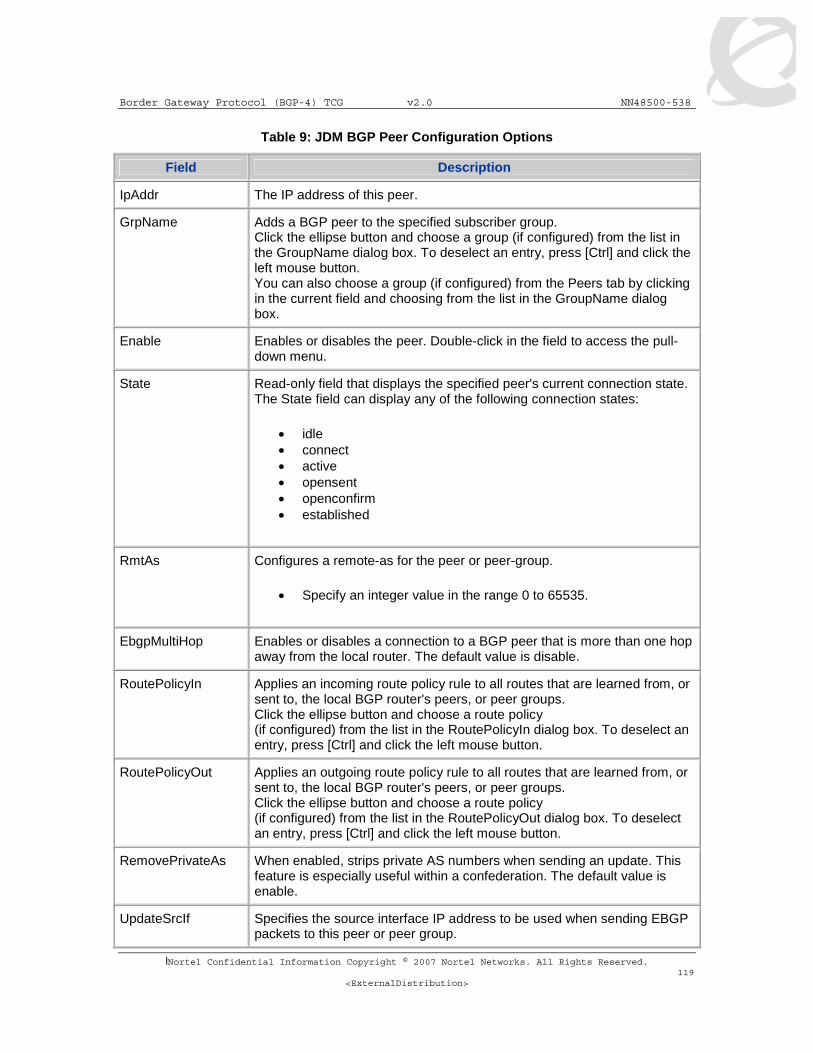
Border Gateway Protocol (BGP-4) TCG v2.0 NN48500-538
lNortel Confidential Information Copyright © 2007 Nortel Networks. All Rights Reserved. 119
<ExternalDistribution>
Table 9: JDM BGP Peer Configuration Options
Field Description
IpAddr The IP address of this peer.
GrpName Adds a BGP peer to the specified subscriber group. Click the ellipse button and choose a group (if configured) from the list in the GroupName dialog box. To deselect an entry, press [Ctrl] and click the left mouse button. You can also choose a group (if configured) from the Peers tab by clicking in the current field and choosing from the list in the GroupName dialog box.
Enable Enables or disables the peer. Double-click in the field to access the pull-down menu.
State Read-only field that displays the specified peer's current connection state. The State field can display any of the following connection states:
• idle • connect • active • opensent • openconfirm • established
RmtAs Configures a remote-as for the peer or peer-group.
• Specify an integer value in the range 0 to 65535.
EbgpMultiHop Enables or disables a connection to a BGP peer that is more than one hop away from the local router. The default value is disable.
RoutePolicyIn Applies an incoming route policy rule to all routes that are learned from, or sent to, the local BGP router's peers, or peer groups. Click the ellipse button and choose a route policy (if configured) from the list in the RoutePolicyIn dialog box. To deselect an entry, press [Ctrl] and click the left mouse button.
RoutePolicyOut Applies an outgoing route policy rule to all routes that are learned from, or sent to, the local BGP router's peers, or peer groups. Click the ellipse button and choose a route policy (if configured) from the list in the RoutePolicyOut dialog box. To deselect an entry, press [Ctrl] and click the left mouse button.
RemovePrivateAs When enabled, strips private AS numbers when sending an update. This feature is especially useful within a confederation. The default value is enable.
UpdateSrcIf Specifies the source interface IP address to be used when sending EBGP packets to this peer or peer group.
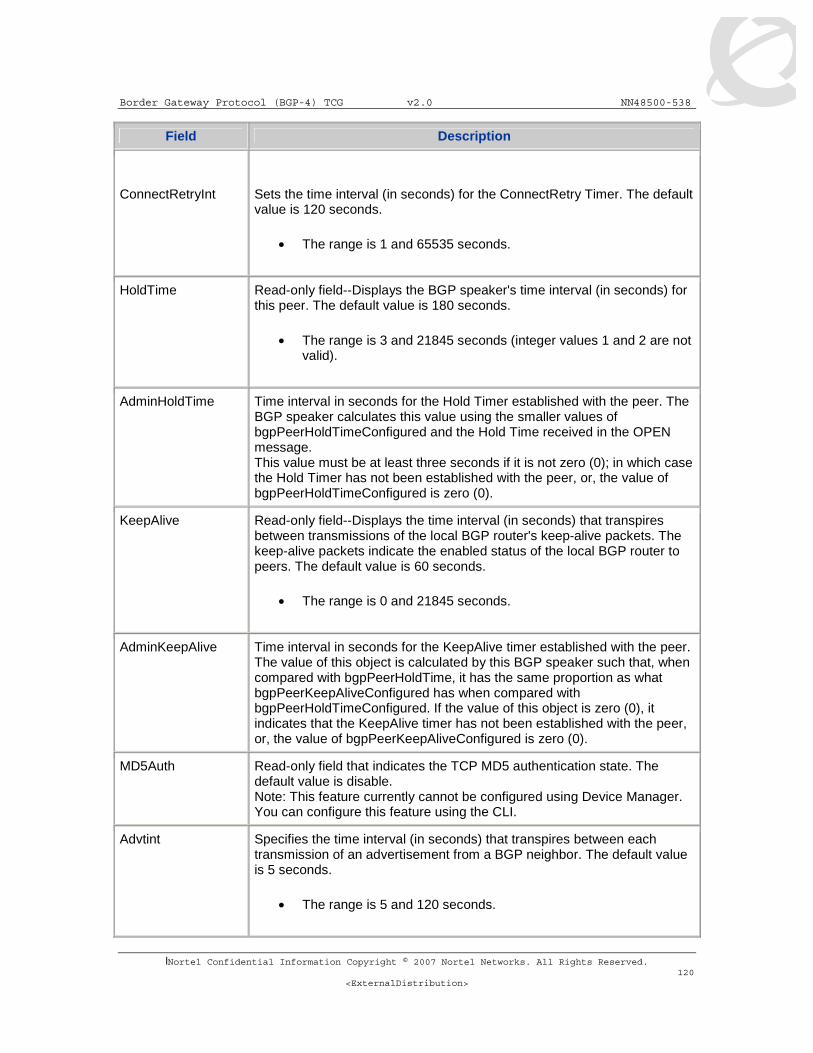
Border Gateway Protocol (BGP-4) TCG v2.0 NN48500-538
lNortel Confidential Information Copyright © 2007 Nortel Networks. All Rights Reserved. 120
<ExternalDistribution>
Field Description
ConnectRetryInt
Sets the time interval (in seconds) for the ConnectRetry Timer. The default value is 120 seconds.
• The range is 1 and 65535 seconds.
HoldTime Read-only field--Displays the BGP speaker's time interval (in seconds) for this peer. The default value is 180 seconds.
• The range is 3 and 21845 seconds (integer values 1 and 2 are not valid).
AdminHoldTime Time interval in seconds for the Hold Timer established with the peer. The BGP speaker calculates this value using the smaller values of bgpPeerHoldTimeConfigured and the Hold Time received in the OPEN message. This value must be at least three seconds if it is not zero (0); in which case the Hold Timer has not been established with the peer, or, the value of bgpPeerHoldTimeConfigured is zero (0).
KeepAlive Read-only field--Displays the time interval (in seconds) that transpires between transmissions of the local BGP router's keep-alive packets. The keep-alive packets indicate the enabled status of the local BGP router to peers. The default value is 60 seconds.
• The range is 0 and 21845 seconds.
AdminKeepAlive Time interval in seconds for the KeepAlive timer established with the peer. The value of this object is calculated by this BGP speaker such that, when compared with bgpPeerHoldTime, it has the same proportion as what bgpPeerKeepAliveConfigured has when compared with bgpPeerHoldTimeConfigured. If the value of this object is zero (0), it indicates that the KeepAlive timer has not been established with the peer, or, the value of bgpPeerKeepAliveConfigured is zero (0).
MD5Auth Read-only field that indicates the TCP MD5 authentication state. The default value is disable. Note: This feature currently cannot be configured using Device Manager. You can configure this feature using the CLI.
Advtint Specifies the time interval (in seconds) that transpires between each transmission of an advertisement from a BGP neighbor. The default value is 5 seconds.
• The range is 5 and 120 seconds.

Border Gateway Protocol (BGP-4) TCG v2.0 NN48500-538
lNortel Confidential Information Copyright © 2007 Nortel Networks. All Rights Reserved. 121
<ExternalDistribution>
Field Description
DeftOriginate When enabled, specifies that the current route originated from the BGP peer. This field enables or disables sending the default route information to the specified neighbor or peer. The default value is disable.
Weight Specifies this peer's or peer groups weight, or the priority of updates that can be received from this BGP peer. The default value is 100. Note: A weight is a numerical value you assign to a path that allows you to control the path selection process. The administrative weight is local to the router. For example, if you have particular neighbors that you want to prefer for most of your traffic, you can assign a higher weight to all routes learned from that neighbor.
• The range is 0 and 65535 seconds.
MaxPrefix Sets a limit on the number of routes that can be accepted from a neighbor. The default value is 12,000 routes.
• The range is 0 and 2147483647.
Note: A value of 0 (zero) indicates that there is no limit to the number of routes that can be accepted.
NextHopSelf Check box--When checked (enabled), specifies that the next-hop attribute in an IBGP update is the address of the local router or the router that is generating the IBGP update. The default value is not checked (disabled).
RouteReflectorClient Check box--When checked (enabled), specifies this peer or peer group as a route reflector client. The default value is disable. Note: All peers that are configured become members of the client group and the remaining IBGP peers become members of the nonclient group for the local route reflector.
SoftReCfgin Allows the router to relearn routes from the specified neighbor or group of neighbors without resetting the connection when the policy changes in the inbound direction. The default value is disable.
SoftReCfg Allows you to specify how the router relearns routes when the policy changes, as follows:
• in (inbound) • out (outbound) • none (default value)
DebugMask Allows you to display specified debug information for the specified BGP peer. The default value is none. Mask choices are: none: disables all debug messages. error: enables display of debug error messages. packet: enables display of debug packet messages.

Border Gateway Protocol (BGP-4) TCG v2.0 NN48500-538
lNortel Confidential Information Copyright © 2007 Nortel Networks. All Rights Reserved. 122
<ExternalDistribution>
Field Description
event: enables display of debug event messages. trace: enables display of debug trace messages. warning: enables display of debug warning messages. state: enables display of debug state transition messages. init: enables display of debug initialization messages. filter: enables display of debug messages related to filtering. update: enables display of debug messages related to sending and receiving updates. all: enables all debug messages.
SendCommunity Enables or disables sending the update message's community attribute to the specified peer. The default value is disable.
Identifier Read-only field--Displays the IP address of the Local system.
LocalAddr Read-only field--Displays the local IP address of this entry's BGP connection.
ConnectRetryInt Sets the time interval (in seconds) for the ConnectRetry Timer. The default value is 120 seconds.
• The range is 1 and 65535 seconds.
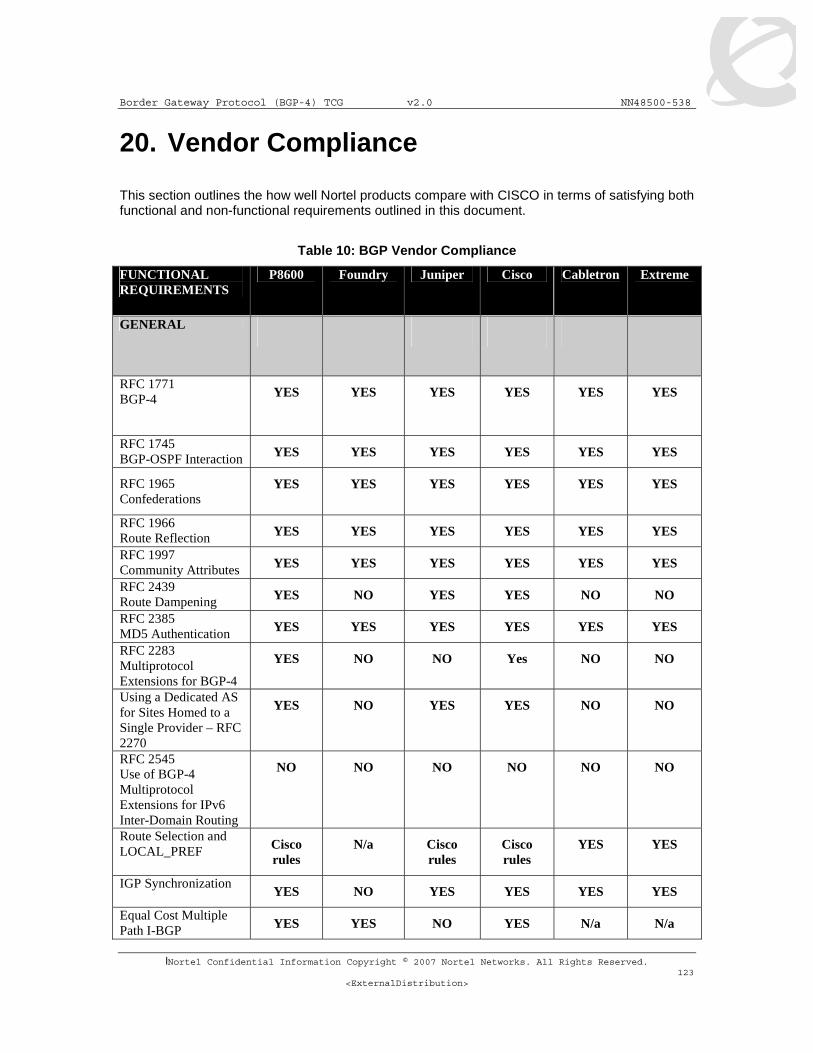
Border Gateway Protocol (BGP-4) TCG v2.0 NN48500-538
lNortel Confidential Information Copyright © 2007 Nortel Networks. All Rights Reserved. 123
<ExternalDistribution>
20. Vendor Compliance This section outlines the how well Nortel products compare with CISCO in terms of satisfying both functional and non-functional requirements outlined in this document.
Table 10: BGP Vendor Compliance
FUNCTIONAL REQUIREMENTS
P8600 Foundry Juniper Cisco Cabletron Extreme
GENERAL
RFC 1771 BGP-4 YES YES YES YES YES YES
RFC 1745 BGP-OSPF Interaction YES YES YES YES YES YES
RFC 1965 Confederations
YES YES YES YES YES YES
RFC 1966 Route Reflection YES YES YES YES YES YES
RFC 1997 Community Attributes YES YES YES YES YES YES
RFC 2439 Route Dampening YES NO YES YES NO NO
RFC 2385 MD5 Authentication YES YES YES YES YES YES
RFC 2283 Multiprotocol Extensions for BGP-4
YES NO NO Yes NO NO
Using a Dedicated AS for Sites Homed to a Single Provider – RFC 2270
YES NO YES YES NO NO
RFC 2545 Use of BGP-4 Multiprotocol Extensions for IPv6 Inter-Domain Routing
NO NO NO NO NO NO
Route Selection and LOCAL_PREF Cisco
rules N/a Cisco
rules Cisco rules
YES YES
IGP Synchronization YES NO YES YES YES YES
Equal Cost Multiple Path I-BGP YES YES NO YES N/a N/a

Border Gateway Protocol (BGP-4) TCG v2.0 NN48500-538
lNortel Confidential Information Copyright © 2007 Nortel Networks. All Rights Reserved. 124
<ExternalDistribution>
Equal Cost Multiple Path E-BGP YES YES YES YES N/a N/a
Multiple Connections to same peer YES NO YES YES N/a N/a
E-BGP Multihop YES NO YES YES N/a N/a
Sink Route in Routing Table for Aggregate YES NO YES YES N/a N/a
Use of I-BGP to redistribute locally generated routes
YES N/a YES YES
Poison Reverse NO N/a YES YES
Handling of Loop Detection YES N/a YES N/a
BGP Connection over circuitless IP YES N/a N/a N/a
MIB
Standard MIB RFC 1657 YES YES YES YES
Enterprise MIB Cisco Passport NO Bay
POLICY ENGINE
Ability to specify Import/Export Policies based upon: AS-PATH, AS number, Community, NLRI, IP Address
YES YES YES YES
Similar to CISCO Policy Engine YES NO YES N/a
CONFIGURATION
Ability to configure: Router ID, AS Number, BGP Timers, Peer Sesssion, Enable/Disable BGP, Max Size of update message to peer
YES N/a YES N/a

Border Gateway Protocol (BGP-4) TCG v2.0 NN48500-538
lNortel Confidential Information Copyright © 2007 Nortel Networks. All Rights Reserved. 125
<ExternalDistribution>
21. Software Baseline Configuration examples in this TCG are based on ERS 8600 software level 3.7.
22. Reference Documentation (Identify reference documentation such as Technical Pubs and Engineering Guidelines).
Document Title Publication Number
Description
Configuring BGP Services 314721-C Passport 8000 Series Software Release 3.7
Border Gateway Protocol (BGP-4) TCG v2.0 NN48500-538
lNortel Confidential Information Copyright © 2007 Nortel Networks. All Rights Reserved. 126
<ExternalDistribution>
Contact us
If you purchased a service contract for your Nortel product from a distributor or authorized reseller, contact the technical support staff for that distributor or reseller for assistance.
If you purchased a Nortel Networks service program, contact Nortel Technical Support. To obtain contact information online, go to www.nortel.com/contactus.
From the Technical Support page, you can open a Customer Service Request online or find the telephone number for the nearest Technical Solutions Center. If you are not connected to the Internet, call 1-800-4NORTEL (1-800-466-7835) to learn the telephone number for the nearest Technical Solutions Center.
An Express Routing Code (ERC) is available for many Nortel products and services. When you use an ERC, your call is routed to a technical support person who specializes in supporting that product or service. To locate an ERC for your product or service, go to www.nortel.com/erc.
Recommended


![[MS-BGPP]: Border Gateway Protocol (BGP) Profile](https://img.dokumen.tips/doc/110x75/627090a8c0b3a405e954234e/ms-bgpp-border-gateway-protocol-bgp-profile.jpg)


