P a g e | 1
ASTROPHOTOGRAPHY WITH A DSLR
Astrophotography with a DSLR
Introduction
Whether you are an experienced photographer wishing to have a go at astronomy or an astronomer
wanting to photograph a few favourite objects, it is amazing what you can do with a DSLR, even
without a telescope. If you need guidance on navigating the night sky, check out Further
Information.
You could easily be forgiven for thinking that astrophotography is an expensive hobby. Certainly, 15
years ago, it was true. I started by borrowing my wife’s compact digital camera at the end of 2003. I
started off with the Moon and have owned a succession of my own since. Initially, I took photos of
bright objects, like the Sun, Moon and brighter planets by holding a camera to a telescope eyepiece.
Over the years, I pushed the boundaries of this technology to the limits and found that even a simple
compact digital camera can capture stellar constellations. I was limited to an exposure time of 8
seconds as I did not have a driven telescope of camera mount. In fact, I still do not have one today.
I felt quite pleased with what I could do with 8 seconds but always thought “imagine what I could do
with 30”. My wish came true in 2013 when I pooled a few cash presents for Christmas to buy a
second-hand DSLR. I was certainly able to photograph constellations and was particularly pleased
when I caught the scorpion’s tail “on film” for the first time.
Fig 1 Scorpius

Phil’s Scribblings
P a g e | 2
This is quite a “pot” for a UK-based astronomer as the tail never rises above the horizon even from
Southern England. I was on a business trip to Aruba in the Caribbean. Conditions were quite poor on
the day, due to a lot of haze on the horizon but could capture the main stars.
Apart from needing to travel far enough south to see Scorpius, the great thing about this photo is
that anyone can do it. A bit of digital wizardry works, too but the constellation can be recognised
from the original image.
The Basics You can skip this bit if you have already used a DSLR camera. In a nutshell, DSLR stands for Digital
Single Lens Reflex. Lenses are interchangeable and most cameras are supplied with a single “zoom”
lens, with a variable focal length, usually around 18mm to 55mm. A short focal length gives you a
wide field of view and brighter image, whereas a longer focal length gives you a closer view but a
fainter image. It follows that you would normally use a short focal length for large, faint objects,
such as constellations and a long focal length for small, bright objects, such as the Moon.
A DSLR also allows you to adjust the brightness of the image and is given by the ISO number, which
usually ranges from 100 to 3200, with the higher number being brighter. You can use automatic
settings, although I do not recommend this for astronomical use, as most cameras are designed for
photographing people and scenery.
You can also adjust the exposure setting, usually from 1/4000 second to 30 seconds. Like the
brightness settings, you can use automatic mode. There is also “bulb” mode where you can control
the exposure time manually but this is best left until you have more practice.
You can also focus a DSLR automatically but, again, manual settings are better for astronomical use.
However, some objects are difficult to focus on and need a lot of patience and experience.
For most DSLR cameras, it is possible to buy additional lenses, such as a zoom lens from 70mm to
300mm focal length. Fixed focal length lenses are available but are often expensive and less
versatile.
For basic information on DSLRs see Further Information.
Constellations It would follow that to photograph constellations, you would use a short focal length, the maximum
brightness setting that your camera allows and a very long exposure. Unfortunately, not. Earth’s
rotation means that everything moves across the sky and blurs if the exposure is too long. Another
factor is that, even an apparently “pitch black” sky is never completely dark.
The solution is to use an exposure time of 30 seconds, 18mm (or shorter) focal length and a
brightness setting of 800. If there are lots of street lights around or the Moon is about, reduce this to
400 and use 1600 if you are well away from artificial light.
You can increase the exposure time if the constellation is nearer the celestial pole (near Polaris in
the northern hemisphere, near Sigma Octanis in the southern hemisphere). About halfway between
the celestial equator and the pole, you can use an exposure of about 42 seconds and about 3
minutes at the pole itself. This is because constellations rotate more slowly in the polar regions.
Ideally, you need a tripod to steady the camera but I have even been known to balance a camera on
the top of a car or a park bench.

P a g e | 3
ASTROPHOTOGRAPHY WITH A DSLR
A favourite target amongst astrophotographers is Orion. I have even taken half-decent shots of it
using a compact digital camera.
Fig 2 Orion
This Orion shot shows a lot of what is good about the method and one problem. Many of the stars
visible were too faint to see from where I took the shot from (suburbia). The scale is large enough to
show the full constellation and parts of the neighbouring ones. You can see the Hyades and Pleiades
(star clusters) on the upper right. The problem with constellations near the horizon is that there is
more atmosphere between the camera and the stars and that usually means more haze. This often
produces a red background glow in the lower part of the photo. You can work around this by
photographing constellations higher in the sky and one of my favourite shots is to capture the zenith
by laying a camera on its back.
It is possible to obtain a photograph like Fig 2 without doing anything special, but I created it using a
technique known as stacking. You can read more about it here: Philip Pugh's Website: Phil's
Scribblings: Stacking. This combines detail from several individual photographs into one.
Another of my favourite constellations is Perseus. Fig 3 shows the neighbouring constellation of
Auriga and parts of Taurus, too. I would almost say it is too good, as the pattern of the constellation
seems lost in the stellar background.

Phil’s Scribblings
P a g e | 4
Fig 3 Perseus
About losing constellations in the stellar background, you can capture the Milky Way with this set-
up, too. From the northern hemisphere, the area around Cygnus and Lyra is particularly attractive.
Those of you who live in the southern hemisphere or south of the Tropic of Cancer should try this
with the galactic centre.
Fig 4 Milky Way
P a g e | 5
ASTROPHOTOGRAPHY WITH A DSLR
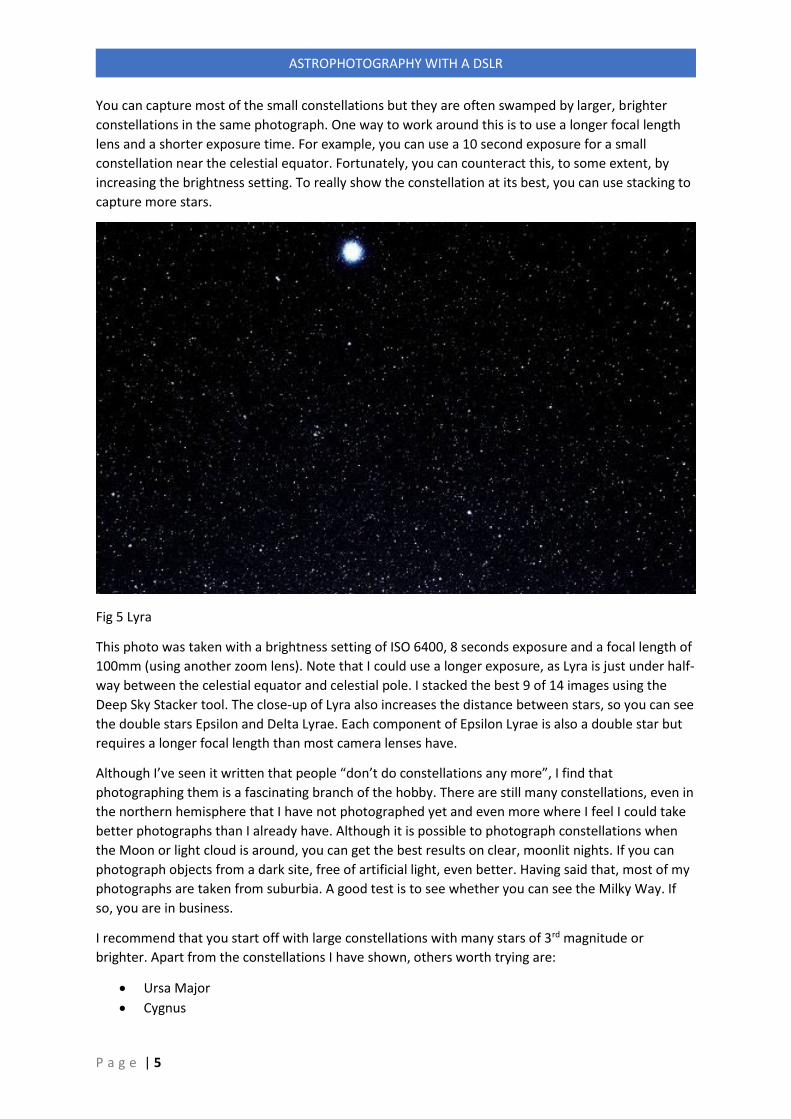
You can capture most of the small constellations but they are often swamped by larger, brighter
constellations in the same photograph. One way to work around this is to use a longer focal length
lens and a shorter exposure time. For example, you can use a 10 second exposure for a small
constellation near the celestial equator. Fortunately, you can counteract this, to some extent, by
increasing the brightness setting. To really show the constellation at its best, you can use stacking to
capture more stars.
Fig 5 Lyra
This photo was taken with a brightness setting of ISO 6400, 8 seconds exposure and a focal length of
100mm (using another zoom lens). Note that I could use a longer exposure, as Lyra is just under half-
way between the celestial equator and celestial pole. I stacked the best 9 of 14 images using the
Deep Sky Stacker tool. The close-up of Lyra also increases the distance between stars, so you can see
the double stars Epsilon and Delta Lyrae. Each component of Epsilon Lyrae is also a double star but
requires a longer focal length than most camera lenses have.
Although I’ve seen it written that people “don’t do constellations any more”, I find that
photographing them is a fascinating branch of the hobby. There are still many constellations, even in
the northern hemisphere that I have not photographed yet and even more where I feel I could take
better photographs than I already have. Although it is possible to photograph constellations when
the Moon or light cloud is around, you can get the best results on clear, moonlit nights. If you can
photograph objects from a dark site, free of artificial light, even better. Having said that, most of my
photographs are taken from suburbia. A good test is to see whether you can see the Milky Way. If
so, you are in business.
I recommend that you start off with large constellations with many stars of 3rd magnitude or
brighter. Apart from the constellations I have shown, others worth trying are:
• Ursa Major
• Cygnus

Phil’s Scribblings
P a g e | 6
• Taurus
• Gemini
• Aquila
• Leo
Trails
Widefield astrophotography can be used to capture events that are not suitable for capture by
telescopes. Meteors can be captured purely by accident or deliberately during major showers. The
International Space Station appears as a bright trail against a stellar or twilit background. Fainter
satellites and aircraft also show as trails. Usually, some break in the trails or lights that appear
alongside the trails differentiate them from meteors. For most of these types of shots, the camera
settings are the same as for constellations. For meteors, it is better to use a higher brightness (ISO)
setting and a shorter exposure time. I’ve found my meteor numbers are up since adopting this
approach and now use ISO 6400 and 5 seconds exposure.
P a g e | 7
ASTROPHOTOGRAPHY WITH A DSLR

Phil’s Scribblings
P a g e | 8
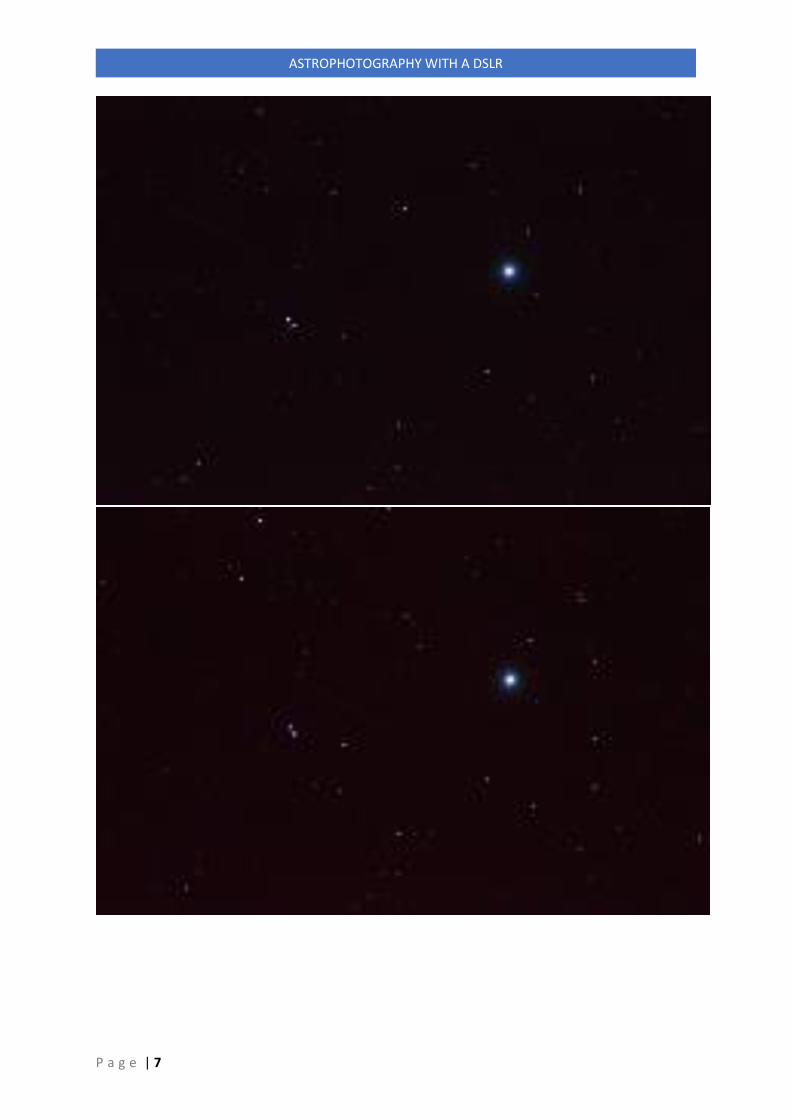
Fig 6 Satellite Trails
The three photos of Fig 6 clearly identify the object as a satellite. You can see the trail from top left
to bottom right in successive photos. Both meteors and aircraft are usually faster moving.
Fig 7 International Space Station

P a g e | 9
ASTROPHOTOGRAPHY WITH A DSLR
Fig 7 shows a 30 second exposure of an International Space Station trail. Notice that it is near the
Plough (a.k.a Big Dipper). You can find when the ISS is visible from your location by looking it up on
the Internet.
Fig 8 Aeroplane Trails
Figure 8 shows some star trails. It was a deliberate attempt to take undriven long exposures of stars
to demonstrate their movement with Earth’s rotation. It is also a good technique for capturing
meteors. You need to be able to take exposures of longer than 30 seconds and up to an hour. You
need to hold the exposure button for a long time or use a remote shutter release (see Accessories,
below). I recommend a low brightness setting (ISO 400 or less), as the long exposure can brighten
the background sky quite considerably. You can tell that the tracks are from aircraft due to the dots
along the trails.

Phil’s Scribblings
P a g e | 10
Fig 9 Meteor Trail
Fig 9 shows the real thing. Even at high zoom level, the trail is continuous. It is slightly twisted in
parts but this is reportedly quite common for meteors. I made a blog comment at the time
suggesting that I could accurately predict the exact appearance and track of meteors but not even
professional astronomers can do that. Honestly? I just happened to be photographing the right part
of the sky at the right time.
So that’s it? No not quite. Sometimes you come across something that nobody can easily explain. It
is quite easy to consider the possibility of little green men. Honestly, whilst I believe that life exists in
the universe at places other than our planet, I’m equally sceptical about Earth being visited by alien
intelligence. With the object not resembling a meteor trail, it was clearly a rather slow-moving
object. The presence of the red dots might suggest an aircraft but the slow speed indicates that it
would be flying very high. The other explanation was a helicopter.

P a g e | 11
ASTROPHOTOGRAPHY WITH A DSLR
Fig 10 UFO
The Moon
Quite honestly, some form of telescope imaging is ideal for lunar astrophotography but you can still
get some good results with a DSLR given a bit of skill and even more luck. The main difficulty is that
the Moon comes nowhere near filling the camera field of view, even at long focal length. Also, a
longer focal length camera lens is a great help (see Recommended Accessories). One of the biggest
challenges is getting accurate focus. The Moon may well appear to be in focus in a viewfinder, only
to appear as a blur when you see it on a computer. If you have terrestrial objects in the distance, you
can use these to tune your focus accurately. Otherwise, it is down to sharp eyes and luck.
Fig 11 The Moon at 55mm Focal Length

Phil’s Scribblings
P a g e | 12
Fig 11 was taken using my older DSLR at 55mm focal length, as I did not have a longer focal length
lens at the time of capture. Although it shows the lunar “seas” quite clearly, the image is too small to
show craters. Interestingly, I took the photo in daylight from Aruba in the Caribbean.
Fig 12 Moon at 300mm Focal Length
Fig 12 is a much more recent effort and shows a lot more detail on the lunar surface. The crater
Tycho is clearly visible near the bottom and others are visible, too. Although it does not match my
efforts with telescopes, it shows the lunar phase (nearly but not quite full) and the major features. I
used ISO 400 and an exposure time of 1/2000 second. You should use a longer exposure time if the
Moon is low in the sky and/or partially covered by thin cloud.
The great thing about this method is that it allows you to record the lunar phases. I often use it when
I am short of time or am grabbing a shot through a gap in the clouds. I nearly always use a focal
length of 300mm and a brightness setting of ISO 400. I vary the exposure time from 1/200 to 1/4000
second, depending on the lunar phase, the altitude of the Moon above the horizon and the presence
or absence of any cloud. Any slight over or under exposure can be dealt with using image processing
tools.
The Sun Frequent readers of Phil’s Scribblings and visitors to my website know of my fascination with our
nearest and dearest star. You should also be aware that there are safety risks in solar viewing.
Looking at the Sun through a viewfinder is dangerous, so PLEASE make sure that you use an
approved solar filter, best obtained from an astronomical supplier. Incorrect use of a camera for
solar photography can damage the camera as well as your eyes. Even with an appropriate solar filter,
the Sun is noticeably brighter than the Moon. I think it could be possible to capture sunspots at very

P a g e | 13
ASTROPHOTOGRAPHY WITH A DSLR
short focal lengths but I’ve never tried it. I’ve only ever used a lens at 300mm focal length and never
used a brightness setting other than ISO 100 (the lowest). At the time of writing, it was near a solar
minimum and I was only able to capture a single, large sunspot. Although I think the method is
worth trying and is the only option without a telescope, it is only capable of recording the largest
and darkest of sunspots. Fig 13 shows the only example so far.
Fig 13 The Sun showing a sunspot
Planets A DSLR with a focal length of 300mm or less is simply incapable of showing any detail on a planet. It
can show Jupiter and Saturn as discs, rather than point light sources but that is all. If you have a lens
capable of 300mm focal length or more, you can capture Jupiter’s main four moons. What is
fascinating is that they change position relative to the planet very quickly and you can record
changes in less than a night. The key is to use the longest focal length that your camera allows
(300mm in my case), ISO 6400 (or the maximum you have) and 2 seconds exposure. You can usually
capture the moons with ½ second exposure but I prefer to capture any background stars as well. It is
rare to catch all four moons this way. Frequently, at least one is in front of the planet, behind it or in
its shadow. Fig 14 shows some recent examples.

Phil’s Scribblings
P a g e | 14
Fig 14 Jupiter with moons
In theory, at least Titan should appear in similar shots of Saturn but, at the time of writing, Saturn
was poorly placed from the UK and was expected to be so for the next 7 years. Its low altitude
makes Titan faint from southern England and near the limit of my equipment.
Deep Sky Objects In astronomy-speak, deep sky objects are known as DSOs. Apart from constellation shots, this is
where a DSLR camera really comes into its own. Ideally you would have a zoom lens that can reach
up to a focal length of 300mm but there are many large ones that can show up with a shorter focal
length of around 50mm. This section lists just three of them. A complete list of DSOs suitable for
focal lengths of 300mm and below would easily fill a book.
Magazines and many websites show a lot of DSOs. These days they are taken using telescopes,
driven mounts and long exposures. This gives a rather false view. There is no doubt that many of
these images are interesting and pretty but, equally, there are many DSOs that are not only within
the capabilities of a DSLR, there are many that look better with more simple equipment due to their
size. With a 300mm there is enough to photograph to keep you busy for years. Even if you
photograph all of them, you will go back to improve them. They are great objects to learn on and
you can experiment by taking shots with different focal lengths.

P a g e | 15
ASTROPHOTOGRAPHY WITH A DSLR
Fig 17 The Hyades
Fig 17 shows the Hyades, an open star cluster in the constellation of Taurus. The bright star to the
bottom left (known as Aldebaran) appears to be a member of the cluster but is a lot closer. The
Hyades appear as a group of stars in a V-shape, representing the head of a bull. It is one of the
largest star clusters in the whole sky.
Fig 18 Melotte 111

Phil’s Scribblings
P a g e | 16
Melotte 111 is also an open star cluster that is large and features a V-shape. Not only is it in the
constellation of Coma Berenices, it forms most of the constellation. Unlike many DSOs, it is best
photographed with a shorter focal length of about 50-100mm. It is more of a challenge than the
Hyades, as its stars are fainter.
Fig 19 Perseus Double Cluster
Just to prove a point, I took this photo in 2014 with my older DSLR. If you know your way around the
sky, it is between Perseus and Cassiopeia. It is what it says on the tin. It is a pair of open star clusters.
Like the previous two objects, it is best photographed with a focal length of 50-100mm.
If you are an experienced photographer with little knowledge of astronomy, please check out the
Further Information section.
To calculate the maximum exposure time for a deep sky object, it is dependent on the focal length F
and the declination of the object in the centre of the photo (θ). When near the celestial pole, use the
declination of the nearest object to the celestial equator.
The maximum exposure time is given by:
500/(FL*cosine θ).
OK, we’re not all mathematics graduates, so mathematics phobics can use this table as a guide.

P a g e | 17
ASTROPHOTOGRAPHY WITH A DSLR
Declination
Focal Length 0 10 20 30 40 50 60 70 80
18 27.78 28.21 30.04 34.74 45.49 71.16 143.67 427.52 2567.58
20 25.00 25.39 27.04 31.27 40.94 64.04 129.30 384.77 2310.82
30 16.67 16.93 18.02 20.85 27.30 42.70 86.20 256.51 1540.55
40 12.50 12.69 13.52 15.63 20.47 32.02 64.65 192.39 1155.41
50 10.00 10.16 10.81 12.51 16.38 25.62 51.72 153.91 924.33
100 5.00 5.08 5.41 6.25 8.19 12.81 25.86 76.95 462.16
150 3.33 3.39 3.60 4.17 5.46 8.54 17.24 51.30 308.11
200 2.50 2.54 2.70 3.13 4.09 6.40 12.93 38.48 231.08
300 1.67 1.69 1.80 2.08 2.73 4.27 8.62 25.65 154.05
As you can see, the exposure time increases more rapidly the nearer that you get to the pole.
Allowing for a non-zero field of view, you can point your camera at the pole with a focal length of
300mm and use an exposure time of 2.5 minutes. Although it appears that you can use an exposure
time of over 40 minutes, this is only true for the central part of the photo. As the field of view at a
focal length of 18mm is rather large, around 30 degrees, a more realistic figure is 143 seconds.
There are no hard-and-fast rules but the maximum brightness at 18mm is an ISO setting of 800 and
at 300mm, it is ISO 6400. It largely depends on the presence or absence of artificial light, haze, etc.
Also, objects near the zenith are easier to photograph than those near the horizon.
If you live in the southern hemisphere, the objects that I have shown are impossible or difficult.
However, you have the Magellanic Clouds, Jewel Box and Coal Sack to try instead.
Conjunctions
As the solar system objects move around the solar systems, many of them pass close to other
objects and each other. Strictly speaking a conjunction is when an object is due north or south of
another and within the plane of the ecliptic. For the purposes of photography, being within the same
photo is enough to be interesting. As the Moon moves through the sky faster than the planets, it
follows that most conjunctions and close passes involve it.
I must confess that I cheat by using some digital trickery. It usually takes at least 1/10 second at any
brightness setting, to over-expose the Moon beyond what anyone can resolve by image processing. I
simply paste a shorter exposure image over the over-exposed one. Fig 20 shows a recent example of
the Moon with Jupiter.

Phil’s Scribblings
P a g e | 18
Fig 20 Moon with Jupiter
Planets sometimes move close to each other, although it is far less common than events with the
Moon. There was a very close encounter between Venus and Mercury in June 2005 but it was long
before I had a DSLR. I photographed them through a telescope and compact digital camera. When
two planets are approaching each other, I like to take photographs on successive nights but the
English weather usually gets in the way.
And what else? Apart from normal “social and domestic use” DSLR cameras can be used to photograph some other
astronomical objects and atmospheric events, which are of interest to astronomers, although strictly
speaking, are not astronomical.
I have never been in the right place at the right time to photograph the northern lights (aurora
borealis). The best displays from southern England were in 2003 before I had access to a digital
camera of any type. At the time of writing, it was near a solar minimum, so there were no likely
chances for a few years. If you live in the southern hemisphere, it is even worse, as most centres of
population are around 35 degrees south. This is too far from the south pole for aurora australis to
make this event common. Other non-astronomical events to look out for are:
• Parahelia (sundogs)
• Rainbows and moonbows
• Noctilucent clouds.
Other astronomical objects to look out for are comets. Unfortunately, the use of digital cameras was
very rare in 1996 and 1997 for the visits of Hyakutake and Hale-Bopp. These would have been ideal
targets for use with a DSLR. Although I have captured comets since then “on film”, I would have had
better results with a telescope and driven mount.
You can capture asteroids on camera but need to take photos on successive nights to differentiate
them from background stars. If you are very lucky, a bright near-Earth asteroid may occur and you
can capture its trail against the background stars. This is a rare event, though.

P a g e | 19
ASTROPHOTOGRAPHY WITH A DSLR
Recommended Accessories I have listed these in order of what I consider cheapest and most useful first, most expensive and
useless last.
Tripod I have managed to take some photographs without a tripod, such as short exposure shots of the
Moon and by leaning a camera against something. This has not been through preference, though.
Most budget tripods are OK for short focal length lenses but longer focal length lenses are longer
and heavier and need a sturdy tripod.
Another important feature is the ability to photograph objects near the zenith.
Remote Shutter Release Many photographers, including me, have painstakingly collected many photographs of the same
object, with the intention of stacking them, only to find that all the images are blurred. Even people
with a steady hand introduce some camera shake, which is also more apparent if the mount is not
steady. A remote shutter release that can be attached via a cable or a remote wireless link solves the
problem. My personal preference is one that uses a cable, as there are less things to go wrong. Also,
they are cheaper.
You can go one better for an extra tenner or so. Including postage, I bought an intervalometer that
matches my camera for £17. Not only does it have a manual control but also an automatic one. If
you are busy, tired or just can’t be bothered to tolerate the cold outside, you can simply program
your intervalometer to take the shots for you. You can set the exposure time, number of exposures
and number of exposures. What is amazing, if you haven’t tried it, is that you can usually take tens of
exposures without having to re-point the camera at an object. The shorter the focal length, the more
exposures you can take.
You can also use an intervalometer to take your dark photos. These are taken with the lens cap on
for use with image processing.
Additional Lenses Most of this booklet has discussed the use of lenses that are supplied with the camera when bought,
often called “kit lenses”. These are usually 18-55mm zoom lenses which are great for constellations,
good for large deep sky objects but not so good for the Moon and smaller deep sky objects.
I was lucky when I bought my most recent DSLR because it came with a 70mm to 300mm zoom lens.
This, almost literally, opened up new worlds. I could make out a lot more detail from my lunar
photographs and I could photograph more of the brighter deep sky objects.

Phil’s Scribblings
P a g e | 20
Fig 21 Pleiades (Seven Sisters)
Fig 21 shows an example. It is the well-known Seven Sisters open star cluster and it shows more stars
than you would obtain with a shorter focal length lens. Note that, while the longer focal length does
not help with brightness, it magnifies the distance between stars and resolves them individually. This
was composed from many photographs combined, with brightness and contrast levels adjusted.
Fixed focal length lenses are available but tend to be more expensive. Most are around 50mm focal
length, which is too long for most constellations and not long enough for the Moon. On the other
hand, the image quality is better than the more common zoom lenses. If money is no object, having
a range of lenses is a good idea. However, once focal lengths reach 300mm or more, lenses start to
become very expensive and heavy. This is true for zoom lenses as well as fixed length. For
astronomical use, it is more cost-effective to buy an attachment to attach the camera to a telescope.
However, this is a topic for another booklet. Figure 22 shows a photograph of the Moon taken
through a telescope of 1.54m focal length.

P a g e | 21
ASTROPHOTOGRAPHY WITH A DSLR
Fig 22 The Moon
In a nutshell, many of the principles of using a camera with lenses apply. I have taken some images
up to 9 metres focal length.
Zoom and fish eye adaptors Astronomers are familiar with Barlow lenses and focal reducers. You can buy similar lenses for
cameras. The fish eye lens reduces the focal length of a camera lens. They give a wide field of view
and can almost capture the whole sky. They can be rather useful for meteor showers. On the other
hand, they do not significantly increase the brightness of stars and, furthermore, need a lower
brightness setting to avoid lightening the background sky. Maybe they would work better from a
truly dark site but I haven’t had the chance to try.
Zoom adaptors are great for taking close-ups of insects but, unfortunately have never enabled me to
obtain a clear focus on the Moon. I was rather disappointed with my purchase and would not
recommend it for astronomical use. The alternative is to use a telescope.

Phil’s Scribblings
P a g e | 22
Driven mounts Unfortunately, I don’t own one. Driven camera mounts retail for £250 and more. If you happen to
own a driven telescope mount, it may have a “piggyback” adaptor for you to attach your camera.
Some really gifted people can even hand-drive their mounts. What driven and hand-guided mounts
enable you to do is use relatively long exposures. The lower the focal ratio, the longer the exposure
you can use. Unfortunately, all but the best mounts are less than 100% accurate and do not
eliminate star trailing. However, a driven camera mount increases the exposure time about tenfold.
That certainly means you can capture fainter stars. However, the top deep sky astrophotographers
use mounts that cost five figures.
Fortunately, there are loads of objects that can be captured by a DSLR, even an undriven one. See
Further Information to find out about what is around.
Conclusion In conclusion, a remote shutter release (or for a bit more money) an intervalometer gives you much
better results than the camera alone.
A 70-300mm zoom lens literally opens up the sky as you can photograph many more objects. I would
go further and suggest that a DSLR with two lenses with zoom from 18-55mm and 70-300mm, a
good tripod and an intervalometer can keep you busy for a lifetime.
Image Processing This is a very big topic, especially as new tools and techniques are being introduced, apparently by
the minute. Almost as a point of principle, I do not buy imaging tools, as there is so much freeware
available. As personal preference, I would prefer to spend money on equipment. The objective of
image processing is to present a better result than the camera alone. It is certainly possible to over-
process a photo and introduce detail that isn’t in the sky at all. As an example, it is quite easy to
introduce “ghost” stars that you won’t find in any catalogue.
Briefly, image processing allows the following adjustments:
• Stacking – combining detail from more than one photo
• Stitching – joining photos to enable adjacent objects to be shown in the same photo
• Colour manipulation – increasing or decreasing a specific colour or replacing one colour with
another
• Adjusting brightness and contrast
• Removing distortion.
See Further Information for more detail.
The Next Steps There is nothing wrong for stopping right here! There is so much to photograph and some objects
photograph better using a DSLR (alone). Large open star clusters and constellations look great and
there is no point in using high magnification for meteors. Then there is the challenge of getting
better results than your best shot of that object. You will try taking more photos to stack and you
will try “snapping” adjoining areas and joining them by stitching.
But we are all human. The best analogy I can think of is that top mountaineers are not just content
with climbing all the mountains in Europe but want to tackle Mount Everest. The next step for most
people usually involves the use of a telescope. Without a (driven) telescope mount, exposure times

P a g e | 23
ASTROPHOTOGRAPHY WITH A DSLR
become limited. For a telescope with a focal length of 1500mm, the maximum exposure time for an
object near the celestial equator reduces to 1/3 second. Fortunately, this is more than enough to
photograph the Sun and Moon. I have yet to try this on larger, brighter deep sky objects but
recommend that you take many individual photos and stack them. Suitable targets for this method
are the Orion Great Nebula and Andromeda Galaxy.
Whilst I have had some success with using Barlow lenses to increase the effective focal length of my
telescope to just over 9 metres, lunar and planetary close-ups require a different approach. Instead,
I use a webcam. This captures a “movie” which can be split into its constituent individual photos (or
frames) and stacked. Fig 23 shows one of my many attempts at Jupiter.
Fig 23 Jupiter
Fortunately, suitable webcams are not expensive. At the time of writing, around £50 was enough.
That is not true for serious deep sky photography. Even DSLRs attached to telescopes on accurate
drives have their limitations. The main one is that they are sensitive to cosmic rays and they can
spoil long exposures. This does not mean that you cannot get good results with this approach and
there is no doubt that it works better with an undriven mount. Instead, most experts prefer to use
dedicated astronomical cameras which have inbuilt cooling systems. Some of these are versatile
enough to cover lunar and planetary imaging as well.
As an alternative, many astronomers pay a monthly subscription to buy time on remote controlled
telescopes and process the images they receive back. Many traditional astrophotographers consider
it cheating but, in my opinion. It is a viable alternative.
Further Information Photographers reading this may feel they need more basic information on astronomer. Similarly,
astronomers reading this may need more data on DSLR cameras. All readers would appreciate more
detail on many issues, such as image processing. The table below lists some further information and
identifies books and/or web references on where to find it. I do not include any recommendations of
specific equipment or image processing tools. I would need to update this several times a day!
Information References
Free reading This is part of Phil’s Scribblings, which is a set of free information provided by me. Click to see.
DSLRs Digital single-lens reflex camera - Wikipedia Simply Google “DSLR” and you will get lots of retailer links. It is best to check the websites of independent retailers, rather than manufacturers.
Navigating the night sky
Turn Left at Orion: Hundreds of Night Sky Objects to See in a Home Telescope - and How to Find Them A Spiral bound edition by Guy Consolmagno and Dan M. Davis
Ultimate Guides: Skywatching The Ultimate Guide To The Universe A Paperback edition by David H. Levy (1 Aug 2005)

Phil’s Scribblings
P a g e | 24
The Cambridge Star Atlas A Spiral bound edition by Wil Tirion in English (27 Jan 2011)
More on astrophotography and image processing
How to photograph the Moon and planets with your digital camera: small version
The science and art of using telescopes: small version
Philip Pugh's Website: Phil's Scribblings: Stacking
Using Deep Sky Stacker to stack DSOs
http://www.stargazing.net/david/DSS/S3P2.7DSSV2HQs.pdf
Using Microsoft ICE to stitch images together. NOTE: It can also be used to stack images of bright objects
https://www.microsoft.com/en-us/research/product/computational-photography-applications/image-composite-editor/#
Free image processing tools
Philip Pugh's Software Downloads
Photographing the Sun http://www.philippughastronomer.com/HowToSeeTheSun.pdf
Lists of objects to see
The science and art of using telescopes: small version
Observing the Messier objects with a small telescope
http://messier.seds.org/favicon.ico
Recommended