VMware AirWatchAndroid PlatformVMware Workspace ONE UEM 1810
VMware AirWatch Android Platform
VMware, Inc. 2
You can find the most up-to-date technical documentation on the VMware website at:
https://docs.vmware.com/
If you have comments about this documentation, submit your feedback to
Copyright © 2018 VMware, Inc. All rights reserved. Copyright and trademark information.
VMware, Inc.3401 Hillview Ave.Palo Alto, CA 94304www.vmware.com
Contents
1 Overview 5
Introduction to Workspace ONE UEM Integration with AndroidAndroid Name Change 5
Requirements for Deploying Android 5
Enrollment Restrictions for Android 6
Key Terms for Android 7
Understanding Android Device Modes 8
2 Android EMM Registration 10
Register Android EMM with Managed Google Play Account 10
Register Android EMM with Managed Google Domain (G-Suite Customers) 11
Setup Google Service Account 12
Setup Google Admin Console 13
Generate EMM Token 14
Upload EMM Token 15
Setup Users 15
Unbind Domain from AirWatch 17
3 Android Enrollment 18
Devices & Users / Android / Android EMM Registration 19
Device Protection for Android Devices 20
Autodiscovery Enrollment 21
Autodiscovery Enrollment 21
Configure Autodiscovery Enrollment from a Child Organization Group 21
Configure Autodiscovery Enrollment from a Parent Organization Group 22
Work Managed Device Enrollment 22
Enroll Work Managed Device with AirWatch Relay 25
Enroll Android Devices Using AirWatch Identifier 34
Enroll Android Device Mode Using a QR Code 35
Enroll Android Device Using Zero Touch Portal 37
Corporate Owned Personally-Enabled Enrollment 42
Enrolling Android Device into Work Profile Mode 44
4 Android Profiles 46
Passcode Profile 48
Enforce Passcode Settings 48
Configure Lockscreen Overlay (Android) 51
Enforce Chrome Browser Settings 52
Chrome Browser Settings Matrix (Android) 54
VMware, Inc. 3

Restrictions Profile 57
Enforce Restrictions 57
Enable Exchange Active Sync 58
Credentials 59
Deploy Credentials 59
Application Control 60
Configure Application Control 60
Configure Proxy Settings 60
Enable System Updates 61
Wi-Fi Profile 61
Configure Wi-Fi Access 62
Configure VPN 62
Configure Per-App VPN 64
Set Permissions 64
Configure Single App Mode 65
Best Practices for Single App Mode 66
Set Date/Time 66
Create AirWatch Launcher Profile 67
Configure Firewall Rules (Android) 68
Configure APN Profile 69
Configure Enterprise Factory Reset Protection 70
Configure Zebra MX Profile 70
Using Custom Settings 72
5 Shared Devices 74
Configure Android for Shared Device Use 75
Log In and Log Out of Shared Android Devices 76
6 Application Management for Android 77
for Android 78
Internal Apps with Android 80
Adding Public Applications for Android 80
Assign Applications for Android 82
Enable Play for Work 83
Integration Features 83
7 Android Device Management Overview 84
Device Management Commands 84
Device Details Apps Tab 85
Specific Profiles Features for Android 85
Specific Restrictions for Android 87
VMware AirWatch Android Platform
VMware, Inc. 4
Overview 1
This chapter includes the following topics:
n Introduction to Workspace ONE UEM Integration with AndroidAndroid Name Change
n Requirements for Deploying Android
n Enrollment Restrictions for Android
n Key Terms for Android
n Understanding Android Device Modes
Introduction to Workspace ONE UEM Integration withAndroidAndroid Name ChangeVMware Workspace ONE UEM™ provides you with a robust set of mobility management solutions forenrolling, securing, configuring, and managing your Android device deployment. Through the WorkspaceONE UEM console, you have several tools and features at your disposal for managing the entire life cycleof corporate and employee owned devices.
The guide explains how to integrate Workspace ONE UEM as your Enterprise Mobility Manager (EMM)with Android devices.
Android for Work was introduced in 2015 to boost enterprise adoption for Android devices. Google hasworked to implement features in Android for Work available for most Android devices. Starting withWorkspace ONE UEM console release v9.4, Workspace ONE UEM has adopted the simplified namingconvention. Android for Work has been renamed to Android and is the default deployment method fornew enrollments. This guide covers this deployment method. If you are an existing VMware AirWatchcustomer, you can continue with your Android deployment using Android (Legacy) for managing yourdevice fleet. For documentation on Android (Legacy) management, see VMware AirWatchAndroid(Legacy) Platform Guide.
Requirements for Deploying AndroidBefore deploying Android devices, consider the following pre-requisites, requirements for enrollment,supporting materials, and helpful suggestions from the AirWatch team.
VMware, Inc. 5
Supported Operating SystemsAndroid 5.X.X (Lollipop)
Note : Workspace ONE UEM supports product provisioning on Android 4.1+ devices. For moreinformation, see the VMware AirWatch Product Provisioning for Android Guide.
Android 6.X.X (Marshmallow)
Android 7.X.X (Nougat)
Android 8.X.X (Oreo)
Your Android device must be able to communicate with the Google Play Store. If your devices do notsupport Google Play Integration, refer to Android (Legacy) deployment.
Enrollment RequirementsEach Android device in your organization's deployment must be enrolled before it can communicate withAirWatch and access internal content and features. The following information is required prior to enrollingyour devices.
n Email address – This is your email address associated with your organization. For example,[email protected].
n Credentials – This username and password allow you to access your AirWatch environment. Thesecredentials may be the same as your network directory services or may be uniquely defined in theWorkspace ONE UEM console .
If a domain is not associated with your environment, you are still prompted to enter your email address.Since auto discovery is not enabled, you are then prompted for the following information:
n Enrollment URL – This URL is unique to your organization's enrollment environment and takes youdirectly to the enrollment screen. For example, mdm.acme.com/enroll.
n Group ID – The Group ID associates your device with your corporate role and is defined in theWorkspace ONE UEM console .
n Credentials – This unique username and password pairing allows you to access your AirWatchenvironment. These credentials may be the same as your network directory services or may beuniquely defined in the Workspace ONE UEM console .
To download the and subsequently enroll an Android device, you'll need the following information:
n Enrollment URL – The enrollment URL is AWAgent.com for all users, organizations and devicesenrolling into AirWatch.
Enrollment Restrictions for AndroidEnrollment restrictions allows you trestrictions allowlimits to enrollment such as restricting enrollment toknown users, user groups, and number of enrolled devices allowed.
VMware AirWatch Android Platform
VMware, Inc. 6
You can create enrollment restrictions based on Android manufacturer and model to ensure onlyapproved deviensure that only approved devices are
These options are available by navigating to Groups & Settings > All Settings > Devices & Users >General > Enrollment and choosing the Restrictionsselectinge Restrictions tab allows you to customizeenrollment restriction policies by organization group and user group roles.
Key Terms for AndroidThese key terms associated with Android will help you in understanding how to configure and deploysettings to your users.
n Work Profile– Work Profile mode, also known as Profile Owner, creates a dedicated container onyour device for only business applications and content. Work Profile mode allows organizations tomanage the business data and applications but not have access to the user's personal data andapps. The Android apps are denoted with a briefcase icon so they are distinguishable from thepersonal apps. For more information, see Work Profile Mode Functionality.
n Work Managed Device– Work Managed Device mode, also referred to as Device Owner, is scopedto the whole device. There is no personal side to the device and APIs pushed from the apply to theentire device. Work Managed Device mode applies to a device which starts in an unprovisioned stateand, through a separate provisioning process, installs the and grants the full control of the entiredevice. For more information, see Work Managed Device Mode Functionality.
n Corporate Owned Personally Enabled – Corporate Owned Personally (COPE) refers to company-owned devices, similar to Work Managed Device, but is provisioned with a Work Profile whichleverages both personal and corporate use. For more information, see Corporate Owned Personally-Enabled (COPE) Mode.
n Managed Google Account – Refers to the Google account registered to the device used for Androidand provides Android app management through Google Play. This account is managed by thedomain that manages your Android configuration.
n Google Service Account – The Google Service Account is a special Google account that is used byapplications to access Google APIs recommended for G Suite customers.
n EMM Token – Unique ID that Workspace ONE UEM uses to connect the Workspace ONE UEMconsole to the Managed Google Account.
n Managed Google Domain – Domain claimed for enabling Android associated with your enterprise.
n Google Domain Setup – Google process for claiming a managed Google domain.
n G Suite – A brand from Google from which you can push cloud computing, productivity andcollaboration tools, software and products developed by Google.
n AirWatch Relay – The Workspace ONE UEM application admins use to bulk enroll Android Devicesinto Workspace ONE UEM.
n NFC Bump – This is done while using the AirWatch Relay app to pass information from the parentdevice to the child device.
VMware AirWatch Android Platform
VMware, Inc. 7
Understanding Android Device ModesAndroid’s built-in management features enable IT admins to fully manage devices used exclusively forwork.
Android offers two modes depending on the ownership of the device being used within your organization.The Work Profile(also called the Profile Owner) creates a dedicated space on the device for only workapplications and data. This is the ideal deployment for Bring Your Own Device (BYOD) applications.Work Managed Device mode allows Workspace ONE UEM and IT admin to control the entire device andenforce an extended range of policy controls unavailable to work profiles, but restricts the device to onlycorporate use. Corporate Owned Personally-Enabled(COPE) mode refers to company-owned devices,similar to Work Managed Device, but is provisioned with a Work Profile which uses both personal andcorporate use.
Note Android 4.0 and below devices might be supported later.
Work Profile Mode FunctionalityApplications in the Work Profile are differentiated by a red briefcase icon, called badged applications, andare shown in a unified launcher with the user's personal applications. For example, your device showsboth a personal icon for Google Chrome and a separate icon for Work Chrome denoted by the badge.From an end-user perspective, it looks like two different applications, but the application is only installedonce with business data stored separately from personal data.
The is badged and exists only within the Work Profile data space. There is no control over personalapplications and the does not have access to personal information.
There are a handful of system applications that are included with the Work Profile by default such asWork Chrome, Google Play, Google settings, Contacts, and Camera – which can be hidden using arestrictions profile.
Certain settings show the separation between personal and work configurations. Users see separateconfigurations for the following settings:
n Credentials – View corporate certificates for user authentication to managed devices.
n Accounts – View the Managed Google Account tied to the Work Profile.
n Applications – Lists all applications installed on the device.
n Security – Shows device encryption status.
Work Managed Device Mode FunctionalityWhen devices are enrolled in Work Managed Device mode, a true corporate ownership mode is created.Workspace ONE UEM controls the entire device and there is no separation of work and personal data.
Important things to note for the Work Managed mode are:
n The homescreen does not show badged applications like Work Profile mode.
VMware AirWatch Android Platform
VMware, Inc. 8
n Users have access to various pre-loaded applications upon activation of the device. Additionalapplications can only be approved and added through the Workspace ONE UEM console.
n The is set as the device administrator in the security settings and cannot be disabled.
n Unenrolling the device from with from Work Managed mode prompts device factory reset.
Corporate Owned Personally Enabled (COPE) ModeWhen devices are enrolled using COPE mode, you still control the entire device. The unique capabilitywith COPE mode is that it allows you to enforce two separate sets of policies, such as restrictions, for thedevice and inside a Work profile.
COPE mode is only available on Android 8.0+ devices. If you enroll Android devices below Android 8.0,the device automatically enrolls as Work Managed Device.
There are some caveats to consider when enrolling devices into COPE mode:
n Pin Based encryption and AirWatch Single Sign On by using SDK is not supported for CorporateOwned Personally Enabled devices. A work passcode can be enforced to ensure that the use of workapplications requires the use of a passcode.
n Single user staging and Multi-user staging are not supported for COPE enrollments.
n Internal applications (hosted in AirWatch) and public applications deployed to COPE devices areshown in the application Catalog within the Work Profile.
n Similar to Work Profile only enrollments, Corporate Owned Personally Enabled devices provide usersthe option to disable the Work Profile (for example, if the user is on vacation). When the Work Profileis disabled, the work applications no longer present notifications and cannot be launched. The status(Enabled or Disabled) of the Work Profile is presented to the admin on the Device Details page.When the Work Profile is disabled, the latest application and profile information cannot be retrievedfrom the Work Profile.
n The Workspace ONE Hub exists in the Work Managed and the Work Profile sections of the CorporateOwned Personally Enabled device. By existing both inside and outside the Work Profile, managementpolicies can be applied within the Work Profile and the entire device. However, the Workspace ONEHub is only visible within the Work Profile.
n When push notifications are sent to the device, the Workspace ONE Hub outside the Work Profile istemporarily available for the user to view messages, ensuring that critical messages reach the usereven if the Work Profile is temporarily disabled.
n Assigned profiles can be viewed through the Workspace ONE Hub in the Work Profile.
n Compliance policies for application management (such as block/ remove applications) are onlysupported for applications within the Work Profile. Applications can be blacklisted on the device(outside the Work Profile) by using Application Control profiles.
n An enterprise wipe will factory reset Corporate Owned Personally Enabled devices.
VMware AirWatch Android Platform
VMware, Inc. 9

Android EMM Registration 2To start managing Android devices, you’ll need to register Workspace ONE UEM as your EnterpriseMobility Management (EMM) provider with Google. The Getting Started page in the Workspace ONEUEM console provides a step by step solution to help configure the enterprise management tools neededto secure and manage your device fleet.
There are two ways to configure Android: by using a Managed Google Play account (preferred) or using amanaged Google domain (recommended by Google for G Suite customers). A Managed Google Playaccount is used when your business does not use G Suite and allows for multiple configurations ofAndroid within your organization using a personal Google account. Workspace ONE UEM manages thisaccount and requires no Active Directory sync or Google verification.
Setting up Android using managed Google domain (G Suite) requires your enterprise to set up a Googledomain and must follow a verification process to prove that you own the domain. This domain can only belinked to one verified EMM account. The setup includes creating a Google Service Account andconfiguring Workspace ONE UEM as your EMM provider. Consider creating a Google account specificallyfor Android for your organization to use so as not to conflict with any existing Google accounts.
To change the Google account or make changes to your admin settings, you have to unbind the accountfrom the Workspace ONE UEM console.
Important The setup of Android includes the integration of third-party tools that is not managed byVMware AirWatch. The information in this guide for the Google Admin Console and Google DeveloperConsole has been documented with the available version as of January 2018. Integration with a third-party product is not guaranteed and is dependent upon the proper functioning of the third-party solutions.
This chapter includes the following topics:
n Register Android EMM with Managed Google Play Account
n Register Android EMM with Managed Google Domain (G-Suite Customers)
n Unbind Domain from AirWatch
Register Android EMM with Managed Google PlayAccountThe Workspace ONE UEM console allows you to complete a simplified setup process to bind the UEMconsole to Google as your EMM provider.
VMware, Inc. 10
To start Android setup in the UEM console, complete the following:
1 Navigate to Getting Started > Workspace ONE > Android EMM Registration.
2 Select Configure and you are redirected to the Android EMM Registration page..
Note If for some reason, the Android EMM Registration page is blocked, make sure you've enabledthe Google URLs in your network architecture to communicate with internal and external endpoints.For more information, see the Recommended Architecture Guide.
3 Select Register with Google. If you are already signed in with your Google credentials, you areredirected back to the Workspace ONE console.
4 Select Sign In,if you are not already, and enter your Google credentials and then select Get Started.
5 Enter your Organization Name. The Enterprise Mobility Manager (EMM) provider field populatesautomatically as AirWatch.
6 Select Confirm > Complete Registration. You are redirected to the Workspace ONE Console, andyour Google Service Account credentials are automatically populated.
7 Select Save > Test Connection to ensure the service account is set up and connected successfully.
Note If your settings in the UEM console have been cleared, when you navigate to register with Google,you will see a message that prompts you to complete setup. You are redirected back to the WorkspaceONE console, to finish setup.
Register Android EMM with Managed Google Domain (G-Suite Customers)Setting up your account with managed Google domain requires the organization to set up a Googledomain if they do not already use one.
You are to complete several manual tasks, such as verifying domain ownership with Google, obtaining anEMM token, and creating an enterprise service account to use this type of setup.
To start Android setup in the Workspace ONE UEM console using managed Google domain method,complete the following:
Note This setup method is recommended by Google if you are using a G Suite account with a GoogleAccount to configure Android.
1 Navigate to Getting Started > Workspace ONE > Android EMM Registration.
2 Select Register to be redirected to the Android Setup Wizard to complete three steps:
n Generate Token: Obtain your enterprise token by registering your enterprise domain withGoogle.
n Upload Token: Enter the EMM Token into the Android setup wizard.
n Setup Users: Configure how users will be created for your entire enterprise.
VMware AirWatch Android Platform
VMware, Inc. 11
3 Select Go To Google. You are redirected to the G Suite site.
4 Register your enterprise and verify your domain.
Setting Description
Google Admin EmailAddress
The Google account used to sign in to the Google.
Client ID The unique identifier Google will use to access the Android APIs. Copy this address from theJSON file saved to your local drive.
Google ServiceAccount Email Address
An account that belongs to your application instead of to an individual end-use that include agenerated email address that is unique and at least one public/private key pair. Copy this addressfrom the JSON file saved to your local drive.
Cert Id Your unique identity certificate. Copy the certificate ID from the P12 file you downloaded whenyou created the Google Service Account.
Setup Google Service AccountThe Google Service Account is a special Google account that is used by applications to access GoogleAPIs. You should create this account after you generate your EMM token so you can upload allinformation at one time. The account is only required if you are using the Google Accounts method fordeploying Android.
1 Navigate to the Google Cloud Platform- Google Developers Console.
2 Sign in with your Google credentials.
Note The Google Admin credentials do not have to be associated with your business domain.Consider creating a Google account specifically for Android for your organization to use so as not toconflict with any existing Google accounts.
3 Use the drop-down menu from the Select a project menu and select Create a project.
4 Enter a Project Name to create your API project in the New project window. Consider using AndroidEMM-CompanyName as the naming convention.
5 Agree to the terms and conditions and select Create.
Your project generates and the Google Developer Console redirects you to the API Manager page.
6 Select Enable APIS and Services for Android from the APIs & Services Dashboard.
7 Search and enable the following APIs: Google EMM API and Admin SDK API.
After creating your project and enabling APIs, create your service account in the Google Developer'sConsole.
VMware AirWatch Android Platform
VMware, Inc. 12

Create Service AccountRemain in the Google Developer's Console to create the service account.
1 Navigate to APIs & Services > Credentials > Create Credentials > Service Account Key > NewService Account.
1 Define the Service Account name for your service account. Consider following the Android namingconvention and be sure to note the name you choose as you will need it in further steps.
2 Use the drop-down menu to select the Role > Project as Owner.
3 Select the Key Type as P12.
4 Select Create. The identity certificate gets automatically created and downloaded to your local drive.
Caution You must save your identity certificate and password for when you upload the certificateinto the Workspace ONE UEM console .
5 Select Manage service accounts from the Service Account Keys list which opens the ServiceAccounts page.
6 Select the menu button (three vertical dots) beside your service account and select Edit.
7 Select Enable G Suite Domain-wide Delegation.
8 Enter a Product name in order change settings for G Suite Domain. Consider using AndroidEMM-CompanyName as the naming convention.
9 Select Save.
10 Select View Client ID under the Options field. The details of your service account displays. Fromhere, you will leave the Developer Console and input your credentials into the Google AdminConsole.
Be sure to save your client ID before navigating away from the Developer's Console. You will also usethese credentials in the Workspace ONE UEM console when you upload your EMM token. For moreinformation, see Upload EMM Token
For steps to configure the Google Admin Console, see Setup Google Admin Console
Setup Google Admin ConsoleThe Google Admin Console is where administrators manage Google services for users in anorganization. AirWatch uses the Google Admin Console for integration with Android and Chrome OS.
The Manage API client access page allows you to control custom internal application and third-partyapplication access to supported Google APIs (scopes).
To set up your Google Admin Console:
1 Login to the Google Admin Console and navigate to Security > Settings > Advanced Settings >Manage API Client Access.
VMware AirWatch Android Platform
VMware, Inc. 13
2 Fill in the following details:
Setting Description
Client Name Enter the Client ID obtained from AirWatch.
Paste the ID from your service account.
One or More API Scopes Copy and paste the following Google API scopes for Android:
Android:https://www.googleapis.com/auth/admin.directory.user
3 Select Authorize.
Generate EMM TokenYour unique EMM token binds your domain for Android management to AirWatch. You are directed to theG Suite setup site after selecting Go to Google from the previous task to begin.
1 Complete the following fields:
n About You – Enter your admin contact information.
n About Your Business – Fill out your company information.
n Your Google Admin Account – Create a Google admin account.
n Finishing Up – Enter the security verification data.
2 Select Accept & create your account after reading and agreeing to terms set by Google.
3 Follow the remaining prompts to Verify domain ownership and Connect with your provider. Onceverified, this becomes your managed Google domain.
To verify domain ownership, the following options are available: add a meta tag to your homepage,add a domain host record, or upload HTML file to your domain site. Configure settings for theavailable options.
4 Select Verify to proceed. If this process is successful, the Connect with your provider sectiondisplays your EMM token. This token is valid for 30 days.
Note If you encounter problems during this step, please refer to Google Support using support numberand unique PIN listed.
1 Copy the generated EMM token and select Finish.
AirWatch recommends that you create your Google Service Account before you return to the WorkspaceONE UEM console to upload the EMM token, so that you can upload all credentials at one time.
VMware AirWatch Android Platform
VMware, Inc. 14

Upload EMM TokenAfter you have finished all tasks in the Google Admin Console and the Google Developer Console, youare redirected to the Workspace ONE UEM console to finish binding your G Suite domain with AirWatchfor Android EMM.
1 Navigate to Getting Started > Workspace ONE > Android EMM Registration. If you have closedthe window or are not automatically redirected back to AirWatch.
2 Select Upload Token from the Android Setup wizard.
3 Complete the following fields:
Setting Description
Domain Domain claimed for enabling Android associated with your enterprise.
Important If your domain has already been registered with another EMM provider, you will notbe allowed to upload a new EMM token.
Enterprise Token Unique identifier that links AirWatch to your G Suite configuration.
Google Admin EmailAddress
Admin email created in the Google Admin Console. The email address displays from the ViewClient ID from where you created your service account.
4 Enter the Directory Access Credentials, if needed. You only need to configure this if you plan tocreate users automatically. For manual creation, you do not have to enter these credentials.
5 Proceed to upload your Google Developer Console Settings retrieved from your Google ServiceAccount.
Setup UsersAll users in your enterprise using Android will need Google accounts created to connect with theirdevices. This final step in the Android EMM Registration wizard allows you to determine which setupmethod you prefer for creating users. Admins have two options for creating users under Android:
n Create users manually by logging into the Google Admin Console or using the Google ActiveDirectory Sync Tool (GADS).
n Allow AirWatch to automatically create Google accounts during enrollment.
The format for the user name is username@<your_enterprise_domain>.com.
To configure these settings:
1 Select Yes or No on the Create accounts during enrollment based on enrolled users' emailprompt.If yes, the next prompt will ask if you desire to use SAML to authenticate the accounts.If no,the Workspace ONE UEM console directs you to the alternative method of creating Google accountsby the Google Active Directory Sync Tool or the Google Admin Console.
2 Select Finish.
VMware AirWatch Android Platform
VMware, Inc. 15
Creating Android Enrollment Users AutomaticallyAirWatch suggests that you create users for Android automatically during enrollment. The Android setupwizard allows you to specify if you want to automatically create user accounts during enrollment, and ifso, to use SAML to authenticate the accounts. If you have not set up SAML previously, the wizard willdisplay a link that directs you to configure your settings.
If you wish to use create users automatically:
1 Select Yes to Create accounts during enrollment based on users' emails.
If you select yes, you will need configure the Directory Access Credential settings in the setup wizard.Upload a Directory Access Certificate and enter a Service Account Email Address and Admin EmailAddress to configure these settings.
2 Select Yes to Use SAML endpoint to authenticate accounts.
If you have not setup SAML, the wizard will prompt you to configure SAML authentication settings.
3 Select Finish to complete Android setup.
Creating Android Enrollment Users ManuallyYou can manually create user accounts for your entire enterprise outside of the Workspace ONE UEMconsole by either using either the Google Cloud Directory Sync (GCDS) tool or the Google AdminConsole. To access the Google Admin Console , you can click the link provided in the setup wizard. Youwill need to contact Google for further instructions on how to use the console.
The GCDS method requires you to use similar settings as the AirWatch Directory Services. Access theDirectory Services settings by navigating to Groups & Settings ► All Settings ► System ►Enterprise Integration ► Directory Services.
You can access the GCDS tool by clicking the link posted in the setup wizard or by downloading the tooldirectly to your computer from the Google Support page.
The GADS tool allows you to manually create Google accounts for every employee in your enterprise inone bulk creation. The accounts are created by synchronized with the information from your AirWatchDirectory Services.
Note The information discussed here is up to date as of latest version of GCDS v4.4.0 for March 2017.
To create users using this method, complete the following:
1 Select the link from the setup wizard or download the GADS tool directly from Google.
2 Open the tool from your desktop and select User Accounts and Groups to synchronize.
3 Select the Google Apps Configuration tab and enter the following:
a Enter Primary Domain Name.
a Select to Replace domain names in LDAP email address (of users and groups) with thisdomain name. This will ensure that all user email addresses match the domain name.
VMware AirWatch Android Platform
VMware, Inc. 16

4 Select the Authorize Now button.
5 Follow the steps to continue the authorization process when the Authorize Google Apps DirectorySync dialog displays.
a Sign-in to your Android admin account.
b Enter the verification received in email.
c Select Validate to confirm these settings.
6 Select the LDAP Configuration tab to enter the connection settings to sync the AirWatch DirectoryServices with Google. From here, you can enter the same settings saved in the AirWatch DirectoryServices to sync with this tool. To access these settings, navigate to Groups & Settings ► AllSettings ► System ► Enterprise Integration ► Directory Services.
7 Select Test Connection. If the sync is successful, this will auto create the linked Active Directoryaccounts and corporate Google accounts in Google.
You will be directed back to the setup wizard to finish setup.
Unbind Domain from AirWatchYou can unbind the Android admin account in the Workspace ONE UEM console in the event you need tomake a change or change Google accounts.
1 Navigate to Devices > Device Settings > Devices & Users > Android > AndroidEMM Registration.
2 Select Clear Settings from the Android EMM Registration page.
VMware AirWatch Android Platform
VMware, Inc. 17
Android Enrollment 3Each Android device in your organization's deployment must be enrolled before it can communicate withthe Workspace ONE UEM console and access internal content and features.
The provides a single resource to enroll a device and provides device and connection details. Hub-basedenrollment allows you to:
n Authenticate users using basic or directory services, such as AD/LDAP/Domino, SAML, tokens, orproxies.
n Register devices in bulk or allow users to self-register.
n Define approved OS versions, models, and maximum number of devices per user.
Android has three enrollment options: Work Managed Device, Work Profile, and Cope Owned Personally-Enable =d enrollment with unique enrollment options for each mode.
Work Managed Device EnrollmentWork Managed Device mode, also called Device Owner, gives Workspace ONE UEM control of the entiredevice. This mode is ideal for corporate owned device configurations that require a parent stagingprocess. For more information, see Work Managed Device Enrollment.
Work Profile EnrollmentWork Profile enrollment, also known as Profile Owner, is facilitated with the which secures a connectionbetween the Android device and the Workspace ONE UEM console. For more information, see EnrollingAndroid Device into Work Profile Mode.
Corporate Owned Personally Enabled EnrollmentWhen devices are enrolled using COPE mode, you still control the entire device but the UEM consoledeploys a Work Profile to the device. For enrollment steps and specifics, see Corporate OwnedPersonally-Enabled Enrollment.
VMware, Inc. 18

Enrollment SettingsThe Android EMM Registration page lets you configure the various options for integrating with Android.This page uses a wizard to help you set up the integration for devices. Enable these settings beforebeginning enrollment.
Device ProtectionAndroid OS 5.1 and above have a feature called Device Protection which requires Google credentials tobe entered before and after a device can be reset. When a device is ready to be enrolled as a WorkManaged device for Android, the device must be factory reset. This feature impacts Android enrollment.For more information, see Device Protection for Android Devices.
Autodiscovery EnrollmentWorkspace ONE UEM makes the enrollment process simple, using an autodiscovery system to enrolldevices to environments and
organization groups (OG) using user email addresses. For more information, see AutodiscoveryEnrollment
This chapter includes the following topics:
n Devices & Users / Android / Android EMM Registration
n Device Protection for Android Devices
n Autodiscovery Enrollment
n Work Managed Device Enrollment
n Corporate Owned Personally-Enabled Enrollment
n Enrolling Android Device into Work Profile Mode
Devices & Users / Android / Android EMM RegistrationThe Android settings page lets you configure the various options for integrating with Android prior toenrolling Android devices. Android configuration uses a wizard to help you set up the integration fordevices.
ConfigurationThe Configuration page shows Google Admin Console Settings and Google API settings aftersuccessful Android EMM registration.
VMware AirWatch Android Platform
VMware, Inc. 19
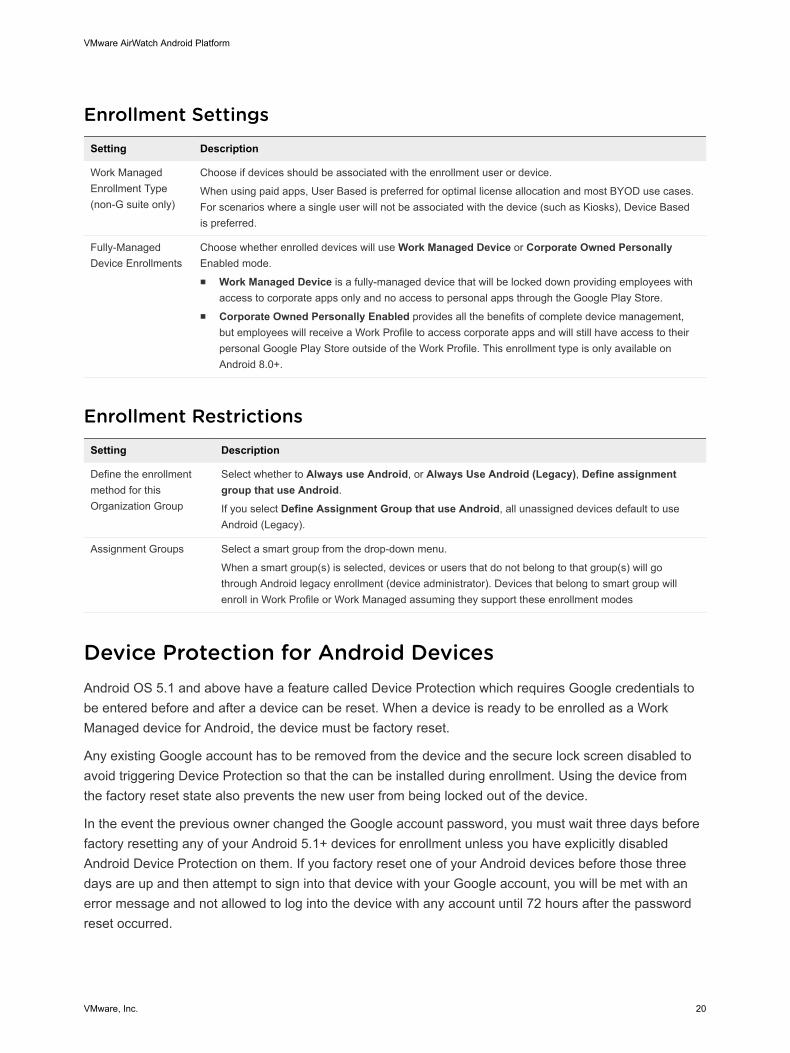
Enrollment Settings
Setting Description
Work ManagedEnrollment Type(non-G suite only)
Choose if devices should be associated with the enrollment user or device.
When using paid apps, User Based is preferred for optimal license allocation and most BYOD use cases.For scenarios where a single user will not be associated with the device (such as Kiosks), Device Basedis preferred.
Fully-ManagedDevice Enrollments
Choose whether enrolled devices will use Work Managed Device or Corporate Owned PersonallyEnabled mode.n Work Managed Device is a fully-managed device that will be locked down providing employees with
access to corporate apps only and no access to personal apps through the Google Play Store.n Corporate Owned Personally Enabled provides all the benefits of complete device management,
but employees will receive a Work Profile to access corporate apps and will still have access to theirpersonal Google Play Store outside of the Work Profile. This enrollment type is only available onAndroid 8.0+.
Enrollment Restrictions
Setting Description
Define the enrollmentmethod for thisOrganization Group
Select whether to Always use Android, or Always Use Android (Legacy), Define assignmentgroup that use Android.
If you select Define Assignment Group that use Android, all unassigned devices default to useAndroid (Legacy).
Assignment Groups Select a smart group from the drop-down menu.
When a smart group(s) is selected, devices or users that do not belong to that group(s) will gothrough Android legacy enrollment (device administrator). Devices that belong to smart group willenroll in Work Profile or Work Managed assuming they support these enrollment modes
Device Protection for Android DevicesAndroid OS 5.1 and above have a feature called Device Protection which requires Google credentials tobe entered before and after a device can be reset. When a device is ready to be enrolled as a WorkManaged device for Android, the device must be factory reset.
Any existing Google account has to be removed from the device and the secure lock screen disabled toavoid triggering Device Protection so that the can be installed during enrollment. Using the device fromthe factory reset state also prevents the new user from being locked out of the device.
In the event the previous owner changed the Google account password, you must wait three days beforefactory resetting any of your Android 5.1+ devices for enrollment unless you have explicitly disabledAndroid Device Protection on them. If you factory reset one of your Android devices before those threedays are up and then attempt to sign into that device with your Google account, you will be met with anerror message and not allowed to log into the device with any account until 72 hours after the passwordreset occurred.
VMware AirWatch Android Platform
VMware, Inc. 20
Autodiscovery EnrollmentWorkspace ONE ™ UEM makes the enrollment process simple, using an autodiscovery system to enrolldevices to environments and organization groups (OG) using user email addresses. Autodiscovery canalso be used to allow end users to authenticate into the Self-Service Portal (SSP) using their emailaddress.
Note To enable an autodiscovery for on-premises environments, ensure that your environment cancommunicate with the Workspace ONE UEM Autodiscovery servers.
Registration for Autodiscovery EnrollmentThe server checks for an email domain uniqueness, only allowing a domain to be registered at oneorganization group in one environment. Because of this server check, register your domain at yourhighest-level organization group.
Autodiscovery is configured automatically for new Software as a Service (SaaS) customers.
Configure Autodiscovery Enrollment from a Child OrganizationGroupYou can configure Autodiscovery Enrollment from a child organization group below the enrollmentorganization group. To enable an autodiscovery enrollment in this way, you must require users to select aGroup ID during enrollment.
1 Navigate to Devices > Device Settings > General > Enrollment and select the Grouping tab.
2 Select Prompt User to Select Group ID.
3 Select Save.
VMware AirWatch Android Platform
VMware, Inc. 21
Configure Autodiscovery Enrollment from a Parent OrganizationGroupAutodiscovery Enrollment simplifies the enrollment process enrolling devices to intended environmentsand organization groups (OG) using end-user email addresses.
Configure an autodiscovery enrollment from a parent OG by taking the following steps.
1 Navigate to Groups & Settings > All Settings > Admin > Cloud Services and enable the AutoDiscovery setting. Enter your login email address in Auto Discovery AirWatch ID and select SetIdentity.a If necessary, navigate to https://my.workspaceone.com/set-discovery-password to set the
password for Auto Discovery service. Once you have registered and selected Set Identity, theHMAC Token auto-populates. Click Test Connection to ensure that the connection is functional.
2 Enable the Auto Discovery Certificate Pinning option to upload your own certificate and pin it to theauto discovery function.
You can review the validity dates and other information for existing certificates, and also can Replaceand Clear these existing certificates.
Select Add a certificate and the settings Name and Certificate display. Enter the name of thecertificate you want to upload, select the Upload button, and select the cert on your device.
3 Select Save to complete an autodiscovery setup.
Instruct end users who enroll themselves to select the email address option for authentication, instead ofentering an environment URL and Group ID. When users enroll devices with an email address, they enrollinto the same group listed in the Enrollment Organization Group of the associated user account.
Work Managed Device EnrollmentAndroid Work Managed Device mode gives Workspace ONE UEM control of the entire device. Using afactory reset device helps ensure that devices are not set up for personal use.
There are several ways to enroll Work Managed devices:
n Using AirWatch Relay to perform an NFC bump
n Using a unique identifier or token code
n Scanning a QR code
n Using Zero Touch enrollment
Your business requirements determine which enrollment methods you want to use. You cannot enrolldevices until you have completed Android EMM Registration. See Chapter 2 Android EMM Registration tocomplete registration.
If the Android devices you are using are on a closed network, unable to communicate with Google Play,or are running Android 5.0 or earlier versions, then enroll Android using the Legacy enrollment method inthe VMware AirWatch Android (Legacy) Platform Guide.
VMware AirWatch Android Platform
VMware, Inc. 22
Enrollment SettingsAndroid EMM Registration lets you configure the various options for integrating with Android. This pageuses a wizard to help you set up the integration for devices. Enable these settings before beginningenrollment.
AirWatch RelayAirWatch Relay is an application that passes information from parent devices to all child devices beingenrolled into Workspace ONE UEM with Android. This process is done through and NFC bump andprovisions child devices to:
n Connect to the parent device to Wi-Fi network and region settings including the device date, time, andlocation.
n Download the latest production version of for Android.
n Silently set the as device administrator.
n Automatically enroll into Workspace ONE UEM.
AirWatch Relay allows you to bulk enroll all child devices before deploying them to end users andeliminates end users from having to enroll their own devices. All child devices must be in factory resetmode and have NFC enabled by default to be enrolled as Work Managed Device for Android.
The NFC bump process depends on the Android OS. Devices running Android 6.0+ perform one bump toconnect and enroll child devices in one step. Devices running Android OS versions between v5.0 andv6.0 perform two NFC bumps. The first bump is to connect the parent device to Wi-Fi network and regionsettings including the device date, time, and location and download the . The second NFC bump is toenroll all child devices before deploying them to end users.
For AirWatch Relay enrollment, see Enroll Work Managed Device with AirWatch Relay.
AirWatch IdentifierThe AirWatch Identifier enrollment method is a simplified approach to enrolling Work Managed devices forAndroid 6.0+ devices. Enter a simple identifier, or hash value, on a factory reset device. After the identifieris entered, the enrollment is automated pushing down the . The user only has to enter server details, username, and password. For AirWatch Identifier enrollment, see Enroll Android Devices Using AirWatchIdentifier.
With the identifier, you can also enroll on behalf of the end user by doing Single-User Device Staging.This method is useful for administrators who set up multiple devices for an entire team or single membersof a team. Such a method saves the end users the time and effort of enrolling their own devices.
QR CodeDevices such as tablets do not support NFC, so these devices cannot use the AirWatch Relay enrollmentmethod which requires NFC bump for Android 7.0+ devices.
VMware AirWatch Android Platform
VMware, Inc. 23
QR code provisioning is an easy way to enroll a fleet of devices that do not support NFC and theNFC bump. The QR code contains a payload of key-value pairs with all the information that is needed forthe device to be enrolled. QR Code enrollment does not require a managed Google domain or a Googleaccount. Create the QR code before starting enrollment. You can use any online QR Code generator,such as Web Toolkit Online, to create your unique QR code. The QR code includes the Server URL andGroup ID information. You can also include the user name and password or the user has to enter theircredentials.
Here is the format of the text to paste into the generator:
{
"android.app.extra.PROVISIONING_DEVICE_ADMIN_COMPONENT_NAME":
"com.airwatch.androidagent/com.airwatch.agent.DeviceAdministratorReceiver",
"android.app.extra.PROVISIONING_DEVICE_ADMIN_SIGNATURE_CHECKSUM":
"6kyqxDOjgS30jvQuzh4uvHPk-0bmAD-1QU7vtW7i_o8=\n",
"android.app.extra.PROVISIONING_DEVICE_ADMIN_PACKAGE_DOWNLOAD_LOCATION":
"https://awagent.com/mobileenrollment/airwatchagent.apk",
"android.app.extra.PROVISIONING_SKIP_ENCRYPTION": false,
"android.app.extra.PROVISIONING_WIFI_SSID": "Your_SSID",
"android.app.extra.PROVISIONING_WIFI_PASSWORD": "Password",
"android.app.extra.PROVISIONING_ADMIN_EXTRAS_BUNDLE": {
"serverurl": "Server URL",
"gid": "Group ID",
"un":"Username",
"pw":"Password"
}
For QR Code enrollment, see Enroll Android Device Mode Using a QR Code.
Zero Touch EnrollmentZero Touch enrollment allows for Android 8.0+ devices to be configured with Workspace ONE UEM asthe enterprise mobility management provider out the box.
When the device is connected to the Internet during the device setup, the is automatically downloadedand enrollment details are automatically passed to enroll the device with no user interaction.
VMware AirWatch Android Platform
VMware, Inc. 24
Zero Touch enrollment is supported by a limited number of mobile carriers and OEMs. Customers workwith their carrier to ensure that zero touch provisioning is supported. Learn more about supported carriersand devices on the Google website.
For Zero Touch enrollment steps, see Enroll Android Device Using Zero Touch Portal
Note Zero Touch enrollment is only supported on Android 8.0 (Oreo) devices.
Enroll Work Managed Device with AirWatch RelayEnrolling the Work Managed Device mode using AirWatch Relay varies depending on the AndroidOS version.
If you are using Android 6.0+, the AirWatch Relay app provides a single NFC bump option whichconfigures Wi-Fi, provisioning, and enrollment settings. For provisioning Work Managed Devices withAirWatch Relay on Android 6.0+ devices, please see Provisioning Android Device with AirWatch Relay forAndroid 6.0+
Enrolling the Work Managed Device mode for devices running Android OS version between v5.0 and v6.0is completed in two NFC bump. Bump one configures region, Wi-Fi, and any applicable advancedsettings applied to all the devices in your fleet. Bump two configures the enrollment settings andautomates the enrollment process. See Enrolling Work Managed Device with AirWatch Relay for Androidv5.0 and Android v6.0.
Provisioning Android Device with AirWatch Relay for Android 6.0+For Android 6.0+, the AirWatch Relay app provides a single bump option which configures region, Wi-Fi,provisioning settings, and enrollment settings in the single bump.
For provisioning Work Managed Devices and Coporate Owned Personally Enabled (COPE) devices withAirWatch Relay:
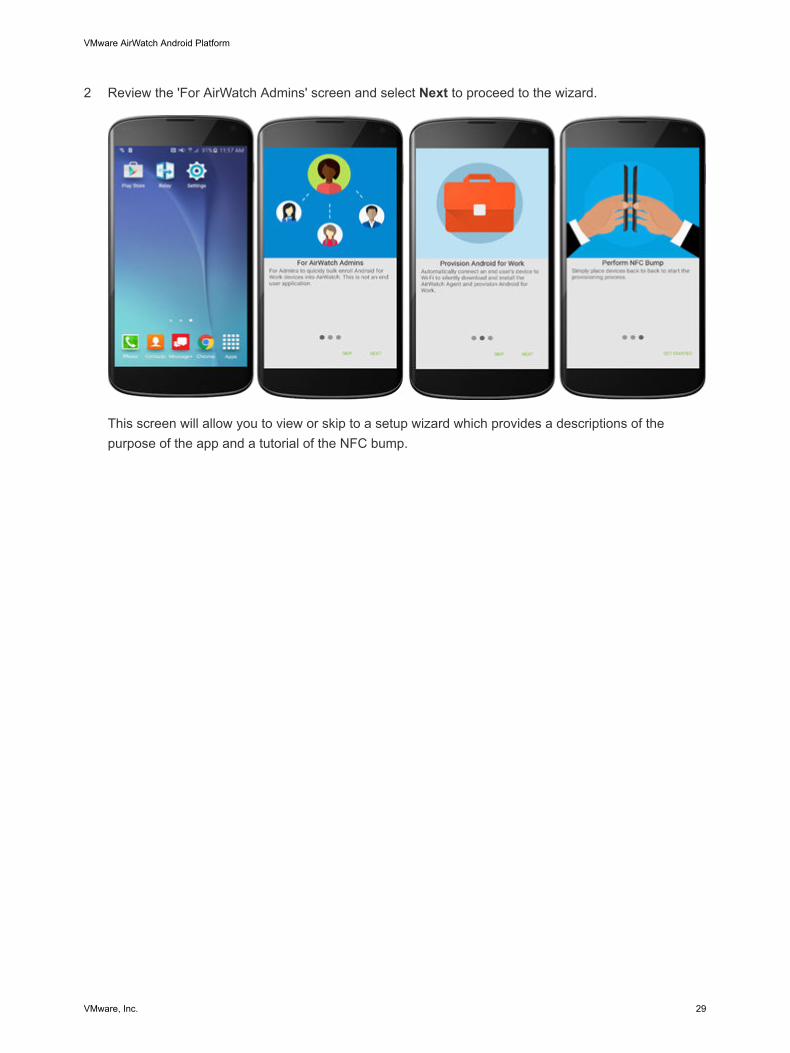
1 Download the AirWatch Relay app from the Google Play Store to the parent device and launch theapp once complete.
2 Review the 'For AirWatch Admins' screen and select Next to proceed to the wizard.
This screen will allow you to view or skip to a setup wizard which provides a descriptions of thepurpose of the app and a tutorial of the NFC bump.
VMware AirWatch Android Platform
VMware, Inc. 25
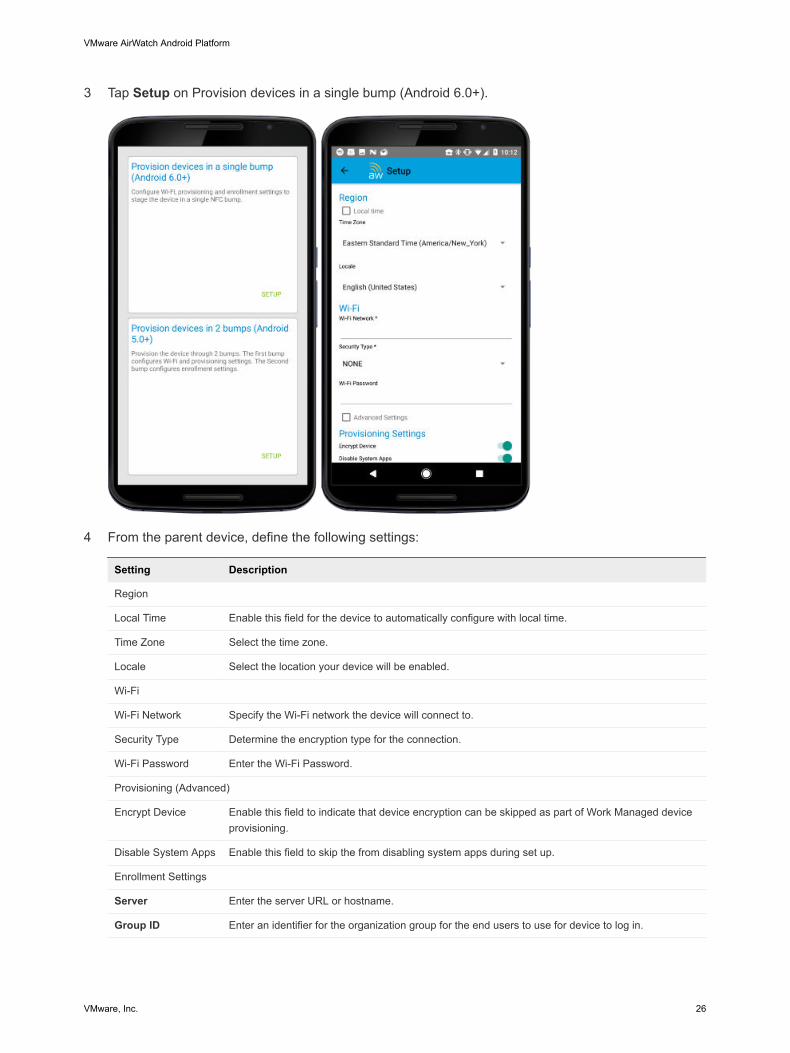
3 Tap Setup on Provision devices in a single bump (Android 6.0+).
4 From the parent device, define the following settings:
Setting Description
Region
Local Time Enable this field for the device to automatically configure with local time.
Time Zone Select the time zone.
Locale Select the location your device will be enabled.
Wi-Fi
Wi-Fi Network Specify the Wi-Fi network the device will connect to.
Security Type Determine the encryption type for the connection.
Wi-Fi Password Enter the Wi-Fi Password.
Provisioning (Advanced)
Encrypt Device Enable this field to indicate that device encryption can be skipped as part of Work Managed deviceprovisioning.
Disable System Apps Enable this field to skip the from disabling system apps during set up.
Enrollment Settings
Server Enter the server URL or hostname.
Group ID Enter an identifier for the organization group for the end users to use for device to log in.
VMware AirWatch Android Platform
VMware, Inc. 26
Setting Description
Username Enter the credentials for the user the child device will be enrolled.
Password Enter the credentials for the user the child device will be enrolled.
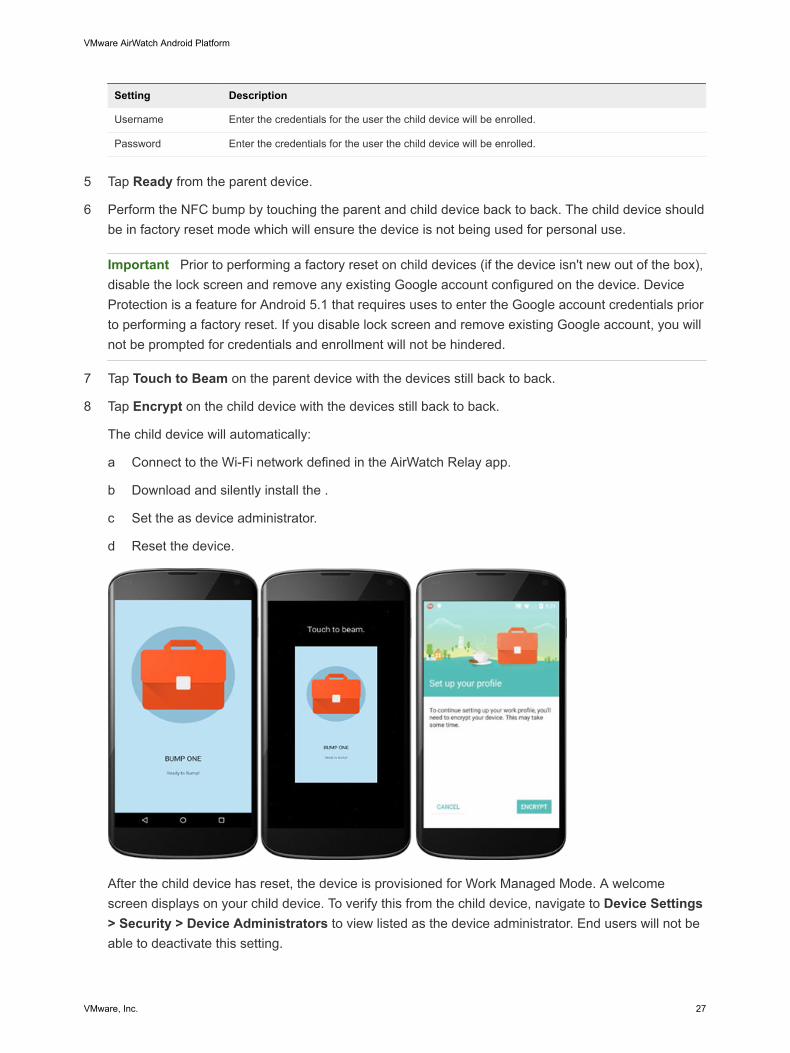
5 Tap Ready from the parent device.
6 Perform the NFC bump by touching the parent and child device back to back. The child device shouldbe in factory reset mode which will ensure the device is not being used for personal use.
Important Prior to performing a factory reset on child devices (if the device isn't new out of the box),disable the lock screen and remove any existing Google account configured on the device. DeviceProtection is a feature for Android 5.1 that requires uses to enter the Google account credentials priorto performing a factory reset. If you disable lock screen and remove existing Google account, you willnot be prompted for credentials and enrollment will not be hindered.
7 Tap Touch to Beam on the parent device with the devices still back to back.
8 Tap Encrypt on the child device with the devices still back to back.
The child device will automatically:
a Connect to the Wi-Fi network defined in the AirWatch Relay app.
b Download and silently install the .
c Set the as device administrator.
d Reset the device.
After the child device has reset, the device is provisioned for Work Managed Mode. A welcomescreen displays on your child device. To verify this from the child device, navigate to Device Settings> Security > Device Administrators to view listed as the device administrator. End users will not beable to deactivate this setting.
VMware AirWatch Android Platform
VMware, Inc. 27
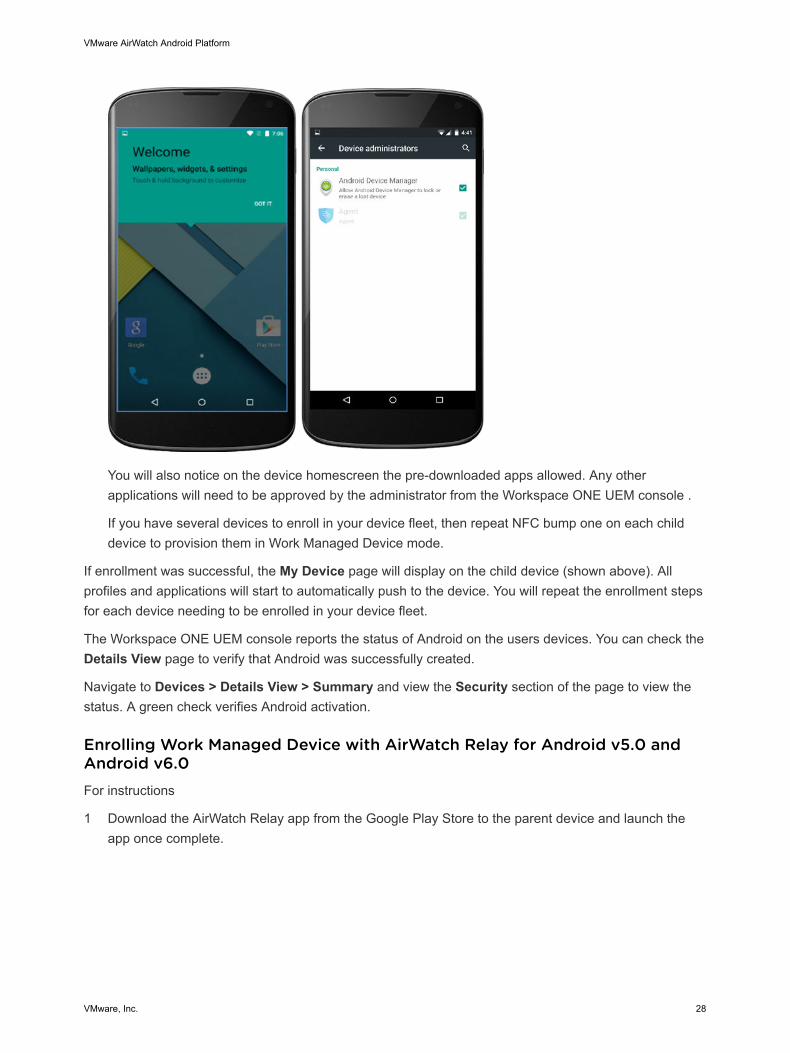
You will also notice on the device homescreen the pre-downloaded apps allowed. Any otherapplications will need to be approved by the administrator from the Workspace ONE UEM console .
If you have several devices to enroll in your device fleet, then repeat NFC bump one on each childdevice to provision them in Work Managed Device mode.
If enrollment was successful, the My Device page will display on the child device (shown above). Allprofiles and applications will start to automatically push to the device. You will repeat the enrollment stepsfor each device needing to be enrolled in your device fleet.
The Workspace ONE UEM console reports the status of Android on the users devices. You can check theDetails View page to verify that Android was successfully created.
Navigate to Devices > Details View > Summary and view the Security section of the page to view thestatus. A green check verifies Android activation.
Enrolling Work Managed Device with AirWatch Relay for Android v5.0 andAndroid v6.0For instructions
1 Download the AirWatch Relay app from the Google Play Store to the parent device and launch theapp once complete.
VMware AirWatch Android Platform
VMware, Inc. 28
2 Review the 'For AirWatch Admins' screen and select Next to proceed to the wizard.
This screen will allow you to view or skip to a setup wizard which provides a descriptions of thepurpose of the app and a tutorial of the NFC bump.
VMware AirWatch Android Platform
VMware, Inc. 29
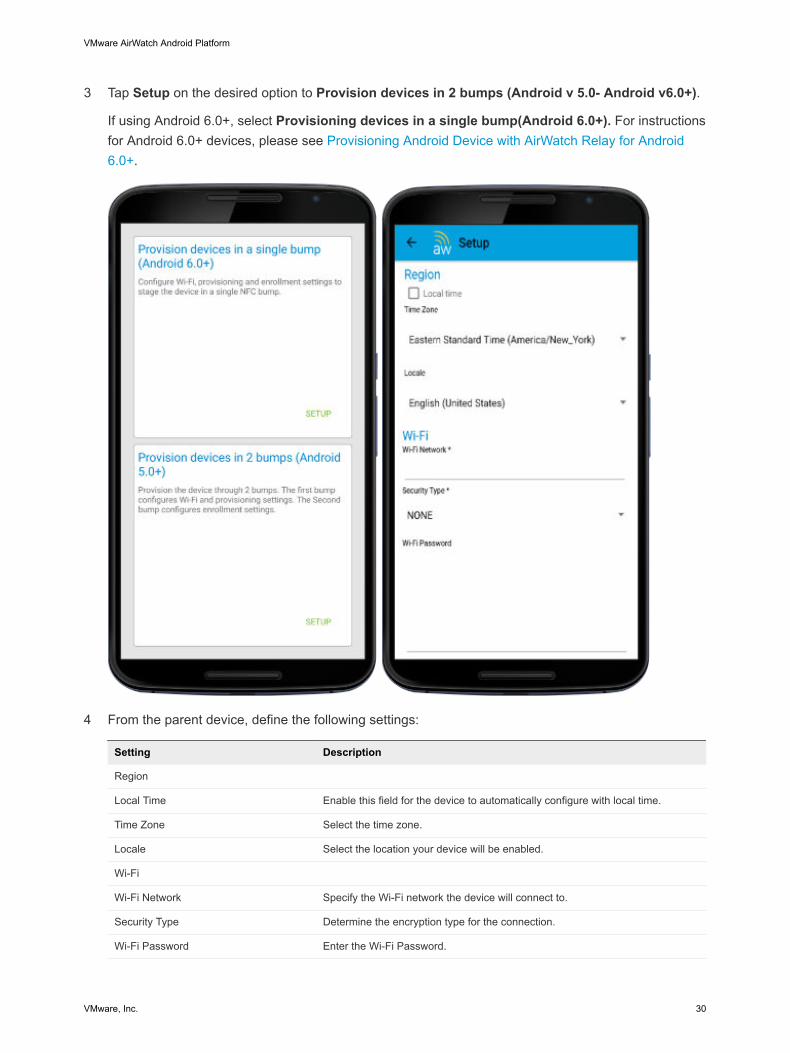
3 Tap Setup on the desired option to Provision devices in 2 bumps (Android v 5.0- Android v6.0+).
If using Android 6.0+, select Provisioning devices in a single bump(Android 6.0+). For instructionsfor Android 6.0+ devices, please see Provisioning Android Device with AirWatch Relay for Android6.0+.
4 From the parent device, define the following settings:
Setting Description
Region
Local Time Enable this field for the device to automatically configure with local time.
Time Zone Select the time zone.
Locale Select the location your device will be enabled.
Wi-Fi
Wi-Fi Network Specify the Wi-Fi network the device will connect to.
Security Type Determine the encryption type for the connection.
Wi-Fi Password Enter the Wi-Fi Password.
VMware AirWatch Android Platform
VMware, Inc. 30
Setting Description
Provisioning Settings
Skip Device Encryption Requirement forProvisioning
Enable this field to indicate that device encryption can be skipped as part ofWork Managed device provisioning.
Do Not Disable System Apps DuringProvisioning
Enable this field to skip the from disabling system apps during set up.
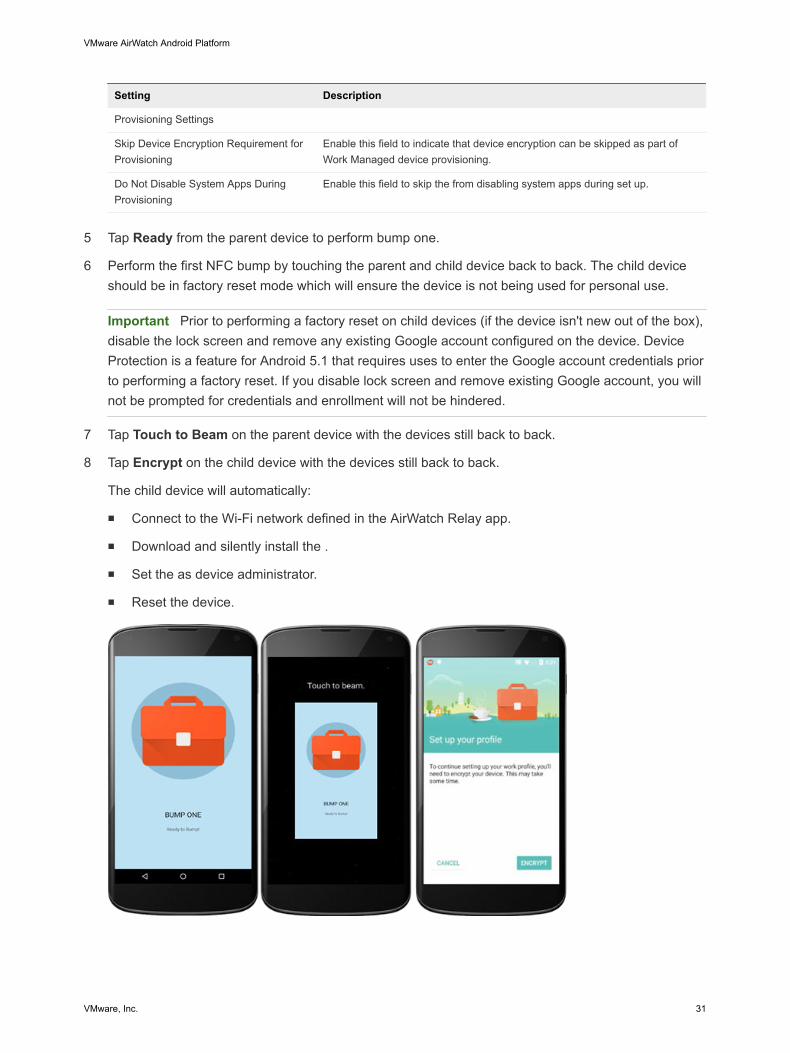
5 Tap Ready from the parent device to perform bump one.
6 Perform the first NFC bump by touching the parent and child device back to back. The child deviceshould be in factory reset mode which will ensure the device is not being used for personal use.
Important Prior to performing a factory reset on child devices (if the device isn't new out of the box),disable the lock screen and remove any existing Google account configured on the device. DeviceProtection is a feature for Android 5.1 that requires uses to enter the Google account credentials priorto performing a factory reset. If you disable lock screen and remove existing Google account, you willnot be prompted for credentials and enrollment will not be hindered.
7 Tap Touch to Beam on the parent device with the devices still back to back.
8 Tap Encrypt on the child device with the devices still back to back.
The child device will automatically:
n Connect to the Wi-Fi network defined in the AirWatch Relay app.
n Download and silently install the .
n Set the as device administrator.
n Reset the device.
VMware AirWatch Android Platform
VMware, Inc. 31
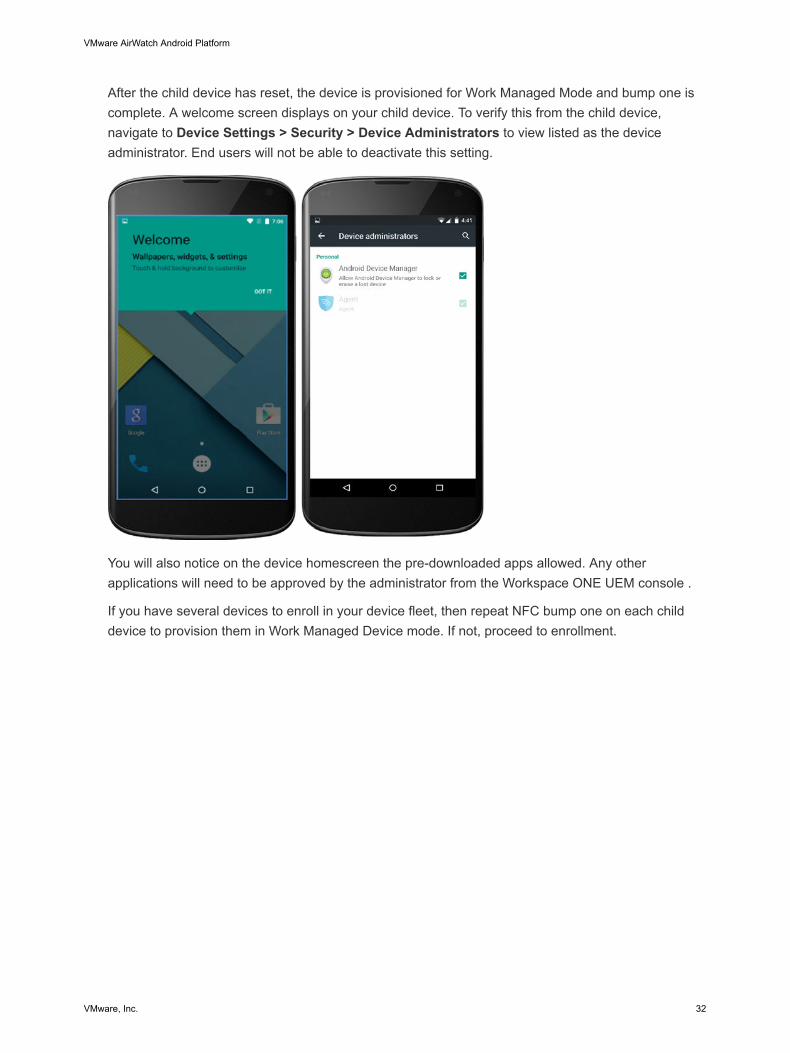
After the child device has reset, the device is provisioned for Work Managed Mode and bump one iscomplete. A welcome screen displays on your child device. To verify this from the child device,navigate to Device Settings > Security > Device Administrators to view listed as the deviceadministrator. End users will not be able to deactivate this setting.
You will also notice on the device homescreen the pre-downloaded apps allowed. Any otherapplications will need to be approved by the administrator from the Workspace ONE UEM console .
If you have several devices to enroll in your device fleet, then repeat NFC bump one on each childdevice to provision them in Work Managed Device mode. If not, proceed to enrollment.
VMware AirWatch Android Platform
VMware, Inc. 32
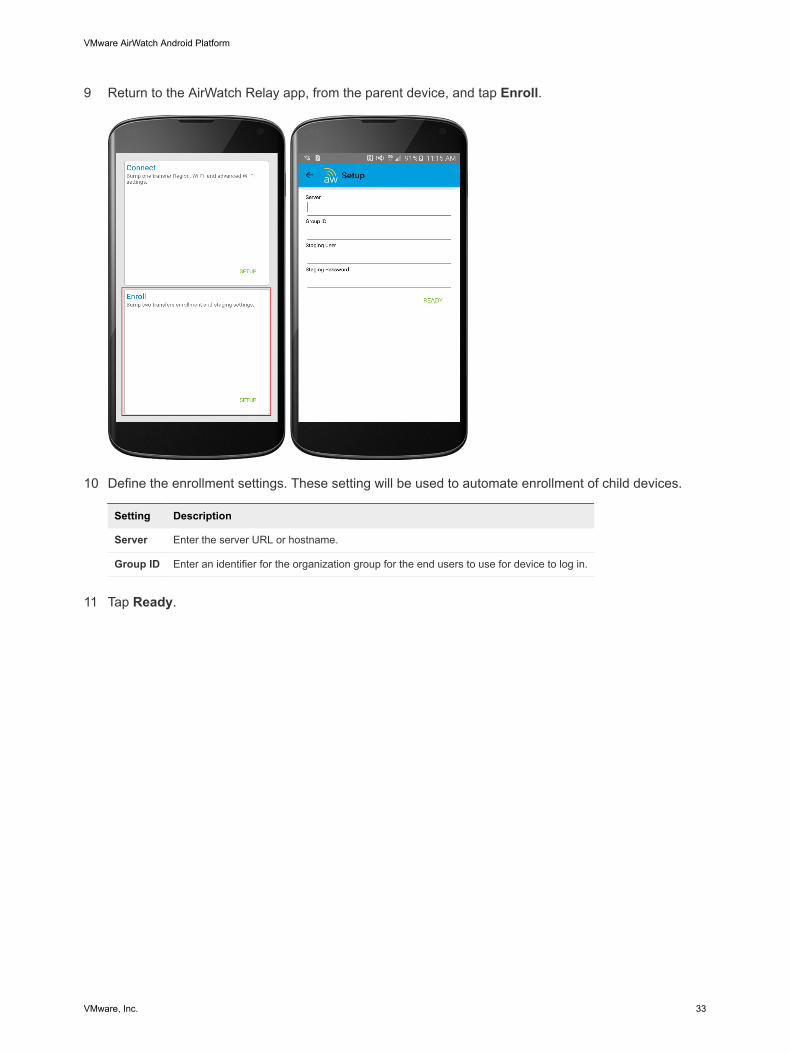
9 Return to the AirWatch Relay app, from the parent device, and tap Enroll.
10 Define the enrollment settings. These setting will be used to automate enrollment of child devices.
Setting Description
Server Enter the server URL or hostname.
Group ID Enter an identifier for the organization group for the end users to use for device to log in.
11 Tap Ready.
VMware AirWatch Android Platform
VMware, Inc. 33
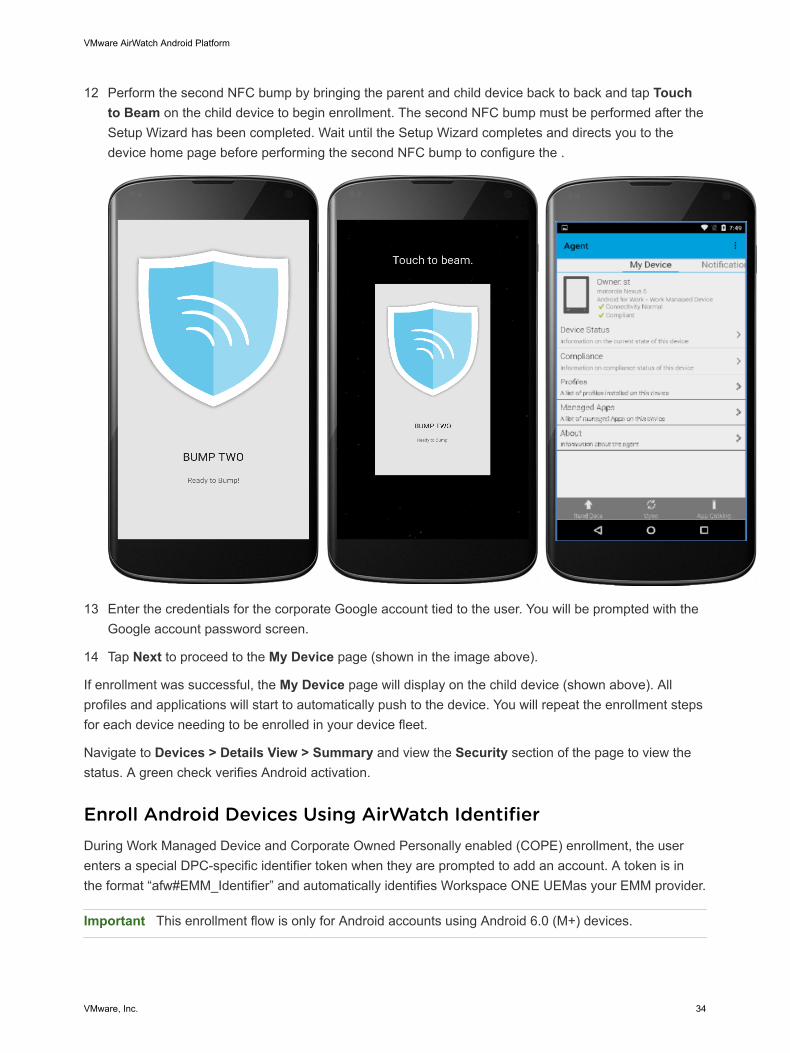
12 Perform the second NFC bump by bringing the parent and child device back to back and tap Touchto Beam on the child device to begin enrollment. The second NFC bump must be performed after theSetup Wizard has been completed. Wait until the Setup Wizard completes and directs you to thedevice home page before performing the second NFC bump to configure the .
13 Enter the credentials for the corporate Google account tied to the user. You will be prompted with theGoogle account password screen.
14 Tap Next to proceed to the My Device page (shown in the image above).
If enrollment was successful, the My Device page will display on the child device (shown above). Allprofiles and applications will start to automatically push to the device. You will repeat the enrollment stepsfor each device needing to be enrolled in your device fleet.
Navigate to Devices > Details View > Summary and view the Security section of the page to view thestatus. A green check verifies Android activation.
Enroll Android Devices Using AirWatch IdentifierDuring Work Managed Device and Corporate Owned Personally enabled (COPE) enrollment, the userenters a special DPC-specific identifier token when they are prompted to add an account. A token is inthe format “afw#EMM_Identifier” and automatically identifies Workspace ONE UEMas your EMM provider.
Important This enrollment flow is only for Android accounts using Android 6.0 (M+) devices.
VMware AirWatch Android Platform
VMware, Inc. 34
To enroll using the AirWatch Identifier:
1 Tap Get Started on your factory reset device.
2 Select your Wi-Fi network and login with your credentials to connect the device.
3 Enter the identifier “afw#airwatch” when prompted to add a Google account. The setup wizard adds atemporary Google Account to the device. This account is only used to download the DPC fromGoogle Play and is removed upon completion.
4 Tap Install to begin configuration of the to the device. The Hub will automatically open after install iscomplete.
5 Choose the Authentication Method to continue enrollment:
n Select Email Address if you have configured Autodiscovery. In addition, you may be prompted toselect your Group ID from a list.
n Choose Server Details and enter Server, Group ID, and user credentials.
n Choose QR Codeif you have created a QR Code in the UEM console.
6 Follow the remaining prompts to complete enrollment.
All profiles and applications start to automatically push to the device. The Workspace ONE UEM consolereports the status of Android on the users devices. You can check the Details View page to verify thatAndroid was successfully created.
Navigate to Devices > Details View > Summary and view the Security section of the page to view thestatus. A green check displays to verify Android activation.
Enroll Android Device Mode Using a QR CodeThe QR code enrollment method sets up and configures Work Managed Device and Corporate OwnedPersonally Enabled (COPE) modes by scanning a QR code from the setup wizard. This enrollment flow isideal for an admin staging multiple devices before deploying to users or for the end user who will beenrolling their own device with the QR code provided by an IT admin. Use the Workspace ONE UEMconsole to create the QR code before starting enrollment. Alternatively, you can use any online QR Codegenerator, such as Web Toolkit Online, to create your QR code.
To use the UEM console to create the QR code, see the Enrollment Configuration Wizard in Staging &Provisioning. For more information on the Enrollment Configuration Wizard, see, Generate a QR CodeUsing the Enrollment Configuration Wizard.
After you have created the QR code, follow these steps to enroll your device:
Important This enrollment flow is available for Managed Google Play and Managed Google Domainusers. This enrollment flow is supported on Android 7.0+ devices.
1 Power on the device. The setup wizard prompts the user to tap the Welcome screen six times. Thetaps have to be done in the same place on the screen.
a For Android 8.0+ devices, proceed to step 2 in order to download the QR Code reader.
VMware AirWatch Android Platform
VMware, Inc. 35
b For Android 9.0+ devices, the camera will open automatically after you complete the six taps.
2 Connect to Wi-Fi and the setup wizard automatically downloads a QR code reader. The QR codereader app automatically starts once complete.
3 Scan your QR code. For Android 9.0+ devices, use the QR code option on the camera to scan.
4 The setup wizard automatically downloads the which should already be configured with Server URLand Group ID information.
5 Enter the user credentials.
If enrollment was successful, the My Device page displays on the device. All profiles and applicationsstart to push automatically to the device.
The Workspace ONE UEM console reports the status of Android on the users devices. You can check theDetails View page to verify that Android was successfully created.
Navigate to Devices > Details View > Summary and view the Security section of the page to view thestatus. The should be a green check to verify Android activation.
Generate a QR Code Using the Enrollment Configuration WizardAfter selecting QR Code enrollment in the Enrollment Configuration wizard, create a QR Code to scanwith your Android 7.0 or later devices to stage the device quickly. The wizard simplifies the stagingconfiguration process.
To create a QR code using the wizard.
1 After taking note of the prerequisites, select Configure to begin.
2 You can connect the device to Wi-Fi prior to enrollment by enabling the Wi-Fi toggle. This enablingaction displays the following options.
Setting Description
SSID Enter the Service Set Identifier, more commonly known as the name of the Wi-Fi Network.
Password Enter the Wi-Fi password for the entered SSID.
3 Select Next.
4 Select the to push to devices during staging. The default selection is Use latest .
If you do not have an added, select Hosted on an external URL and enter the address in the URLtext box to point to an externally-hosted Package.
5 Select Next.
6 Set the Enrollment Details settings. To use token-based authentication, leave both options disabled.
Setting Description
Configure Organization Group
Organization Group Enable and select the organization group the QR Code staging package uses.
Configure Login Credentials
VMware AirWatch Android Platform
VMware, Inc. 36
Setting Description
User name Enable to configure login credentials. Enter the Workspace ONE UEM account user name.
Password. Enter the corresponding password.
7 Select Next.
8 The Summary page allows you to Download File of the PDF. You can also View PDF to see apreview of your QR Code Format selections.
Enroll Android Device Using Zero Touch PortalIn the Zero Touch Portal, add enrollment configurations that should be applied on the device as soon asthe is downloaded.
Note Zero Touch enrollment is only supported on Android 8.0 (Oreo) devices. For Sarmsung devices,use Knox Mobile Enrollment.
VMware AirWatch Android Platform
VMware, Inc. 37
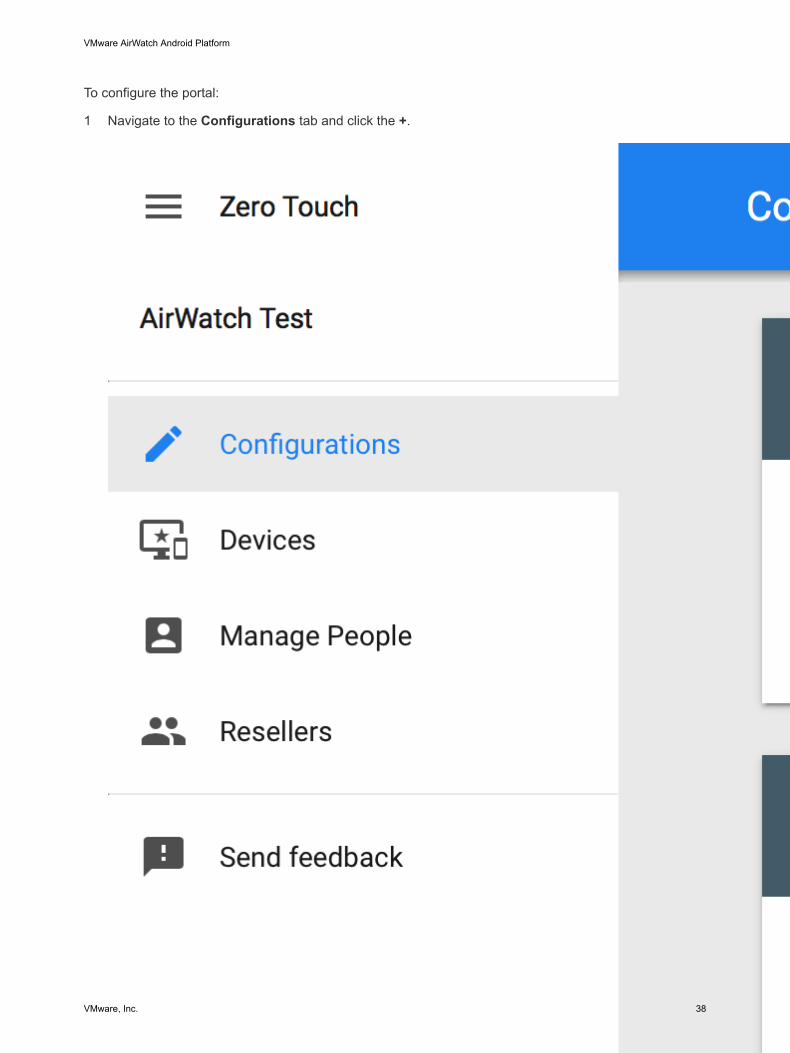
To configure the portal:
1 Navigate to the Configurations tab and click the +.
VMware AirWatch Android Platform
VMware, Inc. 38
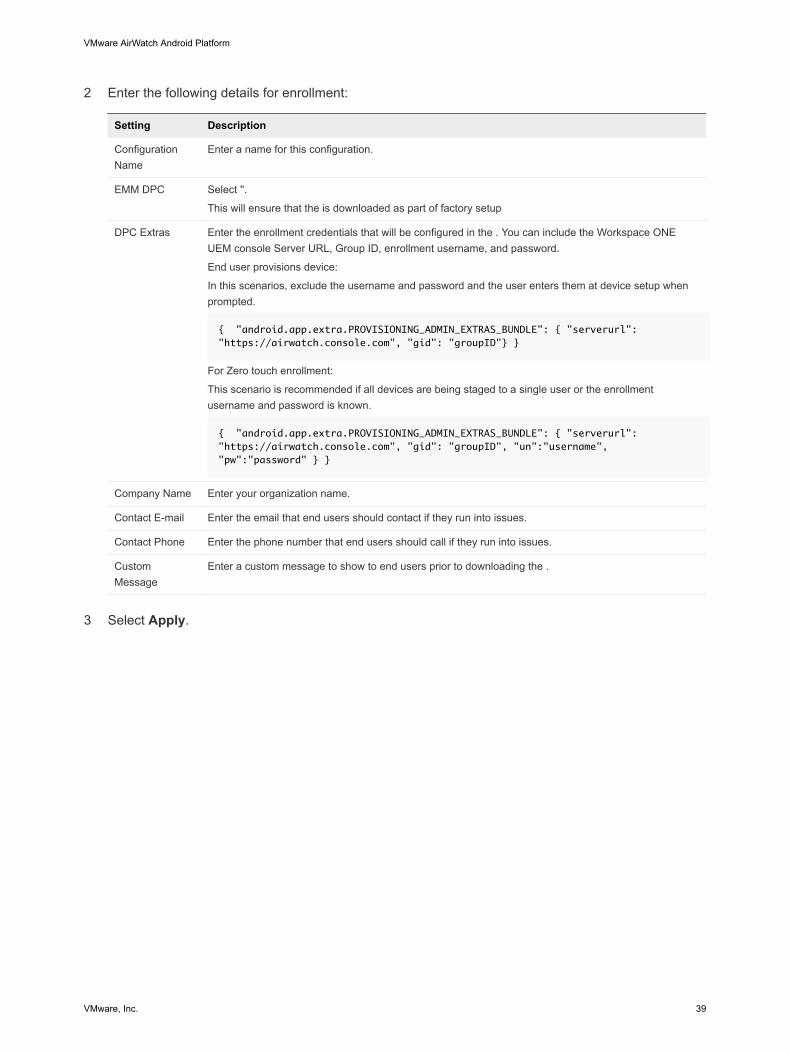
2 Enter the following details for enrollment:
Setting Description
ConfigurationName
Enter a name for this configuration.
EMM DPC Select ''.
This will ensure that the is downloaded as part of factory setup
DPC Extras Enter the enrollment credentials that will be configured in the . You can include the Workspace ONEUEM console Server URL, Group ID, enrollment username, and password.
End user provisions device:
In this scenarios, exclude the username and password and the user enters them at device setup whenprompted.
{ "android.app.extra.PROVISIONING_ADMIN_EXTRAS_BUNDLE": { "serverurl": "https://airwatch.console.com", "gid": "groupID"} }
For Zero touch enrollment:
This scenario is recommended if all devices are being staged to a single user or the enrollmentusername and password is known.
{ "android.app.extra.PROVISIONING_ADMIN_EXTRAS_BUNDLE": { "serverurl": "https://airwatch.console.com", "gid": "groupID", "un":"username", "pw":"password" } }
Company Name Enter your organization name.
Contact E-mail Enter the email that end users should contact if they run into issues.
Contact Phone Enter the phone number that end users should call if they run into issues.
CustomMessage
Enter a custom message to show to end users prior to downloading the .
3 Select Apply.
VMware AirWatch Android Platform
VMware, Inc. 39
4 Assign configurations under the Devices tab by selecting the enrollment configuration that should beapplied to the device.
VMware AirWatch Android Platform
VMware, Inc. 40
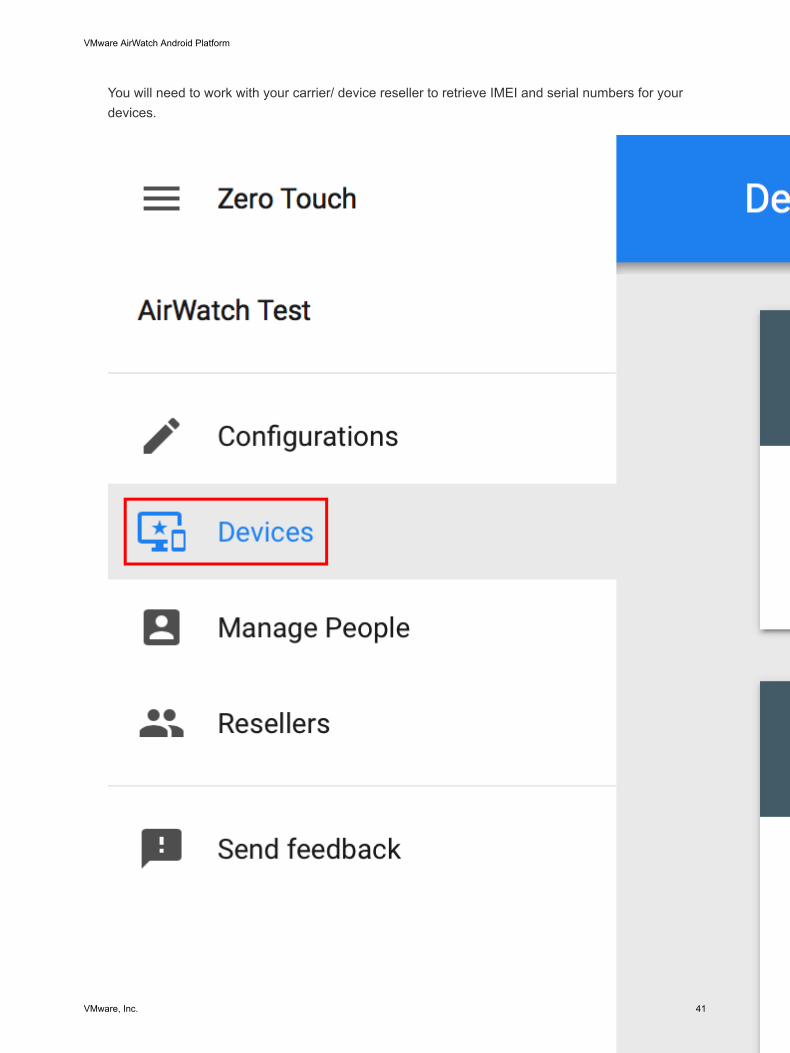
You will need to work with your carrier/ device reseller to retrieve IMEI and serial numbers for yourdevices.
VMware AirWatch Android Platform
VMware, Inc. 41
Corporate Owned Personally-Enabled EnrollmentAndroid Corporate Owned Personally-Enabled(COPE) mode gives Workspace ONE UEM control of theentire device while still deploying a Work profile for the user to use the device as a personal device.COPE is a hybrid between Work Profile and Work Managed Device modes.
There are several ways to enroll COPE devices:
n Using AirWatch Relay to perform an NFC bump
n Using an unique identifier or token code
n Scanning a QR code
n Using Zero Touch enrollment
Your business requirements determine which enrollment methods you want to use. You cannot enrolldevices until you have completed Android EMM Registration. See Chapter 2 Android EMM Registration tocomplete registration.
Android 8.0+ is required to use COPE deployment on your device fleet. If you attempt to enroll a devicethat is not running Android 8.0, the device will automatically be enrolled as a Work Managed device. Forinformation on Work Managed Device enrollment, see Work Managed Device Enrollment.
If the Android devices you are using are on a closed network, unable to communicate with Google Play,or are running Android 7.0 or lower, then enroll Android using the Legacy enrollment method in theVMware AirWatch Android (Legacy) Platform Guide.
Enrollment SettingsThe Android EMM Registration page lets you configure the various options for integrating with Android.This page uses a wizard to help you set up the integration for devices. Enable these settings beforebeginning enrollment.
AirWatch RelayAirWatch Relay is an application that passes information from parent devices to all child devices beingenrolled into Workspace ONE UEM with Android. This process is done through and NFC bump andprovisions child devices to:
n Connect to the parent device to Wi-Fi network and region settings including the device date, time, andlocation.
n Download the latest production version of for Android.
n Silently set the as device administrator.
n Automatically enroll into Workspace ONE UEM.
VMware AirWatch Android Platform
VMware, Inc. 42
AirWatch Relay allows you to bulk enroll all child devices before deploying them to end users andeliminates end users from having to enroll their own devices. All child devices must be in factory resetmode and have NFC enabled by default to be enrolled as a COPE device.
The NFC bump process depends on the Android OS version . Since COPE is only supported on Android8.0+ only, enrollment with AirWatch relay will perform a single bump to connect and enroll child devices inone step.
For AirWatch Relay enrollment, see Provisioning Android Device with AirWatch Relay for Android 6.0+
AirWatch IdentifierThe AirWatch Identifier enrollment method is a simplified approach to enrolling COPE enabled devices.Enter a simple identifier, or hash value, on a factory reset device. After the identifier is entered, theenrollment is automated pushing down the . The user only has to enter server details, user name, andpassword. For AirWatch Identifier enrollment, see Enroll Android Devices Using AirWatch Identifier.
With the identifier, you can also enroll on behalf of the end user by doing Single-User Device Staging.This method is useful for administrators who set up multiple devices for an entire team or single membersof a team. Such a method saves the end users the time and effort of enrolling their own devices.
QR CodeQR code provisioning is an easy way to enroll a fleet of devices that do not support NFC and theNFC bump. The QR code contains a payload of key-value pairs with all the information that is needed forthe device to be enrolled. QR Code enrollment does not require a managed Google domain or a Googleaccount. Create the QR code before starting enrollment. You can generate the QR Code using theEnrollment Configuration Wizard in the Workspace ONE UEM console.
The QR code includes the Server URL and Group ID information. You can also include the user nameand password or the user has to enter their credentials.
Here is the format of the text to paste into the QR Code generator:
{
"android.app.extra.PROVISIONING_DEVICE_ADMIN_COMPONENT_NAME":
"com.airwatch.androidagent/com.airwatch.agent.DeviceAdministratorReceiver",
"android.app.extra.PROVISIONING_DEVICE_ADMIN_SIGNATURE_CHECKSUM":
"6kyqxDOjgS30jvQuzh4uvHPk-0bmAD-1QU7vtW7i_o8=\n",
"android.app.extra.PROVISIONING_DEVICE_ADMIN_PACKAGE_DOWNLOAD_LOCATION":
"https://awagent.com/mobileenrollment/airwatchagent.apk",
"android.app.extra.PROVISIONING_SKIP_ENCRYPTION": false,
VMware AirWatch Android Platform
VMware, Inc. 43
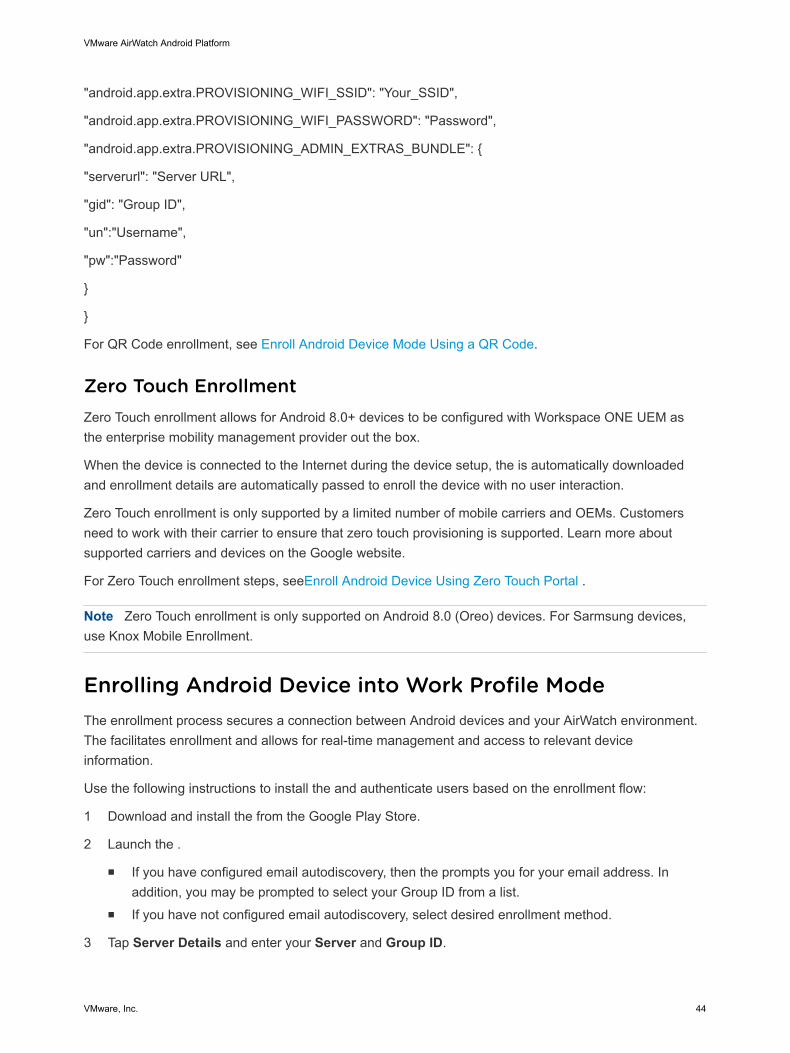
"android.app.extra.PROVISIONING_WIFI_SSID": "Your_SSID",
"android.app.extra.PROVISIONING_WIFI_PASSWORD": "Password",
"android.app.extra.PROVISIONING_ADMIN_EXTRAS_BUNDLE": {
"serverurl": "Server URL",
"gid": "Group ID",
"un":"Username",
"pw":"Password"
}
}
For QR Code enrollment, see Enroll Android Device Mode Using a QR Code.
Zero Touch EnrollmentZero Touch enrollment allows for Android 8.0+ devices to be configured with Workspace ONE UEM asthe enterprise mobility management provider out the box.
When the device is connected to the Internet during the device setup, the is automatically downloadedand enrollment details are automatically passed to enroll the device with no user interaction.
Zero Touch enrollment is only supported by a limited number of mobile carriers and OEMs. Customersneed to work with their carrier to ensure that zero touch provisioning is supported. Learn more aboutsupported carriers and devices on the Google website.
For Zero Touch enrollment steps, seeEnroll Android Device Using Zero Touch Portal .
Note Zero Touch enrollment is only supported on Android 8.0 (Oreo) devices. For Sarmsung devices,use Knox Mobile Enrollment.
Enrolling Android Device into Work Profile ModeThe enrollment process secures a connection between Android devices and your AirWatch environment.The facilitates enrollment and allows for real-time management and access to relevant deviceinformation.
Use the following instructions to install the and authenticate users based on the enrollment flow:
1 Download and install the from the Google Play Store.
2 Launch the .
n If you have configured email autodiscovery, then the prompts you for your email address. Inaddition, you may be prompted to select your Group ID from a list.
n If you have not configured email autodiscovery, select desired enrollment method.
3 Tap Server Details and enter your Server and Group ID.
VMware AirWatch Android Platform
VMware, Inc. 44
4 Enter Username and Password and tap Continue.
5 Accept the Terms of Use.
1 (Optional) Tap the Encrypt button and follow the remaining prompts to accepts the settings. The willclose after accepting the encryption settings. Tap the Encryption Complete notification to return tothe to continue enrollment.
Note The option to encrypt the device depends on the version of Android the device is running.Devices running Android Marshmallow are encrypted by default, so this option will not display duringenrollment.
2 Tap Set Up to configure the Work Profile that will be associated with the device.
3 Tap OK on the Privacy Policy. Depending on how users are being created, the remaining screens forenrollment will vary.The enterprise settings from the Workspace ONE UEM console will be pushed tothe device. This ends enrolling devices for managed Google Play Accounts.
4 For Google Accounts only, tap Get Started to create the Work Profile and connect the ManagedGoogle Account to the device. These steps differ based on authentication method:To proceed withUser-defined enrollment:
a Create the Password with your user credentials and tap Next.
b Enter the Managed Google Account Password and tap Next.
To continue with Directory Service Sync:
a Enter your Password and tap Next.
b Select Continue.
c Select Exit.
To follow the SAML enrollment flow:
a Enter the User Name and Password and tap Login. The user will be redirected to the .
If successful, the Work Profile is configured for the device and displays the settings page. The device isready for use according to Android settings for the Work Profile.
VMware AirWatch Android Platform
VMware, Inc. 45
Android Profiles 4OverviewAndroid profiles ensure proper use of devices and protection of sensitive data. Profiles serve manydifferent purposes, from letting you enforce corporate rules and procedures to tailoring and preparingAndroid capable devices for how they are used.
Android Versus Android (Legacy) ProfilesWhen you go to deploy profiles for Android, you will see two platform types on the profiles page: Androidand Android (Legacy). Select the Android profile option if you have completed the AndroidEMM Registration. If you have opted out of the EMM registration, then the Android (Legacy) profiles areavailable. When you select Android but have not walked through the Android EMM Registration, an errormessage displays prompting you to go to the settings page to complete EMM registration or proceed toAndroid (Legacy) profile deployment.
To walk through Android EMM Registration, see Chapter 2 Android EMM Registration
Work Profile vs. Work Managed Device ModeA Work Profile is a special type of administrator. The user already has a personal device with their ownaccount, and Workspace ONE UEM manages the Work Profile. Workspace ONE UEM enrollment will adda Work Profile and install the inside the Work Profile as the profile owner for that user.
The Work Managed device applies to devices that start in the unprovisioned state, and enrollment installsthe the Work Managed device. The will have full control of the entire device. Some profiles will display thefollowing tags: Work Profile and Work Managed Device.
Profiles configured for the Work Profile only apply to the Android badged apps and not affect the userspersonal apps or settings unless you configure profiles at the device level. For example, certainrestrictions disable access to YouTube, Google Play. Restrictions only affect the Android badged appsand not the regular Play Store versions. Alternatively, profiles configured for Work Managed Device modetype apply to the entire device. Each profile discussed in this section indicates which device type theprofile affects.
VMware, Inc. 46
Device AccessSome device profiles configure the settings for accessing an Android device. Use these profiles to ensurethat access to a device is limited only to authorized users.
Some examples of device access profiles include:
n Secure a device with a Passcode profile. For more information, see Passcode Profile.
n Specify and control how, when and where your employees use their devices. For more information,seeRestrictions Profile.
Device SecurityEnsure that your Android devices remain secure through device profiles. These profiles configure thenative Android security features or configure corporate security settings on a device through WorkspaceONE UEM.
n Access internal resources such as email, files, and content. For more information, see ConfigureVPN.
n Take administrative actions when a user installs or uninstalls certain applications. For moreinformation, see Application Control.
Device ConfigurationConfigure the various settings of your Android devices with the configuration profiles. These profilesconfigure the device settings to meet your business needs.
n Connect your device to internal WiFi automatically. For more information, see Wi-Fi Profile.
n Manage how Android OS update notifications and the actual updates are controlled. For moreinformation, see Enable System Updates.
Note Some profiles display the following tags: AFW v1+ and AFWAPP. The Android App (AFWAPP) isthe Pre-Lollipop solution for Android coming soon.
This chapter includes the following topics:
n Passcode Profile
n Enforce Chrome Browser Settings
n Restrictions Profile
n Enable Exchange Active Sync
n Credentials
n Application Control
n Configure Proxy Settings
VMware AirWatch Android Platform
VMware, Inc. 47
n Enable System Updates
n Wi-Fi Profile
n Configure VPN
n Set Permissions
n Configure Single App Mode
n Set Date/Time
n Create AirWatch Launcher Profile
n Configure Firewall Rules (Android)
n Configure APN Profile
n Configure Enterprise Factory Reset Protection
n Configure Zebra MX Profile
n Using Custom Settings
Passcode ProfileYou can set the Passcode profile for the settings to apply as a Work Passcode or Device Passcode.
The Work Passcode applies passcode policies only to work apps so users do not have to enter complexpasswords each time they unlock their device when enrolled with a Work Profile. The Work passcodeensures that end users can access their private apps in any way they like while keeping corporate appdata protected without the use of wrapping technologies. For Work Managed devices, this passcodepolicy applies to the device. The Work Passcode is available on Android 7.0 (Nougat) and above for WorkProfile enrolled devices.
The Device Passcode applies passcode policies for the device enrolled with a Work Profile. Thispasscode needs to be entered each time the device is unlocked and can be applied in addition to thework passcode.
By default, when creating new profiles, only the work passcode is enabled (device passcode is enabled).The admin has to enable the device passcode manually.
Enforce Passcode SettingsSetting a passcode policy requires your end users to enter a passcode, providing a first layer of defensefor sensitive data on devices.
To create a device passcode profile:
1 Navigate to Devices > Profiles & Resources > Profiles > Add > Add Profile > Android.
2 Configure the General profile settings as appropriate.
VMware AirWatch Android Platform
VMware, Inc. 48
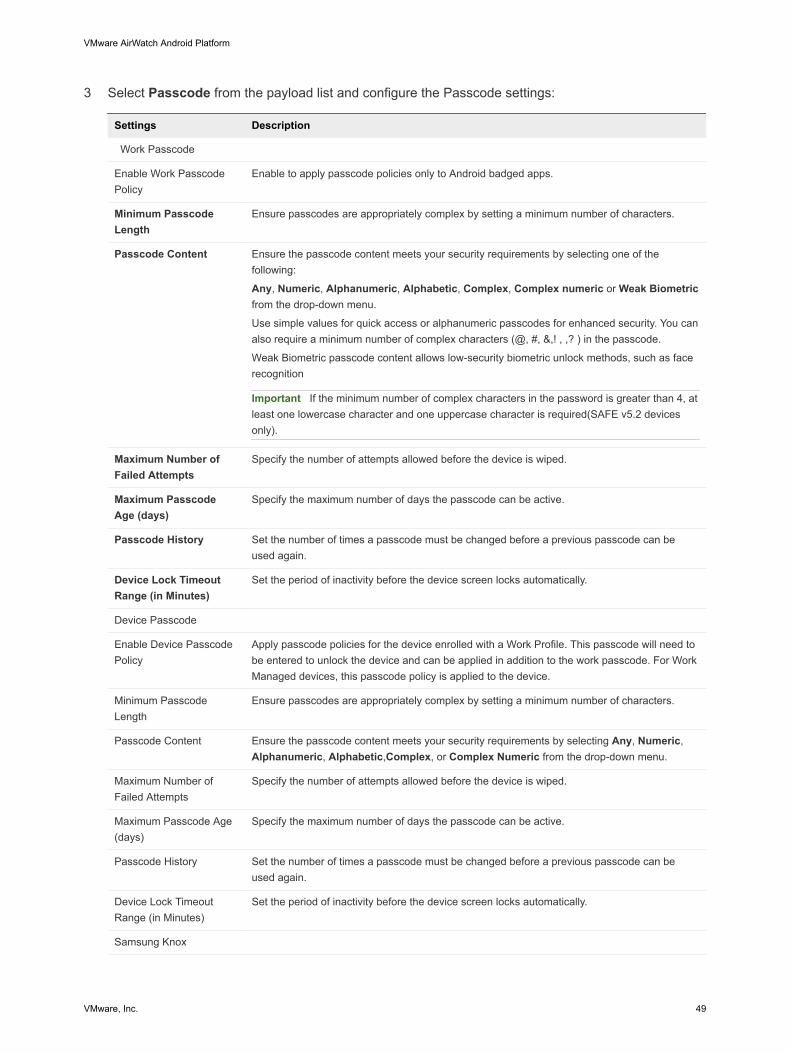
3 Select Passcode from the payload list and configure the Passcode settings:
Settings Description
Work Passcode
Enable Work PasscodePolicy
Enable to apply passcode policies only to Android badged apps.
Minimum PasscodeLength
Ensure passcodes are appropriately complex by setting a minimum number of characters.
Passcode Content Ensure the passcode content meets your security requirements by selecting one of thefollowing:
Any, Numeric, Alphanumeric, Alphabetic, Complex, Complex numeric or Weak Biometricfrom the drop-down menu.
Use simple values for quick access or alphanumeric passcodes for enhanced security. You canalso require a minimum number of complex characters (@, #, &,! , ,? ) in the passcode.
Weak Biometric passcode content allows low-security biometric unlock methods, such as facerecognition
Important If the minimum number of complex characters in the password is greater than 4, atleast one lowercase character and one uppercase character is required(SAFE v5.2 devicesonly).
Maximum Number ofFailed Attempts
Specify the number of attempts allowed before the device is wiped.
Maximum PasscodeAge (days)
Specify the maximum number of days the passcode can be active.
Passcode History Set the number of times a passcode must be changed before a previous passcode can beused again.
Device Lock TimeoutRange (in Minutes)
Set the period of inactivity before the device screen locks automatically.
Device Passcode
Enable Device PasscodePolicy
Apply passcode policies for the device enrolled with a Work Profile. This passcode will need tobe entered to unlock the device and can be applied in addition to the work passcode. For WorkManaged devices, this passcode policy is applied to the device.
Minimum PasscodeLength
Ensure passcodes are appropriately complex by setting a minimum number of characters.
Passcode Content Ensure the passcode content meets your security requirements by selecting Any, Numeric,Alphanumeric, Alphabetic,Complex, or Complex Numeric from the drop-down menu.
Maximum Number ofFailed Attempts
Specify the number of attempts allowed before the device is wiped.
Maximum Passcode Age(days)
Specify the maximum number of days the passcode can be active.
Passcode History Set the number of times a passcode must be changed before a previous passcode can beused again.
Device Lock TimeoutRange (in Minutes)
Set the period of inactivity before the device screen locks automatically.
Samsung Knox
VMware AirWatch Android Platform
VMware, Inc. 49
Settings Description
This section is only available when OEM Settings in the General Profile is enabled and Samsung is selected from the SelectOEM field.
Passcode Visible Enable to show the passcode on the screen as it is entered.
Allow Fingerprint Unlock Enable to allow users to use their fingerprint to unlock their devices and prevents usingfingerprint as the primary method of authentication and instead requires that the end user enterthe specified type of password in the profile instead.
Require SD CardEncryption
Indicate if the SD card requires encryption.
Maximum Number ofRepeating Characters
Prevent your end users from entering easily cracked repetitive passcodes like '1111' by settinga maximum number of repeating characters.
Maximum Length ofNumeric Sequences
Prevent your end user from entering an easily cracked numeric sequence like 1234 as theirpasscode.
Allow Iris Scanner Disable to prevent the Iris Scanner method from being configurable or selectable on theSamsung device.
Allow Face Unlock Disable to prevent the Face Unlock method from being configurable or selectable on theSamsung device.
Lockscreen Overlay Enable to push information to the end user devices and display this information over the lockscreen.n Image Overlay – Upload images to display over the lock screen. You can upload a primary
and secondary image and determine the position and transparency of the images.n Company Information – Enter company information to display over the lock screen. This
can be used for emergency information in the event the device has been lost or reportedstolen.
The Lockscreen Overlay setting is for Safe 5.0 devices and above only. The LockscreenOverlay settings remains configured on the device while in use and cannot be changed by theend user.
For more information on Lockscreen Overlay settings, see Configure Lockscreen Overlay(Android)
The following settings apply if you select Complex from the Passcode Content text box.
Setting Description
Maximum Number of Failed Attempts Specify the number of attempts allowed before the device is wiped.
Minimum Number of Letters Specify the number of letters that can be included in the passcode.
Minimum Number of Lower Case Letters Specify the number of lowercase letters allowed in the passcode.
Minimum Number of Upper Case Letters Specify the number of uppercase letters allowed in the passcode.
Minimum Number of Non-Letters Specify the number of special characters allowed in the passcode.
Minimum Number of Numerical Digits Specify the number of numerical digits allowed in the passcode.
Minimum Number of Symbols Specify the number of symbols allowed in the passcode.
Maximum Passcode Age (days) Set the maximum number of days the passcode can be active.
1 Select Save & Publish to assign the profile to associated devices.
VMware AirWatch Android Platform
VMware, Inc. 50
Configure Lockscreen Overlay (Android)The Lockscreen Overlay option in the passcode profiles gives you the ability to overlay information overthe screen lock image to provide information to the end user or anyone who may find a locked device.Lockscreen Overlay is a part of the Passcode profile.
To configure the lockscreen overlay:
1 Navigate to Devices > Profiles & Resources > Profiles > Add > Add Profile > Android.
2 Select Android or Android (Legacy) depending on your enrollment configuration.
3 Configure the General profile settings as appropriate.
Lockscreen Overlay is a native functionality for Android (Legacy) and available across several OEMs.
The Lockscreen Overlay settings for Androidprofiles on displays when the OEM Settings field istoggled to Enabled and Samsung is selected from the Select OEM field. The OEM settings field inthe General profile only applies to Android profiles and not Android (Legacy) configurations.
4 Select the Passcode profile from the list.
5 Enable the Lockscreen Overlay field.
6 Select your desired lockscreen overlay type: Image Overlay or Company Information.
7 Configure the settings for Image Overlay as desired.
Setting Description
Image Overlay Type Select Single Image or Multi Image to determine the number of overlay imagesrequired.
Primary Image Upload an image file.
Primary Image Top Position inPercent
Determine the position of the top image from 0-90 percent.
Primary Image Bottom Positionin Percent
Determine the position of the bottom image from 0-90 percent.
Secondary Image Upload a second image if desired. This field only displays if Multi Image is selectedfrom the Image Overlay Type field.
Secondary Image Position inPercent
Determine the position of the top image from 0-90 percent. Only application if MultiImage is selected from the Image Overlay Type field.
Secondary Image BottomPosition in Percent
Determine the position of the bottom image from 0-90 percent. Only applicable if MultiImage is selected from the Image Overlay Type field.
Overlay Image Determine the transparency of your image as Transparent or Opaque.
1 Configure the settings for Company Information as desired.
Setting Description
Company Name Enter your company name for display.
Company Logo Upload the company logo with an image file.
VMware AirWatch Android Platform
VMware, Inc. 51
Setting Description
Company Address Enter the company office address.
Company Phone Number Enter the company phone number.
Overlay Image Determine the transparency of your image as Transparent or Opaque.
1 Select Save & Publish.
Enforce Chrome Browser SettingsThe Chrome Browser Settings profile helps you to manage settings for the Work Chrome app.
Chrome is Google's web browser. Chrome offers a number of features such as search, the omnibox (onebox to search and navigate), auto-fill, saved passwords, and Google account sign-in to instantly accessrecent tabs and searches across all your devices. The work Chrome app functions the same as thepersonal version of Chrome. Configuring this profile will not affect the user's personal Chrome app. Youcan push this profile in conjunction with a separate VPN or Credentials+Wi-Fi payload to ensure end-users can authenticate and log in to your internal sites and systems. This will ensure that users must usethe Work Chrome app for business purposes.
To configure Chrome Browser Restrictions:
1 Navigate to Devices > Profiles & Resources > Profiles > Add > Add Profile > Android.
2 Configure the profile's General settings as appropriate.
3 Select the Chrome Browser Settings payload and configure the settings as desired.
Setting Description
Content Settings
Allow Cookies Enable to determine browser cookies settings.
Allow Cookies On These Sites Specify URLs which are allowed to set cookies.
Block Cookies On These Sites Specify URLs which are not allowed to set cookies.
Allow Session Only Cookies On TheseSites
Specify sites which are allowed to set session only cookies.
Allow Images Enable to determine which sites allow images.
Allow Images On These Sites Specify a list of URLs which are allowed to display images.
Block Images On These sites Specify a list of URLs which are not allowed to display images.
Allow JavaScript Enable JavaScript browser settings.
Allow JavaScript On These Sites Specify sites which are allowed to run JavaScript.
Block JavaScript On These Sites Specify sites which are not allowed to run JavaScript.
Allow Pop-Ups Enable pop-up browser settings.
VMware AirWatch Android Platform
VMware, Inc. 52
Setting Description
Allow Popups On These Sites Specify sites which are allowed to open popups.
Block Popups On These sites Specify sites which are not allowed to open popups.
Allow Track Location Set whether websites are allowed to track the users' physical location
Proxy Settings
Proxy Mode Specify the proxy server used by Google Chrome and prevents users fromchanging proxy settings.
Proxy Server URL Specify the URL of the proxy server.
Proxy PAC File URL Specify a URL to a proxy .pac file.
Proxy Bypass Rules Specify which proxy settings to bypass. This policy only takes effect if you haveselected manual proxy settings
Search Settings
Force Google SafeSearch Enable to force search queries in Google web search to be done withSafeSearch
Enable Touch to Search Enables the use of Touch to Search in Google Chrome's content view.
Enable Default Search Provider Specify the default search provider.
Default Search Provider Name Specify the name of the default search provider.
Default Search Provider Keyword Specify the keyword search for the default search provider.
Default search provider search URL Specify the URL of the search engine used when doing a default search.
Default search provider suggest URL Specify the URL of the search engine used to provide search suggestions.
Default Search Provider Icon Specify the favorite icon URL of the default search provider.
Default Search Provider Encodings Specify the character encodings supported by the search provider. Encodingsare code page names like UTF-8, GB2312, and ISO-8859-1. If not set, thedefault will be used which is UTF-8.
List Of Alternate URLs For The DefaultSearch Provider
Specify a list of alternate URLs that can be used to extract search terms fromthe search engine.
Search Provider Image URL Specify the URL of the search engine used to provide image search.
New Tab URL Specify the URL that a search engine uses to provide a new tab page.
POST URL Search Parameters Specify the parameters used when searching a URL with POST.
POST Suggestion Search Parameters Specify the parameters used when doing image search with POST.
POST Image Search Parameters Specify the parameters used when doing image search with POST.
Password Manager
Enable the password manager Enable saving passwords to the password manager.
Start Up Pages
Enable alternate error pages Enable to use alternate error pages that are built into Google Chrome (such as'page not found').
Enable autofill Enable to allow users to auto complete web forms using previously storedinformation such as address or credit card information.
Other Settings
VMware AirWatch Android Platform
VMware, Inc. 53
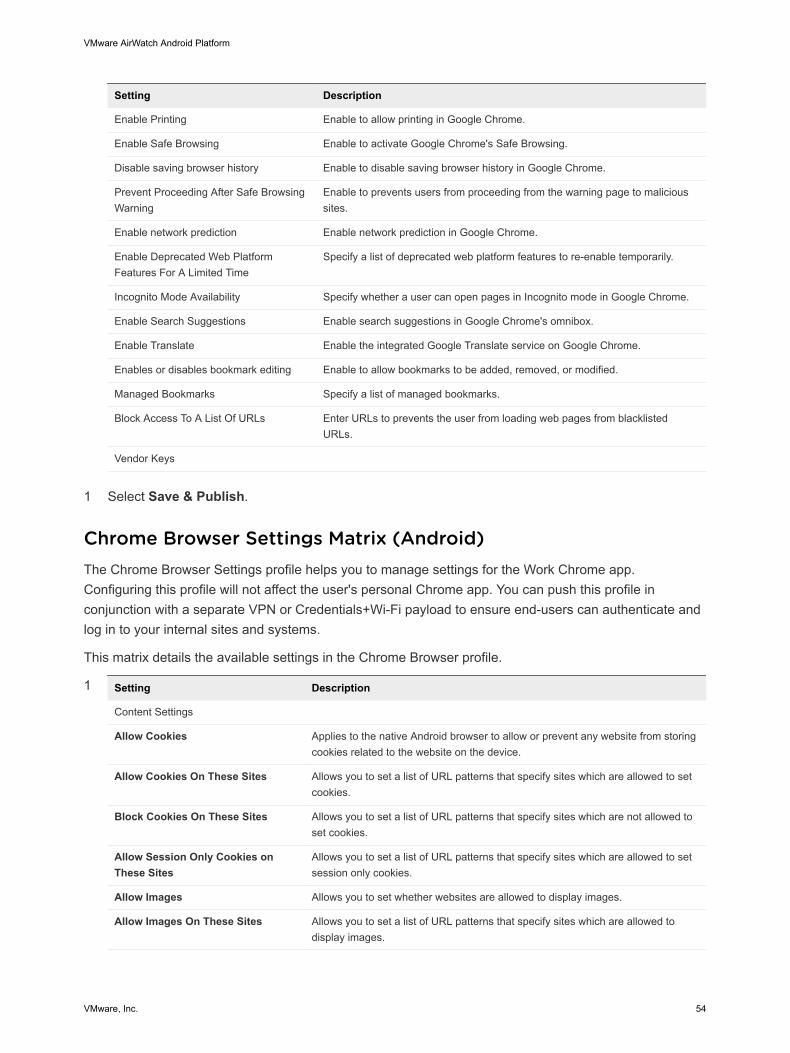
Setting Description
Enable Printing Enable to allow printing in Google Chrome.
Enable Safe Browsing Enable to activate Google Chrome's Safe Browsing.
Disable saving browser history Enable to disable saving browser history in Google Chrome.
Prevent Proceeding After Safe BrowsingWarning
Enable to prevents users from proceeding from the warning page to malicioussites.
Enable network prediction Enable network prediction in Google Chrome.
Enable Deprecated Web PlatformFeatures For A Limited Time
Specify a list of deprecated web platform features to re-enable temporarily.
Incognito Mode Availability Specify whether a user can open pages in Incognito mode in Google Chrome.
Enable Search Suggestions Enable search suggestions in Google Chrome's omnibox.
Enable Translate Enable the integrated Google Translate service on Google Chrome.
Enables or disables bookmark editing Enable to allow bookmarks to be added, removed, or modified.
Managed Bookmarks Specify a list of managed bookmarks.
Block Access To A List Of URLs Enter URLs to prevents the user from loading web pages from blacklistedURLs.
Vendor Keys
1 Select Save & Publish.
Chrome Browser Settings Matrix (Android)The Chrome Browser Settings profile helps you to manage settings for the Work Chrome app.Configuring this profile will not affect the user's personal Chrome app. You can push this profile inconjunction with a separate VPN or Credentials+Wi-Fi payload to ensure end-users can authenticate andlog in to your internal sites and systems.
This matrix details the available settings in the Chrome Browser profile.
1 Setting Description
Content Settings
Allow Cookies Applies to the native Android browser to allow or prevent any website from storingcookies related to the website on the device.
Allow Cookies On These Sites Allows you to set a list of URL patterns that specify sites which are allowed to setcookies.
Block Cookies On These Sites Allows you to set a list of URL patterns that specify sites which are not allowed toset cookies.
Allow Session Only Cookies onThese Sites
Allows you to set a list of URL patterns that specify sites which are allowed to setsession only cookies.
Allow Images Allows you to set whether websites are allowed to display images.
Allow Images On These Sites Allows you to set a list of URL patterns that specify sites which are allowed todisplay images.
VMware AirWatch Android Platform
VMware, Inc. 54

Setting Description
Block Images On These Sites Allows you to set a list of URL patterns that specify sites which are not allowed todisplay images.
Allow JavaScript Applies to the native Android browser to allow or prevent the browser from runningJavaScript code for a website.
Allow JavaScript On These Sites Allows you to set a list of URL patterns that specify sites which are allowed to runJavaScript.
Block JavaScript On These Sites Allows you to set a list of URL patterns that specify sites which are not allowed torun JavaScript.
Allow Pop-Ups Pop-up browser setting to allow or prevent any website from popping up newbrowser windows when the user navigates to a website that invokes such action.
Allow Pop-Ups On These Sites Allows you to set a list of URL patterns that specify sites which are allowed toopen popups.
Allow Track Location Allows you to set whether websites are allowed to track the users' physicallocation.
Proxy Settings
Proxy mode Select how your desired proxy flow.
Proxy Server URL Specify a URL to a proxy .pac file.
Proxy PAC File URL Enter your Proxy PAC file URL, if applicable.
Proxy Bypass Rules Enter any applicable bypass rules to direct requests from certain clients or toparticular origin servers around the proxy.
Search Settings
Force Google SafeSearch
Force YouTube Safety Mode
Enable Touch to Search
Enable Default Search Provider Enable to set a default search provide on the browser.
Default Search Provider Name Specifies the name of the default search provider.
Default Search Provider Keyword Specifies the keyword, which is the shortcut used in the address bar to trigger thesearch for this provider.
Default search provider search URL Specifies the URL of the search engine used when doing a default search.
Default search provider suggestURL
Specifies the URL of the search engine used to provide search suggestions.
Default Search Provider Icon Specifies the favorite icon URL of the default search provider.
Default Search Provider Encodings Specifies the character encodings supported by the search provider.
List Of Alternate URLs For TheDefault Search Provider
Specifies a list of alternate URLs that can be used to extract search terms fromthe search engine.
Search Terms Replacement Key Enter search terms that will display instead of the URL.
Search Provider Image URL Specifies the URL of the search engine used to provide image search.
New Tab URL Specifies the URL that a search engine uses to provide a new tab page.
POST URL Search Parameters Specifies the parameters used when searching a URL with POST.
VMware AirWatch Android Platform
VMware, Inc. 55
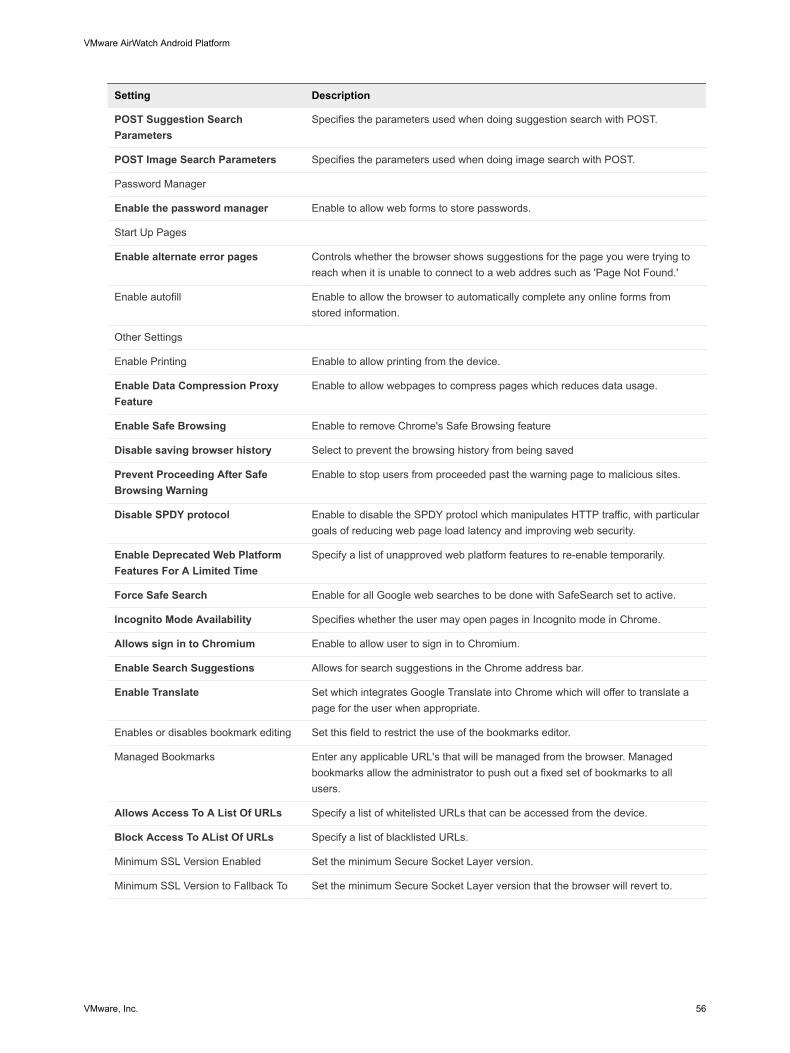
Setting Description
POST Suggestion SearchParameters
Specifies the parameters used when doing suggestion search with POST.
POST Image Search Parameters Specifies the parameters used when doing image search with POST.
Password Manager
Enable the password manager Enable to allow web forms to store passwords.
Start Up Pages
Enable alternate error pages Controls whether the browser shows suggestions for the page you were trying toreach when it is unable to connect to a web addres such as 'Page Not Found.'
Enable autofill Enable to allow the browser to automatically complete any online forms fromstored information.
Other Settings
Enable Printing Enable to allow printing from the device.
Enable Data Compression ProxyFeature
Enable to allow webpages to compress pages which reduces data usage.
Enable Safe Browsing Enable to remove Chrome's Safe Browsing feature
Disable saving browser history Select to prevent the browsing history from being saved
Prevent Proceeding After SafeBrowsing Warning
Enable to stop users from proceeded past the warning page to malicious sites.
Disable SPDY protocol Enable to disable the SPDY protocl which manipulates HTTP traffic, with particulargoals of reducing web page load latency and improving web security.
Enable Deprecated Web PlatformFeatures For A Limited Time
Specify a list of unapproved web platform features to re-enable temporarily.
Force Safe Search Enable for all Google web searches to be done with SafeSearch set to active.
Incognito Mode Availability Specifies whether the user may open pages in Incognito mode in Chrome.
Allows sign in to Chromium Enable to allow user to sign in to Chromium.
Enable Search Suggestions Allows for search suggestions in the Chrome address bar.
Enable Translate Set which integrates Google Translate into Chrome which will offer to translate apage for the user when appropriate.
Enables or disables bookmark editing Set this field to restrict the use of the bookmarks editor.
Managed Bookmarks Enter any applicable URL's that will be managed from the browser. Managedbookmarks allow the administrator to push out a fixed set of bookmarks to allusers.
Allows Access To A List Of URLs Specify a list of whitelisted URLs that can be accessed from the device.
Block Access To AList Of URLs Specify a list of blacklisted URLs.
Minimum SSL Version Enabled Set the minimum Secure Socket Layer version.
Minimum SSL Version to Fallback To Set the minimum Secure Socket Layer version that the browser will revert to.
VMware AirWatch Android Platform
VMware, Inc. 56
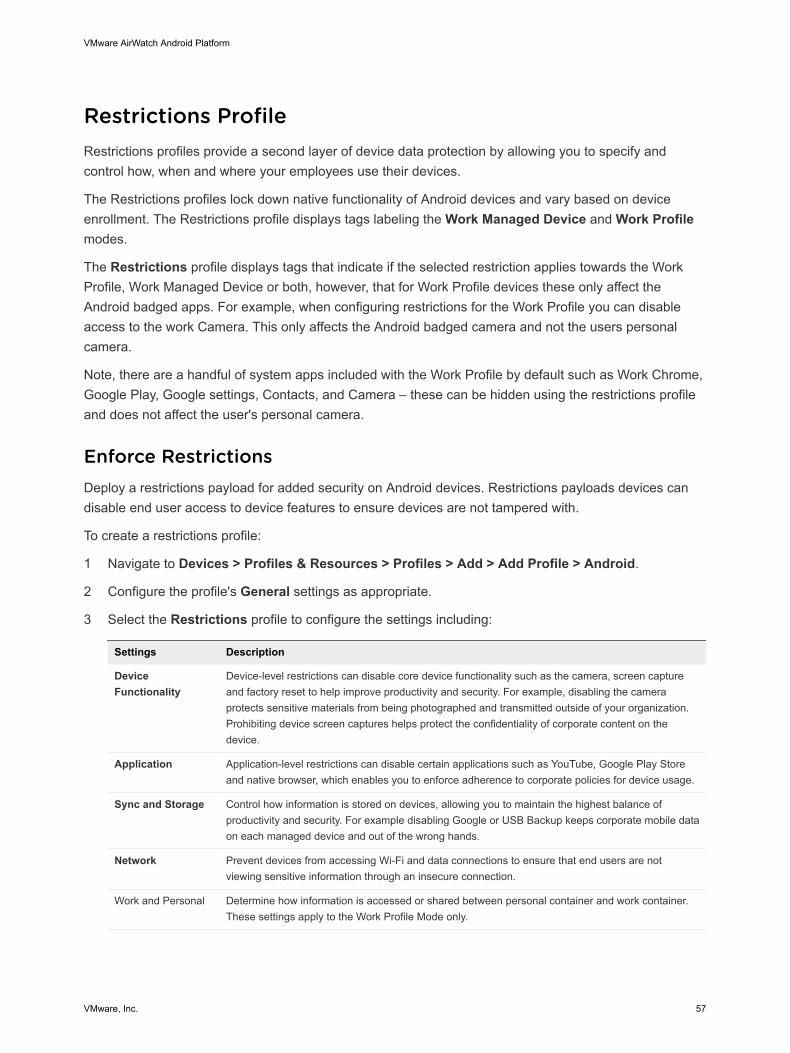
Restrictions ProfileRestrictions profiles provide a second layer of device data protection by allowing you to specify andcontrol how, when and where your employees use their devices.
The Restrictions profiles lock down native functionality of Android devices and vary based on deviceenrollment. The Restrictions profile displays tags labeling the Work Managed Device and Work Profilemodes.
The Restrictions profile displays tags that indicate if the selected restriction applies towards the WorkProfile, Work Managed Device or both, however, that for Work Profile devices these only affect theAndroid badged apps. For example, when configuring restrictions for the Work Profile you can disableaccess to the work Camera. This only affects the Android badged camera and not the users personalcamera.
Note, there are a handful of system apps included with the Work Profile by default such as Work Chrome,Google Play, Google settings, Contacts, and Camera – these can be hidden using the restrictions profileand does not affect the user's personal camera.
Enforce RestrictionsDeploy a restrictions payload for added security on Android devices. Restrictions payloads devices candisable end user access to device features to ensure devices are not tampered with.
To create a restrictions profile:
1 Navigate to Devices > Profiles & Resources > Profiles > Add > Add Profile > Android.
2 Configure the profile's General settings as appropriate.
3 Select the Restrictions profile to configure the settings including:
Settings Description
DeviceFunctionality
Device-level restrictions can disable core device functionality such as the camera, screen captureand factory reset to help improve productivity and security. For example, disabling the cameraprotects sensitive materials from being photographed and transmitted outside of your organization.Prohibiting device screen captures helps protect the confidentiality of corporate content on thedevice.
Application Application-level restrictions can disable certain applications such as YouTube, Google Play Storeand native browser, which enables you to enforce adherence to corporate policies for device usage.
Sync and Storage Control how information is stored on devices, allowing you to maintain the highest balance ofproductivity and security. For example disabling Google or USB Backup keeps corporate mobile dataon each managed device and out of the wrong hands.
Network Prevent devices from accessing Wi-Fi and data connections to ensure that end users are notviewing sensitive information through an insecure connection.
Work and Personal Determine how information is accessed or shared between personal container and work container.These settings apply to the Work Profile Mode only.
VMware AirWatch Android Platform
VMware, Inc. 57
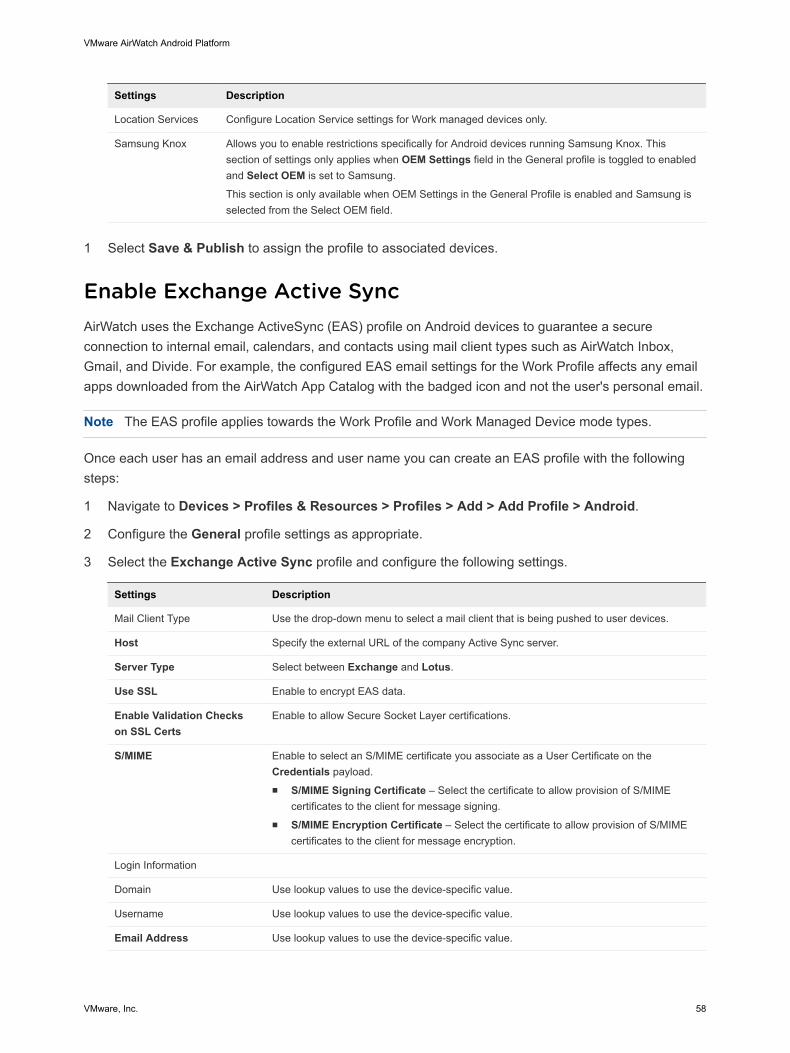
Settings Description
Location Services Configure Location Service settings for Work managed devices only.
Samsung Knox Allows you to enable restrictions specifically for Android devices running Samsung Knox. Thissection of settings only applies when OEM Settings field in the General profile is toggled to enabledand Select OEM is set to Samsung.
This section is only available when OEM Settings in the General Profile is enabled and Samsung isselected from the Select OEM field.
1 Select Save & Publish to assign the profile to associated devices.
Enable Exchange Active SyncAirWatch uses the Exchange ActiveSync (EAS) profile on Android devices to guarantee a secureconnection to internal email, calendars, and contacts using mail client types such as AirWatch Inbox,Gmail, and Divide. For example, the configured EAS email settings for the Work Profile affects any emailapps downloaded from the AirWatch App Catalog with the badged icon and not the user's personal email.
Note The EAS profile applies towards the Work Profile and Work Managed Device mode types.
Once each user has an email address and user name you can create an EAS profile with the followingsteps:
1 Navigate to Devices > Profiles & Resources > Profiles > Add > Add Profile > Android.
2 Configure the General profile settings as appropriate.
3 Select the Exchange Active Sync profile and configure the following settings.
Settings Description
Mail Client Type Use the drop-down menu to select a mail client that is being pushed to user devices.
Host Specify the external URL of the company Active Sync server.
Server Type Select between Exchange and Lotus.
Use SSL Enable to encrypt EAS data.
Enable Validation Checkson SSL Certs
Enable to allow Secure Socket Layer certifications.
S/MIME Enable to select an S/MIME certificate you associate as a User Certificate on theCredentials payload.n S/MIME Signing Certificate – Select the certificate to allow provision of S/MIME
certificates to the client for message signing.n S/MIME Encryption Certificate – Select the certificate to allow provision of S/MIME
certificates to the client for message encryption.
Login Information
Domain Use lookup values to use the device-specific value.
Username Use lookup values to use the device-specific value.
Email Address Use lookup values to use the device-specific value.
VMware AirWatch Android Platform
VMware, Inc. 58
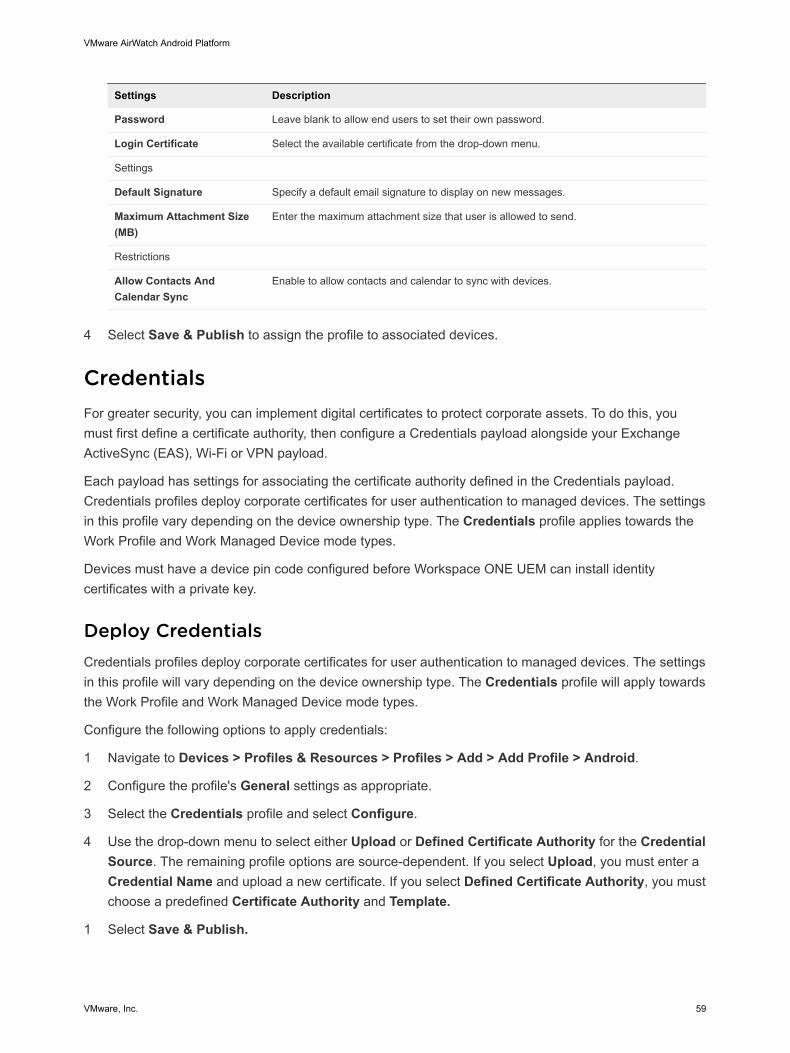
Settings Description
Password Leave blank to allow end users to set their own password.
Login Certificate Select the available certificate from the drop-down menu.
Settings
Default Signature Specify a default email signature to display on new messages.
Maximum Attachment Size(MB)
Enter the maximum attachment size that user is allowed to send.
Restrictions
Allow Contacts AndCalendar Sync
Enable to allow contacts and calendar to sync with devices.
4 Select Save & Publish to assign the profile to associated devices.
CredentialsFor greater security, you can implement digital certificates to protect corporate assets. To do this, youmust first define a certificate authority, then configure a Credentials payload alongside your ExchangeActiveSync (EAS), Wi-Fi or VPN payload.
Each payload has settings for associating the certificate authority defined in the Credentials payload.Credentials profiles deploy corporate certificates for user authentication to managed devices. The settingsin this profile vary depending on the device ownership type. The Credentials profile applies towards theWork Profile and Work Managed Device mode types.
Devices must have a device pin code configured before Workspace ONE UEM can install identitycertificates with a private key.
Deploy CredentialsCredentials profiles deploy corporate certificates for user authentication to managed devices. The settingsin this profile will vary depending on the device ownership type. The Credentials profile will apply towardsthe Work Profile and Work Managed Device mode types.
Configure the following options to apply credentials:
1 Navigate to Devices > Profiles & Resources > Profiles > Add > Add Profile > Android.
2 Configure the profile's General settings as appropriate.
3 Select the Credentials profile and select Configure.
4 Use the drop-down menu to select either Upload or Defined Certificate Authority for the CredentialSource. The remaining profile options are source-dependent. If you select Upload, you must enter aCredential Name and upload a new certificate. If you select Defined Certificate Authority, you mustchoose a predefined Certificate Authority and Template.
1 Select Save & Publish.
VMware AirWatch Android Platform
VMware, Inc. 59
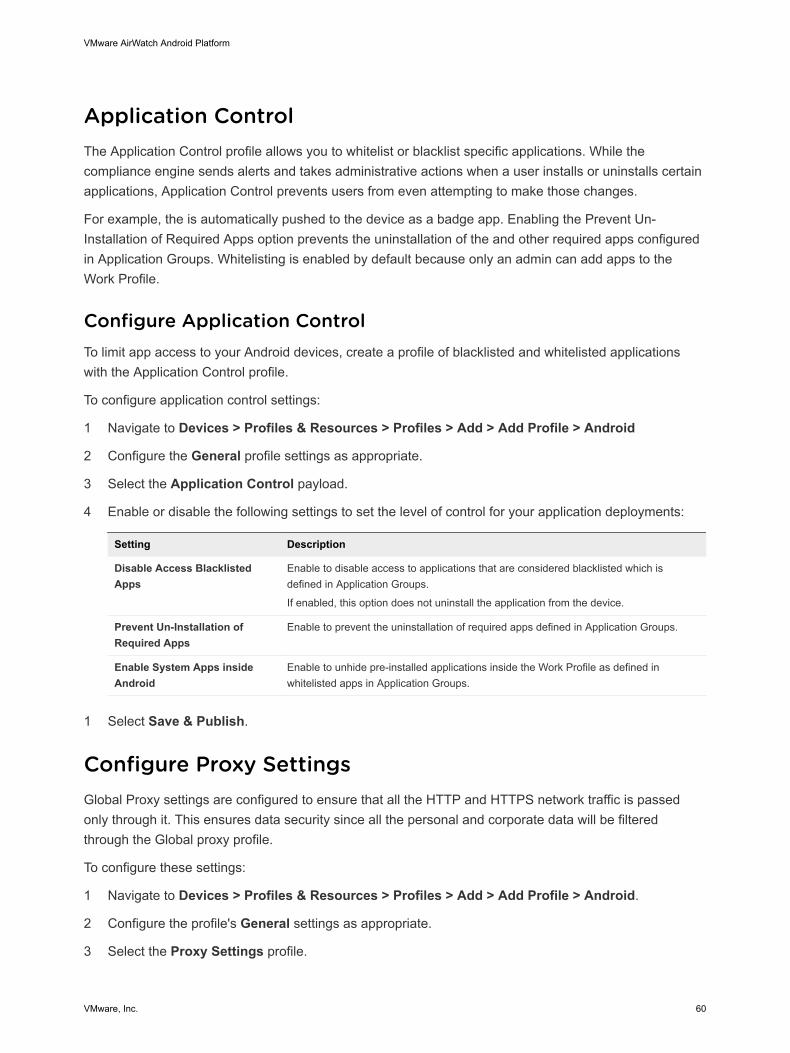
Application ControlThe Application Control profile allows you to whitelist or blacklist specific applications. While thecompliance engine sends alerts and takes administrative actions when a user installs or uninstalls certainapplications, Application Control prevents users from even attempting to make those changes.
For example, the is automatically pushed to the device as a badge app. Enabling the Prevent Un-Installation of Required Apps option prevents the uninstallation of the and other required apps configuredin Application Groups. Whitelisting is enabled by default because only an admin can add apps to theWork Profile.
Configure Application ControlTo limit app access to your Android devices, create a profile of blacklisted and whitelisted applicationswith the Application Control profile.
To configure application control settings:
1 Navigate to Devices > Profiles & Resources > Profiles > Add > Add Profile > Android
2 Configure the General profile settings as appropriate.
3 Select the Application Control payload.
4 Enable or disable the following settings to set the level of control for your application deployments:
Setting Description
Disable Access BlacklistedApps
Enable to disable access to applications that are considered blacklisted which isdefined in Application Groups.
If enabled, this option does not uninstall the application from the device.
Prevent Un-Installation ofRequired Apps
Enable to prevent the uninstallation of required apps defined in Application Groups.
Enable System Apps insideAndroid
Enable to unhide pre-installed applications inside the Work Profile as defined inwhitelisted apps in Application Groups.
1 Select Save & Publish.
Configure Proxy SettingsGlobal Proxy settings are configured to ensure that all the HTTP and HTTPS network traffic is passedonly through it. This ensures data security since all the personal and corporate data will be filteredthrough the Global proxy profile.
To configure these settings:
1 Navigate to Devices > Profiles & Resources > Profiles > Add > Add Profile > Android.
2 Configure the profile's General settings as appropriate.
3 Select the Proxy Settings profile.
VMware AirWatch Android Platform
VMware, Inc. 60

4 Configure the Proxy settings as such:
Setting Description
Proxy Mode Select the desired proxy type.
Proxy PAC URL Specify a URL to a proxy .pac file.
Proxy Server Enter the host name of IP address for the proxy server.
Exclusion List Add hostnames to prevent them from routing through the proxy.
5 Select Save & Publish.
Enable System UpdatesAirWatch manages how OS update notifications and the actual updates are controlled. You can controlOS updates with this profile in three ways.
To create a system update policy:
1 Navigate toDevices > Profiles & Resources > Profiles > Add > Add Profile > Android.
2 Configure the General profile settings as desired.
3 Select the System Updates profile.
4 Use the drop-down menu from the Automatic Updates field to select the update policy.
Setting Description
Install Updates Automatically Automatically install updates when they become available .
Defer Update Notifications Defer all updates. Send a policy that blocks OS updates for a maximum period of 30days.
Set Update Window Set a time window in which to update the device.
5 Select Save & Publish.
Wi-Fi ProfileConfiguring a Wi-Fi profile lets devices connect to corporate networks, even if they are hidden, encryptedor encrypted, or protected. The Wi-Fi profile can be useful for end users who travel to various officelocations that have their own unique wireless networks or for automatically configuring devices to connectto the appropriate wireless network while in an office.
When pushing a Wi-Fi profile to devices running Android 6.0+, if a user already has their deviceconnected to a Wi-Fi network through a manual setup; the Wi-Fi configuration cannot be changed byWorkspace ONE UEM. For example, if the Wi-Fi password has been changed and you push the updatedprofile to enrolled devices, some users have to update their device with the new password manually.
VMware AirWatch Android Platform
VMware, Inc. 61
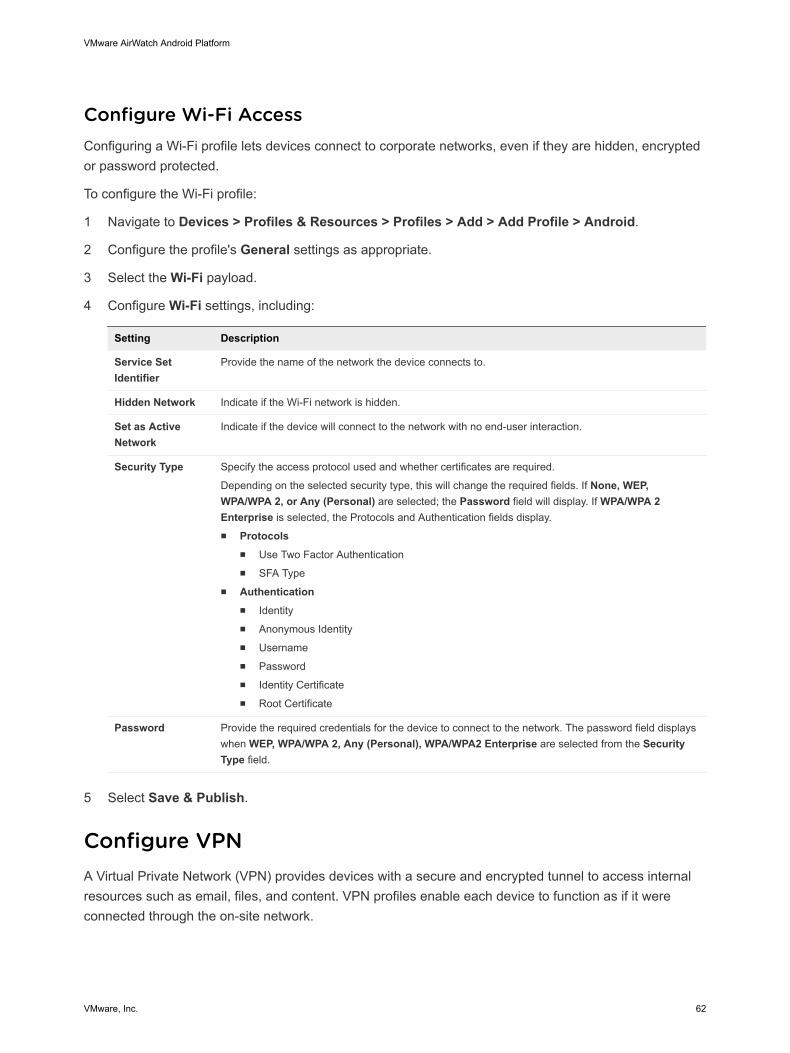
Configure Wi-Fi AccessConfiguring a Wi-Fi profile lets devices connect to corporate networks, even if they are hidden, encryptedor password protected.
To configure the Wi-Fi profile:
1 Navigate to Devices > Profiles & Resources > Profiles > Add > Add Profile > Android.
2 Configure the profile's General settings as appropriate.
3 Select the Wi-Fi payload.
4 Configure Wi-Fi settings, including:
Setting Description
Service SetIdentifier
Provide the name of the network the device connects to.
Hidden Network Indicate if the Wi-Fi network is hidden.
Set as ActiveNetwork
Indicate if the device will connect to the network with no end-user interaction.
Security Type Specify the access protocol used and whether certificates are required.
Depending on the selected security type, this will change the required fields. If None, WEP,WPA/WPA 2, or Any (Personal) are selected; the Password field will display. If WPA/WPA 2Enterprise is selected, the Protocols and Authentication fields display.n Protocols
n Use Two Factor Authenticationn SFA Type
n Authenticationn Identityn Anonymous Identityn Usernamen Passwordn Identity Certificaten Root Certificate
Password Provide the required credentials for the device to connect to the network. The password field displayswhen WEP, WPA/WPA 2, Any (Personal), WPA/WPA2 Enterprise are selected from the SecurityType field.
5 Select Save & Publish.
Configure VPNA Virtual Private Network (VPN) provides devices with a secure and encrypted tunnel to access internalresources such as email, files, and content. VPN profiles enable each device to function as if it wereconnected through the on-site network.
VMware AirWatch Android Platform
VMware, Inc. 62
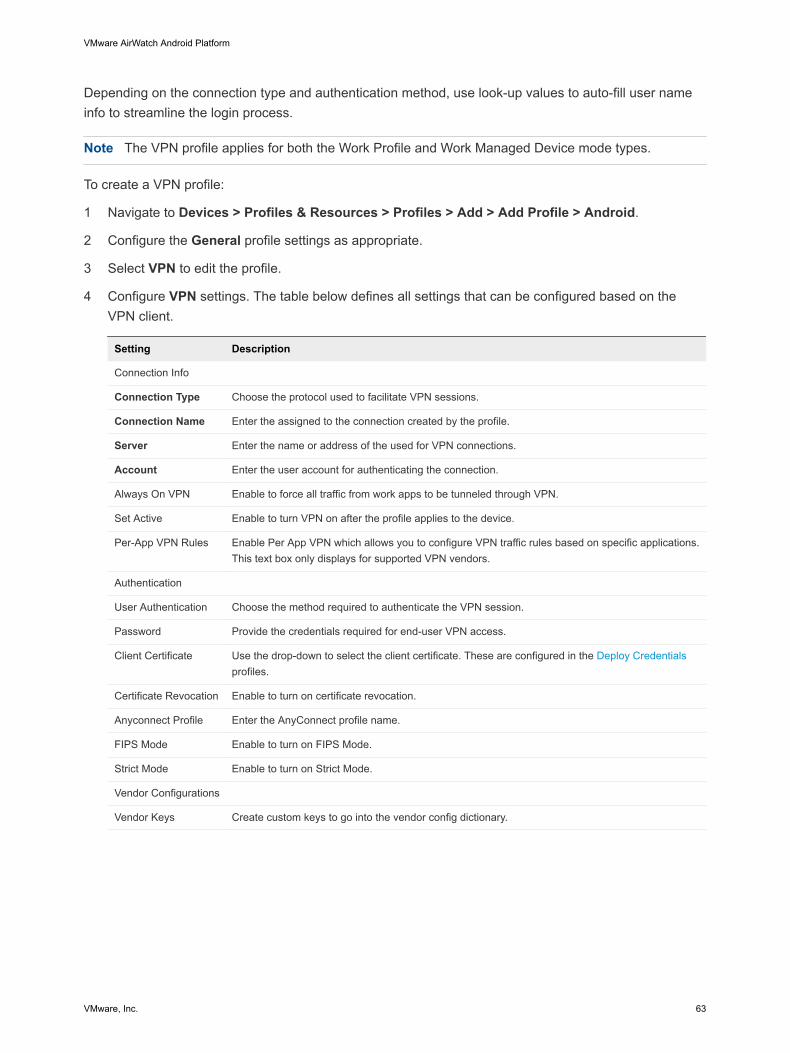
Depending on the connection type and authentication method, use look-up values to auto-fill user nameinfo to streamline the login process.
Note The VPN profile applies for both the Work Profile and Work Managed Device mode types.
To create a VPN profile:
1 Navigate to Devices > Profiles & Resources > Profiles > Add > Add Profile > Android.
2 Configure the General profile settings as appropriate.
3 Select VPN to edit the profile.
4 Configure VPN settings. The table below defines all settings that can be configured based on theVPN client.
Setting Description
Connection Info
Connection Type Choose the protocol used to facilitate VPN sessions.
Connection Name Enter the assigned to the connection created by the profile.
Server Enter the name or address of the used for VPN connections.
Account Enter the user account for authenticating the connection.
Always On VPN Enable to force all traffic from work apps to be tunneled through VPN.
Set Active Enable to turn VPN on after the profile applies to the device.
Per-App VPN Rules Enable Per App VPN which allows you to configure VPN traffic rules based on specific applications.This text box only displays for supported VPN vendors.
Authentication
User Authentication Choose the method required to authenticate the VPN session.
Password Provide the credentials required for end-user VPN access.
Client Certificate Use the drop-down to select the client certificate. These are configured in the Deploy Credentialsprofiles.
Certificate Revocation Enable to turn on certificate revocation.
Anyconnect Profile Enter the AnyConnect profile name.
FIPS Mode Enable to turn on FIPS Mode.
Strict Mode Enable to turn on Strict Mode.
Vendor Configurations
Vendor Keys Create custom keys to go into the vendor config dictionary.
VMware AirWatch Android Platform
VMware, Inc. 63
Setting Description
Key Enter the specific key provided by the vendor.
Value Enter the VPN value for each key.
Note Cisco AnyConnectand Juniper Junos Pulse connections require specific applications to beinstalled on each device before the VPN profile is deployed. These applications can be included as aRecommended App from the App Catalog for easy access.
1 Select Save & Publish.
Configure Per-App VPNYou can force selected applications to connect through your corporate VPN. Your VPN provider mustsupport this feature, and you must publish the apps as managed applications.
Note Per-App VPN does not support internal apps.
1 Navigate toDevices > Profiles & Resources > Profiles > Add > Add Profile > Android.
2 Select Android to configure the settings.
3 Select the VPN payload from the list.
4 Select your VPN vendor from the Connection Type field
5 Configure your VPN profile .
1 Select Per-App VPN to generate a VPN UUID for the current VPN profile settings. The VPN UUID isa unique identifier for this specific VPN configuration.
2 Select Save & Publish.
If this was done as an update to an existing VPN profile, then any existing devices/applications thatcurrently use the profile will be updated. Any devices/applications that were not using any VPN UUIDwhatsoever will also be updated to use the VPN profile.
To configure public apps to use the Per-App VPN profile, see Adding Public Applications for Android
Set PermissionsThe Workspace ONE UEM console provides the admin the ability to view a list of all the permissions thatan app is using and set the default action at run time of the app. The Permissions profile is available onAndroid 6.0+ devices using Work Managed device mode.
VMware AirWatch Android Platform
VMware, Inc. 64
You can set run-time permission policies for each Android badged app. The latest permissions areretrieved when configuring an app at an individual app-level. Permissions apply to all Android badgedapps.
Note All permissions used by an app are listed when you select the app from the Exceptions list,however permission policies from the Workspace ONE UEM console only apply to dangerouspermissions as deemed by Google. Dangerous permissions cover areas where the app requests datathat includes the user's personal information, or could potentially affect the user's stored data. For moreinformation, please reference the Android Developer website.
To create the Permissions profile:
1 Navigate to Devices > Profiles & Resources > Profiles > Add > Add Profile > Android.
2 Configure the General profile settings as appropriate.
3 Configure the Permissions settings, including:
Settings Description
Permission Policy Select whether to Prompt user for permission, Grant all permissions, or Deny all permissions forall work apps.
Exceptions Search for apps that have already been added into AirWatch (should only include Android approvedapps), and make an exception to the permission policy for the app.
1 Select Save & Publish to assign the profile to associated devices.
Configure Single App ModeSingle App Mode allows you use Android devices for a single purpose such as kiosk mode by whitelistingsupported internal and public applications.
Note For more information on supported applications, see the link in the Single App Mode profile in theWorkspace ONE UEM console which directs you to the Google Developer site for specifics.
Note AirWatch application are not currently supported for Single App mode.
For optimal use of single app mode and best practices, see Best Practices for Single App Mode(Android).
To configure Single App Mode:
1 Navigate to Devices > Profiles & Resources > Profiles > Add > Add Profile > Android.
2 Configure the General profile settings as appropriate.
VMware AirWatch Android Platform
VMware, Inc. 65
3 Configure the Single App Mode settings:
Settings Description
Whitelisted Apps Select the desired app to lock device into Single App Mode.
Best Practices for Single App ModeConsider applying these policies and restrictions to ensure the best experience and maintenance for yoursingle-purpose using single app mode policies. These recommendations are useful if you are deploying asingle app mode profile for devices in kiosk and digital signage use cases where an end user is notassociated with the device.
Create a "Restrictions" profile and configure the following within the profile:
n Disable the following options under Device Functionality:
n Allow Status Bar - This ensures an immersive experience when the device is locked into asingle app.
n Allow Keyguard - This ensures that the device does not get locked.
n Enable the following options under Device Functionality:
n Force Screen On when Plugged In on AC Charger
n Force Screen On when Plugged In on USB Charge
n Force Screen On when Plugged In on Wireless Charger
These options ensure that the device screen is always turned on for interaction.
Deploy the System Update Policy profile to ensure the device receives the latest fixes with minimalmanual intervention.
Set Date/TimeSet the date and time as well as the display format to provide your fleet with the appropriate regionalformat.
1 Navigate to Devices > Profiles & Resources > Profiles > Add > Add Profile > Android.
2 Select Device to deploy your profile to a device.
3 Configure the profile's General settings. The Date/Time profile only displays when the OEM Settingsfield is toggled to Enabled.
4 Select the Date/Time payload.
VMware AirWatch Android Platform
VMware, Inc. 66
5 Configure the Date/Time settings, including:
Setting Description
Date Format Set the to change the order that the Month, Day and Year display.
Time Format Choose a of 12 or 24 Hours format.
Date/Time Set which data source your devices will pull from for the date and time settings:n AutomaticSets the date and time based on native device settings.n Server Time – Sets the time based on the server time of the Workspace ONE UEM console .
n Time Zone – Specify the time zone.n HTTP URL – Sets the time based on a URL. This URL can be any URL. For example, you can use
www.google.com for your URL.n URL – Enter the web address the Date/Time schedule.n Enable Periodic Sync – Enable to set the device to check date/time periodically in days.n Set Time Zone – Specify the time zone.
n SNTP Servern URL – Enter the web address the Date/Time schedule. For example, you could enter time.nist.gov
for your use.n Enable Periodic Sync – Enable to set the device to check date/time periodically in days.
1 Select Save & Publish.
Create AirWatch Launcher ProfileAirWatch Launcher is an app launcher that enables you to lock down Android devices for individual usecases and customize the look and behavior of managed Android devices. The AirWatch Launcher appreplaces your device interface with one that is custom- tailored to your business needs.
You can configure Android 6.0 Marshmallow and later devices as corporate-owned, single-use (COSU)mode. COSU mode allows you to configure devices for a single purpose such as kiosk mode bywhitelisting supported internal and public applications. COSU mode is supported for Single App mode,Multi App Mode, and Template Mode. For more information on deploying AirWatch Launcher profile inCOSU mode, see the AirWatch Launcher Guide.
To configure the settings of the AirWatch Launcher profile:
1 Navigate to Devices > Profiles & Resources > Profiles > Add > Add Profile > Android.
2 Configure the profile's General settings.
3 Select the Launcher profile.
VMware AirWatch Android Platform
VMware, Inc. 67
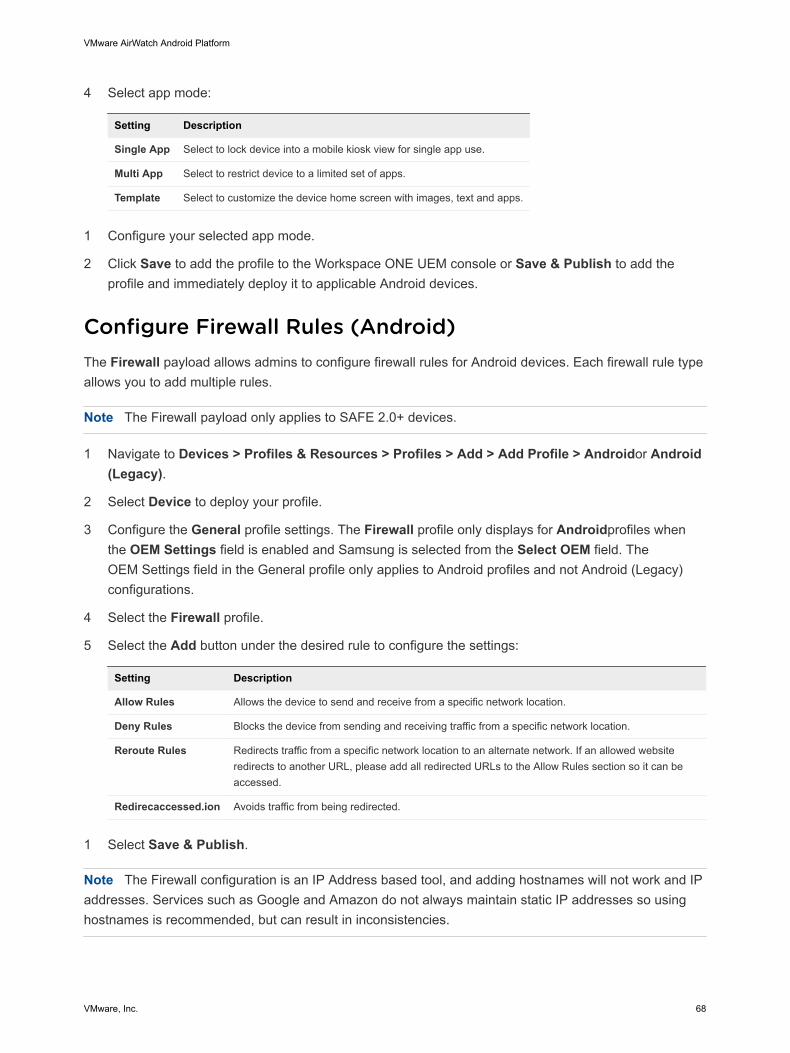
4 Select app mode:
Setting Description
Single App Select to lock device into a mobile kiosk view for single app use.
Multi App Select to restrict device to a limited set of apps.
Template Select to customize the device home screen with images, text and apps.
1 Configure your selected app mode.
2 Click Save to add the profile to the Workspace ONE UEM console or Save & Publish to add theprofile and immediately deploy it to applicable Android devices.
Configure Firewall Rules (Android)The Firewall payload allows admins to configure firewall rules for Android devices. Each firewall rule typeallows you to add multiple rules.
Note The Firewall payload only applies to SAFE 2.0+ devices.
1 Navigate to Devices > Profiles & Resources > Profiles > Add > Add Profile > Androidor Android(Legacy).
2 Select Device to deploy your profile.
3 Configure the General profile settings. The Firewall profile only displays for Androidprofiles whenthe OEM Settings field is enabled and Samsung is selected from the Select OEM field. TheOEM Settings field in the General profile only applies to Android profiles and not Android (Legacy)configurations.
4 Select the Firewall profile.
5 Select the Add button under the desired rule to configure the settings:
Setting Description
Allow Rules Allows the device to send and receive from a specific network location.
Deny Rules Blocks the device from sending and receiving traffic from a specific network location.
Reroute Rules Redirects traffic from a specific network location to an alternate network. If an allowed websiteredirects to another URL, please add all redirected URLs to the Allow Rules section so it can beaccessed.
Redirecaccessed.ion Avoids traffic from being redirected.
1 Select Save & Publish.
Note The Firewall configuration is an IP Address based tool, and adding hostnames will not work and IPaddresses. Services such as Google and Amazon do not always maintain static IP addresses so usinghostnames is recommended, but can result in inconsistencies.
VMware AirWatch Android Platform
VMware, Inc. 68
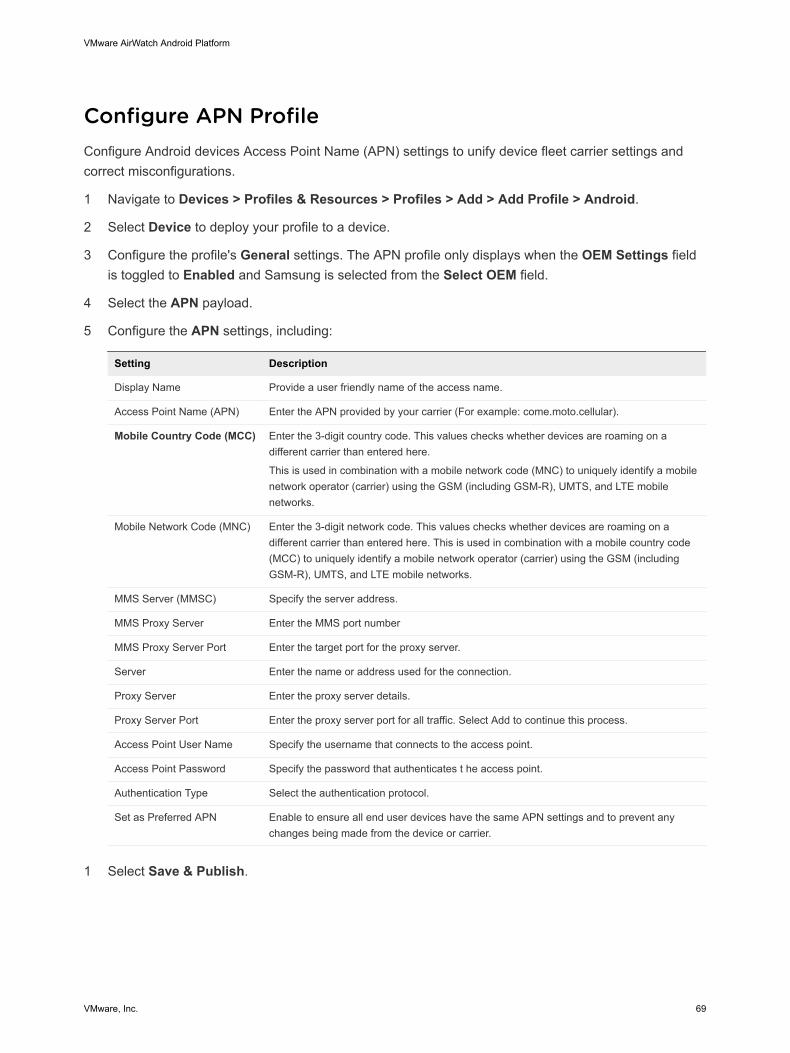
Configure APN ProfileConfigure Android devices Access Point Name (APN) settings to unify device fleet carrier settings andcorrect misconfigurations.
1 Navigate to Devices > Profiles & Resources > Profiles > Add > Add Profile > Android.
2 Select Device to deploy your profile to a device.
3 Configure the profile's General settings. The APN profile only displays when the OEM Settings fieldis toggled to Enabled and Samsung is selected from the Select OEM field.
4 Select the APN payload.
5 Configure the APN settings, including:
Setting Description
Display Name Provide a user friendly name of the access name.
Access Point Name (APN) Enter the APN provided by your carrier (For example: come.moto.cellular).
Mobile Country Code (MCC) Enter the 3-digit country code. This values checks whether devices are roaming on adifferent carrier than entered here.
This is used in combination with a mobile network code (MNC) to uniquely identify a mobilenetwork operator (carrier) using the GSM (including GSM-R), UMTS, and LTE mobilenetworks.
Mobile Network Code (MNC) Enter the 3-digit network code. This values checks whether devices are roaming on adifferent carrier than entered here. This is used in combination with a mobile country code(MCC) to uniquely identify a mobile network operator (carrier) using the GSM (includingGSM-R), UMTS, and LTE mobile networks.
MMS Server (MMSC) Specify the server address.
MMS Proxy Server Enter the MMS port number
MMS Proxy Server Port Enter the target port for the proxy server.
Server Enter the name or address used for the connection.
Proxy Server Enter the proxy server details.
Proxy Server Port Enter the proxy server port for all traffic. Select Add to continue this process.
Access Point User Name Specify the username that connects to the access point.
Access Point Password Specify the password that authenticates t he access point.
Authentication Type Select the authentication protocol.
Set as Preferred APN Enable to ensure all end user devices have the same APN settings and to prevent anychanges being made from the device or carrier.
1 Select Save & Publish.
VMware AirWatch Android Platform
VMware, Inc. 69
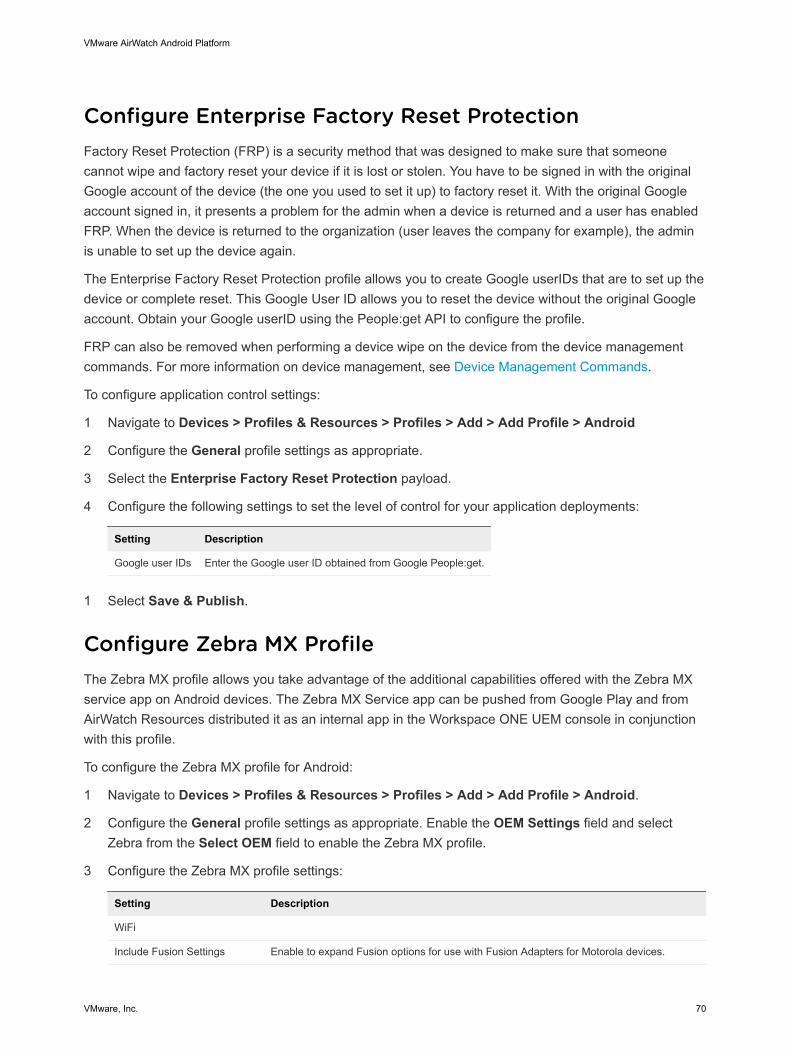
Configure Enterprise Factory Reset ProtectionFactory Reset Protection (FRP) is a security method that was designed to make sure that someonecannot wipe and factory reset your device if it is lost or stolen. You have to be signed in with the originalGoogle account of the device (the one you used to set it up) to factory reset it. With the original Googleaccount signed in, it presents a problem for the admin when a device is returned and a user has enabledFRP. When the device is returned to the organization (user leaves the company for example), the adminis unable to set up the device again.
The Enterprise Factory Reset Protection profile allows you to create Google userIDs that are to set up thedevice or complete reset. This Google User ID allows you to reset the device without the original Googleaccount. Obtain your Google userID using the People:get API to configure the profile.
FRP can also be removed when performing a device wipe on the device from the device managementcommands. For more information on device management, see Device Management Commands.
To configure application control settings:
1 Navigate to Devices > Profiles & Resources > Profiles > Add > Add Profile > Android
2 Configure the General profile settings as appropriate.
3 Select the Enterprise Factory Reset Protection payload.
4 Configure the following settings to set the level of control for your application deployments:
Setting Description
Google user IDs Enter the Google user ID obtained from Google People:get.
1 Select Save & Publish.
Configure Zebra MX ProfileThe Zebra MX profile allows you take advantage of the additional capabilities offered with the Zebra MXservice app on Android devices. The Zebra MX Service app can be pushed from Google Play and fromAirWatch Resources distributed it as an internal app in the Workspace ONE UEM console in conjunctionwith this profile.
To configure the Zebra MX profile for Android:
1 Navigate to Devices > Profiles & Resources > Profiles > Add > Add Profile > Android.
2 Configure the General profile settings as appropriate. Enable the OEM Settings field and selectZebra from the Select OEM field to enable the Zebra MX profile.
3 Configure the Zebra MX profile settings:
Setting Description
WiFi
Include Fusion Settings Enable to expand Fusion options for use with Fusion Adapters for Motorola devices.
VMware AirWatch Android Platform
VMware, Inc. 70
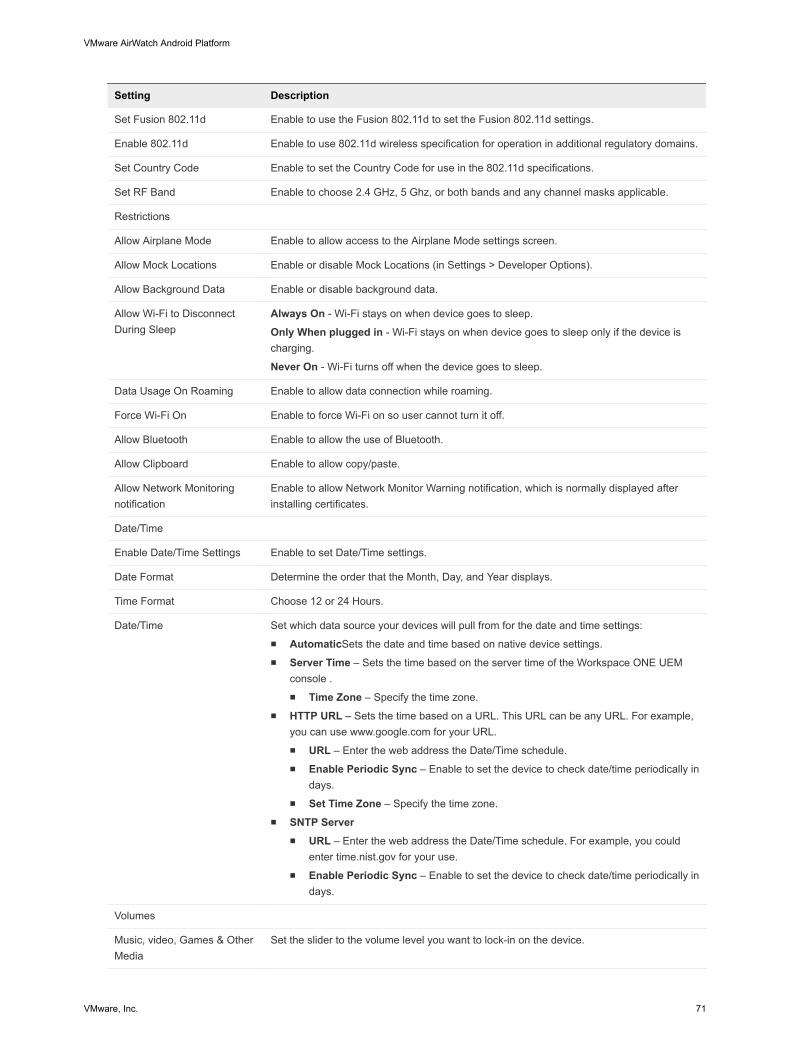
Setting Description
Set Fusion 802.11d Enable to use the Fusion 802.11d to set the Fusion 802.11d settings.
Enable 802.11d Enable to use 802.11d wireless specification for operation in additional regulatory domains.
Set Country Code Enable to set the Country Code for use in the 802.11d specifications.
Set RF Band Enable to choose 2.4 GHz, 5 Ghz, or both bands and any channel masks applicable.
Restrictions
Allow Airplane Mode Enable to allow access to the Airplane Mode settings screen.
Allow Mock Locations Enable or disable Mock Locations (in Settings > Developer Options).
Allow Background Data Enable or disable background data.
Allow Wi-Fi to DisconnectDuring Sleep
Always On - Wi-Fi stays on when device goes to sleep.
Only When plugged in - Wi-Fi stays on when device goes to sleep only if the device ischarging.
Never On - Wi-Fi turns off when the device goes to sleep.
Data Usage On Roaming Enable to allow data connection while roaming.
Force Wi-Fi On Enable to force Wi-Fi on so user cannot turn it off.
Allow Bluetooth Enable to allow the use of Bluetooth.
Allow Clipboard Enable to allow copy/paste.
Allow Network Monitoringnotification
Enable to allow Network Monitor Warning notification, which is normally displayed afterinstalling certificates.
Date/Time
Enable Date/Time Settings Enable to set Date/Time settings.
Date Format Determine the order that the Month, Day, and Year displays.
Time Format Choose 12 or 24 Hours.
Date/Time Set which data source your devices will pull from for the date and time settings:n AutomaticSets the date and time based on native device settings.n Server Time – Sets the time based on the server time of the Workspace ONE UEM
console .n Time Zone – Specify the time zone.
n HTTP URL – Sets the time based on a URL. This URL can be any URL. For example,you can use www.google.com for your URL.n URL – Enter the web address the Date/Time schedule.n Enable Periodic Sync – Enable to set the device to check date/time periodically in
days.n Set Time Zone – Specify the time zone.
n SNTP Servern URL – Enter the web address the Date/Time schedule. For example, you could
enter time.nist.gov for your use.n Enable Periodic Sync – Enable to set the device to check date/time periodically in
days.
Volumes
Music, video, Games & OtherMedia
Set the slider to the volume level you want to lock-in on the device.
VMware AirWatch Android Platform
VMware, Inc. 71
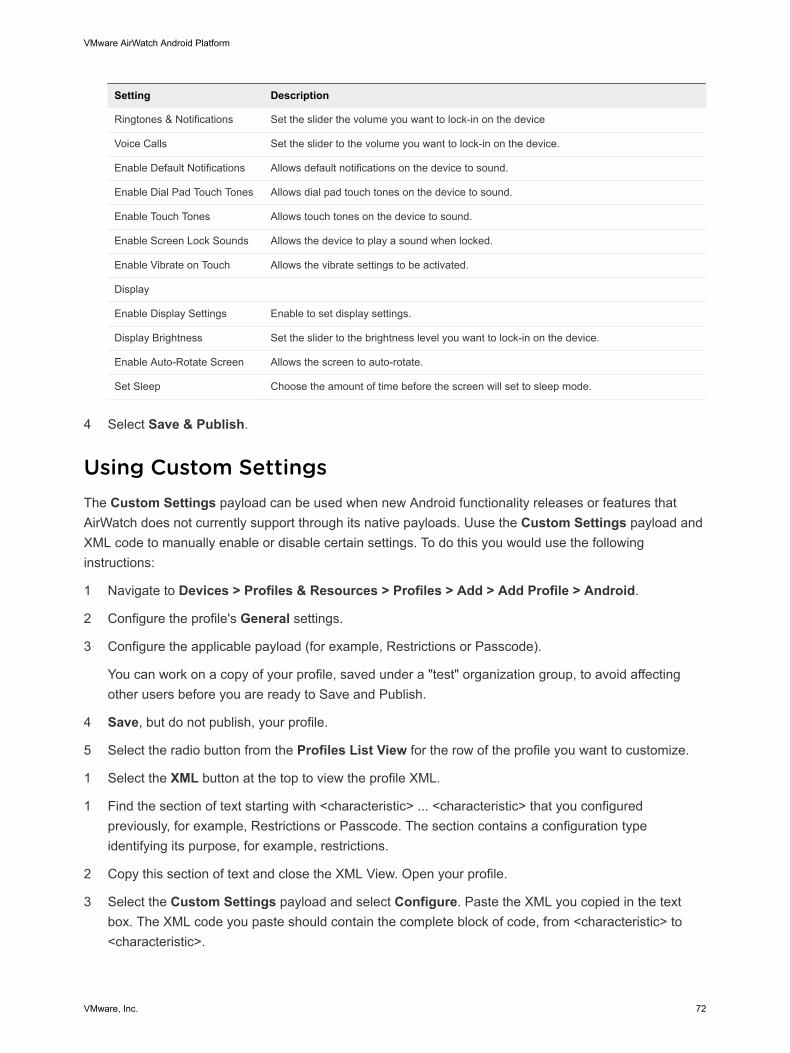
Setting Description
Ringtones & Notifications Set the slider the volume you want to lock-in on the device
Voice Calls Set the slider to the volume you want to lock-in on the device.
Enable Default Notifications Allows default notifications on the device to sound.
Enable Dial Pad Touch Tones Allows dial pad touch tones on the device to sound.
Enable Touch Tones Allows touch tones on the device to sound.
Enable Screen Lock Sounds Allows the device to play a sound when locked.
Enable Vibrate on Touch Allows the vibrate settings to be activated.
Display
Enable Display Settings Enable to set display settings.
Display Brightness Set the slider to the brightness level you want to lock-in on the device.
Enable Auto-Rotate Screen Allows the screen to auto-rotate.
Set Sleep Choose the amount of time before the screen will set to sleep mode.
4 Select Save & Publish.
Using Custom SettingsThe Custom Settings payload can be used when new Android functionality releases or features thatAirWatch does not currently support through its native payloads. Uuse the Custom Settings payload andXML code to manually enable or disable certain settings. To do this you would use the followinginstructions:
1 Navigate to Devices > Profiles & Resources > Profiles > Add > Add Profile > Android.
2 Configure the profile's General settings.
3 Configure the applicable payload (for example, Restrictions or Passcode).
You can work on a copy of your profile, saved under a "test" organization group, to avoid affectingother users before you are ready to Save and Publish.
4 Save, but do not publish, your profile.
5 Select the radio button from the Profiles List View for the row of the profile you want to customize.
1 Select the XML button at the top to view the profile XML.
1 Find the section of text starting with <characteristic> ... <characteristic> that you configuredpreviously, for example, Restrictions or Passcode. The section contains a configuration typeidentifying its purpose, for example, restrictions.
2 Copy this section of text and close the XML View. Open your profile.
3 Select the Custom Settings payload and select Configure. Paste the XML you copied in the textbox. The XML code you paste should contain the complete block of code, from <characteristic> to<characteristic>.
VMware AirWatch Android Platform
VMware, Inc. 72
4 Remove the original payload you configured by selecting the base payload section and selecting theminus [-] button. You can now enhance the profile by adding custom XML code for the newfunctionality.
Important Any device not upgraded to the latest version ignores the enhancements you create.Since the code is now custom, you should test the profile devices with older versions to verifyexpected behavior.
5 Select Save & Publish.
VMware AirWatch Android Platform
VMware, Inc. 73
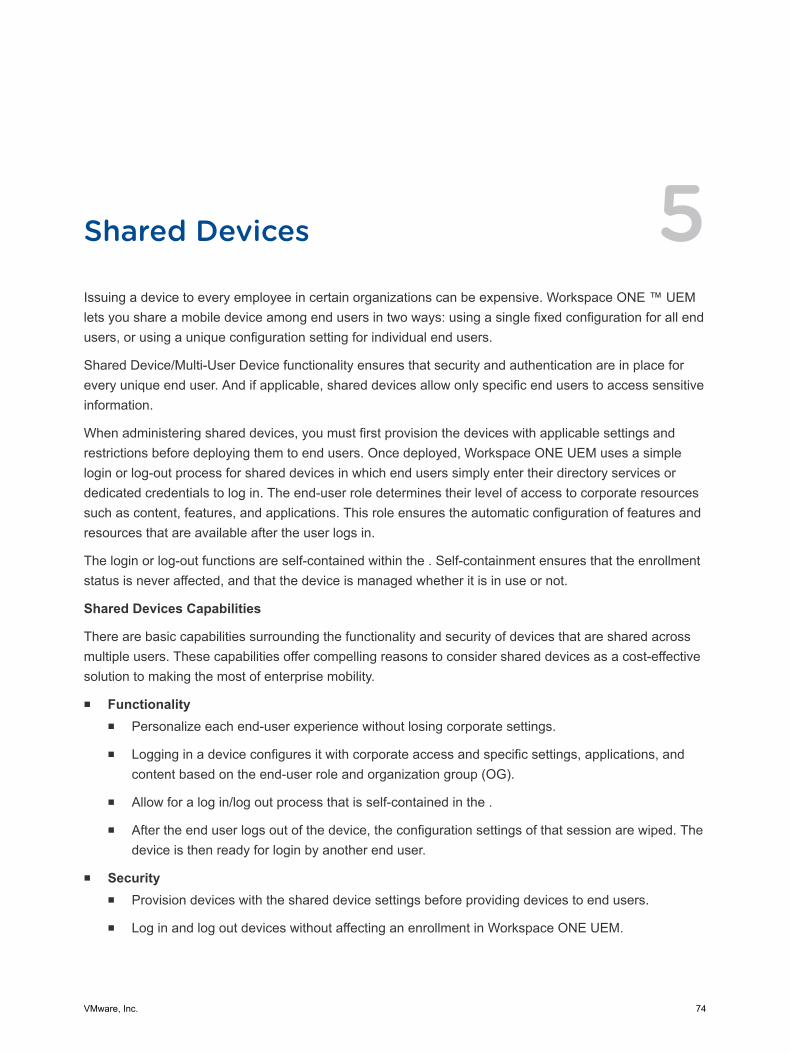
Shared Devices 5Issuing a device to every employee in certain organizations can be expensive. Workspace ONE ™ UEMlets you share a mobile device among end users in two ways: using a single fixed configuration for all endusers, or using a unique configuration setting for individual end users.
Shared Device/Multi-User Device functionality ensures that security and authentication are in place forevery unique end user. And if applicable, shared devices allow only specific end users to access sensitiveinformation.
When administering shared devices, you must first provision the devices with applicable settings andrestrictions before deploying them to end users. Once deployed, Workspace ONE UEM uses a simplelogin or log-out process for shared devices in which end users simply enter their directory services ordedicated credentials to log in. The end-user role determines their level of access to corporate resourcessuch as content, features, and applications. This role ensures the automatic configuration of features andresources that are available after the user logs in.
The login or log-out functions are self-contained within the . Self-containment ensures that the enrollmentstatus is never affected, and that the device is managed whether it is in use or not.
Shared Devices Capabilities
There are basic capabilities surrounding the functionality and security of devices that are shared acrossmultiple users. These capabilities offer compelling reasons to consider shared devices as a cost-effectivesolution to making the most of enterprise mobility.
n Functionalityn Personalize each end-user experience without losing corporate settings.
n Logging in a device configures it with corporate access and specific settings, applications, andcontent based on the end-user role and organization group (OG).
n Allow for a log in/log out process that is self-contained in the .
n After the end user logs out of the device, the configuration settings of that session are wiped. Thedevice is then ready for login by another end user.
n Securityn Provision devices with the shared device settings before providing devices to end users.
n Log in and log out devices without affecting an enrollment in Workspace ONE UEM.
VMware, Inc. 74
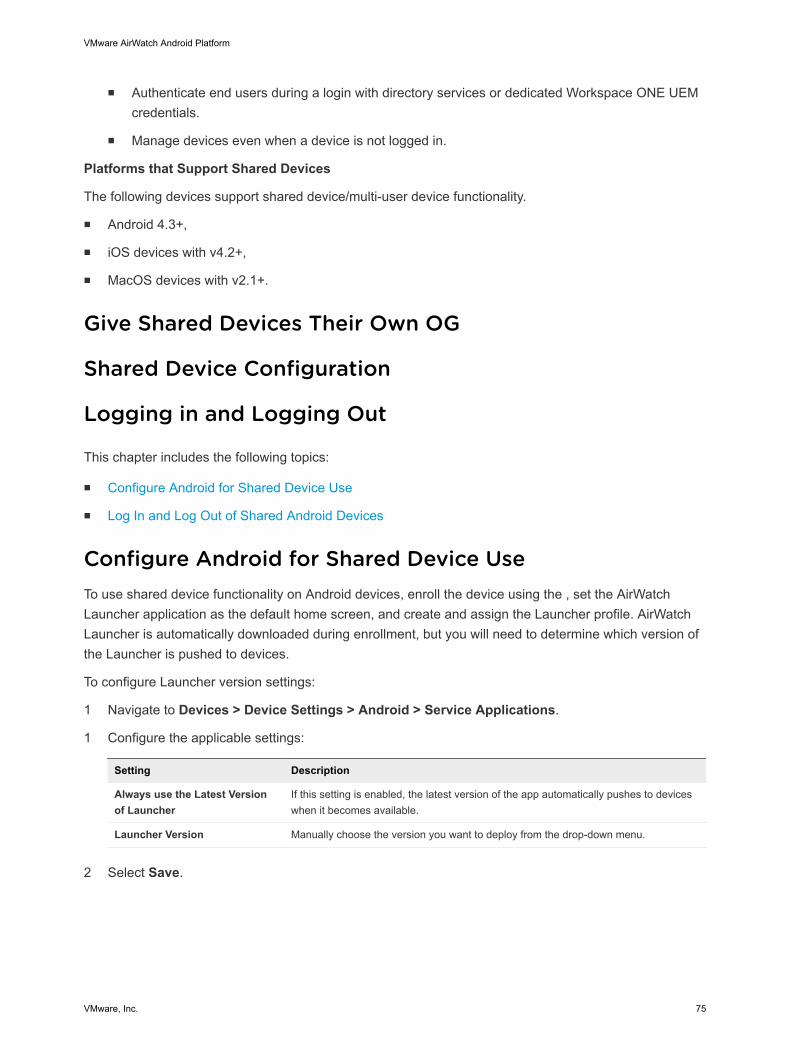
n Authenticate end users during a login with directory services or dedicated Workspace ONE UEMcredentials.
n Manage devices even when a device is not logged in.
Platforms that Support Shared Devices
The following devices support shared device/multi-user device functionality.
n Android 4.3+,
n iOS devices with v4.2+,
n MacOS devices with v2.1+.
Give Shared Devices Their Own OG
Shared Device Configuration
Logging in and Logging Out
This chapter includes the following topics:
n Configure Android for Shared Device Use
n Log In and Log Out of Shared Android Devices
Configure Android for Shared Device UseTo use shared device functionality on Android devices, enroll the device using the , set the AirWatchLauncher application as the default home screen, and create and assign the Launcher profile. AirWatchLauncher is automatically downloaded during enrollment, but you will need to determine which version ofthe Launcher is pushed to devices.
To configure Launcher version settings:
1 Navigate to Devices > Device Settings > Android > Service Applications.
1 Configure the applicable settings:
Setting Description
Always use the Latest Versionof Launcher
If this setting is enabled, the latest version of the app automatically pushes to deviceswhen it becomes available.
Launcher Version Manually choose the version you want to deploy from the drop-down menu.
2 Select Save.
VMware AirWatch Android Platform
VMware, Inc. 75

3 Navigate to Devices > Profiles & Resources > Profiles > Add > Add Profile > Android >Launcher and configure the Launcher profile at each child organization group. This profile shouldcontain all of the necessary settings common to that organization group.
Important Make sure to enable the Persist Admin Passcode If Launcher Profile Is RemovedFrom Device setting, as this will ensure that the staging user, as well as the shared device Usersare not permitted to exit the Launcher without entering the Administrative Passcode.
4 Enroll the device into the enrollment organization group using the staging user. The Launcher .apkwill install and the login screen will appear, by default.
5 Enter the shared device user Group ID, Name, and Password to log in, assigning the device to theShared Device User and the proper child organization group. The Launcher profile will be applied tothe device, and the console will reflect which user is logged in to the device.
Important Only enter the Group ID if you selected Prompt for Organization Group in the GroupOrganization Group assignment mode under the shared device settings.
6 Log out of the Launcher profile on the device. This reassigns the device back to the staging user,moves the device back to the original enrollment organization group, and removes the Launcherprofile.
Log In and Log Out of Shared Android DevicesTo use shared device functionality on Android devices, enroll the device using the and set the AndroidLauncher application as the default home screen. The Launcher application is automatically downloadedduring enrollment.
Once the application is installed and set as the default home screen, the device is in a checked-in state.While in this state, the end user is unable to navigate away from this page and the device prompts theuser to check out. To remove the profile and make the entire device accessible again, perform anEnterprise Wipe on the staging user device from the Workspace ONE ™ UEM console.
1 From the Launcher log in page, users must enter their Group ID, user name, and password. IfPrompt User for Organization Group is enabled on the console, then end users are required toenter a Group ID to log in.
2 Tap Login and accept the terms of use, if applicable. The device is configured.
Once logged in, user profiles are pushed down based on the smart group and user groupassociations.
1 Tap the Settings button.
2 Select log out.
VMware AirWatch Android Platform
VMware, Inc. 76
Application Management forAndroid 6Use Workspace ONE UEM to push Android public and internal applications, and web apps to Androiddevices. This process includes adding and approving applications for integration between WorkspaceONE UEM and the Google Play Store. After approval, assign the application to devices using smartgroups, a Workspace ONE UEM system that allows you to group devices on criteria you set. The finalstep is to assign the Terms of Use.
Applications that you push through the integration of Workspace ONE UEM and Android have the samefunctionality as their counterparts from the Google Play Store.
However, you can use Workspace ONE UEM features to apply policies to the applications. For example,you can add configurations that make using the application more convenient and you can configuresettings that make using the application more secure.
n To add convenience of use, configure the Send Application Configuration option. Applicationconfigurations allow you to pre-configure supported key-value pairs and to push them down todevices with the application. Examples of supported values may include user names, passwords, andVPN settings. Support value depends upon the application.
n To add secure features, use Workspace ONE UEM profiles for Android. Profiles let you setpasscodes, apply restrictions, and use certificates for authentication.
The Workspace ONE UEM console allows you to push alpha, beta, or production versions of apps. Usingalpha and beta versions of apps allows for testing for compatibility and stability before pushing theproduction version. You can select specific smart groups for testing and use flexible deployment todetermine which users receive which version of the app. If you don't select whether to push the alpha orbeta version, the production version is automatically assigned.
For more information on application assignment, see Assign Applications for Android.
Web Links for Android DevicesWeb links applications function much like an application on a device. They provide end users a way toaccess a URL directly from an icon on the menu of their device. The end user sees the web linksapplication icon and title, selects the application, and connects directly to a specified URL.
Web links applications are useful for navigation to extended URLs with many characters. You can placeweb links application icons on the springboard. These icons connect end users to internal contentrepositories or login screens, so end users do not open a browser and type out a long URL.
VMware, Inc. 77

You can add web links as an application in the Apps & Books section of the Workspace ONE UEMconsole.
Important VMware productivity apps (Browser, Boxer, Content Locker, etc) are not supported withAndroid (Legacy) Knox container deployments, such as Dual Persona or Container Only Mode, due totechnical limitations with Knox container data separation. The manages the container from the outside,and is not able to communicate with apps on the inside. Since the apps require a direct link to the in orderto communicate with the Workspace ONE UEM console, the apps cannot be configured inside thecontainer. In order to use productivity apps with Knox, the device must be enrolled using AndroidEnterprise on a device running Knox 3.x or higher.
This chapter includes the following topics:
n for Android
n Internal Apps with Android
n Adding Public Applications for Android
n Assign Applications for Android
n Enable Play for Work
n Integration Features
for AndroidThe AirWatch Hub for Android is an application that enables the Native Android SDK API layer ofmanagement to which Workspace ONE UEM connects.
Workspace ONE UEM engages Native Android SDK APIs on Android devices for management andtracking capabilities. Native Android SDK APIs are available to any third-party application, including theand any other application using the AirWatch Software Development Kit (SDK).
With the AirWatch SDK, applications can take advantage of key MDM features that are available such as:
n Compromised Device Detection
n GPS Tracking
n Additional Telecom Detail
n Additional Network Details such as IP address
n Additional Battery and Memory statistics
n Native number badging
After enrolling, use the to access and manage device information and settings. Access device informationfrom the following tabs on the left of the device display:
n My Device – Displays the name of the enrolled end user, the device Friendly Name, currentenrollment status, connectivity method and compliance status.
VMware AirWatch Android Platform
VMware, Inc. 78
n Device Status – Displays the current enrollment status including:n The server to which the device is currently connected.
n The organization group to which the device is currently enrolled.
n The current network status including the active Wi-Fi SSID to which the device is connected.
n Compliance – Displays a list of compliance policies currently active for the device.
n Profiles – Displays a list of profiles currently installed on the device. From the profiles list, you havethe ability to refresh and reapply profiles from your device that might be out of sync or uninstalled.
n Managed Apps – Displays a list of apps managed by Workspace ONE UEM installed on the deviceas well as their install status.
n About – Displays the version number of the installed on the device and provides a hyperlink to theassociated Privacy Policy agreed to upon device enrollment.
Perform basic device management functions from the menu at the top of the display:
n Send Data – Transmit the latest device data to Workspace ONE UEM.
n Sync – Synchronize corporate directory services data and resources on the device.
n App Catalog – Launch the application catalog within the or the native web browser, if applicable.
Additional functionality is accessible from the application menu in the upper-right corner of the display:
n Edit Phone Number – Modify the assigned phone number, if applicable.
n Send Debug Log – Transmit a debug log for the device to Workspace ONE UEM.
n Un-enroll – Unenroll the device from Workspace ONE UEM.
Android devices running Android 6.0 (Marshmallow) and above utilize power saving options for idle appsand devices. If a user unplugs a device and leaves it stationary, with its screen off, for a period of time,the device goes into Doze mode, where it attempts to keep the device in a sleep state. There will be nonetwork activity during this time. Doze mode affects how the reports information back toWorkspace ONE UEM.
When a device is on battery power, and the screen has been off for a certain time, the device enters Dozemode and applies a subset of restrictions that shut off app network access and defer jobs and syncs.After a device is in doze mode for a period of time, the system sends the remaining Doze restrictions towake locks, alarms, GPS, and Wi-Fi settings.
Additionally, App Standby mode allows the device to determine that an app is idle when the user is notactively using it. When devices are in either state, the Workspace ONE UEM console will not receivereports on device details. When the user plugs a device in to charge or opens an app, the device willresume normal operations and reporting from AirWatch apps installed on the device to the WorkspaceONE UEM console resumes.
VMware AirWatch Android Platform
VMware, Inc. 79
The Hub and SDK-Built Applications
Internal Apps with AndroidInternal apps are company-specific apps developed by your organization that you may not necessarilywant to be searchable in the public app store, but you want your users to have access to this applicationfrom their device.
If you are using Android 6.0+ devices as Work managed devices, add these apps to WorkspaceONE UEM console so that they are available to Android specific users. Once you have added yourinternal application to the UEM console, these apps are treated as public applications.
If you are deploying internal apps on Android Work profile devices, add internal apps to Google Play forWork so that they are available to Android specific users. Upload your application by logging into theGoogle Play Developer Console with your enterprise credentials. There is an option to enable, RestrictDistribution, which only allows users of your domain to view this application on Google Play for Work (thebadged play store). Once you have added your internal application to the developer console, these appsare treated as public applications.
Note : If you are adding an internal application, Per-App VPN Profile tunneling currently supports onlythe Android (Legacy) devices. However, Android Work Profile and the Work Managed devices do notsupport Per-App VPN Profile tunneling for all the internal applications.
Adding Public Applications for AndroidSearch the Google Play Store directly from the Workspace ONE UEM console to add apps to the Androidintegration.
1 Navigate to Apps & Books > Public > Add Application.
2 Select Android from the Platform drop-down menu.
3 Select Search App Store from the Source field.
4 Select Next or enter the Name of the applications you want to add to the integration. The GooglePlay Store will open directly from the Workspace ONE UEM console .
5 Find desired apps by using the Search field or browsing through the apps section.
VMware AirWatch Android Platform
VMware, Inc. 80
6 Select Approve. Be sure to view the permissions for the applications and follow the prompts toconfirm approval.
Important If an application is updated, ensure it does not need to get reapproved in the Google PlayStore.
1 Configure options on the Details tab.
Setting Description
Name View the name of the application.
View in App Store View the store record for the application where you can download it and get information about it.
Categories Use categories to identify the use of the application.
You can configure custom application categories or keep the application's pre-coded category.
Supported Models Select all the device models that you want to run this application.
Is App Restricted toSilent Install
Android
Assign this application to those Android devices that support the Android silent uninstallationfeature.
Workspace ONE UEM cannot silently install or uninstall public applications. However, you cancontrol what applications you push to your Android standard devices or your Android enterprisedevices. Android enterprise devices support silent activity.
Managed By View the organization group (OG) that the application belongs to in your Workspace ONE UEMOG hierarchy.
2 Assign a Required Terms of Use for the application on the Terms of Use tab. This setting isoptional.
Terms of use state specifically how to use the application. They make expectations clear to endusers. When the application pushes to devices, users view the terms of use page that they mustaccept to use the application. If users do not accept the terms of use, they cannot access theapplication.
3 Select the SDK tab and assign the default or custom SDK Profile and an Application Profile to theapplication. SDK profiles apply advanced application management features to applications.
4 Select Save & Assign to configure flexible deployment options for the application.
Check to make sure the application has been imported after approval. The console will direct you to thenext step to designate assignment groups.
VMware AirWatch Android Platform
VMware, Inc. 81
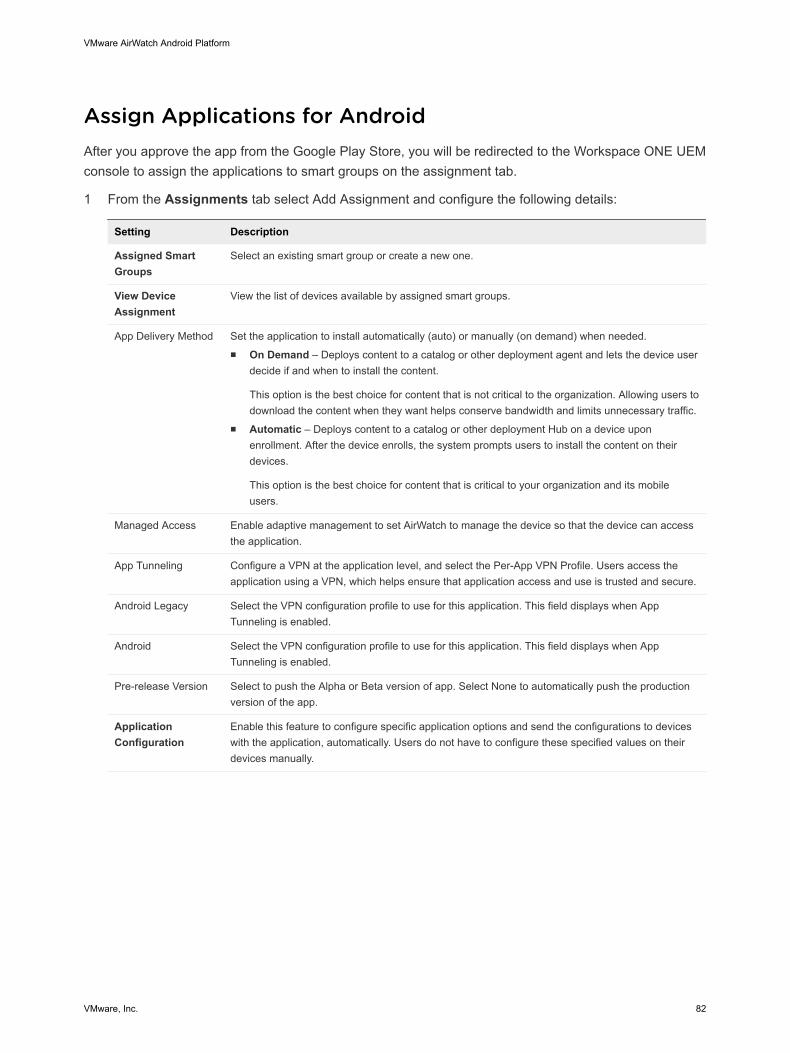
Assign Applications for AndroidAfter you approve the app from the Google Play Store, you will be redirected to the Workspace ONE UEMconsole to assign the applications to smart groups on the assignment tab.
1 From the Assignments tab select Add Assignment and configure the following details:
Setting Description
Assigned SmartGroups
Select an existing smart group or create a new one.
View DeviceAssignment
View the list of devices available by assigned smart groups.
App Delivery Method Set the application to install automatically (auto) or manually (on demand) when needed.n On Demand – Deploys content to a catalog or other deployment agent and lets the device user
decide if and when to install the content.
This option is the best choice for content that is not critical to the organization. Allowing users todownload the content when they want helps conserve bandwidth and limits unnecessary traffic.
n Automatic – Deploys content to a catalog or other deployment Hub on a device uponenrollment. After the device enrolls, the system prompts users to install the content on theirdevices.
This option is the best choice for content that is critical to your organization and its mobileusers.
Managed Access Enable adaptive management to set AirWatch to manage the device so that the device can accessthe application.
App Tunneling Configure a VPN at the application level, and select the Per-App VPN Profile. Users access theapplication using a VPN, which helps ensure that application access and use is trusted and secure.
Android Legacy Select the VPN configuration profile to use for this application. This field displays when AppTunneling is enabled.
Android Select the VPN configuration profile to use for this application. This field displays when AppTunneling is enabled.
Pre-release Version Select to push the Alpha or Beta version of app. Select None to automatically push the productionversion of the app.
ApplicationConfiguration
Enable this feature to configure specific application options and send the configurations to deviceswith the application, automatically. Users do not have to configure these specified values on theirdevices manually.
VMware AirWatch Android Platform
VMware, Inc. 82
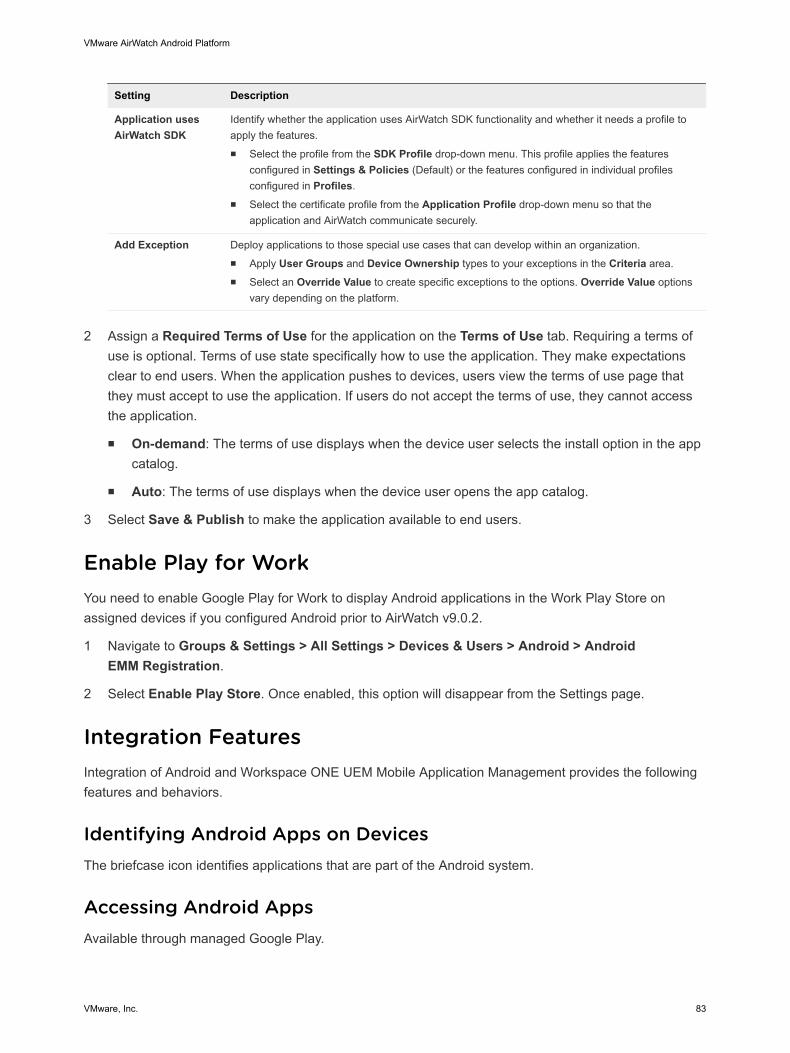
Setting Description
Application usesAirWatch SDK
Identify whether the application uses AirWatch SDK functionality and whether it needs a profile toapply the features.n Select the profile from the SDK Profile drop-down menu. This profile applies the features
configured in Settings & Policies (Default) or the features configured in individual profilesconfigured in Profiles.
n Select the certificate profile from the Application Profile drop-down menu so that theapplication and AirWatch communicate securely.
Add Exception Deploy applications to those special use cases that can develop within an organization.n Apply User Groups and Device Ownership types to your exceptions in the Criteria area.n Select an Override Value to create specific exceptions to the options. Override Value options
vary depending on the platform.
2 Assign a Required Terms of Use for the application on the Terms of Use tab. Requiring a terms ofuse is optional. Terms of use state specifically how to use the application. They make expectationsclear to end users. When the application pushes to devices, users view the terms of use page thatthey must accept to use the application. If users do not accept the terms of use, they cannot accessthe application.
n On-demand: The terms of use displays when the device user selects the install option in the appcatalog.
n Auto: The terms of use displays when the device user opens the app catalog.
3 Select Save & Publish to make the application available to end users.
Enable Play for WorkYou need to enable Google Play for Work to display Android applications in the Work Play Store onassigned devices if you configured Android prior to AirWatch v9.0.2.
1 Navigate to Groups & Settings > All Settings > Devices & Users > Android > AndroidEMM Registration.
2 Select Enable Play Store. Once enabled, this option will disappear from the Settings page.
Integration FeaturesIntegration of Android and Workspace ONE UEM Mobile Application Management provides the followingfeatures and behaviors.
Identifying Android Apps on DevicesThe briefcase icon identifies applications that are part of the Android system.
Accessing Android AppsAvailable through managed Google Play.
VMware AirWatch Android Platform
VMware, Inc. 83
Android Device ManagementOverview 7After your devices are enrolled and configured, manage the devices using the Workspace ONE ™UEM console. The management tools and functions enable you to keep an eye on your devices andremotely perform administrative functions.
You can manage all your devices from the UEM console. The Dashboard is a searchable, customizableview that you can use to filter and find specific devices. This feature makes it easier to performadministrative functions on a particular set of devices. The Device List View displays all the devicescurrently enrolled in your Workspace ONE UEM environment and their status. The Device Details pageprovides device-specific information such as profiles, apps, version and which version of any applicableOEM service currently installed on the device. You can also perform remote actions on the device fromthe Device Details page that are platform-specific.
This chapter includes the following topics:
n Device Management Commands
n Device Details Apps Tab
n Specific Profiles Features for Android
n Specific Restrictions for Android
Device Management CommandsYou can manage Android settings and configurations using the Workspace ONE UEM console .
Admins have the ability to perform one time commands including lock devices, wipe devices and changea passcode from the Workspace ONE UEM console. For Lollipop devices, these commands will apply ateither the Work Profile or Work Managed Device level depending on the ownership of the device.
The following commands are available from this view:
n Lock Device – Lock all selected devices and force users to re-enter device security PIN. This optionapplies to the Work Profile and Work Managed Devices.
n Device Wipe – Wipes all data from the selected device, including all data, email, profiles and MDMcapabilities and returns the device to factory default settings. This setting only applies to the WorkManaged Device type.If Enterprise Factory Protection is enabled, you will see a prompt that allowsyou to disable Enterprise Factory Reset Protection prior to the wipe.
VMware, Inc. 84
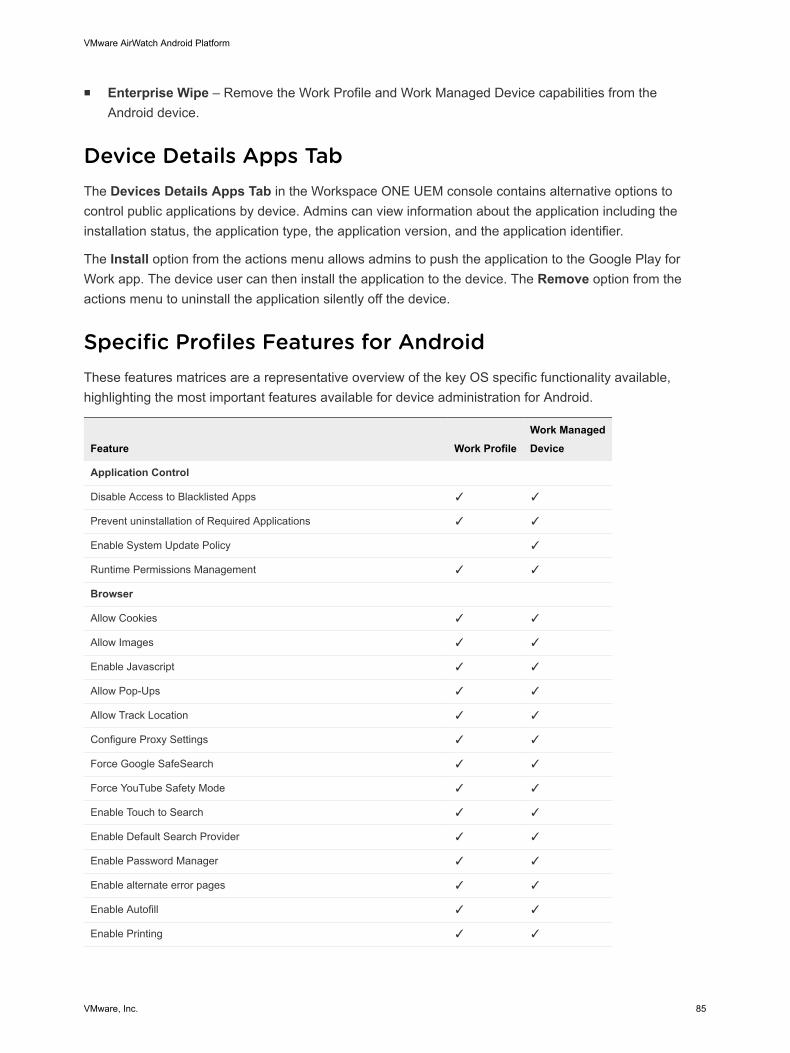
n Enterprise Wipe – Remove the Work Profile and Work Managed Device capabilities from theAndroid device.
Device Details Apps TabThe Devices Details Apps Tab in the Workspace ONE UEM console contains alternative options tocontrol public applications by device. Admins can view information about the application including theinstallation status, the application type, the application version, and the application identifier.
The Install option from the actions menu allows admins to push the application to the Google Play forWork app. The device user can then install the application to the device. The Remove option from theactions menu to uninstall the application silently off the device.
Specific Profiles Features for AndroidThese features matrices are a representative overview of the key OS specific functionality available,highlighting the most important features available for device administration for Android.
Feature Work ProfileWork ManagedDevice
Application Control
Disable Access to Blacklisted Apps ✓ ✓
Prevent uninstallation of Required Applications ✓ ✓
Enable System Update Policy ✓
Runtime Permissions Management ✓ ✓
Browser
Allow Cookies ✓ ✓
Allow Images ✓ ✓
Enable Javascript ✓ ✓
Allow Pop-Ups ✓ ✓
Allow Track Location ✓ ✓
Configure Proxy Settings ✓ ✓
Force Google SafeSearch ✓ ✓
Force YouTube Safety Mode ✓ ✓
Enable Touch to Search ✓ ✓
Enable Default Search Provider ✓ ✓
Enable Password Manager ✓ ✓
Enable alternate error pages ✓ ✓
Enable Autofill ✓ ✓
Enable Printing ✓ ✓
VMware AirWatch Android Platform
VMware, Inc. 85
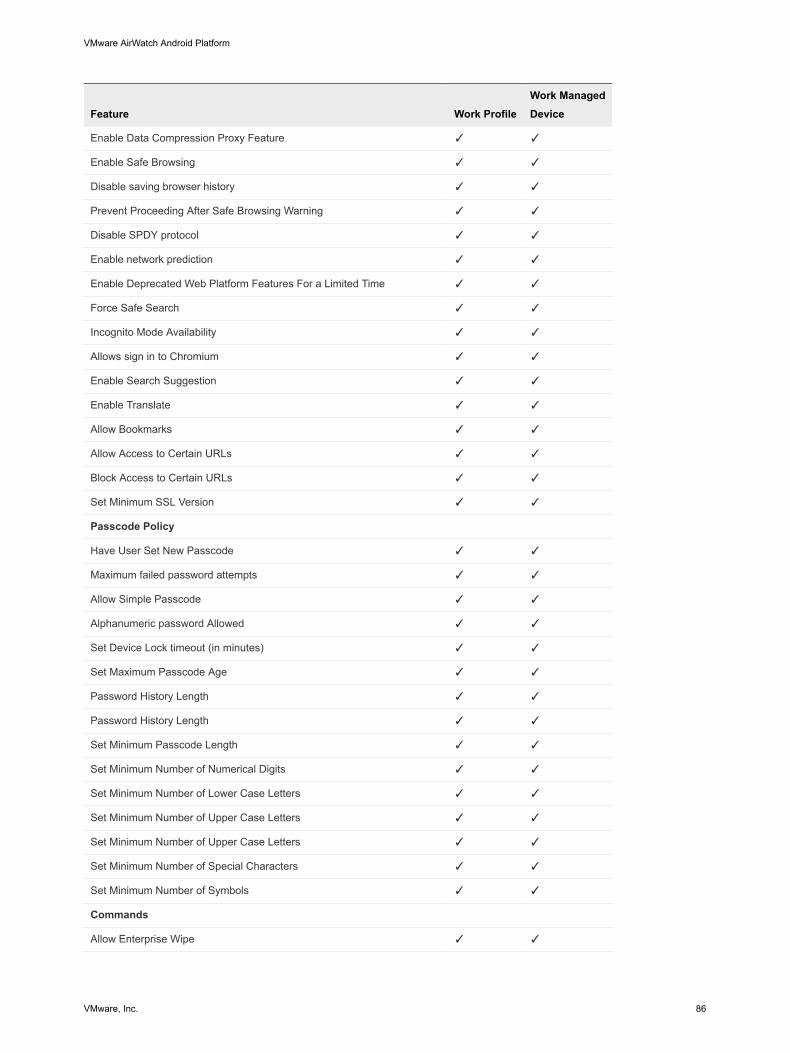
Feature Work ProfileWork ManagedDevice
Enable Data Compression Proxy Feature ✓ ✓
Enable Safe Browsing ✓ ✓
Disable saving browser history ✓ ✓
Prevent Proceeding After Safe Browsing Warning ✓ ✓
Disable SPDY protocol ✓ ✓
Enable network prediction ✓ ✓
Enable Deprecated Web Platform Features For a Limited Time ✓ ✓
Force Safe Search ✓ ✓
Incognito Mode Availability ✓ ✓
Allows sign in to Chromium ✓ ✓
Enable Search Suggestion ✓ ✓
Enable Translate ✓ ✓
Allow Bookmarks ✓ ✓
Allow Access to Certain URLs ✓ ✓
Block Access to Certain URLs ✓ ✓
Set Minimum SSL Version ✓ ✓
Passcode Policy
Have User Set New Passcode ✓ ✓
Maximum failed password attempts ✓ ✓
Allow Simple Passcode ✓ ✓
Alphanumeric password Allowed ✓ ✓
Set Device Lock timeout (in minutes) ✓ ✓
Set Maximum Passcode Age ✓ ✓
Password History Length ✓ ✓
Password History Length ✓ ✓
Set Minimum Passcode Length ✓ ✓
Set Minimum Number of Numerical Digits ✓ ✓
Set Minimum Number of Lower Case Letters ✓ ✓
Set Minimum Number of Upper Case Letters ✓ ✓
Set Minimum Number of Upper Case Letters ✓ ✓
Set Minimum Number of Special Characters ✓ ✓
Set Minimum Number of Symbols ✓ ✓
Commands
Allow Enterprise Wipe ✓ ✓
VMware AirWatch Android Platform
VMware, Inc. 86
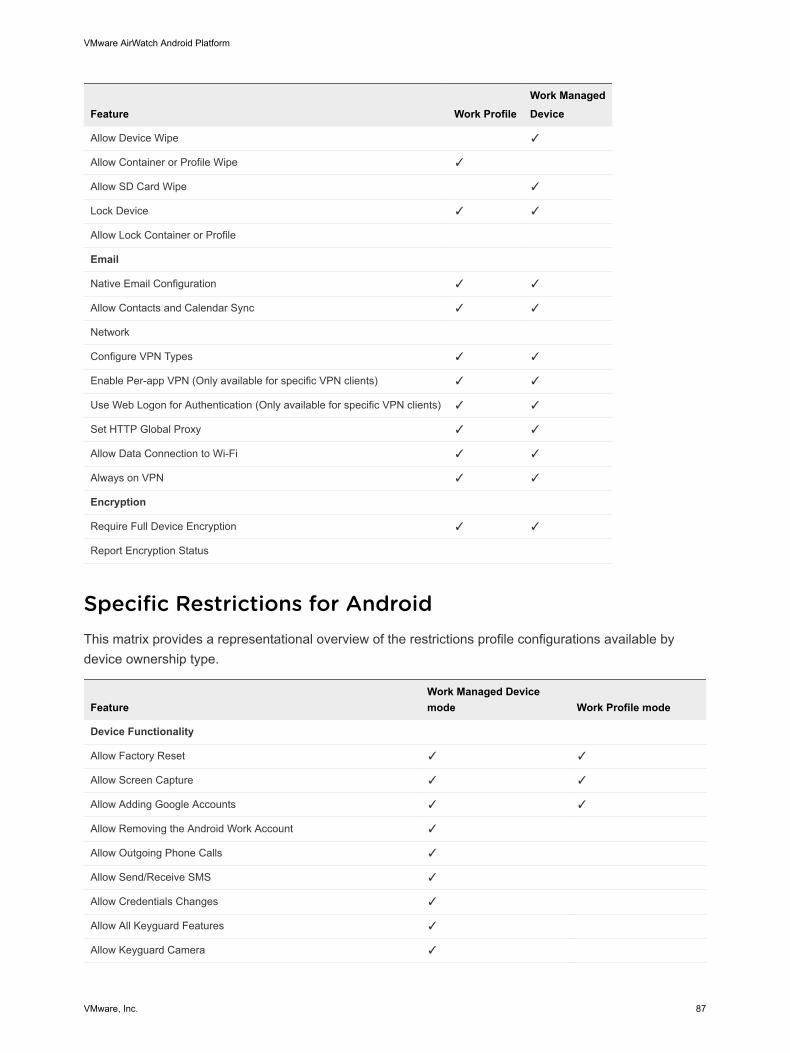
Feature Work ProfileWork ManagedDevice
Allow Device Wipe ✓
Allow Container or Profile Wipe ✓
Allow SD Card Wipe ✓
Lock Device ✓ ✓
Allow Lock Container or Profile
Native Email Configuration ✓ ✓
Allow Contacts and Calendar Sync ✓ ✓
Network
Configure VPN Types ✓ ✓
Enable Per-app VPN (Only available for specific VPN clients) ✓ ✓
Use Web Logon for Authentication (Only available for specific VPN clients) ✓ ✓
Set HTTP Global Proxy ✓ ✓
Allow Data Connection to Wi-Fi ✓ ✓
Always on VPN ✓ ✓
Encryption
Require Full Device Encryption ✓ ✓
Report Encryption Status
Specific Restrictions for AndroidThis matrix provides a representational overview of the restrictions profile configurations available bydevice ownership type.
FeatureWork Managed Devicemode Work Profile mode
Device Functionality
Allow Factory Reset ✓ ✓
Allow Screen Capture ✓ ✓
Allow Adding Google Accounts ✓ ✓
Allow Removing the Android Work Account ✓
Allow Outgoing Phone Calls ✓
Allow Send/Receive SMS ✓
Allow Credentials Changes ✓
Allow All Keyguard Features ✓
Allow Keyguard Camera ✓
VMware AirWatch Android Platform
VMware, Inc. 87
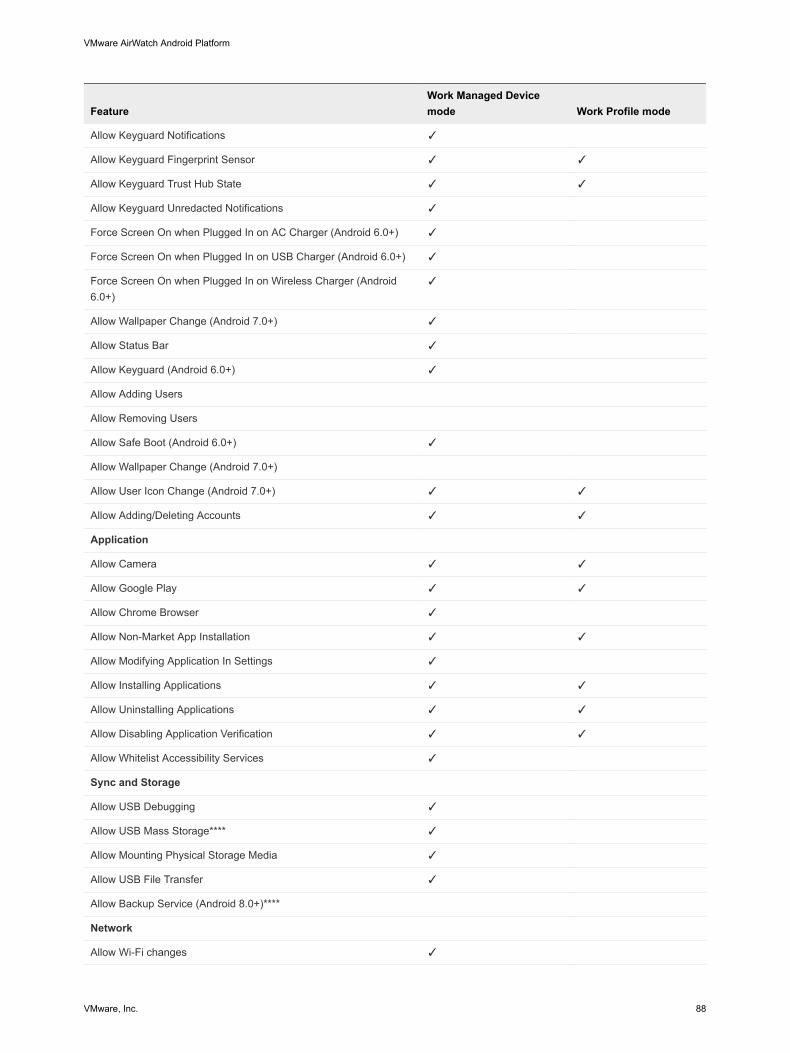
FeatureWork Managed Devicemode Work Profile mode
Allow Keyguard Notifications ✓
Allow Keyguard Fingerprint Sensor ✓ ✓
Allow Keyguard Trust Hub State ✓ ✓
Allow Keyguard Unredacted Notifications ✓
Force Screen On when Plugged In on AC Charger (Android 6.0+) ✓
Force Screen On when Plugged In on USB Charger (Android 6.0+) ✓
Force Screen On when Plugged In on Wireless Charger (Android6.0+)
✓
Allow Wallpaper Change (Android 7.0+) ✓
Allow Status Bar ✓
Allow Keyguard (Android 6.0+) ✓
Allow Adding Users
Allow Removing Users
Allow Safe Boot (Android 6.0+) ✓
Allow Wallpaper Change (Android 7.0+)
Allow User Icon Change (Android 7.0+) ✓ ✓
Allow Adding/Deleting Accounts ✓ ✓
Application
Allow Camera ✓ ✓
Allow Google Play ✓ ✓
Allow Chrome Browser ✓
Allow Non-Market App Installation ✓ ✓
Allow Modifying Application In Settings ✓
Allow Installing Applications ✓ ✓
Allow Uninstalling Applications ✓ ✓
Allow Disabling Application Verification ✓ ✓
Allow Whitelist Accessibility Services ✓
Sync and Storage
Allow USB Debugging ✓
Allow USB Mass Storage**** ✓
Allow Mounting Physical Storage Media ✓
Allow USB File Transfer ✓
Allow Backup Service (Android 8.0+)****
Network
Allow Wi-Fi changes ✓
VMware AirWatch Android Platform
VMware, Inc. 88
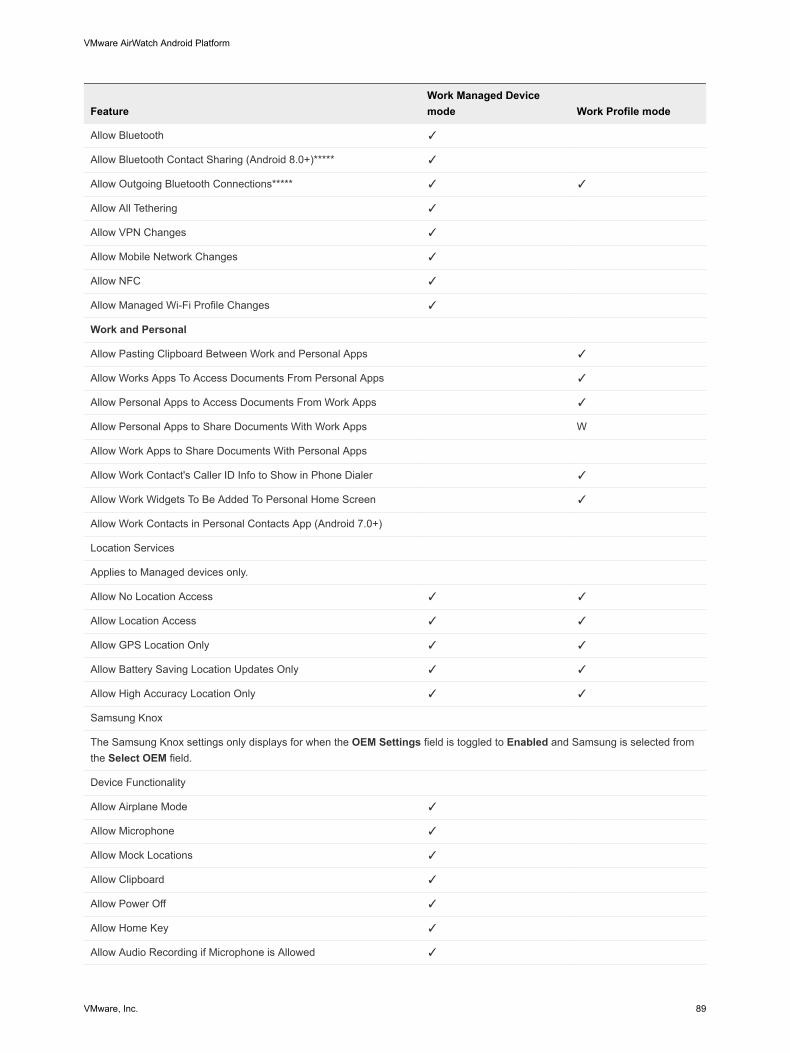
FeatureWork Managed Devicemode Work Profile mode
Allow Bluetooth ✓
Allow Bluetooth Contact Sharing (Android 8.0+)***** ✓
Allow Outgoing Bluetooth Connections***** ✓ ✓
Allow All Tethering ✓
Allow VPN Changes ✓
Allow Mobile Network Changes ✓
Allow NFC ✓
Allow Managed Wi-Fi Profile Changes ✓
Work and Personal
Allow Pasting Clipboard Between Work and Personal Apps ✓
Allow Works Apps To Access Documents From Personal Apps ✓
Allow Personal Apps to Access Documents From Work Apps ✓
Allow Personal Apps to Share Documents With Work Apps W
Allow Work Apps to Share Documents With Personal Apps
Allow Work Contact's Caller ID Info to Show in Phone Dialer ✓
Allow Work Widgets To Be Added To Personal Home Screen ✓
Allow Work Contacts in Personal Contacts App (Android 7.0+)
Location Services
Applies to Managed devices only.
Allow No Location Access ✓ ✓
Allow Location Access ✓ ✓
Allow GPS Location Only ✓ ✓
Allow Battery Saving Location Updates Only ✓ ✓
Allow High Accuracy Location Only ✓ ✓
Samsung Knox
The Samsung Knox settings only displays for when the OEM Settings field is toggled to Enabled and Samsung is selected fromthe Select OEM field.
Device Functionality
Allow Airplane Mode ✓
Allow Microphone ✓
Allow Mock Locations ✓
Allow Clipboard ✓
Allow Power Off ✓
Allow Home Key ✓
Allow Audio Recording if Microphone is Allowed ✓
VMware AirWatch Android Platform
VMware, Inc. 89
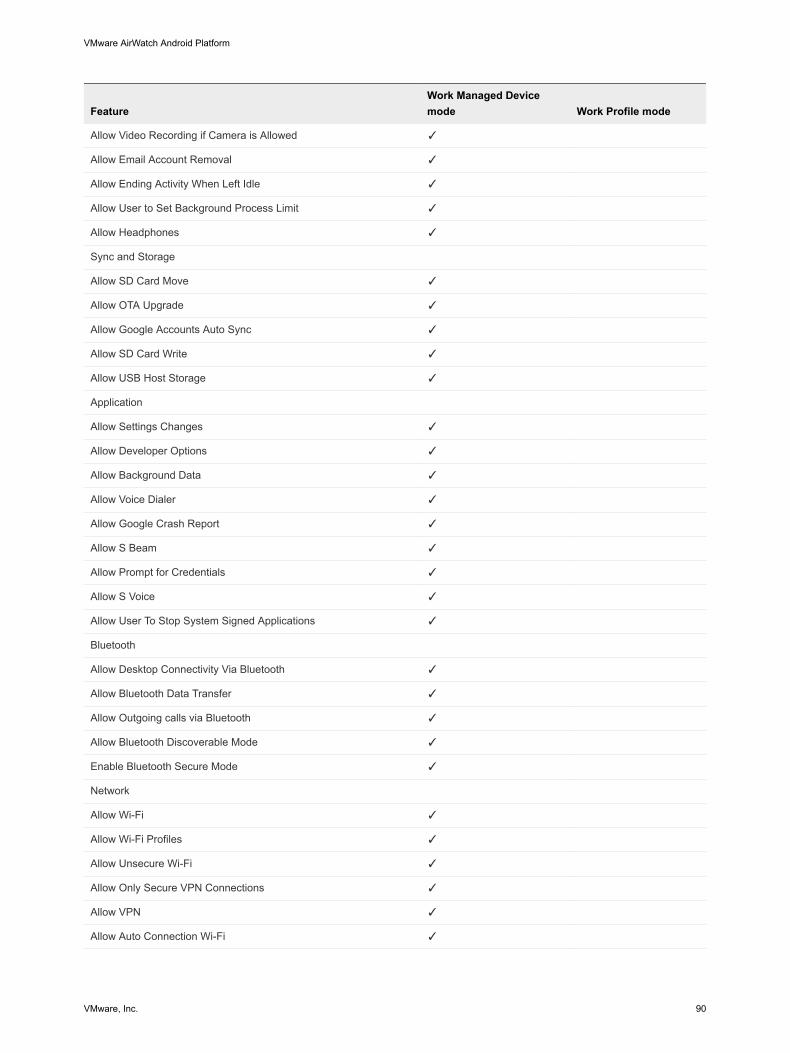
FeatureWork Managed Devicemode Work Profile mode
Allow Video Recording if Camera is Allowed ✓
Allow Email Account Removal ✓
Allow Ending Activity When Left Idle ✓
Allow User to Set Background Process Limit ✓
Allow Headphones ✓
Sync and Storage
Allow SD Card Move ✓
Allow OTA Upgrade ✓
Allow Google Accounts Auto Sync ✓
Allow SD Card Write ✓
Allow USB Host Storage ✓
Application
Allow Settings Changes ✓
Allow Developer Options ✓
Allow Background Data ✓
Allow Voice Dialer ✓
Allow Google Crash Report ✓
Allow S Beam ✓
Allow Prompt for Credentials ✓
Allow S Voice ✓
Allow User To Stop System Signed Applications ✓
Bluetooth
Allow Desktop Connectivity Via Bluetooth ✓
Allow Bluetooth Data Transfer ✓
Allow Outgoing calls via Bluetooth ✓
Allow Bluetooth Discoverable Mode ✓
Enable Bluetooth Secure Mode ✓
Network
Allow Wi-Fi ✓
Allow Wi-Fi Profiles ✓
Allow Unsecure Wi-Fi ✓
Allow Only Secure VPN Connections ✓
Allow VPN ✓
Allow Auto Connection Wi-Fi ✓
VMware AirWatch Android Platform
VMware, Inc. 90
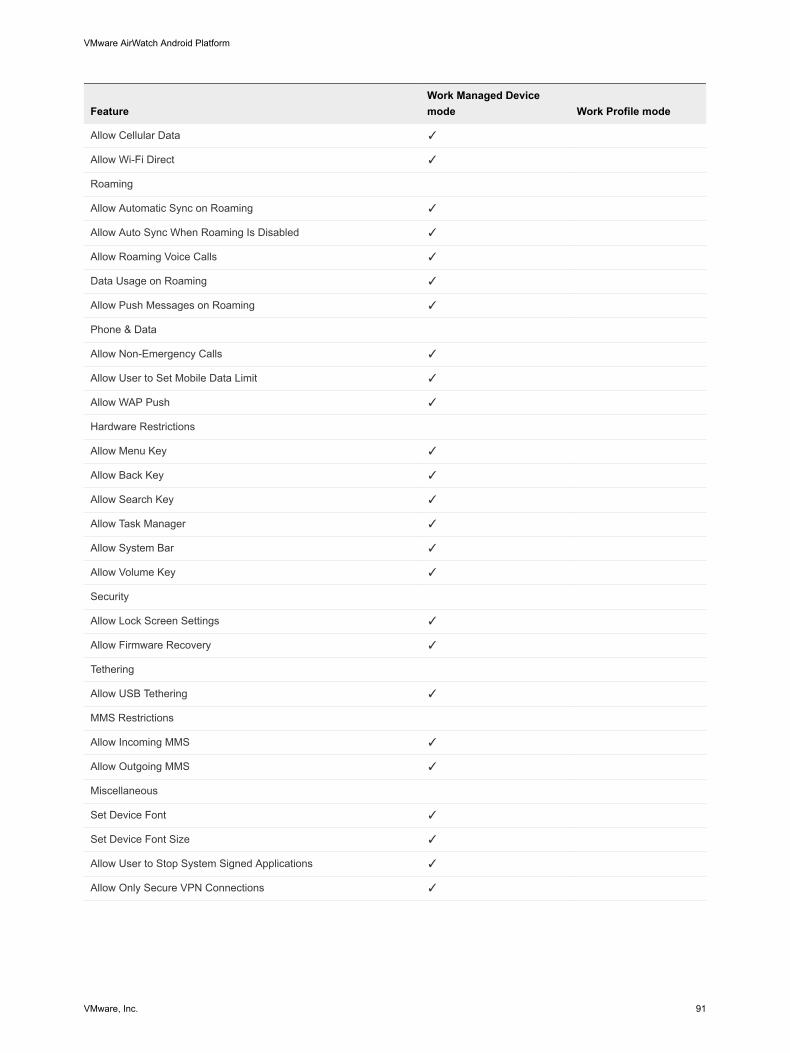
FeatureWork Managed Devicemode Work Profile mode
Allow Cellular Data ✓
Allow Wi-Fi Direct ✓
Roaming
Allow Automatic Sync on Roaming ✓
Allow Auto Sync When Roaming Is Disabled ✓
Allow Roaming Voice Calls ✓
Data Usage on Roaming ✓
Allow Push Messages on Roaming ✓
Phone & Data
Allow Non-Emergency Calls ✓
Allow User to Set Mobile Data Limit ✓
Allow WAP Push ✓
Hardware Restrictions
Allow Menu Key ✓
Allow Back Key ✓
Allow Search Key ✓
Allow Task Manager ✓
Allow System Bar ✓
Allow Volume Key ✓
Security
Allow Lock Screen Settings ✓
Allow Firmware Recovery ✓
Tethering
Allow USB Tethering ✓
MMS Restrictions
Allow Incoming MMS ✓
Allow Outgoing MMS ✓
Miscellaneous
Set Device Font ✓
Set Device Font Size ✓
Allow User to Stop System Signed Applications ✓
Allow Only Secure VPN Connections ✓
VMware AirWatch Android Platform
VMware, Inc. 91
Recommended


![VMware AirWatch Mobile Device Management … · VMware AirWatch Mobile Device Management . Supplemental Administrative Guidance . ... and Syslog Guide [8] VMware AirWatch ... Installation](https://img.dokumen.tips/doc/110x75/5b04e5a37f8b9a2d518e4108/vmware-airwatch-mobile-device-management-airwatch-mobile-device-management-.jpg)