Administrators
Guide
Version 4.0
Published: August 2016

Copyright © 2016 Propalms Technologies Pvt. Ltd. All rights reserved.
The information contained in this document represents the current view of Propalms Technologies Pvt. Ltd. on the
issues discussed as of the date of publication. Because Accops must respond to changing market conditions, it should
not be interpreted to be a commitment on the part of Accops, and Accops cannot guarantee the accuracy of any
information presented after the date of publication.
This white paper is for informational purposes only. PROPALMS TECHNOLOGIES PVT. LTD. MAKES NO
WARRANTIES, EXPRESS OR IMPLIED, IN THIS DOCUMENT.
Complying with all applicable copyright laws is the responsibility of the user. Without limiting the rights under
copyright, no part of this document may be reproduced, stored in or introduced into a retrieval system, or
transmitted in any form or by any means (electronic, mechanical, photocopying, recording or otherwise) or for any
purpose, without the express written permission of Propalms Technologies Pvt. Ltd.
2
CONTENTS
INTRODUCTION ............................................................................................................................................................................................. 7
Overview ..................................................................................................................................................................................................... 7
What is SSL? ................................................................................................................ ......................................................................... 7
Accops HySecure ............................................................................................................. ................................................................ 7
Features .................................................................................................................... ............................................................................. 8
ACCOPS HYSECURE COMPONENTS .................................................................................................. .................................................. 9
Accops OS .............................................................................................................................................................................................. 9
Accops HySecure Service ..................................................................................................................................................................... 9
Accops HySecure Management Console ......................................................................................................................................... 9
Accops HySecure Homepage .................................................................................................................................................... ....... 10
Accops HySecure Clients ................................................................................................................................................................... 10
Web Portal .......................................................................................................................................................................................... 10
Desktop Client .................................................................................................................................................................................... 10
ACCOPS HYSECURE INSTALLATION ................................................................................................................................................... 12
Accops HySecure Virtual Appliance ........................................................................................... ..................................................... 12
Accops HySecure Software ISO ................................................................................................ ........................................................ 12
Steps for Installation of Accops HySecure ISO ............................................................................... ............................................... 13
Configuration of Accops OS................................................................................................... .......................................................... 14
Network Configuration..................................................................................................................................................................... 14
Accops HySecure Administration ............................................................................................................................................... 19
Network Tools ............................................................................................................... ..................................................................... 20
Restart VPN service ............................................................................................................ ............................................................... 20
Restart Appliance ...................................................................................................................... ........................................................ 20
Shutdown Appliance ........................................................................................................................................................................ 20
Go to Shell .......................................................................................................................................................................................... 20
ACCOPS HYSECURE CONFIGURATION .............................................................................................................................. ................ 21
Service States ........................................................................................................................................................................ ................... 21
Boot strap State ................................................................................................................................................................... .............. 21
Configuration State ..................................................................................................................................................................... ...... 21
Run State ............................................................................................................................................................................................. 21
New HySecure Installation ..................................................................................................................................................................... 22
Bootstrap State .................................................................................................................................................................................. 25
Configuration State ........................................................................................................................................................................... 26
Sign Into HySecure Server ..................................................................................................................................................................... 30
HySecure Web Portal ........................................................................................................................................................................ 31
HySecure Desktop Client .................................................................................................................................................................. 32
Change Password......................................................................................................... ..................................................................... 32
Change to RUN State ....................................................................................................................................................................... 34
VPN MANAGEMENT ................................................................................................................................................................................... 35
Overview ................................................................................................................................................................................................... 33
VPN status .................................................................................................................. .............................................................................. 36
Dashboard ................................................................................................................... ....................................................................... 36
Active Users ................................................................................................................ ........................................................................ 37
VPN Server State ............................................................................................................................................................................... 37
Access Management .............................................................................................................................................................................. 37
HySecure Domain ................................................................................................................................................................................ 38
Applications ................................................................................................................ ........................................................................ 38
Application Groups .......................................................................................................... ................................................................. 47
Access Controls ............................................................................................................. .................................................................... 50
Auth Management ............................................................................................................. ................................................................. 56
Authentication Domain ....................................................................................................... ............................................................ 42
Authentication Servers ...................................................................................................... ............................................................... 42
Local User....................................................................................................................................................................................... 60
Local Group....................................................................................................................................................................................... 64
HyID........................................................................................................................................ ............................................... 67
Self Service portal..................................................................................................................................... .......................................... 68
Endpoint Policy Management .............................................................................................................................................................. 69
Create Host scan Policy ................................................................................................................................................... ................ 70
Device Profiles .................................................................................................................................................................................... 74
Example of End User notification when failing Endpoint Security Scan ................................................................................ 77
Resources ................................................................................................................................................................................................. 78
Device Profiles .................................................................................................................................................................................... 78
Lan IP Range ...................................................................................................................................................................................... 79
Site to Site ........................................................................................................................................................................................... 81
Access Filters ...................................................................................................................................................................................... 82
Customize Portal .................................................................................................. ............................................................................. 83
External SSL Certificate ..................................................................................................................................................................... 84

Host Configuration .......................................................................................................... ....................................................................... 86
Network Configuration..................................................................................................................................................................... 86
Route Configuration ......................................................................................................................................................................... 87
Proxy Server................................................................................................................. ....................................................................... 88
SMTP Server ....................................................................................................................................................................................... 89
Global Settings ................................................................................................................................................................................... 90
Client Settings ............................................................................................................. ....................................................................... 94
Password Expiry Time ........................................................................................................ ............................................................... 95
Database Password ........................................................................................................... ................................................................ 96
SSH Configuration ........................................................................................................... .................................................................. 96
ISP Load Balancing .......................................................................................................... .................................................................. 97
Virtual Server .............................................................................................................. ........................................................................ 97
HyLite Configuration ....................................................................................................................................................................... 98
Host Maintenance ............................................................................................................ ...................................................................... 99
Backup and Restore .......................................................................................................... ................................................................ 99
License Status ..................................................................................................................................................................................... 100
Upgrade Firmware ............................................................................................................................................................................ 101
Shutdown / Restart .......................................................................................................... ................................................................. 101
Ping & Traceroute ........................................................................................................... .................................................................. 101
Monitoring & Reporting ...................................................................................................... .................................................................. 102
Activity Logs ....................................................................................................................................................................................... 102
User Logs ............................................................................................................................................................................................ 103
Admin Logs ........................................................................................................................................................................................ 103
HyID Logs ............................................................................................................................. ........................................................... 103
End Point Security Log ..................................................................................................................................................................... 104
Logs setting ...................................................................................................................................... .................................................. 105
High Availability .................................................................................................................................. .................................................... 106
Overview ............................................................................................................................................................................................. 106
HA Configuration ................................................................................................................................. ............................................. 107
Remote Meetings ................................................................................................................................................................................... 108
LICENSING ..................................................................................................................................................................................................... 110
Online Method - Overview .......................................................................................................................... ......................................... 110
Offline Method - Overview ................................................................................................................................................................... 111
Default HySecure License ...................................................................................................................................................................... 111
Checking HySecure License Status ............................................................................................................................................ .......... 111

Getting a New HySecure License – Online Activation ..................................................................................................................... 112
Registering with HySecure License Server .................................................................................................................................... 112
Applying the New HySecure Serial Number ............................................................................ .................................................... 113
Getting a New HySecure License – Offline Activation ..................................................................................................................... 114
Login to Accops Online License Portal ....................................................................................... .............................................. 114
Applying the New HySecure License ........................................................................................... .................................................. 115
Update User Profile……………………………………………………………………………………………………………………………………116
APPENDICES .............................................................................................................................................................................................. 118
Appendix A - Terminology and Acronyms .................................................................................................................................... 118
Terminology .................................................................................................................................................................................... 118
Acronyms ......................................................................................................................................................................................... 119
Appendix B - Supported Applications ............................................................................................................................................ 120
Accops TSE Integration ................................................................................................................................................................. 120
Access TSE with HySecure Web Portal ...................................................................................................................................... 122
Access TSE with HySecure Desktop Client ................................................................................................................................ 124
Other Application Configuration ................................................................................................................................................ 126
CHAPTER 1
INTRODUCTION
OVERVIEW
Accops HySecure Server is an application gateway solution providing secure remote access to your applications and
private network resources through a secure SSL connection. Accops HySecure allows you to access applications securely
over the Internet without re-engineering. HySecure is a highly secure, clientless and client based SSL VPN application
providing access to a wide variety of applications. HySecure provides secure registration and enrollment for all network
resources.
This Administrators Guide provides instructions for configuring, deploying and managing the Accops HySecure Server.
This document is intended for network and security administrators who are familiar with Ethernet and IP configuration.
WHAT IS SSL?
The Secure Socket Layer protocol was created by Netscape to ensure secure transactions between web servers and
browsers. The protocol uses a third party, a Certificate Authority (CA). SSL uses a cryptographic system that uses two
keys to encrypt data − a public key known to everyone and a private or secret key known only to the recipient of the
message. SSL technology is embedded in all popular browsers and engages automatically when the user connects to a
web server that is SSL-enabled. When your browser connects to an SSL server, it automatically asks the server for a
digital Certificate of Authority (CA). This digital certificate positively authenticates the server's identity to ensure you will
not be sending sensitive data to a hacker or imposter site. The browser also makes sure that the domain name matches
the name on the CA, and that the CA has been generated by a trusted authority and bears a valid digital signature.
Once the handshake is completed, your browser will automatically encrypt all information that you send to the site,
before it leaves your computer.
ACCOPS HYSECURE
Accops HySecure provides a flexible and secure way to extend networking resources to virtually any remote user with
access to the Internet and a Web browser. Remote access based on SSL VPN delivers secure access to network
resources by establishing an encrypted tunnel across the Internet using a broadband or ISP dialup connection. The
connectivity in between user and corporate network will happen through SSL tunnel. The administrator can limit access
of a user by using access controls in HySecure. HySecure acts as an application gateway in between the user and
corporate LAN. When a user accesses an application, request will go to HySecure Server and server will route
connectivity of user and requested application.
7

FEATURES MANAGEMENT APPLICATION SUPPORT
Web based management console All web based, TCP and UDP based client-server applications
Dashboard with graphical reporting Windows file shares and drive mapping
Menu driven console interface for system configuration Dynamic port based applications
Wizard driven installation procedure Publish Subnet or IP Range for network access
Self-signed certificate generation Special support for RDP virtual channels
CLI Application server load balancing
Delegated administration Session caching for load balanced applications
Certificate based strong authentication for administrators Per application based compression switch
Auto checking for configuration errors My Desktop and Files for direct personal desktop and file access
Online License service Accops TSE hosted applications
Inline help Accops VDI hosted desktops
AUTHENTICATION FEATURES AUTHORIZATION FEATURES
Authentication based on user identity, endpoint identity, endpoint trust level Publish applications rather than subnet or network
Multiple user authentication options: static passwords, client certificates, Simple access control mechanism
external two factor authentication solutions Access control based on Local database with full customization per user, password policies, password o Device identity and profile
reset support o User Authentication method
Fully integrated client-certificate based two factor authentication server with
o User Role automatic CA and certificate provisioning Dynamic policy evaluation based on run time information about device,
Email based user provisioning
authentication method and user role Authentication method based application access control Display of allowed applications and availability of the application server to
Integrates with AD/LDAP/RADIUS
users Automatic fetching of group information from AD/LDAP/RADIUS Time based restriction policies
Support for multiple authentication servers with cascading mode Auto-detection of applications running in corporate network
Support for external authorization servers Scheduled account expiry
Integrated OTP based Two factor authentication solution based on Block specific groups SMS/Email/Hardware/Voice/PKI tokens
AUDITING FEATURES ENDPOINT MANAGEMENT Complete reporting of user logons and activity Support for checking for antivirus, firewall and antispyware products
Information logged includes Real time status check for o Time of access o Last update time o Username o Real time protection check o MAC Address of endpoint Support for checking for MAC ID and IP address o IP address of endpoint Application control based on device profile
o Application accessed Mandatory profile for non-avoidable policy checks on all endpoints o Device profile
Quarantine profile for devices that fails all other profile Detailed logging of endpoint security scans results
Option to block endpoints that fails to comply to required policies or option to Extract logs in CSV format for feeding to third part report generation allow them to login by putting them in quarantine profile Search logs
Login control based on device signature Auto-archiving of logs
Kill existing TCP connections on user machine Monitor and disconnect live users Block Internet and restrict incoming connection policy
Block access via proxy server policy
DEPLOYMENT SCALABILITY ACCESS MODES
Scalable to thousands of users Multiple access modes:
Active-Active N+1 cluster o VPN portal with java applications
VPN connections load balancing, multiple algorithms o Full access client for desktops
Kiosk based access mode for non-admin access Application connection load balancing can distribute the connection for a
No configuration required on end user machines
specific application across multiple app servers in the LAN based on round Client platforms supported
robin function
o Windows 98/XP/Vista/Windows7/Windows 8 Session persistence: Users do not need to re-authenticate o Windows server 2003/2008/2012
ISP load balancing for incoming connections o Linux OS
Client side failover using Alternate gateways o MAC OS X PPC/Intel 10.4 and above
o iPad / Android Access 64-bit hardware support
Site to site access
ACCESS SECURITY FEATURES GATEWAY FEATURES
SSL 3.0 and TLS 1.0 Runs on hardened Linux based platform
Encryption: Strongest available: DES, 3DES, AES(256), RC4 Menu driven console interface for easy configuration
Authentication: MD-5, SHA-1, RSA 1024, RSA 2048 Can run on any standard or custom hardware
4096 bit RSA key CA certificate support Virtual server for using VPN as HTTPS proxy
Internet network masking and IP address/hostname mangling Runs on virtualization platforms from VMware, XenServer, Hyper-V
Application level gateway and not layer 2 bridging
Hardened gateway operating system
8
CHAPTER 2
ACCOPS HYSECURE COMPONENTS
ACCOPS OS
Accops OS 4 is a security hardened, enterprise class Linux Distribution derived from CentOS. Accops OS hosts the
required services for running Accops HySecure Server and is maintained by Accops Development Team.
When installed, Accops OS has a small menu driven interface to manage host configuration like network settings
modifications or reinstallation of firmware.
Accops OS comes on an integrated installer CD or bootable USB drive. The integrated installer is a single click OS
installer which also installs the HySecure software.
NB: Installing the Accops OS will erase all existing data off your system without asking about details of partition.
Accops HySecure is available as a virtual appliance as well as a software only option.
ACCOPS HYSECURE SERVICE
Accops HySecure is a highly scalable service that provides secure access to corporate applications for incoming users.
HySecure is responsible for:-
1. Encryption/Decryption of all VPN traffic 2. Session Management 3. Application Proxy 4. Policy Management 5. Audit logging
HySecure is highly scalable in terms of number of users it can handle. It can go from 10 to thousands of users utilizing
minimum amounts of hardware resources.
HySecure uses locally installed Apache service to deliver web pages and a My SQL database to store configuration
settings.
ACCOPS HYSECURE MANAGEMENT CONSOLE
Accops HySecure has a web based management console for easy and centralized user management, session
management, policy management and server configuration control. The console also provides a graphical dashboard
showing live users, license usage, resource usage and important gateway information. Reports of user activity can be
generated and downloaded. The management console has built in granular administrative roles. There are two types of
administrators namely Security officers and Administrators. Both security officers and administrators must login using
certificates generated from the console.
Accops HySecure management console can be accessed through the Web Portal or HySecure Desktop Client login
methods.
9
ACCOPS HYSECURE HOMEPAGE
When the IP address or hostname of the HySecure server is browsed, it gives the Accops HySecure home page. This
provides access to the Web Portal and HySecure client for Desktop installers.
The home page can be accessed on URL http://HySecure_ip_address/ or http://<FQDN>/
ACCOPS HYSECURE CLIENTS
There are two methods to login from your client computer to Accops HySecure.
WEB PORTAL
Accops HySecure Web Portal is a browser based access mode. You can access the portal by browsing to
http://HySecure_gateway_ip_address/ or http://<HySecure_hostname>/ and clicking Sign in Now. Users can use a
browser to login to HySecure and access the applications listed on the portal. The following types of applications are
listed on the portal:
Web Applications: Http, Https
Java Based Applications: RDP, VNC, Telnet, SSH, File share, FTP
Integrated Applications: Accops TSE, Accops VDI, RDP
Remote Access: MyDesktop (personal desktop access), MyFiles (Fileshare)
Remote Meeting: Meeting center for sharing presentations, desktops, chat & file transfer
NB: A user may have access to more client-server applications which are not displayed on Web Portal.
SYSTEM REQUIREMENTS Operating System: Windows XP SP1 or higher, Windows Vista, Windows 7, 8, 8.1,10
Browsers: Internet Explorer 9.0 and above, Mozilla Firefox 48.00 and above, Chrome 51.00 and above
Java: Java 1.6 and above
Administrative rights: Admin rights are required for first time use.
DESKTOP CLIENT
Accops HySecure Desktop Client is a small footprint self-upgrading client that is used to login to Accops HySecure
server without having to use a web browser. The HySecure Client for Desktop also supports non-Windows platforms
such as Mac and Linux OS.
The HySecure client can be installed from Accops HySecure Home page.
10

SYSTEM REQUIREMENTS
Accops HySecure desktop client is currently supported on the following platforms:
Microsoft Windows: Windows 2000, XP SP3, Vista, Windows 7/8/8.1/10 and Windows
2003/2008/2012 platforms.
Linux OS: Redhat, Fedora, SUSE, Ubuntu, Debian, CentOS
Mac OS: OS X 10.4 and above (Both PPC and Intel architecture are supported)
Administrative rights: Admin rights are required for first time install only.
11
CHAPTER 3
ACCOPS HYSECURE INSTALLATION
Accops VPN is available as a virtual appliance as well as a software only installer.
ACCOPS HYSECURE VIRTUAL APPLIANCE
Accops HySecure is available in Open Virtualization Format (OVF) which is an open standard for packaging and
distributing virtual appliances to be run in virtual machines. The standard describes an "open, secure, portable, efficient
and extensible format for the packaging and distribution of software to be run in virtual machines". The OVF standard is
not tied to any particular hypervisor or processor architecture. The unit of packaging and distribution is a so called OVF
Package which may contain one or more virtual systems each of which can be deployed to a virtual machine.
The Accops HySecure Virtual Appliance has been verified with VMware ESXi. The Virtual Appliance is downloadable
from the Accops Website (http://www.Accops.com). Simply extract the image file and import directly into your VMware
environment and you are ready to go.
All the functionalities of the virtual appliance are the same as the software version.
ACCOPS HYSECURE SOFTWARE ISO
Accops HySecure is also available as software installer. This single click integrated ISO image installs both Accops OS
and Accops HySecure on any custom hardware. The installer ISO can be downloaded from the Accops Website
(http://www.Accops.com).
Accops OS is a CentOS based platform, hence any hardware that supports the Linux distribution is supported by Accops
OS. Accops OS is available in 64-bit versions.
The functionalities of the HySecure platform are the same irrespective of the underlying platform. Both versions ship
with a system default evaluation license allowing 5 users for 30 days.
ACCOPS HYSECURE ON AMAZON AWS
Accops HySecure image is also available on amazon AWS. User can search and deploy the Accops HySecure appliance
on AWS cloud.
ACCOPS HYSECURE ON Microsoft azure
Accops HySecure image is also available on Microsoft azure. User can search and deploy the Accops HySecure
appliance on azure cloud.
12

STEPS FOR INSTALLATION OF ACCOPS HYSECURE ISO
Installing the Accops HySecure server from the ISO installer is simple. Either burn the ISO to CD or if you are installing in
a virtual environment simply mount the ISO inside the virtual machine.
1. The installer screen will appear as shown. If you are installing through usb, type usb otherwise press Enter.
2. Installation will start automatically and will take approximately 10 minutes to complete, depending on
hardware.
3. After completion of Installation, remove CD and restart the machine. 13

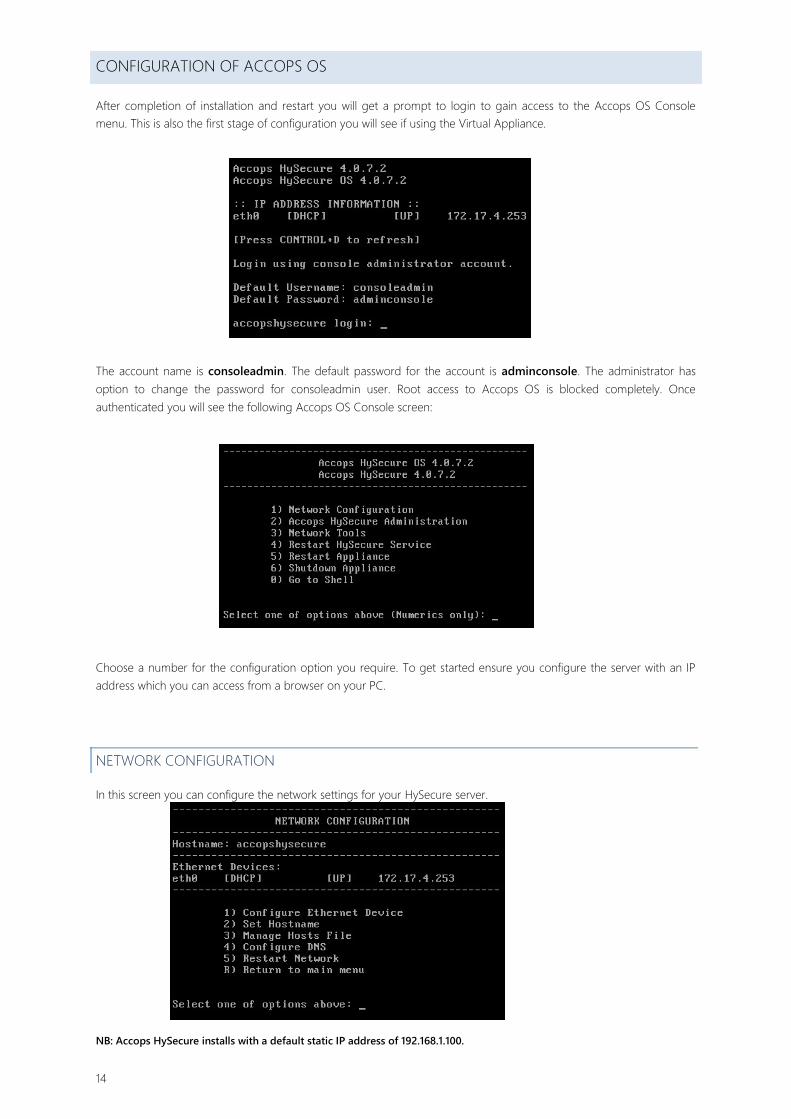
CONFIGURATION OF ACCOPS OS
After completion of installation and restart you will get a prompt to login to gain access to the Accops OS Console
menu. This is also the first stage of configuration you will see if using the Virtual Appliance.
The account name is consoleadmin. The default password for the account is adminconsole. The administrator has
option to change the password for consoleadmin user. Root access to Accops OS is blocked completely. Once
authenticated you will see the following Accops OS Console screen:
Choose a number for the configuration option you require. To get started ensure you configure the server with an IP
address which you can access from a browser on your PC.
NETWORK CONFIGURATION
In this screen you can configure the network settings for your HySecure server.
NB: Accops HySecure installs with a default static IP address of 192.168.1.100.
14
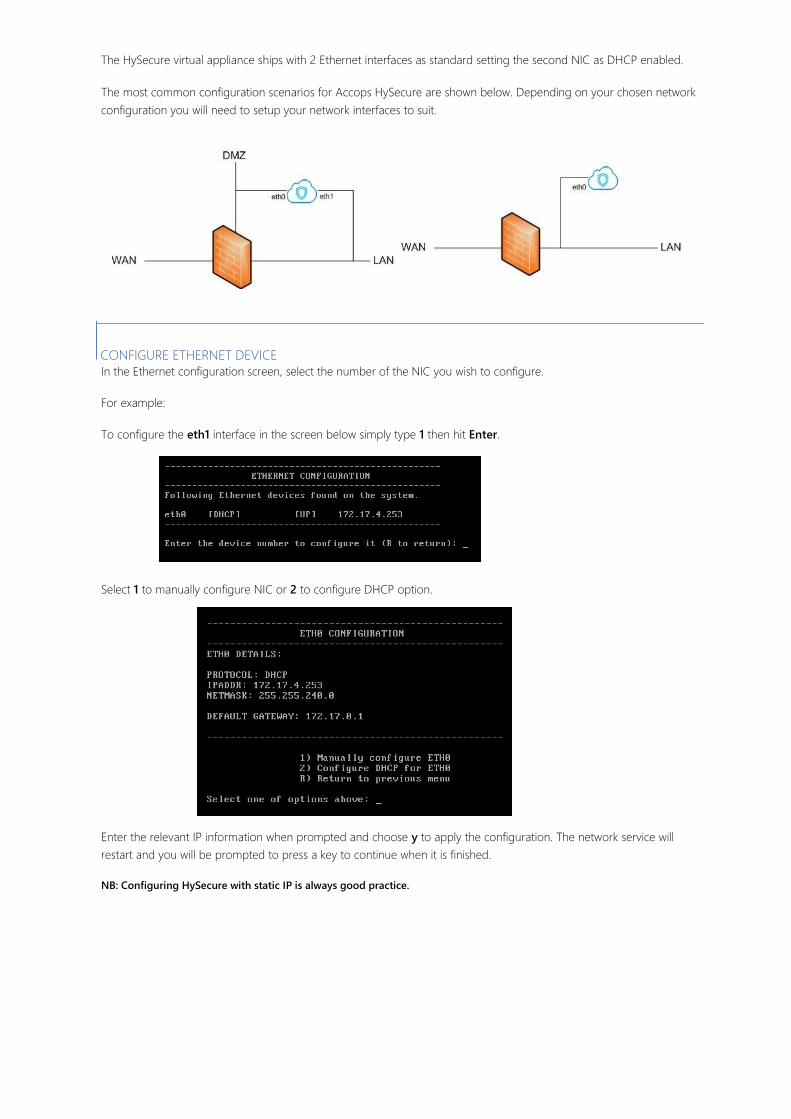
The HySecure virtual appliance ships with 2 Ethernet interfaces as standard setting the second NIC as DHCP enabled.
The most common configuration scenarios for Accops HySecure are shown below. Depending on your chosen network
configuration you will need to setup your network interfaces to suit.
CONFIGURE ETHERNET DEVICE
In the Ethernet configuration screen, select the number of the NIC you wish to configure.
For example:
To configure the eth1 interface in the screen below simply type 1 then hit Enter.
Select 1 to manually configure NIC or 2 to configure DHCP option.
Enter the relevant IP information when prompted and choose y to apply the configuration. The network service will
restart and you will be prompted to press a key to continue when it is finished.
NB: Configuring HySecure with static IP is always good practice.
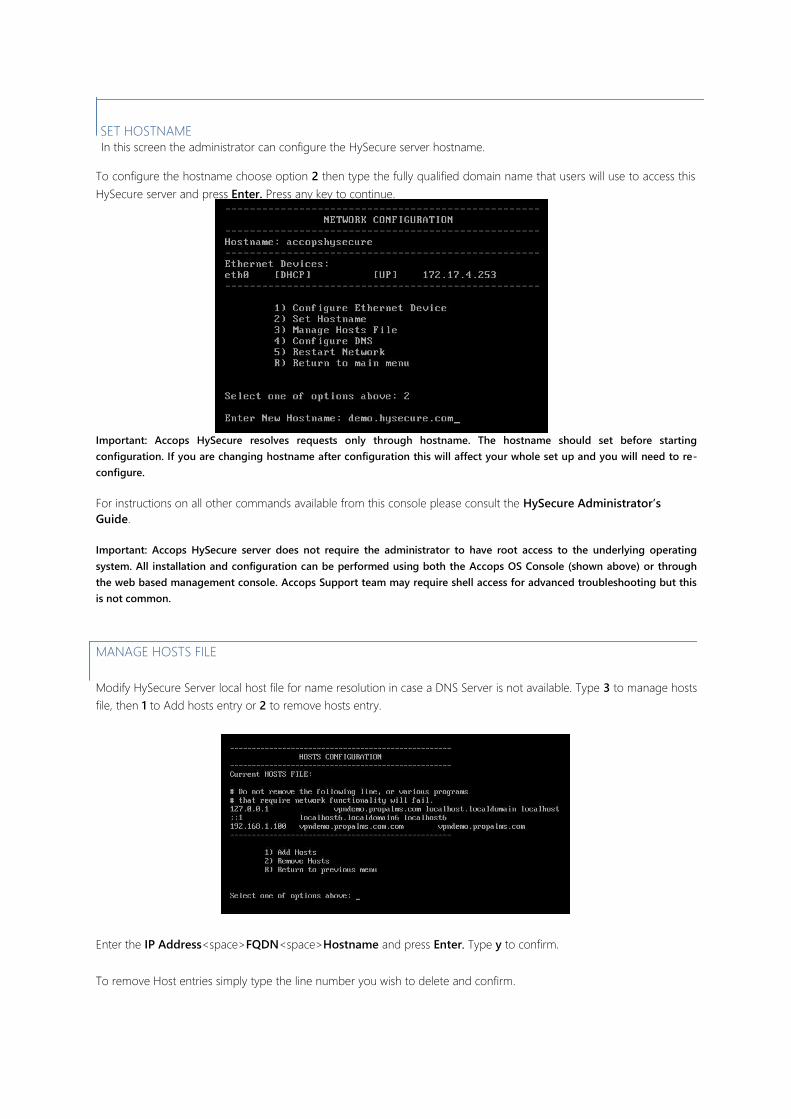
SET HOSTNAME
In this screen the administrator can configure the HySecure server hostname.
To configure the hostname choose option 2 then type the fully qualified domain name that users will use to access this
HySecure server and press Enter. Press any key to continue.
Important: Accops HySecure resolves requests only through hostname. The hostname should set before starting
configuration. If you are changing hostname after configuration this will affect your whole set up and you will need to re-
configure.
For instructions on all other commands available from this console please consult the HySecure Administrator’s
Guide.
Important: Accops HySecure server does not require the administrator to have root access to the underlying operating
system. All installation and configuration can be performed using both the Accops OS Console (shown above) or through
the web based management console. Accops Support team may require shell access for advanced troubleshooting but this
is not common.
MANAGE HOSTS FILE
Modify HySecure Server local host file for name resolution in case a DNS Server is not available. Type 3 to manage hosts
file, then 1 to Add hosts entry or 2 to remove hosts entry.
Enter the IP Address<space>FQDN<space>Hostname and press Enter. Type y to confirm.
To remove Host entries simply type the line number you wish to delete and confirm.
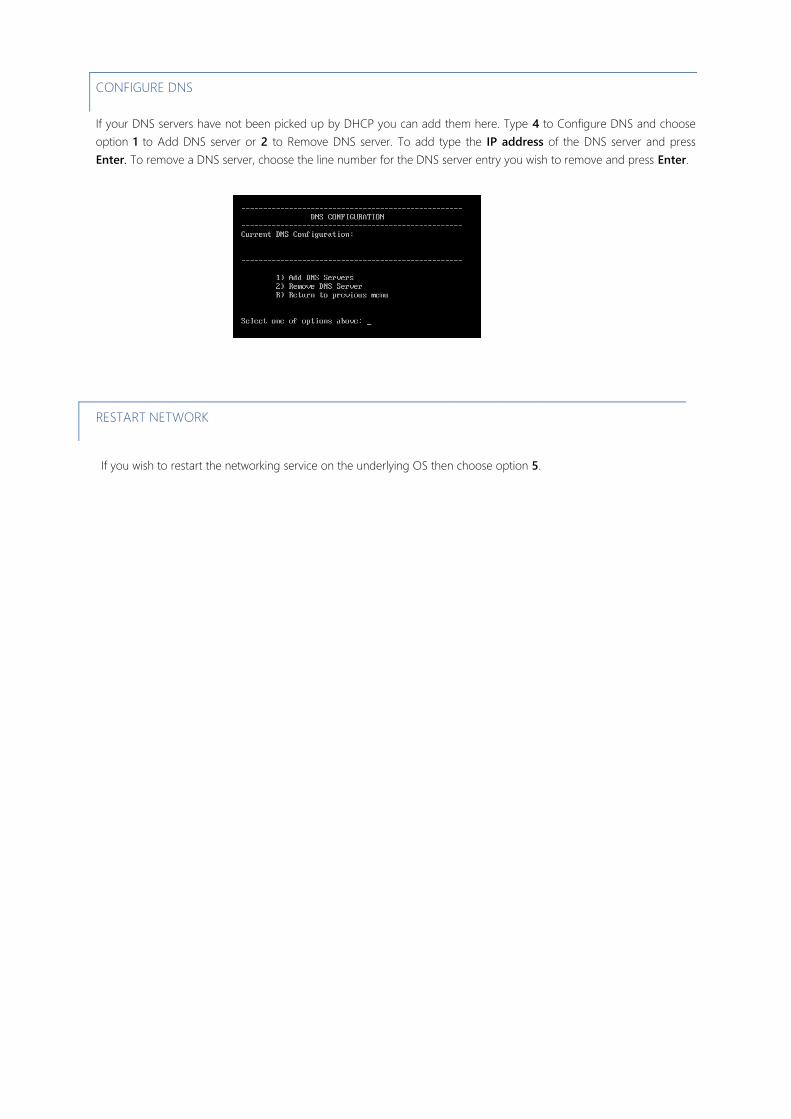
CONFIGURE DNS
If your DNS servers have not been picked up by DHCP you can add them here. Type 4 to Configure DNS and choose
option 1 to Add DNS server or 2 to Remove DNS server. To add type the IP address of the DNS server and press
Enter. To remove a DNS server, choose the line number for the DNS server entry you wish to remove and press Enter.
RESTART NETWORK
If you wish to restart the networking service on the underlying OS then choose option 5.
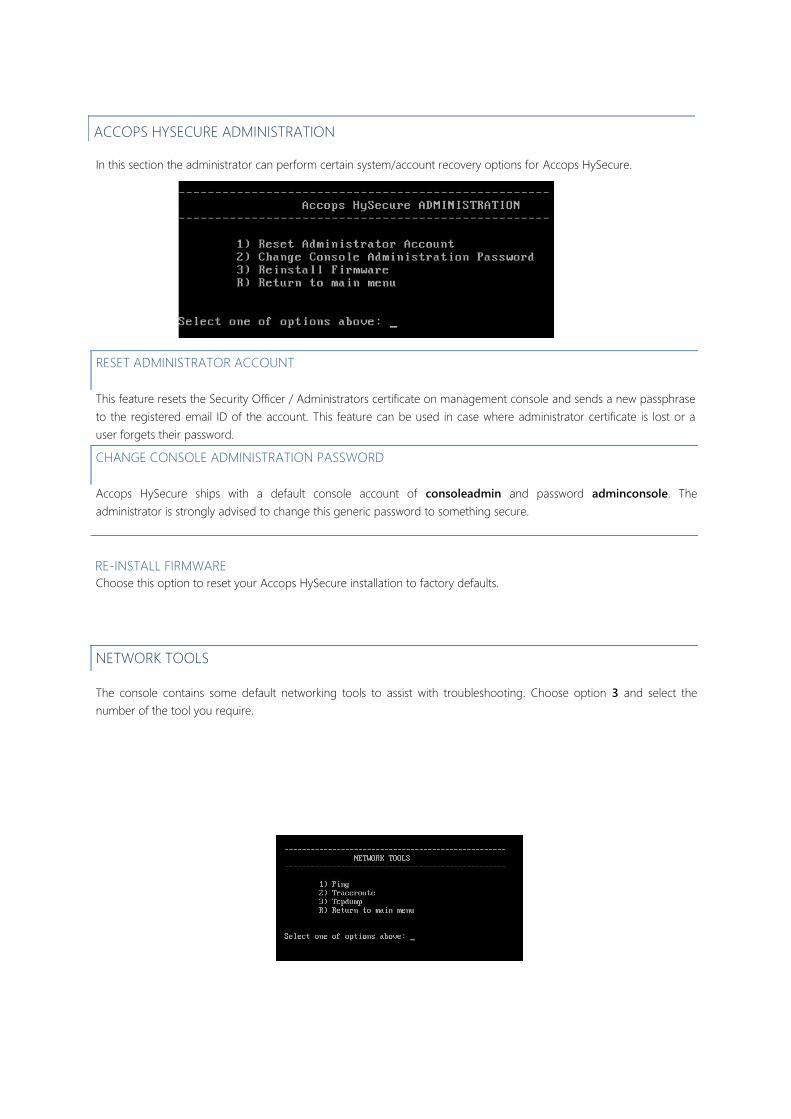
ACCOPS HYSECURE ADMINISTRATION
In this section the administrator can perform certain system/account recovery options for Accops HySecure.
RESET ADMINISTRATOR ACCOUNT
This feature resets the Security Officer / Administrators certificate on management console and sends a new passphrase
to the registered email ID of the account. This feature can be used in case where administrator certificate is lost or a
user forgets their password. CHANGE CONSOLE ADMINISTRATION PASSWORD
Accops HySecure ships with a default console account of consoleadmin and password adminconsole. The
administrator is strongly advised to change this generic password to something secure.
RE-INSTALL FIRMWARE Choose this option to reset your Accops HySecure installation to factory defaults.
NETWORK TOOLS
The console contains some default networking tools to assist with troubleshooting. Choose option 3 and select the
number of the tool you require.
RESTART VPN SERVICE
Choose this option to simply restart the Accops HySecure VPN service.
RESTART APPLIANCE
Choose this option to restart the Accops HySecure server.
SHUTDOWN APPLIANCE
Choose this option to shut down the Accops HySecure server.
GO TO SHELL
Go to Linux shell for advanced administration or troubleshooting.
Important: Accops HySecure does not require the administrator to have root access to the underlying operating system. All
installation and configuration can be performed using both the Accops OS Console (shown above) or through the web
based management console. Accops Support team may require shell access for advanced troubleshooting but this is not
common.
18
CHAPTER 4
ACCOPS HYSECURE CONFIGURATION
SERVICE STATES
The HySecure server has three states:-
1. Boot strap 2. Configuration 3. Run
BOOT STRAP STATE
Immediately after install the HySecure server is in System Configuration state, also known as boot-strap state. During this
stage, admin configures the system settings, including network, license and certificate settings.
During this stage the first security officer account is created.
CONFIGURATION STATE
In this state, the HySecure server is in configuration mode. It will not accept connections from any user other than
Security Officers and Administrators.
Once bootstrap state is complete, the server automatically moves to Configuration state.
Administrators can bring the server from run state to configuration state from administrator console for performing
system wide changes.
RUN STATE
In this state, the HySecure server is fully functional. No critical system wide changes can be performed on the system
during run state.
HySecure server does not move automatically from configuration state to run state after a fresh configuration. To
change from configuration state to run state, you should go to VPN Status > VPN Server State page in the management
console and switch to Run State.
NEW HYSECURE INSTALLATION
BOOTSTRAP STATE
After a new installation of Accops HySecure, the system is running in bootstrap mode. Follow these steps to complete
bootstrap stage.
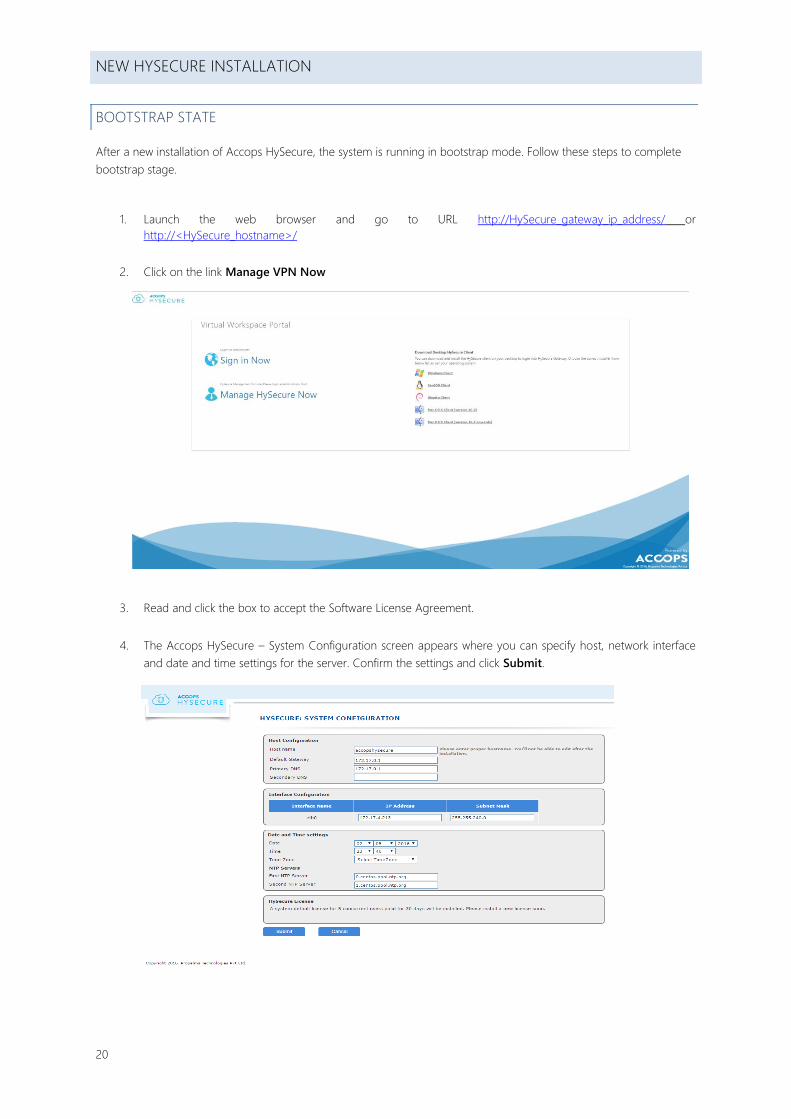
1. Launch the web browser and go to URL http://HySecure_gateway_ip_address/ or
http://<HySecure_hostname>/
2. Click on the link Manage VPN Now
3. Read and click the box to accept the Software License Agreement.
4. The Accops HySecure – System Configuration screen appears where you can specify host, network interface
and date and time settings for the server. Confirm the settings and click Submit.
20
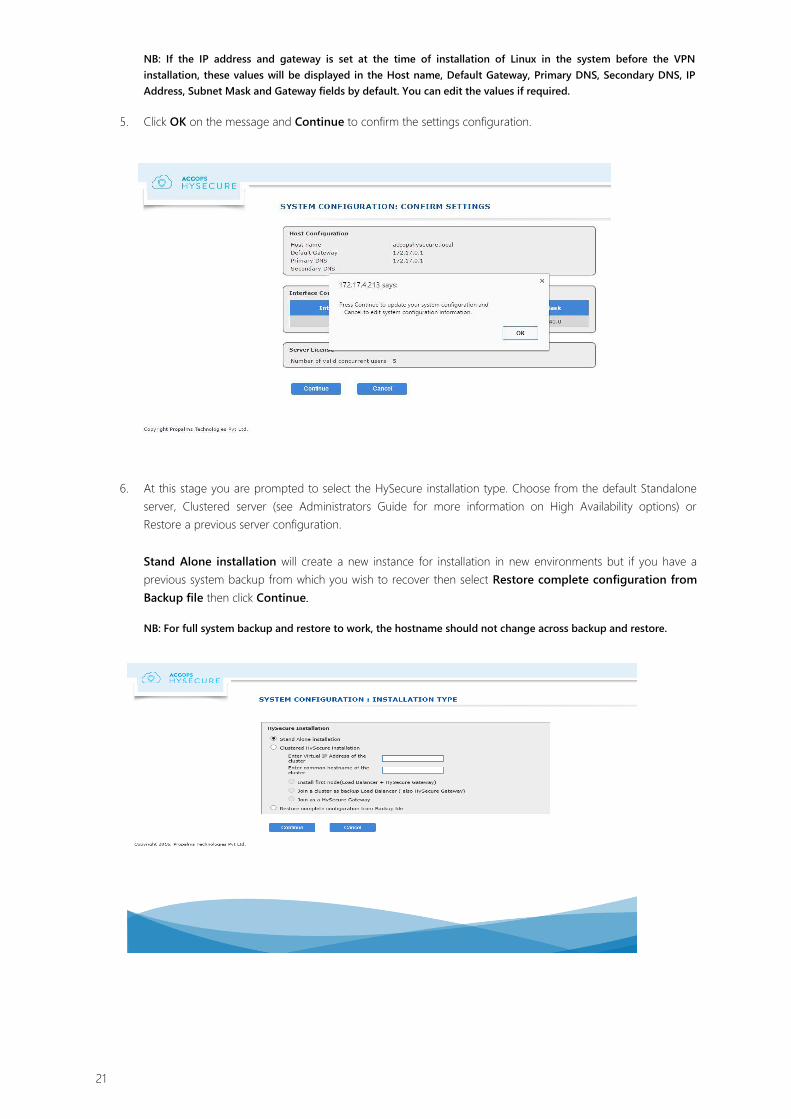
NB: If the IP address and gateway is set at the time of installation of Linux in the system before the VPN
installation, these values will be displayed in the Host name, Default Gateway, Primary DNS, Secondary DNS, IP
Address, Subnet Mask and Gateway fields by default. You can edit the values if required.
5. Click OK on the message and Continue to confirm the settings configuration.
6. At this stage you are prompted to select the HySecure installation type. Choose from the default Standalone
server, Clustered server (see Administrators Guide for more information on High Availability options) or
Restore a previous server configuration.
Stand Alone installation will create a new instance for installation in new environments but if you have a
previous system backup from which you wish to recover then select Restore complete configuration from
Backup file then click Continue.
NB: For full system backup and restore to work, the hostname should not change across backup and restore.
21
On completion of System Configuration, the HySecure server continues through Bootstrap stage, and is ready for a
one-time registration process. In Bootstrap State, first Security Officer Registration, SMTP Server configuration, Database
User configuration, and several others tasks are completed, including:
Register first Security Officer Create Root Certificate Authority (CA) Certificate Register SSL Certificate for VPN Create Signer Certificate Create Verifier Certificate Create VPN database and database tables Register VPN Ports and Apache Ports (port 80/443, 4001, and 4002) Create Configuration files Enter Configuration State (this change occurs automatically after the Bootstrap process is complete)
The tasks such as creating CA certificate, Signer Certificate, Verifier Certificate, and many others take place internally
when you register the necessary details with server during server Bootstrap.
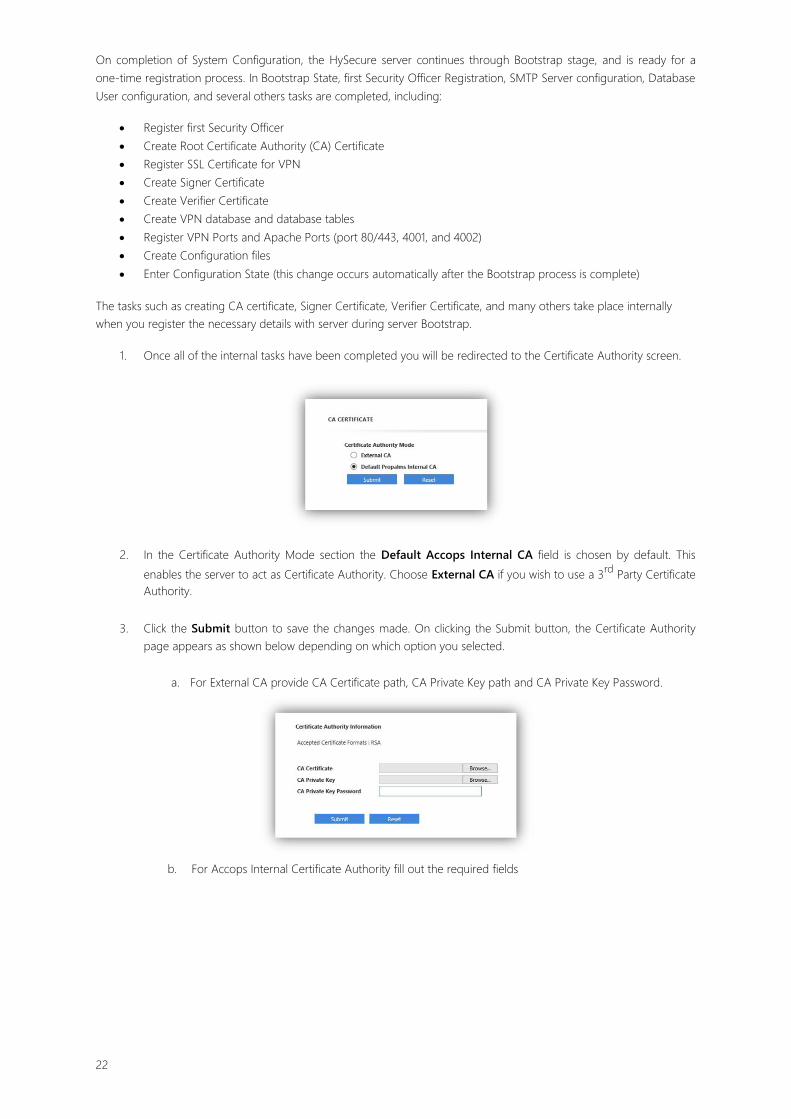
1. Once all of the internal tasks have been completed you will be redirected to the Certificate Authority screen.
2. In the Certificate Authority Mode section the Default Accops Internal CA field is chosen by default. This
enables the server to act as Certificate Authority. Choose External CA if you wish to use a 3rd
Party Certificate
Authority.
3. Click the Submit button to save the changes made. On clicking the Submit button, the Certificate Authority
page appears as shown below depending on which option you selected.
a. For External CA provide CA Certificate path, CA Private Key path and CA Private Key Password.
b. For Accops Internal Certificate Authority fill out the required fields
22

c. You also need to create the Security Officer account on the HySecure server. This account provides
administrator access to the HySecure management console where further accounts can be created.
See table below for description of each field.
FIELD VALUE DESCRIPTION
Certificate Authority Information
Company Name <Company Name> Name of the company to which Certificate will be issued.
Country <Country Name> Name of the country where Certificate will be issued.
State <State Name> Name of the state where Certificate will be issued.
City <City Name> Name of the city where Certificate will be issued.
Validity (days) <No. of Days> Validity period for the Certificate Authority.
Security Officer Account
Name < First Security Officer Name> Full name of First Security Officer.
Email <Username@domain name> Email address of First Security Officer.
User ID <User Name> Basic Authentication Login ID for First Security Officer.
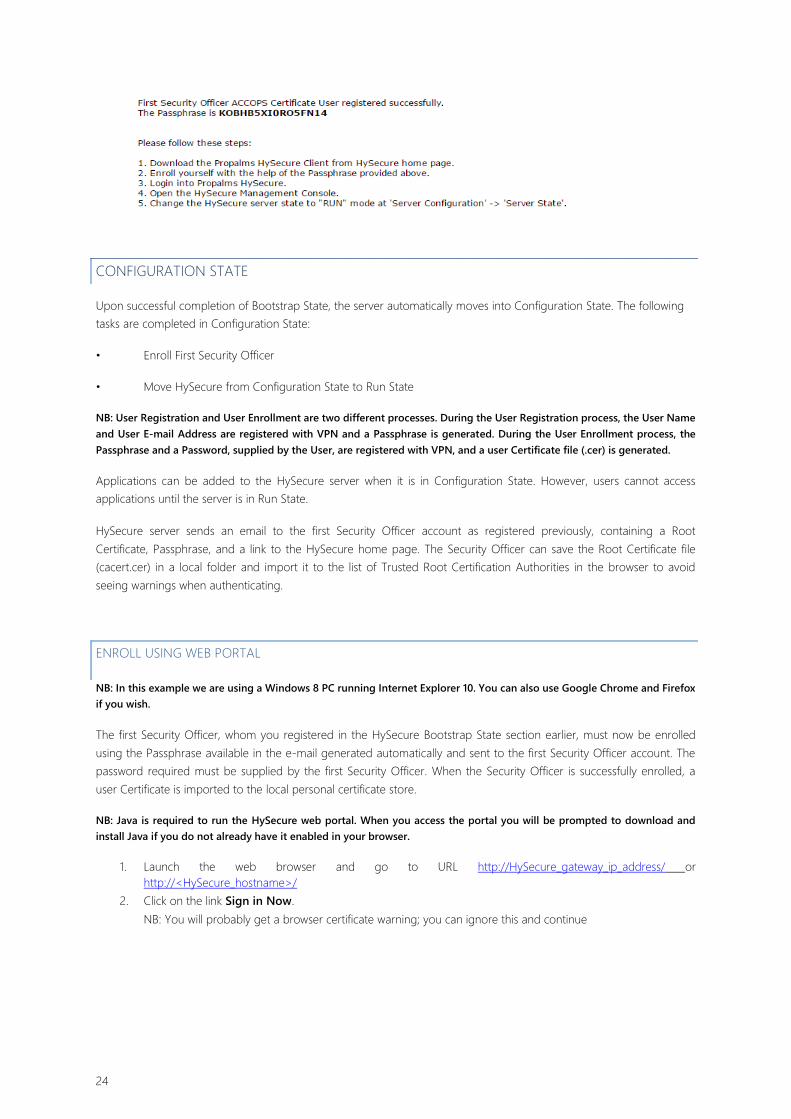
4. On clicking the Submit button, the following screen confirming the registration will appear after a short while.
Accops HySecure Server will attempt to email the Root Certificate (cacert.cer) and the Passphrase to the first
Security Officer’s e-mail address specified. However, it is recommended to leave this page open or copy the
passphrase in case this email isn’t received. You will need the passphrase in order to enroll the first Security
Officer Account and login to the management console.
23
CONFIGURATION STATE
Upon successful completion of Bootstrap State, the server automatically moves into Configuration State. The following
tasks are completed in Configuration State:
• Enroll First Security Officer
• Move HySecure from Configuration State to Run State
NB: User Registration and User Enrollment are two different processes. During the User Registration process, the User Name
and User E-mail Address are registered with VPN and a Passphrase is generated. During the User Enrollment process, the
Passphrase and a Password, supplied by the User, are registered with VPN, and a user Certificate file (.cer) is generated.
Applications can be added to the HySecure server when it is in Configuration State. However, users cannot access
applications until the server is in Run State.
HySecure server sends an email to the first Security Officer account as registered previously, containing a Root
Certificate, Passphrase, and a link to the HySecure home page. The Security Officer can save the Root Certificate file
(cacert.cer) in a local folder and import it to the list of Trusted Root Certification Authorities in the browser to avoid
seeing warnings when authenticating.
ENROLL USING WEB PORTAL
NB: In this example we are using a Windows 8 PC running Internet Explorer 10. You can also use Google Chrome and Firefox
if you wish.
The first Security Officer, whom you registered in the HySecure Bootstrap State section earlier, must now be enrolled
using the Passphrase available in the e-mail generated automatically and sent to the first Security Officer account. The
password required must be supplied by the first Security Officer. When the Security Officer is successfully enrolled, a
user Certificate is imported to the local personal certificate store.
NB: Java is required to run the HySecure web portal. When you access the portal you will be prompted to download and
install Java if you do not already have it enabled in your browser.
1. Launch the web browser and go to URL http://HySecure_gateway_ip_address/ or
http://<HySecure_hostname>/ 2. Click on the link Sign in Now.
NB: You will probably get a browser certificate warning; you can ignore this and continue
24

3. You will receive a browser notification that the webpage wants to run Java. Choose Allow.
You may also receive a Security warning about the HySecure portal’s SSL certificate at this stage. Choose to Trust
content from this publisher and click Yes.
4. On the Sign-in page click Login with SSL client certificate. This will prompt you to run the webmgrapp
from the HySecure portal. Choose Always trust content from this publisher and click Run.
5. It may take a moment for the Java Platform to initiate. Click the Enroll your SSL certificate link.
25
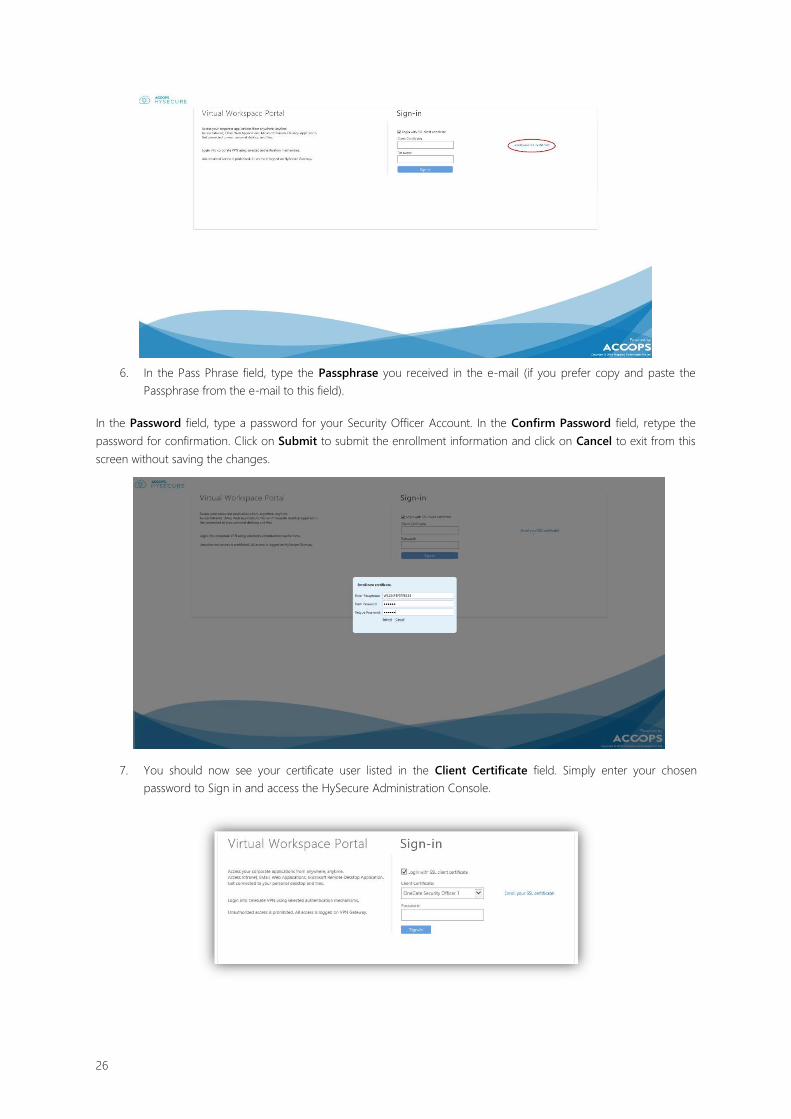
6. In the Pass Phrase field, type the Passphrase you received in the e-mail (if you prefer copy and paste the
Passphrase from the e-mail to this field).
In the Password field, type a password for your Security Officer Account. In the Confirm Password field, retype the
password for confirmation. Click on Submit to submit the enrollment information and click on Cancel to exit from this
screen without saving the changes.
7. You should now see your certificate user listed in the Client Certificate field. Simply enter your chosen
password to Sign in and access the HySecure Administration Console.
26
ENROLL USING DESKTOP CLIENT
1. To download and install the Accops HySecure desktop client, launch the web browser and go to URL
http://HySecure_gateway_ip_address/ or http://<HySecure_hostname>/
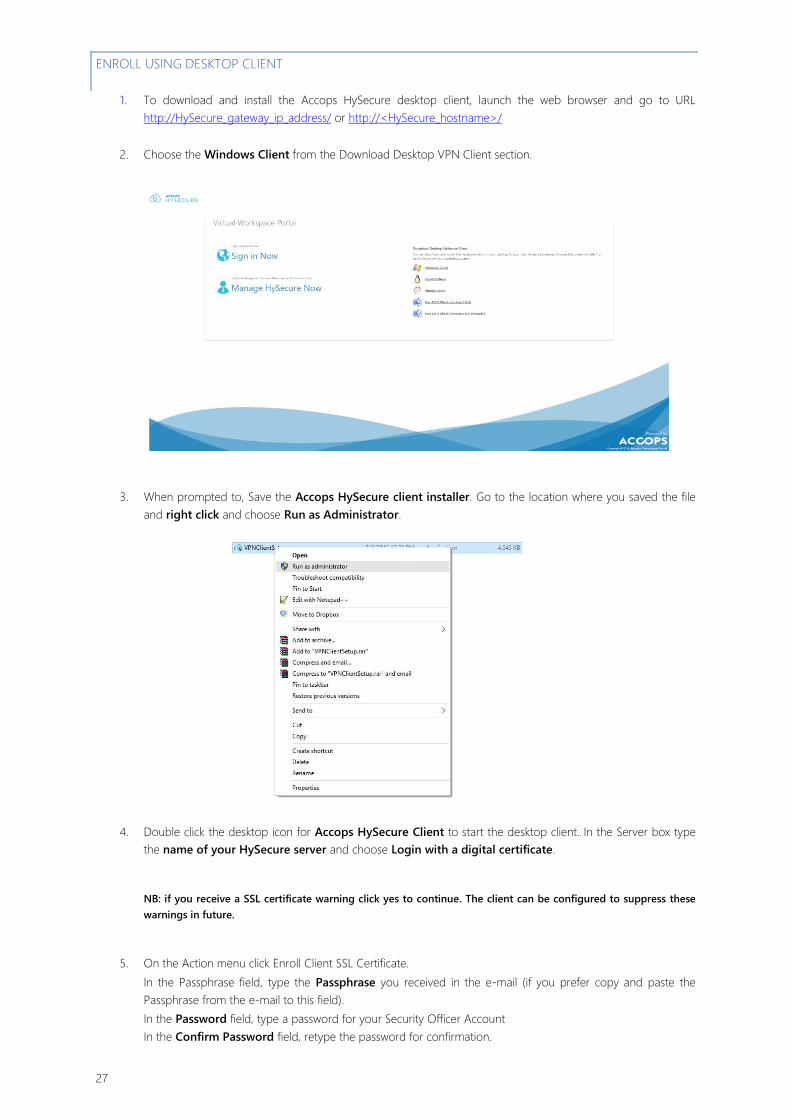
2. Choose the Windows Client from the Download Desktop VPN Client section.
3. When prompted to, Save the Accops HySecure client installer. Go to the location where you saved the file
and right click and choose Run as Administrator.
4. Double click the desktop icon for Accops HySecure Client to start the desktop client. In the Server box type
the name of your HySecure server and choose Login with a digital certificate.
NB: if you receive a SSL certificate warning click yes to continue. The client can be configured to suppress these
warnings in future.
5. On the Action menu click Enroll Client SSL Certificate.
In the Passphrase field, type the Passphrase you received in the e-mail (if you prefer copy and paste the
Passphrase from the e-mail to this field).
In the Password field, type a password for your Security Officer Account
In the Confirm Password field, retype the password for confirmation.
27
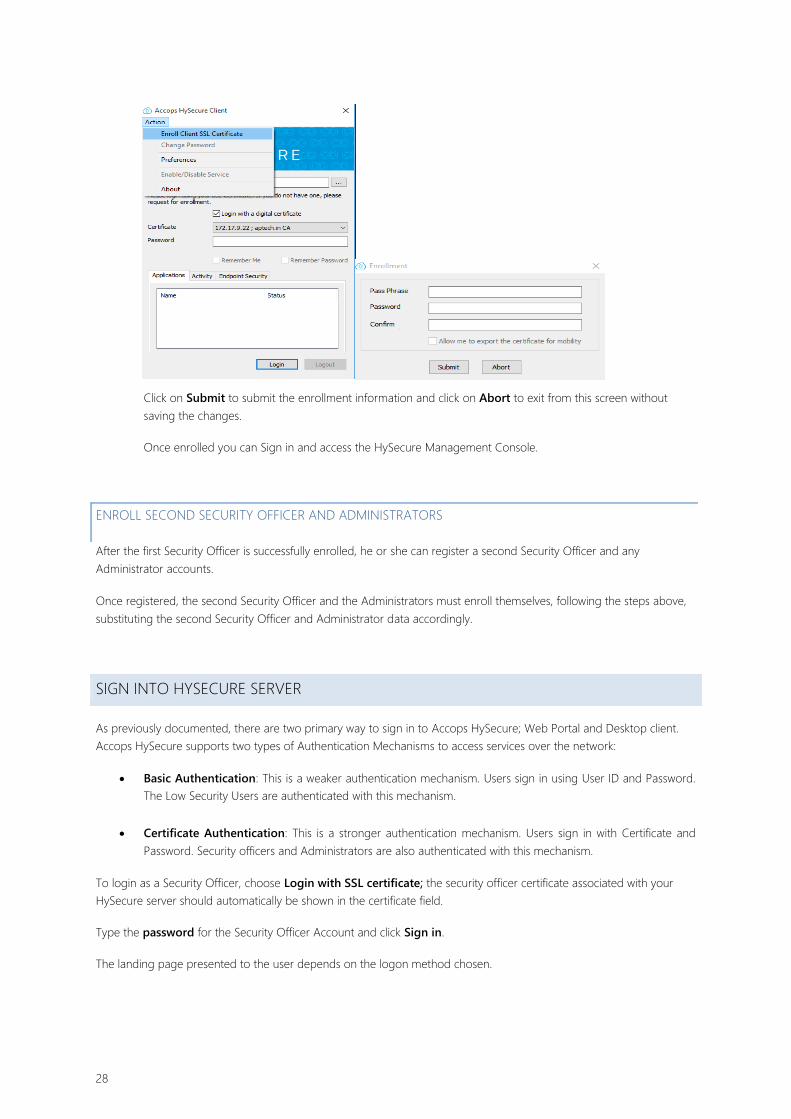
Click on Submit to submit the enrollment information and click on Abort to exit from this screen without
saving the changes.
Once enrolled you can Sign in and access the HySecure Management Console.
ENROLL SECOND SECURITY OFFICER AND ADMINISTRATORS
After the first Security Officer is successfully enrolled, he or she can register a second Security Officer and any
Administrator accounts.
Once registered, the second Security Officer and the Administrators must enroll themselves, following the steps above,
substituting the second Security Officer and Administrator data accordingly.
SIGN INTO HYSECURE SERVER
As previously documented, there are two primary way to sign in to Accops HySecure; Web Portal and Desktop client.
Accops HySecure supports two types of Authentication Mechanisms to access services over the network:
Basic Authentication: This is a weaker authentication mechanism. Users sign in using User ID and Password.
The Low Security Users are authenticated with this mechanism.
Certificate Authentication: This is a stronger authentication mechanism. Users sign in with Certificate and
Password. Security officers and Administrators are also authenticated with this mechanism.
To login as a Security Officer, choose Login with SSL certificate; the security officer certificate associated with your
HySecure server should automatically be shown in the certificate field.
Type the password for the Security Officer Account and click Sign in.
The landing page presented to the user depends on the logon method chosen.
28
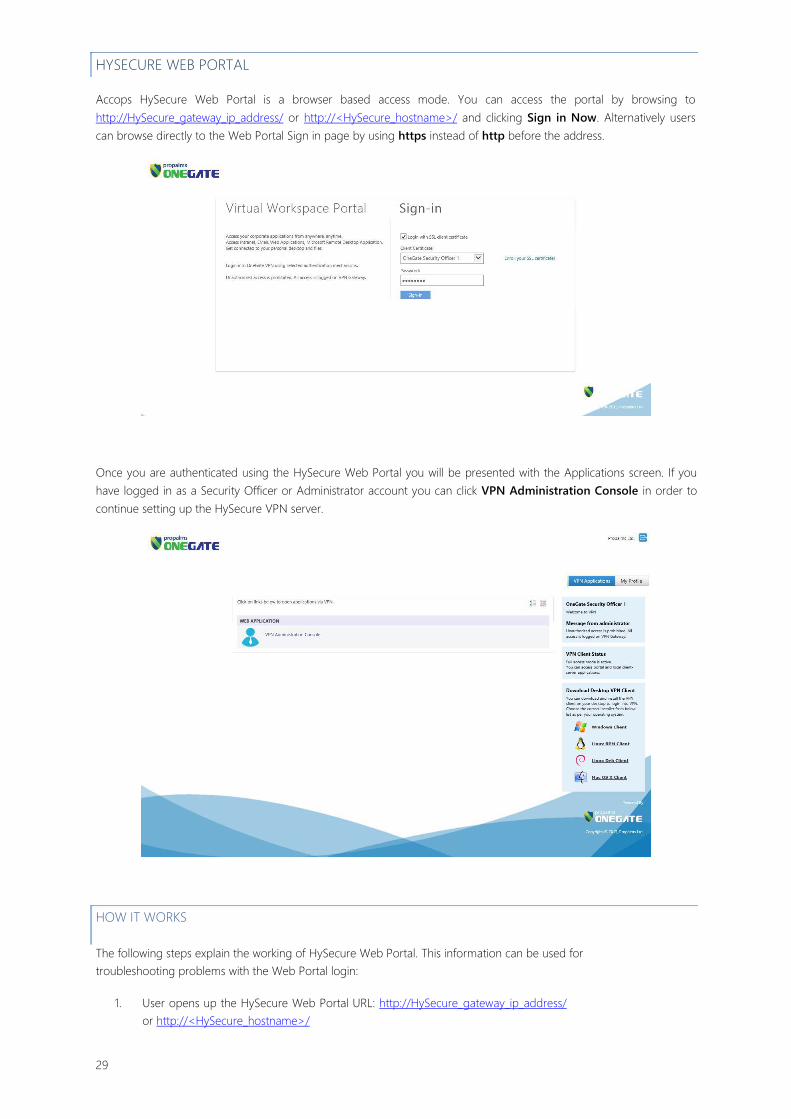
HYSECURE WEB PORTAL
Accops HySecure Web Portal is a browser based access mode. You can access the portal by browsing to
http://HySecure_gateway_ip_address/ or http://<HySecure_hostname>/ and clicking Sign in Now. Alternatively users
can browse directly to the Web Portal Sign in page by using https instead of http before the address.
Once you are authenticated using the HySecure Web Portal you will be presented with the Applications screen. If you
have logged in as a Security Officer or Administrator account you can click VPN Administration Console in order to
continue setting up the HySecure VPN server.
HOW IT WORKS
The following steps explain the working of HySecure Web Portal. This information can be used for
troubleshooting problems with the Web Portal login:
1. User opens up the HySecure Web Portal URL: http://HySecure_gateway_ip_address/
or http://<HySecure_hostname>/
29
2. Authentication methods are displayed to user 3. If using basic authentication user can simply enter username and password and select Sign-in to start login
process.
4. Alternatively, on selecting Login with SSL certificate, Java is initialized; Accops HySecure web components
are downloaded in %appdata%\Accops and currently installed certificates are listed for user to choose. 5. On selecting appropriate certificate user can enter password and press Sign-in to start login process. 6. User can also choose to enroll a new SSL Certificate by selecting option Enroll your SSL Certificate. 7. For either type of authentication, pressing on Sign-in button starts login process. 8. If Java is not initialized, Java is initialized now and Accops HySecure web components are downloaded in
%appdata%\Accops.
9. If Endpoint security is enabled, endpoint security components are downloaded in %appdata%\Accops
directory. Endpoint scan is performed and result is displayed to user if needed. 10. User authentication is performed and on successful authentication HySecure Client status is checked 11. If client is already installed, HySecure client is launched in hidden mode. If client is not present or an
older version is present, newer version of HySecure client is downloaded and installed.
12. Upon successful installation of HySecure Client, it is launched and user is redirected to application
landing page. 13. User can now access the applications.
HySecure Portal shows the following information to the user:
1. List of applications user has access to. NB: User may have access to more client-server applications which are not displayed on portal
2. A logon message by administration on login page 3. A welcome message by administration on portal landing page 4. Status of HySecure VPN client 5. Desktop Client installers 6. My Profile page with option to change password
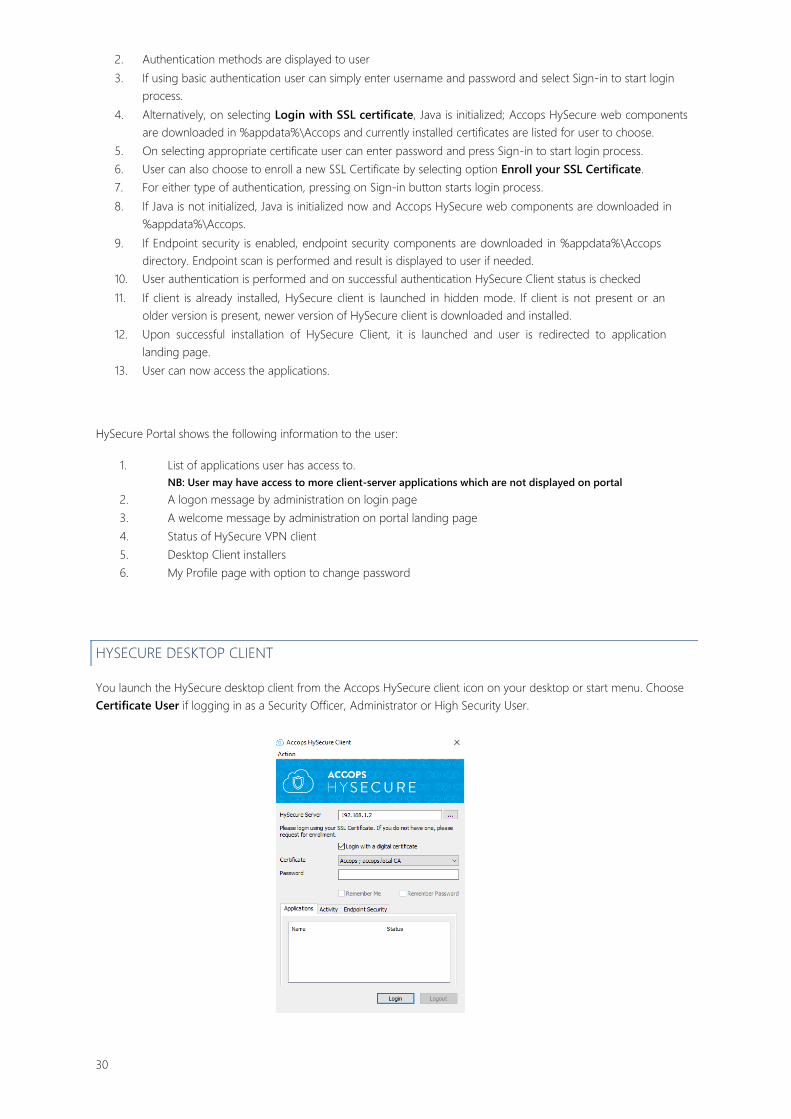
HYSECURE DESKTOP CLIENT
You launch the HySecure desktop client from the Accops HySecure client icon on your desktop or start menu. Choose
Certificate User if logging in as a Security Officer, Administrator or High Security User.
30
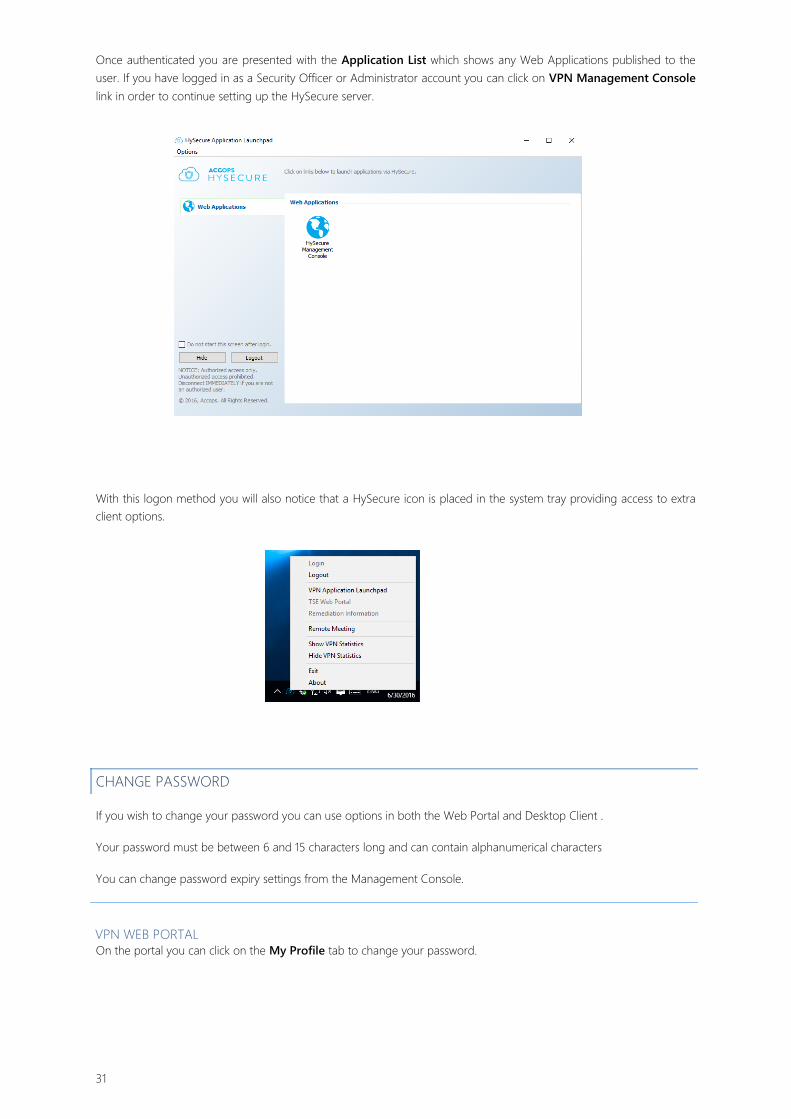
Once authenticated you are presented with the Application List which shows any Web Applications published to the
user. If you have logged in as a Security Officer or Administrator account you can click on VPN Management Console
link in order to continue setting up the HySecure server.
With this logon method you will also notice that a HySecure icon is placed in the system tray providing access to extra
client options.
CHANGE PASSWORD
If you wish to change your password you can use options in both the Web Portal and Desktop Client .
Your password must be between 6 and 15 characters long and can contain alphanumerical characters
You can change password expiry settings from the Management Console.
VPN WEB PORTAL
On the portal you can click on the My Profile tab to change your password.
31

DESKTOP CLIENT
In the Application List screen click Options > Change Password. The Change Password screen appears.
Important: If you accidentally lose your password, contact your HySecure Administrator.
CHANGE TO RUN STATE
In order to access HySecure as a non-admin user a Security officer or Administrator needs to move the server into RUN
state. This is performed in the Management Console under VPN Status > VPN Server State. Simply click Run State
to change the status.
32

CHAPTER 5
HYSECURE MANAGEMENT
OVERVIEW
To perform HySecure management functions, first login to the server as an Administrator or Security Officer. You can
either login through the Web Portal or Desktop Client where you will be presented with a HySecure Management
Console application. If the console doesn’t launch automatically then click the icon to launch the Management Console.
NB: A Security Officer or an Administrator logged onto HySecure with Basic Authentication will not have access to the
Management Console.
The Management Console will appear as shown below. The console is organized into a navigation tree on the left hand
side which is logically grouped into the following management sections:
VPN Status Displays real-time information about HySecure server
Access Management
Provides Application, Group and access configuration
options
Auth Management
Provides User, Group and Authentication configuration
options
Endpoint Management Configure Endpoint Security control and enforcement
Resources Miscellaneous settings for use with other admin tasks
Host Configuration Server specific settings and configuration
Host Maintenance HySecure backup, upgrade and licensing options
Monitoring and
Reporting Reports on User, Admin and Endpoint activities
High Availability Configure and Monitor High Availability options
Remote Meetings Remote meeting gateway configuration
Throughout the console, administrators can use the in-line help feature to assist them with their configuration.
Management tasks can only be performed by Administrators and Security Officers. Some of the administrative functions
include:
Creating/Adding Users Creating User Groups and organizing Users into User Groups Creating Applications Creating Application Groups and organizing registered Applications into Application Groups Creating Endpoint Security Host Scan Policies and Device Profiles Assigning Endpoint Security Host Scan Policies to Device Profiles
Assigning OTP to end user (HyID policy).
Configure self-service profile. Organizing registered Applications into Security Profiles Specifying time-based access restrictions (Access Filters) Assigning Application Groups to User Groups from (Access Control Lists)
Other administrative functions include updating selected configuration parameters registered during Bootstrap State
(such as Network settings, Database password, SMTP, and Proxy server details), specifying authentication settings,
setting client logout time, and specifying IP ranges for auto configuration of applications. These and other functions are
explained in more detail within this chapter.
VPN STATUS
The VPN status section of the console is provided to deliver real-time, relevant information to the administrator to assist
them to monitor the HySecure including user activity on the server as well as force user logout and change system
configuration state.
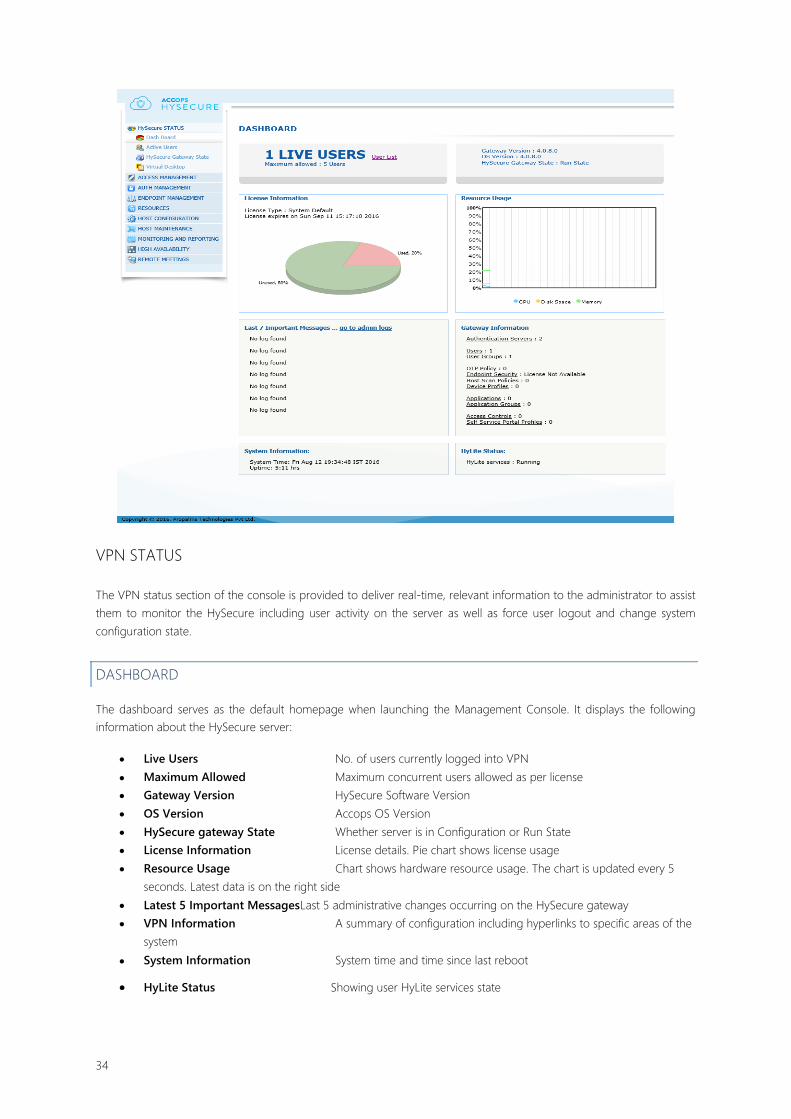
DASHBOARD
The dashboard serves as the default homepage when launching the Management Console. It displays the following
information about the HySecure server:
Live Users No. of users currently logged into VPN
Maximum Allowed Maximum concurrent users allowed as per license
Gateway Version HySecure Software Version
OS Version Accops OS Version
HySecure gateway State Whether server is in Configuration or Run State
License Information License details. Pie chart shows license usage
Resource Usage Chart shows hardware resource usage. The chart is updated every 5 seconds. Latest data is on the right side
Latest 5 Important MessagesLast 5 administrative changes occurring on the HySecure gateway VPN Information A summary of configuration including hyperlinks to specific areas of the
system
System Information System time and time since last reboot
HyLite Status Showing user HyLite services state
34
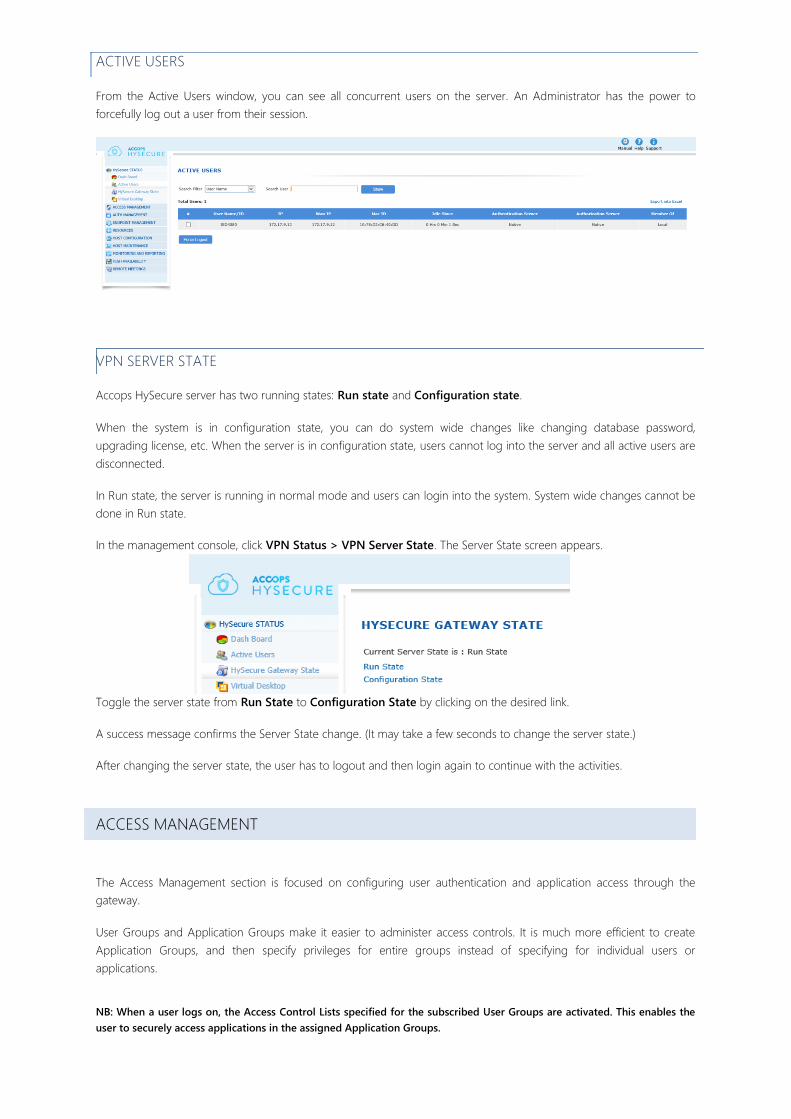
ACTIVE USERS
From the Active Users window, you can see all concurrent users on the server. An Administrator has the power to
forcefully log out a user from their session.
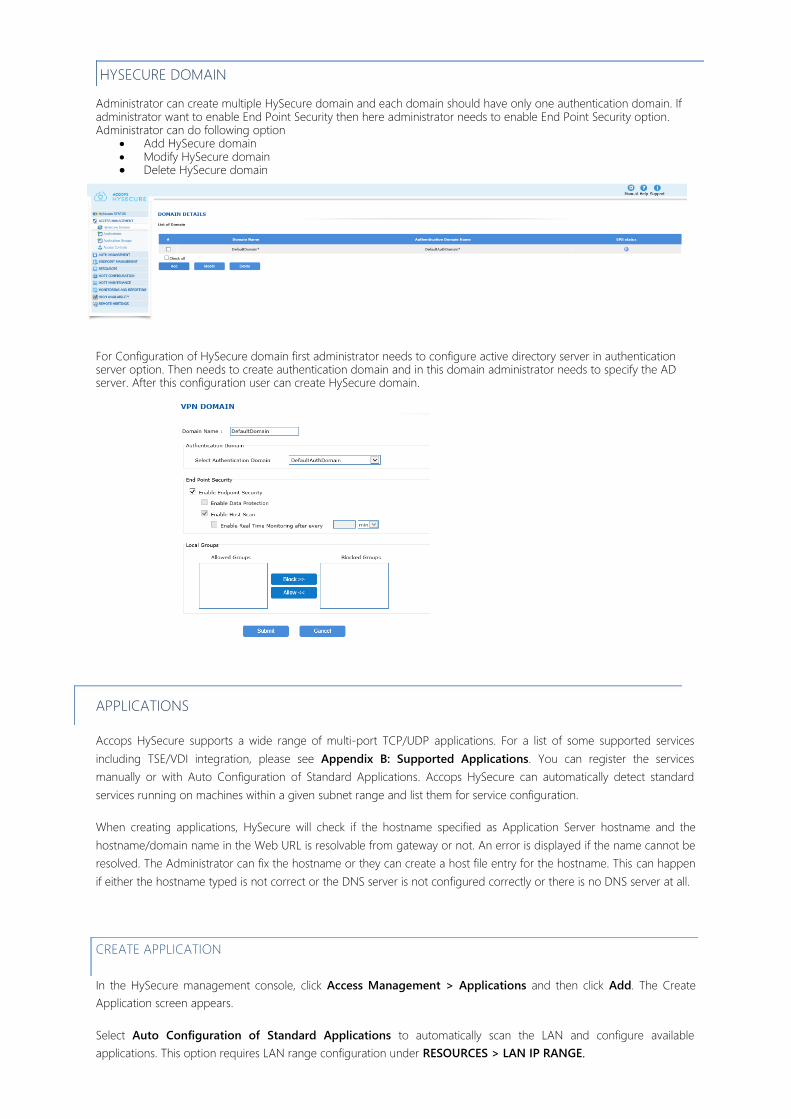
VPN SERVER STATE
Accops HySecure server has two running states: Run state and Configuration state.
When the system is in configuration state, you can do system wide changes like changing database password,
upgrading license, etc. When the server is in configuration state, users cannot log into the server and all active users are
disconnected.
In Run state, the server is running in normal mode and users can login into the system. System wide changes cannot be
done in Run state.
In the management console, click VPN Status > VPN Server State. The Server State screen appears.
Toggle the server state from Run State to Configuration State by clicking on the desired link.
A success message confirms the Server State change. (It may take a few seconds to change the server state.)
After changing the server state, the user has to logout and then login again to continue with the activities.
ACCESS MANAGEMENT
The Access Management section is focused on configuring user authentication and application access through the
gateway.
User Groups and Application Groups make it easier to administer access controls. It is much more efficient to create
Application Groups, and then specify privileges for entire groups instead of specifying for individual users or
applications.
NB: When a user logs on, the Access Control Lists specified for the subscribed User Groups are activated. This enables the
user to securely access applications in the assigned Application Groups.
HYSECURE DOMAIN Administrator can create multiple HySecure domain and each domain should have only one authentication domain. If administrator want to enable End Point Security then here administrator needs to enable End Point Security option. Administrator can do following option
Add HySecure domain Modify HySecure domain Delete HySecure domain
For Configuration of HySecure domain first administrator needs to configure active directory server in authentication server option. Then needs to create authentication domain and in this domain administrator needs to specify the AD server. After this configuration user can create HySecure domain.
APPLICATIONS
Accops HySecure supports a wide range of multi-port TCP/UDP applications. For a list of some supported services
including TSE/VDI integration, please see Appendix B: Supported Applications. You can register the services
manually or with Auto Configuration of Standard Applications. Accops HySecure can automatically detect standard
services running on machines within a given subnet range and list them for service configuration.
When creating applications, HySecure will check if the hostname specified as Application Server hostname and the
hostname/domain name in the Web URL is resolvable from gateway or not. An error is displayed if the name cannot be
resolved. The Administrator can fix the hostname or they can create a host file entry for the hostname. This can happen
if either the hostname typed is not correct or the DNS server is not configured correctly or there is no DNS server at all.
CREATE APPLICATION
In the HySecure management console, click Access Management > Applications and then click Add. The Create
Application screen appears.
Select Auto Configuration of Standard Applications to automatically scan the LAN and configure available
applications. This option requires LAN range configuration under RESOURCES > LAN IP RANGE.
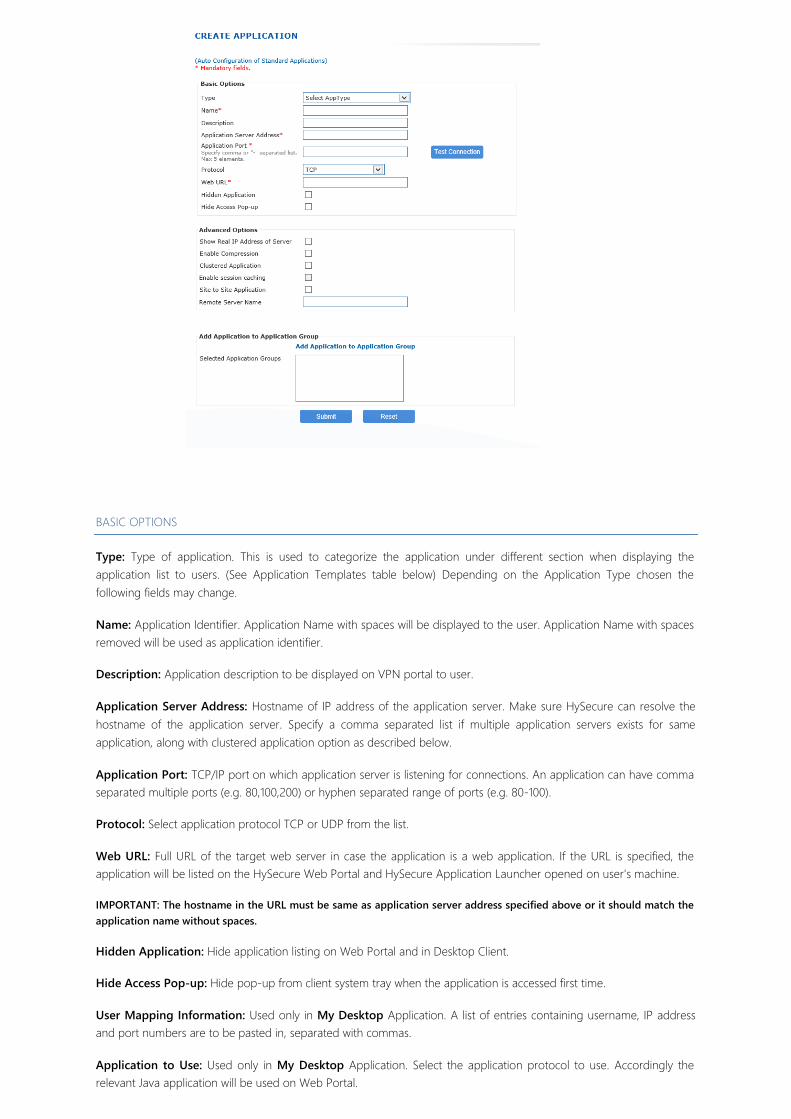
BASIC OPTIONS
Type: Type of application. This is used to categorize the application under different section when displaying the
application list to users. (See Application Templates table below) Depending on the Application Type chosen the
following fields may change.
Name: Application Identifier. Application Name with spaces will be displayed to the user. Application Name with spaces
removed will be used as application identifier.
Description: Application description to be displayed on VPN portal to user.
Application Server Address: Hostname of IP address of the application server. Make sure HySecure can resolve the
hostname of the application server. Specify a comma separated list if multiple application servers exists for same
application, along with clustered application option as described below.
Application Port: TCP/IP port on which application server is listening for connections. An application can have comma
separated multiple ports (e.g. 80,100,200) or hyphen separated range of ports (e.g. 80-100).
Protocol: Select application protocol TCP or UDP from the list.
Web URL: Full URL of the target web server in case the application is a web application. If the URL is specified, the
application will be listed on the HySecure Web Portal and HySecure Application Launcher opened on user's machine.
IMPORTANT: The hostname in the URL must be same as application server address specified above or it should match the
application name without spaces.
Hidden Application: Hide application listing on Web Portal and in Desktop Client.
Hide Access Pop-up: Hide pop-up from client system tray when the application is accessed first time.
User Mapping Information: Used only in My Desktop Application. A list of entries containing username, IP address
and port numbers are to be pasted in, separated with commas.
Application to Use: Used only in My Desktop Application. Select the application protocol to use. Accordingly the
relevant Java application will be used on Web Portal.

ADVANCED OPTIONS
Show Real IP Address of Server: Show Real IP address of server to applications on user machine. This will disable IP
address mangling for this application.
Enable Compression: Enable data compression for this application.
Clustered Application: Select this option if there are multiple application servers present in LAN to serve remote users
and HySecure should do round robin based load balancing among the application servers for this application. Multiple
application servers can be specified as a comma separated list in "Application Server Address" field.
Enable Session Caching: Select this option to enable sticky session feature when the application is running in
clustered mode.
Site to Site Application: Select if the application exists behind a remote HySecure gateway and is available over a site-
to-site connection.
Remote Server Name: In case of site to site application, enter hostname/IP address of remote HySecure gateway.
Auto Launch: Application will auto launch after user signs in.
USER OPTIONS
Certain application types have user configurable options available.
Enable Single Sign-on: Enables single sign-on functionality from VPN Portal.
Use VPN Credentials: VPN Credentials should be used for accessing application.
Use a Common Account: Use a common account for accessing application.
Username: Username for common account.
Password: Password for common account.
Domain: Domain name or workgroup.
User Home Directory: Specify the user’s home directory for file share access. This will also restrict the user to go
above this directory.
User can reboot VM: Applicable for Accops VDI - Allow the user to reboot the Virtual
desktop. For Http applications
REMOTE DISPLAY OPTIONS
Remote Display options are available for My Desktop, RDP and Accops VDI application types.
Let User Choose: Enables user to choose display options, local resources and program options while accessing
application.
Display Options: Choose color, screen resolution and performance options.
Local Resources: Remote Desktop Protocol local resources options for application access.
Program Name: Program to be executed while accessing application.

ADD TO APPLICATION GROUP
You can add an application to an Application Group by clicking on the Add Application to Application Group link.
Please see the Add Application to Application Group section that follows for more information.
Click Submit to create the application or click Reset to clear all data from this
screen. A success message confirms that the application is created.
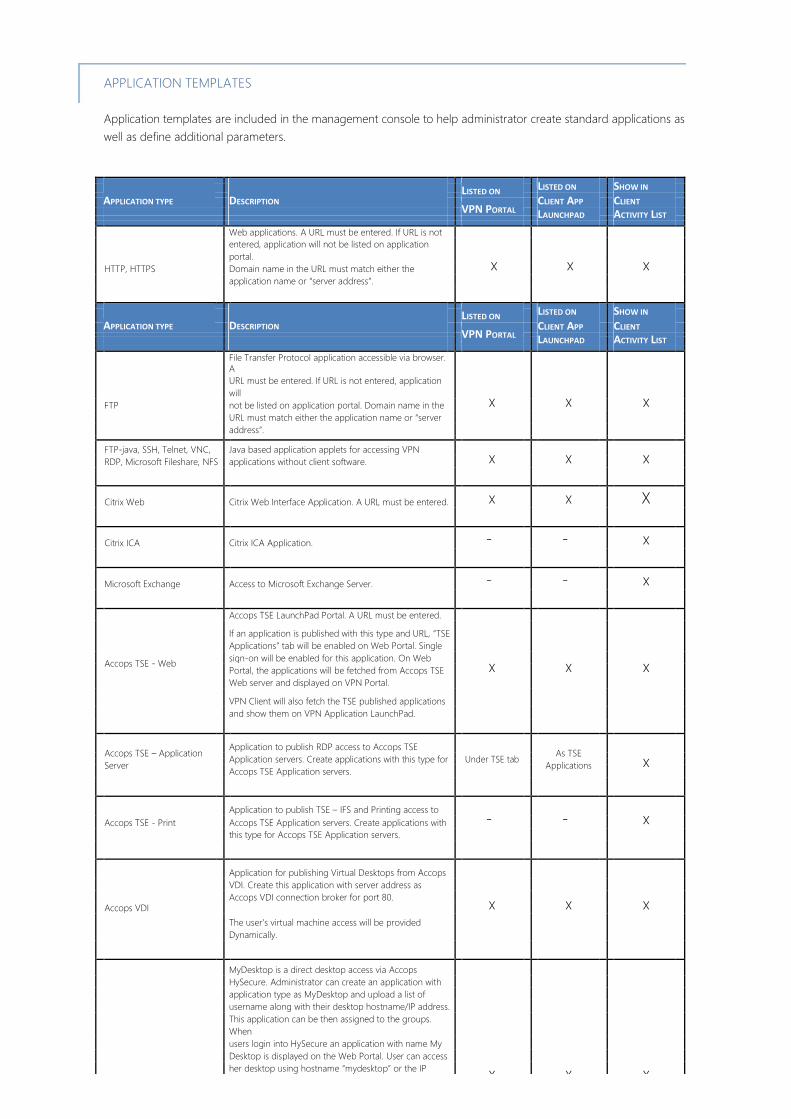
APPLICATION TEMPLATES
Application templates are included in the management console to help administrator create standard applications as
well as define additional parameters.
APPLICATION TYPE
DESCRIPTION
LISTED ON
LISTED ON SHOW IN
CLIENT APP
CLIENT
VPN PORTAL
LAUNCHPAD
ACTIVITY LIST
Web applications. A URL must be entered. If URL is not
HTTP, HTTPS
entered, application will not be listed on application
portal. x
x
x
Domain name in the URL must match either the
application name or “server address”.
APPLICATION TYPE
DESCRIPTION
LISTED ON
LISTED ON SHOW IN
CLIENT APP
CLIENT
VPN PORTAL
LAUNCHPAD
ACTIVITY LIST
File Transfer Protocol application accessible via browser.
A
FTP
URL must be entered. If URL is not entered, application
will x
x
x
not be listed on application portal. Domain name in the
URL must match either the application name or “server
address”.
FTP-java, SSH, Telnet, VNC, Java based application applets for accessing VPN x
x
x
RDP, Microsoft Fileshare, NFS applications without client software.
Citrix Web Citrix Web Interface Application. A URL must be entered. x x X
Citrix ICA Citrix ICA Application. - - x
Microsoft Exchange Access to Microsoft Exchange Server. - - x
Accops TSE LaunchPad Portal. A URL must be entered.
If an application is published with this type and URL, “TSE Applications” tab will be enabled on Web Portal. Single
Accops TSE - Web sign-on will be enabled for this application. On Web
x
x
x
Portal, the applications will be fetched from Accops TSE
Web server and displayed on VPN Portal.
VPN Client will also fetch the TSE published applications and show them on VPN Application LaunchPad.
Accops TSE – Application Application to publish RDP access to Accops TSE
As TSE
x
Application servers. Create applications with this type for
Under TSE tab
Server
Applications
Accops TSE Application servers.
Application to publish TSE – IFS and Printing access to
-
-
x
Accops TSE - Print Accops TSE Application servers. Create applications with this type for Accops TSE Application servers.
Application for publishing Virtual Desktops from Accops VDI. Create this application with server address as
Accops VDI
Accops VDI connection broker for port 80. x
x
x
The user’s virtual machine access will be provided Dynamically.
MyDesktop is a direct desktop access via Accops HySecure. Administrator can create an application with
application type as MyDesktop and upload a list of
username along with their desktop hostname/IP address.
This application can be then assigned to the groups.
When
users login into HySecure an application with name My
Desktop is displayed on the Web Portal. User can access
her desktop using hostname “mydesktop” or the IP x x x
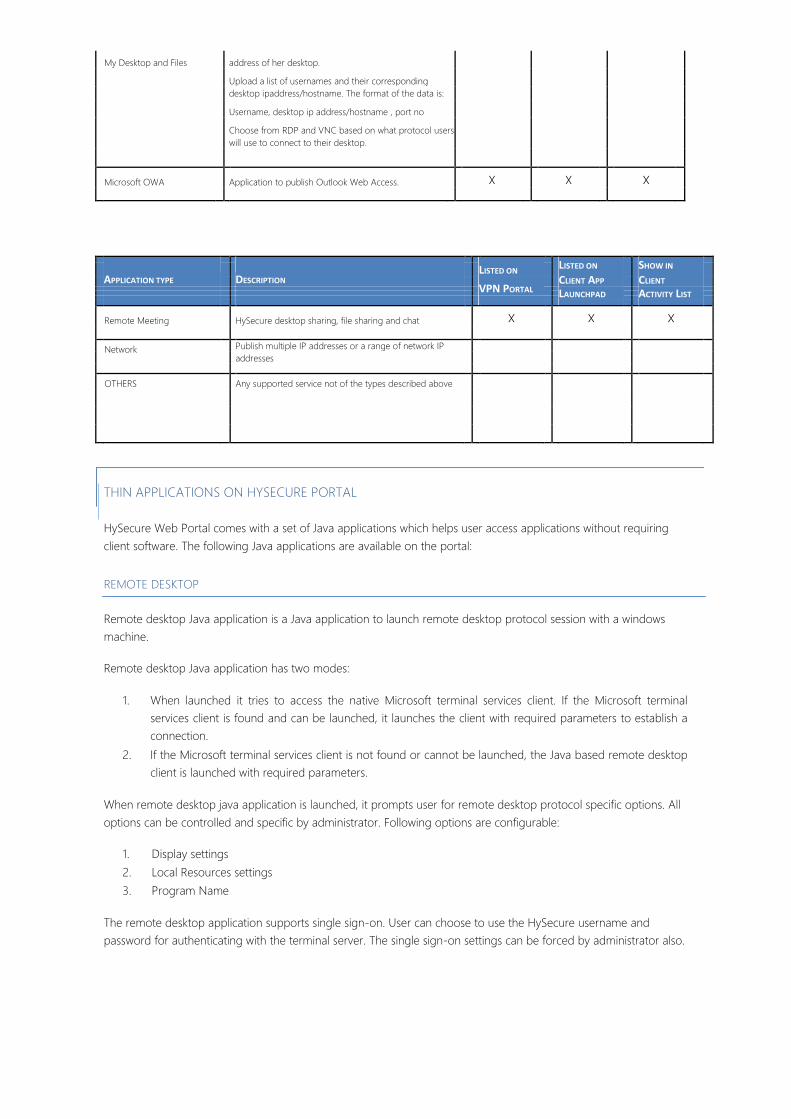
My Desktop and Files address of her desktop.
Upload a list of usernames and their corresponding desktop ipaddress/hostname. The format of the data is:
Username, desktop ip address/hostname , port no
Choose from RDP and VNC based on what protocol users will use to connect to their desktop.
Microsoft OWA Application to publish Outlook Web Access. x x x
APPLICATION TYPE
DESCRIPTION
LISTED ON
LISTED ON SHOW IN
CLIENT APP
CLIENT
VPN PORTAL
LAUNCHPAD
ACTIVITY LIST
Remote Meeting HySecure desktop sharing, file sharing and chat x x x
Network Publish multiple IP addresses or a range of network IP
addresses
OTHERS Any supported service not of the types described above
THIN APPLICATIONS ON HYSECURE PORTAL
HySecure Web Portal comes with a set of Java applications which helps user access applications without requiring
client software. The following Java applications are available on the portal:
REMOTE DESKTOP
Remote desktop Java application is a Java application to launch remote desktop protocol session with a windows
machine.
Remote desktop Java application has two modes:
1. When launched it tries to access the native Microsoft terminal services client. If the Microsoft terminal
services client is found and can be launched, it launches the client with required parameters to establish a
connection.
2. If the Microsoft terminal services client is not found or cannot be launched, the Java based remote desktop
client is launched with required parameters.
When remote desktop java application is launched, it prompts user for remote desktop protocol specific options. All
options can be controlled and specific by administrator. Following options are configurable:
1. Display settings 2. Local Resources settings 3. Program Name
The remote desktop application supports single sign-on. User can choose to use the HySecure username and
password for authenticating with the terminal server. The single sign-on settings can be forced by administrator also.
FILE TRANSFER
File transfer is a Java application to launch FTP session with a FTP server.
The FTP application supports single sign-on. User can choose to use the HySecure username and password for
authenticating with the server. The single sign-on settings can be forced by administrator also.
SECURE SHELL
Secure Shell is a Java application to launch SSH session with a SSH server.
VNC
VNC Application is a Java application for VNC protocol sessions.
The VNC application supports single sign-on. User can choose to use the HySecure username and password for
authenticating with the VNC server. The single sign-on settings can be forced by administrator also.
FILE SHARE
File Share application is a Java application for Microsoft File Share protocol SMB and open protocol NFS. When run by
user, the application browses the shared files and folder on the target server.
The File Share application supports single sign-on. User can choose to use the HySecure username and password for
authenticating with the target server. The single sign-on settings can be forced by administrator also.
Administrator can also force a home directory for the user. If specified, user can only browse the child directories of the
home directory and cannot access any other root directory.
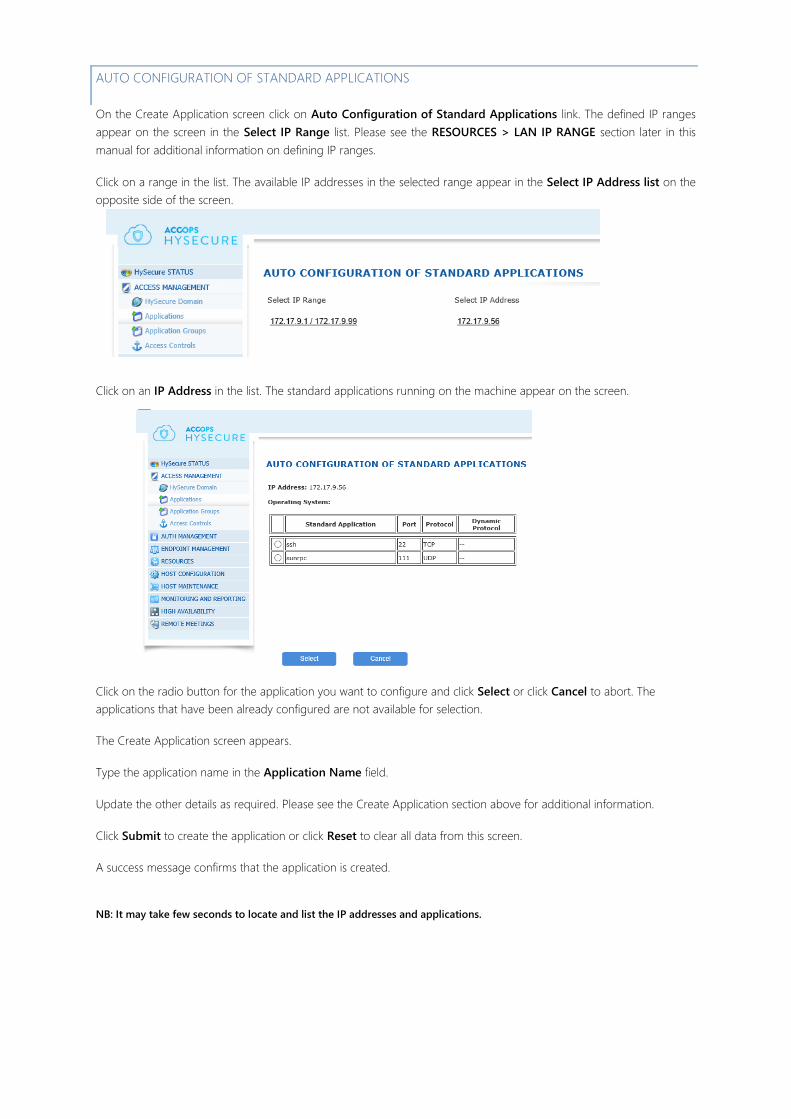
AUTO CONFIGURATION OF STANDARD APPLICATIONS
On the Create Application screen click on Auto Configuration of Standard Applications link. The defined IP ranges
appear on the screen in the Select IP Range list. Please see the RESOURCES > LAN IP RANGE section later in this
manual for additional information on defining IP ranges.
Click on a range in the list. The available IP addresses in the selected range appear in the Select IP Address list on the
opposite side of the screen.
Click on an IP Address in the list. The standard applications running on the machine appear on the screen.
Click on the radio button for the application you want to configure and click Select or click Cancel to abort. The
applications that have been already configured are not available for selection.
The Create Application screen appears.
Type the application name in the Application Name field.
Update the other details as required. Please see the Create Application section above for additional information.
Click Submit to create the application or click Reset to clear all data from this screen.
A success message confirms that the application is created.
NB: It may take few seconds to locate and list the IP addresses and applications.
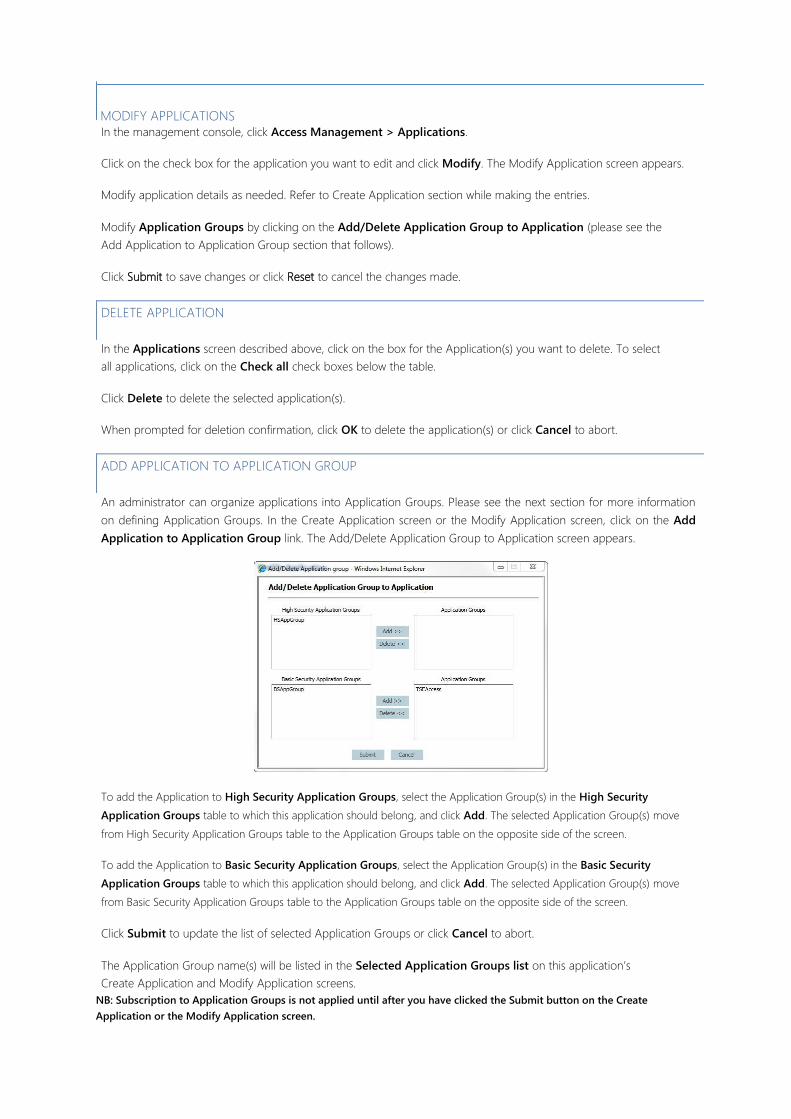
MODIFY APPLICATIONS
In the management console, click Access Management > Applications.
Click on the check box for the application you want to edit and click Modify. The Modify Application screen appears.
Modify application details as needed. Refer to Create Application section while making the entries.
Modify Application Groups by clicking on the Add/Delete Application Group to Application (please see the
Add Application to Application Group section that follows).
Click Submit to save changes or click Reset to cancel the changes made.
DELETE APPLICATION
In the Applications screen described above, click on the box for the Application(s) you want to delete. To select
all applications, click on the Check all check boxes below the table.
Click Delete to delete the selected application(s).
When prompted for deletion confirmation, click OK to delete the application(s) or click Cancel to abort.
ADD APPLICATION TO APPLICATION GROUP
An administrator can organize applications into Application Groups. Please see the next section for more information
on defining Application Groups. In the Create Application screen or the Modify Application screen, click on the Add
Application to Application Group link. The Add/Delete Application Group to Application screen appears.
To add the Application to High Security Application Groups, select the Application Group(s) in the High Security
Application Groups table to which this application should belong, and click Add. The selected Application Group(s) move
from High Security Application Groups table to the Application Groups table on the opposite side of the screen.
To add the Application to Basic Security Application Groups, select the Application Group(s) in the Basic Security
Application Groups table to which this application should belong, and click Add. The selected Application Group(s) move
from Basic Security Application Groups table to the Application Groups table on the opposite side of the screen.
Click Submit to update the list of selected Application Groups or click Cancel to abort.
The Application Group name(s) will be listed in the Selected Application Groups list on this application’s
Create Application and Modify Application screens.
NB: Subscription to Application Groups is not applied until after you have clicked the Submit button on the Create
Application or the Modify Application screen.

APPLICATION GROUPS
Application Groups allow you to organize applications on the basis of function, logistics or any criteria that suits your
organization. HySecure Administrator can create two types of Application Groups:
High Security Application Group Basic Security Application Group
The registered applications can be added to multiple Application Groups of any type. The User Groups and Application
Groups make it easier to administer access controls. When creating Access Control Lists, the Basic Security User Groups
can be assigned only Basic Security Application Groups whereas the High Security User Groups can be assigned both
Basic and High Security Application Groups.
CREATE APPLICATION GROUP
In the management console, click Access Management > Application Groups. To create a new Application Group
click Add.
Type the group name in the Application Group Name field.
To create a High Security Application Group, click on the check box for High. To create a Basic
Security Application Group, leave it empty.
Click on the Select Applications link to add applications to this group (see the next section Add Applications to Group
for more information).
Click Submit to create the Application group or click Reset to clear all data from this screen.
53
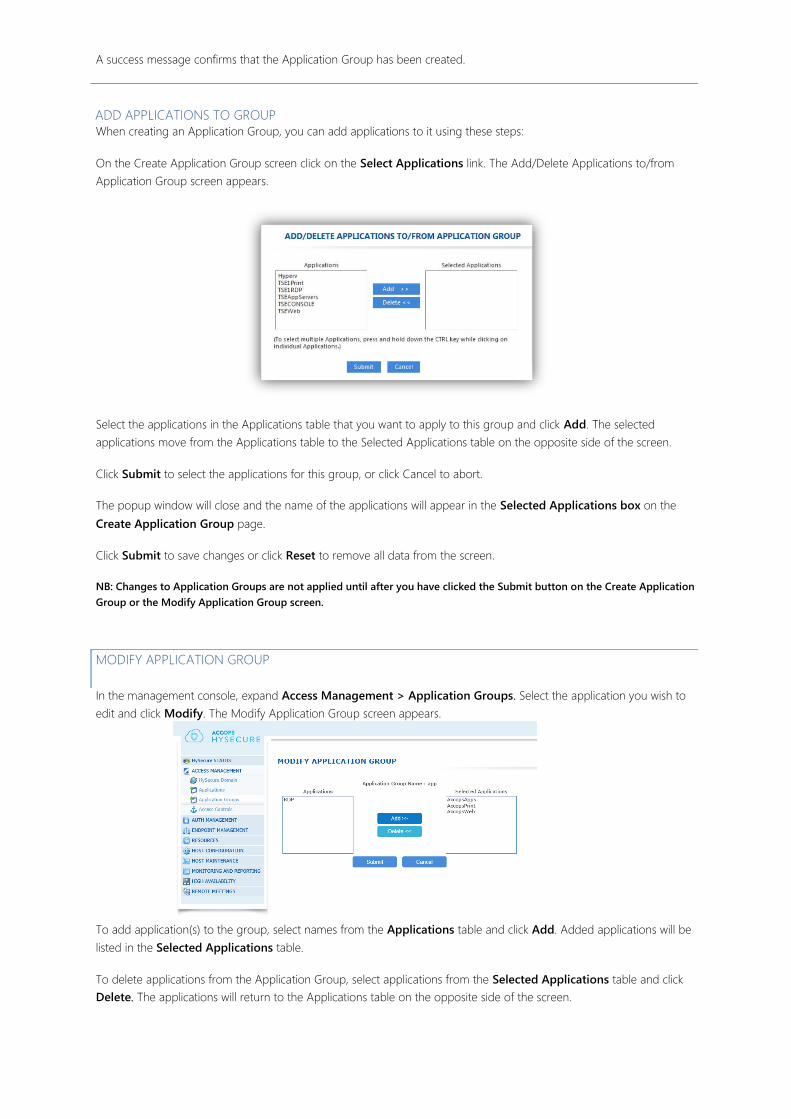
A success message confirms that the Application Group has been created.
ADD APPLICATIONS TO GROUP
When creating an Application Group, you can add applications to it using these steps:
On the Create Application Group screen click on the Select Applications link. The Add/Delete Applications to/from
Application Group screen appears.
Select the applications in the Applications table that you want to apply to this group and click Add. The selected
applications move from the Applications table to the Selected Applications table on the opposite side of the screen.
Click Submit to select the applications for this group, or click Cancel to abort.
The popup window will close and the name of the applications will appear in the Selected Applications box on the Create Application Group page.
Click Submit to save changes or click Reset to remove all data from the screen.
NB: Changes to Application Groups are not applied until after you have clicked the Submit button on the Create Application
Group or the Modify Application Group screen.
MODIFY APPLICATION GROUP
In the management console, expand Access Management > Application Groups. Select the application you wish to
edit and click Modify. The Modify Application Group screen appears.
To add application(s) to the group, select names from the Applications table and click Add. Added applications will be
listed in the Selected Applications table.
To delete applications from the Application Group, select applications from the Selected Applications table and click
Delete. The applications will return to the Applications table on the opposite side of the screen.

Click Submit to update the list of applications for this group or click Cancel to abort.
DELETE APPLICATION GROUP
When in the Application Group screen, click on
select all Application Groups, click on the Check all
the checkbox for the Application Group(s) you want to delete. To
checkbox below the table.
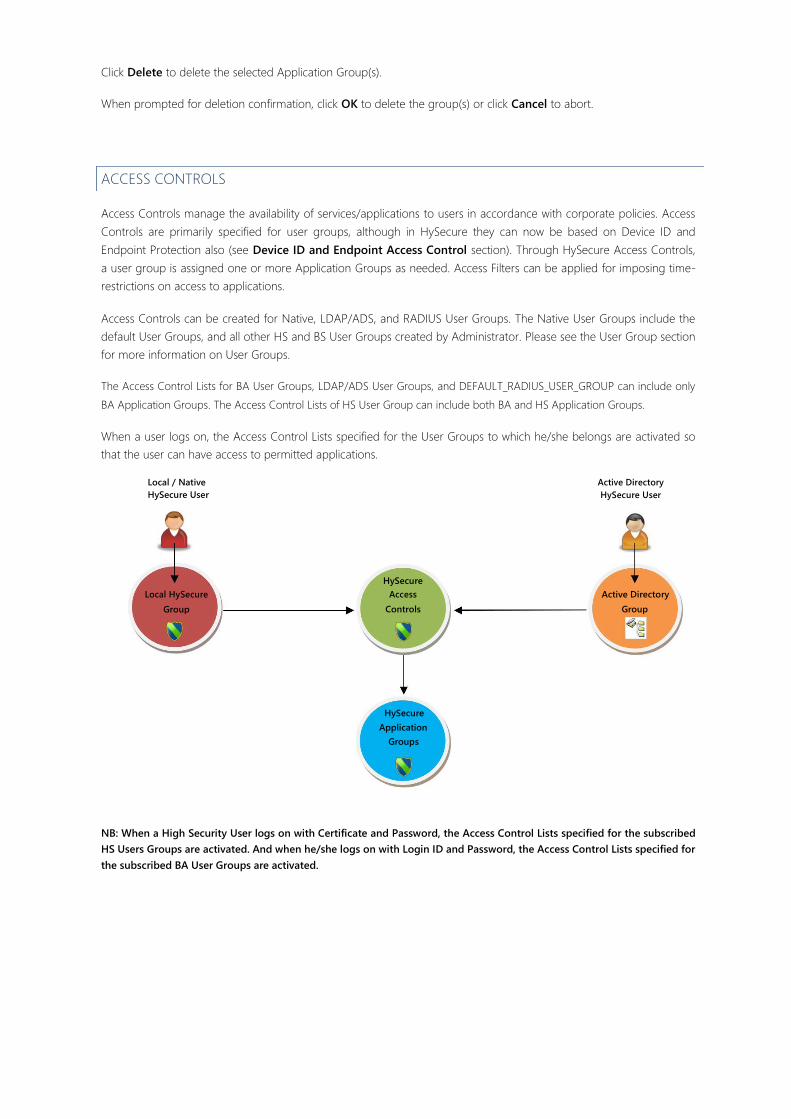
Click Delete to delete the selected Application Group(s).
When prompted for deletion confirmation, click OK to delete the group(s) or click Cancel to abort.
ACCESS CONTROLS
Access Controls manage the availability of services/applications to users in accordance with corporate policies. Access
Controls are primarily specified for user groups, although in HySecure they can now be based on Device ID and
Endpoint Protection also (see Device ID and Endpoint Access Control section). Through HySecure Access Controls,
a user group is assigned one or more Application Groups as needed. Access Filters can be applied for imposing time-
restrictions on access to applications.
Access Controls can be created for Native, LDAP/ADS, and RADIUS User Groups. The Native User Groups include the
default User Groups, and all other HS and BS User Groups created by Administrator. Please see the User Group section
for more information on User Groups.
The Access Control Lists for BA User Groups, LDAP/ADS User Groups, and DEFAULT_RADIUS_USER_GROUP can include only
BA Application Groups. The Access Control Lists of HS User Group can include both BA and HS Application Groups.
When a user logs on, the Access Control Lists specified for the User Groups to which he/she belongs are activated so
that the user can have access to permitted applications.
Local / Native Active Directory
HySecure User HySecure User
HySecure
Local HySecure Access Active Directory
Group Controls Group
HySecure
Application Groups
NB: When a High Security User logs on with Certificate and Password, the Access Control Lists specified for the subscribed
HS Users Groups are activated. And when he/she logs on with Login ID and Password, the Access Control Lists specified for
the subscribed BA User Groups are activated.
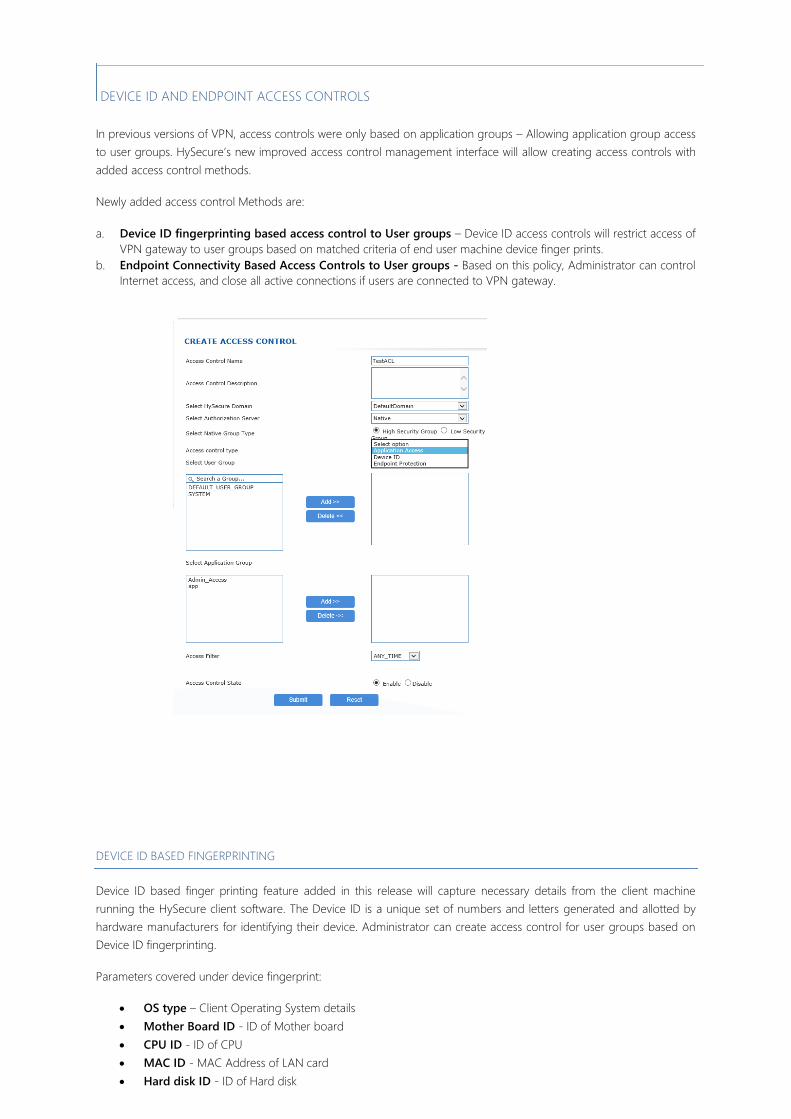
DEVICE ID AND ENDPOINT ACCESS CONTROLS
In previous versions of VPN, access controls were only based on application groups – Allowing application group access
to user groups. HySecure’s new improved access control management interface will allow creating access controls with
added access control methods.
Newly added access control Methods are:
a. Device ID fingerprinting based access control to User groups – Device ID access controls will restrict access of
VPN gateway to user groups based on matched criteria of end user machine device finger prints. b. Endpoint Connectivity Based Access Controls to User groups - Based on this policy, Administrator can control
Internet access, and close all active connections if users are connected to VPN gateway.
DEVICE ID BASED FINGERPRINTING
Device ID based finger printing feature added in this release will capture necessary details from the client machine
running the HySecure client software. The Device ID is a unique set of numbers and letters generated and allotted by
hardware manufacturers for identifying their device. Administrator can create access control for user groups based on
Device ID fingerprinting.
Parameters covered under device fingerprint:
OS type – Client Operating System details Mother Board ID - ID of Mother board CPU ID - ID of CPU MAC ID - MAC Address of LAN card Hard disk ID - ID of Hard disk
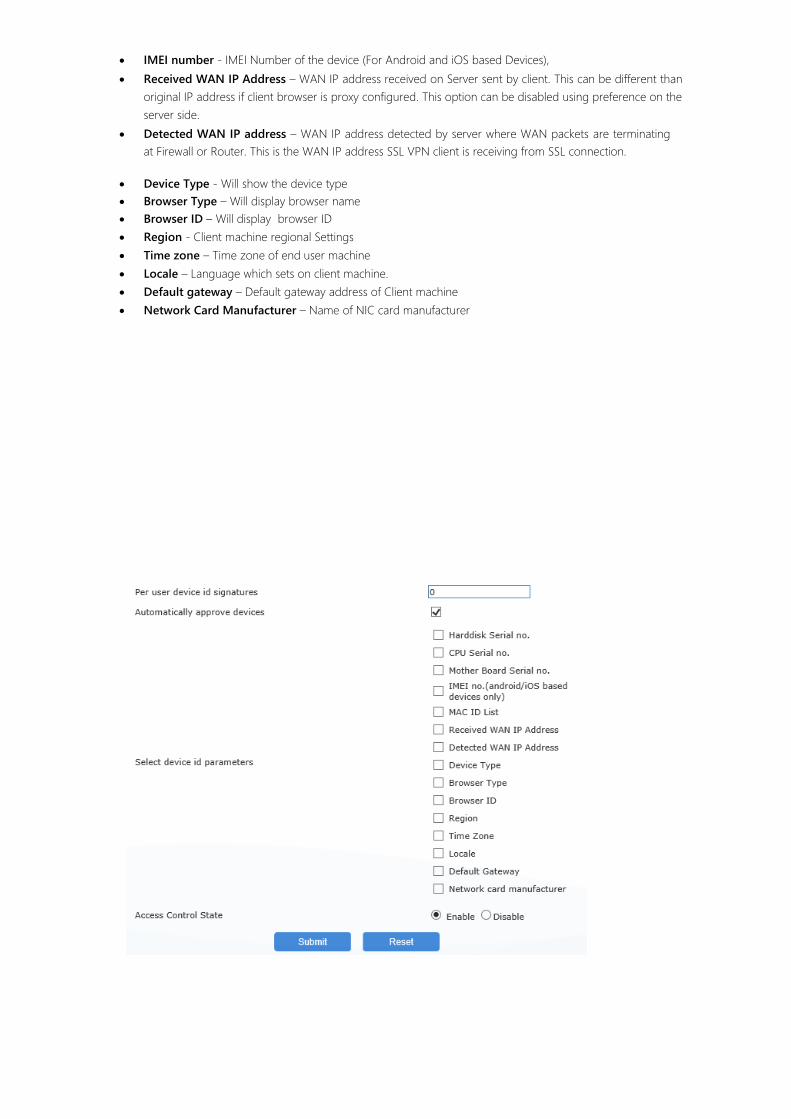
IMEI number - IMEI Number of the device (For Android and iOS based Devices), Received WAN IP Address – WAN IP address received on Server sent by client. This can be different than
original IP address if client browser is proxy configured. This option can be disabled using preference on the
server side.
Detected WAN IP address – WAN IP address detected by server where WAN packets are terminating
at Firewall or Router. This is the WAN IP address SSL VPN client is receiving from SSL connection.
Device Type - Will show the device type
Browser Type – Will display browser name
Browser ID – Will display browser ID Region - Client machine regional Settings Time zone – Time zone of end user machine Locale – Language which sets on client machine. Default gateway – Default gateway address of Client machine Network Card Manufacturer – Name of NIC card manufacturer
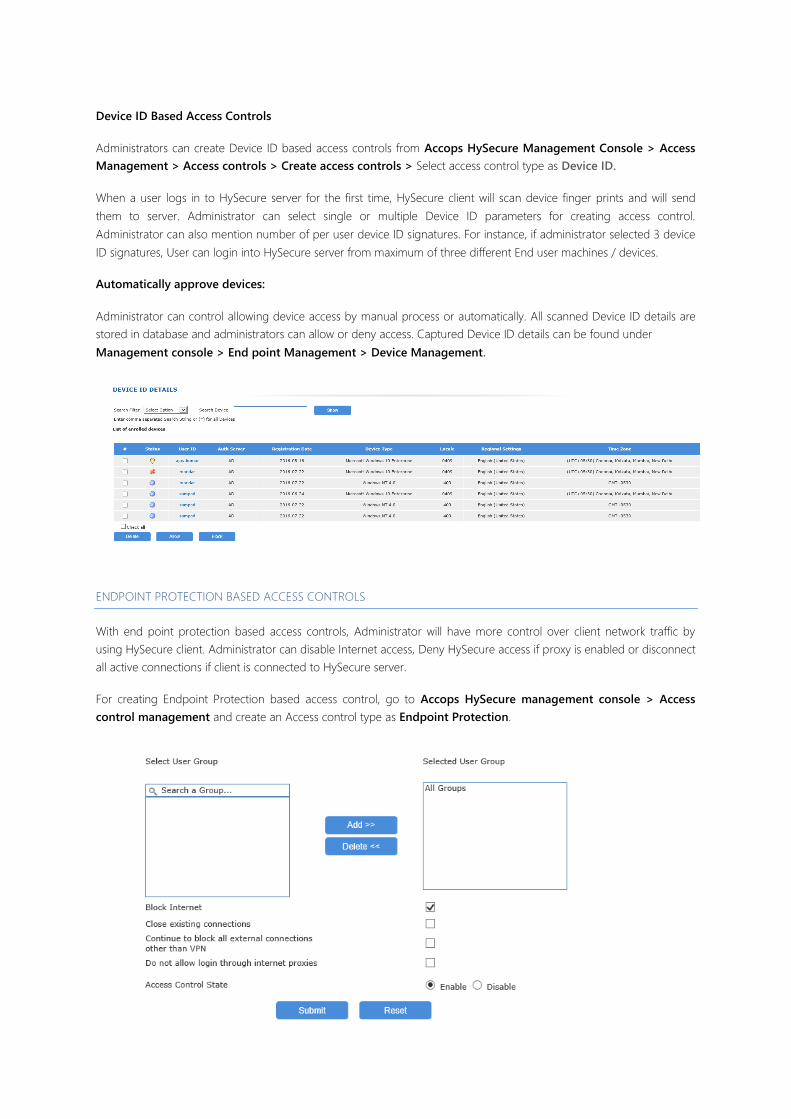
Device ID Based Access Controls
Administrators can create Device ID based access controls from Accops HySecure Management Console > Access
Management > Access controls > Create access controls > Select access control type as Device ID.
When a user logs in to HySecure server for the first time, HySecure client will scan device finger prints and will send
them to server. Administrator can select single or multiple Device ID parameters for creating access control.
Administrator can also mention number of per user device ID signatures. For instance, if administrator selected 3 device
ID signatures, User can login into HySecure server from maximum of three different End user machines / devices.
Automatically approve devices:
Administrator can control allowing device access by manual process or automatically. All scanned Device ID details are
stored in database and administrators can allow or deny access. Captured Device ID details can be found under Management console > End point Management > Device Management.
ENDPOINT PROTECTION BASED ACCESS CONTROLS
With end point protection based access controls, Administrator will have more control over client network traffic by
using HySecure client. Administrator can disable Internet access, Deny HySecure access if proxy is enabled or disconnect
all active connections if client is connected to HySecure server.
For creating Endpoint Protection based access control, go to Accops HySecure management console > Access
control management and create an Access control type as Endpoint Protection.
Close all Existing connections and Keep VPN Session Safe
In access control management, create access control type Endpoint Protection. If close existing connections is
enabled, when the user logs in previously connected external packets will be disconnected. If continue to block all
external connections other than VPN is also turned ON, then no external connections are allowed. HySecure VPN
client will keep checking for applications that are connected to external servers and will kill those applications.
Disable Internet for end users
In access control management, create access control with Endpoint Protection policy type. If Block Internet is
enabled for the user, Internet access will be disabled for the user after login.
Do not allow login through internet proxies
If proxy is enabled on client machine’s browser, end user will not to be allowed to login to HySecure VPN Gateway.
CREATE ACCESS CONTROL In the management console, click Access Management and then choose Access Controls. Click on the Add button.
Give the Access Control a Name and optionally a description.
In the Select Authorization Server dropdown menu choose your Authorization server from which to fetch list of
groups.
Native: Select Native to use HySecure local database groups. You can filter the Native local groups by clicking the
radio button for High Security Group and Low Security Group.
The following default groups can be used for authorization when using local database (Native):
o DEFAULT_USER_GROUP: All users and groups
o SYSTEM: All Security Officers and administrators.
o DEFAULT_BA_USER_GROUP: All users authenticating with basic username/password/token.
Active Directory / LDAP: If you have setup AD / LDAP as an authorization server choose the server from the
dropdown menu.
The following default group can be used for authorization when using AD/LDAP server:
o All Groups: All groups exiting on Ad/LDAP server. In this case the application group would be available
to any user authorized by AD/LDAP server.
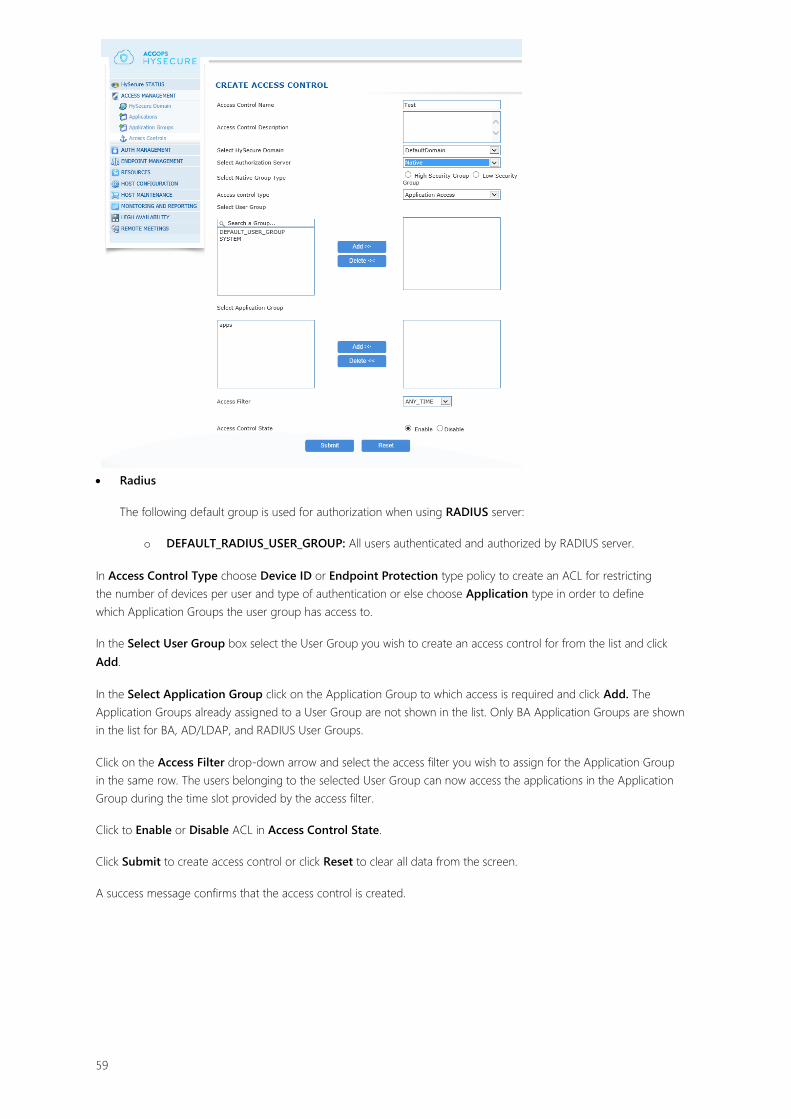
Radius
The following default group is used for authorization when using RADIUS server:
o DEFAULT_RADIUS_USER_GROUP: All users authenticated and authorized by RADIUS server.
In Access Control Type choose Device ID or Endpoint Protection type policy to create an ACL for restricting
the number of devices per user and type of authentication or else choose Application type in order to define
which Application Groups the user group has access to.
In the Select User Group box select the User Group you wish to create an access control for from the list and click Add.
In the Select Application Group click on the Application Group to which access is required and click Add. The
Application Groups already assigned to a User Group are not shown in the list. Only BA Application Groups are shown
in the list for BA, AD/LDAP, and RADIUS User Groups.
Click on the Access Filter drop-down arrow and select the access filter you wish to assign for the Application Group
in the same row. The users belonging to the selected User Group can now access the applications in the Application
Group during the time slot provided by the access filter.
Click to Enable or Disable ACL in Access Control State.
Click Submit to create access control or click Reset to clear all data from the screen.
A success message confirms that the access control is created.
59
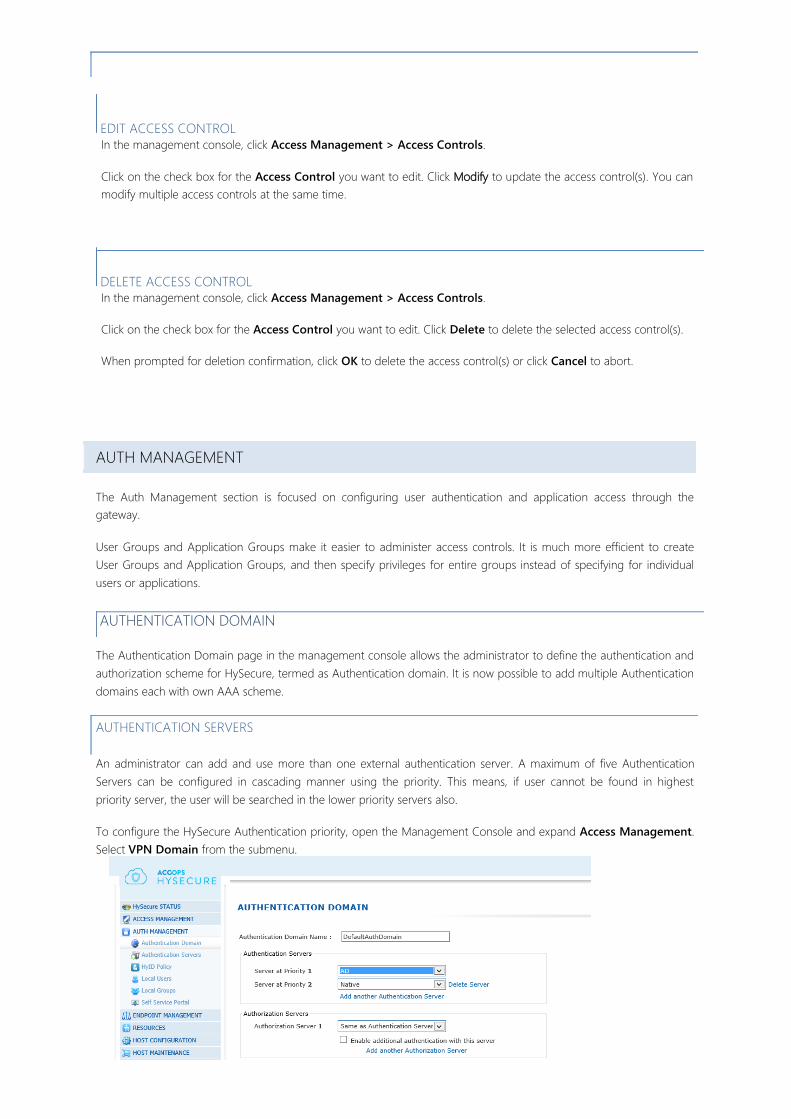
EDIT ACCESS CONTROL
In the management console, click Access Management > Access Controls.
Click on the check box for the Access Control you want to edit. Click Modify to update the access control(s). You can
modify multiple access controls at the same time.
DELETE ACCESS CONTROL
In the management console, click Access Management > Access Controls.
Click on the check box for the Access Control you want to edit. Click Delete to delete the selected access control(s).
When prompted for deletion confirmation, click OK to delete the access control(s) or click Cancel to abort.
AUTH MANAGEMENT
The Auth Management section is focused on configuring user authentication and application access through the
gateway.
User Groups and Application Groups make it easier to administer access controls. It is much more efficient to create
User Groups and Application Groups, and then specify privileges for entire groups instead of specifying for individual
users or applications.
AUTHENTICATION DOMAIN
The Authentication Domain page in the management console allows the administrator to define the authentication and
authorization scheme for HySecure, termed as Authentication domain. It is now possible to add multiple Authentication
domains each with own AAA scheme.
AUTHENTICATION SERVERS
An administrator can add and use more than one external authentication server. A maximum of five Authentication
Servers can be configured in cascading manner using the priority. This means, if user cannot be found in highest
priority server, the user will be searched in the lower priority servers also.
To configure the HySecure Authentication priority, open the Management Console and expand Access Management.
Select VPN Domain from the submenu.

Simply use the drop down list in the Authentication Servers box to specify the priority order for authenticating users
to HySecure.
You can delete servers from the priority list by using the Delete Server option.
NB: Deleting servers from this list does NOT remove the authentication servers from the system.
AUTHORIZATION SERVERS
In case the authentication server cannot provide role/group information for an incoming user, a separate authorization
server can be specified which will be used to provide user role information. Authentication servers like OTP tokens or RSA Secure ID servers may not provide role information to HySecure. HySecure requires user’s role to assign
applications to the user. With such servers an additional external authentication server or native groups can be used to
decide the role of the user.
The authentication is done with the external authentication server and then the username is searched in the configured
external authorization server.
Authorization servers can also be configured in cascading manner using the priority. A maximum of two authorization
servers can be configured. Selecting the option same as Authentication Server will cause the authorization to happen
with the authentication server through which the user is authenticated.
Simply add your chosen Authentication server which is to be used for Authorization search on login.
AUTHENTICATION SERVERS
As well as having a local database of users who can authenticate to HySecure, you can configure authentication servers
which will allow integration with LDAP based directories such as Active Directory or RADIUS based authentication
systems. Once configured, these Authentication Servers become active in the VPN Domains and Access Controls
pages.
ADD AUTHENTICATION SERVER
Open HySecure management console, click to expand Access Management, and then click Authentication
Servers. Click Add to specify a new Authentication Server. Choose from one of AD/LDAP, Radius or ProID
AD/LDAP AUTHENTICATION SERVER
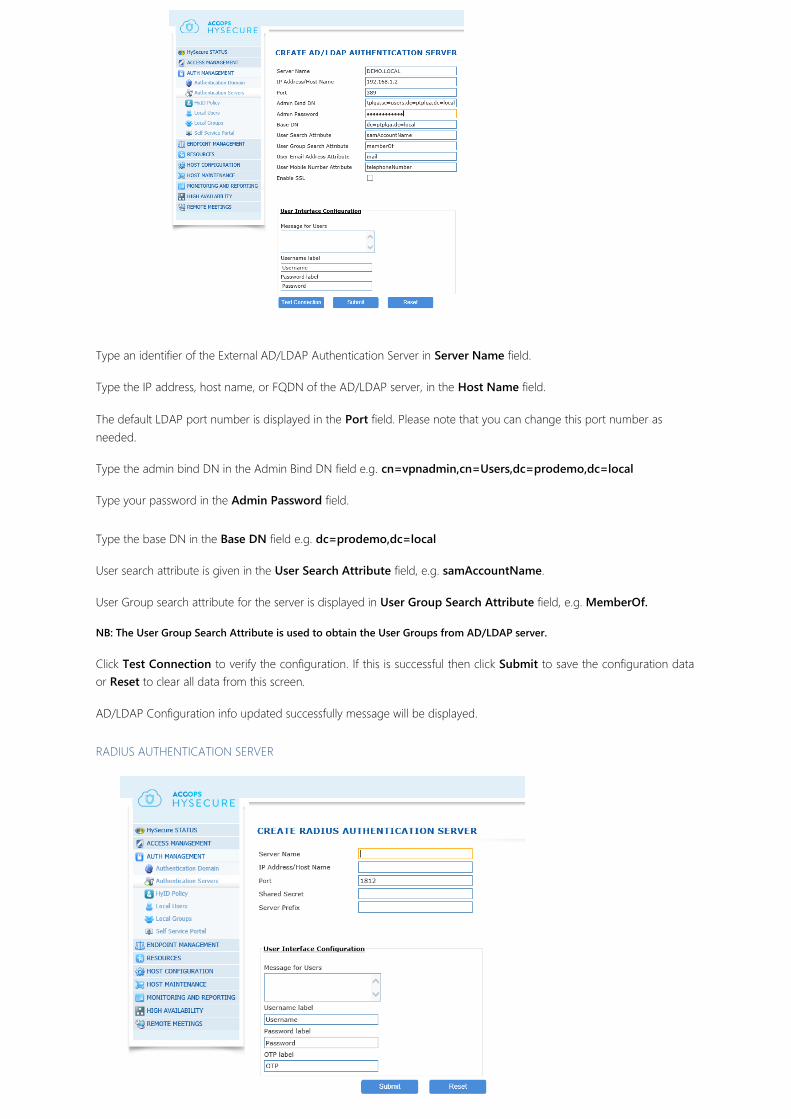
Type an identifier of the External AD/LDAP Authentication Server in Server Name field.
Type the IP address, host name, or FQDN of the AD/LDAP server, in the Host Name field.
The default LDAP port number is displayed in the Port field. Please note that you can change this port number as
needed.
Type the admin bind DN in the Admin Bind DN field e.g. cn=vpnadmin,cn=Users,dc=prodemo,dc=local
Type your password in the Admin Password field.
Type the base DN in the Base DN field e.g. dc=prodemo,dc=local
User search attribute is given in the User Search Attribute field, e.g. samAccountName.
User Group search attribute for the server is displayed in User Group Search Attribute field, e.g. MemberOf.
NB: The User Group Search Attribute is used to obtain the User Groups from AD/LDAP server.
Click Test Connection to verify the configuration. If this is successful then click Submit to save the configuration data
or Reset to clear all data from this screen.
AD/LDAP Configuration info updated successfully message will be displayed.
RADIUS AUTHENTICATION SERVER
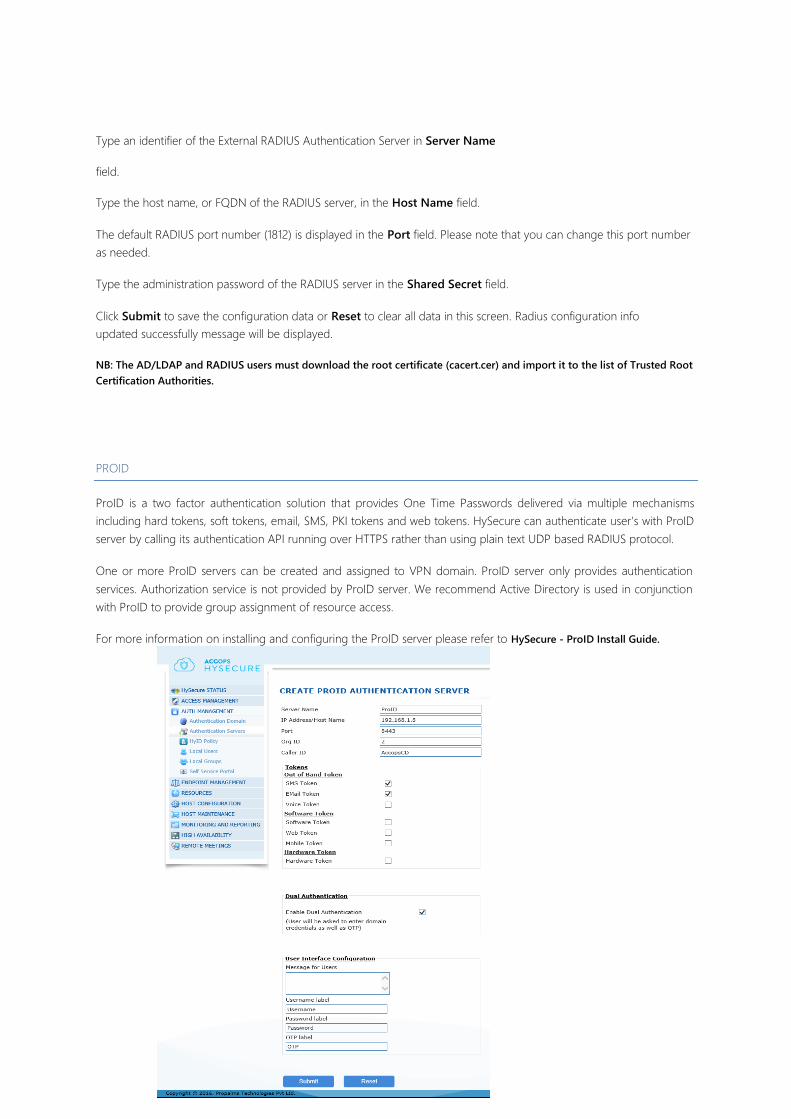
Type an identifier of the External RADIUS Authentication Server in Server Name
field.
Type the host name, or FQDN of the RADIUS server, in the Host Name field.
The default RADIUS port number (1812) is displayed in the Port field. Please note that you can change this port number
as needed.
Type the administration password of the RADIUS server in the Shared Secret field.
Click Submit to save the configuration data or Reset to clear all data in this screen. Radius configuration info
updated successfully message will be displayed.
NB: The AD/LDAP and RADIUS users must download the root certificate (cacert.cer) and import it to the list of Trusted Root
Certification Authorities.
PROID
ProID is a two factor authentication solution that provides One Time Passwords delivered via multiple mechanisms
including hard tokens, soft tokens, email, SMS, PKI tokens and web tokens. HySecure can authenticate user’s with ProID
server by calling its authentication API running over HTTPS rather than using plain text UDP based RADIUS protocol.
One or more ProID servers can be created and assigned to VPN domain. ProID server only provides authentication
services. Authorization service is not provided by ProID server. We recommend Active Directory is used in conjunction
with ProID to provide group assignment of resource access.
For more information on installing and configuring the ProID server please refer to HySecure - ProID Install Guide.
Type an identifier of the External ProID Authentication Server in Server Name field.
Type the IP address, host name, or FQDN of the ProID server, in the Host Name field.
The port number should be changed to 8443 in the Port field.
Type the Organization ID on the ProID authentication server in the Org ID field. (Contact your ProID Authentication
Server administrator to get the Org ID value).
Type the Caller ID on the ProID authentication server in the Caller ID field. (Contact your ProID Authentication Server
administrator to get the Caller ID value).
The Tokens listed can be enabled and used to authenticate users.
Enable Dual Authentication - If checked user will be asked to enter HySecure credentials as well as OTP.
User Interface Configuration:
Message for users - This message will be sent to user with OTP Username label, Password label, OTP labels - These labels will be displayed to the user in the portal.
Click Submit to save the configuration data or Reset to clear all data in this screen.
LOCAL USERS
An Administrator must register the users who need to access applications securely over the network. HySecure supports
multiple user roles and permission grouping. The security privilege of users depends on the role they perform. The
different user roles are:
• Security Officer (SO): The most privileged of all HySecure users. A Security Officer can create, delete, and
modify other SOs, Administrators, High Security, and Low Security Users. An SO can also manage the Access
Control Lists (ACL) for User Groups, as well as manage applications. Only a Security Officer can change the
Server State, Database Password, and Basic Authentication Method and Enable/Disable SSH.
• Administrator (Admin): Administrator can create, delete, and modify other Administrators, High Security,
and Low Security Users. They can also administer Applications, User Groups, and Application Groups, and
manage the Access Control Lists (ACL’s) for User Groups. Admin users cannot create, modify, or delete a Security Officer
• High Security Users: High Security Users are Power Users who are authenticated with the stronger
Certificate-based authentication mechanism. Security Officers and Administrators are Power Users by default.
• Low Security Users: Low Security Users can be Native, LDAP/ ADS, or RADIUS users who are authenticated
with the weaker Basic Authentication mechanism. If you wish to have users login with their Active Directory
credentials then you do not have to create them an account on the HySecure server. See configuring
Authentication Servers for more information.
• Machine Class Users: Machine Class Users are created only in the context of configuring chained VPN.
NB: Security Officers, Administrators, and High Security Users can also log on to server with Basic Authentication but they
will NOT have the Power User privileges when they log on with Login ID and Password.
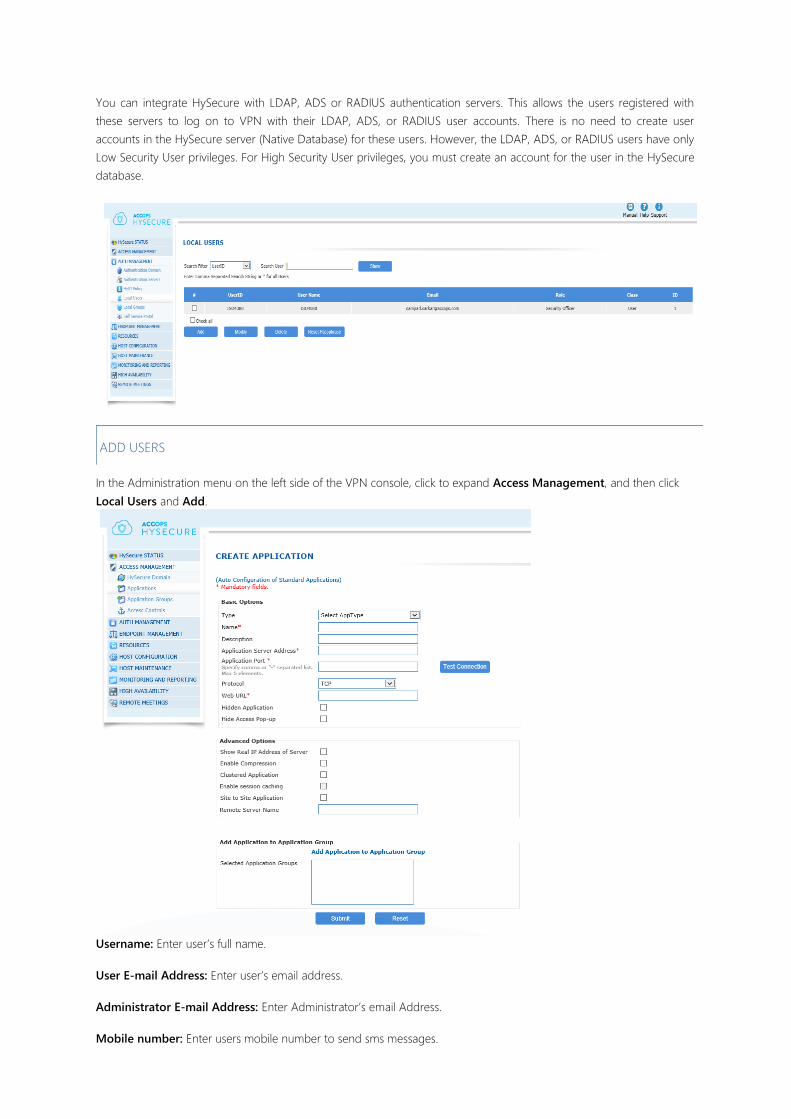
You can integrate HySecure with LDAP, ADS or RADIUS authentication servers. This allows the users registered with
these servers to log on to VPN with their LDAP, ADS, or RADIUS user accounts. There is no need to create user
accounts in the HySecure server (Native Database) for these users. However, the LDAP, ADS, or RADIUS users have only
Low Security User privileges. For High Security User privileges, you must create an account for the user in the HySecure
database.
ADD USERS
In the Administration menu on the left side of the VPN console, click to expand Access Management, and then click Local Users and Add.
Username: Enter user’s full name.
User E-mail Address: Enter user’s email address.
Administrator E-mail Address: Enter Administrator’s email Address.
Mobile number: Enter users mobile number to send sms messages.
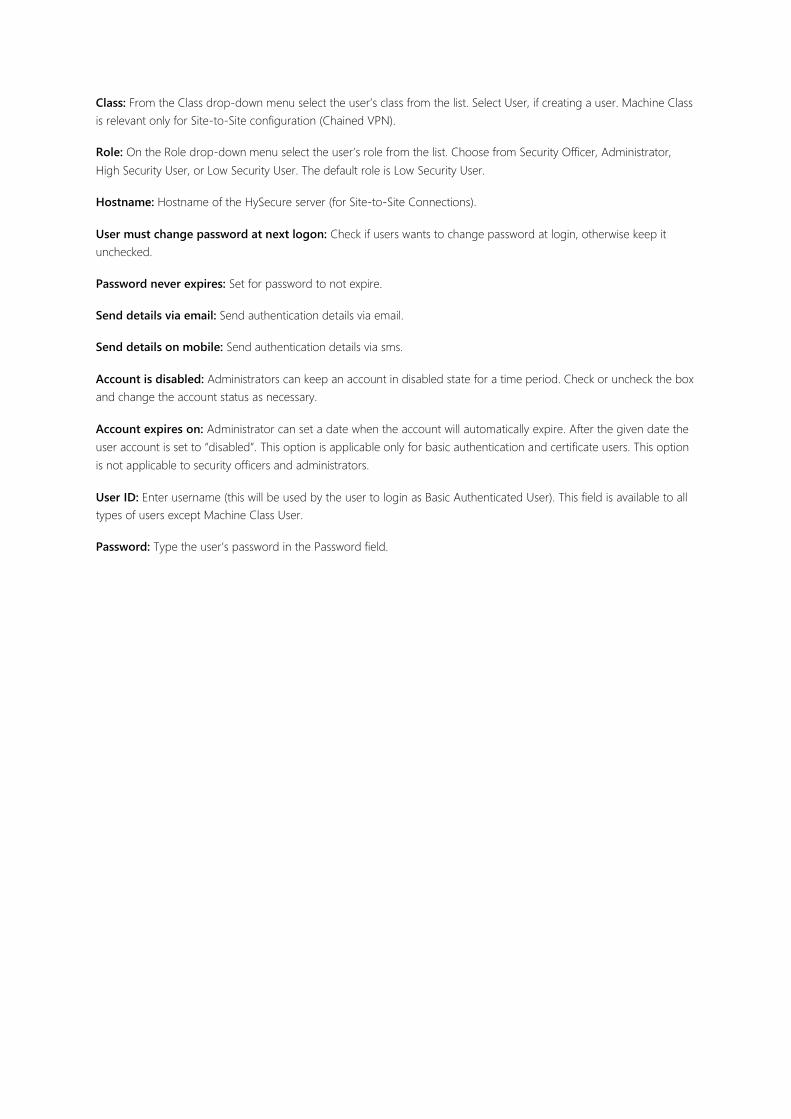
Class: From the Class drop-down menu select the user’s class from the list. Select User, if creating a user. Machine Class
is relevant only for Site-to-Site configuration (Chained VPN).
Role: On the Role drop-down menu select the user’s role from the list. Choose from Security Officer, Administrator, High Security User, or Low Security User. The default role is Low Security User.
Hostname: Hostname of the HySecure server (for Site-to-Site Connections).
User must change password at next logon: Check if users wants to change password at login, otherwise keep it
unchecked.
Password never expires: Set for password to not expire.
Send details via email: Send authentication details via email.
Send details on mobile: Send authentication details via sms.
Account is disabled: Administrators can keep an account in disabled state for a time period. Check or uncheck the box
and change the account status as necessary.
Account expires on: Administrator can set a date when the account will automatically expire. After the given date the
user account is set to “disabled”. This option is applicable only for basic authentication and certificate users. This option
is not applicable to security officers and administrators.
User ID: Enter username (this will be used by the user to login as Basic Authenticated User). This field is available to all
types of users except Machine Class User.
Password: Type the user’s password in the Password field.
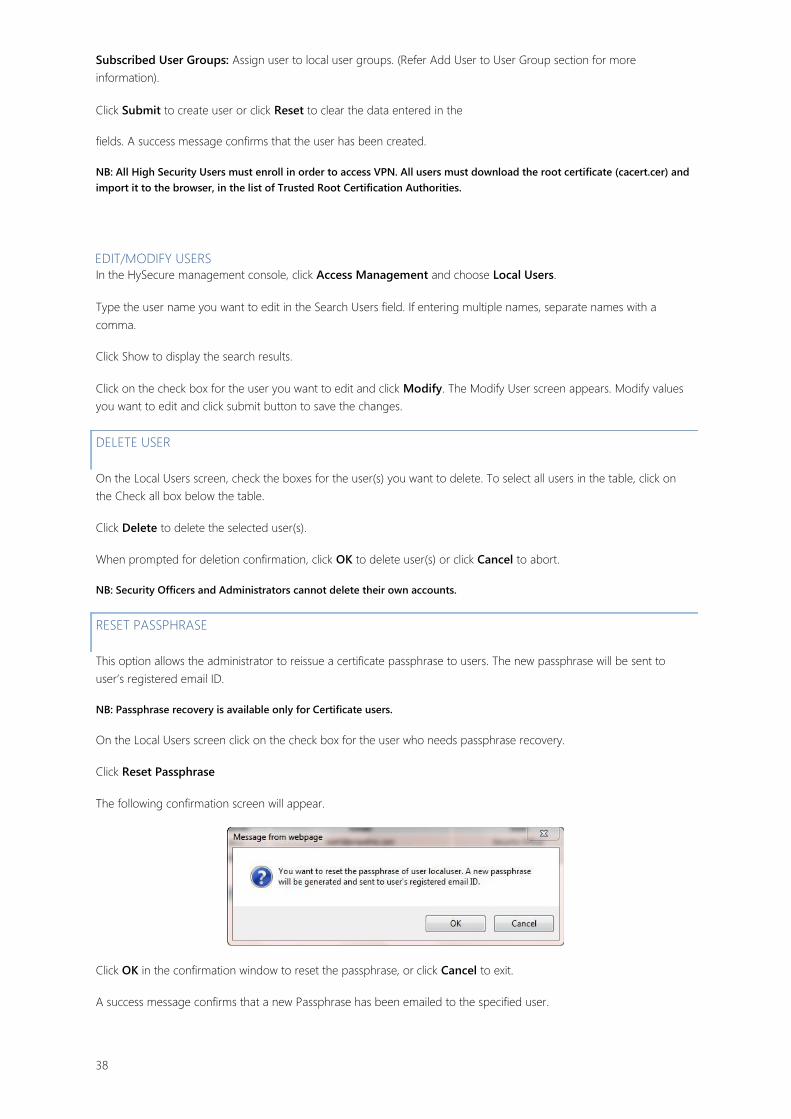
Subscribed User Groups: Assign user to local user groups. (Refer Add User to User Group section for more
information).
Click Submit to create user or click Reset to clear the data entered in the
fields. A success message confirms that the user has been created.
NB: All High Security Users must enroll in order to access VPN. All users must download the root certificate (cacert.cer) and
import it to the browser, in the list of Trusted Root Certification Authorities.
EDIT/MODIFY USERS
In the HySecure management console, click Access Management and choose Local Users.
Type the user name you want to edit in the Search Users field. If entering multiple names, separate names with a
comma.
Click Show to display the search results.
Click on the check box for the user you want to edit and click Modify. The Modify User screen appears. Modify values
you want to edit and click submit button to save the changes.
DELETE USER
On the Local Users screen, check the boxes for the user(s) you want to delete. To select all users in the table, click on
the Check all box below the table.
Click Delete to delete the selected user(s).
When prompted for deletion confirmation, click OK to delete user(s) or click Cancel to abort.
NB: Security Officers and Administrators cannot delete their own accounts.
RESET PASSPHRASE
This option allows the administrator to reissue a certificate passphrase to users. The new passphrase will be sent to
user’s registered email ID.
NB: Passphrase recovery is available only for Certificate users.
On the Local Users screen click on the check box for the user who needs passphrase recovery.
Click Reset Passphrase
The following confirmation screen will appear.
Click OK in the confirmation window to reset the passphrase, or click Cancel to exit.
A success message confirms that a new Passphrase has been emailed to the specified user.
38
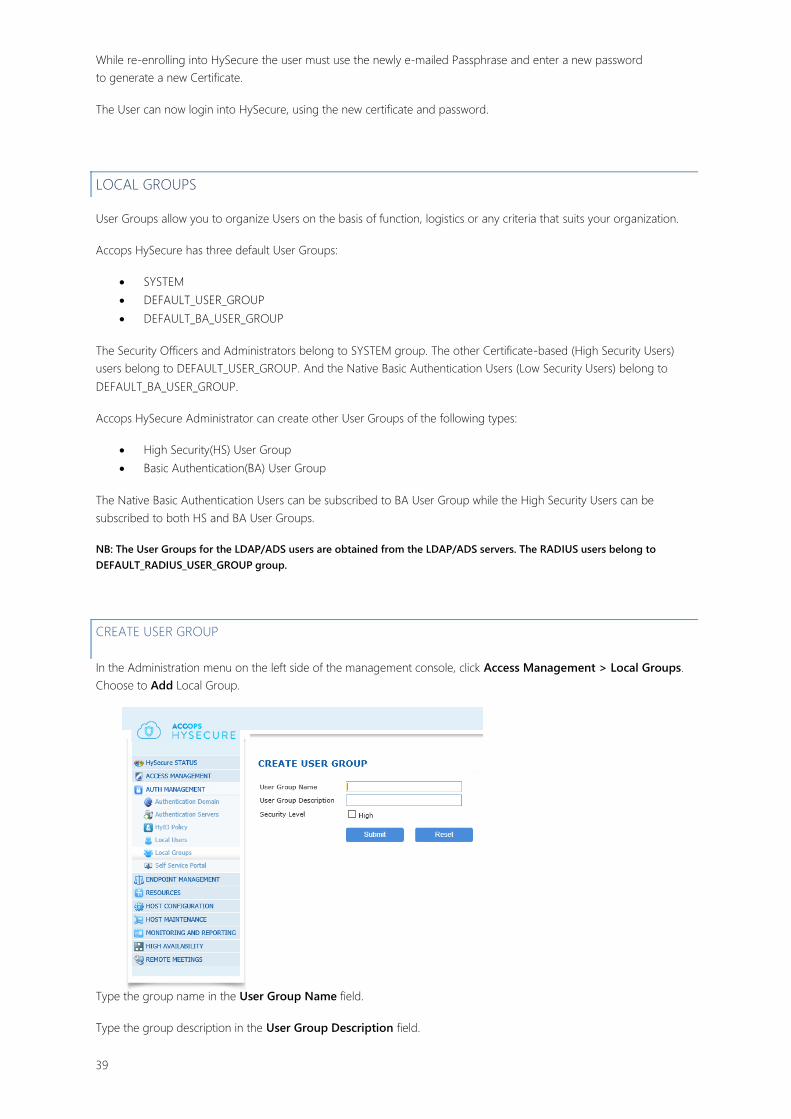
While re-enrolling into HySecure the user must use the newly e-mailed Passphrase and enter a new password
to generate a new Certificate.
The User can now login into HySecure, using the new certificate and password.
LOCAL GROUPS
User Groups allow you to organize Users on the basis of function, logistics or any criteria that suits your organization.
Accops HySecure has three default User Groups:
SYSTEM DEFAULT_USER_GROUP DEFAULT_BA_USER_GROUP
The Security Officers and Administrators belong to SYSTEM group. The other Certificate-based (High Security Users)
users belong to DEFAULT_USER_GROUP. And the Native Basic Authentication Users (Low Security Users) belong to DEFAULT_BA_USER_GROUP.
Accops HySecure Administrator can create other User Groups of the following types:
High Security(HS) User Group Basic Authentication(BA) User Group
The Native Basic Authentication Users can be subscribed to BA User Group while the High Security Users can be
subscribed to both HS and BA User Groups.
NB: The User Groups for the LDAP/ADS users are obtained from the LDAP/ADS servers. The RADIUS users belong to
DEFAULT_RADIUS_USER_GROUP group.
CREATE USER GROUP
In the Administration menu on the left side of the management console, click Access Management > Local Groups.
Choose to Add Local Group.
Type the group name in the User Group Name field.
Type the group description in the User Group Description field.
39
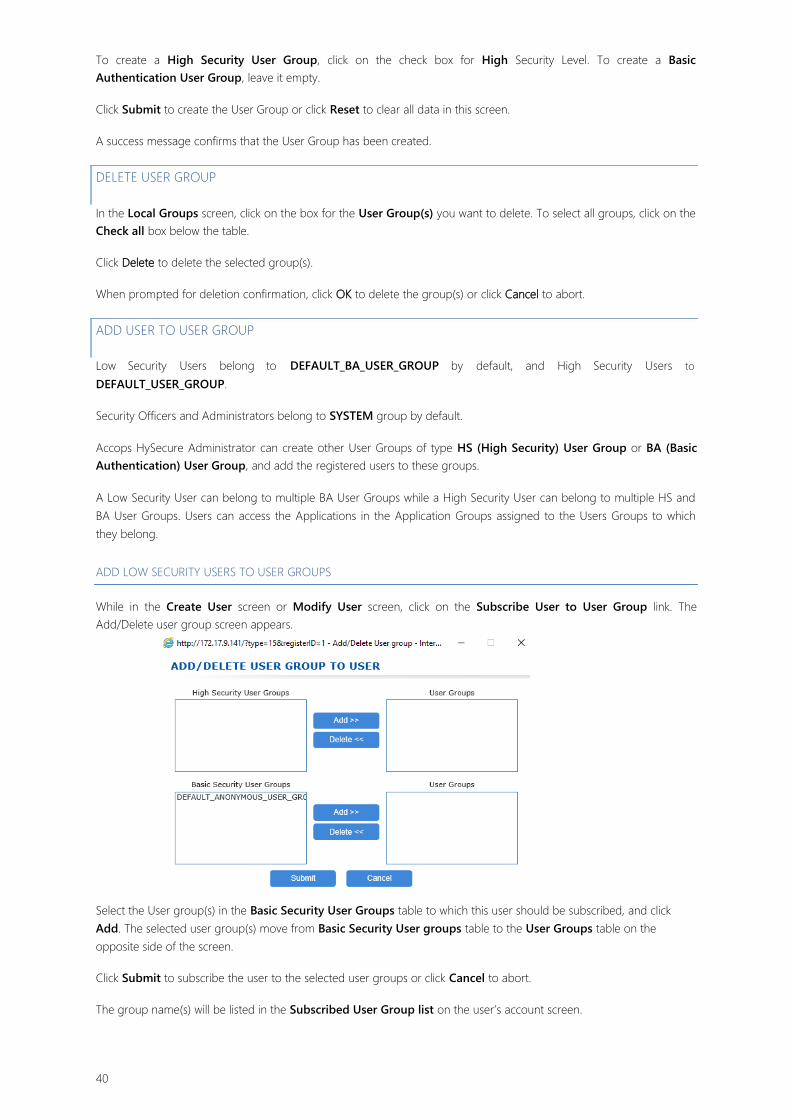
To create a High Security User Group, click on the check box for High Security Level. To create a Basic
Authentication User Group, leave it empty.
Click Submit to create the User Group or click Reset to clear all data in this screen.
A success message confirms that the User Group has been created.
DELETE USER GROUP
In the Local Groups screen, click on the box for the User Group(s) you want to delete. To select all groups, click on the
Check all box below the table.
Click Delete to delete the selected group(s).
When prompted for deletion confirmation, click OK to delete the group(s) or click Cancel to abort.
ADD USER TO USER GROUP
Low Security Users belong to DEFAULT_BA_USER_GROUP by default, and High Security Users to DEFAULT_USER_GROUP.
Security Officers and Administrators belong to SYSTEM group by default.
Accops HySecure Administrator can create other User Groups of type HS (High Security) User Group or BA (Basic
Authentication) User Group, and add the registered users to these groups.
A Low Security User can belong to multiple BA User Groups while a High Security User can belong to multiple HS and
BA User Groups. Users can access the Applications in the Application Groups assigned to the Users Groups to which
they belong.
ADD LOW SECURITY USERS TO USER GROUPS
While in the Create User screen or Modify User screen, click on the Subscribe User to User Group link. The
Add/Delete user group screen appears.
Select the User group(s) in the Basic Security User Groups table to which this user should be subscribed, and click
Add. The selected user group(s) move from Basic Security User groups table to the User Groups table on the
opposite side of the screen.
Click Submit to subscribe the user to the selected user groups or click Cancel to abort.
The group name(s) will be listed in the Subscribed User Group list on the user’s account screen.
40
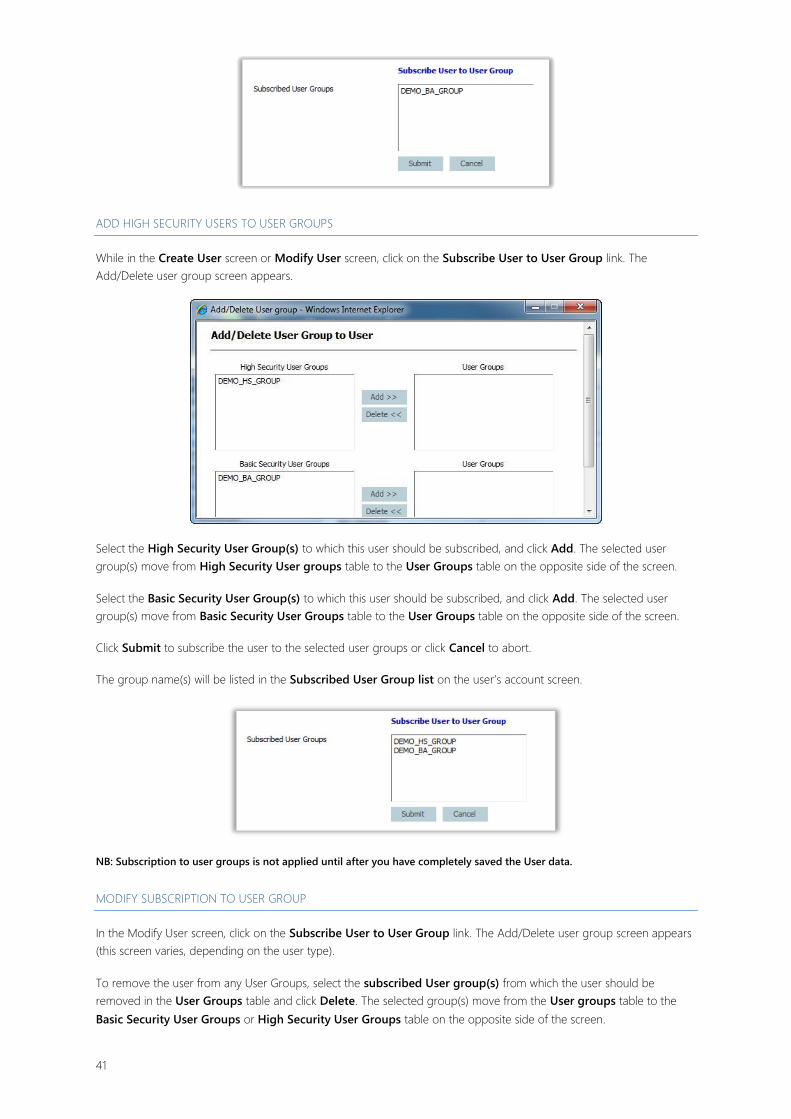
ADD HIGH SECURITY USERS TO USER GROUPS
While in the Create User screen or Modify User screen, click on the Subscribe User to User Group link. The
Add/Delete user group screen appears.
Select the High Security User Group(s) to which this user should be subscribed, and click Add. The selected user
group(s) move from High Security User groups table to the User Groups table on the opposite side of the screen.
Select the Basic Security User Group(s) to which this user should be subscribed, and click Add. The selected user
group(s) move from Basic Security User Groups table to the User Groups table on the opposite side of the screen.
Click Submit to subscribe the user to the selected user groups or click Cancel to abort.
The group name(s) will be listed in the Subscribed User Group list on the user’s account screen.
NB: Subscription to user groups is not applied until after you have completely saved the User data.
MODIFY SUBSCRIPTION TO USER GROUP
In the Modify User screen, click on the Subscribe User to User Group link. The Add/Delete user group screen appears
(this screen varies, depending on the user type).
To remove the user from any User Groups, select the subscribed User group(s) from which the user should be
removed in the User Groups table and click Delete. The selected group(s) move from the User groups table to the Basic Security User Groups or High Security User Groups table on the opposite side of the screen.
41
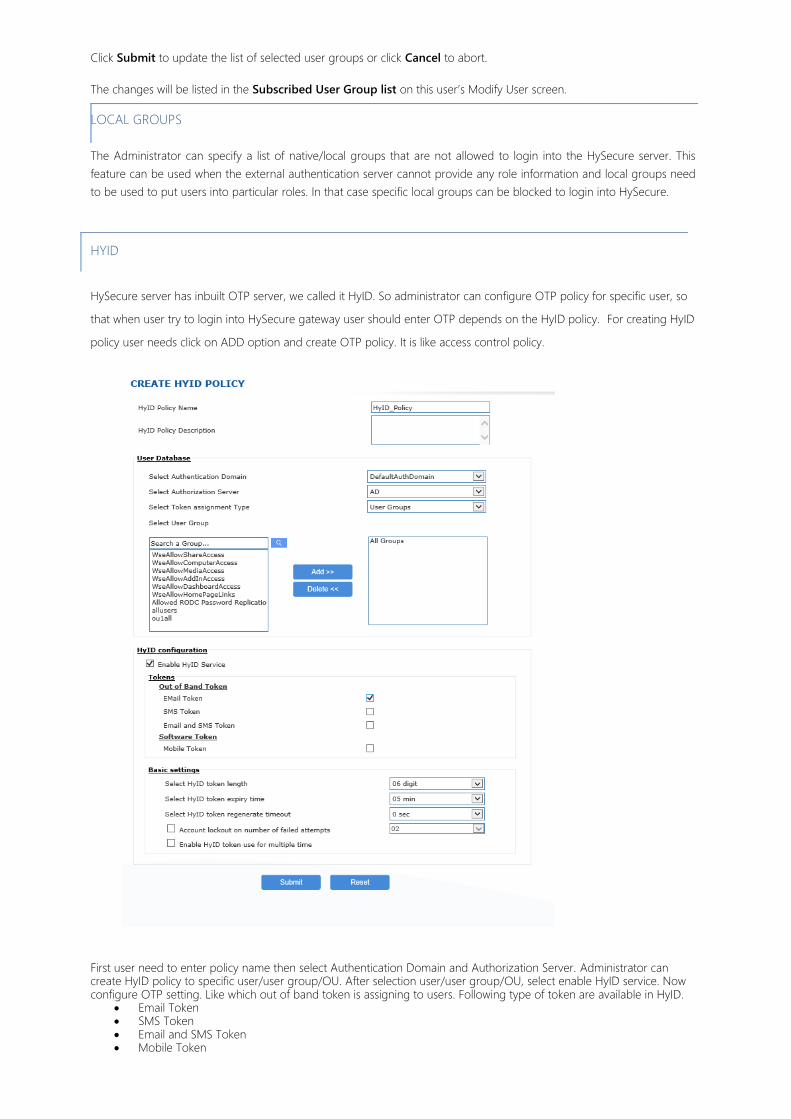
Click Submit to update the list of selected user groups or click Cancel to abort.
The changes will be listed in the Subscribed User Group list on this user’s Modify User screen.
LOCAL GROUPS
The Administrator can specify a list of native/local groups that are not allowed to login into the HySecure server. This
feature can be used when the external authentication server cannot provide any role information and local groups need
to be used to put users into particular roles. In that case specific local groups can be blocked to login into HySecure.
HYID
HySecure server has inbuilt OTP server, we called it HyID. So administrator can configure OTP policy for specific user, so
that when user try to login into HySecure gateway user should enter OTP depends on the HyID policy. For creating HyID
policy user needs click on ADD option and create OTP policy. It is like access control policy.
First user need to enter policy name then select Authentication Domain and Authorization Server. Administrator can create HyID policy to specific user/user group/OU. After selection user/user group/OU, select enable HyID service. Now configure OTP setting. Like which out of band token is assigning to users. Following type of token are available in HyID.
Email Token SMS Token Email and SMS Token Mobile Token

In Basic setting administrator can set the following parameters Select HyID token length Select HyID token expiry time Select HyID token regenerate timeout Account lockout on number of failed attempts Enable HyID token use for multiple time
SELF SERVICE PORTAL
Change and improvements are continuous processes. New user requirements arise as per their usages and
environment. Every organization is working on reducing IT operations costs with increase in efficiency. For many
organizations Identity and Access management i.e IAM is big cost in all terms and hence every organization is working
on managing such task with the help of possible automation without compromising the security. In this regard password
management for all of the corporate users who are authorized to use different resources is big task for corporates if
done manually and its error prone and time consuming for more than one valued resource. This need to be automated
for sure. So as per our esteemed customer’s feedback we are in process of finalizing Self Service Portal for password
management for HySecure secure remote access gateway users.
Using the Self Service Portal, all the HySecure users who authenticate using Active Directory or LDAP will be able to
manage their own password. As a solution we are proposing to integrate a new section on the HySecure portal, called
Self Service Portal, where authenticated and authorized HySecure users can create their own profile which will help
them reset or recover their own password. Using the newly added “forgot password” link on the HySecure login page,
the user will be able to follow a wizard to authenticate via various mechanisms and reset their password without any
intervention from the Administrator. HySecure administrator can control how strongly users have to authenticate with
Self Service Portal and reset their passwords. The authentication mechanisms include PIN authentication, security
questions, email & mobile no. verification and OTP sent to registered email ID or mobile phone.
For configure self-service portal go to option AUTH MANAGEMENT->AUTHENTICATION DOMAIN. Modify the
Authentication Domain where administrator wants to configure self-service portal.

ENDPOINT POLICY MANAGEMENT
Accops HySecure has increased productivity for today’s enterprise by enabling more users to gain wider access by
virtually connecting to private networks. But while broader access clearly enhances productivity, it also inherently widens
network exposure to uncontrolled environments. For Example: If a remote client machine is infected with
virus/worms/Trojans/spy-wares, this un-wanted traffic is also sent to private network over secured connection. To
effectively control these risks, it is no longer enough to manage access by user identity alone. The safety of the user’s
end point environment must also be ensured, and enforce access policy based upon solid end point protection.
Host Scan policies enable scanning the endpoints for specified 3rd party products or information.
With Accops HySecure you can create following type of policies:
Antivirus based Antispyware based Firewall based MAC Address based IP Address based
These policies can be then linked with the security profiles described in later section (Device Profile Management).
NB: Endpoint Security is a licensable option on top of Accops HySecure User License. You have to purchase a valid Endpoint
License in order to enable this feature within Accops HySecure. Endpoint Security is disabled for Security officers and
Administrator logons.
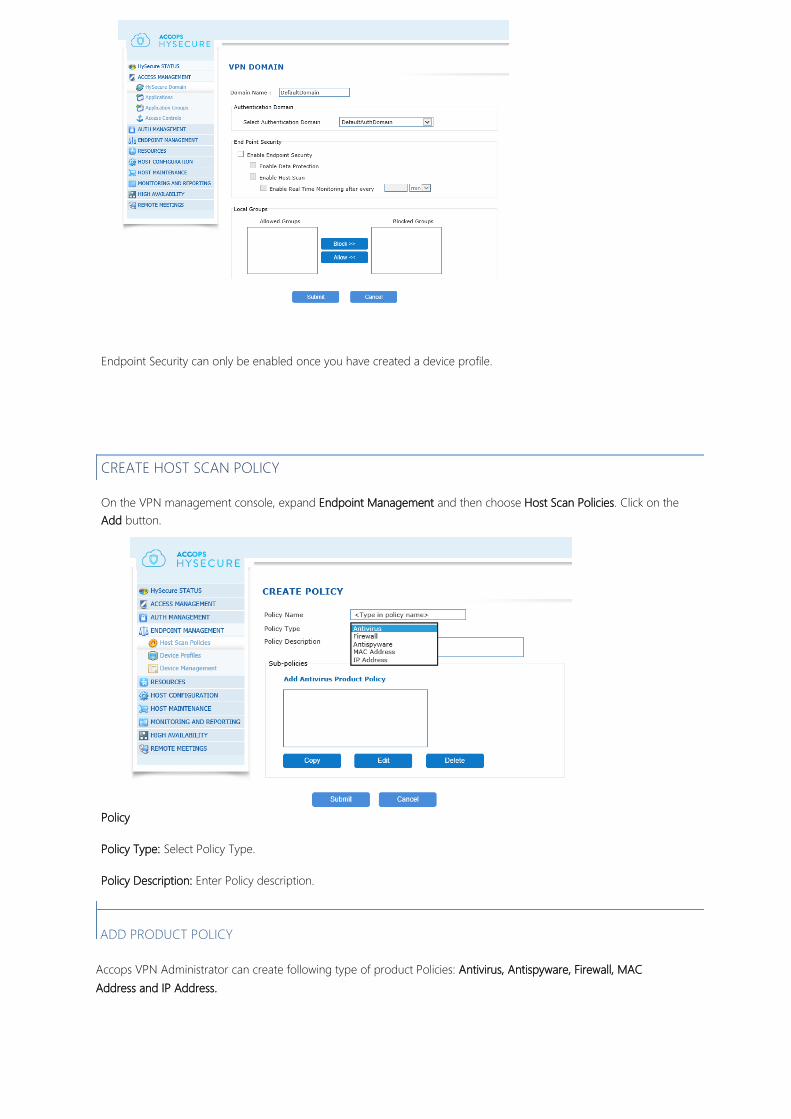
Endpoint Security can only be enabled once you have created a device profile.
CREATE HOST SCAN POLICY
On the VPN management console, expand Endpoint Management and then choose Host Scan Policies. Click on the
Add button.
Policy Name: Policy identifier.
Policy Type: Select Policy Type.
Policy Description: Enter Policy description.
ADD PRODUCT POLICY
Accops VPN Administrator can create following type of product Policies: Antivirus, Antispyware, Firewall, MAC Address and IP Address.
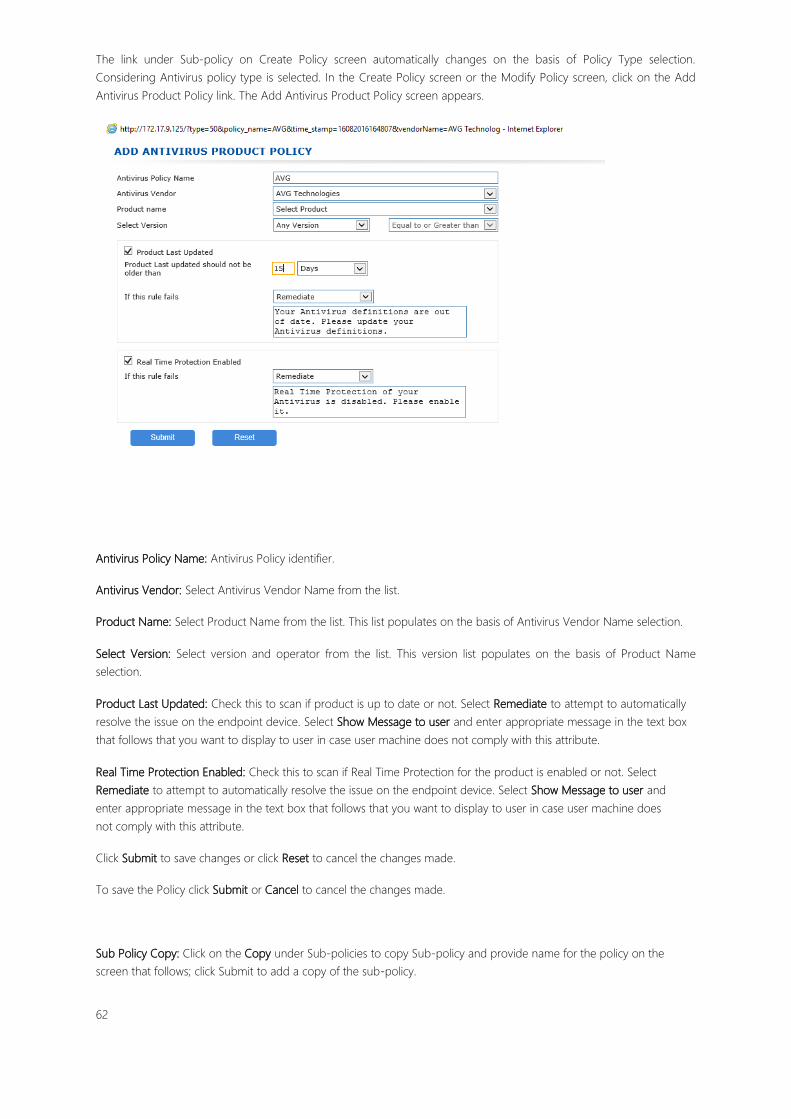
The link under Sub-policy on Create Policy screen automatically changes on the basis of Policy Type selection.
Considering Antivirus policy type is selected. In the Create Policy screen or the Modify Policy screen, click on the Add
Antivirus Product Policy link. The Add Antivirus Product Policy screen appears.
Antivirus Policy Name: Antivirus Policy identifier.
Antivirus Vendor: Select Antivirus Vendor Name from the list.
Product Name: Select Product Name from the list. This list populates on the basis of Antivirus Vendor Name selection.
Select Version: Select version and operator from the list. This version list populates on the basis of Product Name
selection.
Product Last Updated: Check this to scan if product is up to date or not. Select Remediate to attempt to automatically
resolve the issue on the endpoint device. Select Show Message to user and enter appropriate message in the text box
that follows that you want to display to user in case user machine does not comply with this attribute.
Real Time Protection Enabled: Check this to scan if Real Time Protection for the product is enabled or not. Select
Remediate to attempt to automatically resolve the issue on the endpoint device. Select Show Message to user and
enter appropriate message in the text box that follows that you want to display to user in case user machine does
not comply with this attribute.
Click Submit to save changes or click Reset to cancel the changes made.
To save the Policy click Submit or Cancel to cancel the changes made.
Sub Policy Copy: Click on the Copy under Sub-policies to copy Sub-policy and provide name for the policy on the
screen that follows; click Submit to add a copy of the sub-policy.
62
Sub Policy Edit: Select a sub-policy and click Edit to edit sub-policy. Please see the Edit Product Policy section that
follows for more information.
Sub Policy Delete: Select a sub-policy and click Delete to delete sub-policy.
MODIFY POLICY
On the VPN management console, expand Endpoint Management > Host Scan Policies.
Type the policy name in the Search Policies field. If entering multiple names, separate names with a comma. Type [*] to
view all policy names.
Click Show to view the search results.
Click on the check box for the policy you want to edit and click Modify. The Modify Policy screen appears.
Modify policy details as needed. Refer to Create Policy section while making the entries.
Click Submit to save changes or click Cancel to cancel the changes made.
DELETE POLICY
In the Edit Policy screen described above, click on the box for the Policies you want to delete. To select all policies, click
on the Check all check boxes below the table.
Click Delete to delete the selected policies.
When prompted for deletion confirmation, click OK to delete the policies or click Cancel to abort.
NB: Policy for the Antispyware and Firewall products can be created in the same manner as Antivirus product policy.
Now considering MAC Address policy type is selected. In the Create Policy screen or the Modify Policy screen, click on
the Add MAC Address Policy link. The Add MAC Address Policy screen appears.
63
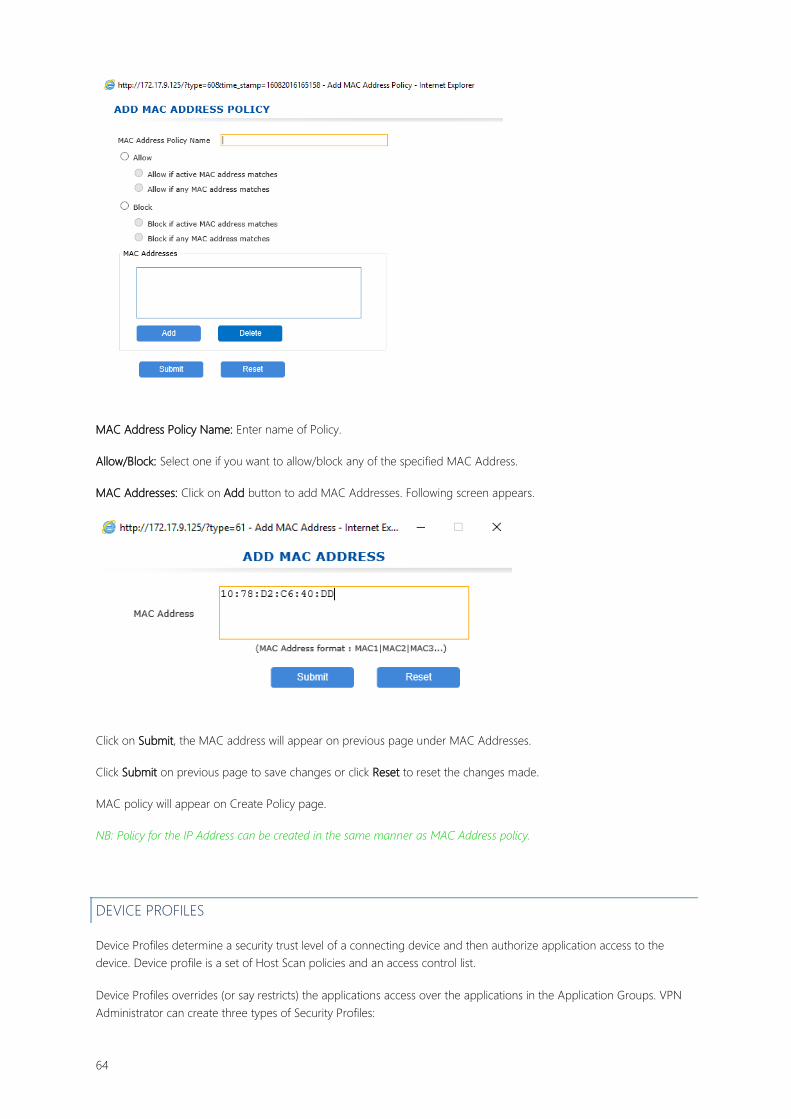
MAC Address Policy Name: Enter name of Policy.
Allow/Block: Select one if you want to allow/block any of the specified MAC Address.
MAC Addresses: Click on Add button to add MAC Addresses. Following screen appears.
Click on Submit, the MAC address will appear on previous page under MAC Addresses.
Click Submit on previous page to save changes or click Reset to reset the changes made.
MAC policy will appear on Create Policy page.
NB: Policy for the IP Address can be created in the same manner as MAC Address policy.
DEVICE PROFILES
Device Profiles determine a security trust level of a connecting device and then authorize application access to the
device. Device profile is a set of Host Scan policies and an access control list.
Device Profiles overrides (or say restricts) the applications access over the applications in the Application Groups. VPN
Administrator can create three types of Security Profiles:
64
Mandatory Profile Quarantine Profile Normal Profile
HySecure Administrator can create only one Quarantine Profile and Mandatory Profile and multiple Normal Profiles.
MANDATORY PROFILE
This is a system profile which contains a subset of policies that must be satisfied by all connecting endpoints before the
user can login into HySecure server. Using mandatory profile, administrators can enforce that the connecting endpoint
must comply with certain requirements. An example of Mandatory Profile would be enforcing login using company
laptops/desktops only from certain branch office only. Only one mandatory profile is allowed. If the endpoint machine
fails any of the policies of Mandatory Profile, the user is denied login into HySecure server. Appropriate remediation
information is sent to the user.
A normal device profile policy must exist before a mandatory profile can be created. Mandatory profile does not contain
any access list as it will only enforce the selected host scan policies on all devices.
QUARANTINE PROFILE
This profile, when present, will be used for endpoints which fail to fall under any other profiles. This is an optional system
profile which does not contain any policies but just list of application which the user can access if the endpoint falls in
this profile. If no quarantine profile exists and the user does not satisfy any other profile, then user is denied login into
HySecure server.
A normal device profile policy must exist before a quarantine profile can be created. A Quarantine profile does not
contain any Host Scan policy list as it is a fallback, no-scan profile.
CREATE PROFILE
On the HySecure management console, expand Endpoint Management > Device Profiles. Click Add to create a new
profile.
Profile Name: Profile identifier.
Security Level: Security Trust Level Identifier. Lower value means higher security trust level. An endpoint is always
scanned again descending order of security trust level.
Mandatory Profile: To create Mandatory Profile, click on the check box for Mandatory Profile. If Mandatory Profile is
already created then this field will be disabled. You can create only one Mandatory Profile.
Quarantine Profile: To create Quarantine Profile, click on the check box for Quarantine Profile. If Quarantine Profile is
already created then this field will be disabled. Only one Quarantine Profile can be created. The Endpoint machine
which fails EPS scanning will fall into this profile.
Profile Description: Enter Profile description.
Click on the Add Policies to Profile link to add policies to this profile (see the next section Add Policies to Profile for
more information). The Policies which are added here must be satisfied by the End Point Devices to fall in this
Device Profile.
Click on the Block Applications to Profile link to block applications to this profile. By default all the applications
are allowed to users. The applications added here will be blocked if the user falls into this Device Profile.
Browser Cache Settings: When enabled HySecure will cleanup cache created by browser or other components after
logout from server.
65
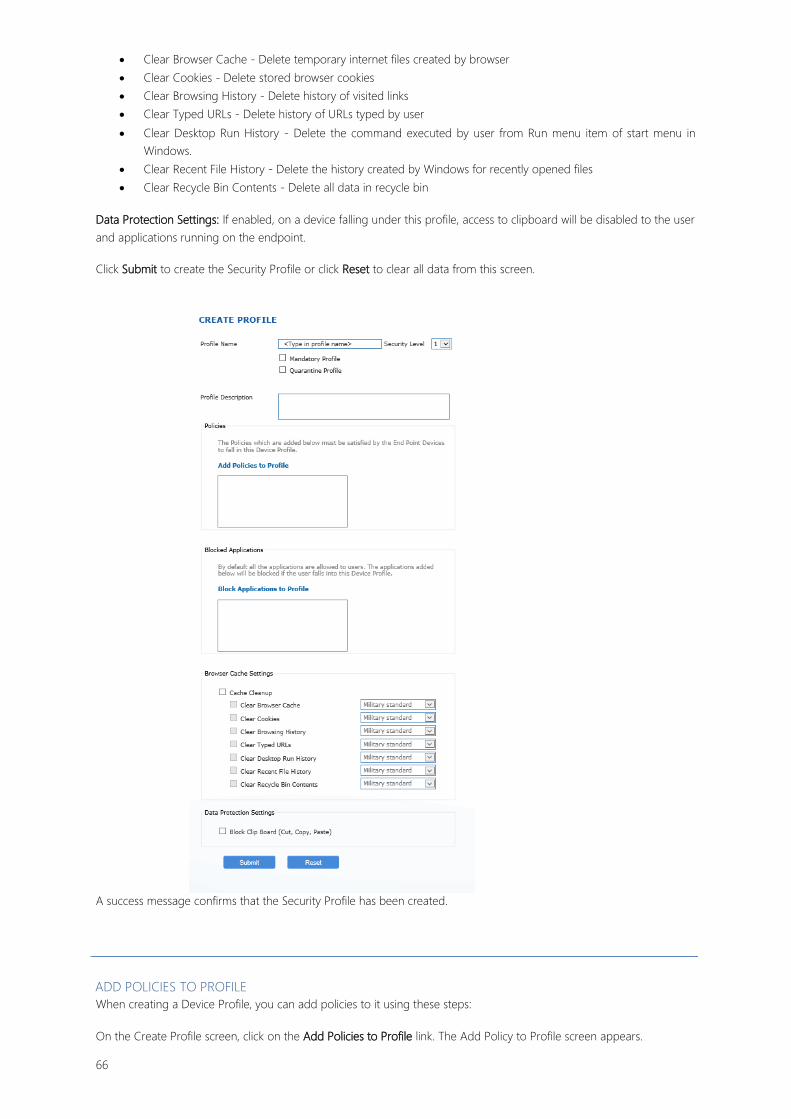
Clear Browser Cache - Delete temporary internet files created by browser Clear Cookies - Delete stored browser cookies Clear Browsing History - Delete history of visited links Clear Typed URLs - Delete history of URLs typed by user
Clear Desktop Run History - Delete the command executed by user from Run menu item of start menu in
Windows.
Clear Recent File History - Delete the history created by Windows for recently opened files Clear Recycle Bin Contents - Delete all data in recycle bin
Data Protection Settings: If enabled, on a device falling under this profile, access to clipboard will be disabled to the user
and applications running on the endpoint.
Click Submit to create the Security Profile or click Reset to clear all data from this screen.
A success message confirms that the Security Profile has been created.
ADD POLICIES TO PROFILE When creating a Device Profile, you can add policies to it using these steps:
On the Create Profile screen, click on the Add Policies to Profile link. The Add Policy to Profile screen appears.
66
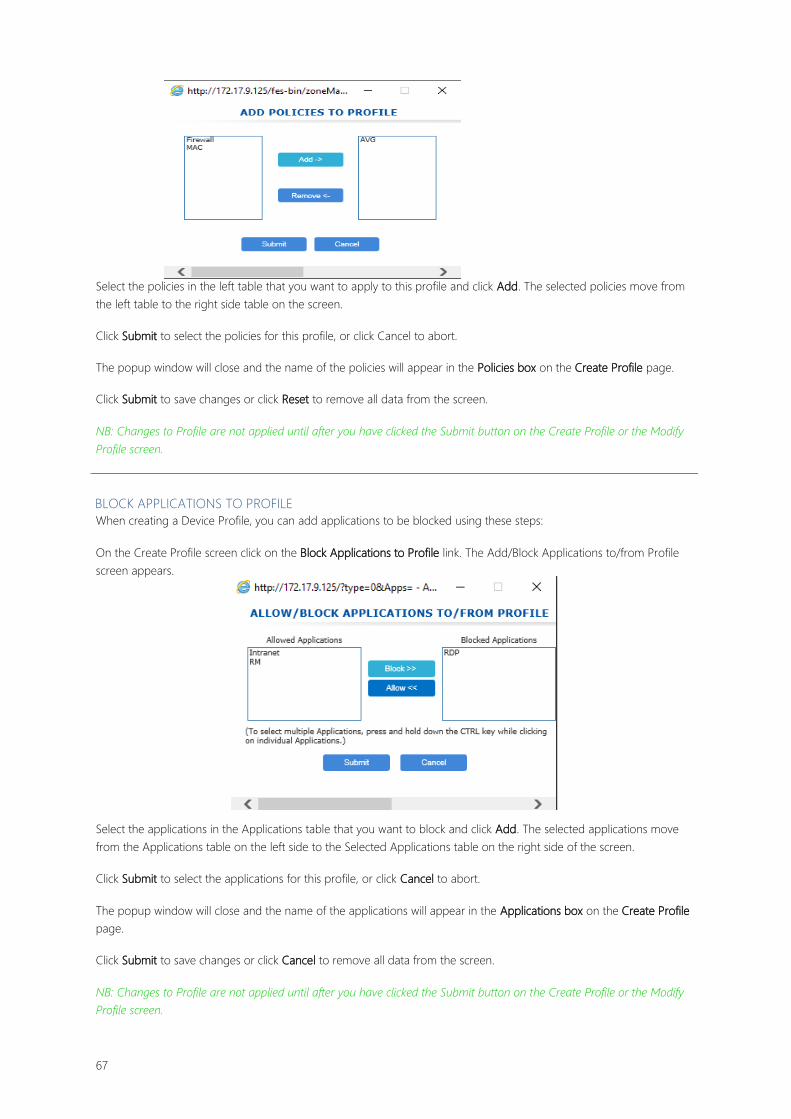
Select the policies in the left table that you want to apply to this profile and click Add. The selected policies move from
the left table to the right side table on the screen.
Click Submit to select the policies for this profile, or click Cancel to abort.
The popup window will close and the name of the policies will appear in the Policies box on the Create Profile page.
Click Submit to save changes or click Reset to remove all data from the screen.
NB: Changes to Profile are not applied until after you have clicked the Submit button on the Create Profile or the Modify
Profile screen.
BLOCK APPLICATIONS TO PROFILE When creating a Device Profile, you can add applications to be blocked using these steps:
On the Create Profile screen click on the Block Applications to Profile link. The Add/Block Applications to/from Profile
screen appears.
Select the applications in the Applications table that you want to block and click Add. The selected applications move
from the Applications table on the left side to the Selected Applications table on the right side of the screen.
Click Submit to select the applications for this profile, or click Cancel to abort.
The popup window will close and the name of the applications will appear in the Applications box on the Create Profile
page.
Click Submit to save changes or click Cancel to remove all data from the screen.
NB: Changes to Profile are not applied until after you have clicked the Submit button on the Create Profile or the Modify
Profile screen.
67
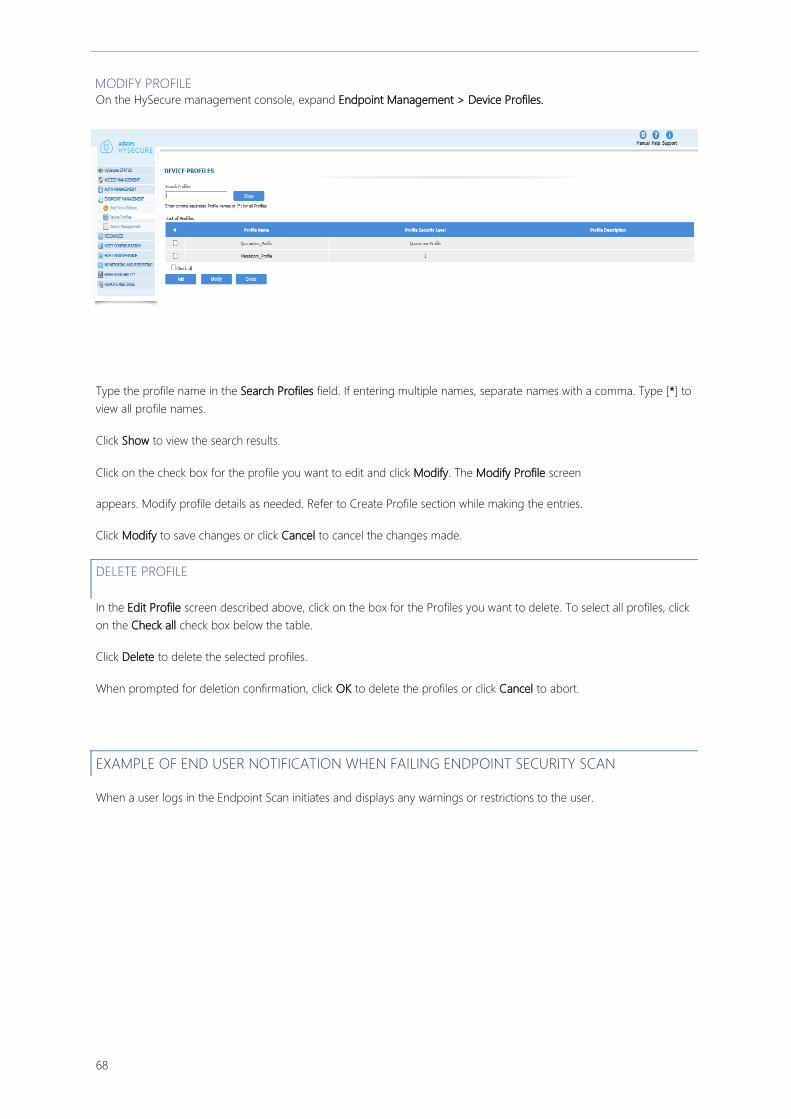
MODIFY PROFILE
On the HySecure management console, expand Endpoint Management > Device Profiles.
Type the profile name in the Search Profiles field. If entering multiple names, separate names with a comma. Type [*] to
view all profile names.
Click Show to view the search results.
Click on the check box for the profile you want to edit and click Modify. The Modify Profile screen
appears. Modify profile details as needed. Refer to Create Profile section while making the entries.
Click Modify to save changes or click Cancel to cancel the changes made.
DELETE PROFILE
In the Edit Profile screen described above, click on the box for the Profiles you want to delete. To select all profiles, click
on the Check all check box below the table.
Click Delete to delete the selected profiles.
When prompted for deletion confirmation, click OK to delete the profiles or click Cancel to abort.
EXAMPLE OF END USER NOTIFICATION WHEN FAILING ENDPOINT SECURITY SCAN
When a user logs in the Endpoint Scan initiates and displays any warnings or restrictions to the user.
68

RESOURCES
IP ADDRESS POOL
Now administrator can create virtual IP pool, so that when user login into HySecure gateway user will get virtual IP base
on the configuration done on gateway. When user try to access any application it will access through virtual IP only.
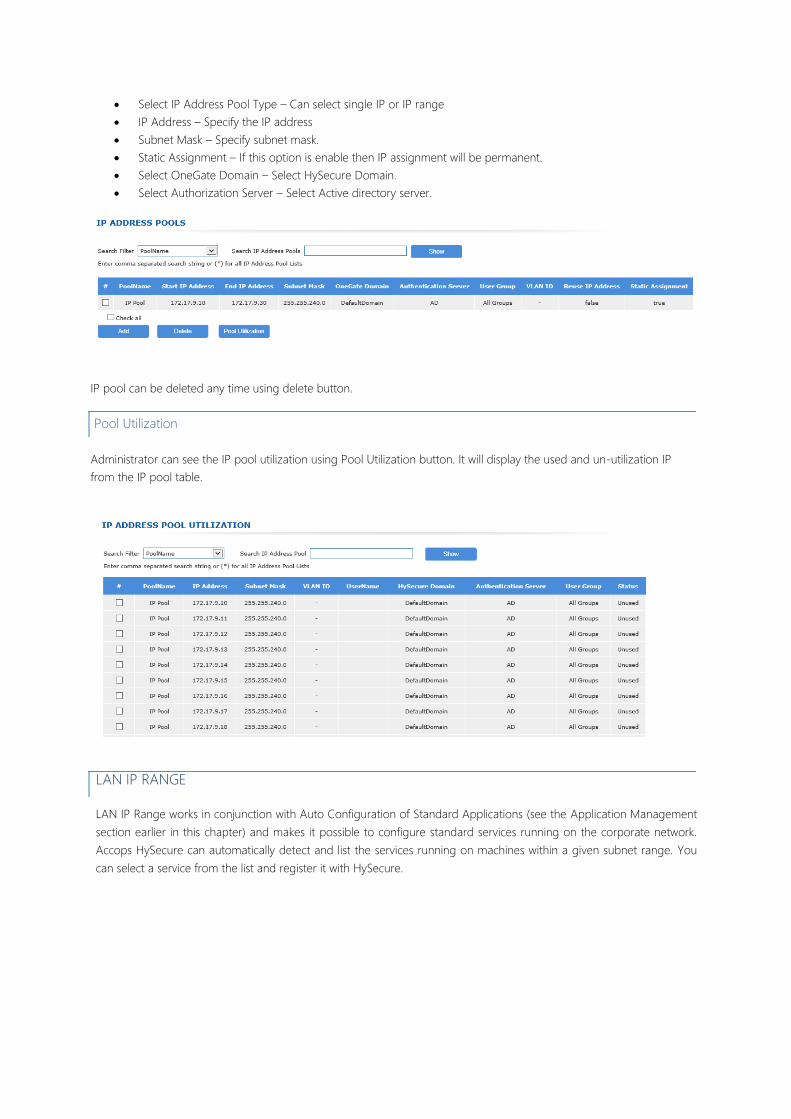
Select IP Address Pool Type – Can select single IP or IP range
IP Address – Specify the IP address
Subnet Mask – Specify subnet mask.
Static Assignment – If this option is enable then IP assignment will be permanent.
Select OneGate Domain – Select HySecure Domain.
Select Authorization Server – Select Active directory server.
Select User Group – Select AD user group for IP assignment.
IP pool can be deleted any time using delete button.
Pool Utilization
Administrator can see the IP pool utilization using Pool Utilization button. It will display the used and un-utilization IP
from the IP pool table.
LAN IP RANGE
LAN IP Range works in conjunction with Auto Configuration of Standard Applications (see the Application Management
section earlier in this chapter) and makes it possible to configure standard services running on the corporate network.
Accops HySecure can automatically detect and list the services running on machines within a given subnet range. You
can select a service from the list and register it with HySecure.

CREATE IP RANGE In the management console, click Resources > LAN IP Range. The Create IP Range screen appears.
Type the first IP address in the range in the Start IP Address field.
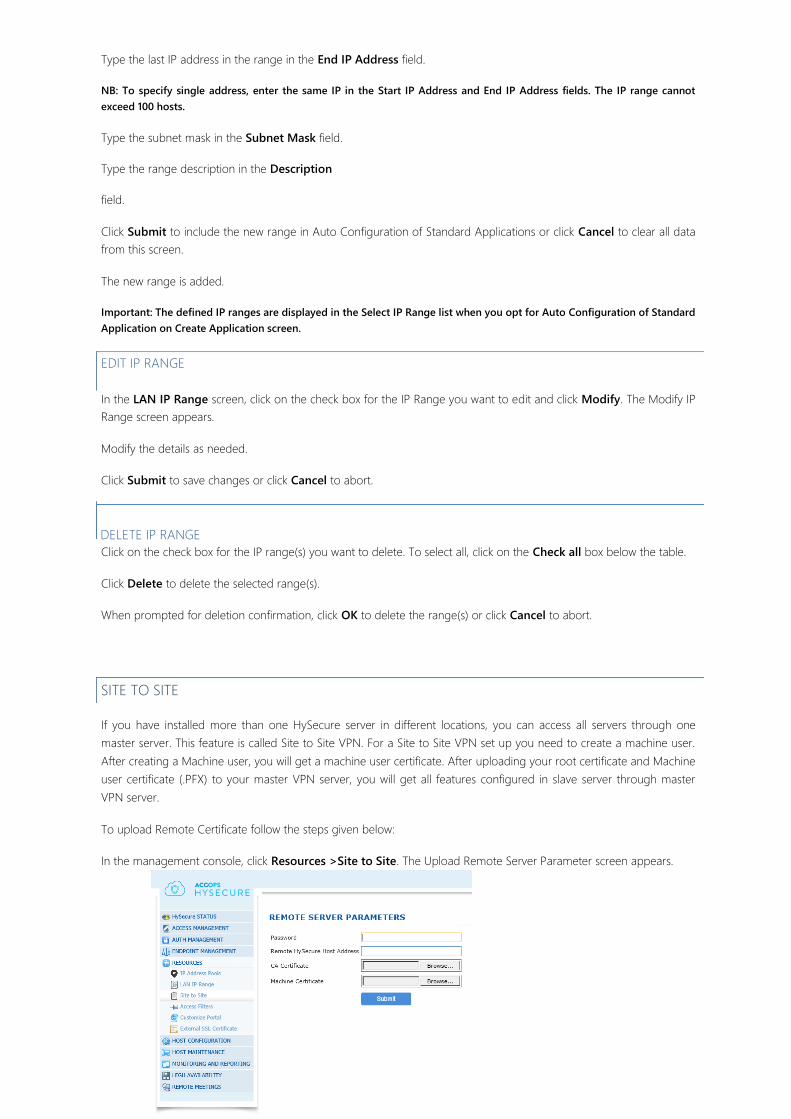
Type the last IP address in the range in the End IP Address field.
NB: To specify single address, enter the same IP in the Start IP Address and End IP Address fields. The IP range cannot
exceed 100 hosts.
Type the subnet mask in the Subnet Mask field.
Type the range description in the Description
field.
Click Submit to include the new range in Auto Configuration of Standard Applications or click Cancel to clear all data
from this screen.
The new range is added.
Important: The defined IP ranges are displayed in the Select IP Range list when you opt for Auto Configuration of Standard
Application on Create Application screen.
EDIT IP RANGE
In the LAN IP Range screen, click on the check box for the IP Range you want to edit and click Modify. The Modify IP
Range screen appears.
Modify the details as needed.
Click Submit to save changes or click Cancel to abort.
DELETE IP RANGE Click on the check box for the IP range(s) you want to delete. To select all, click on the Check all box below the table.
Click Delete to delete the selected range(s).
When prompted for deletion confirmation, click OK to delete the range(s) or click Cancel to abort.
SITE TO SITE
If you have installed more than one HySecure server in different locations, you can access all servers through one
master server. This feature is called Site to Site VPN. For a Site to Site VPN set up you need to create a machine user.
After creating a Machine user, you will get a machine user certificate. After uploading your root certificate and Machine
user certificate (.PFX) to your master VPN server, you will get all features configured in slave server through master
VPN server.
To upload Remote Certificate follow the steps given below:
In the management console, click Resources >Site to Site. The Upload Remote Server Parameter screen appears.

Type the password for the Machine user account created on the other gateway in the Password field. It should
be same as the Machine user PFX certificate's password.
Type the hostname of the other gateway in Remote VPN Host Address
field. Provide CA certificate of the other VPN gateway.
Provide SSL certificate of the Machine user from other VPN Gateway. Certificate should be in PFX
format. Click Submit to upload server parameters.
ACCESS FILTERS
Access Filters are time-based restrictions that are associated with HySecure access control policies. Access Filters are
applied to Access Control Lists to restrict user access to applications to specific times.
CREATE ACCESS FILTER
In the management console, click Resources > Access Filters. Click Add to specify a new access filter.
Type the name for the filter in the Access Filter Name field.
Click on the Time Zone drop-down arrow and select your time zone from the list.
Set Start Time Hrs: and Min: by clicking on the drop-down arrows.
Set End Time Hrs: and Min: by clicking on the drop-down arrows.
Click Submit to create access filter or click on Reset to clear all data in the screen.
A success message confirms that the access filter is created.
EDIT ACCESS FILTER In the management console, click Resources > Access Filters.
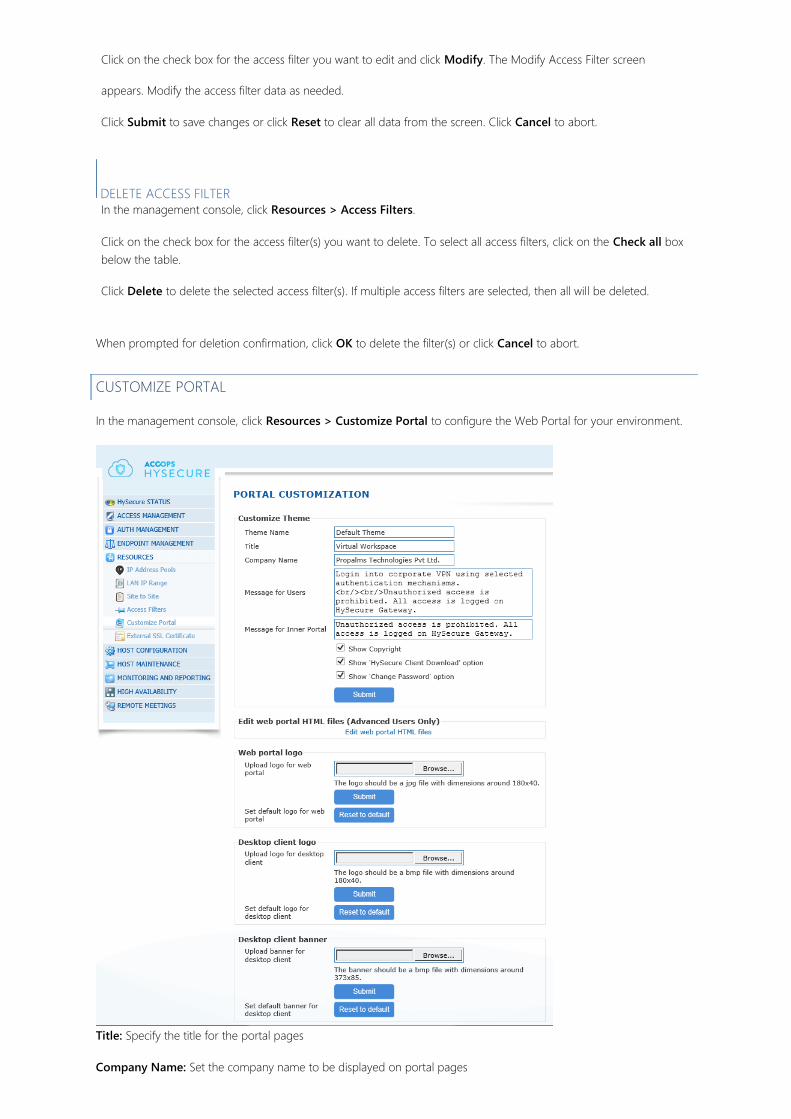
Click on the check box for the access filter you want to edit and click Modify. The Modify Access Filter screen
appears. Modify the access filter data as needed.
Click Submit to save changes or click Reset to clear all data from the screen. Click Cancel to abort.
DELETE ACCESS FILTER
In the management console, click Resources > Access Filters.
Click on the check box for the access filter(s) you want to delete. To select all access filters, click on the Check all box
below the table.
Click Delete to delete the selected access filter(s). If multiple access filters are selected, then all will be deleted.
When prompted for deletion confirmation, click OK to delete the filter(s) or click Cancel to abort.
CUSTOMIZE PORTAL
In the management console, click Resources > Customize Portal to configure the Web Portal for your environment.
Title: Specify the title for the portal pages
Company Name: Set the company name to be displayed on portal pages
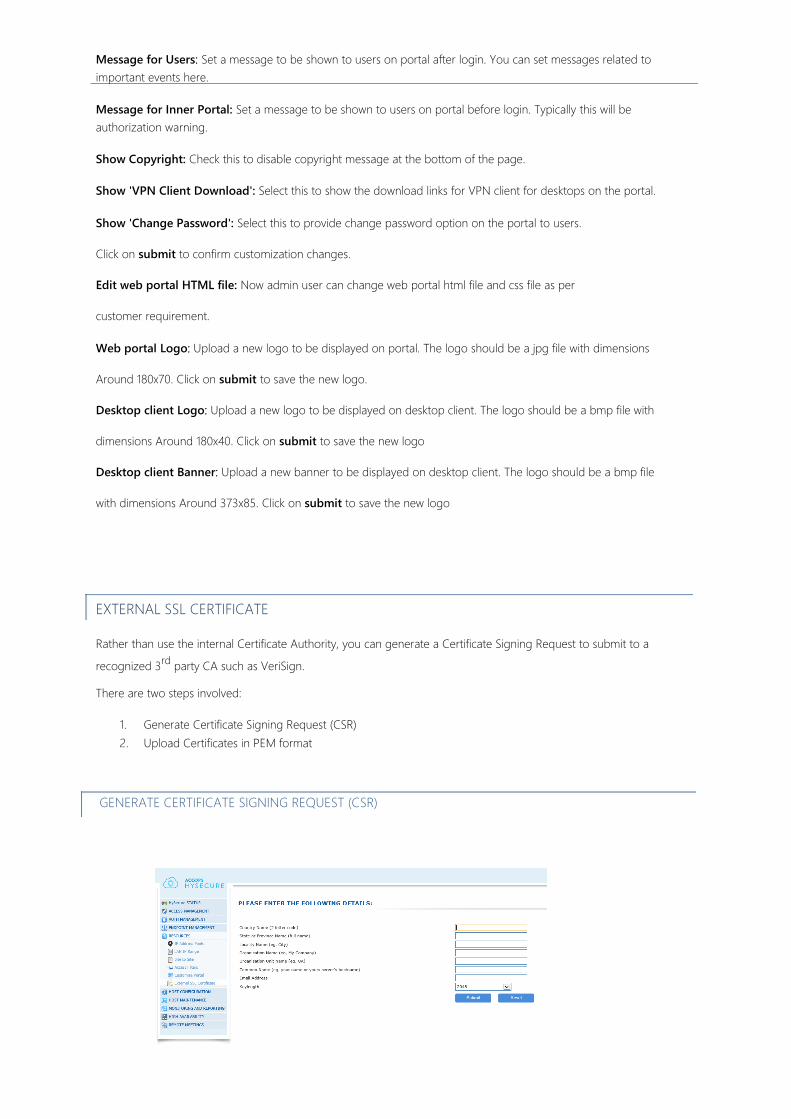
Message for Users: Set a message to be shown to users on portal after login. You can set messages related to
important events here.
Message for Inner Portal: Set a message to be shown to users on portal before login. Typically this will be
authorization warning.
Show Copyright: Check this to disable copyright message at the bottom of the page.
Show 'VPN Client Download': Select this to show the download links for VPN client for desktops on the portal.
Show 'Change Password': Select this to provide change password option on the portal to users.
Click on submit to confirm customization changes.
Edit web portal HTML file: Now admin user can change web portal html file and css file as per
customer requirement.
Web portal Logo: Upload a new logo to be displayed on portal. The logo should be a jpg file with dimensions
Around 180x70. Click on submit to save the new logo.
Desktop client Logo: Upload a new logo to be displayed on desktop client. The logo should be a bmp file with
dimensions Around 180x40. Click on submit to save the new logo
Desktop client Banner: Upload a new banner to be displayed on desktop client. The logo should be a bmp file
with dimensions Around 373x85. Click on submit to save the new logo
EXTERNAL SSL CERTIFICATE
Rather than use the internal Certificate Authority, you can generate a Certificate Signing Request to submit to a
recognized 3rd
party CA such as VeriSign. There are two steps involved:
1. Generate Certificate Signing Request (CSR) 2. Upload Certificates in PEM format
GENERATE CERTIFICATE SIGNING REQUEST (CSR)
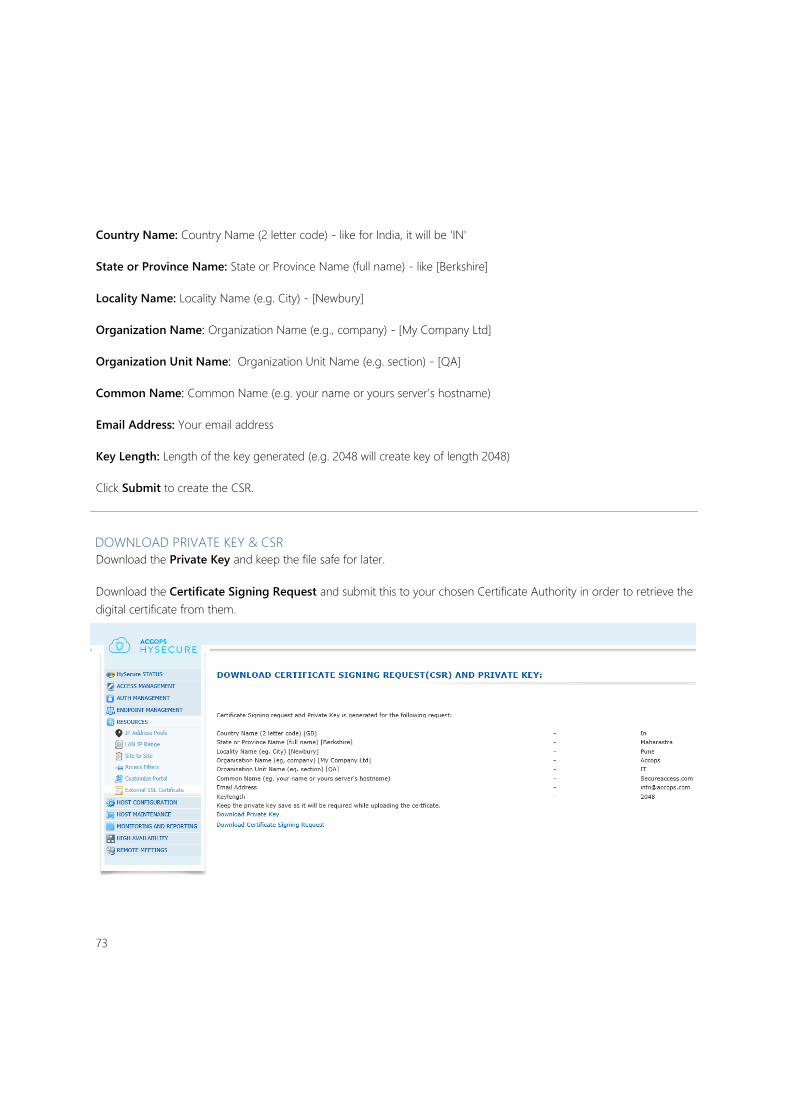
Country Name: Country Name (2 letter code) - like for India, it will be 'IN'
State or Province Name: State or Province Name (full name) - like [Berkshire]
Locality Name: Locality Name (e.g. City) - [Newbury]
Organization Name: Organization Name (e.g., company) - [My Company Ltd]
Organization Unit Name: Organization Unit Name (e.g. section) - [QA]
Common Name: Common Name (e.g. your name or yours server's hostname)
Email Address: Your email address
Key Length: Length of the key generated (e.g. 2048 will create key of length 2048)
Click Submit to create the CSR.
DOWNLOAD PRIVATE KEY & CSR Download the Private Key and keep the file safe for later.
Download the Certificate Signing Request and submit this to your chosen Certificate Authority in order to retrieve the
digital certificate from them.
73
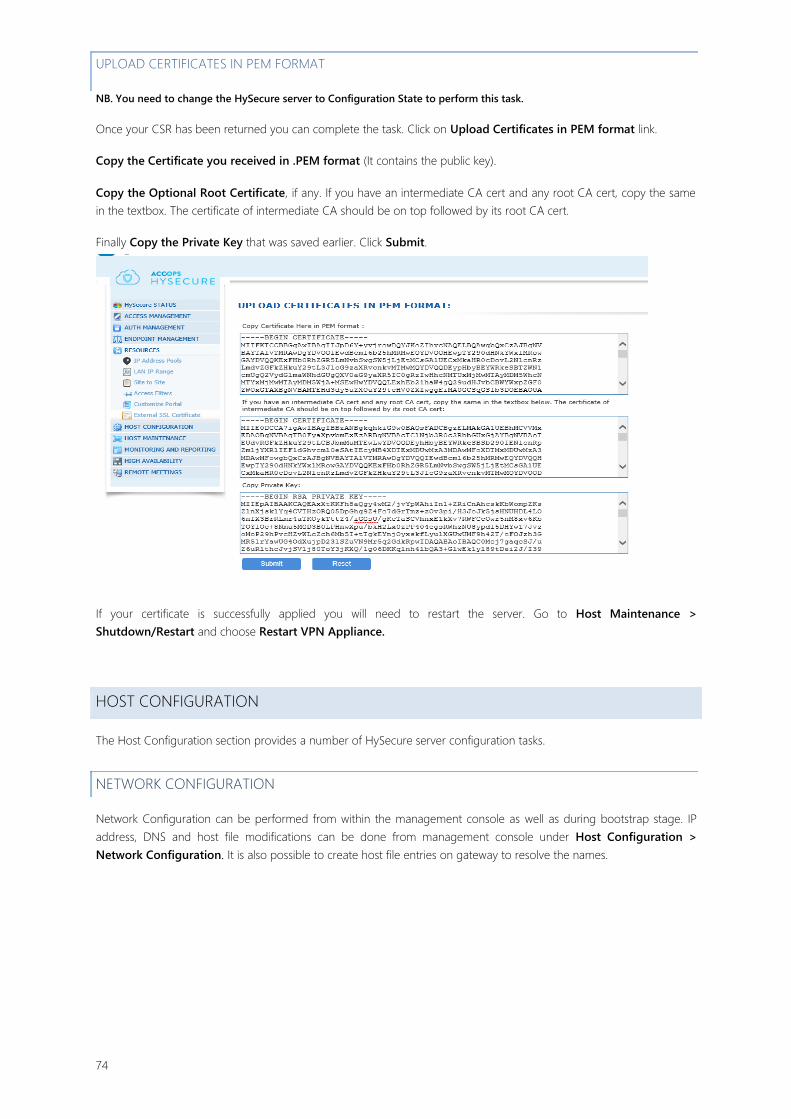
UPLOAD CERTIFICATES IN PEM FORMAT
NB. You need to change the HySecure server to Configuration State to perform this task.
Once your CSR has been returned you can complete the task. Click on Upload Certificates in PEM format link.
Copy the Certificate you received in .PEM format (It contains the public key).
Copy the Optional Root Certificate, if any. If you have an intermediate CA cert and any root CA cert, copy the same
in the textbox. The certificate of intermediate CA should be on top followed by its root CA cert.
Finally Copy the Private Key that was saved earlier. Click Submit.
If your certificate is successfully applied you will need to restart the server. Go to Host Maintenance >
Shutdown/Restart and choose Restart VPN Appliance.
HOST CONFIGURATION
The Host Configuration section provides a number of HySecure server configuration tasks.
NETWORK CONFIGURATION
Network Configuration can be performed from within the management console as well as during bootstrap stage. IP
address, DNS and host file modifications can be done from management console under Host Configuration >
Network Configuration. It is also possible to create host file entries on gateway to resolve the names.
74
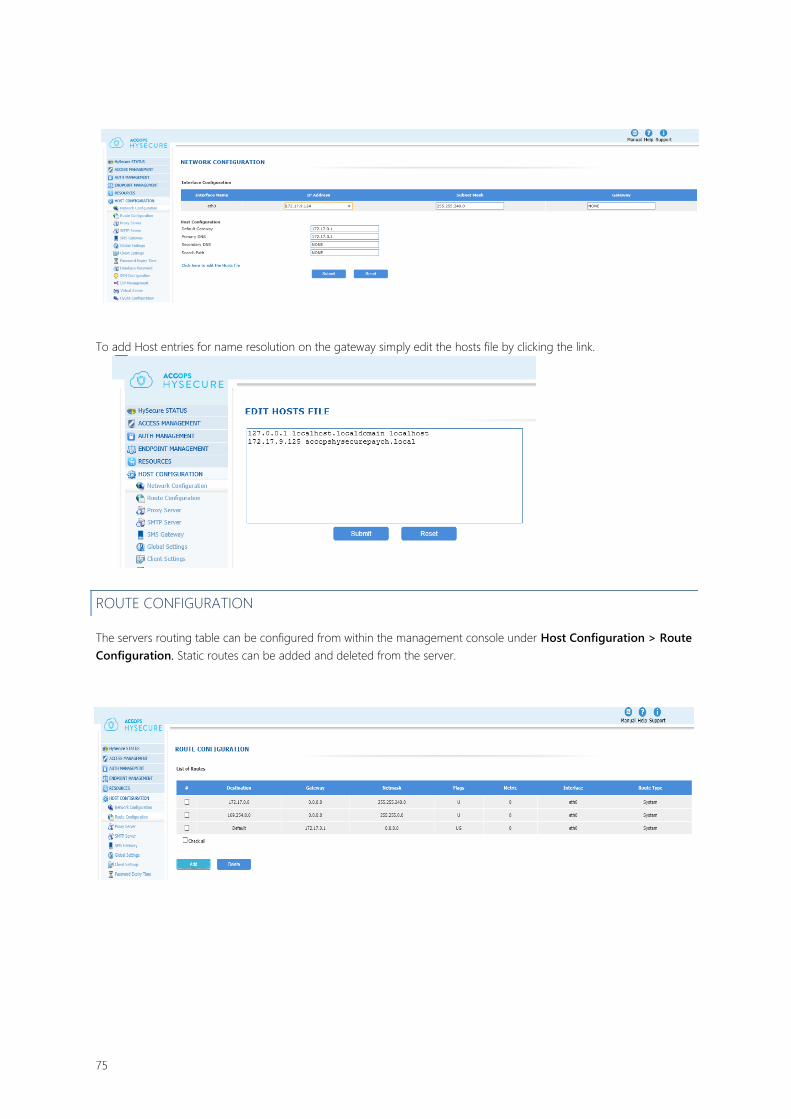
To add Host entries for name resolution on the gateway simply edit the hosts file by clicking the link.
ROUTE CONFIGURATION
The servers routing table can be configured from within the management console under Host Configuration > Route
Configuration. Static routes can be added and deleted from the server.
75
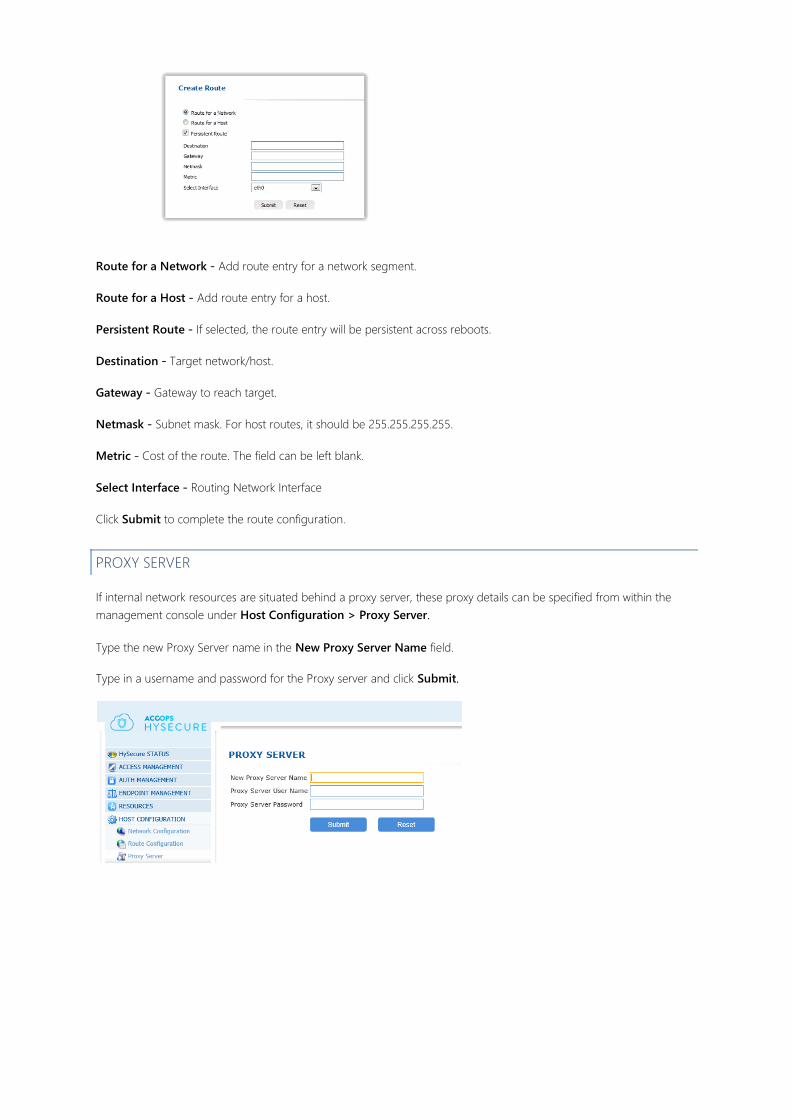
Route for a Network - Add route entry for a network segment.
Route for a Host - Add route entry for a host.
Persistent Route - If selected, the route entry will be persistent across reboots.
Destination - Target network/host.
Gateway - Gateway to reach target.
Netmask - Subnet mask. For host routes, it should be 255.255.255.255.
Metric - Cost of the route. The field can be left blank.
Select Interface - Routing Network Interface
Click Submit to complete the route configuration.
PROXY SERVER
If internal network resources are situated behind a proxy server, these proxy details can be specified from within the
management console under Host Configuration > Proxy Server.
Type the new Proxy Server name in the New Proxy Server Name field.
Type in a username and password for the Proxy server and click Submit.
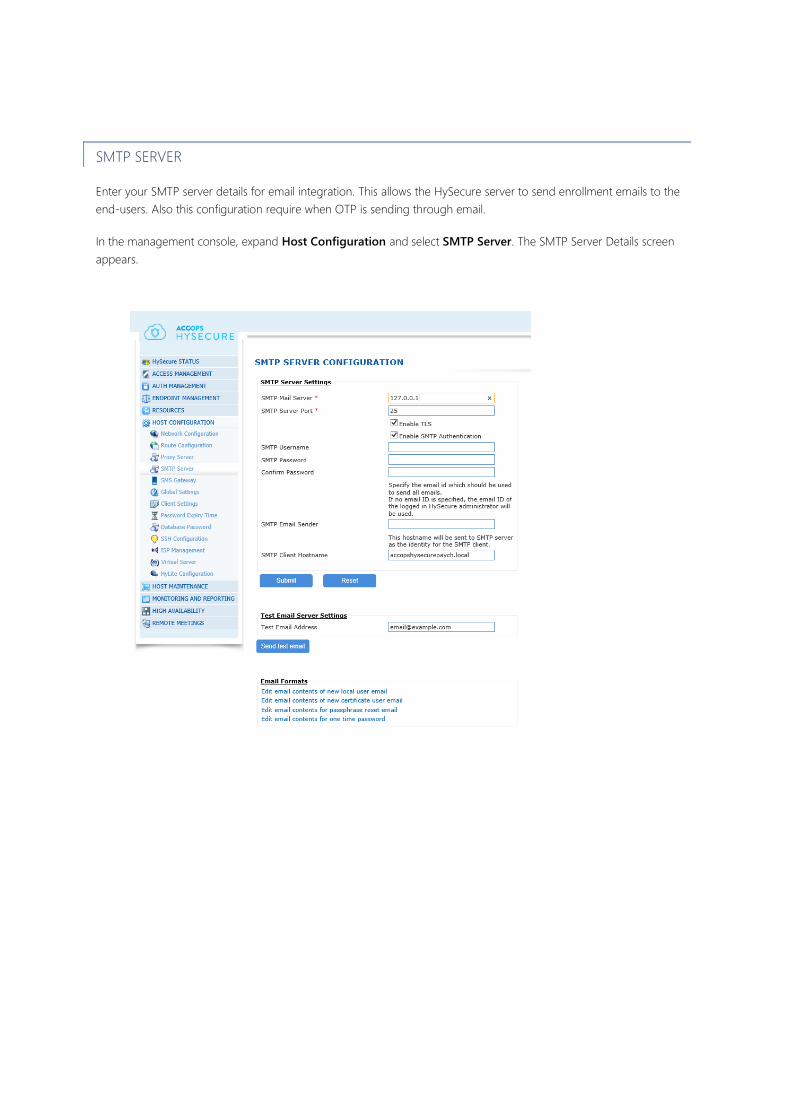
SMTP SERVER
Enter your SMTP server details for email integration. This allows the HySecure server to send enrollment emails to the
end-users. Also this configuration require when OTP is sending through email.
In the management console, expand Host Configuration and select SMTP Server. The SMTP Server Details screen
appears.
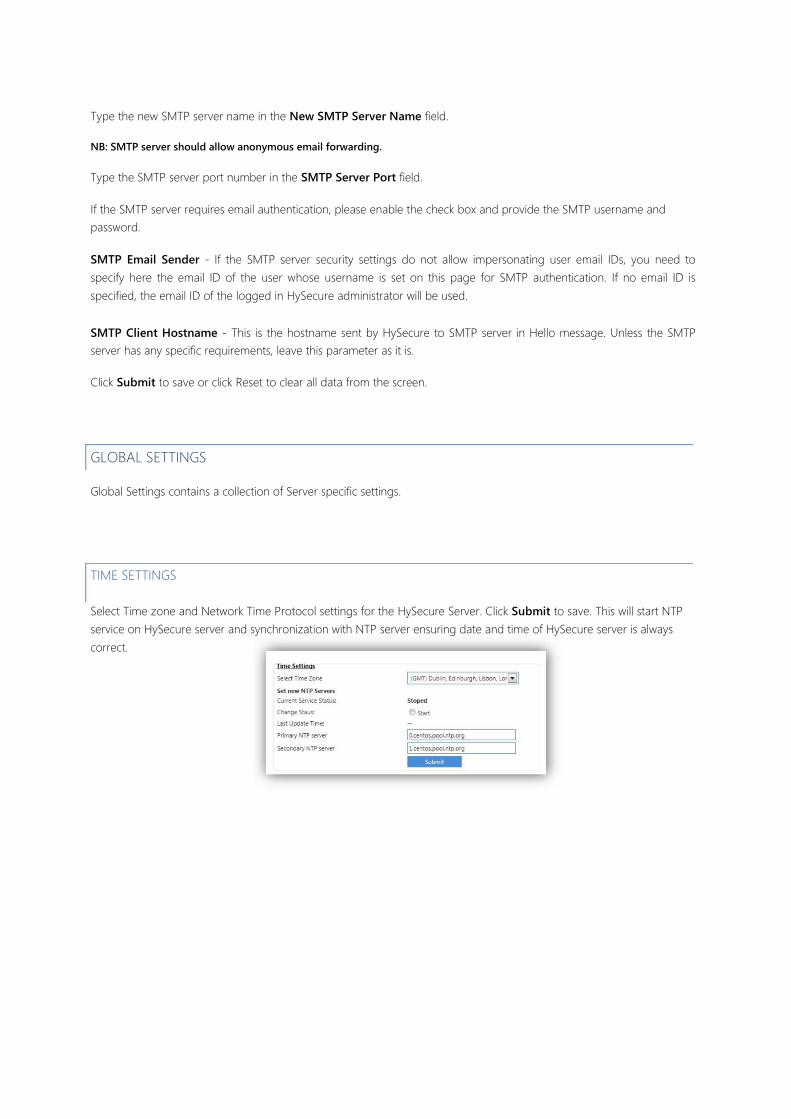
Type the new SMTP server name in the New SMTP Server Name field.
NB: SMTP server should allow anonymous email forwarding.
Type the SMTP server port number in the SMTP Server Port field.
If the SMTP server requires email authentication, please enable the check box and provide the SMTP username and
password.
SMTP Email Sender - If the SMTP server security settings do not allow impersonating user email IDs, you need to
specify here the email ID of the user whose username is set on this page for SMTP authentication. If no email ID is
specified, the email ID of the logged in HySecure administrator will be used.
SMTP Client Hostname - This is the hostname sent by HySecure to SMTP server in Hello message. Unless the SMTP
server has any specific requirements, leave this parameter as it is.
Click Submit to save or click Reset to clear all data from the screen.
GLOBAL SETTINGS
Global Settings contains a collection of Server specific settings.
TIME SETTINGS
Select Time zone and Network Time Protocol settings for the HySecure Server. Click Submit to save. This will start NTP
service on HySecure server and synchronization with NTP server ensuring date and time of HySecure server is always
correct.
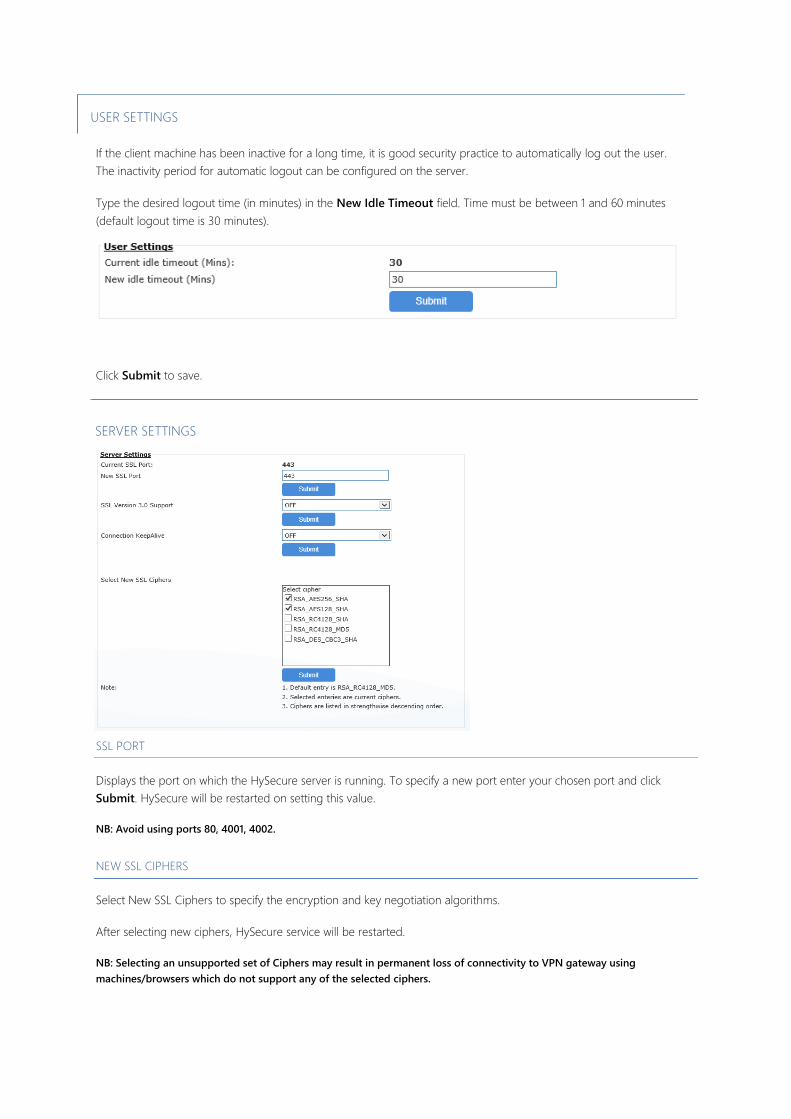
USER SETTINGS
If the client machine has been inactive for a long time, it is good security practice to automatically log out the user.
The inactivity period for automatic logout can be configured on the server.
Type the desired logout time (in minutes) in the New Idle Timeout field. Time must be between 1 and 60 minutes
(default logout time is 30 minutes).
Click Submit to save.
SERVER SETTINGS
SSL PORT
Displays the port on which the HySecure server is running. To specify a new port enter your chosen port and click
Submit. HySecure will be restarted on setting this value.
NB: Avoid using ports 80, 4001, 4002.
NEW SSL CIPHERS
Select New SSL Ciphers to specify the encryption and key negotiation algorithms.
After selecting new ciphers, HySecure service will be restarted.
NB: Selecting an unsupported set of Ciphers may result in permanent loss of connectivity to VPN gateway using
machines/browsers which do not support any of the selected ciphers.

EMAIL FORMATS
Administrator can edit the templates for HySecure automated emails for the following tasks:
New Local Basic Users New Certificate (High Security) Users
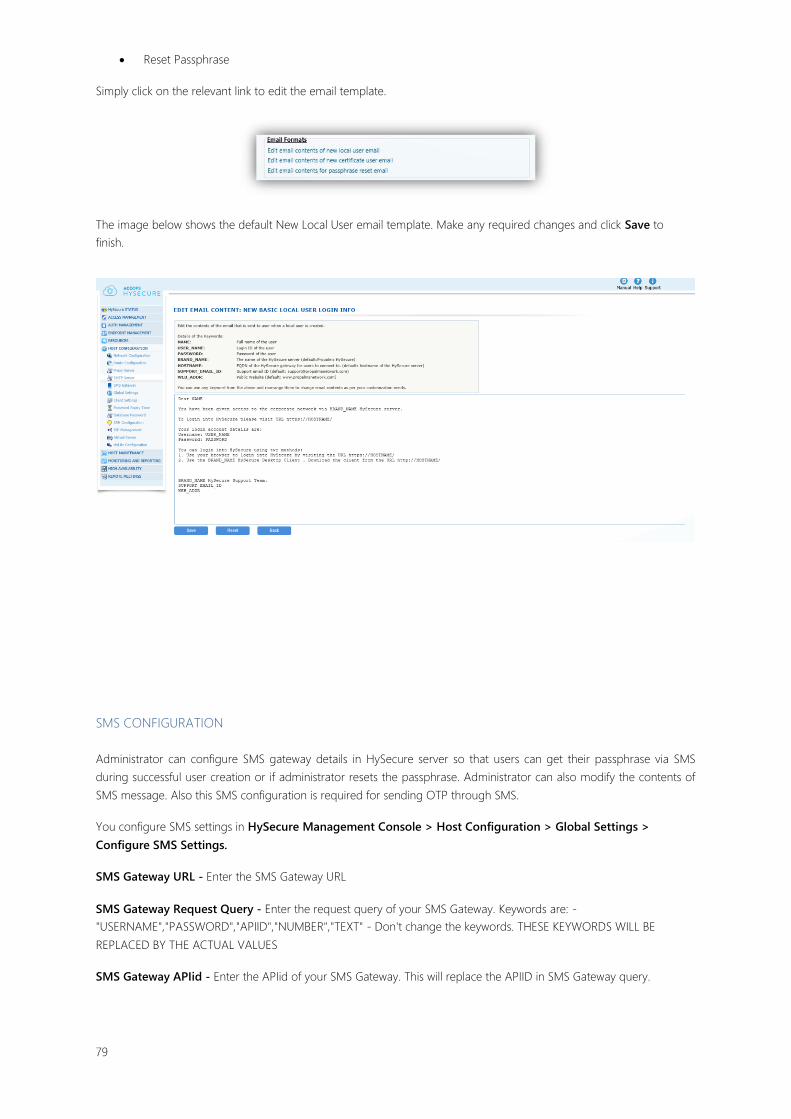
Reset Passphrase
Simply click on the relevant link to edit the email template.
The image below shows the default New Local User email template. Make any required changes and click Save to
finish.
SMS CONFIGURATION
Administrator can configure SMS gateway details in HySecure server so that users can get their passphrase via SMS
during successful user creation or if administrator resets the passphrase. Administrator can also modify the contents of
SMS message. Also this SMS configuration is required for sending OTP through SMS.
You configure SMS settings in HySecure Management Console > Host Configuration > Global Settings > Configure SMS Settings.
SMS Gateway URL - Enter the SMS Gateway URL
SMS Gateway Request Query - Enter the request query of your SMS Gateway. Keywords are: -
"USERNAME","PASSWORD","APIID","NUMBER","TEXT" - Don't change the keywords. THESE KEYWORDS WILL BE REPLACED BY THE ACTUAL VALUES
SMS Gateway APIid - Enter the APIid of your SMS Gateway. This will replace the APIID in SMS Gateway query.
79

SMS Gateway UserName - Enter the username of your SMS Gateway. This will replace the USERNAME in
SMS Gateway query.
SMS Gateway Password - Enter the Password of your SMS Gateway. This will replace the PASSWORD in SMS Gateway
query.
Text sent to local users - Enter the text msg that will be sent to local users. KEYWORDS are: - "USERNAME","PASSWORD". THESE KEYWORDS WILL BE REPLACED BY THE ACTUAL VALUES.
Text sent to Certificate user - Enter the text msg that will be sent to certificate users. KEYWORDS are: - "USERNAME","PASSPHRASE". THESE KEYWORDS WILL BE REPLACED BY THE ACTUAL VALUES.
Text sent on reset passphrase - Enter the text msg that will be sent on reset of passphrase. KEYWORDS are:- "USERNAME","PASSPHRASE". THESE KEYWORDS WILL BE REPLACED BY THE ACTUAL VALUES.
CLIENT SETTINGS
The Administrator can now specify certain client configuration settings for the HySecure client and also optionally
control deployment of Accops TSE client for integration and capability for users to launch applications published on
Accops TSE Server.
These client settings can be accessed from the HySecure management console under Host Configuration > Client Settings.
VPN CLIENT SETTINGS
Option for users ability to save username and password on HySecure desktop client Specify whether HySecure client checks for valid SSL certificate Set HySecure desktop client to automatically start on Windows logon Override default name resolution via HySecure and use local client side Disable user login if user is connecting through a proxy Enable collection of device fingerprint details Enable detection of real WAN IP address if user is behind a proxy Edit comma separated list of alternate gateways that client can connect to If using Alternate Gateways feature, you can specify that client randomly picks gateway from specified list Enable upgrade notification for users when a new HySecure client version is available
80
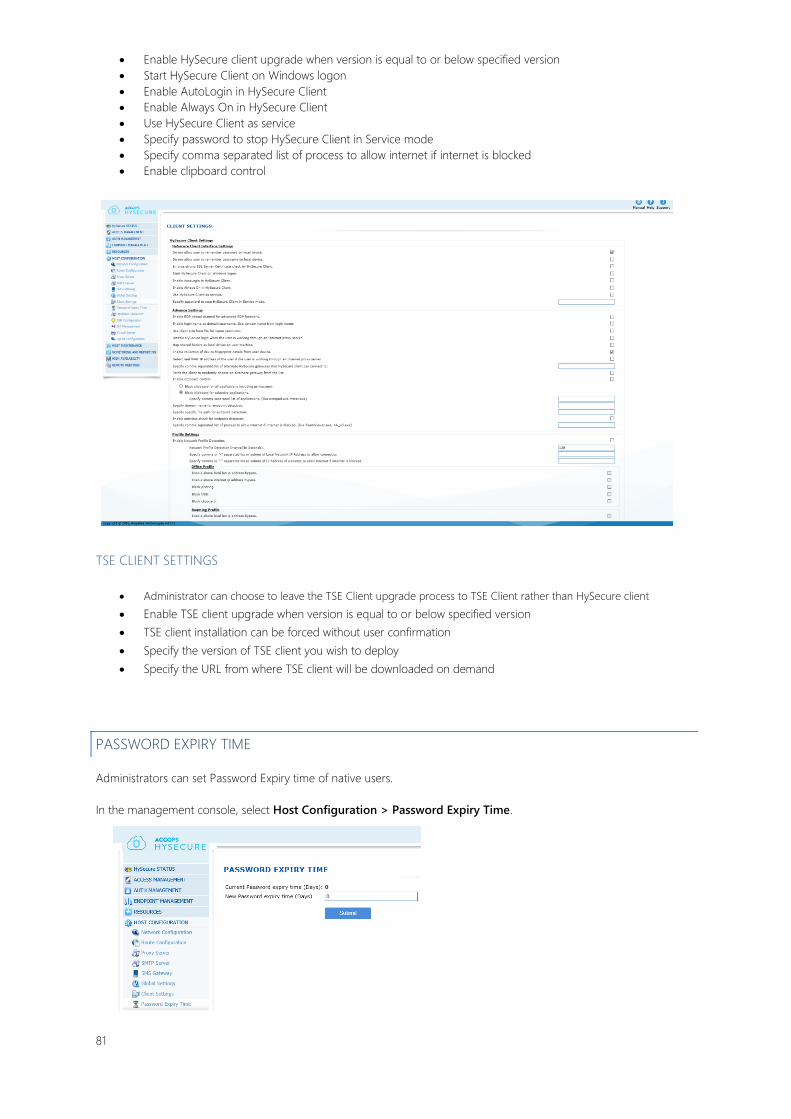
Enable HySecure client upgrade when version is equal to or below specified version
Start HySecure Client on Windows logon
Enable AutoLogin in HySecure Client
Enable Always On in HySecure Client
Use HySecure Client as service
Specify password to stop HySecure Client in Service mode
Specify comma separated list of process to allow internet if internet is blocked
Enable clipboard control
TSE CLIENT SETTINGS
Administrator can choose to leave the TSE Client upgrade process to TSE Client rather than HySecure client
Enable TSE client upgrade when version is equal to or below specified version TSE client installation can be forced without user confirmation Specify the version of TSE client you wish to deploy Specify the URL from where TSE client will be downloaded on demand
PASSWORD EXPIRY TIME
Administrators can set Password Expiry time of native users.
In the management console, select Host Configuration > Password Expiry Time.
81
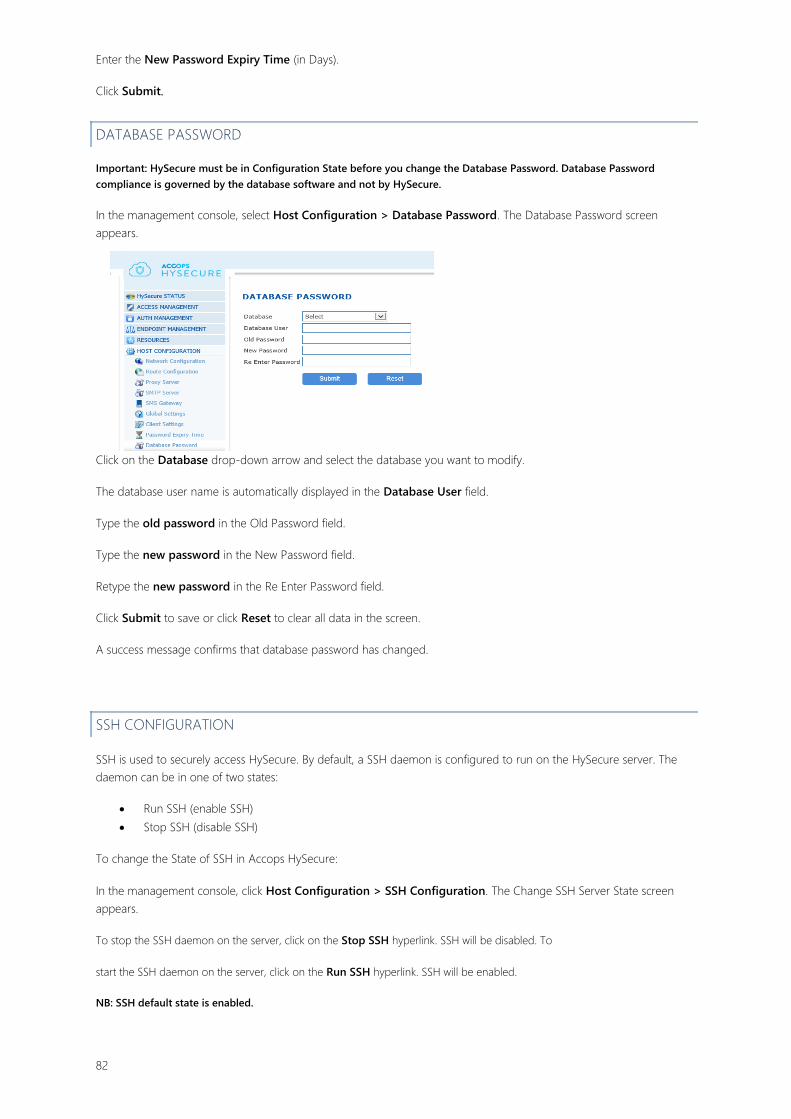
Enter the New Password Expiry Time (in Days).
Click Submit.
DATABASE PASSWORD
Important: HySecure must be in Configuration State before you change the Database Password. Database Password
compliance is governed by the database software and not by HySecure.
In the management console, select Host Configuration > Database Password. The Database Password screen
appears.
Click on the Database drop-down arrow and select the database you want to modify.
The database user name is automatically displayed in the Database User field.
Type the old password in the Old Password field.
Type the new password in the New Password field.
Retype the new password in the Re Enter Password field.
Click Submit to save or click Reset to clear all data in the screen.
A success message confirms that database password has changed.
SSH CONFIGURATION
SSH is used to securely access HySecure. By default, a SSH daemon is configured to run on the HySecure server. The
daemon can be in one of two states:
Run SSH (enable SSH) Stop SSH (disable SSH)
To change the State of SSH in Accops HySecure:
In the management console, click Host Configuration > SSH Configuration. The Change SSH Server State screen
appears.
To stop the SSH daemon on the server, click on the Stop SSH hyperlink. SSH will be disabled. To
start the SSH daemon on the server, click on the Run SSH hyperlink. SSH will be enabled.
NB: SSH default state is enabled.
82
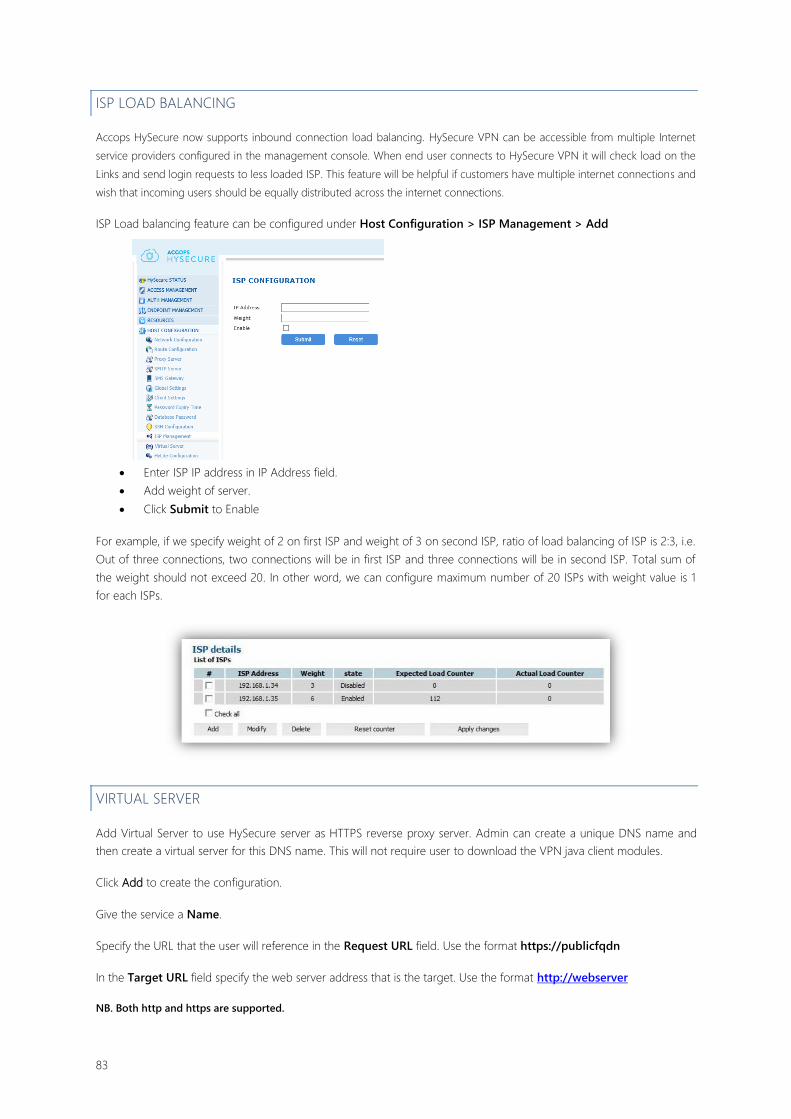
ISP LOAD BALANCING
Accops HySecure now supports inbound connection load balancing. HySecure VPN can be accessible from multiple Internet
service providers configured in the management console. When end user connects to HySecure VPN it will check load on the
Links and send login requests to less loaded ISP. This feature will be helpful if customers have multiple internet connections and
wish that incoming users should be equally distributed across the internet connections.
ISP Load balancing feature can be configured under Host Configuration > ISP Management > Add
Enter ISP IP address in IP Address field. Add weight of server. Click Submit to Enable
For example, if we specify weight of 2 on first ISP and weight of 3 on second ISP, ratio of load balancing of ISP is 2:3, i.e.
Out of three connections, two connections will be in first ISP and three connections will be in second ISP. Total sum of
the weight should not exceed 20. In other word, we can configure maximum number of 20 ISPs with weight value is 1
for each ISPs.
VIRTUAL SERVER
Add Virtual Server to use HySecure server as HTTPS reverse proxy server. Admin can create a unique DNS name and
then create a virtual server for this DNS name. This will not require user to download the VPN java client modules.
Click Add to create the configuration.
Give the service a Name.
Specify the URL that the user will reference in the Request URL field. Use the format https://publicfqdn
In the Target URL field specify the web server address that is the target. Use the format http://webserver
NB. Both http and https are supported.
83
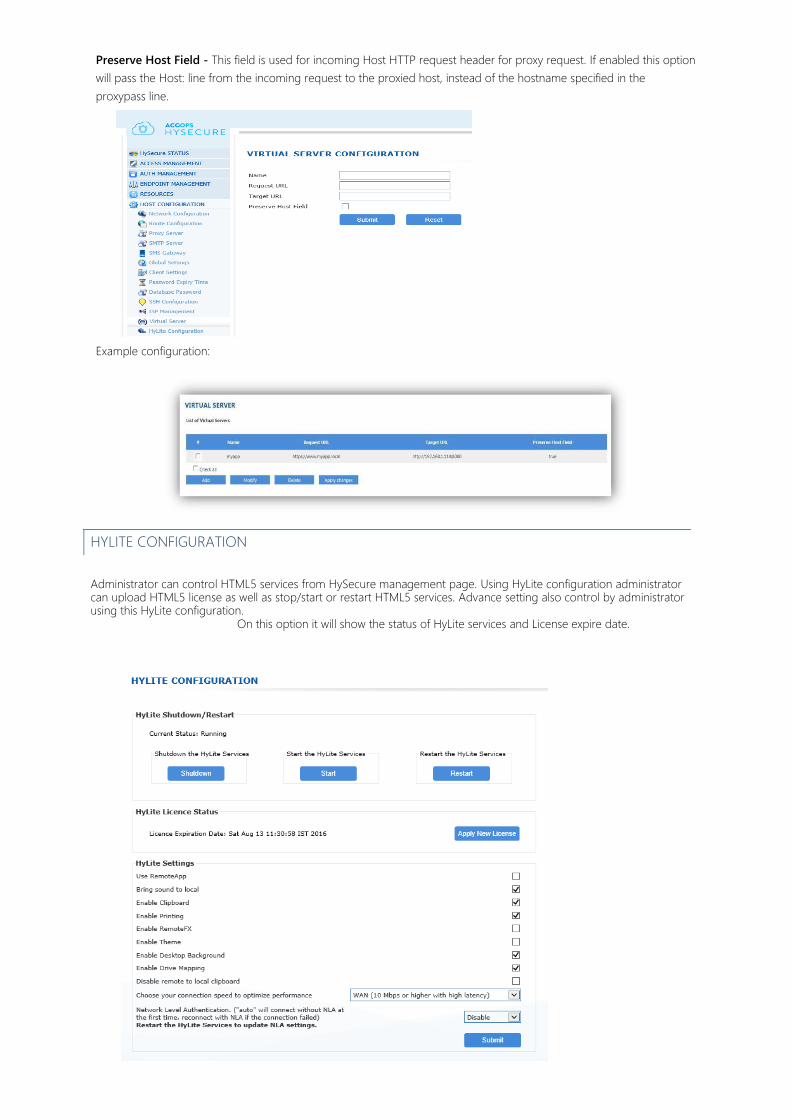
Preserve Host Field - This field is used for incoming Host HTTP request header for proxy request. If enabled this option
will pass the Host: line from the incoming request to the proxied host, instead of the hostname specified in the
proxypass line.
Example configuration:
HYLITE CONFIGURATION Administrator can control HTML5 services from HySecure management page. Using HyLite configuration administrator can upload HTML5 license as well as stop/start or restart HTML5 services. Advance setting also control by administrator using this HyLite configuration. On this option it will show the status of HyLite services and License expire date.
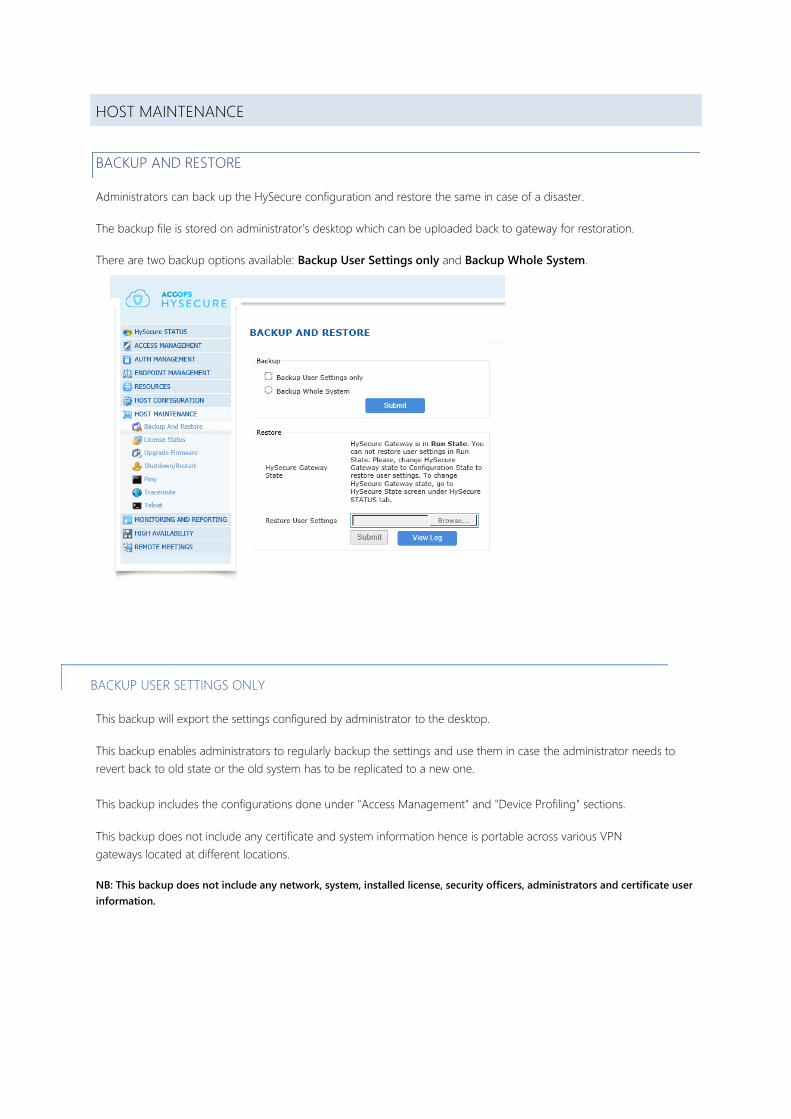
HOST MAINTENANCE
BACKUP AND RESTORE
Administrators can back up the HySecure configuration and restore the same in case of a disaster.
The backup file is stored on administrator’s desktop which can be uploaded back to gateway for restoration.
There are two backup options available: Backup User Settings only and Backup Whole System.
BACKUP USER SETTINGS ONLY
This backup will export the settings configured by administrator to the desktop.
This backup enables administrators to regularly backup the settings and use them in case the administrator needs to
revert back to old state or the old system has to be replicated to a new one.
This backup includes the configurations done under "Access Management" and "Device Profiling" sections.
This backup does not include any certificate and system information hence is portable across various VPN
gateways located at different locations.
NB: This backup does not include any network, system, installed license, security officers, administrators and certificate user
information.
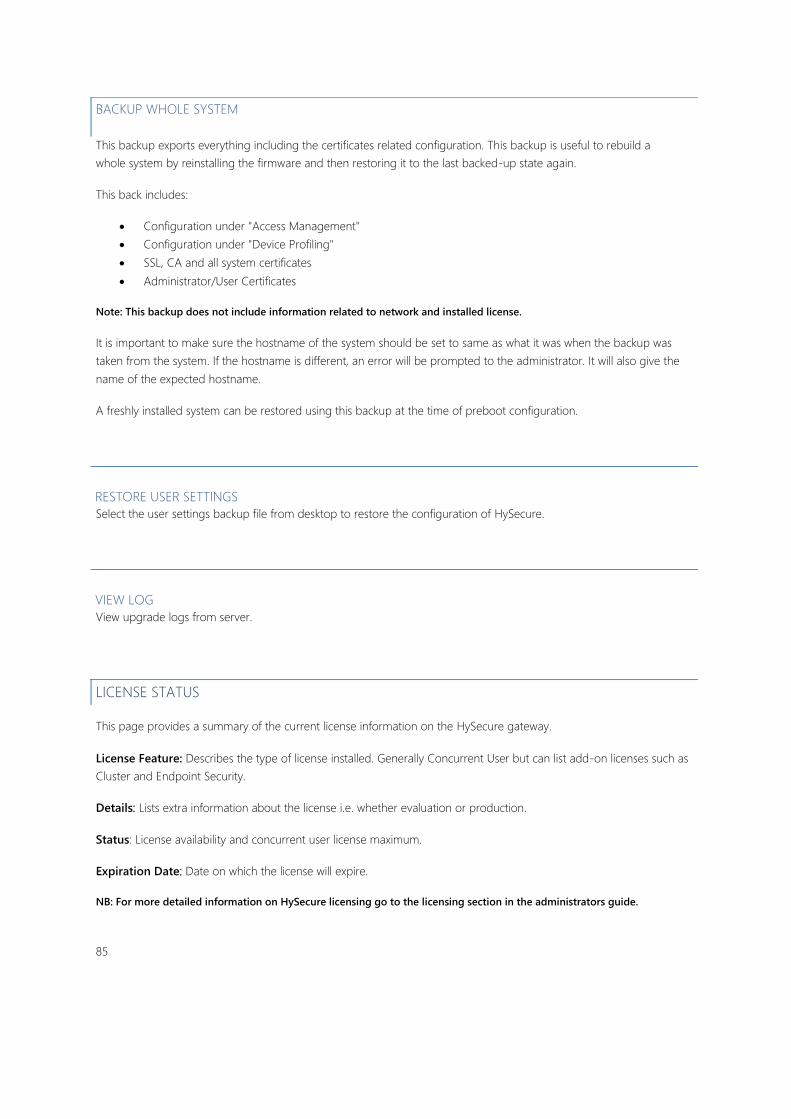
BACKUP WHOLE SYSTEM
This backup exports everything including the certificates related configuration. This backup is useful to rebuild a
whole system by reinstalling the firmware and then restoring it to the last backed-up state again.
This back includes:
Configuration under "Access Management" Configuration under "Device Profiling" SSL, CA and all system certificates Administrator/User Certificates
Note: This backup does not include information related to network and installed license.
It is important to make sure the hostname of the system should be set to same as what it was when the backup was
taken from the system. If the hostname is different, an error will be prompted to the administrator. It will also give the
name of the expected hostname.
A freshly installed system can be restored using this backup at the time of preboot configuration.
RESTORE USER SETTINGS Select the user settings backup file from desktop to restore the configuration of HySecure.
VIEW LOG View upgrade logs from server.
LICENSE STATUS
This page provides a summary of the current license information on the HySecure gateway.
License Feature: Describes the type of license installed. Generally Concurrent User but can list add-on licenses such as
Cluster and Endpoint Security.
Details: Lists extra information about the license i.e. whether evaluation or production.
Status: License availability and concurrent user license maximum.
Expiration Date: Date on which the license will expire.
NB: For more detailed information on HySecure licensing go to the licensing section in the administrators guide.
85
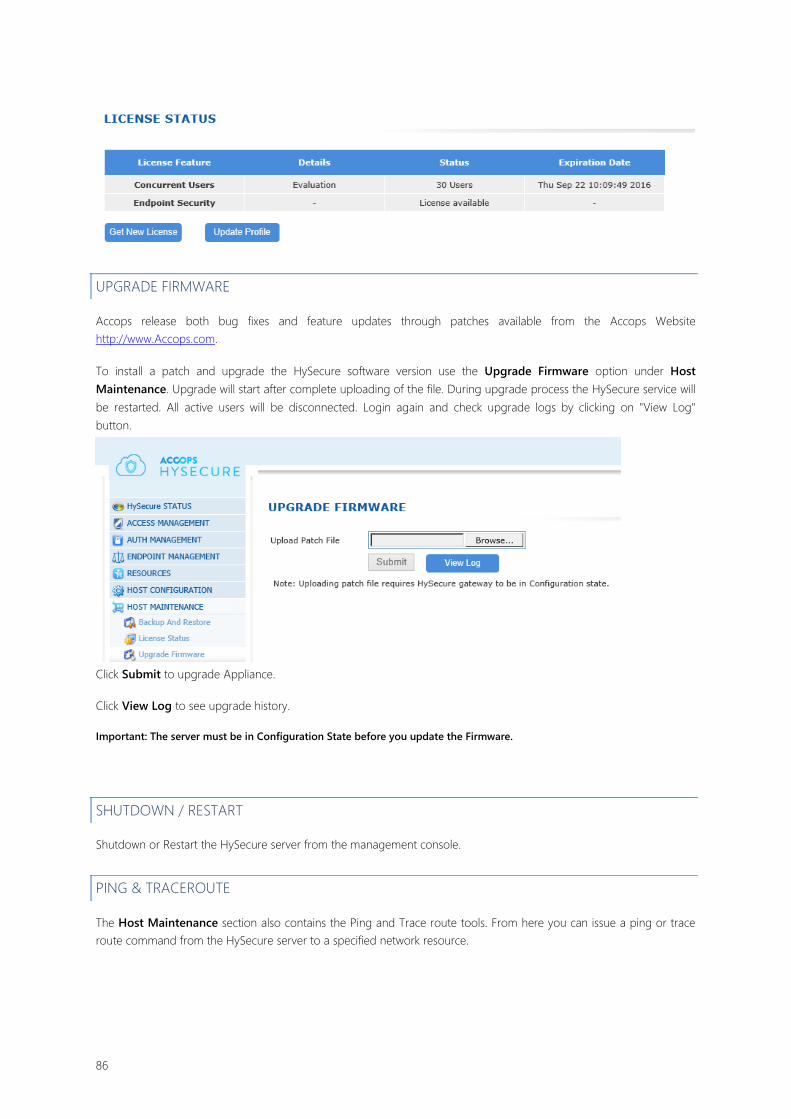
UPGRADE FIRMWARE
Accops release both bug fixes and feature updates through patches available from the Accops Website
http://www.Accops.com.
To install a patch and upgrade the HySecure software version use the Upgrade Firmware option under Host
Maintenance. Upgrade will start after complete uploading of the file. During upgrade process the HySecure service will
be restarted. All active users will be disconnected. Login again and check upgrade logs by clicking on "View Log"
button.
Provide the path of the patch file in Upload Patch File field.
Click Submit to upgrade Appliance.
Click View Log to see upgrade history.
Important: The server must be in Configuration State before you update the Firmware.
SHUTDOWN / RESTART
Shutdown or Restart the HySecure server from the management console.
PING & TRACEROUTE
The Host Maintenance section also contains the Ping and Trace route tools. From here you can issue a ping or trace
route command from the HySecure server to a specified network resource.
86
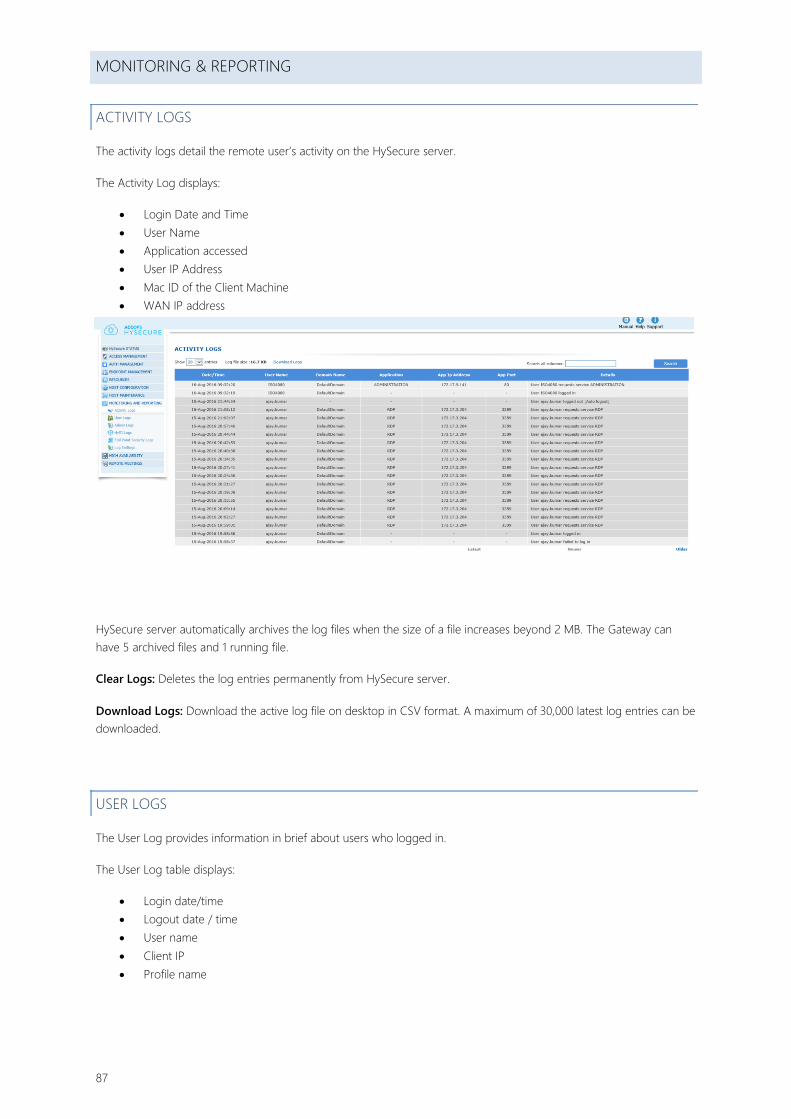
MONITORING & REPORTING
ACTIVITY LOGS
The activity logs detail the remote user’s activity on the HySecure server.
The Activity Log displays:
Login Date and Time User Name Application accessed User IP Address Mac ID of the Client Machine WAN IP address Application Port Details
HySecure server automatically archives the log files when the size of a file increases beyond 2 MB. The Gateway can
have 5 archived files and 1 running file.
Clear Logs: Deletes the log entries permanently from HySecure server.
Download Logs: Download the active log file on desktop in CSV format. A maximum of 30,000 latest log entries can be
downloaded.
USER LOGS
The User Log provides information in brief about users who logged in.
The User Log table displays:
Login date/time Logout date / time User name Client IP Profile name
87
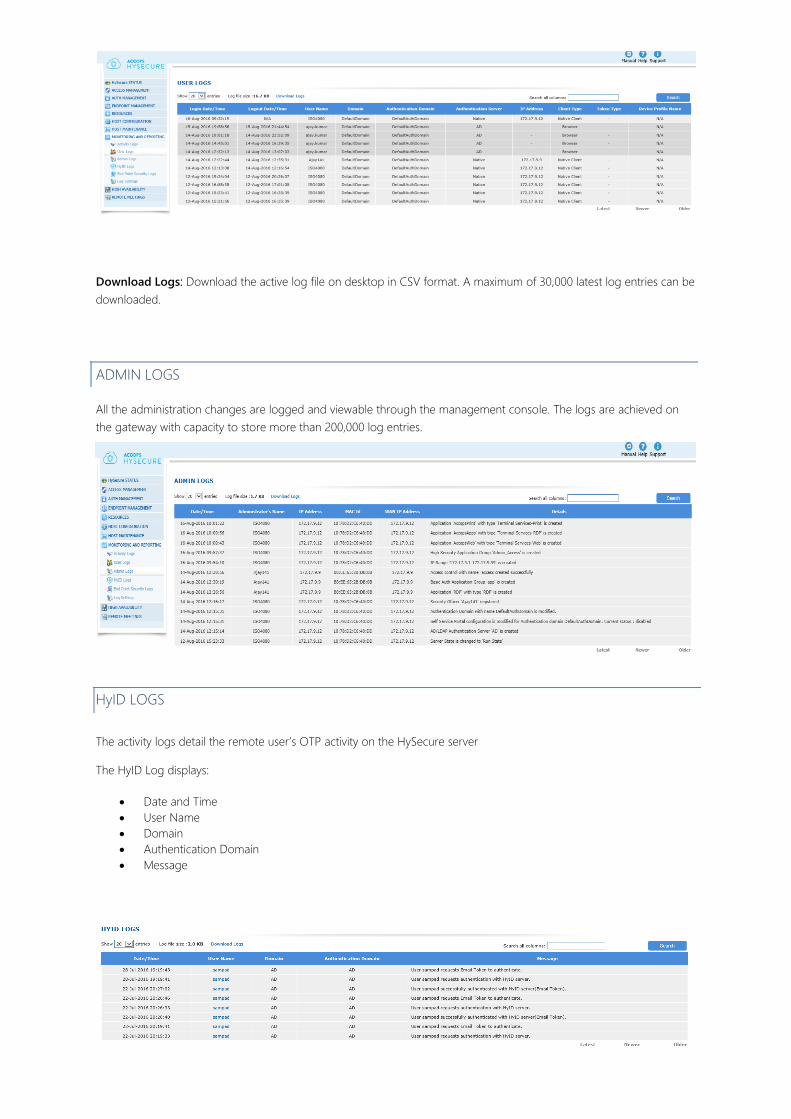
Download Logs: Download the active log file on desktop in CSV format. A maximum of 30,000 latest log entries can be
downloaded.
ADMIN LOGS
All the administration changes are logged and viewable through the management console. The logs are achieved on
the gateway with capacity to store more than 200,000 log entries.
HyID LOGS The activity logs detail the remote user’s OTP activity on the HySecure server
The HyID Log displays:
Date and Time
User Name
Domain
Authentication Domain
Message
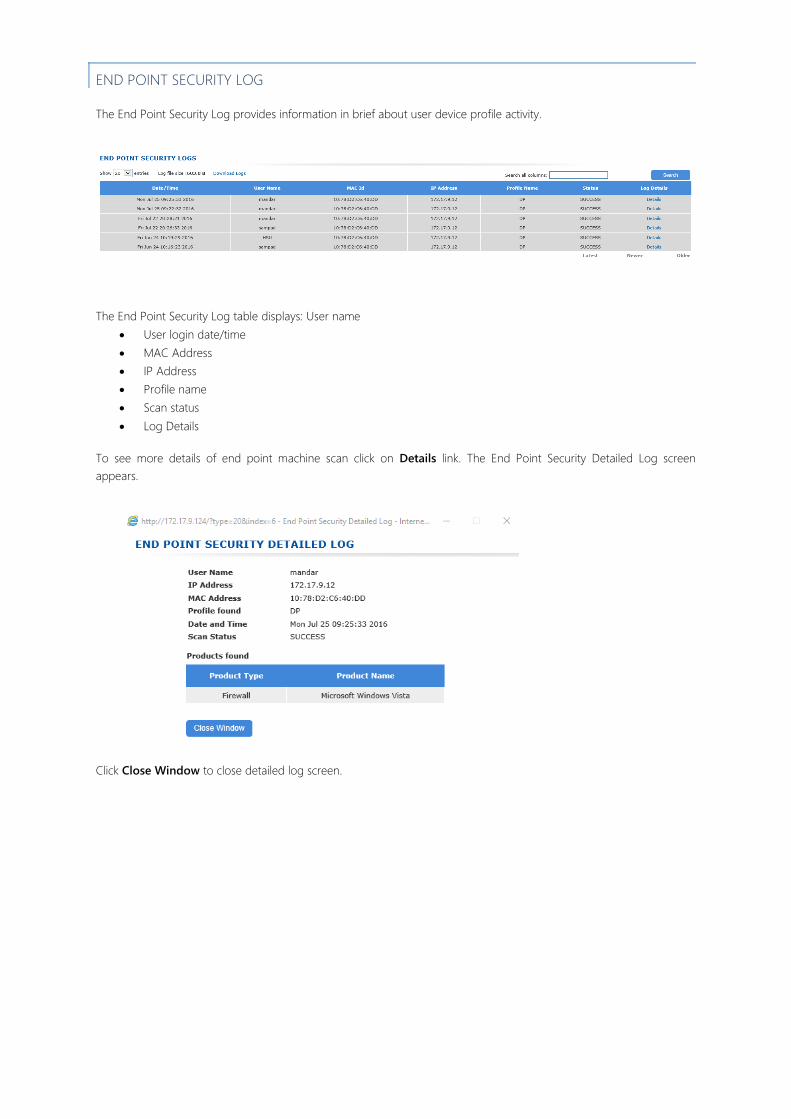
END POINT SECURITY LOG
The End Point Security Log provides information in brief about user device profile activity.
The End Point Security Log table displays: User name User login date/time MAC Address IP Address Profile name Scan status Log Details
To see more details of end point machine scan click on Details link. The End Point Security Detailed Log screen
appears.
Click Close Window to close detailed log screen.
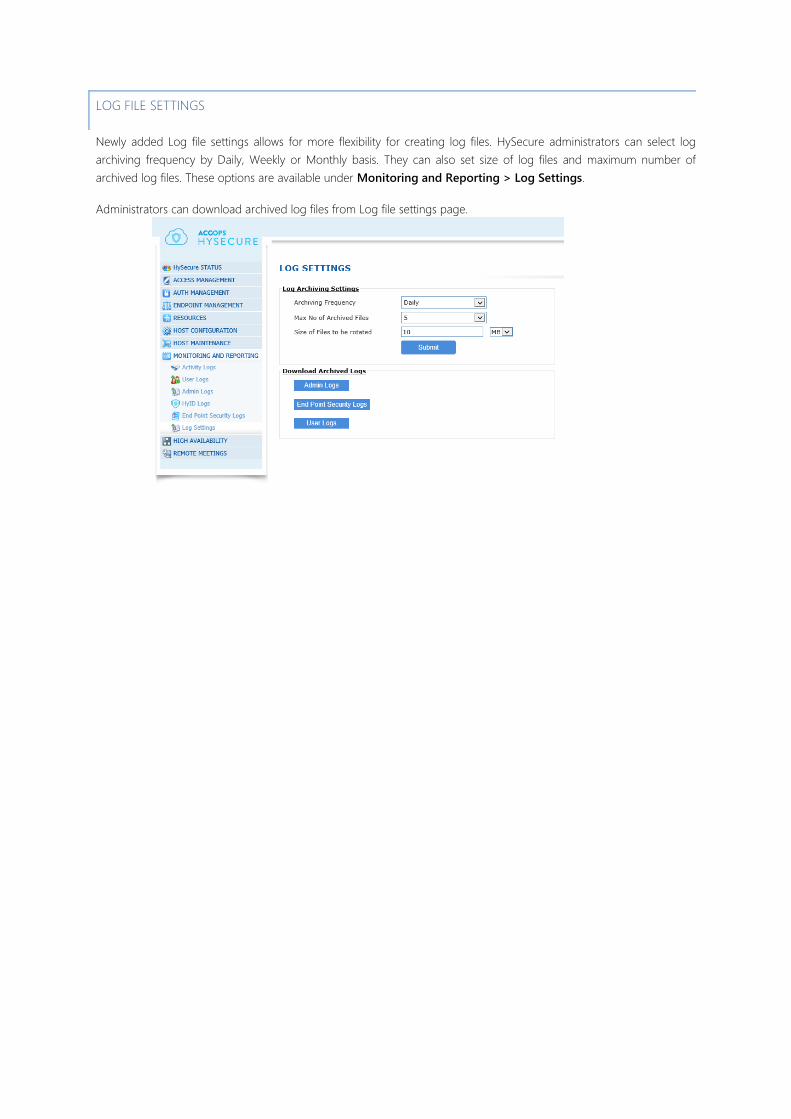
LOG FILE SETTINGS
Newly added Log file settings allows for more flexibility for creating log files. HySecure administrators can select log
archiving frequency by Daily, Weekly or Monthly basis. They can also set size of log files and maximum number of
archived log files. These options are available under Monitoring and Reporting > Log Settings.
Administrators can download archived log files from Log file settings page.
HIGH AVAILABILITY
OVERVIEW
HySecure high availability and load balancing feature is required to make HySecure service always ON and to support
large number of remote users with efficient utilization of hardware resources available. The system would enable
thousands of remote users to be able to access corporate services with maximum performance. The whole deployment
should be fault tolerant and should manage the user load efficiently. The high availability and load balancing system is
referred as HySecure VPN cluster in this document.
Accops HySecure VPN Cluster feature enables organizations to deploy two or more HySecure gateways to support
large no. of user’s with highly available VPN service.
The cluster will have following components:
1. Load balancer module: At least 1, maximum 2 2. High availability module: At least 1, maximum 2 3. VPN Gateway module: At least 1, maximum: 256
The HySecure VPN cluster would provide an active-active load balancing and high availability setup. There are following
type of nodes in the VPN cluster:
1. Load balancing node (LB Node): Load balancer modules, High Availability module for load balancer , Cluster
Management modules and VPN Configuration database 2. VPN Node: Full-fledged VPN Gateway
In a cluster at least 1 LB Node and 1 VPN Node are required. In a cluster maximum of 2 LB Node are possible. The 2 LB
Node works in active-passive manner. If the active LB node goes down, the standby LB Node takes over the cluster.
In a cluster, maximum 256 VPN Nodes can be present.
Both LB Node and VPN Node can run on same hardware that means a single hardware can act as load balancer as well
as process VPN connections.
There are following deployment models for the cluster:
1. Small deployments: Two Hardware instances, both running LB Node and VPN Node. This scenario is good for
smaller deployments, typically good for 2000 users or so based on the hardware capacity. In this scenario,
both the hardware instances are running load balancer and VPN functionality. One of the hardware runs active
LB and other one acts as standby.
2. Large deployments: N no. of hardware with all nodes running VPN Node. This scenario suits deployments
ranging from 2000-10000. In this scenario, there are 2 LB Nodes and there can be any no. of VPN Nodes. The
hardware running LB Node also runs VPN Node.
3. Highly Scalable deployments: N no. of hardware with dedicated LB Node. This scenario suits deployments
ranging from 10000 to 1,000,000 no. of users. The hardware running LB Node is free from doing VPN
processing and hence the overall performance of LB Node is very high. Rest of the hardware runs VPN Nodes.
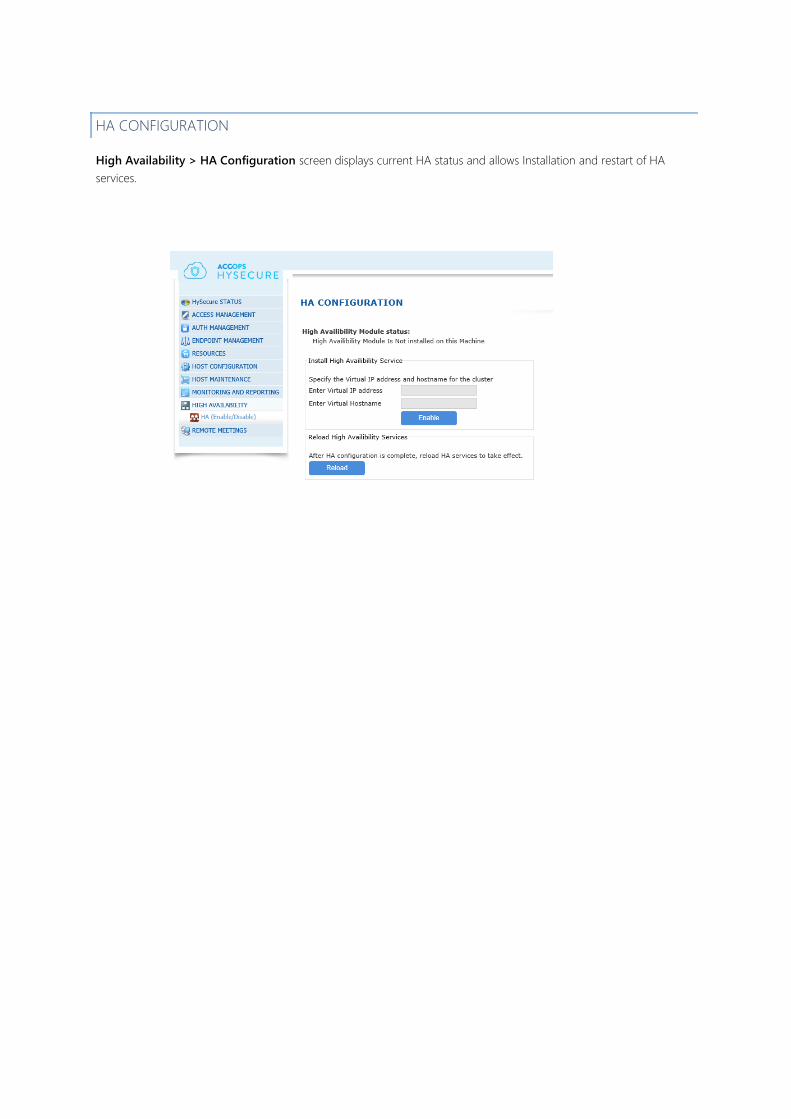
HA CONFIGURATION
High Availability > HA Configuration screen displays current HA status and allows Installation and restart of HA
services.
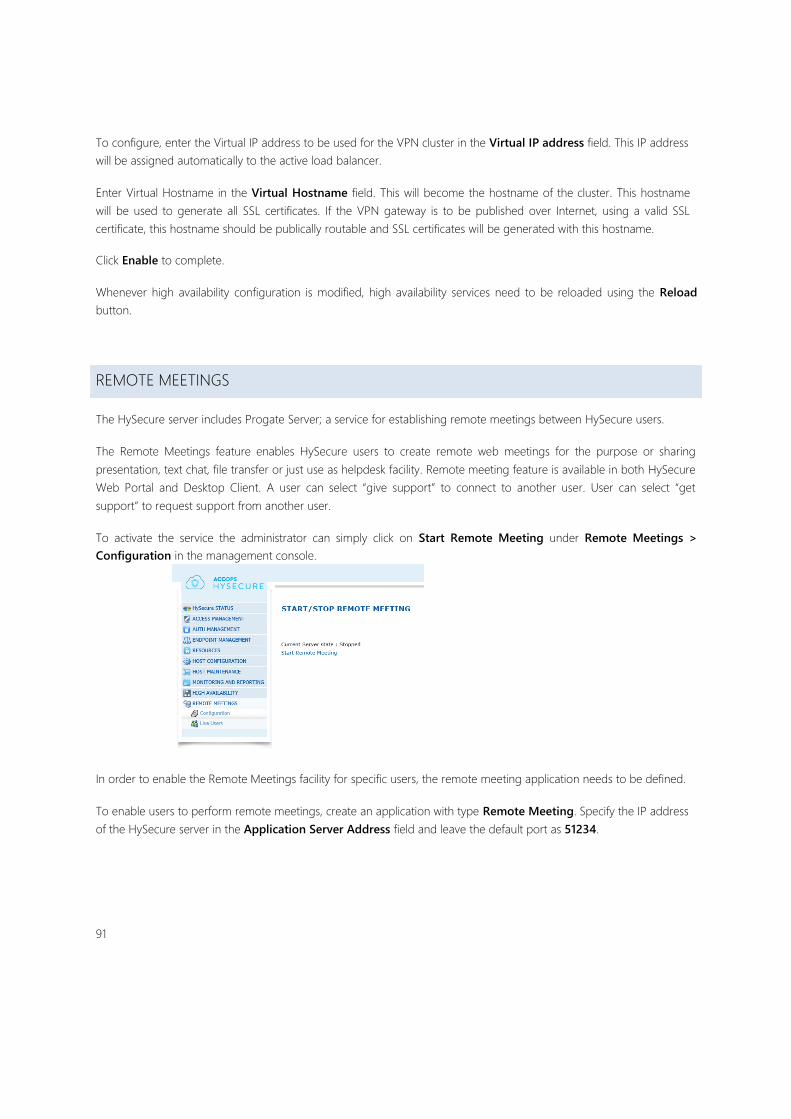
To configure, enter the Virtual IP address to be used for the VPN cluster in the Virtual IP address field. This IP address
will be assigned automatically to the active load balancer.
Enter Virtual Hostname in the Virtual Hostname field. This will become the hostname of the cluster. This hostname
will be used to generate all SSL certificates. If the VPN gateway is to be published over Internet, using a valid SSL
certificate, this hostname should be publically routable and SSL certificates will be generated with this hostname.
Click Enable to complete.
Whenever high availability configuration is modified, high availability services need to be reloaded using the Reload
button.
REMOTE MEETINGS
The HySecure server includes Progate Server; a service for establishing remote meetings between HySecure users.
The Remote Meetings feature enables HySecure users to create remote web meetings for the purpose or sharing
presentation, text chat, file transfer or just use as helpdesk facility. Remote meeting feature is available in both HySecure
Web Portal and Desktop Client. A user can select “give support” to connect to another user. User can select “get
support” to request support from another user.
To activate the service the administrator can simply click on Start Remote Meeting under Remote Meetings >
Configuration in the management console.
In order to enable the Remote Meetings facility for specific users, the remote meeting application needs to be defined.
To enable users to perform remote meetings, create an application with type Remote Meeting. Specify the IP address
of the HySecure server in the Application Server Address field and leave the default port as 51234.
91

Assign this application to users to whom you want to allow remote meetings.
For connecting to another user, user must enter the username of the partner and the meeting password.
92
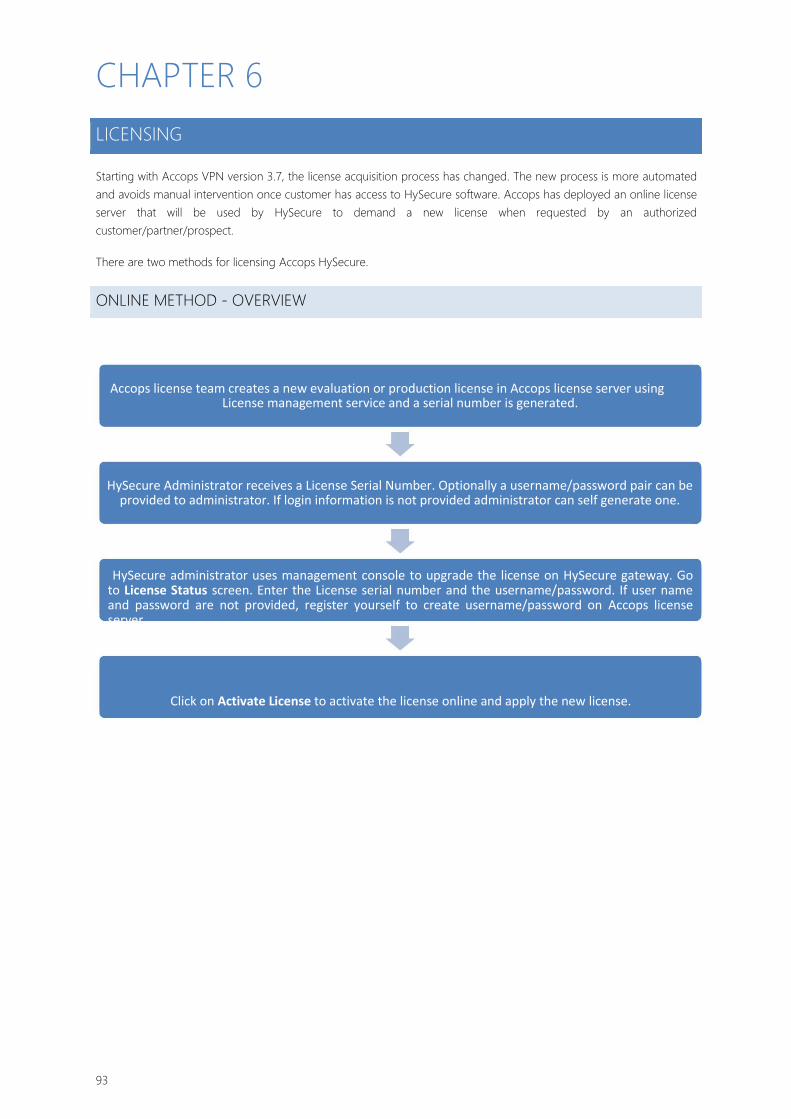
CHAPTER 6
LICENSING
Starting with Accops VPN version 3.7, the license acquisition process has changed. The new process is more automated
and avoids manual intervention once customer has access to HySecure software. Accops has deployed an online license
server that will be used by HySecure to demand a new license when requested by an authorized
customer/partner/prospect.
There are two methods for licensing Accops HySecure.
ONLINE METHOD - OVERVIEW
Accops license team creates a new evaluation or production license in Accops license server using
License management service and a serial number is generated.
HySecure Administrator receives a License Serial Number. Optionally a username/password pair can be provided to administrator. If login information is not provided administrator can self generate one.
HySecure administrator uses management console to upgrade the license on HySecure gateway. Go to License Status screen. Enter the License serial number and the username/password. If user name and password are not provided, register yourself to create username/password on Accops license server.
Click on Activate License to activate the license online and apply the new license.
93
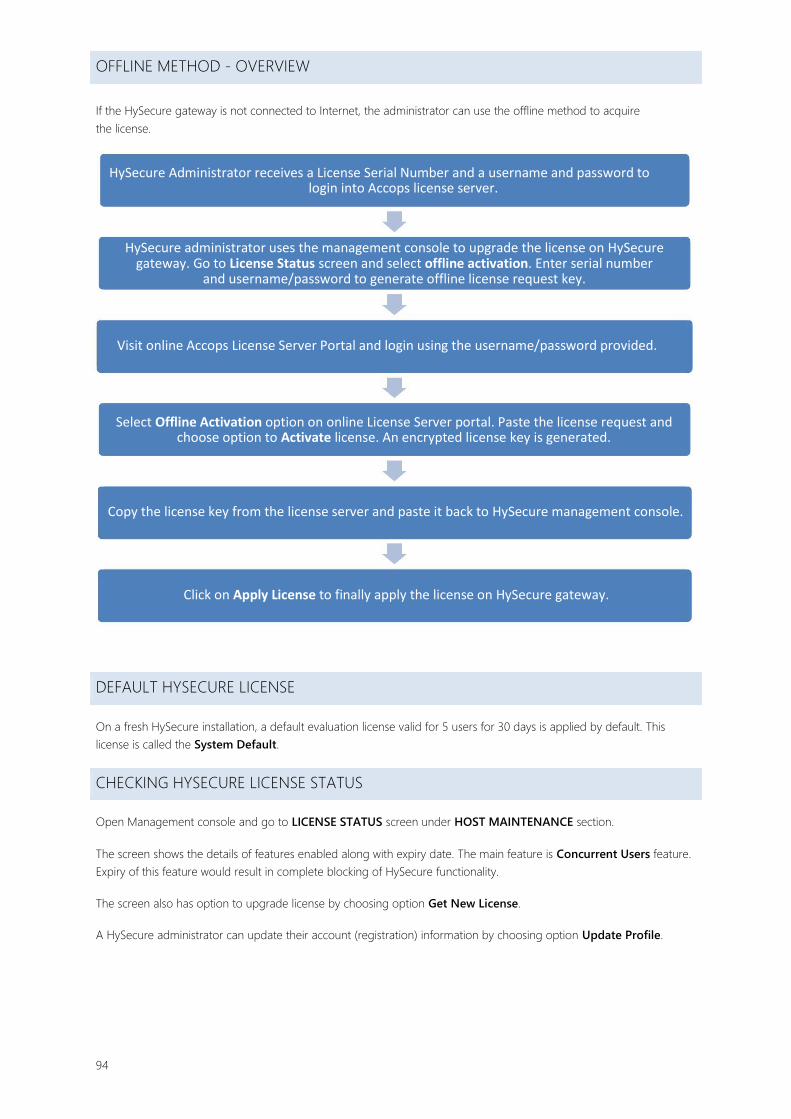
OFFLINE METHOD - OVERVIEW
If the HySecure gateway is not connected to Internet, the administrator can use the offline method to acquire
the license.
HySecure Administrator receives a License Serial Number and a username and password to login into Accops license server.
HySecure administrator uses the management console to upgrade the license on HySecure gateway. Go to License Status screen and select offline activation. Enter serial number
and username/password to generate offline license request key.
Visit online Accops License Server Portal and login using the username/password provided.
Select Offline Activation option on online License Server portal. Paste the license request and choose option to Activate license. An encrypted license key is generated.
Copy the license key from the license server and paste it back to HySecure management console.
Click on Apply License to finally apply the license on HySecure gateway.
DEFAULT HYSECURE LICENSE
On a fresh HySecure installation, a default evaluation license valid for 5 users for 30 days is applied by default. This
license is called the System Default.
CHECKING HYSECURE LICENSE STATUS
Open Management console and go to LICENSE STATUS screen under HOST MAINTENANCE section.
The screen shows the details of features enabled along with expiry date. The main feature is Concurrent Users feature.
Expiry of this feature would result in complete blocking of HySecure functionality.
The screen also has option to upgrade license by choosing option Get New License.
A HySecure administrator can update their account (registration) information by choosing option Update Profile.
94
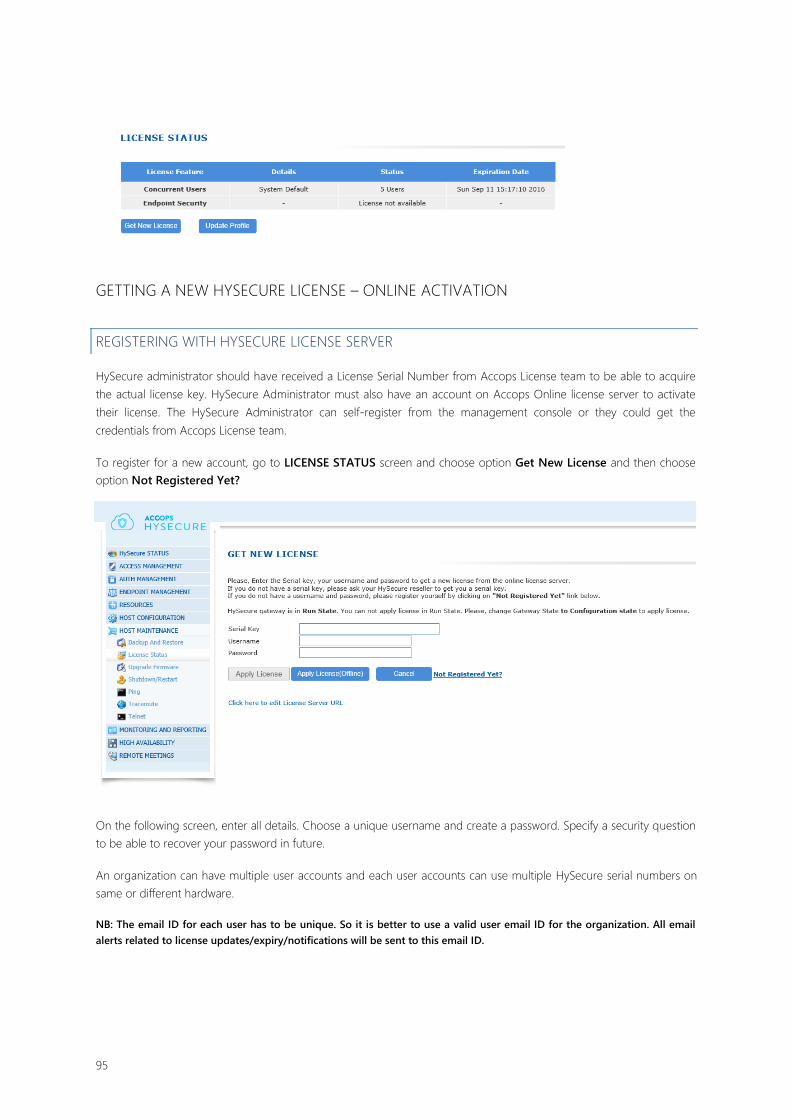
GETTING A NEW HYSECURE LICENSE – ONLINE ACTIVATION
REGISTERING WITH HYSECURE LICENSE SERVER
HySecure administrator should have received a License Serial Number from Accops License team to be able to acquire
the actual license key. HySecure Administrator must also have an account on Accops Online license server to activate
their license. The HySecure Administrator can self-register from the management console or they could get the
credentials from Accops License team.
To register for a new account, go to LICENSE STATUS screen and choose option Get New License and then choose
option Not Registered Yet?
On the following screen, enter all details. Choose a unique username and create a password. Specify a security question
to be able to recover your password in future.
An organization can have multiple user accounts and each user accounts can use multiple HySecure serial numbers on
same or different hardware.
NB: The email ID for each user has to be unique. So it is better to use a valid user email ID for the organization. All email
alerts related to license updates/expiry/notifications will be sent to this email ID.
95
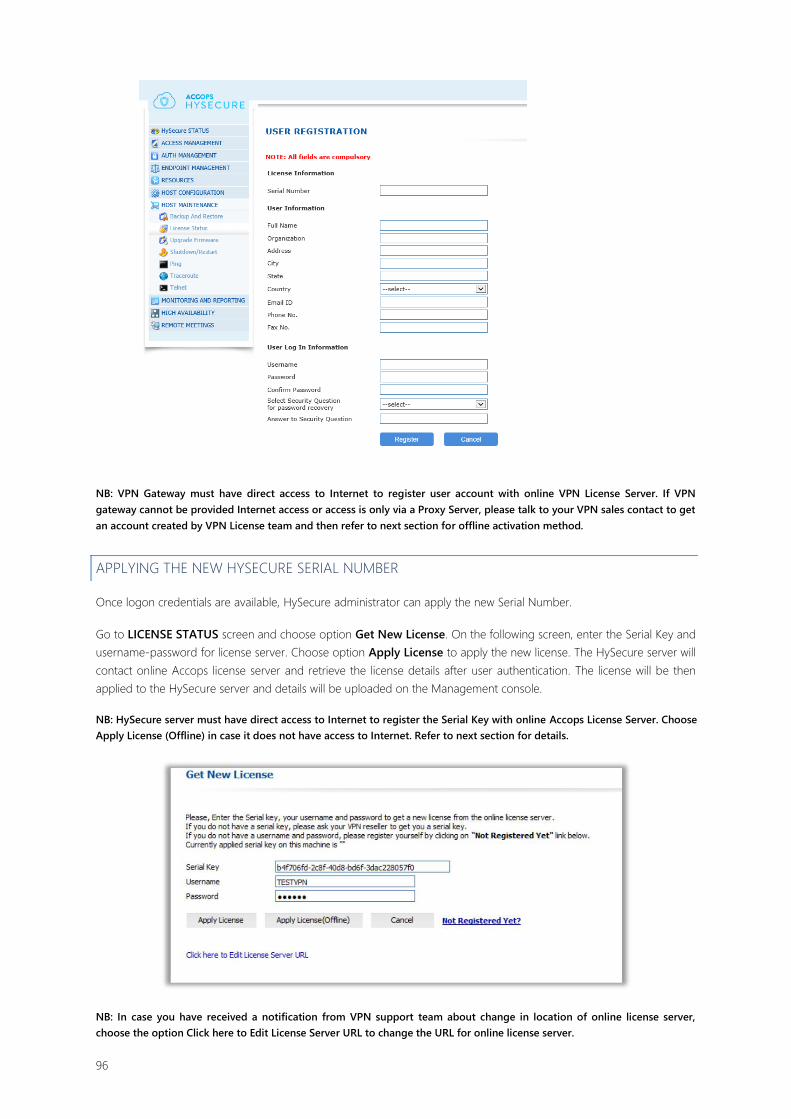
NB: VPN Gateway must have direct access to Internet to register user account with online VPN License Server. If VPN
gateway cannot be provided Internet access or access is only via a Proxy Server, please talk to your VPN sales contact to get
an account created by VPN License team and then refer to next section for offline activation method.
APPLYING THE NEW HYSECURE SERIAL NUMBER
Once logon credentials are available, HySecure administrator can apply the new Serial Number.
Go to LICENSE STATUS screen and choose option Get New License. On the following screen, enter the Serial Key and
username-password for license server. Choose option Apply License to apply the new license. The HySecure server will
contact online Accops license server and retrieve the license details after user authentication. The license will be then
applied to the HySecure server and details will be uploaded on the Management console.
NB: HySecure server must have direct access to Internet to register the Serial Key with online Accops License Server. Choose
Apply License (Offline) in case it does not have access to Internet. Refer to next section for details.
NB: In case you have received a notification from VPN support team about change in location of online license server,
choose the option Click here to Edit License Server URL to change the URL for online license server.
96
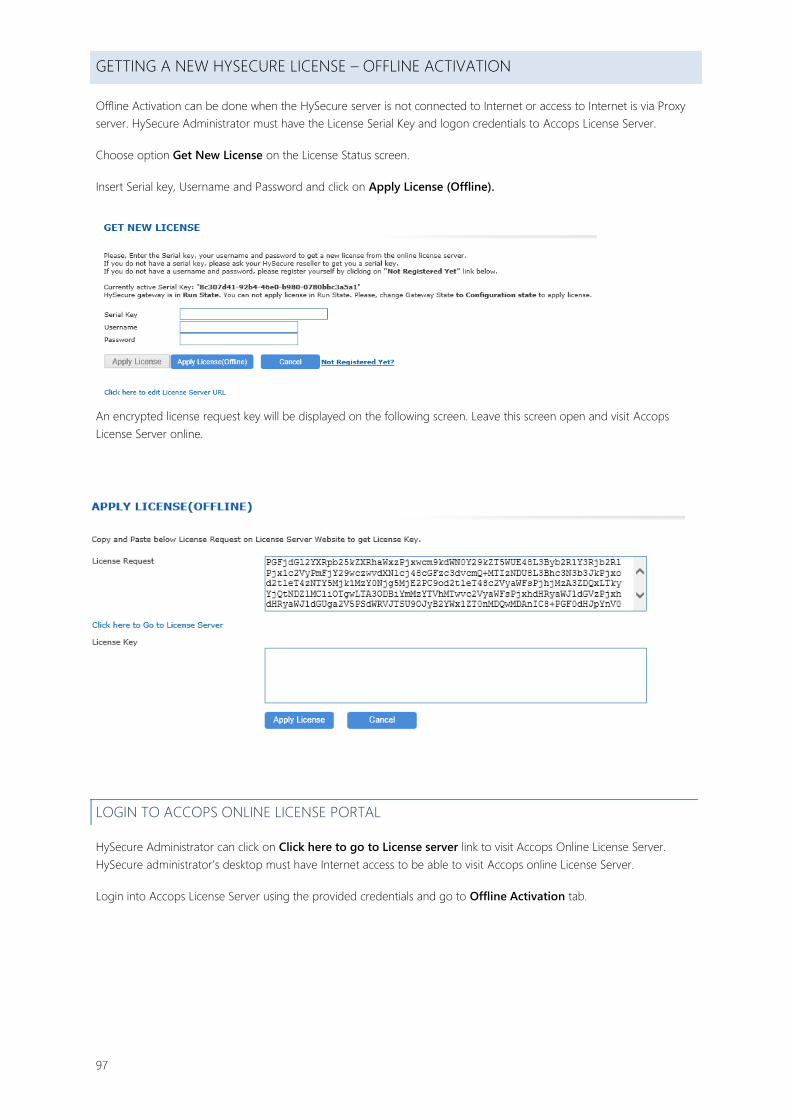
GETTING A NEW HYSECURE LICENSE – OFFLINE ACTIVATION
Offline Activation can be done when the HySecure server is not connected to Internet or access to Internet is via Proxy
server. HySecure Administrator must have the License Serial Key and logon credentials to Accops License Server.
Choose option Get New License on the License Status screen.
Insert Serial key, Username and Password and click on Apply License (Offline).
An encrypted license request key will be displayed on the following screen. Leave this screen open and visit Accops
License Server online.
LOGIN TO ACCOPS ONLINE LICENSE PORTAL
HySecure Administrator can click on Click here to go to License server link to visit Accops Online License Server.
HySecure administrator’s desktop must have Internet access to be able to visit Accops online License Server.
Login into Accops License Server using the provided credentials and go to Offline Activation tab.
97
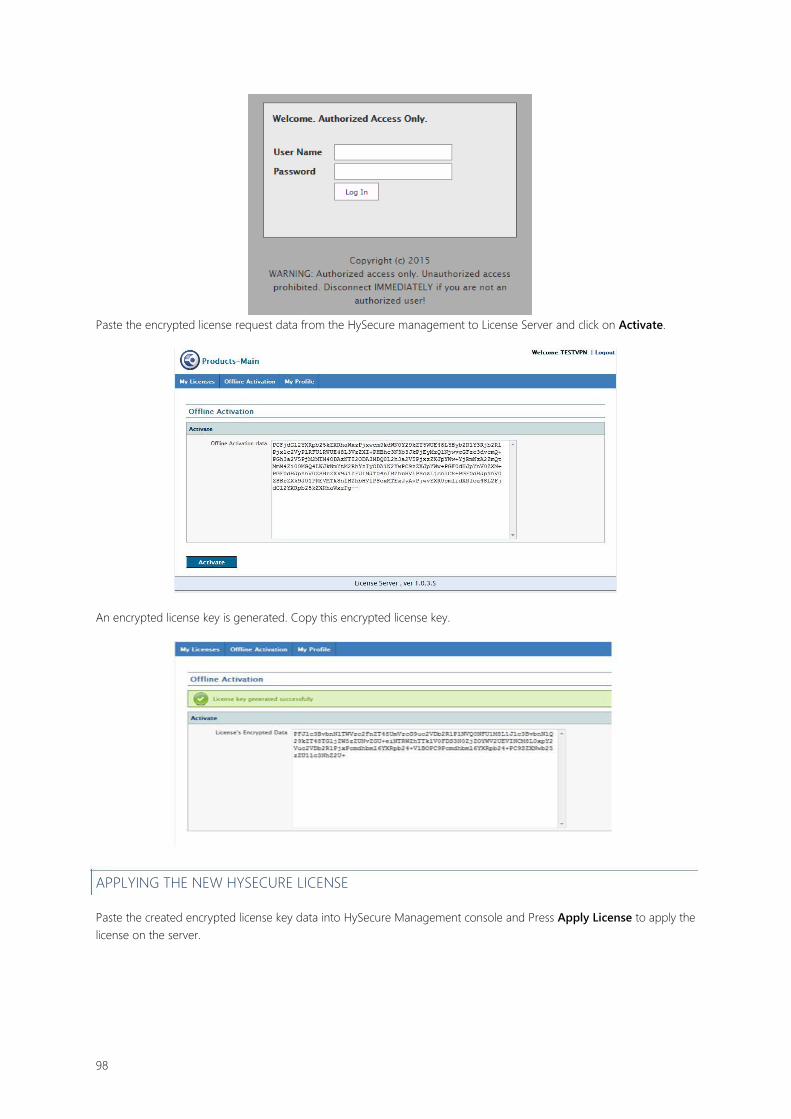
Paste the encrypted license request data from the HySecure management to License Server and click on Activate.
An encrypted license key is generated. Copy this encrypted license key.
APPLYING THE NEW HYSECURE LICENSE
Paste the created encrypted license key data into HySecure Management console and Press Apply License to apply the
license on the server.
98
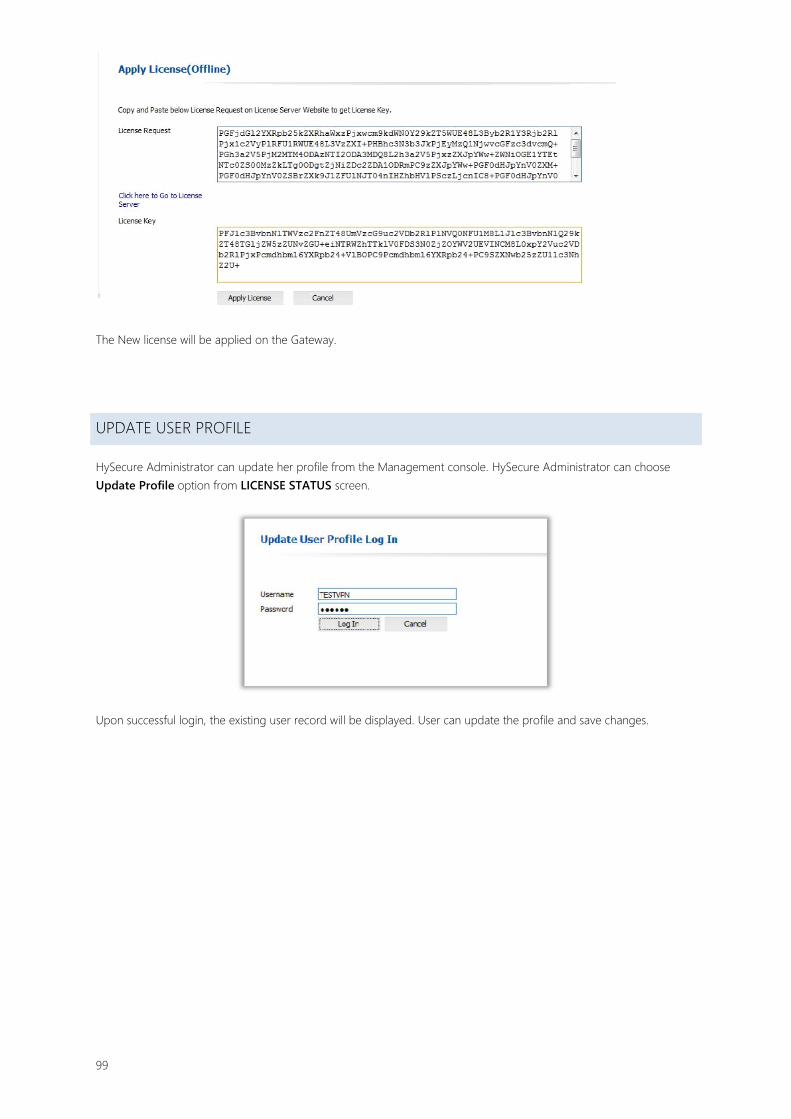
The New license will be applied on the Gateway.
UPDATE USER PROFILE
HySecure Administrator can update her profile from the Management console. HySecure Administrator can choose Update Profile option from LICENSE STATUS screen.
Upon successful login, the existing user record will be displayed. User can update the profile and save changes.
99
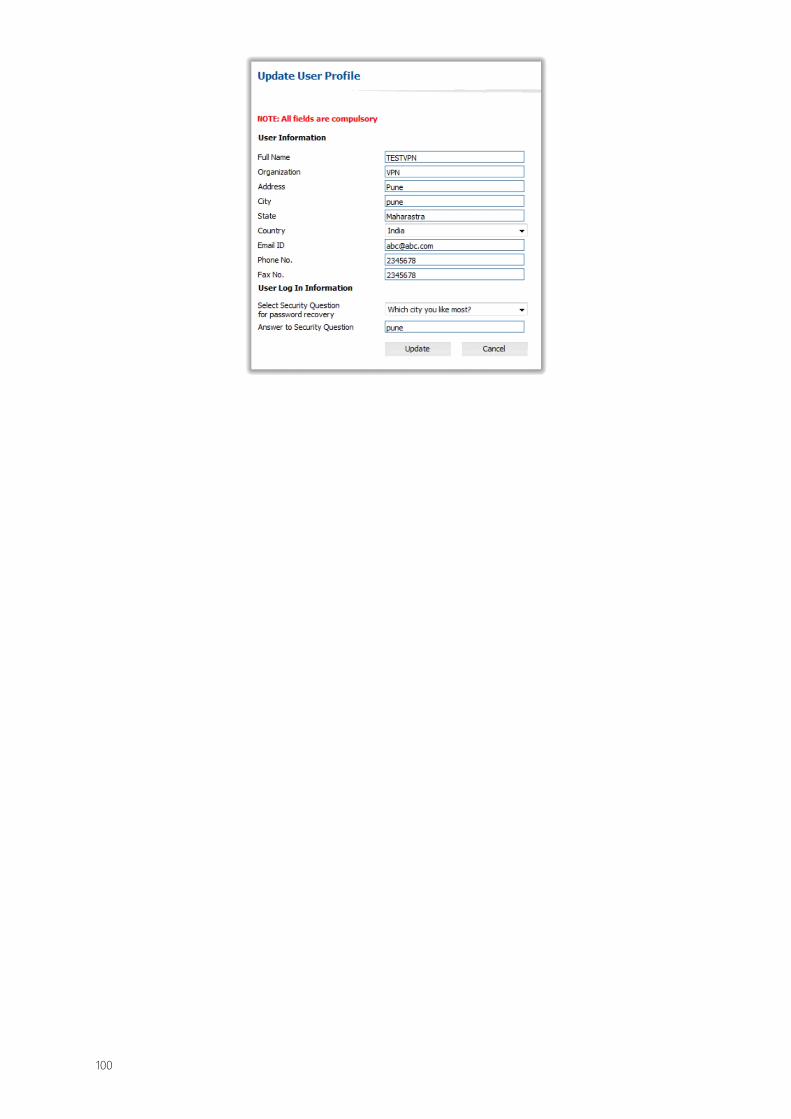
100
CHAPTER 7
APPENDICES
APPENDIX A - TERMINOLOGY AND ACRONYMS
TERMINOLOGY
Access Control: Allows access to the application in accordance to corporate policies. Access control can be applied to
user and application groups.
Access Filter: A time filter that can be applied to user(s) and/or application group(s) to provide access during a
designated time.
Administrator: A privileged user for managing users and services.
Application Group: Applications can be grouped in accordance to policies or functional groups. Further to that access
filter can be applied to these groups.
Endpoint Policy: Endpoint Policy is to define the security rules to be scanned for on End user machine in conjunction with
Endpoint Profile.
Device Profile: Device Profiles are used to organize applications on the basis of end user machine profile. Device Profiles
overrides (or say restricts) the applications access over the applications in the Application Groups.
Basic Authentication: A mechanism to authenticate user credentials using standard authentication protocols, such as
LDAP, RADIUS, AD, etc.
Bootstrap: A process for first time configuration of Accops VPN. In this process the first security officer (designated
certification authority) is enrolled.
Certificate Authentication: A mechanism to authenticate the user based on client Certificate. The Certificate is issued to a
power user during enrollment.
Security Officer (SO): The most privileged user of the system. Only first security officer is responsible for bootstrapping
the server and enrolling other security officer and administrators.
User Group: Users can be grouped in accordance to policies or functional groups. Further to that access filter can be
applied to these groups.
UAC: The Universal Application Connector is an Active-X control that makes the applications you run using Accops VPN
secure.
NB: The UAC works only with Internet Explorer version 6.0 and higher; it does not support other browsers.

ACRONYMS
ACL Access Control List
ADS Active Directory Services
CA Certificate Authority
DNS Domain Name Service
EPS Endpoint Security
FQDN Fully Qualified Domain Name
FTP File Transfer Protocol
HTTP Hypertext Transfer Protocol
HTTPS Secured Hypertext Transfer Protocol
IP Internet Protocol
IPSEC Internet Protocol Security
LDAP Lightweight Directory Access Protocol
SMTP Simple Mail Transfer Protocol
SO Security Officer
SSH Secure Shell
SSL Secure Socket Layer
TCP Transmission Control Protocol
UAC Uniform Application Connector
UDP User Datagram Protocol
URL Uniform Resource Locator
VPN Virtual Private Network
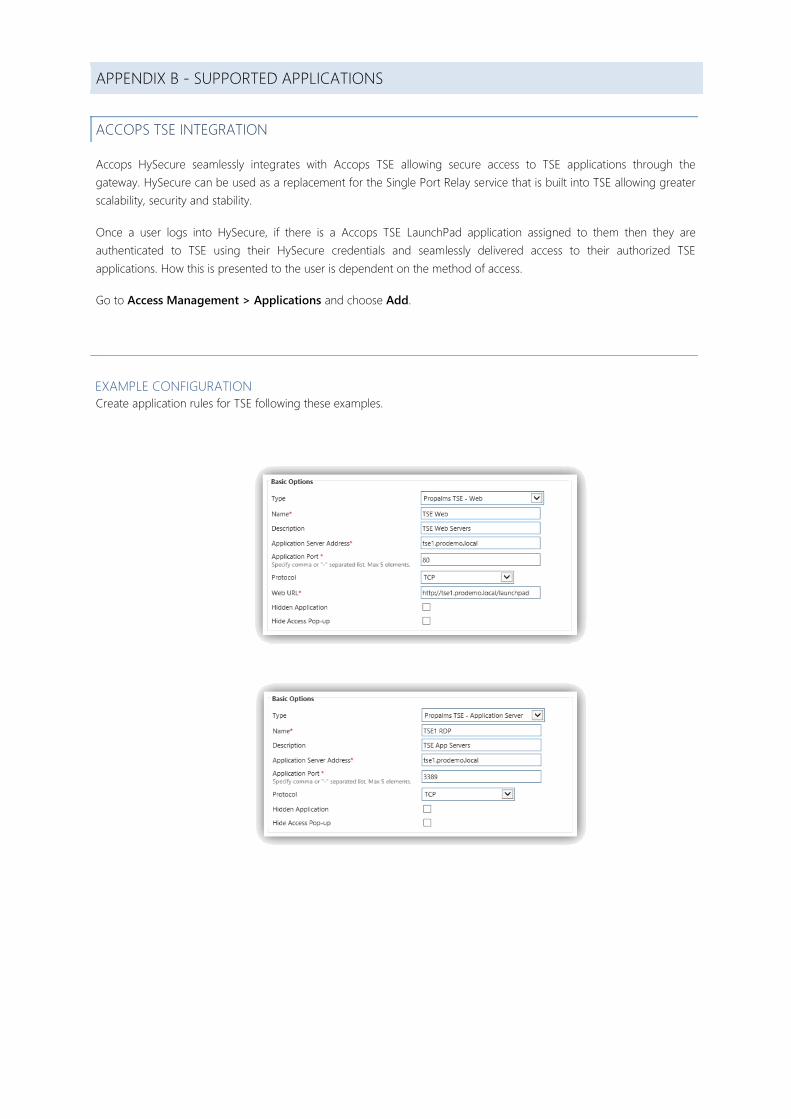
APPENDIX B - SUPPORTED APPLICATIONS
ACCOPS TSE INTEGRATION
Accops HySecure seamlessly integrates with Accops TSE allowing secure access to TSE applications through the
gateway. HySecure can be used as a replacement for the Single Port Relay service that is built into TSE allowing greater
scalability, security and stability.
Once a user logs into HySecure, if there is a Accops TSE LaunchPad application assigned to them then they are
authenticated to TSE using their HySecure credentials and seamlessly delivered access to their authorized TSE
applications. How this is presented to the user is dependent on the method of access.
Go to Access Management > Applications and choose Add.
EXAMPLE CONFIGURATION Create application rules for TSE following these examples.
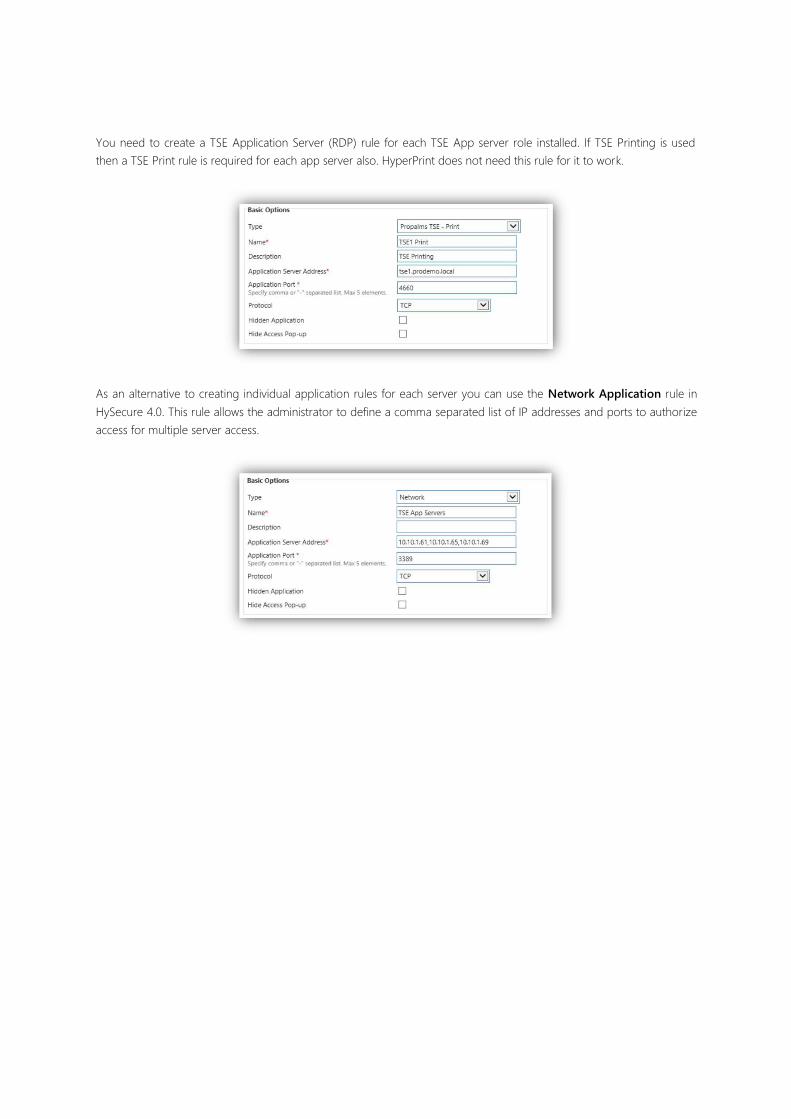
You need to create a TSE Application Server (RDP) rule for each TSE App server role installed. If TSE Printing is used
then a TSE Print rule is required for each app server also. HyperPrint does not need this rule for it to work.
As an alternative to creating individual application rules for each server you can use the Network Application rule in
HySecure 4.0. This rule allows the administrator to define a comma separated list of IP addresses and ports to authorize
access for multiple server access.
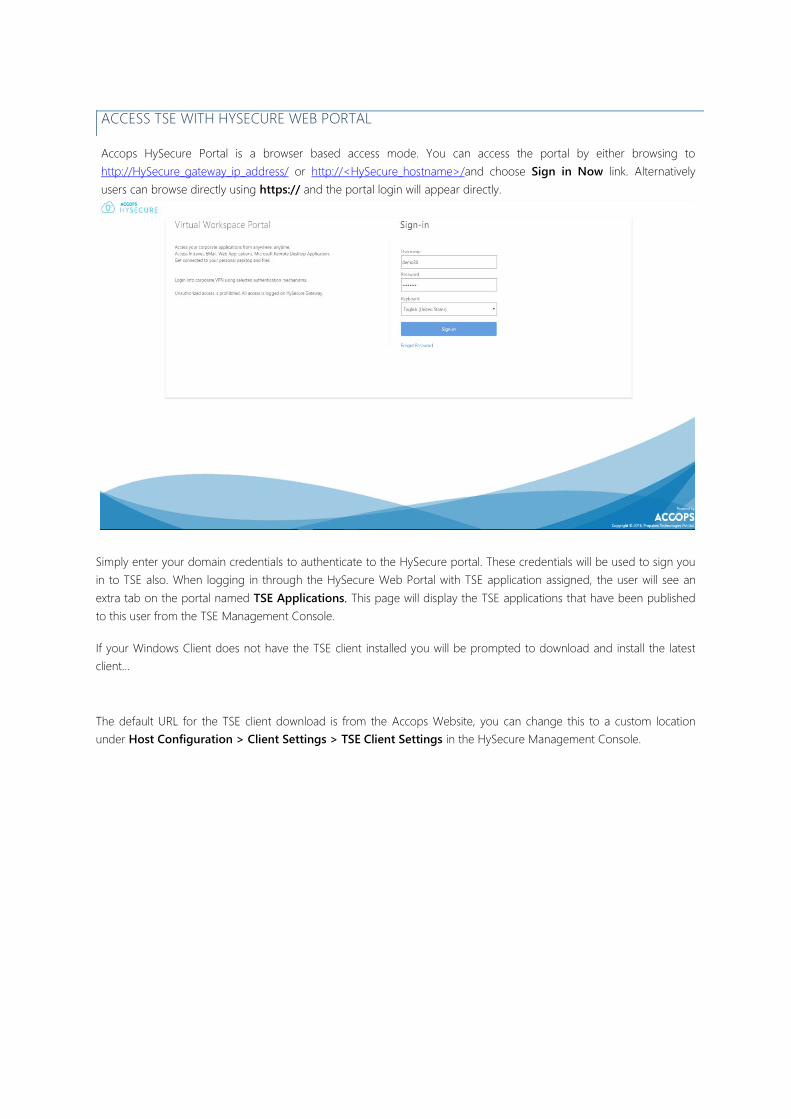
ACCESS TSE WITH HYSECURE WEB PORTAL
Accops HySecure Portal is a browser based access mode. You can access the portal by either browsing to
http://HySecure_gateway_ip_address/ or http://<HySecure_hostname>/and choose Sign in Now link. Alternatively
users can browse directly using https:// and the portal login will appear directly.
Simply enter your domain credentials to authenticate to the HySecure portal. These credentials will be used to sign you
in to TSE also. When logging in through the HySecure Web Portal with TSE application assigned, the user will see an
extra tab on the portal named TSE Applications. This page will display the TSE applications that have been published
to this user from the TSE Management Console.
If your Windows Client does not have the TSE client installed you will be prompted to download and install the latest
client…
The default URL for the TSE client download is from the Accops Website, you can change this to a custom location
under Host Configuration > Client Settings > TSE Client Settings in the HySecure Management Console.

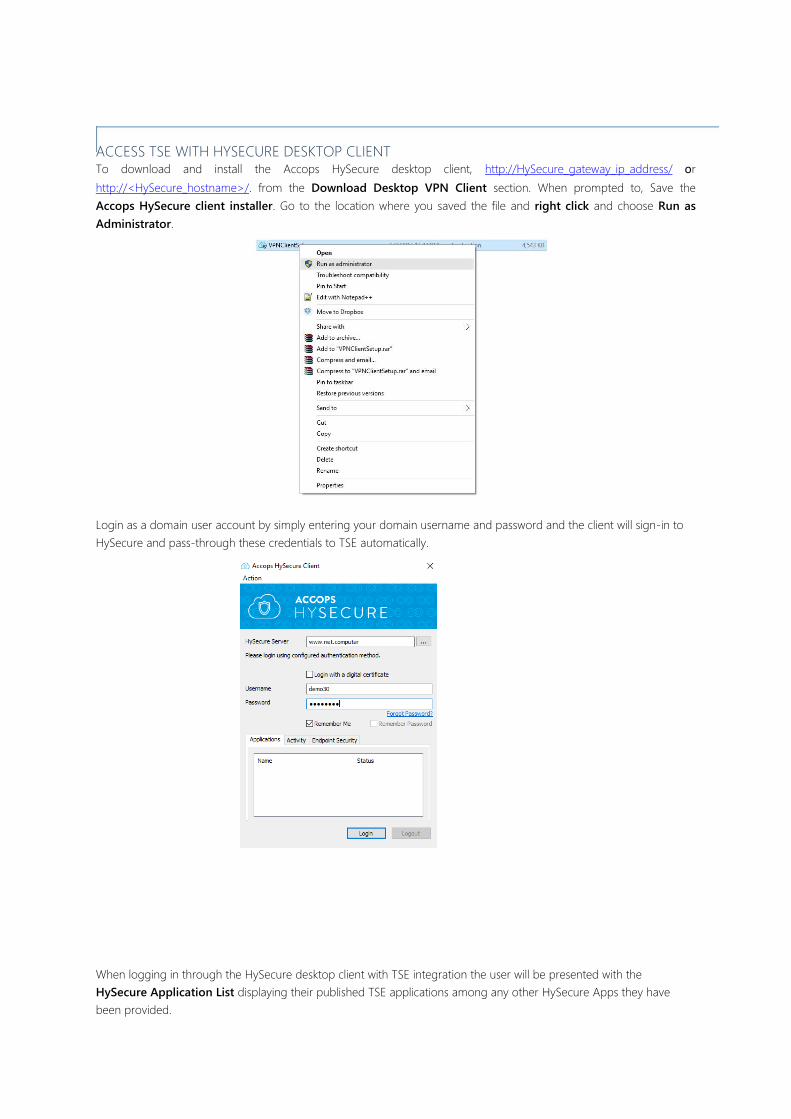
ACCESS TSE WITH HYSECURE DESKTOP CLIENT To download and install the Accops HySecure desktop client, http://HySecure_gateway_ip_address/ or
http://<HySecure_hostname>/. from the Download Desktop VPN Client section. When prompted to, Save the
Accops HySecure client installer. Go to the location where you saved the file and right click and choose Run as
Administrator.
Login as a domain user account by simply entering your domain username and password and the client will sign-in to
HySecure and pass-through these credentials to TSE automatically.
When logging in through the HySecure desktop client with TSE integration the user will be presented with the
HySecure Application List displaying their published TSE applications among any other HySecure Apps they have
been provided.
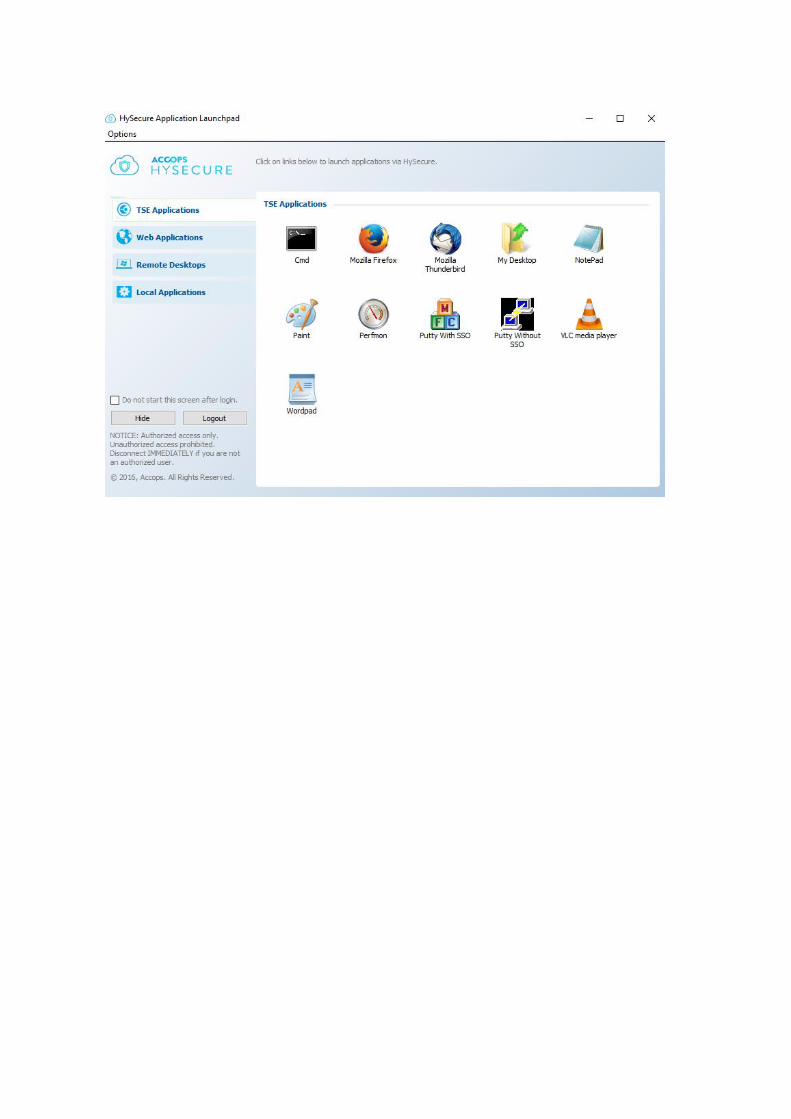

OTHER APPLICATION CONFIGURATION
APPLICATION PROTOCOL STATIC/ DYNAMIC PORT REMARKS
WWW TCP Static 80 Portal
FTP TCP Dynamic 20,21 Portal
SSH TCP Static 22 Portal
TELNET TCP Static 23 Portal
ECHO TCP Static 7
ECHO UDP Static 7
VNC TCP Dynamic 5900 Portal
WINDOWS TERMINAL SERVICE TCP Static 3389 Portal
POP3 TCP Static 110
LDAP TCP Static 389
SECURE LDAP TCP Static 636
IMAP TCP Static 143
IMAP3 TCP Static 220
TIMBUKTU TCP Static 407
SMTP TCP Static 25
FILESHARE TCP Static 445 Portal
PRINT SHARE TCP Static 445 Portal
SAMBA SHARE TCP 139 Portal
SMB SHARE/ NETBIOS OVER TCP/IP TCP Static 139 Portal
CITRIX ICA CLIENT TCP Dynamic 1494 > 1023
CITRIX ICA CLIENT UDP Dynamic 1604 >1023
SQL SERVER TCP Static 1433
SQL MONITOR TOOL TCP Static 1434
MYSQL SERVER TCP Static 3306
ORACLE TCP Static 1521
DB2 TCP Static
LOTUS NOTES TCP Static 1352
TFTP UDP Static 69
RADIUS SERVER TCP Static 1812
DNS SERVER TCP Static 53
DNS SERVER UDP Static 53
PC ANYWHERE TCP Static 5632
PC ANYWHERE DATA TCP Static 5631
TACACS TCP Static 49
TACACS UDP Static 49
ORACLE SQL * NET TCP Static 66
BOOT PS TCP Static 67
BOOT PS UDP Static 67
KERBEROS TCP Static 88
KERBEROS UDP Static 88
NNTP TCP Static 119
NNTP UDP Static 119
INGRES-NET TCP Static 134
INGRES-NET UDP Static 134
HTTPS TCP Static 443
CVS TCP Static 2501
Exchange Server -
109
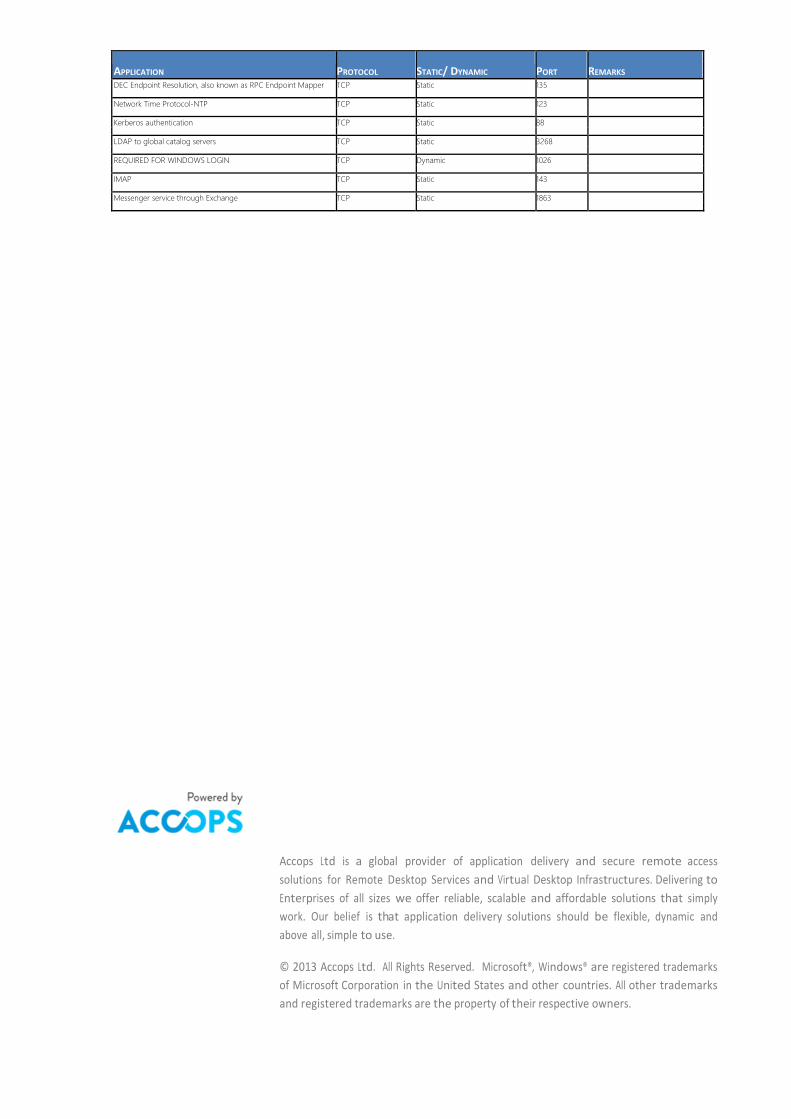
APPLICATION PROTOCOL STATIC/ DYNAMIC PORT REMARKS
DEC Endpoint Resolution, also known as RPC Endpoint Mapper TCP Static 135
Network Time Protocol-NTP TCP Static 123
Kerberos authentication TCP Static 88
LDAP to global catalog servers TCP Static 3268
REQUIRED FOR WINDOWS LOGIN TCP Dynamic 1026
IMAP TCP Static 143
Messenger service through Exchange TCP Static 1863
Accops Ltd is a global provider of application delivery and secure remote access
solutions for Remote Desktop Services and Virtual Desktop Infrastructures. Delivering to
Enterprises of all sizes we offer reliable, scalable and affordable solutions that simply
work. Our belief is that application delivery solutions should be flexible, dynamic and
above all, simple to use.
© 2013 Accops Ltd. All Rights Reserved. Microsoft®, Windows® are registered trademarks
of Microsoft Corporation in the United States and other countries. All other trademarks
and registered trademarks are the property of their respective owners.
Recommended


![notes NOTES ]” BACKGROUND](https://img.dokumen.tips/doc/110x75/61bd44c661276e740b111621/notes-notes-background.jpg)


![Data mangling with mongo db the right way [pyconit 2016]](https://img.dokumen.tips/doc/110x75/58a727221a28ab0d0d8b530b/data-mangling-with-mongo-db-the-right-way-pyconit-2016.jpg)