The natural choice for information security solutions
AA CCoorrssaaiirree WWhhiittee PPaappeerr:: SSeeccuurriinngg MMaacc OOSS XX
Author Stephen de Vries
Document Reference Securing Mac OS X V1.0.doc
Document Revision V1.0 Released
Date 22 June 2004
© Copyright 2000 - 2004, Corsaire Limited, All Rights Reserved.
A Corsaire White Paper: Securing Mac OS X
Page 2 of 22
Table of Contents TABLE OF CONTENTS............................................................................................................ 2
1. INTRODUCTION ............................................................................................................... 3
2. USING THIS GUIDE.......................................................................................................... 3
3. SUMMARY OF SECURITY HARDENING........................................................................ 3
4. SECURITY HARDENING GUIDELINES........................................................................... 4 4.1 Patching & Maintenance ............................................................................................. 4 4.2 Physical Access Controls........................................................................................... 4 4.3 Keychain....................................................................................................................... 8 4.4 Data Encryption ........................................................................................................... 9 4.5 Antivirus solutions ...................................................................................................... 9 4.6 Controlling Administrative Access.......................................................................... 10 4.7 Firewall ....................................................................................................................... 10 4.8 Network Services....................................................................................................... 12 4.9 File Sharing ................................................................................................................ 18 4.10 Intrusion Detection Systems (IDS)........................................................................... 19
REFERENCES ........................................................................................................................ 20
ACKNOWLEDGEMENT ......................................................................................................... 21 About The Author .................................................................................................................. 21 About Corsaire....................................................................................................................... 21
SSeeccuurriinngg MMaacc OOSS XX Copyright © 2000-2004 Corsaire Limited. All Rights Reserved. The natural choice for information security solutions
A Corsaire White Paper: Securing Mac OS X
Page 3 of 22
1. Introduction Mac OS X (10.3) provides many built in security features that, when fully utilised, can greatly reduce the risk of a security incident. OS X is one of the most secure default installations when compared to other operating systems. The install follows the accepted best practice of disabling all network services unless explicitly enabled. The default security settings should suit the needs of most users in a workstation setting.
This guide is aimed at users in environments requiring stronger security controls in an operating system, making full use of the protection features offered in OS X. It would also be of use to system administrators wishing to enforce an organisation wide desktop security policy for Mac OS X.
2. Using this Guide This guide covers Mac OS X 10.3 (Panther) as a multi-user networked system. Most of the console and network based security features are common between OS X and OS X Server, however this guide does not cover Server’s additional user, directory and network based security features.
The reader should be familiar with using the UNIX command line and editing plain text configuration files. Most of the operations will require administrator access and it is recommended that each file be backed up before editing it.
While every effort has been made to test the settings specified in this guide, no guarantee can be made as to their effectiveness or suitability for individual systems.
Any changes to your system are made at your own risk.
3. Summary of Security Hardening This hardening guide includes the following areas:
1. Patching & Maintenance – Strategies to perform regular checks for security updates and patches to mitigate risks in the operating system and software in a timely manner.
2. Physical Access Controls – Steps to make the OS X host resilient to an attacker with physical console access.
3. Keychain – Securing the central authentication repository, or keychain, to reduce the risk of unauthorised access.
4. Data Encryption – Use of user and disk-based encryption to prevent unauthorised access to sensitive data, and to provide organisational escrow to that data.
5. Antivirus Solutions – Solutions to mitigate the risk of viruses or other malware affecting OS X hosts.
6. Controlling Administrative Access – An explanation of administrative privilege under OS X and how best to secure access.
7. Firewall – Details of the provided firewall and how to use its full functionality.
8. Network Services – Information about the available services and how to deploy them securely.
9. File Sharing – How to share files securely.
10. Intrusion Detection System (IDS) – Available host based, and network based IDS solutions.
SSeeccuurriinngg MMaacc OOSS XX Copyright © 2000-2004 Corsaire Limited. All Rights Reserved. The natural choice for information security solutions

A Corsaire White Paper: Securing Mac OS X
Page 4 of 22
4. Security Hardening Guidelines
4.1 Patching & Maintenance
4.1.1 GUI
Mac OS X uses the Software Update tool to download and install system and application patches. It is recommended that it be configured to check for new updates daily and can also be configured to perform downloads in the background and notify the user when the update is ready for installation.
4.1.2 Command Line
Software updates can also be listed and applied through the command line tool: /usr/sbin/softwareupdate. This makes it possible to install updates in shell scripts, or to invoke it remotely through SSH. For example the following command should be executed to automatically install all required updates and log the output to a file:
sudo /usr/sbin/softwareupdate –i –r 2>&1 >> /Library/Logs/auto-softwareupdate.log
Caution should be used when adding software update to the crontab, as some required updates need the system to be manually rebooted before taking effect.
4.2 Physical Access Controls In environments where attackers could gain physical access to the system, it is important that additional security mechanisms are in place to protect the system from unauthorised access. Should an attacker gain physical access to a system, they could boot an alternate operating system and read data stored on the hard drive, or enable a firmware password that will render the system inoperable. The best solution is to control physical access to systems by putting them under lock and key but sometimes this isn’t possible, especially for mobile users or desktop users in shared environments.
4.2.1 Open Firmware security
Open Firmware is the BIOS used by most Apple systems, and is used to provide low level control to some parts of the hardware. Open Firmware uses a command line driven interface more similar to that used by Sun Microsystems than the graphical BIOS used by x86 PCs. For the purposes of securing the system, two operations need to be performed in Open Firmware: Setting a password,
SSeeccuurriinngg MMaacc OOSS XX Copyright © 2000-2004 Corsaire Limited. All Rights Reserved. The natural choice for information security solutions
A Corsaire White Paper: Securing Mac OS X
Page 5 of 22
and changing the security level. These features are only available in Open Firmware version 4.1.7 or later (see: http://docs.info.apple.com/article.html?artnum=106482 ).
4.2.1.1 Caveats
Open Firmware security can be subverted in a number of ways and therefore does not provide complete protection from an attacker with physical access. It does, however, provide more protection than the default settings and will make it more difficult for an attacker to gain access to data. For more information on Open Firmware weaknesses see:
• http://www.msec.net/advisories/of_pwd_bypass.html
• http://www.msec.net/software/index.html#fwsucker
4.2.1.2 Accessing Open Firmware (OF)
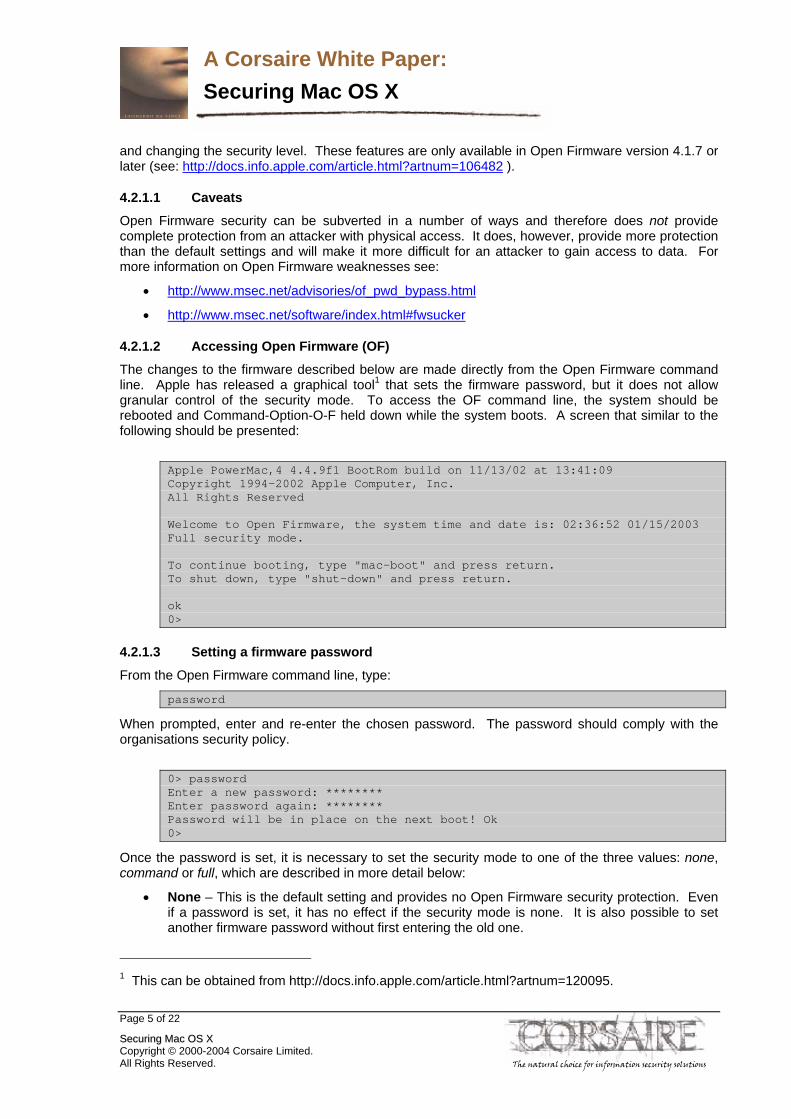
The changes to the firmware described below are made directly from the Open Firmware command line. Apple has released a graphical tool1 that sets the firmware password, but it does not allow granular control of the security mode. To access the OF command line, the system should be rebooted and Command-Option-O-F held down while the system boots. A screen that similar to the following should be presented:
Apple PowerMac,4 4.4.9f1 BootRom build on 11/13/02 at 13:41:09 Copyright 1994-2002 Apple Computer, Inc. All Rights Reserved Welcome to Open Firmware, the system time and date is: 02:36:52 01/15/2003 Full security mode. To continue booting, type "mac-boot" and press return. To shut down, type "shut-down" and press return. ok 0>
4.2.1.3 Setting a firmware password
From the Open Firmware command line, type:
password
When prompted, enter and re-enter the chosen password. The password should comply with the organisations security policy.
0> password Enter a new password: ******** Enter password again: ******** Password will be in place on the next boot! Ok 0>
Once the password is set, it is necessary to set the security mode to one of the three values: none, command or full, which are described in more detail below:
• None – This is the default setting and provides no Open Firmware security protection. Even if a password is set, it has no effect if the security mode is none. It is also possible to set another firmware password without first entering the old one.
1 This can be obtained from http://docs.info.apple.com/article.html?artnum=120095.
SSeeccuurriinngg MMaacc OOSS XX Copyright © 2000-2004 Corsaire Limited. All Rights Reserved. The natural choice for information security solutions
A Corsaire White Paper: Securing Mac OS X
Page 6 of 22
• Command – This setting causes the system to prompt for a password when any changes to Open Firmware are attempted. It will also require a password when booting from any device besides the default boot device.
• Full – This mode requires that a password be entered before booting and before any changes are made to Open Firmware. A password will be required before every reboot.
Once the appropriate security mode has been selected, it can be set by typing:
setenv security-mode full
To save the changes and reboot, type:
reset-all
4.2.2 Login
4.2.2.1 Banner
A login banner informs users accessing a system about the system’s function, ownership and consequences of unauthorised access. This information should be displayed at all points of entry to the system, usually, login prompts on the desktop, shell logins and ftp access prompts. An appropriate login banner should be defined, after consultation with the organisations legal team if appropriate. An example login banner could be similar to:
THIS IS A PRIVATE COMPUTER SYSTEM AND IS FOR AUTHORISED USE ONLY.
Any or all use of this system and all files on this system may be intercepted and monitored.
Unauthorised or improper use of this system may result in disciplinary and/or legal action. By continuing to use this system you indicate your awareness of and consent to these terms and conditions of use.
LOG OFF IMMEDIATELY if you are not an authorised user of this system or do not agree to the conditions stated in this warning.
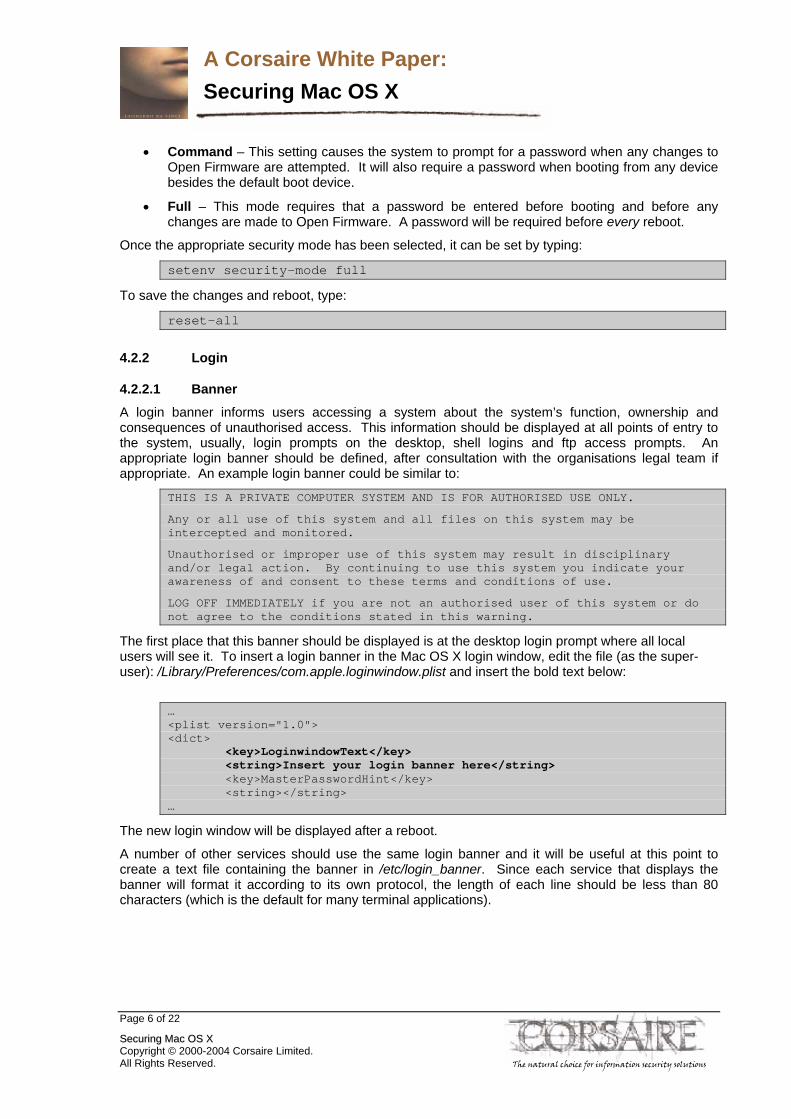
The first place that this banner should be displayed is at the desktop login prompt where all local users will see it. To insert a login banner in the Mac OS X login window, edit the file (as the super-user): /Library/Preferences/com.apple.loginwindow.plist and insert the bold text below:
… <plist version="1.0"> <dict> <key>LoginwindowText</key> <string>Insert your login banner here</string> <key>MasterPasswordHint</key> <string></string> …
The new login window will be displayed after a reboot.
A number of other services should use the same login banner and it will be useful at this point to create a text file containing the banner in /etc/login_banner. Since each service that displays the banner will format it according to its own protocol, the length of each line should be less than 80 characters (which is the default for many terminal applications).
SSeeccuurriinngg MMaacc OOSS XX Copyright © 2000-2004 Corsaire Limited. All Rights Reserved. The natural choice for information security solutions

A Corsaire White Paper: Securing Mac OS X
Page 7 of 22
4.2.2.2 Automatic login
Automatic login should be disabled for all users of the system; ensuring that each user must enter their username and password before being granted access. This can be enforced as a system wide setting from the Security pane of System Preferences:
4.2.2.3 Displayed usernames
By default, OS X displays a list of usernames with accompanying graphic at the console login prompt. This provides too much information for passing attackers and should be disabled, requiring users to enter their usernames and passwords.
Disable this setting from: System Preferences -> Login Options -> Display Login Window as: Name and password.
4.2.2.4 Password hints
Password hints allow users to set a hint if they have forgotten their passwords. While this is a helpful feature for some home users who do not login very often, it is typically not appropriate in a corporate environment, as it increases the risk of an attacker successfully guessing the password.
There is no global setting to ensure that all users have disabled password hints, so each user account will have to be checked. From System Preferences -> Accounts, select each user and ensure that the ‘Password hint’ text box in the ‘Password’ pane is left blank.
4.2.3 Screensaver
A screensaver should be activated after a short period of inactivity, and should require a password to unlock the workstation. This prevents unauthorised passers-by from accessing an unattended workstation that is logged in. A ten-minute period of inactivity before the screensaver is triggered should suit most organisations. The screensaver can be enabled from System Preferences -> Desktop & Screensaver. To enable password protection on the screensaver Require password to
SSeeccuurriinngg MMaacc OOSS XX Copyright © 2000-2004 Corsaire Limited. All Rights Reserved. The natural choice for information security solutions
A Corsaire White Paper: Securing Mac OS X
Page 8 of 22
wake this computer from sleep or screensaver should be selected from the Security pane of System Preferences.
4.3 Keychain The Keychain allows users and applications to store and access authentication details in one place. Users can lock or unlock this keychain with a single password; applications can only access authentication details when the keychain is unlocked. By default, the Keychain password is the same as the login password and the Keychain is unlocked when a user logs in and is locked again when the logout.
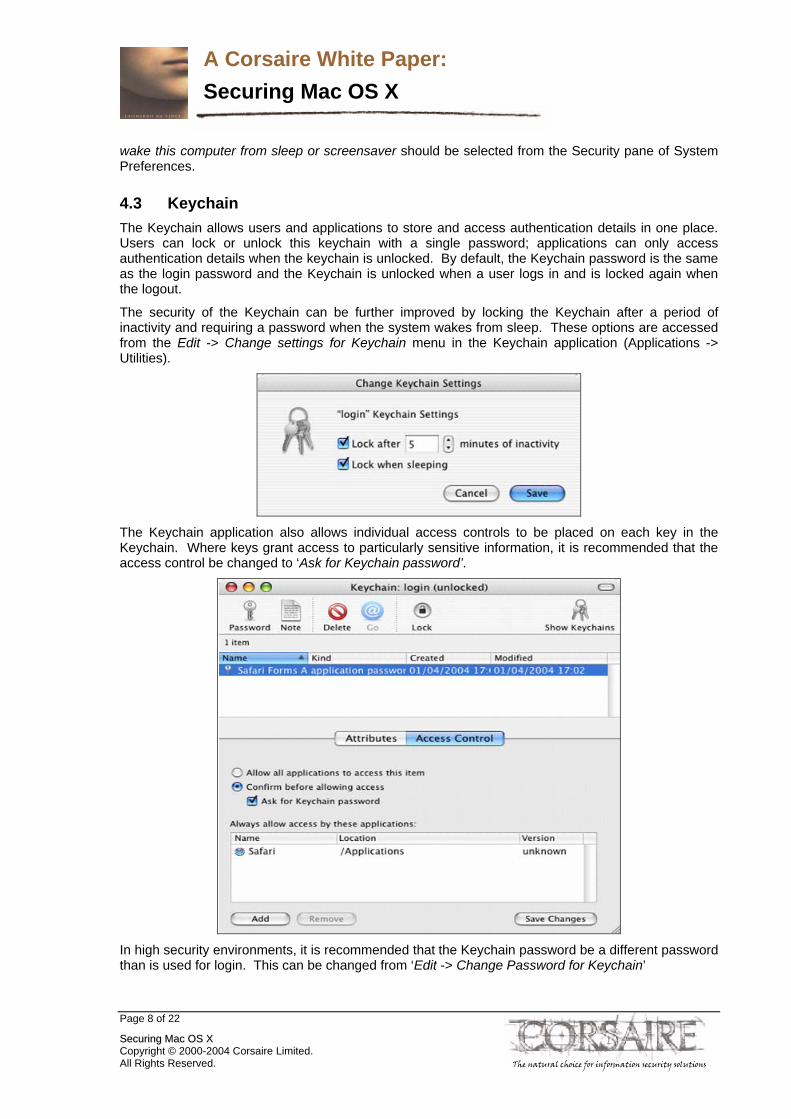
The security of the Keychain can be further improved by locking the Keychain after a period of inactivity and requiring a password when the system wakes from sleep. These options are accessed from the Edit -> Change settings for Keychain menu in the Keychain application (Applications -> Utilities).
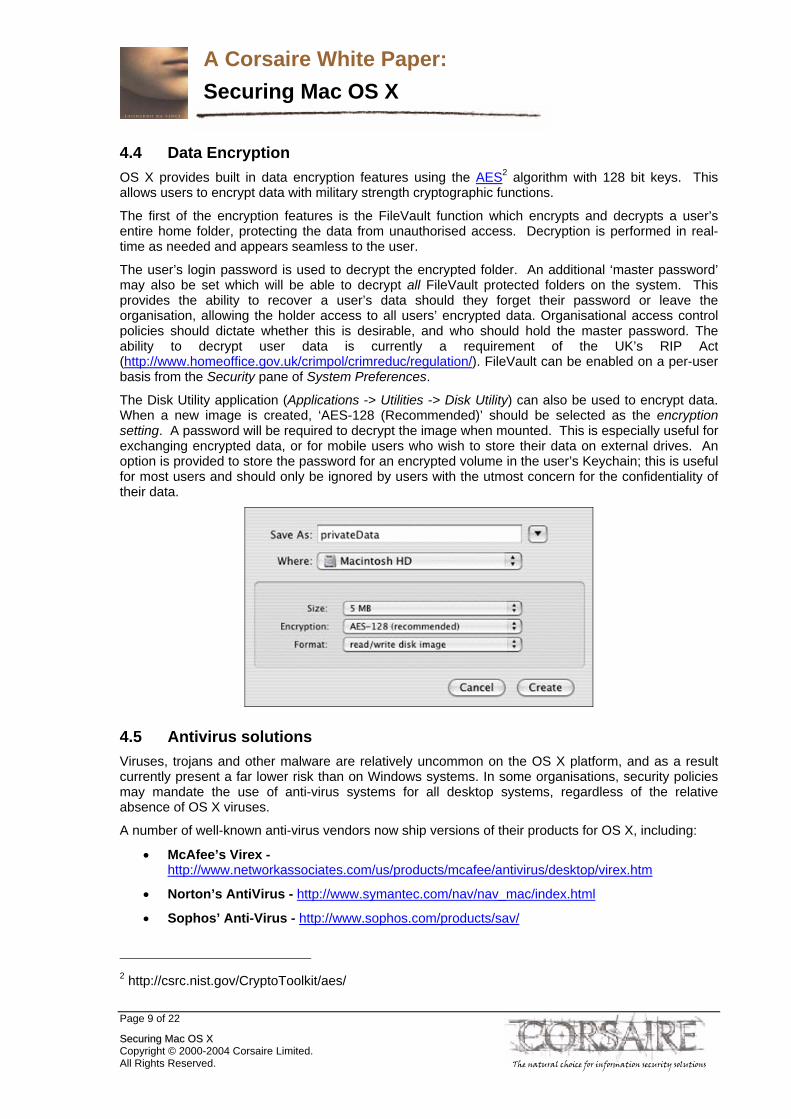
The Keychain application also allows individual access controls to be placed on each key in the Keychain. Where keys grant access to particularly sensitive information, it is recommended that the access control be changed to ‘Ask for Keychain password’.
In high security environments, it is recommended that the Keychain password be a different password than is used for login. This can be changed from ‘Edit -> Change Password for Keychain’
SSeeccuurriinngg MMaacc OOSS XX Copyright © 2000-2004 Corsaire Limited. All Rights Reserved. The natural choice for information security solutions
A Corsaire White Paper: Securing Mac OS X
Page 9 of 22
4.4 Data Encryption OS X provides built in data encryption features using the AES2 algorithm with 128 bit keys. This allows users to encrypt data with military strength cryptographic functions.
The first of the encryption features is the FileVault function which encrypts and decrypts a user’s entire home folder, protecting the data from unauthorised access. Decryption is performed in real-time as needed and appears seamless to the user.
The user’s login password is used to decrypt the encrypted folder. An additional ‘master password’ may also be set which will be able to decrypt all FileVault protected folders on the system. This provides the ability to recover a user’s data should they forget their password or leave the organisation, allowing the holder access to all users’ encrypted data. Organisational access control policies should dictate whether this is desirable, and who should hold the master password. The ability to decrypt user data is currently a requirement of the UK’s RIP Act (http://www.homeoffice.gov.uk/crimpol/crimreduc/regulation/). FileVault can be enabled on a per-user basis from the Security pane of System Preferences.
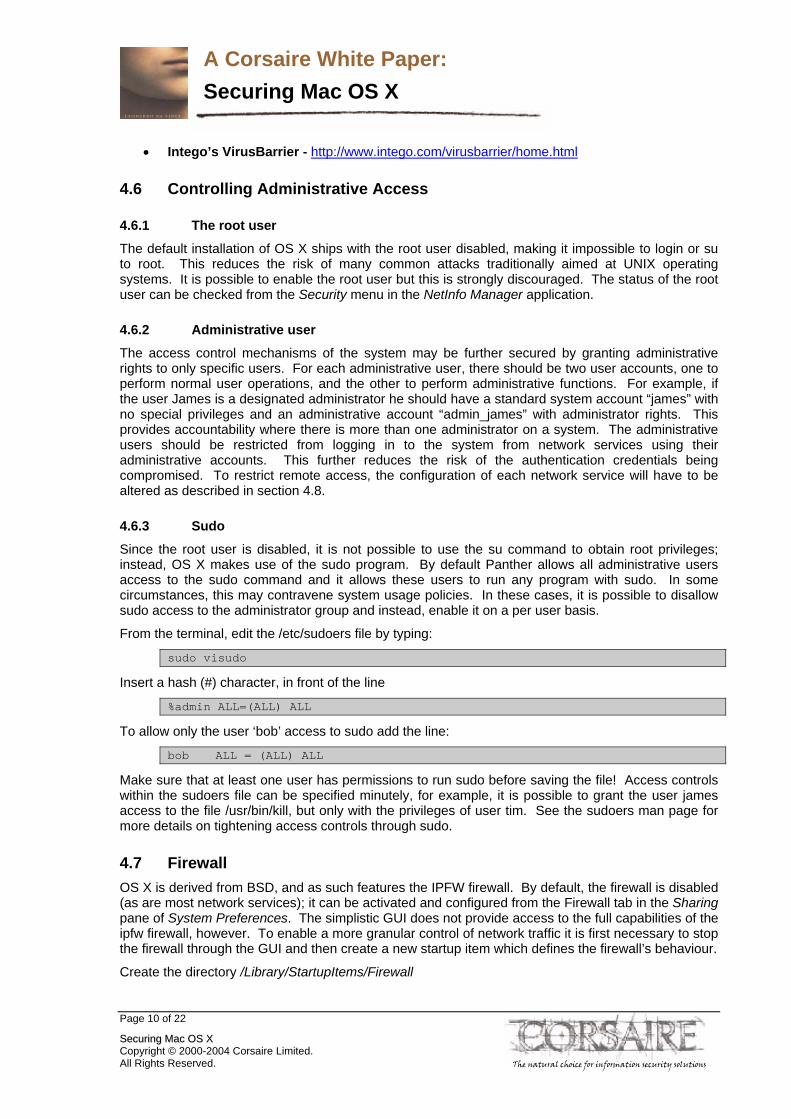
The Disk Utility application (Applications -> Utilities -> Disk Utility) can also be used to encrypt data. When a new image is created, ‘AES-128 (Recommended)’ should be selected as the encryption setting. A password will be required to decrypt the image when mounted. This is especially useful for exchanging encrypted data, or for mobile users who wish to store their data on external drives. An option is provided to store the password for an encrypted volume in the user’s Keychain; this is useful for most users and should only be ignored by users with the utmost concern for the confidentiality of their data.
4.5 Antivirus solutions Viruses, trojans and other malware are relatively uncommon on the OS X platform, and as a result currently present a far lower risk than on Windows systems. In some organisations, security policies may mandate the use of anti-virus systems for all desktop systems, regardless of the relative absence of OS X viruses.
A number of well-known anti-virus vendors now ship versions of their products for OS X, including:
• McAfee’s Virex - http://www.networkassociates.com/us/products/mcafee/antivirus/desktop/virex.htm
• Norton’s AntiVirus - http://www.symantec.com/nav/nav_mac/index.html
• Sophos’ Anti-Virus - http://www.sophos.com/products/sav/
2 http://csrc.nist.gov/CryptoToolkit/aes/
SSeeccuurriinngg MMaacc OOSS XX Copyright © 2000-2004 Corsaire Limited. All Rights Reserved. The natural choice for information security solutions
A Corsaire White Paper: Securing Mac OS X
Page 10 of 22
• Intego’s VirusBarrier - http://www.intego.com/virusbarrier/home.html
4.6 Controlling Administrative Access
4.6.1 The root user
The default installation of OS X ships with the root user disabled, making it impossible to login or su to root. This reduces the risk of many common attacks traditionally aimed at UNIX operating systems. It is possible to enable the root user but this is strongly discouraged. The status of the root user can be checked from the Security menu in the NetInfo Manager application.
4.6.2 Administrative user
The access control mechanisms of the system may be further secured by granting administrative rights to only specific users. For each administrative user, there should be two user accounts, one to perform normal user operations, and the other to perform administrative functions. For example, if the user James is a designated administrator he should have a standard system account “james” with no special privileges and an administrative account “admin_james” with administrator rights. This provides accountability where there is more than one administrator on a system. The administrative users should be restricted from logging in to the system from network services using their administrative accounts. This further reduces the risk of the authentication credentials being compromised. To restrict remote access, the configuration of each network service will have to be altered as described in section 4.8.
4.6.3 Sudo
Since the root user is disabled, it is not possible to use the su command to obtain root privileges; instead, OS X makes use of the sudo program. By default Panther allows all administrative users access to the sudo command and it allows these users to run any program with sudo. In some circumstances, this may contravene system usage policies. In these cases, it is possible to disallow sudo access to the administrator group and instead, enable it on a per user basis.
From the terminal, edit the /etc/sudoers file by typing:
sudo visudo
Insert a hash (#) character, in front of the line
%admin ALL=(ALL) ALL
To allow only the user ‘bob’ access to sudo add the line:
bob ALL = (ALL) ALL
Make sure that at least one user has permissions to run sudo before saving the file! Access controls within the sudoers file can be specified minutely, for example, it is possible to grant the user james access to the file /usr/bin/kill, but only with the privileges of user tim. See the sudoers man page for more details on tightening access controls through sudo.
4.7 Firewall OS X is derived from BSD, and as such features the IPFW firewall. By default, the firewall is disabled (as are most network services); it can be activated and configured from the Firewall tab in the Sharing pane of System Preferences. The simplistic GUI does not provide access to the full capabilities of the ipfw firewall, however. To enable a more granular control of network traffic it is first necessary to stop the firewall through the GUI and then create a new startup item which defines the firewall’s behaviour.
Create the directory /Library/StartupItems/Firewall
SSeeccuurriinngg MMaacc OOSS XX Copyright © 2000-2004 Corsaire Limited. All Rights Reserved. The natural choice for information security solutions
A Corsaire White Paper: Securing Mac OS X
Page 11 of 22
Create and open the file /Library/StartupItems/Firewall/StartupParameters.plist in a text editor and insert the following:
{ Description = "Firewall"; OrderPreference = "None"; Provides = ("Firewall"); Requires = ("Network"); Messages = { start = "Starting firewall"; stop = "Stopping firewall"; }; }
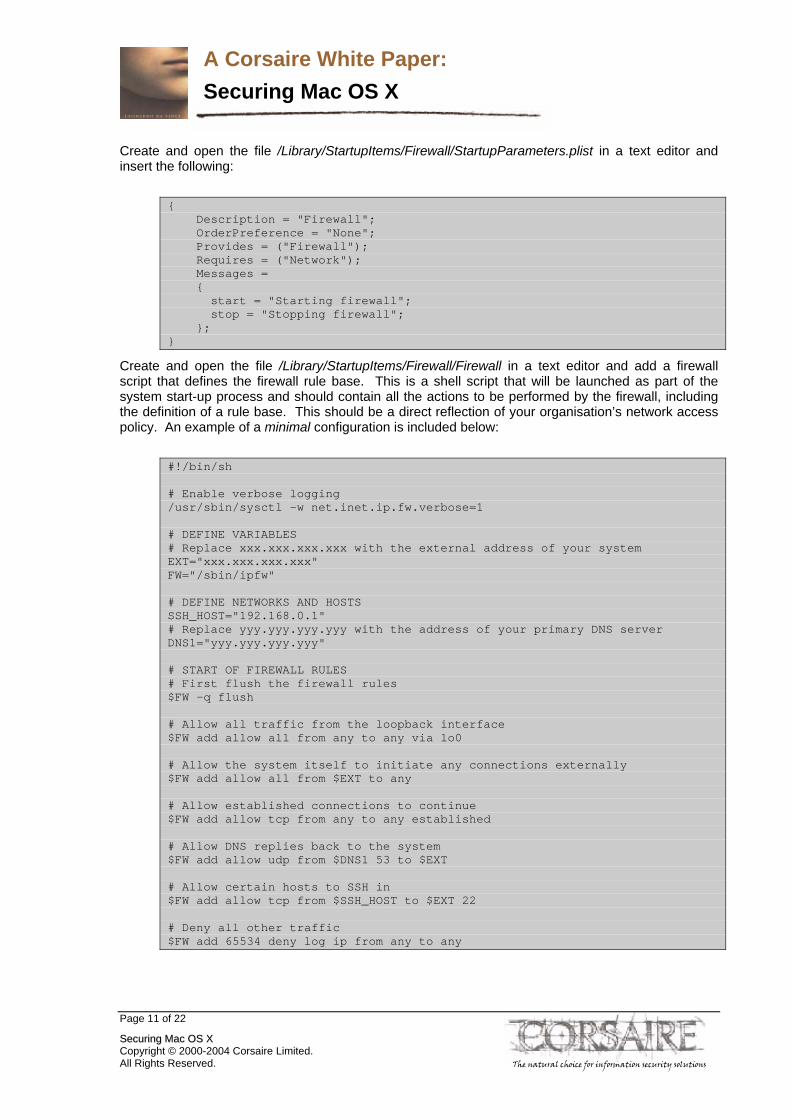
Create and open the file /Library/StartupItems/Firewall/Firewall in a text editor and add a firewall script that defines the firewall rule base. This is a shell script that will be launched as part of the system start-up process and should contain all the actions to be performed by the firewall, including the definition of a rule base. This should be a direct reflection of your organisation’s network access policy. An example of a minimal configuration is included below:
#!/bin/sh # Enable verbose logging /usr/sbin/sysctl -w net.inet.ip.fw.verbose=1 # DEFINE VARIABLES # Replace xxx.xxx.xxx.xxx with the external address of your system EXT="xxx.xxx.xxx.xxx" FW="/sbin/ipfw" # DEFINE NETWORKS AND HOSTS SSH_HOST="192.168.0.1" # Replace yyy.yyy.yyy.yyy with the address of your primary DNS server DNS1="yyy.yyy.yyy.yyy" # START OF FIREWALL RULES # First flush the firewall rules $FW -q flush # Allow all traffic from the loopback interface $FW add allow all from any to any via lo0 # Allow the system itself to initiate any connections externally $FW add allow all from $EXT to any # Allow established connections to continue $FW add allow tcp from any to any established # Allow DNS replies back to the system $FW add allow udp from $DNS1 53 to $EXT # Allow certain hosts to SSH in $FW add allow tcp from $SSH_HOST to $EXT 22 # Deny all other traffic $FW add 65534 deny log ip from any to any
SSeeccuurriinngg MMaacc OOSS XX Copyright © 2000-2004 Corsaire Limited. All Rights Reserved. The natural choice for information security solutions
A Corsaire White Paper: Securing Mac OS X
Page 12 of 22
A more detailed example with service based restrictions can be found at: http://www.novajo.ca/firewall.html.
Since the file /is used system wide, the ownership and permissions of the Firewall directory should be changed as follows:
sudo chown –R root:wheel /Library/StartupItems/Firewall
sudo chmod –R 700 /Library/StartupItems/Firewall
Mac OS X startup items have dependencies, and it is possible to further tighten the network by ensuring that network services start after the firewall has started. This involves changing the system startup items in /System/Library/StartupItems.
As an example, we’ll change /System/Library/StartupItems/IPServices, which starts SSH and other common network services.
In the file /System/Library/StartupItems/IPServices/StartupParameters.plist, add the following line, (between the lines that start with: Provides and Uses):
Requires = (“Firewall”);
Notice that “Firewall” is the same name we used to describe what our firewall service “Provides” in /Library/StartupItems/Firewall/StartupParameters.plist. For the new firewall rules to take effect, either reboot, or manually execute the /Library/StartupItems/Firewall/Firewall script with super user privileges:
sudo /Library/StartupItems/Firewall/Firewall
The state of the firewall (enabled or disabled) of the firewall can be changed by directly changing a kernel parameter:
sudo sysctl -w net.inet.ip.fw.enable=0
disables the firewall, while
sudo sysctl -w net.inet.ip.fw.enable=1
enables it.
For more information on creating a firewall policy see: http://csrc.nist.gov/publications/nistpubs/800-41/sp800-41.pdf
4.8 Network Services
4.8.1 The xinetd super-server
By default all networking services are disabled, which provides less opportunities for remote attackers. Enabling network services (SSH, Apache (Personal Web Sharing), FTP etc.) allows users some form of remote access to systems. Under Mac OS X, some of these services are started through a “super server” called xinetd, which accepts the initial connection and then passes it on to the appropriate service.
The xinetd package used by Panther provides a number of security features including the ability to finely control access based on source IP address and time of access. It features extensive logging and also provides some protection from denial of service attacks. The configuration of xinetd, and the degree to which access is limited will depend largely on the defined function of the server and the organisation’s access control policies.
Global defaults for all services launched through xinetd are configured in the file /etc/xinetd.conf:
SSeeccuurriinngg MMaacc OOSS XX Copyright © 2000-2004 Corsaire Limited. All Rights Reserved. The natural choice for information security solutions
A Corsaire White Paper: Securing Mac OS X
Page 13 of 22
# man xinetd.conf for more information defaults { instances = 60 log_type = SYSLOG daemon log_on_success = HOST PID log_on_failure = HOST cps = 25 30 } includedir /etc/xinetd.d
The first configuration option “instances” specifies the maximum number of connections permitted for any one service. This can be used to protect the system from certain types of denial of service attacks. The value chosen will depend on the available system resources and bandwidth. Another denial of service protection mechanism is to limit the number of connections from a single host. To enable this functionality, add the following line to the configuration (just below “cps = 25 30”):
per_source = 10
this will limit each host to only 10 connections per service.
By default, xinetd accepts connections from all hosts; to change this behaviour, add the line:
only_from =
to the configuration options. This will deny access to all hosts for all services, by default. The hosts permitted to connect to specific services will have to be configured in each of those services’ configuration settings.
Xinetd uses separate configuration files to define the behaviour of each service it supports. The settings in the server specific configuration files override the behaviour specified in the global file. These are found in the /etc/xinetd.d directory. For example, to permit access from 192.168.2.2 and 10.1.1.1 to the SSH (remote login) service, edit the /etc/xinetd.d/ssh file:
service ssh { disable = no socket_type = stream wait = no user = root server = /usr/libexec/sshd-keygen-wrapper server_args = -i groups = yes flags = REUSE IPv6 session_create = yes }
And add the lines (just after the line ‘session_create = yes’): only_from = 192.168.2.2 10.1.1.1
If any hosts are to be explicitly denied access, the no_access setting can be used, for example:
no_access = 10.1.1.9
It is also possible to add networks instead of individual IP addresses to either of the configuration settings mentioned above. These can be specified in a number of formats (see the xinetd.conf man page for more details).
SSeeccuurriinngg MMaacc OOSS XX Copyright © 2000-2004 Corsaire Limited. All Rights Reserved. The natural choice for information security solutions
A Corsaire White Paper: Securing Mac OS X
Page 14 of 22
Any settings specified in service specific configuration files override the global settings specified in /etc/xinetd.conf. For example, to override the default maximum number of instances of SSH, add the line:
instances = 8
Note:
By default, Mac OS X enables IP version 6 on all network services started through the xinetd service, but since the IP addresses specified above are in IPv4 notation, they will not work as expected. It is necessary to disable IPv6 compatibility on all network services where access controls are specified using the IPv4 notation. This is done, by removing the string “IPv6” from the line:
flags = REUSE IPv6
from each service’s configuration file. Restart the xinetd process for the changes to the configuration files to take effect.
4.8.2 SSH
OS X includes the OpenSSH suite of tools to provide encrypted remote shell, copy and tunnel access to a system. It is recommended that, where possible, SSH access to a system be permitted from certain hosts only (as demonstrated above). This reduces the risk of an attacker using compromised authentication details to access a system remotely or launching dictionary attacks against the SSH service.
4.8.2.1 Login banner
SSH should be configured to display a login banner before a user authenticates to the service. As discussed in section 4.2.2.1, a text file containing the login banner should be created in /etc/login_banner. To display the login banner to users, edit the /etc/sshd_config file and replace the line:
#Banner /some/path
With:
Banner /etc/login_banner
The sshd service will have to be restarted before the changes take effect. This banner will be displayed to all users attempting to access the system through SSH.
4.8.2.2 User access controls
By default, all users who have local accounts on the system are permitted to login through SSH. This is often not necessary and only provides attackers with more avenues for attack. Users with permission to SSH to the systems should be clearly defined and SSH configured to only allow access to those users. To enable this, edit /etc/sshd_config and add the following line towards the top of the file:
AllowUsers username1 username2
replacing ‘username1’ and ‘username2’ with the name of the users who should be granted access. Once the AllowUsers directive is enabled, only those users will be granted access to the system, it is not necessary to explicitly deny access to all other users with the DenyUsers directive – and explicitly permitting access is a better control strategy than explicitly denying it.
The AllowUsers directive can be further restricted by using the format: user@host, which will only allow access to a specific user from a specific host, for example:
AllowUsers [email protected]
SSeeccuurriinngg MMaacc OOSS XX Copyright © 2000-2004 Corsaire Limited. All Rights Reserved. The natural choice for information security solutions

A Corsaire White Paper: Securing Mac OS X
Page 15 of 22
Will allow glyn access from only the 192.168.5.3 host, and deny him access if he attempts to connect from anywhere else. For more information on controlling the access control mechanisms in SSH see the man pages for sshd_config.
Note
Four different ways of controlling access to SSH based on the source IP address have been discussed, namely:
- by creating a firewall rule;
- by controlling access through the global options of /etc/xinetd.conf;
- by controlling access through the SSH specific options in /etc/xinetd.d/ssh; and
- by controlling access through the ssh daemon itself.
None of these is inherently better than any other, but the system administration procedures within your organisation will play a large role in deciding which is used. Generally, it is better to specify host based access controls in as few places as possible to avoid unnecessary administrative headaches. Since most of the access control mechanisms mentioned above are available on all UNIX systems, the configuration of OS X systems may have to conform to organisation wide system administration standards.
4.8.2.3 SSH Options
The default installation of OpenSSH allows both SSH version 1 and version 2 connections. There have been many improvements to the security of version 1, and it is strongly recommended that only version 2 be used. To disable version 1 connections, edit the file /etc/sshd_config and change the line that starts with:
#Protocol 2, 1
to:
Protocol 2
As is common with most configuration files on UNIX systems, the # character is used to specify a comment. When it is removed, the directive behind it becomes active.
By default, a security feature called ‘privilege separation’ is enabled. This feature provides some degree of protection by limiting the access of a successful attacker.
OpenSSH has a number of authentication options including plain text, Kerberos and RSA keys. In most cases, plain text authentication in combination with good password management practices should be sufficient. For further information on configuring SSH authentication options see http://www.openssh.org/manual.html
4.8.3 FTP
FTP, the File Transfer Protocol, is a well-established protocol for transferring data. It is a clear text protocol which transmits both the authentication credentials and the data itself unencrypted between the client and server. For this reason it is susceptible to network sniffing attacks and its use on un-trusted network segments should be avoided if possible.
The SSH service offers file transfer mechanisms in the form of scp (secure copy) and sftp (secure file transfer) which encrypt all traffic between the client and server. However, encrypting data incurs a processing overhead which can make the SSH file transfer services slower than FTP in certain environments.
FTP can be enabled from the Sharing section of System Preferences.
SSeeccuurriinngg MMaacc OOSS XX Copyright © 2000-2004 Corsaire Limited. All Rights Reserved. The natural choice for information security solutions

A Corsaire White Paper: Securing Mac OS X
Page 16 of 22
4.8.3.1 Login banner
By default, the FTP server login banner is stored in a specific file. To display the login banner defined above, it is necessary to create a link to the correct file name:
sudo ln -s /etc/login_banner /etc/ftpwelcome
This banner will be displayed to users who attempt to connect to the ftp server.
4.8.3.2 User access controls
All users with local accounts on the system are granted ftp access by default. It is recommended that this access be further restricted so that only users with a clearly defined need for ftp are permitted access. Furthermore, the administrative user should not be permitted ftp access to the system since the clear text nature of the protocol poses too great a risk for credential theft. Other users can be restricted based on their username and/or source IP address.
To restrict access on a per user basis, create and edit the file /etc/ftpusers, an example could be:
tim deny
jane allow
glyn
[email protected] allow
martin
The format of the file is: ‘username@host directive’. The most simple entry is a username without a directive, where FTP assumes the user is denied access. In the example above, user glyn will be denied access, along with tim; jane is permitted access. The user martin will be able to access ftp from host 192.168.0.1, but will be denied access from all other hosts. Any network based access controls stipulated by the xinetd service will take precedence over hosts specified in this file (as xinetd determines whether requests are passed to the FTP daemon). If the 192.168.0.1 host is denied access by xinetd, martin will not be able to login to ftp, irrespective of the ftp configuration.
4.8.3.3 Chroot jail
Users accessing the system through ftp are allowed to move about the entire file system as if connected locally. Read, write, create and delete access to files is limited by their user access privileges and the file permissions. To further protect the system and restrict access to potentially sensitive data, it is recommended that users are only permitted ftp access to their home folders. To enable this feature, create the file /etc/ftpchroot and insert all the usernames who will be granted ftp access, but have their access limited to their home folders. The file is a simple list of usernames, such as:
james
bob
design
4.8.4 Apache (Personal web sharing)
Personal web sharing is provided through the Apache web server, commonly used as a commercial and personal web-server throughout the Internet. Apache is a full featured, complex web server with a multitude of configurations and their associated security implications. Using Apache to share files is not recommended for most organisations, since more secure alternatives with better authentication mechanisms such as SSH are available.
This section details basic changes to the default installation to allow users to serve access-controlled web pages. A fully secure web-server deployment is beyond the scope of this document.
SSeeccuurriinngg MMaacc OOSS XX Copyright © 2000-2004 Corsaire Limited. All Rights Reserved. The natural choice for information security solutions

A Corsaire White Paper: Securing Mac OS X
Page 17 of 22
4.8.4.1 Access control
This configuration is suitable for personal web pages where the server is to serve content from users’ home directories; access to all other resources will be denied by default. Edit the /etc/httpd/httpd.conf file and find the following section:
<Directory />
Options FollowSymLinks
AllowOverride None
</Directory>
and change it to this:
<Directory />
Options FollowSymLinks
AllowOverride None
Order deny,allow
Deny from all
</Directory>
<Directory /Users/*/Sites>
<Limit GET POST>
</Limit>
Order deny,allow
Deny from all
</Directory>
Access to the URL http://your.mac.system/ will now be denied for everyone. The second ‘Directory’ section explicitly denies access to all users’ Sites directories, but this behaviour is overridden by the user specific configuration files found in /etc/httpd/users. At the end of the general /etc/httpd/httpd.conf file is the line:
Include /private/etc/httpd/users/*.conf
This loads individual configuration files for each user, overriding the general access controls that have previously been specified. These user files are automatically created when a new user is added to the system. It is recommended that instead of reading the configuration files of all users, only the configuration files of users that are authorised to use web sharing are read. Instead of using the * wildcard character to read all files, specify each users configuration file explicitly, e.g.:
Include /private/etc/httpd/users/martin.conf
Include /private/etc/httpd/users/jane.conf
Include /private/etc/httpd/users/james.conf
4.8.4.2 Granting access
Once access has been denied by default, and only specific users are permitted to share their ~/Sites directories, it is possible to edit the default configuration for each user file and secure it further. The files are merely extensions to the main configuration file, and follow the same format. A default configuration is included below:
<Directory "/Users/martin/Sites/">
SSeeccuurriinngg MMaacc OOSS XX Copyright © 2000-2004 Corsaire Limited. All Rights Reserved. The natural choice for information security solutions
A Corsaire White Paper: Securing Mac OS X
Page 18 of 22
Options Indexes MultiViews
AllowOverride None
Order allow,deny
Allow from all
</Directory>
By default, everyone is allowed access. If the source IP address(es) of the users who will be accessing this web site are known, then these can be specified to further restrict access, for example:
<Directory "/Users/martin/Sites/">
Options Indexes MultiViews
AllowOverride None
Order deny,allow
Allow from 10.0.1.1
Allow from 192.168.0.1
</Directory>
This has the effect of only allowing access to the http://your.mac.system/~martin URL to users from the 10.0.1.1 and 192.168.0.1 systems.
The default configuration of Apache on OS X provides for unencrypted HTTP transport. However, the OpenSSL suite is included in the OS and can be enabled to provide full encryption of web server traffic. See http://developer.apple.com/internet/serverside/modssl.html for more information.
4.8.4.3 Obfuscating server version
As part of a standard HTTP exchange, the server sends a header used to identify itself. Under a default installation of Mac OS X this is returned as: “Apache/1.3.29 (Darwin)” which reveals both the exact version of Apache installed, and the underlying operating system. Attackers using remote scanning software frequently identify vulnerable system by their version numbers obtained from these banners. It is considered good security practice to remove such information from servers, particularly those accessible from public networks.
To change the HTTP server header, edit the /etc/httpd/httpd.conf file, and add the line:
ServerTokens prod
Once the server is restarted, it will return a header string of “Apache”. This may be further restricted through the use of the mod_header Apache component, although its use is beyond the scope of this document. See http://httpd.apache.org/docs/mod/mod_headers.html.
4.9 File Sharing SSH provides the most secure options for sharing files, but is not always convenient for many users, however, it is possible to use SSH to create an encrypted tunnel which can be used by more familiar sharing protocols such as AFP.
Which file sharing services are enabled should largely be dictated by the location of the OS X system on the network and the sensitivity of the data transferred. As a general rule, only encrypted transfer mechanisms such as SSH and VPNs should be used over un-trusted networks. Unencrypted file sharing protocols such as FTP, Microsoft’s SMB, NFS and Apple’s AFP should only be used on trusted networks. When unencrypted file sharing protocols are used, the authentication credentials of users’ can be compromised by network sniffing. This is an added problem when the same credentials are used for remote system access.
SSeeccuurriinngg MMaacc OOSS XX Copyright © 2000-2004 Corsaire Limited. All Rights Reserved. The natural choice for information security solutions
A Corsaire White Paper: Securing Mac OS X
Page 19 of 22
SSH provides a secure method for transferring files across un-trusted networks and also allows the creation of VPN tunnels between an SSH server and client. Apple have used this in OS X Server (>10.2) to allow users to tunnel AFP over SSH by enabling “secure connections” on the server. Even without OS X Server, it is still possible to manually create a tunnel for AFP over SSH.
From the client’s command line enter:
ssh [email protected] –L 10548:127.0.0.1:548
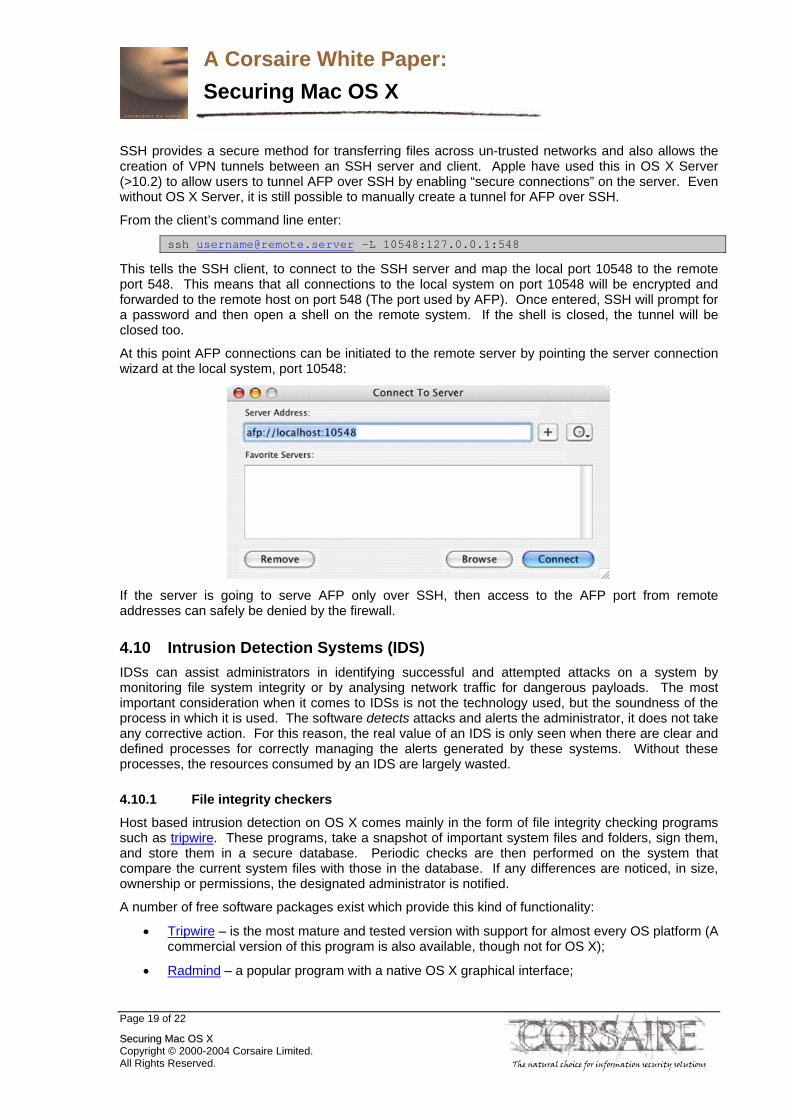
This tells the SSH client, to connect to the SSH server and map the local port 10548 to the remote port 548. This means that all connections to the local system on port 10548 will be encrypted and forwarded to the remote host on port 548 (The port used by AFP). Once entered, SSH will prompt for a password and then open a shell on the remote system. If the shell is closed, the tunnel will be closed too.
At this point AFP connections can be initiated to the remote server by pointing the server connection wizard at the local system, port 10548:
If the server is going to serve AFP only over SSH, then access to the AFP port from remote addresses can safely be denied by the firewall.
4.10 Intrusion Detection Systems (IDS) IDSs can assist administrators in identifying successful and attempted attacks on a system by monitoring file system integrity or by analysing network traffic for dangerous payloads. The most important consideration when it comes to IDSs is not the technology used, but the soundness of the process in which it is used. The software detects attacks and alerts the administrator, it does not take any corrective action. For this reason, the real value of an IDS is only seen when there are clear and defined processes for correctly managing the alerts generated by these systems. Without these processes, the resources consumed by an IDS are largely wasted.
4.10.1 File integrity checkers
Host based intrusion detection on OS X comes mainly in the form of file integrity checking programs such as tripwire. These programs, take a snapshot of important system files and folders, sign them, and store them in a secure database. Periodic checks are then performed on the system that compare the current system files with those in the database. If any differences are noticed, in size, ownership or permissions, the designated administrator is notified.
A number of free software packages exist which provide this kind of functionality:
• Tripwire – is the most mature and tested version with support for almost every OS platform (A commercial version of this program is also available, though not for OS X);
• Radmind – a popular program with a native OS X graphical interface;
SSeeccuurriinngg MMaacc OOSS XX Copyright © 2000-2004 Corsaire Limited. All Rights Reserved. The natural choice for information security solutions

A Corsaire White Paper: Securing Mac OS X
Page 20 of 22
• Samhein – tested on FreeBSD, but should work under OS X;
• Osiris – supports all UNIXs.
Host based IDSs provide a means of alerting administrators if an attacker has managed to gain access to a system, and is actively changing files on it. As essential as it is, this form of alerting is often not quick enough to prevent costly damage to a system. Where systems are deployed in high threat environments, it is recommended that a network based IDS is also deployed.
4.10.2 Network IDS
Most network IDSs are based on packet capturing technology that reads network traffic, checks it for known or suspicious payloads, and alerts the administrator if anything untoward is detected. Since they analyse traffic at the network level, it is possible to be informed of an attack in real-time. There are some systems that use anomaly detection to spot malicious traffic, but by far the most popular method in current technology is to use signature based matching, similar to anti-virus software.
A well-known and free network based IDS is snort, which is available on a multitude of platforms. It is distributed in source form and will require compilation and some modification before working on OS X. There is a native OS X package available that makes installing and managing snort easy: http://seiryu.home.comcast.net/henwen.html
References http://www.apple.com/support/security/
Open Firmware
http://www.macdevcenter.com/pub/a/mac/2003/02/18/secure_tibook.html
http://www.msec.net/advisories/of_pwd_bypass.html
http://docs.info.apple.com/article.html?artnum=106482
Login
http://www.macworld.com/2003/08/secrets/macosxhints/
Keychain
http://www.informit.com/articles/article.asp?p=169576&seqNum=6
Firewall
http://www.cert.org/tech_tips/packet_filtering.html
ipfw manual page
http://www.freebsd.org/doc/en_US.ISO8859-1/books/handbook/firewalls.html
Network Services
http://www.xinetd.org/
xinetd manual page
http://www.openna.com/documentations/articles/xinetd/part4.php
File Sharing
http://security.ucdavis.edu/MacOSXSecPaulAnnot.pdf
SSeeccuurriinngg MMaacc OOSS XX Copyright © 2000-2004 Corsaire Limited. All Rights Reserved. The natural choice for information security solutions
A Corsaire White Paper: Securing Mac OS X
Page 21 of 22
Acknowledgement This Guide was written by Stephen de Vries, Principal Consultant at Corsaire.
About The Author Stephen de Vries is a Principal Consultant in Corsaire’s Security Assessment team. He has worked in IT Security since 1998, and has been programming since 1997. He has spent the last four years focused on Ethical Hacking, Security Assessment and Audit at Corsaire, KPMG and Internet Security Systems. He was a contributing author and trainer on the ISS Ethical Hacking course and Technical Leader for the Automated Perimeter Scanning project.
Stephen’s past roles have included that of a Security Consultant at a leading City of London Financial institution and also Security Engineer at SMC Electronic Commerce. At both positions he was involved in corporate security at many levels and was responsible for consulting on the paper security policies and procedures, conducting vulnerability assessments, designing, deploying and managing the security infrastructure of the organisation.
About Corsaire Corsaire are experts at securing information systems. Through our commitment to excellence we help organisations protect their information assets, whilst communicating more effectively. Whether they are interacting with customers, employees, business partners or shareholders, our sound advice can help our clients reduce corporate risk and achieve tangible value from their investments. Privately founded in 1997 and with offices in the UK and Australia, Corsaire are known for our personable service delivery and an ability to combine both technical and commercial aspects into a single business solution. With over eight years experience in providing information security solutions to the UK Government's National Security Agencies, Government departments and major private and non-profit sectors, we are considered a leading specialist in the delivery of information security planning, assessment, implementation and management. Corsaire take a holistic view to information security. We view both business and security objectives as inseparable and work in partnership with our clients to achieve a cost-effective balance between the two. Through our consultative, vendor-neutral methods we ensure that whatever solution is recommended, an organisation will never be overexposed, nor carry the burden of unnecessary technical measures. Corsaire have one of the most respected and experienced teams of principal consultants available in the industry and have consistently brought fresh ideas and innovation to the information security arena. We take pride in being a knowledge-based organisation, but we do not just stop there. Through a culture of knowledge-share, we are also committed to improving our client’s internal understanding of security principles. It is this approach to knowledge that differentiates us from most other information security consultancies. As a mark of this, we are known globally through our active contribution to the security research community, publishing papers and advisories on a regular basis. These we share freely with our clients, providing them with immediate access to the most up-to-date information risk management advice available, allowing them to minimise their exposure and gain an instant competitive advantage. Whilst it is imperative for us to offer a high level of security to our clients, we believe that it is of equal bearing to provide a high level of service. At Corsaire our clients are not only protected but valued too. We work hard at building strong relationships that are founded on the cornerstones of respect
SSeeccuurriinngg MMaacc OOSS XX Copyright © 2000-2004 Corsaire Limited. All Rights Reserved. The natural choice for information security solutions
A Corsaire White Paper: Securing Mac OS X
Page 22 of 22
and trust. With 80% of our customer base deriving from referrals we are certain that our clients value the quality, flexibility and integrity that partnering with Corsaire brings. For more information contact us at mailto:[email protected] or visit our website at http://www.corsaire.com
SSeeccuurriinngg MMaacc OOSS XX Copyright © 2000-2004 Corsaire Limited. All Rights Reserved. The natural choice for information security solutions
Recommended