5 Tips For Mastering Google Slides
www.synergyse.com

Google Slides got a major update this week, adding the ability to edit the master slides for a presentation template. Before, in order to standardize a template for use by others, or to customize a presentation for a topic, you had to make your own template of sorts, editing each type of slide, then copying and pasting to create more that looked the same.
With this update, you can now edit the master slide layout, then you can simply add more slides using the ‘New slide’ command (or, the quick add button), and your formatting is done for you. It’s great for organizations who want to keep a uniform template, and for longer presentations where formatting really matters. Here are a few pointers to get it just right.
www.synergyse.com

1)Editing the Master Slides ● By using slide formatting, or text formatting on the master slides, you can keep things uniform and
ensure a consistent look throughout.
● To edit:1) Open the Master Slides by clicking ‘Slide’, then ‘Edit Master’.2) You can begin editing the set of slide layouts.3) Once you have completed formatting the slides the way you want, close the master slide
layout interface.4) Add new slides as normal and the changes you made on the master will be reflected on the
new slides.
● Any changes you make on the Master Slide later on will be reflected on all your slides. For example, if you decide halfway through a presentation that you’d like the headings in different font, updating the master slide will update the heading font on all slides at once.
● If you have graphics on the master slide that you need to modify, you’ll have to edit that element on the master slide
● Similar to Google Docs, you can edit Normal Text, Heading 1, etc.. www.synergyse.com

Fig 2. - Slides will still be added and accessed in the same way you’ve always done it, except that the formatting is now set according to your master slides. Notice the dragon - you won’t be able to edit him on your ‘normal’ slide; to move or change him you’d have to do it on the master slide, and that change to the master would be automatically applied to that type of slide throughout the presentation.
www.synergyse.com

● Depending on your workflow when adding new slides, you might continue as normal by clicking the ‘+’ button, which will insert a new slide quickly.
● Notice that it will insert a ‘Title and Body’ slide after the Title Slide, and after that, will continue to insert the type of slide you were just on.
● If you require a different kind of slide layout, such as a ‘Title and Two Columns’, you’ll have to click on the drop down arrow next to the ‘+’ button to make that selection. If you’ve formatted the master slides, you’ll now see your new layouts, and you can choose accordingly.
● If you don’t need all the slide types, don’t edit them in the master slide layout. For example, if your presentation is only using the ‘Title and Body’ slide type, then edit that one and leave the rest alone. No need to waste your time editing masters that you won’t be using.
www.synergyse.com
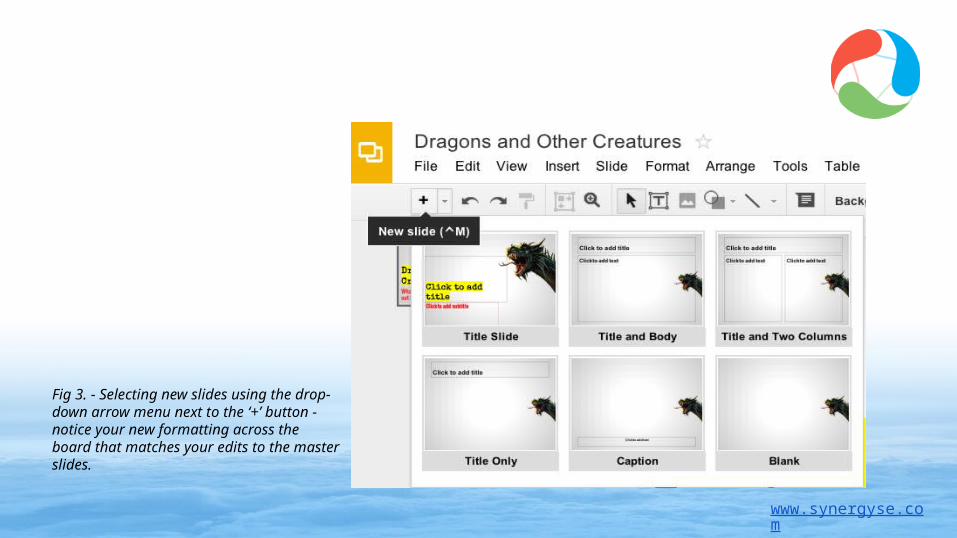
Fig 3. - Selecting new slides using the drop-down arrow menu next to the ‘+’ button - notice your new formatting across the board that matches your edits to the master slides.
www.synergyse.com

2) Working with Graphics● Depending on the type of media you’re using, working with graphics and other media in Google
Slides can be a bit challenging.
● For example, if you want to make a logo transparent on the fly, you’ll have to edit the image using some other program that can manipulate the image file.
● Pixlr is a software that can help with image editing tasks.
● To move media, you may find it easier to hold down the SHIFT key while using the arrow to move the image to where you need them.
● Holding down the SHIFT key allows you to move pixel by pixel.
● I typically search for and use graphics in the .png format, which seems to work really well overall, and many are already transparent. However, when placing them on the master slides, or on any of the slides internal to the presentation, masking doesn’t work well.
www.synergyse.com

3) Tips on Design● To add emphasis to text, use highlighted text.
● Don’t underestimate font choices.
● Fonts should be easy to read.
● Consider the the presentation screen you’ll be displaying / projecting your presentation on when selecting font and color choices.
● Use less text, and more images.
● Remember: Slides are merely there to support the story you’re telling - not for you to read from.
www.synergyse.com

4) Additional New Features of Google Slides
● Slides go wide
o Gives you the option to project to wide screen
o Many projectors still only display in ‘regular’ mode, and won’t support HDMI or wide screen projecting.
o Make sure you know what projector you’ll be using and plan your presentation layout accordingly.
Fig 4. - Slides go wide - you can always play with the slide settings, but prepare your slides accordingly.
www.synergyse.com

5) Old Features Not to ForgetDon’t forget some of the old features you may have overlooked in the past. ● 3 ways of running a presentation (depending on what screen you’re presenting on, make
adjustments accordingly.)o Your owno Extendedo New screen, or with speaker notes)
● You can print your slides with or without notes. Check out the ‘Print settings and preview’ on the ‘File’ menu, and play with the layouts available.
● Share your slides with others by:o A link available for everyoneo Publishing the presentation to the web. o You can embed presentations on your website for easy access, and the added bonus
is your site traffic.
www.synergyse.com

Fig 5. - Printing slides - lots of people like printouts of three slides per page with places where they can take their own notes. That is, if you have to provide printed reference slides at all; if you’ve “gone green” you can always post your presentation on your website and email out a link to participants rather than printing.
www.synergyse.com

Join the conversation and follow us:
www.synergyse.com
Recommended