Instruction Manual: Whipple MY17EBF_R4 Last Updated: September 27th, 2017
Page 1 of 15 www.whipplesuperchargers.com
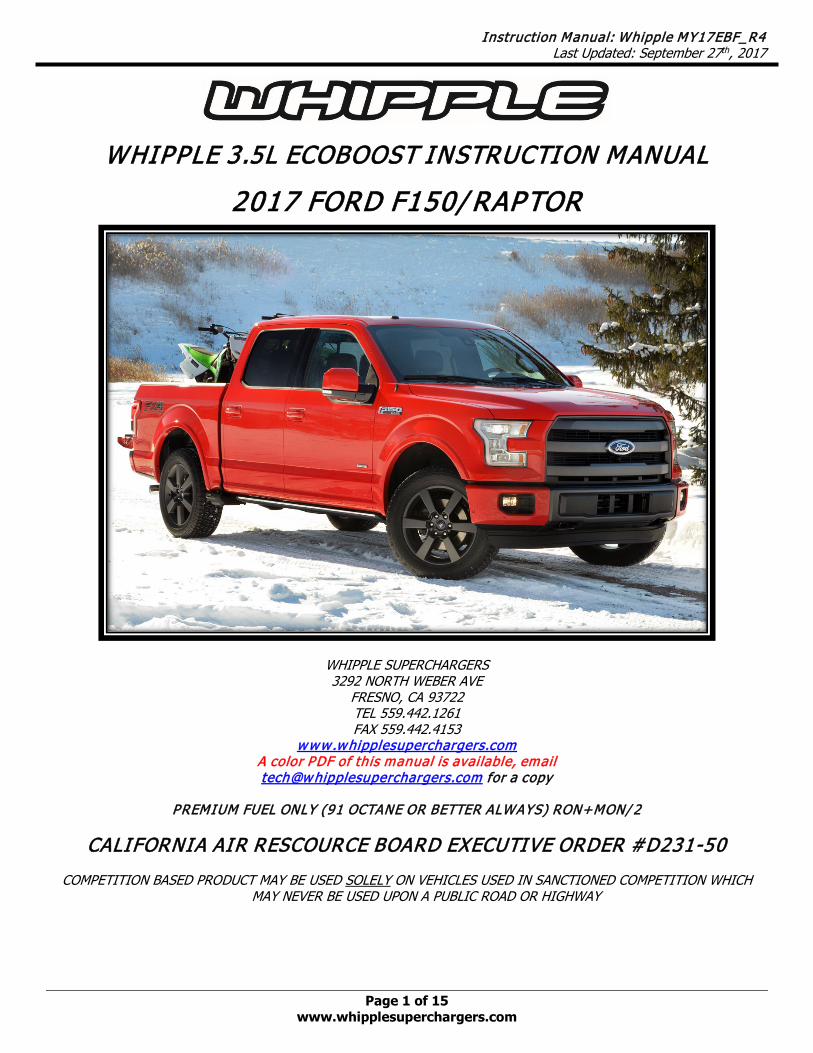
WHIPPLE 3.5L ECOBOOST INSTRUCTION MANUAL
2017 FORD F150/ RAPTOR
WHIPPLE SUPERCHARGERS 3292 NORTH WEBER AVE
FRESNO, CA 93722 TEL 559.442.1261 FAX 559.442.4153
www.whipplesuperchargers.com A color PDF of this manual is available, email tech@w hipplesuperchargers.com for a copy
PREMIUM FUEL ONLY (91 OCTANE OR BETTER ALWAYS) RON+MON/ 2
CALIFORNIA AIR RESCOURCE BOARD EXECUTIVE ORDER #D231-50
COMPETITION BASED PRODUCT MAY BE USED SOLELY ON VEHICLES USED IN SANCTIONED COMPETITION WHICH
MAY NEVER BE USED UPON A PUBLIC ROAD OR HIGHWAY

Instruction Manual: Whipple MY17EBF_R4 Last Updated: September 27th, 2017
Page 2 of 15 www.whipplesuperchargers.com
INTRODUCTION Before beginning installation, please read this manual and important notes: • Please read the installation manual and verify that all items are present. If you are missing hardware or have any
questions, please contact your dealer or Whipple. • Premium fuel (US 91 octane) is required to prevent spark-knock/detonation under certain operating conditions.
Other countries must meet US 91 octane standards, RON+MON/2. If fuel of less than 91-octane is present in the vehicle fuel tank, the tank must be completely drained and refilled with 91 or higher octane to 1/8th of a tank.
• 91 octane should always be from Tier 1 fuel supplier such as Chevron, Shell, Unocal, Texaco, Sunoco. Bargain fuel (Example: Costco, Safeway, Sam’s Club, Vons, Valero) does not perform well and will result in lower power and possible engine damage.
• Running a CAI without a custom calibration may result in a CEL/DTC for crankcase ventilation. • Operating your engine without the Whipple PCM recalibration can result in engine damage or failure and will void
your warranty. • COMPETITION BASED PRODUCT MAY BE USED SOLELY ON VEHICLES USED IN SANCTIONED COMPETITION WHICH
MAY NEVER BE USED UPON A PUBLIC ROAD OR HIGHWAY, UNLESS PERMITTED BY SPECIFIC REGULATORY EXEMPTION (VISIT THE “EMISSIONS” PAGE AT HTTP://WWW.SEMASAN.COM/EMISSIONS FOR STATE BY STATE DETAILS.
• COMPETITION BASED PRODUCT IS LEGAL IN CALIFORNIA ONLY FOR RACING VEHICLES WHICH MAY NEVER BE USED, OR REGISTERED OR LICENSED FOR USE, UPON A HIGHWAY.
• IT IS THE RESPONSIBILITY OF THE INSTALLER AND/OR USER OF THIS PRODUCT TO ENSURE THAT IT IS USED IN COMPLIANCE WITH ALL APPLICABLE LAWS AND REGULATIONS.
RECOMMENDED TOOLS AND SUPPLIES The following items are not included in this supercharger kit and it is strongly recommended that they're used for ease of installation or maximum performance. Safety glasses, 3/8” torque wrench, 3/8” assorted metric socket set, trim pad tool (for pushpin removal), floor jack.
PRE-INSTALLATION CHECKLIST Before installing your Whipple Kit, complete the following checklist.
1. Verify Condition of Vehicle: Before the upgrade kit is installed, ensure the engine runs smoothly and that the factory malfunction indicator light (MIL) is off. Only install the supercharger kit if the engine runs smoothly and the MIL is off.
2. !! CAUTION !! This product is intended for use only on STOCK, UNMODIFIED, WELL-MAINTAINED engines. Installation on a worn-out or modified engine is not recommended without factory computer and fuel system modifications. Custom engine configurations could require custom tuning and other supporting modifications.
3. Verify Fuel System: Upgrade systems should only be installed on vehicles that have new or clean fuel filters.
4. Assess Cleanliness of Installation Area: Make sure your work area and the under-hood area are free from debris.
This supercharger is a high-quality, close-tolerance compressor and must not be subjected to contamination by dirt or any type of foreign material. If necessary, vacuum around engine to remove any foreign material.
5. !! CAUTION !! Identify Kit Components: Before beginning installation, identify all the components of your Whipple Kit and ensure all items are present and undamaged.
Instruction Manual: Whipple MY17EBF_R4 Last Updated: September 27th, 2017
Page 3 of 15 www.whipplesuperchargers.com
SAFETY PRECAUTIONS
CAREFULLY READ THE IMPORTANT SAFETY PRECAUTIONS AND WARNINGS BEFORE PROCEEDING WITH THE INSTALLATION! Appropriate disassembly, assembly methods and procedures are essential to ensure the personal safety of the individual performing the kit installation. Improper installation due to the failure to correctly follow these instructions could cause personally injury or death. Read each step of the installation manual carefully before starting the installation.
• Always wear safety glasses for eye protection. • Place the ignition switch in the off position. • Always apply the parking brake when working on vehicle. • Block the front and rear tire surfaces to prevent unexpected vehicle movement. • Operate the engine only in well-ventilated areas to avoid exposure to carbon monoxide. • Do not smoke or use flammable items near or around fuel system. • Use chemicals and cleaners only in well-ventilated areas. • Batteries can produce explosive hydrogen gas which can cause personal injury. Do not allow flames, sparks or
flammable sources to come near the battery. • Keep hands and any other objects away from the radiator fan blades. • Keep yourself and your clothing away from moving parts when the engine is running. • Do not wear loose clothing or jewelry that can be caught in rotating or moving parts.
WARNING **NOTICE: Installation of Whipple products signifies that you have read this document and have agreed to the terms stated within. It’s the purchaser’s responsibility to follow all installation instruction guidelines and safety procedures supplied with the product as it’s received by the purchaser to determine the compatibility of the product with the vehicle or the device the purchaser intends to install the product on. Whipple assumes no responsibility for damages occurring from accident, misuse, abuse, improper installation, improper operation, lack of reasonable care or all previously stated reasons resulting from incompatibility with other manufacturer’s products. There are no warranties expressed or implied for engine failure or damage to the vehicle in any way, loss of use or inconvenience or labor reimbursement. This includes merchantability and fitness. The information contained in this publication was accurate and in effect at the time the publication was approved for printing and is subject to change without notice or liability. Whipple reserves the right to revise the information presented herein or to discontinue the production of parts described at any time.
PCM CALIBRAITON NOTICE
Your Whipple Performance kit includes a PCM reflash. PCM’s must be shipped to Whipple, please allow for 24-48 hours for reflashing and shipping back. All PCM’s will be shipped Fedex Overnight (US 50 states) at no charge. International shipments will be charged a discounted freight fee. NOTE: Whipple does not offer custom tuning. Calibrations are provided for 100% stock vehicles with an exception to cat-back exhaust systems. Long tube headers, high flow cats and other engine mods are not supported.

Instruction Manual: Whipple MY17EBF_R4 Last Updated: September 27th, 2017
Page 4 of 15 www.whipplesuperchargers.com
INSTALLATION INSTRUCTIONS It is strongly recommended that you read through this guide before you begin installing the Whipple Kit. 1. Remove the PCM from the vehicle, ship to Whipple for reflashing. Use the following address:
Whipple Superchargers
3292 N. Weber Ave Fresno, CA 93722
Attention: EB PCM Reflash 2. Using an air hose, blow off any loose dirt or debris from engine compartment. If really dirty, then steam clean the
engine compartment before proceeding to the next step. 3. Lift the vehicle using a floor hoist, if you do not have access to one, use a hydraulic floor jack and jack stands to
raise the vehicle. NOTE: Jack stands must be used on a level surface and be securely seated. Failure to do so may result in personal injury or vehicle damage.
4. Remove the bolts and the spacer from the front underbody skid plate.
5. Remove the bolts and the front underbody skid plate.

Instruction Manual: Whipple MY17EBF_R4 Last Updated: September 27th, 2017
Page 5 of 15 www.whipplesuperchargers.com
6. Disconnect the intercooler fan assembly. Detatch the retainer and position the wiring harness aside.
7. Remove the bolts, lower bracket and CAC cooling fan assembly.
8. Using an axle stand, support the intercooler core.
Instruction Manual: Whipple MY17EBF_R4 Last Updated: September 27th, 2017
Page 6 of 15 www.whipplesuperchargers.com
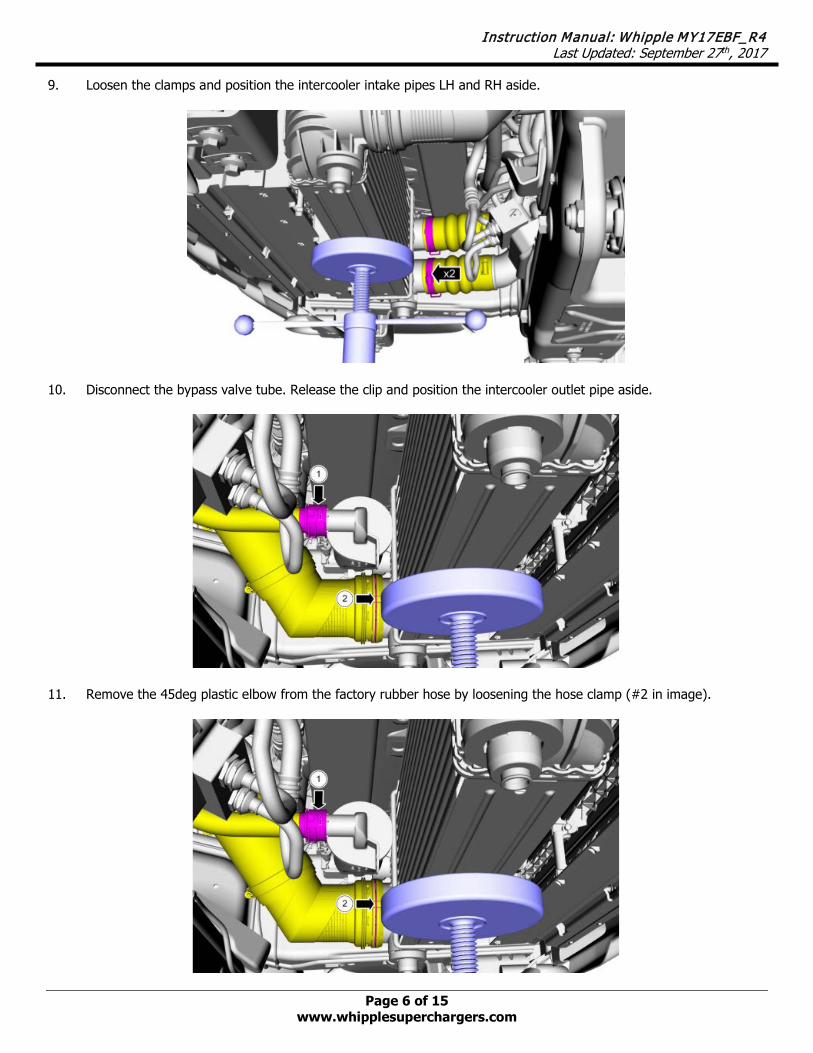
9. Loosen the clamps and position the intercooler intake pipes LH and RH aside.
10. Disconnect the bypass valve tube. Release the clip and position the intercooler outlet pipe aside.
11. Remove the 45deg plastic elbow from the factory rubber hose by loosening the hose clamp (#2 in image).

Instruction Manual: Whipple MY17EBF_R4 Last Updated: September 27th, 2017
Page 7 of 15 www.whipplesuperchargers.com
12. Disconnect the bypass valve electrical connector and place wiring harness aside.
13. Lower the axle stand and remove the intercooler core from vehicle.
14. Remove the bolt from the turbocharger bypass valve. Rotate the bypass and remove from intercooler.
Instruction Manual: Whipple MY17EBF_R4 Last Updated: September 27th, 2017
Page 8 of 15 www.whipplesuperchargers.com
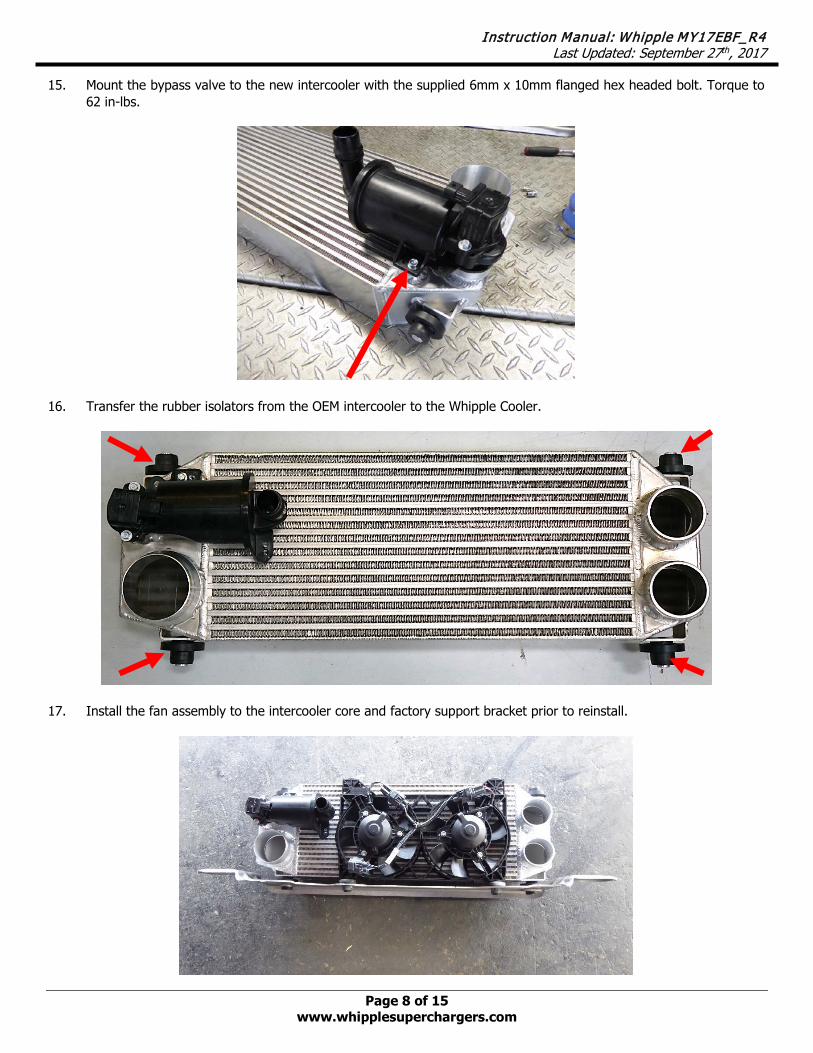
15. Mount the bypass valve to the new intercooler with the supplied 6mm x 10mm flanged hex headed bolt. Torque to 62 in-lbs.
16. Transfer the rubber isolators from the OEM intercooler to the Whipple Cooler.
17. Install the fan assembly to the intercooler core and factory support bracket prior to reinstall.

Instruction Manual: Whipple MY17EBF_R4 Last Updated: September 27th, 2017
Page 9 of 15 www.whipplesuperchargers.com
18. Raise the axle stand and install the intercooler core from vehicle.
19. Connect the bypass valve electrical connector.
20. Connect the bypass valve tube and the supplied 60deg outlet pipe. Secure outlet pipe into factory hose. Secure tube to intercooler using the supplied 3.25” silicone hose coupler and (2) t-bolt clamps.
Instruction Manual: Whipple MY17EBF_R4 Last Updated: September 27th, 2017
Page 10 of 15 www.whipplesuperchargers.com
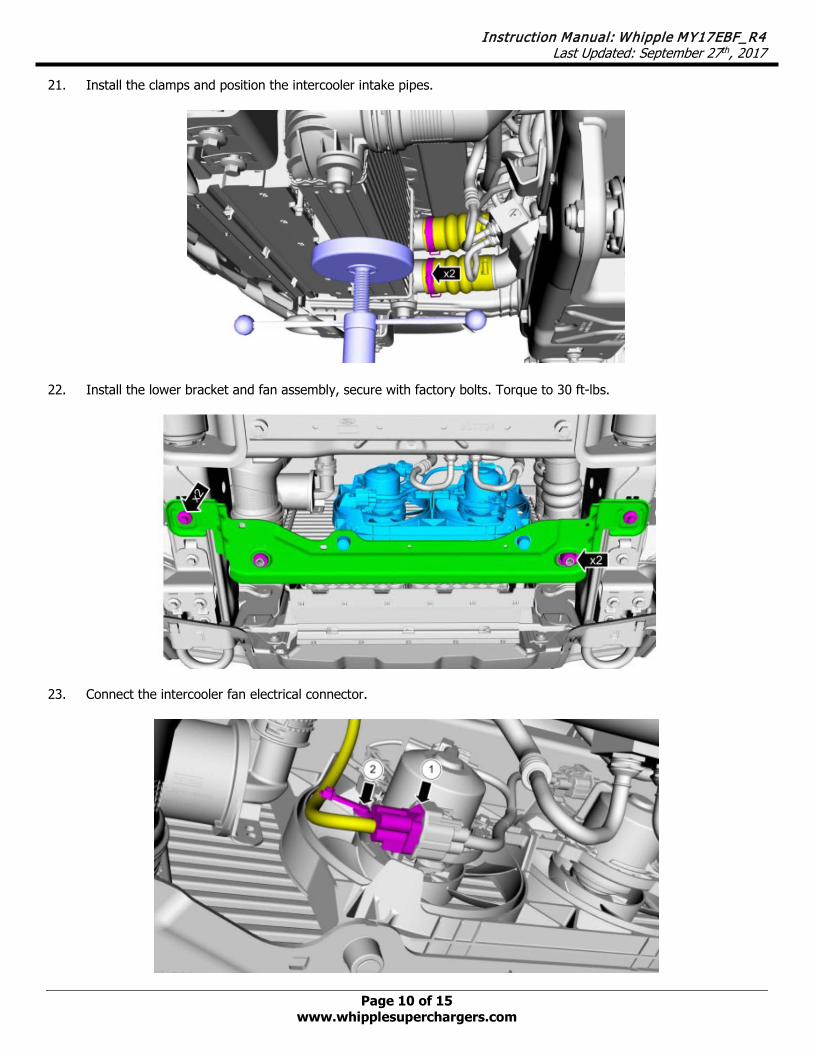
21. Install the clamps and position the intercooler intake pipes.
22. Install the lower bracket and fan assembly, secure with factory bolts. Torque to 30 ft-lbs.
23. Connect the intercooler fan electrical connector.

Instruction Manual: Whipple MY17EBF_R4 Last Updated: September 27th, 2017
Page 11 of 15 www.whipplesuperchargers.com
24. Reinstall the front underbody skid plate with factory hardware. Torque to 35 ft-lbs.
25. Install the underbody skid plate and spacer, secure with factory bolts. Torque to 41 ft-lbs.
26. Disconnect the factory IAT sensor connector by squeezing the tab and pulling back away.
Instruction Manual: Whipple MY17EBF_R4 Last Updated: September 27th, 2017
Page 12 of 15 www.whipplesuperchargers.com
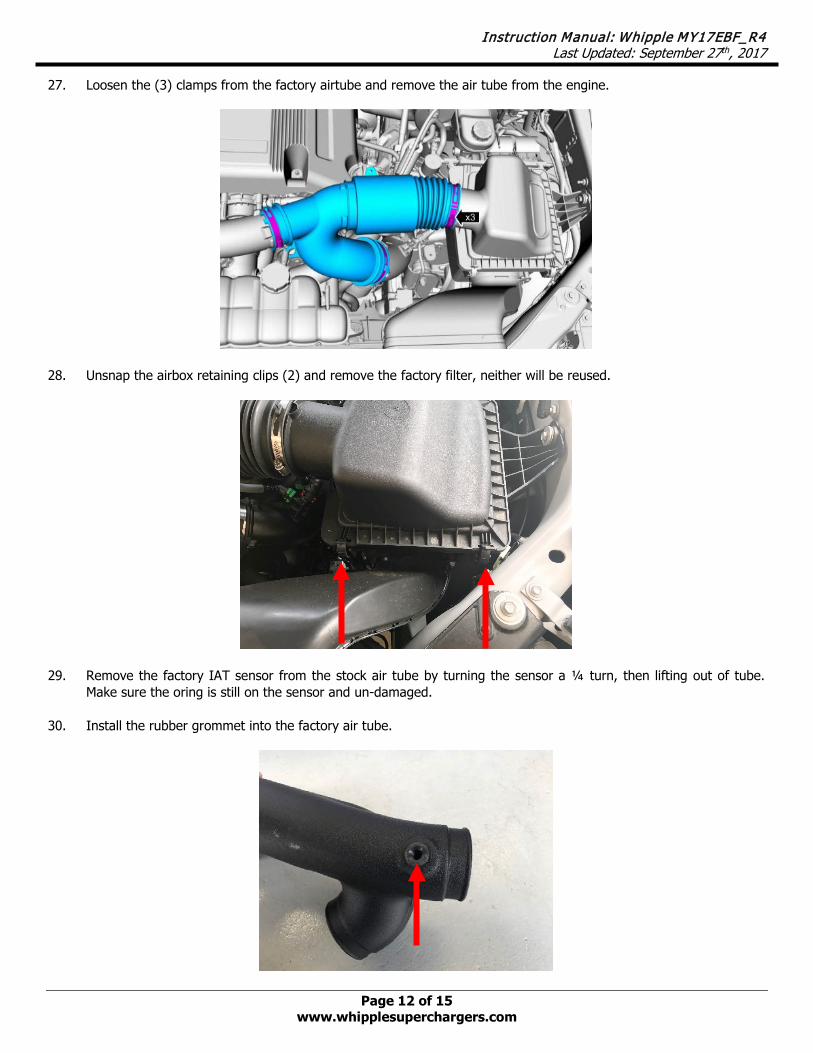
27. Loosen the (3) clamps from the factory airtube and remove the air tube from the engine.
28. Unsnap the airbox retaining clips (2) and remove the factory filter, neither will be reused.
29. Remove the factory IAT sensor from the stock air tube by turning the sensor a ¼ turn, then lifting out of tube.
Make sure the oring is still on the sensor and un-damaged. 30. Install the rubber grommet into the factory air tube.
Instruction Manual: Whipple MY17EBF_R4 Last Updated: September 27th, 2017
Page 13 of 15 www.whipplesuperchargers.com
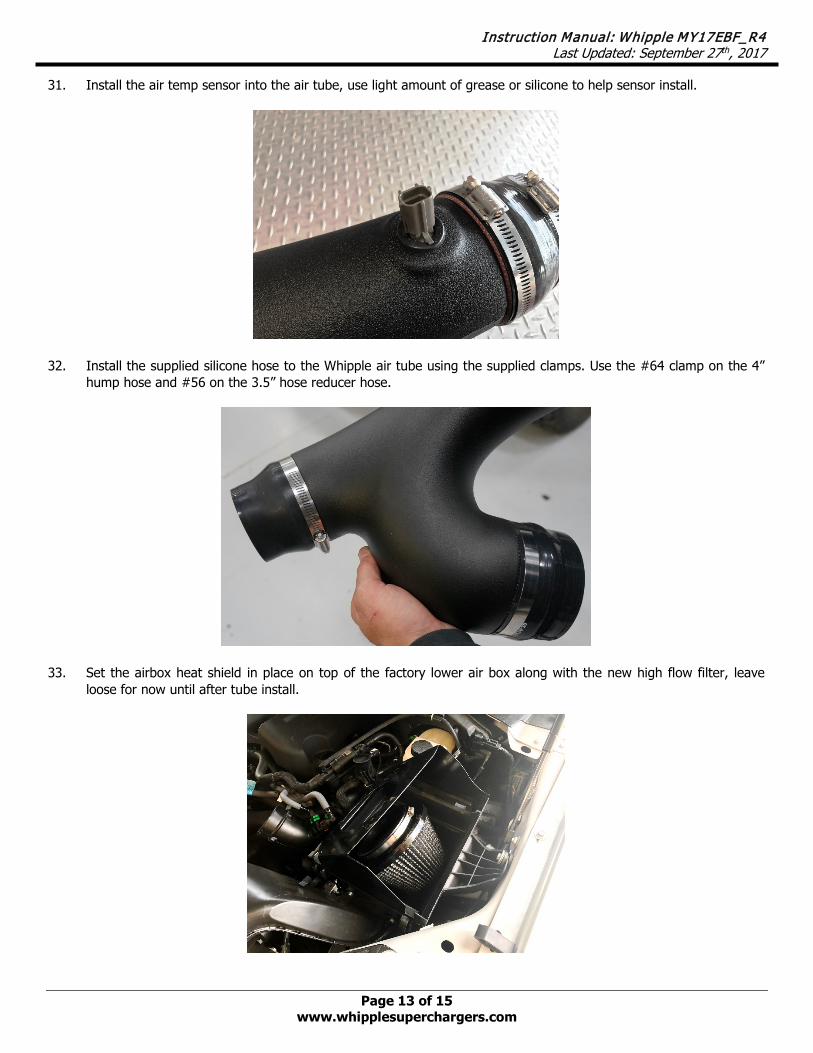
31. Install the air temp sensor into the air tube, use light amount of grease or silicone to help sensor install.
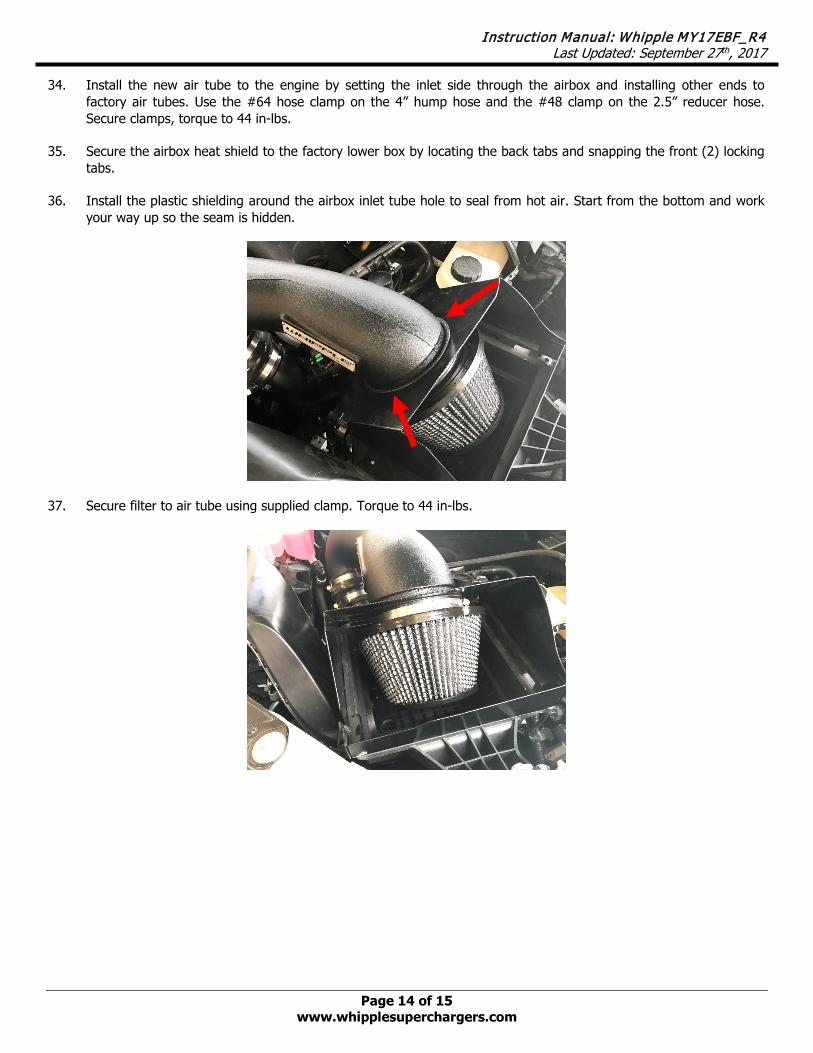
32. Install the supplied silicone hose to the Whipple air tube using the supplied clamps. Use the #64 clamp on the 4” hump hose and #56 on the 3.5” hose reducer hose.
33. Set the airbox heat shield in place on top of the factory lower air box along with the new high flow filter, leave
loose for now until after tube install.
Instruction Manual: Whipple MY17EBF_R4 Last Updated: September 27th, 2017
Page 14 of 15 www.whipplesuperchargers.com
34. Install the new air tube to the engine by setting the inlet side through the airbox and installing other ends to factory air tubes. Use the #64 hose clamp on the 4” hump hose and the #48 clamp on the 2.5” reducer hose. Secure clamps, torque to 44 in-lbs.
35. Secure the airbox heat shield to the factory lower box by locating the back tabs and snapping the front (2) locking
tabs. 36. Install the plastic shielding around the airbox inlet tube hole to seal from hot air. Start from the bottom and work
your way up so the seam is hidden.
37. Secure filter to air tube using supplied clamp. Torque to 44 in-lbs.

Instruction Manual: Whipple MY17EBF_R4 Last Updated: September 27th, 2017
Page 15 of 15 www.whipplesuperchargers.com
38. Install the supplied rubber shielding around the airbox edge, this will require cutting at each 90deg turn.
39. Remove factory spark plugs. Close the stock gap to .025”. Failure to close the gap may result in horsepower
variance and possible misfire. 40. Reinstall reflashed PCM into factory location. 41. Start the vehicle, check for any leaks or check engine lights.
IMPORTANT INFORMATION
BOOST LEVELS All Whipple kits are shipped with boost levels that Whipple feels achieves maximum power while maintaining reliability with stock engines (@ sea level). Additional boost controllers or PCM changes to increase boost may result in engine failure. Higher boost levels must run higher octane levels such as 100LL, 104, 110, 116, etc. or be custom tuned. EXHAUST Cat-back exhaust systems help reduce heat and minimize exhaust back pressure. They do not affect the calibration and are always a good idea for added safety and performance. Long tube headers and/or high flow cats require custom calibrations and are not supported by Whipple. While they make more power, they greatly affect the tuning and therefore this should be custom tuned by a reputable tuner. FUEL OCTANE Never run a fuel octane that is below 91octane, (RON+MON)/2 and never run fuel with more volume than 10% Ethanol. It is recommended, when available, to run 92-94 octane. Never mix mid-level (below 91) with 91+, this is very dangerous and can cause severe engine damage. Do not attempt to increase octane ratings with generic octane boosters, these are very hard on spark plugs and many brands do very little to the actual octane rating (1 point is .1 octane). For emergency situations and racing applications, the best octane booster found to date is Boostane (#1 choice) and NOS “Off-road” formula. Some other brands are hard on spark plugs so constant use will require increased spark plug maintenance. The PCM constantly adapts, if it senses better fuel, it will increase power accordingly. Not all fuel is equal. Tier 1 type fuel such as Chevron, Shell, Unocal, Texaco, Sunoco, BP, Mobil, Phillips are highly recommended. Second rate “bargin” fuel from grocery stores and other vendors should always be avoided. Whipple testing has shown high risk when running premium fuel from places such as Costco, Vons, etc.

COMPUTER RECALIBRATION VOUCHER (FILL OUT AND SHIP WITH FACTORY PCM)
RETURN FACTORY PCM TO:
Whipple Superchargers Attention: PCM Recalibration
3292 N. Weber Ave Fresno, CA 93722
(559) 442-1261 Tel (559) 442-4153 Fax COMPANY NAME ADDRESS CITY STATE ZIP DATE PHONE EMAIL SHIP TO ADDRESS: SAME NEW ADDRESS (CIRCLE ONE) COMPANY ATTENTION ADDRESS CITY STATE ZIP SHIPPING DATE REQUESTED RETURN DATE WHIPPLE SALES ORDER #
VEHICLE INFO
YEAR MAKE VIN # TIRE/AXLE Whipple calibrations are designed around stock, emissions compatible, unaltered vehicles. Installation of non-emission products are not emissions legal in some states. Whipple only supports emission, street legal applications. NOTES:
Recommended


![[FORD] Diagramas Electricos Ford F150 2007](https://img.dokumen.tips/doc/110x75/563db873550346aa9a93cd10/ford-diagramas-electricos-ford-f150-2007.jpg)