Embed Size (px)
Citation preview
1
ZDA ML10 & 30
Installation Guidelines The product is indicated as Zinc Discrete Anode or ZDA Installation procedures The ZDA ML10 / 30 is a discrete zinc-anode imbedded in an ionic conductive paste. Before application the packing material is removed manually and the anode is ready for installation. These anodes are in 2 different types available with 2 different length : 10 and 30cm System monitoring can be performed according international standard EN/ISO12696. Monitoring equipment can be supplied by your distributor together with the anodes on request. Be aware that monitoring equipment designed for an impressed current CP-system is not always compatible with a CP-system based on galvanic anodes, specifically when current-densities are monitored. Before installation it is required to observe the instructions mentioned in the Material Safety Data Sheets (MSDS). The installation procedure includes the following steps :
1. Check accessibility of the construction and take precautions if necessary, 2. Prepare the concrete surface, 3. Localize the reinforcement, 4. Check electric continuity of the reinforcement, 5. If required, perform additional potential mapping of the reinforcement to indicate the
degree and extend of expected corrosion, 6. Install the ZDA ML10 or 30, 7. Make electric connections of the reinforcement with the anode, 8. Check electric connections with a resistance meter, 9. Patch the concrete, 10. Check polarisation of the reinforcement by use of reference electrodes.
It is recommended to keep up a log-book in which all steps are described and checked. Situations which differ from the installation procedures must be indicated accurately in the log-book and checked and signed by the supervisor prior to proceed. In case certain situations is not clear how to handle the anodes properly, we recommend to contact your distributor prior to proceed with the installation. Each step of the installation procedure is described in detail below.
Zinc sacrificial anodes for corrosion control of steel in concrete

2
ZDA ML10 & 30 Prepare the concrete surface. Prior to install the anodes the concrete should be prepared in the following manner (please check manufacturer’s spec of the repair mortar) :
1. Remove all deteriorated concrete, dirt, oil, grease, and all bond-inhibiting materials from surface. Be sure repair area is not less than 5cm in depth.
2. In case the depth of the repair area is less than 5cm and cannot be enlarged for proper anode installation, please check with your distributor.
3. Preparation work should be done by high pressure water blast, scabbler, or other appropriate mechanical means to obtain an exposed aggregate surface with a minimum surface profile of 2mm for proper mortar adhesion.
4. Reinforcing Steel: Steel reinforcement should be thoroughly prepared by mechanical cleaning to remove all traces of rust at least there where the anodes are installed. Where corrosion has occurred due to the presence of chlorides, the steel should be high pressure washed with clean water after mechanical cleaning.
Localize the reinforcement if necessary The best and easy way to localizing the reinforcement is by use of rebar locator, which accurately locates reinforcing bars and welded wire meshes. Some rebar locators also measures the concrete cover and determines the diameter of the bars. A list of suppliers can be forwarded by your distributor upon request. Check electric continuity of the reinforcement After making the right mechanical connection check the electric continuity of the reinforcement using a digital multimeter. Contact is obtained by using so called alligator clips. Switch the central knob of the multimeter to the resistance position (W) and measure the resistance. The criterion for continuity is less than 1 W (DC-) resistance. If required, perform additional potential mapping of the reinforcement to indicate the degree and extend of expected corrosion. If a selective approach is desired due to economic reasons potential mapping of all concrete elements involved should be considered. During mapping the values are logged as computer-tables and later on, with special software, processed as corrosion-graphics. This type of software analyses potential-values and gradients, and calculates for each measuring location the possible chance of active corrosion. After the interpretation the results are presented as colour-cards. By using this measuring method hundreds of square meters of concrete surface per hour can be mapped and processed. For further information about this technique and making the right interpretations, please contact our distributor or refer to the following standards : ASTM, C876-91, 1991, Standard Test Method for Half-Cell Potentials of Uncoated Reinforcing
Steel in Concrete (USA and international).
3
ZDA ML10 & 30 MERKBLATT B3, Merkblatt für elektrochemische Potentialmessungen zur Ermittlung von
Bewehrungsstahlkorrosion in Stahlbetonbauwerken, B. Isecke, BAM Berlin, DGZfP (Germany).
MERKBLATT 2006, Schweizerischer Ingenieur- und Architektenverein, Ausgabe 1993-02,
Durchführung und Interpretation der Potentialmessung an Stahlbetonbauteilen (Switzerland).
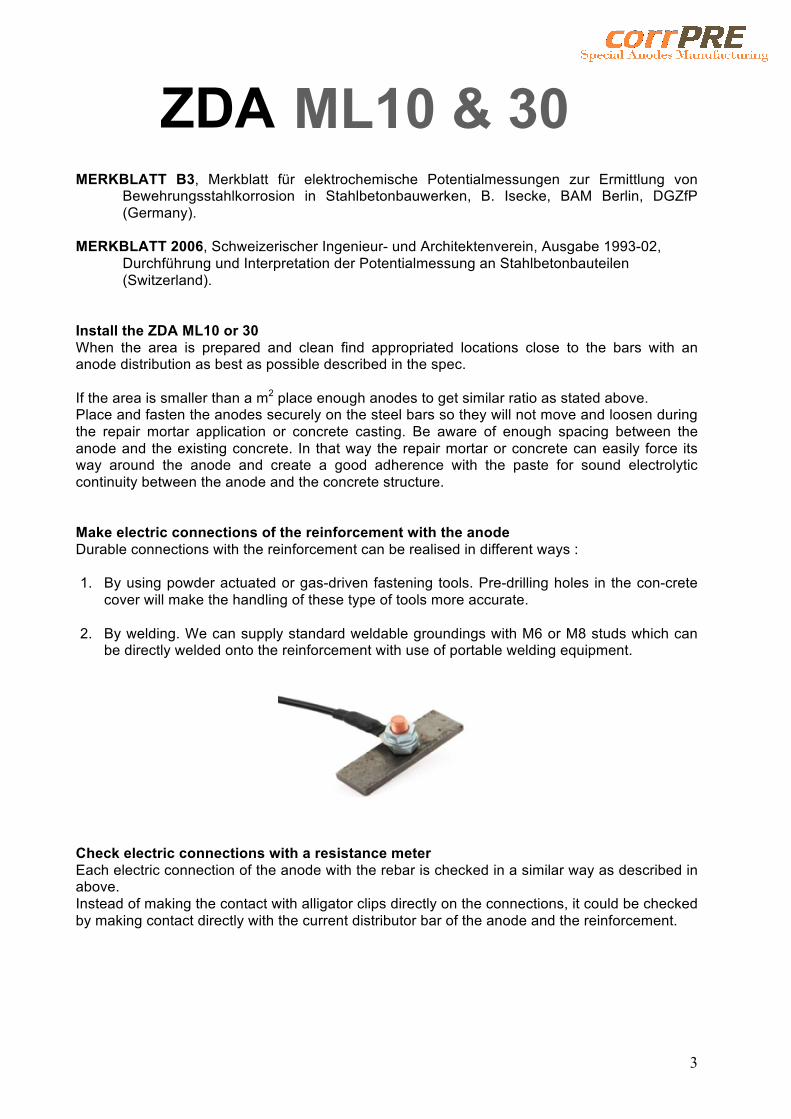
Install the ZDA ML10 or 30 When the area is prepared and clean find appropriated locations close to the bars with an anode distribution as best as possible described in the spec. If the area is smaller than a m2 place enough anodes to get similar ratio as stated above. Place and fasten the anodes securely on the steel bars so they will not move and loosen during the repair mortar application or concrete casting. Be aware of enough spacing between the anode and the existing concrete. In that way the repair mortar or concrete can easily force its way around the anode and create a good adherence with the paste for sound electrolytic continuity between the anode and the concrete structure. Make electric connections of the reinforcement with the anode Durable connections with the reinforcement can be realised in different ways : 1. By using powder actuated or gas-driven fastening tools. Pre-drilling holes in the con-crete
cover will make the handling of these type of tools more accurate. 2. By welding. We can supply standard weldable groundings with M6 or M8 studs which can
be directly welded onto the reinforcement with use of portable welding equipment.
Check electric connections with a resistance meter Each electric connection of the anode with the rebar is checked in a similar way as described in above. Instead of making the contact with alligator clips directly on the connections, it could be checked by making contact directly with the current distributor bar of the anode and the reinforcement.

4
ZDA ML10 & 30
Patch the concrete Use of CP approved mortars (e.g. MasteEmaco S 480) is recommended according to EN/ISO12696. For details See Technical Data Sheet BASF MasterEmaco S 480 Before applying the mortar saturate surface with clean water. Substrate should be saturated but surface dry with no standing water. Be aware that the mortar will make good contact with the anode’s paste all the way around and between the anode and the rebar.
Check polarisation of the reinforcement by use of reference electrodes. If required reference electrodes (RE) which are suitable for concrete are applied for monitoring purposes. Reference electrodes can be supplied together with the ZDA upon request. For proper data storage and data interpretations contact our distributor or refer the international standard EN/ISO12696. CorrPRE Engineering BV, Jan Tinbergenstraat 25-9, 2811DZ, Reeuwijk, Netherlands
Revision Nr. Revision date Approved 03 10th January 2015 R. Giorgini All technical data stated in this Technical Data Sheet are based on laboratory tests. Actual measured data may vary due to circumstances beyond our control. The information, and, in particular, the recommendations relating to the application and end-use of CorrPRE's products, are given in good faith based on CorrPRE's current knowledge and experience of the products when properly stored, handled and applied under normal conditions in accordance with CorrPRE's recommendations.