Embed Size (px)
Citation preview

YOU MAY NOW WEAR THE SCOUT BADGE
Here is the meaning of The Scout Badge. The three fronds represent thethree parts of the Promise-Duty to God and the Queen: Help others: Obey theScout Law.
The two five-pointed stars are sometimes called the “eyes” of the Scout.The ten points on the two stars represent the ten Scout Laws.
The “Be Prepared” band, binding the fronds stands for the bond ofBrotherhood between Scouts.
Tenderfoot to Queen’s Scout page 27

Chapter V
THE SECOND CLASS TESTS
TEST NO. 1
Have one month’s satisfactory service as a Scout and be able to repass theTenderfoot Tests.
Having just completed your Tenderfoot tests it is not likely yourScoutmaster will ask you to repass them until you have qualified for the bal-ance of the Second Class Tests.
One month’s satisfactory service means just that-you must be satisfactoryin your attendance in your co-operation, and in the Scout Spirit, living up toyour Promise and Law and trying to do your Good Turn daily.
TEST NO. 2
Know the general rules of health as given in Camp Fire Yarn 18 of “SCOUT-ING FOR BOYS.”
Good Health
Naturally the possession of good health is taken for granted by the aver-age boy; often so much so that little care is given to its preservation. A Scout,however, keeps in mind the fact that good health is one of his most importantpossessions, also that it will not “just take care of itself,” but must be guard-ed. And the Scout realizes the necessity of forming good health habits whenhe is young, and that this is sure to “pay big dividends” in later years in theability to live out a well-rounded, useful and happy life.
TEST NO. 3
Demonstrate the six exercises described in Camp Fire Yarn 17 of “SCOUTINGFOR BOYS.”
The general rules of health set forth in Scouting for Boys have proved theirvalue for several generations of Scouts. One of the first rules is proper exer-cise. It is possible for any boy, even though he may be small and weak, saysB.-P., to make himself into a strong and healthy man, if he takes the troubleto do a few body exercises every day. They only take about ten minutes, anddo not require any kind of apparatus such as dumb-bells, parallel bars and soon.
Tenderfoot to Queen’s Scout page 28

They should be practised every morning, the first thing on getting up, andevery evening before going to bed. It is best to do them with little clothing on,and in the open air, or close to an open window. The value of the exercise ismuch increased if you think of the object of each move while you are doing it,and if you are very particular tobreathe the air in through yournose and to breathe out throughyour mouth since breathing inthrough the nose prevents youfrom swallowing all sorts of littleseeds of poison or bad healthwhich are always floating aboutin the air,-especially in roomsfrom which the fresh air is shutout.
Begin the exercises by rub-bing the head, face and neck firm-ly several times with the palmsand fingers of both hands. Thumbthe muscles of the neck andthroat. This will serve to makethe neck, usually a weak and ten-der spot, strong and muscular.Next wash your face in coldwater, brush your hair, cleanyour teeth, wash out your mouthand nose, drink a cup of coldwater and- Demonstrate the fiveother exercises described inCamp Fire Yarn 17 of Scouting for Boys (as illustrated above). Do them slow-ly.
TEST NO. 4
Be able to deal with simple First Aid problems as follows: Shock, (not electric);Bleeding from the nose; Sprains; Stings and Bites; Burns and Scalds;Avoidance and Treatment of Sunburn. If a Sea Scout, know how to fasten a lifejacket on himself and be able to throw a lifeline with reasonable accuracy.
Scouts are taught elementary First Aid, not with the idea of becomingamateur doctors, but that they may be able to give prompt and intelligent firstaid to an accident victim. Ability to do this is universally expected of a Scout,whether in uniform or recognized by his Scout Badge.
Points to Remember.-Keep Cool. Act promptly, but not excitedly. Tellyourself, and your patient, that such things are never as bad as they first
Tenderfoot to Queen’s Scout page 29
seem,-that “We’ll have you fixed up in no time.” Remember that the patient isthe one person to be considered; not persons who may be crowding around.Tell them to stand back. Do not be guided in what you do by the advice ofonlookers. As a Scout, you should know what you can do and how to do it.Unless the injury is slight and the treatment simple, send for a doctor, or havearrangements made at once for taking the patient to a doctor or a hospital.
Shock.-The condition of shock may result from any serious accident orfrom burns or scalds, or from severe fright. The sufferer is pale, the skin iscold and clammy, there may be beads of sweat on the forehead; the pulse isfaint, and if the patient speaks, the voice is weak.
First, stop bleeding, if any. Then, keep the patient warm, but not toowarm. Wrap him in warm coats or blankets if available, and apply hot-waterbottles or hot bricks or stones wrapped in cloth to the armpits, the feet andbetween the thighs. Be sure you test the heat of these appliances on yourselfbefore using them on the victim. In a shocked condition, the victim does notfeel the heat as he would normally, and you may quite easily burn him. Thereis also a danger of overheating and thus actually increasing shock. Always calla doctor.
If the victim is unconscious, give nothing by mouth; if conscious and ableto swallow, give hot sweet tea, coffee, milk or a teaspoonful of fresh AromaticSpirits of Ammonia in a glass of water. Never give alcohol to an injured per-son.
Bleeding from the Nose.-If indoors, place the patient in a chair beforean open window, the head thrown slightly back and the hands raised abovethe head. Undo all tight clothing around the neck and chest and apply coldapplications to the nose and back of the neck. Direct the patient to breathethrough the mouth. Outdoors, sit patient upright against a tree or fence andfollow same treatment.
Sprains-A joint is said to be sprained when by a wrench or twist the mus-cles around it have been stretched or torn. Turning the ankle is a commonform of sprain. If on a hike, and lacking time for extended treatment, justbandage tightly over the shoe, if a stream or pond is nearby soak foot, shoeand bandage in the water and provide a cane or improvised crutch and carryon. If in camp, treat with alternate hot and cold water applications, then bindsnugly,-a broad adhesive bandage beneath the instep; draw up snugly oneither side of the foot; slit both ends and cross the slit lengths upwards beforeand behind. Over this apply a tight roller or narrow triangular bandage.
Stings.-Extract the sting, if present, and dab the part with iodine or dilut-ed ammonia. A paste of baking soda or wet salt, or a solution of washing soda(a teaspoon to a glass of water), will relieve the pain. Don’t stir up hornets’nests for unnecessary stings.
Tenderfoot to Queen’s Scout page 30
Bites.-A bite from an animal wound may have very serious consequencesand may easily become dangerously infected. Wash the wound thoroughlyunder running city tap water, or other water that has been boiled. Mild bleed-ing should be encouraged rather than arrested. The surrounding area shouldbe painted with an antiseptic and covered with a sterile gauze dressing and aroller or triangular bandage. Get the patient to a doctor, or a doctor to thepatient as soon as possible. Bleeding may be encouraged by gently squeezingaround the bite.
Burns and Scalds.-Any Scout First Aid Kit contains an excellent emol-lient with directions. If such a preparation is not at hand, do not break blis-ters or remove any clothing adhering to the burned area, cut around the cloththat is sticking. Cover the area as soon as possible with sterile gauze andbandage lightly. A little sterile petrolatum may be applied to the dressing toprevent it from sticking. If it is not possible to get medical aid, immerse theburned area in warm water to which has been added baking soda (1 table-spoon to 1 pint of water). Cover the part with strips of gauze soaked in thesolution and bandage lightly. Keep moist and warm, and get patient to a doc-tor.
Sunburn.-Most boys regard sunburn as something they must endureeach summer in order to acquire a tan. Not only is sunburn (which is the sameas fire burn) unnecessary, but frequently results in considerable suffering,sleepless nights, a “sick headache” and general lack of energy. The simple pre-caution at the summer’s first visit to the old swimming hole, the beach or atcamp, is to take your tan slowly,-by covering up with a shirt or jersey as soonas the skin reddens and begins to sting, and remain covered until the stinghas passed.
For ordinary sunburn use one of the emollients (soothing ointments) orspecial gauzes contained in the Scout First Aid Kit. If a kit is not at hand useolive oil or vaseline. For more serious burns, with blisters, do NOT prick theblisters. In all cases of extensive burns secure medical attention at the earli-est opportunity.
Most serious phase of exposure to the sun is sunstroke, and unconscious-ness. For this, loosen the clothing and remove the patient to a shady spot.Place him in a sitting position, head and body up. Fan vigorously and applycold water or ice to the head, neck and spine. When consciousness hasreturned, give a drink of water.
TEST NO. 5
Demonstrate the use of the Triangular Bandage as a Large and Small sling,and as applied to the head, knee and foot; and understand the importance ofsummoning adult help.
The Triangular Bandage.-The triangular bandage is made by cutting a
Tenderfoot to Queen’s Scout page 31

piece of cotton 40 by 40 inches into two triangles; that is diagonally from cor-ner to corner. Or it may be improvised from a Scout neckerchief or any simi-lar piece of cloth.
Large Arm Sling.-To make a large arm sling spread the bandage downthe front of the patient’s body (as illustrated). Carry one end over the shoul-der on the uninjured side and bring it around behind the neck so that the end
just hangs over in front onthe injured side. Carefullyplace the bandage pointbehind the elbow, and gentlybend the arm across the cen-tre of the bandage. Bring upthe second end and tie to theend at the shoulder, makingthe knot at the side of theneck (not behind the neck).And naturally you use a reefknot.
The sling thus formed (seeillustration) should support the arm so that the little finger is slightly abovethe level of the elbow. Conclude by bringing point forward around the elbow,and fasten with a safety pin.
Small Arm Sling.-To make a small arm sling, fold a triangular bandageas a broad bandage. Lay one end across the shoulder on the uninjured sideand carry it around theback of the neck to theinjured side. Bend theelbow, and, supportingthe forearm, wrist andhand with the bandage,bring up the lower endand tie to the upper end;the knot being at theside of the neck (not atthe back). The knot,again, is a reef knot.
Summoning Help.-A Second Class Scoutmust not assume theresponsibility of treat-ing any serious injuries,and must always call an older, fully qualified first aider or a physician.
Tenderfoot to Queen’s Scout page 32
TEST NO. 6
Follow a trail of half a mile; or in Kim’s Game, remember 16 out of 24 wellassorted small articles after one minute’s observation.
Following a Trail.-This test introduces you to one of the most fascinat-ing of Scouting games,-the following and “reading” of the story told by humanand animal tracks. For the first practise the paper trail of the old game ofHare and Hounds may be used (the paper dropped bit by bit, sparingly).Hounds should collect every piece of paper as they go along.
Next you will want to try following the footprints and other trail marksleft by another Scout-a stone overturned, a maple leaf beneath an oak tree,scrapes where he climbed an old rail fence, a bit of cloth torn from his shirt bythe prong of a wire fence, trampled grass where he rested and ate an apple.
Then you will begin looking along dirt roads and lanes, borders of streamsand ponds, and lakes and river shores for the “track stories” of birds and ani-mals. Or in winter you will go out and look for snow tracks.
Some Tracking Hints.-An old rule of trackers is to “look into the eye ofthe sun.” That is, face the sun so you will have the full benefit of the sun’sshadow across the imprint. Otherwise you may not get the true value of theshadows.
When an animal track has been identified, put your mind, as it were, intothat of the animal. Why was it going in this direction? Was it in a hurry, orwas it taking its time? Was it watching out for a possible attack from anenemy on the ground or a flying enemy?
When a track is lost, never walk forward over its possible location. Markthe spot where the last impression appears, and if you cannot hit upon a direc-tion clue by imagining yourself the animal, begin studying the ground inadvancing half-circles.
The condition of overturned pebbles or stones (damp or dry) may indicatethe time since they were disturbed-the weather being allowed for; that iswhether cloudy, sunny, windy, and the exposure of the stones to these effects.
The passage of a person or animal across a hay or grain field, or throughgrass, will show dark shadows when made coming toward you, and light ifgoing from you. The deduction is based on the fact that light is reflected bygrass stems bent away from the observer, and shadows made when the grassends incline toward him.
In winter a light fall of damp snow provides the best tracking. In very lightsnow the wind will soon erase tracks, so on such a day a start should be madeimmediately the snow has ceased falling.
Tenderfoot to Queen’s Scout page 33

You will not get mixed up on rabbit tracks from the fact that bunny placeshis hind feet in advance of his forefeet. A Tenderfoot has been known to “fol-low” a rabbit backwards. The rabbit’s foot is so well furred that his snowtracks are seldom sharp.
The tracks of an otter are rather round, and in dry snow may be indistin-guishable. He can be identified by the undulating form of the trail and the fre-quent dragging of his tail.
Kim’s Game.-This game was taken by the Founder of Scouting fromRudyard Kipling’s famous boys’ book “Kim”- the story of an orphan son of anIrish soldier in India who grew up among native boys and was later trainedfor Government Intelligence work by a dealer in old jewels and curiosities,and had numerous exciting adventures. The training was begun by showingKim (his name was Kimball O’Hara) a tray of precious stones for a minute’sobservation, then covering it and asking Kim how many stones and what kindthey were. At first Kim could remember only a few, but soon, by practise, hewas able not only to say exactly how many, but to describe the stones. Thenhe practised with other articles, and ultimately was able at a glance to see allsorts 0± details at things which were of value in tracing and dealing withcriminals.
Kim’s Game, while given as an alternative test to following a trail, couldwell be taken by every Scout; and in any one of its numerous possible varia-tions, indoors and out, it always gives good fun.
In its commonly used test form, .24 articles of different kinds,-say, a key,a pocket knife, a coin, a marble, a comb, a lump of coal, etc.-are placed on atable and covered with a cloth. The Scout steps to the table, the cloth isremoved for exactly one minute; the Scout looks, endeavouring to fix as manyas possible of the articles in his mind; the cloth is replaced, and the Scoutretires by himself to a corner and writes down as complete a list as possible.
As with Kim, the purpose of the test is to develop the faculty for observa-tion and memory. (A surprising number of people can look at things and notsee them, or “see” things that aren’t there.) And of course the test will not beregarded as a mere stunt, or “exam” to be passed once-possibly at the first try,by mere good luck. No. It must be proof that you can really see details, andremember them.
Here are some variations of the game:
Elimination Kim’s.-One or more articles are removed after the first look,and the game is to name those after a second minute’s observation.
First Aid Kim’s.-A collection of first aid items (not necessarily 24) is used,and their use as well as number is required.
Knot Kim’s.-Similarly, a selection of knots, bends, splices and lashings is
Tenderfoot to Queen’s Scout page 34

used.
Natural History Kim’s.-On the hike or in camp mixed collections ofleaves, bark, wild flowers, weeds, fungus, pieces of rock, etc., are shown.
Solution To Tracking Problem
Here is the solution to the tracking problem on page 19. Pushing a wheel-barrow full of dead leaves, a man wearing wooden shoes meets a friend on hisbicycle coming from his right. Both stop. The farmer rests his wheelbarrow,but the cyclist remains on his bicycle, resting his toes on the ground. They talkfor about ten minutes, time enough to smoke a cigarette. They leave whiletheir cigarettes are still alight. The cyclist leaves first, as is revealed by thewheelbarrow tracks crossing the bicycle tracks.
TEST NO. 7
Be able to recognize and name six common trees and know the value of theirwoods for fires. (In areas where there are not sufficient trees the examiner maysubstitute shrubs.) If a Sea Scout know the uses of four types of Canadian lum-ber used in boat construction.
This test is self-explanatory. It should not be difficult to find, even in thesmallest community, someone who can identify six trees and advise on theirvalue as firewood. In heavily. treed areas Scouts will want to go beyond theminimum requirements of this test and be able to recognize ten or twelve com-mon trees.
TEST NO. 8
Demonstrate correctly the following: Square Lashing and Sheer Lashing; Guy-line Hitch and Timber Hitch.
The use of lashings instead of nails enters into practically all forms of out-door Scouting,-the making of over-night bivouac shelters, and at camp allsorts of conveniences, usually called gadgets. In fact, when you are a FirstClass Scout you can go into the woods with a rucksack of simple necessitiesand a handaxe, and build a completely equipped camp,- spruce shelter,kitchen with numerous gadgets, rustic table and benches; perhaps a stoutbridge over a creek (providing a short cut to the farm where you get yourmilk); a 20 or 30 foot fire ranger’s or signalling tower. In a word, a layout tomake a Tenderfoot’s eyes stick out.
Practising lashing is always good fun, too; and when you’ve finished a job,all snug and taut, and stronger than if nailed, you feel as if you have donesomething.
In the trades, lashings are used extensively by builders and constructionengineers in erecting “false work” of various kinds, and by carpenters and
Tenderfoot to Queen’s Scout page 35
painters for running up scaffolding on the outside of buildings. If you are liv-ing by the sea or in an inland waterfront community, you can study the use oflashings by sailors, longshoremen and yachtsmen.
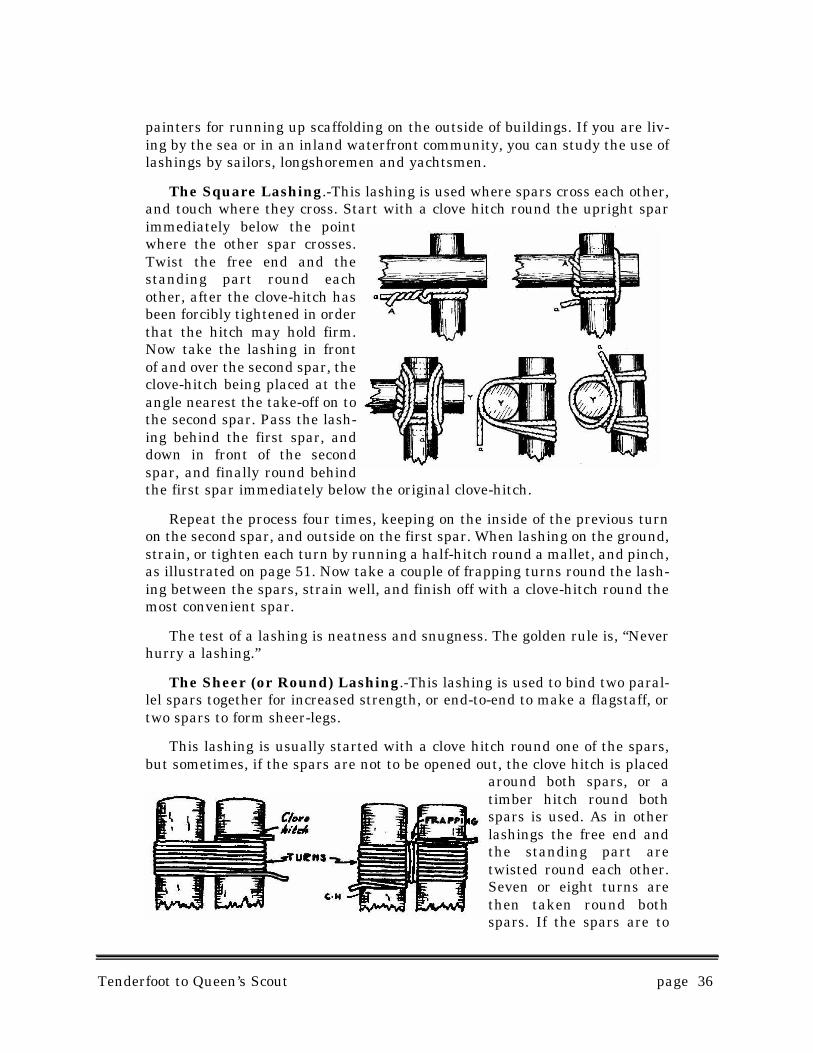
The Square Lashing.-This lashing is used where spars cross each other,and touch where they cross. Start with a clove hitch round the upright sparimmediately below the pointwhere the other spar crosses.Twist the free end and thestanding part round eachother, after the clove-hitch hasbeen forcibly tightened in orderthat the hitch may hold firm.Now take the lashing in frontof and over the second spar, theclove-hitch being placed at theangle nearest the take-off on tothe second spar. Pass the lash-ing behind the first spar, anddown in front of the secondspar, and finally round behindthe first spar immediately below the original clove-hitch.
Repeat the process four times, keeping on the inside of the previous turnon the second spar, and outside on the first spar. When lashing on the ground,strain, or tighten each turn by running a half-hitch round a mallet, and pinch,as illustrated on page 51. Now take a couple of frapping turns round the lash-ing between the spars, strain well, and finish off with a clove-hitch round themost convenient spar.
The test of a lashing is neatness and snugness. The golden rule is, “Neverhurry a lashing.”
The Sheer (or Round) Lashing.-This lashing is used to bind two paral-lel spars together for increased strength, or end-to-end to make a flagstaff, ortwo spars to form sheer-legs.
This lashing is usually started with a clove hitch round one of the spars,but sometimes, if the spars are not to be opened out, the clove hitch is placed
around both spars, or atimber hitch round bothspars is used. As in otherlashings the free end andthe standing part aretwisted round each other.Seven or eight turns arethen taken round bothspars. If the spars are to
Tenderfoot to Queen’s Scout page 36

be lashed parallel to each other for strength, or if the spars are to be used assheer-legs, then a couple of frapping turns are taken, and the lashing finishedoff with a clove hitch on the opposite spar. In sheer-legs the starting clovehitch will be below the lashing on one leg, and the finishing clove hitch abovethe lashing on the other leg. If, however, two staves are being lashed togeth-er in order to make a flagstaff, not only will two lashings be required, but it isbest to omit the frapping turns and tighten up the lashing with wedges, sincethe closer the staves can be brought together the better. These wedges can bejust pointed or sharpened pieces of wood, nothing elaborate is necessary.
The position of sheer-leg lashings depends upon the purpose. If to lift orsustain weight, the lashing is near the top; otherwise, lower down. In any casethe legs should not spread farther than a third of the distance from the sparbutts to the lashings. A light spar, or ledger, should be lashed (square lash-ing) a short distance above the butts, and holes dug for the feet to prevent slip-ping.
Two guy-lines are required for raising and controlling, one “fore” and one“aft” attached to the tips of the sheer.
The Timber Hitch.-In addition to its use for starting a diagonal lashing,the Timber Hitch frequently is useful in camp for hauling logs to the councilfire, and spars and timbers for such pioneering jobs as bridge and tower build-ing. It is quickly adjusted,holds snugly under strain,and is easily freed.
The Guy-Line Hitch.-This hitch (frequently usedfor securing the main guy-lines of large tents) is start-ed by casting two overhandknots in the rope some dis-tance apart (see illustra-tion). The running end isthen passed around thetent peg, carried upward, then down through the two knots. The knots arethen pulled taut. The guy-line is lengthened or shortened by loosening the twoknots and adjusting the running end.
Lengths of Lashings.-It is advisable to know beforehand the length oflashing rope required for the different lashing jobs and different sizes of sparsor timbers.
Lengths depend chiefly on the size of the spars or timbers. As a roughworking rule the diameter of a spar in inches is the length of the lashing ropein fathoms. That is approximately six feet. In other words if you are lashingtwo-inch spars together you will need 12 feet of rope for each lashing; three-
Tenderfoot to Queen’s Scout page 37

inch spars, 18 feet, and so on. For lashing instruction and practise each Patrolshould have in its equipment box, various lengths of rope for particular work,ends properly whipped and kept in bags according to length. Length of ropecan be made readily recognizable by whipping with coloured sailmaker’s yarnor twine.
TEST NO. 9
Know the safety rules, care and use of hand-axe and knife. Demonstrate thecorrect way of chopping firewood.
Axemanship.-Baden-Powell once told of a Canadian guide, with him forsalmon fishing, “who with his axe and no other tool could do the finest as wellas the biggest work, from cutting down a tree to sharpening a pencil.” One daythe guide built a small bridge across a creek near the fishing camp. Said B.-P., “The logs were neatly trimmed, and cut to lock, but what made me starewere the floor boards. They were as smooth and straight-cut-as if done with aplane or saw. it was indeed a work of art.”
A skilful axeman is a true craftsman, and an axe is not “merely an axe,”but a craftsman’s tool, and one of man’s most useful tools. With it alone theearly pioneers of Eastern Canada and the Pacific coast cleared their land,built their cabins, made their furniture and fashioned the sled or cart withwhich they drew their first grain to the new grist mill- whose water wheel hadbeen made with an axe.
Even today the axe is the first tool concerned in the production of manythings, including paper for books. For instance it cut the trees which producedthe paper for this Scout book!
A woodsman takes pride in his axe. It is kept bright and clean, free ofnicks, and often is actually “as sharp as a razor.” Old time Canadian lumber-men were said to have shaved themselves with their axes.
Kinds of axes-There are several kinds of axes in common use in Canadatoday. These are the splitting axe, with a somewhat “fat” blade; the cuttingaxe, with a thin, sharp blade, and the double-bitted (double bladed) cuttingaxe. The last is used in “topping” and felling the giant trees of BritishColumbia.
The most suitable axe for Scout camp use is the medium weight axe, withhead weighing about 21/2 pounds. Also useful is the small axe, or Scout hand-axe, for carrying in a holster on the belt when hiking.
Selecting an Axe.-When buying an axe, look to see that the grain of thehandle is straight throughout. Note whether the head is snugly wedged on,and finally whether it is “well hung.” Most axe blades have a little set-off,right or left from a line along the centre of the handle. Some woodsmen pre-fer a little set-off. To discover this, hold up the axe by the back of the blade,
Tenderfoot to Queen’s Scout page 38

cutting edge up, and sight along edge toward centre of handle head. If set-offis more than a quarter inch, try another axe. Never buy an axe with a paint-ed handle-the paint may hide flaws in the wood.
Sharpening.-Most new axes require some sharpening, and of course allaxes call for resharpening from time to time, however, carefully used. If avail-able, a turning grindstone is used. The blade of the axe is held, as illustrated,at a very slight angle, and the stone turned from you. Plenty of water isrequired (in a trough or dripping steadily from a can hung directly above), toprevent the steel from overheating and losing temper. To remove “wire edge”give the wheel a couple of final turns toward you, and finish off with a car-borundum whetstone (see Scout catalogue). If a grindstone is not available, afine file and the whetstone will do a good job.
Care with an Axe.-Always carry an axe, other than your Scout hand-axe,on the shoulder, the blade flat and cutting edge away from the body.
Pass an axe toanother person by thehandle, hanging, theblade turned to oneside, and be sure theother person grasps itbefore you let go.
When finished with an axe, never go away and leave it on the ground. Thishas caused many serious accidents. When through, “mask” the axe by drivingit lightly into a stump, or log-but never in a live tree. Do not drive it into theground; it may strike a stone, or if left overnight it will probably show rustalong the cutting edge.
Seldom lend your axe, or use another Scout’s axe. One reason is that theset-off of the blade may be considerably different, particularly if yours has a
right set-off and theother Scout’s a leftset-off; which willtend to spoil the pre-cision of your accus-tomed stroke. Inother words be waryof using a strangeaxe.
If an axe head shows signs of coming loose, at once tighten it by whittlingand driving in a hardwood wedge. A flying axe blade may travel a consider-able distance, and is a most dangerous missile.
Occasionally bad handling in camp results in the breaking of an axe han-
Tenderfoot to Queen’s Scout page 39
dle close to the head. If unable to pull or pound out the stub you may have toburn it out. To do this, push the axe blade down into solid damp soil, and builda close small fire about the back. (See illustration).
Axe Practise-Like any other craftsman’s art, axemanship calls for prac-tise to develop skill. A good axeman swings slowly and regularly, with only alittle more effort than is necessary to raise the axe.
When cutting a log, learn to “throw chips” with an even. alternate rightand left stroke, leaving a smooth, even “kerf” as the cut is called. Practise cut-ting and splitting until you can hit a hairline. “Keep your eye on the cut.”
Knifecraft.-A good Scout knife, taken care of and always sharp, is secondonly to a handaxe in its practical usefulness. It is good fun to whittle some-thing out of a piece of white pine, or other soft wood; and all kinds of thingscan be made. (See page 35). Note a few DON’TS: don’t whittle towards, butalways away from you. Beware of nails. Don’t hammer on the back of blade.Don’t use the handle as a hammer or blade as a screw-driver. Don’t stick theblade into the fire. Don’t go about notching benches or railings, or cutting ini-tials in trees. Always have your knife under control, and then you’ll neverhave cut fingers. Playing “knifie,” as some people call it, is a waste of time, badfor the knife and dangerous. Scouts never play this game. Use an oilstone forsharpening.
Note.-Scouts under First Class grade are not permitted to wear or usesheath knives. Tenderfoot and Second Class Scouts should wear and use agood jack-knife.
TEST NO. 10
Know the Semaphore or Morse sign for every letter of the alphabet and for thenumerals; also the table of Miscellaneous Signals given in Camp Fire Yarn 7of “SCOUTING FOR BOYS”, (See Page 60). Be able to send and receive a sim-ple message accurately out of doors. For a Sea Scout this must be under work-ing conditions ship to ship or ship to shore.
To pass this test it is not sufficient merely to know the alphabet. The Scoutshould be able to send and read any letter given, and a few short, easy wordsand numbers.
Semaphore-Semaphore signalling is used chiefly for short distance com-munication, and often is handy when en a hike or camping. For distant sig-nalling flags are necessary, but for shorter distances and when practising, thehands alone may be used. When using the hands they should be extended tofull reach, and held flat to the front.
Tenderfoot to Queen’s Scout page 40

Learning the Alphabet
The simplest method of learning the alphabet is by circles, thus:
1st Circle-A to G.2nd Circle-H to N (omitting J).3rd Circle-O to S.4th Circle-T, U, Y and “Erase -5th Circle-Numerical Sign; J (which also is used as the Alphabetical Sign),and V.6th Circle-W and X.7th Circle-Z.
The letters A to K (omitting J) are read as the numerals 1 to 0 when pre-ceded by the Numerical Sign. When the numbers are finished and letters areresumed the sender again signals J, as the Alphabetical Sign.
Tenderfoot to Queen’s Scout page 41
When practising letters, the arm movements follow in natural order.When making words the letters are formed in the most convenient manner.Thus in sending WHO, the 0 may be made from the H either by moving botharms, or by keeping the one at B steady and moving that at A to C position.In making one arm letters the arm is never brought across the body; thus inmaking C the right arm only is used.
When sending words the arms are not brought back to Ready after eachletter, but if an arm is already in position to assist in forming the next letterit is held steady. Thus, to send CAN, the right arm is first placed at C, aftera slight pause brought down to A and kept steady, and after a similar slightpause the left arm is placed at G which with the right at A forms the next let-ter required, viz., N.
Points to Remember
(1) Signalling is useful only when it can be read; that is, whenthe letters are perfectly made and can be clearly seen. So -
(2) The sender must exactly face the person he is signalling;must stand firmly, the feet eight to ten inches apart.
(3) Flags must be held at full arm reach, arm and flag makinga straight line,-no dropping at the wrist; first finger lyingalong the pole.
(4) Arms inexact position for each letter-no slanting forwardnor to the rear. This is most important.
(5) When making T, 0, W and the Numerical Sign the flagsmust not cover one another.
(6) Turn slightly on the hips when making such letters as Iand X, but keep the eyes to the front.
(7) When making double letters bring the flags in to the bodyafter the first letter.
(8) Don’t try to send fast as soon as you have mastered the let-ters; and never send faster than the ability of the receiverto read. This only wastes time through the necessity ofrepeating.
The International Morse Code.-In the Morse communication systemletters are formed by dots and dashes on a telegraph instrument, by short andlong buzzes on a buzzer, by lamp flashes, by whistle notes or short and longwaves of a flag.
Because of this adaptability, Morse is much more useful than Semaphore,but requires more practise.
Tenderfoot to Queen’s Scout page 42
There are several systems of learning the alphabet. The one here givenwill be found effective. Progress will be most rapid when two or more Scoutswork together, using a buzzer. (This can be easily improvised with a door bell,a dry cell,a flat spring and a few lengths of copper wire.)
Letter Groups.-Practise the letters in the following successive groups,then words containing only those letters; then words including letters previ-ously learned. And so on. Only regular and continued practise will bring speedin reading. In sending do not attempt to be fast as soon as you know the let-ters. As with Semaphore, clearness of signals must be your object. Alwaysremember, a message that cannot be read is no good.
Dot Letters: E I S HDash Letters: T M 0.Remaining Vowels and Two Long Letters: A U C JShort Opposites: A and N, U and D, G and W, R and K.Long Opposites: V and B, F and L, Q and Y, P and X
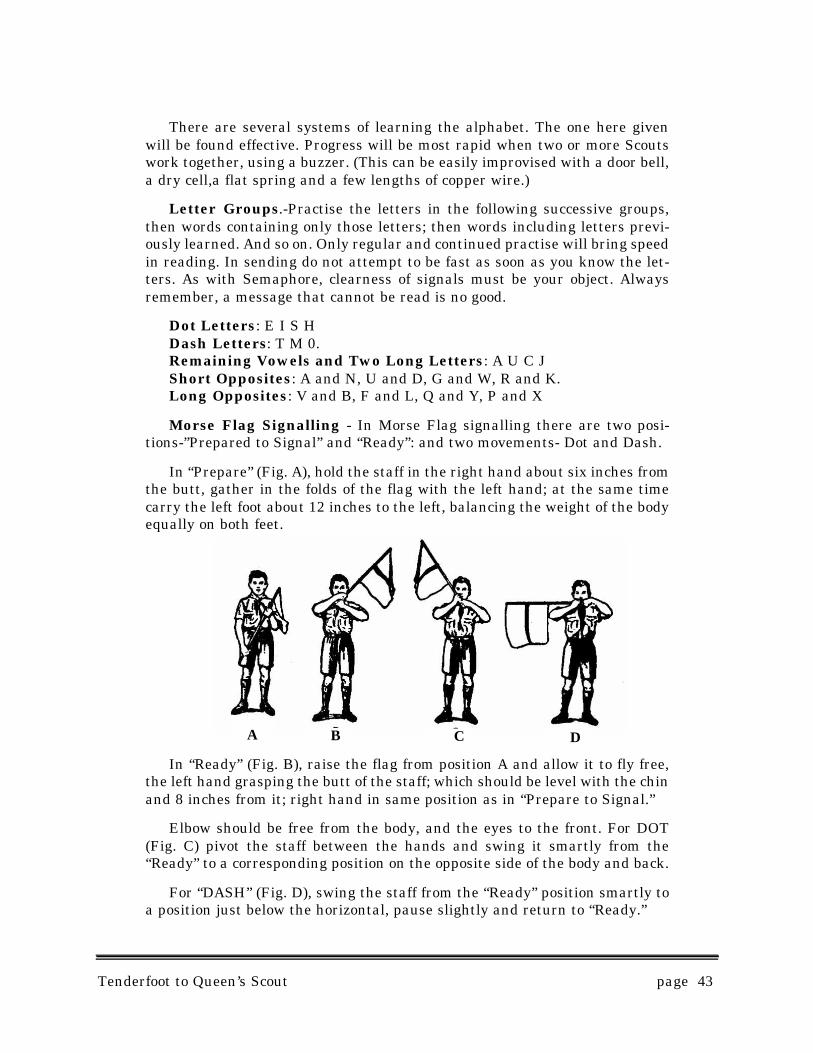
Morse Flag Signalling - In Morse Flag signalling there are two posi-tions-”Prepared to Signal” and “Ready”: and two movements- Dot and Dash.
In “Prepare” (Fig. A), hold the staff in the right hand about six inches fromthe butt, gather in the folds of the flag with the left hand; at the same timecarry the left foot about 12 inches to the left, balancing the weight of the bodyequally on both feet.
In “Ready” (Fig. B), raise the flag from position A and allow it to fly free,the left hand grasping the butt of the staff; which should be level with the chinand 8 inches from it; right hand in same position as in “Prepare to Signal.”
Elbow should be free from the body, and the eyes to the front. For DOT(Fig. C) pivot the staff between the hands and swing it smartly from the“Ready” to a corresponding position on the opposite side of the body and back.
For “DASH” (Fig. D), swing the staff from the “Ready” position smartly toa position just below the horizontal, pause slightly and return to “Ready.”
Tenderfoot to Queen’s Scout page 43
DB CA
To prevent the flag clinging to the staff, swing it in a flattened “figure-of-eight.”
MISCELLANEOUS SIGNALS
Miscellaneous signals are signals which are additional to those shown inthe regular Semaphore or Morse Codes. They are explained below. Semaphore
Signal Meaning and Use
WE., WE., WE. . . . . . . .Calling up signal.
Numerical Sign . . . . . . .Numbers will be sent. See Semaphore Chart.
Numerical Check . . . . .Receiving station repeats each figure.
Alphabetical Sign . . . . .Letters will be sent. See Semaphore Chart.
Erase . . . . . . . . . . . . . .To erase wrongly signalled word-See SemaphoreChart.
K . . . . . . . . . . . . . . . . . .Carry on (answer to V.E. if ready to receive mes-sage.
Q . . . . . . . . . . . . . . . . . . .Wait. (Answer to V.E. if not ready to receive mes-sage.
A . . . . . . . . . . . . . .General Answer (used after each word to showthat it has been received correctly.)
AR . . . . . . . . . . . . . . . . .End of Message signal.
R . . . . . . . . . . . . . . . . . .Message received correctly. (answer to AR)
G.B. . . . . . . . . . . . . .“Good-bye” (used when station is going to closedown.
MORSE
Signal Meaning and Use
WE., WE., WE . . . . . . .Calling up Signal
K . . . . . . . . . . . . . . . . . . .Carry on (Answer to, V.E. if ready to receive mes-sage.)
Q . . . . . . . . . . . . . . . . .Wait (answer to V.E. if not ready to receive mes-sage.)
T . . . . . . . . . . .General Answer (used to answer all signalsexcept numbers.)
AAA . . . . . . . . . . . . . . .Period or Decimal.
AR . . . . . . . . . . . . . . . . .End of message signal.
Tenderfoot to Queen’s Scout page 44

R. . . . . . . . . . . . . . . . . .Message received correctly (answer to A.R.)
8 dots . . . . . . . . . . . . . .Erase (to erase anything sent incorrectly.)
G B . . . . . . . . . . . . .“Good-bye” (used when station is going to closedown.)
When figures are sent by sending station, the receiving station willalways “check” them back by the alphabetical check, that is:-
instead of using the general answer. Thus 6 would be answered by F. Wherethere are figures and letters in the same group the figures only are checkedback.
Tenderfoot to Queen’s Scout page 45
A is check of 1B is check of 2C is check of 3D is check of 4
E is check of 5F is check of 6G is check of 7
H is check of 8I is check of 9K is check of 0

TEST NO. 11
Lay and light a wood fire in the open, using not more than two matches. Nopaper or birch bark to be used. Cook over this fire a quarter pound of meat andtwo potatoes.
One of the most reliable fire starters is the fuzz-stick. This is a piece ofpine or other soft dry wood about a foot in length and an inch in thickness,whittled into the likeness of a shaving brush, but with the end extendingbelow the shavings and sharpened. The sharpened end is stuck in the ground,and kindling piled about it tent-wise.
Another good starter is alittle bundle of dry twigs bro-ken from the ends of deadbranches on live trees, andstood up wigwam-like.
In windy weather a smalldry stone placed in the kin-dling wigwam will solve theproblem of striking the matchsafely.
In dry weather this testwill give you little trouble,but in wet weather you willneed to know where dry woodcan be secured. It is a goodthing to remember to “Go to
the living and get the dead”, which means the lower dead branches of livingtrees.
Making a fire during a rain is a nice test of a Scout’s woodcraft. Onemethod, in continuous downpour, is to find a wide-spreading hardwood tree,climb and shake the moisture from the branches on one side, then build yourfire (a small fire) beneath. By the time your fire is going well the rain will notaffect it; provided, of course, you keep feeding it, preferably keeping it in wig-wam shape.
And being a proper Scout, you will not overlook all the usual forest fireprecautions-building on rock or bare ground, and when through “putting thefire out three times,” so there is not the remotest chance of a spark remainingin the soil or beneath a buried root.
Cooking.-This means that your cooking must be done in the open, with afire similar to that built for the fire-making test, and under conditions whichusually exist in the woods or on the prairies while camping.
Tenderfoot to Queen’s Scout page 46
The quarter pound of meat and two potatoes must be properly cooked, andserved together as a meal. Preferably the steak is broiled on a forked stick ora “tennis racquet” broiler. The potatoes may be covered with clay and roastedin hot coals. Another method is to dig a small hole, build a hot fire in it,remove the fire and put in the potatoes, cover with hot earth and ashes, andrebuild the fire for 40 or 50 minutes.
Another Scouty method is the Kabob. Cut your meat into squares about1½ by 1½ inches. Cut your potatoes into slices about one quarter inch thick.Also cut carrots and onions into slices. Obtain a green stick about one halfinch thick, spear a slice of meat, potato, onion, carrot, meat, potato, onion andcarrot until, your supply is all on the stick, and then slowly cook it over hotcoals. This is called a Kabob, and with salt and pepper to your taste makes anappetizing and satisfying meal.
TEST NO. 12
Demonstrate that he understands the Highway Code of his Province and anyspecial local rules insofar as these affect pedestrians and cyclists.
We cannot give you the details of this test, because Highway Codes differslightly in the various provinces. Get your Scoutmaster to write, or write your-self to the Department of Highways in your Provincial Capital and ask for acopy of the code. It will be gladly sent to you.
Note also that this test provides that you should know and live up to thespecial rules regarding pedestrians and cyclists in your community. If you livein a built up area, it is altogether likely that one of these rules will be that youmust not ride bicycles on the sidewalks. Another rule might be that you mustnot cross an intersection against a red light. Have your Scoutmaster, or your-self enquire at your Town or City Hall for those rules which are local ordi-nances relating to pedestrians and cyclists. This test is provided so that youwill become safety conscious, and do your bit as a Scout to cut down the terri-ble loss of life and limb through traffic accidents. Remember this-it is notalways the motorist who is to blame.
TEST NO. 13
If he has the use of a bicycle, demonstrate that he is keeping it properly main-tained and that he is able to effect minor repairs.
As you will probably have had a bicycle for some time before you becamea Scout you will probably know quite a lot about keeping it in good order andmaking minor repairs. However, boys often overlook important little things,so here are a few reminders for you. They were prepared by an official ofCanada’s largest manufacturer of bicycles.
1. Keep the front hub bearings properly adjusted so that thewheel will revolve freely. Oil often with machine oil.
Tenderfoot to Queen’s Scout page 47

2. Oil the pedals frequently.
3. Keep the brake clean, oiled and adjusted so it will functionquickly and smoothly. Your local bicycle shop will showyou how.
4. Oil and keep adjusted your steering column.
5. Use special chain oil to keep the chain and gears runningeasily.
6. Oil often the main hanger to which the pedal cranks areattached, as this is the power plant of your bicycle.
7. Always keep your tires inflated hard. Avoid skidding andhitting curbs. Check wheel alignment to save tire wear.
Here are the Ten Commandments for Cyclists which will help you observeTest 12.
1. Keep to the right and near the curb.
2. Meeting traffic, pass on the right; overtaking traffic, passon the left.
3. Turn right, close to the curb. To turn left, approach inter-section as closely as possible to centre line of highway,then make left turn by passing to the right of, and as closeto, the intersecting line as possible.
4. Raise one arm when stopping or slowing up to indicatedirection when turning.
5. Ride straight. Don’t wobble.
6. Watch for STOP signs and traffic officers’ signals.
Tenderfoot to Queen’s Scout page 48
Keep Your Bicycle in Good Running Order
7. Give traffic coming from the right the right of way at inter-sections.
8. Do not hang on to moving vehicles.
9. Don’t “cut in” in front of a moving car.
10. Keep your feet on the pedals-your hands on the handle-bars. Always use a light at night, and red light orapproved reflector and a ten inch white strip painted onthe rear mudguard.
TEST NO. 14
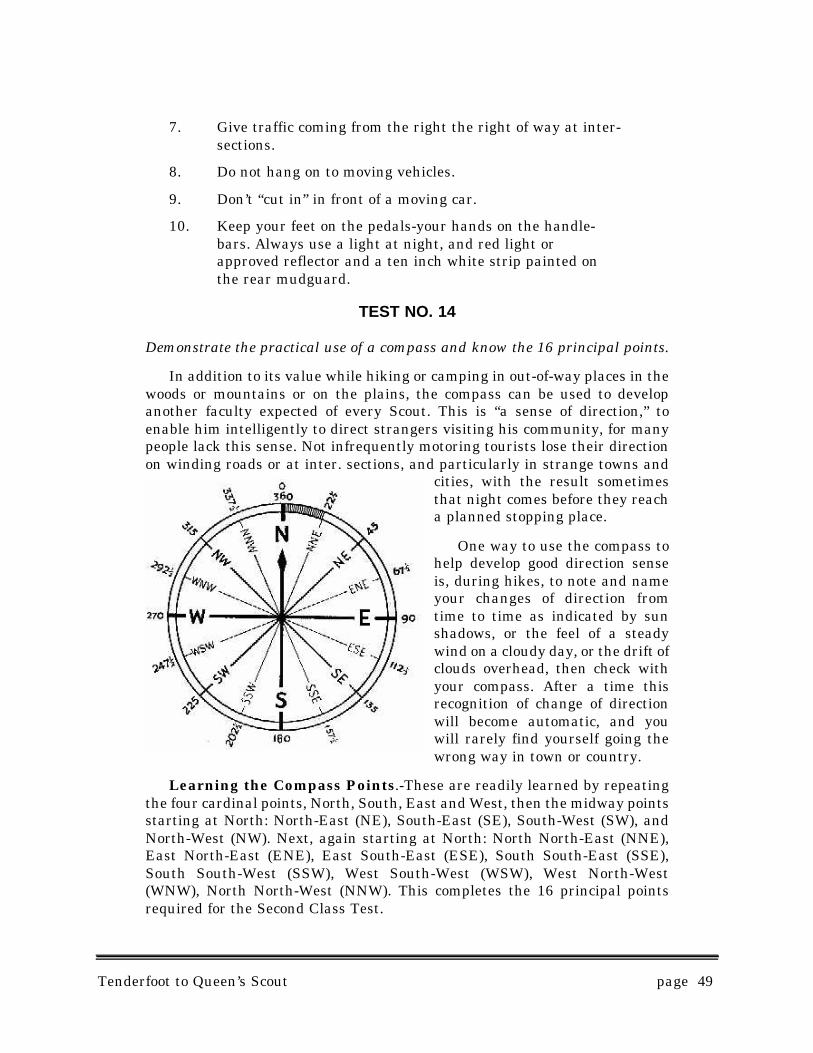
Demonstrate the practical use of a compass and know the 16 principal points.
In addition to its value while hiking or camping in out-of-way places in thewoods or mountains or on the plains, the compass can be used to developanother faculty expected of every Scout. This is “a sense of direction,” toenable him intelligently to direct strangers visiting his community, for manypeople lack this sense. Not infrequently motoring tourists lose their directionon winding roads or at inter. sections, and particularly in strange towns and
cities, with the result sometimesthat night comes before they reacha planned stopping place.
One way to use the compass tohelp develop good direction senseis, during hikes, to note and nameyour changes of direction fromtime to time as indicated by sunshadows, or the feel of a steadywind on a cloudy day, or the drift ofclouds overhead, then check withyour compass. After a time thisrecognition of change of directionwill become automatic, and youwill rarely find yourself going thewrong way in town or country.
Learning the Compass Points.-These are readily learned by repeatingthe four cardinal points, North, South, East and West, then the midway pointsstarting at North: North-East (NE), South-East (SE), South-West (SW), andNorth-West (NW). Next, again starting at North: North North-East (NNE),East North-East (ENE), East South-East (ESE), South South-East (SSE),South South-West (SSW), West South-West (WSW), West North-West(WNW), North North-West (NNW). This completes the 16 principal pointsrequired for the Second Class Test.
Tenderfoot to Queen’s Scout page 49
Ways of Demonstrating Use of the Compass. Indoors: Seated in thecentre of a circle of boys with a compass in your hand, give the compass direc-tion of certain Scouts as they are called by name. . . . With 15 other Scouts youform a 16-point circle. The circle revolves, is halted, and you tell your newcompass position. . . - Outdoors: You are asked to direct a “tourist” to a neigh-bouring town entirely by compass. . . . In town or on the hike you give thedirection of buildings or landscape features as asked.... On a hike you travelentirely by written compass directions, such as: “Proceed WSW to intersectionof three roads. Take road NNW one mile to old log barn; cross field NE tosmall stream,” etc.
TEST NO. 15
Take part in at least three regularly conducted hikes; or two short cruises offrom 4 to 8 hours each under authorized leadership, and if a Sea Scout knowhow time is marked on ship board, and how a crew is divided into watches.
Hiking is one of most enjoyable experiences of Scouting. It is a healthypractice too-ask your doctor. With so many automobiles, motor cycles andbicycles around these days, most boys do far too little hiking.
In “The Hiker’s Handbook” by Douglas Leechman, the author points out:-“We are a little apt to forget that walking is man’s normal method of gettingfrom one place to another. Riding, whether on the back of another animal orin some kind of machine propelled by muscular energy, steam, electricity orgas, is an artificial device.”
“Walking” Mr. Leechman adds, “is a far more healthful mode of progres-sion than any other. The repeated movements of the muscles stimulate thecirculation of the blood, promote the operation of the digestive system, mas-sage the Pymphatic glands, and give the heart and lungs enough work to keepthem healthy. A lack of exercise is definitely harmful because the system isdeprived of these benefits, and lazy habits, if persisted in, result in a loweringof muscular tone, in ‘going soft’, as we call it, and in an impairment of the bal-ance essential to good health.”
Apart entirely from the health standpoint that Mr. Leechman stresses,hiking is both fun and adventure, and the requirement of three hikes beforeyou become a Second Class Scout is by way of introducing you to this fun andadventure.
Make the hikes serve a double purpose. Perhaps one could be used as acompass hike, travelling only on compass directions. Another could be anobservation hike, identifying trees and shrubs or birds. Another could be atracking hike - following a trail of Scout Trail Signs over an extended area. Oryou could have a cooking hike, or a hike just for the fun of hiking.
Keep a log of each hike; it will be good practice and preparation for writ-
Tenderfoot to Queen’s Scout page 50
ing the log of your First Class Journey.
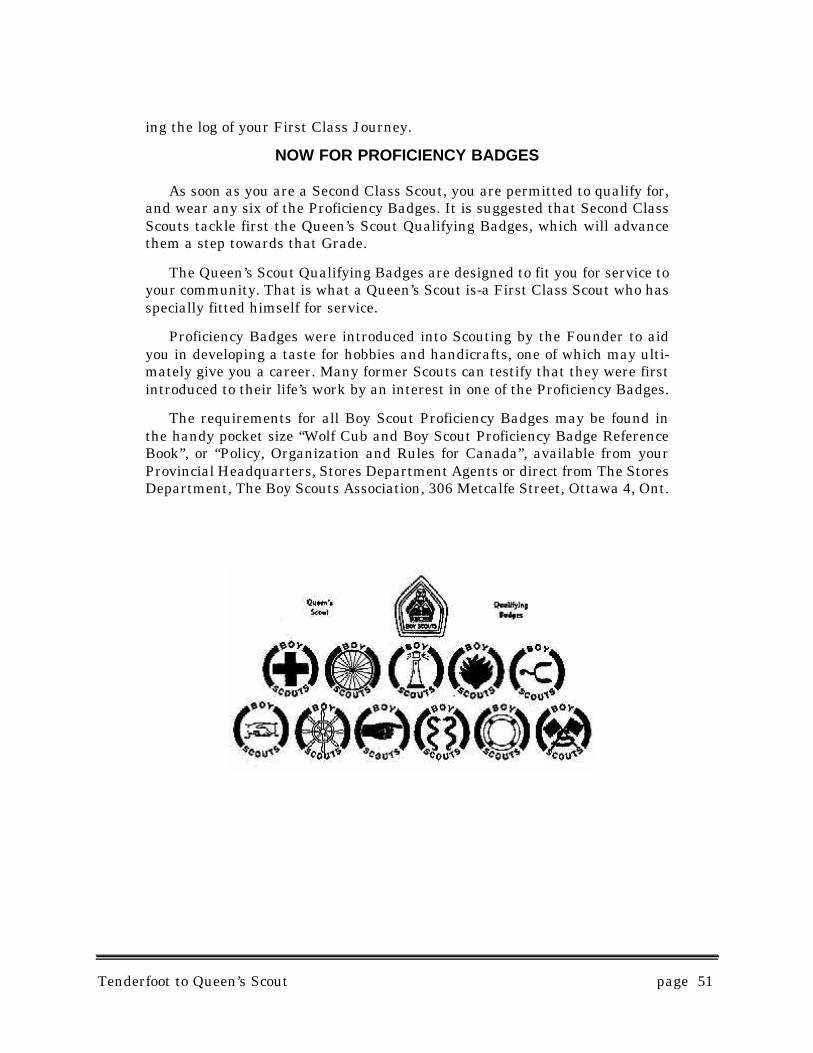
NOW FOR PROFICIENCY BADGES
As soon as you are a Second Class Scout, you are permitted to qualify for,and wear any six of the Proficiency Badges. It is suggested that Second ClassScouts tackle first the Queen’s Scout Qualifying Badges, which will advancethem a step towards that Grade.
The Queen’s Scout Qualifying Badges are designed to fit you for service toyour community. That is what a Queen’s Scout is-a First Class Scout who hasspecially fitted himself for service.
Proficiency Badges were introduced into Scouting by the Founder to aidyou in developing a taste for hobbies and handicrafts, one of which may ulti-mately give you a career. Many former Scouts can testify that they were firstintroduced to their life’s work by an interest in one of the Proficiency Badges.
The requirements for all Boy Scout Proficiency Badges may be found inthe handy pocket size “Wolf Cub and Boy Scout Proficiency Badge ReferenceBook”, or “Policy, Organization and Rules for Canada”, available from yourProvincial Headquarters, Stores Department Agents or direct from The StoresDepartment, The Boy Scouts Association, 306 Metcalfe Street, Ottawa 4, Ont.
Tenderfoot to Queen’s Scout page 51