Embed Size (px)
Citation preview
XR-3 Modular Test Instrument S2 ACM VSAT Satellite Meter
Module Operation Manual
Revision 1.00
Date 04/02/2015
XR-3 S2 ACM Module Operation Manual XR-3
Page 2 of 64
1. INTRODUCTION TO XR-3’S VSAT MODULE ............................................................................. 4
CONNECTIONS ............................................................................................................................................. 5
2. RUN SCREEN ...................................................................................................................................... 6
SOFT KEYS .................................................................................................................................................. 7 CHANGING SATELLITES ............................................................................................................................... 7 CHANGING TRANSPONDERS ........................................................................................................................ 7 POLARITY .................................................................................................................................................... 7 MULTI-LNB SYSTEMS ................................................................................................................................ 8 SATELLITE IDENTIFICATION ........................................................................................................................ 9 ID VERIFICATION ........................................................................................................................................ 9 SATELLITE SCAN ....................................................................................................................................... 10 FIELD GUIDE UPDATES ............................................................................................................................. 10
3. MAIN MENU ...................................................................................................................................... 12
4. SYSTEM SETUP ................................................................................................................................ 12
REGIONS .................................................................................................................................................... 14 SERVICES .................................................................................................................................................. 14 SYSTEMS ................................................................................................................................................... 15 LNB MODEL ............................................................................................................................................. 15 SWITCH TYPE ............................................................................................................................................ 16
5. OPTIONS ............................................................................................................................................ 17
SIGNAL LEVEL .......................................................................................................................................... 17 SIGNAL QUALITY ...................................................................................................................................... 17 FREQUENCY .............................................................................................................................................. 17 SOUNDER OPTION ..................................................................................................................................... 17 SHUTDOWN TIMER .................................................................................................................................... 18 FREQUENCY DEVIATION............................................................................................................................ 18 IRD CALC ................................................................................................................................................. 18
6. VERSIONS .......................................................................................................................................... 19
7. AZIMUTH / ELEVATION LOOKUP ............................................................................................. 20
POLARIZATION OFFSET ............................................................................................................................. 21 SKEW ........................................................................................................................................................ 21
8. MANUAL TUNING ........................................................................................................................... 21
FREQUENCY .............................................................................................................................................. 22 SIGNAL TYPE ............................................................................................................................................. 22 CODE RATE ............................................................................................................................................... 23 SYMBOL RATE ........................................................................................................................................... 23 OPTIONS .................................................................................................................................................... 23 LO FREQUENCY ........................................................................................................................................ 23 LNB CONTROL .......................................................................................................................................... 23
9. CUSTOM TRANSPONDER ............................................................................................................. 24
10. VOLTAGE / CURRENT ............................................................................................................... 27
11. OPI AND DISEQC MONITORING ............................................................................................. 27
OPI SIMULATION ...................................................................................................................................... 27 HUGHESNET™ CROSS-POL CHECK PROCEDURE ...................................................................................... 28 DISEQC MONITORING .............................................................................................................................. 29
12. BIT ERROR RATE / PACKET ERROR RATE ......................................................................... 29

XR-3 S2 ACM Module Operation Manual XR-3
Page 3 of 64
13. PROOF OF PERFORMANCE TESTING ................................................................................... 31
INSTALL PC SOFTWARE ............................................................................................................................ 31 COLLECT TEST DATA ................................................................................................................................ 31 SAVING DATA ........................................................................................................................................... 32 TRANSFER DATA FILE TO PC .................................................................................................................... 35 ERASING FILES .......................................................................................................................................... 36 PRINT REPORTS ......................................................................................................................................... 36
15. LIMIT SCAN .................................................................................................................................. 39
SPECIFICATIONS ........................................................................................................................................ 39 SETUP ........................................................................................................................................................ 39 SCANNING ................................................................................................................................................. 40 EDITING LIMITS ......................................................................................................................................... 41 PRESET LIMITS .......................................................................................................................................... 43 ERRORS ..................................................................................................................................................... 45 LIMITATIONS ............................................................................................................................................. 46 INITIALIZATION ......................................................................................................................................... 46 INSTALL PC SOFTWARE & TRANSFERRING DATA FILES TO PC ................................................................. 48
16. SPECTRUM SCREEN ................................................................................................................... 50
17. CONSTELLATION ....................................................................................................................... 53
18. FILE UTILITY ............................................................................................................................... 54
19. UPDATING YOUR METER......................................................................................................... 58
15. POWER ........................................................................................................................................... 58
LNB POWER .............................................................................................................................................. 58 BATTERY CHARGE .................................................................................................................................... 58 AC POWER ................................................................................................................................................ 59 DC POWER ................................................................................................................................................ 59
16. TROUBLESHOOTING / FAQS ................................................................................................... 60
17. REPLACEMENT PARTS & ACCESSORIES ............................................................................ 62
18. MAINTENANCE AND REPAIRS ............................................................................................... 62
19. SPECIFICATIONS ........................................................................................................................ 63
This manual covers basic operations and functions of the XR-3’s VSAT Module. For more detailed instructions on how to use the instrument for different applications, see the Application Notes available on our website, http://www.appliedin.com
XR-3 S2 ACM Module Operation Manual XR-3
Page 4 of 64
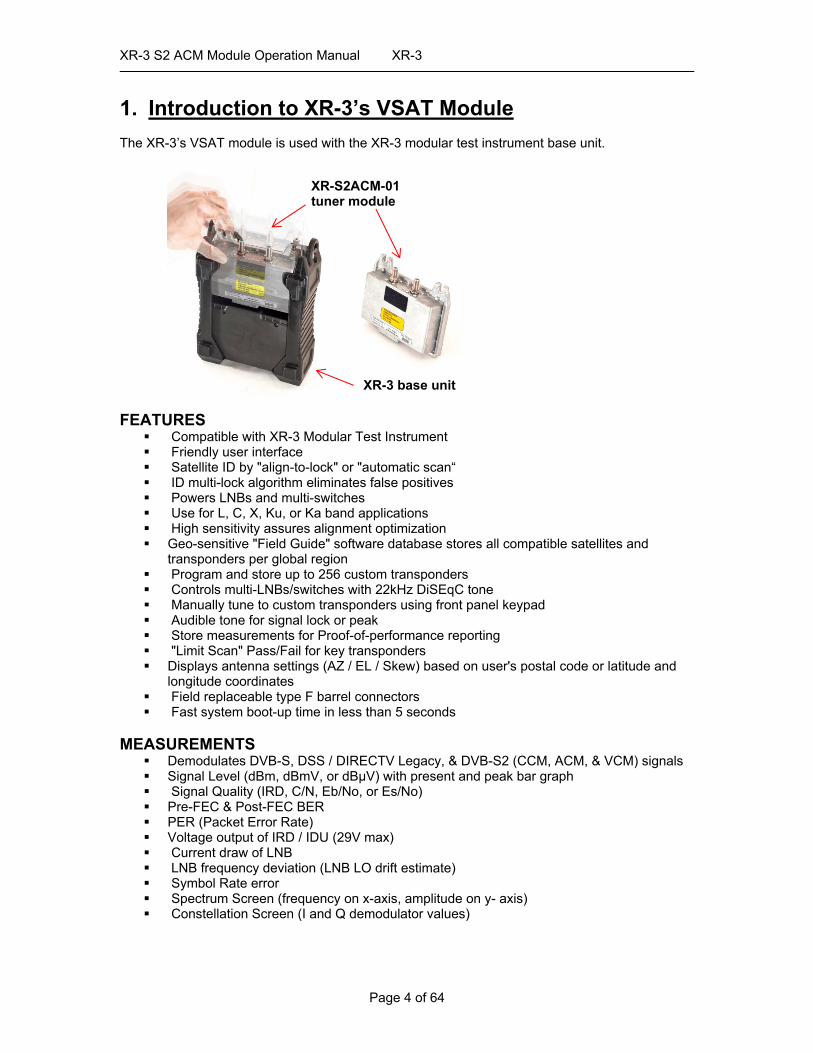
1. Introduction to XR-3’s VSAT Module The XR-3’s VSAT module is used with the XR-3 modular test instrument base unit. FEATURES
Compatible with XR-3 Modular Test Instrument Friendly user interface Satellite ID by "align-to-lock" or "automatic scan“ ID multi-lock algorithm eliminates false positives Powers LNBs and multi-switches Use for L, C, X, Ku, or Ka band applications High sensitivity assures alignment optimization Geo-sensitive "Field Guide" software database stores all compatible satellites and
transponders per global region Program and store up to 256 custom transponders Controls multi-LNBs/switches with 22kHz DiSEqC tone Manually tune to custom transponders using front panel keypad Audible tone for signal lock or peak Store measurements for Proof-of-performance reporting "Limit Scan" Pass/Fail for key transponders Displays antenna settings (AZ / EL / Skew) based on user's postal code or latitude and
longitude coordinates Field replaceable type F barrel connectors Fast system boot-up time in less than 5 seconds
MEASUREMENTS
Demodulates DVB-S, DSS / DIRECTV Legacy, & DVB-S2 (CCM, ACM, & VCM) signals Signal Level (dBm, dBmV, or dBµV) with present and peak bar graph Signal Quality (IRD, C/N, Eb/No, or Es/No) Pre-FEC & Post-FEC BER PER (Packet Error Rate) Voltage output of IRD / IDU (29V max) Current draw of LNB LNB frequency deviation (LNB LO drift estimate) Symbol Rate error Spectrum Screen (frequency on x-axis, amplitude on y- axis) Constellation Screen (I and Q demodulator values)
XR-3 base unit
XR-S2ACM-01tuner module
XR-3 S2 ACM Module Operation Manual XR-3
Page 5 of 64
STANDARD ACCESSORIES Quick Start Guide
The XR-3 VSAT module represents a new standard in satellite identification capability. Rather than loading a limited set of satellites or a large number of channel plans to select from, the XR-3 VSAT module holds all of the compatible satellite transponder information for the entire continent. You just tell it where you are, and what type of system you are connected to, and the XR-3 accesses all compatible satellite transponders visible to that system. The basic operation becomes extremely simple: Left arrow button – goes to next orbit east Right arrow button – goes to next orbit west Up arrow button - next higher transponder Down arrow button – next lower transponder
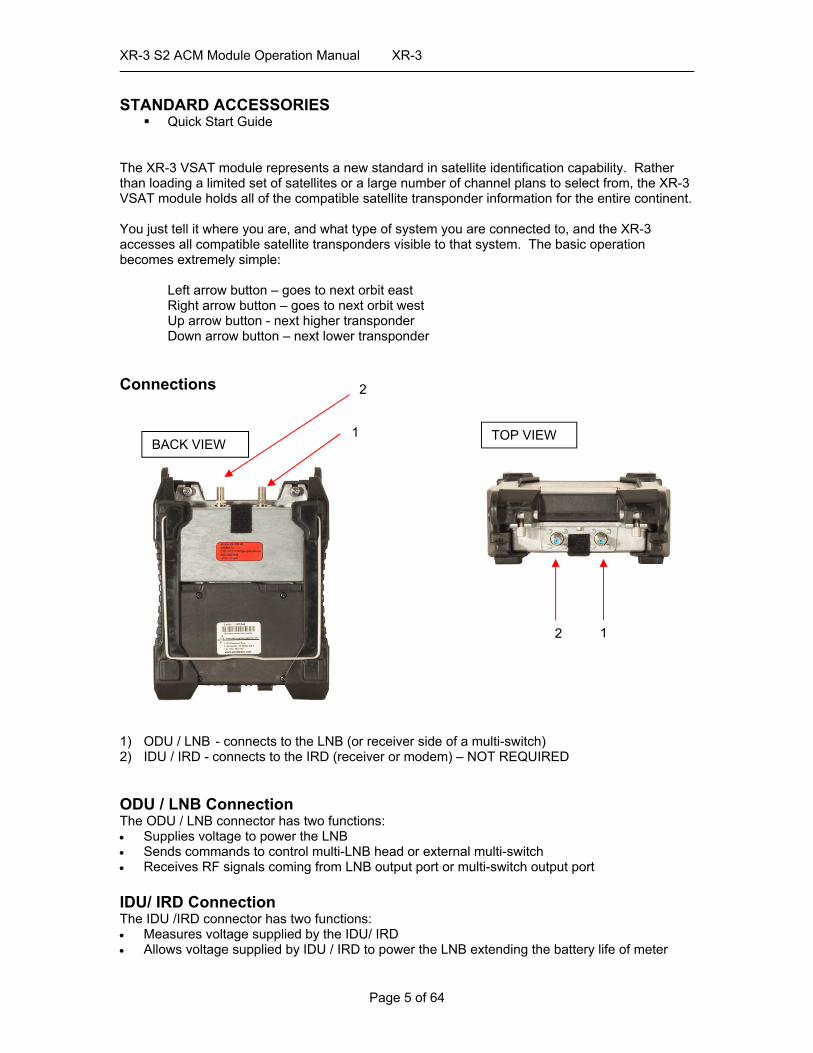
Connections
1) ODU / LNB - connects to the LNB (or receiver side of a multi-switch) 2) IDU / IRD - connects to the IRD (receiver or modem) – NOT REQUIRED ODU / LNB Connection The ODU / LNB connector has two functions: Supplies voltage to power the LNB Sends commands to control multi-LNB head or external multi-switch Receives RF signals coming from LNB output port or multi-switch output port IDU/ IRD Connection The IDU /IRD connector has two functions: Measures voltage supplied by the IDU/ IRD Allows voltage supplied by IDU / IRD to power the LNB extending the battery life of meter
2
1BACK VIEW
TOP VIEW
2
1
XR-3 S2 ACM Module Operation Manual XR-3
Page 6 of 64
However, the meter itself is always powered by its internal battery or by the external AC to DC switching power supply while connected to AC power. Note: In order to prevent damage to the meter’s circuitry, do NOT input more than 30 volts to the XR-3’s VSAT module.
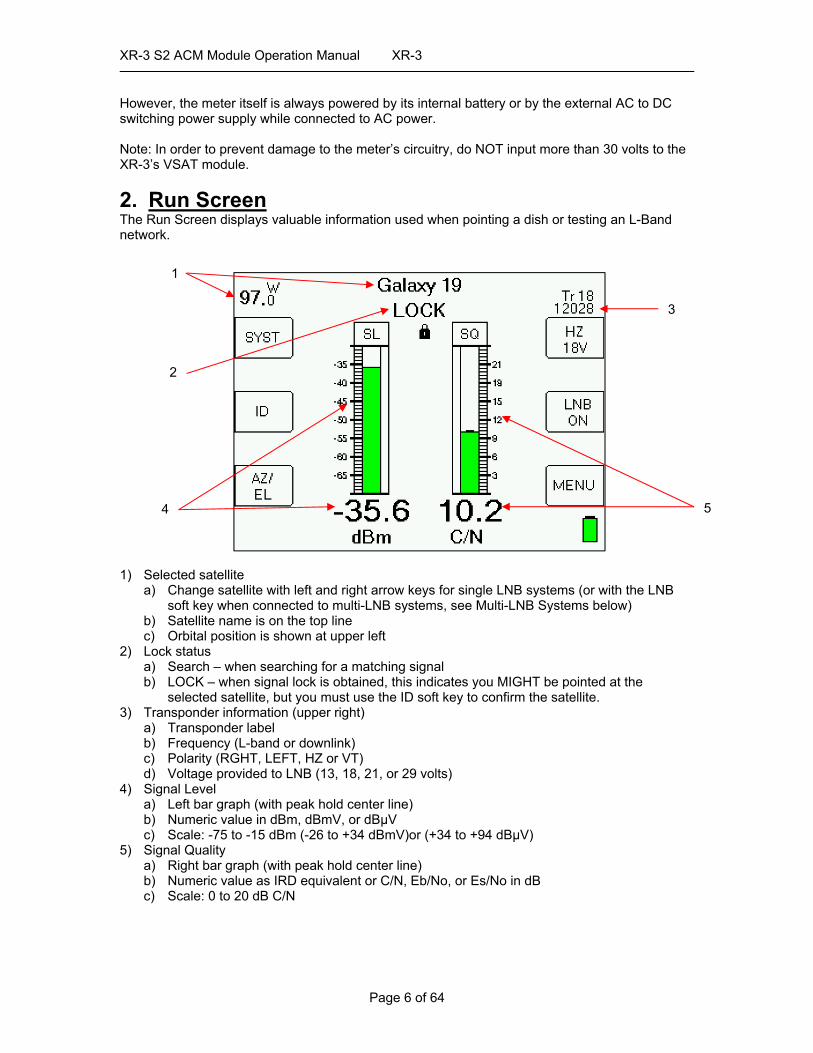
2. Run Screen The Run Screen displays valuable information used when pointing a dish or testing an L-Band network.
1) Selected satellite a) Change satellite with left and right arrow keys for single LNB systems (or with the LNB
soft key when connected to multi-LNB systems, see Multi-LNB Systems below) b) Satellite name is on the top line c) Orbital position is shown at upper left
2) Lock status a) Search – when searching for a matching signal b) LOCK – when signal lock is obtained, this indicates you MIGHT be pointed at the
selected satellite, but you must use the ID soft key to confirm the satellite. 3) Transponder information (upper right)
a) Transponder label b) Frequency (L-band or downlink) c) Polarity (RGHT, LEFT, HZ or VT) d) Voltage provided to LNB (13, 18, 21, or 29 volts)
4) Signal Level a) Left bar graph (with peak hold center line) b) Numeric value in dBm, dBmV, or dBµV c) Scale: -75 to -15 dBm (-26 to +34 dBmV)or (+34 to +94 dBµV)
5) Signal Quality a) Right bar graph (with peak hold center line) b) Numeric value as IRD equivalent or C/N, Eb/No, or Es/No in dB c) Scale: 0 to 20 dB C/N
4
1
2
3
5
XR-3 S2 ACM Module Operation Manual XR-3
Page 7 of 64
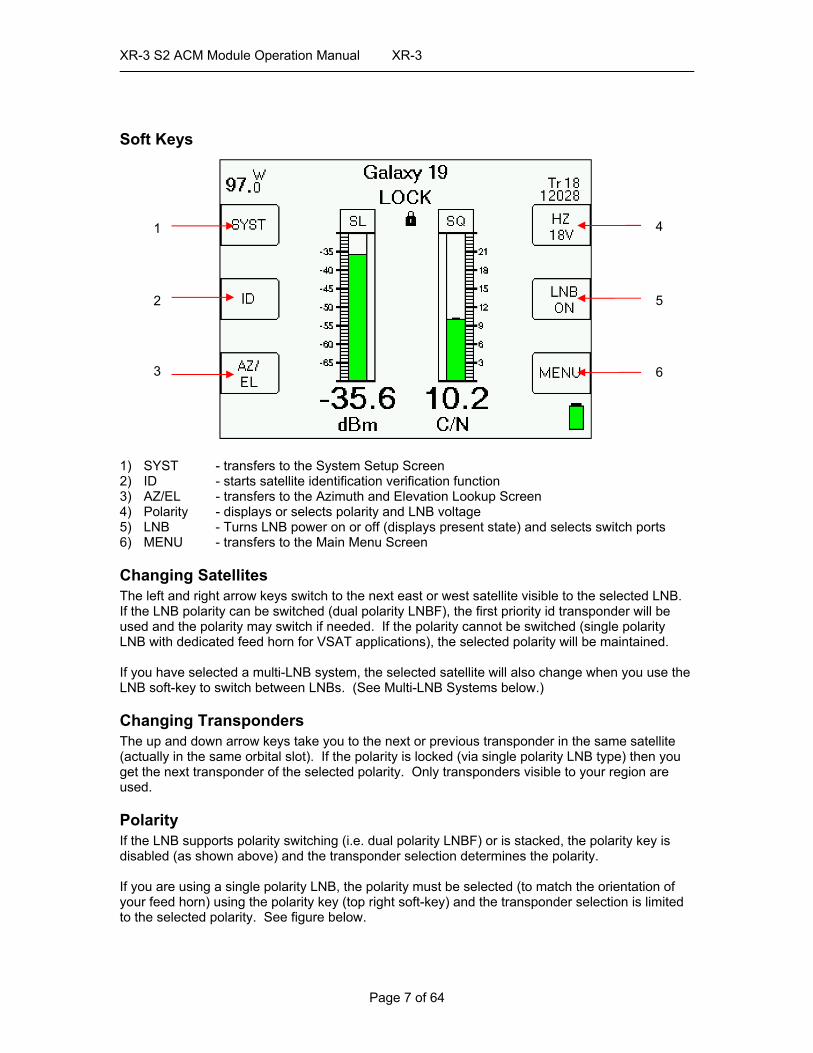
Soft Keys 1) SYST - transfers to the System Setup Screen 2) ID - starts satellite identification verification function 3) AZ/EL - transfers to the Azimuth and Elevation Lookup Screen 4) Polarity - displays or selects polarity and LNB voltage 5) LNB - Turns LNB power on or off (displays present state) and selects switch ports 6) MENU - transfers to the Main Menu Screen
Changing Satellites The left and right arrow keys switch to the next east or west satellite visible to the selected LNB. If the LNB polarity can be switched (dual polarity LNBF), the first priority id transponder will be used and the polarity may switch if needed. If the polarity cannot be switched (single polarity LNB with dedicated feed horn for VSAT applications), the selected polarity will be maintained. If you have selected a multi-LNB system, the selected satellite will also change when you use the LNB soft-key to switch between LNBs. (See Multi-LNB Systems below.)
Changing Transponders The up and down arrow keys take you to the next or previous transponder in the same satellite (actually in the same orbital slot). If the polarity is locked (via single polarity LNB type) then you get the next transponder of the selected polarity. Only transponders visible to your region are used.
Polarity If the LNB supports polarity switching (i.e. dual polarity LNBF) or is stacked, the polarity key is disabled (as shown above) and the transponder selection determines the polarity. If you are using a single polarity LNB, the polarity must be selected (to match the orientation of your feed horn) using the polarity key (top right soft-key) and the transponder selection is limited to the selected polarity. See figure below.
4
6
5
3
2
1

XR-3 S2 ACM Module Operation Manual XR-3
Page 8 of 64
Multi-LNB Systems When the selected LNB system supports multiple LNBs or multi-head LNBFs via the switch setting, the LNB ON/OFF button also controls the switch setting. Upon pressing the LNB power soft-key, the meter sends a switch command to toggle to the next feed horn and the satellite is automatically changed to the one normally used for that port.
XR-3 S2 ACM Module Operation Manual XR-3
Page 9 of 64
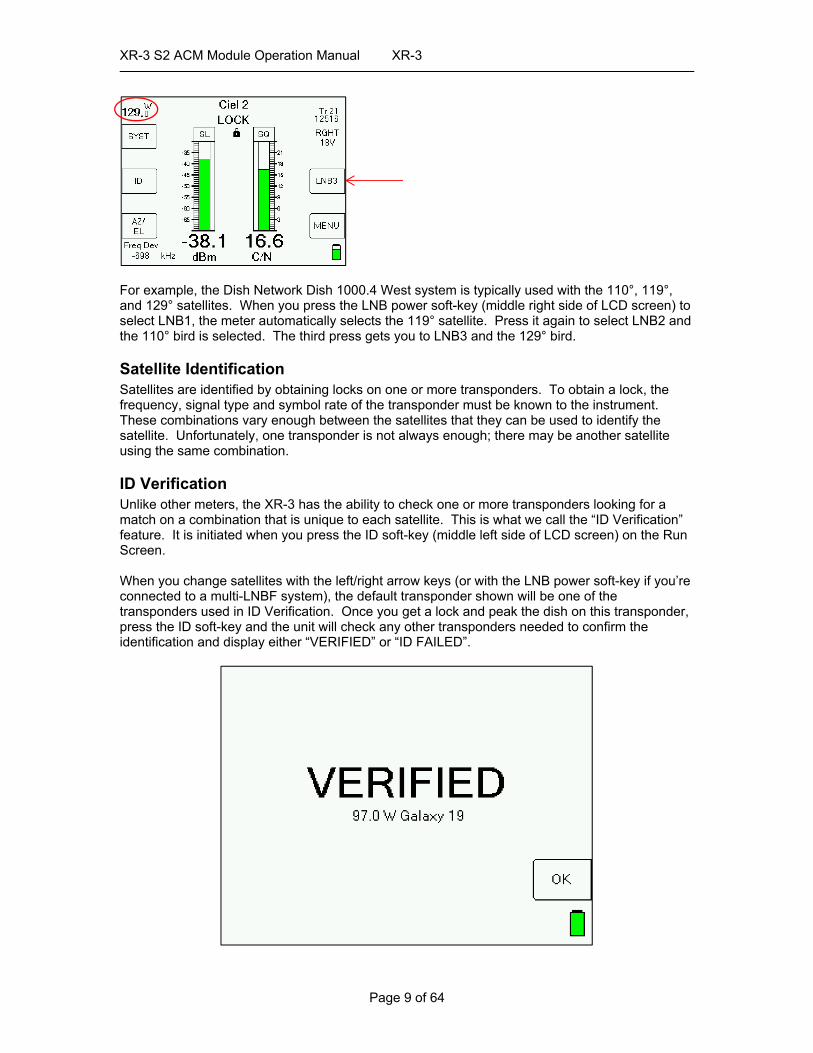
For example, the Dish Network Dish 1000.4 West system is typically used with the 110°, 119°, and 129° satellites. When you press the LNB power soft-key (middle right side of LCD screen) to select LNB1, the meter automatically selects the 119° satellite. Press it again to select LNB2 and the 110° bird is selected. The third press gets you to LNB3 and the 129° bird.
Satellite Identification Satellites are identified by obtaining locks on one or more transponders. To obtain a lock, the frequency, signal type and symbol rate of the transponder must be known to the instrument. These combinations vary enough between the satellites that they can be used to identify the satellite. Unfortunately, one transponder is not always enough; there may be another satellite using the same combination.
ID Verification Unlike other meters, the XR-3 has the ability to check one or more transponders looking for a match on a combination that is unique to each satellite. This is what we call the “ID Verification” feature. It is initiated when you press the ID soft-key (middle left side of LCD screen) on the Run Screen. When you change satellites with the left/right arrow keys (or with the LNB power soft-key if you’re connected to a multi-LNBF system), the default transponder shown will be one of the transponders used in ID Verification. Once you get a lock and peak the dish on this transponder, press the ID soft-key and the unit will check any other transponders needed to confirm the identification and display either “VERIFIED” or “ID FAILED”.
XR-3 S2 ACM Module Operation Manual XR-3
Page 10 of 64
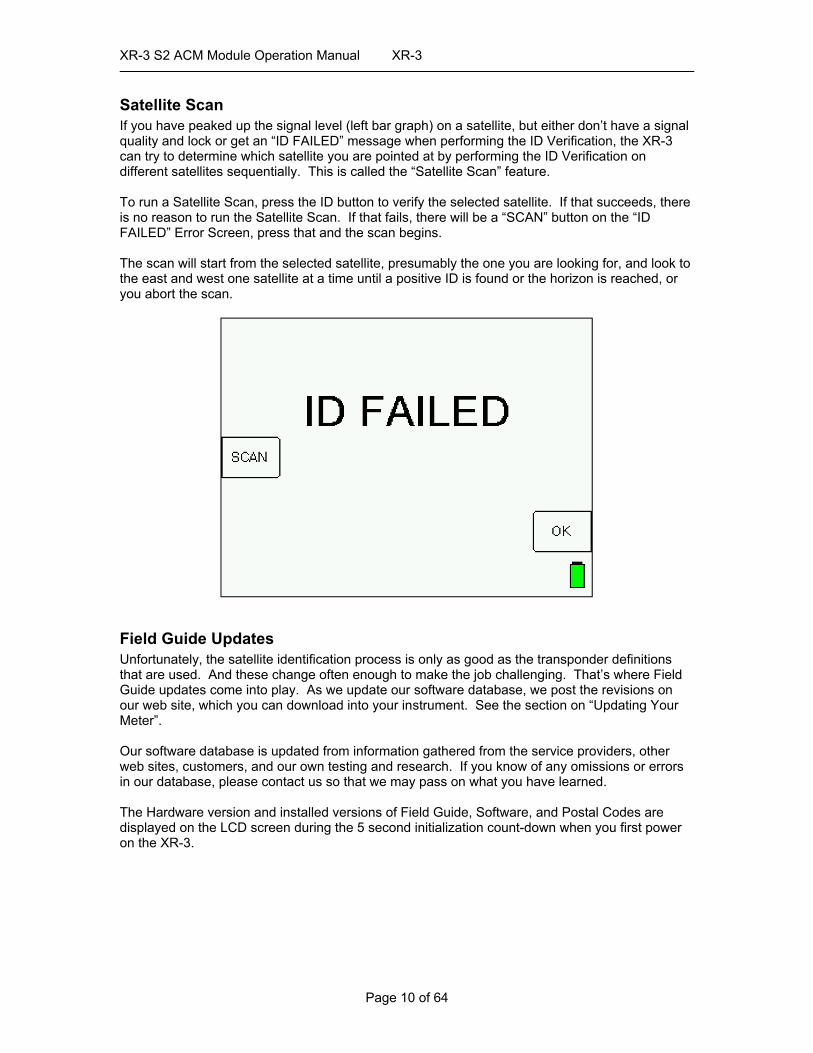
Satellite Scan If you have peaked up the signal level (left bar graph) on a satellite, but either don’t have a signal quality and lock or get an “ID FAILED” message when performing the ID Verification, the XR-3 can try to determine which satellite you are pointed at by performing the ID Verification on different satellites sequentially. This is called the “Satellite Scan” feature. To run a Satellite Scan, press the ID button to verify the selected satellite. If that succeeds, there is no reason to run the Satellite Scan. If that fails, there will be a “SCAN” button on the “ID FAILED” Error Screen, press that and the scan begins. The scan will start from the selected satellite, presumably the one you are looking for, and look to the east and west one satellite at a time until a positive ID is found or the horizon is reached, or you abort the scan.
Field Guide Updates Unfortunately, the satellite identification process is only as good as the transponder definitions that are used. And these change often enough to make the job challenging. That’s where Field Guide updates come into play. As we update our software database, we post the revisions on our web site, which you can download into your instrument. See the section on “Updating Your Meter”. Our software database is updated from information gathered from the service providers, other web sites, customers, and our own testing and research. If you know of any omissions or errors in our database, please contact us so that we may pass on what you have learned. The Hardware version and installed versions of Field Guide, Software, and Postal Codes are displayed on the LCD screen during the 5 second initialization count-down when you first power on the XR-3.

XR-3 S2 ACM Module Operation Manual XR-3
Page 11 of 64

XR-3 S2 ACM Module Operation Manual XR-3
Page 12 of 64
3. Main Menu The MENU button takes you to a menu of all of the XR-3 screens. Some of these screens are also available via soft keys from the Run Screen.
All of the functions are available on the central menu using the up/down and Enter keys. Some functions are also available via soft keys as a shortcut. “Exit” takes you back to the Run Screen. The functions are described in the sections that follow.
4. System Setup You must use this screen to specify the type of system you are connected to and where you are. This step is essential: the XR-3 calculates all frequencies based on this information and displays only the transponders that can actually be received by the selected system in the selected location. To enter the System Setup, press the SYST soft-key from the Run screen or use your up/down arrow keys to select ‘System Setup’ from the Main Menu and then press Enter.
XR-3 S2 ACM Module Operation Manual XR-3
Page 13 of 64
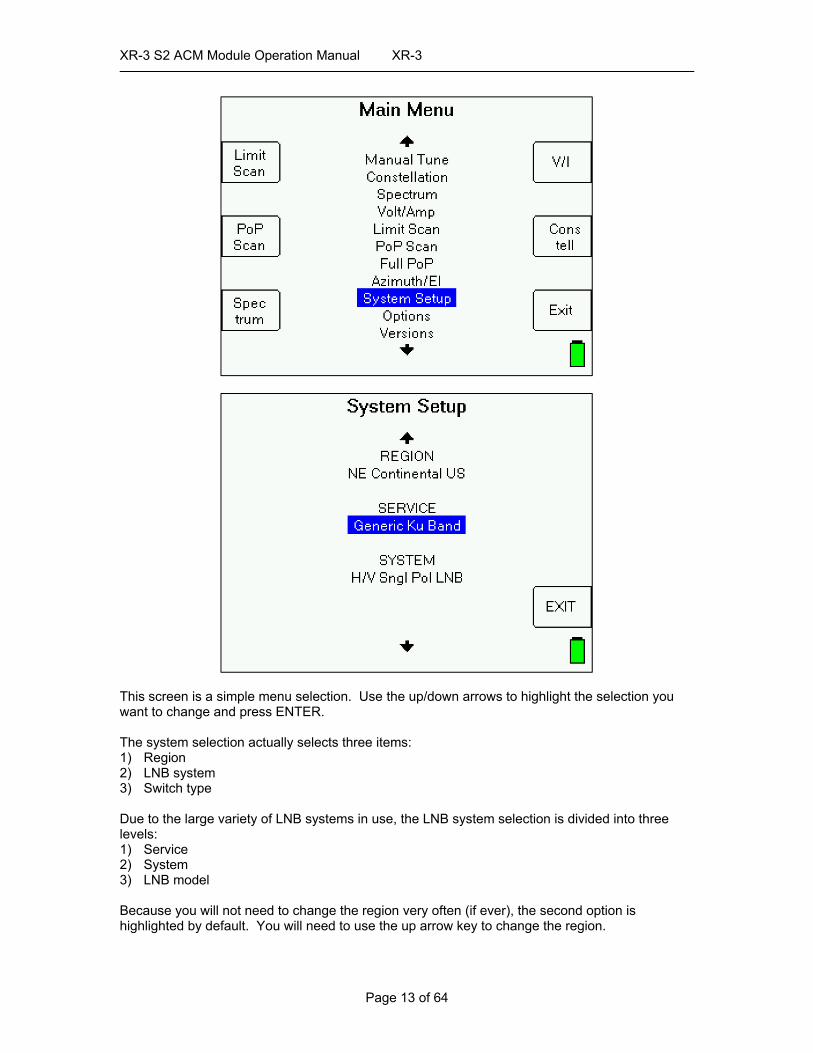
This screen is a simple menu selection. Use the up/down arrows to highlight the selection you want to change and press ENTER. The system selection actually selects three items: 1) Region 2) LNB system 3) Switch type Due to the large variety of LNB systems in use, the LNB system selection is divided into three levels: 1) Service 2) System 3) LNB model Because you will not need to change the region very often (if ever), the second option is highlighted by default. You will need to use the up arrow key to change the region.
XR-3 S2 ACM Module Operation Manual XR-3
Page 14 of 64
The LNB system also defines a default switch type, so this selection is also normally skipped. However, you may override the default switch type if desired.
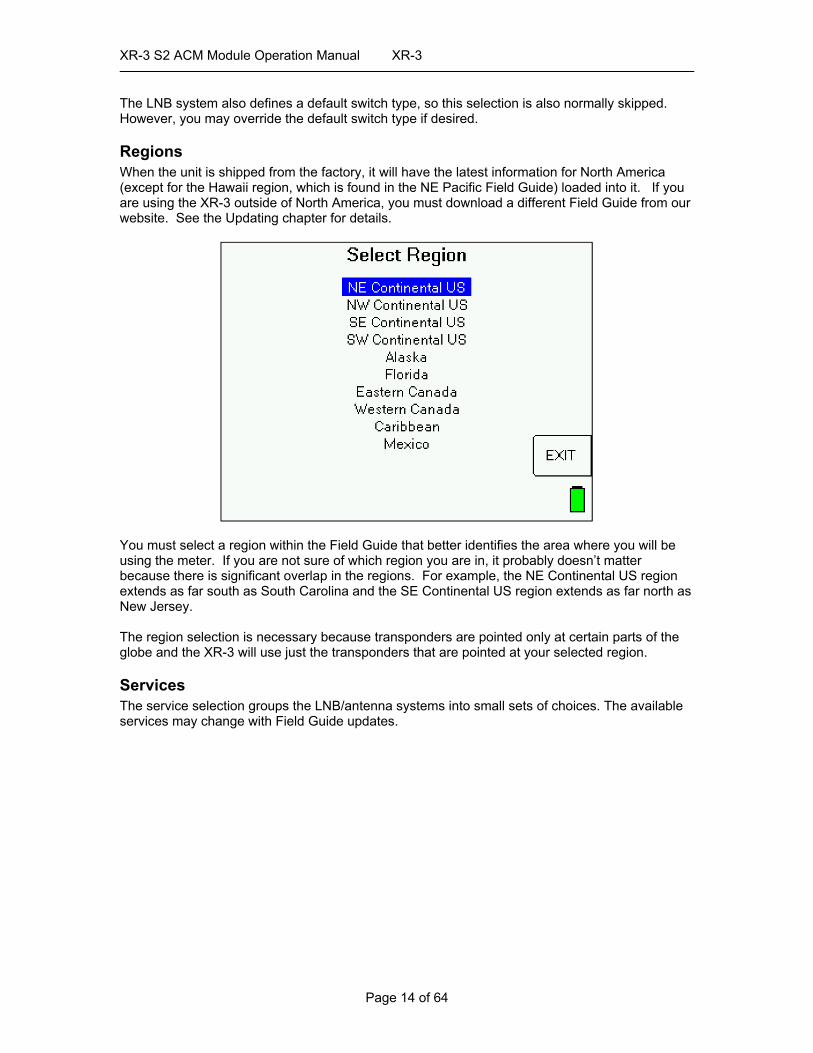
Regions When the unit is shipped from the factory, it will have the latest information for North America (except for the Hawaii region, which is found in the NE Pacific Field Guide) loaded into it. If you are using the XR-3 outside of North America, you must download a different Field Guide from our website. See the Updating chapter for details.
You must select a region within the Field Guide that better identifies the area where you will be using the meter. If you are not sure of which region you are in, it probably doesn’t matter because there is significant overlap in the regions. For example, the NE Continental US region extends as far south as South Carolina and the SE Continental US region extends as far north as New Jersey. The region selection is necessary because transponders are pointed only at certain parts of the globe and the XR-3 will use just the transponders that are pointed at your selected region.
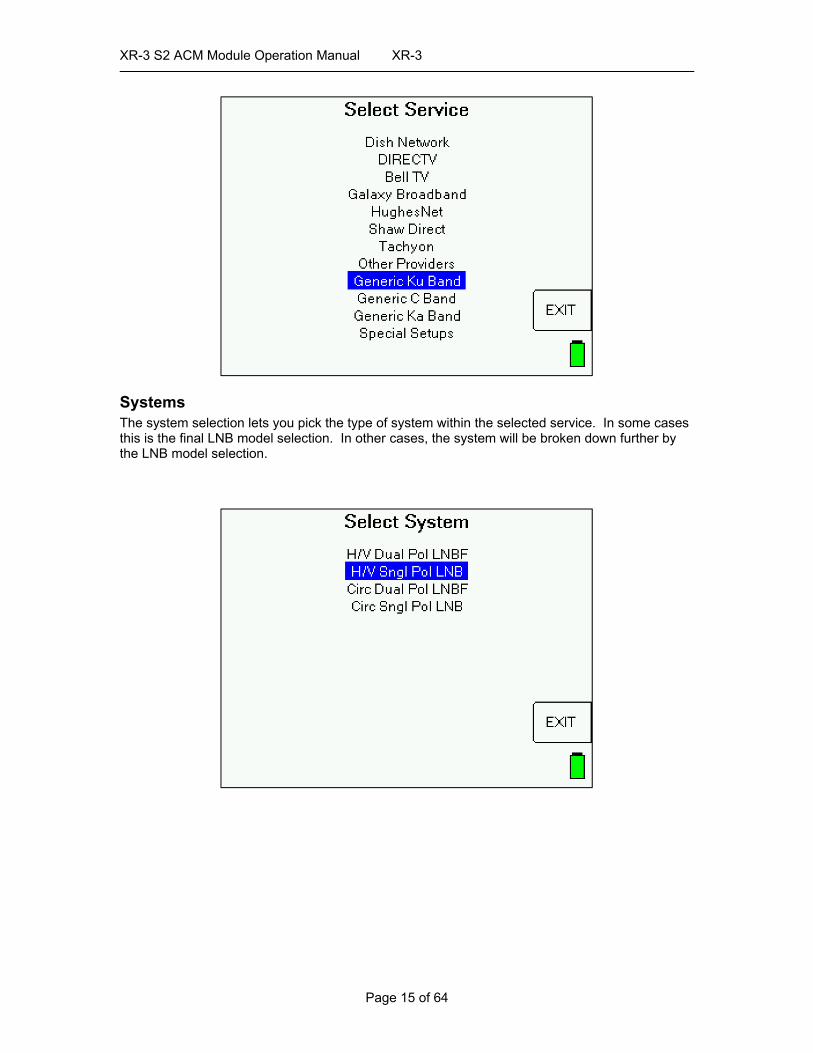
Services The service selection groups the LNB/antenna systems into small sets of choices. The available services may change with Field Guide updates.
XR-3 S2 ACM Module Operation Manual XR-3
Page 15 of 64
Systems The system selection lets you pick the type of system within the selected service. In some cases this is the final LNB model selection. In other cases, the system will be broken down further by the LNB model selection.
XR-3 S2 ACM Module Operation Manual XR-3
Page 16 of 64
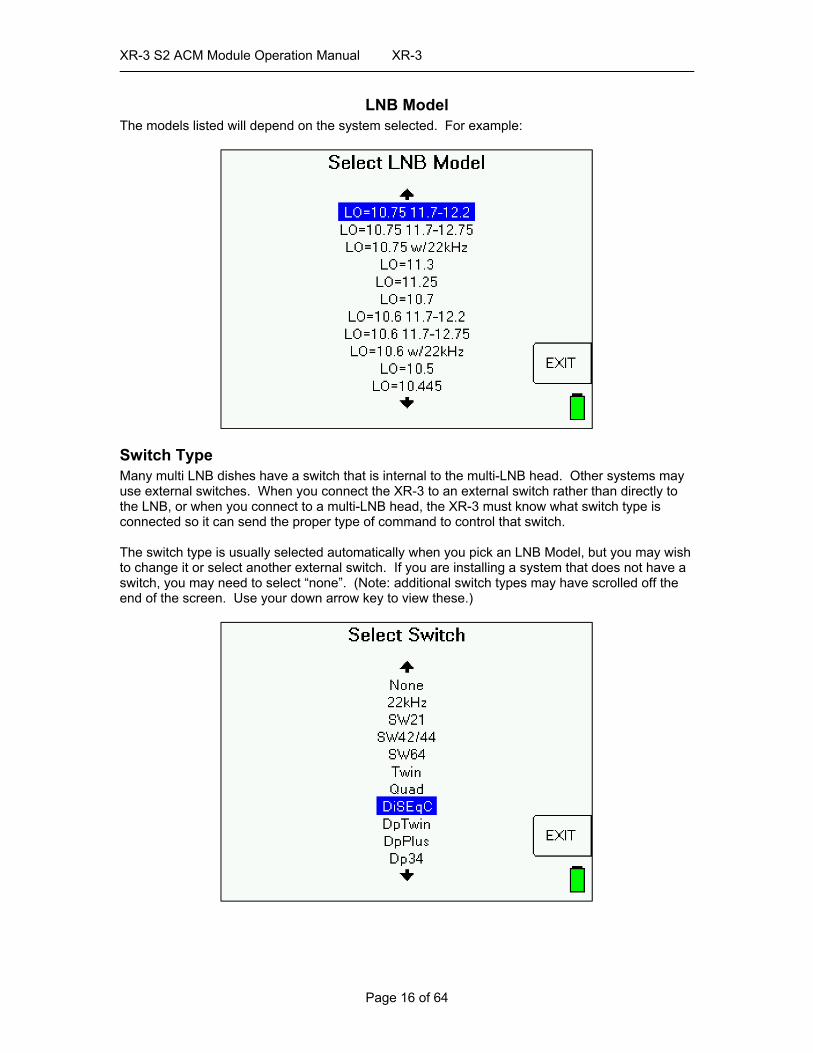
LNB Model The models listed will depend on the system selected. For example:
Switch Type Many multi LNB dishes have a switch that is internal to the multi-LNB head. Other systems may use external switches. When you connect the XR-3 to an external switch rather than directly to the LNB, or when you connect to a multi-LNB head, the XR-3 must know what switch type is connected so it can send the proper type of command to control that switch. The switch type is usually selected automatically when you pick an LNB Model, but you may wish to change it or select another external switch. If you are installing a system that does not have a switch, you may need to select “none”. (Note: additional switch types may have scrolled off the end of the screen. Use your down arrow key to view these.)
XR-3 S2 ACM Module Operation Manual XR-3
Page 17 of 64
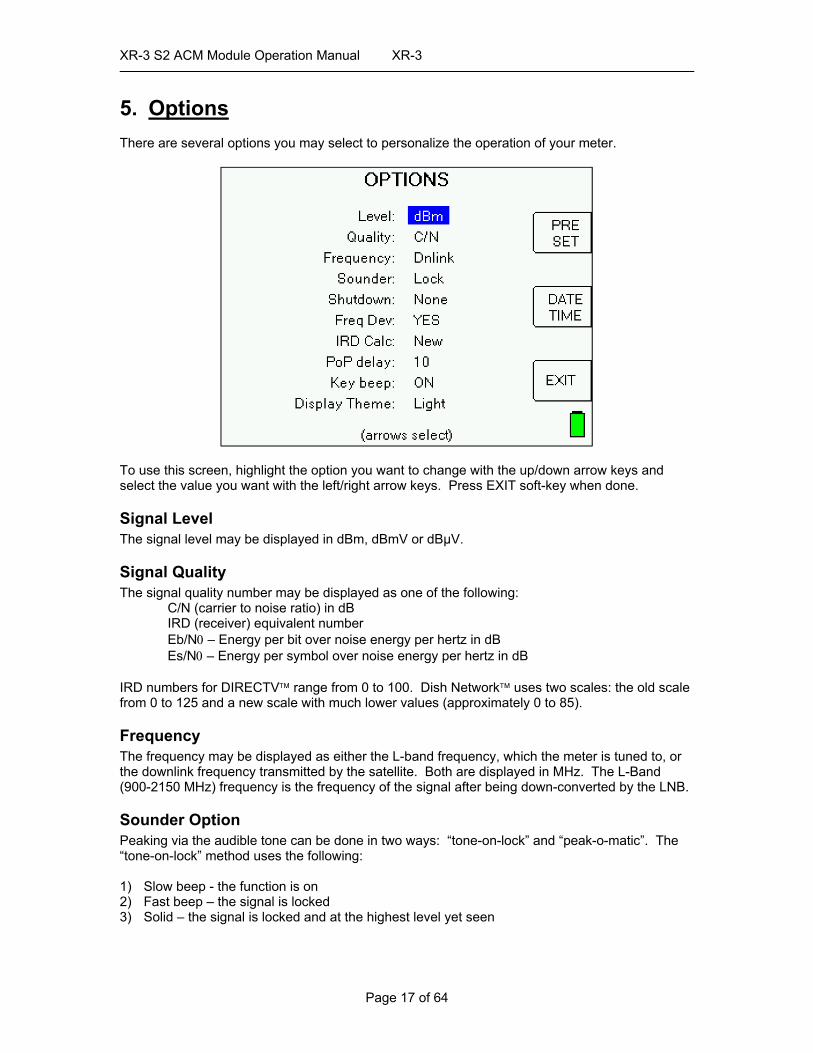
5. Options There are several options you may select to personalize the operation of your meter.
To use this screen, highlight the option you want to change with the up/down arrow keys and select the value you want with the left/right arrow keys. Press EXIT soft-key when done.
Signal Level The signal level may be displayed in dBm, dBmV or dBµV.
Signal Quality The signal quality number may be displayed as one of the following:
C/N (carrier to noise ratio) in dB IRD (receiver) equivalent number
Eb/N – Energy per bit over noise energy per hertz in dB Es/N – Energy per symbol over noise energy per hertz in dB IRD numbers for DIRECTV range from 0 to 100. Dish Network uses two scales: the old scale from 0 to 125 and a new scale with much lower values (approximately 0 to 85).
Frequency The frequency may be displayed as either the L-band frequency, which the meter is tuned to, or the downlink frequency transmitted by the satellite. Both are displayed in MHz. The L-Band (900-2150 MHz) frequency is the frequency of the signal after being down-converted by the LNB.
Sounder Option Peaking via the audible tone can be done in two ways: “tone-on-lock” and “peak-o-matic”. The “tone-on-lock” method uses the following: 1) Slow beep - the function is on 2) Fast beep – the signal is locked 3) Solid – the signal is locked and at the highest level yet seen
XR-3 S2 ACM Module Operation Manual XR-3
Page 18 of 64
This method works well when the dish is close enough to obtain a signal lock. If you have trouble finding a lock however, you may want to use the “peak-o-matic” method: 1) Slow beep – the function is on 2) Fast beep – the signal is at least 5 dB higher than the lowest level seen 3) Solid – the signal is higher and at the highest level seen so far Note that the peak-o-matic method does not indicate a lock. It allows you to peak the azimuth and elevation even before a peak is obtained. In both methods to fully peak the dish, you must move it in one direction until the signal is found, and continue moving it until you move past the peak, then move back to the solid tone.
Shutdown Timer The unit can be set to automatically shut off after 5, 10, or 15 minutes with no buttons being pressed. This timeout can be disabled by setting the option to “none”.
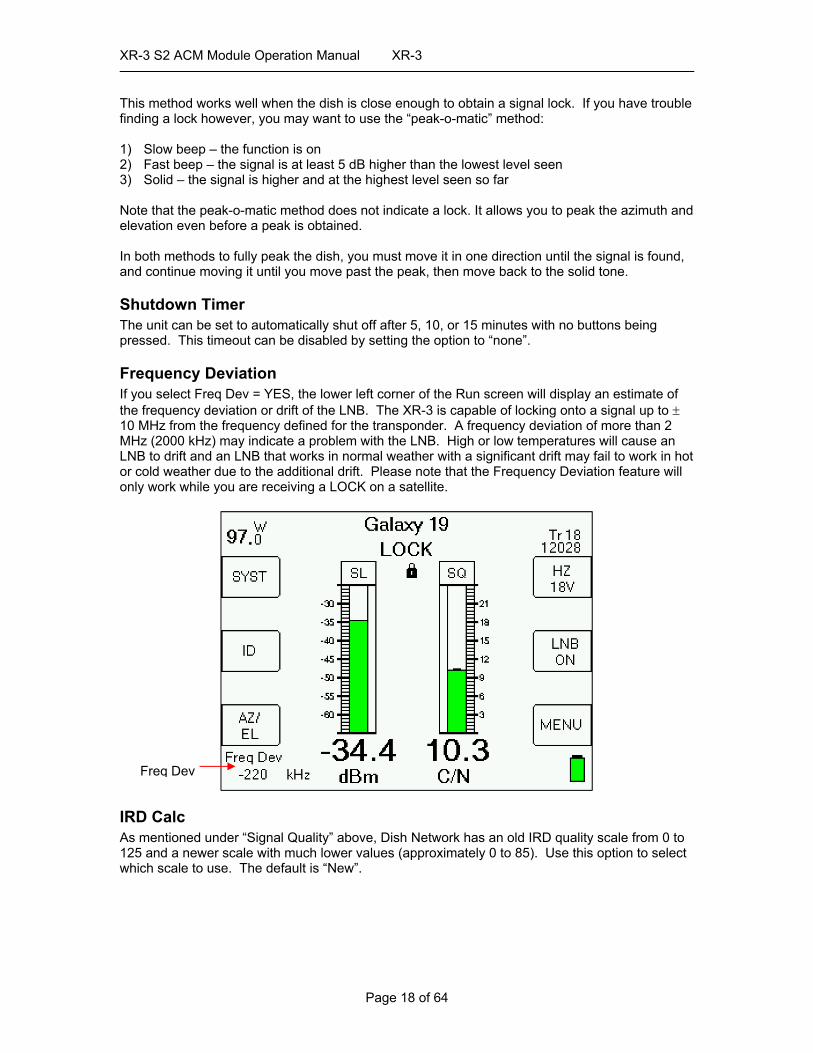
Frequency Deviation If you select Freq Dev = YES, the lower left corner of the Run screen will display an estimate of the frequency deviation or drift of the LNB. The XR-3 is capable of locking onto a signal up to 10 MHz from the frequency defined for the transponder. A frequency deviation of more than 2 MHz (2000 kHz) may indicate a problem with the LNB. High or low temperatures will cause an LNB to drift and an LNB that works in normal weather with a significant drift may fail to work in hot or cold weather due to the additional drift. Please note that the Frequency Deviation feature will only work while you are receiving a LOCK on a satellite.
IRD Calc As mentioned under “Signal Quality” above, Dish Network has an old IRD quality scale from 0 to 125 and a newer scale with much lower values (approximately 0 to 85). Use this option to select which scale to use. The default is “New”.
Freq Dev
XR-3 S2 ACM Module Operation Manual XR-3
Page 19 of 64
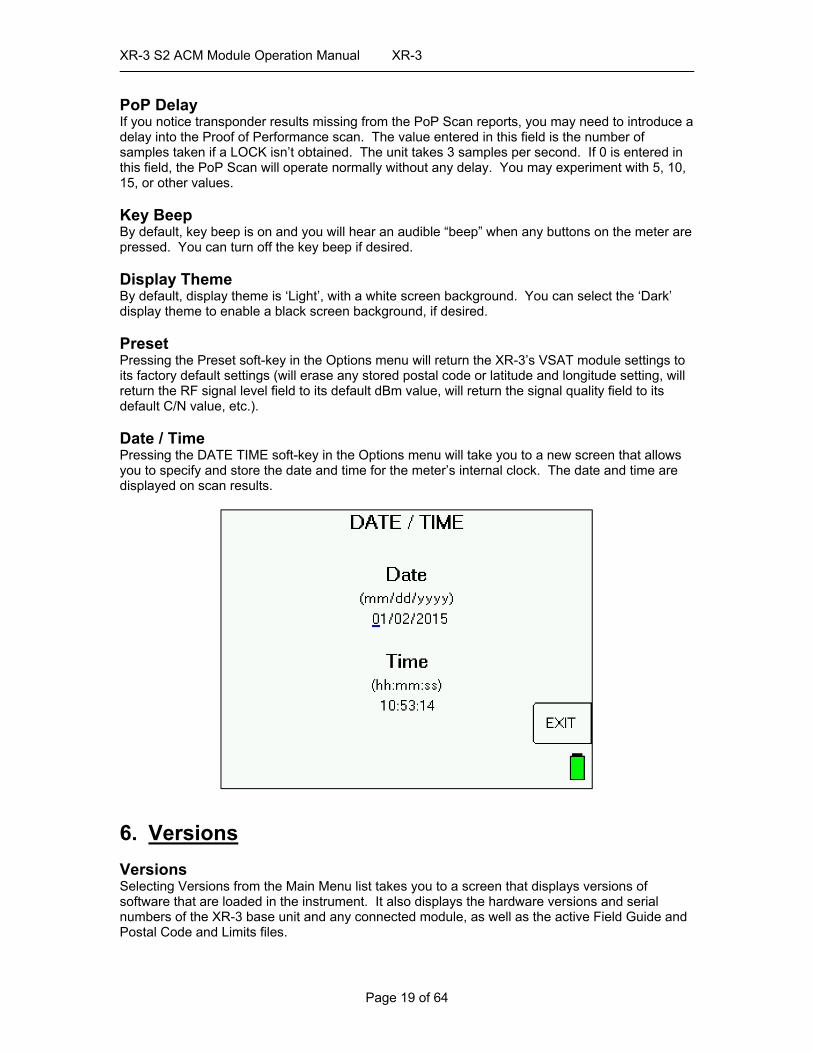
PoP Delay If you notice transponder results missing from the PoP Scan reports, you may need to introduce a delay into the Proof of Performance scan. The value entered in this field is the number of samples taken if a LOCK isn’t obtained. The unit takes 3 samples per second. If 0 is entered in this field, the PoP Scan will operate normally without any delay. You may experiment with 5, 10, 15, or other values. Key Beep By default, key beep is on and you will hear an audible “beep” when any buttons on the meter are pressed. You can turn off the key beep if desired. Display Theme By default, display theme is ‘Light’, with a white screen background. You can select the ‘Dark’ display theme to enable a black screen background, if desired. Preset Pressing the Preset soft-key in the Options menu will return the XR-3’s VSAT module settings to its factory default settings (will erase any stored postal code or latitude and longitude setting, will return the RF signal level field to its default dBm value, will return the signal quality field to its default C/N value, etc.). Date / Time Pressing the DATE TIME soft-key in the Options menu will take you to a new screen that allows you to specify and store the date and time for the meter’s internal clock. The date and time are displayed on scan results.
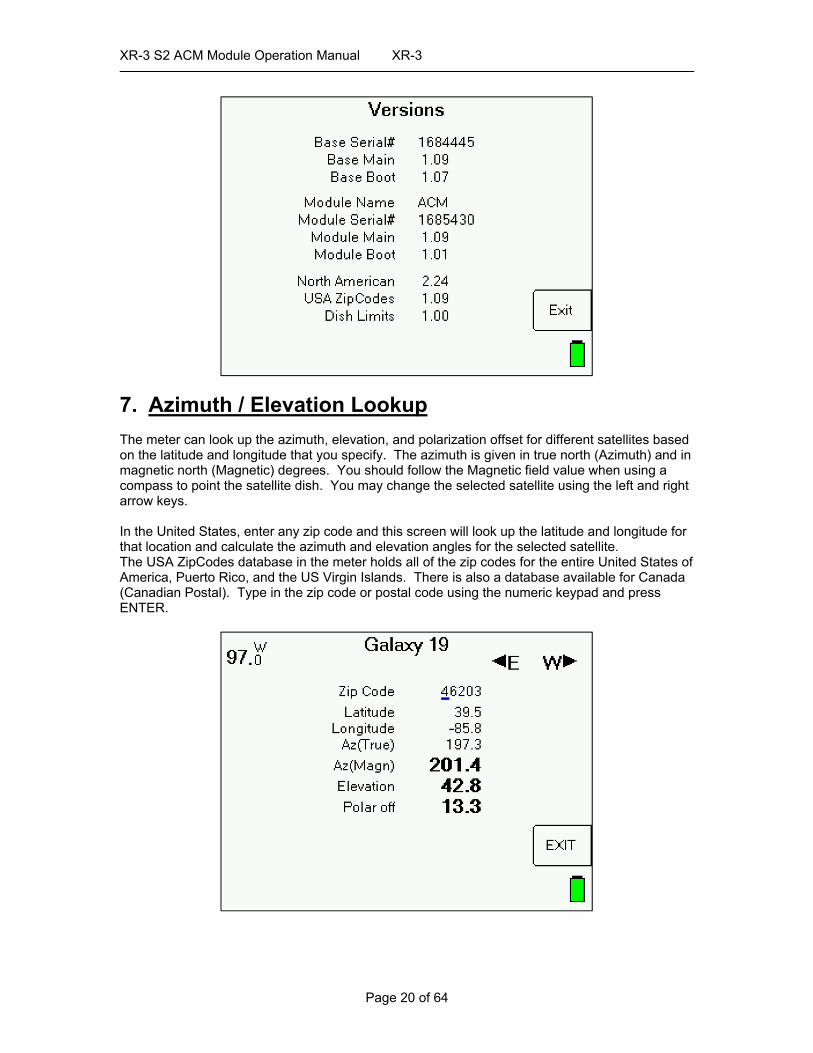
6. Versions Versions Selecting Versions from the Main Menu list takes you to a screen that displays versions of software that are loaded in the instrument. It also displays the hardware versions and serial numbers of the XR-3 base unit and any connected module, as well as the active Field Guide and Postal Code and Limits files.
XR-3 S2 ACM Module Operation Manual XR-3
Page 20 of 64
7. Azimuth / Elevation Lookup The meter can look up the azimuth, elevation, and polarization offset for different satellites based on the latitude and longitude that you specify. The azimuth is given in true north (Azimuth) and in magnetic north (Magnetic) degrees. You should follow the Magnetic field value when using a compass to point the satellite dish. You may change the selected satellite using the left and right arrow keys. In the United States, enter any zip code and this screen will look up the latitude and longitude for that location and calculate the azimuth and elevation angles for the selected satellite. The USA ZipCodes database in the meter holds all of the zip codes for the entire United States of America, Puerto Rico, and the US Virgin Islands. There is also a database available for Canada (Canadian Postal). Type in the zip code or postal code using the numeric keypad and press ENTER.
XR-3 S2 ACM Module Operation Manual XR-3
Page 21 of 64
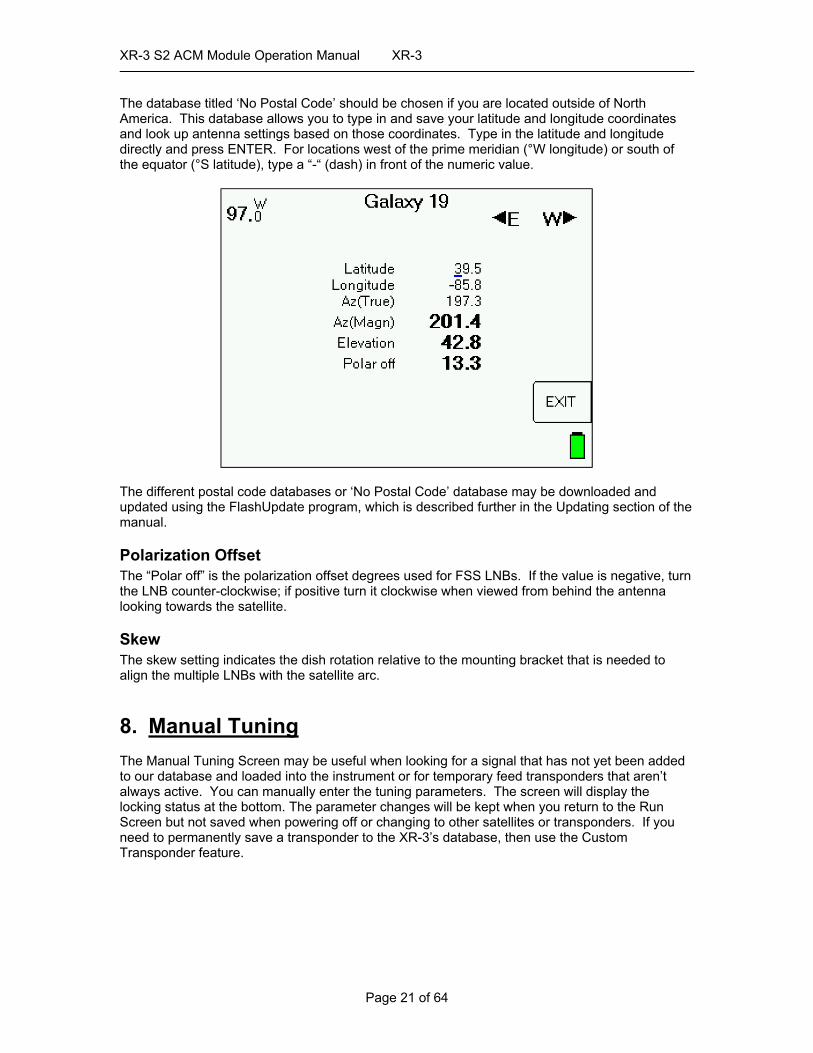
The database titled ‘No Postal Code’ should be chosen if you are located outside of North America. This database allows you to type in and save your latitude and longitude coordinates and look up antenna settings based on those coordinates. Type in the latitude and longitude directly and press ENTER. For locations west of the prime meridian (°W longitude) or south of the equator (°S latitude), type a “-“ (dash) in front of the numeric value.
The different postal code databases or ‘No Postal Code’ database may be downloaded and updated using the FlashUpdate program, which is described further in the Updating section of the manual.
Polarization Offset The “Polar off” is the polarization offset degrees used for FSS LNBs. If the value is negative, turn the LNB counter-clockwise; if positive turn it clockwise when viewed from behind the antenna looking towards the satellite.
Skew The skew setting indicates the dish rotation relative to the mounting bracket that is needed to align the multiple LNBs with the satellite arc.
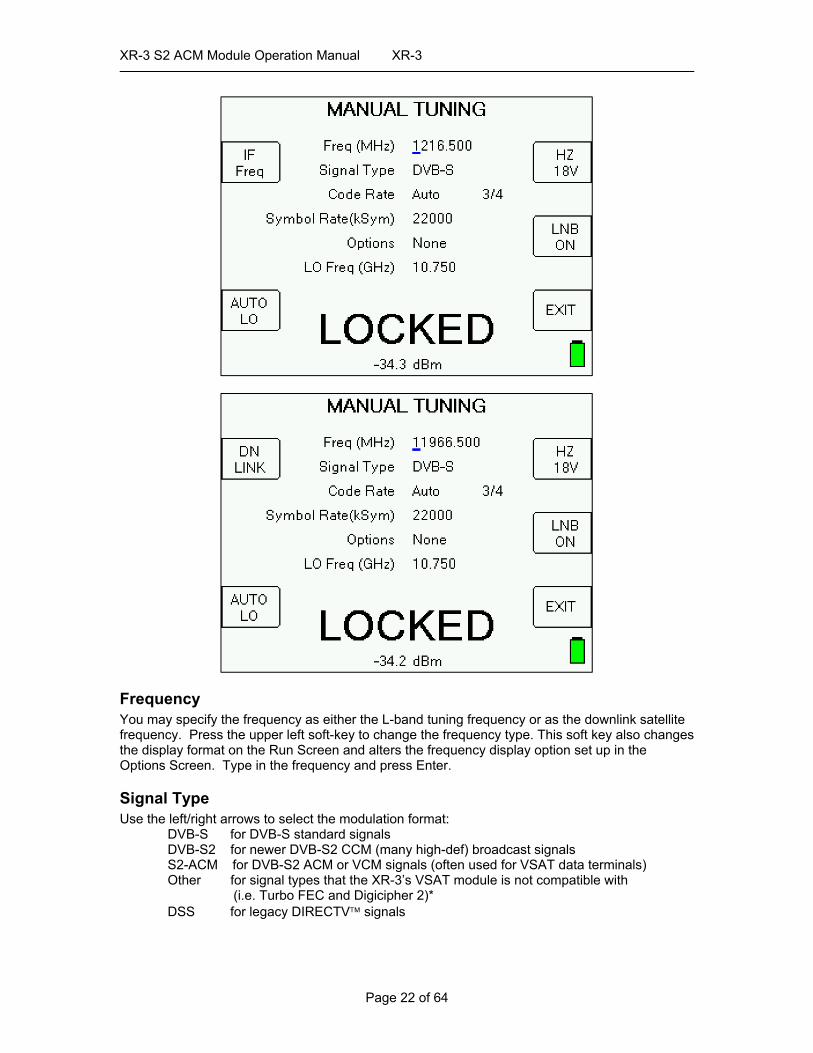
8. Manual Tuning The Manual Tuning Screen may be useful when looking for a signal that has not yet been added to our database and loaded into the instrument or for temporary feed transponders that aren’t always active. You can manually enter the tuning parameters. The screen will display the locking status at the bottom. The parameter changes will be kept when you return to the Run Screen but not saved when powering off or changing to other satellites or transponders. If you need to permanently save a transponder to the XR-3’s database, then use the Custom Transponder feature.
XR-3 S2 ACM Module Operation Manual XR-3
Page 22 of 64
Frequency You may specify the frequency as either the L-band tuning frequency or as the downlink satellite frequency. Press the upper left soft-key to change the frequency type. This soft key also changes the display format on the Run Screen and alters the frequency display option set up in the Options Screen. Type in the frequency and press Enter.
Signal Type Use the left/right arrows to select the modulation format: DVB-S for DVB-S standard signals DVB-S2 for newer DVB-S2 CCM (many high-def) broadcast signals S2-ACM for DVB-S2 ACM or VCM signals (often used for VSAT data terminals)
Other for signal types that the XR-3’s VSAT module is not compatible with (i.e. Turbo FEC and Digicipher 2)*
DSS for legacy DIRECTV signals
XR-3 S2 ACM Module Operation Manual XR-3
Page 23 of 64
*XR-3 will display only RF signal level (i.e. dBm) when tuned to a transponder with an incompatible signal type, but will not display lock or demodulated signal quality.
Code Rate For DSS, DVB-S, DVB-S2, you can select the desired code rate with the left/right arrow keys. DVB-S2 ACM uses only automatic code rate detection. Note: Code Rate is also referred to as ‘puncture code’ or often ‘FEC’ (Forward Error Correction) rate
Symbol Rate Use the keypad to enter the symbol rate (in kiloSymbols per second) and press Enter.
Options Use the left/right arrow keys to toggle through the options related to your chosen signal type. If DVB-S2 signal type is selected and you have chosen a specific code rate, then you may choose between ‘Pilot on’ and ‘Pilot off’. If your code rate is set to ‘Auto’, then your pilot status will automatically be set to ‘Pilot Auto’.
LO Frequency Normally, the LO frequency of the LNB is obtained from the system type selection and may change with different switch settings and polarities. This is the “AUTO” mode of operation. In rare circumstances, you may want to use the lower left key to change to “CUST” or custom mode and specify an LNB LO frequency directly. The LO (Local Oscillator) frequency is the difference between the downlink frequency and the L-band tuner frequency. High-side LO frequencies like those used in C-band LNBs and some stacking LNBs may be specified using a negative number.
LNB Control You may use the right side soft keys to change the LNB voltage, turn the LNB on or off, or change switch settings.
XR-3 S2 ACM Module Operation Manual XR-3
Page 24 of 64
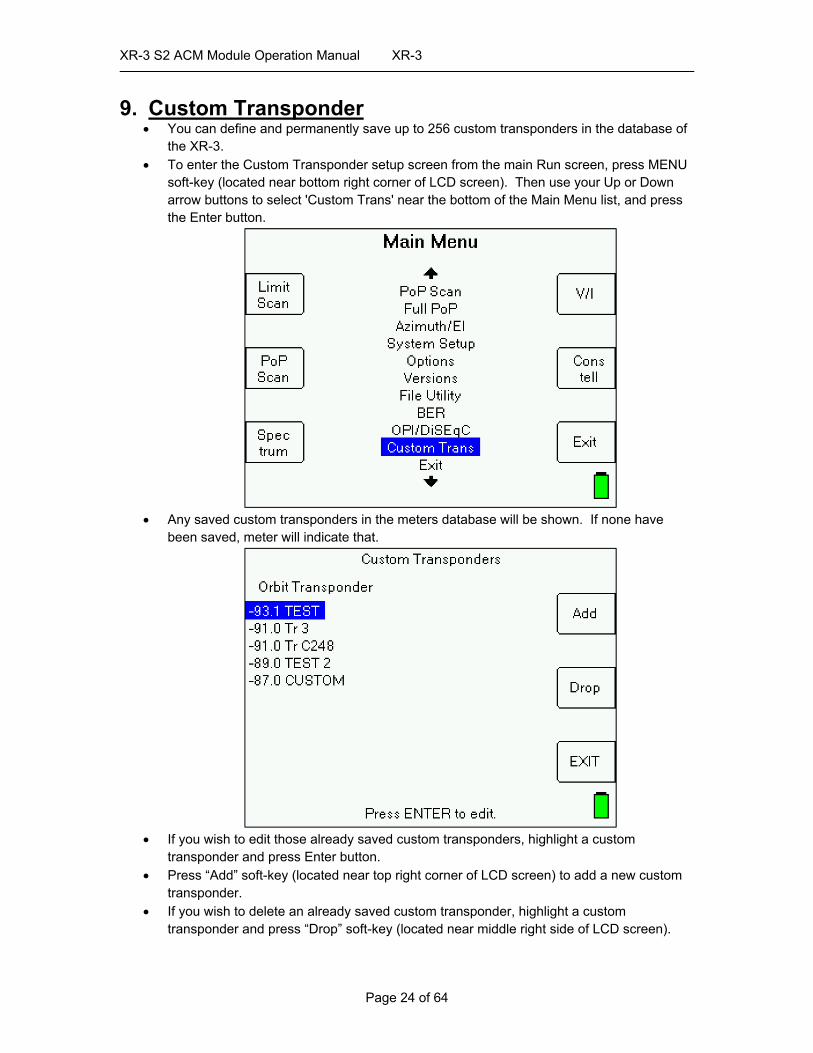
9. Custom Transponder You can define and permanently save up to 256 custom transponders in the database of
the XR-3. To enter the Custom Transponder setup screen from the main Run screen, press MENU
soft-key (located near bottom right corner of LCD screen). Then use your Up or Down arrow buttons to select 'Custom Trans' near the bottom of the Main Menu list, and press the Enter button.
Any saved custom transponders in the meters database will be shown. If none have
been saved, meter will indicate that.
If you wish to edit those already saved custom transponders, highlight a custom
transponder and press Enter button. Press “Add” soft-key (located near top right corner of LCD screen) to add a new custom
transponder. If you wish to delete an already saved custom transponder, highlight a custom
transponder and press “Drop” soft-key (located near middle right side of LCD screen).
XR-3 S2 ACM Module Operation Manual XR-3
Page 25 of 64
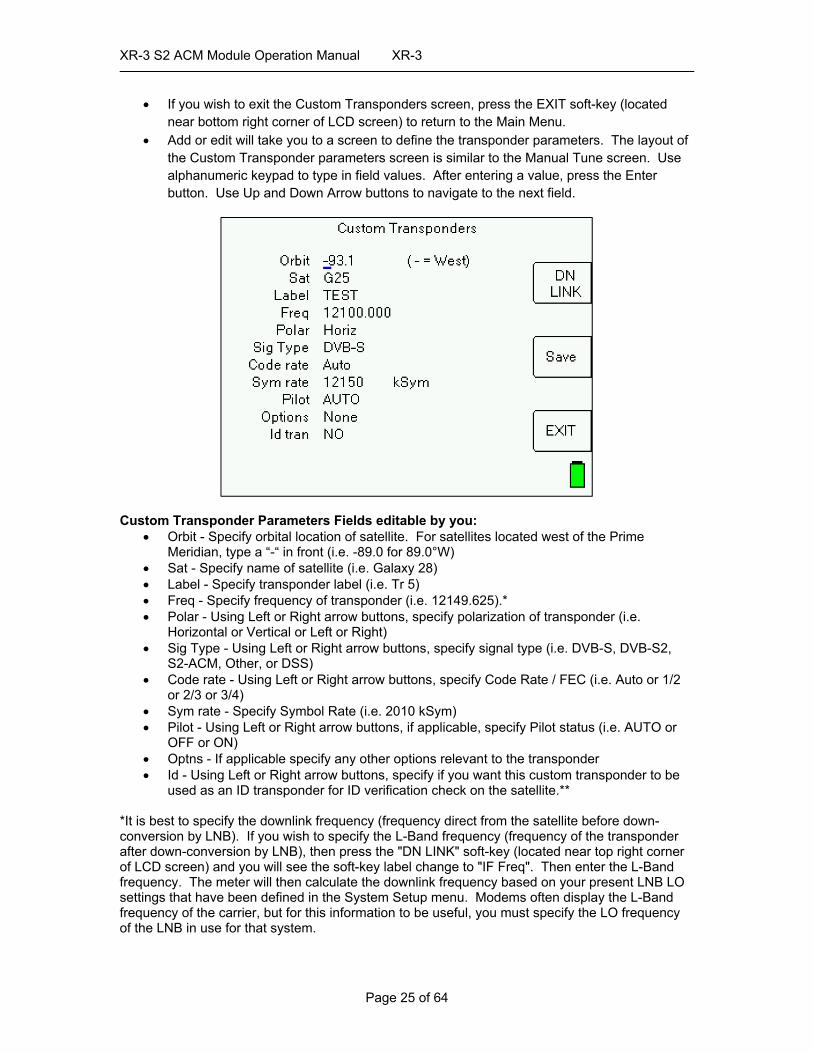
If you wish to exit the Custom Transponders screen, press the EXIT soft-key (located near bottom right corner of LCD screen) to return to the Main Menu.
Add or edit will take you to a screen to define the transponder parameters. The layout of the Custom Transponder parameters screen is similar to the Manual Tune screen. Use alphanumeric keypad to type in field values. After entering a value, press the Enter button. Use Up and Down Arrow buttons to navigate to the next field.
Custom Transponder Parameters Fields editable by you:
Orbit - Specify orbital location of satellite. For satellites located west of the Prime Meridian, type a “-“ in front (i.e. -89.0 for 89.0°W)
Sat - Specify name of satellite (i.e. Galaxy 28) Label - Specify transponder label (i.e. Tr 5) Freq - Specify frequency of transponder (i.e. 12149.625).* Polar - Using Left or Right arrow buttons, specify polarization of transponder (i.e.
Horizontal or Vertical or Left or Right) Sig Type - Using Left or Right arrow buttons, specify signal type (i.e. DVB-S, DVB-S2,
S2-ACM, Other, or DSS) Code rate - Using Left or Right arrow buttons, specify Code Rate / FEC (i.e. Auto or 1/2
or 2/3 or 3/4) Sym rate - Specify Symbol Rate (i.e. 2010 kSym) Pilot - Using Left or Right arrow buttons, if applicable, specify Pilot status (i.e. AUTO or
OFF or ON) Optns - If applicable specify any other options relevant to the transponder Id - Using Left or Right arrow buttons, specify if you want this custom transponder to be
used as an ID transponder for ID verification check on the satellite.** *It is best to specify the downlink frequency (frequency direct from the satellite before down-conversion by LNB). If you wish to specify the L-Band frequency (frequency of the transponder after down-conversion by LNB), then press the "DN LINK" soft-key (located near top right corner of LCD screen) and you will see the soft-key label change to "IF Freq". Then enter the L-Band frequency. The meter will then calculate the downlink frequency based on your present LNB LO settings that have been defined in the System Setup menu. Modems often display the L-Band frequency of the carrier, but for this information to be useful, you must specify the LO frequency of the LNB in use for that system.
XR-3 S2 ACM Module Operation Manual XR-3
Page 26 of 64
**If there is already an ID transponder for the satellite in the meter's database, then the custom transponder would become a 2nd ID transponder used for an additional level of checking. If there is not presently an ID transponder for the satellite in the meter's database, then the custom transponder would become the default transponder and sole ID transponder for that satellite. ***Remember that the XR-3 satellite meter is only designed to measure the downlink / receive / outbound signal. Please do not enter any transponder parameters for the uplink / transmit / inbound signal, as the parameters will not be of any utility in the meter.
Press “Save” to save the changes or the new transponder parameters. Press the "EXIT" soft-key (located near bottom right corner of LCD screen) if you wish to
exit the Custom Transponders editing screen without saving the changes or new transponder parameters.
The custom transponders will appear in the meter as if they are part of the Field Guide. As such, they will be usable and viewable in the Limit Scan and Proof of Performance (PoP Scan) features.
You can save up to 256 custom satellite transponders in the meter. If the custom transponder is not visible to the selected LNB and feed horn configuration, it
won’t appear (i.e. If you define a horizontal transponder and select a circular feed horn in the System Setup menu then you won’t see it displayed. If you define a C-Band transponder and select a Ku Band LNB in the System Setup menu then you won’t see it displayed)
Custom transponders do not have any beam/footprint info so they are considered visible in all geographic regions and therefore will appear in the meter, regardless of which geographic Region is chosen in the System Setup menu and which Field Guide is loaded.
XR-3 S2 ACM Module Operation Manual XR-3
Page 27 of 64
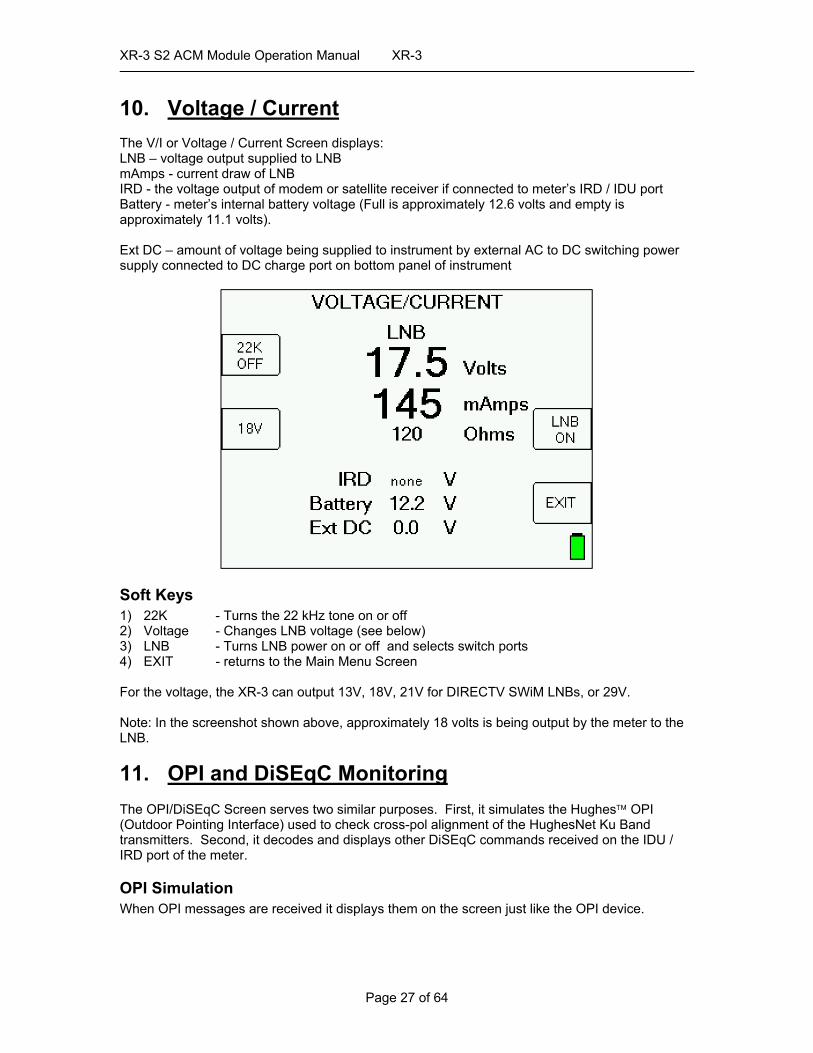
10. Voltage / Current The V/I or Voltage / Current Screen displays: LNB – voltage output supplied to LNB mAmps - current draw of LNB IRD - the voltage output of modem or satellite receiver if connected to meter’s IRD / IDU port Battery - meter’s internal battery voltage (Full is approximately 12.6 volts and empty is approximately 11.1 volts). Ext DC – amount of voltage being supplied to instrument by external AC to DC switching power supply connected to DC charge port on bottom panel of instrument
Soft Keys 1) 22K - Turns the 22 kHz tone on or off 2) Voltage - Changes LNB voltage (see below) 3) LNB - Turns LNB power on or off and selects switch ports 4) EXIT - returns to the Main Menu Screen For the voltage, the XR-3 can output 13V, 18V, 21V for DIRECTV SWiM LNBs, or 29V. Note: In the screenshot shown above, approximately 18 volts is being output by the meter to the LNB.
11. OPI and DiSEqC Monitoring The OPI/DiSEqC Screen serves two similar purposes. First, it simulates the Hughes OPI (Outdoor Pointing Interface) used to check cross-pol alignment of the HughesNet Ku Band transmitters. Second, it decodes and displays other DiSEqC commands received on the IDU / IRD port of the meter.
OPI Simulation When OPI messages are received it displays them on the screen just like the OPI device.

XR-3 S2 ACM Module Operation Manual XR-3
Page 28 of 64
HughesNet™ Cross-Pol Check Procedure 1) Align the dish using the receiving LNB just as you would a normal Ku band dish using the
XR-3’s main Run Screen. 2) Connect the modem and PC to the transmit and receive cables and run the HughesNet
software. 3) Using the PC’s internet browser, access the HughesNet modem setup screens. Ensure that
the OPI display is enabled and display signal strength. The signal strength must be displayed on the PC to generate the display shown on the meter.
4) Return to the dish and connect the XR-3 into the receiver cable. The XR-3’s ODU / LNB port should be connected to the LNB and the IDU / IRD port to the modem’s Rx port.
5) Go to the XR-3 OPI/DiSEqC Screen. This screen displays the numbers transmitted from the modem just like the OPI device.
6) Adjust the dish to peak the transmitter cross-pol quality number. The higher the number, the better the quality.
XR-3 S2 ACM Module Operation Manual XR-3
Page 29 of 64
DiSEqC Monitoring When other DiSEqC commands are received on the IDU / IRD port of the meter, they are displayed on the screen. The most common switch control commands are decoded into switch type and port selection, other commands may be displayed in their hexadecimal format.
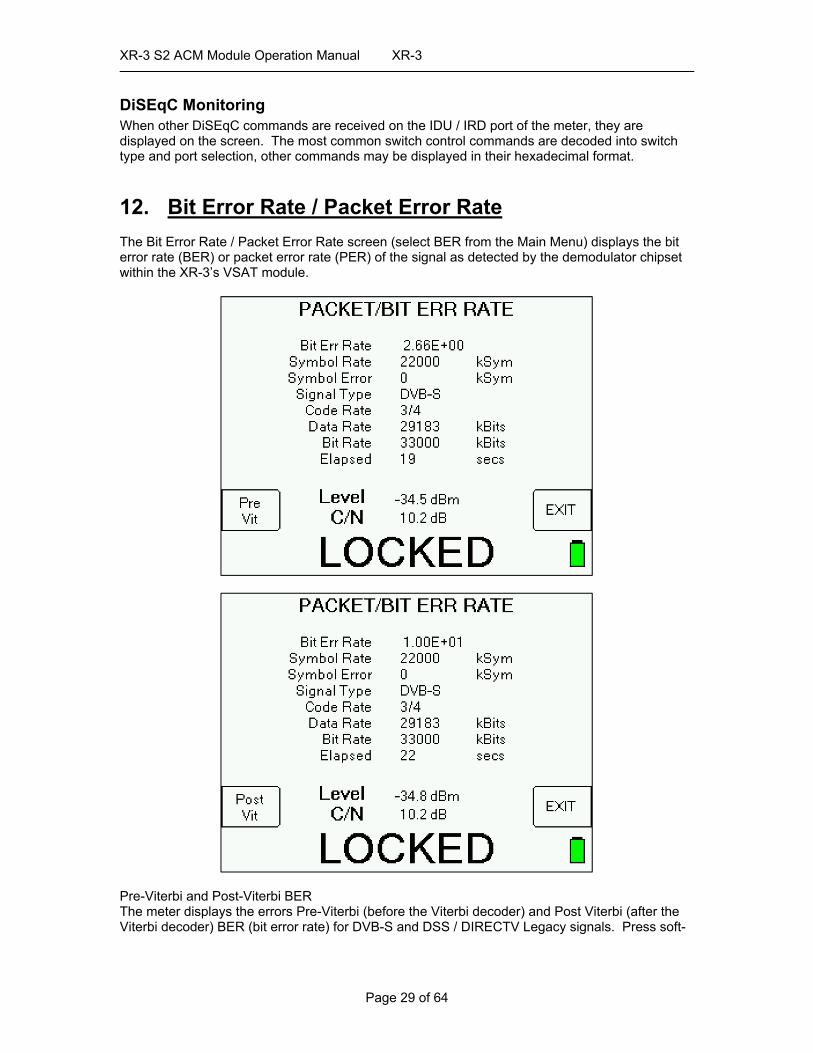
12. Bit Error Rate / Packet Error Rate The Bit Error Rate / Packet Error Rate screen (select BER from the Main Menu) displays the bit error rate (BER) or packet error rate (PER) of the signal as detected by the demodulator chipset within the XR-3’s VSAT module.
Pre-Viterbi and Post-Viterbi BER The meter displays the errors Pre-Viterbi (before the Viterbi decoder) and Post Viterbi (after the Viterbi decoder) BER (bit error rate) for DVB-S and DSS / DIRECTV Legacy signals. Press soft-
XR-3 S2 ACM Module Operation Manual XR-3
Page 30 of 64
key near bottom left corner to toggle between Pre-Viterbi (Pre Vit) and Post-Viterbi (Post Vit) BER. PER The meter displays the PER (packet error rate) for DVB-S2 signals. If the error rate is preceded by a less than sign (<) as in the example above, it indicates that no errors have yet been detected and so the bit error is not known but is less than the number given. The BER Screen accumulates errors as long as the screen is active. To reset the counters, exit and restart the screen. This test can only be performed when a signal lock is obtained. If the lock is lost, the rates are not shown and will be restarted when lock is re-obtained. In most cases, a one minute test is sufficient to determine the BER for the present conditions. As long as both rates continue to read less than some number (the < character is shown), then no errors have been detected and the system is working well. On the other hand, if you are testing during a rainstorm, you can expect some errors to occur. Meter displays: 1) BER error count* (for DVB-S and DSS signal types) or PER error count (for DVB-S2 signal
type) 2) Symbol rate (in kilo-symbols/second) 3) Symbol rate error 4) Signal type (i.e. DVB-S, DSS, DVB-S2, S2-ACM) 5) Code rate or bit puncture rate 6) Data rate – calculated rate of payload kilo-bits per second (post-FEC data rate) 7) Bit rate 8) Elapsed time counter (seconds) *Press soft-key near bottom left corner to toggle between Pre-Viterbi (Pre Vit) and Post-Viterbi (Post Vit) BER for DVB-S and DSS signal types.
XR-3 S2 ACM Module Operation Manual XR-3
Page 31 of 64
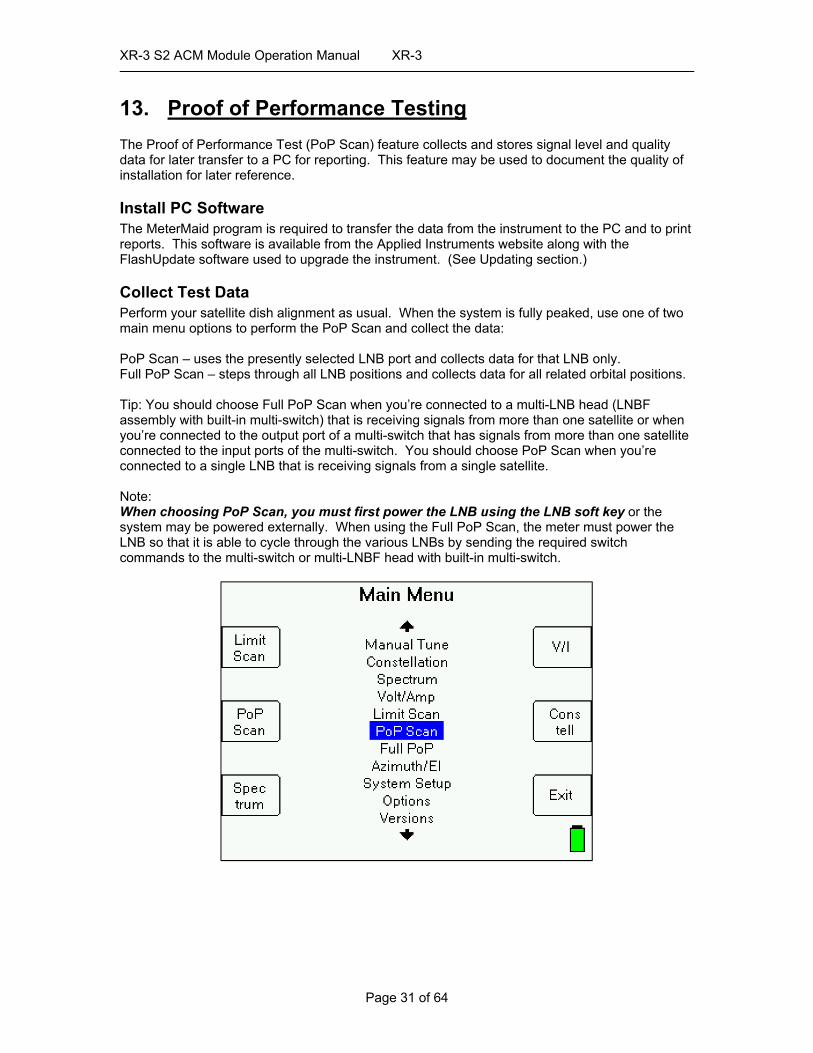
13. Proof of Performance Testing The Proof of Performance Test (PoP Scan) feature collects and stores signal level and quality data for later transfer to a PC for reporting. This feature may be used to document the quality of installation for later reference.
Install PC Software The MeterMaid program is required to transfer the data from the instrument to the PC and to print reports. This software is available from the Applied Instruments website along with the FlashUpdate software used to upgrade the instrument. (See Updating section.)
Collect Test Data Perform your satellite dish alignment as usual. When the system is fully peaked, use one of two main menu options to perform the PoP Scan and collect the data: PoP Scan – uses the presently selected LNB port and collects data for that LNB only. Full PoP Scan – steps through all LNB positions and collects data for all related orbital positions. Tip: You should choose Full PoP Scan when you’re connected to a multi-LNB head (LNBF assembly with built-in multi-switch) that is receiving signals from more than one satellite or when you’re connected to the output port of a multi-switch that has signals from more than one satellite connected to the input ports of the multi-switch. You should choose PoP Scan when you’re connected to a single LNB that is receiving signals from a single satellite. Note: When choosing PoP Scan, you must first power the LNB using the LNB soft key or the system may be powered externally. When using the Full PoP Scan, the meter must power the LNB so that it is able to cycle through the various LNBs by sending the required switch commands to the multi-switch or multi-LNBF head with built-in multi-switch.
XR-3 S2 ACM Module Operation Manual XR-3
Page 32 of 64
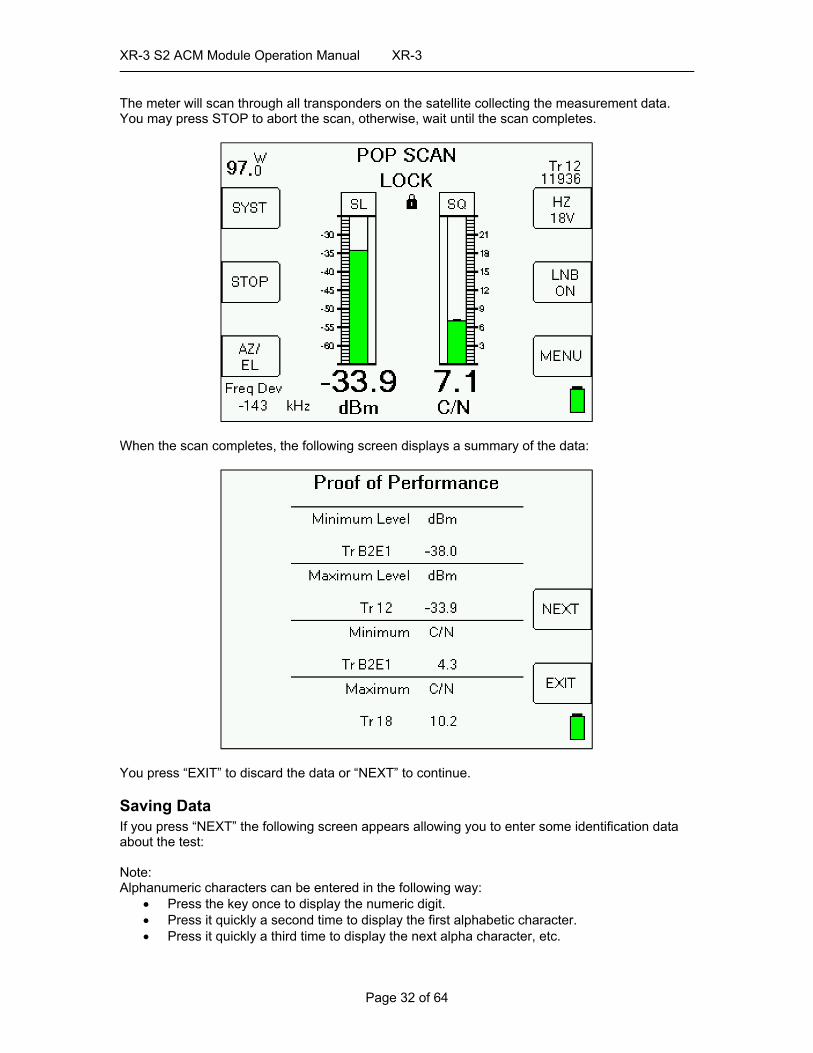
The meter will scan through all transponders on the satellite collecting the measurement data. You may press STOP to abort the scan, otherwise, wait until the scan completes.
When the scan completes, the following screen displays a summary of the data:
You press “EXIT” to discard the data or “NEXT” to continue.
Saving Data If you press “NEXT” the following screen appears allowing you to enter some identification data about the test: Note: Alphanumeric characters can be entered in the following way:
Press the key once to display the numeric digit. Press it quickly a second time to display the first alphabetic character. Press it quickly a third time to display the next alpha character, etc.
XR-3 S2 ACM Module Operation Manual XR-3
Page 33 of 64
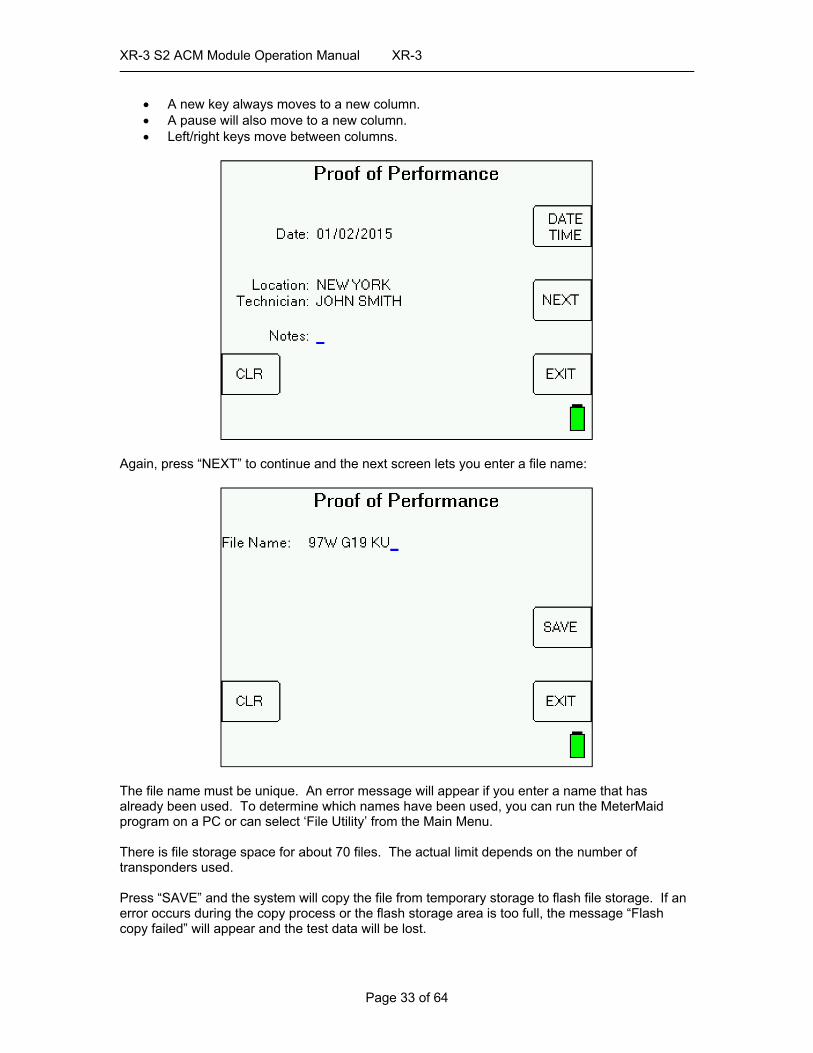
A new key always moves to a new column. A pause will also move to a new column. Left/right keys move between columns.
Again, press “NEXT” to continue and the next screen lets you enter a file name:
The file name must be unique. An error message will appear if you enter a name that has already been used. To determine which names have been used, you can run the MeterMaid program on a PC or can select ‘File Utility’ from the Main Menu. There is file storage space for about 70 files. The actual limit depends on the number of transponders used. Press “SAVE” and the system will copy the file from temporary storage to flash file storage. If an error occurs during the copy process or the flash storage area is too full, the message “Flash copy failed” will appear and the test data will be lost.

XR-3 S2 ACM Module Operation Manual XR-3
Page 34 of 64
If you fill up the file storage space, you can transfer all of the stored files to a PC and then erase the meter’s flash memory to create new space. You can erase the stored files by using the MeterMaid program on a PC or by pressing the ‘Format’ soft-key in the File Utility screen.

XR-3 S2 ACM Module Operation Manual XR-3
Page 35 of 64
Transfer Data File to PC After the data is collected you can take the meter back to your PC and transfer the files to the PC disk using the MeterMaid program, which can be downloaded from the Applied Instruments website. The MeterMaid program, MeterMaid.exe, will most likely be found in the default location of C:\FlashUpdate\ 1) Connect the meter to your PC using the supplied USB data transfer cable and turn the meter
on. 2) Start MeterMaid after the meter has completed its 5 second boot-up countdown. An icon that
looks like the XR-3 should be installed on your desktop for this purpose.
3) The File Transfer window appears somewhat like the following example.
The box on the left displays the files stored on the meter. The box on the right shows the files stored on the PC. The files are stored in a text file format (.txt) so they can be easily opened in Excel or other PC applications. By default, the text files are stored in a “Data” folder under the “Applied” folder where the MeterMaid program is installed (in the folder C:\FlashUpdate\Data ). You may navigate to other folders by double clicking on the folder icons shown in the destination file box. The [parent] folder icon takes you up one level.
XR-3 S2 ACM Module Operation Manual XR-3
Page 36 of 64
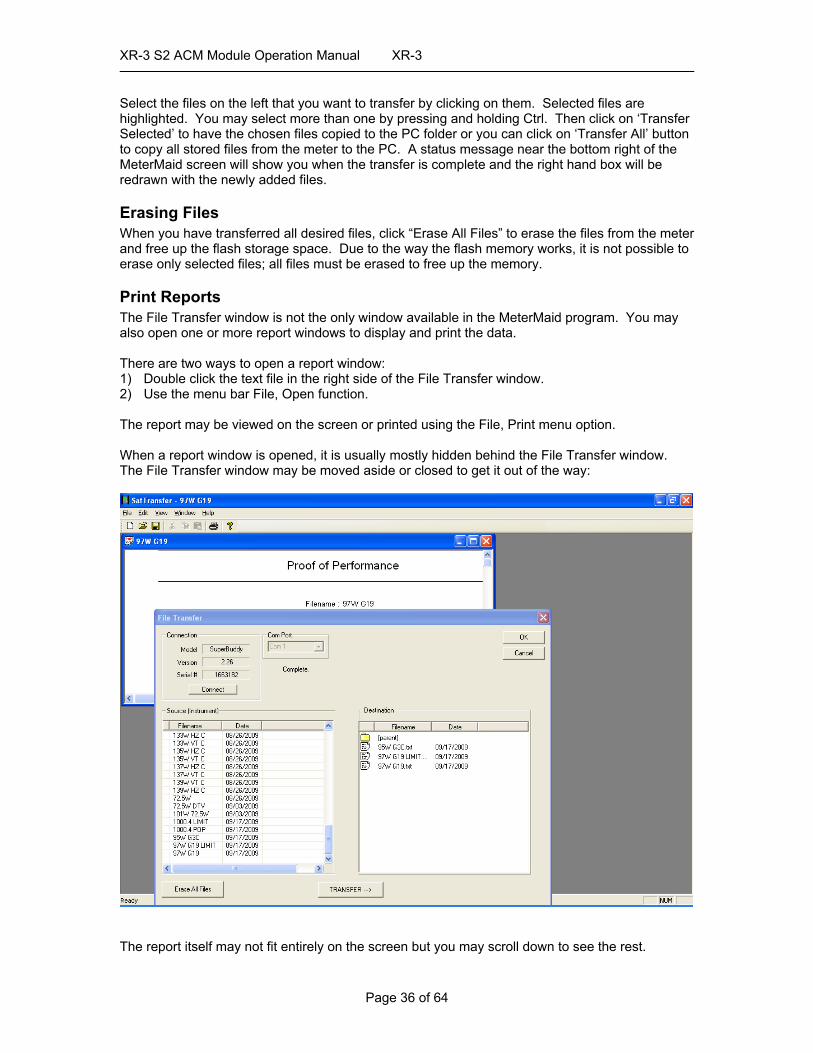
Select the files on the left that you want to transfer by clicking on them. Selected files are highlighted. You may select more than one by pressing and holding Ctrl. Then click on ‘Transfer Selected’ to have the chosen files copied to the PC folder or you can click on ‘Transfer All’ button to copy all stored files from the meter to the PC. A status message near the bottom right of the MeterMaid screen will show you when the transfer is complete and the right hand box will be redrawn with the newly added files.
Erasing Files When you have transferred all desired files, click “Erase All Files” to erase the files from the meter and free up the flash storage space. Due to the way the flash memory works, it is not possible to erase only selected files; all files must be erased to free up the memory.
Print Reports The File Transfer window is not the only window available in the MeterMaid program. You may also open one or more report windows to display and print the data. There are two ways to open a report window: 1) Double click the text file in the right side of the File Transfer window. 2) Use the menu bar File, Open function. The report may be viewed on the screen or printed using the File, Print menu option. When a report window is opened, it is usually mostly hidden behind the File Transfer window. The File Transfer window may be moved aside or closed to get it out of the way:
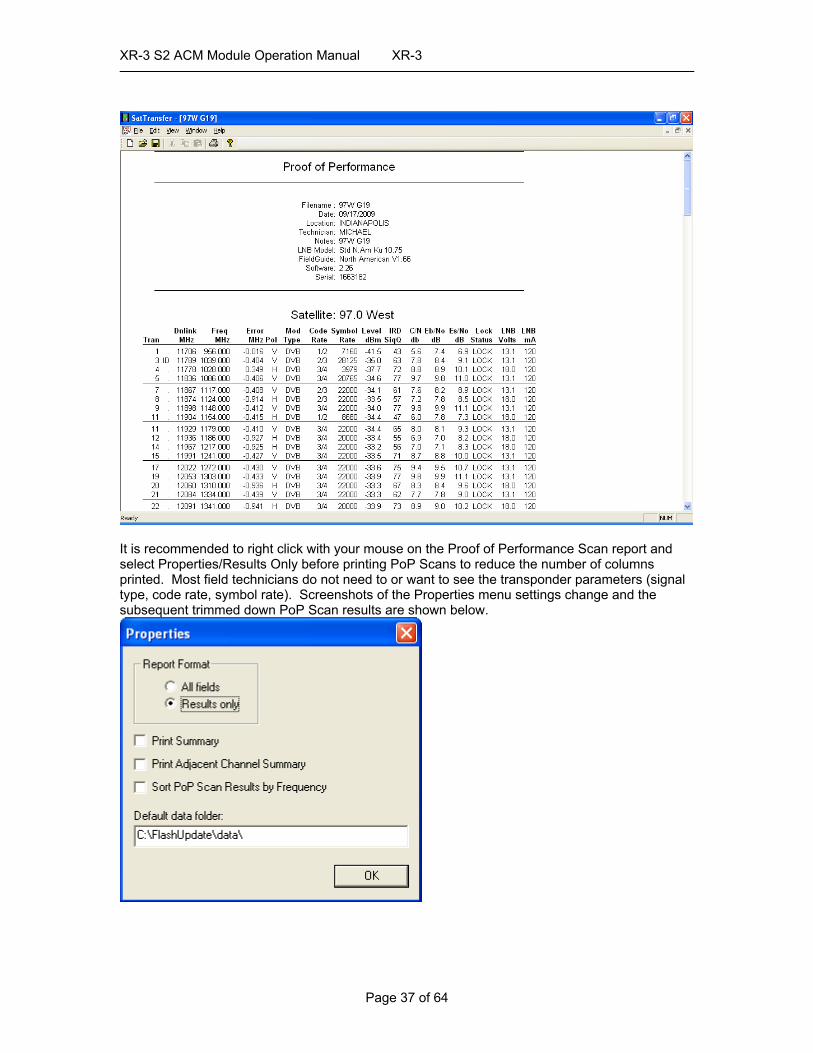
The report itself may not fit entirely on the screen but you may scroll down to see the rest.
XR-3 S2 ACM Module Operation Manual XR-3
Page 37 of 64
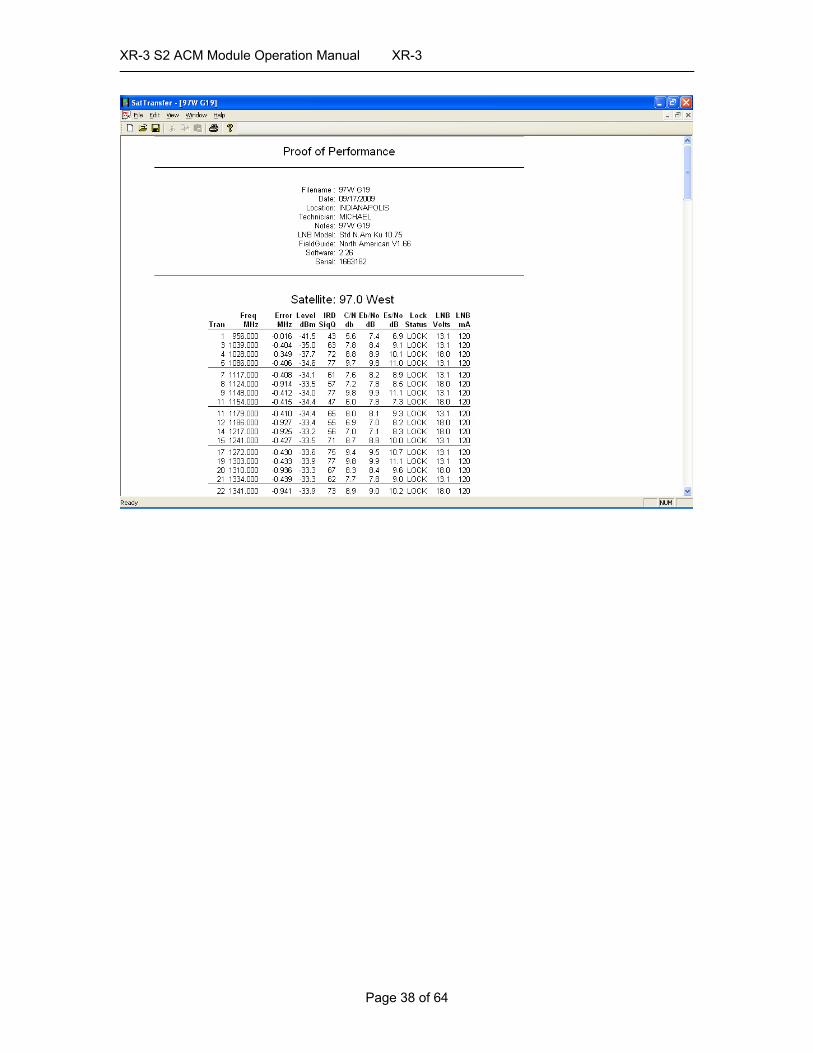
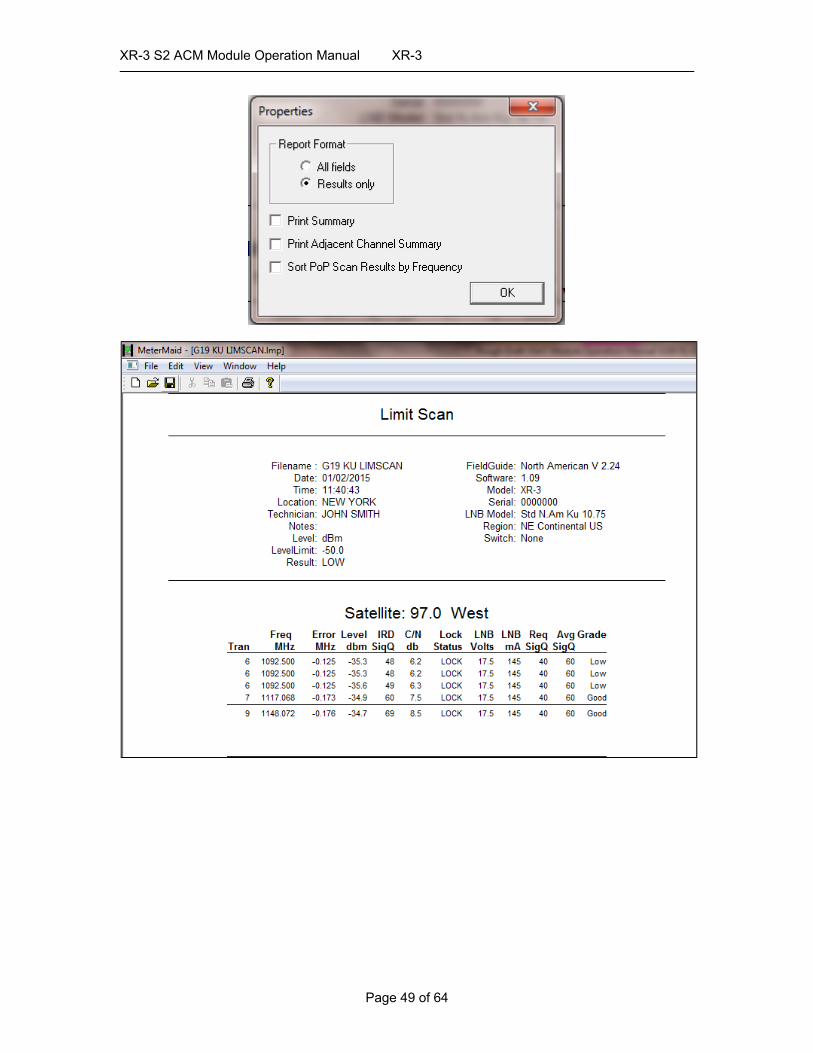
It is recommended to right click with your mouse on the Proof of Performance Scan report and select Properties/Results Only before printing PoP Scans to reduce the number of columns printed. Most field technicians do not need to or want to see the transponder parameters (signal type, code rate, symbol rate). Screenshots of the Properties menu settings change and the subsequent trimmed down PoP Scan results are shown below.
XR-3 S2 ACM Module Operation Manual XR-3
Page 38 of 64

XR-3 S2 ACM Module Operation Manual XR-3
Page 39 of 64
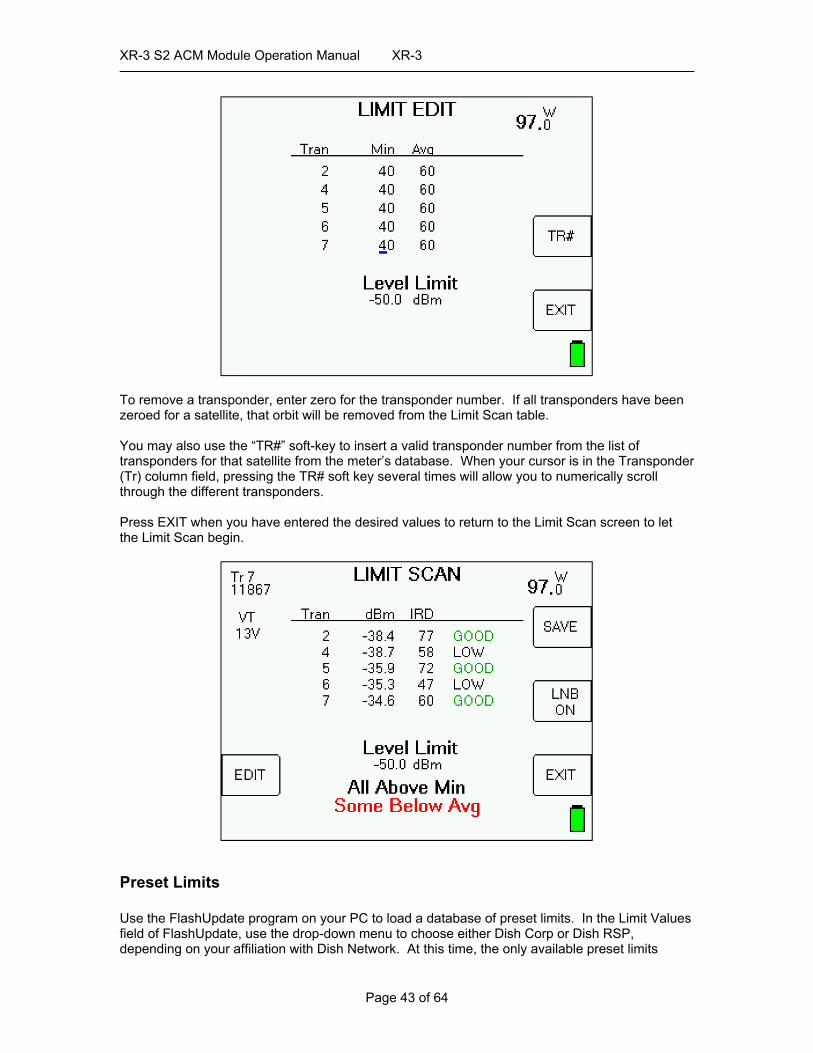
15. Limit Scan The XR-3 Signal Level Meter includes a Limit Scan feature that performs a quick scan of up to 5 transponders on a satellite, checks the values against pre-determined limits, and provides a pass/fail indication. Use this test to quickly verify your installation against recommended level and quality values.
Specifications 1) Up to 5 transponders per satellite may be tested 2) Up to 10 total satellites may be stored 3) Signal quality test (IRD signal quality number – i.e. 0 to 100 signal quality scale) 4) Signal level test 5) Signal quality limits defined for individual transponders 6) Signal level limit defined overall 7) Limits are changeable and are stored in the instrument
Setup Use the normal meter setup for whatever type of system you are installing. When the installation is complete, select “Limit Scan” from the main menu:
XR-3 S2 ACM Module Operation Manual XR-3
Page 40 of 64
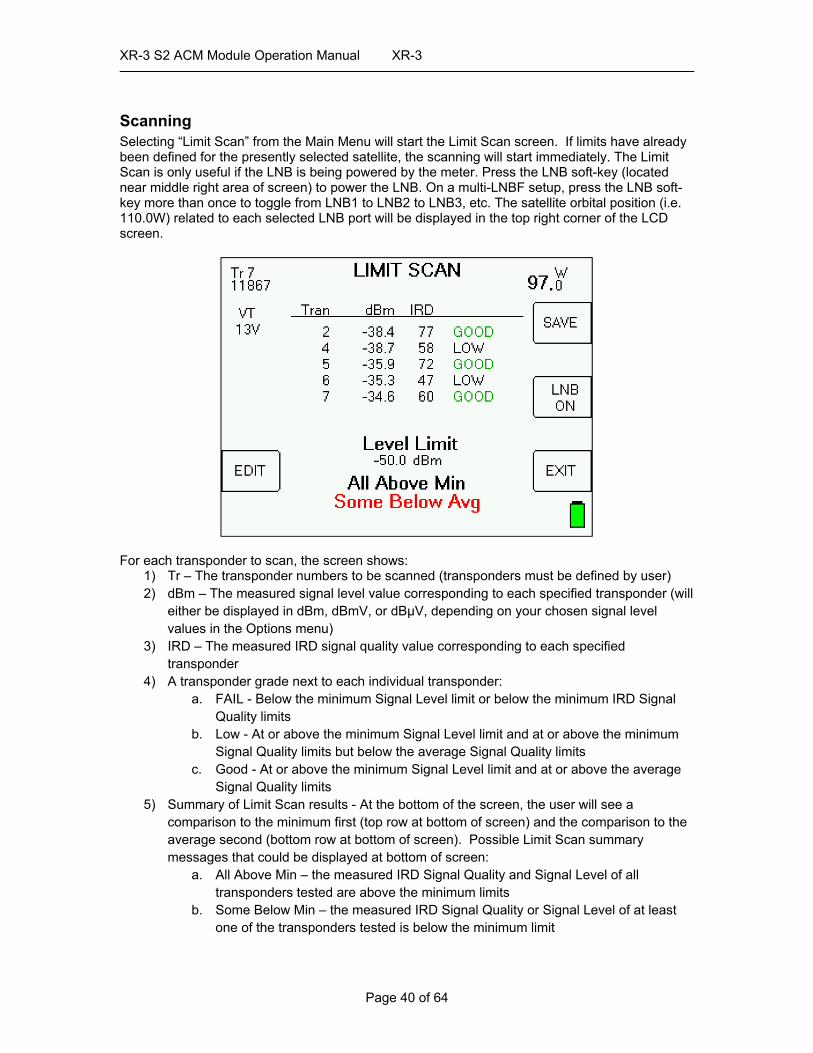
Scanning Selecting “Limit Scan” from the Main Menu will start the Limit Scan screen. If limits have already been defined for the presently selected satellite, the scanning will start immediately. The Limit Scan is only useful if the LNB is being powered by the meter. Press the LNB soft-key (located near middle right area of screen) to power the LNB. On a multi-LNBF setup, press the LNB soft-key more than once to toggle from LNB1 to LNB2 to LNB3, etc. The satellite orbital position (i.e. 110.0W) related to each selected LNB port will be displayed in the top right corner of the LCD screen.
For each transponder to scan, the screen shows:
1) Tr – The transponder numbers to be scanned (transponders must be defined by user) 2) dBm – The measured signal level value corresponding to each specified transponder (will
either be displayed in dBm, dBmV, or dBµV, depending on your chosen signal level values in the Options menu)
3) IRD – The measured IRD signal quality value corresponding to each specified transponder
4) A transponder grade next to each individual transponder: a. FAIL - Below the minimum Signal Level limit or below the minimum IRD Signal
Quality limits b. Low - At or above the minimum Signal Level limit and at or above the minimum
Signal Quality limits but below the average Signal Quality limits c. Good - At or above the minimum Signal Level limit and at or above the average
Signal Quality limits 5) Summary of Limit Scan results - At the bottom of the screen, the user will see a
comparison to the minimum first (top row at bottom of screen) and the comparison to the average second (bottom row at bottom of screen). Possible Limit Scan summary messages that could be displayed at bottom of screen:
a. All Above Min – the measured IRD Signal Quality and Signal Level of all transponders tested are above the minimum limits
b. Some Below Min – the measured IRD Signal Quality or Signal Level of at least one of the transponders tested is below the minimum limit
XR-3 S2 ACM Module Operation Manual XR-3
Page 41 of 64
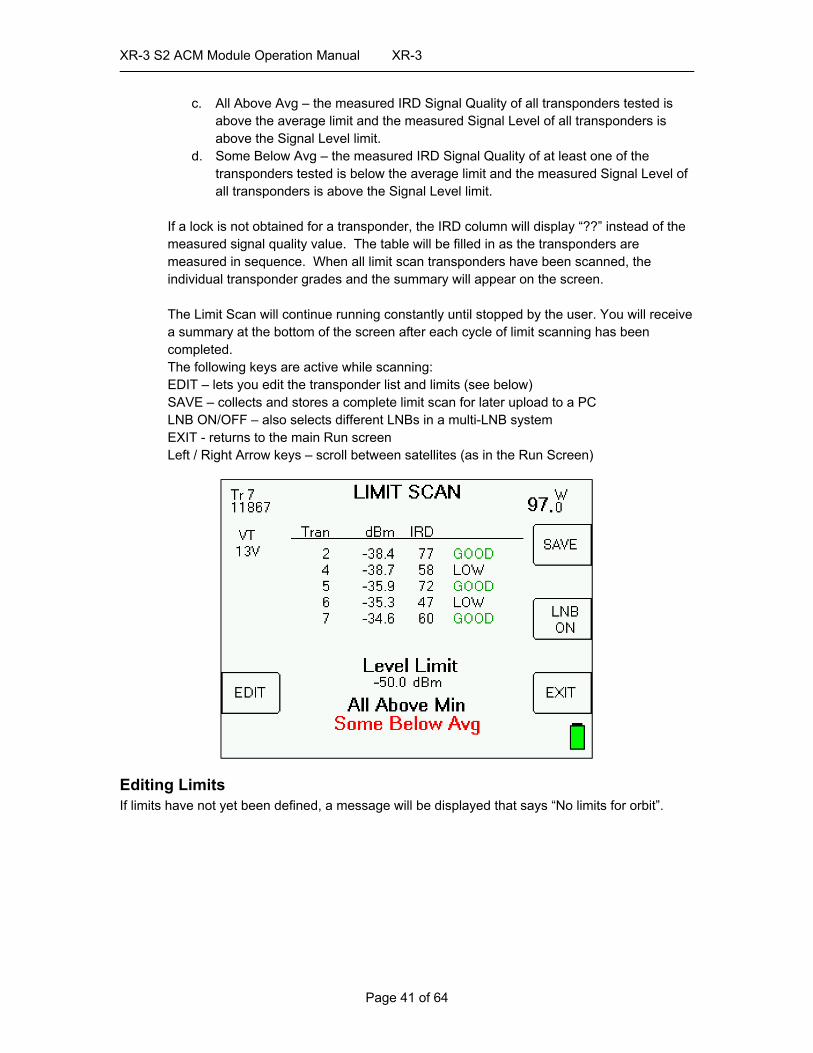
c. All Above Avg – the measured IRD Signal Quality of all transponders tested is above the average limit and the measured Signal Level of all transponders is above the Signal Level limit.
d. Some Below Avg – the measured IRD Signal Quality of at least one of the transponders tested is below the average limit and the measured Signal Level of all transponders is above the Signal Level limit.
If a lock is not obtained for a transponder, the IRD column will display “??” instead of the measured signal quality value. The table will be filled in as the transponders are measured in sequence. When all limit scan transponders have been scanned, the individual transponder grades and the summary will appear on the screen. The Limit Scan will continue running constantly until stopped by the user. You will receive a summary at the bottom of the screen after each cycle of limit scanning has been completed. The following keys are active while scanning: EDIT – lets you edit the transponder list and limits (see below) SAVE – collects and stores a complete limit scan for later upload to a PC LNB ON/OFF – also selects different LNBs in a multi-LNB system EXIT - returns to the main Run screen Left / Right Arrow keys – scroll between satellites (as in the Run Screen)
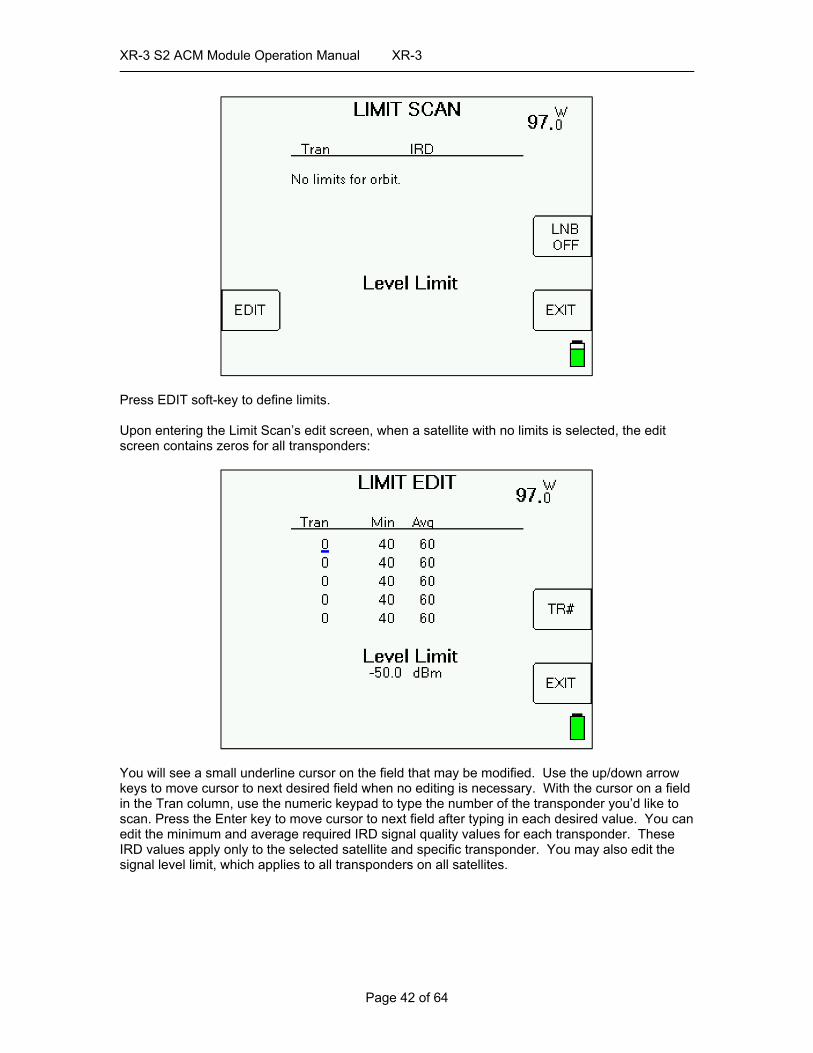
Editing Limits If limits have not yet been defined, a message will be displayed that says “No limits for orbit”.
XR-3 S2 ACM Module Operation Manual XR-3
Page 42 of 64
Press EDIT soft-key to define limits. Upon entering the Limit Scan’s edit screen, when a satellite with no limits is selected, the edit screen contains zeros for all transponders:
You will see a small underline cursor on the field that may be modified. Use the up/down arrow keys to move cursor to next desired field when no editing is necessary. With the cursor on a field in the Tran column, use the numeric keypad to type the number of the transponder you’d like to scan. Press the Enter key to move cursor to next field after typing in each desired value. You can edit the minimum and average required IRD signal quality values for each transponder. These IRD values apply only to the selected satellite and specific transponder. You may also edit the signal level limit, which applies to all transponders on all satellites.
XR-3 S2 ACM Module Operation Manual XR-3
Page 43 of 64
To remove a transponder, enter zero for the transponder number. If all transponders have been zeroed for a satellite, that orbit will be removed from the Limit Scan table. You may also use the “TR#” soft-key to insert a valid transponder number from the list of transponders for that satellite from the meter’s database. When your cursor is in the Transponder (Tr) column field, pressing the TR# soft key several times will allow you to numerically scroll through the different transponders. Press EXIT when you have entered the desired values to return to the Limit Scan screen to let the Limit Scan begin.
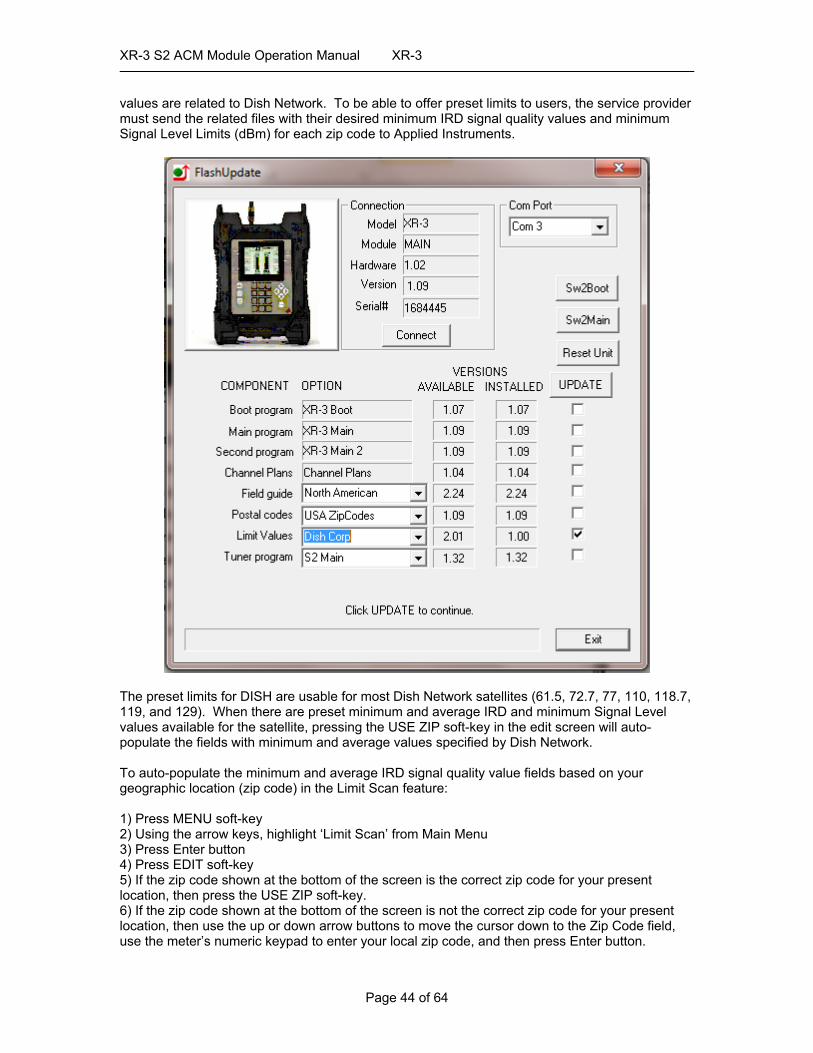
Preset Limits Use the FlashUpdate program on your PC to load a database of preset limits. In the Limit Values field of FlashUpdate, use the drop-down menu to choose either Dish Corp or Dish RSP, depending on your affiliation with Dish Network. At this time, the only available preset limits
XR-3 S2 ACM Module Operation Manual XR-3
Page 44 of 64
values are related to Dish Network. To be able to offer preset limits to users, the service provider must send the related files with their desired minimum IRD signal quality values and minimum Signal Level Limits (dBm) for each zip code to Applied Instruments.
The preset limits for DISH are usable for most Dish Network satellites (61.5, 72.7, 77, 110, 118.7, 119, and 129). When there are preset minimum and average IRD and minimum Signal Level values available for the satellite, pressing the USE ZIP soft-key in the edit screen will auto-populate the fields with minimum and average values specified by Dish Network. To auto-populate the minimum and average IRD signal quality value fields based on your geographic location (zip code) in the Limit Scan feature: 1) Press MENU soft-key 2) Using the arrow keys, highlight ‘Limit Scan’ from Main Menu 3) Press Enter button 4) Press EDIT soft-key 5) If the zip code shown at the bottom of the screen is the correct zip code for your present location, then press the USE ZIP soft-key. 6) If the zip code shown at the bottom of the screen is not the correct zip code for your present location, then use the up or down arrow buttons to move the cursor down to the Zip Code field, use the meter’s numeric keypad to enter your local zip code, and then press Enter button.

XR-3 S2 ACM Module Operation Manual XR-3
Page 45 of 64
7) Press the EXIT soft-key to return to the main Limit Scan screen to begin running a Limit Scan.
Errors If you enter an invalid transponder number, the error will be detected after you press DONE and the system tries to scan that channel. The following error will appear and the invalid transponder will be removed from the list.
XR-3 S2 ACM Module Operation Manual XR-3
Page 46 of 64
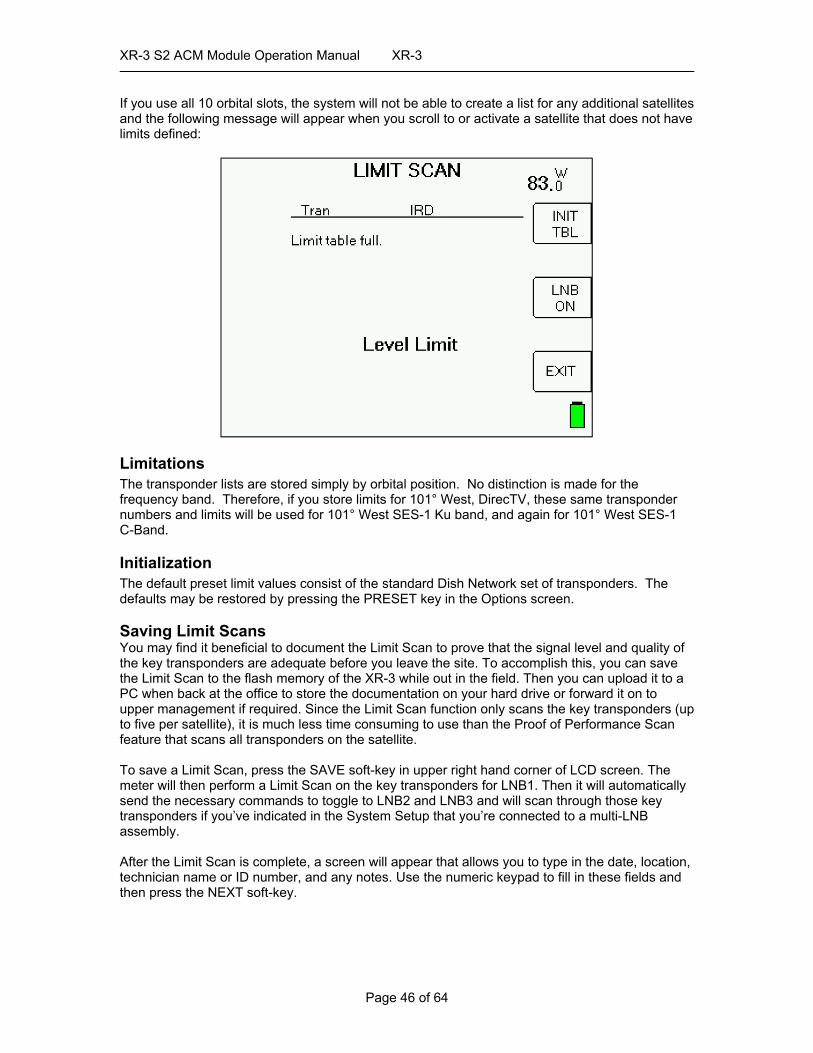
If you use all 10 orbital slots, the system will not be able to create a list for any additional satellites and the following message will appear when you scroll to or activate a satellite that does not have limits defined:
Limitations The transponder lists are stored simply by orbital position. No distinction is made for the frequency band. Therefore, if you store limits for 101° West, DirecTV, these same transponder numbers and limits will be used for 101° West SES-1 Ku band, and again for 101° West SES-1 C-Band.
Initialization The default preset limit values consist of the standard Dish Network set of transponders. The defaults may be restored by pressing the PRESET key in the Options screen. Saving Limit Scans You may find it beneficial to document the Limit Scan to prove that the signal level and quality of the key transponders are adequate before you leave the site. To accomplish this, you can save the Limit Scan to the flash memory of the XR-3 while out in the field. Then you can upload it to a PC when back at the office to store the documentation on your hard drive or forward it on to upper management if required. Since the Limit Scan function only scans the key transponders (up to five per satellite), it is much less time consuming to use than the Proof of Performance Scan feature that scans all transponders on the satellite. To save a Limit Scan, press the SAVE soft-key in upper right hand corner of LCD screen. The meter will then perform a Limit Scan on the key transponders for LNB1. Then it will automatically send the necessary commands to toggle to LNB2 and LNB3 and will scan through those key transponders if you’ve indicated in the System Setup that you’re connected to a multi-LNB assembly.
After the Limit Scan is complete, a screen will appear that allows you to type in the date, location, technician name or ID number, and any notes. Use the numeric keypad to fill in these fields and then press the NEXT soft-key.

XR-3 S2 ACM Module Operation Manual XR-3
Page 47 of 64
Then you must type in a unique file name for this Limit Scan. An error message will appear if you enter a name that has already been used. To determine which names have been used, you can run the MeterMaid program on a PC or can select ‘File Utility’ from the Main Menu of the meter. After you type in the file name using the numeric keypad, press “SAVE” and the system will copy the file from temporary storage to flash file storage.
If an error occurs during the copy process or if the flash storage area is too full, the message “Flash copy failed” will appear and the test data will be lost. There is file storage space for about 70 files. The actual limit depends on the number of transponders used.
XR-3 S2 ACM Module Operation Manual XR-3
Page 48 of 64
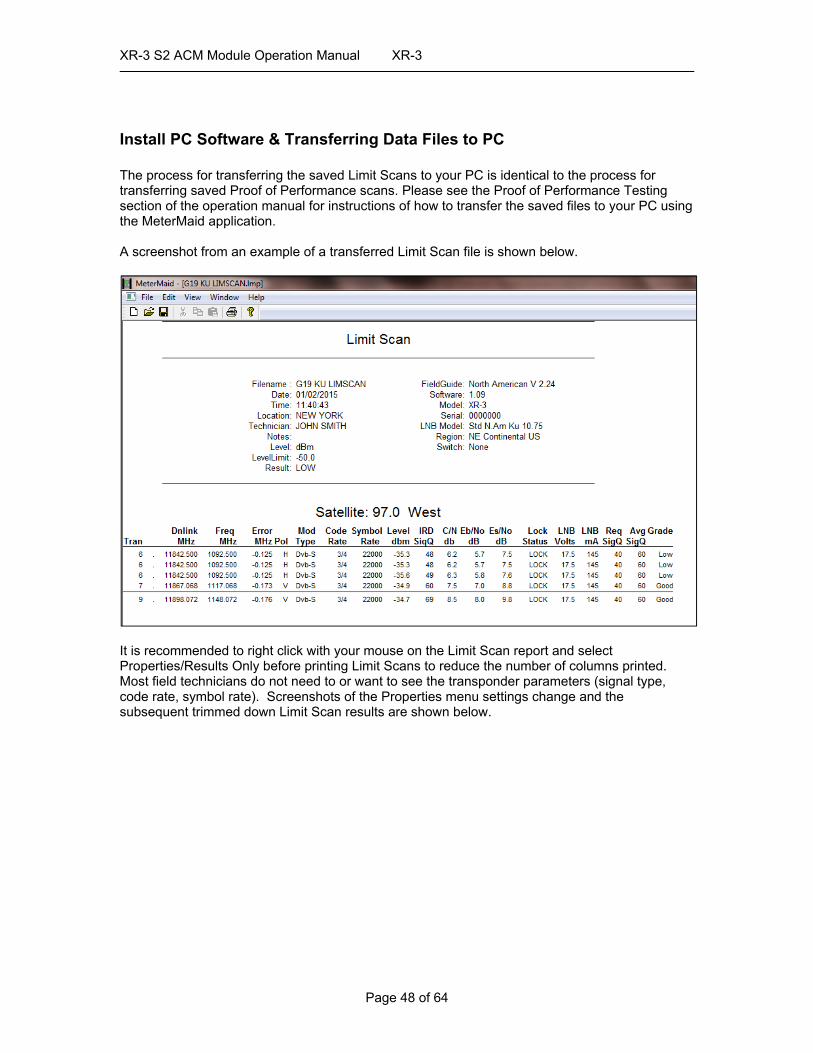
Install PC Software & Transferring Data Files to PC The process for transferring the saved Limit Scans to your PC is identical to the process for transferring saved Proof of Performance scans. Please see the Proof of Performance Testing section of the operation manual for instructions of how to transfer the saved files to your PC using the MeterMaid application. A screenshot from an example of a transferred Limit Scan file is shown below.
It is recommended to right click with your mouse on the Limit Scan report and select Properties/Results Only before printing Limit Scans to reduce the number of columns printed. Most field technicians do not need to or want to see the transponder parameters (signal type, code rate, symbol rate). Screenshots of the Properties menu settings change and the subsequent trimmed down Limit Scan results are shown below.
XR-3 S2 ACM Module Operation Manual XR-3
Page 49 of 64
XR-3 S2 ACM Module Operation Manual XR-3
Page 50 of 64
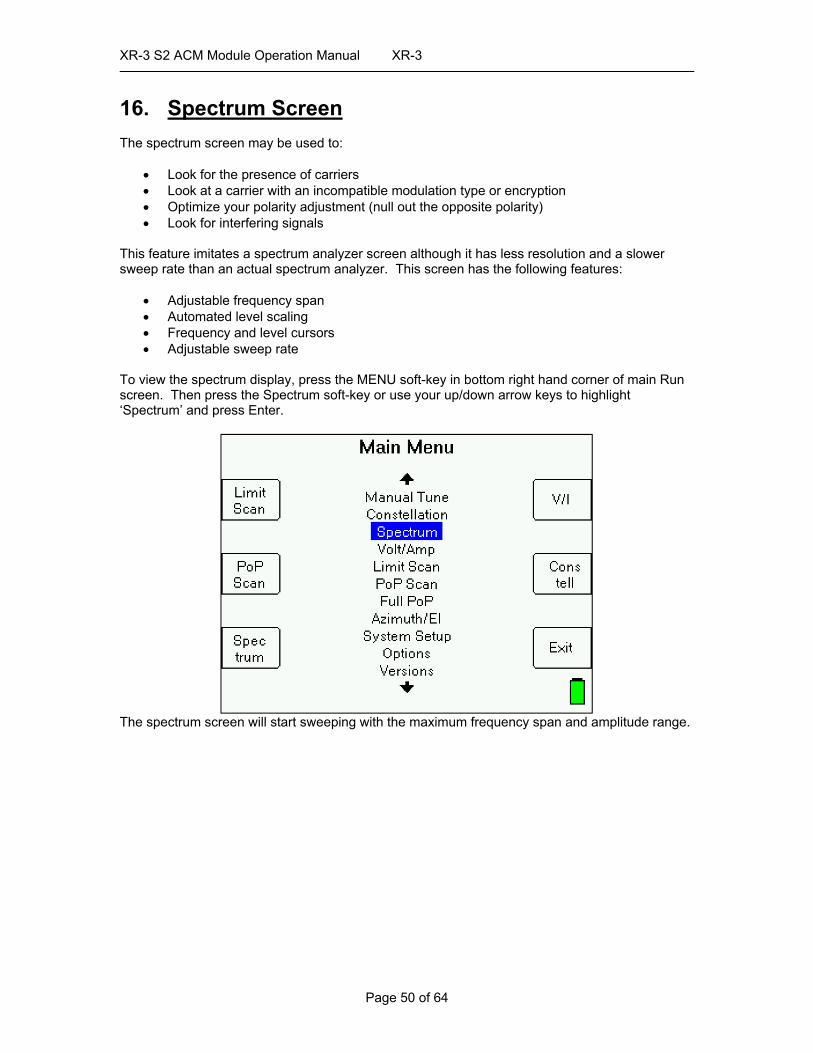
16. Spectrum Screen The spectrum screen may be used to:
Look for the presence of carriers Look at a carrier with an incompatible modulation type or encryption Optimize your polarity adjustment (null out the opposite polarity) Look for interfering signals
This feature imitates a spectrum analyzer screen although it has less resolution and a slower sweep rate than an actual spectrum analyzer. This screen has the following features:
Adjustable frequency span Automated level scaling Frequency and level cursors Adjustable sweep rate
To view the spectrum display, press the MENU soft-key in bottom right hand corner of main Run screen. Then press the Spectrum soft-key or use your up/down arrow keys to highlight ‘Spectrum’ and press Enter.
The spectrum screen will start sweeping with the maximum frequency span and amplitude range.
XR-3 S2 ACM Module Operation Manual XR-3
Page 51 of 64
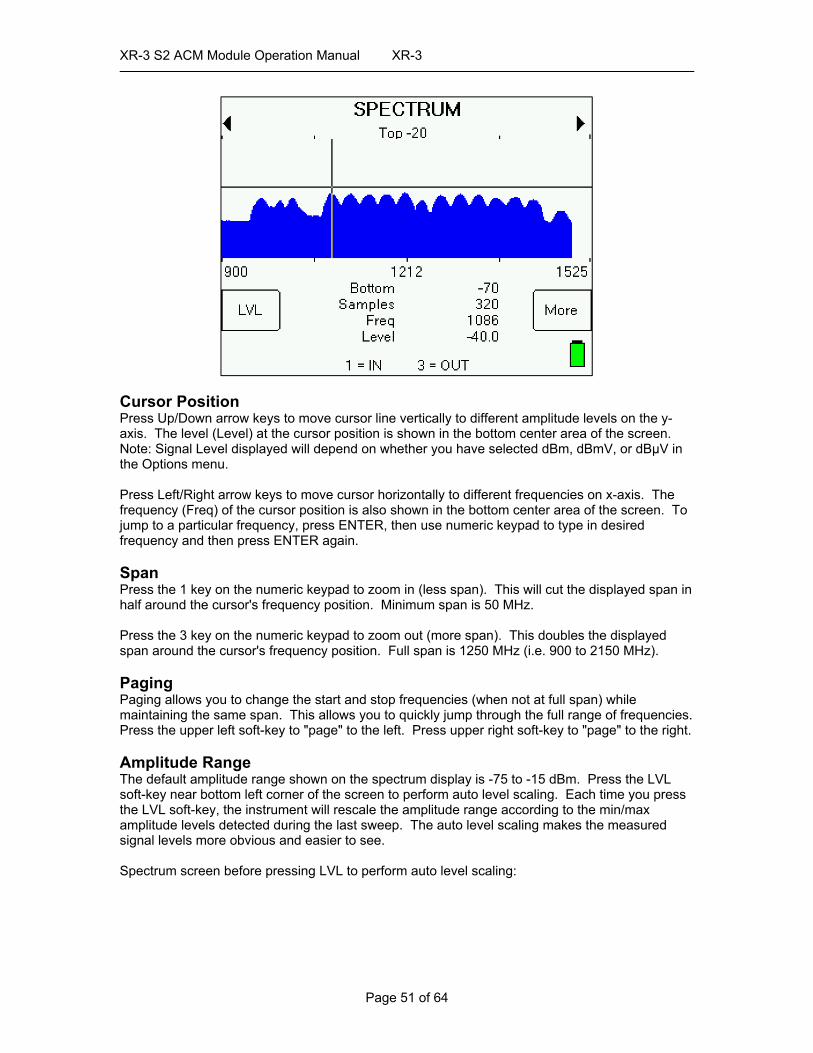
Cursor Position Press Up/Down arrow keys to move cursor line vertically to different amplitude levels on the y-axis. The level (Level) at the cursor position is shown in the bottom center area of the screen. Note: Signal Level displayed will depend on whether you have selected dBm, dBmV, or dBµV in the Options menu. Press Left/Right arrow keys to move cursor horizontally to different frequencies on x-axis. The frequency (Freq) of the cursor position is also shown in the bottom center area of the screen. To jump to a particular frequency, press ENTER, then use numeric keypad to type in desired frequency and then press ENTER again. Span Press the 1 key on the numeric keypad to zoom in (less span). This will cut the displayed span in half around the cursor's frequency position. Minimum span is 50 MHz. Press the 3 key on the numeric keypad to zoom out (more span). This doubles the displayed span around the cursor's frequency position. Full span is 1250 MHz (i.e. 900 to 2150 MHz). Paging Paging allows you to change the start and stop frequencies (when not at full span) while maintaining the same span. This allows you to quickly jump through the full range of frequencies. Press the upper left soft-key to "page" to the left. Press upper right soft-key to "page" to the right. Amplitude Range The default amplitude range shown on the spectrum display is -75 to -15 dBm. Press the LVL soft-key near bottom left corner of the screen to perform auto level scaling. Each time you press the LVL soft-key, the instrument will rescale the amplitude range according to the min/max amplitude levels detected during the last sweep. The auto level scaling makes the measured signal levels more obvious and easier to see. Spectrum screen before pressing LVL to perform auto level scaling:
XR-3 S2 ACM Module Operation Manual XR-3
Page 52 of 64
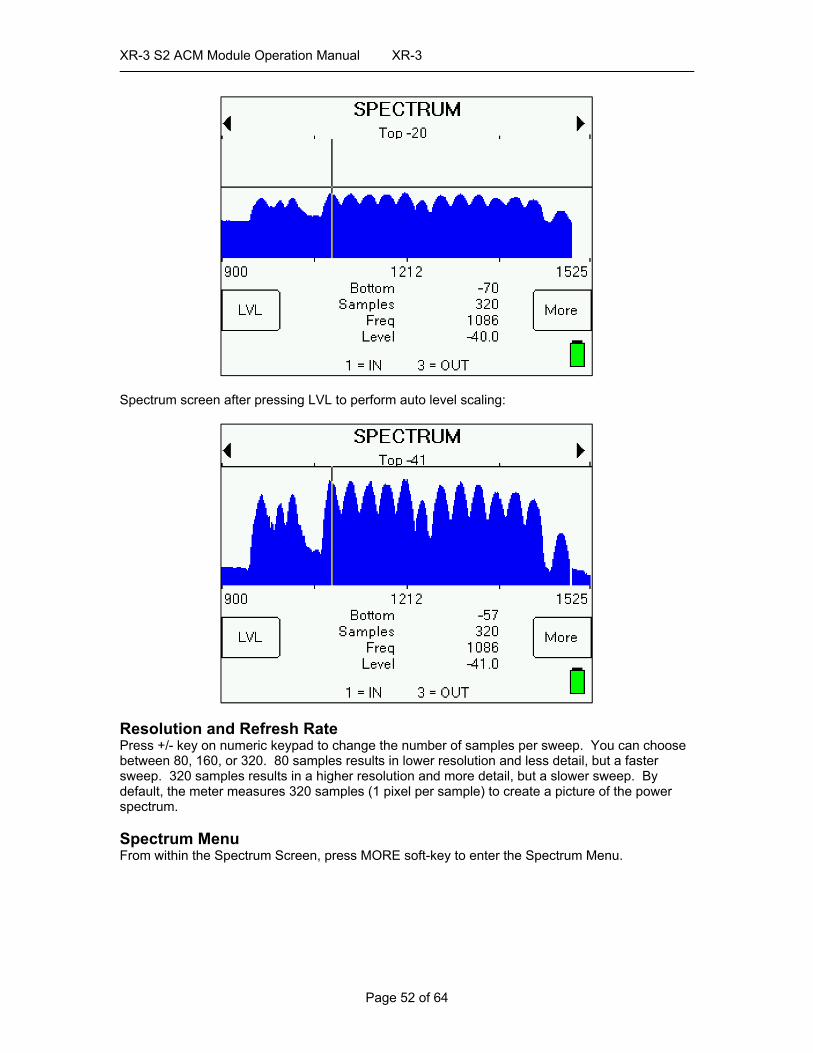
Spectrum screen after pressing LVL to perform auto level scaling:
Resolution and Refresh Rate Press +/- key on numeric keypad to change the number of samples per sweep. You can choose between 80, 160, or 320. 80 samples results in lower resolution and less detail, but a faster sweep. 320 samples results in a higher resolution and more detail, but a slower sweep. By default, the meter measures 320 samples (1 pixel per sample) to create a picture of the power spectrum. Spectrum Menu From within the Spectrum Screen, press MORE soft-key to enter the Spectrum Menu.
XR-3 S2 ACM Module Operation Manual XR-3
Page 53 of 64
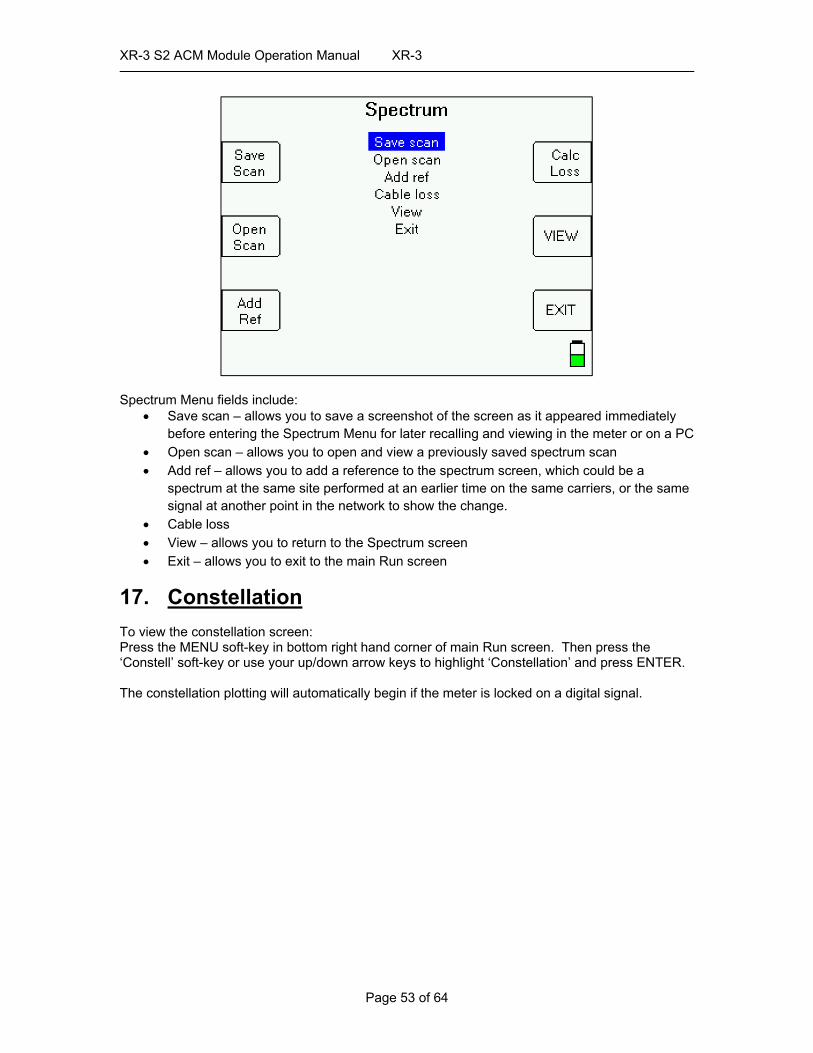
Spectrum Menu fields include:
Save scan – allows you to save a screenshot of the screen as it appeared immediately before entering the Spectrum Menu for later recalling and viewing in the meter or on a PC
Open scan – allows you to open and view a previously saved spectrum scan Add ref – allows you to add a reference to the spectrum screen, which could be a
spectrum at the same site performed at an earlier time on the same carriers, or the same signal at another point in the network to show the change.
Cable loss View – allows you to return to the Spectrum screen Exit – allows you to exit to the main Run screen
17. Constellation To view the constellation screen: Press the MENU soft-key in bottom right hand corner of main Run screen. Then press the ‘Constell’ soft-key or use your up/down arrow keys to highlight ‘Constellation’ and press ENTER. The constellation plotting will automatically begin if the meter is locked on a digital signal.
XR-3 S2 ACM Module Operation Manual XR-3
Page 54 of 64
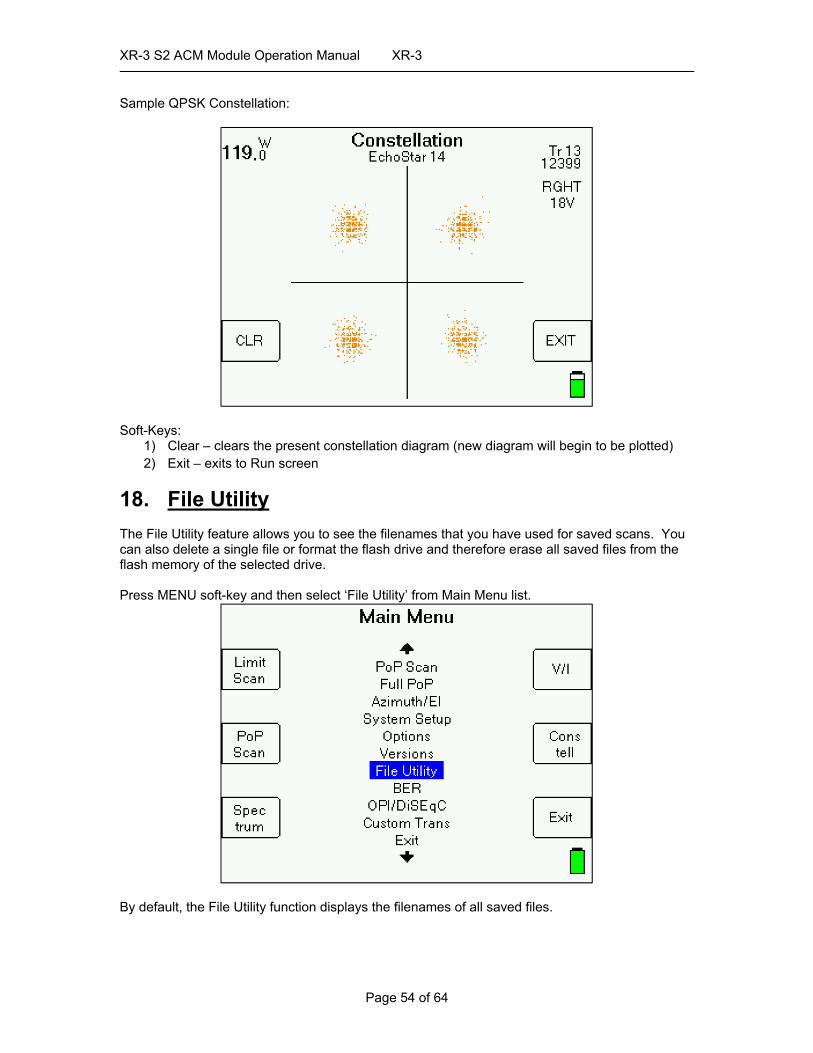
Sample QPSK Constellation:
Soft-Keys: 1) Clear – clears the present constellation diagram (new diagram will begin to be plotted) 2) Exit – exits to Run screen
18. File Utility The File Utility feature allows you to see the filenames that you have used for saved scans. You can also delete a single file or format the flash drive and therefore erase all saved files from the flash memory of the selected drive. Press MENU soft-key and then select ‘File Utility’ from Main Menu list.
By default, the File Utility function displays the filenames of all saved files.

XR-3 S2 ACM Module Operation Manual XR-3
Page 55 of 64
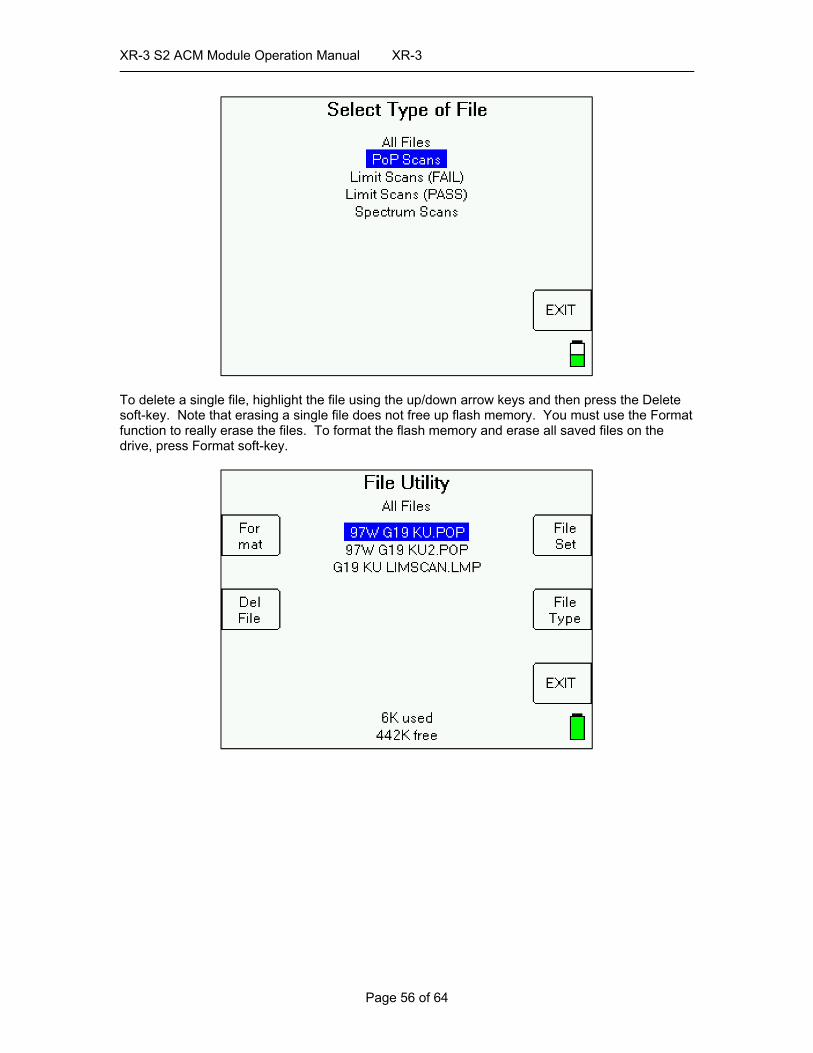
To filter the saved files, first press the File Set soft-key and then use up/down arrow keys to select “Satellite Files”, then press Enter. Then press the File Type soft-key and use up/down arrow keys to select desired file type (i.e. PoP Scans, Limit Scans, Spectrum Scans), then press Enter.
XR-3 S2 ACM Module Operation Manual XR-3
Page 56 of 64
To delete a single file, highlight the file using the up/down arrow keys and then press the Delete soft-key. Note that erasing a single file does not free up flash memory. You must use the Format function to really erase the files. To format the flash memory and erase all saved files on the drive, press Format soft-key.

XR-3 S2 ACM Module Operation Manual XR-3
Page 57 of 64

XR-3 S2 ACM Module Operation Manual XR-3
Page 58 of 64
Each satellite file type is designated by a different file type extension: Limit Scans (fail) = .LMF Limit Scans (pass) = .LMP PoP Scans = .POP Spectrum Scans = .SPC
19. Updating Your Meter Updates to the Field Guide and to the instrument firmware are available from the Applied Instruments website. See Software Updating section in XR-3 base operation manual for more information.
15. Power
LNB Power The LNB current is limited to different values under different conditions:
Current Limit 1) Normal battery operation: 780 mAmps 2) Charger active (AC): 780 mAmps 3) IRD power to LNB: 950 mAmps
Under conditions 1 and 2, an inrush current of 900 mAmps is allowed for a short period of time.
Battery Charge 1) Charging: Use either the AC to DC switching power supply or the 12VDC vehicle charger.
To fully charge a dead battery, it should require approximately 3 hours. It is okay to leave the meter charging all night since the meter will go into trickle charge mode when the battery is almost fully charged. During cold weather keep the XR-3 indoors in a warm environment while charging. The battery charge temperature range is 41°F to 100°F or 5°C to 38°C.
XR-3 S2 ACM Module Operation Manual XR-3
Page 59 of 64
2) Discharge / Charge: Before initial use of the meter you should fully discharge the battery
and then recharge overnight. To quickly discharge the battery, disable the automatic shut-off in the Options menu, connect-to and power an LNB until the meter shuts off. To fully discharge the battery, disconnect from the LNB, power up the meter and let it die from powering itself.
3) Battery Charge Symbol: The battery symbol indicating remaining battery life in the lower
right corner of the LCD display can be misleading. If not powering an LNB it may display full, even if it is not. It is more accurate when connected to an LNB load. It is normal for the battery symbol of a fully charged battery to quickly drop by ¼ when powering an LNB. The symbol should remain in the middle two segments for the longest time period, and will again drop faster when the last battery symbol segment is displayed. In summary the symbol drops by 25% quickly, remains in the middle 50% the longest, and then the last 25% drops quickly. The symbol’s behavior is nonlinear. The battery charge indicator is based on the internal battery voltage, which changes slowly during the normal period of operation but quickly when the battery is either fully charged or nearly discharged. Therefore, the battery indicator will only appear full or empty for a short time. Most of the time, it will appear ½ or ¾ full. When the charge indicator shows ¼ charge, you will need to charge it soon. It will shut off very soon after the indicator goes to empty.
4) Automatic Shutoff: If desired you can activate the automatic shutoff feature. To activate
it, press MENU OPTIONS and then scroll to the Shutdown field with your Up/Down arrows and use the Left/Right arrows to choose the desired auto shut-down time (5 min, 10 min, 15 min, NONE). The auto shutdown feature is turned off (set to NONE) in its default state.
5) LNB Power Awareness: Only power the LNB while taking measurements. Avoid
powering an LNB while not actually taking measurements.
6) Attempting to turn on a unit when the battery contains insufficient charge may result in beeps and/or a flash on the LCD but will not harm the unit.
AC Power When 110VAC or 220VAC power is applied via the external AC to DC switching power supply, it supplies 14VDC power to charge the battery, run the meter, and power the LNB. In this case, the power available to the LNB is limited to 750 mAmps to avoid overdriving the power circuit and the battery charging circuit.
DC Power When external 12VDC power is provided from a vehicle, it supplies enough power only to charge the battery.

XR-3 S2 ACM Module Operation Manual XR-3
Page 60 of 64
16. Troubleshooting / FAQs
a) I receive an error message stating: “Error: LNB under voltage, over current, or short” i) Replace top (Signal In port) F-connector barrel. Use a 7/16" wrench to loosen
existing barrel. Install new F-connector barrel and only tighten to 20 inch pounds of torque with wrench after finger-tightening. Warning: Do NOT over-tighten!
ii) Ensure that you have the latest available version of Field Guide and Software loaded. If you don't, you must update meter's software using the FlashUpdate program.
iii) If issue still remains, contact Applied Instruments' Tech Support department and request a RMA# to send the instrument to the factory for inspection and repair.
b) While I have the LNB connected to the ODU / LNB port of the meter with a coax cable
and the LNB power is turned on, I don't even see any signal level shown on left bar graph. It just says "UNDER". i) Replace top (Signal In port) F-connector barrel. Use a 7/16" wrench to loosen
existing barrel. Install new F-connector barrel and only tighten to 20 inch pounds of torque with wrench after finger-tightening. Warning: Do NOT over-tighten!
c) While attempting to perform a Limit Scan, I receive an Error message saying "ERROR:
Key transponder not found or invalid". i) Turn the meter off and on. Then go to MENU/OPTIONS and press the PRESET soft-
key in the lower left corner of the LCD screen. Then exit back to the MAIN MENU and try to run your Limit Scan again.
d) I believe my dish is properly aligned, but I'm not getting a LOCK on the meter for the
desired satellite. i) Ensure that you have the latest available version of Field Guide and Software loaded.
If you don't, you must update meter's software using the FlashUpdate program. ii) Ensure that you are using the proper LNB type and that you have specified the
correct LNB type in the System Setup software menu. If in doubt, refer to the label or tag on the body of the LNB and contact Applied Instruments' Tech Support department to consult with them.
iii) If the incoming signals are linearly polarized, you must ensure that you have properly adjusted the polarization offset of the LNBF or feed horn assembly. Even if the antenna reflector is set to the proper azimuth and elevation, it is possible to not receive adequate signal if your polarization offset is very far off.
iv) If you're working with circularly polarized signals on a multi-LNB dish assembly, you must ensure that the skew/tilt of the dish is set correctly. You can use the ZIP postal code lookup feature to obtain approximate tilt/skew settings.
e) My XR-3 is displaying a message on the screen that says “LNB already powered by IRD
input”. Why is this message displayed? i) It means the meter is detecting power from an IRD that is connected to the IDU / IRD
port of the XR-3’s VSAT module. The IRD is powering the LNBF through the meter in this configuration. If your reason for pressing the LNB soft key was simply to toggle through the satellites related to the multi-LNB head, then you will have to use the left-right arrow keys instead to navigate in this configuration. If you receive this error message when there isn’t an IRD or modem connected to the meter’s IDU / IRD port of the XR-3’s VSAT module, there may be a problem in the LNB power circuit of the meter which would require service at the factory.
f) Can I connect a coax cable from the receiver or modem’s output to the IDU / IRD port of
the XR-3’s VSAT module to power the XR-3 if the meter has a dead battery? i) No. The IRD/satellite receiver isn’t powerful enough to power both the meter and the
LNB. When the IRD is hooked up to the IDU / IRD port of the XR-3’s VSAT module,
XR-3 S2 ACM Module Operation Manual XR-3
Page 61 of 64
it can power the LNB through the meter (if the ODU / LNB port of the meter is connected to the LNB). If the XR-3’s battery is completely dead, you will need to recharge it for at least a few minutes to allow the battery to power the meter itself. Using the IRD to power the LNB through the meter takes the LNB load off of the meter to make the satellite meter’s battery last longer.
g) Can the XR-3 with the VSAT module be used to measure satellite signals outside the
United States? i) Yes, the XR-3 with the VSAT module can be used outside the United States. Just be
sure to download the appropriate global regional Field Guide into the meter using the FlashUpdate application. We have Field Guides available for North America, Europe, South America, South Pacific, NE Pacific, Asia, Middle East, and Africa. We have postal code files available for the USA and Canada. For any region outside North America, download the postal code file called “No Postal Codes” that allows you to type in and save your geographic coordinates (latitude and longitude).
h) According to my XR-3 meter, I'm getting LOCKs on all of the even transponders, but I'm
not getting locks on any of the odd transponders. What is the issue and how can I fix it? There are a few possible causes for this: i) It’s possible that you have a faulty LNBF & the internal 13V/18V switching isn’t
working properly ii) It’s possible that your satellite meter isn’t providing the correct voltage (most likely
either 13V or 18V), as requested. You can test the voltage output of the meter with a voltmeter. If you confirm that the meter is not outputting voltage correctly, please contact Applied Instruments' Tech Support department and request a RMA# to send the instrument to the factory for inspection and repair.
iii) You may have a stacked system and you have not specified a stacked setting in the System Setup software menu of your XR-3 meter.
iv) There is a chance that only the even transponders are active on the satellite for your beam footprint area.
i) My serial number is missing off the back of my XR-3 meter. How can I obtain my serial
number to know its history and to check if it’s still under warranty? i) Connect your XR-3 meter to the PC, power it on, and open the FlashUpdate or
MeterMaid program. The serial number of the connected unit will be displayed in FlashUpdate and MeterMaid if proper connection is established.
ii) Turn the meter on. Then go to MENU, OPTIONS, and press the VERS soft-key in the lower left corner of the LCD screen to see the unit’s serial number above the loaded software versions.
j) While attempting to download or run the FlashUpdate application, the download just
seems to stall out and not make any progress. What could be the cause of this? i) This issue is most likely caused by your anti-virus software or firewall blocking our
program. Please temporarily disable your computer’s anti-virus software and firewall so it doesn’t interfere with the installation of the FlashUpdate and MeterMaid programs and the related USB drivers. If you have a hardware firewall, either stand-alone, or in a router, you must either modify the settings of the device to permit access to our program or you will have to entirely by-pass the router or other inhibiting hardware device. Also ensure that you are signed on as Administrator or have Administrator rights for Microsoft Windows.
If your company has a strict policy and the firewall blocks any executable files, then please contact your IT department and ask for assistance. Applied Instruments is more than happy to speak to the IT department about a work-around solution.
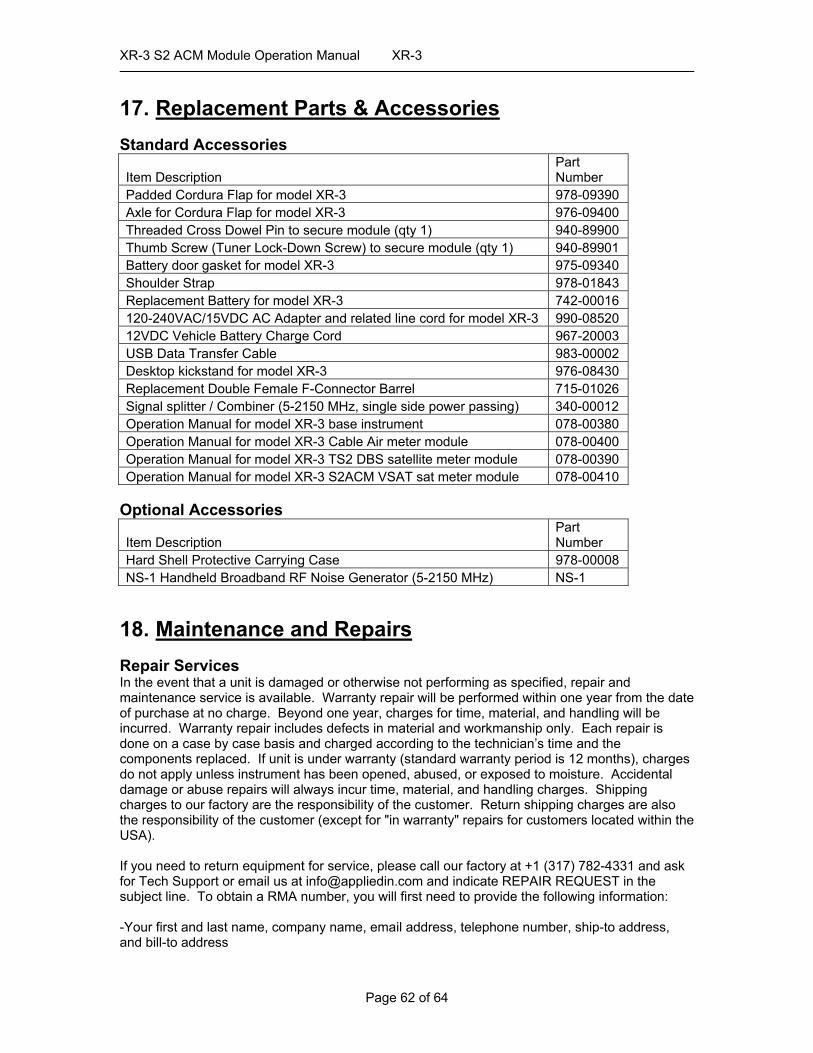
XR-3 S2 ACM Module Operation Manual XR-3
Page 62 of 64
17. Replacement Parts & Accessories Standard Accessories
Item Description Part Number
Padded Cordura Flap for model XR-3 978-09390 Axle for Cordura Flap for model XR-3 976-09400 Threaded Cross Dowel Pin to secure module (qty 1) 940-89900 Thumb Screw (Tuner Lock-Down Screw) to secure module (qty 1) 940-89901 Battery door gasket for model XR-3 975-09340 Shoulder Strap 978-01843 Replacement Battery for model XR-3 742-00016 120-240VAC/15VDC AC Adapter and related line cord for model XR-3 990-08520 12VDC Vehicle Battery Charge Cord 967-20003 USB Data Transfer Cable 983-00002 Desktop kickstand for model XR-3 976-08430 Replacement Double Female F-Connector Barrel 715-01026 Signal splitter / Combiner (5-2150 MHz, single side power passing) 340-00012 Operation Manual for model XR-3 base instrument 078-00380 Operation Manual for model XR-3 Cable Air meter module 078-00400 Operation Manual for model XR-3 TS2 DBS satellite meter module 078-00390 Operation Manual for model XR-3 S2ACM VSAT sat meter module 078-00410
Optional Accessories
Item Description Part Number
Hard Shell Protective Carrying Case 978-00008 NS-1 Handheld Broadband RF Noise Generator (5-2150 MHz) NS-1
18. Maintenance and Repairs Repair Services In the event that a unit is damaged or otherwise not performing as specified, repair and maintenance service is available. Warranty repair will be performed within one year from the date of purchase at no charge. Beyond one year, charges for time, material, and handling will be incurred. Warranty repair includes defects in material and workmanship only. Each repair is done on a case by case basis and charged according to the technician’s time and the components replaced. If unit is under warranty (standard warranty period is 12 months), charges do not apply unless instrument has been opened, abused, or exposed to moisture. Accidental damage or abuse repairs will always incur time, material, and handling charges. Shipping charges to our factory are the responsibility of the customer. Return shipping charges are also the responsibility of the customer (except for "in warranty" repairs for customers located within the USA). If you need to return equipment for service, please call our factory at +1 (317) 782-4331 and ask for Tech Support or email us at [email protected] and indicate REPAIR REQUEST in the subject line. To obtain a RMA number, you will first need to provide the following information: -Your first and last name, company name, email address, telephone number, ship-to address, and bill-to address
XR-3 S2 ACM Module Operation Manual XR-3
Page 63 of 64
-Model of instrument you have -Version of software that you have loaded (if applicable) -Serial number of the instrument -Detailed description of the issue The RMA number must be written on the outside of the shipping box and on all correspondence relating to that particular shipment. Please include details of the service requested. Ensure that the equipment is securely packed with proper cushioning material on all sides. The unit should be insured for its full value in case of damage or loss in transit. After the repair is completed, we will contact you for payment. If payment is not received within 60 days after contact is made, then the repaired equipment will become the property of Applied Instruments. Version Updating As our product lines are refined and features and performance are enhanced, we will upgrade older units at a nominal cost when possible. Shipping charges are additional. Contact us at +1 (317) 782-4331 for price and schedule if you are interested in having a unit updated. Calibration Periodic calibration of modules may be necessary to ensure that the unit is operating within the original factory specifications. A standard calibration charge will be incurred.
19. Specifications SPECIFICATIONS Frequency Range........900-2150 MHz Tuning Resolution........4 kHz Signal Level Range... ..-75 to -15 dBm (-26 to +34 dBmV) (+34 to +94 dBµV) RF Level Accuracy.........+/- 2 dB typical, 3 dB max Signal Lock Formats.....DVB-S (QPSK)
DVB-S2 (QPSK, 8PSK, 16APSK, 32APSK, CCM, VCM, ACM), DSS / DIRECTV Legacy (QPSK) Impedance.....................75 Ohm LNB Power....................13VDC for V/R, 18VDC for H/L (current limited at 780mA), 21VDC for DIRECTV SWM LNBs (current limited at 520 mA), 29VDC (current limited at 360 mA) Switch Control.................22 kHz, DiSEqC RF Connector .................F barrel field replaceable Warranty.........................12 month limited Specifications are subject to change without notice.

XR-3 S2 ACM Module Operation Manual XR-3
Page 64 of 64
Applied Instruments, Inc. 5230 Elmwood Avenue
Indianapolis, IN 46203 USA http://www.appliedin.com
Tel: +1 (317) 782-4331 Toll-free USA Tel: (800) 244-2976
Fax: +1 (317) 786-9665 Email: [email protected]
WARRANTY
The Applied Instruments XR-3 is warranted against defects in materials and workmanship for a period of twelve months. Applied Instruments agrees to repair or replace any assembly or component found to be defective under normal use during this period. Our obligation under this warranty is limited solely to repairing the instrument proven to be defective within the scope of the warranty when returned to the factory. Transportation to the factory is to be prepaid by the customer. Authorization (RMA#) by Applied Instruments is required prior to shipment. Applied Instruments assumes no liability for secondary charges or consequential damages and, in any event, Applied Instruments’ liability for breach of warranty under any contract shall not exceed the purchase price of the instrument shipped, and against which a claim is made. Any application recommendation made by Applied Instruments for the use of its products is based upon tests believed to be reliable, but Applied Instruments makes no guarantee of the results to be obtained. This warranty is in lieu of all other warranties, expressed or implied, and no representative or person is authorized to represent or assume for Applied Instruments any liability in connection with the sale of our products other than that set forth herein.