Embed Size (px)
Citation preview

Search
Advanced Search
Log In | Not a Member? Contact ADC
ADC Home > Open Source > Tools >
The X Window System (more commonly called X11) on Mac OS X provides significantopportunities for Mac OS X developers. Based on the open source XFree86 project, X11 for MacOS X is compatible, fast, and fully integrated with Mac OS X. It includes the full X11R6.6technology including an X11 window server, Quartz window manager, libraries, and basic utilitiessuch as xterm. Whether a Unix user or an X11 developer (or both), Mac OS X offers a platformwhere your applications can run without modification. On a Mac, any of the thousands of availableX11 applications can run in a window running concurrently alongside iTunes, Microsoft Excel,and any other Cocoa, Carbon, or Java applications.
There are some things to know about X11 on Mac OS X before you start, and this article outlinesthe key issues you should be aware of. Many existing X11 applications from the UNIX world areavailable to use for free—if you know the "secret handshake." That is, you can often easilyget the source code, but it’s up to you to build and install the product. There are some binarydistributions available as well, with applications pre-built for X11 on Mac OS X. This represents anew source of useful software that you don’t want to overlook.
We first review some X11 basics (for those new to X11), then discuss installing the X11environment on Mac OS X and starting it for the first time. This section includes a description ofthe advantages stemming from integration with both the Finder and Quartz. It also discussesdifferences between Terminal and xterm, and full screen support. Next, several X11 configurationissues are covered, including X11 forwarding, configuring xauth, using ssh to run remotesessions, and PseudoColor support. Then come examples of building X11 applications from sourceusing configure, IMake and xmkmf; and installing binaries using Fink. We conclude withinstructions on downloading and running OpenOffice, and point you to further resources for nextsteps.
X11 Basics
If you’re not already familiar with it, X11 can be a bit confusing. You need to understand a fewterms and concepts that are essential to X11 before you read the rest of this article. If you are anX11 user, you can skip to the next section.

Which Machine Is the Client?
One important aspect of the X11 architecture is that the typical client and server terminology isreversed. Instead of a user’s local client machine asking a remote server machine to do somethingand send the output back to the client, the user invokes a (potentially remote) client which sends itsoutput back to the user’s local X11 display server. To make this work, the user needs to be able toconnect to the client, the server must allow display connections from the client, and the$DISPLAY environment variable must be properly set on the client.
How and Where $DISPLAY Variables Are Set
$DISPLAY refers to the X11 display server screen. It specifies what display server will receive theoutput generated by the application run on the client. For a given session, or user, you can specifyon which output device the output should appear.
If you use ssh to login to the client from an existing xterm, the $DISPLAY value will be setautomatically, and routed back to the machine from which the connection was initiated.
X11 Installation and Execution
X11 is available as an optional install on the Mac OS X v10.3 Panther, and Mac OS X v10.4 Tigerinstall disks. Run the Installer, select the X11 option, and follow the instructions. You shouldinstall the X11 SDK as well, which is included on the Panther Developer CD. If you intend todownload X11 source code and build your own binaries, you will need the tools and headersincluded in the SDK.
If you have Mac OS X Server, you first need to download the X11User.pkg. Look for theDownload X11 button near the bottom of the content area on this page. This download requiresyou to login using your Apple ID; if you do not already have one, you can register at this time.After downloading, double-click the package icon to install. You also need to install the X11 SDKin order to build X11 applications.
The Installer puts X11.app into /Applications/Utilities. Simply double-click to launch.Congratulations! You now have an X11 environment running on your Macintosh.
Note: Installing X11 on pre-Panther systems requires manually installing XFree86 and XDarwin.app from the Sourceforge "XonX" project.
X11 and Finder Integration
Apple’s X11 implementation is based on the widely-used XFree86 project. The executable thatcontrols the environment, X11.app, runs like any other application in the Finder. You can think ofX11.app as a gateway to the X11 environment: if you click the X11.app Dock icon, you enter theX11 world.
X11.app may be displayed as X11 in the Applications/Utilities folder, depending on the Finder preference "Show all file extensions."

A tremendous benefit of this integration is that the Finder responds to a double-click on a UNIX orX11 application icon by starting X11 (if it’s not already running) and launching the application.This feature can significantly reduce the time you spend typing command-line launch commands.
X11 and Quartz Integration
The Quartz Window Manager (quartz-wm) runs as the default window manager, although you canrun alternate window managers if you prefer. A significant advantage of quartz-wm is that itintegrates Quartz with X11, and adds Aqua buttons (close, minimize, maximize) to X11 windows.This contributes to a unified appearance of visible application windows when running X11 inrootless, or shared screen, mode. In addition, the X11 Dock icon displays running apps in itsmenu, allowing you to easily bring X11 apps to the front.
quartz-wm also provides the pasteboard integration that allows text copying between windows.For example, you can copy text from a Terminal session to an xterm window running under X11.Note that because the key mappings differ between the two environments, you need to use theUNIX equivalents for text manipulation on the X11 side. Command-C copies selected text in bothMac OS X and xterm. But while Command-V pastes in Mac OS X, in X11 the paste key sequencediffers across applications. For example, in xterm you use Option-Click to paste the buffercontents into the current xterm window. This simulates clicking with the middle mouse buttonheld down; UNIX systems typically have multi-button mice. Other X11 applications may behavedifferently. See the X11 FAQ (Technical Q&A QA1232) for a more detailed discussion.
xterm vs. Terminal and open-x11
xterm presents a much simpler shell window than Terminal. But it provides a significantadvantage: when you start an xterm session, it sets up the X11 environment for you. You can theneasily run X11 applications from the command-line. By contrast, in Terminal you need to run the/usr/bin/open-x11 script to set up the X11 environment and launch X11 applications, as shownhere:
Mertz:~ asd$ /usr/bin/open-x11 /sw/bin/xgalaga
On the other hand, xterm does not integrate with Mac OS X technologies the way Terminal does.For example, xterm does not support drag and drop: you cannot drop a folder path into xterm toeasily change to that directory with the cd command.
Full-screen Support
The default mode is for X11 windows to share the screen with native Mac OS X (Quartz-based)applications. However, there is an option to run X11 in full-screen mode, where all the X11applications appear on a full-screen X11 root window, and the Mac OS X desktop and toolbar arenot visible. This can be useful if you are running a full X11 desktop environment (such as KDE orGNOME), need access to the root window, or simply want to segregate your UNIX and Macapplications.
Important: You can always toggle back to the Mac OS X desktop using Command-Option-A. Tore-enter X11, click the X11 Dock icon. If you forget the key sequence, Command-Option-Escape

will bring up the Force Quit Applications dialog in the Finder. At this point you are back in MacOS X, the X11 environment is still running, and you can re-enter at will. You do not need to forcequit X11.
X11 Configuration
X11 is highly configurable, particularly with regard to security. In addition, older X11 applicationsthat rely on the PseudoColor color mode may need some help to run correctly. Each of these pointsis addressed in this section.
X11 Forwarding
X11 forwarding allows the X11 connection to be tunneled from the remote system (client) to thelocal system (display server). For security reasons, Mac OS X does not enable X11 forwarding bydefault. In order for clients to receive X11 forwarding, the system administrator must explicitlyenable it on the Mac OS X system. Enabling X11 Forwarding, Technical Q&A QA1383 showshow to perform this task.
Using ssh -X for Remote Session
This section illustrates the use of ssh -X to connect from a server to a client. ssh -X is preferredover other methods because it encrypts the communication between the server and client. Theclient is assumed to be running Mac OS X. In order for ssh -X to work, you must enable bothX11 forwarding as discussed above, and Remote Login on the client (see Figure 1), beforeattempting to login from the server.

Figure 1: Enabling Remote Login in the Sharing Preferences
The following sequence walks through the establishment of a connection between the server andclient, and running an application. In this scenario, the display server is named Mertz, and theclient is named Gumdrop. The X11 user on Mertz wants to connect to Gumdrop, run xcalc, andhave the calculator display on the primary Mertz screen. The username is asd on both systems.
First, login to the client:
Mertz:~ asd$ ssh -X -l asd Gumdropasd@gumdrop’s password: Last login: Wed Nov 10 13:20:57 2004 from fe80::20d:93ff:Welcome to Darwin![Gumdrop:~] asd%
Run xcalc:

[Gumdrop:/usr/X11R6/bin] asd% ./xcalc &[1] 2452[Gumdrop:/usr/X11R6/bin] asd%
The calculator will launch at this point and display on machine Mertz, as shown in Figure 2.
Figure 2: The Calculator
After closing the calculator, logout of the client:
[Gumdrop:/usr/X11R6/bin] asd% exitlogoutConnection to Gumdrop closed.
ssh -X with X11 forwarding is the preferred approach for running remote X11 applications. Thenext two options, xhost and xauth, are not as secure. However, we discuss them because they arestill used.
Enabling Network Connections in X11
Before we can use xhost and xauth across machines, we need to configure the display server toaccept incoming network connections. The nolisten_tcp setting controls this. It must be set tofalse in order to accept connections. This can easily be accomplished through the Mac OS X userdefaults system. Use defaults write to change a setting:
defaults write com.apple.x11 nolisten_tcp -boolean false
defaults read will display the value of a setting:
Mertz:~ asd$ defaults write com.apple.x11 nolisten_tcp -boolean false

Mertz:~ asd$ defaults read com.apple.x11{ ... "nolisten_tcp" = 0; ...}Mertz:~ asd$
Remember, false enables incoming connections, true disables connections. Use the booleanvalues instead of their numeric counterparts.
Alternatively, you can use the X11 Preferences dialog to perform this task, as shown in Figure 3,but you will need to exit and then restart X11 in order for any changes to take effect.
Figure 3: Enabling Network Connections in the X11 Preferences
For security reasons, checking "Allow connections" requires that you also check "Authenticateconnections". The authenticate checkbox corresponds to the no_auth flag, which can be set orcleared using defaults write:
Mertz:~ asd$ defaults write com.apple.x11 no_auth -boolean falseMertz:~ asd$ defaults read com.apple.x11{ ... "no_auth" = 0; "nolisten_tcp" = 0; ...}Mertz:~ asd$
Using xhost to Control Server Access

xhost controls access to a display server. You run xhost on the server to specify which clientsmay send program output to the server. By itself this does not sound so bad, but xhost is not verysecure and can leave you exposed. Plus, xhost requires more setup than ssh -X. The easiest wayto use it is the following:
xhost +<client-hostname>
The hostname is then added to an internal list of clients. That host can now access your display.Because this command is performed on a per-machine basis, every user on the client machine canaccess the display server. On a network this is an invitation to trouble. Even more dangerous is notspecifying a hostname, because then all hosts can access the display.
You can specify a username in place of a hostname. This allows other users on the local machineto access the display server being executed by the current account.
xhost <username>
The ’-’ (minus sign) character undoes a setting. For example, to disable access from a particularhost:
xhost -<hostname>
Using the xcalc example discussed previously, first add the client to the access list on the server(Mertz).
Mertz:~ asd$ xhost +GumdropGumdrop being added to access control listMertz:~ asd$
After connecting to the client, set the $DISPLAY value on the client to be the primary screen ofMertz:
[Gumdrop:~] asd% cd /usr/X11R6/bin[Gumdrop:/usr/X11R6/bin] asd% setenv DISPLAY Mertz:0.0Gumdrop:/usr/X11R6/bin] asd%
Run xcalc:
[Gumdrop:/usr/X11R6/bin] asd% ./xcalc &[1] 2452[Gumdrop:/usr/X11R6/bin] asd%
After closing the calculator and logging off the client, remove the client from the server’s list:
Mertz:~ asd$ xhost -GumdropGumdrop being removed from access control listMertz:~ asd$
Using xauth to Control Server Access
xauth adds a greater degree of security than xhost by using a cookie generated on the localmachine (display server) to control access by the remote machine (client). You generate the

cookie, then copy the cookie to the client. When you add the server to the list of hosts known tothe client, you pass the cookie as well. When the client connects back to the display server, thecookie is used to authenticate the client.
Learning More about ssh -X, xauth and xhost
A very good discussion of the benefits and pitfalls of ssh -X, xauth, and xhost may be found atthe OroborOSX page.
There are additional options and variations on the xhost flags discussed above. More informationon xhost is available in the man pages (type "man xhost") or on the Internet. Here are a couple ofuseful links covering xhost and xauth:
http://www.leidinger.net/X/xhost.html http://www.acm.uiuc.edu/workshops/cool_unix/xauth.html
PseudoColor Support
X11 applications that were written in the days when video memory was relatively scarce mayoccasionally run into trouble with modern display hardware. X11 supports multiple color models,all of which use pixel values as indices to determine the RGB or grayscale value that will be sentto the video hardware. These models are distinguished by their specification of color vs. grayscale,separate vs. combined RGB colormaps (color lookup tables), and dynamic vs. static entries in eachcolormap.
PseudoColor is one of the X11 color models. In the PseudoColor model, each frame buffer (videomemory) pixel value is used as in index into a single colormap. The entry at that index containsindividual red, green, and blue values, which are then sent to the display hardware. This indexingscheme allows applications to access a subset of the available colors for a display. For example, an8-bit frame buffer that indexes into a 24-bit colormap, containing 8 bits each for red, green, andblue values, supports 256 simultaneous colors, out of a total of 16+ million.
X11 includes additional color models. For example, the DirectColor model uses separate red,green, and blue colormaps. In this case the frame buffer value consists of separate RGB indicesinto each colormap. Because each colormap is typically 8-bits wide, the number of simultaneouscolors or RGB combinations is higher with DirectColor than with PseudoColor.
However, X11 does not support PseudoColor automatically, which presents a problem forapplications that require PseudoColor. Here are a couple of solutions:
1. If you want to run an application that requires PseudoColor, and you do not need tosimultaneously run other applications that require DirectColor, then you can launch X11 in256 color mode. To do this, open the X11 preferences, select the Output pane, and changethe Colors value to 256. Restart X11, and then launch your application.
2. If you want to run both PseudoColor and DirectColor applications at the same time, you canrun a second X server in 256 color mode to handle the PseudoColor apps. This second servermust be started from the command-line with the -depth 8 argument, and the -displayID nargument to specify a display other than the default (which is used by X11.app). This allows

applications that need PseudoColor support to use the second server and DirectColor apps touse the first server. For example:
Mertz:~ asd$ Xquartz -depth 8 -displayID 1
3. There is no support for using both PseudoColor and DirectColor at the same time in a singleapplication.
Building and Installing X11 Software
This section contains examples of downloading and building X11 applications. You have severalpossibilities, depending on how the code is packaged. The standard UNIX approach for buildingfrom source is to first generate a makefile, then compile with gcc. If the makefile does not exist,you can either use a configure script (if provided) or Imake. If a binary has already beenpackaged, you can use a package manager such as Fink to download and install the workingapplication. Each of these options is discussed here.
Generating a makefile with configure
First, download and unpack the tarball (the .tar file, or .tar.gz if gzipped). This exampleassumes you have unpacked the source code for the xpdf application. Since a configure script isincluded, you first run configure from within the project directory to generate the makefile, thenmake to compile, then make install to complete the build:
Mertz:~ asd$ cd /Downloads/xpdf-3.00 Mertz:/Downloads/xpdf-3.00 asd$ ./configurechecking for gcc... gccchecking for C compiler default output... a.outchecking whether the C compiler works... yeschecking whether we are cross compiling... nochecking for suffix of executables... checking for suffix of object files... ochecking whether we are using the GNU C compiler... yes. . .
Mertz:/Downloads/xpdf-3.00 asd$ makecd goo; makeg++ -g -O2 -DHAVE_CONFIG_H -I.. -I. -c GHash.ccg++ -g -O2 -DHAVE_CONFIG_H -I.. -I. -c GList.ccg++ -g -O2 -DHAVE_CONFIG_H -I.. -I. -c GString.ccg++ -g -O2 -DHAVE_CONFIG_H -I.. -I. -c gmempp.ccg++ -g -O2 -DHAVE_CONFIG_H -I.. -I. -c gfile.cc. . .
Mertz:/Downloads/xpdf-3.00 asd$ make installmkdir -p /usr/local/bin/usr/bin/install -c xpdf/pdftops /usr/local/bin/pdftops/usr/bin/install -c xpdf/pdftotext /usr/local/bin/pdftotext/usr/bin/install -c xpdf/pdfinfo /usr/local/bin/pdfinfo/usr/bin/install -c xpdf/pdffonts /usr/local/bin/pdffonts. . .Mertz:/Downloads/xpdf-3.00 asd$
The output from make install shows that this package installs into /usr/local/bin/.
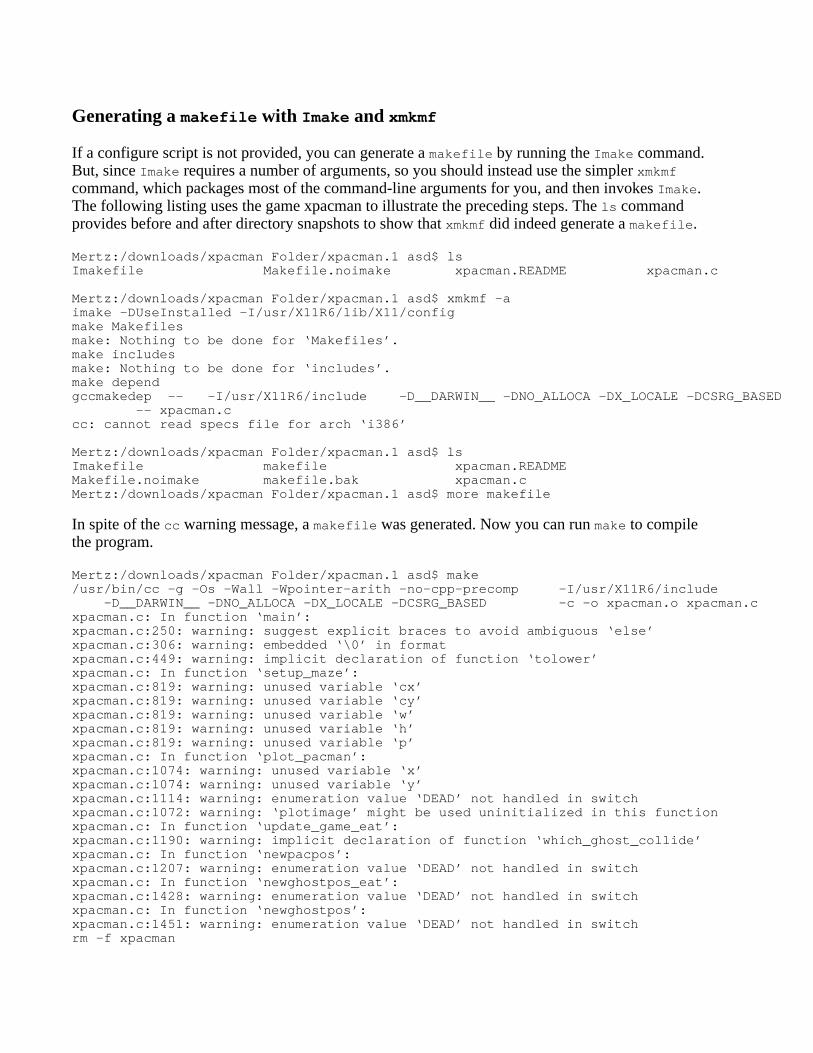
Generating a makefile with Imake and xmkmf
If a configure script is not provided, you can generate a makefile by running the Imake command.But, since Imake requires a number of arguments, so you should instead use the simpler xmkmfcommand, which packages most of the command-line arguments for you, and then invokes Imake.The following listing uses the game xpacman to illustrate the preceding steps. The ls commandprovides before and after directory snapshots to show that xmkmf did indeed generate a makefile.
Mertz:/downloads/xpacman Folder/xpacman.1 asd$ lsImakefile Makefile.noimake xpacman.README xpacman.c
Mertz:/downloads/xpacman Folder/xpacman.1 asd$ xmkmf -aimake -DUseInstalled -I/usr/X11R6/lib/X11/configmake Makefilesmake: Nothing to be done for ‘Makefiles’.make includesmake: Nothing to be done for ‘includes’.make dependgccmakedep -- -I/usr/X11R6/include -D__DARWIN__ -DNO_ALLOCA -DX_LOCALE -DCSRG_BASED -- xpacman.ccc: cannot read specs file for arch ‘i386’
Mertz:/downloads/xpacman Folder/xpacman.1 asd$ lsImakefile makefile xpacman.READMEMakefile.noimake makefile.bak xpacman.cMertz:/downloads/xpacman Folder/xpacman.1 asd$ more makefile
In spite of the cc warning message, a makefile was generated. Now you can run make to compilethe program.
Mertz:/downloads/xpacman Folder/xpacman.1 asd$ make/usr/bin/cc -g -Os -Wall -Wpointer-arith -no-cpp-precomp -I/usr/X11R6/include -D__DARWIN__ -DNO_ALLOCA -DX_LOCALE -DCSRG_BASED -c -o xpacman.o xpacman.cxpacman.c: In function ‘main’:xpacman.c:250: warning: suggest explicit braces to avoid ambiguous ‘else’xpacman.c:306: warning: embedded ‘\0’ in formatxpacman.c:449: warning: implicit declaration of function ‘tolower’xpacman.c: In function ‘setup_maze’:xpacman.c:819: warning: unused variable ‘cx’xpacman.c:819: warning: unused variable ‘cy’xpacman.c:819: warning: unused variable ‘w’xpacman.c:819: warning: unused variable ‘h’xpacman.c:819: warning: unused variable ‘p’xpacman.c: In function ‘plot_pacman’:xpacman.c:1074: warning: unused variable ‘x’xpacman.c:1074: warning: unused variable ‘y’xpacman.c:1114: warning: enumeration value ‘DEAD’ not handled in switchxpacman.c:1072: warning: ‘plotimage’ might be used uninitialized in this functionxpacman.c: In function ‘update_game_eat’:xpacman.c:1190: warning: implicit declaration of function ‘which_ghost_collide’xpacman.c: In function ‘newpacpos’:xpacman.c:1207: warning: enumeration value ‘DEAD’ not handled in switchxpacman.c: In function ‘newghostpos_eat’:xpacman.c:1428: warning: enumeration value ‘DEAD’ not handled in switchxpacman.c: In function ‘newghostpos’:xpacman.c:1451: warning: enumeration value ‘DEAD’ not handled in switchrm -f xpacman

/usr/bin/cc -o xpacman -g -Os -Wall -Wpointer-arith -no-cpp-precomp -L/usr/X11R6/lib xpacman.o -lXext -lX11 make: *** No rule to make target ‘xpacman.man’, needed by ‘xpacman._man’. Stop.Mertz:/downloads/xpacman Folder/xpacman.1 asd$ make installinstall -c -o root -g wheel xpacman /usr/X11R6/bin/xpacman. . .Mertz:/downloads/xpacman Folder/xpacman.1 asd$
Installing Binaries with Fink and FinkCommander
The Fink package manager handles download, installation, and removal of binaries, as long as apackage has been provided on one of the Fink servers. In fact, you should try Fink beforeattempting to build from source (let someone else do the hard work!). You first need to install Finkfrom SourceForge. Fink differs from typical UNIX installers by installing itself and managedpackages into /sw/bin. This prevents collisions with other UNIX software, which typically residein /usr/local/bin.
Fink responds to the list command by connecting to its repositories and displaying a list ofavailable packages:
Mertz:~ asd$ /sw/bin/fink list . . . xft2 [virtual package] xft2-dev [virtual package] xft2-shlibs [virtual package] xgalaga 2.0.34-1 Clone of the classic game of galaga xiangqi [virtual package] ximian-connector 1.4.7-2 M$ Exchange plugin for evolution xinvaders 2.1.2-2 Space Invaders clone for X . . .Mertz:~ asd$
Fink can be used to install or remove packages. When installing, Fink checks for supportingpackages that may be needed for the installation. If any are missing, Fink asks if you want toinstall them, and then handles the download and installation automatically. This example installsthe xgalaga package:
Mertz:~ asd$ /sw/bin/fink install xgalaga/usr/bin/sudo /sw/bin/fink install xgalagaPassword:Information about 1742 packages read in 1 seconds.The following package will be installed or updated: xgalaga. . .Mertz:~ asd$
Running the list command again shows that XGalaga is installed (denoted by the ’i’ in column2):
i xgalaga 2.0.34-1 Clone of the classic game of galaga
An alternative to the command-line is FinkCommander, which provides a graphical user interfaceon top of Fink. See Figure 4. In addition to displaying package summary information,FinkCommander provides menu items that correspond to the Fink commands. You select thepackage to install or remove, then the Binary > Install or Binary > Remove command,

respectively. Note that you must install Fink before installing FinkCommander.
Figure 4: Using FinkCommander to Install a Package. The Fink Output Appears in the Text AreaBeneath the Package List.
Now you can run the installed application. Figure 5 shows the command line used to launchXGalaga, and the application splash screen.

Figure 5: Running XGalaga in Shared Screen Mode
Installing and Running OpenOffice
OpenOffice is an open source office suite that aims to provide many of the features found incommercial Office software. This includes word processing, spreadsheet, presentation, anddrawing capability. The link to the Mac OS X download of OpenOffice is provided at the end ofthis article. The OpenOffice download does not require Fink. However, the OpenOffice installerrequires Mac OS X v10.3 Panther.
After downloading, run the installer. This will place an OpenOffice folder inside /Applications.Inside this folder, double-click Start OpenOffice.org (see Figure 6) to launch OpenOffice andthe X11 environment (if not already running).

Figure 6: The Start OpenOffice Application
There is no additional setup required to run OpenOffice. The OpenOffice.org creators have made itvery easy to get started. Remember that this is an X11 application, not an Aqua application, so itwill look and behave differently than a native Mac OS X app. For example, text rendering in theOpenOffice word processor (see Figure 7) looks less sharp than in TextEdit, and the OpenOfficefile formats are not necessarily compatible with their commercial counterparts. But OpenOfficeoffers a lot of functionality that makes up for these shortcomings.

Figure 7: The OpenOffice Word Processor
Like other open source projects, OpenOffice will improve more quickly based on contributionsmade by the developer community. Check out the OpenOffice.org website if you would like tohelp out.
For More Information
X11 can provide an additional source of software. The references below contain additionalinformation on X11 and related topics.
Join or search the X11 for Mac OS X mailing list.

Several resources are linked off the Darwin X11 page (Darwin is Apple’s open sourceprojects). Technical Q&A QA1232 X11 FAQ. Technical Q&A QA1383 Enabling X11 Forwarding. Additional information is available atHacking Linux Exposed. A great discussion of ssh -X versus xauth versus xhost is available on the Oroborus for MacOS X site. Download X11 for Mac OS X (Note that users of Mac OS X Panther v.10.3 already have thisdownload available on the CD, as well as the X11 SDK). Download OpenOffice for Mac OS X (X11 version). Download Fink and FinkCommander from SourceForge. An overview of the X11 environment, including window managers and Fink, is provided inMac OS X for Unix Geeks from O’Reilly & Associates. For a popular and useful discussion, see Fink and Apple’s X11.
Updated: 2006-6-12
Get information on Apple products.Visit the Apple Store online or at retail locations.
1-800-MY-APPLE
All rights reserved. | Terms of use | Privacy Notice