Embed Size (px)
Citation preview

WOODWORKING-NEWS.COM | Woodworking Projects – September 2010
Page 1 of 5
Woodcarving on a Turned Bedpost By Mary May
Carving an Acanthus leaf
The acanthus leaf design can be seen in ancient Greek ornamentation and has been used in a wide range of styles and design through the years. It is used as a decorative detail in many pieces of furniture such as the knee on a cabriole leg, the decorative top of a highboy, and several different styles of turned bedposts. This particular example that I will be carving is from a Federal style four-post bed from around 1800. It is turned out of a 4” piece of mahogany. There are 4 main leaves around the surface, and 4 secondary leaves that appear to be positioned behind the main leaves.
The first word
This particular carving was completed to simply show the process of carving the acanthus leaf on a turned bedpost. What follows is a step-by-step guide on carving this particular design. For demonstration purposes, only a single leaf was drawn on the bed post. In the 'real world’ all templates and drawings would be laid out on the project before starting to carve.
Woodcarving gouges needed for this project:
• 3 to 5 mm v-chisel (60 degree angle) • #3, 3mm • #3, 6mm • #3, 14mm • #4, 12mm • #5, 5mm • #6, 12mm • #7, 8mm • #11, 3mm
Now, step-by-step When doing a carving project like this, please note that the small edges of the leaf are very fragile. In order to protect the leaf edges from breaking, consider carving a v-cut (with a 3 to 5mm v-chisel) around the entire outside edge of the leaf 1/16” deep before making the first vertical cut. This v-cut will relieve the pressure of the cut and minimize the possibility of the profile getting damaged.
STEP 1: With gouges that accurately fit the edge of the acanthus leaf design, make vertical cuts 1/16” to 1/32” deep along the entire edge of the leaf. I used the #4, 12mm and #3, 6mm
Step 1
WOODWORKING-NEWS.COM | Woodworking Projects – September 2010
Page 2 of 5
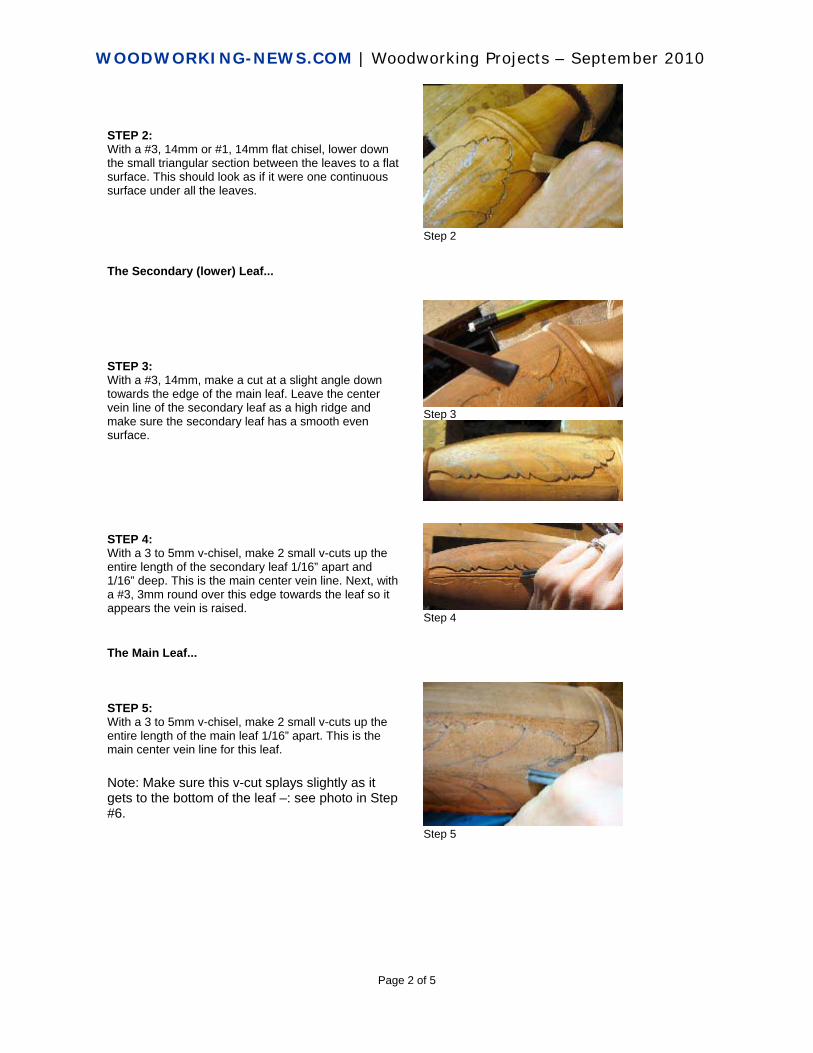
STEP 2: With a #3, 14mm or #1, 14mm flat chisel, lower down the small triangular section between the leaves to a flat surface. This should look as if it were one continuous surface under all the leaves.
Step 2
The Secondary (lower) Leaf...
STEP 3: With a #3, 14mm, make a cut at a slight angle down towards the edge of the main leaf. Leave the center vein line of the secondary leaf as a high ridge and make sure the secondary leaf has a smooth even surface.
Step 3
STEP 4: With a 3 to 5mm v-chisel, make 2 small v-cuts up the entire length of the secondary leaf 1/16” apart and 1/16” deep. This is the main center vein line. Next, with a #3, 3mm round over this edge towards the leaf so it appears the vein is raised.
Step 4
The Main Leaf...
STEP 5: With a 3 to 5mm v-chisel, make 2 small v-cuts up the entire length of the main leaf 1/16” apart. This is the main center vein line for this leaf.
Note: Make sure this v-cut splays slightly as it gets to the bottom of the leaf –: see photo in Step #6.
Step 5

WOODWORKING-NEWS.COM | Woodworking Projects – September 2010
Page 3 of 5
STEP 6: With a #3, 14mm, carve a gentle slope down to this v-cut from the main part of the leaf to give the appearance that the center vein is raised.
Step 6
STEP 7: With a #11, 3mm veiner, cut the “eyes” by making a clean, simple 45 degree angle cut. Leave this cut unfinished at this point.
Step 7
STEP 8: With a gouge that fits the overlapping edge of the leaf, make a vertical cut 1/16” deep. I used the #3, 14mm and #4, 12mm. Note the "eyes" are still not fully completed.
Step 8
STEP 9: With a #3, 6mm, complete the “eye” cut by connecting the cut from STEP #7, to the edge of the leaf, so the line has a continuous flow.
Step 9
STEP 10: With a #3, 6mm or #3, 14mm, lower down the section of leaf that appears to be positioned under the leaf.
Step 10

WOODWORKING-NEWS.COM | Woodworking Projects – September 2010
Page 4 of 5
STEP 11: With a #7, 8mm hollow out the small lobe of the leaf. Also with the #7, 8mm and #6, 12mm, hollow out the main center section of the leaf (see photo to right). Note: Make sure that the high-ridge lines that this cut creates gently flow into the center vein also. .
Step 11
STEP 12: With a #11, 3mm, carve a groove on both sides of each of the “eyes” that creates a raised area. This area is called a “pipe”. This raised pipe flows gently into the center vein.
Step 12
STEP 13: With a v-chisel, carve vein lines and shadow lines that all flow into the main center vein. These cuts are located in the smaller sections of the leaf also.
Step 13
STEP 14: With a #3, 6mm, make a small v-shaped notch at the section that separates the small lobe from the large leaf section
Step 14
STEP 15: With a #5, 5mm, make small notches in the "pipe" that give the appearance of a wrinkle in the leaf.
Step 15

WOODWORKING-NEWS.COM | Woodworking Projects – September 2010
Page 5 of 5
The last word Make sure you finish each step completely before going onto the next step. In many ways, each step you take prepares or sets you up for the next step. If you can keep to a structured process as shown, all the leaves around the bedpost should have a similar shape and appearance. While carving the leaves, try to create a clean and final surface with the gouges themselves. Once you are finished carving, if you wish to use sandpaper (320 grit or higher), be very careful that you do not lose any of the crisp details that were created with the gouges. The high edges and the v-cuts can be sanded away very quickly if you are not careful. Also, if you do plan on sanding the leaves, do not carve on them after you have sanded because the grit left behind from the sandpaper will dull your gouges very quickly. The most important thing to remember in carving is that you should be having fun. If you're worried or anxious about cutting this right, or gouging that exactly – don't fret. It's your carving and if it’s not exactly like it was done 200 years ago, that's fine. You are making it uniquely yours – and having fun doing it! About the Author Mary May is a professional woodcarver in Charleston, SC. She has studied her craft in various countries - England, Greece and Malaysia - and has focused her studies on the traditional techniques of classical European style carving. Much of Mary's work consists of antique reproduction furniture and architectural details. She teaches carving workshops at various locations throughout the US and also teaches at her studio in Charleston. Mary was recently featured on the PBS series "The Woodwright's Shop" with Roy Underhill. She is a member of the Society of American Period Furniture Makers and teaches classes at their various locations. Mary also owns and operates a traditional woodworking and artisan school. About Mary's Traditional Woodworking and Artisan School Mary May owns and operates Cornerstone Creations, LLC, Traditional Woodworking and Artisan School in Charleston, South Carolina. Mary has gathered a gifted group of woodworkers and artisans to create a school that specializes in keeping the traditional woodworking arts alive. Classes such as "Woodcarving for Furniture", "How to Build and Carve a Charleston Tea Table", "How to Make Traditional Wood Inlay", "How to Hand-Cut Dovetail Joints", "How to Use Hand Planes", "How to Re-Cane a Chair" are available for beginners and experienced woodworkers. Saturday classes and full weeklong workshops are available. For additional information about Cornerstone Creations, visit www.marymaycarving.com or call (843) 200-9469.