Embed Size (px)
Citation preview
Vídeňská 172, Vestec
252 42 Jesenice u Prahy
Česká republika
Tel: +420-234 144 746, 790
Fax: +420-234 144 710, 777
e-mail: [email protected]
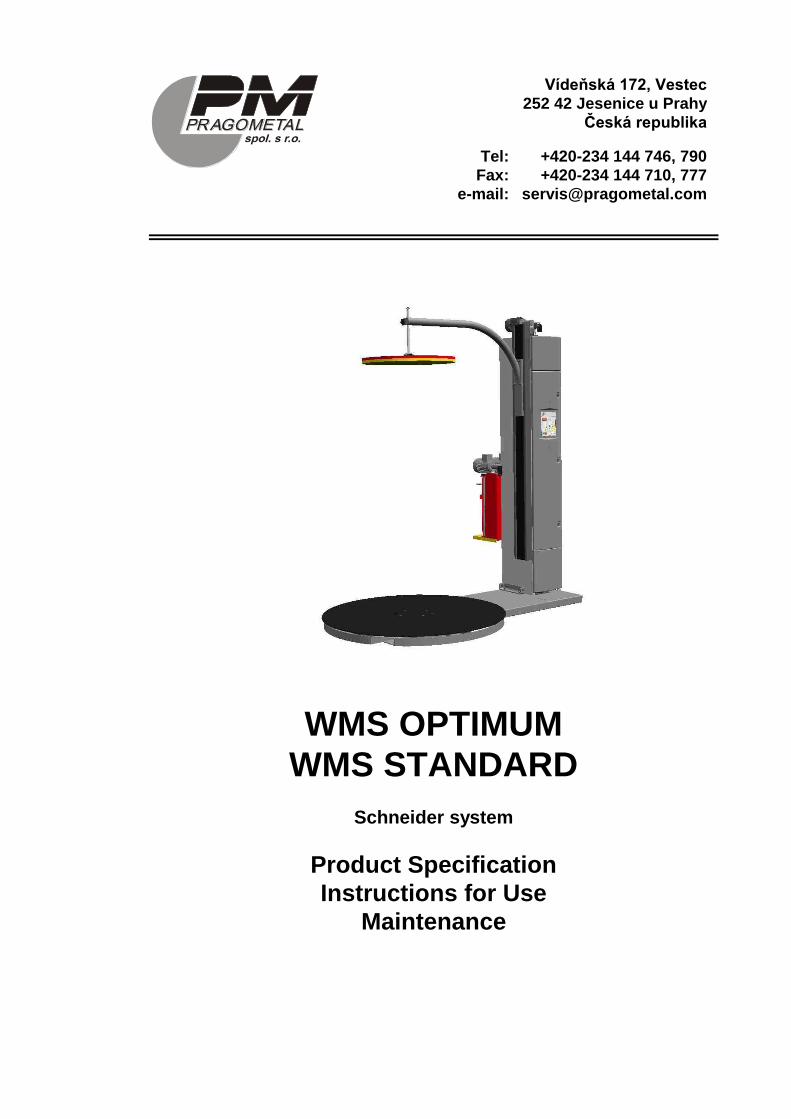
WMS OPTIMUM
WMS STANDARD
Schneider system
Product Specification
Instructions for Use
Maintenance


Pragometal s.r.o. WMS STANDARD Schneider
3
Only worker, who was determined to operate the wrapping machine and
who was provably familiarized with these instructions for use and safety
rules, which are stated hereinafter, may operate the wrapping machine.
CONTENTS
1. INTRODUCTION ...................................................................... 4
2. SPECIFICATION, DETERMINATION AND USE OF THE
MACHINE ........................................................................................ 5
3. SAFETY INSTRUCTIONS ...................................................... 12
4. PUTTING INTO OPERATION, MANIPULATION ................... 17
5. EQUIPMENT .......................................................................... 31
6. OPERATION .......................................................................... 48
7. MAINTENANCE AND CLEANING OF THE MACHINE .......... 85
8. GUARANTEE ......................................................................... 96
9. SERVICE ................................................................................ 97

Pragometal s.r.o. WMS STANDARD Schneider
4
1. INTRODUCTION
WMS wrapping machines of all versions and all models are provided with safety equipment for staff protection as well as for machine protection during its ordinary use. These provisions cannot cover all risks and thus it is necessary for staff to study through and understand these instructions, before using the machine and to follow these instructions.
These instructions are designed for the users and workers, who operate and
maintain WMS wrapping machine of all models. They are written for the machine with full equipment; if your machine does not have some optional features installed, ignore its description and control.
If WMS wrapping machine is installed and operated in accordance with this accompanying documentation, its operation is safe and the goods on the pallet is wrapped quickly, in high-quality and economically.
1.1. Conventions
Text of the instructions is written in current font, such as this paragraph.
Names of buttons and control elements are written in BOLD SMALL CAPITALS.
1.2. Used symbols
These symbols are used in the text:
Danger – omission of these instructions may cause a serious injury or death or serious machine damage
Warning against the danger of machine damage, or injury of staff or people, who are near the machine.
Information, making the machine use easier
These instructions are the original instructions for use according to Directive EU no. 2006/42/ES and they are authorized by the manufacturer.
Pragometal s.r.o. WMS STANDARD Schneider
5
2. SPECIFICATION, DETERMINATION AND USE OF THE MACHINE
Wrapping machines of WMS series create a modular system, enabling wide variety of the equipment and accessories according to the needs of the wrapped goods as well as according to economic operation. They are designed for fixation of the pallet units with the stretch film.
Wrapping machines WMS OPTIMUM of all variants are designed for plants with middle capacity of wrapping and they are suitable for the plants with small changes in procedures of goods wrapping.
Wrapping machines WMS STANDARD of all variants are designed for plants with middle and high capacity of wrapping, with frequently changed height of the goods on pallet and with demand on changes of wrapping procedures.
The machine is designed for one person’s work. The workplace at the control desk ensures that the staff will not be outside the reach of the machine working area.
2.1. Working Conditions of the Machine
Wrapping machine is designed for work in the environment, which has to meet the following conditions:
Normal environment in terms of IEC 364-3 on conditions mentioned hereinafter in this chapter and on the condition of installation and operation according to this accompanying technical documentation. Environment AA5+AE5.
It is necessary to install and operate the machine in covered operating premises protected against atmospheric influences.
The floor has to be even and braced, the maximal allowed deviation of the floor flatness is ± 3 mm / 2m. It is necessary to get raw dirt, grits, etc. off the area before positioning of the machine in the place.
Temperature range for the machine operation is +5ºC up to +40ºC, speed of temperature change max. 10°C / 30 min.
Relative humidity 30% up to 95% without condensating humidity (dew).
It is possible to operate the machine only in premises, which match the requirements of national regulations for working environment.
No obstructions, which can cause injury of the staff (stairs, ramps, drop ceilings other machines, etc) may be near the machine.

Pragometal s.r.o. WMS STANDARD Schneider
6
The product must not be used in explosive environment or in place where the explosive environment may rise even for short time.
Machine and particularly its electric equipment have to be installed and operated according to the producer’s instructions stated in this accompanying technical documentation.
2.2. Design of the Machine
Design of the machine corresponds to regulations and standards mentioned in Declaration of Conformity, which is a part of this accompanying technical documentation. Each machine is checked before despatch and it is tested for fulfilment of requirements of standard EN 60204-1.
Requirements of standards and regulations are included in the product documentation. User’s precautions are described in this accompanying technical documentation – instructions for use.
The machine is shielded and this shielding corresponds to group 1, class B. according to standard EN 55011.
In light of resistance to interference, the machine matches the requirements of these standards:
IEC 1000-4-2, EN 61000-4-2 IEC 1000-4-3, EN 61000-4-3 IEC 1000-4-4, EN 61000-4-4 IEC 1000-4-6, EN 61000-4-6
Electrical components of the machine contain the switchboard and electric mains on the machine. Five-pole input terminal block and switch for the whole machine are placed in the switchboard. Supply to the machine has to be protected by fuses or circuit breaker. The electrical power network, to which the machine will be connected, has to match international and national regulations and standards.
Supposed service life of the machine is 10 years on condition of use of the machine in accordance with this accompanying technical documentation and with keeping the prescribed maintenance and periodical machine check-up.

Pragometal s.r.o. WMS STANDARD Schneider
7
2.3. Technical Parameters
WMS OPTIMUM
WMS STANDARD
Model Turntable Standard 1500 mm
Standard
1650 mm
Standard
1800 mm
Standard 2300 mm
Conveyor no no no no
Weight
(according to equipment, min.)
425 kg 460 kg 515 kg 715 kg
(see type plate)
Dimensions Height 2366 mm
(3066 mm)
Width 1500 mm 1650 mm 1800 mm 2300 mm
Length 2350 mm 2500 mm 2650 mm 3150 mm
Turntable Diameter 1500 mm 1650 mm 1800 mm 2300 mm
Loading limit 1200 kg
Drive el. motor 370W / 50Hz 400 V el. motor 550W / 50Hz
400 V
Revolutions 10 rev/min + 20% 7 rev/min + 20%
Running direction Right
Drive of prestretch device travel
el. motor 180W / 50Hz 400 V
Drive of top-platen el. motor 120W / 50Hz 400 V
Air pressure *)
Input max. 1.5 MPa
Operational 0.6 MPa
Weight of the wrapping film roll c. 17 kg
Conveyor Width ---
Height ---
Speed ---
Drive ---
Electric connection
Operational voltage
3 × 400 V / 50Hz
Machine wattage 1.5 … 3.5 kVA (see type plate)
Supply mains protection
10 … 16 A (see type plate)
Control circuit voltage
24 V
Degree of protection of electric equipment
IP 54
*) only if the machine is provided with pneumatic or portal top-platen

Pragometal s.r.o. WMS STANDARD Schneider
8
WMS OPTIMUM
WMS STANDARD
Model Turntable Forklift-shaped 1500 mm
Forklift-shaped 1800 mm
Forklift-shaped 2300 mm
Conveyor no no no
Weight
(according to equipment, min.)
440 kg 510 kg 835 kg
(see type plate)
Dimensions Height 2369 mm
(3069 mm)
Width 1500 mm 1800 mm 2450 mm
Length 2350 mm 2650 mm 3245 mm
Turntable Diameter 1500 mm 1800 mm 2300 mm
Loading limit 1000 kg
Drive el. motor 370W / 50Hz 400 V
Revolutions 10 rev/min + 20% 8.5 rev/min + 20% 7 rev/min + 20%
Running direction Right
Drive of prestretch device travel
el. motor 180W / 50Hz 400 V
Drive of top-platen el. motor 120W / 50Hz 400 V
Air pressure *)
Input max. 1.5 MPa
Operational 0.6 MPa
Weight of the wrapping film roll c. 17 kg
Conveyor Width ---
Height ---
Speed ---
Propulsion ---
Electric connection
Operational voltage
3 × 400 V / 50Hz
Machine wattage 1.5 … 3.5 kVA (see type plate)
Supply mains protection
10 … 16 A (see type plate)
Control circuit voltage
24 V
Degree of protection of electric equipment
IP 54
*) only if the machine is provided with pneumatic or portal top-platen

Pragometal s.r.o. WMS STANDARD Schneider
9
2.4. Type Plate
Type plate is placed on the bottom part of the mast; its identical copy is protected against damage or loss by its placement in the switchboard (panel with controller) on the internal side plate of the switchboard on the left. The type plate contains the following data:
Name and address of the producer (supplier) Type designation of the product Serial number of the machine Year of production Number of electrical scheme Machine weight (kg) Supply voltage (V) Supply voltage frequency (Hz) Protection (A) Machine wattage (kVA) Control circuit voltage (V) Air pressure (MPa)
Data of the type plate come before the data in technical parameters table or before other data in this accompanying documentation.
2.5. Expendable Material
2.5.1. Stretch Film
The machine is designed for wrapping of goods on pallets into the stretch film from linear low-density polyethylene (LLDPE) in width of 20 ÷ 40 μm. For machines provided with mechanical single-motor or twin-motor prestretch device, the film has to have the minimal dilatability 150%. Manual or electromagnetic brake of the film does not demand guaranteed value of film dilatability. The film has to be in form of rolls with width of 500±10 mm and diameter of max. 250 mm. The tube, on which the film is wrapped, has to have the internal diameter of 76±3 mm and length of 510±5 mm.
It is possible to use non-adhesive film as well as single-adhesive film. The adhesiveness of one side means that the separate layers of the film wrapped on the goods cling together very well, but they do not tend to damage the goods on the pallet. The main purpose for use of such film is better fixation of the goods on the pallet, higher solidity of the wrapping and its better resistance to climatic effects and mechanical tension during transport. After wrapping of the pallet with goods, the wrapped film has to be directed with the adhesive side inward (toward goods), thus the pallets will not be apt to cling together during manipulation with the wrapped pallets and during their transport.
By default, the film is resistant to UV radiation for 6 months, i.e. the wrapped goods may be stocked outside in this period and it may be exposed to the solar radiation, keeping all the original features of the wrapping. If longer period of

Pragometal s.r.o. WMS STANDARD Schneider
10
stocking in the outside environment is required, it is possible to deliver some films in the design with advanced resistance to UV radiation.
The following stretch films satisfy the above-mentioned requirements:
Model dilata-
bility
use Possible variants
POWERFLEX SQ
160% Manual brake of the film.
Wrapping of heavy goods with sharp edges
Various widths
Non-adhesive as well as single-adhesive
With advanced resistance to UV radiation
POWERFLEX PQ
200% Mechanic, single-motor or twin-motor prestretch device.
Wrapping of medium weight or light goods, or of fragile or deformable goods.
Various widths
Non-adhesive as well as single-adhesive
With advanced resistance to UV radiation
POWERFLEX HPQ
250% Automatic machines with mechanic, single-motor or twin-motor prestretch device.
Use similar to PQ.
Various widths
Non-adhesive as well as single-adhesive
With advanced resistance to UV radiation
POWERFLEX SPQ
300% Use similar to HPQ. Various widths
Non-adhesive as well as single-adhesive
With advanced resistance to UV radiation
For putting of the wrapping machine into operation, we recommend to contact the supplier or producer, who will recommend the optimal stretch film for wrapping of your goods from of his/her experience.
We do not recommend using of other wrapping material than it is mentioned hereinafter (e.g. perforated films, network, layered, printed, bubble, from other material, etc.) without previous producer consulting and without his consent – it is not possible to guarantee the correct function of the wrapping machine. If the machine wraps in low-quality in the duration of guarantee, or if the machine damage or damage of the wrapped goods occurs, the use of films or wrapped materials, which were not approved by the producer, may be the reason for complaint rejection.
2.5.2. Overlapping Film
The overlapping film is put manually for the machines WMS OPTIMUM and
WMS STANDARD. A smooth non-stretch film from polyethylene (PE) in width of 50 up to 80 μm supplied in rolls, is determined for the overlap (if overlap is required). If the overlapping film holder produced by company PRAGOMETAL is used, the film has to be wrapped on the tube with internal diameter of min. 40 mm. In light of the machine construction there are no other features of the overlapping film than it is determined in this chapter, for which the requirements
Pragometal s.r.o. WMS STANDARD Schneider
11
are defined. The specific film width is given by the dimensions of the wrapped goods on the pallet and by the method of wrapping.
2.5.3. Ecology
It is possible to include the stretch as well as overlapping film into the sorted waste among plastics (more precisely among the polyethylene PE). Material is easy recyclable. It can be easily burnt and on the correct burning conditions, no pollutant emissions spring. It is not biodegradable and degradation in the dumping place is very slow. No dangerous products leaking in the air or contaminating water or ground, are known.

Pragometal s.r.o. WMS STANDARD Schneider
12
3. SAFETY INSTRUCTIONS
3.1. Safety Recommendations
The machine is liable to regular revisions and tests of the electric equipment. During this work, it is necessary also to satisfy the needs of ČSN EN 60204-1 and ČSN 33 1500.
Before putting of the machine into operation, the revision of electric equipment has to be carried out. The correct function of protection against dangerous contact voltage according standard IEC 60364-4-41 has to be tested and revision of the supply device (cabling) of the machine according to IEC 60364-6 has to be carried out by the worker for revisions realization, who satisfies the conditions of national regulations for revisions.
Regarding the fact that each unprofessional intervention into the electric equipment might cause serious machine damage or staff injury, every intervention may be carried out only by the person competent according to the national regulations for work on electric equipment.
3.2. Work Safety
3.2.1. Protective Devices for Ensuring of Work Safety
The wrapping machine is equipment of simple construction without presence of hazard places, which might cause health threat to the staff during working operation on condition of following the established working procedure of wrapping.
Hazard places in the working area arise from the principle of the machine operation:
1) The turntable rotates with the pallet, which is situated on it. The rotating part of the machine with the pallet is not protected with special covers, because this would disable the technological operation itself.
2) The film is stretched between the rolls of the prestretch device.
3) The film is reeled up on the wrapped goods and it is tightened on them by force.
4) An electrostatic charge may be created on the film.
5) The prestretch device travels along the whole height of the mast down to the ground.
6) Top-platen, if used, pushes down the pallet with the pressure of 500 N (50 kg) with electric or pneumatic top-platen and of 8000 ÷ 12 000 N (800 ÷ 1200 kg) with portal top-platen.

Pragometal s.r.o. WMS STANDARD Schneider
13
7) Roll or chain conveyors, if used, allow the autonomous movement of the pallets with the wrapped goods
For ensuring of the staff protection, the following is used:
1) Button EMERGENCY STOP for quick stop of the whole equipment. The button is mechanically blocked in the pressed position and it is placed within the reach of the staff on the control panel.
2) Button CONTROL VOLTAGE. During outage of power supply or during
pressing of button EMERGENCY STOP, the power supply for control system will be disconnected and the machine will not carry out any activity, even
when the power supply is restored or when the button EMERGENCY STOP is accidentally or by staff’s or maintenance’s mistake unblocked
prematurely. Only pressing of button CONTROL VOLTAGE will allow the next machine operation.
3) The machine control is realized from the control panel, which is placed on the lateral side of the machine, so that it was out of reach of the machine working area.
4) Turn-off border for stop of the movement of the descending prestretch device. It is placed in the bottom part of the prestretch device framework.
5) The tipping film holder fully covers the area of the rolls of prestretch device in the standard single-motor prestretch device (see chapter 5.4.4) and twin-motor prestretch device. Opening (tipping) of the holder will stop and block the machine.
6) During the machine operation in other variants of the prestretch device, the running direction of the coil with film and of the rolls is such that pulling of hand into the mechanism cannot happen.
7) In forklift-shaped turntable with presence of the low-lift truck in the forklift shaped cutout during taking the pallet in or off the turntable, the sensor blocks the machine.
8) Retentivity of desk of the top-platen for unstable goods is regulated so that it does not exceed the value of 500 N and foam rubber layer is fixed on it, which minimizes the staff threat by the pressure.
9) Rotating parts of the transfer devices are constantly placed in the machine construction.
3.3. User’s Obligations
Weight of the wrapping film roll is approximately 17 kg. Manipulation with weights over 15 kg is forbidden for all women and juveniles.
Working environment, where the machine is used, is affected by the character of produced and wrapped goods. The user is obliged to secure the work safety and health protection of the workers in accordance with national regulations for health protection.

Pragometal s.r.o. WMS STANDARD Schneider
14
To reduce the physical effort during manipulation with wrapped pallets, the staff has to use the mechanization hoisting units, which were allocated to him/her by the employer for this purpose.
If the character of the wrapped product is such that injury of hand or of other body part of the staff may occur during the manipulation with the wrapped product or if the wrapped goods do not satisfy the hygienic limits (chemical and biological substances, dustiness, noise, etc.), the staff has to use the personal protective equipment, which the machine user allocated to him/her for this purpose.
The equivalent sound pressure level weighted by A function in the duration of the wrapping cycle is 63.9 dB in the place of staff; the machine itself satisfies the hygienic limits. Precautions for protection against noise are affected by the situation in the workplace and they adhere to the national regulations for health protection.
Workers operating the machine must be provably familiarized with these instructions for use and this manual must be permanently available for the staff.
The main machine switch on the switchboard is lockable and it enables locking of the switch in the switched-off position. We recommend to user solving of the manipulation with the key from the lock within the plant, where the machine is installed and thus preventing putting of the machine into operation by person who is not familiarized with the instructions.
3.4. Obligations of the Machine Staff
Staff is obliged to keep the following instructions for his/her safety:
1) In principle, the machine staff is one person. Nobody except staff may stay near the machine during the working cycle.
2) Staff must stay out of reach of the working area (i.e. by the control desk) during the whole duration of the machine operation.
3) Only worker above 18 years, who was determined to do so and who was provably familiarized with this manual and these safety rules, may operate the wrapping machine.
4) If personal protective equipment was allocated to the worker, staff is obliged to use this equipment in accordance with user’s instructions
5) The staff must not be intoxicated by alcohol, addictive drugs or medicines, which may affect the work safety.
6) The staff is obliged to operate and maintain the machine in accordance with this manual. The correct use of machine prevents material damages and injuries.
7) Before start of the work, the staff is obliged to check the overall condition of the machine and correct function of the individual machine parts, in particular the safety of electric cables. He/she must keep the workplace and its surroundings clean during the work.
Pragometal s.r.o. WMS STANDARD Schneider
15
8) It is possible to replace the coil with the film or anyhow manipulate with the prestretch device, only when the machine is inactive.
9) The staff has to put the pallet on the turntable so that it does not overreach the turntable shape with any its part. The pallet must not be put on the turntable eccentrically.
10) If roll or chain conveyor is used for the manipulation with the pallet and goods, during the operation of the machine or conveyor it is forbidden to manipulate with the wrapped goods or with the conveyor in other way than it is mentioned in this manual.
11) It is allowed to pick, dismount or lift off the covers only after the full stop of the machine and after securing of the switch-off condition.
12) The rotating machine parts have to work in the direction of the arrow, which is placed on them.
13) Safety symbols, symbols and notices on the machine must be kept legible. The user is obliged to restore their conditions in accordance with the original version when they are damaged or illegible.
It is forbidden:
1) To use the machine for other purposes or in other way than it is
stated in these Instructions for use.
2) To put the machine into operation and use the machine when the
protective devices (covers, films, keyboards) are dismounted or
damaged.
3) To touch the moving machine parts, rotating pallets or reeling film.
4) To manipulate in the area of rolls of the prestretch device, when the
turntable is moving.
5) To walk or anyhow manipulate in the area between the mast and the
turntable.
6) To enter on the rotating turntable.
7) To manipulate with the goods when the top-platen is going down.
8) To operate the machine when the machine working area and the
workplace are not lighted sufficiently.
9) To realize the maintenance, cleaning and repairs, when the machine
is not stopped by the main switch and secured against the accidental
start.
10) To realize the check-up or repairs of the electric equipment by the
person, who does not have the necessary qualification.
11) To disable the safety, protective and securing equipment, or interfere
with the construction or electric elements of the machine.

Pragometal s.r.o. WMS STANDARD Schneider
16
3.5. Fire Protection
For securing of the fire safety during use of the wrapping machine, the user has to equip the workplace of the wrapping machine by the appropriate fire-stopping materials. Their designation and placement must be discussed and approved with the professional workers of fire protection and inspection, especially in connection with the character of the processed materials and in connection with the fact that the wrapping machine is electric equipment.
The fire prevention officer of the user will determine the placement and selection of the fire extinguishers according to the local conditions.
3.5.1. Instructions for the Machine Staff
In case of the fire accident, at first the staff must disconnect the electrical power supply by unplugging of the plug from the socket, or by turning the main switch off.
For the consequent extinguishing of the arisen fire, the staff has to use only the fire extinguishers, which were determined for that.
For extinguishing it is not allowed to use water extinguisher or foam extinguisher!
Pragometal s.r.o. WMS STANDARD Schneider
17
4. PUTTING INTO OPERATION, MANIPULATION
This chapter deals with stocking, installation and putting of WMS machine into operation, it also contains information about potential later manipulation with used wrapping machine.
4.1. Stocking
Unless the machine is put into the operation immediately after delivery, it is necessary to stock it in the original protective wrapping in the covered place protected against atmospheric effects (rain, snow). The range of the stocking temperatures from 0ºC up to +55ºC, humidity from 5% up to 95% without condensation (dew). No corrosive substances or substances, which leak the exhalations damaging the insulation of the electric conductors, or substances which may create flammable or explosive environment, may be stocked in the place, where the machine is placed.
4.2. Project
Standard WMS machine without the conveyor on turntable and without the necessity of any building intervention does not demand any project preparation. If the supposed workplace matches the requirements for machine working environment according to chapter 2.1, it is possible to install the machine according to chapter 4.4 and put it into operation.
We recommend processing of at least simple project for the machines inserted in the embedded frame in the floor or for the machines equipped with the portal top-platen. The reason for that is later difficult replacement of the machine and of the cast-in frame, or fixed portal top-platen. This project should solve the placement of the wrapping machine with regard to:
Safety of the staff and other people staying near the workplace;
Access to the wrapping machine with the manipulation technology for putting of the goods on the turntable and for removal of the wrapped goods outside of the machine.
It is necessary to process a solving project for WMS machines built-in the lines with roll or chain tracks before the assembly at the latest:
Matching the requirements for the machine working environment (see chapter 2.1);
Staff work safety and safety of other people staying near the workplace;
Placement and orientation of the machine within the wrapping line in light of the functionality of the machine and line and according to the needs of the wrapped goods;

Pragometal s.r.o. WMS STANDARD Schneider
18
Placement of the switchboard and staff place (in case that the machine is supplied without switchboard or with separate switchboard);
Access to the staff places and to places necessary for service and maintenance work;
Mechanical, electrical and program co-operation with other machines in the line;
Electrical power supply, or even the compressed air supply, and cabling so that these supplies and conductors will not be damaged, and the staff and other people staying near the workplace will not be injured;
If needed, placement of other buttons EMERGENCY STOP so that they are easily available for staff as well as for other people, who may stay near the workplace.
The project may be processed by the company or person, who know the rules of work and machine safety, included in valid international and national standards and regulations. Safety of all workplace must be analyzed by the project supplier, who is responsible for the solution and if needed, he/she also processes the directives for work safety. By default, the project is processed by the machine producer or supplier. The machine complies with the standards and acts valid in European Union on condition of processing of the project, which matches the requirements mentioned in this chapter and which is valid for the specific workplace.
4.3. Minimal Area around the Machine
For the staff safety it is necessary to keep the minimal area around the machine. It is forbidden to place any subjects in this area, any other machine or any other machine’s working area are not allowed to overreach into this area, except for portal top-platen (if used).
Scheme of the minimal area does not suppose the area for putting the goods in and out.

Pragometal s.r.o. WMS STANDARD Schneider
19
10001300
600
500
1)
2)
600
250
Note:
Dimension 1) is valid for machine equipped with the prestretch device without tipping cover of the rolls’ area (i.e. for manual brake of the film, mechanic prestretch device, electromagnetic brake of the film or single-motor prestretch device LIGHT);
Dimension 2) is valid for machine equipped with the prestretch device with tipping cover of the rolls’ area (i.e. for single-motor and twin-motor prestretch device).
You will find in the commercial documentation, which type of the prestretch device is installed on your machine, or the individual prestretch devices are described in the chapter 5.4.
4.4. Assembly, Manipulation
Manipulation with the machine is possible by the help of high-lift truck; necessary dimensions of the skids and loading limit of the truck is always mentioned in the relevant article. For all machines it is forbidden to transport them by the help of hand pallet truck and by the help of the crane. Also it is forbidden to remove the machine with pallet loaded on it.
If the machine is exposed to quick temperature change during transport, it is necessary to wait an adequate time for equalization of the temperatures of the machine and surroundings before connection into the network – risk of humidity condensation (dew).
The machines are, except for the model with conveyor on the turntable, delivered with tipped mast, and it is necessary to erect it during putting into operation.

Pragometal s.r.o. WMS STANDARD Schneider
20
!! CAUTION !!
ALWAYS follow the work procedure and instructions
stated hereinafter in the text, during erecting or tipping of
the mast or during manipulation with the machine.
NEVER try to manipulate with the mast without use of the
tipping preparation! If the mast is erected and if it is not
screwed to the turntable, it is unstable. Regarding the
weight of the mast, there is a risk of serious injury and
machine damage!
The machine may never be lifted at the turntable during
any manipulation!
4.4.1. Type STANDARD, OPTIMUM
This is related to the standard model: machines without forklift shaped cutout and machines without roll or chain driven conveyor on the turntable or roll gravity conveyor on the turntable.
The machine is delivered with the tipped mast. For manipulation with the machine there are ports for the skids of the high-lift truck in the carrying section, with dimensions of max. 130×40 mm, satisfying ISO 2328 – these ports are marked with the arrows in the picture. The loading limit of high-lift truck must be min. 1500 kg.
Put the machine in the place, where it will be used and put it into operation there. We do not recommend manipulation with operated machine – see below in this chapter. The machine workplace must satisfy the conditions stated in chapters 2.1 and 4.3. The material mentioned below in the text, which is necessary for putting the machine into operation, is installed in the places, where it will be used later.

Pragometal s.r.o. WMS STANDARD Schneider
21
Follow these instructions during putting into operation:
Remove the protective wrappings
The mast is tipped in the manipulation preparation; this preparation is created by the hinge join, around which the mast turns over when erecting. For transport, the manipulation preparation with mast is installed in the transport position and so it is necessary to shift it into the working position. In the place for working position, there are prepared ports with screws on the turntable, for installation of the manipulation preparation with mast. Transport position and shift to the working position (dashed line) is illustrated in the picture:
Take out the screws fixing the preparation to the turntable (in the picture marked with ), shift the mast including the preparation and prestretch device to the fixing ports in the working position according to the turntable model and screw down the preparation with the mast in this place again to the turntable. The mast weight is from 160 kg for the simplest model up to 270 kg for maximal equipment.
Take down the front cover of the bottom mast part pos. 1. Dismount the rear cover pos. 2.
Erect the mast (take care so that cabling is not damaged) and screw it to the basement in places pos. 3 – the following is delivered: 4 pc screws M10×20, washers 10.5 and lock washers 10. According to the user’s choice, the manipulation preparation may be kept installed on the turntable and mast (recommended) or dismounted; functions, parameters of the machine or work safety are not affected in any way.
Fix the covers back.
Remove the wooden support joist on the prestretch device.
If the machine with top-platen is delivered from production, its jib is dismounted. The assembly of the jib with the top-platen rests in its screwing down to the truck of the top-platen with delivered connection accessories (2 pc of nut M12, washer 13, Lock washer 12 ).
1
3
2
Pragometal s.r.o. WMS STANDARD Schneider
22
In case that the machine is equipped with pneumatic top-platen, connect it to the source of compressed air.
Finally, check the power supply and connect the machine to the network in the way according to chapter 4.6.
Keep all parts and connection accessories dismounted
during putting machine into operation, for the case of later
transport.
For short distances (c. meters, only corrections of
placement in the workplace) the machine may be carefully
shifted in the erected position on the braced surface without
unevenness and super elevation; as for the high-lift truck,
the provisions from the introduction of this chapter are
valid.
By default, it is necessary to transport the machine in the
tipped position, in which it was delivered!
Act as follows during preparing for transport (positions and marking refer to the pictures in the part putting into operation):
Before preparing for transport the machine is functioning and connected to the network, or to source of the compressed air (if the machine is equipped with the pneumatic top-platen).
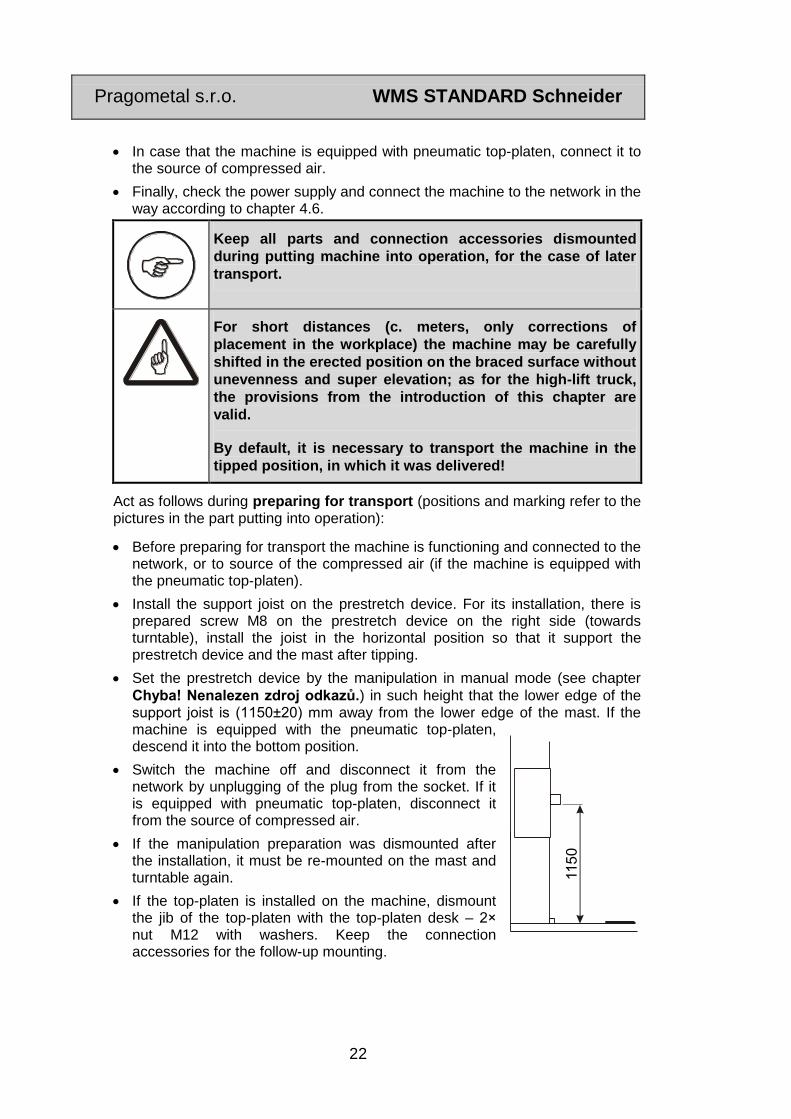
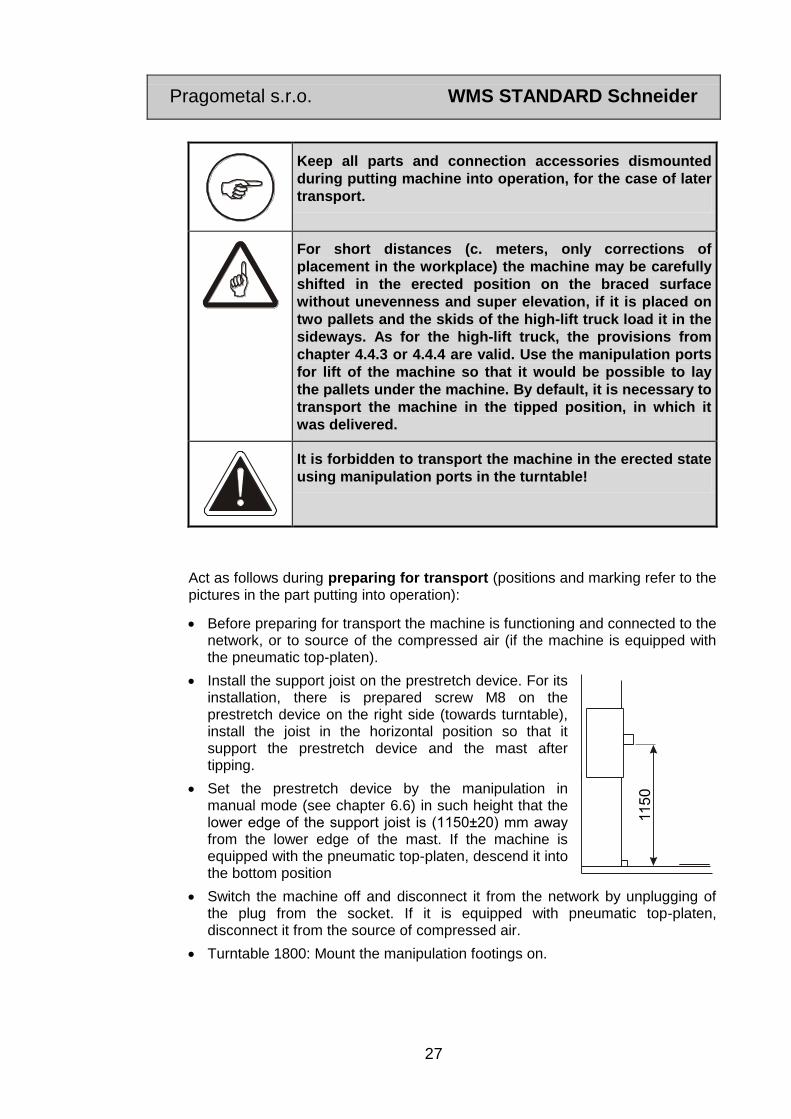
Install the support joist on the prestretch device. For its installation, there is prepared screw M8 on the prestretch device on the right side (towards turntable), install the joist in the horizontal position so that it support the prestretch device and the mast after tipping.
Set the prestretch device by the manipulation in manual mode (see chapter
Chyba! Nenalezen zdroj odkazů.) in such height that the lower edge of the support joist is (1150±20) mm away from the lower edge of the mast. If the machine is equipped with the pneumatic top-platen, descend it into the bottom position.
Switch the machine off and disconnect it from the network by unplugging of the plug from the socket. If it is equipped with pneumatic top-platen, disconnect it from the source of compressed air.
If the manipulation preparation was dismounted after the installation, it must be re-mounted on the mast and turntable again.
If the top-platen is installed on the machine, dismount the jib of the top-platen with the top-platen desk – 2× nut M12 with washers. Keep the connection accessories for the follow-up mounting.
115
0

Pragometal s.r.o. WMS STANDARD Schneider
23
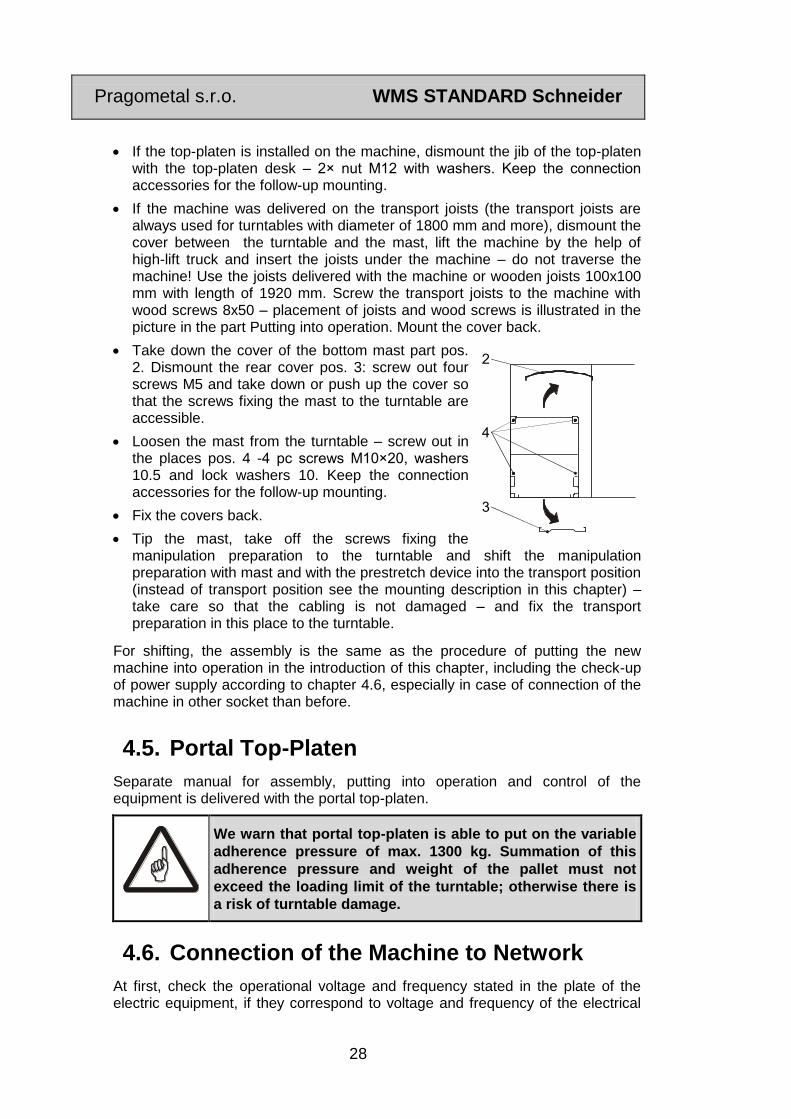
Take down the cover of the bottom mast part pos. 1. Dismount the rear cover pos. 2: screw out four screws M5 and take down or push up the cover so that the screws fixing the mast to the turntable are accessible.
Loosen the mast from the turntable – screw out in the places pos. 3 - 4 pc screws M10×20, washers 10.5 and lock washers 10. Keep the connection accessories for the follow-up mounting.
Fix the covers back.
Tip the mast, take off the screws fixing the manipulation preparation to the turntable and shift the manipulation preparation with mast and with the prestretch device into the transport position (instead of transport position see the mounting description in this chapter) – take care so that the cabling is not damaged – and fix the transport preparation in this place to the turntable.
After shifting, the assembly is the same as the procedure of putting the new machine into operation in the introduction of this chapter, including the check-up of power supply according to chapter 4.6, especially in case of connection of the machine in other socket than before.
4.4.2. Model with Conveyor on the Turntable
This is related to models with roll or chain driven conveyor on the turntable, or the roll gravity conveyor on the turntable.
During assembly the machines are firmly placed in the position according to the project. The supplying company realizes the machine assembly and putting into operation (it is necessary to secure the correct mechanic and electric relation to the conveyor tracks). It is not possible to transfer the machine after assembly.
By default, these types are delivered in partially dismounted state, separate turntable and separate mast of the machine. If the machine is delivered with the top-platen, the jib of the top-platen with the top-platen desk is dismounted. Mast and eventually the jib of the top-platen including the desk are laid on the pallets.
Manipulation with the wrapped turntable is possible by the help of high-lift truck with extensions long min. 1200 mm, with dimensions max. 130×40 mm, satisfying ISO 2328 or by the help of hand handling trucks, loading limit of the truck min. 1500 kg. There are ports for the skids of the high-lift truck in the carrying section under the turntable – these ports are marked with the arrows in the picture. Use the ports for the skids under the turntable only see the picture.Other parts of the machine are delivered separately on the pallet.

Pragometal s.r.o. WMS STANDARD Schneider
24
X
X
If the method of manipulation for the specific machine is different from the instructions mentioned here, all information is stated directly on the wrapped machine, so they are obvious, at the moment of delivery.
4.4.3. Model with Forklift-Shaped Turntable with Diameter
of 1500 or 1650 mm - Manipulation
The following serves for manipulation with the machine ports for the skids of the high-lift truck in the carrying section under the turntable. Skids of the high-lift truck insert in these ports during transport
The skids must have dimensions of max. 100×50 mm and length of 1000 mm and must satisfy ISO 2328. Loading limit of the high-lift truck must be min. 1500 kg.
Manipulation ports serves only for manipulation with the
machine in tipped (transport) state, during putting into
operation for eventual lift of the machine.
4.4.4. Model with Forklift-Shaped Turntable with Diameter
of 1800 mm and More - Manipulation
The machine is delivered underlaid by transport joists for easier manipulation by the high-lift truck. The truck skids insert in sideways – see light arrows in the picture – and they must have length of min. 1500 mm. Recommended loading limit of the truck is min. 1000 kg.

Pragometal s.r.o. WMS STANDARD Schneider
25
Also there are manipulation ports and footings – but they serve only for manipulation with the machine during removal of the transport joists.
Manipulation ports and footings serve only for lift of the
machine during inserting or removing the transport joists. It
is forbidden to transfer the machine or manipulate with it
otherwise by the help of manipulation ports and footings!
After setting of the machine in the place, it is necessary to
remove the manipulation footings (by removal of the cotters
in the internal side of the section and release of the footing
from the port) – when the footings are kept there, there is a
risk of trip and fall. Keep the dismounted footings with
cotters for the eventual later use.
4.4.5. Model with Forklift-Shaped Turntable – Putting into
Operation
Putting into operation is similar for all diameters of forklift-shaped turntables; therefore the following procedure is common for all models. Possible differences are marked directly in the text.
Put the machine in the place, where it will be used and put it into operation there, the machine workplace must satisfy the conditions stated in chapters 2.1 and 4.3. We do not recommend manipulation with operated machine – see below in this chapter. The material mentioned below in the text, which is necessary for putting the machine into operation, is installed in the places, where it will be used later.
Remove the protective wrappings
The mast is tipped in the manipulation preparation, this preparation is created by the hinge join, around which the mast turns over when erecting. For

Pragometal s.r.o. WMS STANDARD Schneider
26
transport, the manipulation preparation with mast is installed in the transport position and so it is necessary to shift it into the working position; in the place for working position, there are prepared ports with screws on the turntable, for installation of the manipulation preparation with mast. Take out the screws fixing the preparation to the turntable (in the picture marked with ), shift the mast including the preparation and prestretch device to the working position (in the picture marked with dark arrow) and fasten preparation with the mast in this place again to the turntable. The mast weight is from 160 kg for the simplest model up to 270 kg for mast with maximal equipment.
Take down the front cover of the bottom mast part pos. 2. Dismount the rear cover pos. 3: screw out four screws M5 and take the cover off.
Erect the mast (take care so that cabling is not damaged) and screw it to the basement in places pos. 4 -the following is delivered: 4 pc screws M10×20, washers 10.5 and lock washers 10. According to the user’s choice, the manipulation preparation may be kept installed on the turntable and mast (recommended) or dismounted; functions, parameters of the machine or work safety are not affected in any way.
Fix the covers back.
Remove the wooden support joist on the prestretch device.
If the machine is delivered on the transport joists: screw out and take off the cover between the turntable and the mast. Take out the screws fixing the transport joists – in the picture marked with . Lift the machine using manipulation ports and footings and remove the transport joists. Put the machine on the ground again. Do not move the machine in any case!
If the machine with top-platen is delivered from production, its jib is dismounted. The assembly of the jib with the top-platen rests in its screwing down to the truck of the top-platen with delivered connection accessories (2 pc of nut M12, washer 13, lock washer 12).
In case that the machine is equipped with pneumatic top-platen, connect it to the source of compressed air.
Finally, check the power supply and connect the machine in the network in the way according to chapter 4.6.
Turntable 1800: Remove the manipulation footings fixed on the turntable (by removal of the cotters in the internal side of the section and release of the footing from the port).
2
4
3
Pragometal s.r.o. WMS STANDARD Schneider
27
Keep all parts and connection accessories dismounted
during putting machine into operation, for the case of later
transport.
For short distances (c. meters, only corrections of
placement in the workplace) the machine may be carefully
shifted in the erected position on the braced surface
without unevenness and super elevation, if it is placed on
two pallets and the skids of the high-lift truck load it in the
sideways. As for the high-lift truck, the provisions from
chapter 4.4.3 or 4.4.4 are valid. Use the manipulation ports
for lift of the machine so that it would be possible to lay
the pallets under the machine. By default, it is necessary to
transport the machine in the tipped position, in which it
was delivered.
It is forbidden to transport the machine in the erected state
using manipulation ports in the turntable!
Act as follows during preparing for transport (positions and marking refer to the pictures in the part putting into operation):
Before preparing for transport the machine is functioning and connected to the network, or to source of the compressed air (if the machine is equipped with the pneumatic top-platen).
Install the support joist on the prestretch device. For its installation, there is prepared screw M8 on the prestretch device on the right side (towards turntable), install the joist in the horizontal position so that it support the prestretch device and the mast after tipping.
Set the prestretch device by the manipulation in manual mode (see chapter 6.6) in such height that the lower edge of the support joist is (1150±20) mm away from the lower edge of the mast. If the machine is equipped with the pneumatic top-platen, descend it into the bottom position
Switch the machine off and disconnect it from the network by unplugging of the plug from the socket. If it is equipped with pneumatic top-platen, disconnect it from the source of compressed air.
Turntable 1800: Mount the manipulation footings on.
115
0
Pragometal s.r.o. WMS STANDARD Schneider
28
If the top-platen is installed on the machine, dismount the jib of the top-platen with the top-platen desk – 2× nut M12 with washers. Keep the connection accessories for the follow-up mounting.
If the machine was delivered on the transport joists (the transport joists are always used for turntables with diameter of 1800 mm and more), dismount the cover between the turntable and the mast, lift the machine by the help of high-lift truck and insert the joists under the machine – do not traverse the machine! Use the joists delivered with the machine or wooden joists 100x100 mm with length of 1920 mm. Screw the transport joists to the machine with wood screws 8x50 – placement of joists and wood screws is illustrated in the picture in the part Putting into operation. Mount the cover back.
Take down the cover of the bottom mast part pos. 2. Dismount the rear cover pos. 3: screw out four screws M5 and take down or push up the cover so that the screws fixing the mast to the turntable are accessible.
Loosen the mast from the turntable – screw out in the places pos. 4 -4 pc screws M10×20, washers 10.5 and lock washers 10. Keep the connection accessories for the follow-up mounting.
Fix the covers back.
Tip the mast, take off the screws fixing the manipulation preparation to the turntable and shift the manipulation preparation with mast and with the prestretch device into the transport position (instead of transport position see the mounting description in this chapter) – take care so that the cabling is not damaged – and fix the transport preparation in this place to the turntable.
For shifting, the assembly is the same as the procedure of putting the new machine into operation in the introduction of this chapter, including the check-up of power supply according to chapter 4.6, especially in case of connection of the machine in other socket than before.
4.5. Portal Top-Platen
Separate manual for assembly, putting into operation and control of the equipment is delivered with the portal top-platen.
We warn that portal top-platen is able to put on the variable
adherence pressure of max. 1300 kg. Summation of this
adherence pressure and weight of the pallet must not
exceed the loading limit of the turntable; otherwise there is
a risk of turntable damage.
4.6. Connection of the Machine to Network
At first, check the operational voltage and frequency stated in the plate of the electric equipment, if they correspond to voltage and frequency of the electrical
2
4
3

Pragometal s.r.o. WMS STANDARD Schneider
29
network, to which it should be connected. Distribution of the electrical network and connection of the sockets have to correspond to the valid international and national regulations and standards. Voltage fluctuation of max. ±5% of the nominal value still secures the correct machine function.
The connection of the machine is realized via cable ended with plug CVG 1643, which is connected to the terminals U,V,W,N,Pe in the switchboard. The supply cable must be led so that the manipulation or transport technology does not drive over it and so that it is not a source of injuries.
Check the connectors on cables connecting the turntable with the mast, which are placed in the bottom mast part. The connectors are already combined from the production for standard machines delivered with the mast, which is mounted on the turntable and tipped. The connectors may be disconnected for the machines with separate or separately delivered mast because of easier manipulation and transport. It is necessary to connect them according to the description on the right side in the picture
Remove the protective label from the main switch after careful check of the service line and connectors. After that it is possible to insert the plug into the socket and connect the machine to the network by the main switch.
Check the phase-matching of the machine. Carry out this check-up always when the machine is connected to other socket than before. The machine turntable, prestretch device and top-platen must move in the correct direction
according to the arrows on the control panel. Caution – check the drive, where
the frequency convertor of revolutions is not included. You must disconnect the
electrical power supply to the machine by switching-off the main switch and unplugging of the plug from the socket, when re-phasing the machine. Only person competent in the terms of chapter 3.1 may carry out the re-phasing of the machine.
If the stretching device of the machine with connected input phases reaches the end-limit switch, the display will show error message Errv. In such case, first connect the machine to phases and then reset the error message using the
procedure given in chapter Chyba! Nenalezen zdroj odkazů..
External protective terminals on the machine and contactor switchboard must be connected by the user to the user’s protective system and they have to be conserved properly.

Pragometal s.r.o. WMS STANDARD Schneider
30
The initial revision of the electric equipment must be realized before putting into operation – see chapter 3.1.
4.7. Machine Dismounting
Before disposal of the machine after end of its technical service time, move all mechanisms in such positions so that there is no risk of fall of the loosened machine parts from the height and so that it is possible to safely remove the parts. Disconnect the electrical power supply by unplugging of the plug from the socket. Person qualified according to chapter 3.1 will check the electrical circuit because of the presence of remanent voltage before start of dismounting; if there is some, it is necessary to discharge this voltage or to wait until the circuit discharges spontaneously. If the machine is equipped with pneumatic top-platen, disconnect it from the source of the compressed air.
Dismount the motors with gear-boxes, remove the lubricants from them (oil, greases), and put them into firm, unbreakable and impermeable container
Dismount all machine elements.
Sort all the elements according to waste classes (steel, non-ferrous metals, plastics, cables, electric elements, etc.). Such assorted waste including the lubricants hand over to the specialized companies for professional disposal.

Pragometal s.r.o. WMS STANDARD Schneider
31
5. EQUIPMENT
5.1. Description, Accessories
1
2
3
4
1 Base frame with round turntable – chapter 5.2
2 Mast (chapter 5.3). Control panel is part of the mast (chapter 5.6).
3 Prestretch device (chapter 5.4) travels on the mast and secures stretching of the film and its wrapping on the goods on pallet.
4 Top-platen for unstable goods (chapter 5.5) is an optional feature (it is not a standard part of the machine).

Pragometal s.r.o. WMS STANDARD Schneider
32
5.2. Turntable
Machines OPTIMUM and STANDARD can be equipped with the turntable:
Standard. Manipulation with the pallets is by the help of high-lift trucks, it is possible to use even low-lift trucks after adding of drive-up ramp. If requested, it is possible to deliver the turntable with plangette for locking of the film before start of the wrapping; it is possible to mount it on even additionally. The standard turntable has diameter of 1500, 1650, 1800 or 2300 mm.
With roll or chain track. This model is designed for the wrapping lines. According to solution of your workplace, the goods either comes
automatically, or it is called by the button PALLET FETCH and after warpping it
is sent further on the track by the additional button PALLET SENDING.
With gravity roll track. This is also designed for wrapping lines. The track is not driven on the turntable, the goods have to be carried on the track and carried away manually by the staff. The rolls make manipulation on the track easier.
Forklift-shaped, which makes the loading of pallets to the wrapping machine easier by the help of low-lift manipulation trucks without the necessity of using the drive-up ramp. Other operation of the machine, its control and possibility of using the plangette for locking of the film are standard. Forklift-shaped turntable has diameter of 1500, 1650, 1800 or 2300 mm
The turntable drive has two variants:
Electrical motor with gear-box, the turntable is driven by the chain. This solution is designed for higher demands on the accuracy of stop in the point of directed stop (see chapter 5.2.1) or for turntables with higher bearing capacity (above 1500 kg).
Electrical motor with inter-gear. First stage of the inter-gear is solved by the V-belt, the second stage is a chain gear. The consequence of V-belt use is more quiet operation, quite soft start and after-running, and possibility of turning the turntable by hand against the gear resistance – however, this possibility should be used only rarely.
5.2.1. Directed Stop
Directed stop means that the turntable will always stop in the same position, which makes the work organization easier during putting the pallets on and off.
In machines fitted with the frequency converter, the directed stop is accurate with tolerance ± 8° in the whole range of operating conditions. If necessary, the turntable can be manually turned to a position enabling the pallet to be removed.
Pragometal s.r.o. WMS STANDARD Schneider
33
In the machines, which do not have the frequency convertors, the accuracy is affected by the inertia of the rotating pallet. Therefore it is necessary to act according to the following procedure:
Place the first pallet of certain weight on the machine turntable and start the wrapping cycle. After the end of the cycle, the pallet will stop in the direction, in which all the following pallets of the same or similar weight will stop. Mark the position of the turntable in reference to the machine frame.
Remove the pallet from the turntable and if the drive-up clapper-bridge is used, put it to the machine in the direction, which will by suitable for carrying the pallets on.
If it is not possible to carry the pallet away (it is turned so that there is no access to it), it is possible to turn it manually in the position, which will enable to carry the pallet away. Then turn the pallet back into the directed position and bring another pallet.
Tolerance of the turntable position in the machine without the frequency convertor is ±10º using the same secondary voltage in the prestretch device and when the difference in pallet weights is less than 100 kg.
For corrections, arising from the operation, it is possible to affect the position of directed stop by parameter P-10 – see the description of configuration parameters in chapter 6.7. Parameters’ setting is described in chapter 6.7.
5.2.2. Drive-Up Ramp
It is not a standard part of the machine, it is delivered to order. If carrying of the goods on the standard turntable (not forklift-shaped) with low-lift truck or other hand manipulation technology is requested, it is possible to add the drive-up ramp to the machine. This ramp will be firmly mounted to the basement during the assembly at the customer’s; its placement (orientation) is given by the area and manipulation conditions in the workplace. It is possible to install the ramp during the machine delivery or anymore later.
5.2.3. Flush Frame
It is not a standard part of the machine, it is delivered to order. Likewise for the drive-up ramp, if carrying of the goods on the standard turntable (not forklift-shaped) with low-lift truck or other hand manipulation technology is requested, it is possible to use the flush frame. The frame use demands building modifications of the workplace (ground recess and frame concrete encasement), and then the wrapping machine is inserted into the flush frame without any assembly or other work. The turntable surface then gets in the floor level and it is not necessary to surpass the difference in elevation when bringing the goods. It is possible to install the flush frame during the machine delivery or anymore later. We recommend processing of at least simple project before installation and use of the flush frame (see chapter 4.2). As for the WMS machine placed in the flush frame, it is necessary to extra respect the ban on driving on the turntable surface with the high-lift truck.
Pragometal s.r.o. WMS STANDARD Schneider
34
5.3. Mast
The machine mast is fixed to the mounting base with screws. Its construction is created from box sections and steel metal or plastic covers. The electric switchboard and control panel are integrated into the mast. The internal mast area contains lead and travel skids and electric drive for travel of the prestretch device, switchboard and set of end sensors. The basic mast lengths are 2300 and 3000 mm.
5.4. Prestretch Device
Prestretch device is mounted on the film truck, placed inside the mast and securing the travel of the prestretch device along the whole height of the mast. Film truck is created by welded frame with travel rollers, driven by electric drive via chain. The prestretch device itself creates various superstructures of the truck.
In machine of OPTIMUM and STANDARD type is – as per order – used one of the prestretch device types, described in chapters 5.4.1 to 5.4.6, which serve for reduction of wrapping material (stretch film).
The films, which are designed for prestretch devices, are specified in chapter 2.5.
The primary stretching occurs between the rolls of the prestretch device because of the difference in speed of their rotation, the main effect is the film reduction. The secondary stretch occurs between the prestretch device and pallet because of the pallet movement against the braked rolls of the prestretch device and it defines the tightness of the wrapping (tightening of the film around the wrapped goods).
Device for measuring of the height of the goods on pallet is mounted on the prestretch device – for more details see chapter 5.4.8.
The device activity, except for the simplest manual prestretch device and mechanical prestretch device, is controlled from the control panel of the wrapping machine.
The machine turntable
MUST NOT
be moving during any work in the area of rolls of the
prestretch device!
Pragometal s.r.o. WMS STANDARD Schneider
35
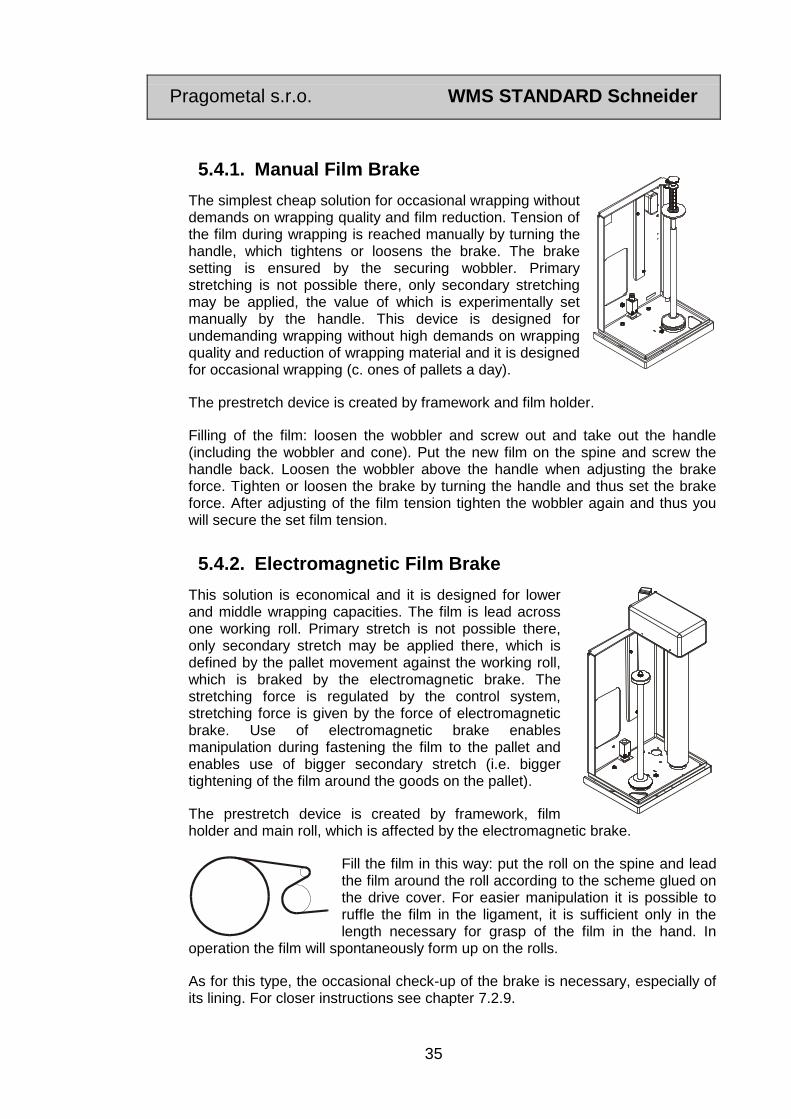
5.4.1. Manual Film Brake
The simplest cheap solution for occasional wrapping without demands on wrapping quality and film reduction. Tension of the film during wrapping is reached manually by turning the handle, which tightens or loosens the brake. The brake setting is ensured by the securing wobbler. Primary stretching is not possible there, only secondary stretching may be applied, the value of which is experimentally set manually by the handle. This device is designed for undemanding wrapping without high demands on wrapping quality and reduction of wrapping material and it is designed for occasional wrapping (c. ones of pallets a day).
The prestretch device is created by framework and film holder.
Filling of the film: loosen the wobbler and screw out and take out the handle (including the wobbler and cone). Put the new film on the spine and screw the handle back. Loosen the wobbler above the handle when adjusting the brake force. Tighten or loosen the brake by turning the handle and thus set the brake force. After adjusting of the film tension tighten the wobbler again and thus you will secure the set film tension.
5.4.2. Electromagnetic Film Brake
This solution is economical and it is designed for lower and middle wrapping capacities. The film is lead across one working roll. Primary stretch is not possible there, only secondary stretch may be applied there, which is defined by the pallet movement against the working roll, which is braked by the electromagnetic brake. The stretching force is regulated by the control system, stretching force is given by the force of electromagnetic brake. Use of electromagnetic brake enables manipulation during fastening the film to the pallet and enables use of bigger secondary stretch (i.e. bigger tightening of the film around the goods on the pallet).
The prestretch device is created by framework, film holder and main roll, which is affected by the electromagnetic brake.
Fill the film in this way: put the roll on the spine and lead the film around the roll according to the scheme glued on the drive cover. For easier manipulation it is possible to ruffle the film in the ligament, it is sufficient only in the length necessary for grasp of the film in the hand. In
operation the film will spontaneously form up on the rolls.
As for this type, the occasional check-up of the brake is necessary, especially of its lining. For closer instructions see chapter 7.2.9.
Pragometal s.r.o. WMS STANDARD Schneider
36
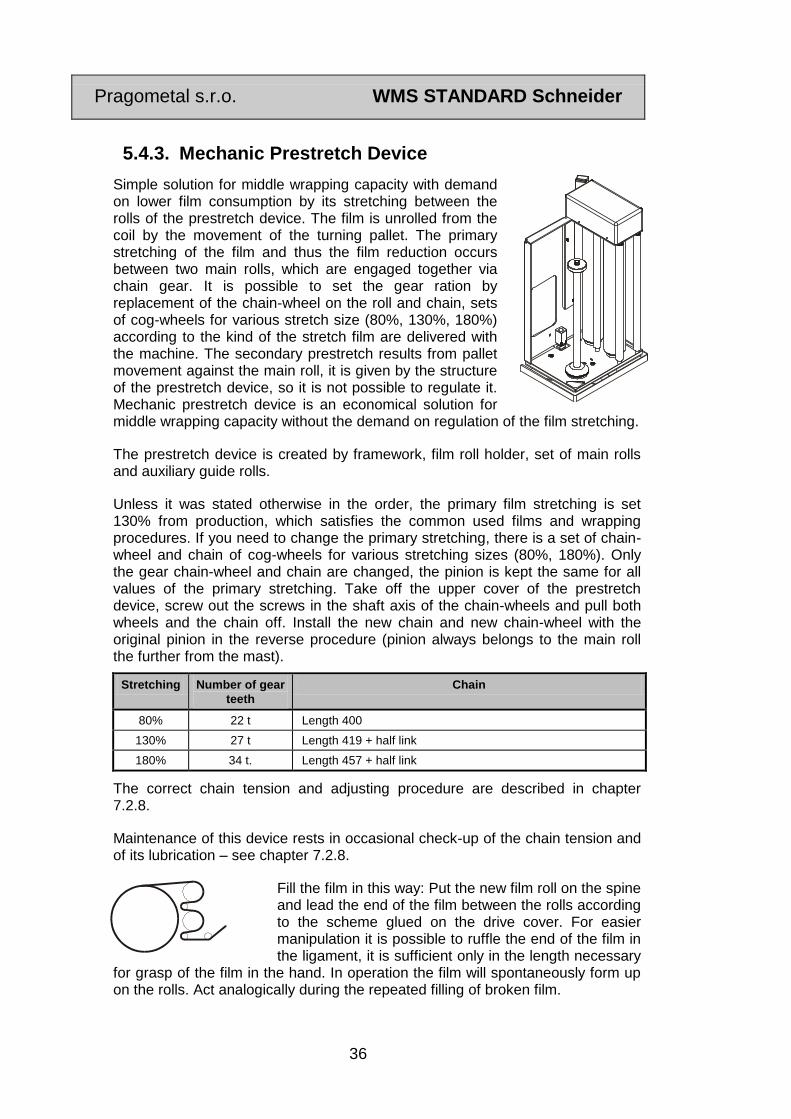
5.4.3. Mechanic Prestretch Device
Simple solution for middle wrapping capacity with demand on lower film consumption by its stretching between the rolls of the prestretch device. The film is unrolled from the coil by the movement of the turning pallet. The primary stretching of the film and thus the film reduction occurs between two main rolls, which are engaged together via chain gear. It is possible to set the gear ration by replacement of the chain-wheel on the roll and chain, sets of cog-wheels for various stretch size (80%, 130%, 180%) according to the kind of the stretch film are delivered with the machine. The secondary prestretch results from pallet movement against the main roll, it is given by the structure of the prestretch device, so it is not possible to regulate it. Mechanic prestretch device is an economical solution for middle wrapping capacity without the demand on regulation of the film stretching.
The prestretch device is created by framework, film roll holder, set of main rolls and auxiliary guide rolls.
Unless it was stated otherwise in the order, the primary film stretching is set 130% from production, which satisfies the common used films and wrapping procedures. If you need to change the primary stretching, there is a set of chain-wheel and chain of cog-wheels for various stretching sizes (80%, 180%). Only the gear chain-wheel and chain are changed, the pinion is kept the same for all values of the primary stretching. Take off the upper cover of the prestretch device, screw out the screws in the shaft axis of the chain-wheels and pull both wheels and the chain off. Install the new chain and new chain-wheel with the original pinion in the reverse procedure (pinion always belongs to the main roll the further from the mast).
Stretching Number of gear
teeth
Chain
80% 22 t Length 400
130% 27 t Length 419 + half link
180% 34 t. Length 457 + half link
The correct chain tension and adjusting procedure are described in chapter 7.2.8.
Maintenance of this device rests in occasional check-up of the chain tension and of its lubrication – see chapter 7.2.8.
Fill the film in this way: Put the new film roll on the spine and lead the end of the film between the rolls according to the scheme glued on the drive cover. For easier manipulation it is possible to ruffle the end of the film in the ligament, it is sufficient only in the length necessary
for grasp of the film in the hand. In operation the film will spontaneously form up on the rolls. Act analogically during the repeated filling of broken film.

Pragometal s.r.o. WMS STANDARD Schneider
37
5.4.4. Single-Motor Prestretch Device
It is designed for high-quality wrapping with no or only occasional demand on change of the primary stretching value. This model of single-motor prestretch device differs from model LIGHT (see chapter 5.4.5) by the tipping cover of rolls area, which enables fast filling of the film between rolls of the prestretch device. The principle of single-motor prestretch device is primary film stretching between two main rolls, which are engaged together via geared transmission. By default, the gear ratio is 180% and it is possible to set it by replacement of cog-wheels on the rolls. The secondary film stretching results from pallet move against the main roll, the brake force of which is defined by the difference between speed of motor and pallet rotation. It is possible to control the secondary stretching from the control panel, its range is 70% up to 400%, whereas the value of 100% means, that the film leaves the prestretch device in such force that after wrapping on the goods the film will not be lengthened or shortened. The single-motor prestretch device is designed for plants with middle or high wrapping capacity, with demands on high-quality of the wrapping and film reduction and with no or only occasional demand on change of primary stretching value.
The prestretch device is created by framework with main rolls, their drive and gear and guide roll, then tipping film roll holder with auxiliary rolls. Film breaking device may be the part of single-motor prestretch device to order, see chapter 5.4.7.
Procedure of film filling: If the machine is working, then before replacement of the used film or before repeated filling of the broken film, stop the machine and replace the roll and fill the film only when the machine is inactive. Press down the opening handle (see the upper picture) and tip the film holder out of the equipment construction towards you. Put the new film roll on the spine. Unroll
about 1 meter of film from the roll, its end in the length necessary for filling into the prestretch device ruffle in the ligament and fill this ligament between the rolls according to the scheme glued on the prestretch device. After filling the ligament should lead over all rolls of the prestretch device. Put the film so that it is led outside of the backstop panel, which is mounted in the upper part by the right main roll and which is obvious when filling the film. In operation the film will spontaneously form up on the rolls and it will slip under this backstop. Give the film holder back and make sure that the latch snapped into the locked position and press the
button CONTROL VOLTAGE. The correct filling of the film between the rolls of prestretch device will happen after closing of the film holder. Act analogically during the repeated filling of broken film.
Pull out the film in the horizontal direction from the prestretch device before its fastening to the wrapped pallet; if you pull it out up or downside, there is an advanced possibility of film reeling on the rolls.
Pragometal s.r.o. WMS STANDARD Schneider
38
At the moment when you press the handle and all the time when the film holder
is tipped out, the display shows tStP and the machine is blocked (it is not possible to start wrapping or manipulate with the machine in manual mode). When you give the film holder back and the latch snaps in the locked position,
press CONTROL VOLTAGE button, the display content is changed to standard according to previous regime of the machine. The machine is ready for operation.
Unless it was stated otherwise in the order, the stretching is set to 180% from production, which satisfies the common used films and wrapping procedures. If you need to change the primary stretching, there are sets (pairs) of cog-wheels delivered with the machine for various stretching sizes (80%, 130%, 230, 280%) – according to the table.
Stretching Number of gear teeth
Note Pinion Wheel
80% 31 28 The same wheel pair like for stretching 130%
130% 28 31 The same wheel pair like for stretching 80%
180% 24 35 Standard stretching value
230% 22 37
280% 20 39
The gear is two-speed and both wheels of the second speed always change when shifting the gear. Take off the upper cover of the prestretch device, screw out the screws in the shaft axis of the cog-wheels pull the wheels off. Install the new pair of cog-wheels in the reverse procedure.
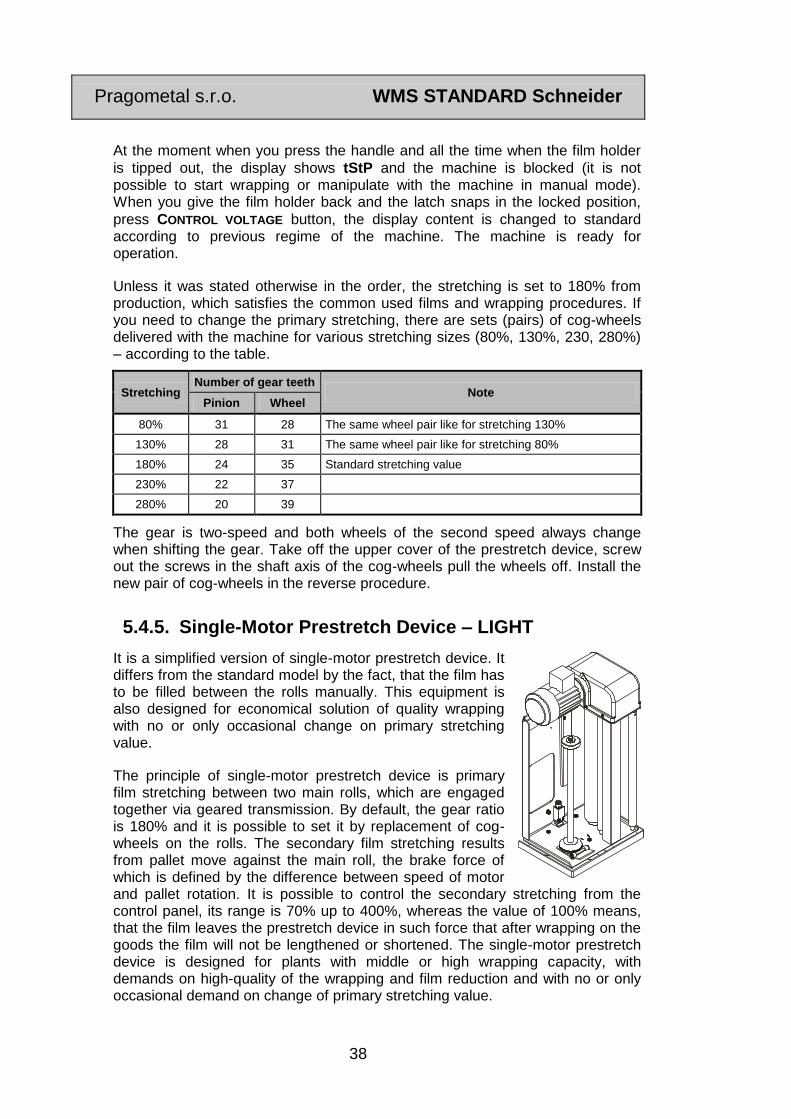
5.4.5. Single-Motor Prestretch Device – LIGHT
It is a simplified version of single-motor prestretch device. It differs from the standard model by the fact, that the film has to be filled between the rolls manually. This equipment is also designed for economical solution of quality wrapping with no or only occasional change on primary stretching value.
The principle of single-motor prestretch device is primary film stretching between two main rolls, which are engaged together via geared transmission. By default, the gear ratio is 180% and it is possible to set it by replacement of cog-wheels on the rolls. The secondary film stretching results from pallet move against the main roll, the brake force of which is defined by the difference between speed of motor and pallet rotation. It is possible to control the secondary stretching from the control panel, its range is 70% up to 400%, whereas the value of 100% means, that the film leaves the prestretch device in such force that after wrapping on the goods the film will not be lengthened or shortened. The single-motor prestretch device is designed for plants with middle or high wrapping capacity, with demands on high-quality of the wrapping and film reduction and with no or only occasional demand on change of primary stretching value.
Pragometal s.r.o. WMS STANDARD Schneider
39
The prestretch device is created by framework, on which all the rolls are placed. It is not possible to add the film breaking device to this model.
Procedure of film filling: If the machine is working, then before replacement of the used film or before repeated filling of the broken film, stop the machine and replace the roll and fill the film only when the machine is inactive. Tip the film holder out of the
equipment construction towards you. Put the new film roll on the spine. Unroll about 1 meter of film from the roll, its end in the length necessary for filling into the prestretch device ruffle in the ligament and fill this ligament between the rolls according to the scheme glued on the prestretch device. In operation the film will spontaneously form up on the rolls. Give the film holder back. If there is need to unroll the film from the prestretch device during film filling or during preparing before wrapping, press and hold the button on the prestretch device and at the same time pull out the film manually – in this time motor of the prestretch device gives a minimal speed to the film. Press of the button when the machine is working and the turntable is rotating, does not affect either the prestretch device or machine operation.
Act analogically during the repeated filling of broken film.
Unless it was stated otherwise in the order, the stretching is set to 180% from production, which satisfies the common used films and wrapping procedures. If you need to change the primary stretching, there are sets (pairs) of cog-wheels delivered with the machine for various stretching sizes (80%, 130%, 180%) – according to the table.
Stretching Number of gear teeth
Note Pinion Wheel
80% 40 44
130% 35 49
180% 31 53 Standard stretching value
The gear is one-speed and both wheels always change when shifting the gear. Take off the upper cover of the prestretch device, screw out the screws in the shaft axis of the cog-wheels pull the wheels off. Install the new pair of cog-wheels in the reverse procedure.
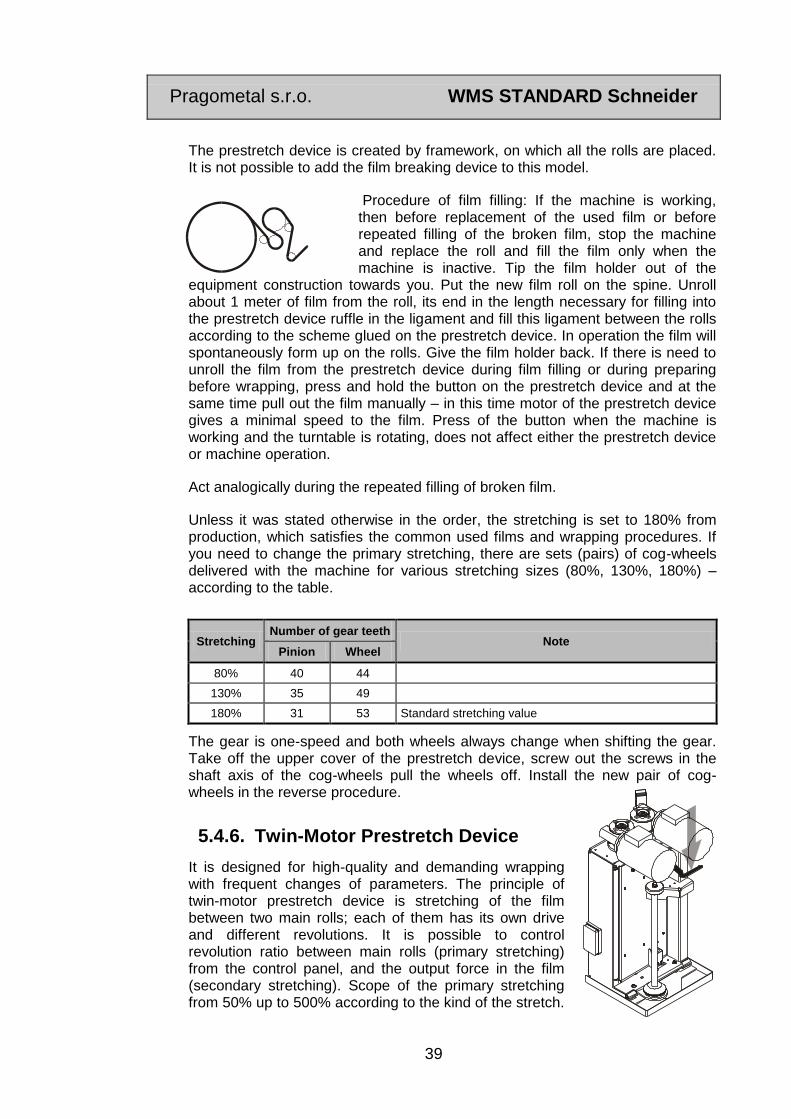
5.4.6. Twin-Motor Prestretch Device
It is designed for high-quality and demanding wrapping with frequent changes of parameters. The principle of twin-motor prestretch device is stretching of the film between two main rolls; each of them has its own drive and different revolutions. It is possible to control revolution ratio between main rolls (primary stretching) from the control panel, and the output force in the film (secondary stretching). Scope of the primary stretching from 50% up to 500% according to the kind of the stretch.

Pragometal s.r.o. WMS STANDARD Schneider
40
Scope of secondary stretching is 70% up to 400%, whereas the value 100% means, that the film leaves the prestretch device in such force that after wrapping on the goods the film will not be lengthened or shortened. Twin-motor prestretch device is designed for high-quality and demanding wrapping in plants with middle and high capacity of wrapping and demand on film reduction and on frequent changes of wrapping parameters.
The prestretch device is created by framework with main rolls, their drive and gear and guide roll, then tipping film roll holder with auxiliary rolls. Film breaking
device may be the part of twin-motor prestretch device to order, see chapter 5.4.7.
Procedure of film filling: If the machine is working, then before replacement of the used film or before repeated filling of the broken film, stop the machine and replace the roll and fill the film only when the machine is inactive. Press down the opening handle (see the upper picture) and tip the film holder out of the
equipment construction towards you. Put the new film roll on the spine. Unroll about 1 meter of film from the roll, its end in the length necessary for filling into the prestretch device ruffle in the ligament and fill this ligament between the rolls according to the scheme glued on the prestretch device. After filling the ligament should lead over all rolls of the prestretch device. Put the film so that it is led outside of the backstop panel, which is mounted in the upper part by the right main roll and which is obvious when filling the film. In operation the film will spontaneously form up on the rolls it will slip under this backstop. Give the film holder back and make sure that the latch snapped into the locked position and
press the button CONTROL VOLTAGE. The correct filling of the film between the rolls of prestretch device will happen after closing of the film holder. Act analogically during the repeated filling of broken film.
Pull out the film in the horizontal direction from the prestretch device before its fastening to the wrapped pallet; if you pull it out up or downside, there is an advanced possibility of film reeling on the rolls.
At the moment when you press the handle and all the time when the film holder
is tipped out, the display shows tStP and the machine is blocked (it is not possible to start wrapping or manipulate with the machine in manual mode). When you give the film holder back and the latch snaps in the locked position,
press CONTROL VOLTAGE button, the display content is changed to standard according to previous regime of the machine. The machine is ready for operation.
5.4.7. Film Breaking Device
Film breaking device is not a standard part of the delivery, it may be delivered with single-motor prestretch device model (not with model LIGHT) and with twin-motor prestretch device to order. It serves for automatic termination of the wrapping. A spike will be pushed out in the last rotation of the turntable and it tears the film, after that the prestretch device will stop and the pallet move will

Pragometal s.r.o. WMS STANDARD Schneider
41
break the film in the tore point. The staff then burnishes the free film end to the wrapped pallet, if necessary.
If the film breaking function is not satisfactory, it is possible to adjust this process by setting of parameters, see chapter 7.2.12. This problem may occur when the pallet with goods is brought to the machine from other direction than before or when the size (dimensions) of the wrapped pallet is different.
Filling of the film into the prestretch device equipped with film breaking device is the same like filling of the film into the standard prestretch device. Function of the film breaking device is controlled by the machine control system.
5.4.8. Measuring of the Goods on Pallet
All WMS wrapping machines are equipped with one of the systems for measuring of the height of the goods on the pallet. This equipment serves for prestretch device to automatically stop after wrapping of the pallet top.
System with mechanically taken pallet top – there is a mechanical end sensor on the prestretch device. Height of the goods on the pallet is set by the position of the finger, this finger is placed in the listel on the mast and it is possible to move it after loosening of the arresting screw. After setting of the correct height of the goods, the finger is again fixed by tightening of the arresting screw. This system is economical and it is suitable when the height of the goods on the wrapped pallet does not change or changes only rarely; but it demands the staff’s attention.
System with optically taken pallet height – an optical sensor is placed on the prestretch device and this optical sensor takes the immediate height of the pallet during the travel of the prestretch device. From the moment when the optical sensor does not record any reflection (it is above the height of the goods on pallet), the prestretch device continues in travel up to the track, which is set in the machine parameters and then it stops. System with variable height of the pallet is universal and it is suitable where the height of the goods on pallet frequently changes and it does not have any demands on the staff.
System with definite pallet height – pallet height is set from the keyboard and the prestretch device acts up to this value. Thus no of the previous sensors of the height of the goods on the pallet needs to be mounted on the machine. If the sensor of height of the goods is under the set definite pallet height for bigger distance than the parameter value of travel across the upper edge of the goods on pallet is, then the prestretch device travels across the sensor in this distance during wrapping and it stops. If the sensor is above this distance or if the sensor is not mounted on the machine, then the prestretch device stops in the set definite pallet height without travelling across. The definite pallet height in version without sensor is the most economical solution, however, the system with definite pallet height lays advanced demands on the staff. It is suitable where the height of the goods on pallet does not change or where it changes only rarely,

Pragometal s.r.o. WMS STANDARD Schneider
42
5.5. Top-Platen
The top-platen serves for fixation of unstable, light goods and to depression of loaded pallet before banding. It is mounted separately on the mast, if needed, it may be mounted even additionally.
5.5.1. Electric Top-Platen
As for electric top-platen, there is a jib fastened on the truck, on the end of the jib there is a top-platen desk. The truck travels along the guide section, which is screwed to the mast and it is driven by electric motor. Top-platen is standard delivered in round form, it freely rotates and the swing bearing enables partial tilting. It is possible to deliver rectangular desk to order, which is also equipped with swing bearing and furthermore with mechanism, which secures the top-platen desk will be put always in the same position after lifting above the goods on the pallet. The adherence pressure is set with the spring by the prestretch device drive. When using the top-platen, the spring is depressed after the desk touch-down and it switches the end sensor for truck move on. Thus the appropriate adherence pressure, which is set from production to maximal size 500 N (50 kg), is created. In case of unreliable function it is necessary to adjust this mechanism, the setting procedure for top-platen is in chapter 7.2.13.
Electric top-platen is controlled from the machine control panel, as for the
STANDARD type it may be also controlled automatically by the machine control system, if the use of top-platen is set in the wrapping program.
5.5.2. Pneumatic Top-Platen
Pneumatic top-platen has similar structure like the electric top-platen, only the pneumatic roll creates the truck drive. The adherence pressure is precisely adjustable in wide range – the setting procedure is mentioned in chapter 7.2.14.
Also the control is the same as for electric top-platen.
5.5.3. Portal Top-Platen
Portal top-platen is designed for the cases, when it is necessary to depress the wrapped goods by huge force – up to 1300 kg. The portal with pneumatic roll and top-platen desk is standing above the turntable. Control of portal top-platen is done by hand lever, which controls the moves of pneumatic roll, there is no relation to machine control system.
Portal top-platen is delivered separately and it has its own instructions for assembly, operation and maintenance.

Pragometal s.r.o. WMS STANDARD Schneider
43
5.6. Control Panel
All buttons for completely equipped machines are described in this chapter. When the machine is equipped with lower standard of additional devices, the appropriate buttons of these devices are not working.
Also there are mentioned special buttons in the separate paragraph, which are not the standard parts of the machine and which are mounted for solving of some specific situations of the user to order.
The system is equipped with control buttons covered with polyester film. Press of each button is indicated with short peep. It is necessary to avoid all activities which may lead to damage of buttons or to damage of the covering film (e.g. press the buttons with sharp objects or affecting the buttons with extreme force, strokes, etc.).
The covering film is an inseparable part of the equipment electrical
insulation and its damage may lead to failure of the whole equipment or to
injury. When this film is damaged, secure its repair without delay.
Also the four-digit display is a part of the control panel; the control system communicates with staff by this display.
Unless it is stated otherwise, the instructions in whole text are valid for
STANDARD as well as OPTIMUM types of all models.
There are some important buttons on the control panel divided into several groups according to their functions :
A ................. Main switch
B ................. Dotykový panel

Pragometal s.r.o. WMS STANDARD Schneider
44
C ................. Button CONTROL VOLTAGE
D ................. Button EMERGENCY STOP
OTHERS ..... Buttons for direct machine control, buttons for setting of parameters a eventually special buttons – they are not pictured
MAIN SWITCH is placed on the mast side. It is lockable and thus it allows an unauthorized person to prevent the manipulation with the machine.
TOUCH PANEL. The touch display is used for entering commands and parameters and for informing operators about the state and operation of the machine.
CONTROL VOLTAGE – the buttons starts the power supply for control system after the machine switch-on or in case that the disconnection of the power supply for the control system occurs as a result of failure. Normal status is indicated by lighting button, if it is off, the control voltage is disconnected. Press of this button restores the power supply for the control system.
EMERGENCY STOP. After press of this button, all machine movements immediately
stop, power supply for the control system will be disconnected (button CONTROL
VOLTAGE will get dark) and the error message tStP will be displayed. It serves for machine stop in emergency or breakdown situation – fall of the goods from the pallet, machine collision with the goods, machine damage, staff injury, etc. During repeated putting of the machine into operation after press of button
EMERGENCY STOP the instructions in chapter 5.7.1 are valid.
SPECIAL BUTTONS. Other buttons or switches are used only in some machines for solving of their specific needs. They need not be placed on the control panel or near to it, but they are placed where they are more efficient in light of functionality or safety (e.g. near the controlled element). If your machine does not have these buttons, please, ignore their descriptions.
In machines equipped with the portal top-platen there is a joystick fro top-platen on the right side near the control panel. The top-platen desk moves to the goods by tilting of the joystick down and it moves above the wrapped pallet by tilting of the joystick up.
Calling of the pallet from the conveyor track to the turntable. The button may be only in the models with roll or chain driven tracks
Sending of the wrapped pallet from the wrapping machine to the conveyor track. The button may be only in the models with roll or chain driven tracks

Pragometal s.r.o. WMS STANDARD Schneider
45
90°
Turning of the turntable. It is used if there is needed to carry the wrapped pallet away in other direction than in which the pallet is brought to the turntable for wrapping. Wrapping must be fully completed, the film has to be broken and burnished to the wrapped goods. After press of the button, the turntable will turn into the previously set position, which is suitable for carrying of the wrapped pallet away. There is stated real final angle and running direction on the plate, in this case the turntable will be turned 90° to the left.
Film reaching. The button is used only in the single-motor prestretch device in model LIGHT and it enables pulling out the film of the prestretch device during filling of the film into the machine or during preparing for wrapping. It is placed directly on the prestretch device; for closer details see chapter 5.4.5)
5.7. Safety Equipment
The machine is equipped with several safety elements for health protection of the worker, who is operating the machine, or for minimalization of damages resulting from emergency events.
5.7.1. Button Emergency Stop
Button EMERGENCY STOP is placed near the control panel and it serves for immediate stop of the machine in case of emergency (machine defect, fall of the goods from the pallet, collision, injury). After press the button is immediately arrested in the pressed position, before the follow-up start of the machine it is
necessary to unblock the button. The pressed button EMERGENCY STOP is
indicated ((the display highlighted in orange shows the message Emergency
stop).
Act as follows during the follow-up putting of the machine into operation:
Remove the cause of the emergency stop Check the condition of the machine (depending on the specific
configuration): Protective frame of the prestretch device must be in inactive position, it
is necessary to remove the eventual strange subject under the prestretch device
The film holder must be in working (closed) position The film has to be correctly filled in the prestretch device
Unblock the button EMERGENCY STOP by turning to the right (it is indicated by the direction of the arrow on the button), until it is turned back in the initial position
Finally, before putting of the machine into operation, it is necessary to start the system control voltage (button Control voltage) – for closer details see chapter 5.7.2 Unless the defect is remedied, the control voltage cannot be switched on (the push-button is not lit on, the display remains highlighted in orange and the machine cannot move in any way).

Pragometal s.r.o. WMS STANDARD Schneider
46
When the push-button START is depressed the program will go on running;
when the push-button STOP is depressed the program will be terminated.
5.7.2. Button Control Voltage
This button and its function matches the requirements of Czech and European safety standards as a preventer against an unexpected and undemanded machine operation after the machine start, failure, power failure or presence of signal of Emergency stop. During power failure or during press of the button
EMERGENCY STOP, the system control voltage will be disconnected and the machine will not perform any activity, even when the power supply is restored or
when the button EMERGENCY STOP is unblocked by the staff’s mistake or by any
other unprofessional or accidental action. Only press of the button CONTROL
VOLTAGE will allow the next machine operation. It is also necessary to press this button when starting the machine. Power supply for control system is indicated by lighting of this button, when the power supply is disconnected the button gets dark.
5.7.3. Protective Frame of the Prestretch Device
Protective frame of the prestretch device prevents from the staff’s injury or machine damage, it switches the machine off, when a limb or a strange subject gets under the prestretch device and thus it causes tilting of the frame from the inactive (open) position.
In the single-motor and twin-motor prestretch device the operation of the system and of the machine during tilting of the film holder is the same like during tilting of the protective frame.
Deviation of the frame in the running machine will cause immediate stopping of the machine; the display is orange highlighted and shows the message Emergency stop. After the frame returns back to its rest position, restore power supply to the control system by depressing the push-button Control voltage; the message on the display is replaced by the standard display highlighted in green. After the push-button START is depressed, the machine goes on running from the point of interruption; when the push-button STOP is depressed the program will be terminated.
If, at the moment of the frame deviation, the machine was in idle time or if, during the idle time of the machine, the film holder is tilted (the display is highlighted in
orange and shows the message Emergency stop), the control system of the machine does not allow starting of the program. After the frame is put into its rest position or after the film holder is closed, restore power supply to the control
system by depressing the push-button CONTROL VOLTAGE..
Pragometal s.r.o. WMS STANDARD Schneider
47
5.7.4. Sensor in the Cutout
It is related only to machines with forklift-shaped turntables.
The sensor prevents from switching the machine on in the time, when the low-lift truck is in the cutout area during bringing or removing the pallet. All the time,
when the low-lift truck is staying in the cutout area, the message tStP shows on the display. After removal of the truck, restore the power supply for control
system by press of the button CONTROL VOLTAGE, message on the display
changes to StoP and this message will automatically disappear in few seconds.

Pragometal s.r.o. WMS STANDARD Schneider
48
6. OPERATION
6.1. Switching on and off of the machine
The machine is started by turning the main switch on the switchboard side to the
position "I" and by switching on control voltage of the control system by
depressing the push-button CONTROL VOLTAGE; the push-button shall be lit on. After about 25 seconds following the machine start, the automatic regime will reset the program that was set on the machine at the moment of switching off.
The machine is switched off by turning the main switch to the position "0".
6.2. Operation of touch panel
The touch display is a sensitive device. It is operated with a finger (without gloves) or with a light rounded stick without sharp edges (e.g. a turned pencil). Light touch is sufficient for activating the display.
When operating the display do not use working gloves or sharp metal objects. Touch the display with appropriate force.
Using of sharp objects, strong depressing, hits or impacts by a heavy object can seriously damage the display and thus cause non-functionality of the machine.
6.2.1. Principles, basic terms
The following basic terms are defined to provide for lucidity of these instructions:
Panel (display panel) – technical device assembled in the switchboard that serves for communication between the operator and the machine system.
Display – What is shown on the display panel, i.e. texts and graphic symbols that facilitate communication of the operator with the machine.
Push-button – the control push-button depicted on the display. It is shown in a way that it looks as an embossed push-button.
Keyboard – the means of the touch panel system for entering numerical or alphanumerical values.
Indicator – it shows the state of the push-button that switches over between two functions or states. Active function or state is indicated by a lit on (light) indicator; non-active, switched off function or state is indicated by a lit off (dark) indicator.

Pragometal s.r.o. WMS STANDARD Schneider
49
Warning
The Instructions are written for all variants of the wrapping
machine WMS. In case your machine is of such configuration
that some push-button would not be functional such push-
button is not shown.
6.2.2. Error message
If an error occurs the red display shows an error message. Detailed description of error messages and their solution is in Chapter 6.9.
6.2.3. Entering passwords
During an attempted access to the list of service parameters, i.e. P-, C- and S-parameters (see Chapter 6.7) or during storing parameters of the program or parameters of manual functions, the system will ask for entering the user name and password – the machine is thus protected against unauthorized intervention to the system.
The name and password are touch-entered into the fields for name or password. After quickly repeated touching of the push-button, the alphanumerical keyboard cyclically changes characters shown on the push-button, for instance, after repeated touching of the key 1, the entered character 1, s, t, u is cyclically changed – the system is similar to that of entering SMS messages in mobile
phones. The push-button Ent confirms the entered character and terminates text
editing; the push-button Esc terminates text editing without storing it; the back arrow erases the character left of the cursor; the left and right arrows change the
cursor position; the push-button Clr clears the whole text.
If the entered pair user–password is correct and corresponds to required level of authorization, the access is allowed to corresponding lists of parameters – see the table below. The user setting is valid for about 10 minutes from the last

Pragometal s.r.o. WMS STANDARD Schneider
50
action of the user; after this time elapses, the user is automatically logged off. It is also possible to log off manually – depress the logging-off push-button on the display for the machine administration (see Chapter 6.7).
The state is indicated by a picture on the push-button: the machine with an active password of any level shows the symbol of closed lock on the push-button; the machine without an active password shows the symbol of lock with key.
The machine and its parameters are protected on several levels:
User
(without password) – this is a standard level enabling selection of number of started program and changing of parameters of just running program and parameters of just active manual functions; i.e. the parameters can be changed without storing. On further starting of the program, initial values of parameters are reset.
U User The user without password, in addition, can change and store parameters of programs and parameters of manual regime.
P P–parameters The user U, in addition, can change configuration of P-parameters (see Chapter 6.7)
C C–parameters The user P, in addition, can change configuration of C-parameters (see Chapter 6.7)
S S–parameters The user C, in addition, can change configuration of S-parameters (see Chapter 6.7). This level is reserved for the manufacturer and service organizations.
6.3. Inserting film roll, film replacing The procedures of inserting new film roll or replacing consumed film differ according to the stretching device used – for detailed description of the film inserting see Chapter 5.4.
The films for which the stretching devices are intended are specified in Chapter 2.5.
Tie the film end at the pallet chock, fasten it between goods on the pallet in their lower part. If the film holder (metal strip on the turntable) is mounted on your machine fasten the film on it.

Pragometal s.r.o. WMS STANDARD Schneider
51
6.4. Automatic regime of machine The automatic regime is always set by switching on the machine.
If the machine is in the manual regime change it to the automatic regime by
touching the push-button A.
In the automatic regime it is possible to start already created programs, to change individual parameters of programs, and to permanently store these changes.
6.4.1. Program selection
The machine STANDARD enables using of up to twenty programs. If any of the programs 1 through 6 is required it can be selected by depressing the push-button with the program number at the upper edge of the display or by entering the program number – after touching the program number at the lower edge of the display, the dialog window is open for entering the program number.
The program 7 through 20 should be selected by direct entering of the program number by touching the program number at the lower edge of the display.
The type OPTIMUM allows operation of only one of two programs selectable by
the push-button PROGRAM 1 or PROGRAM 2.
The selected program is signalized by a lit-on indicator on the push-button; in
case a program with number 7 or higher is selected for the machine STANDARD all indicators are lit off.
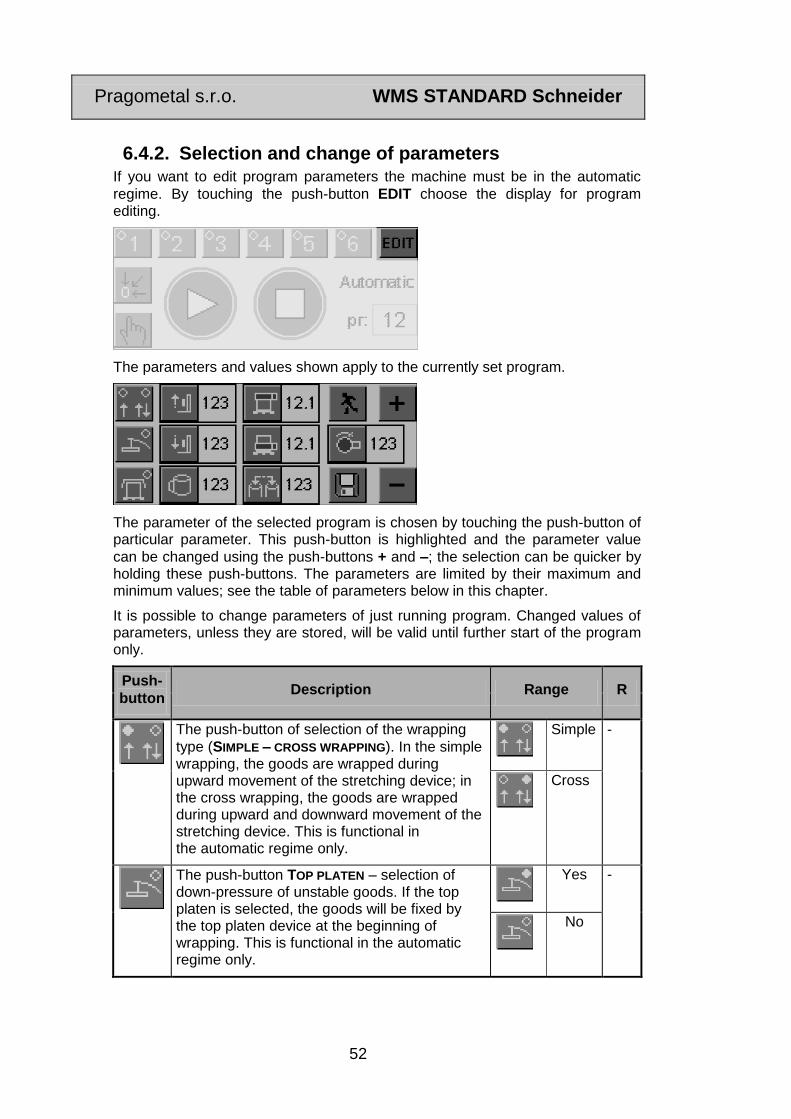
Pragometal s.r.o. WMS STANDARD Schneider
52
6.4.2. Selection and change of parameters If you want to edit program parameters the machine must be in the automatic
regime. By touching the push-button EDIT choose the display for program editing.
The parameters and values shown apply to the currently set program.
The parameter of the selected program is chosen by touching the push-button of particular parameter. This push-button is highlighted and the parameter value
can be changed using the push-buttons + and –; the selection can be quicker by holding these push-buttons. The parameters are limited by their maximum and minimum values; see the table of parameters below in this chapter.
It is possible to change parameters of just running program. Changed values of parameters, unless they are stored, will be valid until further start of the program only.
Push-
button Description Range R
The push-button of selection of the wrapping
type (SIMPLE – CROSS WRAPPING). In the simple wrapping, the goods are wrapped during upward movement of the stretching device; in the cross wrapping, the goods are wrapped during upward and downward movement of the stretching device. This is functional in the automatic regime only.
Simple
-
Cross
The push-button TOP PLATEN – selection of down-pressure of unstable goods. If the top platen is selected, the goods will be fixed by the top platen device at the beginning of wrapping. This is functional in the automatic regime only.
Yes -
No

Pragometal s.r.o. WMS STANDARD Schneider
53
Push-
button Description Range R
The push-button TOP OVERLAP – selection of top overlap in the program. A pause is inserted for putting the overlapping film on the goods; subsequently, the wrapping goes on by fixing the overlapping film to the pallet. This is functional in the automatic regime only.
Yes
No
Type STANDARD: Upward speed of carriage
Type OPTIMUM: Speed of carriage (combined upward and downward)
10, 12, …, 100
%
Type STANDARD: Downward speed of
carriage
Type OPTIMUM: not relevant
10, 12, …, 100
%
Fixed height of pallet (see Chapter 5.4.8)
(It is shown at the place of the push-button Upward speed of carriage. Selection of the upward and downward speed of the carriage can be changed over by repeated depressing of the push-button Downward speed of carriage).
50, 51, …, 350 cm
Rotating speed of turntable. The parameter can only be selected for regulation of the turntable speed by frequency converter.
30, 35, …, 100 %
Film braking force (if electromagnetic brake of the film is used)
or
Secondary stretching of film (for single-motor and twin-motor stretching device). The value 100 % means that the film leaves the device with such a force that, after it is wound on the goods, it is neither prolonged nor shortened.
For other types, the push-button is hidden.
0, 1, …, 100
70, 71, …, 400
%
%
Primary stretching of film in the stretching device. It is adjusted as a length increment of the film, i.e. the film is prolonged between the rollers of the stretching device by a set percentage value. This can be used in the twin-motor stretching device; in other versions the push-button is hidden.
50, 55, …, 500 %
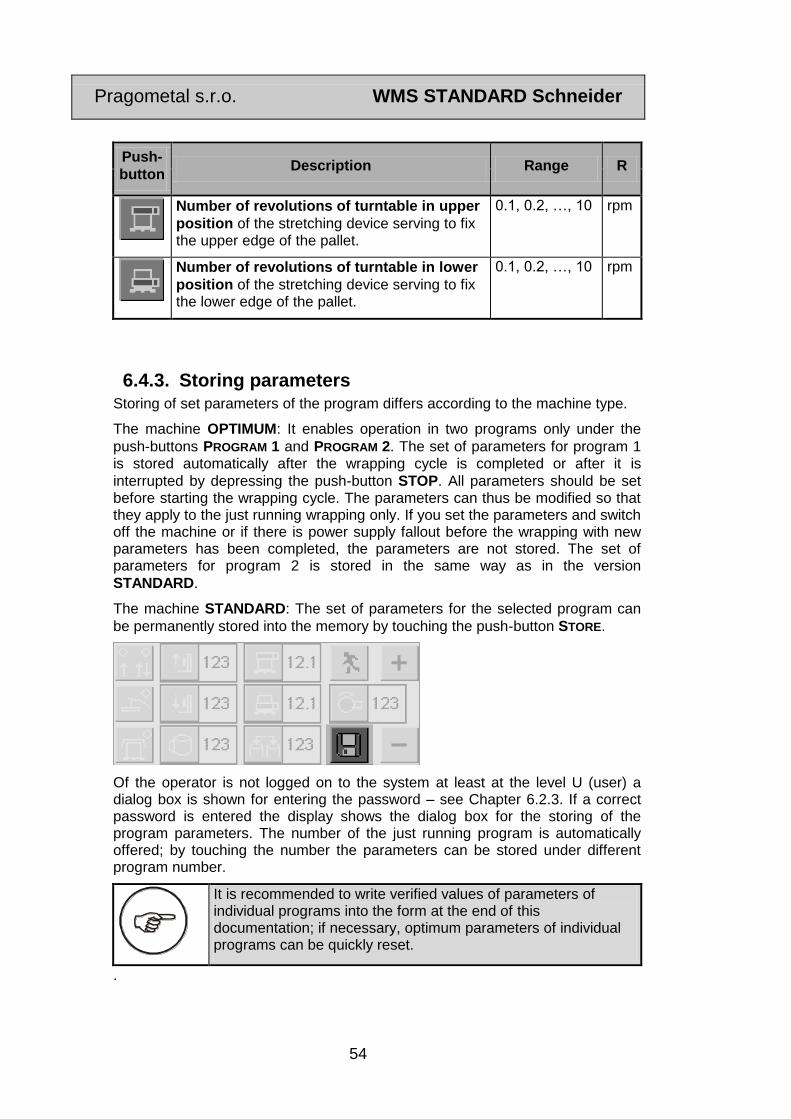
Pragometal s.r.o. WMS STANDARD Schneider
54
Push-
button Description Range R
Number of revolutions of turntable in upper
position of the stretching device serving to fix the upper edge of the pallet.
0.1, 0.2, …, 10 rpm
Number of revolutions of turntable in lower
position of the stretching device serving to fix the lower edge of the pallet.
0.1, 0.2, …, 10 rpm
6.4.3. Storing parameters Storing of set parameters of the program differs according to the machine type.
The machine OPTIMUM: It enables operation in two programs only under the
push-buttons PROGRAM 1 and PROGRAM 2. The set of parameters for program 1 is stored automatically after the wrapping cycle is completed or after it is
interrupted by depressing the push-button STOP. All parameters should be set before starting the wrapping cycle. The parameters can thus be modified so that they apply to the just running wrapping only. If you set the parameters and switch off the machine or if there is power supply fallout before the wrapping with new parameters has been completed, the parameters are not stored. The set of parameters for program 2 is stored in the same way as in the version
STANDARD.
The machine STANDARD: The set of parameters for the selected program can
be permanently stored into the memory by touching the push-button STORE.
Of the operator is not logged on to the system at least at the level U (user) a dialog box is shown for entering the password – see Chapter 6.2.3. If a correct password is entered the display shows the dialog box for the storing of the program parameters. The number of the just running program is automatically offered; by touching the number the parameters can be stored under different program number.
It is recommended to write verified values of parameters of individual programs into the form at the end of this documentation; if necessary, optimum parameters of individual programs can be quickly reset.
.

Pragometal s.r.o. WMS STANDARD Schneider
55
6.4.4. Program starting
The push-button START will start the wrapping cycle according to the selected program (acoustic signalization for about 2 s). Before starting the program, the machine need not be in its initial position.
Any time, the running program can be interrupted using the push-button
INTERRUPTION. In the running program, it is possible to change the program parameters - these will apply immediately.
Then, the push-button START is blinking alternately with the push-button
INTERRUPTION. On depressing the blinking push-button START/INTERRUPTION, the machine will continue in the wrapping cycle;
blinking alternately
by depressing the push-button STOP, the program will be terminated.
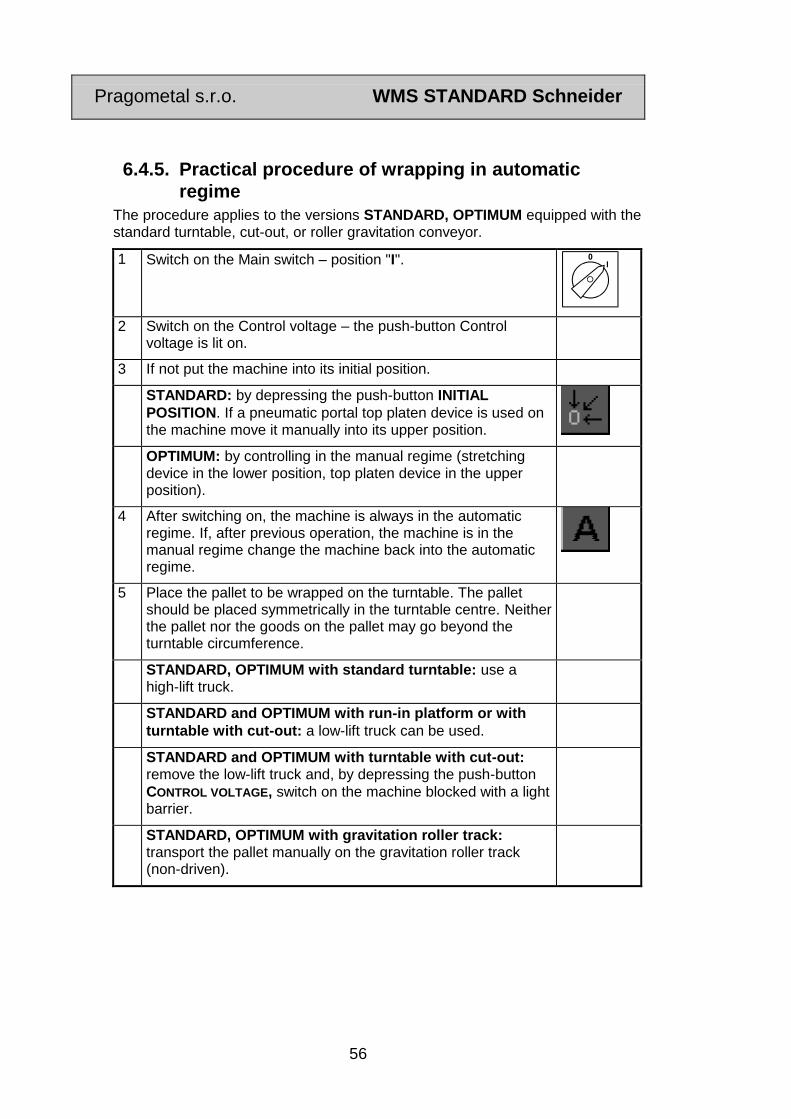
Pragometal s.r.o. WMS STANDARD Schneider
56
6.4.5. Practical procedure of wrapping in automatic
regime
The procedure applies to the versions STANDARD, OPTIMUM equipped with the standard turntable, cut-out, or roller gravitation conveyor.
1 Switch on the Main switch – position "I".
2 Switch on the Control voltage – the push-button Control voltage is lit on.
3 If not put the machine into its initial position.
STANDARD: by depressing the push-button INITIAL
POSITION. If a pneumatic portal top platen device is used on the machine move it manually into its upper position.
OPTIMUM: by controlling in the manual regime (stretching device in the lower position, top platen device in the upper position).
4 After switching on, the machine is always in the automatic regime. If, after previous operation, the machine is in the manual regime change the machine back into the automatic regime.
5 Place the pallet to be wrapped on the turntable. The pallet should be placed symmetrically in the turntable centre. Neither the pallet nor the goods on the pallet may go beyond the turntable circumference.
STANDARD, OPTIMUM with standard turntable: use a high-lift truck.
STANDARD and OPTIMUM with run-in platform or with
turntable with cut-out: a low-lift truck can be used.
STANDARD and OPTIMUM with turntable with cut-out: remove the low-lift truck and, by depressing the push-button
CONTROL VOLTAGE, switch on the machine blocked with a light barrier.
STANDARD, OPTIMUM with gravitation roller track: transport the pallet manually on the gravitation roller track (non-driven).

Pragometal s.r.o. WMS STANDARD Schneider
57
6 Unwind a sufficiently long piece of film from the stretching device and fix its end to the wrapped pallet or, in case the machine is fitted with a metal strip on the turntable, fasten the film to it. If a single-motor or twin-motor stretching device is used on your machine pull the film from the stretching device in horizontal direction before fixing is to the wrapped pallet; if the film is pulled aslope upward or downward there is an increased possibility of reeling up the film onto the rollers. When inserting the film, care should be paid that, any time later during the wrapping, the film cannot come under the rotating part of the turntable; there is a danger of reeling up the film on the turntable chain and the central bearing, and possibly also of falling down of the chain from the gearwheel and pinion.
7 STANDARD: use one of the push-buttons of the program selection to select required wrapping program 1 - 6. Particular indicator is lit on and the display shows the program number.
If the wrapping runs according to the program with number 7 through 20 all indicators will be off and the display will show number of the selected program.
OPTIMUM: The program 1or 2 is active only. The indicator on the push-button Program 1 or Program 2 is lit on and the display shows the program number.
8 By depressing the push-button Start, start the wrapping program.
Operation of the program and possible further action of the operator depend on the machine and on the program setting - see the table Wrapping programs – OPTIMUM and Wrapping programs – STANDARD.
9 Take away the wrapped pallet, continue with point 5.
10 Continue with point 5 or, if there is no further pallet to be wrapped, switch off the machine by the Main switch – the
knob in position "0".
The procedure valid for the version STANDARD with a roller or chain driven conveyor:
1 Turn on the Main switch – the knob in position "I".
2 Switch on control voltage – push-button CONTROL
VOLTAGE is lit on.
3 If not, put the machine into its initial position.
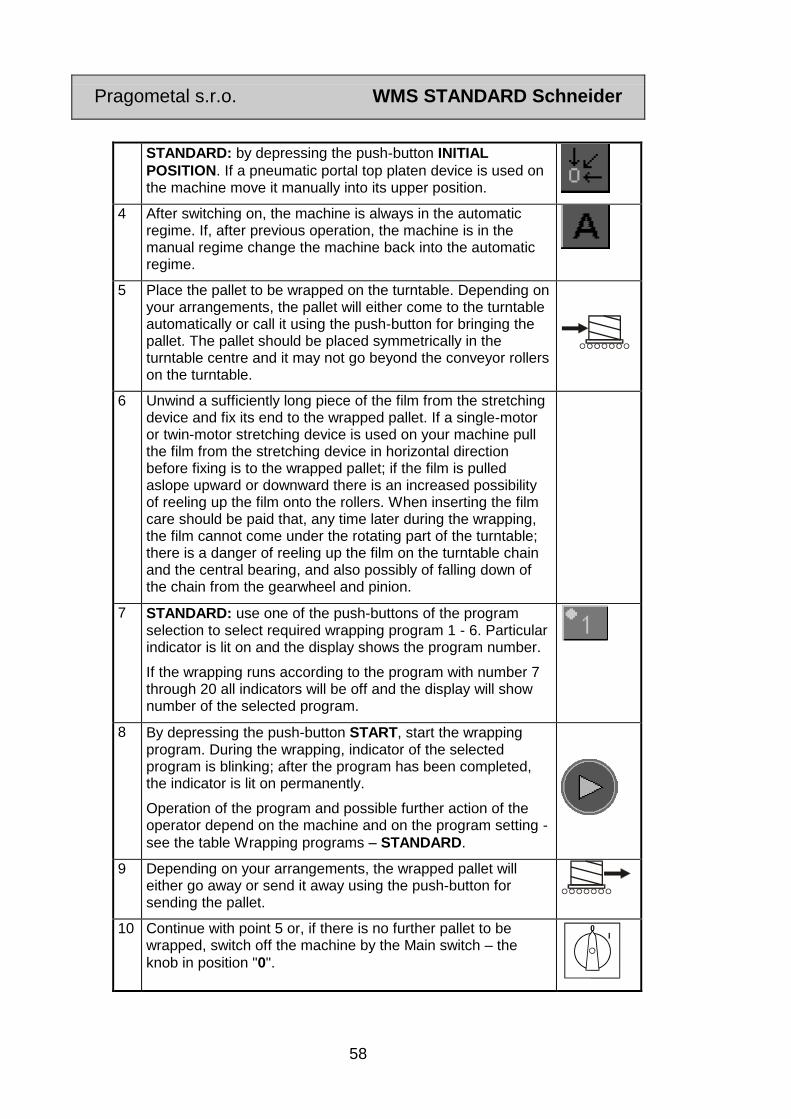
Pragometal s.r.o. WMS STANDARD Schneider
58
STANDARD: by depressing the push-button INITIAL
POSITION. If a pneumatic portal top platen device is used on the machine move it manually into its upper position.
4 After switching on, the machine is always in the automatic regime. If, after previous operation, the machine is in the manual regime change the machine back into the automatic regime.
5 Place the pallet to be wrapped on the turntable. Depending on your arrangements, the pallet will either come to the turntable automatically or call it using the push-button for bringing the pallet. The pallet should be placed symmetrically in the turntable centre and it may not go beyond the conveyor rollers on the turntable.
6 Unwind a sufficiently long piece of the film from the stretching device and fix its end to the wrapped pallet. If a single-motor or twin-motor stretching device is used on your machine pull the film from the stretching device in horizontal direction before fixing is to the wrapped pallet; if the film is pulled aslope upward or downward there is an increased possibility of reeling up the film onto the rollers. When inserting the film care should be paid that, any time later during the wrapping, the film cannot come under the rotating part of the turntable; there is a danger of reeling up the film on the turntable chain and the central bearing, and also possibly of falling down of the chain from the gearwheel and pinion.
7 STANDARD: use one of the push-buttons of the program selection to select required wrapping program 1 - 6. Particular indicator is lit on and the display shows the program number.
If the wrapping runs according to the program with number 7 through 20 all indicators will be off and the display will show number of the selected program.
8 By depressing the push-button START, start the wrapping program. During the wrapping, indicator of the selected program is blinking; after the program has been completed, the indicator is lit on permanently.
Operation of the program and possible further action of the operator depend on the machine and on the program setting -
see the table Wrapping programs – STANDARD.
9 Depending on your arrangements, the wrapped pallet will either go away or send it away using the push-button for sending the pallet.
10 Continue with point 5 or, if there is no further pallet to be wrapped, switch off the machine by the Main switch – the
knob in position "0".

Pragometal s.r.o. WMS STANDARD Schneider
59
6.5. Description of machine operation The column Regime in the tables of the wrapping programs for the machine
OPTIMUM and STANDARD of all versions shows codes of all possible wrapping regimes:
A – simple wrapping
B – cross wrapping
C – simple wrapping with top platen
D – simple wrapping with overlap
E – simple wrapping with top platen and overlap
F – cross wrapping with top platen
G – cross wrapping with overlap
H – cross wrapping with top platen and overlap
In the simple wrapping, the goods are wrapped during the upward movement of the stretching device; in the cross wrapping, the goods are wrapped during the upward and downward movement of the stretching device.
If there is a dark field in the column Regime for the required regime, the machine operation given in the same row in the column Description of operation is performed in the given regime.
The column Parameter gives all parameters directly influencing operation of the machine and the wrapping procedure. The parameters given by text (e.g.
Carriage speed) are parameters entered by push-buttons on the control panel –
see Chapter 5.6. The parameters given as P-number (e.g. P-0) are configuration parameters – for their meaning and setting see Chapter 6.7.
Because of differences in the machine operation, activities of the operator, and parameters, two tables are presented below to provide for better lucidity:
separate for the machine OPTIMUM of all versions, separate for the machine
STANDARD of all versions.

Pragometal s.r.o. WMS STANDARD Schneider
60
Wrapping programs for machines OPTIMUM of all versions
Regime Description of operation Parameter
A B C D E F G H
The top platen of the wrapping machine presses down the pallet.
The turntable starts rotating Speed of turntable (only if the machine is fitted with frequency converter of the turntable)
After the turntable starts rotating, the stretching device will stay in its lower position for a selected number of revolutions.
Number of
revolutions
Electromagnetic brake, single-motor or twin-motor stretching device: after a selected number of revolutions, the stretching device is started.
The stretching device moves upward with selected speed.
Speed of carriage
On the signal from the sensor monitoring height of the wrapped pallet, the stretching device stops.
The stretching device stays in the upper position for selected number of revolutions.
Number of
revolutions
The stretching device stays in the upper position for about one revolution and moves down by the length given by parameter P-4.
The turntable stops with given orientation. The program is interrupted.
The operator moves the top platen up above the pallet.
The operator puts the overlapping film onto the pallet.
The operator presses the pallet with the plate of the top platen device (or the top platen need not be used at this phase provided that the goods are sufficiently fixed).

Pragometal s.r.o. WMS STANDARD Schneider
61
Regime Description of operation Parameter
A B C D E F G H
The operator depresses the push-
button START.
The turntable starts rotating Speed of turntable (only if the machine is fitted with frequency converter of the turntable)
The stretching device moves upward to its previous position.
In the upper position, the stretching device stays for a selected number of revolutions.
Number of
revolutions
The stretching device moves down with selected speed.
Speed of carriage
In the lower position, the stretching device stays for a selected number of revolutions.
Number of
revolutions
The machine is fitted with film
tearing: At the end of wrapping, the tearing pin is pushed out and the film is ruptured. After the machine stops, the operator attaches its end smoothly to the pallet, if necessary.
The turntable stops with given orientation.
The top platen moves up above the pallet by the length given by parameter P-5.
The machine is not fitted with film
tearing: the machine operator cuts the film and attaches its end smoothly to the pallet.
The stretching device is in a position where the wrapping was stopped. The operator depresses the push-
button START. The stretching device moves to its lower position. If necessary, the turntable can be turned manually to a position allowing the pallet to be taken away. After the pallet is removed, the machine is ready for another wrapping cycle.

Pragometal s.r.o. WMS STANDARD Schneider
62
Wrapping program for machine STANDARD of all version
Regime Description of operation Parameter
A B C D E F G H
The top platen of the wrapping machine presses down the pallet.
The turntable starts rotating Speed of turntable (only if the machine is fitted with frequency converter of the turntable)
After the turntable starts rotating, the stretching device will stay in its lower position for a selected number of revolutions.
Number of
revolutions in lower
position
Electromagnetic brake, single-motor or twin-motor stretching device: after a selected number of revolutions, the stretching device is started.
The stretching device moves upward with selected speed.
Upward speed of
carriage
On the signal from the sensor monitoring height of the wrapped pallet, the stretching device moves by the distance P-0 and stops.
The stretching device stays in the upper position for a selected number of revolutions.
Number of
revolutions in upper
position
The stretching device stays in the upper position for about one revolution and moves down by the length given by parameter P-4.
The turntable stops with given orientation.
The top platen moves up above the pallet by the length given by parameter P-5.
The program is interrupted. The operator puts the overlapping film onto the pallet and depresses the
push-button START.

Pragometal s.r.o. WMS STANDARD Schneider
63
Regime Description of operation Parameter
A B C D E F G H
The turntable starts rotating Speed of turntable (only if the machine is fitted with frequency converter of the turntable)
The top platen presses the pallet down.
The stretching device moves upward to its previous position.
In the upper position, the stretching device stays for a selected number of revolutions.
Number of
revolutions in upper
position
The stretching device moves down with selected speed.
Downward speed of
carriage
In the lower position, the stretching device stays for a selected number of revolutions.
Number of
revolutions in lower
position
The machine is fitted with film
tearing: At the end of wrapping, the tearing pin is pushed out and the film is ruptured. After the machine stops, the operator attaches its end smoothly to the pallet, if necessary.
The turntable stops with given orientation.
The top platen moves up above the pallet by the length given by parameter P-5.
The machine is not fitted with film
tearing: the machine operator cuts the film and attaches its end smoothly to the pallet.

Pragometal s.r.o. WMS STANDARD Schneider
64
Regime Description of operation Parameter
A B C D E F G H
The stretching device is in a position where the wrapping was stopped. The operator depresses the push-
button START. The stretching device moves to its lower position. If necessary, the turntable can be turned manually to a position allowing the pallet to be taken away. After the pallet is removed, the machine is ready for another wrapping cycle.
6.6. Manual regime The push-button Manual is used to change the regime from automatic to manual. In the manual regime, active push-buttons are those of direct control of the machine actuators, push-buttons of parameters valid for the manual regime, the push-button of changing into the automatic regime, and, for the type
STANDARD, also the push-button of putting the machine into its initial position.
All movements in the manual regime can be stopped by changing over to the
automatic regime (with push-button A).
The machine with the turntable with cut-out: take away the low-lift truck and, by
depressing the push-button CONTROL VOLTAGE, switch on the machine blocked by the light barrier.
6.6.1. Turntable control First depression Second depression
Turntable starts rotating
Regulation of turntable speed (provided the machine is fitted with frequency converter)
Oriented stop of the turntable. Frame around the push-button is blinking
Turntable stops immediately

Pragometal s.r.o. WMS STANDARD Schneider
65
For the period when the turntable is in the regime of turning to the oriented stop, the frame around the push-button is blinking.
The turntable stops immediately even on changing over to the automatic regime
(push-button A).
6.6.2. Control of travel of the stretching device carriage
or Repeated depressing of
any push-button
Carriage upward
Carriage downward
Regulation of carriage speed
Carriage stops
By short depressing of the push-button, the carriage starts moving in the given direction to the end-limit switch and stops on depressing some of the push-button Carriage upward, Carriage downward, or on changing over to the automatic regime (push-button A). During downward shifting, it moves to the end-limit switch of the lower position; during upward shifting, it moves to the position
determined by a photocell and travel-over of the carriage (parameter P00), or by the emergency end-limit switch.
By long depressing of the push-button or during upward shifting of the carriage with the shielded photocell for scanning the pallet height (during movement above the pallet), the carriage only moves if the push-button is pressed. After releasing the push-button, the travel stops.
6.6.3. Control of travel of top platen device
or Repeated pressing of any
push-button
Top platen downward
Top platen upward
Top platen device stops
By short depressing of the push-button, the top platen starts moving in the given
direction and stops either on depressing some of the push-buttons TOP PLATEN
UPWARD or TOP PLATEN DOWNWARD, or after moving to the end-limit switch, or after the top platen has sat down onto the goods on the pallet and presses them

Pragometal s.r.o. WMS STANDARD Schneider
66
down with a preset force, or after changing over to the automatic regime (push-button A).
By long depressing of the push-button, the top platen only moves if the push-button is depressed. After releasing the push-button, the travel stops.
6.6.4. Putting the machine into initial position The initial position is defined by:
carriage in lower position;
top platen in upper position;
turntable at oriented point (point of oriented stop).
The push-button INITIAL POSITION is only functional in the type STANDARD. After it is depressed, individual parts of the wrapping machine start moving so that the machine is brought into this basic position. During these movements, the push-button for controlling turntable is highlighted. Repeated depressing of this push-button stops the turntable immediately.
Repeated depressing of the push-button INITIAL POSITION or changing over of the automatic / manual regime stops all movements.
In the type OPTIMUM it is necessary to move to the initial position manually (in manual regime).
6.6.5. Selection and change of parameters of manual
regime In the manual regime, the parameters can be set in the same way as in the automatic regime.
The parameters are limited by their maximum and minimum values, see the table of parameters.
Push-
button Description Range Dimension
Original
setting
Turntable speed. It is functional for regulation of the turntable speed with the frequency converter only.
10,11,..,100 % 100

Pragometal s.r.o. WMS STANDARD Schneider
67
Push-
button Description Range Dimension
Original
setting
Braking force of the film (in using electromagnetic film brake)
or
secondary stretching of the film (for the single-motor and twin-motor stretching device). The value 100 % means that the film leaves the device with such a force that it is neither prolonged nor shortened after it has been wound onto the goods.
In other types, the push-button is non-functional.
0, 1, 2, …, 100
70, 71, …, 400
%
%
50
100
Value of the film pre-stretching in the stretching device. It is set as an increment of the film length, i.e. the film is prolonged between the stretching device rollers by a set percentage value. This can be used for the twin-motor stretching device; in other versions, the parameter is non-functional
90, 91, …, 500
% 100
The set values are remembered even after the machine has been switched off.
6.7. Configuration regime The regime of the system configuration and administration is centralized on the system administration display. In the configuration regime, the user can set the machine operation and program performance using the parameters. The user can access two groups of parameters: parameters P and C.
The accessible parameters are marked P- on the display; these parameters directly influence wrapping, its quality, speed, and economy. They complete the wrapping parameters and make them more precise; practically, they are set just occasionally.
The machine parameters are marked C- on the display. These parameters depend on the machine configuration and on the components used. These parameters are only changed in case of a change in the machine configuration (e.g. using of a different stretching device, change of end-limit switches, etc.).

Pragometal s.r.o. WMS STANDARD Schneider
68
These parameters can only be intervened by the manufacturer or the supplier or service organization.
The service parameters are marked S- on the display. These parameters are critical for the machine safety or they are used by the machine system for various calculations and regulations. These parameters can only be accessed by the manufacturer or the service organization. They are not described in this documentation.
Access to configuration regime
The machine must be in the manual regime.
By touching the service symbol, the display for the machine administration is shown.
In case you are not logged on to the machine system with your name and password, touching of push-button Administration of parameters will show the dialog box for entering the password – see Chapter 6.2.3.
After entering the valid password, the display shows the list of groups of parameters and, then, the system allows you to access the areas covered by your set rights.

Pragometal s.r.o. WMS STANDARD Schneider
69
In all groups of parameters, the control is identical and it is described below.
Parameter selection
Changing over between the parameters is performed using the push-buttons with the symbols of Arrow upward and Arrow downward. By touching the parameter value, it can be changed – the keyboard corresponding to the variable type is shown:
The keyboard for setting logical values is shown for parameters with logical value.
By touching the push-button On, the logical 1 (Truth, Yes) is set. By touching the push-button Off, the logical 0 (Untruth, No) is set. The push-button Ent stores the set value; the push-button Esc leaves the value entering without changing the parameter value.
The numerical keyboard is shown for parameters with numerical value.
The parameters cannot attain any value; their range and step are defined in the table of parameters in Chapter 6.7.1. For instance, if the table shows 0, 0.1,…, 25.5, the parameter can only attain values 0, 0.1, 0.2, 0.3 etc. (with the step of 0.1) up to 25.3, 25.4, 25.5.
The complete list of parameters, their meaning and values are given in the table of parameters in Chapter 6.7.1.

Pragometal s.r.o. WMS STANDARD Schneider
70
Termination of configuration regime
By depressing the push-button STORE in the list of parameters, the changed parameters are stored and the display for the machine administration is shown. During storing, the information panel with the text "Parameters are stored…" is shown.
For the period when the text "Parameters are stored…" is shown, the machine must not be switched off; the stored parameters could be damaged and the machine would not work properly.
By depressing BACK, the display for the machine administration is directly shown without storing the parameters.
You can return from the display for the machine administration to the standard
display of the manual regime by depressing the push-button BACK.
Finding out software version
Some parameters depend on the version of software of the control system used in your machine; the number of version of the program can be asked for by the service technician during phone discussion on the machine defect. The version number is shown on the page Diag.

Pragometal s.r.o. WMS STANDARD Schneider
71
6.7.1. Configuration parameters All system parameters for fully equipped machine are given. In case that the machine is fitted with a lower standard auxiliary device, particular parameters of these devices may be non-functional. It is recommended to maintain these values on the figures set by the manufacturer.
Oriented point (term in the text) – position of the turntable scanned by the sensor to which some of its operations are defined. As a standard, the oriented point is identical with the point for oriented stop unless otherwise specified by parameter P-10.
Deviations given for the Type STANDARD apply to all its versions as well as to
OPTIMUM, unless otherwise stated.
Values of the configuration parameters, as set on your machine by the manufacturer, are given in the Annex "Table of configuration parameters". In case of an intervention into these parameters, whether by you or by a service technician, it is recommended to write down these changes into this table; this will facilitate possible further service interventions in the future.
Accessible parameters
Number Description Range Unit
P00 Travel-over of the stretching device above the upper edge of the pallet, i.e. the film overlaps beyond the upper edge of the pallet. This will provide for good fixation of the upper part of the goods in the pallet.
0, 1,..,100 cm
P01 Number of revolutions following the turntable start after which stretching to the value of parameters P15 and P17 is set; only then is the secondary stretching set in the program and the film will be tightened around the goods. The parameter is relevant for the electromagnetic film brake, single- or twin-motor stretching device. During these revolutions, possible sharp edges of the goods are overlaid by a sufficient film layer; during subsequent wrapping with the set higher secondary pre-stretch, the film is not ruptured by sharp edges of the goods on the pallet.
0, 0.1,..,10 rpm

Pragometal s.r.o. WMS STANDARD Schneider
72
Number Description Range Unit
P02 Type of the second revolution delay – it defines the number of revolutions of the turntable in the lower position of the stretching device at the end of the program during the cross wrapping:
0 – number of revolutions is the same as number of revolutions in the beginning; this is a standard setting;
1 – number of revolutions will be zero; the parameter value in program P–3; Number of revolutions in the lower position is neglected;
2 – number of revolutions is given by the parameter value of the system P–3;
3 – number of revolutions is defined in the system parameter P–3 as a percentage part of the program parameter Number of revolutions in the lower position.
0, 1, 2, 3 -
P03 Number of revolutions of the turntable in the lower position of the stretching device at the end of the program during the cross wrapping. Its exact meaning is given by the value of the system parameter P–2.
- – absolute value of the number of revolutions
- – factual number of revolutions is defined as the set percentage of the number of revolutions set in the program parameter Number of revolutions in the lower position.
- If 0 or 1 is set in P–2 , parameter P–3 is irrelevant.
1, 2, …, 500
1, .2, ,..,500
0.1 rpm
%
P05 In the wrapping with overlap: the distance by which the stretching device moves down under the upper edge of the goods on the pallet after the wrapping is completed. The turntable then stops and the machine makes it possible to put the overlapping film.
0, 1,..,200 cm
P06 Electric top platen device: the distance by which the top platen moves up above the upper edge of the pallet at the end of the program or during the pause for laying the overlapping film.
10, 11,...,300 cm

Pragometal s.r.o. WMS STANDARD Schneider
73
Number Description Range Unit
P07 The turntable speeding up or slowing down in the speed changes. The lower is this value the quicker is the change in the turntable speed and the higher is impact on the wrapping machine and on the wrapped goods. The parameter is only relevant for machines fitted with the frequency converter for regulation of the turntable speed. In machines without the turntable regulation by the converter P07 = 0.2.
0.1, 0.2,.., 10 s
P10 Minimum distance from the oriented point of the turntable beyond which the turntable does not manage to slow down to the run- out speed in the oriented stop. This parameter is only intended for elimination of failure quantities (motor slip, etc.). The parameter is only relevant in machines fitted with the frequency converter for regulating the turntable speed.
0, 1,..,180 °
P11 Travel-over of the turntable switch. In the oriented stop, the turntable stops by this value beyond the turntable switch. This parameter is relevant in machines with mounted turntable with cut-out, for instance. With increasing value of this parameter, precision of the stop decreases.
0, 1,..,359 °
P12 Speed in % of maximum speed to which the turntable slows down during the oriented stop and at which the turntable then moves to the oriented point. The parameter is only relevant for machines fitted with the frequency converter for regulating the turntable speed.
1, 2,…,50 %
P13 1 – Travel-over of the turntable oriented point will only be active for the oriented stop in the program or for the manual oriented stop. For travel to the reference, the system will behave as if the travel-over of the turntable oriented point were zero.
0 – travel-over of the turntable oriented point is functional always.

Pragometal s.r.o. WMS STANDARD Schneider
74
Number Description Range Unit
P15 Minimum value of the secondary pre-stretch. The parameter is relevant for single- or twin-motor stretching devices. Secondary pre-stretch with the stopped turntable and with the moving-off turntable is set to this value. At the same time, this parameter is the minimum limit of the secondary pre-stretch in its regulation during wrapping. Its correct value prevents the film from being excessively pulled out from the reel and from its sagging. Do not set to a value lower than 70.
60, 61,…, 100
%
P16 Minimum primary pre-stretch. The parameter is relevant for the twin-motor stretching device. This is the minimum limit of the primary pre-stretch in its regulation during wrapping.
50, 51,…, 300
%
P17 Primary pre-stretch during the start. This value is set from the moment when the wrapping program begins to the moment set in P01.
50,51,…,300 %
P18 Value of the primary pre-stretch to be set at the moment of automatic cutting during termination.
50, 51,…, 300
%
P19 Value of the secondary pre-stretch to be set at the moment of automatic cutting during termination. It provides for reliable tearing of the film before it is ruptured.
70, 71,..., 200
%
P20 Position of the film cutting
For details on setting of this parameter see Chapter 7.2.12.
0, 1,.., 300 °
P21 Beginning of braking after the film tearing.
For details on setting of this parameter see Chapter 7.2.12.
0, 1,.., 300 °
P22 Duration of cutting – time for which the pin of the film tearing is pushed out.
For details on setting of this parameter see Chapter 7.2.12.
0.10, 0.11, ...,1.00
s
Pragometal s.r.o. WMS STANDARD Schneider
75
Number Description Range Unit
P25 Type OPTIMUM: parameter non-functional
Type STANDARD: lock of programs (if S –11 = 3):
1 – programs are locked and they cannot be stored;
0 – programs are unlocked and they can be changed (standard setting).
This is set in case that it is undesirable to change the set and tested programs.
0, 1 -
P26 1 – If the top platen is used, the program type "Special program for wrapping doors" will be executed for the program number 1 - 4 independently of the selected program structure. The parameters of speed, film pre-stretch, and number of revolutions for individual programs are valid. Programs 5 and 6 remain unchanged and can be arbitrarily programmed.
0 – Special wrapping program will not be applied.
P28 Film width. The parameter is relevant for fix entered height of wrapping.
25,26,…,75 cm
P30 Maximum turntable speed. Factual time of one revolution at maximum speed (100 %). The parameter serves for internal needs of the system; change in its value does not influence the turntable speed and can result in unexpected behaviour of the machine.
3,…,30 s
P31 Maximum speed of travel of the stretching device carriage on the column.
100,…,999 cm/min
P32 Maximum speed of the top platen device. 100,…,999 cm/min
P33 Delay in the turntable rotation after lowering the plate of the pneumatic top platen device
0, 1,..,10 s

Pragometal s.r.o. WMS STANDARD Schneider
76
Machine parameters
Number Description Range Unit
C02 1 – the turntable drive is regulated by the frequency converter (the turntable speed can be smoothly regulated; exact oriented stop)
0 – the turntable drive is controlled by the contactor or soft starter
C03 1 – travel of the stretching device carriage on the column is smoothly regulated by the frequency converter
0 – travel of the stretching device on the column is controlled by the contactor
C05 1 - twin-motor stretching device is used
C06 1 – single-motor stretching device is used
C07 1 – single-motor stretching device LIGHT is used
C08 1 – electromagnetic film brake is used
C10 BROUT1 – output for the film brake.
Parameters C7 ÷ C10 set linearity of the dependence of engagement of the electromagnetic film brake at the output from the control system.
Based on the manufacturer’s experience, the parameters C7 ÷ C10 are set as standard during production as follows:
0, 1,..,
100
%
Setting C7 C8 C9 C10
standard 40 70 10 60
Softer characteristic 0 60 0 100
Based on this setting, the electromagnetic brake has stronger engagement in the beginning (higher braking affect) and this characteristic is then levelled off.
C11 BROUT2 – output for the film brake. See parameter C-7.
0, 1,..,
100
%
C12 BRRIZ1 – film brake force (set on the display). see parameter C-7
0, 1,..,
100
%
C13 BRRIZ2 – film brake force (set on the display). See parameter C-7
0, 1,..,
100
%

Pragometal s.r.o. WMS STANDARD Schneider
77
Number Description Range Unit
C15 1 – the top platen device is mounted on the wrapping machine
0 – the top platen device is not mounted on the wrapping machine
C16 1 – pneumatic top platen device is mounted on the machine
0 – electric top platen device is mounted on the machine or no top platen device is used
C17 1 – a device for film tearing is mounted on the stretching device (this can only apply to single- or twin-motor stretching device)
0 – a device for film tearing is not mounted on the stretching device
C20 1 – external signals START and STOP are used
0 – neither external START nor STOP are applied – standard value
C21 1 – the wrapping machine is a part of the conveyor track
0 – the wrapping machine is not a part of the conveyor track
C22 1 – machine version ROLO
0 – standard machine. Value 0 is always set.
C25 1 – program start prohibited unless the sensor of height of the goods on the pallet is activated.
0 – program start is allowed always. This is standard setting
C26 1 – the operator will set fixed height of the pallet with the goods in cm.
0 – height of the pallet is scanned by an optical sensor or by the end-limit switch.
C27 Manual control prohibited. Manual control of the machine not allowed.

Pragometal s.r.o. WMS STANDARD Schneider
78
Number Description Range Unit
C30 Configuration of storing programs
0 - standard way of changing and storing programs;
1 – program parameters cannot be stored while the program is running but with the machine in the idle state only;
2 – the program is also stored at the program start, termination, on switching to another program, or on changing to manual regime;
3 – if the parameter P25 is higher than 0 the program parameters cannot be stored.
The values 1, 2 and 3 are only effective for the programs specified by parameters C31 and C32.
C31 Lower limit of programs for parameter C30
C32 Upper limit of programs for parameter C30
C35 Timeout of travel of the stretching device carriage
0, 1, …, 99
C40 Maximum frequency of the turntable converter. Enter parameter HSP of the turntable converter
Hz
C41 Maximum frequency of the carriage converter. Enter parameter HSP on the converter of drive of travel of the stretching device carriage on the column.
Hz
C42 Maximum frequency of the converter of the motor of driving roller of the stretching device. Enter parameter HSP on the converter of motor of the driving roller of the stretching device.
Hz
C43 Maximum frequency of the converter of the motor of the braking roller of the stretching device. Enter parameter HSP on the converter of the driven roller of the stretching device.
Hz
C44 Maximum frequency of the converter of rollers ROLO. Enter parameter HSP on the converter of rollers. It is irrelevant for standard machines.
Hz
C52 End-limit switch DI02. Setting of type of the end-limit switch (see the electric wiring diagram):
1 – closing contact
0 – opening contact or no switch is used
C53 End-limit switch DI03. See parameter C52.
C54 End-limit switch DI04. See parameter C52.

Pragometal s.r.o. WMS STANDARD Schneider
79
Number Description Range Unit
C55 End-limit switch DI05. See parameter C52.
C56 End-limit switch DI06. See parameter C52.
C57 End-limit switch DI07. See parameter C52.
C58 End-limit switch DI08. See parameter C52.
C59 End-limit switch DI09. See parameter C52.
C60 End-limit switch DI10. See parameter C52.
C61 End-limit switch DI11. See parameter C52.
C62 End-limit switch DI12. See parameter C52.
C63 End-limit switch DI13. See parameter C52.
C80 Initialization. By setting value of this parameter to "1", factory setting of the machine is loaded from the memory.
0, 1
Factual number of wrapped pallets; if the number is equal or higher than that set by the manufacturer the system will ask for service inspection. The number shown should be multiplied by 100. For reading only. See Chapter 6.9.2
6.8. Errors and their remediation The table below shows some most frequent errors and failures, their cause, and remediation. These defects can be remedied by the operator or by the user’s maintenance staff.
Failure Cause Remediation
The machine cannot be switched on
Power supply, circuit breaker
The machine is switched on but not functional
Depressed push-button
EMERGENCY
STOP
see Chapter 5.7.1
Deviated protective frame of stretching device
see Chapter 5.7.3

Pragometal s.r.o. WMS STANDARD Schneider
80
Failure Cause Remediation
Turntable with cut-out: cut-out sensor shielded
Remove the obstacle shielding the cut-out sensor. Clean the sensor and mirror. Check the sensor functionality. See Chapter 5.7.4.
Different text than expected is shown on the display.
Error message System failure. If it occurs after switching the machine off and on, the service intervention is necessary.
Slow or no function of pneumatic mechanisms
Air Check air pressure, connection of air supply to the machine.
Reverse sense of movement of turntable and stretching device
Interchanged phases of power supply
see Chapter 4.6.
The film reels up on the stretching device rollers.
Too low secondary stretch
Increase minimum value of secondary stretch – parameter P8 (see Chapter 6.7)
The film tears Improper film see Chapter 2.5.
Sharp edges of goods on pallet
Change wrapping of the goods or decrease secondary stretch (see the following point)
Too high secondary stretch
Decrease minimum value of the secondary stretch
Unexpected machine behaviour
Program Check selected program and its setting.
System Check the system setting.
Uneven floor Place the machine on a flat consolidated floor (geometry of sensors disturbed)
Heavy run of machine Overloaded machine
Observe the machine load bearing capacity (see Chapter 2.3 or marketing documentation)
Film reeled up on turntable chain
Remove the film from the turntable chain (see Chapter 7.2.4)
Non-standard message on display
System message see Chapter 6.9.1

Pragometal s.r.o. WMS STANDARD Schneider
81
Failure Cause Remediation
Unreliable scanning of height of goods on turntable
The sensor is not oriented in the direction to the goods on the turntable.
Direct the sensor to the goods on the turntable
6.9. Error messages
6.9.1. Response to system message Error message is shown on the display highlighted in orange or red.
Confirm the error message by depressing the tick push-button
and, in case that the control voltage has been disconnected due to a failure (the signal light is lit off), it is necessary, after removing the failure cause, to switch on
the control voltage again by depressing push-button CONTROL VOLTAGE. Standard display is then shown.
On touching the push-button with the list symbol, the list of error messages is shown.

Pragometal s.r.o. WMS STANDARD Schneider
82
The list of error messages is also accessible from the display for the machine administration (see Chapter 6.7) by touching the push-button wit the symbol for error message.
6.9.2. List of error messages
Error message Remediation measures
Service The number of wrapped pallets is higher than the set number for the service inspection. The message can be cancelled by by depressing the tick push-button; the machine continues in standard operation;.after
switching on the control voltage by pressing CONTROL
VOLTAGE button or after a long idle the machines the message appears again. Ask for preventative service inspection of the machine. See also parameters Cxx (Chapter 6.7.1).
External STOP The machine is blocked by an external communication signal.
After cancelling the signal, the message disappears.
Emergency stop The message has some of the following causes:
push-button EMERGENCY STOP depressed;
protective frame under the stretching device activated;
film holder in the single-motor or twin-motor stretching device tilted;
beam of optical barrier of the turntable with cut-out interrupted.
For putting the machine back into operation see the procedure in Chapter 5.7.1 in case of depressed
push-button EMERGENCY STOP, or Chapter 5.7.3 in case of deviated protective frame or tilted film holder in the running machine.
No pallet The wrapping program has been started without the pallet on the turntable.

Pragometal s.r.o. WMS STANDARD Schneider
83
Error message Remediation measures
Timeout of top platen Timeout of travel of the top platen device. Total time of movement in one direction (included interruptions) exceeded maximum time. If the converter is used this time is weighed by shifting speed.
Timeout of turntable Timeout of turntable. The time of the turntable rotation without the turntable sensor being activated exceeded 1.5-times the time of one revolution of the turntable. If converter is used this time is weighed by shifting speed.
Timeout of carriage Timeout of travel of the stretching device carriage. Total time of movement in one direction (included interruptions) exceeded the time set in parameter C–23. If the converter is used this time is weighed by shifting speed.
Communication with FC of turntable
Failure of the frequency converter of the turntable. Check: condition of conductors connected to the converter, message on the converter display (if the converter is a part of the machine the converter documentation is attached to the original documentation of the machine).
Communication with FC of carriage
Failure of the frequency converter of travel of the stretching device carriage on the column. Check: condition of conductors connected to the converter, message on the converter display (if the converter is a part of the machine the converter documentation is attached to the original documentation of the machine).
Communication with FC of film motor
Failure of the frequency converter of the driving roller of the stretching device. Check: condition of conductors connected to the converter, message on the converter display (if the converter is a part of the machine the converter documentation is attached to the original documentation of the machine).
Communication with FC of film brake
Failure of the frequency converter of the driven roller of the stretching device. Check: condition of conductors connected to the converter, message on the converter display (if the converter is a part of the machine the converter documentation is attached to the original documentation of the machine).
Converter of film 1 Error of the converter of the driving roller of the stretching device. Check the message on the converter display, ask the service for intervention.
Converter of film 2 Error of the converter of the driven roller of the stretching device. Check the message on the converter display, ask the service for intervention.
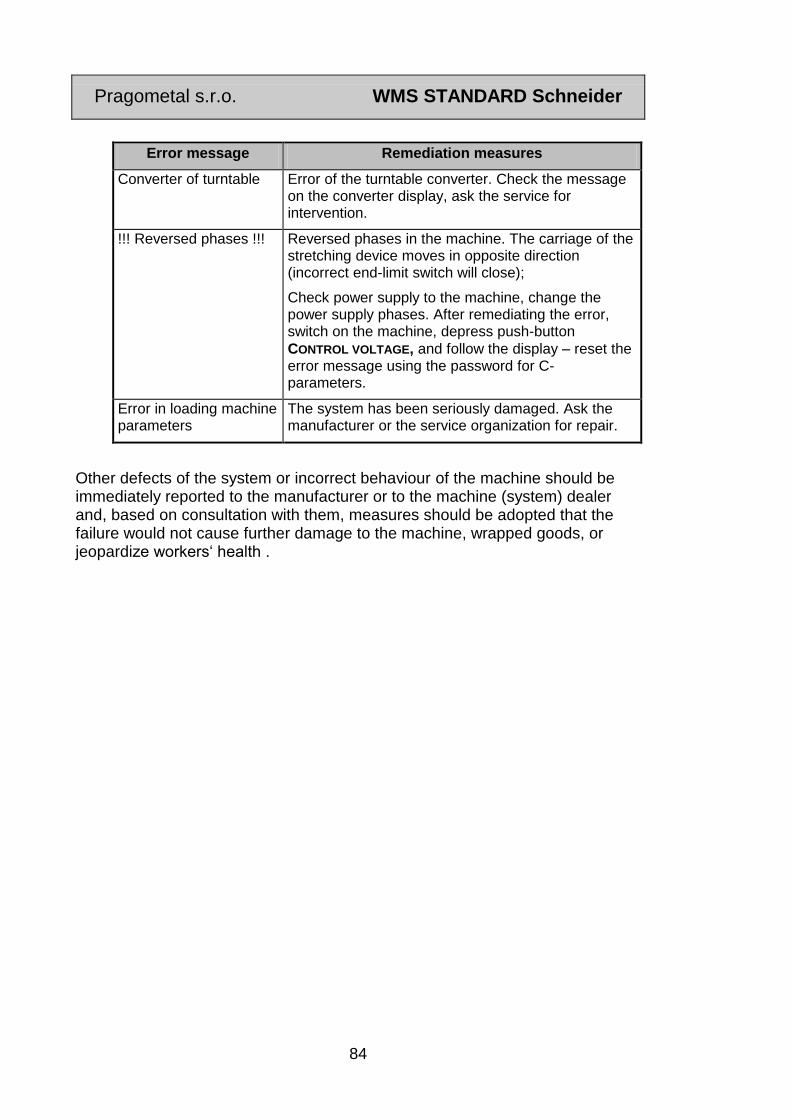
Pragometal s.r.o. WMS STANDARD Schneider
84
Error message Remediation measures
Converter of turntable Error of the turntable converter. Check the message on the converter display, ask the service for intervention.
!!! Reversed phases !!! Reversed phases in the machine. The carriage of the stretching device moves in opposite direction (incorrect end-limit switch will close);
Check power supply to the machine, change the power supply phases. After remediating the error, switch on the machine, depress push-button
CONTROL VOLTAGE, and follow the display – reset the error message using the password for C- parameters.
Error in loading machine parameters
The system has been seriously damaged. Ask the manufacturer or the service organization for repair.
Other defects of the system or incorrect behaviour of the machine should be immediately reported to the manufacturer or to the machine (system) dealer and, based on consultation with them, measures should be adopted that the failure would not cause further damage to the machine, wrapped goods, or jeopardize workers‘ health .
Pragometal s.r.o. WMS STANDARD Schneider
85
7. MAINTENANCE AND CLEANING OF THE MACHINE
The wrapping machine demands regular maintenance. Respecting of this demand will be reflected in substantially longer period of service life of the whole machine. For correct check-up the pallet must not be placed on the turntable and film must not be filled in the prestretch device.
7.1. Maintenance Obligations
During machine maintenance it is necessary to follow the
safety rules and rules of health protection and rules of
machine protection against damage. These rules are
listed in this chapter.
1) Only determined workers may realize the maintenance. Only workers with sufficient qualification according to chapter 3.1 may realize the maintenance of electric equipment.
2) Before any maintenance, which does not demand started and working machine, it is necessary to switch the machine off, lock the main switch, secure it against start by unauthorized person, and place the caution mark on the switchboard.
3) If you realize the maintenance in heights, always use appropriate ladder or work platform and use the footwear and a headgear.
4) Do not remove the sensors and switches and do not modify their positions or orientations beyond the information in this chapter without good familiarization with their functions and without consulting the producer or supplier.
7.2. Maintenance of the Machine
Recommended cycles of
acts
Act of maintenance
Every day Clean the machine and its surroundings (chapter 7.4)
check:
entireness of the supply electric cables
move of the prestretch device and top-platen
the over-all condition of the machine
protective elements of the machine
Every 500 hrs. of operation
or 1× in 3 months
Check-up of tension and lubrication of the chain of mechanical prestretch device (chapter 7.2.8)
Lubrication of chains of the prestretch device trucks (chapter 7.2.1) and top-plate trucks (chapter 7.2.2)

Pragometal s.r.o. WMS STANDARD Schneider
86
Recommended cycles of
acts
Act of maintenance
Every 1000 hrs. of operation
or 1× in 6 months
Check-up of the turntable bearing (chapter 7.2.3)
Check-up of the condition of turntable rollers (chapter 7.2.5)
Check-up of the tension and lubrication of gear of the turntable with gear-box (chapter 7.2.6)
Check-up of the tension and lubrication of gear of the turntable with inter-gear (chapter 7.2.7)
Check-up of the prestretch device end switch (chapter 7.2.10 – it is related only to machines equipped with single-motor or twin-motor prestretch device).
Recommended cycles of the acts – according to what occurs earlier.
Recommended lubricant for lubrication of chains and turntable bearing: Mogul G3, Mogul LV2-3 or other grease with similar qualities – usual grease determined for lubrication on common conditions (temperature, speed, environment).
7.2.1. Lubrication of Prestretch Device Truck
The chain is placed inside the mast behind the cover. Move the prestretch device into the bottom half of the mast, so that the cover screws are accessible. Screw out 4 screws, which fasten the cover behind the prestretch device to the mast and push the cover upwards. After lubrication of the chain, mount the cover back in the reverse procedure.
7.2.2. Lubrication of Top-Platen Truck
The chain is placed inside the mast of the top-platen behind the cover, which is fastened with four screws. Move the top-platen in the position, where all screws are accessible. Screw out the screws and push the cover upwards. After lubrication of the chain the mounting procedure is reverse.
7.2.3. Procedure for Check-Up of the Turntable Bearing
Turntable except for the forklift-shaped turntable: loosen the screws on the turntable and lift the turntable. Loosen the chain stretcher and take off the big chain-wheel, the axis of which is laid in the turntable bearing. Check and eventually lubricate the bearing, mounting procedure is the reverse procedure.
Forklift-shaped turntable: take off the turntable cover and move the turntable so that one pulley is in the cutout, if it is not there. Mark the position of one of the springs, which push the pulleys to the turntable and loosen the spring. Take off the spring from the pin in the chain stretcher. Then it is possible to take the turntable itself from the base by upward traction (rotating part, on which the pallet is placed during wrapping). Check the bearings, lubricate the axial bearing, if necessary and eventually check the condition of turntable rollers (see chapter 7.2.5). The mounting procedure is reverse, take care so that the ball is in the

Pragometal s.r.o. WMS STANDARD Schneider
87
central pin of the turntable; finally adjust the springs back to their original stretching.
7.2.4. Repair of Turntable Chain
If the turntable suddenly does not rotate or if it rotates with difficulty and irregularly, the cause is mostly the film remainder reeled on the chain gearing of the turntable. In the extreme it may cause even the fall of chain from the cog-wheel or pinion.
Turntable except for forklift-shaped turntable: loosen the screws on the turntable and lift the turntable.
All turntable models: take off the cover between the mast and turntable; now the whole chain gearing is transparent.
Remove the film remainders and impurities from the chain, chain-wheel and pinion. Refill the lubricant grease if necessary. Clean also the whole area under the turntable and under the cover between the mast and turntable.
If the chain is fallen, then the repair procedure is depending on the turntable model:
Turntable except for forklift-shaped turntable: loosen the stretchers spring. If it is not possible to put the chain on the chain-wheel in such condition, it is necessary to unlink it and link it together again after it is put on the chain-wheel (the chain is always linked with chain coupler).
Forklift-shaped turntable: Loosen the spring of the tipping stretcher. Mark the position of the solid stretcher (it is fixed by screw in the forklift-shaped cutout) and loosen the screw, thus you will loosen the stretcher. Put the chain on the pinion and on as many teeth of chain-wheel as possible and you put the chain on the chain-wheel by manual turning of the V-belt wheel. Put the solid stretcher back into the original position and draw the screw close. Put the spring on the tipping stretcher.
After any work with turntable chain put the cover and metal plate of the turntable back and test the turntable operation by wrapping several pallets with advanced care.
7.2.5. Check-Up of the Turntable Rollers
Realize the check-up together with the check-up of the turntable bearing, when the turntable is taken off. The rollers must not have any deformations (flats or ruptures) and roller bearings must rotate fluently without any hint of irregular operation, scouring or inadequate difficulty of rotation. It is possible to order new rollers, if necessary – state the machine type, turntable diameter, loading limit of the machine (plastic or steel rollers) and as for the big turntables state, whether the rollers are external (in the turntable edge) or internal. Bearing, which are used in the rollers, do not demand other maintenance or lubrication.

Pragometal s.r.o. WMS STANDARD Schneider
88
7.2.6. Check-Up of the Turntable with Gear-Box
It is related to the turntable with gear-box.
Take off the turntable. The chain is tensioned by two stretchers, which are hauled by spring, the main stretcher lift is limited by stop screw M10. When the machine is inactive and without pallet (goods) on the turntable, loosen the lock-nut and turn the screw until slight touch with the stretcher. The tighten the screw for 2 more turns in turntable with diameter up to 1800 mm including, or for 3 more turns in the turntable with diameter over 1800 mm. Tighten the lock-nut again. If it is not possible to adjust the stretcher correctly in this way, the chain is used-up and it must be replaced.
7.2.7. Check-Up of the Gear of Turntable with Inter-Gear
It is related to the turntable with inert-gear – the electrical motor of the turntable is hidden in the mast of the wrapping machine. The turntable drive is two-stage, where the first stage is V-belt and the second stage is a chain.
Realize the check-up of the belt and chain together with check-up of the central bearing (chapter 7.2.3) and rollers (chapter 7.2.5). Take off the turntable (for procedure see chapter 7.2.3) and cover between the mast and turntable (6× screw M5).
Check-up and tension of V-belt: Check the condition of the V-belt, if the upper layer is flaggy or the belt is warped or with broken rubber pieces, it is necessary to replace the belt with new belt of the same dimension and designation. V-belt must be tensioned correctly: when pressing with the force of 10 up to 20 N (1 up to 2 kg) in the middle between the sheaves, it shall drop for 10 up to 15 mm; the belt, which is tensioned too much, means bigger abrasion of the gear-box, bearings, belt and thus the shorter service life of the machine. If the sagging is bigger, it is necessary to tension the belt: take off the cover of the bottom part of the mast pos. 1. Loosen screws M8 of the motor base pos. 2 (4×) and move the motor base in the slotted holes by turning of the screw shackle M10 pos. 3, thus you loosen or tension the belt as necessary, until you reach the prescribed value of the belt tension. Finally tighten the screws pos. 2 and cover the area.
Check the V-belt also when unpleasant squeaky or scratchy sound occurs during start or stop; then gradually try all possibilities for its removal: smear the belt sides with soap; degrease inside (functional) parts of the sheaves and belt; tension the belt correctly.
The chain is tensioned by two stretchers, which are hauled by spring. In the case of falling of chain from chain-wheel, the chain is used-up and it must be replaced.
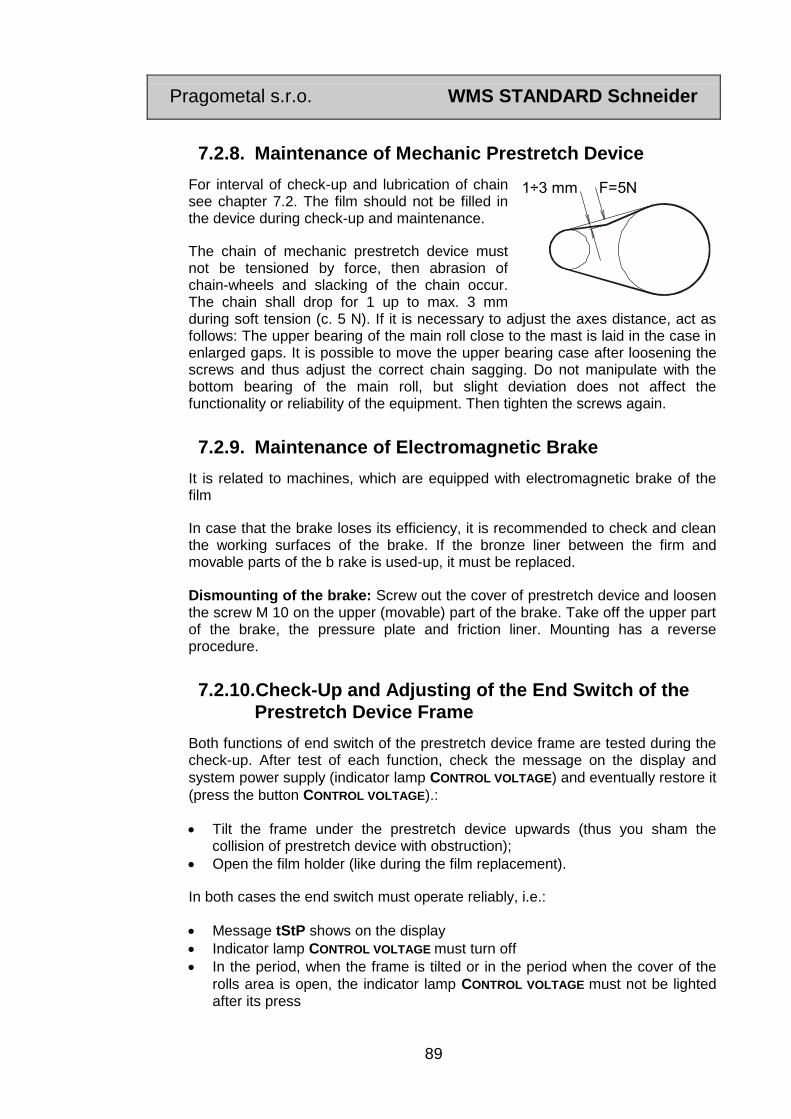
Pragometal s.r.o. WMS STANDARD Schneider
89
7.2.8. Maintenance of Mechanic Prestretch Device
For interval of check-up and lubrication of chain see chapter 7.2. The film should not be filled in the device during check-up and maintenance.
The chain of mechanic prestretch device must not be tensioned by force, then abrasion of chain-wheels and slacking of the chain occur. The chain shall drop for 1 up to max. 3 mm during soft tension (c. 5 N). If it is necessary to adjust the axes distance, act as follows: The upper bearing of the main roll close to the mast is laid in the case in enlarged gaps. It is possible to move the upper bearing case after loosening the screws and thus adjust the correct chain sagging. Do not manipulate with the bottom bearing of the main roll, but slight deviation does not affect the functionality or reliability of the equipment. Then tighten the screws again.
7.2.9. Maintenance of Electromagnetic Brake
It is related to machines, which are equipped with electromagnetic brake of the film
In case that the brake loses its efficiency, it is recommended to check and clean the working surfaces of the brake. If the bronze liner between the firm and movable parts of the b rake is used-up, it must be replaced.
Dismounting of the brake: Screw out the cover of prestretch device and loosen the screw M 10 on the upper (movable) part of the brake. Take off the upper part of the brake, the pressure plate and friction liner. Mounting has a reverse procedure.
7.2.10.Check-Up and Adjusting of the End Switch of the
Prestretch Device Frame
Both functions of end switch of the prestretch device frame are tested during the check-up. After test of each function, check the message on the display and
system power supply (indicator lamp CONTROL VOLTAGE) and eventually restore it
(press the button CONTROL VOLTAGE).:
Tilt the frame under the prestretch device upwards (thus you sham the collision of prestretch device with obstruction);
Open the film holder (like during the film replacement).
In both cases the end switch must operate reliably, i.e.:
Message tStP shows on the display
Indicator lamp CONTROL VOLTAGE must turn off
In the period, when the frame is tilted or in the period when the cover of the
rolls area is open, the indicator lamp CONTROL VOLTAGE must not be lighted after its press
1 3 mm F=5N÷

Pragometal s.r.o. WMS STANDARD Schneider
90
If the end switch of the prestretch device frame does not operate reliably, it is necessary to adjust it. Act as follows:
1) Open the film holder (in the picture there is rear view of the film holder).
2) Adjust the spring for returning of the rod pos. 2 by nut pos. 1 to length of c. 40 mm. Then secure it with the counternut.
3) Check that the frame lever touches down with the pin to the frame – close-up in pos. 3. If it does not touch down (there is a gap between the pin and the frame), lengthen the rod pos. 4 by turning the nut pos. 5.
4) Close the film holder and adjust the end switch so that it touched the frame lever. The end switch is placed outside from the front in the bottom part of the prestretch device and it is possible to move it after loosening two screws.
5) Check that tilting of the frame upwards switches the machine off.
6) Open the film holder. The rod is automatically secured in the upper position (jag of the rod is leant on the reed pos. 6).
7) Shorten the rod pos. 3 by turning the nut pos. 5 until the end switch of the frame operates. Continue in shortening until press of the button Control voltage is not functional, i.e. when the film holder is open, the indicator lamp Control voltage is dark even after its pressing.
8) Shorten the rod for one thread and secure it with the counternut. The rod must not be shortened too much, because the end switch may be damaged during opening of the film holder.
9) Check again both functions of the end switch as it is described in the introduction of this chapter.
7.2.11.Testing of Prestretch Device
The control system allows testing single- and twin-motor prestretch device. If you suppose the defect of the prestretch device, control system or wrong settings of the parameters of the wrapping machine or convertors, it is possible to tell information from this testing to service engineer during providing of service mission via phone call and thus speed the repair or adjusting of the machine.
Act as follows during testing:
1) In configuration regime (see chap. 6.7) press the button Diag
2) Turn manually the measuring roll in the correct direction – number of impulses of the measuring roll is shown on the display, this number must correspond to the reality (128 impulses per revolution). Then turn the roll in the opposite direction and the displayed value decreases.

Pragometal s.r.o. WMS STANDARD Schneider
91
7.2.12.Adjusting of the Film Breaking
If the film breaking does not work satisfactory (the film does not break or the end film of the prestretch device fastens to the wrapped pallet), it is necessary to adjust the parameters of the wrapping procedure P–20, P–21 a P–23 in the configuration mode – for configuration mode see chapter 6.7.
The optimal turntable positions are illustrated in the pictures: for cutting (P-20) the pallet with pallet is in continuous line, for breaking (P-21) in dashed line.
Set the cutting so that after wrapping on the pallet the torn point comes on the pallet corner or closely behind the corner.
Set the breaking so that the stop of the prestretch device occurs after the film adheres to the corner in the torn point (see the picture) and the film breaks before the following corner is wrapped. At the moment of prestretch device stop, the turntable must still be rotating so that the rotating pallet can develop the necessary tension for film breaking, we recommend the film breaking to happen approximately in 1/4 revolution of the turntable before its stopping in the directed stop.
Parameter P-20: defines the moment of film scotching and its value defines the distance of the point, where the film is scotched, from the pallet corner. If the film is broken too early, i.e. the torn point is wrapped to the pallet, it is necessary to move the torn point towards the prestretch device by decreasing this parameter value. On the contrary, if the film is torn too late, i.e. there is too long free piece of the film on the pallet, it is necessary to move the torn point towards the pallet by increasing this parameter value.
Parameter P-21: value of this parameter defines, when the prestretch device is locked and the resulting tension break the film in the scotched point. Value of this parameter is defined like rotation of the pallet from the moment, when the film is scotched until the moment, when the prestretch device is stopped. In case that the value is 0, the moment of scotch and the moment of engaging of the maximal brake force will be the same. If the breaking occurs too early, it is necessary to increase this parameter value and vice versa. Value of this parameter does not affect the position of film breaking and therefore it is necessary to adjust parameter P-20 at first and then parameter P-21.
Set the period, for which the cutting spike will be pushed out, by parameter P–23. Too low value of this parameter causes, that the film perforation is too small and it is not guaranteed that the breaking occurs in the scotched point in all circumstances. On the contrary, too high value causes large damage of the film and thus resulting large free ends of the film, which adhere to the wrapped goods very badly.
After adjusting the parameters, test the film breaking function by wrapping several pallets.
P20
P21
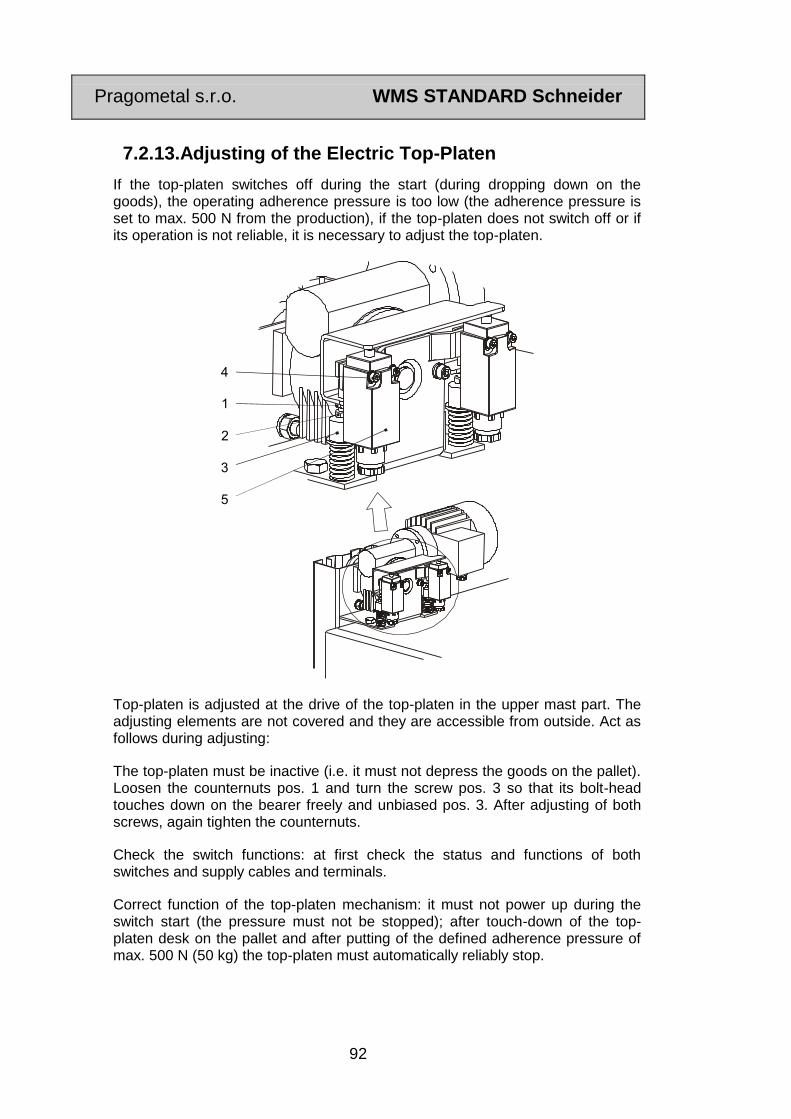
Pragometal s.r.o. WMS STANDARD Schneider
92
7.2.13.Adjusting of the Electric Top-Platen
If the top-platen switches off during the start (during dropping down on the goods), the operating adherence pressure is too low (the adherence pressure is set to max. 500 N from the production), if the top-platen does not switch off or if its operation is not reliable, it is necessary to adjust the top-platen.
2
1
3
4
5
Top-platen is adjusted at the drive of the top-platen in the upper mast part. The adjusting elements are not covered and they are accessible from outside. Act as follows during adjusting:
The top-platen must be inactive (i.e. it must not depress the goods on the pallet). Loosen the counternuts pos. 1 and turn the screw pos. 3 so that its bolt-head touches down on the bearer freely and unbiased pos. 3. After adjusting of both screws, again tighten the counternuts.
Check the switch functions: at first check the status and functions of both switches and supply cables and terminals.
Correct function of the top-platen mechanism: it must not power up during the switch start (the pressure must not be stopped); after touch-down of the top-platen desk on the pallet and after putting of the defined adherence pressure of max. 500 N (50 kg) the top-platen must automatically reliably stop.

Pragometal s.r.o. WMS STANDARD Schneider
93
Check the correct function by dropping down the top-platen on the goods. Loosen the screws pos. 4 , if necessary and put both end switches pos. 5 in the positions, in which their function will correspond to the previous description.
Always both springs and both switches are adjusted, their functions is the same. After adjusting tighten the screws pos. 4 and counternuts pos. 1.
7.2.14.Adjusting of the Pneumatic Top-Platen
The adherence pressure is regulated by adjusting of the air pressure by the pressure control valve (it is placed outside the mast) according to the diagram of dependence of adherence pressure on the air pressure. At the same time, check whether there is set the same pressure or higher on the unit for air transforming (inside the mast) than on the pressure control valve. By default, the pressure of 0.6 MPa is adjusted on the unit for air transforming.
Do not set the air pressure to value higher than
0.8 MPa
Because the safe and reliable equipment operation cannot
be secured when it is higher!
0.30.20.1 0.4 0.60.5
30
20
10
40
50
60
70
80
90
100
110
[kg]
[MPa]
7.2.15.Maintenance of Wiring
As for maintenance of wiring it is necessary to keep the provisions of chapter 3.1 about qualification of the worker, who realizes the maintenance.

Pragometal s.r.o. WMS STANDARD Schneider
94
Before manipulation on the contactor switchboard and during other work with
electric equipment, it is necessary to turn the MAIN SWITCH off and lock it, the key must be taken out from the lock.
During big repairs disconnect electrical power supply for the machine by unplugging of the supply cable from the socket!
The electric equipment demands planned and regular maintenance. When you respect this demand, it will be reflected in substantially longer service time of the wiring. In short intervals it is necessary to remove dust and impurities from the area of the electric equipment as well as from all devices. In longer intervals we draw close all screwed joints and contactors points, especially after serious short circuits. We also check the function of thermal protections, insulance, zeroising, eventually grounding. Before each work on motors, it is necessary to turn the main switch off!
If the motor is not active for long time, it is necessary to check its condition, especially:
If there is no obvious damage in any of its parts
Winding insulance
Conditions of motor bearings (after long period it is necessary to replace the grease packing)
7.2.16.Replacement of Damaged Keyboard
If the foil keyboard is damaged (breaking of the plastic foil, some keys are functionless or malfunctional), replace the keyboard.
Open the switchboard cover, on which the keyboard is glued.
The keyboard is connected to the system via flat strip conductor. Pull the conductor out of the connector on the board of the control system.
The keyboard is glued to the switchboard cover by self-adhesive layer. Peel the old keyboard off, remove the remainder of the glue carefully from the base (e.g. by petrol).
Peel the covering paper out of the new keyboard, insert the strip conductor via the opening in the cover and glue the keyboard to the original place. The display window must cover the system display. For easier manipulation we recommend damp the base by the help of water sprayer with small quantity of soaking agent (detergent) during foil gluing. Then it is possible to slightly move the foil and thus modify the precise position. Then push water out by the rubber roller (for photographers).
Insert the strip conductor in the connector. Close the cover. Switch the machine on and test the function of new keyboard.
Pragometal s.r.o. WMS STANDARD Schneider
95
7.2.17.Notes
Dates of check-ups and repairs, which are mentioned in this material by the producer, may be put more precisely on the basis of experience from the operation and from machine tests at producer’s and at user’s.
7.3. Ordering of Spare Parts
When ordering spare parts, always state the operational voltage and frequency, furthermore state the number of wiring scheme and marking of the machine in the scheme.
7.4. Cleaning
In short intervals it is necessary to remove dust and impurities. Remove continuously subjects and raw impurities, which may affect adversely the machine operation (rest of films, goods, thrown subjects, etc.) every day.
It is possible to wash the machine surface with water and common detergents (the machine must be disconnected from the electrical network).
Pragometal s.r.o. WMS STANDARD Schneider
96
8. GUARANTEE
The general guarantee conditions are defined in the guarantee certificate, which is an inseparable part of the documentation delivered with the machine. The certificate of guarantee must be properly and completely filled-in and confirmed by the producer.
The guarantee condition is regular check-up and maintenance of the machine, complying with the instructions for use and use of original spare parts only.
The guarantee does not apply to defects caused by incorrect manipulation, violation of the instruction for use for the product, if an interference with the product was realized by unauthorized person (organization) and if the product was overloaded. It also does not apply to defects caused by natural wear of the machine parts.
8.1. User’s Obligations
The user is obliged to provide only workers competent in health and physical state and provably familiarized with the instructions for use and maintenance and safety rules for the machine operation.

Pragometal s.r.o. WMS STANDARD Schneider
97
9. SERVICE
Repairs in guaranteed period and after-guaranteed period are realized by the producer. He/she also supplies the separate spare parts on the basis of consumer’s order.
Producer’s address: PRAGOMETAL spol. s r.o. Vídeňská 172 252 42 Jesenice u Prahy Telephone: +420 234 144 746, 790 Fax: +420 234 144 710, 777 e-mail: [email protected]
Document WMS_STANDARD-OBB_Sch_GB.doc
Date 03/2013


Pragometal s.r.o. WMS STANDARD Schneider
1
2
3
4
5
6
7
8
9
10
11
12
Pragometal s.r.o. WMS STANDARD Schneider
2
Pa
ram
etr
y r
učníh
o r
ežim
u
13
14
15
16
17
18
19
20
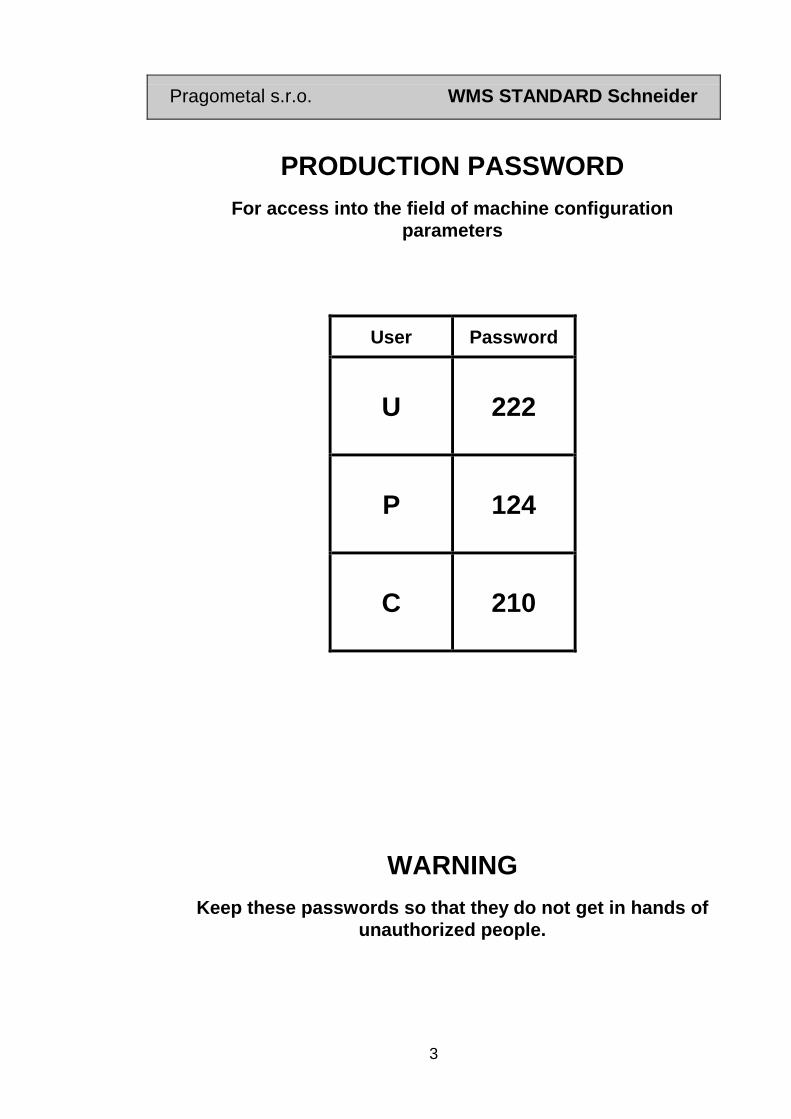
Pragometal s.r.o. WMS STANDARD Schneider
3
PRODUCTION PASSWORD
For access into the field of machine configuration
parameters
User Password
U 222
P 124
C 210
WARNING
Keep these passwords so that they do not get in hands of
unauthorized people.