Embed Size (px)
Citation preview
Learn more | novusbio.comLearn more | novusbio.com
Novus-lu-2945 Western BlotHandbook
Learn more | novusbio.com
INTRODUCTION TO WESTERN BLOTTING Western blotting uses antibodies to identify individual proteins within a cell or tissue lysate.Antibodies bind to highly specific sequences of amino acids, known as epitopes. Because amino acid sequences vary from protein to protein, western blotting analysis can be used to identify and quantify a single protein in a lysate that contains thousands of different proteins First, proteins are separated from each other based on their size by SDS-PAGE gel electrophoresis. Next, the proteins are transferred from the gel to a membrane by application of an electrical current. The membrane can then be processed with primary antibodies specific for target proteins of interest. Next, secondary antibodies bound to enzymes are applied and finally a substrate that reacts with the secondary antibody-bound enzyme is added for detection of the antibody/protein complex. This step-by-step guide is intended to serve as a starting point for understanding, performing, and troubleshooting a standard western blotting protocol.
Learn more | novusbio.com
Learn more | novusbio.comLearn more | novusbio.com
Controls Positive control lysate Negative control lysate Endogenous control lysate Loading controls Sample Preparation Lysis Protease and phosphatase inhibitors Carrying out lysis Example lysate preparation from cell culture protocol Determination of protein concentration Preparation of samples for gel loading Sample preparation protocol
Loading and Running the SDS-PAGE SDS-PAGE protocol Protein Transfer from the Gel to the Membrane SDS-PAGE protocol
Immunoblotting Immunoblotting protocol
Detection Detection protocol
Stripping/Re-probing Blot stripping protocols
Blot Storage Blot storage protocol
Troubleshooting No signal or weak signal High uniform background Non-specific bands/wrong size or multiple bands Speckled or swirled background Other issues
Benchtop Western Blotting Protocol
Reference - Recipes
Western Blot Reagents Available from Novus Biolgoicals
1-2
3-6
7
7-8
9-10
11
12
13
14-16
17-18
19
20
TABLE OF CONTENTS

Learn more | novusbio.com
CONTROLS Western blotting is considered the gold standard for protein detection and quantification in molecular biology research. Proper controls for western blotting are important for determining the source of problems and for validating results. Including appropriate controls from the start can save you time and frustration down the road.
Positive Control LysateA positive control lysate is from a cell line or tissue sample that is known to express the protein of interest. This control will yield a positive band on the western blot, even if the test samples are negative for the protein of interest. This control is important to ensure that there were no issues in the western blotting protocol. It will also verify that any negative results are indeed negative. If the positive control lysate doesnot result in a positive signal, the western blotting protocol requires optimization. See the troubleshooting section for guidance.
Commonly used positive controls:
• Samples from cells exhibiting overexpression of target protein • Cell line/tissue/experimental condition with proven positive signal • Purified recombinant protein
Negative Control lysateA negative control lysate is a lysate from a sample known to not express the target protein. This control is important for determining whether non-specific binding (false positive result) has occurred in the western blotting procedure.
Commonly used negative controls:
• Samples from knockdown or knockout tissue/cell lines • Samples from RNA interference targeted lines • Cell line/tissue/experimental condition with proven negative signal
Endogenous control lysateIf testing a sample of recombinant protein, a positive endogenous control lysate known to express the target of interest is recommended. This is suggested because there are several possible difficulties with expression of recombinant proteins that may occur. For example,
folding of the recombinant protein might not match that of the endogenous native form. Misfolding may prevent antibody access to the epitope and this is especially common with tagged proteins. Like the positive control lysate, this control will help ensure that the western blotting protocol is working and indicate whether there might be an issue with the recombinant protein.
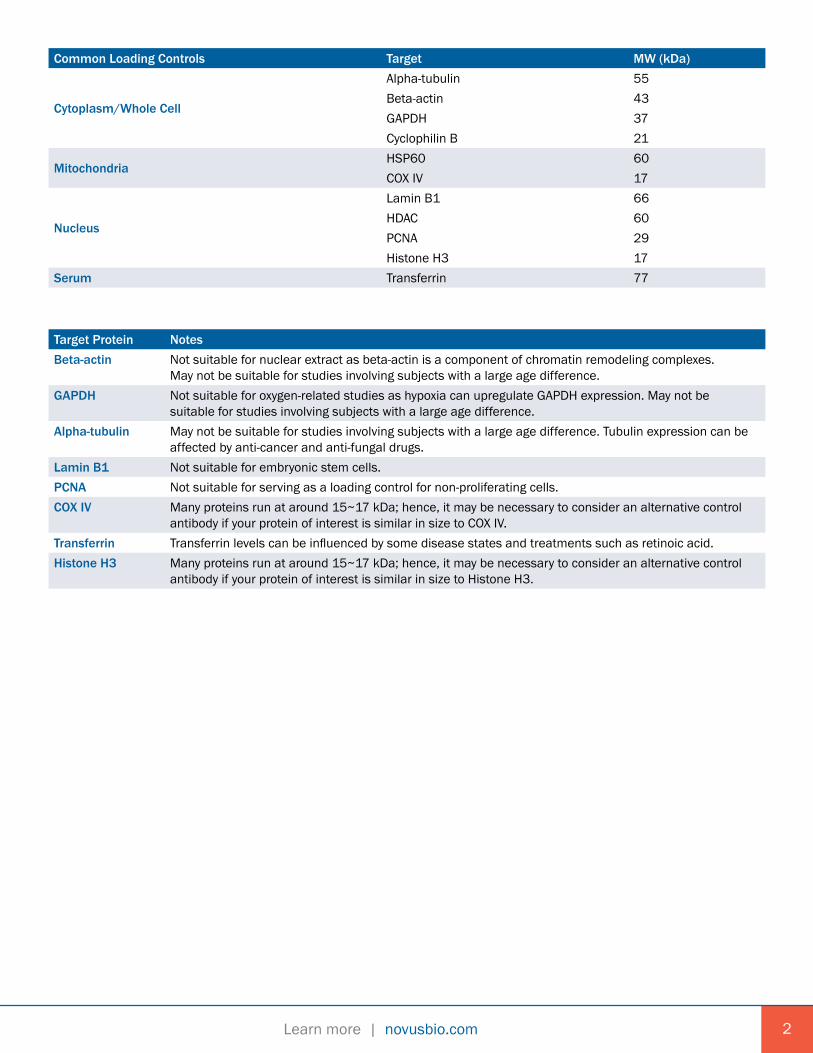
Loading controlWhen performing western blotting, loading controls are required for the semi-quantification of protein levels between wells. Without loading controls, it is impossible to determine that observed alterations in target protein levels are due to experimental manipulations.
What to look for Expression of loading control protein must be equal across all wells to confirm that observed changes in target protein expression are true. Equal expression of loading controls confirms the samples have been equally loaded and protein has been evenly transferred from gel to membrane.
It is important to consider the following when choosing a
loading control:
• Detection size: Choose a loading control that can be distinguished in MW from the target protein of interest.
• Expression level: Choose a loading control that is highly expressed in your sample. Common loading controls are highly expressed genes required for basic cellular processes and vitality, also known as housekeeping genes.
• Expression consistency: Choose a loading control that is ubiquitously and constitutively expressed. The expression should be unchanged throughout an experiment, regardless of experimental treatment, cell type, tissue type, etc.
1
Learn more | novusbio.comLearn more | novusbio.com
Common Loading Controls Target MW (kDa)
Cytoplasm/Whole Cell
Alpha-tubulin 55Beta-actin 43GAPDH 37Cyclophilin B 21
MitochondriaHSP60 60COX IV 17
Nucleus
Lamin B1 66HDAC 60PCNA 29Histone H3 17
Serum Transferrin 77
Target Protein NotesBeta-actin Not suitable for nuclear extract as beta-actin is a component of chromatin remodeling complexes.
May not be suitable for studies involving subjects with a large age difference.GAPDH Not suitable for oxygen-related studies as hypoxia can upregulate GAPDH expression. May not be
suitable for studies involving subjects with a large age difference.Alpha-tubulin May not be suitable for studies involving subjects with a large age difference. Tubulin expression can be
affected by anti-cancer and anti-fungal drugs.Lamin B1 Not suitable for embryonic stem cells.PCNA Not suitable for serving as a loading control for non-proliferating cells.COX IV Many proteins run at around 15~17 kDa; hence, it may be necessary to consider an alternative control
antibody if your protein of interest is similar in size to COX IV.Transferrin Transferrin levels can be influenced by some disease states and treatments such as retinoic acid.Histone H3 Many proteins run at around 15~17 kDa; hence, it may be necessary to consider an alternative control
antibody if your protein of interest is similar in size to Histone H3.
2
Learn more | novusbio.com
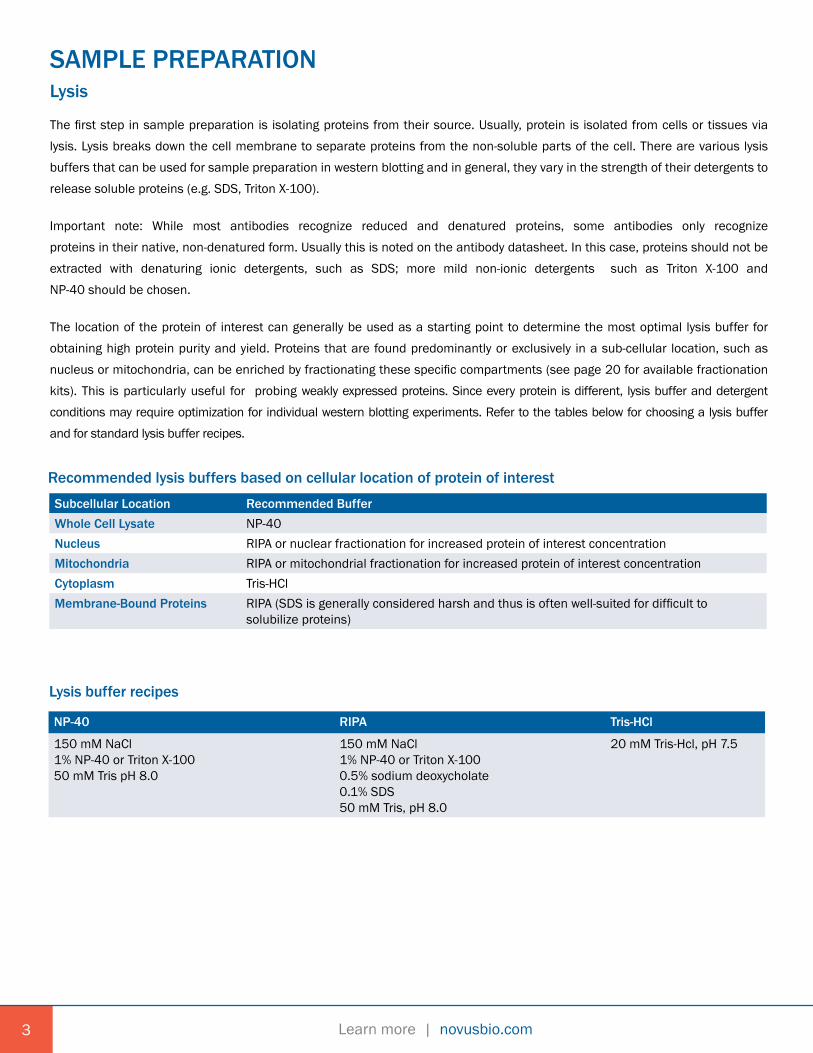
SAMPLE PREPARATION Lysis
The first step in sample preparation is isolating proteins from their source. Usually, protein is isolated from cells or tissues via lysis. Lysis breaks down the cell membrane to separate proteins from the non-soluble parts of the cell. There are various lysis buffers that can be used for sample preparation in western blotting and in general, they vary in the strength of their detergents to release soluble proteins (e.g. SDS, Triton X-100).
Important note: While most antibodies recognize reduced and denatured proteins, some antibodies only recognize proteins in their native, non-denatured form. Usually this is noted on the antibody datasheet. In this case, proteins should not be extracted with denaturing ionic detergents, such as SDS; more mild non-ionic detergents such as Triton X-100 andNP-40 should be chosen.
The location of the protein of interest can generally be used as a starting point to determine the most optimal lysis buffer for obtaining high protein purity and yield. Proteins that are found predominantly or exclusively in a sub-cellular location, such as nucleus or mitochondria, can be enriched by fractionating these specific compartments (see page 20 for available fractionation kits). This is particularly useful for probing weakly expressed proteins. Since every protein is different, lysis buffer and detergent conditions may require optimization for individual western blotting experiments. Refer to the tables below for choosing a lysis buffer and for standard lysis buffer recipes.
Subcellular Location Recommended BufferWhole Cell Lysate NP-40 Nucleus RIPA or nuclear fractionation for increased protein of interest concentrationMitochondria RIPA or mitochondrial fractionation for increased protein of interest concentrationCytoplasm Tris-HClMembrane-Bound Proteins RIPA (SDS is generally considered harsh and thus is often well-suited for difficult to
solubilize proteins)
Recommended lysis buffers based on cellular location of protein of interest
NP-40 RIPA Tris-HCl
150 mM NaCl1% NP-40 or Triton X-10050 mM Tris pH 8.0
150 mM NaCl1% NP-40 or Triton X-100 0.5% sodium deoxycholate 0.1% SDS 50 mM Tris, pH 8.0
20 mM Tris-Hcl, pH 7.5
Lysis buffer recipes
23
Learn more | novusbio.comLearn more | novusbio.com 2
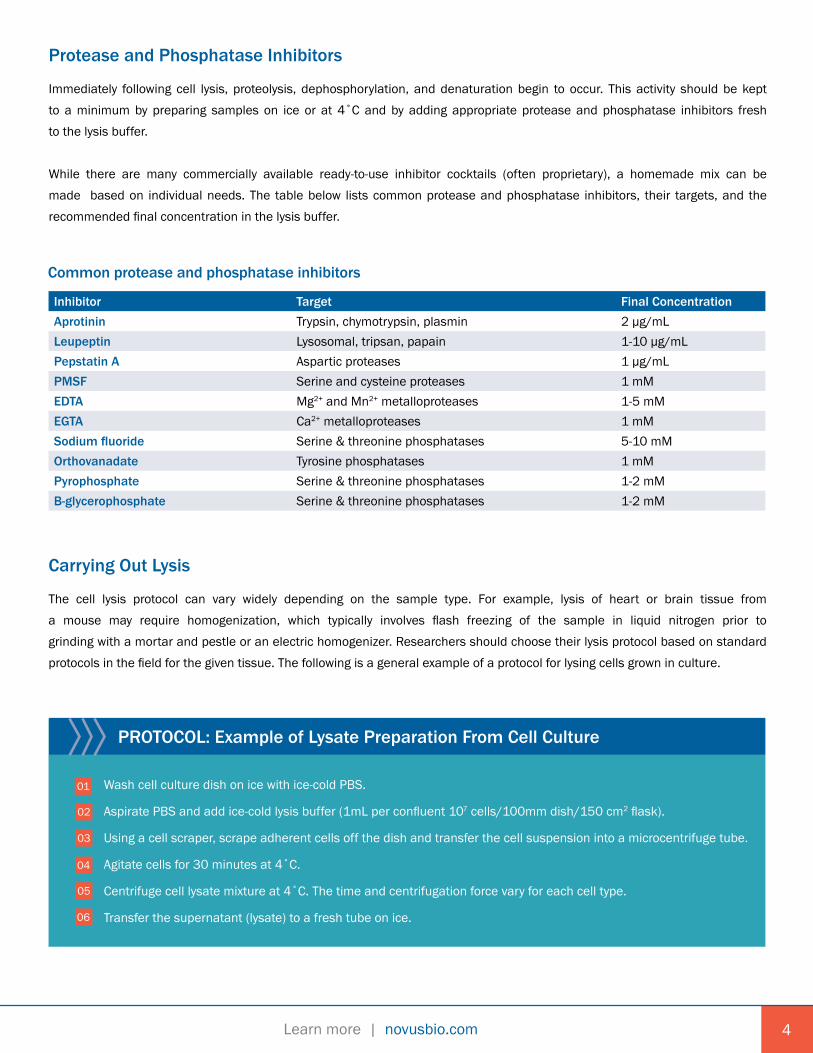
Protease and Phosphatase Inhibitors
Immediately following cell lysis, proteolysis, dephosphorylation, and denaturation begin to occur. This activity should be kept to a minimum by preparing samples on ice or at 4˚C and by adding appropriate protease and phosphatase inhibitors fresh to the lysis buffer.
While there are many commercially available ready-to-use inhibitor cocktails (often proprietary), a homemade mix can be made based on individual needs. The table below lists common protease and phosphatase inhibitors, their targets, and the recommended final concentration in the lysis buffer.
Inhibitor Target Final ConcentrationAprotinin Trypsin, chymotrypsin, plasmin 2 µg/mLLeupeptin Lysosomal, tripsan, papain 1-10 µg/mLPepstatin A Aspartic proteases 1 µg/mLPMSF Serine and cysteine proteases 1 mMEDTA Mg2+ and Mn2+ metalloproteases 1-5 mMEGTA Ca2+ metalloproteases 1 mMSodium fluoride Serine & threonine phosphatases 5-10 mMOrthovanadate Tyrosine phosphatases 1 mMPyrophosphate Serine & threonine phosphatases 1-2 mMΒ-glycerophosphate Serine & threonine phosphatases 1-2 mM
Common protease and phosphatase inhibitors
Carrying Out Lysis
The cell lysis protocol can vary widely depending on the sample type. For example, lysis of heart or brain tissue from a mouse may require homogenization, which typically involves flash freezing of the sample in liquid nitrogen prior to grinding with a mortar and pestle or an electric homogenizer. Researchers should choose their lysis protocol based on standard protocols in the field for the given tissue. The following is a general example of a protocol for lysing cells grown in culture.
01
PROTOCOL: Example of Lysate Preparation From Cell Culture
Wash cell culture dish on ice with ice-cold PBS.
Aspirate PBS and add ice-cold lysis buffer (1mL per confluent 107 cells/100mm dish/150 cm2 flask).
Using a cell scraper, scrape adherent cells off the dish and transfer the cell suspension into a microcentrifuge tube.
Agitate cells for 30 minutes at 4˚C.
Centrifuge cell lysate mixture at 4˚C. The time and centrifugation force vary for each cell type.
Transfer the supernatant (lysate) to a fresh tube on ice.
02
03
04
05
06
4
Learn more | novusbio.com5
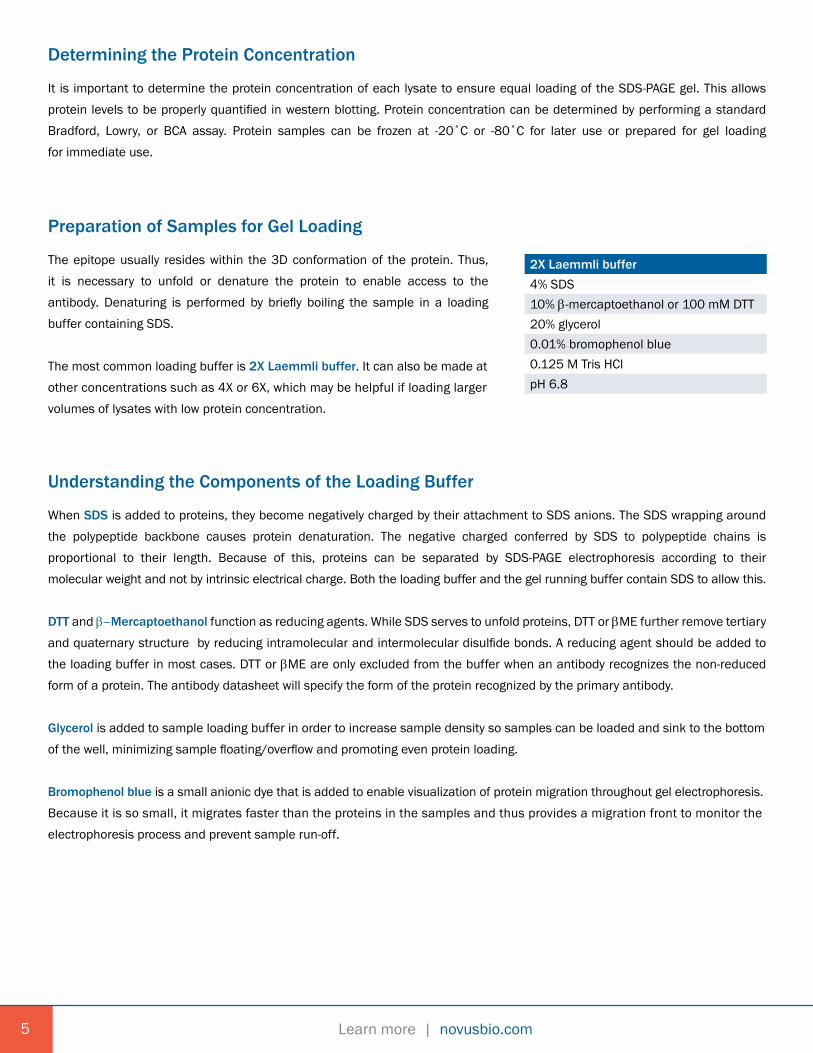
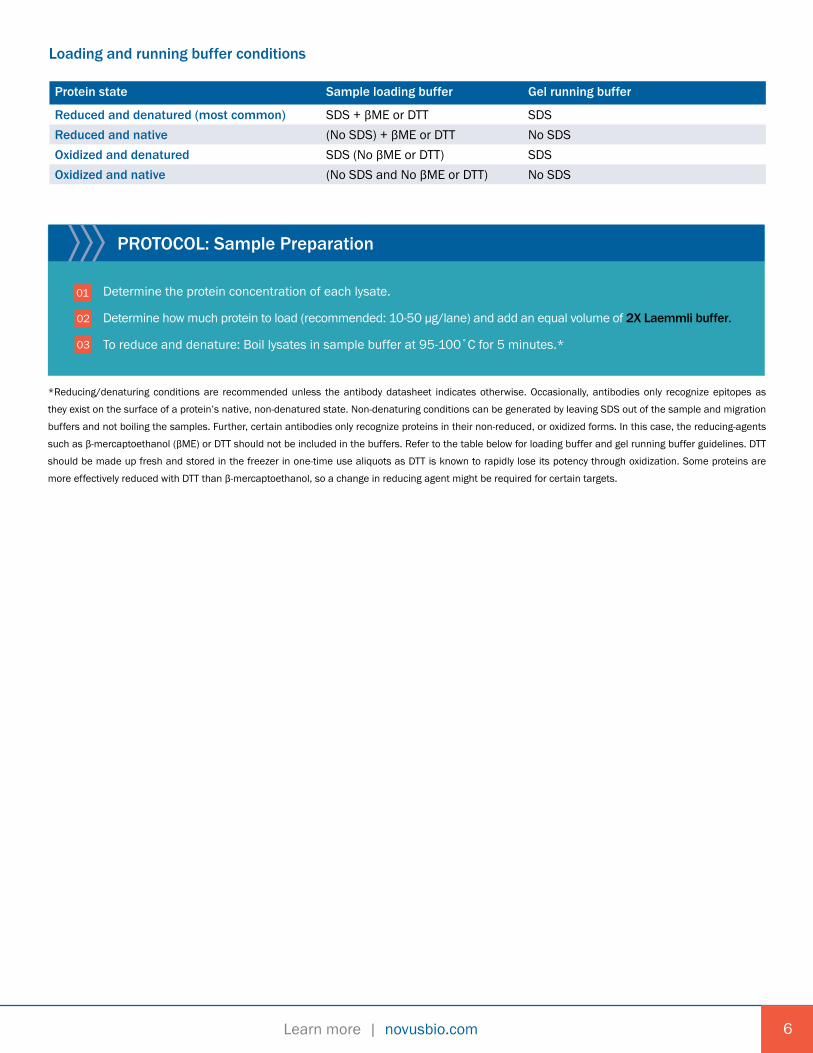
Preparation of Samples for Gel Loading
The epitope usually resides within the 3D conformation of the protein. Thus, it is necessary to unfold or denature the protein to enable access to the antibody. Denaturing is performed by briefly boiling the sample in a loading buffer containing SDS. The most common loading buffer is 2X Laemmli buffer. It can also be made at other concentrations such as 4X or 6X, which may be helpful if loading larger volumes of lysates with low protein concentration.
2X Laemmli buffer 4% SDS10% b-mercaptoethanol or 100 mM DTT20% glycerol0.01% bromophenol blue0.125 M Tris HClpH 6.8
Understanding the Components of the Loading Buffer
When SDS is added to proteins, they become negatively charged by their attachment to SDS anions. The SDS wrapping around the polypeptide backbone causes protein denaturation. The negative charged conferred by SDS to polypeptide chains is proportional to their length. Because of this, proteins can be separated by SDS-PAGE electrophoresis according to their molecular weight and not by intrinsic electrical charge. Both the loading buffer and the gel running buffer contain SDS to allow this. DTT and b-Mercaptoethanol function as reducing agents. While SDS serves to unfold proteins, DTT or bME further remove tertiary and quaternary structure by reducing intramolecular and intermolecular disulfide bonds. A reducing agent should be added to the loading buffer in most cases. DTT or bME are only excluded from the buffer when an antibody recognizes the non-reduced form of a protein. The antibody datasheet will specify the form of the protein recognized by the primary antibody.
Glycerol is added to sample loading buffer in order to increase sample density so samples can be loaded and sink to the bottom of the well, minimizing sample floating/overflow and promoting even protein loading. Bromophenol blue is a small anionic dye that is added to enable visualization of protein migration throughout gel electrophoresis. Because it is so small, it migrates faster than the proteins in the samples and thus provides a migration front to monitor the electrophoresis process and prevent sample run-off.
Determining the Protein Concentration
It is important to determine the protein concentration of each lysate to ensure equal loading of the SDS-PAGE gel. This allows protein levels to be properly quantified in western blotting. Protein concentration can be determined by performing a standard Bradford, Lowry, or BCA assay. Protein samples can be frozen at -20˚C or -80˚C for later use or prepared for gel loadingfor immediate use.
Learn more | novusbio.comLearn more | novusbio.com
01
PROTOCOL: Sample Preparation
Determine the protein concentration of each lysate.
Determine how much protein to load (recommended: 10-50 µg/lane) and add an equal volume of 2X Laemmli buffer.
To reduce and denature: Boil lysates in sample buffer at 95-100˚C for 5 minutes.*
02
03
*Reducing/denaturing conditions are recommended unless the antibody datasheet indicates otherwise. Occasionally, antibodies only recognize epitopes as
they exist on the surface of a protein’s native, non-denatured state. Non-denaturing conditions can be generated by leaving SDS out of the sample and migration
buffers and not boiling the samples. Further, certain antibodies only recognize proteins in their non-reduced, or oxidized forms. In this case, the reducing-agents
such as β-mercaptoethanol (βME) or DTT should not be included in the buffers. Refer to the table below for loading buffer and gel running buffer guidelines. DTT
should be made up fresh and stored in the freezer in one-time use aliquots as DTT is known to rapidly lose its potency through oxidization. Some proteins are
more effectively reduced with DTT than β-mercaptoethanol, so a change in reducing agent might be required for certain targets.
Loading and running buffer conditions
Protein state Sample loading buffer Gel running buffer
Reduced and denatured (most common) SDS + βME or DTT SDSReduced and native (No SDS) + βME or DTT No SDSOxidized and denatured SDS (No βME or DTT) SDSOxidized and native (No SDS and No βME or DTT) No SDS
6
Learn more | novusbio.com
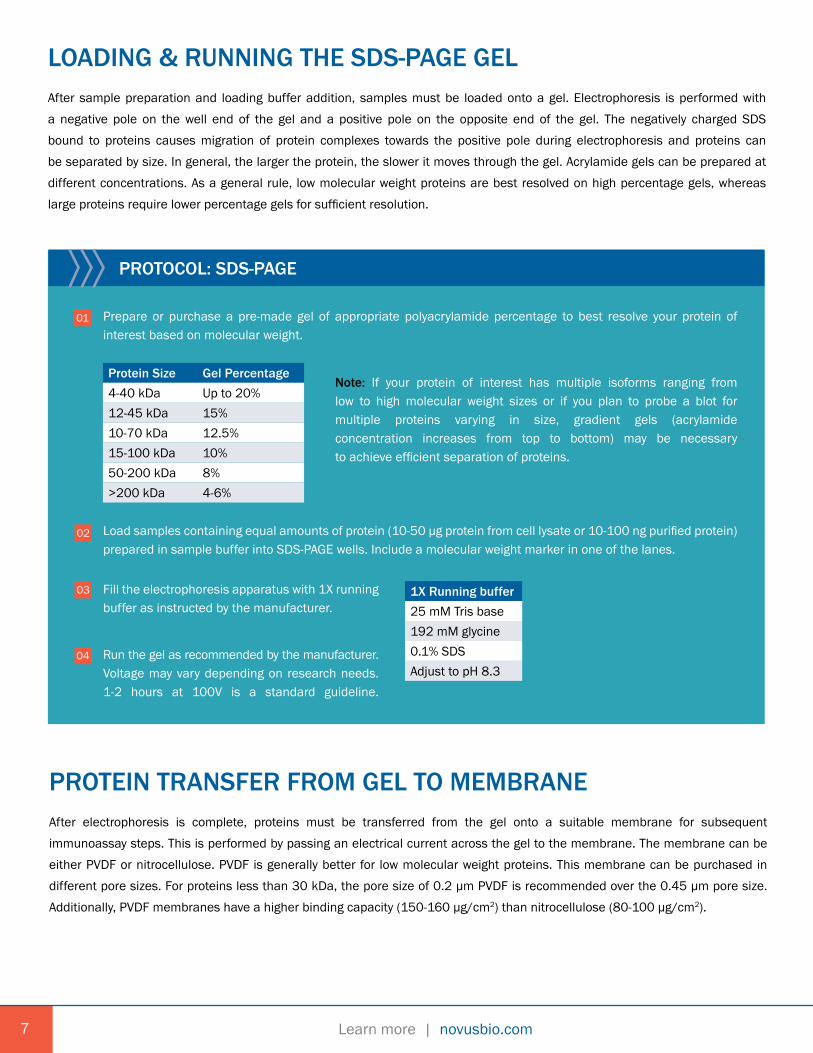
LOADING & RUNNING THE SDS-PAGE GEL After sample preparation and loading buffer addition, samples must be loaded onto a gel. Electrophoresis is performed with a negative pole on the well end of the gel and a positive pole on the opposite end of the gel. The negatively charged SDS bound to proteins causes migration of protein complexes towards the positive pole during electrophoresis and proteins can be separated by size. In general, the larger the protein, the slower it moves through the gel. Acrylamide gels can be prepared at different concentrations. As a general rule, low molecular weight proteins are best resolved on high percentage gels, whereas large proteins require lower percentage gels for sufficient resolution.
01
PROTOCOL: SDS-PAGE
Prepare or purchase a pre-made gel of appropriate polyacrylamide percentage to best resolve your protein of interest based on molecular weight.
02
03
04
Protein Size Gel Percentage4-40 kDa Up to 20%12-45 kDa 15%10-70 kDa 12.5%15-100 kDa 10%50-200 kDa 8%>200 kDa 4-6%
Note: If your protein of interest has multiple isoforms ranging from low to high molecular weight sizes or if you plan to probe a blot for multiple proteins varying in size, gradient gels (acrylamide concentration increases from top to bottom) may be necessary to achieve efficient separation of proteins.
Load samples containing equal amounts of protein (10-50 µg protein from cell lysate or 10-100 ng purified protein) prepared in sample buffer into SDS-PAGE wells. Include a molecular weight marker in one of the lanes.
Fill the electrophoresis apparatus with 1X running buffer as instructed by the manufacturer.
1X Running buffer 25 mM Tris base192 mM glycine0.1% SDSAdjust to pH 8.3
Run the gel as recommended by the manufacturer. Voltage may vary depending on research needs. 1-2 hours at 100V is a standard guideline.
PROTEIN TRANSFER FROM GEL TO MEMBRANE After electrophoresis is complete, proteins must be transferred from the gel onto a suitable membrane for subsequent immunoassay steps. This is performed by passing an electrical current across the gel to the membrane. The membrane can be either PVDF or nitrocellulose. PVDF is generally better for low molecular weight proteins. This membrane can be purchased in different pore sizes. For proteins less than 30 kDa, the pore size of 0.2 µm PVDF is recommended over the 0.45 µm pore size. Additionally, PVDF membranes have a higher binding capacity (150-160 µg/cm2) than nitrocellulose (80-100 µg/cm2).
7
Learn more | novusbio.comLearn more | novusbio.com
01
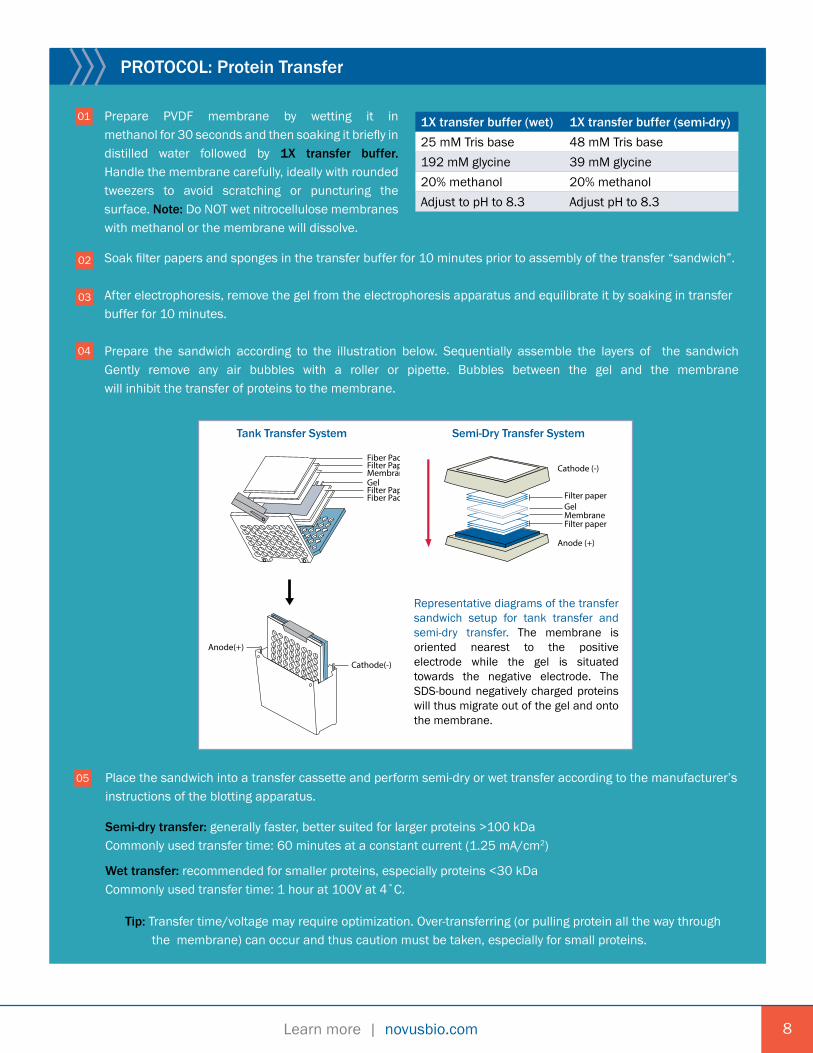
PROTOCOL: Protein Transfer
Prepare PVDF membrane by wetting it in methanol for 30 seconds and then soaking it briefly in distilled water followed by 1X transfer buffer. Handle the membrane carefully, ideally with rounded tweezers to avoid scratching or puncturing the surface. Note: Do NOT wet nitrocellulose membranes with methanol or the membrane will dissolve.
02
03
04
Soak filter papers and sponges in the transfer buffer for 10 minutes prior to assembly of the transfer “sandwich”.
After electrophoresis, remove the gel from the electrophoresis apparatus and equilibrate it by soaking in transfer buffer for 10 minutes.
Prepare the sandwich according to the illustration below. Sequentially assemble the layers of the sandwichGently remove any air bubbles with a roller or pipette. Bubbles between the gel and the membrane will inhibit the transfer of proteins to the membrane.
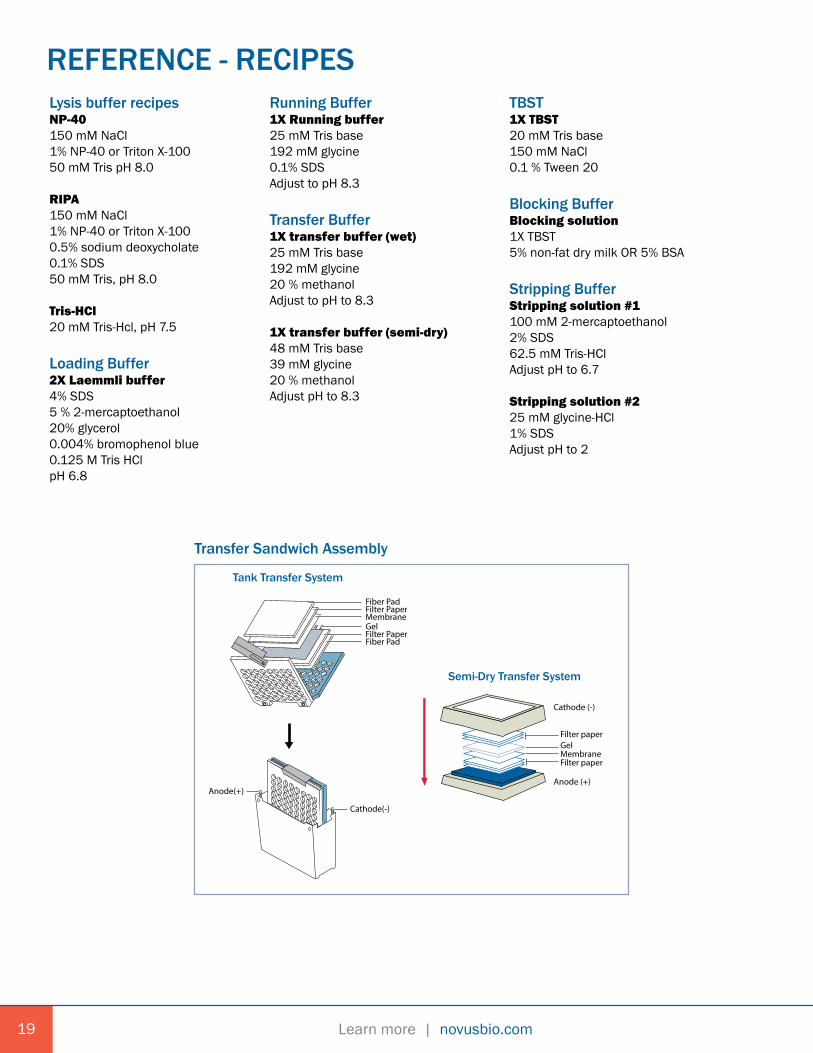
1X transfer buffer (wet) 1X transfer buffer (semi-dry)25 mM Tris base 48 mM Tris base192 mM glycine 39 mM glycine20% methanol 20% methanolAdjust to pH to 8.3 Adjust pH to 8.3
Fiber PadFilter PaperMembraneGelFilter PaperFiber Pad
Anode(+)
Cathode(-)
Cathode (-)
Filter paperGelMembraneFilter paper
Anode (+)
Cassette holder
Foam padFilter paperGelMembraneFilter paperFoam pad
(+) Anode(-) Cathode
Cathode (-)
Filter paperGelMembraneFilter paper
Anode (+)
Tank Transfer System Semi-Dry Transfer System
Representative diagrams of the transfer sandwich setup for tank transfer and semi-dry transfer. The membrane is oriented nearest to the positive electrode while the gel is situated towards the negative electrode. The SDS-bound negatively charged proteinswill thus migrate out of the gel and ontothe membrane.
Place the sandwich into a transfer cassette and perform semi-dry or wet transfer according to the manufacturer’s instructions of the blotting apparatus.
Semi-dry transfer: generally faster, better suited for larger proteins >100 kDa Commonly used transfer time: 60 minutes at a constant current (1.25 mA/cm2)
Wet transfer: recommended for smaller proteins, especially proteins <30 kDa Commonly used transfer time: 1 hour at 100V at 4˚C.
Tip: Transfer time/voltage may require optimization. Over-transferring (or pulling protein all the way through the membrane) can occur and thus caution must be taken, especially for small proteins.
05
8
Learn more | novusbio.com9
IMMUNOBLOTTING BlockingThe first step in immunoblotting is to rinse and block the membrane with non-specific protein, such as milk or BSA. The purpose of this blocking step is to bind non-specific protein to the surface of the membrane where sample protein is not already present. This prevents antibody from binding non-specifically to the membrane, which gives rise to a high background signal. The choice of milk vs. BSA is antibody specific and may require optimization. Often the antibody information sheet will recommend one over the other. For phosphorylated targets, milk should be avoided, as it contains a high amount of phosphorylated proteins
Antibody BindingPrimary antibody: After blocking, the membrane is incubated in a solution containing the primary antibody. As mentioned previously, the primary antibody recognizes the epitope, or the specific amino-acid sequence, of the protein of interest.
Secondary antibody: After washing to remove unbound primary antibody, secondary antibody is added. Secondary antibody recognizes the primary antibody. Secondary antibodies used for western blotting are usually conjugated to an enzyme; the most commonly used enzymes are Horse Radish Peroxidase (HRP) and Alkaline Phosphatase (AP).
Note: Some primary antibodies are directly conjugated to HRP, eliminating the need for the secondary antibody incubation steps. In this case, it is possible to proceed to detection after the primary antibody incubation and subsequent rinses. Novus offers primary antibodies conjugated to HRP. If elimination of the secondary antibody step is desired, Novus offers Lightning-Link Antibody Labeling Kits, which allow primary antibodies to be labeled with HRP or AP (see page 20 for avalaible labeling kits).
01
PROTOCOL: Immunoblotting
After transfer, rinse the membrane briefly indistilled water or 1X TBST.
02
03
Gently mark MW ladder bands with a pencil for size detection. If all blue molecular weight markers were used, this step can be omitted as the bands of all blue markers will be visible after detection when used in conjugation with the Blue Marker Antibody.
If desired, stain the membrane with Ponceau red (a reversible protein stain) for 30 seconds to visualize protein bands to confirm that protein transfer was successful. Rinsing the membrane briefly with distilled water after Ponceau staining will reveal protein bands. Wash away Ponceau red with several washes in 1X TBST until membrane is clear. Additionally, Coomassie staining of the gel after transfer can help assure that proteins were completely transferred from the gel to the membrane (minimal or no protein staining should be visible on a coomassie-stained gel after successful complete transfer).
1X TBST20 mM Tris base150 mM NaCl0.1% Tween 20
Learn more | novusbio.comLearn more | novusbio.com
05
PROTOCOL: Immunoblotting Cont’d.
06
07
08
Optional step: Rinse the membrane for 5 mins in 1X TBST
Dilute the primary antibody to working concentration in 1X TBST with 1% milk or BSA (Whatever was chosen for blocking). Note: Typical working antibody dilutions range from 1:500 to 1:5000 or greater. Antibody specification sheets often contain suggested dilutions, but optimal dilutions may need to be determined experimentally. See the troubleshooting section of this guide for more detail.
Optional: If using blue molecular weight markers, add 1 µg/mL Blue Marker Antibody to the primary antibody solution to visualize the molecualar weight markers. This antibody does not cross react with protein lysates and will bind specifically to the blue dye of each molecular weight marker.
Incubate the membrane in primary antibody solution for 2-3 hours at room temperature or overnight at 4˚C with gentle rocking. Incubation time may require optimization. See antibody datasheet for recommended dilutions.
Wash the membrane with 1X TBST three times for 10 minutes each with gentle rocking.
Tip: Increase the number of washes to 5-6 if high background occurs. See the troubleshooting guide.
Incubate the membrane in the appropriate diluted secondary antibody (in 1X TBST and may include 1% milk or BSA) for 1 hour at room temperature with gentle rocking. Note: See primary antibody information sheet for proper secondary antibody selection- must recognize host species of the primary antibody. Secondary antibody concentration guidelines are listed in the product information sheet. For more information on secondary antibodies, read Novus’ Secondary Antibody Handbook.
Wash the membrane in 1X TBST three times for 10 minutes each with gentle rocking.
Tip: Do not let the membrane dry at any point during the blotting process.
09
04 Incubate membrane in blocking solution for 1 hour at room temperature or overnightat 4˚C with constant rocking.
Blocking Solution1X TBS5% non-fat dry milk OR 5% BSA0.1% Tween 20
10
10
Learn more | novusbio.com11
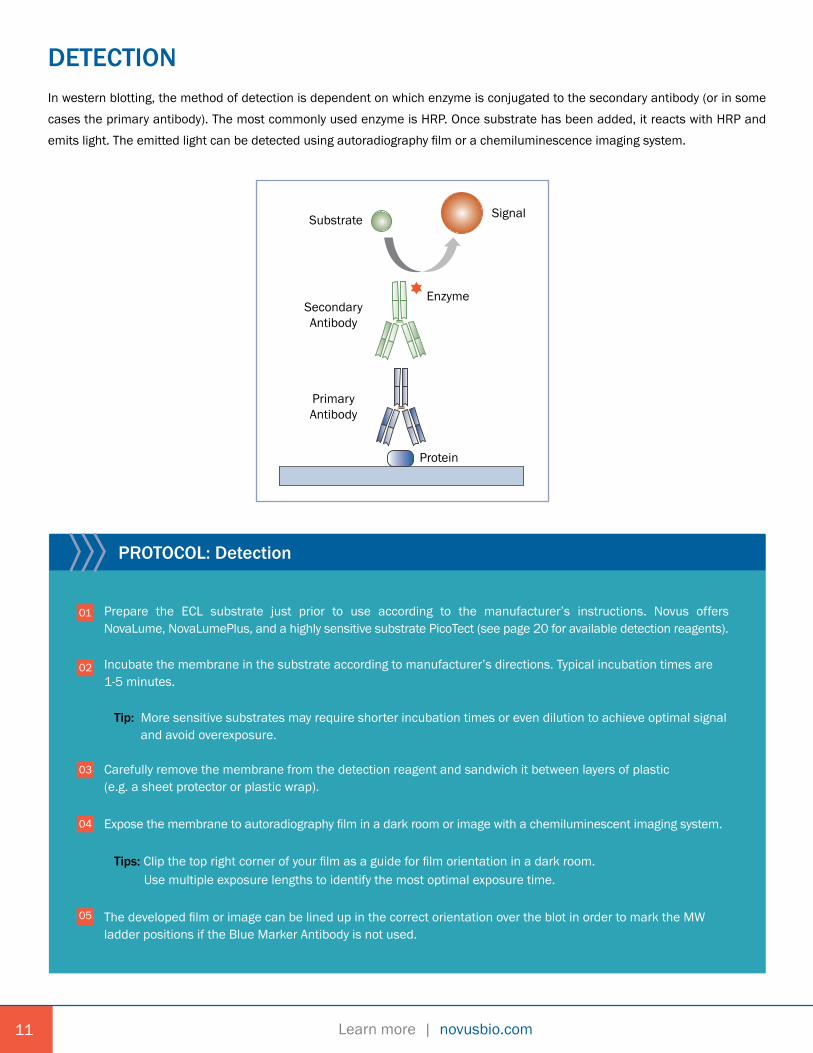
DETECTION In western blotting, the method of detection is dependent on which enzyme is conjugated to the secondary antibody (or in some cases the primary antibody). The most commonly used enzyme is HRP. Once substrate has been added, it reacts with HRP and emits light. The emitted light can be detected using autoradiography film or a chemiluminescence imaging system.
Protein
PrimaryAntibody
SecondaryAntibody
Substrate Signal
Enzyme
01
PROTOCOL: Detection
Prepare the ECL substrate just prior to use according to the manufacturer’s instructions. Novus offersNovaLume, NovaLumePlus, and a highly sensitive substrate PicoTect (see page 20 for available detection reagents).
Incubate the membrane in the substrate according to manufacturer’s directions. Typical incubation times are 1-5 minutes.
Tip: More sensitive substrates may require shorter incubation times or even dilution to achieve optimal signal and avoid overexposure.
Carefully remove the membrane from the detection reagent and sandwich it between layers of plastic (e.g. a sheet protector or plastic wrap).
Expose the membrane to autoradiography film in a dark room or image with a chemiluminescent imaging system.
Tips: Clip the top right corner of your film as a guide for film orientation in a dark room. Use multiple exposure lengths to identify the most optimal exposure time.
The developed film or image can be lined up in the correct orientation over the blot in order to mark the MW ladder positions if the Blue Marker Antibody is not used.
02
03
04
05
Learn more | novusbio.comLearn more | novusbio.com
STRIPPING/RE-PROBING A single blot can be analyzed sequentially with multiple antibodies by stripping one antibody from the blot and subsequently incubating with an additional antibody. This practice may be useful when sample is limited. Two methods are outlined below. The first method uses heat and detergent to release antibodies and the second uses low pH to inactivate the antigen binding site of the antibody.
Stripping solution #1 Stripping solution #2 1X PBS100 mM 2-mercaptoethanol 25 mM glycine-HCl 137 mM NaCl2% SDS 1% SDS 2.7 mM KCl62.5 mM Tris-HCl Adjust pH to 2 4.3 mM Na2HPO4Adjust pH to 6.7 1.47 mM KH2PO4
Adjust pH to 7.4
01
PROTOCOL: Stripping With Heat & Detergent
In a fume hood, agitate the blot in stripping solution #1 for 30 minutes at 50˚C
Agitate the blot in 1X PBS for 10 minutes at room temperature. Repeat with fresh buffer.
Proceed to the blocking step of the immunoblotting protocol to re-probe the blot with a second antibody.
02
03
01
PROTOCOL: Stripping With Acid pH
Agitate the blot in stripping solution #2 for 30 minutes at room temperature.
Agitate the blot in 1X PBS for 10 minutes at room temperature. Repeat with fresh buffer.
Proceed to the blocking step of the immunoblotting protocol to re-probe the blot with a second antibody.
02
03
12
Learn more | novusbio.com
BLOT STORAGE One of the advantages of PVDF membranes is that PVDF is a chemically resistant polymer that has excellent long term stability. Sometimes it might be desirable to store a blot for future use, such as for stripping and re-probing.
01
PROTOCOL: Storing A Blot
Sandwich the dry PVDF blot between two clean sheets of Whatman 3MM paper.
Place the sandwich between two sheets of card stock or thin cardboard.
Use paperclips to clip the stack together on the edges.
Place the stack in a plastic bag and seal the plastic bag closed.
Store the blot at 4˚C for up to 2 weeks, -20˚C for up to 2 months, or -70˚C for more than 2 months. Tip: Thaw frozen blots to room temperature before removal from the plastic bag because frozen blots are prone to breakage.
Tip: Blots can also be stored wet at 4˚C, but sodium azide should be added to prevent bacterial growth. As sodium azide inhibits HRP activity, it should be thoroughly washed out of a blot prior to use.
02
03
04
05
13
Learn more | novusbio.comLearn more | novusbio.com
TROUBLESHOOTING The following troubleshooting guide is intended to explain causes and possible solutions for common problems with western blotting.
No Signal or Weak Signal Primary antibody concentration is too low • Increase the concentration of the primary antibody (titrations may be helpful) - Use Novus Antibody Concentration Kits to increase primary antibody concentration • Increase the incubation time to 4°C overnight • If re-used too many times, the effective antibody concentration may be too low; use fresh antibody to improve signal
Target protein concentration is too low • Load more protein per well (titrations might be helpful) • Use a positive control control lysate known to express the target protein, an overexpression lysate, or a recombinant protein • Ensure lysis buffer is optimal for localization of target protein • Use immunoprecipitation or fractionation (i.e. nuclear fractionation) if necessary to increase the concentration of a non-abundant protein • Include protease inhibitors in the lysis buffer • Ensure the sample has not degraded
Protein transfer from gel to membrane was unsuccessful • Confirm that proteins were successfully transferred to the membrane by Ponceau S staining of the membrane • Confirm that proteins were completely transferred by coomassie staining of the gel • Confirm equal transfer by analyzing loading control expression
Primary and secondary antibody are not compatible • Ensure that secondary antibody was raised against the species in which the primary was raised (e.g. if primary was raised in mouse, use an anti-mouse secondary)
Membrane choice was not ideal • Check the hydrophobicity/hydrophilicity of the antigen sequence - PVDF membrane may work better for hydrophilic/polar/charged antigens - Nitrocellulose may work better for hydrophobic/non-polar antigens
There are issues with blocking • Blocking for too long can mask certain epitopes and inhibit antibody binding • Reduce blocking time • Reduce concentration of blocking solution • Reduce percentage or remove blocking reagent from antibody incubation buffers • Switch to a different blocking solution
Excessive washing of membrane • Detection reagent issues • Detection reagents can become inactive over time- - Ensure reagents are fresh - Test by dot blotting secondary onto membrane and incubating with detection reagent • Use more sensitive reagents when working with low abundance proteins (titrations may be helpful; if diluting, use high-purity water)
14
Learn more | novusbio.com15
No Signal or Weak Signal Cont’d.Image exposure was too short • Increase exposure time (check several times to achieve optimal exposure time)
Antibody only recognizes native proteins • Do not use reduced, denatured proteins if working with an antibody that only recognizes native proteins
Targets are low molecular weight • Reduce transfer time to prevent over transfer - Use membranes with smaller pore size (0.2 µm vs. 0.45 µm) - Wet transfer is recommended for small proteins
Sodium azide contamination has occurred • Sodium azide (often used to store primary antibodies) inhibits HRP activity - Ensure sufficient washing to remove presence of sodium azide - Use sodium azide-free buffers
High Uniform BackgroundInsufficient blocking • Increase blocking time and/or temperature • Increase the concentration of blocking reagent (try up to 10%) • Consider changing the blocking agent (milk vs. BSA) • Include the optional blocking agents in antibody buffers (can also increase %)
Blocking not compatible • For phosphorylated protein detection, milk should not be used (milk and casein are phospho-protein rich) • If your secondary is anti-bovine, anti-goat, or anti-sheep, use 5% serum from the host species of the secondary antibody as a blocking agent
Non-specific binding due to high antibody concentration • Lower concentration of primary or secondary (titrations may be helpful) • Include blocking agents in antibody buffers • Confirm the secondary is specific by omitting the primary and performing a secondary antibody only control blot
Insufficient washing of unbound antibodies • Increase the number and/or time of washes
Dry membrane • Make sure the membrane never becomes dry during the western blotting protocol
Film exposure is too long • Lower the exposure time (may be necessary to test a range of exposure times)
Detection reagents are too sensitive • Dilute the detection reagent in pure water or use a less sensitive detection reagent
Learn more | novusbio.comLearn more | novusbio.com
Non-specific bands/wrong size or multiple bandsTarget protein is less abundant than the threshold of non-specific binding • Load more protein in the SDS-PAGE gel • Enrich low-abundance proteins by immunoprecipitation or fractionation
Sample degradation • Use fresh lysates • Keep sample on ice until just before sample buffer addition and boiling • Always include protease inhibitors and phosphatase inhibitors if detecting phosphorylated target
Other protein isoforms may be present • Alternative splicing, multimer formation, etc. • May need an isoform-specific antibody
Post-translational modifications may be present • Predicted molecular weight can be influenced by many factors such as glycosylation, phosphorylation, protein processing (cleavage from a pro-form to a mature form) • To confirm specificity, perform positive and negative controls such as recombinant protein or overexpression lysate, downregulated knockdown/knockout lysate Speckled or Swirled BackgroundMembrane mishandling • Minimize contact with membrane. Use clean tools to handle the membrane
Buffer contamination • Use fresh buffers
Air bubbles • Roll out any bubbles between the gel and membrane before transfer
HRP aggregation • Filter the secondary antibody using a 0.2 µm filter to remove aggregate
Insufficient washing • Increase the volume of the washing buffer • Increase the number and/or duration of the washes Other Issues
White/hollow bands • Decrease the concentration of primary/secondary antibody or use less protein
Smeared bands/lanes (sample overloading) • Load less protein into each lane
“Smiling” bands • Migration was too fast; decrease the voltage while running the gel • Migration was too hot; run the gel in the cold room
Molecular weight marker lane is black • The antibody may react with the molecular weight marker • Add a blank lane between the molecular weight marker and the first sample lane
16
Learn more | novusbio.com17
BENCHTOP WESTERN BLOTTING PROTOCOL SAMPLE PREPARATION 1 Determine the protein concentration of each cell lysate. 2. Determine how much protein to load (Recommended: 10-50 µg/lane) and add an equal volume 2X Laemmli buffer. 3. Reduce and denature by boiling lysates in sample buffer at 95-100˚C for 5 minutes.
SDS-PAGE 1. Prepare or purchase a pre-made gel of appropriate polyacrylamide percentage to best resolve your protein of interest based on molecular weight. 2. Load samples containing equal amounts of protein (10-50 µg/lane protein from cell lysate or 10-100 ng/lane purified protein) prepared in sample buffer into SDS-PAGE wells. Include a molecular weight marker in one of the lanes. 3. Fill the electrophoresis apparatus with 1X running buffer as instructed by the manufacturer. 4. Run the gel as recommended by the manufacturer.
PROTEIN TRANSFER 1. Prepare PVDF membrane by wetting it in methanol for 30 seconds and then soaking it briefly in distilled water followed by 1X transfer buffer. Handle the membrane carefully, ideally with rounded tweezers to avoid scratching or puncturing the surface. 2. Soak filter papers and sponges in the transfer buffer for 10 minutes prior to assembly of the transfer “sandwich”. 3. After electrophoresis, remove the gel from the electrophoresis apparatus and equilibrate it by soaking in transfer buffer for 10 minutes. 4. Prepare the sandwich. Sequentially assemble the layers of the sandwich. Gently remove any air bubbles with a roller or pipette. Bubbles between the gel and the membrane will inhibit the transfer of proteins to the membrane. 5. Place the sandwich into a transfer cassette and perform semi-dry or wet transfer according to the manufacturer’s instructions of the blotting apparatus.
IMMUNOBLOTTING 1. After transfer, rinse the membrane briefly in distilled water or 1X TBST. 2. Gently mark molecular weight ladder bands with a pencil for size detection. If all blue molecular weight markers were used, this step can be omitted as the bands of all blue markers will be visible after detection when used in conjugation with the Blue Marker Antibody. 3. If desired, stain the membrane with Ponceau red for 30 seconds to visualize protein bands to confirm that protein transfer was successful. Rinsing the membrane briefly with distilled water after Ponceau staining will reveal protein bands. Wash away Ponceau red with several washes in 1x TBST until membrane is clear. Additionally, coomassie staining of the gel after transfer can help assure that proteins were completely transferred from the gel to the membrane. 4. Incubate membrane in blocking solution for 1 hour at room temperature or overnight at 4˚C with constant rocking 5. Optional step: Rinse the membrane for 5 minutes in 1X TBST. 6. Dilute the primary antibody to working concentration in 1X TBST with 1% milk or BSA (whatever was chosen for blocking) Optional: To visualize the molecular weight markers in addition to the protein of interest, add 1 µg/mL Blue Marker Antibody to the primary antibody solution.

Learn more | novusbio.comLearn more | novusbio.com
7. Incubate the membrane in primary antibody solution for 1 hour at room temperature or overnight at 4˚C with gentle rocking. This time may require optimization. 8. Wash the membrane with 1X TBST three times for 10 minutes each with gentle rocking.
Tip: Increase the number of washes to 5-6 if high background occurs. See the troubleshooting guide page 10.
9. Incubate the membrane in the appropriate diluted secondary antibody (in 1X TBST and may include 1% milk or BSA) for 1 hour at room temperature with gentle rocking. 10. Wash the membrane in 1X TBST three times for 10 minutes each with gentle rocking.
Tip: Do not let the membrane dry at any point during the blotting process.
DETECTION 1. Prepare the ECL substrate just prior to use according to the manufacturer’s instructions. 2. Incubate the membrane in the substrate according to manufacturer’s directions. Typical incubation times are 1-5 minutes. Tip: More sensitive substrates may require shorter incubation times or even dilution to achieve optimal signal and avoid overexposure.
3. Carefully remove the membrane from the detection reagent and sandwich it between layers of plastic (i.e. a sheet protector or plastic wrap). 4. Expose the membrane to autoradiography film in a dark room or image with a chemiluminescent imaging system, such as a ChemiDoc.
Tip: Clip the top right corner of your film as a guide for film orientation in a dark room. Tip: Use multiple exposure lengths to identify the most optimal exposure time. 5. The developed film or image can be lined up in the correct orientation over the blot in order to mark the molecular weight ladder positions if the Blue Marker Antibody is not used.
18
Learn more | novusbio.com19
REFERENCE - RECIPES
Fiber PadFilter PaperMembraneGelFilter PaperFiber Pad
Anode(+)
Cathode(-)
Cathode (-)
Filter paperGelMembraneFilter paper
Anode (+)
Cassette holder
Foam padFilter paperGelMembraneFilter paperFoam pad
(+) Anode(-) Cathode
Cathode (-)
Filter paperGelMembraneFilter paper
Anode (+)
Tank Transfer System
Semi-Dry Transfer System
Lysis buffer recipesNP-40150 mM NaCl1% NP-40 or Triton X-10050 mM Tris pH 8.0
RIPA150 mM NaCl1% NP-40 or Triton X-1000.5% sodium deoxycholate0.1% SDS50 mM Tris, pH 8.0
Tris-HCl20 mM Tris-Hcl, pH 7.5
Loading Buffer2X Laemmli buffer 4% SDS5 % 2-mercaptoethanol20% glycerol0.004% bromophenol blue0.125 M Tris HClpH 6.8
Running Buffer1X Running buffer 25 mM Tris base192 mM glycine0.1% SDSAdjust to pH 8.3
Transfer Buffer1X transfer buffer (wet)25 mM Tris base192 mM glycine20 % methanolAdjust to pH to 8.3
1X transfer buffer (semi-dry)48 mM Tris base39 mM glycine20 % methanolAdjust pH to 8.3
TBST1X TBST20 mM Tris base150 mM NaCl0.1 % Tween 20
Blocking BufferBlocking solution1X TBST5% non-fat dry milk OR 5% BSA
Stripping BufferStripping solution #1100 mM 2-mercaptoethanol2% SDS62.5 mM Tris-HClAdjust pH to 6.7
Stripping solution #225 mM glycine-HCl1% SDSAdjust pH to 2
Transfer Sandwich Assembly
Learn more | novusbio.comLearn more | novusbio.com
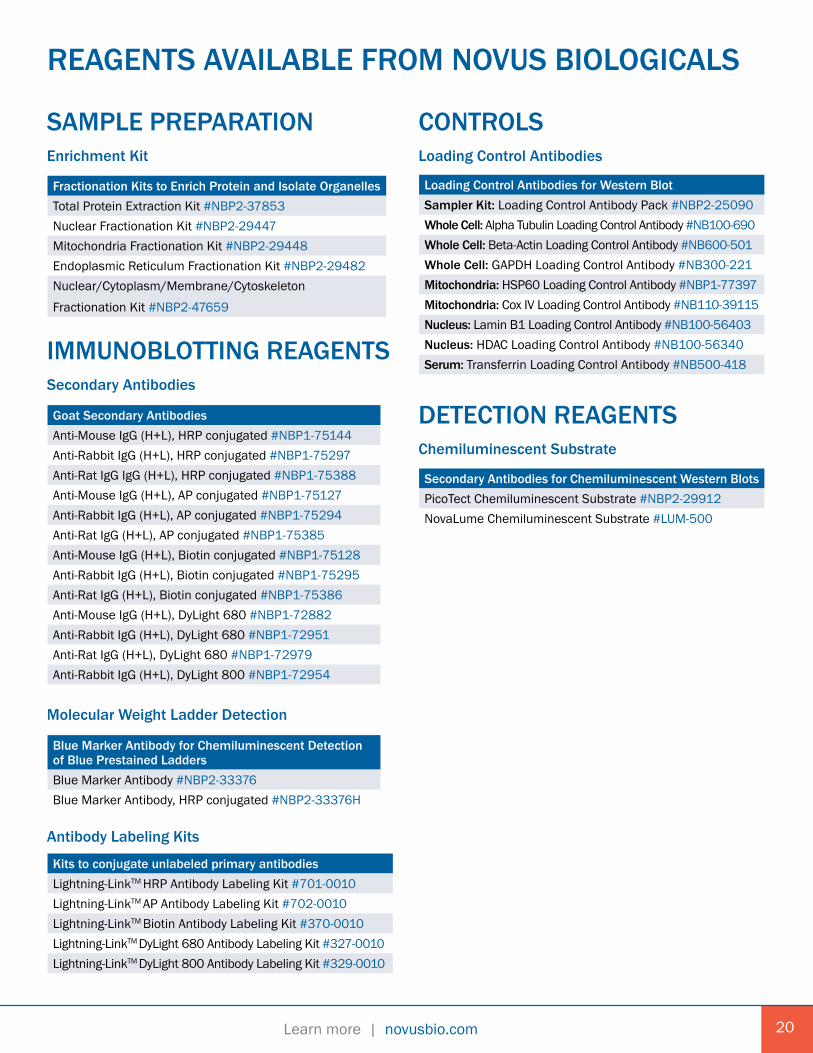
REAGENTS AVAILABLE FROM NOVUS BIOLOGICALS
Fractionation Kits to Enrich Protein and Isolate OrganellesTotal Protein Extraction Kit #NBP2-37853Nuclear Fractionation Kit #NBP2-29447Mitochondria Fractionation Kit #NBP2-29448Endoplasmic Reticulum Fractionation Kit #NBP2-29482Nuclear/Cytoplasm/Membrane/Cytoskeleton Fractionation Kit #NBP2-47659
SAMPLE PREPARATION Enrichment Kit
IMMUNOBLOTTING REAGENTS Secondary Antibodies
Goat Secondary AntibodiesAnti-Mouse IgG (H+L), HRP conjugated #NBP1-75144Anti-Rabbit IgG (H+L), HRP conjugated #NBP1-75297Anti-Rat IgG IgG (H+L), HRP conjugated #NBP1-75388Anti-Mouse IgG (H+L), AP conjugated #NBP1-75127Anti-Rabbit IgG (H+L), AP conjugated #NBP1-75294Anti-Rat IgG (H+L), AP conjugated #NBP1-75385Anti-Mouse IgG (H+L), Biotin conjugated #NBP1-75128Anti-Rabbit IgG (H+L), Biotin conjugated #NBP1-75295Anti-Rat IgG (H+L), Biotin conjugated #NBP1-75386Anti-Mouse IgG (H+L), DyLight 680 #NBP1-72882Anti-Rabbit IgG (H+L), DyLight 680 #NBP1-72951Anti-Rat IgG (H+L), DyLight 680 #NBP1-72979Anti-Rabbit IgG (H+L), DyLight 800 #NBP1-72954
Molecular Weight Ladder Detection
Blue Marker Antibody for Chemiluminescent Detection of Blue Prestained LaddersBlue Marker Antibody #NBP2-33376Blue Marker Antibody, HRP conjugated #NBP2-33376H
CONTROLS Loading Control Antibodies
Loading Control Antibodies for Western BlotSampler Kit: Loading Control Antibody Pack #NBP2-25090Whole Cell: Alpha Tubulin Loading Control Antibody #NB100-690Whole Cell: Beta-Actin Loading Control Antibody #NB600-501Whole Cell: GAPDH Loading Control Antibody #NB300-221Mitochondria: HSP60 Loading Control Antibody #NBP1-77397Mitochondria: Cox IV Loading Control Antibody #NB110-39115Nucleus: Lamin B1 Loading Control Antibody #NB100-56403Nucleus: HDAC Loading Control Antibody #NB100-56340Serum: Transferrin Loading Control Antibody #NB500-418
DETECTION REAGENTS Chemiluminescent Substrate
Secondary Antibodies for Chemiluminescent Western BlotsPicoTect Chemiluminescent Substrate #NBP2-29912NovaLume Chemiluminescent Substrate #LUM-500
Antibody Labeling Kits
Kits to conjugate unlabeled primary antibodiesLightning-LinkTM HRP Antibody Labeling Kit #701-0010Lightning-LinkTM AP Antibody Labeling Kit #702-0010Lightning-LinkTM Biotin Antibody Labeling Kit #370-0010Lightning-LinkTM DyLight 680 Antibody Labeling Kit #327-0010Lightning-LinkTM DyLight 800 Antibody Labeling Kit #329-0010
20

Learn more | novusbio.comBR_SecondaryGuide_041316
Global [email protected] bio-techne.com/find-us/distributors TEL +1 612 379 2956North America TEL 800 343 7475 Europe | Middle East | Africa TEL +44 (0)1235 529449China [email protected] TEL +86 (21) 52380373
bio-techne.com
Tocri-2945
For research use or manufacturing purposes only. Trademarks and registered trademarks are the property of their respective owners.


![Western Blotting BCH 462[practical] Lab#6. Objective: -Western blotting of proteins from SDS-PAGE](https://img.dokumen.tips/doc/110x75/56649dc85503460f94abe06c/western-blotting-bch-462practical-lab6-objective-western-blotting-of.jpg)