Embed Size (px)
Citation preview

Web-based CMMS Quick Start Guide
Entire Contents Copyright 2020, CyberMetrics Corporation All Rights Reserved Worldwide. 8.7.004-03262020
CyberMetrics Corporation1523 W. Whispering Wind DriveSuite 100Phoenix, Arizona 85085USA
Toll-free: 1-800-776-3090 (USA)Phone: 480-295-3465Fax: 480-922-7400
www.CyberMetrics.com
Web-based CMMS Quick Start Guide
U.S. GOVERNMENT RESTRICTED RIGHTSThis software and documentation are provided with RESTRICTED RIGHTS. Use, duplication, or disclosure by the Government is subject to restrictions as set forth in subdivision (b)(3)(ii) of The Rights in Technical Data and Computer Software clause at 252.227-7013. Contractor/manufacturer is CyberMetrics Corporation.
QUESTIONSShould you have any questions concerning this agreement, or if you wish to contact CyberMetrics Corporation for any reason, please write or call:
CyberMetrics Corporation1523 West Whispering Wind Drive, Suite 100Phoenix, Arizona 85085 Toll-free: 1-800-776-3090 (USA)Phone: 480-295-3465Fax: 480-922-7400
TECHNICAL SUPPORTTechnical support cannot be provided unless the user has a current maintenance agreement.
Local or outside US: +1 (480) 212-1257 Toll-free: 1-800-777-7020 M-F 8:00 a.m. to 5:00 p.m., MST [email protected]://faciliworks.com/support/
TRADEMARK ACKNOWLEDGMENTSAll CyberMetrics Corporation products are trademarks or registered trademarks of CyberMetrics Corporation. All other brand and product names are trademarks or registered trademarks of their respective holders.
SOFTWARE LICENSE AGREEMENTThis is a legal agreement between you, the end user and CyberMetrics Corporation (“CyberMetrics”). BY USING THIS SOFTWARE, YOU ARE AGREEING TO BE BOUND BY THE TERMS OF THIS AGREEMENT. IF YOU DO NOT AGREE TO THE TERMS OF THE AGREEMENT, PROMPTLY RETURN THE DISKS AND THE ACCOMPANYING ITEMS (including written materials and binders or other containers) TO THE PLACE FROM WHICH YOU OBTAINED THEM FOR A FULL REFUND.
SOFTWARE LICENSE
1. GRANT OF FACILIWORKS 8i LICENSE. CyberMetrics grants to you the right to install one instance of FaciliWorks 8i (“the SOFTWARE”) on one server. This installation will serve concurrent client sessions up to the number of purchased concurrent user licenses.
2. COPYRIGHT. The SOFTWARE is owned by CyberMetrics or its suppliers and is protected by United States copyright laws and international treaty provisions. Therefore, you must treat the SOFTWARE like any other copyrighted material (e.g., a book or musical recording) except that you may (a) make copies of the SOFTWARE solely for backup or archival purposes and (b) transfer the software to hard disks provided that only one copy of the SOFTWARE is used at any time. You MAY NOT COPY the written materials accompanying the SOFTWARE.
3. OTHER RESTRICTIONS. You may not rent or lease the SOFTWARE, but you may transfer the SOFTWARE and accompanying written materials on a permanent basis provided you retain no copies and the recipient agrees to the terms of this Agreement.
LIMITED WARRANTY. CyberMetrics warrants that you may return the SOFTWARE and all accompanying written materials, for any reason, for a full refund, for a period of 30 days from the date of receipt.
CUSTOMER REMEDIES. CyberMetrics’ entire liability and your exclusive remedy shall be, at CyberMetrics’ option, either (a) return of the price paid or (b) repair or replacement of the SOFTWARE that does not meet CyberMetrics Limited Warranty and which is returned to CyberMetrics with a copy of your invoice or receipt. This Limited Warranty is void if failure of the SOFTWARE has resulted from accident, abuse or misapplication. Any replacement SOFTWARE will be warranted for the remainder of the original warranty period or 30 days, whichever is longer.
NO OTHER WARRANTIES. CyberMetrics DISCLAIMS ALL OTHER WARRANTIES, EITHER EXPRESSED OR IMPLIED, INCLUDING BUT NOT LIMITED TO IMPLIED WARRANTIES OF MERCHANTABILITY AND FITNESS FOR A PARTICULAR PURPOSE, WITH RESPECT TO THE SOFTWARE, THE ACCOMPANYING WRITTEN MATERIALS and ANY ACCOMPANYING HARDWARE. THIS LIMITED WARRANTY GIVES YOU SPECIFIC LEGAL RIGHTS; YOU MAY HAVE OTHERS WHICH VARY FROM STATE TO STATE.
NO LIABILITY FROM CONSEQUENTIAL DAMAGES. In no event shall CyberMetrics, its distributors, its representatives or its suppliers be liable for any damages whatsoever (including, without limitation, damages for the loss of business profits, business interruption, loss of business information or other pecuniary loss) arising out of the use or inability to use this CyberMetrics product, even if CyberMetrics has been advised of the possibility of such damages. Because some states do not allow the exclusion or limitation of liability for consequential or incidental damages, the above limitation may not apply to you.
Table of ContentsChapter One: Overview 8
About This Guide .......................................................................................................................... 8
Chapter Two: What Does FaciliWorks Do? 9A Typical Day in the Maintenance Department .................................................................................. 9Benefits ..................................................................................................................................... 12
Chapter Three: Using FaciliWorks 14Launching FaciliWorks ................................................................................................................. 14Navigation of FaciliWorks.............................................................................................................. 14
Navigation Links ............................................................................................................................................ 15Shortcuts and Breadcrumbs .......................................................................................................................... 16Data Administration ....................................................................................................................................... 17Naming Conventions ...................................................................................................................................... 17Automatic Numbering .................................................................................................................................... 18
Chapter Four: Data Entry 19Procedures ................................................................................................................................. 20
Procedures - Text Tab .................................................................................................................................... 20Procedures - Attachments Tab ....................................................................................................................... 21
Suppliers .................................................................................................................................... 22Contractors ................................................................................................................................ 23Inventory .................................................................................................................................... 24Personnel ................................................................................................................................... 25Tools .......................................................................................................................................... 26Variable Data .............................................................................................................................. 27Checklists ................................................................................................................................... 29Tasks ......................................................................................................................................... 30
Tasks - Labor Tab .......................................................................................................................................... 31
Tasks - Parts Tab ........................................................................................................................................... 32Tasks - Tools Tab ........................................................................................................................................... 32Tasks - Variables Tab .....................................................................................................................................33Tasks - Procedures Tab..................................................................................................................................33Tasks - Checklist Tab .....................................................................................................................................34
Assets ........................................................................................................................................ 34Assets - Information Tab ................................................................................................................................ 35
Asset Record ...................................................................................................................................... 36Gage Record (8i Calibration Only) ........................................................................................................ 36
Assets - PM Task Tab .................................................................................................................................... 37Task Sub-tab ....................................................................................................................................... 37Labor Sub-tab .....................................................................................................................................38Parts Sub-tab ...................................................................................................................................... 39Tools Sub-tab ......................................................................................................................................40Variables Sub-tab ................................................................................................................................ 41Procedures Sub-tab ............................................................................................................................ 42Schedule Sub-tab ................................................................................................................................43
Meter-based Schedule ...................................................................................................................43Date-based Schedule ....................................................................................................................44
Adding a Second Task .........................................................................................................................44
Chapter Five: Preventative Maintenance 45Manual Create PMs ..................................................................................................................... 45
Open PMs ..................................................................................................................................................... 47
Edit PMs .................................................................................................................................... 47Completing a PM ........................................................................................................................................... 47Closing out a PM ...........................................................................................................................................48
Chapter Six: Work Orders 49Work Order Manager .................................................................................................................... 49
Creating a Work Order ................................................................................................................................... 49
Chapter Seven: Tech Support 51
Chapter Eight: Products/Services 52Training ...................................................................................................................................... 52Other Professional Services .......................................................................................................... 52FaciliWorks Product Options ......................................................................................................... 53
Web Service Requests ...................................................................................................................................53TaskPro .........................................................................................................................................................53SafetyPro .......................................................................................................................................................53Maintenance Label Kit ...................................................................................................................................54Validation Kit ..................................................................................................................................................54FaciliWorks 8i Mobile .....................................................................................................................................54
8 Chapter One: Overview FaciliWorks 8i Quick Start Guide
Chapter One: OverviewFaciliWorks 8i gives you all the tools you need to effectively track and schedule all of your maintenance tasks, personnel, assets and supplies. It is designed to be used by maintenance managers and personnel, as well as by tool crib, purchasing, accounting and inventory professionals.
In FaciliWorks, asset records store identification, warranty and accounting information and associated maintenance tasks. Each maintenance task record contains information regarding its schedule, estimated and actual time, costs, labor, personnel, tools and parts required as well as the procedures and variables required to inspect, measure, repair and replace asset components.
You can create detailed work orders based on this information, coordinating the required items for each category with your available resources. You can print detailed listings of all of your assets and resources, filtered and sorted according to your preference. It’s also easy to generate and keep track of the service requests and contracts that are part of each maintenance task. Part consumption and reorder reports facilitate inventory control.
Useful graphs can be prepared for quick comparison of asset downtime, maintenance costs or inventory valuation, while other graphs illustrate employee performance and purchasing information.
FaciliWorks helps you coordinate purchase orders, staff and supplier information, inventory and costs of tools, parts and supplies. Powerful forecasting tools are incorporated into the program in the form of a visual calendar that shows the number of jobs and hours for each day of the month, along with a projected schedule of tasks and hours.
The program’s interactive table design allows each part of the maintenance management process to become an independent component. These components are then combined, forming building blocks for the solid construction of your maintenance management system. Once you have mastered the basics, you will find that FaciliWorks is a vital software tool for analyzing, budgeting and managing your maintenance program.
About This GuideThis guide will give you a look at how your company might use FaciliWorks on a typical day and will help you focus on entering basic data to get FaciliWorks up and running quickly. Be sure to reference the other FaciliWorks 8i guides for detailed information and instruction: Installation Guide, Data Transfer Utility (DTU) Guide, Administrator Guide and User Guide and you can also access the Help System from within the software.
Chapter Two: What Does FaciliWorks Do? 9FaciliWorks 8i Quick Start Guide
Chapter Two: What Does FaciliWorks Do?To answer this question, let’s explore how your maintenance department might use FaciliWorks on an average day. This story is meant to illustrate FaciliWorks features; not to dictate how you plan your work. In this chapter, the names of FaciliWorks features and reports appear in bold type; names of optional FaciliWorks products appear in italic type.
A Typical Day in the Maintenance DepartmentIt’s Monday morning - time to plan the day. You pour your coffee, turn on your computer and launch FaciliWorks. The Automatic Work Order Due Report pops up on the screen, showing all of the preventative maintenance and work orders that are due. You print it out to use as a handy reference to be sure that today’s work is finished.
Now it’s time to organize the work for your maintenance crew. As the maintenance manager, you plan the week’s schedule for your technicians. Thanks to FaciliWorks, it’s easy to view the week’s schedule of work orders and preventative maintenance and reassign the work as needed.
To avoid duplication of effort, you give your maintenance staff access to FaciliWorks 8i Mobile so that they can complete WOs and PMs, update meter readings and even create work orders on the fly while in the field. In 8i Mobile, the WO and PM records include asset information, estimated labor hours, any required labor, contracts, parts, tools, variables that should be checked and a list of the procedures required for each task. Now you’re ready to send your technicians off to work.
10 Chapter Two: What Does FaciliWorks Do? FaciliWorks 8i Quick Start Guide
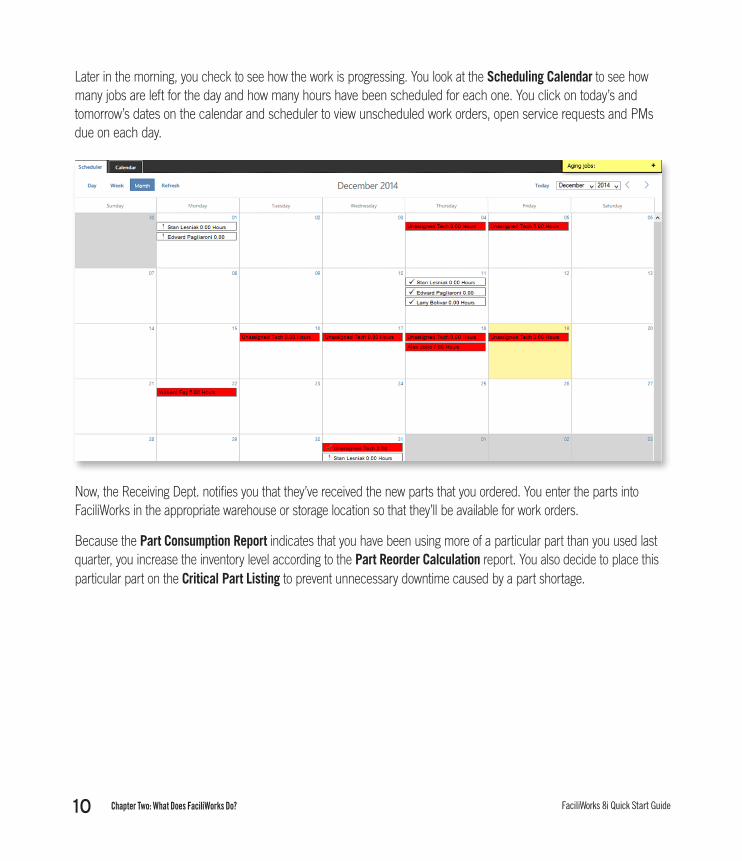
Later in the morning, you check to see how the work is progressing. You look at the Scheduling Calendar to see how many jobs are left for the day and how many hours have been scheduled for each one. You click on today’s and tomorrow’s dates on the calendar and scheduler to view unscheduled work orders, open service requests and PMs due on each day.
Now, the Receiving Dept. notifies you that they’ve received the new parts that you ordered. You enter the parts into FaciliWorks in the appropriate warehouse or storage location so that they’ll be available for work orders.
Because the Part Consumption Report indicates that you have been using more of a particular part than you used last quarter, you increase the inventory level according to the Part Reorder Calculation report. You also decide to place this particular part on the Critical Part Listing to prevent unnecessary downtime caused by a part shortage.

Chapter Two: What Does FaciliWorks Do? 11FaciliWorks 8i Quick Start Guide
You control and track the usage of all tools through FaciliWorks’ Tool Issue function, but your business is expanding and you notice that in addition to part shortages, sometimes tools aren’t available when you need them. You compare the Tool Issue History report with the printout of the parts and tools that aren’t available for next week’s work orders and decide to purchase more of the most frequently used tools by using the Purchase Order function.
Next, you need to update the FaciliWorks database. Your company has acquired an additional piece of production equipment that is the same type as another piece of equipment that you already have. You use the Clone Asset feature to copy the common information about this asset into a new asset record.
When you clone the asset, all of its associated tasks and information, including task variables, procedures, labor, contract, part and tool information are copied to the clone. All you have to do next is enter the asset’s unique information, including serial number, purchase date and next date due for maintenance.
You’ll need an additional safety procedure for this asset, too. You use SafetyPro, a database of safety checklists that cover everything from fire protection to stairways and hand tools. Thanks to SafetyPro, you don’t have to waste time researching or creating safety procedures, you can simply import the procedures directly into FaciliWorks. Using SafetyPro also helps your company comply with OSHA safety standards.
After lunch, you spend the afternoon doing some work orders yourself. Once you’ve finished, you use the FaciliWorks Maintenance Label Kit to print out maintenance labels for each asset. These laminated, durable labels are oil resistant, water resistant and they’re easy to print and apply to your assets.
Later in the afternoon, you check on the tool crib again. Some tools that were used for work orders are being returned. An employee with a bar code reader is quickly scanning the bar-coded labels on each tool. A second scan on a department identification bar code completes the tool return information.
Employees in other departments have used the Service Request Module to enter maintenance requests. Because of the preferences you’ve set in FaciliWorks, you automatically receive an Email Notification alerting you that service requests have been created. You can immediately go into Approve Service Requests to approve or delete them.
12 Chapter Two: What Does FaciliWorks Do? FaciliWorks 8i Quick Start Guide
You can then enter more information about each request and create a Work Order directly from the service request record. FaciliWorks automatically sends an Email Notification to the technician alerting him that a new work order has been created. The email even includes a copy of the work order.
As maintenance manager, you’re responsible for budget and resource planning. FaciliWorks’ powerful tools help you plan ahead. To obtain a historical perspective for the last quarter and for the same quarter in the previous year, you generate the Work Order Costs and Labor Report several times, sorting by asset, task, location and technician, so that you can better analyze past use of resources. Using the Budget Entry feature, you compare actual and estimated costs. FaciliWorks flags over-budget months so that you can easily recognize them.
Next, you go to a managers’ meeting. You’re well-prepared with your budget, schedule and cost reports. You’ve also printed graphs for your presentation, including Asset Downtime, Asset Costs by Type, Employee Performance and Inventory Value by Category. You feel confident that everything in your department is under control and these reports and graphs prove it.
After the meeting, it’s time to go home. As you leave, you try to remember what your workday was like before you had FaciliWorks. How did you ever manage?
BenefitsAs you can see, using FaciliWorks and its accessories saved you a lot of time, effort and stress.
As soon as you started FaciliWorks, the Automatic Work Order Due Report listed the assets that were due for maintenance today.
You gave your technicians access to 8i Mobile in order to record work information in the field. Because the 8i Mobile records include task details, each technician had thorough information for each task, including procedures.
The FaciliWorks Scheduling Calendar made it easy for you to check on the status of each maintenance task without even leaving your desk. It also helped you see where labor bottlenecks occur and allows you to easily reschedule work.
Thanks to the Part Consumption Listing, Part Reorder Calculation and Critical Part Listing, you quickly determined which parts needed reorder point adjustment, thus eliminating downtime due to part shortages. Without FaciliWorks, this task would require much more time, effort and paperwork.
Using the Tool Issue function and the Tool Issue History Report, you were able to analyze which tools were most frequently used so that you could order more of the popular tools, thus preventing future shortages. These features took the guesswork out of ordering and ensured that you knew exactly when and to what location each tool had been issued.
Chapter Two: What Does FaciliWorks Do? 13FaciliWorks 8i Quick Start Guide
The Clone Asset feature also saved time. Without it, entering the new asset’s information would have been redundant and time consuming. Also, because you didn’t have to enter as much information, you were assured of more accurate and uniform data entry.
SafetyPro provided you with proven safety procedures that were already researched and documented and you easily imported them straight into your FaciliWorks program without having to enter them by hand.
The Maintenance Label Kit helped you quickly print easy-to-read, durable maintenance labels for each asset.
Thanks to the FaciliWorks Email Notification, you instantly knew when a maintenance request was made. And, because your company has a multi-user license of FaciliWorks Web Service Requests, other employees could easily enter maintenance requests without leaving their desks or picking up the phone. After that, it was easy to create a work order directly from the request, without phone calls or excessive paperwork.
With the FaciliWorks Budget Entry feature and cost and scheduling reports, you conveniently documented information about your resources, including printed graphs to help you analyze your consumption and scheduling. You don’t dread budget meetings anymore because you know you can easily retrieve any necessary information from FaciliWorks, whether for a complex analysis or a quick overview.
FaciliWorks’ features and optional products helped you comply with your company’s demands for high-quality, on-time maintenance. They also helped you ensure your company’s compliance with ISO, AS, FDA and other standards that require your maintenance program to be efficient and effective.
14 Chapter Three: Using FaciliWorks FaciliWorks 8i Quick Start Guide
Chapter Three: Using FaciliWorksNow that you’ve seen what FaciliWorks can do for you, it’s time to learn how to use it. First, use the Installation Guide to properly install FaciliWorks. Then, see the DTU Guide for detailed instructions on how to transfer existing data into FaciliWorks. The Administrator Guide will give your system administrator an in-depth look at how to define FaciliWorks preferences, control security and use the more advanced features within FaciliWorks. After using this Quick Start Guide to get up and running as quickly as possible, consult the User Guide for detailed information about all of the functions that are now at your fingertips. The Help System, accessible from within the software, contains the User and Administrator Guides in their entirety.
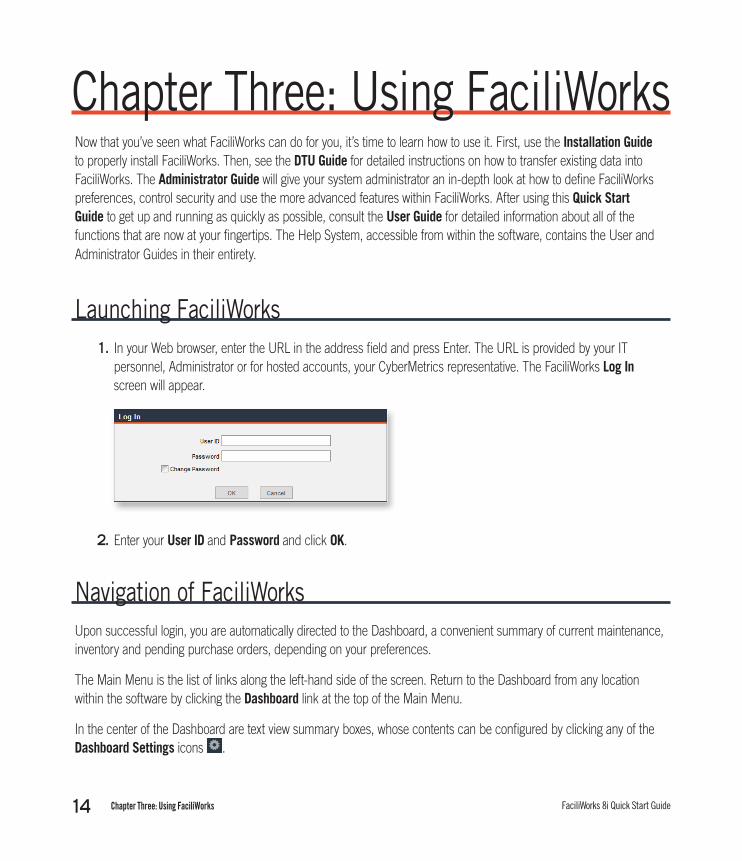
Launching FaciliWorks1. In your Web browser, enter the URL in the address field and press Enter. The URL is provided by your IT
personnel, Administrator or for hosted accounts, your CyberMetrics representative. The FaciliWorks Log In screen will appear.
2. Enter your User ID and Password and click OK.
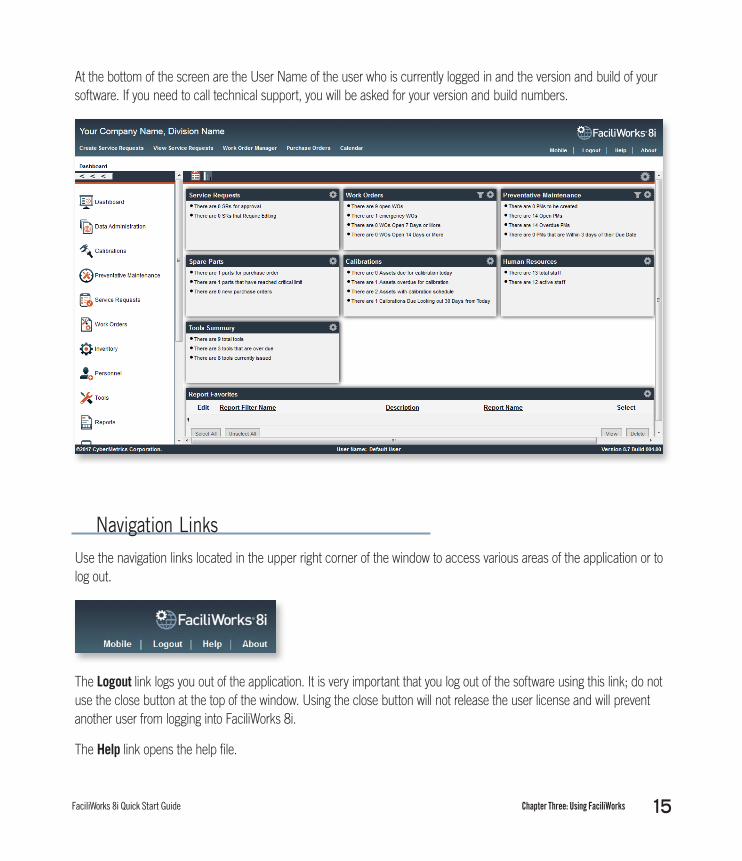
Navigation of FaciliWorksUpon successful login, you are automatically directed to the Dashboard, a convenient summary of current maintenance, inventory and pending purchase orders, depending on your preferences.
The Main Menu is the list of links along the left-hand side of the screen. Return to the Dashboard from any location within the software by clicking the Dashboard link at the top of the Main Menu.
In the center of the Dashboard are text view summary boxes, whose contents can be configured by clicking any of the Dashboard Settings icons .
Chapter Three: Using FaciliWorks 15FaciliWorks 8i Quick Start Guide
At the bottom of the screen are the User Name of the user who is currently logged in and the version and build of your software. If you need to call technical support, you will be asked for your version and build numbers.
Navigation LinksUse the navigation links located in the upper right corner of the window to access various areas of the application or to log out.
The Logout link logs you out of the application. It is very important that you log out of the software using this link; do not use the close button at the top of the window. Using the close button will not release the user license and will prevent another user from logging into FaciliWorks 8i.
The Help link opens the help file.
16 Chapter Three: Using FaciliWorks FaciliWorks 8i Quick Start Guide
The About link displays the number of records in the database, software license information and serial number and contact information for the FaciliWorks support team.
The Mobile link takes you to the FaciliWorks 8i Mobile site.
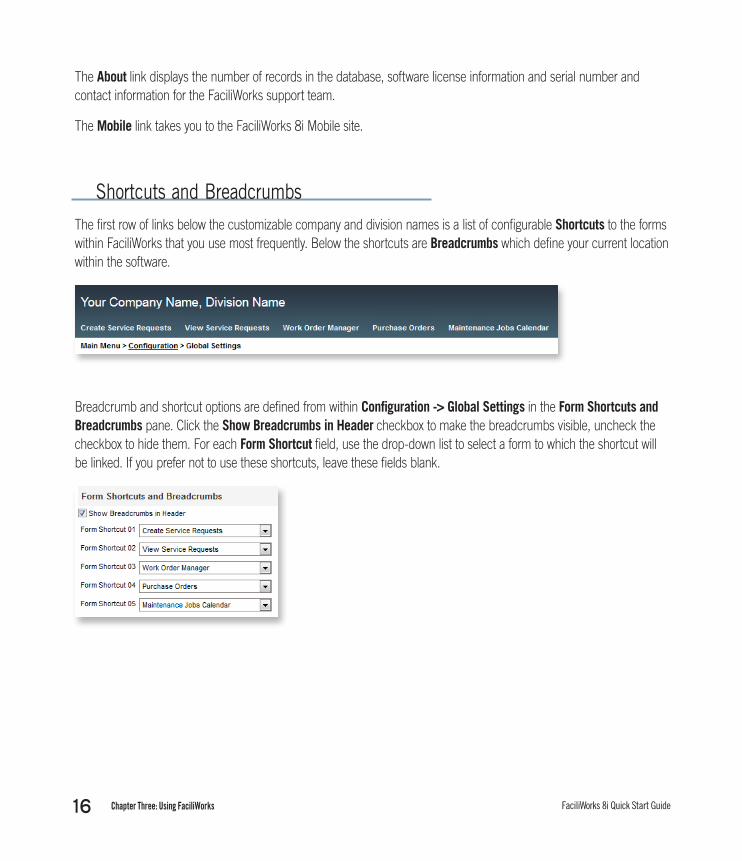
Shortcuts and BreadcrumbsThe first row of links below the customizable company and division names is a list of configurable Shortcuts to the forms within FaciliWorks that you use most frequently. Below the shortcuts are Breadcrumbs which define your current location within the software.
Breadcrumb and shortcut options are defined from within Configuration -> Global Settings in the Form Shortcuts and Breadcrumbs pane. Click the Show Breadcrumbs in Header checkbox to make the breadcrumbs visible, uncheck the checkbox to hide them. For each Form Shortcut field, use the drop-down list to select a form to which the shortcut will be linked. If you prefer not to use these shortcuts, leave these fields blank.
Chapter Three: Using FaciliWorks 17FaciliWorks 8i Quick Start Guide
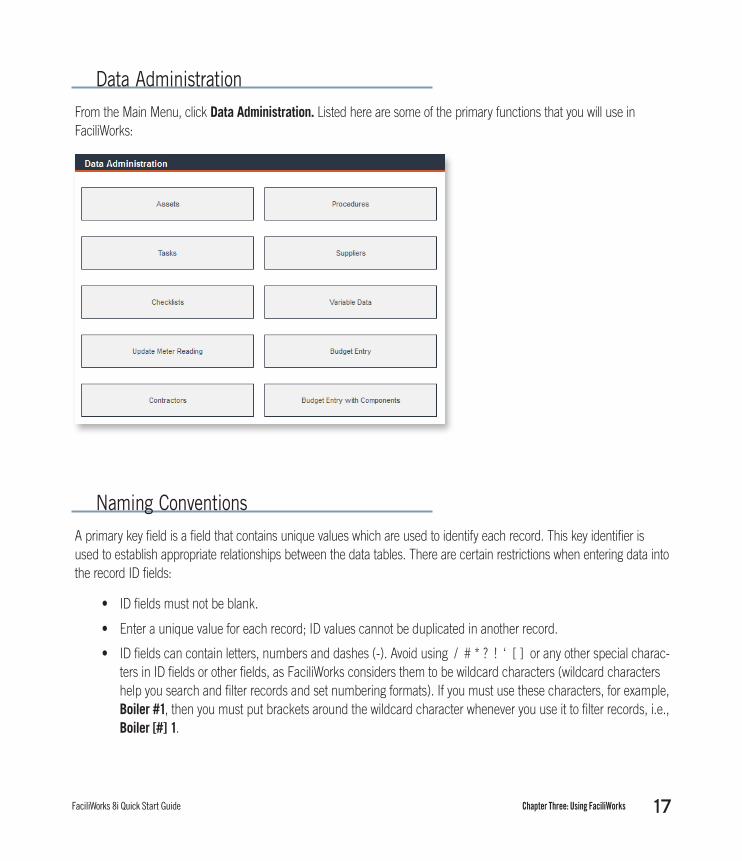
Data AdministrationFrom the Main Menu, click Data Administration. Listed here are some of the primary functions that you will use in FaciliWorks:
Naming ConventionsA primary key field is a field that contains unique values which are used to identify each record. This key identifier is used to establish appropriate relationships between the data tables. There are certain restrictions when entering data into the record ID fields:
• ID fields must not be blank.
• Enter a unique value for each record; ID values cannot be duplicated in another record.
• ID fields can contain letters, numbers and dashes (-). Avoid using / # * ? ! ‘ [ ] or any other special charac-ters in ID fields or other fields, as FaciliWorks considers them to be wildcard characters (wildcard characters help you search and filter records and set numbering formats). If you must use these characters, for example, Boiler #1, then you must put brackets around the wildcard character whenever you use it to filter records, i.e., Boiler [#] 1.
18 Chapter Three: Using FaciliWorks FaciliWorks 8i Quick Start Guide
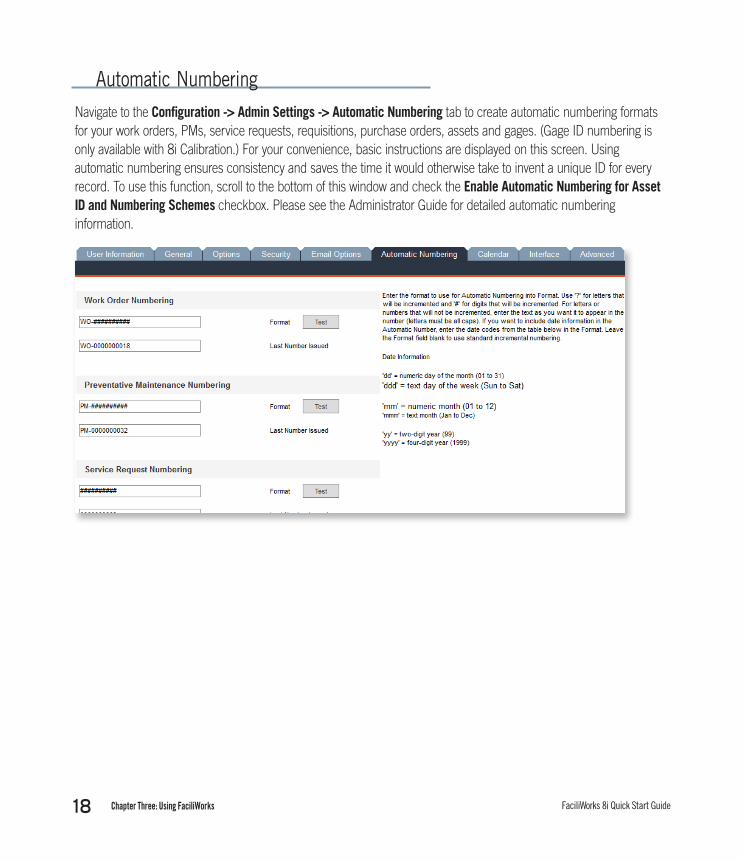
Automatic NumberingNavigate to the Configuration -> Admin Settings -> Automatic Numbering tab to create automatic numbering formats for your work orders, PMs, service requests, requisitions, purchase orders, assets and gages. (Gage ID numbering is only available with 8i Calibration.) For your convenience, basic instructions are displayed on this screen. Using automatic numbering ensures consistency and saves the time it would otherwise take to invent a unique ID for every record. To use this function, scroll to the bottom of this window and check the Enable Automatic Numbering for Asset ID and Numbering Schemes checkbox. Please see the Administrator Guide for detailed automatic numbering information.

Chapter Four: Data Entry 19FaciliWorks 8i Quick Start Guide
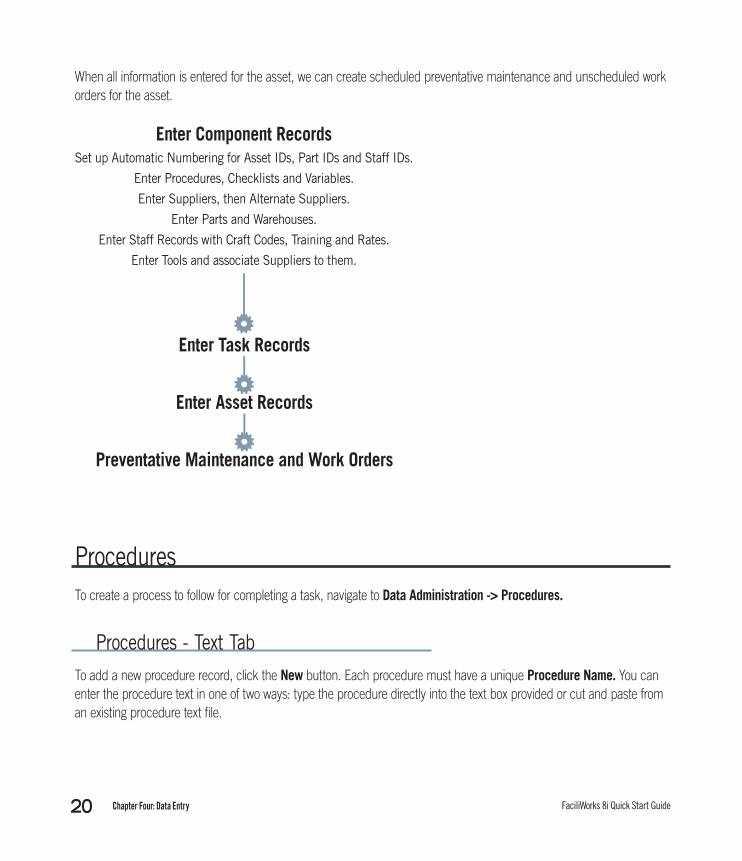
Chapter Four: Data EntryThe diagram below shows how records are arranged within FaciliWorks. Each asset may have one or more tasks that are performed on it for preventative maintenance; the task is comprised of a number of components needed to complete the task.
To help you quickly get started with FaciliWorks and to evaluate and use its major functions, this guide provides instructions for entering preventative maintenance information which includes asset and task information. To have the data available to create preventative maintenance and work orders easily and efficiently, it is best to follow a process. We start by entering all task component data as shown on the next page. Once the task components are entered, we can then associate the components to the task and the task can then be associated to the asset.
20 Chapter Four: Data Entry FaciliWorks 8i Quick Start Guide
When all information is entered for the asset, we can create scheduled preventative maintenance and unscheduled work orders for the asset.
ProceduresTo create a process to follow for completing a task, navigate to Data Administration -> Procedures.
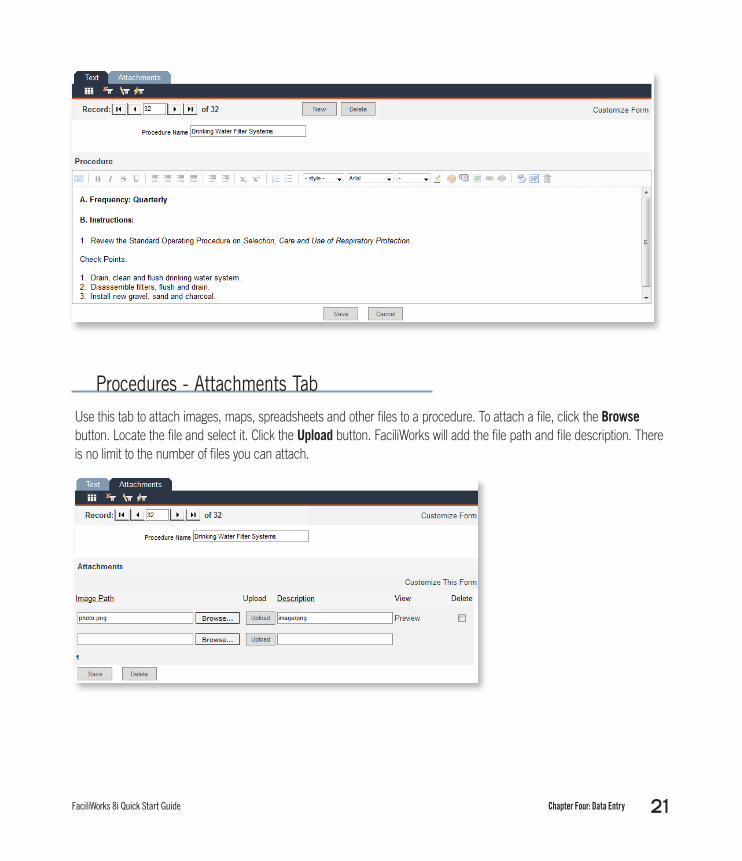
Procedures - Text TabTo add a new procedure record, click the New button. Each procedure must have a unique Procedure Name. You can enter the procedure text in one of two ways: type the procedure directly into the text box provided or cut and paste from an existing procedure text file.
Enter Task Records
Enter Asset Records
Preventative Maintenance and Work Orders
Enter Component RecordsSet up Automatic Numbering for Asset IDs, Part IDs and Staff IDs.
Enter Procedures, Checklists and Variables.
Enter Suppliers, then Alternate Suppliers.
Enter Parts and Warehouses.
Enter Staff Records with Craft Codes, Training and Rates.
Enter Tools and associate Suppliers to them.
Chapter Four: Data Entry 21FaciliWorks 8i Quick Start Guide
Procedures - Attachments TabUse this tab to attach images, maps, spreadsheets and other files to a procedure. To attach a file, click the Browse button. Locate the file and select it. Click the Upload button. FaciliWorks will add the file path and file description. There is no limit to the number of files you can attach.
22 Chapter Four: Data Entry FaciliWorks 8i Quick Start Guide
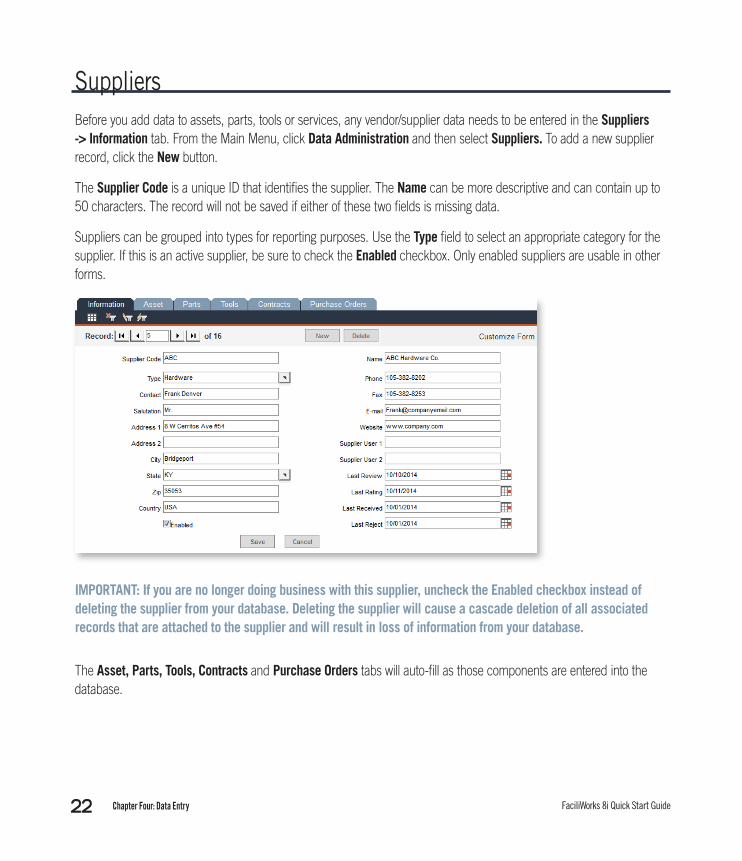
SuppliersBefore you add data to assets, parts, tools or services, any vendor/supplier data needs to be entered in the Suppliers -> Information tab. From the Main Menu, click Data Administration and then select Suppliers. To add a new supplier record, click the New button.
The Supplier Code is a unique ID that identifies the supplier. The Name can be more descriptive and can contain up to 50 characters. The record will not be saved if either of these two fields is missing data.
Suppliers can be grouped into types for reporting purposes. Use the Type field to select an appropriate category for the supplier. If this is an active supplier, be sure to check the Enabled checkbox. Only enabled suppliers are usable in other forms.
IMPORTANT: If you are no longer doing business with this supplier, uncheck the Enabled checkbox instead of deleting the supplier from your database. Deleting the supplier will cause a cascade deletion of all associated records that are attached to the supplier and will result in loss of information from your database.
The Asset, Parts, Tools, Contracts and Purchase Orders tabs will auto-fill as those components are entered into the database.
Chapter Four: Data Entry 23FaciliWorks 8i Quick Start Guide
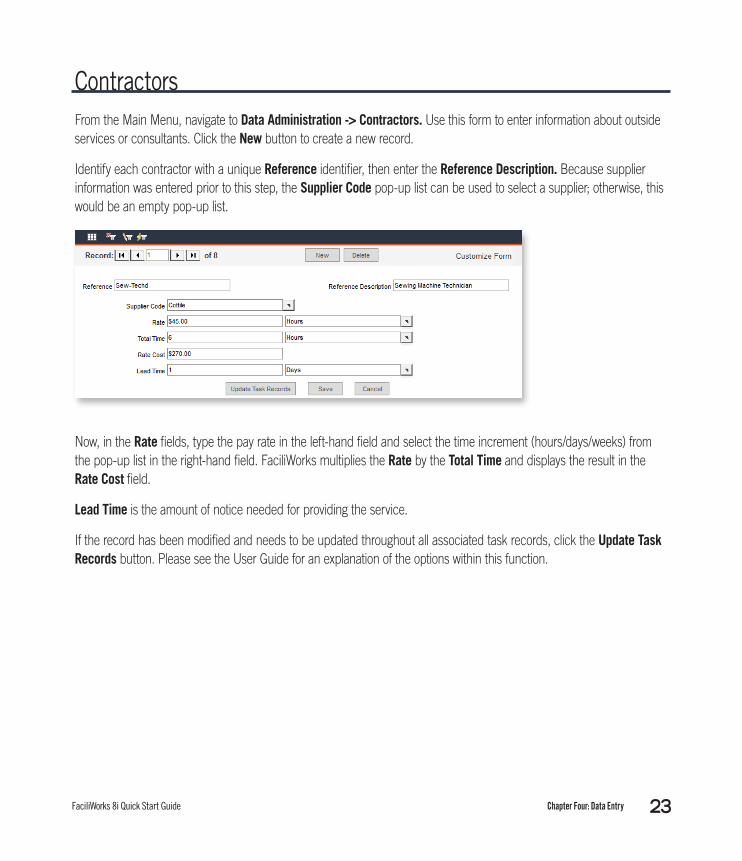
Contractors From the Main Menu, navigate to Data Administration -> Contractors. Use this form to enter information about outside services or consultants. Click the New button to create a new record.
Identify each contractor with a unique Reference identifier, then enter the Reference Description. Because supplier information was entered prior to this step, the Supplier Code pop-up list can be used to select a supplier; otherwise, this would be an empty pop-up list.
Now, in the Rate fields, type the pay rate in the left-hand field and select the time increment (hours/days/weeks) from the pop-up list in the right-hand field. FaciliWorks multiplies the Rate by the Total Time and displays the result in the Rate Cost field.
Lead Time is the amount of notice needed for providing the service.
If the record has been modified and needs to be updated throughout all associated task records, click the Update Task Records button. Please see the User Guide for an explanation of the options within this function.
24 Chapter Four: Data Entry FaciliWorks 8i Quick Start Guide
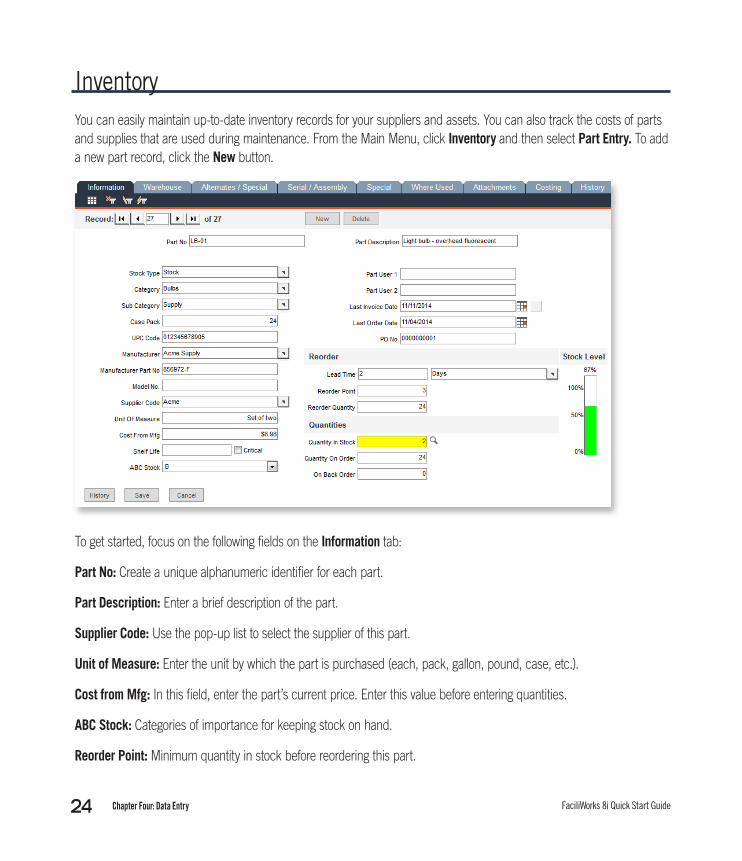
InventoryYou can easily maintain up-to-date inventory records for your suppliers and assets. You can also track the costs of parts and supplies that are used during maintenance. From the Main Menu, click Inventory and then select Part Entry. To add a new part record, click the New button.
To get started, focus on the following fields on the Information tab:
Part No: Create a unique alphanumeric identifier for each part.
Part Description: Enter a brief description of the part.
Supplier Code: Use the pop-up list to select the supplier of this part.
Unit of Measure: Enter the unit by which the part is purchased (each, pack, gallon, pound, case, etc.).
Cost from Mfg: In this field, enter the part’s current price. Enter this value before entering quantities.
ABC Stock: Categories of importance for keeping stock on hand.
Reorder Point: Minimum quantity in stock before reordering this part.

Chapter Four: Data Entry 25FaciliWorks 8i Quick Start Guide
Quantity In Stock: Enter the current quantity in this field. FaciliWorks will automatically update this quantity based on work orders and purchase orders. Please see the User Guide for instructions on changing this quantity.
Quantity On Order: This field shows the quantity currently on order based on purchase order records.
On Back Order: This field shows the current back-ordered quantity based on purchase order records.
PersonnelNavigate to the Personnel -> Staff Entry -> Information tab. Detailed employee records for your maintenance staff are entered and viewed here including training information, assigned work orders and tools issued. Fields that store sensitive information such as SS No. can be hidden from certain user groups. Generally, staff records are entered and maintained by the system administrator; please see the FaciliWorks Administrator Guide for details.
IMPORTANT: Never delete employee records; instead, uncheck the Active checkbox to make the employee inactive. This preserves the integrity of your FaciliWorks database.
To add a new employee record, click the New button.
Staff ID: Create a unique alphanumeric identifier.
26 Chapter Four: Data Entry FaciliWorks 8i Quick Start Guide
Staff Name: Enter the employee’s full name.
Active: If this checkbox is not checked, the employee will not appear on reports or in pop-up lists.
Craft Code: Use this field to categorize workers by profession. A description, code or number classification can be used.
Salary: Enter the employee’s hourly rate. FaciliWorks uses this rate to calculate the cost of maintenance based on actual hours worked.
Seniority: Enter the work status of the employee or the date that determines seniority.
Skill Level: Use an internal or external classification system to assign a skill level to each staff member.
Staff User 1 & 2: These fields are for any additional information.
The fields within the Training tab are used to keep track of the employee’s current and continuing education.
The Work Orders and Issued Tools tabs are auto-filled as the employee is assigned work and issued tools.
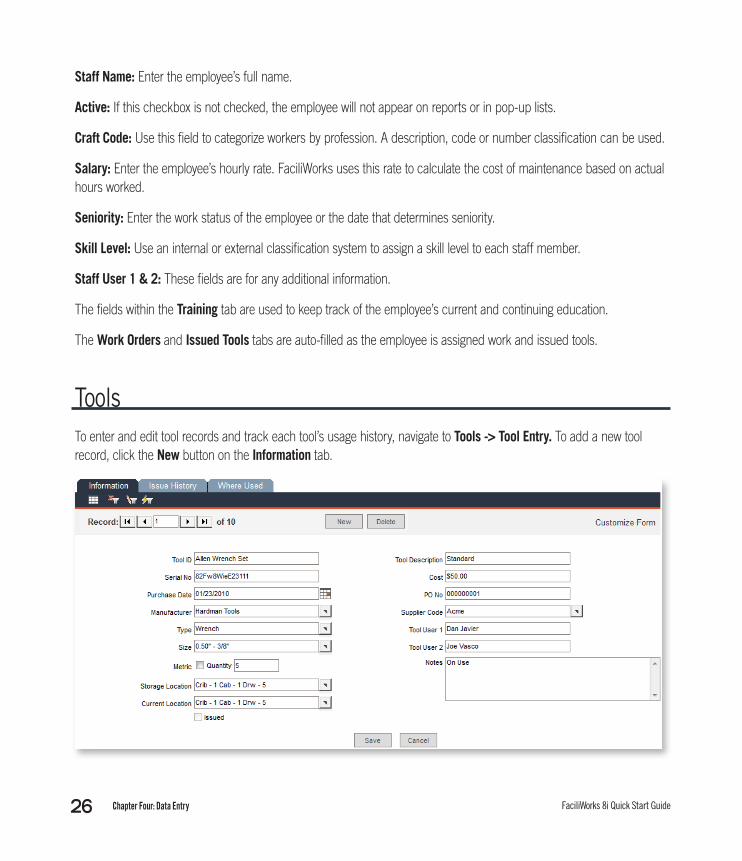
ToolsTo enter and edit tool records and track each tool’s usage history, navigate to Tools -> Tool Entry. To add a new tool record, click the New button on the Information tab.
Chapter Four: Data Entry 27FaciliWorks 8i Quick Start Guide
For now, enter information into the following fields to quickly create your new tool record:
Tool ID: Enter a unique alphanumeric ID code for each tool.
Tool Description: Enter a brief description of the tool.
Type: Because you can use this field to filter your tool records, enter tool types consistently. When you enter a new tool type, you can quickly add it to the pop-up list for easy selection in the future.
Quantity: If this tool is part of a set, use this field to enter the number of pieces in the set.
Storage Location: Enter the location at which the tool is stored when it is not in use.
Current Location: When you first enter the tool, enter its storage location in this field. FaciliWorks automatically updates this field when the tool is issued and returned.
Issued: This checkbox is automatically checked when the tool is issued and unchecked when the tool is returned.
The Issue History tab is auto-filled as tools are issued to employees for use on a task. Every tool issuance and return is displayed here.
In the Where Used tab, you can list each asset that requires the tool. Select as many assets as needed using the pop-up list in the Asset ID field; the additional information will automatically display in the remaining fields. You can also automatically take tool records from completed work orders and add them to this list by clicking the Fill from Maintenance Jobs button.
Variable DataA variable is a condition that may affect the maintenance or safe operation of an asset. As a result, you must check this condition during maintenance. Measured variables such as temperature or pressure normally have to fall within a minimum and maximum range. From the Main Menu, click Data Administration and then select Variable Data. To add a new variable record, click the New button.
Assets and their possible variable(s):
Brake Drum Degree of flatness Motor Oil temperature and oil pressure Tires Depth of tread Electrical Amps Gages Calibration tolerances

28 Chapter Four: Data Entry FaciliWorks 8i Quick Start Guide
Variable: Enter a unique name of the variable being tested.
Variable Description: Enter a brief description of the variable.
Minimum/Maximum: Enter the variable’s range limit. Use the pop-up list to select the unit of measure.
Format: Use the pop-up list to select the number of decimal places for accuracy.
Notes: Enter any pertinent information, such as instructions for testing the variable.
Chapter Four: Data Entry 29FaciliWorks 8i Quick Start Guide
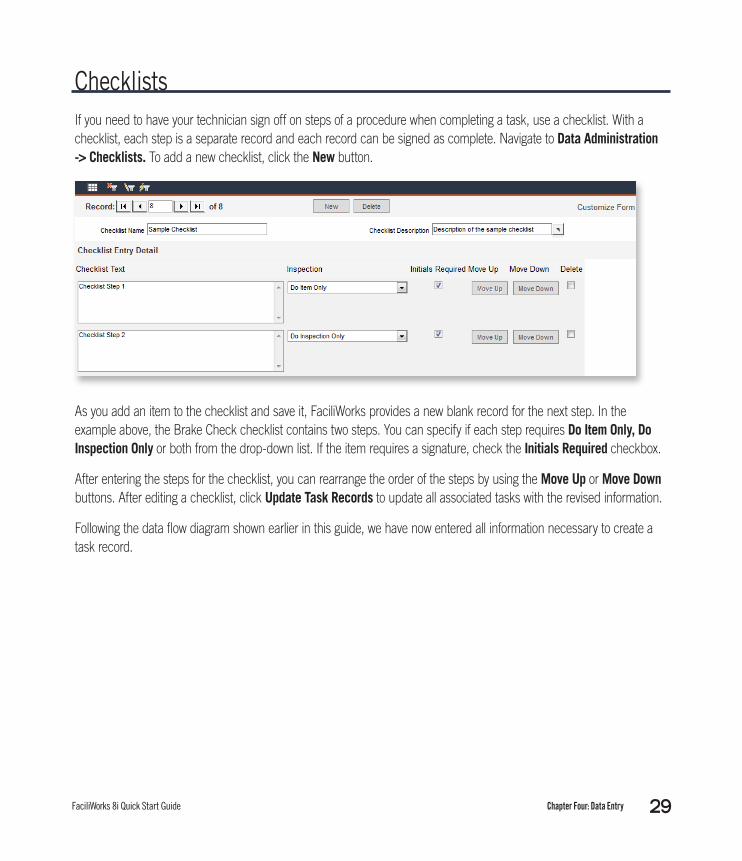
ChecklistsIf you need to have your technician sign off on steps of a procedure when completing a task, use a checklist. With a checklist, each step is a separate record and each record can be signed as complete. Navigate to Data Administration -> Checklists. To add a new checklist, click the New button.
As you add an item to the checklist and save it, FaciliWorks provides a new blank record for the next step. In the example above, the Brake Check checklist contains two steps. You can specify if each step requires Do Item Only, Do Inspection Only or both from the drop-down list. If the item requires a signature, check the Initials Required checkbox.
After entering the steps for the checklist, you can rearrange the order of the steps by using the Move Up or Move Down buttons. After editing a checklist, click Update Task Records to update all associated tasks with the revised information.
Following the data flow diagram shown earlier in this guide, we have now entered all information necessary to create a task record.
30 Chapter Four: Data Entry FaciliWorks 8i Quick Start Guide
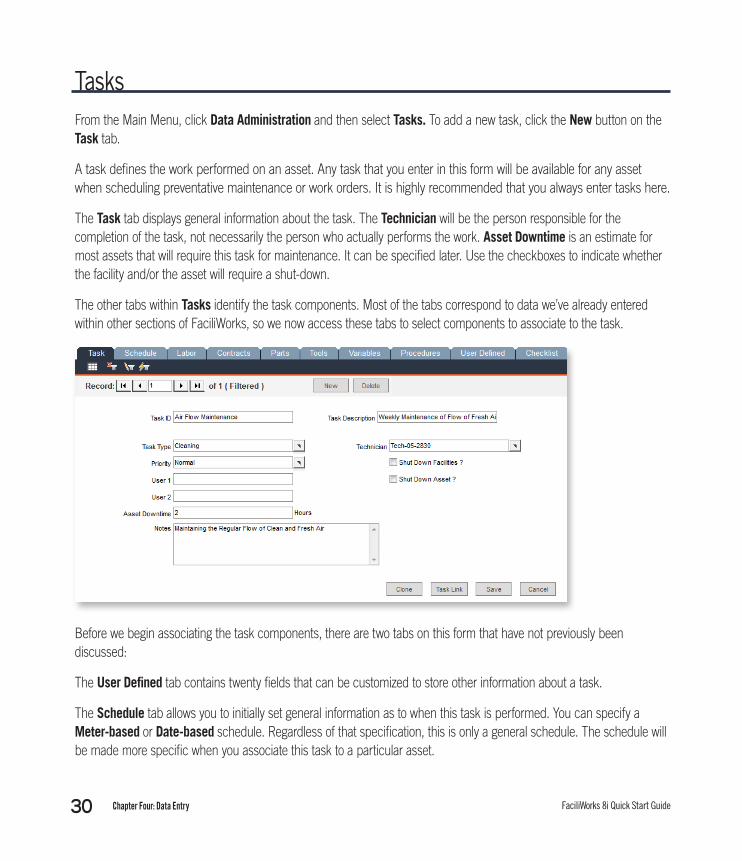
TasksFrom the Main Menu, click Data Administration and then select Tasks. To add a new task, click the New button on the Task tab.
A task defines the work performed on an asset. Any task that you enter in this form will be available for any asset when scheduling preventative maintenance or work orders. It is highly recommended that you always enter tasks here.
The Task tab displays general information about the task. The Technician will be the person responsible for the completion of the task, not necessarily the person who actually performs the work. Asset Downtime is an estimate for most assets that will require this task for maintenance. It can be specified later. Use the checkboxes to indicate whether the facility and/or the asset will require a shut-down.
The other tabs within Tasks identify the task components. Most of the tabs correspond to data we’ve already entered within other sections of FaciliWorks, so we now access these tabs to select components to associate to the task.
Before we begin associating the task components, there are two tabs on this form that have not previously been discussed:
The User Defined tab contains twenty fields that can be customized to store other information about a task.
The Schedule tab allows you to initially set general information as to when this task is performed. You can specify a Meter-based or Date-based schedule. Regardless of that specification, this is only a general schedule. The schedule will be made more specific when you associate this task to a particular asset.
Chapter Four: Data Entry 31FaciliWorks 8i Quick Start Guide
For an oil change task, the schedule can be set to every 3000 miles or every 3 months. If both meter-based and date-based schedules are defined, FaciliWorks will automatically schedule the task based on the method that comes up first. Further, the date-based method allows you to schedule the task on a defined season.
For example, if an oil change is to be performed on a garden tractor, the season can be defined for May through October. The task would not be automatically scheduled for any months outside of this range.
Both methods also include a schedule type of either Fixed or Floating. Suppose that on a one-month schedule, the task is due to be performed on 3/15/15. Say that the task was not completed until 3/30/15. On a fixed schedule, FaciliWorks will calculate the next due date one month from the original schedule date. The floating schedule will show one month from last date performed, allowing more flexibility. If you are following OSHA or FDA regulations, be sure to use the fixed schedule method.
Last Done 9/15/15 Due Date 10/15/15 Actually Done 10/30/15
Next Due Date on a Fixed schedule: 11/15/15 Next Due Date on a Floating schedule: 11/30/15
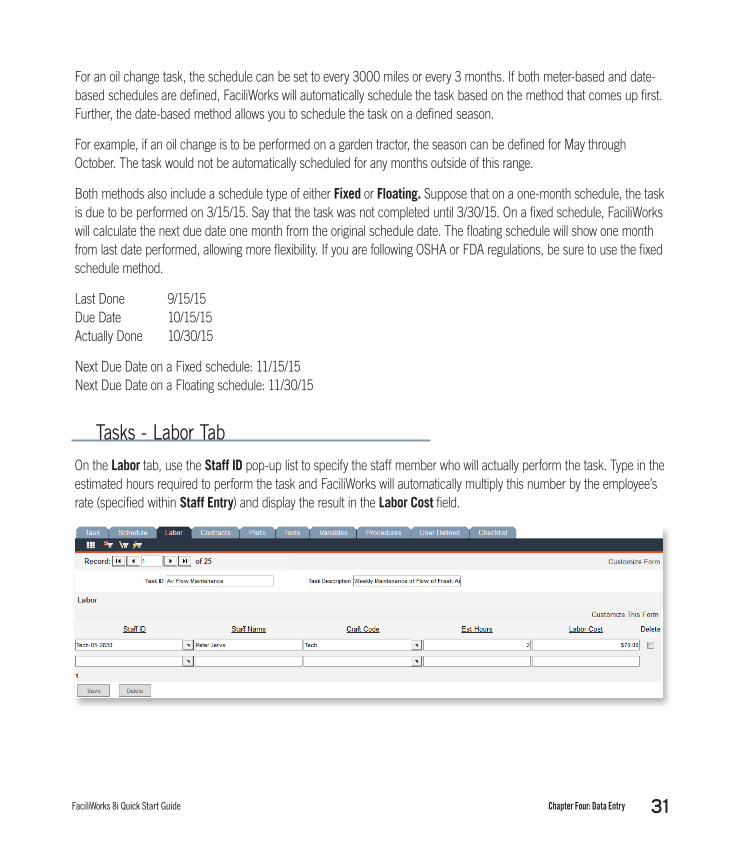
Tasks - Labor TabOn the Labor tab, use the Staff ID pop-up list to specify the staff member who will actually perform the task. Type in the estimated hours required to perform the task and FaciliWorks will automatically multiply this number by the employee’s rate (specified within Staff Entry) and display the result in the Labor Cost field.
32 Chapter Four: Data Entry FaciliWorks 8i Quick Start Guide
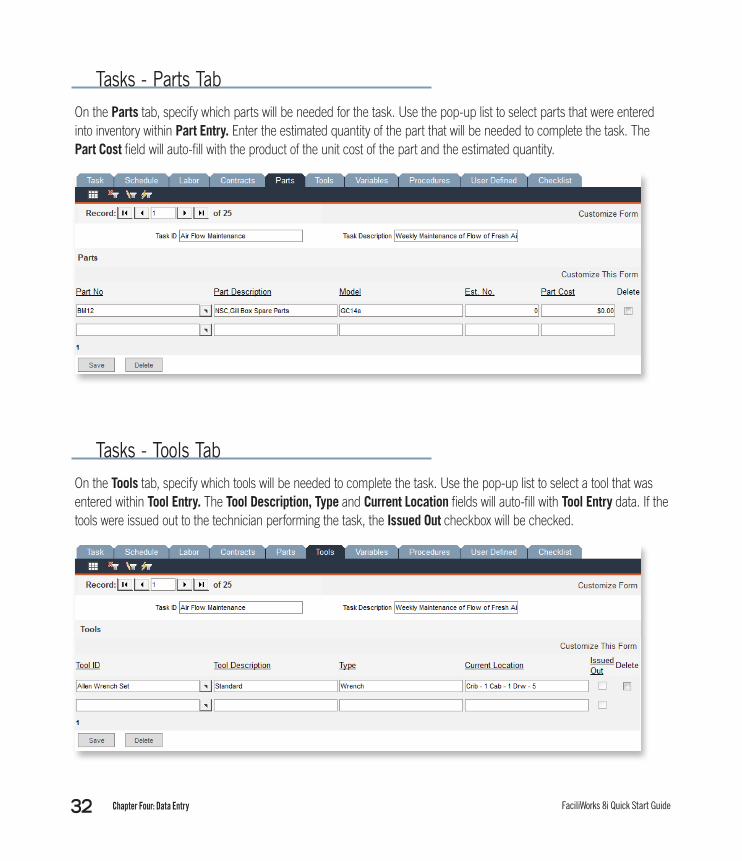
Tasks - Parts TabOn the Parts tab, specify which parts will be needed for the task. Use the pop-up list to select parts that were entered into inventory within Part Entry. Enter the estimated quantity of the part that will be needed to complete the task. The Part Cost field will auto-fill with the product of the unit cost of the part and the estimated quantity.
Tasks - Tools TabOn the Tools tab, specify which tools will be needed to complete the task. Use the pop-up list to select a tool that was entered within Tool Entry. The Tool Description, Type and Current Location fields will auto-fill with Tool Entry data. If the tools were issued out to the technician performing the task, the Issued Out checkbox will be checked.
Chapter Four: Data Entry 33FaciliWorks 8i Quick Start Guide
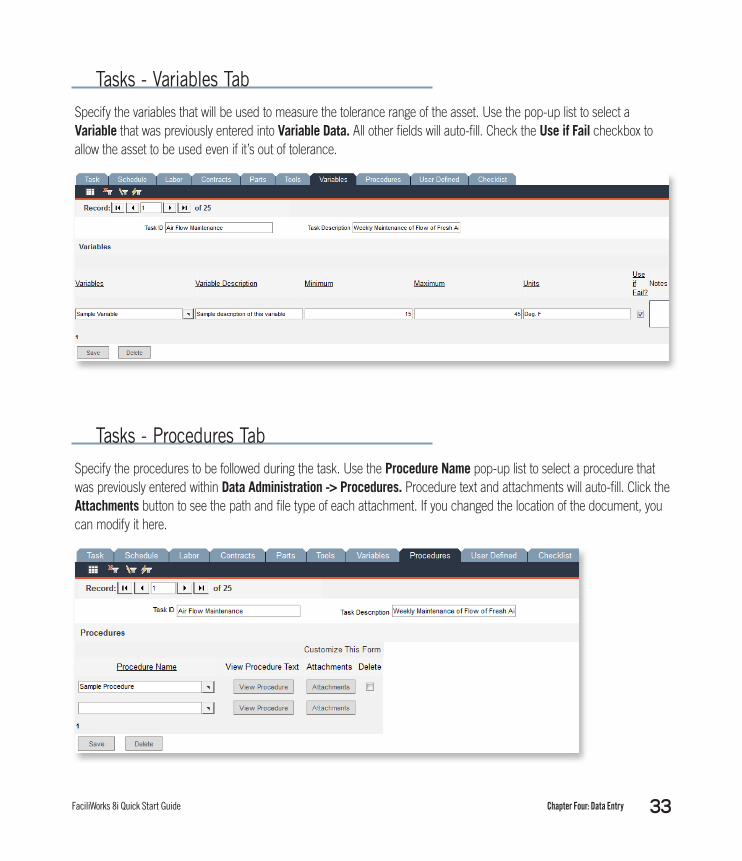
Tasks - Variables TabSpecify the variables that will be used to measure the tolerance range of the asset. Use the pop-up list to select a Variable that was previously entered into Variable Data. All other fields will auto-fill. Check the Use if Fail checkbox to allow the asset to be used even if it’s out of tolerance.
Tasks - Procedures TabSpecify the procedures to be followed during the task. Use the Procedure Name pop-up list to select a procedure that was previously entered within Data Administration -> Procedures. Procedure text and attachments will auto-fill. Click the Attachments button to see the path and file type of each attachment. If you changed the location of the document, you can modify it here.
34 Chapter Four: Data Entry FaciliWorks 8i Quick Start Guide
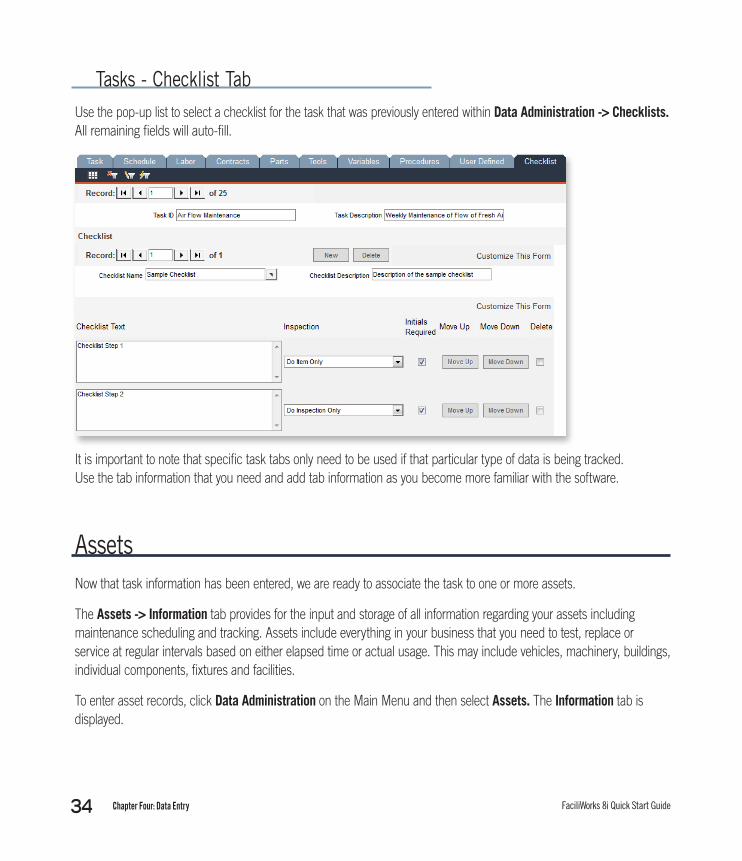
Tasks - Checklist TabUse the pop-up list to select a checklist for the task that was previously entered within Data Administration -> Checklists. All remaining fields will auto-fill.
It is important to note that specific task tabs only need to be used if that particular type of data is being tracked. Use the tab information that you need and add tab information as you become more familiar with the software.
AssetsNow that task information has been entered, we are ready to associate the task to one or more assets.
The Assets -> Information tab provides for the input and storage of all information regarding your assets including maintenance scheduling and tracking. Assets include everything in your business that you need to test, replace or service at regular intervals based on either elapsed time or actual usage. This may include vehicles, machinery, buildings, individual components, fixtures and facilities.
To enter asset records, click Data Administration on the Main Menu and then select Assets. The Information tab is displayed.
Chapter Four: Data Entry 35FaciliWorks 8i Quick Start Guide
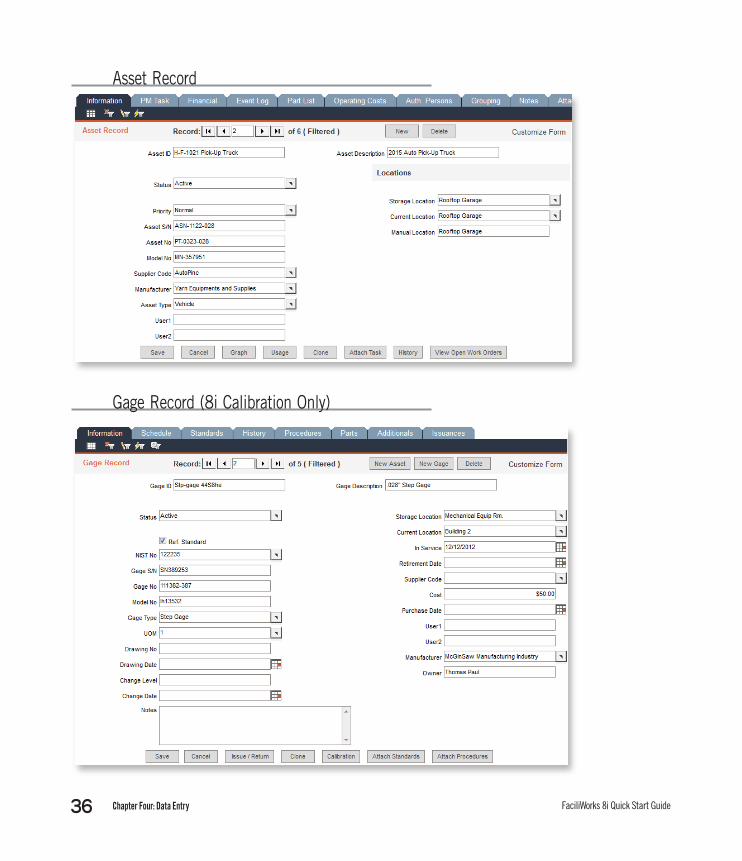
NOTE: If you’re using FaciliWorks 8i Calibration, this form is used to enter gage records as well as asset records. To add an asset record, click the New Asset button; to add a gage record, click the New Gage button. For the sake of getting started quickly, we will focus on asset records. For full information about entering gage records and other calibration information, please see the User Guide.
To get started, we will focus on the Information and Task List tabs.
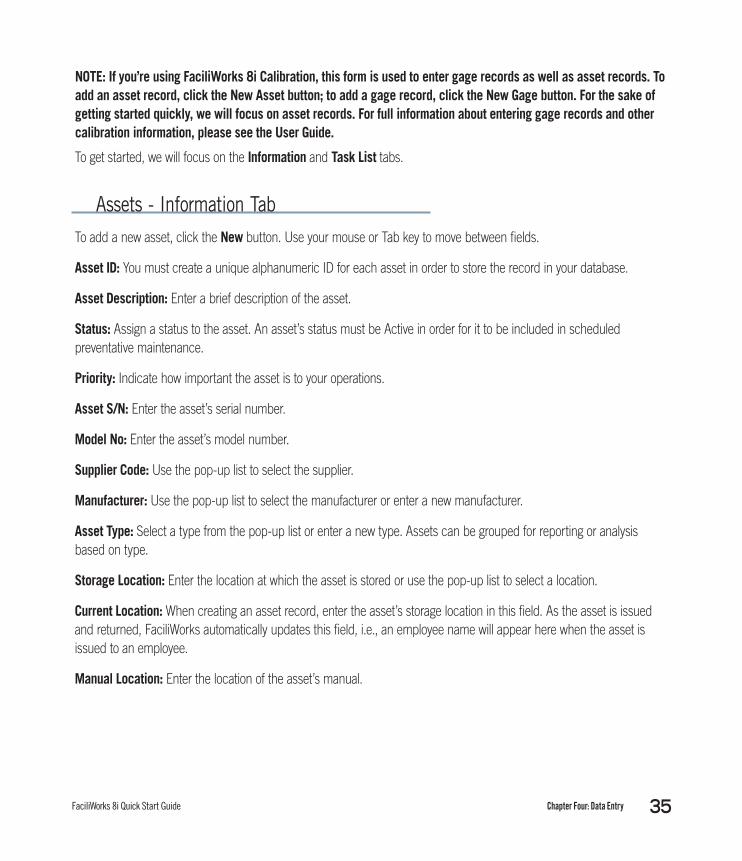
Assets - Information TabTo add a new asset, click the New button. Use your mouse or Tab key to move between fields.
Asset ID: You must create a unique alphanumeric ID for each asset in order to store the record in your database.
Asset Description: Enter a brief description of the asset.
Status: Assign a status to the asset. An asset’s status must be Active in order for it to be included in scheduled preventative maintenance.
Priority: Indicate how important the asset is to your operations.
Asset S/N: Enter the asset’s serial number.
Model No: Enter the asset’s model number.
Supplier Code: Use the pop-up list to select the supplier.
Manufacturer: Use the pop-up list to select the manufacturer or enter a new manufacturer.
Asset Type: Select a type from the pop-up list or enter a new type. Assets can be grouped for reporting or analysis based on type.
Storage Location: Enter the location at which the asset is stored or use the pop-up list to select a location.
Current Location: When creating an asset record, enter the asset’s storage location in this field. As the asset is issued and returned, FaciliWorks automatically updates this field, i.e., an employee name will appear here when the asset is issued to an employee.
Manual Location: Enter the location of the asset’s manual.
36 Chapter Four: Data Entry FaciliWorks 8i Quick Start Guide
Asset Record
Gage Record (8i Calibration Only)
Chapter Four: Data Entry 37FaciliWorks 8i Quick Start Guide
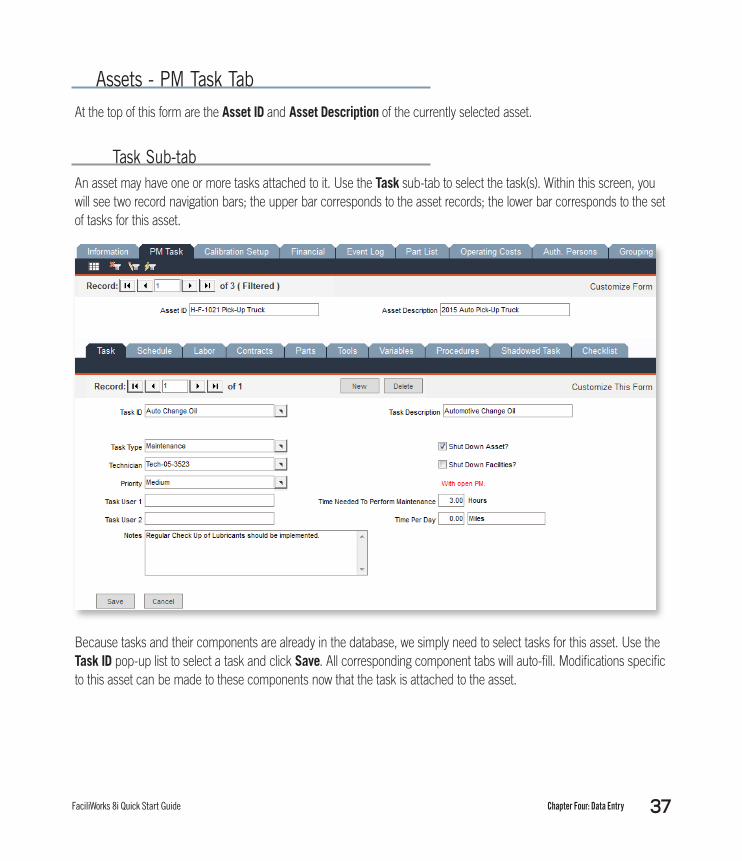
Assets - PM Task TabAt the top of this form are the Asset ID and Asset Description of the currently selected asset.
Task Sub-tabAn asset may have one or more tasks attached to it. Use the Task sub-tab to select the task(s). Within this screen, you will see two record navigation bars; the upper bar corresponds to the asset records; the lower bar corresponds to the set of tasks for this asset.
Because tasks and their components are already in the database, we simply need to select tasks for this asset. Use the Task ID pop-up list to select a task and click Save. All corresponding component tabs will auto-fill. Modifications specific to this asset can be made to these components now that the task is attached to the asset.
38 Chapter Four: Data Entry FaciliWorks 8i Quick Start Guide
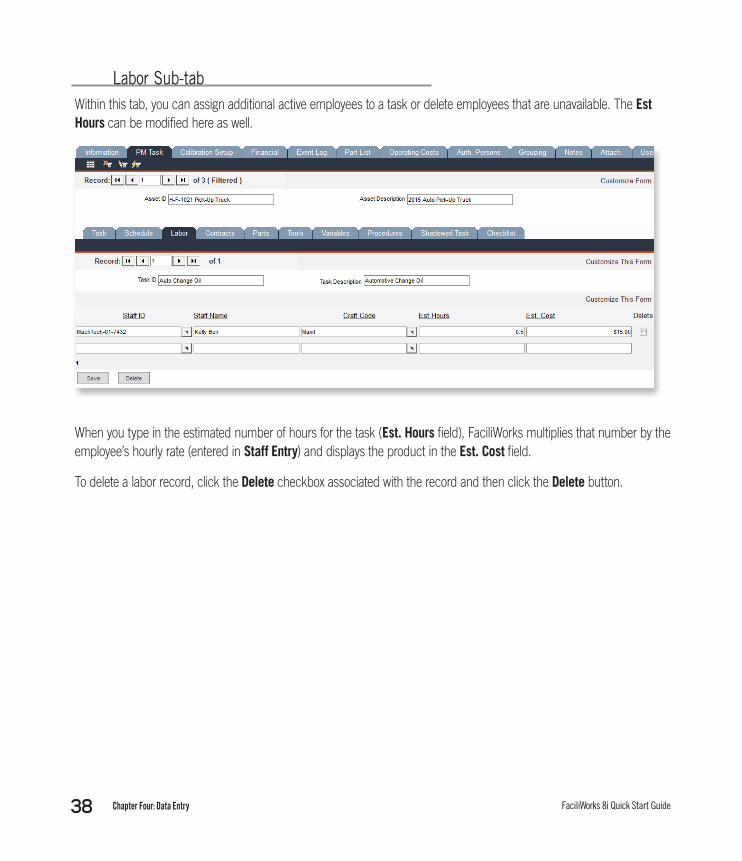
Labor Sub-tabWithin this tab, you can assign additional active employees to a task or delete employees that are unavailable. The Est Hours can be modified here as well.
When you type in the estimated number of hours for the task (Est. Hours field), FaciliWorks multiplies that number by the employee’s hourly rate (entered in Staff Entry) and displays the product in the Est. Cost field.
To delete a labor record, click the Delete checkbox associated with the record and then click the Delete button.
Chapter Four: Data Entry 39FaciliWorks 8i Quick Start Guide
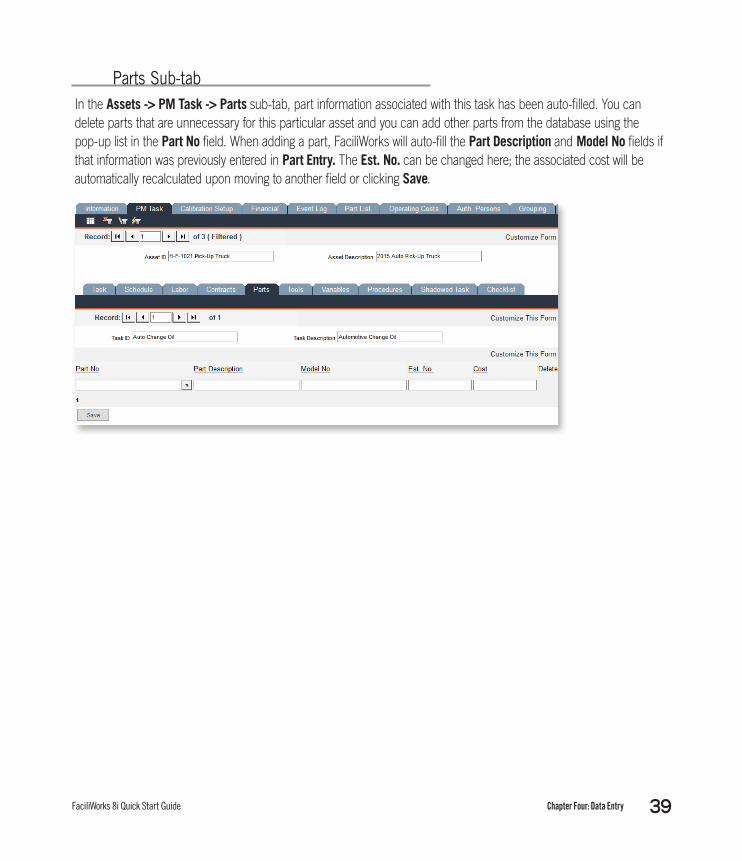
Parts Sub-tabIn the Assets -> PM Task -> Parts sub-tab, part information associated with this task has been auto-filled. You can delete parts that are unnecessary for this particular asset and you can add other parts from the database using the pop-up list in the Part No field. When adding a part, FaciliWorks will auto-fill the Part Description and Model No fields if that information was previously entered in Part Entry. The Est. No. can be changed here; the associated cost will be automatically recalculated upon moving to another field or clicking Save.
40 Chapter Four: Data Entry FaciliWorks 8i Quick Start Guide
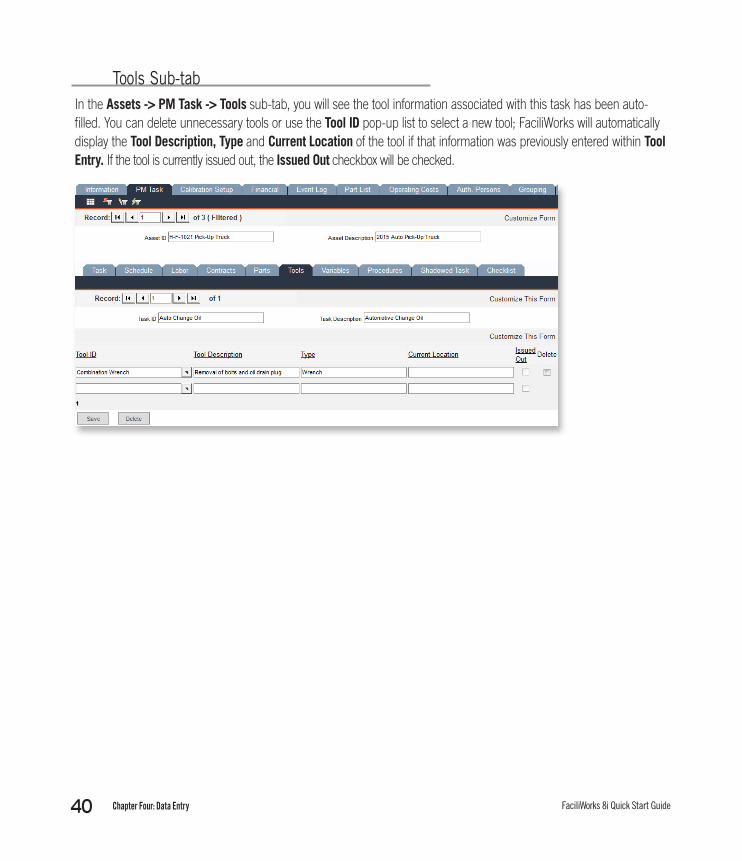
Tools Sub-tabIn the Assets -> PM Task -> Tools sub-tab, you will see the tool information associated with this task has been auto-filled. You can delete unnecessary tools or use the Tool ID pop-up list to select a new tool; FaciliWorks will automatically display the Tool Description, Type and Current Location of the tool if that information was previously entered within Tool Entry. If the tool is currently issued out, the Issued Out checkbox will be checked.
Chapter Four: Data Entry 41FaciliWorks 8i Quick Start Guide
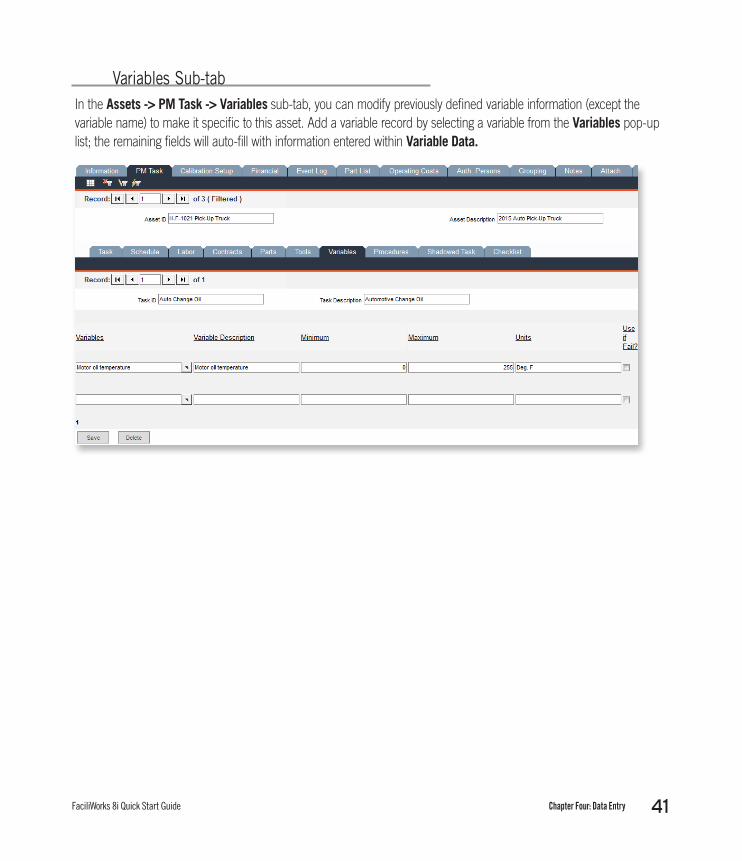
Variables Sub-tabIn the Assets -> PM Task -> Variables sub-tab, you can modify previously defined variable information (except the variable name) to make it specific to this asset. Add a variable record by selecting a variable from the Variables pop-up list; the remaining fields will auto-fill with information entered within Variable Data.
42 Chapter Four: Data Entry FaciliWorks 8i Quick Start Guide
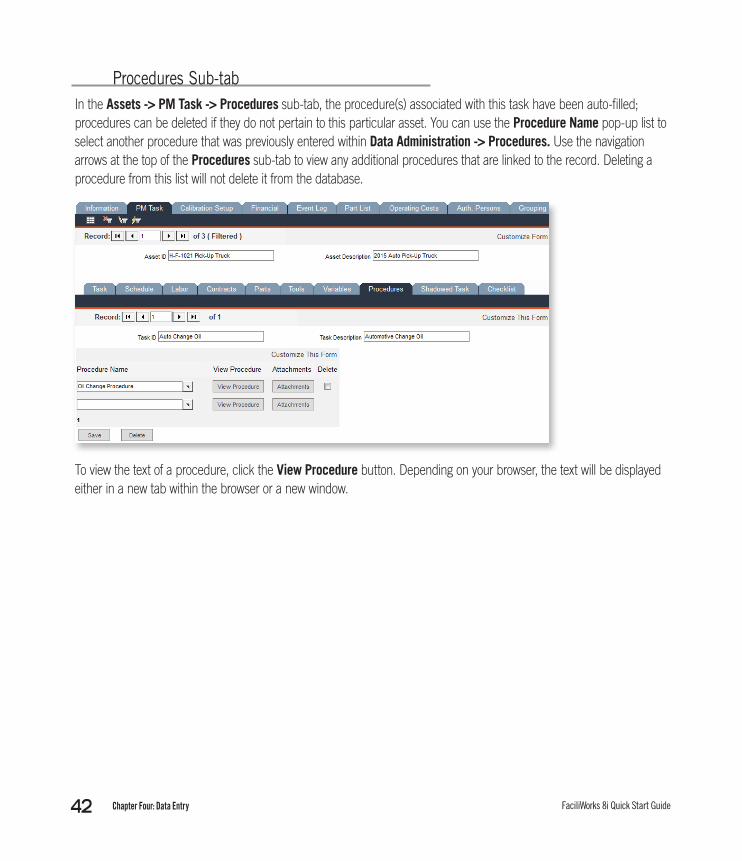
Procedures Sub-tabIn the Assets -> PM Task -> Procedures sub-tab, the procedure(s) associated with this task have been auto-filled; procedures can be deleted if they do not pertain to this particular asset. You can use the Procedure Name pop-up list to select another procedure that was previously entered within Data Administration -> Procedures. Use the navigation arrows at the top of the Procedures sub-tab to view any additional procedures that are linked to the record. Deleting a procedure from this list will not delete it from the database.
To view the text of a procedure, click the View Procedure button. Depending on your browser, the text will be displayed either in a new tab within the browser or a new window.

Chapter Four: Data Entry 43FaciliWorks 8i Quick Start Guide
Schedule Sub-tabEnter schedule information for the task as it pertains to this asset.
Meter-based Schedule
If the schedule for this maintenance is based on usage or meter readings, enter the number of units in the left-hand field and select the type of units from the pop-up list in the right-hand field. Available units include minutes, hours, days, cycles, miles and kilometers.
Rollover Meter Reading: In this field, enter the meter value at which the asset’s meter will roll over to zero.
Total Time/On Current Meter columns: Enter the total meter value for Meter at Last Maintenance, Current Meter and Next Meter Due in the Total Time column as described below. FaciliWorks will enter values in the On Current Meter column based on the value entered in Rollover Meter Reading.
Meter at Last Maintenance: Enter the meter reading of the asset at the time maintenance was last performed. This field is automatically updated when a work order for the task is completed.
Current Meter: Enter the asset’s current meter value. If a work order for this asset shows a value greater than this value,
44 Chapter Four: Data Entry FaciliWorks 8i Quick Start Guide
the greater value will populate this field.
Click the Calculate Next Meter Due button and FaciliWorks will perform the calculation. You can override the Next Time Due value by typing a new value into this field. This field will be recalculated when you complete a work order for this asset task.
Date-based Schedule
If you perform a task according to a calendar schedule, enter the interval number in the left-hand field and select the unit of time from the pop-up list in the right-hand field. Among the available units are EOM (End of Month) and DOM (Date of Month).
EOM is similar to months, but it advances the next due date to the last valid day of the month.
DOM is similar to months, but it advances the next due date to the same date each month.
Last Maintenance Date: Enter the last date on which this task was performed for this asset. After the task has been completed, FaciliWorks automatically updates this field with the most recent completion date.
Click the Calculate Next Date Due button and FaciliWorks will automatically calculate the next date on which this task should be performed. This value can be changed manually.
Season Start and Last Mo. of Season: If the current task is a seasonal task, meaning that it is not performed year-round, such as mowing a lawn, select the Season Start month and the Last Mo. of Season from the corresponding drop-down lists. The calculated Next Date Due for that asset will fall between those months, inclusively. For year-round maintenance, leave the Season Start and Last Mo. of Season fields blank.
Upon completing the information in the Schedule sub-tab and clicking Save, the Next Time Due (meter) and/or Next Date Due fields are calculated and FaciliWorks sends a notification that a preventative maintenance order (PM) is to be created for this asset task; this schedule continues as long as the asset’s Status is Active.
Adding a Second TaskTo attach another task to the same asset, return to the PM Task -> Task sub-tab and click the New button. Use the Task ID pop-up list to select a task. All component sub-tabs will auto-fill with information previously entered within Data Administration -> Tasks.
Modify information in each component sub-tab as necessary. When you complete the Schedule sub-tab, the process will be set for scheduled preventative maintenance.

Chapter Five: Preventative Maintenance 45FaciliWorks 8i Quick Start Guide
Chapter Five: Preventative MaintenanceOnce you have developed an asset-task record and set a schedule for it, FaciliWorks will generate a notification that a PM can be created. Depending on your system settings, you can retain control of PM creation or you can set up the system to automatically create them based on elapsed time.
Manual Create PMsIf an asset is due for maintenance based on its meter-based or date-based schedule, the asset will be listed in Preventative Maintenance -> Manual Create PMs. However, only assets marked as Active in the Status field will be included in this list. This Status field is found on the Assets -> Information tab:
46 Chapter Five: Preventative Maintenance FaciliWorks 8i Quick Start Guide
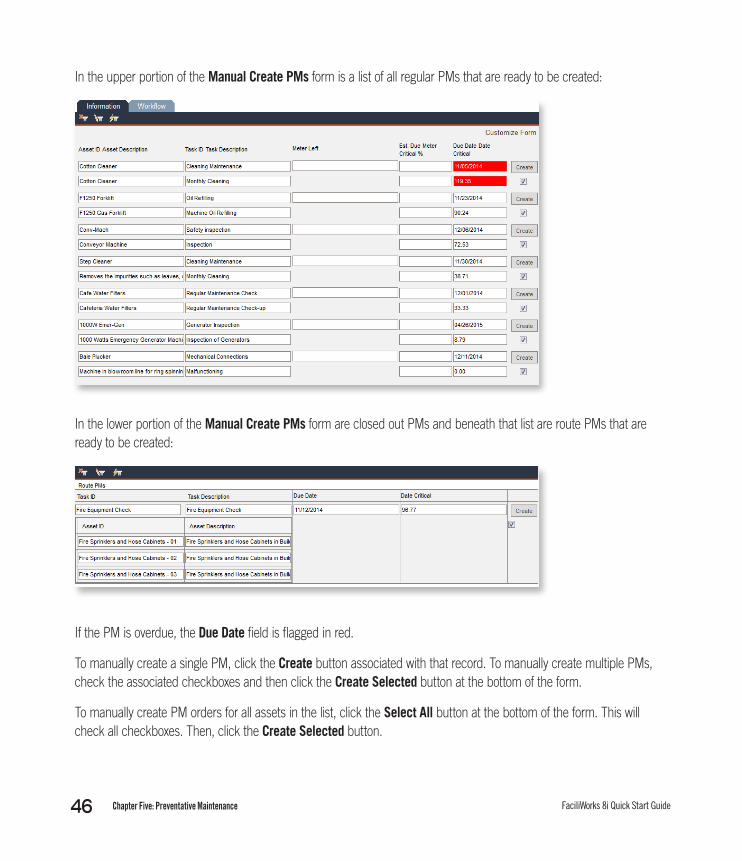
In the upper portion of the Manual Create PMs form is a list of all regular PMs that are ready to be created:
In the lower portion of the Manual Create PMs form are closed out PMs and beneath that list are route PMs that are ready to be created:
If the PM is overdue, the Due Date field is flagged in red.
To manually create a single PM, click the Create button associated with that record. To manually create multiple PMs, check the associated checkboxes and then click the Create Selected button at the bottom of the form.
To manually create PM orders for all assets in the list, click the Select All button at the bottom of the form. This will check all checkboxes. Then, click the Create Selected button.
Chapter Five: Preventative Maintenance 47FaciliWorks 8i Quick Start Guide
Open PMsNavigate to the Assets -> PM Task -> Task sub-tab. Beneath the Shut Down Facilities checkbox, you’ll see either With open PM or Without open PM in red type. If the record shows Without open PM, the PM will appear in the Manual Create PMs list because the PM has not yet been created and hence, is not open.
From the Manual Create PMs list, click the Create button and the PM will then appear in Edit PMs and the record will now display With open PM.
Edit PMsOnce a PM has been created, navigate to Preventative Maintenance -> Edit PMs to modify, delete or add information to the component sub-tabs.
Completing a PMWhen the work for a PM order has been completed, scroll down to the Completion pane on the Edit PMs -> Information tab and check the Completed Notice checkbox.
If a checklist has not been properly addressed, FaciliWorks will prompt you to complete it.
If any information is missing from the component tabs, FaciliWorks will display a message stating so and give you the opportunity to return to the record to enter those values.
If the Maintenance Done Date is blank, FaciliWorks will alert you, asking if you’d like to fill that field with today’s date; otherwise, you can return to the record to enter a different date.
For assets with meter-based schedules, enter the appropriate meter values in the Total Time and On Current Meter fields.
The Completed checkbox will now be checked and the Maintenance Done Date is filled in. The Progress Name is also updated to indicate that the work order has been completed. Be sure to click Save before exiting this form.
If the Electronic Signature feature is enabled, you’ll be prompted to go to the Signature tab to sign off on the work.
48 Chapter Five: Preventative Maintenance FaciliWorks 8i Quick Start Guide
Closing out a PMIf the work for a PM order has not been completed, but the PM record must be bypassed to keep maintenance on schedule, then the PM must be closed out. To allow this as an option, navigate to the Configuration -> Admin Settings -> Options tab and in the Maintenance Jobs section, check the Allow Closing out of Preventative Maintenance Jobs checkbox. (This setting can only be modified by a user with administrator rights.) Please see the Administrator Guide for further details.
The Closed Out PM checkbox will now be available within the Edit PMs -> Information tab (whereas it would otherwise be visible, yet grayed out and uneditable).
If the PM must be closed out, check the Closed Out PM checkbox (on the Edit PMs -> Information tab) and the field beneath it will auto-fill with the current date.
Chapter Six: Work Orders 49FaciliWorks 8i Quick Start Guide
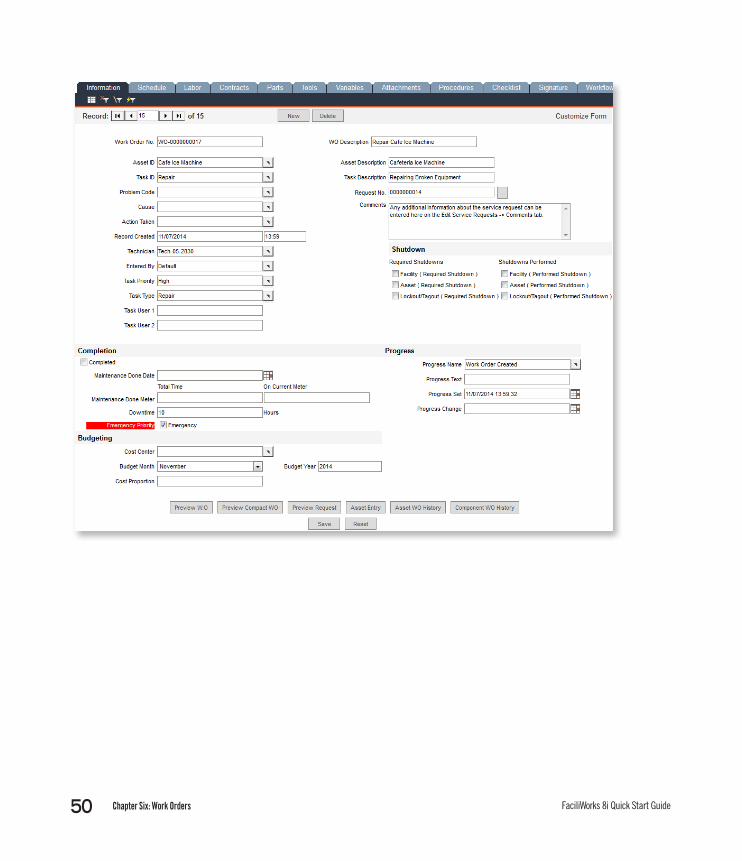
Chapter Six: Work OrdersWork Order ManagerIf a work order was created from a service request or created on the fly by a member of the maintenance staff, it will be available within Work Orders -> Work Order Manager and will include all previously entered information that applies. Access each component tab to complete the work order.
Creating a Work OrderTo create a work order from scratch, navigate to the Work Orders -> Work Order Manager -> Information tab and click New. Each tab within Work Order Manager displays the same information as the task component tabs. Access each component tab to enter information. It is highly recommended that both Asset IDs and Task IDs are used for accurate recording of unscheduled maintenance activities.
The Schedule tab will automatically calculate the Next Date Due field as one week after the work order’s Occurrence date. This date can be altered.
Once the information is complete, click the Preview WO button on the Information tab. From the preview screen, the work order can be printed or exported. When you are ready to complete the work order, click the Completed checkbox.
If a checklist has not been properly addressed, FaciliWorks will prompt you to complete it.
If any information is missing from the component tabs, FaciliWorks will display a message stating so and give you the opportunity to return to the record to enter those values.
If the Maintenance Done Date is blank, FaciliWorks will alert you, asking if you’d like to fill that field with today’s date; otherwise, you can return to the record to enter a different date.
The Completed checkbox will now be checked and the Date Completed is filled in. The Progress Name is also updated to indicate that the work order has been completed. Be sure to click Save before exiting this form.
If the Electronic Signature feature is enabled, you’ll be prompted to go to the Signature tab to sign off on the work order.
50 Chapter Six: Work Orders FaciliWorks 8i Quick Start Guide

Chapter Seven: Tech Support 51FaciliWorks 8i Quick Start Guide
Chapter Seven: Tech SupportWe hope that you’re more familiar with FaciliWorks now and that this introductory guide has helped you understand more about how FaciliWorks can help you maximize productivity and asset uptime. Please consult the User Guide for detailed instructions about other entry screens, reports, program setup options and other product features.
If you have any questions about or problems with your software, please contact CyberMetrics Technical Support at 1-800-776-3090 or [email protected].
52 Chapter Eight: Products/Services FaciliWorks 8i Quick Start Guide
Chapter Eight: Products/ServicesTrainingLearn how to save time, avoid common mistakes and get the most out of your software with FaciliWorks training classes. We offer personalized web training, regional classes and on-site training. Contact us today at 1-800-776-3090 or [email protected] for more information.
Other Professional ServicesWhether FaciliWorks is your first maintenance management software solution or you’re upgrading to FaciliWorks from another application, our comprehensive suite of professional services will minimize your downtime and make the transition seamless.
Our team of in-house Client Solutions Managers will advise you on the ideal setup and use of our products for your company’s unique infrastructure and get FaciliWorks up and running quickly so you can focus on what you do best.
• Consultation
• Data Import
• On-site Implementation
• On-site Validation
Chapter Eight: Products/Services 53FaciliWorks 8i Quick Start Guide
FaciliWorks Product Options
Web Service RequestsThe seamless, fast and secure FaciliWorks Web Service Request module allows users in various locations to quickly and easily create and submit service requests over the Internet and automatically routes them to a central maintenance department, eliminating time-consuming phone calls and written requests while providing centralized documentation of every service request and its outcome.
• Seamless integration with FaciliWorks
• Convenient access using a Web browser
• Unlimited concurrent users
• Quick and easy - no training needed
• Secure and password protected
Once a request is submitted, it is automatically routed to FaciliWorks to be viewed by the maintenance manager who can then delete or approve the request and convert it into a work order. FaciliWorks can be configured to send automatic email notifications at each step of the process, informing need-to-know personnel of the requests’ status and the associated work orders can be monitored from the FaciliWorks Dashboard. Contact us today for a free web demonstration to see how easy it is to reduce costs and improve the efficiency of your maintenance department with the seamless, fast and secure FaciliWorks Web Service Request module.
TaskProThis comprehensive, fully customizable database of maintenance procedures covers 250 different topics relating to facility and equipment maintenance and easily installs directly into your FaciliWorks database. These general procedures will save you time and effort setting up your maintenance tasks.
SafetyProThis complete database of OSHA-compliant safety checklists can be used within FaciliWorks or in your company’s maintenance procedure manual. SafetyPro covers 40 different topics including fire protection, first aid, stairs and stairways, hand tools and more. It’s fully customizable and easily installs directly into FaciliWorks.
54 Chapter Eight: Products/Services FaciliWorks 8i Quick Start Guide
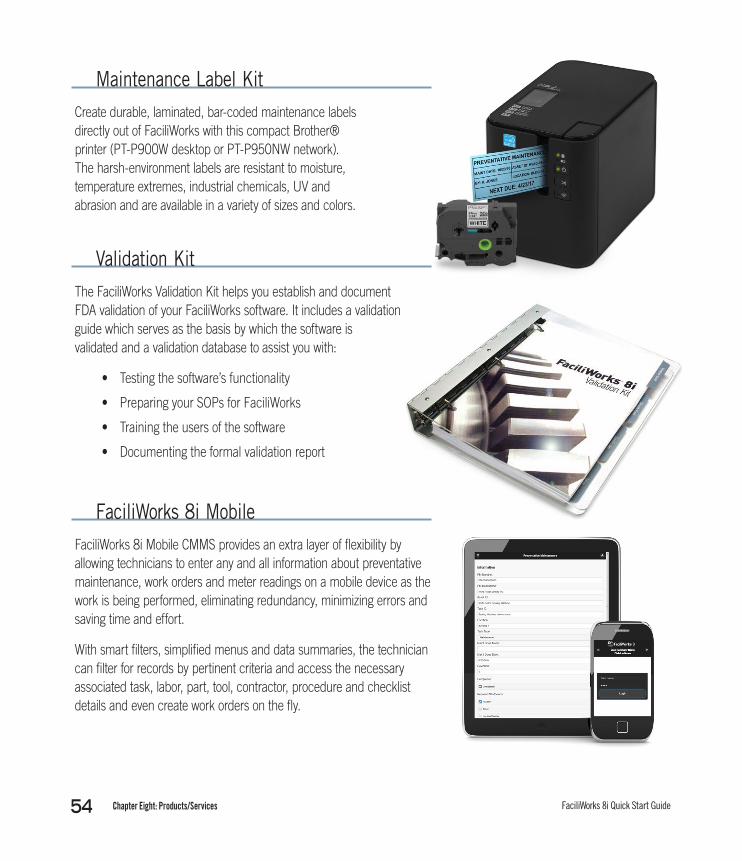
Maintenance Label KitCreate durable, laminated, bar-coded maintenance labels directly out of FaciliWorks with this compact Brother® printer (PT-P900W desktop or PT-P950NW network). The harsh-environment labels are resistant to moisture, temperature extremes, industrial chemicals, UV and abrasion and are available in a variety of sizes and colors.
Validation KitThe FaciliWorks Validation Kit helps you establish and document FDA validation of your FaciliWorks software. It includes a validation guide which serves as the basis by which the software is validated and a validation database to assist you with:
• Testing the software’s functionality
• Preparing your SOPs for FaciliWorks
• Training the users of the software
• Documenting the formal validation report
FaciliWorks 8i MobileFaciliWorks 8i Mobile CMMS provides an extra layer of flexibility by allowing technicians to enter any and all information about preventative maintenance, work orders and meter readings on a mobile device as the work is being performed, eliminating redundancy, minimizing errors and saving time and effort.
With smart filters, simplified menus and data summaries, the technician can filter for records by pertinent criteria and access the necessary associated task, labor, part, tool, contractor, procedure and checklist details and even create work orders on the fly.


![[Quick Video] CMMS Maintenance Requests](https://img.dokumen.tips/doc/110x75/588662a81a28ab26598b7803/quick-video-cmms-maintenance-requests.jpg)

![[Quick Video] CMMS Reporting](https://img.dokumen.tips/doc/110x75/588662b41a28ab26598b7857/quick-video-cmms-reporting.jpg)