Embed Size (px)
Citation preview

Oracle® E-Business SuiteDesktop Integration Framework Developer's GuideRelease 12.1Part No. E15877-02
June 2010
Oracle E-Business Suite Desktop Integration Framework Developer's Guide, Release 12.1
Part No. E15877-02
Copyright © 2009, 2010, Oracle and/or its affiliates. All rights reserved.
Primary Author: Clara Jaeckel
Contributing Author: Padmaprabodh Ambale, Rekha Ayothi, Senthilkumar Ramalingam, Ramkumar Sekar
Oracle is a registered trademark of Oracle Corporation and/or its affiliates. Other names may be trademarks of their respective owners.
This software and related documentation are provided under a license agreement containing restrictions on use and disclosure and are protected by intellectual property laws. Except as expressly permitted in your license agreement or allowed by law, you may not use, copy, reproduce, translate, broadcast, modify, license, transmit, distribute, exhibit, perform, publish or display any part, in any form, or by any means. Reverse engineering, disassembly, or decompilation of this software, unless required by law for interoperability, is prohibited.
The information contained herein is subject to change without notice and is not warranted to be error-free. If you find any errors, please report them to us in writing.
If this software or related documentation is delivered to the U.S. Government or anyone licensing it on behalf of the U.S. Government, the following notice is applicable:
U.S. GOVERNMENT RIGHTSPrograms, software, databases, and related documentation and technical data delivered to U.S. Government customers are "commercial computer software" or "commercial technical data" pursuant to the applicable Federal Acquisition Regulation and agency-specific supplemental regulations. As such, the use, duplication, disclosure, modification, and adaptation shall be subject to the restrictions and license terms set forth in the applicable Government contract, and, to the extent applicable by the terms of the Government contract, the additional rights set forth in FAR 52.227-19, Commercial Computer Software License (December 2007). Oracle USA, Inc., 500 Oracle Parkway, Redwood City, CA 94065.
This software is developed for general use in a variety of information management applications. It is not developed or intended for use in any inherently dangerous applications, including applications which may create a risk of personal injury. If you use this software in dangerous applications, then you shall be responsible to take all appropriate fail-safe, backup, redundancy and other measures to ensure the safe use of this software. Oracle Corporation and its affiliates disclaim any liability for any damages caused by use of thissoftware in dangerous applications.
This software and documentation may provide access to or information on content, products and services from third parties. Oracle Corporation and its affiliates are not responsible for and expressly disclaim all warranties of any kind with respect to third party content, products and services. Oracle Corporation and its affiliates will not be responsible for any loss, costs, or damages incurred due to your access to or use of third party content, products or services.
iii
Contents
Send Us Your Comments
Preface
1 Introduction to Oracle E-Business Suite Desktop Integration FrameworkOverview................................................................................................................................... 1-1
2 Managing IntegratorsManaging Integrators................................................................................................................ 2-1Defining Integrators.................................................................................................................. 2-3
3 Managing ComponentsManaging Components............................................................................................................. 3-1Defining Components............................................................................................................... 3-3
4 Managing ParametersManaging Parameters................................................................................................................ 4-1
A Loading Integrator DefinitionsLoading Integrator Definitions................................................................................................ A-1
Index

v
Send Us Your Comments
Oracle E-Business Suite Desktop Integration Framework Developer's Guide, Release 12.1Part No. E15877-02
Oracle welcomes customers' comments and suggestions on the quality and usefulness of this document. Your feedback is important, and helps us to best meet your needs as a user of our products. For example:
• Are the implementation steps correct and complete? • Did you understand the context of the procedures? • Did you find any errors in the information? • Does the structure of the information help you with your tasks? • Do you need different information or graphics? If so, where, and in what format? • Are the examples correct? Do you need more examples?
If you find any errors or have any other suggestions for improvement, then please tell us your name, the name of the company who has licensed our products, the title and part number of the documentation andthe chapter, section, and page number (if available).
Note: Before sending us your comments, you might like to check that you have the latest version of the document and if any concerns are already addressed. To do this, access the new Oracle E-Business Suite Release Online Documentation CD available on My Oracle Support and www.oracle.com. It contains the most current Documentation Library plus all documents revised or released recently.
Send your comments to us using the electronic mail address: [email protected]
Please give your name, address, electronic mail address, and telephone number (optional).
If you need assistance with Oracle software, then please contact your support representative or Oracle Support Services.
If you require training or instruction in using Oracle software, then please contact your Oracle local officeand inquire about our Oracle University offerings. A list of Oracle offices is available on our Web site at www.oracle.com.

vii
Preface
Intended AudienceWelcome to Release 12.1 of the Oracle E-Business Suite Desktop Integration Framework Developer's Guide.
This guide assumes you have a working knowledge of the following:
• The principles and customary practices of your business area.
• Computer desktop application usage and terminology.
If you have never used Oracle E-Business Suite, we suggest you attend one or more of the Oracle E-Business Suite training classes available through Oracle University.
See Related Information Sources on page viii for more Oracle E-Business Suite product information.
Deaf/Hard of Hearing Access to Oracle Support ServicesTo reach Oracle Support Services, use a telecommunications relay service (TRS) to call Oracle Support at 1.800.223.1711. An Oracle Support Services engineer will handle technical issues and provide customer support according to the Oracle service request process. Information about TRS is available at http://www.fcc.gov/cgb/consumerfacts/trs.html, and a list of phone numbers is available at http://www.fcc.gov/cgb/dro/trsphonebk.html.
Documentation AccessibilityOur goal is to make Oracle products, services, and supporting documentation accessibleto all users, including users that are disabled. To that end, our documentation includes features that make information available to users of assistive technology. This documentation is available in HTML format, and contains markup to facilitate access by
viii
the disabled community. Accessibility standards will continue to evolve over time, and Oracle is actively engaged with other market-leading technology vendors to address technical obstacles so that our documentation can be accessible to all of our customers. For more information, visit the Oracle Accessibility Program Web site at http://www.oracle.com/accessibility/.
Accessibility of Code Examples in DocumentationScreen readers may not always correctly read the code examples in this document. The conventions for writing code require that closing braces should appear on an otherwise empty line; however, some screen readers may not always read a line of text that consists solely of a bracket or brace.
Accessibility of Links to External Web Sites in DocumentationThis documentation may contain links to Web sites of other companies or organizationsthat Oracle does not own or control. Oracle neither evaluates nor makes any representations regarding the accessibility of these Web sites.
Structure1 Introduction to Oracle E-Business Suite Desktop Integration Framework2 Managing Integrators3 Managing Components4 Managing ParametersA Loading Integrator Definitions
Related Information SourcesThis book is included on the Oracle E-Business Suite Documentation Library, which is supplied in the Release 12.1 Media Pack. You can download soft-copy documentation as PDF files from the Oracle Technology Network at http://www.oracle.com/technology/documentation/. The Oracle E-Business Suite Release 12.1 Documentation Library contains the latest information, including any documents that have changed significantly between releases. If substantial changes to this book are necessary, a revised version will be made available on the "virtual" documentation library on My Oracle Support (formerly OracleMetaLink).
If this guide refers you to other Oracle E-Business Suite documentation, use only the latest Release 12.1 versions of those guides.
Online Documentation
All Oracle E-Business Suite documentation is available online (HTML or PDF).
• Online Help - Online help patches (HTML) are available on My Oracle Support.
• PDF Documentation - See the Oracle E-Business Suite Documentation Library for
ix
current PDF documentation for your product with each release. The Oracle E-Business Suite Documentation Library is also available on My Oracle Support andis updated frequently.
• Release Notes - For information about changes in this release, including new features, known issues, and other details, see the release notes for the relevant product, available on My Oracle Support.
• Oracle Electronic Technical Reference Manual - The Oracle Electronic Technical Reference Manual (eTRM) contains database diagrams and a detailed description ofdatabase tables, forms, reports, and programs for each Oracle E-Business Suite product. This information helps you convert data from your existing applications and integrate Oracle E-Business Suite data with non-Oracle applications, and write custom reports for Oracle E-Business Suite products. The Oracle eTRM is available on My Oracle Support.
Related Guides
You should have the following related books on hand. Depending on the requirements of your particular installation, you may also need additional manuals or guides.
Oracle E-Business Suite Concepts
This book is intended for all those planning to deploy Oracle E-Business Suite Release 12, or contemplating significant changes to a configuration. After describing the Oracle E-Business Suite architecture and technology stack, it focuses on strategic topics, giving a broad outline of the actions needed to achieve a particular goal, plus the installation and configuration choices that may be available.
Oracle E-Business Suite Flexfields Guide
This guide provides flexfields planning, setup, and reference information for the Oracle E-Business Suite implementation team, as well as for users responsible for the ongoing maintenance of Oracle E-Business Suite product data. This guide also provides information on creating custom reports on flexfields data.
Oracle E-Business Suite Installation Guide: Using Rapid Install
This book is intended for use by anyone who is responsible for installing or upgrading Oracle E-Business Suite. It provides instructions for running Rapid Install either to carryout a fresh installation of Oracle E-Business Suite, or as part of an upgrade. The book also describes the steps needed to install the technology stack components only, for the special situations where this is applicable.
Oracle E-Business Suite Multiple Organizations Implementation Guide
This guide describes the multiple organizations concept in Oracle E-Business Suite. It describes setting up and working effectively with multiple organizations in Oracle E-Business Suite.
Oracle E-Business Suite System Administrator's Guide Documentation Set
This documentation set provides planning and reference information for the Oracle
x
E-Business Suite System Administrator. Oracle E-Business Suite System Administrator's Guide - Configuration contains information on system configuration steps, including defining concurrent programs and managers, enabling Oracle Applications Manager features, and setting up printers and online help. Oracle E-Business Suite System Administrator's Guide - Maintenance provides information for frequent tasks such as monitoring your system with Oracle Applications Manager, administering Oracle E-Business Suite Secure Enterprise Search, managing concurrent managers and reports, using diagnostic utilities including logging, managing profile options, and using alerts. Oracle E-Business Suite System Administrator's Guide - Security describes User Management, data security, function security, auditing, and security configurations.
Oracle E-Business Suite User's Guide
This guide explains how to navigate, enter data, query, and run reports using the user interface (UI) of Oracle E-Business Suite. This guide also includes information on settinguser profiles, as well as running and reviewing concurrent requests.
Oracle General Ledger User's Guide
This guide provides information on how to use Oracle General Ledger. Use this guide to learn how to create and maintain ledgers, ledger currencies, budgets, and journal entries. This guide also includes information about running financial reports.
Oracle Report Manager User's Guide
Oracle Report Manager is an online report distribution system that provides a secure and centralized location to produce and manage point-in-time reports. Oracle Report Manager users can be either report producers or report consumers. Use this guide for information on setting up and using Oracle Report Manager.
Oracle Web Applications Desktop Integrator Implementation and Administration Guide
Oracle Web Applications Desktop Integrator brings Oracle E-Business Suite functionality to a spreadsheet, where familiar data entry and modeling techniques can be used to complete Oracle E-Business Suite tasks. You can create formatted spreadsheets on your desktop that allow you to download, view, edit, and create OracleE-Business Suite data, which you can then upload. This guide describes how to implement Oracle Web Applications Desktop Integrator and how to define mappings, layouts, style sheets, and other setup options.
Oracle XML Publisher Report Designer's Guide
Oracle XML Publisher is a template-based reporting solution that merges XML data with templates in RTF or PDF format to produce a variety of outputs to meet a variety of business needs. Using Microsoft Word or Adobe Acrobat as the design tool, you can create pixel-perfect reports from the Oracle E-Business Suite. Use this guide to design your report layouts.
This guide is available through the Oracle E-Business Suite online help.
Oracle XML Publisher Administration and Developer's Guide
xi
Oracle XML Publisher is a template-based reporting solution that merges XML data with templates in RTF or PDF format to produce a variety of outputs to meet a variety of business needs. Outputs include: PDF, HTML, Excel, RTF, and eText (for EDI and EFT transactions). Oracle XML Publisher can be used to generate reports based on existing Oracle E-Business Suite report data, or you can use Oracle XML Publisher's data extraction engine to build your own queries. Oracle XML Publisher also provides arobust set of APIs to manage delivery of your reports via e-mail, fax, secure FTP, printer, WebDav, and more. This guide describes how to set up and administer Oracle XML Publisher as well as how to use the Application Programming Interface to build custom solutions.
This guide is available through the Oracle E-Business Suite online help.
Integration RepositoryThe Oracle Integration Repository is a compilation of information about the service endpoints exposed by the Oracle E-Business Suite of applications. It provides a complete catalog of Oracle E-Business Suite's business service interfaces. The tool lets users easily discover and deploy the appropriate business service interface for integration with any system, application, or business partner.
The Oracle Integration Repository is shipped as part of the E-Business Suite. As your instance is patched, the repository is automatically updated with content appropriate for the precise revisions of interfaces in your environment.
Do Not Use Database Tools to Modify Oracle E-Business Suite DataOracle STRONGLY RECOMMENDS that you never use SQL*Plus, Oracle Data Browser, database triggers, or any other tool to modify Oracle E-Business Suite data unless otherwise instructed.
Oracle provides powerful tools you can use to create, store, change, retrieve, and maintain information in an Oracle database. But if you use Oracle tools such as SQL*Plus to modify Oracle E-Business Suite data, you risk destroying the integrity of your data and you lose the ability to audit changes to your data.
Because Oracle E-Business Suite tables are interrelated, any change you make using an Oracle E-Business Suite form can update many tables at once. But when you modify Oracle E-Business Suite data using anything other than Oracle E-Business Suite, you may change a row in one table without making corresponding changes in related tables.If your tables get out of synchronization with each other, you risk retrieving erroneous information and you risk unpredictable results throughout Oracle E-Business Suite.
When you use Oracle E-Business Suite to modify your data, Oracle E-Business Suite automatically checks that your changes are valid. Oracle E-Business Suite also keeps track of who changes information. If you enter information into database tables using database tools, you may store invalid information. You also lose the ability to track whohas changed your information because SQL*Plus and other database tools do not keep a

xii
record of changes.

Introduction to Oracle E-Business Suite Desktop Integration Framework 1-1
1Introduction to Oracle E-Business Suite
Desktop Integration Framework
This chapter covers the following topics:
• Overview
OverviewOracle Web Applications Desktop Integrator brings Oracle E-Business Suite functionality to the desktop where the familiar Microsoft Excel, Word, and Project applications can be used to complete Oracle E-Business Suite tasks. Oracle Web Applications Desktop Integrator uses a set of metadata called an integrator to encapsulate all the information needed to integrate a particular Oracle E-Business Suite task with a desktop application. Several Oracle E-Business Suite applications provide seeded integrators for their functionality. With Oracle E-Business Suite Desktop Integration Framework, you can define custom integrators for additional tasks according to your users' needs.
• Tasks in a standard Oracle E-Business Suite application that are not covered by seeded integrators
• Tasks in custom applications developed for your instance
By defining an integrator, you enable your users to do the following.
• Create a formatted document such as a spreadsheet on the desktop containing application-specific fields for data entry.
• Import data into the desktop document from the database or a text file.
• Work with the data in the desktop application while enforcing the owning application's business rules.
• Upload data from the desktop document into Oracle E-Business Suite.
1-2 Oracle E-Business Suite Desktop Integration Framework Developer's Guide
• Validate the data being uploaded and receive immediate feedback about the results of the validation during the upload process.
Oracle E-Business Suite Desktop Integration Framework provides a graphical user interface in which developers can define integrators and all associated supporting objects, without needing to work directly with the underlying Oracle Web Applications Desktop Integrator tables and APIs. Through this user interface, Oracle E-Business SuiteDesktop Integration Framework reduces development time, increases developer productivity, and enhances ease of maintenance for the integrators you define.
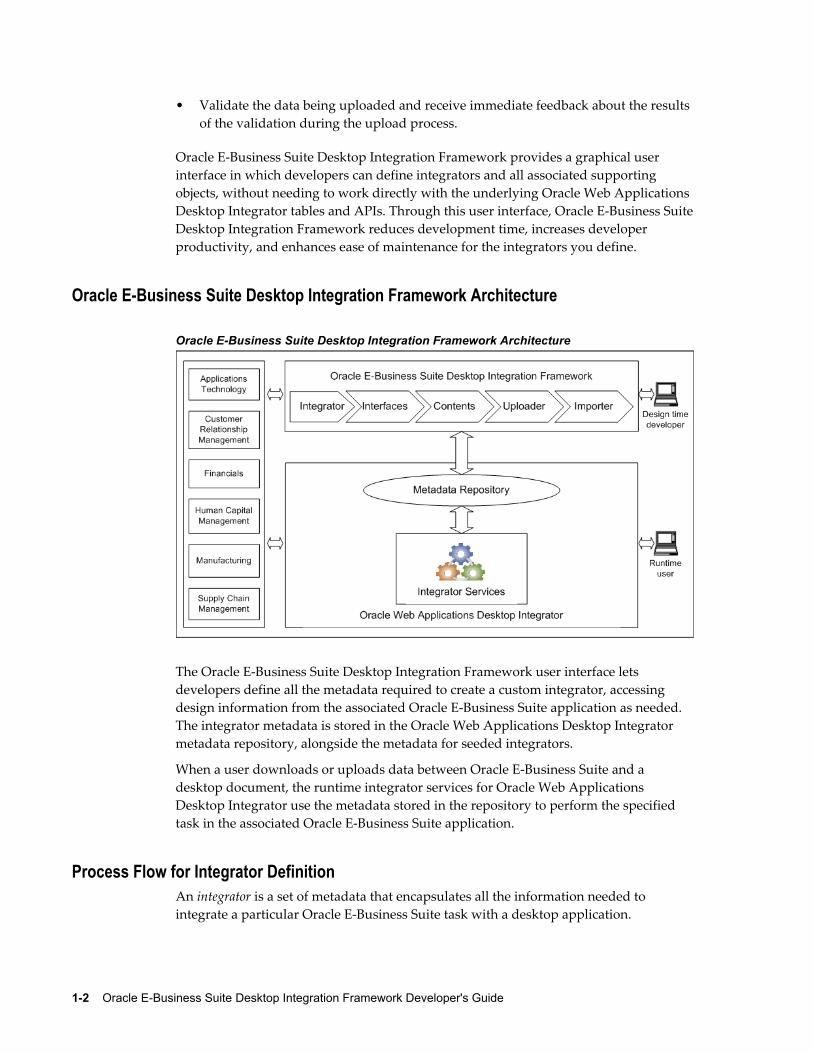
Oracle E-Business Suite Desktop Integration Framework Architecture
Oracle E-Business Suite Desktop Integration Framework Architecture
The Oracle E-Business Suite Desktop Integration Framework user interface lets developers define all the metadata required to create a custom integrator, accessing design information from the associated Oracle E-Business Suite application as needed. The integrator metadata is stored in the Oracle Web Applications Desktop Integrator metadata repository, alongside the metadata for seeded integrators.
When a user downloads or uploads data between Oracle E-Business Suite and a desktop document, the runtime integrator services for Oracle Web Applications Desktop Integrator use the metadata stored in the repository to perform the specified task in the associated Oracle E-Business Suite application.
Process Flow for Integrator DefinitionAn integrator is a set of metadata that encapsulates all the information needed to integrate a particular Oracle E-Business Suite task with a desktop application.

Introduction to Oracle E-Business Suite Desktop Integration Framework 1-3
• You can define integrators that only download data from Oracle E-Business Suite into a desktop document and do not upload data. The document serves as a report of the Oracle E-Business Suite data that can be viewed in the desktop application. This type of integrator is called a reporting-only integrator.
• You can also define integrators that create a desktop document and then upload data from that document into Oracle E-Business Suite. An integrator can create a document in one of these ways.
• Create a blank document that is laid out and formatted according to an Oracle E-Business Suite application's business rules but contains no data. Users must enter all data into the document manually.
• Create a document that is initially populated with data from a text file. Users can work with the data in the desktop application before uploading it to Oracle E-Business Suite.
• Create a document that is initially populated with data downloaded from Oracle E-Business Suite through a SQL query or Java class. Users can work withthe data in the desktop application before uploading it back to Oracle E-Business Suite.
Process Flow for Integrator Definition
Oracle E-Business Suite Desktop Integration Framework provides a wizard interface to guide you through the main steps for defining integrators. In the integrator definition wizard, you can perform the following tasks:
• Define basic integrator properties.
• Define an interface for the integrator. An interface is a set of metadata that
1-4 Oracle E-Business Suite Desktop Integration Framework Developer's Guide
determines how the integrator uploads data from a desktop document to Oracle E-Business Suite. An interface attribute defines a single data column within the interface.
You do not need to define an interface for a reporting-only integrator.
• Define contents for the integrator. A content is a set of metadata that determines what data the integrator uses to populate the desktop document that it creates. A content column defines a single data column within the content. You can define thesecontent types:
• Text File - Populate the desktop document with data from a text file.
• SQL Query - Populate the desktop document with data from a SQL query that selects from Oracle E-Business Suite application tables.
• Java - Populate the desktop document with data returned by a Java class from Oracle E-Business Suite application tables.
You should always define at least one SQL query or Java content for a reporting-only integrator. If you want the integrator to create a blank document initially, then you do not need to define a content for the integrator.
• Define an uploader for the integrator. An uploader is a set of metadata that determines what options are available to a user in the upload parameters window when the user uploads data from a desktop document to Oracle E-Business Suite.
You do not need to define an uploader for a reporting-only integrator.
• Define an importer for the integrator. An importer is a set of metadata that determines how Oracle Web Applications Desktop Integrator moves uploaded datafrom Oracle E-Business Suite interface tables to base application tables. Define an importer if you want to invoke an import process automatically after uploading data from the desktop document to the interface tables. An importer can invoke oneof these types of import processes:
• Asynchronous concurrent request
• Synchronous concurrent request
• PL/SQL API
You do not need to define an importer for a reporting-only integrator.
Oracle E-Business Suite Desktop Integration Framework also provides a user interface that lets you manage and create components for use in integrators. A component is a set of metadata that provides a list of values for a field in a document.
Additionally, Oracle E-Business Suite Desktop Integration Framework provides a user interface that lets you define parameters for an integrator.

Introduction to Oracle E-Business Suite Desktop Integration Framework 1-5
After completing the main integrator definition in the wizard, you can also optionally define layouts and mappings for use with your integrator. A layout is a set of metadata that determines what fields appear in the desktop document and how those fields are displayed and formatted. A mapping is a set of metadata that links content columns to the corresponding interface attributes. You can create layouts and mappings for your users to use with the integrator you defined. Depending on the access granted to them, users can also define layouts and mappings themselves. See: Oracle Web Applications Desktop Integrator Implementation and Administration Guide.

Managing Integrators 2-1
2Managing Integrators
This chapter covers the following topics:
• Managing Integrators
• Defining Integrators
Managing IntegratorsAn integrator is a set of metadata that encapsulates all the information needed to integrate a particular Oracle E-Business Suite task with a desktop application. Use the Integrators page to view and manage the integrators defined for your Oracle E-BusinessSuite installation.
To manage integrators:1. Navigate to the Integrators page from the Oracle E-Business Suite Navigator by
choosing either Desktop Integration Manager: Manage Integrators or a custom responsibility and menu path specified by your system administrator.
2. Search for the integrators you want to display. You can enter the following search criteria:
• Integrator Name - Enter the display name of the integrator. You can enter a partial value to search for integrators whose names contain that value.
• Internal Name - Enter the unique internal name of the integrator. You can enter a partial value to search for integrators whose names contain that value.
• Application - Select the application that owns the integrator.
• Enabled - Select Yes to search for integrators that are enabled or No to search for integrators that are disabled.
• Source - Select Oracle to search for integrators seeded by Oracle E-Business
2-2 Oracle E-Business Suite Desktop Integration Framework Developer's Guide
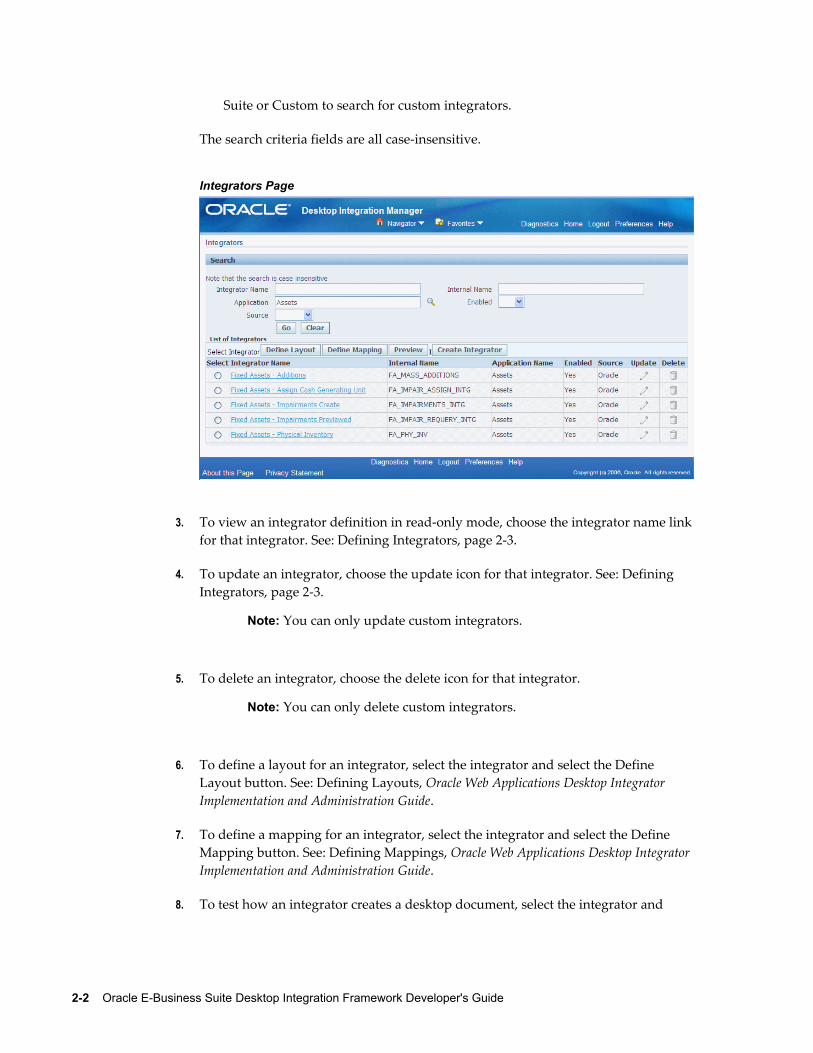
Suite or Custom to search for custom integrators.
The search criteria fields are all case-insensitive.
Integrators Page
3. To view an integrator definition in read-only mode, choose the integrator name linkfor that integrator. See: Defining Integrators, page 2-3.
4. To update an integrator, choose the update icon for that integrator. See: Defining Integrators, page 2-3.
Note: You can only update custom integrators.
5. To delete an integrator, choose the delete icon for that integrator.
Note: You can only delete custom integrators.
6. To define a layout for an integrator, select the integrator and select the Define Layout button. See: Defining Layouts, Oracle Web Applications Desktop Integrator Implementation and Administration Guide.
7. To define a mapping for an integrator, select the integrator and select the Define Mapping button. See: Defining Mappings, Oracle Web Applications Desktop Integrator Implementation and Administration Guide.
8. To test how an integrator creates a desktop document, select the integrator and
Managing Integrators 2-3
select the Preview button. Oracle Web Applications Desktop Integrator then displays the Create Document page flow, with the specified integrator selected, to let you finish creating the preview document. See: Creating a Spreadsheet, Oracle Web Applications Desktop Integrator Implementation and Administration Guide.
9. To define a new integrator, select the Create Integrator button. See: Defining Integrators, page 2-3.
Defining IntegratorsUse the integrator definition wizard to create a new integrator, update an existing integrator, or view the definition for an existing integrator.
Note: You can only update custom integrators.
To define an integrator:1. Navigate to the integrator definition wizard by one of the following methods:
• Choose the Create Integrator button in the Integrators page.
• Choose the update icon in the Integrators page.
• From the Oracle E-Business Suite Navigator, choose either Desktop Integration Manager: Create Integrator or a custom responsibility and menu path specified by your system administrator.
If you are updating an existing integrator, then the fields in the wizard are populated with previously defined information for the selected integrator.
2. In the first step of the wizard, define the basic properties of the integrator. See: To define integrator information, page 2-5.
3. If you want to use this integrator to upload data from a desktop document to OracleE-Business Suite, define an interface for the integrator in the second step of the wizard. See: To define interfaces, page 2-7.
4. In the third step of the wizard, optionally define contents for the integrator. See: To define contents, page 2-16.
5. If you want to use this integrator to upload data from a desktop document to OracleE-Business Suite, define the uploader for the integrator in the fourth step of the wizard. See: To define an uploader, page 2-19.
6. If you want to use this integrator to import uploaded data from Oracle E-Business Suite interface tables to application base tables, define the importer for the
2-4 Oracle E-Business Suite Desktop Integration Framework Developer's Guide
integrator in the fifth step of the wizard. See: To define an importer, page 2-25.
To view an integrator definition:1. Navigate to the integrator definition wizard by choosing the integrator name link in
the Integrators page. The integrator definition appears in the wizard in read-only mode.
2. Use the Next and Back buttons to navigate among the pages of the wizard. For more information about the fields displayed in each page, see: To define integrator information, page 2-5, To define interfaces, page 2-7, To define contents, page 2-16, To define an uploader, page 2-19, and To define an importer, page 2-25.
3. Choose the Cancel button in the Integrator Information, Interfaces, Contents, Uploader, or Importer page to return to the Integrators page.
Managing Integrators 2-5
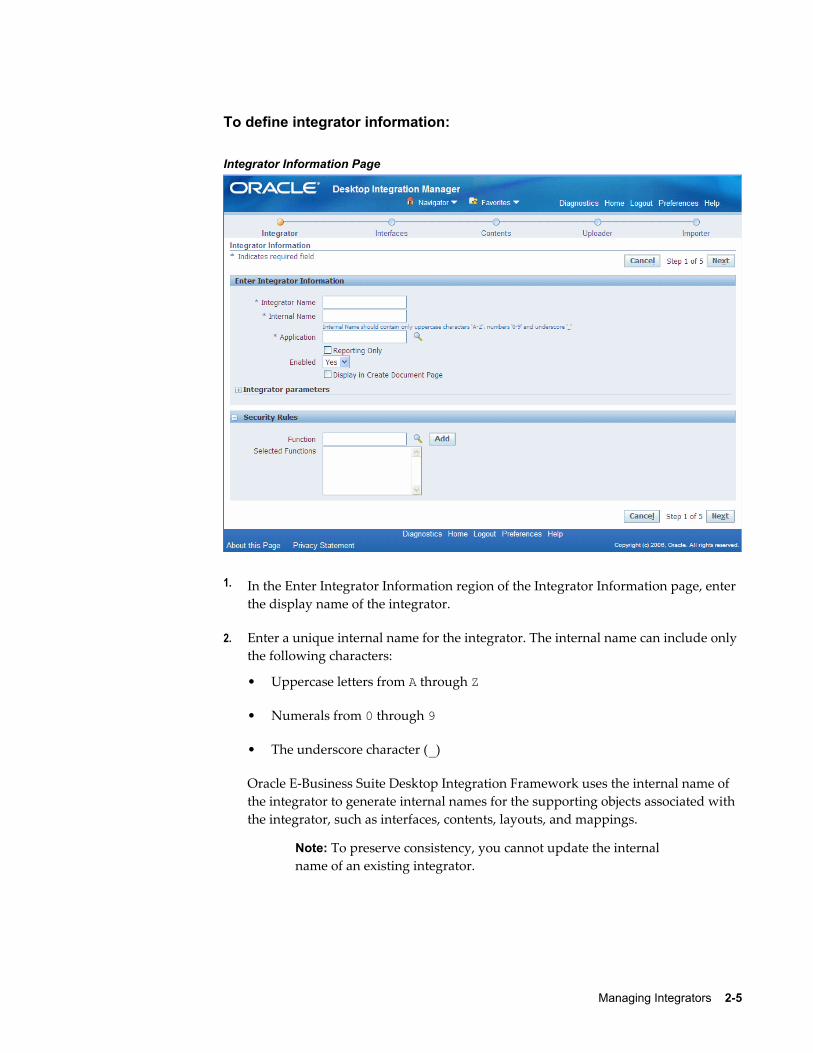
To define integrator information:
Integrator Information Page
1. In the Enter Integrator Information region of the Integrator Information page, enter the display name of the integrator.
2. Enter a unique internal name for the integrator. The internal name can include only the following characters:
• Uppercase letters from A through Z
• Numerals from 0 through 9
• The underscore character (_)
Oracle E-Business Suite Desktop Integration Framework uses the internal name of the integrator to generate internal names for the supporting objects associated with the integrator, such as interfaces, contents, layouts, and mappings.
Note: To preserve consistency, you cannot update the internal name of an existing integrator.
2-6 Oracle E-Business Suite Desktop Integration Framework Developer's Guide
3. Select the application that owns the integrator.
Note: To preserve consistency, you cannot update the application of an existing integrator.
4. If you want to use this integrator only for exporting data from Oracle E-Business Suite to a desktop document, select the Reporting Only option. In this case the document serves as a report of the Oracle E-Business Suite data that can be viewed in the desktop application. If you want to use this integrator to upload data from a desktop document to Oracle E-Business Suite, do not select this option.
5. In the Enabled field, select Yes to enable this integrator or No to disable this integrator. If you disable an integrator, its definition remains available for reference,but you cannot use it to define layouts or mappings, create a document, or download or upload Oracle E-Business Suite data.
6. If you want your users to be able to select this integrator in the Create Document page flow within Oracle Web Applications Desktop Integrator, select the Display in Create Document Page option. If you will include the functionality to create documents within the functional page flow of your own application, then you do not need to select this option.
7. To specify parameters for the integrator, expand the Integrator Parameters region. See: Managing Parameters, page 4-1.
8. Select the server-side upload parameter list.
9. Select the document parameter list for use in the Create Document page flow in Oracle Web Applications Desktop Integrator.
10. Select the session parameter list.
11. The Security Rules region displays a list of form functions through which the integrator can be accessed. A user must have menu access to at least one of these functions in order to use this integrator, including creating a desktop document, using a list of values based on Oracle E-Business Suite data within the desktop document, and uploading data to Oracle E-Business Suite. To add a function to the list, select the function in the Function field and select the Add button. You can repeat this step to allow access through additional functions.
12. Select Next.
• If you did not select the Reporting Only option, then the integrator definition wizard displays the Interfaces page. See: To define interfaces, page 2-7.
• If you selected the Reporting Only option, then you do not need to define an
Managing Integrators 2-7
interface. In this case the integrator definition wizard proceeds directly to the Contents page. See: To define contents, page 2-16.
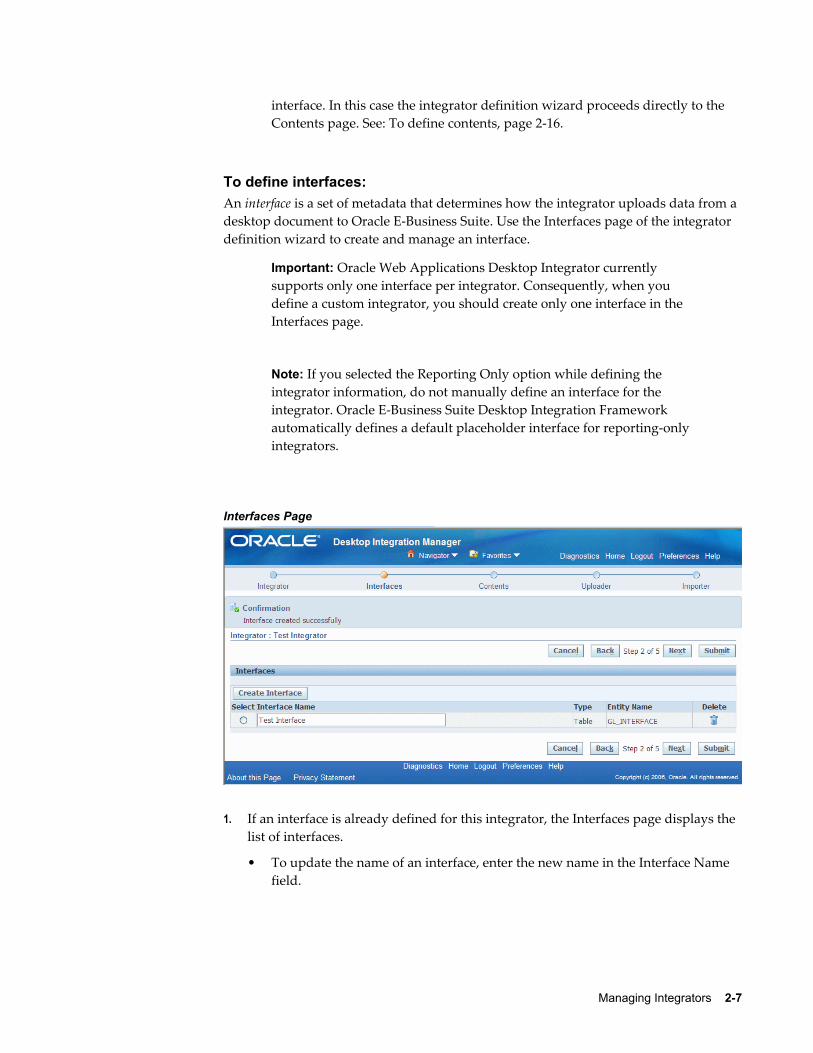
To define interfaces:An interface is a set of metadata that determines how the integrator uploads data from a desktop document to Oracle E-Business Suite. Use the Interfaces page of the integrator definition wizard to create and manage an interface.
Important: Oracle Web Applications Desktop Integrator currently supports only one interface per integrator. Consequently, when you define a custom integrator, you should create only one interface in the Interfaces page.
Note: If you selected the Reporting Only option while defining the integrator information, do not manually define an interface for the integrator. Oracle E-Business Suite Desktop Integration Framework automatically defines a default placeholder interface for reporting-only integrators.
Interfaces Page
1. If an interface is already defined for this integrator, the Interfaces page displays the list of interfaces.
• To update the name of an interface, enter the new name in the Interface Name field.
2-8 Oracle E-Business Suite Desktop Integration Framework Developer's Guide
• To delete an interface, choose the delete icon for that interface.
• To create a new interface, select the Create Interface button. The Create Interface region appears.
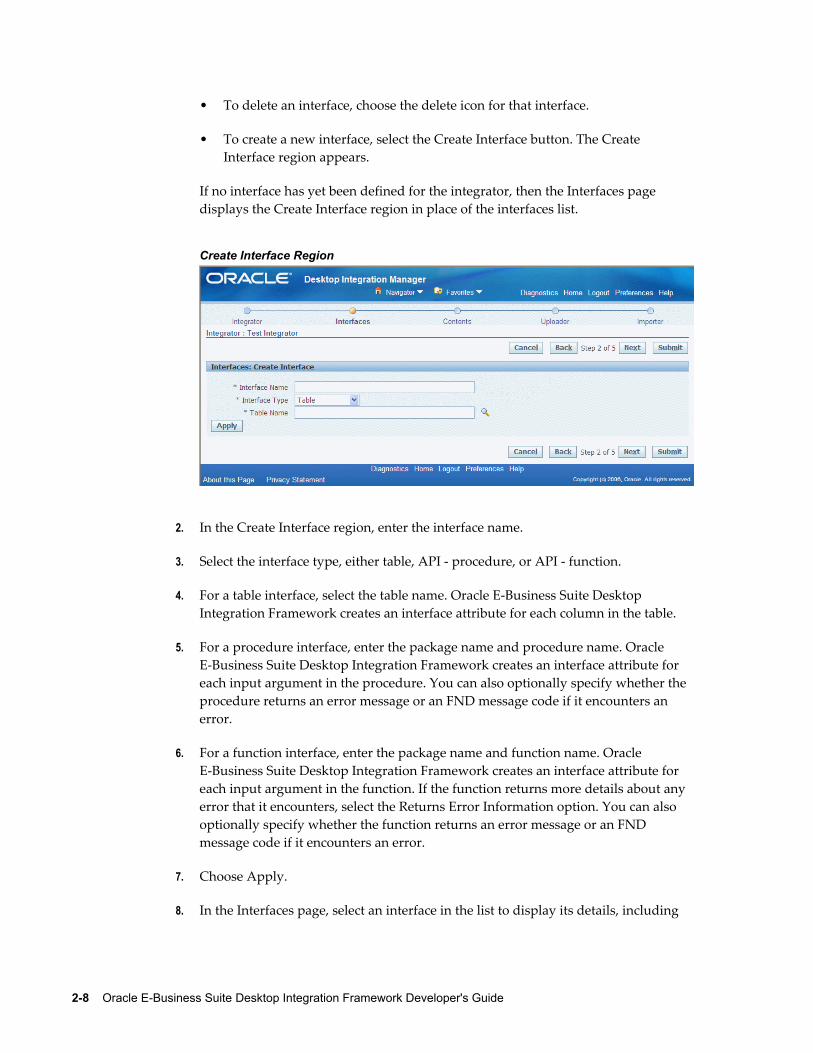
If no interface has yet been defined for the integrator, then the Interfaces page displays the Create Interface region in place of the interfaces list.
Create Interface Region
2. In the Create Interface region, enter the interface name.
3. Select the interface type, either table, API - procedure, or API - function.
4. For a table interface, select the table name. Oracle E-Business Suite Desktop Integration Framework creates an interface attribute for each column in the table.
5. For a procedure interface, enter the package name and procedure name. Oracle E-Business Suite Desktop Integration Framework creates an interface attribute for each input argument in the procedure. You can also optionally specify whether the procedure returns an error message or an FND message code if it encounters an error.
6. For a function interface, enter the package name and function name. Oracle E-Business Suite Desktop Integration Framework creates an interface attribute for each input argument in the function. If the function returns more details about any error that it encounters, select the Returns Error Information option. You can also optionally specify whether the function returns an error message or an FND message code if it encounters an error.
7. Choose Apply.
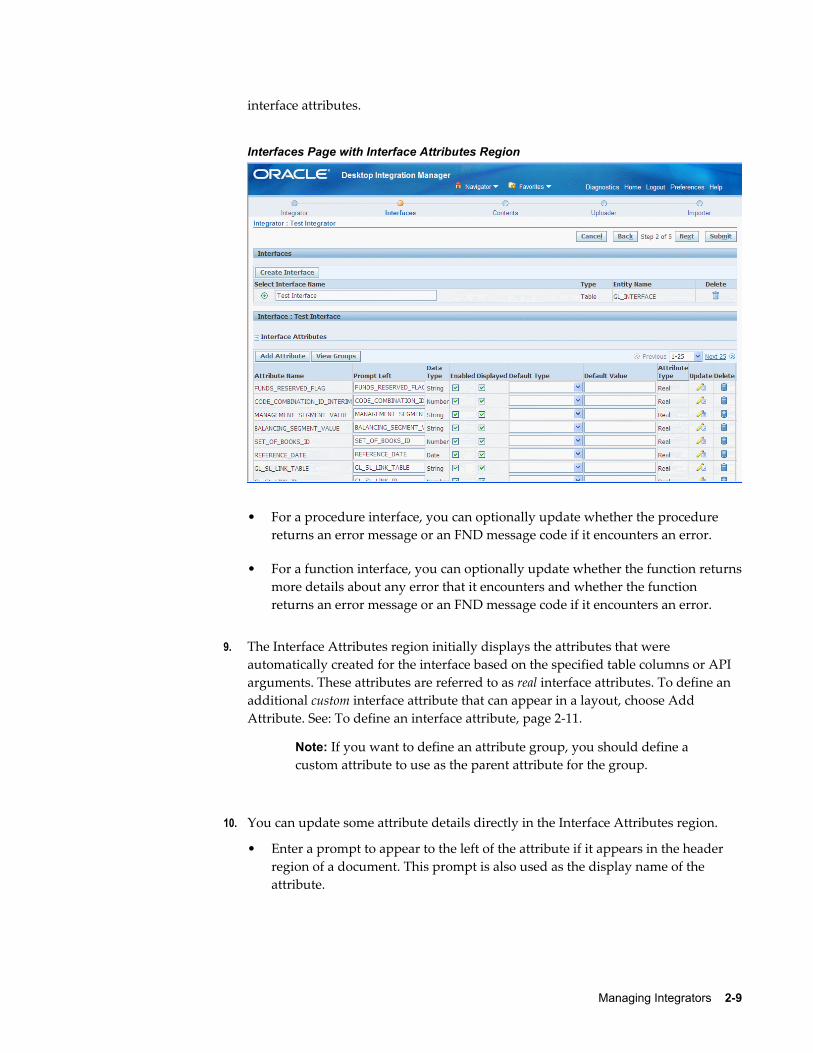
8. In the Interfaces page, select an interface in the list to display its details, including
Managing Integrators 2-9
interface attributes.
Interfaces Page with Interface Attributes Region
• For a procedure interface, you can optionally update whether the procedure returns an error message or an FND message code if it encounters an error.
• For a function interface, you can optionally update whether the function returnsmore details about any error that it encounters and whether the function returns an error message or an FND message code if it encounters an error.
9. The Interface Attributes region initially displays the attributes that were automatically created for the interface based on the specified table columns or API arguments. These attributes are referred to as real interface attributes. To define an additional custom interface attribute that can appear in a layout, choose Add Attribute. See: To define an interface attribute, page 2-11.
Note: If you want to define an attribute group, you should define a custom attribute to use as the parent attribute for the group.
10. You can update some attribute details directly in the Interface Attributes region.
• Enter a prompt to appear to the left of the attribute if it appears in the header region of a document. This prompt is also used as the display name of the attribute.
2-10 Oracle E-Business Suite Desktop Integration Framework Developer's Guide
• Select whether the attribute is enabled for use in a layout.
• Select whether the attribute is available for display in a layout.
• Optionally select the source type from which the default value for the attribute is derived, either Constant, Environment Variable, Parameter, Profile Option, SQL Query, or Lookup.
• Enter a default value for the attribute corresponding to the selected type.
You can also choose the update icon for an attribute to update additional attribute details. See: To update an interface attribute, page 2-13.
11. To delete an interface attribute, choose the delete icon for that attribute.
12. If validation of one interface attribute depends on the value of another attribute, or if several attributes are validated the same way, you can associate those attributes with each other by defining an attribute group and perform validation for all attributes in the group together. To view and manage groups, choose View Groups. See: To manage interface attribute groups, page 2-14.
13. To proceed to the Contents page, select Next, or to save this integrator definition without defining contents or an uploader or importer, select Submit.
Managing Integrators 2-11
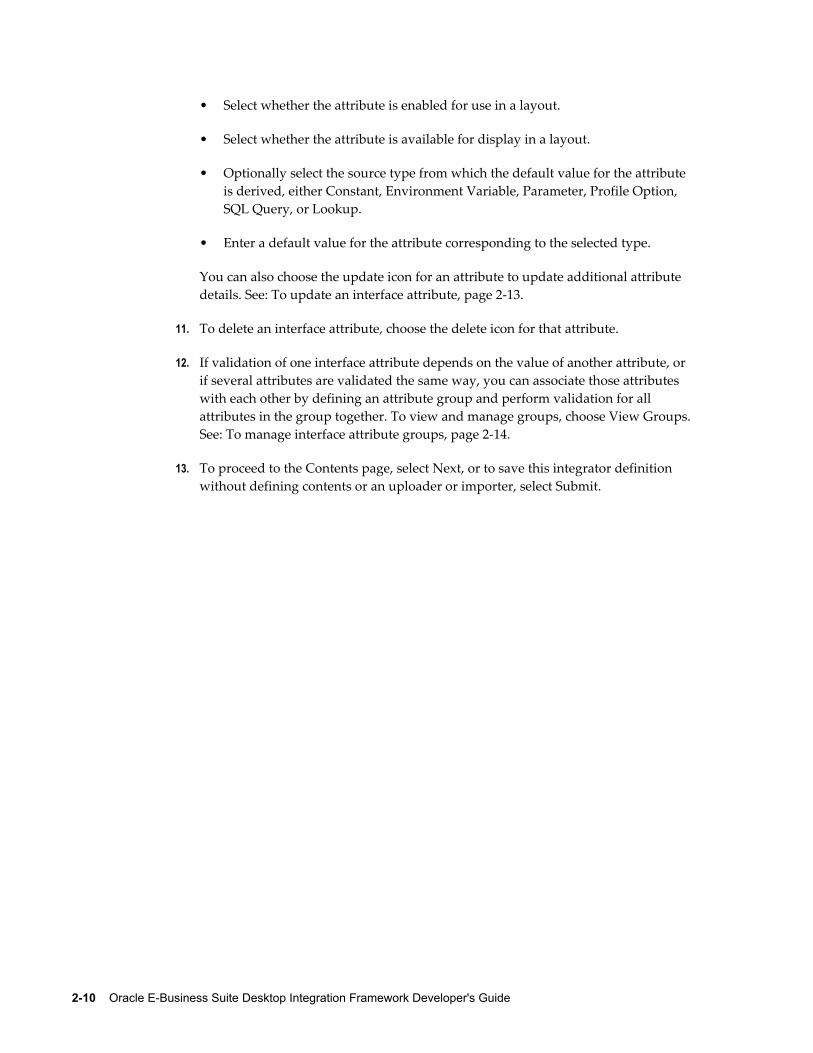
To define an interface attribute:
Interface Attribute Definition Page
1. In the Interface Attribute Definition page, enter a unique internal name for the attribute. The name can include only the following characters:
• Uppercase letters from A through Z
• Numerals from 0 through 9
• The underscore character (_)
2. Select the attribute data type, either number, string, or date.
3. Enter the size of the interface table column or the character length of the interface API parameter to which this attribute corresponds.
4. Select whether the attribute is enabled for use in a layout.
2-12 Oracle E-Business Suite Desktop Integration Framework Developer's Guide
5. Select whether the attribute is available for display in a layout.
6. Select whether the attribute is required to be included in all layouts for this integrator.
7. Select whether the attribute can be summed to form a total value.
8. Select whether the attribute is read-only. A read-only attribute is placed in the context section of the desktop document and users cannot change its value.
9. Select whether the attribute is enabled for use in a mapping, to be mapped to a content column.
10. Select whether the interface table column or the interface API parameter to which this attribute corresponds must not be null.
11. Optionally select the source type from which the default value for the attribute is derived, either Constant, Environment Variable, Parameter, Profile Option, SQL Query, or Lookup.
Note: The default value for an attribute is not inserted into the document when the document is created. Instead, if no other value has been specified for the attribute, the default value is derived andinserted when the user performs an upload.
12. Enter a default value for the attribute corresponding to the selected type.
13. Select the validation type for the attribute, either Descriptive Flexfield, Descriptive Flexfield Context, Descriptive Flexfield Segment, Group, Java, Key Flexfield, Key Flexfield Segment, or Table. If you only want to validate the data type, length, and not null requirement for the attribute, then you can leave the validation type blank.
14. If the attribute should be validated as part of an attribute group, select the group name. See: To manage interface attribute groups, page 2-14.
15. If the attribute should use a list of values defined in a component, select the component name. See: Managing Components, page 3-1.
16. Select the type of list of values that the component uses, either None, Pop List for a predefined static set of values, or Standard for a dynamic set of values based on Oracle E-Business Suite data.
17. Enter a prompt to appear to the left of the attribute if it appears in the header regionof a document. This prompt is also used as the display name of the attribute.
18. Optionally enter a prompt to appear above the attribute if it appears in the lines
Managing Integrators 2-13
region of a document.
19. Optionally enter hint text to provide users further guidance on the attribute. The hint text appears between the header region and the lines region in the document.
20. Choose Save.
To update an interface attribute:1. Use the Interface Attribute Definition pop-up window to update attribute details
that are not displayed in the Interfaces page.
Note: To preserve consistency, you cannot update the interface name, data type, length, or attribute type.
2. Select whether the attribute is required to be included in all layouts for this integrator.
3. Select whether the attribute can be summed to form a total value.
4. Select whether the attribute is read-only. A read-only attribute is placed in the context section of the desktop document and users cannot change its value.
5. Select whether the attribute is enabled for use in a mapping, to be mapped to a content column.
6. Select whether the interface table column or the interface API parameter to which this attribute corresponds must not be null.
7. Select the validation type for the attribute, either Descriptive Flexfield, Descriptive Flexfield Context, Descriptive Flexfield Segment, Group, Java, Key Flexfield, Key Flexfield Segment, or Table. If you only want to validate the data type, length, and not null requirement for the attribute, then you can leave the validation type blank.
8. If the attribute should be validated as part of an attribute group, select the group name. See: To manage interface attribute groups, page 2-14.
9. If the attribute should use a list of values defined in a component, select the component name. See: Managing Components, page 3-1.
10. Select the type of list of values that the component uses, either None, Pop List for a predefined static set of values, or Standard for a dynamic set of values based on Oracle E-Business Suite data.
11. Optionally enter a prompt to appear above the attribute if it appears in the lines region of a document.
2-14 Oracle E-Business Suite Desktop Integration Framework Developer's Guide
12. Optionally enter hint text to provide users further guidance on the attribute. The hint text appears between the header region and the lines region in the document.
13. Choose Save.
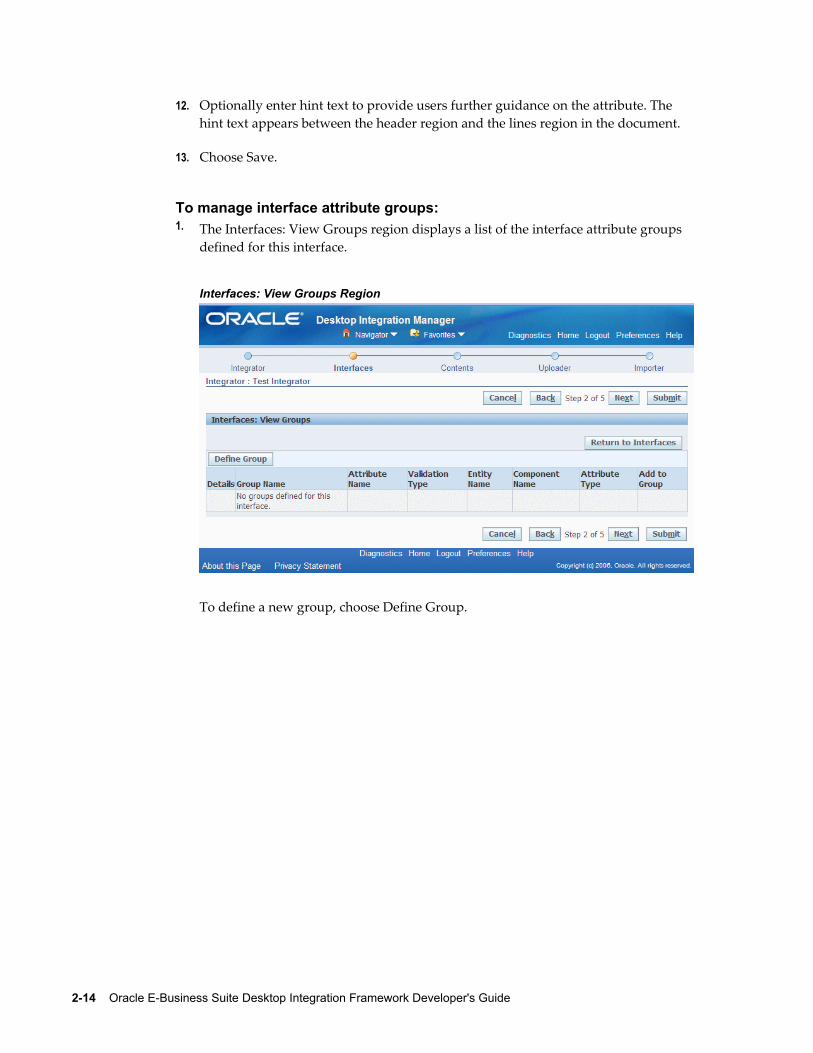
To manage interface attribute groups:1. The Interfaces: View Groups region displays a list of the interface attribute groups
defined for this interface.
Interfaces: View Groups Region
To define a new group, choose Define Group.
Managing Integrators 2-15
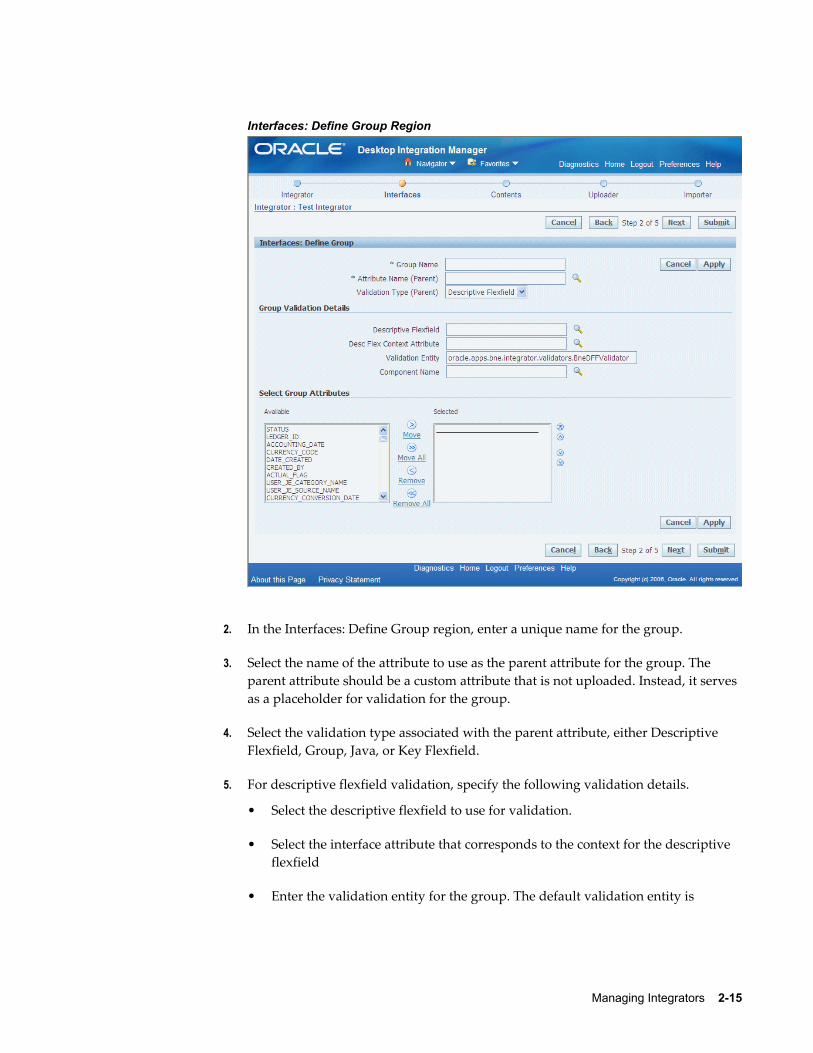
Interfaces: Define Group Region
2. In the Interfaces: Define Group region, enter a unique name for the group.
3. Select the name of the attribute to use as the parent attribute for the group. The parent attribute should be a custom attribute that is not uploaded. Instead, it serves as a placeholder for validation for the group.
4. Select the validation type associated with the parent attribute, either Descriptive Flexfield, Group, Java, or Key Flexfield.
5. For descriptive flexfield validation, specify the following validation details.
• Select the descriptive flexfield to use for validation.
• Select the interface attribute that corresponds to the context for the descriptive flexfield
• Enter the validation entity for the group. The default validation entity is
2-16 Oracle E-Business Suite Desktop Integration Framework Developer's Guide
oracle.apps.bne.integrator.validators.BneDFFValidator.
• Select the component name that defines the list of values to use for validation. See: Managing Components, page 3-1.
6. For group validation or Java validation, specify the following validation details.
• Enter the validation entity for the group.
• Select the component name that defines the list of values to use for validation. See: Managing Components, page 3-1.
7. For key flexfield validation, specify the following validation details.
• Select the key flexfield to use for validation.
• Enter the validation entity for the group. The default validation entity is oracle.apps.bne.integrator.validators.BneKFFValidator.
• Select Yes or No to indicate whether the key flexfield segment values should be concatenated.
• Select the component name that defines the list of values to use for validation. See: Managing Components, page 3-1.
8. Select the attributes you want in the Available list and move them to the Selected list.
9. Choose Apply.
10. In the Interfaces: View Groups region, to display the attributes that belong to a group, choose Show in the Details column for the group.
11. To remove an attribute from the group, choose the Ungroup icon for the attribute inthe group attributes list.
12. To add more attributes to the group, choose the Add to Group icon for the group in the list of groups.
13. After you finish managing interface attribute groups, choose Return to Interfaces.
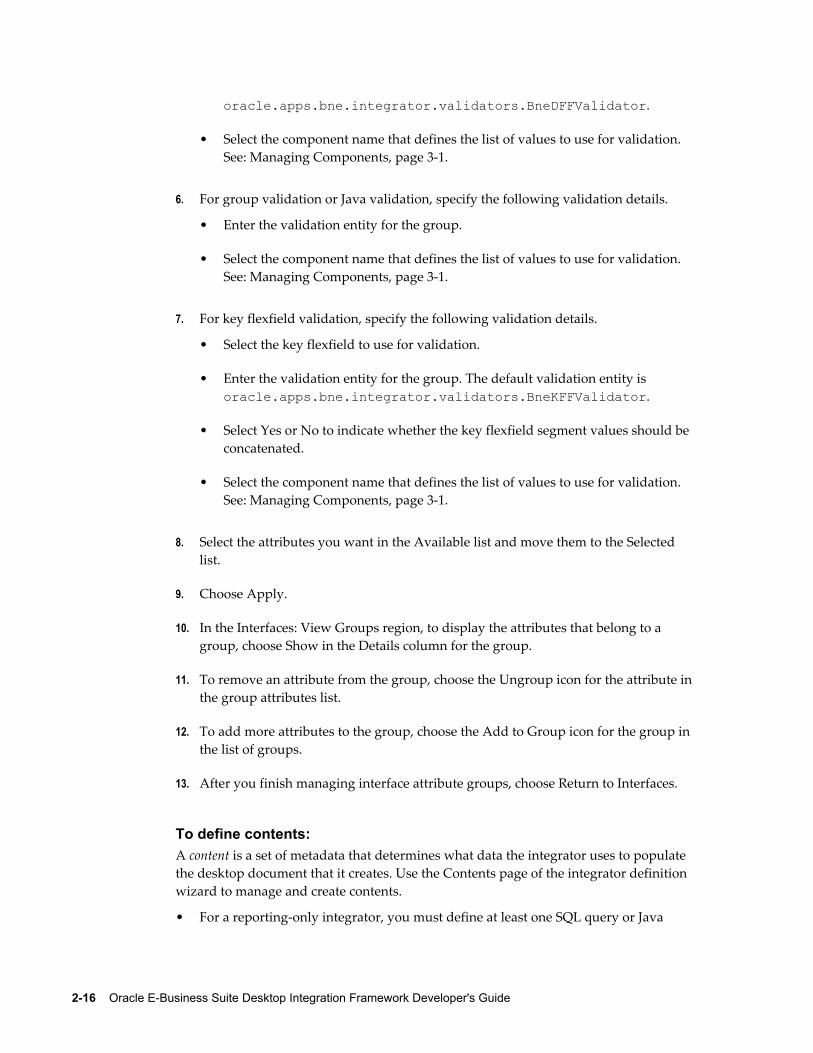
To define contents:A content is a set of metadata that determines what data the integrator uses to populate the desktop document that it creates. Use the Contents page of the integrator definition wizard to manage and create contents.
• For a reporting-only integrator, you must define at least one SQL query or Java
Managing Integrators 2-17
content to specify the Oracle E-Business Suite data that the integrator downloads into the desktop document.
• For an integrator that can upload data to Oracle E-Business Suite, you can optionally define SQL query or Java contents that download data from Oracle E-Business Suite into the document, or text file contents that populate the documentwith data from the specified text file. You can also choose not to define any contentsto create a blank document. In this case users must enter all data into the document manually.
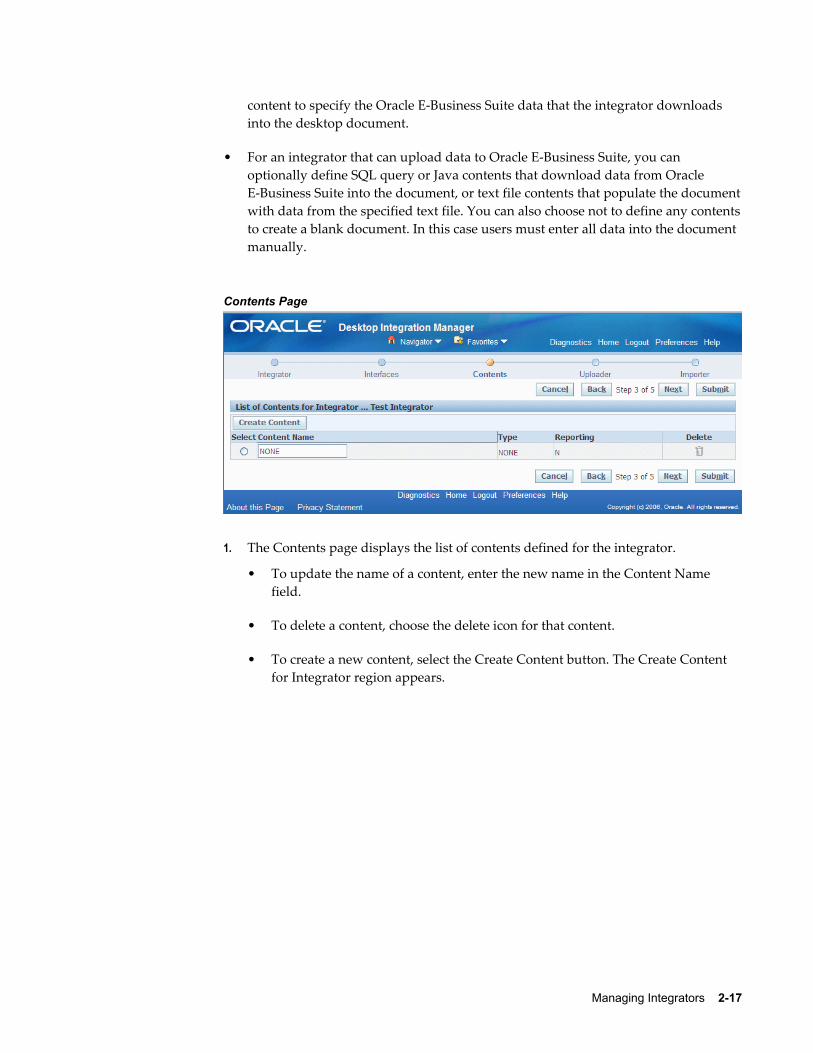
Contents Page
1. The Contents page displays the list of contents defined for the integrator.
• To update the name of a content, enter the new name in the Content Name field.
• To delete a content, choose the delete icon for that content.
• To create a new content, select the Create Content button. The Create Content for Integrator region appears.
2-18 Oracle E-Business Suite Desktop Integration Framework Developer's Guide
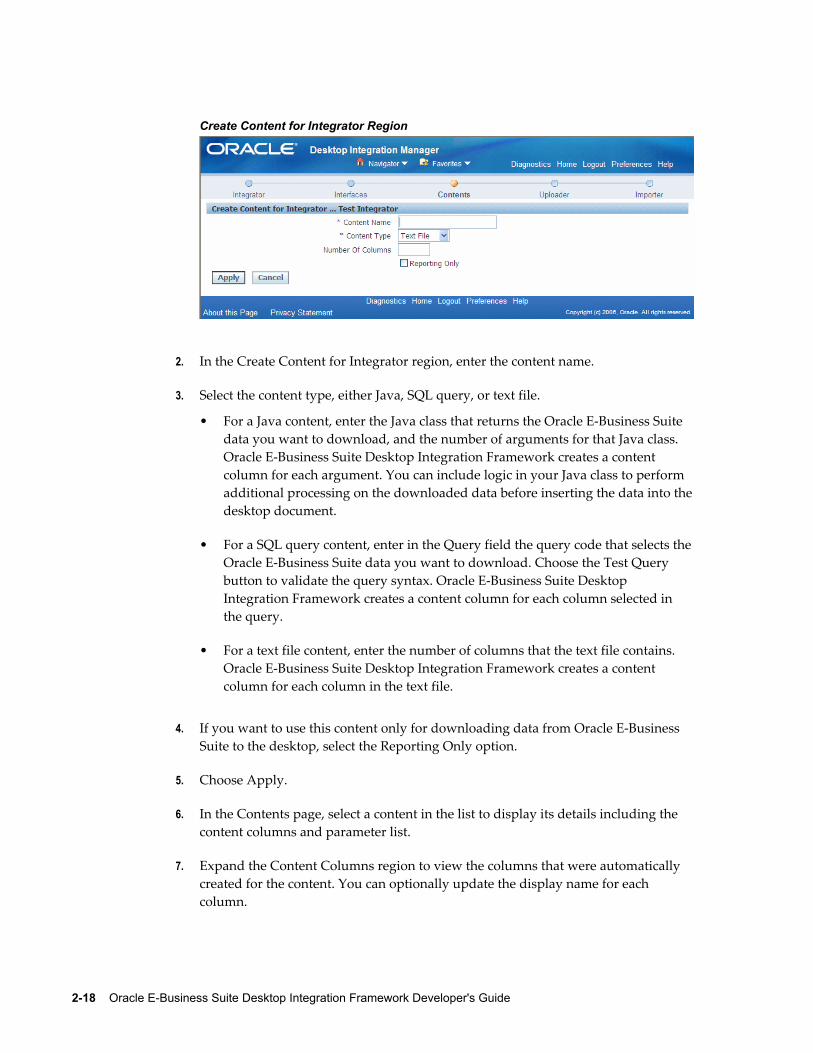
Create Content for Integrator Region
2. In the Create Content for Integrator region, enter the content name.
3. Select the content type, either Java, SQL query, or text file.
• For a Java content, enter the Java class that returns the Oracle E-Business Suite data you want to download, and the number of arguments for that Java class. Oracle E-Business Suite Desktop Integration Framework creates a content column for each argument. You can include logic in your Java class to perform additional processing on the downloaded data before inserting the data into thedesktop document.
• For a SQL query content, enter in the Query field the query code that selects theOracle E-Business Suite data you want to download. Choose the Test Query button to validate the query syntax. Oracle E-Business Suite Desktop Integration Framework creates a content column for each column selected in the query.
• For a text file content, enter the number of columns that the text file contains. Oracle E-Business Suite Desktop Integration Framework creates a content column for each column in the text file.
4. If you want to use this content only for downloading data from Oracle E-Business Suite to the desktop, select the Reporting Only option.
5. Choose Apply.
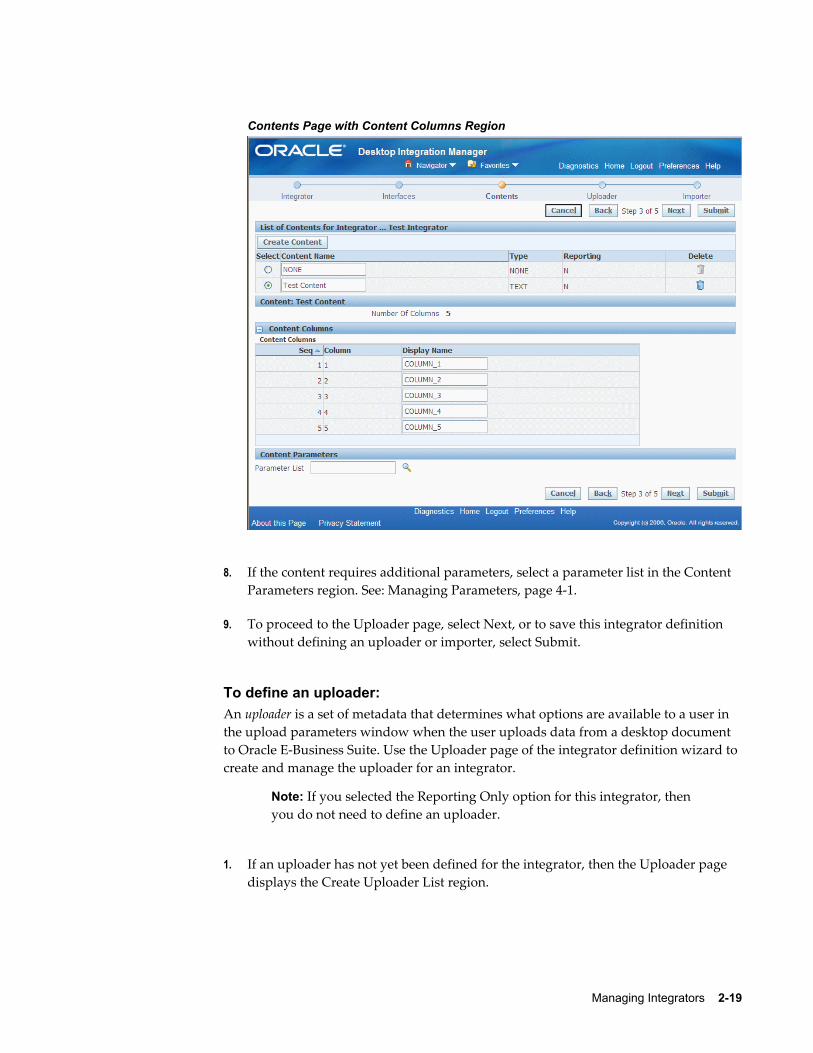
6. In the Contents page, select a content in the list to display its details including the content columns and parameter list.
7. Expand the Content Columns region to view the columns that were automatically created for the content. You can optionally update the display name for each column.
Managing Integrators 2-19
Contents Page with Content Columns Region
8. If the content requires additional parameters, select a parameter list in the Content Parameters region. See: Managing Parameters, page 4-1.
9. To proceed to the Uploader page, select Next, or to save this integrator definition without defining an uploader or importer, select Submit.
To define an uploader:An uploader is a set of metadata that determines what options are available to a user in the upload parameters window when the user uploads data from a desktop document to Oracle E-Business Suite. Use the Uploader page of the integrator definition wizard to create and manage the uploader for an integrator.
Note: If you selected the Reporting Only option for this integrator, thenyou do not need to define an uploader.
1. If an uploader has not yet been defined for the integrator, then the Uploader page displays the Create Uploader List region.

2-20 Oracle E-Business Suite Desktop Integration Framework Developer's Guide
Create Uploader List Region
In the Uploader field, select the method by which to create the uploader.
• None - Select this option if you do not want to use this integrator to upload datafrom a desktop document to Oracle E-Business Suite. In this case no uploader iscreated. To proceed to the Importer page, select Next, or to save this integrator definition without defining an importer, select Submit.
• From Template - Use the standard template provided by Oracle E-Business Suite Desktop Integration Framework as the basis for the uploader definition. After selecting this option, choose the Create button to create the uploader.
• Copy From Existing Definition - Use the definition of an existing uploader fromanother integrator as the basis for the uploader definition. After selecting this option, select the existing uploader definition that you want to copy. Then choose the Create button to create the uploader.
Note: You can copy an uploader definition only from another integrator that belongs to the same application as the integratoryou are defining.
Managing Integrators 2-21
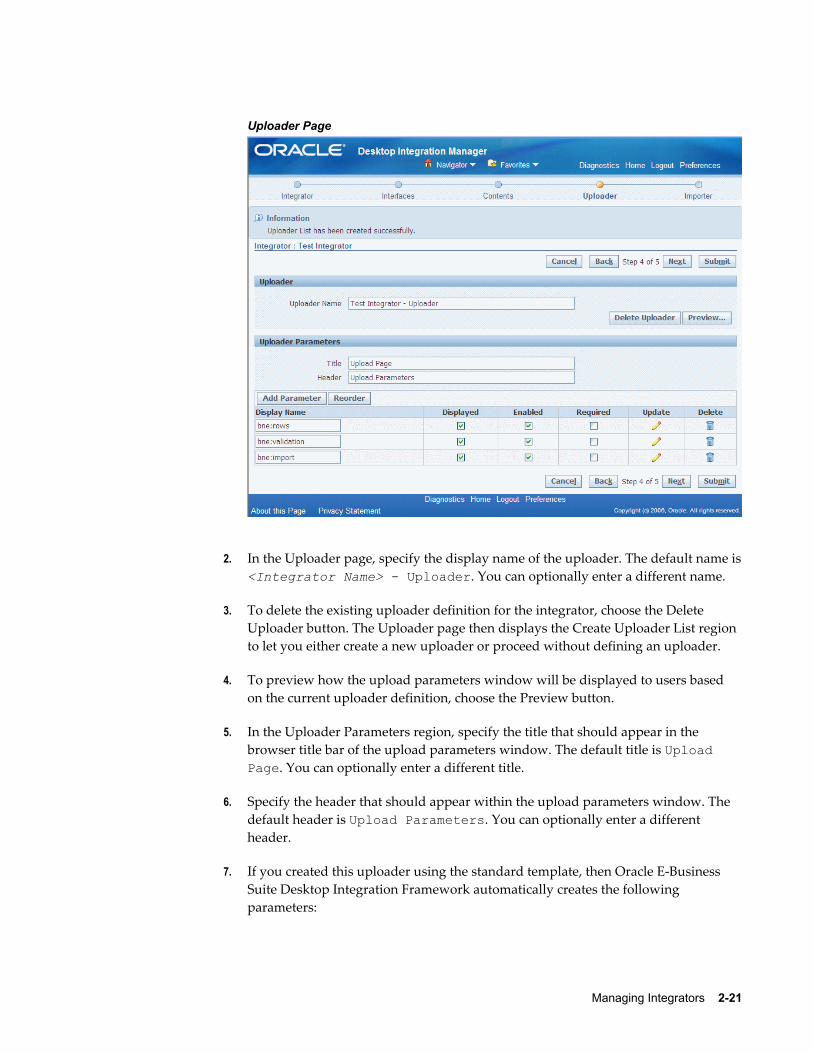
Uploader Page
2. In the Uploader page, specify the display name of the uploader. The default name is<Integrator Name> - Uploader. You can optionally enter a different name.
3. To delete the existing uploader definition for the integrator, choose the Delete Uploader button. The Uploader page then displays the Create Uploader List region to let you either create a new uploader or proceed without defining an uploader.
4. To preview how the upload parameters window will be displayed to users based on the current uploader definition, choose the Preview button.
5. In the Uploader Parameters region, specify the title that should appear in the browser title bar of the upload parameters window. The default title is Upload Page. You can optionally enter a different title.
6. Specify the header that should appear within the upload parameters window. The default header is Upload Parameters. You can optionally enter a different header.
7. If you created this uploader using the standard template, then Oracle E-Business Suite Desktop Integration Framework automatically creates the following parameters:
2-22 Oracle E-Business Suite Desktop Integration Framework Developer's Guide
• Rows to Upload (bne:rows) - Determines whether to upload all rows in the spreadsheet, or only those rows marked with an upload flag. Oracle Web Applications Desktop Integrator marks all changed rows with an upload flag.
• Validate Before Upload (bne:validation) - Determines whether to validate data before uploading the data to Oracle E-Business Suite.
• Automatically Submit Import (bne:import) - Determines whether to submit an import process to move the uploaded data from Oracle E-Business Suite interface tables to base application tables automatically after the upload. If you include this parameter, then you should define an importer for this integrator to specify the import process that will be submitted.
If you created this uploader as a copy of an existing uploader definition, then Oracle E-Business Suite Desktop Integration Framework automatically creates copies of all the parameters defined for the existing uploader.
You can update or delete any of the automatically created parameters or define additional parameters as needed.
8. You can update some parameter details directly in the Uploader Parameters region.
• Enter the display name for the parameter.
• Select whether the parameter is displayed in the upload parameters window.
• Select whether the parameter is enabled for users to enter a value in the upload parameters window.
• Select whether users are required to enter a value for the parameter in the upload parameters window.
You can also choose the update icon for a parameter to update additional parameterdetails. See: To define an upload parameter, page 2-23.
9. To delete a parameter, choose the delete icon for that parameter.
10. To define a new upload parameter, choose the Add Parameter button. See: To define an upload parameter, page 2-23.
11. To change the order in which the parameters appear in the upload parameters window, choose the Reorder button. Select one or more parameters in the list, and use the arrow buttons to move those parameters to the desired position. Then choose Apply.
Note: You can only reorder parameters when the list contains two or more parameters.
Managing Integrators 2-23
12. To proceed to the Importer page, select Next, or to save this integrator definition without defining an importer, select Submit.
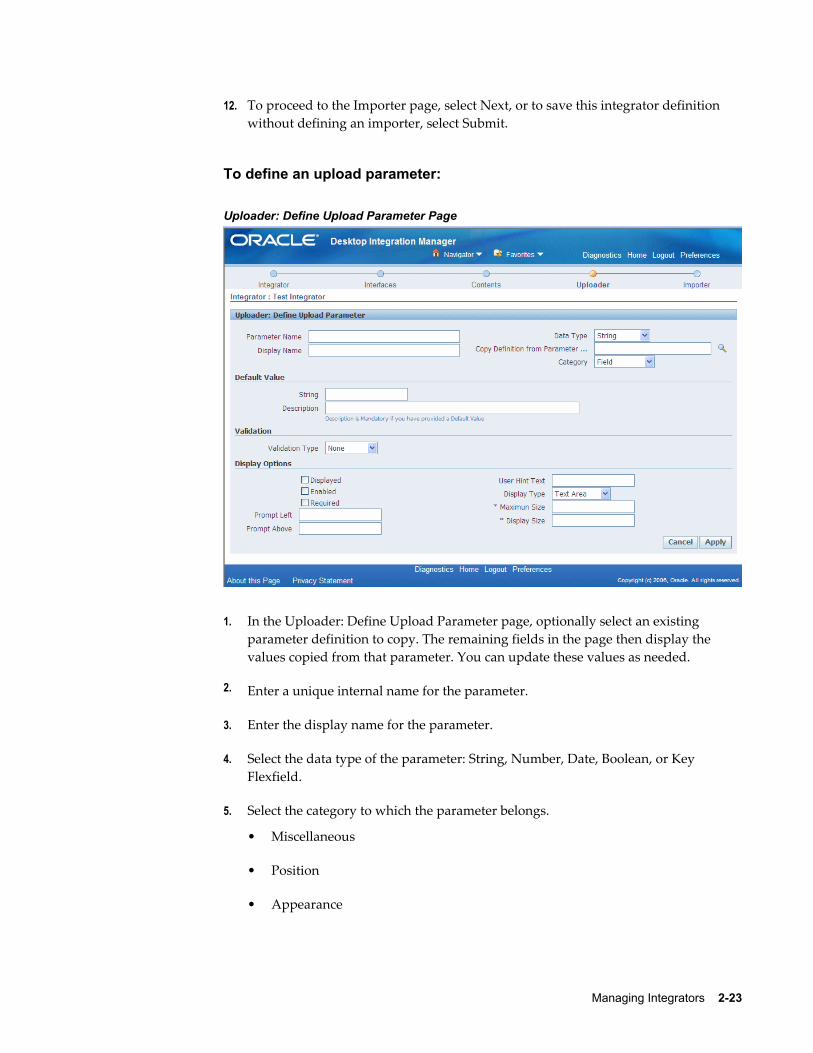
To define an upload parameter:
Uploader: Define Upload Parameter Page
1. In the Uploader: Define Upload Parameter page, optionally select an existing parameter definition to copy. The remaining fields in the page then display the values copied from that parameter. You can update these values as needed.
2. Enter a unique internal name for the parameter.
3. Enter the display name for the parameter.
4. Select the data type of the parameter: String, Number, Date, Boolean, or Key Flexfield.
5. Select the category to which the parameter belongs.
• Miscellaneous
• Position
• Appearance
2-24 Oracle E-Business Suite Desktop Integration Framework Developer's Guide
• Behavior
• Data
• Field
6. Optionally enter a default value of the appropriate data type for the parameter.
• For Boolean parameter, select either Yes or No as the default value.
• For a key flexfield parameter, select the flexfield structure. The Default Value region displays the ID of the application to which the flexfield belongs and the numerical ID for the flexfield.
7. If you entered a default value, enter a description for that value.
8. Select the validation type for the parameter: None, Value Set, Fnd Lookup, or Bne Query.
9. Depending on the selected validation type, enter the value set, lookup type, or SQL query against which you want to validate the parameter value.
For a SQL query, select whether you want to use a simple or complex query.
• For a simple query, you can enter the following common query details and let Oracle E-Business Suite Desktop Integration Framework generate the complete query syntax for you.
• A list of one or more tables from which to select data, separated by commas
• The ID column to select, and an alias for that column
• The meaning column to select, and an alias for that column
• The description column to select, and an alias for that column
• A list of additional columns to select
• A WHERE clause that specifies the conditions defining the data to select
• A list of the columns by which the query results should be ordered
• For a complex query, you must enter the complete query syntax yourself.
After entering the query, choose the Validate Query button to validate the query syntax.
10. Select whether the parameter is displayed in the upload parameters window.
Managing Integrators 2-25
11. Select whether the parameter is enabled for users to enter a value in the upload parameters window.
12. Select whether users are required to enter a value for the parameter in the upload parameters window.
13. Optionally enter a prompt to appear to the left of the parameter.
14. Optionally enter a prompt to appear above the parameter.
15. Optionally enter a hint to display to provide users further guidance on the parameter.
16. Select the display type for the parameter.
• For a string parameter, you can select Check Box, Radio Button, List Box, Text Area, or Password.
• For a number or date parameter, you can select Radio Button, List Box, Text Area, or Password.
• For a Boolean parameter, you can select Check Box, Radio Button, List Box, or Text Area.
• A key flexfield parameter must use the Text Area display type.
17. If you selected the display type Radio Button, select whether the radio buttons should be displayed in a vertical or horizontal style.
18. Enter the maximum size for the parameter value.
19. Enter the display size for the parameter value. The display size must be equal to or less than the maximum size.
20. Choose Apply.
To define an importer:An importer is a set of metadata that determines how Oracle Web Applications Desktop Integrator moves uploaded data from Oracle E-Business Suite interface tables to base application tables. Use the Importer page of the integrator definition wizard to define the importer for an integrator.
Ensure that you define the uploader for an integrator before defining an importer. Additionally, ensure that you define the Automatically Submit Import (bne:import) upload parameter within the uploader to enable the import process to be submitted automatically after the upload.
2-26 Oracle E-Business Suite Desktop Integration Framework Developer's Guide
Note: If you selected the Reporting Only option for this integrator, thenyou do not need to define an uploader.
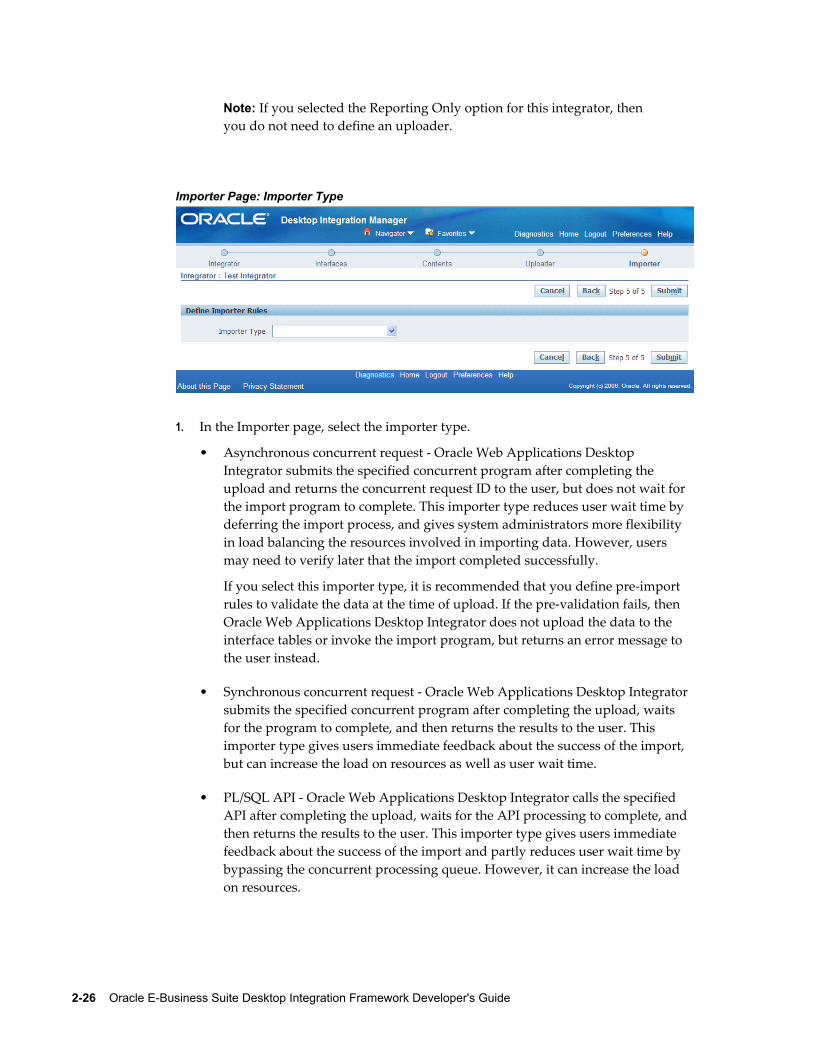
Importer Page: Importer Type
1. In the Importer page, select the importer type.
• Asynchronous concurrent request - Oracle Web Applications Desktop Integrator submits the specified concurrent program after completing the upload and returns the concurrent request ID to the user, but does not wait for the import program to complete. This importer type reduces user wait time by deferring the import process, and gives system administrators more flexibility in load balancing the resources involved in importing data. However, users may need to verify later that the import completed successfully.
If you select this importer type, it is recommended that you define pre-import rules to validate the data at the time of upload. If the pre-validation fails, then Oracle Web Applications Desktop Integrator does not upload the data to the interface tables or invoke the import program, but returns an error message to the user instead.
• Synchronous concurrent request - Oracle Web Applications Desktop Integrator submits the specified concurrent program after completing the upload, waits for the program to complete, and then returns the results to the user. This importer type gives users immediate feedback about the success of the import, but can increase the load on resources as well as user wait time.
• PL/SQL API - Oracle Web Applications Desktop Integrator calls the specified API after completing the upload, waits for the API processing to complete, and then returns the results to the user. This importer type gives users immediate feedback about the success of the import and partly reduces user wait time by bypassing the concurrent processing queue. However, it can increase the load on resources.
Managing Integrators 2-27
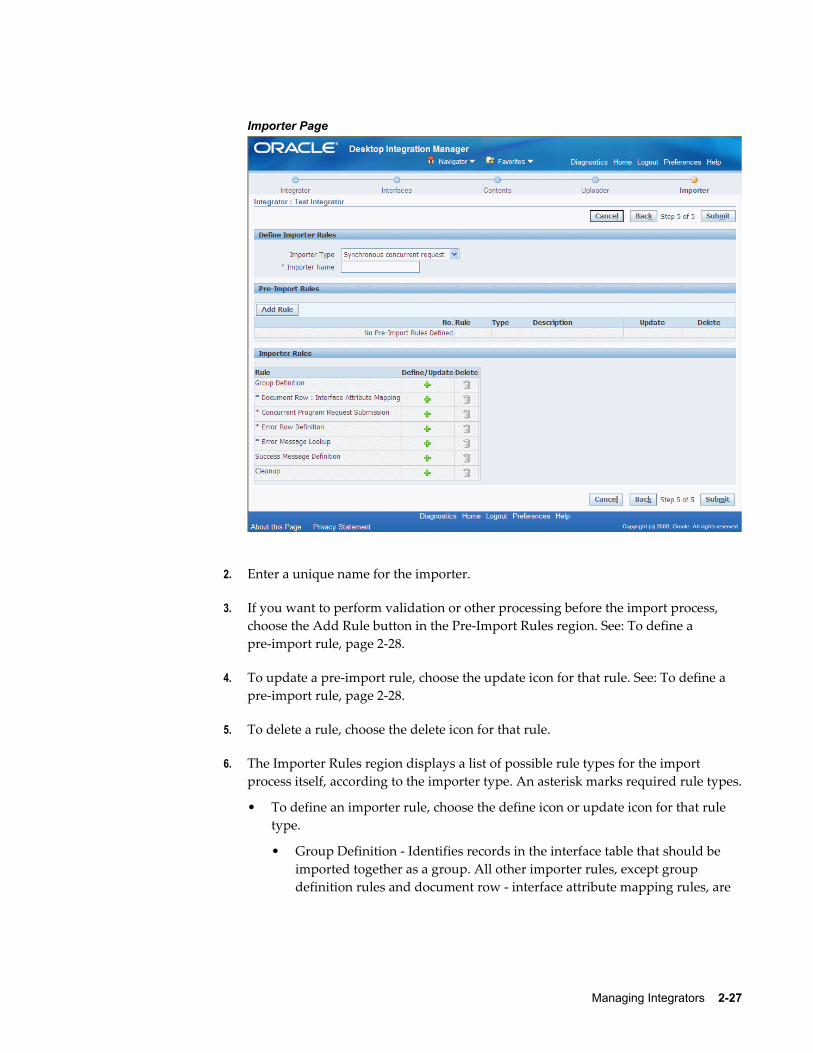
Importer Page
2. Enter a unique name for the importer.
3. If you want to perform validation or other processing before the import process, choose the Add Rule button in the Pre-Import Rules region. See: To define a pre-import rule, page 2-28.
4. To update a pre-import rule, choose the update icon for that rule. See: To define a pre-import rule, page 2-28.
5. To delete a rule, choose the delete icon for that rule.
6. The Importer Rules region displays a list of possible rule types for the import process itself, according to the importer type. An asterisk marks required rule types.
• To define an importer rule, choose the define icon or update icon for that rule type.
• Group Definition - Identifies records in the interface table that should be imported together as a group. All other importer rules, except group definition rules and document row - interface attribute mapping rules, are
2-28 Oracle E-Business Suite Desktop Integration Framework Developer's Guide
repeated for each group of records in the interface table. See: To define a group definition importer rule, page 2-31.
• Document Row: Interface Attribute Mapping - Maps rows in the desktop spreadsheet to records in the interface table. This rule type is required for a synchronous concurrent request importer and optional for other importer types. See: To define a document row - interface attribute mapping importer rule, page 2-32.
• Concurrent Program Request Submission - Specifies the concurrent program to perform the import. This rule type is available and required only for an asynchronous or synchronous concurrent request importer. See: To define a concurrent program request submission importer rule, page 2-33.
• PL/SQL API call - Specifies the PL/SQL API to perform the import. This ruletype is available and required only for a PL/SQL API importer. See: To define a PL/SQL API call importer rule, page 2-34.
• Error Row Definition - Identifies records that were not imported successfully. This rule type is available and required only for a synchronousconcurrent request or a PL/SQL API importer. See: To define an error row definition importer rule, page 2-35.
• Error Message Lookup - Retrieves the error message to return to the user for records that were not imported successfully. This rule type is available and required only for a synchronous concurrent request or a PL/SQL API importer. See: To define an error message lookup importer rule, page 2-37.
• Success Message Definition - Specifies a message to display to the user when the import process is submitted successfully. See: To define a success message definition importer rule, page 2-38.
• Cleanup - Specifies cleanup processing to perform if errors occurred duringany of the previous importer rules. See: To define a cleanup importer rule, page 2-39.
• To delete a rule definition, choose the delete icon for that rule type. The rule type still appears in the list to let you create a new rule definition later if you choose.
7. To save the integrator definition, select Submit.
To define a pre-import rule:Use pre-import rules to specify validation or other processing that you want to perform

Managing Integrators 2-29
on the data being uploaded before importing the data into application base tables. A pre-import rule can perform a SQL query, call a PL/SQL function or procedure, or retrieve the next value of a database sequence.
Importer Page: Pre-Import Rule
1. Enter a unique name for the pre-import rule.
2. Enter a description for the rule.
3. Select the rule type: SQL Query, PL/SQL API Function, PL/SQL API Procedure, or Sequence.
4. For a SQL query rule, enter the query. Choose the Test Query button to validate the query syntax.
5. For a PL/SQL function rule, enter the package name and function name, and specifywhether the API returns an error message or an FND message code if it encounters an error.
6. For a PL/SQL procedure rule, enter the package name and procedure name, and specify whether the API returns an error message or an FND message code if it encounters an error.
7. For a sequence rule, enter the sequence name. You can optionally also enter a unique reference name by which subsequent rules can refer to this sequence.
8. For a SQL query, PL/SQL function, or PL/SQL procedure rule, choose Apply. OracleE-Business Suite Desktop Integration Framework displays additional details

2-30 Oracle E-Business Suite Desktop Integration Framework Developer's Guide
depending on the rule type.
9. For a SQL query rule, the page displays a list of the columns selected by the query. You can optionally enter a unique reference name for each column by which subsequent rules can refer to the column.
The page also displays a list of the parameters used in the query.
• You can optionally enter a unique reference name by which subsequent rules can refer to the parameter.
• Select the data type for the parameter.
• Specify the source from which the parameter value will be obtained: Environment Variables, Import, or Upload Parameters.
• Specify the value based on the selected source. If the source is environment variables, enter the variable to use for the value, such as User ID, Application, Responsibility ID, or Language. If the source is Import, enter the interface attribute or reference parameter to use for the value. If the source is upload parameters, enter the upload parameter to use for the value.
10. For a PL/SQL function rule, if the function returns more details about any error that it encounters, select the Returns Error Information option.
11. For a PL/SQL function or procedure rule, specify whether the API returns an error message or an FND message code if it encounters an error.
12. For a PL/SQL function or procedure rule, the page displays a list of the parameters for the function or procedure.
• If the parameter is used to retrieve an error message, select the Error Message check box.
• Optionally enter a default value for the parameter.
• Specify the source from which the parameter value will be obtained: Environment Variables, Import, or Upload Parameters.
• Specify the value based on the selected source. If the source is environment variables, enter the variable to use for the value, such as User ID, Application, Responsibility ID, or Language. If the source is Import, enter the interface attribute or reference parameter to use for the value. If the source is upload parameters, enter the upload parameter to use for the value.
• Optionally specify a parameter list to use for key-value lookups.
• Optionally enter a SQL clause to modify the value, such as TO_CHAR().
Managing Integrators 2-31
13. Choose Apply.
Note: If you no longer require this rule definition, you can choose the Delete button to remove it.
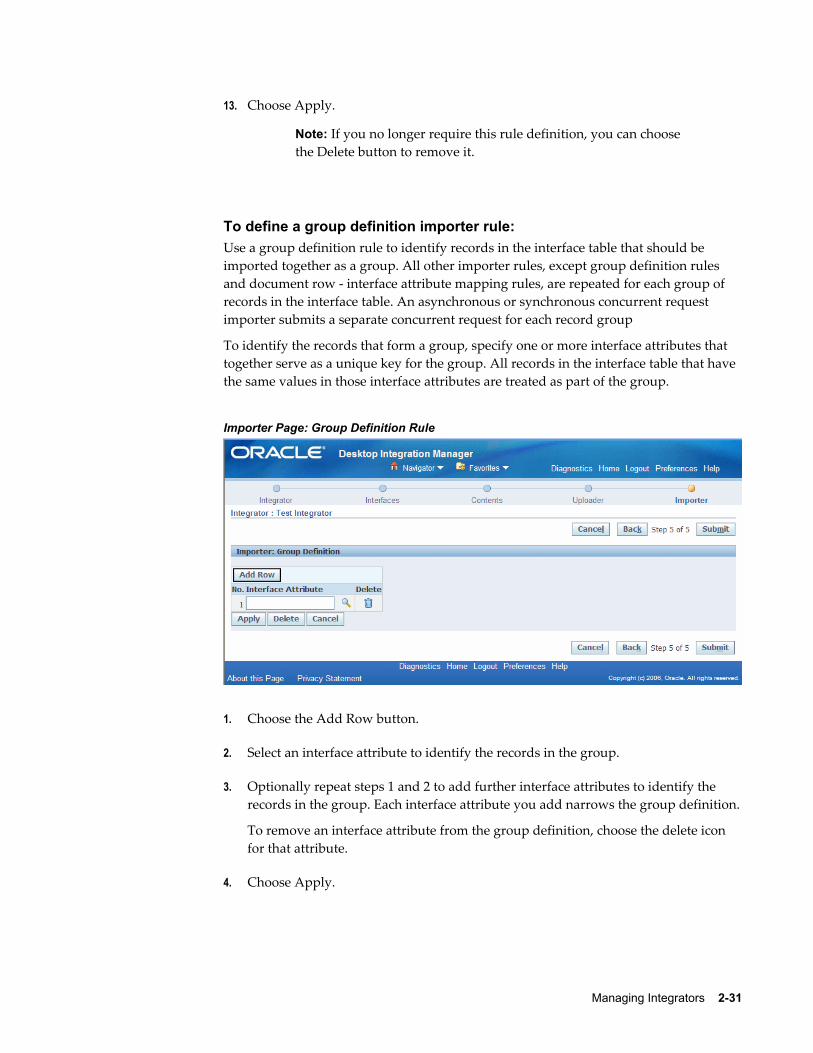
To define a group definition importer rule:Use a group definition rule to identify records in the interface table that should be imported together as a group. All other importer rules, except group definition rules and document row - interface attribute mapping rules, are repeated for each group of records in the interface table. An asynchronous or synchronous concurrent request importer submits a separate concurrent request for each record group
To identify the records that form a group, specify one or more interface attributes that together serve as a unique key for the group. All records in the interface table that have the same values in those interface attributes are treated as part of the group.
Importer Page: Group Definition Rule
1. Choose the Add Row button.
2. Select an interface attribute to identify the records in the group.
3. Optionally repeat steps 1 and 2 to add further interface attributes to identify the records in the group. Each interface attribute you add narrows the group definition.
To remove an interface attribute from the group definition, choose the delete icon for that attribute.
4. Choose Apply.
2-32 Oracle E-Business Suite Desktop Integration Framework Developer's Guide
Note: If you no longer require this rule definition, you can choose the Delete button to remove it.
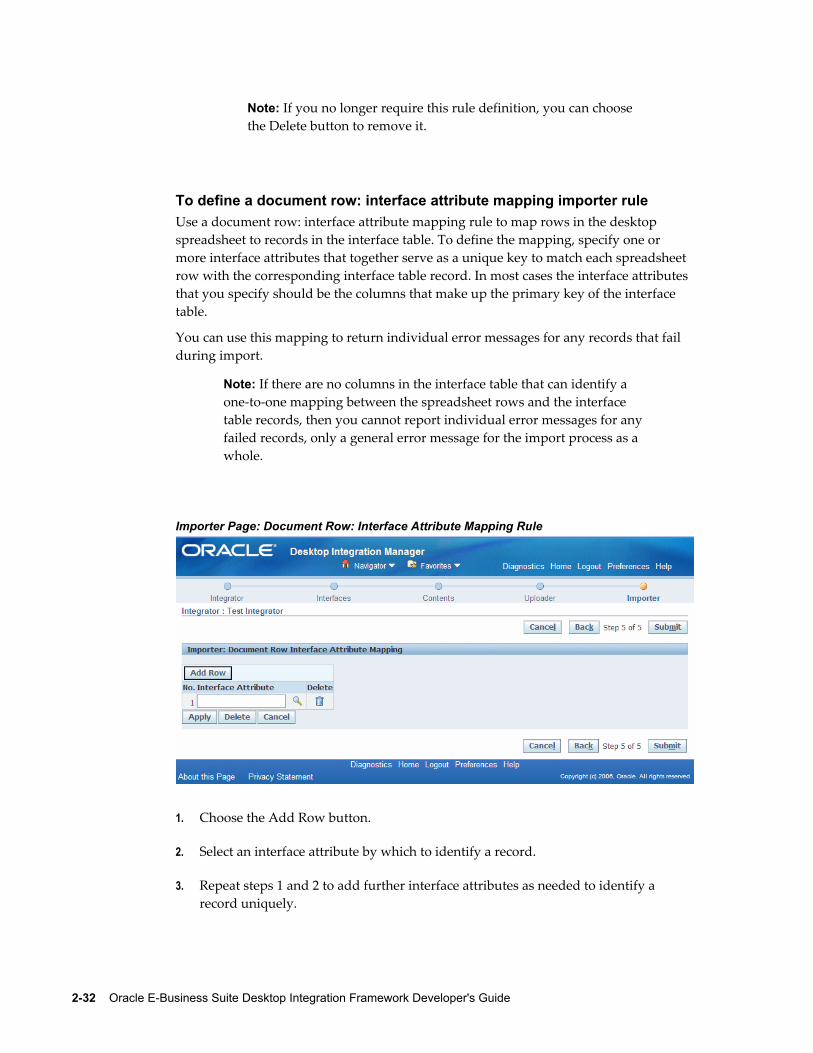
To define a document row: interface attribute mapping importer ruleUse a document row: interface attribute mapping rule to map rows in the desktop spreadsheet to records in the interface table. To define the mapping, specify one or more interface attributes that together serve as a unique key to match each spreadsheet row with the corresponding interface table record. In most cases the interface attributes that you specify should be the columns that make up the primary key of the interface table.
You can use this mapping to return individual error messages for any records that fail during import.
Note: If there are no columns in the interface table that can identify a one-to-one mapping between the spreadsheet rows and the interface table records, then you cannot report individual error messages for any failed records, only a general error message for the import process as a whole.
Importer Page: Document Row: Interface Attribute Mapping Rule
1. Choose the Add Row button.
2. Select an interface attribute by which to identify a record.
3. Repeat steps 1 and 2 to add further interface attributes as needed to identify a record uniquely.
Managing Integrators 2-33
To remove an interface attribute from the unique key, choose the delete icon for thatattribute.
4. Choose Apply.
Note: If you no longer require this rule definition, you can choose the Delete button to remove it.
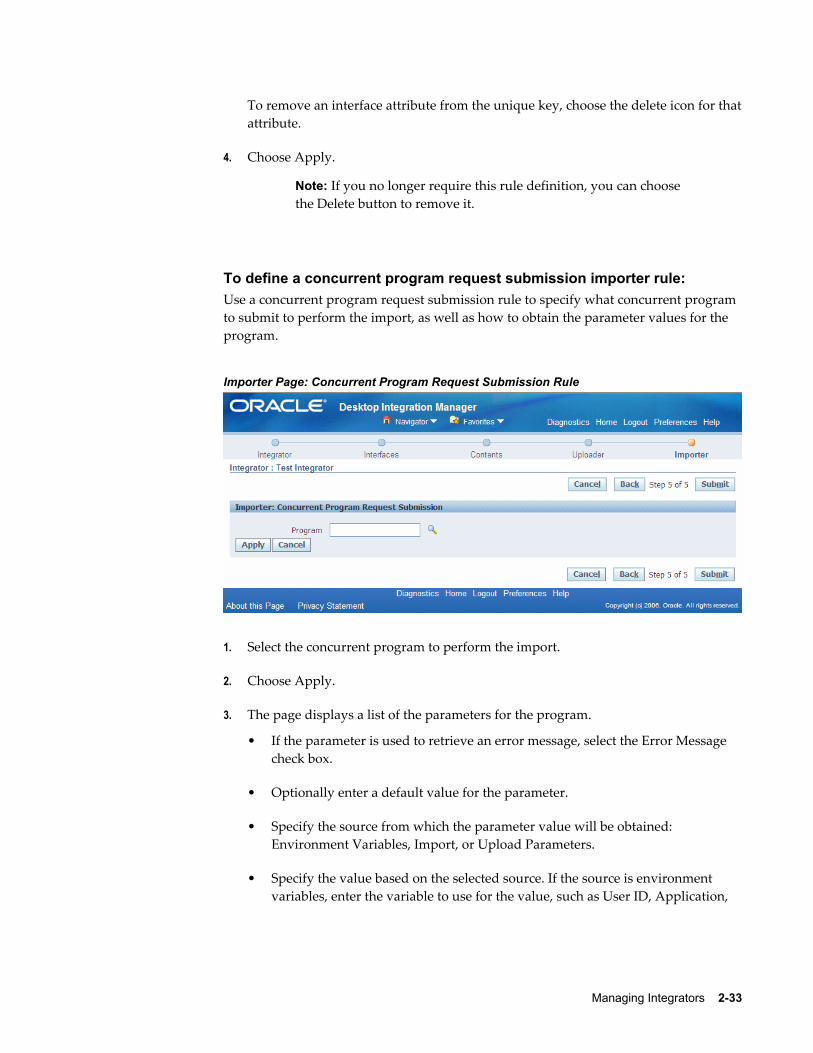
To define a concurrent program request submission importer rule:Use a concurrent program request submission rule to specify what concurrent program to submit to perform the import, as well as how to obtain the parameter values for the program.
Importer Page: Concurrent Program Request Submission Rule
1. Select the concurrent program to perform the import.
2. Choose Apply.
3. The page displays a list of the parameters for the program.
• If the parameter is used to retrieve an error message, select the Error Message check box.
• Optionally enter a default value for the parameter.
• Specify the source from which the parameter value will be obtained: Environment Variables, Import, or Upload Parameters.
• Specify the value based on the selected source. If the source is environment variables, enter the variable to use for the value, such as User ID, Application,
2-34 Oracle E-Business Suite Desktop Integration Framework Developer's Guide
Responsibility ID, or Language. If the source is Import, enter the interface attribute or reference parameter to use for the value. If the source is upload parameters, enter the upload parameter to use for the value.
• Optionally specify a parameter list to use for key-value lookups.
• Optionally enter a SQL clause to modify the value, such as TO_CHAR().
4. Choose Apply.
Note: If you no longer require this rule definition, you can choose the Delete button to remove it.
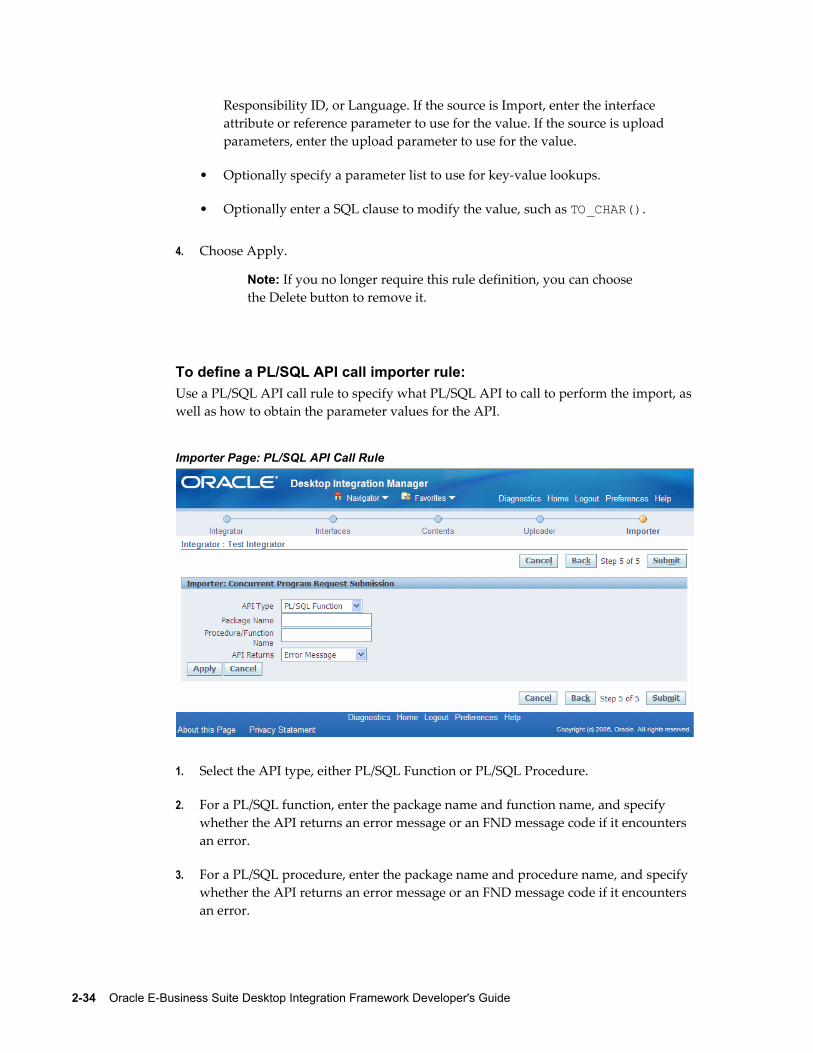
To define a PL/SQL API call importer rule:Use a PL/SQL API call rule to specify what PL/SQL API to call to perform the import, aswell as how to obtain the parameter values for the API.
Importer Page: PL/SQL API Call Rule
1. Select the API type, either PL/SQL Function or PL/SQL Procedure.
2. For a PL/SQL function, enter the package name and function name, and specify whether the API returns an error message or an FND message code if it encounters an error.
3. For a PL/SQL procedure, enter the package name and procedure name, and specify whether the API returns an error message or an FND message code if it encounters an error.
Managing Integrators 2-35
4. Choose Apply. Oracle E-Business Suite Desktop Integration Framework displays additional details for the API.
5. For a PL/SQL function, if the function returns more details about any error that it encounters, select the Returns Error Information option.
6. Specify whether the API returns an error message or an FND message code if it encounters an error.
7. The page displays a list of the parameters for the function or procedure.
• If the parameter is used to retrieve an error message, select the Error Message check box.
• Optionally enter a default value for the parameter.
• Specify the source from which the parameter value will be obtained: Environment Variables, Import, or Upload Parameters.
• Specify the value based on the selected source. If the source is environment variables, enter the variable to use for the value, such as User ID, Application, Responsibility ID, or Language. If the source is Import, enter the interface attribute or reference parameter to use for the value. If the source is upload parameters, enter the upload parameter to use for the value.
• Optionally specify a parameter list to use for key-value lookups.
• Optionally enter a SQL clause to modify the value, such as TO_CHAR().
8. Choose Apply.
Note: If you no longer require this rule definition, you can choose the Delete button to remove it.
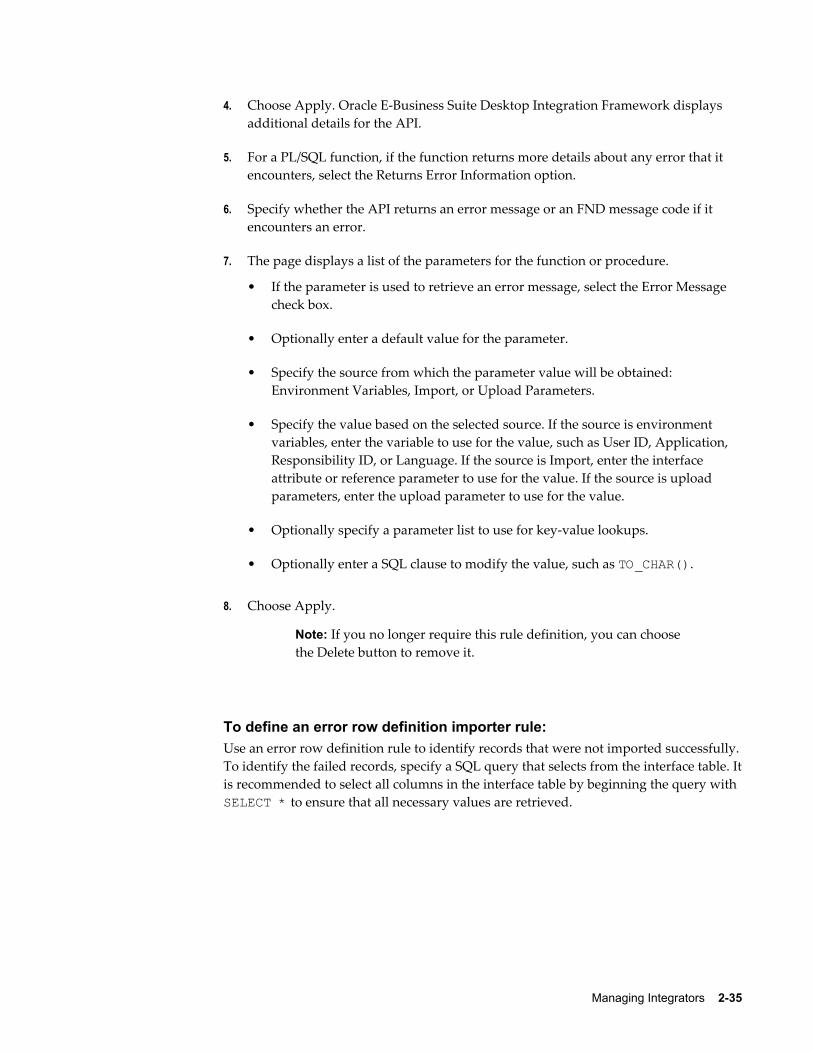
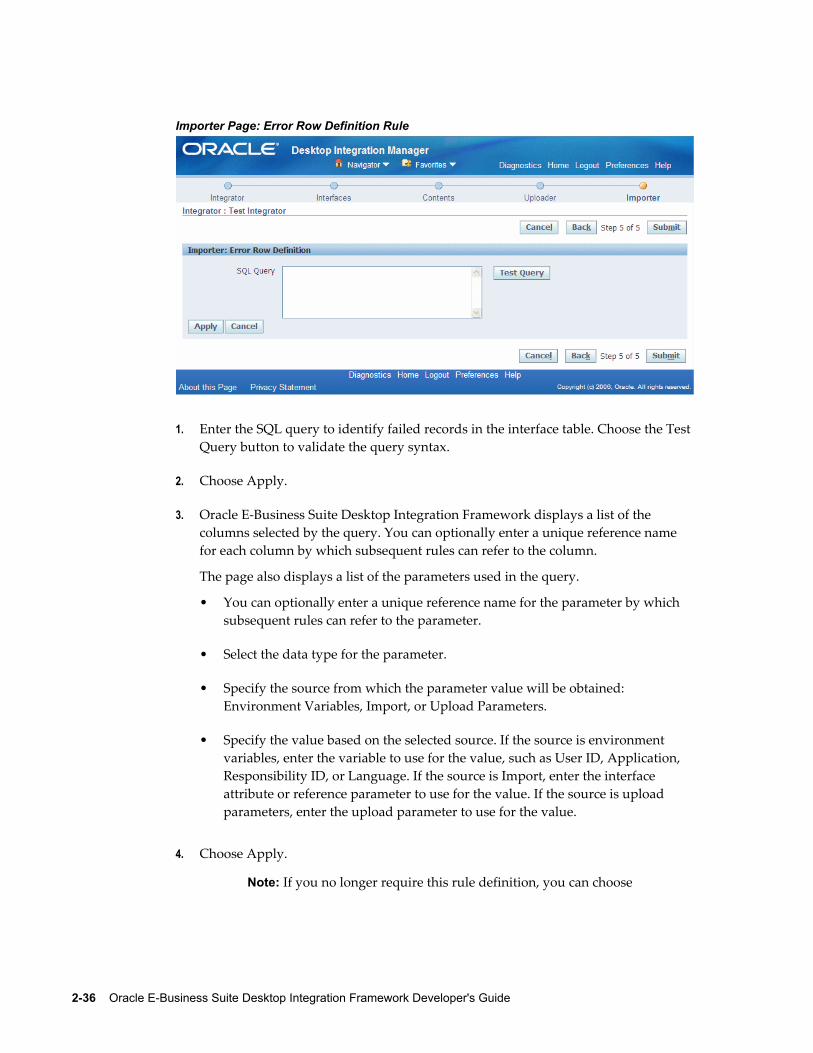
To define an error row definition importer rule:Use an error row definition rule to identify records that were not imported successfully.To identify the failed records, specify a SQL query that selects from the interface table. Itis recommended to select all columns in the interface table by beginning the query with SELECT * to ensure that all necessary values are retrieved.
2-36 Oracle E-Business Suite Desktop Integration Framework Developer's Guide
Importer Page: Error Row Definition Rule
1. Enter the SQL query to identify failed records in the interface table. Choose the Test Query button to validate the query syntax.
2. Choose Apply.
3. Oracle E-Business Suite Desktop Integration Framework displays a list of the columns selected by the query. You can optionally enter a unique reference name for each column by which subsequent rules can refer to the column.
The page also displays a list of the parameters used in the query.
• You can optionally enter a unique reference name for the parameter by which subsequent rules can refer to the parameter.
• Select the data type for the parameter.
• Specify the source from which the parameter value will be obtained: Environment Variables, Import, or Upload Parameters.
• Specify the value based on the selected source. If the source is environment variables, enter the variable to use for the value, such as User ID, Application, Responsibility ID, or Language. If the source is Import, enter the interface attribute or reference parameter to use for the value. If the source is upload parameters, enter the upload parameter to use for the value.
4. Choose Apply.
Note: If you no longer require this rule definition, you can choose
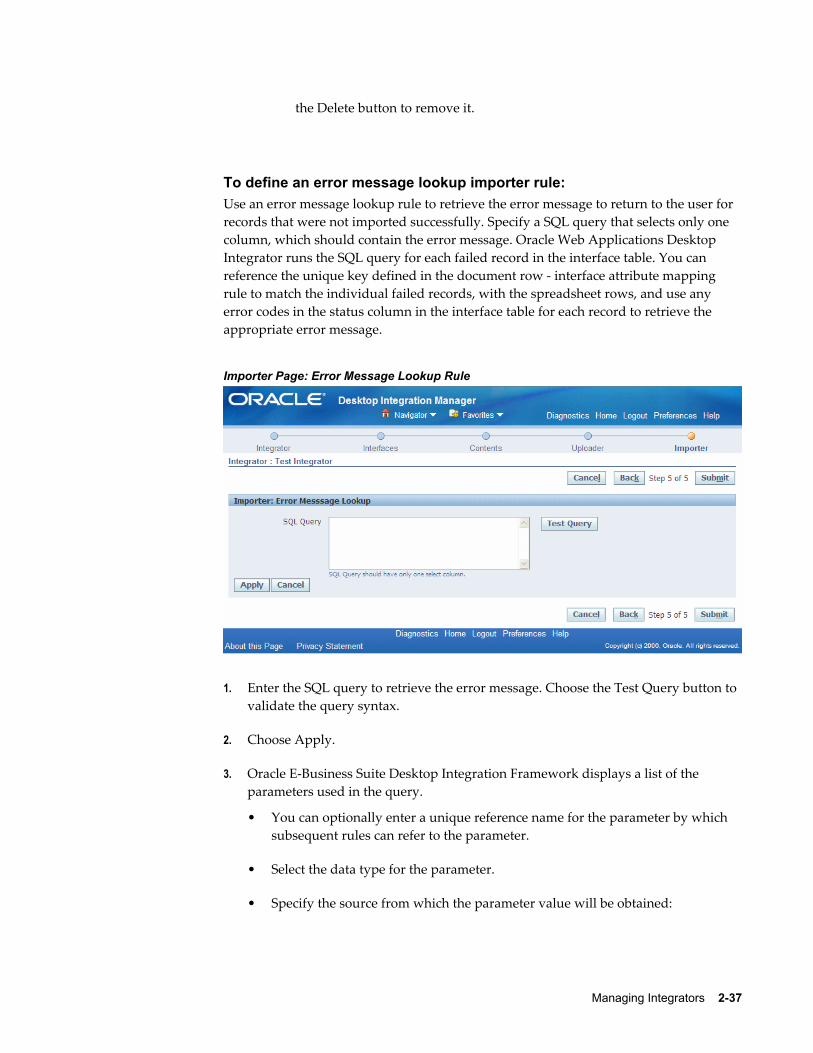
Managing Integrators 2-37
the Delete button to remove it.
To define an error message lookup importer rule:Use an error message lookup rule to retrieve the error message to return to the user for records that were not imported successfully. Specify a SQL query that selects only one column, which should contain the error message. Oracle Web Applications Desktop Integrator runs the SQL query for each failed record in the interface table. You can reference the unique key defined in the document row - interface attribute mapping rule to match the individual failed records, with the spreadsheet rows, and use any error codes in the status column in the interface table for each record to retrieve the appropriate error message.
Importer Page: Error Message Lookup Rule
1. Enter the SQL query to retrieve the error message. Choose the Test Query button to validate the query syntax.
2. Choose Apply.
3. Oracle E-Business Suite Desktop Integration Framework displays a list of the parameters used in the query.
• You can optionally enter a unique reference name for the parameter by which subsequent rules can refer to the parameter.
• Select the data type for the parameter.
• Specify the source from which the parameter value will be obtained:
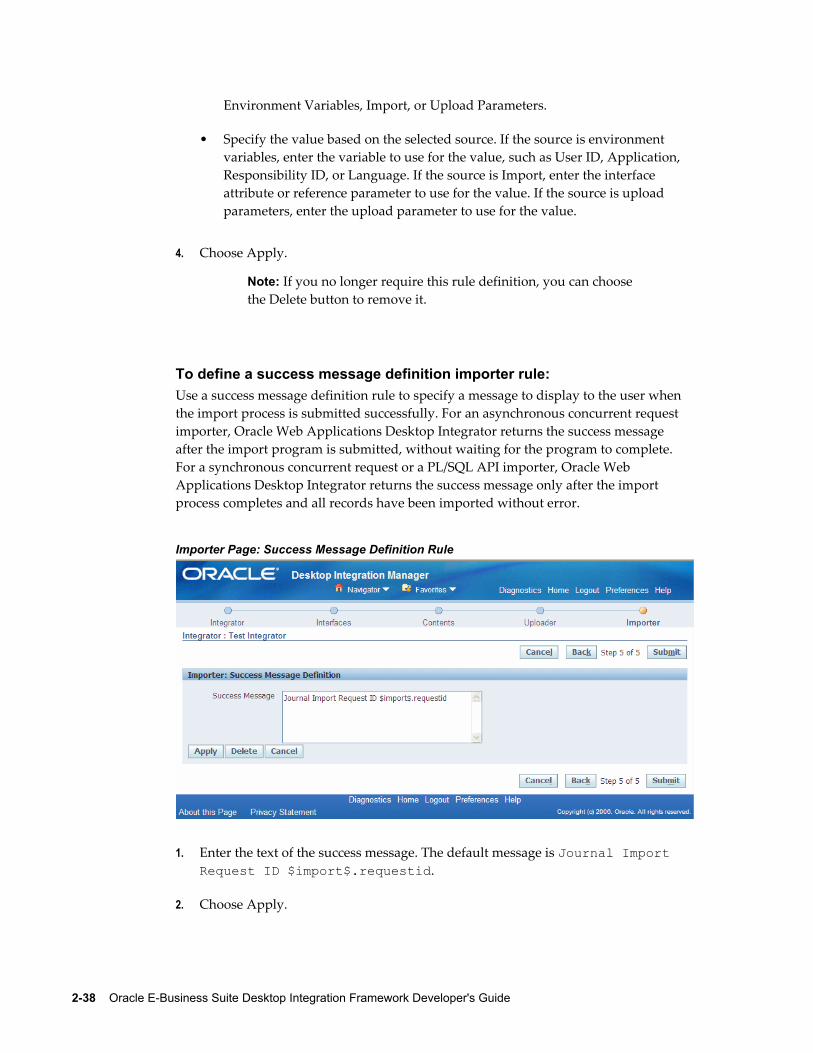
2-38 Oracle E-Business Suite Desktop Integration Framework Developer's Guide
Environment Variables, Import, or Upload Parameters.
• Specify the value based on the selected source. If the source is environment variables, enter the variable to use for the value, such as User ID, Application, Responsibility ID, or Language. If the source is Import, enter the interface attribute or reference parameter to use for the value. If the source is upload parameters, enter the upload parameter to use for the value.
4. Choose Apply.
Note: If you no longer require this rule definition, you can choose the Delete button to remove it.
To define a success message definition importer rule:Use a success message definition rule to specify a message to display to the user when the import process is submitted successfully. For an asynchronous concurrent request importer, Oracle Web Applications Desktop Integrator returns the success message after the import program is submitted, without waiting for the program to complete. For a synchronous concurrent request or a PL/SQL API importer, Oracle Web Applications Desktop Integrator returns the success message only after the import process completes and all records have been imported without error.
Importer Page: Success Message Definition Rule
1. Enter the text of the success message. The default message is Journal Import Request ID $import$.requestid.
2. Choose Apply.
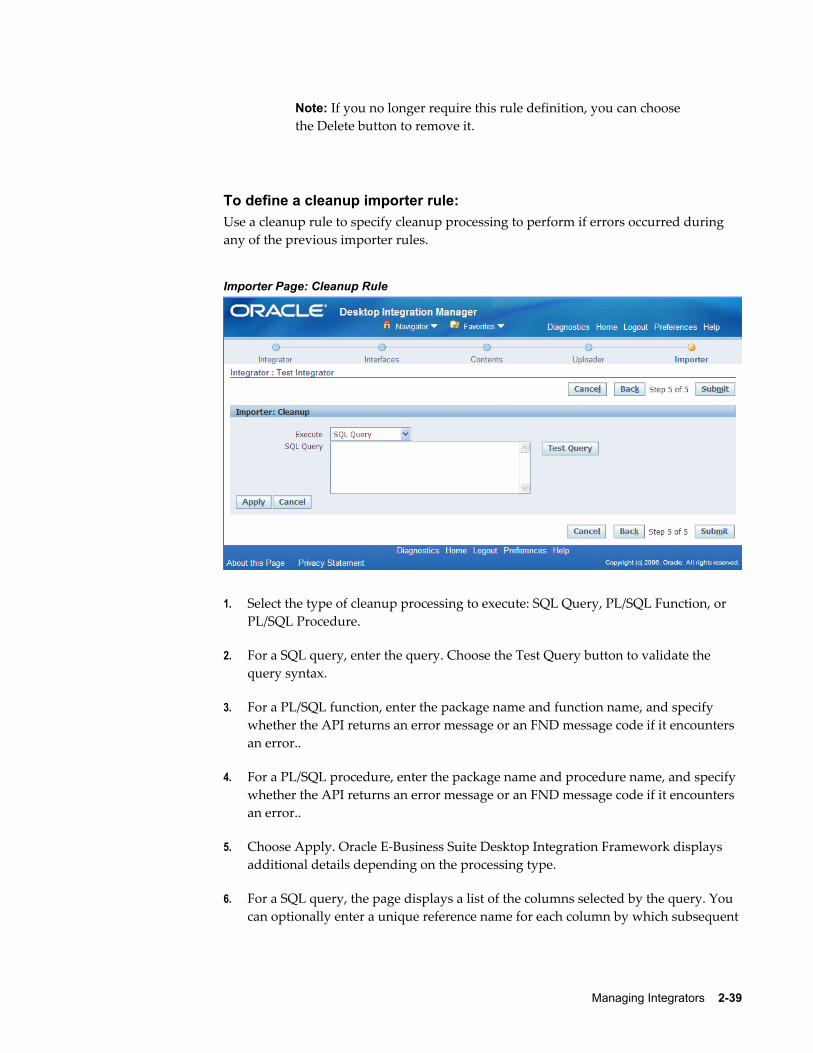
Managing Integrators 2-39
Note: If you no longer require this rule definition, you can choose the Delete button to remove it.
To define a cleanup importer rule:Use a cleanup rule to specify cleanup processing to perform if errors occurred during any of the previous importer rules.
Importer Page: Cleanup Rule
1. Select the type of cleanup processing to execute: SQL Query, PL/SQL Function, or PL/SQL Procedure.
2. For a SQL query, enter the query. Choose the Test Query button to validate the query syntax.
3. For a PL/SQL function, enter the package name and function name, and specify whether the API returns an error message or an FND message code if it encounters an error..
4. For a PL/SQL procedure, enter the package name and procedure name, and specify whether the API returns an error message or an FND message code if it encounters an error..
5. Choose Apply. Oracle E-Business Suite Desktop Integration Framework displays additional details depending on the processing type.
6. For a SQL query, the page displays a list of the columns selected by the query. You can optionally enter a unique reference name for each column by which subsequent
2-40 Oracle E-Business Suite Desktop Integration Framework Developer's Guide
rules can refer to the column.
The page also displays a list of the parameters used in the query.
• You can optionally enter a unique reference name for the parameter by which subsequent rules can refer to the parameter.
• Select the data type for the parameter.
• Specify the source from which the parameter value will be obtained: Environment Variables, Import, or Upload Parameters.
• Specify the value based on the selected source. If the source is environment variables, enter the variable to use for the value, such as User ID, Application, Responsibility ID, or Language. If the source is Import, enter the interface attribute or reference parameter to use for the value. If the source is upload parameters, enter the upload parameter to use for the value.
7. For a PL/SQL function, if the function returns more details about any error that it encounters, select the Returns Error Information option.
8. For a PL/SQL function or procedure, specify whether the API returns an error message or an FND message code if it encounters an error.
9. For a PL/SQL function or procedure, the page displays a list of the parameters for the function or procedure.
• If the parameter is used to retrieve an error message, select the Error Message check box.
• Optionally enter a default value for the parameter.
• Specify the source from which the parameter value will be obtained: Environment Variables, Import, or Upload Parameters.
• Specify the value based on the selected source. If the source is environment variables, enter the variable to use for the value, such as User ID, Application, Responsibility ID, or Language. If the source is Import, enter the interface attribute or reference parameter to use for the value. If the source is upload parameters, enter the upload parameter to use for the value.
• Optionally specify a parameter list to use for key-value lookups.
• Optionally enter a SQL clause to modify the value, such as TO_CHAR().
10. Choose Apply.

Managing Integrators 2-41
Note: If you no longer require this rule definition, you can choose the Delete button to remove it.

Managing Components 3-1
3Managing Components
This chapter covers the following topics:
• Managing Components
• Defining Components
Managing ComponentsA component is a set of metadata that provides a list of values for a field in a desktop document. You can assign a component to an interface attribute to use the list of values defined in the component to validate the value in the document field corresponding to that interface attribute. In this way you can enforce your Oracle E-Business Suite application's business rules for the field values within the desktop document. Use the Components List page to view and manage the components defined for your Oracle E-Business Suite installation.
To manage components:1. Navigate to the Components List page from the Oracle E-Business Suite Navigator
by choosing either Desktop Integration Manager: Manage Components or a custom responsibility and menu path specified by your system administrator.
2. Search for the components you want to display. You can enter the following search criteria:
• Component Name - Enter the display name of the component. You can enter a partial value to search for components whose names contain that value. This field is case-insensitive.
• Component Code - Enter the unique internal code for the component. You can enter a partial value to search for components whose codes contain that value. This field is case-insensitive.
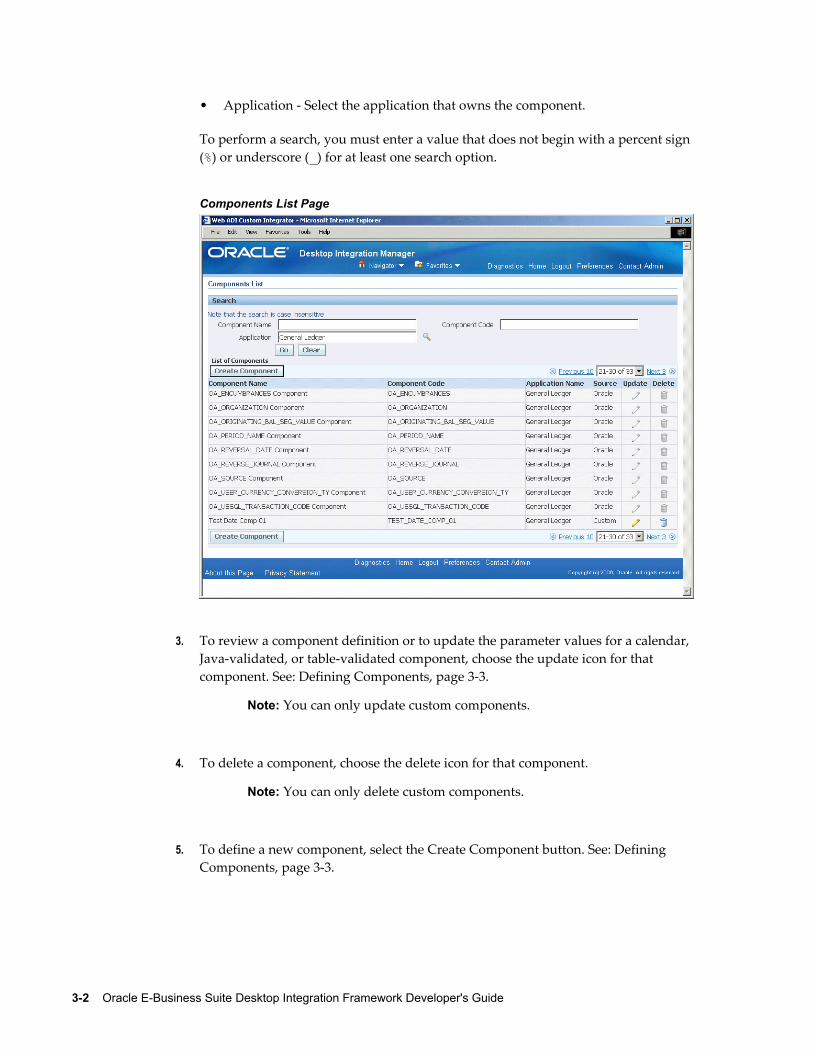
3-2 Oracle E-Business Suite Desktop Integration Framework Developer's Guide
• Application - Select the application that owns the component.
To perform a search, you must enter a value that does not begin with a percent sign (%) or underscore (_) for at least one search option.
Components List Page
3. To review a component definition or to update the parameter values for a calendar, Java-validated, or table-validated component, choose the update icon for that component. See: Defining Components, page 3-3.
Note: You can only update custom components.
4. To delete a component, choose the delete icon for that component.
Note: You can only delete custom components.
5. To define a new component, select the Create Component button. See: Defining Components, page 3-3.
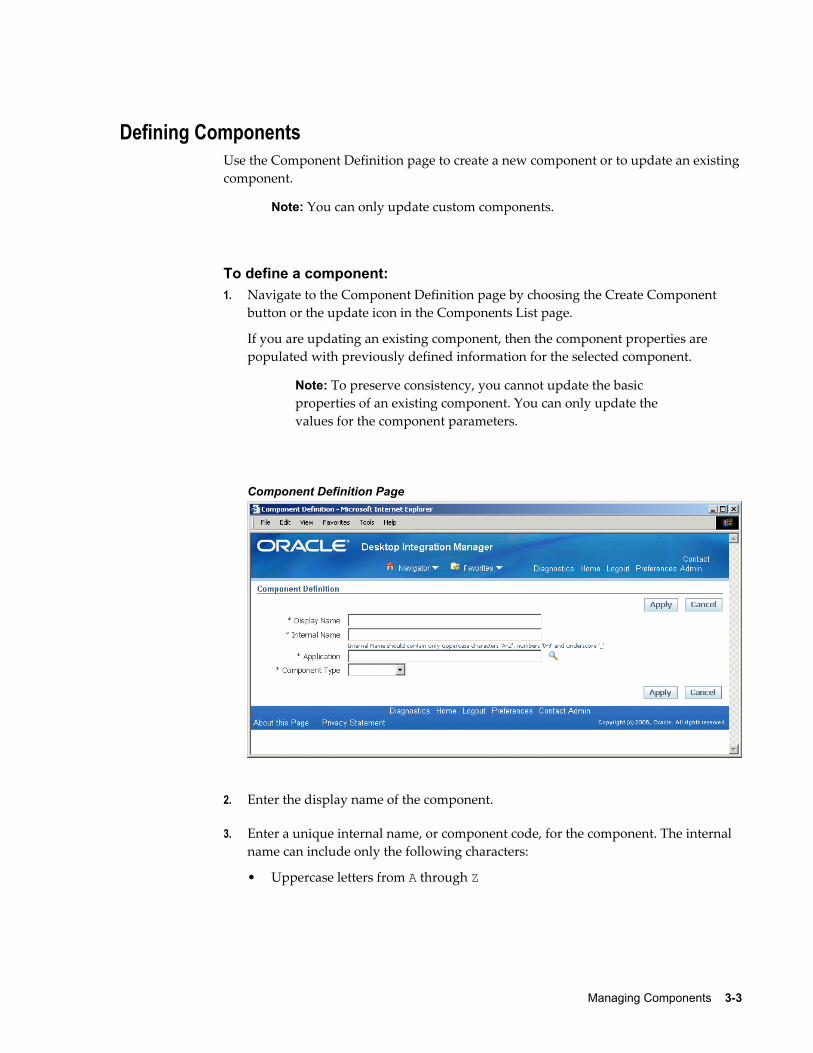
Managing Components 3-3
Defining ComponentsUse the Component Definition page to create a new component or to update an existingcomponent.
Note: You can only update custom components.
To define a component:1. Navigate to the Component Definition page by choosing the Create Component
button or the update icon in the Components List page.
If you are updating an existing component, then the component properties are populated with previously defined information for the selected component.
Note: To preserve consistency, you cannot update the basic properties of an existing component. You can only update the values for the component parameters.
Component Definition Page
2. Enter the display name of the component.
3. Enter a unique internal name, or component code, for the component. The internal name can include only the following characters:
• Uppercase letters from A through Z
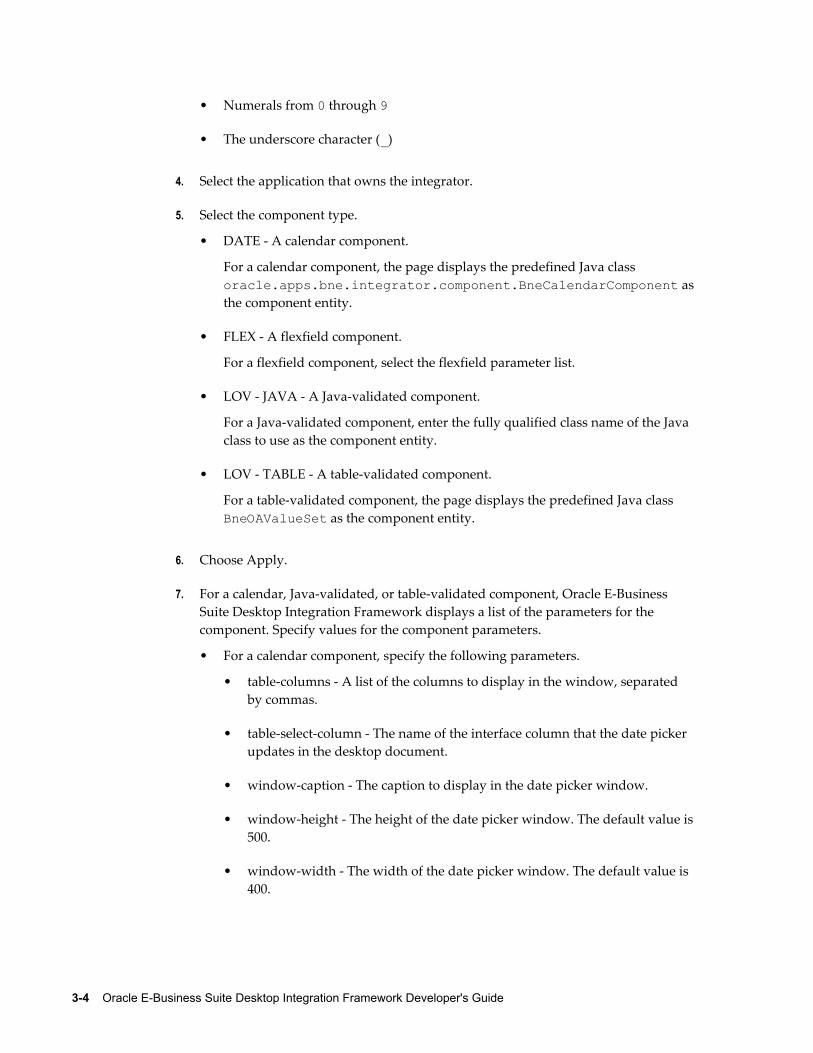
3-4 Oracle E-Business Suite Desktop Integration Framework Developer's Guide
• Numerals from 0 through 9
• The underscore character (_)
4. Select the application that owns the integrator.
5. Select the component type.
• DATE - A calendar component.
For a calendar component, the page displays the predefined Java class oracle.apps.bne.integrator.component.BneCalendarComponent asthe component entity.
• FLEX - A flexfield component.
For a flexfield component, select the flexfield parameter list.
• LOV - JAVA - A Java-validated component.
For a Java-validated component, enter the fully qualified class name of the Java class to use as the component entity.
• LOV - TABLE - A table-validated component.
For a table-validated component, the page displays the predefined Java class BneOAValueSet as the component entity.
6. Choose Apply.
7. For a calendar, Java-validated, or table-validated component, Oracle E-Business Suite Desktop Integration Framework displays a list of the parameters for the component. Specify values for the component parameters.
• For a calendar component, specify the following parameters.
• table-columns - A list of the columns to display in the window, separated by commas.
• table-select-column - The name of the interface column that the date picker updates in the desktop document.
• window-caption - The caption to display in the date picker window.
• window-height - The height of the date picker window. The default value is500.
• window-width - The width of the date picker window. The default value is 400.
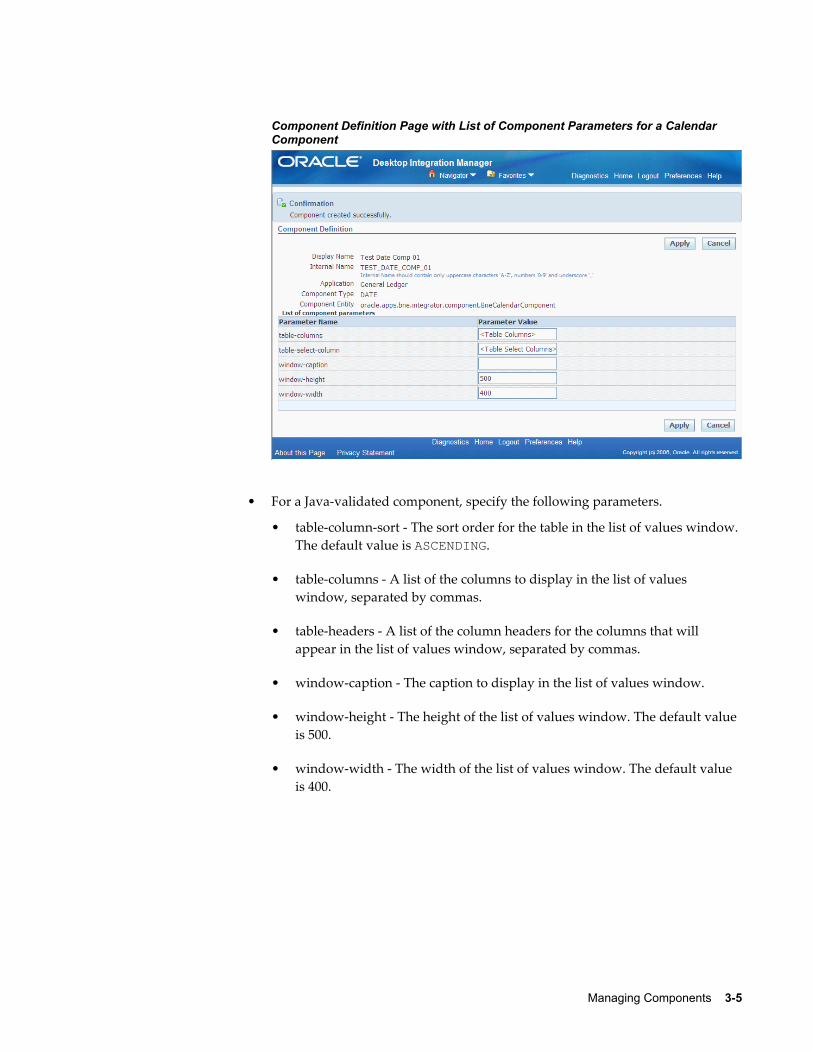
Managing Components 3-5
Component Definition Page with List of Component Parameters for a Calendar Component
• For a Java-validated component, specify the following parameters.
• table-column-sort - The sort order for the table in the list of values window. The default value is ASCENDING.
• table-columns - A list of the columns to display in the list of values window, separated by commas.
• table-headers - A list of the column headers for the columns that will appear in the list of values window, separated by commas.
• window-caption - The caption to display in the list of values window.
• window-height - The height of the list of values window. The default value is 500.
• window-width - The width of the list of values window. The default value is 400.
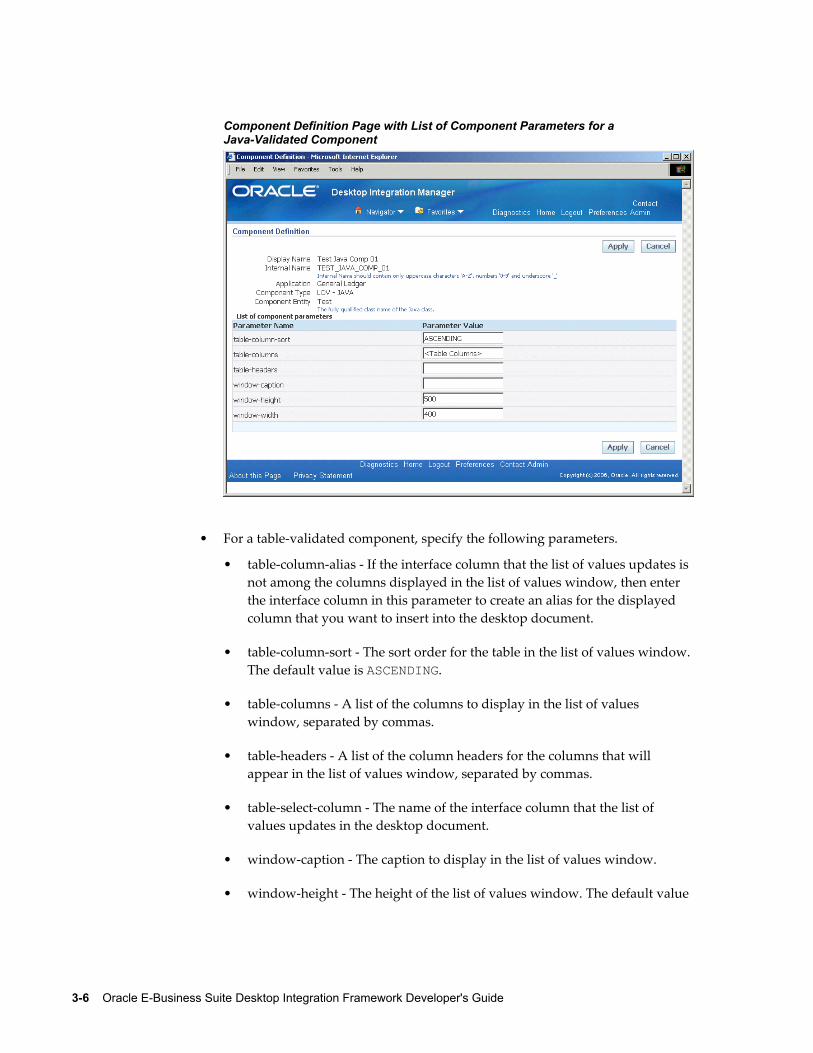
3-6 Oracle E-Business Suite Desktop Integration Framework Developer's Guide
Component Definition Page with List of Component Parameters for a Java-Validated Component
• For a table-validated component, specify the following parameters.
• table-column-alias - If the interface column that the list of values updates is not among the columns displayed in the list of values window, then enter the interface column in this parameter to create an alias for the displayed column that you want to insert into the desktop document.
• table-column-sort - The sort order for the table in the list of values window. The default value is ASCENDING.
• table-columns - A list of the columns to display in the list of values window, separated by commas.
• table-headers - A list of the column headers for the columns that will appear in the list of values window, separated by commas.
• table-select-column - The name of the interface column that the list of values updates in the desktop document.
• window-caption - The caption to display in the list of values window.
• window-height - The height of the list of values window. The default value
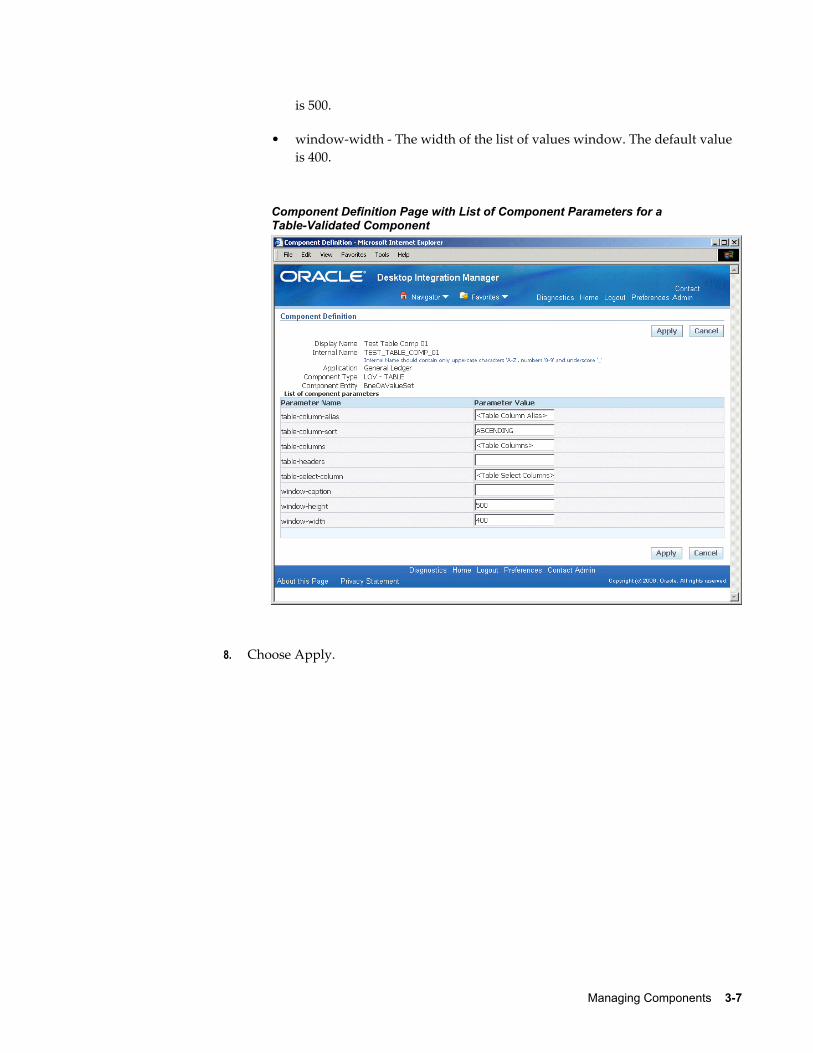
Managing Components 3-7
is 500.
• window-width - The width of the list of values window. The default value is 400.
Component Definition Page with List of Component Parameters for a Table-Validated Component
8. Choose Apply.

Managing Parameters 4-1
4Managing Parameters
This chapter covers the following topics:
• Managing Parameters
Managing ParametersUse the parameter list definition pages to define and manage parameter lists and parameters.
To manage parameter lists and parameters:1. Navigate to the parameter list definition pages from the Oracle E-Business Suite
Navigator by choosing either Desktop Integration Manager: Define Parameter or a custom responsibility and menu path specified by your system administrator.
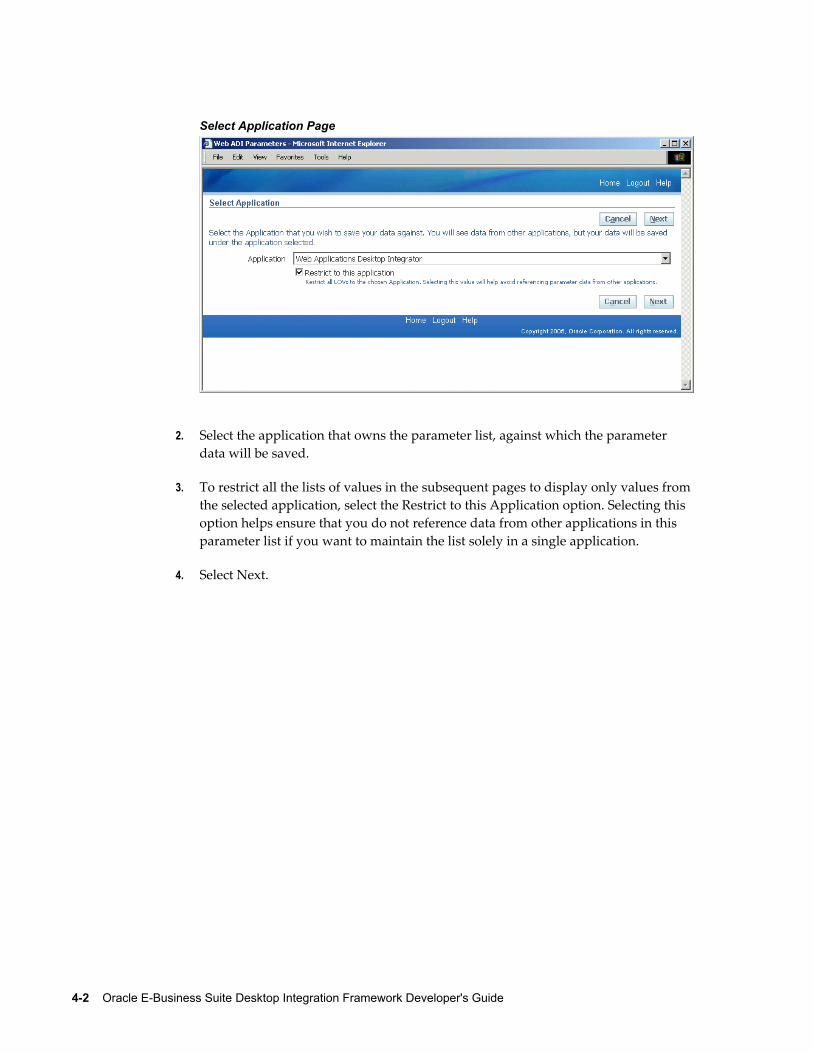
4-2 Oracle E-Business Suite Desktop Integration Framework Developer's Guide
Select Application Page
2. Select the application that owns the parameter list, against which the parameter data will be saved.
3. To restrict all the lists of values in the subsequent pages to display only values from the selected application, select the Restrict to this Application option. Selecting this option helps ensure that you do not reference data from other applications in this parameter list if you want to maintain the list solely in a single application.
4. Select Next.
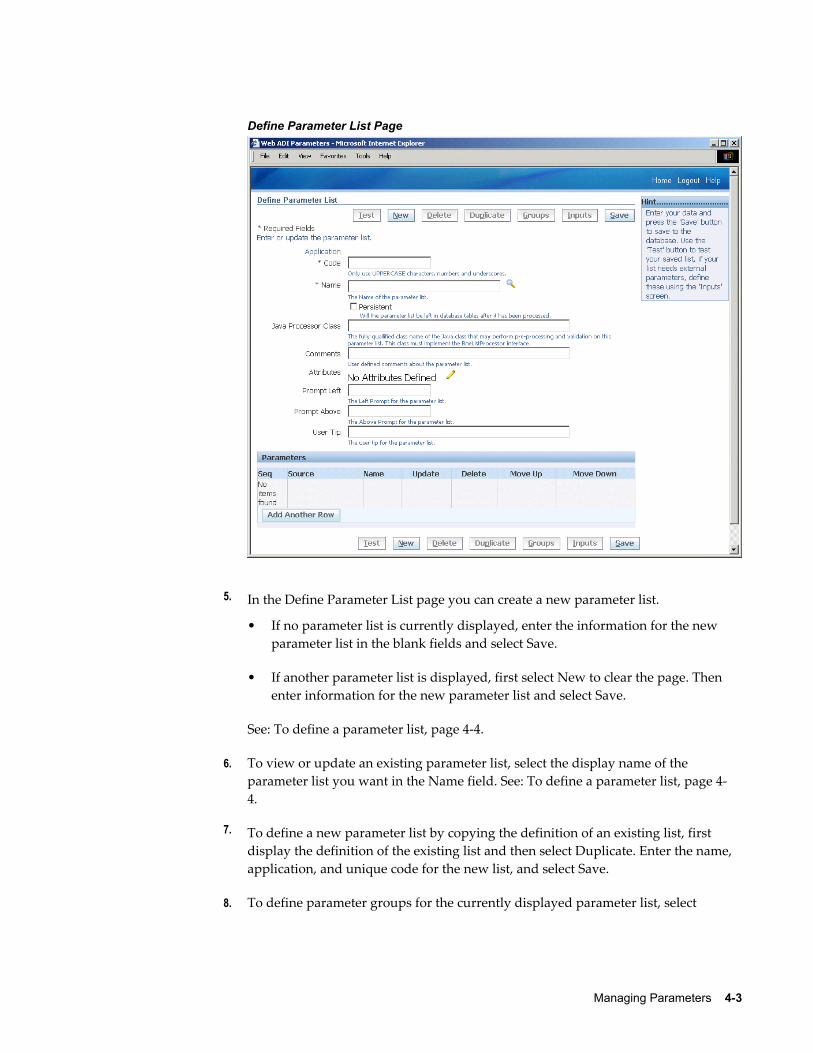
Managing Parameters 4-3
Define Parameter List Page
5. In the Define Parameter List page you can create a new parameter list.
• If no parameter list is currently displayed, enter the information for the new parameter list in the blank fields and select Save.
• If another parameter list is displayed, first select New to clear the page. Then enter information for the new parameter list and select Save.
See: To define a parameter list, page 4-4.
6. To view or update an existing parameter list, select the display name of the parameter list you want in the Name field. See: To define a parameter list, page 4-4.
7. To define a new parameter list by copying the definition of an existing list, first display the definition of the existing list and then select Duplicate. Enter the name, application, and unique code for the new list, and select Save.
8. To define parameter groups for the currently displayed parameter list, select
4-4 Oracle E-Business Suite Desktop Integration Framework Developer's Guide
Groups. See: To define parameter groups, page 4-12.
9. If the currently displayed parameter list requires external API parameters, select Inputs to enter test data for those parameters before testing the parameter list. See: To define inputs, page 4-14.
10. To test how the currently displayed parameter list will appear, select Test. See: To test a parameter list, page 4-14.
11. To delete the currently displayed parameter list, select Delete.
To define a parameter list:1. In the Define Parameter List page, to create a new list, enter a unique code to
identify the parameter list. The code can include only the following characters:
• Uppercase letters from A through Z
• Numerals from 0 through 9
• The underscore character (_)
Note: To preserve consistency, you cannot update the application or code for an existing parameter list.
2. In the Name field, enter the display name of the parameter list.
3. If you want the parameter list to remain in the Oracle Web Applications Desktop Integrator database tables after the list has been processed, select the Persistent option. If you do not select this option, the parameter list is deleted from the database tables after the list has been processed.
4. Optionally enter the fully qualified class name of a Java class that can perform pre-processing and validation on this parameter list. This class must implement the BneListProcessor interface.
5. Optionally enter comments about the parameter list.
6. The Define Parameter List page indicates whether any attributes are defined for the parameter list. To create or update attributes for the parameter list, select the Update List Attributes icon. See: To define attributes, page 4-5.
7. Optionally enter a prompt to appear to the left of the parameter list if it appears in the header region of the document.
8. Optionally enter a prompt to appear above the parameter list if it appears in the
Managing Parameters 4-5
lines region of the document.
9. Optionally enter a tip to provide users further guidance on the parameter list.
10. Select Save.
11. In the Parameters region, select Add Another Row to add a new parameter to the parameter list. See: To define a parameter, page 4-7.
12. To update a parameter definition, choose the update icon for that parameter. See: To define a parameter, page 4-7.
13. To delete a parameter from the list, choose the delete icon for that parameter.
14. To change the position of a parameter in the sequence, choose the move up icon or the move down icon for that parameter.
To define attributes:1. Use the Define Attributes page to define attributes for a parameter list, a parameter,
or a parameter group.
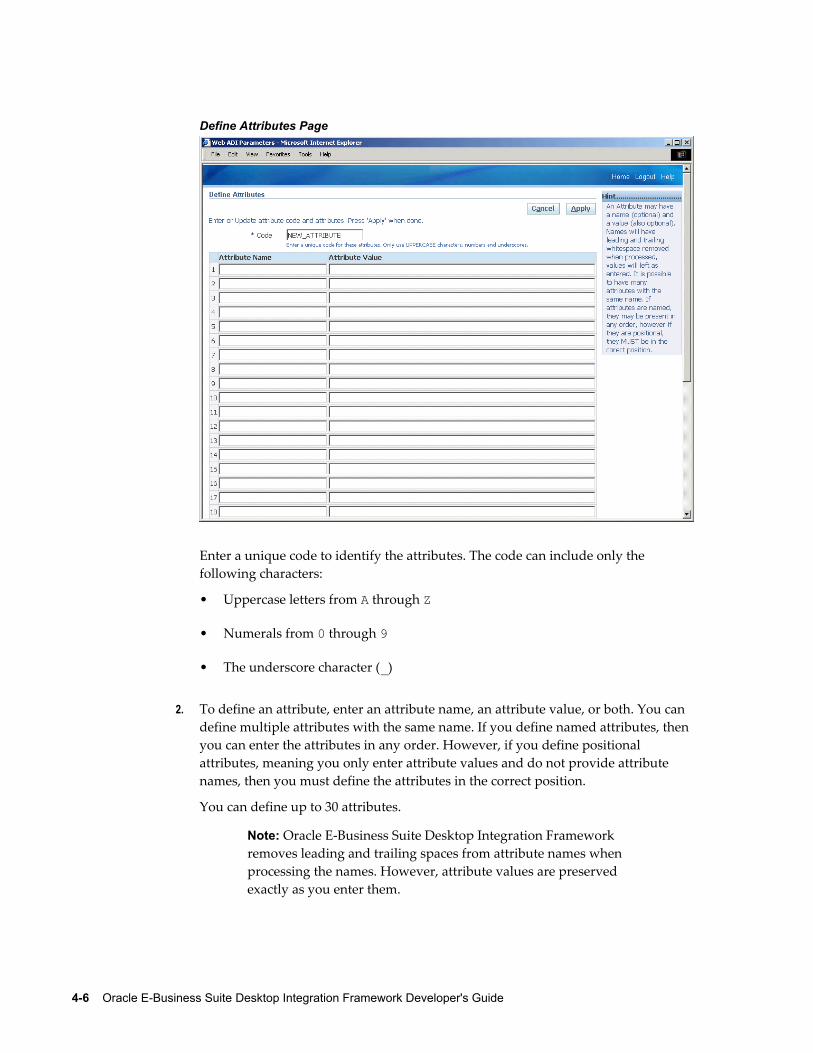
4-6 Oracle E-Business Suite Desktop Integration Framework Developer's Guide
Define Attributes Page
Enter a unique code to identify the attributes. The code can include only the following characters:
• Uppercase letters from A through Z
• Numerals from 0 through 9
• The underscore character (_)
2. To define an attribute, enter an attribute name, an attribute value, or both. You can define multiple attributes with the same name. If you define named attributes, then you can enter the attributes in any order. However, if you define positional attributes, meaning you only enter attribute values and do not provide attribute names, then you must define the attributes in the correct position.
You can define up to 30 attributes.
Note: Oracle E-Business Suite Desktop Integration Framework removes leading and trailing spaces from attribute names when processing the names. However, attribute values are preserved exactly as you enter them.
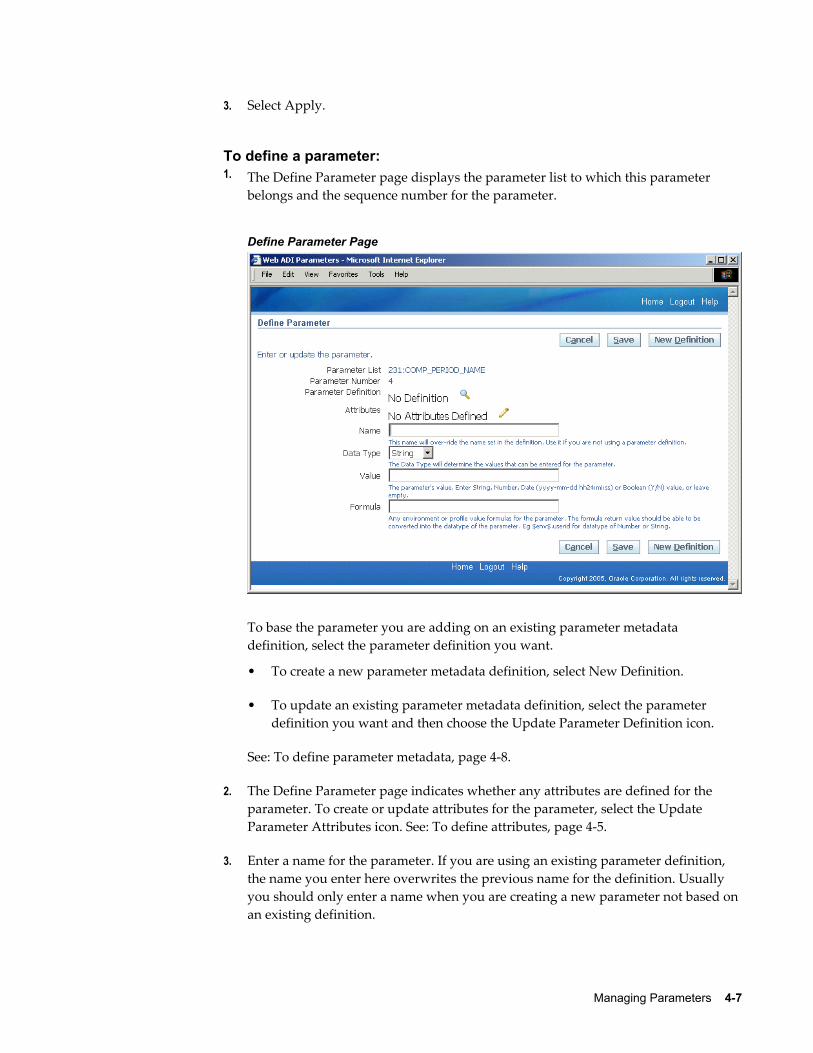
Managing Parameters 4-7
3. Select Apply.
To define a parameter:1. The Define Parameter page displays the parameter list to which this parameter
belongs and the sequence number for the parameter.
Define Parameter Page
To base the parameter you are adding on an existing parameter metadata definition, select the parameter definition you want.
• To create a new parameter metadata definition, select New Definition.
• To update an existing parameter metadata definition, select the parameter definition you want and then choose the Update Parameter Definition icon.
See: To define parameter metadata, page 4-8.
2. The Define Parameter page indicates whether any attributes are defined for the parameter. To create or update attributes for the parameter, select the Update Parameter Attributes icon. See: To define attributes, page 4-5.
3. Enter a name for the parameter. If you are using an existing parameter definition, the name you enter here overwrites the previous name for the definition. Usually you should only enter a name when you are creating a new parameter not based on an existing definition.
4-8 Oracle E-Business Suite Desktop Integration Framework Developer's Guide
4. Select the data type for the parameter.
The data type can be String, Number, Date, or Boolean.
5. Optionally enter a default parameter value.
• For a date parameter, enter the value in the following format: yyyy-mm-dd hh24:mi:ss
• For a Boolean parameter, enter either Y or N.
If you enter a value, you must also enter a description for the parameter. If you do not enter a parameter value, then the description is optional.
6. Optionally enter any environment variable or profile option value formulas to derive the default value for the parameter. The formula should return a value that can be converted into the data type of the parameter. For example, a possible formula for a parameter with a data type of Number or String could be: $env$.userid
7. Select Save.
To define parameter metadata:1. The Define Parameter Metadata page displays the application to which the
parameter definition belongs.
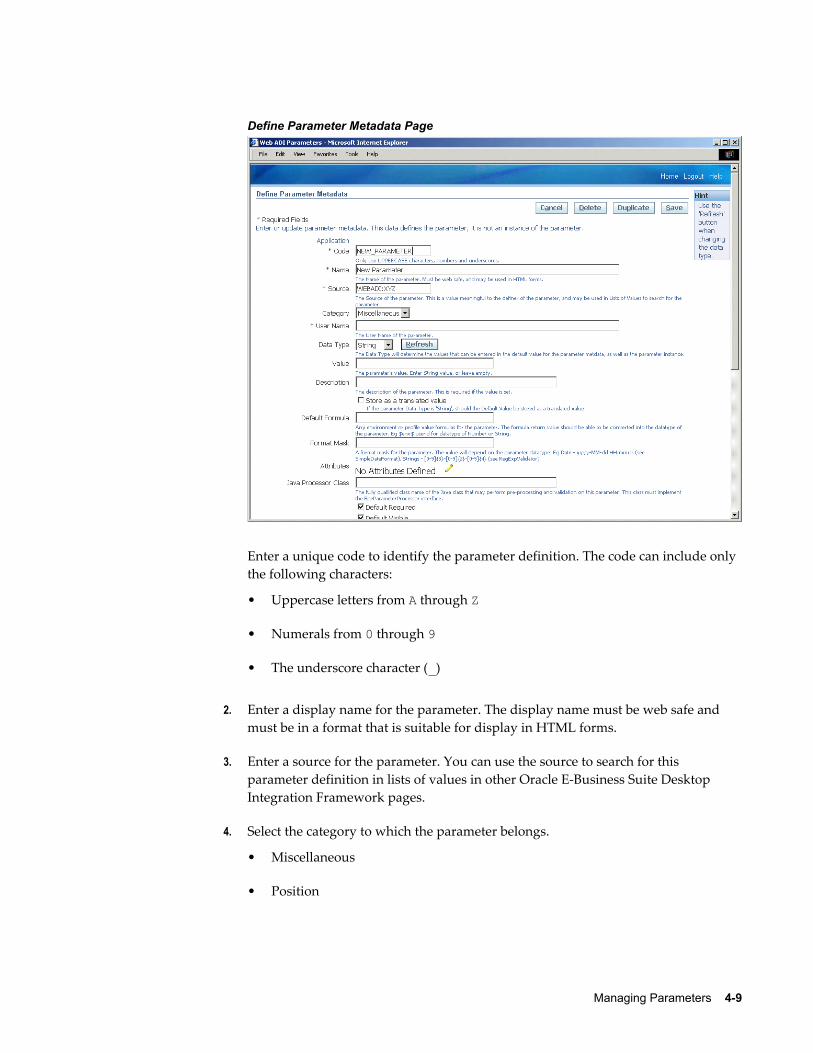
Managing Parameters 4-9
Define Parameter Metadata Page
Enter a unique code to identify the parameter definition. The code can include only the following characters:
• Uppercase letters from A through Z
• Numerals from 0 through 9
• The underscore character (_)
2. Enter a display name for the parameter. The display name must be web safe and must be in a format that is suitable for display in HTML forms.
3. Enter a source for the parameter. You can use the source to search for this parameter definition in lists of values in other Oracle E-Business Suite Desktop Integration Framework pages.
4. Select the category to which the parameter belongs.
• Miscellaneous
• Position
4-10 Oracle E-Business Suite Desktop Integration Framework Developer's Guide
• Appearance
• Behavior
• Data
• Field
5. Enter a user name for the parameter.
6. Select the data type for the parameter: String, Number, Date, Boolean, or Key Flex. Then choose Refresh to update the subsequent fields based on the selected data type.
7. For a key flexfield parameter, select the application to which the flexfield belongs, enter the flexfield structure code, and enter the flexfield number.
8. Optionally enter a default parameter value.
• For a date parameter, enter the value in the following format: yyyy-mm-dd hh24:mi:ss
• For a Boolean parameter, select either None, True, or False.
• For a key flexfield parameter, enter the concatenated flexfield value.
If you enter a value, you must also enter a description for the parameter. If you do not enter a parameter value, then the description is optional.
9. For a string parameter, if you want to store the default value as a translated value, select the Store as a Translated Value option.
10. Optionally enter any environment variable or profile option value formulas to derive the default value for the parameter. The formula should return a value that can be converted into the data type of the parameter. For example, a possible formula for a parameter with a data type of Number or String could be: $env$.userid
11. Optionally enter a format mask for the parameter. The value for the format mask depends on the parameter data type. For example, a format mask for a date parameter could be: yyyy-MM-dd HH:mm:ss
An example format mask for a string parameter could be: [0-9]{3}-[0-9]{2}-[0-9]{4}
12. The Define Parameter Metadata page indicates whether any attributes are defined for the parameter. To create or update attributes for the parameter, select the Update Parameter Attributes icon. See: To define attributes, page 4-5.
Managing Parameters 4-11
13. Optionally enter the fully qualified class name of a Java class that can perform pre-processing and validation on this parameter. This class must implement the BneParameterProcessor interface.
14. Select whether a default value is required for the parameter.
15. Select whether the default value for the parameter is visible to users.
16. Select whether users can modify the parameter value to a value other than the default.
17. Select the validation type for the parameter: None, Fnd Lookups, Value Set, or Bne Query.
18. Depending on the selected validation type, enter the lookup type, value set, or query against which you want to validate the parameter value. If you selected the validation type None, leave the Validation Value field blank.
19. Enter the maximum size for the parameter value. The default value is 100.
20. Enter the display size for the parameter value. The display size must be equal to or less than the maximum size. The default value is 100.
21. Select the display type for the parameter.
• For a string parameter, you can select List Box, CheckBox, Radio Buttons, Text Field, or Password Field.
• For a number or date parameter, you can select List Box, Radio Buttons, Text Field, or Password Field.
• For a Boolean parameter, you can select List Box, CheckBox, Radio Buttons, or Text Field.
• A key flexfield parameter must use the Text Field display type.
22. If you selected the display type Radio Buttons, select whether the display style of the radio buttons should be vertical or horizontal. For all other display types, leave the display style set to None.
23. Optionally enter a prompt to appear to the left of the parameter if it appears in the header region of the document.
24. Optionally enter a prompt to appear above the parameter if it appears in the lines region of the document.
25. Optionally enter a tip to provide users further guidance on the parameter.
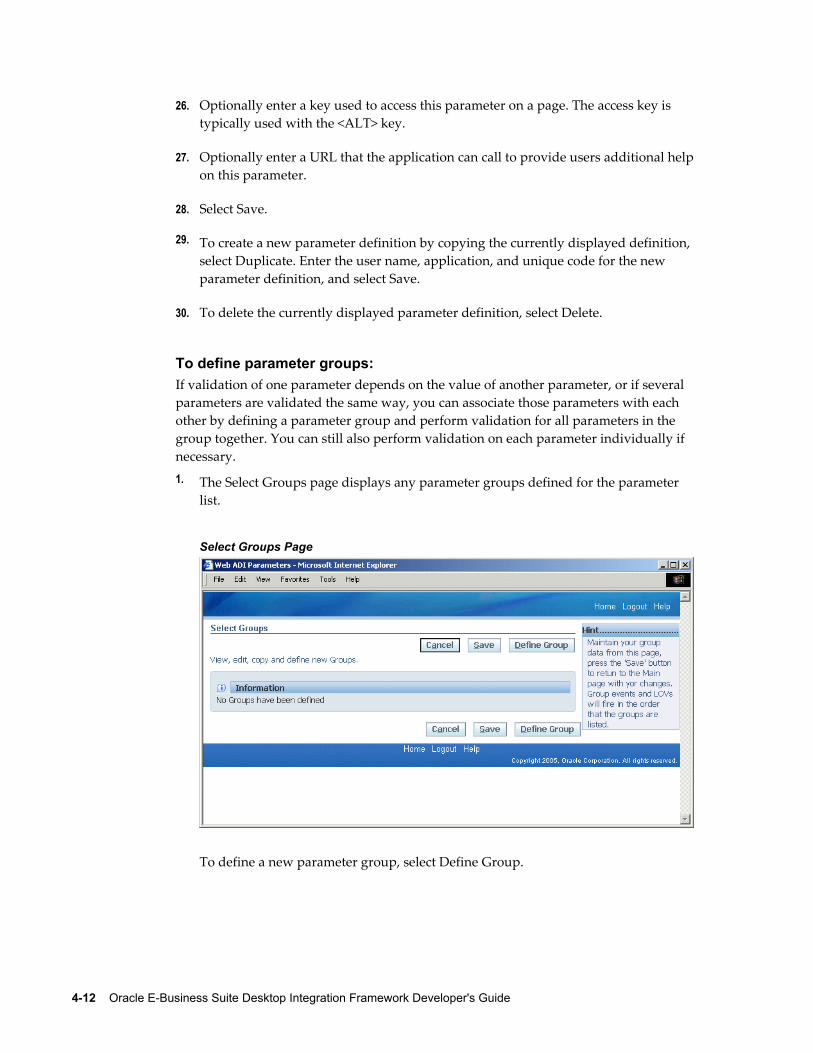
4-12 Oracle E-Business Suite Desktop Integration Framework Developer's Guide
26. Optionally enter a key used to access this parameter on a page. The access key is typically used with the <ALT> key.
27. Optionally enter a URL that the application can call to provide users additional helpon this parameter.
28. Select Save.
29. To create a new parameter definition by copying the currently displayed definition, select Duplicate. Enter the user name, application, and unique code for the new parameter definition, and select Save.
30. To delete the currently displayed parameter definition, select Delete.
To define parameter groups:If validation of one parameter depends on the value of another parameter, or if several parameters are validated the same way, you can associate those parameters with each other by defining a parameter group and perform validation for all parameters in the group together. You can still also perform validation on each parameter individually if necessary.1. The Select Groups page displays any parameter groups defined for the parameter
list.
Select Groups Page
To define a new parameter group, select Define Group.
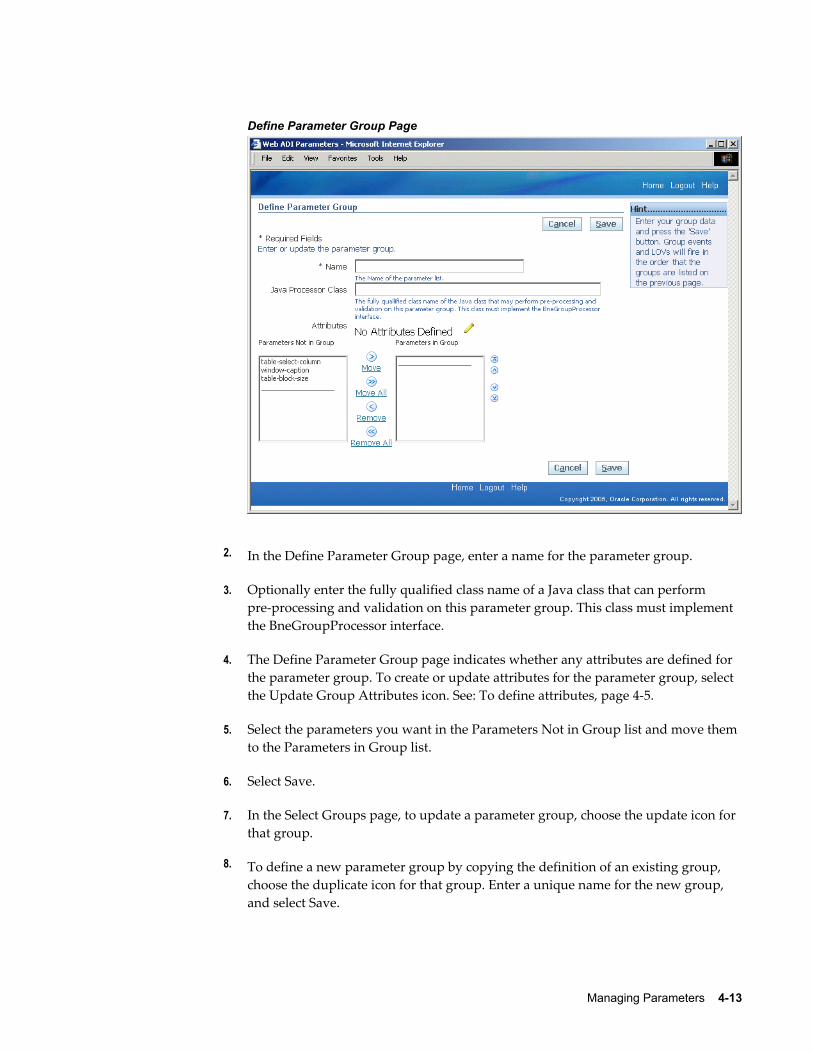
Managing Parameters 4-13
Define Parameter Group Page
2. In the Define Parameter Group page, enter a name for the parameter group.
3. Optionally enter the fully qualified class name of a Java class that can perform pre-processing and validation on this parameter group. This class must implement the BneGroupProcessor interface.
4. The Define Parameter Group page indicates whether any attributes are defined for the parameter group. To create or update attributes for the parameter group, select the Update Group Attributes icon. See: To define attributes, page 4-5.
5. Select the parameters you want in the Parameters Not in Group list and move them to the Parameters in Group list.
6. Select Save.
7. In the Select Groups page, to update a parameter group, choose the update icon for that group.
8. To define a new parameter group by copying the definition of an existing group, choose the duplicate icon for that group. Enter a unique name for the new group, and select Save.
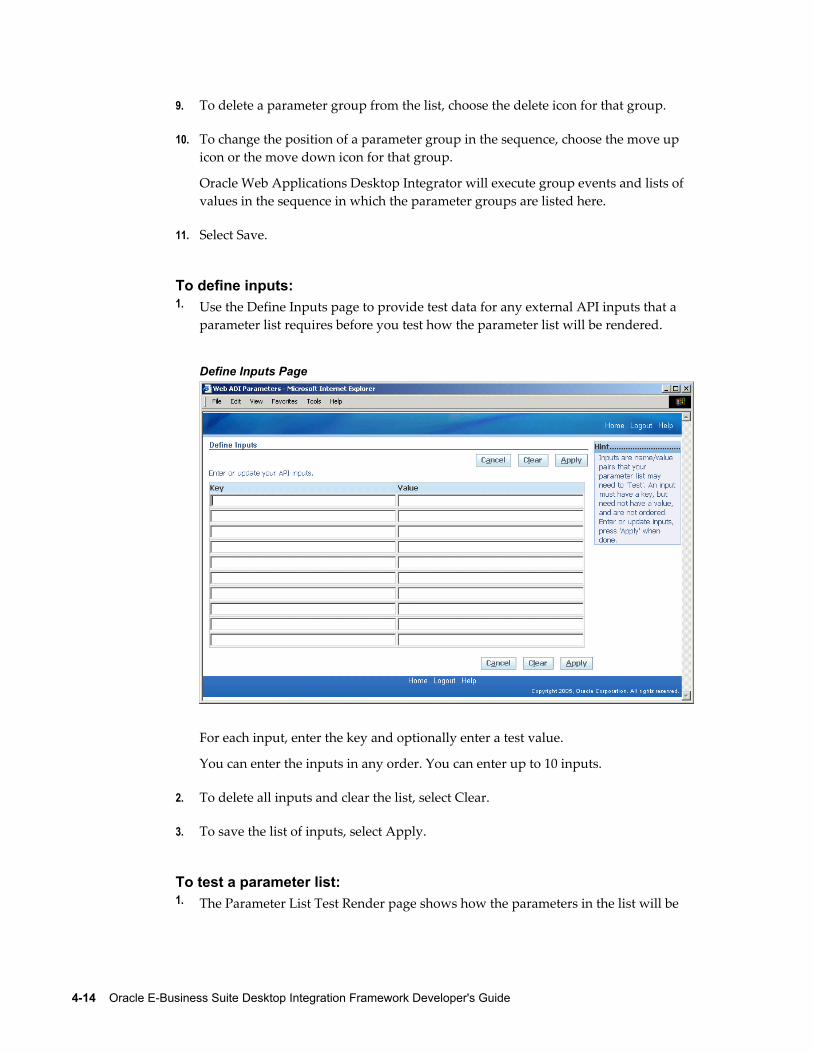
4-14 Oracle E-Business Suite Desktop Integration Framework Developer's Guide
9. To delete a parameter group from the list, choose the delete icon for that group.
10. To change the position of a parameter group in the sequence, choose the move up icon or the move down icon for that group.
Oracle Web Applications Desktop Integrator will execute group events and lists of values in the sequence in which the parameter groups are listed here.
11. Select Save.
To define inputs:1. Use the Define Inputs page to provide test data for any external API inputs that a
parameter list requires before you test how the parameter list will be rendered.
Define Inputs Page
For each input, enter the key and optionally enter a test value.
You can enter the inputs in any order. You can enter up to 10 inputs.
2. To delete all inputs and clear the list, select Clear.
3. To save the list of inputs, select Apply.
To test a parameter list:1. The Parameter List Test Render page shows how the parameters in the list will be
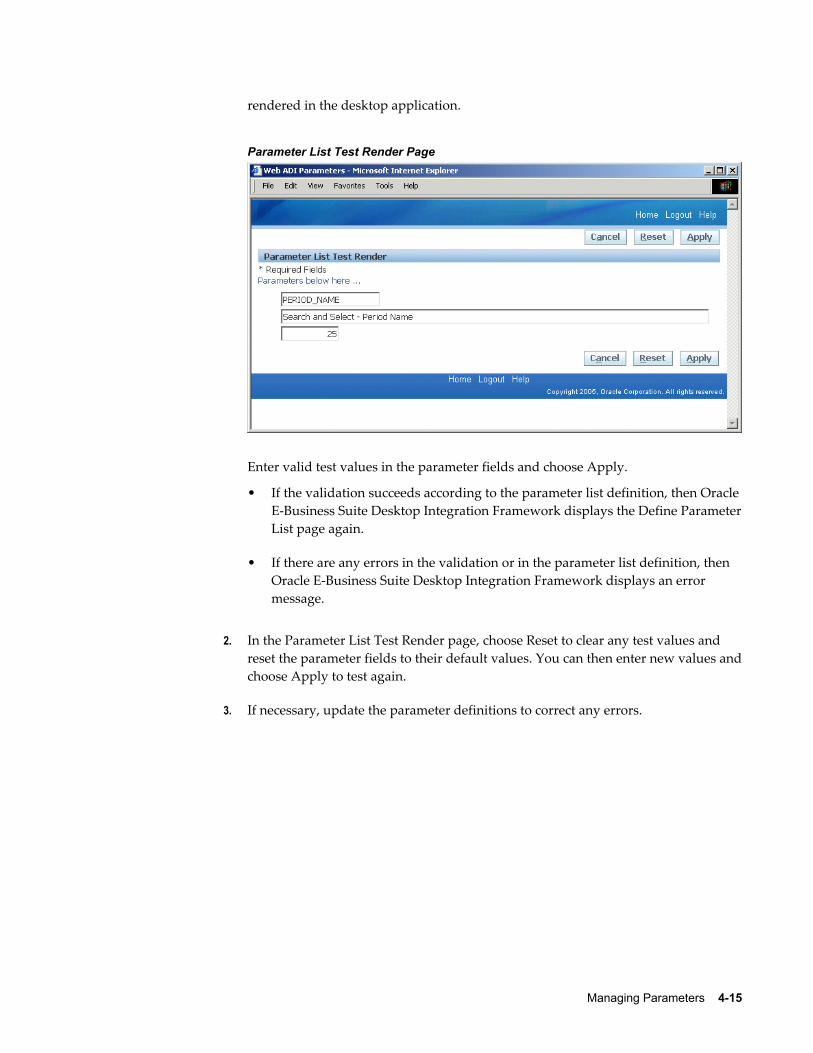
Managing Parameters 4-15
rendered in the desktop application.
Parameter List Test Render Page
Enter valid test values in the parameter fields and choose Apply.
• If the validation succeeds according to the parameter list definition, then OracleE-Business Suite Desktop Integration Framework displays the Define ParameterList page again.
• If there are any errors in the validation or in the parameter list definition, then Oracle E-Business Suite Desktop Integration Framework displays an error message.
2. In the Parameter List Test Render page, choose Reset to clear any test values and reset the parameter fields to their default values. You can then enter new values andchoose Apply to test again.
3. If necessary, update the parameter definitions to correct any errors.

Loading Integrator Definitions A-1
ALoading Integrator Definitions
This appendix covers the following topics:
• Loading Integrator Definitions
Loading Integrator DefinitionsYou can use the Generic Loader (FNDLOAD) concurrent program to download integrator definitions from an Oracle E-Business Suite instance to a text file, and to upload integrator definitions from a text file to an Oracle E-Business Suite instance. For example, you can download an integrator definition from a development or test instance and upload it to a production instance. You can also download and store a text file representation of an integrator definition for source control purposes.
Use the bneintegrator.lct configuration file with the Generic Loader to load integrator definitions. The bneintegrator.lct file is located in the $BNE_TOP/patch/115/import/ directory.
The entity for this configuration file is BNE_INTEGRATORS. This entity includes the following sub-entities: BNE_QUERIES, BNE_PARAM_LISTS, BNE_COMPONENTS, BNE_SECURED_OBJECTS, and BNE_VIEWERS.
Downloading Integrator DefinitionsTo download integrator definitions using the Generic Loader, specify the bneintegrator.lct configuration file, the name of an LDT file in which to save the downloaded data, and the BNE_INTEGRATORS entity. You can choose to download all integrators for an application, a single specific integrator, or two or more specific integrators.
• To download all integrators for an application, specify the application short name for that application in the INTEGRATOR_ASN download parameter. For example:$ FNDLOAD apps/apps 0 Y DOWNLOAD bneintegrator.lct bneintegrators.ldt BNE_INTEGRATORS INTEGRATOR_ASN=BNE
A-2 Oracle E-Business Suite Desktop Integration Framework Developer's Guide
• To download a single specific integrator, specify the application short name for thatapplication in the INTEGRATOR_ASN download parameter and the internal name ofthe integrator in the INTEGRATOR_CODE download parameter. For example:$ FNDLOAD apps/apps 0 Y DOWNLOAD bneintegrator.lct bneNewMsgs.ldt BNE_INTEGRATORS INTEGRATOR_ASN=BNE INTEGRATOR_CODE=FND_NEW_MESSAGES_INTG
• To download two or more specific integrators, specify the application short name for that application in the INTEGRATOR_ASN download parameter and a list of the internal names of the integrators in the INTEGRATOR_CODE_LIST download parameter. The integrator internal names in the list should be separated by commasand should not include wildcards. For example:$ FNDLOAD apps/apps 0 Y DOWNLOAD bneintegrator.lct bneNewMsgs.ldt BNE_INTEGRATORS INTEGRATOR_ASN=BNE INTEGRATOR_CODE_LIST=FND_NEW_MESSAGES_INTG,JOURNALS_115
Note: When you download integrators with the INTEGRATOR_CODE_LIST parameter, the Generic Loader may download any integrators whose internal names are substrings of the specified integrator internal names, in addition to the specified integrators. For example, if you specify INTEGRATOR_CODE_LIST=XYZ_INTEG01,XYZ_INTEG02, the Generic Loader may download integrators named XYZ_INTEG andXYZ_INT as well as the integrators XYZ_INTEG01 and XYZ_INTEG02.
Note: Do not specify both the INTEGRATOR_CODE parameter and the INTEGRATOR_CODE_LIST parameter in the same command. Use only one of these parameters at a time, depending on the number of integrators you want to download.
Uploading Integrator DefinitionsTo upload integrator definitions using the Generic Loader, specify the bneintegrator.lct configuration file, the name of the LDT file that contains the definition or definitions to upload, and - to upload all entities in the LDT file. For example:$ FNDLOAD apps/apps 0 Y UPLOAD bneintegrator.lct bneintegrators.ldt -
Related TopicsGeneric Loader, Oracle E-Business Suite System Administrator's Guide - Configuration
Index-1
Index
CComponents
defining, 3-3managing, 3-1
IIntegrator definitions
extracting, A-1Integrators
defining, 2-3managing, 2-1
OOverview, 1-1
PParameters
defining, 4-1
SShipping integrator definitions, A-1