Embed Size (px)
DESCRIPTION
web 2.0 survey &
Citation preview

Web 2.0 Survey & Polling Tools: A Quick Guide
MOHAMED AMIN EMBI
Centre for Academic Advancement Universiti Kebangsaan Malaysia
2012
Table of Contents i
TABLE OF CONTENTS
Page
CHAPTER 1 SURVEYMONKEY
What is SurveyMonkey?..……………………………………………………….1
SurveyMonkey in Education…..………………………………………………....1
Get started with SurveyMonkey...…………………………………….................3
References……………………………………………………………………....11
CHAPTER 2 OBSURVEY
What is Obsurvey?.....…………………………………………………….............1
Advantages of Obsurvey…..……………………………………………………1
Get started with Obsurvey…………………………………………………….2
References……………………………………………………………………......4
CHAPTER 3 POLLDADDY
What is Polldaddy?.............……………………………………………………….1
Polldaddy in Education....…..…..………………………………………………....1
Get started with Polldaddy....….....……………………………………..................2
References……………………………………………………………………......8
CHAPTER 4 POLL EVERYWHERE
What is Poll Everywhere?...……………………………………………………...1
Ideas for using Poll Everywhere in the classroom……………………………..1
Benefits of Poll Everywhere …………...….……………………………………..1
Get started with Poll Everywhere…...…………………………………………..2
References……………………………………………………………………......4
CHAPTER 5 SURVEYTOOL
What is SurveyTool?...........……………………………………………………...1
Benefits of SurveyTool...……..…………………………………………………..1
Get started with SurveyTool…........……………………………………………..2
References……………………………………………………………………......4
1
1
3
12
13
13
15
24
25
25
26
32
33
33
34
35
42
43
43
44
53

ii Table of Contents
CHAPTER 6 ZOOMERANG
What is Zoomerang?.........……………………………………………………….1
Zoomerang in Education…..…..………………………………………………....1
Get started with Zoomerang….....……………………………………..................2
References……………………………………………………………………......6
CHAPTER 7 FLUIDSURVEYS
What is FluidSurveys?..........……………………………………………………...1
Benefits of FluidSurveys.……..…………………………………………………..1
Using FluidSurveys in the classroom…………………………………………..1
Get started with FluidSurveys..........……………………………………………..2
References……………………………………………………………………......4
CHAPTER 8 KWIK SURVEYS
What is Kwik Surveys?.......……………………………………………………...1
Benefits of Kwik Surveys...…..…………………………………………………..1
Get started with Kwik Surveys........……………………………………………..2
References……………………………………………………………………......4
CHAPTER 9 QUIZSNACK
What is Quizsnack?.......………………………………………………………….1
Benefits of Quizsnack…....….....………………………………………………....1
Get started with Quizsnack…..…..………………………………………...........3
References……………………………………………………………………......9
CHAPTER 10 FLISTI
What is Flisti?.....................…………………………………………………….......1
Benefits of Flisti…….....……..…………………………………………………...1
Get started with Flisti……..…........……………………………………………..2
References……………………………………………………………………......4
54
54
55
59
60
60
61
62
77
78
78
79
90
91
91
92
99
100
100
101
104

Chapter 1: SurveyMonkey 1
WHAT IS SURVEYMONKEY?
SurveyMonkey is an online survey tool. It allows user to easily create professional
surveys. Both free and paying user can design surveys, collect responses, and analyze
the responses of their created surveys. The results of the surveys can be shared
instantly with targeted respondents. These surveys from SurveyMonkey can be on
any subjects. Users can also change the font and color of the survey page. The
results of the survey are viewed in real time. SurveyMonkey lets the user send out
the survey on email lists or put a URL link on a web page to make it easy to get the
desired audience for the survey. The survey also can be used in education to improve
learning and teaching experiences.
Source: https://wiki.itap.purdue.edu/display/INSITE/SurveyMonkey#SurveyMonkey-
history.[25 September 2011]
SURVEYMONKEY IN EDUCATION
SurveyMonkey has many different applications that would be practical for a
classroom and educational purposes. Educators have used it for:
1. Gaining background knowledge on what information students had learned in
previous classes.
2. Multiple choice quiz - Save time where it can be made available to students
outside class time.
3. Learning students interests/activities.
4. Student/teacher evaluations.
5. Practice exams/ mock exams.
Chapter 1 SURVEYMONKEY

2 Chapter 1: SurveyMonkey
6. Anonymous classroom reports.
7. Student in-class/outside-of-class projects.
8. Pre-test or pre-class survey.
9. Post-class surveys – Help the educators to re-evaluate their lesson plans and
improve those critical areas.
10. Assessment of background knowledge- Benefit the students; where educators
can know the level of his/her students and can create the lesson planning
accordingly.
Source: https://wiki.itap.purdue.edu/display/INSITE/SurveyMonkey#SurveyMonkey-
history.[25 September 2011]

Chapter 1: SurveyMonkey 3
GET STARTED WITH SURVEYMONKEY
Go to: http://www.surveymonkey.com/
Sign up/ Registering
STEP 1
STEP 2
Click on the ‘Sign Up
FREE’ button here.
4 Chapter 1: SurveyMonkey
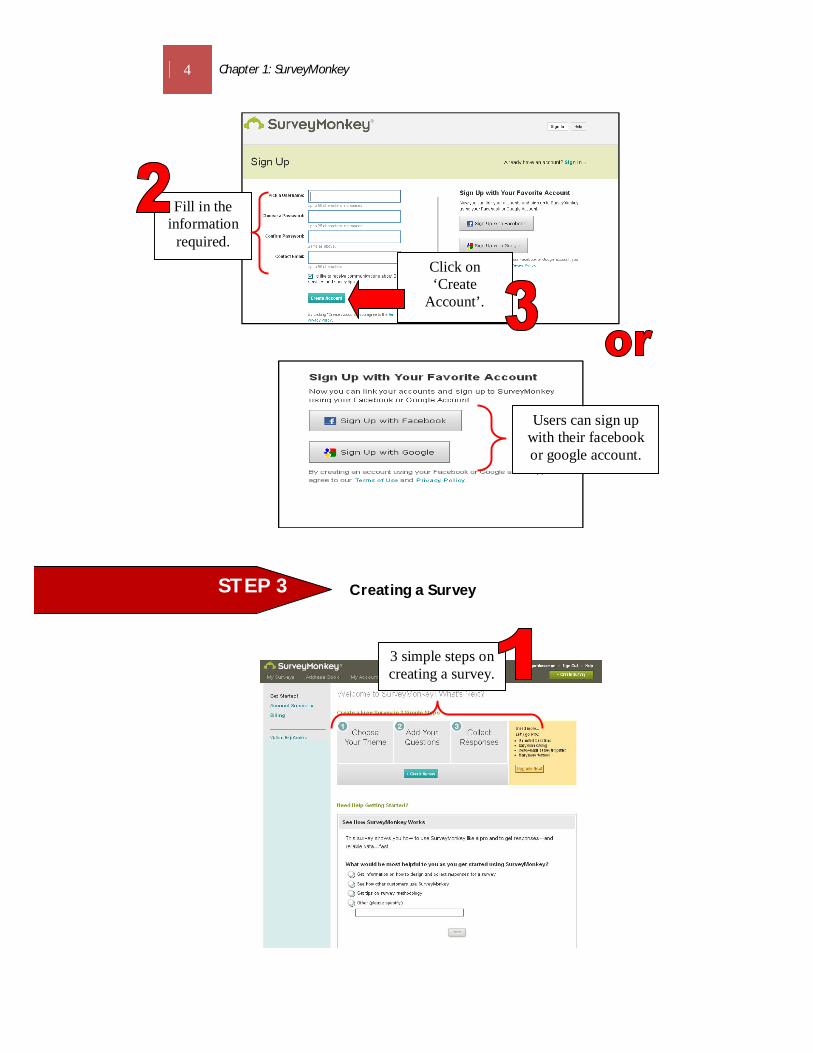
Creating a Survey
STEP 3
Fill in the information
required.
Click on ‘Create
Account’.
Users can sign up with their facebook or google account.
3 simple steps on creating a survey.

Chapter 1: SurveyMonkey 5
Click on ‘Create survey’.
Fill in the survey title and select a category from the list given.
Click ‘Continue’.
Select from the available templates.
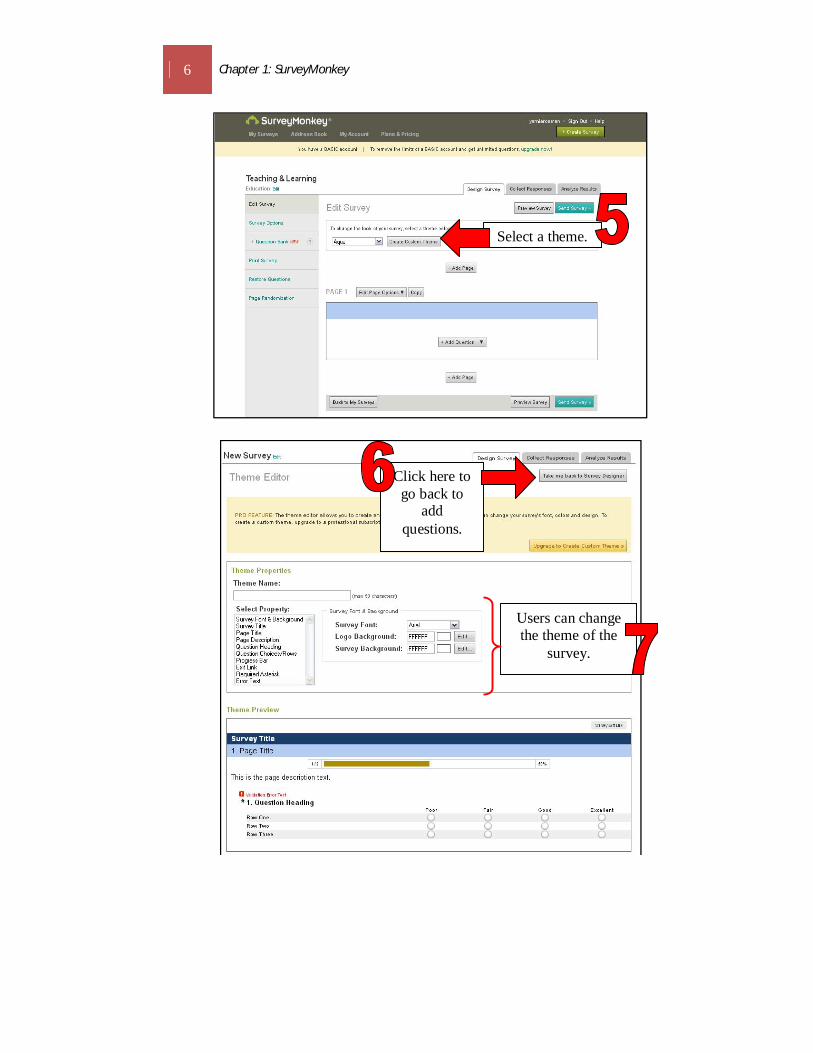
6 Chapter 1: SurveyMonkey
Select a theme.
Users can change the theme of the
survey.
Click here to go back to
add questions.

Chapter 1: SurveyMonkey 7
Click on ‘Add Question’.
Users can choose from
various question type.
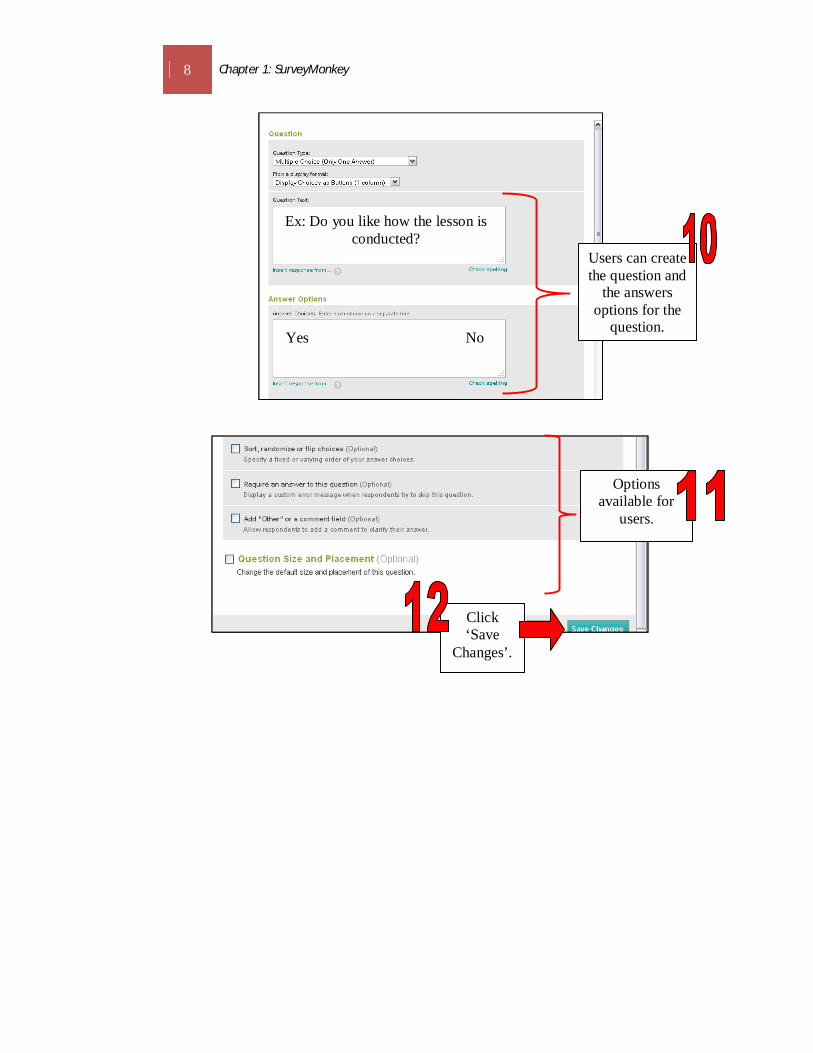
8 Chapter 1: SurveyMonkey
Users can create the question and
the answers options for the
question.
Ex: Do you like how the lesson is conducted?
Yes No
Options available for
users.
Click ‘Save
Changes’.

Chapter 1: SurveyMonkey 9
Users can add more
questions.
Users can add pages.

10 Chapter 1: SurveyMonkey
Click on ‘Send
Survey’.
Users can customize the link.
Users can use other options to send the
survey.

Chapter 1: SurveyMonkey 11
Users can also use questions in the question bank based on available categories. E.g.
Education, community.
Survey analysis options.
Users can view the
analysis of completed
survey.
Various category
of questions.

12 Chapter 1: SurveyMonkey
REFERENCES
SurveyMonkey. http:// www.surveymonkey.com. [ 27 September 2011]
O’shea,Kevin (2010). Edited by Lolkus, M.R. SurveyMonkey.
https://wiki.itap.purdue.edu/display/INSITE/SurveyMonkey#SurveyMonkey-history.[25
September 2011]
Survey Monkey User Manual.
http://s3.amazonaws.com/SurveyMonkeyFiles/UserManual.pdf. [25 September 2011]

Chapter 2: Obsurvey 13
WHAT IS OBSURVEY?
Obsurvey is a very powerful tool for hosting online surveys. You can share the URL
to the survey you create with Obsurvey, and embed it on your webpage/wiki and
you also can download a pdf file of the results.
Source: http://www.yourlearningcurve.com/2010/10/obsurvey-trumps-google-
forms.html [22 February 2012]
ADVANTAGES OF OBSURVEY
The following are some advantages of using Observey:
(a) In General
There is no need to install any software to create surveys, collect responses
and analyze the results. It is all done on the obsurvey.com servers.
It is free, with no advertisements and no limitations.
It gives unlimited surveys, questions in a survey and unlimited responses to a
survey.
(b) Surveys
You can hide/show questions based on what was answered to previous
questions, even for questions on the same page.
You can modify all the text, title and buttons of a survey.
You can upload and insert images anywhere in the survey.
You can pick any of the predefined themes for your survey.
Chapter 2 OBSURVEY
14 Chapter 2: Obsurvey
(c) Publishing Surveys
You can protect your surveys with a password.
You can restrict answers to one response per computer.
You can send an email with a link to your survey.
You can put a survey inside blog posts or websites by copying and pasting the
provided embed code.
(d) Reporting
Exclude duplicate answers from the same IP-address, for polls or voting-style
surveys.
Download report as a Pdf file.
Download all answers as a .CSV file (Excel).
Download individual charts for responses to a single question as image files
for easy to insert in Word document or Powerpoint presentation.
Protect your shared reports with a password that must be entered before
you can see the report.
Source: http://obsurvey.com/#features [22 February 2012]
Chapter 2: Obsurvey 15
GET STARTED WITH OBSURVEY
Go to: http://obsurvey.com/
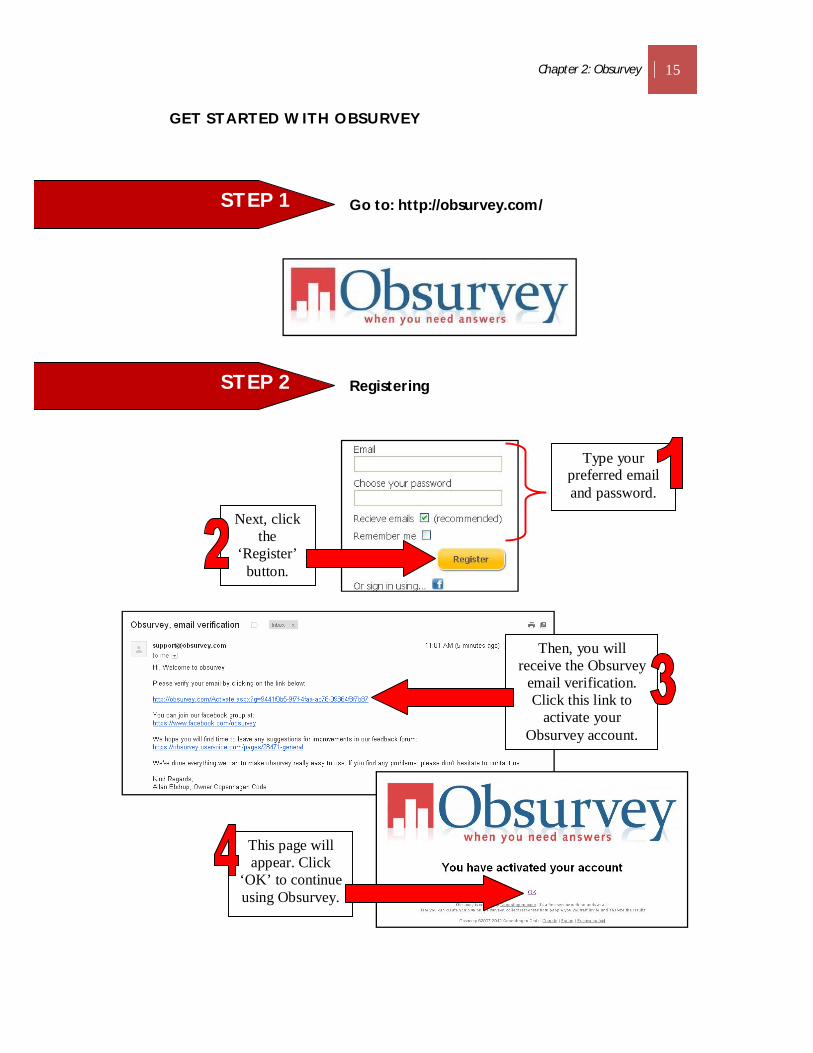
Registering
STEP 1
STEP 2
Next, click the
‘Register’ button.
Type your preferred email and password.
Then, you will receive the Obsurvey
email verification. Click this link to
activate your Obsurvey account.
This page will appear. Click
‘OK’ to continue using Obsurvey.

16 Chapter 2: Obsurvey
Creating a Survey
STEP 3
At the Obsurvey home page, click ‘Create a survey
now’.
Click this icon to create a new
survey.
Go to Obsurvey‘s
Facebook page.
Click ‘My suggestion’ to add your suggestion or any comment regarding
Obsurvey’.
To get more information on how to use Observey. Click
at ‘Help videos’.
Click ‘My surveys’ to view the list of your
created surveys.
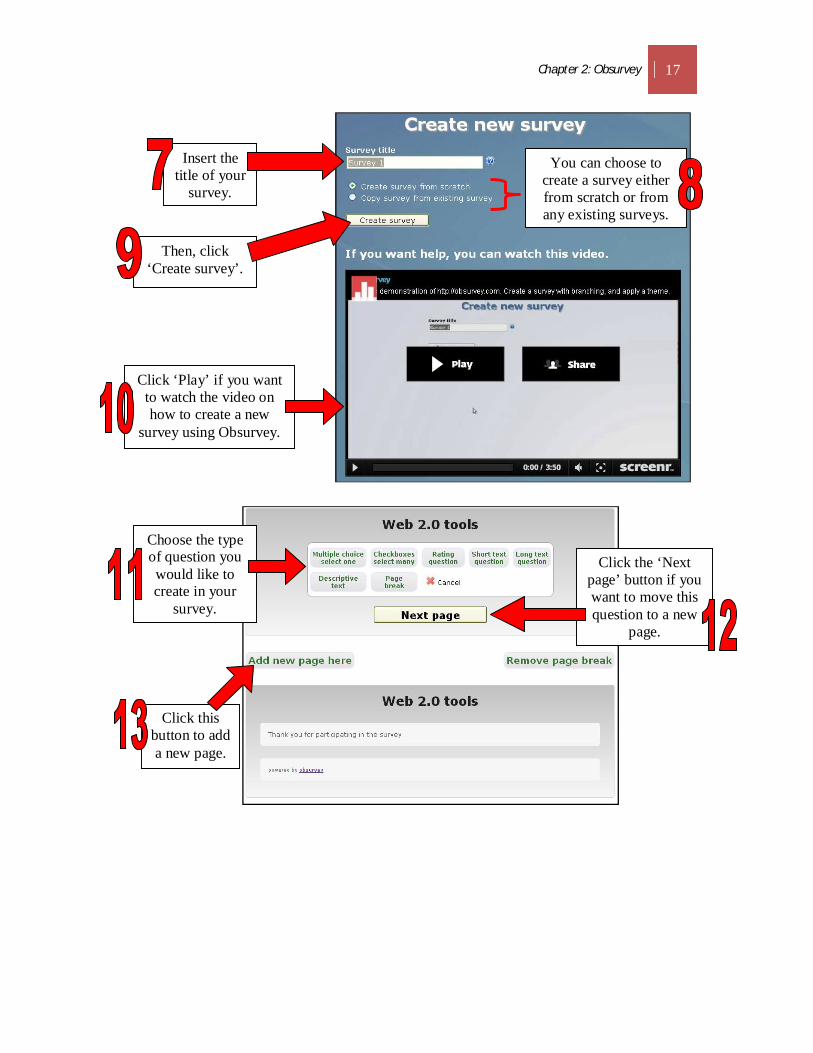
Chapter 2: Obsurvey 17
Insert the title of your
survey.
You can choose to create a survey either from scratch or from any existing surveys.
Then, click ‘Create survey’.
Click ‘Play’ if you want to watch the video on how to create a new
survey using Obsurvey.
Choose the type of question you would like to create in your
survey.
Click the ‘Next page’ button if you want to move this question to a new
page.
Click this button to add a new page.

18 Chapter 2: Obsurvey
(a) Multiple Choice Questions
Click the ‘Multiple choice
select one’ button.
Type your question
here.
Type your choices here.
You can use the predefined rating
scale given in ‘More options’.
If you want to delete the
question, click this button.
Use this arrow button to move the question.
Examples of multiple choice
questions.

Chapter 2: Obsurvey 19
(b) Checkboxes
(c) Rating questions
Click the ‘Checkboxes select many’
button.
Type your question and answer
choices.
If you want the respondent to select more than one
choice or type other choice, go to ‘More
options’ and select options for question.
Click ‘Rating
question’.
Choose the rating scale or you can create your own rating
scale.
Examples of select many questions.

20 Chapter 2: Obsurvey
(d) Short text questions
(e) Long text questions
Click ‘Short text
question’.
Choose the templates of
short text questions available.
Click ‘Long text
question’.
Type the question
here.
Examples of short text questions.
Examples of long text questions.

Chapter 2: Obsurvey 21
(f) Descriptive text
An example of A Survey Created
Click ‘Descriptive
text’
Type your text here.
Examples of a
descriptive text.
22 Chapter 2: Obsurvey
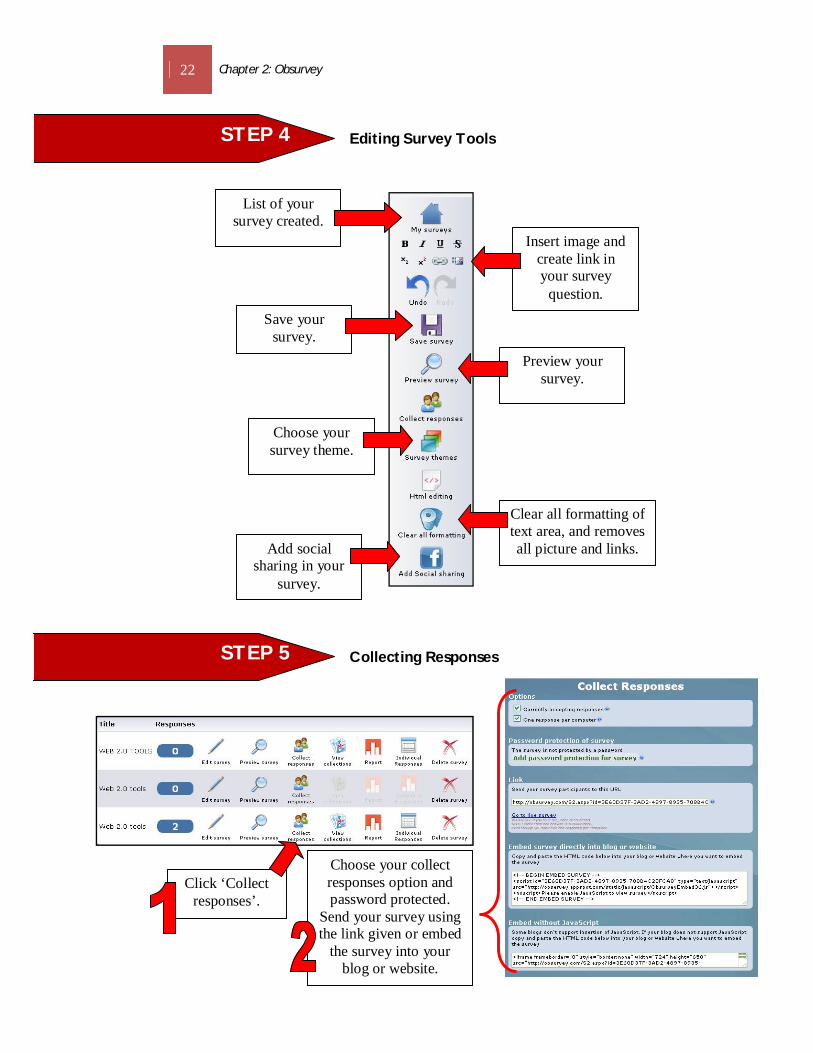
Editing Survey Tools
Collecting Responses
STEP 4
STEP 5
Save your survey.
Preview your survey.
Choose your survey theme.
Clear all formatting of text area, and removes all picture and links.
List of your survey created.
Insert image and create link in your survey
question.
Add social sharing in your
survey.
Click ‘Collect responses’.
Choose your collect responses option and password protected.
Send your survey using the link given or embed
the survey into your blog or website.

Chapter 2: Obsurvey 23
Generating Survey Report
Individual Responses and Downloading .csv File
STEP 6
STEP 7
Click this icon to download the report
either in JPEG, PDF or SVG.
Your survey report will be displayed
shown as a graph, bar chart and frequency
table.
Download the individual responses data in .csv (excel)
file.
Individual responses data.

24 Chapter 2: Obsurvey
REFERENCES
http://www.yourlearningcurve.com/2010/10/obsurvey-trumps-google-forms.html [22
February 2012]
http://obsurvey.com/#features [22 February 2012]

Chapter 3: Polldaddy 25
WHAT IS POLLDADDY?
Polldaddy is an online survey and poll too. It is almost similar to Zoomerang as they
offer survey and poll tools to users. Polldaddy is easy to use and has a user-friendly
interface. Users can simply register for an account then click a button to create a
new poll or survey. They can then enter the question and answers, choose the design
and it is done. PollDaddy will automatically provide the necessary code to be copied
and paste or embed into various sites (e.g. twitter, Ning).
Source: Gunelius (2011).
POLLDADDY IN EDUCATION
Educators can use Polldaddy features for quizzes, gather feedback on course work.
Tutors can get reviews on events from student and colleagues. It saves time for the
educators instead of using the paper-based quizzes. Among the features useful for
educations is, where users can add html, images, video and other media. Responses
gathered can be filtered accordingly. Users can also easily collect responses on iPad,
iPhone, and iPod Touch.
Source: http://www.polldaddy.com
Chapter 3 POLLDADDY

26 Chapter 2: Polldaddy
GET STARTED WITH POLLDADDY
Go to: http://www.polldaddy.com/
Sign up/Registering
STEP 1
STEP 2
Click ‘See Plans & Pricing’.
Click ‘Sign Up’.
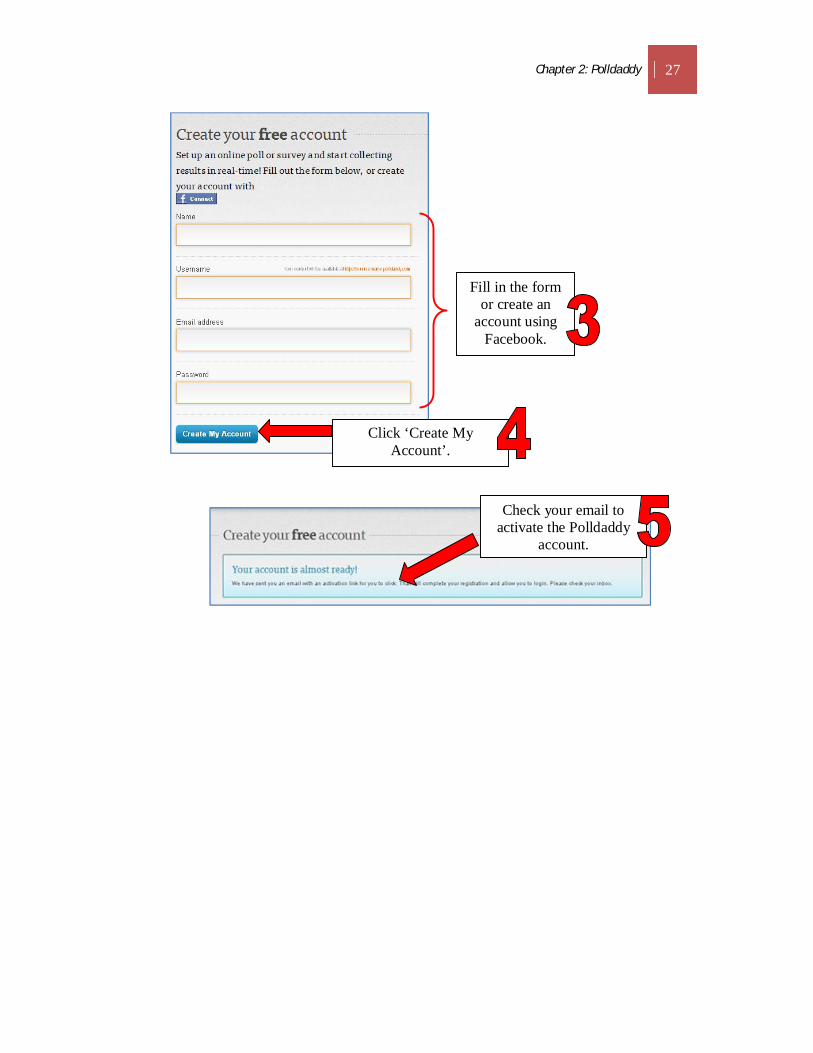
Chapter 2: Polldaddy 27
Fill in the form or create an
account using Facebook.
Click ‘Create My Account’.
Check your email to activate the Polldaddy
account.
28 Chapter 2: Polldaddy
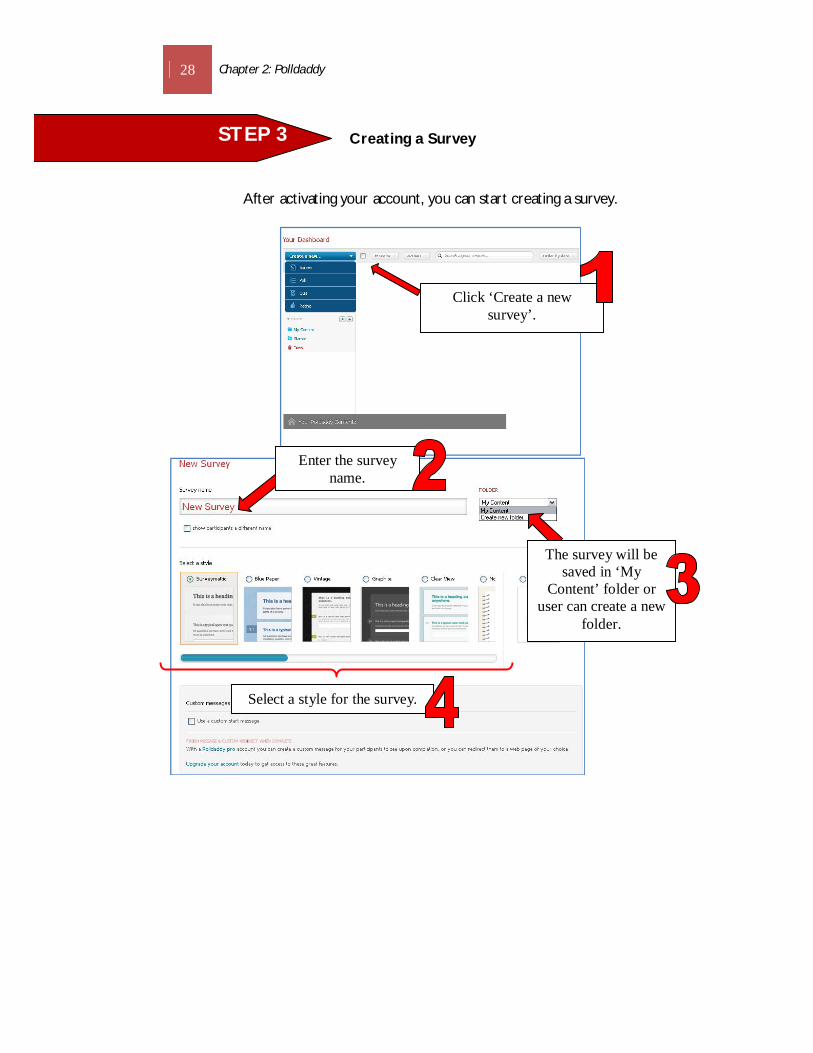
Creating a Survey
After activating your account, you can start creating a survey.
STEP 3
Click ‘Create a new survey’.
Enter the survey name.
The survey will be
saved in ‘My Content’ folder or
user can create a new folder.
Select a style for the survey.

Chapter 2: Polldaddy 29
Options available for users.
Click ‘Save & Add Questions’.
After dragging and dropping the type of questions,
type your questions.
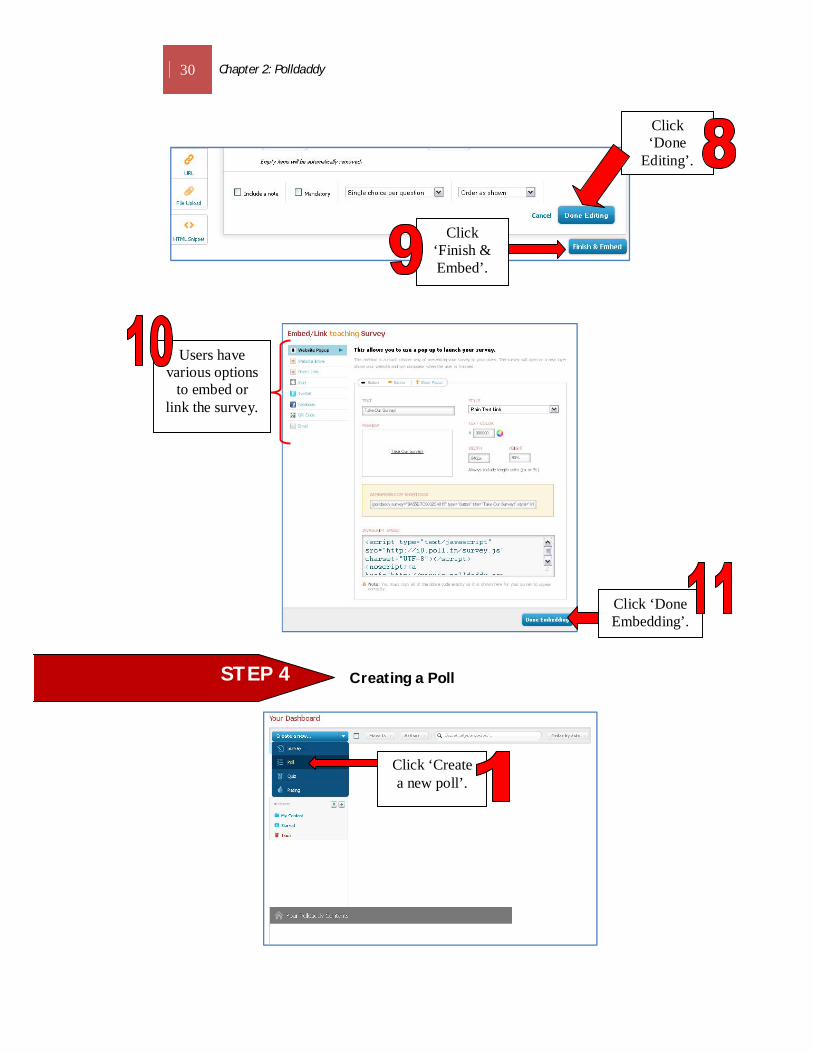
30 Chapter 2: Polldaddy
Creating a Poll
STEP 4
Click ‘Done
Editing’.
Click ‘Finish & Embed’.
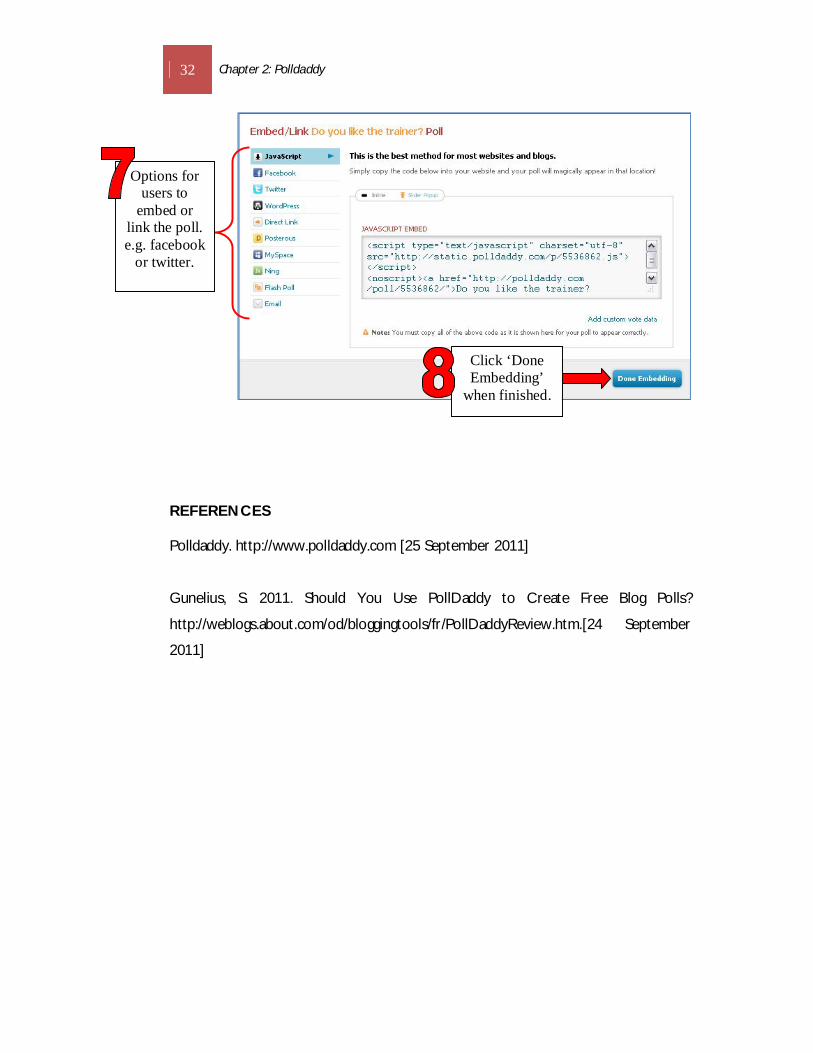
Users have various options
to embed or link the survey.
Click ‘Done Embedding’.
Click ‘Create a new poll’.

Chapter 2: Polldaddy 31
Type the options for your poll.
Type the poll name.
Select a folder for the poll.
Select a poll theme.
Options available for users.
32 Chapter 2: Polldaddy
REFERENCES Polldaddy. http://www.polldaddy.com [25 September 2011]
Gunelius, S. 2011. Should You Use PollDaddy to Create Free Blog Polls?
http://weblogs.about.com/od/bloggingtools/fr/PollDaddyReview.htm.[24 September
2011]
Options for users to
embed or link the poll. e.g. facebook
or twitter.
Click ‘Done Embedding’
when finished.

Chapter 4: Poll Everywhere 33
WHAT IS POLL EVERYWHERE?
Poll Everywhere is a text message polling and audience response system. It is simple
enough for anyone to use and flexible enough for a wide range of scenarios to
interact with audiences and collect data.
Source: http://blog.polleverywhere.com/ [14 February 2012]
IDEAS FOR USING POLL EVERYWHERE IN THE CLASSROOM
A few activities to use Poll Everywhere in the classroom:
Quizzes
Attendance
Teacher feedback
Group evaluations
Class discussions
Source: http://www.slideshare.net/amysuesue/a-guide-to-poll-everywhere [14
February 2012]
Chapter 4 POLL EVERYWHERE
34 Chapter 4: Poll Everywhere
BENEFITS OF POLL EVERYWHERE
Some benefits for using Poll Everywhere:
Ease of use
Live results
Low cost or free to students
Affordable for the instructor
Option to select multiple devices to respond
Students engaged
Ability to identify and address challenging problems
Source:
http://nercomp.org/corecode/uploads/event/uploaded_pdfs/Will%20Texting%20Hel
p%20Improve%20Student%20Learning-
Fabienne%20Miller%20&%20Jianyu%20Liang%20-%20WPI_55.pdf [17 February
2012].
Chapter 4: Poll Everywhere 35
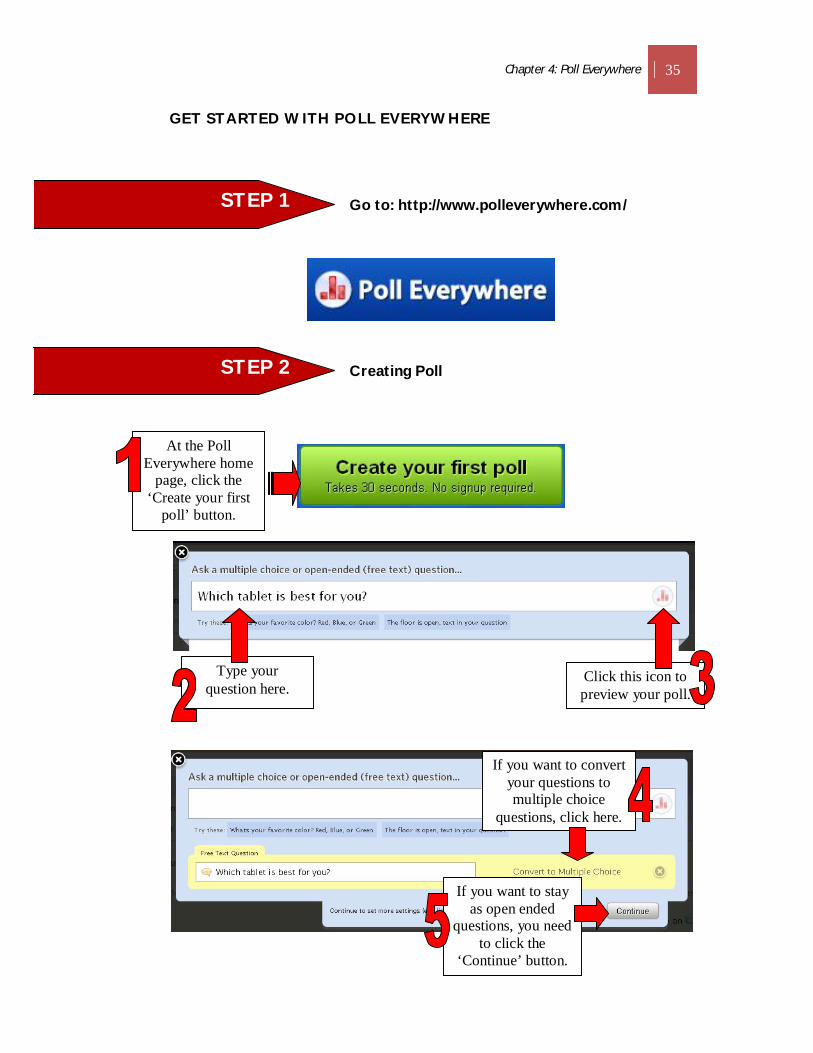
GET STARTED WITH POLL EVERYWHERE
Go to: http://www.polleverywhere.com/
Creating Poll
STEP 2
STEP 1
At the Poll Everywhere home
page, click the ‘Create your first
poll’ button.
Type your question here.
Click this icon to preview your poll.
If you want to convert your questions to multiple choice
questions, click here.
If you want to stay as open ended
questions, you need to click the
‘Continue’ button.

36 Chapter 4: Poll Everywhere
Insert the possible answers for your multiple choice
questions.
Click here if you want to delete the answers selected.
Then, click ‘Continue’.
This is how your poll will
look like.

Chapter 4: Poll Everywhere 37
Poll Setting
STEP 3
Showing all the public polls created
by other users.
You can use these functions when you
upgrade your account.

38 Chapter 4: Poll Everywhere
(a) Visual Setting
(b) Show Instruction/Show Chart
To change the appearance, go to ‘Visual
Setting’ and select the appearance, instruction
and chart you would like to use as your poll view.
Click here to view your poll as chart or
instruction.

Chapter 4: Poll Everywhere 39
(c) Fullscreen
People Responding
STEP 4
To enable and disable fullscreen view, click this
icon.
Select the respond types you prefer. The respond
types will be shown here.
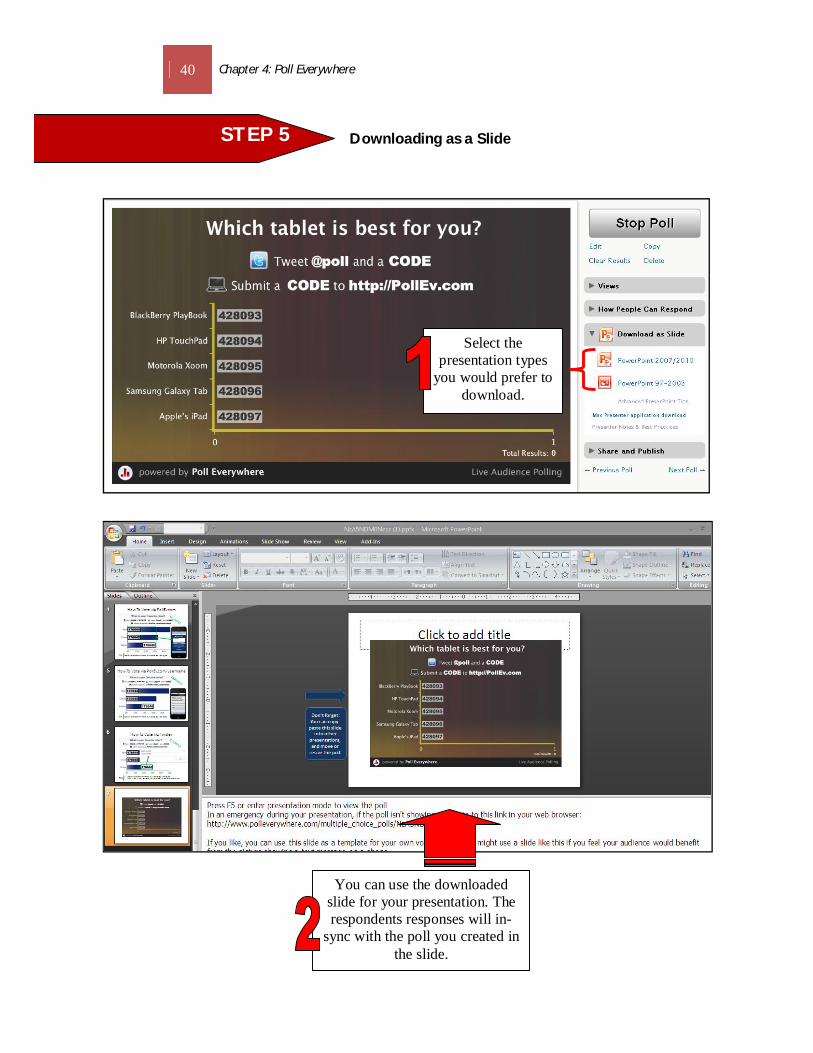
40 Chapter 4: Poll Everywhere
Downloading as a Slide
STEP 5
Select the presentation types
you would prefer to download.
You can use the downloaded slide for your presentation. The respondents responses will in-
sync with the poll you created in the slide.
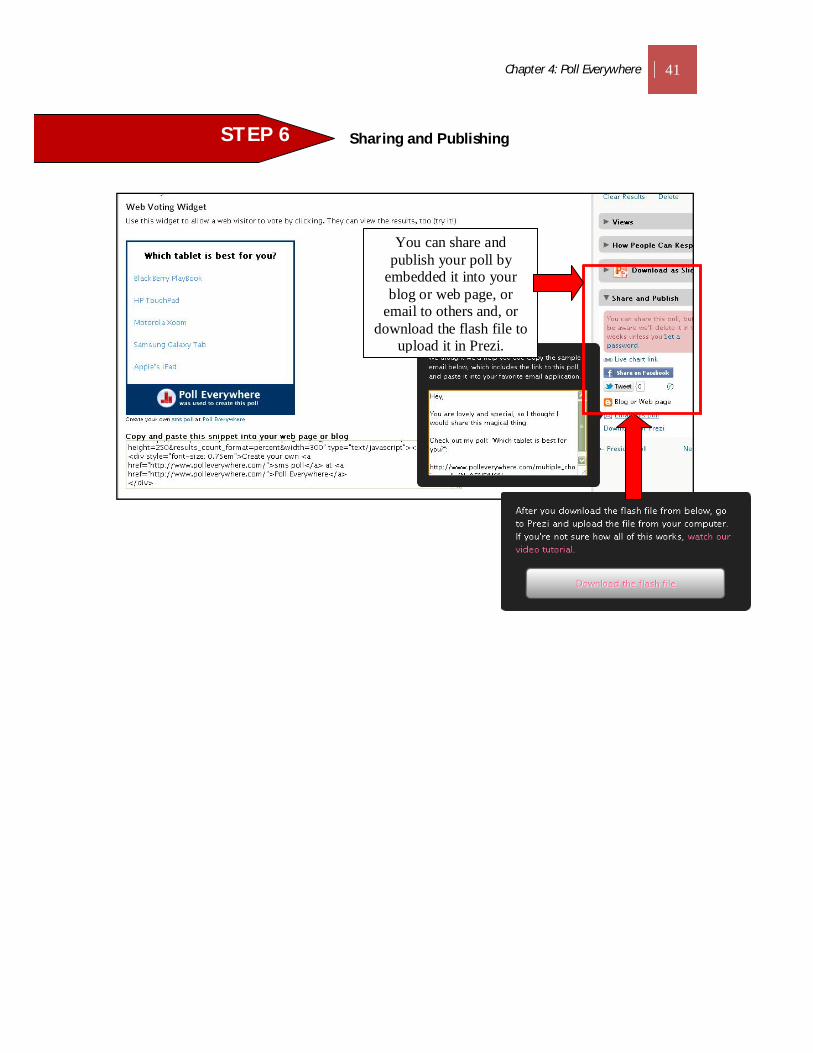
Chapter 4: Poll Everywhere 41
Sharing and Publishing
STEP 6
You can share and publish your poll by
embedded it into your blog or web page, or
email to others and, or download the flash file to
upload it in Prezi.

42 Chapter 4: Poll Everywhere
REFERENCES
http://blog.polleverywhere.com/ [14 February 2012]
http://www.slideshare.net/amysuesue/a-guide-to-poll-everywhere [14 February 2012]
http://nercomp.org/corecode/uploads/event/uploaded_pdfs/Will%20Texting%20Hel
p%20Improve%20Student%20Learning-
Fabienne%20Miller%20&%20Jianyu%20Liang%20-%20WPI_55.pdf [17 February
2012].

Chapter 5: SurveyTool 43
WHAT IS SURVEYTOOL?
SurveyTool is a revolutionary sampling tool developed by Peanut Labs Inc. which is
an E-Rewards company. SurveyTool can be used by business owners, consumers,
corporations, or anyone looking to generate market research to better their
business and/or knowledge.
Source: http://blog.surveytool.com/ [2 March 2012]
BENEFITS OF SURVEYTOOL
The following are some benefits when using SurveyTool:
Fastest way to create a survey.
Easy, intuitive interface makes survey creation a breeze.
Choose from a range of customizable templates.
SurveyTool's robust reporting enables you to visualize your data in real-time.
Collect responses via email, social media, or by embedding the survey within
your page.
Source: http://www.surveytool.com/# [2 March 2012].
Chapter 5 SURVEYTOOL
44 Chapter 5: SurveyTool
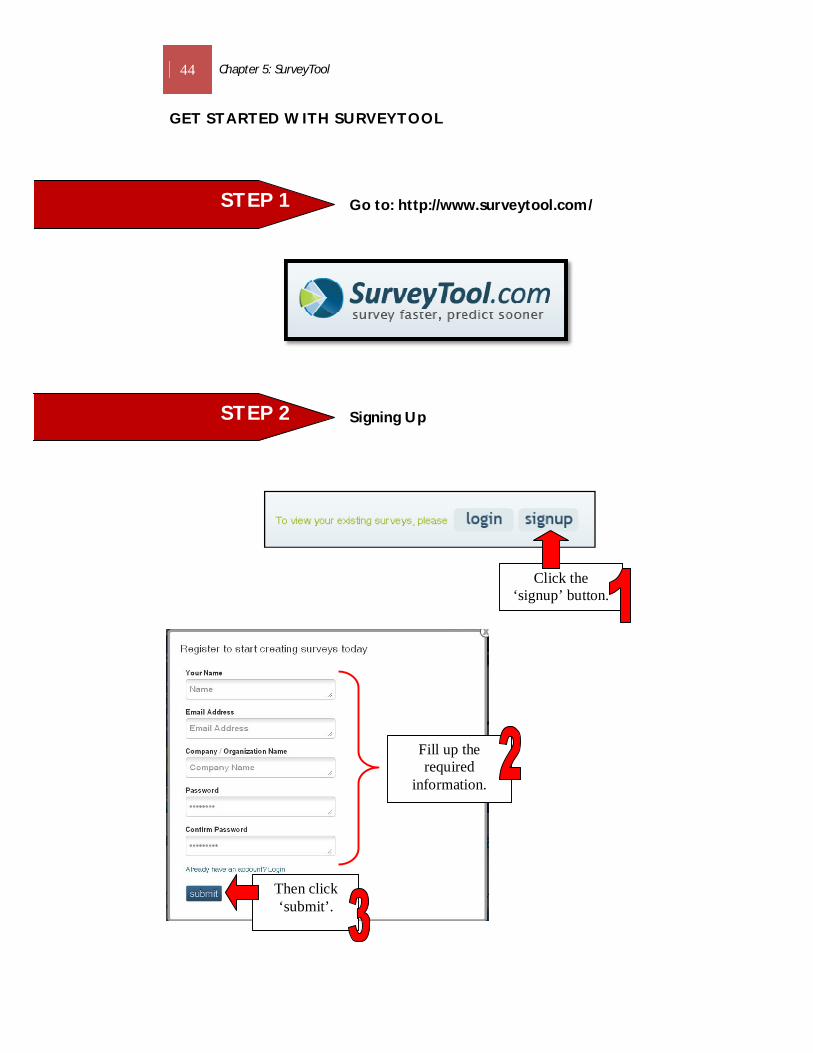
GET STARTED WITH SURVEYTOOL
Go to: http://www.surveytool.com/
Signing Up
STEP 1
STEP 2
Click the ‘signup’ button.
Fill up the required
information.
Then click ‘submit’.

Chapter 5: SurveyTool 45
Creating a Survey
STEP 3
Click ‘+ Create New Survey’.
Insert the title of your survey
here.
You also can duplicate from
an existing survey.
Next, click the ‘Start’ button.

46 Chapter 5: SurveyTool
Adding Question
(a) Checkbox Questions
STEP 4
Go to the ‘Edit Survey’ tab.
Click at ‘Add Questions’ here.
Then, choose type of questions you would like
to add.
Click at the ‘Checkbox’ button
under ‘Basic Questions’.
Go to the ‘Question’ tab and type your question.
Click at the ‘Row Choice’ tab and list the possible answer
choices.
Lastly, click ‘Add Question to Bottom’ to insert the question in
your survey.

Chapter 5: SurveyTool 47
(b) Multiple Choice Questions
This is an example of a
checkbox question.
Click at the ‘Multiple
Choices’ button.
Click at the ‘Question’ tab and type your question here.
At the ‘Row Choice’ tab, type
the possible answer choices.
Lastly, click ‘Add Question to Bottom’ to insert the question in your survey.

48 Chapter 5: SurveyTool
(c) Dropdown
This is an example of a
multiple choice questions.
Click at the ‘Multiple
Choices’ button.
Click at the ‘Question’ tab and insert your
question. At the ‘Row
Choices’ area, type the possible answer
choices.
Then, click ‘Add Question to
Bottom’ to insert the question in your survey.
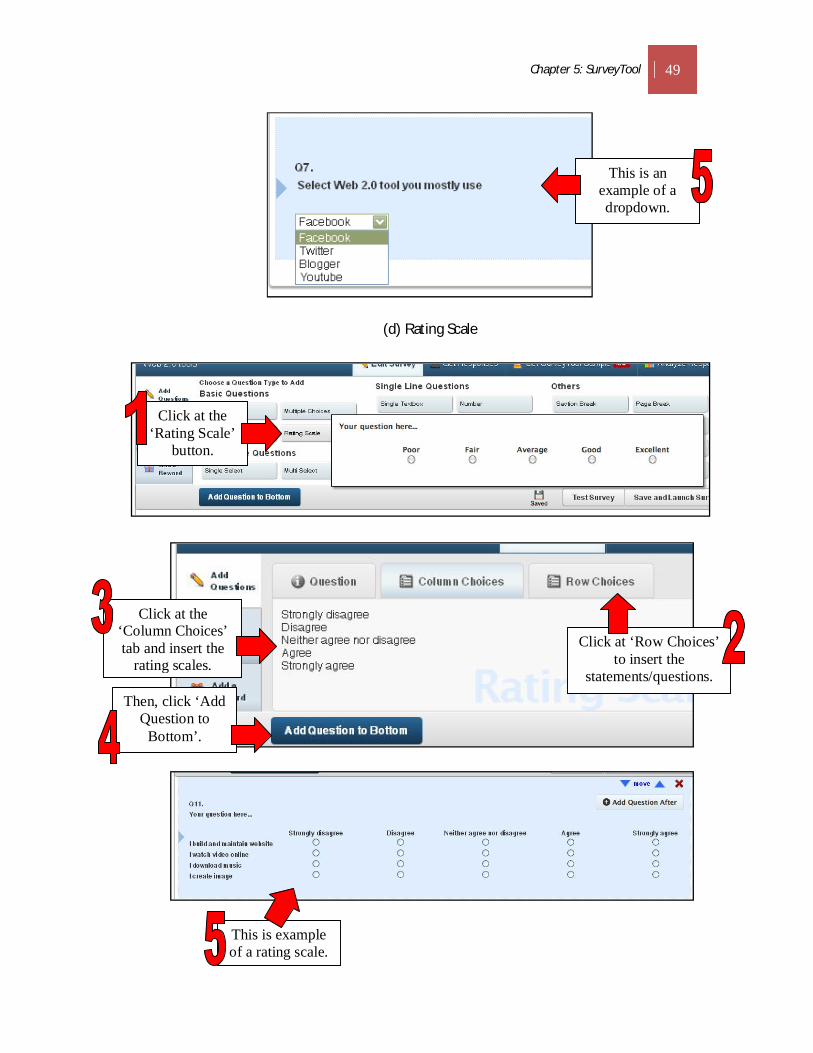
Chapter 5: SurveyTool 49
(d) Rating Scale
This is an example of a dropdown. questions.
Click at the ‘Rating Scale’
button.
Click at the ‘Column Choices’ tab and insert the
rating scales. Click at ‘Row Choices’
to insert the statements/questions.
Then, click ‘Add Question to
Bottom’.
This is example of a rating scale.
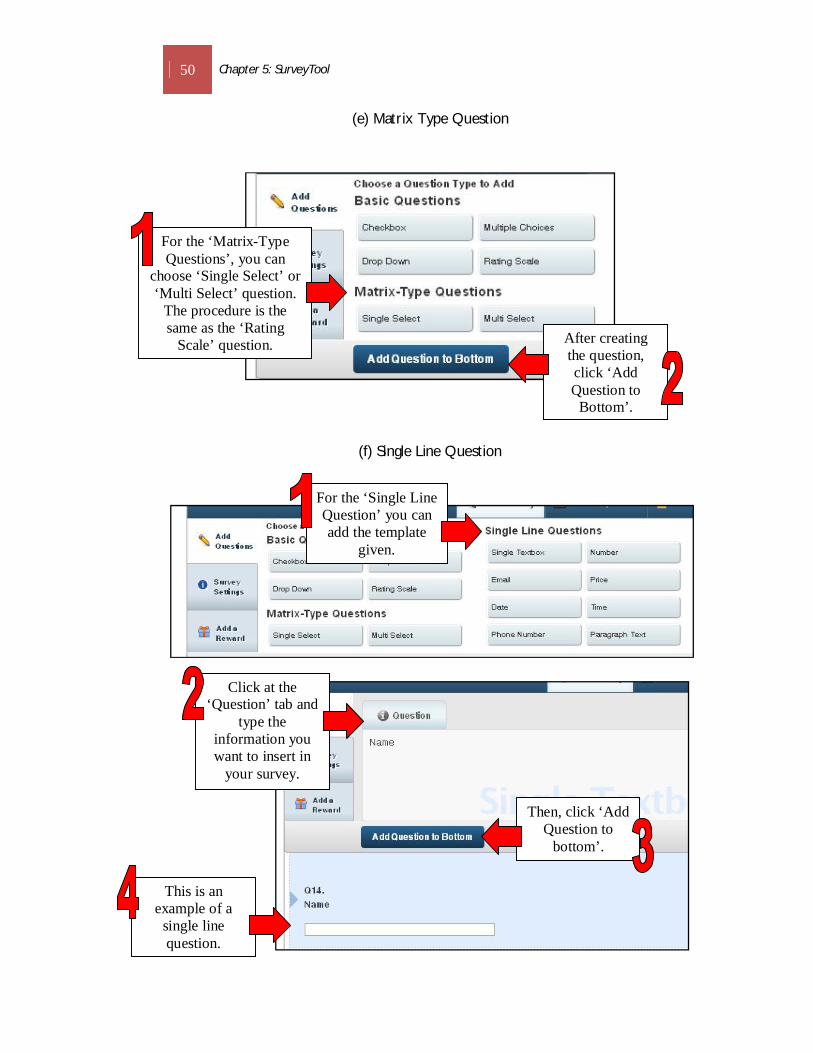
50 Chapter 5: SurveyTool
(e) Matrix Type Question
(f) Single Line Question
For the ‘Matrix-Type Questions’, you can
choose ‘Single Select’ or ‘Multi Select’ question.
The procedure is the same as the ‘Rating
Scale’ question.
For the ‘Single Line Question’ you can add the template
given.
After creating the question, click ‘Add Question to
Bottom’.
Click at the ‘Question’ tab and
type the information you want to insert in
your survey.
This is an example of a
single line question.
Then, click ‘Add Question to
bottom’.

Chapter 5: SurveyTool 51
Survey Settings
STEP 5
Go to ‘Survey Settings’.
Click ‘Customize Your Survey’ to
change the background, color etc of your survey.
Insert your survey
description.
After you have completed creating your survey,
click this button to save and launch your survey.
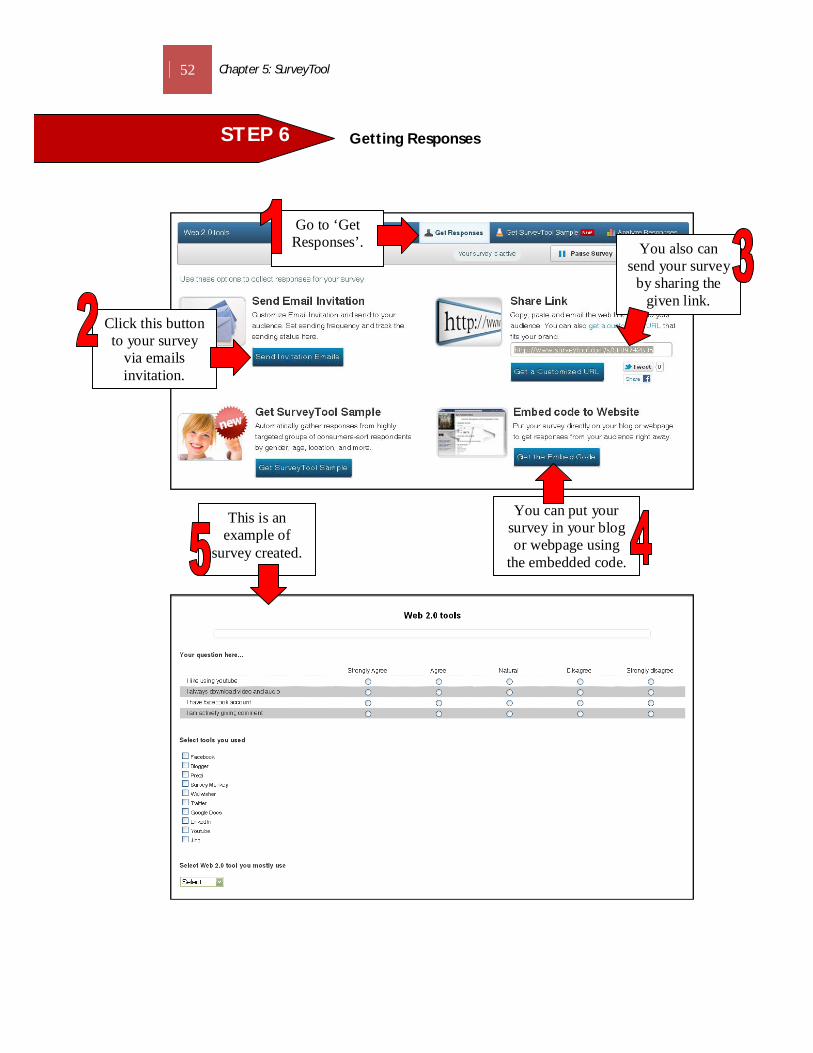
52 Chapter 5: SurveyTool
Getting Responses
STEP 6
Go to ‘Get Responses’.
Click this button to your survey
via emails invitation.
You also can send your survey
by sharing the given link.
You can put your survey in your blog or webpage using
the embedded code.
This is an example of
survey created.

Chapter 5: SurveyTool 53
Analyzing Responses
REFERENCES
http://blog.surveytool.com/ [2 March 2012]
http://www.surveytool.com/# [2 March 2012].
STEP 7
Go to ‘Analyze Responses’ to
get the responses.
You can export the report in different
format either ‘pdf’, ‘share link’ or
‘excel’ for further analysis.

54 Chapter 6: Zoomerang
WHAT IS ZOOMERANG?
Zoomerang is an online survey tool that allows individuals to quickly and easily
create online surveys to collect and share feedback. Zoomerang also offers polling
application. Zoomerang polls delivers a unique, engaging online polling applications
allowing users them to post a poll on any website. The quantifiable results appear in
real-time and can be shared easily with students and colleagues. Zoomerang enables
users to leverage social networking platforms to get a fast read on timely issues and
drive easier decision making. Users can customize color schemes and the ability to
randomize up to five answer options gives the feel of traditional online surveys to
these one-question polls. In addition, users can easily take the poll they created on
any social media networking sites (MySpace or Facebook) and host it on a web site
or blog.
Source: http:// www.zoomerang.com
ZOOMERANG IN EDUCATION
Zoomerang surveys and polls can be used by educators in getting responses from
students regarding the courses they teach. The tools are simple and easy to use by
users; equipped with skip logic; makes it the best option to gather information.
Surveys can be used by tutors or lecturers to gain some insight on their lessons and
teaching plans. They can conduct a survey to know what the students think of the
course and the tutors and share their ideas for improvements. They can also use the
tools to conduct quizzes. It helps saves time and money.
Source: http://www.idealware.org/articles/fgt_online_surveys.php.
Chapter 6 ZOOMERANG

Chapter 6: Zoomerang 55
GET STARTED WITH ZOOMERANG
Go to: http://www.zoomerang.com/
Sign up/Registering
STEP 1
STEP 2
Fill in the required
information here.
Click ‘Sign Up
Now’.

56 Chapter 6: Zoomerang
Creating a Survey
STEP 3
Click ‘Create Survey.
’.
Create a title for the
survey.
Click ‘Get Started’.
Click ‘Add a Question’.

Chapter 6: Zoomerang 57
Users can choose type of
questions.
Type the question and
answers.
Click ‘Save’.
Users can change the
survey settings.
Use the link given to the
survey.
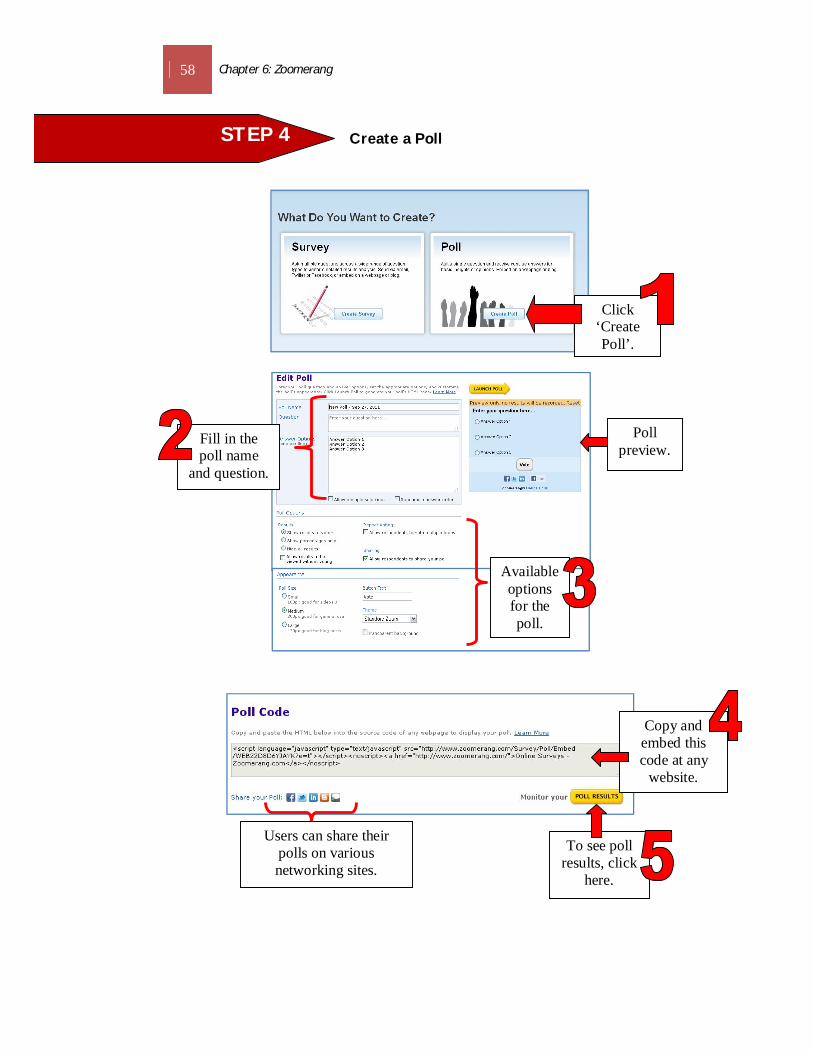
58 Chapter 6: Zoomerang
Create a Poll
STEP 4
Click ‘Create Poll’.
Fill in the poll name
and question.
Poll preview.
To see poll results, click
here.
Users can share their polls on various networking sites.
Copy and embed this code at any
website.
Available options for the poll.

Chapter 6: Zoomerang 59
REFERENCES
Leland,E. 2011. A Few Good Online Survey Tools.
http://www.idealware.org/articles/fgt_online_surveys.php. [23 September 2011]
Zoomerang. http:// www.zoomerang.com. [26 September 2011]

60 Chapter 7: FluidSurveys
WHAT IS FLUIDSURVEYS?
FluidSurveys is designed to provide users with easy-to-use survey software online. It
has advanced survey-making features and presents them in a convenient, user-friendly
way. After purchasing an account, a user can easily create surveys, polls, invite
anyone to participate and analyze their results through charts and graphs, and share
results with colleagues. FluidSurveys provides everything users need to conduct
research surveys and create and share reports of findings.
Source: https://wiki.itap.purdue.edu/display/INSITE/FluidSurveys [5 March 2012]
BENEFITS OF FLUIDSURVEYS
The following are some benefits of using FluidSurveys:
FluidSurveys is very flexible. It can be exported to PowerPoint, Excel, PDF,
and SPSS.
Users have the ability to create surveys and polls using the innovative drag
and drop interface.
Users can view incoming data in real time and begin creating a report for that
information right away.
Users can cross-reference data with criteria such as age, gender, question
answers, etc., which allows the results to be interpreted in a more in depth
manner.
Source: https://wiki.itap.purdue.edu/display/INSITE/FluidSurveys [5 March 2012]
Chapter 7 FLUIDSURVEYS

Chapter 7: FluidSurveys 61
USING FLUIDSURVEY IN THE CLASSROOM
The following are some ways of using FluidSurveys in the classroom:
Students can use FluidSurveys to gather constructive feedback about the
project assign by the teacher.
Teachers can use this survey to figure out their students learning styles in
order to teach more effectively.
Teachers can use FluidSurveys as a pretesting tool to gauge student
understanding of a topic in order to modify lesson plans accordingly.
Source: https://wiki.itap.purdue.edu/display/INSITE/FluidSurveys [5 March 2012]
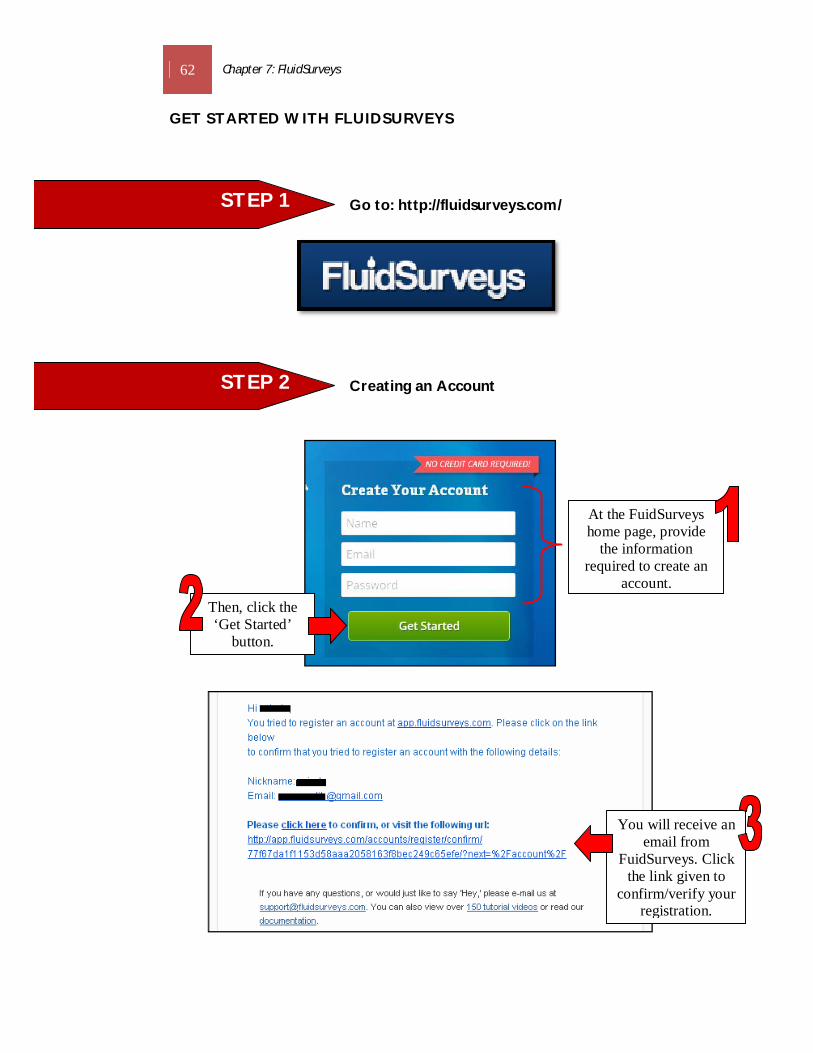
62 Chapter 7: FluidSurveys
GET STARTED WITH FLUIDSURVEYS
Go to: http://fluidsurveys.com/
Creating an Account
STEP 1
STEP 2
At the FuidSurveys home page, provide
the information required to create an
account. Then, click the ‘Get Started’
button.
You will receive an email from
FuidSurveys. Click the link given to
confirm/verify your registration.

Chapter 7: FluidSurveys 63
Creating a New Survey
After you have created an account or login, you will be taken to your ‘Surveys’ page.
STEP 3
Click ‘+New Survey’.
Type your survey title
here.
Then click the ‘√ Create Survey’
button.
If you have a ‘SurveyMonkey’ account and want
to import your survey from there,
click at the link ‘here’.
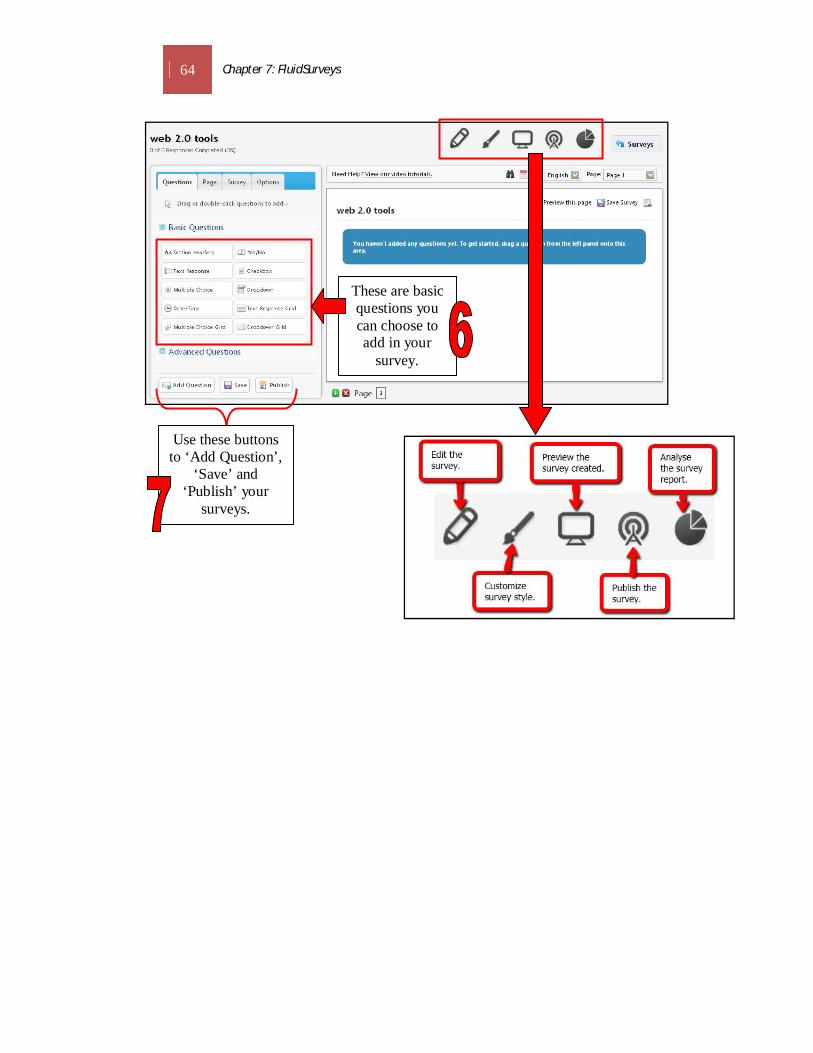
64 Chapter 7: FluidSurveys
Use these buttons to ‘Add Question’,
‘Save’ and ‘Publish’ your
surveys.
These are basic questions you can choose to add in your
survey.

Chapter 7: FluidSurveys 65
Adding Question
Click the ‘Save’ button every time you add
question to make sure you do not lose your
data.
STEP 4
Go to the ‘Questions’
tab.
Choose the questions want to
create. Choose either basic (free
account) or advanced questions
(pro account).
To add more questions, click ‘Add Question’.
If you want to publish your survey, click the
‘Publish’ button.
66 Chapter 7: FluidSurveys
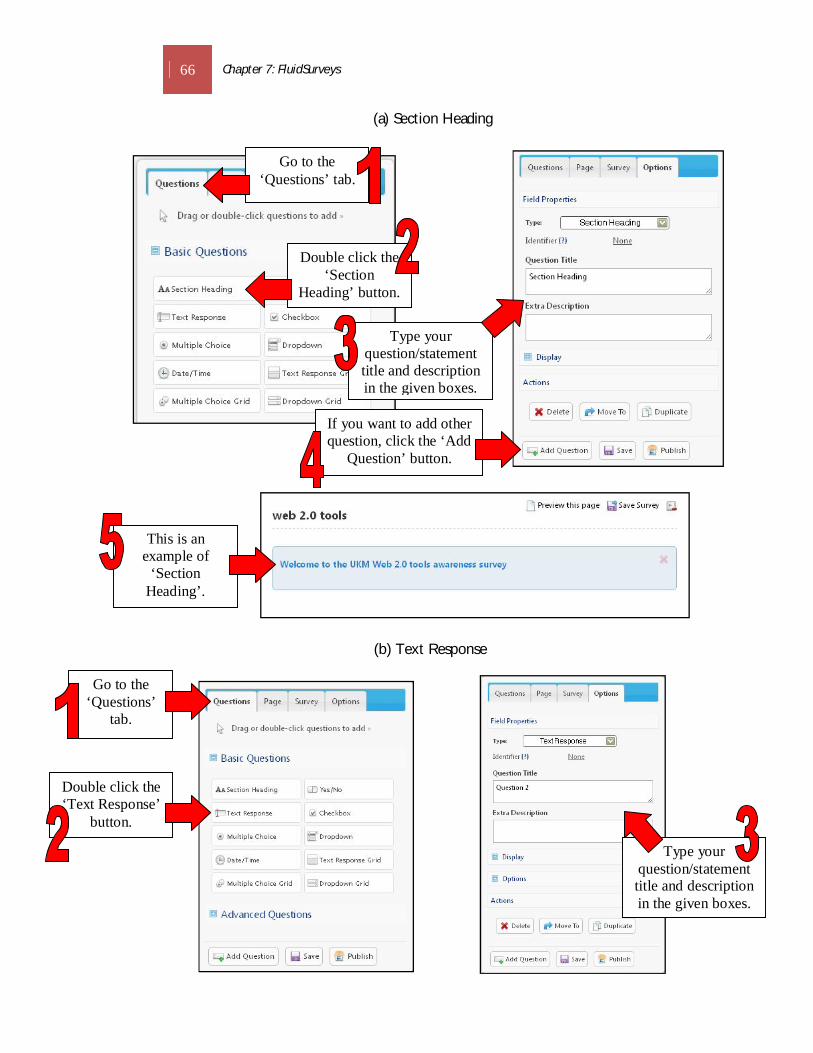
(a) Section Heading
(b) Text Response
Go to the ‘Questions’ tab.
Double click the ‘Section
Heading’ button.
Type your question/statement title and description in the given boxes.
If you want to add other question, click the ‘Add
Question’ button.
This is an example of
‘Section Heading’.
Go to the ‘Questions’
tab.
Double click the ‘Text Response’
button.
Type your question/statement title and description in the given boxes.

Chapter 7: FluidSurveys 67
(c) Multiple Choices
This is an example of ‘Text
Response’ question.
Go to the ‘Questions’ tab.
Double click the ‘Multiple
Choice’ button.
Type your question and
description in the given boxes.
If you want to add other question, click the ‘Add
Question’ button.
This is an example of a ‘Multiple
Choice’ question.
Insert the choices answer.
68 Chapter 7: FluidSurveys
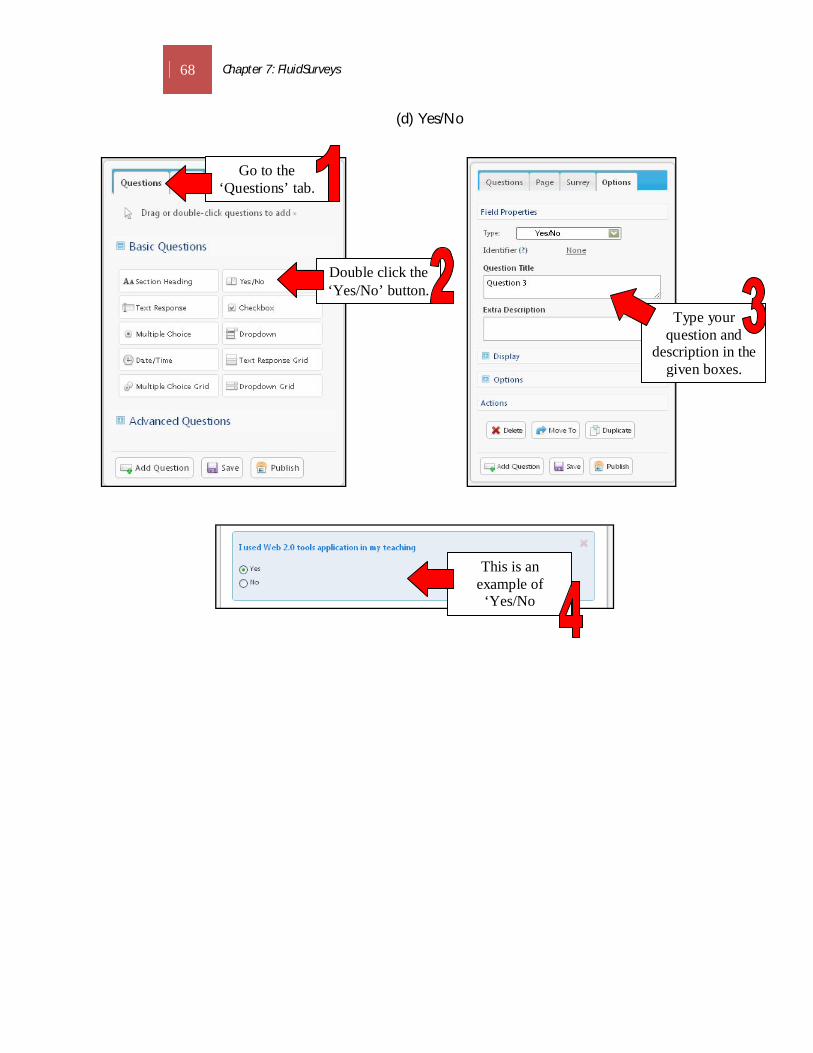
(d) Yes/No
Go to the ‘Questions’ tab.
Double click the ‘Yes/No’ button.
Type your question and
description in the given boxes.
This is an example of
‘Yes/No question.
Chapter 7: FluidSurveys 69
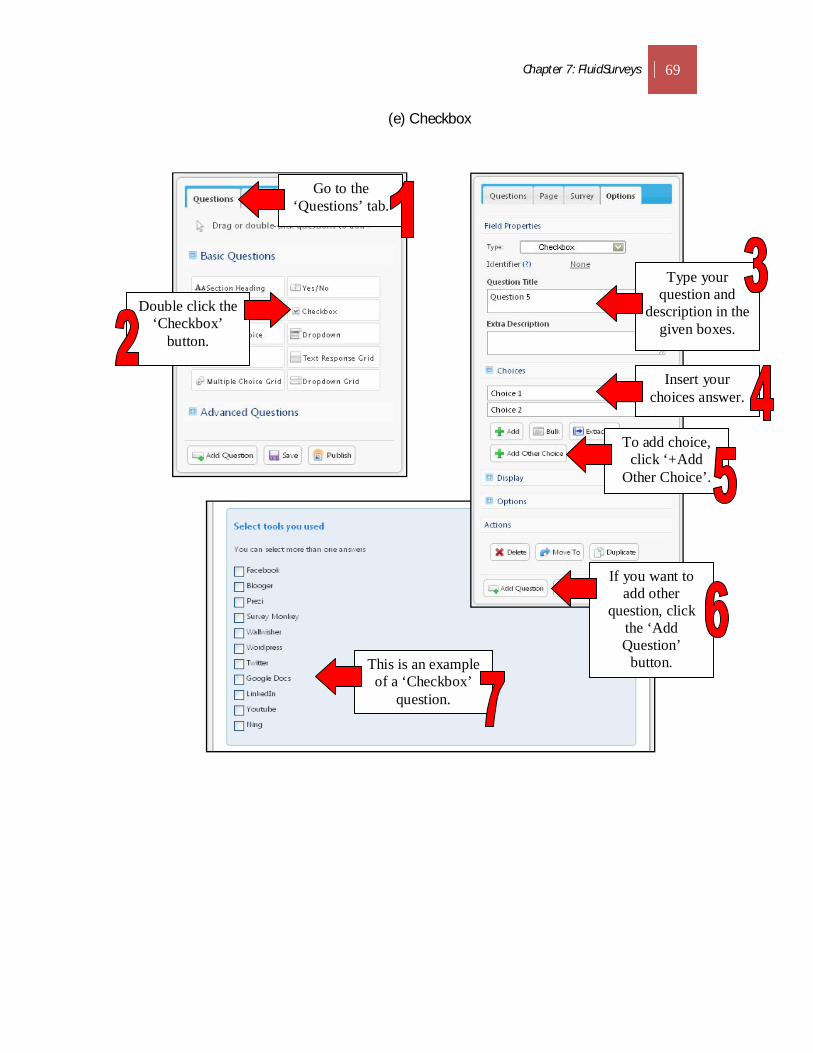
(e) Checkbox
Go to the ‘Questions’ tab.
Double click the ‘Checkbox’
button.
Type your question and
description in the given boxes.
Insert your choices answer.
If you want to add other
question, click the ‘Add Question’
button.
This is an example of a ‘Checkbox’
question.
To add choice, click ‘+Add
Other Choice’.

70 Chapter 7: FluidSurveys
(f) Dropdown
Go to the ‘Questions’ tab.
Double click the ‘Dropdown’
button. If you want to add other
question, click the ‘Add Question’
This is an example of a ‘Dropdown’
question.
Insert your choices answer.

Chapter 7: FluidSurveys 71
(g) Multiple Choice Grid
Go to the ‘Questions’ tab.
Double click the ‘Text Response
Grid’ button.
If you want to add other
question, click the ‘Add Question’
button.
Insert your variables/scale.
This is an example of a
‘Text Response’ question.
Insert your choices/statement.

72 Chapter 7: FluidSurveys
Page Setting
Survey Option Setting
STEP 5
STEP 6
Go to the ‘Page’ tab.
Go to the ‘Survey’ tab.
Insert or change the title of your
survey.
Then, click the ‘Save’ button to
save your changes.
Then, click the ‘Save’ button to
save your changes.
Use this option to edit your page setting.

Chapter 7: FluidSurveys 73
Customizing Survey Style
Publishing Survey
STEP 7
STEP 8
To customize your survey,
click this icon.
Then click this link.
To publish your survey, click this
icon.
This is the link of your survey.
You can send the link given to the
potential respondents.
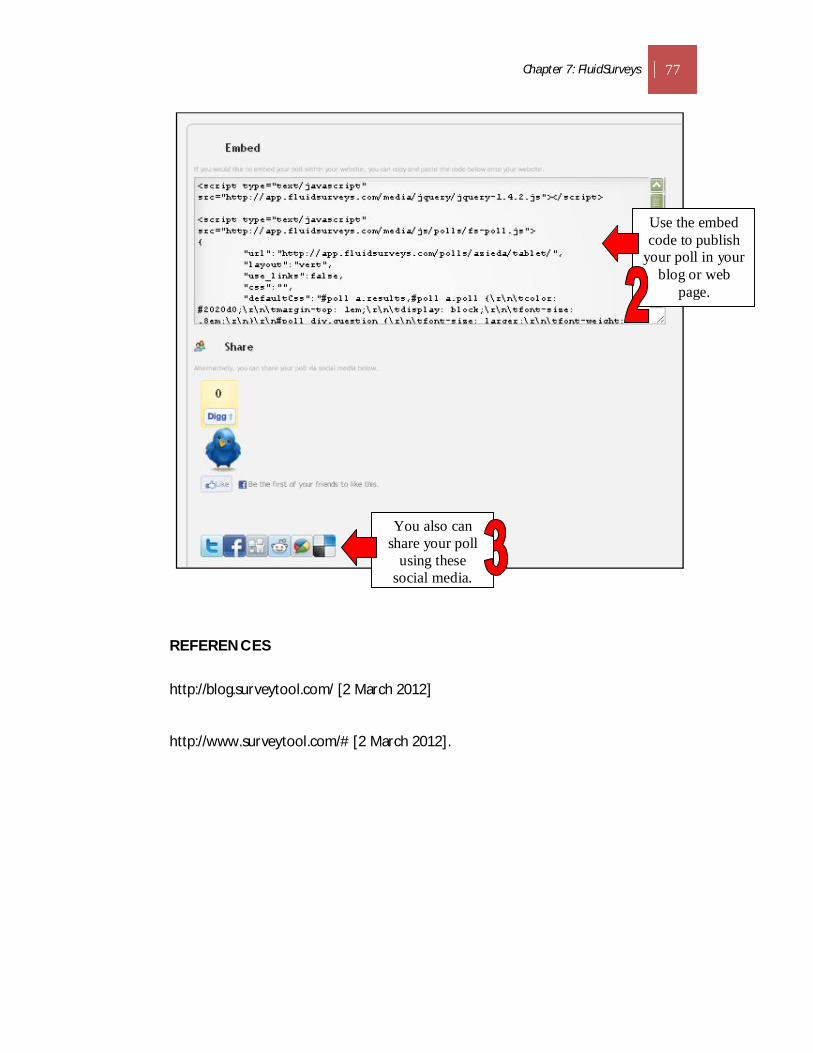
You can use the embed code to publish your
survey in your blog or webpage.

74 Chapter 7: FluidSurveys
Analyzing Survey
STEP 9
This is an example of a
survey created using
FluidSurveys.
To analyse the survey
conducted, click this icon.
Click ‘Export’ to export your survey
either into PowerPoint, excel,
Pdf or SPSS formats. You can
only use this feature if you are registered as Pro
user.

Chapter 7: FluidSurveys 75
Creating a New Poll
STEP 10
To create a poll, go to the
‘Polls’ tab.
Then click ‘+New Poll’.
Insert the ‘Poll Name’ here.
Type the question of your
poll.
Insert the choices.
Select your poll result.
Then, click the ‘Publish’ button.
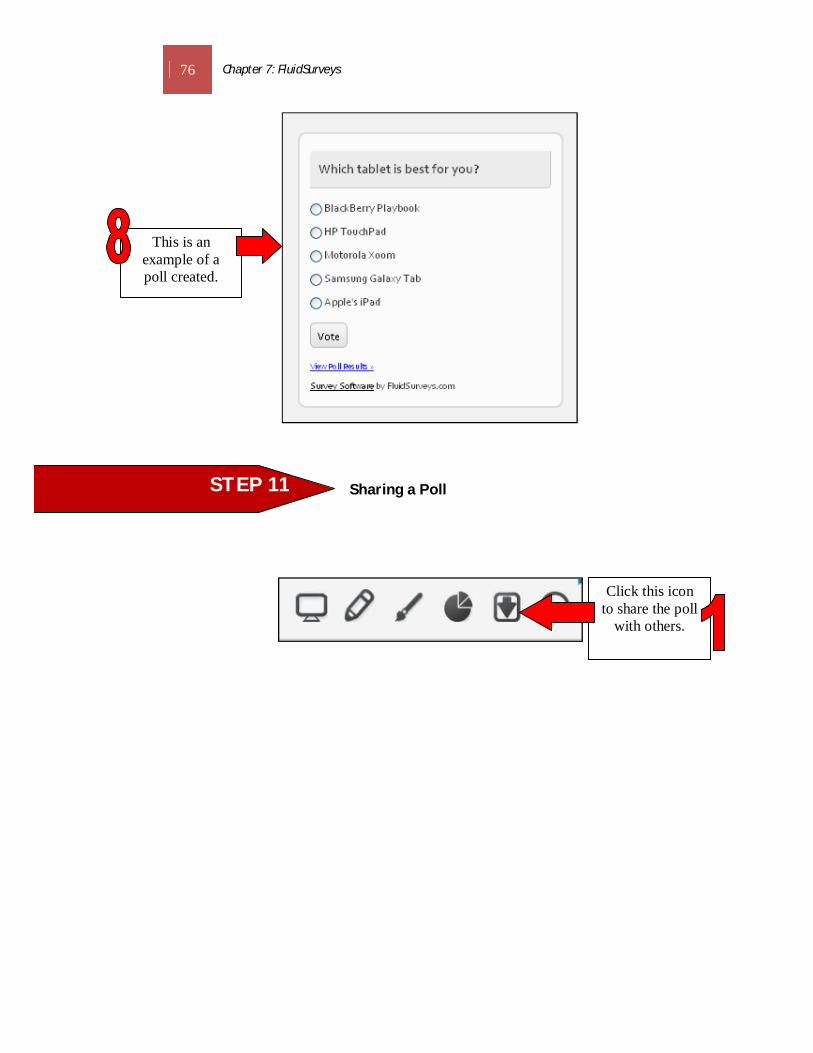
76 Chapter 7: FluidSurveys
Sharing a Poll
STEP 11
This is an example of a poll created.
Click this icon to share the poll
with others.
Chapter 7: FluidSurveys 77
REFERENCES
http://blog.surveytool.com/ [2 March 2012]
http://www.surveytool.com/# [2 March 2012].
Use the embed code to publish
your poll in your blog or web
page.
You also can share your poll
using these social media.

78 Chapter 8: Kwik Surveys
WHAT IS KWIK SURVEYS?
Kwik Surveys is a free web-based application that allows anyone to quickly and easily
create their own surveys and share them across a wide array of sites and services.
Simply sign up for an account and then create a new survey in which you have the
options of making a title and questions, along with being able to modify the colors
and background of the survey.
Source: http://www.killerstartups.com/Web-App-Tools/kwiksurveys-com-create-and-
analyze-surveys [27 February 2012]
BENEFITS OF KWIK SURVEYS
The following are some benefits of using Kwik Surveys:
Upload an appropriate photo to be used as the background of the survey
created.
Distribute surveys for people to answer by email, YouTube, Facebook or
post them in online forums.
Get survey results instantly.
Download and print the survey created and survey result.
Set up account for email notifications if someone new has responded to the
survey.
Source: http://www.killerstartups.com/Web-App-Tools/kwiksurveys-com-create-and-
analyze-surveys [27 February 2012].
Chapter 8 KWIK SURVEYS

Chapter 8: Kwik Surveys 79
GET STARTED WITH KWIK SURVEYS
Go to: http://kwiksurveys.com/
Signing Up
STEP 1
STEP 2
Fill in the required
information.
Click the ‘Sign up’ button to
register.
80 Chapter 8: Kwik Surveys
Creating a Survey
STEP 3
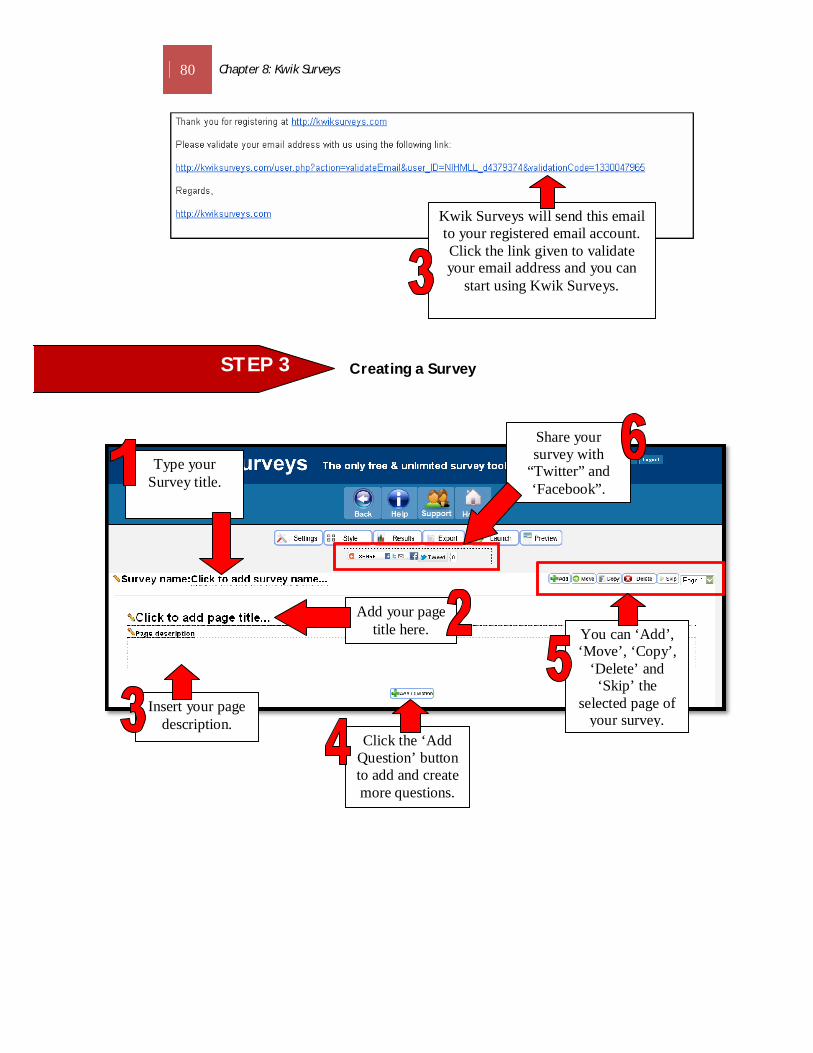
Kwik Surveys will send this email to your registered email account. Click the link given to validate your email address and you can
start using Kwik Surveys.
Type your Survey title.
Click the ‘Add Question’ button to add and create more questions.
Add your page title here.
Insert your page description.
You can ‘Add’, ‘Move’, ‘Copy’,
‘Delete’ and ‘Skip’ the
selected page of your survey.
Share your survey with
“Twitter” and ‘Facebook”.
Chapter 8: Kwik Surveys 81
Adding Questions
STEP 4
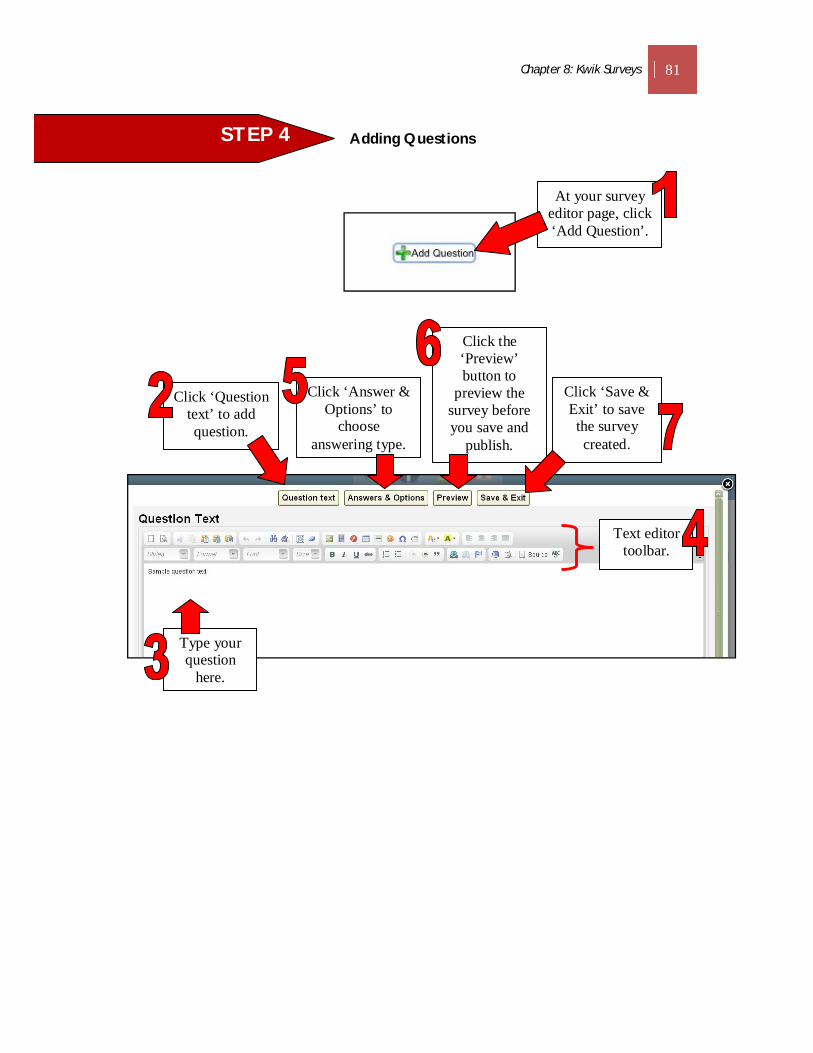
At your survey editor page, click ‘Add Question’.
Click ‘Question text’ to add question.
Click ‘Answer & Options’ to
choose answering type.
Click the ‘Preview’ button to
preview the survey before you save and
publish.
Click ‘Save & Exit’ to save the survey created.
Text editor toolbar.
Type your question
here.
82 Chapter 8: Kwik Surveys
(a) Multiple Choice Questions
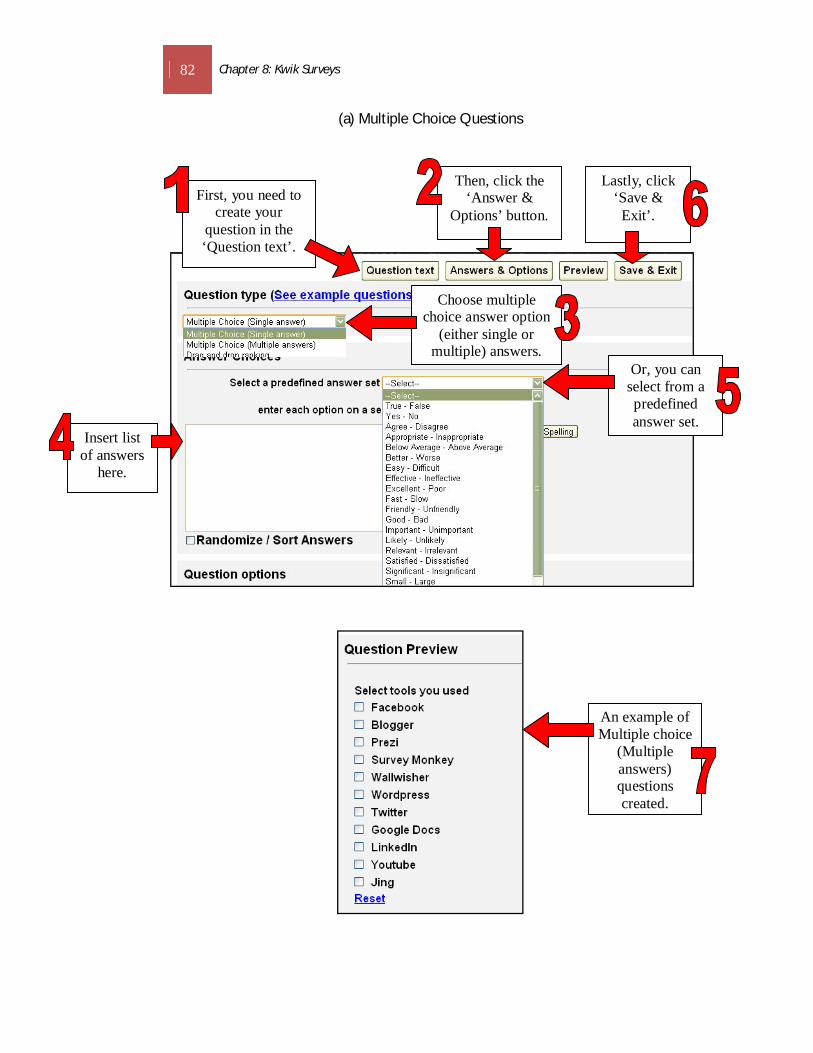
First, you need to create your
question in the ‘Question text’.
Then, click the ‘Answer &
Options’ button.
Lastly, click ‘Save &
Exit’.
Choose multiple choice answer option
(either single or multiple) answers.
Or, you can select from a predefined answer set.
Insert list of answers
here.
An example of Multiple choice
(Multiple answers) questions created.

Chapter 8: Kwik Surveys 83
(b) Drag and Drop Ranking
Choose ‘Drag and drop ranking’ at question type.
Type possible answers here.
An example of a drag and drop
ranking question.

84 Chapter 8: Kwik Surveys
(c) Star Rating
(d) Single Textbox
At the question options, you can
choose either text, number or email
address.
Choose ‘Single Text Box’ at the question
type.
Choose ‘Star Rating’ at
question type.
Type possible answers here.
An example of a star rating question.

Chapter 8: Kwik Surveys 85
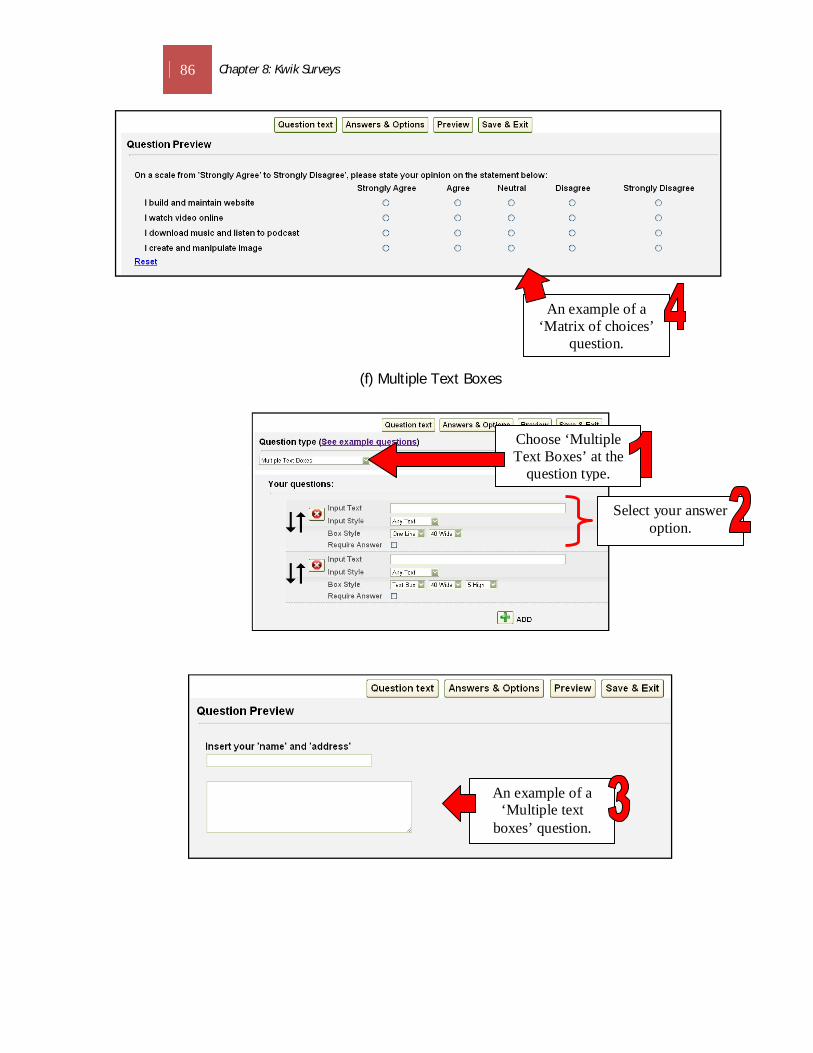
(e) Matrix of Choices
An examples of a single textbox
question.
Choose ‘Matrix of Choices (Single or multiple answers)’
at the question type.
In the ‘Column Headings’, select your
predefined answer set. Or you can add your own
scale.
Type your statement or question at the
’Row Heading’ area.
86 Chapter 8: Kwik Surveys
(f) Multiple Text Boxes
An example of a ‘Matrix of choices’
question.
Choose ‘Multiple Text Boxes’ at the
question type.
Select your answer option.
An example of a ‘Multiple text
boxes’ question.

Chapter 8: Kwik Surveys 87
Survey Setting
Style
STEP 5
Click ‘Setting’.
STEP 6
At the ‘Survey status’, you can
select either to do an open or close
survey. Also, you can insert survey
dates and edit participant options and number of responses.
Click ‘Style’.
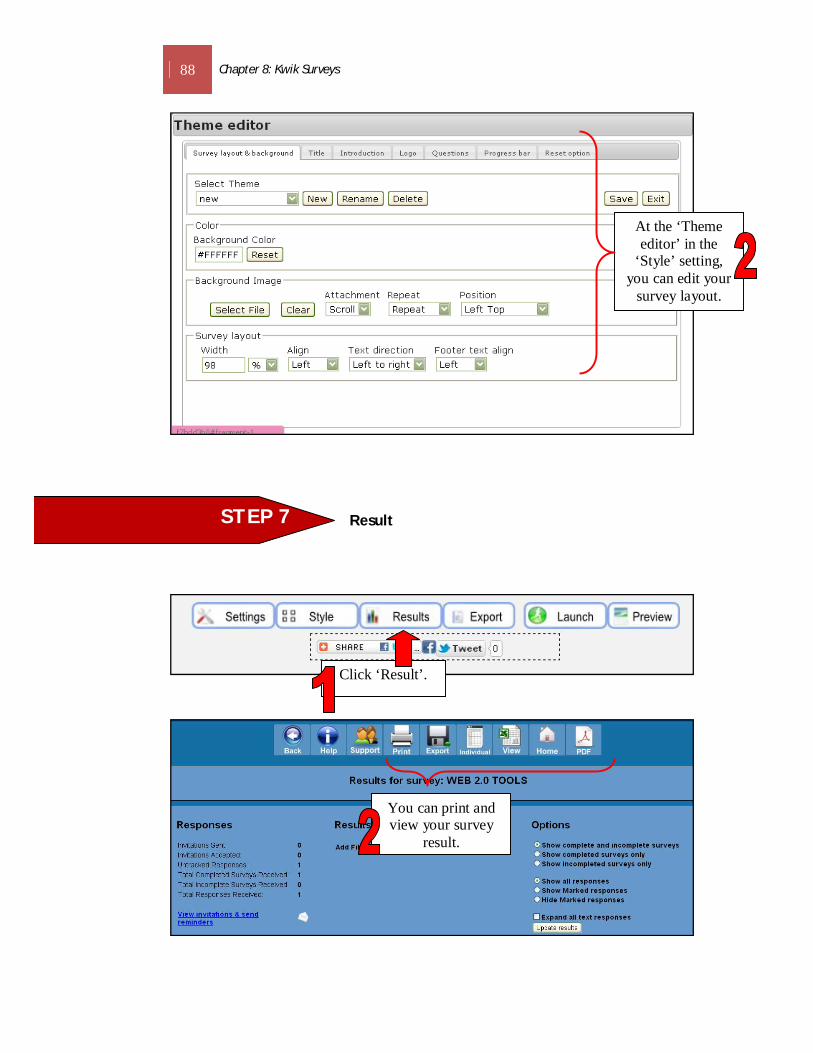
88 Chapter 8: Kwik Surveys
Result
STEP 7
At the ‘Theme editor’ in the
‘Style’ setting, you can edit your
survey layout.
Click ‘Result’.
You can print and view your survey
result.
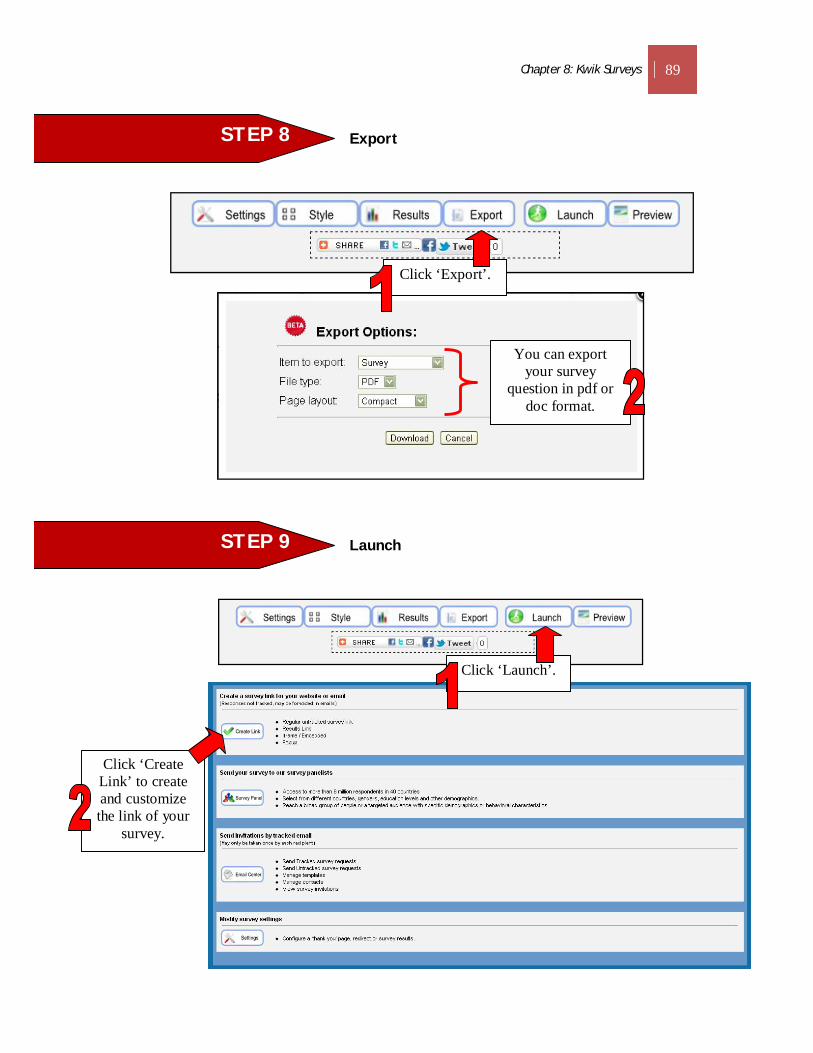
Chapter 8: Kwik Surveys 89
Export
Launch
STEP 8
STEP 9
You can export your survey
question in pdf or doc format.
Click ‘Export’.
Click ‘Launch’.
Click ‘Create Link’ to create and customize the link of your
survey.

90 Chapter 8: Kwik Surveys
REFERENCES
http://www.killerstartups.com/Web-App-Tools/kwiksurveys-com-create-and-analyze-
surveys [27 February 2012]

Chapter 9: Quizsnack 91
WHAT IS QUIZSNACK?
Quizsnack is the most easy to use online poll and survey tool, allowing you to create
and conduct market questionnaires without having to learn complicated software.
Also, the reporting is very simple and straightforward, with results being displayed
in real-time.
Source: http://www.quizsnack.com/
BENEFITS OF QUIZSNACK
Using Quizsnack you can:
Customize the looks of your poll/survey widgets.
Create poll/survey in any language you wish.
Embed your poll/survey your website.
Store your data securely for an indefinite amount of time.
User-friendly application.
Source: http://www.quizsnack.com/
Chapter 9 QUIZSNACK

92 Chapter 9: Quizsnack
GET STARTED WITH QUIZSNACK
Go to: http://www.quizsnack.com/
Signing In/Registering
STEP 1
STEP 2
On Quizsnack page, click ‘Sign in’.
If you do not have an account, go to
‘Register’.
Insert your name, e-mail
and password to start the
registration.
Then, click ‘Register’.
If you do not want to register, you can sign using these
accounts.

Chapter 9: Quizsnack 93
Creating a Poll/Survey
(a) Creating a poll
STEP 3
To create a poll/survey after you
have signing click ‘Make a poll (or
survey)’.
Click ‘Poll’ to start creating a
poll.

94 Chapter 9: Quizsnack
Then, type your question.
Number of your answer option.
Check the box if you want to shuffle
your options.
Type your thank you massage (optional).
Then, click ‘Next’.

Chapter 9: Quizsnack 95
(b) Creating a survey
Click ‘Survey’ to start creating
a survey.
Then, type your question.
Choose type of your question.
Check the box if you want to shuffle
your options.
To insert other question, you just need to type the question here.

96 Chapter 9: Quizsnack
Choosing a Templates
STEP 4
When you have finished creating your quiz, you can go to the quiz templates. Choose the
template you prefer for your quiz.
Type your thank you massage (optional). Then, click
‘Next’.

Chapter 9: Quizsnack 97
You can review before you use the template.
If you like this template, click ‘Use
this template’.
Then, click ‘Finish’.
Now, your poll/survey is ready to publish. You can edit or delete your
quiz.
Click ‘Copy’ to copy the link given and you can post
it to your Facebook wall, Twitter or sent to email.
You also can embed it to your
blog or web.
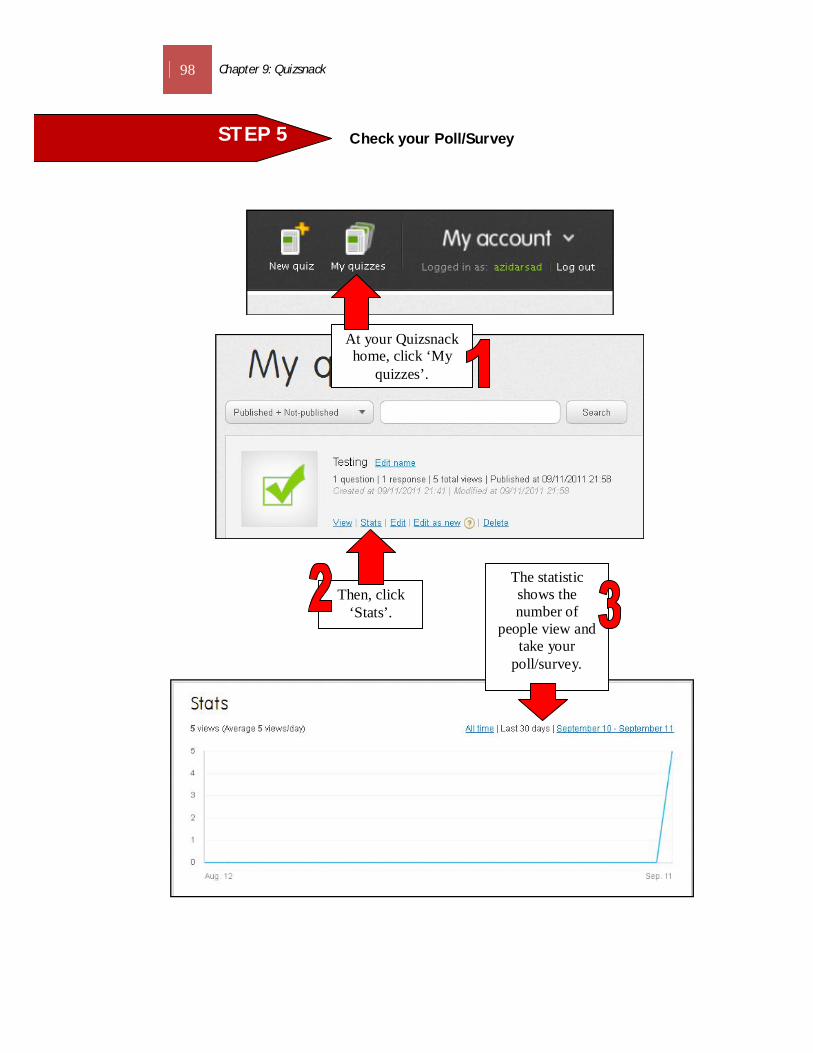
98 Chapter 9: Quizsnack
Check your Poll/Survey
STEP 5
At your Quizsnack home, click ‘My
quizzes’.
Then, click ‘Stats’.
The statistic shows the number of
people view and take your
poll/survey.
Chapter 9: Quizsnack 99
REFERENCES
http://www.quizsnack.com/ [21 October 2011]
https://sites.google.com/site/bdemireleportfolio/projects/web-2-0 [21 October 2011]
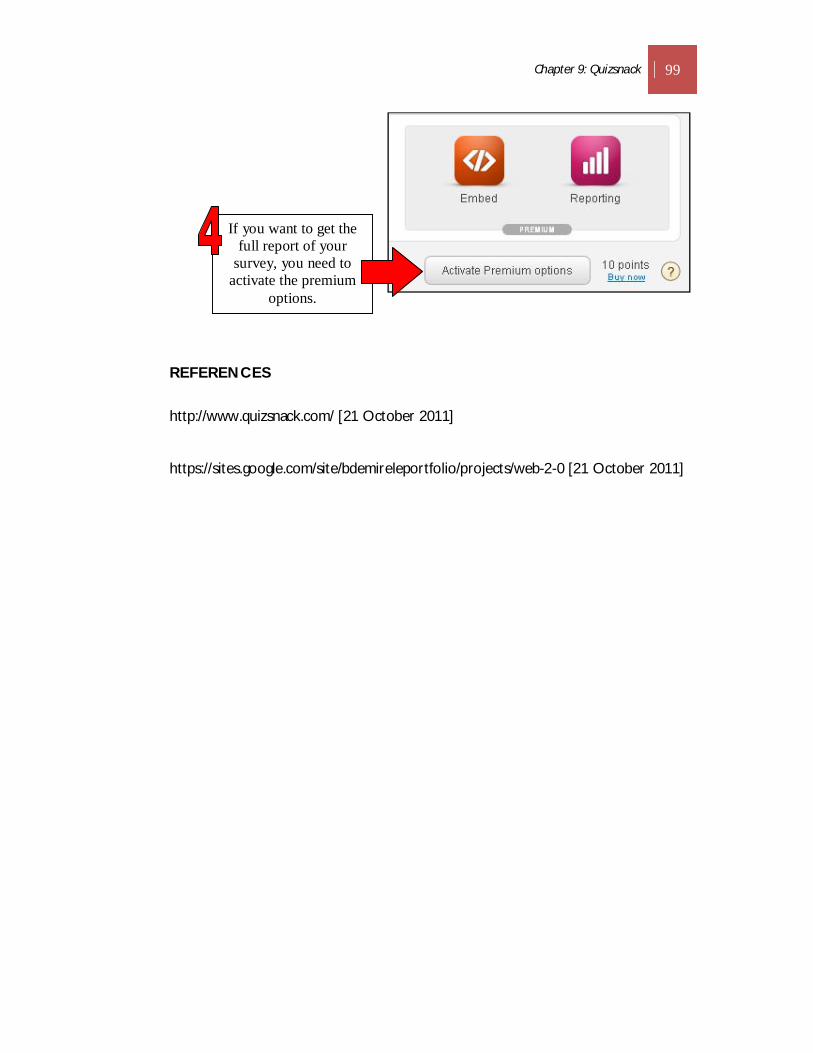
If you want to get the full report of your
survey, you need to activate the premium
options.

100 Chapter 10: Flisti
WHAT IS FLISTI?
Flisti is a free online poll website that does not require any sign up.
Source: http://edutechintegration.blogspot.com/2010/09/flisti.html [9 March 2012]
BENEFITS OF FLISTI
The following are several benefits of using Flisti:
A great tool to use on the first day of school or the beginning of a unit to
gauge where students stand on a particular subject.
The tool is simple to use.
If you have a school or class Twitter or Facebook page you can share the poll
there to get response from students.
Flisti is easily adapted into the classroom
Source: http://edutechintegration.blogspot.com/2010/09/flisti.html [9 March 2012]
Chapter 10 FLISTI

Chapter 10: Flisti 101
GET STARTED WITH FLISTI
Go to: http://flisti.com/
Creating a Poll
STEP 1
STEP 2
Type your poll question.
Insert the possible answers.
If you want to add more
answers click here.
Lastly, click create new poll.

102 Chapter 10: Flisti
This is an example of a poll created.
You can view the result by clicking this
link.
Chapter 10: Flisti 103
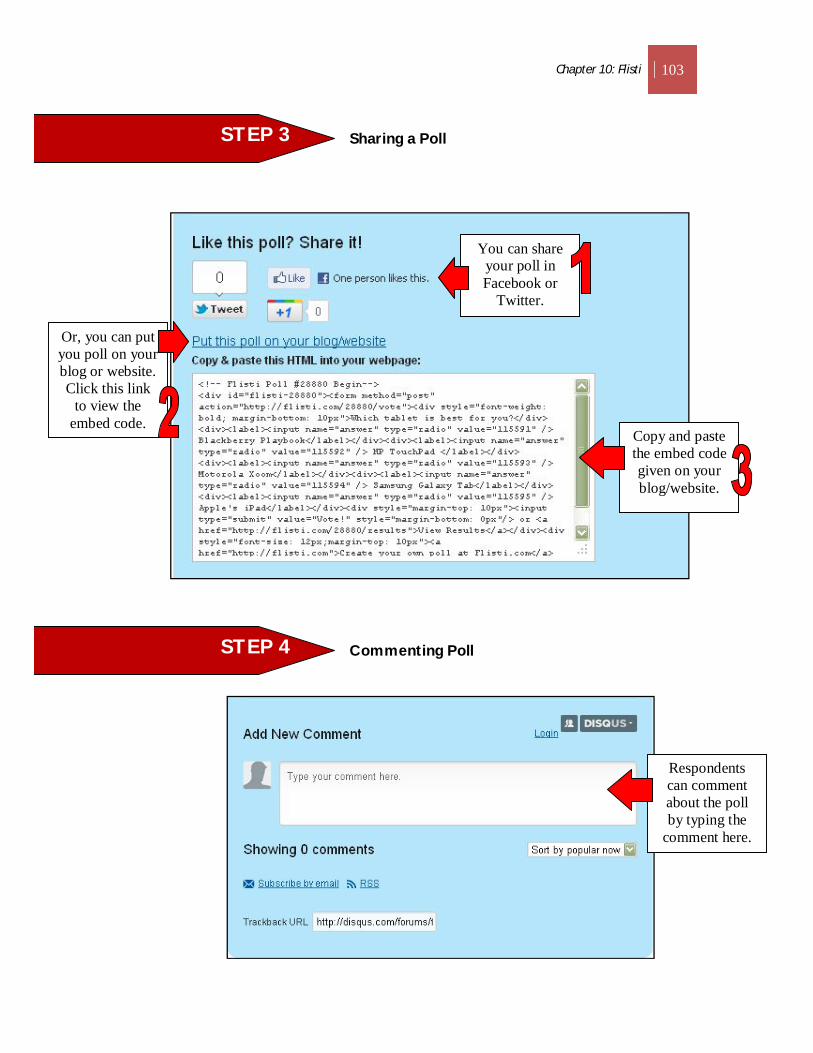
Sharing a Poll
Commenting Poll
STEP 3
STEP 4
You can share your poll in Facebook or
Twitter.
Or, you can put you poll on your blog or website. Click this link
to view the embed code.
Copy and paste the embed code given on your blog/website.
Respondents can comment about the poll by typing the
comment here.

104 Chapter 10: Flisti
REFERENCES
http://edutechintegration.blogspot.com/2010/09/flisti.html [9 March 2012]